Administration Guide - Rahul.net
202
Administration Guide Version 5.2
-
Upload
khangminh22 -
Category
Documents
-
view
2 -
download
0
Transcript of Administration Guide - Rahul.net

Administration GuideVersion 5.2

Copyright Notice Copyright © 2006, 2007 ZipLip, Inc. All rights reserved
ZipLip.com, Inc. (“ZipLip”) and its licensors retain all ownership rights to the software programs offered by ZipLip (referred to herein as “Software”) and related documentation. Use of the Software and related documentation is governed by the license agreement accompanying the Software and applicable copyright law.
Your right to copy this documentation is limited by copyright law. Making unauthorized copies, adaptations, or compilation works is prohibited and constitutes a punishable violation of the law. ZipLip may revise this documentation occasionally without notice.
THIS DOCUMENTATION IS PROVIDED “AS IS” WITHOUT WARRANTY OF ANY KIND. IN NO EVENT SHALL ZIPLIP BE LIABLE FOR INDIRECT, SPECIAL, INCIDENTAL, OR CONSEQUENTIAL DAMAGES OF ANY KIND ARISING FROM ANY ERROR IN THIS DOCUMENTATION, INCLUDING WITHOUT LIMITATION ANY LOSS OR INTERRUPTION OF BUSINESS, REVENUE, USE, OR DATA.
Other product and company names appearing in ZipLip products and materials are used for identification purposes only and may be trademarks or registered trademarks of their respective companies. Registered and unregistered trademarks used in any ZipLip products and materials are the exclusive property of their respective owners.
Part Number: AG52-014
2 Administration Guide
About This Guide
This guide is intended for those responsible for implementing and administering the ZipLip system. To get the most out of this guide, the reader should have moderate to strong knowledge of mail servers and protocols. The reader will most likely be the individual or individuals responsible for managing the corporate mail infrastructure.
What to Expect From This Guide
This guide will give you an overview of the ZipLip system and its core functionality and features. The guide includes information on configuring your ZipLip server, log files, database tables, managing the Mail Vault, monitoring, and backups. You will also learn about administering the advanced features and options of the ZipLip server.
Conventions Used
Text in Courier indicates:
Filenames, commands, and programsText that you enterText that the system displays
Words printed in italics are generic terms representing names to be devised by you.
Square brackets [] mean the material inside them is optional.
Braces {} mean that you must choose from the options listed inside them. If there is only one option in the braces, the braces mean the option can be repeated.
If a command line does not fit across the page, a backward slash (\) appears at the end of the line, and the command continues on the next line.
Where the following steps ask you to do something as root, log in as a normal user and then switch to super-user mode.
Changes Made Since the Last Version of this Document
The following changes have been made to this document since the previous version:
On page 2, the version number was changed from 13 to 14.This section was added.
Administration Guide 3

In Chapter 10, “MTA Processing,” the section “Using SNMP for Event Monitoring” was added on page 152.In Chapter 11, “Report Management,” the existing information was overhauled, and information about reports generated using the Compliance application was added.Because of the added information, pagination has changed. If you are printing replacement pages, we recommend you reprint the Table of Contents and from page 152 onward.
4 Administration Guide

Table of Contents
Chapter 1: Getting Started with ZipLip .................................................................11ZipLip Applications...........................................................................................................................12
Compliance ....................................................................................................................................12Unified Archival Admin ................................................................................................................12Secure Messaging ..........................................................................................................................12Virtual Storage ...............................................................................................................................12
Basic Components..............................................................................................................................12Deployment Options ......................................................................................................................13Platform Components ....................................................................................................................13
Understanding the ZipLip Platform ................................................................................................17Messaging Applications and Gateway .............................................................................................17
Mail Transfer Agent.......................................................................................................................18Mail Store.......................................................................................................................................20HTML-Based Interface..................................................................................................................21SMTP Listener ...............................................................................................................................21IMAP4 Listener .............................................................................................................................22MIME Parsing................................................................................................................................22
Chapter 2: Configuration .......................................................................................23Configuration File Structure.............................................................................................................24
Key Configuration Files.................................................................................................................24How Configuration Files Are Loaded ...........................................................................................25
Configuring Single Sign-On..............................................................................................................26Enabling LDAP Authentication .......................................................................................................28
Chapter 3: Database...............................................................................................31Database Configuration ....................................................................................................................31Important Database Tables ...............................................................................................................32
Administration Guide 5

Chapter 4: Retention Manager .............................................................................. 37Viewing and Editing Retention Periods ...........................................................................................37
Creating a Retention Period ...........................................................................................................37Editing a Retention Period.............................................................................................................39Deleting a Retention Period ...........................................................................................................40
Viewing the Retention Enforcement History...................................................................................40
Chapter 5: Policy Manager .................................................................................... 43Viewing and Editing Storage Management Policies .......................................................................43
Creating a New Archiving Policy ..................................................................................................43Adding a Rule to an Archive Policy ..............................................................................................45
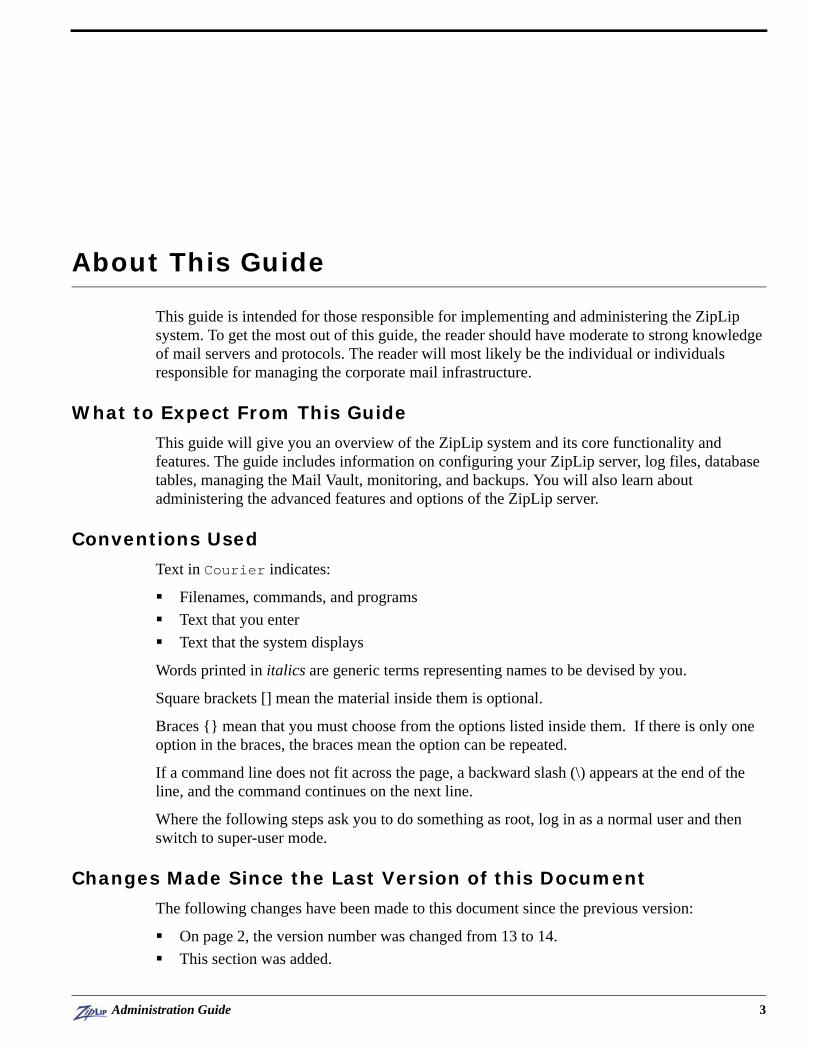
Viewing and Editing Stubbing Policies ............................................................................................46Stubbing Templates........................................................................................................................49Retention Policies ..........................................................................................................................49Associating Policies .......................................................................................................................50
Policy Assignments ............................................................................................................................53Compliance Policies ...........................................................................................................................54
Creating a Compliance Retention Policy.......................................................................................55Deleting a ComplianceRetention Policy........................................................................................57Compliance Policy Assignments ...................................................................................................58
Chapter 6: Log Files............................................................................................... 61Log File Name Conventions ..............................................................................................................61Detailed Log Descriptions .................................................................................................................61
Chapter 7: Domain and User Fundamentals........................................................ 65User Privileges....................................................................................................................................65
Domains .........................................................................................................................................65Domain Routing.............................................................................................................................66
Domain Management ........................................................................................................................66Creating Domains ..........................................................................................................................67Searching for Domains ..................................................................................................................68Editing Domain Properties.............................................................................................................69Editing E-mail Domain Properties.................................................................................................70Creating and Editing a Storage Domain ........................................................................................72Creating and Editing a Compliance Domain .................................................................................73Administering Domain-Level Settings (Postmaster Console).......................................................75
Domain Routing .................................................................................................................................75Adding Domain Routing................................................................................................................75Editing Domain Routing................................................................................................................77
6 Administration Guide

Chapter 8: Vault Store Fundamentals...................................................................79Messaging Application-Related Storage Unit..................................................................................81Virtual Storage Application-Related Storage Unit .........................................................................81Partitioning.........................................................................................................................................81Vault Item ...........................................................................................................................................82Storage Unit Types .............................................................................................................................82
Filesystem-Based Storage Units ....................................................................................................82Third-Party Storage Units ..............................................................................................................82
Failover ...............................................................................................................................................83Internal Disk Volume .....................................................................................................................83Vault Item.......................................................................................................................................84Replication .....................................................................................................................................84File Striping ...................................................................................................................................84
Configuring a SnapLock Volume for the ZipLip Server................................................................85Setting Up a SnapLock Storage Unit in ZipLip ..............................................................................86Configuring the ZipLip Server for a Centera Storage Unit...........................................................91Creating an EMC Centera Disk Volume .........................................................................................92Replicating a ZipLip Storage Unit to a Centera Storage Unit.....................................................100Changing the Centera Server Address in a Disk Volume ............................................................105Centera Storage Unit Disaster Recovery .......................................................................................110
Connection ...................................................................................................................................110Storage Unit Creation ..................................................................................................................110Disk Unit Creation .......................................................................................................................110Working With Disk Volumes and EMC Centera Clusters ...........................................................110
How To Create an IBM Content Manager Storage Unit.............................................................. 111Creating an Archivas Cluster Disk Volume...................................................................................115Creating a Disk Storage Unit ..........................................................................................................119Changing the Storage Unit Associated With Mail Storage ..........................................................123Vault Management...........................................................................................................................125
Creating Disk Volumes ................................................................................................................125Modifying a Disk Volume............................................................................................................127Monitoring Disk Volumes............................................................................................................130Monitoring Storage Units ............................................................................................................130Managing Stores and Storage Units.............................................................................................131
Chapter 9: Coordinator/Executor........................................................................133Coordinator/Executor Configuration ............................................................................................134
Cluster Name ...............................................................................................................................134Local Coordinator Parameters .....................................................................................................134
Global Coordinator..........................................................................................................................135
Administration Guide 7

Chapter 10: MTA Processing............................................................................... 137Configuring the SMTP Staging Vault ............................................................................................140Mail Queue Monitoring...................................................................................................................142
Monitoring MTA Activity............................................................................................................142Monitoring the MTA File Stores..................................................................................................144Monitoring the Message Queue ...................................................................................................145Monitoring the SMTP Queue ......................................................................................................147Monitoring MTA Queue Statistics ...............................................................................................148
Setting Up Event Monitoring..........................................................................................................149Using the Event Viewer ...................................................................................................................151Using SNMP for Event Monitoring................................................................................................152
Configuring ZipLip for SNMP Monitoring .................................................................................152Installing and Starting SNMP on Windows.................................................................................153Installing and Starting SNMP on Solaris, Linux, or AIX ............................................................155
Chapter 11: Report Management ........................................................................ 157Generating Reports in the SysAdmin Application .......................................................................157
Scheduling Reports in the SysAdmin Application ......................................................................158Viewing, Editing, and Disabling Scheduled Reports...................................................................160
Viewing Automatically Generated Reports...................................................................................162Configuring the Department Reviewer Statistic Report ..............................................................162Viewing the Department Reviewer Statistics Report...................................................................163
Creating a Report in the Compliance Application .......................................................................164Interpreting Compliance Reports ..................................................................................................165
Interpreting User/Dept Compliance Statistics Reports ................................................................166Interpreting Reviewer Action Statistics Reports..........................................................................168Interpreting Department Review Statistics Reports.....................................................................169
Chapter 12: Administrative Tasks....................................................................... 173System Monitoring...........................................................................................................................173
Monitoring Global Coordinators .................................................................................................173Monitoring Database Connections...............................................................................................174
Monitoring and Administrating Systems ......................................................................................176Monitoring Systems.....................................................................................................................176Monitoring Entry Point Statistics.................................................................................................176Monitoring Machine Event History .............................................................................................177Viewing the System Audit Trail...................................................................................................178Monitoring System Module Status ..............................................................................................178Starting, Stopping, and Creating Child Processes........................................................................179
8 Administration Guide

Chapter 13: Storage Backup and Redundancy..................................................183Protecting Configuration Files........................................................................................................183Protecting the Database...................................................................................................................183
Protecting the Oracle database.....................................................................................................184Protecting Vault Information..........................................................................................................185Offsite and Online Backups ............................................................................................................185
Chapter 14: Troubleshooting and FAQ...............................................................187
Appendix A: ZipLip E-mail Features Summary .................................................189
Appendix B: Global Tasks ...................................................................................195
Appendix C: Batch Files ......................................................................................197
Index ......................................................................................................................199
Administration Guide 9

10 Administration Guide

Chapter 1
Getting Started with ZipLip
The ZipLip Data Exchange Platform is written in 100 % Java and is built on J2EE standards. The software can be run on multiple operating systems; Windows 2003 Server, Solaris, and Linux are currently supported. ZipLip servers are designed to scale using a farm of load-balanced middleware servers operating with a database. The middleware servers store necessary transient information in the database to allow transparent fail-over from one middleware server to another.
Figure 1.1: ZipLip Clustering Architecture
Figure 1.1 depicts the general deployment architecture of the ZipLip Server and Gateway products. Typically one or more ZipLip servers are attached to a load balancer for the purpose of load sharing and for transparent failover from one machine to another in the event of a failure on any given machine. ZipLip servers typically connect to an industrial-strength relational database such as Oracle or MS-SQL servers. The database is used to persist system and
DB
Load Balancer
ZipLip ZipLip
DB
. . .. . . . . .
FileStores
Administration Guide 11

Getting Started with ZipLip
application-specific data. The servers also access one or more common file servers typically implemented using a NAS or SAN solution for storing and retrieving application-specific files.
ZipLip Applications
The ZipLip server is made up of several components that work together to provide security, compliance, and disaster recovery.
Compliance
ZipLip protects companies from legal liability due to HIPAA, GLBA, NASD, and SEC regulations that require companies to conform to certain specific guidelines in regards to their messaging traffic. All messages can be reviewed before or after being sent; they can also be stored for later review.
Unified Archival Admin
ZipLip archives messages from e-mail, instant messaging, and Bloomberg traffic all in one. This enables your company to keep all of this data easily accessible and search through it at a moment’s notice. Messages can be archived using stubbing, which allows easy access for an administrator or end user, while freeing up storage resources and improving performance on the local machine.
Note: Stubbing is a method of archiving where the text of a message is replaced in an inbox with a “stub” containing a link to the message content in the system archives.
Secure Messaging
ZipLip enables comprehensive end-to-end secure communications among staff, vendors, customers and partners. Unlike competing products, ZipLip’s solution requires no client, supports both PKI and non-PKI secure messaging standards, multi-spectrum delivery (supports push, pull, and other delivery methods), can handle very large files (100MB+), and offers a centralized policy and rules engine.
Virtual Storage
The virtual storage application lets organizations share valuable data with outside staff and partners without concerns of security breaches or inappropriate access. The virtual storage application creates a place where files and folders can be stored and accessed externally but cannot be accessed by unauthorized users. Data is transferred securely, without the need of installing clients, and you keep policy control and detailed audit trails of all activity.
Basic Components
The ZipLip server and gateway is comprised of the following basic components:
HTTP Web Server J2EE Application Server (supporting Java Servlets and JSP)
12 Administration Guide

Basic Components
Database ServerFile ServerWrite to WORM media (optional)
The ZipLip server requires an HTTP server to support the administrative interface. ZipLip supports a variety of external servers including Apache Web Server (Linux, Windows, Solaris) and IIS (Windows). The web servers listen to HTTP and HTTPS requests and transfer control to the J2EE Application Servers using connectors. The J2EE application server only needs to support Java Servlets and JSP standards. This enables ZipLip to run on lightweight Application Servers such as JRun, Tomcat as well as more robust Application Servers such as WebLogic and WebSphere. ZipLip Server components run within the Application Server and are typically invoked from the main PmApp Servlet. ZipLip servers provide several protocol Listeners including SMTP, POP3, IMAP4, FTP, and their TLS Versions. In addition, ZipLip supports two protocols built on HTTP; namely WEB-DAV and Web-Services. ZipLip Servers and gateways can be configured to serve requests from one or more of these protocols.
ZipLip software deployed within the application server persists its system and application data inside an industrial strength Database and File Servers. ZipLip software uses the Java Data Base Connectivity (JDBC) standard to connect to the database and a mechanism has been implemented to account for the SQL difference between different databases. This gives the ability for ZipLip to support different industrial strength databases such as ORACLE, MS-SQL Server, and Postgres. In addition, ZipLip can easily add support for DB2, Sybase and other databases that support JDBC.
ZipLip Software uses file systems to store large unstructured information such as e-mail messages, virtual storage files, and customization logos. The number of files typically runs in the millions and ZipLip’s Vault Architecture enables virtualization of these files. The files can be stored on any media including NAS, SAN and Direct attached storage.
Deployment Options
ZipLip software is built to fit within a customer’s environment. Due to its flexibility, it can be deployed on Windows, Solaris, Linux, and AIX.
Platform Components
The base ZipLip platform has several components and is described briefly in this section. All applications are built on top of this platform. The ZipLip platform is comprised of several components, some of which are described here.
Domain and User Module
Users on the system are grouped into domains. The domains are organized in a hierarchical fashion; a domain can have a parent domain and subdomains. Each user on the system belongs to a domain. Domain and user information are stored in the database. A Domain carries information and privileges common to all its member users. ZipLip also has modules that integrate with directories such as Microsoft Active Directory and Lotus Domino.
Administration Guide 13

Getting Started with ZipLip
Database Communication Module
This component enables applications and core components to access the database in a uniform manner via JDBC. This module enables multiple databases to be accessed concurrently from a single runtime instance. All database operations performed on a database are abstracted as a named connection. A named connection typically refers to a single database, although it can be configured to access multiple databases. The named connection object maintains a pool of connections that the application and other components can use to perform operations. The SQL queries associated with the system and applications are externalized to the configuration files and each query is associated with a named connection. This gives the flexibility to support several databases and also gives the flexibility to partition database information across multiple databases. Though, this flexibility is available, typically only one database is deployed except during one time operations such as migration.
Session Management Module
ZipLip Servers have a built-in Session Manager. All atomic operations need a session. Session object information consists of a user object, create date, last touch date, default language, default devices, and any other state variables. Applications and system components use this session information to perform security functions and customized presentation. Each session is associated with one or more transactions, and a single atomic operation is a transaction. The session objects can be persistent or non-persistent, and persistent sessions enable transparent failover from one machine to another. In addition, the Transaction manager keeps tracks of all transactions currently running on a single machine and monitoring the transaction manager information (from the SysAdmin application) gives visibility into what the server is doing.
Configuration Module
The configuration module is what makes the system flexible, modular, and manageable. ZipLip configuration files consist of parameters System Administrators are expected to change and other parameters that act as glue between various components. The configuration files have been organized in a structure and operators are expected to modify only a few parameters. Apart from the configuration module, other critical configuration parameters are stored in the database in the System Registry.
Caching Module
The caching module helps reduce the load on the database by storing objects that were constructed using the database or otherwise in memory for subsequent usage. The caching policy specified from the configuration files helps manage the stored object and reduce the memory requirements of the server. The caching module exposes cache utilization parameters through the system administration interface and thus helps in manageability of the ZipLip servers.
Vault Storage Module
The Vault storage is used to virtualize storage of application and system files. Metadata associated with files in the vault is stored in the database while the actual is file is stored on the file system. The vault has two abstract notions: storage unit and disk volume. A storage unit contains one or more disk volumes and is associated with additional services such as
14 Administration Guide

Basic Components
encryption, compression, failover, and escrow decryption. The disk volume refers to a physical storage on the disk. The vault is designed so files in it can be accessed from multiple operating systems concurrently.
Security Infrastructure Module
The core security framework known as the Encryption Service Provider of ZipLip is built on top of Java standards such as Java Cryptographic Engine (JCE), Java Security Engine (JSE) and Java Secure Socket Engine (JSSE). This framework enables the application to transparently use security appropriate to the user and other session state variables. The framework enables the application to mix and match a variety of Symmetric algorithms from different providers such as Sun and RSA toolkits. The default version uses the SunJCE crypto engine. Transport security needed to perform secure SMTP, secure POP and secure IMAP is achieved using JSSE. Storage encryption is based on the framework.
Coordinator Executor Module
The Coordinator Executor uses a Grid architecture. It provides a generic distributed task management framework and is responsible for distribution task across multiple machines and processes. One or more machines can be grouped into a virtual cluster. Each cluster has a live Global Coordinator (GC) and one or more Global Coordinators in standby mode. Each machine on the cluster has a Local Coordinator (LC). The Local Coordinators manage a set of executors; tasks include creating and resetting of executors. The number of executors on the machine can be set from the configuration file. The GC and LC maintain queues of tasks sorted according to scheduled time of execution, task priority, and arrival time. Applications typically submit their tasks to the LC on the local machine, and the LC forwards them to the live GC if the number of tasks exceeds a certain queue limit and if there is a live GC. The LC also polls the live GC for tasks when it doesn’t have enough in its queue. Executors are spawned by the LC’s requests for tasks, and the LC either gives a task if available or blocks until it finds one. Executors use the task handle, execute the task, return the status to the LC, and request the next task. The standby GC constantly checks if the live GC responds to a ping and if not, upgrades itself to the live state. The Coordinator Executor architecture distributes load across multiple systems, thus scaling the ZipLip System.
Child Application Module
The ZipLip Child Application Module enables the starting and stopping of child execution units. Some Child units canbe run for the lifetime of the server, such as SMTP, POP, IMAP, and other listeners, while others shut down after completing their background tasks such as MailBox Manager and ReceivedMailCleaner. This module allows systems deployed with the same software to behave differently. The Child Applications can be started from a configuration file or from the SysAdmin application. These two mechanisms let child processes be started on a single machine. A child process needs to be started only once and only on one system in the cluster. This is done via the Global Task mechanism, which is a task run by the live Global Coordinator. The GC uses the task deployment table stored in the database for guaranteed deployment of tasks on one system in the cluster. These tasks include background tasks such as the mailbox manager, received mail cleaner, and automated reports. The global tasks mechanism enables the ZipLip system to guarantee time-critical tasks with no single point of failure.
Administration Guide 15

Getting Started with ZipLip
Presentation Module
The ZipLip presentation module makes it possible for a single runtime instance of the server to serve multiple application UIs, present information to multiple devices, serve content in multiple languages, and present a custom UI for multiple domains. ZipLip achieves this by using the session and state variables routing the results of any request to the correct JSP page for content rendition.
Search Module
ZipLip has an index search framework which is used by the application to index unstructured contents such as messages. A modified version of the Lucene Search engine is used to index documents. The search can perform incremental indexing to add documents to the index as new documents arrive. The index search uses the ZipLip vaults to store its indexes.
Internationalization Infrastructure Module
ZipLip can store, retrieve, and present text information in various languages, including double-byte languages such as Japanese and Korean. The ZipLip infrastructure can handle multiple languages from a single runtime instance. ZipLip has inbuilt infrastructure to support both fixed-length encoding, such as Unicode, and variable length encoding, such as UTF-8 and EUC. The session and the transaction carry the internationalization information; this information is used to redirect responses to the server to request to the appropriate JSP pages. ZipLip also has a tagging process and a precompilation methodology that easily localizes the base English JSP page to support other languages. Precompilation tools enable incremental localization and therefore help the localized version and the base English JSP pages to be in synch.
Web Services API
The ZipLip Development Kit (ZDK) provides a SOAP-based API to make ZipLip server services available. The ZDK is built using a Web services framework. The transport layer for Web services is limited to HTTP and HTTPS. Web services enable the ZDK to easily support multiple programming languages and operating systems. Finally, special care has been to taken to support large data transfers. A ZDK-based client can exist within the LAN of the servers or communicate over the Internet. The server and the ZDK based clients communicate using Web services over HTTP and HTTPS and therefore do not require any special firewall requirements
zVite Module
The patent-pending technology zVite enables easy collaboration and sharing of applications with anyone who has an e-mail account. The granularity of access is very fine, and access can be given at Project level and a single folder level with subfolder access. The access is associated with user-defined privileges such as read, write, and delete and a timeframe. Access granted through zVite is protected by a password mechanism and is assigned by the user who initiates the zVite creation. The user also can revoke access at any time to stop the sharing and can also monitor the activities of the shared user from detailed audit trails that are logged.
Profiling Module
The profiling framework built into the session framework enables ZipLip to deliver top performance in its system. Each transaction within the session is automatically profiled, and
16 Administration Guide

Understanding the ZipLip Platform
application modules can sub-profile the transactions. For example, all database access is profiled. At the end of the transaction, the profiles are written to the profile logs on a separate thread. The profile logs are very useful for proactively detecting any sluggishness in the server and pinpointing offending parts of the software.
Other Modules
ZipLip has several other modules. These include MIME parsing, XML/XSL parsing and formatting, WebServices framework module, Regular Expression framework, Cross Scripting Prevention Module, Logging and Events Framework, Inbuilt Module status framework, Simplified Work flow Engine, Listener Framework, Schedulers, Object-Pooling, Customization Engine, and Data Copy Framework to facilitate migration and replication.Applications
Understanding the ZipLip Platform
The ZipLip platform has several components which forms the general basis to build applications. ZipLip applications can be broadly classified into:
System Administration (SysAdmin)Unified Archival AdminSecure Messaging (Postmaster)Compliance
The ZipLip Server supports a variety of protocols, including:
HTTP and HTTPS (via Web Server and App Server)SMTPIMAP4FTPWeb ServicesJMS (via App Server, used in integration only)
Messaging Applications and Gateway
ZipLip’s messaging products are comprised of the following major components:
Mail Transfer Agent (MTA)Mail StoreWebMail applicationSMTP ServerIMAP4 ServerInstant MessagingBloombergSearch Indexing
Administration Guide 17

Getting Started with ZipLip
Mail Transfer Agent
The Mail Transfer Agent (MTA) is a software component that processes and routes messages. The MTA receives its messages from various other components. If a message is to be delivered to an external address, the MTA sends it out onto the Internet; otherwise, if the message is to be delivered to an internal address, the MTA processes it and then delivers it to another component. This process is illustrated in Figure 1.2.
Figure 1.2: Mail Transfer Agent
A message can be received by the MTA in the following ways:
The SMTP listener can pass incoming messages, addressed to internal and external users, received from external mail servers and from external mail clients such as Outlook, Netscape, Eudora and Gateway mail to the MTA.Servers running Lotus Domino, Microsoft Exchange, and IMAP can pass messages addressed to internal and external users from a user to the MTA.Instant Messaging and Bloomberg can log communication which is then passed as an e-mail message to the MTA.A plug-in component can pass messages addressed to internal or external users to the MTA using the methods in the ZipLip Development Kit (ZDK).The Queue Fetcher can fetch messages from a mail queue that is a storage directory and pass incoming messages addressed to internal or external users to the MTA. The queue can be populated by third-party SMTP server applications and by manually copying messages.
The MTA receives the e-mail messages from these sources and stages them before processing in two different ways
Mail Queue – Mail to be processed is stored in a file directory. The main queue directory has three subdirectories: queue, process, and done. Initially all messages are written to
ExternalSMTPClient
InternalSMTP
InternalSMTP
SMTPClient
(Outlook, Thunderbird)
Lotus or Exchange
Agents
HandlerRouterHandlerRouter
PostReceiveHandler
MTA
API
IM/Bloomberg
Gateway
18 Administration Guide

Messaging Applications and Gateway
the queue directory. Before processing, the MTA moves the mail from the queue directory to the process directory and once the mail is processed (successfully or unsuccessfully) it is moved to the done directory. Database – Mail to be processed is stored in the database and the filesystem. The actual message is stored in the Vault, which has both a database record pointing to a file on the file system. Additional database records to keep track of mail and recipient states. These records include a database record in the ZLPReceivedMail table for each mail and one ZLPRecipientInfo record for each recipient within the message.
Both methods have pros and cons. The advantage with the queue approach is no database overhead. Disadvantages include poor error-handling and lack of visibility into mails when error occurs. In the database case, advantages include very good exception error handling, excellent monitoring capabilities, but a disadvantage in the overhead on the database. Although it is possible to use the mail queue or the Database to handle e-mail messages, ZipLip uses a hybrid scheme where by the MTA is extremely reliable and serviceable with very little database overhead. The hybrid approach first uses the mail queue for all incoming mail and if the mail cannot be processed in the first attempt (Unable to contact destination SMTP servers), the mail is moved from the queue to the database. Database overhead is therefore only incurred in situations where good visibility or error-handling are required.
The Mail Processing is modeled as a task to be executed by the Coordinator/Executor Module. When mail initially gets submitted by one of the methods to the MTA, the MTA stages the messages and then creates a task and submits the task to the LC. The task is finally given to an executor which then does the processing; this executor can be on the same or a different system. This distributed architecture makes the MTA extremely scalable and also provides support for scheduled delivery of mails.
The executor processes the message given by the LC. MTA processing is extremely flexible due to the ZipLip MTA Handler Architecture. The type of processing performed is specified in terms of chained-handler. The handling of mail can be defined in five steps:
1. Pre-processing Handler – Performed once for the entire message, this perform operations that are common to all recipients such as virus scanning, group list expansion, and advanced mail forwarding. The message also gets scanned to see if any phrases match those in the Lexicon. If the Lexicon is triggered, the message is tagged for review per the Rules engine. This handler can nest multiple handlers.
2. Archive Handler – This tags messages for retention. If tagged, messages are archived. It also indexes messages in the archive database.
3. Secure Mail Handler – This determines whether the message is to be encrypted or left unencrypted for each recipient. If applicable, the message is encrypted.
4. Delivery Handler – Delivery handler categorizes the recipients of the mail and groups them into categories RELAY, STORE, and LOOP-BACK. Delivery handlers also contain handlers for each category for performing these operations. For example, the RELAY handler further categorizes the recipients based on the delivery security requirements and then performs the SMTP delivery. Similarly, the STORE handler has additional processing, such as a personal spam filter and Folder Filtering before Storing the message in the mail store. This handler also relays messages to Microsoft Exchange and Lotus Domino servers.
Administration Guide 19

Getting Started with ZipLip
5. Post-processing Handler – This is done once all recipients in the message are DONE (with or without errors). Handlers typically perform post-processing actions including sending undeliverable error message for completed mail with errors and rescheduling the next retry according to a retry policy.
Mail processing can fail due to system crashes, reboots, or for other normal reasons such as the destination server not responding. If the failure of a recipient is normal, the processing states are updated in the ZLPReceivedMail and ZLPRecipientStatus tables. If the message is in the queue, the message is moved to database before updating the states. For abnormal failures, the messages may get stuck in the queue directory or the process directory. In this situation, a background global task child process known as the SMTPQueueFetcher polls for files in the queue and process directories that are older than certain threshold, moves them to database, and schedules them for reprocessing. For failures that occur while processing a message stored in the database, the background child process ReceivedMailFetcher polls the ZLPReceivedMail tables for messages that need to be retried and submits them to the LC and GC for reprocessing.
The MTA has several advantages over existing MTAs provided by other vendors:
It is very flexible; its behavior can be modified with very little effort.It is very scalable due to the Coordinator/Executor architecture.It is very reliable; all states are stored in persistent stores (database or files). Given a system crash, delivery of all messages is guaranteed.
Mail Store
The mail store provides storage and retrieval services for messages. It is built on top of the vault, which is ZipLip’s mechanism that provides for message encryption, audit trails, and storage of each message in an individual file.
ZipLip messages are stored in the database and filesystem. All metadata that corresponds to a single message is stored in the database, and the actual message itself is stored in the file system using the aforementioned Vault architecture.
Metadata includes pieces of information such as the message subject, the sent date, the folder name, the From address, the To address, the associated vault item ID, a password (if the message is a secure message), and message flags. Flags indicate if the message has been read, and if there are attachments. The metadata is stored in a ZLPMessage record.
The vault is a storage-related layer. It defines objects such as storage units, disk volumes, and vault items.
A storage unit is an object that is comprised of one or more disk volumes. A disk volume is a location where message data can be stored. Only one disk volume is “live” at any given time for a storage unit. Division of a storage unit into several disk volumes provides flexibility in moving disk volume data around while maintaining accessibility to messages.
The vault item is an object that contains the virtual path of the actual message and any password information. The actual physical path of the message is determined at runtime by the storage unit.
20 Administration Guide

Messaging Applications and Gateway
The vault can be configured so each message can be encrypted with the specified encryption scheme using the account owner’s personal key. The vault also has escrow capabilities to retrieve messages in the event of the loss of the personal key.
The ZipLip software uses a Vault to hold data and Rules. The vault provides several storage virtualization benefits at the application layer, including:
Unlimited storage that can be comprised of several different physical disk storage units.A single integration point that supports specialized storage systems, such as EMC Centera and HSM storage systems, such as Q-Star and Bridgehead, and other industry standard vaults, such as IBM Content Manager.Transparent encryption and compression of data.Storing files across many directories and filesystems simultaneously and enabling the server to overcome limitations of an operating system or filesystem.Partitioning based on date that enables physical separation of data. This enables incremental backup and replication.Easy management of data.
The mail store provides several major benefits:
Only one copy of a message sent to multiple recipients within the same organization is stored.Pre-parsed MIME messages provide for easy loading and navigation of large messages. They also allow the WebMail application to support complex mail presentation schemes such as inline attachments, multi-part/alternative, and drafts.Generated events give the flexibility to modify the behavior of the mail store.The mail store architecture helps in supporting large mailboxes with ease.The mail store supports Single Instance Storage.
HTML-Based Interface
The HTML-Based ZipLip application provides an abundance of features, including:
Display of message summaries, such as subject, sender names, and sent dates.A Secure e-mail application.The ability to view the archive via the Web.The ability to search and sort messages based on a variety of criteria.A Compliance application.
SMTP Listener
The SMTP listener supports SMTP Protocol as defined by RFCs 821 and 2821. In addition, the SMTP listener supports Message Size Declaration (RFC 1870) and Authenticated SMTP (RFC 2554). Connection pooling of Sessions enables quick session initialization. Tight integration of SMTP listener with ZipLip MTA reduces the end-to-end mail processing latency. The SMTP listener is a child process within the ZipLip and hence can be started from the configuration files or the SysAdmin Application.
Administration Guide 21

Getting Started with ZipLip
IMAP4 Listener
IMAP listeners support IMAP4 protocol as defined by RFCs 2060 and 2177 to access messages in the mail store. Secure IMAP over TLS (RFC 2595) is also supported.
MIME Parsing
All e-mail messages that are received by the MTA for internal delivery are stored in the vault. RFC 822 and other Internet standard documents have defined the content and protocols used to exchange e-mail messages via the Internet. The ZipLip software stores a message with additional header information that is useful in supporting the IMAP and POP3 protocols. ZipLip’s Java classes perform the MIME parsing.
22 Administration Guide

Chapter 2
Configuration
ZipLip relies on its configuration technology for the flexibility, manageability, and modularity of the platform. All system-specific settings are stored in either System Registry tables in the database or in configuration files. The definitions in the configuration files include database settings, queries, cache settings, connection pool settings (used for database and network connections), and entry point settings (separation of business logic from presentation).
The System Registry is a central point of control in the ZipLip system for the various system settings. In the System Registry you can edit settings for:
Unified Archival Admin and ComplianceSystem Configuration and User Authentication Web Applications MTA ListenersSecure MailDocument ConversionLanguage Parameters
A configuration file consists of name-value pairs in a text file that can be edited with a regular text editor. In addition to simple values, the configuration system can define and specify objects. Also, the definition of an object within the configuration file can use previously-defined objects. This creates a system with easily modified behavior that does not involve recompiling of any source code. Over 100 different object types are created during configuration.
ZipLip has designed the configuration parameters so most of the parameters that need to be changed either during installation or configuration can be set from the Web interface. The modified values are stored in the database and can be shared with other systems. The configuration technology also provides a flexible way to group systems. The Web interface provides the following benefits:
Configuration changes made via the Web UI automatically applies to all machines and thus changes need be made once per group.Current parameter settings are visible from the Web interfaceAll easily customizable variables are visible with appropriate help.All changes are logged to the System Audit table and can be easily controlled.
Administration Guide 23

Configuration
Configuration File Structure
ZipLip uses configuration files extensively and has over 200 configuration files and is organized into a file structure. The System Administrator is not expected to change most of the configuration file. Configuration files are located in the $ZipLip/zlserver/WEB-INF/config directory with the following major subdirectories:
common – Some common settings; typically no changes are needed here.app – Contains a nested set of directories, each signifying an application or major component. No changes are needed here necessary except during major customization. Changes here have to be made with care as they impact the proper running of the system.i18n – Contains a nested set of directories pertaining to a particular language. Again, no changes are needed.runnable – Files here contain the system runtime settings. Many of the settings here need to be modified by the System Administrator. Many parameters within here can be modified from the Web interface.
Key Configuration Files
The following is a description of the key configuration files which need to be modified and set up for each new installation:
runnable/pmapp/pmapp.cfg – The main configuration file; includes flags to turn on and off certain applications, and includes crucial settings for connecting to databases.runnable/pmapp/pmappChild.cfg – The child daemon configuration and automatic startup of child daemons.runnable/pmapp/pmappURL.cfg – This file needs to be modified for e-mail generated by ZipLip that contains a URL. It also needs to be modified if ZipLip is deployed behind a proxy server that rewrites URLS or requests.
The following parameters in runnable/pmapp/pmapp.cfg must be modified:
machine.local.ip – The local IP address of the machine. The system automatically detects this. This parameter is used when the system administrator needs to force a specific IP address (such as when there are multiple NICs). machine.local.name – The local hostname (short version, usually truncated to three characters; used to identify the machine in a cluster). This is also detected automatically. machine.local.host – The local hostname (fully-qualified domain name)SmDsURL – The data source URL; used to identify the required database server location.SmDsUserid – The database login user ID; used in conjunction with the SmDsPwd field to identify database privileges.SmDsPwd – The database login password.coord.cluster.default.name – The default coordinator cluster name; must be the same for all machines in a cluster.
24 Administration Guide

Configuration File Structure
The following parameters in runnable/pmapp/pmappURL.cfg may need to be modified:
machine.local.ip – The local IP address of the machine. When a system has multiple IP addresses, this parameter is used to force listening on a specific a specific IP address.HAS_SSL – This variable is normally set to false. If you are using SSL (HTTPS connections), set the value of this variable to true.Reverse URL redirections – If you have deployed ZipLip behind a proxy server that rewrites URLs or requests, add the following lines to the end of the pmappURL.cfg file:
//REVERSE URL REDIRECTIONS DUE TO PROXY SERVER RE-WRITING//url.reverseMap.0=#wsi.config.StringNameValuePair~~http://localhost~~http://10.0.0.71com.ziplip.url.prefix.reverseMap = #wsi.config.ArrayFactory~~url.reverseMap~~0
How Configuration Files Are Loaded
When the J2EE Application Server starts up, it first loads the initialization parameters that bring up the rest of the system. These parameters can be found in $ZipLip/zlserver/WEB-INF/web.xml :
com.ziplip.config.dir – Specifies the configuration directory, for example, “/Marin/WEB-INF/Config”.com.ziplip.root.dir – Specifies the root directory of the application, such as “/Marin”.com.ziplip.prefix.appname – Specifies the application prefix, such as “/ps”. Do not change this after the initial installation, as notification e-mail messages contain URLs which use this parameter.com.ziplip.url.prefix.secure, insecure, default – Specifies Secure, Insecure and Default URL prefixes (used in notification e-mail messages), such as “https://hostname/ps”.com.ziplip.pmapp.config.main – First configuration file loaded by the system, such as “/Marin/WEB-INF/runnable/pmapp/pmapp.cfg”. Only change this value to reflect the full path of the pmapp.cfg file.com.ziplip.pmapp.config.include – Specifies the first configuration file is loaded in stage three. This file is loaded after the parameters from the main configuration file and the database registry are loaded.com.ziplip.logs.dir – Specifies the location of the directory into which the system dumps its logs, for example, “/Marin/WEB-INF/Logs”.
The following is a description of how configuration files are loaded by the system before it can begin to serve requests.
1. The Application Server loads the parameters defined in $ZipLip/zlserver/WEB-INF/web.xml. The system then parses and loads the first configuration file specified in the com.ziplip.pmapp.config.main parameter, which is $ZipLip/zlserver/WEB-INF/Config/runnable/pmapp/pmapp.cfg.
Note: This file includes many other configuration files.
Administration Guide 25

Configuration
2. After loading pmapp.cfg and the associated files, the database is up, and the system begins to load default values from the configuration registry residing in the database that are common to all machines in the configuration group.
3. The System Registry is loaded.4. After the database defaults are loaded, the Application Server loads the final stage of the
configuration files, which is defined by the parameter com.ziplip.pmapp.config.include. This file is typically in $ZipLip/zlserver/WEB-INF/Config/runnable/pmapp/ and is typically called pmappIncludes.cfg.
5. The pmappIncludes.cfg file loads the child daemons specified in the directory $ZipLip/zlserver/WEB-INF/Config/runnable/pmapp/ in the file pmappChild.cfg. This file starts the SMTP, POP3, IMAP and FTP servers, depending on the configuration and is ready to serve requests. See Chapter 12, “Administrative Tasks,” on page 173 for information on editing pmappChild.cfg.
Configuring Single Sign-On
Configuring user authentication for single sign-on is done in the ZipLip System Registry.
1. Click the left menu item System Configuration. Under System Configuration, click Registry.
Figure 2.1: System Registry pane
2. In the System Registry pane to the right, click User Authentication.
26 Administration Guide

Configuring Single Sign-On
Figure 2.2: System Registry - User Authentication pane
3. In the User Authentication pane, select Single Sign-On from Portals.
Figure 2.3: System Registry - User Authentication - Single Sign-On from Portals pane
4. In the Single Sign-On from Portals pane, check Enable Portal Single Sign-On to enable ZipLip to integrate with external portals.
Note: Enabling single sign-on from portals disables signing out directly from ZipLip.
Other options available are:
Allow users to change passphrase – Check to enable users to change their own password from the external portal.Enable redirection on signout/timeout – Check to redirect the user to a specific URL upon signout from or timeout of the external portal. If you check this option, next to
Administration Guide 27

Configuration
Signin URL to redirect to on signout/timeout, enter the URL to which the user is to be directed.
When you have made completed the appropriate information for your site, click Save to save your changes, then click OK to the pop-up box saying you must restart ZipLip for your changes to take effect.
5. Restart ZipLip by entering the following in a command-line window or shell:zlstopzlstart
Enabling LDAP Authentication
To enable LDAP user authentication during login:
1. Click the left menu item System Configuration. Under System Configuration, click Registry.
2. In the System Registry pane to the right (see Figure 2.1 on page 26), click User Authentication.
3. In the User Authentication pane (see Figure 2.2 on page 27), select User Authentication Mechanism.
Figure 2.4: System Registry - User Authentication - User Authentication Mechanism pane
4. In the User Authentication Mechanism pane, complete the following fields:Default Authentication Method – Enter a default authentication method. Default Authentication schemes known to ZipLip are:ZipLipDB – Authenticate logon against the ZipLip server database.LDAP – Authenticate logon against an LDAP server.ArchiveMailServer – Authenticate against an archive server.
If you leave this field blank it defaults to ZipLipDB.
28 Administration Guide

Enabling LDAP Authentication
Use LDAP Server for Authentication – Check if you want to use an LDAP server for user authentication. If you have checked this option, complete the following:
LDAP Host – Enter the name of the LDAP host.LDAP Port – Enter the port being used by the LDAP server.
Use SSL to connect to LDAP server – Check if you want to use Secure Sockets Layer protocol to connect to the LDAP server.Authentication User Type – From the pull-down menu select one of the following to specify what to match the LDAP user address against:
ZLPUser Address – ZipLip user ID.Archive User Address – Archive user ID.Archive User Alias – Accept any archive user ID alias.
Use DN for Binding – If checked, the user address is treated as an alias and the DN alias is looked up in the ZipLip database. If a DN alias is found, it is used for authenticating against the LDAP server; if not, the user address provided is used.External Callback class names – Enter external authentication callback class names to be registered with the server. For multiple entries, separate each class with a comma. Registration errors appear in the log file or the event logs.
When you have made completed the appropriate information for your site, click Save to save your changes, then click OK to the pop-up box saying you must restart ZipLip for your changes to take effect.
5. Restart ZipLip by entering the following in a command-line window or shell:zlstopzlstart
Administration Guide 29

Configuration
30 Administration Guide

Chapter 3
Database
ZipLip relies on an industrial strength relational database to store state, transient, and application information. The use of database enables ZipLip server to deal with concurrent data access from multiple machines/processes. A large portion of scalability and reliability of ZipLip server can be attributed to the use of database for dealing with the concurrent data.
Database Configuration
ZipLip supports Oracle, MS SQL Server, and Sybase and can potentially support any JDBC database.
A database must be setup per the ZipLip Installation Guide. Typically after installing the database instance, the System Administrator is expected to run the installation scripts provided with the software. The scripts create several system and application tables with in the database. These tables are needed for ZipLip servers and applications to function. The database URLs and parameters in $ZipLip/zlserver/WEB-INF/Config/runnable/pmapp/pmapp.cfg need to be modified to give the ZipLip servers database access information. The following is an excerpt of this file for an Oracle database://Default Datasource URL, userid and password.#define DB_DB2SQL_DEFAULT=false#define DB_MSSQL_DEFAULT=false#define DB_ORACLE_DEFAULT=true
//SmDsURL=jdbc:db2://127.0.0.1/ziplip//SmDsURL=jdbc:microsoft:sqlserver://127.0.0.1:1433SmDsURL=jdbc:oracle:thin:@127.0.0.1:1521:ZLDBSmDsUserid = UserSmDsPwd = Password
This excerpt defines an Oracle instance named ZLDB located at 127.0.0.1:1521; the user ID and password are specified. Upon startup, the ZipLip Platform tries to connect to this database. To use other databases, edit the configuration file and set the proper #define constant to true. For example, to use an MS SQL Server set DB_MSSQL_DEFAULT to true and the other databases to false, and comment and uncomment the proper SmDsURL lines.
After initializing the database, for efficiency reasons, the ZipLip server maintains a connection pool with the database. Depending on the default database, the connection pool properties are specified in one of the following files:
$ZipLip/zlserver/WEB-INF/Config/app/db/oracle/dbcmap.cfg
Administration Guide 31

Database
$ZipLip/zlserver/WEB-INF/Config/app/db/mssql/dbcmap.cfg$ZipLip/zlserver/WEB-INF/Config/app/db/db2/dbcmap.cfg
The parameters specifiable are initial, optimal and maximum values for the database connections. This file also specifies the time to wait before creating and deleting connections. The following is an excerpt from the configuration file:
db.connections.initial=1db.connections.optimum=2//Connection Pool Policy// slope,intercept,min,max
//For 0-10 connection wait of 100ms dbc.policy.fn.0 = #wsi.util.PieceWiseFunction~~0~~50~~0~~5dbc.policy.fn.1 = #wsi.util.PieceWiseFunction~~100~~100~~5~~10dbc.policy.fn.2 = #wsi.util.PieceWiseFunction~~150~~1000~~10~~100dbc.policy.fn = #wsi.config.ArrayFactory~~dbc.policy.fn~~3
The first two lines specify the initial and optimum number of database connections. During system startup, the connection pool associated with database is created. A specified number of database connections are initially created during the when the connection pool is created. This is specified by the db.connections.initial parameter. As the system runs, modules that need database connections request more connections from the pool. The pool returns a connection if there is a free one; otherwise, the pool waits a specified period of time before creating a new connection. The time to wait is a function of the current connection pool size. This function is defined as a piece-wise linear function as shown in the preceding code sample. If the current size exceeds a maximum number, the connection pool returns no connection. If the pool size goes beyond the optimum size, the background maintenance task tries to shrink the pool by closing unused connections.
Important Database Tables
The following table is a quick overview of some important database tables the scripts in $ZipLip/database/mydatabase/app create (substitute your database name, such as “oracle”, “mssql”, or “db2”, for mydatabase).
Type of Table Table Name DescriptionUser Information DomainInfo Stores Domain Information
ZipAccount User InformationSystem Registry and Customization Tables
ParameterSet, ParameterElement
Generic table for storing key value pairs, used by applications to store constants
Transient Tables EventLog Stores System and Application Events
32 Administration Guide

Important Database Tables
User Session UserSession Stores Persistent Session information, allows failover of user sessions when one machine goes down
ProfileLog Stores profile informationSystemAudit Stores audit trail information for the sessionProtectedKey Stores password information for the sessionUserAuthentication Stores user authentication information for a
sessionUserRoles Stores the user’s roles for the sessionSystemLock Keeps track of process locks.ZLPolicy Stores policy information for the sessionZLPolicyRule Stores Rules for the sessionRetentionPeriod Stores retention period definitions
Lexicon Related Classifier Stores rule categoriesClassifierEntity Stores rule typesCategory Stores the category of the ruleCategoryAction Stores the actions that go with each ruleLexRule Stores Lexicon rulesLexPhrase Stores Lexicon phrasesLexPhraseSynonym Stores Lexicon synonymsClassifyReason Stores Lexicon reasonsClassifierAuditTrail Stores the audit trail for the Lexicon, including
actions taken and comments madeLexHits Stores the number of hits on a phrase in the
LexiconLexHitsSummary Stores an aggregation of data about the
number of hits on a phrase in the LexiconSearch Related SearchStore Stores information about the Search Store
SearchStoreInstance Stores a given instance of the Search StoreInstanceDataFiles Stores the data files for a given instance of a
searchEntitySearchStore Stores the Search Store to use for a domain,
Department, or userInstanceMergeDetails Stores merge details for a searchInstanceIntegrity Stores an integrity check of the search dataInstanceSegments Stores segments of search instances
Type of Table Table Name Description
Administration Guide 33

Database
Tracker Related TrackerDomainInfo Stores domain informationTrackerProject Stores information about a project, such as the
folders and items (internal)TrackerProjectPrivileges Stores privileges associated with a projectTrackerEntity Stores Compliance-related information, such
as privileges, and options, for a Domain, Department, or User
TrackerItem Stores quarantined messagesTrackerAuditTrail Stores audit trail informationUserMailComplianceStat Stores mail Compliance statistics for a userComplianceMail Keeps track of all messages processed by the
Compliance system whether or not they are caught for review. The table stores one entry per message per known user. This table is also used for compliance statistics reporting at a user level, such as how many messages were sent to a user in a given timeframe, and how many were prereviewed.
Global Coordinator State Information
GlobalCoordCluster One record per cluster; stores the current live global coordinator
GlobalCoordRuntime One record per machine per clusterTaskDrivers Stores information about tasks coordinated by
the GCTaskDriverRuns Stores information about tasks actually run by
the GCTaskStatus Stores status information about GC tasksReportVaultItem Stores the vault item information for a given
report instance.MigrationTask Stores migration task details, such as when the
task started, when it ended, how many messages were processed, and how many were successful.
Vault Related VaultItem One record per item stored in the vaultDiskVolume One record per disk volumeDiskStorageUnit One record per disk storage unitVaultContainerRefCount Stores the number of times a storage unit is
referencedVaultReplication Stores information about replicated unitsStorageContainerLog Stores information about volumes that have
been created.DBStorageHeader Storage header for the databaseDBStorageData Storage data for the database
Type of Table Table Name Description
34 Administration Guide

Important Database Tables
zVite zViteInfo One record for each resource that is sharedzViteAccess Contains access control information for each
zVitezViteAuditTrail Contains audit trial information
E-mail Domain and User Related
ZLPUser Stores e-mail account informationZLPUserVacResponse Stores e-mail vacation response informationZLPDomainInfo Stores domain privileges and settingsManagedEmailDomain Stores all domains that the system manages.Doc Stores e-mail attachmentsStagedAttachment Stores staged attachmentsUserEmailSig Stores e-mail accounts’ signatures
Message Store Related
ZLPMessage Stores message information. Ties to the VaultItem table.
ZLPFolder Stores folder informationReceivedFileStore Stores the SMTP staging vault and other
statistics related to SMTP mail flow.Filters and AutoResponders
ZLPFolderFilterRule Stores e-mail account folder filter rulesZLPSpamFilterRule Stores e-mail and corporate level spam filter
rulesAutoResponder Stores auto responder information pertaining
to an e-mail account.MTA Related ZLPReceivedMail Stores received e-mail messages. Typically
used for retried messages, web e-mail, system mail, and secure mail.
ZLPRecipientInfo Stores ReceivedMail recipient information. One record per recipient
MTATranscript Logs certain MTA transactionsZLHost Stores IP addresses, host names, and
descriptions of them.MTAExecutionTranscript If a message is not processed successfully, it is
stored here, along with why it was not processed successfully (which system processed the message, when it was processed, the action that took place, and why).
ZLPViolator Stores data regarding which users have violated the mailbox quota limit.
ZLPViolatorTranscript Keeps track of the ZLPViolator data.ZLPAdvancedForwarding Stores a description of the user options for
where to forward mail.ZLMailDeliveryOptions Stores mail delivery optionsMessageSingleInstanceDigest For any given message, all the properties
related to a single instance.
Type of Table Table Name Description
Administration Guide 35

Database
Archive Related ArchiveServer Stores Department and mail server information
ArchiveServerAgent Stores mail server agentsArchiveUserInfo Stores information about all Department
memebers relating to archiving and Compliance
ArchiveUserAlias Stores aliases for all usersEntityArchivePolicy Stores Compliance flags and policies (review
flags, sampling rate) for domains, Departments, and users
ArchiveAuditTrail Stores the audit trail for the archiveWormArchive Location of WORM archiving information.WormArchiveInstance Stores specific WORM archive instances.ImportTask Stores all import tasksAttyClientMessage Stores whether a message is marked for
attorney client privilegeMailServerTransaction Stores mail server transactionsExportTask Stores all export tasksArchiveServerAgentRuns Stores when the server agent has runArchiveUserRuns Stores information about the agent for each
run for each user
Type of Table Table Name Description
36 Administration Guide

Chapter 4
Retention Manager
When you set up archiving you need to have a policy that determines how long messages are kept in the archive. Storage management policies are set and tracked using the Retention Manager.
Viewing and Editing Retention Periods
To view or edit retention periods, in the Unified Archival Admin application, in the left menu select Retention Manager. Under Retention Manager select View/Edit Periods. A list of defined Retention Periods appears in the right pane.
Figure 4.1: Retention Periods list
Creating a Retention Period
ZipLip comes with a default retention period. To create an additional retention period:
1. In the Retention Periods pane click New Period. A pane in which you can enter a new retention period appears.
Administration Guide 37

Retention Manager
Figure 4.2: New Retention Period pane
2. Complete the following fields:Period Name – Enter the case-insensitive name of the period as stored by ZipLip. Do not use spaces.Period Display Name – Enter the case-insensitive name of the period as you want it displayed by ZipLip. This name may have spaces and special characters.Retain period – The minimum amount of time to keep a message in the archive. Select one of the following:
None (Delete-able immediately)days – Enter an integer representing the number of days for the messages to be retained.Forever (Never delete)
Min. Retain period – The minimum amount of time a message is to be retained. The Retain period cannot be lower than this value. Select one of the following:
None (Delete-able immediately)days – Enter an integer representing the minimum number of days for the messages to be retained.Forever (Never delete)
Priority – An integer that determines the priority in the event of a conflict. The higher the number, the higher the message priority.
3. Click Create to create the new retention period.
The new retention period appears in the Retention Periods list.
38 Administration Guide

Viewing and Editing Retention Periods
Figure 4.3: Retention Periods list with new retention period
Editing a Retention Period
To edit a retention period, click on its name in the Retention Periods list. A pane appears in which you can change the Retain period and the Priority.
Figure 4.4: Edit Retention Period pane
When you have made your changes, click Save. To return to the Retention Periods list without making any changes, click the X in the upper right corner of the pane.
Administration Guide 39

Retention Manager
Deleting a Retention Period
Note: You can edit the the Default retention period, but you cannot delete it.
To delete a retention period, in the Retention Periods list, select the checkbox next to each retention period you want to remove, or click the checkbox at the top of and click Delete, then click OK in the pop-up window.
Viewing the Retention Enforcement History
ZipLip keeps a log of every time retention periods are enforced. To view these records:
1. In the Unified Archival Admin application, in the left menu select Retention Manager. Under Retention Manager select Enforcement History. The right pane
Figure 4.5: Retention Enforcement History pane
2. In the Retention Enforcement History pane you can enter the date range by using a combination of the pull-down menus, entering the year in the boxes, and clicking on the calendar ( ) icons. To close the calendar icon, left-click the mouse on any of the pull-down menus. Click Go. A list of records appears in the right pane.
40 Administration Guide

Viewing the Retention Enforcement History
Figure 4.6: Retention Enforcement Records pane
3. To view details of a particular record, click on the Dates. The Retention enforcement details pane appears.
Figure 4.7: Retention enforcement details pane
4. To view details about a particular row, click on data in any column of the row. the Mail Purge details pane for that line appears.
Administration Guide 41

Retention Manager
Figure 4.8: Mail Purge details pane
42 Administration Guide

Chapter 5
Policy Manager
The Policy Manager is where you create and edit storage management (Mailbox Management) and Compliance policies.
Viewing and Editing Storage Management Policies
To view or edit storage management policies, in the Unified Archival Admin application, in the left menu select Policy Manager. Under Policy Manager select Storage Management. A list of defined Archiving Policies appears in the right pane.
Figure 5.1: Storage Management Policies - Archiving Policies tab
Creating a New Archiving Policy
ZipLip comes with a default archiving policy. To create an additional archiving policy:
1. Under the Archiving Policies tab select New Policy. A pane in which you can enter a new archiving policy appears.
Administration Guide 43

Policy Manager
Figure 5.2: New Archiving Policy pane
2. Complete the following fields:Policy Name – Enter the case-insensitive name (16 characters maximum) of the policy.Policy Description – Enter a text description of the policy (optional).
Click Create Policy to create the policy, or click the X in the upper right corner to return to the Archiving Policy tab without making any changes. After you click Create Policy, the Archiving Policy tab shows your new policy.
3. To add a new policy, under the Archiving tab select New Policy. The New Archiving Policy window appears.
Figure 5.3: New Archiving Policy window
4. In the New Archiving Policy window, enter:Policy Name – An alphanumeric name for the policy.
44 Administration Guide

Viewing and Editing Storage Management Policies
Policy Description – An optional text description of this policy.
Click Create Policy to create the policy.
Figure 5.4: Archiving Policy with no rules
Adding a Rule to an Archive Policy
To add a new rule to an archive policy:
1. In the Archiving Policy information pane (see Figure 5.4), click Add New Rule.
Figure 5.5: Archiving Rule pane
2. In the Archiving Rule pane, complete the following information:Rule Name – Enter an alphanumeric name for the rule; avoid using special characters (Japanese text is allowed). Rule names are case-insensitive.
Administration Guide 45

Policy Manager
Rule Description – (Optional) Enter a text description of the rule.Add New Condition – Rules need conditions on which to operate. You can add multiple conditions to a rule.
Field – From the pull-down menu, select MessageDate, FolderType, MessageProperty, Subject, Age (days), or Message Size KB.
Operator – Select an operator from the pull-down menu. The choices in the Operator menu vary depending on which Field you select:MessageDate – Select Date Later Than or Date Earlier Than FolderType – Select Equals (Match case) or Equals (Ignore case)MessageProperty – Select Equals (Match case), Equals (Ignore case), Contains Word, or Not Contains Word Subject – Select Select Equals (Match case), Equals (Ignore case), Contains Word, or Not Contains WordAge (days) – Select Less than or Greater than or equals.Message Size KB – Select Less than or Greater than or equals.
Pattern – Enter a text pattern or number on which to operate.Click Add this condition to add the condition.Action – Select an action from the pull-down menu. Archive Action – From the pull-down menu, select Archive, Don't Archive, or Delete.
3. Click Add this Rule to add the rule and return to the Archiving Policy pane with the new rule added, or click Cancel to return to the Archiving Policy pane without creating this rule.
Viewing and Editing Stubbing Policies
You can view and edit stubbing policies. In the left menu, select Policy Manager. Under Policy Manager, select Storage Management. In the Storage Management Policies - Archiving Policies pane, select the Stubbing tab. The Stubbing Policies pane appears.
Figure 5.6: Stubbing Policies pane
46 Administration Guide

Viewing and Editing Stubbing Policies
Note: The DEFAULT policy is always present and is created during installation of the ZipLip system.
To create a new stubbing policy, under the Stubbing tab select New Policy. The New Stubbing Policy pane appears.
Figure 5.7: New Stubbing Policy pane
Enter an alphanumeric Policy Name (text-insensitive) and (optional) Policy Description. Click Create Policy to create this policy. The Stubbing Policy pane for this policy appears with no rules.
Figure 5.8: Stubbing Policy pane for a new policy with no rules
To add a rule to this policy, click Add New Rule. The Stubbing Rule pane appears.
Administration Guide 47

Policy Manager
Figure 5.9: Stubbing Rule pane
In the Stubbing Rule pane, complete the following fields:
Rule Name – Enter an alphanumeric name for the rule; avoid using special characters. Rule names are case-insensitive.Rule Description – (Optional) Enter a text description of the rule.Add New Condition – Rules need conditions on which to operate. You can add multiple conditions to a rule.
Field – From the pull-down menu, select MessageDate, FolderType, Age (days), or Message Size KB.
Operator – Select an operator from the pull-down menu. The choices in the Operator menu vary depending on which Field you select:MessageDate – Select Date Later Than or Date Earlier Than FolderType – Select Equals (Match case) or Equals (Ignore case)MessageProperty – Select Equals (Match case), Equals (Ignore case), Contains Word, or Not Contains Word Subject – Select Select Equals (Match case), Equals (Ignore case), Contains Word, or Not Contains WordAge (days) – Select Less than or Greater than or equals.Message Size KB – Select Less than or Greater than or equals.
Pattern – Enter a text pattern or number on which to operate.Click Add this condition to add the condition.Action – From the pull-down menu, select Stub, Don't Stub, or Delete.Stub Method – From the pull-down menu, select one of the following options for stubbing methods:
Stub Partial Message – All but a portion of the initial part of the e-mail body is stubbed, allowing some of the context of message to be retained in the mailbox.
48 Administration Guide

Viewing and Editing Stubbing Policies
Attachments only – Only the attachments of the messages are stubbed, leaving behind the body of the message.
Full Message Stub – The entire message is stubbed in the mailbox.4. Click Add this Rule to add the rule and return to the Archiving Policy pane with the new
rule added, or click Cancel to return to the Archiving Policy pane without creating this rule.
Stubbing Templates
When messages are stubbed, mailboxes contain a pointer to the stubbed message data. These are created using stubbing templates.
To modify and edit these templates, in the ZipLip Archival application, in the left menu, select Lotus Templates or Exchange Templates. Under Lotus Templates and Exchange Templates there are three types of stubbing templates corresponding to the three stubbing methods:
Full Message StubPartial Message StubAttachment Stub
To view and modify these templates, in the left menu click on the name of the template, edit it in the text box in the right pane, then click Save to save it.
Retention Policies
The retention policy specifies the lifecycle of the message. During e-mail processing, the mail server runs the retention policy to determine how long to keep each message.
To view retention policies, in the left menu, select Policy Manager. Under Policy Manager, select Storage Management. In the Storage Management Policies - Archiving Policies pane, select the Retention tab. The Retention Policies pane appears.
Figure 5.10: Retention Policies pane
Administration Guide 49

Policy Manager
Associating Policies
Policies can be associated at the system level, Department level, or user level. The default policy is always at the system level.
Overriding System Policies at the Department Level
To associate a policy with a Department other than the system DEFAULT policy:
1. In the left menu of the Unified Archival Admin application, select Departments. Under Departments, select View/Edit.
2. In the middle pane, select a Department. This example uses Department My Department.
Figure 5.11: Department General tab
Note: The procedure for associating policies is the same whether done at the mail server or Department level.
3. Under the Department Policy tab select Archive Policies. The Archive Policies pane appears.
50 Administration Guide

Viewing and Editing Stubbing Policies
Figure 5.12: Archive Policies pane
4. In the Archive Policies pane, use the pull-down menus to change the associated ComplianceRetention, ArchiveRetention, Stubbing Policy, Archiving Policy, and Folder Categorizer as desired. Click Save to save your changes.
Overriding Policies at the User Level
To customize policy associations at the user level:
1. In the left menu of the Unified Archival Admin application, select User Manager. Under Departments, select Find/Edit users/mailing lists.
2. In the Find department members window, enter search criteria for the user you want to modify or leave blank to return all users. Click Find.
Figure 5.13: Search results for users/Mailing lists pane
Administration Guide 51
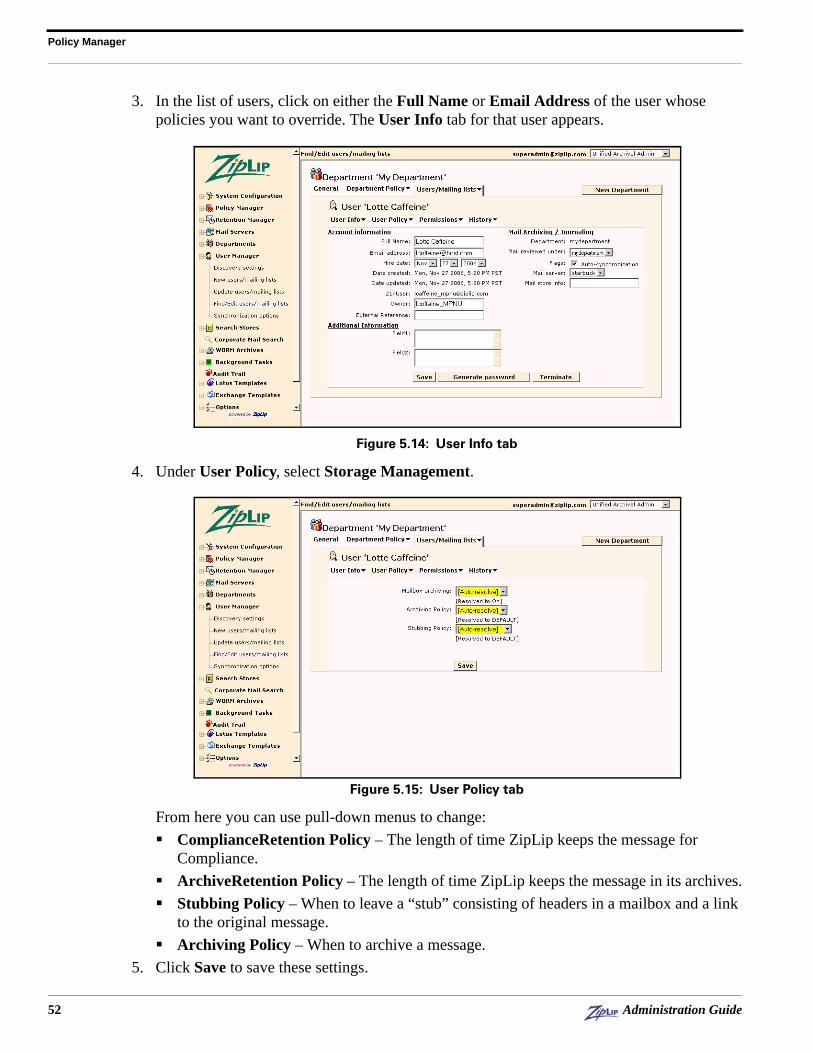
Policy Manager
3. In the list of users, click on either the Full Name or Email Address of the user whose policies you want to override. The User Info tab for that user appears.
Figure 5.14: User Info tab
4. Under User Policy, select Storage Management.
Figure 5.15: User Policy tab
From here you can use pull-down menus to change:ComplianceRetention Policy – The length of time ZipLip keeps the message for Compliance.ArchiveRetention Policy – The length of time ZipLip keeps the message in its archives.Stubbing Policy – When to leave a “stub” consisting of headers in a mailbox and a link to the original message.Archiving Policy – When to archive a message.
5. Click Save to save these settings.
52 Administration Guide

Policy Assignments
Policy Assignments
To view policy assignments, in the left menu, select Policy Manager. Under Policy Manager, select Storage Management. In the Storage Management Policies - Archiving Policies pane, select the Policy Assignments tab. The Policy Assignments pane that appears displays storage management policy assignments for the system and for all entities (Departments and users) with non-default policies assigned.
Figure 5.16: Storage Management Policy Assignments pane
To view or edit the default policies for an entity, click on its name. Selecting a Department takes you to the Department Policy screen; selecting a user takes you to the Users/Mailing lists->User Policy tab.
Figure 5.17: User Policy tab
Administration Guide 53

Policy Manager
From here you can use the pull-down menu to change the Stubbing Policy and Archiving Policy.
Selecting System/Global takes you to the Storage Management tab of the System Defaults pane.
Figure 5.18: Policy Assignments pane
From here you can use the pull-down menus to change the associated ComplianceRetention, ArchiveRetention, Stubbing Policy, Archiving Policy, and Folder Categorizer as desired. You can also check the box next to Apply/propagate these settings to all sub-departments and users recursively to have your changes apply to all Departments and users under the selected entity (in this case, the changes would propagate system-wide). Click Save to save your changes.
Compliance Policies
Compliance policies are also set using the Policy Manager. To view the available compliance retention policies, the left menu, select Policy Manager. Under Policy Manager, select Compliance. The ComplianceRetention Policies pane that appears displays the default Compliance retention policy assignments for the system and any other policies that have been created.
54 Administration Guide

Compliance Policies
Figure 5.19: Compliance Retention Policies pane
Creating a Compliance Retention Policy
To create a new Compliance retention policy, under the Retention tab select New Policy. The New Compliance Retention Policy pane appears.
Figure 5.20: New Compliance Retention Policy pane
Enter an alphanumeric Policy Name (text-insensitive) and (optional) Policy Description. Click Create Policy to create this policy. The ComplianceRetention Policy pane for this policy appears with no rules.
Administration Guide 55

Policy Manager
Figure 5.21: ComplianceRetention Policy pane for a new policy with no rules
To add a rule to this policy, click Add New Rule. The Stubbing Rule pane appears.
Figure 5.22: Compliance Rule pane
In the Compliance Rule pane, complete the following fields:
Rule Name – Enter an alphanumeric name for the rule; avoid using special characters. Rule names are case-insensitive.Rule Description – (Optional) Enter a text description of the rule.Add New Condition – Rules need conditions on which to operate. You can add multiple conditions to a rule.
Field – From the pull-down menu, select MessageDate, FolderType, Age (days), or Message Size KB.
56 Administration Guide

Compliance Policies
Operator – Select an operator from the pull-down menu. The choices in the Operator menu vary depending on which Field you select:MessageDate – Select Date Later Than or Date Earlier Than. MessageHeader – Select Equals (Match case), Equals (Ignore case), Contains Word, or Not Contains Word. Subject – Select Equals (Match case), Equals (Ignore case), Contains Word, or Not Contains Word.Category – Select Equals (Match case).AttachNameArray – Select Any Element Like (Ignore Case), All Element not Like (Ignore Case), Size Less than, or Size Greater than or equals.Message Size KB – Select Less than or Greater than or equals.
Pattern – Enter a text pattern or number on which to operate.Click Add this condition to add the condition. To remove a condition, select it in the Conditions box and click Remove.Retention Period – From the pull-down menu, select a retention period. To add or edit a retention period, click Add/Edit Periods.
Note: For information on editing retention periods, see “Retention Policies” on page 49.
Click Add this Rule to add the rule and return to the Compliance Policies pane with the new rule added, or click Cancel to return to the Compliance Policies pane without creating this rule. Click the X in the upper right corner to return to the Compliance Policies pane.
Figure 5.23: Compliance Policies pane with new policy
Deleting a ComplianceRetention Policy
To delete a Compliance retention policy, in the Compliance Policies pane check the box next to the name of the policy and click Delete.
Administration Guide 57

Policy Manager
Compliance Policy Assignments
To view and edit policy assignments for the system and for any Department or user with policies that override the system defaults, in the left menu, select Policy Manager. Under Policy Manager, select Storage Management. In the Storage Management Policies - Archiving Policies pane, select the Policy Assignments tab. The Policy Assignments pane that appears displays storage management policy assignments for the system and for all entities (Departments and users) with non-default policies assigned.
Figure 5.24: Compliance Policy Assignments pane
To view or edit the default policies for an entity, click on its name. Selecting a Department takes you to the Department Policy tab with Compliance settings showing; selecting a user takes you to the Users/Mailing lists->User Policy tab with Compliance settings showing.
58 Administration Guide

Compliance Policies
Figure 5.25: User Policy tab
From here you can check and uncheck the options to change the Storage Management Policy. Selecting System/Global takes you to the Storage Management tab of the System Defaults pane.
Figure 5.26: Policy Assignments pane
From here you can check and uncheck the options to change the Storage Management Policy as desired. You can also check the box next to Apply/propagate these settings to all sub-departments and users recursively to have your changes apply to all Departments and users under the selected entity (in this case, the changes would propagate system-wide). Click Save to save your changes.
Administration Guide 59

Policy Manager
60 Administration Guide

Chapter 6
Log Files
Each ZipLip server logs its state and transaction information to log files that give visibility into the operations of the server. Log files record details of transactions which can be used later to identify potential problems and evaluate system and hardware performance. This information is useful in making decisions to upgrade infrastructure, identify bottlenecks, and spot and debug errors.
Log File Name Conventions
Log files start with respective prefixes. For example, in logs start with in. The date and time in which they are created are appended to the end of the filename. Often, for a long-running system, the log files are rolled over to keep the sizes of individual log files down.
The file $ZipLip/zlserver/WEB-INF/runnable/pmapp/pmapp.cfg contains the following parameters that control the logs:log.flush = 10log.rollOver= 86400log.level = 12
where:
Detailed Log Descriptions
The following types of logs are created by the ZipLip Server:
in logs – These contain transaction information about HTTP transactions, SMTP listeners, POP3 listeners and other listeners. Details written to the in log include the date and time of the request and transaction status.
log.flush Defines the frequency of flushing in seconds (logs are automatically flushed).
log.rollover Defines, in seconds, the period after which a new log is started or “rolled over.” In this example, 86400 seconds denotes 24 hours; every 24 hours a new log file is started.
log.level Denotes the priority level of the log. Log levels are priorities in the logging; 12 is the highest and 0 is the lowest. Logging events with a priority lower than the log.level are not logged.
Administration Guide 61

Log Files
Searching for exceptions in the in logs can help determine the status of some server transactions. When an exception is logged, it usually means a request was not successful.
The in logs also maintain records of child process activity. Available information can include the date, time, and session information of connections made to SMTP and POP servers.
req logs – All web requests are written to these logs.
Request logs contain summary information about all the requests made to the Web servers, in sequence. They give a quick understanding of all the requests that came into the Web server.
out logs – ZipLip servers send information from servers to a JSP Page for execution. The out logs record the information sent from the servers to JSP page. Since the information written to the out log creates some performance implications, the out log is primarily used for debugging.pr logs – These logs store the profile information of a transaction. Each transaction can have multiple profile line items depending on the profile log level and the transaction itself. Each line item contains a section ID, the start time, the elapsed time, and several other parameters. The section ID corresponds to a specified start and end point inside the software. By looking at the elapsed time you can identify potential performance issues and isolate a problem to a small code section within the ZipLip Software. This insight into the ZipLip server execution makes the server extremely manageable.
In the following example we can identify the transaction number of 157554. This transaction indicates an SMTP session (smtp.start) took 10 milliseconds to start (as determined from the second to last number). The transaction ID starts with the server’s local machine name (buc) set in pmapp.cfg.1,bucUDVKP3TZYASWYCVJSX50VLMDRMST10OWT2MBWSKS,157554,1,1,smtp.start,1012948961486,10,1
In the next example, transaction number 157720 was the result of the SMTP Queue Fetcher running. This transaction took 41 milliseconds to complete.1,buc0XD2P2SV1YNIRI4RP1KQ1ZHY51TYOXJNRNAHQGVK,157720,1,0,smtpQueueFetcher,1012949542581,41,1
cp logs – These logs contain information about connection pool usage. They track the number of connections at any point in time and help you understand whether the current connections are above or below the optimal number. The cp log also indicates (in seconds) how long a transaction held a connection. These logs are extremely important for tuning the system.clus log – This log contains coordinator cluster and fail-over state information. The clus log indicates the current cluster and live global coordinator for that cluster.globalCoord log – This log shows the state information of the global coordinator.
The global coordinator log shows the number of tasks added to the global coordinator queue and delegated to a local coordinator. The number of rejected tasks can be tasks that were inadvertently tried twice. The following is an example of a globalCoord log:02.05.2002 02:43:34 PM PST:157569:->
62 Administration Guide

Detailed Log Descriptions
(GlobalCoord22)02.05.2002 02:43:34 PM PST->GlobalCoordinator Errand Current State:0(GlobalCoord22)02.05.2002 02:43:34 PM PST->Global Coord Status:queue=0;schQueue=0progress=0;added=11005;delegated=11005;success=0;failed=0;removed=0;rejected=5;clogged=002.05.2002 02:43:41 PM PST:End-> 157032
lCoord log – This log shows the state information of the local coordinator. The following example shows the status of the local coordinator. Notice that no tasks were delegated since only the global coordinator delegates tasks.
02.07.2002 06:37:23 PM PST:3601578:->(VitalServices Errand_Runner8)02.07.2002 06:37:23 PM PST->Servicing Local Coordinator; Current Status:queue=0;schQueue=0progress=4;added=337402;delegated=0;success=337365;failed=33;removed=0;rejected=69;clogged=002.07.2002 06:37:23 PM PST:End-> 3601578
The next line show the Local Coordinator polled the live Global Coordinator (buc) for tasks. The Local Coordinator polls for five tasks for each executor running. Therefore, this server has three executors running.(VitalServices Errand_Runner8)02.07.2002 03:27:25 PM PST->Polling for max of 15 from buc; Found 0;Current Status progress=4;nQueue=0
exec logs – These logs record information about tasks or transactions processed by a specified executor. Each log is numbered and corresponds to a running executor.
The following example shows the executor picking up the task for transaction ID 2BMCL2UC0RPYQAX0IEWVUCID0QNJAHYFUCBJ3PMB and processing the transaction. In this case, the task is a message addressed to [email protected]. The status=1000 indicates the message was processed successfully.02.07.2002 08:55:53 PM PST:2467:->Processing job stId=2BMCL2UC0RPYQAX0IEWVUCID0QNJAHYFUCBJ3PMB.(qab1)02.07.2002 08:55:54 PM PST->To Process Single store get handler:[email protected] Mail: 2BMCL2UC0RPYQAX0IEWVUCID0QNJAHYFUCBJ3PMBHeaders Parsed: Store Mail Handler Preprocessing done, beginning to storeTo Create Message Record:DBConnection dbc.mattORCL has connect no 8Creating Wmp:Getting Attachment State:Found Attachment State: falseDone Recipient [email protected] with status 1000PostReceivedMail Handler: fDone=truePostReceivedMail Handler: Returning status=1000processed mail 2BMCL2UC0RPYQAX0IEWVUCID0QNJAHYFUCBJ3PMB status=1000;NextRetry=neverTo post ProcessEnd 2467
The log files carry significant debugging and performance information. Monitoring the logs can help you find errors proactively. The amount of logs created by the ZipLip server can be
Administration Guide 63

Log Files
controlled by the log.level parameter. In the default mode, ZipLip logs a significant amount of information. Therefore, logs must be periodically moved to an archive or destroyed.
64 Administration Guide

Chapter 7
Domain and User Fundamentals
The domain and user are the fundamental concepts of ZipLip system. Users are assigned to a domain, and the domain is arranged in a hierarchical fashion. This design enables ZipLip system to manage and administer millions of users.
User Privileges
A user is the lowest-level entity and is represented in the ZipLip system by a record in the ZipAccount and ZLPUser tables. Each user belongs to only one domain, and each domain may have a parent domain. A domain that has no parent domain is known as a top-level domain. A user can carry three fundamental privileges that allow wide range of access to the system:
Domain AdministratorSystem AdministratorSuper Administrator
A Domain Administrator can administer users belonging to a domain using the Postmaster application. Administration tasks include resetting of passwords of existing users, creating of additional users, and modifying users’ privileges.
A System Administrator administers the technical aspects of the running ZipLip system. The System Administrator typically monitors the system, modifies vault settings, and starts child daemons. The System Administrator performs the necessary tasks using the SysAdmin application, which is the focus of this manual. A System Administrator cannot manipulate domains or Domain Administrator features unless they also possess Domain Administrator privilege or Super Administrator privilege. This separation of powers is important, as it lets a System Administrator keep the system functioning without granting them access to sensitive information pertaining to each domain.
Finally, the Super Administrator is the all-powerful user in the ZipLip Platform context. The Super Administrator has complete power over the ZipLip platform. A Super Administrator can assume the powers of any Domain Administrator and delete or change users’ passwords and modify the runtime parameters of the server.
Domains
A domain represents a group of users. Each domain is represented in the system by a DomainInfo Record and ZLPDomainInfo record. Domains carry certain privileges which are automatically transferred unless otherwise specified to users who are members of that domain.
Administration Guide 65

Domain and User Fundamentals
Privileges and settings that are inherited include the e-mail domain, maximum number of users, expiry date, default language, and default privileges. In addition, each application can associate privileges to a domain. For example, the ZLPDomainInfo record stores domain privileges corresponding to the Messaging application.
Each domain can have a parent domain and inherits the parent domain’s privileges unless otherwise specified. Domain Administrators can change the domain’s privileges to be different than that of the parent. Applications use the domain’s privileges to determine the default privileges for its users.
Domain Routing
ZipLip’s MTA and SMTP servers accept mail from external sources. To process the messages they need to know the domain routing type. There are three types of routing control: No Control, Full Control, and Full Relay.
All domains not defined in the system by default belong to the No Control category. Basically, the MTA doesn’t recognize those domains and, unless the SMTP Server and MTA are designed to do open relay, inbound e-mail messages addressed to No Control domains are rejected.
Full Control domains are domains in which ZipLip server controls all the users belonging to the domain. Thus if the MTA or SMTP server receives mail for “[email protected]” and does not find the user “someone” in the testdomain.net domain, it rejects that mail because it has full authority on the domain.
Full Relay domains are domains in which all e-mail messages bound for the domain are forwarded to a third party, the ZipLip email server in this case will act as a simple proxy for e-mail messages of this domain. This is typically used when the ZipLip server is configured as a gateway.
Domain Management
The ZipLip SysAdmin application provides a web-based interface for configuring, administering, and monitoring the entire ZipLip system. You must be either a Super Administrator or a System Administrator to login to this application. Only a Super Administrator can manage and administer domains.
To start the SysAdmin application, enter the following URL:http://myzipliphost/ps/app/home.jsp?domain=mydomain.com
replacing myzipliphost with the host on which you have installed the ZipLip server and mydomain.com with your domain.
Complete the following fields:
Email Address – Enter your e-mail address.Passphrase – Enter your ZipLip password.Application – From the pull-down menu, select SysAdmin.Language – From the pull-down menu, select a language.
Click Login. The SysAdmin welcome screen appears as shown in Figure 7.1.
66 Administration Guide

Domain Management
Figure 7.1: ZipLip SysAdmin welcome screen
Creating Domains
1. Select Domains in the left menu.2. Under Domains, select Create New. This opens the Create New Domain form as shown in
Figure 7.2.
Figure 7.2: Creat New Domain form
3. Fill in the following fields:Domain Name – Enter a name for the domain you want to create.Parent Domain – (Optional) Enter a parent domain name, such as “ziplip.com”. If this domain is not to be a sub-domain of another domain, leave the field blankLanguage – Select a default language for the domain from the pull-down menu.
Administration Guide 67

Domain and User Fundamentals
Expiry Date – Select Never, or select an expiration date for the domain from the pull-down menus.Primary Usage Purpose – Select one or more of the following: Mail Store, Secure Mail, Archiving, JournalingEmail Domain – (Optional) Enter an e-mail domain, and check the box next to Create Email Domain to create an e-mail domain for this domain. An E-mail domain is the domain used by the e-mail application. This option is available only if you purchase the e-mail application.Create Email Domain – If you have created an e-mail domain, select a message store from the pull-down menu.Create Storage Domain – Check if you want to create a storage domain.Create Compliance Domain – (Optional) Check the box to create a Compliance domain. This option is only available if you purchased the Compliance application. If you check this option, use the pull-down menu to select a store.Search Store – Select one of the following options:
No search store – Check if you are not using a storage domain.Use self – Use this host as the relative search store.Use parent domain – Use the parent domain for the relative search store.
When you are ready, click Create to create the domain. A screen appears with a confirmation message saying the domain has been created successfully.
Figure 7.3: Domain Creation Success screen
Searching for Domains
To search for a domain:
1. Click Domains in the main menu2. Click Search/Edit.
68 Administration Guide

Domain Management
Figure 7.4: Search for domains
3. Enter text from the name of the domain for which you are searching, or leave blank to return all domains.
4. Click Go or press the Enter key. A list of domains containing the search string (or all domains) is returned similar to the screen shown in Figure 7.5.
Figure 7.5: Domain Search results
Editing Domain Properties
To edit properties of a domain, in the Domain Search results screen, click on the name of the domain you want to edit. A screen appears showing the current general properties for this domain.
Administration Guide 69

Domain and User Fundamentals
Figure 7.6: General Domain Properties screen
Here you can change the following:
Parent Domain – The parent domain for this domain.Language – The default language of the domain, by selecting a different language from the pull-down menu.Timezone – The time zone in which the domain exists, by selecting a different time zone from the pull-down menu.
Click Save to save your changes, or click Delete to delete the domain.
Editing E-mail Domain Properties
To edit e-mail properties of a domain:
1. In the Domain Search results screen, click on the name of the domain you want to edit. The General Domain Properties screen appears as shown in Figure 7.6.
2. Click the Email tab. A screen appears showing the e-mail properties for this domain.
70 Administration Guide

Domain Management
Figure 7.7: Domain E-mail Properties screen
3. Change any of the following, as appropriate:Email Settings
Store ID – Use the pull-down menu to change the message store. To create additional stores, use the Vault function in the left menu.Max Email Accounts – Select Unlimited to allow an unlimited number of e-mail accounts, or select the other box and enter the maximum number of e-mail accounts to allow in this domain.Max Storage per Account – Select Unlimited to allow an unlimited number of e-mail accounts, or select the other box and enter the maximum e-mail accounts size in KB in this domain.
User Privileges – Check or uncheck any of the following domain user privileges to grant or revoke them, as desired:
Send via Client – Enables users to relay mail via SMTP.Receive Mail – Enables users to receive WebMail.Send WebMail – Enables users to send WebMail.Index Search – Enables users to perform an indexed search over all messages.POP Access – Enables users to access e-mail via POP.Web Mail Access – Enables users to log into the WebMail application.Calendar Access – Enables use of the Calendar in the WebMail application.IMAP Access – Enables users to access e-mail via IMAP.Forward Mail – Enables users to forward e-mail.Virus Check – Enables ZipLip to perform virus checking on users’ e-mail.Journal Search – Enables end-users to search the Journaled mailboxes for e-mail that refers to them.Archive Search – Enables end-users to search the archive serial stores.Search Export – Enables users to export search results.
Administration Guide 71

Domain and User Fundamentals
Delivery Privileges – Use the pull-down menus to Grant, Deny (allow override), or Deny (no override) domain delivery privileges, as desiredAuthentication – Use the pull-down menus to Grant, Deny (allow override), or Deny (no override) Message and User authentication privileges, as desired.
4. Click Save to save your changes.
Creating and Editing a Storage Domain
To create a storage domain:
1. In the Domain Search results screen, click on the name of the domain you want to edit. The General Domain Properties screen appears as shown in Figure 7.6.
2. Click the Storage tab. A screen appears showing the storage domain for this domain or, if there is none, offers you the chance to Create one.
Figure 7.8: Storage Domain screen
3. Click Create. This creates the storage domain.
72 Administration Guide

Domain Management
Figure 7.9: Create Storage Domain screen
4. Edit the following Properties and Options, as desired:Max Projects – Select Unlimited to allow an unlimited number of storage accounts, or select the other box and enter the maximum number of storage accounts to allow in this domain.Max Storage per Project – Select Unlimited to allow an unlimited amount of storage per account, or select the other box and enter the maximum storage per account in KB for this domain.Project Privileges
Allow Vault-Store Projects – Check if you want to create a virtual file server. If you check this box, use the pull-down menu to select a default Store associated with this storage domain.Allow File-Store Projects – Check to allow mapping of an existing file hierarchy residing on another server.Allow Versioning – Check to allow ZipLip to set and increment version numbers.
Audit Level – Use the pull-down menu to select an audit level. Note that using a higher audit level consumes database space and makes subsequent queries for audit slower.Preserve Audit Trail for – Enter the number of days to preserve the audit trail.
5. Click Save to save your changes.
Creating and Editing a Compliance Domain
To create a Compliance domain:
1. In the Domain Search results screen, click on the name of the domain you want to edit. The General Domain Properties screen appears as shown in Figure 7.6 on page 70.
2. Click the Compliance tab. A screen appears showing the Compliance domain for this domain or, if there is none, offers you the chance to Create one.
Administration Guide 73

Domain and User Fundamentals
Figure 7.10: Create Compliance Domain
3. Click Create. This creates the Compliance domain.
Figure 7.11: Compliance Domain Properties sheet
4. Edit the following Properties, as desired:Max Accounts – Select Unlimited to allow an unlimited number of Compliance accounts, or select the other box and enter the maximum number of Compliance accounts to allow in this domain.Max Storage per Project – Select Unlimited to allow an unlimited amount of storage per Compliance account, or select the other box and enter the maximum storage per Compliance account in KB for this domain. Store ID – Use the pull-down menu to select the message store. To create additional stores, use the Vault function in the left menu.
5. Click Save to save your changes.
74 Administration Guide

Domain Routing
Administering Domain-Level Settings (Postmaster Console)
To administer domain-level settings:
1. In the Domain Search results screen, click on the name of the domain you want to administer. The General Domain Properties screen appears as shown in Figure 7.6 on page 70.
2. Click the Launch Poastmaster link in the upper right corner of the pane. The Postmaster application is launched in a new window.
Figure 7.12: Postmaster Application Welcome screen
Domain Routing
This section discusses the tasks involved with domain routing.
Adding Domain Routing
Follow these directions to add domain routing.
1. Select Domains in the left menu of the SysAdmin application.2. Under Domains, select Routing. This opens a screen where you can search for domains for
which to show routing as shown in Figure 7.13.
Administration Guide 75

Domain and User Fundamentals
Figure 7.13: Search for routing in domains
3. Enter text from the name of the domain for which you are searching, or leave blank to return all domains.
4. Click Go or press the Enter key. A list of domains containing the search string (or all domains) is returned similar to the screen shown in Figure 7.5.
Figure 7.14: List of Domains for Routing
5. Click the Create New button in the upper right corner of the pane. A screen appears where you can enter information about routing records.
76 Administration Guide

Domain Routing
Figure 7.15: Add Routing Record for a domain
6. In the Domain Name field, enter the domain name for which you want to create a routing record.
7. Select the type of control for this domain: No Control (External) – Give no control. Full Control (Internal) – Give full control.Full Relay (Internal) – Relay control. If you select Full Relay, use the pull-down menu that appears to select an Internal Relay Host Set.
8. Click Save to save the domain routing record, then click the “x” in the upper right corner to return to the list of domains for routing.
Editing Domain Routing
To edit domain routing:
1. Select Domains in the left menu.2. Under Domains, select Routing. This opens a screen where you can search for domains for
which to show routing as shown in Figure 7.13 on page 76.3. Click Go or press the Enter key. A list of domains containing the search string (or all
domains) is returned similar to the screen shown in Figure 7.5 on page 69.4. Click on the the domain name for which you want to change the routing information.
Administration Guide 77

Domain and User Fundamentals
Figure 7.16: Edit Routing Records pane
5. Edit the following parameters, as desired:In the Domain Name field, change the domain name for which you want to create a routing record.Select the type of control for this domain:
No Control (External) – Give no control. Full Control (Internal) – Give full control.Full Relay (Internal) – Relay control. If you select Full Relay, use the pull-down menu that appears to select an Internal Relay Host Set.
6. Click Save to save the domain routing record, then click the “x” in the upper right corner to return to the list of domains for routing.
78 Administration Guide

Chapter 8
Vault Store Fundamentals
ZipLip applications require the storage and retrieval of large numbers of files. The ZipLip Vault Store is ZipLip’s answer to widespread, efficient and scalable management of storage.
The Vault virtualizes disparate storage spaces in forms of hard disks or NAS or SAN storage into a single flat space so data or files can be stored across different disks and storage devices and have the application manage its use of space.
Figure 8.1: ZipLip Vault Architecture
There are two concepts used in the Vault: disk volume and storage unit.
The disk volume is the lower-level logical unit that is closely tied to the physical storage. In the case of disk stores such as RAID, NAS, or SAN, this signifies a physical directory on the disk. The disk volume has a name, an internally generated short name, and data properties such as root path for the physical directory and the alternate root path for failover. In addition, a disk volume can be writable, in which case new data can be written to it, whereas readable disk volumes are used for read only. The disk volume is represented as a record in the DiskVolume table.
Administration Guide 79

Vault Store Fundamentals
A disk volume typically denotes a physical directory within a disk. This is the directory the ZipLip Platform manages. It typically creates around 25 directories and stores data in these directories.
A storage unit is a collection of one or more disk volumes. Its purpose is to provide a logical name for the collection of disk volumes or disks it manages. A storage unit is a logical unit of the vault at which the application layer interacts. All applications write to a particular storage unit at any given time. The storage unit has a name, an internally generated short name, a type, and data properties for encryption, compression, partitioning, and replication. The storage unit data is represented as a record in the DiskStorageUnit table. The SysAdmin application enables creation of storage units.
An application points to a file within the storage unit’s name, and it is up to the storage unit to retrieve the file depending on which storage volume it resides. The storage unit controls all the logic of distributing and load balancing the filesystem; these operations are transparent to the calling application. The storage unit also controls whether the stored data is encrypted or compressed.
There are two kinds of disk volumes in each storage unit: Live and Not Live. There can be only one live disk volume within a storage unit. All file creation operations performed on the storage unit automatically go to the live volume. This is used mainly to aid in the incremental backup. As new disk volumes are regularly added, the old live disk volumes are set to non-live and ultimately can be backed up to media because there are no changes made on the non-live storage volumes.
ZipLip comes with the following default storage units:
Each storage unit is typically associated with an application’s functionality. The core applications require the following storage units:
Resource Storage Unit – All custom logos, customs message templates, and other resources are stored here rather than on a secure storage unit.Report Storage Unit – This is used to store system-generated reports. Depending on the preference, regular or secure storage units are used.
Storage Unit Purposesuresource Used for system resources such as attachments and logs.susecureResource Used for system resources such as attachments and logs in a secure
environment.sustaging Used for the temporary database queue.suzlsecure Used for secure e-mail messages.suzlregular Used for standard e-mail messages.susearch Used for Lucene search segments and indexes.sustoresecure Used for secure file storage.sustoreregular Used for standard file storage.suzlcomplianceSecure Used to store annotations of secure messages in Compliance.suzlcomplianceRegular Used to store annotations of messages in Compliance.suzlreport Used for reports.
80 Administration Guide

Messaging Application-Related Storage Unit
Messaging Application-Related Storage Unit
The messaging application has a secure storage unit and a set of message stores. Each Message Store has a set of storage units:
Staging Storage Unit – This Storage unit is used by the MTA to stage e-mail messages to be processed. This storage unit is considered to be transient; other applications may also use it to store its transient files. For example, Web mail uses this staging storage unit to store uploaded attachments before assembling an outgoing message.
Regular Storage Unit – This storage unit is used to store regular user e-mail messages. Depending on policy, this storage unit can be made secure or insecure.
Secure Storage Unit – This storage unit is used to store users’ secure e-mail messages. This storage unit typically uses the Secure type.
Search Storage Unit – This storage unit is used by the Search component to store indexed e-mail messages. Use only regular storage units here.
Virtual Storage Application-Related Storage Unit
The virtual application has the following set of storage units:
Regular Storage Unit – This is used to store insecure project files. Typically this uses a regular storage unit.
Secure Storage Unit – This is used to store secure project files. Use a Secure storage unit here.
The vault provides scalable, flexible and efficient framework to store unstructured content such as e-mail, files, and tracker items. Fundamentally, the vault is a virtual layer with the metadata written to the database and the actual file written to the file system. The vault also provides several storage virtualization benefits at the application layer, including:
Unlimited storage that can be comprised of several different physical disk storage units.A single integration point that supports specialized storage systems, such as EMC Centera and HSM storage systems, such as Q-Star and Bridgehead, and other industry standard vaults, such as IBM Content Manager.Transparent encryption and compression of data.Storing files across many directories and filesystems simultaneously and enabling the server to overcome limitations of an operating system or filesystem.Partitioning based on date that enables physical separation of data. This enables incremental backup and replication.Easy management of data.
The vault virtualization is enabled by three major concepts: Storage Unit, Disk Volume, and Vault Item.
Partitioning
Partitioning allows data to be grouped by time. Common means of partitioning include hour, day, week, and month. This allows separation of data for backup purposes. Partitioning changes
Administration Guide 81

Vault Store Fundamentals
the directory used for storage within a disk volume. More frequent partitioning results in more directories with fewer files in a given partition.
Vault Item
The vault item represents the actual unstructured data and is represented by a VaultItem record. Typically, the number of records in the vault item are in the same order as the number of e-mail messages and files stored in the system and consequently can have a very high row count. The VaultItem record is represented by a unique string identifier and applications typically store it along with a key to access the data. The vault record can carry up to two virtual locations, and each virtual location has the following structure:suShortName/dvShortName/partition/partition_type/sub-partition/rel_path/rel_path
In most cases, the vault item record only has one primary virtual location, and this is converted to a physical path.
Storage Unit Types
ZipLip supports storage units that can be broadly classified into two categories:
Generic filesystem-based storage units including SAN, NAS, RAID, and JBOD, and HSM software with filesystem views such as Q-Star and Legato Disk Extender.Third-party storage units such as EMC Centera, IBM Content Manager, and BridgeHead.
Filesystem-Based Storage Units
Filesystem-based storage units, also called disk-based storage units, are the most commonly used vault type. The unit presents itself as a standard filesystem and the server has complete read and write privileges. The disk volume corresponding to this storage type stores the root path. The vault creates as many subdirectories as required. In this scheme, a new directory is created for each partition. For example, if the partition type is month, a new directory is created every month, and data created for those months is written to that directory or its subdirectory. When a new vault item is created, the right partition is chosen and, based on the disk volume setting, an additional two subdirectories are chosen. The filename is the same as the vaultitem identifier.
For example, the identifier:GFOJAMEDAPD0HUIPNUJ1OBCIIMEOMBNSAIKHJZAE
could have the virtual location:
H/H/200507/8/4
Third-Party Storage Units
Third-party storage units, also known as content-based storage units, are most commonly used for Unified Archival Admin and Compliance requirements. The unit requires the use of third-party libraries that access a remote server. The minimum requirements for such a library are to:
82 Administration Guide

Failover
write a file or stream (returning a tag)read a file or stream (using the tag obtained during writing)check a file for existence (using a tag)delete a file (using a tag).
Retention policies are accommodated with name and period mapping to ZipLip retention time policies. The server has complete read and write privileges. The disk volume corresponding to this storage type stores the server name and authentication parameters (username, password). The vault creates a cache for the file as required. The root directory for the cache is defined via the SysAdmin application:
1. Click the left menu item System Configuration, then Registry. In the System Registry pane, click System Configuration.
2. In the System Configuration pane, click Vault Global Settings.
The use and clean up of the directory is handled by ZipLip.
In this scheme, a new directory is created for each partition. For example, if the partition type is month, a new directory is created every month, and data created for those months are written to that directory or its subdirectory. When a new vault item is created, the right partition is chosen and, based on the disk volume setting, an additional two subdirectories are picked. The filename is the same as the vaultitem identifier.
For example, if the identifier is:GFOJAMEDAPD0HUIPNUJ1OBCIIMEOMBNSAIKHJZAE
The two virtual locations would be:H/H/200507/8/4;ABMZ4FGPO3DJEeK142JKEODFW92
andG/N/200508/12/14;91 3 ICM8 icmnlsdb11 ZL_G_N59 26 A10001001A05D28B43706B7150218 A05D28B43706B715021 14 1022
Failover
To provide redundancy, vault items can be stored in both a primary and alternate or failover location. The following forms of failover are available.
Internal Disk Volume
With a filesystem-based disk volume, vault items can be copied to an alternate root directory using replication. The alternate root directory has the same directory structure as the primary root directory. When this occurs, the alternate root directory can be used for failover when the primary root directory is unavailable (disk unavailable, disk replacement).
Administration Guide 83

Vault Store Fundamentals
Vault Item
Vault items can be copied to an alternate storage unit and disk volume using replication. When this occurs, the alternate location can be used for failover when the primary location is unavailable (disk unavailable, disk replacement).
Replication
In replication, vault items are copied from filesystem-based disk volumes to any other storage unit and disk volume, including third-party based disk volumes. If the target is filesystem-based, the directory structure and file names are preserved. ZipLip requires the compression and encryption settings to match between the source and target storage unit for performance reasons.
A progress file named zl.rep is created in the source directory to mark which vault items have been incrementally processed. Partitions that are replicated are stored in the VaultReplication table. When a partition is completely processed, its state is changed so no further processing takes place.
Replication of a storage unit either operates on a complete partition (full backup) or incrementally. To ensure that all processes have finished writing to a vault item during incremental replication, only files more than two hours old are replicated.
Methods of Replication
Internal disk volume replication copies directories and files from the primary root directory to an alternate root directory. This method preserves all partitioning.
Disk volume replication copies vault items from a source disk volume to a target disk volume. Because the write occurs at a different time than the source vault item, the partition data is lost.
Modes of Replication
Copy makes a copy of the source file to the target replication storage unit and disk volume. The target location is stored in the vault item as a failover location. The target replication disk volume is marked as a mirror and may not be used as a source for replication.
Move makes a copy of the source file to the target replication storage unit and disk volume, then deletes the source file. The target location is stored in the vault item as the primary location.
Delayed delete makes a copy of the source file to the target replication storage unit and disk volume, then deletes the source file after a given time. The target location is stored in the vault item as the failover location. After the source file is deleted, the failover location is moved to the primary location.
File Striping
To activate file striping, put multiple writable disk volumes in the same storage unit. Files are written to all writable disk volumes in round-robin fashion. This allows the administrator to place files on separate physical disks for performance.
84 Administration Guide

Configuring a SnapLock Volume for the ZipLip Server
Configuring a SnapLock Volume for the ZipLip Server
To use a NetApp SnapLock storage unit with ZipLip you need:
SnapLock version 7.1 or higher.Filer version 5.3 or higher.
You need to set up the SnapLock volume before you set up ZipLip for the SnapLock storage device. To accomplish this:
1. Connect to Filer.2. Enable the SnapLock license. Enter:
license add snaplock_license_code
where snaplock_license_code is your license code for SnapLock.
3. Initialize ComplianceClockTM.date -c initialize
Note: You can only initialize ComplianceClock for the system; make sure the clock time is set correctly. Once you have initialized ComplianceClock you can display it using the date -c command.
4. Create the SnapLock volume. Enter:vol create volume_name -L
where volume_name is the name of your SnapLock disk volume. For example, the command:vol create snaplock -L Enterprise 3
creates a SnapLock volume named “snaplock” containing three disks.
5. Set up the retention period defaults.The maximum retention period is the longest allowed retention period for any files or Snapshot copies committed to WORM state on the SnapLock volume. Any file or Snapshot copy committed to WORM state with a greater retention period is automatically assigned this retention period. To set it, enter:vol options volume_name snaplock_maximum_period duration
where volume_name is the name of your SnapLock disk volume and duration is the time period as an integer followed by “d” for days and “y” for years. For example, the command:vol options snaplock snaplock_maximum_period 10y
sets the maximum retention period for volume snaplock to ten years.The minimum retention period is the shortest allowed retention period for any files or Snapshot copies committed to WORM state on the SnapLock volume. Any file or Snapshot copy committed to WORM state with a lesser retention period is automatically assigned this retention period. To set it, enter:vol options volume_name snaplock_minimum_period duration
where volume_name is the name of your SnapLock disk volume and duration is the time period as an integer followed by “d” for days and “y” for years. For example, the command:
Administration Guide 85

Vault Store Fundamentals
vol options snaplock snaplock_minimum_period 1d
sets the minimum retention period for volume snaplock to one day.The default retention period is the retention period assigned to any files or Snapshot copies committed to WORM state on the SnapLock volume without an explicitly-assigned retention period. To set it, enter:vol options volume_name snaplock_default_period duration
where volume_name is the name of your SnapLock disk volume and duration is the time period as an integer followed by “d” for days and “y” for years. For example, the command:vol options snaplock snaplock_default_period 30d
sets the default retention period for volume snaplock to 30 days.6. Create a qtree in the SnapLock volume. Enter:
qtree create /vol/volume_name/directory
where volume_name is the name of the SnapLock volume and directory is the name of the qtree directory. For example:qtree create /vol/snaplock/ZipLip
creates a qtree named “ZipLip” in the volume “snaplock”.
7. Share the SnapLock volume through CIFS. Enter:cifs shares -add share_name filer_path
where share_name is the name of the SnapLock volume and filer_path is the path to the filer qtree. For example:cifs shares -add ZipLip /vol/snaplock/ZipLip
generates a CIFS share named accounting based on the qtree /vol/snaplock/ZipLip.
Setting Up a SnapLock Storage Unit in ZipLip
To set up a SnapLock storage unit in ZipLip:
1. Log into the ZipLip Archive application as a privileged user.
Enter the following URL:http://myzipliphost/ps/app/home.jsp?domain=mydomain.com
replacing myzipliphost with the host on which you have installed the ZipLip server and mydomain.com with your domain.
Complete the following fields:
Email Address – Enter your e-mail address.Passphrase – Enter your ZipLip password.Application – From the pull-down menu, select SysAdmin.Language – From the pull-down menu, select a language.
Click Login. The SysAdmin welcome screen appears similar to the one in the following figure.
86 Administration Guide

Setting Up a SnapLock Storage Unit in ZipLip
Figure 8.2: SysAdmin welcome screen
2. In the left menu, select Vault. Under Vault select Storage Units. A list of storage units available for ZipLip appears in the right pane.
Figure 8.3: Storage Units screen
3. Click Add New to start the Storage Unit Wizard.
Administration Guide 87

Vault Store Fundamentals
Figure 8.4: Storage Unit Wizard – Storage Unit Type screen (SnapLock)
4. In the Storage Unit Type page of the Storage Unit Wizard, select NetApp SnapLock. Click Next to continue.
Figure 8.5: Storage Unit Wizard – Storage Unit Information screen
Note: From the Storage Unit Wizard – Storage Unit Information screen to the end of the wizard you can also click Prev to go back to the previous screen.
5. In the Storage Unit Information screen, complete the following information:Properties
Name – Enter a name for the StorageUnit here. This example uses “suSnapLock”.Application – Select the ZipLip application that uses this vault. If this vault is used by all applications, select Common to all applications.
88 Administration Guide

Setting Up a SnapLock Storage Unit in ZipLip
Module – Leave blank.Comments – Enter a description for the storage unit you are creating (optional).
Data Provider ServicesEncryption – Check to have this storage unit be encrypted. ZipLip recommends you leave it unchecked. If you are creating a Replication Vault, this value must match that of the original Vault.Compression – Check to enable compression for this storage unit. ZipLip recommends you leave it unchecked. If you are creating a Replication Vault, this value must match that of the original Vault.Partitioning Period – Use the pull-down menu to specify how often you wish to partition the storage unit. This example uses WEEKDAYHOUR (recommended for high-volume storage). If you are creating a Replication Vault, this value must match that of the original Vault.Partitioning Usage – Use the pull-down menu to define the depth and width of the folders created. This example uses the recommended value Light.
Click proceed to continue. The Disk Volume Information screen appears.
Figure 8.6: Storage Unit Wizard – Disk Volume Information screen
6. Enter the following disk volume information:Name – Enter a name for identifying this disk volume. This example uses “dvSnapLock”.Comments – (Optional) Enter a description of the volume.
Click Next to continue to the NetApp SnapLock Disk Volume Information screen.
Administration Guide 89

Vault Store Fundamentals
Figure 8.7: Storage Unit Wizard – NetApp SnapLock Disk Volume Information screen
7. Complete the following information:Width – Enter a numeric value for the width of the disk volume. This example uses “10” for light use; ZipLip recommends “25” for heavy use.Depth – Enter a numeric value for the depth of the disk volume. This example uses “10” for light use; ZipLip recommends “25” for heavy use.Path – Enter the UNC path or other network-available path for the SnapLock disk volume. This example uses the path \\netapp\ZipLip\Vault\suSnapLock.Create folder if not found – Check to create the path for the disk volume if it doesn’t already exist.Failover Path – Enter the failover path for the disk volume. This is used for replicated volumes or IP addresses.Filer Name – Enter the NetApp Snaplock filer host name.Volume Name – Enter the NetApp volume name for identifying the shared SnapLock disk volume. This example uses “snaplock”.Volume Path – Enter the local path on the SnapLock disk volume. This example uses the path ZipLip/Vault/suSnapLock on the volume /vol/snaplock.User Name – Enter the user name to connect to the SnapLock disk volume.Password – Enter the password to connect to NetApp SnaplockConfirm password – Enter the password again.
Click Next to continue to the Confirm Wizard Submission screen.
90 Administration Guide

Configuring the ZipLip Server for a Centera Storage Unit
Figure 8.8: Storage Unit Wizard – Confirm Wizard Submission screen
8. Click Next to confirm your submission. In the pop-up window that appears, click OK to continue. The Storage Unit Wizard – Success screen appears.
Figure 8.9: Storage Unit Wizard – Success screen
Configuring the ZipLip Server for a Centera Storage Unit
To configure the ZipLip server for a Centera storage unit:
1. Locate the EMC Centera SDK for the installed platform. (This is required for shared libraries. If you have an EMC PowerLink account, use it to obtain the latest SDK.)
2. On Microsoft Windows Server, copy the following library files from the EMC Centera SDK to the %ZIPLIP_HOME%\bin directory:
FPLibrary.dll
Administration Guide 91

Vault Store Fundamentals
PAI_module.dll
FPParser.dll
On Solaris, copy the following *.so files from the EMC Centera SDK Solaris version to the $ZIPLIP_HOME/bin directory:
libFPLibrary32.so
libPAI_module32.so
libFPParser32.so
Centera provides a 32-bit as well as a 64-bit version of the files; only copy the files that apply to your architecture. Create symbolic links to these files if required.
Note: For more information, see the installation script provided with the Centera SDK version.
3. Collect the following data for connection:Server name or IP address (ensure connectivity by using ping).Port number (default is 3218 for TCP and UDP).Application name (assigned from the EMC Centera cluster to an application using the cluster for storage for authorization purposes).Application password (assigned from the EMC Centera cluster to an application using the cluster for storage for authorization purposes).
Creating an EMC Centera Disk Volume
Several *.dll or *.so files are necessary for an EMC Centera disk volume to work with ZipLip. EMC usually supplies these files.
To create an EMC Centera disk volume in ZipLip:
1. In the ZipLip SysAdmin application, in the left menu, click Vault, then under Vault, click Storage Units. A list of storage units appears.
Figure 8.10: Storage Units screen
92 Administration Guide

Creating an EMC Centera Disk Volume
2. In the Storage Units screen, click the Add New button. This starts the Storage Unit Wizard.
Figure 8.11: Storage Unit Wizard – Storage Unit Type screen
3. In the Storage Unit Wizard – Storage Unit Type screen, select EMC Centera.
Click Next to continue to the Storage Unit Information screen.
Note: From the Storage Unit Wizard – Storage Unit Information screen to the end of the wizard you can also click Prev to go back to the previous screen.
Figure 8.12: Storage Unit Wizard – Storage Unit Information screen
4. In the Storage Unit Information screen, enter the following information:Properties
Name – Enter a name for the StorageUnit here. This example uses “suCentera”.
Administration Guide 93

Vault Store Fundamentals
Application – Select the ZipLip application that uses this vault. If this vault is used by all applications, select Common to all applications.Module – Leave blank.Comments – Enter a description for the storage unit you are creating.
Data Provider ServicesEncryption – Check to have this storage unit be encrypted. ZipLip recommends you leave it unchecked. If you are creating a Replication Vault, this value must match that of the original Vault.Compression – Check to enable compression for this storage unit. ZipLip recommends you leave it unchecked. If you are creating a Replication Vault, this value must match that of the original Vault.Partitioning Period – Use the pull-down menu to specify how often you wish to partition the storage unit. This example uses WEEKDAYHOUR. If you are creating a Replication Vault, this value must match that of the original Vault. For example, if you are setting up replication from the ZLPRegular storage unit to the suCentera storage unit you are creating here, make sure the partition periods for both storage units are identical.Partitioning Usage – Use the pull-down menu to define the depth and width of the folders created. This example uses the recommended value Light.
Click Next to continue. The Disk Volume Information screen appears.
Figure 8.13: Storage Unit Wizard – Disk Volume Information screen
5. Enter the following disk volume information:Name – Enter a name for identifying this disk volume. This example uses “dvCentera”.Comments – (Optional) Enter a description of the volume.
Click Next to continue to the Centera Disk Volume Information screen.
94 Administration Guide

Creating an EMC Centera Disk Volume
Figure 8.14: Storage Unit Wizard – Centera Disk Volume Information screen
Enter the following information:
Cluster Address(es) – Enter a comma-separated list of cluster addresses for the EMC Centera server. If the port number is not the default, add “:port” to the cluster addresses.
Note: The host 128.221.200.56:3218 is the EMC Centera public server. Do not use in your actual production site.
PEA – Enter the authentication information in the format:name=application_name,secret=application_password
Authorization file – If you did not specify PEA authentication information, specify the location of the file containing a provided PEA file from the EMC Centera cluster. If you have provided PEA information, leave this field blank. Make sure the authorization file resides locally on the ZipLip server.
Click Next to continue to the Centera Retention confirmation screen.
Administration Guide 95

Vault Store Fundamentals
Figure 8.15: Storage Unit Wizard – Centera Retention confirmation screen
6. The Centera Retention confirmation screen contains a warning message advising you to make sure the EMC retention periods exist and are set up correctly on the Ziplip system before continuing.
To verify this, use Control-N to create a new browser window and either log into or use the upper right pull-down menu to switch to the Unified Archival Admin application. In the left menu of the Unified Archival Admin application, select Policy Manager; under Policy Manager, select Compliance.
Figure 8.16: Compliance Policies screen
In the Compliance Policies screen, under the Retention tab, select DEFAULT.
96 Administration Guide

Creating an EMC Centera Disk Volume
Figure 8.17: ComplianceRetention Policy DEFAULT screen
In the ComplianceRetention Policy DEFAULT screen, under the Retention tab, in the Rule Name column select default.
Figure 8.18: Compliance Policy Rule screen (default)
The value of “-1” for message size means this rule applies the default retention period to every message. Click Add/Edit Periods.
Administration Guide 97

Vault Store Fundamentals
Figure 8.19: Storage Management Policies Retention Periods tab
In the Storage Management Policies Retention Periods tab, in the Period Name column, select Default.
Figure 8.20: Default Retention Period pane
In the Default Retention Period pane, select the button next to days and enter the number of days you want to retain messages in the archive. This example uses (365*6)+1, or 2191 days, which is six years, assuming one leap year in the span.
Note: Consult your chief compliance officer before changing the retention policy in this pane.
Click Save to save your change.
Once you have verified the retention periods exist, in the Storage Unit Wizard, click Next to go to the Confirm Wizard Submission screen.
98 Administration Guide

Creating an EMC Centera Disk Volume
Figure 8.21: Storage Unit Wizard – Confirm Wizard Submission screen
7. Click Next to confirm your submission. In the pop-up window that appears, click OK to continue. The Storage Unit Wizard – Success screen appears.
Figure 8.22: Storage Unit Wizard – Success screen
To verify the new EMC Centera storage unit has been created, in the left menu, click Vault, then under Vault, click Storage Units.
Administration Guide 99

Vault Store Fundamentals
Figure 8.23: Storage Units screen with new EMC storage unit
The Storage Units screen appears, this time with the newly-created suCentera storage unit at the bottom of the list as shown in Figure 8.23.
Replicating a ZipLip Storage Unit to a Centera Storage Unit
Follow these instructions to replicate a ZipLip storage unit (in this example, suzlpregular) to an EMC Centera storage unit (in this example, suCentera).
1. In the ZipLip SysAdmin application, in the left menu, click Vault, then under Vault, click Storage Units. A list of storage units appears (see Figure 8.3 on page 87).
2. In the Storage Units screen, select the source storage unit you want to replicate (in this example, suzlpregular).
Figure 8.24: Storage Unit Properties screen (‘suzlpregular’)
100 Administration Guide

Replicating a ZipLip Storage Unit to a Centera Storage Unit
3. In the Storage Unit Properties screen for suzlpregular, in the upper right corner click Enable Replication to start the Replication Wizard.
Figure 8.25: Replication Wizard – Vault Replication screen
4. In the Replication Wizard – Vault Replication screen, complete the following:Storage Unit to Replicate – Select the source storage unit from the pull-down menu (suzlpregular).Operation – Select Move (Delayed Delete) from the pull-down menu to copy messages from the source Vault to the destination Vault as soon as the Vault Replication Background task is run, but wait a specified time (set in the Hours to wait before deleting field) before deleting the original messages from the source Vault.Hours to wait before deleting – Enter the number of hours to wait before deleting messages from the source Vault. Incremental Replication – Check the Yes box.Internal DV replication – Leave unchecked, as it is not applicable here.
Click Next to continue.
Administration Guide 101

Vault Store Fundamentals
Figure 8.26: Replication Wizard – Storage Unit Replication screen
5. In the Replication Wizard – Storage Unit Replication screen, use the pull-down menu to select the destination Vault (in this example, suCentera). Click Next to continue.
Figure 8.27: Replication Wizard – Storage Unit Replication (DV Mapping) screen
6. In the Replication Wizard – Storage Unit Replication (DV Mapping) screen, use the pull-down menu to select the destination Vault (in this example, dvCentera). Click Next to continue to the Replication Wizard – Confirmation screen.
102 Administration Guide

Replicating a ZipLip Storage Unit to a Centera Storage Unit
Figure 8.28: Replication Unit Wizard – Confirmation screen
7. Click Next to confirm your replication. In the pop-up window that appears, click OK to continue. The Replication Wizard – Success screen appears.
Figure 8.29: Replication Unit Wizard – Success screen
8. To verify the replication, in the left menu under Vault select Storage Units.
Administration Guide 103

Vault Store Fundamentals
Figure 8.30: Storage Units screen with replicated unit
The icon next to suzlpregular indicates that it is a replicated storage unit.
Once you have defined the source and destination storage units for replication, you need to start the Vault Replication background task to start the replication. To accomplish this:
1. In the left menu, select Global Tasks. Under Global Tasks select View/Schedule Tasks.
Figure 8.31: Global Tasks list screen
2. In the Global Tasks list screen, scroll down and select Vault Replication.
104 Administration Guide

Changing the Centera Server Address in a Disk Volume
Figure 8.32: Vault Replication Task screen
3. In the Vault Replication Task pane, set the Run Frequency to 15 mins. In the upper right corner click Save to save your change and run the task.
The task now runs every 15 minutes and creates a time-stamped log file in the ZipLip logs directory.
Changing the Centera Server Address in a Disk Volume
Follow these instructions to change an EMC Centera server address in a disk volume.
1. Collect the following data for connection:Server name or IP address (ensure connectivity using ping)Port number (default is 3218 for TCP and UDP)Application name (assigned from the Centera cluster)Application password (assigned from the Centera cluster)
2. In the Storage Units screen (see Figure 8.23), click on the name of the EMC Centera storage unit you want to edit. A Storage Unit Properties screen for the Centera storage unit appears similar to the one in Figure 8.33.
Administration Guide 105

Vault Store Fundamentals
Figure 8.33: Storage Properties Screen for an EMC Centera storage unit
3. Click on the disk volume name (dvCentera). A Disk Volume Details pane appears similar to the one in Figure 8.34.
Figure 8.34: Centera Disk Volume Details pane
4. In the Disk Volume Details pane, click the Edit Details button in the upper right corner to start the Centera Disk Volume Wizard.
106 Administration Guide

Changing the Centera Server Address in a Disk Volume
Figure 8.35: Centera Disk Volume Wizard – Disk Volume Information screen
5. In the Disk Volume Information screen, change the following as desired:Write Flag – When checked, allows this volume to be written.Read Flag – When checked, allows this volume to be read.HSM Flag – When checked, use hierarchical storage managementComments – Add or edit comments as desired.
Click Next to continue to the Connectivity Information screen.
Figure 8.36: Centera Disk Volume Wizard – Connectivity Information screen
6. In the Connectivity Information screen, change the following as desired:Cluster Address(es) – Enter a comma-separated list of cluster addresses for the EMC Centera server. If the port number is not the default, add “:port” to the cluster addresses.
Administration Guide 107

Vault Store Fundamentals
Note: The host 128.221.200.56:3218 is the EMC Centera public server. Do not use in your actual production site.
PEA – Enter the authentication information in the format:name=application_name,secret=application_password
Authorization file – If you did not specify PEA authentication information, specify the location of the file containing a provided PEA file from the EMC Centera cluster. If you have provided PEA information, leave this field blank.
Click Next to continue to the Centera Retention confirmation screen.
Figure 8.37: Centera Disk Volume Wizard – Centera Retention screen
7. The Centera Retention confirmation screen contains a warning message advising you to make sure the EMC retention periods exist and are set up correctly on the Ziplip system before continuing.
Once you have verified the retention periods exist, back in the Disk Volume Creation Wizard, click Next to go to the Confirm Wizard Submission screen.
108 Administration Guide

Changing the Centera Server Address in a Disk Volume
Figure 8.38: Centera Disk Volume Wizard – Confirm Wizard Submission screen
8. Click Next to confirm your submission. In the pop-up window that appears, click OK to continue. The Centera Disk Volume Wizard – Success screen appears.
Figure 8.39: Centera Disk Volume Wizard – Success screen
To verify the EMC Centera storage unit has been changed:
1. In the left menu, click Vault, then under Vault, click Storage Units.2. In the In the Storage Units screen (see Figure 8.23), click on the name of the EMC Centera
storage unit you want to edit.3. In the Storage Unit Properties screen, click on the disk volume name (dvCentera). In the
Disk Volume Details pane (see Figure 8.34), you can view the changes you have made.
Administration Guide 109

Vault Store Fundamentals
Centera Storage Unit Disaster Recovery
This section contains instructions for disaster recovery of an EMC Centera storage unit in various situations.
Connection
Collect the following data:
Server name or IP address (ensure connectivity using ping)Port number (default is 3218 for TCP and UDP)Application nameApplication password
Storage Unit Creation
Collect the following data:
NameEncryption setting (on/off, what method)Compression setting (on/off, what method)Storage Unit short namePartitioning periodPartitioning usage
Disk Unit Creation
Collect the following data:
NameCluster AddressesPEA user name and passwordDisk volume short name
Working With Disk Volumes and EMC Centera Clusters
For instructions on updating a disk volume for a replicated EMC Centera cluster, see “Changing the Centera Server Address in a Disk Volume” on page 105.
For information on creating a disk volume for an EMC Centera disk in the ZipLip database, see “Creating an EMC Centera Disk Volume” on page 92.
To update a disk volume for an EMC Centera disk in the ZipLip database:
1. Determine the original short name for storage unit.2. Determine the original short name for disk volume.3. Either contact ZipLip technical support, or if you are comfortable using SQL, connect to the
ZLDB database and enter the following:
110 Administration Guide

How To Create an IBM Content Manager Storage Unit
select * from DiskStorageUnitupdate DiskStorageUnit set ShortName=’correct_short_name’ where dsuId = created_disk_storage_unit_IDupdate DiskVolume set ShortName=’correct_short_name’ where dvId = created_disk_storage_unit_ID
How To Create an IBM Content Manager Storage Unit
To create an IBM Content Manager Storage Unit:
4. In the Storage Units screen, click the Add New button. This starts the Storage Unit Wizard.
Figure 8.40: Storage Unit Wizard – Storage Unit Type screen
5. In the Storage Unit Wizard – Storage Unit Type screen, select IBM Content Manager.
Click Next to continue to the Storage Unit Information screen.
Note: From the Storage Unit Wizard – Storage Information Unit screen to the end of the wizard you can also click Prev to go back to the previous screen.
Administration Guide 111

Vault Store Fundamentals
Figure 8.41: Storage Unit Wizard – Storage Unit Information screen
6. In the Storage Unit Information screen, enter the following information:Properties
Name – Enter a name for the StorageUnit here. This example uses “suIBM”.Application – Select the ZipLip application that uses this vault. If this vault is used by all applications, select Common to all applications.Module – Leave blank.Comments – Enter a description for the storage unit you are creating.
Data Provider ServicesEncryption – Check to have this storage unit be encrypted. ZipLip recommends you leave it unchecked. If you are creating a Replication Vault, this value must match that of the original Vault.Compression – Check to enable compression for this storage unit. ZipLip recommends you leave it unchecked. If you are creating a Replication Vault, this value must match that of the original Vault.Partitioning Period – Use the pull-down menu to specify how often you wish to partition the storage unit. This example uses MONTH (recommended). If you are creating a Replication Vault, this value must match that of the original Vault.Partitioning Usage – Use the pull-down menu to define the depth and width of the folders created. This example uses the recommended value Light.
Click Next to continue. The Disk Volume Information screen appears.
112 Administration Guide

How To Create an IBM Content Manager Storage Unit
Figure 8.42: Storage Unit Wizard – Disk Volume Information screen
7. Enter the following disk volume information:Name – Enter a name for identifying this disk volume. This example uses “dvIBM”.Comments – (Optional) Enter a description of the volume.
Click Next to continue to the IBM Disk Volume Information screen.
Figure 8.43: Storage Unit Wizard – IBM Disk Volume Information screen
Enter the following information:
Library Server Name – Enter the IBM Content Manager library server name. This example uses “zlIBM”.User Name – Enter the username needed to connect to the IBM Content Manager. This example uses “ibmadmin”.
Administration Guide 113

Vault Store Fundamentals
Password – Enter the password associated with the IBM Content Manager username.Confirm password – Re-enter the password associated with the IBM Content Manager username.Item Type – Enter an item type up to 15 characters long to store vault items in the IBM Content Manager. This example uses “ZL_Vault”.Create base item type if not found – Check to create the base item type if none exists.
Click Next to continue to the Confirm Wizard Submission screen.
Figure 8.44: Storage Unit Wizard – Confirm Wizard Submission screen
8. Click Next to confirm your submission. In the pop-up window that appears, click OK to continue. The Storage Unit Wizard – Success screen appears.
Figure 8.45: Storage Unit Wizard – Success screen
114 Administration Guide

Creating an Archivas Cluster Disk Volume
To verify the new IBM Content Manager storage unit has been created, in the left menu, click Vault, then under Vault, click Storage Units to see the new unit at the bottom of the list.
Creating an Archivas Cluster Disk Volume
To create an Archivas Cluster disk volume in ZipLip:
1. In the ZipLip SysAdmin application, in the left menu, click Vault, then under Vault, click Storage Units. A list of storage units appears.
Figure 8.46: Storage Units screen
2. In the Storage Units screen, click the Add New button. This starts the Storage Unit Wizard.
Figure 8.47: Storage Unit Wizard – Storage Unit Type screen
Administration Guide 115

Vault Store Fundamentals
3. In the Storage Unit Wizard – Storage Unit Type screen, select Archivas Cluster.
Click Next to continue to the Storage Unit Information screen.
Note: From the Storage Unit Wizard – Storage Unit Information screen to the end of the wizard you can also click Prev to go back to the previous screen.
Figure 8.48: Storage Unit Wizard – Storage Unit Information screen
4. In the Storage Unit Information screen, enter the following information:Properties
Name – Enter a name for the StorageUnit here. This example uses “suArchivas”.Application – Select the ZipLip application that uses this vault. If this vault is used by all applications, select Common to all applications.Module – Leave blank.Comments – Enter a description for the storage unit you are creating.
Data Provider ServicesEncryption – Check to have this storage unit be encrypted. ZipLip recommends you leave it unchecked. If you are creating a Replication Vault, this value must match that of the original Vault.Compression – Check to enable compression for this storage unit. ZipLip recommends you leave it unchecked. If you are creating a Replication Vault, this value must match that of the original Vault.Partitioning Period – Use the pull-down menu to specify how often you wish to partition the storage unit. This example uses YEAR. If you are creating a Replication Vault, this value must match that of the original Vault. For example, if you are setting up replication from the ZLPRegular storage unit to the storage unit you are creating here, make sure the partition periods for both storage units are identical.Partitioning Usage – Use the pull-down menu to define the depth and width of the folders created. This example uses the recommended value Light.
116 Administration Guide

Creating an Archivas Cluster Disk Volume
Click Next to continue. The Disk Volume Information screen appears.
Figure 8.49: Storage Unit Wizard – Disk Volume Information screen
5. Enter the following disk volume information:Name – Enter a name for identifying this disk volume. This example uses “dvArchivas”.Comments – (Optional) Enter a description of the volume.
Click Next to continue to the Archivas Cluster Disk Volume Information screen.
Figure 8.50: Storage Unit Wizard – Archivas Cluster Disk Volume Information screen
Enter the following information:
Width – Enter the width for the disk volume.Depth – Enter the depth for the disk volume.
Administration Guide 117

Vault Store Fundamentals
HTTP Server Protocol – Enter the HTTP server protocol (either “http” or “https”). ZipLip recommends you use “http”.HTTP Server Name – Enter the URL of the Archivas Cluster HTTP server.HTTP Server Port – Enter the HTTP server port (the default value is 80).Server Path – Enter the UNC path or other network-available path for the Archivas Cluster disk volume. This example uses “/cluster/ZipLip/Vault/zlRegular”.Create folder if not found – Check to create the path for the disk volume if it doesn’t already exist.File UID – Enter the UID for created files. ZipLip recommends you make this number unique so it is easily distinguished when other applications use the Archivas Cluster.File GID – Enter the GID for created files. ZipLip recommends you make this number unique so it is easily distinguished when other applications use the Archivas Cluster.File Permissions – Enter the file permissions setting in octal on the HTTP server, or leave blank to accept the default settings on the Archivas cluster.Directory Permissions – Enter the directory permissions setting on the HTTP server, or leave blank to accept the default settings on the Archivas cluster.Shred – Enter “1” to have files “shredded” after deletion, or leave blank to accept the default settings on the Archivas cluster.
Click Next to continue to the Confirm Wizard Submission screen.
Figure 8.51: Storage Unit Wizard – Confirm Wizard Submission screen
6. Click Next to confirm your submission. In the pop-up window that appears, click OK to continue. The Storage Unit Wizard – Success screen appears.
118 Administration Guide

Creating a Disk Storage Unit
Figure 8.52: Storage Unit Wizard – Success screen
Creating a Disk Storage Unit
To create a disk storage unit in ZipLip:
1. In the ZipLip SysAdmin application, in the left menu, click Vault, then under Vault, click Storage Units. A list of storage units appears.
Figure 8.53: Storage Units screen
2. In the Storage Units screen, click the Add New button. This starts the Storage Unit Wizard.
Administration Guide 119

Vault Store Fundamentals
Figure 8.54: Storage Unit Wizard – Storage Unit Type screen
3. In the Storage Unit Wizard – Storage Unit Type screen, select Disk.
Click Next to continue to the Storage Unit Information screen.
Note: From the Storage Unit Wizard – Storage Information Unit screen to the end of the wizard you can also click Prev to go back to the previous screen.
Figure 8.55: Storage Unit Wizard – Storage Unit Information screen
4. In the Storage Unit Information screen, enter the following information:Properties
Name – Enter a name for the Storage Unit here. This example uses “suzlpmessage”.
120 Administration Guide

Creating a Disk Storage Unit
Application – Select the ZipLip application that uses this vault. If this vault is used by all applications, select Common to all applications. This example uses End-User Mailbox Access.Module – Enter a module name.Comments – Enter a description for the storage unit you are creating (optional).
Data Provider ServicesEncryption – Check to have this storage unit be encrypted; leave unchecked to have the storage unit be unencrypted. ZipLip recommends you leave it unchecked. If you are creating a Replication Vault, this value must match that of the original Vault.Compression – Check to enable compression for this storage unit. ZipLip recommends you check this field. If you are creating a Replication Vault, this value must match that of the original Vault.Partitioning Period – Use the pull-down menu to specify how often you wish to partition the storage unit. This example uses WEEKDAYHOUR (recommended). If you are creating a Replication Vault, this value must match that of the original Vault.Partitioning Usage – Use the pull-down menu to define the depth and width of the folders created. This example uses the recommended value Heavy.
Click Next to continue. The Disk Volume Information screen appears.
Figure 8.56: Storage Unit Wizard – Disk Volume Information screen
5. Enter the following disk volume information:Name – Enter a name for identifying this disk volume. This example uses “dvzlpmessage”.Comments – (Optional) Enter a description of the volume.
Click Next to continue to the Disk Volume Information screen.
Administration Guide 121

Vault Store Fundamentals
Figure 8.57: Storage Unit Wizard – second Disk Volume Information screen
Enter the following information:
Width – Enter a numeric value for the width of the disk volume. This example uses “25”.Depth – Enter a numeric value for the depth of the disk volume. This example uses “25”.Path – Enter the path (physical location) for the disk volume.Failover Path – (Optional) Enter the failover path for the disk volume.Local Path – If applicable, enter the local path for the disk volume.Create folder if not found – Check to create the folder if it does not exist.Cluster – Use the pull-down menu to select a cluster.LocalMachine – Enter the local machine for the disk volume.
Click Next to continue to the Confirm Wizard Submission screen.
122 Administration Guide

Changing the Storage Unit Associated With Mail Storage
Figure 8.58: Storage Unit Wizard – Confirm Wizard Submission screen
6. Click Next to confirm your submission. In the pop-up window that appears, click OK to continue. The Storage Unit Wizard – Success screen appears.
Figure 8.59: Storage Unit Wizard – Success screen
Changing the Storage Unit Associated With Mail Storage
To change the storage unit associated with a message store:
1. In the left menu, select Vault. Under Vault, select Application Vault.2. In the Application Vault Systems pane, click the Mail tab. The Application Vault Mail
pane appears.
Administration Guide 123

Vault Store Fundamentals
Figure 8.60: Application Vault Mail pane
3. Next to the volume on which you want to change the storage unit, click the Disassociate button. This example uses Message Store MSFRE (Default), Module Regular. A pop-up warning window appears.
4. Click OK to continue.5. In the Application Vault Mail pane the Storage Unit name is replaced by a pull-down
menu. Select a different storage unit from the menu. A pop-up window appears asking you to confirm your choice.
6. Click OK to confirm your selection.
124 Administration Guide

Vault Management
Vault Management
Managing a vault involves creating, modifying, and monitoring disk volumes and storage units.
Creating Disk Volumes
To create a disk volume.
1. In the left menu, select Vault. Under Vault, select Storage Units.2. In the Storage Units screen (see Figure 8.10 on page 92), select the name of a storage unit
to which you want to add a disk volume. The Storage Unit Properties screen appears.3. In the Storage Unit Properties screen, click the Add New Disk Volume button. This starts
the Disk Volume Wizard.
Figure 8.61: Disk Volume Wizard screen
4. Enter the following:Name – Enter a name for the disk volume you wish to create. Do not include non-alphanumeric characters in the name.Comments – (Optional) Enter comments about the disk volume.
Click Next to continue to the Disk Volume Information screen.
Administration Guide 125

Vault Store Fundamentals
Figure 8.62: Disk Volume Wizard – Disk Volume Information screen
5. Complete the following fields:Width – Enter a numeric value for the width of the disk volume.Depth – Enter a numeric value for the depth of the disk volume.Path – Enter the path (physical location) for the disk volume.Failover Path – Enter the failover path for the disk volume.Local Path – If applicable, enter the local path for the disk volume.Create folder if not found – Check to create the folder if it does not exist.Cluster – Use the pull-down menu to select a cluster.LocalMachine – Enter the local machine for the disk volume.
Click Next to continue to the Confirm Wizard Submission screen.
Note: To change a previous screen, click Prev, change the information, then click Next.
126 Administration Guide

Vault Management
Figure 8.63: Disk Volume Wizard – Confirm Wizard Submission screen
6. Click Next. A pop-up box appears asking whether you want to continue. Click OK to continue. A screen appears confirming the creation.
Note: Disk Volumes cannot be deleted.
Modifying a Disk Volume
To edit a disk volume:
1. In the left menu, select Vault. Under Vault, select Storage Units.2. In the Storage Units screen (see Figure 8.10 on page 92), select the name of a storage unit
contaning a disk volume you want to modify. The Storage Unit Properties screen appears.3. In the Storage Unit Properties screen, select the name of the disk volume you want to
modify. The Disk Volume Details screen appears.
Administration Guide 127

Vault Store Fundamentals
Figure 8.64: Disk Volume Details screen
4. In the Disk Volume Details screen, click the Edit Details button to start the Disk Volume Wizard.
Figure 8.65: Disk Volume Wizard screen
5. The fields are similar to those when you create a disk. In this example you can change the following information, as appropriate:
Write Flag – When checked, allows this volume to be written.Read Flag – When checked, allows this volume to be read.HSM Flag – When checked, use hierarchical storage managementComments – Add or edit comments as desired.
Click Next to continue to the Disk Volume Information screen.
128 Administration Guide

Vault Management
Figure 8.66: Disk Information Wizard – Edit Disk Volume Information screen
6. Edit the following fields, as appropriateWidth – Enter a numeric value for the width of the disk volume.Depth – Enter a numeric value for the depth of the disk volume.Path – Enter the path (physical location) for the disk volume.Failover Path – Enter the failover path for the disk volume.Local Path – If applicable, enter the local path for the disk volume.Create folder if not found – Check to create the folder if it does not exist.Cluster – Use the pull-down menu to select a cluster.LocalMachine – Enter the local machine for the disk volume.
Click Next to continue to the Confirm Wizard Submission screen.
Note: To change a previous screen, click Prev, change the information, then click Next.
Administration Guide 129

Vault Store Fundamentals
Figure 8.67: Disk Volume Wizard – Confirm Wizard Submission screen
7. Click Next. A pop-up box appears asking whether you want to continue. Click OK to continue. A screen appears confirming the creation.
Monitoring Disk Volumes
To monitor information in the disk volumes:
1. In the left menu, select Vault. Under Vault, select Storage Units.2. In the Storage Units screen (see Figure 8.10 on page 92), select the name of a storage unit
in which you want to view a disk volume. The Storage Unit Properties screen appears.3. In the Storage Unit Properties screen, the Associated Disk Volumes are listed at the
bottom. Click on the name of a disk volume to view its properties.
In the Disk Volume Details screen (see Figure 8.64 on page 128) you can see the storage unit associated with it, the size of the volume (width, depth), creation date, flags, and paths of the disk volume (physical location of the volume).
Monitoring Storage Units
1. In the left menu, select Vault. Under Vault, select Storage Units.2. In the Storage Units screen (see Figure 8.10 on page 92), select the name of a storage unit
you want to monitor. The Storage Unit Properties pane appears.
130 Administration Guide

Vault Management
Figure 8.68: Storage Unit Properties pane
3. The pane shows the disk name, short name, type, application, module, any comments, creation date and user, whether encryption and compression are enabled, the type of partitioning, and all associated disk volumes. You can also enable or disable Escrow Decryption.
To return to the Storage Units screen, click the “x” in the upper right corner of the pane.
Managing Stores and Storage Units
To change the association of a system store and a storage unit:
1. In the left menu, select Vault. Under Vault, select Application Vault.2. Click any of the application tabs to see a list of stores available, as shown in the following
figure:
Administration Guide 131

Vault Store Fundamentals
Figure 8.69: Application Vault – Secure File Management tab
3. To disassociate a specific store from a storage unit, click the Disassociate button next to it, then click OK in the pop-up window to confirm.
4. To associate a specific store with a storage unit, select a storage unit from the pull-down menu next to the store you want to modify, then click OK in the pop-up window to confirm.
132 Administration Guide

Chapter 9
Coordinator/Executor
The ZipLip Platform relies on the Coordinator/Executor architecture for ensuring scalability, failover, and load balancing. The architecture consists of nodes running in a logical cluster. The nodes in a cluster communicate with each other through the use of the database and TCP/IP sockets. There can be more than one cluster in a TCP/IP subnet.
Each node, typically a single system, contains a Local Coordinator and one or more Executors. Each Executor is a single worker that can execute any arbitrary task one at a time, such as processing and sending an e-mail message. The Local Coordinator assigns work and manages the Executors residing in the same system. When all the Executors are doing work and there is more work to be done, the Local Coordinator contacts the Global Coordinator and passes the work to the Global Coordinator.
The Global Coordinator knows all the nodes in the cluster. There is also no single point of failure, as a cluster is usually configured to have more than one machine running a Global Coordinator. Although there can only be one Live Global Coordinator at any one time to which all nodes submit work, there can be multiple Backup Global Coordinators monitoring the activities of the Live Global Coordinator to ensure proper operation. When the Live Global Coordinator is not responding, one of the remaining Backup Global Coordinators becomes the new Live Global Coordinator. All failover activity is transparent to different nodes and allows work to flow smoothly.
GC
Ziplip Server/Process Ziplip Server
Executor Task
Executor Task
Executor Task
. .. .. .
LC
GC
Executor Task
Executor Task
Executor Task
. .. .. .
LC TaskTask
ping
Queries Queries
StandbyLive
Administration Guide 133

Coordinator/Executor
Each system has a cluster object which keeps track of the Live Global Coordinator. The Local Coordinator uses the information in the cluster object to poll the Live Global Coordinator for more tasks if it doesn’t have enough tasks. The Local Coordinator also transfers tasks to the Global Coordinator if it is overloaded or if a task has stayed in its queue beyond a certain time. Thus the Live Global Coordinator functions as a task distributor. An application running on any machine has a choice to submit tasks to the Local Coordinator or directly to the Live Global Coordinator. Adding more machines into the cluster increases the total processing capability in a linear fashion.
All failover and Global Coordinator activity is logged in the globalCoord logs. Local Coordinator activity is logged to the lc logs, and Executor activity is logged into the various exec logs, with each Executor getting its own log file.
Coordinator/Executor Configuration
The parameters for Coordinator/Executors can be modified from the configuration files.
Cluster Name
The default cluster name for a machine may be modified in $ZipLip/WEB-INF/Config/runnable/pmapp/pmapp.cfg. Locate and change the name to the variable coord.cluster.default.name.
Local Coordinator Parameters
The local coordinator parameters for a machine may be modified in $ZipLip/WEB-INF/Config/app/shared/pmappSystem.cfg. The following is an excerpt of the necessary parameters in the file:coord.taskMgr.maxSchedule = 100coord.taskMgr.maxScheduleTime = @TEN_MIN_MS@
coord.cluster.name = @[email protected] = @[email protected] = 5
coord.localCoord.cluster = @[email protected] = 5coord.localCoord.pollingInterval = 5000
The last two parameters are important.
coord.localCoord.initialExecutors – This variable denotes the number of Executors the machine spawns. Setting a high number causes more CPU and disk resources in this system to be consumed.
coord.localCoord.pollingInterval – This variable denotes how often, in milliseconds, the Local Coordinator polls the Global Coordinator for work.
134 Administration Guide

Global Coordinator
Global Coordinator
There are no settings for Global Coordinators, apart from having to run a Global Coordinator at startup. Not all nodes in the cluster need to run a Global Coordinator, as it might entail a fair amount of network traffic and CPU usage when a machine is voted to be the Live Global Coordinator. The following chapters contain information on how to start the Global Coordinator as a Child Process at startup.
Administration Guide 135

Coordinator/Executor
136 Administration Guide

Chapter 10
MTA Processing
The Mail Transfer Agent, or MTA, is the major component in the ZipLip e-mail server which handles all mail from various sources, such as SMTP and IMAP. The MTA is built to be extremely scalable, flexible, and reliable. The MTA uses the Coordinator/Executor architecture to handle mail processing tasks.
Figure 10.1: ZipLip MTA Architecture Diagram
The MTA temporarily stores files in the SMTP Staging Vault, which can be viewed in the SysAdmin application by selecting Vault and under Vault selecting SMTP Staging Vault.
SMTP
Web Client
Web Services
POP Pull Agent
IMAP Pull Agent
IMAP Client
Ext.Mail
StoreMail
Acceptor
Acceptor
InternalMail Store
1. Coordinator/Executor
MTA Components
MTA: Core Engine
2. Monitoring
3. Rules Engine
4. Handler Architecture
Delivery
VirusScan
SecMsg
SMTPMgr
SMTPMgr
CustomProcess
AntiSpam
ExternalRelay
The ZipLip MTA
DBQueue
FileQueue
Handlers
Exit Points
DB and Storage Engine
Administration Guide 137

MTA Processing
Figure 10.2: SMTP Staging Vault
In the example shown in Figure 10.2, the path to the SMTP Staging Vault is shown as:Path: \\127.0.0.1\C$\ZipLip_Vault\smtpStagingLocal Path: C:\ZipLip_Vault\smtpStaging
The SMTP Queue provides high performance in processing e-mail, as it uses very few resources when handling a large number of incoming messages. Mail is sent to the MTA for processing in the SMTP Queue and the Staging Vault as follows:
1. The SMTP Listener starts writing a new file for each new message it receives over the network into the queue directory under the SMTP Staging Vault (in this example, C:\ZipLip_Vault\smtpStaging\queue).
2. When the message transfer has finished, the SMTP Listener task submits a mail processing job to the Local Coordinator.
3. If the Local Coordinator is too busy to run the job, it passes it back to the Global Coordinator, which then decides which other Local Coordinator to use. This may be a different system than the one with the SMTP server.
4. The selected Local Coordinator delegates the task to an Executor, which is a thread that does processing within ZipLip.
5. The Executor moves the file to the process directory (in this example, C:\ZipLip_Vault\smtpStaging\process) before processing.
6. If, in the parsing of the original e-mail, if there is some kind of syntax error causing a failure in the parsing process, the message is moved to the dead folder (in this example, C:\ZipLip_Vault\smtpStaging\dead).
7. The Executor continues processing the message. Once the message is processed successfully it is moved to the system Vault.
8. If the “Use Done Folder” option is checked for the SMTP Staging Vault, a copy of the message is also placed into the done directory (in this example, C:\ZipLip_Vault\smtpStaging\done).
138 Administration Guide

9. If the e-mail cannot be delivered (for example, if the recipient’s SMTP server is down or the DNS cannot find the mail server), it is moved to the database queue (ZLStaging in the Vault) and reprocessed for the time specified in the System Registry (default is three days).
10. If the e-mail cannot be delivered after the maximum allowed reprocessing time, it is bounced back to the sender and deleted from the ZipLip system.
11. The SMTP Queue Fetcher task cleans the done directory (in this example, C:\ZipLip_Vault\smtpStaging\done) according to the policy specified in configuration files.
Figure 10.3: ZipLip MTA Process Flow
By staging a message in the Staging Vault, the MTA uses the Vault Store to copy a message into the Staging Vault. This submits the message to the database queue and creates pointers to this message in the ZLPReceivedMail and ZLPRecipientInfo tables. These tables are polled by an administrative process and retried for a specified number of times or period of time.
MTA processing information is logged to the MTATranscript table. Information on the state of a particular message can be found using the web-based ZipLip SysAdmin application. The
Administration Guide 139

MTA Processing
MTA also uses the MTATranscript table to detect loops, to set up rate control policies, and construct automated reports to monitor MTA processing.
Configuring the SMTP Staging Vault
The SMTP Queue and Staging Vault can be assigned using the SysAdmin application. To assign one or more queue stores:
1. In the SysAdmin application, select Vault. Under Vault, select SMTP Staging Vault.
Figure 10.4: SMTP Staging Vault
In the example shown in Figure 10.4, the path to the default SMTP Staging Vault is shown as:Path: \\127.0.0.1\C$\ZipLip_Vault\smtpStagingLocal Path: C:\ZipLip_Vault\smtpStaging
2. To further examine an SMTP Staging Vault, click the name of the Vault (in this case, default).
140 Administration Guide

Configuring the SMTP Staging Vault
Figure 10.5: SMTP Staging Vault details screen
3. The SMTP Staging Vault details screen for the Vault contains the following information:Name – The name of this Vault (in this case, default).Path – The network path to this Vault (in this case, \\127.0.0.1\C$\ZipLip_Vault\smtpStaging).Local Path – The path to this Vault on the local system (in thie case, C:\ZipLip_Vault\smtpStaging).Local Machine – None Queue Folder – The name of the SMTP staging queue folder (in this case, queue as in C:\ZipLip_Vault\smtpStaging\queue).Process Folder – The name of the folder that holds mail being processed (in this case, process as in C:\ZipLip_Vault\smtpStaging\process).Use Done Folder – Check to have a copy of each successfully processed message copied into a folder in the staging queue. This is mostly used for debugging.Done Folder – The name of the folder that holds copies of succesfully processed messages (in this case, process as in C:\ZipLip_Vault\smtpStaging\process). Dead Folder – name of the folder that holds copies messages that could not be processed (in this case, dead as in C:\ZipLip_Vault\smtpStaging\dead).Active – Check to make this staging Vault active.System Default – Check to make this Vault the default SMTP Staging Vault for this system.Cluster Name – The name of the ZipLip cluster this Vault uses (in this case, DEFAULT).Default Cluster – Check to make this cluster the default ZipLip cluster for the SMTP Staging Vault for this system.State (On/Off) – Checking this turns on the SMTP QueueFetcher tasks. Check to process mail; uncheck to stop mail processing.
Administration Guide 141

MTA Processing
Frequency (in seconds) – A frequency of “0” as in this example means e-mail is processed constantly. Raise this number if the system is highly loaded and you want to run the SMTP QueueFetcher task less frequently.Created By – The user who created this Vault (in this case, _system_@system because it was created during the ZipLip installation process).Date Created – The date on which this Vault was created (in this case, 6/27/06 5:25 PM).Last Updated On – The date on which this Vault was last updated (in this case, 6/27/06 5:25 PM).
To save any changes you have made to the vault, click Save. To return to the SMTP Staging Vault list, click Cancel.
Mail Queue Monitoring
This section contains instructions on how to monitor the mail-related queues.
Monitoring MTA Activity
To view transcripts of MTA activity, in the SysAdmin application, select Monitoring in the left menu. Under Monitoring, click MTA Monitor. The MTA Transcript Search screen appears
Figure 10.6: MTA Transcript Search screen
From here you can search the MTA Queue for messages processed anywhere from within 30 minutes to three days. Use the pull-down menus and blanks to specify the following criteria:
Period – Select a duration ranging from 30 minutes (mins) to 3 days.Source Type – Select ALL for all messages, or select a specific source type.Message Type – Select ALL for all messages, or select a specific message type.
142 Administration Guide

Mail Queue Monitoring
From like – Leave blank to return messages from any address, or enter a string the From field must contain.To like – Leave blank to return messages addressed to any address, or enter a string the To field must contain.Subject like – Leave blank to return messages from any address, or enter a string the Subject field must contain.
Click Go to start the search. The MTA Transcript Search screen now contains a list of messages processed by the MTA that fit the search criteria.
Figure 10.7: MTA Transcript Search results screen
Clicking on any of the links shows you a transcript containing a summary of the message headers, direction, source type, and size, as well as processing information similar to the one shown in Figure 10.8.
Administration Guide 143

MTA Processing
Figure 10.8: MTA Transcript screen
Monitoring the MTA File Stores
To get the path for the SMTP staging vault and the name of its subdirectories, click Monitoring in the left menu. Under Monitoring, click MTA File Store. The MTA File Store screen appears.
Figure 10.9: MTA File Store screen
Here you can view the following:
FileStore Name – This column contains the name of the file store (in this case, default).
144 Administration Guide

Mail Queue Monitoring
Cluster – This coumn contains the name of the cluster for this file store (in this case, DEFAULT).Cluster Default – Whether this is the default path for this file store.Path – The various filesystem paths for the file store:
Base Path – The base file structure on which the file store resides (in this case, C:\ZipLip_Vault\smtpStaging).Queue Folder – The folder under the base file structure that holds the mail queue (in this case, queue, as in C:\ZipLip_Vault\smtpStaging\queue).Process Folder – The folder under the base file structure that holds mail being processed (in this case, process, as in C:\ZipLip_Vault\smtpStaging\process).Done Folder – The folder under the base file structure that holds transcripts of processed mail (in this case, done, as in C:\ZipLip_Vault\smtpStaging\done).Dead Folder – The folder under the base file structure that holds transcripts of mail that could not be processed after a specified retry time (in this case, dead, as in C:\ZipLip_Vault\smtpStaging\dead).
Number of Files – The number of files in each of the file store subdirectories.
Monitoring the Message Queue
To monitor the message queue, click Monitoring in the left menu. Under Monitoring, click MTA DB Queue. The MTA Queue Summary screen appears.
Figure 10.10: MTA Queue Summary screen
Here you can see a summary of the mail queue with information such as the mail source and number of messages in the queue.
To filter based on source type, select one of the following source types from the Source pull-down menu and click the Go button.
Administration Guide 145
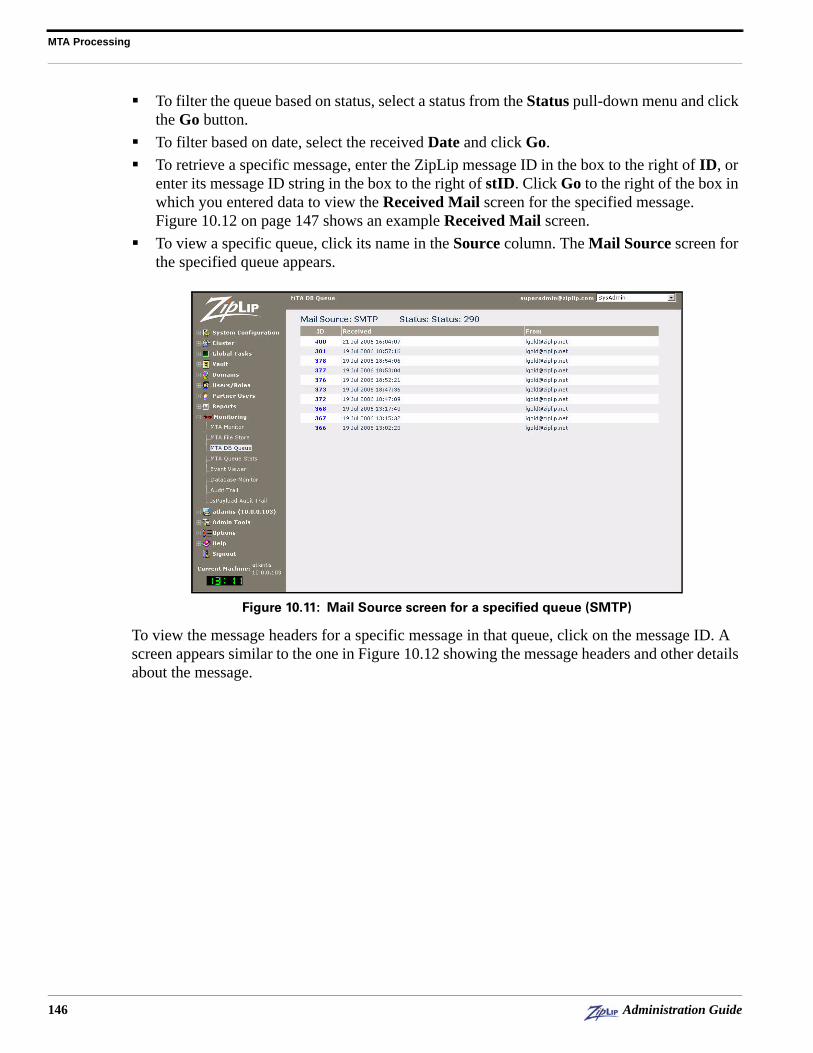
MTA Processing
To filter the queue based on status, select a status from the Status pull-down menu and click the Go button.To filter based on date, select the received Date and click Go.To retrieve a specific message, enter the ZipLip message ID in the box to the right of ID, or enter its message ID string in the box to the right of stID. Click Go to the right of the box in which you entered data to view the Received Mail screen for the specified message. Figure 10.12 on page 147 shows an example Received Mail screen.To view a specific queue, click its name in the Source column. The Mail Source screen for the specified queue appears.
Figure 10.11: Mail Source screen for a specified queue (SMTP)
To view the message headers for a specific message in that queue, click on the message ID. A screen appears similar to the one in Figure 10.12 showing the message headers and other details about the message.
146 Administration Guide

Mail Queue Monitoring
Figure 10.12: Received Mail screen
In the Received Mail screen you can:
click the Process Now button to schedule the message for processing by the MTA.click the Abort button to permanently abort processing of the message. A pop-up box appears; click OK to permanently kill the message.click the Cancel button to return to the Mail Source screen.click the Detailed Transcript button to see a detailed transcript of the processing of the message similar to the example in Figure 10.8 on page 144.
To return to the Received Mail screen, click the View Received Mail button.
Monitoring the SMTP Queue
To monitor the SMTP queue, click Monitoring in the left menu. Under Monitoring, click MTA File Store. The MTA FileStores screen appears.
Administration Guide 147

MTA Processing
Figure 10.13: FileStores screen
This shows a summary of the SMTP queue with the number of files in each directory.
Too many messages in the Queue Folder indicates more Executors need to be added to the cluster because it is not processing mail fast enough.Too many messages in the Process Folder indicates a content filtering segment, such as a virus scanner, is taking too long.Too many messages in the Done Folder indicates it might be time to make sure the SMTP Queue Fetcher is running correctly.
Monitoring MTA Queue Statistics
To monitor MTA queue statistics, click Monitoring in the left menu. Under Monitoring, click MTA Queue Stats. The MTA Queue Statistics screen appears.
148 Administration Guide

Setting Up Event Monitoring
Figure 10.14: MTA Queue Statistics screen
This summary of mail processing in the cluster contains a table of five values:
Scheduled – These are used by some applications to delay sending e-mail to a later time.Scheduled Done – The number of scheduled messages that have been properly delivered.Queued – Messages waiting in the mail queue.Done – All successfully sent messages.Failed – Messages that did not reach their destination.
Queued, Done, and Failed refer to all messages whether they are in the SMTP Queue or the Staging Vault.
Setting Up Event Monitoring
To determine how you monitor your ZipLip system:
1. Click System Configuration in the left menu. Under System Configuration, click Registry.
2. In the Registry pane, click System Configuration.3. In the System Configuration pane, click System Monitoring.
Administration Guide 149

MTA Processing
Figure 10.15: System Registry - System Monitoring pane
4. In the System Monitoring pane, configure the following parameters to suit your needs:JMX Monitoring On – Check to use Java Management Extensions (JMX) to monitor ZipLip activity from remote consoles.JMX port – Enter the port for JMX monitoring. The default value is 9000.JMX username – If you are using JMX monitoring, enter the username for JMX monitoring.JMX password – If you are using JMX monitoring, enter the password for the JMX monitoring username.Syslog Host – To use syslog system monitoring, enter a syslog server to receive messages from the ZipLip server.System Event On – Check to enable syslog monitoring of system event messages.System Event Facility – Use the pull-down menu to select the facility name for system event messages.System Audit On – Check to enable syslog monitoring of system audit messages.System Audit Facility – Use the pull-down menu to select the facility name for system audit messages.Archive Audit On – Check to enable syslog monitoring of archive audit messages.Archive Audit Facility – Use the pull-down menu to select the facility name for archive audit messages.Classifier Audit On – Check to enable syslog monitoring of Classifier audit messages.Classifier Audit Facility – Use the pull-down menu to select the facility name for Classifier audit messages.Tracker Audit On – Check to enable syslog monitoring of Tracker audit messages.
150 Administration Guide

Using the Event Viewer
Tracker Audit Facility – Use the pull-down menu to select the facility name for Tracker audit messages.
To save your settings, click Save, then click OK to the message warning you that you must restart the ZipLip server for your changes to take effect.
Using the Event Viewer
The Event Viewer enables ZipLip to monitor activity. To use the Event Viewer, in the left menu, click Monitoring. Under Monitoring, click Event Viewer. The Event Viewer screen appears.
The columns have the following meanings:
Type – An icon depicting the type of event. One of the following: – Fatal or Error; mouse over the icon to see which type of event was triggered – Warning
– Information
– Register
– Module – Unknown
Event – If successful, shows the type of event. If not successful, shows the type of exception, along with the location of the exception and details.Server Run Instance – The instance of the ZipLip server.Machine – The system on which the event occurred.Txn ID – ZipLip internal transaction ID number.Date – The date and time on which this event occurred.
ZipLip uses this information for debugging.
Administration Guide 151

MTA Processing
Using SNMP for Event Monitoring
SNMP lets your management console monitor how the ZipLip server is running. The ZipLip SNMP agent talks SNMP protocol on one side, JMX on the other.
Configuring ZipLip for SNMP Monitoring
To configure ZipLip for SNMP monitoring you must edit the following file:
On Windows:%ZIPLIP_HOME%\ZLSNMPAgent\config\zlSnmp.cfg
On Solaris, Linux, or AIX:$ZIPLIP_HOME/ZLSNMPAgent/config/zlSnmp.cfg
This file contains SNMP configuration variables for the agent. The management station needs to know the following values. Set these so the management station can get to you, or set the management station values to match these values:
For SNMP version 1 or version 2:__snmpPool.SNMPport=9161__snmpPool.SNMPread=public__snmpPool.SNMPwrite=private
For SNMP version 3:__snmpPool.SNMPport=9161__snmpPool.SNMPcontextEngineId=__snmpPool.SNMPcontextName=__snmpPool.SNMPuserName=initial__snmpPool.SNMPuseAuthentication=false__snmpPool.SNMPauthenticationProtocol=@__snmp.authentication.MD5@__snmpPool.SNMPuserAuthenticationPassword=__snmpPool.SNMPusePrivacy=false__snmpPool.SNMPuserPrivacyPassword=
The JMX server talks to the JMX host (in this case, localhost). The settings in this section of the configuration file must match the settings in the ZipLip System Registry (see Figure 10.15 on page 150):
__snmpPool.JMXhost=localhost__snmpPool.JMXport=9000__snmpPool.JMXuser=__snmpPool.JMXpass=__snmpPool.JMXdomainname=ZLServer/@machine.local.name@
The last value (@machine.local.name@) must be set to something meaningful to ZipLip and the SNMP agent. The ZipLip naming system starts out with the name of the local system. This string is correct if you are the running ZipLip server and JMX on the same system. If you are running the ZipLip server and the SNMP agent on separate systems, you need to change this value to “ZLServer/name.of.ziplip.server”.
To have SNMP traps that tell the management station when something goes wrong, add a trap target based on your version of SNMP.
152 Administration Guide

Using SNMP for Event Monitoring
SNMP version 1:__snmpPool.snmpTrap.target.v1=#com.ziplip.snmp.SnmpAddress~~localhost~~@__snmp.trap.port.default@~~@__snmp.version.1@~~@__snmpPool.SNMPread@~~@__snmpPool.SNMPwrite@
SNMP version 2:
__snmpPool.snmpTrap.target.v2c=#com.ziplip.snmp.SnmpAddress~~localhost~~@__snmp.trap.port.default@~~@__snmp.version.2c@~~@__snmpPool.SNMPread@~~@__snmpPool.SNMPwrite@
SNMP version 3:__snmpPool.snmpTrap.target.v3=#com.ziplip.snmp.Snmp3Address~~localhost~~@__snmp.trap.port.default@~~@__snmp.version.3@~~@__snmpPool.SNMPcontextEngineId@~~@__snmpPool.SNMPcontextName@~~@__snmpPool.SNMPuserName@~~@__snmpPool.SNMPuseAuthentication@~~@__snmpPool.SNMPauthenticationProtocol@~~@__snmpPool.SNMPuserAuthenticationPassword@~~@__snmpPool.SNMPusePrivacy@~~@__snmpPool.SNMPuserPrivacyPassword@
In the appropriate line, replace localhost with the system name or IP address of the management station or trap reciever. You may also have to replace “@__snmp.trap.port.default@” with a port number (usually 162).
Installing and Starting SNMP on Windows
To install the SNMP service on Windows:
1. Open a command prompt and change to the %ZIPLIP_HOME%\ZLSNMPAgent\bin directory.
Figure 10.16: Running the SNMP agent installation script
2. Enter:zlsnmpservice.bat install
The syntax for running the installation script is:zlsnmpservice.bat command [service_name]
where command is one of the following:
Administration Guide 153

MTA Processing
install – Install the service using zlsnmpsvc as the service name. The service is installed using default settings.remove – Remove the service from the system.update – Update the service on the system.
and service_name (optional) is the name of your new service.
To start the ZLSNMP agent, enter:net start zlsnmpsvc
To stop the ZLSNMP agent, enter:net stop zlsnmpsvc
To verify that the ZLSNMP agent is installed and running, open a command prompt window and enter services.msc. This opens the Windows services console.
Scroll down to the bottom of the list to where the ZipLip SNMP agent is listed, as shown in Figure 10.17.
Figure 10.17: ZLSNMP service
To change startup parameters for the ZipLip SNMP agent, in a command window, enter:
%ZIPLIP_HOME%\ZLSNMPAgent\bin\zlsnmpsvcw
To run the SNMP agent interactively, enter:%ZIPLIP_HOME%\ZLSNMPAgent\bin\zlSnmp.exe
154 Administration Guide

Using SNMP for Event Monitoring
Installing and Starting SNMP on Solaris, Linux, or AIX
To install the SNMP service on Solaris, Linux, or AIX, run the zlSnmp.sh script in the $ZIPLIP_HOME/ZLSNMPAgent/bin directory.
Administration Guide 155

MTA Processing
156 Administration Guide

Chapter 11
Report Management
Reports help gather statistical information about a system. The ZipLip SysAdmin application contains preset reports that enable you to gather statistical information about your system. Reports in ZipLip work as background tasks that keep running at a specified interval. The system can also send out automatic e-mail messages when the reports are generated. The ZipLip Compliance Suite also lets users with Compliance Administrator and Compliance Auditor roles create system reports. You can dynamically generate reports in ZipLip Compliance, and you can schedule reports using the ZipLip SysAdmin application.
This chapter covers scheduling of reports and understanding the different types of reports.
Generating Reports in the SysAdmin Application
To select a report to schedule:
In the left menu of the SysAdmin application, select Reports. Under Reports, select Reports -> Create New. The Available Reports screen appears.
Figure 11.1: Available Reports screen
Administration Guide 157

Report Management
The different types of reports available are:
Classifier Top Hits – This report provides information about the top n classifier hits where n can be specified while creating the report. This information includes rule information such as ID, Hit Count, Name, Main Phrase, Result Category, Include Phrase, Exclude Phrase, and Synonyms. MTA Statistics – This report provides information about mail processes, including:
Mail Retry Counts – the number of times ZipLip has retried to send a messageMachine v/s Mails Processed – the number of e-mail messages processed by each system in the specified time periodTime v/s Mails Processed – the amount of e-mail messages processed, by hourSource v/s Mails Processed – the number of messages of each mail source type processedSystem Standard Values – tables containing lists of Mail Source Values and Message Type Values
Mailbox Quota Violation Statistics – This report provides information about which users have exceeded their mailbox quotas, when, and by how much.Secure Mail Statistics – This report provides information about secure e-mail message traffic, including: the total number of secure e-mail messages sent by specfic users, users who sent more than a specified number of secure e-mail messages, users who received more than a specified number of secure e-mail messages, and the number of secure e-mail messages sent over a specified number of days.Secure Mail Summary – This report provides hourly and weekly summaries about secure e-mail message traffic.
Scheduling Reports in the SysAdmin Application
To create a new instance of a report, select a report in the Available Reports screen. A screen appears in which you can schedule this report as a background task. For example, the following is the form for a new Classifier Top Hits Report.
158 Administration Guide

Generating Reports in the SysAdmin Application
Figure 11.2: New Classifier Top Hits Report screen
Specify the following task properties:
Task Name – The name of the report.Cluster Name – The name of the machine cluster on which this report is to run.Primary Machine Name/IP – The name or IP address of the primary system in the cluster on which this report is to run.Run on Primary Machine Only – Check to only run this report on the primary system.Scheduling Info:
Start Date – Use the pull-down menus and box to set the date and time to start the task.Run Days – Either check Daily or check one or more days of the week this task is to run.
Report ParametersArchive – Check to archive mail sent to users specified in the Email Recipients field.Email Recipients – Enter e-mail addresses to receive the report.Last ‘n’ days – The default value is 30 days; this means the report will contain data from the last 30 days. Leave this field empty if you want to specify an exact date.Start Date – The required start date in the format “yyyy/mm/dd”. Only fill in this field if the Last ‘n’ days field is left blank. If this field is left blank, the start date is set to 30 days before the end date. End date – The required end date in the format “yyyy/mm/dd”. Only fill in this field if the Last ‘n’ days field is left blank. If this field is left blank, the end date is set to today’s date.Top ‘n’ hits – Enter the number of most relevant rows to appear in the generated reports. This field is unique to the Classifier Top Hits report.
Click the Save button in the upper right corner of the screen to schedule the report.
Note: All other reports require similar data for scheduling.
Administration Guide 159

Report Management
Viewing, Editing, and Disabling Scheduled Reports
To view the different types of already scheduled reports:
1. In the left menu of the SysAdmin application, select Reports. Under Reports, select Reports -> View/Edit. The Scheduled Reports screen appears.
Figure 11.3: Scheduled Reports screen
2. To disable a scheduled report, click the icon, then in the pop-up window click OK to confirm.
To edit a scheduled report, click a report name in this screen. A screen appears in which you can edit report parameters.
160 Administration Guide

Generating Reports in the SysAdmin Application
Figure 11.4: Edit Scheduled Report screen
3. This screen has two additional buttons to the right of Save labeled Disable and Run History. Click Disable to disable the background report process and prohibit future runs of this report. Click Run History to see the report iterations run so far.
Figure 11.5: Report Iterations screen
4. To view iterations, click the icon; to download iterations in HTML forma,t click the icon. Click the Back button to return to the Edit Scheduled Report screen.
To return to the Scheduled Reports screen, click the “x” in the upper right corner.
Administration Guide 161

Report Management
Viewing Automatically Generated Reports
In addition to the reports available in the Reports menu item, ZipLip automatically generates a report that can be e-mailed to all reviewers and Department heads daily.
Configuring the Department Reviewer Statistic Report
To configure and run this report:
1. In the left menu of the SysAdmin application, select Global Tasks. Under Global Tasks, select View/Schedule Tasks.
Figure 11.6: Global Tasks screen
2. Select Department Reviewer Stat. A screen appears in which you can configure and schedule this report.
Figure 11.7: Department Reviewer Stat Task form
3. In the Department Reviewer Stat Task form, set the following parameters:Cluster Name – The name of the machine cluster on which this report is to run.
Select to configure and run the Department Reviewer Statistics Report
162 Administration Guide

Viewing Automatically Generated Reports
Primary Machine Name/IP – The name or IP address of the primary system in the cluster on which this report is to run.Run on Primary Machine Only – Check to only run this report on the primary system.Scheduling Info:
Start Date – Use the pull-down menus and box to set the date and time to start the task.Run Days – Either check Daily or check one or more days of the week this task is to run.Run Frequency – Either enter a value in Occurs every _ mins or use the pull-down menu and box to set a precise start time (Occurs at _ hours and _ mins). The default value is 120 (two hours).Minumum interval between successive runs – Enter, in minutes, the minimum time between runs of this report. The default value is 10.
Click Save in the upper right corner to schedule the task, or click the “x” in the upper right corner to return to the View/Schedule Tasks screen. Once you have clicked Save the report runs as scheduled.
If you have previously run this report, two additional buttons appear at the top.
Figure 11.8: Edit Department Reviewer Stat Task form
Click Disable to disable the background report process and prohibit future runs of this report. Click Run History to see the report iterations run so far.
Viewing the Department Reviewer Statistics Report
To view the report from the SysAdmin application:
1. In the left menu, select Global Tasks. Under Global Tasks, select View Task Run History. The Background Tasks Runs screen appears.
Administration Guide 163

Report Management
Figure 11.9: Background Tasks Runs screen
2. In the Background Tasks Runs screen, to only show the Department Reviewer Statistics report, in the Task Type box, enter DeptReviewStat. The screen only shows runs of the Department Reviewer Statistics report.
Figure 11.10: Background Tasks Runs screen - DeptReviewStat only
3. To view a report in XML format, click the icon. To download the report in XML format, click the icon.
Creating a Report in the Compliance Application
To create a new report, select Reports in the Main Navigation Menu bar. The Report screen appears.
164 Administration Guide

Interpreting Compliance Reports
Figure 11.11: Reports screen (empty)
From the pull-down menus and radio buttons you can select the following:
Report – one of the following:User/Dept Compliance Statistics – This report provides information about messages caught for review, including their status, type, and count in the specified period.Reviewer Action Statistics – This report lists information about messages such as departments, corresponding reviewers, actions taken by reviewers, and a count of the number of messages reviewed and taken action upon in the specified period.Department review statistics – This report summarizes the review statistics for each Department in the specified time period. It shows the number and type of messages, the number of messages that have been reviewed, and the number of messages awaiting review. Department review statistics are generated every week.
Date(s) – select an appropriate option, depending upon the type of report you are generating:
User/Dept Compliance Statistics – Select Any, or select Message date between or Last modified date between and use the pull-down menus or calendar icon to select the date range.Reviewer Action Statistics – Select Any or select Reviewed date between and use the pull-down menus or calendar icon to select the date range.Department review statistics – Select Any or select Processed date between and use the pull-down menus or calendar icon to select the date range
Reviewer critieria – Select one of the following:Review Department – Return results from the Review Department (the Department under which this user’s e-mail messages are reviewed) as specified using the pull-down menu to the right of this one, or if ALL is selected, reviews all Departments. Note that the Review Department might not be the Department to which this user belongs.Reviewer name like – Return results where the reviewer’s username contains the string entered in the box that appears to the right of this menu.Reviewer alias like – Return results where the reviewer’s alias contains the string entered in the box that appears to the right of this menu.
Once you have selected the report and parameters, click GO to generate the report in the bottom pane of the screen.
Interpreting Compliance Reports
This section explains how to interpret the dynamic reports you can generate using ZipLip Compliance.
Administration Guide 165

Report Management
Interpreting User/Dept Compliance Statistics Reports
This report can generate statistics for a specific Department, users, or user aliases as defined within ZipLip. Figure 11.12 shows a User/Dept Compliance Statistics report generated for the “mydepartment” Department.
Figure 11.12: User/Department Compliance Statistics report for a Department
Figure 11.13 on page 166 shows a User/Dept Compliance Statistics report generated for user “Brandy Tea.”
Figure 11.13: User/Department Compliance Statistics report for a user
Figure 11.14 shows a User/Dept Compliance Statistics report generated for alias “brandy.”
166 Administration Guide

Interpreting Compliance Reports
Figure 11.14: User/Department Compliance Statistics report for an alias
The report contains the following columns:
Review Department – The Review Department (the Department under which this user’s e-mail messages are reviewed) or Departments to which the report pertains. Note that the Review Department might not be the Department to which this user belongs.
Sender/Recipient – The user who has sent or received e-mail messages processed by ZipLip Compliance in the specified time period. An alert ( ) icon appears in this column if the percentage of messages caught by Compliance is less than the review requirement.Sent/Received – The combined number of messages this user has sent and received in the specified time period.Subject to Compliance – The number of e-mail messages that have been tagged as subject to compliance because they either triggered the Lexicon or were caught in random Pre-review or Post-review. This does not include messages that are tagged as single instance messages (that were already tested for compliance and are thus not subject to compliance again), forced pass-through messages, or messages migrated from another mailsystem.Post-Review Requirement – The percentage of e-mail messages randomly caught for Post-review.Flagged For Review – This denotes how many messages and percentage of messages were flagged for various types of review:
Content Pre-review – The number of messages flagged for Pre-review because they triggered the Lexicon.
Content Post-review – The number of messages flagged for Post-review because they triggered the Lexicon.
Random Pre-review – The number of messages randomly selected for Pre-review. Random Post-review – The number of messages randomly selected for Post-review. Backfill – The percentage of messages held to backfill the random review quota.% Total – The total percent of messages flagged for any kind of review.
Administration Guide 167

Report Management
Mail Reviewed – This denotes the number of messages that have actually been reviewed: Reviewed – The number of messages that have been individually approved. Bulk Reviewed – The number of messages that have been bulk approved. Reviewed (follow-up) – The number of messages that have been individually
rejected. Bulk Reviewed (follow-up) – The number of messages that have been bulk rejected. Total – The total number of messages that have been reviewed.
Pending Review – The number of e-mail messages pending review.
You can print a copy of this report by clicking the icon or save a copy of any report in CSV format (readable by MS Excel) by clicking the icon.
When you click the icon, a pop-up box appears showing the automatically-generated filename (ComplianceStatsReportyymmdd.csv). You can Open the file in a spreadsheet program such as MS Excel, Save the file, or Cancel the download.
Note: Exporting reports from huge Departments can be time-consuming, especially during peak working hours.
Interpreting Reviewer Action Statistics Reports
This report generates statistics for a specific Department, users, or user aliases as defined within ZipLip. This report is not real-time and it is generated by a task that runs weekly. Figure 11.15 shows a Reviewer Action Statistics report generated for the “mydepartment” Department.
Figure 11.15: Reviewer Action Statistics report for a Department
The report contains the following columns:
Review Department – The Department or Departments to which the report pertains.Reviewer – Each reviewer for that Department.
168 Administration Guide

Interpreting Compliance Reports
Mail Reviewed – This denotes the number of messages that have been reviewed: Reviewed – The number of messages that have been individually approved. Bulk Reviewed – The number of messages that have been bulk approved. Reviewed (follow-up) – The number of messages that have been individually
rejected. Bulk Reviewed (follow-up) – The number of messages that have been bulk rejected. Total – The total number of messages that have been reviewed.
You can print a copy of this report by clicking the icon or save a copy of any report in CSV format (readable by MS Excel) by clicking the icon.
When you click the icon, a pop-up box appears showing the automatically-generated filename (ReviewerActionsReportyymmdd.csv). You can Open the file in a spreadsheet program such as MS Excel, Save the file, or Cancel the download.
Note: Exporting reports from huge Departments can be time-consuming, especially during peak working hours.
Interpreting Department Review Statistics Reports
This report lists information about messages that have been reviewed for one or more specified Review Departments. It lists Departments, the time period, reviewers, actions taken by the reviewers, and a count of the items acted upon in the specified time period. Figure 11.16 shows a Department Review Statistics report generated for the “mydepartment” Review Department.
Figure 11.16: Department Review Statistics report
The report contains the following columns:
Review Department – The Department or Departments to which the report pertains.
Administration Guide 169

Report Management
Period – The time period for which this report was issued. Department review statistics are generated every week, so multiple weeks can appear in this report.Total Mail – The total number of e-mail messages processed in that period.
Compliance not required – The number of e-mail messages that were not caught for compliance.Flagged For Review – This denotes how many messages and percentage of messages were flagged for various types of review during that period:
Content Pre-review – The number of messages flagged for Pre-review because they triggered the Lexicon.
Content Post-review – The number of messages flagged for Post-review because they triggered the Lexicon.
Random Pre-review – The number of messages randomly selected for Pre-review. Random Post-review – The number of messages randomly selected for Post-review. Backfill – The percentage of messages held to backfill the random review quota. Total – The total number of messages flagged for any kind of review.
Pending Review – This denotes how many messages were awaiting review during that period:
Flagged – The number of messages flagged for various types of review.Random – The number of messages randomly selected for review.
Total – The total number of messages pending review.Reviewed – This denotes the total number of messages that were reviewed in the specified time period:
Flagged – The number of messages flagged for various types of review: Reviewed – The number of messages that have been individually approved. Bulk Reviewed – The number of messages that have been bulk approved. Reviewed (follow-up) – The number of messages that have been individually
rejected. Bulk Reviewed (follow-up) – The number of messages that have been bulk
rejected. Total – The total number of messages that have been reviewed.
Random – The number of messages randomly selected for review: Reviewed – The number of messages that have been individually approved. Bulk Reviewed – The number of messages that have been bulk approved. Reviewed (follow-up) – The number of messages that have been individually
rejected. Bulk Reviewed (follow-up) – The number of messages that have been bulk
rejected. Total – The total number of messages that have been reviewed.
You can print a copy of this report by clicking the icon or save a copy of any report in CSV format (readable by MS Excel) by clicking the icon.
170 Administration Guide

Interpreting Compliance Reports
When you click the icon, a pop-up box appears showing the automatically-generated filename (DeptReviewStatsReportyymmdd.csv). You can Open the file in a spreadsheet program such as MS Excel, Save the file, or Cancel the download.
Note: Exporting reports from huge Departments can be time-consuming, especially during peak working hours.
Administration Guide 171

Report Management
172 Administration Guide

Chapter 12
Administrative Tasks
This chapter summarizes the SysAdmin application by describing the various monitoring sections of the application. This chapter also contains a discussion of child applications and how to enable them.
System Monitoring
Apart from log files, the ZipLip platform can be monitored through the SysAdmin application. There are menu items for working with important subsystems such as the Global Coordinator, the Database, and Entry Points. While some generic events are logged into the event logs, these logs are present only in the database and they are there to provide more than just informational purposes but are used to compose statistics which are used by the system to modify its behavior, for example, the MTATranscript table is used to limit users who send out too many e-mail messages in a day and to prevent spammers. Event logs are accessible from the SysAdmin application. Using a combination of log files and SysAdmin tools, an administrator can get a clear picture of the running system.
Monitoring Global Coordinators
To monitor Global Coordinators, select Cluster in the left menu. Under Cluster, select Global Coordinator. The Global Coordinators screen appears in the right pane.
Administration Guide 173

Administrative Tasks
Figure 12.1: Global Coordinators screen
The Global Coordinators screen shows the list of machines running Global Coordinators on the system network.
The upper table shows a list of Global Coordinators on the network, their IP addresses, process name, and tasks statistics. There are four possible states for a Global Coordinator: Initializing, Live, Standby, and Dead. The lower table shows a task summary of the Live Global Coordinator.
Monitoring Database Connections
To monitor database connections, select Monitoring in the left menu. Under Monitoring, select Database Monitor. The Database Monitor screen appears.
174 Administration Guide

System Monitoring
Figure 12.2: Database Monitor screen
The Database Monitor screen displays statistics pertaining to the database connection pool, such as the wait policy for creating new database connections and the graph for the connection creation algorithm. Status shows the number of connections allocated at the moment and how many are being used. Other properties show the parameters of this database pool.
Selecting the Properties tab shows the list of database connections other machines in the cluster have obtained. This is useful to determine which machine in the cluster is taking up most of the database connections.
Figure 12.3: Database Properties screen
Administration Guide 175

Administrative Tasks
Monitoring and Administrating Systems
This section discusses the various tasks involved with monitoring and administering systems.
Monitoring Systems
To monitor systems, select Cluster in the left menu. Under Cluster, select Machines. A screen appears showing the list of available machines on the system network.
Figure 12.4: Machines screen
The table shows a list of systems on the network, their IP addresses, the application version each system is running, and the date and time each system was last updated. The machine to which you are currently pointing is shown with a small arrow next to its IP address. This screen also shows machine status. A green circle indicates the machine was alive at the time when data was last refreshed. A red circle indicates a dead machine. A multicolored circle indicates the machine is initializing, and a yellow one indicates it is suspended.
To switch to a different machine context, click on the IP address of the machine to which you want to connect. A new window appears with the context switched to the machine on which you clicked.
Monitoring Entry Point Statistics
To monitor entry point statistics, select your system in the left menu. Under your system name and address, select Entry Point Stats. A list of entry point statistics for the SysAdmin application appears.
Note: Entry point statistics are local to a specific machine. To view the entry point statistics for a different system, you must first connect to that system.
176 Administration Guide

Monitoring and Administrating Systems
Figure 12.5: SysAdmin Entry Point Statistics screen
To view the entry point statistics for a different application, click on the tab of the application you want to monitor. For example, to view entry point statistics for the Postmaster application, click on the Postmaster tab.
Monitoring Machine Event History
To monitor the event history for your system, select your system in the left menu. Under your system name and address, select Event Viewer. A list of events for this system appears.
Figure 12.6: Show Events screen
The event title and details tell you if anything is awry in the cluster.
Administration Guide 177

Administrative Tasks
Viewing the System Audit Trail
As the Super Administrator it is useful to look at the system audit trail. In the left menu, select Monitor. Under Monitor, select Audit Trail.
Figure 12.7: Show System Audit Trail screen
The Show System Audit Trail screen contains a list of important audit events such as Super Administrator login event. This list of audit events is distinct from the regular Local Machine Events. Monitor this log for Domain or System Administrator security violations.
Monitoring System Module Status
To monitor the status of modules running on your system, select your system in the left menu. Under your system name and address, select Module Status. The System Module Status screen appears.
178 Administration Guide

Monitoring and Administrating Systems
Figure 12.8: System Module Status screen
This screen shows a list of modules running on the current system, along with their properties and status. To monitor other modules on this system, click on the respective tab corresponding to the particular module.
To view details for any of these modules, click on the Module Name. A screen appears showing the details of that particular module.
Figure 12.9: Module Status Details
Starting, Stopping, and Creating Child Processes
To start, stop, or create a child process, select your system in the left menu. Under your system name and address, select Child Processes. The Child Processes screen appears.
Administration Guide 179

Administrative Tasks
Figure 12.10: Child Processes screen
The Child Processes screen contains a list of child processes you can start or stop.
Note: The Child Processes listed are local to the system to which you are currently connected. To start or stop child processes on a different system, you must connect to that system.
To start a child process, make sure that the path of the configuration file where the process is located is correct, then click the button.To stop a process, click the button corresponding to the process you want to stop.To create and start a new child process that is not listed, in the blank space at the bottom of the list enter a name for the process, enter the full path of location of the configuration file, and click the button.
To make sure a child application starts with the server every time, edit the configuration file:$ZipLip/WEB-INF/Config/runnable/pmapp/pmappChild.cfg
The following is an excerpt from the file.
//_child.2 = #pm.ScheduleChildAppOperation~~@_zlplus.cp.cfgLoad.SSLsmtp@[email protected]@//_child.3 = #pm.ScheduleChildAppOperation~~@_zlplus.cp.cfgLoad.virusCheckSmtp@[email protected]@_child.4 = #pm.ScheduleChildAppOperation~~@_zlplus.cp.cfgLoad.pop3@[email protected]@//_child.5 = #pm.ScheduleChildAppOperation~~@_zlplus.cp.cfgLoad.SSLpop3@[email protected]@_child.6 = #pm.ScheduleChildAppOperation~~@_zlplus.cp.cfgLoad.imap4@[email protected]@
180 Administration Guide

Monitoring and Administrating Systems
//_child.7 = #pm.ScheduleChildAppOperation~~@_zlplus.cp.cfgLoad.SSLimap4@[email protected]@_child.8 = #pm.ScheduleChildAppOperation~~@_zlplus.cp.cfgLoad.ftp@[email protected]@
Child applications that start at server startup do not have // at the beginning of the lines. To have _child.2, which is the SSL SMTP server, start up at server startup, delete the leading // in front of _child.2.
Administration Guide 181

Administrative Tasks
182 Administration Guide

Chapter 13
Storage Backup and Redundancy
Business continuity is a fundamental goal of any organization. You need to ensure continuity of operations in case of a system failure or disaster. The ZipLip platform is designed to offer very high availability. When properly configured the ZipLip system can be made available 24 hours a day, seven days a week. There is a tradeoff between system and data availability and the cost of the solution. This section addresses the various issues.
Backing up data is very important due to the following reasons :
human errorsdisk and system failuresdisasters such as fires, earthquakes, floods, and power outagesarchival purposes
The ZipLip platform uses the database and the filesystem to store its data. The three most important data to protect are:
configuration settings of each middleware server and databasedatabase informationinformation stored in the Vaults
Losing any of this information could result in system failure.
Protecting Configuration Files
The configuration files are usually changed only during installation or on rare occasions to tune performance. To protect these files, archive them along with the ZipLip Software.
Protecting the Database
ZipLip stores all the state and metadata information inside the database. Since all the middleware machines point to the same database, the uptime of the ZipLip system corresponds directly to the uptime of the database. ZipLip works with many industrial database including Oracle, MS-SQL server, and DB2. To protect the database, regularly backup all data associated with the database. Although the rest of the section focuses on Oracle databases, the methodologies also apply in principle for the other databases.
Administration Guide 183

Storage Backup and Redundancy
Protecting the Oracle database
Data within the Oracle database is stored in the instance data files and the control files. Backup of the data within Oracle is done by one of the following ways:
export importcold backuphot backup using archive logspoint-in-time snapshot solutions
Export import is a logical backup method that works well for small databases. It is also useful when you want to defragment the data files within Oracle. In this method, automatic scripts export tables to an export file at appropriate times. The exported file can be imported into another Oracle instance, and the configuration files can be modified to point to the new database. Depending on the size of the database, the export can take anywhere from five to 30 minutes, and the importing of the data can take about five to ten times the time of export. For a large database the import time can be as high as six hours, and if backup recovery is initiated, the system will not be available for six hours. ZipLip therefore recommends only using this approach to migrate or defragment Oracle data files.
Cold backup is an offline physical backup approach where the physical data files and control files corresponding to the database are backed up. During the copying, all the files must be in a consistent state and therefore the database should be brought down. It is highly recommended that a cold back up is made from time to time. But to do this requires a back up window and if the solution needs to highly available, cold backup can be made using Snap-Shot solutions (see in Point in Time Snap Shot section). For traditional cold backup, it takes in hours to perform cold backup for medium to large databases and consequently the system will not be available during this period. Therefore for highly available conditions use snap-shot solutions.
Hot backup, as it pertains to the Oracle database, is achieved by running the database in archive log mode. Oracle stores uncommitted transactions inside a set of log files known as redo logs. These uncommitted transactions are later flushed to the data file from a background process. In archive log mode, the redo logs are copied to the archive log so the archive log contains all modifications to the database since the last physical backup. The standby database can be kept in sync by applying changes to data in the archive logs. See Oracle Manuals for more details. In addition, products from Veritas and other backup vendors makes this task easier.
Point-in-time snapshots provide a very good option. In this approach, the file server or virtualization software quickly marks the blocks of data and associates it to a snap shot. When blocks are subsequently modified by the database, a copy of the old block is made and is associated with the current copy; and another snapshot points to the old blocks. This process takes only a fraction of second. The blocks in the snapshot can be mounted onto a filesystem, and thus a static copy of the files or blocks is available. Since the files in the snapshot do not change, these files can be copied to another system or to tapes for offsite and online backup. Most of the NAS and SAN solutions support point-in-time snapshots. In addition, NAS solutions such as Network Appliance have special checkpoint software for Oracle that allow taking a snapshot of the blocks associated with Oracle physical files while maintaining consistency. This approach therefore allows you to perform a cold backup of an Oracle database without having to take it down.
184 Administration Guide

Protecting Vault Information
Protecting Vault Information
Unstructured information is stored in the form of files inside the vault. A vault can be conceptually thought of as a set of directories, which contain several files and subdirectories. A database record in the VaultItem table points to a file within the vault. The vault architecture groups the files into a set of disk volumes. New files are created only in the Live disk volume. On Not Live disk volumes only reads and deletes are performed. Because of the way files are created inside the vault, it is possible to have files that are not referred to by the VaultItem table. These files are known as orphan files. You can run the background process DvOrphanRemover to remove orphaned files. Backup of the files in the vault directories is similar to backing up a filesystem. To be consistent with the database, ZipLip recommends you backup the database before backing up the directories. Also make sure all background cleanup tasks are stopped during the backup so vault items are consistent with the backed up database. Alternatively, you can use the point-in-time snapshot technique described in the “Protecting the Oracle database” on page 184 to make sure the database and filesystem backups are consistent.
Offsite and Online Backups
While backing up data, you needs to consider both offsite and online backups. Offsite backups are sometimes needed for disaster recovery. Onsite backups are needed for recovery from media failure, system failure, or human error. Ideally, onsite backups are conducted in a way to cause minimal downtime. System deployment includes considering the times to backup and analyze the mean recovery time for each failure and have an appropriate correction. Requirements for recovery time determine the type of redundancy your installation requires. The smaller the recovery time, the higher the cost.
Administration Guide 185

Storage Backup and Redundancy
186 Administration Guide

Chapter 14
Troubleshooting and FAQ
The following is a compendium of frequently asked questions and debugging procedures.
Problem: I’m having trouble connecting to your secure Web site.
This is usually due to one of two reasons:
1. Your browser may not support encryption.2. You may be behind a corporate firewall and your corporate policy may not allow secure
connections.
Problem: I’m getting a message that says “HTTP 1.1/ 500 Server Error”.
Sometimes our Web site may be very busy. Although we have configured our systems for maximum scalability, the surging demand for secure e-mail may tax our current resources. We apologize for any inconvenience while we ramp up to meet demand.
Problem: A network error occurred when sending the ZipLip message.
There was a failure in the network connection from your computer to the ZipLip Web site. Please contact your network manager or system administrator.
Problem: I am not able to see the Browse button for attachments.
You may be using Microsoft IE 3.0 or another browser that does not support attachments. To correct this problem, you can download a patch from Microsoft to add this attachment functionality to your browser, or you can upgrade your browser to a newer version.
Problem: I received a ZipLip notification e-mail, but when I click on the message number, nothing happens.
Your e-mail software may have some trouble opening the link. Cut and paste the entire message number from your notification e-mail message to your browser URL line and press the Enter key.
Problem: I clicked on the message number in the e-mail, but it says my message has expired.
You either tried to access a message that was sent you more than 30 days ago and has since been deleted, or you tried to access a message more than 24 hours after you first picked it up. Both of these restrictions were added to protect your confidential information.
Problem: My questions were not answered here. Where can I get more help?
Administration Guide 187

Troubleshooting and FAQ
Visit http://www.ZipLip.com or send e-mail to [email protected]
188 Administration Guide

Appendix A
ZipLip E-mail Features Summary
The following tables contain a list of e-mail handling features supported by the ZipLip server.f
Mailsystem FeaturesPOP3 connectivityIMAP4 accessConfigurable mailbox storage quotaCorporate Spam List managementIntegrated SMTP listener and senderPolicy based message routing featuresPrivate domainsDesignate affiliate users with partial domainsVault storage architectureIntegrated personal and corporate address bookIntegrated PIM (Personal Information Management)E-mail integration with virtual storageLDAP connectivityWAP enabledEasy integration with mail clients such as outlook expressSupport cookie authentication and single sign onAuthenticated SMTPMultiple SMTP queues to support policy based mail processingE-mail integration with the billing moduleConfigurable database connection pool architecture to optimize DB connectionsEfficient error handling procedures to present comprehensive error messages to usersUser and system activity reports (log files) for easier bug analysis and activity management.
Message ManagementCompose standard mailCompose secure mailUpload signatureDesignate Cc & Bcc recipients
Administration Guide 189

Choose addresses from address book during message compositionAttach files to a messageSave message draftsInclude original message during 'Reply' or 'Reply All' as inline textSet importance of the messageSchedule messagesAdd sender's address to address bookDesignate sender's name for outgoing mailsRequest receipt confirmation for secure mailSet an alternative 'Reply To' addressSet expiry for secure messageForward messages with attachmentShow embedded images, shockwave flash etc.Send message as text or HTMLDownload attachments from a received mailFilter incoming mails to specific foldersNotification of a received message to outside e-mail accountsSave sent messagesSet vacation responseAuto respondersSpam block a particular mail address or an entire domainVirus check on all incoming mails and uploading attachmentsE-mail Spell checkSearch engine incorporated with the mail system
Folder ManagementCreate foldersCreate nested subfoldersView folders in an explorer-style folders treeDelete / Edit foldersMove messages between foldersFolder name validation (check for special characters)Create public (shared) foldersSort messages in a folder based on subject, sender, dateEmpty trash folder
Message Search EnginePrivilege based searchSearch for messages (text based)
Message Management
190 Administration Guide

Subject-based searchSize-based searchFolder-based search (all folders, specific folders etc.)Header-based search (From/To/Cc etc.)Search based on clauses like containing, beginning with and ending withSearch based on dates (received date, sent date etc.)
Address Book ManagementPersonal address bookCorporate address bookNicknames / AliasesManage mailing listsAccessible using wireless devicesEdit Personal address bookCreate Personal LDAP Server accessSearch for addresses in specified address bookSend mail to contacts in address bookSend mail to LDAP addresses
Display OptionsLow bandwidth / High bandwidth interfaceDisplay message previewDisplay all message headersDesignate number of messages to be displayed per pageSelectively turn on display of message attributes such as size, date and day, status (read or unread) Low bandwidth / High bandwidth interfaceDisplay message previewDisplay all message headers
Message Search Engine
Administration Guide 191

Messaging OptionsSpecify default compose security mode (send regular mail or secure mail by default)Save sent messagesNotification to outside e-mail accountsMail forwarding to outside e-mail accountsMail receipt confirmationAttach original message on forwardingSpecify From-nameSpecify Reply-To AddressSpecify Vacation Response MessageEnable/Disable Vacation response
SignaturesCreate signaturesDelete SignaturesSpecify default signatureUpdate signatures
Folder Filter RulesFrom address based filtersSubject based filtersContains, does not contain, begins with, ends with clausesMatch case optionDeliver messages to nested subfolders
Spam List ManagementBlock e-mail addresses from sending e-mail (Add to Red List)Block entire domain from sending e-mail (Add to Red List)Allow specific e-mail address to send e-mail, from a blocked domain (Add to Green List)Delete e-mail address or domain from Red ListDelete e-mail address or domain from Green List
User Profile ManagementUpdate user password, password hint question, and hint response“Forgot Password” feature to assign passwords upon validating hint responseUpdate other user-specific information (zip code, time zone, and country)
192 Administration Guide

Update user password, password hint question, and hint responseForgot Password' feature to assign passwords upon validating hint responseUpdate other user specific information (zip code, time zone and country)Update user password, password hint question, and hint responseForgot Password' feature to assign passwords upon validating hint response
LocalizationEnglish, Japanese, Chinese, Russian, othersMultilingual e-mail address resolution and composition
Security (assumes ZL Secure)Webmail over secure socket layer (SSL)Secure and standard messages secured via encryptionVacation response and signatures are encrypted and storedPOP over SSLPassword hashingPublic Key Infrastructure supportIP address validation to access various administration modulesCache blockingSession expiration using cookies
High AvailabilityHardware failoverBackup and recovery proceduresRegular DB and file backup at remote locationsNo single point failureRedundant hardware componentsDynamic load balancing of web server requestsServers such as POP, SMTP, mail store can be quickly scaled to accommodate heavy trafficAvailability of hot spares in network storage
Supported Platforms and DatabasesPlatforms – Sun Solaris SPARC, Linux, Windows NT/2000Databases – Oracle, MS SQL, DB2, and Sybase
User Profile Management
Administration Guide 193

194 Administration Guide

Appendix B
Global Tasks
The ZipLip SysAdmin application contains Global Tasks you can run. To access these, select Global Tasks. Under Global Tasks, select View/Schedule Tasks.
Figure B.1: Global Tasks screen
To view or schedule any of these global tasks, click on the name of the task.
Task Name Function Archive Server Run all Journaling and Archiving agents associated with all mail servers.Bloomberg Import Import data from the Bloomberg daily data file into the ZipLip archive.Compliance Backfill Performs post-review of messages according to the sampling requirement.DB Data Mover Takes information from certain key tables and merges them into a larger table. This
must be run for reports to work.Department Reviewer Stat Sends information about e-mail review statistics to Department heads and reviewers.Exchange Transport Mailbox Verify Make sure the Exchange Transport mailboxes in ZipLip match the mailboxes in
Exchange.Ftp Listener Not currently implemented.Global Coordinator Balance loads between the Local Coordinators.Imap4 Listener Not currently implemented.
Administration Guide 195

Index Document Delete Driver Remove deleted messages from the index.Instance Merger Merge all search index temporary instances into the master index to make messages
available for searching.Integration Tasks Perform integration tasks.Log File Manager ZIP the current log files, put them into the logs/oldLogs directory, and create new logs.Lotus Transport Mailbox Verify Make sure the Lotus Transport mailboxes in ZipLip match the mailboxes in Domino;
also removes deleted and expired messages from the ZipLip server.Mail Purge Util Remove expired messages from the archive. (No longer necessary.)Mail Retention Manager Based on policies, removes objects such as mail messages, database entries, and index
entries from ZipLip.Mailbox Manager Remove old webmail messages. (No longer necessary.)NSF Import A, NSF Import B, NSF Import C
Import NSF files from Lotus notes into ZipLip.
PST Journal Import Import PST journal files from Exchange into ZipLip.PST Mailbox Import Import PST mail files from Exchange into ZipLip.Parlano Import Import data from Parlano instant messages into ZipLip for archiving and Compliance.Pop3 Listener Run a POP3 server.Received Mail Fetcher Queries the database to see if there is any mail that has not been processed. Also
requeues mail that was not successfully processed in the first pass.Search Reconciliation Perform search reconciliation.SSL Imap4 Listener Run an IMAP4 SSL server. Note that SSL must be running on the client.Smtp Listener Run an SMTP server.Smtp Listener 2525 Run an SMTP server on port 2525.Smtp Queue Fetcher, Smtp Queue Fetcher A, Smtp Queue Fetcher B
Poll from the SMTP mail flow queue directory. Also deletes mail over an hour old in the done directory.
System Cleanup Purges deleted domains and other deleted files from the system.User Synchronization Synchronize users between ZipLip and the mail server directories.Vault Replication Copies data bewteen vaults.Vault Replication Mig A Copies migrated data between vaults.Virus Check Smtp Listener Not currently implemented.Worm Archive Run the WORM archive driver.ZLPlus Cleanup Removes terminated and deleted accounts and domains from the system.ZLStorage Cleanup Remove old secure share files.ZLStorage Project Manager Not currently implemented.
Task Name Function
196 Administration Guide

Appendix C
Batch Files
The ZipLip server comes with batch files under %ZIPLIP_HOME%bin. The following table lists and describes them.
Batch File Descriptionbase64.bat Encrypt or decrypt using base64 encoding.bin.bat Changes the directory to %ZIPLIP_HOME%/bin.cl.bat Runs the config loader with the supplied options.cleanJrunLogs.bat Deletes all unused JRun logs.cleanJspc.bat Clears the JSP cache.cleanlogs.bat Deletes all unused ZipLip logs, Tomcat logs, and JRun logs.compileJSP.bat Compiles JSP pages.convertLIB.bat Flattens *.jar files in the %ZipLip_Home\zlserver\WEB-INF\lib
directory.config.bat Change to the %ZIPLIP_HOME%\zlserver\WEB-INF\config
directory.crawler.bat Mail generator; crawls the Internet and generates e-mail content (body and
attachments).crawlerjp.bat Japanese e-mail generator; crawls the Internet and generates Japanese
language e-mail content (body and attachments).db.bat Change to the %ZIPLIP_HOME%\database directory.failover.bat Sets up the failover system.HexDump.bat Creates a hexadecimal dump of the values in the file supplied.hten.bat Change to the %ZIPLIP_HOME%\zlserver\zlplus\ui\html\en
directory.incrbuild.bat No longer used.jrstart.bat Start jrun.jrstop.bat Stop jrun.jrunlogs.bat Change to the \Program Files\Allaire\Jrun\logs directory.keyview.bat Converts mail attachments into a format ZipLip can parse.ldap.bat Discover users from LDAP and AD.lin.bat Search manually using a Lucene query as input.logs.bat Change to the %ZIPLIP_HOME%\logs directory.
Administration Guide 197

lp.bat In Notepad, edit the file:C:\Program Files\Allaire\Jrun\servers\default\local.properties
make1.bat Sample file for building a jrun program on Windows.makeProxy.bat No longer applicable.makew.bat Sample file for building a jrun program on Windows.MapiProxy.bat MAPI proxy setting and conection test.movelogs.bat Move the Jrun logs to the specified directory.movesh.bat Move the Jrun logs to the specified directory every three hours.out.bat Use Notepad to edit %CATALINA_HOME%\logs\stdout.log.per.bat Sets up a MAPI proxy.pmdebug.bat For internal debugging use.pranal.bat Profile analysis; shows time consumed for earch task or process.restart.bat Runs zlstop.bat and zlstart.bat to restart ZipLip.restartoo.bat Restart Open Office (no longer needed).runProxy.bat Can be used to manually run the MAPI proxy.server.bat Change to the %ZIPLIP_HOME%\zlserver\WEB-INF\classes
directory.shut.bat Shut down the system and go to the failover system.smtpDoneDel.bat Clear the SMTP staging queue directory.startup.bat Run the config loader with the startup configuration.stop.bat Stop the Jrun and IIS processes.tcjsp.bat Change to the JSP cache directory
(%CATALINA_HOME%\work\Catalina\localhost\ps\org\apache\jsp).
tclogs.bat Change to the Tomcat logs directory (%CATALINA_HOME%\logs).tcstart.bat Start Tomcat.tcstop.bat Stop Tomcat.testCenteraConnection.bat Test the connection to the EMC Centera device.testFilerConnection.bat Test the connection to the NetApp Filer.testICMConnection.bat Test the connection to the IBM Content Manager.timer.bat Backup the log files and shut down ZipLip.w3start.bat Start the IIS service.w3stop.bat Stop the IIS service.ZExchangeTest.bat Retrieve Journaled e-mail messages from Exchange.zipliptc.bat Move the contents of %ZipLip_Home%\bin\config\tomcat5 to
%CATALINA_HOME%.ZLStart.bat Start the ZipLip server and all associated services.ZLStop.bat Stop the ZipLip server and all associated services.
Batch File Description
198 Administration Guide

Index
AAdd Routing Record for a domain 77Adding Domain Routing 75Administering Domain-Level Settings (Postmaster Console) 75Administrative Tasks 173AIX
installing SNMP 155API 16Application Vault – Secure File Management tab 132Application Vault Mail pane 124Archivas Cluster
creating a disk volume 115Archive Policies pane 51archiving policy
creating 43Archiving Policy with no rules 45Archiving Rule pane 45Available Reports screen 157
BBackground Tasks Runs screen 164Background Tasks Runs screen - DeptReviewStat only 164
CCentera
see EMC CenteraCentera Disk Volume Wizard – Centera Retention screen 108Centera Disk Volume Wizard – Confirm Wizard Submission
screen 109Centera Disk Volume Wizard – Connectivity Information screen 107Centera Disk Volume Wizard – Disk Volume Information screen 107Centera Disk Volume Wizard – Success screen 109Centera Storage Unit Disaster Recovery 110Changing the Storage Unit Associated With Mail Storage 123Child Application Module 15Compliance 12
policy assignments 58Compliance application 17Compliance Domain Properties sheet 74Compliance Policies screen 96Compliance Policy Assignments pane 58Compliance Policy Rule screen (default) 97Compliance Retention Policy DEFAULT screen 97Compliance Rule pane 56ComplianceRetention policy
deleting 57ComplianceRetention Policy pane for a new policy with new rule 57ComplianceRetention Policy pane for a new policy with no rules 56
Administration Guide
configuration 23directory structure 24key files 24loading files 25
Configuring a SnapLock Volume for the ZipLip Server 85Configuring the ZipLip Server for a Centera Storage Unit 91Connection 110Coordinator/Executor
configuration 134Coordinator/Executor architecture 133Create Compliance Domain 74Create Storage Domain screen 73Creating a Disk Storage Unit 119Creating an EMC Centera Disk Volume 92, 115Creating and Editing a Compliance Domain 73Creating and Editing a Storage Domain 72Creating Disk Volumes 125Creating Domains 67Creating New Reports 158
DDatabase 31Database Configuration 31Default Retention Period pane 98Department Reviewer Stat Task form 162Detailed Log Descriptions 61Disk Information Wizard – Edit Disk Volume Information screen 129Disk Unit Creation 110disk volume
creating 125definition 79editing 127modifying 127
Disk Volume Wizard – Confirm Wizard Submission screen 127, 130Disk Volume Wizard screen 125, 128disk volumes
monitoring 130domain
administrator 65deleting 69editing 69fundamentals 65module 13
Domain Administrator 65Domain E-mail Properties screen 71Domain Management 66Domain Routing 66, 75Domains 65
199

EEdit Department Reviewer Stat Task form 163Edit Retention Period pane 39Edit Routing Records pane 78Edit Scheduled Report screen 161Editing Domain Properties 69Editing Domain Routing 77Editing E-mail Domain Properties 70EMC Centera
changing the server address 105configuring ZipLip for 91creating a disk volume 92storage unit disaster recovery 110updating a disk volume 110
event monitoring 151setting up 149
event viewer 151Exchange Templates 49
FFailover 83File Striping 84FileStores screen 148Filesystem-Based Storage Units 82
GGetting Started with ZipLip 11Global Coordinator 15, 133, 135Global Tasks list screen 104Global Tasks screen 162, 195
HHow To Change the Centera Server Address in a Disk Volume 105How To Create an IBM Content Manager Storage Unit 111
IIBM Content Manager
creating a storage unit 111IMAP4 Listener 22Important Database Tables 32Internal Disk Volume 83internationalization 16
JJMX monitoring 150
LLinux
installing SNMP 155List of Domains for Routing 76load balancing 133
Global Coordinator 15Local Coordinator 15, 133
configuring 134Log Files 61
naming 61Lotus Templates 49
MMail Purge details pane 42Mail Source screen for a specified queue 146mail storage
changing storage unit 123Mail Store 17, 20Mail Transfer Agent
200
see MTA 18Managing Stores and Storage Units 131Messaging Application-Related Storage Unit 81Methods of Replication 84MIME parsing 22Modes of Replication 84Modifying a Disk Volume 127Monitoring and Administrating Systems 176Monitoring Database Connections 174Monitoring Disk Volumes 130Monitoring Entry Point Statistics 176Monitoring Global Coordinators 173Monitoring Machine Event History 177Monitoring MTA Queue Statistics 148Monitoring Storage Units 130Monitoring System Module Status 178Monitoring Systems 176Monitoring the SMTP Queue 147MTA 18, 137
Mail Transfer Agent 17process flow diagram 139SMTP Staging Vault 138
MTA Processing 137MTA Queue Summary screen 145MTA Transcript screen 144MTA Transcript Search results screen 143MTA Transcript Search screen 142
NNetapp SnapLock
setting up in ZipLip 86New Archiving Policy pane 44New Archiving Policy window 44New Classifier Top Hits Report screen 159New Retention Period pane 38New Stubbing Policy pane 47
OOffsite and Online Backups 185
PPartitioning 81pmapp.cfg file 24pmappURL.cfg file 25policy assignments
Compliance 58storage management 53
Policy Assignments pane 54, 59Postmaster application 17Postmaster Application Welcome screen 75privileged users 65Protecting Configuration Files 183Protecting the Database 183Protecting the Oracle database 184Protecting Vault Information 185
RReceived Mail screen 147Replication Unit Wizard – Confirmation screen 103Replication Unit Wizard – Success screen 103Replication Wizard – Vault Replication screen 101, 102Replication 84Report Iterations screen 161Report Management 157
Administration Guide

reportsavailable types 157, 164downloading 168, 169, 170printing 168, 169, 170scheduling 158, 160
Reports screen (empty) 165Retention enforcement details pane 41Retention Enforcement History pane 40Retention Enforcement Records pane 41Retention Manager 37retention period
creating 37deleting 40editing 39viewing list of 37
Retention Periods list with new retention period 39Retention Periods pane 37retention policies 49Retention Policies pane 49Running the SNMP agent installation script 153
SScheduled Reports screen 160Scheduling Reports 160Search results for users/Mailing lists pane 51Searching for Domains 68Secure Messaging
see Postmaster application 17Secure Messaging 12Session Manager 14Setting Up a SnapLock Storage Unit in ZipLip 86SMTP listener 21SMTP Staging Vault 138, 140SMTP staging vault 144SMTP Staging Vault details screen 141Snaplock
see Netapp SnaplockSNMP
configuring ZipLip for 152event monitoring 152installing on AIX 155installing on Linux 155installing on Solaris 155installing on Windows 153
Solarisinstalling SNMP 155
startingZLSNMP agent 154
Starting, Stopping, and Creating Child Processes 179stopping
ZLSNMP agent 154Storage Backup and Redundancy 183Storage Domain screen 72storage management
policy assignments 53viewing policies 43
Storage Management Policies - Archiving Policies tab 43Storage Management Policy Assignments pane 53storage unit
Archivas Cluster 115changing unit associated with mail storage 123creating a disk storage unit 119definition 80EMC Centera 91, 92IBM Content Manager 111monitoring 130
Administration Guide
Netapp Snaplock 86replicating to an EMC Centera unit 100
Storage Unit Creation 110Storage Unit Properties pane 131Storage Unit Properties screen (‘suzlpregular’) 100Storage Unit Types 82Storage Unit Wizard – Archivas Cluster Disk Volume Information
screen 117Storage Unit Wizard – Centera Disk Volume Information screen 95Storage Unit Wizard – Centera Retention confirmation screen 96Storage Unit Wizard – Confirm Wizard Submission screen 91, 114,
118, 123Storage Unit Wizard – Disk Volume Information screen 89, 94, 113,
117, 121Storage Unit Wizard – IBM Disk Volume Information screen 113Storage Unit Wizard – NetApp SnapLock Disk Volume Information
screen 90Storage Unit Wizard - second Disk Volume Information screen 122Storage Unit Wizard – Storage Unit Information screen 88, 93, 112,
116, 120Storage Unit Wizard – Storage Unit Type screen 93, 111, 115, 120Storage Unit Wizard – Storage Unit Type screen (SnapLock) 88Storage Unit Wizard – Success screen 91, 114, 123Storage Units screen 115, 119Storage Units screen with replicated unit 104stubbing
templates 49viewing and editing policies 46
Stubbing Policies pane 46Stubbing Policy pane for a new policy with no rules 47Stubbing Rule pane 48Super Administrator 65SysAdmin application 17SysAdmin welcome screen 87Syslog monitoring 150System Administrator 65System Monitoring 173System Registry 26System Registry - User Authentication - Single Sign-On from Portals
pane 27System Registry - User Authentication pane 27System Registry pane 26
TThird-Party Storage Units 82Troubleshooting and FAQ 187Types of Available Reports 157, 164
UUnified Archival Admin application 17Unified Archival Admin 12User Info tab 52User Policy tab 52User Privileges 65User/Department Compliance Statistics report for a Department 166User/Department Compliance Statistics report for a user 166User/Department Compliance Statistics report for an alias 167users
privileges 65
VVault
SMTP Staging 138vault 14
fundamentals 79Vault Item 82, 84
201

Vault Management 125Vault Store Fundamentals 79Viewing the System Audit Trail 178Virtual Storage Application-Related Storage Unit 81Virtual Storage 12
WWebMail application 17Working With Disk Volumes and EMC Centera Clusters 110
ZZDK 16ZipLip
applications 12, 17caching module 14components 12, 13configuration module 14Coordinator Executor module 15database communication module 14deployment options 13domain and user module 13e-mail features 189HTML-Based Interface 21IMAP4 listener 22internationalization infrastructure module 16load balancing 15Messaging applications and gateway 17MIME parsing 17, 22presentation module 16profiling module 16search module 16security infrastructure module 15server architecture 11Session Management module 14SMTP listener 21vault storage module 14Web Services API 16XML parsing and formatting 17zVite module 16
ZipLip Development Kitsee also ZDK 16
ZipLip MTA Architecture Diagram 137ZipLip MTA Process Flow 139ZipLip Vault Architecture 79ZLSNMP agent
starting 154stopping 154
ZLSNMP service 154zlsnmpservice.bat command 153
syntax 153
202
Administration Guide