Blackbaud CRM Administration Guide
232
Administration Guide
-
Upload
khangminh22 -
Category
Documents
-
view
1 -
download
0
Transcript of Blackbaud CRM Administration Guide

Administration Guide

03/21/2013 Blackbaud CRM 3.0 Administration US
©2013 Blackbaud, Inc. This publication, or any part thereof, may not be reproduced or transmitted in any form or by anymeans, electronic, or mechanical, including photocopying, recording, storage in an information retrieval system, or oth-erwise, without the prior written permission of Blackbaud, Inc.
The information in this manual has been carefully checked and is believed to be accurate. Blackbaud, Inc., assumes noresponsibility for any inaccuracies, errors, or omissions in this manual. In no event will Blackbaud, Inc., be liable for direct,indirect, special, incidental, or consequential damages resulting from any defect or omission in this manual, even if advisedof the possibility of damages.
In the interest of continuing product development, Blackbaud, Inc., reserves the right to make improvements in this manualand the products it describes at any time, without notice or obligation.
All Blackbaud product names appearing herein are trademarks or registered trademarks of Blackbaud, Inc.
All other products and company names mentioned herein are trademarks of their respective holder.
Administration-2013

ContentsCONFIGURATION TASKS 1Countries and States 2
Manage Country Information 2Add Countries 2
Add a Country Screen 4Edit a Country 4Delete a Country 5Set a Country as Default 5
Manage State Information 5Add States 5Edit a State 6Delete a State 6
Manage International Address Formats 7Add Address Formats 7
Add a Country Address Format Screen 8Edit an Address Format 9Delete an Address Format 9
Time Zones 9Update Daylight Savings Rules 10
Fiscal Year End 11Application Usage Report 11Report Model Record Access Security 11Enable or Disable Phone Formatting 12Notifications 12
Add Notifications to a Group of Records 12Add Notification Screen 13
Edit Notifications for a Group of Records 14Delete Notifications for a Group of Records 14Update Notification Query Relationships 14
Reason Codes 14Add Reason Codes 15Edit a Reason Code 16Delete a Reason Code 16Mark a Reason Code as Inactive or Active 16
Import ZIP Code Table 17Enable/Disable Default Blank Query Criteria 17Mapping 18
Edit Mapping Credentials 18Edit the Map Distance Unit 18
Organization Information 19Unmapped Transaction Setting 19Payment Posting Options 20Enable or Disable General Ledger 21Individual Display Name 22Self-service Password Reset 22Enable/Disable Matching 23
EMAIL MANAGEMENT 25Email Services 25
Configure Email Service Settings 25Edit the External Server Settings 25
Manage Email Services 26Email Processes 26
Disable an Email Process 27Enable an Email Process 27Run an Email Process 27Reset the Last Run On Date for an Email Process 27Email Process History 27
Email Jobs 28Email Process Job Details 28Search Email Jobs 28Delete a Submitted General Purpose Email Process Job 29Email Job Statuses 29
Blacklisted Email Addresses 29Change the Blacklisted Status of an Email Address 30Add a Blacklisted Address 30
Email Services Reports 30Transactional Email Job Status Report 31General Purpose Email Job Status Report 32Transactional Email Jobs Processed Report 33General Purpose Email Jobs Processed Report 33
Undelivered Email 34Email Alerts 35
Manage Email Alerts 35Edit Email Alert Settings 35
Edit Alert Settings Screen 36Standard Email Alert Types 37Custom Email Alert Types 37
Add Custom Email Alert Types 37Edit a Custom Email Alert Type 37Delete a Custom Email Alert Type 38

Email Alert Record 38Manage Alert Definition 38
Edit Content of an Email Alert 39Assign an Email Alert to Application Users 40Disable an Email Alert for an Application User 40Add Instances of a Custom Email Alert 40Edit an Instance of a Custom Email Alert 41Disable or Enable an Instance of a Custom Email Alert 41Delete an Instance of a Custom Email Alert 41
Process Details 41Delete an Instance of the Send Process 42Add a Job Schedule for the Send Process 42Edit a Job Schedule for the Send Process 42Edit Job Schedules 43Delete a Job Schedule for the Send Process 43
Start the Send Process for an Email Alert 43Generate a Windows Scripting File for the Send Process 43
Custom Email Alert Instance Record 43Assign Users to a Custom Email Alert Instance 43Unassign Users from a Custom Email Alert Instance 44
Subscribe to Email Alerts 45Configure Appeal Mailing Task Email Alerts 45Configure Batch Email Alerts 45Configure Prospect Email Alerts 46
Configure Prospect Email Alerts Screen 46Configure Marketing Plan Item Task Email Alerts 47Configure Event Task Email Alerts 47
Configure Email Preferences for Users 48Edit Alert Settings for an Application User 48Enable or Disable Email Alerts for an Application User 48Manage Custom Email Alerts for an Application User 49
SMART FIELDS 51Smart Field Workflow 51
System Roles Involved in the Smart Field Process 51Manage Smart Fields 52
Add Smart Fields 53Edit a Smart Field 68Delete a Smart Field 68Add Value Groups to a Smart Field 69Edit a Value Group for a Smart Field 69Delete a Value Group for a Smart Field 70

Process the Values of a Smart Field 70Clear the Results from the Last Run of a Smart Field 70Update Smart Field Query Relationships 71
Smart Field Record 71Recent Status 71History 72
Delete a Process Status Record 72Job Schedules 73
Add a Job Schedule 73Create Job Screen 73
Edit a Job Schedule 73Delete a Job Schedule 73
Smart Field Values 73Constituent Smart Fields 74Marketing Smart Fields 79
Calculation for Loyalty 80Calculation for Single Gift Consecutive Year Donors 80
Membership Smart Fields 81Sponsorship Smart Fields 81
SEARCH LIST CONFIGURATION 83Configure Search List Fields 83Manage Search List Replacements 84
RECORD SOURCES 87Manage Record Sources 87Add/Remove Record Sources 87Record Source Properties 88
Specify Person Field Mappings for a Record Source 89Person Field Mappings Screen 90
Specify Gift Field Mappings for a Record Source 90Gift Field Mappings Screen 91
Specify Appeal Field Mappings for a Record Source 92Appeal Field Mappings Screen 93
Specify Membership Field Mappings for a Record Source 93Membership Field Mappings Screen 93
Specify Sponsorship Field Mappings for a Record Source 94Sponsorship Field Mappings Screen 94
Specify Duplicate Criteria for a Record Source 95Specify Source Analysis Rule Fields for a Record Source 96
Source Analysis Rules Smart Fields 97Specify a Record Source List Code 98

ORGANIZATION HIERARCHY 99Implications and Uses of Hierarchy 99Access organization Hierarchy 101Manage an organization Hierarchy 101
Add Positions 101Add Fundraiser to Existing Position 103Replace Fundraiser in Hierarchy 104Edit Position Information 105Edit Fundraiser Start Date 106Copy and Paste Positions and Branches 107Show Position History 107Delete Information from organization Hierarchy 107
Manage organizational Teams 108organizational Team Screen 111
Parameters Tab 111Results Tab 111Options 112
ORGANIZATION CALENDAR 113Calendar 113
Export the Organization Calendar 114List View 114Manage Items and Activities 115
Add Items to the Organization Calendar 115Edit a Calendar Item 115Delete an Item or Activity from the Organization Calendar 116
OPTIONAL MODULES 117Unlock Optional Modules 117
FISCAL YEARS 119Add Fiscal Year 119
Add Fiscal Year Information Screen 121Copy Fiscal Year Information 122Edit Fiscal Year 122Delete Fiscal Year 122
CODE TABLES 123Access Code Tables 123Manage Code Table Entries 124

Add New Table Entries 124Edit a Code Table Entry 125Delete Code Table Entries 125
Show Lookup Screen 126Edit the Sort Method of Code Table Entries 126Establish User Permissions for Code Tables 127
GLOBAL CHANGE 131Access Global Change 131Add a Global Change Instance 131Edit a Global Change Instance 132Process Global Change 132Assign Global Change Permissions 133Delete a Global Change Instance 134Reset Last Run Date 134Global Change Process Record 134
View a Global Change Process Record 134Recent Status 135History 135
Delete Archived Global Change Process Record 135Job Schedule 135
Create a New Job Schedule 135Create Job Screen 136
Edit an Existing Job Schedule 138Delete an Existing Job Schedule 138
Global Change Definitions 138Delete Audit Tables 138Enable or Disable Audit Tables 139Delete Batch Control and Exception Reports 140Delete Business Process Outputs 140Complete Pending Transfer through Global Change 141Adjust Sponsorship Rates 142Cancel Expired Sponsorships 142Unreserve Opportunity Reservation Keys in Bulk 143Add Constituent Attribute 143Add Constituent Mail Preference 144Add Constituent Site 145Add Constituent Solicit Code 146Add Relationship Manager 147Add User-defined Constituency 148Change Relationship Manager 149Delete Constituent Attribute 150

Add Site to Records 150Delete Constituent Mail Preference 151Delete Constituent Site 152Standardize Constituent Names and Addresses 152Delete Constituent Solicit Code 153Delete User-defined Constituency 154Set All Constituent Mail Preferences 155Refresh Event Registration Campaigns on Payments 156Refresh Membership Program Campaigns on Payments 156Manage Purpose or Designation Information 157Retag Revenue Split Records with New Campaign 158Set Recurring Gift Status 159Credit Card Conversion 160Set Recognition Credit Type 161Address Geocodes 161Set Auto-Calculate Realized Amount 162Auction Donation Write-offs 163Unlock Sponsorship Sales Orders 163Unlock Sponsorship Opportunities 164Clean Up Inactive Prospect’s Interactions 164Update Membership Status 165
EDUCATIONAL HISTORY 167Educational Institutions 167
Add Educational Institutions 167Add Educational Institution Screen 168
Edit Educational Institutions 168Delete Educational Institutions 169
Academic Catalog 169Add to the Academic Catalog 169
Add Programs 170Add Degrees 170Add Colleges 170Add Divisions 170Add Departments 170Add Sub Departments 170Add Degree Types 170
Edit Items in the Academic Catalog 171Delete from the Academic Catalog 171Configure the Academic Catalog to Display 171
Scholarship Terms 171Add Scholarship Terms 172

Edit Scholarship Terms 172Delete Scholarship Terms 172
Academic Code Tables 173
CONFIGURATION DATA 175Configuration Export 175
Add Configuration Export Processes 175Add Export Instances 176Edit an Export Instance 177Edit a Configuration Export Process 177Delete a Configuration Export Process 177Run a Configuration Export Process 178Assign Permissions for a Configuration Export Process 178View the Status Page of a Configuration Export Process 179
Configuration Export Process Status Page 179Configuration Import 180Configuration Import Process Status Page 180Import or Export Accounting Configuration Data 180
APPLICATION 183Catalog Browser 183
Catalog Browser Tab 183Optional Features Tab 184Catalog Browser Tasks 184
Load All Catalog Items 184Load All Reports 185Refresh Shell Navigation 186
Application Features 186Record Types 187Features 188New Features 189
ATTRIBUTE CATEGORIES 191Manage Attribute Categories 191
Add Attribute Categories 191Add Attribute Category Screen 193Data Types 193
Edit Attribute Categories 194Delete Attribute Categories 195Create Code Tables 195
Manage Attribute Form Extensions 195

Add Attribute Form Extensions 196Disable or Enable Attribute Form Extensions 197Delete Attribute Form Extensions 197
Update Attribute Query Relationship 198Global Data Entry Settings 199
Constituent Data Hygiene 199Address Standardization Rules 200Text Capitalization Rules 202
Constituent Matching Settings 202Constituent Matching Algorithm 204
Constituent Update Rules 208Configure Constituent Update Rules 209Data Conflicts 214
INDEX 217


Configuration TasksCountries and States 2
Time Zones 9
Fiscal Year End 11
Application Usage Report 11
Report Model Record Access Security 11
Enable or Disable Phone Formatting 12
Notifications 12
Reason Codes 14
Import ZIP Code Table 17
Enable/Disable Default Blank Query Criteria 17
Mapping 18
Organization Information 19
Unmapped Transaction Setting 19
Payment Posting Options 20
Enable or Disable General Ledger 21
Individual Display Name 22
Self-service Password Reset 22
Enable/Disable Matching 23
There are several tasks you can perform from Administration, under Configuration.
Note: Some configuration tasks are only available to users with certain security rights.
chapter 1

Countries and StatesYou can add country and state information to the program and include address block format information. Inaddition, you can edit and delete any existing country and state information. From the Countries and Statespage in Administration, you can view a list of all country and state entries and the address formats configured foryour organization. To access the Countries and States page from Administration, click Countries and statesunder Configuration.To help you manage this information, the Countries and States page includes multiple tabs.
Manage Country InformationOn the Countries tab, you can view a list of all country entries configured for your organization.For each country, you can view its abbreviation and address format. You can also viewwhether a country entry isactive and which is the default country entry for your organization. To view the states, provinces, or territoriesconfigured for a country, select it in the grid and click Go to state list. For information about the state list, seeManage State Information on page 5.From the grid, you can add and manage country entries as necessary.
Add CountriesWhen you add new countries to the program, you can select a default address format and phone format for eachcountry. You can also customize the field labels that appear for address information for a country. Each time youadd a new address, the country you select determines how the address components appear, how phonenumbers are formatted, and what text appears in the address field labels. For information about how to managedefault address formats, see Add Address Formats on page 7.
} Add a country entry
1. From Administration, click Countries and states under Configuration. The Countries and States pageappears.
2. On the Countries tab, click Add. The Add a country screen appears. For information about the items onthis screen, see Add a Country Screen on page 4.
2 CHAPTER 1

3. In theDescription field, enter the name of the country.
4. In the Abbreviation field, enter the abbreviation for the country, such as UK for the United Kingdom orUSA for the United States of America.
5. In the ISO 3166 two-letter code field, enter the international, standardized two-letter code for thecountry as set by the International Organization for Standardization (ISO), such as GB for the UnitedKingdom or US for the United States of America.
Note: This field is primarily used with the Blackbaud Payment Service. To successfully process creditcard information, the Blackbaud Payment Service requires the international, standardized two-lettercode for the country to be those set by ISO. For more information, seehttp://www.iso.org/iso/country_codes.html.
6. To set up the country entry but not allow users to select it, select Inactive.
7. In the Address format field, select the default address format to use with the country. For informationabout how to add an address format for a country, see Add Address Formats on page 7.
8. In the Phone format field, select the default phone number format to use with the country. To notautomatically format phone numbers for the country, select Unformatted.
9. In the Phone country code field, enter the international country calling code required with phonenumbers for the country when called from the default country of your organization. When users enterphone numbers for the country, the program automatically adds the country code as a prefix to theselected phone format.
10. Under Address input field labels, enter the captions to appear in the program for address fields for thecountry. For example, in the State label field, enter Province for Canada or Region for the UnitedKingdom.
Note: To validate addresses for the country, you must install the Address Validation Service andconfigure the web server. For information, see the Installation and Update Guide.
11. Click Save. You return to the Countries and States page. Unless you select Inactive, the new countryappears for users the next time they log in.
CONFIGURATION TASKS 3

Add a Country Screen
Screen Item Description
Description Enter the name of the country. When users enter address information in the program,this name appears in the list of available entries for the Country field.
Abbreviation Enter an abbreviation for the country. For example, enter USA for the United States ofAmerica or AUS for Australia.
ISO 3166two-lettercode
Enter the international, standardized two-letter code for the country as set by theInternational Organization for Standardization (ISO), such as GB for the United Kingdomor US for the United States of America.Note: To successfully process credit card transactions with the Blackbaud PaymentService, the program requires the international, standardized two-letter code for thecountry to be those set by the International Organization for Standardization (ISO). Formore information, see http://www.iso.org/iso/country_codes.html.
InactiveTo not have the country appear in the Country field list available in address sections inthe program, select this checkbox.You cannot mark the default country inactive.
Addressformat
Select a default address format for this country. For information about how to add anaddress format for a country, see Add Address Formats on page 7.
Phoneformat
Select a default format for phone numbers associated with this country. The programuses this selection to automatically format phone numbers that users enter in theprogram. The phone format does not include country codes. For example, if you select“###-####”, when users enter a phone number as “5550199,” the program automaticallyformats this number as “555-0199.”To display the phone number exactly as users enter it, select Unformatted.
Phonecountry code
Enter the international calling code required for phone numbers for the country whencalled from your default country. When users enter phone numbers for the country, theprogram automatically adds this code as a prefix to selected phone format.
Addressinput fieldlabels
Define the address fields available to users throughout the program. For example, in thePostcode label field, enter Postcode for the United Kingdom or ZIP Code for the UnitedStates.
Edit a CountryYou can edit a country entry for your organization, such as to change the default address or phone format,update the address field labels, or mark an entry active or inactive. When you select a country in the program,the address components conform to the format settings established on the Countries and States page.
} Edit a country entry
1. From Administration, click Countries and states under Configuration. The Countries and States pageappears.
2. On the Countries tab, select a country and click Edit. The Edit country screen appears.
3. Make changes as necessary. The items on this screen are the same as the Add country screen. Forinformation about the items on this screen, see Add a Country Screen on page 4.
Note: To validate addresses, you must install the Address Validation Service and configure the web server. Forinformation, see the Installation and Update Guide.
4. Click Save. You return to the Countries and States page.
4 CHAPTER 1

Delete a CountryTip: Rather than delete a country entry, you can mark it as inactive. Inactive countries and their settings remainin the database but do not appear as options for users when they enter address information. To mark acountry as inactive, edit the country and select Inactive. For information about how to edit a country, see Edita Country on page 4.
When your organization no longer uses a country entry, you can delete it so users cannot select it when theyenter address information. To delete a country entry, select the country on the Countries tab of the Countriesand States page and click Delete. On the confirmation message that appears, click Yes.
Set a Country as DefaultYou must set a country as the default for your organization. When users enter address information, the programautomatically displays the default country and uses the address and phone format selected for the defaultcountry. To set a country as the default, select it on the Countries tab on the Countries and States page and clickMark as default. You cannot mark an inactive country as the default.
Manage State InformationOn the States page, you can view a list of the states, provinces, or territories associated with a specific country.You can access the States page from the Countries and States page in Administration. On the Countries tab,select a country to view state information and click Go to state list.
Under States, you can view the states, provinces, or territories configured for the country and the abbreviationfor each. When users enter address information for the country in the program, these states appear as optionsfor the user.From the grid, you can add and manage states for the country as necessary.
Add StatesWhen users enter address information in the program, they select the state, province, or territory of the addressbased on the selected country. You can add states to appear as options for a country. When you add a state,
CONFIGURATION TASKS 5

you can include an abbreviation for the state.
} Add a state
1. From Administration, click Countries and states under Configuration. The Countries and States pageappears.
2. On the Countries tab, select the country for the state and click Go to state list. The States page for thecountry appears.
3. Click Add. The Add a state screen appears.
4. In theDescription field, enter the name of the state.
5. Enter an abbreviation for the state.
6. To set up the state but not make it available as an option for users, select Inactive.
7. Click Save. You return to the States page for the country. Unless you select Inactive, the new state isavailable to users the next time they log in.
Edit a StateYou can edit state information included in the program, such as to update its abbreviation or mark it as inactive.
} Edit a state
1. From Administration, click Countries and states under Configuration. The Countries and States pageappears.
2. On the Countries tab, select the state’s country and click Go to state list. The States page for the countryappears.
3. Select the state and click Edit. The Edit state screen appears.
4. Make changes as necessary. The items on this screen are the same as the Add a state screen. Forinformation about the items on this screen, see Add States on page 5.
5. Click Save. You return to the States page for the country.
Note:
Delete a StateTip: Rather than delete a state, you can mark it as inactive. Inactive states and their settings remain in thedatabase but do not appear as options for users when they enter address information. To mark a state asinactive, edit the state and select Inactive. For information about how to edit a state, see Edit a State on page6.
6 CHAPTER 1

When your organization no longer uses a state, you can delete it so users cannot select it when they enteraddress information.
} Delete a state
1. From Administration, click Countries and states under Configuration. The Countries and States pageappears.
2. On the Countries tab, select the state’s country and click Go to state list. The States page for the countryappears.
3. Select the state and click Delete. A confirmation message appears.
4. Click Yes. You return to the Countries and States page.
Manage International Address FormatsTo automatically format addresses you enter in the program, you must assign a default address format for eachcountry. The preferred address format for mailing and communication varies between countries. For example,some countries may require the post code come before the city, while somemay require it come after the stateor province. To view and manage the address formats configured for your organization, select the AddressFormats tab.Under Address formats, you can view the countries for which address formats are configured. To view the formatconfigured for a country, select in the grid and click Show details. The Format stringwindow appears anddisplays how addresses for the country appear.Although the program includes the proper address format for many countries, you can add new formats or editformats as necessary from the grid.
Add Address FormatsWhen you enter an address in the program, the format assigned to the country you select determines how theaddress components appear on the constituent record, mailings, or any other area that displays addressinformation for the constituent.
} Add an address format for a country
1. From Administration, click Countries and states under Configuration. The Countries and States pageappears.
2. On the Address Formats tab, click Add. The Add a country address format screen appears.
CONFIGURATION TASKS 7

3. Enter a name for the address format.
Note: If you enter the name of a country, the program does not automatically associate the format with thecountry. You select the default address format for each country on the Countries tab. If multiple countries usethe same address format, you can associate the format with each country that applies. For information abouthow to link a country with a default address format, see Add Countries on page 2.
4. To base the address format on an existing format, in the Copy from field, select the existing addressformat.
5. To create or add address components to a format, at the bottom of the screen, click the componentsand punctuation to appear on the first line of the format. The selected components appear underAddress Format. For example, if you click Address, “[Address]” appears.
To enter a new address line to the format, click New line and the components and punctuation toappear.
6. Click Save. You return to the Address Formats tab.
Add a Country Address Format Screen
Screen Item Description
NameEnter a name for this address format.If you enter the name of a country that uses this format, the program does notautomatically link the country to the address format. For information about how toassociate a default address format with a country, see Add Countries on page 2.
8 CHAPTER 1

Screen Item Description
Copy from
If the address format is similar to an existing format, you can copy the components andpunctuation of the existing address format and edit it as necessary to save time. Selectthe address format you want to copy address components and punctuation from. UnderAddress Format, the address components and punctuation of the selected formatappear.
AddressFormat
Displays the address format selected in the Copy from field or the address componentsand punctuation selected at the bottom of the screen.You can remove components from the format as necessary. To remove the lastcomponent of an address line, select the line and click Delete. To remove an entireaddress line, select the line and click Delete line. To remove all components from theaddress format, click Clear all.
Addresscomponents
Click the address components and punctuation to appear under Address Format. Toenter a space between components, click Space. To start a new address line, click Newline. For example, to include a comma between the city name and the state name in anaddress format, click City, then click Comma [,], Space, and State. “[City], [State]”appears under Address Format.
Edit an Address FormatYou can edit an address format as necessary. If you edit a format linked to a country, all addresses that currentlyuse this format automatically update to reflect your changes. For information about how to associate a defaultaddress format with a country, see Add Countries on page 2.
} Edit an address format
1. From Administration, click Countries and states under Configuration. The Countries and States pageappears.
2. On the Address Formats tab, select a format and click Edit. The Edit country address format screenappears.
3. Make changes the format as necessary. The items on this screen are the same as the Add a countryaddress format screen. For information about the items on this screen, see Add a Country AddressFormat Screen on page 8.
4. Click Save. You return to the Countries and States page.
Delete an Address FormatTip: To determine whether a country uses an address format, select the Countries tab on the Countries andStates page. Under Countries, the Address format column displays the address format used by each country.
If your organization no longer uses an address format, you can delete it as long as it is not currently linked to acountry. To delete an address format, select the format on the Address Formats tab on the Countries and Statespage and click Delete. On the confirmation message that appears, click Yes.
Time ZonesTo ensure time is formatted and displayed correctly for time zone-aware areas of the system, select yourorganization’s default time zone. From the Time Zones page in Administration, you can view a list of supportedtimes zones and designate one as the default. You can also make time zones inactive or active.
CONFIGURATION TASKS 9

The default time zone setting is especially necessary for organizations with a hosted Blackbaud solution. Forexample, if your organization is located in the Pacific time zone but our servers hosting the solution are located inthe Eastern time zone, you must set the default time zone to “(GMT- 8:00) Pacific Time” so that time zone-awareareas of the application function using the correct local time.The default time zone setting affects the following time-zone aware areas of the program:• Program event dates and times displayed through advance sales, daily sales, group sales, and online• On sale date for tickets• Availability time for discounts and combinations• Times displayed on sales receipts• Order information, including the order date and print date• Times displayed on the Average Hourly Sales Report
Note: TheUpdate time zone daylight savings rules task is used to refresh and apply daylight savings rulesstored in the database. This tasks is needed only if the government changes the rules for when daylight savingstime begins and ends in a particular region. For example, if the date and time that daylight savings begins forthe “(GMT-05:00) Eastern Time” region changes, then rules stored in the database will be updated to match thechanges. To apply the new rules, you must access Administration and click Update time zone daylight savingsrules. For more information see, Update Daylight Savings Rules on page 10.
} Select a default time zone for your organization
1. From Administration, click Time zones under Configuration. The Time Zones page appears.
2. In the grid, select the default time zone for your organization and clickMark as default. The selectedtime zone is now the system default and is displayed with a green checkmark.
Note: When a time zone is marked the default, the daylight savings rules for that time zone are automaticallyupdated to match the latest rules stored in the database.
} Mark time zones inactive or active
1. From Administration, click Time zones under Configuration. The Time Zones page appears.
2. In the grid, select a time zone to make inactive and clickMark inactive. The time zone is removed fromthe grid. By default, inactive time zones are not displayed on the Time Zones page. To view inactive timeszones, select Include inactive and click Apply.
3. If needed, you can make the time zone active again. To do so, select Include inactive and click Apply todisplay the inactive zone. All inactive zones are now displayed. Select the one to activate and click Markactive.
Note: When a time zone is marked active, the daylight savings rules for that time zone are automaticallyupdated to match the latest rules stored in the database.
Update Daylight Savings RulesTheUpdate time zone daylight savings rules task is used to manually refresh and apply daylight savings rulesstored in the database to all active time zones. This task is needed only if the government changes the rules forwhen daylight savings time begins and ends in a particular region. For example, if the date and time that daylightsavings begins for the “(GMT-05:00) Eastern Time” region changes, then rules stored in the database will beupdated to match the changes. To apply those new changes, you run through this brief process.
10 CHAPTER 1

} Update daylight savings rules
1. From Administration, click Time zones under Configuration. The Time Zones page appears.
2. Under Tasks, click Update time zone daylight savings rules. The rules stored in the database are appliedand updated to all active time zones.
Fiscal Year EndYou can specify the final month of your fiscal year, to be used in calculations in reports and other instancesthroughout the program. The default ending month is December.
} Edit ending month of fiscal year
1. From Administration, click Fiscal year end under Configuration. The Fiscal Year End page appears.
2. Click Edit. The Edit final month in the fiscal year screen appears.
3. Select the final month of your fiscal year.
4. Click Save. You return to the Fiscal Year End page.
Application Usage ReportWith the application usage report, you can monitor overall system usage and tallies. The report includes countsfor howmany records of different types are in the system, along with information about howmany system rolesand users there are. The report also includes information about any custom catalog components that have beenadded.To view the report, in Administration, click Generate application usage report file under Tools. Then click Startprocess under Tasks. Select a date and the report is processed. You can click View report.
Report Model Record Access SecurityYou can configure security for the Report Model Generator to use the same user access rights that exist in theprogram for records. To use record access security for the Report Model Generator, go to Administration, thenclick Configure Report Model Record Access Security under Configuration. Select Use record access securityand click Save.
CONFIGURATION TASKS 11

Enable or Disable Phone FormattingIf phone formatting is enabled, the program automatically applies the format you selected for the correspondingcountry on the Countries and States page. For information about how to assign a default phone format to acountry, see Add Countries on page 2.When you disable phone formatting, you must manually enter phone numbers exactly as you want them toappear in the program. You must also enter phone numbers as you want them to appear for countries assigned“<Unformatted>” as the default phone format.For information about how to add phone numbers on a constituent record, see the Constituents Guide.
} Enable or disable phone formatting
1. From the Administration page, click Enable/disable phone formatting under Configuration. Averification message appears.
2. Click Yes to enable or disable phone formatting, depending on the current configuration setting. Forexample, if phone formatting is enabled, click Yes to disable formatting.
NotificationsNotifications allow you to share important information about a record or a group of records with users. You candetermine whether all users should receive a notification or only a targeted group of users. For example, youmay want all users to receive a notification when they open the record of a board member.Notifications appear on the information bar of a record.Notifications for constituents also appear in the Constituent Window of a revenue batch.You can also set notifications to appear on a separate screen when a record is accessed. The notification screenappears the first time a record is accessed during a session. If you leave the record and return within 60minutes,the notification screen does not appear again. However, if you return after more than 60minutes, thenotification screen appears again.You can create notifications for groups of records in Administration. You can also create notifications for a specificrecord from the Documentation tab of the record.
AddNotifications to a Group of RecordsYou can create notifications for groups of records in Administration. You determine whether all users shouldreceive the notification or only a targeted group of users.
} Add a notification to a group of records
1. From Administration, clickManage notifications under Configuration. The Notifications page appears.
2. Click Add. The Add notification screen appears.
12 CHAPTER 1

3. Enter the name of the notification (such as “Board Member Alert”) as well themessage or text to displayin the actual notification.
4. You can specify a date if this notification expires. You can also specify whether the notification displaysonly in the information bar of a record or whether it also displays on a separate screen.
5. Select the record type and a selection of records to use. The notification displays for records included inthe selection.
6. Select whether this notification displays for all users or for selected users. If you select “Selected users,”pick the selection of users to receive the notification.
7. Click Save. You return to the Notifications page. The notification is available for the users you selectedwhen they access the records you selected.
Add Notification ScreenScreen Item DescriptionName Enter an intuitive name for the notification, such as “Board Member Alert”.Message Enter themessage text you want to display for this notification.
Valid until If this notification will expire or is temporary, you can select a date after which thenotification is no longer valid and will not display.
Display innotificationwindow
Select this checkbox to have the notification appear in separate window that displayswhen a user first accesses the record, as well as in the information bar at the top of eachrecord.
Display thisnotification for thefollowing records
Select the record type for the notification. You can add notifications to constituentrecords and event records. You can also specify a selection of records to use; only recordsin the selection would display the notification.
Display thisnotification to thefollowing users
Specify the users who should receive the notification. If the notification is not for all users,you can specify a selection of users; only users in the selection will receive the notification.
CONFIGURATION TASKS 13

Edit Notifications for a Group of RecordsYou can make changes to a notification for a group of records that has already been set up in Administration. If anotification was added from a record, you can edit the notification from the Documentation tab of the record.
} Edit a notification for a group of records
1. From Administration, clickManage notifications under Configuration. The Notifications page appears.
2. Select a notification and click Edit. The Edit notification screen appears.
3. Make changes as necessary. You can change the name or message text for the notification. You can alsochange how the notification displays, the records that have the notification, and the users who receivethe notification. For more information about the items on this screen, see Add Notification Screen onpage 13.
4. Click Save. You return to the Notifications page.
Delete Notifications for a Group of RecordsYou can remove a notification from a group of records when you no longer need it. To remove the notification,select it on the Notifications page in Administration and click Delete.
Update Notification Query RelationshipsIf through a customization process, you add a new query view after a notification is created, the new query viewdoes not automatically add the notification. To add the notification to the new query view, click Updatenotification query relationship.
Reason CodesWith reason codes, your organization can standardize the reasons users change information and restrict the useof records, such as when they mark a constituent as inactive or write off unpaid pledges. When users make thechange, they can select this code to consistently explain the reason for the change. On the Reason Codes page,you can view and manage the reason codes your organization uses. To access the Reason Codes page fromAdministration, click Reason codes under Configuration.Depending on your system role, multiple tabs may appear on this page so you can manage reason codes byfunctional area.
Note: You can also configure reason codes from the Configuration section of Constituents, Revenue, andMemberships.
Constituents
On the Constituents tab, you can view the reason codes your organization uses to designate a constituent “inact-ive” and to rollback constituent record changes. By default, all active reason codes display in both theMarkinactive and Constituent data review rollback grids. To view all reason codes, including thosemarked “inactive,”click Filter, select Include inactive, and click Apply. For each reason code, you can view its description andwhether it is active. To update the information that appears in the grid, click Refresh List.
14 CHAPTER 1

Revenue
On the Revenue tab, you can view the reason codes your organization uses to write off pledge balances andinstallments and adjust revenue that has posted to the general ledger. If your organization enables gift fees, youcan also view the reason codes your organization uses to waive gift fees automatically applied to payments. Forrejected direct debit transactions you receive from your financial institution, you can select which adjustmentcode to automatically apply to the corresponding entry in a Direct Debit Return batch file. In the Adjustment sec-tion, select Default for direct debit return batch rejections on the Add a reason code screen. For informationabout the Direct Debit Return batch rejections, see the Batch and Import Guide.
For auction import adjustments, you can select which adjustment code to automatically apply as the default. Onthe Add a reason code screen, select Default for auction import adjustments.
To include reason codes marked as inactive in a grid, click Filter, select Include inactive, and click Apply. For eachreason code, you can view a description and whether it is active. To update the information that appears in agrid, click Refresh List.
Receipts
On the Receipts tab, you can view the reason codes your organization uses to designate a re-receipt payment. Bydefault, all active reason codes display under Re-receipt payments. To view all reason codes, including thosemarked “inactive,” click Filter, select Include inactive, and click Apply. For each reason code, you can view itsdescription and whether it is active. To update the information that appears in the grid, click Refresh List.
Membership
On theMembership tab, you can view the reason codes your organization uses for canceled memberships.When a membership is canceled, you select a reason code. By default, all active reason codes display underCancellation. To view all reason codes, including thosemarked “inactive,” click Filter, select Include inactive, andclick Apply.
On theMembership tab, you can view the reason codes your organization uses for canceled memberships.When a membership is canceled, you select a reason code. By default, all active reason codes display underCancellation. To view all reason codes, including thosemarked “inactive,” click Filter, select Include inactive, andclick Apply.
From these grids, you can perform multiple tasks to manage the reason codes.
AddReason CodesWith reason codes, your organization can standardize the reasons users make changes to information andrecords. Before users can select a reason code, you must add it to your database. Reason codes can be up to 10characters in length.
} Add a reason code
1. From Administration, click Reason codes under Configuration. The Reason Codes page appears.
2. On the applicable tab, click Add. The Add a reason code screen appears.
CONFIGURATION TASKS 15

3. In the Reason code field, enter an alphanumeric code to identify the reason for the change. For example,for a change to correct a data entry error, enter ERR.
4. In theDescription field, enter an explanation of when to select the reason code.
5. Click Save. You return to the Reason Codes page.
Edit a Reason CodeAfter you add a reason code, you can edit its name or description as necessary, such as to correct a typographicalerror.
} Edit a reason code
1. From Administration, click Reason codes under Configuration. The Reason Codes page appears.
2. Select a reason code and click Edit. The Edit a reason code screen appears.
3. Edit the name or description as necessary.
4. Click Save. You return to the Reason Codes page.
Delete a Reason CodeIf your organization no longer uses a reason code, you can delete it from your database.If a reason code is currently in use, you cannot delete it from your database. To prevent the future use of thereason code, you can mark it as inactive. For information about how to mark a reason code as inactive, see Marka Reason Code as Inactive or Active on page 16.
Tip: To avoid the loss of data, we recommend you mark a reason code as inactive rather than delete it. Inactivereason codes remain in the database as archived information, but users cannot assign it to a change.
} Delete a reason code
1. From Administration, click Reason codes under Configuration. The Reason Codes page appears.
2. Select a reason code and click Delete. A confirmation message appears.
3. Click Yes. You return to the Reason Codes page.
Mark a Reason Code as Inactive or ActiveIf you no longer use a reason code, you can mark it as inactive. The code remains in the database as archivedinformation, but users cannot assign it to a future change. To view an inactive reason code on theManageReason Codes page, you must first click Filter, select Include inactive, and click Apply.
16 CHAPTER 1

Tip: If you cannot delete a reason code such as when assigned to a change, but do not plan to use it in thefuture, you can mark it as inactive.
After you mark a reason code as inactive, you can mark it as active again to resume its use.
} Mark a reason code as inactive
1. From Administration, clickManage reason codes under Configuration. The Reason Codes page appears.
2. Select a reason code and clickMark inactive. A confirmation message appears.
3. Click Yes. You return to the Reason Codes page.
} Mark a reason code as active
1. From Administration, click Reason codes under Configuration. The Reason Codes page appears.
2. Select a reason code and clickMark active. A confirmation message appears. To display inactive reasoncodes in the grid, select Include inactive on the filter tool and click Apply.
3. Click Yes. You return to the Reason Codes page.
Import ZIP Code TableTo use the Zip code lookup feature in the program, a system administrator must first import Zip code tableentries in .csv format. The spreadsheet must contain the following header information in this order: Zip code,city, state, country. In the State column, use the abbreviated form of the state’s name, for example, “SC” for“South Carolina”. For entries in the Country column, use the country’s name, not the abbreviation. For example,enter “United States” rather than “US.” After you import Zip codes for a country, when you select the country onscreens that contain address information, you can search for the code that matches the city and state entered.
} Import Zip code table entries
1. From Administration, click Import Zip code table under Configuration. The Import Zip code table screenappears.
2. In the File field, click the folder to browse to the directory where you store the .csv file.
3. Click Save. You return to Administration. You can now use the Zip code lookup feature.
Enable/Disable Default Blank Query CriteriaThe Include blanks checkbox appears on query criteria screens for these criteria operators: Not Equal To, NotOne Of, Less Than, Less Than or Equal To, Not Between, Not Like, and Does Not Contain. When the Includeblanks checkbox is selected, the program includes blanks in the query results by adding the “or is blank” filter to
CONFIGURATION TASKS 17

the query condition. When the checkbox is cleared, the program excludes blanks from the query results byadding the “and is not blank” filter to the query condition.
Note: Query treats nulls as blanks. When you include or exclude blank values, this also includes or excludes nullvalues.
The program is set to select Include blanks by default. Using Enable/Disable Default Blank Query Criteria, youcan change this setting. It is important to remember that the enable/disable setting simply determines thedefault behavior for the Include blanks checkbox. You can always select or clear Include blanks on the individualcriteria screen. This allows you to evaluate and handle queries on a case by case basis. If you later change theEnable/Disable Default Blank Query Criteria setting, it will not affect any queries created prior to the change.
MappingTo access and useMapping functionality, you must have the appropriate credentials. When you enableMapping, you can select whether to display maps and distances in miles or kilometers (km). On theMappingpage, you can configureMapping to meet the needs of your organization. To access theMapping page fromAdministration, clickMapping under Configuration.From this page, you can manage theMapping credentials and configure the distance unit to use.
Edit Mapping CredentialsFrom Administration, you can configure the credentials required to access and use theMapping functionality.
} Edit map credentials
1. From Administration, clickMapping under Configuration. TheMapping page appears.
2. Under Credentials, click Edit. The Edit mapping credentials screen appears.
3. Enter your license key.
4. Click Save. You return to theMapping page. To access themapping functionality, clickMapping underTasks.
Edit theMapDistance UnitFrom Administration, you can select whether to display theMapping functionality in miles or kilometers (km).Your selection determines how distance appears inMapping, such as in the legend or a radius search.
} Edit the map distance unit
1. From Administration, clickMapping under Configuration. TheMapping page appears.
2. UnderMap distance unit, click Edit. The Edit map distance unit screen appears.
3. Select whether to viewmaps in miles or kilometers.
4. Click Save. You return to theMapping page.
18 CHAPTER 1
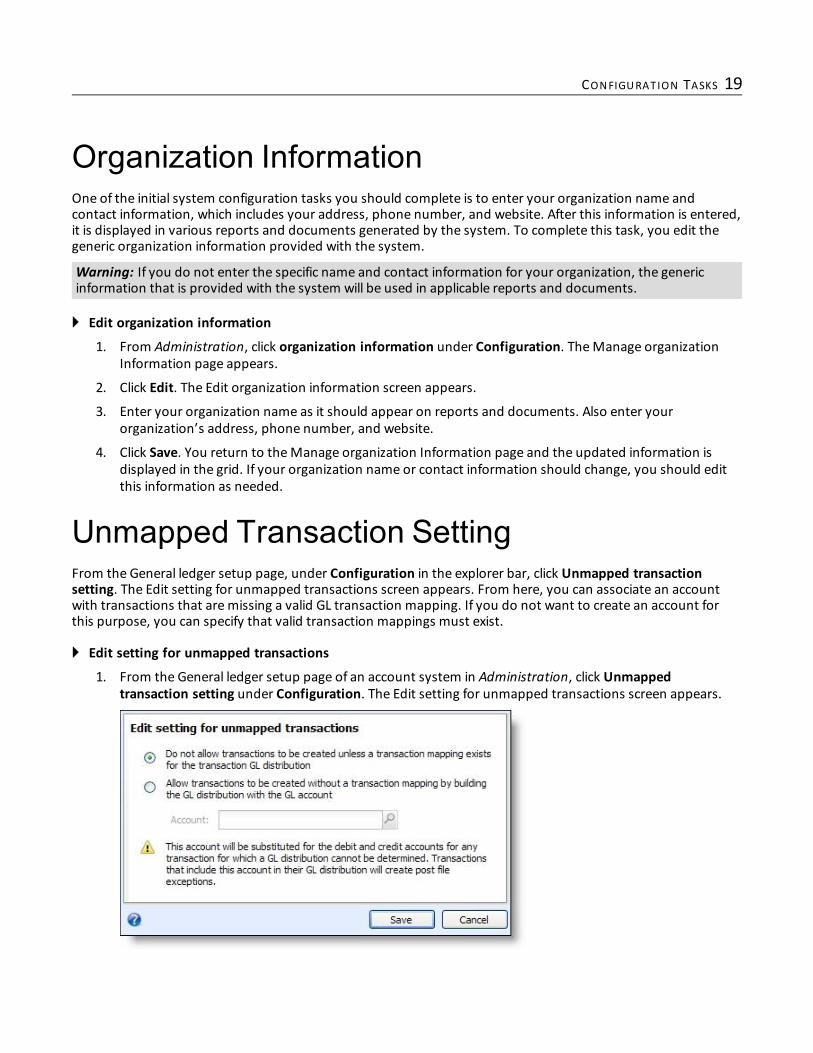
Organization InformationOne of the initial system configuration tasks you should complete is to enter your organization name andcontact information, which includes your address, phone number, and website. After this information is entered,it is displayed in various reports and documents generated by the system. To complete this task, you edit thegeneric organization information provided with the system.
Warning: If you do not enter the specific name and contact information for your organization, the genericinformation that is provided with the system will be used in applicable reports and documents.
} Edit organization information
1. From Administration, click organization information under Configuration. TheManage organizationInformation page appears.
2. Click Edit. The Edit organization information screen appears.
3. Enter your organization name as it should appear on reports and documents. Also enter yourorganization’s address, phone number, and website.
4. Click Save. You return to theManage organization Information page and the updated information isdisplayed in the grid. If your organization name or contact information should change, you should editthis information as needed.
Unmapped Transaction SettingFrom the General ledger setup page, under Configuration in the explorer bar, click Unmapped transactionsetting. The Edit setting for unmapped transactions screen appears. From here, you can associate an accountwith transactions that aremissing a valid GL transaction mapping. If you do not want to create an account forthis purpose, you can specify that valid transaction mappings must exist.
} Edit setting for unmapped transactions
1. From the General ledger setup page of an account system in Administration, click Unmappedtransaction setting under Configuration. The Edit setting for unmapped transactions screen appears.
CONFIGURATION TASKS 19

2. When you select Do not allow transactions to be created unless a transaction mapping exists for thetransaction GL distribution, transactions cannot be saved and posted unless a valid transactionmapping exists. To map transactions, click Define Transaction Mappings on the General ledger setuppage.
3. When you select Allow transactions to be created without a transaction mapping by building the GLdistribution with the GL account, the Account field is enabled. Click the search button at the end of thefield to access the Account Search screen. Select an account to use temporarily for transactions withincorrect transaction mappings.
The account you select here is only temporary. To successfully save and post transactions, validtransaction mappings must exist within all applicable offices. If these do not exist, an error is generated inthe exception report for the post process. You may also receive an error during the post process due tounmapped segments or missing GL accounts.
Note: Unmapped transaction messages play an important part in ensuring your general ledger setup isconfigured properly. The program tracks unmapped transaction messages only when you use the Unmappedtransaction setting to associate an account with transactions that aremissing a valid GL transaction mapping.
4. Click Save. You return to the General ledger setup page.
Payment Posting OptionsYou can specify whether or not payments must be linked to deposits in order to successfully post to your generalledger.The Payment posting options configuration task is only available when you enable general ledger. To work withthe Enable/disable general ledger task, from the General ledger setup page of an account system inAdministration, click Enable/disable general ledger.
} Specify payment posting options
1. From the General ledger setup page of an account system in Administration, click Payment postingoptions under Configuration. The Payment posting options screen appears.
2. To require that payments must be linked to deposits in order to post to the general ledger, selectRequire posting Cash, Check, Credit card payments with deposits. Use this setting to post depositswith their linked payments.
Warning: The Payment posting options configuration task in only available when you enable generalledger. To work with the Enable/disable general ledger task, from the General ledger setup page of anaccount system in Administration, click Enable/disable general ledger.
20 CHAPTER 1

3. To allow unlinked payments to post directly to the general ledger, select Allow direct posting of allpayments. Use this setting to post all payments including Cash, Check, and Credit card withoutlinking payments to deposits.
When you select this option, the program uses the default transaction mappings for the cash account topost payments. The post date uses the transaction date similar to non-depositable payment methods,such as stock.
4. Click Save. You return to the General ledger setup page.
Enable or Disable General LedgerYou can select to disable or enable general ledger at any time.
} Enable or disable general ledger
1. From the General ledger setup page of an account system in Administration, click Enable/disablegeneral ledger under Configuration. The Enable/disable general ledger screen appears.
2. To enable general ledger, select Enable general ledger.
General ledger is, by default, enabled and creates transactions with a post status of “Not posted.”
You do not need to “turn on” general ledger unless you previously disabled it and nowwish to enable itagain. Note that when you enable general ledger after you previously disabled it, transactions youpreviously entered in the program will retain a post status of “Do not post.”
3. To disable general ledger, select Disable general ledger.
You may find that your organization needs to track constituents and other activity within the system,but has no need to post transaction activity from within the program for use with an external generalledger. To meet this need, you can disable general ledger.
When you disable general ledger, tasks in the General ledger setup area of Administration are no longerrequired. Valid transaction and segment mappings, GL accounts, and an account structure are no longernecessary to save and post transactions in your system. Going forward, the program will createtransactions without GL distributions. Since no distributions exist, a GL distribution tab may continue toappear on a transaction record, but will not display distribution account rows for the transaction.Transactions you enter in the program will have a post status of “Do not post.”
Note: When general ledger is disabled, the tasks in the General ledger setup area of Administration are stillavailable to you. You can choose to create transaction and segment mappings, GL accounts, and an accountstructure. You may find it easier to set up your general ledger while general ledger is disabled. Remember, you
CONFIGURATION TASKS 21

must enable general ledger in order for all parts of your general ledger setup to work properly and fortransactions to post.
If general ledger is enabled and you nowwish to disable it, and your system includes transactions with apost status of “Not posted,” a warning message appears. Before you can disable general ledger, youmust either manually post those transactions or change their post status to “Do not post.”
Warning: If you work with ticketing transactions, such as group sales or daily sales, and you select to disablegeneral ledger, you must first create a bank account so that your sales can reconcile using a sales deposit. Youcreate bank accounts in Treasury.
4. Click Save. You return to the General ledger setup page.
Individual Display NameIndividual display name enables you to configure how individual constituent names format throughout thesystem. When you configure the name format for individual constituents, you set the display name for all yoursystem users. The default individual display name is first name, middle initial, last name. You can select to changethe individual display name to any of the existing name formats for individuals.
Tip: To review, change, or add individual name formats, see Name Format Options in the CommunicationsConfigurations chapter of the Communications Guide.
For the individual display name, we recommend the following fields for use in the name format: Last name, Firstname, Middle name, Maiden name, Title, and Suffix. If you choose one of the following fields, you may notice adecrease in system performance: Nickname, Title 2, Suffix 2, Spouse last name, Spouse first name, Spousemiddlename, Spouse nickname, Spouse title, Spouse title 2, Spouse suffix, Spouse Suffix 2, Spousemaiden name, Classyear, and Spouse class year.
} Edit individual display names
1. From Administration, click Individual display name under Configuration. The Individual Display Namepage appears.
2. Click Edit. The Edit individual display name screen appears.
3. Select the name format to display for all individual constituents in the system.
Note: The name format you select here does not interfere with the options you have already set up for mailingsand communications.
4. Click Save. You return to the Individual Display Name page and the updated information displays in thegrid.
Self-service Password ResetWhen you host your own Blackbaud application and turn on forms authentication in the web.config file, the Self-service password reset task appears under Configuration. You can configure this task to provide a way for usersto change passwords.
Note: Forms authentication includes other login enhancements such as invalid login messages to help clarifyhow to successfully log in to the application. When you host your Blackbaud applicaton, you can edit theweb.config file to turn this on. For more information, see the Infinity Platform Installer and Upgrade Guide. IfBlackbaud hosts your application and you want to turn on forms authentication, create a case on Case Central.
22 CHAPTER 1

When you click Self-service password reset, the Edit self-service password reset options screen appears. SelectEnable self-service password reset so users can change passwords. If you have your own website for users tochange passwords, enter the URL for that site in the Custom password reset URL field. Otherwise, leave thisblank.
When you select Enable self-service password reset, an Update your email address screen appears the next timea user logs in to your application.
When a user clicks Forgot your user name or password on the login screen, an email sends to the email addressthat includes the user name and a link to reset the password. When the user clicks the link, a screen appears toenter a new password and confirm it. By default, the link expires after the user clicks it or after 24 hours. Toadjust this time, edit the SelfServicePasswordResetUrlValidHours key in the web.config file.
Tip: To change the email address for the user, select the user name at the top of the page. From themenu thatappears, click Update email address. You cannot associate an email address with more than one user.
Enable/Disable MatchingFrom the Administration page, under Configuration, click Enable/disable matching. The Edit duplicate recordcheck settings screen appears.To turn off all duplicate checking in the program, including batches, imports, and manually adding records on theAdd Individual or Add Organization screens, clear Check for duplicates.To turn off the automatic updates feature for batches and imports, clear Auto-match duplicates in batch.
CONFIGURATION TASKS 23

24 CHAPTER 1

Email ManagementEmail Services 25
Email Services Reports 30
Undelivered Email 34
Email Alerts 35
From Administration, your organization can configure and manage the delivery of email messages to itsconstituents and application users.
Email ServicesFrom Administration, you can manage the processes used to send email through the program such as forcommunications and notifications. From the Email Services page, you can configure the connection to theShared Services server, hosted by Blackbaud, used to send email messages through the program. You can alsoprioritize the order in which the program submits general purpose email jobs for messages such as email blastsand newsletters to the server. You can use key performance indicators (KPIs) to determine the health andduration of your email processes.
Configure Email Service SettingsTo send email messages through the program, you must first configure the connection to the Shared Servicesserver hosted by Blackbaud. You can also prioritize the order in which the program sends each type of generalpurpose email job to the server. From the Email Services Configuration page, you can configure these settings.To access this page from the Email Services page, click Email service settings under Configuration.To send email messages through the program, you must configure the connection to the Shared Services serverhosted by Blackbaud. Under Connection health, you can viewwhether the program can connect to this server.Under Email services external server settings, you can view the network address and credentials used toconnect to the server. For information about how to edit this information, see Edit the External Server Settingson page 25.When you run a general purpose email process, the program submits jobs for email messages such asnewsletters, blasts, and notifications to the Shared Services server. Under Email category processing order, youcan view the order in which the program submits each type of email message. You can prioritize each category asnecessary. For example, to submit email blasts before newsletters, you can give email blasts a higher priority. Toadjust the priority of an email category, select it in the grid and click the up or down arrow.
Edit the External Server SettingsTo send email messages through the program, you must first configure the connection to the Shared Servicesserver hosted by Blackbaud.
chapter 2

Warning: If you do not configure the connection to the Shared Services server, or if you enter the incorrectcredentials for the server, the program automatically disables all email job processes.
} Configure the email services server
1. From Administration, click Email services under Configuration. The Email Services page appears.
2. Under Configuration, click Email service settings. The Email Services Configuration page appears.
3. Under Email services external server settings, click Edit. The settings screen appears.
4. In theHost URL field, enter the network address for the Shared Services server.
5. In theUser name field, enter the user name your organization uses to connect to the server.
6. In the Password and Confirm Password fields, enter the password used to connect to the server.
7. To use Secure Sockets Layer (SSL) to connect to the server, select Use SSL.
8. Click Save. The program verifies and saves the connection information. You return to the Email ServicesConfiguration page.
Manage Email ServicesOn the Email Services page, you can manage the processes used to generate and send email messages, thestatus of email processes and their jobs, and any invalid email addresses encountered by the processes. Toaccess the Email Services page, from Administration, click Email services under Configuration.To help you navigate through this information, the Email Services page contains multiple tabs.
Email ProcessesOn the Email Processes tab of the Email Services page, you can view and manage the processes used to generateand send email messages through the program. You can managemultiple email processes.• The email status process updates the status of an email job or invalid email addresses list based oninformation received from the Shared Services server.
• The general purpose process generates email messages for general communications such as newsletters,blasts, and notifications.
26 CHAPTER 2

• The transactional process generates email messages for communications based on revenue transactions suchas revenue acknowledgements and receipts.
Under Scheduled email processing, you can viewwhether a schedule is enabled for the email processes.Under Email processing jobs, the processes used for email messages appear. For each process, you can view thedate and status of its most recent instance, the dates the process most recently started and stopped, and anymessage about its status. You can enable or disable an email process as necessary.To view additional information about a process, click its row under Email processing jobs. Beneath the row,information about themost recent instance of the process appears.When an email process runs, the program generates a record of the instance of the process. To view the JobHistory page of a process, click its name under Email processing jobs. For information about the Job Historypage, see Email Process History on page 27.From the Email Processes tab, you can manage the email processes as necessary.
Disable an Email ProcessFrom the Email Services page, you can quickly disable an email process, such as to help troubleshoot problemswith email jobs. On the Email Processes tab, select the email process under Email processing jobs and clickDisable. When the confirmation message appears, click Yes.
Enable an Email ProcessFrom the Email Services page, you can quickly enable an email process, such as if you previously disabled it. Onthe Email Processes tab, select the email process under Email processing jobs and click Enable. When theconfirmation message appears, click Yes.
Warning: If you enable either the transactional or general purpose email job process, we strongly recommendyou also enable the email status job process to help track its status.
Run an Email ProcessTo generate email messages, you can run an email processing job to submit themessages to the Shared Servicesserver hosted by Blackbaud. You can run separate job processes for general purpose email messages such asnewsletters and transactional email messages such as revenue acknowledgements. You can also run a process toupdate the status of general purpose and transactional email jobs and any invalid email recipients. On the EmailServices page, select the process to run on the Email Processes tab and click Run email process.
Reset the Last Run On Date for an Email ProcessTo undo themost recent instance of an email process, you can reset its last run on date. When you reset the lastrun on date, the program resets the sent status of any email messages generated by the process during themostrecent instance. On the Email Services page, select the process to reset on the Email Processes tab and click Resetlast run on date. When the confirmation message appears, click Yes.
Email Process HistoryWhen an email process runs, the program generates a record of the instance of the process. On the Job Historypage of a process, you can view the records of the process instances.To access the Job History page of a process, click the name of the process on the Email Processes tab of the EmailServices page.Under Scheduled Job History, select the status of the instances to view, such as Completed or Did not finish, andclick Apply. The previously run instances of the process with the selected status appear. For each instance, you
EMAIL MANAGEMENT 27

can view its status, run date and time details, and the number of records included in the process. To remove thefilter and view all instances regardless of status, click Reset.You can delete the record of an instance if necessary. To delete a record of an instance, select the instance underScheduled Job History and click Delete.
Email JobsTo view and manage previously run email processes, select the Email Jobs tab on the Email Services page.Under Email status processing, you can view the date and time of themost recent instance of the Email statusprocess, such as to verify the process is up-to-date. To run the Email Status Poll process, click Get latest status.Under Email jobs, you can view the general purpose email processes and transactional email processes. For eachprocess, you can view its status, the number of retries, the number ofmessages requested and sent, and its dateand time.To view additional information about a process, select its row under Email jobs. Beneath the row, informationabout the process, such as the subject of the email, its sent from email address and display name, and fieldname, appear.To view detail information about an email process on its own page, click its name under Email jobs. The EmailJob Details page appears.To help reduce the number of processes in the grid, filter the grid by process type or status. Select the criteria ofthe process to view, and click Apply. To remove the filters and display all processes, click Reset.To use additional criteria to search for an email job, such as by description and email subject, click Search jobs tosearch for the email job and view its Email Job Details page.From the grid, you can delete a general purpose email process job that has been submitted to the SharedServices server but has not yet been processed. For example, if you submit a process to generate newsletters fora future date and then need to revise the content, you can delete the job from the server.
Email Process Job DetailsOn the Email Jobs tab of the Email Services page, you can view information about general purpose email processand transactional email process jobs. To view additional detail about a process job, access its Email Job Detailspage. On this page, you can view the subject of the email, its sent from email address and display name, and fieldname information.To access this page from the Email Jobs tab on the Email Services page, search for the email job, or click the nameof the job under Email jobs.For a general purpose email process, you can delete a job that has been submitted to the Shared Services serverbut has not yet been processed. For example, if you submit a process to generate newsletters for a future dateand then need to revise the newsletter content, you can delete the process from the server. For informationabout how to delete an email process, see Delete a Submitted General Purpose Email Process Job on page 29.To return to the Email Services page, click Go back to Email Services under Email Services.
Search Email JobsOn the Email Jobs tab of the Email Services page, you can view information about your general purpose emailprocesses and transactional email processes, such as status, the number of retries, the number ofmessagesrequested and sent, and its date and time. To view additional information about a specific email job, you cansearch for the job to access its Email Job Details page. When you search for an email job, you can use criteriasuch as description, email subject, status, and job type.
28 CHAPTER 2

On the Email Jobs tab, click Search jobs under Email jobs. On the Email Services Email Job Search screen, enterthe criteria of the email job to view and click Search. Under Results, the email jobs that meet the criteria appear.To view the Email Job Details of a job, click its name under Results . For information about the Email Job Detailspage, see Email Process Job Details on page 28.
Delete a Submitted General Purpose Email Process JobFrom the Email Services page or an Email Job Details page, you can delete a general purpose email process thathas been submitted to the Shared Services server but has not yet been processed. For example, if you submit aprocess to generate newsletters for a future date and then need to revise the newsletter content, you can deletethe process from the server.• On the Email Services page, under Email jobs on the Email Jobs tab, select the process to delete and clickDelete.
• On the Email Job Details page, click Delete.When the confirmation message appears, click Yes.
Email Job StatusesAs the Email Services process an email job, activity through the program or on the Shared Services server hostedby Blackbaud determine the current status of the job. The table below explains the statuses of an email job.
Status DescriptionCanceled The email job was canceled or manually stopped on the Shared Services server.
Completed The Shared Services server finished processing the email job and messages have beensent.
Deleted A user deleted the email job from the queue.Exception occurred The Shared Services server encountered an exception while processing the email job.
Local chunking The program is sending the data required for the Shared Services server to process theemail job, but not all data has yet been sent.
Maximum numberof retries exceeded
The email job has been removed from the queue because the program exceeded themaximum number of attempts allowed to send it to the Shared Services server.
Processing A complete email job has been submitted to the Shared Services server, which is activelyprocessing the job.
Queued The email job is scheduled to be sent to the Shared Services server, but no data has yetbeen sent.
Server chunking The Shared Services server is adding the email job to a group of email jobs to beprocessed.
Server chunkingpaused
The Shared Services server paused while adding the email job to a group of email jobs tobe processed.
Status unknown The Shared Services server reports an unknown job status.
Blacklisted Email AddressesOn the Blacklisted Email Addresses tab of the Email Services page, you can manage the list of email addressesthat have been blacklisted to prevent the program from sending email to them.When you run the email status process, the program records any email addresses that return hard bounces andadds them to the blacklist. A hard bounce indicates a permanent delivery failure such as when the InternetService Provider reports that an address is canceled or nonexistent. The program does not blacklist soft bouncesthat indicate temporary delivery failures such as network issues or full mailboxes.
EMAIL MANAGEMENT 29

You can also manually add email addresses to the blacklist to prevent the program from sending email. Forexample, you can blacklist email addresses that you associate with malicious or fraudulent activity.You cannot remove email addresses from the Blacklisted Email Addresses tab, but you can update the status ofemail addresses to allow the program to resume sending email.The Blacklisted email addresses grid the blacklist status of email addresses, the number of failed deliveryattempts, and themost recent notification message. To filter the grid by blacklist status, click Filter, select astatus, and click Apply. To remove the filter and view all addresses, click Reset.To search for a blacklisted address, click Search addresses On the Email Services Invalid Account Search screen,enter your criteria and click Search. Under Results, the email addresses that meet the criteria appear. For eachaddress, you can view information such as its blacklist status and number of failed attempts. To return to theBlacklisted Email Addresses tab, select the address to view.
Note: For email addresses that return hard bounces, the program synchronizes the Blacklisted Email Addressestab with Invalid accounts in Blackbaud Internet Solutions. However, the program does not synchronize emailaddresses that you manually blacklist, so these addresses do not appear in Invalid accounts. When you markan address as valid in Invalid accounts, the program automatically toggles the status on the Blacklisted EmailAddresses tab. Likewise, when you toggle the status of an address on the blacklist, the program automaticallymarks it as valid in Invalid accounts.
Change the Blacklisted Status of an Email AddressYou cannot remove blacklisted email addresses from the Blacklisted Email Addresses tab. To resume sendingemail to a blacklisted email address, you can toggle its status. For example, if the Internet Service Providerincorrectly reports an email address as invalid and you want to change its status to "Not blacklisted," select theaddress under Blacklisted email addresses and click Toggle blacklisted status. On the confirmation message,click Yes. You return to the Blacklisted Email Addresses tab.
Add a Blacklisted AddressFrom the Email Services page, you can manually add an email address to the blacklist. For example, you canblacklist email addresses that you associate with malicious or fraudulent activity.
} Add an email address to the blacklist
1. From Administration, click Email services under Configuration. The Email Services page appears.
2. Select the Blacklisted Email Addresses tab.
3. Under Blacklisted email addresses, click Add blacklisted address. The Add an email address to theblacklist screen appears.
4. Enter the email address to add to the blacklist.
5. In the Reasonfield, enter an explanation for the blacklisted status.
6. Click Save. You return to the Blacklisted Email Addresses tab. The program no longer sends email to thisaddress.
Email Services ReportsFrom Administration, you can generatemultiple reports to analyze activity with your general purpose andtransactional email job processes.
30 CHAPTER 2

Transactional Email Job Status ReportWith the Transactional Email Job Status report, you can view the status of your transactional email jobs for aspecific date or period of time. For example, you can run the report to verify all email job processes completedsuccessfully. When you generate the report, you can select to include only email that meets specific criteria, suchas status, recipient, or subject.For each status, the report displays each job that meets the selected criteria with that status during the selectedtime period. For each job, you can view information such as its description, subject, and the dates added andchanged. Under Summary, you can view a breakdown, by grid and pie chart, of the total emails that meet theselected criteria for each status.
} View the Transactional Email Job Status report
1. From Administration, click Email services. The Email Services page appears.
2. Under Reports, click Transactional Email Job Status. The Transactional Email Job Status report pageappears.
3. In theDate range field, select the time period of the transactional email jobs to analyze.
4. By default, the report includes all transactional email from the selected time period. To include onlyspecific email, specify the criteria of the email to include, such as by status, recipient, or subject.
5. Click View report. The report generates. From the report menu bar, you can print or export the report asnecessary.
EMAIL MANAGEMENT 31

General Purpose Email Job Status ReportWith the General Purpose Email Job Status report, you can view the status of your general purpose email jobs fora specific date or period of time. For example, you can run the report to verify all email job processes completedsuccessfully. When you generate the report, you can select to include only email that meets specific criteria, suchas status or subject.For each status, the report displays each job that meets the selected criteria with that status during the selectedtime period. For each job, you can view information such as its description, subject, and the dates added andchanged. Under Summary, you can view a breakdown of the total emails that meet the selected criteria for eachstatus.
} View the General Purpose Email Job Status report
1. From Administration, click Email services. The Email Services page appears.
2. Under Reports, click General Purpose Email Job Status. The General Purpose Email Job Status reportpage appears.
3. In theDate range field, select the time period of the general purpose email jobs to analyze.
4. By default, the report includes all general purpose email from the selected time period. To include onlyspecific email, specify the criteria of the email to include, such as by status or subject.
32 CHAPTER 2

5. Click View report. The report generates. From the report menu bar, you can print or export the report asnecessary.
Transactional Email Jobs Processed ReportWith the Transactional Email Jobs Processed report, you can view information about the transactional email jobsprocessed during a specific date or period of time. For example, you can run the report to view howmany emailjobs processed for the time period. When you generate the report, you select whether to group the results byevery two hours or on a daily or monthly interval. You can also select to include only email that meets specificcriteria, such as recipient or subject.For each interval, the report displays each transactional email job that meets the selected criteria processedduring the selected time period. For each job, you can view information such as its description, subject, and thedates added and changed. You can also view a bar chart of the total emails that meet the selected criteriaprocessed for each interval.
} View the Transactional Email Jobs Processed report
1. From Administration, click Email services. The Email Services page appears.
2. Under Reports, click Transactional Email Jobs Processed. The Transactional Email Jobs Processed reportpage appears.
3. In theDate range field, select the time period of the transactional email jobs to analyze.
4. In theGrouping field, select whether to group the results by every two hours or on a daily or monthlyinterval.
5. By default, the report includes all transactional email from the selected time period. To include onlyspecific email, specify the criteria of the email to include, such as by recipient or subject.
6. Click View report. The report generates. From the report menu bar, you can print or export the report asnecessary.
General Purpose Email Jobs Processed ReportWith the General Purpose Email Jobs Processed report, you can view information about the general purposeemail jobs processed during a specific date or period of time. For example, you can run the report to view howmany email jobs processed for the time period. When you generate the report, you select whether to group theresults by every two hours or on a daily or monthly interval. You can also select to include only email that meetsspecific criteria, such as subject.For each interval, the report displays each general purpose email job that meets the selected criteria processedduring the selected time period. For each job, you can view information such as its description, subject, and thedates added and changed. You can also view a bar chart of the total emails that meet the selected criteriaprocessed for each interval.
} View the General Purpose Email Jobs Processed report
1. From Administration, click Email services. The Email Services page appears.
2. Under Reports, click General Purpose Email Jobs Processed. The General Purpose Email Jobs Processedreport page appears.
3. In theDate range field, select the time period of the general purpose email jobs to analyze.
EMAIL MANAGEMENT 33

4. In theGrouping field, select whether to group the results by every two hours or on a daily or monthlyinterval.
5. By default, the report includes all general purpose email from the selected time period. To include onlyspecific email, specify the criteria of the email to include, such as by subject.
6. Click View report. The report generates. From the report menu bar, you can print or export the report asnecessary.
Undelivered EmailOn the Undelivered Email page, you can monitor undelivered email jobs to ensure that your email is workingproperly. The page displays undelivered email jobs within an hour of the time you send, and it removes anyemail jobs that are subsequently delivered. To open the page, from Administration, click Undelivered email.
The page summary lists the current statuses for those undelivered email jobs that were sent during the pastmonth, along with the number of email jobs for each status and a description of the status. The grid below thesummary displays details for the undelivered email jobs. By default, email jobs remain in the grid for a month,but you can filter the grid to display a different time frame. To do this, click Filter, select a cutoff date in the Jobscreated since field, and click Apply. The grid displays all email jobs during the time frame you select, but thesummary still only displays numbers for undelivered email jobs during the past month.To receive alerts when the program adds undelivered email jobs to the list, you can click View RSS Feed to opena web browser and subscribe to an RSS feed.
Note: To receive email alerts about changes on the Undelivered Email page, you can create a custom email alertfor the Undelivered Email Data List. However, when you select create the content for the body of the email alert,keep in mind that the EMAILADDRESS and RECIPIENTNAMEmerge fields are not applicable to all job types andstatuses. This means that if you include thesemerge fields and they are not applicable to an email job, the
34 CHAPTER 2

merge fields will be blank in the body of the email alert. For information about how to create email alerts, seeEmail Alerts on page 35.
Email AlertsWith email alerts, you can configure the program to automatically notify application users by email whenchanges in the database impact them. For example, you can set up alerts to inform users in Batch entry whenownership of batches transfer to them as the result of a batch status update.
Note: To generate system alerts, the program requires that you first set up a profile of DatabaseMail in yoursupported installation ofMicrosoft SQL Server. For information about how to configure DatabaseMail in SQLServer, visit theMicrosoft Developer Network (MSDN) at http://msdn.microsoft.com/en-us/library/ms175951.aspx.
To generate email alerts, you must configure information about the databasemail settings in Administration.You can then generate standard email alerts to inform users of changes in batch ownership or prospectmanagement or custom email alerts to meet the specific needs of your organization.
Manage Email AlertsYou can use email alerts to automatically notify application users by email when changes in the database impactthem. For example, users can receive email alerts when the ownership of a batch transfers to them. To view thesettings for email alerts at your organization and information about the types of email alerts your organizationuses, from Administration, click Email alerts. The Email alerts page appears.The program provides standard email alerts, such as to inform users in Batch entry when the ownership of abatch transfers to them. Your organization can also create custom email alerts to meet its specific needs. Fromthe Email Alerts page, you can manage the standard and custom email alerts your organization uses.
Edit Email Alert SettingsYou can use email alerts to automatically notify application users by email when changes in the database affectthem. To enable email alerts, you must enter information about your profile of DatabaseMail set up in SQLServer. If Blackbaud does not host your organization’s database, you must also enter information about thedatabase to use email alerts.
Note: When you enable email alerts for your organization, the Email preferences tab appears on applicationuser records. From this tab, users can select whether to receive specific types of email alerts and enter the emailaddress at which to receive the alerts. For information about the Email preferences tab, see Configure EmailPreferences for Users on page 48.
} Enable email alerts and configure database mail settings for alerts
To generate email alerts, the program requires that you first set up a profile of DatabaseMail in your supportedinstallation ofMicrosoft SQL Server. For information about how to configure DatabaseMail in SQL Server, visittheMicrosoft Developer Network (MSDN) at http://msdn.microsoft.com/en-us/library/ms175951.aspx.
1. From Administration, click Email alerts. The Email alerts page appears.
2. Under Tasks, click Edit alert settings. The Edit alert settings screen appears. For information about theitems on this screen, see Edit Alert Settings Screen on page 36.
EMAIL MANAGEMENT 35

3. To enable email alerts for your organization, select Enabled.
4. Under Database Mail settings, enter the name of your DatabaseMail profile set up in Microsoft SQLServer.
5. If Blackbaud does not host your organization’s database, the Application URL parts frame appears. Toinclude links to pages in the program in email alerts, enter the root URL to the program and the name ofthe database to use with the alerts.
6. Under Application link format, select whether you access the program through a web-based userexperience or aWindows-based user experience.
7. Click Save. You return to the Email alerts page.
Edit Alert Settings ScreenThe table below explains the items on the Email alerts screen. For information about how to access this screen,see Manage Email Alerts on page 35.
Screen Item Description
Enabled To generate email alerts to notify users of changes in the database that affect them,select this checkbox.
SQL ServerDatabaseMail Profile
To generate email alerts, the program requires that you first set up a profile of DatabaseMail in Microsoft SQL Server. If you select Enabled, enter the name of the DatabaseMailprofile to generate email alerts.
ApplicationURL root
If Blackbaud does not host your database, this field appears. If you select Enabled, toinclude links to pages in the program within the email alerts, enter the root URL to theprogram.
Selecteddatabase
If Blackbaud does not host your database, this field appears. If you select Enabled, enterthe name of the database to use with the email alerts.
Applicationlink format
Select whether you access the program through a web browser-based user experience.or aWindows-based user experience.
36 CHAPTER 2

Standard Email Alert TypesOn the Email alert types tab, you can view the types of standard email alerts your organization uses. To updatethe information in the grid, click Refresh List.To view additional information about an email alert, such as the users who receive the alert and the emailmessage they receive, click its name under Email alert types. The record of the email alert type appears. Forinformation about the items on this record, see Email Alert Record on page 38.
Custom Email Alert TypesTo meet the needs of your organization, you can create custom email alerts, such as to inform users when aspecific constituent makes a large donation. To manage the custom email alerts for your organization, select theCustom email alert types tab.Under Custom email alert types, you can view the types of custom email alerts your organization uses. Toupdate the information in the grid, click Refresh List.To view additional information about an email alert, such as the users who receive the alert and the emailmessage they receive, click its name under Custom email alert types. The record of the email alert type appears.For information about the items on this record, see Email Alert Record on page 38.From the grid, you can add and manage the custom email alert types for your organization.
Add Custom Email Alert TypesTo meet the needs of your organization, you can create custom email alerts based on the activity of a data list.For example, you can create an email alert to inform users when a specific constituent makes a large donation.After you add a custom email alert type, you can configure its content and manage instances of the alert. You canalso edit and delete custom email alert types as necessary.
} Add custom email alert types
1. From Administration, click Email alerts. The Email alerts page appears.
2. Select the Custom email alert types tab.
3. Under Custom email alert types, click Add. The Add a custom email alert type screen appears.
4. Enter a unique name to help identify the alert type.
5. In theData list field, search for and select the data list on which to base the email alert.
6. Click Save. You return to the Email alerts page. Under Custom email alert types, the new alert typeappears.
7. To configure the email content and design of the email alert, click its name under Custom email alerttypes. The record of the alert appears.
Edit a Custom Email Alert TypeAfter you add a custom email alert type, you can edit its name as necessary. You cannot edit the data listassociated with the alert.
} Edit a custom email alert type
1. From Administration, click Email alerts. The Email alerts page appears.
2. Select the Custom email alert types tab.
EMAIL MANAGEMENT 37

3. Under Custom email alert types, select the alert type and click Edit. The Edit custom email alert typescreen appears.
4. Edit the name of the alert as necessary.
5. Click Save. You return to the Email alerts page.
Delete a Custom Email Alert TypeAfter you add a custom email alert type, you can delete it as necessary. To delete a custom email alert type fromthe Email alerts page, select it on the Custom email alert types tab and click Delete. When the confirmationmessage appears, click Yes. You return to the Email alerts page.
Email Alert RecordThe program automatically creates a record of each type of email alert your organization uses.To view the record of an email alert from the Email alerts page, click its name on the Email alert types or Customemail alert types tab.For a custom email alert or a task reminder email alert, you can view and manage the instances of the alert, theemail message sent with the alert, and the process that sends the alert to its users. To help you navigate throughthis information, the record contains theManage alert definition tab and Process Details tab.For a standard email alert other than a task reminder alert, you can view and manage the application users whoreceive the alert and the email message they receive from the record.Under Email content, the subject and body of the email message that application users receive with the alertappears. To edit the email message users receive, click Edit. For information about how to edit the email messageof an alert, see Edit Content of an Email Alert on page 39.
Note: The program automatically includes a link to the area of the application related to the email alert. Forexample, an email alert that notifies the user of a batch assignment automatically includes a link to the batch inBatch entry.
Under Users, the names of the application users who receive the email alert appear. To update the information inthe grid, click Refresh List. From the grid, you can also assign the alert to users or disable the alert for a selecteduser.From the record of a custom email alert or task reminder email alert, you can manage the process to send theemail alert to remind users to complete their tasks.
Manage Alert DefinitionFor a custom email alert or a task reminder email alert, theManage alert definition tab appears. From this tab,you can configure the email content sent with the alert and view and manage the instances of the alert.Under Email content, the subject and body of the email message that application users receive with the alertappears. To edit the email message users receive, click Edit. For information about how to edit the email messageof an alert, see Edit Content of an Email Alert on page 39.For a task reminder email alert, under Users, the names of the application users who receive the email alertappear. To update the information in the grid, click Refresh List. From the grid, you can also assign the alert tousers or disable the alert for a selected user.For a custom email alert, under Instances, you can view information about the alert, such as whether it has acontext record or parameters and howmany users to which it is assigned. The Enabled column indicates whetherthe alert is enabled. To update the information in the grid, click Refresh List.
38 CHAPTER 2

To view or manage the users assigned to an instance of a custom email alert, click its name under Instances . Therecord of the alert instance appears. For information about the items on this record, see Custom Email AlertInstance Record on page 43.Under Instances, you can also add and manage instances of the alert.
Edit Content of an Email AlertWhen application users receive an email alert, they receive an email message to notify them of changes in thedatabase that affect them. You can edit the subject or body of the email message to better fit the needs of yourorganization.
Note: The program automatically includes a link to the area of the application related to the email alert. Forexample, an email alert that notifies the user of a batch assignment automatically includes a link to the batch inBatch entry.
} Edit email content
1. From Administration, click Email alerts. The Email alerts page appears.
2. On the Email alerts page, select the alert with the email content to edit and click Go to alert type. Therecord of the email alert appears.
3. For a custom email alert or a task reminder email alert, select theManage alert definition tab.
4. Under Email content, click Edit. The Edit email content screen appears.
5. In the Email subject field, edit the subject line of the email message as necessary.
6. Under Email body, compose the email message users receive with the alert.
EMAIL MANAGEMENT 39

Under Available merge fields, a list ofmerge fields available for the type of email alert appears. Topersonalize themessage, usemerge fields to include information specific to the recipient or the changethat causes the email alert. To add a merge field in the body, select it under Available merge fields andclick the right arrow. For example, for an email alert about a change in the ownership of a batch, usemerge fields to include information about the number, type, and status of the batch.
7. Click Save. You return to the email alert record.
Assign an Email Alert to Application UsersWhen you assign an email alert to application users, they receive an email message to notify them of changes inthe database that affect them. You can assign email alerts to specific users or a selection of users.
Tip: Application users can select whether to receive specific email alerts. For information about how to select toreceive an email alert, see Subscribe to Email Alerts on page 45.
} Assign an email alert to application users
1. From Administration, click Email alerts. The Email alerts page appears.
2. Select the Email alert types tab.
3. Under Email alert types, click the name of the alert to assign to users. The record of the alert appears.
4. For a task reminder email alert, select theManage alert definition tab.
5. Under Users, click Assign to users. The Assign to users screen appears.
6. In the Assign to field, select whether to assign the email alert to selected users or a specific user.
7. If you select Selected users, in the Selection field, search for and select the selection of application usersto receive the email alert.
If you select Specific user, in theUser field, search for and select the application user to receive the emailalert.
8. Click Save. You return to the email alert record.
Disable an Email Alert for an Application UserAfter you assign an email alert to an application user, you can disable the alert for the user, such as if the userrequests to no longer receive the alert. To disable an email alert for an application user from the record of thealert, select the user under Users and click Disable alert. The program disables the email alert for the user andremoves the user from theUsers grid.
Tip: You can also enable email alerts for a user from the application user record. For information about how tomanage email alerts from the user record, see Enable or Disable Email Alerts for an Application User on page 48.
Add Instances of a Custom Email AlertAfter you add a custom email alert type, you can add instances of the alert. When you add an instance of analert, you configure the parameters of when the program sends the alert to user. The parameters depend on thedata list on which you base the alert. For example, if you create an alert to notify users when a constituent makesa large donation, you can configure the constituent and minimum donation amount for each instance of thealert.
} Add instances of an email alert
1. On the record of the email alert, select theManage alert definitions tab.
40 CHAPTER 2

2. Under Instances, click Add. The Add a custom email alert instance screen appears.
3. Enter a unique name to help identify the alert instance.
4. Enter the parameters of when to send the alert. For example, to send an alert to notify users when aconstituent makes a large donation, select the constituent and enter theminimum donation amount forwhich to send an alert.
5. Click Save. You return to the email alert record.
After you add an instance of an alert, you can then assign users to the instance so they can receive alertswhen you run the send process. For information about how to assign users to the instance, see AssignUsers to a Custom Email Alert Instance on page 43.
Edit an Instance of a Custom Email AlertAfter you add an instance of a custom email alert, you can edit its name and parameters as necessary.
} Edit an instance of a custom email alert
1. On the record of the email alert, select theManage alert definitions tab.
2. Under Instances, select an instance and click Edit. The Add a custom email alert instance screen appears.For information about the items on this screen, see Add Instances of a Custom Email Alert on page 40.
3. Edit the information as necessary.
4. Click Save. You return to the email alert record.
Disable or Enable an Instance of a Custom Email AlertYou can disable an instance of a custom email alert, such as when your organization temporarily does not requireits use. When you disable an instance of an alert, users assigned to the instance do not receive alerts based onthe instance. To disable an instance of a custom email alert, select it on theManage alert definition tab of theemail alert record and click Disable.After you disable an alert instance, you can enable it to resume its use. To enable an instance of a custom emailalert, select it on theManage alert definition tab of the email alert record and click Enable.
Delete an Instance of a Custom Email AlertYou can delete an instance of a custom email alert, such as when your organization no longer requires its use.When you delete an instance, you remove the instance and any historical information about its send process.
Tip: Rather than delete an instance of a custom email alert, you can disable the instance. When you disable aninstance, the program retains the instance and information about its process history, but users do not receivealerts based on the instance. For information about how to disable an instance, see Disable or Enable anInstance of a Custom Email Alert on page 41.
To delete an instance of a custom email alert from the record of the email alert, select it under Instances and clickDelete. When the confirmation message appears, click Yes. You return to the record of the email alert.
Process DetailsTo send alerts for a custom email alert type or a task reminder email alert, you must run a send process. Whenyou run the send process, the program determines whether changes to the selected data list match theparameters of the alert type. If the changes match the parameters, the program then automatically send alertsto the assigned users to inform them of the change. From the record of the email alert, you can start the send
EMAIL MANAGEMENT 41
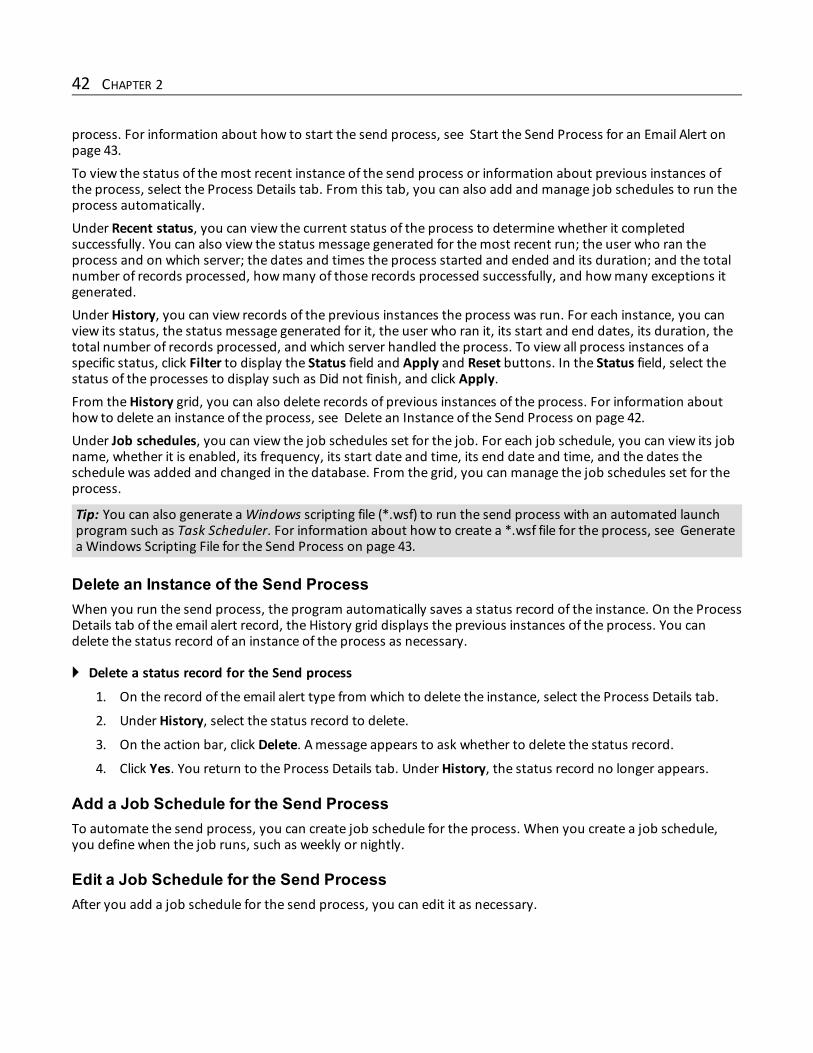
process. For information about how to start the send process, see Start the Send Process for an Email Alert onpage 43.To view the status of themost recent instance of the send process or information about previous instances ofthe process, select the Process Details tab. From this tab, you can also add and manage job schedules to run theprocess automatically.Under Recent status, you can view the current status of the process to determine whether it completedsuccessfully. You can also view the status message generated for themost recent run; the user who ran theprocess and on which server; the dates and times the process started and ended and its duration; and the totalnumber of records processed, howmany of those records processed successfully, and howmany exceptions itgenerated.Under History, you can view records of the previous instances the process was run. For each instance, you canview its status, the status message generated for it, the user who ran it, its start and end dates, its duration, thetotal number of records processed, and which server handled the process. To view all process instances of aspecific status, click Filter to display the Status field and Apply and Reset buttons. In the Status field, select thestatus of the processes to display such as Did not finish, and click Apply.From theHistory grid, you can also delete records of previous instances of the process. For information abouthow to delete an instance of the process, see Delete an Instance of the Send Process on page 42.Under Job schedules, you can view the job schedules set for the job. For each job schedule, you can view its jobname, whether it is enabled, its frequency, its start date and time, its end date and time, and the dates theschedule was added and changed in the database. From the grid, you can manage the job schedules set for theprocess.
Tip: You can also generate aWindows scripting file (*.wsf) to run the send process with an automated launchprogram such as Task Scheduler. For information about how to create a *.wsf file for the process, see Generatea Windows Scripting File for the Send Process on page 43.
Delete an Instance of the Send ProcessWhen you run the send process, the program automatically saves a status record of the instance. On the ProcessDetails tab of the email alert record, the History grid displays the previous instances of the process. You candelete the status record of an instance of the process as necessary.
} Delete a status record for the Send process
1. On the record of the email alert type from which to delete the instance, select the Process Details tab.
2. Under History, select the status record to delete.
3. On the action bar, click Delete. Amessage appears to ask whether to delete the status record.
4. Click Yes. You return to the Process Details tab. Under History, the status record no longer appears.
Add a Job Schedule for the Send ProcessTo automate the send process, you can create job schedule for the process. When you create a job schedule,you define when the job runs, such as weekly or nightly.
Edit a Job Schedule for the Send ProcessAfter you add a job schedule for the send process, you can edit it as necessary.
42 CHAPTER 2

Edit Job SchedulesAfter you create a job schedule for a process, you can update it as necessary. For example, you can adjust itsfrequency. You cannot edit the package selected to create the job schedule.
Delete a Job Schedule for the Send ProcessAfter you add a job schedule for the send process, you can delete it as necessary.
} Delete a job schedule
1. On the Job schedules tab, select the job and click Delete. A confirmation screen appears.
2. Click Yes. You return to the Job schedules tab.
Start the Send Process for an Email AlertTo send alerts for a custom email alert type or a task reminder alert, you must run a send process.• When you run the send process for a custom email alert, the program determines whether changes to theselected data list match the parameters of the alert type. If the changes match the parameters, the programthen automatically send alerts to the assigned users to inform them of the change.
• When you run the send process for a task reminder alert, the program determines whether users assigned tothe alert have active tasks with a a due date set for the current date or a future date. If assigned users haveactive tasks, the program then automatically sends alerts to the users who have not already received areminder for the task.
To start the send process from the record of the email alert, click Start send process under Tasks. The status ofthe process appears on the Process Details tab of the email alert record.For information about the Process Details tab, see Process Details on page 41.
Generate a Windows Scripting File for the Send ProcessYou can generate aWindows scripting file (*.wsf) to use to run the send process with an automated launchprogram such as Task Scheduler.
Custom Email Alert Instance RecordAfter you add an instance of a custom email alert, you can assign users to the instance so they can receive alertswhen you run the send process. To view and manage the users assigned to the instance of an alert, access therecord of the instance. To access the record of an instance from the record of its email alert type, click its nameunder Instances.Under Assigned users, you can view the application users assigned to receive alerts for the instance. You canview the display and user names and the email address at which each user receives the alert. To view additionalinformation about a user, click the user's name. The record of the user appears.From the grid, you can manage the assignment of users as necessary.
Assign Users to a Custom Email Alert InstanceWhen you assign application users to an instance of a custom email alert, they receive an email message to notifythem of changes in the database that match the parameters of the alert instance. You can assign a single user ora selection of users to an email alert instance.
EMAIL MANAGEMENT 43

} Assign a single user to an email alert instance
1. On the record of the custom email alert type with the instance to which to assign the user, select theManage alert definition tab.
2. Under Instances, click the name of the instance to assign the user. The record of the instance appears.
3. Under Assigned users, click Assign and select User. The Add user to custom email alert instance screenappears.
4. In the Application user field, search for and select the user to assign to the instance.
5. Click Save. You return to the record of the instance.
} Assign a selection of users to an email alert instance
1. On the record of the custom email alert type with the instance to which to assign the users, select theManage alert definition tab.
2. Under Instances, click the name of the instance to assign the user. The record of the instance appears.
3. Under Assigned users, click Assign and select Bulk. The Assign users to a custom email alert instancescreen appears.
4. In the Assign users from selection field, search for and select the selection of application users to assignto the instance.
5. Click Save. You return to the record of the instance.
Unassign Users from a Custom Email Alert InstanceYou can unassign users from an instance of a custom email alert instance, such as if they request to no longerreceive the alert. You can unassign a single user or multiple users from an email alert instance.
} Unassign a single user from an email alert instance
1. On the record of the custom email alert type with the instance from which to unassign the user, selecttheManage alert definition tab.
2. Under Instances, click the name of the instance to remove from the user. The record of the instanceappears.
3. Under Assigned users, select the user to remove from the instance.
4. On the action bar, click Unassign and select User. A confirmation message appears.
5. Click Yes. You return to the record of the alert instance.
} Unassign multiple users from an email alert instance
1. On the record of the custom email alert type with the instance from which to unassign the users, selecttheManage alert definition tab.
2. Under Instances, click the name of the instance to remove from the users. The record of the instanceappears.
3. Under Assigned users, click Unassign and select Bulk. The Unassign users from a custom email alertscreen appears.
4. Select whether to unassign all currently subscribed users or only a selection of users.
44 CHAPTER 2

If you select Unassign selected users, search for and select the selection of application users to removefrom the alert instance.
5. Click Yes. You return to the record of the instance.
Subscribe to Email AlertsThroughout the program, you can select to receive email alerts as notification for various changes to thedatabase. When you subscribe to an email alert, you can enter the email address at which you receive the alert.
Tip: You can also enable email alerts from your application user record. For information about how to manageemail alerts from an application user record, see Enable or Disable Email Alerts for an Application User on page48.
Configure Appeal Mailing Task Email AlertsFrom the record of an appeal mailing, you can select to receive email alerts as notifications when the ownershipof an appeal mailing task transfers to you. You can also select to receive alerts as reminders of tasks to completefor the appeal mailing.
} Configure settings for email alerts for appeal mailing tasks
To generate email alerts inMarketing and Communications, the system administrator must first configure yourdatabasemail settings. For information about how to configure these settings, see Manage Email Alerts on page35.
1. Open the record of the appeal mailing for which to receive email alerts.
2. Under Tasks, click Email alerts. The Configure appeal mailing task email alerts screen appears.
3. Select whether to receive email alerts when the ownership of a task for themailing transfers to you.
4. To receive email alerts to remind you of tasks pending for themailing, select Send me an alert for taskreminders.
5. If you select to receive an alert, in the Send email alerts to field, enter the email address to receive alerts.
6. Click Save. You return to the appeal mailing record.
Configure Batch Email AlertsIn Batch entry, you can select to receive email alerts as notification when the ownership of batches transfer toyou as the result of a batch status update, the addition of a new batch, or an edit of a batch’s properties.
} Configure settings for email alerts for batches
To generate email alerts in Batch entry, the system administrator must first configure your databasemailsettings. For information about how to configure these settings, see Manage Email Alerts on page 35.
1. On the Batch Entry page, click Email alerts under Tasks. The Configure batch email alerts screen appears.
2. Select whether to receive email alerts when the ownership of a batch transfers to you in Batch entry.
3. If you select to receive an alert, in the Send email alerts to field, enter the email address to receive alerts.
4. Click Save. You return to the Batch Entry page.
EMAIL MANAGEMENT 45

Configure Prospect Email AlertsIn Prospects, major giving fundraisers can select to receive email alerts as notification when they become themanager on a prospect or prospect plan. For example, you can Email alerts to notify fundraisers when anotheruser assigns them as the primary or secondary manager on the record of a prospect plan.To generate system alerts for a fundraiser, you must Email alerts from the record of the fundraiser to receive thealerts. To receive email alerts, the fundraiser must be linked to an application user.
} Configure prospect email alerts for a fundraiser
To generate email alerts in Prospects, the system administrator must first configure your databasemail settings.For information about how to enable email alerts, see Manage Email Alerts on page 35.
1. Open the record of the fundraiser to receive email alerts.
2. Under Tasks, click Email alerts. The Configure prospect email alerts screen appears. For informationabout the items on this screen, see Configure Prospect Email Alerts Screen on page 46.
Note: To receive email alerts, the fundraiser must be linked to an application user. If Email alerts isdisabled, you must first link the fundraiser to a user. For information about how to link constituents toapplication users, see the Constituents Guide.
3. Select when the fundraiser should receive an email alert. To select an option, select its checkbox.
4. In the Send email alerts to field, enter the email address to receive alerts sent to the fundraiser.
5. Click Save. You return to the fundraiser record.
Configure Prospect Email Alerts ScreenThe table below explains the items on the Configure prospect email alerts screen. For information about how toaccess this screen, see Configure Prospect Email Alerts on page 46.
Screen Item Description
Send me analert when I amassigned as theprospectmanager
To notify the fundraiser when another user assigns the fundraiser as the primarymanager on a prospect, select this checkbox. When you select this checkbox, thefundraiser receives an email alert when assigned as themanager during the additionor edit of a major giving prospect record or from the Prospect and Plans tab of thefundraiser’s record.For more information about major giving prospects and fundraisers, see theProspects Guide.
46 CHAPTER 2

Screen Item DescriptionSend me analert when I asassigned as theprimarymanager on aprospect plan
To notify the fundraiser when another user assigns the fundraiser as the primarymanager on a prospect plan, select this checkbox. When you select this checkbox, thefundraiser receives an email alert when assigned as the primary manager during theaddition of a prospect plan, from the Fundraisers and Participants tab of the prospectplan record, or from the Prospect and Plans tab of the fundraiser’s record.For more information about prospect plans and fundraisers, see the Prospects Guide.
Send me analert when I asassigned as thesecondarymanager on aprospect plan
To notify the fundraiser when another user assigns the fundraiser as the secondarymanager on a prospect plan, select this checkbox. When you select this checkbox, thefundraiser receives an email alert when assigned as the secondary manager duringthe addition of a prospect plan, from the Fundraisers and Participants tab of theprospect plan record, or from the Prospect and Plans tab of the fundraiser’s record.For more information about prospect plans and fundraisers, see the Prospects Guide.
Send emailalerts to Enter the email address to receive email alerts sent to the fundraiser.
Configure Marketing Plan Item Task Email AlertsFromMarketing and Communications, you can select to receive email alerts as notification when the ownershipof tasks for items on marketing items transfer to you, such as the result of a the addition of a new task or an editof an item task.
} Configure settings for email alerts for marketing plan item tasks
To generate email alerts inMarketing and Communications, the system administrator must first configure yourdatabasemail settings. For information about how to configure these settings, see Manage Email Alerts on page35.
1. Open the record of themarketing plan for which to receive email alerts.
2. Under Tasks, click Email alerts. The Configure plan item task email alerts screen appears.
3. Select whether to receive email alerts when the ownership of an item task for themarketing plantransfers to you.
4. If you select to receive an alert, in the Send email alerts to field, enter the email address to receive alerts.
5. Click Save. You return to themarketing plan record.
Configure Event Task Email AlertsFrom the record of an event, you can select to receive email alerts as reminders of tasks to complete for theevent.
} Configure settings for email alerts for event tasks
To generate email alerts in Events, the system administrator must first configure your databasemail settings. Forinformation about how to configure these settings, see Manage Email Alerts on page 35.
1. Open the record of the event for which to receive email alerts.
2. Under Tasks, click Configure email alerts. The Configure event task email alerts screen appears.
3. To receive email alerts to remind you of tasks pending for the event, select Send me an alert for taskreminders.
4. If you select to receive an alert, in the Send email alerts to field, enter the email address to receive alerts.
5. Click Save. You return to the event record.
EMAIL MANAGEMENT 47

Configure Email Preferences for UsersThe Email preferences tab appears on application user records. On this tab, you can view and manage the emailalerts that the application user receives and the email address at which the user receives alerts.
Note: The Email preferences tab appears on application user records only if you have enabled email alerts. Formore information, see Edit Email Alert Settings on page 35.
Under Email alert settings, the email address at which the application user receives email alerts appears. Forinformation about how to edit the email address, see Edit Alert Settings for an Application User on page 48.Under Email alerts, the types of email alerts the application user can receive appears. To update the informationin the grid, click Refresh List. For each alert, you can viewwhether the alert is enabled for the user. Forinformation about how to select the alerts the user receives, see Enable or Disable Email Alerts for an ApplicationUser on page 48.Under Custom email alerts, the types of custom email alerts the application user can receive appears. To updatethe information in the grid, click Refresh List. For each alert, you can view its type and name. When the user isassigned to the alert from the alert record rather than the application user record, a checkmark appears in the Issystem-defined column. From the grid, you can add and manage the custom email alerts assigned to anapplication user. For information about how to manage the custom email alerts assigned to a user, see ManageCustom Email Alerts for an Application User on page 49.
Edit Alert Settings for an Application UserFor an application user to receive email alerts, you must enter the email address at which the user prefers toreceive the alerts. You can edit this email address as necessary, such as if the user changes the preferred address.
} Edit alert settings
1. On the record of the application user with the alert settings to edit, select the Email preferences tab.
2. Under Alert settings, click Edit. The Edit alert settings screen appears.
3. Enter the email address where the user requests to receive email alerts.
4. Click Save. You return to the application user record.
Enable or Disable Email Alerts for an Application UserWith email alerts, the program can automatically notify application users by email when changes in the databaseimpact them. From the record of an application user, you can manage the email alerts the user receives.
Note: When you enable an alert, the user receives the selected alert type at the email address that appearsunder Alert settings on the Email preferences tab. If the user does not have an email address entered when youattempt to enable an alert, the Edit alert settings screen appears so you can enter an address for the user. Forinformation about the Edit alert settings screen, see Edit Alert Settings for an Application User on page 48.
} Enable an email alert for an application user
1. On the record of the application user for whom to enable the email alert, select the Email preferencestab.
2. Under Email alerts, select the alert to enable.
48 CHAPTER 2

3. On the action bar, click Enable. The program enables the email alert for the user. You return to the Emailpreferences tab. Under Email alerts, a checkmark appears in the Enabled column for the selected alert.
} Disable an email alert for an application user
1. On the record of the application user for whom to disable the email alert, select the Email preferencestab.
2. Under Email alerts, select the alert to disable.
3. On the action bar, click Disable. The program disables the email alert for the user. You return to the Emailpreferences tab.
Manage Custom Email Alerts for an Application UserYour organization can create custom email alerts to inform users of activity in the database. For example, youcan create an alert to inform a user when specific constituents make a large donation. From the record of anapplication user, you can manage the custom email alerts the user receives.
Note: When you assign a custom alert to a user, the user receives the selected alert type at the email addressthat appears under Alert settings on the Email preferences tab. If the user does not have an email addressentered when you attempt to assign an alert, the Edit alert settings screen appears so you can enter an addressfor the user. For information about the Edit alert settings screen, see Edit Alert Settings for an Application Useron page 48.
} Add a custom email alert to an application user
1. On the record of the application user for whom to enable the email alert, select the Email preferencestab.
2. Under Custom email alerts, click Add. The Alert type search screen appears so you can select the customemail alert type to add to the user.
3. After you select the alert type, the parameters screen for the selected alert type appears. Configure theparameters for when the user receives the alert. For example, to inform the user when a constituentmakes a large donation, select the constituent and enter theminimum revenue amount for which tosend an alert.
4. Click OK. You return to the Email preferences tab.
} Edit a custom email alert for an application user
1. On the record of the application user for whom to enable the email alert, select the Email preferencestab.
2. Under Custom email alerts, select the alert to edit.
3. On the action bar, click Edit. The parameters screen for the selected alert type appears.
4. Edit the information as necessary.
5. Click OK. You return to the Email preferences tab.
} Delete a custom email alert from an application user
When the user requests to no longer receive an alert, you can delete the alert from the user’s email preferences.
1. On the record of the application user for whom to enable the email alert, select the Email preferencestab.
EMAIL MANAGEMENT 49

2. Under Custom email alerts, select the alert to delete.
3. On the action bar, click Delete. Amessage appears to ask whether to delete the alert from the user.
4. Click Yes. You return to the Email preferences tab.
50 CHAPTER 2

Smart FieldsSmart Field Workflow 51
Manage Smart Fields 52
Smart Field Record 71
Smart Field Values 73
Certain fields available for user-defined reports, views, and queries do more than select a specific piece of data.These fields, called smart fields, combinemultiple pieces of data or decide which data to display based on what isavailable. You can use smart fields to provide time-saving flexibility when you mine information in your database.For example, you create a query of all donors in your database who gave $10,000, along with their first gift date.You routinely run this query, which takes a considerable amount of time to execute due to the size of yourdatabase and the complexity of the query—the server must calculate the total for every record in your database.As the number of records in your database increases, the time necessary to run the query also increases. Whenyou replace the summary fields in the query with smart fields, you improve the time it takes to run the queryconsiderably. The program automatically generates and caches the smart field values at intervals set by yoursystem administrator. In addition, smart field updates consider only records added to the database since the lastrun date and do not reconsider records already included in the value.
Smart Field WorkflowSmart fields provide users and managers who work in the program with quick access to specific information thatotherwise would take hours or days to compile.For example, one of the default smart field definitions included with the program counts appeals associated withconstituent records. Other smart fields track revenue information such as a constituent’s largest gift date andconstituent revenue amounts.After a smart field is created and the values are generated, users can use the smart fields to generate time-savingqueries and reports and view the information from the Smart Fields tab on the related record.
System Roles Involved in the Smart Field ProcessIf you use smart fields, you can create system roles that make sense for your organization. Typically, the smartfield workflow involves multiple people, including a smart field author, an administrator, and consumers who usethe data generated by the smart field. Here are the primary roles involved in the smart field process andexplanations of each:• Smart Field author: The ability to author smart field definitions is available as a customization. If you needdefinitions beyond those included in the program, contact your in-house developer or implementationconsultant.
chapter 3

• Smart Field administrator: The administrator creates smart fields based on management’s requests. Forexample, at the beginning of each quarter, a user in your organization generates a query to track constituentswho gave $1,000 or more in the previous quarter. Management makes its request to the administrator anddetails what the smart field values should represent. The administrator creates the smart fields and generatesvalues, which the program makes available to users in queries, reports, and related records. To satisfy thisuser, the smart field administrator creates two smart fields: one with constituent revenue amounts andanother with constituent revenue dates.
• Smart Field data consumer: The consumer is the individual who views and uses the data generated by thesmart field. Continuing with the smart field administrator example, the query user includes the “Value” field ofthe revenue amount smart field, assigning it a value Greater than or equal to $1,000, and the “Value” field ofthe revenue dates smart field, assigning it a value Equal to last quarter.
Manage Smart FieldsSmart fields provide users with quick access to specific information that otherwise could take hours or days tocomplete. After you create a smart field and generate its values, users can use it to generate time-saving queriesand reports and view the information on the Smart Fields tab on the related record. You can create and manageyour organization’s smart fields on the Smart Fields page in Administration. To access this page fromAdministration, click Smart fields.
Under Smart fields, you can view the smart fields your organization uses. For each smart field, you can view thedate the values were last generated, the type of record to which it applies, its type, and the type of data itdisplays. To update the information that appears in the grid, click Refresh List.
Note: The program provides system smart fields used to calculate several values. You cannot delete the defaultsmart fields. For information about these smart fields and the values they generate, see Smart Field Values onpage 73.
To view information about a specific smart field, such as about its recent and previous updates and any jobschedules set for the update, select the field in the Smart fields grid and click View process history. The record ofthe smart field appears. For information about the items on the record, see Smart Field Record on page 71.
52 CHAPTER 3

To view information about a specific smart field, such as about its recent and previous updates and any jobschedules set for the update, select the field in the Smart fields grid and click View process history. The record ofthe smart field appears.To view details about a smart field, select the field in the Smart fields grid and click Show details. The detailswindow displays the date the field was last updated, the value groups used, and the sites associated with thefield.From the grid, you can perform multiple tasks to manage the smart fields your organization uses. Depending onyour security rights and system role, you can update the relationships between smart fields and new queryviewsfrom the record.When you click the Filter button, the Sites field appears so you can filter the smart fields in the grid by site. ASites column also appears in the grid for each smart field. The Site field and Site column refer to the sitesassigned on the Site filtering tab, not the sites assigned on the Parameters tab.If you add a new queryview, such as through a customization process, after you create a smart field, the newqueryview does not automatically add the smart field. From the Smart Fields page, you can update therelationships between your smart fields and queries. For information about how to update these relationships,see Update Smart Field Query Relationships on page 71.
Add Smart FieldsSmart fields provide users with quick access to specific information that otherwise could take hours or days tocomplete. You can add smart fields to quickly generate data values your organization routinely requires. Theprocedure to create a smart field varies, based on the selected smart field definition.
} Add a gift amounts smart field
The exact procedure to create a specific smart field varies based on the Smart Field definition you select. Thisprocedure is based on the following scenario.
Scenario: A prospector in your organization begins each quarter by querying constituent records for donorswho gave a total of $1,000 or more the previous quarter. Due to the size of the database, this query takes a con-siderable amount of time to run. In an effort to save time, he has requested that the system administrator cre-ate smart fields to help. In addition, the prospector has asked that the gift smart field include his ratinginformation: Fair = $1,000; Good = $3,000; and Excellent = $5,000. Finally, he asked that all gift types be includedbut not soft credits. The administrator has determined two smart fields are necessary: one to determine giftamounts and another for gift dates. This procedure shows you how to create the gift amounts smart field.
1. From Administration, click Smart fields. The Smart Fields page appears.
Note: If you need smart field definitions beyond those included in the program, contact your in-housedeveloper or implementation consultant.
2. Click Add. The Select a smart field definition screen appears. Definitions specify how to calculate a smartfield.
For this scenario, select “RE7 Gift Amounts.”
3. Click OK. The Add gift amounts smart field screen appears.
4. On the General tab, enter a name for your smart field. For this scenario, enter “Gift Amounts.”
5. In theDescription field, enter a description for the field, such as how it should be used.
SMART F IELDS 53

6. Under Value groups, select Use value groups. In this scenario, the prospector wants three value groups:“Fair” for $1,000 donors; “Good” for $3,000 donors; and “Excellent” for $5,000 donors. For informationabout how to add value groups, see Add Value Groups to a Smart Field on page 69.
7. Select the Parameters tab.
8. In the Aggregate typefield, select the calculation type for the smart field. For this scenario, select "Totalgift amount" because the prospector wants each constituent’s total gift for the previous quarter.
9. In theGift selection field, select the selection that contains all gifts from the last quarter.
10. Because you do not want to include soft credits, in the Include field, select "Gifts only."
54 CHAPTER 3

11. Click Save. The smart field is added to the system, and you return to the Smart Fields page. You nowmust process the smart field. This makes the smart field value available for queries, reports, and inrelated records.
} Add a constituent revenue amounts smart field
The exact procedure to create a specific smart field varies based on the Smart Field definition you select. Forexample, if you select the “Constituent appeal count” definition, the Parameters tab on the Add constituentappeal count smart field screen requests information specific to appeals, such as the business units andcategories to include in the smart field value. If you select the “Constituent revenue amounts” definition, theParameters tab on the Add constituent revenue amounts smart field screen requests information specific torevenue, such as calculation type and revenue type to include in the smart field value. This procedure is based onthe following scenario.
Scenario: A prospector in your organization begins each quarter by querying constituent records for donorswho gave a total of $1,000 or more the previous quarter. Due to the size of the database, this query takes a con-siderable amount of time to run. In an effort to save time, he has requested that the system administrator cre-ate smart fields to help. In addition, the prospector has asked that the revenue smart field included his ratinginformation: Fair = $1,000; Good = $3,000; and Excellent = $5,000. Finally, he asked that all revenue types beincluded but not soft credits. The administrator has determined two smart fields are necessary: one to determ-ine revenue amounts and another for revenue dates. This procedure shows you how to create the revenueamount smart field.
SMART F IELDS 55
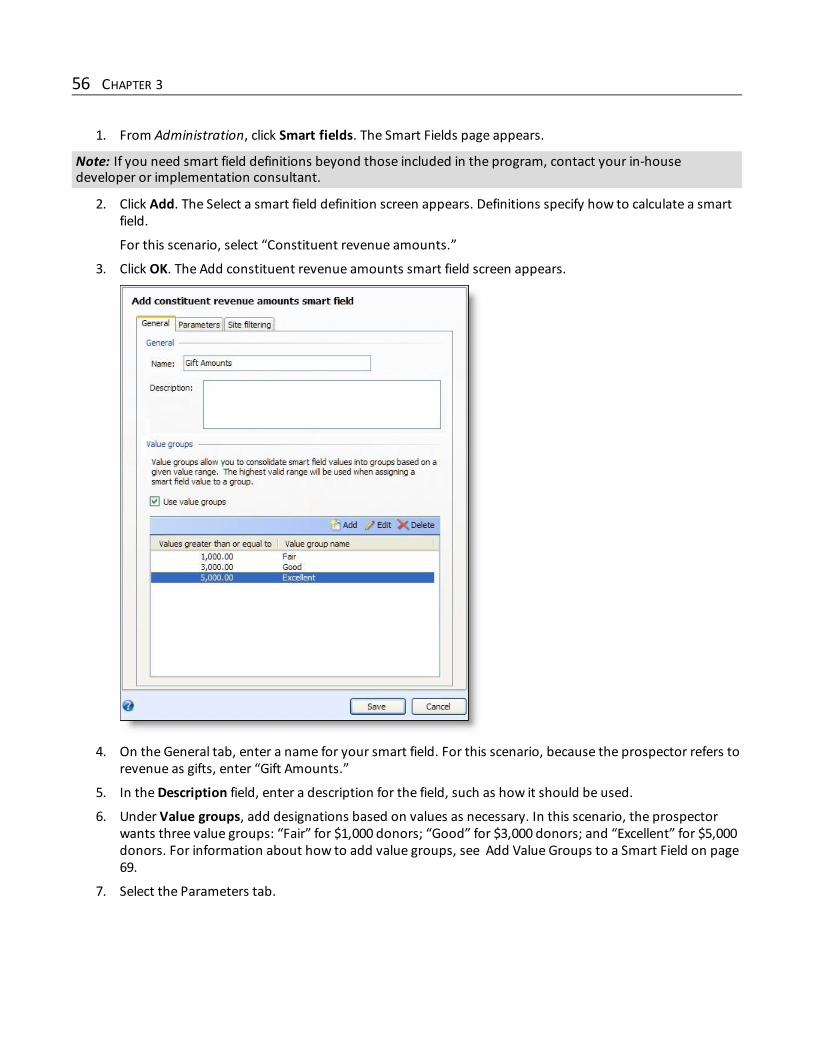
1. From Administration, click Smart fields. The Smart Fields page appears.
Note: If you need smart field definitions beyond those included in the program, contact your in-housedeveloper or implementation consultant.
2. Click Add. The Select a smart field definition screen appears. Definitions specify how to calculate a smartfield.
For this scenario, select “Constituent revenue amounts.”
3. Click OK. The Add constituent revenue amounts smart field screen appears.
4. On the General tab, enter a name for your smart field. For this scenario, because the prospector refers torevenue as gifts, enter “Gift Amounts.”
5. In theDescription field, enter a description for the field, such as how it should be used.
6. Under Value groups, add designations based on values as necessary. In this scenario, the prospectorwants three value groups: “Fair” for $1,000 donors; “Good” for $3,000 donors; and “Excellent” for $5,000donors. For information about how to add value groups, see Add Value Groups to a Smart Field on page69.
7. Select the Parameters tab.
56 CHAPTER 3

8. In the Value to return field, select the calculation type for the smart field. For this scenario, select Totalgift amount because the prospector wants each constituent’s total gift for the previous quarter.
9. If necessary, select whether to base the smart field on specific dates or recent dates, and enter the timeperiod for the smart field.
For this scenario, the revenue date smart field and the values selected by the prospector in Querydetermine the time period for the smart field, so leave the fields blank.
10. Under Revenue types and designations, select the revenue types to include in the smart field value. Forthis scenario, the prospector requested all types of revenue, so select all the checkboxes.
11. You can filter revenue included in the smart field value based on the designation associated with therevenue. Under Designations, search for and select the designations to use in your smart field value. Ifyou do not select a designation, the value includes revenue from all designations. No designations wererequested for this smart field.
12. You can filter revenue included in the smart field value based on the campaign associated with therevenue. Under Campaigns, search for and select the campaigns to use in your smart field value. If youdo not select a campaign, the value includes revenue from all campaigns. No campaigns were requestedfor this smart field.
13. Click Save. The smart field is added to the system, and you return to the Smart Fields page. You nowmust process the smart field. This makes the smart field value available for queries, reports, and inrelated records.
SMART F IELDS 57

} Add a constituent revenue date smart field
This procedure is a continuation of the scenario outlined in the Add a constituent revenue amounts smart fieldon page 55.
1. On the Smart Fields page, click Add. The Select a smart field definition screen appears. Definitions specifyhow to calculate a smart field.
Note: If you need smart field definitions beyond those included in the program, contact your in-housedeveloper or implementation consultant.
For this scenario, select “Constituent revenue dates.”
2. Click OK. The Add constituent revenue dates smart field screen appears.
58 CHAPTER 3

3. On the General tab, enter a name for your smart field. For this scenario, because the prospector refers torevenue as gifts, enter “Gift dates.”
4. In theDescription field, enter a description for the field, such as how it should be used.
5. Under Value groups, add designations based on values as necessary. In this scenario, value groups arenot needed for the gift date smart field.
6. Select the Parameters tab.
SMART F IELDS 59

7. In the Value to return field, select the calculation type for this smart field. For this scenario, select Latestdate.
8. If necessary, in the Start date and End date fields, select the time period for the smart field. For thisscenario, the values selected by the prospector in Query determine the time period, so leave the fieldsblank.
9. Under Revenue types and designations, select the revenue types to include in the smart field value. Forthis scenario, the prospector requested all types of revenue, so select all the checkboxes.
10. You can filter dates included in the smart field value based on the designation. Under Designations,search for and select the designations to use in your smart field value. If you do not select a designation,the value includes revenue from all designations. No designations were requested for this smart fieldscenario.
11. You can filter dates included in the smart field value based on the campaign. Under Campaigns, searchfor and select the campaigns to use in your smart field value. If you do not select a campaign, the valueincludes revenue from all campaigns. No campaigns were requested for this smart field scenario.
12. Click Save. The smart field is added to the system, and you return to the Smart Fields page. You nowmust process the smart field. This makes the smart field value available for queries, reports, and inrelated records.
} Add a constituent revenue application amounts smart field
The exact procedure to create a specific smart field varies based on the Smart Field definition you select. Forexample, if you select the “Constituent appeal count” definition, the Parameters tab on the Add constituentappeal count smart field screen requests information specific to appeals, such as the business units andcategories to include in the smart field value. If you select the “Constituent revenue application amounts”definition, the Parameters tab on the Add constituent revenue application amounts smart field screen requests
60 CHAPTER 3

information specific to revenue, such as revenue type and recognition credit type to include in the smart fieldvalue. This procedure is based on the following scenario.
Scenario: A prospector in your organization begins each quarter by querying constituent records for donorswho gave a total of $1,000 or more the previous quarter. Due to the size of the database, this query takes a con-siderable amount of time to run. In an effort to save time, he has requested that the system administrator cre-ate smart fields to help. In addition, the prospector has asked that the revenue smart field included his ratinginformation: Fair = $1,000; Good = $3,000; and Excellent = $5,000. Finally, he asked that all revenue types beincluded but not soft credits. The administrator has determined two smart fields are necessary: one to determ-ine revenue amounts and another for revenue dates. This procedure shows you how to create the revenueapplication amount smart field.
1. From Administration, click Smart fields. The Smart Fields page appears.
Note: If you need smart field definitions beyond those included in the program, contact your in-housedeveloper or implementation consultant.
2. Click Add. The Select a smart field definition screen appears. Definitions specify how to calculate a smartfield.
For this scenario, select “Constituent revenue application amounts.”
3. Click OK. The Add constituent revenue application amounts smart field screen appears.
SMART F IELDS 61

4. On the General tab, enter a name for your smart field. For this scenario, because the prospector refers torevenue as applications, enter “Application Amounts.”
5. In theDescription field, enter a description for the field, such as how it should be used.
6. Under Value groups, add values as necessary. In this scenario, the prospector wants three value groups:“Fair” for $1,000 donors; “Good” for $3,000 donors; and “Excellent” for $5,000 donors. For informationabout how to add value groups, see Add Value Groups to a Smart Field on page 69.
7. Select the Parameters tab.
8. In the Value to return field, select the calculation type for the smart field. For this scenario, select “Totalapplication amount” because the prospector wants each constituent’s total application for the previousquarter.
9. In the For field, select “Constituent revenue” because the prospector wants to base the smart field onconstituent revenue.
10. If necessary, select whether to base the smart field on specific dates or recent dates, and enter the timeperiod for the smart field.
For this scenario, the revenue date smart field and the values selected by the prospector in Querydetermine the time period for the smart field, so leave the fields blank.
11. Under Revenue types, select the revenue types to include in the smart field value. For this scenario, theprospector requested all types of revenue, so select all the checkboxes.
12. Under Transaction type/Application, select the application types to include in the smart field value. Forthis scenario, the prospector requested all application types, so select all the checkboxes.
62 CHAPTER 3

13. You can filter revenue included in the smart field value based on a selection. In the Application selectionfield, search for and select the selection to use in your smart field value. No application selection wasrequested for this smart field.
14. Under Timeframe, select the date range for applications to include. You can also select whether toinclude historical household data or include data only from current household members.
15. To restrict the records processed in the calculation by site, under Sites, select the sites to include. Thesites available in the grid are only those you have rights to. If you do not select sites, the smart field iscalculated for all sites in the organization.
The sites selected on the Parameters tab do not have to match those selected on the Site Filtering tab.
Note: If the sites selected in the grid are not the same as those assigned to the application selection, this mayresult in no records being calculated by the smart field. For example, a selection includes gifts from Site A. Whenyou add this selection to a Constituent Revenue Application Counts smart field assigned to Site B, no recordsare returned because because the sites conflict.
16. Select the Site filtering tab.
17. To enable site filtering, select Site filter enabled.
18. In the Site grid, select sites to associate with this smart field. For this scenario, select “Site 1” and “Site 3.”
Warning: If a user can add or edit smart fields but does not have rights to all sites, Site filter enabled isselected by default and the checkbox is disabled. The Site grid is enabled and contains only those sites availableto a user.
SMART F IELDS 63

The sites you select here in combination with user security setup determine the smart fields a user canview on constituent records, sponsorship child records, and sponsorship project records. When youassociate a site with a smart field, a filter is created so that only users with rights to sites you select canview the associated smart fields on the Smart Fields page. Sites selected on the Site filtering tab do notrestrict the smart field from inclusion in a process.
Note: Site settings on the Parameters tab and Site filtering tab work independently of each other and do nothave to match. Site filtering simply restricts the smart fields a user can view on the Smart Fields tab of records.Sites selected on the Parameters tab restrict the records included in the smart field calculation.
Note: Not all sites appear as selections in the Site grid. Available sites are determined by permissions and sitesassigned to a user’s system role. Only those sites assigned to a user through a system role that is associatedwith the smart field add or edit permission appear as selections in the grid.
19. Click Save. The smart field is added to the system, and you return to the Smart Fields page. You nowmust process the smart field. This makes the smart field value available for queries, reports, and inrelated records.
} Add a constituent revenue application dates smart field
This procedure is a continuation of the scenario outlined in the Add a constituent revenue application amountssmart field on page 60.
64 CHAPTER 3

1. On the Smart Fields page, click Add. The Select a smart field definition screen appears. Definitions specifyhow to calculate a smart field.
Note: If you need smart field definitions beyond those included in the program, contact your in-housedeveloper or implementation consultant.
For this scenario, select “Constituent revenue application dates.”
2. Click OK. The Add constituent revenue application dates smart field screen appears.
3. On the General tab, enter a name for your smart field. For this scenario, because the prospector refers torevenue as applications, enter “Application Dates.”
4. In theDescription field, enter a description for the field, such as how it should be used.
5. Under Value groups, add values as necessary. In this scenario, value groups are not needed for theapplication date smart field.
6. Select the Parameters tab.
SMART F IELDS 65

7. In the Value to return field, select the calculation type for the smart field. For this scenario, select “Lastapplication date.”
8. In the For field, select “Constituent revenue” because the prospector wants to base the smart field onconstituent revenue.
9. If necessary, in the Start date and End date fields, select the time period for the smart field. For thisscenario, the values selected by the prospector in Query determine the time period, so leave the fieldsblank.
10. Under Revenue types, select the revenue types to include in the smart field value. For this scenario, theprospector requested all types of revenue, so select all the checkboxes.
11. Under Transaction type/Application, select the application types to include in the smart field value. Forthis scenario, the prospector requested all application types, so select all the checkboxes.
12. You can filter revenue included in the smart field value based on a selection. In the Application selectionfield, search for and select the selection to use in your smart field value. No application selection wasrequested for this smart field.
13. Under Timeframe, select the date range for applications to include. You can also select whether toinclude historical household data or include data only from current household members.
14. To restrict the records processed in the calculation by site, under Sites, select the sites to include. Thesites available in the grid are only those you have rights to. If you do not select sites, the smart field iscalculated for all sites in the calculation.
The sites selected on the Parameters tab do not have to match those selected on the Site Filtering tab.
66 CHAPTER 3

Note: If the sites selected in the grid are not the same as those assigned to the application selection, this mayresult in no records being calculated by the smart field. For example, a selection includes gifts from Site A. Whenyou add this selection to a Constituent Revenue Application Counts smart field assigned to Site B, no recordsare returned because revenue because the sites conflict.
15. Select the Site filtering tab.
16. To enable site filtering, select Site filter enabled.
17. In the Site grid, select sites to associate with this smart field. For this scenario, select “Site 1” and “Site 3.”
Warning: If a user can add or edit smart fields but does not have rights to all sites, Site filter enabled isselected by default and the entire checkbox is disabled. The Site grid is enabled and contains only those sitesavailable to a user.
The sites you select here in combination with user security setup determine the smart fields a user canview on constituent records, sponsorship child records, and sponsorship project records. When youassociate a site with a smart field, a filter is created so that only users with rights to sites you select canview the associated smart fields. Selecting sites here does not restrict smart fields from inclusion in aprocess.
Note: Site settings on the Parameters tab and Site filtering tab work independently of each other and do nothave to match. Site filtering simply restricts the smart fields a user can view on the Smart Fields tab of records.Sites selected on the Parameters tab restrict the records included in the smart field calculation.
SMART F IELDS 67

Note: Not all sites appear as selections in the Sites grid. Available sites are determined by permissions and sitesassigned to a user’s system role. Only those sites assigned to a user through a system role that is associatedwith the smart field add or edit permission appear as selections in the grid.
18. Click Save. The smart field is added to the system, and you return to the Smart Fields page. You nowmust process the smart field. This makes the smart field value available for queries, reports, and inrelated records.
Edit a Smart FieldYou can adjust a smart field and its parameters. After you edit a smart field, you must process it again to updateits values in the program.
} Edit a smart field
1. From Administration, click Smart fields. The Smart Fields page appears.
Note: To edit a smart field from its record, click Edit smart field under Tasks. For information about the record,see Smart Field Record on page 71.
2. Under Smart fields, select the smart field and click Edit. The Edit smart field screen appears. The items onthis screen are the same as the Add smart field screen. For information about the items on this screen,see Add Smart Fields on page 53.
3. Edit the information as necessary. For information about how to manage the value groups of the smartfield, see Add Value Groups to a Smart Field on page 69, Edit a Value Group for a Smart Field on page 69,and Delete a Value Group for a Smart Field on page 70.
4. Click Save. You return to the Smart Fields page.
5. To update the values available in the program, process the smart field.
Delete a Smart FieldAfter you add a smart field, you can delete it from the program, such as if your organization no longer uses itsvalues. When you delete a smart field, it and its values no longer appear in the program or on records.
Note: The program provides system smart fields used to calculate several values. You cannot delete thesesmart fields. For information about these smart fields and the values they generate, see Smart Field Values onpage 73.
} Delete a smart field
1. From Administration, click Smart fields. The Smart Fields page appears.
Note: To delete a smart field from its record, click Delete smart field under Tasks on the explorer bar. Forinformation about the record, see Smart Field Record on page 71.
2. Under Smart fields, select the smart field and click Delete. A confirmation message appears.
3. Click Yes. You return to the Smart Fields page.
68 CHAPTER 3
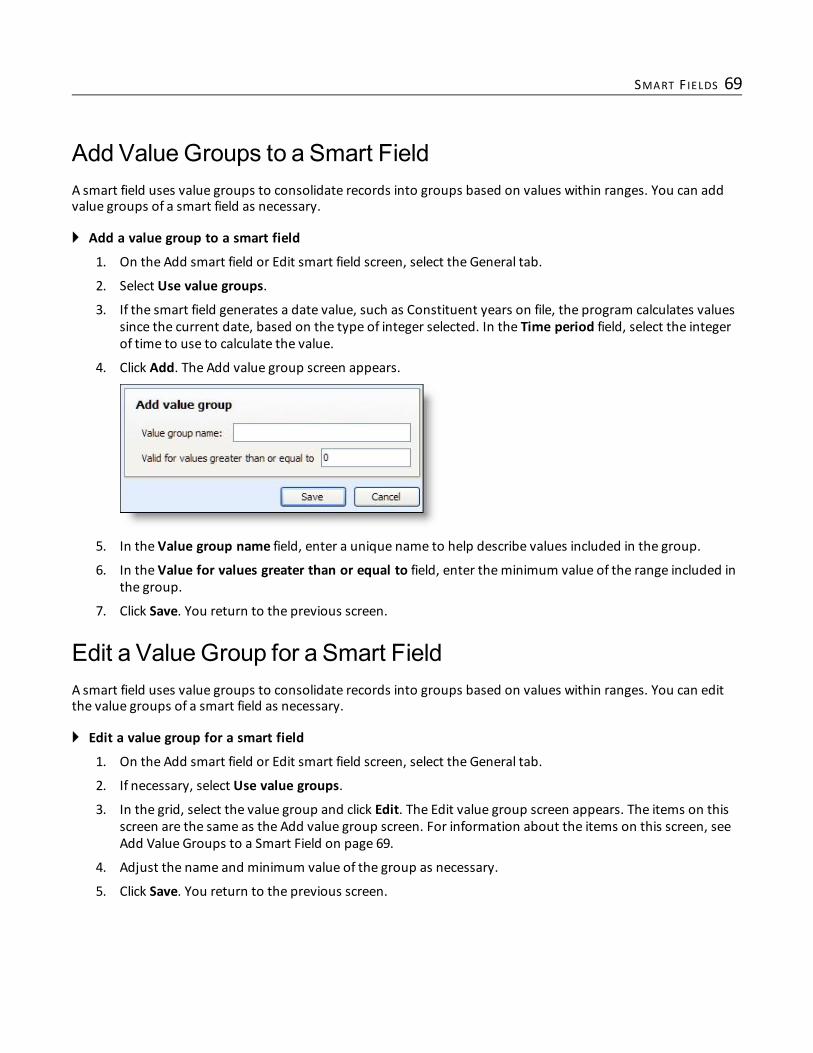
Add ValueGroups to a Smart FieldA smart field uses value groups to consolidate records into groups based on values within ranges. You can addvalue groups of a smart field as necessary.
} Add a value group to a smart field
1. On the Add smart field or Edit smart field screen, select the General tab.
2. Select Use value groups.
3. If the smart field generates a date value, such as Constituent years on file, the program calculates valuessince the current date, based on the type of integer selected. In the Time period field, select the integerof time to use to calculate the value.
4. Click Add. The Add value group screen appears.
5. In the Value group name field, enter a unique name to help describe values included in the group.
6. In the Value for values greater than or equal to field, enter theminimum value of the range included inthe group.
7. Click Save. You return to the previous screen.
Edit a Value Group for a Smart FieldA smart field uses value groups to consolidate records into groups based on values within ranges. You can editthe value groups of a smart field as necessary.
} Edit a value group for a smart field
1. On the Add smart field or Edit smart field screen, select the General tab.
2. If necessary, select Use value groups.
3. In the grid, select the value group and click Edit. The Edit value group screen appears. The items on thisscreen are the same as the Add value group screen. For information about the items on this screen, seeAdd Value Groups to a Smart Field on page 69.
4. Adjust the name and minimum value of the group as necessary.
5. Click Save. You return to the previous screen.
SMART F IELDS 69

Delete a ValueGroup for a Smart FieldA smart field uses value groups to consolidate records into groups based on values within ranges. You can deletevalue groups of a smart field as necessary, such as when your organization no longer uses them.
} Delete a value group for a smart field
1. On the Add smart field or Edit smart field screen, select the General tab.
2. If necessary, mark Use value groups.
3. In the grid, select the value group and click Delete. A confirmation message appears.
4. Click Yes. You return to the previous screen. Under Value groups, the selected group no longer appears.Another value group now includes theminimum value of the deleted group.
Process the Values of a Smart FieldAfter you add or edit a smart field, you can generate its output value when necessary. When you process a smartfield, its values are then available for use in queries, reports, and records in the program.
Tip: You can schedule the process to automatically update the values of a smart field to run at set intervals. Forinformation about how to schedule a smart field process, see Add a Job Schedule on page 73.
Warning: When you update the values of a smart field, the program bases new values on any informationadded to the database since the last run on date for the smart field. To update the value of smart field andconsider information entered during all dates that satisfy the date range entered for the smart field and not justinformation entered since the previous update, you can reset the last run date for the smart field. Forinformation about how to reset the last run on date, see Clear the Results from the Last Run of a Smart Field onpage 70.
} Generate the values for a smart field
1. On the Administration page, click Smart fields. The Smart Fields page appears.
Note: To process a smart field from its record, click Start process under Tasks. For information about therecord, see Smart Field Record on page 71.
2. Under Smart fields, select the smart field and click Process smart field. The program generates thevalues for the smart field. When the program completes the process, the record of the smart fieldappears.
For information about the items on the record, see Smart Field Record on page 71.
Clear the Results from the Last Run of a Smart FieldWhen you process a smart field, the program updates its values based on the information added to the databasesince themost recent process of the smart field. To update the value of smart field and consider informationentered during all dates that satisfy the date range entered for the smart field and not just information enteredsince the previous update, you can reset the last run date for the smart field. On the Smart Fields page, the lastrun date appears in the Last run on column.
70 CHAPTER 3

} Reset the last run date for a smart field
1. On the Administration page, click Smart fields. The Smart Fields page appears.
2. Select the smart field and click Clear results. A confirmation message appears.
3. Click Yes. You return to the Smart Fields page.
Update Smart Field Query RelationshipsIf you add a new queryview, such as through a customization process, after you create a smart field, the newqueryview does not automatically add the smart field. To add the smart field to the new queryview, you mustupdate the relationships between your smart fields and queries.
} Update the relationships between smart fields and queries
1. On the Administration page, click Smart fields. The Smart Fields page appears.
2. Under Tasks, click Update smart field query relationships. A confirmation message appears.
3. Click Yes. The program update new queryviews with your smart fields. You return to the Smart Fieldspage.
Smart Field RecordThe program automatically generates a record of each smart field in the database. To access the record of asmart field, select the field in the Smart fields grid on the Smart Fields page and click View process history. Fromthe record, you can perform multiple tasks to manage the smart field.On the record, you can view the information about themost recent process of the smart field’s values,information about previous processes of the smart field’s values, and any job schedules set for the process. Tohelp you navigate through this information, each smart field record contains multiple tabs.
Recent StatusTo view information about themost recent update of the smart field, select the Recent status tab. On this tab,you can view the current status of the process to determine whether it completed successfully. You can also viewthe status message generated for themost recent run; the user who ran the process and on which server; thedates and times the process started and ended and its duration; and the total number of records processed,howmany of those records processed successfully, and howmany exceptions it generated.
SMART F IELDS 71

HistoryTo view information about the previous updates of the smart field, select the History tab. On this tab, you canview records of the previous instances the process was run. For each instance, you can view its status, the statusmessage generated for it, the user who ran it, it start and end dates, its duration, the total number of recordsprocessed, and which server handled the process.
To view all process instances of a specific status, click Filter to display the Status field and Apply and Resetbuttons. In the Status field, select the status of the processes to display such as “Did not finish”, and click Apply.From the action bar of the tab, you can delete records of previous instances of the process. For informationabout how to delete a previous instance of the process, see Delete a Process Status Record on page 72.
Delete a Process Status RecordTo clean up your database, you can remove previous instances of a process from the History tab of its statuspage.
} Delete a process status record from the History tab
1. Open the record of the smart field with the instance to delete. For information about how to access asmart field record, see Smart Field Record on page 71.
2. Select the History tab.
3. In the grid, select the status record to delete.
4. On the action bar, click Delete. Amessage appears to confirm the deletion of the status record.
5. Click Yes. You return to the History tab. In the grid, the status record no longer appears.
72 CHAPTER 3

Job SchedulesTo view the job schedules set for the update process, select the Job schedules tab. For each job schedule, youcan view its job name, whether it is enabled, its frequency, its start date and time, its end date and time, and thedates the schedule was added and changed in the database.
From the Job schedules grid, you can manage the job schedules set for the business process.
Add a Job ScheduleTo automate a process, you can create a job schedule for the process. When you create a job schedule, youdefine when the job begins to run. After you add the schedule, you can use SQL Server Agent jobs toautomatically process smart field values and run the task on a recurring basis. To schedule the job, you mustdefine the conditions that cause the job to begin.
Create Job ScreenThe table below explains the items on the Create job screen. For information about how to access this screen,see Add a Job Schedule on page 73.
Edit a Job ScheduleYou can edit the settings for a job schedule, such as to adjust its frequency. You can edit a job schedule from thestatus page of the process.
Delete a Job ScheduleYou can delete a job schedule from a business process, such as if you no longer use it. You can delete a jobschedule from the status page of the process.
Smart Field ValuesBy category, each smart field is described along with the parameters and calculations for each value returned.
SMART F IELDS 73

Constituent Smart FieldsThe tables below explain the smart field definitions you can create for constituent data.Date and gift type parameters defined in the ETL configuration determine the number and type of recordsbrought over to the data mart.A Site filtering tab appears for the following smart field types: Constituent recurring gift last installment date;Constituent recurring gift missed installment counts; Constituent revenue application; Constituent revenueapplication amounts; Constituent revenue application annual renewer; Constituent revenue application counts;and Constituent revenue application dates.To associate sites with smart fields, select Site filter enabled on the smart field add or edit screen. You can thenselect sites to associate with the smart field. The sites you select in combination with user security setupdetermine the smart fields a user can view on constituent records, sponsorship child records, and sponsorshipproject records. When you associate a site with a smart field, a filter is created so that only users with rights tosites you select can view the associated smart fields.
Smart Field Type Description Parameters tab
Constituentappeal count
Provides the number ofappeals made to theconstituent during thespecified time period.
To define additional filters on the values returned,you can select Start date/End dates, Business Units,Categories, Report Codes, and Sites.
Constituentappeal years
Provides the number ofyears between the earliestand latest appeal made tothe constituent.
To define additional filters on the values returned,you can select Start date/End dates, Business Units,Categories, Report Codes, and Sites.
Last constituentappeal name
Provides the name of themost recent appeal made tothe constituent during thespecified time period.
To define additional filters on the values returned,you can select Start date/End dates, Business Units,Categories, Report Codes, and Sites.
Constituent existsin selection
Browses a constituentselection and adds thesmart field to the records ofthe constituents thatappear in the selection.
Select the selection of constituents to browse. Youcan also restrict the records processed by the selectedsites.NOTE: If the sites selected in the grid are not the sameas those assigned to the application selection, thismay result in no records being calculated by thesmart field. For example, a selection includes giftsfrom Site A. When you add this selection to aConstituent Revenue Application Counts smart fieldassigned to Site B, no records are returned becausethe sites conflict.
Constituentrecognition creditamounts
Provides a constituent’ssmallest, total, average, orlargest gift amount.
Value to return - Select the gift value to return:Smallest gift amount, Total gift amount, Average giftamount, or Largest gift amountTo define additional filters on the values returned,you can select Start date/End dates, Revenue types,Designations, Campaigns, and Sites.NOTE: If you do not select revenue types, all types areused.
Constituentrecognition creditdates
Provides the earliest orlatest recognition creditdate.
Value to return - select the recognition credit date toreturn: Earliest date or Latest dateTo define additional filters on the values returned,you can select Start date/End dates, Revenue types,Designations, Campaigns, and Sites.
74 CHAPTER 3

Smart Field Type Description Parameters tabNOTE: If you do not select revenue types, all types areused.
Constituentannual revenuerenewer
Determines whether theconstituent is an annualrevenue renewer.Returns Yes/No values.
To define additional filters on the values returned,you can select Start date/End dates, Revenue types,Designations, and Campaigns, and SItes.NOTE: If you do not select revenue types, all types areused.
Constituentlargest revenuedate
Provides the date of theconstituent’s largest giftduring the specified timeperiod.
To define additional filters on the values returned,you can select Start date/End dates, Revenue types,Designations, Campaigns, and Sites.NOTE: If you do not select revenue types, all types areused.
Constituentrecurring gift lastinstallment date
Provides the date of theselected constituents’ mostrecent recurring giftpayments.
To define additional filters on values returned, selectthe applicable start and end dates, designations,campaigns, and sites.
Constituentrecurring giftmissedinstallment counts
Provides the number ofrecurring gift paymentsmissed by each selectedconstituent.
To define additional filters on values returned, selectthe applicable start and end dates, designations,campaigns, and sites.
Constituentrevenue amounts
Provides the constituent’slargest, smallest, total oraverage gift amounts.
Value to return - select the gift amount to return:Largest gift amount, Smallest gift amount, Total giftamount, or Average gift amountTo define additional filters on the values returned,you can select Start date/End dates, Revenue types,Designations, Campaigns, and Sites.NOTE: If you do not select revenue types, all types areused.
Constituentrevenueapplication
Provides the largest,smallest, first, or latestconstituent orhousehold/group revenueapplication.“Household or group gifts”include gifts from theconstituent, theconstituent’s household,any of the constituent’sgroups, and any member ofthe constituent’shousehold or groups.This smart field returns therevenue application recordIDs for the type of revenueselected using settings onthe Parameters tab. Forexample, you can set theparameters so the fieldreturns all “First gift”records. “First gifts SmartField” then appears as aquery node under SmartFields in all constituentqueries. The query node
Source view - On the General tab, select the sourceview containing the type of revenue applicationrecord you want to include in the query.Value to return — select the revenue application toreturn: Largest application amount, Smallestapplication amount, First application amount, orLatest application amountFor - select if the data returned should representrevenue or revenue recognition credits forconstituents or household members.To define additional filters on the values returned,you can select Start date/End dates, Revenue types,Transaction or Application types, Recognition credittypes, a specified application selection, and site. Youcan also select whether to include historicalhousehold data or include data only from currenthousehold members.NOTE: If you do not select revenue types,transaction/application types, recognition credittypes, or an application selection, all types are used.NOTE: If the sites selected in the grid are not the sameas those assigned to the application selection, thismay result in no records being calculated by thesmart field. For example, a selection includes giftsfrom Site A. When you add this selection to aConstituent Revenue Application Counts smart field
SMART F IELDS 75

Smart Field Type Description Parameters tabincludes field informationassociated with the first giftrecord, such as the appealname or package ID.
assigned to Site B, no records are returned becausethe sites conflict
Constituentrevenueapplicationamounts
Provides the largest,smallest, total, average,first, or latest constituent orhousehold/group giftamounts“Household or group gifts”include gifts from theconstituent, theconstituent’s household,any of the constituent’sgroups, and any member ofthe constituent’shousehold or groups.
Value to return - select the gift amount to return:Largest application amount, Smallest applicationamount, Total application amount, Averageapplication amount, First application amount, Latestapplication amount.For - select if the data returned should representrevenue or revenue recognition credits forconstituents or household members.To define additional filters on the values returned,you can select Start date/End dates, Revenue types,Transaction or Application types, Recognition credittypes, a specified application selection, and sites. Youcan also select whether to include historicalhousehold data or include data only from currenthousehold members.NOTE: If you do not select revenue types,transaction/application types, or recognition credittypes, all types are used.NOTE: If the sites selected in the grid are not the sameas those assigned to the application selection, thismay result in no records being calculated by thesmart field. For example, a selection includes giftsfrom Site A. When you add this selection to aConstituent Revenue Application Counts smart fieldassigned to Site B, no records are returned becausethe sites conflict.
Constituentrevenueapplicationannual renewer
Determines whether theconstituent orhousehold/group is anannual revenue renewer. Anannual renewer is aconstituent orhousehold/group that hasgiven a gift every year sincetheir first gift.Returns Yes/No values.
For - select if the data returned should representrevenue or revenue recognition credits forconstituents or household members.To define additional filters on the values returned,you can select Start date/End dates, Revenue types,Transaction or Application types, Recognition credittypes, a specified application selection, and sites. Youcan also select whether to include historicalhousehold data or include data only from currenthousehold members.NOTE: If you do not select revenue types,transaction/application types, or recognition credittypes, all types are used.NOTE: If the sites selected in the grid are not the sameas those assigned to the application selection, thismay result in no records being calculated by thesmart field. For example, a selection includes giftsfrom Site A. When you add this selection to aConstituent Revenue Application Counts smart fieldassigned to Site B, no records are returned becauserevenue the sites conflict.
Constituentrevenueapplicationcounts
Provides the number ofgiving years, distinct givingyears, total number ofapplications, or consecutivegiving years for revenue
Value to return - select the revenue count value toreturn: Giving years, Distinct giving years, Totalnumber of records, Consecutive giving years.For - select if the data returned should representrevenue or revenue recognition credits for
76 CHAPTER 3

Smart Field Type Description Parameters tabapplications for theconstituent orhousehold/group.Giving years = Year ofmostrecent gift — year of earliestgift +1Distinct giving years = Totalnumber of years gifts weregiven (not necessarilyconsecutive)Consecutive giving years =Number of consecutiveyears gifts were givenFor example, Joe gave in theyears 2002, 2003, 2007,2008, and 2009.Giving years = 8 (2009-2002+1)Distinct giving years = 5Consecutive giving years = 3(2007-present)
constituents or household members.To define additional filters on the values returned,you can select Start date/End dates, Revenue types,Transaction or Application types, Recognition credittypes, a specified application selection, and sites. Youcan also select whether to include historicalhousehold data or include data only from currenthousehold members.NOTE: If you do not select revenue types,transaction/application types, or recognition credittypes, all types are used.
Constituentrevenueapplication dates
Provides the latest, earliest,or largest gift dates for theconstituent orhousehold/group.“Household or group gifts”include gifts from theconstituent, theconstituent’s household orgroups, and any member ofthe constituent’shousehold or groups.
Value to return - select the giving year information toreturn: First application date, Latest application date,Largest application date.For - select if the data returned should representrevenue or revenue recognition credits forconstituents or household members.To define additional filters on the values returned,you can select Start date/End dates, Revenue types,Transaction or Application types, Recognition credittypes, a specified application selection, and sites. Youcan also select whether to include historicalhousehold data or include data only from currenthousehold members.NOTE: If you do not select revenue types,transaction/application types, or recognition credittypes, all types are used.NOTE: If the sites selected in the grid are not the sameas those assigned to the application selection, thismay result in no records being calculated by thesmart field. For example, a selection includes giftsfrom Site A. When you add this selection to aConstituent Revenue Application Counts smart fieldassigned to Site B, no records are returned becauserevenue because the sites conflict.
Constituentrevenue counts
Provides the constituent’snumber of gifts.
To define additional filters on the values returned,you can select Start date/End dates or a specific timeperiod (including years, quarters, months, weeks ordays), Revenue types, Designations, Campaigns, andSites.NOTE: If you do not select revenue types, all types areused.
Constituentrevenue dates
Provides the constituent’searliest or latest gift dates.
Value to return - select the gift date to return: Earliestor LatestTo define additional filters on the values returned,you can select Start date/End dates, Revenue types,
SMART F IELDS 77

Smart Field Type Description Parameters tabDesignations, Campaigns, and Sites.NOTE: If you do not select revenue types, all types areused.
Constituentrevenue givingyears
Provides the number ofyears between first andlatest gifts or the number ofyears the constituent gavegifts.
Value to return - select the giving year information toreturn:Years between first and latest gifts - Returns thenumber of years the constituent gave a gift, notincluding the first and last gifts.Distinct giving years - Returns the total number ofyears the constituent gave a gift.To define additional filters on the values returned,you can select Start date/End dates, Revenue types,Designations, Campaigns, and Sites.NOTE: If you do not select revenue types, all types areused.
Householdrevenue amounts
Provides the largest,smallest, total, or averagehousehold/group giftamounts.“Household/group gifts”include gifts from theconstituent, theconstituent’s household orgroup, and any member ofthe constituent’shousehold or group.
Value to return - select the gift amount to return:Largest gift amount, Smallest gift amount, Total giftamount, Average gift amountTo define additional filters on the values returned,you can select Start date/End dates, Revenue types,Designations, Campaigns, and Sites.NOTE: If the Revenue type is set to Event registrationand you select a designation in the Designations field,the Household revenue amounts smart field will notprocess any event registration records.NOTE: If you do not select revenue types, all types areused.
Householdrevenue dates
Provides the latest orearliest household/groupgift dates.“Household/group gifts”include gifts from theconstituent, theconstituent’s household orgroup, and any member ofthe constituent’shousehold or group.
Value to return - select the date to return. Earliestdate or Latest dateTo define additional filters on the values returned,you can select Start date/End dates, Revenue types,Designations, Campaigns, and Sites.NOTE: If you do not select revenue types, all types areused.
Householdrevenue givingyears
Provides the number ofyears between first andlatest gifts or the number ofyears the household gavegifts.“Household/group gifts”include gifts from theconstituent, theconstituent’s household orgroup, and any member ofthe constituent’shousehold or group.
Value to return - select the giving year information toreturn:Years between first and latest gifts - Returns thenumber of years the household gave a gift, notincluding the first and last gifts.Distinct giving years - Returns the total number ofyears the household gave a gift.To define additional filters on the values returned,you can select Start date/End dates, Revenue types,Designations, Campaigns, and Sites.NOTE: If you do not select revenue types, all types areused.
78 CHAPTER 3

Marketing Smart FieldsThe tables below explain the smart field definitions you can create for marketing data.Date and gift type parameters defined in the ETL configuration determine the number and type of recordsbrought over to the data mart.
Smart Field Type Description Parameters tab
Constituent AskLadder
Provides the smallest, last,largest, or average gift value.
Value to return - Select the gift value to return:Smallest Gift Value, Last Gift Value, Largest Gift Value,Average Gift ValueDefault value - Enter the entry amount to returnwhen a value can not be calculated.Revenue date options - Enter the date range forrevenue to include.Revenue amount options - Enter the range ofamounts to include.Site - To restrict the records processed in thecalculation by site, under Sites, select the sites toinclude. The sites available in the grid are only thoseyou have rights to. If you do not select sites, thesmart field is calculated for all sites in theorganization.Selected revenue - Select a revenue selection.
ConstituentLifetime gifts onfile
Provides the number of giftson file for each member of agroup of constituents.
You can restrict the records processed by the selectedsites.
ConstituentLifetime giving
Provides the sum total of allgifts for each constituent.
You can restrict the records processed by the selectedsites.N/A
ConstituentLoyalty
Determines a loyaltycategory based on giftsgiven on an annual basis.Assigns these categories toconstituents based on thecalculation for loyalty:- New- Multi- Lapsed- Reactivated- Non DonorFor more information, seeCalculation for Loyalty onpage 80.
You can restrict the records processed by the selectedsites.N/A
ConstituentSingle giftconsecutive yeardonors
Determines a category fordonors who gave a singlegift in the last 5 consecutiveyears.This is a variant on loyalty.Applies a calculation tocategorize single gifts. Formore information, seeCalculation for Single GiftConsecutive Year Donors onpage 80.
You can restrict the records processed by the selectedsites.N/A
SMART F IELDS 79

Smart Field Type Description Parameters tab
Constituent Yearson file
Provides the years since firstdonation for each memberof a group of constituents.
You can restrict the records processed by the selectedsites.N/A
Calculation for LoyaltyCategory CriteriaNew Gift within 1 year of As Of DateMulti (10 +years) Gift each year within the past 10+ years, based on As Of Date
Multi (9 years) Gift each year within the past 9 years, based on As Of DateMulti (8 years) Gift each year within the past 8 years, based on As Of DateMulti (7 years) Gift each year within the past 7 years, based on As Of DateMulti (6 years) Gift each year within the past 6 years, based on As Of DateMulti (5 years) Gift each year within the past 5 years, based on As Of DateMulti (4 years) Gift each year within the past 4 years, based on As Of DateMulti (3 years) Gift each year within the past 3 years, based on As Of DateMulti (2 years) Gift each year within the past 2 years, based on As Of Date
Reactivated Gift in the current year, No gift in the previous year, and a gift in some prior year, basedon As Of Date
Lapsed (1yr-New)
No gift in the current year, a gift in the previous year, and no gifts in some prior year,based on As Of Date
Lapsed (1yr) No gift in the current year, a gift in the previous year, and gifts in some prior year, basedon As Of Date
Lapsed (2yr) No gifts in the past 2 years, based on As Of DateLapsed (3yr) No gifts in the past 3 years, based on As Of DateLapsed (4yr) No gifts in the past 4 years, based on As Of DateLapsed (5yr) No gifts in the past 5 years, based on As Of DateLapsed (6yr) No gifts in the past 6 years, based on As Of DateLapsed (7yr) No gifts in the past 7 years, based on As Of DateLapsed (8yr) No gifts in the past 8 years, based on As Of DateLapsed (9+yr) No gifts in the past 9 years, based on As Of DateNon-donor No gift in the past 10+ years, based on As Of Date
Calculation for Single Gift Consecutive Year DonorsCategory CriteriaNo Gifts No gift in the past 10+ years, based on As Of Date
2 years A single gift each year in the past 2 years and any or no gifts in the following years, based onAs Of Date
3 years A single gift each year in the past 3 years and any or no gifts in the following years, based onAs Of Date
4 years A single gift each year in the past 4 years and any or no gifts in the following years, based onAs Of Date
80 CHAPTER 3

Category Criteria
5 years A single gift each year in the past 5 years and any or no gifts in the following years, based onAs Of Date
Other Any other combination of gifts over past 10+ years, based on the As Of Date
Membership Smart FieldsThe tables below explain the smart field definitions you can create for membership data.Date and gift type parameters defined in the ETL configuration determine the number and type of recordsbrought over to the data mart.
Smart Field Type Description Parameters tab
Membershipexpiration
Provides the number of days,weeks, months, quarters, oryears until a membership is setto expire.
Value to return - Select the time period to return:Days, Weeks, Months, Quarters, or YearsYou can restrict the records processed by theselected sites.
Sponsorship Smart FieldsThe tables below explain the smart field definitions you can create for sponsorship data.
Smart FieldType Description Parameters tab
Sponsoractivesponsorshipcount
Provides the number of active sponsorships associated with thesponsor.
You can restrict therecords processed bythe selected sites.
Sponsorshipchild activesponsorcount
Provides the number of children associated with an activesponsor.
You can restrict therecords processed bythe selected sites.
Sponsorshipchildavailablecount
Provides the number of children available beforemeeting thethreshold defined for greatest need.For example, you can set up a smart field instance which uses“Opportunity Region” as its Opportunity dimension. Next you goto Sponsorship and create a greatest need rule set based on“Region,” and you list three regions: Africa, Asia, and LatinAmerica. If in Use threshold of field you select the smart fieldyou just created for Opportunity Regions and specify Is greaterthan “10,” instead of the available count in Africa having to godown to zero before the rule starts assigning to Asia, the rulestarts assigning sponsors to Asia when only 10 children remain inAfrica, and so on. This insures you have children in reserve shoulda sponsor specifically request a child in Africa.
Opportunitydimensions - Selectthe dimensions youwant measured whengreatest need isdetermined. You canselect more than onedimension. Thedimension listed firstis the first consideredwhen determininggreatest need.You can restrict therecords processed bythe selected sites.
Sponsorchildavailablepercent
Provides the percentage of children available beforemeeting thethreshold defined for greatest need.For example, you can set up a smart field instance which uses“Opportunity Region” as its Opportunity dimension. Next you goto Sponsorship and create a greatest need rule set based on
Opportunitydimensions - Selectthe dimensions youwant measured whengreatest need is
SMART F IELDS 81

Smart FieldType Description Parameters tab
“Region,” and you list three regions: Africa, Asia, and LatinAmerica. If in Use threshold of field you select the smart fieldyou just created for Opportunity Regions and specify Is greaterthan “10,” instead of the available count in Africa having to godown to zero before the rule starts assigning to Asia, the rulestarts assigning sponsors to Asia when only 10% of the pool ofchildren from Africa remain, and so on. This insures you havechildren in reserve should a sponsor specifically request a child inAfrica.
determined. You canselect more than onedimension. Thedimension listed firstis the first consideredwhen determininggreatest need.You can restrict therecords processed bythe selected sites.
Sponsorshipprojectactivesponsorcount
Provides the number of projects associated with an activesponsor.
You can restrict therecords processed bythe selected sites.
Sponsorshipprojectavailablecount
Provides the number of projects available beforemeeting thethreshold defined for greatest need.For example, you can set up a smart field instance which uses“Opportunity Region” as its Opportunity dimension. Next you goto Sponsorship and create a greatest need rule set based on“Region,” and you list three regions: Africa, Asia, and LatinAmerica. If in Use threshold of field you select the smart fieldyou just created for Opportunity Regions and specify Is greaterthan “10,” instead of the available count in Africa having to godown to zero before the rule starts assigning to Asia, the rulestarts assigning sponsors to Asia when only 10 projects remain inAfrica, and so on. This insures you have projects in reserveshould a sponsor specifically request a project in Africa.
Opportunitydimensions - Selectthe dimensions youwant measured whengreatest need isdetermined. You canselect more than onedimension. Thedimension listed firstis the first consideredwhen determininggreatest need.You can restrict therecords processed bythe selected sites.
Sponsorprojectavailablepercent
Provides the percentage of projects available beforemeeting thethreshold defined for greatest need.For example, you can set up a smart field instance which uses“Opportunity Region” as its Opportunity dimension. Next you goto Sponsorship and create a greatest need rule set based on“Region,” and you list three regions: Africa, Asia, and LatinAmerica. If in Use threshold of field you select the smart fieldyou just created for Opportunity Regions and specify Is greaterthan “10,” instead of the available count in Africa having to godown to zero before the rule starts assigning to Asia, the rulestarts assigning sponsors to Asia when only 10% of the pool ofprojects from Africa remain, and so on. This insures you haveprojects in reserve should a sponsor specifically request a projectin Africa.
Opportunitydimensions - Selectthe dimensions youwant measured whengreatest need isdetermined. You canselect more than onedimension. Thedimension listed firstis the first consideredwhen determininggreatest need.You can restrict therecords processed bythe selected sites.
82 CHAPTER 3

Search List ConfigurationConfigure Search List Fields 83
Manage Search List Replacements 84
The program provides multiple search lists to search for and select records. To better meet the needs of yourorganization, the default search lists support optional output columns and filters. You can configure the fieldsincluded in the filters and output of search results. You can also replace a default search list with another searchlist, such as one configured for your organization.
Configure Search List FieldsTo better meet the needs of your organization, the default search lists provided by the program support optionaloutput columns and filters. For example, while the default constituent search list does not allow you to filtersearches based on email address information, the ability to filter on this information may be useful forcommunication with constituents. To view the constituent search lists available for configuration fromAdministration, click Search list configuration. On the Search list configuration page, click Configure search listfields. The Search List Fields page appears.
Under Search list fields, the search lists that support optional columns and filters appear. You can configurethese search lists as necessary to allow users to filter on or provide output for additional fields.
} Edit the search list field settings
1. From Administration, click Search list configuration. The Search list configuration page appears.
2. Click Configure search list fields. The Search List Fields page appears.
3. Under Search list fields, select a search list and click Edit settings. The Edit settings screen appears.
chapter 4

4. Under Available output fields, select the additional information to appear under Results on the searchscreen. To include all output fields, click Include all. To remove all fields from the search screen, clickClear all.
5. Under Available filter fields, select the additional search criteria fields to appear on the search screen.To include all filter fields, click Include all. To remove all fields from the search screen, click Clear all.
6. Click Save. You return to the Search List Fields page. The next time you access the search screen, theselected output and filter fields appear.
Manage Search List ReplacementsTo better meet the needs of your organization, you can replace a default search list with another search list. Forexample, you can replace the default constituent search list to one that uses only the lookup ID to select aconstituent. To add and manage replacement search lists from Administration, click Search list configuration.On the Search list configuration page, clickManage search list replacements. The Search List Replacements pageappears.
Under Search list replacements, you can view the replacement search lists configured for your organization. Foreach search list replacement, you can view the original default search list and its replacement search list. You can
84 CHAPTER 4

also view the record type associated with each search list replacement. To view only search list replacements of aspecific record type, click Filter, select the record type to view, and click Apply. Only replacements of the selectedrecord type appear in the grid. To remove the filter, click Reset.
Note: You can use an existing search list to replace a default search list in the program. To meet the needs ofyour organization, Blackbaud Services or your system administrator may also add a custom search list to use asa replacement for a default search list.
From the grid, you can add and manage search list replacements as necessary.
Note: If you add a constituent attribute category and select “Constituent record” as your data type, you canselect a search list for users to select constituents as the attribute values for this category. If you change thedefault search list or create a custom search list to use, you must also change the search list for the attributecategory.
} Add search list replacements
1. From Administration, click Search list configuration. The Search list configuration page appears.
2. ClickManage search list replacements. The Search List Replacements page appears.
3. Under Search list replacements, click Add. The Add a search list replacement screen appears.
4. In the Search list field, select the search list to replace with a new search list.
5. In the Replace with field, select the search list to use instead of the selected search list.
6. Click Save. You return to the Search List Replacements page.
} Edit a search list replacement
To select a different list to replace the original search list, you can edit a search list replacement as necessary.
1. From Administration, click Search list configuration. The Search list configuration page appears.
2. ClickManage search list replacements. The Search List Replacements page appears.
3. Under Search list replacements, select the replacement configuration to edit.
4. On the action bar, click Edit. The Edit a search list replacement screen appears. TheOriginal search listfield displays the search list to be replaced by another search list.
5. In the Replace with field, search for and select the search list to use instead of the original search list.
6. Click Save. You return to the Search List Replacements page.
} Delete a search list replacement
To resume use of the original search list, you can delete the search list replacement as necessary. When youdelete a search list replacement, you delete only the configuration of the replacement. Both the original andreplacement search lists remain in the program.
1. From Administration, click Search list configuration. The Search list configuration page appears.
SEARCH LIST CONFIGURATION 85

2. ClickManage search list replacements. The Search List Replacements page appears.
3. Under Search list replacements, select the replacement configuration to delete.
4. On the action bar, click Delete. Amessage appears to ask whether to delete the search list replacement.
5. Click Yes. You return to the Search List Replacements page.
86 CHAPTER 4

Record SourcesManage Record Sources 87
Add/Remove Record Sources 87
Record Source Properties 88
Record sources are a core part of setting up the program. A record source is any separate set of donor data;sources can be from more than one system.
Manage Record SourcesTheManage Record Sources page offers a central location to configure settings for one or more record sourcesused by the program.
From this page, you can add or remove record sources, and edit properties for existing sources.
Add/Remove Record SourcesYou can add or remove record sources by using the link on the left of the page and selecting the record source orsources you want to use. Record sources that are in use in a segment, list, mailing, or export cannot be removed.
} Add or remove a record source
1. From theManage Record Sources page in Administration, click the Add/remove record sources task.The Edit record sources screen appears.
chapter 5

All available sources established during installation of the program appear with checkboxes beside them.
2. Select the checkboxes for record sources to include for mailings.
3. When you clear a checkbox, records from that source will not appear in your mailing segments. If youattempt to clear a checkbox for a record source that is in use by a segment, list, mailing, or export, amessage informs you that the source cannot be removed.
4. Click Save. You return to theManage Record Sources page.
Record Source PropertiesThe Record Source page contains summary information to help you identify which types of fields have beenmapped, and options for editing mappings, specifying duplicate criteria for the source, and editing list sourcecodes for the record source.
88 CHAPTER 5

Specify Person Field Mappings for a Record SourcePerson field mappings are used to map name, address, phone, and email address information between theprogram and a record source.
} Set person field mappings
1. From the Person field mappings tab of a record source, click Edit person field mappings. The Edit fieldmappings screen appears with the personal and contact information fields.
2. Under Personal information field mappings, select the name, title, or suffix fields in the record source tomap to the corresponding fields in the program.
To enable householding, you must map the following fields:
a. In theHousehold ID field, select the field to map to this record source, for example, “Household ID.”
b. In theHead of household field, select the field to map to this record source, for example, “Head ofhousehold.”
Note: When you enable householding, you can select to send one piece ofmail only to an entire household,rather than sending a separate piece ofmail to each person in the household.
3. Under Donor metrics field mappings, select themetrics field in the record source to map to thecorresponding field in the program.
4. Under Contact information field mappings, select the address, phone, or email fields in the recordsource to map to the corresponding fields in the program.
For more information about how to map person fields, see Person Field Mappings Screen on page 90.
RECORD SOURCES 89

5. Click Save. You return to the Person field mappings tab.
Person Field Mappings ScreenThe table below explains the fields on this screen.
Field MappingFull name Full nameFirst name First nameMiddle name Middle nameLast name Last nameOrg name Organization nameLookup ID Lookup IDTitle Title (Dr., Mrs., etc.)Suffix Suffix (Jr., Esq., etc.)Household ID Unique numeric value assigned to each constituent/spouse relationship
Head of household Determines whether the constituent is head of household (1=Head of Household,0=Not Head of Household)
Is household Constituent is a household (Yes/No)First gift date Date constituent gave first giftDate last changed Date constituent record was last changedCountry CountryAddress line 1 Address line 1Address line 2 Address line 2Address line 3 Address line 3Address line 4 Address line 4Address line 5 Address line 5City CityState StatePost code Post codeAddressee AddresseeSalutation SalutationPhone number Phone numberEmail address Email addressCART Carrier RouteDPC Delivery Point CodeLOT Line of Travel
Specify Gift Field Mappings for a Record SourceTo activate a mailing, you must select a gift record source. When you select a gift record source and map theappropriate fields, an activated mailing can locate all the gifts associated with a mailing and calculateperformancemeasures based on the gift amounts.
90 CHAPTER 5

} Specify gift field mappings
1. From the Gift field mappings tab of a record source, click Edit gift field mappings. The Edit gift recordsource screen appears.
2. Under Gift record source, select the gift record source. This is required to activate a mailing.
3. Under Field mappings, select the fields in the record source to map to the corresponding fields in theprogram. All the fields are required. For more information about how to map gift fields, see Gift FieldMappings Screen on page 91.
4. Click Save. You return to the Gift field mappings tab.
Gift Field Mappings ScreenThe table below explains the fields on this screen.
Field MappingGift amount Gift amountGift date Date constituent gave giftDonor ID System record ID (found by selecting File, Properties from constituent record)Date added Date the revenue was added to the system
Date changed Date the revenue was changed in the system. IfDate changed is not mapped, theprogram uses theDate added. IfDate added is not mapped, you receive an error.
Do notacknowledge
Whether or not the selected revenue should be included in the acknowledgementprocess (0=Will be processed, 1=Will not be processed)If integrated with Blackbaud CRM, reads Do not acknowledge flag on revenue record
Do notreceipt
Whether or not the selected revenue should be included in the receipt process (0=Willbe processed, 1=Will not be processed)If integrated with Blackbaud CRM, reads Do not receipt flag on revenue recordIf integrated with The Raiser’s Edge, reads Do not receipt flag on gift; also excludesalready receipted gifts
Lookup ID Lookup ID
RECORD SOURCES 91

Field MappingAppealsystem ID
System record ID for the appeal (found by selecting File, Properties from an appealrecord)
Appeal ID Appeal ID (from the General tab of the appeal record — must be unique)Appealdescription Appeal description
Effort ID Marketing Effort IDSource code Source codeFindernumber Finder number
Specify Appeal Field Mappings for a Record SourceThe appeal record source is not required, but if you do not specify it, your users will not be able to search for anyexisting appeals when they activate a mailing. Instead, they will need to enter the appeal name. The Appeal IDand Appeal Description fields are also required.
Note: When you create a standard data mart for data for The Raiser’s Edge, person fields aremappedautomatically. The Edit appeal field mappings button does not appear for this record source.
} Specify appeal field mappings
1. From the Appeal field mappings tab of a record source, click Edit appeal field mappings. The Edit appealrecord source screen appears.
2. Under Appeal record source, select the appeal record source. This is not required, but if you do notspecify it, your users will not be able to search for any existing appeals when they activate a mailing.Instead, they will need to enter the appeal name.
3. Under Field mappings, select the fields in the record source to map to the corresponding fields in theprogram. The Appeal ID and Appeal Description fields are required. The Inactive, Start Date, and EndDate fields provide extra information to search for an appeal. For more information about how to mapappeal fields, see Appeal Field Mappings Screen on page 93.
4. Click Save to save your mappings and return to the Appeal field mappings tab.
92 CHAPTER 5

Appeal Field Mappings ScreenThe table below explains the fields on this screen.
Field MappingAppeal ID field Appeal ID (from the General tab of the appeal record — must be unique)Description field Appeal descriptionInactive field Determines whether an appeal is inactive (Yes = Inactive, No = Active)Start date field Appeal start dateEnd date field Appeal end date
Specify Membership Field Mappings for a Record SourceThemembership record source is configured for you automatically.
} Specify membership field mappings
1. From theMembership field mappings tab of a record source, click Edit membership field mappings. TheEdit membership record source screen appears.
2. The program maps fields for themembership record source automatically so you should not need tochange these settings. If for some reason you need to remap the fields, select the fields in the recordsource to map to the corresponding fields in the program. For more information about how to mapmembership fields, see Membership Field Mappings Screen on page 93.
3. Click Save to save your mappings and return to theMembership field mappings tab.
Membership Field Mappings ScreenThe table below explains the fields on this screen.
RECORD SOURCES 93

Field MappingSystem record ID field Membership IDProgram field Membership programLevel field Membership levelTerm field Membership termType field Membership typeStatus field Membership status (Active or Pending)Is gift? field Membership is a gift (Yes or No)Send renewal to field Constituent that receives renewal noticesLookup ID Lookup IDMember ID field Member’s record IDMember name field Member’s nameGiven by ID field Record ID of constituent who gave themembershipGiven by name field Name of constituent who gave themembershipExpiration date field Datemembership expiresJoin date field Datemembership beganLast renewed on field Datemembership was last renewed
Specify Sponsorship Field Mappings for a Record SourceThemembership record source is configured for you automatically.
} Specify sponsorship field mappings
1. From the Sponsorship field mappings tab of a record source, click Edit sponsorship field mappings. TheEdit sponsorship record source screen appears.
2. The program maps fields for the sponsorship record source automatically so you should not need tochange these settings. If for some reason you need to remap the fields, select the fields in the recordsource to map to the corresponding fields in the program. For more information about how to mapmembership fields, see Sponsorship Field Mappings Screen on page 94.
3. Click Save to save your mappings and return to the Sponsorship field mappings tab.
Sponsorship Field Mappings ScreenThe table below explains the fields on this screen.
Field MappingChild field ChildChild program field Sponsorship child programGift sponsorship field Gift sponsorshipLast action field Last actionLast action reason field Last action reasonLocation field Sponsorship locationProject field Project
94 CHAPTER 5

Field MappingProject program field Sponsorship project programSystem record ID field System record IDSponsor field Constituent
Specify Duplicate Criteria for a Record SourceYou can define the criteria for the program to find duplicate records. When you import a list, the program usesthe criteria to determine which records on the list already exist in the record source. For example, you can specifythat for individual constituents, the program compares the first 20 characters in the First name, Last name, andPreferred Address/Address Block fields of constituent records in the source to records in the list to determine ifany are duplicates.
} Specify duplicate criteria
1. From the Duplicate criteria tab of a record source, click Edit duplicate criteria. The Edit duplicate criteriascreen appears.
2. To use the duplicate criteria when you import lists into the program, select Apply duplicate criteriaduring list import. If you clear the checkbox, duplicate processing is removed from the list importprocess, and the Process duplicates task is not available on the Acquisition Lists page. In most cases, youwill probably want to select the checkbox, but you may want to unmark it if you use a duplicate criteriachecking mechanism other than the default one included with the program.
3. In the grid, select a field in the Field Name column and enter a corresponding character count in theField Length column. Under Field Name, the down arrow displays all possible field entries.
4. Add as many rows as necessary to define your duplicate criteria.
5. Click Save. You return to the Duplicate criteria tab.
RECORD SOURCES 95

Specify Source Analysis Rule Fields for a Record SourceA source analysis rule is a way to store the state of selected attributes for constituents in a record source whenyou send a marketing effort. You can think of a source analysis rule as a snapshot of a donor’s attributes at aspecific time. For example, in one source analysis rule, you want to captureMembership Status and Giving Levelinformation for your donors. When you capture this information, you can record over time how your marketingefforts impact the constituents included in the selected membership or giving level. Source analysis rules do notapply to donors included as part of an acquisition list.To create a source analysis rule, you select the captured data fields from smart fields, selections, and fieldsassociated with the Constituent query view. When you activate a marketing effort, the program automaticallystores the current value for each field of a source analysis rule, and links this information to themarketing effortand segment.You can generate a Source Analysis Response Report to view the source analysis values for a specific recordsource. For more information about the Source Analysis Response Report, see theMarketing Efforts Reportschapter of theMarketing Efforts Guide.
} Specify source analysis rule fields
1. From the Source analysis rule tab of an active record source, click Edit fields. The Edit source analysisrule screen appears.
Note: You can define only one source analysis rule per record source.
2. Under Available fields, the list on the left displays the query views available for the record source. Whenyou select a query view, the list on the right displays all fields included in that view. To include a field in
96 CHAPTER 5

the source analysis rule, drag and drop the field or select the field and click the + button. The fieldappears in the Fields in use grid at the bottom.
3. The Capture data option is selected by default for all fields you add to the grid. If you deselect Capturedata for a field, the program no longer captures its data for reports and queries. However, data fromearlier captures is still available.
To remove a captured data field permanently from all reports and queries, select the field and clickDelete.
4. The Field to capture from column displays the captured field's name. In the SAR field name column,enter a name to identify the captured data in reports and queries. For example, "SAR–ConstituentLifetime Giving."
5. To explain why you included a specific field in the source analysis rule, enter a description for the field inthe Purpose column.
6. TheQueryable option is selected by default for all fields so they will appear in ad-hoc queries. If you use alarge number of SAR fields, you can deselect Queryable for any fields that you do not need available inqueries. If you deselect Capture Data, you may leaveQueryable selected so you can still query historicaldata.
7. Add as many fields as you need to create a source analysis rule.
8. Click Save. You return to the Source analysis rule tab.
Source Analysis Rules Smart FieldsThe table below explains the smart fields for source analysis rules. These fields are required.
Warning: Before you activate any mailings for the selected record source, you must first process any smartfields for the source analysis rule. Because the program processes the smart fields separately from the sourceanalysis rule, if you activate a mailing without processing the smart fields, the information the fields display maybe out of date.
Smart Field Description
Ask LadderThis smart field displays entry amounts for ask ladders in the date and amount rangesyou select. The entry amount is the value from a constituent’s giving history that you useto calculate the ask amounts.
Lifetimegifts on file This smart field displays the total number of gifts to your organization from a constituent.
Lifetimegiving This smart field displays the total amount given to your organization by a constituent.
Loyalty This smart field defines member status in terms of NewDonor, Multi Year donor, LapsedDonor, and Reactivated Donors.
Single giftconsecutiveyeardonors
This smart field displays all donors who gave a single direct mail gift consecutively for thepast five years.
Years onfile This smart field displays the number of years since the constituent’s first donation.
GiftAmounts
This smart field is associated with the standard data mart. It is used to calculate aggregatevalues such as first, last, largest, smallest, average, and total gift amounts. These fieldscan also be found in the Lifetime Giving node of the Constituent view query. Thedifference is that the Lifetime Giving fields are calculated during the ETL process for all
RECORD SOURCES 97

Smart Field Descriptiongifts, whereas the smart field allows you to calculate these values for a subset of giftsdefined by any gift selection.
Gift Counts This smart field is associated with the standard data mart. It displays various sums forgifts in the record source.
Gift Dates This smart field is associated with the standard data mart. It displays the date of the firstor last gift in a gift selection for the record source.
Specify a Record Source List CodeYou can specify a code to identify members of this record source in source codes. Specifying a code helps youdistinguish members of this source from members of other sources or lists.
} Specify a list code
1. From a record source, click the Edit list code task. The Edit record source list code screen appears.
2. Enter the code to identify members of this record source.
The code you enter must meet the formatting requirements of at least one source code layout thatincludes a list code. The valid formats for list codes for all layouts that include one appear beside the field.A valid code is indicated by a green check mark. For more information about source codes and sourcecode layouts, see theMailing Guide.
3. Click Save. You return to the Record Source page.
98 CHAPTER 5

Organization HierarchyImplications and Uses of Hierarchy 99
Access Organization Hierarchy 101
Manage an Organization Hierarchy 101
Manage Organizational Teams 108
TheManage organization hierarchy feature in Administration helps you create tools to better view and analyzethe fundraising performance of a specific group of fundraisers. With this functionality, the system administrator(or any user granted the necessary permissions) defines the organization’s internal structure and creates teamsuseful to other users of the application. For example, the organization hierarchy created in the feature includesResearcher and Primary Solicitor positions. The performance of both positions is of interest to theMajor GivingDirector, so the system administrator creates a Major Giving team that includes both positions. TheMajor GivingDirector can then use the team to generate reports, dashboards, or KPIs and track the Researcher and PrimarySolicitor performance.The hierarchy created in the application clearly defines and displays the relationships between the variouspositions; however, individuals in your system are not inextricably linked to the positions. This allows thestructure and relationships established in the hierarchy to remain unchanged even when individuals holding thepositions move on. For example, your organization includes a Northwest Planned Giving Director position in itshierarchy, and Arthur Andrews currently holds this position. If next year Arthur leaves your organization, theposition Northwest Planned Giving Director remains in the hierarchy even though Arthur left. The applicationkeeps the position intact even after you remove Arthur from your system. If a replacement is immediatelyknown, you can assign the new individual to the position or leave the position vacant.
Implications and Uses of HierarchyThe organization hierarchy and organizational teams created from the hierarchy help application users to bettertrack major giving data and fundraising performances based on positions. Fundraising managers can trackfundraising activities for entire teams of fundraisers instead of just by individual fundraisers.Once the hierarchy and teams are in place, fundraising managers can create dashboards inMajor Giving, reportsin Revenue, and KPI instances in KPIs, filtering the data included in the various output formats based on theorganizational teams created inManage organization hierarchy.
chapter 6

Major Giving: Using theMajor Giving Dashboard functionality, users can filter dashboard results generated inFundraisers and steps, Proposals, and Opportunities based on a selected organizational team created inManage organization hierarchy. An organizational team field is included as a filter in allMajor Givingdashboards. For more information, see theMajor Giving Guide.
KPIs: Using either a Fundraiser or Major Giving KPI definition, users can filter KPI results based on anorganizational team created in organization Hierarchy. An organizational team field is included as a filter on theParameters tab of the KPI Instance screen. For more information, see the Key Performance Indicators chapter intheData Management Guide.
100 CHAPTER 6

Access Organization HierarchyYou access theManage organization hierarchy function from the Administration page. Only authorized userscan openManage organization hierarchy and create and edit the hierarchies.
} Access the Organization Hierarchy page
1. From the action bar, click Administration, organization hierarchy. The organization Hierarchy pageappears. Your organization’s name defaults as the top node.
Note: If the application cannot derive your organization’s name from the database stamp, “organization”displays instead.
2. From this page, authorized users can create and edit your organization’s hierarchy, defining multipleorganizational teams. For detailed instructions about working on the organization Hierarchy page, seethe following sections:
• Manage an organization Hierarchy on page 101
• Manage organizational Teams on page 108
Manage an Organization HierarchyWhen you first open the organization Hierarchy page, the application displays only your organization’s name.From this default node, you add the additional branches to your hierarchy.In addition to defining your organization’s internal structure, you can assign fundraisers to the various positions,or if the position is not currently filled, you can leave it vacant. After your hierarchy is in place, you can return atany time to add new positions, assign fundraisers to new or existing positions, and edit or delete existinginformation.
Add PositionsA position is a discrete unit in an organization representing jobs, roles, or functions commonly held by oneperson. A position may represent a manager, a fundraiser, a gift officer, or similar type job description. Althoughpositions are usually held by an individual, in the hierarchy you can add positions without assigning individuals.For example, if the position is currently vacant, you can still add the position even though no one holds the job.
ORGANIZATION HIERARCHY 101

You may also use positions to designate the name of a team and never assign a specific individual. For example,you can create a “Northeast Region” position that houses all positions available in your northeast office.In the organization’s hierarchy, positions are represented by nodes. In the example below, the “NortheastDirector” node represents a parent position in the Blackbaud Demo organization. Within this parent position,there are two children positions: “Researcher” and “Development Officer”. If need be, you can add childrenpositions to the children positions. For instances, you can add an “Assistant Researcher” position under the“Researcher” position.
Groups of interrelated positions, such as the “Northeast Director” or “Southeast Director” nodes in the exampleabove, are known as business units. Business units usually represent fundraising teams, managerial divisions(Major Giving, Planned Giving), and geographic divisions (regional offices).
} Add a position to your organization’s hierarchy
1. From the organization Hierarchy page, click Edit Hierarchy. The Edit Hierarchy screen appears.
Note: For information about accessing the organization Hierarchy page, see Access organization Hierarchy onpage 101.
2. Click Add and select “Position." The Add position screen appears.
3. In the Position title field, enter the name of the position as you want it to appear in your hierarchy.
102 CHAPTER 6

4. You can specify a business unit for the position, so you can report on performance based on businessunits.
5. In the Site field, enter the site in your organization to which the position is associated.
If the position is a child node, the Site information entered in the parent node defaults. In addition, if youchange the Site information in the parent node, all child nodes automatically change to the new Site.
Note: Administrators can set up security access based on site. Any security settings your administratorsestablished for the site you specify in the Site field take effect for this position as soon as you click OK.
6. In the Fundraiser field, enter the name of the fundraiser, if any, assigned to the position. If no one isassigned the position, leave this field blank. To access the Fundraiser Search screen and locate thefundraiser in your database, click the binoculars at the end of the field.
7. If you enter a Fundraiser, you must enter a Start date for the fundraiser.
8. Click OK to save the new position and return to the Edit Hierarchy screen. The new position appears inyour hierarchy.
Note: Once you create a position or a branch, you can use the Copy and Paste functionality to save timecreating additional positions and branches. For more information, see Copy and Paste Positions and Brancheson page 107.
9. When you finish adding positions to your hierarchy, click Save on the Edit Hierarchy screen. Yourhierarchy is saved, and you return to the organization Hierarchy page.
Add Fundraiser to Existing PositionIf after you create a position, you have to either change the fundraiser originally associated with the position oradd a fundraiser to a position that currently has no fundraiser assigned, you can easily do so from the EditHierarchy screen.
} Add a fundraiser to an existing position in your hierarchy
1. From the organization Hierarchy page, click Edit Hierarchy. The Edit Hierarchy screen appears.
Note: For information about accessing the organization Hierarchy page, see Access organization Hierarchy onpage 101.
2. In the hierarchy, select the position for which you want to assign a fundraiser.
3. Click Add and select “Fundraiser”. The Add Fundraiser screen appears.
ORGANIZATION HIERARCHY 103

4. In the Replace with field located in the Fundraiser information section, enter the name of the fundraiserto be associated with this position. Click the binoculars at the end of the field to access the FundraiserSearch screen and search your database for the fundraiser.
5. In the Start date field, enter the date the selected fundraiser assumed the position. The Start datecannot be equal to or later than the system date.
6. Click OK. You return to the Edit Hierarchy screen. The new fundraiser’s name appears next to theselected position.
Replace Fundraiser in HierarchyWhen you create a position in your organization hierarchy, you have the option of assigning a fundraiser to theposition; however, normal turnover within an organization will require you to occasionally change the fundraiserassigned various positions. When necessary, you can do so easily from the organization Hierarchy page.
} Replace the fundraiser assigned to a position
1. From the Organization Hierarchy page, select the position for which you need to change the assignedfundraiser.
Note: For information about accessing the Organization Hierarchy page, see Access organization Hierarchy onpage 101.
2. Click Replace fundraiser. The Add Fundraiser screen appears, displaying the position Title, Site, currentFundraiser, and the Start date of the current fundraiser.
Note: You can also replace a fundraiser from the Edit Hierarchy screen. From this screen, select the position forwhich you need to change the assigned fundraiser, click Add, and select “Fundraiser”. The Add Fundraiserscreen appears, and you can continue from step 3 in this procedure.
104 CHAPTER 6
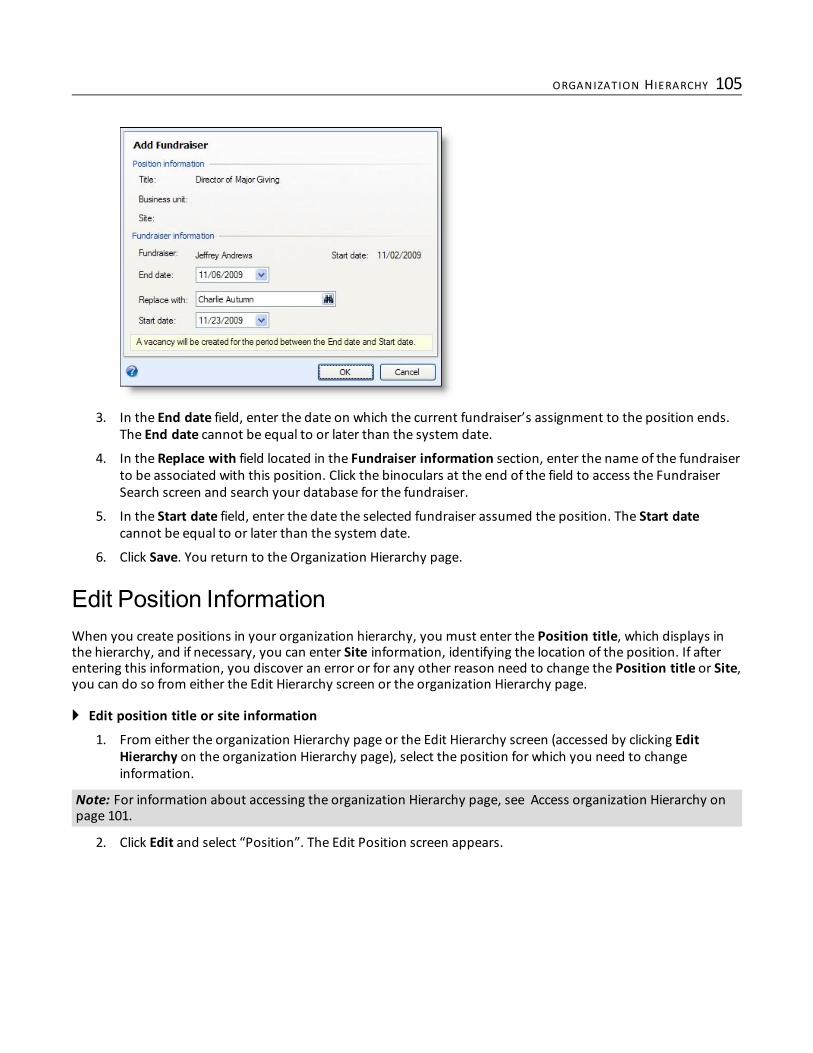
3. In the End date field, enter the date on which the current fundraiser’s assignment to the position ends.The End date cannot be equal to or later than the system date.
4. In the Replace with field located in the Fundraiser information section, enter the name of the fundraiserto be associated with this position. Click the binoculars at the end of the field to access the FundraiserSearch screen and search your database for the fundraiser.
5. In the Start date field, enter the date the selected fundraiser assumed the position. The Start datecannot be equal to or later than the system date.
6. Click Save. You return to the Organization Hierarchy page.
Edit Position InformationWhen you create positions in your organization hierarchy, you must enter the Position title, which displays inthe hierarchy, and if necessary, you can enter Site information, identifying the location of the position. If afterentering this information, you discover an error or for any other reason need to change the Position title or Site,you can do so from either the Edit Hierarchy screen or the organization Hierarchy page.
} Edit position title or site information
1. From either the organization Hierarchy page or the Edit Hierarchy screen (accessed by clicking EditHierarchy on the organization Hierarchy page), select the position for which you need to changeinformation.
Note: For information about accessing the organization Hierarchy page, see Access organization Hierarchy onpage 101.
2. Click Edit and select “Position”. The Edit Position screen appears.
ORGANIZATION HIERARCHY 105

3. In the Position title field, enter the title. The title displays in the organization hierarchy.
4. You can edit the business unit the position is associated with.
5. In the Site field, enter the site in your organization to which the position is associated.
If the position is a child node, the Site information entered in the parent node defaults. In addition, if youchange the Site information in the parent node, all child nodes automatically change to the new Site.
Note: Administrators can set up security access based on site. Any security settings your administratorsestablished for the site you specify in the Site field take effect for this position as soon as you click OK.
6. Click Save to save the new position information and close the Edit Position screen.
Edit Fundraiser Start DateWhen you assign a fundraiser to a position in your organization hierarchy, you must enter the date thefundraiser started at the position. If after entering this information, you discover an error or for any other reasonneed to change the Start date, you can do so from either the Edit Hierarchy screen or the organization Hierarchypage.
} Edit the fundraiser start date
1. From either the organization Hierarchy page or the Edit Hierarchy screen (accessed by clicking EditHierarchy on the organization Hierarchy page), select the fundraiser position for which you need tochange the Start date information.
Note: For information about accessing the organization Hierarchy page, see Access organization Hierarchy onpage 101.
2. Click Edit and select “Fundraiser start date”. The Edit Fundraiser Start Date screen appears.
106 CHAPTER 6

3. In the Start date field, enter the new date.
4. Click OK. You return to the organization Hierarchy page or the Edit Hierarchy screen.
Copy and Paste Positions and BranchesThe Copy and Paste functionality allows you to replicate a single position or an entire branch of your hierarchy.For example, if your organization has two divisions, Northeast and Southeast, and the positions are exactly thesame in both divisions, you can create the Northeast division, copy the division when it is complete, and paste areplica of the entire Northeast branch to a new location on your hierarchy. You then can edit the branch name,make structural changes needed, and assign fundraisers to the positions, rather than create the entire Southeastbranch from scratch.When you copy a branch or position, any subordinate nodes are also copied. Site and Fundraiser information isnot copied.
} Copy and paste positions and branches in your organization hierarchy
1. From the organization Hierarchy page, click Edit Hierarchy. The Edit Hierarchy screen appears.
Note: For information about accessing the organization Hierarchy page, see Access organization Hierarchy onpage 101.
2. In the hierarchy, select either the single position or the top position of the branch you want to copy.
3. Click Copy.
4. Select the location to which you want to paste the copied position or branch. For example, if you arecreating a new branch off the primary organizational node, select the organization’s name.
5. Click Paste. The copied branch or position appears in the selected location.
ShowPosition HistoryWith the Show history option on the organization Hierarchy page, you can view the history of any selectedposition. Simply select the position for which you want to view history information and click Show history. Theorganization Position History page appears.
From this page, you can view the different individuals assigned the position, and vacancy information, and datesassociated with the various assignments.
Delete Information from organization HierarchyDepending on from where in the hierarchy you are working, you can delete fundraisers, positions, and branches.
ORGANIZATION HIERARCHY 107

} Delete fundraisers, positions, and branches from your hierarchy
1. From either the organization Hierarchy page or the Edit Hierarchy screen (accessed by clicking EditHierarchy on the organization Hierarchy page), select the fundraiser or position you want to delete.
If you want to delete an entire branch from your hierarchy, click Edit Hierarchy on the organizationHierarchy page to access the Edit Hierarchy screen. From this screen, select the branch you want todelete.
Note: For information about accessing the organization Hierarchy page, see Access organization Hierarchy onpage 101.
2. Click Delete and select what you want removed from your system: “Fundraiser,” “Position,” or “Branch.”On the confirmation screen that appears, click Yes.
Manage organizational TeamsAn organizational team is a selected group of positions in the hierarchy for which development managers usuallywant to analyze fundraising or performance data. Teams can represent development teams or any logical groupof related positions for which a manager wants to view information. You can mix and match positions fromanywhere in the hierarchy when creating a team.In addition, a position can be a member ofmultiple teams. For example, you can create separate Northeast andSoutheast teams, and then create an East team that includes all positions included in the Northeast andSoutheast teams.
Note: Security rights determine who can add, edit, and delete organizational teams. The teams defined inorganization Hierarchy are available for use to authorized development managers and administrators for thepurpose of generating reports, KPIs, and dashboards.
} Define an organizational team
1. From the organization Hierarchy page, in the Tasks pane on the left side of the page, clickManageorganizational Teams.
Note: For information about accessing the organization Hierarchy page, see Access organization Hierarchy onpage 101.
The Query page appears, displaying the Smart query tab. From this tab, you can open any existing teamsor define a new team. Any existing teams display in the Smart Queries grid.
Note: Smart queries are designed to enable you to easily create a query that is not ad-hoc, but that groupsrecords based on specific criteria, in this case positions in the organization.
108 CHAPTER 6

2. To open an existing team, select the team in the grid and click Edit. The Query screen appears displayingthe Parameters tab. This tab displays the organizational hierarchy with the selected positions included inthe query.
Note: For a detailed explanation of this screen, see organizational Team Screen on page 111.
To create a new team, complete the following steps.
a. Click Add. The Select a Smart Query Definition screen appears.
b. Scroll down and select “organization Positions”.
ORGANIZATION HIERARCHY 109

c. Click OK. The organizational Team screen appears, displaying the Parameters tab.
d. Define your organizational team. For detailed information about working on the organizationalTeam screen, see organizational Team Screen on page 111.
e. Click Save and Close. The Save Query As screen appears.
f. In theName field, enter a name for this team, which will be saved as the name for the query.
g. In theDescription field, enter a description to help you identify the query.
h. If you group your queries by categories, in the Category field select the category to which this querybelongs.
i. If you want to allow other users to change the query parameters, mark Allow other users tomodify this query.
j. On the Create Selection tab, mark the Create a Selection? checkbox if you want to create a selectionfrom this query.
If you mark this checkbox, select to Create a dynamic Selection or Create a static selection. Adynamic selection is automatically refreshed each time it is used. Whenever a dynamic selectionruns, the program searches the database for any new records meeting the criteria of the selectionand adds them to the results. A static selection is like a “snapshot” of your database. Only therecords included when the selection is first executed are included. The same records are included inthe selection until it is refreshed manually or during an automated process.
You can also choose to Show this Selection in the Query Designer. Including the selection in querydesigner makes the selection available to produce output fields or to filter data in other queries.
For more information about selections, see the Query chapter in the Data Management Guide.
k. Click OK. The query is saved and you return to the Results tab.
3. After you exit the organizational Team screen, you return to the Query page. To return to theorganization Hierarchy page, click the Back button.
Note: For more information about working in Query, see the Query chapter in the Data Management Guide
110 CHAPTER 6
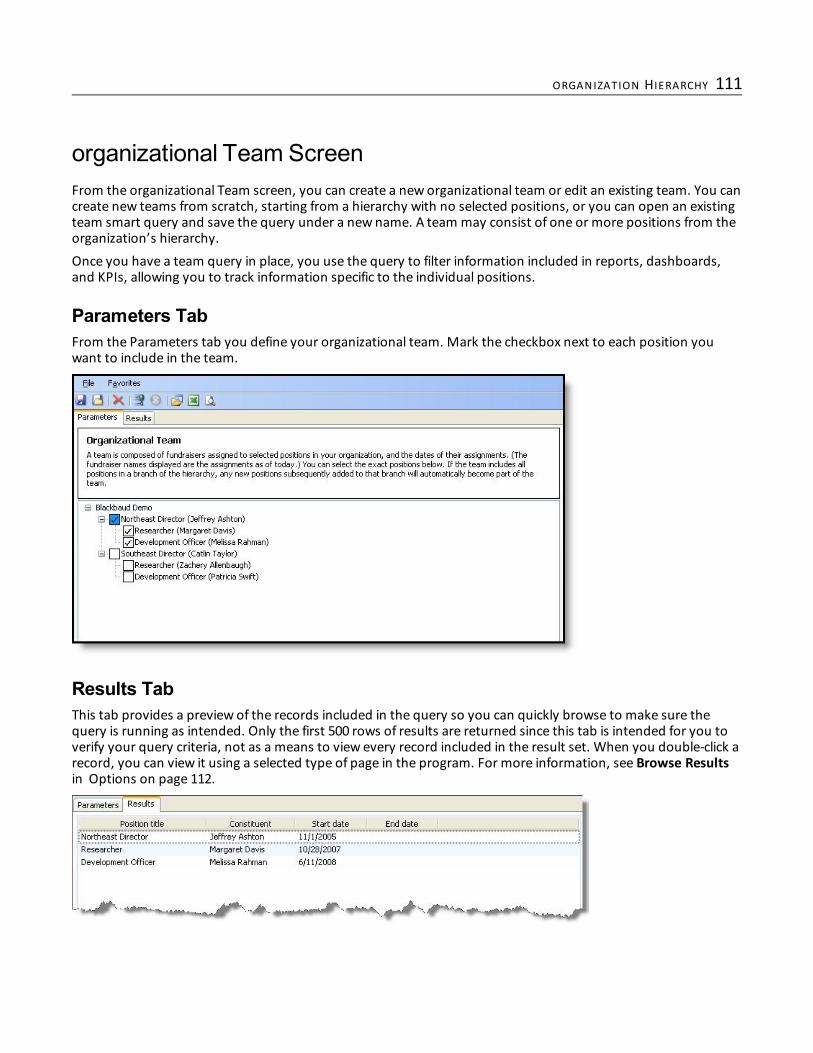
organizational Team ScreenFrom the organizational Team screen, you can create a new organizational team or edit an existing team. You cancreate new teams from scratch, starting from a hierarchy with no selected positions, or you can open an existingteam smart query and save the query under a new name. A team may consist of one or more positions from theorganization’s hierarchy.Once you have a team query in place, you use the query to filter information included in reports, dashboards,and KPIs, allowing you to track information specific to the individual positions.
Parameters TabFrom the Parameters tab you define your organizational team. Mark the checkbox next to each position youwant to include in the team.
Results TabThis tab provides a preview of the records included in the query so you can quickly browse to make sure thequery is running as intended. Only the first 500 rows of results are returned since this tab is intended for you toverify your query criteria, not as a means to view every record included in the result set. When you double-click arecord, you can view it using a selected type of page in the program. For more information, see Browse Resultsin Options on page 112.
ORGANIZATION HIERARCHY 111

OptionsThe following options are available from either the Parameters tab or the Results tab of the organizational Teamscreen.
ScreenItem Description
Save For new queries, it opens the Save Query as screen. For existing queries, it saves the queryunder the existing save information.
Save andClose
For new queries, it opens the Save Query as screen. After you enter the save informationand click OK, the organizational Team screen closes. For existing queries, it saves the queryunder the existing save information and closes the organizational Team screen.
Delete Deletes the query from your system.
Process Runs the query and takes you to the Results tab. You can also process the query byselecting the Results tab.
Cancelquery If after you click Process to run the query, you want to stop the process, click this button.
Save Gridresults
Exports the information in the Results tab to Microsoft Excel. When you click this button,the Save as screen appears. Enter a File name and click Save to export the data.
Printpreview
Displays the Results tab data in the Print Preview screen, allowing you to see how the datawill print. From the Print Preview screen, you can choose to print the information.
Add toFavorites
This option is accessed from the Favoritesmenu. It adds the opened organizational team toyour Favorites list on your Home page. If you click the link from your Home page, theselected organization Team query opens.
Save as This option is accessed from the Filemenu. It opens the Save query as screen.
PropertiesThis option is accessed from the Filemenu. It opens the Properties screen for the openedorganizational team. The screen displays the query type, information about who createdthe query, when the query was created, modification information, and the system IDnumber. It also displays the save information, which can be edited from this screen.
112 CHAPTER 6

Organization CalendarCalendar 113
List View 114
Manage Items and Activities 115
On the Organization Calendar page, you can view scheduled items and activities related to your organization orcommunity, such as to help schedule and coordinate activities and processes. From the organization calendar,you can add and manage calendar items such as holidays, community events, or scheduled breaks in yourorganization’s operation. You can also select to view and manage activities, such as events or communications,scheduled during a specific period of time. To access the Organization Calendar page from Administration, clickOrganization calendar. From a calendar view, you can view and manage items and activities as necessary.
CalendarOn the organization Calendar page, you can view scheduled items and activities in a calendar view. From thecalendar, you can view and manage planned activities related to your organization or community, such as tohelp schedule and coordinate activities and processes.When you first open the calendar, the current month appears, with the current date selected. You can adjust theperiod of time that appears as necessary.• To view the items and activities for another month, click the left or right arrow above the calendar to navigateto themonth to view.
• To view the dates on the calendar in a daily, weekly, or yearly format, click the interval to use above thecalendar. To return to themonthly format, clickMonth.
• To view the items and activities for a specific date, in the Jump to date field, select the date to view.Under Calendars, you can select the items and activities to view on the calendar, such as scheduled calendaritems, events, or mailings scheduled during the selected period of time. To help you navigate through theinformation on the calendar, each type of calendar item or activity is color-coded. To adjust the color of an itemtype, click Customize style. To viewmore information about an item or activity, select it on the calendar and clickGo to activity. The record of the selected item appears.After you select the activities to view, you can apply filters to further define the activities that appear. To applyfilters to a selected activity type, click the down arrow next to the activity type and select the criteria of the itemsto view. The calendar updates to display the activities that meet the selected criteria.From the calendar, you can add and manage items to keep track of important dates or occasions such asholidays and community events. For information about how to add and manage calendar items and activities,see Manage Items and Activities on page 115.To receive notifications as a Really Simple Syndication (RSS) feed through your browser or reader such asMicrosoft Outlook, click View RSS feed. You can select to receive notifications when new events and calendaritems are added.
chapter 7

After you add items and activities to the organization calendar, you can export the calendar, such as for use witha calendar on a mobile device. For information about how to export the calendar, Export the OrganizationCalendar on page 114
Export the Organization CalendarAfter you add items and activities to the organization calendar, you can export the calendar to an iCalendar (*.ics)or a vCalendar (*.vcs) file. With the export file, you can view and manage the items or activities in a calendaroutside of the program, such as in Microsoft Outlook or on a mobile device. When you export the calendar, youselect the date range of the items and activities to export.
} Export the organization calendar
1. From Administration, click Organization calendar. The Organization Calendar page appears.
2. On the Calendar tab, click Export calendar. The Export calendar screen appears.
3. In the Save as field, click the ellipsis, and browse to the location to save the export file.
4. Specify the name and format to use to save the export file. You can save the export file as either aniCalendar (*.ics) or a vCalendar (*.vcs) file.
5. Click OK. When the program saves the export file at the designated location, a message appears.
6. Click OK. You return to the Organization Calendar page.
List ViewOn the List View tab, you can view a list of items and activities scheduled on the organization calendar. From thelist view, you can view and manage planned activities related to your organization or community, such as to helpschedule and coordinate activities and processes.Under Items, the scheduled calendar items and planned activities for your organization appear. For each item,you can view its duration, type, and the user who added it to the organization calendar. To viewmoreinformation about an item or activity, select it in the list and click Go to activity. The record of the selected itemappears.To help locate a specific item or reduce the number of items that appear, you can filter the list by item type anddate range. To filter the list, select the criteria of the items to view and click Apply.From the list view, you can add and manage items to keep track of important dates or occasions such as holidaysand community events. You can also add and manage events and appeal mailings from the list, such as to planactivities for the future. For information about how to add and manage calendar items and activities, seeManage Items and Activities on page 115.
114 CHAPTER 7

Manage Items and ActivitiesFrom the Organization Calendar page, you can add and manage items to keep track of important dates oroccasions such as holidays and community events. You can also add and manage activities such as events andappeal mailings to the organization calendar, such as to help you quickly plan for a future time period.
Note: To add an event to the organization calendar, click Add and select Event. To edit an event from theorganization calendar, select the event and click Edit. For information about how to add or edit events, see theEvents Guide.
Note: To add an appeal mailing to the organization calendar, click Add and select Appeal mailing. To edit anappeal mailing from the organization calendar, select the event and click Edit. For information about how toadd or edit appeal mailings, see the Communications Guide.
Add Items to the Organization CalendarTo help you schedule your organization’s activities and processes, you can add items such as holidays andcommunity events to the organization calendar.
} Add a calendar item
1. From Administration, click Organization calendar. The Organization Calendar page appears.
2. On the action bar, click Add and select Calendar item. The Add a calendar item screen appears.
3. Enter a unique name to help identify the item, such as St. Patrick’s Day or Downtown Arts Expo.
4. In the Start date and End date fields, select the duration of the item. When you add the item from thecalendar view, the date range selected on the calendar automatically appears.
5. Click Save. You return to the Organization Calendar page. On the selected dates, the new item appears.
Edit a Calendar ItemAfter you add an item to the calendar, you can edit it as necessary, such as to adjust its schedule or correct atypographical error.
ORGANIZATION CALENDAR 115

You can only edit items manually added to the calendar. You cannot edit activities that appear on the calendarfrom elsewhere in the program.
} Edit a calendar event
1. From Administration, click Organization calendar. The Organization Calendar page appears.
Note: To viewmanually added items on the calendar view, you must select Items under Calendars. To viewonly manually added items in the list view, select Calendar items in the Type field and click Apply.
2. On the calendar, select the item to edit.
3. On the action bar, click Edit. The Edit calendar item screen appears. The items on this screen are thesame as the Add a calendar item screen. For information about the items on this screen, see Add Itemsto the Organization Calendar on page 115.
4. Edit the information as necessary.
5. Click Save. You return to the Organization Calendar page.
Delete an Item or Activity from theOrganization CalendarAfter you add an item or activity to the organization calendar, you can delete it as necessary, such as due to acancellation. You cannot delete activities that appear on the calendar from elsewhere in the program, such asevents or mailings.To delete an item or activity from the organization calendar, select it on the calendar and click Delete. When theconfirmation message appears, click Yes. You return to the Organization Calendar page.
116 CHAPTER 7

Optional ModulesUnlock Optional Modules 117
Optional modules enable you to customize the program to meet specific needs of your organization. When youpurchase an optional module from Blackbaud, you receive an activation key. You can use this key to unlock themodule and access its features. For information about how to unlock optional modules, see Unlock OptionalModules on page 117.
Unlock Optional ModulesYou can automatically unlock all your optional modules based on information specific to your installation. Youcan also select to unlock a specific optional module with a unqiue activation key received from Blackbaud.
} Unlock optional modules
1. On themenu bar, clickWelcome and select Unlock optional modules. The Unlock OptionalModulesscreen appears.
2. Select whether to automatically unlock all modules or manually unlock a single module.
If you selectManually unlock module, enter the activation key received from Blackbaud to unlock themodule. If you receive an expiration date for themodule, in the Expiration date field, select the date themodule expires.
3. Click OK. You return to the previous page.
chapter 8

118 CHAPTER 8

Fiscal YearsAdd Fiscal Year 119
Copy Fiscal Year Information 122
Edit Fiscal Year 122
Delete Fiscal Year 122
The Fiscal Years page displays the fiscal years you have defined in the system. You can add, edit, and delete fiscalyears and financial periods for your organization from this page.To access the Fiscal Years page, select Fiscal years on the Administration page.
Add Fiscal YearYou can add an unlimited number of fiscal years to the database, including previous fiscal years.You can divide each fiscal year into a maximum of 13 periods. Each period acts as a container, which you use totrack transactions. When you create a journal entry, the transaction appears in the period and fiscal yeardetermined by the post date. Journal entries must balance by fiscal period. You can also soft-close fiscal years.Soft-closing prohibits new journal entries to a period, but allows you to reopen the period at a later date.
} Add next fiscal year
1. From the Fiscal Years page, select Add next from the action bar. The Add fiscal year information screenappears.
chapter 9

2. In the Fiscal year and Description fields, enter a unique year and a unique description for the fiscal yearyou are creating.
3. In theNumber of periods field, select the number of periods for the fiscal year. You can choose from 1 to13 periods. The Periods grid changes based on your selection.
4. Once you enter the number of periods, you must enter valid start and end dates for each period of thefiscal year. The start date for period 1 is enabled only on the first fiscal year. For the years after the firstyear, this date is automatically set based on the end date of the previous fiscal year. All other period startdates are set based on the end date of the previous period.
5. Select Closed to soft-close a fiscal period. When you soft-close a fiscal period, you cannot enterpayments with a post date that falls within the period. The term “soft-close” means that you can alwaysreturn to the period and edit this setting at a later date.
6. To auto-fill the periods based on the start date and number of periods selected, select Auto-complete.
7. Click Save to save the fiscal year. The new fiscal year appears in the Fiscal years grid.
} Add previous fiscal year
1. From the Fiscal Years page, select Add previous from the action bar. The Add fiscal year informationscreen appears.
120 CHAPTER 9

2. In the Fiscal year and Description fields, enter a unique year and a unique description for the fiscal yearyou are creating.
3. In theNumber of periods field, select the number of periods for the fiscal year. You can choose from 1 to13 periods. The Periods grid changes based on your selection.
4. Once you enter the number of periods, you must enter valid start and end dates for each period of thefiscal year. The end date of the last period is disabled and is based on the start date of the oldest fiscalyear in your database.
5. Select Closed to soft-close a fiscal period. When you soft-close a fiscal period, you cannot enterpayments with a post date that falls within the period. The term “soft-close” means that you can alwaysreturn to the period and edit this setting at a later date.
6. To auto-fill the periods based on the start date and number of periods selected, select Auto-complete.
7. Click Save to save the fiscal year. The previous fiscal year now appears in the Fiscal years grid.
Add Fiscal Year Information ScreenThe table below explains the fields on the Add fiscal year information screen. For information about how toaccess this screen, see Add Fiscal Year on page 119.
Screen Item DescriptionFiscal year Enter a unique year to identify the fiscal year.Description Enter a description for the fiscal year.Number ofperiods Enter the number of periods for the fiscal year.
Closed Select this checkbox to soft-close a fiscal period. When you soft-close a fiscal period,you cannot enter payments with post dates within the period. The term “soft-close”
F ISCAL YEARS 121

Screen Item Descriptionmeans that you can always return to the period and clear the checkbox at a later date.
Auto-complete Select this to auto-fill the periods based on the start date and number of periods.
Copy Fiscal Year InformationWhen adding a fiscal year, you can populate the fields with information from another fiscal year already saved inthe system. To copy existing fiscal year information, select Copy on Fiscal years action bar.
} Copy fiscal year information
1. In the Fiscal years grid, select the existing fiscal year you want to copy, and click Copy. You return to theAdd fiscal year information screen, and the period information from the fiscal year you selectedpopulates the periods grid for the fiscal year you are adding.
2. Enter a name and description for the new fiscal year.
3. Click Save to save the fiscal year. The fiscal year appears in the Fiscal years grid.
Edit Fiscal YearYou can edit only open or soft-closed fiscal years. To edit a fiscal year, highlight the year in the Fiscal years grid onthe Fiscal Years page and select Edit. For example, you might want to change the description or number ofperiods.For information about the fields on the Edit fiscal year information screen, see Add Fiscal Year InformationScreen on page 121.
Delete Fiscal YearYou can delete fiscal years from the Fiscal Years page by selecting Delete under Fiscal years. Keep in mind, youcan delete fiscal years only if they have no activity.For more information about fiscal years, see Fiscal Years on page 119.
122 CHAPTER 9

Code TablesAccess Code Tables 123
Manage Code Table Entries 124
Show Lookup Screen 126
Edit the Sort Method of Code Table Entries 126
Establish User Permissions for Code Tables 127
Code tables increase data entry speed and accuracy throughout the program. When users enter information intoa field with a code table, they can quickly access a list of possible entries for that field to select an entry ratherthan type it manually.Code tables also help maintain consistency in your data entry. For example, when users add a new constituentphone number, onemay enter “Cell Phone” as a phone type, another may enter “Mobile,” and yet another mayenter “Cell.” All three designate the same phone type. To prevent inconsistency and ease the interpretation andretrieval of information from your database in queries and reports, you can enter your organization’s acceptedphone types in Code Tables and limit the rights of your users to add and edit table entries.
Access Code TablesTo view and manage your organization’s code tables, from Administration, click Code tables. The Code Tablespage appears.
Warning: To ensure the validity of your database and consistency of your data entry, we recommend you limitrights to manage code table entries to only a few key users. This also increases the accuracy of your records andreports. For information about how to limit rights, see Establish User Permissions for Code Tables on page 127.
Under Code tables, you can view the category and sort method for each category. To limit the code tables thatappear, you can filter the grid by category. On the action bar, click Filter, select the category to view, and clickApply.In the program, users access code table entries (along with value list fields and simple data list fields) from thedrop-down arrow at the end of a field. Depending on permission settings, users can enter text directly in the field.If the program does not recognize the text as an existing code table entry, it asks whether to add the text as anew entry. To access a screen to view code table entries, users can also press F7 on their keyboard when thecursor is in the table field. Depending on permission settings, users can also add and manage entries from thisscreen.From the Code Tables page, you manage code tables and their entries as necessary.
chapter 10

Manage Code Table EntriesFrom the Code Tables page, you can add and manage code table entries. To view the entries for a code table,select the table under Code tables and click Go to entry list. For example, to view the address type entries,under Biographical, select Address Type. The Table Entries page for the code table appears.In the grid, you can view the description and active status of each entry for the code table. You can also view forwhich sites the entry appears as a selection. You can select whether to display inactive code table entries. On theaction bar, click Filter, select whether to include inactive entries, and click Apply.From the grid, you can add and manage the entries for the code table.
AddNew Table EntriesYou can add entries for code tables. When you add a code table entry, you enter its description to appear as aselection for the table throughout the program.
Warning: To ensure the validity of your database and consistency of your data entry, we recommend you limitrights to add code table entries to only a few key users. This also increases the accuracy of your records andreports. For information about how to limit rights, see Establish User Permissions for Code Tables on page 127.
} Add a new table entry
1. From Administration, click Code tables. The Code Tables page appears.
2. Under Code tables, select a code table and click Go to entry list. The Table Entries page appears.
Note: You can also add entries from the lookup screen for the code table. For information about the lookupscreen, see Show Lookup Screen on page 126.
3. Click Add entry. The New Table Entry screen appears.
4. Enter a description to help identify the new table entry.
124 CHAPTER 10

5. Under Filtering, select whether to make the entry available to all sites at your organization or onlyselected sites. If you select Selected sites, select the checkboxes of the sites to use the entry.
6. Click Save. You return to the Table Entries page. The next time a user accesses the code table through afield, the new entry appears as an option.
Edit a Code Table EntryYou can edit a code table entry, such as to correct a misspelled word. When you edit an entry, you can select tomark it as inactive to make it unavailable to users. Inactive table entries remain in the database, but users can nolonger select it from the table field.
Warning: To ensure the validity of your database and consistency of your data entry, we recommend you limitrights to edit code table entries to only a few key users. This also increases the accuracy of your records andreports. For information about how to limit rights, see Establish User Permissions for Code Tables on page 127.
} Edit a table entry
1. From Administration, click Code tables. The Code Tables page appears.
2. Under Code tables, select a code table and click Go to entry list. The Table Entries page appears.
Note: You can also edit entries from the lookup screen for the code table. For information about the lookupscreen, see Show Lookup Screen on page 126.
3. Select the entry to edit and click Edit. The Edit Table Entry screen appears.
4. Edit the information as necessary. To make the entry unavailable for use but retain it in your database,select Inactive.
5. Click Save. You return to the Table Entries page.
Delete Code Table EntriesYou can delete a code table entry, such as if your organization no longer uses it. When you delete an entry, youremove it completely from your database. You cannot delete a code table entry currently used by a record.
Note: To remove an entry as a data entry option but retain it in your database, you can mark the entry asinactive. For information about how to mark an entry as inactive, see Edit a Code Table Entry on page 125.
Warning: To ensure the validity of your database and consistency of your data entry, we recommend you limitrights to delete code table entries to only a few key users. This also increases the accuracy of your records andreports. For information about how to limit rights, see Establish User Permissions for Code Tables on page 127.
} Delete a table entry
1. From Administration, click Code tables. The Code Tables page appears.
2. Under Code tables, select a code table and click Go to entry list. The Table Entries page appears.
Note: You can also delete entries from the lookup screen for the code table. For information about the lookupscreen, see Show Lookup Screen on page 126.
3. Select the entry to delete and click Delete. A confirmation message appears.
4. Click Yes. You return to the Table Entries page.
CODE TABLES 125

Show Lookup ScreenTo view all available entries for a code table, select the table on the Code Tables page and click Show lookup. Thelookup screen for the code table appears and displays all entries for the code table.
From the lookup screen, you can view and manage the entries for the code table. For a code table with a user-defined sort method, you can also arrange the order of the entries as necessary.
Note: For information about sort methods, see Edit the Sort Method of Code Table Entries on page 126.
• To add an entry to the code table, click Add. The New Table Entry screen appears so you can enter thedescription of the entry.If you use the alphabetical sort method, the new entry appears in alphabetical order. If you use the user-defined sort method, select whether to add the new entry to the bottom of the list or above the selectedentry.
• To edit an entry, select it and click Edit. The Edit Table Entry screen appears so you can edit the entry asnecessary.
• To permanently remove an entry from your database, select it and click Delete. When a message appears toask whether to delete the entry, click Yes.
• To arrange the order of the entries for a table with a user-defined sort method, select the entry to move andclick the up or down arrow as necessary.
Edit the Sort Method of Code Table EntriesYou can select whether to display code table entries alphabetically or in a user-defined method. For example, youmay select to sort entries so more commonly selected entries appear first in the code table. In the program, theentries appear for code table fields in the same order as you arrange in Administration.
126 CHAPTER 10

} Edit sort method of entries for a code table
1. From Administration, click Code tables. The Code Tables page appears.
2. Under Code tables, select a table and click Edit sort method. The Edit code table entry list sort methodscreen appears.
3. Select whether to sort the entries of the table alphabetically or in a user-defined method.
4. Click Save. You return to the Code Tables page.
Establish User Permissions for Code TablesYou can grant or deny your users permission to add, edit, and delete code table entries. Code tables provideentry options in various fields in the program. If you grant rights to change a code table, users can press F7 onthe keyboard when the cursor is in its table field to manage its entry list from its lookup screen. To limit yourtable entries to a reasonable number and protect the consistency of your database, we recommend you limitcode table permissions.
Note: Any user can click F7 to access the code table lookup screen, regardless of the permission settings.Permissions control only a user’s ability to add, edit, and delete entries.
} Establish user permissions to add, edit, and delete code table entries
1. From Administration, click Code tables. The Code Tables page appears.
2. Under Code tables, select the table for which to establish permissions.
3. Click Assign permissions. The Edit Code Table Permissions screen appears.
CODE TABLES 127

4. In the System Role column, locate the system role for which to establish permission settings.
5. Assign the selected system role permissions:
• To establish an Add permission to determine whether users can add new entries to the code table,in the Add column, select whether to grant or deny the system role permission. If you grantpermission, users who log in under the system role can press F7while in the table field to add anentry.
Note: If you do not grant or deny a role permission, but leave the setting blank, the following occurs: If a userbelongs to no other roles, the user is not granted rights; if the user belongs to another role to whichpermissions are granted, the user has the rights assigned that role. In addition, Deny trumps Grant, and Granttrumps no entry.
• To establish an Edit permission to determine whether users can edit the entries of a code table, inthe Edit column, select whether to grant or deny the system role permission. If you grantpermission, users who log in under the system role can press F7while in the table field to edit anentry.
• To establish a Delete permission to determine whether user can delete entries from the code table,in theDelete column, select whether to grant or deny the system role permission. If you grantpermission, users who log in under the system role can press F7while in the table field to delete anentry.
• To grant all system roles permission to manage the code table, click Grant All.
• To deny all system roles permission to manage the code table, click Deny All.
128 CHAPTER 10

• To clear all boxes in the grid and start over, click Clear All.
6. Click Save. Your return to the Code Tables page.
CODE TABLES 129

130 CHAPTER 10

Global ChangeAccess Global Change 131
Add a Global Change Instance 131
Edit a Global Change Instance 132
Process Global Change 132
Assign Global Change Permissions 133
Delete a Global Change Instance 134
Reset Last Run Date 134
Global Change Process Record 134
Global Change Definitions 138
TheGlobal changes functionality allows you to make select changes to a specific group of records in yoursystem. For example, trustees for your organization are rotated annually, so every year you have to remove the“Trustee” constituency from all previous year trustees. Using a selection of your previous year trustees, you canuse the “Delete user-defined constituency” definition included in Global changes and remove the “Trustee”constituency from all expired trustees’ records.
Access Global ChangeThe global change functionality is housed in the Data section of the Administration page.
} Access the global change functionality
1. From the action bar in the application, click Administration. The Administration page appears.
2. In theData section of the Administration page, click Global changes. The Global Changes page appears.
Add a Global Change InstanceA global change instance defines what you want changed where. Once you create an instance, it is saved in theGlobal changes grid on the Global Changes page. You can process and reprocess the instance at anytime andeven open the existing instance and make any necessary changes.
chapter 11

} Add a global change instance
1. From the Global Changes page, click Add. The Select a global change definition screen appears.
Note: For information about how to access the Global Changes page, see Access Global Change on page 131.
2. Select the global change definition that meets your needs. For example, if you want to delete aconstituency from selected records, select “Delete user-defined constituency”; if you want to add aconstituent attribute to selected records, select “Add constituent attributes”.
3. Click OK. The Add global change screen appears. The fields and options included on this screen vary,based on the global change definition you selected in step 2.
4. Complete the Add global change screen. In this section all definitions are explained and information isincluded about the fields and options included on the specific definition add screen.
5. Click Save. The new global change instance appears in the Global Changes grid.
Edit a Global Change InstanceA global change instance defines what you want changed where. Once you create an instance, it is saved in theGlobal changes grid on the Global Changes page. If you discover you must change an existing instance, you canopen the instance using the Edit button and make and save any necessary changes.
} Edit a global change instance
1. From the Global Changes page, select the instance you want to change.
Note: For information about how to access the Global Changes page, see Access Global Change on page 131.
2. Click Edit. The Edit global change screen appears. The fields and options included on this screen vary,based on the global change definition selected when the instance was created.
3. Make any necessary changes.
4. Click Save. The global change edits are saved, and you return to the Global changes page.
Process Global ChangeOnce you create or edit a global change instance, defining specifically what you want changed and where, youmust process the instance. This executes the change, updating all selected records.
132 CHAPTER 11

} Process a global change instance
1. From the Global Changes page, select the instance you want to process.
Note: For information about how to access the Global Changes page, see Access Global Change on page 131;for information about creating a global change instance, see Add a Global Change Instance on page 131; forinformation about changing an existing global change instance, see Edit a Global Change Instance on page 132.
2. Click Process global change. The selected records are changed, and the process screen appears.
Assign Global Change PermissionsYou can control system role permissions granted to each individual global change instance. Using the AssignPermissions functionality, you can control who has access to change, execute, and delete you global changeinstance.When a user assigned the specific role opens the program, only instances for which they are granted permissionappear.
Note: For instructions about managing system roles and establishing security, see the System Roles chapter inthe Administration Guide.
} Set user permissions for global change instances
1. From the Administration page, click Global changes. The Global Changes page appears displaying anyexisting global change instances.
Note: For information about accessing the Administration page, see Access Global Change on page 131.
2. Select the global change instance for which you want to assign permissions.
3. Click the Assign Permissions button. The Assign Permissions screen appears.
4. To grant permission to all roles in your system, select All roles.
To select the individual roles to which you want to “Grant” or “Deny” permission, select Selected roles.
a. The System Roles box is activated, and you can select a role.
b. To grant the selected role access, click Grant; to deny the selected role access, click Deny; to clear anassignments, click Clear.
5. Click Save to save your assignments and close the Assign Permissions screen.
GLOBAL CHANGE 133

Delete a Global Change InstanceA global change instance defines what you want changed where. Once you create an instance, it is saved in theGlobal Changes grid on the Global Changes page. If you discover you no longer need a saved instance, you canremove the instance from your system.
} Delete a global change instance
1. From the Global Changes page, select the instance you want to delete.
Note: For information about how to access the Global Changes page, see Access Global Change on page 131.
2. Click Delete. A confirmation screen appears.
3. Click Yes. The selected instance is removed from the Global changes page.
Reset Last Run DateWhenever you execute a selected global change, the program process the change based on any new dataentered in the database since the Last run on date. This date displays in theGlobal Changes grid on the GlobalChanges page.If for some reason, you want the program to process the change for all selected records, regardless of if therecords were included in the last execution of the global change, you can reset the Last run on date by selectingthe instance in theGlobal Changes grid and clicking Reset last run on date. A confirmation screen appears. ClickYes to reset the Last run on date.
Global Change Process RecordThe global change process record displays status and history information about the selected global changeinstance. You can also schedule a global change processing job.
Note: For information about executing a global change, see Process Global Change on page 132.
View aGlobal Change Process RecordWhenever you process a global change, the selected global change process record automatically opens after theprocess generates. When not processing changes, you can open process records from the Global Changes page.
} Open an existing global change process record
1. From the Global Changes page, select the instance for which you want to view processing information.
Note: For information about how to access the Global Changes page, see Access Global Change on page 131.
2. Click View process history. The selected process record appears.
3. Also from this screen, the following Tasks are available:
• Start process: Processes the global change.
• Edit global change: Accesses the Edit global change screen.
134 CHAPTER 11

• Create job schedule: Accesses the Create Job screen.
• Delete global change: Removes the global change instance from the system.
Recent StatusThe Recent status tab displays information about themost recent global change process. For example, if theprocess “Completed”, the tab displays dates and times of the last change, the number of records processed, thenumber of exceptions, and much more.
HistoryThe History tab lists all global changes executed for the selected global change instance. It includes informationabout dates, status, duration, and more. You can also delete archived processing records from this tab.
Delete Archived Global Change Process RecordYou can permanently delete any archived global change process record stored on the History tab.
} Delete a global change process record from the History tab
1. From the global change process record, select the History tab.
2. Select the archived record you want to delete.
3. Click Delete. A confirmation message appears.
4. Click Yes. The record is deleted, and you return to the History tab.
Job ScheduleYou can arrange to process global changes automatically, even during off-hours, from the Job Schedule tabavailable in the global change process record.Using SQL Server Agent jobs, the program automatically processes global changes, and it executes the changeson a recurring basis, following the instructions you set. Scheduling jobs involves defining the condition orconditions that cause the job to begin running.
Create a New Job ScheduleWhen you create a job schedule for a selected global change instance, the program automatically executes theglobal change at a frequency you determine.
} Create a global change job schedule
1. From a global change process record, select the Job Schedule tab.
2. Click Add. The Create Job screen appears.
GLOBAL CHANGE 135

3. In the Job name field, enter a descriptive name for the scheduled process.
4. You can suspend the scheduled process by unchecking the Enabled checkbox. To make the processactive, mark the Enabled checkbox. The default is checked.
5. In the Schedule Type field, select the desired frequency on which the scheduled process should run.
Note: For a detailed explanation of each field and option included on the Create Job screen, see Create JobScreen on page 136.
6. Click Save. You return to the global change process record.
Create Job ScreenYou access the Create Job screen by clicking Add on the Job Schedule tab of the global change process record.
ScreenItem Description
Jobname Enter the name of the job schedule.
Scheduletype
Selections for job frequency include:-One time: The scheduled process runs once, on the date and time specified in the One-timeoccurrence field.-Daily: The scheduled process runs on a daily basis. In the Frequency section, specify thenumber of days to lapse between each run of the job. In the Daily frequency section, specify atime for the process to run or specify that the process run repeatedly during a specific periodof time. In the Duration section, specify the date that your process begins. If you want the
136 CHAPTER 11

ScreenItem Description
process to run over a specific period of time, specify an optional End date or keep the defaultofNo end date.-Weekly: The scheduled process runs on a weekly basis. In the Frequency section specify thenumber of weeks to lapse before the process runs, in addition to the day of the week for it torun. In the Daily frequency section, set a specific time for the process to run, or specify thatthe process run repeatedly during a specific period of time. In the Duration section, specifythe date that your process begins. If you want the process to run over a specific period oftime, specify an optional End date or keep the default ofNo end date.-Monthly: The scheduled process runs on a monthly basis. In the Frequency section, specifythe number ofmonths to lapse before the process runs, in addition to the day of themonthfor it to run. In theDaily frequency section, specify a specific time for the process to run orspecify that the process run repeatedly during a specific period of time. In the Durationsection, specify the date that your process begins. If you want the process to run over aspecific period of time, specify an optional End date or keep the default ofNo end date.-Start when SQL Server Agent service starts: The scheduled job process runs when the SQLServer Agent service starts. This is useful if you use the SQL Server Agent service for othertasks.-Start when the computer becomes idle: The job runs when enough resources are availableon the server. This is determined by the idle condition defined in the SQL Server Agentproperties on the server.
Enabled To suspend the scheduled process, unmark this checkbox. To make the process active, markEnabled. By default, this checkbox is marked.
Date Appears when you select One time in the Schedule type field. Use the date formatmm/dd/yyyy, or click the drop down arrow to select from a calendar.
Time Appears when you select One time in the Schedule type field. Enter the date of the one-timeoccurrence.
Occursevery [ ]month(s)
Enabled when you select Daily, Weekly, or Monthly in the Schedule type field.
Days oftheweek
Appears when you select Weekly in the Schedule type field. Mark the checkbox beside theday of the week to run the job. You can select one or multiple days.
Day [ ]of themonth
Appears when you select Monthly in the Schedule type field.
The [ ] [ ] of themonth
Appears when you select Monthly in the Schedule type field. In the first field select First,Second, Third, Fourth, or Last. In the second field select a day of the week or Day, Weekday,or Weekend day. For example, to run a process the last Friday of every month, select Last inthe first field and Friday in the second field.
Occursonce at[ ]
Enabled when you select Daily, Weekly, or Monthly in the Schedule type field.
Occursevery [ ][ ]
Enabled when you select Daily, Weekly, or Monthly in the Schedule type field. To move thenumber by one, click the up and down arrow in the first field. In the second field, selectMinutes or Hour. For example, to run this process in themorning and afternoon every day atwork, enter 4 in the first field and select Hours in the second field.
Startingat andEndingat
Enabled when you select Occurs every [ ] [ ]. Using the example in the previous row, enter8:00:00AM in the Start at field and 5:00:00PM in the Ending at field.
GLOBAL CHANGE 137

ScreenItem Description
Startdate
Enter the date for the job schedule to begin to process. Use the date format mm/dd/yyyy, orclick the arrow to select from a calendar.
End dateEnter the date for the job schedule to end. For example, enter an end-of-year date. Use thedate format mm/dd/yyyy, or click the arrow to select from a calendar. This option is disabledwhen No end date is selected.
No enddate If your job schedule does not have an end date, mark this option.
Edit an Existing Job ScheduleYou can change any existing global change job schedule.
} Edit an existing global change job schedule
1. From the global change process record for which you want to edit a scheduled job, select the JobSchedule tab.
2. Click Edit. The Edit Job screen appears.
3. Make any necessary changes.
Note: For a detailed explanation of each field and option included on the Edit Schedule screen, see Create JobScreen on page 136.
4. Click Save to save the changes.
Delete an Existing Job ScheduleYou can easily remove any existing global change job schedule from your system.
} Delete an existing global change job schedule
1. From the global change process record for which you want to delete a scheduled job, select the JobSchedule tab.
2. Select the scheduled job you want to delete.
3. Click Delete. A confirmation message appears.
4. Click Yes to delete the job.
Global Change DefinitionsDepending upon the global change that you process, there are parameters specific to that change. This sectioncontains definitions and procedures for each global change.
Delete Audit TablesOver time your database can accumulate numerous audit tables you no longer need. Use the Delete Audit Tabledefinition to permanently remove audit data from these tables. After you create the definition, you can execute
138 CHAPTER 11

the global change process to remove the data. For more information about processing a global change, seeProcess Global Change on page 132.
} Delete audit tables globally
1. From the Administration page, click Global changes. The Global Changes page appears.
2. Click Add. The Select a global change definition screen appears.
3. Under Audit Tables, select Delete audit data.
4. Click OK. The Add global change screen appears.
5. In theName field, enter a name to identify your global change process.
6. You can restrict the use of the process to a specific site in your organization. When you select a site, onlyusers associated with the site can access the process. To allow users of all sites to access the process,select “All sites.”
7. To delete all audit tables, select All audit tables.
8. To delete a specific group of audit tables from Query, select Selected audit tables. Click the binoculars atthe end of the field to access a search screen and locate the selection to use.
9. Under Delete audit information older than, filter the audit tables to delete by entering a time frame. Forexample, to delete audit tables older than three years, enter “3” in the first field and select “Year(s)” inthe second field.
Tip: Themaximum number you can enter in the first field is 100. In the second field, you can select to delete bydays, weeks, months, or years.
10. Click Save. The global change process appears on the Global Changes page.
11. When you are ready to execute the global change, select it and click Process global change.
Enable or Disable Audit TablesOver time your database can accumulate numerous audit tables you no longer need. You can disable an audittable rather than permanently delete it. If you decide later to use it again, you can enable it.
} Enable or disable audit tables
1. From the Administration page, click Global changes. The Global Changes page appears.
2. Click Add. The Select a global change definition screen appears.
3. Under Audit Tables, select Enable or disable audit tables.
4. Click OK. The Add global change screen appears.
5. In theName field, enter a name to identify your global change process.
6. You can restrict the use of the process to a specific site in your organization. When you select a site, onlyusers associated with the site can access the process. To allow users of all sites to access the process,select “All sites.”
7. To disable all audit tables, select All audit tables.
8. To disable a specific group of audit tables, select Selected audit tables. Click the binoculars at the end ofthe field to access a search screen and locate the selection to use.
9. If you want to enable, rather than disable, audit tables, select Enable.
GLOBAL CHANGE 139

10. Click Save. The global change process appears on the Global Changes page.
11. When you are ready to execute the global change, select it and click Process global change.
Delete Batch Control and Exception ReportsOver time your database can accumulate numerous batch control and exception reports you no longer need. Toremove these from the database, create a batch control and exception report global change definition. After youcreate the definition, you can execute the global change process to remove the batch reports. For moreinformation about processing a global change, see Process Global Change on page 132.
} Delete batch control and exception reports globally
1. From the Administration page, click Global changes. The Global Changes page appears.
2. Click Add. The Select a global change definition screen appears.
3. Under Batch Reports, select Batch control and exception report delete.
4. Click OK. The Add global change screen appears.
5. In theName field, enter a name to identify your global change process.
6. You can restrict the use of the process to a specific site in your organization. When you select a site, onlyusers associated with the site can access the process. To allow users of all sites to access the process,select “All sites.”
7. To delete all batch control and exception reports for committed batches, select All committed batches.
8. To delete a specific group of batch control and exception reports from Query, select Selected batches.Click the binoculars at the end of the field to access a search screen and locate the selection to use.
9. Under Delete batch control and exception reports older than, filter the reports to delete by entering atime frame. For example, to delete batch control and exception reports older than three years, enter “3”in the first field and select “Year(s)” in the second field.
Tip: Themaximum number you can enter in the first field is 100. In the second field, you can select to delete bydays, weeks, months, or years.
10. Click Save. The global change process appears on the Global Changes page.
11. When you are ready to execute the global change, select it and click Process global change.
Delete Business Process OutputsOver time your database can accumulate export process outputs you no longer need. To remove these from thedatabase, create a business process output global change definition. After you create the definition, you canexecute the global change process to remove the export process outputs. For more information aboutprocessing a global change, see Process Global Change on page 132.
Note: This global change definition only removes outputs from export processes. For example, in Export, youcreate an export process. You export the data into a.csv file. When you run this global change, the table thatcontains the data in the.csv file deletes. To download the data into a.csv file again, you must run the exportprocess again.
} Delete business process outputs globally
1. From the Administration page, click Global changes. The Global Changes page appears.
140 CHAPTER 11
2. Click Add. The Select a global change definition screen appears.
3. Under Business Process, select Business process output delete.
4. Click OK. The Add global change screen appears.
5. In theName field, enter a name to identify your global change process.
6. You can restrict the use of the process to a specific site in your organization. When you select a site, onlyusers associated with the site can access the process. To allow users of all sites to access the process,select “All sites.”
7. To delete all export process outputs, select All business processes.
8. To delete a specific group of export process outputs from Query, select Selected business processes.Click the binoculars at the end of the field to access a search screen and locate the selection to use.
9. Under Delete output tables generated by business processes older than, filter the export processoutputs to delete by entering a time frame. For example, to delete outputs older than three years, enter“3” in the first field and select “Year(s)” in the second field.
Tip: Themaximum number you can enter in the first field is 100. In the second field, you can select to delete bydays, weeks, months, or years.
10. Click Save. The global change process appears on the Global Changes page.
11. When you are ready to execute the global change, select it and click Process global change.
Complete Pending Transfer throughGlobal ChangeWhen you transfer a child to a new sponsor, the new sponsorship status is pending until you complete theprocess. If you complete the process through Global Change you can define a time period you want to passbefore the system automatically changes the sponsorships’ statuses.
} Complete pending transfers in Global Change
1. From Administration, click Global changes.
2. Click Add. The Select a global change definition appears.
3. Under Sponsorship, select Complete pending transfers.
4. Click OK. The Add global change screen appears.
5. In theName field, enter a name to identify your global change process.
6. If you want to base the change on just a specific site, in the Site field select the site you want changed.
7. In the Parameters frame, define the time period you want to wait before “pending” transferred arecompleted. For example, if you want to wait seven days, in the Units field enter “7” and in the Periodfield select “Day(s).”
8. In the Selection field, you can select a selection of records, created in Query, that you want updated. Ifyou do not choose a selection, all pending transfers satisfying your parameter definitions are included inthe change process.
9. Click Save to save the global change process and return to the Global Changes page.
GLOBAL CHANGE 141

Adjust Sponsorship RatesThe billing coordinator for your organization may need to implement a global rate change in order to meetchanges in the cost ofmaintaining the sponsorship. The Adjust sponsorship rates definition in Global Changeallows you to globally increase or decrease the rate of sponsorships based on a % or fixed amount.
} Adjust the sponsorship rates globally
1. From Administration, click Global Changes. The Global Changes page appears.
2. Click Add. The Select a global change definition screen appears.
3. Under Sponsorship, select Adjust sponsorship rates.
4. Click OK.
5. In the Name field, enter a name to identify this global change process.
6. In the Site field, select the specific site you want changed. For example, if your organization maintainsseveral offices - office A, office B, and office C - and you just want office B changed, select office B. SelectAll sites to change the amount in all locations.
7. If you want to globally change the rate set on a specific program, select Program and then in the drop-down menu select the specific program to use.
8. If you want to globally change the rate set on a specific group of records included in a selection created inQuery, select Selection. Click the binoculars at the end of the field to access a search screen and locatethe specific selection you want to use.
9. In the Adjust method field, you can choose to “Set rate to” a specific amount or to “Increase rate by” aspecified amount.
10. In the Amount field, enter the new rate or the amount by which you want the existing rate increased.This depends on the option you selected in the Adjust method field.
11. In theDevelopment function field, select the function you want to include on the record whenrecognizing the rate change. For example, if the new rate is for upgrades, select “Upgrade.
12. Click Save.
13. When your are ready to execute the rate change, click Process global change.
Cancel Expired SponsorshipsIf when you created the sponsorship record, you entered an Expiration date to identify when you expect thesponsorship relationship to end, you can run a Global Change process and bulk cancel any expired fixed-termsponsorships.
} Cancel expired sponsorships in bulk
1. From Administration, click Global changes. The Global Changes page appears.
2. Click Add. The Select a global change definition screen appears.
3. Under Sponsorship, select Cancel expired sponsorships.
4. Click OK. The Add global change screen appears.
5. In theName field, enter a name for this global change process.
142 CHAPTER 11

6. Click Save.
7. When your are ready to cancel the sponsorships, click Process global change.
For more information about theGlobal Change process, see the Global Change chapter in the DataManagement Guide.
Unreserve Opportunity Reservation Keys in BulkIf you have a large number of opportunities you want to unreserve at once, you can create a global changeprocess. The global change process releases all reserved opportunities from multiple reservation keys based onthe End date entered in the key.
} Unreserve opportunity groups in bulk
1. From Administration, click Global changes. The Global Changes page appears.
2. Click Add. The Select a global change definition screen appears.
3. Under Sponsorship, select Unreserve opportunity reservation keys.
4. Click OK. The Add global change screen appears.
5. In theName field, enter a name for this global change process.
6. Click Save.
7. When your are ready to unreserve the opportunities, click Process global change.
AddConstituent AttributeAttributes add flexibility to your record keeping by giving you the ability to define and store special informationabout a wide variety of record types. If after entering an attribute value in a number of records in your systemyou find you need to change the value, you can change all values at once with Global Change and a selection ofthe affected records. For example, if you have the attribute category “Athletics” and a value of “Soccer” but youneed to change all “Soccer” values to “Football,” you can useGlobal Change to make the change. You can alsouse the process to add new information to records. For example, if a constituent in the selection does not havean “Athletics” category included on his record but he is included in the record selection, the new data is added tothe Attribute tab on his record.
} Change attribute values globally
1. From Administration, click Global changes. The Global Changes page appears.
2. Click Add. The Select a global change definition screen appears.
3. Under Constituent, select Add constituent attribute.
4. Click OK.
5. In the Name field, enter a name to identify this global change process. The name displays in the Globalchanges grid on the Global Changes page.
6. In the Site field, select the site that you want to use to secure this global change instance. This fieldcontains only sites to which you have rights.
When you select a site and save the process:
• Only users with access to the selected site can run the global change process.
GLOBAL CHANGE 143

• Other users cannot edit the Site entry. The system administrator or the user who created theprocess can edit the Site.
• The site automatically appears in the Site field on the Assign Permissions screen (only systemadministrators and the process owner can access this screen)
• On the Global Change page, an Owner column displays, so you can see who created the process
7. If you want to globally change attribute information on a specific group of records included in a selectioncreated in Query, select Selection. Click the binoculars at the end of the field to access a search screenand locate the specific selection you want to use. If you do not select a selection, all records are changed.
8. In the Category field, select the attribute category that contains the value you want to change. Allconstituent attribute categories created inManage attribute categories are available in this field.
9. In the Value field, enter the new value you want entered for the selected attribute Category.
10. In the Comments field, enter any note information you want to add to the constituent attribute. Thisinformation displays in the Comment column of the constituent’s Attributes tab.
11. Select Overwrite existing value if you want the new value to replace the existing value. If you do notmark this checkbox, the new value is added to records with no existing value for the attribute category,but if the constituent does have a value entered for the selected attribute category, no new data isentered.
12. Select Remove value from unqualified records if you want the attribute value removed from recordsnot qualified to receive the data.
13. Click Save.
14. When you are ready to execute the changes, open the process. On the process status page, select theJob Schedules tab to schedule the process or click Start process to run the process now.
AddConstituent Mail PreferenceConstituent mail preferences let you track, based on mail type, whether to send mail to constituents. You canalso track how to send that type ofmail. You can add a mail preference to a selection of constituents or allconstituents at once with Global Change. For example, if you have themail type “Pledge Reminders,” you canuseGlobal Change to add a preference to send pledge reminders by email to a selection of constituents.
} Add constituent mail preference globally
1. From Administration, click Global changes. The Global Changes page appears.
2. Click Add. The Select a global change definition screen appears.
3. Under Constituent, select Add constituent mail preference.
4. Click OK.
5. In the Name field, enter a name to identify this global change process. The name displays in the Globalchanges grid on the Global Changes page.
6. In the Site field, select the site that you want to use to secure this global change instance. This fieldcontains only sites to which you have rights.
When you select a site and save the process:
• Only users with access to the selected site can run the global change process.
144 CHAPTER 11

• Other users cannot edit the Site entry. The system administrator or the user who created theprocess can edit the Site.
• The site automatically appears in the Site field on the Assign Permissions screen (only systemadministrators and the process owner can access this screen)
• On the Global Change page, an Owner column displays, so you can see who created the process
7. If you want to globally add a constituent mail preference for a specific group of records included in aselection created in Query, select Selection. Click the binoculars at the end of the field to access a searchscreen and locate the specific selection you want to use. If you do not select a selection, all records arechanged.
8. In theMail type field, select themail type preference that you want to add. For example, you can select“Appeals.”
9. Select Send or Do not send.
10. If you select Send,
• In Send by, select themethod. For example, you can select “Mail” or “Email.”
• If you select “Mail,” select Send to seasonal address when valid to change the address when thereis a seasonal address and themailing occurs in the date range for that season.
11. In the Comments field, enter any note information you want to add to the constituent mail preferences.You can view comments in theMail Preferences frame in the Comments column. The frame is on theconstituent’s Communications page on the Preferences tab.
12. Click Save.
13. When you are ready to execute the changes, open the process. On the process status page, select theJob Schedules tab to schedule the process or click Start process to run the process now.
AddConstituent SiteConstituent sites allow you to associate locations with constituents. You can add a site to a selection ofconstituents or all constituents at once with Global Change. For example, if you have the constituent site“Northwest,” you can useGlobal Change to add “Northwest” as a site to every constituent.
} Add constituent site globally
1. From Administration, click Global changes. The Global Changes page appears.
2. Click Add. The Select a global change definition screen appears.
3. Under Constituent, select Add constituent site.
4. Click OK.
5. In the Name field, enter a name to identify this global change process. The name displays in the Globalchanges grid on the Global Changes page.
6. In the Site field, select the site that you want to use to secure this global change instance. This fieldcontains only sites to which you have rights.
When you select a site and save the process:
• Only users with access to the selected site can run the global change process.
GLOBAL CHANGE 145

• Other users cannot edit the Site entry. The system administrator or the user who created theprocess can edit the Site.
• The site automatically appears in the Site field on the Assign Permissions screen (only systemadministrators and the process owner can access this screen)
• On the Global Change page, an Owner column displays, so you can see who created the process
7. If you want to globally add constituent sites for a specific group of constituent records included in aselection created in Query, select Selection. Click the binoculars at the end of the field to access a searchscreen and locate the specific selection you want to use. If you do not select a selection, all records arechanged.
8. In the Site field, select the constituent site that you want to add. All constituent sites created in Sites areavailable in this field.
9. When you are ready to execute the changes, open the process. On the process status page, select theJob Schedules tab to schedule the process or click Start process to run the process now.
AddConstituent Solicit CodeSolicit codes allow you to keep track of special considerations for contacting constituents. Solicit codes mayinclude, “Do not solicit” or “Spring mailing only.” If after entering a solicit code in a number of records in yoursystem you find you need to change dates or comments, you can change all dates or comments at once withGlobal Change and a selection of the affected records. For example, if you have the solicit code “Do not solicit”and the start date for the solicit code needs to be “July 14, 2010,” you can use Global Change to make thechange. You can also use the process to add new information to records. For example, if a constituent in theselection does not have an solicit code included on his record but he is included in the record selection, the newsolicit code is added to the his record.
} Add or change solicit codes globally
1. From Administration, click Global changes. The Global Changes page appears.
2. Click Add. The Select a global change definition screen appears.
3. Under Constituent, select Add constituent solicit code.
4. Click OK.
5. In the Name field, enter a name to identify this global change process. The name displays in the Globalchanges grid on the Global Changes page.
6. In the Site field, select the site that you want to use to secure this global change instance. This fieldcontains only sites to which you have rights.
When you select a site and save the process:
• Only users with access to the selected site can run the global change process.
• Other users cannot edit the Site entry. The system administrator or the user who created theprocess can edit the Site.
• The site automatically appears in the Site field on the Assign Permissions screen (only systemadministrators and the process owner can access this screen)
• On the Global Change page, an Owner column displays, so you can see who created the process
146 CHAPTER 11

7. If you want to globally add solicit codes for a specific group of records included in a selection created inQuery, select Selection. Click the binoculars at the end of the field to access a search screen and locatethe specific selection you want to use. If you do not select a selection, all records are changed.
8. In the Solicit Code field, select the solicit code that you want to add. All solicit codes created inManagesolicit codes are available in this field.
9. In the Start date field, enter the new start date.
10. In the End date field, enter the new end date.
11. In the Comments field, enter any note information you want to add to the solicit code. This informationdisplays in the Comment column of the solicit code.
12. Click Save.
13. When you are ready to execute the changes, open the process. On the process status page, select theJob Schedules tab to schedule the process or click Start process to run the process now.
AddRelationshipManagerYour organization may assign a fundraiser to maintain your organization’s relationship with a constituent. Youcan view these in the Constituent relationship manager section of the Constituencies tab of a Constituentrecord. You can add a relationship manager to a selection of constituents or all constituents at once with GlobalChange. For example, you can useGlobal Change to assign a fundraiser, “John Doe,” as a relationship managerfor every constituent.
} Add relationship manager globally
1. From Administration, click Global changes. The Global Changes page appears.
2. Click Add. The Select a global change definition screen appears.
3. Under Constituent, select Add relationship manager.
4. Click OK.
5. In the Name field, enter a name to identify this global change process. The name displays in the Globalchanges grid on the Global Changes page.
6. In the Site field, select the site that you want to use to secure this global change instance. This fieldcontains only sites to which you have rights.
When you select a site and save the process:
• Only users with access to the selected site can run the global change process.
• Other users cannot edit the Site entry. The system administrator or the user who created theprocess can edit the Site.
• The site automatically appears in the Site field on the Assign Permissions screen (only systemadministrators and the process owner can access this screen)
• On the Global Change page, an Owner column displays, so you can see who created the process
7. If you want to globally add the relationship manager to a specific group of constituent records includedin a selection created in Query, select Selection. Click the binoculars at the end of the field to access asearch screen and locate the specific selection you want to use. If you do not select a selection, allrecords are changed.
8. In theManager field, select a fundraiser. You can use the binoculars icon to look up fundraisers.
GLOBAL CHANGE 147

9. Select Remove value from unqualified records to remove the relationship manager from constituentrecords not included in the Selection.
10. Click Save.
11. When you are ready to execute the changes, open the process. On the process status page, select theJob Schedules tab to schedule the process or click Start process to run the process now.
AddUser-defined ConstituencyUser-defined constituencies are defined by your organization. You can add a user-defined constituency to aselection of constituents or all constituents at once with Global Change. For example, if you have a user-definedconstituency, “Online friend,” you can useGlobal Change to add this constituency to a selection of constituents.
} Add user-defined constituency globally
1. From Administration, click Global changes. The Global Changes page appears.
2. Click Add. The Select a global change definition screen appears.
3. Under Constituent, select Add user-defined constituency.
4. Click OK.
5. In the Name field, enter a name to identify this global change process. The name displays in the Globalchanges grid on the Global Changes page.
6. In the Site field, select the site that you want to use to secure this global change instance. This fieldcontains only sites to which you have rights.
When you select a site and save the process:
• Only users with access to the selected site can run the global change process.
• Other users cannot edit the Site entry. The system administrator or the user who created theprocess can edit the Site.
• The site automatically appears in the Site field on the Assign Permissions screen (only systemadministrators and the process owner can access this screen)
• On the Global Change page, an Owner column displays, so you can see who created the process
7. If you want to globally add a user-defined constituency to a specific group of constituent recordsincluded in a selection created in Query, select Selection. Click the binoculars at the end of the field toaccess a search screen and locate the specific selection you want to use. If you do not select a selection,all records are changed.
8. In the Constituency field, select the type of constituency to assign to the constituent. The constituencydefines why the constituent is in your database and the affiliation with your organization.
9. Enter the date the constituency begins.
10. Enter the date the constituency ends. If the duration of the constituency is undetermined, leave this fieldblank.
11. Select Overwrite existing value to change the duration of the constituency to match your new globalentries where the constituency already exists.
12. Select Remove value from unqualified records to remove the constituency from records not included inthe Selection.
148 CHAPTER 11

13. Click Save.
14. When you are ready to execute the changes, open the process. On the process status page, select theJob Schedules tab to schedule the process or click Start process to run the process now.
Change RelationshipManagerYour organization may assign a fundraiser to maintain your organization’s relationship with a constituent. Youcan view these in the Constituent relationship manager section of the Constituencies tab of a Constituentrecord. You can change or remove a relationship manager from a selection of constituents or all constituents atonce with Global Change. For example, you can useGlobal Change to change the relationship manager for aselection of constituents to “John Doe.”
} Change relationship manager globally
1. From Administration, click Global changes. The Global Changes page appears.
2. Click Add. The Select a global change definition screen appears.
3. Under Constituent, select Change relationship manager.
4. Click OK.
5. In the Name field, enter a name to identify this global change process. The name displays in the Globalchanges grid on the Global Changes page.
6. In the Site field, select the site that you want to use to secure this global change instance. This fieldcontains only sites to which you have rights.
When you select a site and save the process:
• Only users with access to the selected site can run the global change process.
• Other users cannot edit the Site entry. The system administrator or the user who created theprocess can edit the Site.
• The site automatically appears in the Site field on the Assign Permissions screen (only systemadministrators and the process owner can access this screen)
• On the Global Change page, an Owner column displays, so you can see who created the process
7. If you want to globally change the relationship manager for a specific group of constituent recordsincluded in a selection created in Query, select Selection. Click the binoculars at the end of the field toaccess a search screen and locate the specific selection you want to use. If you do not select a selection,all records are changed.
8. In theManager field, select a fundraiser. You can use the binoculars icon to look up fundraisers.
9. Select Remove fundraiser or Change Fundraiser. Remove fundraiserwill remove the fundraiser as arelationship manager from all constituents or from the constituents in your selection.
10. If you select Change Fundraiser, select a new fundraiser in theManager field for that option. You can usethe binoculars icon to look up fundraisers. Change fundraiserwill change the relationship manager for allconstituents or constituents in your selection that have the relationship manager in the firstManagerfield to the fundraiser in the secondManager field.
11. Click Save.
12. When you are ready to execute the changes, click Process global change.
GLOBAL CHANGE 149

Delete Constituent AttributeAttributes add flexibility to your record keeping by giving you the ability to define and store special informationabout a wide variety of record types. If after adding an attribute to a number of records in your system you findyou need to delete it, you can do so all at once with Global Change and a selection of the affected records. Forexample, if you have the attribute category “Athletics” and you need to delete it from all constituents, you canuseGlobal Change to make the deletion.
} Delete constituent attribute globally
1. From Administration, click Global changes. The Global Changes page appears.
2. Click Add. The Select a global change definition screen appears.
3. Under Constituent, select Delete constituent attribute.
4. Click OK.
5. In the Name field, enter a name to identify this global change process. The name displays in the Globalchanges grid on the Global Changes page.
6. In the Site field, select the site that you want to use to secure this global change instance. This fieldcontains only sites to which you have rights.
When you select a site and save the process:
• Only users with access to the selected site can run the global change process.
• Other users cannot edit the Site entry. The system administrator or the user who created theprocess can edit the Site.
• The site automatically appears in the Site field on the Assign Permissions screen (only systemadministrators and the process owner can access this screen)
• On the Global Change page, an Owner column displays, so you can see who created the process
7. If you want to globally delete an attribute from a specific group of constituent records included in aselection created in Query, select Selection. Click the binoculars at the end of the field to access a searchscreen and locate the specific selection you want to use. If you do not select a selection, all records arechanged.
8. In the Category field, select the attribute category to delete. All constituent attribute categories createdinManage attribute categories are available in this field.
9. Click Save.
10. When you are ready to execute the deletions, click Process global change.
Add Site to RecordsYou can globally assign site to a group of records in your database to restrict who can see these records. Afteryou create the definition, you can execute the global change process to assign the sites. For more informationabout processing a global change, see Process a global change instance on page 133.
} Add site to records globally
1. From the Administration page, click Global Changes. The Global Changes page appears.
2. Click Add. The Select a global change definition screen appears.
150 CHAPTER 11

3. Under Site, select Add site to records.
4. Click OK. The Add global change screen appears.
5. In theName field, enter a name to identify this global change process.
6. You can restrict the use of the process to a specific site. When you select a site, only users associatedwith the site can access the process. To allow users of all sites to access the process, select "All sites."
Note: The first Site field in this form allows you to restrict the global change process to one site. This is not thesite that will be applied to the records when you run the global change.
7. Select the type of records you want to apply the global change to.
8. In the Selection field, indicate the specific group of records you want to globally change. Click thebinoculars at the end of the field to access a search screen and locate the specific selection you want touse.
9. In the Action field, select the action you want the global change to take.
For records that can only have one site, if they already have a site assigned you can replace it or delete it.If they do not have a site assigned, you can add it.
For records that can havemore than one site, you can add site, delete and individual site, or delete allsites.
10. In the Site field, select the site you want to assign to your selection of records.
11. Click Save.
12. When you are ready to execute the additions, click Process global change.
Delete Constituent Mail PreferenceConstituent mail preferences let you track, based on mail type, whether to send mail to constituents. You canalso track how to send that type ofmail. You can delete a mail preference from a selection of constituents or allconstituents at once with Global Change. For example, if you have themail type “Pledge Reminders,” you canuseGlobal Change to delete a preference to send pledge reminders by email from a selection of constituents.
} Delete constituent mail preference globally
1. From Administration, click Global changes. The Global Changes page appears.
2. Click Add. The Select a global change definition screen appears.
3. Under Constituent, select Delete constituent mail preference.
4. Click OK.
5. In the Name field, enter a name to identify this global change process. The name displays in the Globalchanges grid on the Global Changes page.
6. In the Site field, select the site that you want to use to secure this global change instance. This fieldcontains only sites to which you have rights.
When you select a site and save the process:
• Only users with access to the selected site can run the global change process.
• Other users cannot edit the Site entry. The system administrator or the user who created theprocess can edit the Site.
GLOBAL CHANGE 151

• The site automatically appears in the Site field on the Assign Permissions screen (only systemadministrators and the process owner can access this screen)
• On the Global Change page, an Owner column displays, so you can see who created the process
7. If you want to globally delete a constituent mail preference from a specific group of records included in aselection created in Query, select Selection. Click the binoculars at the end of the field to access a searchscreen and locate the specific selection you want to use. If you do not select a selection, all records arechanged.
8. In theMail type field, select themail type preference that you want to delete. For example, you canselect “Appeals.”
9. Click Save.
10. When you are ready to execute the deletions, click Process global change.
Delete Constituent SiteConstituent sites allow you to associate locations with constituents. You can delete a site from a selection ofconstituents or all constituents at once with Global Change. For example, if you have the constituent site“Northwest,” you can useGlobal Change to delete “Northwest” as a site from every constituent.
} Delete constituent site globally
1. From Administration, click Global changes. The Global Changes page appears.
2. Click Add. The Select a global change definition screen appears.
3. Under Constituent, select Delete constituent site.
4. Click OK.
5. In the Name field, enter a name to identify this global change process. The name displays in the Globalchanges grid on the Global Changes page.
6. If you want to globally delete constituent sites for a specific group of constituent records included in aselection created in Query, select Selection. Click the binoculars at the end of the field to access a searchscreen and locate the specific selection you want to use. If you do not select a selection, all records arechanged.
7. In the Site field, select the constituent site that you want to delete. All constituent sites created in Sitesare available in this field.
8. Click Save.
9. When you are ready to execute the deletions, click Process global change.
Standardize Constituent Names and AddressesFrom the Global data entry settings page in Administration, you can define data hygiene settings to standardizethe format of constituent addresses and names when you add or edit a constituent record through batch,import, or the Add an individual or Add an organization screens.With the Data formatting options turned on, the program automatically formats text entered into constituentaddress and name fields according to the defined standardization rules. For example, when a user enters "3186WESTMAIN STREET" in the Address field and then tabs to the next field, the program automatically updates thetext to "3186WMain St".
152 CHAPTER 11

Standardization only applies to constituent records added after you turn on the global data entry settings. Tostandardize all existing constituent records, you must use the Standardize Constituent Names and Addressesglobal change process.
} Standardize constituent names and addresses in a selection
1. From Administration, click Global changes. The Global Changes page appears.
2. Click Add. The Select a global change definition screen appears.
3. Under Constituent, select Standardize constituent names/addresses.
4. Click OK.
5. In the Name field, enter a name to identify this global change process. The name displays in the Globalchanges grid on the Global Changes page.
6. In the Selection field, choose a selection of constituents to update.
7. The bottom of the screen displays the Data hygiene settings currently defined on the Global data entrysettings page in Administration. To standardize formats and correct capitalization, both settings must beturned on before you run the global change process. For more information about Data hygiene settings,see Constituent Data Hygiene on page 199
8. Click Save. You return to the Global Changes page.
9. When you are ready to execute the changes, open the process. On the process status page, select theJob Schedules tab to schedule the process or click Start process to run the process now.
Warning: The program uses the data hygiene settings defined when you start the global changeprocess. If you schedule the process to run at a later time, make sure that you do not change the datahygiene settings in the interim period.
Delete Constituent Solicit CodeSolicit codes allow you to keep track of special considerations for contacting constituents. Solicit codes mayinclude, “Do not solicit” or “Spring mailing only.” You can delete solicit codes from a selection of constituents orall constituents at once with Global Change. For example, if you have added the solicit code “Do not solicit” tomany constituent records, you can useGlobal Change to delete it from all records that have that code.
} Delete constituent solicit codes globally
1. From Administration, click Global changes. The Global Changes page appears.
2. Click Add. The Select a global change definition screen appears.
3. Under Constituent, select Delete constituent solicit code.
4. Click OK.
5. In the Name field, enter a name to identify this global change process. The name displays in the Globalchanges grid on the Global Changes page.
6. In the Site field, select the site that you want to use to secure this global change instance. This fieldcontains only sites to which you have rights.
When you select a site and save the process:
• Only users with access to the selected site can run the global change process.
GLOBAL CHANGE 153

• Delete constituent solicit codes globallyOther users cannot edit the Site entry. The systemadministrator or the user who created the process can edit the Site.
• The site automatically appears in the Site field on the Assign Permissions screen (only systemadministrators and the process owner can access this screen)
• On the Global Change page, an Owner column displays, so you can see who created the process
7. If you want to globally delete solicit codes from a specific group of records included in a selection createdin Query, select Selection. Click the binoculars at the end of the field to access a search screen and locatethe specific selection you want to use. If you do not select a selection, all records are changed.
8. In the Solicit Code field, select the solicit code that you want to delete. All solicit codes created inManage solicit codes are available in this field.
9. Click Save.
10. When you are ready to execute the deletions, click Process global change.
Delete User-defined ConstituencyUser-defined constituencies are defined by your organization. You can delete a user-defined constituency from aselection of constituents or all constituents at once with Global Change. For example, if you have a user-definedconstituency, “Online friend,” you can useGlobal Change to delete this constituency from a selection ofconstituents.
} Delete user-defined constituency globally
1. From Administration, click Global changes. The Global Changes page appears.
2. Click Add. The Select a global change definition screen appears.
3. Under Constituent, select Delete user-defined constituency.
4. Click OK.
5. In the Name field, enter a name to identify this global change process. The name displays in the Globalchanges grid on the Global Changes page.
6. In the Site field, select the site that you want to use to secure this global change instance. This fieldcontains only sites to which you have rights.
When you select a site and save the process:
• Only users with access to the selected site can run the global change process.
• Other users cannot edit the Site entry. The system administrator or the user who created theprocess can edit the Site.
• The site automatically appears in the Site field on the Assign Permissions screen (only systemadministrators and the process owner can access this screen)
• On the Global Change page, an Owner column displays, so you can see who created the process
7. If you want to globally delete a user-defined constituency from a specific group of constituent recordsincluded in a selection created in Query, select Selection. Click the binoculars at the end of the field toaccess a search screen and locate the specific selection you want to use. If you do not select a selection,all records are changed.
154 CHAPTER 11

8. In the Constituency field, select the type of constituency to delete from the selected constituents. Theconstituency defines why the constituent is in your database and the affiliation with your organization.
9. Click Save.
10. When you are ready to execute the deletions, click Process global change.
Set All Constituent Mail PreferencesConstituent mail preferences let you track, based on mail type, whether to send mail to constituents. You canalso track how to send that type ofmail. You can set all mail preferences for a selection of constituents or allconstituents at once with Global Change. For example, if you have themail type “Pledge Reminders,” you canuse Global Change to add a preference to send pledge reminders by email to a selection of constituents.
} Set all constituent mail preferences globally
1. From Administration, click Global changes. The Global Changes page appears.
2. Click Add. The Select a global change definition screen appears.
3. Under Constituent, select Set all constituent mail preferences.
4. Click OK.
5. In the Name field, enter a name to identify this global change process. The name displays in the Globalchanges grid on the Global Changes page.
6. In the Site field, select the site that you want to use to secure this global change instance. This fieldcontains only sites to which you have rights.
When you select a site and save the process:
• Only users with access to the selected site can run the global change process.
• Other users cannot edit the Site entry. The system administrator or the user who created theprocess can edit the Site.
• The site automatically appears in the Site field on the Assign Permissions screen (only systemadministrators and the process owner can access this screen)
• On the Global Change page, an Owner column displays, so you can see who created the process
7. If you want to globally set all constituent mail preferences for a specific group of records included in aselection created in Query, select Selection. Click the binoculars at the end of the field to access a searchscreen and locate the specific selection you want to use. If you do not select a selection, all records arechanged.
8. Select Overwrite existing mail preferences to replace the constituent mail preferences with these newpreferences. If you do not select this, the new preferences will be added to the existing ones.
9. Select Send or Do not send.
10. If you select Send,
• In Send by, select themethod. For example, you can select “Mail” or “Email.”
• If you select “Mail,” select Send to seasonal address when valid to change the address when thereis a seasonal address and themailing occurs in the date range for that season.
GLOBAL CHANGE 155

11. In the Comments field, enter any note information you want to add to the constituent mail preferences.You can view comments in theMail Preferences frame in the Comments column. The frame is on theconstituent’s Communications page on the Preferences tab.
12. Click Save.
13. When you are ready to execute the changes, click Process global change.
Refresh Event Registration Campaigns on PaymentsEvents are often associated with a campaigns. With this Global Change definition, you can update eventpayments with a campaign.
} Globally add campaigns to payments for events with campaigns
1. From Administration, click Global changes. The Global Changes page appears.
2. Click Add. The Select a global change definition screen appears.
3. Under Fundraising Efforts - Campaigns, select Refresh event registration campaigns on payments.
4. Click OK.
5. In the Name field, enter a name to identify this global change process. The name displays in the Globalchanges grid on the Global Changes page.
6. In the Site field, select the site that you want to use to secure this global change instance. This fieldcontains only sites to which you have rights.
When you select a site and save the process:
• Only users with access to the selected site can run the global change process.
• Other users cannot edit the Site entry. The system administrator or the user who created theprocess can edit the Site.
• The site automatically appears in the Site field on the Assign Permissions screen (only systemadministrators and the process owner can access this screen)
• On the Global Change page, an Owner column displays, so you can see who created the process
7. In the Event field, select the event to which you want to add campaigns to payments.
8. Click Save.
9. When you are ready to execute the changes, click Process global change.
RefreshMembership Program Campaigns on PaymentsMembership programs are often associated with a campaigns. With this Global Change definition, you canupdate event payments with a campaign.
} Globally add campaigns to payments for membership programs with campaigns
1. From Administration, click Global changes. The Global Changes page appears.
2. Click Add. The Select a global change definition screen appears.
3. Under Fundraising Efforts - Campaigns, select Refresh membership program campaigns on payments.
4. Click OK.
156 CHAPTER 11

5. In the Name field, enter a name to identify this global change process. The name displays in the Globalchanges grid on the Global Changes page.
6. In the Site field, select the site that you want to use to secure this global change instance. This fieldcontains only sites to which you have rights.
When you select a site and save the process:
• Only users with access to the selected site can run the global change process.
• Other users cannot edit the Site entry. The system administrator or the user who created theprocess can edit the Site.
• The site automatically appears in the Site field on the Assign Permissions screen (only systemadministrators and the process owner can access this screen)
• On the Global Change page, an Owner column displays, so you can see who created the process
7. In theMembership program field, select the program to which you want to add campaigns to payments.
8. Click Save.
9. When you are ready to execute the changes, click Process global change.
Manage Purpose or Designation InformationYou use designations and fundraising purposes to track the reasons your organization raises money and howyour donors’ gifts should be used. At times, you may need to add, edit, or delete fields associated withdesignations and fundraising purposes. To do this, you can change all values at once with Global Change and aselection of the affected records.
} Manage fundraising purpose or designation information globally
1. From the Administration page, click Global Changes. The Global Changes page appears.
2. Click Add. The Select a global change definition screen appears.
3. Under Fundraising Efforts - Purposes and Designations, select Manage purpose or designationinformation.
4. Click OK.
5. In the Name field, enter a name to identify this global change process. The name displays in the Globalchanges grid on the Global Changes page.
6. You can restrict the use of the process for a specific site in your organization. When you select a site, onlyusers associated with the site can access the process. To allow users of all sites to access the process,select “All sites.”
7. In the Record type field, select the type of records you want to change. You can select “Designation” or“Fundraising Purpose.”
8. If you want to globally change attributes for a specific group of records included in a selection created inQuery, select Selection. Click the binoculars at the end of the field to access a search screen and locatethe specific selection you want to use. If you do not select a selection, all records are changed.
Note: A selection is a named set of IDs of the same record type. It has a name and description and isoften used as input into a process, such as the terminate sponsorship process, as a means to specifywhich set of records should be acted on by that process. Because selections consist only of IDs (rather
GLOBAL CHANGE 157

than output fields), they are optimized for peak processing speed. You create selections in Query,accessed through Analysis.
9. In the Available field options grid, select any fields you want to edit during the global change process.Click the right arrow to move the fields to the Selected fields grid.
10. Fields that remain in the Available field options grid are not included in the global change process.
11. For any fields you include in the Selected fields grid, select an action and a new value. The followingactions are available:
12. Add value if it does not exist - Adds the new value to the specific field you select.
13. Add value if it does not exist and overwrite existing values - Adds the new value to the specific field youselect. If a value currently exists for the specific field, the existing value is overwritten with the new valueyou select. All records in the selection will have this new field value.
14. Delete value if it exists - Deletes the existing value from the field you select.
15. To add new entries to the NewValue field, enter your new entry and click tab on your keyboard.
16. Click Save.
17. When you are ready to execute the additions, click Process global change.
Retag Revenue Split Records with NewCampaignFundraising revenue is associated with a campaign. You can change the campaign and subpriorities for multiplerecords at once with a global change. For example, you can retag all revenue associated with an annual campaignto be associated with a disaster relief campaign.
} Retag revenue split records with new campaign globally
1. From Administration, click Global changes. The Global Changes page appears.
2. Click Add. The Select a global change definition screen appears.
3. Under Fundraising Efforts - Campaigns, select Retag revenue split records with new campaign.
4. Click OK.
5. In the Name field, enter a name to identify this global change process. The name displays in the Globalchanges grid on the Global Changes page.
6. In the Site field, select the site that you want to use to secure this global change instance. This fieldcontains only sites to which you have rights.
When you select a site and save the process:
• Only users with access to the selected site can run the global change process.
• Other users cannot edit the Site entry. The system administrator or the user who created theprocess can edit the Site.
• The site automatically appears in the Site field on the Assign Permissions screen (only systemadministrators and the process owner can access this screen)
• On the Global Change page, an Owner column displays, so you can see who created the process
158 CHAPTER 11

7. In the Source campaign field, select the campaign to retag in revenue records. This campaign appears onthe Campaigns tab of a Revenue page. The target campaign will replace the source campaign in revenuerecords.
8. In the Target campaign field, select the new campaign.
9. In the Subpriority mapping grid, select the source subpriorities to retag.
10. In the Subpriority mapping grid, select a target subpriority for each source subpriority. These will replacethe source subpriorities. If you do not select a subpriority, the goal will map without one.
11. Click Save.
12. When you are ready to execute the changes, click Process global change.
Set Recurring Gift StatusYou can change the recurring gift status for all revenue records or a selection of them. For example, if all of yourconstituents have paid for all of their recurring gifts, then you can globally update the recurring gift status for allrevenue records to “Completed.”
} Set recurring gift status globally
1. From Administration, click Global changes. The Global Changes page appears.
2. Click Add. The Select a global change definition screen appears.
3. Under Revenue, select Set recurring gift status.
4. Click OK.
5. In the Name field, enter a name to identify this global change process. The name displays in the Globalchanges grid on the Global Changes page.
6. In the Site field, select the site that you want to use to secure this global change instance. This fieldcontains only sites to which you have rights.
When you select a site and save the process:
• Only users with access to the selected site can run the global change process.
• Other users cannot edit the Site entry. The system administrator or the user who created theprocess can edit the Site.
• The site automatically appears in the Site field on the Assign Permissions screen (only systemadministrators and the process owner can access this screen)
• On the Global Change page, an Owner column displays, so you can see who created the process
7. In the Site field, select the site that you want to use to secure this global change instance. This fieldcontains only sites to which you have rights.
When you select a site and save the process:
• Only users with access to the selected site can run the global change process.
• Other users cannot edit the Site entry. The system administrator or the user who created theprocess can edit the Site.
• The site automatically appears in the Site field on the Assign Permissions screen (only systemadministrators and the process owner can access this screen)
GLOBAL CHANGE 159

• On the Global Change page, an Owner column displays, so you can see who created the process
8. If you want to globally set the recurring gift status for a specific group of records included in a selectioncreated in Query, select Selection. Click the binoculars at the end of the field to access a search screenand locate the specific selection you want to use. If you do not select a selection, all records are changed.
9. In the Status field, select the status to apply to the recurring gift.
• Active – To reactivate a held or completed recurring gift, select “Active”. You can apply payments toan “active” recurring gift.
• Held – To make a recurring gift temporarily inactive, such as if the constituent requests totemporarily stop the recurring gift, select “Held”. You cannot apply payments to a “held” recurringgift.
• Terminated – If the constituent requests to stop a recurring gift entirely, select “Terminated”. A“terminated” recurring gift is no longer active in the database, and you cannot apply payments to it.
• Completed – If the constituent makes all payments for a recurring gift, select “Completed”. A“completed” recurring gift is no longer active in the database, and you cannot apply payments to it.
10. Click Save.
11. When you are ready to execute the changes, click Process global change.
} Map marketing plan task owners to staff members globally
1. From Administration, click Global changes. The Global Changes page appears.
2. Click Add. The Select a global change definition screen appears.
3. UnderMarketing, selectMap marketing plan task owners to staff members.
4. Click OK.
5. In the Name field, enter a name to identify this global change process. The name displays in the Globalchanges grid on the Global Changes page.
6. In the Parameters grid, enter the task owners and staff members that you want to map.
7. Click Save.
8. When you are ready to execute the changes, click Process global change.
Credit Card ConversionTo help you comply with PCI DSS, the program no longer stores complete credit card numbers in your database.To securely store sensitive credit card and merchant account information, the program nowuses the BlackbaudPayment Service (BBPS) web service. You should only run this global change as a part of the upgrade procedureto BBPS.
} Change credit cards globally
1. From Administration, click Global changes. The Global Changes page appears.
2. Click Add. The Select a global change definition screen appears.
3. Under Revenue, select Credit card conversion.
4. Click OK.
160 CHAPTER 11

5. In the Name field, enter a name to identify this global change process. The name displays in the Globalchanges grid on the Global Changes page.
6. Click Save.
7. When you are ready to execute the changes, click Process global change.
Set Recognition Credit TypeThis global change definition allows you to change the recognition credit type currently associated with a groupof existing recognition credits you saved to a query selection. You can change the credits to match the systemdefault recognition or a selected recognition type.
} Change revenue recognition credit types globally
1. From Administration, click Global Changes. The Global Changes page appears.
2. Click Add. The Select a global change definition screen appears.
3. Under Revenue, select Set recognition credit type.
4. Click OK. The Add global change screen appears.
5. In the Name field, enter a name to identify this global change process. The name displays in the Globalchanges grid on the Global Changes page.
6. In the Site field, select the site that you want to use to secure this global change instance. This fieldcontains only sites to which you have rights.
When you select a site and save the process:
• Only users with access to the selected site can run the global change process.
• Other users cannot edit the Site entry. The system administrator or the user who created theprocess can edit the Site.
• The site automatically appears in the Site field on the Assign Permissions screen (only systemadministrators and the process owner can access this screen).
• On the Global Change page, an Owner column displays, so you can see who created the process.
7. In the Selection field, you must select a selection of records, created in Query, that you want updated.Only Revenue recognition credit query types can be used.
8. In the Set recognition type section, you can choose to change recognition credit types Based on systemconfiguration or to a specific type. To change to a specific type, select To this type and select the typefrom the drop-down menu.
9. Click Save.
10. When you are ready to execute the changes, click Process global change.
Address GeocodesBefore an address can bemapped, it must have a geocode. You can assign geocodes when you create newrecords or import records into the system. For existing records, we recommend you use the global changefunctionality to assign geocodes.
GLOBAL CHANGE 161

} Add address geocodes
1. From Administration, click Global changes. The Global Changes page appears.
2. Click Add. The Add Global Change Instance screen appears.
3. Select Address Geocode and click OK. The Add global change screen appears.
4. Enter a unique name and selection for the global change. If necessary, click the binoculars to locate anexisting selection of records.
5. In the Site field, select the site that you want to use to secure this global change instance. This fieldcontains only sites to which you have rights.
When you select a site and save the process:
• Only users with access to the selected site can run the global change process.
• Other users cannot edit the Site entry. The system administrator or the user who created theprocess can edit the Site.
• The site automatically appears in the Site field on the Assign Permissions screen (only systemadministrators and the process owner can access this screen).
• On the Global Change page, an Owner column displays, so you can see who created the process.
6. Select whether to process only primary addresses in the global change.
7. Click Save. You return to the Global Changes page.
8. To process the records, select the global change you created and click Process global change.
Set Auto-Calculate Realized AmountWhen you add a planned gift, you select its applicable vehicle such as charitable gift annuity or bequest. On thePlanned Giving tab, you can view and manage the options for your planned gift vehicles.For each vehicle type, you can select whether to automatically calculate the realized amount as your organizationreceives revenue toward a planned gift. However, if you select to automatically calculate the realized amount fora planned gift vehicle, users can disable the automatically calculated amount for a planned gift if necessary.With the Set auto-calculate realized amount global change, you can set a selection of planned gifts to have therealized amount auto-calculated, rather than manually changing it on each planned gift.
} Globally set auto-calculate realized amounts for planned gifts
1. From the Administration page, click Global changes. The Global Changes page appears.
2. Click Add. The Select a global change definition screen appears.
3. Under Major Giving - Planned Gifts, select Set auto-calculate realized amount.
4. Click OK.
5. In the Name field, enter a name to identify this global change process. The name displays in the Globalchanges grid on the Global Changes page.
6. You can restrict the use of the process to a specific site in your organization. When you select a site, onlyusers associated with the site can access the process. To allow users of all sites to access the process,select “All sites.”
7. In the Selection field, select the group of planned gifts and mark Auto-calculate realized amount.
162 CHAPTER 11

8. Click Save.
9. When you are ready to execute the changes, click Process global change.
Auction DonationWrite-offsAfter an auction event is held, you can write-off any items that were not sold, expire, or have been lost. To write-off multiple items at one time, we recommend you use the global change functionality.
} Write-off auction donations
1. From Administration, click Global changes. The Global Changes page appears.
2. Click Add. The Add Global Change Instance screen appears.
3. Select Auction donation write-off and click OK. The Add global change screen appears.
4. Enter a unique name for the global change.
5. In the Site field, select the site that you want to use to secure this global change instance. This fieldcontains only sites to which you have rights.
When you select a site and save the process:
• Only users with access to the selected site can run the global change process.
• Other users cannot edit the Site entry. The system administrator or the user who created theprocess can edit the Site.
• The site automatically appears in the Site field on the Assign Permissions screen (only systemadministrators and the process owner can access this screen).
• On the Global Change page, an Owner column displays, so you can see who created the process.
6. Enter a selection for the global change. If necessary, click the binoculars to locate an existing selection ofrecords.
• Rather than use a selection of records, you can click Auction and select a specific auction for whichto conduct the global write-off of auction donations. This will only write-off auction donationsrelated to the selected auction.
7. Select the GL post status and post date for which to write-off auction donations.
8. In the Recognition credits field, select how recognitions credits should be handled as a result of thewrite-off.
9. In the Reason code field, select the reason why the write-offs occurred.
10. Enter any further information you would like to include in the Details field.
11. Click Save. You return to the Global Changes page.
12. To process the records, select the global change you created and click Process global change.
Unlock Sponsorship Sales OrdersThis global change definition is designed for you to run on a daily basis. It unlocks any sponsorship opportunitieswhose sales orders have expired. When a sponsor selects an opportunity on your website, a sales order item iscreated and the opportunity itself becomes reserved. This reservation comes with an expiration date. When thedate passes, this global change releases them so they become available to other sponsors.
GLOBAL CHANGE 163

} Unlock sponsorship sales orders
1. From Administration, click Global changes.
2. Click Add. The Select global change definition screen appears.
3. Under Sponsorship, select Unlock sponsorship sales orders.
4. Click OK. The Add global change screen appears.
5. In theName field, enter a name to identify your global change process.
6. You can restrict the use of the process to a specific site in your organization. When you select a site, onlyusers associated with the site can access the process. To allow users of all sites to access the process,select “All sites.”
7. Click Save to save the global change process and return to the Global Changes page.
Unlock Sponsorship OpportunitiesThis global change definition is designed for you to run on a daily bases. It releases opportunities inadvertentlylocked by an operation or process that may not have cleanly closed. For example, if during the unreserve processyour system times out leaving a number of opportunities that you intended to unlock locked, this global changecompletes the process.
} Unlock sponsorship opportunities
1. From Administration, click Global changes.
2. Click Add. The Select global change definition screen appears.
3. Under Sponsorship, select Unlock sponsorship opportunities.
4. Click OK. The Add global change screen appears
5. In theName field, enter a name to identify your global change process.
6. If you want to base the change on just a specific site, in the Site field select the site you want changed.
7. In the Timeout (in minutes) field, select how old the lock should be before it is released by the globalchange. For example, if you select 15minutes, only locks the occurred in the past 15minutes arereleased. If the lock occurred 13minutes ago, it is not included in the process.
8. Click Save to save the global change process and return to the Global Changes page.
Clean Up Inactive Prospect’s InteractionsThis process cancels any pending or planned prospect plan steps associated with an inactive prospect. The stepsare not deleted, but they aremarked as canceled.
} Clean up inactive prospect’s interactions
1. From Administration, click Global changes.
2. Click Add. The Select global change definiton screen appears.
3. Under Constituent, select Cleanup inactive prospect’s interactions.
4. Click OK. The Add global change screen appears.
164 CHAPTER 11

5. In theName field, enter a name to identify your global change process.
6. You can restrict the use of the process to a specific site in your organization. When you select a site, onlyusers associated with the site can access the process. To allow users of all sites to access the process,select “All sites.”
7. Click Save to save the global change process and return to the Global Changes page.
UpdateMembership StatusWhen you set up membership programs, you determine how and when themembership status of a membershould change once themembership has expired, based on the rules for themembership renewal window. Forexample, a member's status might change to lapsed once themembership expires. You can run the UpdateMembership Status global change to go through your membership programs and update themembers' statusesautomatically based on the rules for the renewal window for the programs.To updatemembership statuses, go to Administration and click Global changes. On the Global Changes page,click Add and select the UpdateMembership Status global change definition. You can use a selection to specifythemembership programs to include.If your organization uses site security, you can also specify which sites to include.
GLOBAL CHANGE 165

166 CHAPTER 11

Educational HistoryEducational Institutions 167
Academic Catalog 169
Scholarship Terms 171
Academic Code Tables 173
You can track educational institutions and, if your product has the academic catalog, you may build and manageit for affiliated institutions. Affiliated institutions are related to your organization, usually because you are aneducational institution and want to track detailed information about your institution and academics.
Educational InstitutionsYou can track two types of educational institutions: unaffiliated and affiliated.Using unaffiliated institutions, you can track basic information about other schools and educational institutions,such as location.For affiliated institutions, you can enable the academic catalog to track more detailed information about theacademics of the institution, such as the different programs and degrees offered. You can track more detailedinformation on the constituent records of alumni. When you add or edit educational institutions, you candesignate them as affiliated.
Add Educational InstitutionsEducational institutions are schools, colleges, or universities you can associate with your constituent records.When you add or edit educational institutions, you can designate them as affiliated.For affiliated institutions, you can also track more detailed information about the academics of the institution,such as the different programs and degrees offered.
} Add an educational institution
1. From Administration, click Educational institutions.
2. On the Educational Institutions tab, click Add. The Add an educational institution screen appears.
chapter 12

3. Enter the basic information about this institution. If the institution is affiliated with your organization,mark the checkbox. For more information about the fields on this screen, see Add EducationalInstitution Screen on page 168.
4. Click Save. Affiliated institutions are displayed before unaffiliated ones on the Educational Institutionstab.
Add Educational Institution ScreenThe table below explains the items on this screen.
Screen Item Description
FICE codeEnter the FICE code, if applicable, of the educational institution. A FICE code is anumber formerly assigned to all two-year or higher educational institutions by theFederal Interagency Committee on Education. FICE codes are no longer assigned,but may still be used to help track institutions.
Name Enter the name of the educational institution.
This institution isaffiliated with ourorganization
Mark this checkbox if the educational institution is affiliated with yourorganization.For affiliated institutions, you can track more detailed information about theacademics of the institution, such as the different programs and degrees offered,using the Academic Catalog. For more information, see Academic Catalog on page169.
Address, Country,City, State, ZIP,Phone number
Enter the location of the educational institution.
Edit Educational InstitutionsAfter you add an educational institution, you can edit it as needed.
} Edit an educational institution
1. From Administration, click Educational institutions.
2. On the Educational Institutions tab, select the educational institution and click Edit. The Edit aneducational institution screen appears.
3. Edit the basic information about the educational institution. For more information about the fields onthis screen, see Add Educational Institution Screen on page 168.
168 CHAPTER 12

4. Click Save. Affiliated institutions are displayed above unaffiliated ones on the Educational Institutionstab.
Delete Educational InstitutionsIf you no longer need to track an educational institution, you can delete it. However, in order to preserveacademic catalog history, you cannot delete affiliated institutions with an Academic Catalog.
} Delete an educational institution
1. From Administration, click Educational institutions.
2. On the Educational Institutions tab, select the educational institution and click Delete. A confirmationmessage appears.
3. Click Yes and the educational institution is deleted.
Academic CatalogThe Academic Catalog is used to track more detailed information about the academics of the affiliatededucational institutions, such as the different programs and degrees offered. The Academic Catalog is ahierarchical view of the programs and degrees. The structuremaps to the categories and counts on the VSEsurvey and report.To use the academic catalog, see Configure the Academic Catalog to Display on page 171.For more information about educational institutions, see Educational Institutions on page 167.There are up to seven levels in the Academic Catalog. VSE reporting relies on the top level in the AcademicCatalog hierarchy. The top level is a Program. After Program, the levels areDegree, College, Division,Department, Sub department, and Degree type. Division and Sub department are optional.Your organization may have a Academic Catalog hierarchy such as: Undergraduate (Program), Bachelor ofScience (Degree), School ofMath and Science (College), Mathematics (Division), Department ofMath andComputer Science (Department), Calculous and Trigonometry (Sub-department) and BS in Math or Minor inMiddle SchoolMathematics(Degree type).You can use the Academic Catalog to show current and historical views of how your institution is arranged. Thisallows you to track the specific degree and program information for alumni based on when they attended yourinstitution. For example, the School of Business may be renamed in honor of an important alumni or donor. Anasterisk next to an item in the Academic Catalog indicates there is historical information for that item.
Add to the Academic CatalogWhen building the academic catalog, you must first select the affiliated institution on the Academic Catalog tab.The top level of the Academic Catalog hierarchy is Program. After the program, the levels areDegree, College,Division, Department, Sub-department, and Degree type. Division and Sub-department are optional. Yourorganization may have a Academic Catalog hierarchy such as: Undergraduate (Program), Bachelor of Science(Degree), School ofMath and Science (College), Mathematics (Division), Department ofMath and ComputerScience (Department), Calculus and Trigonometry (Sub-department) and BS in Math or Minor in Middle SchoolMathematics(Degree type).
EDUCATIONAL HISTORY 169

Add ProgramsPrograms are the top level of the Academic Catalog. A Program can be Undergraduate, Graduate, Doctorate, Nodegree, or Other. These programs map directly to the VSE survey and report. You can have only one Program ofeach type for each affiliated institution.
Add DegreesDegrees are the second level of the Academic Catalog. ADegree could be “Bachelor of Science,” for example. Foreach Degree, enter a unique ID, a name, and a date from which this Degree is effective. Only the ID must beunique among other degrees.
Note: You can also enter short codes and descriptions for degrees.
Add CollegesColleges are the third and middle level of the Academic Catalog. A College could be “School of Science and Math,”for example. For each College, enter a unique ID, a name, and a date from which this College is effective. Onlythe ID must be unique among other colleges.
Add DivisionsDivisions are the fourth level of the Academic Catalog. ADivision could be “Mathematics and Computer Science”for example. For each Division, enter a unique ID, a name, and a date from which this Division is effective. Onlythe ID must be unique among other divisions.
Add DepartmentsDepartments are the fifth level of the Academic Catalog. ADepartment could be “Math Department,” forexample. For each Department, enter a unique ID, a name, and a date from which this Department is effective.Only the ID must be unique among other departments.
Note: You can also enter short codes and descriptions for departments.
Add Sub DepartmentsSub departments are the sixth level of the Academic Catalog. A Sub department could be “Calculous andTrigonometry,” for example. For each Sub department, enter a unique ID, a name, and a date from which thisSub department is effective. Only the ID must be unique among other sub departments.
Note: You can also enter short codes and descriptions for sub departments.
Add Degree TypesDegree types are the lowest level of the Academic Catalog. ADegree type could be “BS in Math” or “Minor inMiddle SchoolMathematics,” for example. For each Degree type, enter a unique ID and select a type. TheDegreetypemust be unique within the department, but could be used in other departments.
170 CHAPTER 12

Edit Items in the Academic CatalogWhen you edit items in the Academic Catalog, you have the opportunity to move information into the cataloghistory. This allows you to track the specific degree and program information for alumni based on when theyattended your institution. For example, the School of Business may be renamed in honor of an important alumnior donor. An asterisk next to an item in the Academic Catalog indicates there is historical information for thatitem.
} Edit item in the Academic Catalog to preserve historical information
1. Select the item in the Academic Catalog and click Edit.
2. If the catalog item is Degree type, you can edit the ID and select another degree type. For other catalogitems, clickMove to catalog history to add a new row to the Catalog history. You can modify theeffective dates and add comments to items in the Catalog history.
3. After you move an item to the Catalog history, the ID and name of the catalog item are blank. Enter theupdated name and ID for the catalog item. You can also edit the effective or start date for the namechange.
4. Click Save. The catalog item has been changed. An asterisk appears beside the item in the AcademicCatalog to denote the old catalog item information is preserved in the Catalog history.
Delete from the Academic CatalogYou can delete items from the Academic Catalog when you no longer need them. However, in order to preservehistorical information about your degrees and programs, you should edit items and move the outdated programinformation to the Catalog history. For more information, see Edit Items in the Academic Catalog on page 171.
Configure the Academic Catalog to DisplayThe Academic Catalog is used to track more detailed information about the academics of the affiliatededucational institutions, such as the different programs and degrees offered. To use the academic catalog andview the tab, go to the Educational Catalog page in Administration. Click Edit configuration under Tasks andmark Use academic catalog.For more information, see Academic Catalog on page 169.
Scholarship TermsTo provide scholarship fund donors another level of detail about how your organization distributes funding toscholarship recipients, you can define scholarship terms. You can select the term for which an award applieswhen you add a recipient to a scholarship fund. This information appears in the stewardship report generated bythe stewardship package process for the fund. For example, if you add “Summer Study Abroad” and “WinterStudy Abroad” to the Scholarship Terms tab, when you add a recipient to a scholarship fund, you can selectwhich term the award applies to. Stewardship recipients can view the scholarship recipients and the amountsawarded for each term.For more information about fund stewardship, see the Fundraising Purposes chapter of the Fundraising Guide.
EDUCATIONAL HISTORY 171

Add Scholarship TermsWhen you add a recipient to a scholarship fund, you can select a scholarship term for the award.
} Add a scholarship term
1. From Administration, click Educational Catalog.
2. On the Scholarship Terms tab, click Add. The Add a scholarship term screen appears.
3. Enter a name and date range for the term.
4. Click Save. You return to the Scholarship Terms tab.
Edit Scholarship TermsWhen you edit the name or dates for a scholarship term, the changes also appear on the Recipients tab of thescholarship fund for students who received funding for the term.
} Edit a scholarship term
1. From Administration, click Educational Catalog.
2. On the Scholarship Terms tab, select a term and click Edit. The Edit a scholarship term screen appears.
3. Enter a name and date range for the term.
4. Click Save. You return to the Scholarship Terms tab.
Delete Scholarship TermsWhen you a delete a scholarship term associated with a scholarship recipient, the term information no longerappears for the student on the Recipients tab of the scholarship fund.
} Delete a scholarship term
1. From Administration, click Educational Catalog.
2. On the Scholarship Terms tab, select an entry and click Delete. A confirmation message appears.
3. Click Yes. You return to the Scholarship Terms tab.
172 CHAPTER 12

Academic Code TablesFrom the Educational Catalog page, you can manage entries in academic code tables for Department, Sub Depart-ment, and Degree.
Note: When you add or edit from the Academic Code Tables tab on the Educational Catalog page, fields forShort code and Description appear. However, when you add or edit from the Code Tables page inAdministration or from options under Tasks, those fields do not appear.
} Add an academic code table entry
1. From Administration, click Educational catalog. The Educational Catalog page appears.
2. From the Academic Code Tables tab, under Department, Sub Department, or Degree, click Add. The addscreen appears.
3. Enter a description to help identify the new entry. This is how the entry appears throughout theprogram.
4. You can also enter short codes and, for degrees, a long description.
5. Under Filtering, select whether to make the entry available to all sites at your organization or onlyselected sites. If you select Selected sites, select the checkboxes of the sites to use the entry.
Warning: To ensure the validity of your database and consistency of your data entry, we recommend you limitrights to add code table entries to only a few key users. This also increases the accuracy of your records andreports. For information about how to limit rights, see Establish User Permissions for Code Tables on page 127.
} Edit academic code table entry
1. From Administration, click Educational catalog. The Educational Catalog page appears.
2. From the Academic Code Tables tab, under Department, Sub Department, or Degree, highlight the entryto edit.
3. Select the entry to edit and click Edit. The edit screen appears.
4. Edit the information as necessary. To make the entry unavailable for use but retain it in your database,select Inactive.
5. Click Save. You return to the Academic Code Tables tab.
} Delete academic code table entry
1. From Administration, click Educational catalog. The Educational Catalog page appears.
2. From the Academic Code Tables tab, under Department, Sub Department, or Degree, highlight the entryto delete.
3. Select the entry to edit and click Delete. A confirmation screen appears.
4. Click Yes. You return to the Academic Code Tables tab.
EDUCATIONAL HISTORY 173

174 CHAPTER 12

Configuration DataConfiguration Export 175
Configuration Export Process Status Page 179
Configuration Import 180
Configuration Import Process Status Page 180
Import or Export Accounting Configuration Data 180
We recommend you safely configure your system settings in a test environment before you apply them to yourlive environment. From Administration, you can work with configuration data to export and import yourconfiguration settings, such as batch designs and workflows, code tables, and queries, between a testenvironment and your live database.
Configuration ExportOn the Configuration Export page, you can create and manage processes to export configuration data from yourlive database. To access the Configuration Export page from Administration, click Configuration data and thenConfiguration export.Under Configuration exports, the names and descriptions of your configuration export processes appear. Fromthe grid, you can manage your configuration export processes.
AddConfiguration Export ProcessesTo export configuration data, you must first create an export process for the data. When you create an exportprocess for configuration data, you enter a name and description to help identify the process and select thetypes of data to export.
} Add a process to export configuration data
1. From Administration, click Configuration data and then Configuration export. The Configuration Exportpage appears.
2. Under Configuration exports, click Add. The Add configuration export screen appears.
chapter 13

3. Enter a unique name and description to help identify the export process.
4. Under Export instances, add the types of configuration data to export.
To select a type of configuration data, in the box on the left, select a type of data to export and click Add.Under Selected types, the export instance for the selected data type appears.
For some configuration data such as smart fields and queries, enter the parameters required for theexport instance. For information about how to add an export instance, see Add Export Instances onpage 176.
5. After you add all configuration data types to export, arrange the order in which to export the instances.The process exports the instances in the order in which they appear under Selected types. To adjust theorder in which an instance exports, select it under Selected types and click the up or down arrow tochange its position in the process.
For some configuration data such as smart fields and queries, you can edit its parameters as necessary.To edit the parameters of an export instance, select it under Selected types and click Edit.
To remove an instance from the export process, select it under Selected types and click Delete.
6. Click Save. You return to the Configuration Exports page. Under Configuration exports, the new exportprocess appears.
Add Export InstancesWhen you add or edit a configuration export process, you select the types of configuration data to export. Someinstances of configuration data, such as smart fields and queries, require parameters to determine the data toexport.
176 CHAPTER 13

When you add an instance that requires additional parameters to a configuration export process, the Add exportinstance screen appears. On this screen, select the parameters necessary for the selected instance. For example,to include smart fields in a configuration export process, select whether to export all smart fields or only selectedsmart fields. To export a query, select the selection of queries to export.
Edit an Export InstanceWhen you add or edit a configuration export process, you select the types of configuration data to export. Someinstances of configuration data, such as smart fields and queries, require parameters to determine the data toexport. After you add one of these instances to a configuration export process, you can edit its parameters asnecessary from the Add configuration export screen or Edit configuration export screen.To edit the parameters of an export instance, select it under Selected types and click Edit. The Edit exportinstance screen appears so you can edit the parameters as necessary. For example, to include smart fields in aconfiguration export process, select whether to export all smart fields or only selected smart fields. To export aquery, select the selection of queries to export.
Edit a Configuration Export ProcessAfter you add a process to export configuration data, you can edit its information as necessary. For example, youcan edit its description or adjust the configuration data types it includes.
} Edit a configuration export process
1. From Administration, click Configuration data and then Configuration export. The Configuration Exportpage appears.
2. Under Configuration exports, select the process to edit and click Edit. The Edit configuration exportscreen appears.
3. Edit the information as necessary. The items on this screen are the same as the Add configuration exportscreen. For information about the items on this screen, see Add Configuration Export Processes on page175.
Note: You can also edit a configuration export process from its status page. Select Tasks, Edit process from themenu bar, or click Edit process under Tasks.
4. Click Save. You return to the Configuration Export page.
Delete a Configuration Export ProcessYou can delete a configuration export process, such as if you no longer use it.
} Delete a configuration export process
1. From Administration, click Configuration data and then Configuration export. The Configuration Exportpage appears.
2. Under Configuration exports, select a process and click Delete. Amessage appears to ask whether todelete the process.
Note: You can also delete a configuration export process from its status page. Select Tasks, Delete process fromthemenu bar, or click Delete process under Tasks.
CONFIGURATION DATA 177

3. Click Yes. You return to the Configuration Export page.
Run aConfiguration Export ProcessTo export configuration data, you must first run its export process. When you run the process, the programretrieves the selected configuration data types to create an export data file. After the process completes, you candownload the data file from the status page of the export process.To run an export process, select it under Configuration exports on the Configuration Export page and clickExport data. The program runs the process and displays the status page of the process so you can track thestatus of the process and download the data file upon completion.For information about the items on the status page, see Configuration Export Process Status Page on page 179.
Note: You can also run a configuration export process from its status page. Select Tasks, Start process from themenu bar, or click Start process under Tasks.
Assign Permissions for a Configuration Export ProcessAfter you add an export process, you can assign permissions to the roles who can use the process. When youassign permissions for the process, you can select to allow all roles to use the process or only select roles.
} Assign permissions for a configuration export process
1. From Administration, click Configuration data and then Configuration export. The Configuration Exportpage appears.
2. Under Configuration exports, select the process to assign permissions for.
3. Click Assign permissions. The Assign permissions screen appears.
178 CHAPTER 13

4. Select whether all roles or only selected roles may access the export process.
If you select Selected roles, select the permissions for the roles in the System roles box.
• To grant a role access, select it in the box and click Grant.
• To deny a role access, select it in the box and click Deny.
• To remove an existing permission assignment from a role, select it in the box and click Clear.
5. Click Save. You return to the Configuration Exports page.
View the Status Page of a Configuration Export ProcessAfter you add an export process, you can view its status page. On this page, you can view its most recent statusand a history of previous instances of the process. After you run the process, you can download the export datafile of a specific instance of the process. You can also schedule the process to run automatically.For information about the items on the status page, see Configuration Export Process Status Page on page 179.
Configuration Export Process Status PageWhen you add a configuration export process, the program automatically generates a status page of theprocess. On the status page, you can view the name and description of the process. To access a configurationexport process status page, select the process in the Configuration exports grid on the Configuration Exportspage and click Go to process.
CONFIGURATION DATA 179

The status page also displays the current status and historical information about the process. To help younavigate through this information, each process status page contains multiple tabs.Depending on your system role, you can perform tasks to manage a process from its status page. To perform atask, select it from the Tasksmenu, or click it under Tasks.
Configuration ImportYou can import an extensible markup language (*.xml) data file of configuration data into your live database,such as after you configure system settings in a test environment.
} Import configuration data into the database
1. From Administration, click Configuration data and then Configuration import. The Import configurationdata screen appears.
Note: To import configuration data from the status page of the import process, click Start process under Tasks.
2. Browse to and select the *.xml data file to import.
3. Click Save. The program imports the selected data file and displays the status page of the configurationimport process so you can track its status.
For information about the items on the status page, see Configuration Import Process Status Page onpage 180
Configuration Import Process Status PageWhen you import a configuration data file, the program automatically displays a status page of the configurationimport process. On the status page, you can view the file name of the imported data file.The status page also displays the current status and historical information about the process. To help younavigate through this information, each process status page contains multiple tabs.Depending on your system role, you can perform tasks to manage a process from its status page. To perform atask, select it from the Tasksmenu, or click it under Tasks.
Import or Export Accounting Configuration DataWhen you run a process to import or export Accounting configuration data (located under the Accountingfolder), you can import or export each item separately or together in one file. However, you must import orexport the data in the following order:• Account Systems (if multiple account systems are used)• Composite Segment Definition (if composite segments are used)
180 CHAPTER 13

• Account Structure• Segment Values• Accounts• Account CodeMapping• Segment Mapping• Composite Segment Mapping (if composite segments are used)When you import or export Accounting data, also consider the following:• You can import Account CodeMapping, Segment Mapping, and Composite Segment Mapping in any order,but you must import them after Accounts.
• We recommend you import Segment Values before you import Accounts. If you import Accounts beforeSegment Values, the program does not import themappings for Accounts.
• You can import Fiscal Years at any time.
CONFIGURATION DATA 181

182 CHAPTER 13

ApplicationCatalog Browser 183
Application Features 186
On the Application page, you can high-level administrative tasks to manage the program. For example, you canuse the catalog browser to load reports to a new report server. To access the Application page, go toAdministration and click Application. The Application page appears.
Catalog BrowserSystem administrators use the catalog browser to manage the installation of custom catalog items and reports.For example, they can load reports to a new report server, if needed. To access the catalog browser, go toAdministration and click Application. On the Application page, click Catalog browser. The Catalog Browser pageappears.
Note: A catalog item is a single specification, while an optional, custom featuremay includemultiplespecifications.
Catalog Browser TabOn the Catalog Browser page, the Catalog Browser tab displays catalog items along with information such asdescriptions and whether the items are loaded. By default, all new features are loaded through revisions duringan installation or upgrade.To access the Catalog Browser, go to Administration and click Application. On the Application page, click Catalogbrowser. The Catalog Browser page appears.On the Catalog Browser tab, use the filter tool to select the catalog items to display. You can filter the catalogitems by type, source, and author. To only display items that are not loaded, select Exclude loaded items.
Load item
To load a catalog item, select it in the grid and click Load item. To load multiple items, click Load all catalog itemsunder Tasks. For more information about how to load multiple catalog items, see Load All Catalog Items on page184.
View xml
To view the specification for a catalog item in XML format, select it and click View xml. The XML appears in a sep-arate window.
chapter 14
Optional Features TabOn the Catalog Browser page, the Optional Features tab displays new features by release and indicates whetherthey are loaded. With the tree view on the tab, you can view the features that are available for different areas ofthe program.When you select a folder in the tree view, its features appear in the grid. To only display items that are notloaded, select Exclude loaded items.
Load feature
To load an optional feature to the program, select it in the grid and click Load feature.
View xml
To view the specification for a feature in XML format, select it and click View xml. The XML appears in a separatewindow.
Catalog Browser TasksFrom the Catalog Browser page, you can access these tasks load catalog items, load reports, and refresh shellnavigation.
Load All Catalog ItemsTo load multiple catalog items, click Load all catalog items under Tasks.
} Load all catalog items
1. From Administration, click Application, and on the Application page, click Catalog browser. The CatalogBrowser page appears.
2. Under Tasks, click Load all catalog items. The Load All Catalog Items screen appears.
184 CHAPTER 14

3. By default all items aremarked for loading.
• To load only items that are not already loaded, select Only load items that have never beenloaded.
• To exclude certain catalog items, clear the checkboxes for those items.
4. Click Start. The Status box displays the processing status for each catalog item. Processing may take afewminutes.
5. When processing finishes, click Close to return to the Catalog Browser page. To update the grid, clickRefresh List.
Load All ReportsTo load all report catalog items, click Load all reports under Tasks.
} Load all reports
1. From Administration, click Application, and on the Application page, click Catalog browser. The CatalogBrowser page appears.
2. Under Tasks, click Load all reports. The Load All Reports screen appears.
APPLICATION 185

3. By default all report items aremarked for loading.
• To only load reports that are not already loaded, select Only load reports that have never beenloaded.
• To exclude certain reports, clear the checkboxes for those items.
4. Click Start. The Status box displays the processing status for each report catalog item. Processing maytake a fewminutes.
5. When processing finishes, click Close to return to Catalog Browser page. To update the grid, click RefreshList.
Refresh Shell NavigationAfter you load catalog items or optional features, click Refresh shell navigation under Tasks to make the loadeditems available in the program.
Application FeaturesOn the Features page, you can search the program for features such as data forms, query views, and KPIs in thesameway that you search for constituents, interactions, and other first-class records elsewhere in the program.You can then access the features to view details and access security permissions. This information can be usefulfor developers who need information about features and where they are used, as well as for administrators whowant an in-depth view of features. Under New Features, you can also search for features according to when theywere added to the program.To access the Features page, go to Administration and click Application. On the Application page, click Features.The Features page appears.
186 CHAPTER 14

Record TypesUnder Record Types, you can access record types to view their scale and scope in the program. You can searchfor record types, view a list of record types, and filter a list of record types according to the time framewhen theywere added to the program.To view a list of record types, click Record types.
On the Record types page, you can access record type definitions to view details such as the features in theprogram that require or return records for a record type. For example, you can select the Constituent recordtype and click Go to record type definition to view the features in the program that require or return records oftype “Constituent.”
APPLICATION 187

FeaturesUnder Features, you can search for features such as data forms, query views, and KPIs in the sameway that yousearch for constituents, interactions, and other first-class records elsewhere in the program. To search for anitem, click a search task and enter your search criteria. When you select a feature, the program displays detailssuch as ID, record type, implementation information, and whether the feature is installed. You can also viewoutput fields and filters, as well as the pages and dashboards that use the feature.
Note: You can also create ad-hoc queries to view details about many of these features. For example, to identifythe data lists that include themost output fields, you can create a Data List query, add Field ID to the outputfields, apply the COUNT summary, and organize the results in descending order.
For example, to search for a data list, click Data list search. On the search screen, enter your search criteria andselect a data list. The Data List page appears. On this page, you can view the ID for the list, the record type,implementation information, and whether the data list is installed. You can also view the output fields and filters,as well as the pages and dashboards that use the data list.
On the details page for a feature, the API tab includes a reference for developers about how to use the featurefrom a variety of APIs. To set a reference to a BBMetalWeb assembly when you write .NET client-side code, usethis tab to see which assembly contains the wrapper for a feature. The tab also includes the BizOp SOAP URL touse to get the data that a feature returns.
188 CHAPTER 14

New FeaturesUnder New Features, you can use the filter fields to search for features such as data forms, query views, and KPIsaccording to when they were added to the program. When you select a feature, the program displays detailsabout the feature.For example, to view new record operations, click New record operations. The Record operations page appears.In the Show field, select a time frame to filter the record operations and click Apply.
APPLICATION 189

190 CHAPTER 14

Attribute CategoriesManage Attribute Categories 191
Manage Attribute Form Extensions 195
Update Attribute Query Relationship 198
Attributes provide flexibility to your record keeping. With attributes, you can define and store special informationabout a wide variety of record types. You can identify a category for the attribute and then store an entry specificto that category.From Administration, you create the attribute categories available to users in the program. Users can assign anynecessary values to these categories. For example, if a constituent is a gourmet cook and a cyclist, a user canenter each activity in the constituent’s record with an attribute category of Hobbies. This helps keep attributesneatly organized and helps with reports and queries.To enable users to enter attributes when they add or edit information throughout the program, you can useform extensions. With form extensions, you can add a tab or section for users to enter attribute information onapplicable forms and pages that otherwise do not include fields for attributes.To view and manage the attributes available to users, go to Administration and click Attribute categories. TheAttribute Categories page appears.
Manage Attribute CategoriesOn the Attribute categories tab, you can view the categories available to users. For each category, you can viewits name, record type, and data type.From the grid, you can add and manage categories as necessary.
Add Attribute CategoriesTo help better manage the attributes your organization uses, you can add attribute categories. You can usethese categories to store information. For example, to track seating preferences for an event, you can create aSeating Preference attribute category so users knowwhere to find this information on constituent records.You can assign attributes to a category and then assign the category to a group. For example, you can create aHobbies attribute category and assign the category to constituent records. The next time you open a constituentrecord and want to record the fact that this constituent’s favorite hobby is golf, “Hobbies” appears as an optionin the Category field of the constituent attribute screen accessed from the Attributes tab. Under Code tables inAdministration, you can also create an attribute group called Outside Interests. In this group, you might havecategories for hobbies and for arts.
chapter 15

} Add an attribute category
1. From Administration, click Attribute categories. The Attribute Categories page appears. Any existingattribute categories appear on this page.
2. On the Attribute categories tab, click Add. The Add attribute category screen appears. For a detailedexplanation of the options on this screen, see Add Attribute Category Screen on page 193.
3. Enter a unique name to help identify the category.
4. In the Record type field, select a record type for the attribute. For example, to use the attribute to trackthe interests of constituents, select “Constituent.”
5. To assign the attribute to a group, select the attribute group code table in the Attribute group field. Forexample, you may assign the attribute categories “Hobbies” and “Arts” to an attribute group called“Outside Interests.”
6. In theData type field, select the type of data for users to provide in the attribute category. For example,to allow users to enter text to describe constituent interests, select “Text.” For a detailed explanation ofthe available data types, see Data Types on page 193.
• If you select “Code table,” users select attribute values from a defined list. In the Code table field,select the code table for users to select from. To create a code table, see Create Code Tables onpage 195.
• If you select “Constituent record,” users can search for and select constituents as the attributevalues. In the Search list field, select a search screen for users to find constituents. For example, toallow users to select individual constituents only, select “Individual Search.” Once you add theattribute category, you can change which search list is used.
7. To limit the category to one per record, select Allow only one per record.
Note: To include the attribute category on form extensions, you must select Allow only one per record. Formextensions allow users to enter attribute information throughout the program. For more information, seeManage Attribute Form Extensions on page 195.
8. To make the category available as a list column, selectMake available in lists. After the programexecutes a nightly business process which adds the categories and attribute values to lists, the categoryappears as an option when you click Columns from list pages.
Note: For Friends Asking Friends lists and reports that refresh data from the Data Mart, the program alsoexecutes a business process to refresh the data after the process to add the categories is complete.
Tip: We recommend you only select categories you need for lists. If you include a large number, the categorieswill slow list performance.
192 CHAPTER 15

9. Click Save. You return to the AttribAute Categories page.
Note: If you add a query view after you create an attribute category, the program does not automatically addthe attribute category to the new query view. For information about how to add an attribute category to aquery view, see Update Attribute Query Relationship on page 198.
Add Attribute Category Screen
ScreenItem Description
NameEnter a unique name to identify the attribute category. The name appears in the Categoryfield drop-down menu when you add or edit attribute information on a record.If no attribute categories exist for a record type, the Attributes tab does not appear.
Recordtype
Select the record type for the attribute. For example, to track your constituents’ hobbies,select “Constituent.” This attribute appears as an option for constituent records only.
Attributegroup
To further define attribute categories, you can create attribute groups and assign thecategory to a group. For example, you can create an attribute group called Outside Intereststhat includes attribute categories of Athletics and Arts.You add and manage attribute groups as code tables, in Administration.
Datatype
Select the type of data users for users to provide in the attribute category. For example, for aDeposit Date category for revenue records, select “Date,” and for a Seating Preferencecategory for event records, select “Text.” For a detailed explanation of the available datatypes, see Data Types on page 193.
Codetable
If you select “Code table” as your data type, select a code table to associate with theattribute in this category. Code tables help improve data entry speed and accuracythroughout the program. When users enter information into a field with a code table, theycan quickly select an entry for the field rather than type it in manually.To create a code table, click the New button. The Add a code table screen appears. Forinformation about his screen, see Create Code Tables on page 195.
Searchlist
If you select “Constituent record” as your data type, select a search screen for users to selectconstituents as the attribute values for this category. For example, to allow users to selectindividual constituent only, select “Individual Search.” Once you add the attribute category,you can change which search list is used.
Allowonly oneperrecord
To limit the attribute category to one per record, select this checkbox. If you select thecheckbox and a user tries to use the category multiple times on a record, an error messageexplains the restriction.
Makeavailablein lists
Select the checkbox to make the category available as a list column. The category appears asan option when you click Columns from list pages.
Data TypesData types determine the values that users can enter when they add attributes. When users add attributes, theyselect attribute categories in the Category field. The data types you select for the attribute categories determinethe type of data that the users can enter in the Value field. For example, if you create an attribute category forconstituent records and select “Currency” as the data type, users who add attributes and select this attributecategory can enter only monetary values.
ATTRIBUTE CATEGORIES 193
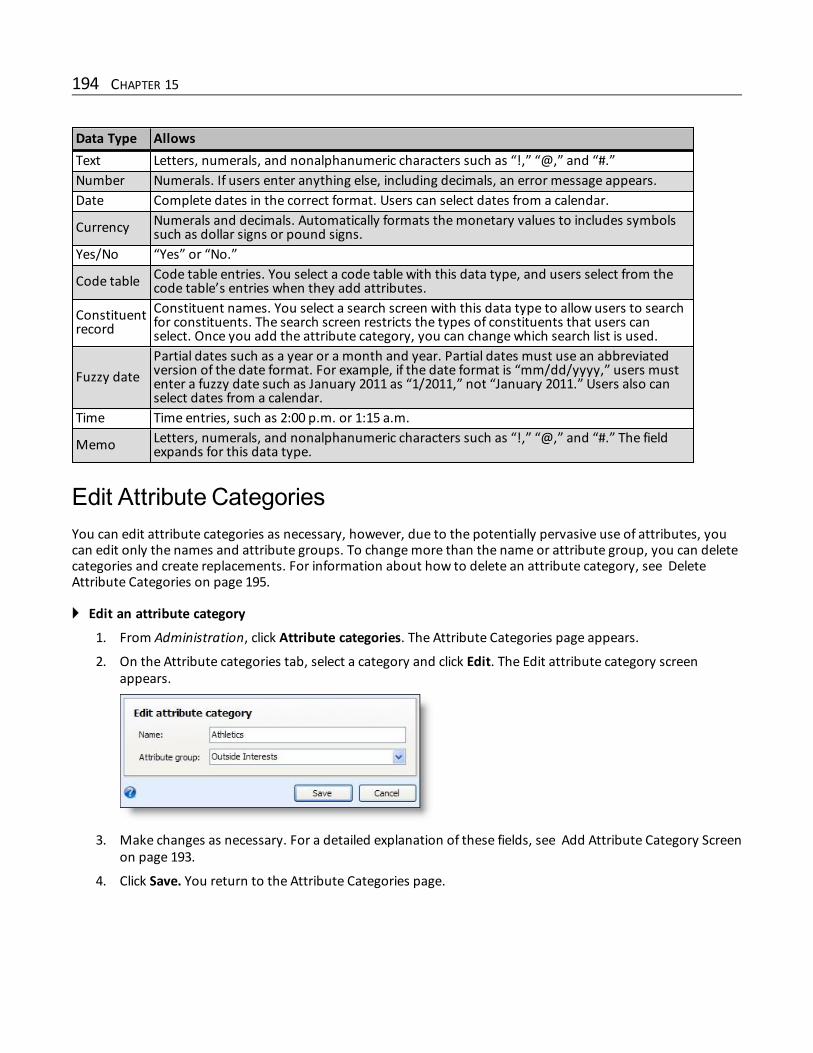
Data Type AllowsText Letters, numerals, and nonalphanumeric characters such as “!,” “@,” and “#.”Number Numerals. If users enter anything else, including decimals, an error message appears.Date Complete dates in the correct format. Users can select dates from a calendar.
Currency Numerals and decimals. Automatically formats themonetary values to includes symbolssuch as dollar signs or pound signs.
Yes/No “Yes” or “No.”
Code table Code table entries. You select a code table with this data type, and users select from thecode table’s entries when they add attributes.
Constituentrecord
Constituent names. You select a search screen with this data type to allow users to searchfor constituents. The search screen restricts the types of constituents that users canselect. Once you add the attribute category, you can change which search list is used.
Fuzzy datePartial dates such as a year or a month and year. Partial dates must use an abbreviatedversion of the date format. For example, if the date format is “mm/dd/yyyy,” users mustenter a fuzzy date such as January 2011 as “1/2011,” not “January 2011.” Users also canselect dates from a calendar.
Time Time entries, such as 2:00 p.m. or 1:15 a.m.
Memo Letters, numerals, and nonalphanumeric characters such as “!,” “@,” and “#.” The fieldexpands for this data type.
Edit Attribute CategoriesYou can edit attribute categories as necessary, however, due to the potentially pervasive use of attributes, youcan edit only the names and attribute groups. To changemore than the name or attribute group, you can deletecategories and create replacements. For information about how to delete an attribute category, see DeleteAttribute Categories on page 195.
} Edit an attribute category
1. From Administration, click Attribute categories. The Attribute Categories page appears.
2. On the Attribute categories tab, select a category and click Edit. The Edit attribute category screenappears.
3. Make changes as necessary. For a detailed explanation of these fields, see Add Attribute Category Screenon page 193.
4. Click Save. You return to the Attribute Categories page.
194 CHAPTER 15

Delete Attribute CategoriesYou can delete an attribute category as necessary, such as when your organization no longer uses it. When youdelete an attribute category, the program completely removes the attribute category from any associatedrecords.
} Delete an attribute category
1. From Administration, click Attribute categories. The Attribute Categories page appears.
2. On the Attribute categories tab, select a category and click Delete. A confirmation message appears. ClickYes. If the attribute category is used on existing records, a warning message appears. You cannot deletean attribute category that exists on one or more records.
3. You return to the Attribute Categories page.
Create Code TablesWhen you create an attribute category and select “Code table” as the data type, you must select a code table touse as the source of the attribute. If a code table with the desired attributes does not exist in the program, youcan create a code table from the Add attribute category screen.
} Create a code table
1. On the Add attribute category screen, select “Code table” in the Data type field. The program enables theCode table field.
2. In the Code table field, click New. The Add a code table screen appears.
3. In theName field, enter a name for the code table in the program. This is the name that appears on theCode Tables page in Administration.
4. In theDB table name field, enter a name for the code table in the database schema. This is the name youuse to reference the code table in SQL.
Note: The database table name can be up to 30 characters. It can start with a capital letter from “A” to “Z,”followed by one or more uppercase letters or numerals and ending with “CODE.” To designate the table as acode table, it must end with “CODE.” For example, the database table name for the Alias Type code table in theprogram is ALIASTYPECODE.
5. In the Category field, select a category for the code table. The Code Tables page in Administrationorganizes code tables by category for easier viewing. If the category does not exist, click Add a codetable category and you can create the new category.
6. In the Sort type field, select how to organize the entries in the code table.
7. In theDescription field, enter a description of the code table.
8. Click Save. You return to the Add attribute category screen.
Manage Attribute Form ExtensionsTo create tabs or sections for users to enter attributes, you can add form extensions throughout the program.Form extensions add tabs or sections to forms and pages that do not otherwise include attribute fields. On the
ATTRIBUTE CATEGORIES 195

Attribute form extensions tab, you can create and manage the form extensions for your organization.
Add Attribute Form ExtensionsAfter you create attribute categories, you can use form extensions to create tabs or sections in related areas ofthe program. This allows users to enter attribute information on forms and pages that otherwise do not includeattribute fields. For example, you can create attribute categories for constituent records and add a formextension to the Individual, Spouse, Business Add Form. When users add constituents, they can then enterattributes on the tab or section you create with the form extension.When you create a form extension, you select the form or page to modify; select whether to create a tab orsection; enter a label for the tab or section; and select the attribute categories to include.
Note: To include an attribute category on a tab or section that you create with a form extension, the attributecategory must limit attributes to one per record. When you create an attribute category, you must select Allowonly one per record. For information about how to create attribute categories, see Add Attribute Categorieson page 191.
} Add an attribute form extension
1. From Administration, click Attribute categories. The Attribute Categories page appears.
2. On the Attribute form extensions tab, click Add. The Add attribute form extension screen appears.
3. In theData form field, click the binoculars to search for a form or page to modify. A search screenappears. You can search name, record type, and whether the form is in Add, Edit, or Viewmode.
4. In the Render style field, select whether to create a tab or section.
• If you select “Tab,” the program adds a tab to the right of any existing tabs. In the Tab caption field,enter a label for the new tab.
• If you select “After parent,” the program adds a section below the existing content. If the form orpage includes tabs, the section appears on the first tab. In theGroup caption field, enter a label forthe new section.
196 CHAPTER 15
5. Under Name, select the attribute categories to include on the form extension and click the right arrow.Attribute categories only appear under Namewhen their record typematches the record type of theform or page you select in theData form field.
Note: Form extensions require attribute categories to limit attributes to one per record. If an attribute categoryallows multiple attributes per record, it does not appear under Name. When you create attribute categories,you must select Allow only one per record.
6. To require users to enter an attribute, select the Required checkbox for the attribute category.
7. If you includemultiple attribute categories, use the up and down arrows to arrange the order.
8. Click Save. You return to the Attribute Categories page. The program creates the tab or section thatallows users to enter attribute information on the form or page you select.
Note: To disable a form extension, select it and click Disable. For more information, see Disable or EnableAttribute Form Extensions on page 197.
Disable or Enable Attribute Form ExtensionsAfter you add an attribute form extension, you can enable or disable it as necessary. For example, you maydisable a form extension if your organization temporarily stops its use. On the Attribute form extensions tab ofthe Attribute Categories page, the Enabled column displays whether a form extension is enabled.When you disable a form extension, the program removes the tab from the form or page but retains itsconfiguration for later use. To disable a form extension, select it on the Attribute form extensions tab and clickDisable.To resume use of an attribute form extension, you can enable it when necessary. When you enable a formextension, the program adds the tab to the applicable form or page so users can add attribute information asnecessary. To enable a form extension, select it on the Attribute form extensions tab and click Enable.
Delete Attribute Form ExtensionsAfter you add an attribute form extension, you can delete it as necessary. When you delete a form extension, theprogram removes the tab or section from its form or page and deletes the configuration from the database.
Tip: Rather than delete an attribute form extension, you can disable it. When you disable a form extension, theprogram removes the tab or section from the form or page but retains the configuration for later use. Forinformation about how to disable a form extension, see Disable or Enable Attribute Form Extensions on page197.
} Delete an attribute form extension
1. From Administration, click Attribute categories. The Attribute Categories page appears.
2. On the Attribute form extensions tab, select a form extension and click Delete. On the confirmationmessage that appears, click Yes.
3. You return to the Attribute Categories page.
ATTRIBUTE CATEGORIES 197

Update Attribute Query RelationshipIf you add a query view after you create an attribute category, the program does not automatically add theattribute category to the query view. To add the attribute category to the query view, go to the AttributeCategories page and click Update attribute query relationship under Tasks.
198 CHAPTER 15

Global Data Entry SettingsTo help ensure that your constituent data is clean and formatted consistently, you can define default rules fordata entry on the Global data entry settings page. To access this page, go to Administration and click Global dataentry settings under Data.On this page, you select the type of settings to define. After you select a type, the page displays its existing rules,the areas where those rules apply, and the areas where you can override the rules. To edit the data entry rules,you click Edit.
Constituent Data HygieneTo standardize the format of constituent addresses and names that you add or edit through batches, imports, orthe Add an individual or Add an organization screens, you can define data-formatting settings on the Global dataentry settings page. To access this page, go to Administration and click Global data entry settings under Data.On the Global data entry settings page, select Constituent data hygiene to manage your data-formattingoptions.
When you turn on data formatting options, the program automatically formats any text that users enter inconstituent address and name fields based on the standardization rules that you define. For example, if a userenters "3186WESTMAIN STREET" in the Address field, the program can automatically update that entry to "3186WMain St" when the user moves on to the next field.To turn on data formatting options, click Edit. The Configure data hygiene screen.
chapter 16

l To turn on automatic address formatting, select Use address standardization. For information aboutaddress standardization rules, see Address Standardization Rules on page 200.Address standardization applies to batch templates with the Constituent Address Update Batch,Constituent Batch, Constituent Update Batch, Event Sponsorship Batch, and Registrant Batch batchtypes, as well as to import processes that use batch templates with these types. Standardization alsoapplies to manual entry on batch templates with the Enhanced Revenue Batch, Sponsor Batch, andAuction Item Batch batch types.
l To turn on automatic capitalization, select Correct capitalization in name and address fields. Forinformation about capitalization rules, see Text Capitalization Rules on page 202Automatic capitalization applies to batch templates with the Constituent Address Update Batch,Constituent Batch, Constituent Update Batch, Donation Batch, Event Sponsorship Batch, and RegistrantBatch batch types, as well as to import processes that use batch templates with these types. Capitalizationalso applies to manual entry on batch templates with the Enhanced Revenue Batch, Sponsor Batch, andAuction Item Batch batch types.
Note: To overwrite a correction, delete the corrected entry and then re-enter the text. The program does notstandardize that text again. To re-apply a correction, delete the entry, tab out of the field, and then tab back tothe field and re-enter the text.
Note: If you use a CASS-certified address validation provider such as Satori, that addressvalidation/standardization process can overwrite standardization and capitalization corrections from the datahygiene settings.
Address Standardization Rules
To view the address standardization rules, select Constituent data hygiene on the Global data entry settingspage and click View standardization table under Data formatting .The address standardization table includes the rules on how to format addresses. By default, the program usesstandards defined by the U.S. Postal Service except for capitalization. Instead of capitalizing all letters inaddresses, the program title cases most words and removes punctuation. The changes during standardizationinclude:
l Convert spelled-out numbers to numerals. ("Two" becomes "2" and "Tenth" becomes "10th")
l Convert some spelled-out words to abbreviations, including:
200 CHAPTER 16

l Street suffixes ("Street" becomes "St" and "Road" becomes "Rd")
l Directionals ("North" becomes "N" and "Southwest" becomes "SW")
l Secondary unit designations ("Apartment" becomes "Apt" and "Suite" becomes "Ste")
} Edit the address standardization table
1. On the Global data entry settings page, select Constituent data hygiene and click Edit . The Configuredata hygiene screen appears.
2. Under Use address standardization, click Edit standardization table. The Address standardization tablescreen appears.
Note: You can use filters to limit the rules that appear in the grid.
l To add a standardization rule, click Add. The Add replacement value screen appears.a. In the Value type field, select the type of text to create a rule for.
b. In the Country field, select the country that the rule applies to.
c. In theOriginal value field, enter the text to replace.
d. In the Replacement value field, enter the text to use instead.
e. Click Save. You return to the Address standardization table screen.
l To edit a standardization rule, select it in the grid and click Edit. The Edit replacement value screenappears. Edit theOriginal value and Replacement value fields as necessary. Click Save. You returnto the Address standardization table screen.
l To delete a standardization rule, select it in the grid and click Delete. On the confirmation screen,
201

click Yes. After you delete a rule, the program no longer applies it to new addresses, but it does notchange existing addresses.
3. Click Close. You return to the Configure data hygiene screen.
Text Capitalization Rules
When you use automatic capitalization, the program capitalizes the first letter of every word. It then lowercasesall subsequent letters with the following exceptions:
l First letter after an apostrophe ("O’donald" becomes "O’Donald.")
l First letter after a space ("Mac donald" becomes "Mac Donald.")
l First letter after a hyphen ("Smith-jones" becomes "Smith-Jones.")
l Third letter when the first and third letters in a last name are both capitalized ("DeFazio" remains"DeFazio" and "McDonald" remains "McDonald.")
l First letter after “Mc” if the entire name is lowercase or uppercase ("MCDONALD" and "mcdonald" become"McDonald.")
Note: If a name begins with "Mc" and all subsequent letters are lowercase, the program assumes this isintentional and does not capitalize the third letter. ("Mcdonald" remains "Mcdonald.")
l First letter after "Mac" if it is capitalized and all subsequent letters are lowercase ("MacDonald" remains"MacDonald.")
Constituent Matching SettingsTo prevent the creation of duplicate records, you can define constituent match settings on the Global data entrysettings page. To access this page, go to Administration and click Global data entry settings under Data. On theGlobal data entry settings page, select Constituent matching to define thematch confidence thresholds that theprogram uses to determine whether new constituent records match existing records in your database.
Note: Constituent match settings only apply when you turn thematching feature on with the Enable/disablematching configuration task in Administration.
When you add constituent records through batches, imports, the Add an individual screen, or the Add anorganization screen, the program applies an algorithm to calculate "match confidence scores." To measure howsimilar new records are to existing records in your database, the algorithm compares field values on incomingrecords with field values on existing records and then assigns match scores that are weighted by field type.Records with high cumulative scores are likely matches, while records with low scores probably are not. Forinformation about how the algorithm calculates match confidence scores, see Constituent Matching Algorithmon page 204.The program then compares match confidence scores to the percentage ranges, or "match confidencethresholds," that determine whether new records arematches, possible matches, or not matches. You managetwo separate sets ofmatch confidence thresholds: one for records added by batch or import and one for recordsadded manually on the Add an individual or Add an organization screens. The default thresholds are 100-95%, 94-70%, and 69-0% for batch and import and 100-70% and 69-0% for manual entry.
Warning: If necessary, you can edit default thresholds for your organization. However, we recommend thatyou retain the defaults because thematching algorithm is designed to provide optimal results with thosepercentages and may return unexpected results if you change them. For example, if two records havematchingemail addresses but no other matching data, the program flags them as possible matches because their match
202 CHAPTER 16

confidence score of 70 is in the Possible matches threshold's default range of 94-70%. But if you change thethreshold by just one point to 94-71%, the program no longer flags those two records as possible matches. Forseveral factors to consider before you edit the default thresholds, see Constituent Matching Algorithm on page204.
The first set ofmatch confidence thresholds applies to batch templates with the Constituent Batch, ConstituentUpdate Batch, Membership Dues Batch, Enhanced Revenue Batch, Revenue Batch, Revenue Update Batch, andSponsor Batch batch types, as well as the import processes that use batch templates with these types. Foradditional flexibility, you can overwrite match thresholds for individual batch templates and import processes.For example, if data that you import from a particular vendor requires extra scrutiny, you can edit thresholds forthat vendor under Configure options on the batch template or under Set options on the import process.
Note: You cannot edit match thresholds on batch templates or import processes that use the ConstituentBatch or Sponsor Batch batch types. These batch types always use the thresholds on the Global data entrysettings page.
For information about how to edit constituent match settings on batch templates and import processes, see theBatch and Import Guide.
Action Description
Processautomatically
Use the percentage range for theMatched constituents threshold to indicate records withmatch scores that likely match existing records. When a new record and existing record have amatch confidence score in this range, the program assigns the record ID from the existingrecord to thematched record in the batch. If multiple match confidence scores are within thisrange, the program uses the highest score as thematch. This process occurs automatically andrequires no action from users.Note: For Constituent Update and Enhanced Revenue batches, the program may update theexisting constituent with information from the incoming constituent according to yourorganization's selected constituent update rules. For more information, see ConstituentUpdate Rules on page 208. For Constituent, Membership Dues, Revenue, Revenue Update,and Sponsor batches, the program ignores any new or conflicting data. No updates aremade
203

Action Descriptionto the existing constituent.To turn off automatic updates, clear Process automatically.
Reviewconstituents
Use the percentage range for the Possible matches threshold to indicate records with matchscores that are similar to existing records but still require manual review. When a new recordand existing record have a match confidence score in this range, the program prompts you tocompare the records and select whether to update the existing record or create a new one.For information about how to compare records on the duplicate resolution screen, see theBatch and Import Guide.To turn offmanual reviews, clear Review constituents. For example, you might clear Reviewconstituents for an import process when you have a high volume of records but no time orresources to manually compare records before you commit them. In this case, it might bebetter to quickly add records and then find and delete duplicates later.
Create newrecord
Use the percentage range for theNo match threshold to indicate records with match scoresthat are not likely to match existing records. This range is based on your settings for the upperthresholds.For Constituent, Constituent Update, and Sponsor batches, the program creates a newconstituent record. For Revenue, Enhanced Revenue, or Revenue Update batches, theprogram creates a new constituent record and associates the revenue with that record. Thisprocess occurs automatically and requires no actions from users.
The second set ofmatch confidence thresholds applies to constituent records (individual, organization, vendor,or vendor contact) that you enter manually on the Add an individual or Add an organization screens.For information about how to manage duplicate constituents from forms, see the Constituents Guide.
Action Description
Reviewconstituents
Use the percentage range for the Possible matches threshold to indicate records that aresimilar enough to require manual review. When a record that you add on the Add an individualor Add an organization screens and an existing record have a match confidence score in thisrange, the program prompts you to compare the records and select whether to update theexisting record or create a new constituent.
Create newrecord
Use the percentage range for theNo match threshold to indicate records with match scoresthat are not likely to match existing records. This range is based on your settings for the upperthreshold. The program creates a new record behind the scenes and requires no action fromusers.
Constituent Matching AlgorithmThe program performs several steps to identify matches. First, it standardizes data on the incoming record. Thenit selects a pool of records that are potential matches and standardizes data on those records for comparison.Next, it compares field values on the incoming record with field values on the existing records and calculatesmatch scores and are weighted based on field type. Next, the algorithm deducts match scores from a perfectscore of 100 to calculate total match confidence scores. And finally, the program compares match confidencescores to thematch confidence thresholds to determine whether the incoming record is a match, a possiblematch, or not a match.
Standardize Values
To ensure that minor differences such as capitalization and punctuation do not prevent the program fromfinding matches, the program standardizes data from incoming records to make the values easier to match. Thestandardization process:• Capitalizes all letters• Removes periods from first names, last names/organization names, and street names• Removes apostrophes from last names/organization names
204 CHAPTER 16

• Removes extra spaces before and after all values• Converts carriage returns, dashes, and double spaces in addresses to single spaces• Removes add-on digits to convert ZIP+4 to 5-digit ZIP codes
Select a Pool of Records
To select the pool of potential matches from the records in your database, the program compares the followingfields on the incoming record to the corresponding fields on existing records:• Lookup ID (Constituent Update batches only)• Lookup ID that matches an Alternate ID on the existing constituent (Constituent Update batches only)• Alternate lookup ID and Alternate lookup type (Constituent Update batches only)
Note: Matches found by Lookup ID or Alternate lookup ID/Alternate lookup type receivematch confidencescores of 100. If the Process automatically option is selected for batches, the program automatically assignsrecord IDs from existing records to thesematched records in batches.
• Email address• Phone number• Zip code and first four characters of Last name/Organization name• Zip code, street name soundex (an algorithm that indexes names by sound), and first three characters of Lastname
• First three characters of Zip code, First name soundex (an algorithm that indexes names by sound), first fourcharacters of street name, and the street number
If the program does not find any potential matches based on these field comparisons, it compares incomingconstituents to existing constituents without addresses based on Last name/Organization name and the firstthree characters of First name. For example, if the incoming constituent is Jonathan Mott, the program includesJon Mott, JoniMott, or Jonathon Mott as possible matches.If First name is blank on the incoming record, the program compares the incoming constituent to existingconstituents matching last names and blank first names based on Last name. For example, if the incomingconstituent has the last nameMott and First name is blank, the program only includes existing records with thelast nameMott and no first name.If the first name-only search finds no matches for an incoming record without an address, the program attemptsto match that record by Organization name or Last name and the first three characters of First name to existingrecords with addresses.
Note: To prevent performance issues, the program excludes common names from the name-only search. Aname is "common" if more than 1000 constituents in your database without addresses have the same lastname and first 3 characters of the first name. If no constituents without addresses have that name, but 1000 ormore constituents with addresses have it, the name is considered "common" and excluded from the search.The program identifies the common names in your database when you upgrade to 2.94 or later and storesthem in a table. To edit this table, contact Professional Services.
After the program selects a pool of potential matches from the records in your database, it performs additionalstandardization on addresses:
l Convert spelled-out numbers to numerals. ("Two" becomes "2" and "Tenth" becomes "10th")
l Converts some spelled-out words to abbreviations, including:
205

l Street suffixes ("Street" becomes "ST" and "Road" becomes "RD")
l Directionals ("North" becomes "N" and "Southwest" becomes "SW")
l Secondary unit designations ("Apartment" becomes "APT" and " Suite" becomes "STE")
Calculate Matching Scores
After the program determines its pool of potential matches, it compares the fields on the incoming record to thecorresponding fields on each of the records in the pool and then assigns match scores to each field. Each type offield has a range of scores to determine whether it is a match, likely match, possible match, or not a match. Thealgorithm checks the following scenarios:
Scenario Example Result
First name / First initial John vs. J Likely match
Middle name / First initial John vs. J Likely match
First name / First name&middle initial John vs. John A Match
First name spelling variation Chris vs. Kris Likely match
Different first names with similar spelling or pronunciation John vs. Joan Not a match
Nickname Christopher vs. Chris Match
Last name / Hyphenated last name Smith vs. Smith-Jones Match
Street number / Hyphenated street number 4 vs. 4-2 Match
Same base street names, different street suffixesMain St vs. Main RdNorthwest vs. NW
Possible match
Same base street names, missing or reordered street suffixesMain vs. Main StSE King St. vs. King St.
Match
Three digits of zip codematch, but not first three 02138 vs. 0223402141 vs. 02138
Not a matchPossible match
Titles are different but have the same genderTitles are different and one or both genders are unknownTitles are different and their genders are different
Mrs. vs. Ms.Mrs. vs. Dr.Mrs. vs. Mr.
Likely matchPossible matchNot a match
Suffixes
II vs. Jr.blank vs. Sr.blank vs. Jr., II, III, or IVSr. vs .Jr., II, III, or IVII vs. III or IVIII vs. IVAny other suffixcombination without blanks
MatchLikely matchPossible matchNot a matchNot a matchNot a matchPossible match
206 CHAPTER 16
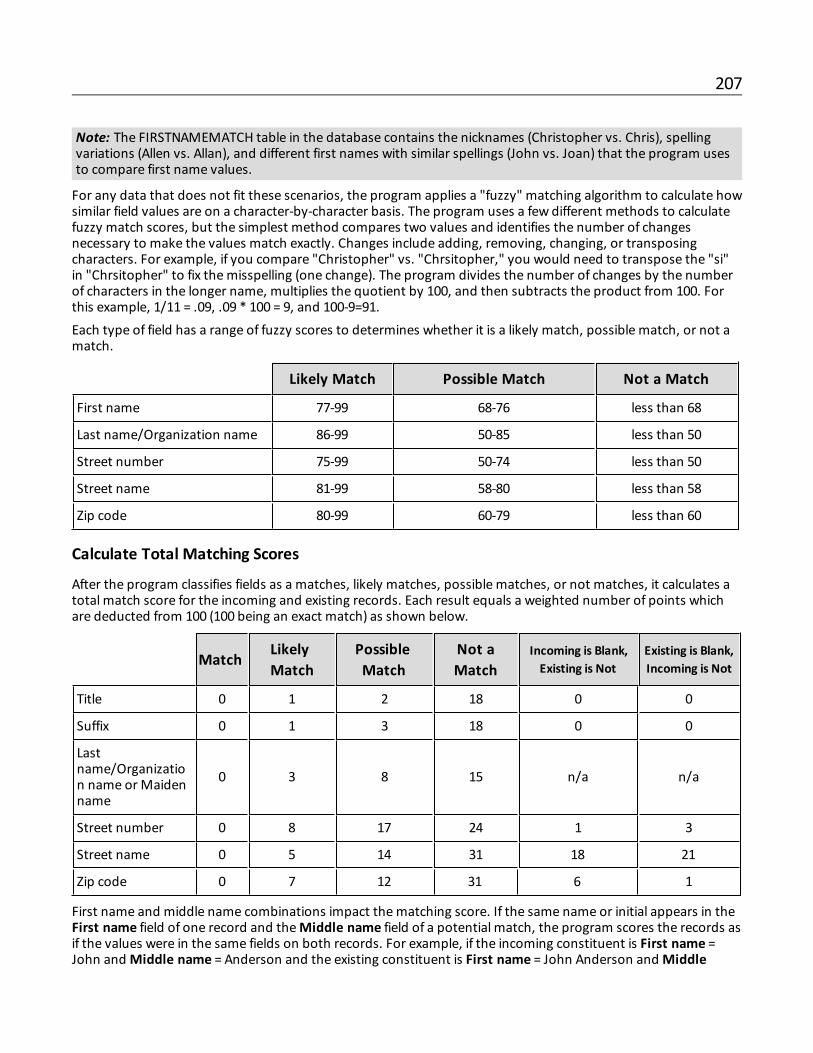
Note: The FIRSTNAMEMATCH table in the database contains the nicknames (Christopher vs. Chris), spellingvariations (Allen vs. Allan), and different first names with similar spellings (John vs. Joan) that the program usesto compare first name values.
For any data that does not fit these scenarios, the program applies a "fuzzy" matching algorithm to calculate howsimilar field values are on a character-by-character basis. The program uses a few different methods to calculatefuzzy match scores, but the simplest method compares two values and identifies the number of changesnecessary to make the values match exactly. Changes include adding, removing, changing, or transposingcharacters. For example, if you compare "Christopher" vs. "Chrsitopher," you would need to transpose the "si"in "Chrsitopher" to fix themisspelling (one change). The program divides the number of changes by the numberof characters in the longer name, multiplies the quotient by 100, and then subtracts the product from 100. Forthis example, 1/11 = .09, .09 * 100 = 9, and 100-9=91.Each type of field has a range of fuzzy scores to determines whether it is a likely match, possible match, or not amatch.
Likely Match Possible Match Not a Match
First name 77-99 68-76 less than 68
Last name/Organization name 86-99 50-85 less than 50
Street number 75-99 50-74 less than 50
Street name 81-99 58-80 less than 58
Zip code 80-99 60-79 less than 60
Calculate Total Matching Scores
After the program classifies fields as a matches, likely matches, possible matches, or not matches, it calculates atotal match score for the incoming and existing records. Each result equals a weighted number of points whichare deducted from 100 (100 being an exact match) as shown below.
MatchLikelyMatch
PossibleMatch
Not aMatch
Incoming is Blank,Existing is Not
Existing is Blank,Incoming is Not
Title 0 1 2 18 0 0
Suffix 0 1 3 18 0 0
Lastname/Organization name or Maidenname
0 3 8 15 n/a n/a
Street number 0 8 17 24 1 3
Street name 0 5 14 31 18 21
Zip code 0 7 12 31 6 1
First name and middle name combinations impact thematching score. If the same name or initial appears in theFirst name field of one record and theMiddle name field of a potential match, the program scores the records asif the values were in the same fields on both records. For example, if the incoming constituent is First name =John andMiddle name = Anderson and the existing constituent is First name = John Anderson andMiddle
207

name = blank, the program scores the first and middle names as "Matches." If the incoming constituent is Firstname = John andMiddle name = Anderson and the existing constituent is First name = John A, the programscores the first name as a "Match" and themiddle name as a "Likely match." The table below demonstrates howthe program scores first and middle name combinations.
Should I Adjust Constituent Matching Settings?
A record's total matching score determines its matching threshold. This in turn determines whether the programautomatically assigns the record ID from the existing constituent to thematched incoming constituent, waits fora user to manually review thematch and make a decision, or automatically creates a record.Thematching algorithm provides optimal results when you use the default threshold percentages (such as 100-95%, 94-70%, and 69-0% for batches). If you adjust the percentages, the program may automatically updaterecords that you do not expect or require you to manually review records that are not matches.Before you adjust the default thresholds, you should weigh the following considerations:• If you turn off theMatched constituents threshold for batches, all matches require manual review, even if theLookup IDs are the same or all values match exactly.
• If you lower the bottom percentage of theMatched constituents threshold for batches, matches thatpreviously required manual reviewmay subsequently be automatic matches. Unless you consistently approvematches with scores just below the currentMatched constituents threshold, you should not edit thisthreshold.
• If you raise the bottom percentage of theMatched constituents threshold for batches, matches thatpreviously werematched automatically may subsequently require manual review. Unless the programautomatically matches constituents that do not match, you should not edit this threshold.
• If you lower the bottom percentage of the Possible matches threshold, constituents that previously were notconsidered possible matches may subsequently require manual review. Unless the program consistentlycreates duplicate records for constituents that already exist, you should not edit this threshold.
• If you raise the bottom percentage of the Possible matches threshold, potential matches that previouslyrequired manual reviewmay no longer be flagged for manual review. Unless you consistently reject possiblematches with lower match scores, you should not edit this threshold.
Constituent Update RulesTo manage how the program resolves conflicting data on matched constituents, you can set constituent updaterules on the Global data entry settings page. To access this page, go to Administration and click Global dataentry settings under Data. On the Global data entry settings page, select Constituent updates.
208 CHAPTER 16

Note: Constituent update rules apply when you add a constituent using the Add an individual screen or theAdd an organization screen, or when you add a constituent through manual or imported Constituent Update orEnhanced Revenue batches.
Constituent update rules apply when an incoming constituent matches an existing constituent by matchingalgorithm or Constituent ID, but their names or contact information are different. For example, two records arevery similar but the first name is "Dave" on the existing constituent and "David" on the incoming constituent.Update rules allow you to choose how the program handles this conflict for you. You can set the program toupdate the existing name, add the incoming name as an alias, ignore the incoming name, or require users tocompare the constituents on the duplicate resolution screen to determine which action to take.
Note: When you add the constituent through manual Constituent Update or Enhanced Revenue batches, andyou enter the Constituent ID for an existing constituent, the program assumes you intend to update theexisting constituent manually and does not apply any constituent update rules to avoid overwriting the valuesyou enter.
If thematching constituents qualify for automatic updates (their match confidence score is above the topthreshold), the program applies the update rules automatically to an import or batch. For example, if you selecttheUpdate name rule, the program automatically replaces the name on the existing constituent with the namefrom the incoming constituent when the batch is committed. If thematching constituents qualify for manualreview (their match confidence score falls in themiddle range), the program prompts you to resolve the conflictson the duplicate resolution screen. The duplicate resolution also appears if you selected Require manual review(generate exception) for any field. On the duplicate resolution screen, you can click Use my organization's rulesto apply your selected update rules to conflicting fields automatically. For example, if you selected theUpdatename rule, when you click Use my organization's rules, the program automatically moves the name from theincoming constituent column to the existing constituent column. For any fields that are not resolvedautomatically, you can use options to manually add, update, or ignore the incoming data. For more informationabout the duplicate resolution screen for batches, see the Batch and Import Guide.When you add a potential duplicate from the Add an individual screen or the Add an organization screen, you arealso prompted to resolve the conflicts on the duplicate resolution screen. In this case, the program applies yourselected update rules automatically; you do not need to click Use my organization's rules. For any fields that arenot resolved automatically, you can use options to manually add, update, or ignore the incoming data. For moreinformation about the duplicate resolution screen for individual constituents, see the Constituents Guide.
Configure Constituent Update RulesTo configure constituent update rules, from Administration, click Global data entry settings. On the Global dataentry settings page, select Constituent updates. The Constituent updates (for matched constituents) pageappears. Click Edit. The Configure constituent updates screen appears.
Note: Blanks are not considered conflicts. For more information about how the program handles blanks, seeData Conflicts on page 214.
Warning: If you use a ClickOnce installation of Blackbaud CRM, Constituent updates is disabled on the Globaldata entry settings page. For ClickOnce installations, the program uses the default constituent update rules;you cannot edit these. Do not attempt to configure the constituent update rules using the web shell linkbecause it will make ClickOnce inaccessible.
Name Updates
Under Name updates, for the If name is different from existing name setting, select one of these options:
209
nikkitr
Typewritten Text
nikkitr
Typewritten Text
nikkitr
Typewritten Text
nikkitr
Typewritten Text
nikkitr
Typewritten Text
nikkitr
Typewritten Text
nikkitr
Typewritten Text
nikkitr
Typewritten Text

• Update name—Select this option to replace the name on the existing constituent with the name from theincoming constituent.
• Add name as an alias—Select this option to add the name from the incoming constituent as an alias to theexisting constituent rather than replace an existing name. For example, if the incoming first name is "David"and the existing first name is "Dave," the program adds David an alias and leaves "Dave" as the first name.
• Ignore name—Select this option to never update the name on the existing constituent. For example, if theincoming first name is "David" and the existing first name is "Dave," the program leaves the first name as"Dave."
• Require manual review (generate exception)—Select this option to always require a user to manuallycompare conflicting names on the duplicate resolution screen even if thematch confidence score is highenough to automatically update the name. Also, when you select Require manual review (generateexception) for any field, the program does not apply updates to other fields on the existing record, regardlessof the selected rule, until you complete the duplicate resolution screen. For example, if you select Requiremanual review for names but Update existing address for addresses, the program does not automaticallyupdate the address fields on the existing constituent. On the duplicate resolution screen, when you click Usemy organization's rules, the program automatically moves the address from the incoming constituent columnto the existing constituent column, but you must manually select whether to add, update, or ignore theincoming name.
For the Retain existing name for historical reference setting, to store the existing name on the constituentrecord under Historical names, select Yes. This occurs when the batch is committed. To discard the existingname, select No.
Note: Need a visual? View the name update flowchart.
Address Updates
Under Address updates, for the If incoming address is similar to an existing address setting, select one ofthese options:
Note: “Similar” means the incoming address (Street number, Street name, and Zip code) is very close to anexisting address, but there are differences in one or more of the address fields. To find similar addresses, theprogram compares the incoming address to each address on the existing constituent (home, business, etc.) andapplies the address portion of thematching algorithm to calculate how similar the addresses are. When a pairof addresses score 86 or higher, they are considered similar. For example, if the existing street address is 1955Main St. 29402 and the incoming is 1956Main St. 29402, their address matching score is 92, so the programapplies the rule selected for the If address is similar to an existing address setting. If the incoming address issimilar to multiple existing addresses, the program applies the rule to the existing address with the highestaddress matching score. If no existing addresses are found that are similar to an incoming address, the programapplies the rule selected for the If address is NOT similar to any existing address setting.
• Update existing address (old address will not be retained)—Select this option to replace the address on theexisting constituent with the address from the incoming constituent.
Note: For imported Constituent Update or Enhanced Revenue batches, if the constituent row includes theconstituent ID as well as the address ID (generally only used in vendor files), the address is always updated onthe constituent regardless of the selected constituent update rule. If the row includes the constituent ID butnot the address ID, the program applies the selected constituent update rule to the address.
• Add as new address—Select this option to add the incoming address as an additional address rather thanupdate the existing address.
• Ignore address—Select this option to never overwrite the address on the existing constituent. The programdiscards the incoming address.
210 CHAPTER 16

• Require manual review (generate exception)—Select this option to always require a user to manuallycompare conflicting addresses on the duplicate resolution screen even if thematch confidence score is highenough to automatically update the address. Also, when you select Require manual review (generateexception) for any field, the program does not apply updates to other fields on the existing record, regardlessof the selected rule, until you complete the duplicate resolution screen. For example, if you select Requiremanual review for addresses but Update name for names, the program does not automatically update thename fields on the existing constituent. On the duplicate resolution screen, when you click Use myorganization's rules, the program automatically moves the name from the incoming constituent column tothe existing constituent column, but you must manually select whether to add, update, or ignore the incomingaddress.
For the If address is NOT similar to any existing address setting, select one of these options:• Add as new address—Select this option to add the incoming address as a new address to the existingconstituent.
• Ignore address—Select this option to never add the incoming address to the existing constituent.• Require manual review (generate exception)—Select this option to always require a user to manuallycompare conflicting addresses on the duplicate resolution screen even if thematch confidence score is highenough to automatically add the address.
UnderWhen you add an incoming address as new, you can select additional options for the new addresses.These options also apply to new addresses entered on the duplicate resolution screen.For the If new address had the same type as any existing address setting, select one of these options:• Make existing address inactive—Select this option to make inactive any existing addresses with the sameaddress type as the new address. The program updates the End date field on the constituent for all existingaddresses with that address type.
Note: If the new and existing addresses are similar and neither has an address type assigned, the program doesnot make the existing address inactive. If the new address is not similar to any existing addresses and it doesnot have an address type assigned, any existing addresses that do not have an address type assigned remainactive.
• Keep the existing address active—Select this option to keep the existing address active and add theincoming address as an additional address with the same address type.
For theMake new address primary setting, select one of these options:
Note: If the existing constituent has no addresses, the primary address in the batch is always primaryregardless of the option selected forMake new address primary.
• Always—Select this option to always make the new address primary. If a constituent has more than one newaddress in the batch, the onemarked primary is made primary. If none of the new addresses is markedprimary, the one that appears first in the batch is made primary.
• Only if the current primary address has the same address type—Select this option to make the newaddress primary only if it has the same address type as the existing primary address. If there aremultiple newaddresses in the batch and one has the same address type as the existing primary address, it becomesprimary. If there aremultiple new addresses with the same address type as the existing primary address andone of those new addresses is marked primary, it becomes primary. If there aremultiple new addresses withthe same address type as the existing primary address and none of those new addresses is marked primary,the one that appears first in the batch is made primary.
• Never—Select this option to never make the new address primary.
Note: Need a visual? View the address update flowchart.
211

Phone Number Updates
Under Phone number updates, for the If incoming phone is not identical to any existing phone setting, selectone of these options:• Add as new phone—Select this option to add the incoming phone number as a new number.• Ignore phone—Select this option to never add the incoming phone number to the existing constituent.• Require manual review (generate exception)—Select this option to always require a user to manuallycompare conflicting phone numbers on the duplicate resolution screen even if thematch confidence score ishigh enough to automatically update the phone number. Also, when you select Require manual review(generate exception) for any field, the program does not apply updates to other fields on the existing record,regardless of the selected rule, until you complete the duplicate resolution screen. For example, if you selectRequire manual review for phone numbers but Update name for names, the program does not automaticallyupdate the name fields on the existing constituent. On the duplicate resolution screen, when you click Use myorganization's rules, the program automatically moves the name from the incoming constituent column tothe existing constituent column, but you must manually select whether to add, update, or ignore the incomingphone number.
Note: For imported Constituent Update or Enhanced Revenue batches, if the constituent row includes theconstituent ID as well as the phone ID (generally only used in vendor files), the phone number is alwaysupdated on the constituent regardless of the selected constituent update rule. If the row includes theconstituent ID but not the phone ID, the program applies the selected constituent update rule to the phonenumber.
UnderWhen you add an incoming phone as new, you can select additional options for the new phonenumbers. These options also apply to new phone numbers entered on the duplicate resolution screen.For the If new phone has the same type as any existing phone setting, select one of these options:• Make existing phone inactive—Select this option to make inactive any existing phone numbers with thesame phone type as the new phone number. The program updates the End date field on all existing phonenumbers on the constituent with that phone type.
• Keep existing phone active—Select this option to keep the existing phone number active and add theincoming phone number as an additional phone number with the same phone type.
For theMake new phone primary setting, select one of these options:
Note: If the existing constituent has no phone numbers, the primary phone number in the batch is alwaysprimary regardless of the option selected for theMake new phone primary setting.
• Always—Select this option to always make the new phone number primary. If a constituent has more thanone new phone number in the batch, the onemarked primary is made primary. If none of the new phonenumbers is marked primary, the number that appears first in the batch is made primary.
• Only if the current primary phone has the same phone type—Select this option to make the new phonenumber primary only if it has the same phone type as the existing primary phone number. If there aremultiplenew phone numbers in the batch and one has the same phone type as the existing primary phone number, itbecomes primary. If there aremultiple new phone numbers with the same phone type as the existing primaryphone number and one of those new phone numbers is marked primary, it becomes primary. If there aremultiple new phone numbers with the same phone type as the existing primary phone number and none ofthose new phone numbers is marked primary, the one that appears first in the batch is made primary.
• Never—Select this option to never make the new phone number primary.
Note: Need a visual? View the phone number update flowchart.
212 CHAPTER 16

Email Address Updates
Under Email address updates, for the If incoming email address is not identical to any existing email addresssetting, select one of these options:• Add as new email address—Select this option to add the incoming email address as an new email address.• Ignore email address—Select this option to never add the incoming email address to the constituent.• Require manual review (generate exception)—Select this option to always require a user to manuallycompare conflicting email addresses on the duplicate resolution screen even if thematch confidence score ishigh enough to automatically update the name. Also, when you select Require manual review (generateexception) for any field, the program does not apply updates to other fields on the existing record, regardlessof the selected rule, until you complete the duplicate resolution screen. For example, if you select Requiremanual review for email addresses but Update name for names, the program does not automatically updatethe name fields on the existing constituent. On the duplicate resolution screen, when you click Use myorganization's rules, the program automatically moves the name from the incoming constituent column tothe existing constituent column, but you must manually select whether to add, update, or ignore the incomingemail address.
Note: For imported Constituent Update or Enhanced Revenue batches, if the constituent row includes theconstituent ID as well as the email ID (generally only used in vendor files), the email address is always updatedon the constituent regardless of the selected constituent update rule. If the row includes the constituent ID butnot the email ID, the program applies the selected constituent update rule to the email address.
UnderWhen you add an incoming email address as new, you can select additional options for the new emailaddresses. These options also apply to new email addresses entered on the duplicate resolution screen.For the If new email address has the same type as any existing email address setting, select one of theseoptions:• Make existing email address inactive—Select this option to make inactive any existing email addresses withthe same email type as the new address. The program updates the End date field on all existing emailaddresses on the constituent with that email type.
• Keep existing email address active—Select this option to keep the existing email address active and add theincoming email as an additional email address with the same email type.
For theMake new email address primary setting, select one of these options:
Note: If the existing constituent has no email addresses, the primary email address in the batch is alwaysprimary regardless of the option selected forMake new email address primary.
• Always—Select this option to always make the new email address primary. If a constituent has more thanone new email address in the batch, the email marked primary is made primary. If none of the new emailaddresses is marked primary, the email that appears first in the batch is made primary.
• Only if the current primary email address has the same email type—Select this option to make the newemail address primary only if it has the same email type as the existing primary email address. If there aremultiple new email addresses in the batch and one has the same email type as the existing primary emailaddress, it becomes primary. If there aremultiple new email addresses with the same email type as the existingprimary email address and one of those new email addresses is marked primary, it becomes primary. If therearemultiple new email addresses with the same email type as the existing primary email address and none ofthose new email addresses is marked primary, the email that appears first in the batch is made primary.
• Never—Select this option to never make the new email address primary.
Note: Need a visual? View the email address update flowchart.
213

Birth Date Updates
Under Birth date updates, for the If incoming birth date is not identical to existing birth date setting, selectone of these options:• Update birth date—Select this option to replace the birth date on the existing constituent with the birth datefrom the incoming constituent. The program updates the date automatically for all matched constituents.
• Ignore birth date—Select this option to never overwrite the birth date on the existing constituent. Theprogram discards the incoming birth date.
Note: For imported Constituent Update or Enhanced Revenue batches, if the constituent row includes theconstituent ID, the birth date is always updated on the constituent regardless of the selected constituentupdate rule.
Data ConflictsWhen matching constituents have different names or contact information, we call these "conflicts." The programcompares data in these fields to find conflicts and then applies constituent update rules to resolve thedifferences:• Birth dates: Birth date field• Phone numbers: Number or Phone type fields• Email address: Email address or Email type fieldsFor names and addresses, the program first checks these core name and address fields for conflicts:• Names: First name,Middle name, Last name, Title, and Suffix fields• Addresses: Address type, Street number, Street name, City, State, Zip code, Is primary? and End date fields.Then, the program checks all other additional name and address fields on the constituent record.Automatic updates: If there are no conflicts in the core fields, the program updates them and then checks forconflicts in all additional name and address fields. If there are no conflicts in the additional fields, the programupdates those as well. If there are conflicts in the additional fields, but not in the core fields, the program updatesthe additional fields unless the constituent update rule is set to Ignore name/address. In that case, the programdoes not add or update the additional fields. If there are conflicts in the core fields, the program uses the selectedconstituent update rule for all fields (core and additional).Manual Review: If there are conflicts in the core fields, the program uses the selected constituent update rule forall fields (core and additional) except when the rule is set to Ignore name/address. In that case, the program doesnot add or update the additional fields.
Rules For Resolving Conflicts
• If the existing constituent has a value for a field that is blank on the incoming constituent, the program doesnot overwrite the existing value to make it blank.
• A blank value is not considered a conflict. When the incoming record includes values for fields that are blank onthe existing record, the program adds the new values to the existing constituent if there are no conflicts in theother address or name fields. regardless of which constituent update rule is selected. For example, in the tablebelow, the blank apartment number is updated because there are no conflicts between the address fields. Thisupdate occurs even if the rule is set to Add as new address, Ignore address, or Require manual review.
Incoming Existing Final5Main St. 5Main St. 5Main St.
214 CHAPTER 16
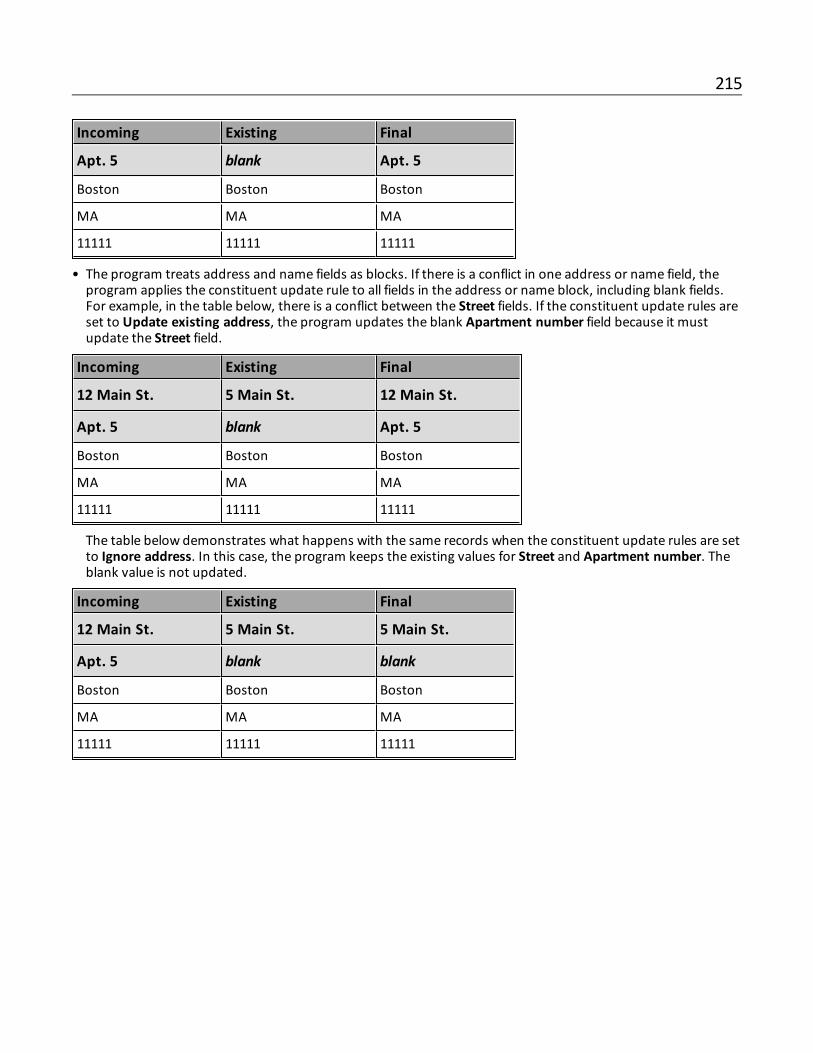
Incoming Existing Final
Apt. 5 blank Apt. 5
Boston Boston Boston
MA MA MA
11111 11111 11111
• The program treats address and name fields as blocks. If there is a conflict in one address or name field, theprogram applies the constituent update rule to all fields in the address or name block, including blank fields.For example, in the table below, there is a conflict between the Street fields. If the constituent update rules areset to Update existing address, the program updates the blank Apartment number field because it mustupdate the Street field.
Incoming Existing Final
12 Main St. 5 Main St. 12 Main St.
Apt. 5 blank Apt. 5
Boston Boston Boston
MA MA MA
11111 11111 11111
The table below demonstrates what happens with the same records when the constituent update rules are setto Ignore address. In this case, the program keeps the existing values for Street and Apartment number. Theblank value is not updated.
Incoming Existing Final
12 Main St. 5 Main St. 5 Main St.
Apt. 5 blank blank
Boston Boston Boston
MA MA MA
11111 11111 11111
215

216 CHAPTER 16

Index
Aacademic catalog 169add
attribute category 191code table 124configuration export process 175global change 131items to organization calendar 115job schedule 73value groups to smart field 69
address formattingadd 7
administrationconfiguration data 175configuration export 175configuration import 180configure email alerts 35search list configuration 83
alertsdisable for user 48edit user settings 48enable for user 48
Application 183application users
application usersdisable alert 48
edit alert settings 48enable alert 48preferences 48
assignconfiguration export permissions 178email alert to application user 40
attribute categoryadd 191delete 195edit 194
Bbatch alerts
configuration 45
Ccalendar items
add to organization calendar 115delete from organization calendar 116edit on organization calendar 115
catalog browser 183code table
access 123add new 124delete 125edit 125show lookup 126sort entries 126user permissions, establish 127
configurationreason codes 14
add 15delete 16edit 16inactive 16
configuration dataadd export process 175delete export process 177edit export process 177run export process 178
configuration export 175add process 175assign permissions 178delete process 177edit process 177export data 178process status page 179

run process 178view process status page 179
configuration export process status page 179configuration import 180
process status page 180configuration import process status page 180configure
batch alerts 45event task email alerts 47mailing task alerts 45plan item task email alerts 47prospect email alerts for fundraisers 46search list fields 83search list replacements 84search lists 83
countryadd 2address formatting 7delete 5edit 4
Ddatabasemail settings 35delete
attribute category 195code table 125configuration export process 177global change 134items from organization calendar 116job schedule 73job schedule for mailing process 73process status record 72smart field process status record 72value group for smart field 70
disablealerts for user 48email alert for application user 40
disable general ledger 21
Eedit
attribute category 194code table 125configuration export process 177databasemail settings 35
email alert content 39email alert settings 35global change 132items on organization calendar 115job schedule 73job schedule for mailing process 73search list settings 83user alert settings 48value group for smart field 69
edit a job schedule 43edit setting for unmapped transactions 19educational history 167educational institutions 167email alerts 35
assign to application user 40disable for application user 40edit content 39edit settings 35for appeal mailing tasks 45for batch 45for event tasks 47for fundraisers 46for marketing plan item tasks 47record 38send process 41
enablealerts for user 48
enable general ledger 21event task email alert
configuration 47events
configure email alerts 47export
configuration data 178export accounting data 180
Ffundraisers
configure email alerts 46
GGL account setup
edit setting for unmapped transactions 19global change 131
add 131
218 INDEX

delete 134edit 132last run date, reset 134permission, assign 133process 132process record, view 134
Hhistory tab
delete process status record 72
Iimport
configuration data 180import ZIP Code tables 17
Jjob schedule
add 73delete 73edit 73
job schedulesdelete 73edit 73
Llast run date, reset
global change 134load catalog items 184
Mmailing task alerts
configuration 45mailings
configure email alerts 47delete job schedule 73edit job schedule 73
mappinggeocodes, add 161
Nnotifications 12
Ooptional features tab 184organization calendar 113
add items 115delete items 116edit items 115view 113
organization information 19
Ppermission
global change, assign 133permissions
assign for configuration export 178phone formatting, edit or disable 12plan item task email alert
configuration 47process
global change 132process record, global change, view 134process smart fields 70prospect email alert
configuration 46
Rreason codes 14
add 15delete 16edit 16inactive 16
record sourcesadd or remove 87appeal field mappings 92duplicate criteria 95gift field mappings 90membership field mappings 93person field mappings 89properties 88source analysis rules 96
INDEX 219
specify list code 98replace
search list 84run
configuration export process 178
Sscholarship terms 171
add terms 172delete terms 172edit terms 172
search listsconfiguration 83configure filter fields 83configure output fields 83replacements 84
show lookup 126smart fields
add 53add value groups 69delete 68delete status record 72delete value group 70edit 68edit value group 69process 70reset last run date 70schedule job 73
sort, code table entries 126state
add 5delete 6edit 6
Ttime zones, select default 9
Uuser permissions, code table 127
Vvalue groups
add to smart field 69
delete for smart fields 70edit for smart field 69
viewconfiguration export process status page 179organization calendar 113
ZZIP Code tables 17zones, time 9
220 INDEX