Clusterware Administration and Deployment Guide
725
Oracle® Clusterware Clusterware Administration and Deployment Guide 21c F30298-02 June 2022
-
Upload
khangminh22 -
Category
Documents
-
view
0 -
download
0
Transcript of Clusterware Administration and Deployment Guide

Oracle® ClusterwareClusterware Administration and DeploymentGuide
21cF30298-02June 2022

Oracle Clusterware Clusterware Administration and Deployment Guide, 21c
F30298-02
Copyright © 2007, 2022, Oracle and/or its affiliates.
Primary Authors: Subhash Chandra, Eric Belden
Contributors: David Jimenez Alvarez, Troy Anthony, Ram Avudaiappan, Mark Bauer, Devang Bagaria, SumanBezawada, Gajanan Bhat, Burt Clouse, Ian Cookson, Jonathan Creighton, Mark Fuller, ApostolosGiannakidis, Angad Gokakkar, Donald Graves, John Grout, Vikash Gunreddy, Andrey Gusev, WinstonHuang, Shankar Iyer, Sameer Joshi, Ashwinee Khaladkar, Roland Knapp, Erich Kreisler, Karen Li, BarbLundhild, Manuel Garcia Maciel, Saar Maoz, John McHugh, Markus Michalewicz, Lars Mortimer, Anil Nair,Siva Nandan, Philip Newlan, Gia-Khanh Nguyen, Balaji Pagadala, Srinivas Poovala, Kevin Reardon, DipakSaggi, Luv Sharma, Duane Smith, Janet Stern, Su Tang, Manasvi Nishith Vohra, James Warnes, DouglasWilliams
This software and related documentation are provided under a license agreement containing restrictions onuse and disclosure and are protected by intellectual property laws. Except as expressly permitted in yourlicense agreement or allowed by law, you may not use, copy, reproduce, translate, broadcast, modify, license,transmit, distribute, exhibit, perform, publish, or display any part, in any form, or by any means. Reverseengineering, disassembly, or decompilation of this software, unless required by law for interoperability, isprohibited.
The information contained herein is subject to change without notice and is not warranted to be error-free. Ifyou find any errors, please report them to us in writing.
If this is software or related documentation that is delivered to the U.S. Government or anyone licensing it onbehalf of the U.S. Government, then the following notice is applicable:
U.S. GOVERNMENT END USERS: Oracle programs (including any operating system, integrated software,any programs embedded, installed or activated on delivered hardware, and modifications of such programs)and Oracle computer documentation or other Oracle data delivered to or accessed by U.S. Government endusers are "commercial computer software" or "commercial computer software documentation" pursuant to theapplicable Federal Acquisition Regulation and agency-specific supplemental regulations. As such, the use,reproduction, duplication, release, display, disclosure, modification, preparation of derivative works, and/oradaptation of i) Oracle programs (including any operating system, integrated software, any programsembedded, installed or activated on delivered hardware, and modifications of such programs), ii) Oraclecomputer documentation and/or iii) other Oracle data, is subject to the rights and limitations specified in thelicense contained in the applicable contract. The terms governing the U.S. Government’s use of Oracle cloudservices are defined by the applicable contract for such services. No other rights are granted to the U.S.Government.
This software or hardware is developed for general use in a variety of information management applications.It is not developed or intended for use in any inherently dangerous applications, including applications thatmay create a risk of personal injury. If you use this software or hardware in dangerous applications, then youshall be responsible to take all appropriate fail-safe, backup, redundancy, and other measures to ensure itssafe use. Oracle Corporation and its affiliates disclaim any liability for any damages caused by use of thissoftware or hardware in dangerous applications.
Oracle, Java, and MySQL are registered trademarks of Oracle and/or its affiliates. Other names may betrademarks of their respective owners.
Intel and Intel Inside are trademarks or registered trademarks of Intel Corporation. All SPARC trademarks areused under license and are trademarks or registered trademarks of SPARC International, Inc. AMD, Epyc,and the AMD logo are trademarks or registered trademarks of Advanced Micro Devices. UNIX is a registeredtrademark of The Open Group.
This software or hardware and documentation may provide access to or information about content, products,and services from third parties. Oracle Corporation and its affiliates are not responsible for and expresslydisclaim all warranties of any kind with respect to third-party content, products, and services unless otherwiseset forth in an applicable agreement between you and Oracle. Oracle Corporation and its affiliates will not beresponsible for any loss, costs, or damages incurred due to your access to or use of third-party content,products, or services, except as set forth in an applicable agreement between you and Oracle.

Contents
Preface
Audience xxvi
Documentation Accessibility xxvi
Diversity and Inclusion xxvii
Set Up Java Access Bridge to Implement Java Accessibility xxvii
Command Syntax xxvii
Conventions xxviii
1 Introduction to Oracle Clusterware
Changes in Oracle Clusterware 21c 1-1
Deprecated Features in Oracle Clusterware 21c 1-2
Desupported Features in Oracle Clusterware 21c 1-2
Overview of Oracle Clusterware 1-2
Understanding System Requirements for Oracle Clusterware 1-4
Oracle Clusterware Hardware Concepts and Requirements 1-4
Oracle Clusterware Operating System Concepts and Requirements 1-6
Oracle Clusterware Software Concepts and Requirements 1-6
Oracle Clusterware Network Configuration Concepts 1-7
Single Client Access Name (SCAN) 1-8
Manual Addresses Configuration 1-8
Overview of Oracle Clusterware Platform-Specific Software Components 1-9
The Oracle Clusterware Technology Stack 1-9
The Cluster Ready Services Technology Stack 1-9
The Oracle High Availability Services Technology Stack 1-10
Oracle Clusterware Processes on Windows Systems 1-14
High Availability Options for Oracle Database 1-15
Overview of Installing Oracle Clusterware 1-16
Oracle Clusterware Version Compatibility 1-16
Overview of Upgrading and Patching Oracle Clusterware 1-17
Overview of Grid Infrastructure Management Repository 1-17
Overview of Domain Services Clusters 1-19
Overview of Managing Oracle Clusterware Environments 1-20
iii

Overview of Command Evaluation 1-22
Overview of Cloning and Extending Oracle Clusterware in Grid Environments 1-23
Overview of the Oracle Clusterware High Availability Framework and APIs 1-24
Overview of Cluster Time Management 1-24
Activating and Deactivating Cluster Time Management 1-25
2 Oracle Clusterware Configuration and Administration
Role-Separated Management 2-1
Managing Cluster Administrators 2-2
Configuring Role Separation 2-2
Configuring Oracle Grid Infrastructure Using Grid Setup Wizard 2-4
Configuring a Single Node 2-5
Configuring Multiple Nodes 2-5
Upgrading Oracle Grid Infrastructure 2-6
Running the Configuration Wizard in Silent Mode 2-6
Moving and Patching an Oracle Grid Infrastructure Home 2-7
Server Weight-Based Node Eviction 2-7
Overview of Oracle Database Quality of Service Management 2-8
Overview of Grid Naming Service 2-9
Network Administration Tasks for GNS and GNS Virtual IP Address 2-9
Understanding Grid Naming Service Configuration Options 2-10
Highly-Available Grid Naming Service 2-11
Automatic Configuration Option for Addresses 2-12
Static Configuration Option for Addresses 2-12
Shared GNS Option for Addresses 2-12
Administering Grid Naming Service 2-13
Configuring Highly-Available GNS 2-13
Removing Primary and Secondary GNS Instances 2-14
Starting and Stopping GNS with SRVCTL 2-15
Converting Clusters to GNS Server or GNS Client Clusters 2-15
Converting a Non-GNS Cluster to a GNS Server Cluster 2-16
Converting a Non-GNS Cluster to a Client Cluster 2-16
Converting a Single Cluster Running GNS to a Server Cluster 2-17
Converting a Single Cluster Running GNS to be a GNS Client Cluster 2-17
Moving GNS to Another Cluster 2-18
Changing the GNS Subdomain when Moving from IPv4 to IPv6 Network 2-19
Rolling Conversion from DNS to GNS Cluster Name Resolution 2-20
Node Failure Isolation 2-21
Server Hardware Configuration for IPMI 2-22
Post-installation Configuration of IPMI-based Failure Isolation Using CRSCTL 2-22
iv

IPMI Post-installation Configuration with Oracle Clusterware 2-23
Modifying IPMI Configuration Using CRSCTL 2-24
Removing IPMI Configuration Using CRSCTL 2-25
Understanding Network Addresses on Manually Configured Networks 2-26
Understanding Network Address Configuration Requirements 2-26
About IPv6 Address Formats 2-27
Name Resolution and the Network Resource Address Type 2-27
Understanding SCAN Addresses and Client Service Connections 2-28
SCAN Listeners and Service Registration Restriction With Valid Node Checking 2-29
Configuring Shared Single Client Access Names 2-30
About Configuring Shared Single Client Access Names 2-30
Configuring the Use of Shared SCAN 2-31
Changing Network Addresses on Manually Configured Systems 2-32
Changing the Virtual IP Addresses Using SRVCTL 2-32
Changing Oracle Clusterware Private Network Configuration 2-35
About Private Networks and Network Interfaces 2-35
Redundant Interconnect Usage 2-35
Consequences of Changing Interface Names Using OIFCFG 2-36
Changing a Network Interface 2-37
Creating a Network Using SRVCTL 2-39
Network Address Configuration in a Cluster 2-40
Changing Static IPv4 Addresses To Static IPv6 Addresses Using SRVCTL 2-41
Changing Dynamic IPv4 Addresses To Dynamic IPv6 Addresses Using SRVCTL 2-43
Changing an IPv4 Network to an IPv4 and IPv6 Network 2-44
Transitioning from IPv4 to IPv6 Networks for VIP Addresses Using SRVCTL 2-44
Cross-Cluster Dependency Proxies 2-44
3 Policy-Based Cluster and Capacity Management
Overview of Server Pools and Policy-Based Management 3-1
Server Pools and Server Categorization 3-2
Server Pools and Policy-Based Management 3-2
How Server Pools Work 3-3
Default Server Pools 3-3
The Free Server Pool 3-3
The Generic Server Pool 3-4
Server Pool Attributes 3-4
How Oracle Clusterware Assigns New Servers Using Server Pools 3-7
Servers Moving from Server Pool to Server Pool 3-9
Managing Server Pools Using Default Attributes 3-9
Overview of Server Categorization 3-10
v

Overview of Cluster Configuration Policies and the Policy Set 3-10
Load-Aware Resource Placement 3-11
Server Configuration and Server State Attributes 3-11
Memory Pressure Management for Database Servers 3-14
Server Category Attributes 3-15
An Example Policy Set Configuration 3-16
4 Oracle Flex Clusters
Overview of Oracle Flex Clusters 4-1
Managing Oracle Flex Clusters 4-3
Changing the Cluster Mode 4-3
Changing an Oracle Clusterware Standard Cluster to an Oracle Flex Cluster 4-3
Oracle Extended Clusters 4-4
Configuring Oracle Extended Clusters 4-5
5 Managing Oracle Cluster Registry and Voting Files
Managing Oracle Cluster Registry and Oracle Local Registry 5-1
Migrating Oracle Cluster Registry to Oracle Automatic Storage Management 5-2
Migrating Oracle Cluster Registry from Oracle ASM to Other Types of Storage 5-4
Adding, Replacing, Repairing, and Removing Oracle Cluster Registry Locations 5-5
Adding an Oracle Cluster Registry Location 5-6
Removing an Oracle Cluster Registry Location 5-7
Replacing an Oracle Cluster Registry Location 5-8
Repairing an Oracle Cluster Registry Configuration on a Local Node 5-9
Overriding the Oracle Cluster Registry Data Loss Protection Mechanism 5-10
Backing Up Oracle Cluster Registry 5-11
Listing Backup Files 5-11
Changing Backup Location 5-12
Restoring Oracle Cluster Registry 5-12
How to Check Oracle Cluster Registry Issues 5-13
Restoring the Oracle Cluster Registry on Linux or Unix Systems 5-13
Restoring the Oracle Cluster Registry on Windows Systems 5-16
Restoring the Oracle Cluster Registry in an Oracle Restart Environment 5-17
Diagnosing Oracle Cluster Registry Problems 5-18
Administering Oracle Cluster Registry with Export and Import Commands 5-18
Importing Oracle Cluster Registry Content on Linux or Unix Systems 5-20
Importing Oracle Cluster Registry Content on Windows Systems 5-22
Oracle Local Registry 5-23
Managing Voting Files 5-25
vi

Storing Voting Files on Oracle ASM 5-26
Backing Up Voting Files 5-28
Restoring Voting Files 5-28
Adding, Deleting, or Migrating Voting Files 5-30
Modifying Voting Files that are Stored in Oracle ASM 5-30
Modifying Voting Files that are Not Stored on Oracle ASM 5-30
Migrating Voting Files to Oracle ASM 5-31
Verifying the Voting File Location 5-31
6 Adding and Deleting Cluster Nodes
Prerequisite Steps for Adding Cluster Nodes 6-1
Adding and Deleting Cluster Nodes on Linux and UNIX Systems 6-3
Adding a Cluster Node on Linux and UNIX Systems 6-4
Deleting a Cluster Node on Linux and UNIX Systems 6-9
Adding and Deleting Cluster Nodes on Windows Systems 6-12
Adding a Node to a Cluster on Windows Systems 6-12
Deleting a Cluster Node on Windows Systems 6-14
7 Cloning Oracle Clusterware
Introduction to Cloning Oracle Clusterware 7-1
Preparing the Oracle Grid Infrastructure Home for Cloning 7-3
Step 1: Install Oracle Clusterware 7-3
Step 2: Shut Down Running Software 7-4
Step 3: Create a Copy of the Oracle Grid Infrastructure Home 7-4
Method 1: Create a Copy of the Oracle Grid Infrastructure Home Using the SetupWizard 7-4
Method 2a: Create a Copy of the Oracle Grid Infrastructure Home by RemovingUnnecessary Files from the Copy 7-5
Method 2b: Create a Copy of the Oracle Grid Infrastructure Home Using the -XOption 7-6
Creating a Cluster by Cloning Oracle Clusterware 7-7
Step 1: Prepare the New Cluster Nodes 7-7
Step 2: Deploy the Oracle Grid Infrastructure Home 7-8
Step 3: Run the gridSetup.sh Utility 7-9
Using Cloning to Add Nodes to a Cluster 7-9
Locating and Viewing Log Files Generated During Cloning 7-11
8 Making Applications Highly Available Using Oracle Clusterware
Oracle Clusterware Resources and Agents 8-1
vii

Oracle Clusterware Resources 8-2
Virtual Machine Resources 8-2
Resource Groups 8-5
Oracle Clusterware Resource Types 8-13
Agents in Oracle Clusterware 8-16
Oracle Clusterware Built-in Agents 8-19
Action Scripts 8-20
Building an Agent 8-20
Building and Deploying C and C++ Agents 8-20
Registering a Resource in Oracle Clusterware 8-22
Overview of Using Oracle Clusterware to Enable High Availability 8-23
Resource Attributes 8-24
Resource States 8-24
Resource Dependencies 8-25
Start Dependencies 8-26
Stop Dependencies 8-31
Resource Placement 8-32
Registering an Application as a Resource 8-33
Creating an Application VIP Managed by Oracle Clusterware 8-33
Adding an Application VIP with Oracle Enterprise Manager 8-35
Adding User-Defined Resources 8-36
Deciding on a Deployment Scheme 8-36
Adding a Resource to a Specified Server Pool 8-37
Adding a Resource Using a Server-Specific Deployment 8-38
Creating Resources that Use the generic_application Resource Type 8-39
Adding Resources Using Oracle Enterprise Manager 8-41
Changing Resource Permissions 8-42
Application Placement Policies 8-42
Unregistering Applications and Application Resources 8-43
Managing Resources 8-43
Registering Application Resources 8-44
Starting Application Resources 8-44
Relocating Applications and Application Resources 8-45
Stopping Applications and Application Resources 8-46
Displaying Clusterware Application and Application Resource Status Information 8-46
Managing Automatic Restart of Oracle Clusterware Resources 8-47
Preventing Automatic Restarts of Oracle Clusterware Resources 8-47
Automatically Manage Restart Attempts Counter for Oracle Clusterware Resources 8-47
viii

A Cluster Verification Utility Reference
About Cluster Verification Utility A-1
Overview of CVU A-2
CVU Operational Notes A-3
CVU Installation Requirements A-3
CVU Usage Information A-4
CVU Configuration File A-6
Privileges and Security A-7
Using CVU Help A-7
Deprecated and Desupported CLUVFY Commands A-7
Special CVU Topics A-8
Generating Fixup Scripts A-8
Using CVU to Determine if Installation Prerequisites are Complete A-9
Entry and Exit Criteria A-9
Verbose Mode and UNKNOWN Output A-10
CVU Node List Shortcuts A-10
Cluster Verification Utility Command Reference A-11
cluvfy comp acfs A-11
cluvfy comp admprv A-12
cluvfy comp asm A-15
cluvfy comp baseline A-16
cluvfy comp clocksync A-18
cluvfy comp clu A-19
cluvfy comp clumgr A-21
cluvfy comp clusterware A-22
cluvfy comp crs A-23
cluvfy comp dhcp A-24
cluvfy comp dns A-26
cluvfy comp freespace A-28
cluvfy comp gns A-28
cluvfy comp gpnp A-30
cluvfy comp ha A-31
cluvfy comp healthcheck A-32
cluvfy comp nodeapp A-33
cluvfy comp nodecon A-34
cluvfy comp nodereach A-36
cluvfy comp ocr A-37
cluvfy comp ohasd A-39
cluvfy comp olr A-41
cluvfy comp peer A-42
ix

cluvfy comp scan A-44
cluvfy comp software A-45
cluvfy comp space A-47
cluvfy comp ssa A-48
cluvfy comp sys A-51
cluvfy comp vdisk A-53
cluvfy stage acfscfg A-54
cluvfy stage appcluster A-55
cluvfy stage cfs A-56
cluvfy stage crsinst A-57
cluvfy stage dbcfg A-61
cluvfy stage dbinst A-62
cluvfy stage hacfg A-65
cluvfy stage hwos A-66
cluvfy stage nodeadd A-67
cluvfy stage nodedel A-68
cluvfy stage patch A-70
Troubleshooting and Diagnostic Output for CVU A-71
Enabling Tracing A-71
Known Issues for the Cluster Verification Utility A-71
Database Versions Supported by Cluster Verification Utility A-71
Linux Shared Storage Accessibility (ssa) Check Reports Limitations A-71
Shared Disk Discovery on Red Hat Linux A-72
B Oracle Clusterware Resource Reference
Resource Attributes B-1
Configurable Resource Attributes B-2
ACL B-3
ACTION_SCRIPT B-4
ACTION_TIMEOUT B-4
ACTIONS B-4
ACTIVE_PLACEMENT B-5
AGENT_FILENAME B-5
ALERT_TEMPLATE B-5
AUTO_START B-6
CARDINALITY B-6
CARDINALITY_ID B-6
CHECK_INTERVAL B-6
CHECK_TIMEOUT B-7
CLEAN_TIMEOUT B-7
x

CRITICAL_RESOURCES B-7
DELETE_TIMEOUT B-7
DESCRIPTION B-7
ENABLED B-8
FAILURE_INTERVAL B-8
FAILURE_THRESHOLD B-8
HOSTING_MEMBERS B-8
INSTANCE_FAILOVER B-9
INTERMEDIATE_TIMEOUT B-9
LOAD B-9
MODIFY_TIMEOUT B-9
NAME B-10
OFFLINE_CHECK_INTERVAL B-10
ONLINE_RELOCATION_TIMEOUT B-10
PLACEMENT B-10
RANK B-11
RELOCATE_KIND B-11
RELOCATE_BY_DEPENDENCY B-11
RESTART_ATTEMPTS B-12
SCRIPT_TIMEOUT B-12
SERVER_CATEGORY B-12
SERVER_POOLS B-13
START_CONCURRENCY B-13
START_DEPENDENCIES B-14
START_TIMEOUT B-16
STOP_CONCURRENCY B-17
STOP_DEPENDENCIES B-17
STOP_TIMEOUT B-18
UPTIME_THRESHOLD B-18
USER_WORKLOAD B-19
USE_STICKINESS B-19
WORKLOAD_CPU B-19
Read-Only Resource Attributes B-20
ACTION_FAILURE_EVENT_TEMPLATE B-20
INSTANCE_COUNT B-20
INTERNAL_STATE B-20
LAST_SERVER B-21
LAST_STATE_CHANGE B-21
PROFILE_CHANGE_EVENT_TEMPLATE B-21
RESOURCE_LIST B-21
RESTART_COUNT B-21
xi

STATE B-21
STATE_CHANGE_EVENT_TEMPLATE B-21
STATE_DETAILS B-22
TARGET B-22
TARGET_SERVER B-22
TYPE B-22
Examples of Action Scripts for Third-party Applications B-22
C OLSNODES Command Reference
Using OLSNODES C-1
Overview C-1
Operational Notes C-1
Summary of the OLSNODES Command C-1
Syntax C-2
Examples C-2
D Oracle Interface Configuration Tool (OIFCFG) Command Reference
Starting the OIFCFG Command-Line Interface D-1
Summary of the OIFCFG Usage D-1
OIFCFG Command Format D-2
OIFCFG Commands D-2
OIFCFG Command Parameters D-2
OIFCFG Usage Notes D-3
OIFCFG Examples D-5
E Oracle Clusterware Control (CRSCTL) Utility Reference
CRSCTL Overview E-1
Clusterized (Cluster Aware) Commands E-2
CRSCTL Operational Notes E-2
Deprecated Subprograms or Commands E-3
Dual Environment CRSCTL Commands E-6
crsctl check css E-6
crsctl check evm E-6
crsctl get hostname E-7
crsctl add resource E-7
crsctl delete resource E-11
crsctl eval add resource E-12
crsctl eval fail resource E-14
crsctl eval relocate resource E-15
xii

crsctl eval modify resource E-16
crsctl eval start resource E-18
crsctl eval stop resource E-18
crsctl getperm resource E-19
crsctl modify resource E-20
crsctl relocate resource E-22
crsctl restart resource E-24
crsctl setperm resource E-25
crsctl start resource E-27
crsctl status resource E-28
crsctl stop resource E-31
crsctl add resourcegroup E-32
crsctl check resourcegroup E-33
crsctl delete resourcegroup E-33
crsctl eval add resourcegroup E-34
crsctl eval fail resourcegroup E-35
crsctl eval relocate resourcegroup E-36
crsctl eval start resourcegroup E-36
crsctl eval stop resourcegroup E-37
crsctl export resourcegroup E-38
crsctl modify resourcegroup E-38
crsctl relocate resourcegroup E-40
crsctl restart resourcegroup E-41
crsctl start resourcegroup E-42
crsctl status resourcegroup E-43
crsctl stop resourcegroup E-45
crsctl add resourcegrouptype E-46
crsctl delete resourcegrouptype E-47
crsctl modify resourcegrouptype E-47
crsctl get tracefileopts E-48
crsctl set tracefileopts E-48
crsctl add type E-49
crsctl delete type E-51
crsctl getperm type E-52
crsctl modify type E-53
crsctl setperm type E-54
crsctl status type E-55
Oracle RAC Environment CRSCTL Commands E-56
crsctl request action E-57
crsctl add category E-58
crsctl delete category E-58
xiii

crsctl modify category E-59
crsctl status category E-60
crsctl check cluster E-62
crsctl start cluster E-63
crsctl stop cluster E-63
crsctl get cluster class E-64
crsctl get cluster configuration E-64
crsctl set cluster disabledtlsciphersuite E-65
crsctl get cluster extended E-65
crsctl get cluster hubsize E-65
crsctl set cluster hubsize E-66
crsctl get cluster mode E-66
crsctl set cluster mode E-66
crsctl get cluster name E-66
crsctl add cluster site E-67
crsctl delete cluster site E-67
crsctl modify cluster site E-68
crsctl query cluster site E-68
crsctl get cluster tlsciphersuite E-69
crsctl get cluster type E-69
crsctl set cluster type E-70
crsctl get cpu equivalency E-70
crsctl set cpu equivalency E-70
crsctl get restricted placement E-71
crsctl set restricted placement E-71
crsctl check crs E-72
crsctl config crs E-72
crsctl disable crs E-73
crsctl enable crs E-73
crsctl start crs E-73
crsctl stop crs E-74
crsctl query crs activeversion E-75
crsctl add crs administrator E-76
crsctl delete crs administrator E-77
crsctl query crs administrator E-78
crsctl query crs autostart E-78
crsctl set crs autostart E-79
crsctl query crs releasepatch E-79
crsctl query crs releaseversion E-80
crsctl query crs site E-80
crsctl query crs softwarepatch E-80
xiv

crsctl query crs softwareversion E-81
crsctl get css E-81
crsctl pin css E-82
crsctl set css E-82
crsctl unpin css E-83
crsctl unset css E-83
crsctl get ipmi binaryloc E-84
crsctl set ipmi binaryloc E-84
crsctl get css ipmiaddr E-85
crsctl set css ipmiaddr E-85
crsctl set css ipmiadmin E-86
crsctl query css ipmiconfig E-86
crsctl unset css ipmiconfig E-87
crsctl query css ipmidevice E-87
crsctl get css noautorestart E-88
crsctl set css noautorestart E-88
crsctl delete css votedisk E-89
crsctl query css votedisk E-89
crsctl check ctss E-90
crsctl discover dhcp E-90
crsctl get clientid dhcp E-91
crsctl release dhcp E-92
crsctl request dhcp E-92
crsctl replace discoverystring E-93
crsctl query dns E-93
crsctl start ip E-94
crsctl status ip E-95
crsctl stop ip E-95
crsctl lsmodules E-96
crsctl create member_cluster_configuration E-97
crsctl delete member_cluster_configuration E-97
crsctl query member_cluster_configuration E-98
crsctl delete node E-98
crsctl get nodename E-99
crsctl get node role E-99
crsctl add policy E-100
crsctl delete policy E-100
crsctl eval activate policy E-101
crsctl modify policy E-103
crsctl status policy E-104
crsctl create policyset E-104
xv

crsctl modify policyset E-104
crsctl status policyset E-106
crsctl check resource E-107
crsctl relocate resource E-108
crsctl get resource use E-110
crsctl set resource use E-110
crsctl start rollingpatch E-111
crsctl stop rollingpatch E-112
crsctl start rollingupgrade E-112
crsctl eval add server E-113
crsctl eval delete server E-115
crsctl eval relocate server E-116
crsctl modify server E-117
crsctl relocate server E-118
crsctl status server E-119
crsctl get server css_critical E-121
crsctl set server css_critical E-121
crsctl get server label E-121
crsctl set server label E-121
crsctl add serverpool E-122
crsctl delete serverpool E-124
crsctl eval add serverpool E-124
crsctl eval delete serverpool E-127
crsctl eval modify serverpool E-129
crsctl getperm serverpool E-132
crsctl modify serverpool E-133
crsctl setperm serverpool E-135
crsctl status serverpool E-136
crsctl query socket udp E-138
crsctl start testdns E-139
crsctl status testdns E-140
crsctl stop testdns E-141
crsctl replace votedisk E-141
crsctl add wallet E-142
crsctl delete wallet E-143
crsctl modify wallet E-144
crsctl query wallet E-145
Oracle Restart Environment CRSCTL Commands E-146
crsctl check has E-146
crsctl config has E-147
crsctl disable has E-147
xvi

crsctl enable has E-147
crsctl query has releaseversion E-148
crsctl query has softwareversion E-148
crsctl start has E-148
crsctl stop has E-149
Troubleshooting and Diagnostic Output E-149
Dynamic Debugging Using crsctl set log E-149
Component Level Debugging E-150
Enabling Debugging for Oracle Clusterware Modules E-150
Enabling Debugging for Oracle Clusterware Resources E-154
F Server Control (SRVCTL) Command Reference
SRVCTL Usage Information F-1
Specifying Command Parameters as Keywords Instead of Single Letters F-2
Character Set and Case Sensitivity of SRVCTL Object Values F-2
Using SRVCTL Help F-4
SRVCTL Privileges and Security F-4
Additional SRVCTL Topics F-5
Deprecated SRVCTL Subprograms or Commands F-5
Single Character Parameters Deprecated for all SRVCTL Commands F-5
Miscellaneous SRVCTL Commands and Parameters F-13
SRVCTL Command Reference F-13
srvctl add asm F-15
srvctl config asm F-16
srvctl disable asm F-17
srvctl enable asm F-18
srvctl getenv asm F-19
srvctl modify asm F-19
srvctl predict asm F-20
srvctl relocate asm F-21
srvctl remove asm F-22
srvctl setenv asm F-22
srvctl start asm F-23
srvctl status asm F-24
srvctl stop asm F-25
srvctl unsetenv asm F-26
srvctl add asmnetwork F-26
srvctl config asmnetwork F-27
srvctl modify asmnetwork F-27
srvctl remove asmnetwork F-28
xvii

srvctl add cdp F-28
srvctl config cdp F-29
srvctl disable cdp F-29
srvctl enable cdp F-29
srvctl modify cdp F-30
srvctl relocate cdp F-30
srvctl remove cdp F-31
srvctl start cdp F-31
srvctl status cdp F-32
srvctl stop cdp F-32
srvctl add cdpproxy F-32
srvctl config cdpproxy F-33
srvctl disable cdpproxy F-33
srvctl enable cdpproxy F-34
srvctl modify cdpproxy F-34
srvctl relocate cdpproxy F-35
srvctl remove cdpproxy F-35
srvctl start cdpproxy F-36
srvctl status cdpproxy F-36
srvctl stop cdpproxy F-37
srvctl add cvu F-37
srvctl config cvu F-38
srvctl disable cvu F-38
srvctl enable cvu F-39
srvctl modify cvu F-39
srvctl relocate cvu F-40
srvctl remove cvu F-40
srvctl start cvu F-40
srvctl status cvu F-41
srvctl stop cvu F-41
srvctl add exportfs F-42
srvctl config exportfs F-43
srvctl disable exportfs F-44
srvctl enable exportfs F-44
srvctl modify exportfs F-45
srvctl remove exportfs F-45
srvctl start exportfs F-46
srvctl status exportfs F-47
srvctl stop exportfs F-47
srvctl add filesystem F-48
srvctl config filesystem F-51
xviii

srvctl disable filesystem F-51
srvctl enable filesystem F-52
srvctl modify filesystem F-53
srvctl predict filesystem F-54
srvctl remove filesystem F-55
srvctl start filesystem F-56
srvctl status filesystem F-57
srvctl stop filesystem F-59
srvctl add gns F-60
srvctl config gns F-61
srvctl disable gns F-62
srvctl enable gns F-63
srvctl export gns F-63
srvctl import gns F-64
srvctl modify gns F-65
srvctl relocate gns F-66
srvctl remove gns F-66
srvctl start gns F-67
srvctl status gns F-67
srvctl stop gns F-68
srvctl update gns F-68
srvctl add havip F-70
srvctl config havip F-71
srvctl disable havip F-72
srvctl enable havip F-72
srvctl modify havip F-73
srvctl relocate havip F-74
srvctl remove havip F-74
srvctl start havip F-75
srvctl status havip F-76
srvctl stop havip F-76
srvctl add ioserver F-77
srvctl config ioserver F-77
srvctl disable ioserver F-78
srvctl enable ioserver F-78
srvctl getenv ioserver F-78
srvctl modify ioserver F-79
srvctl relocate ioserver F-79
srvctl remove ioserver F-80
srvctl setenv ioserver F-80
srvctl start ioserver F-81
xix

srvctl status ioserver F-81
srvctl stop ioserver F-82
srvctl unsetenv ioserver F-82
srvctl add mgmtdb F-83
srvctl config mgmtdb F-83
srvctl disable mgmtdb F-83
srvctl enable mgmtdb F-84
srvctl getenv mgmtdb F-84
srvctl modify mgmtdb F-85
srvctl relocate mgmtdb F-86
srvctl remove mgmtdb F-87
srvctl setenv mgmtdb F-87
srvctl start mgmtdb F-88
srvctl status mgmtdb F-89
srvctl stop mgmtdb F-90
srvctl unsetenv mgmtdb F-90
srvctl add mgmtlsnr F-91
srvctl config mgmtlsnr F-92
srvctl disable mgmtlsnr F-92
srvctl enable mgmtlsnr F-93
srvctl getenv mgmtlsnr F-93
srvctl modify mgmtlsnr F-94
srvctl remove mgmtlsnr F-94
srvctl setenv mgmtlsnr F-95
srvctl start mgmtlsnr F-96
srvctl status mgmtlsnr F-96
srvctl stop mgmtlsnr F-97
srvctl unsetenv mgmtlsnr F-97
srvctl add mountfs F-98
srvctl config mountfs F-98
srvctl disable mountfs F-99
srvctl enable mountfs F-99
srvctl modify mountfs F-100
srvctl remove mountfs F-101
srvctl start mountfs F-101
srvctl status mountfs F-102
srvctl stop mountfs F-102
srvctl add netstorageservice F-102
srvctl config netstorageservice F-103
srvctl disable netstorageservice F-103
srvctl enable netstorageservice F-104
xx

srvctl remove netstorageservice F-104
srvctl start netstorageservice F-105
srvctl status netstorageservice F-105
srvctl stop netstorageservice F-106
srvctl add ovmm F-106
srvctl config ovmm F-107
srvctl modify ovmm F-108
srvctl remove ovmm F-108
srvctl add qosmserver F-109
srvctl config qosmserver F-109
srvctl disable qosmserver F-110
srvctl enable qosmserver F-110
srvctl modify qosmserver F-111
srvctl predict qosmserver F-111
srvctl relocate qosmserver F-112
srvctl remove qosmserver F-112
srvctl start qosmserver F-113
srvctl status qosmserver F-113
srvctl stop qosmserver F-113
srvctl add rhpclient F-114
srvctl config rhpclient F-115
srvctl disable rhpclient F-116
srvctl enable rhpclient F-116
srvctl modify rhpclient F-117
srvctl relocate rhpclient F-118
srvctl remove rhpclient F-118
srvctl start rhpclient F-119
srvctl status rhpclient F-119
srvctl stop rhpclient F-120
srvctl add rhpserver F-120
srvctl config rhpserver F-121
srvctl disable rhpserver F-122
srvctl enable rhpserver F-122
srvctl modify rhpserver F-123
srvctl relocate rhpserver F-124
srvctl remove rhpserver F-124
srvctl start rhpserver F-125
srvctl status rhpserver F-125
srvctl stop rhpserver F-126
srvctl add vm F-126
srvctl check vm F-127
xxi

srvctl config vm F-128
srvctl disable vm F-129
srvctl enable vm F-129
srvctl modify vm F-130
srvctl relocate vm F-131
srvctl remove vm F-132
srvctl start vm F-132
srvctl status vm F-133
srvctl stop vm F-134
G Oracle Clusterware Agent Framework C Application Program Interfaces
Agent Framework Data Types G-1
Agent Framework Context Initialization and Persistence G-2
Prototype for C and C++ Entry Point Functions G-2
C and C++ Entry Point Types and Codes G-2
C and C++ Entry Point Function Return Values G-3
Multithreading Considerations G-3
Deprecated APIs G-4
API Reference G-4
clsagfw_add_type() G-5
clsagfw_check_resource() G-5
clsagfw_create_attr_iterator() G-5
clsagfw_delete_cookie() G-6
clsagfw_exit2() G-6
clsagfw_get_attr_from_iterator() G-7
clsagfw_get_attrvalue() G-7
clsagfw_get_check_type() G-8
clsagfw_get_cmdid() G-9
clsagfw_get_cookie() G-9
clsagfw_get_request_action_name() G-9
clsagfw_get_resource_id() G-10
clsagfw_get_resource_name() G-10
clsagfw_get_retry_count() G-10
clsagfw_get_type_name() G-11
clsagfw_init() G-11
clsagfw_is_cmd_timedout() G-12
clsagfw_log() G-12
clsagfw_modify_attribute() G-13
clsagfw_reset_attr_iterator() G-13
clsagfw_send_status2() G-13
xxii

clsagfw_set_cookie() G-14
clsagfw_set_entrypoint() G-14
clsagfw_set_exitcb() G-15
clsagfw_set_resource_state_label() G-15
clsagfw_startup() G-16
Agent Example G-16
H Oracle Clusterware C Application Program Interfaces
About the Programming Interface (C API) to Oracle Clusterware H-1
Overview H-1
Operational Notes H-2
Deprecated CLSCRS APIs H-8
Changes to Existing CLSCRS APIs H-10
Interactive CLSCRS APIs H-10
Non-Interactive CLSCRS APIs H-12
Command Evaluation APIs H-15
clscrs_whatif_set_activepolicy H-17
clscrs_whatif_fail_resource H-18
clscrs_whatif_register_resource H-18
clscrs_whatif_relocate_resource H-19
clscrs_whatif_start_resource H-20
clscrs_whatif_stop_resource H-20
clscrs_whatif_register_serverpool H-21
clscrs_whatif_unregister_serverpool H-22
clscrs_whatif_add_server H-23
clscrs_whatif_delete_server H-24
clscrs_whatif_relocate_server H-24
Server Categorization APIs H-25
clscrs_servercategory_create H-25
clscrs_servercategory_destroy H-26
clscrs_register_servercategory H-26
clscrs_unregister_servercategory H-27
clscrs_get_server_by_category H-28
clscrs_register_server H-28
STAT3 API H-29
clscrs_stat3 H-30
Miscellaneous APIs H-31
clscrs_get_error_details H-31
clscrs_request_action H-31
clscrs_restart_resource H-32
xxiii

clscrs_start_resource_in_pools H-33
clscrs_stop_resource_in_pools H-34
I Oracle Cluster Registry Utility Reference
About OCRCONFIG I-1
OCRCONFIG Command Reference I-1
ocrconfig -add I-2
ocrconfig -backuploc I-3
ocrconfig -copy I-3
ocrconfig -delete I-4
ocrconfig -export I-5
ocrconfig -import I-5
ocrconfig -manualbackup I-6
ocrconfig -overwrite I-6
ocrconfig -repair I-7
ocrconfig -replace I-8
ocrconfig -restore I-8
ocrconfig -showbackup I-9
ocrconfig -showbackuploc I-10
Troubleshooting Oracle Cluster Registry and Diagnostic Output I-10
Troubleshooting Oracle Cluster Registry I-11
Using the OCRCHECK Utility I-11
Syntax I-11
Examples I-12
Using the OCRDUMP Utility to View Oracle Cluster Registry Content I-14
OCRDUMP Utility Syntax and Options I-15
OCRDUMP Utility Examples I-15
Sample OCRDUMP Utility Output I-16
J REST APIs for Oracle Clusterware
About REST APIs for Oracle Clusterware J-1
K Troubleshooting Oracle Clusterware
Troubleshooting an Incompatible Fleet Patching and Provisioning Client Resource K-1
Using the Cluster Resource Activity Log to Monitor Cluster Resource Failures K-2
crsctl query calog K-3
crsctl get calog maxsize K-10
crsctl get calog retentiontime K-11
crsctl set calog maxsize K-11
xxiv

crsctl set calog retentiontime K-12
Oracle Clusterware Diagnostic and Alert Log Data K-12
Diagnostics Collection Script K-15
Storage Split in Oracle Extended Clusters K-17
Rolling Upgrade and Driver Installation Issues K-17
Testing Zone Delegation K-18
Oracle Clusterware Alerts K-19
Alert Messages Using Diagnostic Record Unique IDs K-19
xxv

Preface
The Oracle Clusterware Administration and Deployment Guide describes the OracleClusterware architecture and provides an overview of this product. This book alsodescribes administrative and deployment topics for Oracle Clusterware.
Information in this manual applies to Oracle Clusterware as it runs on all platformsunless otherwise noted. In addition, the content of this manual supplementsadministrative and deployment topics for Oracle single-instance databases that appearin other Oracle documentation. Where necessary, this manual refers to platform-specific documentation. This Preface contains these topics:
• Audience
• Documentation Accessibility
• Diversity and Inclusion
• Set Up Java Access Bridge to Implement Java Accessibility
• Command Syntax
• Conventions
AudienceThe Oracle Clusterware Administration and Deployment Guide provides a descriptionof Oracle Clusterware architecture as well as administrative and deployment topics fordatabase administrators, network administrators, and system administrators.
This guide is also intended for administrators who administer and manage Oracle RealApplication Clusters (Oracle RAC) databases.
Documentation AccessibilityFor information about Oracle's commitment to accessibility, visit the OracleAccessibility Program website at http://www.oracle.com/pls/topic/lookup?ctx=acc&id=docacc.
Access to Oracle Support
Oracle customers that have purchased support have access to electronic supportthrough My Oracle Support. For information, visit http://www.oracle.com/pls/topic/lookup?ctx=acc&id=info or visit http://www.oracle.com/pls/topic/lookup?ctx=acc&id=trsif you are hearing impaired.
Preface
xxvi

Diversity and InclusionOracle is fully committed to diversity and inclusion. Oracle respects and values having adiverse workforce that increases thought leadership and innovation. As part of our initiative tobuild a more inclusive culture that positively impacts our employees, customers, andpartners, we are working to remove insensitive terms from our products and documentation.We are also mindful of the necessity to maintain compatibility with our customers' existingtechnologies and the need to ensure continuity of service as Oracle's offerings and industrystandards evolve. Because of these technical constraints, our effort to remove insensitiveterms is ongoing and will take time and external cooperation.
Set Up Java Access Bridge to Implement Java AccessibilityInstall Java Access Bridge so that assistive technologies on Microsoft Windows systems canuse the Java Accessibility API.
Java Access Bridge is a technology that enables Java applications and applets thatimplement the Java Accessibility API to be visible to assistive technologies on MicrosoftWindows systems.
Refer to Java Platform, Standard Edition Accessibility Guide for information about theminimum supported versions of assistive technologies required to use Java Access Bridge.Also refer to this guide to obtain installation and testing instructions, and instructions for howto use Java Access Bridge.
Related Topics
• Java Platform, Standard Edition Java Accessibility Guide
Command SyntaxRefer to these command syntax conventions to understand command examples in this guide.
Convention Description
$ Bourne or BASH shell prompt in a command example. Do not enter the promptas part of the command.
% C Shell prompt in a command example. Do not enter the prompt as part of thecommand.
# Superuser (root) prompt in a command example. Do not enter the prompt as partof the command.
monospace UNIX command syntax
backslash \ A backslash is the UNIX and Linux command continuation character. It is used incommand examples that are too long to fit on a single line. Enter the commandas displayed (with a backslash) or enter it on a single line without a backslash:
dd if=/dev/rdsk/c0t1d0s6 of=/dev/rst0 bs=10b \ count=10000
braces { } Braces indicate required items:
.DEFINE {macro1}
Preface
xxvii

Convention Description
brackets [ ] Brackets indicate optional items:
cvtcrt termname [outfile]
ellipses ... Ellipses indicate an arbitrary number of similar items:
CHKVAL fieldname value1 value2 ... valueN
italic Italic type indicates a variable. Substitute a value for the variable:
library_name
vertical line | A vertical line indicates a choice within braces or brackets:
FILE filesize [K|M]
ConventionsThe following text conventions are used in this document:
Convention Meaning
boldface Boldface type indicates graphical user interface elements associatedwith an action, or terms defined in text or the glossary.
italic Italic type indicates book titles, emphasis, or placeholder variables forwhich you supply particular values.
monospace Monospace type indicates commands within a paragraph, URLs, codein examples, text that appears on the screen, or text that you enter.
Preface
xxviii

1Introduction to Oracle Clusterware
Oracle Clusterware concepts and components.
Oracle Clusterware enables servers to communicate with each other, so that they appear tofunction as a collective unit. This combination of servers is commonly known as a cluster.Although the servers are standalone servers, each server has additional processes thatcommunicate with other servers. In this way the separate servers appear as if they are onesystem to applications and end users.
This chapter includes the following topics:
• Changes in Oracle Clusterware 21c
• Overview of Oracle Clusterware
• Understanding System Requirements for Oracle Clusterware
• Overview of Oracle Clusterware Platform-Specific Software Components
• High Availability Options for Oracle Database
• Overview of Installing Oracle Clusterware
• Overview of Upgrading and Patching Oracle Clusterware
• Overview of Grid Infrastructure Management Repository
• Overview of Domain Services Clusters
• Overview of Managing Oracle Clusterware Environments
• Overview of Command Evaluation
• Overview of Cloning and Extending Oracle Clusterware in Grid Environments
• Overview of the Oracle Clusterware High Availability Framework and APIs
• Overview of Cluster Time Management
Changes in Oracle Clusterware 21c
See Also:
• Oracle Database Licensing Information User Manual to determine whether afeature is available on your edition of Oracle Database
• Learning Database New Features for a complete description of the newfeatures in this release
• Oracle Database Upgrade Guide for a complete description of the deprecatedand desupported features in this release
1-1

The following are changes in Oracle Clusterware 21c.
• Deprecated Features in Oracle Clusterware 21c
• Desupported Features in Oracle Clusterware 21c
Note:
Oracle Fleet Patching and Provisioning is documented in a separate book forthe Oracle 21c release. For information about Oracle Fleet Patching andProvisioning, refer to:
Oracle Fleet Patching and Provisioning Administrator's Guide
Deprecated Features in Oracle Clusterware 21cThe following features are deprecated in Oracle Clusterware 21c, and may bedesupported in a future release:
• Deprecation of Policy-Managed Databases
Policy-managed databases are deprecated in Oracle Grid Infrastructure 21c. Youcan continue to use existing server pools, and create new pools and policies.Resources using existing server pools can continue to use them transparently. Theuse of CRS configuration policies and the CRS policy set can be desupported in afuture release.
• Deprecation of Cluster Domain - Domain Services Cluster
Domain Services Clusters (DSC), which is part of the Oracle Cluster Domainarchitecture, is deprecated in Oracle Grid Infrastructure 21c and can bedesupported in a future release.
Desupported Features in Oracle Clusterware 21cThese are the desupported features for Oracle Clusterware 21c:
• Desupport of Vendor Clusterware Integration with Oracle Clusterware
The integration of vendor or third party clusterware with Oracle Clusterware isdesupported in Oracle Clusterware 21c. The integration of vendor clusterware withOracle Clusterware is desupported in Oracle Database 21c.
• Desupport of Cluster Domain - Member Clusters
Member Clusters, which are part of the Oracle Cluster Domain architecture, aredesupported in Oracle Grid Infrastructure 21c.
Overview of Oracle ClusterwareOracle Clusterware is portable cluster software that provides comprehensive multi-tiered high availability and resource management for consolidated environments. Itsupports clustering of independent servers so that they cooperate as a single system.
Oracle Clusterware is the integrated foundation for Oracle Real Application Clusters(Oracle RAC), and the high-availability and resource management framework for all
Chapter 1Overview of Oracle Clusterware
1-2

applications on any major platform. Oracle Clusterware was first released with OracleDatabase 10g Release 1 (10.1) as the required cluster technology for the Oraclemultiinstance database, Oracle RAC. The intent is to leverage Oracle Clusterware in thecloud to provide enterprise-class resiliency where required, and dynamic, online allocation ofcompute resources where and when they are needed.
You can configure Oracle Clusterware to manage the availability of user applications andOracle databases. In an Oracle RAC environment, Oracle Clusterware manages all of theresources automatically. All of the applications and processes that Oracle Clusterwaremanages are either cluster resources, or local resources.
Oracle Clusterware is required for using Oracle RAC; it is the only clusterware that you needfor platforms on which Oracle RAC operates. Note that the servers on which you want toinstall and run Oracle Clusterware must use the same operating system.
Using Oracle Clusterware eliminates the need for proprietary vendor clusterware andprovides the benefit of using only Oracle software. Oracle provides an entire softwaresolution, including everything from disk management with Oracle Automatic StorageManagement (Oracle ASM) to data management with Oracle Database and Oracle RAC. Inaddition, Oracle Database features, such as Oracle Services, provide advanced functionalitywhen used with the underlying Oracle Clusterware high-availability framework.
Oracle Clusterware has two stored components, besides the binaries: The voting files, whichrecord node membership information, and the Oracle Cluster Registry (OCR), which recordscluster configuration information. Voting files and OCRs must reside on shared storageavailable to all cluster member nodes.
Benefits of Oracle Clusters
The benefits of using a cluster include:
• Scalability of applications (including Oracle RAC and Oracle RAC One databases)
• Reduce total cost of ownership for the infrastructure by providing a scalable system withlow-cost commodity hardware
• Ability to fail over
• Increase throughput on demand for cluster-aware applications, by adding servers to acluster to increase cluster resources
• Increase throughput for cluster-aware applications by enabling the applications to run onall of the nodes in a cluster
• Ability to program the startup of applications in a planned order that ensures dependentprocesses are started in the correct sequence
• Ability to monitor processes and restart them if they stop
• Eliminate unplanned downtime due to hardware or software malfunctions
• Reduce or eliminate planned downtime for software maintenance
Oracle Flex Clusters
Starting at Oracle Clusterware 12c release 2 (12.2), all clusters are configured as Oracle FlexClusters. Clusters configured under older versions of Oracle Clusterware are converted inplace as part of the upgrade process, including the activation of Oracle Flex ASM (which is arequirement for Oracle Flex Clusters). For information about Oracle Flex Clusters, refer to Overview of Oracle Flex Clusters.
Chapter 1Overview of Oracle Clusterware
1-3
Clusterware Architectures
Note:
Effective with Oracle Grid Infrastructure 21c, Member Clusters, which arepart of the Oracle Cluster Domain architecture, are desupported. However,Domain Services Clusters continue to support Members Clusters in releasesprevious to Oracle Grid Infrastructure 21c.
Member Clusters from previous releases are converted to StandaloneClusters using remote services (on the Domain Services Cluster) whenupgraded to 21c.
Note:
Starting with Oracle Grid Infrastructure 21c, Domain Services Cluster (DSC),which is part of the Oracle Cluster Domain architecture, are deprecated andcan be desupported in a future release.
Oracle Clusterware provides several deployment architecture choices for new clustersduring the installation process. You can either choose a standalone cluster, a domainservices cluster, or a member cluster which is used to host applications anddatabases.
A standalone cluster hosts all Oracle Grid Infrastructure services and Oracle ASMlocally and requires direct access to shared storage.
A domain services cluster is an Oracle Flex Cluster that has one or more Hub Nodes(for database instances) and zero or more other nodes. Shared storage is locallymounted on each of the Hub Nodes and an Oracle ASM instance is available to allHub Nodes. In addition, a management database is stored and accessed, locally,within the cluster. This deployment is also used for an upgraded, pre-existing cluster.
Understanding System Requirements for OracleClusterware
Oracle Clusterware hardware and software concepts and requirements.
To use Oracle Clusterware, you must understand the hardware and software conceptsand requirements.
Oracle Clusterware Hardware Concepts and RequirementsUnderstanding the hardware concepts and requirements helps ensure a successfulOracle Clusterware deployment.
Chapter 1Understanding System Requirements for Oracle Clusterware
1-4

A cluster consists of one or more servers. Access to an external network is the same for aserver in a cluster (also known as a cluster member or node) as for a standalone server.
Note:
Many hardware providers have validated cluster configurations that provide a singlepart number for a cluster. If you are new to clustering, then use the information inthis section to simplify your hardware procurement efforts when you purchasehardware to create a cluster.
A node that is part of a cluster requires a second network. This second network is referred toas the interconnect. For this reason, cluster member nodes require at least two networkinterface cards: one for a public network and one for a private network. The interconnectnetwork is a private network using a switch (or multiple switches) that only the nodes in thecluster can access.1
Note:
Oracle does not support using crossover cables as Oracle Clusterwareinterconnects.
Cluster size is determined by the requirements of the workload running on the cluster and thenumber of nodes that you have configured in the cluster. If you are implementing a cluster forhigh availability, then configure redundancy for all of the components of the infrastructure asfollows:
• At least two network interfaces for the public network, bonded to provide one address
• At least two network interfaces for the private interconnect network
The cluster requires shared connection to storage for each server in the cluster. OracleClusterware supports Network File Systems (NFSs), iSCSI, Direct Attached Storage (DAS),Storage Area Network (SAN) storage, and Network Attached Storage (NAS).
To provide redundancy for storage, generally provide at least two connections from eachserver to the cluster-aware storage. There may be more connections depending on your I/Orequirements. It is important to consider the I/O requirements of the entire cluster whenchoosing your storage subsystem.
Most servers have at least one local disk that is internal to the server. Often, this disk is usedfor the operating system binaries; you can also use this disk for the Oracle software binaries.The benefit of each server having its own copy of the Oracle binaries is that it increases highavailability, so that corruption of one binary does not affect all of the nodes in the clustersimultaneously. It also allows rolling upgrades, which reduce downtime.
1 Oracle Clusterware supports up to 100 nodes in a cluster on configurations running Oracle Database 12c release 2(12.2) and later releases.
Chapter 1Understanding System Requirements for Oracle Clusterware
1-5

Oracle Clusterware Operating System Concepts and RequirementsYou must first install and verify the operating system before you can install OracleClusterware.
Each server must have an operating system that is certified with the OracleClusterware version you are installing. Refer to the certification matrices available inthe Oracle Grid Infrastructure Installation and Upgrade Guide for your platform or onMy Oracle Support (formerly OracleMetaLink) for details.
When the operating system is installed and working, you can then install OracleClusterware to create the cluster. Oracle Clusterware is installed independently ofOracle Database. After you install Oracle Clusterware, you can then install OracleDatabase or Oracle RAC on any of the nodes in the cluster.
Related Topics
• Oracle RAC Technologies Certification Matrix for UNIX Platforms
• Oracle Grid Infrastructure Installation and Upgrade Guide
Oracle Clusterware Software Concepts and RequirementsOracle Clusterware uses voting files to provide fencing and cluster node membershipdetermination. Oracle Cluster Registry (OCR) provides cluster configurationinformation. Collectively, voting files and OCR are referred to as Oracle Clusterwarefiles.
Oracle Clusterware files must be stored on Oracle ASM. If the underlying storage forthe Oracle ASM disks is not hardware protected, such as RAID, then Oraclerecommends that you configure multiple locations for OCR and voting files. The votingfiles and OCR are described as follows:
• Voting Files
Oracle Clusterware uses voting files to determine which nodes are members of acluster. You can configure voting files on Oracle ASM, or you can configure votingfiles on shared storage.
If you configure voting files on Oracle ASM, then you do not need to manuallyconfigure the voting files. Depending on the redundancy of your disk group, anappropriate number of voting files are created.
If you do not configure voting files on Oracle ASM, then for high availability, Oraclerecommends that you have a minimum of three voting files on physically separatestorage. This avoids having a single point of failure. If you configure a single votingfile, then you must use external mirroring to provide redundancy.
Oracle recommends that you do not use more than five voting files, even thoughOracle supports a maximum number of 15 voting files.
• Oracle Cluster Registry
Oracle Clusterware uses the Oracle Cluster Registry (OCR) to store and manageinformation about the components that Oracle Clusterware controls, such asOracle RAC databases, listeners, virtual IP addresses (VIPs), and services andany applications. OCR stores configuration information in a series of key-valuepairs in a tree structure. To ensure cluster high availability, Oracle recommendsthat you define multiple OCR locations. In addition:
Chapter 1Understanding System Requirements for Oracle Clusterware
1-6

– You can have up to five OCR locations
– Each OCR location must reside on shared storage that is accessible by all of thenodes in the cluster
– You can replace a failed OCR location online if it is not the only OCR location
– You must update OCR through supported utilities such as Oracle EnterpriseManager, the Oracle Clusterware Control Utility (CRSCTL), the Server Control Utility(SRVCTL), the OCR configuration utility (OCRCONFIG), or the DatabaseConfiguration Assistant (DBCA)
Related Topics
• Oracle Clusterware Configuration and AdministrationConfiguring and administering Oracle Clusterware and its various components involvesmanaging applications and databases, and networking within a cluster.
Oracle Clusterware Network Configuration ConceptsOracle Clusterware enables a dynamic Oracle Grid Infrastructure through the self-management of the network requirements for the cluster.
Oracle Clusterware supports the use of Dynamic Host Configuration Protocol (DHCP) orstateless address auto-configuration for the VIP addresses and the Single Client AccessName (SCAN) address, but not the public address. DHCP provides dynamic assignment ofIPv4 VIP addresses, while Stateless Address Autoconfiguration provides dynamicassignment of IPv6 VIP addresses.
The use of node VIPs is optional in a cluster deployment. By default node VIPs are includedwhen you deploy the cluster environment.
When you are using Oracle RAC, all of the clients must be able to reach the database, whichmeans that the clients must resolve VIP and SCAN names to all of the VIP and SCANaddresses, respectively. This problem is solved by the addition of Grid Naming Service (GNS)to the cluster. GNS is linked to the corporate Domain Name Service (DNS) so that clients canresolve host names to these dynamic addresses and transparently connect to the cluster andthe databases. Oracle supports using GNS without DHCP or zone delegation in OracleClusterware 12c or later releases (as with Oracle Flex ASM server clusters, which you canconfigure without zone delegation or dynamic networks).
Note:
Oracle does not support using GNS without DHCP or zone delegation on Windows.
Starting with Oracle Clusterware 12c, a GNS instance was enhanced to enable the servicingmultiple clusters rather than just one, thus only a single domain must be delegated to GNS inDNS. GNS still provides the same services as in previous versions of Oracle Clusterware.
The cluster in which the GNS server runs is referred to as the server cluster. A client clusteradvertises its names with the server cluster. Only one GNS daemon process can run on theserver cluster. Oracle Clusterware puts the GNS daemon process on one of the nodes in thecluster to maintain availability.
In previous, single-cluster versions of GNS, the single cluster could easily locate the GNSservice provider within itself. In the multicluster environment, however, the client clusters
Chapter 1Understanding System Requirements for Oracle Clusterware
1-7

must know the GNS address of the server cluster. Given that address, client clusterscan find the GNS server running on the server cluster.
In order for GNS to function on the server cluster, you must have the following:
• The DNS administrator must delegate a zone for use by GNS
• A GNS instance must be running somewhere on the network and it must not beblocked by a firewall
• All of the node names in a set of clusters served by GNS must be unique
Related Topics
• Oracle Automatic Storage Management Administrator's Guide
• Overview of Grid Naming ServiceOracle Clusterware uses Grid Naming Service (GNS) for address resolution in asingle-cluster or multi-cluster environment. You can configure your clusters with asingle, primary GNS instance, and you can also configure one or more secondaryGNS instances with different roles to provide high availability address lookup andother services to clients.
Single Client Access Name (SCAN)Oracle Clusterware can use the Single Client Access Name (SCAN) for dynamic VIPaddress configuration, removing the need to perform manual server configuration.
The SCAN is a domain name registered to at least one and up to three IP addresses,either in DNS or GNS. When using GNS and DHCP, Oracle Clusterware configuresthe VIP addresses for the SCAN name that is provided during cluster configuration.
The node VIP and the three SCAN VIPs are obtained from the DHCP server whenusing GNS. If a new server joins the cluster, then Oracle Clusterware dynamicallyobtains the required VIP address from the DHCP server, updates the cluster resource,and makes the server accessible through GNS.
Related Topics
• Understanding SCAN Addresses and Client Service ConnectionsPublic network addresses are used to provide services to clients.
Manual Addresses ConfigurationYou have the option to manually configure addresses, instead of using GNS andDHCP for dynamic configuration.
In manual address configuration, you configure the following:
• One public address and host name for each node.
• One VIP address for each node.
You must assign a VIP address to each node in the cluster. Each VIP addressmust be on the same subnet as the public IP address for the node and should bean address that is assigned a name in the DNS. Each VIP address must also beunused and unpingable from within the network before you install OracleClusterware.
• Up to three SCAN addresses for the entire cluster.
Chapter 1Understanding System Requirements for Oracle Clusterware
1-8

Note:
The SCAN must resolve to at least one address on the public network. For highavailability and scalability, Oracle recommends that you configure the SCAN toresolve to three addresses on the public network.
Related Topics
• Oracle Grid Infrastructure Installation and Upgrade Guide
Overview of Oracle Clusterware Platform-Specific SoftwareComponents
In an operational Oracle Clusterware, various platform-specific processes or services run oneach cluster node.
This section describes these processes and services.
The Oracle Clusterware Technology StackOracle Clusterware consists of two separate technology stacks: an upper technology stackanchored by the Cluster Ready Services (CRS) daemon (CRSD) and a lower technologystack anchored by the Oracle High Availability Services daemon (OHASD).
These two technology stacks have several processes that facilitate cluster operations. Thefollowing sections describe these technology stacks in more detail.
The Cluster Ready Services Technology StackThe Cluster Ready Services (CRS) technology stack leverages several processes to managevarious services.
The following list describes these processes:
• Cluster Ready Services (CRS): The primary program for managing high availabilityoperations in a cluster.
The CRSD manages cluster resources based on the configuration information that isstored in OCR for each resource. This includes start, stop, monitor, and failoveroperations. The CRSD process generates events when the status of a resource changes.When you have Oracle RAC installed, the CRSD process monitors the Oracle databaseinstance, pluggable database (PDB) except for policy-managed databases, listener, andso on, and automatically restarts these components when a failure occurs.
• Cluster Synchronization Services (CSS): Manages the cluster configuration bycontrolling which nodes are members of the cluster and by notifying members when anode joins or leaves the cluster. If you are using certified third-party clusterware, thenCSS processes interface with your clusterware to manage node membership information.
The cssdagent process monitors the cluster and provides I/O fencing. This serviceformerly was provided by Oracle Process Monitor Daemon (oprocd), also known asOraFenceService on Windows. A Cluster Synchronization Services Daemon (CSSD)failure may result in Oracle Clusterware restarting the node.
Chapter 1Overview of Oracle Clusterware Platform-Specific Software Components
1-9

• Oracle ASM: Provides disk management for Oracle Clusterware and OracleDatabase.
• Cluster Time Synchronization Service (CTSS): Provides time management in acluster for Oracle Clusterware.
• Event Management (EVM): A background process that publishes events thatOracle Clusterware creates.
• Grid Naming Service (GNS): Handles requests sent by external DNS servers,performing name resolution for names defined by the cluster.
• Oracle Agent (oraagent): Extends clusterware to support Oracle-specificrequirements and complex resources. This process runs server callout scriptswhen FAN events occur. This process was known as RACG in Oracle Clusterware11g release 1 (11.1).
• Oracle Notification Service (ONS): A publish and subscribe service forcommunicating Fast Application Notification (FAN) events.
• Oracle Root Agent(orarootagent): A specialized oraagent process that helps theCRSD manage resources owned by root, such as the network, and the Gridvirtual IP address.
The Cluster Synchronization Service (CSS), Event Management (EVM), and OracleNotification Services (ONS) components communicate with other cluster componentlayers on other nodes in the same cluster database environment. These componentsare also the main communication links between Oracle Database, applications, andthe Oracle Clusterware high availability components. In addition, these backgroundprocesses monitor and manage database operations.
The Oracle High Availability Services Technology StackThe Oracle High Availability Services technology stack uses several processes toprovide Oracle Clusterware high availability.
The following list describes the processes in the Oracle High Availability Servicestechnology stack:
• appagent: Protects any resources of the application resource type used inprevious versions of Oracle Clusterware.
• Cluster Logger Service (ologgerd): Receives information from all the nodes inthe cluster and persists in an Oracle Grid Infrastructure Management Repository-based database. This service runs on only two nodes in a cluster.
• Grid Interprocess Communication (GIPC): A support daemon that enablesRedundant Interconnect Usage.
• Grid Plug and Play (GPNPD): Provides access to the Grid Plug and Play profile,and coordinates updates to the profile among the nodes of the cluster to ensurethat all of the nodes have the most recent profile.
• Multicast Domain Name Service (mDNS): Used by Grid Plug and Play to locateprofiles in the cluster, and by GNS to perform name resolution. The mDNSprocess is a background process on Linux and UNIX and on Windows.
• Oracle Agent (oraagent): Extends clusterware to support Oracle-specificrequirements and complex resources. This process manages daemons that run asthe Oracle Clusterware owner, like the GIPC, GPNPD, and GIPC daemons.
Chapter 1Overview of Oracle Clusterware Platform-Specific Software Components
1-10

Note:
This process is distinctly different from the process of the same name that runsin the Cluster Ready Services technology stack.
• Oracle Root Agent (orarootagent): A specialized oraagent process that helps theCRSD manage resources owned by root, such as the Cluster Health Monitor (CHM).
Note:
This process is distinctly different from the process of the same name that runsin the Cluster Ready Services technology stack.
• scriptagent: Protects resources of resource types other than application when usingshell or batch scripts to protect an application.
• System Monitor Service (osysmond): The monitoring and operating system metriccollection service that sends the data to the cluster logger service. This service runs onevery node in a cluster.
Table 1-1 lists the processes and services associated with Oracle Clusterware components.In Table 1-1, if a UNIX or a Linux system process has an (r) beside it, then the process runsas the root user.
Note:
Oracle ASM is not just one process, but an instance. Given Oracle Flex ASM,Oracle ASM does not necessarily run on every cluster node but only some of them.
Table 1-1 List of Processes and Services Associated with Oracle ClusterwareComponents
Oracle ClusterwareComponent
Linux/UNIX Process Windows Processes
CRS crsd.bin (r) crsd.exeCSS ocssd.bin, cssdmonitor,
cssdagentcssdagent.exe, cssdmonitor.exeocssd.exe
CTSS octssd.bin (r) octssd.exeEVM evmd.bin, evmlogger.bin evmd.exeGIPC gipcd.binGNS gnsd (r) gnsd.exeGrid Plug and Play gpnpd.bin gpnpd.exeLOGGER ologgerd.bin (r) ologgerd.exeMaster Diskmon diskmon.binmDNS mdnsd.bin mDNSResponder.exe
Chapter 1Overview of Oracle Clusterware Platform-Specific Software Components
1-11

Table 1-1 (Cont.) List of Processes and Services Associated with Oracle ClusterwareComponents
Oracle ClusterwareComponent
Linux/UNIX Process Windows Processes
Oracle agent oraagent.bin (Oracle Clusterware12c release 1 (12.1) and laterreleases
oraagent.exe
Oracle High AvailabilityServices
ohasd.bin (r) ohasd.exe
ONS ons ons.exeOracle root agent orarootagent (r) orarootagent.exeSYSMON osysmond.bin (r) osysmond.exe
Note:
Oracle Clusterware on Linux platforms can have multiple threads that appearas separate processes with unique process identifiers.
Figure 1-1 illustrates cluster startup.
Chapter 1Overview of Oracle Clusterware Platform-Specific Software Components
1-12

Figure 1-1 Cluster Startup
Listenerora.LISTENER.lsnr
VIPora.NODENAME.vip
SCAN VIPora.SCAN.vip
ADVM Volumeora.dg.vol.advm
Oracle ACFSora.dg.vol.acfs
NFS Serviceora.netstorageservice
HANFS / HASMBora.name.exportfs
HAVIPora.id.havip
ONS.Daemonora.eons
GNSDora.gnsd
ONS.Daemonora.ons
Database Instanceora.DB.db
SCAN Listenerora.LISTENER_
SCAN.lsnr
Oracle ASM Proxyora.proxy_advm
CTSSDora.ctssd
GNSDora.gnsd
CRSDora.crsd
CSSDora.ocssd
EVMDora.evmd
MDNSDora.mdnsd
Oracle ASMora.asm
GPNPDora.gpnpd
Init
orarootagent
cssdagent
oraagentOHASD
oraagent
Oracle ASMInstanceora.asm
Communication
GIPCDora.gipcd
OSYSMONDora.crf
Communication
orarootagent
Chapter 1Overview of Oracle Clusterware Platform-Specific Software Components
1-13

Related Topics
• Oracle Clusterware ResourcesOracle Clusterware manages applications and processes as resources that youregister with Oracle Clusterware.
• Oracle Clusterware Diagnostic and Alert Log DataReview this content to understand clusterware-specific aspects of how OracleClusterware uses ADR.
Transport Layer Security Cipher Suite ManagementOracle Clusterware provides CRSCTL commands to disable a given cipher suite, andstores disabled cipher suite details in Oracle Local Registry and Oracle ClusterRegistry, ensuring that cipher suites included on the disabled list are not used tonegotiate transport layer security.
Starting with Oracle Clusterware 19c, the technology stack uses the GIPC library forboth inter-node and intra-node communication. To secure an inter-nodecommunication channel, the GIPC library uses transport layer security. For any OracleClusterware release, the GIPC library supports a set of precompiled cipher suites.Over time, a cipher suite may get compromised. Prior to Oracle Clusterware 19c, youcould not disable a given cipher suite included in the set to prevent it from being usedin any new connections in the future.
Querying the Cipher List
To obtain a list of available cipher suites:
crsctl get cluster tlsciphersuite
Adding a Cipher Suite to the Disabled List
To add a cipher suite to the disabled list:
crsctl set cluster disabledtlsciphersuite add cipher_suite_name
Removing a Cipher Suite from the Disabled List
To remove a cipher suite from the disabled list:
crsctl set cluster disabledtlsciphersuite delete cipher_suite_name
Related Topics
• crsctl get cluster tlsciphersuite
• crsctl set cluster disabledtlsciphersuite
Oracle Clusterware Processes on Windows SystemsOracle Clusterware uses various Microsoft Windows processes for operations onMicrosoft Windows systems.
These include the following processes:
Chapter 1Overview of Oracle Clusterware Platform-Specific Software Components
1-14

• mDNSResponder.exe: Manages name resolution and service discovery within attachedsubnets
• OracleOHService: Starts all of the Oracle Clusterware daemons
High Availability Options for Oracle DatabaseReview the high availability options available to you for Oracle Database using StandardEdition High Availability, Oracle Restart, Oracle Real Application Clusters (Oracle RAC), andOracle RAC One Node.
The following is an overview of the high availability options available to you for OracleDatabase.
Standard Edition High Availability
• Cluster-based active/passive Oracle Database failover solution
• Designed for single instance Standard Edition Oracle Databases
• Available with Oracle Database 19c release update (RU) 19.7 and later
• Requires Oracle Grid Infrastructure 19c RU 19.7 and later, installed as a StandaloneCluster
Oracle Restart
• Oracle Database instance restart only feature and basis for Oracle Automatic StorageManagement (Oracle ASM) for standalone server deployments
• For single instance Oracle Databases
• Requires Oracle Grid Infrastructure for a standalone server (no cluster)
Oracle Real Application Clusters (Oracle RAC) One Node
• Provides a cluster-based active/passive Oracle Database failover and online databaserelocation solution
• Available for Oracle RAC-enabled Oracle Databases
• Only one instance of an Oracle RAC-enabled Oracle Database is running under normaloperations
• Enables relocation of the active instance to another server in the cluster in an onlinefashion. To relocate the active instance, you can temporarily start a second instance onthe destination server, and relocate the workload
• Supports Rolling Upgrades - patch set, database, and operating system
• Supports Application Continuity
• Requires Oracle Grid Infrastructure to be installed as a Standalone Cluster
Oracle Real Application Clusters (Oracle RAC)
• Provides active / active Oracle Database high availability and scalability solution
• Enables multiple servers to perform concurrent transactions on the same OracleDatabase
Chapter 1High Availability Options for Oracle Database
1-15

• Provides high availability: a failure of a database instance or server does notinterrupt the database service as a whole, because other instances and theirservers remain operational
• Supports Rolling Upgrades - patch set, database, and operating system
• Supports Application Continuity
• Requires Oracle Grid Infrastructure to be installed as a Standalone Cluster
Overview of Installing Oracle ClusterwareA successful deployment of Oracle Clusterware is more likely if you understand theinstallation and deployment concepts.
Note:
Install Oracle Clusterware with the Oracle Universal Installer.
Oracle Clusterware Version CompatibilityYou can install different releases of Oracle Clusterware, Oracle ASM, and OracleDatabase on your cluster. However you should be aware of compatibilityconsiderations.
Follow these guidelines when installing different releases of software on your cluster:
• You can only have one installation of Oracle Clusterware running in a cluster, andit must be installed into its own software home (Grid_home). The release of OracleClusterware that you use must be equal to or higher than the Oracle ASM andOracle RAC versions that run in the cluster. You cannot install a version of OracleRAC that was released after the version of Oracle Clusterware that you run on thecluster. For example:
– Oracle Clusterware 21c only supports Oracle ASM 21c, because Oracle ASMis in the Oracle Grid Infrastructure home, which also includes OracleClusterware
– Oracle Clusterware 21c supports Oracle Database 21c, Oracle Database 19c,Oracle Database 18c, and Oracle Database 12c Release 2 (12.2)
– Oracle Database 21c requires Oracle Clusterware 21c. For example, If youhave Oracle Clusterware 21c installed as your clusterware, then you can havean Oracle Database 18c single-instance database running on one node, andseparate Oracle Real Application Clusters 19c and Oracle Real ApplicationClusters 21c databases also running on the cluster.
• There can be multiple Oracle homes for the Oracle Database software (both singleinstance and Oracle RAC) in the cluster. The Oracle homes for all nodes of anOracle RAC database must be the same.
• You can use different users for the Oracle Clusterware and Oracle Databasehomes if they belong to the same primary group.
• Starting with Oracle Clusterware 12c, there can only be one installation of OracleASM running in a cluster. Oracle ASM is always the same version as Oracle
Chapter 1Overview of Installing Oracle Clusterware
1-16

Clusterware, which must be the same (or higher) release than that of the Oracledatabase.
• Oracle recommends that you do not run different cluster software on the same serversunless they are certified to work together. However, if you are adding Oracle RAC toservers that are part of a cluster, then either migrate to Oracle Clusterware or ensurethat:
– The clusterware you run is supported to run with Oracle RAC 18c and later releases.
– You have installed the correct options for Oracle Clusterware and the other vendorclusterware to work together.
Note:
Starting with Oracle Clusterware 21c, the integration of vendor or third partyclusterware with Oracle Clusterware is desupported.
Related Topics
• Oracle Automatic Storage Management Administrator's Guide
• Oracle Grid Infrastructure Installation and Upgrade Guide
Overview of Upgrading and Patching Oracle ClusterwareIn-place patching replaces the Oracle Clusterware software with the newer version in thesame Grid home. Out-of-place upgrade has both versions of the same software present onthe nodes at the same time, in different Grid homes, but only one version is active.
For Oracle Clusterware 12c and later releases, Oracle supports in-place or out-of-placepatching. Oracle supports only out-of-place upgrades.
Oracle supports patch bundles and one-off patches for in-place patching but only supportspatch sets and major point releases as out-of-place upgrades.
Rolling upgrades avoid downtime and ensure continuous availability of Oracle Clusterwarewhile the software is upgraded to the new version. When you upgrade to Oracle Clusterware12c or later releases, Oracle Clusterware and Oracle ASM binaries are installed as a singlebinary called the Oracle Grid Infrastructure.
Oracle supports force upgrades in cases where some nodes of the cluster are down.
Related Topics
• Oracle Grid Infrastructure Installation and Upgrade Guide
Overview of Grid Infrastructure Management RepositoryThe Grid Infrastructure Management Repository stores information about the cluster, such asreal-time performance data and metadata that various cluster clients collect and require.
Chapter 1Overview of Upgrading and Patching Oracle Clusterware
1-17

Note:
Domain Services Cluster (DSC), which is part of the Oracle Cluster Domainarchitecture, is deprecated in Oracle Grid Infrastructure 21c and can bedesupported in a future release.
In previous versions of Oracle Grid Infrastructure, the Grid Infrastructure ManagementRepository was a standalone database in the Grid Infrastructure home. Starting withOracle Grid Infrastructure 21c, GIMR is hosted in a new GIMR home that is differentfrom the Oracle Grid Infrastructure home. This required disk space in the first diskgroup created, sharing that space with the Oracle Cluster Registry (OCR) and thevoting disk. For standalone clusters, you can install the Grid InfrastructureManagement Repository into its own MGMT disk group, along with the OCR backupfiles during Oracle Grid Infrastructure installation.
You can install both the local Grid Infrastructure Management Repository and DomainServices Cluster Grid Infrastructure Management Repository into the MGMT diskgroup during installation of Oracle Grid Infrastructure. It is mandatory for the domainservices cluster to be located in a disk group separate from the OCR and voting disk.
The Grid Infrastructure Management Repository:
• Is an Oracle database that stores real-time operating system metrics collected byCluster Health Monitor. You configure the Grid Infrastructure ManagementRepository during an installation of or upgrade to Oracle Clusterware 21c on acluster.
• Must run on a Hub Node, and must support failover to another node in case ofnode or storage failure.
• Communicates with any cluster clients (such as Cluster Health Advisor, clusterresource activity log, Fleet Patching and Provisioning Server, OLOGGERD, andOCLUMON) through the private network. The Grid Infrastructure ManagementRepository communicates with external clients and Domain Services Clusters overthe public network, only.
• Oracle recommends that you store data files in their own Oracle ASM disk group,MGMT, which you can create during Oracle Grid Infrastructure installation. If you didnot create this disk group during installation, then the data files will be co-locatedwith the OCR and voting files.
Oracle increased the Oracle Clusterware shared storage requirement toaccommodate the Grid Infrastructure Management Repository, which can be anetwork file system (NFS), cluster file system, or an Oracle ASM disk group.
• Is managed with SRVCTL commands with the mgmtdb and mgmtlsnr nouns.
• Is managed by each of its clients’ command one utility for retention.
Chapter 1Overview of Grid Infrastructure Management Repository
1-18

Note:
Starting with Oracle Grid Infrastructure 19c, the Grid Infrastructure ManagementRepository (GIMR) is optional for new installations of Oracle Standalone Cluster.Oracle Domain Services Clusters still require the installation of a GIMR as a servicecomponent.
Related Topics
• Oracle Autonomous Health Framework User's Guide
• Oracle Fleet Patching and Provisioning Administrator's Guide
Overview of Domain Services ClustersDomain Services Cluster is the base for a service-oriented infrastructure for deployingclustered systems within a single Management Domain.
Note:
Effective with Oracle Grid Infrastructure 21c, Member Clusters, which are part of theOracle Cluster Domain architecture, are desupported. However, Domain ServicesClusters continue to support Members Clusters in releases previous to Oracle GridInfrastructure 21c.
Member Clusters from previous releases are converted to Standalone Clustersusing remote services (on the Domain Services Cluster) when upgraded to 21c.
Note:
Starting with Oracle Grid Infrastructure 21c, Domain Services Cluster (DSC), whichis part of the Oracle Cluster Domain architecture, are deprecated and can bedesupported in a future release.
A Domain Services Cluster is an Oracle cluster deployed to provide services to MemberClusters within that Management Domain. The Member Clusters use the configured servicesas they are needed. The services include a centralized Domain Management Repository,Storage Management services, and Fleet Patching and Provisioning.
Configuring a Domain Services Cluster has many benefits, including:
• Ease of deployment and provisioning
– Configure shared services once, reuse many times over
– No need to provision and configure shared storage for each member cluster
– Deploy Database Member Clusters with the option of using the shared storagemanagement services or locally configured storage
Chapter 1Overview of Domain Services Clusters
1-19

– Deploy Application Member Clusters without support for a database,consuming fewer resources and using Oracle ACFS Remote for sharedstorage
• Centralized shared services
– Benefits of consolidation of storage management to the Domain ServicesClusters:
* Efficiencies of scale (save storage and effort)
* Manage all storage simultaneously
– Database management goes from the local cluster to the DomainManagement Repository
– Member clusters have access to the Oracle ACFS file systems on the DomainServices Cluster using Oracle ACFS Remote
The Cluster Domain consists of the Domain Services Cluster and the Member Clustersthat make use of the services provided. All clusters use the same standard OracleClusterware and are deployed using the Oracle Universal Installer. The DomainServices Cluster must be deployed first, then used to provide services to the MemberClusters as they are deployed and configured for the services they require.
Application Member Clusters are configured, as follows:
• To not support Oracle databases and database resources, thus consuming farfewer memory resources
• Access to shared storage provisioned from the Domain Services Cluster usingOracle ACFS Remote
• Management repositories and the storage of their Oracle Cluster Registry andvoting files provided by centralized storage
The Database Member Clusters can be configured in three different ways, dependingupon how storage is to be accessed. In all cases, the management repositories arestored in the Domain Management Repository. The three configurations for DatabaseMember Cluster storage access are:
• Locally configured shared storage, with local Oracle ASM instances on the cluster
• Direct access to storage that is managed through remote Oracle ASM on theDomain Services Cluster
• Indirect access to Oracle ASM storage on the Domain Services Cluster throughOracle ACFS Remote and through an Oracle ASM IO service
Related Topics
• Cross-Cluster Dependency ProxiesCross-cluster dependency proxies are lightweight, fault-tolerant proxy resourceson Member Clusters for resources running on a Domain Services Cluster.
• Oracle Fleet Patching and Provisioning Administrator's Guide
• Oracle Automatic Storage Management Administrator's Guide
Overview of Managing Oracle Clusterware EnvironmentsOracle Clusterware provides you with several different utilities with which to managethe environment.
Chapter 1Overview of Managing Oracle Clusterware Environments
1-20

The following list describes the utilities for managing your Oracle Clusterware environment:
• Cluster Health Monitor (CHM): Cluster Health Monitor detects and analyzes operatingsystem and cluster resource-related degradation and failures to provide more details tousers for many Oracle Clusterware and Oracle RAC issues, such as node eviction. Thetool continuously tracks the operating system resource consumption at the node,process, and device levels. It collects and analyzes the clusterwide data. In real-timemode, when thresholds are met, the tool shows an alert to the user. For root-causeanalysis, historical data can be replayed to understand what was happening at the time offailure.
• Cluster Verification Utility (CVU): CVU is a command-line utility that you use to verify arange of cluster and Oracle RAC specific components. Use CVU to verify shared storagedevices, networking configurations, system requirements, and Oracle Clusterware, andoperating system groups and users.
Install and use CVU for both preinstallation and postinstallation checks of your clusterenvironment. CVU is especially useful during preinstallation and during installation ofOracle Clusterware and Oracle RAC components to ensure that your configuration meetsthe minimum installation requirements. Also use CVU to verify your configuration aftercompleting administrative tasks, such as node additions and node deletions.
• Oracle Cluster Registry Configuration Tool (OCRCONFIG): OCRCONFIG is acommand-line tool for OCR administration. You can also use the OCRCHECK andOCRDUMP utilities to troubleshoot configuration problems that affect OCR.
• Oracle Clusterware Control (CRSCTL): CRSCTL is a command-line tool that you canuse to manage Oracle Clusterware. Use CRSCTL for general clusterware management,management of individual resources, configuration policies, and server pools for non-database applications.
Oracle Clusterware 12c introduced cluster-aware commands with which you can performoperations from any node in the cluster on another node in the cluster, or on all nodes inthe cluster, depending on the operation.
You can use crsctl commands to monitor cluster resources (crsctl status resource)and to monitor and manage servers and server pools other than server pools that havenames prefixed with ora.*, such as crsctl status server, crsctl status serverpool,crsctl modify serverpool, and crsctl relocate server. You can also manageOracle High Availability Services on the entire cluster (crsctl start | stop | enable |disable | config crs), using the optional node-specific arguments -n or -all. You alsocan use CRSCTL to manage Oracle Clusterware on individual nodes (crsctl start |stop | enable | disable | config crs).
• Oracle Enterprise Manager: Oracle Enterprise Manager has both the Cloud Control andGrid Control GUI interfaces for managing both single instance and Oracle RAC databaseenvironments. It also has GUI interfaces to manage Oracle Clusterware and allcomponents configured in the Oracle Grid Infrastructure installation. Oracle recommendsthat you use Oracle Enterprise Manager to perform administrative tasks.
• Oracle Interface Configuration Tool (OIFCFG): OIFCFG is a command-line tool forboth single-instance Oracle databases and Oracle RAC environments. Use OIFCFG toallocate and deallocate network interfaces to components. You can also use OIFCFG todirect components to use specific network interfaces and to retrieve componentconfiguration information.
• Server Control (SRVCTL): SRVCTL is a command-line interface that you can use tomanage Oracle resources, such as databases, services, or listeners in the cluster.
Chapter 1Overview of Managing Oracle Clusterware Environments
1-21

Starting in Oracle Database 21c, PDBs are a resource managed by OracleClusterware. You can use SRVCTL commands to manage PDBs.
Note:
– You cannot use SRVCTL to manage PDBs on policy-manageddatabases.
– You can only use SRVCTL to manage server pools that have namesprefixed with ora.*.
Related Topics
• Oracle Autonomous Health Framework User's Guide
• Cluster Verification Utility ReferenceLearn about Cluster Verification Utility (CVU), and how to use it to prepare forinstallations, patching, or other system changes.
• Oracle Clusterware Configuration and AdministrationConfiguring and administering Oracle Clusterware and its various componentsinvolves managing applications and databases, and networking within a cluster.
• Oracle Clusterware Control (CRSCTL) Utility Reference
• Oracle Interface Configuration Tool (OIFCFG) Command Reference
• Server Control (SRVCTL) Command ReferenceUse the Server Control (SRVCTL) utility to manage various components andapplications in your cluster.
Overview of Command EvaluationYou can use the Oracle Clusterware Control (CRSCTL) utility to evaluate what(command evaluation) will happen and why (reasoned command evaluation) when youuse CRSCTL commands to manage servers, server pools, and policies within yourOracle Clusterware environment without making any actual changes.
In addition to showing you consequences of a planned or unplanned event, commandevaluation is helpful in a policy-managed environment by validating any assumptionsyou may have about Oracle Clusterware policy decisions. Reasoned commandevaluation expands on this by showing you why Oracle Clusterware performs aparticular action through verbose output of various CRSCTL commands.
Note:
Policy-managed databases are deprecated in Oracle Grid Infrastructure 21c.
Following is an example of what would happen if you removed a server from a serverpool:
$ crsctl eval delete server mjk-node2-3 -explain
Chapter 1Overview of Command Evaluation
1-22

Stage Group 1:-----------------------------------------------------------------------------Stage Required Action----------------------------------------------------------------------------- 1 E Server 'mjk-node2-3' is removed from server pool 'sp1'. E Server pool 'sp1' is below the MIN_SIZE value of 2 with 1 servers. E Looking at other server pools to see whether MIN_SIZE value 2 of server pool 'sp1' can be met. E Scanning server pools with MIN_SIZE or fewer servers in ascending order of IMPORTANCE. E Considering server pools (IMPORTANCE): sp2(2) for suitable servers. E Considering server pool 'sp2' because its MIN_SIZE is 2 and it has 0 servers above MIN_SIZE. E Relocating server 'mjk-node2-0' to server pool 'sp1'. Y Server 'mjk-node2-3' will be removed from pools 'sp1'. Y Server 'mjk-node2-0' will be moved from pools 'sp2' to pools 'sp1'===============================================================================
The information contained in the preceding example is what a command evaluation returns.Each action plan explains the attributes and criteria Oracle Clusterware used to arrive at thefinal decision.
Note:
CRSCTL can only evaluate third-party resources. Resources with the ora prefix,such as ora.orcl.db, must be evaluated using SRVCTL commands.
Related Topics
• Command Evaluation APIsYou can use the command evaluation APIs to predict Oracle Clusterware's response to ahypothetical planned or unplanned event.
• Oracle Clusterware Control (CRSCTL) Utility Reference
Overview of Cloning and Extending Oracle Clusterware in GridEnvironments
Cloning nodes is one method of creating new clusters. Use cloning to quickly create severalclusters of the same configuration.
The cloning process copies Oracle Clusterware software images to other nodes that havesimilar hardware and software. Before using cloning, you must install an Oracle Clusterwarehome successfully on at least one node using the instructions in your platform-specific OracleClusterware installation guide.
For new installations, or if you must install on only one cluster, Oracle recommends that youuse the automated and interactive installation methods, such as Oracle Universal Installer or
Chapter 1Overview of Cloning and Extending Oracle Clusterware in Grid Environments
1-23

the Provisioning Pack feature of Oracle Enterprise Manager. These methods performinstallation checks to ensure a successful installation. To add or delete OracleClusterware to or from nodes in the cluster, use the gridsetup.sh script.
Related Topics
• Cloning Oracle Clusterware
• Adding and Deleting Cluster NodesDescribes how to add nodes to an existing cluster, and how to delete nodes fromclusters.
Overview of the Oracle Clusterware High AvailabilityFramework and APIs
Oracle Clusterware provides many high availability application programming interfacescalled CLSCRS APIs that you use to enable Oracle Clusterware to manageapplications or processes that run in a cluster. The CLSCRS APIs enable you toprovide high availability for all of your applications.
You can define a VIP address for an application to enable users to access theapplication independently of the node in the cluster on which the application is running.This is referred to as the application VIP. You can define multiple application VIPs, withgenerally one application VIP defined for each application running. The application VIPis related to the application by making it dependent on the application resource definedby Oracle Clusterware.
To maintain high availability, Oracle Clusterware components can respond to statuschanges to restart applications and processes according to defined high availabilityrules. You can use the Oracle Clusterware high availability framework by registeringyour applications with Oracle Clusterware and configuring the clusterware to start,stop, or relocate your application processes. That is, you can make customapplications highly available by using Oracle Clusterware to create profiles thatmonitor, relocate, and restart your applications.
Related Topics
• Oracle Clusterware C Application Program Interfaces
Overview of Cluster Time ManagementThe Cluster Time Synchronization Service (CTSS) can detect time synchronizationproblems between nodes in the cluster.
CTSS is installed as part of Oracle Clusterware. It runs in observer mode if it detects atime synchronization service (such as NTP or Chrony) or a time synchronizationservice configuration, valid or broken, on the system. For example, if the etc/ntp.conffile exists on any node in the cluster, then CTSS runs in observer mode even if no timesynchronization software is running.
If CTSS detects that there is no time synchronization service or time synchronizationservice configuration on any node in the cluster, then CTSS goes into active mode andtakes over time management for the cluster.
If CTSS is running in active mode while another, non-NTP, time synchronizationsoftware is running, then you can change CTSS to run in observer mode by creating a
Chapter 1Overview of the Oracle Clusterware High Availability Framework and APIs
1-24

file called etc/ntp.conf. CTSS puts an entry in the alert log about the change to observermode.
When nodes join the cluster, if CTSS is in active mode, then it compares the time on thosenodes to a reference clock located on one node in the cluster. If there is a discrepancybetween the two times and the discrepancy is within a certain stepping limit, then CTSSperforms step time synchronization, which is to step the time, forward or backward, of thenodes joining the cluster to synchronize them with the reference.
Clocks on nodes in the cluster become desynchronized with the reference clock (a timeCTSS uses as a basis and is on the first node started in the cluster) periodically for variousreasons. When this happens, CTSS performs slew time synchronization, which is to speedup or slow down the system time on the nodes until they are synchronized with the referencesystem time. In this time synchronization method, CTSS does not adjust time backward,which guarantees monotonic increase of the system time.
When Oracle Clusterware starts, if CTSS is running in active mode and the time discrepancyis outside the stepping limit (the limit is 24 hours), then CTSS generates an alert in the alertlog, exits, and Oracle Clusterware startup fails. You must manually adjust the time of thenodes joining the cluster to synchronize with the cluster, after which Oracle Clusterware canstart and CTSS can manage the time for the nodes.
When performing slew time synchronization, CTSS never runs time backward to synchronizewith the reference clock. CTSS periodically writes alerts to the alert log containing informationabout how often it adjusts time on nodes to keep them synchronized with the reference clock.
CTSS writes entries to the Oracle Clusterware alert log and syslog when it:
• Detects a time change
• Detects significant time difference from the reference node
• The mode switches from observer to active or vice versa
Having CTSS running to synchronize time in a cluster facilitates troubleshooting OracleClusterware problems, because you will not have to factor in a time offset for a sequence ofevents on different nodes.
Activating and Deactivating Cluster Time ManagementYou can activate CTSS to assume time management services for your cluster. You can alsodeactivate it if you want to use a different cluster time synchronization service.To activate CTSS in your cluster, you must stop and deconfigure the vendor timesynchronization service on all nodes in the cluster. CTSS detects when this happens andassumes time management for the cluster.
For example, to deconfigure NTP, you must remove or rename the etc/ntp.conf file.
Similarly, to deactivate CTSS in your cluster:
1. Configure the vendor time synchronization service on all nodes in the cluster. CTSSdetects this change and reverts back to observer mode.
2. Use the crsctl check ctss command to ensure that CTSS is operating in observermode.
3. Start the vendor time synchronization service on all nodes in the cluster.
4. Use the cluvfy comp clocksync -n all command to verify that the vendor timesynchronization service is operating.
Chapter 1Overview of Cluster Time Management
1-25

Related Topics
• Oracle Grid Infrastructure Installation and Upgrade Guide
• crsctl check ctss
• cluvfy comp clocksync
Chapter 1Overview of Cluster Time Management
1-26

2Oracle Clusterware Configuration andAdministration
Configuring and administering Oracle Clusterware and its various components involvesmanaging applications and databases, and networking within a cluster.
You can choose from one of two methods of configuring and administering clusters. You canuse the traditional, administrator-managed approach, where you administer cluster resourcesand workloads manually, or you can invoke varying degrees of automated administrationusing a policy-managed approach.
Administrator-managed clusters requires that you manually configure how the clusterresources are deployed and where the workload is managed. Typically, this means that mustconfigure which database instances run on what cluster nodes, by preference, and wherethose instances will restart in case of failures. By configuring where the database instancesreside, You configure the workloads across the cluster.
With policy-managed clusters, you configure the workloads to run in server pools, for whichyou configure policy sets to direct how those workloads are managed in each server pool.You manage the server pools and policy sets, leaving the details of the database instancelocation and workload placement to the policies they have instituted. In using this approach,you have the additional option of further automating the management of the cluster by usingOracle Quality of Service Management (Oracle QoS Management).
Note:
Policy-managed databases are deprecated in Oracle Grid Infrastructure 21c.
Role-Separated ManagementRole-separated management is an approach to managing cluster resources and workloads ina coordinated fashion in order to reduce the risks of resource conflicts and shortages.
Role-separated management uses operating system security and role definitions, and OracleClusterware access permissions to separate resource and workload management accordingto the user’s role. This is particularly important for those working in consolidatedenvironments, where there is likely to be competition for computing resources, and a degreeof isolation is required for resource consumers and management of those resources. Bydefault, this feature is not implemented during installation.
Configuring role-separated management consists of establishing the operating system usersand groups that will administer the cluster resources (such as databases), according to theroles intended, adding the permissions on the cluster resources and server pools throughaccess control lists (ACLs), as necessary. In addition, Oracle Automatic StorageManagement (Oracle ASM) provides the capability to extend these role-separation constructsto the storage management functions.
2-1

Role-separated management principles apply equally to administrator-managed andpolicy-managed systems. In the case of administrator-managed, you configure thecluster resources and roles to manage them at the node level, while for policy-managed systems you configure the cluster resources and roles to manage them inthe server pools.
Role-separated management in Oracle Clusterware no longer depends on a clusteradministrator (although Oracle maintains backward compatibility). By default, the userthat installed Oracle Clusterware in the Oracle Grid Infrastructure home (Grid home)and root are permanent cluster administrators. Primary group privileges (oinstall, bydefault) enable database administrators to create databases in newly created serverpools using the Database Configuration Assistant (DBCA), but do not enable roleseparation.
Note:
Oracle recommends that you enable role separation before you create thefirst server pool in the cluster. Create and manage server pools usingconfiguration policies and a respective policy set. Access permissions arestored for each server pool in the ACL attribute, described in Table 3-1.
Related Topics
• Overview of Cluster Configuration Policies and the Policy SetA cluster configuration policy is a document that contains exactly one definition foreach server pool managed by the cluster configuration policy set. A clusterconfiguration policy set is a document that defines the names of all server poolsconfigured for the cluster and definitions for all policies.
Managing Cluster AdministratorsYou use an access control list (ACL) to define administrators for the cluster.
The ability to create server pools in a cluster is limited to the cluster administrators. Inprior releases, by default, every registered operating system user was considered acluster administrator and, if necessary, the default could be changed using crsctl add| delete crs administrator commands. The use of these commands, however, isdeprecated in this release and, instead, you should use the ACL of the policy set tocontrol the ability to create server pools.
As a rule, to have permission to create a server pool or cluster resource, the operatingsystem user or an operating system group of which the user is a member must havethe read, write, and execute permissions set in the ACL attribute.
Configuring Role SeparationRole separation is the determination of the roles that are needed, the resources andserver pools that they will administer, and what their access privileges should be. Afteryou determine these, you then create or modify the operating system user accounts
Chapter 2Role-Separated Management
2-2

for group privileges (such as oinstall or grid), using the ACLs and the CRSCTL utility.
The most basic case is to create two operating system users as part of the oinstall group,then create the cluster, and two server pools. For each server pool, assign one of theoperating system users to administer that server pool and exclude anyone else from all butread access to that server pool.
This requires careful planning, and disciplined, detail-oriented execution, but you can modifythe configuration after implementation, to correct mistakes or make adjustments over time.
Note:
You cannot apply role separation techniques to ora.* resources (Oracle RACdatabase resources). You can only apply these techniques to server pools anduser-defined cluster resources and types.
You create the server pools or resources under the root or grid accounts. For thedesignated operating system users to administer these server pools or resources, they mustthen be given the correct permissions, enabling them to fulfill their roles.
Use the crsctl setperm command to configure horizontal role separation using ACLs thatare assigned to server pools, resources, or both. The CRSCTL utility is located in the pathGrid_home/bin, where Grid_home is the Oracle Grid Infrastructure for a cluster home.
The command uses the following syntax, where the access control (ACL) string is indicatedby italics:
crsctl setperm {resource | type | serverpool} name {-u acl_string | -x acl_string | -o user_name | -g group_name}
The flag options are:
• -u: Update the entity ACL
• -x: Delete the entity ACL
• -o: Change the entity owner
• -g: Change the entity primary group
The ACL strings are:
{user:user_name[:readPermwritePermexecPerm] | group:group_name[:readPermwritePermexecPerm] | other[::readPermwritePermexecPerm] }
In the preceding syntax example:
• user: Designates the user ACL (access permissions granted to the designated user)
• group: Designates the group ACL (permissions granted to the designated groupmembers)
• other: Designates the other ACL (access granted to users or groups not grantedparticular access permissions)
Chapter 2Role-Separated Management
2-3

• readperm: Location of the read permission (r grants permission and "-" forbidspermission)
• writeperm: Location of the write permission (w grants permission and "-" forbidspermission)
• execperm: Location of the execute permission (x grants permission, and "-" forbidspermission)
For example, to set permissions on a server pool called psft for the group personnel,where the administrative user has read/write/execute privileges, the members of thepersonnel group have read/write privileges, and users outside of the group aregranted no access, enter the following command as the root user:
# crsctl setperm serverpool psft -u user:personadmin:rwx,group:personnel:rw-, other::---
For cluster resources, to set permissions on an application (resource) calledMyProgram (administered by Maynard) for the group crsadmin, where the administrativeuser has read, write, and execute privileges, the members of the crsadmin group haveread and execute privileges, and users outside of the group are granted only readaccess (for status and configuration checks), enter the following command aswhichever user originally created the resource (root or grid owner):
# crsctl setperm resource MyProgram -u user:Maynard:r-x,group:crsadmin:rw-,other:---:r--
Related Topics
• Oracle Clusterware Resource Reference
Configuring Oracle Grid Infrastructure Using Grid SetupWizard
Using the Configuration Wizard, you can configure a new Oracle Grid Infrastructure onone or more nodes, or configure an upgraded Oracle Grid Infrastructure. You can alsorun the Grid Setup Wizard in silent mode.
After performing a software-only installation of the Oracle Grid Infrastructure, you canconfigure the software using Grid Setup Wizard. This Wizard performs variousvalidations of the Grid home and inputs before and after you run through the wizard.
Chapter 2Configuring Oracle Grid Infrastructure Using Grid Setup Wizard
2-4

Note:
• Before running the Grid Setup Wizard, ensure that the Oracle GridInfrastructure home is current, with all necessary patches applied.
• To launch the Grid Setup Wizard in the subsequent procedures:
On Linux and UNIX, run the following command:
Oracle_home/gridSetup.sh
On Windows, run the following command:
Oracle_home\gridSetup.bat
Configuring a Single NodeYou can configure a single node by using the Configuration Wizard.
To configure a single node:
1. Start the Configuration Wizard, as follows:
$ Oracle_home/gridSetup.sh2. On the Select Installation Option page, select Configure Oracle Grid Infrastructure for
a Cluster.
3. On the Cluster Node Information page, select only the local node and corresponding VIPname.
4. Continue adding your information on the remaining wizard pages.
5. Review your inputs on the Summary page and click Finish.
6. Run the root.sh script as instructed by the Configuration Wizard.
Configuring Multiple NodesYou can use the Configuration Wizard to configure multiple nodes in a cluster.
It is not necessary that Oracle Grid Infrastructure software be installed on nodes you want toconfigure using the Configuration Wizard.
Note:
Before you launch the Configuration Wizard, ensure the following:
While software is not required to be installed on all nodes, if it is installed, then thesoftware must be installed in the same Grid_home path and be at the identical levelon all the nodes.
To use the Configuration Wizard to configure multiple nodes:
Chapter 2Configuring Oracle Grid Infrastructure Using Grid Setup Wizard
2-5

1. Start the Configuration Wizard, as follows:
$ Oracle_home/gridSetup.sh2. On the Select Installation Option page, select Configure Oracle Grid
Infrastructure for a Cluster.
3. On the Cluster Node Information page, select the nodes you want to configure andtheir corresponding VIP names. The Configuration Wizard validates the nodes youselect to ensure that they are ready.
4. Continue adding your information on the remaining wizard pages.
5. Review your inputs on the Summary page and click Finish.
6. Run the root.sh script as instructed by the Configuration Wizard.
Upgrading Oracle Grid InfrastructureYou use the Grid Setup Wizard to upgrade a cluster’s Oracle Grid Infrastructure.
To use upgrade Oracle Grid Infrastructure for a cluster:
1. Start the Grid Setup Wizard:
$ Oracle_home/gridSetup.sh
2. On the Select Installation Option page, select Upgrade Oracle GridInfrastructure.
3. On the Oracle Grid Infrastructure Node Selection page, review the nodes you wantto upgrade. Additionally, you can choose not to upgrade nodes that are down.
4. Continue adding your information on the remaining wizard pages.
5. Review your inputs on the Summary page and click Finish.
6. Run the rootupgrade.sh script as instructed by the Configuration Wizard.
Related Topics
• Oracle Database Installation Guide
See Also:
Oracle Database Installation Guide for your platform for Oracle Restartprocedures
Running the Configuration Wizard in Silent ModeYou can run the Configuration Wizard in silent mode by specifying the —silentparameter.
To use the Configuration Wizard in silent mode to configure or upgrade nodes:
Chapter 2Configuring Oracle Grid Infrastructure Using Grid Setup Wizard
2-6

1. Start the Configuration Wizard from the command line, as follows:
$ $ORACLE_HOME/gridSetup.sh -silent -responseFile file_name
The Configuration Wizard validates the response file and proceeds with the configuration.If any of the inputs in the response file are found to be invalid, then the ConfigurationWizard displays an error and exits.
2. Run the root and Grid_home/gridSetup -executeConfigTools scripts as prompted.
Moving and Patching an Oracle Grid Infrastructure HomeYou use the Grid Setup Wizard to move and patch an Oracle Grid Infrastructure home.
The Oracle Installer script gridSetup.sh supports a new switch -switchGridHome for thispurpose. This feature enables you to move and patch an Oracle Grid Infrastructure home to anewer or same patch level.
See Also:
• Oracle Grid Infrastructure Installation and Upgrade Guide for Linux forinformation about switching the Oracle Grid Infrastructure home after patching
Server Weight-Based Node EvictionYou can configure the Oracle Clusterware failure recovery mechanism to choose whichcluster nodes to terminate or evict in the event of a private network (cluster interconnect)failure.
In a split-brain situation, where a cluster experiences a network split, partitioning the clusterinto disjoint cohorts, Oracle Clusterware applies certain rules to select the surviving cohort,potentially evicting a node that is running a critical, singleton resource.
You can affect the outcome of these decisions by adding value to a database instance ornode so that, when Oracle Clusterware must decide whether to evict or terminate, it willconsider these factors and attempt to ensure that all critical components remain available.You can configure weighting functions to add weight to critical components in your cluster,giving Oracle Clusterware added input when deciding which nodes to evict when resolving asplit-brain situation.
You may want to ensure that specific nodes survive the tie-breaking process, perhapsbecause of certain hardware characteristics, or that certain resources survive, perhapsbecause of particular databases or services. You can assign weight to particular nodes,resources, or services, based on the following criteria:
• You can assign weight only to administrator-managed nodes.
• You can assign weight to servers or applications that are registered Oracle Clusterwareresources.
Weight contributes to importance of the component and influences the choice that OracleClusterware makes when managing a split-brain situation. With other critical factors being
Chapter 2Server Weight-Based Node Eviction
2-7

equal between the various cohorts, Oracle Clusterware chooses the heaviest cohort tosurvive.
You can assign weight to various components, as follows:
• To assign weight to database instances or services, you use the -css_criticalyes parameter with the srvctl add database or srvctl add service commandswhen adding a database instance or service. You can also use the parameter withthe srvctl modify database and srvctl modify service commands.
• To assign weight to non ora.* resources, use the -attr "CSS_CRITICAL=yes"parameter with the crsctl add resource and crsctl modify resourcecommands when you are adding or modifying resources.
• To assign weight to a server, use the -css_critical yes parameter with thecrsctl set server command.
Note:
• You must restart the Oracle Clusterware stack on the node for the valuesto take effect. This does not apply to resources where the changes takeeffect without having to restart the resource.
• If you change the environment from administrator managed to policymanaged, or a mixture of the two, any weight that you have assigned isstored, but is not considered, meaning that it will no longer apply or beconsidered unless and until you reconfigure the cluster back to beingadministrator managed.
Overview of Oracle Database Quality of ServiceManagement
Oracle Database Quality of Service Management (Oracle Database QoSManagement) is an automated, policy-based product that monitors the workloadrequests for an entire system.
Oracle Database QoS Management manages the resources that are shared acrossapplications, and adjusts the system configuration to keep the applications running atthe performance levels needed by your business. Oracle Database QoS Managementresponds gracefully to changes in system configuration and demand, thus avoidingadditional oscillations in the performance levels of your applications.
Oracle Database QoS Management monitors and manages Oracle RAC databaseworkload performance objectives by identifying bottlenecked resources impactingthese objectives, and both recommending and taking actions to restore performance.Administrator-managed deployments bind database instances to nodes but policy-managed deployments do not, so the Oracle Database QoS Management server poolsize resource control is only available for the latter. All other resource managementcontrols are available for both deployments.
Chapter 2Overview of Oracle Database Quality of Service Management
2-8

Note:
Starting with Oracle Grid Infrastructure 21c, policy-managed databases aredeprecated.
You can continue to use existing server pools, and create new pools and policies.Resources using existing server pools can continue to use them transparently.
The use of CRS configuration policies and the CRS policy set can be desupportedin a future release. In place of server pools and policy-managed databases, Oraclerecommends that you use the new "Merged" management style.
Oracle Database QoS Management supports administrator-managed Oracle RAC and OracleRAC One Node databases with its Measure-Only, Monitor, and Management modes. Thisenables schema consolidation support within an administrator-managed Oracle RACdatabase by adjusting the CPU shares of performance classes running in the database.Additionally, database consolidation is supported by adjusting CPU counts for databaseshosted on the same physical servers.
Because administrator-managed databases do not run in server pools, the ability to expandor shrink the number of instances by changing the server pool size that is supported in policy-managed database deployments is not available for administrator-managed databases. Thisnew deployment support is integrated into the Oracle QoS Management pages in OracleEnterprise Manager Cloud Control.
Overview of Grid Naming ServiceOracle Clusterware uses Grid Naming Service (GNS) for address resolution in a single-cluster or multi-cluster environment. You can configure your clusters with a single, primaryGNS instance, and you can also configure one or more secondary GNS instances withdifferent roles to provide high availability address lookup and other services to clients.
• Network Administration Tasks for GNS and GNS Virtual IP Address
• Understanding Grid Naming Service Configuration Options
Network Administration Tasks for GNS and GNS Virtual IP AddressTo implement GNS, your network administrator must configure the DNS to set up a domainfor the cluster, and delegate resolution of that domain to the GNS VIP. You can use aseparate domain, or you can create a subdomain of an existing domain for the cluster.
GNS distinguishes between nodes by using cluster names and individual node identifiers aspart of the host name for that cluster node, so that cluster node 123 in cluster A isdistinguishable from cluster node 123 in cluster B.
However, if you configure host names manually, then the subdomain you delegate to GNSshould have no subdomains. For example, if you delegate the subdomainmydomain.example.com to GNS for resolution, then there should be noother.mydomain.example.com domains. Oracle recommends that you delegate a subdomainto GNS that is used by GNS exclusively.
Chapter 2Overview of Grid Naming Service
2-9

Note:
You can use GNS without DNS delegation in configurations where staticaddressing is being done, such as in Oracle Flex ASM or Oracle FlexClusters. However, GNS requires a domain be delegated to it if addressesare assigned using DHCP.
Example 2-1 shows DNS entries required to delegate a domain calledmyclustergns.example.com to a GNS VIP address 10.9.8.7.
The GNS daemon and the GNS VIP run on one node in the server cluster. The GNSdaemon listens on the GNS VIP using port 53 for DNS requests. Oracle Clusterwaremanages the GNS daemon and the GNS VIP to ensure that they are always available.If the server on which the GNS daemon is running fails, then Oracle Clusterware failsover the GNS daemon and the GNS VIP to a surviving cluster member node. If thecluster is an Oracle Flex Cluster configuration, then Oracle Clusterware fails over theGNS daemon and the GNS VIP to a Hub Node.
Note:
Oracle Clusterware does not fail over GNS addresses to different clusters.Failovers occur only to members of the same cluster.
Example 2-1 DNS Entries
# Delegate to gns on myclustermycluster.example.com NS myclustergns.example.com#Let the world know to go to the GNS vipmyclustergns.example.com. 10.9.8.7
Related Topics
• Oracle Grid Infrastructure Installation and Upgrade Guide
• Oracle Flex ClustersAn Oracle Flex Cluster scales Oracle Clusterware to large numbers of nodes.
Understanding Grid Naming Service Configuration OptionsGNS can run in either automatic or standard cluster address configuration mode.Automatic configuration uses either the Dynamic Host Configuration Protocol (DHCP)for IPv4 addresses or the Stateless Address Autoconfiguration Protocol (autoconfig)(RFC 2462 and RFC 4862) for IPv6 addresses.
This section includes the following topics:
• Highly-Available Grid Naming Service
• Automatic Configuration Option for Addresses
• Static Configuration Option for Addresses
• Shared GNS Option for Addresses
Chapter 2Overview of Grid Naming Service
2-10

Highly-Available Grid Naming ServiceHighly-available GNS consists of one primary GNS instance and zero or more secondaryGNS instances.
The primary GNS instance services all updates from the clients, while both the primary andthe secondary GNS instances process the lookup queries. Additionally, the secondary GNSinstances act as backup for the primary GNS instance. Secondary GNS instances can bepromoted to the primary role whenever an existing primary GNS instance fails or is removedby the cluster administrator.
Further, highly-available GNS provides fault tolerance by taking data backup on secondaryGNS instance using zone transfer. Secondary GNS instances get a copy of data from theprimary GNS instance during installation. Thereafter, any update on the primary GNSinstance gets replicated to the secondary GNS instances.
The primary GNS instance manages zone data and holds all records on the delegateddomain. It stores the zone data and its change history in the Oracle Cluster Registry (OCR).Updating the zone data on a secondary GNS instance involves a zone transfer, which can beone of two methods:
• Full zone transfer: The primary GNS instance replicates all zone data to the secondaryGNS instances.
• Incremental zone transfer: The primary GNS instance only replicates the changed datato secondary GNS instances. GNS uses this transfer mechanism for the followingscenarios:
– When there is an update to the zone data in the primary GNS instance, the instancenotifies the secondary instances to initiate a data transfer. The secondary GNSinstances will ask for a data transfer only if the serial number of the data in OCR ofthe primary GNS instance is greater than that of the data of the secondary GNSinstances.
– When the refresh time of a secondary GNS instance expires, the instance sends aquery containing its data serial number to the primary GNS instance. If the serialnumber of the secondary GNS instance is less than that of the primary GNSinstance, then GNS initiates a zone transfer.
Note:
Refresh time must be long enough to reduce the load on the primary GNSinstance so that answering a secondary GNS instance does not prevent theprimary instance from being able to function. Default refresh time is onehour but the cluster administrator can change this value based on clustersize.
You must configure a primary GNS instance before you configure any secondary. Once yousuccessfully configure a primary GNS instance, you export client data for clients andsecondary GNS instances. You provide exported client data when you configure secondaryGNS instances. All secondary GNS instances register themselves with the primary GNSinstance and get a copy of zone data. Secondary GNS instances contact the primary GNSinstance for data updates using the zone transfer mechanism, when either the refresh time ofthe secondary GNS instance expires or in response to a notification.
Chapter 2Overview of Grid Naming Service
2-11

Related Topics
• Configuring Highly-Available GNSConfiguring highly-available GNS involves configuring primary and secondaryGNS instances. You can configure GNS during installation of Oracle Clusterwareusing Oracle Universal Installer but you can only configure highly-available GNSafter you install Oracle Clusterware because you can only configure a secondaryGNS instance after you install Oracle Clusterware.
• Removing Primary and Secondary GNS InstancesYou can remove primary and secondary GNS instances from a cluster.
Automatic Configuration Option for AddressesWith automatic configurations, a DNS administrator delegates a domain on the DNS tobe resolved through the GNS subdomain. During installation, Oracle Universal Installerassigns names for each cluster member node interface designated for Oracle GridInfrastructure use during installation or configuration. SCANs and all other clusternames and addresses are resolved within the cluster, rather than on the DNS.
Automatic configuration occurs in one of the following ways:
• For IPv4 addresses, Oracle Clusterware assigns unique identifiers for each clustermember node interface allocated for Oracle Grid Infrastructure, and generatesnames using these identifiers within the subdomain delegated to GNS. A DHCPserver assigns addresses to these interfaces, and GNS maintains address andname associations with the IPv4 addresses leased from the IPv4 DHCP pool.
• For IPv6 addresses, Oracle Clusterware automatically generates addresses withautoconfig.
Static Configuration Option for AddressesWith static configurations, no subdomain is delegated. A DNS administrator configuresthe GNS VIP to resolve to a name and address configured on the DNS, and a DNSadministrator configures a SCAN name to resolve to three static addresses for thecluster.
A DNS administrator also configures a static public IP name and address, and virtualIP name and address for each cluster member node. A DNS administrator must alsoconfigure new public and virtual IP names and addresses for each node added to thecluster. All names and addresses are resolved by DNS.
GNS without subdomain delegation using static VIP addresses and SCANs enablesOracle Flex Cluster and CloudFS features that require name resolution informationwithin the cluster. However, any node additions or changes must be carried out asmanual administration tasks.
Shared GNS Option for AddressesWith dynamic configurations, you can configure GNS to provide name resolution forone cluster, or to advertise resolution for multiple clusters, so that a single GNSinstance can perform name resolution for multiple registered clusters. This option iscalled shared GNS.
Shared GNS provides the same services as standard GNS, and appears the same toclients receiving name resolution. The difference is that the GNS daemon running on
Chapter 2Overview of Grid Naming Service
2-12

one cluster is configured to provide name resolution for all clusters in domains that aredelegated to GNS for resolution, and GNS can be centrally managed using SRVCTLcommands. You can use shared GNS configuration to minimize network administration tasksacross the enterprise for Oracle Grid Infrastructure clusters.
You cannot use the static address configuration option for a cluster providing shared GNS toresolve addresses in a multi-cluster environment. Shared GNS requires automatic addressconfiguration, either through addresses assigned by DHCP, or by IPv6 stateless addressautoconfiguration.
Note:
All of the node names in a set of clusters served by GNS must be unique.
Oracle Universal Installer enables you to configure static addresses with GNS for sharedGNS clients or servers, with GNS used for discovery.
Administering Grid Naming ServiceUse SRVCTL to administer Grid Naming Service (GNS) in both single-cluster and multi-cluster environments.
Note:
The GNS server and client must run on computers using the same operatingsystem and processor architecture. Oracle does not support running GNS oncomputers with different operating systems, processor architectures, or both.
This section includes the following topics:
• Configuring Highly-Available GNS
• Removing Primary and Secondary GNS Instances
• Starting and Stopping GNS with SRVCTL
• Converting Clusters to GNS Server or GNS Client Clusters
• Moving GNS to Another Cluster
• Changing the GNS Subdomain when Moving from IPv4 to IPv6 Network
• Rolling Conversion from DNS to GNS Cluster Name Resolution
Configuring Highly-Available GNSConfiguring highly-available GNS involves configuring primary and secondary GNSinstances. You can configure GNS during installation of Oracle Clusterware using OracleUniversal Installer but you can only configure highly-available GNS after you install Oracle
Chapter 2Administering Grid Naming Service
2-13

Clusterware because you can only configure a secondary GNS instance after youinstall Oracle Clusterware.
Highly-available GNS provides the ability to run multiple GNS instances in multi-clusterenvironment with different roles. There will be one primary GNS instance and zero ormore secondary instances. The primary instance manages update and resolutionoperations. However, the secondary instance only manages resolution operations. Ifyou choose to use secondary GNS instances, then you must first configure a primaryGNS instance or change the existing GNS in a shared GNS environment to a primaryGNS instance.
1. As the cluster administrator, configure the primary GNS instance on any node inan existing cluster, as follows:
# srvctl add gns -vip gns_vip -domain gns_subdomain
2. Start the primary GNS instance, as follows:
# srvctl start gns
There can be only one primary GNS instance in a multi-cluster environment. IfGNS detects more than one primary GNS instance, then it will abort the startcommand. You can then configure this instance as a secondary GNS instance, asdescribed in step 5.
3. Create client data for the secondary GNS instances, as follows
# srvctl export gns -clientdata file_name -role secondary
GNS stores this zone data information in OCR and updates secondary GNSinstances once they are configured.
4. Copy the client data file you created in the preceding step to the secondary GNSinstance.
5. Configure the secondary GNS instance, as follows:
# srvctl add gns -vip gns_vip -clientdata file_name
6. Start the secondary GNS instance, as follows:
# srvctl start gns
Once you successfully configure and start a secondary GNS instance, it queriesthe primary GNS instance for the zone data.
Removing Primary and Secondary GNS InstancesYou can remove primary and secondary GNS instances from a cluster.
You cannot remove a primary GNS instance until you configure another primary GNSinstance. If you remove a primary GNS instance before you have another one toreplace it, then GNS will not function.
Chapter 2Administering Grid Naming Service
2-14

As the cluster administrator, select a secondary GNS instance and promote it to primary, asfollows:
# srvctl modify gns -role primary
1. Depending on whether you are removing a primary or secondary GNS instance, stop theinstance, as follows:
# srvctl stop gns
2. Remove the instance, as follows:
# srvctl remove gns
Note:
A DNS administrator can delete the instance's name server and A/AAAA recordentries from the DNS zone data, so that the client will not attempt to query aninstance which is no longer available.
Starting and Stopping GNS with SRVCTLYou use the srvctl command to start and stop GNS.
Start and stop GNS on the server cluster by running the following commands as root,respectively:
# srvctl start gns# srvctl stop gns
Note:
You cannot start or stop GNS on a client cluster.
Converting Clusters to GNS Server or GNS Client ClustersYou can convert clusters that are not running GNS into GNS server or client clusters, and youcan change GNS cluster type configurations for server and client clusters.
This section includes the following cluster conversion scenarios:
• Converting a Non-GNS Cluster to a GNS Server Cluster
• Converting a Non-GNS Cluster to a Client Cluster
• Converting a Single Cluster Running GNS to a Server Cluster
• Converting a Single Cluster Running GNS to be a GNS Client Cluster
Chapter 2Administering Grid Naming Service
2-15

Converting a Non-GNS Cluster to a GNS Server ClusterYou can use the srvctl commandto convert a cluster that is not running GNS to a GNSserver cluster.
1. Add GNS to the cluster by running the following command as root, providing avalid IP address and a domain:
# srvctl add gns -vip IP_address -domain domain
2. Start the GNS instance:
# srvctl start gns -node node_name
Note:
• Specifying a domain is not required when adding a GNS VIP.
• The IP address you specify cannot currently be used by another GNSinstance.
• The configured cluster must have DNS delegation for it to be a GNSserver cluster.
Converting a Non-GNS Cluster to a Client ClusterTo convert a cluster that is not running GNS to a client cluster, you must import thecredentials file from the server cluster.
Convert a cluster that is not running GNS to a GNS client cluster, as follows:
1. Run the following command in the server cluster to export the GNS instance clientdata configuration to a file:
$ srvctl export gns -clientdata path_to_file -role client
You must specify the fully-qualified path to the file.
Note:
You can use the GNS configuration Client Data file you generate withOracle Universal Installer as an input file for creating shared GNSclients.
2. Import the file you created in the preceding step on a node in the cluster to makethat cluster a client cluster by running the following command, as root:
# srvctl add gns -clientdata path_to_file
Chapter 2Administering Grid Naming Service
2-16

Note:
You must copy the file containing the GNS data from the server cluster to anode in the cluster where you run this command.
3. Change the SCAN name, as follows:
$ srvctl modify scan -scanname scan_name.client_cluster_name.server_GNS_subdomain
Converting a Single Cluster Running GNS to a Server ClusterYou do not need to do anything to convert a single cluster running GNS to be a GNS servercluster. It is automatically considered to be a server cluster when a client cluster is added.
Converting a Single Cluster Running GNS to be a GNS Client ClusterYou can use the srvctl command to convert a single cluster running GNS to GNC clientcluster. Because it is necessary to stay connected to the current GNS during this conversionprocess, the procedure is more involved than that of converting a single cluster to a servercluster.
To convert a single cluster running GNS to a GNS client cluster:
1. Run the following command in the server cluster to export the GNS client information to afile:
$ srvctl export gns -clientdata path_to_client_data_file
You must specify the fully-qualified path to the file.
2. Stop GNS on the cluster you want to convert to a client cluster.
# srvctl stop gns
Note:
While the conversion is in progress, name resolution using GNS will beunavailable.
3. Run the following command in the server cluster to export the GNS instance:
$ srvctl export gns -instance path_to_file
You must specify the fully-qualified path to the file.
4. Run the following command as root in the server cluster to import the GNS instance file:
# srvctl import gns -instance path_to_file
Chapter 2Administering Grid Naming Service
2-17

You must specify the fully-qualified path to the file.
5. Run the following command as root on the node where you imported the GNSinstance file to start the GNS instance:
# srvctl start gns
By not specifying the name of the node on which you want to start the GNSinstance, the instance will start on a random node.
6. Remove GNS from the GNS client cluster using the following command:
# srvctl remove gns
7. Make the former cluster a client cluster, as follows:
# srvctl add gns -clientdata path_to_client_data_file
Note:
You must copy the file containing the GNS data from the server cluster toa node in the cluster where you run this command.
8. Modify the SCAN in the GNS client cluster to use the GNS subdomain qualifiedwith the client cluster name, as follows:
$ srvctl modify scan -scanname scan_name.gns_domain
In the preceding command, gns_domain is in the formclient_cluster_name.server GNS subdomain
Moving GNS to Another ClusterIf it becomes necessary to make another cluster the GNS server cluster, eitherbecause a cluster failure, or because of an administration plan, then you can moveGNS to another cluster with the srvctl command.
Note:
This procedure requires server cluster and client cluster downtime.Additionally, you must import GNS client data from the new server cluster toany Oracle Flex ASM and Fleet Patching and Provisioning Servers andClients.
To move GNS to another cluster:
1. Stop the GNS instance on the current server cluster.
# srvctl stop gns
Chapter 2Administering Grid Naming Service
2-18

2. Export the GNS instance configuration to a file.
# srvctl export gns -instance path_to_file
Specify the fully-qualified path to the file.
3. Remove the GNS configuration from the former server cluster.
# srvctl remove gns4. Add GNS to the new cluster.
# srvctl add gns -domain domain_name -vip vip_name
Alternatively, you can specify an IP address for the VIP.
5. Configure the GNS instance in the new server cluster using the instance informationstored in the file you created in step 2, by importing the file, as follows:
# srvctl import gns -instance path_to_file
Note:
The file containing the GNS data from the former server cluster must reside onthe node in the cluster where you run the srvctl import gns command.
6. Start the GNS instance in the new server cluster.
# srvctl start gns
Changing the GNS Subdomain when Moving from IPv4 to IPv6 NetworkWhen you move from an IPv4 network to an IPv6 network, you must change the GNSsubdomain.
To change the GNS subdomain, you must add an IPv6 network, update the GNS domain,and update the SCAN, as follows:
1. Add an IPv6 subnet using the srvctl modify network command, as follows:
$ srvctl modify network -subnet ipv6_subnet/ipv6_prefix_length[/interface] -nettype autoconfig
2. Update the GNS domain, as follows:
$ srvctl stop gns -force$ srvctl stop scan -force$ srvctl remove gns -force$ srvctl add gns -vip gns_vip -domain gns_subdomain$ srvctl start gns
3. Update the SCAN name with a new domain, as follows:
$ srvctl remove scan -force$ srvctl add scan -scanname new_domain$ srvctl start scan
Chapter 2Administering Grid Naming Service
2-19

4. Convert the network IP type from IPv4 to both IPv4 DHCP and IPv6 autoconfig, asfollows:
$ srvctl modify network -iptype both
5. Transition the network from using both protocols to using only IPv6 autoconfig, asfollows:
$ srvctl modify network -iptype ipv6
Rolling Conversion from DNS to GNS Cluster Name ResolutionYou can convert Oracle Grid Infrastructure cluster networks using DNS for nameresolution to cluster networks using Grid Naming Service (GNS) obtaining nameresolution through GNS.
Use the following procedure to convert from a standard DNS name resolution networkto a GNS name resolution network, with no downtime:
1. Log in as the Grid user (grid), and use the following Cluster Verification Utility tocheck the status for moving the cluster to GNS, where nodelist is a comma-delimited list of cluster member nodes:
$ cluvfy stage -pre crsinst -n nodelist
2. As the Grid user, check the integrity of the GNS configuration using the followingcommands, where domain is the domain delegated to GNS for resolution, andgns_vip is the GNS VIP:
$ cluvfy comp gns -precrsinst -domain domain -vip gns_vip
3. Log in as root, and use the following SRVCTL command to configure the GNSresource, where domain_name is the domain that your network administrator hasconfigured your DNS to delegate for resolution to GNS, and ip_address is the IPaddress on which GNS listens for DNS requests:
# srvctl add gns -domain domain_name -vip ip_address
4. Use the following command to start GNS:
# srvctl start gns
GNS starts and registers VIP and SCAN names.
5. As root, use the following command to change the network CRS resource tosupport a mixed mode of static and DHCP network addresses:
# srvctl modify network -nettype MIXED
The necessary VIP addresses are obtained from the DHCP server, and broughtup.
Chapter 2Administering Grid Naming Service
2-20

6. As the Grid user, enter the following command to ensure that Oracle Clusterware is usingthe new GNS, dynamic addresses, and listener end points:
cluvfy stage -post crsinst -n all
7. After the verification succeeds, change the remote endpoints that previously used theSCAN or VIPs resolved through the DNS to use the SCAN and VIPs resolved throughGNS.
For each client using a SCAN, change the SCAN that the client uses so that the clientuses the SCAN in the domain delegated to GNS.
For each client using VIP names, change the VIP name on each client so that they usethe same server VIP name, but with the domain name in the domain delegated to GNS.
8. Enter the following command as root to update the system with the SCAN name in theGNS subdomain:
# srvctl modify scan -scanname scan_name.gns_domain
In the preceding command syntax, gns_domain is the domain name you entered in step 3of this procedure.
9. Disable the static addresses once all clients are using the dynamic addresses, as follows:
$ srvctl modify network -nettype DHCP
Related Topics
• Oracle Grid Infrastructure Installation and Upgrade Guide
Node Failure IsolationFailure isolation is a process by which a failed node is isolated from the rest of the cluster toprevent the failed node from corrupting data.
When a node fails, isolating it involves an external mechanism capable of restarting aproblem node without cooperation either from Oracle Clusterware or from the operatingsystem running on that node. To provide this capability, Oracle Clusterware supports theIntelligent Platform Management Interface specification (IPMI) (also known as BaseboardManagement Controller (BMC)), an industry-standard management protocol.
Typically, you configure failure isolation using IPMI during Oracle Grid Infrastructureinstallation, when you are provided with the option of configuring IPMI from the FailureIsolation Support screen. If you do not configure IPMI during installation, then you canconfigure it after installation using the Oracle Clusterware Control utility (CRSCTL), asdescribed in a subsequent sectioin.
To use IPMI for failure isolation, each cluster member node must be equipped with an IPMIdevice running firmware compatible with IPMI version 2.0, which supports IPMI over a localarea network (LAN). In addition to BMC, ipmiutil must be installed on each node. Theipmiutil utility is not distributed with the Oracle Grid Infrastructure installation and must bedownloaded. You can download ipmiutil from ipmiutil.sourceforge.net or otherrepositories. The minimum version of the ipmiutil utility required is 3.08. Running ipmiutildisplays the version number, in addition to a version number display from the help prompt.
Chapter 2Node Failure Isolation
2-21

During database operation, failure isolation is accomplished by communication fromthe evicting Cluster Synchronization Services daemon to the failed node's IPMI deviceover the LAN. The IPMI-over-LAN protocol is carried over an authenticated sessionprotected by a user name and password, which are obtained from the administratorduring installation.
To support dynamic IP address assignment for IPMI using DHCP, the ClusterSynchronization Services daemon requires direct communication with the local IPMIdevice during Cluster Synchronization Services startup to obtain the IP address of theIPMI device. (This is not true for HP-UX and Solaris platforms, however, which requirethat the IPMI device be assigned a static IP address.) This is accomplished using anIPMI probe command (OSD), which communicates with the IPMI device through anIPMI driver, which you must install on each cluster system.
If you assign a static IP address to the IPMI device, then the IPMI driver is not strictlyrequired by the Cluster Synchronization Services daemon. The driver is required,however, to use ipmitool or ipmiutil to configure the IPMI device but you can alsodo this with management consoles on some platforms.
Related Topics
• Post-installation Configuration of IPMI-based Failure Isolation Using CRSCTLYou use the crsctl command to configure IPMI-based failure isolation, afterinstalling Oracle Clusterware. You can also use this command to modify or removethe IPMI configuration.
Server Hardware Configuration for IPMIYou must first install the ipmiutil binary, install and enable the IPMI driver, andconfigure the IPMI device, as described in the Oracle Grid Infrastructure Installationand Upgrade Guide for your platform.
Related Topics
• Oracle Grid Infrastructure Installation and Upgrade Guide
Post-installation Configuration of IPMI-based Failure Isolation UsingCRSCTL
You use the crsctl command to configure IPMI-based failure isolation, after installingOracle Clusterware. You can also use this command to modify or remove the IPMIconfiguration.
This is described in the following topics:
• IPMI Postinstallation Configuration with Oracle Clusterware
• Modifying IPMI Configuration Using CRSCTL
• Removing IPMI Configuration Using CRSCTL
Chapter 2Node Failure Isolation
2-22

IPMI Post-installation Configuration with Oracle ClusterwareAfter you install the ipmiutil binary, install and enable the IPMI driver, configure the IPMIdevice, and complete the server configuration, you can use the CRSCTL command tocomplete IPMI configuration.
Before you started the installation, you installed the ipmiutil binary, installed and enabledthe IPMI driver in the server operating system, and configured the IPMI hardware on eachnode (IP address mode, admin credentials, and so on), as described in Oracle GridInfrastructure Installation Guide. When you install Oracle Clusterware, the installer collectsthe IPMI administrator user ID and password, and stores them in an Oracle Wallet in node-local storage, in OLR. In addition, the installer also collects information on the ipmiutilbinary location.
After you complete the server configuration, and the configuration of the ipmiutil binarylocation, complete the following procedure on each cluster node to register IPMIadministrators and passwords on the nodes.
Note:
If IPMI is configured to obtain its IP address using DHCP, it may be necessary toreset IPMI or restart the node to cause it to obtain an address.
1. Start Oracle Clusterware, which allows it to obtain the current IP address from IPMI. Thisconfirms the ability of the clusterware to communicate with IPMI, which is necessary atstartup.
If Oracle Clusterware was running before IPMI was configured, you can shut OracleClusterware down and restart it. Alternatively, you can use the IPMI management utility toobtain the IPMI IP address and then use CRSCTL to store the IP address in OLR byrunning a command similar to the following:
crsctl set css ipmiaddr 192.168.10.452. Use CRSCTL to set the the ipmiutil binary location on each node.
For example:
crsctl set ipmi binaryloc /usr/bin/ipmiutil3. Use CRSCTL to store the previously established user ID and password for the resident
IPMI in OLR by running the crsctl set css ipmiadmin command, and supplyingpassword at the prompt. For example:
crsctl set css ipmiadmin administrator_nameIPMI BMC password: password
This command validates the supplied credentials and fails if another cluster node cannotaccess the local IPMI using them.
After you complete hardware and operating system configuration, and register the IPMIadministrator on Oracle Clusterware, IPMI-based failure isolation should be fullyfunctional.
Before you start the installation, you must download and install ipmiutil on each node inthe cluster, install and enable the IPMI driver in the server operating system, and
Chapter 2Node Failure Isolation
2-23

configure the IPMI hardware on each node (IP address mode, admin credentials,and so on), as described in Oracle Grid Infrastructure Installation Guide. Whenyou install Oracle Clusterware, the installer collects the IPMI administrator user IDand password, and stores them in an Oracle Wallet in node-local storage, in OLR.
Modifying IPMI Configuration Using CRSCTLYou may need to modify an existing IPMI-based failure isolation configuration tochange IPMI passwords, or to configure IPMI for failure isolation in an existinginstallation. You may also need to modify the path to the ipmiutil binary file.
You use CRSCTL with the IPMI configuration tool appropriate to your platform toaccomplish these modifications.
For example, to change the administrator password for IPMI, you must first modify theIPMI configuration as described in Oracle Grid Infrastructure Installation and UpgradeGuide, and then use CRSCTL to change the password in OLR.
The configuration data needed by Oracle Clusterware for IPMI is kept in an OracleWallet in OCR. Because the configuration information is kept in a secure store, it mustbe written by the Oracle Clusterware installation owner account (the Grid user), so youmust log in as that installation user.
Use the following procedure to modify an existing IPMI configuration:
1. Set the location of the ipmiutil binary file if the binary file location has beenchanged. For example:
$ crsctl set ipmi binaryloc /usr/bin/ipmiutil
Before running any other CRSCTL commands that modify the IPMI configuration,the crsctl set ipmi binaryloc command must be run on all nodes where thebinary location has changed.
2. Enter the crsctl set css ipmiadmin administrator_name command. Forexample, with the user IPMIadm:
$ crsctl set css ipmiadmin IPMIadm
Provide the administrator password. Oracle Clusterware stores the administratorname and password for the local IPMI in OLR.
After storing the new credentials, Oracle Clusterware can retrieve the newcredentials and distribute them as required.
3. Enter the crsctl set css ipmiaddr bmc_ip_address command. For example:
$ crsctl set css ipmiaddr 192.0.2.244
This command stores the new IPMI IP address of the local IPMI in OLR, Afterstoring the IP address, Oracle Clusterware can retrieve the new configuration anddistribute it as required.
Chapter 2Node Failure Isolation
2-24

4. Enter the crsctl get css ipmiaddr command. For example:
$ crsctl get css ipmiaddr
This command retrieves the IP address for the local IPMI from OLR and displays it on theconsole.
5. Remove the IPMI configuration information for the local IPMI from OLR and delete theregistry entry, as follows:
$ crsctl unset css ipmiconfig
Related Topics
• Oracle Grid Infrastructure Installation and Upgrade Guide
• Oracle RAC Environment CRSCTL CommandsYou can use the following commands only in an Oracle RAC environment.
Removing IPMI Configuration Using CRSCTLYou can remove an IPMI configuration from a cluster using CRSCTL if you want to stop usingIPMI completely or if IPMI was initially configured by someone other than the user thatinstalled Oracle Clusterware.
If the latter is true, then Oracle Clusterware cannot access the IPMI configuration data andIPMI is not usable by the Oracle Clusterware software, and you must reconfigure IPMI as theuser that installed Oracle Clusterware.
To completely remove IPMI, perform the following steps. To reconfigure IPMI as the user thatinstalled Oracle Clusterware, perform steps 3 and 4, then repeat steps 3 and 4 in theprevious section.
1. Disable the IPMI driver and eliminate the boot-time installation, as follows:
/sbin/modprobe -r
2. Disable IPMI-over-LAN for the local IPMI using either ipmitool or ipmiutil, to preventaccess over the LAN or change the IPMI administrator user ID and password.
3. Ensure that Oracle Clusterware is running and then use CRSCTL to remove the IPMIconfiguration data from OLR by running the following command:
$ crsctl unset css ipmiconfig
4. Restart Oracle Clusterware so that it runs without the IPMI configuration by running thefollowing commands as root:
# crsctl stop crs# crsctl start crs
Chapter 2Node Failure Isolation
2-25

Related Topics
• Modifying IPMI Configuration Using CRSCTLYou may need to modify an existing IPMI-based failure isolation configuration tochange IPMI passwords, or to configure IPMI for failure isolation in an existinginstallation. You may also need to modify the path to the ipmiutil binary file.
• Oracle Grid Infrastructure Installation and Upgrade Guide
Understanding Network Addresses on Manually ConfiguredNetworks
It is helpful to understand the concepts and requirements for network addresses onmanually configured networks.
This section contains the following topics:
• Understanding Network Address Configuration Requirements
• Understanding SCAN Addresses and Client Service Connections
• SCAN Listeners and Service Registration Restriction With Valid Node Checking
Understanding Network Address Configuration RequirementsAn Oracle Clusterware configuration requires at least one public network interface andone private network interface.
• A public network interface connects users and application servers to access dataon the database server.
• A private network interface is for internode communication and used exclusively byOracle Clusterware.
You can configure a public network interface for either IPv4, IPv6, or both types ofaddresses on a given network. If you use redundant network interfaces (bonded orteamed interfaces), then be aware that Oracle does not support configuring oneinterface to support IPv4 addresses and the other to support IPv6 addresses. Youmust configure network interfaces of a redundant interface pair with the same IPprotocol.
You can configure one or more private network interfaces, using either IPv4 or IPv6addresses for all the network adapters. You cannot mix IPv4 and IPv6 addresses forany private network interfaces.
Note:
You can only use IPv6 for private networks in clusters using OracleClusterware 12c release 2 (12.2), or later.
All the nodes in the cluster must use the same IP protocol configuration. Either all thenodes use only IPv4, or all the nodes use only IPv6, or all the nodes use both IPv4and IPv6. You cannot have some nodes in the cluster configured to support only IPv6addresses, and other nodes in the cluster configured to support only IPv4 addresses.
Chapter 2Understanding Network Addresses on Manually Configured Networks
2-26

The VIP agent supports the generation of IPv6 addresses using the Stateless AddressAutoconfiguration Protocol (RFC 2462), and advertises these addresses with GNS. Run thesrvctl config network command to determine if DHCP or stateless addressautoconfiguration is being used.
This section includes the following topics:
• About IPv6 Address Formats
• Name Resolution and the Network Resource Address Type
About IPv6 Address FormatsEach node in an Oracle Grid Infrastructure cluster can support both IPv4 and IPv6 addresseson the same network. The preferred IPv6 address format is as follows, where each xrepresents a hexadecimal character:
xxxx:xxxx:xxxx:xxxx:xxxx:xxxx:xxxx:xxxx
The IPv6 address format is defined by RFC 2460 and Oracle Grid Infrastructure supportsIPv6 addresses, as following:
• Global and site-local IPv6 addresses as defined by RFC 4193.
Note:
Link-local and site-local IPv6 addresses as defined in RFC 1884 are notsupported.
• The leading zeros compressed in each field of the IP address.
• Empty fields collapsed and represented by a '::' separator. For example, you could writethe IPv6 address 2001:0db8:0000:0000:0000:8a2e:0370:7334 as2001:db8::8a2e:370:7334.
• The four lower order fields containing 8-bit pieces (standard IPv4 address format). Forexample 2001:db8:122:344::192.0.2.33.
Name Resolution and the Network Resource Address TypeYou can review the network configuration and control the network address type using thesrvctl config network (to review the configuration) and srvctl modify network -iptypecommands, respectively.
You can configure how addresses are acquired using the srvctl modify network -nettypecommand. Set the value of the -nettype parameter to dhcp or static to control how IPv4network addresses are acquired. Alternatively, set the value of the -nettype parameter toautoconfig or static to control how IPv6 addresses are generated.
The -nettype and -iptype parameters are not directly related but you can use -nettypedhcp with -iptype ipv4 and -nettype autoconfig with -iptype ipv6.
Chapter 2Understanding Network Addresses on Manually Configured Networks
2-27

Note:
If a network is configured with both IPv4 and IPv6 subnets, then Oracle doesnot support both subnets having -nettype set to mixed.
Oracle does not support making transitions from IPv4 to IPv6 while -nettypeis set to mixed. You must first finish the transition from static to dhcp beforeyou add IPv6 into the subnet.
Similarly, Oracle does not support starting a transition to IPv4 from IPv6while -nettype is set to mixed. You must first finish the transition fromautoconfig to static before you add IPv4 into the subnet.
Related Topics
• Network Address Configuration in a ClusterYou can configure a network interface for either IPv4, IPv6, or both types ofaddresses on a given network.
Understanding SCAN Addresses and Client Service ConnectionsPublic network addresses are used to provide services to clients.
If your clients are connecting to the Single Client Access Name (SCAN) addresses,then you may need to change public and virtual IP addresses as you add or removenodes from the cluster, but you do not need to update clients with new clusteraddresses.
Note:
You can edit the listener.ora file to make modifications to the Oracle Netlistener parameters for SCAN and the node listener. For example, you canset TRACE_LEVEL_listener_name. However, you cannot set protocoladdress parameters to define listening endpoints, because the listener agentdynamically manages them.
SCANs function like a cluster alias. However, SCANs are resolved on any node in thecluster, so unlike a VIP address for a node, clients connecting to the SCAN no longerrequire updated VIP addresses as nodes are added to or removed from the cluster.Because the SCAN addresses resolve to the cluster, rather than to a node address inthe cluster, nodes can be added to or removed from the cluster without affecting theSCAN address configuration.
The SCAN is a fully qualified name (host name and domain) that is configured toresolve to all the addresses allocated for the SCAN. The SCAN resolves to all threeaddresses configured for the SCAN name on the DNS server, or resolves within thecluster in a GNS configuration. SCAN listeners can run on any node in the cluster.SCANs provide location independence for the databases, so that client configurationdoes not have to depend on which nodes run a particular database.
Chapter 2Understanding Network Addresses on Manually Configured Networks
2-28

Oracle Database instances only register with SCAN listeners as remote listeners. Upgradeddatabases register with SCAN listeners as remote listeners, and also continue to register withall node listeners.
Note:
Because of the Oracle Clusterware installation requirement that you provide aSCAN name during installation, if you resolved at least one IP address using theserver /etc/hosts file to bypass the installation requirement but you do not havethe infrastructure required for SCAN, then, after the installation, you can ignore theSCAN and connect to the databases in the cluster using VIPs.
Oracle does not support removing the SCAN address.
Related Topics
• Oracle Database Net Services Reference
SCAN Listeners and Service Registration Restriction With Valid NodeChecking
You can use valid node checking to specify the nodes and subnets from which the SCANlistener accepts registrations.
SRVCTL stores the node and subnet information in the SCAN listener resource profile. TheSCAN listener agent reads that information from the resource profile and writes it to thelistener.ora file.
Database instance registration with a listener succeeds only when the request originates froma valid node. The network administrator can specify a list of valid nodes, excluded nodes, ordisable valid node checking altogether. The list of valid nodes explicitly lists the nodes andsubnets that can register with the database. The list of excluded nodes explicitly lists thenodes that cannot register with the database. The control of dynamic registration results inincreased manageability and security of Oracle RAC deployments.
By default, the SCAN listener agent sets REMOTE_ADDRESS_REGISTRATION_listener_name to aprivate IP endpoint. The SCAN listener accepts registration requests only from the privatenetwork. Remote nodes that are not accessible to the private network of the SCAN listenermust be included in the list of valid nodes by using the registration_invited_nodes_aliasparameter in the listener.ora file, or by modifying the SCAN listener using the command-line interface, SRVCTL.
Note:
Starting with Oracle Grid Infrastructure 12c, for a SCAN listener, if theVALID_NODE_CHECKING_REGISTRATION_listener_name andREGISTRATION_INVITED_NODES_listener_name parameters are set in thelistener.ora file, then the listener agent overwrites these parameters.
Chapter 2Understanding Network Addresses on Manually Configured Networks
2-29

If you use the SRVCTL utility to set the invitednodes and invitedsubnets values,then the listener agent automatically setsVALID_NODE_CHECKING_REGISTRATION_listener_name to SUBNET and setsREGISTRATION_INVITED_NODES_listener_name to the specified list in the listener.orafile.
For other listeners managed by CRS, the listener agent setsVALID_NODE_CHECKING_REGISTRATION_listener_name to be SUBNET in thelistener.ora file only if it is not already set in the listener.ora file. The SRVCTLutility does not support setting the invitednodes and invitedsubnets values for anon-SCAN listener. The listener agent does not updateREGISTRATION_INVITED_NODES_listener_name in the listener.ora file for a nonSCAN listener.
Related Topics
• Oracle Real Application Clusters Administration and Deployment Guide
• Oracle Database Net Services Administrator's Guide
Configuring Shared Single Client Access NamesA shared single client access name (SCAN) enables you to share one set of SCANvirtual IPs (VIPs) and listeners on a dedicated cluster with other clusters.
About Configuring Shared Single Client Access NamesYou must configure the shared single client access name (SCAN) on both thedatabase server and the database client.
Note:
Effective with Oracle Grid Infrastructure 21c, Member Clusters, which arepart of the Oracle Cluster Domain architecture, are desupported. However,Domain Services Clusters continue to support Members Clusters in releasesprevious to Oracle Grid Infrastructure 21c.
Member Clusters from previous releases are converted to StandaloneClusters using remote services (on the Domain Services Cluster) whenupgraded to 21c.
Note:
Starting with Oracle Grid Infrastructure 21c, Domain Services Cluster (DSC),which is part of the Oracle Cluster Domain architecture, are deprecated andcan be desupported in a future release.
The use of a shared SCAN enables multiple clusters to use a single common set ofSCAN virtual IP (VIP) addresses to manage user connections, instead of deploying aset of SCAN VIPs per cluster. For example, instead of 10 clusters deploying 3 SCAN
Chapter 2Configuring Shared Single Client Access Names
2-30

VIPs per cluster using a total of 30 IP addresses, with shared SCAN deployments, you onlydeploy 3 SCAN VIPs for those same 10 clusters, requiring only 3 IP addresses.
Be aware the SCAN VIPs (shared or otherwise) are required for Oracle Real ApplicationCluster (Oracle RAC) database clusters, but not for application member clusters or thedomain services cluster.
The general procedure for configuring shared SCANs is to use the srvctl utility to configurefirst on the server (that is, the cluster that hosts the shared SCAN), then on the client (theOracle RAC cluster that will use this shared SCAN). On the server, in addition to theconfiguration using srvctl, you must to set environment variables, create a credential file,and ensure that the Oracle Notification Service (ONS) process that is specific to a SCANcluster can access its own configuration directory to create and manage the ONSconfiguration.
Configuring the Use of Shared SCANUse SRVCTL to configure shared SCANs on the server that hosts the dedicated cluster, inaddition to performing other necessary configuration tasks.
1. Log in to the server cluster on which you want to configure the shared SCAN.
2. Create a SCAN listener that is exclusive to this shared SCAN cluster, as follows:
$ srvctl add scan_listener -clientcluster cluster_name
3. Create a new Oracle Notification Service (ONS) resource that is specific to the servercluster.
$ srvctl add ons -clientcluster cluster_name
The srvctl add ons command assigns an ID to the SCAN.
4. Export the SCAN listener to the client cluster, as follows:
$ srvctl export scan_listener -clientcluster cluster_name -clientdata file_name
5. Export the ONS resource to the client cluster, as follows:
$ srvctl export ons -clientcluster cluster_name -clientdata file_name
Note:
You can use the same credential file name for both the SCAN listener andONS. SRVCTL creates a credential file that you will use when adding theseobjects to the client cluster.
6. Configure shared SCAN on each cluster that will use this service.
a. Log in to the client cluster on which you want to configure the shared SCAN.
Chapter 2Configuring Shared Single Client Access Names
2-31

b. Add the SCAN to the client cluster, as follows:
$ srvctl add scan -clientdata file_name
c. Create a SCAN listener that is exclusive to this client cluster, as follows:
$ srvctl add scan_listener -clientdata file_name
d. Create an ONS resource for this cluster, as follows:
$ srvctl add ons -clientdata file_name
Note:
For each of the preceding commands, specify the name of thecredential file you created in the previous steps.
Changing Network Addresses on Manually ConfiguredSystems
You can perform network address maintenance on manually configured systems.
This is described in the following topics:
• Changing the Virtual IP Addresses Using SRVCTL
• Changing Oracle Clusterware Private Network Configuration
• Creating a Network Using SRVCTL
• Network Address Configuration in a Cluster
• Changing Static IPv4 Addresses To Static IPv6 Addresses Using SRVCTL
• Changing Dynamic IPv4 Addresses To Dynamic IPv6 Addresses Using SRVCTL
• Changing an IPv4 Network to an IPv4 and IPv6 Network
• Transitioning from IPv4 to IPv6 Networks for VIP Addresses Using SRVCTL
Changing the Virtual IP Addresses Using SRVCTLYou can use SRVCTL to change a virtual IP address.
Clients configured to use public VIP addresses for Oracle Database releases beforeOracle Database 11g release 2 (11.2) can continue to use their existing connectionaddresses. Oracle recommends that you configure clients to use SCANs, but you arenot required to use SCANs. When an earlier version of Oracle Database is upgraded,it is registered with the SCAN, and clients can start using the SCAN to connect to thatdatabase, or continue to use VIP addresses for connections.
If you continue to use VIP addresses for client connections, you can modify the VIPaddress while Oracle Database and Oracle ASM continue to run. However, you muststop services while you modify the address. When you restart the VIP address,services are also restarted on the node.
Chapter 2Changing Network Addresses on Manually Configured Systems
2-32

You cannot use this procedure to change a static public subnet to use DHCP. Only the srvctladd network -subnet command creates a DHCP network.
Note:
The following instructions describe how to change only a VIP address, and assumethat the host name associated with the VIP address does not change. Note that youdo not need to update VIP addresses manually if you are using GNS, and VIPs areassigned using DHCP.
If you are changing only the VIP address, then update the DNS and the client hostsfiles. Also, update the server hosts files, if those are used for VIP addresses.
Perform the following steps to change a VIP address:
1. Stop all services running on the node whose VIP address you want to change using thefollowing command syntax, where database_name is the name of the database,service_name_list is a list of the services you want to stop, and my_node is the name ofthe node whose VIP address you want to change:
srvctl stop service -db database_name -service "service_name_list" -node node_name
The following example specifies the database name (grid) using the -db option andspecifies the services (sales,oltp) on the appropriate node (mynode).
$ srvctl stop service -db grid -service "sales,oltp" -node mynode
2. Confirm the current IP address for the VIP address by running the srvctl config vipcommand. This command displays the current VIP address bound to one of the networkinterfaces. The following example displays the configured VIP address for a VIP namednode03-vip:
$ srvctl config vip -vipname node03-vipVIP exists: /node03-vip/192.168.2.20/255.255.255.0/eth0
3. Stop the VIP resource using the srvctl stop vip command:
$ srvctl stop vip -node node_name
4. Verify that the VIP resource is no longer running by running the ifconfig -a commandon Linux and UNIX systems (or issue the ipconfig /all command on Windowssystems), and confirm that the interface (in the example it was eth0:1) is no longer listedin the output.
5. Make any changes necessary to the /etc/hosts files on all nodes on Linux and UNIXsystems, or the %windir%\system32\drivers\etc\hosts file on Windows systems, andmake any necessary DNS changes to associate the new IP address with the old hostname.
6. To use a different subnet or network interface card for the default network before youchange any VIP resource, you must use the srvctl modify network -subnet subnet/
Chapter 2Changing Network Addresses on Manually Configured Systems
2-33

netmask/interface command as root to change the network resource, wheresubnet is the new subnet address, netmask is the new netmask, and interface isthe new interface. After you change the subnet, then you must change eachnode's VIP to an IP address on the new subnet, as described in the next step.
7. Modify the node applications and provide the new VIP address using the followingsrvctl modify nodeapps syntax:
$ srvctl modify nodeapps -node node_name -address new_vip_address
The command includes the following flags and values:
• -n node_name is the node name
• -A new_vip_address is the node-level VIP address: name|ip/netmask/[if1[|if2|...]]For example, run the following command as the root user:
# srvctl modify nodeapps -node mynode -address 192.168.2.125/255.255.255.0/eth0
Attempting to run this command as the installation owner account may resultin an error. For example, if the installation owner is oracle, then you may seethe error PRCN-2018: Current user oracle is not a privileged user. Toavoid the error, run the command as the root or system administratoraccount.
8. Start the node VIP by running the srvctl start vip command:
$ srvctl start vip -node node_name
The following command example starts the VIP on the node named mynode:
$ srvctl start vip -node mynode
9. Repeat the steps for each node in the cluster.
Because the SRVCTL utility is a clusterwide management tool, you canaccomplish these tasks for any specific node from any node in the cluster, withoutlogging in to each of the cluster nodes.
10. Run the following command to verify node connectivity between all of the nodesfor which your cluster is configured. This command discovers all of the networkinterfaces available on the cluster nodes and verifies the connectivity between allof the nodes by way of the discovered interfaces. This command also lists all ofthe interfaces available on the nodes which are suitable for use as VIP addresses.
$ cluvfy comp nodecon -n all -verbose
Related Topics
• Oracle Real Application Clusters Administration and Deployment Guide
Chapter 2Changing Network Addresses on Manually Configured Systems
2-34

Changing Oracle Clusterware Private Network ConfigurationYou can make changes to the Oracle Clusterware private network configuration.
This section describes the following topics:
• About Private Networks and Network Interfaces
• Redundant Interconnect Usage
• Consequences of Changing Interface Names Using OIFCFG
• Changing a Network Interface
About Private Networks and Network InterfacesOracle Clusterware requires that each node is connected through a private network (inaddition to the public network). The private network connection is referred to as the clusterinterconnect.
Table 2-1 describes how the network interface card and the private IP address are stored.
Oracle only supports clusters in which all of the nodes use the same network interfaceconnected to the same subnet (defined as a global interface with the oifcfg command). Youcannot use different network interfaces for each node (node-specific interfaces).
Table 2-1 Storage for the Network Interface, Private IP Address, and Private HostName
Entity Stored In... Comments
Network interface name Operating system
For example: eth1You can use wildcards when specifyingnetwork interface names.
For example: eth*Private network Interfaces Oracle Clusterware, in the
Grid Plug and Play (GPnP)Profile
Configure an interface for use as a privateinterface during installation by marking theinterface as Private, or use the oifcfgsetif command to designate an interfaceas a private interface.
Related Topics
• Oracle Interface Configuration Tool (OIFCFG) Command Reference
Redundant Interconnect UsageYou can define multiple interfaces for Redundant Interconnect Usage by classifying the roleof interfaces as private either during installation or after installation using the oifcfg setifcommand.
When you do, Oracle Clusterware creates from one to four (depending on the number ofinterfaces you define) highly available IP (HAIP) addresses, which Oracle Database andOracle ASM instances use to ensure highly available and load balanced communications.
The Oracle software (including Oracle RAC, Oracle ASM, and Oracle ACFS, by default, usesthe HAIP address of the interfaces designated with the private role as the HAIP address forall of its traffic, enabling load balancing across the provided set of cluster interconnect
Chapter 2Changing Network Addresses on Manually Configured Systems
2-35

interfaces. If one of the defined cluster interconnect interfaces fails or becomes non-communicative, then Oracle Clusterware transparently moves the corresponding HAIPaddress to one of the remaining functional interfaces.
For example, after installation, if you add a new interface to a server named eth3 withthe subnet number 172.16.2.0, then use the following command to make this interfaceavailable to Oracle Clusterware for use as a private interface:
$ oifcfg setif -global eth3/172.16.2.0:cluster_interconnect
While Oracle Clusterware brings up a HAIP address on eth3 of 169.254.*.* (which isthe reserved subnet for HAIP), and the database, Oracle ASM, and Oracle ACFS usethat address for communication, Oracle Clusterware also uses the 172.16.2.0 addressfor its own communication.
Caution:
Do not use OIFCFG to classify HAIP subnets (169.264.*.*). You can useOIFCFG to record the interface name, subnet, and type (public, clusterinterconnect, or Oracle ASM) for Oracle Clusterware. However, you cannotuse OIFCFG to modify the actual IP address for each interface.
Note:
Oracle Clusterware uses at most four interfaces at any given point,regardless of the number of interfaces defined. If one of the interfaces fails,then the HAIP address moves to another one of the configured interfaces inthe defined set.
When there is only a single HAIP address and multiple interfaces from whichto select, the interface to which the HAIP address moves is no longer theoriginal interface upon which it was configured. Oracle Clusterware selectsthe interface with the lowest numeric subnet to which to add the HAIPaddress.
Related Topics
• Oracle Grid Infrastructure Installation and Upgrade Guide
Consequences of Changing Interface Names Using OIFCFGThe consequences of changing interface names depend on which name you arechanging, and whether you are also changing the IP address.
In cases where you are only changing the interface names, the consequences areminor. If you change the name for the public interface that is stored in OCR, then youalso must modify the node applications for the cluster. Therefore, you must stop thenode applications for this change to take effect.
Chapter 2Changing Network Addresses on Manually Configured Systems
2-36

Changing a Network InterfaceYou can change a network interface and its associated subnet address by using the OIFCFGcommand..
This procedure changes the network interface and IP address on each node in the clusterused previously by Oracle Clusterware and Oracle Database.
Caution:
The interface that the Oracle RAC (RDBMS) interconnect uses must be the sameinterface that Oracle Clusterware uses with the host name. Do not configure theprivate interconnect for Oracle RAC on a separate interface that is not monitored byOracle Clusterware.
1. Ensure that Oracle Clusterware is running on all of the cluster nodes by running thefollowing command:
$ olsnodes -s
The command returns output similar to the following, showing that Oracle Clusterware isrunning on all of the nodes in the cluster:
./olsnodes -smyclustera Activemyclusterc Activemyclusterb Active
2. Ensure that the replacement interface is configured and operational in the operatingsystem on all of the nodes. Use the ifconfig command (or ipconfig on Windows) foryour platform. For example, on Linux, use:
$ /sbin/ifconfig
3. Add the new interface to the cluster as follows, providing the name of the new interfaceand the subnet address, using the following command:
$ oifcfg setif -global if_name/subnet:cluster_interconnect
You can use wildcards with the interface name. For example, oifcfg setif -global"eth*/192.168.0.0:cluster_interconnect is valid syntax. However, be careful to avoidambiguity with other addresses or masks used with other cluster interfaces. If you usewildcards, then you see a warning similar to the following:
eth*/192.168.0.0 global cluster_interconnectPRIF-29: Warning: wildcard in network parameters can cause mismatchamong GPnP profile, OCR, and system
Chapter 2Changing Network Addresses on Manually Configured Systems
2-37

Note:
Legacy network configuration does not support wildcards; thus wildcardsare resolved using current node configuration at the time of the update.
4. If you change the Oracle ASM network, then update the Oracle ASM listener, asfollows:
$ srvctl update listener -listener listener_name -asm -remove -force$ srvctl add listener -listener listener_name -asmlistener -subnet subnet
5. After the previous step completes, you can remove the former subnet, as follows,by providing the name and subnet address of the former interface:
oifcfg delif -global if_name/subnet
For example:
$ oifcfg delif -global eth1/10.10.0.0
Caution:
This step should be performed only after a replacement interface iscommitted into the Grid Plug and Play configuration. Simple deletion ofcluster interfaces without providing a valid replacement can result ininvalid cluster configuration.
6. Verify the current configuration using the following command:
oifcfg getif
For example:
$ oifcfg getifeth2 10.220.52.0 global cluster_interconnecteth0 10.220.16.0 global public
7. If you change the private network, then stop Oracle Clusterware on all nodes byrunning the following command as root on each node:
# crsctl stop crs
Chapter 2Changing Network Addresses on Manually Configured Systems
2-38

Note:
If you configured HAIP on eth0 and eth1, and you want to replace eth1 witheth3, then you do not have to stop Oracle Clusterware. If, however, you want toadd another set of interfaces, such as eth2 and eth3 to your HAIP configuration,which you already configured on eth0 and eth1, then you must stop OracleClusterware.
8. When Oracle Clusterware stops, you can deconfigure the deleted network interface in theoperating system using the ifconfig command. For example:
$ ifconfig down
At this point, the IP address from network interfaces for the old subnet is deconfiguredfrom Oracle Clusterware. This command does not affect the configuration of the IPaddress on the operating system.
You must update the operating system configuration changes, because changes madeusing ifconfig are not persistent.
9. Restart Oracle Clusterware by running the following command on each node in thecluster as the root user:
# crsctl start crs
The changes take effect when Oracle Clusterware restarts.
If you use the CLUSTER_INTERCONNECTS initialization parameter, then you must update it toreflect the changes.
Related Topics
• Oracle Interface Configuration Tool (OIFCFG) Command Reference
Creating a Network Using SRVCTLYou can use SRVCTL to create a network for a cluster member node, and to add applicationconfiguration information.
Create a network for a cluster member node, as follows:
1. Log in as root.
2. Add a node application to the node, using the following syntax, where:
srvctl add nodeapps -node node_name -address {vip | addr}/netmask[/if1[|if2|...]] [-pingtarget "ping_target_list"]
In the preceding syntax:
• node_name is the name of the node
• vip is the VIP name or addr is the IP address
• netmask is the netmask
Chapter 2Changing Network Addresses on Manually Configured Systems
2-39

• if1[|if2|...] is a pipe (|)-delimited list of interfaces bonded for use by theapplication
• ping_target_list is a comma-delimited list of IP addresses or host names toping
Note:
• Use the -pingtarget parameter when link status monitoring doesnot work as it does in a virtual machine environment.
• Enter the srvctl add nodeapps -help command to review othersyntax options.
In the following example of using srvctl add nodeapps to configure an IPv4 nodeapplication, the node name is node1, the netmask is 255.255.252.0, and theinterface is eth0:
# srvctl add nodeapps -node node1 -address node1-vip.mycluster.example.com/255.255.252.0/eth0
Related Topics
• Oracle Real Application Clusters Administration and Deployment Guide
Network Address Configuration in a ClusterYou can configure a network interface for either IPv4, IPv6, or both types of addresseson a given network.
If you configure redundant network interfaces using a third-party technology, thenOracle does not support configuring one interface to support IPv4 addresses and theother to support IPv6 addresses. You must configure network interfaces of a redundantinterface pair with the same IP address type. If you use the Oracle ClusterwareRedundant Interconnect feature, then you must use IPv4 addresses for the interfaces.
All the nodes in the cluster must use the same IP protocol configuration. Either all thenodes use only IPv4, or all the nodes use only IPv6, or all the nodes use both IPv4and IPv6. You cannot have some nodes in the cluster configured to support only IPv6addresses, and other nodes in the cluster configured to support only IPv4 addresses.
The local listener listens on endpoints based on the address types of the subnetsconfigured for the network resource. Possible types are IPV4, IPV6, or both.
Chapter 2Changing Network Addresses on Manually Configured Systems
2-40

Changing Static IPv4 Addresses To Static IPv6 Addresses Using SRVCTLWhen you change from IPv4 static addresses to IPv6 static addresses, you add an IPv6address and modify the network to briefly accept both IPv4 and IPv6 addresses, beforeswitching to using static IPv6 addresses, only.
Note:
If the IPv4 network is in mixed mode with both static and dynamic addresses, thenyou cannot perform this procedure. You must first transition all addresses to static.
To change a static IPv4 address to a static IPv6 address:
1. Add an IPv6 subnet using the following command as root once for the entire network:
# srvctl modify network -subnet ipv6_subnet/prefix_length
In the preceding syntax ipv6_subnet/prefix_length is the subnet of the IPv6 address towhich you are changing along with the prefix length, such as 3001::/64.
2. Add an IPv6 VIP using the following command as root once on each node:
# srvctl modify vip -node node_name -netnum network_number -address vip_name/netmask
In the preceding syntax:
• node_name is the name of the node
• network_number is the number of the network
• vip_name/netmask is the name of a local VIP that resolves to both IPv4 and IPv6addresses
The IPv4 netmask or IPv6 prefix length that follows the VIP name must satisfy tworequirements:
– If you specify a netmask in IPv4 format (such as 255.255.255.0), then the VIPname resolves to IPv4 addresses (but can also resolve to IPv6 addresses).Similarly, if you specify an IPv6 prefix length (such as 64), then the VIP nameresolves to IPv6 addresses (but can also resolve to IPv4 addresses).
– If you specify an IPv4 netmask, then it should match the netmask of theregistered IPv4 network subnet number, regardless of whether the -iptype of thenetwork is IPv6. Similarly, if you specify an IPv6 prefix length, then it must matchthe prefix length of the registered IPv6 network subnet number, regardless ofwhether the -iptype of the network is IPv4.
3. Add the IPv6 network resource to OCR using the following command:
$ oifcfg setif -global if_name/subnet:public
Chapter 2Changing Network Addresses on Manually Configured Systems
2-41

4. Update the SCAN in DNS to have as many IPv6 addresses as there are IPv4addresses. Add IPv6 addresses to the SCAN VIPs using the following commandas root once for the entire network:
# srvctl modify scan -scanname scan_name
scan_name is the name of a SCAN that resolves to both IPv4 and IPv6 addresses.
5. Convert the network IP type from IPv4 to both IPv4 and IPv6 using the followingcommand as root once for the entire network:
srvctl modify network -netnum network_number -iptype both
This command brings up the IPv6 static addresses.
6. Change all clients served by the cluster from IPv4 networks and addresses to IPv6networks and addresses.
7. Transition the network from using both protocols to using only IPv6 using thefollowing command:
# srvctl modify network -iptype ipv6
8. Modify the VIP using a VIP name that resolves to IPv6 by running the followingcommand as root:
# srvctl modify vip -node node_name -address vip_name -netnum network_number
Do this once for each node.
9. Modify the SCAN using a SCAN name that resolves to IPv6 by running thefollowing command:
# srvctl modify scan -scanname scan_name
Do this once for the entire cluster.
Related Topics
• Oracle Real Application Clusters Administration and Deployment Guide
• OIFCFG Command Format
Chapter 2Changing Network Addresses on Manually Configured Systems
2-42

Changing Dynamic IPv4 Addresses To Dynamic IPv6 Addresses UsingSRVCTL
You change dynamic IPv4 addresses to dynamic IPv6 addresses by the SRVCTL command.
Note:
If the IPv4 network is in mixed mode with both static and dynamic addresses, thenyou cannot perform this procedure. You must first transition all addresses todynamic.
To change dynamic IPv4 addresses to dynamic IPv6 addresses:
1. Add an IPv6 subnet using the srvctl modify network command.
To add the IPv6 subnet, log in as root and use the following command syntax:
# srvctl modify network -netnum network_number -subnet ipv6_subnet/ ipv6_prefix_length[/interface] -nettype autoconfig
In the preceding syntax:
• network_number is the number of the network
• ipv6_subnet is the subnet of the IPv6 addresses to which you are changing (forexample, 2001:db8:122:344:c0:2:2100::)
• ipv6_prefix_length is the prefix specifying the IPv6 network addresses (forexample, 64)
For example, the following command modifies network 3 by adding an IPv6 subnet,2001:db8:122:344:c0:2:2100::, and the prefix length 64:
# srvctl modify network -netnum 3 -subnet 2001:db8:122:344:c0:2:2100::/64 -nettype autoconfig
2. Add the IPv6 network resource to OCR using the following command:
$ oifcfg setif -global if_name/subnet:public
3. Start the IPv6 dynamic addresses, as follows:
# srvctl modify network -netnum network_number -iptype both
For example, on network number 3:
# srvctl modify network -netnum 3 -iptype both
4. Change all clients served by the cluster from IPv4 networks and addresses to IPv6networks and addresses.
Chapter 2Changing Network Addresses on Manually Configured Systems
2-43

At this point, the SCAN in the GNS-delegated domain scan_name.gns_domain willresolve to three IPv4 and three IPv6 addresses.
5. Turn off the IPv4 part of the dynamic addresses on the cluster using the followingcommand:
# srvctl modify network -iptype ipv6
After you run the preceding command, the SCAN (scan_name.gns_domain) willresolve to only three IPv6 addresses.
Related Topics
• OIFCFG Command Format
Changing an IPv4 Network to an IPv4 and IPv6 NetworkYou can change an IPv4 network to an IPv4 and IPv6 network by adding an IPv6network to an existing IPv4 network.
This process is described in steps 1 through 5 of the procedure documented in"Changing Static IPv4 Addresses To Static IPv6 Addresses Using SRVCTL".
After you complete those steps, log in as the Grid user, and run the followingcommand:
$ srvctl status scan
Review the output to confirm the changes to the SCAN VIPs.
Transitioning from IPv4 to IPv6 Networks for VIP Addresses UsingSRVCTL
You use the SRVCTL command to remove an IPv4 address type from a combinedIPv4 and IPv6 network.
Enter the following command:
# srvctl modify network -iptype ipv6
This command starts the removal process of IPv4 addresses configured for the cluster.
Cross-Cluster Dependency ProxiesCross-cluster dependency proxies are lightweight, fault-tolerant proxy resources onMember Clusters for resources running on a Domain Services Cluster.
Note:
Member Clusters, which are part of the Oracle Cluster Domain architecture,are desupported in Oracle Grid Infrastructure 21c.
Chapter 2Cross-Cluster Dependency Proxies
2-44

Note:
Domain Services Cluster (DSC), which is part of the Oracle Cluster Domainarchitecture, is deprecated in Oracle Grid Infrastructure 21c and can bedesupported in a future release.
Member Clusters reduce the overhead of having infrastructure resources and it is importantto be able to effectively monitor the state of the shared infrastructure resources, such asOracle Automatic Storage Management (Oracle ASM), on a Domain Services Cluster, so thatresources on Member Clusters can properly adjust their states.
Cross-cluster dependency proxies provide this functionality for Domain Services Clusterresources, specifically, and, more generally, to reflect the state of resources running on onecluster, in other clusters. Cross-cluster dependency proxies are configured, by default, onDomain Services Clusters.
Chapter 2Cross-Cluster Dependency Proxies
2-45

3Policy-Based Cluster and CapacityManagement
Oracle Clusterware uses policy-based management of servers and resources used by Oracledatabases or applications.This chapter includes the following topics:
• Overview of Server Pools and Policy-Based Management
• Default Server Pools
• Overview of Server Categorization
• Overview of Cluster Configuration Policies and the Policy Set
• Server Weight-Based Node Eviction
• Load-Aware Resource Placement
• Server Configuration and Server State Attributes
• Server Category Attributes
• An Example Policy Set Configuration
Note:
Starting with Oracle Grid Infrastructure 21c, policy-managed databases aredeprecated.
You can continue to use existing server pools, and create new pools and policies.Resources using existing server pools can continue to use them transparently.
The use of CRS configuration policies and the CRS policy set can be desupportedin a future release. In place of server pools and policy-managed databases, Oraclerecommends that you use the new "Merged" management style.
Overview of Server Pools and Policy-Based ManagementResources managed by Oracle Clusterware are contained in logical groups of servers calledserver pools.
Resources are hosted on a shared infrastructure and are contained within server pools.Examples of resources that Oracle Clusterware manages are database instances, databaseservices, application VIPs, and application components.
In an Oracle Cluster you can use server pools to run particular types of workloads on clustermember nodes, while providing simplified administration options. You can use a clusterconfiguration policy set to provide dynamic management of cluster policies across the cluster.
3-1

You can continue to manage resources in an Oracle Clusterware standard Cluster byusing the server pool model, or you can manually manage resources by using thetraditional fixed, non-server pool method.
This section includes the following topics:
• Server Pools and Server Categorization
• Server Pools and Policy-Based Management
• How Server Pools Work
• Default Server Pools
• Server Pool Attributes
• How Oracle Clusterware Assigns New Servers Using Server Pools
• Managing Server Pools Using Default Attributes
Server Pools and Server CategorizationAdministrators can deploy and manage servers dynamically using server pools byidentifying servers distinguished by particular attributes, a process called servercategorization. In this way, you can create clusters made up of heterogeneous nodes.
Related Topics
• Overview of Server CategorizationServer categorization enables you to organize servers into particular categories byusing attributes such as processor types, memory, and other distinguishing systemfeatures.
Server Pools and Policy-Based ManagementWith policy-based management, administrators specify the server pool (excluding theGeneric and Free pools) in which the servers run.
For example, a database administrator uses SRVCTL to create a server pool forservers hosting a database or database service. A clusterware administrator usesCRSCTL to create server pools for non-database use, such as creating a server poolfor servers hosting an application.
Policy-based management:
• Enables online server reallocation based on a defined policy to satisfy workloadcapacity requirements
• Guarantees the allocation of required resources for critical work as defined by thepolicy
• Ensures isolation where necessary, so that you can provide dedicated servers in acluster for applications and databases
• Enables policies to be configured to change pools in accordance with businessneeds or application demand, so that pools provide the required capacity at theright time
Server pools provide resource isolation to prevent applications running in one serverpool from accessing resources running in another server pool. Oracle Clusterwareprovides fine-grained role separation between server pools. This capability maintains
Chapter 3Overview of Server Pools and Policy-Based Management
3-2

required management role separation between these groups in organizations that haveclustered environments managed by separate groups.
Oracle Clusterware efficiently allocates servers in the cluster. Server pool attributes, definedwhen the server pool is created, dictate placement and prioritization of servers based on theIMPORTANCE server pool attribute.
Related Topics
• Oracle Clusterware Resource Reference
• Overview of Cluster Configuration Policies and the Policy SetA cluster configuration policy is a document that contains exactly one definition for eachserver pool managed by the cluster configuration policy set. A cluster configuration policyset is a document that defines the names of all server pools configured for the cluster anddefinitions for all policies.
How Server Pools WorkServer pools divide the cluster into logical groups of servers hosting both singleton anduniform applications. The application can be a database service or a non-databaseapplication. An application is uniform when the application workload is distributed over allservers in the server pool. An application is singleton when it runs on a single server withinthe server pool. Oracle Clusterware role-separated management determines access to anduse of a server pool.
You manage server pools that contain Oracle RAC databases with the Server Control(SRVCTL) utility. Use the Oracle Clusterware Control (CRSCTL) utility to manage all otherserver pools. Only cluster administrators have permission to create top-level server pools.
Database administrators use the Server Control (SRVCTL) utility to create and manageserver pools that will contain Oracle RAC databases. Cluster administrators use the OracleClusterware Control (CRSCTL) utility to create and manage all other server pools, such asserver pools for non-database applications. Only cluster administrators have permission tocreate top-level server pools.
Top-level server pools:
• Logically divide the cluster
• Are always exclusive, meaning that one server can only reside in one particular serverpool at a certain point in time
Default Server PoolsWhen Oracle Clusterware is installed, two internal server pools are created automatically: Generic and Free. All servers in a new installation are assigned to the Free server pool,initially. Servers move from Free to newly defined server pools automatically.
The Free Server PoolThe Free server pool contains servers that are not assigned to any other server pools. Theattributes of the Free server pool are restricted, as follows:
• SERVER_NAMES, MIN_SIZE, and MAX_SIZE cannot be edited by the user
• IMPORTANCE and ACL can be edited by the user
Chapter 3Overview of Server Pools and Policy-Based Management
3-3

The Generic Server PoolThe Generic server pool stores any server that is not in a top-level server pool and isnot policy managed. Servers that host non-policy-managed applications, such asadministrator-managed databases, are statically assigned to the Generic server pool.
The Generic server pool's attributes are restricted, as follows:
• No one can modify configuration attributes of the Generic server pool (all attributesare read-only)
• You can only create administrator-managed databases in the Generic Pool, if theserver you want to create the database on is one of the following:
– Online and exists in the Generic server pool
– Online and exists in the Free server pool, in which case Oracle Clusterwaremoves the server into the Generic server pool
– Online and exists in any other server pool and the user is either a clusteradministrator or is allowed to use the server pool's servers, in which case, theserver is moved into the Generic server pool
– Offline and the user is a cluster administrator
Server Pool AttributesYou can use SRVCTL or CRSCTL to create server pools for databases and otherapplications, respectively.
If you use SRVCTL to create a server pool, then you can only use a subset of theserver pool attributes described in this section. If you use CRSCTL to create serverpools, then you can use the entire set of server pool attributes.
Server pool attributes are the attributes that you define to create and manage serverpools.
The decision about which utility to use is based upon the type of resource beinghosted in the server pool. You must use SRVCTL to create server pools that hostOracle databases. You must use CRSCTL to create server pools that host non-database resources such as middle tiers and applications.
When you use SRVCTL to create a server pool, the server pool attributes available toyou are:
-category-importance-min-max-serverpool-servers
SRVCTL prepends "ora." to the name of the server pool.
When you use CRSCTL to create a server pool, all attributes listed and described inthe following table are available to you.
Chapter 3Overview of Server Pools and Policy-Based Management
3-4

Table 3-1 Server Pool Attributes
Attribute Description
ACL String in the following format:
owner:user:rwx,pgrp:group:rwx,other::r—
Defines the owner of the server pool and which privileges are granted tovarious operating system users and groups. The server pool ownerdefines the operating system user of the owner, and which privileges thatuser is granted.
The value of this optional attribute is populated at the time a server poolis created based on the ACL of the user creating the server pool, unlessexplicitly overridden. The value can subsequently be changed, if such achange is allowed based on the existing privileges of the server pool.
In the string:
• owner: The operating system user of the server pool owner,followed by the privileges of the owner
• pgrp: The operating system group that is the primary group of theowner of the server pool, followed by the privileges of members ofthe primary group
• other: Followed by privileges of others
• r: Read only
• w: Modify attributes of the pool or delete it
• x: Assign resources to this pool
By default, the identity of the client that creates the server pool is theowner. Also by default, root, and the user specified in owner have fullprivileges. You can grant required operating system users and operatingsystem groups their privileges by adding the following lines to the ACLattribute:
user:user_name:rwx
group:group_name:rwx
The operating system user that creates the server pool is the owner ofthe server pool, and the ACL attribute for the server pool reflects theUNIX-like read, write, and execute ACL definitions for the user, primarygroup, group, and other.
ACTIVE_SERVERS A string of server names in the following format:
server_name1 server_name2 ...
Oracle Clusterware automatically manages this attribute, which containsthe space-delimited list of servers that are currently assigned to a serverpool.
Chapter 3Overview of Server Pools and Policy-Based Management
3-5

Table 3-1 (Cont.) Server Pool Attributes
Attribute Description
EXCLUSIVE_POOLS This optional attribute indicates if servers assigned to this server pool areshared with other server pools. A server pool can explicitly state that it ismutually exclusive of any other server pool that has the same value forthis attribute. Two or more server pools are mutually exclusive when thesets of servers assigned to them do not have a single server in common.For example, server pools A and B must be mutually exclusive if theyboth have the value of this attribute set to the same string, such aspools_A_B.
Top-level server pools are mutually exclusive, by default.
IMPORTANCE Relative importance of the server pool, expressed as an integer from 0 to1000, with 0 denoting the lowest level of importance and 1000, thehighest. This optional attribute is used to determine how to reconfigurethe server pools when a node joins or leaves the cluster. The defaultvalue is 0.
MIN_SIZE The minimum size of a server pool expressed as any nonnegativeinteger. If the number of servers contained in a server pool is below thenumber you specify in this attribute, then Oracle Clusterwareautomatically moves servers from other pools into this one until thatnumber is met.
Note: The value of this optional attribute does not set a hard limit. Itgoverns the priority for server assignment whenever the cluster isreconfigured. The default value is 0.
MAX_SIZE The maximum number of servers a server pool can contain, expressedas any nonnegative integer. This attribute is optional and is set to -1 (nolimit), by default.
Note: A value of -1 for this attribute spans the entire cluster.
NAME The name of the server pool, which you must specify when you createthe server pool. Server pool names must be unique within the domain ofnames of user-created entities, such as resources, types, and servers. Aserver pool name has a 254 character limit and can contain anyplatform-supported characters except the exclamation point (!), the tilde(~), and spaces. A server pool name cannot begin with a period nor withora.
Note: When you create server pools using SRVCTL, the utility prepends"ora." to the name of the server pool.
PARENT_POOLS Use of this attribute makes it possible to create nested server pools.Server pools, listed as a string of space-delimited server pool names, inthis attribute are referred to as parent server pools. A server poolincluded in a parent server pool is referred to as a child server pool.
Note: If you use SRVCTL to create the server pool, then you cannotspecify this attribute.
Chapter 3Overview of Server Pools and Policy-Based Management
3-6

Table 3-1 (Cont.) Server Pool Attributes
Attribute Description
SERVER_CATEGORY The name of a registered server category, used as part of servercategorization. Oracle Clusterware standard clusters and Oracle FlexClusters have a default category of hub. When you create a server pool,if you set a value for SERVER_CATEGORY, then you cannot set a value forSERVER_NAMES. Only one of these parameters may have a non-emptyvalue.
Use the SERVER_CATEGORY attribute to classify servers assigned to aserver pool based on server attributes. You can organize servers andserver pools in a cluster to match specific workload to servers and serverpools, based on server attributes that you define.
SERVER_NAMES A list of candidate node names, expressed as a string of space-delimitedserver names, that may be associated with a server pool. If you do notprovide a set of server names for this optional attribute, then OracleClusterware is configured so that any server may be assigned to anyserver pool, to the extent allowed by values of other attributes, such asPARENT_POOLS.
The server names identified as candidate node names are not validatedto confirm that they are currently active cluster members. Use thisattribute to define servers as candidates that have not yet been added tothe cluster.
If you set a value for SERVER_NAMES, then you cannot set a value forSERVER_CATEGORY; Only one of these attributes may have a non-emptyvalue.
Note: If you set the SERVER_CATEGORY attribute and you need to specifyindividual servers, then you can list servers by name using theEXPRESSION server category attribute.
Related Topics
• crsctl add serverpool
• crsctl status server
• Server Category Attributes
• Oracle Real Application Clusters Administration and Deployment Guide
How Oracle Clusterware Assigns New Servers Using Server PoolsOracle Clusterware assigns new servers to server pools in the following order:
1. Generic server pool
2. User-created server pool
3. Free server pool
Oracle Clusterware continues to assign servers to server pools until the following conditionsare met:
1. Until all server pools are filled in order of importance to their minimum (MIN_SIZE).
2. Until all server pools are filled in order of importance to their maximum (MAX_SIZE).
3. By default, any servers not placed in a server pool go into the Free server pool.
Chapter 3Overview of Server Pools and Policy-Based Management
3-7

You can modify the IMPORTANCE attribute for the Free server pool. If the value ofthe IMPORTANCE attribute of the Free server pool is greater than one or more of theother server pools, then the Free server pool will receive any remaining serversonce the value of their MIN_SIZE attribute is met.
When a server joins a cluster, several things occur.
Consider the server pools configured in Table 3-2:
Table 3-2 Sample Server Pool Attributes Configuration
NAME IMPORTANCE MIN_SIZE MAX_SIZE PARENT_POOLS
EXCLUSIVE_POOLS
sp1 1 1 10
sp2 3 1 6
sp3 2 1 2
sp2_1 2 1 5 sp2 S123
sp2_2 1 1 5 sp2 S123
For example, assume that there are no servers in a cluster; all server pools are empty.
When a server, named server1, joins the cluster:
1. Server-to-pool assignment commences.
2. Oracle Clusterware only processes top-level server pools (those that have noparent server pools), first. In this example, the top-level server pools are sp1, sp2,and sp3.
3. Oracle Clusterware lists the server pools in order of IMPORTANCE, as follows: sp2,sp3, sp1.
4. Oracle Clusterware assigns server1 to sp2 because sp2 has the highestIMPORTANCE value and its MIN_SIZE value has not yet been met.
5. Oracle Clusterware processes the remaining two server pools, sp2_1 and sp2_2.The sizes of both server pools are below the value of the MIN_SIZE attribute (bothserver pools are empty and have MIN_SIZE values of 1).
6. Oracle Clusterware lists the two remaining pools in order of IMPORTANCE, asfollows: sp2_1, sp2_2.
7. Oracle Clusterware assigns server1 to sp2_1 but cannot assign server1 to sp2_2because sp2_1 is configured to be exclusive with sp2_2.
After processing, the cluster configuration appears, as follows
Chapter 3Overview of Server Pools and Policy-Based Management
3-8

Table 3-3 Post Processing Server Pool Configuration
Server Pool Name Assigned Servers
sp1
sp2 server1
sp3
sp2_1 server1
sp2_2
Servers Moving from Server Pool to Server PoolIf the number of servers in a server pool falls below the value of the MIN_SIZE attribute for theserver pool (such as when a server fails), based on values you set for the MIN_SIZE andIMPORTANCE attributes for all server pools, Oracle Clusterware can move servers from otherserver pools into the server pool whose number of servers has fallen below the value forMIN_SIZE. Oracle Clusterware selects servers from other server pools to move into thedeficient server pool that meet the following criteria:
• For server pools that have a lower IMPORTANCE value than the deficient server pool,Oracle Clusterware can take servers from those server pools even if it means that thenumber of servers falls below the value for the MIN_SIZE attribute.
• For server pools with equal or greater IMPORTANCE, Oracle Clusterware only takes serversfrom those server pools if the number of servers in a server pool is greater than the valueof its MIN_SIZE attribute.
Managing Server Pools Using Default AttributesBy default, each server pool is configured with the following attribute options for managingserver pools:
• MIN_SIZE: The minimum number of servers the server pool should contain.
If the number of servers in a server pool is below the value of this attribute, then OracleClusterware automatically moves servers from elsewhere into the server pool until thenumber of servers reaches the attribute value.
• MAX_SIZE: The maximum number of servers the server pool should contain.
• IMPORTANCE: A number from 0 to 1000 (0 being least important) that ranks a server poolamong all other server pools in a cluster.
In addition, you can assign additional attributes to provide more granular management ofserver pools, as part of a cluster configuration policy. Attributes such as EXCLUSIVE_POOLSand SERVER_CATEGORY can assist you to create policies for your server pools that enhanceperformance and build tuning design management into your server pool.
Chapter 3Overview of Server Pools and Policy-Based Management
3-9

Overview of Server CategorizationServer categorization enables you to organize servers into particular categories byusing attributes such as processor types, memory, and other distinguishing systemfeatures.
You can configure server pools to restrict eligible members of the pool to a category ofservers, which share a particular set of attributes. Originally, server pools wererestricted to a set of basic attributes characterizing servers as belonging to a givenpool, with no way to distinguish between types of servers; all servers were consideredto be equal in relation to their processors, physical memory, and other characteristics.Server categorization now provides a way to distinguish these servers.
Note:
If you create policies with Oracle Database Quality of Service Management(Oracle Database QoS Management), then you categorize servers by settingserver pool directive overrides, and CRSCTL commands using the policyand policyset nouns are disabled. Also if you switch from using OracleClusterware policies to using Oracle Database QoS Management policies,then the Oracle Clusterware policies are replaced, because the two policytypes cannot coexist. Oracle recommends that you create a backup usingcrsctl status policyset -file file_name before you switch policies.
Related Topics
• Oracle Clusterware Control (CRSCTL) Utility Reference
Overview of Cluster Configuration Policies and the PolicySet
A cluster configuration policy is a document that contains exactly one definition foreach server pool managed by the cluster configuration policy set. A clusterconfiguration policy set is a document that defines the names of all server poolsconfigured for the cluster and definitions for all policies.
In Oracle Clusterware 12c and later releases, you use the policies defined in thecluster configuration policy set for server pool specification and management, andOracle Clusterware manages the server pools according to the policies in the policyset. With a cluster configuration policy set, for example, you can allocate more serversto OLTP workload during weekly business hours to respond to email demand, and onthe weekends and evenings, allocate more servers to batch workloads, and performtransitions of server pool configuration or server allocation, atomically.
At any point in time, only one policy is in effect for the cluster. But you can createseveral different policies, so that you can configure pools of servers with parameters toreflect differences in requirements for the cluster based on business needs or demand,or based on calendar dates or times of the day.
Chapter 3Overview of Server Categorization
3-10

Related Topics
• An Example Policy Set Configuration
Load-Aware Resource PlacementYou can configure a database so that Oracle Clusterware is aware of the CPU requirementsand limits for the given database.
Oracle Clusterware uses this information to place the database resource only on servers thathave a sufficient number of CPUs, amount of memory, or both.
If you have configured resources with CPU or memory requirements in Oracle Clusterware,then Oracle Clusterware will only attempt to start those resources on the servers that havethat meet those requirements. For database resources, specifically, you can configure theCPU or memory values into the CPU_COUNT and MEMORY_TARGET instance parameters,respectively.
Note:
Configuring the instance parameters requires the following:
• For CPU (Instance Caging), the Resource Manager must be enabled
• For memory, Automatic Memory Management must be used for the database
When you add or modify a database instance, you can configure load-aware resourceplacement, as follows:
$ srvctl modify database -db db_unique_name -cpucount cpu_count -memorytarget memory_target
In the preceding example, cpu_count refers to the number of workload CPUs andmemory_target refers to the target memory, in MB, used by the resource.
If the Resource Manager is enabled in the database, then Oracle Clusterware sets theCPU_COUNT parameter to the value of -cpucount. Also, if Automatic Memory Managementis enabled for the database, then Oracle Clusterware sets the MEMORY_TARGET databaseparameter to the value of -memorytarget.
Related Topics
• Oracle Database Reference
• Oracle Database Reference
• Oracle Database Administrator’s Guide
Server Configuration and Server State AttributesOracle Clusterware assigns each server a set of attributes as soon as you add a server to acluster.
Some of these attributes describe the physical characteristics of the server, while othersdescribe the state conditions of the server. Also, there are other server attributes which you
Chapter 3Load-Aware Resource Placement
3-11

can modify that help further categorize servers. If you remove the server from thecluster, then Oracle Clusterware deletes the server object.
You use server configuration attributes to categorize servers, as part of a servercategorization management policy.
The following table lists and describes server configuration attributes.
Table 3-4 Server Configuration Attributes
Attribute Description
ACTIVE_CSS_ROLE Role being performed by the server. A server can have the hub role, which is adesignated role for a server in an Oracle Flex Cluster or the designated role forany node in an Oracle Clusterware standard Cluster.
Note: You cannot configure this attribute.
CONFIGURED_CSS_ROLE Configured role for the server. A server can have the hub role, which is thedesignated role for a server in an Oracle Flex Cluster or the designated role forany node in an Oracle Clusterware standard Cluster.
Note: You cannot configure this attribute.
CPU_CLOCK_RATE CPU clock rate in megahertz (MHz)
CPU_COUNT Number of processors
CPU_EQUIVALENCY The relative value (expressed as a positive integer greater than or equal to 1) thatOracle Clusterware uses to describe that the CPU power provided by a servermay deviate (positively or negatively) from its physical representation using abaseline of 1000, for example. A value lower than 1000 describes that, despite acertain value for the CPU_COUNT and CPU_CLOCK_RATE parameters, theequivalent power provided by this server is respectively lower.
Use the following commands to view or modify, respectively, this attribute on thelocal server:
crsctl get cpu equivalencycrsctl set cpu equivalency
CPU_HYPERTHREADING Status of hyperthreading for the CPU. A value of 0 signifies that hyperthreading isnot in use. A value of 1 signifies that hyperthreading is in use.
MEMORY_SIZE Memory size in megabytes (MB)
NAME The name of the server.
RESOURCE_USE_ENABLED A server pool resource management parameter. If the value for this attribute is 1,which is the default, then the server can be used for resource placement. If thevalue is 0, then Oracle Clusterware disallows starting server pool resources onthe server. The server remains in the Free pool.
You can review the setting and control this attribute for each cluster member nodeby using the crsctl get resource use and crsctl set resource usecommands.
Chapter 3Server Configuration and Server State Attributes
3-12

Table 3-4 (Cont.) Server Configuration Attributes
Attribute Description
SERVER_LABEL An arbitrary value that you can use to label the server. You can use this attributewhen setting up server categories. For example, you can specify a location (suchas building_A or building_B), which makes it possible to put servers into poolswhere location is a requirement, by creating an appropriate server category andusing it for the server pool.
Use the following commands to view or modify, respectively, this attribute on thelocal server:
crsctl get server labelcrsctl set server label
The following table lists and describes read-only server state and configuration attributes:
Table 3-5 Server State Attributes
Attribute Description
ACTIVE_POOLS A space-delimited list of the names of the server pools to which a server belongs.Oracle Clusterware manages this list automatically.
STATE A server can be in one of the following states:
• ONLINE: The server is a member of the cluster and is available for resourceplacement.
• OFFLINE: The server is not currently a member of the cluster. Subsequently,it is not available for resource placement.
• JOINING: When a server joins a cluster, Oracle Clusterware processes theserver to ensure that it is valid for resource placement. Oracle Clusterwarealso checks the state of resources configured to run on the server. Once thevalidity of the server and the state of the resources are determined, theserver transitions out of this state.
• LEAVING: When a planned shutdown for a server begins, the state of theserver transitions to LEAVING, making it unavailable for resource placement.
• VISIBLE: Servers that have Oracle Clusterware running, but not the ClusterReady Services daemon (CRSD), are put into the VISIBLE state. Thisusually indicates an intermittent issue or failure and Oracle Clusterwaretrying to recover (restart) the daemon. Oracle Clusterware cannot manageresources on servers while the servers are in this state.
• RECONFIGURING: When servers move between server pools due to serverpool reconfiguration, a server is placed into this state if resources that ran onit in the current server pool must be stopped and relocated. This happensbecause resources running on the server may not be configured to run in theserver pool to which the server is moving. As soon as the resources aresuccessfully relocated, the server is put back into the ONLINE state.
Use the crsctl status server command to obtain server information.
Chapter 3Server Configuration and Server State Attributes
3-13

Table 3-5 (Cont.) Server State Attributes
Attribute Description
STATE_DETAILS This is a read-only attribute that Oracle Clusterware manages. The attributeprovides additional details about the state of a server. Possible additional detailsabout a server state are:
Server state: ONLINE:
• AUTOSTARTING RESOURCESIndicates that the resource autostart procedure (performed when a serverreboots or the Oracle Clusterware stack is restarted) is in progress for theserver.
• AUTOSTART QUEUEDThe server is waiting for the resource autostart to commence. Once thathappens, the attribute value changes to AUTOSTARTING RESOURCES.
Server state: RECONFIGURING:
• STOPPING RESOURCESResources that are restricted from running in a new server pool are stopping.
• STARTING RESOURCESResources that can run in a new server pool are starting.
• RECONFIG FAILEDOne or more resources did not stop and thus the server cannot transition intothe ONLINE state. At this point, manual intervention is required. You muststop or unregister resources that did not stop. After that, the serverautomatically transitions into the ONLINE state.
Server state: JOINING:
• CHECKING RESOURCESWhenever a server reboots, the Oracle Clusterware stack restarts, or CRSDon a server restarts, the policy engine must determine the current state ofthe resources on the server. While that procedure is in progress, this value isreturned.
Memory Pressure Management for Database ServersEnterprise database servers can use all available memory due to too many opensessions or runaway workloads. Running out of memory can result in failedtransactions or, in extreme cases, a restart of the server and the loss of a valuableresource for your applications. Oracle Database QoS Management detects memorypressure on a server in real time and redirects new sessions to other servers toprevent using all available memory on the stressed server.
When Oracle Database QoS Management is enabled and managing an OracleClusterware server pool, Cluster Health Monitor sends a metrics stream that providesreal-time information about memory resources for the cluster servers to OracleDatabase QoS Management. This information includes the following:
• Amount of available memory
• Amount of memory currently in use
If Oracle Database QoS Management determines that a node is under memory stress,then the database services managed by Oracle Clusterware are stopped on that node,preventing new connections from being created. After the memory stress is relieved,the services on that node are restarted automatically, and the listener starts sending
Chapter 3Server Configuration and Server State Attributes
3-14

new connections to that server. Memory pressure can be relieved in several ways (forexample, by closing existing sessions or by user intervention).
Rerouting new sessions to different servers protects the existing workloads on the memory-stressed server and enables the server to remain available. Managing the memory pressurefor servers adds a new resource protection capability in managing service levels forapplications hosted on Oracle RAC databases.
Server Category AttributesYou define servers into named categories, and assign attributes that define servers asmembers of that category.
Some attributes that you can use to define members of a category describe the stateconditions for the server, and others describe the physical characteristics of the server. Youcan also create your own characteristics to define servers as members of a particularcategory.
Note:
If you change the value of any of the server attributes listed in the EXPRESSIONserver category attribute, then you must restart the Oracle Clusterware technologystack on the affected servers before the new values take effect.
The following table lists and describes possible server category attributes.
Table 3-6 Server Category Attributes
Attribute Description
NAME The name of the server category, which you must specify when you create theserver category. Server category names must be unique within the domain ofnames of user-created entities, such as resources, types, and servers. A serverpool name has a 254 character limit and can contain any platform-supportedcharacters except the exclamation point (!) and the tilde (~). A server pool namecannot begin with a period nor with ora.
ACTIVE_CSS_ROLE Active role for the server, which is hub for a server that is a Hub Node in either anOracle Flex Cluster or an Oracle Clusterware standard Cluster. This is the defaultvalue in either case.
Chapter 3Server Category Attributes
3-15

Table 3-6 (Cont.) Server Category Attributes
Attribute Description
EXPRESSION A set of server attribute names, values, and conditions that can be evaluated foreach server to determine whether it belongs to the category. Table 3-4 lists anddescribes server attributes.
Acceptable comparison operators include:
=: equaleqi: equal, case insensitive>: greater than<: less than!=: not equalco: containscoi: contains, case insensitivest: starts withen: ends withnc: does not containnci: does not contain, case insensitive
Acceptable boolean operators include:
ANDOR
Note: Spaces must surround the operators used in the EXPRESSION string.
For example:
EXPRESSION='((NAME = server1) OR (NAME = server2))'"
An Example Policy Set ConfigurationIn this example, you have a four-node cluster that is used by three differentapplications, app1, app2, and app3, and that you have created three server pools,pool1, pool2, and pool3. You configure the server pools such that each application isassigned to run in its own server pool, and that app1 wants to have two servers, andapp2 and app3 each want one server.
The server pool configurations are as follows:
$ crsctl status serverpool pool1 -pNAME=pool1IMPORTANCE=0MIN_SIZE=2MAX_SIZE=2SERVER_NAMES=PARENT_POOLS=EXCLUSIVE_POOLS=ACL=owner:mjk:rwx,pgrp:g900:rwx,other::r--SERVER_CATEGORY=
$ crsctl status serverpool pool2 -pNAME=pool2IMPORTANCE=0
Chapter 3An Example Policy Set Configuration
3-16

MIN_SIZE=1MAX_SIZE=1SERVER_NAMES=PARENT_POOLS=EXCLUSIVE_POOLS=ACL=owner:mjk:rwx,pgrp:g900:rwx,other::r--SERVER_CATEGORY=
$ crsctl status serverpool pool3 -pNAME=pool3IMPORTANCE=0MIN_SIZE=1MAX_SIZE=1SERVER_NAMES=PARENT_POOLS=EXCLUSIVE_POOLS=ACL=owner:mjk:rwx,pgrp:g900:rwx,other::r--SERVER_CATEGORY=
Note:
The crsctl status serverpool command shown in the preceding examples onlyfunctions if you created the server pools using CRSCTL.
This configuration, however, does not consider the fact that some applications need servertime at different times of the day, week, or month. Email applications, for example, typicallyuse more resources during business hours and use less resources at night and onweekends.
Further assume that app1 requires two servers during business hours, but only requires oneserver at night and does not require any servers on weekends. At the same time, app2 andapp3 each require one server during business hours, while at night, app2 requires twoservers and app3 requires one. On the weekend, app2 requires one server and app3requires three. This scenario suggests three configurations that you must configure for thecluster:
1. Day Time:
app1 uses two serversapp2 and app3 use one server, each
2. Night Time:
app1 uses one serverapp2 uses two serversapp3 uses one server
3. Weekend:
app1 is not running (0 servers)app2 uses one serverapp3 uses three servers
Policy Set Creation
Chapter 3An Example Policy Set Configuration
3-17

Given these assumptions, run the crsctl create policyset command to create apolicy set with a single policy named Default, which reflects the configurationdisplayed by the crsctl status serverpool command. You can use the Defaultpolicy to create other policies to meet the needs assumed in this example. The crsctlcreate policyset command creates a text file similar to Example 3-1.
Example 3-1 Policy Set Text File
SERVER_POOL_NAMES=Free pool1 pool2 pool3POLICY NAME=Default SERVERPOOL NAME=pool1 IMPORTANCE=0 MAX_SIZE=2 MIN_SIZE=2 SERVER_CATEGORY= SERVERPOOL NAME=pool2 IMPORTANCE=0 MAX_SIZE=1 MIN_SIZE=1 SERVER_CATEGORY= SERVERPOOL NAME=pool3 IMPORTANCE=0 MAX_SIZE=1 MIN_SIZE=1 SERVER_CATEGORY=
Policy Modification
To modify the preceding policy set to meet the needs assumed in this example, editthe text file to define policies for the three scenarios discussed previously, by changingthe name of the policy from Default to DayTime. Then, copy the policy and paste ittwice to form two subsequent policies, which you name NightTime and Weekend, asshown in Example 3-2.
Example 3-2 Modified Policy Set Text File
SERVER_POOL_NAMES=Free pool1 pool2 pool3POLICY NAME=DayTime SERVERPOOL NAME=pool1 IMPORTANCE=0 MAX_SIZE=2 MIN_SIZE=2 SERVER_CATEGORY= SERVERPOOL NAME=pool2 IMPORTANCE=0 MAX_SIZE=1 MIN_SIZE=1 SERVER_CATEGORY=
Chapter 3An Example Policy Set Configuration
3-18

SERVERPOOL NAME=pool3 IMPORTANCE=0 MAX_SIZE=1 MIN_SIZE=1 SERVER_CATEGORY=POLICY NAME=NightTime SERVERPOOL NAME=pool1 IMPORTANCE=0 MAX_SIZE=1 MIN_SIZE=1 SERVER_CATEGORY= SERVERPOOL NAME=pool2 IMPORTANCE=0 MAX_SIZE=2 MIN_SIZE=2 SERVER_CATEGORY= SERVERPOOL NAME=pool3 IMPORTANCE=0 MAX_SIZE=1 MIN_SIZE=1 SERVER_CATEGORY=POLICY NAME=Weekend SERVERPOOL NAME=pool1 IMPORTANCE=0 MAX_SIZE=0 MIN_SIZE=0 SERVER_CATEGORY= SERVERPOOL NAME=pool2 IMPORTANCE=0 MAX_SIZE=1 MIN_SIZE=1 SERVER_CATEGORY= SERVERPOOL NAME=pool3 IMPORTANCE=0 MAX_SIZE=3 MIN_SIZE=3 SERVER_CATEGORY=
Notice that, in addition to changing the names of the individual policies, the MAX_SIZE andMIN_SIZE policy attributes for each of the server pools in each of the policies were alsomodified according to the needs of the applications.
The following command registers the policy set stored in a file with Oracle Clusterware:
$ crsctl modify policyset -file file_name
Chapter 3An Example Policy Set Configuration
3-19

You can achieve the same results as shown in the previous examples by editing theDefault policy set, as a whole, using the crsctl modify policyset command, and byusing the crsctl modify serverpool command to change individual server poolattributes for a specific policy.
The following command modifies the Default policy set to manage the three serverpools:
$ crsctl modify policyset -attr "SERVER_POOL_NAMES=Free pool1 pool2 pool3"
The following commands add the three policies:
$ crsctl add policy DayTime$ crsctl add policy NightTime$ crsctl add policy Weekend
The following commands configure the three server pools according to therequirements of the policies:
$ crsctl modify serverpool pool1 -attr "MIN_SIZE=2,MAX_SIZE=2" -policy DayTime$ crsctl modify serverpool pool1 -attr "MIN_SIZE=1,MAX_SIZE=1" -policy NightTime$ crsctl modify serverpool pool1 -attr "MIN_SIZE=0,MAX_SIZE=0" -policy Weekend
$ crsctl modify serverpool pool2 -attr "MIN_SIZE=1,MAX_SIZE=1" -policy DayTime$ crsctl modify serverpool pool2 -attr "MIN_SIZE=2,MAX_SIZE=2" -policy NightTime$ crsctl modify serverpool pool2 -attr "MIN_SIZE=1,MAX_SIZE=1" -policy Weekend
$ crsctl modify serverpool pool3 -attr "MIN_SIZE=1,MAX_SIZE=1" -policy DayTime$ crsctl modify serverpool pool3 -attr "MIN_SIZE=1,MAX_SIZE=1" -policy NightTime$ crsctl modify serverpool pool3 -attr "MIN_SIZE=3,MAX_SIZE=3" -policy Weekend
There are now three distinct policies to manage the server pools to accommodate therequirements of the three applications.
Policy Activation
The policy set is now configured and controlling the three server pools with threedifferent policies. You can activate policies when necessary, prompting OracleClusterware to reconfigure a server pool according to each policy's configuration.
The following command activates the DayTime policy:
$ crsctl modify policyset -attr "LAST_ACTIVATED_POLICY=DayTime"
Chapter 3An Example Policy Set Configuration
3-20

The current status of the resources is as follows:
$ crsctl status resource -t--------------------------------------------------------------------------------Name Target State Server State details--------------------------------------------------------------------------------Cluster Resources--------------------------------------------------------------------------------app1 1 ONLINE ONLINE mjk_has3_2 STABLE 2 ONLINE ONLINE mjk_has3_0 STABLEapp2 1 ONLINE ONLINE mjk_has3_1 STABLEapp3 1 ONLINE ONLINE mjk_has3_3 STABLE
The status of the server pools is as follows:
$ crsctl stat serverpoolNAME=FreeACTIVE_SERVERS=
NAME=GenericACTIVE_SERVERS=
NAME=pool1ACTIVE_SERVERS=mjk_has3_0 mjk_has3_2
NAME=pool2ACTIVE_SERVERS=mjk_has3_1
NAME=pool3ACTIVE_SERVERS=mjk_has3_3
The servers are allocated according to the DayTime policy and the applications run on theirrespective servers.
The following command activates the Weekend policy (remember, because the server poolshave different sizes, as servers move between server pools, some applications will bestopped and others will be started):
$ crsctl modify policyset -attr "LAST_ACTIVATED_POLICY=Weekend"CRS-2673: Attempting to stop 'app1' on 'mjk_has3_2'CRS-2673: Attempting to stop 'app1' on 'mjk_has3_0'CRS-2677: Stop of 'app1' on 'mjk_has3_0' succeededCRS-2672: Attempting to start 'app3' on 'mjk_has3_0'CRS-2677: Stop of 'app1' on 'mjk_has3_2' succeededCRS-2672: Attempting to start 'app3' on 'mjk_has3_2'CRS-2676: Start of 'app3' on 'mjk_has3_2' succeededCRS-2676: Start of 'app3' on 'mjk_has3_0' succeeded
Chapter 3An Example Policy Set Configuration
3-21

The current status of the resources is as follows:
$ crsctl status resource -t--------------------------------------------------------------------------------Name Target State Server State details --------------------------------------------------------------------------------Cluster Resources--------------------------------------------------------------------------------app1 1 ONLINE OFFLINE STABLE 2 ONLINE OFFLINE STABLEapp2 1 ONLINE ONLINE mjk_has3_1 STABLEapp3 1 ONLINE ONLINE mjk_has3_0 STABLE 2 ONLINE ONLINE mjk_has3_2 STABLE 3 ONLINE ONLINE mjk_has3_3 STABLE--------------------------------------------------------------------------------
The status of the server pools is as follows:
$ crsctl status serverpoolNAME=FreeACTIVE_SERVERS=
NAME=GenericACTIVE_SERVERS=
NAME=pool1ACTIVE_SERVERS=
NAME=pool2ACTIVE_SERVERS=mjk_has3_1
NAME=pool3ACTIVE_SERVERS=mjk_has3_0 mjk_has3_2 mjk_has3_3
Using the crsctl modify policyset command, Oracle Clusterware changed serverpool configuration, moved servers according to the requirements of the policy, andstopped and started the applications.
Related Topics
• Oracle Clusterware Control (CRSCTL) Utility Reference
Chapter 3An Example Policy Set Configuration
3-22

4Oracle Flex Clusters
An Oracle Flex Cluster scales Oracle Clusterware to large numbers of nodes.
This chapter includes the following topics:
• Overview of Oracle Flex Clusters
• Managing Oracle Flex Clusters
• Oracle Extended Clusters
Overview of Oracle Flex ClustersOracle Grid Infrastructure installed in an Oracle Flex Cluster configuration is a scalable,dynamic, robust network of nodes.
Oracle Flex Clusters provide a platform for a variety of applications, including Oracle RealApplication Clusters (Oracle RAC) databases with large numbers of nodes. Oracle FlexClusters also provide a platform for other service deployments that require coordination andautomation for high availability. Starting at Oracle Clusterware 12c release 2 (12.2), allclusters are configured as Oracle Flex Clusters.
All nodes in an Oracle Flex Cluster belong to a single Oracle Grid Infrastructure cluster. Thisarchitecture centralizes policy decisions for deployment of resources based on applicationneeds, to account for various service levels, loads, failure responses, and recovery.
Oracle Flex Clusters contain Hub Nodes and any number of other supported nodes. Thenumber of Hub Nodes in an Oracle Flex Cluster can be as many as 64. The number of othernodes can be many more. Hub Nodes can host different types of applications.
Hub Nodes are similar to Oracle Grid Infrastructure nodes in an Oracle Clusterware standardCluster configuration: they are tightly connected, and have direct access to shared storage.Use Hub Nodes to host read-write database instances.
Other supported nodes in an Oracle Flex Cluster are different from standard Oracle GridInfrastructure nodes, in that they do not require direct access to shared storage, but insteadrequest data through Hub Nodes. Use other nodes to host read-only database instances.
Note:
Read-write and read-only database instances of the same primary database cancoexist in an Oracle Flex Cluster.
Hub Nodes can run in an Oracle Flex Cluster configuration without having any other nodes ascluster member nodes, but other nodes must be members of a cluster that includes at leastone Hub Node.
4-1

Note:
If you upgrade an Oracle Flex Cluster, then Oracle recommends that youupgrade the Hub Nodes first, and that you also have any upgraded HubNodes up and running as part of the upgrade process.
Oracle Flex Cluster Configuration
Figure 4-1 Oracle Clusterware Configuration
Cluster
Heartbeat hb
Pool of Storage
hb
hb
HubNode 1
HubNode 3
HubNode 2
Node 5 Node 6Node 3 Node 4Node 1 Node 2
• Hub Nodes are tightly connected, and have direct access to shared storage. Theywould traditionally be deployed as hosts for Oracle RAC or Oracle RAC Onedatabase instances. Other nodes in the cluster differ from Hub Nodes in that theydo not require direct access to shared storage, but instead access data throughthe Hub Nodes.
• All nodes in an Oracle Flex Cluster belong to a single Oracle Grid Infrastructurecluster. This architecture centralizes policy decisions for deployment of resourcesbased on application needs, to account for various service levels, loads, failureresponses, and recovery.
• Oracle Flex Clusters consists of Hub Nodes that support other nodes in thecluster. The number of Hub Nodes in an Oracle Flex Cluster must be at least oneand can be as many as 64, while the number of other, supported nodes can bemany more. Hub Nodes can host different types of applications.
• Oracle Flex Clusters may operate with one or many Hub Nodes, but other nodesare optional and can only exist as members of a cluster that includes at least oneHub Node.
Chapter 4Overview of Oracle Flex Clusters
4-2

Reader Nodes
You can use other nodes to host Oracle RAC database instances that run in read-only mode,which become reader nodes. You can optimize these nodes for parallel query operations byprovisioning nodes with a large amount of memory so that data is cached in the hosting node.
A hosting node sends periodic heartbeat messages to its associated Hub Node, which isdifferent from the heartbeat messages that occur between Hub Nodes. During plannedshutdown of the Hub Nodes, a hosting node attempts to connect to another Hub Node,unless the hosting node is connected to only one Hub Node. If the Hub Node is evicted, thenthe hosting node is also evicted from the cluster.
Managing Oracle Flex ClustersUse CRSCTL to manage Oracle Flex Clusters after successful installation of Oracle GridInfrastructure for either a small or large cluster.
This section includes the following topics:
• Changing the Cluster Mode
Related Topics
• Oracle Grid Infrastructure Installation and Upgrade Guide
• Oracle Clusterware Control (CRSCTL) Utility Reference
Changing the Cluster ModeYou can change the mode of an existing Oracle Clusterware standard Cluster to be an OracleFlex Cluster.
Note:
• Changing the cluster mode requires cluster downtime.
• Oracle does not support changing an Oracle Flex Cluster to an OracleClusterware standard Cluster.
• Oracle Flex Cluster requires Grid Naming Service (GNS).
• Zone delegation is not required.
Changing an Oracle Clusterware Standard Cluster to an Oracle Flex ClusterUse CRSCTL to change an existing Oracle Clusterware standard Cluster to an Oracle FlexCluster.
Perform the following steps:
Chapter 4Managing Oracle Flex Clusters
4-3

1. Run the following command to determine the current mode of the cluster:
$ crsctl get cluster mode status
2. Run the following command to ensure that the Grid Naming Service (GNS) isconfigured with a fixed VIP:
$ srvctl config gns
This procedure cannot succeed unless GNS is configured with a fixed VIP. If thereis no GNS, then, as root, create one, as follows:
# srvctl add gns -vip vip_name | ip_address
Run the following command as root to start GNS:
# srvctl start gns
3. Use the Oracle Automatic Storage Management Configuration Assistant (ASMCA)to enable Oracle Flex ASM in the cluster before you change the cluster mode.
4. Run the following command as root to change the mode of the cluster to be anOracle Flex Cluster:
# crsctl set cluster mode flex
5. Stop Oracle Clusterware by running the following command as root on each nodein the cluster:
# crsctl stop crs
6. Start Oracle Clusterware by running the following command as root on each nodein the cluster:
# crsctl start crs -wait
Note:
Use the -wait option to display progress and status messages.
Related Topics
• Oracle Automatic Storage Management Administrator's Guide
Oracle Extended ClustersYou can extend an Oracle RAC cluster across two, or more, geographically separatesites, each equipped with its own storage. In the event that one of the sites fails, theother site acts as an active standby.
Chapter 4Oracle Extended Clusters
4-4

Both Oracle ASM and the Oracle Database stack, in general, are designed to use enterprise-class shared storage in a data center. Fibre Channel technology, however, enables you todistribute compute and storage resources across two or more data centers, and connectthem through ethernet cables and Fibre Channel, for compute and storage needs,respectively.
While you can configure Oracle Extended Clusters when you install Oracle GridInfrastructure, you can also do so post installation using the ConvertToExtended script. Youmanage your Oracle Extended Cluster using CRSCTL.
Configuring Oracle Extended ClustersThis procedure is only supported for clusters that have been installed with or upgraded toOracle Grid Infrastructure 12c release 2 (12.2), or later, which are typically configured withone site (default site).
Note:
This procedure requires that all nodes in the cluster be accessible. There will alsobe a cluster outage during which time database access is disrupted.
You can configure an Oracle Extended Cluster with one or many disk groups and withmultiple failure groups. Using the ConvertToExtended script you can create multiple datasites and associate a node with each data site. All Oracle Flex ASM storage remainsassociated with the default cluster site because there is no mechanism to convert an existingdisk group to an extended disk group. After you convert your cluster to an Oracle ExtendedCluster, the voting file membership remains flat, and not hierarchical.
You must also add an extended disk group, and migrate the voting files to the extended diskgroup to take advantage of a site-specific hierarchical voting file algorithm.
Use CRSCTL to query the cluster, as follows, to determine its extended status:
$ crsctl get cluster extendedCRS-6579: The cluster is 'NOT EXTENDED'
$ crsctl query cluster site -allSite 'crsclus' identified by '7b7b3bef4c1f5ff9ff8765bceb45433a' in state 'ENABLED', and contains nodes 'node1,node2,node3,node4', and disks ''.
The preceding example identifies a cluster called crsclus that has four nodes—node1, node2,node3, and node4—and a disk group—datadg. The cluster has one site configured.
Shut down the Oracle Clusterware stack to prevent some Oracle Flex ASM instances, cssd,and crsd from considering the cluster mode is not extended, and other components toconsider that it is extended. The advantage to keeping the Grid Plug and Play daemon(gpnpd) online is that the profile gets updated on the remote nodes. When you next start theOracle Clusterware stack, the cluster mode will be extended.
# crsctl stop cluster -all
Chapter 4Oracle Extended Clusters
4-5

1. On the first node in the cluster, run the following command:
$ rootcrs.sh -converttoextended -firstnode -sites site_list -site site_name
2. Run crsctl check css to ensure that Cluster Synchronization Servcies (CSS) isnot running on any remote nodes.
3. Generate the site names and the site GUIDs, using the following command:
$ crsctl query cluster site -all
The preceding command displays output similar to the following:
Site 'SiteA' identified by GUID '7b7b3bef4c1f5ff9ff8765bceb45433a' in state 'ONLINE' contains nodes 'node1,node2,node3', and disks 'disk1, disk2, disk3'.Site 'SiteB' identified by GUID '23453bef4c1f5ff9ff8765bceb45433a' in state 'QUARANTINED' contains nodes 'node4, node5, node6', and disks 'disk4, disk5, disk6'.Site 'SiteQ' identified by GUID '98763bef4c1f5ff9ff8765bceb45433a' in state 'ONLINE' contains no nodes and disk 'disk7'.Site 'SiteD' identified by GUID '4abcd453c6bc6fc1ffd3a58849d5ba41' in state 'ONLINE' contains nodes 'cuj1234' and no disk
Update the checkpoint with this information, and copy it to the rest of the nodes inthe cluster.
4. Update the Grid Plug and Play profile and set ext_mode to TRUE using thefollowing commands:
$ cd $Grid_home/gpnp/host_name/profiles/peer
$ gpnptool getpval -p=profile.xml -prf_sq -o=temp_file // run_gpnptool_getpval()$ gpnptool edit -p=profile.xml -asm_ext="" prf_sq=seq+1 -o=profile_ext.xml
Note:
The value of prf_sq must be greater than what is in the current profile forthe ProfileSequence key.
$ gpnptool sign -p=profile_ext.xml -o=profile_ext_sign.xml$ mv profile_ext_sign.xml profile.xml$ gpnptool put -p=profile.xml
5. Add sites to the local configuration, as follows:
$ crsctl add crs site site_name -guid site_guid -local
Chapter 4Oracle Extended Clusters
4-6

6. Add sites to the global configuration, as follows (this requires that OCR be running):
$ crsctl add crs site site_name -guid site_guid
7. Update the to-site mapping in the local configuration for this node, as follows:
$ crsctl modify cluster site site_name -n local_host -local
8. Update the node-to-site mapping, as follows:
$ crsctl modify cluster site site_name -n host1, host2, ...
9. Stop and then start the Oracle High Availability Services stack, as follows:
# crsctl stop crs# crsctl start crs
Do the following on the rest of the nodes in the cluster:
1. Extend the cluster to the specific node, as follows:
$ rootcrs.sh -converttoextended -site site_name
2. Ensure that CSS is not running on any remote nodes.
3. Look up new sites and the site GUIDs using the previous checkpoint information.
4. Add sites to the local configuration, as follows:
$ crsctl add crs site site_name -guid site_guid -local
5. Update the to-site mapping in the local configuration for this node, as follows:
$ crsctl modify cluster site site_name -n local_host -local
6. Stop and then start the Oracle High Availability Services stack, as follows:
# crsctl stop crs# crsctl start crs
After you finish configuring the Oracle Extended Cluster, run the following command to verifythe configuration:
$ crsctl get cluster extendedCRS-XXXX: The cluster is 'EXTENDED'
$ crsctl query cluster site -allSite 'crsclus' identified by '7b7b3bef4c1f5ff9ff8765bceb45433a' is 'ONLINE', and contains nodes '', and disks ''.Site 'ny' identified by '888b3bef4c1f5ff9ff8765bceb45433a' is 'ONLINE', and \contains nodes 'node1,node2', and disks ''.Site 'nj' identified by '999b3bef4c1f5ff9ff8765bceb45433a' is 'ONLINE', and \contains nodes 'node3,node4', and disks ''.
Chapter 4Oracle Extended Clusters
4-7

The output in the preceding command examples is similar to what CRSCTL displayswhen you run the commands.
Chapter 4Oracle Extended Clusters
4-8

5Managing Oracle Cluster Registry and VotingFiles
Oracle Clusterware includes two important components that manage configuration and nodemembership: Oracle Cluster Registry (OCR), which also includes the local component OracleLocal Registry (OLR), and voting files.
• OCR stores Oracle Clusterware and Oracle RAC database configuration information
• OLR resides on every node in the cluster and manages Oracle Clusterware configurationinformation for each particular node
• Voting files store information about node membership. Each voting file must beaccessible by all nodes in the cluster for nodes to be members of the cluster
Notes:
You can store OCR and voting files on Oracle ASM or a shared file system onOracle Standalone Clusters.
In Oracle Database 12c Release 2 (12.2), the placement of OCR and voting diskfiles directly on a shared file system was desupported. Starting with OracleDatabase 19c (19.3), that desupport is rescinded for Oracle Standalone Clusters.For Oracle Domain Services Clusters, you must continue to place OCR and votingdisk files in disk groups managed by Oracle ASM.
Oracle recommends that you configure multiple voting files during Oracle Clusterwareinstallation to improve availability. If you use Oracle ASM for Oracle Clusterware storage,then Oracle ASM ensures the configuration of multiple voting files if you use a normal or highredundancy disk group. If you choose to store the voting files on a shared file system, thenselect the option to configure multiple voting files, in which case you will have to specify threedifferent file systems based on different disks.
If necessary, you can dynamically add or replace voting files after you complete the OracleClusterware installation process without stopping the cluster.
This chapter includes the following topics:
• Managing Oracle Cluster Registry and Oracle Local Registry
• Managing Voting Files
Managing Oracle Cluster Registry and Oracle Local RegistryTo manage OCR and the Oracle Local Registry (OLR), use OCRCONFIG, OCRDUMP, andOCRCHECK.
OCR contains information about all Oracle resources in the cluster.
5-1

OLR is a registry similar to OCR located on each node in a cluster, but containsinformation specific to each node. It contains manageability information about OracleClusterware, including dependencies between various services. Oracle HighAvailability Services uses this information. OLR is located on local storage on eachnode in a cluster. Its default location is in the path Grid_base/crsdata/host_name/olr/, where host_name is the host name of the node.
Administering OCR is decribed in the following topics:
• Migrating Oracle Cluster Registry to Oracle Automatic Storage Management
• Adding_ Replacing_ Repairing_ and Removing Oracle Cluster Registry Locations
• Backing Up Oracle Cluster Registry
• Restoring Oracle Cluster Registry
• Diagnosing Oracle Cluster Registry Problems
• Administering Oracle Cluster Registry with Export and Import Commands
• Oracle Local Registry
Related Topics
• About OCRCONFIGUse the ocrconfig command to manage OCR. Using this utility you can import,export, add, delete, restore, overwrite, backup, repair, replace, move, upgrade, ordowngrade OCR.
• Troubleshooting Oracle Cluster Registry
Migrating Oracle Cluster Registry to Oracle Automatic StorageManagement
You can migrate OCR to reside on Oracle ASM, and take advantage of theimprovements in managing Oracle Clusterware storage.
To migrate OCR to Oracle ASM using OCRCONFIG:
1. Ensure the upgrade to Oracle Clusterware 21c is complete. Run the followingcommand to verify the current running version:
$ crsctl query crs activeversion
2. Use the Oracle ASM Configuration Assistant (ASMCA) to configure and startOracle ASM on all nodes in the cluster.
3. Use ASMCA to create an Oracle ASM disk group that is at least the same size ofthe existing OCR and has at least normal redundancy.
Chapter 5Managing Oracle Cluster Registry and Oracle Local Registry
5-2

Note:
• If OCR is stored in an Oracle ASM disk group with external redundancy,then Oracle recommends that you add another OCR location to anotherdisk group to avoid the loss of OCR, if a disk fails in the disk group.
Oracle does not support storing OCR on different storage typessimultaneously, such as storing OCR on both Oracle ASM and a shared filesystem, except during a migration.
• If an Oracle ASM instance fails on any node, then OCR becomesunavailable on that particular node.
If the CRSD process running on the node affected by the Oracle ASMinstance failure is the OCR writer, then the majority of the OCR locationsare stored in Oracle ASM, and you attempt I/O on OCR during the time theOracle ASM instance is down on this node, then CRSD stops and becomesinoperable. Cluster management is now affected on this particular node.
Under no circumstances will the failure of one Oracle ASM instance on onenode affect the whole cluster.
• Ensure that Oracle ASM disk groups that you create are mounted on all ofthe nodes in the cluster.
4. To add OCR to an Oracle ASM disk group, first ensure that the Oracle Clusterware stackis running, and then run the following command as root:
# ocrconfig -add +new_disk_group
You can run this command more than once if you add multiple OCR locations. You canhave up to five OCR locations. However, each successive run must point to a differentdisk group.
5. To remove storage configurations no longer in use, run the following command as root:
# ocrconfig -delete old_storage_location
Run this command for every configured OCR.
The following example shows how to migrate two OCRs to Oracle ASM using OCRCONFIG.
# ocrconfig -add +new_disk_group# ocrconfig -delete /ocrdata/ocr_1# ocrconfig -delete /ocrdata/ocr_2
Chapter 5Managing Oracle Cluster Registry and Oracle Local Registry
5-3

Note:
• OCR inherits the redundancy of the disk group. If you want highredundancy for OCR, you must configure the disk group with highredundancy when you create it.
• Oracle recommends that you put the SPFILE for Oracle ASM in thisnewly-created OCR location.
Related Topics
• Oracle Automatic Storage Management Administrator's Guide
• Oracle Automatic Storage Management Administrator's Guide
• Oracle Automatic Storage Management Administrator's Guide
Migrating Oracle Cluster Registry from Oracle ASM to Other Types ofStorage
To migrate the Oracle Cluster Registry (OCR) from Oracle ASM to another storagetype, use this procedure.
1. Ensure the upgrade to Oracle Clusterware 21c is complete. To verify the currentrunning version, run the following command:
$ crsctl query crs activeversion
2. Create a file in a shared or cluster file system with the following permissions: root,oinstall, 640.
Note:
Create at least two mirrors of the primary storage location to eliminate asingle point of failure for the OCR. The OCR supports up to fivelocations.
3. Ensure that there is at least 500 MB of space on the mount partition.
4. Ensure that the file that you created is visible from all nodes in the cluster.
5. To add the file as an OCR location, ensure that the Oracle Clusterware stack isrunning, and then run the following command as root:
# ocrconfig -add file_location
You can run this command more than once if you add more than one OCRlocation. Each successive run of this command must point to a different filelocation.
6. Ensure that the OCR backup location is not configured on an Oracle ASM diskgroup.
Chapter 5Managing Oracle Cluster Registry and Oracle Local Registry
5-4

To migrate the OCR backup location to a file system, run the following command as root:
# ocrconfig -backuploc file_location
7. To remove storage configurations no longer in use, run the following command as root:
# ocrconfig -delete +asm_disk_group
You can run this command more than once if there is more than one OCR locationconfigured.
The following example shows how to migrate OCR from Oracle ASM to network-attachedstorage (NAS) using OCRCONFIG.
# ocrconfig -add /nas/ocr
For OCRs not stored on Oracle ASM, Oracle recommends that you mirror the OCRs ondifferent devices.
Adding, Replacing, Repairing, and Removing Oracle Cluster RegistryLocations
Manage OCR locations using OCRCONFIG.
The Oracle installation process for Oracle Clusterware gives you the option of automaticallymirroring OCR. You can manually put the mirrored OCRs on a shared Network File System(NFS), or on any cluster file system that is certified by Oracle. Alternatively, you can placeOCR on Oracle ASM and allow it to create mirrors automatically, depending on theredundancy option you select.
You can manually mirror OCR, as described in the Adding an Oracle Cluster RegistryLocation section, if you:
• Upgraded to Oracle Clusterware 21c but did not choose to mirror OCR during theupgrade
• Created only one OCR location during the Oracle Clusterware installation
Oracle recommends that you configure:
• At least three OCR locations, if OCR is configured on non-mirrored or non-redundantstorage. Oracle strongly recommends that you mirror OCR if the underlying storage is notRAID. Mirroring can help prevent OCR from becoming a single point of failure.
• At least two OCR locations if OCR is configured on an Oracle ASM disk group. Youshould configure OCR in two independent disk groups. Typically this is the work area andthe recovery area.
• At least two OCR locations if OCR is configured on mirrored hardware or third-partymirrored volumes.
Chapter 5Managing Oracle Cluster Registry and Oracle Local Registry
5-5

Note:
• If the original OCR location does not exist, then you must create anempty (0 byte) OCR location with appropriate permissions before yourun the ocrconfig -add or ocrconfig -replace commands.
• Ensure that the OCR devices that you specify in the OCR configurationexist and that these OCR devices are valid.
• Ensure that the Oracle ASM disk group that you specify exists and ismounted.
• The new OCR file, device, or disk group must be accessible from all ofthe active nodes in the cluster.
In addition to mirroring OCR locations, managing OCR locations include:
• Adding an Oracle Cluster Registry Location
• Removing an Oracle Cluster Registry Location
• Replacing an Oracle Cluster Registry Location
• Repairing an Oracle Cluster Registry Configuration on a Local Node
• Overriding the Oracle Cluster Registry Data Loss Protection Mechanism
Note:
The operations in this section affect OCR throughout the entire cluster: theoperations change the OCR configuration information in the ocr.loc file onLinux and UNIX systems and the Registry keys on Windows systems.However, the ocrconfig command cannot modify OCR configurationinformation for nodes that are shut down or for nodes on which OracleClusterware is not running.
Related Topics
• Oracle Grid Infrastructure Installation and Upgrade Guide
• Oracle Automatic Storage Management Administrator's Guide
Adding an Oracle Cluster Registry LocationUse the procedure in this section to add an OCR location. Oracle Clusterware canmanage up to five redundant OCR locations.
Chapter 5Managing Oracle Cluster Registry and Oracle Local Registry
5-6

Note:
If OCR resides on a cluster file system file or a network file system, create an empty(0 byte) OCR location file before performing the procedures in this section.
As the root user, run the following command to add an OCR location to either Oracle ASM orother storage device:
# ocrconfig -add +asm_disk_group | file_name
Note:
On Linux and UNIX systems, you must be root to run ocrconfig commands. OnWindows systems, the user must be a member of the Administrator's group.
Removing an Oracle Cluster Registry LocationTo remove an OCR location or a failed OCR location, at least one other OCR must be online. You can remove an OCR location to reduce OCR-related overhead or to stop mirroring yourOCR because you moved OCR to redundant storage such as RAID.
Perform the following procedure as the root user to remove an OCR location from yourOracle Clusterware environment:
1. Ensure that at least one OCR location other than the OCR location that you are removingis online.
Caution:
Do not perform this OCR removal procedure unless there is at least one otheractive OCR location online.
2. Run the following command on any node in the cluster to remove an OCR location fromeither Oracle ASM or other location:
# ocrconfig -delete +ASM_disk_group | file_name
The file_name variable can be a device name or a file name. This command updates theOCR configuration on all of the nodes on which Oracle Clusterware is running.
Note:
The only configured Oracle ASM OCR location, which is on a different OracleASM disk group than the Oracle ASM OCR backup location, cannot beremoved.
Chapter 5Managing Oracle Cluster Registry and Oracle Local Registry
5-7

Replacing an Oracle Cluster Registry LocationIf you must change an existing OCR location, or change a failed OCR location to aworking location, then you can use the following procedure, if all remaining OCRlocations remain online. The ocrconfig -replace command requires that at least twoOCR locations are configured.
To change an Oracle Cluster Registry location:
Complete the following procedure:
1. Use the OCRCHECK utility to verify that a copy of OCR other than the one you aregoing to replace is online, using the following command:
$ ocrcheck
OCRCHECK displays all OCR locations that are registered and whether they areavailable (online). If an OCR location suddenly becomes unavailable, then it mighttake a short period for Oracle Clusterware to show the change in status.
Note:
The OCR location that you are replacing can be either online or offline.
2. Use the following command to verify that Oracle Clusterware is running on thenode on which you are going to perform the replace operation:
$ crsctl check crs
3. Run the following command as root to replace the current OCR location usingeither destination_file or +ASM_disk_group to indicate the current and targetOCR locations:
# ocrconfig -replace current_OCR_location -replacement new_OCR_location
The preceding command fails if you have less than two configured OCR locationsthat are online.
If you have only one OCR location configured and online, then you must first add anew location and then delete the failed location, as follows:
# ocrconfig -add new_OCR_location# ocrconfig -delete current_OCR_location
Chapter 5Managing Oracle Cluster Registry and Oracle Local Registry
5-8

Note:
If your cluster configuration changes while the node on which OCR resides isstopped, and the Oracle Clusterware stack is running on the other nodes, thenOCR detects configuration changes and self-corrects the configuration bychanging the contents of the ocr.loc file.
Related Topics
• Oracle Automatic Storage Management Administrator's Guide
Repairing an Oracle Cluster Registry Configuration on a Local NodeIt may be necessary to repair OCR if your cluster configuration changes while that node isstopped and this node is the only member in the cluster.
Repairing an OCR involves either adding, deleting, or replacing an OCR location. Forexample, if any node that is part of your current Oracle RAC cluster is shut down, then youmust update the OCR configuration on the stopped node to let that node rejoin the clusterafter the node is restarted. Use the following command syntax as root on the restarted nodewhere you use either a destination_file or +ASM_disk_group to indicate the current andtarget OCR locations:
# ocrconfig -repair -replace current_OCR_location -replacement target_OCR_location
This operation only changes OCR on the node on which you run this command. For example,if the OCR location is /dev/sde1, then use the command syntax ocrconfig -repair -add /dev/sde1 on this node to repair OCR on that node.
Note:
• You cannot repair the OCR configuration on a node on which the Oracle ClusterReady Services daemon is running.
• When you repair OCR on a stopped node using ocrconfig -repair, you mustprovide the same OCR file name (which should be case-sensitive) as the OCRfile names on other nodes.
• If you run the ocrconfig -add | -repair | -replace command, then thedevice, file, or Oracle ASM disk group that you are adding must be accessible.This means that a device must exist. You must create an empty (0 byte) OCRlocation, or the Oracle ASM disk group must exist and be mounted.
Related Topics
• OCRCONFIG Command Reference
• Oracle Automatic Storage Management Administrator's Guide
Chapter 5Managing Oracle Cluster Registry and Oracle Local Registry
5-9

Overriding the Oracle Cluster Registry Data Loss Protection MechanismOCR has a mechanism that prevents data loss due to accidental overwrites. If youconfigure a mirrored OCR and if Oracle Clusterware cannot access the mirrored OCRlocations and also cannot verify that the available OCR location contains the mostrecent configuration, then Oracle Clusterware prevents further modification to theavailable OCR location. In addition, the process prevents overwriting by prohibitingOracle Clusterware from starting on the node on which only one OCR is available. Insuch cases, Oracle Database displays an alert message in either Oracle EnterpriseManager, the Oracle Clusterware alert log files, or both. If this problem is local to onlyone node, you can use other nodes to start your cluster database.
However, if you are unable to start any cluster node in your environment and if you canneither repair OCR nor restore access to all OCR locations, then you can override theprotection mechanism. The procedure described in the following list enables you tostart the cluster using the available OCR location. However, overriding the protectionmechanism can result in the loss of data that was not available when the previousknown good state was created.
Caution:
Overriding OCR using the following procedure can result in the loss of OCRupdates that were made between the time of the last known good OCRupdate made to the currently accessible OCR and the time at which youperformed the overwrite. In other words, running the ocrconfig -overwritecommand can result in data loss if the OCR location that you are using toperform the overwrite does not contain the latest configuration updates foryour cluster environment.
Perform the following procedure to overwrite OCR if a node cannot start and if the alertlog contains CLSD-1009 and CLSD-1011 messages.
1. Attempt to resolve the cause of the CLSD-1009 and CLSD-1011 messages.
Compare the node's OCR configuration (ocr.loc on Linux and UNIX systems andthe Registry on Windows systems) with other nodes on which Oracle Clusterwareis running.
• If the configurations do not match, run ocrconfig -repair.
• If the configurations match, ensure that the node can access all of theconfigured OCRs by running an ls command on Linux and UNIX systems. OnWindows, use a dir command if the OCR location is a file and runGuiOracleObjectManager.exe to verify that the part of the cluster with thename exists.
2. Ensure that the most recent OCR contains the latest OCR updates.
Look at output from the ocrdump command and determine whether it has yourlatest updates.
3. If you cannot resolve the problem that caused the CLSD message, then run thecommand ocrconfig -overwrite to start the node.
Chapter 5Managing Oracle Cluster Registry and Oracle Local Registry
5-10

Backing Up Oracle Cluster RegistryThis section describes how to back up OCR content and use it for recovery. The first methoduses automatically generated OCR copies and the second method enables you to issue abackup command manually:
• Automatic backups: Oracle Clusterware automatically creates OCR backups every fourhours. At any one time, Oracle Database always retains the last three backup copies ofOCR. The CRSD process that creates the backups also creates and retains an OCRbackup for each full day and after each week. You cannot customize the backupfrequencies or the number of files that Oracle Database retains.
• Manual backups: Run the ocrconfig -manualbackup command on a node where theOracle Clusterware stack is up and running to force Oracle Clusterware to perform abackup of OCR at any time, rather than wait for the automatic backup. You must run thecommand as a user with administrative privileges. The -manualbackup option isespecially useful when you want to obtain a binary backup on demand, such as beforeyou make changes to OCR. The OLR only supports manual backups.
When the clusterware stack is down on all nodes in the cluster, the backups that are listed bythe ocrconfig -showbackup command may differ from node to node.
Note:
After you install or upgrade Oracle Clusterware on a node, or add a node to thecluster, when the root.sh script finishes, it backs up OLR.
This section includes the following topics:
• Listing Backup Files
• Changing Backup Location
Listing Backup FilesRun the following command to list the backup files:
ocrconfig -showbackup
The ocrconfig -showbackup command displays the backup location, timestamp, and theoriginating node name of the backup files that Oracle Clusterware creates. By default, the -showbackup option displays information for both automatic and manual backups but you caninclude the auto or manual flag to display only the automatic backup information or only themanual backup information, respectively.
Run the following command to inspect the contents and verify the integrity of the backup file:
ocrdump -backupfile backup_file_name
You can use any backup software to copy the automatically generated backup files at leastonce daily to a different device from where the primary OCR resides.
Starting with Oracle Clusterware 18c, you can use Oracle ASM or a shared file system forgenerating backups, but you cannot change to a local file system. Oracle recommends that
Chapter 5Managing Oracle Cluster Registry and Oracle Local Registry
5-11

you include the backup file created with the OCRCONFIG utility as part of youroperating system backup using standard operating system or third-party tools.
Changing Backup LocationRun the following command to change the location where OCR creates backups:
# ocrconfig -backuploc file_name
The file_name variable in the preceding command can be a full directory path namethat is accessible by all nodes, or it can be an Oracle ASM disk group that is mountedon all nodes. You must migrate OCR to Oracle ASM before changing the OCR backuplocation to an Oracle ASM disk group. You can change the OCR backup location to anOracle ASM disk group only if there is at least one Oracle ASM OCR location in aseparate disk group.
For example, to specify an OCR backup location in a directory:
# ocrconfig -backuploc Grid_home/cdata/cluster3
To specify an OCR backup location in an Oracle ASM disk group:
# ocrconfig -backuploc +bkupdg
Note:
On Linux and UNIX systems, you must be root user to run most but not all ofthe ocrconfig command options. On Windows systems, the user must be amember of the Administrator's group.
Related Topics
• Administering Oracle Cluster Registry with Export and Import Commands
• OCRCONFIG Command Reference
Restoring Oracle Cluster RegistryLearn how to check for Oracle Cluster Registry (OCR) issues, and how to resolvethose issues.
• How to Check Oracle Cluster Registry Issues
• Restoring the Oracle Cluster Registry on Linux or Unix Systems
• Restoring the Oracle Cluster Registry on Windows Systems
• Restoring the Oracle Cluster Registry in an Oracle Restart Environment
Chapter 5Managing Oracle Cluster Registry and Oracle Local Registry
5-12

How to Check Oracle Cluster Registry IssuesIf you encounter an Oracle Cluster Registry (OCR) issue, then review these checks andguidelines.
If a resource fails, then before attempting to restore OCR, restart the resource. As a definitiveverification that OCR failed, run ocrcheck. If the command returns a failure message, thenboth the primary OCR and the OCR mirror have failed.
Note:
• You cannot restore your configuration from an OCR backup file by using the -import option, which is explained in "Administering Oracle Cluster Registry withExport and Import Commands". You must instead use the -restore option, asdescribed in the following sections.
• If you store OCR on an Oracle ASM disk group, and the disk group is notavailable, then you must recover and mount the Oracle ASM disk group.
Restoring the Oracle Cluster Registry on Linux or Unix SystemsUse this procedure to restore OCR on Linux or Unix systems.
If you are storing OCR on an Oracle ASM disk group, and that disk group is corrupt, then youmust restore the Oracle ASM disk group using Oracle ASM utilities, and then mount the diskgroup again before recovering OCR. Recover OCR by running the ocrconfig -restorecommand, as instructed in the following procedure.
Note:
If the original OCR location does not exist, then you must create an empty (0 byte)OCR location with the same name as the original OCR location before you run theocrconfig -restore command.
Use the following procedure to restore OCR on Linux or Unix systems:
1. List the nodes in your cluster by running the following command on one node:
$ olsnodes
2. Depending on whether OCR is located in an Oracle ASM disk group or on networkattached storage (NAS), stop Oracle Clusterware by running one of the followingcommands as root on all of the nodes:
If OCR is located in an Oracle ASM disk group, then stop the Oracle Clusterwaredaemon:
# crsctl stop crs
Chapter 5Managing Oracle Cluster Registry and Oracle Local Registry
5-13

If the preceding command returns any error due to OCR corruption, then forcestop Oracle Clusterware by running the following command as root on all of thenodes:
# crsctl stop crs -f
3. If you are restoring OCR to a cluster file system or network file system, then runthe following command as root to restore OCR with an OCR backup that you canidentify in "Listing Backup Files":
# ocrconfig -restore file_name
Note:
If the OCR backup file is located in an Oracle ASM disk group, thenensure that the disk group exists and is mounted.
After you complete this step, proceed to step 11.
If you are not restoring OCR to a cluster file system or network file system, thenproceed to the next step.
4. Start the Oracle Clusterware stack on one node in exclusive mode by running thefollowing command as root:
# crsctl start crs -excl -nocrs
The -nocrs option ensures that the CRSD process and OCR do not start with therest of the Oracle Clusterware stack.
Ignore any errors that display.
5. Check whether CRSD is running by running the following command:
$ crsctl status resource ora.crsd -init
If CRSD is running, then stop it by running the following command as root:
# crsctl stop resource ora.crsd -init
Caution:
Do not use the -init flag with any other command unless directed to doso by My Oracle Support.
6. To restore OCR to an Oracle ASM disk group, you must first create a disk groupusing SQL*Plus that has the same name as the disk group you want to restoreand mount it on the local node.
Chapter 5Managing Oracle Cluster Registry and Oracle Local Registry
5-14

If you cannot mount the disk group locally, then run the following SQL*Plus command:
SQL> drop diskgroup disk_group_name force including contents;
7. Restore OCR with an OCR backup that you can identify in "Listing Backup Files" byrunning the following command as root:
# ocrconfig -restore file_name
Note:
• If the original OCR location does not exist, then you must create an empty(0 byte) OCR location before you run the ocrconfig -restore command.
• Ensure that the OCR devices that you specify in the OCR configurationexist and that these OCR devices are valid.
• If you configured OCR in an Oracle ASM disk group, then ensure that theOracle ASM disk group exists and is mounted.
• If the OCR backup file is located in an Oracle ASM disk group, then ensurethat the disk group exists and is mounted.
8. Verify the integrity of OCR:
# ocrcheck
9. Stop Oracle Clusterware on the node where it is running in exclusive mode:
# crsctl stop crs -f
10. Run the ocrconfig -repair -replace command as root on all the nodes in the clusterwhere you did not run the ocrconfig -restore command. For example, if you ran theocrconfig -restore command on node 1 of a four-node cluster, then you must run theocrconfig -repair -replace command on nodes 2, 3, and 4.
11. Begin to start Oracle Clusterware by running the following command as root on all of thenodes:
# crsctl start crs
12. Verify OCR integrity of all of the cluster nodes that are configured as part of your clusterby running the following CVU command:
$ cluvfy comp ocr -n all -verbose
Chapter 5Managing Oracle Cluster Registry and Oracle Local Registry
5-15

Restoring the Oracle Cluster Registry on Windows SystemsUse this procedure to restore the Oracle Cluster Registry (OCR) on MicrosoftWindows systems.
If you are storing OCR on an Oracle ASM disk group, and that disk group is corrupt,then you must restore the Oracle ASM disk group using Oracle ASM utilities, and thenmount the disk group again before recovering OCR. Recover OCR by running theocrconfig -restore command.
Note:
If the original OCR location does not exist, then you must create an empty (0byte) OCR location with the same name as the original OCR location beforeyou run the ocrconfig -restore command.
Use the following procedure to restore OCR on Windows systems:
1. List the nodes in your cluster by running the following command on one node:
C:\>olsnodes
2. Stop Oracle Clusterware by running the following command as a member of theAdministrators group on all of the nodes:
C:\>crsctl stop crs
If the preceding command returns any error due to OCR corruption, stop OracleClusterware by running the following command as a member of the Administratorsgroup on all of the nodes:
C:\>crsctl stop crs -f
3. Start the Oracle Clusterware stack on one node in exclusive mode by running thefollowing command as a member of the Administrators group:
C:\>crsctl start crs -excl -nocrs
The -nocrs option ensures that the CRSD process and OCR do not start with therest of the Oracle Clusterware stack.
Ignore any errors that display.
4. Restore OCR with the OCR backup file that you identified in "Listing Backup Files"by running the following command as a member of the Administrators group:
C:\>ocrconfig -restore file_name
Make sure that the OCR devices that you specify in the OCR configuration existand that these OCR devices are valid.
Chapter 5Managing Oracle Cluster Registry and Oracle Local Registry
5-16

Note:
• Ensure that the OCR devices that you specify in the OCR configurationexist and that these OCR devices are valid.
• Ensure that the Oracle ASM disk group you specify exists and is mounted.
5. Verify the integrity of OCR:
C:\>ocrcheck
6. Stop Oracle Clusterware on the node where it is running in exclusive mode:
C:\>crsctl stop crs -f
7. Begin to start Oracle Clusterware by running the following command as a member of theAdministrators group on all of the nodes:
C:\>crsctl start crs
8. Run the following Cluster Verification Utility (CVU) command to verify OCR integrity of allof the nodes in your cluster database:
C:\>cluvfy comp ocr -n all -verbose
Restoring the Oracle Cluster Registry in an Oracle Restart EnvironmentUse this procedure to restore OCR in an Oracle Restart environment.
Note:
• OCR is present for backward compatibility.
• After an OCR location is created, it does not get updated in the Oracle Restartenvironment.
• If the Oracle Restart home has been backed up, and if there is a failure, thenrestoring the Oracle Restart home restores OCR.
1. Stop Oracle High Availability Services by running the following command as root on allof the nodes:
# crsctl stop has [-f]
2. Run the ocrcheck -config command to determine the OCR location and then create anempty (0 byte) OCR location with appropriate permissions in that location.
Chapter 5Managing Oracle Cluster Registry and Oracle Local Registry
5-17

3. Restore OCR by running the following command as root:
# crsctl pin css -n host_name
Note:
Ensure that the OCR devices that you specify in the OCR configurationexist and that these OCR devices are valid.
4. Run the ocrcheck command to verify the integrity of OCR.
5. Start Oracle High Availability Services by running the following command on all ofthe nodes:
$ crsctl start has
Diagnosing Oracle Cluster Registry ProblemsUse the OCRDUMP and OCRCHECK utilities to diagnose OCR problems.
Related Topics
• OCRDUMP Utility Syntax and Options
• Using the OCRCHECK UtilityThe OCRCHECK utility displays the version of the OCR's block format, total spaceavailable and used space, OCRID, and the OCR locations that you haveconfigured.
Administering Oracle Cluster Registry with Export and ImportCommands
In addition to using the automatically created OCR backup files, you should alsoexport OCR contents before and after making significant configuration changes, suchas adding or deleting nodes from your environment, modifying Oracle Clusterwareresources, and upgrading, downgrading or creating a database. Do this by using theocrconfig -export command, which exports OCR content to a file format.
Chapter 5Managing Oracle Cluster Registry and Oracle Local Registry
5-18

Caution:
Note the following restrictions for restoring OCR:
• The file format generated by ocrconfig -restore is incompatible with the fileformat generated by ocrconfig -export. The ocrconfig -export andocrconfig -import commands are compatible. The ocrconfig -manualbackupand ocrconfig -restore commands are compatible. The two file formats areincompatible and must not be interchangeably used.
• When exporting OCR, Oracle recommends including "ocr", the cluster name,and the timestamp in the name string. For example:
ocr_mycluster1_20090521_2130_export
Using the ocrconfig -export command also enables you to restore OCR using the -importoption if your configuration changes cause errors. For example, if you have configurationproblems that you cannot resolve, or if you are unable to restart Oracle Clusterware aftersuch changes, then restore your configuration using the procedure for your platform.
Oracle recommends that you use either automatic or manual backups, and the ocrconfig -restore command instead of the ocrconfig -export and ocrconfig -import commands torestore OCR for the following reasons:
• A backup is a consistent snapshot of OCR, whereas an export is not.
• Backups are created when the system is online. You must shut down Oracle Clusterwareon all nodes in the cluster to get a consistent snapshot using the ocrconfig -exportcommand.
• You can inspect a backup using the OCRDUMP utility. You cannot inspect the contents ofan export.
• You can list backups with the ocrconfig -showbackup command, whereas you mustkeep track of all generated exports.
This section includes the following topics:
• Importing Oracle Cluster Registry Content on Linux or UNIX Systems
• Importing Oracle Cluster Registry Content on Windows Systems
Note:
Most configuration changes that you make not only change OCR contents, theconfiguration changes also cause file and database object creation. Some of thesechanges are often not restored when you restore OCR. Do not restore OCR as acorrection to revert to previous configurations, if some of these configurationchanges should fail. This may result in an OCR location that has contents that donot match the state of the rest of your system.
Chapter 5Managing Oracle Cluster Registry and Oracle Local Registry
5-19

Importing Oracle Cluster Registry Content on Linux or Unix SystemsUse this procedure to import OCR on Linux or Unix systems.
Note:
This procedure assumes default installation of Oracle Clusterware on allnodes in the cluster, where Oracle Clusterware autostart is enabled.
1. List the nodes in your cluster by running the following command on one node:
$ olsnodes
2. Stop Oracle Clusterware by running the following command as root on all of thenodes:
# crsctl stop crs
If the preceding command returns any error due to OCR corruption, then stopOracle Clusterware by running the following command as root on all of the nodes:
# crsctl stop crs -f
3. Start the Oracle Clusterware stack on one node in exclusive mode by running thefollowing command as root:
# crsctl start crs -excl
Ignore any errors that display.
Check whether CRSD is running. If it is, stop it by running the following commandas root:
# crsctl stop resource ora.crsd -init
Caution:
Do not use the -init flag with any other command.
4. Import OCR by running the following command as root:
# ocrconfig -import file_name
If you are importing OCR to a cluster or network file system, then skip to step 7.
Chapter 5Managing Oracle Cluster Registry and Oracle Local Registry
5-20

Note:
• If the original OCR location does not exist, then you must create an empty(0 byte) OCR location before you run the ocrconfig -import command.
• Ensure that the OCR devices that you specify in the OCR configurationexist and that these OCR devices are valid.
• If you configured OCR in an Oracle ASM disk group, then ensure that theOracle ASM disk group exists, and is mounted.
5. To verify the integrity of OCR, enter the following command:
# ocrcheck
6. Stop Oracle Clusterware on the node where it is running in exclusive mode, using thefollowing command:
# crsctl stop crs -f
7. Begin to start Oracle Clusterware by running the following command as root on all of thenodes:
# crsctl start crs
8. Verify OCR integrity of all of the cluster nodes that are configured as part of your clusterby running the following CVU command:
$ cluvfy comp ocr -n all -verbose
Note:
You can only import an exported OCR. To restore OCR from a backup, you mustinstead use the -restore option, as described in "Backing Up Oracle ClusterRegistry".
Related Topics
• Oracle Automatic Storage Management Administrator's Guide
• Backing Up Oracle Cluster Registry
• Cluster Verification Utility ReferenceLearn about Cluster Verification Utility (CVU), and how to use it to prepare forinstallations, patching, or other system changes.
Chapter 5Managing Oracle Cluster Registry and Oracle Local Registry
5-21

Importing Oracle Cluster Registry Content on Windows SystemsUse this procedure to import OCR on Windows systems.
Note:
This procedure assumes default installation of Oracle Clusterware on allnodes in the cluster, where Oracle Clusterware autostart is enabled.
1. List the nodes in your cluster by running the following command on one node:
C:\>olsnodes
2. Stop Oracle Clusterware by running the following command as a member of theAdministrators group on all of the nodes:
C:\>crsctl stop crs
If the preceding command returns any error due to OCR corruption, stop OracleClusterware by running the following command as a member of the Administratorsgroup on all of the nodes:
C:\>crsctl stop crs -f
3. Start the Oracle Clusterware stack on one node in exclusive mode by running thefollowing command as a member of the Administrators group:
C:\>crsctl start crs -excl
Ignore any errors that display.
Check whether CRSD is running. If it is, stop it by running the following commandas a member of the Administrators group:
C:\>crsctl stop resource ora.crsd -init
Caution:
Do not use the -init flag in any other command.
4. Import OCR by running the following command as a member of the Administratorsgroup:
C:\>ocrconfig -import file_name
Make sure that the OCR devices that you specify in the OCR configuration existand that these OCR devices are valid.
Chapter 5Managing Oracle Cluster Registry and Oracle Local Registry
5-22

Note:
• If the original OCR location does not exist, then you must create an empty(0 byte) OCR location before you run the ocrconfig -import command.
• Ensure that the OCR devices that you specify in the OCR configurationexist and that these OCR devices are valid.
• Ensure that the Oracle ASM disk group you specify exists and is mounted.
5. Verify the integrity of OCR:
C:\>ocrcheck
6. Stop Oracle Clusterware on the node where it is running in exclusive mode:
C:\>crsctl stop crs -f
7. Begin to start Oracle Clusterware by running the following command as a member of theAdministrators group on all of the nodes:
C:\>crsctl start crs
8. Run the following Cluster Verification Utility (CVU) command to verify OCR integrity of allof the nodes in your cluster database:
C:\>cluvfy comp ocr -n all -verbose
Related Topics
• Oracle Automatic Storage Management Administrator's Guide
• Cluster Verification Utility ReferenceLearn about Cluster Verification Utility (CVU), and how to use it to prepare forinstallations, patching, or other system changes.
Oracle Local RegistryIn Oracle Clusterware, each node in a cluster has a local registry for node-specific resources,called an Oracle Local Registry (OLR), that is installed and configured when OracleClusterware installs OCR. Multiple processes on each node have simultaneous read andwrite access to the OLR particular to the node on which they reside, regardless of whetherOracle Clusterware is running or fully functional.
By default, OLR is located at Grid_base/crsdata/host_name/olr/hostname_release.olr oneach node.
Manage OLR using the OCRCHECK, OCRDUMP, and OCRCONFIG utilities as root with the-local option.
Chapter 5Managing Oracle Cluster Registry and Oracle Local Registry
5-23

• You can check the status of OLR on the local node using the OCRCHECK utility,as follows:
# ocrcheck -localStatus of Oracle Local Registry is as follows : Version : 4 Total space (kbytes) : 491684 Used space (kbytes) : 83120 Available space (kbytes) : 408564 ID : 1260380057 Device/File Name : Grid_base/crsdata/dglnx6/olr/dglnx6_21.olr Device/File integrity check succeeded Local registry integrity check succeeded Logical corruption check succeeded
• You can display the content of OLR on the local node to the text terminal thatinitiated the program using the OCRDUMP utility, as follows:
# ocrdump -local -stdout• You can perform administrative tasks on OLR on the local node using the
OCRCONFIG utility.
– To export OLR to a file:
# ocrconfig -local -export file_name
Note:
* Oracle recommends that you use the -manualbackup and -restore commands and not the -import and -exportcommands.
* When exporting OLR, Oracle recommends including "olr", thehost name, and the timestamp in the name string. For example:
olr_myhost1_20090603_0130_export
– To import a specified file to OLR:
# ocrconfig -local -import file_name– To manually back up OLR:
# ocrconfig -local -manualbackup
Chapter 5Managing Oracle Cluster Registry and Oracle Local Registry
5-24

Note:
Oracle Clusterware backs up OLR after installation or upgrade and, bydefault, periodically backs up OLR, thereafter. At any time after the initialbackup, you can manually back up OLR.
Oracle also recommends that you create a new backup when you migrateOCR from Oracle ASM to other storage, or when you migrate OCR fromother storage to Oracle ASM.
The default backup location for the OLR is in the path Grid_base/crsdata/host_name/olr/.
– To view the contents of the OLR backup file:
ocrdump -local -backupfile olr_backup_file_name– To change the OLR backup location:
ocrconfig -local -backuploc new_olr_backup_path– To restore OLR:
# crsctl stop crs# ocrconfig -local -restore file_name# ocrcheck -local# crsctl start crs$ cluvfy comp olr
Managing Voting FilesThis section includes the following topics for managing voting files in your cluster:
• Storing Voting Files on Oracle ASM
• Backing Up Voting Files
• Restoring Voting Files
• Adding_ Deleting_ or Migrating Voting Files
Caution:
The dd commands used to back up and recover voting files in previous versions ofOracle Clusterware are not supported in Oracle Clusterware 12c and later releases.Restoring voting files that were copied using dd or cp commands can prevent theOracle Clusterware 12c and later releases stack from coming up. Use the backupand restore procedures described in this chapter to ensure proper voting filefunctionality.
Chapter 5Managing Voting Files
5-25

Note:
• Voting file management requires a valid and working OCR. Before youadd, delete, replace, or restore voting files, run the ocrcheck commandas root. If OCR is not available or it is corrupt, then you must restoreOCR as described in "Restoring Oracle Cluster Registry".
• If you upgrade from a previous version of Oracle Clusterware to OracleClusterware 12c and later releases, and you want to store voting files inan Oracle ASM disk group, then you must set the ASM Compatibility(COMPATIBLE.ASM) compatibility attribute to 12.1.0.0.
Related Topics
• Restoring Oracle Cluster RegistryLearn how to check for Oracle Cluster Registry (OCR) issues, and how to resolvethose issues.
• Oracle Automatic Storage Management Administrator's Guide
Storing Voting Files on Oracle ASMIf you choose to store your voting files in Oracle ASM, then Oracle ASM stores all thevoting files for the cluster in the disk group you choose.
Oracle ASM manages voting files differently from other files that it stores. You cannotuse voting files stored in Oracle ASM and voting files not stored in Oracle ASM in thesame cluster.
Once you configure voting files on Oracle ASM, you can only make changes to thevoting files' configuration using the crsctl replace votedisk command. This is trueeven in cases where there are no working voting files. Despite the fact that crsctlquery css votedisk reports zero vote disks in use, Oracle Clusterware remembersthe fact that Oracle ASM was in use and the replace verb is required. Only after youuse the replace verb to move voting files back to non-Oracle ASM storage are theverbs add css votedisk and delete css votedisk again usable.
The number of voting files you can store in a particular Oracle ASM disk groupdepends upon the redundancy of the disk group.
By default, Oracle ASM puts each voting file in its own failure group within the diskgroup. A failure group is a subset of the disks in a disk group. Failure groups definedisks that share components, such that if one fails then other disks sharing thecomponent might also fail. An example of what you might define as a failure groupwould be a set of SCSI disks sharing the same SCSI controller. Failure groups areused to determine which Oracle ASM disks to use for storing redundant data. Forexample, if two-way mirroring is specified for a file, then redundant copies of fileextents must be stored in separate failure groups.
The redundancy level that you choose for the Oracle ASM disk group determines howOracle ASM mirrors files in the disk group, and determines the number of disks andamount of disk space that you require. If the voting files are in a disk group, then thedisk groups that contain Oracle Clusterware files (OCR and voting files) have a higher
Chapter 5Managing Voting Files
5-26

minimum number of failure groups than other disk groups because the voting files are storedin quorum failure groups.
A quorum failure group is a special type of failure group that is used to store the OracleClusterware voting files. The quorum failure group is used to ensure that a quorum of thespecified failure groups are available. When Oracle ASM mounts a disk group that containsOracle Clusterware files, the quorum failure group is used to determine if the disk group canbe mounted if there is a loss of one or more failure groups. Disks in the quorum failure groupdo not contain user data, therefore a quorum failure group is not considered whendetermining redundancy requirements in respect to storing user data.
An Oracle ASM flex disk group is a disk group type that supports Oracle ASM file groups andquota groups. In general, a flex disk group enables users to manage storage at thegranularity of the database, in addition to at the disk group level.
Redundancy levels include:
• External redundancy: An external redundancy disk group requires a minimum of onedisk device. The effective disk space in an external redundancy disk group is the sum ofthe disk space in all of its devices.
Because Oracle ASM does not mirror data in an external redundancy disk group, Oraclerecommends that you use external redundancy with storage devices such as RAID, orother similar devices that provide their own data protection mechanisms.
• Normal redundancy: A normal redundancy disk group requires a minimum of two diskdevices (or two failure groups). The effective disk space in a normal redundancy diskgroup is half the sum of the disk space in all of its devices.
For Oracle Clusterware files, a normal redundancy disk group requires a minimum ofthree disk devices (two of the three disks are used by failure groups and all three disksare used by the quorum failure group) and provides three voting files and one OCR andmirror of the OCR. When using a normal redundancy disk group, the cluster can survivethe loss of one failure group.
• High redundancy: In a high redundancy disk group, Oracle ASM uses three-waymirroring to increase performance and provide the highest level of reliability. A highredundancy disk group requires a minimum of three disk devices (or three failure groups).The effective disk space in a high redundancy disk group is one-third the sum of the diskspace in all of its devices.
For Oracle Clusterware files, a high redundancy disk group requires a minimum of fivedisk devices (three of the five disks are used by failure groups and all five disks are usedby the quorum failure group) and provides five voting files and one OCR and two mirrorsof the OCR. With high redundancy, the cluster can survive the loss of two failure groups.
Using the crsctl replace votedisk command, you can move a given set of voting files fromone Oracle ASM disk group into another, or onto a certified file system. If you move votingfiles from one Oracle ASM disk group to another, then you can change the number of votingfiles by placing them in a disk group of a different redundancy level as the former disk group.
Chapter 5Managing Voting Files
5-27

Note:
• You cannot directly influence the number of voting files in one disk group.
• You cannot use the crsctl add | delete votedisk commands onvoting files stored in Oracle ASM disk groups because Oracle ASMmanages the number of voting files according to the redundancy level ofthe disk group.
• You cannot add a voting file to a cluster file system if the voting files arestored in an Oracle ASM disk group. Oracle does not support havingvoting files in Oracle ASM and directly on a cluster file system for thesame cluster at the same time.
Related Topics
• Oracle Automatic Storage Management Administrator's Guide
• Adding, Deleting, or Migrating Voting Files
Backing Up Voting FilesOracle Clusterware automatically backs up voting file data in OCR as part of anyconfiguration change and automatically restores the data to any voting file you add.
If all voting files are corrupted, however, you can restore them as described in"Restoring Voting Files".
Related Topics
• Restoring Voting FilesIf all of the voting files are corrupted, then you can use this procedure to restorethem.
Restoring Voting FilesIf all of the voting files are corrupted, then you can use this procedure to restore them.
1. Restore the OCR as described in "Restoring Oracle Cluster Registry", ifnecessary.
This step is necessary only if the OCR is also corrupted, or otherwise unavailable,such as if the OCR is on Oracle ASM, and the ASM disk group is no longeravailable.
2. Run the following command as root from only one node to start the OracleClusterware stack in exclusive mode, which does not require voting files to bepresent or usable:
# crsctl start crs -excl
3. Run the command crsctl query css votedisk to retrieve the list of voting filescurrently defined.
Chapter 5Managing Voting Files
5-28

For example:
$ crsctl query css votedisk-- ----- ----------------- --------- ---------## STATE File Universal Id File Name Disk group 1. ONLINE 6f57843d89464c46ea747362e8a3fa43 (/dev/sdb1) [DATA] 2. ONLINE 7c54856e98474f61bf349401e7c9fb95 (/dev/sdc1) [DATA] 3. ONLINE 9c46232b76234f61fc934673d5c8ec59 (/dev/sdd1) [DATA]
This list may be empty if all voting files were corrupted, or the list may have entries thatare marked as status 3, or OFF.
4. Depending on where you store your voting files, do one of the following:
• If the voting files are stored in Oracle ASM, then run the following command tomigrate the voting files to the Oracle ASM disk group you specify:
crsctl replace votedisk +asm_disk_group
The Oracle ASM disk group to which you migrate the voting files must exist in OracleASM. You can use this command whether the voting files were stored in Oracle ASMor some other storage device.
• If you did not store voting files in Oracle ASM, then run the following command usingthe File Universal Identifier (FUID) obtained in the previous step:
$ crsctl delete css votedisk FUID
Add a voting file, as follows:
$ crsctl add css votedisk path_to_voting_disk
5. Stop the Oracle Clusterware stack as root:
# crsctl stop crs
Note:
If the Oracle Clusterware stack is running in exclusive mode, then use the -foption to force the shutdown of the stack.
6. Restart the Oracle Clusterware stack in normal mode as root:
# crsctl start crs
Related Topics
• Oracle Automatic Storage Management Administrator's Guide
Chapter 5Managing Voting Files
5-29

Adding, Deleting, or Migrating Voting FilesYou can add, remove, and migrate voting files after you install Oracle Clusterware.Note that the commands you use to do this are different, depending on whether yourvoting files are located in Oracle ASM, or are located in another storage option.
Modifying Voting Files that are Stored in Oracle ASM• To display the voting file FUID and file path of each current voting file, run the
crsctl query css votedisk command to display output similar to the following:
$ crsctl query css votedisk-- ----- ----------------- --------- ---------## STATE File Universal Id File Name Disk group 1. ONLINE 6f57843d89464c46ea747362e8a3fa43 (/dev/sdb1) [DATA] 2. ONLINE 7c54856e98474f61bf349401e7c9fb95 (/dev/sdc1) [DATA] 3. ONLINE 9c46232b76234f61fc934673d5c8ec59 (/dev/sdd1) [DATA]
This command returns a disk sequence number, the status of the disk, the FUID,the path of the disk, and the name of the Oracle ASM disk group on which the diskis stored.
• To migrate voting files from Oracle ASM to an alternative storage device, specifythe path to the non-Oracle ASM storage device with which you want to replace theOracle ASM disk group using the following command:
$ crsctl replace votedisk path_to_voting_disk
You can run this command on any node in the cluster.
• To replace all voting files not stored in Oracle ASM with voting files managed byOracle ASM in an Oracle ASM disk group, run the following command:
$ crsctl replace votedisk +asm_disk_group
Modifying Voting Files that are Not Stored on Oracle ASM• To display the voting file FUID and file path of each current voting file, run the
following command:
$ crsctl query css votedisk## STATE File Universal Id File Name Disk group-- ----- ----------------- --------- --------- 1. ONLINE 7c54856e98474f61bf349401e7c9fb95 (/cfs/host09_vd3) []
This command returns a disk sequence number, the status of the disk, the FUID,and the path of the disk and no name of an Oracle ASM disk group.
• To add one or more voting files, run the following command, replacing thepath_to_voting_disk variable with one or more space-delimited, complete pathsto the voting files you want to add:
$ crsctl add css votedisk path_to_voting_disk [...]• To replace voting file A with voting file B, you must add voting file B, and then
delete voting file A. To add a new disk and remove the existing disk, run thefollowing command, replacing the path_to_voting_diskB variable with the fullyqualified path name of voting file B:
Chapter 5Managing Voting Files
5-30

$ crsctl add css votedisk path_to_voting_diskB -purge
The -purge option deletes existing voting files.
• To remove a voting file, run the following command, specifying one or more space-delimited, voting file FUIDs or comma-delimited directory paths to the voting files youwant to remove:
$ crsctl delete css votedisk {FUID | path_to_voting_disk[...]}
Note:
If the cluster is down and cannot restart due to lost voting files, then you must startCSS in exclusive mode by running the following command, as root:
# crsctl start crs -excl
After you start CSS in exclusive mode, you can replace the voting file, as follows:
# crsctl replace votedisk path_to_voting_disk
Migrating Voting Files to Oracle ASMTo migrate voting files to Oracle ASM, specify the Oracle ASM disk group name in thefollowing command:
$ crsctl replace votedisk +asm_disk_group
You can run this command on any node in the cluster.
Verifying the Voting File LocationAfter modifying the voting file, verify the voting file location, as follows:
$ crsctl query css votedisk
Related Topics
• crsctl query css votedisk
Chapter 5Managing Voting Files
5-31

6Adding and Deleting Cluster Nodes
Describes how to add nodes to an existing cluster, and how to delete nodes from clusters.
This chapter provides procedures for these tasks for Linux, UNIX, and Windows systems.
Note:
• Unless otherwise instructed, perform all add and delete node steps as the userthat installed Oracle Clusterware.
• You can use Fleet Patching and Provisioning to added and delete clusternodes.
• Oracle recommends that you use the cloning procedure described in "CloningOracle Clusterware" to create clusters.
This chapter includes the following topics:
• Prerequisite Steps for Adding Cluster Nodes
• Adding and Deleting Cluster Nodes on Linux and UNIX Systems
• Adding and Deleting Cluster Nodes on Windows Systems
Related Topics
• Cloning Oracle Clusterware
Prerequisite Steps for Adding Cluster Nodes
Note:
Ensure that you perform the preinstallation tasks listed in Oracle Grid InfrastructureInstallation and Upgrade Guide for Linux before adding a node to a cluster.
Do not install Oracle Clusterware. The software is copied from an existing nodewhen you add a node to the cluster.
Complete the following steps to prepare nodes to add to the cluster:
1. Make physical connections.
Connect the nodes' hardware to the network infrastructure of your cluster. This includesestablishing electrical connections, configuring network interconnects, configuring shareddisk subsystem connections, and so on. See your hardware vendor documentation fordetails about this step.
6-1

2. Install the operating system.
Install a cloned image of the operating system that matches the operating systemon the other nodes in your cluster. This includes installing required servicepatches, updates, and drivers. See your operating system vendor documentationfor details about this process.
Note:
Oracle recommends that you use a cloned image. However, if theinstallation fulfills the installation requirements, then install the operatingsystem according to the vendor documentation.
3. Create Oracle users.
You must create all Oracle users on the new node that exist on the existing nodes.For example, if you are adding a node to a cluster that has two nodes, and thosetwo nodes have different owners for the Oracle Grid Infrastructure home and theOracle home, then you must create those owners on the new node, even if you donot plan to install an Oracle home on the new node.
Note:
Perform this step only for Linux and UNIX systems.
As root, create the Oracle users and groups using the same user ID and group IDas on the existing nodes.
4. Ensure that SSH is configured on the node.
Note:
SSH is configured when you install Oracle Clusterware. If SSH is notconfigured, then see Oracle Grid Infrastructure Installation and UpgradeGuide for information about configuring SSH.
5. Verify the hardware and operating system installations with the Cluster VerificationUtility (CVU).
After you configure the hardware and operating systems on the nodes you want toadd, you can run the following commands to verify that the nodes you want to addare reachable by other nodes in the cluster. You can also use this command toverify user equivalence to all given nodes from the local node, node connectivityamong all of the given nodes, accessibility to shared storage from all of the givennodes, and so on.
a. From the Grid_home/bin directory on an existing node, run the CVU commandto obtain a detailed comparison of the properties of the reference node with allof the other nodes that are part of your current cluster environment. Replaceref_node with the name of a node in your existing cluster against which youwant CVU to compare the nodes to be added. Specify a comma-delimited list
Chapter 6Prerequisite Steps for Adding Cluster Nodes
6-2

of nodes after the -n option. In the following example, orainventory_group is thename of the Oracle Inventory group, and osdba_group is the name of the OSDBAgroup:
$ cluvfy comp peer [-refnode ref_node] -n node_list[-orainv orainventory_group] [-osdba osdba_group] [-verbose]
b. Ensure that the Grid Infrastructure Management Repository has at least an additional500 MB of space for each node added above four, as follows:
$ oclumon manage -get repsize
Add additional space, if required, as follows:
$ oclumon manage -repos changerepossize total_in_MB
See Also:
Oracle Autonomous Health Framework User's Guide for more informationabout using OCLUMON
Note:
For the reference node, select a cluster node against which you want CVU tocompare, for example, the nodes that you want to add that you specify with the-n option.
After completing the procedures in this section, you are ready to add the nodes to the cluster.
Note:
Avoid changing host names after you complete the Oracle Clusterware installation,including adding or deleting domain qualifications. Nodes with changed host namesmust be deleted from the cluster and added back with the new name.
Related Topics
• Oracle Grid Infrastructure Installation and Upgrade Guide for Linux
• Oracle Autonomous Health Framework User's Guide
Adding and Deleting Cluster Nodes on Linux and UNIX SystemsAdd or delete cluster nodes on Linux and UNIX systems.
The procedure in the section for adding nodes assumes that you have performed the steps inthe "Prerequisite Steps for Adding Cluster Nodes" section.
Chapter 6Adding and Deleting Cluster Nodes on Linux and UNIX Systems
6-3

The last step of the node addition process includes extending the Oracle Clusterwarehome from an Oracle Clusterware home on an existing node to the nodes that youwant to add.
This section includes the following topics:
• Adding a Cluster Node on Linux and UNIX Systems
• Deleting a Cluster Node on Linux and UNIX Systems
Note:
Beginning with Oracle Clusterware 11g release 2 (11.2), Oracle UniversalInstaller defaults to silent mode when adding nodes.
Related Topics
• Prerequisite Steps for Adding Cluster Nodes
Adding a Cluster Node on Linux and UNIX SystemsThere are two methods that you can use to add a node to your cluster.
Using Fleet Patching and Provisioning to Add a Node
If you have a Fleet Patching and Provisioning Server, then you can use Fleet Patchingand Provisioning to add a node to a cluster with one command, as shown in thefollowing example:
$ rhpctl addnode gihome -client rhpclient -newnodes clientnode2:clientnode2-vip -root
The preceding example adds a node named clientnode2 with VIP clientnode2-vipto the Fleet Patching and Provisioning Client named rhpclient, using root credentials(login for the node you are adding).
Using Oracle Grid Infrastructure Installer to Add a Node
If you do you not want to use Fleet Patching and Provisioning to add a node to thecluster, then you can use the Oracle Grid Infrastructure installer to accomplish thetask.
Note:
You can use the $Oracle_home/install/response/gridSetup.rsptemplate to create a response file to add nodes using the Oracle GridInfrastructure Installer for non-interactive (silent mode) operation.
This procedure assumes that:
• There is an existing cluster with two nodes named node1 and node2
Chapter 6Adding and Deleting Cluster Nodes on Linux and UNIX Systems
6-4

• You have successfully installed Oracle Clusterware on node1 and node2• You are adding a node named node3To add a node to the cluster using the Oracle Grid Infrastructure installer
1. In the Grid_home on an existing node of the cluster, run ./gridSetup.sh as the grid userto start the installer. The Grid_home is the Oracle Grid Infrastructure home.
2. On the Select Configuration Option page, select Add more nodes to the cluster.
3. On the Cluster Node Information page, click Add... to provide information for nodes youwant to add.
4. When the verification process finishes on the Perform Prerequisite Checks page, checkthe summary and then click Install.
5. If prompted, then run the orainstRoot.sh script as root on the node being added topopulate the /etc/oraInst.loc file with the location of the central inventory. Forexample:
# /opt/oracle/oraInventory/orainstRoot.sh
Note:
If there is no policy-managed or administrator-managed database with apreconfigured database instance for the new node, run the Grid_home/root.shscript as prompted. You may be prompted to run Grid_home/root.sh in thefollowing steps, but you do not need to run it again after running the scriptsuccessfully.
6. Run the Grid_home/root.sh script on the node3 as root and run the subsequent script,as instructed. Review the following note before running the script.
Note:
• If you ran the root.sh script in the previous step, then you do not need torun it again.
• If you have a policy-managed database, then you must ensure that theOracle home is cloned to the new node before you run the root.sh script.
• If you have any administrator-managed database instances configured onthe nodes which are going to be added to the cluster, then you must extendthe Oracle home to the new node before you run the root.sh script.
Alternatively, remove the administrator-managed database instances usingthe srvctl remove instance command.
7. Perform the following procedures that apply to your system configuration.
Chapter 6Adding and Deleting Cluster Nodes on Linux and UNIX Systems
6-5

Note:
Note that running Oracle_home/addnode in interactive mode displaysseveral prerequisite check failures because the new node has not yetbeen configured for the Oracle Grid Infrastructure. These warnings canbe ignored.
If you have an Oracle RAC or Oracle RAC One Node database configured onthe cluster and you have a local Oracle home, then do the following to extendthe Oracle database home to node3:
a. Navigate to the Oracle_home/addnode directory on node1 and run theaddnode.sh script as the user that installed Oracle RAC using the followingsyntax:
$ ./addnode.sh "CLUSTER_NEW_NODES={node3}"
b. Run the Oracle_home/root.sh script on node3 as root, where Oracle_home isthe Oracle RAC home.
c. Open the pluggable databases (PDBs) on the newly added node using thefollowing commands in your SQL*Plus session:
SQL> CONNECT / AS SYSDBASQL> ALTER PLUGGABLE DATABASE pdb_name OPEN;
If you have a shared Oracle home that is shared using Oracle AdvancedCluster File System (Oracle ACFS), then do the following to extend the Oracledatabase home to node3:
a. Run the Grid_home/root.sh script on node3 as root, where Grid_home is theOracle Grid Infrastructure home.
b. Run the following command as the user that installed Oracle RAC from theOracle_home/oui/bin directory on the node you are adding to add the OracleRAC database home:
$ ./runInstaller -attachHome ORACLE_HOME="ORACLE_HOME" "CLUSTER_NODES={node3}"LOCAL_NODE="node3" ORACLE_HOME_NAME="home_name" -cfs
c. Navigate to the Oracle_home/addnode directory on node1 and run theaddnode.sh script as the user that installed Oracle RAC using the followingsyntax:
$ ./addnode.sh -noCopy "CLUSTER_NEW_NODES={node3}"
Note:
Use the -noCopy option because the Oracle home on the destinationnode is already fully populated with software.
Chapter 6Adding and Deleting Cluster Nodes on Linux and UNIX Systems
6-6

If you have a shared Oracle home on a shared file system that is not Oracle ACFS,then you must first create a mount point for the Oracle RAC database home on the targetnode, mount and attach the Oracle RAC database home, and update the OracleInventory, as follows:
a. Run the srvctl config database -db db_name command on an existing node in thecluster to obtain the mount point information.
b. Run the following command as root on node3 to create the mount point:
# mkdir -p mount_point_path
c. Mount the file system that hosts the Oracle RAC database home.
d. Run the following command as the user that installed Oracle RAC from theOracle_home/oui/bin directory on the node you are adding to add the Oracle RACdatabase home:
$ ./runInstaller -attachHome ORACLE_HOME="ORACLE_HOME" "CLUSTER_NODES={local_node_name}" LOCAL_NODE="node_name" ORACLE_HOME_NAME="home_name" -cfs
Navigate to the Oracle_home/addnode directory on node1 and run the addnode.shscript as the user that installed Oracle RAC using the following syntax:
$ ./addnode.sh -noCopy "CLUSTER_NEW_NODES={node3}"
Note:
Use the -noCopy option because the Oracle home on the destination nodeis already fully populated with software.
Note:
After running addnode.sh, ensure the Grid_home/network/admin/samplesdirectory has permissions set to 750.
8. Start the Oracle ACFS resource on the new node (node3) by running the followingcommand as root from the Grid_home/bin directory:
# srvctl start filesystem -device volume_device_name -node node3
Chapter 6Adding and Deleting Cluster Nodes on Linux and UNIX Systems
6-7

Note:
• This step is required only if there were Oracle ACFS file systemsregistered in the cluster before performing the adding cluster nodeprocedure. If the step is required, then repeat for each registeredOracle ACFS file system.
• Ensure the Oracle ACFS resources, including Oracle ACFS registryresource and Oracle ACFS file system resource where the Oraclehome is located, are online on the newly added node.
9. Run the following CVU command as the user that installed Oracle Clusterware tocheck cluster integrity. This command verifies that any number of specified nodeshas been successfully added to the cluster at the network, shared storage, andclusterware levels:
$ cluvfy stage -post nodeadd -n node3 [-verbose]
Related Topics
• cluvfy stage nodeadd
• Oracle Grid Infrastructure Installation and Upgrade Guide
• Oracle Real Application Clusters Administration and Deployment Guide
• Oracle Real Application Clusters Administration and Deployment Guide
• Oracle Fleet Patching and Provisioning Administrator's Guide
Chapter 6Adding and Deleting Cluster Nodes on Linux and UNIX Systems
6-8

Deleting a Cluster Node on Linux and UNIX SystemsDelete a node from a cluster on Linux and UNIX systems.
Note:
• You can remove the Oracle RAC database instance from the node beforeremoving the node from the cluster but this step is not required. If you do notremove the instance, then the instance is still configured but never runs.Deleting a node from a cluster does not remove a node's configurationinformation from the cluster. The residual configuration information does notinterfere with the operation of the cluster.
See Also:Oracle Real Application Clusters Administration and DeploymentGuide for more information about deleting an Oracle RAC database instance
• If you delete the last node of a cluster that is serviced by GNS, then you mustdelete the entries for that cluster from GNS.
• If you have nodes in the cluster that are unpinned, then Oracle Clusterwareignores those nodes after a time and there is no need for you to remove them.
• If you create node-specific configuration for a node, such as disabling a serviceon a specific node or adding the node to the candidate list for a server pool,then that node-specific configuration is not removed when the node is deletedfrom the cluster. Such node-specific configuration must be removed manually.
• Voting files are automatically backed up in OCR after any changes you make tothe cluster.
• When you want to delete a node from an Oracle Flex Cluster, you need onlycomplete steps 1 through 4 of this procedure.
To delete a node from a cluster, you can do one of the following procedures. The firstprocedure using gridSetup.sh is the recommended procedure.
Note:
Some steps in the below procedures include commands that you need to executefrom the node that you are deleting. If the node that you are deleting is notaccessible, then you can skip these steps.
Using gridSetup to Delete a Node
1. As the grid user, run the gridSetup.sh script in the Oracle Grid Infrastructure home froma node that you are not deleting.
$ Grid_home/gridSetup.sh
2. Select the Delete node option, and click Next.
Chapter 6Adding and Deleting Cluster Nodes on Linux and UNIX Systems
6-9

3. Select the nodes that you want to delete, and click Next. Make sure that the nodeis accessible for you to be able to delete the selected node.
4. Select the root execution option, such as the sudo privilege.
5. Follow the prompts to delete the select nodes.
6. When prompted to run the crsctl delete node command, you can specify the -purge option to delete the node permanently and to reuse its node number.However, if you want to add the deleted node back with the same node name andthe same node number, then do not use the -purge option.
Using the crsctl delete node Command to Delete a Node
1. (Optional) Ensure that Grid_home correctly specifies the full directory path for theOracle Clusterware home on each node, where Grid_home is the location of theinstalled Oracle Clusterware software.
2. (Optional) Run the following command as either root or the user that installedOracle Clusterware to determine whether the node you want to delete is activeand whether it is pinned:
$ olsnodes -s -t
If the node is pinned, then run the crsctl unpin css command. Otherwise,proceed to the next step.
3. (Optional) On the node that you are deleting, depending on whether you have ashared or local Oracle home, complete one of the following procedures as the userthat installed Oracle Clusterware:
• For a local home, deinstall the Oracle Clusterware home from the node thatyou want to delete, as follows, by running the following command, whereGrid_home is the path defined for the Oracle Clusterware home:
$ Grid_home/deinstall/deinstall -local
Caution:
– If you do not specify the -local flag, then the commandremoves the Oracle Grid Infrastructure home from every node inthe cluster.
Note:
Alternatively, after you configure Oracle Grid Infrastructure, if youwant to delete any node from the grid infrastructure, then you can doso by running Grid_home/gridSetup.sh, selecting Remove nodesfrom the cluster and following the prompts.
• If you have a shared home, then run the following commands in the followingorder on the node you want to delete.
Chapter 6Adding and Deleting Cluster Nodes on Linux and UNIX Systems
6-10

Run the following command to deconfigure Oracle Clusterware:
$ Grid_home/crs/install/rootcrs.sh -deconfig -force
Run the following command from the Grid_home/oui/bin directory to detach the Gridhome:
$ ./runInstaller -detachHome ORACLE_HOME=Grid_home -silent -local
Manually delete any configuration files, as prompted by the installation utility.
4. From any node that you are not deleting, run the following command from theGrid_home/bin directory as root to delete the node from the cluster:
# crsctl delete node -n node_to_be_deleted [-purge]
Use the -purge option to delete the node permanently and to reuse its node number.However, if you want to add the deleted node back with the same node name and thesame node number, then do not use the -purge option.
5. Run the following CVU command to verify that the specified nodes have beensuccessfully deleted from the cluster:
$ cluvfy stage -post nodedel -n node_list [-verbose]
6. If you remove a cluster node on which Oracle Clusterware is down, then determinewhether the VIP for the deleted node still exists, as follows:
$ srvctl config vip -node deleted_node_name
If the VIP still exists, then delete it, as follows:
$ srvctl stop vip -vip vip_name$ srvctl remove vip -vip vip_name
Using Oracle Fleet Patching and Provisioning to Delete a Node
Alternatively, you can use Fleet Patching and Provisioning to delete a node from a clusterwith one command, as shown in the following example:
$ rhpctl deletenode gihome -client rhpclient -node clientnode2 -root
The preceding example deletes a node named clientnode2 from the Fleet Patching andProvisioning Client named rhpclient, using root credentials (login for the node you aredeleting).
Related Topics
• cluvfy stage nodedel
• Oracle Real Application Clusters Administration and Deployment Guide
• Oracle Fleet Patching and Provisioning Administrator's Guide
Chapter 6Adding and Deleting Cluster Nodes on Linux and UNIX Systems
6-11

Adding and Deleting Cluster Nodes on Windows SystemsThis section explains cluster node addition and deletion on Windows systems. Thissection includes the following topics:
• Adding a Node to a Cluster on Windows Systems
• Deleting a Cluster Node on Windows Systems
See Also:
Oracle Grid Infrastructure Installation and Upgrade Guide for MicrosoftWindows x64 (64-Bit) for more information about deleting an entire cluster
Adding a Node to a Cluster on Windows SystemsEnsure that you complete the prerequisites listed in "Prerequisite Steps for AddingCluster Nodes" before adding nodes.
This procedure describes how to add a node to your cluster. This procedure assumesthat:
• There is an existing cluster with two nodes named node1 and node2• You are adding a node named node3• You have successfully installed Oracle Clusterware on node1 and node2 in a local
home, where Grid_home represents the successfully installed home
To add a node:
1. Verify the integrity of the cluster and node3:
C:\>cluvfy stage -pre nodeadd -n node3 [-fixup] [-verbose]
You can specify the -fixup option and a directory into which CVU printsinstructions to fix the cluster or node if the verification fails.
2. On node1, go to the Grid_home\addnode directory and run the addnode.bat script,as follows:
C:\>addnode.bat "CLUSTER_NEW_NODES={node3}""CLUSTER_NEW_VIRTUAL_HOSTNAMES={node3-vip}"
3. Run the following command on the new node:
C:\>Grid_home\crs\config\gridconfig.bat
4. The following steps are required only if you have database homes configured touse Oracle ACFS:
Chapter 6Adding and Deleting Cluster Nodes on Windows Systems
6-12

a. For each database configured to use Oracle ACFS, run the following command fromthe Oracle RAC database home:
C:\>ORACLE_HOME\bin\srvctl stop database -db database_unique_name
Note:
Run the srvctl config database command to list all of the databasesconfigured with Oracle Clusterware. Use the srvctl config database -dbdatabase_unique_name to find the database details. If the ORACLE_HOME pathleads to the Oracle ACFS mount path, then the database uses OracleACFS. Use the command output to find the database instance nameconfigured to run on the newly added node.
b. Use Windows Server Manager Control to stop and delete services.
c. For each of the databases and database homes collected in the first part of this step,run the following command:
C:\> ORACLE_HOME\bin\srvctl start database -db database_unique_name
5. Run the following command to verify the integrity of the Oracle Clusterware componentson all of the configured nodes, both the preexisting nodes and the nodes that you haveadded:
C:\>cluvfy stage -post crsinst -n all [-verbose]
After you complete the procedure in this section for adding nodes, you can optionally extendOracle Database with Oracle RAC components to the new nodes, making them members ofan existing Oracle RAC database.
See Also:
Oracle Real Application Clusters Administration and Deployment Guide for moreinformation about extending Oracle Database with Oracle RAC to new nodes
Creating the OraMTS Service for Microsoft Transaction Server
Oracle Services for Microsoft Transaction Server (OraMTS) permit Oracle databases to beused as resource managers in Microsoft application-coordinated transactions. OraMTS actsas a proxy for the Oracle database to the Microsoft Distributed Transaction Coordinator(MSDTC). As a result, OraMTS provides client-side connection pooling and allows clientcomponents that leverage Oracle to participate in promotable and distributed transactions. Inaddition, OraMTS can operate with Oracle databases running on any operating system, giventhat the services themselves are run on Windows.
On releases earlier than Oracle Database 12c, the OraMTS service was created as part of asoftware-only installation. Starting with Oracle Database 12c, you must use a configurationtool to create this service.
Chapter 6Adding and Deleting Cluster Nodes on Windows Systems
6-13

Create the OraMTS service after adding a node or performing a software-onlyinstallation for Oracle RAC, as follows:
1. Open a command window.
2. Change directories to %ORACLE_HOME%\bin.
3. Run the OraMTSCtl utility to create the OraMTS Service, where host_name is a listof nodes on which the service should be created:
C:\..bin> oramtsctl.exe -new -host host_name
Related Topics
• Prerequisite Steps for Adding Cluster Nodes
• Oracle Real Application Clusters Administration and Deployment Guide
• Oracle Services for Microsoft Transaction Server Developer's Guide for MicrosoftWindows
See Also:
Oracle Services for Microsoft Transaction Server Developer's Guide forMicrosoft Windows for more information about OraMTS, which allows Oracledatabases to be used as resource managers in distributed transactions
Deleting a Cluster Node on Windows SystemsDelete a cluster node from Windows systems.
This procedure assumes that Oracle Clusterware is installed on node1, node2, andnode3, and that you are deleting node3 from the cluster.
Note:
• Oracle does not support using Oracle Enterprise Manager to deletenodes on Windows systems.
• If you delete the last node of a cluster that is serviced by GNS, then youmust delete the entries for that cluster from GNS.
• You can remove the Oracle RAC database instance from the nodebefore removing the node from the cluster but this step is not required. Ifyou do not remove the instance, then the instance is still configured butnever runs. Deleting a node from a cluster does not remove a node'sconfiguration information from the cluster. The residual configurationinformation does not interfere with the operation of the cluster.
See Also: Oracle Real Application Clusters Administration andDeployment Guide for more information about deleting an Oracle RACdatabase instance
Chapter 6Adding and Deleting Cluster Nodes on Windows Systems
6-14

To delete a cluster node on Windows systems:
1. Only if you have a local home, on the node you want to delete, run the followingcommand with -local option to update the node list:
C:\>Grid_home\oui\bin\setup.exe -updateNodeList ORACLE_HOME=Grid_home "CLUSTER_NODES={node_to_be_deleted}" CRS=TRUE -local
Note:
If you are deleting a node from an Oracle Flex Cluster, then you do not haverun this command.
2. Run the deinstall tool on the node you want to delete to deinstall and deconfigure theOracle Clusterware home, as follows:
C:\Grid_home\deinstall\>deinstall.bat -local
Caution:
• If you do not specify the -local flag, then the command removes theOracle Grid Infrastructure home from every node in the cluster.
• If you cut and paste the preceding command, then paste it into a text editorbefore pasting it to the command line to remove any formatting thisdocument might contain.
3. On a node that you are not deleting, run the following command:
C:\>Grid_home\bin\crsctl delete node -n node_to_be_deleted
4. Run the following CVU command to verify that the specified nodes have beensuccessfully deleted from the cluster:
C:\>cluvfy stage -post nodedel -n node_list [-verbose]
5. If you remove a cluster node on which Oracle Clusterware is down, then determinewhether the VIP for the deleted node still exists, as follows:
C:\> ORACLE_HOME\bin\srvctl config vip -node deleted_node_name
If the VIP still exists, then delete it, as follows:
C:\> ORACLE_HOME\bin\srvctl stop vip -vip vip_nameC:\> ORACLE_HOME\bin\srvctl remove vip -vip vip_name
Chapter 6Adding and Deleting Cluster Nodes on Windows Systems
6-15

Related Topics
• Oracle Real Application Clusters Administration and Deployment Guide
• cluvfy stage nodedel
Chapter 6Adding and Deleting Cluster Nodes on Windows Systems
6-16

7Cloning Oracle Clusterware
This chapter describes how to clone an Oracle Grid Infrastructure home and use the clonedhome to create a cluster. You perform the cloning procedures in this chapter by runningscripts in silent mode. The cloning procedures are applicable to Linux and UNIX systems.Although the examples in this chapter use Linux and UNIX commands, the cloning conceptsand procedures apply generally to all platforms.
Note:
This chapter assumes that you are cloning an Oracle Clusterware 21c installationconfigured as follows:
• No Grid Naming Service (GNS)
• No Intelligent Platform Management Interface specification (IPMI)
• Voting file and Oracle Cluster Registry (OCR) are stored in Oracle AutomaticStorage Management (ASM)
• Single Client Access Name (SCAN) resolves through DNS
This chapter contains the following topics:
• Introduction to Cloning Oracle Clusterware
• Preparing the Oracle Grid Infrastructure Home for Cloning
• Creating a Cluster by Cloning Oracle Clusterware
• Using Cloning to Add Nodes to a Cluster
• Locating and Viewing Log Files Generated During Cloning
Introduction to Cloning Oracle ClusterwareCloning is the process of copying an existing Oracle Clusterware installation to a differentlocation and then updating the copied installation to work in the new environment. Changesmade by one-off patches applied on the source Oracle Grid Infrastructure home are alsopresent after cloning. During cloning, you run a script that replays the actions that installedthe Oracle Grid Infrastructure home.
Cloning requires that you start with a successfully installed Oracle Grid Infrastructure home.You use this home as the basis for implementing a script that extends the Oracle GridInfrastructure home to create a cluster based on the original Grid home.
Manually creating the cloning script can be error prone because you prepare the scriptwithout interactive checks to validate your input. Despite this, the initial effort is worthwhile forscenarios where you run a single script to configure tens or even hundreds of clusters. If youhave only one cluster to install, then you should use the traditional, automated and interactive
7-1

installation methods, such as Oracle Universal Installer (OUI) or the Provisioning Packfeature of Oracle Enterprise Manager.
Note:
Cloning is not a replacement for Oracle Enterprise Manager cloning that is apart of the Provisioning Pack. During Oracle Enterprise Manager cloning, theprovisioning process simplifies cloning by interactively asking for detailsabout the Oracle home. The interview questions cover such topics as thelocation to which you want to deploy the cloned environment, the name ofthe Oracle database home, a list of the nodes in the cluster, and so on.
The Provisioning Pack feature of Oracle Enterprise Manager Grid Control provides aframework that automates the provisioning of nodes and clusters. For data centerswith many clusters, the investment in creating a cloning procedure to provision newclusters and new nodes to existing clusters is worth the effort.
The following list describes some situations in which cloning is useful:
• Cloning prepares an Oracle Grid Infrastructure home once and deploys it to manyhosts simultaneously. You can complete the installation in silent mode, as anoninteractive process. You do not need to use a graphical user interface (GUI)console, and you can perform cloning from a Secure Shell (SSH) terminal session,if required.
• Cloning enables you to create an installation (copy of a production, test, ordevelopment installation) with all patches applied to it in a single step. Once youhave performed the base installation and applied all patch sets and patches on thesource system, cloning performs all of these individual steps as a singleprocedure. This is in contrast to going through the installation process to performthe separate steps to install, configure, and patch the installation on each node inthe cluster.
• Installing Oracle Clusterware by cloning is a quick process. For example, cloningan Oracle Grid Infrastructure home to a cluster with more than two nodes requiresa few minutes to install the Oracle software, plus a few minutes more for eachnode (approximately the amount of time it takes to run the root.sh script).
• Cloning provides a guaranteed method of accurately repeating the same OracleClusterware installation on multiple clusters.
A cloned installation acts the same as its source installation. For example, you canremove the cloned Oracle Grid Infrastructure home using OUI or patch it usingOPatch. You can also use the cloned Oracle Grid Infrastructure home as the sourcefor another cloning operation. You can create a cloned copy of a test, development, orproduction installation by using the command-line cloning scripts.
The default cloning procedure is adequate for most cases. However, you can alsocustomize some aspects of cloning, such as specifying custom port assignments orpreserving custom settings.
For example, you can specify a custom port for the listener, as follows:
$ export ORACLE_HOME=/u01/app/21.0.0/grid$ $ORACLE_HOME/bin/srvctl modify listener -endpoints tcp:12345
Chapter 7Introduction to Cloning Oracle Clusterware
7-2

The cloning process works by copying all of the files from the source Oracle GridInfrastructure home to the destination Oracle Grid Infrastructure home. You can clone either alocal (non-shared) or shared Oracle Grid Infrastructure home. Thus, any files used by thesource instance that are located outside the source Oracle Grid Infrastructure home'sdirectory structure are not copied to the destination location.
The size of the binary files at the source and the destination may differ because these filesare relinked as part of the cloning operation, and the operating system patch levels may alsodiffer between these two locations. Additionally, the number of files in the cloned home wouldincrease because several files copied from the source, specifically those being instantiated,are backed up as part of the clone operation.
Preparing the Oracle Grid Infrastructure Home for CloningTo prepare the source Oracle Grid Infrastructure home to be cloned, create a copy of aninstalled Oracle Grid Infrastructure home and then use it to perform the cloning procedure onother nodes. Use the following step-by-step procedure to prepare the copy of the Oracle GridInfrastructure home:
• Step 1: Install Oracle Clusterware
• Step 2: Shut Down Running Software
• Step 3: Create a Copy of the Oracle Grid Infrastructure Home
Step 1: Install Oracle ClusterwareUse the detailed instructions in the Oracle Grid Infrastructure Installation and UpgradeGuideto perform the following steps on the source node:
1. Install Oracle Clusterware. This installation puts Oracle Cluster Registry (OCR) and thevoting file on Oracle Automatic Storage Management (Oracle ASM).
Note:
Either install and configure the Oracle Grid Infrastructure for a cluster or installjust the Oracle Clusterware software, as described in your platform-specificOracle Grid Infrastructure Installation and Upgrade Guide.
If you installed and configured Oracle Grid Infrastructure for a cluster, then you must stopOracle Clusterware before performing the cloning procedures. If you performed asoftware-only installation, then you do not have to stop Oracle Clusterware.
2. Install any patches that are required (for example, an Oracle Grid Infrastructure bundlepatch), if necessary.
3. Apply one-off patches, if necessary.
Related Topics
• Oracle Grid Infrastructure Installation and Upgrade Guide
Chapter 7Preparing the Oracle Grid Infrastructure Home for Cloning
7-3

Step 2: Shut Down Running SoftwareBefore copying the source Oracle Grid Infrastructure home, shut down all of theservices, databases, listeners, applications, Oracle Clusterware, and Oracle ASMinstances that run on the node. Oracle recommends that you use the Server Control(SRVCTL) utility to first shut down the databases, and then the Oracle ClusterwareControl (CRSCTL) utility to shut down the rest of the components.
Related Topics
• Oracle Real Application Clusters Administration and Deployment Guide
• Oracle Clusterware Control (CRSCTL) Utility Reference
Step 3: Create a Copy of the Oracle Grid Infrastructure HomeTo keep the installed Oracle Grid Infrastructure home as a working home, make a fullcopy of the source Oracle Grid Infrastructure home for cloning.
Tip:
When creating the copy, a best practice is to include the release number inthe name of the file.
You can use one of the following methods to create a create a copy of the Oracle GridInfrastructure home.
• Method 1: Create a Copy of the Oracle Grid Infrastructure Home Using the SetupWizard
• Method 2a: Create a Copy of the Oracle Grid Infrastructure Home by RemovingUnnecessary Files from the Copy
• Method 2b: Create a Copy of the Oracle Grid Infrastructure Home Using the -XOption
Method 1 is the recommended method to create the a gold image of a working OracleGrid Infrastructure home.
You can use Method 2a or 2b to manually create copy of the Oracle Grid Infrastructurehome, where Grid_home is the original Oracle Grid Infrastructure home on the originalnode with all files included, and copy_path is the directory path to the copied OracleGrid Infrastructure home with unnecessary files deleted.
Method 1: Create a Copy of the Oracle Grid Infrastructure Home Using theSetup Wizard
You can use the grid setup wizard to create a gold image of a working Oracle GridInfrastructure home.
1. Run gridSetup.sh with the appropriate options to create a gold image.
Chapter 7Preparing the Oracle Grid Infrastructure Home for Cloning
7-4

For example, create a gold image in a specified destination:
./gridSetup.sh -createGoldImage -destinationLocation /tmp/my_grid_images
2. Run gridSetup.sh with the -help option for additional information.
See Also:
• Oracle Grid Infrastructure Installation and Upgrade Guide for informationabout using the grid setup wizard installation options for creating images
Method 2a: Create a Copy of the Oracle Grid Infrastructure Home by RemovingUnnecessary Files from the Copy
1. On the source node, create a copy of the Oracle Grid Infrastructure home. To keep theinstalled Oracle Grid Infrastructure home as a working home, make a full copy of thesource Oracle Grid Infrastructure home and remove the unnecessary files from the copy.For example, as root on Linux systems, run the cp command:
# cp -prf Grid_home copy_path
2. Delete unnecessary files from the copy.
The Oracle Grid Infrastructure home contains files that are relevant only to the sourcenode, so you can remove the unnecessary files from the copy of the Oracle GridInfrastructure home in the log, crs/init, crf, and cdata directories. The followingexample for Linux and UNIX systems shows the commands to run to remove theunnecessary files from the copy of the Oracle Grid Infrastructure home:
[root@node1 root]# cd copy_path[root@node1 grid]# rm -rf log/host_name[root@node1 grid]# rm -rf gpnp/host_name[root@node1 grid]# find gpnp -type f -exec rm -f {} \;[root@node1 grid]# rm -rf cfgtoollogs/*[root@node1 grid]# rm -rf cdata/*[root@node1 grid]# rm -rf crf/*[root@node1 grid]# rm -rf network/admin/*.ora[root@node1 grid]# rm -rf crs/install/crsconfig_params[root@node1 grid]# rm -rf crs/install/crsgenconfig_params[root@node1 grid]# find . -name '*.ouibak' -exec rm {} \;[root@node1 grid]# find . -name '*.ouibak.1' -exec rm {} \;[root@node1 grid]# rm -rf root.sh*[root@node1 grid]# rm -rf bin/clsecho/*[root@node1 grid]# rm -rf rdbms/audit/*[root@node1 grid]# rm -rf rdbms/log/*[root@node1 grid]# rm -rf inventory/backup/*[root@node1 grid]# rm -rf oraInst.loc
3. Create a compressed copy of the previously copied Oracle Grid Infrastructure homeusing tar or gzip on Linux and UNIX systems. Ensure that the tool you use preserves thepermissions and file timestamps. For example:
Chapter 7Preparing the Oracle Grid Infrastructure Home for Cloning
7-5

On Linux and UNIX systems:
[root@node1 root]# cd copy_path[root@node1 grid]# tar -zcvpf /copy_path/gridHome.tgz
In the preceding example, the cd command changes the location to the copy of theOracle Grid Infrastructure home with the unnecessary files removed that youcreated in the first two steps of this procedure, and the tar command creates a filenamed gridHome.tgz. In the tar command, copy_path represents the location ofthe copy of the Oracle Grid Infrastructure home.
On AIX or HPUX systems:
uncompress gridHome.tar.Ztar xvf gridHome.tar
On Windows systems, use WinZip to create a zip file.
Method 2b: Create a Copy of the Oracle Grid Infrastructure Home Using the -XOption
1. Create a file that lists the unnecessary files in the Oracle Grid Infrastructure home.For example, list the following file names, using the asterisk (*) wildcard, in a filecalled excludeFileList:
Grid_home/host_nameGrid_home/log/host_nameGrid_home/gpnp/host_name/*Grid_home/bin/clsecho/*Grid_home/cdata/*Grid_home/crf/*Grid_home/network/admin/*.oraGrid_home/root.sh*Grid_home/cfgtoollogs/*Grid_home/crs/install/crsconfig_paramsGrid_home/crs/install/crsgenconfig_paramsGrid_home/rdbms/audit/*Grid_home/rdbms/log/*Grid_home/inventory/backup/*Grid_home/oraInst.loc*.ouibak*.ouibak1
2. Use the tar command or Winzip to create a compressed copy of the Oracle GridInfrastructure home. For example, on Linux and UNIX systems, run the followingcommand to archive and compress the source Oracle Grid Infrastructure home:
tar cpfX - excludeFileList Grid_home | compress -fv > temp_dir/gridHome.tar.Z
Chapter 7Preparing the Oracle Grid Infrastructure Home for Cloning
7-6

Note:
Do not use the jar utility to copy and compress the Oracle Grid Infrastructurehome.
Creating a Cluster by Cloning Oracle ClusterwareThis section explains how to create a cluster by cloning a successfully installed OracleClusterware environment and copying it to the nodes on the destination cluster. Theprocedures in this section describe how to use cloning for Linux, UNIX, and Windowssystems. OCR and voting files are not shared between the two clusters after you successfullycreate a cluster from a clone.
For example, you can use cloning to quickly duplicate a successfully installed OracleClusterware environment to create a cluster. Figure 7-1 shows the result of a cloningprocedure in which the Oracle Grid Infrastructure home on Node 1 has been cloned to Node2 and Node 3 on Cluster 2, making Cluster 2 a new two-node cluster.
Figure 7-1 Cloning to Create an Oracle Clusterware Environment
Cluster 1
Heartbeat hb
Node 1
Cluster 2
hb
Node 3
Node 2
The steps to create a cluster through cloning are as follows:
• Step 1: Prepare the New Cluster Nodes
• Step 2: Deploy the Oracle Grid Infrastructure Home
• Step 3: Run the gridSetup.sh Utility
Step 1: Prepare the New Cluster NodesBefore you clone Oracle Clusterware you must complete preinstallation steps.
On each destination node, perform the following preinstallation steps:
1. Specify the kernel parameters
2. Configure block devices for Oracle Clusterware devices
3. Ensure that you have set the block device permissions correctly
4. Use short, nondomain-qualified names for all of the names in the /etc/hosts file
5. Test whether the interconnect interfaces are reachable, by using the ping command
Chapter 7Creating a Cluster by Cloning Oracle Clusterware
7-7

6. Verify that the virtual IP (VIP) addresses are not active at the start of the cloningprocess, by using the ping command (the ping command of the VIP address mustfail)
7. (IBM AIX systems and Oracle Solaris x86-64-bit systems running vendorclusterware only) If you add a node to the cluster, then you must run therootpre.sh script (located at the mount point it you install Oracle Clusterware froma DVD or in the directory where you unzip the tar file if you download the software)on the node before you add the node to the cluster
Note:
Starting with Oracle Clusterware 21c, the integration of vendor or thirdparty clusterware with Oracle Clusterware is desupported.
8. To verify that your hardware and operating system environment is configuredcorrectly, run the Cluster Verification Utility (CVU)
Note:
Make sure you check your cluster with CVU before you proceed. Unliketraditional methods of installation, the cloning process does not validateyour input during the preparation phase. By comparison, during thetraditional method of installation using Oracle Universal Installer (OUI),various checks occur during the interview phase. Thus, if you makeerrors during the hardware setup or in the preparation phase, then thecloned installation fails.
Refer to your platform-specific Oracle Clusterware installation guide for the completepreinstallation checklist.
Step 2: Deploy the Oracle Grid Infrastructure HomeBefore you begin the cloning procedure that is described in this section, ensure thatyou have completed the prerequisite tasks to create a copy of the Oracle GridInfrastructure home, as described in the section titled "Preparing the Oracle GridInfrastructure Home for Cloning".
1. On one of the nodes in the cluster, deploy the copy of the Oracle GridInfrastructure home that you created in "Step 3: Create a Copy of the Oracle GridInfrastructure Home", as follows:
For example, on Linux or UNIX systems, run commands similar to the following:
[root@node1 root]# mkdir -p location_of_the_copy_of_the_Grid_home[root@node1 root]# cd location_of_the_copy_of_the_Grid_home[root@node1 crs]# tar -zxvf /gridHome.tgz
In this example, location_of_the_copy_of_the_Grid_home represents thedirectory structure in which you want to install the Oracle Grid Infrastructure home,
Chapter 7Creating a Cluster by Cloning Oracle Clusterware
7-8

such as /u01/app/21.0.0/grid. Note that you can change the Grid home location aspart of the process.
2. If you have not already deleted unnecessary files from the Oracle Grid Infrastructurehome, then repeat step 2 in "Method 2: Create a Compressed Copy of the Oracle GridInfrastructure Home Using the -X Option".
3. If necessary, change the ownership of all of the files in the Oracle Grid Infrastructurehome to be owned by the Oracle Grid Infrastructure installation owner and by the OracleInventory (oinstall privilege) group. If the Oracle Grid Infrastructure installation owner isoracle, and the Oracle Inventory group is oinstall, then the following example showsthe commands to do this on a Linux system:
[root@node1 crs]# chown -R oracle:oinstall /u01/app
When you run the preceding command on the Grid home, it clears setuid and setgidinformation from the Oracle binary. As expected, the command also clears setuid fromthe following binaries:
Grid_home/bin/extjobGrid_home/bin/jssuGrid_home/bin/oradism
The setuid information is properly set in subsequent steps.
4. It is important to remove any Oracle network files from the Grid_home directory on boththe source and destination nodes before continuing.
Related Topics
• Step 3: Create a Copy of the Oracle Grid Infrastructure Home
• Method 2b: Create a Copy of the Oracle Grid Infrastructure Home Using the -X Option
• Preparing the Oracle Grid Infrastructure Home for Cloning
• Locating and Viewing Log Files Generated During Cloning
Step 3: Run the gridSetup.sh UtilityTo set up the new Oracle Clusterware environment, run the gridSetup.sh utility in eitherinteractive or silent mode on one node, as you would when installing Oracle GridInfrastructure for a new cluster.
Once you launch the $ORACLE_home/gridSetup.sh utility, you can select to run it either ininteractive mode, using the interactive interface, or in silent mode, where you provide aresponse file.
Using Cloning to Add Nodes to a ClusterYou can also use cloning to add nodes to a cluster.
Figure 7-2 shows the result of a cloning procedure in which the Oracle Grid Infrastructurehome on Node 1 has been cloned to Node 2 in the same cluster, making it a two-nodecluster. Newly added nodes to the cluster share the same OCR and voting files.
Chapter 7Using Cloning to Add Nodes to a Cluster
7-9

Figure 7-2 Cloning to Add Nodes to a Cluster
Node 1
Cluster 1
Node 2
Using Figure 7-2 as an example, the following procedure explains how to add nodes toa cluster using cloning. In this procedure, you make a copy of the image (a clone) thatyou used to create Node 1, initially, to Node 2.
Prepare Node 2 as described in "Step 1: Prepare the New Cluster Nodes".
1. Deploy the Oracle Grid Infrastructure home on Node 2, as described in "Step 2:Deploy the Oracle Grid Infrastructure Home on the Destination Nodes".
Use the tar utility to create an archive of the Oracle Grid Infrastructure home onthe Node 1 and copy it to Node 2. If the location of the Oracle Grid Infrastructurehome on Node 1 is $ORACLE_HOME, then you must use this same directory as thedestination location on Node 2.
2. Run the gridSetup.sh script and select the Software Only installation option.
3. This step does not apply to Windows.
In the Central Inventory directory on Node 2, run the orainstRoot.sh script asroot. This script populates the /etc/oraInst.loc directory with the location of thecentral inventory. For example:
[root@node2 root]# /opt/oracle/oraInventory/orainstRoot.sh
You can run the script on more than one destination node simultaneously.
4. Run the gridSetup.sh -noCopy script and select Add more nodes tocluster.
5. On Node 2, run the Grid_home/root.sh script.
Note:
• Ensure that you extend any database homes before you run theroot.sh or gridconfig.bat scripts.
• The cluster in this example has only two nodes. When you addmultiple nodes to a cluster, you can run root.sh concurrently on allof the nodes.
Chapter 7Using Cloning to Add Nodes to a Cluster
7-10

The following example is for a Linux or UNIX system. On Node 2, run the followingcommand:
[root@node2 root]# Grid_home/root.sh
The root.sh script automatically configures the virtual IP (VIP) resources in the OracleCluster Registry (OCR).
On Windows, run the following command on Node 2:
C:\>Grid_home\crs\config\gridconfig.bat
6. Run the following cluster verification utility (CVU) command on Node 1:
$ cluvfy stage -post nodeadd -n destination_node_name [-verbose]
Related Topics
• cluvfy stage nodeadd
Locating and Viewing Log Files Generated During CloningThe cloning script runs multiple tools, each of which can generate log files. After thegridSetup.sh utility finishes running, you can view log files to obtain more information aboutthe status of your cloning procedures. Table 7-1 lists the log files that are generated duringcloning that are the key log files for diagnostic purposes.
Note:
Central_inventory in Table 7-1 refers to the Oracle Inventory directory.
Table 7-1 Cloning Log Files and their Descriptions
Log File Name and Location Description
Central_inventory/logs/cloneActionstimestamp.log
Contains a detailed log of the actions that occur duringthe OUI part of the cloning.
Central_inventory/logs/oraInstalltimestamp.err
Contains information about errors that occur when OUI isrunning.
Central_inventory/logs/oraInstalltimestamp.out
Contains other miscellaneous information.
Table 7-2 lists the location of the Oracle Inventory directory for various platforms.
Table 7-2 Finding the Location of the Oracle Inventory Directory
Type of System Location of the Oracle Inventory Directory
All UNIX computers exceptLinux and IBM AIX
/var/opt/oracle/oraInst.loc
Chapter 7Locating and Viewing Log Files Generated During Cloning
7-11

Table 7-2 (Cont.) Finding the Location of the Oracle Inventory Directory
Type of System Location of the Oracle Inventory Directory
IBM AIX and Linux /etc/oraInst.locWindows C:\Program Files\Oracle\Inventory
Chapter 7Locating and Viewing Log Files Generated During Cloning
7-12

8Making Applications Highly Available UsingOracle Clusterware
When an application, process, or server fails in a cluster, you want the disruption to be asshort as possible, if not completely unknown to users. For example, when an application failson a server, that application can be restarted on another server in the cluster, minimizing ornegating any disruption in the use of that application. Similarly, if a server in a cluster fails,then all of the applications and processes running on that server must be able to fail over toanother server to continue providing service to the users. Using the built-ingeneric_application resource type or customizable scripts and application agent programs,and resource attributes that you assign to applications and processes, Oracle Clusterwarecan manage all these entities to ensure high availability.
This chapter explains how to use Oracle Clusterware to start, stop, monitor, restart, andrelocate applications. Oracle Clusterware is the underlying cluster solution for Oracle RealApplication Clusters (Oracle RAC). The same functionality and principles you use to manageOracle RAC databases are applied to the management of applications.
This chapter includes the following topics:
• Oracle Clusterware Resources and Agents
• Overview of Using Oracle Clusterware to Enable High Availability
• Registering an Application as a Resource
• Managing Resources
• Managing Automatic Restart of Oracle Clusterware Resources
Oracle Clusterware Resources and AgentsThis section discusses the framework that Oracle Clusterware uses to monitor and manageresources, to ensure high application availability.
This section includes the following topics:
• Oracle Clusterware Resources
• Oracle Clusterware Resource Types
• Agents in Oracle Clusterware
• Action Scripts
• Building an Agent
• Registering a Resource in Oracle Clusterware
8-1

Oracle Clusterware ResourcesOracle Clusterware manages applications and processes as resources that youregister with Oracle Clusterware.
The number of resources you register with Oracle Clusterware to manage anapplication depends on the application. Applications that consist of only one processare usually represented by only one resource. For more complex applications that arebuilt on multiple processes or components that may require multiple resources, youcan create resource groups.
Each resource is based on a resource type that serves as a template. You canconfigure how Oracle Clusterware will place an application in the cluster by specifyingan explicit list of servers, or by using features such as server pools and policies.Relationships between applications and components are expressed usingdependencies. Oracle Clusterware manages the application by performing operationson the resources, and the resource state represents the availability of the application.
When you register an application as a resource in Oracle Clusterware, in addition toactually adding the resource to the system, you define how Oracle Clusterwaremanages the application using resource attributes you ascribe to the resource. Thefrequency with which the resource is checked and the number of attempts to restart aresource on the same server after a failure before attempting to start it on anotherserver (failover) are examples of resource attributes. The registration information alsoincludes a path to an action script or application-specific action program that OracleClusterware calls to start, stop, check, and clean up the application.
An action script is a shell script (a batch script in Windows) that a generic script agentprovided by Oracle Clusterware calls. An application-specific agent is usually a C orC++ program that calls Oracle Clusterware-provided APIs directly.
Critical Resources
Some large enterprise applications modeled as resource groups can comprise multipleresources representing application or infrastructure components. If any resource in theresource group fails, then Oracle Clusterware must fail the entire resource group overto another server in the cluster.
You can mark a resource as critical for its resource group by specifying the name ofthe resource in the CRITICAL_RESOURCES attribute of the resource group.
Related Topics
• Oracle Clusterware Resource Reference
• Resource GroupsA resource group is a container for a logically related group of resources.
Virtual Machine ResourcesA virtual machine is an environment created for a running operating system, known asa guest operating system. The virtual machine displays as a window on yourcomputer’s desktop which can be displayed in full-screen mode or remotely on anothercomputer.
A virtual machine is, essentially, a set of parameters that determines its behavior,analogous to computer system hardware. Parameters include hardware settings (such
Chapter 8Oracle Clusterware Resources and Agents
8-2

as how much memory the virtual machine has) as well as state information (such as whetherthe virtual machine is currently running).
Black-box virtual machines are virtual machines whose contents are unknown to themanagement interface. All that is known about black-box virtual machines is the virtualhardware they contain: the number of CPUs, the amount of RAM, attached disks, andattached network interfaces. The contents of the hardware however, are unknown. Forexample, there may be a number of disks attached, but it is not known which operatingsystem is installed on them, nor is it known whether the network cards are configured.
You can manage black-box Oracle virtual machines on physical hardware using OracleClusterware, which provides high availability and ease of management of virtual machines.
Note:
This is specific to virtual machines, and does not apply to Oracle VM VirtualBox, orany other Oracle VM product.
As an example, in following figure, there are two physical computers, each of which hasmultiple virtual machines running on it. One of the computers, for each physical host, is anOracle Grid Infrastructure virtual machine (GIVM).
The GIVMs, themselves, form an Oracle Clusterware cluster, and within this cluster are fourblack-box virtual machine Oracle Clusterware resources, each monitoring one of the non-GIVM virtual machines. The cluster is not aware of the contents of the virtual machines it ismonitoring because they are black-box virtual machines. In this example, if one of thephysical hosts goes down, then its GIVM would also go down, causing the GIVM to leave thecluster, which, in turn, causes the resources to fail over to the other GIVM, which starts theblack-box virtual machines on the new physical host.
Chapter 8Oracle Clusterware Resources and Agents
8-3

Figure 8-1 Highly Available Virtual Machines in Oracle Database Appliance
Physical Virtual Machine Cluster
Computer
Computer
GIVM1
App VM1
App VM3
GIVM2
App VM4
App VM2
GIVM1
GIVM2
Black-box VMResource 4
Black-box VMResource 3
Black-box VMResource 2
Black-box VMResource 1
Virtual Machine Architecture
Oracle virtual machines consist of two parts: the virtual machine server and the virtualmachine manager. The virtual machine server is a minimal operating system installedon bare hardware that uses a Xen hypervisor to manage guests. The server has anagent process, the Oracle virtual machine agent, which acts as an intermediarythrough which the virtual machine manager manipulates domains on the server.
The virtual machine manager is a web-based management console that is used tomanage virtual machine servers and their virtual machines. The virtual machinemanager requires a database as well as an Oracle WebLogic Server in order to run,and is necessary for Oracle-supported management of the Oracle virtual machineserver. The management domain is supposed to be as small as possible and,therefore, the virtual machine manager may not be installed there. You must install thevirtual machine manager on another host, which means either having another physicalcomputer or manually creating a temporary virtual machine using the Xen xmcommands.
The Oracle virtual machine manager is the sole interface for managing virtualmachines. All requests are directed through it, including all APIs and utilities.
Chapter 8Oracle Clusterware Resources and Agents
8-4

The resource type for a virtual machine resource (which is an Oracle Clusterware resource)is similar to the following:
ATTRIBUTE=DESCRIPTIONTYPE=stringDEFAULT_VALUE="Resource type for VM Agents"ATTRIBUTE=AGENT_FILENAMETYPE=stringDEFAULT_VALUE=%CRS_HOME%/bin/oraagent%CRS_EXE_SUFFIX%ATTRIBUTE=CHECK_INTERVALDEFAULT_VALUE=1TYPE=intATTRIBUTE=OVMM_VM_IDTYPE=stringDEFAULT_VALUE=''ATTRIBUTE=OVMM_VM_NAMETYPE=stringDEFAULT_VALUE=''ATTRIBUTE=VMTYPE=strings
Resource GroupsA resource group is a container for a logically related group of resources.
An application is modeled as a resource group that contains the application resource andrelated application resources (such as WebServer), and infrastructure resources (such asdisk groups and VIPs). A resource group provides a logical and intuitive entity for highavailability modeling of all classes of applications.
You create resource groups using CRSCTL, and then add resources to the resource group. Aresource group provides a set of attributes that cover naming, description, and commonplacement and failover parameter values for the resources that are members of the resourcegroup.
Resource Group Principles
• You create a resource group based on a resource group type.
• A resource can be member of only one resource group. You can specify a resource groupfor a resource when you create the resource.
If you do not specify a resource group when you create a resource, then the resourcebecomes a member of an automatic resource group created for that resource. You canlater add the resource to a different resource group.
• Resource groups are aware of critical resources, and the state of the resource group issolely determined by the state of its critical resources.
You can remove a non-critical resource from a resource group (subject to dependencychecks) and, at a later time, add it to another resource group.
• Resource groups have cardinality to specify the number of instances of the resourcegroup that can simultaneously run in the cluster.
• All member resources of a running resource group instance are located on the sameserver.
Chapter 8Oracle Clusterware Resources and Agents
8-5

• Oracle Clusterware restarts a resource group in the event of failure and thenrelocates the resource group to another server in the event of local restart failures.
Automatic Resource Groups
If you create a resource without specifying a resource group, then Oracle Clusterwareimplicitly and automatically adds the resource to a resource group with the same nameas the resource.
An automatic resource group is created for each resource that is not explicitly added toa resource group. You can create resources without using resource groups and workwith Oracle Clusterware without disruption. Using resource groups, however, enablesyou to define relationships to infrastructure and application resources (throughautomatic resource groups) created by SRVM or other existing utilities.
An automatic resource group is solely described by the resource that it has beencreated for, and cannot be modified by an administrator. Resources that you createwithout specifying a resource group can be added to a resource group at a later time.Oracle Clusterware deletes the automatic resource group to which the resourcebelongs when the resource has been explicitly added to a resource group.
Resource Group Management
• You can add a resource to a resource group when you create the resource.
• You can explicitly add a resource that belongs to its automatic resource group toanother resource group. The resource must be OFFLINE when you add theresource to a group that is either ONLINE or OFFLINE.
• You can remove a non-critical resource from a resource group (OFFLINE orONLINE) as long as no other resource in the group depends on it. The resourceyou remove then becomes a member of its automatic resource group. At a latertime, you can add this resource to another group.
• You can delete a non-critical resource, thereby removing the resource from theresource group and deleting it from Oracle Clusterware. You cannot delete acritical resource of a resource group, unless you first update the critical resourceslist of the resource group to unmark the resource as critical.
• A resource group is empty when it is initially created and also becomes emptywhen each resource in the group has been removed. An empty resource groupcannot be started and its state will be always be OFFLINE.
Share Resources
In various Oracle Clusterware deployments, there are components, such as filesystems, that multiple applications share. A single Oracle ACFS resource, forexample, cannot be a member of multiple resource groups that make use of thefilesystem because, by definition, a resource can be a member of only one resourcegroup.
For these types of resources, Oracle recommends that you put them in their ownindividual resource groups, either explicit or automatic, and configure appropriatedependencies from the application resource groups to these shared resource groups.In this manner, multiple applications can share components.
Chapter 8Oracle Clusterware Resources and Agents
8-6

Critical Resources
You can have a large-enterprise type application that is modeled as a resource group thatcontains multiple resources corresponding to application or infrastructure components. If anyof the resources in such a resource group fails, then Oracle Clusterware fails the entireresource group over to another server in the cluster. Some resources in the resource group,however, are not critical to the application and would not necessarily require failing over theentire resource group, which would cause an unnecessary disruption in the running of theinstance.
You can define certain resources within a resource group as critical (by specifying the nameof the resource in the CRITICAL_RESOURCES list attribute of the resource group) and,should any of those resources fail, then Oracle Clusterware will fail the resource group overto another server in the cluster.
Further, the state of a resource group is determined by the state of its critical resources. Non-critical resources do not affect the state of the resource group nor can they trigger failover ofthe resource group. A resource group must have at least one critical resource before theresource group can be started and brought online.
You can specify individual resources in a resource group as critical or you can specify aresource type as critical, which would make all resources of that particular type critical. Forexample:
CRITICAL_RESOURCES="r1 r2 r3"
The preceding example lists three, space-delimited resources marked as critical.
CRITICAL_RESOURCES="appvip type:ora.export.type"
The preceding example lists a particular resource type as critical, thereby making anyresource of this type a critical resource.
When you create a resource group or remove its members, it is empty and, consequently,there are no critical resources. The first resource that you add to the resource group isautomatically marked as critical by Oracle Clusterware, provided that you have not alreadyspecified a resource type in the CRITICAL_RESOURCES attribute of the resource group.Oracle Clusterware always checks for the presence of a critical resource before attempting tostart a resource group.
Resource Group Privileges
You can create resource groups and resource group types, and then create and addresources to those groups. You and also define privileges for modifying and executingoperations on a resource group using the ACL attribute of the resource group. The resourcegroup owner can assign privileges to other operating system users and groups byappropriately setting the ACL attribute of the resource group. A resource within a resourcegroup can maintain its own privilege specification within its ACL attribute. Specifically:
• A user with write privilege on a resource group and write privilege on a resource can addthe resource to the group.
• The owner of the resource group must at all times have execute privileges on allresources in the group. Any user or group granted execute privileges on the group musthave execute privileges on all resources in the group.
Chapter 8Oracle Clusterware Resources and Agents
8-7

For example, in cases where certain infrastructure resources in a resource groupmust be managed by root , the owner of the resource must be specified as rootand execute permissions on the resource granted to the group owner. This mustbe done explicitly by root user.
• The local administrative user (root on Unix or Administrators group user onWindows) can modify, delete, start, and stop any resource group.
Resource Group Dependencies
You can set dependencies among resource groups, providing a means to expressrelationships between applications and components. Oracle Clusterware providesmodifiers to specify different ordering, location, and enforcement level of dependenciesamongst resource groups. Some things to consider about resource groupdependencies:
• A resource group can have a dependency relationship to another resource groupand not to individual resources.
• An explicitly created resource group can have a dependency relationship to anautomatic resource group.
• A resource in a group can have a dependency relationship to another resource inthe same group.
• Resources created without specifying a resource group (thus belonging to anautomatic resource group) can have a dependency relationship to anotherresource group.
• A resource cannot have a dependency relationship to a resource group nor to aresource in a different resource group.
All available Oracle Clusterware resource dependencies are also available to use withresource groups. You configure the START_DEPENDENCIES andSTOP_DEPENDENCIES attributes of a resource group to specify dependencies forresource groups.
Table 8-1 Resource Group Dependency Types and Modifiers
Dependency Type Description
hard start Specifies the requirement that specific other resource groups mustbe online (anywhere in the cluster) before this resource group canbe started.
For example:
START_DEPENDENCIES=hard([global: | intermediate: | uniform: ] other_resource_group)
If the start of any dependent resource group fails, then OracleClusterware aborts the start of this resource group.
Chapter 8Oracle Clusterware Resources and Agents
8-8

Table 8-1 (Cont.) Resource Group Dependency Types and Modifiers
Dependency Type Description
weak start Specifies the requirement that an attempt must be made to startspecific other resource groups before starting this resource group.If the attempt fails to start the specific other resource groups, thenOracle Clusterware starts this resource group, regardless.
For example:
START_DEPENDENCIES=weak([global: | concurrent: | uniform: ] other_resource_group)
pullup Use This dependency when this resource group must beautomatically started when a dependent resource group starts.
For example:
START_DEPENDENCIES=pullup([intermediate: | always: ]other_resource_group])
Oracle recommends that you use this dependency when a stopdependency exists between the resource groups.
hard stop This dependency specifies the mandatory requirement of stoppingthis resource group when another specific resource group stopsrunning.
For example:
STOP_DEPENDENCIES=hard([intermediate: | global: | shutdown: ]other_resource_group)
attraction Specifies a co-location preference with specific other resourcegroups.
For example:
START_DEPENDENCIES=attraction([intermediate:]other_resource_group)
Oracle Clusterware will attempt to start this resource group on thesame server where a specific other resource group is alreadyonline.
dispersion Specifies preference to not be co-located with specific otherresource groups. Oracle Clusterware will attempt to start thisresource group on a server with the least number of onlineresource groups with dispersion dependency.
For example:
START_DEPENDENCIES=dispersion([intermediate: | active: | pool:]:other_resource_group)
Chapter 8Oracle Clusterware Resources and Agents
8-9

Table 8-1 (Cont.) Resource Group Dependency Types and Modifiers
Dependency Type Description
exclusion Specifies a mandatory requirement that this resource group not runon the same server as specific other resource groups. OracleClusterware will either reject the start of this resource group or stopthe dependent resource groups and restart them on another server.
For example:
START_DEPENDENCIES=exclusion[(preempt_pre: | preempt_post )] other_resource_group)
Resource Group Failure and Recovery
As previously discussed, critical resources determine resource group state andfailover.
Failure and Recovery of Critical Resources
• When a critical resource of a resource group fails, the resource group immediatelytransitions to the OFFLINE state.
• Oracle Clusterware attempts local restart of the failed critical resource according tothe RESTART_ATTEMPTS and UPTIME_THRESHOLD resource attributes.
• Oracle Clusterware initiates immediate check actions on other resources in thesame group that have a stop dependency on the failed resource.
• Oracle Clusterware initiates immediate check actions on other resource groupsdependent on this resource group.
• If the resource restarts successfully, then the resource group transitions toONLINE state and Oracle Clusterware performs pullup dependency evaluationwithin and across resource groups.
• If Oracle Clusterware exhausts all local restart attempts of the resource, thenOracle Clusterware stops the entire resource group. Oracle Clusterware alsoimmediately stops other resource groups with a stop dependency on the resourcegroup. Oracle Clusterware attempts local restart of the resource group, ifconfigured to do so. On exhausting all restart attempts, the resource group will failover to another server in the cluster.
Failure and Recovery of Non-Critical Resources
• When a non-critical resource in a resource group fails, Oracle Clusterwareattempts local restart of the failed resource according to the values of theRESTART_ATTEMPTS and UPTIME_THRESHOLD resource attributes. There isno impact on the state of the resource group when a non-critical resource fails.
• Oracle Clusterware initiates immediate check actions on other resources in thesame group that have a stop dependency on the failed resource.
• If the resource restarts successfully, Oracle Clusterware performs pullupdependency evaluation and corresponding startup actions.
Chapter 8Oracle Clusterware Resources and Agents
8-10

• If Oracle Clusterware exhausts all local restart attempts of the resource, then there is noimpact on the state of the resource group. You must then explicitly start the non-criticalresource after fixing the cause of the failure.
Related Topics
• Resource Group TypesIn Oracle Clusterware, a resource type is a template for a class of resources.
• Using Resource GroupsUse CRSCTL to create resource groups, resource group types, and to add resources toresource groups.
Resource Group TypesIn Oracle Clusterware, a resource type is a template for a class of resources.
Resource group types provide a commonly applicable set of attributes to all resource groups.When you create a resource group, you must specify a resource group type. OracleClusterware provides two base resource group types: local_resourcegroup andcluster_resourcegroup. The base resource types have attributes similar to resources, someof which you can configure.
Local Resource Group Type
Use the local_resourcegroup type to create a resource group that contains only localresources. Instances of a resource group of this type can run on each node in the cluster.Local resource group type attributes include:
NAMEDESCRIPTIONACLAUTO_STARTCRITICAL_RESOURCESDEBUGENABLEDINTERNAL_STATERESOURCE_LISTRESTART_ATTEMPTSSERVER_CATEGORYSTART_DEPENDENCIESSTOP_DEPENDENCIESSTATESTATE_DETAILSUPTIME_THRESHOLD
Cluster Resource Group Type
A resource group of type cluster_resourcegroup can have one or more instances runningon a static or dynamic set of servers in the cluster. Such a resource group can fail over toanother server in the cluster according to the placement policy of the group. Cluster resourcegroup type attributes include:
NAMEDESCRIPTIONACL
Chapter 8Oracle Clusterware Resources and Agents
8-11

ACTIVE_PLACEMENTAUTO_STARTCARDINALITYCRITICAL_RESOURCESDEBUGENABLEDFAILURE_INTERVALFAILURE_THRESHOLDHOSTING_MEMBERSINTERNAL_STATEPLACEMENTRESOURCE_LISTRESTART_ATTEMPTSSERVER_CATEGORYSERVER_POOLSSTART_DEPENDENCIESSTOP_DEPENDENCIESSTATESTATE_DETAILSUPTIME_THRESHOLD
Related Topics
• Using Resource GroupsUse CRSCTL to create resource groups, resource group types, and to addresources to resource groups.
• Oracle Clusterware Resource Reference
Using Resource GroupsUse CRSCTL to create resource groups, resource group types, and to add resourcesto resource groups.
To use resource groups, you must first create the resource group based on either abuilt-in resource group type or a resource group type that you create. Once you havecreate a resource group, you can add resources to it.
1. Use the following command to create a resource group:
$ crsctl add resourcegroup group_name -type group_type
The preceding command creates an empty resource group into which you can addresources. You must provide a name for the resource group and a resource grouptype. If you choose to base your resource group on a custom resource group type,then you must first create a resource group type, as described in the next step.
2. If you want to create a resource group based on a custom resource group type,then you must create the resource group type, as follows:
$ crsctl add resourcegrouptype group_type_name –basetype base_group_type {-file file_path | -attr "attribute_name=attribute_value"}
Chapter 8Oracle Clusterware Resources and Agents
8-12

The preceding command creates a resource group type that provides a singular set ofattributes for any resource group you created based on this resource group type. Youmust provide an existing resource group type as a base resource group type, and either apath to a file that contains a line-delimited list of attribute/attribute value pairs or,alternatively, you can provide a comma-delimited list of attribute/attribute value pairs onthe command line.
3. After you create a resource group, you can begin to add resources to the resource group,as follows:
$ crsctl add resource resource_name -group group_name
The resource group to which you add a resource must exist and the resource you areadding must be in an offline state. A resource can be a member of only one resourcegroup. If you have a resource that is shared by multiple applications, such as a filesystem, then Oracle recommends that you put those resources into their own individualresource groups.
Oracle Clusterware Resource TypesGenerally, all resources are unique but some resources may have common attributes. OracleClusterware uses resource types to organize these similar resources. Benefits that resourcetypes provide are:
• Manage only necessary resource attributes
• Manage all resources based on the resource type
Every resource that you register in Oracle Clusterware must have a certain resource type. Inaddition to the resource types included in Oracle Clusterware, you can define customresource types using the Oracle Clusterware Control (CRSCTL) utility. The included resourcetypes are:
• Local resource: Instances of local resources—type name is local_resource—run oneach server of the cluster (the default) or you can limit them to run on servers belongingto a particular server category. When a server joins the cluster, Oracle Clusterwareautomatically extends local resources to have instances tied to the new server. When aserver leaves the cluster, Oracle Clusterware automatically sheds the instances of localresources that ran on the departing server. Instances of local resources are pinned totheir servers; they do not fail over from one server to another.
• Cluster resource: Cluster-aware resource types—type name is cluster_resource—areaware of the cluster environment and are subject to cardinality and cross-serverswitchover and failover.
• Generic application: You can use this resource type—type name isgeneric_application—to protect any generic applications without requiring additionalscripts. High availability for an application is achieved by defining a resource with thegeneric_application resource type and providing the values for key attributes of theresource. The generic_application resource type is derived from thecluster_resource resource type and, therefore, all resources of thegeneric_application resource type are cluster-aware resources. Attributes include:
– START_PROGRAM: A complete path to the executable that starts the application, with allappropriate arguments. The executable must exist on every server where Oracle Grid
Chapter 8Oracle Clusterware Resources and Agents
8-13

Infrastructure is configured to run the application. This attribute is required. Forexample:
/opt/my_app –start
The executable must also ensure that the application starts and return an exitstatus value of zero (0) to indicate that the application started successfully andis online. If the executable fails to start the application, then the executableexits with a non-zero status code.
– STOP_PROGRAM: A complete path to the executable that stops the application,with all appropriate arguments. The executable must exist on every serverwhere Oracle Grid Infrastructure is configured to run the application. If you donot specify this attribute value, then Oracle Clusterware uses an operatingsystem-equivalent of the kill command. For example:
/opt/my_app –stop
The executable must also ensure that the application stops and return an exitstatus value of zero (0) to indicate that the application stopped successfully. Ifthe executable fails to stop the application, then the executable exits with anon-zero status code and Oracle Clusterware initiates a clean of the resource.
– CLEAN_PROGRAM: A complete path to the executable that cleans the program,with all appropriate arguments. The executable must exist on every serverwhere Oracle Grid Infrastructure is configured to run the application. If you donot specify a value for this attribute, then Oracle Clusterware uses anoperating system-equivalent of the kill -9 command. For example:
/opt/my_app –clean
Note:
The difference between STOP_PROGRAM and CLEAN_PROGRAM is thatCLEAN_PROGRAM is a forced stop that stops an applicationungracefully, and must always be able to stop an application or theapplication becomes unmanageable.
– PID_FILES: A comma-delimited list of complete paths to files that will bewritten by the application and contain a process ID (PID) to monitor. Failure ofa single process is treated as a complete resource failure. For example:
/opt/app.pid
Note:
The files that you specify in the PID_FILES attribute are readimmediately after the START action completes and monitoringcommences for the PIDs listed in the files.
Chapter 8Oracle Clusterware Resources and Agents
8-14

– EXECUTABLE_NAMES: A comma-delimited list of names of executables that is createdwhen the application starts and the state of these executables is subsequentlymonitored. Failure of a single executable is treated as a complete resource failure.For example:
my_app
Note:
You need specify only the complete name of the executables. This attributedoes not accept the path of the executable or wild cards. The PIDsmatching the executable names are cached immediately after the STARTaction completes.
– CHECK_PROGRAMS: A list of complete paths to the executable that determines the stateof the application. Reporting a non-running state by any of the applications is treatedas a failure of the entire resource. For example:
/opt/my_app –check
– ENVIRONMENT_FILE: A complete path to the file containing environment variables tosource when starting the application. The file must be a text file containingname=value pairs, one per line. For example:
/opt/my_app.env
– ENVIRONMENT_VARS: A comma-delimited list of name=name pairs to be included into theenvironment when starting an application. For example:
USE_FILES=No, AUTO_START=Yes
– SEND_OUTPUT_ALWAYS: This attribute is responsible for sending the application outputthat is sent to STDOUT, which is then displayed. A value of 0 does not display anyapplication output unless an action fails. When an action fails, whatever applicationoutput that has been saved by the agent is displayed. Any value greater than 0displays every application output. The default value is 0. For example:
SEND_OUTPUT_ALWAYS=1
Note:
If you do not specify the STOP_PROGRAM, CHECK_PROGRAMS, and CLEAN_PROGRAMattributes, then you must specify either PID_FILES or EXECUTABLE_NAMES, orOracle Clusterware will not allow you to register a resource of this type.
If you specify all the attributes, then the following rules apply:
1. When stopping a resource, if you specified STOP_PROGRAM, then Oracle Clusterwarecalls STOP_PROGRAM. Otherwise, Oracle Clusterware uses an operating system-
Chapter 8Oracle Clusterware Resources and Agents
8-15

equivalent of the kill -9 command on the PID obtained from either thePID_FILES or the EXECUTABLE_NAMES attribute.
2. When you need to establish the current state of an application, if you specifiedCHECK_PROGRAMS, then Oracle Clusterware calls CHECK_PROGRAMS. Otherwise,Oracle Clusterware uses an operating system-equivalent of the ps -pcommand with the PID obtained from either the PID_FILES orEXECUTABLE_NAMES attribute.
3. When cleaning a resource, if you specified CLEAN_PROGRAM, then OracleClusterware calls CLEAN_PROGRAM. Otherwise, Oracle Clusterware uses anoperating system-equivalent of the kill -9 command on the PID obtainedfrom either the PID_FILES or the EXECUTABLE_NAMES attribute.
Related Topics
• crsctl add resourceRegisters a resource to be managed by Oracle Clusterware.
• Resource States
• Creating Resources that Use the generic_application Resource TypeUse the crsctl add resource command to create resources using thegeneric_application resource type to model any type of application requiringhigh availability without having to create any action scripts.
Agents in Oracle ClusterwareOracle Clusterware runs all resource-specific commands through an entity called anagent.
Oracle Clusterware manages applications when they are registered as resources withOracle Clusterware. Oracle Clusterware has access to application-specific primitivesthat have the ability to start, stop, and monitor a specific resource.
Note:
To increase security and further separate administrative duties, OracleClusterware agents run with the SYSRAC administrative privilege, and nolonger require the SYSDBA administrative privilege. The SYSRACadministrative privilege is the default mode of connecting to the database bythe Oracle Clusterware agent on behalf of Oracle RAC utilities, such asSRVCTL, so that no SYSDBA connections to the database are necessary foreveryday administration of Oracle RAC database clusters.
An agent is a process that contains the agent framework and user code to manageresources. The agent framework is a library that enables you to plug in yourapplication-specific code to manage customized applications. You program all of theactual application management functions, such as starting, stopping and checking thehealth of an application, into the agent. These functions are referred to as entry points.
The agent framework is responsible for invoking these entry point functions on behalfof Oracle Clusterware. Agent developers can use these entry points to plug in therequired functionality for a specific resource regarding how to start, stop, and monitor aresource. Agents are capable of managing multiple resources.
Chapter 8Oracle Clusterware Resources and Agents
8-16

Agent developers can set the following entry points as callbacks to their code:
• ABORT: If any of the other entry points hang, the agent framework calls the ABORTentry point to stop the ongoing action. If the agent developer does not supply a stopfunction, then the agent framework exits the agent program.
• ACTION: The ACTION entry point is Invoked when a custom action is invoked using the clscrs_request_action API of the crsctl request action command.
• CHECK: The CHECK (monitor) entry point acts to monitor the health of a resource. Theagent framework periodically calls this entry point. If it notices any state change duringthis action, then the agent framework notifies Oracle Clusterware about the change in thestate of the specific resource.
• CLEAN: The CLEAN entry point acts whenever there is a need to clean up a resource. Itis a non-graceful operation that is invoked when users must forcefully terminate aresource. This command cleans up the resource-specific environment so that theresource can be restarted.
• DELETE: The DELETE entry point is invoked on every node where a resource can runwhen the resource is unregistered.
• MODIFY: The MODIFY entry point is invoked on every node where a resource can runwhen the resource profile is modified.
• START: The START entry point acts to bring a resource online. The agent frameworkcalls this entry point whenever it receives the start command from Oracle Clusterware.
• STOP: The STOP entry points acts to gracefully bring down a resource. The agentframework calls this entry point whenever it receives the stop command from OracleClusterware.
START, STOP, CHECK, and CLEAN are mandatory entry points and the agent developermust provide these entry points when building an agent. Agent developers have severaloptions to implement these entry points, including using C, C++, or scripts. It is also possibleto develop agents that use both C or C++ and script-type entry points. When initializing theagent framework, if any of the mandatory entry points are not provided, then the agentframework invokes a script pointed to by the ACTION_SCRIPT resource attribute.
At any given time, the agent framework invokes only one entry point per application. If thatentry point hangs, then the agent framework calls the ABORT entry point to end the currentoperation. The agent framework periodically invokes the CHECK entry point to determine thestate of the resource. This entry point must return one of the following states as the resourcestate:
• CLSAGFW_ONLINE: The CHECK entry point returns ONLINE if the resource was brought upsuccessfully and is currently in a functioning state. The agent framework continues tomonitor the resource when it is in this state. This state has a numeric value of 0 for thescriptagent.
• CLSAGFW_UNPLANNED_OFFLINE and CLSAGFW_PLANNED_OFFLINE: The OFFLINE stateindicates that the resource is not currently running. These two states have numericvalues of 1 and 2, respectively, for the scriptagent.
Two distinct categories exist to describe an resource's offline state: planned andunplanned.
When the state of the resource transitions to OFFLINE through Oracle Clusterware, thenit is assumed that the intent for this resource is to be offline (TARGET=OFFLINE), regardlessof which value is returned from the CHECK entry point. However, when an agent detectsthat the state of a resource has changed independent of Oracle Clusterware (such as
Chapter 8Oracle Clusterware Resources and Agents
8-17

somebody stopping the resource through a non-Oracle interface), then the intentmust be carried over from the agent to the Cluster Ready Services daemon(CRSD). The intent then becomes the determining factor for the following:
– Whether to keep or to change the value of the resource's TARGET resourceattribute. PLANNED_OFFLINE indicates that the TARGET resource attribute mustbe changed to OFFLINE only if the resource was running before. If theresource was not running (STATE=OFFLINE, TARGET=OFFLINE) and a requestcomes in to start it, then the value of the TARGET resource attribute changes toONLINE. The start request then goes to the agent and the agent reports backto Oracle Clusterware a PLANNED_OFFLINE resource state, and the value of theTARGET resource attribute remains ONLINE. UNPLANNED_OFFLINE does notchange the TARGET attribute.
– Whether to leave the resource's state as UNPLANNED_OFFLINE or attempt torecover the resource by restarting it locally or failing it over to a another serverin the cluster. The PLANNED_OFFLINE state makes CRSD leave the resource asis, whereas the UNPLANNED_OFFLINE state prompts resource recovery.
• CLSAGFW_UNKNOWN: The CHECK entry point returns UNKNOWN if the current stateof the resource cannot be determined. In response to this state, OracleClusterware does not attempt to failover or to restart the resource. The agentframework continues to monitor the resource if the previous state of the resourcewas either ONLINE or PARTIAL. This state has a numeric value of 3 for thescriptagent.
• CLSAGFW_PARTIAL: The CHECK entry point returns PARTIAL when it knows that aresource is partially ONLINE and some of its services are available. OracleClusterware considers this state as partially ONLINE and does not attempt tofailover or to restart the resource. The agent framework continues to monitor theresource in this state. This state has a numeric value of 4 for the scriptagent.
• CLSAGFW_FAILED: The CHECK entry point returns FAILED whenever it detects thata resource is not in a functioning state and some of its components have failedand some clean up is required to restart the resource. In response to this state,Oracle Clusterware calls the CLEAN action to clean up the resource. After theCLEAN action finishes, the state of the resource is expected to be OFFLINE. Next,depending on the policy of the resource, Oracle Clusterware may attempt tofailover or restart the resource. Under no circumstances does the agent frameworkmonitor failed resources. This state has a numeric value of 5 for the scriptagent.
The agent framework implicitly monitors resources in the states listed in Table 8-2 atregular intervals, as specified by the CHECK_INTERVAL or OFFLINE_CHECK_INTERVALresource attributes.
Table 8-2 Agent Framework Monitoring Characteristics
State Condition Frequency
ONLINE Always \CHECK_INTERVAL
PARTIAL Always CHECK_INTERVALOFFLINE Only if the value of the
OFFLINE_CHECK_INTERVALresource attribute is greater than 0.
OFFLINE_CHECK_INTERVAL
Chapter 8Oracle Clusterware Resources and Agents
8-18

Table 8-2 (Cont.) Agent Framework Monitoring Characteristics
State Condition Frequency
UNKNOWN Only monitored if the resource waspreviously being monitored becauseof any one of the previouslymentioned conditions.
If the state becomes UNKNOWNafter being ONLINE, then the valueof CHECK_INTERVAL is used.Otherwise, there is no monitoring.
Whenever an agent starts, the state of all the resources it monitors is set to UNKNOWN.After receiving an initial probe request from Oracle Clusterware, the agent frameworkexecutes the CHECK entry point for all of the resources to determine their current states.
Once the CHECK action successfully completes for a resource, the state of the resourcetransitions to one of the previously mentioned states. The agent framework then startsresources based on commands issued from Oracle Clusterware. After the completion ofevery action, the agent framework invokes the CHECK action to determine the currentresource state. If the resource is in one of the monitored states listed in Table 8-2, then theagent framework periodically executes the CHECK entry point to check for changes inresource state.
By default, the agent framework does not monitor resources that are offline. However, if thevalue of the OFFLINE_CHECK_INTERVAL attribute is greater than 0, then the agent frameworkmonitors offline resources.
Related Topics
• ACTION_SCRIPT
• CHECK_INTERVAL
• OFFLINE_CHECK_INTERVAL
Oracle Clusterware Built-in AgentsOracle Clusterware uses agent programs (agents) to manage resources and includes thefollowing built-in agents to protect applications:
• appagent: This agent (appagent.exe in Windows) automatically protects resources of thegeneric_application resource type and any resources in previous versions of OracleClusterware of the application resource type.
Note:
Oracle recommends that you not use the deprecated application resourcetype, which is only provided to support pre-Oracle Clusterware 11g release 2(11.2) resources.
• scriptagent: Use this agent (scriptagent.exe in Windows) when using shell or batchscripts to protect an application. Both the cluster_resource and local_resourceresource types are configured to use this agent, and any resources of these typesautomatically take advantage of this agent.
Additionally, you can create your own agents to manage your resources in any manner youwant.
Chapter 8Oracle Clusterware Resources and Agents
8-19

Related Topics
• Oracle Clusterware Resource Types
• Building an Agent
Action ScriptsAn action script defines one or more actions to start, stop, check, or clean resources.
The agent framework invokes these actions without the C/C++ actions. Using actionscripts, you can build an agent that contains the C/C++ entry points and the scriptentry points. If all of the actions are defined in the action script, then you can use thescript agent to invoke the actions defined in any action scripts.
Before invoking the action defined in the action script, the agent framework exports allthe necessary attributes from the resource profile to the environment. Action scriptscan log messages to the stdout/stderr, and the agent framework prints thosemessages in the agent logs. However, action scripts can use special tags to send theprogress, warning, or error messages to the crs* client tools by prefixing one of thefollowing tags to the messages printed to stdout/stderr:
CRS_WARNING:CRS_ERROR:CRS_PROGRESS:
The agent framework strips out the prefixed tag when it sends the final message to thecrs* clients.
Resource attributes can be accessed from within an action script as environmentvariables prefixed with _CRS_. For example, the START_TIMEOUT attribute becomes anenvironment variable named _CRS_START_TIMEOUT.
Related Topics
• crsctl start resource
• crsctl stop resource
Building an AgentBuilding an agent for a specific application involves the following steps:
1. Implement the agent framework entry points either in scripts, C, or C++.
2. Build the agent executable (for C and C++ agents).
3. Collect all the parameters needed by the entry points and define a new resourcetype. Set the AGENT_FILENAME attribute to the absolute path of the newly builtexecutable.
Building and Deploying C and C++ AgentsExample C and C++ agents are included with Oracle Clusterware that demonstrateusing the agent framework to implement high availability agents for applications.Appendix F describes an example of an agent called demoagent1.cpp. This agent
Chapter 8Oracle Clusterware Resources and Agents
8-20

manages a simple resource that represents a file on disk and performs the following tasks:
• On start: Creates the file
• On stop: Gracefully deletes the file
• On check: Detects whether the file is present
• On clean: Forcefully deletes the file
To describe this particular resource to Oracle Clusterware, you must first create a resourcetype that contains all the characteristic attributes for this resource class. In this case, the onlyattribute to be described is the name of the file to be managed. The following stepsdemonstrate how to set up the resource and its agent and test the functionality of theresource:
1. Compile the C++ agent using the demoagent1.cpp source file provided and a makefile.Modify the makefile based on the local compiler and linker paths and installationlocations. The output is an executable named demoagent1. This example assumes thatthe executable is located in a directory named /path/to/ on every node of the cluster.
2. Use CRSCTL to add a new resource type, as follows:
$ crsctl add type hotfile_type -basetype cluster_resource -attr "ATTRIBUTE=PATH_NAME,TYPE=string,DEFAULT_VALUE=default.txt, ATTRIBUTE=AGENT_FILENAME,TYPE=string,DEFAULT_VALUE=/path/to/demoagent1"
In the preceding command example, PATH_NAME is the directory path for every resource ofthis type. Modify the value of PATH_NAME to the appropriate directory location on the disk.
The AGENT_FILENAME attribute specifies the location of the agent binary that implementsthe resource management commands for this resource type. This step adds a newresource type to Oracle Clusterware.
3. Create a new resource based on the type that is defined in the previous step, as follows:
$ crsctl add res file1 -type hotfile_type -attr "PATH_NAME=/var/log/file1.txt"$ crsctl add res file2 -type hotfile_type -attr "PATH_NAME=/var/log/file2.txt"
The preceding commands add resources named file1 and file2 to be managed andmonitored by Oracle Clusterware.
4. Start and stop the resources using CRSCTL, as follows:
$ crsctl start res file1$ crsctl start res file2$ crsctl relocate res file1$ crsctl stop res file2
Oracle Clusterware creates and deletes the disk files as the resources are started andstopped.
Related Topics
• Oracle Clusterware Agent Framework C Application Program Interfaces
Chapter 8Oracle Clusterware Resources and Agents
8-21

Registering a Resource in Oracle ClusterwareRegister resources in Oracle Clusterware using the crsctl add resource command.
To register an application as a resource:
$ crsctl add resource resource_name -type [-group group_name] resource_type [-file file_path] | [-attr "attribute_name='attribute_value', attribute_name=' attribute_value', ..."]
Choose a name for the resource based on the application for which it is being created.For example, if you create a resource for an Apache Web server, then you might namethe resource myApache. Specify the name of an existing resource type after the -typeoption. Optionally, you can add the resource to an existing resource group.
You can specify resource attributes in either a text file specified with the -file optionor in a comma-delimited list of resource attribute-value pairs enclosed in doublequotation marks ("") following the -attr option. You must enclose space- or comma-delimited attribute names and values enclosed in parentheses in single quotationmarks ('').
The following is an example of an attribute file:
PLACEMENT=favoredHOSTING_MEMBERS=node1 node2 node3RESTART_ATTEMPTS@CARDINALITYID(1)=0RESTART_ATTEMPTS@CARDINALITYID(2)=0FAILURE_THRESHOLD@CARDINALITYID(1)=2FAILURE_THRESHOLD@CARDINALITYID(2)=4FAILURE_INTERVAL@CARDINALITYID(1)=300FAILURE_INTERVAL@CARDINALITYID(2)=500CHECK_INTERVAL=2CARDINALITY=2
The following is an example of using the -attr option:
$ crsctl add resource resource_name -type resource_type [-attr "PLACEMENT=' favored', HOSTING_MEMBERS='node1 node2 node3', ..."]
Related Topics
• Adding User-Defined ResourcesYou can add resources to Oracle Clusterware at any time.
• crsctl add resourceRegisters a resource to be managed by Oracle Clusterware.
• Resource Attributes
• Resource GroupsA resource group is a container for a logically related group of resources.
Chapter 8Oracle Clusterware Resources and Agents
8-22

Overview of Using Oracle Clusterware to Enable HighAvailability
Oracle Clusterware manages resources and resource groups based on how you configurethem to increase their availability.
You can configure your resources and resource groups so that Oracle Clusterware:
• Starts resources and resource groups during cluster or server start
• Restarts resources and resource groups when failures occur
• Relocates resources and resource groups to other servers, if the servers are available
To manage your applications with Oracle Clusterware:
1. Use the generic_application resource type, write a custom script for the script agent, ordevelop a new agent.
2. Register your applications as resources with Oracle Clusterware.
If a single application requires that you register multiple resources, then you can create aresource group that Oracle Clusterware manages like a single resource. You may berequired to define relevant dependencies between the resources within the resourcegroup.
3. Assign the appropriate privileges to the resource or resource group.
4. Start or stop your resources and resource groups.
When a resource fails, Oracle Clusterware attempts to restart the resource based on attributevalues that you provide when you register an application or process as a resource. If thefailed resource is a non-critical resource member of a resource group, then the resourcegroup remains in an ONLINE state. If a server in a cluster fails, then you can configure yourresources and resource groups so that processes that were assigned to run on the failedserver restart on another server. Based on various resource attributes, Oracle Clusterwaresupports a variety of configurable scenarios.
When you register a resource or create a resource group in Oracle Clusterware, the relevantinformation about the application and the resource-relevant information, is stored in theOracle Cluster Registry (OCR). This information includes:
• Path to the action script or application-specific agent: This is the absolute path to thescript or application-specific agent that defines the start, stop, check, and clean actionsthat Oracle Clusterware performs on the application.
See Also:
"Agents in Oracle Clusterware" for more information about these actions
• Privileges: Oracle Clusterware has the necessary privileges to control all of thecomponents of your application for high availability operations, including the right to startprocesses that are owned by other user identities. Oracle Clusterware must run as aprivileged user to control applications with the correct start and stop processes.
Chapter 8Overview of Using Oracle Clusterware to Enable High Availability
8-23

• Resource Dependencies: You can create relationships among resources andresource groups that imply an operational ordering or that affect the placement ofresources on servers in the cluster. For example, Oracle Clusterware can onlystart a resource that has a hard start dependency on another resource if the otherresource is running. Oracle Clusterware prevents stopping a resource if otherresources that depend on it are running. However, you can force a resource tostop using the crsctl stop resource -f command, which first stops allresources that depend on the resource being stopped.
Related Topics
• Resource GroupsA resource group is a container for a logically related group of resources.
• Resource Attributes
• Resource States
• Resource Dependencies
• Resource Placement
• Agents in Oracle ClusterwareOracle Clusterware runs all resource-specific commands through an entity calledan agent.
Resource AttributesResource attributes define how Oracle Clusterware manages resources of a specificresource type. Each resource type has a unique set of attributes. Some resourceattributes are specified when you register resources, while others are internallymanaged by Oracle Clusterware.
Note:
Where you can define new resource attributes, you can only use US-7 ASCIIcharacters.
Related Topics
• Oracle Clusterware Resource Reference
Resource StatesEvery resource in a cluster is in a particular state at any time. Certain actions or eventscan cause that state to change.
Table 8-3 lists and describes the possible resource states.
Table 8-3 Possible Resource States
State Description
ONLINE The resource is running.
OFFLINE The resource is not running.
Chapter 8Overview of Using Oracle Clusterware to Enable High Availability
8-24

Table 8-3 (Cont.) Possible Resource States
State Description
UNKNOWN An attempt to stop the resource has failed. Oracle Clusterwaredoes not actively monitor resources that are in this state. Youmust perform an application-specific action to ensure that theresource is offline, such as stop a process, and then run thecrsctl stop resource command to reset the state of theresource to OFFLINE.
INTERMEDIATE A resource can be in the INTERMEDIATE state because of oneof two events:
1. Oracle Clusterware cannot determine the state of theresource but the resource was either attempting to go onlineor was online the last time its state was precisely known.Usually, the resource transitions out of this state on its ownover time, as the conditions that impeded the check actionno longer apply.
2. A resource is partially online. For example, the OracleDatabase VIP resource fails over to another server when itshome server leaves the cluster. However, applicationscannot use this VIP to access the database while it is on anon-home server. Similarly, when an Oracle Databaseinstance is started and not open, the resource is partiallyonline: it is running but is not available to provide services.
Oracle Clusterware actively monitors resources that are in theINTERMEDIATE state and, typically, you are not required tointervene. If the resource is in the INTERMEDIATE state due tothe preceding reason 1, then as soon as the state of theresource is established, Oracle Clusterware transitions theresource out of the INTERMEDIATE state.
If the resource is in the INTERMEDIATE state due to thepreceding reason 2, then it stays in this state if it remainspartially online. For example, the home server of the VIP mustrejoin the cluster so the VIP can switch over to it. A databaseadministrator must issue a command to open the databaseinstance.
In either case, however, Oracle Clusterware transitions theresource out of the INTERMEDIATE state automatically as soonas it is appropriate.Use the STATE_DETAILS resource attributeto explain the reason for a resource being in the INTERMEDIATEstate and provide a solution to transition the resource out of thisstate.
Resource DependenciesYou can configure resources to be dependent on other resources, so that the dependentresources can only start or stop when certain conditions of the resources on which theydepend are met. For example, when Oracle Clusterware attempts to start a resource, it isnecessary for any resources on which the initial resource depends to be running and in thesame location. If Oracle Clusterware cannot bring the resources online, then the initial(dependent) resource cannot be brought online, either. If Oracle Clusterware stops aresource or a resource fails, then any dependent resource is also stopped.
Chapter 8Overview of Using Oracle Clusterware to Enable High Availability
8-25

Some resources require more time to start than others. Some resources must startwhenever a server starts, while other resources require a manual start action. Theseand many other examples of resource-specific behavior imply that each resource mustbe described in terms of how it is expected to behave and how it relates to otherresources (resource dependencies).
You can configure resources so that they depend on Oracle resources. When creatingresources, however, do not use an ora prefix in the resource name. This prefix isreserved for Oracle use only.
Previous versions of Oracle Clusterware included only two dependency specifications:the REQUIRED_RESOURCES resource attribute and the OPTIONAL_RESOURCES resourceattribute. The REQUIRED_RESOURCES resource attribute applied to both start and stopresource dependencies.
Note:
The REQUIRED_RESOURCES and OPTIONAL_RESOURCES resource attributes arestill available only for resources of application type. Their use to defineresource dependencies is deprecated in Oracle Clusterware 12c and laterreleases.
Resource dependencies are separated into start and stop categories. This separationimproves and expands the start and stop dependencies between resources andresource types.
This section includes the following topics:
• Start Dependencies
• Stop Dependencies
Start DependenciesOracle Clusterware considers start dependencies contained in the profile of a resourcewhen the start effort evaluation for that resource begins. You specify startdependencies for resources using the START_DEPENDENCIES resource attribute. Youcan use modifiers on each dependency to further configure the dependency.
This section includes descriptions of the following START dependencies:
• attraction
• dispersion
• exclusion
• hard
• pullup
• weak
Related Topics
• START_DEPENDENCIES
Chapter 8Overview of Using Oracle Clusterware to Enable High Availability
8-26

attractionIf resource A has an attraction dependency on resource B, then Oracle Clusterware prefersto place resource A on servers hosting resource B. Dependent resources, such as resourceA in this case, are more likely to run on servers on which resources to which they haveattraction dependencies are running. Oracle Clusterware places dependent resources onservers with resources to which they are attracted.
You can configure the attraction start dependency with the following constraints:
• START_DEPENDENCIES=attraction(intermediate:resourceB)Use the intermediate modifier to specify whether the resource is attracted to resourcesthat are in the INTERMEDIATE state.
• START_DEPENDENCIES=attraction(type:resourceB.type)Use the type modifier to specify whether the dependency acts on a particular resourcetype. The dependent resource is attracted to the server hosting the greatest number ofresources of a particular type.
Note:
Previous versions of Oracle Clusterware used the now deprecatedOPTIONAL_RESOURCES attribute to express attraction dependency.
dispersionIf you specify the dispersion start dependency for a resource, then Oracle Clusterware startsthis resource on a server that has the fewest number of resources to which this resource hasdispersion. Resources with dispersion may still end up running on the same server if thereare not enough servers to which to disperse them.
You can configure the dispersion start dependency with the following modifiers:
• START_DEPENDENCIES=dispersion(intermediate:resourceB)Use the intermediate modifier to specify that Oracle Clusterware disperses resource Awhether resource B is either in the ONLINE or INTERMEDIATE state.
• START_DEPENDENCIES=dispersion:active(resourceB)Typically, dispersion is only applied when starting resources. If at the time of starting,resources that disperse each other start on the same server (because there are notenough servers at the time the resources start), then Oracle Clusterware leaves theresources alone once they are running, even when more servers join the cluster. If youspecify the active modifier, then Oracle Clusterware reapplies dispersion on resourceslater when new servers join the cluster.
• START_DEPENDENCIES=dispersion(pool:resourceB)Use the pool modifier to specify that Oracle Clusterware disperses the resource to adifferent server pool rather than to a different server.
Chapter 8Overview of Using Oracle Clusterware to Enable High Availability
8-27

exclusionThe exclusion start dependency contains a clause that defines the exclusiverelationship between resources while starting. Resources that have the exclusionstart dependency cannot run on the same node. For example, if resource A has anexclusion start dependency on resource B, then the CRSD policy provides thefollowing options when resource B is already running on the server where resource Aneeds to start:
• Deny the start of resource A if resource B is already running.
• Start resource A by preempting resource B. There are two variations to thepreempt operation:
– Resource B is stopped and, if possible, restarted on another node. ResourceA is subsequently started.
– Resource A is started first. Subsequently, resource B is stopped and, ifpossible, restarted on another node.
You can configure the exclusion start dependency with the following modifiers:
• START_DEPENDENCIES=exclusion([[preempt_pre: | preempt_post:]]target_resource_name | type:target_resource_type]*)All modifiers specified are per resource or resource type. Oracle Clusterwarepermits only one exclusion dependency per resource dependency tree. Withoutany preempt modifier, CRSD will only attempt to start the resource if all of its targetresources are offline.
– preempt_pre: If you choose this preempt modifier, then CRSD stops thespecified target resource or resources defined by a specific resource typebefore starting the source resource. If restarting the stopped resources ispossible, then CRSD can do this concurrently while starting the preemptingresource.
– preempt_post: If you choose this preempt modifier, then, after starting thesource resource, CRSD stops and relocates, if possible, the specified targetresource or resources defined by a specific resource type.
If CRSD cannot stop the target resources successfully, or cannot start the sourceresource, then the entire operation fails. Oracle Clusterware then attempts toreturn the affected resources to their original state, if possible.
hardDefine a hard start dependency for a resource if another resource must be runningbefore the dependent resource can start. For example, if resource A has a hard startdependency on resource B, then resource B must be running before resource A canstart. Similarly, if both resources (A and B) are initially offline, then resource B isstarted first to satisfy resource A's dependency.
Chapter 8Overview of Using Oracle Clusterware to Enable High Availability
8-28

Note:
Oracle recommends that resources with hard start dependencies also have pullupstart dependencies.
You can configure the hard start dependency with the following constraints:
• START_DEPENDENCIES=hard(global:resourceB)By default, resources A and B must be located on the same server (collocated). Use theglobal modifier to specify that resources need not be collocated. For example, ifresource A has a hard(global:resourceB) start dependency on resource B, then, ifresource B is running on any node in the cluster, resource A can start.
• START_DEPENDENCIES=hard(intermediate:resourceB)Use the intermediate modifier to specify that the dependent resource can start if aresource on which it depends is in either the ONLINE or INTERMEDIATE state.
• START_DEPENDENCIES=hard(type:resourceB.type)Use the type modifier to specify whether the hard start dependency acts on a particularresource or a resource type. For example, if you specify that resource A has a hard startdependency on the resourceB.type type, then if any resource of the resourceB.typetype is running, resource A can start.
• START_DEPENDENCIES=hard(uniform:resourceB)Use the uniform modifier to attempt to start all instances of resource B, but only oneinstance, at least must start to satisfy the dependency.
• START_DEPENDENCIES=hard(resourceB, intermediate:resourceC,intermediate:global:type:resourceC.type)You can combine modifiers and specify multiple resources in the START_DEPENDENCIESresource attribute.
Note:
Separate modifier clauses with commas. The type modifier clause must alwaysbe the last modifier clause in the list and the type modifier must always directlyprecede the type.
pullupUse the pullup start dependency if resource A must automatically start whenever resource Bstarts. This dependency only affects resource A if it is not running. As is the case for otherdependencies, pullup may cause the dependent resource to start on any server. Use thepullup dependency whenever there is a hard stop dependency, so that if resource Adepends on resource B and resource B fails and then recovers, then resource A is restarted.
Chapter 8Overview of Using Oracle Clusterware to Enable High Availability
8-29

Note:
Oracle recommends that resources with hard start dependencies also havepullup start dependencies.
You can configure the pullup start dependency with the following constraints:
• START_DEPENDENCIES=pullup(intermediate:resourceB)Use the intermediate modifier to specify whether resource B can be either in theONLINE or INTERMEDIATE state to start resource A.
If resource A has a pullup dependency on multiple resources, then resource Astarts only when all resources upon which it depends, start.
• START_DEPENDENCIES=pullup:always(resourceB)Use the always modifier to specify whether Oracle Clusterware starts resource Adespite the value of its TARGET attribute, whether it is ONLINE or OFFLINE. Bydefault, without using the always modifier, pullup only starts resources if the valueof the TARGET attribute of the dependent resource is ONLINE.
• START_DEPENDENCIES=pullup(type:resourceB.type)Use the type modifier to specify that the dependency acts on a particular resourcetype.
weakIf resource A has a weak start dependency on resource B, then an attempt to startresource A attempts to start resource B, if resource B is not running. The result of theattempt to start resource B is, however, of no consequence to the result of startingresource A.
You can configure the weak start dependency with the following constraints:
• START_DEPENDENCIES=weak(global:resourceB)By default, resources A and B must be collocated. Use the global modifier tospecify that resources need not be collocated. For example, if resource A has aweak(global:resourceB) start dependency on resource B, then, if resource B isrunning on any node in the cluster, resource A can start.
• START_DEPENDENCIES=weak(concurrent:resourceB)Use the concurrent modifier to specify that resource A and resource B can startconcurrently.
• START_DEPENDENCIES=weak(type:resourceB.type)Use the type modifier to specify that the dependency acts on a resource of aparticular resource type, such as resourceB.type.
• START_DEPENDENCIES=weak(uniform:resourceB)Use the uniform modifier to attempt to start all instances of resource B.
Chapter 8Overview of Using Oracle Clusterware to Enable High Availability
8-30

Stop DependenciesOracle Clusterware considers stop dependencies between resources whenever a resource isstopped (the resource state changes from ONLINE to any other state).
hardIf resource A has a hard stop dependency on resource B, then resource A must be stoppedwhen B stops running. The two resources may attempt to start or relocate to another server,depending upon how they are configured. Oracle recommends that resources with hard stopdependencies also have hard start dependencies.
You can configure the hard stop dependency with the following modifiers:
• STOP_DEPENDENCIES=hard(intermedite:resourceB)Use the intermediate modifier to specify whether resource B must be in either theONLINE or INTERMEDIATE state for resource A to stay online.
• STOP_DEPENDENCIES=hard(global:resourceB)Use the global modifier to specify whether resource A requires that resource B bepresent on the same server or on any server in the cluster to remain online. If thisconstraint is not specified, then resources A and B must be running on the same server.Oracle Clusterware stops resource A when that condition is no longer met.
• STOP_DEPENDENCIES=hard(shutdown:resourceB)Use the shutdown modifier to stop the resource only when you shut down the OracleClusterware stack using either the crsctl stop crs or crsctl stop clustercommands.
Related Topics
• STOP_DEPENDENCIES
Effect of Resource Dependencies on Resource State RecoveryWhen a resource goes from a running to a non-running state, while the intent to have itrunning remains unchanged, this transition is called a resource failure. At this point, OracleClusterware applies a resource state recovery procedure that may try to restart the resourcelocally, relocate it to another server, or just stop the dependent resources, depending on thehigh availability policy for resources and the state of entities at the time.
When two or more resources depend on each other, a failure of one of them may end upcausing the other to fail, as well. In most cases, it is difficult to control or even predict theorder in which these failures are detected. For example, even if resource A depends onresource B, Oracle Clusterware may detect the failure of resource B after the failure ofresource A.
This lack of failure order predictability can cause Oracle Clusterware to attempt to restartdependent resources in parallel, which, ultimately, leads to the failure to restart someresources, because the resources upon which they depend are being restarted out of order.
In this case, Oracle Clusterware reattempts to restart the dependent resources locally if eitheror both the hard stop and pullup dependencies are used. For example, if resource A haseither a hard stop dependency or pullup dependency, or both, on resource B, and resourceA fails because resource B failed, then Oracle Clusterware may end up trying to restart both
Chapter 8Overview of Using Oracle Clusterware to Enable High Availability
8-31

resources at the same time. If the attempt to restart resource A fails, then as soon asresource B successfully restarts, Oracle Clusterware reattempts to restart resource A.
Resource PlacementAs part of the start effort evaluation, the first decision that Oracle Clusterware mustmake is where to start (or place) the resource. Making such a decision is easy whenthe caller specifies the target server by name. If a target server is not specified,however, then Oracle Clusterware attempts to locate the best possible server forplacement given the resource's configuration and the current state of the cluster.
Oracle Clusterware considers a resource's placement policy first and filters out serversthat do not fit with that policy. Oracle Clusterware sorts the remaining servers in aparticular order depending on the value of the PLACEMENT resource attribute of theresource.
The result of this consideration is a maximum of two lists of candidate servers onwhich Oracle Clusterware can start the resource. One list contains preferred serversand the other contains possible servers. The list of preferred servers will be empty ifthe value of the PLACEMENT resource attribute for the resource is set to balanced orrestricted. The placement policy of the resource determines on which server theresource wants to run. Oracle Clusterware considers preferred servers over possibleservers, if there are servers in the preferred list.
Oracle Clusterware then considers the resource's dependencies to determine where toplace the resource, if any exist. The attraction and dispersion start dependencies affectthe resource placement decision, as do some dependency modifiers. OracleClusterware applies these placement hints to further order the servers in the twopreviously mentioned lists. Note that Oracle Clusterware processes each list of serversindependently, so that the effect of the resource's placement policy is not confused bythat of dependencies.
Finally, Oracle Clusterware chooses the first server from the list of preferred servers, ifany servers are listed. If there are no servers on the list of preferred servers, thenOracle Clusterware chooses the first server from the list of possible servers, if anyservers are listed. When no servers exist in either list, Oracle Clusterware generates aresource placement error.
Note:
Neither the placement policies nor the dependencies of the resources relatedto the resource Oracle Clusterware is attempting to start affect the placementdecision.
Related Topics
• Application Placement PoliciesA resource can be started on any server, subject to the placement policies, theresource start dependencies, and the availability of the action script on that server.
Chapter 8Overview of Using Oracle Clusterware to Enable High Availability
8-32

Registering an Application as a ResourceThis section presents examples of the procedures for registering an application as a resourcein Oracle Clusterware.
The procedures instruct you how to add an Apache Web server (as an example) as aresource to Oracle Clusterware. The examples in this section assume that the OracleClusterware administrator has full administrative privileges over Oracle Clusterware and theuser or group that owns the application that Oracle Clusterware is going to manage. Once theregistration process is complete, Oracle Clusterware can start any application on behalf ofany operating system user.
Oracle Clusterware distinguishes between an owner of a registered resource and a user. Theowner of a resource is the operating system user under which the agent runs. The ACLresource attribute of the resource defines permissions for the users and the owner. Only rootcan modify any resource.
Note:
• Oracle Clusterware commands prefixed with crs_ are desupported with thisrelease and can no longer be used. CRSCTL commands replace thosecommands. See "Oracle Clusterware Control (CRSCTL) Utility Reference" for alist of CRSCTL commands and their corresponding crs_ commands.
• Do not use CRSCTL commands on any resources that have names prefixedwith ora (because these are Oracle resources), unless My Oracle Supportdirects you to do so.
To configure Oracle resources, use the server control utility, SRVCTL, whichprovides you with all configurable options.
Related Topics
• Oracle Clusterware Control (CRSCTL) Utility Reference
• Role-Separated ManagementRole-separated management is an approach to managing cluster resources andworkloads in a coordinated fashion in order to reduce the risks of resource conflicts andshortages.
Creating an Application VIP Managed by Oracle ClusterwareAn application VIP is a cluster resource that Oracle Clusterware manages (OracleClusterware provides a standard VIP agent for application VIPs).
If clients of an application access the application through a network, and the placement policyfor the application allows it to fail over to another node, then you must register a virtualinternet protocol address (VIP) on which the application depends. You should base any newapplication VIPs on this VIP type to ensure that your system experiences consistent behavioramong all of the VIPs that you deploy in your cluster.
While you can add a VIP in the same way that you can add any other resource that OracleClusterware manages, Oracle recommends using the Grid_home/bin/appvipcfg command-
Chapter 8Registering an Application as a Resource
8-33

line utility to create or delete an application VIP on the default network for which theora.net1.network resource is created by default.
To create an application VIP, use the following syntax:
appvipcfg create -network=network_nummber -ip=ip_address -vipname=vip_name-user=user_name [-group=group_name] [-failback=0 | 1]
Note:
You can modify the VIP name while the resource remains online, withoutrestarting the resource.
When you create an application VIP on a default network, set -network=1.
To create an application VIP on a non-default network, you may have to first create thenetwork using the srvctl add network command. Then you can create theapplication VIP, setting -network=non-default_network_number.
To delete an application VIP, use the following syntax:
appvipcfg delete -vipname=vip_name
In the preceding syntax examples, network_number is the number of the network,ip_address is the IP address, vip_name is the name of the VIP, user_name is the nameof the user who installed Oracle Database, and group_name is the name of the group.The default value of the -failback option is 0. If you set the option to 1, then the VIP(and therefore any resources that depend on VIP) fails back to the original node whenit becomes available again.
Note:
The -ip=ip_address parameter is required, but if Grid Plug and Play andGNS with DHCP have been configured, the parameter always takes the IPaddress from the DHCP server and ignores the IP address specified in thecommand. The value for the -vipname=vip_name parameter is also ignoredwith DHCP.
For example, as root, run the following command:
# Grid_home/bin/appvipcfg create -network=1 -ip=148.87.58.196 -vipname=appsVIP -user=root
The script only requires a network number, the IP address, and a name for the VIPresource, in addition to the user that owns the application VIP resource. A VIPresource is typically owned by root because VIP related operations require rootprivileges.
Chapter 8Registering an Application as a Resource
8-34

To delete an application VIP, use the same script with the delete option. This option acceptsthe VIP name as a parameter. For example:
# Grid_home/bin/appvipcfg delete -vipname=appsVIP
After you have created the application VIP using this configuration script, you can view theVIP profile using the following command:
$ Grid_home/bin/crsctl status res appsVIP -p
Verify and, if required, modify the following parameters using the Grid_home/bin/crsctlmodify res command.
The appvipcfg script requires that you specify the -network option, even if -network=1.
As the Oracle Database installation owner, start the VIP resource:
$ crsctl start resource appsVIP
Related Topics
• Oracle Real Application Clusters Administration and Deployment Guide
• Oracle Flex ClustersAn Oracle Flex Cluster scales Oracle Clusterware to large numbers of nodes.
• Oracle Clusterware Resource Reference
Adding an Application VIP with Oracle Enterprise ManagerTo add an application VIP with Oracle Enterprise Manager:
1. Log into Oracle Enterprise Manager Cloud Control.
2. Select the cluster target that you want to modify.
3. From the cluster target menu, select Administration > Resources > Manage.
4. Enter a cluster administrator user name and password to display the Manage Resourcespage.
5. Click Add Application VIP.
6. Enter a name for the VIP in the Name field.
7. Enter a network number in the Network Number field.
8. Enter an IP address for the VIP in the Internet Protocol Address field.
9. Enter root in the Primary User field. Oracle Enterprise Manager defaults to whateveruser name you are logged in as.
10. Select Start the resource after creation if you want the VIP to start immediately.
11. Click Continue to display the Confirmation: Add VIP Resource page.
12. Enter root and the root password as the cluster credentials.
13. Click Continue to create the application VIP.
Chapter 8Registering an Application as a Resource
8-35

Adding User-Defined ResourcesYou can add resources to Oracle Clusterware at any time.
However, if you add a resource that depends on another resource, then you must firstadd the resource upon which it is dependent.
In the examples in this section, assume that an action script, myApache.scr, resides inthe /opt/cluster/scripts directory on each node to facilitate adding the resource tothe cluster. Assume also that a server pool has been created to host an application.This server pool is not a sub-pool of Generic, but instead it is used to host theapplication in a top-level server pool.
Note:
Oracle recommends that you use shared storage, such as Oracle AdvancedCluster File System (Oracle ACFS), to store action scripts to decrease scriptmaintenance.
This section includes the following topics:
• Deciding on a Deployment Scheme
• Adding a Resource to a Specified Server Pool
• Adding a Resource Using a Server-Specific Deployment
• Creating Resources that Use the generic_application Resource Type
Related Topics
• Examples of Action Scripts for Third-party ApplicationsYou can use third-party applications, such as Apache scripts, or xclock, by usingscript agents.
Deciding on a Deployment SchemeYou must decide whether to use administrator or policy management for theapplication. Use administrator management for smaller, two-node configurations,where your cluster configuration is not likely to change. Use policy management formore dynamic configurations when your cluster consists of more than two nodes. Forexample, if a resource only runs on node 1 and node 2 because only those nodeshave the necessary files, then administrator management is probably moreappropriate.
Oracle Clusterware supports the deployment of applications in access-controlledserver pools made up of anonymous servers and strictly based on the desired poolsize. Cluster policies defined by the administrator can and must be used in this case togovern the server assignment with desired sizes and levels of importance.Alternatively, a strict or preferred server assignment can be used, in which resourcesrun on specifically named servers. This represents the pre-existing model available inearlier releases of Oracle Clusterware now known as administrator management.
Chapter 8Registering an Application as a Resource
8-36

Conceptually, a cluster hosting applications developed and deployed in both of thedeployment schemes can be viewed as two logically separated groups of servers. One servergroup is used for server pools, enabling role separation and server capacity control. Theother server group assumes a fixed assignment based on named servers in the cluster.
To manage an application using either deployment scheme, you must create a server poolbefore adding the resource to the cluster. A built-in server pool named Generic always ownsthe servers used by applications of administrator-based management. The Generic serverpool is a logical division and can be used to separate the two parts of the cluster usingdifferent management schemes.
For third party developers to use the model to deploy applications, server pools must beused. To take advantage of the pre-existing application development and deployment modelbased on named servers, sub-pools of Generic (server pools that have Generic as theirparent pool, defined by the server pool attribute PARENT_POOLS) must be used. By creatingsub-pools that use Generic as their parent and enumerating servers by name in the sub-pooldefinitions, applications ensure that named servers are in Generic and are used exclusivelyfor applications using the named servers model.
Adding a Resource to a Specified Server PoolUse the crsctl add resource command to add a resource to a server pool.
To add the Apache Web server to a specific server pool as a resource using the policy-baseddeployment scheme, run the following command as the user that is supposed to run theApache Server (for an Apache Server this is typically the root user):
$ crsctl add resource myApache -type cluster_resource -attr "ACTION_SCRIPT=/opt/cluster/scripts/myapache.scr, PLACEMENT=restricted, SERVER_POOLS=server_pool_list, CHECK_INTERVAL=30, RESTART_ATTEMPTS=2, START_DEPENDENCIES=hard(appsvip), STOP_DEPENDENCIES=hard(appsvip)"
In the preceding example, myApache is the name of the resource added to the cluster.
Note:
• You must enclose comma or space-delimited attribute values in single quotationmarks (' ') to avoid errors. If you enclose single attributes values in singlequotation marks, they are ignored and no errors ensue.
• A resource name cannot begin with a period nor with the character string ora.
The resource is configured, as follows:
• The resource is a cluster_resource type.
• ACTION_SCRIPT=/opt/cluster/scripts/myapache.scr: The path to the required actionscript.
• PLACEMENT=restricted
Chapter 8Registering an Application as a Resource
8-37

• SERVER_POOLS=server_pool_list: This resource can only run in the server poolsspecified in a space-delimited list.
• CHECK_INTERVAL=30: Oracle Clusterware checks this resource every 30 seconds todetermine its status.
• RESTART_ATTEMPTS=2: Oracle Clusterware attempts to restart this resource twicebefore failing it over to another node.
• START_DEPENDENCIES=hard(appsvip): This resource has a hard STARTdependency on the appsvip resource. The appsvip resource must be online inorder for myApache to start.
• STOP_DEPENDENCIES=hard(appsvip): This resource has a hard STOP dependencyon the appsvip resource. The myApache resource stops if the appsvip resourcegoes offline.
Related Topics
• Examples of Action Scripts for Third-party ApplicationsYou can use third-party applications, such as Apache scripts, or xclock, by usingscript agents.
• Application Placement PoliciesA resource can be started on any server, subject to the placement policies, theresource start dependencies, and the availability of the action script on that server.
Adding a Resource Using a Server-Specific DeploymentTo add the Apache Web server as a resource that uses a named server deployment,assume that you add the resource to a server pool that is, by definition, a sub-pool ofthe Generic server pool. You create server pools that are sub-pools of Generic usingthe crsctl add serverpool command. These server pools define the Generic serverpool as their parent in the server pool attribute PARENT_POOLS. In addition, they includea list of server names in the SERVER_NAMES parameter to specify the servers thatshould be assigned to the respective pool. For example:
$ crsctl add serverpool myApache_sp -attr "PARENT_POOLS=Generic, SERVER_NAMES=host36 host37"
After you create the sub-pool, add the Apache Web server resource, as follows:
$ crsctl add resource myApache -type cluster_resource -attr "ACTION_SCRIPT=/opt/cluster/scripts/myapache.scr, PLACEMENT='restricted', SERVER_POOLS=myApache_sp, CHECK_INTERVAL='30', RESTART_ATTEMPTS='2', START_DEPENDENCIES='hard(appsvip)', STOP_DEPENDENCIES='hard(appsvip)'"
Chapter 8Registering an Application as a Resource
8-38

Note:
A resource name cannot begin with a period nor with the character string ora.
In addition, note that when adding a resource using a server-specific deployment, the serverpools listed in the SERVER_POOLS resource parameter must be sub-pools under Generic.
Related Topics
• Policy-Based Cluster and Capacity Management
Creating Resources that Use the generic_application Resource TypeUse the crsctl add resource command to create resources using thegeneric_application resource type to model any type of application requiring highavailability without having to create any action scripts.
This section includes two examples for Linux/UNIX platforms of creating resources that usethe generic_application resource type.
In the following command example, a Samba server resource is created for high availability:
$ crsctl add resource samba1 -type generic_application -attr "START_PROGRAM='/etc/init.d/smb start', STOP_PROGRAM='/etc/init.d/smb stop', CLEAN_PROGRAM='/etc/init.d/smb stop', PID_FILES='/var/run/smbd.pid,/var/run/nmbd.pid'"
In the preceding example, the attributes that define the resource are configured, as follows:
• START_PROGRAM='/etc/init.d/smb start': This attribute contains the complete pathand arguments to the script that starts the Samba server
• STOP_PROGRAM='/etc/init.d/smb stop': This attribute contains the complete path andarguments to the script that stops the Samba server
• CLEAN_PROGRAM='/etc/init.d/smb stop': This attribute contains the complete path andarguments to the script that forcefully terminates and cleans up the Samba server in casethere is any failure in starting or stopping the server
• PID_FILES='/var/run/smbd.pid,/var/run/nmbd.pid': This attribute contains the pathsto the text files listing the process IDs (PIDs) that must be monitored to ensure that theSamba server and all its components are running
Chapter 8Registering an Application as a Resource
8-39

Note:
• If script-based monitoring is required for this Samba server configuration,then you can use the CHECK_PROGRAMS attribute instead of the PID_FILESattribute, as follows:
CHECK_PROGRAMS='/etc/init.d/smb status'
• You can specify standard Oracle Clusterware placement and cardinalityproperties by configuring the HOSTING_MEMBERS, SERVER_POOLS,PLACEMENT, and CARDINALITY attributes of the Samba server resource.
In the second command example, a database file server (DBFS) resource is createdfor high availability. The DBFS provides a Filesystem in Userspace (FUSE) file systemto access data stored in an Oracle Database.
You can use the generic_application resource type to define a resource thatcorresponds to the DBFS file system. You can use this DBFS resource to start, stop,monitor, and failover the DBFS file system mount point. The command syntax tocreate this resource is as follows:
$ crsctl add resource dbfs1 -type generic_application -attr "START_PROGRAM='/app/oracle/12.2/bin/dbfs_client -o wallet /@inst1 /scratch/mjk/data/dbfs_mount', STOP_PROGRAM='/bin/fusermount -u /scratch/mjk/data/dbfs_mount', CHECK_PROGRAMS='ls /scratch/mjk/data/dbfs_mount/dbfsdata1', ENVIRONMENT_VARS='ORACLE_HOME=/app/oracle/12.2, LD_LIBRARY_PATH=/app/oracle/12.2/lib:/app/oracle/12.2/rdbms/lib, TNS_ADMIN=/app/oracle/12.2/network/admin', CLEAN_PROGRAM='/bin/fusermount -u -z /scratch/mjk/data/dbfs_mount', START_DEPENDENCIES='hard(ora.inst1_srv.svc)', STOP_DEPENDENCIES='hard(ora.inst1_srv.svc)'"
In addition to the mandatory START_PROGRAM, STOP_PROGRAM, CHECK_PROGRAMS, andCLEAN_PROGRAM attributes, the above example also includes the following:
• The ENVIRONMENT_VARS attribute specifies custom environment variables that arepassed when starting or stopping the program
• The START_DEPENDENCIES and STOP_DEPENDENCIES dependency attributes create astart and stop dependency on the database service that is the underlying databasestore of the DBFS file system
You can create dependencies on to the DBFS resource for higher-level applicationresources based on the application requirements of the DBFS file system.
Chapter 8Registering an Application as a Resource
8-40
Note:
• The ORACLE_HOME directory shown in the preceding syntax is an example.
• You can specify standard Oracle Clusterware placement and cardinalityproperties by configuring the HOSTING_MEMBERS, SERVER_POOLS, PLACEMENT, andCARDINALITY attributes of the DBFS file system resource.
Related Topics
• Oracle Clusterware Resource Types
• Oracle Database SecureFiles and Large Objects Developer's Guide
Adding Resources Using Oracle Enterprise ManagerUse Enterprise Manager to add resources.
To add resources to Oracle Clusterware using Oracle Enterprise Manager:
1. Log into Oracle Enterprise Manager Cloud Control.
2. Select the cluster target that you want to modify.
3. From the cluster target menu, select Administration > Resources > Manage.
4. Enter a cluster administrator user name and password to display the Add Resource page.
5. Enter a name for the resource in the Name field.
Note:
A resource name cannot begin with a period nor with the character string ora.
6. Choose either cluster_resource or local_resource from the Resource Type dropdown.
7. Optionally, enter a description of the resource in the Description field.
8. Select Start the resource after creation if you want the resource to start immediately.
9. The optional parameters in the Placement section define where in a cluster OracleClusterware places the resource.
The attributes in this section correspond to the attributes described in Oracle ClusterwareResource Reference.
10. In the Action Program section, choose from the Action Program drop down whetherOracle Clusterware calls an action script, an agent file, or both to manage the resource.
You must also specify a path to the script, file, or both, depending on what you selectfrom the drop down.
If you choose Action Script, then you can click Create New Action Script to use theOracle Enterprise Manager action script template to create an action script for yourresource, if you have not yet done so.
Chapter 8Registering an Application as a Resource
8-41

11. To further configure the resource, click Attributes. On this page, you canconfigure start, stop, and status attributes, and offline monitoring and anyattributes that you define.
12. Click Advanced Settings to enable more detailed resource attributeconfigurations.
13. Click Dependencies to configure start and stop dependencies between resources.
14. Click Submit when you finish configuring the resource.
Related Topics
• Application Placement PoliciesA resource can be started on any server, subject to the placement policies, theresource start dependencies, and the availability of the action script on that server.
• Resource Dependencies
Changing Resource PermissionsOracle Clusterware manages resources based on the permissions of the user whoadded the resource. The user who first added the resource owns the resource and theresource runs as the resource owner. Certain resources must be managed as root. Ifa user other than root adds a resource that must be run as root, then the permissionsmust be changed as root so that root manages the resource, as follows:
1. Change the permission of the named resource to root by running the followingcommand as root:
# crsctl setperm resource resource_name –o root2. As the user who installed Oracle Clusterware, enable the Oracle Database
installation owner (oracle, in the following example) to run the script, as follows:
$ crsctl setperm resource resource_name –u user:oracle:r-x3. Start the resource:
$ crsctl start resource resource_name
Application Placement PoliciesA resource can be started on any server, subject to the placement policies, theresource start dependencies, and the availability of the action script on that server.
The PLACEMENT resource attribute determines how Oracle Clusterware selects a serveron which to start a resource and where to relocate the resource after a server failure.The HOSTING_MEMBERS and SERVER_POOLS attributes determine eligible servers to host aresource and the PLACEMENT attribute further refines the placement of resources.
The value of the PLACEMENT resource attribute determines how Oracle Clusterwareplaces resources when they are added to the cluster or when a server fails. Togetherwith either the HOSTING_MEMBERS or SERVER_POOLS attributes, you can configure howOracle Clusterware places the resources in a cluster. When the value of the PLACEMENTattribute is:
• balanced: Oracle Clusterware uses any online server pool for placement. Lessloaded servers are preferred to servers with greater loads. To measure how
Chapter 8Registering an Application as a Resource
8-42

loaded a server is, Oracle Clusterware uses the LOAD resource attribute of the resourcesthat are in an ONLINE state on the server. Oracle Clusterware uses the sum total of theLOAD values to measure the current server load.
• favored: If a value is assigned to either of the HOSTING_MEMBERS, SERVER_POOLS, orSERVER_CATEGORY resource attributes, then that value expresses a preference. IfHOSTING_MEMBERS is populated and either SERVER_POOLS or SERVER_CATEGORY is set, thenHOSTING_MEMBERS indicates placement preference and SERVER_POOLS or SERVER_CATEGORYindicates a restriction. For example, the ora.cluster.vip resource has a policy that setsthe value of PLACEMENT to favored, SERVER_CATEGORY is set to Hub, and HOSTING_MEMBERSis set to server_name1. In this case, Oracle Clusterware restricts the placement ofora.cluster.vip to the servers in the Hub category and then it prefers the server knownas server_name1.
• restricted: Oracle Clusterware only considers servers that belong to server pools listedin the SEVER_POOLS resource attribute, servers of a particular category as configured inthe SERVER_CATEGORY resource attribute, or servers listed in the HOSTING_MEMBERSresource attribute for resource placement. Only one of these resource attributes can havea value, otherwise it results in an error.
You can also use the restricted:pack variation in which the resource placement isfurther affected by the WORKLOAD_CPU attribute value of the resource and the currentpacking type of the cluster. Oracle Clusterware supports the following types of packing:
– fill: Oracle Clusterware fills up a node with resources up to the configured CPUsbefore placing resources on other nodes. You can configure the amount of CPUs,which a resource uses on a node, using the WORKLOAD_CPU attribute.
– spread: Oracle Clusterware spreads resources evenly among cluster nodes using theWORKLOAD_CPU as the measure.
Related Topics
• crsctl get restricted placement
• crsctl set restricted placement
• Oracle Clusterware Resource Reference
Unregistering Applications and Application ResourcesTo unregister a resource, use the crsctl delete resource command. You cannot unregisteran application or resource that is ONLINE or required by another resource, unless you usethe -force option. The following example unregisters the Apache Web server application:
$ crsctl delete resource myApache
Run the crsctl delete resource command as a clean-up step when a resource is no longermanaged by Oracle Clusterware. Oracle recommends that you unregister any unnecessaryresources.
Managing ResourcesThis section includes the following topics:
• Registering Application Resources
• Starting Application Resources
Chapter 8Managing Resources
8-43

• Relocating Applications and Application Resources
• Stopping Applications and Application Resources
• Displaying Clusterware Application and Application Resource Status Information
Registering Application ResourcesEach application that you manage with Oracle Clusterware is registered and stored asa resource in OCR.
Use the crsctl add resource command to register applications in OCR. Forexample, enter the following command to register the Apache Web server applicationfrom the previous example:
$ crsctl add resource myApache -type cluster_resource-group group_name -attr "ACTION_SCRIPT=/opt/cluster/scripts/myapache.scr, PLACEMENT=restricted,SERVER_POOLS=server_pool_list,CHECK_INTERVAL=30,RESTART_ATTEMPTS=2,START_DEPENDENCIES=hard(appsvip),STOP_DEPENDENCIES=hard(appsvip)"
In the preceding example, you can assign the resource to a resource group byspecifying the -group parameter.
If you modify a resource, then update OCR by running the crsctl modify resourcecommand.
Related Topics
• crsctl add resourceRegisters a resource to be managed by Oracle Clusterware.
• crsctl modify resourceModifies the attributes of a particular resource in Oracle Clusterware.
Starting Application ResourcesStart resources with the crsctl start resource command.
Manually starting or stopping resources outside of Oracle Clusterware can invalidatethe resource status. In addition, Oracle Clusterware may attempt to restart a resourceon which you perform a manual stop operation.
To start an application resource that is registered with Oracle Clusterware, use thecrsctl start resource command. For example:
$ crsctl start resource myApache
The command waits to receive a notification of success or failure from the actionprogram each time the action program is called. Oracle Clusterware can startapplication resources if they have stopped due to exceeding their failure thresholdvalues. You must register a resource using crsctl add resource before you can startit.
Chapter 8Managing Resources
8-44

Running the crsctl start resource command on a resource sets the resource TARGETvalue to ONLINE. Oracle Clusterware attempts to change the state to match the TARGET byrunning the action program with the start action.
If a cluster server fails while you are starting a resource on that server, then check the stateof the resource on the cluster by using the crsctl status resource command.
Related Topics
• Oracle Clusterware Control (CRSCTL) Utility Reference
Relocating Applications and Application ResourcesUse the crsctl relocate resource command to relocate applications and applicationresources.
For example, to relocate the Apache Web server application to a server named rac2, run thefollowing command:
# crsctl relocate resource myApache -n rac2
Each time that the action program is called, the crsctl relocate resource command waitsfor the duration specified by the value of the SCRIPT_TIMEOUT resource attribute to receivenotification of success or failure from the action program. A relocation attempt fails if:
• The application has required resources that run on the initial server
• Applications that require the specified resource run on the initial server
To relocate an application and its required resources, use the -f option with the crsctlrelocate resource command. Oracle Clusterware relocates or starts all resources that arerequired by the application regardless of their state.
You can also relocate a resource group using the crsctl relocate resourcegroupcommand, which first stops the resources in the resource group before relocating theresource group on the destination server.
Online Relocation
Some resources or resource groups must remain highly available, even during a relocationoperation. You can set the RELOCATE_KIND resource attribute (which you can also use withresource groups) to online (RELOCATE_KIND=online), which will start a new resource instance(or several instances for resources belonging to a resource group) on the destination serverbefore stopping it on the original server when you run either the crsctl relocate resourceor crsctl relocate resourcegroup command.
Note:
Before using online relocation, ensure that the resource can manage the extraresource instances that are started during online relocation.
Chapter 8Managing Resources
8-45

Stopping Applications and Application ResourcesStop application resources with the crsctl stop resource command.
The command sets the resource TARGET value to OFFLINE. Because OracleClusterware always attempts to match the state of a resource to its target, the OracleClusterware subsystem stops the application. The following example stops the ApacheWeb server:
# crsctl stop resource myApache
You cannot stop a resource if another resource has a hard stop dependency on it,unless you use the force (-f) option. If you use the crsctl stop resourceresource_name -f command on a resource upon which other resources depend, andif those resources are running, then Oracle Clusterware stops the resource and all ofthe resources that depend on the resource that you are stopping.
Displaying Clusterware Application and Application Resource StatusInformation
Use the crsctl status resource command to display status information aboutapplications and resources that are on cluster servers.
The following example displays the status information for the Apache Web serverapplication:
# crsctl status resource myApache
NAME=myApacheTYPE=cluster_resourceTARGET=ONLINESTATE=ONLINE on server010
Other information this command returns includes the following:
• How many times the resource has been restarted
• How many times the resource has failed within the failure interval
• The maximum number of times that a resource can restart or fail
• The target state of the resource and the normal status information
Use the -f option with the crsctl status resource resource_name command to viewfull information of a specific resource.
Enter the following command to view information about all applications and resourcesin tabular format:
# crsctl status resource -t
Related Topics
• Oracle Clusterware Control (CRSCTL) Utility Reference
Chapter 8Managing Resources
8-46

Managing Automatic Restart of Oracle Clusterware ResourcesYou can prevent Oracle Clusterware from automatically restarting a resource by settingseveral resource attributes. You can also control how Oracle Clusterware manages therestart counters for your resources. In addition, you can customize the timeout values for thestart, stop, and check actions that Oracle Clusterware performs on resources.
This section includes the following topics:
• Preventing Automatic Restarts of Oracle Clusterware Resources
• Automatically Manage Restart Attempts Counter for Oracle Clusterware Resources
Preventing Automatic Restarts of Oracle Clusterware ResourcesTo manage automatic restarts, use the AUTO_START resource attribute to specify whetherOracle Clusterware should automatically start a resource when a server restarts.
When a server restarts, Oracle Clusterware attempts to start the resources that run on theserver as soon as the server starts. Resource startup might fail, however, if systemcomponents on which a resource depends, such as a volume manager or a file system, arenot running. This is especially true if Oracle Clusterware does not manage the systemcomponents on which a resource depends.
Note:
Regardless of the value of the AUTO_START resource attribute for a resource, theresource can start if another resource has a hard or weak start dependency on it orif the resource has a pullup start dependency on another resource.
Related Topics
• Start Dependencies
• Oracle Clusterware Resource Reference
Automatically Manage Restart Attempts Counter for Oracle ClusterwareResources
When a resource fails, Oracle Clusterware attempts to restart the resource the number oftimes specified in the RESTART_ATTEMPTS resource attribute. Note that this attribute does notspecify the number of attempts to restart a failed resource (always one attempt), but ratherthe number of times the resource fails locally, before Oracle Clusterware attempts to fail itover. The CRSD process maintains an internal counter to track how often Oracle Clusterwarerestarts a resource. The number of times Oracle Clusterware has attempted to restart aresource is reflected in the RESTART_COUNT resource attribute. Oracle Clusterware canautomatically manage the restart attempts counter based on the stability of a resource. TheUPTIME_THRESHOLD resource attribute determines the time period that a resource must remainonline, after which the RESTART_COUNT attribute gets reset to 0. In addition, the RESTART_COUNTresource attribute gets reset to 0 if the resource is relocated or restarted by the user, or theresource fails over to another server.
Chapter 8Managing Automatic Restart of Oracle Clusterware Resources
8-47

ACluster Verification Utility Reference
Learn about Cluster Verification Utility (CVU), and how to use it to prepare for installations,patching, or other system changes.
When you modify your cluster, Oracle recommends that you use Cluster Verification Utility(CVU) to perform system checks. Using CVU ensures that you have completed the requiredsystem configuration and preinstallation steps, so that your Oracle Grid Infrastructure orOracle Real Application Clusters (Oracle RAC) installation, update, or patch operation,completes successfully.
Oracle Universal Installer is fully integrated with CVU, automating many CVU prerequisitechecks. Oracle Universal Installer runs all prerequisite checks and associated fixup scriptswhen you run the installer.
See Also:
• Oracle Real Application Clusters Administration and Deployment Guide forinformation about using the Server Control utility (SRVCTL) to manage CVU
• Oracle Grid Infrastructure Installation Guide and Oracle Real ApplicationClusters Installation Guide for information about how to manually install CVU
Note:
Check for and download updated versions of CVU on Oracle Technology Networkat the following URL:
http://www.oracle.com/technetwork/index.html
This appendix describes CVU under the following topics:
• About Cluster Verification Utility
– Overview of CVU
– CVU Operational Notes
– Special CVU Topics
• Cluster Verification Utility Command Reference
• Troubleshooting and Diagnostic Output for CVU
About Cluster Verification UtilityThis section includes topics which relate to using CVU.
A-1

• Overview of CVU
• CVU Operational Notes
• Special CVU Topics
Overview of CVUCVU can verify the primary cluster components during an operational phase or stage.
A component can be basic, such as free disk space, or it can be complex, such aschecking Oracle Clusterware integrity. For example, CVU can verify multiple OracleClusterware subcomponents across Oracle Clusterware layers. Additionally, CVU cancheck disk space, memory, processes, and other important cluster components. Astage could be, for example, database installation, for which CVU can verify whetheryour system meets the criteria for an Oracle Real Application Clusters (Oracle RAC)installation. Other stages include the initial hardware setup and the establishing ofsystem requirements through the fully operational cluster setup.
Table A-1 lists verifications you can perform using CVU.
Table A-1 Performing Various CVU Verifications
Verification to Perform CVU Commands to Use
System requirementsverification
cluvfy comp sys
Oracle Cluster FileSystem verification
cluvfy stage cfs
Storage verifications • cluvfy comp freespace• cluvfy comp space• cluvfy comp ssa• cluvfy stage acfscfg
Network verification cluvfy stage hwos
Connectivity verifications • cluvfy comp nodecon• cluvfy comp nodereach
Cluster TimeSynchronization Servicesverification
cluvfy comp clocksync
User and Permissionsverification
cluvfy comp admprv
Node comparison andverification
cluvfy comp peer
Healthcheck verification cluvfy comp healthcheck
Installation verification • cluvfy stage appcluster• cluvfy stage hwos• cluvfy stage dbcfg• cluvfy stage dbinst• cluvfy stage crsinst• cluvfy stage hacfg• cluvfy stage nodeadd
Patch verification cluvfy stage patch
Appendix AAbout Cluster Verification Utility
A-2

Table A-1 (Cont.) Performing Various CVU Verifications
Verification to Perform CVU Commands to Use
Deletion verification cluvfy stage nodedel
Oracle Clusterware andOracle ASM Componentverifications
• cluvfy comp acfs• cluvfy comp asm• cluvfy comp clumgr• cluvfy comp crs• cluvfy comp dhcp• cluvfy comp dns• cluvfy comp gns• cluvfy comp gpnp• cluvfy comp ha• cluvfy comp nodeapp• cluvfy comp ocr• cluvfy comp ohasd• cluvfy comp olr• cluvfy comp scan• cluvfy comp software• cluvfy comp vdisk
CVU Operational NotesThis section includes the following topics:
• CVU Installation Requirements
• CVU Usage Information
• CVU Configuration File
• Privileges and Security
• Using CVU Help
• Deprecated and Desupported CLUVFY Commands
CVU Installation RequirementsCVU installation requirements are:
• At least 30 MB free space for the CVU software on the node from which you run CVU
• A work directory with at least 25 MB free space on each node. The default location of thework directory is /tmp on Linux and UNIX systems, and the value specified in the TEMPenvironment variable on Windows systems. You can specify a different location by settingthe CV_DESTLOC environment variable.
When using CVU, the utility attempts to copy any needed information to the CVU workdirectory. It checks for the existence of the work directory on each node. If it does not findone, then it attempts to create one. Make sure that the CVU work directory either existson all nodes in your cluster or proper permissions are established on each node for theuser running CVU to create that directory.
Appendix AAbout Cluster Verification Utility
A-3

CVU Usage InformationCVU includes two scripts: runcluvfy.sh (runcluvfy.bat on Windows), which you usebefore installing Oracle software, and cluvfy (cluvfy.bat on Windows), located in theGrid_home directory and Grid_home/bin, respectively. The runcluvfy.sh scriptcontains temporary variable definitions which enable it to run before you install OracleGrid Infrastructure or Oracle Database. After you install Oracle Grid Infrastructure, usethe cluvfy command to check prerequisites and perform other system readinesschecks.
Note:
Oracle Universal Installer runs cluvfy to check all prerequisites duringOracle software installation.
Before installing Oracle software, run runcluvfy.sh from the directory where you wantyour Grid home to be located, as follows:
cd /u01/app/12.2.0/grid./runcluvfy.sh options
In the preceding example, the options variable represents CVU command options thatyou select. For example:
$ ./runcluvfy.sh comp nodereach -n node1,node2 -verbose
CVU commands may include the following report options:
• -json: Displays the report output in a JSON format. If the -json option is notspecified, then the detailed report is displayed as text to the standard output.
• –html: Displays the CVU report output in HTML format. If the -html option is notspecified, then the detailed report is displayed as text to the standard output.
• -verbose: Displays explanations about all CVU checks, both failed and passed, inthe detailed summary section of the output.
• –file file_location: Depending on the format specified, save the output withthe .htm, .json, or .txt file extension to the specific location.
When you enter a CVU command, it provides a summary of the test. Duringpreinstallation, Oracle recommends that you obtain detailed output by using the -verbose argument with the CVU command. The -verbose argument produces detailedoutput of individual checks. Where applicable, it shows results for each node in atabular layout.
Run the CVU command-line tool using the cluvfy command. Using cluvfy does notadversely affect your cluster environment or your installed software. You can runcluvfy commands at any time, even before the Oracle Clusterware installation. In fact,CVU is designed to assist you as soon as your hardware and operating system are
Appendix AAbout Cluster Verification Utility
A-4

operational. If you run a command that requires Oracle Clusterware on a node, then CVUreports an error if Oracle Clusterware is not yet installed on that node.
The node list that you use with CVU commands should be a comma-delimited list of hostnames without a domain. CVU ignores domains while processing node lists. If a CVUcommand entry has duplicate node entries after removing domain information, then CVUeliminates the duplicate node entries.
For network connectivity verification, CVU discovers all of the available network interfaces ifyou do not specify an interface on the CVU command line. For storage accessibilityverification, CVU discovers shared storage for all of the supported storage types if you do notspecify a particular storage identification on the command line. CVU also discovers theOracle Clusterware home if one is available.
See Also:
Privileges and Security for usage security information
CVU Output
CVU output consists of five distinct sections, including:
• Header: A single line containing information about what checks the stage or componentis performing.
• Configuration: CVU evaluates whether the operation can be performed on all nodes. Ifthe nodes you specify are either down or do not satisfy the necessary prerequisiteconditions (such as no SSH setup), then error messages about these nodes aredisplayed here. This section may not always be included in the output. When the checkbeing performed can be run on all nodes involved in the operation, then this section willnot display in the output.
• Progress Message: CVU displays progress messages in this section as it cycles throughvarious checks, which helps you determine if CVU hangs.
• Detailed Summary: By default, CVU only displays failed tasks or subtasks in thissection. If you choose the -verbose option, then CVU displays detailed information for alltasks and subtasks.
• Executive Summary: Finally, CVU displays a concise summary of the entire checkingprocess, similar to the following examples:
$ cluvfy stage -pre crsinst -n sales65
CVU operation performed: stage -pre crsinstDate: Oct 13, 2016 9:43:39 PMCVU home: /ade/scott_abc4/oracle/User: scott
$ cluvfy comp baseline -collect all -n sales65
CVU operation performed: baselineDate: Oct 13, 2016 9:48:19 PMOperating system: Linux2.6.39-400.211.1.el6uek.x86_64
Appendix AAbout Cluster Verification Utility
A-5

CVU Configuration FileYou can use the CVU configuration file to define specific inputs for the execution ofCVU. The path for the configuration file is Grid_home/cv/admin/cvu_config (orStaging_area\clusterware\stage\cvu\cv\admin on Windows platforms). You canmodify this file using a text editor. The inputs to CVU are defined in the form of keyentries. You must follow these rules when modifying the CVU configuration file:
• Key entries have the syntax name=value• Each key entry and the value assigned to the key only defines one property
• Lines beginning with the number sign (#) are comment lines and are ignored
• Lines that do not follow the syntax name=value are ignored
The following is the list of keys supported by CVU:
• CV_NODE_ALL: If set, it specifies the list of nodes that should be picked up whenOracle Clusterware is not installed. By default, this entry is commented out.
• CV_ORACLE_RELEASE: If set, it specifies the specific Oracle release (12.2, 18, 19, 20,or 21) for which the verifications have to be performed. If set, you do not have touse the -r release option wherever it is applicable. The default value is 21.
• CV_RAW_CHECK_ENABLED: If set to TRUE, it enables the check for accessibility ofshared disks on Linux and UNIX systems. This shared disk accessibility checkrequires that you install the cvuqdisk RPM Package Manager (rpm) on all of thenodes. By default, this key is set to TRUE and shared disk check is enabled.
• CV_ASSUME_DISTID: This property is used in cases where CVU cannot detect orsupport a particular platform or a distribution. Oracle does not recommend that youchange this property as this might render CVU non-functional.
• CV_XCHK_FOR_SSH_ENABLED: If set to TRUE, it enables the X-Windows check forverifying user equivalence with ssh. By default, this entry is commented out and X-Windows check is disabled.
• ORACLE_SRVM_REMOTECOPY: If set, it specifies the location for the scp or rcpcommand to override the CVU default value. By default, this entry is commentedout and CVU uses /usr/bin/scp and /usr/sbin/rcp.
• ORACLE_SRVM_REMOTESHELL: If set, it specifies the location for ssh command tooverride the CVU default value. By default, this entry is commented out and thetool uses /usr/sbin/ssh.
• CV_ASSUME_CL_VERSION: By default, the command line parser uses crsactiveversion for the display of command line syntax usage and syntaxvalidation. Use this property to pass a version other than crs activeversion forcommand line syntax display and validation. By default, this entry is commentedout.
If CVU does not find a key entry defined in the configuration file, then CVU searchesfor the environment variable that matches the name of the key. If the environmentvariable is set, then CVU uses its value, otherwise CVU uses a default value for thatentity.
Appendix AAbout Cluster Verification Utility
A-6

Privileges and SecurityBecause of a lack of user equivalence for the root user, most CVU commands cannot be runas root to perform any remote node operations, except for the following:
• cluvfy comp dhcp
• cluvfy comp dns
However, using privilege delegation, you can specify the -method parameter and choose oneof two methods (sudo or root) to enable the checks and run the fixup scripts that require rootprivileges to be performed on remote nodes. You will be prompted for a password but thepassword is used dynamically while the CVU commands run, rather than being stored on astorage device.
Specifying the -method parameter is advantageous in the context of fixup scripts. If youchoose privilege delegation, then all the fixup scripts can be run at one time from the localnode. If you do not choose privilege delegation, then you must log onto each relevant nodeas root and run the fixup script.
Using CVU HelpThe cluvfy commands have context sensitive help that shows their usage based on thecommand-line arguments that you enter. For example, if you enter cluvfy, then CVU displayshigh-level generic usage text describing the stage and component syntax. The following is alist of context help commands:
• cluvfy -help: CVU displays detailed CVU command information.
• cluvfy -version: CVU displays the version of Oracle Clusterware.
• cluvfy comp -list: CVU displays a list of components that can be checked, and briefdescriptions of how the utility checks each component.
• cluvfy comp -help: CVU displays detailed syntax for each of the valid componentchecks.
• cluvfy stage -list: CVU displays a list of valid stages.
• cluvfy stage -help: CVU displays detailed syntax for each of the valid stage checks.
You can also use the -help option with any CVU command. For example, cluvfy stage -pre nodeadd -help returns detailed information for that particular command.
If you enter an invalid CVU command, then CVU shows the correct usage for that command.For example, if you type cluvfy stage -pre dbinst, then CVU shows the correct syntax forthe precheck commands for the dbinst stage. Enter the cluvfy -help command to seedetailed CVU command information.
Deprecated and Desupported CLUVFY CommandsThe following table includes deprecated and desupported CLUVFY commands:
Appendix AAbout Cluster Verification Utility
A-7

Table A-2 Deprecated and Desupported Cluvfy Commands
Command or Command Options Deprecated Desupported
cluvfy comp cfs
(command)
Oracle Database 12c release 1 (12.1) No
-n all
(command option)
Oracle Database 21c
Note:
Use the -allnodesoption, instadof -n all torunverification onall the clusternodes.
No
Special CVU TopicsThis section includes the following topics:
• Generating Fixup Scripts
• Using CVU to Determine if Installation Prerequisites are Complete
• Entry and Exit Criteria
• Verbose Mode and UNKNOWN Output
• CVU Node List Shortcuts
Generating Fixup ScriptsYou can use the -fixup flag with certain CVU commands to generate fixup scriptsbefore installation. Oracle Universal Installer can also generate fixup scripts duringinstallation. The installer then prompts you to run the script as root in a separateterminal session. If you generate a fixup script from the command line, then you canrun it as root after it is generated. When you run the script, it raises kernel values torequired minimums, if necessary, and completes other operating system configuration.
Alternatively, you can specify the -method parameter with certain CVU commands toenable privilege delegation and enable you to run fixup scripts as root on remotenodes from the local node.
Appendix AAbout Cluster Verification Utility
A-8

See Also:
"Privileges and Security"
Using CVU to Determine if Installation Prerequisites are CompleteYou can use CVU to determine which system prerequisites for installation are completed.
Use this option if you are installing Oracle Database software on a system with a pre-existingOracle software installation. In using this option, note the following:
• You must run CVU as the user account you plan to use to run the installation. You cannotrun CVU as root, and running CVU as another user other than the user that isperforming the installation does not ensure the accuracy of user and group configurationfor installation or other configuration checks.
• Before you can complete a clusterwide status check, SSH must be configured for allcluster nodes. You can use the installer to complete SSH configuration, or you cancomplete SSH configuration yourself between all nodes in the cluster. You can also useCVU to generate a fixup script to configure SSH connectivity.
• CVU can assist you by finding preinstallation steps that must be completed, but it cannotperform preinstallation tasks.
Use the following syntax to determine what preinstallation steps are completed, and whatpreinstallation steps you must perform; running the command with the -fixup flag generatesa fixup script to complete kernel configuration tasks as needed:
$ ./runcluvfy.sh stage -pre crsinst -fixup -n node_list
In the preceding syntax example, replace the node_list variable with the names of the nodesin your cluster, separated by commas. On Windows, you must enclose the comma-delimitednode list in double quotation marks ("").
For example, for a cluster with mountpoint /mnt/dvdrom/, and with nodes node1, node2, andnode3, enter the following command:
$ cd /mnt/dvdrom/$ ./runcluvfy.sh stage -pre crsinst -fixup -n node1,node2,node3
Review the CVU report, and complete additional steps as needed.
See Also:
Your platform-specific installation guide for more information about installing yourproduct
Entry and Exit CriteriaWhen verifying stages, CVU uses entry and exit criteria. Each stage has entry criteria thatdefine a specific set of verification tasks to be performed before initiating that stage. Thischeck prevents you from beginning a stage, such as installing Oracle Clusterware, unlessyou meet the Oracle Clusterware prerequisites for that stage.
Appendix AAbout Cluster Verification Utility
A-9

The exit criteria for a stage define another set of verification tasks that you mustperform after the completion of the stage. Post-checks ensure that the activities forthat stage have been completed. Post-checks identify stage-specific problems beforethey propagate to subsequent stages.
Verbose Mode and UNKNOWN OutputAlthough by default CVU reports in nonverbose mode by only reporting the summaryof a test, you can obtain detailed output by using the -verbose argument. The -verbose argument produces detailed output of individual checks and where applicableshows results for each node in a tabular layout.
If a cluvfy command responds with UNKNOWN for a particular node, then this is becauseCVU cannot determine whether a check passed or failed. The cause could be a loss ofreachability or the failure of user equivalence to that node. The cause could also beany system problem that was occurring on that node when CVU was performing acheck.
The following is a list of possible causes for an UNKNOWN response:
• The node is down
• Executables that CVU requires are missing in Grid_home/bin or the Oracle homedirectory
• The user account that ran CVU does not have privileges to run common operatingsystem executables on the node
• The node is missing an operating system patch or a required package
• The node has exceeded the maximum number of processes or maximum numberof open files, or there is a problem with IPC segments, such as shared memory orsemaphores
CVU Node List ShortcutsTo obtain the CVU node list, there are several options you can use with the cluvfycommand.
To provide CVU a list of all of the nodes of a cluster, enter -n all. CVU attempts toobtain the node list in the following order:
1. If vendor clusterware is available, then CVU selects all of the configured nodesfrom the vendor clusterware using the lsnodes utility.
Note:
The integration of vendor or third party clusterware with OracleClusterware is desupported in Oracle Clusterware 21c.
2. If Oracle Clusterware is installed, then CVU selects all of the configured nodesfrom Oracle Clusterware using the olsnodes utility.
3. If neither the vendor clusterware nor Oracle Clusterware is installed, then CVUsearches for a value for the CV_NODE_ALL key in the configuration file.
Appendix AAbout Cluster Verification Utility
A-10

4. If vendor clusterware and Oracle Clusterware are not installed and no key namedCV_NODE_ALL exists in the configuration file, then CVU searches for a value for theCV_NODE_ALL environmental variable. If you have not set this variable, then CVU reportsan error.
To provide a partial node list, you can set an environmental variable and use it in the CVUcommand. For example, on Linux or Unix systems you can enter:
setenv MYNODES node1,node3,node5cluvfy comp nodecon -n $MYNODES [-verbose]
Cluster Verification Utility Command ReferenceThis section lists and describes CVU commands.
cluvfy comp acfsChecks the integrity of Oracle Advanced Cluster File System (Oracle ACFS) on the nodes ina cluster.
Syntax
cluvfy comp acfs [-n node_list | -allnodes] [-f file_system] [-verbose] [-json] [-html] [-save [-savedir directory_path]]
Note:
Starting with Oracle Database 21c, the name of Oracle Automatic StorageManagement Cluster File System (Oracle ACFS) is changed to Oracle AdvancedCluster File System (Oracle ACFS). This change is only a change of the name. Thebasic function of Oracle's cluster file system continues to be the same. Oraclecontinues to develop and enhance Oracle ACFS.
Parameters
Table A-3 cluvfy comp acfs Command Parameters
Parameter Description
-n node_list | -allnodes
The comma-delimited list of non domain-qualified node names on whichto conduct the verification, or all nodes in a cluster.
If you do not specify this option, then CVU checks only the local node.
-f file_system The name of the file system to check.
-verbose CVU prints detailed output.
-jsonUse the -json flag to generate a detailed report in JSON format.If you do not specify the -json flag, then CVU generates thedetailed report in a text file.
Appendix ACluster Verification Utility Command Reference
A-11

Table A-3 (Cont.) cluvfy comp acfs Command Parameters
Parameter Description
-htmlUse the -html flag to generate a detailed report in HTML format.If you specify the -html flag, and a browser that CVU recognizesis available on the system, then CVU starts the browser anddisplays the report on the browser when the checks arecomplete.If you do not specify the -html flag, then CVU generates thedetailed report in a text file.
-save [-savedirdirectory_path] Use the -save or -save -savedir flags to save validation reports
(cvuchecdkreport_timestamp.txt andcvucheckreport_timestamp.htm), where timestamp is the timeand date of the validation report.If you use the -save flag by itself, then CVU saves the reports inthe CVU_home/cv/report directory, where CVU_home is thelocation of the CVU binaries.If you use the -save -savedir flags, then specify a directorywhere you want CVU to save the reports.
cluvfy comp admprvChecks the required administrative privileges for the operation specified by -oparameter on all the nodes that you specify in the node list, or all nodes in a cluster.
Syntax
On Linux and UNIX platforms:
cluvfy comp admprv [-n node_list | -allnodes] -o user_equiv [-sshonly] [-fixup] | -o crs_inst [-asmgrp asmadmin_group] [-asmdbagrp asmdba_group] [-asmopergrp asmoper_group] [-orainv orainventory_group] [-fixup] [-fixupnoexec] [-method {sudo -user user_name [-location directory_path] | -method root}] | -o db_inst [-osdba osdba_group] [-osoper osoper_group] [-fixup] [-fixupnoexec] [-method {sudo -user user_name [-location dir_path] | -method root}] | -o db_config -d oracle_home [-fixup] [-fixupnoexec] [-method {sudo -user user_name [-location directory_path] | -method root}] [-verbose] [-json] [-html] [-save [-savedir directory_path]]
On Windows platforms:
cluvfy comp admprv [-n node_list | -allnodes] | -o user_equiv | -o crs_inst [-fixup] [-fixupnoexec] | -o db_inst [-fixup] [-fixupnoexec] | -o db_config -d oracle_home [-
Appendix ACluster Verification Utility Command Reference
A-12

fixup] [-fixupnoexec] [-verbose] [-json] [-html] [-save [-savedir directory_path]]
Parameters
Table A-4 cluvfy comp admprv Command Parameters
Parameter Description
-n node_list | -allnodes
The comma-delimited list of non domain-qualified node names on whichto conduct the verification, or all nodes in a cluster.
If you do not specify this option, then CVU checks only the local node.
-o user_equiv [-sshonly]
Checks user equivalence between the nodes. On Linux and UNIXplatforms, you can optionally verify user equivalence using ssh byadding the -sshonly parameter.
-o crs_inst [option] Checks administrative privileges for installing Oracle Clusterware.Optionally, you can specify the following:
-asmgrp: Specify the name of the OSASM group. The default isasmadmin.
-asmdbagrp: Specify the name of the ASMDBA group. The default isasmdba.
-orainv: Specify the name of the Oracle Inventory group. Thedefault is oinstall.
-o db_inst option] Checks administrative privileges for installing an Oracle RAC database.Optionally, you can specify the following:
-osdba: The name of the OSDBA group. The default is dba.
–osoper: The name of the OSOPER group.
-o db_config -doracle_home
Checks administrative privileges for creating or configuring an OracleRAC database. Specify the location of the Oracle home for the OracleRAC database.
-fixup Specifies that if the verification fails, then CVU generates fixupinstructions, if feasible.
-fixupnoexec Specifies that if verification fails, then CVU generates the fixup data anddisplays the instructions for manual execution of the generated fixups.
-method {sudo -useruser_name [-locationdir_path] | root}
Specify whether the privilege delegation method is sudo or root, forroot user access. If you specify sudo, then you must specify the username to access all the nodes with root privileges and, optionally, providethe full file system path for the sudo executable.
–verbose CVU prints detailed output.
-jsonUse the -json flag to generate a detailed report in JSON format.If you do not specify the -json flag, then CVU generates thedetailed report in a text file.
Appendix ACluster Verification Utility Command Reference
A-13

Table A-4 (Cont.) cluvfy comp admprv Command Parameters
Parameter Description
-htmlUse the -html flag to generate a detailed report in HTML format.If you specify the -html flag, and a browser that CVU recognizesis available on the system, then CVU starts the browser anddisplays the report on the browser when the checks arecomplete.If you do not specify the -html flag, then CVU generates thedetailed report in a text file.
-save [-savedirdirectory_path] Use the -save or -save -savedir flags to save validation reports
(cvuchecdkreport_timestamp.txt andcvucheckreport_timestamp.htm), where timestamp is the timeand date of the validation report.If you use the -save flag by itself, then CVU saves the reports inthe CVU_home/cv/report directory, where CVU_home is thelocation of the CVU binaries.If you use the -save -savedir flags, then specify a directorywhere you want CVU to save the reports.
Usage Notes
• The operations following the -o parameter are mutually exclusive and you canspecify only one operation at a time.
• By default, the equivalence check does not verify X-Windows configurations, suchas whether you have disabled X-forwarding, whether you have the proper settingfor the DISPLAY environment variable, and so on.
To verify X-Windows aspects during user equivalence checks, set theCV_XCHK_FOR_SSH_ENABLED key to TRUE in the configuration file that resides in theCV_HOME/cv/admin/cvu_config directory before you run the cluvfy comp admprv-o user_equiv command.
Examples
You can verify that the permissions required for installing Oracle Clusterware havebeen configured on the nodes racnode1 and racnode2 by running the followingcommand:
$ cluvfy comp admprv -n racnode1,racnode2 -o crs_inst -verbose
You can verify that the permissions required for creating or modifying an Oracle RACdatabase using the C:\app\oracle\product\21.0.0\dbhome_1 Oracle home directory,and generate a script to configure the permissions by running the following command:
cluvfy comp admprv -n racnode1,racnode2 -o db_config -d C:\app\oracle\product\21.0.0\dbhome_1 -fixup -verbose
Appendix ACluster Verification Utility Command Reference
A-14

cluvfy comp asmChecks the integrity of Oracle Automatic Storage Management (Oracle ASM) on specificnodes in the cluster.This check ensures that the Oracle ASM instances on the specified nodes are running fromthe same Oracle home and that asmlib, if it exists, has a valid version and ownership.
Syntax
cluvfy comp asm [-n node_list | -allnodes] [-verbose] [-json] [-html] [-save [-savedir directory_path]]
Parameters
Table A-5 cluvfy comp asm Command Parameters
Parameter Description
-n node_list | -allnodes
The comma-delimited list of non domain-qualified node names on whichto conduct the verification, or all nodes in a cluster.
If you do not specify this option, then CVU checks only the local node.
-verbose CVU prints detailed output.
-jsonUse the -json flag to generate a detailed report in JSON format.If you do not specify the -json flag, then CVU generates thedetailed report in a text file.
-htmlUse the -html flag to generate a detailed report in HTML format.If you specify the -html flag, and a browser that CVU recognizesis available on the system, then CVU starts the browser anddisplays the report on the browser when the checks arecomplete.If you do not specify the -html flag, then CVU generates thedetailed report in a text file.
-save [-savedirdirectory_path] Use the -save or -save -savedir flags to save validation reports
(cvuchecdkreport_timestamp.txt andcvucheckreport_timestamp.htm), where timestamp is the timeand date of the validation report.If you use the -save flag by itself, then CVU saves the reports inthe CVU_home/cv/report directory, where CVU_home is thelocation of the CVU binaries.If you use the -save -savedir flags, then specify a directorywhere you want CVU to save the reports.
Examples
This command produces output similar to the following:
$ cluvfy comp asm –n all
Appendix ACluster Verification Utility Command Reference
A-15

Verifying ASM Integrity
Task ASM Integrity check started...
Starting check to see if ASM is running on all cluster nodes...
ASM Running check passed. ASM is running on all specified nodes
Starting Disk Groups check to see if at least one Disk Group configured...Disk Group Check passed. At least one Disk Group configured
Task ASM Integrity check passed...
Verification of ASM Integrity was successful.
cluvfy comp baselineCaptures system and cluster configuration information to create a baseline.You can use this baseline for comparison with the state of the system. You can collectbaselines at strategic times, such as after Oracle Clusterware installation, before andafter upgrading Oracle Clusterware, or automatically as part of periodic execution ofCVU running as an Oracle Clusterware resource. You can also compare severalbaselines.
Syntax
cluvfy comp baseline -collect {all | cluster | database | asm} [-n node_list | -allnodes] [-d Oracle_home] [-db db_unique_name] [-bestpractice | -mandatory] [-binlibfilesonly] [-reportname report_name] [-savedir save_dir] [-method {sudo -user user_name [-location directory_path] | -method root}] [-html]
cluvfy comp baseline -compare baseline1,baseline2,... [-cross_compare] [-deviations] [-savedir save_dir]
Parameters
Table A-6 cluvfy comp baseline Command Parameters
Parameter Description
-collect {all |cluster | database |asm}
The -collect parameter instructs CVU to create a baseline andsave it in the Grid_home/cv/report/xml directory.
You can collect a baseline related to Oracle Clusterware(cluster), the database (database), Oracle ASM, or all three(all).
-n node_list | -allnodes
Specify a comma-delimited list of non domain-qualified nodenames, or all nodes in a cluster, on which the test should beconducted.
Appendix ACluster Verification Utility Command Reference
A-16

Table A-6 (Cont.) cluvfy comp baseline Command Parameters
Parameter Description
-d Oracle_home When collecting a database baseline, if you specify an Oraclehome, then CVU collects baselines for all the databases runningfrom the Oracle home.
Use the -db parameter to collect a baseline for a specific database.
-db db_unique_name The name of the database for which you want to collect information.
When collecting a database baseline, if you specify the -dbparameter, then CVU only collects the baseline for the specifieddatabase. If you do not specify -db, then CVU discovers all of thecluster databases configured in the system and the collectsbaselines for each of those.
-bestpractice | -mandatory
Specify -bestpractice to collect a baseline for only best practicerecommendations. Specify -mandatory to collect a baseline foronly mandatory requirements.
-binlibfilesonly Specify -binlibfilesonly to collect only files in the bin/, lib/,and jlib/ subdirectories of the software home.
-report report_name Use this optional parameter to specify a name for the report.
-savedir save_dir Use this optional parameter to specify a location in which CVUsaves the reports. If you do not specify the -savedir option, thenCVU saves the reports in the Grid_home/cv/report directory.
-method {sudo -useruser_name [-locationdir_path] | root}
Specify whether the privilege delegation method is sudo or root,for root user access. If you specify sudo, then you must specify theuser name to access all the nodes with root privileges and,optionally, provide the full file system path for the sudo executable.
-comparebaseline1,baseline2,...
Specify -compare to compare baselines. If you specify only onebaseline, then CVU displays the results of the collections. If youspecify multiple baselines in a comma-delimited list, then CVUcompares the values from the baselines against each other in anHTML document.
-cross_compare Specify -cross_compare to compare baselines across clusters oracross cluster nodes and databases.
-deviations Optionally, you can specify this parameter to display only thedeviations from best practice recommendations or mandatoryrequirements, or both, (depending on whether you specified the -bestpractice and -mandatory parameters).
-htmlUse the -html flag to generate a detailed report in HTMLformat.If you specify the -html flag, and a browser that CVUrecognizes is available on the system, then CVU starts thebrowser and displays the report on the browser when thechecks are complete.If you do not specify the -html flag, then CVU generates thedetailed report in a text file.
Usage Notes
• You must specify either the -collect or -compare parameter.
Appendix ACluster Verification Utility Command Reference
A-17

• Items that CVU collects when running this command include:
Physical memoryAvailable memorySwap spaceFree spaceRequired packagesRecommended kernel parameters/etc/inittab permissionsDomain sockets under /var/tmp/.oracleOracle Clusterware software file attributesNetwork MTU sizeOCR permissions, group, and owner (if OCR is stored on a shared file system)OCR disk group (if OCR is stored on Oracle ASMSystem requirement pluggable tasks (Zeroconf settings, /boot mount, HugePages existence, 8888 port availability, Ethernet jumbo frames)Oracle Clusterware post-check pluggable tasks (css miscount, reboottime,disktimeout)1
Database best practices
Examples
The following examples illustrate usage for both -collect and -compare commandparameters:
$ cluvfy comp baseline -collect all -n allnodes -db orcl -bestpractice -report bl1 -savedir /tmp
$ cluvfy comp baseline -compare bl1,bl2
cluvfy comp clocksyncChecks clock synchronization across all the nodes in the node list.CVU verifies a time synchronization service is running (Oracle Cluster TimeSynchronization Service (CTSS) or Network Time Protocol (NTP)), that each node isusing the same reference server for clock synchronization, and that the time offset foreach node is within permissible limits.
Syntax
cluvfy comp clocksync [-noctss] [-n node_list | -allnodes] [-verbose] [-json] [-html] [-save [-savedir directory_path]]
1 Applicable only on UNIX platforms
Appendix ACluster Verification Utility Command Reference
A-18

Parameters
Table A-7 cluvfy comp clocksync Command Parameters
Parameter Description
-noctss If you specify this parameter, then CVU does not perform a check onCTSS. Instead, CVU checks the platform's native time synchronizationservice, such as NTP.
-n node_list | -allnodes
The comma-delimited list of non domain-qualified node names on whichto conduct the verification, or all nodes in a cluster.
If you do not specify this option, then CVU checks only the local node.
-verbose CVU prints detailed output.
-jsonUse the -json flag to generate a detailed report in JSON format.If you do not specify the -json flag, then CVU generates thedetailed report in a text file.
-htmlUse the -html flag to generate a detailed report in HTML format.If you specify the -html flag, and a browser that CVU recognizesis available on the system, then CVU starts the browser anddisplays the report on the browser when the checks arecomplete.If you do not specify the -html flag, then CVU generates thedetailed report in a text file.
-save [-savedirdirectory_path] Use the -save or -save -savedir flags to save validation reports
(cvuchecdkreport_timestamp.txt andcvucheckreport_timestamp.htm), where timestamp is the timeand date of the validation report.If you use the -save flag by itself, then CVU saves the reports inthe CVU_home/cv/report directory, where CVU_home is thelocation of the CVU binaries.If you use the -save -savedir flags, then specify a directorywhere you want CVU to save the reports.
cluvfy comp cluChecks the integrity of the cluster on all nodes.
Syntax
cluvfy comp clu [-verbose] [-json] [-html] [-save [-savedir directory_path]]
Appendix ACluster Verification Utility Command Reference
A-19

Parameters
Table A-8 cluvfy comp clu Command Parameters
Parameter Description
–verbose CVU prints detailed output.
-jsonUse the -json flag to generate a detailed report in JSONformat.If you do not specify the -json flag, then CVU generates thedetailed report in a text file.
-htmlUse the -html flag to generate a detailed report in HTMLformat.If you specify the -html flag, and a browser that CVUrecognizes is available on the system, then CVU starts thebrowser and displays the report on the browser when thechecks are complete.If you do not specify the -html flag, then CVU generates thedetailed report in a text file.
-save [-savedirdirectory_path] Use the -save or -save -savedir flags to save validation
reports (cvuchecdkreport_timestamp.txt andcvucheckreport_timestamp.htm), where timestamp is thetime and date of the validation report.If you use the -save flag by itself, then CVU saves thereports in the CVU_home/cv/report directory, whereCVU_home is the location of the CVU binaries.If you use the -save -savedir flags, then specify a directorywhere you want CVU to save the reports.
Usage Notes
Note:
The command has been deprecated and may be desupported in a futurerelease.
You can also choose to print detailed output.
See Also:
CVU Usage Information for CVU operational notes including informationabout report options
Appendix ACluster Verification Utility Command Reference
A-20

cluvfy comp clumgrChecks the integrity of the cluster manager subcomponent, or Oracle Cluster SynchronizationServices (CSS), on the nodes in the node list.
Syntax
cluvfy comp clumgr [-n node_list | -allnodes] [-verbose] [-json] [-html] [-save [-savedir directory_path]]
Parameters
Table A-9 cluvfy comp clumgr Command Parameters
Parameter Description
-n node_list | -allnodes
Specify a comma-delimited list of non domain-qualified node names onwhich to conduct the verification, or all nodes in a cluster.
–verbose CVU prints detailed output.
-jsonUse the -json flag to generate a detailed report in JSON format.If you do not specify the -json flag, then CVU generates thedetailed report in a text file.
-htmlUse the -html flag to generate a detailed report in HTML format.If you specify the -html flag, and a browser that CVU recognizesis available on the system, then CVU starts the browser anddisplays the report on the browser when the checks arecomplete.If you do not specify the -html flag, then CVU generates thedetailed report in a text file.
-save [-savedirdirectory_path] Use the -save or -save -savedir flags to save validation reports
(cvuchecdkreport_timestamp.txt andcvucheckreport_timestamp.htm), where timestamp is the timeand date of the validation report.If you use the -save flag by itself, then CVU saves the reports inthe CVU_home/cv/report directory, where CVU_home is thelocation of the CVU binaries.If you use the -save -savedir flags, then specify a directorywhere you want CVU to save the reports.
Usage Notes
You can specify a comma-delimited list of non domain-qualified node names on which toconduct the verification, or all nodes in a cluster. If you do not specify this option, then CVUchecks only the local node.
You can also choose to print detailed output.
Appendix ACluster Verification Utility Command Reference
A-21

cluvfy comp clusterwarePerforms diagnostics and reports potential issues that cause Oracle Cluster ReadyServices (CRS) startup failures.
Syntax
cluvfy comp clusterware [-time_out seconds] [-fixup] [-fixupnoexec] [-method {sudo -user user_name [-location directory_path] | -method root}] [-json] [-html] [-save [-savedir directory_path]]
Parameters
Table A-10 cluvfy comp clusterware Command Parameters
Parameter Description
-time_out You can specify a time out of 30 seconds or more for the commandexecution using the -time_out option. If the -time_out option isnot specified, then a default value is 60 seconds for the commandexecution.
-fixup Specifies that if the verification fails, then CVU generates fixupinstructions, if feasible.
-fixupnoexec Specifies that if verification fails, then CVU generates the fixup dataand displays the instructions for manual execution of the generatedfixups.
-method {sudo -useruser_name [-locationdir_path] | root}
Specify whether the privilege delegation method is sudo or root,for root user access. If you specify sudo, then you must specify theuser name to access all the nodes with root privileges and,optionally, provide the full file system path for the sudo executable.
-jsonUse the -json flag to generate a detailed report in JSONformat.If you do not specify the -json flag, then CVU generates thedetailed report in a text file.
-htmlUse the -html flag to generate a detailed report in HTMLformat.If you specify the -html flag, and a browser that CVUrecognizes is available on the system, then CVU starts thebrowser and displays the report on the browser when thechecks are complete.If you do not specify the -html flag, then CVU generates thedetailed report in a text file.
Appendix ACluster Verification Utility Command Reference
A-22

Table A-10 (Cont.) cluvfy comp clusterware Command Parameters
Parameter Description
-save [-savedirdirectory_path] Use the -save or -save -savedir flags to save validation
reports (cvuchecdkreport_timestamp.txt andcvucheckreport_timestamp.htm), where timestamp is thetime and date of the validation report.If you use the -save flag by itself, then CVU saves thereports in the CVU_home/cv/report directory, whereCVU_home is the location of the CVU binaries.If you use the -save -savedir flags, then specify a directorywhere you want CVU to save the reports.
cluvfy comp crsChecks the integrity of the Cluster Ready Services (CRS) daemon on the specified nodes.
Syntax
cluvfy comp crs [-n node_list | -allnodes] [-json] [-html] [-save [-savedir directory_path]]
Parameters
Table A-11 cluvfy comp crs Command Parameters
Parameter Description
-n node_list | -allnodes
Specify a comma-delimited list of non domain-qualified node names onwhich to conduct the verification, or all nodes in a cluster. If you do notspecify this parameter, then CVU checks only the local node.
-jsonUse the -json flag to generate a detailed report in JSON format.If you do not specify the -json flag, then CVU generates thedetailed report in a text file.
-htmlUse the -html flag to generate a detailed report in HTML format.If you specify the -html flag, and a browser that CVU recognizesis available on the system, then CVU starts the browser anddisplays the report on the browser when the checks arecomplete.If you do not specify the -html flag, then CVU generates thedetailed report in a text file.
Appendix ACluster Verification Utility Command Reference
A-23

Table A-11 (Cont.) cluvfy comp crs Command Parameters
Parameter Description
-save [-savedirdirectory_path] Use the -save or -save -savedir flags to save validation reports
(cvuchecdkreport_timestamp.txt andcvucheckreport_timestamp.htm), where timestamp is the timeand date of the validation report.If you use the -save flag by itself, then CVU saves the reports inthe CVU_home/cv/report directory, where CVU_home is thelocation of the CVU binaries.If you use the -save -savedir flags, then specify a directorywhere you want CVU to save the reports.
Usage Notes
You can also choose to print detailed output.
See Also:
CVU Usage Information for CVU operational notes including informationabout report options
cluvfy comp dhcpVerifies that the DHCP server exists on the network, and that it can provide a requirednumber of IP addresses.The required number of IP addresses is calculated, as follows:
• Regardless of the size of the cluster, there must be three scan VIPs
• One node VIP for each node you specify with the -n option
• One application VIP for each application VIP resource you specify with the -vipresname option
This verification also verifies the response time for the DHCP server.
Syntax
cluvfy comp dhcp -clustername cluster_name [-vipresname application_vip_resource_name] [-port dhcp_port] [-n node_list |-allnodes] [-method {sudo -user user_name [-location directory_path] | -method root}] [-networks network_list] [-verbose] [-json] [-html] [-save [-savedir directory_path]]
Appendix ACluster Verification Utility Command Reference
A-24

Parameters
Table A-12 cluvfy comp dhcp Command Parameters
Parameter Description
-clusternamecluster_name
You must specify the name of the cluster of which you want to check theintegrity of DHCP.
-vipresnameapplication_vip_resource_name
Optionally, you can specify a comma-delimited list of the names of theapplication VIP resource.
-port dhcp_port Optionally, you can specify the port to which DHCP packages are sent.The default port is 67.
-n node_list | -allnodes
Optionally, you can specify a comma-delimited list of non domain-qualified node names, or all nodes in a cluster, on which to conduct theverification.
If you do not specify this parameter, then CVU checks only the localnode.
-method {sudo -useruser_name [-locationdirectory_path] | -method root}
Optionally, you can specify whether the privilege delegation method issudo or root, for root user access. If you specify sudo, then you mustspecify the user name to access all the nodes with root privileges and,optionally, provide the full file system path for the sudo executable.
-networksnetwork_list
Optionally, you can specify a list of network classifications for the clusterseparated by forward slashes (/) that you want CVU to check, whereeach network is in the form of"if_name"[:subnet_id[:if_type[,if_type...]]].
In the preceding format, you must enclose if_name in double quotationmarks (""), and you can use regular expressions, such as ".*", as in"eth*", to match interfaces like eth1 and eth02. The subnet_id is thesubnet number of the network interface. The if_type is a comma-separated list of interface types: {CLUSTER_INTERCONNECT | PUBLIC| ASM}.
-verbose CVU prints detailed output.
-jsonUse the -json flag to generate a detailed report in JSON format.If you do not specify the -json flag, then CVU generates thedetailed report in a text file.
-htmlUse the -html flag to generate a detailed report in HTML format.If you specify the -html flag, and a browser that CVU recognizesis available on the system, then CVU starts the browser anddisplays the report on the browser when the checks arecomplete.If you do not specify the -html flag, then CVU generates thedetailed report in a text file.
Appendix ACluster Verification Utility Command Reference
A-25

Table A-12 (Cont.) cluvfy comp dhcp Command Parameters
Parameter Description
-save [-savedirdirectory_path] Use the -save or -save -savedir flags to save validation reports
(cvuchecdkreport_timestamp.txt andcvucheckreport_timestamp.htm), where timestamp is the timeand date of the validation report.If you use the -save flag by itself, then CVU saves the reports inthe CVU_home/cv/report directory, where CVU_home is thelocation of the CVU binaries.If you use the -save -savedir flags, then specify a directorywhere you want CVU to save the reports.
Usage Notes
• You must run this command as root.
• Do not run this check while the default network Oracle Clusterware resource,configured to use a DHCP-provided IP address, is online (because the VIPs getreleased and, since the cluster is online, DHCP has provided IP, so there is noneed to double the load on the DHCP server).
• Run this check on the local node. This is unlike other CVU commands, which runon all nodes specified in node list. As a result, even though the local node is notincluded in the node list you specify with the -n option, the error messages getreported to the local node.
• Before running this command, ensure that the network resource is offline. Use thesrvctl stop nodeapps command to bring the network resource offline, ifnecessary.
See Also:
Oracle Real Application Clusters Administration and Deployment Guidefor more information about the srvctl stop nodeapps command
cluvfy comp dnsVerifies that the Grid Naming Service (GNS) subdomain delegation has been properlyset up in the Domain Name Service (DNS) server.
Syntax
cluvfy comp dns -server -domain gns_sub_domain -vipaddress gns_vip_address [-port dns_port] [-method {sudo -user user_name [-location directory_path] | -method root}] [-verbose] [-json] [-html] [-save [-savedir directory_path]]
cluvfy comp dns -client -domain gns_sub_domain -vip gns_vip [-port
Appendix ACluster Verification Utility Command Reference
A-26

dns_port] [-last] [-method {sudo -user user_name [-location directory_path] | -method root}] [-n <node_list>|-allnodes] [-verbose] [-json] [-html] [-save [-savedir directory_path]]
Parameters
Table A-13 cluvfy comp dns Command Parameters
Parameter Description
-server Start a test DNS server for the GNS subdomain that listens on thedomain specified by the -domain option.
-client Validate connectivity to a test DNS server started on a specific address.You must specify the same information you specified when you startedthe DNS server.
-domaingns_sub_domain
Specify the name of the GNS subdomain.
-vipaddressgns_vip_address
Specify the GNS virtual IP address in the form {ip_name |ip_address}/net_mask/interface_name. You can specify eitherip_name, which is a name that resolves to an IP address, orIP_address, which is an IP address. Either name or address is followedby net_mask, which is the subnet mask for the IP address, andinterface_name, which is the interface on which to start the IPaddress.
-vip gns_vip Specify a GNS virtual IP address, which is either a name that resolves toan IP address or a dotted decimal numeric IP address.
-port dns_port Specify the port on which the test DNS server listens. The default port is53.
–last Optionally, you can use this parameter to send a termination request tothe test DNS server after all the validations are complete.
-method {sudo -useruser_name [-locationdirectory_path] |root}
Optionally, you can specify whether the privilege delegation method issudo or root, for root user access. If you specify sudo, then you mustspecify the user name to access all the nodes with root privileges and,optionally, provide the full file system path for the sudo executable.
-n node_list | -allnodes
The comma-delimited list of non domain-qualified node names on whichto conduct the verification, or all nodes in a cluster.
If you do not specify this option, then CVU checks only the local node.
-verbose CVU prints detailed output.
-jsonUse the -json flag to generate a detailed report in JSON format.If you do not specify the -json flag, then CVU generates thedetailed report in a text file.
-htmlUse the -html flag to generate a detailed report in HTML format.If you specify the -html flag, and a browser that CVU recognizesis available on the system, then CVU starts the browser anddisplays the report on the browser when the checks arecomplete.If you do not specify the -html flag, then CVU generates thedetailed report in a text file.
Appendix ACluster Verification Utility Command Reference
A-27

Table A-13 (Cont.) cluvfy comp dns Command Parameters
Parameter Description
-save [-savedirdirectory_path] Use the -save or -save -savedir flags to save validation reports
(cvuchecdkreport_timestamp.txt andcvucheckreport_timestamp.htm), where timestamp is the timeand date of the validation report.If you use the -save flag by itself, then CVU saves the reports inthe CVU_home/cv/report directory, where CVU_home is thelocation of the CVU binaries.If you use the -save -savedir flags, then specify a directorywhere you want CVU to save the reports.
Usage Notes
• You must run this command as root.
• Run cluvfy comp dns -server on one node of the cluster.
• On the last node, specify the -last option to terminate the cluvfy comp dns -server instance.
• Run cluvfy comp dns -client on the specified nodes, or all nodes of the cluster,to verify DNS server setup for the cluster.
• Do not run this command while the GNS resource is online.
• Oracle does not support this command on Windows.
cluvfy comp freespaceChecks the free space available in the Oracle Clusterware home storage and ensurethat there is at least 5% of the total space available.For example, if the total storage is 10GB, then the check ensures that at least 500MBof it is free.
Syntax
cluvfy comp freespace [-n node_list | -allnodes]
If you choose to include the -n option, then enter a comma-delimited list of nodenames, or all nodes in a cluster, on which to run the command.
cluvfy comp gnsVerifies the integrity of the Grid Naming Service (GNS) on the cluster.
Syntax
cluvfy comp gns -precrsinst {-vip gns_vip [-domain gns_domain] | -clientdata file_name} [-networks network_list] [-n node_list | -allnodes] [-verbose] [-
Appendix ACluster Verification Utility Command Reference
A-28

json] [-html] [-save [-savedir directory_path]] cluvfy comp gns -postcrsinst [-verbose] [-json] [-html] [-save [-savedir directory_path]]
Parameters
Table A-14 cluvfy comp gns Command Parameters
Parameter Description
-precrsinst Use this parameter to perform checks on the GNS domain name andVIP address before Oracle Clusterware is installed.
-vip gns_vip Specify the GNS virtual IP address. When you specify -vip and -domain together, CVU validates that this cluster can become a GNSserver (local GNS).
-domain gns_domain Optionally, you can specify the GNS subdomain name.
-clientdata file_name Specify the name of the file that contains the GNS credentials. CVUvalidates that this cluster can use the specified client data to become aclient GNS cluster of another GNS server cluster (shared GNS).
-networksnetwork_list
Specify a list of network classifications for the cluster, including publicnetworks for GNS, separated by forward slashes (/) that you want CVUto check, where each network is in the form of"if_name"[:subnet_id[:if_type[,if_type...]]].
In the preceding format, you must enclose if_name in double quotationmarks (""), and you can use regular expressions, such as ".*", as in"eth*", to match interfaces like eth1 and eth02. The subnet_id is thesubnet number of the network interface. The if_type is a comma-separated list of interface types: {CLUSTER_INTERCONNECT | PUBLIC| ASM}.
-n node_list | -allnodes
The comma-delimited list of non domain-qualified node names on whichto conduct the verification, or all nodes in a cluster.
If you do not specify this option, then CVU checks only the local node.
-jsonUse the -json flag to generate a detailed report in JSON format.If you do not specify the -json flag, then CVU generates thedetailed report in a text file.
-htmlUse the -html flag to generate a detailed report in HTML format.If you specify the -html flag, and a browser that CVU recognizesis available on the system, then CVU starts the browser anddisplays the report on the browser when the checks arecomplete.If you do not specify the -html flag, then CVU generates thedetailed report in a text file.
Appendix ACluster Verification Utility Command Reference
A-29

Table A-14 (Cont.) cluvfy comp gns Command Parameters
Parameter Description
-save [-savedirdirectory_path] Use the -save or -save -savedir flags to save validation reports
(cvuchecdkreport_timestamp.txt andcvucheckreport_timestamp.htm), where timestamp is the timeand date of the validation report.If you use the -save flag by itself, then CVU saves the reports inthe CVU_home/cv/report directory, where CVU_home is thelocation of the CVU binaries.If you use the -save -savedir flags, then specify a directorywhere you want CVU to save the reports.
-postcrsinst Use this parameter to check the integrity of GNS on all nodes in thecluster.
If you use this parameter, then you can use no other parameters with theexception of -verbose.
–verbose CVU prints detailed output.
cluvfy comp gpnpChecks the integrity of Grid Plug and Play on a list of nodes in a cluster.
Syntax
cluvfy comp gpnp [-n node_list | -allnodes] [-verbose] [-json] [-html] [-save [-savedir directory_path]]
Parameters
Table A-15 cluvfy comp gpnp Command Parameters
Parameter Description
-n node_list | -allnodes
The comma-delimited list of non domain-qualified node names onwhich to conduct the verification, or all nodes in a cluster.
If you do not specify this option, then CVU checks only the localnode.
-verbose CVU prints detailed output.
-jsonUse the -json flag to generate a detailed report in JSONformat.If you do not specify the -json flag, then CVU generates thedetailed report in a text file.
Appendix ACluster Verification Utility Command Reference
A-30

Table A-15 (Cont.) cluvfy comp gpnp Command Parameters
Parameter Description
-htmlUse the -html flag to generate a detailed report in HTMLformat.If you specify the -html flag, and a browser that CVUrecognizes is available on the system, then CVU starts thebrowser and displays the report on the browser when thechecks are complete.If you do not specify the -html flag, then CVU generates thedetailed report in a text file.
-save [-savedirdirectory_path] Use the -save or -save -savedir flags to save validation
reports (cvuchecdkreport_timestamp.txt andcvucheckreport_timestamp.htm), where timestamp is thetime and date of the validation report.If you use the -save flag by itself, then CVU saves thereports in the CVU_home/cv/report directory, whereCVU_home is the location of the CVU binaries.If you use the -save -savedir flags, then specify a directorywhere you want CVU to save the reports.
cluvfy comp haChecks the integrity of Oracle Restart on the local node.
Syntax
cluvfy comp ha [-verbose] [-json] [-html] [-save [-savedir directory_path]]
Parameters
Table A-16 cluvfy comp ha Command Parameters
Parameter Description
–verbose CVU prints detailed output.
-jsonUse the -json flag to generate a detailed report in JSON format.If you do not specify the -json flag, then CVU generates thedetailed report in a text file.
Appendix ACluster Verification Utility Command Reference
A-31

Table A-16 (Cont.) cluvfy comp ha Command Parameters
Parameter Description
-htmlUse the -html flag to generate a detailed report in HTML format.If you specify the -html flag, and a browser that CVU recognizesis available on the system, then CVU starts the browser anddisplays the report on the browser when the checks arecomplete.If you do not specify the -html flag, then CVU generates thedetailed report in a text file.
-save [-savedirdirectory_path] Use the -save or -save -savedir flags to save validation reports
(cvuchecdkreport_timestamp.txt andcvucheckreport_timestamp.htm), where timestamp is the timeand date of the validation report.If you use the -save flag by itself, then CVU saves the reports inthe CVU_home/cv/report directory, where CVU_home is thelocation of the CVU binaries.If you use the -save -savedir flags, then specify a directorywhere you want CVU to save the reports.
cluvfy comp healthcheckChecks your Oracle Clusterware and Oracle Database installations for theircompliance with mandatory requirements and best practices guidelines, and to ensurethat they are functioning properly.
Syntax
cluvfy comp healthcheck [-collect {cluster|database|asm}] [-db db_unique_name] [-bestpractice|-mandatory] [-deviations] [-json] [-html] [-save [-savedir directory_path]]
Parameters
Table A-17 cluvfy comp healthcheck Command Parameters
Parameter Description
-collect {cluster|database|asm}
Use -collect to specify that you want to perform checks forOracle Clusterware (cluster), Oracle Database (database), orOracle ASM. If you do not use the -collect flag with thehealthcheck option, then CVU performs checks for all three.
-db db_unique_name Use -db to specify checks on the specific database that you enterafter the -db flag. If you use the -db flag but do not provide adatabase unique name, then CVU reports error.
CVU uses JDBC to connect to the database as the user dbsnmp toverify various database parameters.
Appendix ACluster Verification Utility Command Reference
A-32

Table A-17 (Cont.) cluvfy comp healthcheck Command Parameters
Parameter Description
[-bestpractice|-mandatory] [-deviations]
Use the -bestpractice flag to specify best practice checks, andthe -mandatory flag to specify mandatory checks. Add the -deviations flag to specify that you want to see only the deviationsfrom either the best practice recommendations or the mandatoryrequirements. You can specify either the -bestpractice or -mandatory flag, but not both flags. If you specify neither -bestpractice nor -mandatory, then CVU displays both bestpractices and mandatory requirements.
-jsonUse the -json flag to generate a detailed report in JSONformat.If you do not specify the -json flag, then CVU generates thedetailed report in a text file.
-htmlUse the -html flag to generate a detailed report in HTMLformat.If you specify the -html flag, and a browser that CVUrecognizes is available on the system, then CVU starts thebrowser and displays the report on the browser when thechecks are complete.If you do not specify the -html flag, then CVU generates thedetailed report in a text file.
-save [-savedirdirectory_path] Use the -save or -save -savedir flags to save validation
reports (cvuchecdkreport_timestamp.txt andcvucheckreport_timestamp.htm), where timestamp is thetime and date of the validation report.If you use the -save flag by itself, then CVU saves thereports in the CVU_home/cv/report directory, whereCVU_home is the location of the CVU binaries.If you use the -save -savedir flags, then specify a directorywhere you want CVU to save the reports.
cluvfy comp nodeappChecks for the existence of node applications, namely VIP, NETWORK, and ONS, on all ofthe specified nodes.
Syntax
cluvfy comp nodeapp [-n node_list | -allnodes] [-verbose] [-json] [-html] [-save [-savedir directory_path]]
Appendix ACluster Verification Utility Command Reference
A-33

Parameters
Table A-18 cluvfy comp nodeapp Command Parameters
Parameter Description
-n node_list | -allnodes
Specify a comma-delimited list of non domain-qualified nodenames on which to conduct the verification, or all nodes in a cluster.
If you do not specify this option, then CVU checks only the localnode.
–verbose CVU prints detailed output.
-jsonUse the -json flag to generate a detailed report in JSONformat.If you do not specify the -json flag, then CVU generates thedetailed report in a text file.
-htmlUse the -html flag to generate a detailed report in HTMLformat.If you specify the -html flag, and a browser that CVUrecognizes is available on the system, then CVU starts thebrowser and displays the report on the browser when thechecks are complete.If you do not specify the -html flag, then CVU generates thedetailed report in a text file.
-save [-savedirdirectory_path] Use the -save or -save -savedir flags to save validation
reports (cvuchecdkreport_timestamp.txt andcvucheckreport_timestamp.htm), where timestamp is thetime and date of the validation report.If you use the -save flag by itself, then CVU saves thereports in the CVU_home/cv/report directory, whereCVU_home is the location of the CVU binaries.If you use the -save -savedir flags, then specify a directorywhere you want CVU to save the reports.
cluvfy comp nodeconChecks the connectivity among the nodes specified in the node list. If you provide aninterface list, then CVU checks the connectivity using only the specified interfaces.
Syntax
cluvfy comp nodecon [-n node_list | -allnodes] [-networks network_list] [-multicast] [-repeat -iterations number_of_iterations [-interval interval_in_seconds]] [-verbose][-json] [-html] [-save [-savedir directory_path]]
Appendix ACluster Verification Utility Command Reference
A-34

Parameters
Table A-19 cluvfy comp nodecon Command Parameters
Parameter Description
-n node_list | -allnodes
Specify a comma-delimited list of non domain-qualified node names onwhich to conduct the verification, or all nodes in a cluster.
If you do not specify this option, then CVU checks only the local node.
-networksnetwork_list
Specify a forward slash (/)-delimited list of networks on which to conductthe verification.
-multicast CVU performs only multicast connectivity check.
-repeat -iterationsnumber_of_iterations
CVU repeats the connectivity check for the number of iterations specifiedin the -iterations flag.
-intervalinterval_in_seconds
Specify the time interval between iterations.
-verbose CVU prints detailed output.
-jsonUse the -json flag to generate a detailed report in JSON format.If you do not specify the -json flag, then CVU generates thedetailed report in a text file.
-htmlUse the -html flag to generate a detailed report in HTML format.If you specify the -html flag, and a browser that CVU recognizesis available on the system, then CVU starts the browser anddisplays the report on the browser when the checks arecomplete.If you do not specify the -html flag, then CVU generates thedetailed report in a text file.
-save [-savedirdirectory_path] Use the -save or -save -savedir flags to save validation reports
(cvuchecdkreport_timestamp.txt andcvucheckreport_timestamp.htm), where timestamp is the timeand date of the validation report.If you use the -save flag by itself, then CVU saves the reports inthe CVU_home/cv/report directory, where CVU_home is thelocation of the CVU binaries.If you use the -save -savedir flags, then specify a directorywhere you want CVU to save the reports.
Usage Notes
• You can run this command in verbose mode to identify the mappings between theinterfaces, IP addresses, and subnets.
• On Solaris platforms, this command skips testing IP addresses that are marked asdeprecated.
• Use the nodecon command without the -networks parameter and with -n set to all touse CVU to:
– Discover all of the network interfaces that are available on the cluster nodes
Appendix ACluster Verification Utility Command Reference
A-35

– Review the interfaces' corresponding IP addresses and subnets
– Obtain the list of interfaces that are suitable for use as VIPs and the list ofinterfaces to private interconnects
– Verify the connectivity between all of the nodes through those interfaces
Examples
Example A-1 Verifying the connectivity between nodes through specificnetwork interfaces
To verify the connectivity between the nodes node1 and node3 through interface eth0:
cluvfy comp nodecon -n node1/node3 –networks eth0 -verbose
Example A-2 Discovering all available network interfaces and verifying theconnectivity between the nodes in the cluster through those network interfaces
Use the following command to discover all of the network interfaces that are availableon the cluster nodes. CVU then reviews the interfaces' corresponding IP addressesand subnets. Using this information, CVU obtains a list of interfaces that are suitablefor use as VIPs and a list of interfaces to private interconnects. Finally, CVU verifiesthe connectivity between all of the nodes in the cluster through those interfaces.
cluvfy comp nodecon -n all -verbose
cluvfy comp nodereachDetermines whether a source node can communicate with other, specific nodes, or allnodes in a cluster.
Syntax
cluvfy comp nodereach {-n node_list | -allnodes} [-srcnode node] [-verbose] [-json] [-html] [-save [-savedir directory_path]]
Parameters
Table A-20 cluvfy comp nodereach Command Parameters
Parameter Description
-n node_list | -allnodes
Specify a comma-delimited list of non domain-qualified nodenames on which to conduct the verification, or all nodes in a cluster.
-srcnode node Optionally, specify the name of the source node from which CVUperforms the reachability test. If you do not specify a source node,then CVU uses the node on which you run the command as thesource node.
–verbose CVU prints detailed output.
Appendix ACluster Verification Utility Command Reference
A-36

Table A-20 (Cont.) cluvfy comp nodereach Command Parameters
Parameter Description
-jsonUse the -json flag to generate a detailed report in JSONformat.If you do not specify the -json flag, then CVU generates thedetailed report in a text file.
-htmlUse the -html flag to generate a detailed report in HTMLformat.If you specify the -html flag, and a browser that CVUrecognizes is available on the system, then CVU starts thebrowser and displays the report on the browser when thechecks are complete.If you do not specify the -html flag, then CVU generates thedetailed report in a text file.
-save [-savedirdirectory_path] Use the -save or -save -savedir flags to save validation
reports (cvuchecdkreport_timestamp.txt andcvucheckreport_timestamp.htm), where timestamp is thetime and date of the validation report.If you use the -save flag by itself, then CVU saves thereports in the CVU_home/cv/report directory, whereCVU_home is the location of the CVU binaries.If you use the -save -savedir flags, then specify a directorywhere you want CVU to save the reports.
Example
To verify that node3 is reachable over the network from the local node, use the followingcommand:
cluvfy comp nodereach -n node3
This command produces output similar to the following:
Verifying node reachability
Checking node reachability...Node reachability check passed from node "node1"
Verification of node reachability was successful.
cluvfy comp ocrChecks the integrity of Oracle Cluster Registry (OCR) on all specified nodes.
Appendix ACluster Verification Utility Command Reference
A-37

Syntax
cluvfy comp ocr [-n node_list | -allnodes] [-method {sudo -user user_name [-location directory_path] | -method root}] [-verbose] [-json] [-html] [-save [-savedir directory_path]]
Parameters
Table A-21 cluvfy comp ocr Command Parameters
Parameter Description
-n node_list | -allnodes
The comma-delimited list of non domain-qualified node names onwhich to conduct the verification, or all nodes in a cluster.
If you do not specify this option, then CVU checks only the localnode.
-method {sudo -useruser_name [-locationdirectory_path] |root}
Specify whether the privilege delegation method is sudo or root,for root user access. If you specify sudo, then you must specify theuser name to access all the nodes with root privileges and,optionally, provide the full file system path for the sudo executable.
–verbose CVU prints detailed output.
-jsonUse the -json flag to generate a detailed report in JSONformat.If you do not specify the -json flag, then CVU generates thedetailed report in a text file.
-htmlUse the -html flag to generate a detailed report in HTMLformat.If you specify the -html flag, and a browser that CVUrecognizes is available on the system, then CVU starts thebrowser and displays the report on the browser when thechecks are complete.If you do not specify the -html flag, then CVU generates thedetailed report in a text file.
-save [-savedirdirectory_path] Use the -save or -save -savedir flags to save validation
reports (cvuchecdkreport_timestamp.txt andcvucheckreport_timestamp.htm), where timestamp is thetime and date of the validation report.If you use the -save flag by itself, then CVU saves thereports in the CVU_home/cv/report directory, whereCVU_home is the location of the CVU binaries.If you use the -save -savedir flags, then specify a directorywhere you want CVU to save the reports.
Usage Notes
This command does not verify the integrity of OCR contents. You must use theOCRCHECK utility to verify the contents of OCR.
Appendix ACluster Verification Utility Command Reference
A-38

Example
To verify the integrity of OCR on the local node, run the following command:
cluvfy comp ocr
This command returns output similar to the following:
Verifying OCR integrity
Checking OCR integrity...
Checking the absence of a non-clustered configurationl...All nodes free of non-clustered, local-only configurations
ASM Running check passed. ASM is running on all specified nodes
Checking OCR config file "/etc/oracle/ocr.loc"...
OCR config file "/etc/oracle/ocr.loc" check successful
Disk group for ocr location “+DATA" available on all the nodes
NOTE:This check does not verify the integrity of the OCR contents. Execute ‘ocrcheck' as a privileged user to verify the contents of OCR.
OCR integrity check passed
Verification of OCR integrity was successful.
cluvfy comp ohasdChecks the integrity of the Oracle High Availability Services daemon.
Syntax
cluvfy comp ohasd [-n node_list | -allnodes] [-verbose] [-json] [-html] [-save [-savedir directory_path]]
Parameters
Table A-22 cluvfy comp ohasd Command Parameters
Parameter Description
-n node_list | -allnodes
Specify a comma-delimited list of non domain-qualified node names onwhich to conduct the verification, or all nodes in a cluster.
If you do not specify this option, then CVU checks only the local node.
Appendix ACluster Verification Utility Command Reference
A-39

Table A-22 (Cont.) cluvfy comp ohasd Command Parameters
Parameter Description
–verbose CVU prints detailed output.
-jsonUse the -json flag to generate a detailed report in JSON format.If you do not specify the -json flag, then CVU generates thedetailed report in a text file.
-htmlUse the -html flag to generate a detailed report in HTML format.If you specify the -html flag, and a browser that CVU recognizesis available on the system, then CVU starts the browser anddisplays the report on the browser when the checks arecomplete.If you do not specify the -html flag, then CVU generates thedetailed report in a text file.
-save [-savedirdirectory_path] Use the -save or -save -savedir flags to save validation reports
(cvuchecdkreport_timestamp.txt andcvucheckreport_timestamp.htm), where timestamp is the timeand date of the validation report.If you use the -save flag by itself, then CVU saves the reports inthe CVU_home/cv/report directory, where CVU_home is thelocation of the CVU binaries.If you use the -save -savedir flags, then specify a directorywhere you want CVU to save the reports.
Example
To verify that the Oracle High Availability Services daemon is operating correctly on allnodes in the cluster, use the following command:
cluvfy comp ohasd -n allnodes -verbose
This command returns output similar to the following:
Verifying OHASD integrity
Checking OHASD integrity...ohasd is running on node "node1"ohasd is running on node "node2"ohasd is running on node "node3"ohasd is running on node "node4"
OHASD integrity check passed
Verification of OHASD integrity was successful.
Appendix ACluster Verification Utility Command Reference
A-40

cluvfy comp olrChecks the integrity of Oracle Local Registry (OLR) on the local node.
Syntax
cluvfy comp olr [-n node_list | -allnodes] [-verbose] [-json] [-html] [-save [-savedir directory_path]]
Parameters
Table A-23 cluvfy comp olr Command Parameters
Parameter Description
-n node_list | -allnodes
Specify a comma-delimited list of non domain-qualified node names onwhich to conduct the verification, or all nodes in a cluster.
If you do not specify this option, then CVU checks only the local node.
–verbose CVU prints detailed output.
-jsonUse the -json flag to generate a detailed report in JSON format.If you do not specify the -json flag, then CVU generates thedetailed report in a text file.
-htmlUse the -html flag to generate a detailed report in HTML format.If you specify the -html flag, and a browser that CVU recognizesis available on the system, then CVU starts the browser anddisplays the report on the browser when the checks arecomplete.If you do not specify the -html flag, then CVU generates thedetailed report in a text file.
-save [-savedirdirectory_path] Use the -save or -save -savedir flags to save validation reports
(cvuchecdkreport_timestamp.txt andcvucheckreport_timestamp.htm), where timestamp is the timeand date of the validation report.If you use the -save flag by itself, then CVU saves the reports inthe CVU_home/cv/report directory, where CVU_home is thelocation of the CVU binaries.If you use the -save -savedir flags, then specify a directorywhere you want CVU to save the reports.
Usage Notes
• This command does not verify the integrity of the OLR contents. You must use theocrcheck -local command to verify the contents of OLR.
Appendix ACluster Verification Utility Command Reference
A-41

Example
To verify the integrity of the OLR on the current node, run the following command:
cluvfy comp olr -verbose
This command returns output similar to the following:
Verifying OLR integrity
Checking OLR integrity...
Checking OLR config file...
OLR config file check successful
Checking OLR file attributes...
OLR file check successful
WARNING:This check does not verify the integrity of the OLR contents. Execute 'ocrcheck -local' as a privileged user to verify the contents of OLR.
OLR integrity check passed
Verification of OLR integrity was successful.
cluvfy comp peerChecks the compatibility and properties of the specified nodes against a referencenode.You can check compatibility for non-default user group names and for differentreleases of the Oracle software. This command compares physical attributes, such asmemory and swap space, user and group values, kernel settings, and installedoperating system packages.
Syntax
cluvfy comp peer [-n node_list | -allnodes] [-refnode node] [-r {12.2|18|19|20|21}] [-osdba osdba_group] [-osoper osoper_group] [-orainv orainventory_group] [-verbose] [-json] [-html] [-save [-savedir directory_path]]
Appendix ACluster Verification Utility Command Reference
A-42

Parameters
Table A-24 cluvfy comp peer Command Parameters
Parameter Description
-n node_list | -allnodes
Specify a comma-delimited list of non domain-qualified node names, orall nodes in a cluster, on which to conduct the verification.
If you do not specify this option, then CVU checks only the local node.
-refnode node Optionally, specify a node that CVU uses as a reference for checkingcompatibility with other nodes. If you do not specify this option, then CVUreports values for all the nodes in the node list.
-r {12.2|18|19|20|21} Optionally, specify the software release that CVU checks as required forinstallation of Oracle Clusterware or Oracle RAC. If you do not specifythis option, then CVU assumes Oracle Clusterware 21c or OracleDatabase 21c.
-osdba osdba_group Optionally, you can specify the name of the OSDBA group. If you do notspecify this option, then CVU uses dba as the OSDBA group.
Note: This parameter is not available on Windows systems.
-osoper osoper_group Optionally, you can specify the name of the OSOPER group.
Note: This parameter is not available on Windows systems.
-orainvorainventory_group
Optionally, you can specify the name of the Oracle Inventory group. Ifyou do not specify this option, then CVU uses oinstall as theinventory group.
Note: This parameter is not available on Windows systems.
–verbose CVU prints detailed output.
-jsonUse the -json flag to generate a detailed report in JSON format.If you do not specify the -json flag, then CVU generates thedetailed report in a text file.
-htmlUse the -html flag to generate a detailed report in HTML format.If you specify the -html flag, and a browser that CVU recognizesis available on the system, then CVU starts the browser anddisplays the report on the browser when the checks arecomplete.If you do not specify the -html flag, then CVU generates thedetailed report in a text file.
-save [-savedirdirectory_path] Use the -save or -save -savedir flags to save validation reports
(cvuchecdkreport_timestamp.txt andcvucheckreport_timestamp.htm), where timestamp is the timeand date of the validation report.If you use the -save flag by itself, then CVU saves the reports inthe CVU_home/cv/report directory, where CVU_home is thelocation of the CVU binaries.If you use the -save -savedir flags, then specify a directorywhere you want CVU to save the reports.
Appendix ACluster Verification Utility Command Reference
A-43

Usage Notes
Peer comparison with the -refnode option compares the system properties of othernodes against the reference node. If the value of the other node is not greater than thevalue for that of the reference node, then CVU flags that comparison as a deviationfrom the reference node. If a group or user exists on neither the reference node nor onthe other node, then CVU reports a match to indicate that there is no deviation fromthe reference node. Similarly, CVU reports as mismatched a comparison with a nodethat has less total memory than the reference node.
Example
The following command lists the values of several preselected properties on differentnodes from Oracle Database 12c:
cluvfy comp peer -n node1,node2,node4,node7 -verbose
cluvfy comp scanChecks the Single Client Access Name (SCAN) configuration.
Syntax
cluvfy comp scan [-verbose] [-json] [-html] [-save [-savedir directory_path]]
Parameters
Table A-25 cluvfy comp scan Command Parameters
Parameter Description
–verbose CVU prints detailed output.
-jsonUse the -json flag to generate a detailed report in JSONformat.If you do not specify the -json flag, then CVU generates thedetailed report in a text file.
-htmlUse the -html flag to generate a detailed report in HTMLformat.If you specify the -html flag, and a browser that CVUrecognizes is available on the system, then CVU starts thebrowser and displays the report on the browser when thechecks are complete.If you do not specify the -html flag, then CVU generates thedetailed report in a text file.
Appendix ACluster Verification Utility Command Reference
A-44

Table A-25 (Cont.) cluvfy comp scan Command Parameters
Parameter Description
-save [-savedirdirectory_path] Use the -save or -save -savedir flags to save validation
reports (cvuchecdkreport_timestamp.txt andcvucheckreport_timestamp.htm), where timestamp is thetime and date of the validation report.If you use the -save flag by itself, then CVU saves thereports in the CVU_home/cv/report directory, whereCVU_home is the location of the CVU binaries.If you use the -save -savedir flags, then specify a directorywhere you want CVU to save the reports.
Example
To verify that the SCAN and SCAN listeners are configured and operational on all nodes inthe cluster, use the following command:
$ cluvfy comp scan
This command returns output similar to the following:
Verifying scan
Checking Single Client Access Name (SCAN)...
Checking TCP connectivity to SCAN Listeners...TCP connectivity to SCAN Listeners exists on all cluster nodes
Checking name resolution setup for "node1.example.com"...
Verification of SCAN VIP and Listener setup passed
Verification of scan was successful.
cluvfy comp softwareChecks the files and attributes installed with the Oracle software.
Syntax
cluvfy comp software [-n node_list | -allnodes] [-d oracle_home] [-allfiles] [-verbose] [-json] [-html] [-save [-savedir directory_path]]
Appendix ACluster Verification Utility Command Reference
A-45

Parameters
Table A-26 cluvfy comp software Command Parameters
Parameter Description
-n node_list | -allnodes
Optionally, you can specify a comma-delimited list of non domain-qualified node names, or all nodes in a cluster, on which to conductthe verification. If you do not specify this option, then CVU checksonly the local node.
-d oracle_home Optionally, you can specify the directory where the OracleDatabase software is installed. If you do not specify this option,then CVU verifies the files installed in the Grid home.
-allfiles If you specify this parameter, then CVU checks the attributes of allfiles of the specified Oracle home. If you do not specify thisparmater, then CVU checks the attributes of the lib, jlib, andbin files under the specified Oracle home.
–verbose CVU prints detailed output.
-jsonUse the -json flag to generate a detailed report in JSONformat.If you do not specify the -json flag, then CVU generates thedetailed report in a text file.
-htmlUse the -html flag to generate a detailed report in HTMLformat.If you specify the -html flag, and a browser that CVUrecognizes is available on the system, then CVU starts thebrowser and displays the report on the browser when thechecks are complete.If you do not specify the -html flag, then CVU generates thedetailed report in a text file.
-save [-savedirdirectory_path] Use the -save or -save -savedir flags to save validation
reports (cvuchecdkreport_timestamp.txt andcvucheckreport_timestamp.htm), where timestamp is thetime and date of the validation report.If you use the -save flag by itself, then CVU saves thereports in the CVU_home/cv/report directory, whereCVU_home is the location of the CVU binaries.If you use the -save -savedir flags, then specify a directorywhere you want CVU to save the reports.
Usage Notes
Add additional information about the command here.
Appendix ACluster Verification Utility Command Reference
A-46

Example
To verify that the installed files for Oracle Clusterware are configured correctly, use acommand similar to the following:
$ cluvfy comp software -n allnodes -verbose
This command returns output similar to the following:
Verifying software
Check: Software
1021 files verified
Software check passed
Verification of software was successful.
cluvfy comp spaceChecks for free disk space at the location you specify in the -l parameter on all the specifiednodes.
Syntax
cluvfy comp space [-n node_list | -allnodes] -l storage_location -z disk_space {B | K | M | G} [-verbose] [-json] [-html] [-save [-savedir directory_path]]
Parameters
Table A-27 cluvfy comp space Command Parameters
Parameter Description
-n node_list Specify a comma-delimited list of non domain-qualified node names onwhich to conduct the verification, or all nodes in a cluster. If you do notspecify this parameter, then CVU checks only the local node.
-l storage_location Specify the directory path to the storage location you want to check.
-z disk_space {B | K| M | G}
Specify the required disk space, in units of bytes (B), kilobytes (K),megabytes (M), or gigabytes (G). There should be no space between thenumeric value and the byte indicator; for example, 2G. Use only wholenumbers.
–verbose CVU prints detailed output.
-jsonUse the -json flag to generate a detailed report in JSON format.If you do not specify the -json flag, then CVU generates thedetailed report in a text file.
Appendix ACluster Verification Utility Command Reference
A-47

Table A-27 (Cont.) cluvfy comp space Command Parameters
Parameter Description
-htmlUse the -html flag to generate a detailed report in HTML format.If you specify the -html flag, and a browser that CVU recognizesis available on the system, then CVU starts the browser anddisplays the report on the browser when the checks arecomplete.If you do not specify the -html flag, then CVU generates thedetailed report in a text file.
-save [-savedirdirectory_path] Use the -save or -save -savedir flags to save validation reports
(cvuchecdkreport_timestamp.txt andcvucheckreport_timestamp.htm), where timestamp is the timeand date of the validation report.If you use the -save flag by itself, then CVU saves the reports inthe CVU_home/cv/report directory, where CVU_home is thelocation of the CVU binaries.If you use the -save -savedir flags, then specify a directorywhere you want CVU to save the reports.
Usage Notes
The space component does not support block or raw devices.
See Also:
The Oracle Certification site on My Oracle Support for the most currentinformation about certified storage options:
https://support.oracle.com
Example
You can verify that each node has 5 GB of free space in the /home/dbadmin/productsdirectory by running the following command:
$ cluvfy comp space -n all -l /home/dbadmin/products –z 5G -verbose
cluvfy comp ssaUse the cluvfy comp ssa component verification command to discover and check thesharing of the specified storage locations. CVU checks sharing for nodes in the nodelist, or all nodes in a cluster.
Appendix ACluster Verification Utility Command Reference
A-48

Syntax
cluvfy comp ssa [-n node_list | -allnodes] [-s storage_path_list] [-t {gi_software | rac_software | data | ocr_vdisk}] [-asm [-asmdev asm_device_list]] [-r {12.2|18|19|20|21}] [-verbose] [-json] [-html] [-save [-savedir directory_path]]
Parameters
Table A-28 cluvfy comp ssa Command Parameters
Parameter Description
-n node_list | -allnodes
The comma-delimited list of non domain-qualified node names on whichto conduct the verification, or all nodes in a cluster.
If you do not specify any of these options, then CVU checks only thelocal node.
-s storage_path_list A comma-delimited list of storage paths, for example, /dev/sda,/dev/sdb.
If you do not specify the -s option, then CVU discovers supportedstorage types and checks sharing for each of them.
-t {gi_software |rac_software | data |ocr_vdisk}
The type of Oracle files (Oracle Grid Infrastructure binaries, Oracle RAC,or Oracle Database binaries) that will be stored on the storage device.
If you do not specify -t, then CVU discovers or checks the data filetype.
-asm Specify this parameter to discover all storage suitable for use by OracleASM.
-asmdevasm_device_list
A comma-delimited list of Oracle ASM devices for which you want tocheck sharing of storage locations. If the list contains shellmetacharacters, then enclose the list in double quotation marks ("").
-r {12.2|18|19|20|21} Optionally, you can specify the release number of the product for whichyou are running the verification. If you do not specify -r, then CVU runsthe verification for 21.
-verbose CVU prints detailed output.
-jsonUse the -json flag to generate a detailed report in JSON format.If you do not specify the -json flag, then CVU generates thedetailed report in a text file.
-htmlUse the -html flag to generate a detailed report in HTML format.If you specify the -html flag, and a browser that CVU recognizesis available on the system, then CVU starts the browser anddisplays the report on the browser when the checks arecomplete.If you do not specify the -html flag, then CVU generates thedetailed report in a text file.
Appendix ACluster Verification Utility Command Reference
A-49

Table A-28 (Cont.) cluvfy comp ssa Command Parameters
Parameter Description
-save [-savedirdirectory_path] Use the -save or -save -savedir flags to save validation reports
(cvuchecdkreport_timestamp.txt andcvucheckreport_timestamp.htm), where timestamp is the timeand date of the validation report.If you use the -save flag by itself, then CVU saves the reports inthe CVU_home/cv/report directory, where CVU_home is thelocation of the CVU binaries.If you use the -save -savedir flags, then specify a directorywhere you want CVU to save the reports.
Usage Notes
• The current release of cluvfy has the following limitations on Linux regardingshared storage accessibility check.
– Currently NAS storage and OCFS2 (version 1.2.1 or higher) are supported.
See Also:
Oracle Grid Infrastructure Installation Guide for more informationabout NAS mount options
– When checking sharing on NAS, cluvfy commands require that you havewrite permission on the specified path. If the cluvfy user does not have writepermission, cluvfy reports the path as not shared.
• To perform discovery and shared storage accessibility checks for SCSI disks onLinux systems, CVU requires the CVUQDISK package. If you attempt to use CVUand the CVUQDISK package is not installed on all of the nodes in your OracleRAC environment, then CVU responds with an error. See Shared Disk Discoveryon Red Hat Linux for information about how to install the CVUQDISK package.
See Also:
CVU Usage Information for CVU operational notes including informationabout report options
Examples
To discover all of the shared storage systems available on your system:
$ cluvfy comp ssa -allnodes -verbose
Appendix ACluster Verification Utility Command Reference
A-50

To discover all the storage suitable for use by Oracle ASM, based on the specified OracleASM discovery string:
$ cluvfy comp ssa -n node1,node2 -asm -asmdev "/dev/xda*"
You can verify the accessibility of specific storage locations, such as an Oracle ASM diskgroup called OCR13, for storing data files for all the cluster nodes by running a commandsimilar to the following:
$ cluvfy comp ssa -allnodes -s OCR13
This command produces output similar to the following:
Verifying shared storage acessibility
Checking shared storage accessibility...
"OCR13" is shared
Shared storage check was successful on nodes "node1,node2,node3,node4"
Verification of shared storage accessibility was successful.
cluvfy comp sysChecks that the minimum system requirements are met for the specified product on all thespecified nodes.
Syntax
cluvfy comp sys [-n node_list | -allnodes] -p {crs | ha | database} [-r {12.2|18|19|20|21}] [-osdba osdba_group] [-osoper osoper_group] [-orainv orainventory_group] [-fixup] [-fixupnoexec] [-method {sudo -user user_name [-location directory_path] | -method root}] [-verbose] [-json] [-html] [-save [-savedir directory_path]]
Parameters
Table A-29 cluvfy comp sys Command Parameters
Parameter Description
-n node_list | -allnodes
Specify a comma-delimited list of non domain-qualified node names onwhich to conduct the verification, or all nodes in a cluster. If you do notspecify this option, then CVU checks only the local node.
-p {crs | ha |database}
Specifies whether CVU checks the system requirements for OracleClusterware, Oracle Restart (HA), or Oracle RAC.
Appendix ACluster Verification Utility Command Reference
A-51

Table A-29 (Cont.) cluvfy comp sys Command Parameters
Parameter Description
-r {12.2|18|19|20|21} Specifies the Oracle Database release that CVU checks as required forinstallation of Oracle Clusterware or Oracle RAC. If you do not specifythis option, then CVU assumes Oracle Database 21c.
-osdba osdba_group The name of the OSDBA group. If you do not specify this option, thenCVU uses dba as the OSDBA group.
-osoper osoper_group The name of the OSOPER group.
-orainvorainventory_group
The name of the Oracle Inventory group. If you do not specify this option,then CVU uses oinstall as the inventory group.
-fixup Specifies that if the verification fails, then CVU performs fixup operations,if feasible.
-fixupnoexec Specifies that if verification fails, then CVU generates the fixup data anddisplays the instructions for manual execution of the generated fixups.
-method {sudo -useruser_name [-locationdirectory_path] |root}
Specify whether the privilege delegation method is sudo or root, forroot user access. If you specify sudo, then you must specify the username to access all the nodes with root privileges and, optionally, providethe full file system path for the sudo executable.
–verbose CVU prints detailed output.
-jsonUse the -json flag to generate a detailed report in JSON format.If you do not specify the -json flag, then CVU generates thedetailed report in a text file.
-htmlUse the -html flag to generate a detailed report in HTML format.If you specify the -html flag, and a browser that CVU recognizesis available on the system, then CVU starts the browser anddisplays the report on the browser when the checks arecomplete.If you do not specify the -html flag, then CVU generates thedetailed report in a text file.
-save [-savedirdirectory_path] Use the -save or -save -savedir flags to save validation reports
(cvuchecdkreport_timestamp.txt andcvucheckreport_timestamp.htm), where timestamp is the timeand date of the validation report.If you use the -save flag by itself, then CVU saves the reports inthe CVU_home/cv/report directory, where CVU_home is thelocation of the CVU binaries.If you use the -save -savedir flags, then specify a directorywhere you want CVU to save the reports.
Example
To verify the system requirements for installing Oracle Clusterware 19c on the clusternodes node1,node2 and node3, run the following command:
cluvfy comp sys -n node1,node2,node3 -p crs -verbose
Appendix ACluster Verification Utility Command Reference
A-52

cluvfy comp vdiskChecks the voting files configuration and the udev settings for the voting files on all thespecified nodes.
See Also:
Oracle Grid Infrastructure Installation and Upgrade Guide for Linux for moreinformation about udev settings
Syntax
cluvfy comp vdisk [-n node_list | -allnodes] [-verbose] [-json] [-html] [-save [-savedir directory_path]]
Parameters
Table A-30 cluvfy comp vdisk Command Parameters
Parameter Description
-n node_list | -allnodes
Specify a comma-delimited list of non domain-qualified node names onwhich to conduct the verification, or all nodes in a cluster.
If you do not specify this option, then CVU checks only the local node.
–verbose CVU prints detailed output.
-jsonUse the -json flag to generate a detailed report in JSON format.If you do not specify the -json flag, then CVU generates thedetailed report in a text file.
-htmlUse the -html flag to generate a detailed report in HTML format.If you specify the -html flag, and a browser that CVU recognizesis available on the system, then CVU starts the browser anddisplays the report on the browser when the checks arecomplete.If you do not specify the -html flag, then CVU generates thedetailed report in a text file.
-save [-savedirdirectory_path] Use the -save or -save -savedir flags to save validation reports
(cvuchecdkreport_timestamp.txt andcvucheckreport_timestamp.htm), where timestamp is the timeand date of the validation report.If you use the -save flag by itself, then CVU saves the reports inthe CVU_home/cv/report directory, where CVU_home is thelocation of the CVU binaries.If you use the -save -savedir flags, then specify a directorywhere you want CVU to save the reports.
Appendix ACluster Verification Utility Command Reference
A-53

cluvfy stage acfscfgUse the cluvfy stage -pre acfscfg command to verify that your cluster nodes areset up correctly before configuring Oracle Advanced Cluster File System (OracleACFS). Use the cluvfy stage -post acfscfg to check an existing cluster after youconfigure Oracle ACFS.
Syntax
cluvfy stage -pre acfscfg {-n node_list | -allnodes} [-asmdev asm_device_list] [-afdconfig] [-verbose] [-json] [-html] [-save [-savedir directory_path]]
cluvfy stage -post acfscfg {-n node_list | -allnodes} [-verbose] [-json] [-html] [-save [-savedir directory_path]]
Note:
Starting with Oracle Database 21c, the name of Oracle Automatic StorageManagement Cluster File System (Oracle ACFS) is changed to OracleAdvanced Cluster File System (Oracle ACFS). This change is only a changeof the name. The basic function of Oracle's cluster file system continues tobe the same. Oracle continues to develop and enhance Oracle ACFS.
Parameters
Table A-31 cluvfy stage acfscfg Command Parameters
Parameter Description
-n node_list | -allnodes
Specify a comma-delimited list of non domain-qualified nodenames, or all nodes in a cluster, on which to conduct theverification, for both before and after configuring Oracle ACFS.
-asmdevasm_device_list
The list of devices you plan for Oracle ASM to use. If you do notspecify this option, then CVU uses an internal operating system-dependent value; for example, /dev/raw/* on Linux systems.
-afdconfig Verifies Oracle ASM Filter Driver configuration prerequisites.
-verbose CVU prints detailed output.
-jsonUse the -json flag to generate a detailed report in JSONformat.If you do not specify the -json flag, then CVU generates thedetailed report in a text file.
Appendix ACluster Verification Utility Command Reference
A-54

Table A-31 (Cont.) cluvfy stage acfscfg Command Parameters
Parameter Description
-htmlUse the -html flag to generate a detailed report in HTMLformat.If you specify the -html flag, and a browser that CVUrecognizes is available on the system, then CVU starts thebrowser and displays the report on the browser when thechecks are complete.If you do not specify the -html flag, then CVU generates thedetailed report in a text file.
-save [-savedirdirectory_path] Use the -save or -save -savedir flags to save validation
reports (cvuchecdkreport_timestamp.txt andcvucheckreport_timestamp.htm), where timestamp is thetime and date of the validation report.If you use the -save flag by itself, then CVU saves thereports in the CVU_home/cv/report directory, whereCVU_home is the location of the CVU binaries.If you use the -save -savedir flags, then specify a directorywhere you want CVU to save the reports.
cluvfy stage appclusterPerforms the appropriate pre-stage and post-stage checks for Oracle Clusterware applicationcluster installations on the specified nodes.
Syntax
cluvfy stage -pre appcluster {-n node_list | -allnodes} [-verbose]
cluvfy stage -post appcluster {-n node_list | -allnodes} [-method sudo -user user_name [-location dir_path] | root] [-verbose]
Parameters
Table A-32 cluvfy stage appcluster Command Parameters
Parameter Description
-n node_list | -allnodes
Specify a comma-delimited list of non domain-qualified node names onwhich you want to run the verification. Specify -allnodes to run theverification on all nodes in the cluster.
-method sudo -useruser_name[-locationdir_path] | root
Chose the privilege delegation method, either sudo or root, to be usedfor root user access.
If you choose the sudo method, then you must provide a user name toaccess all the nodes with root privileges, and, optionally, the full filesystem path for the sudo executable.
Appendix ACluster Verification Utility Command Reference
A-55

cluvfy stage cfsUse the cluvfy stage -pre cfs stage verification command to verify your clusternodes are set up correctly before configuring OCFS2. Use the cluvfy stage -postcfs stage verification command to perform the appropriate checks on the specifiednodes after configuring OCFS2.
See Also:
Oracle Grid Infrastructure Installation and Upgrade Guide for your platformfor a list of supported shared storage types
Syntax
cluvfy stage -pre cfs {-n node_list | -allnodes} -s storageID_list [-verbose] [-json] [-html] [-save [-savedir directory_path]]
cluvfy stage -post cfs {-n node_list | -allnodes} -f file_system [-verbose] [-json] [-html] [-save [-savedir directory_path]]
Parameters
Table A-33 cluvfy stage cfs Command Parameters
Parameter Description
-n node_list | -allnodes
Specify a comma-delimited list of non domain-qualified nodenames on which to conduct the verification, for both before andafter configuring OCFS2. Specify -allnodes to run the verificationon all nodes in the cluster.
-s storageID_list Specify a comma-delimited list of storage locations to check beforeconfiguring OCFS2.
-f file_system Specify a file system to check after configuring OCFS2.
–verbose CVU prints detailed output.
-jsonUse the -json flag to generate a detailed report in JSONformat.If you do not specify the -json flag, then CVU generates thedetailed report in a text file.
Appendix ACluster Verification Utility Command Reference
A-56

Table A-33 (Cont.) cluvfy stage cfs Command Parameters
Parameter Description
-htmlUse the -html flag to generate a detailed report in HTMLformat.If you specify the -html flag, and a browser that CVUrecognizes is available on the system, then CVU starts thebrowser and displays the report on the browser when thechecks are complete.If you do not specify the -html flag, then CVU generates thedetailed report in a text file.
-save [-savedirdirectory_path] Use the -save or -save -savedir flags to save validation
reports (cvuchecdkreport_timestamp.txt andcvucheckreport_timestamp.htm), where timestamp is thetime and date of the validation report.If you use the -save flag by itself, then CVU saves thereports in the CVU_home/cv/report directory, whereCVU_home is the location of the CVU binaries.If you use the -save -savedir flags, then specify a directorywhere you want CVU to save the reports.
Example
To check that a shared device is configured correctly before setting up OCFS2, use acommand similar to the following, where you replace /dev/sdd5 with the name of the shareddevice on your system:
$ cluvfy stage -pre cfs -n node1,node2,node3,node4 -s /dev/sdd5
cluvfy stage crsinstUse the cluvfy stage -pre crsinst command with either the -file, -n, -flex, or -upgradeparameters to check the specified nodes before installing or upgrading Oracle Clusterware.Use the cluvfy stage -post crsinst command to check the specified nodes after installingOracle Clusterware.
Syntax
cluvfy stage -pre crsinst -responseFile file_name [-fixup] [-fixupnoexec] [-method {sudo -user user_name [-location directory_path] | -method root}] [-r {12.2|18|19|20|21}] [-verbose] [-json] [-html] [-save [-savedir directory_path]]
cluvfy stage -pre crsinst -file config_file [-fixup] [-fixupnoexec] [-method {sudo -user user_name [-location directory_path] | -method root}] [-verbose] [-json] [-html] [-save [-savedir directory_path]]
cluvfy stage -pre crsinst (-n node_list | -allnodes}
Appendix ACluster Verification Utility Command Reference
A-57

[-r {12.2|18|19|20|21}] [-c ocr_location_list] [-q voting_disk_list] [-osdba osdba_group] [-osoper osoper_group] [-orainv orainventory_group] [-asm [-presence {local | flex} | -asmcredentials client_data_file] [-asmgrp asmadmin_group] [-asmdev asm_device_list]] [-afdconfig] [-crshome Grid_home] [-fixup] [-fixupnoexec] [-method {sudo -user user_name [-location directory_path] | -method root}] [-networks network_list] [-dhcp -clustername cluster_name [-dhcpport dhcp_port]] [-dns -vipaddress gns_vip_address [-domain gns_sub_domain]] [-software_only] [-verbose] [-json] [-html] [-save [-savedir directory_path]]
cluvfy stage -pre crsinst -upgrade [-rolling] [-src_crshome src_crshome] -dest_crshome dest_crshome -dest_version dest_version [-fixup] [-fixupnoexec] [-method {sudo -user user_name [-location directory_path] | -method root}] [-verbose] [-json] [-html] [-save [-savedir directory_path]]
cluvfy stage -post crsinst {-n node_list | -allnodes} [-method {sudo -user user_name [-location directory_path] | -method root}] [-verbose] [-json] [-html] [-save [-savedir directory_path]]
Parameters
Table A-34 cluvfy stage [-pre | -post] crsinst Command Parameters
Parameter Description
-responseFile Specify the response file, created by the Oracle Universal Installer,containing Oracle installation variables.
-file config_file Specify the root script configuration file containing Oracleinstallation variables.
-n node_list | -allnodes
Specify a comma-delimited list of non domain-qualified nodenames on which to conduct the verification. Specify -allnodes torun the verification on all nodes in the cluster.
-r {12.2|18|19|20|21}
Specifies the Oracle Clusterware release that CVU checks asrequired for installation of Oracle Clusterware. If you do not specifythis option, then CVU assumes Oracle Clusterware 21c.
-c ocr_location_list Specify a comma-delimited list of directory paths for OCR locationsor files that CVU checks for availability to all nodes. If you do notspecify this option, then the OCR locations are not checked.
-q voting_disk_list Specify a comma-delimited list of directory paths for voting files thatCVU checks for availability to all nodes. If you do not specify thisoption, then CVU does not check the voting file locations.
-osdba osdba_group Specify the name of the OSDBA group. If you do not specify thisoption, then CVU uses dba as the OSDBA group.
-osoper osoper_group Specify the name of the OSOPER group.
Appendix ACluster Verification Utility Command Reference
A-58

Table A-34 (Cont.) cluvfy stage [-pre | -post] crsinst Command Parameters
Parameter Description
-orainvorainventory_group
Specify the name of the Oracle Inventory group. If you do notspecify this option, then CVU uses oinstall as the inventorygroup.
-asm [-presence{local | flex} | -asmcredentialsclient_data_file
This parameter indicates that Oracle ASM is used for storing theOracle Clusterware files.
Specify the Oracle ASM presence, either LOCAL or FLEX, on thisOracle Clusterware installation. Optionally, for an Oracle ASMclient, specify the path to an Oracle ASM client credential file.
-asmgrpasmadmin_group
Specify the name of the OSASM group. If you do not specify thisparameter, then CVU uses the same group as the Oracle Inventorygroup.
-asmdevasm_device_list
Specify a list of devices you plan for Oracle ASM to use that CVUchecks for availability to all nodes.
If you do not specify this parameter, then CVU uses an internaloperating system-dependent value.
-afdconfig Verifies Oracle ASM Filter Driver configuration prerequisites.
-crshome Grid_home Specify the location of the Oracle Grid Infrastructure or OracleClusterware home directory. If you specify this parameter, then thesupplied file system location is checked for sufficient free space foran Oracle Clusterware installation.
-networksnetwork_list
Checks the network parameters of a slash ("/")-delimited list ofnetworks in the form of "if_name" [:subnet_id [:public| :cluster_interconnect]].
• You can use the asterisk (*) wildcard character when youspecify the network interface name (if_name), such as eth*,to match interfaces.
• Specify a subnet number for the network interface for thesubnet_id variable and choose the type of network interface.
-dhcp -clusternamecluster_name [-dhcpport dhcp_port]
Specify the name of the cluster. Optionally, you can specify the portto which the DHCP packets will be sent. The default value for thisport is 67.
-dns -vipaddressgns_vip_address
Specify the GNS virtual IP address in the form {ip_name |ip_address}/net_mask/interface_name. You can specifyeither ip_name, which is a name that resolves to an IP address, orIP_address, which is an IP address. Either name or address isfollowed by net_mask, which is the subnet mask for the IPaddress, and interface_name, which is the interface on which tostart the IP address.
-domaingns_sub_domain
Specify the name of the GNS subdomain.
–upgrade Specify this parameter to verify upgrade prerequisites.
-rolling Specify this parameter to perform a rolling upgrade.
-src_crshomesrc_crshome
Specify the location of the source Grid home.
-dest_crshomedest_crshome
Specify the location of the destination Grid home.
Appendix ACluster Verification Utility Command Reference
A-59

Table A-34 (Cont.) cluvfy stage [-pre | -post] crsinst Command Parameters
Parameter Description
-dest_versiondest_version
Specify the version to which you are upgrading, such as21.0.0.0.0.
-fixup Specifies that if the verification fails, then CVU performs fixupoperations, if feasible.
-fixupnoexec Specifies that if verification fails, then CVU generates the fixup dataand displays the instructions for manual execution of the generatedfixups.
-method {sudo -useruser_name [-locationdir_path] | root}
Specify whether the privilege delegation method is sudo or root,for root user access. If you specify sudo, then you must specify theuser name to access all the nodes with root privileges and,optionally, provide the full file system path for the sudo executable.
–verbose CVU prints detailed output.
-jsonUse the -json flag to generate a detailed report in JSONformat.If you do not specify the -json flag, then CVU generates thedetailed report in a text file.
-htmlUse the -html flag to generate a detailed report in HTMLformat.If you specify the -html flag, and a browser that CVUrecognizes is available on the system, then CVU starts thebrowser and displays the report on the browser when thechecks are complete.If you do not specify the -html flag, then CVU generates thedetailed report in a text file.
-save [-savedirdirectory_path] Use the -save or -save -savedir flags to save validation
reports (cvuchecdkreport_timestamp.txt andcvucheckreport_timestamp.htm), where timestamp is thetime and date of the validation report.If you use the -save flag by itself, then CVU saves thereports in the CVU_home/cv/report directory, whereCVU_home is the location of the CVU binaries.If you use the -save -savedir flags, then specify a directorywhere you want CVU to save the reports.
Usage Notes
• To perform checks for a new installation, specify -responseFile, -file, or -nparameters. Use -upgrade for performing checks for upgrading to another version.
• CVU performs additional checks on OCR and voting files if you specify the -c and-q options with the -n parameter.
Appendix ACluster Verification Utility Command Reference
A-60

cluvfy stage dbcfgChecks the specified nodes before configuring an Oracle RAC database to verify whetheryour system meets all of the criteria for creating a database or for making a databaseconfiguration change.
Syntax
On Linux and UNIX platforms:
cluvfy stage -pre dbcfg (-n node_list | -allnodes} -d Oracle_home [-fixup] [-fixupnoexec] [-method {sudo -user user_name [-location directory_path] | -method root}] [-verbose] [-json] [-html] [-save [-savedir directory_path]]
On Windows platforms:
cluvfy stage -pre dbcfg (-n node_list | -allnodes} -d oracle_home [-fixup] [-fixupnoexec] [-verbose] [-servicepwd] [-json] [-html] [-save [-savedir directory_path]]
Parameters
Table A-35 cluvfy stage -pre dbcfg Command Parameters
Parameter Description
-n node_list | -allnodes
The comma-delimited list of nondomain qualified node names on whichto conduct the verification. Specify -allnodes to run the verification onall nodes in the cluster.
-d Oracle_home The location of the Oracle home directory for the database that is beingchecked.
-fixup Specifies that if the verification fails, then CVU performs fixup operations,if feasible.
-fixupnoexec Specifies that if verification fails, then CVU generates the fixup data anddisplays the instructions for manual execution of the generated fixups.
-method {sudo -useruser_name [-locationdirectory_path] | -method root}
Specify whether the privilege delegation method is sudo or root, forroot user access. If you specify sudo, then you must specify the username to access all the nodes with root privileges and, optionally, providethe full file system path for the sudo executable.
–verbose CVU prints detailed output.
-jsonUse the -json flag to generate a detailed report in JSON format.If you do not specify the -json flag, then CVU generates thedetailed report in a text file.
Appendix ACluster Verification Utility Command Reference
A-61

Table A-35 (Cont.) cluvfy stage -pre dbcfg Command Parameters
Parameter Description
-htmlUse the -html flag to generate a detailed report in HTML format.If you specify the -html flag, and a browser that CVU recognizesis available on the system, then CVU starts the browser anddisplays the report on the browser when the checks arecomplete.If you do not specify the -html flag, then CVU generates thedetailed report in a text file.
-save [-savedirdirectory_path] Use the -save or -save -savedir flags to save validation reports
(cvuchecdkreport_timestamp.txt andcvucheckreport_timestamp.htm), where timestamp is the timeand date of the validation report.If you use the -save flag by itself, then CVU saves the reports inthe CVU_home/cv/report directory, where CVU_home is thelocation of the CVU binaries.If you use the -save -savedir flags, then specify a directorywhere you want CVU to save the reports.
cluvfy stage dbinstChecks the specified nodes before installing or creating an Oracle RAC database toverify that your system meets all of the criteria for installing or creating an Oracle RACdatabase.
Syntax
On Linux and UNIX platforms:
cluvfy stage -pre dbinst (-n node_list | -allnodes} [-r {12.2|18|19|20|21}] [-osdba osdba_group] [-osoper osoper_group] [-osbackup osbackup_group] [-osdg osdg_group] [-oskm oskm_group] [-d oracle_home] [-fixup] [-fixupnoexec] [-method {sudo -user user_name [-location directory_path] | -method root}] [-verbose] [-json] [-html] [-save [-savedir directory_path]]
cluvfy stage pre dbinst -upgrade -src_dbhome src_dbhome [-dbname dbname-list] -dest_dbhome dest_dbhome -dest_version dest_version [-fixup] [-fixupnoexec] [-method sudo -user user_name [-location directory_path] | -method root}] [-verbose] [-json] [-html] [-save [-savedir directory_path]]
Appendix ACluster Verification Utility Command Reference
A-62

On Windows platforms:
cluvfy stage -pre dbinst (-n node_list | -allnodes} [-r {12.2|18|19|20|21}] [-d Oracle_home] [-fixup] [-fixupnoexec] [-serviceuser user_name [-servicepasswd]]] [-verbose] [-json] [-html] [-save [-savedir directory_path]]
cluvfy stage -pre dbinst -upgrade -src_dbhome src_dbhome [-dbname dbname-list -dest_dbhome dest_dbhome -dest_version dest_version [-fixup] [-fixupnoexec] [-verbose]] [-json] [-html] [-save [-savedir directory_path]]
Parameters
Table A-36 cluvfy stage -pre dbinst Command Parameters
Parameter Description
-n node_list | -allnodes
Specify a comma-delimited list of non domain-qualified node names onwhich to conduct the verification. Specify -allnodes to run theverification on all nodes in the cluster.
-r {12.2|18|19|20|21} Specifies the Oracle Database release that CVU checks as required forinstallation of Oracle RAC. If you do not specify this option, then CVUassumes Oracle Database 21.
-osdba osdba_group The name of the OSDBA group. If you do not specify this option, thenCVU uses dba as the OSDBA group.
-osoper osoper_group Specify the name of the OSOPER group.
-osbackuposbackup_group
Specify the name of the OSBACKUP group.
-osdg osdg_group Specify the name of the OSDG group.
-oskm oskm_group Specify the name of the OSKM group.
-d oracle_home The location of the Oracle home directory where you are installingOracle RAC and creating the Oracle RAC database. If you specify thisparameter, then the specified location is checked for sufficient free diskspace for a database installation.
-fixup Specifies that if the verification fails, then CVU performs fixup operations,if feasible.
-fixupnoexec Specifies that if verification fails, then CVU generates the fixup data anddisplays the instructions for manual execution of the generated fixups.
-upgrade Specify this parameter to verify upgrade prerequisites.
-src_dbhomesrc_dbhome
Specify the location of the source database home from which you areupgrading.
-dbname dbname-list Specify a comma-delimited list of unique names of the databases youwant to upgrade.
-dest_dbhomedest_dbhome
Specify the location of the destination database home to which you areupgrading.
-dest_versiondest_version
Specify the version to which you are upgrading, such as 21.0.0.0.0.
Appendix ACluster Verification Utility Command Reference
A-63

Table A-36 (Cont.) cluvfy stage -pre dbinst Command Parameters
Parameter Description
-method {sudo -useruser_name [-locationdirectory_path] |root}
Specify whether the privilege delegation method is sudo or root, forroot user access. If you specify sudo, then you must specify the username to access all the nodes with root privileges and, optionally, providethe full file system path for the sudo executable.
-serviceuseruser_name [-servicepasswd]
If you specify this option, then CVU checks the following:
• Whether the specified user is a domain user. If the specified user isnot a domain user, then CVU returns an error and does not performany subsequent checks on the validation of the user.
Note: You must specify the user name of the Oracle home user.• Whether the specified user is an administrator on all nodes in the
cluster. If the user is not an administrator on any node in the cluster,then the check passes. Otherwise, the check fails.
• If you do not specify the -servicepwd option, then CVU checkswhether there is a password stored in the wallet on OCR for thisuser. If no password exists for the specified user, then CVUcontinues to run.
• If you specify the -servicepwd option, then CVU prompts you forthe password of the specified user, even if the password exists in thewallet.
Note: The -serviceuser and -servicepwd parameters only apply toWindows.
–verbose CVU prints detailed output.
-jsonUse the -json flag to generate a detailed report in JSON format.If you do not specify the -json flag, then CVU generates thedetailed report in a text file.
-htmlUse the -html flag to generate a detailed report in HTML format.If you specify the -html flag, and a browser that CVU recognizesis available on the system, then CVU starts the browser anddisplays the report on the browser when the checks arecomplete.If you do not specify the -html flag, then CVU generates thedetailed report in a text file.
-save [-savedirdirectory_path] Use the -save or -save -savedir flags to save validation reports
(cvuchecdkreport_timestamp.txt andcvucheckreport_timestamp.htm), where timestamp is the timeand date of the validation report.If you use the -save flag by itself, then CVU saves the reports inthe CVU_home/cv/report directory, where CVU_home is thelocation of the CVU binaries.If you use the -save -savedir flags, then specify a directorywhere you want CVU to save the reports.
Appendix ACluster Verification Utility Command Reference
A-64

cluvfy stage hacfgChecks the local node before and after configuring Oracle Restart.
Syntax
cluvfy stage -pre hacfg [-osdba osdba_group] [-osoper osoper_group] [-orainv orainventory_group] [-fixup] [-fixupnoexec] [-method {sudo -user user_name [-location directory_path] | -method root}] [-verbose] [-json] [-html] [-save [-savedir directory_path]]
cluvfy stage -post hacfg [-verbose] [-json] [-html] [-save [-savedir directory_path]]
Parameters
Table A-37 cluvfy stage hacfg Command Parameters
Parameter Description
-osdba osdba_group Specify the name of the OSDBA group. If you do not specify this option,then CVU uses dba as the OSDBA group.
-osoper osoper_group Specify the name of the OSOPER group.
-orainvorainventory_group
Specify the name of the Oracle Inventory group. If you do not specify thisoption, then CVU uses oinstall as the inventory group.
-fixup Specifies that if the verification fails, then CVU performs fixup operations,if feasible.
-fixupnoexec Specifies that if verification fails, then CVU generates the fixup data anddisplays the instructions for manual execution of the generated fixups.
-method {sudo -useruser_name [-locationdir_path] | -methodroot}
Specify whether the privilege delegation method is sudo or root, forroot user access. If you specify sudo, then you must specify the username to access all the nodes with root privileges and, optionally, providethe full file system path for the sudo executable.
-verbose CVU prints detailed output.
-jsonUse the -json flag to generate a detailed report in JSON format.If you do not specify the -json flag, then CVU generates thedetailed report in a text file.
-htmlUse the -html flag to generate a detailed report in HTML format.If you specify the -html flag, and a browser that CVU recognizesis available on the system, then CVU starts the browser anddisplays the report on the browser when the checks arecomplete.If you do not specify the -html flag, then CVU generates thedetailed report in a text file.
Appendix ACluster Verification Utility Command Reference
A-65

Table A-37 (Cont.) cluvfy stage hacfg Command Parameters
Parameter Description
-save [-savedirdirectory_path] Use the -save or -save -savedir flags to save validation reports
(cvuchecdkreport_timestamp.txt andcvucheckreport_timestamp.htm), where timestamp is the timeand date of the validation report.If you use the -save flag by itself, then CVU saves the reports inthe CVU_home/cv/report directory, where CVU_home is thelocation of the CVU binaries.If you use the -save -savedir flags, then specify a directorywhere you want CVU to save the reports.
cluvfy stage hwosChecks network and storage on the specified nodes in the cluster. This command alsochecks for supported storage types and checks each one for sharing.
Syntax
cluvfy stage -post hwos {-n node_list | -allnodes} [-s storageID_list] [-verbose] [-json] [-html] [-save [-savedir directory_path]]
Parameters
Table A-38 cluvfy stage hwos Command Parameters
Parameter Description
-n node_list The comma-delimited list of non domain-qualified node names onwhich to conduct the verification. Specify -allnodes to run theverification on all nodes in the cluster.
-s storageID_list Checks the comma-delimited list of storage locations for sharing ofsupported storage types.
If you do not specify the -s parameter, then CVU discoverssupported storage types and checks sharing for each of them.
–verbose CVU prints detailed output.
-jsonUse the -json flag to generate a detailed report in JSONformat.If you do not specify the -json flag, then CVU generates thedetailed report in a text file.
Appendix ACluster Verification Utility Command Reference
A-66

Table A-38 (Cont.) cluvfy stage hwos Command Parameters
Parameter Description
-htmlUse the -html flag to generate a detailed report in HTMLformat.If you specify the -html flag, and a browser that CVUrecognizes is available on the system, then CVU starts thebrowser and displays the report on the browser when thechecks are complete.If you do not specify the -html flag, then CVU generates thedetailed report in a text file.
-save [-savedirdirectory_path] Use the -save or -save -savedir flags to save validation
reports (cvuchecdkreport_timestamp.txt andcvucheckreport_timestamp.htm), where timestamp is thetime and date of the validation report.If you use the -save flag by itself, then CVU saves thereports in the CVU_home/cv/report directory, whereCVU_home is the location of the CVU binaries.If you use the -save -savedir flags, then specify a directorywhere you want CVU to save the reports.
cluvfy stage nodeaddUse the cluvfy stage -pre nodeadd command to verify the specified nodes are configuredcorrectly before adding them to your existing cluster, and to verify the integrity of the clusterbefore you add the nodes. Use the cluvfy stage -post nodeadd command to verify that thespecified nodes have been successfully added to the cluster at the network, shared storage,and clusterware levels.The cluvfy stage -pre nodeadd command verifies that the system configuration, such asthe operating system version, software patches, packages, and kernel parameters, for thenodes that you want to add, is compatible with the existing cluster nodes, and that theclusterware is successfully operating on the existing nodes. Run this command on any nodeof the existing cluster.
Syntax
cluvfy stage -pre nodeadd -n node_list [-vip vip_list]] [-fixup] [-fixupnoexec] [-method {sudo -user user_name [-location directory_path] | -method root}] [-verbose] [-json] [-html] [-save [-savedir directory_path]]
cluvfy stage -post nodeadd -n node_list [-verbose] [-json] [-html] [-save [-savedir directory_path]]
Appendix ACluster Verification Utility Command Reference
A-67

Parameters
Table A-39 cluvfy stage nodeadd Command Parameters
Parameter Description
-n node_list Specify a comma-delimited list of non domain-qualified nodenames on which to conduct the verification. These are the nodesyou are adding or have added to the cluster.
-vip vip_list A comma-delimited list of virtual IP addresses to be used by thenew nodes.
-fixup This optional parameter specifies that if the verification fails, thenCVU performs fixup operations, if feasible.
-fixupnoexec This optional parameter specifies that if verification fails, then CVUgenerates the fixup data and displays the instructions for manualexecution of the generated fixups.
-method {sudo -useruser_name [-locationdirectory_path] |root}
Specify whether the privilege delegation method is sudo or root,for root user access. If you specify sudo, then you must specify theuser name to access all the nodes with root privileges and,optionally, provide the full file system path for the sudo executable.
–verbose CVU prints detailed output.
-jsonUse the -json flag to generate a detailed report in JSONformat.If you do not specify the -json flag, then CVU generates thedetailed report in a text file.
-htmlUse the -html flag to generate a detailed report in HTMLformat.If you specify the -html flag, and a browser that CVUrecognizes is available on the system, then CVU starts thebrowser and displays the report on the browser when thechecks are complete.If you do not specify the -html flag, then CVU generates thedetailed report in a text file.
-save [-savedirdirectory_path] Use the -save or -save -savedir flags to save validation
reports (cvuchecdkreport_timestamp.txt andcvucheckreport_timestamp.htm), where timestamp is thetime and date of the validation report.If you use the -save flag by itself, then CVU saves thereports in the CVU_home/cv/report directory, whereCVU_home is the location of the CVU binaries.If you use the -save -savedir flags, then specify a directorywhere you want CVU to save the reports.
cluvfy stage nodedelVerifies that specific nodes have been successfully deleted from a cluster. Typically,this command verifies that the node-specific interface configuration details have been
Appendix ACluster Verification Utility Command Reference
A-68

removed, the nodes are no longer a part of cluster configuration, and proper Oracle ASMcleanup has been performed.
Syntax
cluvfy stage -post nodedel -n node_list [-verbose] [-json] [-html] [-save [-savedir directory_path]]
Parameters
Table A-40 cluvfy stage nodedel Command Parameters
Parameter Description
-n node_list Specify a comma-delimited list of non domain-qualified node names thatyou have deleted from the cluster.
–verbose CVU prints detailed output.
-jsonUse the -json flag to generate a detailed report in JSON format.If you do not specify the -json flag, then CVU generates thedetailed report in a text file.
-htmlUse the -html flag to generate a detailed report in HTML format.If you specify the -html flag, and a browser that CVU recognizesis available on the system, then CVU starts the browser anddisplays the report on the browser when the checks arecomplete.If you do not specify the -html flag, then CVU generates thedetailed report in a text file.
-save [-savedirdirectory_path] Use the -save or -save -savedir flags to save validation reports
(cvuchecdkreport_timestamp.txt andcvucheckreport_timestamp.htm), where timestamp is the timeand date of the validation report.If you use the -save flag by itself, then CVU saves the reports inthe CVU_home/cv/report directory, where CVU_home is thelocation of the CVU binaries.If you use the -save -savedir flags, then specify a directorywhere you want CVU to save the reports.
Usage Notes
• If the cluvfy stage -post nodedel check fails, then repeat the node deletion procedure.
See Also:
Adding and Deleting Cluster Nodes
Appendix ACluster Verification Utility Command Reference
A-69

cluvfy stage patchPerforms the appropriate pre-stage checks for the patch application on all nodes.Performs post-stage check for the patch application.
Syntax
cluvfy stage -pre patch [-non_rolling] [-json] [-html] [-save [-savedir directory_path]]
cluvfy stage -post patch [-json] [-html] [-save [-savedir directory_path]]
Parameters
Table A-41 cluvfy stage patch Command Parameters
Parameter Description
-non_rolling Use the -non_rolling flag to apply patch in non-rolling mode.
-jsonUse the -json flag to generate a detailed report in JSONformat.If you do not specify the -json flag, then CVU generates thedetailed report in a text file.
-htmlUse the -html flag to generate a detailed report in HTMLformat.If you specify the -html flag, and a browser that CVUrecognizes is available on the system, then CVU starts thebrowser and displays the report on the browser when thechecks are complete.If you do not specify the -html flag, then CVU generates thedetailed report in a text file.
-save [-savedirdirectory_path] Use the -save or -save -savedir flags to save validation
reports (cvuchecdkreport_timestamp.txt andcvucheckreport_timestamp.htm), where timestamp is thetime and date of the validation report.If you use the -save flag by itself, then CVU saves thereports in the CVU_home/cv/report directory, whereCVU_home is the location of the CVU binaries.If you use the -save -savedir flags, then specify a directorywhere you want CVU to save the reports.
Usage Notes
By default, the pre-stage checks are performed for patching in rolling mode.
Appendix ACluster Verification Utility Command Reference
A-70

Troubleshooting and Diagnostic Output for CVUThis section describes the following troubleshooting topics for CVU:
• Enabling Tracing
• Known Issues for the Cluster Verification Utility
Enabling TracingCVU generates trace files unless you disable tracing. You can disable tracing by setting theSRVM_TRACE environment variable to false or FALSE. For example, in tcsh an entry such assetenv SRVM_TRACE FALSE disables tracing.
The CVU trace files are created in the ORACLE_BASE/crsdata/host_name/cvu directory bydefault. Oracle Database automatically rotates the log files and the most recently created logfile has the name cvutrace.log.0. You should remove unwanted log files or archive them toreclaim disk place if needed.
Oracle Clusterware stores log files that CVU generates when it runs periodically in theORACLE_BASE/crsdata/host_name/cvu/cvutrc directory.
To use a non-default location for the trace files, set the CV_TRACELOC environment variable tothe absolute path of the desired trace directory.
Known Issues for the Cluster Verification UtilityThis section describes the following known limitations for Cluster Verification Utility (CVU):
• Database Versions Supported by Cluster Verification Utility
• Linux Shared Storage Accessibility (ssa) Check Reports Limitations
• Shared Disk Discovery on Red Hat Linux
Database Versions Supported by Cluster Verification UtilityThe current CVU release supports only Oracle Database 12c Release 2 (12.2.0.1) or higher,Oracle RAC, and Oracle Clusterware; CVU is not backward compatible. CVU cannot checkor verify Oracle Database products for releases before Oracle Database 12c Release 2(12.2.0.1).
Linux Shared Storage Accessibility (ssa) Check Reports LimitationsThe current release of cluvfy has the following limitations on Linux regarding shared storageaccessibility check.
• OCFS2 (version 1.2.1 or higher) is supported.
• For sharedness checks on NAS, cluvfy commands require you to have write permissionon the specified path. If the user running the cluvfy command does not have writepermission, then cluvfy reports the path as not shared.
Appendix ATroubleshooting and Diagnostic Output for CVU
A-71

Shared Disk Discovery on Red Hat LinuxTo perform discovery and shared storage accessibility checks for SCSI disks on RedHat Linux 5.0 (or higher) and Oracle Linux 5.0 (or higher), and SUSE Linux EnterpriseServer, CVU requires the CVUQDISK package. If you attempt to use CVU and theCVUQDISK package is not installed on all of the nodes in your Oracle RACenvironment, then CVU responds with an error.
Perform the following procedure to install the CVUQDISK package:
1. Login as the root user.
2. Copy the package, cvuqdisk-1.0.9-1.rpm (or higher version) to a local directory.You can find this rpm in the rpm subdirectory of the top-most directory in the OracleClusterware installation media. For example, you can find cvuqdisk-1.0.9-1.rpmin the directory /mountpoint/clusterware/rpm/ where mountpoint is the mountpoint for the disk on which the directory is located.
# cp /mount_point/clusterware/rpm/cvuqdisk-1.0.9-1.rpm /u01/oradba3. Set the CVUQDISK_GRP environment variable to the operating system group that
should own the CVUQDISK package binaries. If CVUQDISK_GRP is not set, then, bydefault, the oinstall group is the owner's group.
# set CVUQDISK_GRP=oinstall
4. Determine whether previous versions of the CVUQDISK package are installed byrunning the command rpm -q cvuqdisk. If you find previous versions of theCVUQDISK package, then remove them by running the command rpm -ecvuqdisk previous_version where previous_version is the identifier of theprevious CVUQDISK version, as shown in the following example:
# rpm -q cvuqdiskcvuqdisk-1.0.2-1# rpm -e cvuqdisk-1.0.2-1
5. Install the latest CVUQDISK package by running the command rpm -ivcvuqdisk-1.0.9-1.rpm.
# cd /u01/oradba# rpm -iv cvuqdisk-1.0.9-1.rpm
Appendix ATroubleshooting and Diagnostic Output for CVU
A-72

BOracle Clusterware Resource Reference
This appendix is a reference for Oracle Clusterware resources. This appendix includesdescriptions and usage examples of resource attributes and detailed descriptions andexamples of resource attribute action scripts. This appendix includes the following topics:
• Resource Attributes
• Examples of Action Scripts for Third-party Applications
Resource AttributesThis section lists and describes attributes used when you register applications as resourcesin Oracle Clusterware. Use these attributes with the crsctl add resource command, asfollows:
$ crsctl add resource resource_name -type resource_type -group group_name{[-attr "attribute_name='attribute_value', attribute_name='attribute_value', ..."] | [-file file_name]}
List attribute-value pairs in a comma-delimited list after the -attr flag and enclose the valueof each attribute in single quotation marks (''). Some resource attributes you cannotconfigure and are read only.
Alternatively, you can create a text file that contains the attribute-value pairs. For example:
PLACEMENT=favoredHOSTING_MEMBERS=node1 node2 node3RESTART_ATTEMPTS@CARDINALITYID(1)=0RESTART_ATTEMPTS@CARDINALITYID(2)=0FAILURE_THRESHOLD@CARDINALITYID(1)=2FAILURE_THRESHOLD@CARDINALITYID(2)=4FAILURE_INTERVAL@CARDINALITYID(1)=300FAILURE_INTERVAL@CARDINALITYID(2)=500CHECK_INTERVAL=2CARDINALITY=2
Note:
The length limit for these attributes is 254 characters.
This section includes the following topics:
• Configurable Resource Attributes
• Read-Only Resource Attributes
B-1

Configurable Resource AttributesThis section describes the following resource attributes that you can configure whenregistering an application as a resource in Oracle Clusterware:
Note:
Values for all attributes must be in lowercase. Attribute names must be in alluppercase letters.
• ACL
• ACTION_SCRIPT
• ACTION_TIMEOUT
• ACTIONS
• ACTIVE_PLACEMENT
• AGENT_FILENAME
• ALERT_TEMPLATE
• AUTO_START
• CARDINALITY
• CARDINALITY_ID
• CHECK_INTERVAL
• CHECK_TIMEOUT
• CLEAN_TIMEOUT
• CRITICAL_RESOURCES
• DELETE_TIMEOUT
• DESCRIPTION
• ENABLED
• FAILURE_INTERVAL
• FAILURE_THRESHOLD
• HOSTING_MEMBERS
• INSTANCE_FAILOVER
• INTERMEDIATE_TIMEOUT
• LOAD
• MODIFY_TIMEOUT
• NAME
• OFFLINE_CHECK_INTERVAL
• ONLINE_RELOCATION_TIMEOUT
Appendix BResource Attributes
B-2

• PLACEMENT
• RANK
• RELOCATE_BY_DEPENDENCY
• RELOCATE_KIND
• RESTART_ATTEMPTS
• SCRIPT_TIMEOUT
• SERVER_CATEGORY
• SERVER_POOLS
• START_CONCURRENCY
• START_DEPENDENCIES
• START_TIMEOUT
• STOP_CONCURRENCY
• STOP_DEPENDENCIES
• STOP_TIMEOUT
• UPTIME_THRESHOLD
• USER_WORKLOAD
• USE_STICKINESS
• WORKLOAD_CPU
ACLDefines the owner of a resource and the access privileges granted to various operatingsystem users and groups. The resource owner defines the operating system user of theowner and its privileges. You configure this optional attribute when you create a resource. Ifyou do not configure this attribute, then the value is based on the identity of the processcreating the resource. You can change the value of the attribute if such a change is allowedbased on the existing privileges of the resource.
Note:
All operating system user names and user groups, including owner, pgrp, user, andgroup, must be registered on all servers in the cluster.
In the string:
• owner: The operating system user that owns a resource and the user under which theaction script or application-specific agent runs, followed by the privileges of the owner.
• pgrp: The operating system group that is the primary group of the owner of a resource,followed by the privileges of members of the primary group.
• other: Operating system users that are neither the owner nor member of the primarygroup
Appendix BResource Attributes
B-3

• r: The read option, which gives the ability to only see a resource, its state, andconfiguration
• w: The write option, which gives the ability to modify a resource's attributes and todelete the resource
• x: The execute option, which gives the ability to start, stop, and relocate aresource
By default, the identity of the client that creates a resource is the owner. Also bydefault, root, and the user specified in owner have full privileges. You can grantrequired operating system users and operating system groups their privileges byadding the following lines to the ACL attribute:
user:user_name:rwxgroup:group_name:rwx
Usage Example
ACL=owner:user_1:rwx,pgrp:osdba:rwx,other::r-
In the preceding example, the owner of the resource is user_1, whose primary group isosdba. The user, user_1, has all privileges, as does the osdba group, while other userscan only view the resource.
ACTION_SCRIPTAn absolute file name that includes the path and file name of an action script. Theagent specified in the AGENT_FILENAME attribute calls the script specified in theACTION_SCRIPT attribute.
Usage Example
ACTION_SCRIPT=fully_qualified_path_to_action_script
ACTION_TIMEOUTA single timeout value, in seconds, for all supported actions that Oracle Clusterwarecan perform on a resource.
Usage Example
ACTION_TIMEOUT=30
ACTIONSThe ACTIONS attribute declares a table of names that lists the actions that OracleClusterware can perform on a resource and the permissions that correspond to theactions. The ACTIONS attribute contains a space-delimited list of action specifications,where each specification has the following format, where:
• actionName is the name of the action (the maximum length is 32 US7ASCIIalphanumeric, case-sensitive characters)
• userName is an operating system user name that is enabled to perform the action
• groupName is an operating system group name that is enabled to perform theaction
Appendix BResource Attributes
B-4

actionName [,user:userName | group:groupName][ ...]
If you do not specify a userName or groupName, then Oracle Clusterware assumes that theactions are universally accessible.
Usage Example
The following example enables multiple actions:
ACTIONS='action1 action2,user:user2 action3,group:group1'
ACTIVE_PLACEMENTWhen set to 1, Oracle Clusterware uses this attribute to reevaluate the placement of aresource during addition or restart of a cluster server. For resources wherePLACEMENT=favored, Oracle Clusterware may relocate running resources if the resources runon a non-favored server when a favored one joins the cluster.
Usage Example
ACTIVE_PLACEMENT=1
AGENT_FILENAMEA fully qualified file name of an agent program that a resource type uses to manage itsresources. Every resource type must have an agent program to manage its resources.Resource types use agent programs by either specifying a value for this attribute or inheritingit from their base resource type. There are two script agents included with Oracle Clusterware12c and later releases: application and scriptagent. Oracle Clusterware uses theapplication script agent for resources of the deprecated application resource type. Thedefault value for this attribute is scriptagent.
Note:
Once the resource is created, you can no longer modify this attribute.
Usage Example
AGENT_FILENAME=%Grid_home%/bin/application
ALERT_TEMPLATEUse to specify additional resource attributes that are to be included in resource state alertmessages. You can specify the attribute as a space-delimited list of resource attributes.These attributes must be accessible from the resource type to display in alert messages.
Usage Example
ALERT_TEMPLATE="DESCRIPTION HOSTING_MEMBERS"
Appendix BResource Attributes
B-5

AUTO_STARTIndicates whether Oracle Clusterware automatically starts a resource after a clusterserver restart. Valid AUTO_START values are:
• always: Restarts the resource when the server restarts regardless of the state ofthe resource when the server stopped.
• restore: Restores the resource to the same state that it was in when the serverstopped. Oracle Clusterware attempts to restart the resource if the value of TARGETwas ONLINE before the server stopped.
• never: Oracle Clusterware never restarts the resource regardless of the state ofthe resource when the server stopped.
CARDINALITYThe number of servers on which a resource or resource group can run,simultaneously. This is the upper limit for resource cardinality.
Usage Example
CARDINALITY=1
You can also use a value such that cardinality always increases and decreases withthe number of servers that are assigned to the server pool in which the resource orresource group is configured to run. The values are:
CARDINALITY=%CRS_SERVER_POOL_SIZE%CARDINALITY=%CRS_HUB_SIZE%
Only resources with PLACEMENT=restricted and that use the SERVER_POOLS attributecan use this value.
CARDINALITY_IDAn integer different for each of the INSTANCE_COUNT resource instances.
The value for this parameter varies from 1 to CARDINALITY*2. The number ofresource instances can be greater than that of th value of CARDINALITY only whenyou use online relocation (RELOCATE_KIND=online), or if you decrease the resourceinstance count.
CHECK_INTERVALThe time interval, in seconds, between repeated executions of the check action.Shorter intervals enable more frequent checks but also increase resourceconsumption if you use the script agent. Use an application-specific agent to reduceresource consumption.
Usage Example
CHECK_INTERVAL=60
Appendix BResource Attributes
B-6

CHECK_TIMEOUTThe maximum time, in seconds, in which a check action can run. Oracle Clusterware returnsan error message if the action does not complete within the time specified. If you do notspecify this attribute or if you specify 0 seconds, then Oracle Clusterware uses the value ofthe SCRIPT_TIMEOUT attribute.
Usage Example
CHECK_TIMEOUT=30
CLEAN_TIMEOUTThe maximum time, in seconds, in which a clean action can run. Oracle Clusterware returnsan error message if the action does not complete within the time specified. If you do notspecify a value for this attribute or you specify 0 seconds, then Oracle Clusterware uses thevalue of the STOP_TIMEOUT attribute.
Usage Example
CLEAN_TIMEOUT=30
CRITICAL_RESOURCESResource group attribute that contains a list of resources marked critical for a resource group.
You specify a space-delimited list of critical resources in the CRITICAL_RESOURCESattribute of a resource group. Use this attribute for both local and cluster resource grouptypes. You can add a type: option followed by a resource type name to indicate that allmember resources of the specified type are critical resources of the group.
Example B-1 Usage Examples
CRITICAL_RESOURCES="r1 r2 r3"CRITICAL_RESOURCES="appvip type:ora.export.type"
DELETE_TIMEOUTThe maximum time, in seconds, in which a delete action can run. Oracle Clusterware returnsan error message if the action does not complete within the time specified. If you do notspecify a value for this attribute or you specify 0 seconds, then Oracle Clusterware uses thevalue of the SCRIPT_TIMEOUT attribute.
Usage Example
DELETE_TIMEOUT=30
DESCRIPTIONEnter a description of the resource you are adding.
Usage Example
DESCRIPTION=Apache Web server
Appendix BResource Attributes
B-7

ENABLEDOracle Clusterware uses this attribute to manage the state of the resource. OracleClusterware does not attempt to manage a disabled (ENABLED=0) resource eitherdirectly or because of a dependency to another resource. A disabled resource cannotbe started but it can be stopped. Oracle Clusterware does not actively monitordisabled resources, meaning that Oracle Clusterware does not check their state.
Usage Example
ENABLED=1
FAILURE_INTERVALThe interval, in seconds, before which Oracle Clusterware stops a resource if theresource has exceeded the number of failures specified by the FAILURE_THRESHOLDattribute. If the value is zero (0), then tracking of failures is disabled.
Usage Example
FAILURE_INTERVAL=30
FAILURE_THRESHOLDThe number of failures of a resource detected within a specified FAILURE_INTERVAL forthe resource before Oracle Clusterware marks the resource as unavailable and nolonger monitors it. If a resource fails the specified number of times, then OracleClusterware stops the resource. If the value is zero (0), then tracking of failures isdisabled. The maximum value is 20.
Usage Example
FAILURE_THRESHOLD=3
HOSTING_MEMBERSA space-delimited, ordered list of cluster server names that can host a resource. Thisattribute is required only when using administrator management, and when the valueof the PLACEMENT attribute is set to favored or restricted. When registeringapplications as Oracle Clusterware resources, use the SERVER_POOLS attribute, instead.
Note:
For resources of application type, Oracle Clusterware places servers listedin the HOSTING_MEMBERS attribute in the Generic server pool.
Appendix BResource Attributes
B-8

See Also:
• "Default Server Pools " for more information about the Generic server pool
• "LOAD" for more information about this attribute
• "PLACEMENT" for more information about this attribute
To obtain a list of candidate node names, run the olsnodes command to display a list of yourserver names.
Usage Example
HOSTING_MEMBERS=server1 server2 server3
INSTANCE_FAILOVERUse the INSTANCE_FAILOVER attribute for resources of type CLUSTER_RESOURCE. Using thisattribute enables you to disallow the failover of resource instances from the servers on whichthey fail. This enables you to bind the resource to a particular server.
Set to 0 to disable instance failover.
Usage Example
INSTANCE_FAILOVER=1
INTERMEDIATE_TIMEOUTDenotes the maximum amount of time in seconds that a resource can remain in theINTERMEDIATE state before the resource is declared as failed. The value ofINTERMEDIATE_TIMEOUT must be greater than 0 to take effect.
Usage Example
INTERMEDIATE_TIMEOUT=60
LOADOracle Clusterware interprets the value of this attribute along with that of the PLACEMENTattribute. When the value of PLACEMENT is balanced, the value of LOAD determines where bestto place a resource. A nonnegative, numeric value that quantitatively represents how muchserver capacity an instance of a resource consumes relative to other resources. OracleClusterware attempts to place resources on servers with the least total load of runningresources.
Usage Example
LOAD=1
MODIFY_TIMEOUTThe maximum time, in seconds, in which a modify action can run. Oracle Clusterware returnsan error message if the action does not complete within the time specified. If you do not
Appendix BResource Attributes
B-9

specify a value for this attribute or you specify 0 seconds, then Oracle Clusterwareuses the value of the SCRIPT_TIMEOUT attribute.
Usage Example
MODIFY_TIMEOUT=30
NAMEA case-sensitive alphanumeric string that names the resource. Oracle recommends anaming convention that starts with an alphanumeric prefix, such as myApache, andcomplete the name with an identifier to describe it. A resource name can contain anyplatform-supported characters except the exclamation point (!) and the tilde (~). Aresource name cannot begin with a period (.) nor with the string ora.
Usage Example
NAME=myApache
OFFLINE_CHECK_INTERVALControls offline monitoring of a resource. The value represents the interval (inseconds) that Oracle Clusterware monitors a resource when its state is OFFLINE.Monitoring is disabled if the value is 0.
Usage Example
OFFLINE_CHECK_INTERVAL=30
ONLINE_RELOCATION_TIMEOUT
The amount of time (minutes) after the relocated instance starts and services aremigrated, before the former instance of the service stops. The default value is 30minutes.
See Also:
• Oracle Real Application Clusters Administration and Deployment Guidefor information about online database relocation
• Oracle Real Application Clusters Administration and Deployment Guidefor information about srvctl relocate database
PLACEMENTSpecifies how Oracle Clusterware selects a cluster server on which to start a resource.Valid values are balanced, favored, or restricted.
If you set the PLACEMENT attribute to favored or restricted, then you must also assignvalues to the SERVER_POOLS and HOSTING_MEMBERS attributes. If you set the value of thePLACEMENT attribute to balanced, then the HOSTING_MEMBERS attribute is not required.
Appendix BResource Attributes
B-10

See Also:
• "Application Placement Policies" for more information about the PLACEMENTattribute
• "HOSTING_MEMBERS" for more information about this attribute
• "SERVER_POOLS" for more information about this attribute
Usage Example
PLACEMENT=favored
RANKUse this resource attribute to set rank of a resource. The higher rank resources start first, failover first, and they shut down last. You must log in as the grid user or the root user tomodify RANK of any resource.
Usage Example
RANK=5
RELOCATE_KIND
Use to control how a resource is relocated. During an offline relocation operation, the targetresource instance is stopped on the source server and subsequently started on thedestination server. An online relocation operation first starts the resource instance on thedestination server before stopping it on the source server. Start-only starts the resourceinstance on the destination server, but will not stop the resource instance on the sourceserver. Instead, the agent stops the resource instance once the relocate is complete.
You can choose either offline/0, online/1, or start-only/2 as a value for this parameter.
Usage Examples
RELOCATE_KIND=1RELOCATE_KIND=start-only
RELOCATE_BY_DEPENDENCYUse to declare whether a resource will be enabled for relocation if requested to do sobecause of a dependency on the resource for which the relocation was requested. If 0, theresource will not be allowed to relocate because of a dependency on the resource for whichrelocate request was issued. The valid values are 1 or 0.
Usage Example
RELOCATE_BY_DEPENDENCY=1
Appendix BResource Attributes
B-11

RESTART_ATTEMPTSThe number of times that Oracle Clusterware attempts to restart a resource on theresource's current server before attempting to relocate it. A value of 1 indicates thatOracle Clusterware only attempts to restart the resource once on a server. A secondfailure causes Oracle Clusterware to attempt to relocate the resource. A value of 0indicates that there is no attempt to restart but Oracle Clusterware always tries to failthe resource over to another server.
Usage Example
RESTART_ATTEMPTS=2
SCRIPT_TIMEOUTThe maximum time (in seconds) for an action to run. Oracle Clusterware returns anerror message if the action script does not complete within the time specified. Thetimeout applies to all actions (start, stop, check, and clean).
Usage Example
SCRIPT_TIMEOUT=45
SERVER_CATEGORYFor local resources, the definition of a local_resource type is extended to becategory-aware. In other words, you can restrict local resources to belong to aparticular server category. For cluster resources, the value for the SERVER_CATEGORYattribute always functions with the value for the PLACEMENT attribute. Set SERVER_POOLS to * when PLACEMENT is restricted and SERVER_CATEGORY is used. Ifyou set PLACEMENT to restricted, then Oracle Clusterware expects one of thefollowing attributes to also be set:
• HOSTING_MEMBERS
• SERVER_POOLS
• SERVER_CATEGORY
For example, a resource, known as resource1, can have a policy that sets the valueof PLACEMENT to be restricted, and SERVER_CATEGORY is set to HubCategory. In sucha case, Oracle Clusterware would only enable resource1 to run on the servers thatbelong to the HubCategory.
If PLACEMENT is set to favored and if only one of HOSTING_MEMBERS, SERVER_POOLS, or SERVER_CATEGORY is set, then that value expresses a preference.If HOSTING_MEMBERS is populated and one of SERVER_POOLS or SERVER_CATEGORYis set, then the HOSTING_MEMBERS indicates placement preference and SERVER_POOLS or SERVER_CATEGORY indicates a restriction. For example, theora.cluster.vip resource can have a policy that sets the value of PLACEMENT tofavored, and SERVER_CATEGORY is set to HubCategory and HOSTING_MEMBERS is setto server_name1. In such a case, Oracle Clusterware restricts the placement ofora.cluster.vip to the servers in the HubCategory and then it prefers the serverknown as server_name1.
Appendix BResource Attributes
B-12

Usage Example
SERVER_CATEGORY=my_category
SERVER_POOLSThe SERVER_POOLS resource attribute is described.
A space-delimited list of the server pools to which a particular resource can belong. If aresource can run on any server in a cluster, then use the default value, *, unless the resourceis a cluster_resource type, in which case, the default value for the SERVER_POOLS attribute isempty. Only cluster administrators can specify * as the value for this attribute.
• Use the PLACEMENT attribute with the SERVER_POOLS attribute, as follows: If you set thevalue of the PLACEMENT attribute to either restricted or favored, then you must alsoprovide a value for the SERVER_POOLS attribute when using policy management for theresource.
• If the value for PLACEMENT is set to balanced, then the resource only runs in the Genericand Free pools, unless SERVER_POOLS=*.
This attribute creates an affinity between a resource and one or more server pools regardingplacement, and depends on the value of the PLACEMENT attribute.
Usage Example
SERVER_POOLS=pool1 pool2 pool3
See Also:
• Policy-Based Cluster and Capacity Management for more information aboutserver pools
"Role-Separated Management" for more information about clusteradministrators
• "HOSTING_MEMBERS" for more information about this attribute
• "PLACEMENT" for more information about this attribute
START_CONCURRENCYDescribes the maximum number of start actions that can be concurrent at a time. A value of 0means “no limit."
Usage Example
START_CONCURRENCY=10
Appendix BResource Attributes
B-13

START_DEPENDENCIESSpecifies a set of relationships that Oracle Clusterware considers when starting aresource. You can specify a space-delimited list of dependencies on several resourcesand resource types on which a particular resource can depend.
Syntax
START_DEPENDENCIES=dependency(resource_set) [dependency(resource_set)] [...]
In the preceding syntax example the variables are defined, as follows:
• dependency: Possible values are attraction, dispersion, exclusion, hard,pullup, and weak. You can specify each dependency only once, except for pullup,which you can specify multiple times.
• resource_set: A comma-delimited list of resource entities—either individualresources or resource types—enclosed in parentheses (), in the form of res1[,res2[, ...]], upon which the resource you are configuring depends.
Each resource entity is defined, as follows:
[modifier1:[modifier2:]] {resource_name | type:resource_type}
In the preceding syntax example, resource_name is the name of a specificresource and type:resource_type is the name of a specific resource type. Theresource type must be preceded by type and the type modifier must be the lastresource entity in the list.
Optionally, you can specify modifiers to further configure resource entitydependencies. You can modify each dependency by prefixing the followingmodifiers to the resource entity:
– attraction([intermediate:]{resource_name | type:resource_type})—Use the attraction start dependency when you want this resource to run onthe same server with a particular named resource or any resource of aparticular type.
Use intermediate to specify that this resource is attracted to resource entitieson which it depends that are in the INTERMEDIATE state. If not specified, thenresources must be in the ONLINE state to attract the dependent resource.
If you specify the attraction dependency on a resource type for a resource,then any resource of that particular type attracts the dependent resource.
– exclusion([[preempt_pre: | preempt_post:]] target_resource_name |type:target_resource_type])—Use the exclusion start dependency tokeep resources with this dependency from running on the same node.
Use the preempt_pre modifier to configure the exclusion dependency to stopthe specified target resource or resources defined by a specific resource typebefore starting the source resource.
Use the preempt_post modifier to configure the exclusion dependency tostop and relocate, if possible, the specified target resource or resourcesdefined by a specific resource type after starting the source resource.
– dispersion[:active]([intermediate:][pool:]{resource_name |type:resource_type})—Specify the dispersion start dependency for a
Appendix BResource Attributes
B-14

resource that you want to run on a server that is different from the named resourcesor resources of a particular type. Resources may still end up running on the sameserver, depending on availability of servers.
Use the active modifier to configure the dispersion dependency so that OracleClusterware attempts to relocate the dependent resource to another server if it iscollocated with another resource and another server comes online. OracleClusterware does not relocate resources to newly available servers unless youspecify the active modifier.
Use the intermediate modifier to specify that Oracle Clusterware can relocate thedependent resource if a resource is in either the ONLINE or INTERMEDIATE state. If notspecified, then resources must be in the ONLINE state for dispersion of the dependentresource to occur.
Use the pool modifier if you want a resource to be located in a different server poolthan the target, rather than just a different server.
– hard([intermediate:][global:][uniform:]{resource_name |type:resource_type})—Specify a hard start dependency for a resource when youwant the resource to start only when a particular resource or resource of a particulartype starts.
Use the intermediate modifier to specify that Oracle Clusterware can start thisresource if a resource on which it depends is in either the ONLINE or INTERMEDIATEstate. If not specified, then resources must be in the ONLINE state for OracleClusterware to start this resource.
Use the global modifier to specify that resources are not required to reside on thesame server as a condition to Oracle Clusterware starting this resource. If notspecified, then resources must reside on the same server for Oracle Clusterware tostart this resource.
Use the uniform modifier to attempt to start all instances of resource B, but only oneinstance, at least must start to satisfy the dependency.
If you specify the hard dependency on a resource type for a resource, then theresource can start if any resource of that particular type is running.
Note:
Oracle recommends that resources with hard start dependencies also havepullup start dependencies.
– pullup[:always]([intermediate:][global:]{resource_name |type:resource_type})—When you specify the pullup start dependency for aresource, then this resource starts because of named resources starting.
Use the always modifier for pullup so that Oracle Clusterware starts this resourcedespite the value of its TARGET attribute, whether that value is ONLINE or OFFLINE.Otherwise, if you do not specify the always modifier, then Oracle Clusterware startsthis resource only if the value of the TARGET attribute is ONLINE for this resource.
Use the intermediate modifier to specify that Oracle Clusterware can start thisresource if a resource on which it depends is in either the ONLINE or INTERMEDIATEstate. If not specified, then resources must be in the ONLINE state for OracleClusterware to start this resource.
Appendix BResource Attributes
B-15

Use the global modifier to specify that resources on which this resourcedepends are not required to reside on the same server as a condition toOracle Clusterware starting this resource. If not specified, then resources onwhich this resource depends must reside on the same server for OracleClusterware to start this resource.
If you specify the pullup dependency on a resource type for a resource, then,when any resource of that particular type starts, Oracle Clusterware can startthis resource.
Note:
Oracle recommends that resources with hard start dependenciesalso have pullup start dependencies.
– weak([concurrent:][global:][uniform:]{resource_name |type:resource_type})—Specify a weak start dependency for a resourcewhen you want that resource to start despite whether named resources arerunning, or not. An attempt to start this resource also attempts to start anyresources on which this resource depends if they are not running.
Use the concurrent modifier to specify that Oracle Clusterware can start adependent resource while a resource on which it depends is in the process ofstarting. If concurrent is not specified, then resources must complete startupbefore Oracle Clusterware can start the dependent resource.
Use the global modifier to specify that resources are not required to reside onthe same server as a condition to Oracle Clusterware starting the dependentresource.
Use the uniform modifier to start all instances of the resource everywhere theresource can run. If you do not specify a modifier (the default), then theresource starts on the same server as the resource on which it depends.
If you specify the weak start dependency on a resource type for a resource,then the resource can start if any resource of that particular type is running.
See Also:
"Start Dependencies" for more details about start dependencies
START_TIMEOUTThe maximum time (in seconds) in which a start action can run. Oracle Clusterwarereturns an error message if the action does not complete within the time specified. Ifyou do not specify a value for this attribute or you specify 0 seconds, then OracleClusterware uses the value of the SCRIPT_TIMEOUT attribute.
Usage Example
START_TIMEOUT=30
Appendix BResource Attributes
B-16

See Also:
"SCRIPT_TIMEOUT" for more information about this attribute
STOP_CONCURRENCYDescribes the maximum number of stop actions that can be concurrent at a time. A value of 0means “no limit."
Usage Example
STOP_CONCURRENCY=10
STOP_DEPENDENCIESSpecifies a set of relationships that Oracle Clusterware considers when stopping a resource.
Syntax
STOP_DEPENDENCIES=dependency(resource_set) [dependency(resource_set)] ...
In the preceding syntax example the variables are defined, as follows:
• dependency: The only possible value is hard.
• resource_set: A comma-delimited list, in the form of res1[, res2 [,...]], of resourceentities—either individual resources or resource types—upon which the resource you areconfiguring depends.
Each resource entity is defined, as follows:
[modifier1:[modifier2:][modifier3:]] resource_name | type:resource_type
In the preceding syntax example, resource_name is the name of a specific resource andtype:resource_type is the name of a specific resource type. The resource type must bepreceded by type:.
Optionally, you can specify modifiers to further configure resource entity dependencies.You can modify each dependency by prefixing the following modifiers to the resourceentity:
hard([intermediate:][global:][shutdown:]{resource_name |type:resource_type})—Specify a hard stop dependency for a resource that you want tostop when named resources or resources of a particular resource type stop.
Use intermediate to specify that the dependent resource can remain in an ONLINE stateif a resource is in either the ONLINE or INTERMEDIATE state. If not specified, then OracleClusterware stops the dependent resource unless resources are in the ONLINE state.
Use global to specify that the dependent resource remains in an ONLINE state if aresource is in an ONLINE state on any node in the cluster. If not specified, then whenresources residing on the same server go offline, Oracle Clusterware stops thedependent resource.
Use shutdown to apply this dependency when the Oracle Clusterware stack is shut down.This is a convenient way to affect the order of stopping resources when stopping thestack, without having any affect on planned or unplanned events on the individual
Appendix BResource Attributes
B-17

resources. This dependency, when used with the shutdown modifier, does not gointo effect if somebody stops the resource directly, but only when the stack is shutdown.
See Also:
"Stop Dependencies" for more details about stop dependencies
STOP_TIMEOUTThe maximum time (in seconds) in which a stop or clean action can run. OracleClusterware returns an error message if the action does not complete within the timespecified. If you do not specify this attribute or if you specify 0 seconds, then OracleClusterware uses the value of the SCRIPT_TIMEOUT attribute.
Usage Example
STOP_TIMEOUT=30
See Also:
• "SCRIPT_TIMEOUT" for more information about this attribute
• "START_TIMEOUT" for more information about this attribute
UPTIME_THRESHOLDThe value for UPTIME_THRESHOLD represents the length of time that a resource must beup before Oracle Clusterware considers the resource to be stable. By setting a valuefor the UPTIME_THRESHOLD attribute, you can indicate the stability of a resource.
Enter values for this attribute as a number followed by a letter that represents seconds(s), minutes (m), hours (h), days (d), or weeks (w). For example, a value of 7hrepresents an uptime threshold of seven hours.
After the time period you specify for UPTIME_THRESHOLD elapses, Oracle Clusterwareresets the value for RESTART_COUNT to 0 at the next resource state change event, suchas stop, start, relocate, or failure. Oracle Clusterware can alert you when the value forRESTART_COUNT reaches the value that you set for RESTART_ATTEMPTS. The counter iseffectively reset the next time the resource fails or restarts. The threshold representsthe amount of time that restarts are to be counted and discarded. If the resource failsafter the threshold, it will still restart.
Appendix BResource Attributes
B-18

Note:
Oracle Clusterware writes an alert to the clusterware alert log file when the value forRESTART_COUNT reaches the value that you set for RESTART_ATTEMPTS.
See Also:
• "RESTART_ATTEMPTS" for more information about this attribute
• "RESTART_COUNT" for more information about this attribute
USER_WORKLOADUse to indicate whether a resource is a workload generating resource for what-if analysis.Possible values are yes or no.
Usage Example
USER_WORKLOAD=yes
USE_STICKINESSUse to indicate that a resource should run where it last ran, if possible, and to not permitload-balancing that would otherwise apply. If set to 1, Oracle Clusterware attempts to start theresource where it last ran. Enabling USE_STICKINESS also disables load-balancing. Thedefault value is 0. Possible values are 0 and 1.
Usage Example
USE_STICKINESS=1
WORKLOAD_CPUAssigns the CPU cores to a resource. The value must be in hundredths of a CPU core (1/100CPU core). Specify a positive integer value that is equal to or greater than 10 and increasethis value by 5, as required. You can set the value of this resource attribute to greater than100 to assign more than one CPU cores to a resource.
Usage Example
The following example assigns half CPU core to the specified resource.
WORKLOAD_CPU=50
The following example assign two CPU cores to the specified resource.
WORKLOAD_CPU=200
Appendix BResource Attributes
B-19

Read-Only Resource AttributesYou can view these attributes when you run the crsctl status resource commandon a particular resource. Oracle Clusterware sets these attributes when you registerresources.
• ACTION_FAILURE_EVENT_TEMPLATE
• INSTANCE_COUNT
• INTERNAL_STATE
• LAST_SERVER
• LAST_STATE_CHANGE
• PROFILE_CHANGE_EVENT_TEMPLATE
• RESTART_COUNT
• STATE
• STATE_CHANGE_EVENT_TEMPLATE
• STATE_DETAILS
• TARGET
• TARGET_SERVER
• TYPE
ACTION_FAILURE_EVENT_TEMPLATEThis is an internally-managed attribute for an ora.* resource. You cannot edit thisattribute.
INSTANCE_COUNTThe INSTANCE_COUNT attribute is an internally managed attribute that contains thenumber of instances that the resource currently has.
INTERNAL_STATEAn internally managed, read-only attribute that describes what, if any, action the policyengine is currently executing on the resource. Possible values and their meanings areas follows:
• STARTING: The policy engine is currently starting the resource
• STOPPING: The policy engine is currently stopping the resource
• CLEANING: The policy engine is currently cleaning the resource
• STABLE: The policy engine is not currently executing any action on the resource
Note, however, that the resource can still be locked as part of some othercommand.
Appendix BResource Attributes
B-20

LAST_SERVERFor cluster_resource-type resources, this is an internally managed, read-only attribute thatcontains the name of the server on which the last start action for the resource succeeded.
For local_resource-type resources, this is the name of the server to which the resourceinstance is pinned.
LAST_STATE_CHANGEAn internally managed, read-only attribute that describes when the policy engine registers thecurrent state of the resource. Note that this may either be the timestamp of when state of theresource changed or when the policy engine discovered the state, as occurs when CRSDrestarts.
PROFILE_CHANGE_EVENT_TEMPLATEThis is an internally-managed attribute for an ora.* resource. You cannot edit this attribute.
RESOURCE_LISTList of resources belonging to a resource group. Oracle Clusterware populates and updatesthis attribute when resources are added to the group.
Use this attribute with resource groups.
RESTART_COUNTAn internally-managed attribute used by the Oracle Clusterware daemon to count the numberof attempts to restart a resource, starting from zero up to the value specified in theRESTART_ATTEMPTS attribute. You cannot edit this attribute.
STATEAn internally-managed attribute that reflects the current state of the resource as reported byOracle Clusterware. The state of a resource can be one of the following:
• ONLINE: The resource is online and resource monitoring is enabled (see CHECK_INTERVAL).
• OFFLINE: The resource is offline and only offline resource monitoring is enabled, ifconfigured (see OFFLINE_CHECK_INTERVAL).
• INTERMEDIATE: The resource is either partially online or was known to be online beforeand subsequent attempts to determine its state have failed; resource monitoring isenabled (see CHECK_INTERVAL).
• UNKNOWN: The resource is unmanageable and its current state is unknown; manualintervention is required to resume its operation. A resource in this state is not monitored.
STATE_CHANGE_EVENT_TEMPLATEThis is an internally-managed attribute for an ora.* resource. You cannot edit this attribute.
Appendix BResource Attributes
B-21

STATE_DETAILSAn internally managed, read-only attribute that contains details about the state of aresource.
The four resource states—ONLINE, OFFLINE, UNKNOWN, and INTERMEDIATE—may map todifferent resource-specific values, such as mounted, unmounted, and open. Resourceagent developers can use the STATE_DETAILS attribute to provide a more detaileddescription of this mapping, resource to the resource state.
Providing details is optional. If details are not provided, then Oracle Clusterware usesonly the four possible resource states. Additionally, if the agent cannot provide thesedetails (as may also happen to the value of the resource state), then OracleClusterware sets the value of this attribute to provide minimal details about why theresource is in its current state.
TARGETAn internal, read-only attribute that describes the desired state of a resource. Usingthe crsctl start resource_name or crsctl stop resource_name commands,however, can affect the value of this attribute.
TARGET_SERVERThis is an internally-managed attribute that contains the name of the server where theresource is starting. This value is relevant when the resource is starting.
TYPEThe type of resource indicated when you create a resource. This attribute is requiredwhen creating a resource and cannot be changed after the resource is created.
See Also:
"Oracle Clusterware Resource Types" for details of resource types
Examples of Action Scripts for Third-party ApplicationsYou can use third-party applications, such as Apache scripts, or xclock, by usingscript agents.
The following example shows an action script that fails over the Apache Web server.
Example B-2 Apache Action Script
#!/bin/sh
HTTPDCONFLOCATION=/etc/httpd/conf/httpd.confWEBPAGECHECK=http://<MyVIP>:80/icons/apache_pb.gif
case $1 in'start')
Appendix BExamples of Action Scripts for Third-party Applications
B-22

/usr/sbin/apachectl -k start -f $HTTPDCONFLOCATION RET=$? ;;sleep(10) ;;'stop') /usr/sbin/apachectl -k stop RET=$? ;;'clean') /usr/sbin/apachectl -k stop RET=$? ;;'check') /usr/bin/wget -q --delete-after $WEBPAGECHECK RET=$? ;;*) RET=0 ;;esac# 0: success; 1 : errorif [ $RET -eq 0 ]; thenexit 0elseexit 1fi
The following example shows shows the xclock script, which is a simple action script usingxclock available as a default binary on all Linux and UNIX platforms.
Example B-3 xclock Action Script
#!/bin/bash# start/stop/check script for xclock example# To test this change BIN_DIR to the directory where xclock is based# and set the DISPLAY variable to a server within your network.
BIN_DIR=/usr/X11R6/binLOG_DIR=/tmpBIN_NAME=xclockDISPLAY=yourhost.example.com:0.0export DISPLAYexit_code=0
if [ ! -d $BIN_DIR ]then echo "start failed" exit 2fi
PID1=`ps -ef | grep $BIN_NAME | grep -v grep | grep -v xclock_app | awk '{ print $2 }'`case $1 in'start') if [ "$PID1" != "" ] then status_p1="running" else if [ -x $BIN_DIR/$BIN_NAME ] then umask 002
Appendix BExamples of Action Scripts for Third-party Applications
B-23

${BIN_DIR}/${BIN_NAME} & 2>${LOG_DIR}/${BIN_NAME}.log status_p1="started" else echo `basename $0`": $BIN_NAME: Executable not found" exit_code=1 fi fi
echo "$BIN_NAME: $status_p1" exit $exit_code ;;
'stop') if [ "${PID1}" != "" ] then kill -9 ${PID1} && echo "$BIN_NAME daemon killed" else echo "$BIN_NAME: no running Process!" fi exit $exit_code ;;'check') if [ "$PID1" != "" ] then echo "running" exit 0 else echo "not running" exit 1 fi ;;*) echo "Usage: "`basename $0`" {start|stop|check}" ;;esac
The following example is of an action script example, using a shell script for an agentto monitor a file. When the agent is started, it creates the file (which is specifiedthrough an attribute) and when it is stopped, it deletes the file. The CHECK actionconsists of only checking whether the file exists. The variables with the _CRS_ prefixare attribute values that are provided to the script in its environment.
Example B-4 Action Script Example
#!/bin/shTOUCH=/bin/touchRM=/bin/rmPATH_NAME=/tmp/$_CRS_NAME
## These messages go into the CRSD agent log file.echo " ******* `date` ********** "echo "Action script '$_CRS_ACTION_SCRIPT' for resource[$_CRS_NAME] called for action $1"#
case "$1" in 'start') echo "START entry point has been called.." echo "Creating the file: $PATH_NAME" $TOUCH $PATH_NAME exit 0
Appendix BExamples of Action Scripts for Third-party Applications
B-24

;;
'stop') echo "STOP entry point has been called.." echo "Deleting the file: $PATH_NAME" $RM $PATH_NAME exit 0 ;;
'check') echo "CHECK entry point has been called.." if [ -e $PATH_NAME ]; then echo "Check -- SUCCESS" exit 0 else echo "Check -- FAILED" exit 1 fi ;;
'clean') echo "CLEAN entry point has been called.." echo "Deleting the file: $PATH_NAME" $RM -f $PATH_NAME exit 0 ;;
esac
Appendix BExamples of Action Scripts for Third-party Applications
B-25

COLSNODES Command Reference
This appendix describes the syntax and command options for the olsnodes command.
This appendix contains the following topics:
• Using OLSNODES
– Overview
– Operational Notes
• Summary of the OLSNODES Command
Using OLSNODESThis section contains topics which relate to using the OLSNODES command.
• Overview
• Operational Notes
OverviewThe olsnodes command provides the list of nodes and other information for all nodesparticipating in the cluster.
You can use this command to quickly check that your cluster is operational, and all nodes areregistered as members of the cluster. This command also provides an easy method forobtaining the node numbers.
Operational NotesUsage Information
This command is used by the Cluster Verification Utility (CLUVFY) to obtain a list of nodenames when the -n all option is used.
This command utility is located in the $ORA_CRS_HOME/bin directory. You can only use thiscommand if the CRS daemon is started.
Privileges and Security
You can run this command as either the root user, the user that installed Oracle Clusterware,or the user that installed Oracle Database.
Summary of the OLSNODES CommandThe olsnodes command does not use keywords, but accepts one or more options. Theavailable options are described in Table C-1.
C-1

Syntax
olsnodes [[-n] [-s] [-t] [node_name | -l [-p]] | [-c]] [-a] [-g] [-v]
If you issue the olsnodes command without any command parameters, the commandreturns a listing of the nodes in the cluster:
[root@node1]# olsnodesnode1node2node3node4
Table C-1 OLSNODES Command Options
Options Description
-n Lists all nodes participating in the cluster and includes the assignednode numbers.
-s Displays the status of the node: active or inactive.
-t Displays node type: pinned or unpinned.
node_name Displays information for a particular node.
-l [-p] Lists the local node and includes the private interconnect for thelocal node. The -p option is only valid when you specify along withthe -l option.
-c Displays the name of the cluster.
-a Displays only active nodes in the cluster with no duplicates.
-g Logs cluster verification information with more details.
-v Logs cluster verification information in verbose mode. Use in debugmode and only at the direction of My Oracle Support.
ExamplesExample 1: List all nodes currently in the cluster
To list the nodes that are currently members of the cluster, use the command:
[root@node1]# olsnodesnode1node2node3node4
Example 2: List the node names and node numbers for cluster members
To list the node name and the node number for each node in the cluster, use thecommand:
[root@node1]# olsnodes -nnode1 1node2 2
Appendix CSummary of the OLSNODES Command
C-2

node3 3node4 4
Example 3: Display node roles for cluster members
To list the node roles for each node in the cluster, use the command:
[root@node1]# olsnodes -anode1 Hubnode2 Hubnode3 node4
Appendix CSummary of the OLSNODES Command
C-3

DOracle Interface Configuration Tool (OIFCFG)Command Reference
The Oracle Interface Configuration Tool (OIFCFG) command-line interface helps you todefine and administer network interfaces. You can use OIFCFG commands OracleClusterware environments to:
• Allocate and deallocate network interfaces to components
• Direct components to use specific network interfaces
• Retrieve component configuration information
This appendix includes the following topics:
• Starting the OIFCFG Command-Line Interface
• Summary of the OIFCFG Usage
Starting the OIFCFG Command-Line InterfaceBefore you invoke OIFCFG, ensure that you have started Oracle Clusterware on at least thelocal node and preferably on all nodes if you intend to include the -global option in thecommand syntax.
Note:
To change the global network interface, Oracle Clusterware must be running on allcluster nodes.
Run OIFCFG from the Grid_home/bin/ directory as the user who installed the OracleClusterware software. For example:
$ ./oifcfg
Run the oifcfg -help command to display online help for OIFCFG.
$ ./oifcfg -help
Summary of the OIFCFG UsageThis section contains the following topics:
• OIFCFG Command Format
• OIFCFG Commands
• OIFCFG Command Parameters
• OIFCFG Usage Notes
D-1

• OIFCFG Examples
OIFCFG Command Formatoifcfg iflist [-p] [-n]oifcfg setif {-node nodename | -global} {if_name/subnet:if_type[,if_type]}[,...]oifcfg getif [-node nodename | -global] [ -if if_name[/subnet] [-type if_type]]oifcfg delif {{-node nodename | -global} [if_name[/subnet]] [-force] | -force}oifcfg [-help]
OIFCFG CommandsUse these commands to define and manage network interfaces.
You can enter any of the OIFCFG commands listed in Table D-1.
Table D-1 OIFCFG Commands
Command Description
oifcfg iflist [-p [-n]]
Shows the available interfaces that you can configure with setif.The iflist command queries the operating system to find whichnetwork interfaces are present on this node. You can specify twooptions with this command:
• -p: Displays a heuristic assumption of the interface type(PRIVATE, PUBLIC, or UNKNOWN)
• -n: Displays the netmask
If the interface has an IPv6 network, then OIFCFG prints the IPv6subnet on a separate line, similar to the following:
eth1 fec0::80 PUBLIC 64eth1 10.229.184.0 PUBLIC 255.255.248.0
oifcfg setif Sets an interface type (public, cluster interconnect, or Oracle ASM)for an interface.
oifcfg getif Displays the interfaces for which an interface type has been definedwith the setif command, along with the type for that interface.
Note: The -node command parameter that you can use with thiscommand returns no result if you not set the interface details usingthe oifcfg setif -node command.
oifcfg delif Deletes the stored network configuration for global or node-specificinterfaces. You can use the -force option without specifying the -node or -global options to delete the stored networkconfigurations from all nodes in the cluster.
OIFCFG Command ParametersThis section lists the parameters for the OIFCFG commands. Note that someparameters are optional, depending on which command you run.
• -node node_name: The name of the Oracle Clusterware node as listed in theoutput from the olsnodes command. OLSNODES Command Referencedescribes the olsnodes command.
Appendix DSummary of the OIFCFG Usage
D-2

• -global: A network interface can be stored either as a global interface (as reported bythe iflist command) or as a node-specific interface:
– An interface is stored as a global interface when all of the nodes of an Oracle RealApplication Clusters (Oracle RAC) cluster have the same interface connected to thesame subnet. The global interface (and configuring all nodes with the same networkinterface for each public subnet and the same network interface for each privatesubnet) is not only the recommended configuration, but it is also the defaultinstallation configuration.
– An interface can be stored as a node-specific (local) interface.
Note:
Oracle supports interface name wildcards for different interface namesacross nodes. Oracle does not support using -node to configure differentspecific interface names on different nodes.
• -if if_name: The name by which the interface is configured in the system.
• subnet: The subnet address of the interface.
• -type if_type: One or more comma-delimited interface types: public,cluster_interconnect, or asm.
• -help: Display online help for OIFCFG commands.
Related Topics
• OLSNODES Command Reference
OIFCFG Usage Notes• A network interface specification takes the following form:
if_name/subnet:if_type
The specification uniquely identifies the network interface using the:
– Interface name
When using the oifcfg setif command, you can specify interface names thatcontain wildcard characters, such as an asterisk (*), which matches any string.However, you must surround interface names that contain wildcards with doublequotation marks ("").
Appendix DSummary of the OIFCFG Usage
D-3

Note:
Oracle recommends that you do not use wildcards in a cluster withpre-Oracle Database 11g release 2 (11.2.0.2) databases becauseOracle resolves the interface name by expanding the wildcard on thelocal node and also issues a PRIF-0029 warning every time you runthe oifcfg getif command.
If you use wildcards with Oracle Databases that are pre-11g release2 (11.2.0.2), then those databases must use theCLUSTER_INTERCONNECTS parameter, instead.
– Associated subnet
– Interface type
The interface type indicates the purpose for which the network is configured.The supported interface types are:
* public: An interface that can be used for communication with componentsexternal to Oracle RAC instances, such as Oracle Net and Virtual InternetProtocol (VIP) addresses.
* cluster_interconnect: A private interface used for the clusterinterconnect to provide interinstance or Cache Fusion1 communication.
* asm: An interface that can be used for communication with Oracle ASM.
If you set the interface type to cluster_interconnect, then it affects instancesas they start and changes do not take effect until you restart the instances.
For example, the following specification identifies qfe0 as a cluster interconnectlocated at the address 204.152.65.0:
qfe0/204.152.65.0:cluster_interconnect• The Oracle Universal Installer uses OIFCFG to identify and display available
interfaces.
• The effect of changing the interface names depends on which name you arechanging, and whether you are also changing the IP address. In cases where youchange only the interface names, the ramifications are minor. If you change thename for the public interface that is stored in the Oracle Cluster Registry (OCR),you must modify the nodeapps for each node. Therefore, you must stop thenodeapps for this change to take effect.
• You must restart Oracle Clusterware on all members of the cluster when you makeglobal changes. For local changes, you need only to perform a node restart.Interconnect changes for the database occur at instance startup. However, theinterconnect for Oracle Clusterware might be different.
• Because interconnects are chosen when instances start, just issuing OIFCFGcommands does not have an immediate effect on the running system. Instead,changes take effect after restarting the component that might be affected by thecommand.
1 Cache Fusion is a diskless cache coherency mechanism that provides copies of blocks directly from a holdinginstance's memory cache to a requesting instance's memory cache.
Appendix DSummary of the OIFCFG Usage
D-4

• Changes you make to cluster-wide network classifications with OIFCFG require all knowncluster nodes to be up so that their Grid Plug and Play profiles can be updated.
OIFCFG ExamplesThe following examples show some common uses for the OIFCFG commands:
Listing the Names of Network Interfaces
You can use OIFCFG to list the interface names and the subnets of all of the interfacesavailable on the local node by executing the iflist keyword, as shown in this example:
oifcfg iflisteth0 172.19.141.0eth1 172.21.65.0
Retrieving Network Information
You can also retrieve specific OIFCFG information with a getif command.
For example, after you install Oracle Clusterware, you can verify that the public and clusterinterconnect have been set to the desired values by entering the following command:
$ oifcfg getif
This command returns values for global public and global cluster_interconnect, similar tothe following:
eth0 172.19.141.0 global publiceth1 172.21.65.0 global cluster_interconnect
Storing a Global Interface
To store an interface, use the setif keyword. For example, to store the interface eth0, withthe subnet 172.19.141.0, as a global interface (to be used as an interconnect for all of theOracle RAC instances in your cluster and Oracle Clusterware), use the command:
oifcfg setif -global eth0/172.19.141.0:cluster_interconnect
Note:
Ensure that all nodes are running when you run the setif command becauseOracle cannot update Grid Plug and Play profiles on nodes that are not running.
Deleting the Stored Interface
Use the oifcfg delif command to delete the stored configuration for global or node-specificinterfaces. A specific node-specific or global interface can be deleted by supplying theinterface name, with an optional subnet, on the command line.
Appendix DSummary of the OIFCFG Usage
D-5

Note:
If you only enter oifcfg delif, with no other arguments given on thecommand line, then OIFCFG deletes all interfaces on all nodes in the cluster.
For example, the following command deletes the global interface named eth1 for thesubnet 172.21.65.0:
oifcfg delif -global eth1/172.21.65.0
The following command deletes all of the global interfaces assigned with OIFCFG:
oifcfg delif -global
Appendix DSummary of the OIFCFG Usage
D-6

EOracle Clusterware Control (CRSCTL) UtilityReference
This appendix contains reference information for the Oracle Clusterware Control (CRSCTL)utility.
Note:
Do not use CRSCTL commands on Oracle entities (such as resources, resourcetypes, and server pools) that have names beginning with ora unless you aredirected to do so by My Oracle Support. The Server Control utility (SRVCTL) is thecorrect utility to use on Oracle entities. Starting in Oracle Database 21c, PDBs are aresource managed by Oracle Clusterware. You can use SRVCTL commands tomanage PDBs, except for the policy-managed databases.
This appendix includes the following topics:
• CRSCTL Overview
• Dual Environment CRSCTL Commands
• Oracle RAC Environment CRSCTL Commands
• Oracle Restart Environment CRSCTL Commands
• Troubleshooting and Diagnostic Output
CRSCTL OverviewCRSCTL is an interface between you and Oracle Clusterware, parsing and calling OracleClusterware APIs for Oracle Clusterware objects.
CRSCTL provides cluster-aware commands with which you can perform check, start, andstop operations on the cluster. You can run these commands from any node in the cluster onanother node in the cluster, or on all nodes in the cluster, depending on the operation.
You can use CRSCTL commands to perform several operations on Oracle Clusterware, suchas:
• Starting and stopping Oracle Clusterware resources
• Enabling and disabling Oracle Clusterware daemons
• Checking the health of the cluster
• Managing resources that represent third-party applications
• Integrating Intelligent Platform Management Interface (IPMI) with Oracle Clusterware toprovide failure isolation support and to ensure cluster integrity
• Debugging Oracle Clusterware components
E-1

This section includes the following topics:
• Clusterized (Cluster Aware) Commands
• CRSCTL Operational Notes
• Deprecated Subprograms or Commands
Clusterized (Cluster Aware) CommandsYou can run clusterized commands on one node to perform operations on anothernode in the cluster. These are referred to as remote operations. This simplifiesadministration because, for example, you no longer have to log in to each node tocheck the status of the Oracle Clusterware on all of your nodes.
Clusterized commands are completely operating system independent; they rely on theOHASD (Oracle High Availability Services daemon). If this daemon is running, thenyou can perform remote operations, such as the starting, stopping, and checking thestatus of remote nodes.
Clusterized commands include the following:
• crsctl check cluster
• crsctl start cluster
• crsctl stop cluster
CRSCTL Operational NotesInformation about using the CRSCTL command-line interface.
Usage Information
• The CRSCTL utility is located in the Grid_home/bin directory. To run CRSCTLcommands, type in crsctl at the operating system prompt followed by thecommand and arguments, as shown in the following example:
crsctl stop crs
• There are three categories of CRSCTL commands:
– Those that you use in either the Oracle Real Application Clusters (OracleRAC) environment or in the Oracle Restart environment
– Those that you use in the Oracle RAC environment, only
– Those that you use in the Oracle Restart environment, only
• Many CRSCTL commands use the -f parameter to force the command to run andignore any checks.
For example, if you specify the force parameter for the crsctl stop resourcecommand on a resource that is running and has dependent resources that arealso running, then the force parameter omits the error message and instead stopsor relocates all the dependent resources before stopping the resource youreference in the command.
• You must use the CRSCTL commands from the same release to manage OracleClusterware.
Appendix ECRSCTL Overview
E-2

Filters
You can use filters to narrow down Oracle Clusterware entities upon which a CRSCTLcommand operates, as follows:
• Simple filters are attribute-value pairs with an operator.
• Operators must be surrounded by spaces, as shown in the examples.
• You can combine simple filters into expressions called expression filters using Booleanoperators.
Supported filter operators are:
=><!=co: Containsst: Starts withen: Ends with
Supported Boolean operators are AND and OR.
Examples of filters are:
• TYPE = type1• ((TYPE = type1) AND (CHECK_INTERVAL > 50))• (TYPE = type1) AND ((CHECK_INTERVAL > 30) OR (AUTO_START co never))• NAME en network.res• TYPE st ora.db
Using CRSCTL Help
To print the help information for CRSCTL, use the following command:
crsctl -help
If you want help for a specific command, such as start, then enter the command and append-help to the end, as shown in the following example:
crsctl start -help
You can also use the abbreviations -h or -? (this parameter functions in Linux, UNIX, andWindows environments) instead of -help.
Deprecated Subprograms or CommandsTable E-1 lists deprecated commands and their replacements that you can use to perform thesame or similar functionality.
Appendix ECRSCTL Overview
E-3

Table E-1 Deprecated CRSCTL Commands and Replacements
Deprecated Command Replacement Commands
crs_stat crsctl check clustercrsctl status resource
crs_register crsctl add resourcecrsctl add typecrsctl modify resourcecrsctl modify type
crs_unregister crsctl stop resourcecrsctl delete resource
crs_start crsctl start resourcecrsctl start crscrsctl start cluster
crs_stop crsctl stop resourcecrsctl stop crscrsctl stop cluster
crs_getperm crsctl getperm resourcecrsctl getperm type
crs_profile crsctl add resourcecrsctl add typecrsctl status resourcecrsctl status typecrsctl modify resourcecrsctl modify type
crs_relocate crsctl relocate resource
crs_setperm crsctl setperm resourcecrsctl setperm type
Appendix ECRSCTL Overview
E-4

Table E-1 (Cont.) Deprecated CRSCTL Commands and Replacements
Deprecated Command Replacement Commands
crsctl add crs administrator
Use the access control list (ACL) to control who can addserver pools.
crsctl check crsd crsctl check crs
crsctl check cssd crsctl check css
crsctl check evmd crsctl check evm
crsctl debug res log resource_name:level
crsctl set log
crsctl set css votedisk crsctl add css votediskcrsctl delete css votediskcrsctl query css votediskcrsctl replace votedisk
crsctl start resources crsctl start resource -all
crsctl stop resources crsctl stop resource -all
crsctl set css logfilesize
crsctl get tracefileopts csscrsctl set tracefileopts css
crsctl get css logfilesize
crsctl set tracefileopts css
Appendix ECRSCTL Overview
E-5

Table E-1 (Cont.) Deprecated CRSCTL Commands and Replacements
Deprecated Command Replacement Commands
crsctl set trace module_name "component:debugging_level [,component:debugging_level][,...]"
crsctl get trace
Dual Environment CRSCTL CommandsUse these commands in either the Oracle RAC or the Oracle Restart environments.
The commands listed in this section manage the Oracle Clusterware resources in bothOracle RAC and Oracle Restart environments.
crsctl check cssChecks the status of Cluster Synchronization Services.This command is most often used when Oracle Automatic Storage Management(Oracle ASM) is installed on the local server.
Syntax
crsctl check css
Example
This command returns output similar to the following:
CRS-4529: Cluster Synchronization Services is online
crsctl check evmChecks the status of the Event Manager.
Syntax
crsctl check evm
Appendix EDual Environment CRSCTL Commands
E-6

Example
This command returns output similar to the following:
CRS-4533: Event Manager is online
crsctl get hostnameRetrieves the host name of the local server.
Syntax
crsctl get hostname
Example
Oracle Clusterware returns the host name of the local server:
$ crsctl get hostname
node2
crsctl add resourceRegisters a resource to be managed by Oracle Clusterware.
A resource can be an application process, a database, a service, a listener, and so on.
Syntax
crsctl add resource resource_name -type resource_type [-group group_name [-file file_path | -attr "attribute_name=attribute_value[,...]"] [-i] [-f]
Parameters
Table E-2 crsctl add resource Command Parameters
Parameter Description
resource_name Specify a short, descriptive name for the resource.
-type resource_type Specify the type of resource that you are adding preceded by the -type flag.
-group group_name Specify a resource group to which you want to add the resource.
-file file_path Path name (either absolute or relative) for a text file containing line-delimitedattribute name-value pairs that define the resource.
Appendix EDual Environment CRSCTL Commands
E-7
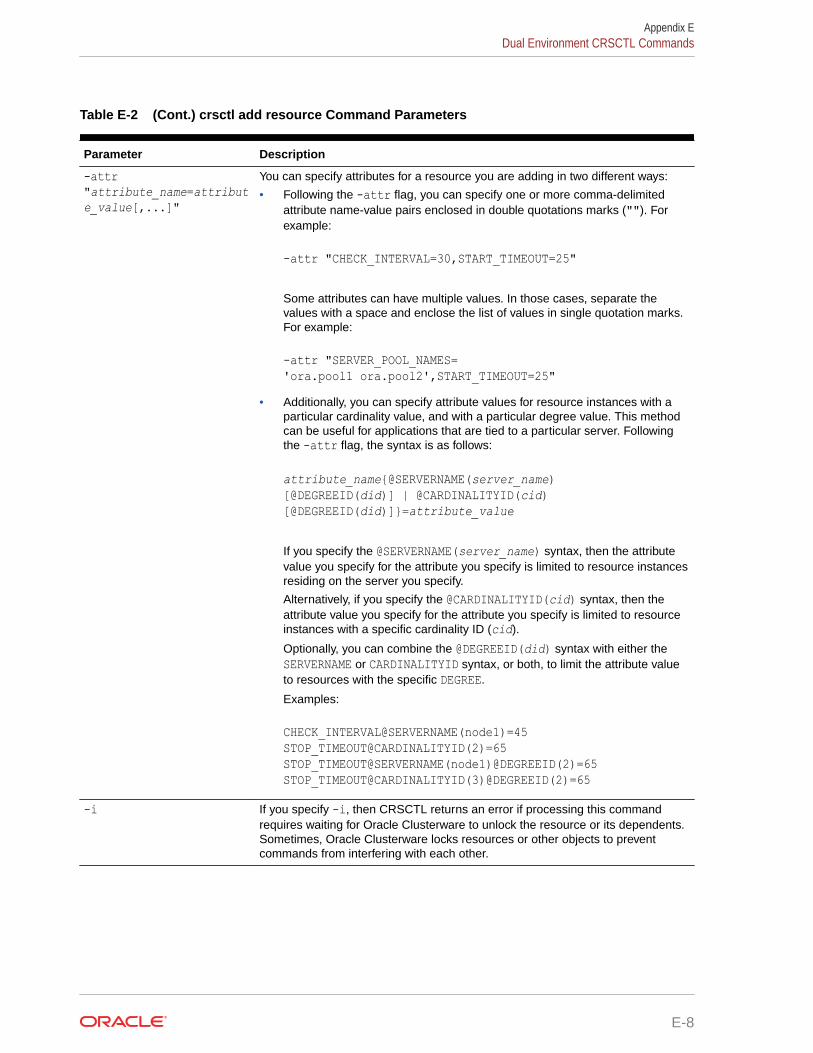
Table E-2 (Cont.) crsctl add resource Command Parameters
Parameter Description
-attr"attribute_name=attribute_value[,...]"
You can specify attributes for a resource you are adding in two different ways:
• Following the -attr flag, you can specify one or more comma-delimitedattribute name-value pairs enclosed in double quotations marks (""). Forexample:
-attr "CHECK_INTERVAL=30,START_TIMEOUT=25"
Some attributes can have multiple values. In those cases, separate thevalues with a space and enclose the list of values in single quotation marks.For example:
-attr "SERVER_POOL_NAMES='ora.pool1 ora.pool2',START_TIMEOUT=25"
• Additionally, you can specify attribute values for resource instances with aparticular cardinality value, and with a particular degree value. This methodcan be useful for applications that are tied to a particular server. Followingthe -attr flag, the syntax is as follows:
attribute_name{@SERVERNAME(server_name)[@DEGREEID(did)] | @CARDINALITYID(cid)[@DEGREEID(did)]}=attribute_value
If you specify the @SERVERNAME(server_name) syntax, then the attributevalue you specify for the attribute you specify is limited to resource instancesresiding on the server you specify.
Alternatively, if you specify the @CARDINALITYID(cid) syntax, then theattribute value you specify for the attribute you specify is limited to resourceinstances with a specific cardinality ID (cid).
Optionally, you can combine the @DEGREEID(did) syntax with either theSERVERNAME or CARDINALITYID syntax, or both, to limit the attribute valueto resources with the specific DEGREE.
Examples:
CHECK_INTERVAL@SERVERNAME(node1)=45STOP_TIMEOUT@CARDINALITYID(2)=65STOP_TIMEOUT@SERVERNAME(node1)@DEGREEID(2)=65STOP_TIMEOUT@CARDINALITYID(3)@DEGREEID(2)=65
-i If you specify -i, then CRSCTL returns an error if processing this commandrequires waiting for Oracle Clusterware to unlock the resource or its dependents.Sometimes, Oracle Clusterware locks resources or other objects to preventcommands from interfering with each other.
Appendix EDual Environment CRSCTL Commands
E-8

Table E-2 (Cont.) crsctl add resource Command Parameters
Parameter Description
-f Use the force parameter:
• To add a resource that has dependencies on other resources that do not yetexist. The force parameter overrides checks that would prevent a commandfrom being completed.
• To add a resource if the resource has hard dependencies on other resourcesand the owner of the resources does not execute permissions on one ormore of the dependencies. If you do not specify the force parameter in thiscase, an error displays.
• To add resources of application type because you may need to moveservers into the Generic server pool. If the servers currently host resourcesthat must be stopped, then the force parameter is required.
Usage Notes
• Both the resource_name and -type resource_type parameters are required. You cancreate an associated resource type using the crsctl add type command.
• Any user can create a resource but only clusterware administrators can create resourcesof type local_resource or resources of type cluster_resource that haveSERVER_POOLS=*.
Once a resource is defined, its ACL controls who can perform particular operations withit. The Oracle Clusterware administrator list is no longer relevant.
On Windows, a member of the Administrators group has full control over everything.
See Also:
"crsctl setperm resource" for more information about setting ACLs
• If an attribute value for an attribute name-value pair contains commas, then the valuemust be enclosed in single quotation marks ('').
• Following is an example of an attribute file:
PLACEMENT=favoredHOSTING_MEMBERS=node1 node2 node3RESTART_ATTEMPTS@CARDINALITYID(1)=0RESTART_ATTEMPTS@CARDINALITYID(2)=0FAILURE_THRESHOLD@CARDINALITYID(1)=2FAILURE_THRESHOLD@CARDINALITYID(2)=4FAILURE_INTERVAL@CARDINALITYID(1)=300FAILURE_INTERVAL@CARDINALITYID(2)=500CHECK_INTERVAL=2CARDINALITY=2
• Do not use this command for any resources with names that begin with ora becausethese resources are Oracle resources.
Appendix EDual Environment CRSCTL Commands
E-9

Examples
Example E-1 Example 1
To register a VIP as a resource with Oracle Clusterware:
$ crsctl add resource app.appvip -type app.appvip.type -attr "RESTART_ATTEMPTS=2,START_TIMEOUT=100,STOP_TIMEOUT=100,CHECK_INTERVAL=10,USR_ORA_VIP=172.16.0.0,START_DEPENDENCIES=hard(ora.net1.network)pullup(ora.net1.network),STOP_DEPENDENCIES=hard(ora.net1.network)"
Example E-2 Example 2
To register a resource based on the test_type1 resource type:
$ crsctl add resource r1 -type test_type1 -attr "PATH_NAME=/tmp/r1.txt"$ crsctl add resource r1 -type test_type1 -attr "PATH_NAME=/tmp/r2.txt"
Example E-3 Example 3
To register a Samba server resource of the generic_application resource type, usingthe EXECUTABLE_NAMES attribute:
# crsctl add resource my_samba -type generic_application -attr"EXECUTABLE_NAMES=smbd,START_PROGRAM='/etc/rc.d/init.d/smb start',STOP_PROGRAM='/etc/rc.d/init.d/smb stop'"
Example E-4 Example 4
To register a DNS server of the generic_application resource type, using theEXECUTABLE_NAMES attribute:
# crsctl add resource my_dns -type generic_application -attr"EXECUTABLE_NAMES=named,START_PROGRAM='/etc/rc.d/init.d/named start',STOP_PROGRAM='/etc/rc.d/init.d/named stop'"
Example E-5 Example 5
To register an Apache web server of the generic_application resource type usingthe PID_FILES attribute:
# crsctl add resource my_apache -type generic_application -attr"START_PROGRAM='/usr/sbin/httpd -k start',STOP_PROGRAM='/usr/sbin/httpd -k stop',PID_FILES=/etc/httpd/run/httpd.pid"
Appendix EDual Environment CRSCTL Commands
E-10

Example E-6 Example 6
To register an application of generic_application resource type using environmentvariables:
# crsctl add resource my_app -type generic_application -attr"START_PROGRAM='/opt/my_app start', EXECUTABLE_NAMES=my_app,ENVIRONMENT_VARS='USE_NETAPP=no,USE_BACKUP=yes,CLEAN_ON_KILL=yes'"
Related Topics
• Oracle Clusterware Resource Reference
crsctl delete resourceRemoves resources from the Oracle Clusterware configuration.
Syntax
crsctl delete resource {"resource_name [...]" | -w "filter"} [-i] [-f]
Parameters
Table E-3 crsctl delete resource Command Parameters
Parameter Description
resource_name Specify one or more resource names that you want to delete. Multipleresources must be space-delimited and enclosed in double quotationmarks ("").
-w "filter" Specify a resource filter that Oracle Clusterware uses to limit the numberof resources evaluated for deletion. The filter must be enclosed in doublequotation marks (""). Examples of resource filters include:
• "TYPE == cluster_resource": This filter limits OracleClusterware to relocate only resources of cluster_resource type
• "CHECK_INTERVAL > 10": This filter limits Oracle Clusterware torelocate resources that have a value greater than 10 for theCHECK_INTERVAL resource attribute
• "(CHECK_INTERVAL > 10) AND (NAME co 2)": This filter limitsOracle Clusterware to relocate resources that have a value greaterthan 10 for the CHECK_INTERVAL resource attribute and the name ofthe resource contains the number 2
Note: All operators must be surrounded by spaces.
See Also: Filters for more information about operators
-i If you specify -i, then CRSCTL returns an error if processing thiscommand requires waiting for Oracle Clusterware to unlock the resourceor its dependents. Sometimes, Oracle Clusterware locks resources orother objects to prevent commands from interfering with each other.
-f Use this parameter to delete a resource that is online.
Usage Notes
• Either the resource_name or -w "filter" parameter is required
Appendix EDual Environment CRSCTL Commands
E-11

• You must have read and write permissions to delete the specified resources
• Do not use this command for any resources with names that begin with orabecause these resources are Oracle resources
Example
To delete a resource from Oracle Clusterware:
# crsctl delete resource myResource
crsctl eval add resourcePredicts the effects of adding a resource without making changes to the system.This command may be useful to application administrators.
Syntax
crsctl eval add resource resource_name -type resource_type [-file file_path | -attr "attribute_name=attribute_value[,...]"]] [-group group_name] [-f]
Parameters
Table E-4 crsctl eval add resource Command Parameters
Parameter Description
resource_name Specify a short, descriptive name for the resource.
-type resource_type Specify the type of resource that you are adding following the -type flag.
-file file_path Path name (either absolute or relative) for a text file containing line-delimited attribute name-value pairs that define the resource.
Appendix EDual Environment CRSCTL Commands
E-12

Table E-4 (Cont.) crsctl eval add resource Command Parameters
Parameter Description
-attr"attribute_name=attribute_value"
You can specify attributes for a resource you are adding in twodifferent ways:
• Following the -attr flag, you can specify one or more comma-delimited attribute name-value pairs enclosed in doublequotations marks (""). For example:
-attr "CHECK_INTERVAL=30,START_TIMEOUT=25"
Some attributes can have multiple values. In those cases,separate the values with a space and enclose the list of valuesin single quotation marks. For example:
-attr "SERVER_POOL_NAMES='ora.pool1 ora.pool2',START_TIMEOUT=25"
• Optionally, you can specify attribute values for resourceinstances with a particular cardinality value, and with aparticular degree value. This method can be useful forapplications that are tied to a particular server. Following the -attr flag, the syntax is as follows:
attribute_name{@SERVERNAME(server_name)[@DEGREEID(did)] | @CARDINALITYID(cid)[@DEGREEID(did)]}=attribute_value
If you specify the @SERVERNAME(server_name) syntax, thenthe attribute value you specify for the attribute you specify islimited to resource instances residing on the server youspecify.
Alternatively, if you specify the @CARDINALITYID(cid)syntax, then the attribute value you specify for the attribute youspecify is limited to resource instances with a specificcardinality ID (cid).
Optionally, you can combine the @DEGREEID(did) syntax witheither the SERVERNAME or CARDINALITYID syntax, or both, tolimit the attribute value to resources with the specific DEGREE.
Examples:
CHECK_INTERVAL@SERVERNAME(node1)=45STOP_TIMEOUT@CARDINALITYID(2)=65STOP_TIMEOUT@SERVERNAME(node1)@DEGREEID(2)=65STOP_TIMEOUT@CARDINALITYID(3)@DEGREEID(2)=65
-group group_name Specify a resource group to which you want to add the resource.
Appendix EDual Environment CRSCTL Commands
E-13

Table E-4 (Cont.) crsctl eval add resource Command Parameters
Parameter Description
-f Use the force parameter:
• To add a resource that has dependencies on other resourcesthat do not yet exist. The force parameter overrides checks thatwould prevent a command from being completed.
• To add a resource if the resource has hard dependencies onother resources and the owner of the resources does notexecute permissions on one or more of the dependencies. Ifyou do not specify the force parameter in this case, an errordisplays.
• To add resources of application type because you mayneed to move servers into the Generic server pool. If theservers currently host resources that must be stopped, thenthe force parameter is required.
crsctl eval fail resourcePredicts the consequences of a resource failing.
Syntax
crsctl eval fail resource {resource_name | -w "filter"} [-n server] [-env "attr=val[,...]"]
Parameters
Table E-5 crsctl eval fail resource Command Parameters
Parameter Description
resource_name Specify the name of a resource for which you want to simulate afailure. You must specify either the name of a resource or resourcefilters using the -w parameter.
-w "filter" Alternatively, you can specify a resource filter that OracleClusterware uses to limit the number of resources evaluated. Thefilter must be enclosed in double quotation marks (""). Examples ofresource filters include:
• "TYPE == cluster_resource": This filter limits OracleClusterware to relocate only resources of cluster_resourcetype
• "CHECK_INTERVAL > 10": This filter limits OracleClusterware to relocate resources that have a value greaterthan 10 for the CHECK_INTERVAL resource attribute
• "(CHECK_INTERVAL > 10) AND (NAME co 2)": This filterlimits Oracle Clusterware to relocate resources that have avalue greater than 10 for the CHECK_INTERVAL resourceattribute and the name of the resource contains the number 2
Note: All operators must be surrounded by spaces.
See Also: Filters for more information about operators
Appendix EDual Environment CRSCTL Commands
E-14

Table E-5 (Cont.) crsctl eval fail resource Command Parameters
Parameter Description
-n server Specify the name of the server on which the resource that you wantto simulate a failure resides.
-env"attr=val[,...]"
You can optionally override one or more resource profile attributevalues with the -env command parameter. If you specify multipleenvironment name-value pairs, then you must separate each pairwith a comma and enclose the entire list in double quotation marks("").
For example, you could use -env "RESTART_ATTEMPTS=0" topredict what would happen if the resource has run out of localrestart attempts and cannot be restarted locally.
Example
This command returns output similar to the following:
$ crsctl eval fail res cs1 Stage Group 1:-----------------------------------------------------------------------------Stage Number Required Action----------------------------------------------------------------------------- 1 Y Resource 'cs1' (1/1) will be in state [ONLINE|INTERMEDIATE] on server [mjkeenan_node_0] Y Resource 'cs1' (2/1) will be in state [ONLINE|INTERMEDIATE] on server [mjkeenan_node_1] -----------------------------------------------------------------------------
crsctl eval relocate resourceSimulates relocating a resource without making changes to the system.
Syntax
crsctl eval relocate resource {resource_name | -all} {-s source_server | -w "filter"} [-n destination_server] [-f]
Parameters
Table E-6 crsctl eval relocate resource Command Parameters
Parameter Description
resource_name Specify the name of a resource you want to relocate.
Appendix EDual Environment CRSCTL Commands
E-15

Table E-6 (Cont.) crsctl eval relocate resource Command Parameters
Parameter Description
-all Alternatively, you can use this parameter to specify all resources forrelocation.
-s source_server Specify a particular server from which you want to relocate theresources.
-w "filter" Alternative to using -s, you can specify a resource filter that CRSCTLuses to limit the number of resources relocated. The filter must beenclosed in double quotation marks (""). Examples of resource filtersinclude:
• "TYPE == cluster_resource": This filter limits OracleClusterware to relocate only resources of cluster_resource type
• "CHECK_INTERVAL > 10": This filter limits Oracle Clusterware torelocate resources that have a value greater than 10 for theCHECK_INTERVAL resource attribute
• "(CHECK_INTERVAL > 10) AND (NAME co 2)": This filter limitsOracle Clusterware to relocate resources that have a value greaterthan 10 for the CHECK_INTERVAL resource attribute and the name ofthe resource contains the number 2
See Also: Filters for more information
-n destination_server Specify the name of the server to which you want to relocate resources.If you do not specify a destination server, then CRSCTL relocates theresources to the best server according to the attribute profile of eachresource.
–f Specify the -f parameter to force the relocation of the resource when ithas other resources running that depend on it. CRSCTL stops orrelocates dependent resources when you use this parameter.
Note: When you are relocating resources that have cardinality greaterthan 1, you must use either -k or -s to narrow down which resourceinstances are to be relocated.
crsctl eval modify resourcePredicts the effects of modifying a resource without making changes to the system.
Syntax
crsctl eval modify resource resource_name -attr "attribute_name=attribute_value[,...]" [-group group_name] [-f]
Parameters
Table E-7 crsctl eval modify resource Command Parameters
Parameter Description
resource_name Specify the name of the resource you want to evaluate.
Appendix EDual Environment CRSCTL Commands
E-16

Table E-7 (Cont.) crsctl eval modify resource Command Parameters
Parameter Description
-attr"attribute_name=attribute_value[,...]"
You can specify attributes for a resource you want to evaluate intwo different ways:
• Following the -attr flag, you can specify one or more comma-delimited attribute name-value pairs to modify enclosed indouble quotations marks (""). For example:
-attr "CHECK_INTERVAL=30, START_TIMEOUT=25"
Some attributes can have multiple values. In those cases,separate the values with a space and enclose the list of valuesin single quotation marks. For example:
-attr "SERVER_POOL_NAMES='ora.pool1 ora.pool2',START_TIMEOUT=25"
• Alternatively, you can specify attribute values for resources ona particular server, with a particular cardinality value, and witha particular degree value. This method can be useful forapplications that are somehow tied to a particular server.Following the -attr flag, the syntax is as follows:
attribute_name{@SERVERNAME(server_name)[@DEGREEID(did)] | @CARDINALITYID(cid)[@DEGREEID(did)]}=attribute_value
If you specify the @SERVERNAME(server_name) syntax, thenthe attribute value you specify for the attribute you specify islimited to resources residing on the server you specify.
Alternatively, if you specify the @CARDINALITYID(cid)syntax, then the attribute value you specify for the attribute youspecify is limited to resource instances with a specificcardinality ID (cid).
Optionally, you can combine the @DEGREEID(did) syntax witheither the SERVERNAME or CARDINALITYID syntax, or both, tolimit the attribute value to resources with the specific DEGREE.
Examples:
CHECK_INTERVAL@SERVERNAME(node1)=45STOP_TIMEOUT@CARDINALITYID(2)=65STOP_TIMEOUT@SERVERNAME(node1)@DEGREEID(2)=65STOP_TIMEOUT@CARDINALITYID(3)@DEGREEID(2)=65
-group group_name Specify a resource group to which the resource belongs that youwant to evaluate.
–f Specify this parameter to evaluate what happens if you run thecommand with the force parameter.
Appendix EDual Environment CRSCTL Commands
E-17

crsctl eval start resourcePredicts the effects of starting a resource without making changes to the system.
Syntax
crsctl eval start resource {resource_name [...] | -w "filter"} [-n server_name] [-f]
Parameters
Table E-8 crsctl eval start resource Command Parameters
Parameter Description
resource_name [...] Specify one or more space-delimited resource names to start.
-w "filter" Specify a resource filter surrounded by double quotation marks ("")that Oracle Clusterware uses to match resources. For example, -w"TYPE = ora.database.type" or -w "NAME = cs1".
See Also: "Filters" for more information
-n server_name Specify the name of the server on which the resources you want tostart reside. If you do not specify a server, then Oracle Clusterwarestarts the resources on the best server according to the attributeprofile of each resource.
–f Use the -f parameter to relocate a resource running on anotherserver on which the resource you want to start has a hard startdependency. If you do not specify the force parameter in this case,then the start command fails.
crsctl eval stop resourcePredicts the effect of stopping a resource without making changes to the system.
Syntax
crsctl eval stop resource {resource_name [...] | -w "filter"} [-f]
Parameters
Table E-9 crsctl eval stop resource Command Parameters
Parameter Description
resource_name [...] Specify one or more space-delimited resource names to stop.
Appendix EDual Environment CRSCTL Commands
E-18

Table E-9 (Cont.) crsctl eval stop resource Command Parameters
Parameter Description
-w "filter" Specify a resource filter that Oracle Clusterware uses to limit thenumber of resources stopped. The filter must be enclosed in doublequotation marks (""). Examples of resource filters include:
• "TYPE == cluster_resource": This filter limits OracleClusterware to stop only resources of cluster_resourcetype
• "CHECK_INTERVAL > 10": This filter limits OracleClusterware to stop resources that have a value greater than10 for the CHECK_INTERVAL resource attribute
• "(CHECK_INTERVAL > 10) AND (NAME co 2)": This filterlimits Oracle Clusterware to stop resources that have a valuegreater than 10 for the CHECK_INTERVAL resource attributeand the name of the resource contains the number 2
See Also: Filters for more information
–f Specify the -f parameter to force the stopping of the resourcewhen it has other resources running that depend on it. Dependentresources are relocated or stopped when you use this parameter.
crsctl getperm resourceDisplays the user and group permissions for the specified resource.
Syntax
crsctl getperm resource resource_name [{-u user_name | -g group_name}]
Parameters
Table E-10 crsctl getperm resource Command Parameters
Parameter Description
resource_name Specify the name of the resource for which you want to obtainpermissions.
-u user_name If you specify -u, then Oracle Clusterware obtains permissions for aparticular user.
-g group_name If you specify -g, then Oracle Clusterware obtains permissions for aparticular group.
Usage Notes
• The resource_name parameter is required
• You must have read permission on the specified resources to obtain their permissions
• Do not use this command for any resources with names that begin with ora becausethese resources are Oracle resources
Appendix EDual Environment CRSCTL Commands
E-19

See Also:
Oracle Clusterware Resource Reference for more information aboutresources and resource attributes
Examples
The crsctl getperm resource command returns output similar to the following,depending on the command option you choose:
$ crsctl getperm resource app.appvip
Name: app.appvipowner:root:rwx,pgrp:oinstall:rwx,other::r--
$ crsctl getperm resource app.appvip -u oracle
Name: app.appviprwx
$ crsctl getperm resource app.appvip -g dba
Name: app.appvipr--
crsctl modify resourceModifies the attributes of a particular resource in Oracle Clusterware.
Syntax
crsctl modify resource resource_name -attr "attribute_name=attribute_value"[-i] [-f] [-delete] [-group group_name] [-env "env1=val1,env2=val2,..."]
Parameters
Table E-11 crsctl modify resource Command Parameters
Parameter Description
resource_name The name of the resource you want to modify.
Appendix EDual Environment CRSCTL Commands
E-20

Table E-11 (Cont.) crsctl modify resource Command Parameters
Parameter Description
-attr"attribute_name=attribute_value"
You can specify attributes for a resource you want to modify in twodifferent ways:
• Following the -attr flag, you can specify one or more comma-delimited attribute name-value pairs to modify enclosed indouble quotations marks (""). For example:
-attr "CHECK_INTERVAL=30, START_TIMEOUT=25"
Some attributes can have multiple values. In those cases,separate the values with a space and enclose the list of valuesin single quotation marks. For example:
-attr "SERVER_POOL_NAMES='ora.pool1 ora.pool2',START_TIMEOUT=25"
• Alternatively, you can specify attribute values for resources ona particular server, with a particular cardinality value, and witha particular degree value. This method can be useful forapplications that are somehow tied to a particular server.Following the -attr flag, the syntax is as follows:
attribute_name{@SERVERNAME(server_name)[@DEGREEID(did)] | @CARDINALITYID(cid)[@DEGREEID(did)]}=attribute_value
If you specify the @SERVERNAME(server_name) syntax, thenthe attribute value you specify for the attribute you specify islimited to resources residing on the server you specify.
Alternatively, if you specify the @CARDINALITYID(cid)syntax, then the attribute value you specify for the attribute youspecify is limited to resource instances with a specificcardinality ID (cid).
Optionally, you can combine the @DEGREEID(did) syntax witheither the SERVERNAME or CARDINALITYID syntax, or both, tolimit the attribute value to resources with the specific DEGREE.
Examples:
CHECK_INTERVAL@SERVERNAME(node1)=45STOP_TIMEOUT@CARDINALITYID(2)=65STOP_TIMEOUT@SERVERNAME(node1)@DEGREEID(2)=65STOP_TIMEOUT@CARDINALITYID(3)@DEGREEID(2)=65
-i If you specify -i, then CRSCTL returns an error if processing thiscommand requires waiting for Oracle Clusterware to unlock theresource or its dependents. Sometimes, Oracle Clusterware locksresources or other objects to prevent commands from interferingwith each other.
Appendix EDual Environment CRSCTL Commands
E-21

Table E-11 (Cont.) crsctl modify resource Command Parameters
Parameter Description
-f Use the -f parameter when:
• The resource has a hard dependency on a non-existingresource
• The owner of the resource does not have execute permissionson one or more hard dependencies
• The modification results in servers being moved into theGeneric pool and resources being stopped or relocated toaccomplish the server move
-delete If you specify the -delete parameter, then Oracle Clusterwaredeletes the named attribute.
-group group_name Specify a resource group to which the resource belongs. Theresource group must exist, and the resource cannot be a memberof any other explicit resource group. If you do not specify aresource group, then CRSCTL adds the resource to a resourcegroup with the same name as the resource.
-env"env1=val1,env2=val2,..."
You can optionally override one or more resource profile attributevalues for this command. If you specify multiple environment name-value pairs, then you must separate each pair with a comma andenclose the entire list in double quotation marks ("").
Usage Notes
• The resource_name parameter is required
• If an attribute value for an attribute name-value pair contains commas, then thevalue must be enclosed in single quotation marks (''). For example:
"START_DEPENDENCIES='hard(res1,res2,res3)'"
• You must have read and write permissions on the specified resources to modifythem
• Do not use this command for any resources with names that begin with orabecause these resources are Oracle resources
Example
To modify the attributes of the appsvip resource:
$ crsctl modify resource appsvip -attr USR_ORA_VIP=10.1.220.17 -i
Related Topics
• Oracle Clusterware Resource Reference
crsctl relocate resourceRelocates resources to another server in the cluster.
Appendix EDual Environment CRSCTL Commands
E-22

Syntax
crsctl relocate resource {resource_name [-k cid] | -all | -w "filter"} -s source_server | [-n destination_server] [-env "env1=val1,env2=val2,..."] [-i] [-f]
Parameters
Table E-12 crsctl relocate resource Command Parameters
Parameter Description
resource_name Specify the name of a resource you want to relocate.
-k cid Optionally, you can specify the resource cardinality ID. If you specify thisparameter, then CRSCTL relocates the resource instance that has thecardinality you specify.
-all Alternatively, you can use this parameter to specify all resources forrelocation.
-w "filter" Alternative to using -k or -all, you can specify a resource filter thatCRSCTL uses to limit the number of resources relocated. The filter mustbe enclosed in double quotation marks (""). Examples of resource filtersinclude:
• "TYPE == cluster_resource": This filter limits OracleClusterware to relocate only resources of cluster_resource type
• "CHECK_INTERVAL > 10": This filter limits Oracle Clusterware torelocate resources that have a value greater than 10 for theCHECK_INTERVAL resource attribute
• "(CHECK_INTERVAL > 10) AND (NAME co 2)": This filter limitsOracle Clusterware to relocate resources that have a value greaterthan 10 for the CHECK_INTERVAL resource attribute and the name ofthe resource contains the number 2
See Also: "Filters" for more information
-s source_server Specify a particular server from which you want to relocate theresources.
-n destination_server Specify the name of the server to which you want relocate resources. Ifyou do not specify a destination server, then CRSCTL relocates theresources to the best server according to the attribute profile of eachresource.
-env"env1=val1,env2=val2,..."
You can optionally override one or more resource profile attribute valuesfor this command. If you specify multiple environment name-value pairs,then you must separate each pair with a comma and enclose the entirelist in double quotation marks ("").
–i If you specify -i, then the command returns an error if processing thiscommand requires waiting for Oracle Clusterware to unlock the resourceor its dependents. Sometimes, Oracle Clusterware locks resources orother objects to prevent commands from interfering with each other.
–f Specify the -f parameter to force the relocation of the resource when ithas other resources running that depend on it. CRSCTL stops orrelocates dependent resources when you use this parameter.
Note: When you are relocating resources that have cardinality greaterthan 1, you must use either -k or -s to narrow down which resourceinstances are to be relocated.
Appendix EDual Environment CRSCTL Commands
E-23
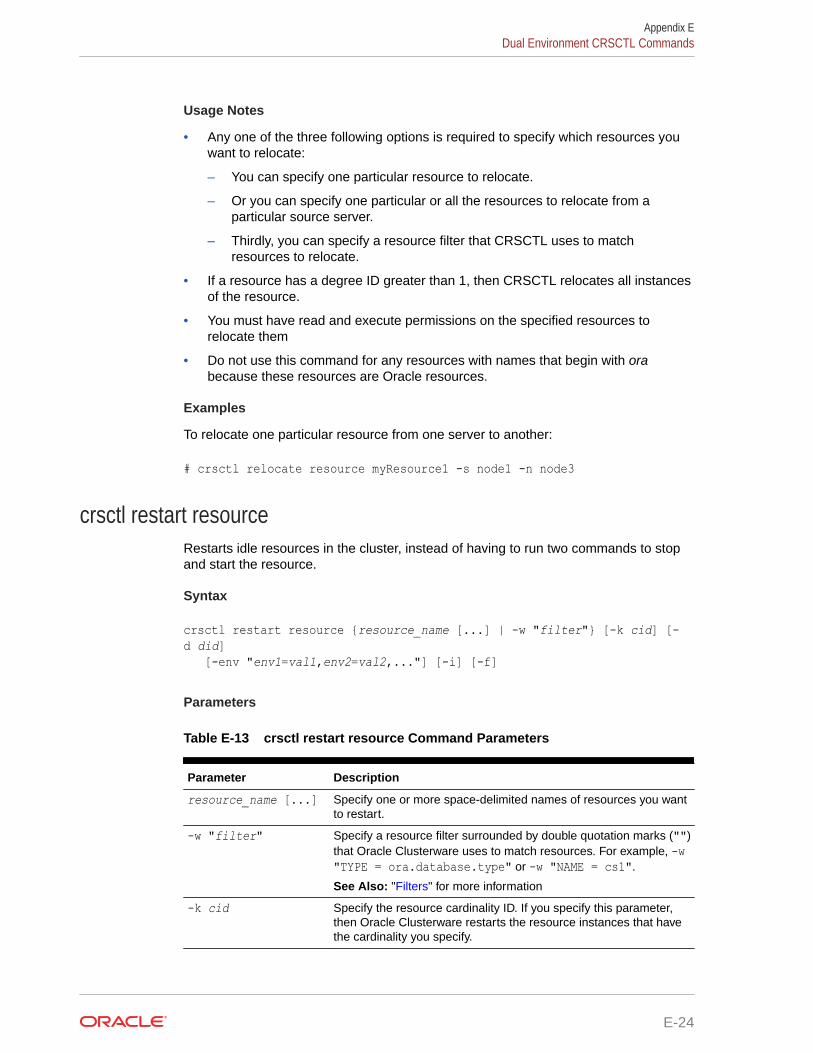
Usage Notes
• Any one of the three following options is required to specify which resources youwant to relocate:
– You can specify one particular resource to relocate.
– Or you can specify one particular or all the resources to relocate from aparticular source server.
– Thirdly, you can specify a resource filter that CRSCTL uses to matchresources to relocate.
• If a resource has a degree ID greater than 1, then CRSCTL relocates all instancesof the resource.
• You must have read and execute permissions on the specified resources torelocate them
• Do not use this command for any resources with names that begin with orabecause these resources are Oracle resources.
Examples
To relocate one particular resource from one server to another:
# crsctl relocate resource myResource1 -s node1 -n node3
crsctl restart resourceRestarts idle resources in the cluster, instead of having to run two commands to stopand start the resource.
Syntax
crsctl restart resource {resource_name [...] | -w "filter"} [-k cid] [-d did] [-env "env1=val1,env2=val2,..."] [-i] [-f]
Parameters
Table E-13 crsctl restart resource Command Parameters
Parameter Description
resource_name [...] Specify one or more space-delimited names of resources you wantto restart.
-w "filter" Specify a resource filter surrounded by double quotation marks ("")that Oracle Clusterware uses to match resources. For example, -w"TYPE = ora.database.type" or -w "NAME = cs1".
See Also: "Filters" for more information
-k cid Specify the resource cardinality ID. If you specify this parameter,then Oracle Clusterware restarts the resource instances that havethe cardinality you specify.
Appendix EDual Environment CRSCTL Commands
E-24

Table E-13 (Cont.) crsctl restart resource Command Parameters
Parameter Description
-d did Specify the resource degree ID. If you specify this parameter andthe degree ID is greater than 1, then Oracle Clusterware restarts allresource instances that meet this criteria.
Note: You cannot use the -d parameter without specifying the -kparameter.
-env"env1=val1,env2=val2,..."
You can optionally override one or more resource profile attributevalues with the -env command parameter. If you specify multipleenvironment name-value pairs, then you must separate each pairwith a comma and enclose the entire list in double quotation marks("").
-i If you specify -i, then the command returns an error if processingthis command requires waiting for Oracle Clusterware to unlock theresource or its dependents. Sometimes, Oracle Clusterware locksresources or other objects to prevent commands from interferingwith each other.
–f Use the -f parameter to relocate a resource running on anotherserver on which the resource you want to restart has a hard startdependency. If you do not specify the force parameter in this case,then the start command fails.
Usage Notes
• Either of the following options is required to specify which resources you want to restart:
– You can specify one or more resources by name to restart
– You can specify a resource filter that Oracle Clusterware uses to match resources torestart
• You must have read and execute permissions on the specified resources to restart them
• Do not use this command to restart any resources with names that begin with orabecause these resources are Oracle resources
crsctl setperm resourceSets permissions for a particular resource.
Syntax
crsctl setperm resource resource_name {-u acl_string | -x acl_string |-o user_name | -g group_name}
Parameters
Table E-14 crsctl setperm resource Command Parameters
Parameter Description
resource_name Specify the name of the resource for which you want to set permissions.
Appendix EDual Environment CRSCTL Commands
E-25

Table E-14 (Cont.) crsctl setperm resource Command Parameters
Parameter Description
-u | -x | -o | -g You can set only one of the following permissions for a resource:
• -u acl_string: You can update the access control list (ACL) for aresource
• -x acl_string: You can delete the ACL for a resource
• -o user_name: You can change the owner of a resource byentering a user name
• -g group_name: You can change the primary group of a resourceby entering a group name
Specify a user, group, or other ACL string, as follows:
user:user_name[:readPermwritePermexecPerm] |group:group_name[:readPermwritePermexecPerm] |other[::readPermwritePermexecPerm]
• user: User ACL
• group: Group ACL
• other: Other ACL
• readPerm: Read permission for the resource; the letter r grants auser, group, or other read permission, the minus sign (-) deniesread permission
• writePerm: Write permission for the resource; the letter w grants auser, group, or other write permission, the minus sign (-) denieswrite permission
• execPerm: Execute permission for the resource; the letter x grants auser, group, or other execute permission, the minus sign (-) deniesexecute permission
See Also:
Oracle Clusterware Resource Reference for more information aboutresources and resource attributes
Usage Notes
• Do not use this command for any resources with names that begin with orabecause these resources are Oracle resources.
• You must have read and write permissions on the specified resources to set theirpermissions
Examples
To grant read, write, and execute permissions on a resource for user Scott:
$ crsctl setperm resource myResource -u user:scott:rwx
Appendix EDual Environment CRSCTL Commands
E-26

crsctl start resourceStarts idle resources on a particular server in the cluster.
Syntax
crsctl start resource {resource_name [...] | -w "filter" | -all} [-n server_name | -s server_pool_names] [-k cid] [-d did] [-env "env1=val1,env2=val2,..."] [-begin] [-end] [-i] [-f] [-l]
Parameters
Table E-15 crsctl start resource Command Parameters
Parameter Description
resource_name [...] Specify one or more space-delimited names of resources you want tostart.
-w "filter" Specify a resource filter surrounded by double quotation marks ("") thatOracle Clusterware uses to match resources. For example, -w "TYPE =ora.database.type" or -w "NAME = cs1".
See Also: "Filters" for more information
–all Use this parameter to start all resources in the cluster.
-n server_name Specify the name of the server on which the resources you want to startreside. If you do not specify a server, then Oracle Clusterware starts theresources on the best server according to the attribute profile of eachresource.
-s server_pool_names Specify a single server pool name or a space-delimited list of serverpools in which a resource resides that you want to start.
-k cid Specify the resource cardinality ID. If you specify this parameter, thenOracle Clusterware starts the resource instances that have thecardinality you specify.
-d did Specify the resource degree ID. If you specify this parameter and thedegree ID is greater than 1, then Oracle Clusterware starts all resourceinstances that meet this criteria.
Note: You cannot use the -d parameter without specifying the -kparameter.
-env"env1=val1,env2=val2,..."
You can optionally override one or more resource profile attribute valueswith the -env command parameter. If you specify multiple environmentname-value pairs, then you must separate each pair with a comma andenclose the entire list in double quotation marks ("").
-begin You can specify this parameter to begin a transparent HA action.
-end You can specify this parameter to end a transparent HA action.
–i If you specify -i, then the command returns an error if processing thiscommand requires waiting for Oracle Clusterware to unlock the resourceor its dependents. Sometimes, Oracle Clusterware locks resources orother objects to prevent commands from interfering with each other.
Appendix EDual Environment CRSCTL Commands
E-27

Table E-15 (Cont.) crsctl start resource Command Parameters
Parameter Description
–f Use the -f parameter to relocate a resource running on another serveron which the resource you want to start has a hard start dependency. Ifyou do not specify the force parameter in this case, then the startcommand fails.
–l Use the -l parameter to leave the resources in the state they were in ifthe start command fails.
Usage Notes
• Any one of the three following options is required to specify which resources youwant to start:
– You can specify one or more resources to start
– You can specify a resource filter that Oracle Clusterware uses to matchresources to start
– You can specify the -all parameter to start all resources on the specifiedserver
• You must have read and execute permissions on the specified resources to startthem
• Do not use this command to start any resources with names that begin with orabecause these resources are Oracle resources
• Oracle does not support starting managed applications outside of the Oracle GridInfrastructure
Example
To start a resource:
# crsctl start resource myResource -n server1
crsctl status resourceObtains the status and configuration information of any number of particular resources.
Syntax
crsctl status resource resource_name [...] | -w "filter" [-p | -v] | [-f | -l | -g] [[-k cid | -n server_name] [ -e [-p | -v]] [-d did]] | [-s -k cid [-d did]] [-p [-attr attribute_name[,...] [-noname]]
To print the status of the resources in tabular form:
crsctl status resource resource_name [...] | -w "filter" -t
Appendix EDual Environment CRSCTL Commands
E-28

To print a list of the resource dependencies:
crsctl status resource [resource_name [...]] -dependency [-stop | -pullup]
Parameters
Table E-16 crsctl status resource Command Parameters
Parameter Description
resource_name [...] |-w "filter"
Specify one or more space-delimited names of resources of which youwant to check the status.
Optionally, you can specify a resource filter that CRSCTL uses to limitthe number of resources displayed. The filter must be enclosed in doublequotation marks (""). Values that contain parentheses or spaces mustbe enclosed in single quotation marks (''). Operators must besurrounded by spaces. Examples of resource filters include:
• "TYPE == cluster_resource": This filter limits the display toonly resources of cluster_resource type.
• "CHECK_INTERVAL > 10": This filter limits the display to resourcesthat have a value greater than 10 for the CHECK_INTERVAL resourceattribute
• "(CHECK_INTERVAL > 10) AND (NAME co 2)": This filter limitsthe display to resources that have a value greater than 10 for theCHECK_INTERVAL resource attribute and the name of the resourcecontains the number 2.
• "START_DEPENDENCIES='hard(appsvip)'": This filter limits thedisplay to resources that have a hard start dependency on theappsvip resource.
See Also: "Filters" for more information
[-p | -v] | [-f | -l| -g]
You can optionally specify the following parameters:• Specify either the -p parameter to display the static configuration of
the resource or the -v parameter to display the run-timeconfiguration of the resource.
• Specify the -f parameter to display the full configuration of theresource; or specify the -l parameter to display all cardinal anddegree values of the resource; or specify the -g parameter to checkwhether the specified resources are registered
[[-k cid | -nserver_name] [ -e [-p| -v]] [-d did | [-s-k cid [-d did]]]
You can specify one of the following two options:• Specify the -k cid parameter to specify a cardinality ID of the
resources you want to query. Or you can specify the -n parameterto specify a particular server on which to check resources.Optionally, you can specify the -d parameter with the -n parameterto specify the degree ID of resources you want to check. If youspecify a degree ID greater than 1, then Oracle Clusterware checksall resource instances on the server that meet this criteria.
Use the -e parameter to evaluate the special values of a resourceinstance. You must also specify -p or -v with the -e parameter.
• Specify the -s parameter with the -k parameter to obtain a list oftarget servers for relocation. You can further limit the output byspecifying a degree ID with the -d parameter.
–t Specify the -t parameter to display the output in tabular form.
Appendix EDual Environment CRSCTL Commands
E-29

Table E-16 (Cont.) crsctl status resource Command Parameters
Parameter Description
-p [-attrattribute_name[,...][-noname]
Specify -attr (followed by a single attribute name or a comma-delimitedlist of attribute names) or -noname following -p to either print specificattributes or bypass the default printing of the resource name,respectively.
-dependency [-stop |-pullup]
Specify the -dependency parameter to display resource dependencies.If you do not specify either the -stop or -pullup option, then CRSCTLdisplays the start dependencies of the resource.
Use either of the following options with the -dependency parameter:• Specify the -stop parameter to display resource stop
dependencies.• Specify the -pullup parameter to display resource pull up
dependencies.
Usage Notes
• Either a space-delimited list of resources or a resource filter is required.
• You must have read permissions on the specified resources to obtain their status.
• Use crsctl status resource to query the status information of any resourcedeployed in the cluster. Oracle recommends, however, that you use the respectiveSRCVTL command to query the status information of Oracle (ora.*) resources.
Examples
The crsctl status resource command returns output similar to the following:
$ crsctl status resource ora.staii14.vip
NAME=ora.staii14.vipTYPE=ora.cluster_vip_net1.typeTARGET=ONLINESTATE=ONLINE on staii14
The following example shows the start dependencies for a resource namedora.newdb.db:
$ crsctl status resource ora.newdb.db -dependency ora.newdb.db(ora.database.type)
ora.ACFS_DG1.dg(ora.diskgroup.type)[hard,pullup] ora.asm(ora.asm.type)[hard,pullup] ora.LISTENER.lsnr(ora.listener.type)[weak] type:ora.cluster_vip_net1.type[hard:type,pullup:type] ora.net1.network(ora.network.type)[hard,pullup] ora.dbhome_dg.dbhome_dg_v.acfs(ora.acfs.type)[hard,pullup] ora.asm(ora.asm.type)[pullup:always]
Appendix EDual Environment CRSCTL Commands
E-30

crsctl stop resourceStops running resources.
Syntax
crsctl stop resource {resource_name [...] | -w "filter" | -all} [-n server_name | -s server_pool] [-k cid] [-d did] [-env "env1=val1,env2=val2,..."] [-begin | -end] [-i] [-f] [-l]
Parameters
Table E-17 crsctl stop resource Command Parameters
Parameter Description
resource_name [...] Alternative to using -w or -all, you can specify one or more space-delimited resource names that you want to stop.
-w "filter" Alternative to specifying a resource name or using -all, you can specifya resource filter that CRSCTL uses to limit the number of resourcesstopped. The filter must be enclosed in double quotation marks ("").Examples of resource filters include:
• "TYPE == cluster_resource": This filter limits OracleClusterware to stop only resources of cluster_resource type
• "CHECK_INTERVAL > 10": This filter limits Oracle Clusterware tostop resources that have a value greater than 10 for theCHECK_INTERVAL resource attribute
• "(CHECK_INTERVAL > 10) AND (NAME co 2)": This filter limitsOracle Clusterware to stop resources that have a value greater than10 for the CHECK_INTERVAL resource attribute and the name of theresource contains the number 2
See Also: "Filters" for more information
-all Alternative to specifying a resource name or using -w, you can use thisparameter to stop all resources in the cluster.
-n server_name | -sserver_pool
Optionally, you can specify the name of the server on which the resourceinstances you want to stop reside, or the name of a server pool in whichthe resource instances you want to stop reside. If you do not specify aserver or server pool, then CRSCTL stops all instances of the resource.
-k cid Optionally, you can specify the resource cardinality ID. If you specify thisparameter, then CRSCTL stops the resource instances that have thecardinality you specify.
-d did Specify the resource degree ID. If you specify this parameter and thedegree ID is greater than 1, then CRSCTL stops all resource instancesthat meet this criteria.
-env"env1=val1,env2=val2,..."
You can optionally override one or more resource profile attribute valueswith the -env command parameter. If you specify multiple environmentname-value pairs, then you must separate each pair with a comma andenclose the entire list in double quotation marks ("").
-begin | -end Optionally, you can specify either of these parameters to begin or end atransparent HA action, respectively.
Appendix EDual Environment CRSCTL Commands
E-31

Table E-17 (Cont.) crsctl stop resource Command Parameters
Parameter Description
–i If you specify -i, then the command returns an error if processing thiscommand requires waiting for Oracle Clusterware to unlock the resourceor its dependents. Sometimes, Oracle Clusterware locks resources orother objects to prevent commands from interfering with each other.
–f Specify the -f parameter to force the stopping of the resource when ithas other resources running that depend on it. Dependent resources arerelocated or stopped when you use this parameter.
–l Use the -l parameter to leave the resources in the state they were in ifthe stop command fails.
Usage Notes
• Any one of the three following options is required to specify which resources youwant to stop:
– You can specify by name one or more resources to stop.
– You can specify a resource filter that CRSCTL uses to match resources tostop
– You can specify the -all parameter to stop all resources on a particular server
• You must have read and execute permissions on the specified resources to stopthem
• Do not use this command for any resources with names that begin with orabecause these resources are Oracle resources
• Oracle does not support stopping managed applications outside of the Oracle GridInfrastructure
Example
To stop a resource:
$ crsctl stop resource -n node1 -k 2
crsctl add resourcegroupCreates a resource group based on a resource group type.
Use this command to create an empty resource group into which you can addresources.
Syntax
crsctl add resourcegroup group_name –type group_type [[-file file_path] | [-attr "attribute_name= attribute_value"]] [-f] [-i]
Appendix EDual Environment CRSCTL Commands
E-32

Parameters
Table E-18 crsctl add resourcegroup Command Parameters
Parameter Description
group_name Specify the name of the resource group.
–type group_type Specify a group type for the resource group.
-file file_path | -attr"attribute_name=attribute_value[,...]"
Provide either a file or a list of attributes that define the resource group.
Path name (either absolute or relative) for a text file containing line-delimited attribute name-value pairs that define the resource group.
Following the -attr flag, you can specify one or more comma-delimitedattribute name-value pairs enclosed in double quotations marks ("").
–f Use this parameter to add a resource group that is online.
–i If you specify -i, then CRSCTL returns an error if processing thiscommand requires waiting for Oracle Clusterware to unlock the resourceor its dependents. Sometimes, Oracle Clusterware locks resources orother objects to prevent commands from interfering with each other.
crsctl check resourcegroupInitiates a check operation on all member resources of the specified groups.
Syntax
crsctl check resourcegroup {group_name [...] | -w "filter"} [-n server_name] [-k cid]
Parameters
Table E-19 crsctl check resourcegroup Command Parameters
Parameter Description
group_name Specify a resource group or a number of resource groups in a space-delimited list that you want to check.
-w "filter" Alternatively, you can specify a resource group filter surrounded bydouble quotation marks ("") that Oracle Clusterware uses to matchresource groups. For example, -w "TYPE = ora.database.type" or-w "NAME = cs1".
See Also: Filters for more information about using filters.
-n server_name Optionally, you can specify the name of the server on which the resourcegroup you want to check resides.
-k cid Optionally, you can specify the resource group cardinality ID. If youspecify this parameter, then Oracle Clusterware checks the resourceinstances that have the cardinality you specify.
crsctl delete resourcegroupDeletes one or more resource groups from Oracle Clusterware.
Appendix EDual Environment CRSCTL Commands
E-33

Syntax
crsctl delete resourcegroup {"group_name [...]" | -w "filter"} [-f] [-i]
Parameters
Table E-20 crsctl delete resourcegroup Command Parameters
Parameter Description
group_name Specify one or more group names that you want to delete. Multiplegroups must be space-delimited and enclosed in double quotationmarks ("").
-w "filter" Specify a resource filter that Oracle Clusterware uses to limit thenumber of resources evaluated for deletion. The filter must beenclosed in double quotation marks (""). Examples of resourcefilters include:
• "TYPE == cluster_resource": This filter limits OracleClusterware to relocate only resources of cluster_resourcetype
• "CHECK_INTERVAL > 10": This filter limits OracleClusterware to relocate resources that have a value greaterthan 10 for the CHECK_INTERVAL resource attribute
• "(CHECK_INTERVAL > 10) AND (NAME co 2)": This filterlimits Oracle Clusterware to relocate resources that have avalue greater than 10 for the CHECK_INTERVAL resourceattribute and the name of the resource contains the number 2
Note: All operators must be surrounded by spaces.
See Also: Filters for more information about operators
-f Use this parameter to delete a resource group that is online.
-i If you specify -i, then CRSCTL returns an error if processing thiscommand requires waiting for Oracle Clusterware to unlock theresource or its dependents. Sometimes, Oracle Clusterware locksresources or other objects to prevent commands from interferingwith each other.
Usage Notes
• You must specify either a group name (or several group names) or a resourcefilter.
• You can only delete a resource group if no other resource groups havedependencies to it.
crsctl eval add resourcegroupPredicts the effects of adding a resource group without making changes to the system.
Appendix EDual Environment CRSCTL Commands
E-34

Syntax
crsctl eval add resourcegroup group_name -type group_type [-file file_path | -attr "attribute_name=attribute_value[,...]"] [-f]
Parameters
Table E-21 crsctl eval add resourcegroup Command Parameters
Parameter Description
group_name Specify the name of the resource group.
-type group_type Specify a group type for the resource group.
-file file_path | -attr"attribute_name=attribute_value[,...]"
Provide either a file or a list of attributes that define the resource group.
Path name (either absolute or relative) for a text file containing line-delimited attribute name-value pairs that define the resource group.
Following the -attr flag, you can specify one or more comma-delimitedattribute name-value pairs enclosed in double quotations marks ("").
–f Use this parameter to add a resource group that is online.
crsctl eval fail resourcegroupPredicts the consequences of a resource failing.
Syntax
crsctl eval fail resourcegroup {group_name | -w filter} [-n server] [-env "attr=val[,...]"]
Parameters
Table E-22 crsctl eval fail resourcegroup Command Parameters
Parameter Description
group_name Specify the name of a resource group you want to evaluate.
-w filter Alternative you specifying a particular resource group, you can specify aresource group filter surrounded by double quotation marks ("") thatCRSCTL uses to match resource groups. For example, -w "TYPE =ora.database.type" or -w "NAME = cs1".
See Also: Filters for more information about filters
-n server Optionally, you can specify the name of the server to which resourcegroups reside that you want to evaluate.
-env "attr=val[,...]" You can optionally override one or more resource group profile attributevalues with the -env command parameter. If you specify multipleenvironment name-value pairs, then you must separate each pair with acomma and enclose the entire list in double quotation marks ("").
Appendix EDual Environment CRSCTL Commands
E-35

crsctl eval relocate resourcegroupPredicts the effect of relocating a resource group without making changes to thesystem.
Syntax
crsctl eval relocate resourcegroup {group_name | -all} -s server | -w filter} {-n server} [-f]
Parameters
Table E-23 crsctl eval relocate resourcegroup Command Parameters
Parameter Description
group_name Specify the name of a resource group that you want to evaluate.
-all Alternative to specifying a particular resource group, you can usethis parameter to evaluate relocating all resource groups.
-s server Specify the name of the source server on which the resource groupresides that you want to relocate. This parameter is required.
-w filter Alternative to specifying a particular resource group, you canspecify a resource group filter surrounded by double quotationmarks ("") that CRSCTL uses to match resource groups. Forexample, -w "TYPE = ora.database.type" or -w "NAME =cs1". This parameter is required if you do not use -s.
See Also: Filters for more information about filters
-n server Specify the name of the server to which you want to relocate theresource groups. This parameter is required.
–f Use this parameter to evaluate the operation with the force option.
crsctl eval start resourcegroupPredicts the effects of starting a resource group without making changes to thesystem.
Syntax
crsctl eval start resourcegroup {group_name | -w filter} [-n server] [-f]
Appendix EDual Environment CRSCTL Commands
E-36

Parameters
Table E-24 crsctl eval start resourcegroup Command Parameters
Parameter Description
group_name Specify a resource group or a number of resource groups in a space-delimited list that you want to evaluate. This parameter is required.
-w filter Alternatively, you can specify a resource group filter surrounded bydouble quotation marks ("") that CRSCTL uses to match resourcegroups. For example, -w "TYPE = ora.database.type" or -w "NAME= cs1". This parameter is required if you do not specify a particularresource group.
See Also: Filters for more information about filters
-n server Specify the name of the server on which the resource group you want toevaluate resides.
–f Use the -f parameter to evaluate a resource group on a server on whichone of the resources in the resource group you want to start has a hardstart dependency.
crsctl eval stop resourcegroupPredicts the effect of stopping a resource group without making changes to the system.
Syntax
crsctl eval stop resourcegroup {group_name | -w filter} [-f]
Parameters
Table E-25 crsctl eval stop resourcegroup Command Parameters
Parameter Description
group_name Specify a resource group or a number of resource groups in a space-delimited list that you want to stop.
-w "filter" Alternative to specifying a resource group, you can specify a resourcegroup filter surrounded by double quotation marks ("") that CRSCTLuses to match resource groups. For example, -w "TYPE =ora.database.type" or -w "NAME = cs1".
See Also: Filters for more information about using filters.
–f Use the -f parameter to stop a resource running on another server onwhich one of the resources in the resource group you want to stop has ahard stop dependency.
Appendix EDual Environment CRSCTL Commands
E-37

crsctl export resourcegroupExports the complete information and attributes of a resource groups and its memberresources to a script file.
This command also exports configuration information of the resource group type andmember resource types. You can run the script file on another cluster to import theresource group configuration.
Syntax
crsctl export resourcegroup [group_name [...]] –file file_name
Parameters
Table E-26 crsctl export resource Command Parameters
Parameter Description
group_name Specify a resource group or a number of resource groups in aspace-delimited list that you want to export.
–file file_name Specify a name for the output script file that you will run to importthe group.
crsctl modify resourcegroupModifies a resource group to add attributes or update the values of existing attributes.
Syntax
crsctl modify resourcegroup group_name -attr "attribute_name=attribute_value"} [-i] [-f] [-delete]
Parameters
Table E-27 crsctl modify resourcegroup Command Parameters
Parameter Description
group_name Specify the name of the resource group you want to modify.
Appendix EDual Environment CRSCTL Commands
E-38

Table E-27 (Cont.) crsctl modify resourcegroup Command Parameters
Parameter Description
-attr"attribute_name=attribute_value"
You can specify attributes for a resource group you want to modifyin two different ways:
• Following the -attr flag, you can specify one or more comma-delimited attribute name-value pairs to modify enclosed indouble quotations marks (""). For example:
-attr "CHECK_INTERVAL=30, START_TIMEOUT=25"
Some attributes can have multiple values. In those cases,separate the values with a space and enclose the list of valuesin single quotation marks. For example:
-attr "SERVER_POOL_NAMES='ora.pool1 ora.pool2',START_TIMEOUT=25"
• Alternatively, you can specify attribute values for resources ona particular server, with a particular cardinality value, and witha particular degree value. This method can be useful forapplications that are somehow tied to a particular server.Following the -attr flag, the syntax is as follows:
attribute_name{@SERVERNAME(server_name)[@DEGREEID(did)] | @CARDINALITYID(cid)[@DEGREEID(did)]}=attribute_value
If you specify the @SERVERNAME(server_name) syntax, thenthe attribute value you specify for the attribute you specify islimited to resources residing on the server you specify.
Alternatively, if you specify the @CARDINALITYID(cid)syntax, then the attribute value you specify for the attribute youspecify is limited to resource instances with a specificcardinality ID (cid).
Optionally, you can combine the @DEGREEID(did) syntax witheither the SERVERNAME or CARDINALITYID syntax, or both, tolimit the attribute value to resources with the specific DEGREE.
Examples:
CHECK_INTERVAL@SERVERNAME(node1)=45STOP_TIMEOUT@CARDINALITYID(2)=65STOP_TIMEOUT@SERVERNAME(node1)@DEGREEID(2)=65STOP_TIMEOUT@CARDINALITYID(3)@DEGREEID(2)=65
–i If you specify -i, then CRSCTL returns an error if processing thiscommand requires waiting for Oracle Clusterware to unlock theresource group or its dependents. Sometimes, Oracle Clusterwarelocks resource groups or other objects to prevent commands frominterfering with each other.
Appendix EDual Environment CRSCTL Commands
E-39

Table E-27 (Cont.) crsctl modify resourcegroup Command Parameters
Parameter Description
–f Use the -f parameter when:
• The resource group has a hard dependency on a non-existingresource.
• The owner of the resource group does not have executepermissions on one or more hard dependencies.
• The modification results in servers being moved into theGeneric pool and resources being stopped or relocated toaccomplish the server move.
–delete If you specify the -delete parameter, then Oracle Clusterwaredeletes the named attribute.
Usage Notes
You can modify the name of the resource group and add or change existing attributes.
crsctl relocate resourcegroupRelocates online resource groups from a source server to a target server.
This command first stops the resource groups you specify on the source server andthen starts them on the target server.
Syntax
crsctl relocate resourcegroup {group_name [...] [-k cid] | -all | -w "filter"} [-env "attr=val[,...]"] [-f] [-i]
Parameters
Table E-28 crsctl relocate resourcegroup Command Parameters
Parameter Description
group_name Specify a resource group or a number of resource groups in aspace-delimited list that you want to relocate.
-k cid Optionally, you can specify the resource group cardinality ID. If youspecify this parameter, then CRSCTL relocates the resourceinstances that have the cardinality you specify.
-all Specify this parameter to relocate all resource groups on thesource server.
-w "filter" Specify a resource group filter surrounded by double quotationmarks ("") that CRSCTL uses to match resource groups. Forexample, -w "TYPE = ora.database.type" or -w "NAME =cs1".
See Also: Filters for more information about filters
-ssource_server_name
Specify the name of the source server on which the resourcegroups reside that you want to relocate. This parameter is required.
Appendix EDual Environment CRSCTL Commands
E-40

Table E-28 (Cont.) crsctl relocate resourcegroup Command Parameters
Parameter Description
-ntarget_server_name
Optionally, you can specify the name of the server to which youwant to relocate the resource groups. If you do not specify a targetserver, then CRSCTL relocates the resource groups on the bestserver according to the attribute profile of each resource group.
-env"attr=val[,...]"
You can optionally override one or more resource group profileattribute values with the -env command parameter. If you specifymultiple environment name-value pairs, then you must separateeach pair with a comma and enclose the entire list in doublequotation marks ("").
–f Specify this option force the relocation of the resource groups youspecify.
–i If you specify -i, then the command returns an error if processingthis command requires waiting for Oracle Clusterware to unlock theresource or its dependents. Sometimes, Oracle Clusterware locksresources or other objects to prevent commands from interferingwith each other.
Example
To relocate all resource groups running on node1 to node2:
$ crsctl relocate resourcegroup resGrp1 -s node1 -n node2
crsctl restart resourcegroupRestarts resource groups on the server where they currently reside.
Syntax
crsctl restart resourcegroup {group_name [...] | -w "filter"} [-k cid] [-env "env1=val1,env2=val2,..."] [-f] [-i]
Parameters
Table E-29 crsctl restart resourcegroup Command Parameters
Parameters Description
group_name Specify a resource group or a number of resource groups in a space-delimited list that you want to restart.
-w "filter" Specify a resource group filter surrounded by double quotation marks("") that Oracle Clusterware uses to match resource groups. Forexample, -w "TYPE = ora.database.type" or -w "NAME = cs1".
See Also: Filters for more information about filters
-k cid Specify the resource group cardinality ID. If you specify this parameter,then Oracle Clusterware restarts the resource instances that have thecardinality you specify.
Appendix EDual Environment CRSCTL Commands
E-41

Table E-29 (Cont.) crsctl restart resourcegroup Command Parameters
Parameters Description
-env"env1=val1,env2=val2,..."
You can optionally override one or more resource group profile attributevalues with the -env command parameter. If you specify multipleenvironment name-value pairs, then you must separate each pair with acomma and enclose the entire list in double quotation marks ("").
–f Use the -f parameter to restart a resource, running on the server onwhich the resource group resides that you want to restart, that has ahard start dependency on another resource. If you do not specify theforce parameter in this case, then the start command fails.
–i If you specify -i, then the command returns an error if processing thiscommand requires waiting for Oracle Clusterware to unlock the resourceor its dependents. Sometimes, Oracle Clusterware locks resources orother objects to prevent commands from interfering with each other.
Example
The following command restarts resource group resGrp1:
$ crsctl restart resourcegroup resGrp1
crsctl start resourcegroupStarts one or more resource groups on specific or preconfigured servers or serverpools.
CRSCTL starts resource groups to which there is a hard or weak start dependency,and all enabled member resources of the group. This command reports progressmessages for each resource and resource group that CRSCTL starts.
Syntax
crsctl start resourcegroup {group_name [...] | -w "filter"] | -all} [-n server_name | -s server_pool] [-k cid] [-env "attr=val[,..."]] [-f] [-i] [-l]
Parameters
Table E-30 crsctl start resourcegroup Command Parameters
Parameter Description
group_name Specify a resource group or a number of resource groups in aspace-delimited list that you want to start.
-w "filter" Specify a resource group filter surrounded by double quotationmarks ("") that CRSCTL uses to match resource groups. Forexample, -w "TYPE = ora.database.type" or -w "NAME =cs1".
See Also: Filters for more information about filters
-all Specify this parameter to start all resource groups on the cluster.
Appendix EDual Environment CRSCTL Commands
E-42

Table E-30 (Cont.) crsctl start resourcegroup Command Parameters
Parameter Description
-n server_name Specify the name of the server on which the resource group youwant to start resides. If you do not specify a server, then CRSCTLstarts the resources on the best server according to the attributeprofile of each resource.
-s server_pool Specify a single server pool name or a space-delimited list ofserver pools in which a resource group resides that you want tostart.
-k cid Specify the resource group cardinality ID. If you specify thisparameter, then CRSCTL starts the resource instances that havethe cardinality you specify.
-env"attr=val[,...]"
You can optionally override one or more resource group profileattribute values with the -env command parameter. If you specifymultiple environment name-value pairs, then you must separateeach pair with a comma and enclose the entire list in doublequotation marks ("").
–f Use the -f parameter to start a resource group on a server onwhich one of the resources in the resource group you want to starthas a hard start dependency. If you do not specify the forceparameter in this case, then the start command fails.
–i If you specify -i, then the command returns an error if processingthis command requires waiting for Oracle Clusterware to unlock theresource or its dependents. Sometimes, Oracle Clusterware locksresources or other objects to prevent commands from interferingwith each other.
–l Use the -l parameter to leave the resource groups in the state theywere in if the start command fails.
Examples
To start a resource group in a server pool:
$ crsctl start resourcegroup rg1 -s pool1
crsctl status resourcegroupDisplays the state of resource groups.
Syntax
crsctl status resourcegroup [group_name [...] | -w "filter"] [-p [-attr "attribute_name=attribute_value" [-noname]] | -v [-attr "attribute_name=attribute_value"] [-noname]]] | [-f] [-l] [-g] | [[-k cid | -n server_name] [-e [-p | -v]]] [-s -k cid] | -noauto]]
Appendix EDual Environment CRSCTL Commands
E-43

Parameters
Table E-31 crsctl status resourcegroup Command Parameters
Parameter Description
group_name Specify a resource group or a number of resource groups in aspace-delimited list that you want to query. If you do not specify aresource group name or filters, then CRSCTL displays the statusfor all resource groups.
-w "filter" Specify a resource group filter surrounded by double quotationmarks ("") that Oracle Clusterware uses to match resource groups.For example, -w "TYPE = ora.database.type" or -w "NAME =cs1".
See Also: Filters for more information about filters
-p -attr"attribute_name=attribute_value" [-noname]-v [-attr"attribute_name=attribute_value"] [-noname]]
Optionally, you can specify this parameter to display the status forall member resources of a particular resource group.
–f Optionally, you can specify this parameter to display the fullconfiguration of the resource group.
-l-g-k cid Specify the resource group cardinality ID. If you specify this
parameter, then CRSCTL displays the status of the resourcegroups that have the cardinality you specify.
-n server_name–e Optionally, you can specify this parameter to exclude automatic
resource groups. The default is to display the status of all resourcegroups.
-p | -v-s -k cid-noauto
Example
The following command shows the status of resource group rg1, which resides onnode1:
$ crsctl status resourcegroup rg1 -n node1
Appendix EDual Environment CRSCTL Commands
E-44

crsctl stop resourcegroupStops one or more resource groups on optionally specified preconfigured servers or serverpools.
CRSCTL stops all member resources of the resource group. You must use the -f to stop theresource group if other resource groups have stop dependencies on it.
Syntax
crsctl stop resourcegroup {group_name [...] | -w "filter"] | -all} [-n server_name | -s server_pool] [-k cid] [-env "attr=val[,...]"] [-f] [-i] [-l]
Parameters
Table E-32 crsctl stop resourcegroup Command Parameters
Parameter Description
group_name Alternative to using -w or -all, you can specify a resource group or anumber of resource groups in a space-delimited list that you want tostop.
-w "filter" Alternative to specifying a resource group name or using -all, you canspecify a resource group filter surrounded by double quotation marks("") that CRSCTL uses to match resource groups. For example, -w"TYPE = ora.database.type" or -w "NAME = cs1".
See Also: Filters for more information about using filters.
-all Alternative to specifying a resource name or using -w, you can specifythis parameter to stop all resource groups on the cluster.
-n server_name Specify the name of the server on which the resource group you want tostop resides. If you do not specify a server, then CRSCTL stops theresources on the best server according to the attribute profile of eachresource.
-s server_pool Specify a single server pool name or a space-delimited list of serverpools in which a resource group resides that you want to stop.
-k cid Specify the resource group cardinality ID. If you specify this parameter,then Oracle Clusterware stops the resource instances that have thecardinality you specify.
-env "attr=val[,...]" You can optionally override one or more resource group profile attributevalues with the -env command parameter. If you specify multipleenvironment name-value pairs, then you must separate each pair with acomma and enclose the entire list in double quotation marks ("").
–f Use the -f parameter to stop a resource running on another server onwhich one of the resources in the resource group you want to stop has ahard stop dependency. If you do not specify the force parameter in thiscase, then the stop command fails.
–i If you specify -i, then the command returns an error if processing thiscommand requires waiting for Oracle Clusterware to unlock the resourceor its dependents. Sometimes, Oracle Clusterware locks resources orother objects to prevent commands from interfering with each other.
Appendix EDual Environment CRSCTL Commands
E-45

Table E-32 (Cont.) crsctl stop resourcegroup Command Parameters
Parameter Description
–l Use the -l parameter to leave the resource groups in the state theywere in if the stop command fails.
Example
The following command stops resource group rg1:
$ crsctl stop resourcegroup rg1
crsctl add resourcegrouptypeRegisters a new resource group type in Oracle Clusterware.
Oracle recommends that applications that are made up of multiple resources define aresource group type to obtain a distinct identity and also to create new group-levelattributes.
Syntax
crsctl add resourcegrouptype group_type_name –basetype base_group_type {-file file_path | -attr "attribute_name=attribute_value"} [-i]
Parameters
Table E-33 crsctl add resourcegrouptype Command Parameters
Parameter Description
group_type_name Specify the name of the resource group type.
–basetypebase_group_type
Specify the base group type of the resource group type.
-file file_path | -attr"attribute_name=attribute_value"
You must provide either a file or a list of attributes that define theresource group type.
Path name (either absolute or relative) for a text file containing line-delimited attribute name-value pairs that define the resource grouptype.
Following the -attr flag, you can specify one or more comma-delimited attribute name-value pairs enclosed in double quotationsmarks ("").
-i If you specify -i, then CRSCTL returns an error if processing thiscommand requires waiting for Oracle Clusterware to unlock theresource or its dependents. Sometimes, Oracle Clusterware locksresources or other objects to prevent commands from interferingwith each other.
Appendix EDual Environment CRSCTL Commands
E-46

crsctl delete resourcegrouptypeDeletes one or more resource group types from Oracle Clusterware.
Syntax
crsctl delete resourcegrouptype {"group_type_name [...]" | -w "filter" [-i]
Parameters
Table E-34 crsctl delete resourcegrouptype Command Parameters
Parameter Description
group_type_name Specify one or more group type names that you want to delete. Multiplegroup types must be space-delimited and enclosed in double quotationmarks ("").
-w "filter" Specify a resource filter that Oracle Clusterware uses to limit the numberof resources evaluated for deletion. The filter must be enclosed in doublequotation marks (""). Examples of resource filters include:
• "TYPE == cluster_resource": This filter limits OracleClusterware to relocate only resources of cluster_resource type
• "CHECK_INTERVAL > 10": This filter limits Oracle Clusterware torelocate resources that have a value greater than 10 for theCHECK_INTERVAL resource attribute
• "(CHECK_INTERVAL > 10) AND (NAME co 2)": This filter limitsOracle Clusterware to relocate resources that have a value greaterthan 10 for the CHECK_INTERVAL resource attribute and the name ofthe resource contains the number 2
Note: All operators must be surrounded by spaces.
See Also: Filters for more information about operators
-i If you specify -i, then CRSCTL returns an error if processing thiscommand requires waiting for Oracle Clusterware to unlock the resourceor its dependents. Sometimes, Oracle Clusterware locks resources orother objects to prevent commands from interfering with each other.
crsctl modify resourcegrouptypeModifies a resource group type to add attributes or update the values of existing attributes.
Syntax
crsctl modify resourcegrouptype group_type_name -attr "attribute_name=attribute_value"
Usage Notes
You can modify the name of the resource group type and add or change existing attributes.
Appendix EDual Environment CRSCTL Commands
E-47

crsctl get tracefileoptsReturns the tracing settings for a specific module.
Syntax
crsctl get tracefileopts module_name
Usage Notes
Specify one of the following modules to obtain tracing information:
mdns: Multicast domain name servergpnp: Grid Plug and Play servicecss: Cluster Synchronization Servicescrf: Cluster Health Monitorcrs: Cluster Ready Servicesctss: Cluster Time Synchronization Serviceevm: Event Managergipc: Grid Interprocess Communication
crsctl set tracefileoptsSets the tracing parameters for a specific module.
Syntax
crsctl set tracefileopts module_name [-filesize file_size[K|k|M|m|G|g]] [-numsegments number_of_segments]
Parameters
Table E-35 crsctl set tracefileopts Command Parameters
Parameter Description
module_name Specify one of the following modules to set tracing information:
mdns: Multicast domain name server
gpnp: Grid Plug and Play service
css: Cluster Synchronization Services
crf: Cluster Health Monitor
crs: Cluster Ready Services
ctss: Cluster Time Synchronization Service
evm: Event Manager
gipc: Grid Interprocess Communication
-filesize file_size Specify the size of a single trace file in kilobytes (K|k), megabytes(M|m), or gigabytes (G|g).
-numsegmentsnumber_of_segments
Specify the number of trace files to save before Oracle Clusterwarerotates the older files out.
Appendix EDual Environment CRSCTL Commands
E-48

crsctl add typeCreates a resource type in Oracle Clusterware.
Syntax
crsctl add type type_name -basetype base_type_name {-attr "ATTRIBUTE=attribute_name | -file file_path,TYPE={string | int} [,DEFAULT_VALUE=default_value][,FLAGS=typeFlags"} [-i]
Parameters
Table E-36 crsctl add type Command Parameters
Parameter Description
type_name Specify a name for the resource type in the form of xxx.yyy.type.Resource type names must be unique and cannot be changed after theresource type is registered.
-basetypebase_type_name
The name of an existing base type. Any resource type that you createmust either have local_resource or cluster_resource as its baseresource type.
Appendix EDual Environment CRSCTL Commands
E-49

Table E-36 (Cont.) crsctl add type Command Parameters
Parameter Description
-attr"ATTRIBUTE=attribute_name
You can specify the resource type attributes using the -attr argument.Each type attribute definition can contain up to four type attributekeywords that must be displayed in the order shown. Enter a comma-delimited description of one or more resource type attributes enclosed indouble quotation marks (""). The keywords for an attribute include:
1. ATTRIBUTE: Specify a name for the attribute. The name is case-sensitive and cannot contain spaces.
2. TYPE: Specify whether the attribute type is integer or string.
3. DEFAULT_VALUE: (Optional) If the attribute is required, then adefault value is not required. For attributes that are not required, youmust specify a default value that Oracle Clusterware uses when youcreate resources based on this resource type.
4. FLAGS: (Optional) Specify one or more of the following types,separated by a vertical bar (|):
CONFIG: After you register a resource with this resource type, youcan configure the attribute.
READONLY: After you register a resource with this resource type, youcannot modify this attribute.
REQUIRED: You must specify the name and value of this attributewhen you create a resource that is based on this resource type. Ifyou specify that this attribute is not required, then OracleClusterware uses the default value of this attribute that you specify.
HOTMOD: If you change the value of an attribute for resources of thistype, then the changes are applied immediately with the need torestart the resource.
You cannot use multiple -attr arguments to define multiple argumentsfor the resource type. Instead, you can specify multiple types within thedouble quotation marks after the -attr flag. For example:
"ATTRIBUTE=FOO,TYPE=integer,DEFAULT_VALUE=0,FLAGS=REQUIRED|HOTMOD,ATTRIBUTE=BAR,TYPE=string"
The preceding example defines two type attributes, FOO and BAR. Whenyou specify the ATTRIBUTE keyword, it ends the previous type attribute(if any) and begins a new type attribute.
Appendix EDual Environment CRSCTL Commands
E-50

Table E-36 (Cont.) crsctl add type Command Parameters
Parameter Description
-file file_path Path name (either absolute or relative) for a text file containing line-delimited resource type keyword-value pairs that define the resourcetype. An example of the contents of the file is:
ATTRIBUTE=FOOTYPE=integerDEFAULT_VALUE=0FLAGS=REQUIREDATTRIBUTE=BARTYPE=string
Note: The keywords must be in the following order: ATTRIBUTE, TYPE,DEFAULT_VALUE, and FLAGS. When you specify the ATTRIBUTEkeyword, it ends the previous type attribute (if any) and begins a newtype attribute.
The preceding example defines two type attributes, FOO and BAR.
Note: All operators must be surrounded by spaces.
See Also: "Filters" for more information about operators
–i If you specify -i, then the command fails if Oracle Clusterware cannotprocess the request immediately.
See Also:
"Oracle Clusterware Resource Types" for more information about resource types
Usage Notes
• Both the type_name and base_type_name parameters are required
• You can either specify a file containing the type information or you can specify the typeinformation on the command line
• Do not use this command for any resource types with names that begin with ora becausethese resource types are Oracle resource types
• You must have read permissions on the base type
Example
To create a resource type for demoActionScript:
# crsctl add type test_type1 -basetype cluster_resource -attr "ATTRIBUTE=FOO,TYPE=integer,DEFAULT_VALUE=0"
crsctl delete typeRemoves resource types from the Oracle Clusterware configuration.
Appendix EDual Environment CRSCTL Commands
E-51

Syntax
crsctl delete type type_name [-i]
Usage Notes
• The type_name parameter is required. You can specify more than one type byseparating each type by a space.
• If you specify -i, then the command fails if Oracle Clusterware cannot process therequest immediately.
• Do not use this command for any resource types with names that begin with orabecause these resource types are Oracle resource types.
Example
To delete two resource types, run the following command as a user who has writepermissions on the resource type:
$ crsctl delete type test_type1 test_type2
crsctl getperm typeObtains permissions for a particular resource type.
Syntax
crsctl getperm type resource_type [-u user_name] | [-g group_name]
Parameters
Table E-37 crsctl getperm type Command Parameters
Parameter Description
resource_type Specify the resource type for which you want to obtain permissions.
-u user_name If you specify -u, then Oracle Clusterware obtains permissions fora particular user.
-g group_name If you specify -g, then Oracle Clusterware obtains permissions fora particular group.
Usage Notes
• The resource_type parameter is required
• Do not use this command for any resource types with names that begin with orabecause these resource types are Oracle resource types
Appendix EDual Environment CRSCTL Commands
E-52

See Also:
"Oracle Clusterware Resource Types" for more information about resource types
Example
This command returns output similar to the following:
$ crsctl getperm type app.appvip.type
Name: app.appvip.typeowner:root:rwx,pgrp:oinstall:rwx,other::r--
crsctl modify typeModifies an existing resource type.
Syntax
crsctl modify type type_name -attr "ATTRIBUTE=attribute_name,TYPE={string | int} [,DEFAULT_VALUE=default_value [,FLAGS=[READONLY][| REQUIRED]]" [-i] [-f]]
Parameters
Table E-38 crsctl modify type Command Parameters
Parameter Description
type_name Specify the name of the resource type you want to modify. You cannotmodify resource type names.
–attr You can modify the following resource type keywords:
• TYPE• DEFAULT_VALUE• FLAGSNote: Although you must specify the ATTRIBUTE keyword, you cannotmodify it.
See Also: crsctl add type for descriptions of these keywords
–i If you specify the -i parameter, then the command fails if OracleClusterware cannot process the request immediately.
Usage Notes
• The type_name parameter is required
• Do not use this command for any resource types with names that begin with ora becausethese resource types are Oracle resource types
Appendix EDual Environment CRSCTL Commands
E-53

See Also:
"Oracle Clusterware Resource Types" for more information about resourcetypes
Example
The following example modifies the two type attributes FOO and BAR:
$ crsctl modify type myType.type -attr "ATTRIBUTE=FOO,DEFAULT_VALUE=0ATTRIBUTE=BAR,DEFAULT_VALUE=baz"
crsctl setperm typeSets permissions for resources of a particular resource type.
Syntax
crsctl setperm type resource_type_name {-u acl_string | -x acl_string |-o user_name | -g group_name}
Parameters
Table E-39 crsctl setperm type Command Parameters
Parameter Description
resource_type_name Specify the name of the resource type for which you want to setpermissions.
Appendix EDual Environment CRSCTL Commands
E-54

Table E-39 (Cont.) crsctl setperm type Command Parameters
Parameter Description
-u | -x | -o | -g You can specify only one of the following parameters for a resourcetype:
• -u acl_string: You can update the access control list (ACL)for a resource type
• -x acl_string: You can delete the ACL for a resource type
• -o user_name: You can change the owner of a resource typeby entering a user name
• -g group_name: You can change the primary group of aresource type by entering a group name
Specify a user, group, or other ACL string, as follows:
user:user_name[:readPermwritePermexecPerm] |group:group_name[:readPermwritePermexecPerm] |other[::readPermwritePermexecPerm]
• user: User ACL
• group: Group ACL
• other: Other ACL
• readPerm: Read permission for the resource type; the letter rgrants a user, group, or other read permission, the minus sign(-) denies read permission
• writePerm: Write permission for the resource type; the letter wgrants a user, group, or other write permission, the minus sign(-) denies write permission
• execPerm: Execute permission for the resource type; the letterx grants a user, group, or other execute permission, the minussign (-) denies execute permission
Usage Notes
• The resource_type_name parameter is required
• You must have read and write permissions on the specified resources to set theirpermissions
• Do not use this command for any resource types with names that begin with ora becausethese resource types are Oracle resource types
Example
To grant read, write, and execute permissions on a resource type for user Scott:
$ crsctl setperm type resType -u user:scott:rwx
crsctl status typeObtains the configuration information of one or more particular resource types.
Appendix EDual Environment CRSCTL Commands
E-55

Syntax
crsctl status type [resource_type_name [...] | -w "filter"] [-g] [-p] [-f] [-r]
Parameters
Table E-40 crsctl status type Command Parameters
Parameter Description
resource_type_name[...] | -w "filter"
Specify one or more space-delimited resource type names of whichyou want to check the status.
Alternatively, you can specify a resource type filter surrounded bydouble quotation marks ("") that CRSCTL uses to match resourcetypes. For example, -w "TYPE = ora.database.type".
See Also: "Filters" for more information
[-g] [-p] [-f] [-r] You can specify the following parameters as options when CRSCTLchecks the status of specific resource types:
• -g: Use this parameter to check if the specified resource typesare registered
• -p: Use this parameter to display static configuration of thespecified resource types
• -f: Use this parameter to display the full configuration of theresource types
• –r: Use this parameter to print all of the base types
Usage Notes
The resource_type_name parameter or a filter is required.
Example
The crsctl status type command returns output similar to the following:
$ crsctl status type ora.network.type
TYPE_NAME=ora.network.typeBASE_TYPE=ora.local_resource.type
Oracle RAC Environment CRSCTL CommandsYou can use the following commands only in an Oracle RAC environment.
The commands listed in this section manage the Oracle Clusterware stack in anOracle RAC environment, which consists of the following:
• Oracle Clusterware, the member nodes and server pools
• Oracle ASM (if installed)
• Cluster Synchronization Services
• Cluster Time Synchronization Services
Appendix EOracle RAC Environment CRSCTL Commands
E-56

crsctl request actionPerforms a specific action on specific resource.
Syntax
crsctl request action action_name {-r resource_name [...] | -w "filter"} [-env "env1=val1,env2=val2,..."] [-i]
Parameters
Table E-41 crsctl request action Command Parameters
Parameter Description
action_name Specify the name of the action you want perform. Actions supported by aparticular resource are listed in the ACTIONS resource attribute of thatresource.
-r resource_name[...]
Specify a particular resource. Multiple resource names must beseparated by a space.
-w "filter" Alternative to specifying resource names, you can specify a resourcefilter that Oracle Clusterware uses to limit the number of resources onwhich actions are performed. Examples of resource filters include:
• TYPE == cluster_resource: This filter limits Oracle Clusterwareto perform actions on only resources of cluster_resource type
• CHECK_INTERVAL > 10: This filter limits Oracle Clusterware toperform actions on only resources that have a value greater than 10for the CHECK_INTERVAL resource attribute
• (CHECK_INTERVAL > 10) AND (NAME co 2): This filter limitsOracle Clusterware to perform actions on only resources that have avalue greater than 10 for the CHECK_INTERVAL resource attributeand the name of the resource contains the number 2
See Also: "Filters" for more information
-env"env1=val1,env2=val2,..."
You can optionally override one or more resource profile attribute valueswith the -env command parameter. If you specify multiple environmentname-value pairs, then you must separate each pair with a comma andenclose the entire list in double quotation marks ("").
–i If you specify -i, then the command fails if Oracle Clusterware cannotprocess the request immediately.
Usage Notes
The action_name must be a supported action, defined both in the agent and in the ACTIONSresource attribute, and the user must have permission to run the action. You can setpermissions in the ACTIONS resource attribute.
Example
To initiate the specified action inside the application specific agent of a particular resource:
$ crsctl request action action1 -r res1
Appendix EOracle RAC Environment CRSCTL Commands
E-57

crsctl add categoryAdds a server category.
Syntax
crsctl add category category_name [-attr "attr_name=attr_value [,attr_name=attr_value[,...]]"] [-i]
Parameters
Table E-42 crsctl add category Command Parameters
Parameter Description
category_name Specify a name for the server category you want to add.
-attr"attr_name=attr_value[,...]"
Specify the name-value pair of a category attribute you want to addpreceded by the -attr flag.
Note: The attr_name and attr_value parameters must beenclosed in double quotation marks (""), and separate multiplename-value pairs with commas. For example:
-attr "EXPRESSION='(CPU_COUNT > 2) AND (MEMORY_SIZE > 2048)'"
See Also:• Table 3-4 for a list of attributes you can use with this command• "Filters" for information about operators
–i If you specify -i, then the command fails if Oracle Clusterwarecannot process the request immediately.
Usage Notes
If an attribute value for an attribute name-value pair contains commas, then the valuemust be enclosed in single quotation marks (''). For example:
"START_DEPENDENCIES='hard(res1,res2,res3)'"
Example
To add a server category:
$ crsctl add category cat1 -attr "EXPRESSION='(CPU_COUNT > 2) AND (MEMORY_SIZE > 2048)'"
crsctl delete categoryDeletes a server category.
Appendix EOracle RAC Environment CRSCTL Commands
E-58

Syntax
crsctl delete category category_name [category_name [...]] [-i]
Usage Notes
• Specify the name of the server category or a space-delimited list of server categories thatyou want to delete.
• If you specify -i, then the command fails if Oracle Clusterware cannot process therequest immediately.
Example
To delete a server category:
$ crsctl delete category blue_server -i
crsctl modify categoryModifies an existing server category.
Syntax
crsctl modify category category_name [-attr "attr_name=attr_value [,attr_name=attr_value[,...]]"] [-i] [-f]
Parameters
Table E-43 crsctl modify category Command Parameters
Parameter Description
category_name Specify the name of the server category you want to modify.
-attr"attr_name=attr_value[,...]"
Specify the name-value pair of a category attribute you want to modifypreceded by the -attr flag.
Note: The attr_name and attr_value parameters must be enclosedin double quotation marks (""), and separate multiple name-value pairswith commas. For example:
"ACL='owner:st-cdc\cdctest:rwx,pgrp::---',ACTIVE_CSS_ROLE=hub"
See Also:• Table 3-4 for a list of attributes you can use with this command• "Filters" for information about operators
–i If you specify -i, then the command fails if Oracle Clusterware cannotprocess the request immediately.
–f Use this parameter to force the operation.
Appendix EOracle RAC Environment CRSCTL Commands
E-59

Usage Notes
If an attribute value for an attribute name-value pair contains commas, then the valuemust be enclosed in single quotation marks (''). For example:
"START_DEPENDENCIESs=s'hard(res1,res2,res3)'"
Example
To modify a server category:
$ crsctl modify category blue_server -attr "EXPRESSION=(LOCATION=hub)"
crsctl status categoryObtains information about a server category.
Syntax
crsctl status category {category_name [category_name [...]] | [-w "filter" | -server server_name]}
Parameters
Table E-44 crsctl status category Command Parameters
Parameter Description
category_name [...] Specify the name of the server category or a space-delimited list ofserver categories for which you want to obtain the status.
-w "filter" Alternatively, you can specify a category filter preceded by the -wflag.
See Also: "Filters" for more information
-server server_name Alternatively, you can specify a particular server to list all of thecategories that the server matches.
Examples
To obtain the status of a server category using filters:
$ crsctl stat category -w "ACTIVE_CSS_ROLE = hub"
NAME=my_category_iACL=owner:scott:rwx,pgrp:svrtech:rwx,other::r--ACTIVE_CSS_ROLE = hubEXPRESSION=(CPU_COUNT > 3)
Appendix EOracle RAC Environment CRSCTL Commands
E-60

To obtain the status of a server category by server:
$ crsctl stat category -server node1
NAME=my_categoryACL=owner:scott:rwx,pgrp:svrtech:rwx,other::r--ACTIVE_CSS_ROLE = hubEXPRESSION=
To print all resources containing ASM:
$ crsctl stat res -w "NAME co asm" -t--------------------------------------------------------------------------------Name Target State Server State details -------------------------------------------------------------------------------- Cluster Resources--------------------------------------------------------------------------------ora.asm(ora.asmgroup)1 ONLINE ONLINE stbm000042-vm1 Started,STABLE2 ONLINE ONLINE stbm000042-vm2 Started,STABLE3 ONLINE ONLINE stbm000042-vm3 Started,STABLE ora.asmnet1.asmnetwork(ora.asmgroup) 1 ONLINE ONLINE stbm000042-vm1 STABLE2 ONLINE ONLINE stbm000042-vm2 STABLE3 ONLINE ONLINE stbm000042-vm3 STABLE--------------------------------------------------------------------------------
To print all resources containing db:
$ crsctl stat res -w "NAME co db" -t--------------------------------------------------------------------------------Name Target State Server State details -------------------------------------------------------------------------------- Cluster Resources--------------------------------------------------------------------------------ora.cdb19.db1 ONLINE ONLINE stbm000042-vm1 Open,HOME=/u01/app/oracle/product/19c/dbhome,STABLE2 ONLINE ONLINE stbm000042-vm2 Open,HOME=/u01/app/oracle/product/19c/dbhome,STABLE3 ONLINE ONLINE stbm000042-vm3 Open,HOME=/u01/app/oracle/product/19c/dbhome,STABLE4 ONLINE ONLINE stbm000042-vm4 Open,HOME=/u01/app/oracle/product/19c/dbhome,STABLE--------------------------------------------------------------------------------
Appendix EOracle RAC Environment CRSCTL Commands
E-61

To print all resources containing db and their state is ONLINE:
crsctl stat res -w "(NAME en db) AND (STATE = ONLINE)" -t--------------------------------------------------------------------------------Name Target State Server State details --------------------------------------------------------------------------------Cluster Resources--------------------------------------------------------------------------------ora.cdb19.db1 ONLINE ONLINE stbm000042-vm1 Open,HOME=/u01/app/oracle/product/19c/dbhome,STABLE2 ONLINE ONLINE stbm000042-vm2 Open,HOME=/u01/app/oracle/product/19c/dbhome,STABLE3 ONLINE ONLINE stbm000042-vm3 Open,HOME=/u01/app/oracle/product/19c/dbhome,STABLE4 ONLINE ONLINE stbm000042-vm4 Open,HOME=/u01/app/oracle/product/19c/dbhome,STABLE
crsctl check clusterChecks the status of the Oracle Clusterware stack from any node in the cluster.
Syntax
crsctl check cluster [-all | [-n server_name [...]]
Usage Notes
• You can check the status of the Oracle Clusterware stack on all nodes in thecluster with the -all parameter or you can specify one or more space-delimitednodes. If you do not specify either parameter, then Oracle Clusterware checks thestatus of the Oracle Clusterware stack on the local server.
• You can use this cluster-aware command on any node in the cluster.
Example
The crsctl check cluster command returns output similar to the following:
$ crsctl check cluster -all*****************************************************************node1:CRS-4537: Cluster Ready Services is onlineCRS-4529: Cluster Synchronization Services is onlineCRS-4533: Event Manager is online*****************************************************************node2:CRS-4537: Cluster Ready Services is onlineCRS-4529: Cluster Synchronization Services is onlineCRS-4533: Event Manager is online*****************************************************************
Appendix EOracle RAC Environment CRSCTL Commands
E-62

crsctl start clusterStarts the Oracle Clusterware stack when run on any node in the cluster.
Syntax
crsctl start cluster [[-all] | [-n server [...]] | -hub | -w "filter"]
Parameters
Table E-45 crsctl start cluster Command Parameters
Parameter Description
-all Use this parameter to start the Oracle Clusterware stack on all servers inthe cluster.
-n server [...] Optionally, you can specify one or more named servers in the cluster(separate multiple server names by a space), or the local server, if youdo not specify either -all or -n.
-hub Optionally, you can specify -hub to start the Oracle Clusterware stack onHub Nodes in the cluster.
-w "filter" Optionally, you can use this parameter to start only servers that match afilter, such as "ACTIVE_CSS_ROLE = hub".
See Also: Filters for more information about filters.
crsctl stop clusterStops the Oracle Clusterware stack on all servers in the cluster or specific servers when yourun the command on any node in the cluster.
Syntax
crsctl stop cluster [[-all] | [-n server [...]] | -hub | -w "filter"] [-f]
Parameters
Table E-46 crsctl stop cluster Command Parameters
Parameter Description
-all Use this parameter to start the Oracle Clusterware stack on all servers inthe cluster.
-n server [...] Optionally, you can specify one or more named servers in the cluster(separate multiple server names by a space), or the local server, if youdo not specify either -all or -n.
-hub Optionally, you can specify -hub to stop the Oracle Clusterware stack ona specific Hub Node in the cluster.
Appendix EOracle RAC Environment CRSCTL Commands
E-63

Table E-46 (Cont.) crsctl stop cluster Command Parameters
Parameter Description
-w "filter" Optionally, you can use this parameter to stop only servers that match afilter, such as "ACTIVE_CSS_ROLE = hub".
See Also: Filters for more information about filters.
Usage Notes
• If you do not specify -all or one or more space-delimited server names, thenOracle Clusterware stops the Oracle Clusterware stack on the local server.
• You can use this cluster-aware command on any node in the cluster.
• This command attempts to gracefully stop resources managed by OracleClusterware while attempting to stop the Oracle Clusterware stack.
If any resources that Oracle Clusterware manages are still running after you runthe crsctl stop cluster command, then the command fails. Use the -fparameter to unconditionally stop all resources and stop the Oracle Clusterwarestack.
• If you intend to stop Oracle Clusterware on all or a list of nodes, then use thecrsctl stop cluster command, because it prevents certain resources frombeing relocated to other servers in the cluster before the Oracle Clusterware stackis stopped on a particular server. If you must stop the Oracle High AvailabilityServices on one or more nodes, then wait until the crsctl stop clustercommand completes and then run the crsctl stop crs command on any particularnodes, as necessary.
Example
To stop the Oracle Clusterware stack on a particular server:
# crsctl stop cluster -n node1
crsctl get cluster classObtains cluster class information.
Syntax
crsctl get cluster class
Usage Notes
This command has no parameters.
crsctl get cluster configurationDisplays the cluster configuration information.
Appendix EOracle RAC Environment CRSCTL Commands
E-64

Syntax
crsctl get cluster configuration
Usage Notes
This command has no parameters.
crsctl set cluster disabledtlsciphersuiteAdds a cipher suite to or removes a cipher suite from a list of disabled cipher suites used tosecure inter-node communication.
Syntax
crsctl set cluster disabledtlsciphersuite add | delete cipher_suite_name
Usage Notes
Use the add or delete verb to perform the operation you want and specify the name of thecipher suite you want to add or remove.
crsctl get cluster extendedDetermines whether the cluster is an extended cluster.
Syntax
crsctl get cluster extended
Usage Notes
This command has no parameters.
Example
This command returns output similar to the following:
$ crsctl get cluster extendedCRS-XXXX: The cluster is 'EXTENDED'$ crsctl get cluster extendedCRS-XXXX: The cluster is 'NOT EXTENDED'
crsctl get cluster hubsizeObtains the value of Hub Nodes in an Oracle Flex Cluster.
Syntax
crsctl get cluster hubsize
Appendix EOracle RAC Environment CRSCTL Commands
E-65

Example
This command returns output similar to the following:
CRS-4950: Current hubsize parameter value is 32
crsctl set cluster hubsizeSets the maximum number of Hub Nodes for an Oracle Flex Cluster.
Syntax
crsctl set cluster hubsize
Example
The following command example sets the maximum number of Hub Nodes to 32:
$ crsctl set cluster hubsize 32
crsctl get cluster modeAscertains whether the cluster is configured for Oracle Flex Clusters or obtains thecurrent status.
Syntax
crsctl get cluster mode [config | status]
Usage Notes
• Specify the config option to obtain the mode in which the cluster is configured.
• Specify the status option to obtain the current status of the cluster.
crsctl set cluster modeChanges a standard cluster to an Oracle Flex Cluster.
Syntax
crsctl set cluster mode flex
Usage Notes
This command takes only the flex parameter, which is required.
crsctl get cluster nameDisplays the current cluster name.
Appendix EOracle RAC Environment CRSCTL Commands
E-66

Syntax
crsctl get cluster name
Usage Notes
This command has no parameters.
crsctl add cluster siteUse the crsctl add cluster site command to add a site to an extended cluster.
Syntax
$ crsctl add cluster site site_name [-guid site_guid]
Usage Notes
• You must specify a name for the site you are adding. Optionally, you can provide a GUIDfor the site.
• An extended cluster can have a maximum of five sites.
• You cannot run this command in a cluster that is not extended.
Examples
The following command example adds a site called SiteA to an extended cluster:
$ crsctl add cluster site SiteA
crsctl delete cluster siteUse the crsctl delete cluster site command to delete a specific site from an extendedcluster.
Syntax
$ crsctl delete cluster site site_name
Usage Notes
• You must specify the name of the site that you want to delete.
• You cannot run this command in a cluster that is not extended.
• You cannot delete a site that has nodes or disks. You must delete the nodes and drop thedisks before you can delete the site.
Appendix EOracle RAC Environment CRSCTL Commands
E-67

Examples
The following command deletes a site named SiteA from an extended cluster:
$ crsctl delete cluster site SiteA
crsctl modify cluster siteModifies the configuration of a site in an extended cluster.
Syntax
crsctl modify cluster site site_name {–n node1, node2, ... | -s {rejuvenate | quarantine} | [-local]}
Parameters
Table E-47 crsctl modify cluster site Command Parameters
Parameter Description
site_name Specify the name of the site you want to modify.
–n node1, node2, ... Specify this parameter to make a global change in Oracle ClusterRegistry (OCR) and also push the changes to the Oracle LocalRegistry (OLR) on all the nodes.
-s {rejuvenate |quarantine}
Specify a state for the site.
• rejuvenate: Use this option to enable a previouslyquarantined site.
A site is typically quarantined by Oracle Clusterware andOracle ASM when it detects a storage split.
• quarantine: Use this option if you want to explicitlyquarantine a site. Oracle Clusterware will not start anydatabase instances nor Oracle ASM on a quarantined site. Inthe event of a storage split, Oracle Clusterware detects thecondition and sets the site to quarantine status.
-local Optionally, you can specify this parameter to make changes only tothe Oracle Local Registry on the local node. Oracle provides thiscommand for certain scripts that can run this when OCR is notavailable or for a user, if the node goes down when a global changeis performed.
Examples
The following command example adds a node called node11 to the SiteA:
$ crsctl modify cluster site SiteA –n node1, node2,node11
crsctl query cluster siteDisplays site information in an extended cluster.
Appendix EOracle RAC Environment CRSCTL Commands
E-68

Syntax
$ crsctl query cluster site {site_name | -all}
Usage Notes
• You can specify a particular site by name or you use -all to get the information for all thesites in the extended cluster.
• The command returns the names of the sites, the site GUID, the site state, and thecomponents of the site.
• The Oracle Clusterware technology stack must be active and up to run this command.
• An extended cluster can have up to five sites.
Examples
This command returns output similar to the following:
$ crsctl query cluster site –allSite 'SiteA' identified by GUID '7b7b3bef4c1f5ff9ff8765bceb45433a' in state 'ONLINE' contains nodes 'node1,node2,node3', and disks 'disk1, disk2, disk3'.Site 'SiteB' identified by GUID '23453bef4c1f5ff9ff8765bceb45433a' in state 'QUARANTINED' contains nodes 'node4, node5, node6', and disks 'disk4, disk5, disk6'.Site 'SiteQ' identified by GUID '98763bef4c1f5ff9ff8765bceb45433a' in state 'ONLINE' contains no nodes and disk 'disk7'.Site 'SiteD' identified by GUID '4abcd453c6bc6fc1ffd3a58849d5ba41' in state 'ONLINE' contains nodes 'cuj1234' and no disk.
crsctl get cluster tlsciphersuiteLists available cipher suites used by transport layer security for securing inter-nodecommunication.
Syntax
crsctl get cluster tlsciphersuite [disabled|all]
Usage Notes
Optionally, you can specify disabled to list only those cipher suites disabled for use, or youcan specify all to list all cipher suites.
crsctl get cluster typeUse the crsctl get cluster type command to determine whether the cluster is an OracleFlex Cluster or an application cluster.
Syntax
crsctl get cluster type
Appendix EOracle RAC Environment CRSCTL Commands
E-69

This command returns the cluster type, either flex or application.
crsctl set cluster typeSets the type of the cluster.
Syntax
crsctl Set cluster type flex | application
Usage Notes
Specify either flex or application to choose which type of cluster you want to set.
crsctl get cpu equivalencyThe crsctl get cpu equivalency command obtains the value of theCPU_EQUIVALENCY server configuration attribute.
Syntax
crsctl get cpu equivalency
Example
This command returns output similar to the following:
$ crsctl get cpu equivalency
CRS-4963: Current cpu equivalency parameter value is 1000
Related Topics
• Server Configuration and Server State AttributesOracle Clusterware assigns each server a set of attributes as soon as you add aserver to a cluster.
crsctl set cpu equivalencyThe crsctl set cpu equivalency command sets a value for the CPU_EQUIVALENCYserver configuration attribute.
Syntax
crsctl set cpu equivalency number
Usage Notes
This command takes only a numerical value to set the CPU_EQUIVALENCY serverconfiguration attribute.
Appendix EOracle RAC Environment CRSCTL Commands
E-70

Example
The following example sets the value of the CPU_EQUIVALENCY server configuration attribute to2000:
$ crsctl set cpu equivalency 2000
CRS-4416: Server attribute 'CPU_EQUIVALENCY' successfully changed. Restart Oracle High Availability Services for new value to take effect.
Related Topics
• Server Configuration and Server State AttributesOracle Clusterware assigns each server a set of attributes as soon as you add a serverto a cluster.
crsctl get restricted placementThe crsctl get restricted placement command obtains the value of the placement policyfor resources that use WORKLOAD_CPU server configuration attribute.
Syntax
crsctl get restricted placement
Example
This command returns output similar to the following:
$ crsctl get restricted placementCRS-46857: Current restricted placement value (of PACK_FLAVOR attribute) is 'spread'
Related Topics
• Server Configuration and Server State AttributesOracle Clusterware assigns each server a set of attributes as soon as you add a serverto a cluster.
crsctl set restricted placementThe crsctl set restricted placement command sets a value for the placement policy forresources that use the WORKLOAD_CPU server configuration attribute.
Syntax
crsctl set restricted placement {fill|spread}
Options
Appendix EOracle RAC Environment CRSCTL Commands
E-71

Option Description
fill Sets the placement policy for WORKLOAD_CPUresources to the value of fill.
spread Sets the placement policy for WORKLOAD_CPUresources to the value of spread.
Usage Notes
Specify either fill or spread to set the value of the placement policy for resourcesthat use the WORKLOAD_CPU attribute.
Example
The following example sets the value of the placement policy for resources that useWORKLOAD_CPU to fill.
$ crsctl set restricted placement fill
Related Topics
• Server Configuration and Server State AttributesOracle Clusterware assigns each server a set of attributes as soon as you add aserver to a cluster.
crsctl check crsChecks the status of Oracle High Availability Services and the Oracle Clusterwarestack on the local server.
Syntax
crsctl check crs
Example
This command returns output similar to the following:
CRS-4638: Oracle High Availablity Services is onlineCRS-4537: Cluster Ready Services is onlinCRS-4529: Cluster Synchronization Services is onlineCRS-4533: Event Manager is online
crsctl config crsDisplays Oracle High Availability Services automatic startup configuration.
Syntax
crsctl config crs
Appendix EOracle RAC Environment CRSCTL Commands
E-72

Example
This command returns output similar to the following:
CRS-4622: Oracle High Availability Services autostart is enabled.
crsctl disable crsPrevents the automatic startup of Oracle High Availability Services when the server boots.
Syntax
crsctl disable crs
Usage Notes
• This command only affects the local server
• If you disable Oracle High Availability Services automatic startup, you must use the crsctlstart crs command to start Oracle High Availability Services
Example
This command returns output similar to the following:
CRS-4621: Oracle High Availability Services autostart is disabled.
crsctl enable crsEnables automatic startup of Oracle High Availability Services when the server boots.
Syntax
crsctl enable crs
Usage Notes
This command only affects the local server
Example
This command returns output similar to the following:
CRS-4622: Oracle High Availability Services autostart is enabled.
crsctl start crsStarts Oracle High Availability Services on the local server.
Appendix EOracle RAC Environment CRSCTL Commands
E-73

Syntax
crsctl start crs [-excl [-nocrs] [-cssonly]] | [-wait | -waithas | -nowait] | [-noautostart]
Parameters
Table E-48 crsctl start crs Command Parameters
Parameter Description
-excl [-nocrs] [-cssonly]
Starts Oracle Clusterware in exclusive mode with two options:
• Specify the -nocrs parameter to start Oracle Clusterware inexclusive mode without starting CRSD.
• Specify the -cssonly parameter to start CSSD, only.
-wait | -waithas | -nowait
Choose one of the following:
• Specify -wait to wait until startup is complete and display allprogress and status messages.
• Specify -waithas to wait until startup is complete and displayOHASD progress and status messages.
• Specify -nowait to not wait for OHASD to start
-noautostart Start only OHASD.
Usage Notes
• You must run this command as root• This command starts Oracle High Availability Services only on the local server
Example
To start Oracle High Availability Services on the local server:
# crsctl start crs
crsctl stop crsStops Oracle High Availability Services on the local server.
Syntax
crsctl stop crs [-f]
Usage Notes
• You must run this command as root.
• This command attempts to gracefully stop resources managed by OracleClusterware while attempting to stop Oracle High Availability Services on the localserver.
If any resources that Oracle Clusterware manages are still running after you runthe crsctl stop crs command, then the command fails. Use the -f parameter to
Appendix EOracle RAC Environment CRSCTL Commands
E-74

unconditionally stop all resources and stop Oracle High Availability Services on the localserver.
• If you intend to stop Oracle Clusterware on all or a list of nodes, then use the crsctl stopcluster command, because it prevents certain resources from being relocated to otherservers in the cluster before the Oracle Clusterware stack is stopped on a particularserver. If you must stop the Oracle High Availability Services on one or more nodes, thenwait until the crsctl stop cluster command completes and then run the crsctl stopcrs command on any particular nodes, as necessary.
• Before attempting to shut down the Oracle Clusterware technology stack on all nodeswith an Oracle ASM instance running in parallel in an Oracle Clusterware standardCluster with Oracle Flex ASM enabled, you must first relocate at least one Oracle ASMinstance to another node where Oracle ASM is not running.
• CRSCTL uses a shutdown abort stop option when running this command to improvehigh availability and failover times.
• If you shut down the database with SRVCTL, before you run crsctl stop crs, then youmust restart the resources after Oracle Clusterware comes up.
Example
To stop Oracle High Availability Services on the local server:
# crsctl stop crs
crsctl query crs activeversionDisplays the active version and the configured patch level of the Oracle Clusterware softwarerunning in the cluster.During a rolling upgrade, however, the active version is not advanced until the upgrade isfinished across the cluster, until which time the cluster operates at the pre-upgrade version.Additionally, during a rolling patch, the active patch level is not advanced until the patching isfinished across the cluster, until which time the cluster operates at the pre-upgrade patchlevel.
Syntax
crsctl query crs activeversion [-f]
Usage Notes
If you specify the -f parameter, then this command also prints the patch level for eachconfigured node in the cluster.
Example
This command returns output similar to the following:
Oracle Clusterware active version on the cluster is [12.2.0.1.0]. The clusterupgrade state is [NORMAL]. The cluster active patch level is [456789126].
Appendix EOracle RAC Environment CRSCTL Commands
E-75

States
The following table lists and describes Oracle Clusterware upgrade states that aredisplayed by the crsctl query crs activeversion -f command.
Table E-49 Oracle Clusterware Upgrade State Descriptions
State Description
NORMAL Oracle Clusterware upgrade has completed successfully and thecluster is ready for next patching or upgrade cycle.
FORCED Oracle Clusterware upgrade was completed forcibly on allreachable nodes, while one or more cluster nodes wereunreachable.
You can either upgrade or delete the unreachable cluster nodes tochange the upgrade state from FORCED to NORMAL.
ROLLING PATCH Oracle Clusterware is in the middle of a rolling patch.
ROLLING UPGRADE Oracle Clusterware is in the middle of a rolling upgrade.
UPGRADE FINAL Oracle Clusterware upgrade and the root script execution hascompleted successfully, and the installer is performing the finalupgrade steps.
FORCED UPGRADE FINAL Oracle Clusterware upgrade and the root script execution hascompleted successfully on all reachable nodes, while one or morecluster nodes were unreachable. The installer is performing thefinal upgrade steps.
ROLLING PATCH DURINGROLLING UPGRADE
Oracle Clusterware is being patched in the middle of a rollingupgrade.
UPGRADE AV UPDATED Oracle Clusterware active version has updated to latest version andthe root script is performing the final upgrade steps.
FORCED UPGRADE AVUPDATED
Oracle Clusterware active version has updated forcibly to latestversion on all reachable nodes, while one or more nodes wereunreachable. The root script is performing the final upgrade steps.
crsctl add crs administratorAdds a user to the list of cluster administrators.
Syntax
crsctl add crs administrator -u user_name [-f]
Parameters
Table E-50 crsctl add crs administrator Command Parameters
Parameter Description
-u user_name The name of the user to whom you want to give Oracle Clusterwareadministrative privileges.
-f Use this parameter to override the user name validity check.
Appendix EOracle RAC Environment CRSCTL Commands
E-76

Usage Notes
• This command is deprecated in Oracle Clusterware 12c and later releases.
• You must run this command as root or a cluster administrator, or an administrator onWindows systems
• By default, root, the user that installed Oracle Clusterware, and the * wildcard aremembers of the list of users who have Oracle Clusterware administrative privileges. Runthe crsctl delete crs administrator command to remove the wildcard and enable role-separated management of Oracle Clusterware.
Example
To add a user to the list of Oracle Clusterware administrators:
# crsctl add crs administrator -u scott
Related Topics
• Role-Separated ManagementRole-separated management is an approach to managing cluster resources andworkloads in a coordinated fashion in order to reduce the risks of resource conflicts andshortages.
crsctl delete crs administratorRemoves a user from the list of Oracle Clusterware administrators.
Syntax
crsctl delete crs administrator -u user_name [-f]
Parameters
Table E-51 crsctl delete crs administrator Parameters
Parameter Description
-u user_name The name of the user whose Oracle Clusterware administrativeprivileges you want to remove.
By default, the list of users with Oracle Clusterware administrativeprivileges consists of the user who installed Oracle Clusterware, root,and *. The user who installed Oracle Clusterware and root arepermanent members this list. The * value gives Oracle Clusterwareadministrative privileges to all users and must be removed to enablerole-separated management.
-f Use this parameter to override the user name validity check.
Usage Notes
• The user_name parameter is required
• You must run this command as root or a cluster administrator, or an administrator onWindows systems
Appendix EOracle RAC Environment CRSCTL Commands
E-77

• To enable role-separated management, you must remove the * value enclosed indouble quotation marks ("")
Example
To remove a user from the list of cluster administrators:
# crsctl delete crs administrator -u scott
See Also:
"Role-Separated Management"
crsctl query crs administratorDisplays the list of users with Oracle Clusterware administrative privileges.
Syntax
crsctl query crs administrator
Usage Notes
Add additional information about the command here.
Example
This command returns output similar to the following:
CRS Administrator List: scott
crsctl query crs autostartObtains the values of the Oracle Clusterware automatic resource start criteria.
Syntax
crsctl query crs autostart
Example
This command returns output similar to the following:
'Autostart delay': 60'Autostart servercount': 2
Appendix EOracle RAC Environment CRSCTL Commands
E-78

crsctl set crs autostartSets the Oracle Clusterware automatic resource start criteria.The autostart delay and minimum server count criteria delay Oracle Clusterware resourceautostart until one of the two conditions are met.
Syntax
crsctl set crs autostart [delay delay_time] [servercount count]
Parameters
Table E-52 crsctl set crs autostart Command Parameters
Parameter Description
delay delay_time Specify the number of seconds to delay Oracle Clusterware autostart.
servercount count Specify the minimum number of servers required for Oracle Clusterwareautostart.
Example
To ensure that Oracle Clusterware delays resource autostart for 60 seconds after the firstserver in the cluster is ONLINE:
$ crsctl set crs autostart delay 60
To ensure that Oracle Clusterware waits for there to be at least two servers ONLINE before itinitiates resource autostart:
$ crsctl set crs autostart servercount 2
To ensure that Oracle Clusterware delays resource autostart until either of the previous twoconditions are met (in no particular order):
$ crsctl set crs autostart delay 60 servercount 2
crsctl query crs releasepatchDisplays the patch level which is updated in the Grid home patch repository while patching anode.The patch level corresponds to only the local node on which you run the command. You canrun this command while the Oracle Clusterware stack is not running.
Syntax
crsctl query crs releasepatch
Appendix EOracle RAC Environment CRSCTL Commands
E-79

Example
This command returns output similar to the following for a node which has no patchesapplied:
Oracle Clusterware release patch level is [3180840333] and the complete list ofpatches is [13559647] on the local node.
crsctl query crs releaseversionDisplays the version of the Oracle Clusterware software stored in the binaries on thelocal node.
Syntax
crsctl query crs releaseversion
Example
This command returns output similar to the following:
Oracle High Availablity Services release version on the local node is [12.2.0.1.0]
crsctl query crs siteUse the crsctl query crs site command to determine to which site a specific hostor disk belongs.
Syntax
crsctl query crs site {-n host_name | -d disk_name}
Usage Notes
• You must specify either a host name or a disk name.
• The Oracle Clusterware technology stack must be active to run this command.
Examples
This command returns output similar to the following:
$ crsctl query crs site –n hostAHost 'hostA' is a part of site 'SiteA'
crsctl query crs softwarepatchDisplays the configured patch level of the installed Oracle Clusterware.
Appendix EOracle RAC Environment CRSCTL Commands
E-80

Syntax
crsctl query crs softwarepatch [host_name]
Usage Notes
You can optionally specify a host name to display the patch level of Oracle Clusterwareinstalled on that particular host. Otherwise, CRSCTL displays the patch level of OracleClusterware installed on the local host.
Example
This command returns output similar to the following:
Oracle Clusterware patch level on node [node1] is [456789126]
crsctl query crs softwareversionDisplays the latest version of the software that has been successfully started on the specifiednode.
Syntax
crsctl query crs softwareversion [node_name]
Usage Notes
If you do not provide a node name, then Oracle Clusterware displays the version of OracleClusterware running on the local server.
Example
This command returns output similar to the following:
Oracle Clusterware version on node [node1] is [12.2.0.1.0]
crsctl get cssObtains the value of a specific Cluster Synchronization Services parameter.
Syntax
crsctl get css parameter
Usage Notes
• Cluster Synchronization Services parameters and their default values include:
clusterguiddiagwaitdisktimeout (200 (seconds))
Appendix EOracle RAC Environment CRSCTL Commands
E-81

misscount (30 (seconds))reboottime (3 (seconds))priority (4 (UNIX), 3 (Windows))logfilesize (50 (MB))
• This command does not display default values.
• This command only affects the local server.
Example
This command returns output similar to the following:
$ crsctl get css disktimeoutCRS-4678: Successful get disktimeout 200 for Cluster Synchronization Services.
crsctl pin cssPins many specific nodes.Pinning a node means that the association of a node name with a node number isfixed. If a node is not pinned, its node number may change if the lease expires while itis down. The lease of a pinned node never expires.
Syntax
crsctl pin css -n node_name [ node_name [...]]
Usage Notes
• You can specify a space-delimited list of servers
• Any pre-12c release 1 (12.1) Oracle software must reside on a pinned server.
• A node may be unpinned with crsctl unpin css.
• Deleting a node with the crsctl delete node command implicitly unpins the node.
Example
To pin the node named node2:
# crsctl pin css -n node2
crsctl set cssSets the value of a Cluster Synchronization Services parameter.
Syntax
crsctl set css parameter value
Appendix EOracle RAC Environment CRSCTL Commands
E-82

Usage Notes
• Do not use the crsctl set css command to set the following parameters unlessinstructed to do so by My Oracle Support.
• Cluster Synchronization Services parameters include:
diagwaitdisktimeoutlogfilesizemisscountpriorityreboottime
crsctl unpin cssUnpins many servers.If a node is not pinned, its node number may change if the lease expires while it is down.
Syntax
crsctl unpin css -n node_name [node_name [...exit]]
Usage Notes
• You can specify a space-delimited list of nodes.
• Unpinned servers that stop for longer than a week are no longer reported by olsnodes.These servers are dynamic when they leave the cluster, so you do not need to explicitlyremove them from the cluster.
• Deleting a node with the crsctl delete node command implicitly unpins the node.
• During upgrade of Oracle Clusterware, all servers are pinned, whereas after a freshinstallation of Oracle Clusterware 12c or a later release, all servers you add to the clusterare unpinned.
• You cannot unpin a server that has an instance of Oracle RAC that is older than 12crelease 1 (12.1) if you installed Oracle Clusterware 12c or a later release on that server.
Example
To unpin two nodes:
$ crsctl unpin css -n node1 node4
crsctl unset cssUnsets the value of a Cluster Synchronization Services parameter and restores it to itsdefault value.
Syntax
crsctl unset css parameter
Appendix EOracle RAC Environment CRSCTL Commands
E-83

Usage Notes
• You can specify the following Cluster Synchronization Services parameters:
– diagwait– disktimeout– misscount– reboottime– priority– logfilesize
Example
To restore the reboottime Cluster Synchronization Services parameter to its defaultvalue:
$ crsctl unset css reboottime
crsctl get ipmi binarylocRetrieves the location of the ipmiutil binary.
Syntax
get ipmi binaryloc
Usage Notes
Run the command to retrieve the ipmiutil binary location on each node. A value isreturned only if the location has been previously set with the set ipmi binaryloccommand.
Examples
To retrieve the ipmiutil binary location on a node:
crsctl get ipmi binaryloc
crsctl set ipmi binarylocSets the location of the ipmiutil binary.
Syntax
set ipmi binaryloc binary_location
Usage Notes
Run the command to set the ipmiutil binary location on each node.
Appendix EOracle RAC Environment CRSCTL Commands
E-84

Before running any other CRSCTL commands that modify the IPMI configuration, the crsctlset ipmi binaryloc command must be run on all nodes where the binary location haschanged.
Examples
To set the ipmiutil binary location on a node:
crsctl set ipmi binaryloc /usr/bin/ipmiutil
crsctl get css ipmiaddrRetrieves the address stored in the Oracle Local Registry of the local Intelligent PlatformManagement Interface (IPMI) device.
Syntax
crsctl get css ipmiaddr
Usage Notes
• Run the command under the user account used to install Oracle Clusterware.
• This command only obtains the IP address stored in the Oracle Local Registry. It may notbe the IP address actually used by IPMI.
Use either ipmiutil or ipmitool as root on the local server to obtain the IP addressused by the IPMI device.
crsctl set css ipmiaddrStores the address of the local Intelligent Platform Management Interface (IPMI) device in theOracle Local Registry.
Syntax
crsctl set css ipmiaddr ip_address
Usage Notes
• Run the command under the user account used to install Oracle Clusterware
• Obtain the IP address used by the IPMI device using either ipmiutil or ipmitool asroot on the local server
• Oracle Clusterware stores the IP address for IPMI in the configuration store, anddistributes the address as required
• This command only stores the IPMI IP address on the server from which you run it
• This command fails if another server cannot access IPMI at the supplied address
Appendix EOracle RAC Environment CRSCTL Commands
E-85

Example
To store the IPMI IP address on a local server and distribute it to other cluster nodes:
$ crsctl set css ipmiaddr 192.0.2.244
crsctl set css ipmiadminStores the login credentials of an Intelligent Platform Management Interface (IPMI)administrator in the Oracle Local Registry.
Syntax
crsctl set css ipmiadmin ipmi_administrator_name
Usage Notes
• This command must be run under the user account that installed OracleClusterware.
• When prompted, provide the new password to associate with the newadministrator account name. Oracle Clusterware stores the name and passwordfor the local IPMI in the configuration store, and distributes the new credentials asrequired.
• This command only modifies the IPMI administrator on the server from which yourun it.
• This command fails if another server cannot access the local IPMI at the suppliedaddress.
Example
To modify the IPMI administrator scott:
$ crsctl set css ipmiadmin scott
crsctl query css ipmiconfigDetermines whether Oracle Clusterware on the local server has been configured touse IPMI for failure isolation.Note that this command detects the presence of configuration data, but cannot notvalidate its correctness.
Syntax
crsctl query css ipmiconfig
Usage Notes
• This command attempts to locate and access the IPMI configuration stored in theOracle Cluster Registry (OCR) and should be executed under the account used toinstall Oracle Clusterware, or an authorization failure may be reported.
Appendix EOracle RAC Environment CRSCTL Commands
E-86

• An authorization failure may not result when executed under another account, if theregistry contains no IPMI configuration data.
Example
This command returns output similar to the following:
CRS-4236: Oracle Clusterware configured to use IPMI
Or:
CRS-4237: Oracle Clusterware is not fully configured to use IPMI
crsctl unset css ipmiconfigClears all previously stored IPMI configuration (login credentials and IP address) from theOracle Local Registry.
Prerequisites
This is appropriate when deconfiguring IPMI in your cluster or if IPMI configuration waspreviously stored by the wrong user.
Syntax
crsctl unset css ipmiconfig
Usage Notes
• This command must be run under the user account originally used to configure IPMI orby a privileged user.
• This command only clears the IPMI configuration on the server on which you run it.
• If Oracle Clusterware was able to access and use the configuration data to be deleted bythis command, then it will continue to do so until you restart Oracle Clusterware.
Example
To clear the IPMI configuration data from the Oracle Local Registry and restart OracleClusterware to prevent further use of IPMI, log in as root or a member of the Administrator'sgroup on Windows and run the following commands:
# crsctl unset css ipmiconfig# crsctl stop crs# crsctl start crs
crsctl query css ipmideviceDetermines the presence of the Intelligent Platform Management Interface (IPMI) driver onthe local system.
Appendix EOracle RAC Environment CRSCTL Commands
E-87

Syntax
crsctl query css ipmidevice
Usage Notes
• This command performs a pre-check during IPMI installation, and is normallyissued only by the installer.
• This command performs a perfunctory check and a success return does notguarantee that the IPMI hardware is fully configured for use.
• There are no special privileges required to run this command.
Example
This command returns output similar to the following:
CRS-4231: IPMI device and/or driver found
Or:
CRS-4218: Unable to access an IPMI device on this system
crsctl get css noautorestartLists the problems for which automatic restart of Cluster Synchronization Services isdisabled.
Syntax
crsctl get css noautorestart
Usage Notes
• This command has no parameters.
• CRSCTL returns one of three possible values:
all: Auto restart is disabled for any problem.interconnect: Auto restart is disabled when an interconnect problem occurs.vf: Auto restart is disabled when a voting files problem occurs.
crsctl set css noautorestartStops the automatic restart of Cluster Synchronization Services when a specificproblem occurs.
Syntax
crsctl set css noautorestart {all | interconnect | vf | none}
Appendix EOracle RAC Environment CRSCTL Commands
E-88

Usage Notes
Specify one of the following values:
all: Disables automatic restart when any problem occurs.interconnect: Disables automatic restart when an interconnect problem occurs.vf: Disables automatic restart when a voting files problem occurs.none: Enables Cluster Synchronization Services automatic restart.
crsctl delete css votediskRemoves a voting file from the Oracle Clusterware configuration.
Syntax
crsctl delete css votedisk {voting_disk_GUID [...] | vdisk [...] | +diskgroup}
Parameters
Table E-53 crsctl delete css votedisk Command Parameters
Parameter Description
voting_disk_GUID[...]
Specify the file universal identifier (GUID) of the voting file you want toremove. Specify multiple GUIDs in a space-delimited list.
vdisk [...] Alternatively, specify the path of the voting file you want to remove.Specify multiple voting file paths in a space-delimited list.
+diskgroup Alternatively, specify the name of an Oracle ASM disk group thatcontains voting files you want to remove. You can only use parameterwhen Oracle Clusterware is in exclusive mode.
Usage Notes
• You can specify one or more GUIDs of voting files you want to remove, one or morepaths to voting files you want to remove, or the name of an Oracle ASM disk group thatcontains voting files you want to remove.
• You can obtain the GUIDs of each current voting file by running the crsctl query css votediskcommand
Example
To remove a voting file using a GUID:
$ crsctl delete css votedisk 26f7271ca8b34fd0bfcdc2031805581e
crsctl query css votediskDisplays the voting files used by Cluster Synchronization Services, the status of the votingfiles, and the location of the disks, whether they are stored in Oracle ASM or elsewhere.
Appendix EOracle RAC Environment CRSCTL Commands
E-89

Syntax
crsctl query css votedisk
Example
This command returns output similar to the following:
## STATE File Universal Id File Name Disk group-- ----- ----------------- --------- ---------1. ONLINE 296641fd201f4f3fbf3452156d3b5881 (/ocfs2/host09_vd3) []2. ONLINE 8c4a552bdd9a4fd9bf93e444223146f2 (/netapp/ocrvf/newvd) []3. ONLINE 8afeee6ae3ed4fe6bfbb556996ca4da5 (/ocfs2/host09_vd1) []Located 3 voting file(s).
crsctl check ctssChecks the status of the Cluster Time Synchronization services.
Syntax
crsctl check ctss
Example
This command returns output similar to the following:
CRS-4700: The Cluster Time Synchronization Service is in Observer mode.
Or:
CRS-4701: The Cluster Time Synchronization Service is in Active mode.CRS-4702: Offset from the reference node (in msec): 100
crsctl discover dhcpSends DHCP discover packets on the network at the specified port. If DHCP serversare present on the network, then they respond to the discovery message and thecommand succeeds.
Syntax
crsctl discover dhcp -clientid clientid [-port port] [-subnet subnet]
Appendix EOracle RAC Environment CRSCTL Commands
E-90

Parameters
Table E-54 crsctl discover dhcp Command Parameters
Parameter Description
-clientid clientid Specify the client ID for which you want to attempt discovery. Obtain theclient ID by running the crsctl get clientid dhcp command.
-port port Specify the port to which CRSCTL sends the discovery packets.
-subnet subnet Optionally, you can specify the subnet on which DHCP discover packetsare sent.
Usage Notes
You must run this command as root.
Example
This command returns output similar to the following:
CRS-10009: DHCP server returned server: 192.168.53.232, loan address : 192.168.29.221/255.255.252.0, lease time: 43200
crsctl get clientid dhcpDisplays the client ID that the Oracle Clusterware agent uses to obtain the IP addresses fromthe DHCP server for configured cluster resources. The VIP type is required.
Syntax
crsctl get clientid dhcp -cluname cluster_name -viptype vip_type[-vip vip_res_name] [-n node_name]
Parameters
Table E-55 crsctl get clientid dhcp Command Parameters
Parameter Description
-cluname cluster_name Specify the name of the cluster where the cluster resources areconfigured.
-viptype vip_type Specify the type of the VIP resource for which you want to display clientIDs: HOSTVIP, SCANVIP, or APPVIP.
-vip vip_res_name Specify the name of the VIP resource. This parameter is required if youspecify the APPVIP VIP type.
-n node_name Specify the name of the node for which you want to obtain the client ID.This parameter is required if you specify the HOSTVIP VIP type.
Appendix EOracle RAC Environment CRSCTL Commands
E-91

Example
This command returns output similar to the following:
CRS-10007: stmjk0462clr-stmjk01-vip
crsctl release dhcpSends a DHCP lease release request to a specific client ID, and sends releasepackets on the network to a specific port.
Syntax
crsctl release dhcp -clientid clientid [-port port]
Parameters
Table E-56 crsctl release dhcp Command Parameters
Parameter Description
-clientid clientid Specify the client ID for which you want to attempt release. Obtainthe client ID by running the crsctl get clientid command.
-port port The port to which CRSCTL sends the release packets. If you do notspecify a port, then CRSCTL uses the default value 67.
Example
This command returns output similar to the following:
CRS-10012: released DHCP server lease for client ID stmjk0462clr-stmjk01-vipon port 67
crsctl request dhcpSends DHCP request packets on the network to the specified port.If the DHCP server has an IP address it can provide, then it responds with the IPaddress for the client ID.
Syntax
crsctl request dhcp -clientid clientid [-port port]
Appendix EOracle RAC Environment CRSCTL Commands
E-92

Parameters
Table E-57 crsctl request dhcp Command Parameters
Parameter Description
-clientid clientid Specify the client ID for which you want to attempt request. Obtain theclient ID by running the crsctl get clientid command.
-port port Optionally, you can specify the port to which CRSCTL sends the requestpackets. If you do not specify a port, then CRSCTL uses the defaultvalue 67.
Example
This command returns output similar to the following:
CRS-10009: DHCP server returned server: 192.168.53.232,loan address : 192.168.29.228/255.255.252.0, lease time: 43200
crsctl replace discoverystringReplaces the existing discovery string used to locate voting files.
Syntax
crsctl replace discoverystring "absolute_path[,...]"
Usage Notes
• Specify one or more comma-delimited absolute paths that match one or more voting filelocations. You can use wild cards and a list of paths must be enclosed in doublequotation marks ("").
• You must be root, the Oracle Clusterware installation owner, or a member of theAdministrators group to run this command.
• You can run this command on any node in the cluster.
• If you store voting files in an Oracle ASM disk group, then you cannot change thediscovery string.
Example
Assume the current discovery string is /oracle/css1/*. To also use voting files in the /oracle/css2/ directory, replace the current discovery string using the following command:
# crsctl replace discoverystring "/oracle/css1/*,/oracle/css2/*"
crsctl query dnsObtains a list of addresses returned by DNS lookup of the name with the specified DNSserver.
Appendix EOracle RAC Environment CRSCTL Commands
E-93

Syntax
crsctl query dns -name name [-dnsserver DNS_server_address] [-type query_type][-port port] [-attempts number_of_attempts] [-timeout timeout_in_seconds] [-v]
Parameters
Table E-58 crsctl query dns Command Parameters
Parameter Description
-name name Specify the fully-qualified domain name that you want to query.
-dnsserverDNS_server_address
Optionally, you can specify the address of the DNS server on whichyou want the domain name to be queried.
-type query_type Optionally, you can select either IPv4 or IPv6 by specifying either Aor AAAA, respectively, as a query type.
-port port Optionally, you can specify the port on which the DNS serverlistens. If you do not specify a port, then it defaults to port 53.
-attemptsnumber_of_attempts
Optionally, you can specify the number of retry attempts.
-timeouttimeout_in_seconds
Optionally, you can specify the timeout length in seconds.
–v Verbose output.
Example
The crsctl query dns command returns output similar to the following for a DNSserver named stmjk07-vip.stmjk0462.example.com:
CRS-10024: DNS server returned 192.168.29.250 for namestmjk07-vip.stmjk0462.example.com
crsctl start ipStarts a given IP name or IP address on a specified interface with a specified subnetmask.Run this command on the server on which you want to start the IP.
Syntax
crsctl start ip -A {IP_name | IP_address}/netmask/interface_name
Appendix EOracle RAC Environment CRSCTL Commands
E-94

Parameters
Table E-59 crsctl start ip Command Parameters
Parameter Description
IP_name | IP_address Specify either a domain name or an IP address preceded by -A. If youdo not specify a fully-qualified domain name, then CRSCTL uses astandard name search.
/netmask/interface_name
Specify a subnet mask and an interface name for the IP to start,separated by a forward slash (/). This pair must also be preceded by aforward slash.
Example
To start an IP on the local server, run the command similar to the following:
$ crsctl start ip -A 192.168.29.220/255.255.252.0/eth0
crsctl status ipChecks if a given IP address is up on the network.
Syntax
crsctl status ip -A {IP_name | IP_address}
Usage Notes
Specify either a domain name or an IP address preceded by –A. If you do not specify a fully-qualified domain name, then CRSCTL uses a standard name search.
Example
This command returns output similar to the following:
CRS-10003: IP address 192.168.29.220 could be reached from current node
crsctl stop ipStops a given IP name or IP address on a specified interface with a specified subnet mask.Run this command on the server on which you want to stop the IP.
Syntax
crsctl stop ip -A {IP_name | IP_address}/interface_name
Appendix EOracle RAC Environment CRSCTL Commands
E-95

Parameters
Table E-60 crsctl stop ip Command Parameters
Parameter Description
IP_name | IP_address Specify either a domain name or an IP address preceded by -A. Ifyou do not specify a fully-qualified domain name, then CRSCTLuses a standard name search.
interface_name Specify an interface on which to stop the IP.
Example
To stop an IP on the local server, run the command similar to the following:
$ crsctl stop ip -A MyIP.example.com/eth0
crsctl lsmodulesLists the components of the modules that you can debug.
Syntax
crsctl lsmodules {mdns | gpnp | css | crf | crs | ctss | evm | gipc}
Usage Notes
You can obtain a list of components for any of the following modules:
mdns: Multicast domain name servergpnp: Grid Plug and Play servicecss: Cluster Synchronization Servicescrf: Cluster Health Monitorcrs: Cluster Ready Servicesctss: Cluster Time Synchronization Serviceevm: Event Managergipc: Grid Interprocess Communication
Example
This command returns output similar to the following:
$ crsctl lsmodules evmList EVMD Debug Module: CLSVERList EVMD Debug Module: CLUCLSList EVMD Debug Module: COMMCRSList EVMD Debug Module: COMMNSList EVMD Debug Module: CRSOCRList EVMD Debug Module: CSSCLNTList EVMD Debug Module: EVMAGENT
Appendix EOracle RAC Environment CRSCTL Commands
E-96

List EVMD Debug Module: EVMAPP...
Related Topics
• Dynamic Debugging Using crsctl set log
crsctl create member_cluster_configurationCreates the configuration deployment file for a new member cluster.
Syntax
crsctl create member_cluster_configuration member_cluster_name -file cluster_manifest_file -member_type database | application [-version member_cluster_version] [-domain_services [asm_storage local | direct | indirect] [rhp] [acfs]
Parameters
Table E-61 crsctl create member_cluster_configuration Command Parameters
Parameter Description
member_cluster_name Specify the name of the new member cluster.
-filecluster_manifest_file
Specify the path of the cluster manifest file (including the .xmlextension) you want to create.
-member_type database| application
Specify the type of member cluster you want to create. If you choosedatabase, then you can use the cluster to deploy Oracle databases. Ifyou choose application, then you can use the cluster to only deployapplications.
-versionmember_cluster_version
Optionally, you can specify the five-digit version of Oracle GridInfrastructure (such as 12.2.0.1.0) on the new member cluster, if isdifferent from that of the domain services cluster.
-domain_services[asm_storage local |direct | indirect][rhp] [acfs]
Optionally, you can specify services to be initially configured for thismember cluster. If you do not use the -domain_services parameter,then CRSCTL only configures the Grid Infrastructure ManagementRepository and TFA services.
Additionally, you can optionally specify the Oracle ASM storage accesspath for the database member clusters.
local: Storage is local to the cluster
direct or indirect: Choose direct or indirect access to storageprovided on the domain services cluster
Optionally, you can choose rhp to generate credentials and configurationfor a Fleet Patching and Provisioning Client cluster.
Optionally, you can choose acfs for an indirect-access Member Clusterto utilize Oracle ACFS Remote to provide storage to the Member Cluster.
crsctl delete member_cluster_configurationDeletes a member cluster configuration.
Appendix EOracle RAC Environment CRSCTL Commands
E-97

Syntax
crsctl delete member_cluster_configuration member_cluster_name [-f]
Usage Notes
You must specify the name of the member cluster you want to delete and you canoptionally use -f to force the delete operation.
crsctl query member_cluster_configurationDisplays the configuration for a member cluster.
Syntax
crsctl query member_cluster_configuration [member_cluster_name]
Usage Notes
If you choose not to specify a particular member cluster by name, then CRSCTLdisplays the details of all the member clusters.
Example
This command returns output similar to the following:
$ crsctl query member_cluster_configuration
indirect-mc0 12.2.0.1.0 66cdb4efd2f77f7affe559cc56003a14 ASM,GIMR,TFAindirect-mc1 12.2.0.1.0 2b85c6ac63434f30bfa6d074bb337621 ASM,GIMR,TFAindirect-mc2 12.2.0.1.0 d883e65af9ffff1fbf67e922e99bd6e4 ASM,GIMR,TFAindirect-mc3 12.2.0.1.0 60dcca80166aff0cffaf8e33213bfacb ASM,GIMR,TFAindirect-mc4 12.2.0.1.0 78d64e1454505f3effda0136738f325e ASM,GIMR,TFA
crsctl delete nodeRemoves a node from the cluster.
Syntax
crsctl delete node -n node_name [-purge]
Usage Notes
• You must be root to run this command
• The node_name parameter is required
Appendix EOracle RAC Environment CRSCTL Commands
E-98

• Use the -purge option to delete the node permanently and to reuse its node number.However, if you want to add the deleted node back with the same node name and thesame node number, then do not use the -purge option.
Example
To delete the node named node06 from the cluster, run the following command as root:
# crsctl delete node -n node06
crsctl get nodenameObtains the name of the local node.
Syntax
crsctl get nodename
Example
This command returns output similar to the following:
node2
crsctl get node roleObtains the configured node role of nodes in the cluster.
Syntax
crsctl get node role {config | status} [node node_name | -all]
Usage Notes
• Specify the config option to obtain the configured node role for a specific node.
• Specify the status option to obtain the current status of a specific node.
• You can specify a particular node for which to obtain role information or you can use -allto obtain information for all nodes in the cluster. If you do not specify a particular node,then CRSCTL returns information about the local node.
Examples
This command returns output similar to the following:
$ crsctl get node role config -allNode 'mjkeenan_node5_0' configured role is 'hub'Node 'mjkeenan_node5_1' configured role is 'hub'Node 'mjkeenan_node5_2' configured role is 'hub'Node 'mjkeenan_node5_3' configured role is 'hub'
$ crsctl get node role status -all
Appendix EOracle RAC Environment CRSCTL Commands
E-99

Node 'mjkeenan_node5_0' active role is 'hub'Node 'mjkeenan_node5_2' active role is 'hub'Node 'mjkeenan_node5_3' active role is 'hub'
$ crsctl get node role config -node mjkeenan_node5_1Node 'mjkeenan_node5_1' configured role is 'hub'
crsctl add policyAdds a configuration policy to the policy set.
Syntax
crsctl add policy policy_name -attr "attr_name=attr_value[,attr_name=attr_value[, ...]]"
Parameters
Table E-62 crsctl add policy Command Parameters
Parameter Description
policy_name Specify a name for the policy you want to add.
attr_name Specify a description for the policy using the DESCRIPTION policyattribute preceded by the -attr flag.
attr_value A value for the DESCRIPTION policy attribute that describes thepolicy.
Note: The attr_name and attr_value parameters must beenclosed in double quotation marks ("") and separated bycommas. For example:
-attr "DESCRIPTION=daytime"
Usage Notes
• Adding a policy does not activate the policy
• The policy_name parameter is required
• Privileges necessary to run this command depend on the value of the ACL attributeof the policy set
Example
To add a policy:
$ crsctl add policy nightTime -attr "DESCRIPTION=nighttime"
crsctl delete policyDeletes a configuration policy from the policy set.
Appendix EOracle RAC Environment CRSCTL Commands
E-100

Syntax
crsctl delete policy policy_name [policy_name [...]] [-i]
Usage Notes
• Specify a name for the policy or a space-delimited list of policy names you want to delete.The policy_name parameter is required.
• If you specify -i, then the command fails if Oracle Clusterware cannot process therequest immediately.
• Privileges necessary to run this command depend on the value of the ACL attribute of thepolicy set.
Example
To delete a policy, run the following command as root or the Oracle Clusterware installationowner:
# crsctl delete policy nightTime
crsctl eval activate policyPredicts the effects of activating a specific policy without making changes to the system.
This command may be useful to cluster administrators.
Syntax
crsctl eval activate policy policy_name [-f] [-admin [-l serverpools | resources | all] [-x] [-a]] [-explain]
Parameters
Table E-63 crsctl eval activate policy Command Paramaters
Parameter Description
-f Specify this parameter to evaluate what happens if you try to forciblyactivate a policy.
Appendix EOracle RAC Environment CRSCTL Commands
E-101

Table E-63 (Cont.) crsctl eval activate policy Command Paramaters
Parameter Description
-admin [-lserverpools |resources | all] [-x][-a]
You must specify -admin if you specify any combination of -l, -x, and -a.
If you specify the -l parameter, then you can choose one of the followingthree output levels:
• serverpools: Restricts the output to servers running in a serverpool
• resources: Restricts the output to resources running on servers ina server pool
• all: Displays all available output
If you specify the -x parameter, then CRSCTL displays the differences.
If you specify the -a parameter, then CRSCTL displays all resources.
-explain Specify this parameter to display reasoned command evaluationinformation.
Example
This command returns output similar to the following:
$ crsctl eval activate policy p2 -explain
Stage Group 1:---------------------------------------------------------------------------Stage Required Action---------------------------------------------------------------------------1 E Starting to evaluate activation of policy 'p2' with server pools (MIN_SIZE, MAX_SIZE) 'Free(0,-1),sp1(2,-1),sp2(4,-1)'. E Looking at other server pools to see whether MIN_SIZE value 4 of server pool 'sp2' can be met. E Scanning server pools with MIN_SIZE or fewer servers in ascending order of IMPORTANCE. E Considering server pools (IMPORTANCE): sp1(0) for suitable servers. E Considering server pool 'sp1' because its MIN_SIZE is 2 and it has 0 servers above MIN_SIZE. E Relocating server 'mjkeenan_node1_0' to server pool 'sp2'. E Scanning server pools with MIN_SIZE or fewer servers in ascending order of IMPORTANCE. E Considering server pools (IMPORTANCE): sp1(0) for suitable servers. E Considering server pool 'sp1' because its MIN_SIZE is 2 and it has 0 servers above MIN_SIZE. E Relocating server 'mjkeenan_node1_1' to server pool 'sp2'.2 Y Resource 'cs2' (3/1) will be in state 'ONLINE|INTERMEDIATE'
Appendix EOracle RAC Environment CRSCTL Commands
E-102

on server 'mjkeenan_node1_0'. Y Resource 'cs2' (4/1) will be in state 'ONLINE|INTERMEDIATE' on server 'mjkeenan_node1_1'.3 Y Server 'mjkeenan_node1_0' will be moved from pool 'sp1' to pool 'sp2'. Y Server 'csivanan_node1_1' will be moved from pool 'sp1' to pool 'sp2'.---------------------------------------------------------------------------
Related Topics
• How Server Pools Work
crsctl modify policyModifies an existing configuration policy.
Syntax
crsctl modify policy policy_name -attr "attr_name=attr_value"
Parameters
Table E-64 crsctl modify policy Command Parameters
Parameter Description
policy_name Specify the name of the policy you want to modify.
attr_name Specify a description for the policy using the DESCRIPTION policyattribute following the -attr flag.
attr_value A value for the DESCRIPTION policy attribute that describes the policy.
Note: The attr_name and attr_value parameters must be enclosedin double quotation marks ("") and separated by commas. For example:
-attr "DESCRIPTION=daytime"
Usage Notes
• The policy_name parameter is required
• Privileges necessary to run this command depend on the value of the ACL attribute of thepolicy set
Example
To modify an existing policy, run the following command as root or the Oracle Clusterwareinstallation owner:
# crsctl modify policy p1 -attr "DESCRIPTION=daytime"
Appendix EOracle RAC Environment CRSCTL Commands
E-103

crsctl status policyObtains the status and definition of a configuration policy.
Syntax
crsctl status policy [policy_name [...]] | -w "filter" | -active]
Parameters
Table E-65 crsctl status policy Command Parameters
Parameter Description
policy_name [...] Specify the name of the policy or a space-delimited list of policynames for which you want to view the status.
-w "filter" Alternatively, you can specify a policy filter preceded by the -w flag.
See Also: "Filters" for more information
-active Alternatively, you can specify this parameter to display the status ofthe active policy.
Usage Notes
Privileges necessary to run this command depend on the value of the ACL attribute ofthe policy set.
crsctl create policysetCreates a single policy set, in the form of a text file, that reflects the server poolconfiguration.After you create a policy set, you can copy the contents of the text file to create otherpolicy sets.
Syntax
crsctl create policyset -file path_to_file
Usage Notes
Specify a path to where CRSCTL creates a file that you can edit and then send backusing crsctl modify policyset to add, delete, or update policies.
Example
To create a policy set:
$ crsctl create policyset -file /tmp/ps
crsctl modify policysetModifies an existing policy set.
Appendix EOracle RAC Environment CRSCTL Commands
E-104

Syntax
crsctl modify policyset {-attr "attr_name=attr_value[,attr_name=attr_value[, ...]]" | -file file_name} [-ksp] [-f]
Parameters
Table E-66 crsctl modify policyset Command Parameters
Parameter Description
attr_name The name of a policy attribute you want to modify following the -attrflag. With this command, you can specify any of the following attributes:
ACLLAST_ACTIVATED_POLICYSERVER_POOL_NAMES
attr_value A value for the policy attribute.
Note: The attr_name and attr_value parameters must be enclosedin double quotation marks ("") and separated by commas. For example:
-attr "ACL='owner:mjkeenan:rwx,pgrp:svrtech:rwx,other::r--',SERVER_POOL_NAMES=sp1 sp2 Free"
-file file_name If you specify this parameter instead of -attr, then enter a name of afile that contains policy set definitions.
-ksp If you specify this parameter, then CRSCTL keeps the server pools in thesystem, which means that they are independent and not managed by thepolicy set.
–f Specify this parameter to force enable policy set modifications.
Usage Notes
• Privileges necessary to run this command depend on the value of the ACL attribute of thepolicy set
• You can only specify policy definitions using the -file parameter or by running the crsctlmodify policy command
Example
To modify an existing policy set, run the following command as root or the OracleClusterware installation owner:
# crsctl modify policyset –file my_policy_set.def
Appendix EOracle RAC Environment CRSCTL Commands
E-105

crsctl status policysetObtains the current policies in the policy set, including the access control list, whichgoverns who can modify the set, the last activated policy, and the configuration whichis now in effect, which is known as the Current policy.
Syntax
crsctl status policyset [-file file_name]
Usage Notes
• You can specify this parameter to create a file that you can edit and then sendback using crsctl modify policyset to add, delete, or update multiple policies. If you donot specify this optional parameter, then CRSCTL displays the Currentconfiguration.
• Privileges necessary to run this command depend on the value of the ACL attributeof the policy set.
Example
This command returns output similar to the following:
ACL=owner:'mjkeenan:rwx,pgrp:g900:rwx,other::r--'LAST_ACTIVATED_POLICY=DayTimeSERVER_POOL_NAMES=Free pool1 pool2 pool3POLICYNAME=DayTimeDESCRIPTION=Test policySERVERPOOL NAME=pool1 IMPORTANCE=0 MAX_SIZE=2 MIN_SIZE=2 SERVER_CATEGORY= SERVER_NAMES=SERVERPOOL NAME=pool2 IMPORTANCE=0 MAX_SIZE=1 MIN_SIZE=1 SERVER_CATEGORY=SERVERPOOL NAME=pool3 IMPORTANCE=0 MAX_SIZE=1 MIN_SIZE=1 SERVER_CATEGORY=POLICYNAME=NightTimeDESCRIPTION=Test policySERVERPOOL NAME=pool1
Appendix EOracle RAC Environment CRSCTL Commands
E-106

IMPORTANCE=0 MAX_SIZE=1 MIN_SIZE=1 SERVER_CATEGORY=SERVERPOOL NAME=pool2 IMPORTANCE=0 MAX_SIZE=2 MIN_SIZE=2 SERVER_CATEGORY=SERVERPOOL NAME=pool3 IMPORTANCE=0 MAX_SIZE=1 MIN_SIZE=1 SERVER_CATEGORY=POLICYNAME=WeekendDESCRIPTION=Test policySERVERPOOL NAME=pool1 IMPORTANCE=0 MAX_SIZE=0 MIN_SIZE=0 SERVER_CATEGORY=SERVERPOOL NAME=pool2 IMPORTANCE=0 MAX_SIZE=1 MIN_SIZE=1 SERVER_CATEGORY=SERVERPOOL NAME=pool3 IMPORTANCE=0 MAX_SIZE=3 MIN_SIZE=3 SERVER_CATEGORY=
crsctl check resourceInitiates the check action inside the application-specific agent of a particular resource.Oracle Clusterware only provides output if something prevents the system from issuing thecheck request, such as a bad resource name.
Syntax
crsctl check resource {resource_name [...] | -w "filter"} [-n node_name] [-k cardinality_id] [-d degree_id]
Appendix EOracle RAC Environment CRSCTL Commands
E-107

Parameters
Table E-67 crsctl check resource Command Parameters
Parameter Description
resource_name [...] Specify a particular resource. You can check multiple resources byentering a space-delimited list of resource names.
-w "filter" Specify a resource filter that Oracle Clusterware uses to limit thenumber of resources checked. The filter must be enclosed indouble quotation marks (""). Examples of resource filters include:
• "TYPE == cluster_resource": This filter limits OracleClusterware to check only resources of cluster_resourcetype
• "CHECK_INTERVAL > 10": This filter limits OracleClusterware to check resources that have a value greater than10 for the CHECK_INTERVAL resource attribute
• "(CHECK_INTERVAL > 10) AND (NAME co 2)": This filterlimits Oracle Clusterware to check resources that have a valuegreater than 10 for the CHECK_INTERVAL resource attributeand the name of the resource contains the number 2
See Also: "Filters" for more information
-n node_name Check the resource instance on a specific node. If you do notspecify the -n parameter, then Oracle Clusterware checks theresource instances only on the local server.
-k cardinality_id Specify the resource cardinality ID.
-d degree_id Specify the resource degree ID.
Usage Notes
• You must have read and execute permissions on the specified resources to checkthem.
• Do not use this command for any resources with names that begin with orabecause these resources are Oracle resources.
• If this command is successful, it only means that a check was issued; it does notmean the CHECK action was completed.
Example
To initiate the check action inside the application-specific agent of a particularresource:
$ crsctl check resource appsvip
crsctl relocate resourceRelocates resources to another server in the cluster.
Appendix EOracle RAC Environment CRSCTL Commands
E-108

Syntax
crsctl relocate resource {resource_name [-k cid] | {resource_name | -all} -s source_server | -w "filter"} [-n destination_server] [-env "env1=val1,env2=val2,..."] [-i] [-f]
Parameters
Table E-68 crsctl relocate resource Command Parameters
Parameter Description
resource_name [-kcid]
Specify the name of a resource you want to relocate.
Optionally, you can also specify the resource cardinality ID. If you specifythis parameter, then Oracle Clusterware relocates the resource instancethat have the cardinality you specify.
resource_name | -all-s source_server
Alternatively, you can specify one particular resource or all resourceslocated on a particular server that you specify from which you want torelocate those resources.
-w "filter" Alternatively, you can specify a resource filter that Oracle Clusterwareuses to limit the number of resources relocated. The filter must beenclosed in double quotation marks (""). Examples of resource filtersinclude:
• "TYPE == cluster_resource": This filter limits OracleClusterware to relocate only resources of cluster_resource type
• "CHECK_INTERVAL > 10": This filter limits Oracle Clusterware torelocate resources that have a value greater than 10 for theCHECK_INTERVAL resource attribute
• "(CHECK_INTERVAL > 10) AND (NAME co 2)": This filter limitsOracle Clusterware to relocate resources that have a value greaterthan 10 for the CHECK_INTERVAL resource attribute and the name ofthe resource contains the number 2
See Also: "Filters" for more information
-n destination_server Specify the name of the server to which you want relocate resources. Ifyou do not specify a destination server, then Oracle Clusterwarerelocates the resources to the best server according to the attributeprofile of each resource.
-env"env1=val1,env2=val2,..."
You can optionally override one or more resource profile attribute valuesfor this command. If you specify multiple environment name-value pairs,then you must separate each pair with a comma and enclose the entirelist in double quotation marks ("").
–i If you specify -i, then the command returns an error if processing thiscommand requires waiting for Oracle Clusterware to unlock the resourceor its dependents. Sometimes, Oracle Clusterware locks resources orother objects to prevent commands from interfering with each other.
–f Specify the -f parameter to force the relocating of the resource when ithas other resources running that depend on it. Dependent resources arerelocated or stopped when you use this parameter.
Note: When you are relocating resources that have cardinality greaterthan 1, you must use either -k or -s to narrow down which resourceinstances are to be relocated.
Appendix EOracle RAC Environment CRSCTL Commands
E-109

Usage Notes
• Any one of the three following options is required to specify which resources youwant to relocate:
– You can specify one particular resource to relocate.
– Or you can specify one particular or all the resources to relocate from aparticular source server.
– Thirdly, you can specify a resource filter that Oracle Clusterware uses tomatch resources to relocate.
• If a resource has a degree ID greater than 1, then Oracle Clusterware relocates allinstances of the resource.
• You must have read and execute permissions on the specified resources torelocate them.
• Do not use this command for any resources with names that begin with orabecause these resources are Oracle resources.
Example
To relocate one particular resource from one server to another:
# crsctl relocate resource myResource1 -s node1 -n node3
crsctl get resource useChecks the current setting value of the RESOURCE_USE_ENABLED server configurationparameter.
Syntax
crsctl get resource use
Usage Notes
The possible values are 1 or 0. If the value for this attribute is 1, which is the default,then the server can be used for resource placement. If the value is 0, then OracleClusterware disallows starting server pool resources on the server. The server remainsin the Free server pool.
Example
This command returns output similar to the following:
CRS-4966: Current resource use parameter value is 1
crsctl set resource useSets the value of the RESOURCE_USE_ENABLED server configuration parameter for theserver on which you run this command.
Appendix EOracle RAC Environment CRSCTL Commands
E-110

Syntax
crsctl set resource use [1 | 0]
Usage Notes
• The possible values are 1 or 0. If you set the value for this attribute to 1, which is thedefault, then the server can be used for resource placement. If you set the value to 0,then Oracle Clusterware disallows starting server pool resources on the server. Theserver remains in the Free server pool.
• You must run this command as root or a cluster administrator, or an administrator onWindows systems.
Example
To set the value of the RESOURCE_USE_ENABLED server configuration parameter:
# crsctl set resource use 1
crsctl start rollingpatchTransitions Oracle Clusterware and Oracle ASM into rolling patch mode.
Note:
crsctl start rollingpatch and crsctl stop rollingpatch should not be rundirectly except under the direction of Oracle Support. These commands are invokedas part of rootcrs.pl -prepatch/-postpatch which orchestrates patching on eachnode.
In this mode, the software tolerates nodes having different patch levels.
Syntax
crsctl start rollingpatch
Usage Notes
• This command queries the Oracle Clusterware rolling patch state and Oracle ASM clusterstate. If either one is not in rolling patch mode, then it will use the appropriate method totransition Oracle Clusterware or Oracle ASM to rolling patch mode.
• If Oracle Clusterware and Oracle ASM are both in rolling patch mode when you run thiscommand, then this command does nothing.
• The rolling patch mode is not persistent. If all the nodes in a cluster are shut down andrestarted, then the cluster transitions out of rolling patch mode when it is restarted.Similarly, if Oracle Clusterware is stopped and then restarted on all nodes in the cluster,then the rolling patch mode is lost.
Appendix EOracle RAC Environment CRSCTL Commands
E-111

• This command does not transition Oracle ASM to rolling patch mode if issuedwithin an Oracle ASM Client Cluster.
crsctl stop rollingpatchTransitions Oracle Clusterware and Oracle ASM out of rolling patch mode.
Note:
crsctl start rollingpatch and crsctl stop rollingpatch should not berun directly except under the direction of Oracle Support. These commandsare invoked as part of rootcrs.pl -prepatch/-postpatch which orchestratespatching on each node.
After the software transitions out of rolling patch mode, it does not tolerate nodeshaving different patch levels.
Syntax
crsctl stop rollingpatch
Usage Notes
• This command queries the Oracle Clusterware rolling patch state and Oracle ASMcluster state. If either one is in rolling patch mode, then it will use the appropriatemethod to transition Oracle Clusterware or Oracle ASM out of rolling patch mode.
• This command verifies that all the nodes in the cluster have a consistent patchlevel, and returns an error otherwise.
• If neither Oracle Clusterware or Oracle ASM are in rolling patch mode when youissue this command, then this command does nothing.
• This command does not transition Oracle ASM out of rolling patch mode if issuedwithin an Oracle ASM Client Cluster.
crsctl start rollingupgradeTransitions Oracle Clusterware and Oracle ASM into rolling upgrade mode.
Note:
This command should not be invoked directly except under the direction ofOracle Support. It is invoked by the rootupgrade scripts as part of theupgrade.
Syntax
crsctl start rollingupgrade version
Appendix EOracle RAC Environment CRSCTL Commands
E-112

Usage Notes
• This command queries the Oracle Clusterware rolling upgrade state and Oracle ASMcluster state. If either one is not in rolling upgrade mode, then it will use the appropriatemethod to transition Oracle Clusterware or Oracle ASM to rolling upgrade mode.
• If Oracle Clusterware and Oracle ASM are both in rolling upgrade mode when you runthis command, then this command does nothing.
• This command does not transition Oracle ASM to rolling upgrade mode if run within anOracle ASM Client Cluster.
crsctl eval add serverSimulates the addition of a server without making changes to the system.
This command may be useful to cluster administrators.
Syntax
crsctl eval add server server_name [-file file_path] | [-attr "attr_name=attr_value[,...]"] [-admin [-l level [-x] [-a]] [-explain]
Parameters
Table E-69 crsctl eval add server Command Parameters
Parameter Description
server_name The name of the server you want to add.
-file file_path Fully-qualified path to a file containing server attributes.
-attr"attr_name=attr_value[,...]"
Alternatively, you can specify the name of a server attribute you want tomodify preceded by the -attr flag, followed by a value for the serverattribute.
Note: The attr_name=attr_value name-value pairs must beenclosed in double quotation marks (""). Multiple name-value pairs mustbe separated by commas. For example:
-attr "MAX_SIZE=30,IMPORTANCE=25"
Appendix EOracle RAC Environment CRSCTL Commands
E-113

Table E-69 (Cont.) crsctl eval add server Command Parameters
Parameter Description
-admin [-l level] [-x] [-a]
If you specify this parameter, then CRSCTL displays output for thecluster administrator.
If you specify the -l parameter, then you can choose one of the followingthree output levels:
• serverpools: Restricts the output to servers running in a serverpool
• resources: Restricts the output to resources running on servers ina server pool
• all: Displays all available output
If you specify the -x parameter, then CRSCTL displays the differences.
If you specify the -a parameter, then CRSCTL displays all resources.
Note: To specify either the -l, -x, or -a parameters, or any combinationof the three, you must specify the -admin parameter.
-explain Specify this parameter to display reasoned command evaluationinformation.
Example
This command returns output similar to the following:
$ crsctl eval add server scott_node5_0
Stage Group 1:---------------------------------------------------------------------------Stage Required Action---------------------------------------------------------------------------1 E Looking for a suitable server pool for server 'scott_node5_0'. E Scanning server pools with MIN_SIZE or more servers in descending order of IMPORTANCE. E Considering server pools (IMPORTANCE): Free(0) for relocating servers. E Relocating server 'scott_node5_0' to server pool 'Free'. Y Server 'scott_node5_0' will be added to pools 'Free'.---------------------------------------------------------------------------
Related Topics
• Server Category AttributesYou define servers into named categories, and assign attributes that defineservers as members of that category.
Appendix EOracle RAC Environment CRSCTL Commands
E-114

crsctl eval delete serverPredicts the effects of deleting a server without making changes to the system.
This command may be useful to cluster administrators.
Syntax
crsctl eval delete server server_name [-admin [-l level] [-x] [-a]] [-f] [-explain]
Parameters
Table E-70 crsctl eval delete server Command Parameters
Parameter Description
server_name Specify the name of the server you want to evaluate before deleting.
-admin [-l level] [-x] [-a]
If you specify this parameter, then CRSCTL displays output for thecluster administrator.
If you specify the -l parameter, then you can choose one of the followingthree output levels:
• serverpools: Restricts the output to servers running in a serverpool
• resources: Restricts the output to resources running on servers ina server pool
• all: Displays all available output
If you specify the -x parameter, then CRSCTL displays the differences.
If you specify the -a parameter, then CRSCTL displays all resources.
Note:To specify either the -l, -x, or -a parameters, or any combinationof the three, you must specify the -admin parameter.
-explain Specify this parameter to display reasoned command evaluationinformation.
Examples
This command returns output similar to the following:
$ crsctl eval delete server scott_node1_0 -explain
Stage Group 1:---------------------------------------------------------------------------Stage Number Required Action---------------------------------------------------------------------------1 Y Resource 'cs1' (1/1) will be in state 'OFFLINE'. E Server 'scott_node1_0' is removed from server pool 'sp1'. E Server pool 'sp1' is below the MIN_SIZE value of 2 with 1 servers. E Looking at other server pools to see whether MIN_SIZE value 2 of server pool 'sp1' can be met. E Scanning server pools with more than MIN_SIZE servers in ascending order of IMPORTANCE.
Appendix EOracle RAC Environment CRSCTL Commands
E-115

E Considering server pools (IMPORTANCE): sp2(4) for suitable servers. E Considering server pool 'sp2' because its MIN_SIZE is 1 and it has 1 servers above MIN_SIZE. E Relocating server 'scott_node1_2' to server pool 'sp1'. Y Server 'scott_node1_2' will be moved from pool 'sp2' to pool 'sp1'. Y Server 'scott_node1_0' will be removed from pools 'sp1'. Y Resource 'cs2' (1/1) will be in state 'OFFLINE'.2 Y Resource 'cs1' (1/1) will be in state 'ONLINE|INTERMEDIATE' on server 'scott_node1_2'.---------------------------------------------------------------------------
Related Topics
• How Server Pools Work
crsctl eval relocate serverPredicts the effects of relocating a server to a different server pool without makingchanges to the system.
This command might be useful for a cluster administrator.
Syntax
crsctl eval relocate server server_name -to server_pool_name [-f] [-admin [-l level] [-x] [-a]]
Parameters
Table E-71 crsctl eval relocate server Parameters
Parameter Description
server_name The name of the server you want to relocate. You can provide aspace-delimited list of servers to evaluate relocating multipleservers.
-to Specify the name of the server pool to which you want relocate theserver.
-f If you specify this parameter, then CRSCTL predicts the effects offorcibly relocating a server.
Appendix EOracle RAC Environment CRSCTL Commands
E-116

Table E-71 (Cont.) crsctl eval relocate server Parameters
Parameter Description
-admin [-l level] [-x] [-a]
If you specify this parameter, then CRSCTL displays output for thecluster administrator.
If you specify the -l parameter, then you can choose one of thefollowing three output levels:
• serverpools: Restricts the output to servers running in aserver pool
• resources: Restricts the output to resources running onservers in a server pool
• all: Displays all available output
If you specify the -x parameter, then CRSCTL displays thedifferences.
If you specify the -a parameter, then CRSCTL displays allresources.
Note: To specify either the -l, -x, or -a parameters, or anycombination of the three, you must specify the -admin parameter.
Example
This command returns output similar to the following:
$ crsctl eval relocate server scott-node4-0 -to sp2
Stage Group 1:-------------------------------------------------------------------------------Stage Required Action------------------------------------------------------------------------------- 1 Y Server 'scott-node4-0' will be moved from pool 'sp1' to pool 'sp2'. 2 Y Resource 'cs2' (2/1) will be in state 'ONLINE|INTERMEDIATE' on server 'scott-node4-0'. Y Resource 'cs1' (2/1) will be in state 'ONLINE|INTERMEDIATE' on server 'scott-node4-0'.--------------------------------------------------------------------------------
crsctl modify serverModifies the configuration of a particular server.
Syntax
crsctl modify server server_name -attr "attr_name=attr_value[,...]"
Appendix EOracle RAC Environment CRSCTL Commands
E-117

Parameters
Table E-72 crsctl modify server Command Parameters
Parameter Description
server_name Specify the name of the server you want to modify.
-attr"attr_name=attr_value
Specify the name of a server attribute you want to modify precededby the -attr flag, followed by a value for the server attribute.
Note: The attr_name=attr_value name-value pairs must beenclosed in double quotation marks (""). Multiple name-value pairsmust be separated by commas. For example:
-attr "CHECK_INTERVAL=30,START_TIMEOUT=25"
Usage Notes
If an attribute value for an attribute name-value pair contains commas, then the valuemust be enclosed in single quotation marks (''). For example:
"START_DEPENDENCIES='hard(res1,res2,res3)'"
Example
To modify the configuration of a specific server, enter a command similar to thefollowing:
$ crsctl modify server email_server_2 -attr "WORKLOAD_VALUE=1"
crsctl relocate serverRelocates a server to a different server pool.
Syntax
crsctl relocate server server_name [...] -c server_pool_name [-i] [-f]
Parameters
Table E-73 crsctl relocate server Command Parameters
Parameter Description
server_name [...] Specify the name of the server you want to relocate. You canprovide a space-delimited list of servers to relocate multipleservers.
-c server_pool_name Specify the name of the server pool to which you want relocate theservers.
Appendix EOracle RAC Environment CRSCTL Commands
E-118

Table E-73 (Cont.) crsctl relocate server Command Parameters
Parameter Description
–i If you specify -i, then the command fails if Oracle Clusterwarecannot process the request immediately.
–f If you specify the -f parameter, then Oracle Clusterware stopsresources running on the servers in another server pool andrelocates that server into the server pool you specified.
If you do not specify the -f parameter, then Oracle Clusterwarechecks for resources that must be stopped on the servers that arebeing relocated. If it finds any, then Oracle Clusterware rejects thecrsctl relocate server command.
Note: If the number of servers in the server pool is not above thevalue of the MIN_SIZE server pool attribute, then the forceparameter will have no affect because CRSCTL will not violate theconfiguration.
Usage Notes
The server_name and -c server_pool_name parameters are required.
Example
To move the node6 and node7 servers into the sp1 server pool without disrupting any activeresources on those nodes, use the following command:
$ crsctl relocate server node6 node7 -c sp1
crsctl status serverObtains the status and configuration information of one or more particular servers.
Syntax
crsctl status server {server_name [...] | -w "filter"} [-g | -p | -v | -f] | [-category category_name | -w "filter"]
Parameters
Table E-74 crsctl status server Command Parameters
Parameter Description
server_name [...] Specify one or more space-delimited server names.
-w "filter" Alternatively, specify a filter to determine which servers are displayed.The filter must be enclosed in double quotation marks (""). Values thatcontain parentheses or spaces must be enclosed in single quotationmarks (''). For example, "STATE = ONLINE" limits the display toservers that are online.
See Also: "Filters" for more information
Appendix EOracle RAC Environment CRSCTL Commands
E-119

Table E-74 (Cont.) crsctl status server Command Parameters
Parameter Description
-g | -p | -v | -f You can specify one of the following parameters when OracleClusterware checks the status of specific servers:
• -g: Use this parameter to check if the specified servers areregistered
• -p: Use this parameter to display static configuration of the specifiedservers
• -v: Use this parameter to display the run-time configuration of thespecified servers
• -f: Use this parameter to display the full configuration of thespecified servers
-categorycategory_name
Optionally, you can specify a particular category of servers for which toobtain status.
-w "filter" Alternatively, specify a filter to determine which categories are displayed.The filter must be enclosed in double quotation marks (""). Values thatcontain parentheses or spaces must be enclosed in single quotationmarks (''). For example, "STATE = ONLINE" limits the display toservers that are online.
See Also: "Filters" for more information
Examples
Example E-7 Example 1
This command returns output similar to the following:
NAME=node1STATE=ONLINE
NAME=node2STATE=ONLINE
Example E-8 Example 2
The full configuration of a specific server is similar to the following:
NAME=node2MEMORY_SIZE=72626CPU_COUNT=12CPU_CLOCK_RATE=1711CPU_HYPERTHREADING=0 CPU_EQUIVALENCY=1000DEPLOYMENT=otherCONFIGURED_CSS_ROLE=hubRESOURCE_USE_ENABLED=1SERVER_LABEL=PHYSICAL_HOSTNAME=STATE=ONLINEACTIVE_POOLS=ora.pool1
Appendix EOracle RAC Environment CRSCTL Commands
E-120

STATE_DETAILS=ACTIVE_CSS_ROLE=hub
crsctl get server css_criticalObtains the current configured value for the CSS_CRITICAL server attribute
Syntax
crsctl get server css_critical
Usage Notes
This command has no parameters.
crsctl set server css_criticalSets the configuration value for the CSS_CRITICAL server attribute.
Syntax
crsctl set server css_critical {yes | no}
Usage Notes
Choose yes to set the server as CSS_CRITICAL.
crsctl get server labelChecks the current setting value of the SERVER_LABEL server attribute.
Syntax
crsctl get server label
Example
This command returns output similar to the following:
CRS-4972: Current SERVER_LABEL parameter value is hubserver
crsctl set server labelSets the configuration value of the SERVER_LABEL server configuration attribute for the serveron which you run this command.
Syntax
crsctl set server label value
Appendix EOracle RAC Environment CRSCTL Commands
E-121

Usage Notes
• Specify a value for the server. This value can reflect a physical location, such asbuilding_A, or some other identifying characteristic of the server, such ashubserver.
• You must restart the Oracle Clusterware technology stack on the node before anychanges you make take effect.
crsctl add serverpoolAdds a server pool that is for hosting non-database resources (such as applicationservers) to Oracle Clusterware.
Syntax
crsctl add serverpool server_pool_name {-file file_path | -attr "attr_name=attr_value[,...]"} [-i] [-f]
Parameters
Table E-75 crsctl add serverpool Command Parameters
Parameter Description
server_pool_name A short, descriptive name for the server pool. A server pool namehas a 254 character limit and can contain any platform-supportedcharacters except the exclamation point (!), the tilde (~), andspaces. A server pool name cannot begin with a period nor withora.
-file file_path Fully-qualified path to an attribute file to define the server pool.
-attr"attr_name=attr_value[,...]"
Alternatively, specify the name of a server pool attribute for theserver pool you are adding preceded by the -attr flag, followed bya value for the server pool attribute.
Note: The attr_name=attr_value name-value pairs must beenclosed in double quotation marks (""). Multiple name-value pairsmust be separated by commas. For example:
-attr "MAX_SIZE=30,IMPORTANCE=3"
The available attribute names include:
• IMPORTANCE• MIN_SIZE• MAX_SIZE• SERVER_NAMES• PARENT_POOLS• EXCLUSIVE_POOLS• ACL• SERVER_CATEGORY
-i If you specify -i, then the command fails if Oracle Clusterwarecannot process the request immediately.
Appendix EOracle RAC Environment CRSCTL Commands
E-122

Table E-75 (Cont.) crsctl add serverpool Command Parameters
Parameter Description
-f If you specify the -f parameter, then Oracle Clusterware stopsresources running on a server in another server pool and relocatesthat server into the server pool you are adding. If you do not specifythe -f parameter, then Oracle Clusterware checks whether thecreation of the server pool results in stopping any resources on aserver in another server pool that is going to give up a server to theserver pool you are adding. If so, then Oracle Clusterware rejectsthe crsctl add serverpool command.
Usage Notes
• The server_pool_name parameter is required.
• If an attribute value for an attribute name-value pair contains commas, then the valuemust be enclosed in single quotation marks ('').
• Do not use this command for any server pools with names that begin with ora becausethese server pools are Oracle server pools.
• Running this command may result in Oracle Clusterware relocating other serversbetween server pools to comply with the new configuration.
• You must run this command as root or a cluster administrator.
• Use the crsctl add serverpool command to create server pools that host non-database resources. To create server pools that host Oracle databases, use the SRVCTLcommand utility.
See Also:
Oracle Real Application Clusters Administration and Deployment Guide forinformation about using the SRVCTL command utility to create server pools
Examples
To add a server pool named testsp with a maximum size of 5 servers, run the followingcommand as root or the Oracle Clusterware installation owner:
# crsctl add serverpool testsp -attr "MAX_SIZE=5"
Create the sp1_attr file with the attribute values for the sp1 server pool, each on its own line,as shown in the following example:
IMPORTANCE=1MIN_SIZE=1MAX_SIZE=2SERVER_NAMES=node3 node4 node5PARENT_POOLS=Generic
Appendix EOracle RAC Environment CRSCTL Commands
E-123

EXCLUSIVE_POOLS=testspACL=owner:oracle:rwx,pgrp:oinstall:rwx,other::r--
Use the following command to create the sp1 server pool using the sp1_attr file asinput:
$ crsctl add serverpool sp1 -file /tmp/sp1_attr
crsctl delete serverpoolRemoves a server pool from the Oracle Clusterware configuration.
Syntax
crsctl delete serverpool server_pool_name [server_pool_name [...]] [-i]
See Also:
"How Server Pools Work" for more information about server pools and serverpool attributes
Usage Notes
• The server_pool_name parameter is required
. Use spaces to delimit multiple server pool names.
• If you specify -i, then the command fails if Oracle Clusterware cannot process therequest immediately.
• Do not use this command for any server pools with names that begin with orabecause these server pools are Oracle server pools.
• While you can use this command in either environment, it is only useful in theOracle RAC environment.
Example
To delete a server pool, run the following command as root or the Oracle Clusterwareinstallation owner:
# crsctl delete serverpool sp1
crsctl eval add serverpoolPredicts the effects of adding a server pool without making changes to the system.
This command may be useful to cluster administrators.
Appendix EOracle RAC Environment CRSCTL Commands
E-124

Syntax
crsctl eval add serverpool server_pool_name [-file file_path | -attr "attr_name=attr_value[,...]"] [-admin [-l level [-x] [-a]] [-explain] [-f]
Parameters
Table E-76 crsctl eval add serverpool Command Parameters
Parameter Description
server_pool_name Specify a short, descriptive name for the server pool.
-file file_path Specify a fully-qualified path to an attribute file to define the server pool.
-attr"attr_name=attr_value[,...]"
Alternatively, specify the name of a server pool attribute for the server pool youare adding preceded by the -attr flag, followed by a value for the server poolattribute.
Note: The attr_name=attr_value name-value pairs must be enclosed indouble quotation marks (""). Multiple name-value pairs must be separated bycommas. For example:
-attr "MAX_SIZE=30,IMPORTANCE=3"
Server pool attributes include:
• IMPORTANCE• MIN_SIZE• MAX_SIZE• SERVER_NAMES• PARENT_POOLS• EXCLUSIVE_POOLS• ACL
-admin [-l level] [-x][-a]
If you specify this parameter, then CRSCTL displays output for the clusteradministrator.
If you specify the -l parameter, then you can choose one of the following threeoutput levels:
• serverpools: Restricts the output to servers running in a server pool
• resources: Restricts the output to resources running on servers in a serverpool
• all: Displays all available output
If you specify the -x parameter, then CRSCTL displays the differences.
If you specify the -a parameter, then CRSCTL displays all resources.
Note:To specify either the -l, -x, or -a parameters, or any combination of thethree, you must specify the -admin parameter.
-explain Specify this parameter to display reasoned command evaluation information.
-f If you specify this parameter, then CRSCTL predicts the effects of forcibly addinga server pool.
Appendix EOracle RAC Environment CRSCTL Commands
E-125

Example
The following example evaluates adding a server pool named sp1:
$ crsctl eval add serverpool sp1 -explain
Stage Group 1:----------------------------------------------------------------------------Stage Required Action----------------------------------------------------------------------------
1 E Starting to look for server pools that will donate servers to be reallocated to the new pool 'sp1'. E Scanning server pools with more than MIN_SIZE servers in ascending order of IMPORTANCE. E Considering server pools (IMPORTANCE): Free(0) for suitable servers. E Considering server pool 'Free' because its MIN_SIZE is 0 and it has 4 servers above MIN_SIZE. E Relocating server 'scott_node1_0' to server pool 'sp1'. E Scanning server pools with more than MIN_SIZE servers in ascending order of IMPORTANCE. E Considering server pools (IMPORTANCE): Free(0) for suitable servers. E Considering server pool 'Free' because its MIN_SIZE is 0 and it has 3 servers above MIN_SIZE. E Relocating server 'scott_node1_1' to server pool 'sp1'. E Scanning server pools with more than MIN_SIZE servers in ascending order of IMPORTANCE. E Considering server pools (IMPORTANCE): Free(0) for suitable servers. E Considering server pool 'Free' because its MIN_SIZE is 0 and it has 2 servers above MIN_SIZE. E Relocating server 'scott_node1_2' to server pool 'sp1'. E Scanning server pools with more than MIN_SIZE servers in ascending order of IMPORTANCE. E Considering server pools (IMPORTANCE): Free(0) for suitable servers. E Considering server pool 'Free' because its MIN_SIZE is 0 and it has 1 servers above MIN_SIZE. E Relocating server 'scott_node1_3' to server pool 'sp1'. E Scanning server pools with MIN_SIZE or fewer servers in ascending order of IMPORTANCE. Y Server 'scott_node1_2' will be moved from pool 'Free' to pool 'sp1'. Y Server 'scott_node1_0' will be moved from pool 'Free' to
Appendix EOracle RAC Environment CRSCTL Commands
E-126

pool 'sp1'. Y Server 'scott_node1_1' will be moved from pool 'Free' to pool 'sp1'. Y Server 'scott_node1_3' will be moved from pool 'Free' to pool 'sp1'.
-------------------------------------------------------------------------------
Related Topics
• How Server Pools Work
crsctl eval delete serverpoolSimulates the deletion of a server pool without making changes to the system.
This command may be useful to cluster administrators.
Syntax
crsctl eval delete serverpool server_pool_name [-admin [-l level] [-x] [-a]] [-explain]
Parameters
Table E-77 crsctl eval delete serverpool Paramaters
Parameter Description
server_pool_nameThe name of the server pool you want to delete.
-admin [-l level] [-x] [-a]
If you specify this parameter, then CRSCTL displays output for thecluster administrator.
If you specify the -l parameter, then you can choose one of the followingthree output levels:
• serverpools: Restricts the output to servers running in a serverpool
• resources: Restricts the output to resources running on servers ina server pool
• all: Displays all available output
If you specify the -x parameter, then CRSCTL displays the differences.
If you specify the -a parameter, then CRSCTL displays all resources.
Note:To specify either the -l, -x, or -a parameters, or any combinationof the three, you must specify the -admin parameter.
-explainSpecify this parameter to display reasoned command evaluationinformation.
Appendix EOracle RAC Environment CRSCTL Commands
E-127

Examples
Consider the following server pool configuration:
NAME=FreeACTIVE_SERVERS=
NAME=GenericACTIVE_SERVERS=
NAME=sp1ACTIVE_SERVERS=scott-node2-0 scott-node2-3
NAME=sp2ACTIVE_SERVERS=scott-node2-1
The following command evaluates the effect of deleting server pool sp1:
$ crsctl eval delete sp sp1
Stage Group 1:--------------------------------------------------------------------------------Stage Required Action--------------------------------------------------------------------------------
1 Y Server 'scott-node2-0' will be moved from pool 'sp1' to pool 'sp2'. Y Server 'scott-node2-3' will be moved from pool 'sp1' to pool 'sp2'.
--------------------------------------------------------------------------------
Adding the -explain parameter to the preceding command returns reasonedcommand evaluation similar to the following:
$ crsctl eval delete sp sp1 -explain
Stage Group 1:--------------------------------------------------------------------------------Stage Required Action--------------------------------------------------------------------------------
1 E Starting to look for server pools to reallocate servers from pool 'sp1'. E Looking for a suitable server pool for server 'scott-node2-0'. E Scanning server pools with fewer than MIN_SIZE servers in
Appendix EOracle RAC Environment CRSCTL Commands
E-128

descending order of IMPORTANCE. E Considering server pools (IMPORTANCE): sp2(1) for relocating servers. E Relocating server 'scott-node2-0' to server pool 'sp2'. E Looking for a suitable server pool for server 'scott-node2-3'. E Scanning server pools with fewer than MIN_SIZE servers in descending order of IMPORTANCE. E Considering server pools (IMPORTANCE): sp2(1) for relocating servers. E Relocating server 'scott-node2-3' to server pool 'sp2'. 2 Y Server 'scott-node2-0' will be moved from pool 'sp1' to pool 'sp2'. Y Server 'scott-node2-3' will be moved from pool 'sp1' to pool 'sp2'.
--------------------------------------------------------------------------------
Related Topics
• How Server Pools Work
crsctl eval modify serverpoolUse the crsctl eval modify serverpool command to predict the effects of modifying aserver pool without making changes to the system. This command may be useful to clusteradministrators.
Syntax
crsctl eval modify serverpool server_pool_name {-file file_path | -attr "attr_name=attr_value [,attr_name=attr_value[, ...]]"} [-f] [-admin [-l level [-x] [-a]] [-explain]
Parameters
Table E-78 crsctl eval modify serverpool Parameters
Parameter Description
server_pool_name The name of the server pool you want to modify.
-file file_path Fully-qualified path to an attribute file to define the server pool you want to modify.
Appendix EOracle RAC Environment CRSCTL Commands
E-129

Table E-78 (Cont.) crsctl eval modify serverpool Parameters
Parameter Description
attribute_name The name of a server pool attribute that you want to modify that OracleClusterware uses to manage the server pool preceded by the -attr flag. Theavailable attribute names include:
• IMPORTANCE• MIN_SIZE• MAX_SIZE• SERVER_NAMES• PARENT_POOLS• EXCLUSIVE_POOLS• ACL
attribute_value A value for the server pool attribute you want to modify.
Note: The attribute_name and attribute_value parameters must beenclosed in double quotation marks ("") and separated by commas. Forexample:
-attr "MAX_SIZE=30,IMPORTANCE=3"
-f If you specify this parameter, then CRSCTL predicts the effects of forciblymodifying a server pool.
-admin [-l level] [-x][-a]
If you specify this parameter, then CRSCTL displays output for the clusteradministrator.
If you specify the -l parameter, then you can choose one of the following threeoutput levels:
• serverpools: Restricts the output to servers running in a server pool
• resources: Restricts the output to resources running on servers in a serverpool
• all: Displays all available output
If you specify the -x parameter, then CRSCTL displays the differences.
If you specify the -a parameter, then CRSCTL displays all resources.
Note: To specify either the -l, -x, or -a parameters, or any combination of thethree, you must specify the -admin parameter.
-explain Specify this parameter to display reasoned command evaluation information.
Usage Notes
• The server_pool_name parameter is required
• If an attribute value for an attribute name-value pair contains commas, then thevalue must be enclosed in single quotation marks (''). For example:
"START_DEPENDENCIES='hard(res1,res2,res3)'"
• Running this command may result in Oracle Clusterware relocating other serversbetween server pools to comply with the new configuration
• Do not use this command for any server pools with names that begin with orabecause these server pools are Oracle server pools
Appendix EOracle RAC Environment CRSCTL Commands
E-130

• While you can use this command in either environment, it is only useful in the OracleRAC environment
Example
For the following examples, consider two server pools, sp1 and sp2. Server pool sp1 isconfigured, as follows:
ACTIVE_SERVERS=mjkeenan-node2-0 mjkeenan-node2-3
Server pool sp2 is configured, as follows:
ACTIVE_SERVERS=mjkeenan-node2-1
Currently, sp1 has more importance than sp2. The following command evaluates what wouldhappen if you modified the IMPORTANCE and MAX_SIZE attributes for sp2:
$ crsctl eval modify sp sp2 -attr "MAX_SIZE=3,IMPORTANCE=5"
Stage Group 1:--------------------------------------------------------------------------------Stage Required Action--------------------------------------------------------------------------------
1 Y Server 'mjkeenan-node2-0' will be moved from pool 'sp1' to pool 'sp2'. Y Server 'mjkeenan-node2-3' will be moved from pool 'sp1' to pool 'sp2'.
--------------------------------------------------------------------------------
Adding the -explain parameter to the preceding command returns reasoned commandevaluation similar to the following:
$ crsctl eval modify sp sp2 -attr "MAX_SIZE=3,IMPORTANCE=5" -explain
Stage Group 1:--------------------------------------------------------------------------------Stage Required Action--------------------------------------------------------------------------------
1 E Starting to look at server pools due to a configuration change in the pool 'sp2'. E Looking at other server pools to see whether MIN_SIZE value 3 of server pool 'sp2' can be met. E Scanning server pools with MIN_SIZE or fewer servers in ascending order of IMPORTANCE. E Considering server pools (IMPORTANCE): sp1(3) for suitable
Appendix EOracle RAC Environment CRSCTL Commands
E-131

servers. E Considering server pool 'sp1' because its MIN_SIZE is 2 and it has 0 servers above MIN_SIZE. E Relocating server 'mjkeenan-node2-0' to server pool 'sp2'. E Scanning server pools with MIN_SIZE or fewer servers in ascending order of IMPORTANCE. E Considering server pools (IMPORTANCE): sp1(3) for suitable servers.
E Considering server pool 'sp1' because its MIN_SIZE is 2 and it has 0 servers above MIN_SIZE. E Relocating server 'mjkeenan-node2-3' to server pool 'sp2'. Y Server 'mjkeenan-node2-0' will be moved from pool 'sp1' to pool 'sp2'. Y Server 'mjkeenan-node2-3' will be moved from pool 'sp1' to pool 'sp2'.
--------------------------------------------------------------------------------
Related Topics
• How Server Pools Work
crsctl getperm serverpoolRetrieves permissions for a particular server pool.
Syntax
crsctl getperm serverpool server_pool_name [-u user_name | -g group_name]
See Also:
"How Server Pools Work" for more information about server pools and serverpool attributes
Parameters
Table E-79 crsctl getperm serverpool Command Parameters
Parameter Description
server_pool_name Specify the name of the server pool for which you want to retrievepermissions.
Appendix EOracle RAC Environment CRSCTL Commands
E-132

Table E-79 (Cont.) crsctl getperm serverpool Command Parameters
Parameter Description
-u user_name If you specify -u, then Oracle Clusterware retrieves permissions fora particular user.
-g group_name If you specify -g, then Oracle Clusterware retrieves permissions fora particular group.
Usage Notes
• The server_pool_name parameter is required
• Do not use this command for any server pools with names that begin with ora becausethese server pools are Oracle server pools
• While you can use this command in either environment, it is only useful in the OracleRAC environment
Example
This command returns output similar to the following:
$ crsctl getperm serverpool sp1
NAME: sp1owner:root:rwx,pgrp:root:r-x,other::r--
crsctl modify serverpoolModifies an existing server pool.
Syntax
crsctl modify serverpool server_pool_name -attr "attr_name=attr_value[, ...]" [-policy policyName | -all_policies] [-i] [-f]
Parameters
Table E-80 crsctl modify serverpool Command Parameters
Parameter Description
server_pool_name Specify the name of the server pool you want to modify.
Appendix EOracle RAC Environment CRSCTL Commands
E-133

Table E-80 (Cont.) crsctl modify serverpool Command Parameters
Parameter Description
-attr"attr_name=attr_value[, ...]"
Specify the name of a server pool attribute that you want to modifypreceded by the -attr flag, followed by a value for the server poolattribute.
Note: The attr_name=attr_value name-value pairs must beenclosed in double quotation marks (""). Multiple name-value pairs mustbe separated by commas. For example:
-attr "MAX_SIZE=30,IMPORTANCE=3"
The available attribute names include:
• IMPORTANCE• MIN_SIZE• MAX_SIZE• SERVER_NAMES• PARENT_POOLS• EXCLUSIVE_POOLS• ACL• SERVER_CATEGORY
-policy policyName |-all_policies
Specify a particular policy or all policies for which you want to modify theserver pool definition.
–i If you specify -i, then the command fails if Oracle Clusterware cannotprocess the request immediately.
–f If you specify the -f parameter, then Oracle Clusterware stopsresources running on a server in another server pool and relocates thatserver into the server pool you are modifying.
If you do not specify the -f parameter, then Oracle Clusterware checkswhether the creation of the server pool results in stopping any resourceson a server in another server pool that is going to give up a server to theserver pool you are modifying. If so, then Oracle Clusterware rejects thecrsctl modify serverpool command.
See Also:
"How Server Pools Work" for more information about server pools and serverpool attributes
Usage Notes
• The server_pool_name parameter is required.
• If an attribute value for an attribute name-value pair contains commas, then thevalue must be enclosed in single quotation marks (''). For example:
"START_DEPENDENCIES='hard(res1,res2,res3)'"• Running this command may result in Oracle Clusterware relocating other servers
between server pools to comply with the new configuration.
Appendix EOracle RAC Environment CRSCTL Commands
E-134

• Do not use this command for any server pools with names that begin with ora becausethese server pools are Oracle server pools.
• While you can use this command in either environment, it is only useful in the OracleRAC environment.
Example
To modify an existing server pool, run the following command as root or the OracleClusterware installation owner:
# crsctl modify serverpool sp1 -attr "MAX_SIZE=7"
crsctl setperm serverpoolSets permissions for a particular server pool.
Syntax
crsctl setperm serverpool server_pool_name {-u acl_string | -x acl_string | -o user_name | -g group_name}
Parameters
Table E-81 crsctl setperm serverpool Command Parameters
Parameter Description
server_pool_name Specify the name of the server pool for which you want to setpermissions.
Appendix EOracle RAC Environment CRSCTL Commands
E-135

Table E-81 (Cont.) crsctl setperm serverpool Command Parameters
Parameter Description
{-u | -x | -o | -g} You can specify only one of the following parameters for a server pool:
• -u acl_string: You can update the access control list (ACL) for aserver pool
• -x acl_string: You can delete the ACL for a server pool
• -o user_name: You can change the owner of a server pool byentering a user name
• -g group_name: You can change the primary group of a serverpool by entering a group name
Specify a user, group, or other ACL string, as follows:
user:user_name[:readPermwritePermexecPerm] |group:group_name[:readPermwritePermexecPerm] |other[::readPermwritePermexecPerm]
• user: User ACL
• group: Group ACL
• other: Other ACL
• readPerm: Read permission for the server pool; the letter r grants auser, group, or other read permission, the minus sign (-) deniesread permission
• writePerm: Write permission for the server pool; the letter w grantsa user, group, or other write permission, the minus sign (-) denieswrite permission
• execPerm: Execute permission for the server pool; the letter xgrants a user, group, or other execute permission, the minus sign (-)denies execute permission
Usage Notes
• The server_pool_name parameter is required
• Do not use this command for any server pools with names that begin with orabecause these server pools are Oracle server pools
• While you can use this command in either environment, it is only useful in theOracle RAC environment
Example
To grant read, write, and execute permissions on a server pool for user Jane Doe:
$ crsctl setperm serverpool sp3 -u user:jane.doe:rwx
crsctl status serverpoolRetrieves the status and configuration information of one or more particular serverpools.
Appendix EOracle RAC Environment CRSCTL Commands
E-136

Syntax
crsctl status serverpool [server_pool_name [...] | -w "filter"] [-p | -v | -f]
crsctl status serverpool {[server_pool_name [...]} -g
Parameters
Table E-82 crsctl status serverpool Command Parameters
Parameter Description
server_pool_name[...] —g
Specify one or more space-delimited server pool names to identifyspecific server pools.
-g: Use this parameter to check if the specified server pools areregistered
Note: You cannot use the -g parameter with any other parameters afteryou specify the server pool names.
-w "filter" Alternative to specifying a server pool by name, you can use thisparameter to specify a filter, such as MIN_SIZE > 3, surrounded bydouble quotation marks (""). Use this parameter to identify server poolsby a particular characteristic.
See Also: "Filters" for more information
-p | -v | -f You can optionally specify one of the following parameters:
• -p: Use this parameter to display static configuration of the specifiedserver pools
• -v: Use this parameter to display the run-time configuration of thespecified server pools
• -f: Use this parameter to display the full configuration of thespecified server pools
Usage Notes
• The server_pool_name parameter or a filter is required
• Do not use this command for any server pools with names that begin with ora becausethese server pools are Oracle server pools
• While you can use this command in either environment, it is only useful in the OracleRAC environment
Examples
Example E-9 Example 1
To display the full configuration of the server pool sp1:
$ crsctl status serverpool sp1 -f
NAME=splIMPORTANCE=1MIN_SIZE=0MAX_SIZE=-1
Appendix EOracle RAC Environment CRSCTL Commands
E-137

SERVER_NAMES=node3 node4 node5PARENT_POOLS=GenericEXCLUSIVE_POOLS=ACL=owner:oracle:rwx,pgrp:oinstall:rwx,other::r--SERVER_CATEGORY=ora.hub.categoryACTIVE_SERVERS=node3 node4
Example E-10 Example 2
To display all the server pools and the servers associated with them, use the followingcommand:
$ crsctl status serverpool
NAME=FreeACTIVE_SERVERS=
NAME=GenericACTIVE_SERVERS=node1 node2
NAME=ora.orclACTIVE_SERVERS=node1 node2
NAME=sp1ACTIVE_SERVERS=node3 node4
Example E-11 Example 3
To find a server pool that meets certain criteria, use the following command:
$ crsctl status serverpool -w "MAX_SIZE > 1"
NAME=sp2ACTIVE_SERVERS=node3 node4
crsctl query socket udpVerifies that a daemon can listen on a specified address and port.
Syntax
crsctl query socket udp [-address address] [-port port]
Parameters
Table E-83 crsctl query socket udp Command Parameters
Parameter Description
-address address Specify the IP address on which the socket is to be created. If youdo not specify an address, then CRSCTL assumes the local hostas the default.
Appendix EOracle RAC Environment CRSCTL Commands
E-138

Table E-83 (Cont.) crsctl query socket udp Command Parameters
Parameter Description
-port port Specify the port on which the socket is to be created. If you do notspecify a port, then CRSCTL assumes 53 as the default.
Usage Notes
You must run this command as root to verify port numbers less than 1024.
Examples
The command returns output similar to the following:
$ crsctl query socket udp
CRS-10030: could not verify if port 53 on local node is in use
# crsctl query socket udp
CRS-10026: successfully created socket on port 53 on local node
The first of the preceding two commands was not run as root, and in both commands no portwas specified, so CRSCTL assumed the default, 53, which is less than 1024. This conditionnecessitates running the command as root.
$ crsctl query socket udp -port 1023
CRS-10030: could not verify if port 1023 on local node is in use
# crsctl query socket udp -port 1023
CRS-10026: successfully created socket on port 1023 on local node
Similar to the first two examples, the first of the preceding two commands was not run asroot, and, although a port number was specified, it is still less than 1024, which requires rootprivileges to run the command.
In this last example, a port number greater than 1024 is specified, so there is no need to runthe command as root:
$ crsctl query socket udp -port 1028
CRS-10026: successfully created socket on port 1028 on local node
crsctl start testdnsStarts a test DNS server that will listen on a specified IP address and port.The test DNS server does not respond to incoming packets but does display the packets itreceives. Typically, use this command to check if domain forwarding is set up correctly for theGNS domain.
Appendix EOracle RAC Environment CRSCTL Commands
E-139

Syntax
crsctl start testdns [-address address [-port port]] [-once] [-v]
Parameters
Table E-84 crsctl start testdns Command Parameters
Parameter Description
-address address Specify a server address in the form IP_address/netmask[/interface_name].
-port port The port on which the server listens. If you do not specify a port,then it defaults to port 53.
–once Specify this parameter to indicate that the DNS server should exitafter it receives one DNS query packet.
–v Verbose output.
Example
To start a test DNS server on the local server, run the command similar to thefollowing:
$ crsctl start testdns -address 192.168.29.218 -port 63 -v
crsctl status testdnsQueries the test DNS server running on a specified address and local host name.
Syntax
crsctl status testdns [-server DNS_server_address] [-port port] [-v]
Parameters
Table E-85 crsctl status testdns Command Parameters
Parameter Description
-serverDNS_server_address
Optionally, you can specify the DNS server address for which youwant to check the status.
-port port Optionally, you can specify the port on which the DNS serverlistens. If you do not specify a port, then it defaults to port 53.
–v Verbose output.
Appendix EOracle RAC Environment CRSCTL Commands
E-140

Example
This command returns output similar to the following:
CRS-10024: DNS server returned 192.168.28.74 for namestmjk07-vip.stmjk0462.example.com
crsctl stop testdnsStops a test DNS server.
Syntax
crsctl stop testdns [-address address] [-port port] [-v]
Parameters
Table E-86 crsctl stop testdns Command Parameters
Parameter Description
-address address Optionally, you can specify the server address for which you started thetest DNS server in the form IP_address/netmask[/interface_name].
-port port Optionally, you can specify the port on which the DNS server listens. Ifyou do not specify a port, then it defaults to port 53.
–v Verbose output.
Example
This command returns output similar to the following:
CRS-10032: successfully stopped the DNS listening daemon running on port 53 onlocal node
crsctl replace votediskMoves or replaces the existing voting files.This command creates voting files in the specified locations, either in Oracle ASM or someother storage option. Oracle Clusterware copies existing voting file information into the newlocations and removes the voting files from the former locations.
Syntax
crsctl replace votedisk [+asm_disk_group | path_to_voting_disk [...]]
Appendix EOracle RAC Environment CRSCTL Commands
E-141

Parameters
Table E-87 crsctl replace votedisk Command Parameters
Parameter Description
+asm_disk_group Specify the Oracle ASM disk group (preceded by a plus sign(+))where you want to locate the voting file.
path_to_voting_disk[...]
Alternatively, you can specify a space-delimited list of voting filepaths for voting files that reside outside of Oracle ASM.
Usage Notes
• You must be root, the Oracle Clusterware installation owner, or a member of theAdministrators group to run this command.
• Specify to replace a voting file in either an Oracle ASM disk group or in some otherstorage device.
• You can run this command on any node in the cluster.
Examples
Example E-12 Example 1
To replace a voting file that is located within Oracle ASM:
# crsctl replace votedisk +diskgroup1
Example E-13 Example 2
To replace a voting file that is located on a shared file system:
# crsctl replace votedisk /mnt/nfs/disk1 /mnt/nfs/disk2
crsctl add walletCreates and adds users to a wallet.
Syntax
crsctl add wallet -type wallet_type [-name name] [-user user_name -passwd]
Appendix EOracle RAC Environment CRSCTL Commands
E-142

Parameters
Table E-88 crsctl add wallet Command Parameters
Parameter Description
-type wallet_type Speicfy the type of wallet you want to create, such as APPQOSADMIN,APPQOSUSER, APPQOSDB, MGMTDB, OSUSER, or CVUDB.
• OSUSER: This wallet type stores a low-privileged Windows user'suser name and password that the agent uses when you create aWindows service on a policy-managed database or in general toupdate the Windows service's password.
• CVUDB: This wallet type stores a database user name andpassword that the health check component of CVU uses to connectto the database and perform database checks.
-name name You must specify a name for the wallet to create APPQOSDB andCVUDB wallets.
-user user_name -passwd
Specify the user name you want to add to the wallet and provide thepassword through standard input. The user name is required to createan OSUSER wallet.
Usage Notes
If you are using a policy-managed database, then you must have a wallet. Otherwise, walletsare optional.
Example
To add a wallet:
$ crsctl add wallet -type OSUSER -user lp_oracle_home_user -passwd
In the preceding example, lp_oracle_home_user is a low-privileged Oracle home user whoowns the home where the policy-managed database was created.
crsctl delete walletRemoves wallets or users from a wallet.
Syntax
crsctl delete wallet -type wallet_type [-name name] [-user user_name]
Appendix EOracle RAC Environment CRSCTL Commands
E-143

Parameters
Table E-89 crsctl delete wallet Command Parameters
Parameter Description
-type wallet_type Type of wallet you want to remove, such as APPQOSADMIN,APPQOSUSER, APPQOSDB, MGMTDB, OSUSER, or CVUDB.• OSUSER: This wallet type stores a low-privileged Windows
user's user name and password that the agent uses when youcreate a Windows service on a policy-managed database or ingeneral to update the Windows service's password.
• CVUDB: This wallet type stores a database user name andpassword that the health check component of CVU uses toconnect to the database and perform database checks.
-name name You must specify the name of the wallet to remove an APPQOSDBwallet.
-user user_name You must specify a user name to remove a user from an OSUSERwallet.
Example
To delete a user from the OSUSER wallet:
$ crsctl delete wallet -type OSUSER -user lp_oracle_home_user
In the preceding example, lp_oracle_home_user is a low-privileged Oracle home userwho owns the home where the policy-managed database was created. Additionally,the command does not delete the wallet if it contains other users.
crsctl modify walletModifies the password for a specific user in a specific wallet.
Syntax
crsctl modify wallet -type wallet_type [-name name] [-user user_name -passwd]
Appendix EOracle RAC Environment CRSCTL Commands
E-144

Parameters
Table E-90 crsctl modify wallet Command Parameters
Parameter Description
-type wallet_type Specify the type of wallet you want to modify, such as APPQOSADMIN,APPQOSUSER, APPQOSDB, MGMTDB, OSUSER, or CVUDB.
• OSUSER: This wallet type stores a low-privileged Windows user'suser name and password that the agent uses when you create aWindows service on a policy-managed database or in general toupdate the Windows service's password.
• CVUDB: This wallet type stores a database user name andpassword that the health check component of CVU uses to connectto the database and perform database checks.
-name name You must specify the wallet name to modify an APPQOSDB wallet.
-user user_name -passwd
You must specify the user name for whom you want to modify thepassword. Modify the password through standard input.
Usage Notes
You cannot use this command to change a user name.
Example
To modify the password of a low-privileged Oracle home user:
$ crsctl modify wallet -type OSUSER -user lp_oracle_home_user -passwd
crsctl query walletQueries low-privileged users from a wallet.
Syntax
crsctl query wallet -type wallet_type [-name name] [-user user_name] [-all]
Parameters
Table E-91 crsctl query wallet Command Parameters
Parameter Description
-type wallet_type Type of wallet you want to query, such as APPQOSADMIN,APPQOSUSER, APPQOSDB, MGMTDB, OSUSER, or CVUDB.
• OSUSER: This wallet type stores a low-privileged Windows user'suser name and password that the agent uses when you create aWindows service on a policy-managed database or in general toupdate the Windows service's password.
• CVUDB: This wallet type stores a database user name andpassword that the health check component of CVU uses to connectto the database and perform database checks.
Appendix EOracle RAC Environment CRSCTL Commands
E-145

Table E-91 (Cont.) crsctl query wallet Command Parameters
Parameter Description
-name name You must specify the name of the wallet to query an APPQOSDB wallet.
-user user_name You must specify a user name to query a user from an OSUSER wallet.
–all Specify -all to list all of the users in a specific wallet.
Example
To list all of the users in the OSUSER wallet:
$ crsctl query wallet -type OSUSER -all
Oracle Restart Environment CRSCTL CommandsYou can only use these commands in the Oracle Restart environment.
The commands listed in this section control Oracle High Availability Services. Thesecommands manage the Oracle High Availability Services stack in the Oracle Restartenvironment, which consists of the Oracle High Availability Services daemon (ohasd),Oracle ASM (if installed), and Cluster Synchronization Services (if Oracle ASM isinstalled). These commands only affect the local server on which you run them.
Note:
Oracle does not support using crs_* commands in an Oracle Restartenvironment.
Each server in the cluster is in one of two possible states:
• The whole stack is up, which means that Oracle High Availability Services is active
• The whole stack is down, which means that Oracle High Availability Services isinactive
crsctl check hasChecks the status of ohasd.
Syntax
crsctl check has
Example
This command returns output similar to the following:
CRS-4638: Oracle High Availability Services is online
Appendix EOracle Restart Environment CRSCTL Commands
E-146

crsctl config hasDisplays the automatic startup configuration of the Oracle High Availability Services stack onthe server.
Syntax
crsctl config has
Usage Notes
This command has no parameters.
Example
This command returns output similar to the following:
CRS-4622 Oracle High Availability Services autostart is enabled.
crsctl disable hasDisables automatic startup of the Oracle High Availability Services stack when the serverboots up.
Syntax
crsctl disable has
Example
This command returns output similar to the following:
CRS-4621 Oracle High Availability Services autostart is disabled.
crsctl enable hasEnables automatic startup of the Oracle High Availability Services stack when the serverboots up.
Syntax
crsctl enable has
Example
This command returns output similar to the following:
CRS-4622 Oracle High Availability Services autostart is enabled.
Appendix EOracle Restart Environment CRSCTL Commands
E-147

crsctl query has releaseversionDisplays the release version of the Oracle Clusterware software that is stored in thebinaries on the local node.
Syntax
crsctl query has releaseversion
Example
This command returns output similar to the following:
Oracle High Availability Services release version on the local node is [12.2.0.1.0]
crsctl query has softwareversionDisplays the software version on the local node.
Syntax
crsctl query has softwareversion [server_name]
Usage Notes
If you do not provide a server name, then Oracle Clusterware displays the version ofOracle Clusterware running on the local server.
Example
This command returns output similar to the following:
Oracle High Availability Services version on the local node is [12.2.0.1.0]
crsctl start hasStarts Oracle High Availability Services on the local server.
Syntax
crsctl start has [-nowait] [-noautostart] [-wait]
Usage Notes
• Use the -nowait parameter to skip waiting for Oracle High Availability Services tostart.
• Use the -noautorestart parameter to start only Oracle High Availability Services.
• Use the -wait parameter to wait for Oracle High Availability Services to start.
Appendix EOracle Restart Environment CRSCTL Commands
E-148

Example
To start Oracle High Availability Services on the local server:
# crsctl start has
crsctl stop hasStops Oracle High Availability Services on the local server.This command attempts to gracefully stop resources managed by Oracle Clusterware whileattempting to stop Oracle High Availability Services.
Syntax
crsctl stop has [-f]
Usage Notes
If any resources that Oracle Clusterware manages are still running after you run the crsctlstop has command, then the command fails. Use the -f parameter to unconditionally stop allresources and stop Oracle High Availability Services.
Example
To stop Oracle High Availability Services on the local server:
# crsctl stop has
Troubleshooting and Diagnostic OutputYou can use crsctl set log commands as the root user to enable dynamic debugging forCluster Ready Services (CRS), Cluster Synchronization Services (CSS), and the EventManager (EVM), and the clusterware subcomponents.
You can dynamically change debugging levels using crsctl debug commands. Debugginginformation remains in the Oracle Cluster Registry (OCR) for use during the next startup. Youcan also enable debugging for resources.
This section includes the following topics:
• Dynamic Debugging Using crsctl set log
• Component Level Debugging
Dynamic Debugging Using crsctl set logSetting log levels for Oracle Clusterware.
Syntax
crsctl set log module_name "component1=level1,..."
Appendix ETroubleshooting and Diagnostic Output
E-149

Usage Notes
• You can set log levels for various components of the following modules:
mdns: Multicast domain name servergpnp: Grid Plug and Play servicecss: Cluster Synchronization Servicescrf: Cluster Health Monitorcrs: Cluster Ready Servicesctss: Cluster Time Synchronization Serviceevm: Event Managergipc: Grid Interprocess Communication
Use the crsctl lsmodules command to obtain a list of components for eachmodule.
• You can specify multiple component name/log level pairs in a comma-delimited listenclosed in double quotation marks ("").
• Separate component name/log level pairs with an equals sign (=) in OracleClusterware 11g release 2 (11.2.0.3), and later. Previous Oracle Clusterwareversions used a colon (:).
• The log_level is a number from 1 to 5 that sets the log level for the component orresource, where 1 is the least amount of log output and 5 provides the mostdetailed log output. The default log level is 2.
Example
To set log levels for the CRSRTI and CRSCOMM components of the CRS module:
$ crsctl set log crs "CRSRTI=1,CRSCOMM=2"
Component Level DebuggingYou can use crsctl set log and crsctl set trace commands as the root user toenable dynamic debugging for the various Oracle Clusterware modules.
Enabling Debugging for Oracle Clusterware ModulesYou can enable debugging for Oracle Clusterware modules and their components, andfor resources, by setting environment variables or by running the crsctl set logcommand.Use the following syntax to enable debugging for various Oracle Clusterware modules:
crsctl set {log | trace} module_name "component:debugging_level[,...]"
Run the crsctl set command as the root user, and supply the following information:
• module_name: Specify the name of one of the following modules:
mdns: Multicast domain name servergpnp: Grid Plug and Play servicecss: Cluster Synchronization Services
Appendix ETroubleshooting and Diagnostic Output
E-150

crf: Cluster Health Monitorcrs: Cluster Ready Servicesctss: Cluster Time Synchronization Serviceevm: Event Managergipc: Grid Interprocess Communication
• component: Specify the name of a component for one of the modules. See Table E-92 fora list of all of the components.
• debugging_level: Specify a number from 1 to 5 to indicate the level of detail you wantthe debug command to return, where 1 is the least amount of debugging output and 5provides the most detailed debugging output. The default debugging level is 2.
The following examples show how to enable debugging for the various modules:
• To enable debugging for Oracle Clusterware:
# crsctl set log crs "CRSRTI:1,CRSCOMM:2"
• To enable debugging for OCR:
# crsctl set log crs "CRSRTI:1,CRSCOMM:2,OCRSRV:4"
• To enable debugging for EVM:
# crsctl set log evm "EVMCOMM:1"
• To enable debugging for resources
# crsctl set log res "resname:1"
To obtain a list of components that can be used for debugging, run the crsctl lsmodulescommand, with the following syntax:
$ crsctl lsmodules {mdns | gpnp | css | crf | crs | ctss | evm | gipc}
Note:
You do not have to be the root user to run the crsctl lsmodulues command.
Table E-92 shows the components for the CRS, CSS, and EVM modules, respectively. Notethat some component names are common between the CRS, EVM, and CSS daemons andmay be enabled on that specific daemon. For example, COMMNS is the NS layer and becauseeach daemon uses the NS layer, you can enable this specific module component on any ofthe daemons to get specific debugging information.
Appendix ETroubleshooting and Diagnostic Output
E-151

Table E-92 Components for the CRS, CSS, and EVM Modules
CRS Components1 CSS Components2 EVM Components3
CRSUICRSCOMMCRSRTICRSMAINCRSPLACECRSAPPCRSRESCRSCOMMCRSOCRCRSTIMERCRSEVTCRSDCLUCLSCSSCLNTCOMMCRSCOMMNS
CSSDCOMMCRSCOMMNS
EVMDEVMDMAINEVMCOMMEVMEVTEVMAPPEVMAGENTCRSOCRCLUCLSCSSCLNTCOMMCRSCOMMNS
1 Obtain the list of CRS components using the crsctl lsmodules crs command.2 Obtain the list of CSS components using the crsctl lsmodules css command.3 Obtain the list of EVM components using the crsctl lsmodules evm command.
For example, use the following command to set debugging levels on specific clusternodes, include the -nodelist keyword and the names of the nodes, as follows:
crsctl set log crs "CRSRTI:1,CRSCOMM:2" -nodelist node1,node2
Table E-93 describes the Cluster Synchronization Services modules.
Table E-93 Cluster Synchronization Services (CSS) Modules and Functions
Module Description
CSS CSS client component
CSSD CSS daemon component
Table E-94 describes the function of each communication (COMM) module.
Table E-94 Communication (COMM) Modules and Functions
Module Description
COMMCRS Clusterware communication layer
COMMNS NS communication layer
Table E-95 describes the functions performed by each CRS module.
Appendix ETroubleshooting and Diagnostic Output
E-152

Table E-95 Oracle Clusterware (CRS) Modules and Functions
Module Descriptions
CRSUI User interface module
CRSCOMM Communication module
CRSRTI Resource management module
CRSMAIN Main module/driver
CRSPLACE CRS placement module
CRSAPP CRS application
CRSRES CRS resources
CRSOCR Oracle Cluster Registry interface
CRSTIMER Various timers related to CRS
CRSEVT CRS EVM/event interface module
CRSD CRS daemon
Using the crsctl set log crs command, you can debug the OCR components listed in Table E-96. The components listed in Table E-96 can also be used for the Oracle LocalRegistry (OLR) except for OCRMAS and OCRASM. You can also use them for OCR andOLR clients, except for OCRMAS and OCRSRV. Some OCR and OLR clients areOCRCONFIG, OCRDUMP, and so on.
Table E-96 Oracle Cluster Registry (OCR) Component Names
Module Description
OCRAPI OCR abstraction component
OCRCLI OCR client component
OCRSRV OCR server component
OCRMAS OCR master thread component
OCRMSG OCR message component
OCRCAC OCR cache component
OCRRAW OCR raw device component
OCRUTL OCR util component
OCROSD OCR operating system dependent (OSD) layer
OCRASM OCR ASM component
Table E-97 describes the OCR tool modules.
Table E-97 OCRCONFIG Modules and Functions
Module Description
OCRCONFIG OCRCONFIG component for configuring OCR
OCRDUMP OCRDUMP component that lists the Oracle Cluster Registry contents
OCRCHECK OCRCHECK component that verifies all of the configured OCRs
Appendix ETroubleshooting and Diagnostic Output
E-153

Enabling Debugging for Oracle Clusterware ResourcesYou can enable debugging for Oracle Clusterware resources by running the crsctlset log command, using the following syntax:
crsctl set log res "resource_name=debugging_level"
Run the crsctl set log command as the root user, and supply the followinginformation:
• resource_name: The name of the resource to debug.
• debugging_level: A number from 1 to 5 to indicate the level of detail you want thedebug command to return, where 1 is the least amount of debugging output and 5provides the most detailed debugging output.
Note:
After you resolve an issue that required additional debugging, you canreset the debug level to default, as follows:
# crsctl set log crs resource_name=default
To obtain a list of resources that can be used for debugging, run the crsctl statusresource command.
Example
To generate a debugging log for the VIP resource on node1, issue the followingcommand:
# crsctl set log res "ora.node1.vip:1"
Appendix ETroubleshooting and Diagnostic Output
E-154

FServer Control (SRVCTL) CommandReference
Use the Server Control (SRVCTL) utility to manage various components and applications inyour cluster.
This appendix contains reference information for Server Control commands, including utilityusage information and a comprehensive listing of the SRVCTL commands.
Note:
SRVCTL commands specific to Oracle RAC administration operations aredocumented in Oracle Real Application Clusters Administration and DeploymentGuide. Starting in Oracle Database 21c, PDBs are a resource managed by OracleClusterware. You can use SRVCTL commands to manage PDBs, except for thepolicy-managed databases.
SRVCTL Usage InformationSRVCTL is installed on each node in a cluster by default. To use SRVCTL, log in to theoperating system of a node and enter the SRVCTL command and its parameters in case-sensitive syntax.
• Use the version of SRVCTL that is provided with the current Oracle Database releasefrom the Oracle home of the database that you are managing. The version of SRVCTLmust be the same as the version of the object (listeners, Oracle ASM instances, OracleDatabase, Oracle Database instances, and Oracle Database services) being managed.
• SRVCTL does not support concurrent executions of commands on the same object. Runonly one SRVCTL command at a time for each database, service, or other object.
• When specifying a comma-delimited list as part of a SRVCTL command, there should notbe any spaces between the items in the list. For example:
srvctl add filesystem ... -serverpool "serverpool1,serverpool3" ...
When you specify a comma-delimited list in Windows environments, enclose the list indouble quotation marks (""). You can enclose a comma-delimited list in double quotationmarks in a Linux or UNIX environment but they will be ignored.
• If you are entering a SRVCTL command and you want to continue the input on a newline, then you can use the operating system continuation character. In Linux, this is thebackslash (\) symbol.
• A SRVCTL command that produces no output is a successful command. Not all SRVCTLcommands return a message when it completes, successfully. However, if a SRVCTLcommand fails, then it always returns an error message.
F-1

• SRVCTL returns 0 on success, 1 on failure, and 2 on warnings. Some commands,such as start, stop, enable, and disable, can return 2 for a warning when therequest would not change anything. In other words, the object of the command isalready started, already stopped, already disabled, and so on. In warning cases,SRVCTL also prints a message about what was already done.
Specifying Command Parameters as Keywords Instead ofSingle Letters
The use of single letter commands is deprecated. Oracle recommends that you usefull command words with SRVCTL.
In releases earlier than Oracle Database 12c, the SRVCTL command-line interface usedsingle letter parameters. However, single letter parameters impose a limit on thenumber of unique parameters available for use with SRVCTL commands. SRVCTLcommand parameters in current Oracle Database releases use full words instead ofsingle letters, such as -multicastport and -subdomain.
To support backward compatibility, you can use a mix of single-letter parameters andnew keyword parameters. New parameters introduced with keywords can be used withsingle letter parameters.
Note:
The use of single letter parameters are deprecated. Oracle recommends thatyou use the keyword parameters, so that you avoid using the same letter toimplement different functionality, depending on the command.
You can obtain the single-letter equivalents, where applicable, by adding the-compatible parameter after the -help parameter.
Character Set and Case Sensitivity of SRVCTL ObjectValues
SRVCTL interacts with many different types of objects. The character set and namelength limitations, and whether the object name is case sensitive, can vary betweenobject types.
Table F-1 String Restrictions for SRVCTL Object Names
ObjectType
Character Set Limitations CaseSensitive?
Maximum Length
db_domain
Alpha-numeric characters,underscore (_), and number sign(#)
No 128 characters
Appendix FSpecifying Command Parameters as Keywords Instead of Single Letters
F-2

Table F-1 (Cont.) String Restrictions for SRVCTL Object Names
ObjectType
Character Set Limitations CaseSensitive?
Maximum Length
db_unique_name
Alpha-numeric characters,underscore (_), number sign (#),and dollar sign ($); the first 8characters must be uniquebecause those characters areused to form instance names forpolicy-managed databases
No 30 characters but the first 8characters must be unique relativeto any other database in the samecluster
pdb_name Alpha-numeric characters andunderscore (_); the first charactermust be an alphabet character
No 30 characters
diskgroup_name
Naming disk groups have thesame limitations as naming otherdatabase objects.
No (allnames areconvertedtouppercase)
30 characters but the first 8characters must be unique relativeto any other database in the samecluster
instance_name
Alphanumeric characters Dependson theplatform
15 characters
listener_name
Alphanumeric characters Dependson theplatform
15 characters
node_name
Alphanumeric characters No 15 characters
scan_name
The first character must be analphabetic character
No 15 characters
server_pool
Alphanumeric characters,underscore (_), number sign (#),period (.), and dollar sign ($); thename cannot begin with a period,contain single quotation marks(''), nor can the name be"Generic" or "Free" because thosetwo names are reserved for thebuilt-in server pools
No 250 characters
service_name
Alphanumeric characters,underscore (_), number sign (#),period (.), and dollar sign ($); thename cannot begin with a period,contain single quotation marks(''), nor can the name be"Generic" or "Free" because thosetwo names are reserved for thebuilt-in server pools
No 250 characters
volume_name
Alphanumeric characters; dashes(-) are not allowed and the firstcharacter must be an alphabeticcharacter.
No 11 characters
Appendix FCharacter Set and Case Sensitivity of SRVCTL Object Values
F-3

Using SRVCTL HelpLearn about how to use context sensitive help with SRVCTL commands.
To see help for all SRVCTL commands, from the command line enter:
srvctl -help
To see the command syntax and a list of parameters for each SRVCTL command,from the command line enter:
srvctl command (or verb) object (or noun) -help
When you request online help for a command using -help, SRVCTL prints the fullwords for each parameter. You can obtain the single-letter equivalents, whereapplicable, by adding the -compatible parameter after the -help parameter. Forexample:
$ srvctl config database -help -compatible
The preceding command prints usage information for the srvctl config databasecommand, listing all parameters as full words followed by their single-letter equivalentsin parentheses, where applicable.
To see the SRVCTL version number enter:
$ srvctl -version
SRVCTL Privileges and SecurityTo use SRVCTL to change your Oracle RAC database configuration, log in to theoperating system as the software owner of the home that you want to manage.
For example, if different users installed Oracle Database and the Oracle GridInfrastructure, then log in as the database software owner (for example, ora_db) tomanage databases and log in as the Oracle Grid Infrastructure software owner (forexample, ora_asm) to manage the Oracle ASM instances.
Users who are members of the OSDBA operating system group can start and stop thedatabase. To stop and start an Oracle ASM instance, you must be a member of theOSASM operating system group.
To create or register objects such as listeners, Oracle Notification Services, andservices, you must be logged in to the operating system as the software owner of theOracle home. The objects you create or register for that Oracle home will run underthe user account of the owner of the Oracle home. Databases run as the databaseinstallation owner of the home from which they run.
To perform srvctl add operations on any object, you must be logged in as the Oracleaccount owner of the home on which the object runs.
Appendix FUsing SRVCTL Help
F-4

For some SRVCTL commands, to run the commands on Linux and Unix systems, you mustbe logged in as root, and on Windows systems, you must be logged in as a user withAdministrator privileges. In this appendix, those commands are preceded by the root prompt(#) in the command examples.
Additional SRVCTL TopicsYou can use SRVCTL to manage Oracle-supplied resources, but Oracle strongly advises youto follow the guidelines provided here.
• Use SRVCTL to manage Oracle-supplied resources such as listener, instances, diskgroups, and networks, and CRSCTL for managing Oracle Clusterware and its resources.
Caution:
Oracle strongly discourages you from using CRSCTL to directly manipulateOracle-supplied resources (resources whose names begin with ora). Makingmanual changes to Oracle resources using CRSCTL can adversely affect thecluster configuration.
• Although you may be able to cancel running SRVCTL commands by pressing theControl-C keys, Oracle strongly advises that you do not attempt to do this, because youcan corrupt your configuration data by doing this.
Do not to attempt to terminate SRVCTL in this manner.
Deprecated SRVCTL Subprograms or CommandsOracle recommends that you use alternatives for several SRVCTL commands andparameters deprecated with Oracle Database 12c.
Single Character Parameters Deprecated for all SRVCTL CommandsSingle-character parameters were deprecated in Oracle Database 12c. Use the full keywordfor each parameter. Refer to the information here to understand how to update scripts usingsingle-character parameters.
Oracle recommends that you use the full keyword for each SRVCTL parameter. To supportolder tools and scripts that still use single-character parameters, the current version ofSRVCTL continues to support both single-character parameters and full keyword parameters.However, deprecated functionality can be desupported in a future release.
The command reference topics for SRVCTL show the keywords for each SRVCTL command.The following table lists the deprecated single-character parameters.
Appendix FAdditional SRVCTL Topics
F-5

Table F-2 Deprecated Single-Character Parameters for SRVCTL Commands
SingleLetter
Long Form Values Description Related Commands
A address {VIP_name |IP}/netmask/[if1[|if2...]]
VIP addressspecification for nodeapplications
Node applications, VIP,network, Listener,SCAN VIP, and SCANlistener commands
a all none All resources of thatkind
srvctl configdatabaseCommon
a diskgroup diskgroup_list Comma-delimited listof Oracle ASM diskgroups
Database, instance,Oracle ASM, diskgroup, and file systemcommands
a detail None Print detailedconfigurationinformation
Common
a available available_list A comma-delimited listof available instances
Service and server poolcommands
a abort None Abort failed onlinerelocation
Relocate database
a viponly None Display VIPconfiguration
Node applications, VIP,network, listener, SCANVIP, and SCAN listenercommands
B rlbgoal {NONE|SERVICE_TIME|THROUGHPUT}
The runtime loadbalancing goal of aservice
Service and server poolcommands
c currentnode
current_node Node name fromwhich to relocate theservice
Service and server poolcommands
c cardinality
{UNIFORM|SINGLETON}
Whether the serviceshould run on everyactive server in theserver pool(UNIFORM) or justone server(SINGLETON)
Service and server poolcommands
c dbtype type Type of database:Oracle RAC OneNode, Oracle RAC, orsingle instance
Database, instance,Oracle ASM, diskgroup, and file systemcommands
d db ordatabase
db_unique_name Database uniquename
Common
d device volume_device Volume device path Database, instance,Oracle ASM, diskgroup, and file systemcommands
d domain None Display subdomainserved by GNS
OC4J, home, CVU, andGNS commands
Appendix FDeprecated SRVCTL Subprograms or Commands
F-6

Table F-2 (Cont.) Deprecated Single-Character Parameters for SRVCTLCommands
SingleLetter
Long Form Values Description Related Commands
e emport em_port_number Local listen port forOracle EnterpriseManager
Node applications, VIP,network, listener, SCANVIP, and SCAN listenercommands
e failovertype
{NONE|SESSIONBASIC|TRANSACTION}
The failover type for aservice
Service and server poolcommands
e server server_list Candidate server listfor Oracle RAC OneNode database
Database, instance,Oracle ASM, diskgroup, and file systemcommands
f force None Force remove Common
g diskgroup diskgroup_name Disk group name File system, Diskgroupcommands
g gsdonly None Display GSDconfiguration
Node applications, VIP,network, listener, SCANVIP, and SCAN listenercommands
g serverpool server_pool_nameserver_pool_list
A server pool name
Comma-delimited listof database serverpool names
Service and server poolcommands
Database, instance,Oracle ASM, diskgroup, and file systemcommands
h help None None Common
i importance number A number thatrepresents theimportance of theserver pool
Service and server poolcommands
i instance instance_nameinstance_list
Instance name prefixfor administrator-managed Oracle RACOne Node database
A comma-delimited listof instance names
Database, instance,Oracle ASM, diskgroup, and file systemcommands
I ip ip_address VIP address on whichGNS is to listen
OC4J, home, CVU, andGNS commands
i oldinst instance_name The old instancename
Service and server poolcommands
i scannumber scan_ordinal_number
Ordinal number of theIP address for theSCAN
Node applications, VIP,network, listener, SCANVIP, and SCAN listenercommands
Appendix FDeprecated SRVCTL Subprograms or Commands
F-7

Table F-2 (Cont.) Deprecated Single-Character Parameters for SRVCTLCommands
SingleLetter
Long Form Values Description Related Commands
i vip vip_name or"vip_name_list"
VIP names Node applications,GNS, VIP, network,listener, SCAN VIP, andSCAN listenercommands
j acfspath acfs_path_list Comma-delimited listof Oracle ACFS pathswhere thedependency on thedatabase will be set
Database, instance,Oracle ASM, diskgroup, and file systemcommands
j clbgoal {SHORT|LONG} The connection loadbalancing goal for aservice
Service and server poolcommands
k netnum network_number The network number Service and server poolcommands
Node applications, VIP,network, listener, SCANVIP, and SCAN listenercommands
OC4J, home, CVU, andGNS commands
l list List all records in GNS OC4J, home, CVU, andGNS commands
l listener listener_name The name of a listener ASM commands
l loglevel log_level Specify the level (0-6)of logging that GNSshould run with
OC4J, home, CVU, andGNS commands
l min number The minimum size ofthe server pool
Service and server poolcommands
l onslocalport
port_number Oracle NotificationService listening portfor local clientconnections
Node applications, VIP,network, listener, SCANVIP, and SCAN listenercommands
l role service_role Comma-delimited listof server roles withindouble quotationmarks (""), whereeach role is one ofPRIMARY,PHYSICAL_STANDBY,LOGICAL_STANDBY, orSNAPSHOT_STANDBY
Service and server poolcommands
m domain domain_name The domain for thedatabase
Database, instance,Oracle ASM, diskgroup, and file systemcommands
Appendix FDeprecated SRVCTL Subprograms or Commands
F-8

Table F-2 (Cont.) Deprecated Single-Character Parameters for SRVCTLCommands
SingleLetter
Long Form Values Description Related Commands
m failovermethod
{NONE|BASIC} The failover method ofa service
Service and server poolcommands
m multicastpost
The port on which theGNS daemon islistening for multicastrequests
OC4J, home, CVU, andGNS commands
m path mountpoint_path Mountpoint path Database, instance,Oracle ASM, diskgroup, and file systemcommands
n name Advertise a namethrough GNS usingthe given address
OC4J, home, CVU, andGNS commands
n node node_name The name of a specificnode
Common
n nodes node_list A comma-delimited listof node names
File system commands
n dbname database_name The database name(DB_NAME), ifdifferent from theunique name specifiedby the -db parameter
Database, instance,Oracle ASM, diskgroup, and file systemcommands
n scanname scan_name Fully-qualified SCANname (includes thedomain)
Node applications, VIP,network, listener, SCANVIP, and SCAN listenercommands
n servers server_list A comma-delimited listof candidate servernames
Service and server poolcommands
n targetnode node_name Node name to whichto relocate the service
Service and server poolcommands
o oraclehome oracle_home $ORACLE_HOME path Database commands
p endpoints [TCP:]port_number[/IPC:key][/NMP:pipe_name][/TCPS:s_port][/SDP:port]
SCAN listenerendpoints
Node applications, VIP,network, listener, SCANVIP, and SCAN listenercommands
p port The port which theGNS daemon uses tocommunicate with theDNS server
OC4J, home, CVU, andGNS commands
p rmiport port_number OC4J RMI portnumber
OC4J, home, CVU, andGNS commands
P tafpolicy {NONE|BASIC} TAF policyspecification
Service and server poolcommands
Appendix FDeprecated SRVCTL Subprograms or Commands
F-9

Table F-2 (Cont.) Deprecated Single-Character Parameters for SRVCTLCommands
SingleLetter
Long Form Values Description Related Commands
p spfile spfile_location Server parameter filepath
Database, instance,Oracle ASM, diskgroup, and file systemcommands
q notification
{TRUE|FALSE} Whether FAN isenabled for OCIconnections
Service commands
q query Query GNS for therecords belonging to aname
OC4J, home, CVU, andGNS commands
r preferred preferred_list A comma-delimited listof preferred instances
Service and server poolcommands
r onsremoteport
port_number Oracle NotificationService listening portfor connections fromremote hosts
Node applications, VIP,network, listener, SCANVIP, and SCAN listenercommands
r relocate Relocate the VIP Node applications, VIP,network, listener, SCANVIP, and SCAN listenercommands
r revert None Remove target nodeof failed onlinerelocation requestfrom the candidateserver list ofadministrator-managed Oracle RACOne Node database
Relocate database
r role role_type Role of the standbydatabase: PRIMARY,PHYSICAL_STANDBY,LOGICAL_STANDBY, orSNAPSHOT_STANDBY
Database, instance,Oracle ASM, diskgroup, and file systemcommands
s onsonly Display OracleNotification Servicedaemon configuration
Node applications, VIP,network, listener, SCANVIP, and SCAN listenercommands
s skip None Skip checking theports
Listener, SCAN, andSCAN listener.
s statfile file_name The file path of thestate_file createdby a previouslyexecuted srvctlstop home command
OC4J, home, CVU, andGNS commands
s status Display the status ofGNS
OC4J, home, CVU, andGNS commands
Appendix FDeprecated SRVCTL Subprograms or Commands
F-10

Table F-2 (Cont.) Deprecated Single-Character Parameters for SRVCTLCommands
SingleLetter
Long Form Values Description Related Commands
S subnet subnet/net_mask/[if1[|if2...]]
Network addressspecification for anetwork
Node applications, VIP,network, listener, SCANVIP, and SCAN listenercommands
s service service_nameservice_name_list
The name of a service
A comma-delimited listof service names
Service and server poolcommands
s startoption
start_options Startup options for thedatabase (mount,open, read only)
Database, instance,Oracle ASM, diskgroup, and file systemcommands
t checkinterval
time_interval Interval in minutesbetween checks
OC4J, home, CVU, andGNS commands
t edition edition_name The initial sessionedition of a service
Service and server poolcommands
t envs "name_list" A list of environmentvariables
Common
t namevals "name=value,..."
Names and values ofenvironment variables
Common
T nameval "name=value" Name and value of asingle environmentvariable
Common
t update instance_name The new instancename
Service and server poolcommands
t remoteservers
host_name[:port_number][,host_name[:port_number]...]
List of remote hostname and portnumber pairs forOracle NotificationService daemonsoutside this cluster
Node applications, VIP,network, listener, SCANVIP, and SCAN listenercommands
t stopoption stop_options Stop options for thedatabase (NORMAL,TRANSACTIONAL,IMMEDITATE, orABORT)
Database, instance,Oracle ASM, diskgroup, and file systemcommands
t toversion target_version Version to which youare downgrading
Database, instance,Oracle ASM, diskgroup, and file systemcommands
u max number Maximum size of theserver pool
Service and server poolcommands
u nettype network_type The network servertype, which can beSTATIC, DHCP, orMIXED
Node applications, VIP,network, listener, SCANVIP, and SCAN listenercommands
Appendix FDeprecated SRVCTL Subprograms or Commands
F-11

Table F-2 (Cont.) Deprecated Single-Character Parameters for SRVCTLCommands
SingleLetter
Long Form Values Description Related Commands
u newinst None Add a new instance tothe serviceconfiguration
Service commands
u update Update SCANlisteners to match thenumber of SCAN VIPs
Node applications, VIP,network, listener, SCANVIP, and SCAN listenercommands
u user oracle_user Oracle user or otherauthorized user tomount and unmountfile systems
Database, instance,Oracle ASM, diskgroup, and file systemcommands
v verbose Verbose output Common
v volume volume_name Name of a volume Database, instance,Oracle ASM, diskgroup, and file systemcommands
V versions Common
w failoverdelay
number Failover delay Service and server poolcommands
w nettype network_type The network servertype, which can beSTATIC, DHCP, orMIXED
Node applications, VIP,network, listener, SCANVIP, and SCAN listenercommands
w timeout timeout Online relocationtimeout in minutes
Database, instance,Oracle ASM, diskgroup, and file systemcommands
x dtp {TRUE | FALSE} Whether to enabledistributed transactionprocessing
Service and server poolcommands
x node node_name Node name (use thisparameter only withnoncluster databases)
Common
y noprompt Suppress theconfirmation prompt
Common
y policy {AUTOMATIC |MANUAL}
Management policy forthe resource
Database, instance,Oracle ASM, diskgroup, file system,service and server poolcommands
z failoverretry
number Number of failoverretries
Service and server poolcommands
z rmdepondisk
To remove adatabase'sdependency upon diskgroups
Database, instance,Oracle ASM, diskgroup, and file systemcommands
Appendix FDeprecated SRVCTL Subprograms or Commands
F-12

Miscellaneous SRVCTL Commands and ParametersIf you have scripts dating from Oracle Database 12.2 or earlier releases, then Oraclerecommends that you review the deprecated parameters and update your usage to currentforms.
The following command parameters were deprecated in Oracle Database 12c:
Table F-3 Deprecated Commands and Parameters for SRVCTL
Command Deprecated Parameters
srvctl modify asm -node node_namesrvctl modifyinstance
-zInstead, use the -node option with the value set to ""
srvctl modify gns [-ip ip_address] [-advertise host_name -address address][-delete host_name -address address] [-createalias name-alias alias] [-deletealias alias]Use the srvctl update gns command instead.
srvctl * oc4j The oc4j noun has been deprecated and replaced with qosmserver.SRVCTL still accepts the oc4j noun until it is desupported.
srvctl add service The PRECONNECToption with the -tafpolicy parameter is deprecated.
srvctl modify service The -failovermethod {NONE | BASIC} is deprecated.
The PRECONNECToption with the -tafpolicy parameter is deprecated.
SRVCTL Command ReferenceA comprehensive list of SRVCTL commands to use in Oracle Grid Infrastructureenvironments.
SRVCTL uses the following command syntax:
srvctl command object [parameters]
In SRVCTL syntax:
• command is a verb such as start, stop, or remove• object (also known as a noun) is the target or object on which SRVCTL performs the
command, such as Oracle Automatic Storage Management (Oracle ASM) or a filesystem. You can also use object abbreviations.
• parameters extend the use of a preceding command combination to include additionalparameters for the command. Some parameters are required while others are optional.
Note:
If specifying a comma-delimited list in a command parameter on Windows, then youmust enclose the list within double quotation marks ("").
Appendix FSRVCTL Command Reference
F-13

Table F-4 lists the keywords that can be used for the object portion of SRVCTLcommands. You can use either the full name or the abbreviation for each objectkeyword. The Purpose column describes the object and the actions that can beperformed on that object.
Table F-4 Object Keywords and Abbreviations
Object Keyword Purpose
Oracle ASM asm To add, modify, manage environment variables for,list the configuration of, enable, disable, start,stop, and obtain the status of Oracle ASM
Oracle ASM Network asmnetwork To add, configure, modify and remove an OracleASM network configuration
Cluster VerificationUtility
cvu To add, modify, enable, disable, remove, relocate,start, stop, and obtain the status of the ClusterVerification Utility
Cross-clusterdependency
cdp To add, modify, enable, disable, remove, relocate,start, stop, and obtain the status of cross-clusterdependency services.
Cross-clusterdependency proxies
cdpproxy To add, modify, enable, disable, remove, relocate,start, stop, and obtain the status of cross-clusterdependency proxy resources.
Export file system exportfs To add, modify, list the configuration of, enable,disable, start, stop, obtain the status of, andremove export file systems
Oracle AdvancedCluster File System
filesystem To add, modify, list the configuration of, remove,start, stop, and obtain the status of Oracle ACFS
Grid Naming Service gns To add, modify, list the configuration of, import,export, enable, disable, start, stop, obtain thestatus of, relocate, remove, and update the GridNaming Service
Highly available VIP havip To add, list the configuration of, enable, start,obtain the status of, stop, disable, relocate, andremove highly available VIPs
Oracle ASM IOServer ioserver To add, list the configuration of, modify, enable,disable, start, stop, relocate, obtain the status of,manage environment variables for, and removeOracle ASM IOServer
Managementdatabase
mgmtdb To add, modify, list the configuration of, enable,disable, start, stop, obtain the status of, relocate,manage environment variables for, and removemanagement databases (Cluster Health Monitorrepositories)
Management listener mgmtlsnr To add, modify, list the configuration of, enable,disable, start, stop, obtain the status of, relocate,manage environment variables for, and removemanagement listener resources for Cluster HealthMonitor
Network AttachedStorage (NAS)
mountfs To add, list the configuration of, enable, start,obtain the status of, stop, disable, relocate, andremove NAS
Appendix FSRVCTL Command Reference
F-14

Table F-4 (Cont.) Object Keywords and Abbreviations
Object Keyword Purpose
Network StorageService Resource
netstorageservice
To add, list the configuration of, enable, start,obtain the status of, stop, disable, and removeNetStorageService Resource
Virtual machinemanager
ovmm To add, list the configuration of, enable, modify,and remove a virtual machine manager
Oracle DatabaseQuality of ServiceManagement Server
qosmserver To add, modify, list the configuration of, enable,disable, start, stop, obtain the status of, relocate,and remove Oracle Database Quality of ServiceManagement Server
Fleet Patching andProvisioning Client
rhpclient To add, modify, list the configuration of, enable,disable, start, stop, obtain the status of, relocate,and remove Fleet Patching and ProvisioningClients
Fleet Patching andProvisioning Server
rhpserver To add, modify, list the configuration of, enable,disable, start, stop, obtain the status of, relocate,and remove Fleet Patching and ProvisioningServers
Virtual machine vm To add, modify, list the configuration of, enable,disable, start, stop, obtain the status of, relocate,and remove virtual machines
Note:
SRVCTL commands specific to Oracle RAC administration operations aredocumented in Oracle Real Application Clusters Administration and DeploymentGuide
srvctl add asmAdds a record for an Oracle ASM instance to the entire cluster.
This command must be run only one time from the Oracle Grid Infrastructure home.
Syntax
srvctl add asm [-listener listener_name] [-pwfile password_file_path [-flex [-count {number_of_instances | ALL}] | -proxy [-spfile server_parameter_file_path]]
Appendix FSRVCTL Command Reference
F-15

Parameters
Table F-5 srvctl add asm Command Parameters
Parameter Description
-listener listener_name
Enter the name of a listener. If you do not specify this parameter,then the listener name defaults to LISTENER.
-pwfile password_file_path
Enter the full path to the location of the password file on OracleASM.
-flex [-count {number_of_instances | ALL}] | -proxy [-spfile server_parameter_file_path]
Specify that the Oracle ASM instances are configured as OracleFlex ASM instances. You can optionally specify the number ofOracle ASM instances to create or that an Oracle ASM instanceshould be created on all nodes.
Alternatively, you can specify the -proxy parameter to configurethe Oracle ASM Dynamic Volume Manager proxy instanceresource. Optionally, you can specify the path to the serverparameter file.
Usage Notes
To manage Oracle ASM on Oracle Database 12c and later installations, use theSRVCTL binary in the Oracle Grid Infrastructure home for a cluster (Grid home). If youhave Oracle RAC or Oracle Database installed, then you cannot use the SRVCTLbinary in the database home to manage Oracle ASM.
Example
To add a clusterware resource for Oracle ASM to every node in the cluster, use thefollowing command:
$ srvctl add asm
srvctl config asmDisplays the configuration for all Oracle ASM instances.
Syntax
srvctl config asm [-proxy] [-detail]
Appendix FSRVCTL Command Reference
F-16

Parameters
Table F-6 srvctl config asm Command Parameters
Parameter Description
-proxy Optionally, you can use this parameter to specify whether the OracleASM configuration to display is a proxy instance.
-detail Optionally, you can use this parameter to print detailed configurationinformation.
Usage Notes
To manage Oracle ASM on Oracle Database 12c and later installations, use the SRVCTLbinary in the Oracle Grid Infrastructure home for a cluster (Grid home). If you have OracleRAC or Oracle Database installed, then you cannot use the SRVCTL binary in the databasehome to manage Oracle ASM.
Example
This command returns output similar to the following:
$ srvctl config asm
ASM Home: /u01/app/21.0.0/gridASM Listener: LISTENERASM instance count: 3Password file:
srvctl disable asmDisables the Oracle ASM proxy resource.Oracle ASM will restart if it contains Oracle Clusterware data or if the node restarts and it wasrunning before the node failed. The srvctl disable asm command also prevents the srvctlstart asm command from starting Oracle ASM instances.
Disabling the Oracle ASM proxy resource prevents the databases and disk groups fromstarting because they depend on the Oracle ASM proxy resource.
Syntax
srvctl disable asm [-proxy] [-node node_name]
Parameters
Table F-7 srvctl disable asm Command Parameters
Parameter Description
-proxy Optionally, you can use this parameter to specify whether you aredisabling a proxy Oracle ASM configuration.
Appendix FSRVCTL Command Reference
F-17

Table F-7 (Cont.) srvctl disable asm Command Parameters
Parameter Description
-node node_name Optionally, you can specify a particular node on which you want todisable Oracle ASM.
Usage Notes
• To manage Oracle ASM on Oracle Database 12c and later installations, use theSRVCTL binary in the Oracle Grid Infrastructure home for a cluster (Grid home). Ifyou have Oracle RAC or Oracle Database installed, then you cannot use theSRVCTL binary in the database home to manage Oracle ASM.
• Oracle ASM is part of the Oracle Clusterware stack and when OCR and votingfiles are stored on Oracle ASM, then Oracle ASM starts when OHASD starts theOracle Clusterware stack. The srvctl disable asm command does not preventthe Oracle ASM instance managed by OHASD from starting. Oracle ASM,therefore, starts as needed by the Oracle Clusterware stack.
The srvctl disable asm command prevents the Oracle ASM Oracle Clusterwareproxy resource, and any resources that depend on it, from starting. So, thecommand prevents Oracle Clusterware-managed objects, such as databases, diskgroups, and file systems that depend on Oracle ASM, from starting. For example,the srvctl start database | diskgroup | filesystem command fails to startany of those objects on nodes where the Oracle ASM Oracle Clusterware proxyresource is disabled. The command also prevents the srvctl start asmcommand from starting Oracle ASM on remote nodes.
Example
The following example disables Oracle ASM on a node named crmnode1:
$ srvctl disable asm -node crmnode1
srvctl enable asmEnables an Oracle ASM instance.
Syntax
srvctl enable asm [-proxy] [-node node_name]
Parameters
Table F-8 srvctl enable asm Command Parameters
Parameter Description
-proxy Optionally, you can use this parameter to specify whether you areenabling a proxy Oracle ASM configuration.
-node node_name Optionally, you can specify a particular node on which you want toenable Oracle ASM.
Appendix FSRVCTL Command Reference
F-18

Usage Notes
To manage Oracle ASM on Oracle Database 12c and later installations, use the SRVCTLbinary in the Oracle Grid Infrastructure home for a cluster (Grid home). If you have OracleRAC or Oracle Database installed, then you cannot use the SRVCTL binary in the databasehome to manage Oracle ASM.
Example
An example of this command is:
$ srvctl enable asm -node crmnode1
srvctl getenv asmDisplays the values for environment variables associated with Oracle ASM.
Syntax
srvctl getenv asm [-envs "name_list"]
Usage Notes
• If you choose not use the -env parameter, then the values of all environment variablesassociated with Oracle ASM are displayed.
• You can specify a comma-delimited list of the names of environment variables for whichyou want to retrieve the values.
Example
The following example displays the current values for all the environment variables used byOracle ASM:
$ srvctl getenv asm
srvctl modify asmModifies the listener used by Oracle ASM, the disk group discovery string used by OracleASM, or the SPFILE used by Oracle ASM for a noncluster database or a cluster database.
Note:
To manage Oracle ASM on Oracle Database 12c and later installations, use theSRVCTL binary in the Oracle Grid Infrastructure home for a cluster (Grid home). Ifyou have Oracle RAC or Oracle Database installed, then you cannot use theSRVCTL binary in the database home to manage Oracle ASM.
Appendix FSRVCTL Command Reference
F-19

Syntax
srvctl modify asm [-listener listener_name] [-pwfile password_file_path] [-pwfilebackup backup_password_file_path] [-count {number_of_instances | ALL}] [-diskstring asm_diskstring] [-spfile spfile_path_name [-proxy] [-force]]
Parameters
Parameter Description
-listenerlistener_name
Specify the name of the listener with which Oracle ASM registers.
-pwfilepassword_file_path
Specify the full path to the location of the password file for OracleASM.
-pwfilebackupbackup_password_file_path
Specify this option to update the location of the Oracle ASMpassword backup file.
Note:
This option does not backup theOracle ASM password file.
-count{number_of_instances| ALL}
Specify the number of Oracle ASM instances to create, or that anOracle ASM instance should be created on all nodes.
-diskstringasm_diskstring
Specify a new Oracle ASM disk group discovery string.
-spfilespfile_path_name
Specify the path to the new spfile to be used by Oracle ASM.
-proxy Use this parameter to specify an Oracle ASM proxy instance.
–force Use this parameter to force modification of Oracle ASM.
Example
An example of this command to modify the configuration of Oracle ASM is:
$ srvctl modify asm -listener lsnr1
srvctl predict asmPredicts the consequences of Oracle ASM failure.
Syntax
srvctl predict asm [-node node_name] [-verbose]
Appendix FSRVCTL Command Reference
F-20

Usage Notes
• Optionally, you can specify a particular node on which you want to predict theconsequences of an Oracle ASM failure.
• You can choose verbose output.
Example
An example of this command to predict the consequences of an Oracle ASM failure on aparticular node:
$ srvctl predict asm -node crmnode2
srvctl relocate asmRelocates an Oracle Flex ASM instance from one Hub Node of an Oracle Flex Cluster toanother.
Syntax
srvctl relocate asm -currentnode current_node [-targetnode target_node] [-force]
Parameters
Table F-9 srvctl relocate asm Parameters
Parameter Description
-currentnodecurrent_node
Name of the node on which the Oracle Flex ASM instance currentlyresides.
-targetnodetarget_node
Name of the node to which you want to relocate the Oracle Flex ASMinstance.
-force Force the relocation of the Oracle Flex ASM instance.
Usage Notes
• You cannot use this command if there is only one Oracle Flex ASM instance running.
• Because of bootstrap issues between Oracle ASM and Oracle Clusterware, on the nodewhere Oracle Clusterware uses Oracle ASM run either crsctl stop crs or crsctl stopcluster to stop Cluster Ready Services on the node before you relocate the Oracle ASMinstance.
Example
An example of this command to relocate an Oracle Flex ASM instance from the current nodeto a node named hubnode2 is:
$ srvctl relocate asm -currentnode hubnode1 -targetnode hubnode2
Appendix FSRVCTL Command Reference
F-21

srvctl remove asmRemoves the Oracle ASM resource from Oracle Clusterware management.
Note:
To manage Oracle ASM on Oracle Database 12c and later installations, usethe SRVCTL binary in the Oracle Grid Infrastructure home for a cluster (Gridhome). If you have Oracle RAC or Oracle Database installed, then youcannot use the SRVCTL binary in the database home to manage OracleASM.
Syntax
srvctl remove asm [-proxy] [-force]
Parameters
Table F-10 srvctl remove asm Command Parameters
Parameter Description
-proxy Optionally, you can use this parameter to specify whether you areremoving a proxy Oracle ASM configuration.
-force Forcefully removes an Oracle ASM resource (ignores anydependencies).
Example
An example of this command is:
$ srvctl remove asm -force
srvctl setenv asmSets Oracle ASM environment configurations.
Syntax
Use this command with one of the following syntaxes:
srvctl setenv asm -envs "name=value,[...]"
srvctl setenv asm -env "name=value"
Appendix FSRVCTL Command Reference
F-22

Parameters
Table F-11 srvctl setenv asm Command Parameters
Parameter Description
-envs "name=value,[...]"
Use this parameter to specify either a single name-value pair or acomma-delimited list of multiple name-value pairs of environmentvariables enclosed in double quotation marks ("").
-env "name=value" Use this parameter to enable a single environment variable to be set to avalue that contains commas or other special characters, enclosed indouble quotation marks ("").
Example
The following example sets the language environment configuration for Oracle ASM:
$ srvctl setenv asm -envs "LANG=en"
srvctl start asmStarts an Oracle ASM instance.
Note:
To manage Oracle ASM on Oracle Database 12c and later installations, use theSRVCTL binary in the Oracle Grid Infrastructure home for a cluster (Grid home). Ifyou have Oracle RAC or Oracle Database installed, then you cannot use theSRVCTL binary in the database home to manage Oracle ASM.
Syntax
srvctl start asm [-proxy] [-node node_name [-startoption start_options]]
Parameters
Table F-12 srvctl start asm Command Parameters
Parameter Description
-proxy Optionally, you can use this parameter to specify whether you arestarting a proxy Oracle ASM configuration.
-node node_name Optionally, you can specify a particular node on which you want to startOracle ASM.
Note: You can use this parameter only with Oracle Clusterware.
Appendix FSRVCTL Command Reference
F-23

Table F-12 (Cont.) srvctl start asm Command Parameters
Parameter Description
-startoptionstart_options
Optionally, you can specify options to the startup command, such asOPEN, MOUNT, or NOMOUNTNote: For multi-word startup options, such as read only and readwrite, separate the words with a space and enclose in double quotationmarks (""). For example, "read only".
See Also: SQL*Plus User's Guide and Reference for more informationabout startup options
Examples
An example of this command to start an Oracle ASM instance on a single node of acluster is:
$ srvctl start asm -node crmnode1
An example to start an Oracle ASM instance on all nodes in the cluster, or for anoncluster database, is:
$ srvctl start asm
srvctl status asmDisplays the status of an Oracle ASM instance.
Note:
To manage Oracle ASM on Oracle Database 12c and later installations, usethe SRVCTL binary in the Oracle Grid Infrastructure home for a cluster (Gridhome). If you have Oracle RAC or Oracle Database installed, then youcannot use the SRVCTL binary in the database home to manage OracleASM.
Syntax
srvctl status asm [-proxy] [-node node_name] [-detail] [-verbose]
Parameters
Table F-13 srvctl status asm Command Parameters
Parameter Description
-proxyOptionally, you can use this parameter to display thestatus for an Oracle ASM proxy instance.
Appendix FSRVCTL Command Reference
F-24

Table F-13 (Cont.) srvctl status asm Command Parameters
Parameter Description
-node node_nameOptionally, you can specify a particular node. If you donot specify this parameter, then SRVCTL displays thestatus of all Oracle ASM instances.
-detailPrint detailed status information.
-verboseDisplays verbose output.
Example
This command returns output similar to the following:
$ srvctl status asm -verbose
ASM is running on node2, node3, node4iDetailed state on node node2: StartedDetailed state on node node3: StartedDetailed state on node node4: Started
srvctl stop asmStops an Oracle ASM instance.
Syntax
srvctl stop asm [-proxy] [-node node_name] [-stopoption stop_options] [-force]
Parameters
Table F-14 srvctl stop asm Command Parameters
Parameter Description
-proxy Optionally, you can use this parameter to specify whether you arestopping a proxy Oracle ASM configuration.
-node node_name Optionally, you can specify a particular node on which you want to stopOracle ASM.
If you do not specify this parameter, then SRVCTL stops the Oracle ASMinstance on every active node in the cluster.
Note: You can use this parameter only with Oracle Clusterware.
Appendix FSRVCTL Command Reference
F-25

Table F-14 (Cont.) srvctl stop asm Command Parameters
Parameter Description
-stopoptionstop_options
Optionally, you can specify options to the shutdown command, such asNORMAL, TRANSACTIONAL, IMMEDIATE, or ABORT.
See Also: SQL*Plus User's Guide and Reference for more informationabout shutdown options
-force Optionally, you can use this parameter to stop disk groups, file systems,and databases that depend on Oracle ASM.
Usage Notes
• To manage Oracle ASM on Oracle Database 12c and later installations, useSRVCTL in the Oracle Grid Infrastructure home for a cluster (Grid home). If youhave Oracle RAC or Oracle Database installed, then you cannot use SRVCTL inthe database home to manage Oracle ASM.
• You cannot use this command when OCR is stored in Oracle ASM because it willnot stop Oracle ASM. To stop Oracle ASM you must shut down OracleClusterware.
Example
An example of this command is:
$ srvctl stop asm -node crmnode1 -stopoption IMMEDIATE
srvctl unsetenv asmUnsets the Oracle ASM environment configurations.
Syntax
srvctl unsetenv asm -envs "name_list"
Usage Notes
Use the -envs parameter to specify a comma-delimited list of the names ofenvironment variables enclosed in double quotation marks ("").
Example
The following example unsets the environment configuration for an Oracle ASMenvironment variable:
$ srvctl unsetenv asm -envs "CLASSPATH"
srvctl add asmnetworkAdds an Oracle ASM network configuration to Oracle Clusterware.
Appendix FSRVCTL Command Reference
F-26

Syntax
srvctl add asmnetwork [-netnum asm_network_number] [-deptype {optional | mandatory}] -subnet subnet[/netmask/if1[|if2...]]
Parameters
Table F-15 srvctl add asmnetwork Command Parameters
Parameter Description
-netnumasm_network_number
Optionally, you can specify an Oracle ASM network number (defaultnumber is 1) that you want to add.
-deptype {optional |mandatory}
Specify whether the Oracle ASM dependency type is optional ormandatory. The default is optional.
-subnet subnet[/netmask/if1[|if2...]]
Specify a subnet for the Oracle ASM network you want to add. If you donot specify any interface names, then the network uses any interface onthe given subnet.
For IPv6, netmask is a prefix length, such as 64.
srvctl config asmnetworkDisplays the configuration information for Oracle ASM networks registered with OracleClusterware.
Syntax
srvctl config asmnetwork [-netnum asm_network_number]
Usage Notes
Optionally, you can specify an Oracle ASM network number (default number is 1) for whichyou want to view configuration information.
srvctl modify asmnetworkModifies an Oracle ASM network configuration in Oracle Clusterware.
Syntax
srvctl modify asmnetwork [-netnum asm_network_number] [-deptype {optional | mandatory}]
Appendix FSRVCTL Command Reference
F-27

Parameters
Table F-16 srvctl modify asmnetwork Command Parameter
Parameter Description
-netnumasm_network_number
Optionally, you can specify an Oracle ASM network number (defaultnumber is 1) that you want to modify.
-deptype {optional |mandatory}
Specify whether the Oracle ASM dependency type is optional ormandatory.
srvctl remove asmnetworkRemoves an Oracle ASM network configuration from Oracle Clusterware.
Syntax
srvctl remove asmnetwork {-netnum asm_network_number | -all} [-force]
Parameters
Table F-17 srvctl remove asmnetwork Command Parameters
Parameter Description
-netnumasm_network_number |—all
Specify an Oracle ASM network number (default number is 1) thatyou want to remove or specify –all to remove all Oracle ASMnetwork numbers configured on Oracle Clusterware.
-force Use this parameter to forcibly remove an Oracle ASM networkregardless of any dependencies.
srvctl add cdpAdds a cross-cluster dependency proxy resource to a cluster (only on the first publicnetwork).
Syntax
srvctl add cdp [-port port_number] [–passfile_admin afile] [-passfile_readonly rfile]
Parameters
Table F-18 srvctl add cdp Command Parameters
Parameter Description
-port port_number Optionally, you can specify a port on which all cross-clusterdependency proxy resources in the cluster listen. If you do notspecify a port, then SRVCTL chooses a port that is available on allnodes of the Domain Services Cluster.
Appendix FSRVCTL Command Reference
F-28

Table F-18 (Cont.) srvctl add cdp Command Parameters
Parameter Description
–passfile_adminafile
If you have a password file for administrators, then you can specifyit using this parameter. If no password file exists, then SRVCTLrandomly generates a password.
-passfile_readonlyrfile
If you have a password file for read-only users, then you canspecify it using this parameter. If no password file exists, thenSRVCTL writes a randomly-generated password to a file.
srvctl config cdpDisplays the configuration of cross-cluster dependency proxy resources.
Syntax
srvctl config cdp [-cdpnumber cdp_ordinal_number]
Usage Notes
You can optionally specify the ordinal number of a specific cross-cluster dependency proxyresource for which you want to display configuration information. If you do not specify theordinal number option, then SRVCTL displays the configuration information for all cross-cluster dependency proxy resources in a cluster.
srvctl disable cdpDisables a cross-cluster dependency proxy resource.
Syntax
srvctl disable cdp [-cdpnumber cdp_ordinal_number]
Usage Notes
You can optionally specify the ordinal number of a specific cross-cluster dependency proxyresource that you want to disable. If you choose not to do so, then SRVCTL disables allcross-cluster dependency proxy resources in a cluster.
srvctl enable cdpEnables a cross-cluster dependency proxy resource.
Syntax
srvctl enable cdp [-cdpnumber cdp_ordinal_number]
Appendix FSRVCTL Command Reference
F-29

Usage Notes
You can optionally specify the ordinal number of a specific cross-cluster dependencyproxy resource that you want to enable. If you choose not to do so, then SRVCTLenables all cross-cluster dependency proxy resources in cluster.
srvctl modify cdpModifies ports and passwords for a cross-cluster dependency proxy resource.
Syntax
srvctl modify cdp [-port port_number] [–passfile_admin afile] [-passfile_readonly rfile]
Parameters
Table F-19 srvctl modify cdp Command Parameters
Parameter Description
-port port_number Optionally, you can modify the port on which all cross-clusterdependency proxy resources in the cluster listen.
–passfile_adminafile
Optionally, you can modify the password information foradministrators.
-passfile_readonlyrfile
Optionally, you can modify the password information for read-onlyusers.
Usage Notes
You must stop the cross-cluster dependency proxy resource before you make anychanges.
srvctl relocate cdpRelocates a cross-cluster dependency proxy resource in a cluster.
Syntax
srvctl relocate cdp -cdpnumber cdp_ordinal_number [-node node_name] [-force]
Parameters
Table F-20 srvctl relocate cdp Command Parameters
Parameter Description
-cdpnumbercdp_ordinal_number
Specify a cross-cluster dependency proxy resource that you wantto relocate by specifying its identifying ordinal number.
Appendix FSRVCTL Command Reference
F-30

Table F-20 (Cont.) srvctl relocate cdp Command Parameters
Parameter Description
-node node_name Optionally, you can specify the name of a node on which a cross-cluster dependency proxy resource resides that you want torelocate.
–force Optionally, you can use this parameter to relocate a cross-clusterdependency proxy resource with a running VIP. If you try to relocatea cross-cluster dependency proxy resource with a running VIPwithout using this parameter, then the command fails.
srvctl remove cdpRemoves a cross-cluster dependency proxy resource from a cluster without removing cross-cluster dependency proxy resources.
Syntax
srvctl remove cdp [-force]
Usage Notes
• Use the –force parameter to remove a running cross-cluster dependency proxyresource.
• This command completely removes all cross-cluster dependency proxy configuration. Ifyou use -force while proxies exist, then the proxies will no longer function until they arere-created.
srvctl start cdpStarts a cross-cluster dependency proxy resource on a cluster.
Syntax
srvctl start cdp [-cdpnumber cdp_ordinal_number] [-node node_name]
Parameters
Table F-21 srvctl start cdp Command Parameters
Parameter Description
-cdpnumbercdp_ordinal_number
Optionally, you can use this parameter to start a specific cross-clusterdependency proxy resource by specifying its identifying ordinal number.
-node node_name Optionally, you can specify the name of a node on which a cross-clusterdependency proxy resource resides that you want to start.
Appendix FSRVCTL Command Reference
F-31

srvctl status cdpObtains the status of cross-cluster dependency proxy resources.
Syntax
srvctl status cdp [-cdpnumber cdp_ordinal_number]
Usage Notes
You can optionally specify the ordinal number of a specific cross-cluster dependencyproxy resource. If you choose not to do so, then SRVCTL returns the status of allcross-cluster dependency proxy resources in the cluster.
srvctl stop cdpStops a cross-cluster dependency proxy resource on a cluster.
Syntax
srvctl stop cdp [-cdpnumber cdp_ordinal_number]
Usage Notes
Optionally, you can stop a specific cross-cluster dependency proxy resource byspecifying its identifying ordinal number.
srvctl add cdpproxyAdds a cross-cluster dependency proxy resource to a cluster (credentials must exist orbe imported, first).
Syntax
srvctl add cdpproxy -client_type client_type -client_name client_name [-remote_start {YES|NO}]
Parameters
Table F-22 srvctl add cdpproxy Command Parameters
Parameter Description
-client_typeclient_type
Specify the cluster resource type that you want to proxy.
-client_nameclient_name
Specify a name for the cluster resource that you want to proxy.
-remote_start {YES|NO}
Specify whether to start the proxy resource when the remoteresource starts.
Appendix FSRVCTL Command Reference
F-32

Usage Notes
• For Oracle Clusterware 18c, the client type is always diskgroup.
• For Oracle Clusterware 18c, the client name is the name of a remote disk group.
srvctl config cdpproxyDisplays configuration information for a cross-cluster dependency proxy resource.
Syntax
srvctl config cdpproxy -client_type client_type [-client_name client_name]
Parameters
Table F-23 srvctl config cdpproxy Command Parameters
Parameter Description
-client_typeclient_type
The cluster resource type of the proxy for which you want to display theconfiguration information.
-client_nameclient_name
Specify a name for the cluster resource proxy that you want to displaythe configuration information.
Usage Notes
• For Oracle Clusterware 18c, the client type is always diskgroup.
• For Oracle Clusterware 18c, the client name is the name of a remote disk group.
srvctl disable cdpproxyDisables a cross-cluster dependency proxy resource.
Syntax
srvctl disable cdpproxy -client_type client_type -client_name client_name
Parameters
Table F-24 srvctl disable cdpproxy Command Parameters
Parameter Description
-client_typeclient_type
The cluster resource type of the proxy you want to disable.
-client_nameclient_name
Specify a name for the cluster resource proxy that you want to disable.
Usage Notes
• For Oracle Clusterware 18c, the client type is always diskgroup.
Appendix FSRVCTL Command Reference
F-33

• For Oracle Clusterware 18c, the client name is the name of a remote disk group.
srvctl enable cdpproxyEnables a cross-cluster dependency proxy resource.
Syntax
srvctl enable cdpproxy -client_type client_type -client_name client_name
Parameters
Table F-25 srvctl enable cdpproxy Command Parameters
Parameter Description
-client_typeclient_type
The cluster resource type of the proxy you want to enable.
-client_nameclient_name
Specify a name for the cluster resource proxy that you want toenable.
Usage Notes
• For Oracle Clusterware 18c, the client type is always diskgroup.
• For Oracle Clusterware 18c, the client name is the name of a remote disk group.
srvctl modify cdpproxyModifies the configuration of a cross-cluster dependency proxy resource.
Syntax
srvctl modify cdpproxy -client_type client_type -client_name client_name [-remote_start {YES|NO}]
Parameters
Table F-26 srvctl modify cdpproxy Command Parameters
Parameter Description
-client_typeclient_type
The cluster resource type that you want to proxy.
-client_nameclient_name
Specify a name for the cluster resource that you want to proxy.
-remote_start {YES|NO}
Specify whether to start the proxy resource when the remoteresource starts.
Appendix FSRVCTL Command Reference
F-34

Usage Notes
• For Oracle Clusterware 18c, the client type is always diskgroup.
• For Oracle Clusterware 18c, the client name is the name of a remote disk group.
srvctl relocate cdpproxyRelocates a cross-cluster dependency proxy from one node of a cluster to another.
Syntax
srvctl relocate cdpproxy -client_type client_type -client_name client_name [-node node_name] [-force]
Parameters
Table F-27 srvctl relocate cdpproxy Command Parameters
Parameter Description
-client_typeclient_type
Specify the cluster resource type of the proxy that you want to relocate.
-client_nameclient_name
Specify the name of the cluster resource proxy that you want to relocate.
-node node_name Optionally, you can specify the name of a node to which you want torelocate the cross-cluster dependency proxy.
–force You must use this parameter if resources dependent on the cross-clusterdependency proxy are running.
Usage Notes
• For Oracle Clusterware 18c, the client type is always diskgroup.
• For Oracle Clusterware 18c, the client name is the name of a remote disk group.
srvctl remove cdpproxyRemoves a cross-cluster dependency proxy resource.
Syntax
srvctl remove cdpproxy -client_type client_type [-client_name client_name] [-force]
Appendix FSRVCTL Command Reference
F-35

Parameters
Table F-28 srvctl remove cdpproxy Command Parameters
Parameter Description
-client_typeclient_type
Specify the cluster resource type of the proxy that you want toremove.
-client_nameclient_name
Optionally, you can specify the name of a cluster resource proxythat you want to remove.
–force You must use this parameter if the cross-cluster dependency proxyresource you want to remove is running.
Usage Notes
• For Oracle Clusterware 18c, the client type is always diskgroup.
• For Oracle Clusterware 18c, the client name is the name of a remote disk group.
srvctl start cdpproxyStarts a cross-cluster dependency proxy resource.
Syntax
srvctl start cdpproxy -client_type client_type -client_name client_name [-node node_name]
Parameters
Table F-29 srvctl start cdpproxy Command Parameters
Parameter Description
-client_typeclient_type
Specify the cluster resource type of the proxy that you want to start.
-client_nameclient_name
Specify a name for the cluster resource proxy that you want to start.
-node node_name Optionally, you can specify the name of a node on which you wantto start the cross-cluster dependency proxy.
Usage Notes
• For Oracle Clusterware 18c, the client type is always diskgroup.
• For Oracle Clusterware 18c, the client name is the name of a remote disk group.
srvctl status cdpproxyRetrieves the status of a cross-cluster dependency proxy resource.
Appendix FSRVCTL Command Reference
F-36

Syntax
srvctl status cdpproxy -client_type client_type -client_name client_name]
Parameters
Table F-30 srvctl status cdpproxy Command Parameters
Parameter Description
-client_typeclient_type
Specify the cluster resource type of the proxy of which you want to checkthe status.
-client_nameclient_name
Specify the name of the cluster resource proxy of which you want tocheck the status.
Usage Notes
• For Oracle Clusterware 18c, the client type is always diskgroup.
• For Oracle Clusterware 18c, the client name is the name of a remote disk group.
srvctl stop cdpproxyStops a cross-cluster dependency proxy resource.
Syntax
srvctl stop cdpproxy -client_type client_type -client_name client_name [-node node_name]
Parameters
Table F-31 srvctl stop cdpproxy Command Parameters
Parameter Description
-client_typeclient_type
Specify the cluster resource type of the proxy that you want to stop.
-client_nameclient_name
Specify a name for the cluster resource proxy that you want to stop.
-node node_name Optionally, you can specify the name of a node on which you want tostop the cross-cluster dependency proxy resource.
Usage Notes
• For Oracle Clusterware 18c, the client type is always diskgroup.
• For Oracle Clusterware 18c, the client name is the name of a remote disk group.
srvctl add cvuAdds the Cluster Verification Utility (CVU) to an Oracle Clusterware configuration.
Appendix FSRVCTL Command Reference
F-37

Note:
This command is only available with Oracle Clusterware.
Syntax and Parameters
Use the srvctl add cvu command with the following syntax:
srvctl add cvu [-checkinterval time_in_minutes]
Usage Notes
• Optionally, you can change the interval between checks. By default, CVU runsonce every 6 hours and verifies the health of the cluster. The shortest interval youcan specify for CVU check is 10 minutes.
• Run this command while logged in as the Grid home user.
Example
To add CVU with a check interval of 6 hours, use the following command:
$ srvctl add cvu -checkinterval 360
srvctl config cvuDisplays the time interval, in minutes, between CVU checks.
Syntax and Parameters
Use the srvctl config cvu command with the following syntax:
srvctl config cvu
This command has no parameters.
Example
This command returns output similar to the following:
CVU is configured to run once every 360 minutes
srvctl disable cvuDisables the Cluster Verification Utility (CVU) for Oracle Clusterware management (ifenabled).
Syntax
srvctl disable cvu [-node node_name]
Appendix FSRVCTL Command Reference
F-38

Parameters
Optionally, you can specify the name of a particular node on which you want to disable CVU.Otherwise, SRVCTL disables CVU on all nodes.
Example
An example of this command to disable CVU on a node named crmnode1 is:
$ srvctl disable cvu -node crmnode1
srvctl enable cvuEnables the Cluster Verification Utility (CVU) for Oracle Clusterware management (ifdisabled).
Syntax
srvctl enable cvu [-node node_name]
Parameters
Optionally, you can specify the name of a particular node on which you want to enable CVU.Otherwise, SRVCTL enables CVU on all nodes.
Example
An example of this command to enable CVU on a node named crmnode1 is:
$ srvctl enable cvu -node crmnode1
srvctl modify cvuModifies the check interval for CVU.
Syntax
srvctl modify cvu [-checkinterval time_in_minutes]
Parameters
By default, CVU runs once every 360 minutes (six hours) and verifies the health of cluster. Ifyou change the interval, then the shortest interval you can specify for CVU check is 10minutes.
Example
An example of this command to modify CVU to have a check interval of 4 hours is:
$ srvctl modify cvu -checkinterval 240
Appendix FSRVCTL Command Reference
F-39

srvctl relocate cvuTemporarily relocates the CVU to another node in a cluster.
Syntax
srvctl relocate cvu [-node node_name]
Usage Notes
Optionally, you can specify a particular node to which you want to relocate CVU.
Example
An example of this command to temporarily relocate CVU from the local node to thecluster node named crmnode2 is:
$ srvctl relocate cvu -node crmnode2
srvctl remove cvuRemoves CVU from an Oracle Clusterware configuration.
Note:
This command is only available with Oracle Clusterware.
Syntax
srvctl remove cvu [-force]
Usage Notes
Use the -force parameter to remove a CVU resource that is running or starting.
srvctl start cvuStarts the CVU resource on one node in a cluster. If you specify a node name, thenCVU starts on that node.
Note:
This command is only available with Oracle Clusterware.
Appendix FSRVCTL Command Reference
F-40

Syntax
srvctl start cvu [-node node_name]
Usage Notes
Optionally, you can specify a particular node to which you want to start CVU. Otherwise,SRVCTL starts CVU on all nodes.
Example
An example of this command to start CVU on a single node of a cluster is:
$ srvctl start cvu -node crmnode1
srvctl status cvuDisplays the current state of the CVU resource on one node in a cluster. If you specify a nodename, then the command checks CVU status on that node.
Note:
This command is only available with Oracle Clusterware.
Syntax
srvctl status cvu [-node node_name]
Usage Notes
Optionally, you can specify a particular node where the CVU resource is running, if it is notthe local node.
Example
An example of this command to check the status of CVU on the node in the cluster namedcrmnode1 is:
$ srvctl status cvu -node crmnode1
srvctl stop cvuStops the Cluster Verification Utility (CVU) that is either in the running or starting state.
Note:
This command is only available with Oracle Clusterware.
Appendix FSRVCTL Command Reference
F-41

Syntax
srvctl stop cvu [-force]
Usage Notes
Optionally, you can specify the -force parameter to stop CVU if it is a dependantresource.
Example
An example of this command to stop CVU:
$ srvctl stop cvu
srvctl add exportfsCreates an export file system configuration in Oracle Clusterware.
Syntax
srvctl add exportfs -name unique_name -id havip_name -path path_to_export [-clients export_clients] [-options export_options] [-type NFS | SMB]
Parameters
Table F-32 svrctl add exportfs Command Parameters
Parameter Description
-name unique_name Enter a unique name for the export file system that you arecreating. This parameter is required.
-id havip_name Enter the number or name that identifies an existing HAVIP, thatyou specified in the srvctl add havip command. Thisparameter is required.
-path path_to_export Enter the path to the Oracle Advanced Cluster File System (OracleACFS) that you want to export. This parameter is required.
-clientsexport_clients -optionsexport_options
Optionally, enter a comma-delimited list of clients to which you wantthe file system exported. You can enter net groups and wildcards.For example:
-clients @netgroup1,*.example.com,16.140.0.0, hostname1
Note: You can use the -clients parameter only for Linuxsystems. Use the -options parameter for Solaris and AIXsystems.
Appendix FSRVCTL Command Reference
F-42

Table F-32 (Cont.) svrctl add exportfs Command Parameters
Parameter Description
-type NFS | SMB Specify the export type (NFS for a network file system or SMB forOracle ACFS server message block). The default is NFS for Linuxand UNIX platforms, and SMB for Windows.
Usage Notes
• You cannot use the –clients parameter with —type SMB.
• You must run this command as root on Linux and UNIX platforms.
Example
To export with operating system defaults:
# srvctl add exportfs -name cifsExport -path "/acfs1" -options "browsable = yes,read only = no,comment = acfs1"
To export read-only to certain clients:
# srvctl add exportfs -name export1 -id havip1 -path /u01/db1 -clients node1 -options ro
srvctl config exportfsDisplays the configuration information for the export file system in Oracle Clusterware.
Syntax
srvctl config exportfs [-name unique_name | -id havip_name]
Parameters
Table F-33 srvctl config exportfs Command Parameters
Parameter Description
-name unique_name Enter the unique name of the NFS export for which you want to displaythe configuration.
-id havip_name Enter the name of a HAVIP to display the configuration of all the NFSexports attached to the specific HAVIP.
Example
If you specify the -name parameter, then this command returns output similar to the following,whether you specify -name or -id:
$ srvctl config exportfs -id havip1
Appendix FSRVCTL Command Reference
F-43

export file system kep1 is configuredExported path: /scratch/ghnew/base/mymount3Export options: Export Type: Exported clients: export file system kexp2 is configuredExported path: /scratch/ghnew/base/mymount3Export options: Export Type: Exported clients:
srvctl disable exportfsDisables an export file system managed by Oracle Clusterware.
Syntax
srvctl disable exportfs -name filesystem_name
Usage Notes
• This command takes only the unique name of the file system you want to disable.
• You must run this command as root user on Linux and UNIX platforms.
Example
The following example disables an export file system called export1:
# srvctl disable exportfs -name export1
srvctl enable exportfsEnables an export file system configuration in Oracle Clusterware.
Syntax
srvctl enable exportfs -name filesystem_name
This command takes only the name of the file system you want to enable, which is arequired parameter.
Usage Notes
You must run this command as the root user on Linux and UNIX platforms.
Example
The following command example enables a file system named export1:
# srvctl enable exportfs -name export1
Appendix FSRVCTL Command Reference
F-44

srvctl modify exportfsModifies an export file system configuration in Oracle Clusterware.
Syntax
srvctl modify exportfs -name unique_name [-path path_to_export] [-clients node_list] [-options nfs_options_string]
Parameters
Table F-34 srvctl modify exportfs Command Parameters
Parameter Description
-name unique_name Enter the unique name of the NFS export file system to modify. Thisparameter is required.
-path path_to_export You can modify the path to the Oracle Advanced Cluster File System(Oracle ACFS) where the export is located.
-clients node_list You can modify the comma-delimited list of clients (hosts) to where thefile system is exported. You can enter net groups and wildcards. Forexample:
-clients @netgroup1,*.example.com,16.140.0.0, hostname1
Note: You can use the -clients parameter only for Linux systems. Usethe -options parameter for Oracle Solaris and IBM AIX systems.
-optionsnfs_client_string
Use this parameter to modify the export options for the export filesystem.
Usage Notes
• You must run this command as root user on Linux and UNIX platforms.
• You must start and stop the NFS export before any changes you make take effect.
Example
The following command example modifies the path of an export file system namedexportfs1:
# srvctl modify exportfs -name exportfs1 -path /mnt/racdb1
srvctl remove exportfsRemoves the specified export file system configuration.
Syntax
srvctl remove exportfs -name exportfs_name [-force]
Appendix FSRVCTL Command Reference
F-45

Parameters
Table F-35 srvctl remove exportfs Command Parameters
Parameter Description
-name exportfs_name Enter the unique name of the export file system you want toremove.
-force Use this parameter to ignore any dependencies and forcibly removethe export file system.
Usage Notes
• You must run this command as root user on Linux and UNIX platforms.
• If you do not use the -force parameter, then you must first stop the export filesystem you want to remove before you remove it.
• If you use the -force parameter, then the resulting configuration can cause errorswhen attempting to shut down the Oracle Clusterware stack.
Examples
To remove the stopped export file system named export1:
# srvctl remove exportfs -name export1
To remove a running export file system, leaving it exported:
# srvctl remove exportfs -name export1 -force
srvctl start exportfsStarts an export file system configuration in Oracle Clusterware.
Syntax
srvctl start exportfs {-name unique_name | -id havip_name}
Parameters
Table F-36 srvctl start exportfs Command Parameters
Parameter Description
-name unique_name Enter the unique name of the NFS export you want to start.
-id havip_name The unique ID associated with the HAVIP resource.
Appendix FSRVCTL Command Reference
F-46

Example
To start an export file system:
$ srvctl start exportfs -name export1
srvctl status exportfsDisplays the status of an export file system configuration.
Note:
This command is only available with Oracle Clusterware.
Syntax
srvctl status exportfs [-name unique_name | -id havip_name]
Parameters
Table F-37 srvctl status exportfs Command Parameters
Parameter Description
-name unique_name Optionally, you can specify the unique name of the NFS export for whichyou want to display the status.
-id havip_name Alternatively, you can specify the name of an HAVIP resource anddisplay the status of all of the NFS exports associated with the specifiedHAVIP resource.
Usage Notes
If you do not specify any parameters, then SRVCTL displays the status for all NFS exports inthe cluster.
Example
This command returns output similar to the following:
$ srvctl status exportfs
export file system export1 is enabledexport file system export1 is not exportedexport file system export2 is enabledexport file system export2 is exported on node node1
srvctl stop exportfsStops an export file system configuration managed by Oracle Clusterware.
Appendix FSRVCTL Command Reference
F-47

Syntax
srvctl stop exportfs {-name unique_name | -id havip_name} [-force]
Parameters
Table F-38 srvctl stop exportfs Command Parameters
Parameter Description
-name unique_name Enter the unique name of the NFS export you want to stop.
-id havip_name Alternatively, you can specify the name of an HAVIP. If you specifythis parameter, then SRVCTL stops all of the NFS exportsassociated with the HAVIP resource you specify.
–force Stop the NFS export, ignoring errors.
Usage Notes
You must run this command as root user on Linux and UNIX platforms.
Example
An example of this command is:
# srvctl stop exportfs -name export1
srvctl add filesystemAdds a device containing a file system (Oracle Advanced Cluster File System (OracleACFS) or other) to the Oracle Clusterware stack for automount and high availability.An Oracle ACFS file system resource is typically created for use with applicationresource dependency lists. For example, if an Oracle ACFS file system is configuredfor use as an Oracle Database home, then a resource created for the file system canbe included in the resource dependency list of the Oracle Database application. Thiswill cause the file system and stack to be automatically mounted because of the startaction of the database application.
Syntax
srvctl add filesystem {-device volume_device | -volume volume_name -diskgroup disk_group_name} -path mountpoint_path [-node "node_list" | -serverpool "server_pool_list"] [-user "user_list"] [-mountowner user_name] [-mountgroup group_name] [-mountperm octal_permission] [-fstype {ACFS | EXT3 | EXT4}] [-fsoptions options] [-description description] [-appid application_id] [-autostart {ALWAYS | NEVER | RESTORE}] [-acceleratorvols volume_name]
Appendix FSRVCTL Command Reference
F-48

Note:
Oracle supports the EXT3 and EXT4 values for the -fstype parameter only for Linux.
Parameters
Table F-39 srvctl add filesystem Command Parameters
Parameter Description
-device volume_device Specify the path to the file system volume device.
-volume volume_name Specify the name of the volume.
-diskgroupdisk_group_name
Specify the name of the disk group on which the -volume is located.
-path mountpoint_path Specify the mount point path that is used to set up dependencies onother resources for nested mounts. This must be an absolute path.
-node node_list | -serverpoolserver_pool_list
Optionally, you can specify a comma-delimited list of nodes on which tomount the file system device. If you specify a list of nodes or a serverpool, then SRVCTL creates a single-node file system resource. Withoutany nodes or server pools, SRVCTL creates a file system resource thatruns on every cluster node.
Alternatively, you can specify a comma-delimited list of server pools inwhich a file system will run. If you specify a list of server pools, then youdynamically limit the number or type of nodes on which a file system willrun. This does not count as a cluster-wide file system for later usage thatmay require a cluster-wide Oracle ACFS resource, such as HANFS.
Note: Nodes and server pools are mutually exclusive.
-user user_list Optionally, you can specify a comma-delimited list of users authorized tomount and unmount the file system.
If the file system is for Oracle Database software, then specify the nameof the Oracle home owner.
If you specify no users, then only root can mount and unmount the filesystem, or run srvctl start filesystem on the file system.
-mountowner user_name Optionally, you can specify the user that is the mount point owner.
-mountgroupgroup_name
Optionally, you can specify the group that includes the mount pointowners.
-mountpermoctal_permission
Optionally, you can specify the permissions (OCTAL format) for themount point.
-fstype {ACFS | EXT3| EXT4}
Optionally, you can specify the type of file system to be mounted. Thedefault value is ACFS.
If the type of file system to be mounted is not ACFS, then it must be asingle-node file system, and you must specify -node or -serverpool.
-fsoptions options Optionally, you can specify options used to mount the file system. Theoptions are file system and operating system dependent.
-descriptiondescription
Optionally, you can specify a description of the file system. This is storedas an attribute for later viewing by an administrator.
Appendix FSRVCTL Command Reference
F-49

Table F-39 (Cont.) srvctl add filesystem Command Parameters
Parameter Description
-appid application_id Optionally, you can specify an application ID, which is a unique identifierused to group file systems into logical groupings. You can use thismethod to group file systems that may be different on different nodes butare used by an application that must have a dependency on the resourcetype, which is ora.id.fs.type.
-autostart {ALWAYS |NEVER | RESTORE}
Optionally, you can specify the file system resource autostart policy.
ALWAYS: The file system resource always automatically starts.
NEVER: The file system does not automatically start.
RESTORE: The file system is restored to its last state. This is thedefault option.
-acceleratorvolsvolume_name
Optionally, you can specify the accelerator volume. An acceleratorvolume is a secondary Oracle ACFS volume that is used by OracleACFS to store critical metadata.
Usage Notes
• Use the -device parameter to specify the path to the file system resource forwhich you want to add, or specify -volume volume_name -diskgroupdisk_group_name.
• You must run this command as root user on Linux and UNIX platforms, or as anAdministrator user on Windows platforms.
• This command must be run only one time from the Oracle Grid Infrastructurehome.
• To manage Oracle ACFS on Oracle Database installations, use the SRVCTLbinary in the Oracle Grid Infrastructure home for a cluster (Grid home). If you haveOracle RAC or Oracle Database installed, then you cannot use the SRVCTLbinary in the database home to manage Oracle ACFS.
• Standard Edition High Availability (SEHA) databases are supported only on OracleDatabase 19c (19.7) release or later.
• This command is only available with Oracle Clusterware.
Examples
To add the d1volume1-295 disk device in the disk group RAC_DATA as the Oracle ACFSvolume VOLUME1 with a mount point of /oracle/cluster1/acfs:
# srvctl add filesystem -device /dev/asm/d1volume1-295 -path /oracle/cluster1/acfs1
To add an Oracle ACFS file system on the dynamic volume device asm-test-55, withthis file system mounted on one of the specified nodes at a time:
# srvctl add filesystem -fstype ACFS -device asm-test-55 -path myacfs -node node1,node2,node3
Appendix FSRVCTL Command Reference
F-50

To add an Oracle ACFS file system for configuring Standard Edition High Availability (SEHA)on the sehome volume of the DATA disk group with a mount point of /u01/app/oracle:
# srvctl add filesystem -volume sehome -diskgroup DATA -path /u01/app/oracle -fstype ACFS -autostart ALWAYS -user oracle
srvctl config filesystemDisplays the configuration for a specific file system resource.
Syntax
srvctl config filesystem [-device volume_device | -volume volume_name -diskgroup disk_group_name]
Parameters
Table F-40 srvctl config filesystem Command Parameters
Parameter Description
-device volume_device Specify the path to the file system volume device.
-volume volume_name Specify the name of the volume.
-diskgroupdisk_group_name
Specify the name of the disk group on which the -volume is located.
Usage Notes
• Use the -device parameter to specify the path to the file system resource for which youwant to display the configuration or specify -volume volume_name -diskgroupdisk_group_name.
• This command is only available with Oracle Clusterware.
Examples
The following example lists the configuration of all file systems:
$ srvctl config filesystem
The following example displays the configuration for a specific device:
$ srvctl config filesystem -device /dev/asm/d1volume1-295
srvctl disable filesystemDisables a specific Oracle Clusterware-managed file system volume.
Appendix FSRVCTL Command Reference
F-51

Syntax
srvctl disable filesystem {-device volume_device | -volume volume_name -diskgroup disk_group_name}
Parameters
Table F-41 srvctl disable filesystem Command Parameters
Parameter Description
-devicevolume_device
Specify the path to the file system volume device.
-volume volume_name Specify the name of the volume.
-diskgroupdisk_group_name
Specify the name of the disk group on which the -volume islocated.
Usage Notes
• Use the -device parameter to specify the path to the file system resource forwhich you want to disable, or specify -volume volume_name -diskgroupdisk_group_name.
• This command is only available with Oracle Clusterware.
Example
An example of this command is:
# srvctl disable filesystem -device /dev/asm/racvol1
srvctl enable filesystemEnables an Oracle ACFS volume or generic file system in Oracle Clusterware.
Syntax
srvctl enable filesystem {-device volume_device | -volume volume_name -diskgroup disk_group_name}
Parameters
Table F-42 srvctl enable filesystem Command Parameters
Parameter Description
-devicevolume_device
Specify the path to the file system volume device.
-volume volume_name Specify the name of the volume.
-diskgroupdisk_group_name
Specify the name of the disk group on which the -volume islocated.
Appendix FSRVCTL Command Reference
F-52

Usage Notes
• Use the -device parameter to specify the path to the file system resource for which youwant to enable, or specify -volume volume_name -diskgroup disk_group_name.
• This command is only available with Oracle Clusterware.
Example
An example of this command is:
# srvctl enable filesystem -device /dev/asm/racvol1
srvctl modify filesystemModifies the configuration of the file system resource.
Syntax
srvctl modify filesystem {-device volume_device | -volume volume_name -diskgroup disk_group_name} [-user {/+|/-}user_name | "user_list"] [-mountowner user_name] [-mountgroup group_name] [-mountperm octal_permission] [-path mountpoint_path] [-node "node_list" | -serverpool "server_pool_list"] [-fsoptions options] [-description description] [-autostart {ALWAYS | NEVER | RESTORE}] [-force]
Parameters
Table F-43 srvctl modify filesystem Command Parameters
Parameter Description
-device volume_device Specify the path to the file system volume device.
-volume volume_name Specify the name of the volume.
-diskgroupdisk_group_name
Specify the name of the disk group on which the -volume is located.
-user user_name |"user_list"
Specify the user(s) who is authorized to mount and unmount the filesystem. You can add (/+) or remove (/-) single a user, or replace theentire set of users with a comma-delimited list. If you do not specify thisparameter, then SRVCTL defaults to the user running the command.
-mountowner user_name Modify the owner of the mount point with the specified value.
-mountgroupgroup_name
Modify the group of the mount point with the specified value.
-mountpermoctal_permission
Modify the permissions of the user, group, and others with the specifiedvalue.
-path mountpoint_path Modify the mount point path that is used to set up dependencies on otherresources for nested mounts. This must be an absolute path.
Appendix FSRVCTL Command Reference
F-53

Table F-43 (Cont.) srvctl modify filesystem Command Parameters
Parameter Description
-node "node_list" | -serverpool"server_pool_list"
Modify a comma-delimited list of nodes on which to mount the filesystem device. If you specify a list of nodes or a server pool, thenSRVCTL creates a single-node file system resource. Without any nodesor server pools, SRVCTL creates a file system resource that runs onevery cluster node.
Alternatively, you can modify a comma-delimited list of server pools inwhich a file system will run. If you specify a list of server pools, then youdynamically limit the number or type of nodes on which a file system willrun. This does not count as a cluster-wide file system for later usage thatmay require a cluster-wide Oracle ACFS resource, such as HANFS.
Note: Nodes and server pools are mutually exclusive.
-fsoptions options Modify options used to mount the file system. The options (comma-delimited list) are file system and operating system dependent.
-descriptiondescription
Modify the description of the file system.
-autostart {ALWAYS |NEVER | RESTORE}
Modify the file system resource autostart policy.
ALWAYS: The file system resource always automatically starts
NEVER: The file system does not automatically start
RESTORE: The file system is restored to its last state. This is thedefault option.
-force Force modification. This option ignores dependencies.
Usage Notes
• Use the -device parameter to specify the path to the file system resource forwhich you want to modify, or specify -volume volume_name -diskgroupdisk_group_name.
• When performing online changes to the file system resource, the changes takeeffect only after the resource is next (re)started.
• You must run this command as root user on Linux and UNIX platforms.
• This command is only available with Oracle Clusterware.
Example
The following example changes the authorized user to sysad for the RACVOL1 volume:
# srvctl modify filesystem -device /dev/asm/racvol1 -user /+sysad
srvctl predict filesystemPredicts the consequences of file system failure.
Appendix FSRVCTL Command Reference
F-54

Syntax
srvctl predict filesystem {-device volume_device | -volume volume_name -diskgroup disk_group_name} [-verbose]
Parameters
Table F-44 srvctl predict filesystem Command Parameters
Parameter Description
-device volume_device Specify the path to the file system volume device.
-volume volume_name Specify the name of the volume.
-diskgroupdisk_group_name
Specify the name of the disk group on which the -volume is located.
-verbose Optionally, you can use the -verbose parameter to display detailedoutput.
Usage Notes
• Specify the -device parameter to specify the path to the file system resource for whichyou want to predict the consequences of file system failure, or specify -volumevolume_name -diskgroup disk_group_name.
• Optionally, you can choose verbose output.
• This command is only available with Oracle Clusterware.
Example
An example of this command is:
$ srvctl predict filesystem -device /dev/asm/volume1-123
srvctl remove filesystemRemoves a specific file system resource from the cluster.
Syntax
srvctl remove filesystem {-device volume_device | -volume volume_name -diskgroup disk_group_name} [-force]
Parameters
Table F-45 srvctl remove filesystem Command Parameters
Parameter Description
-device volume_device Specify the path to the file system volume device.
-volume volume_name Specify the name of the volume.
Appendix FSRVCTL Command Reference
F-55

Table F-45 (Cont.) srvctl remove filesystem Command Parameters
Parameter Description
-diskgroupdisk_group_name
Specify the name of the disk group on which the -volume is located.
-force Optionally, you can use the -force parameter to forcibly remove theresource from the cluster.
Usage Notes
• Specify the -device parameter to specify the path to the file system resource forwhich you want to remove, or specify -volume volume_name -diskgroupdisk_group_name.
• Optionally, you can use the -force parameter to ignore any resourcedependencies and forcibly remove the resource from the cluster.
• You must run this command as root user on Linux and UNIX platforms, or as anAdministrator user on Windows platforms.
• This command is only available with Oracle Clusterware.
Examples
An example of this command is:
# srvctl remove filesystem -device /dev/asm/racvol1
srvctl start filesystemStarts (mounts) the file system resource.
Syntax
srvctl start filesystem {-device volume_device | -volume volume_name -diskgroup disk_group_name} [-node node_name]
Parameters
Table F-46 srvctl start filesystem Command Parameters
Parameter Description
-devicevolume_device
Specify the path of the file system resource device that you want tostart.
-volume volume_name Specify the name of the volume.
-diskgroupdisk_group_name
Specify the name of the disk group on which the -volume islocated.
Appendix FSRVCTL Command Reference
F-56

Table F-46 (Cont.) srvctl start filesystem Command Parameters
Parameter Description
-node node_name Optionally, you can specify the name of the node on which the filesystem resource should be started.
If you do not specify this parameter, then SRVCTL starts the filesystem resource on all the available nodes in the cluster.
Usage Notes
• Use the -device parameter to specify the path to the file system resource for which youwant to start, or specify -volume volume_name -diskgroup disk_group_name.
• You must run this command as root user on Linux and UNIX platforms, or as anAdministrator user on Windows platforms, or as a configured file system user.
If srvctl add filesystem was executed with the -user parameter to identify usersauthorized to mount and unmount the file system, then you can run srvctl startfilesystem as one of the configured file system users.
See Also:
srvctl add filesystem for more information about configuring file system users
• This command is only available with Oracle Clusterware.
Examples
To start a file system on all configured nodes in the cluster:
$ srvctl start filesystem -device /dev/asm/data_db1-68
To start the file system on node1:
$ srvctl start filesystem -device /dev/asm/data_db1-68 -node node1
srvctl status filesystemDisplays the status of the file system resource.
Syntax
srvctl status filesystem [-device volume_device | -volume volume_name -diskgroup disk_group_name] [-verbose]
Appendix FSRVCTL Command Reference
F-57

Parameters
Table F-47 srvctl status filesystem Command Parameters
Parameter Description
-devicevolume_device
Specify the path to the file system volume device.
-volume volume_name Specify the name of the volume.
-diskgroupdisk_group_name
Specify the name of the disk group on which the -volume islocated.
-verbose Optionally, you can use the -verbose parameter to display detailedoutput.
Usage Notes
• Optionally, you can use the -device parameter to specify the path to the filesystem resource for which you want to obtain status, or specify -volumevolume_name -diskgroup disk_group_name. If you do not specify -device or -volume -diskgroup, then SRVCTL displays the status of all file systems.
• This command is only available with Oracle Clusterware.
Examples
You can specify a device, or volume and disk group.
For example, if you specify a device name:
$ srvctl status filesystem -d /dev/asm/fs1vol-358ACFS file system /acfs/fs1 is not mounted
$ srvctl start filesystem -d /dev/asm/fs1vol-358...$ srvctl status filesystem -d /dev/asm/fs1vol-358ACFS file system /acfs/fs1 is mounted on nodes nd1-4n-01,nd1-4n-02,nd1-4n-03,nd1-4n-04
For example, if you specify a volume and disk group:
$ srvctl status filesystem -volume fs1vol -diskgroup DATAACFS file system /acfs/fs1 is mounted on nodes nd1-4n-01,nd1-4n-02,nd1-4n-03,nd1-4n-04
If you do not specify a device, or volume and disk group:
$ srvctl status filesystemACFS file system /acfs/fs1 is mounted on nodes nd1-4n-01,nd1-4n-02,nd1-4n-03,nd1-4n-04
Appendix FSRVCTL Command Reference
F-58

Note:
In the preceding examples, the file system is Oracle ACFS. If you are using otherfile systems, then the file systems display as EXT3 or EXT4.
srvctl stop filesystemStops (unmounts) the Oracle ACFS file system or generic file system.
Syntax
srvctl stop filesystem {-device volume_device | -volume volume_name -diskgroup disk_group_name} [-node node_name] [-force]
Parameters
Table F-48 srvctl stop filesystem Command Parameters
Parameter Description
-device volume_device Specify the path to the file system volume device that you want to stop.
-volume volume_name Specify the name of the volume.
-diskgroupdisk_group_name
Specify the name of the disk group on which the -volume is located.
-node node_name Optionally, you can specify the name of a node. If you do not specify thisparameter, then SRVCTL stops the volume resource on all active nodesin the cluster.
-force Optionally, you can use -force to stop the file system and also stop anydatabases or other resources that depend on this file system.
Usage Notes
• Use the -device parameter to specify the path to the file system resource for which youwant to stop, or specify -volume volume_name -diskgroup disk_group_name.
• You must run this command as root user on Linux and UNIX platforms, or as anAdministrator user on Windows platforms, or as a configured file system user.
If srvctl add filesystem was executed with the -user parameter to identify usersauthorized to mount and unmount the file system, then you can run srvctl stopfilesystem as one of the configured file system users.
See Also:
srvctl add filesystem for more information about configuring file system users
• This command is only available with Oracle Clusterware.
Appendix FSRVCTL Command Reference
F-59

Example
An example of this command is:
# srvctl stop filesystem -device /dev/asm/racvol_1 -force
srvctl add gnsAdds the Grid Naming Service (GNS) to a cluster when you are using a DHCP publicnetwork or creating a client cluster.
Syntax
Use the srvctl add gns command with one of the following syntax models:
To add GNS to a cluster that is not currently running GNS:
srvctl add gns [-domain domain_name] -vip {vip_name | ip_address} [-skip] [-verbose]
To change a cluster that is not running GNS to be a client cluster of another clusterthat is running GNS:
srvctl add gns -clientdata file_name
To add a secondary GNS to a cluster:
srvctl add gns -vip vip_name | ip_address -clientdata file_name
Parameters
Table F-49 srvctl add gns Command Parameters
Parameter Description
-domain domain_name The network subdomain that is used for Forward DNS Lookup ofcluster IP addresses. You can only use this parameter if you specify-vip, and you must use this parameter if the cluster to which youare adding GNS has a GNS zone delegation and you are usingDHCP. The cluster to which you add GNS using -vip with the -domain parameters becomes a server cluster.
If you do not specify -domain, then SRVCTL adds GNS without adomain.
-vip {vip_name |ip_address}
Specify either the virtual IP (VIP) name or IP address on whichGNS listens for DNS requests. You cannot use -vip with -clientdata.
Use the -domain parameter with -vip to make the cluster to whichyou are adding GNS a server cluster.
-skip Specify this parameter to skip the reachability check of the VIPaddress.
Appendix FSRVCTL Command Reference
F-60

Table F-49 (Cont.) srvctl add gns Command Parameters
Parameter Description
-clientdatapath_to_file
Specify the path to the file you created with the srvctl exportgns command that contains the GNS credentials. You must copythis file to a node in the cluster you are adding before running thesrvctl add gns command.
The cluster to which you add GNS using -clientdata becomeseither a client cluster or a secondary GNS.
You can only use the -clientdata parameter with the -vipparameter when you are adding a secondary GNS.
-verbose Verbose output.
Usage Notes
• You must run this command as root user on Linux and UNIX platforms, or as anAdministrator user on Windows platforms.
• When you are adding GNS to a cluster for the first time, use the -vip parameter with the-domain parameter.
• When you are adding GNS to a cluster using the -clientdata parameter, you must firstexport the GNS data to a file and manually copy the file to a node in the cluster you areadding. Use the -clientdata parameter and run this command on any node in thecluster.
• You can only specify the -vip and -clientdata parameters at the same time when youare adding a secondary GNS.
Examples
To add GNS to a cluster, making it a server cluster:
# srvctl add gns -vip 192.168.16.17 -domain cluster.mycompany.com
To add GNS to a cluster, making it a client cluster:
# srvctl add gns -clientdata /tmp/gnsdata
srvctl config gnsDisplays the configuration for the grid naming service (GNS).
Syntax
srvctl config gns [-detail] [-subdomain] [-multicastport] [-node node_name] [-port] [-status] [-version] [-query name] [-list] [-clusterguid] [-clustername] [-clustertype] [-loglevel] [-network] [-role] [-instances]
Appendix FSRVCTL Command Reference
F-61

Parameters
Table F-50 srvctl config gns Command Parameters
Parameter Description
-detail Print detailed configuration information about the GNS.
-subdomain Display the subdomain served by GNS.
-multicastport Display the port on which the GNS daemon is listening for multicastrequests.
-node node_name Display the configuration information for GNS on the specifiednode.
-port Display the port that the GNS daemon uses to communicate withthe DNS server.
-status Display the status of GNS.
-version Display the version of GNS.
-query name Query GNS for the records belonging to a specific name.
-list List all records in GNS.
-clusterguid Display the globally unique identifier of the cluster where GNS isrunning.
-clustername Display the name of the cluster where GNS is running.
-clustertype Display the type of configuration of GNS on this cluster.
-loglevel Print the log level of the GNS.
-network Display network on which GNS is listening.
-role Display the role of the GNS instance.
-instances Display the instance list.
srvctl disable gnsDisables GNS for a specific node, or all available nodes in the cluster.
Note:
This command is only available with Oracle Clusterware.
Syntax
srvctl disable gns [-node node_name] [-verbose]
Usage Notes
• Optionally, you can specify the name of a node in the cluster on which you want todisable GNS. If you do not specify this parameter, then SRVCTL disables GNS forthe entire cluster.
• Optionally, you can use the -verbose parameter to display detailed output.
Appendix FSRVCTL Command Reference
F-62

Example
An example of this command to disable GNS on the node named crm7 is:
$ srvctl disable gns -node crm7
srvctl enable gnsEnables GNS on all nodes or a specific node.
Note:
This command can be used only with Oracle Clusterware.
Syntax
srvctl enable gns [-node node_name] [-verbose]
Usage Notes
• Optionally, you can specify the name of a node on which you want to enable GNS. If youdo not specify this parameter, then SRVCTL enables GNS on all nodes in the cluster.
• Optionally, you can use the -verbose parameter to print detailed output.
Example
An example of this command is:
$ srvctl enable gns -node node1
srvctl export gnsExports Grid Naming Service (GNS) instance data to a file that you can use when you areeither moving GNS from one server cluster to another or when you are creating a clientcluster.
SRVCTL extracts the data from OCR. Exported data includes:
• The credentials used to authorize users, which includes the VIP address on which theserver listens
• The names and DNS records kept in GNS
Syntax
srvctl export gns {-instance path_to_file | {-clientdata path_to_file -role {CLIENT|SECONDARY} [-version]}}
Appendix FSRVCTL Command Reference
F-63

Parameters
Table F-51 srvctl export gns Command Parameters
Parameter Description
-instancepath_to_file
Use this parameter to specify the file to which GNS instance data iswritten, when you are moving GNS from one server cluster toanother.
-clientdatapath_to_file -role{CLIENT|SECONDARY}
Use this parameter to specify the file to which GNS credentials datais written, when you are adding a client cluster to create a file thatcontains credentials that the client cluster accesses to performname management operations on the server cluster.
You must also use the -role parameter to specify a role for whichthe client data will be exported.
-version Optionally, you can use this parameter to specify the version forwhich the client data will be generated.
Note:
When exporting the GNS client datafile for an earlier release, make surethat you specify the -versionparameter.
Example
The following command exports the GNS credentials data to a file named gns.txt:
$ srvctl export gns -clientdata /temp/gnsdata/gns.txt
srvctl import gnsThe srvctl import gns command imports data from a file that you create when yourun the srvctl export gns command. Use this command when you want to locateGNS to a different server cluster.
When you import GNS data, SRVCTL stores the credentials and places the recorddata into OCR. If another GNS instance is running or data for another instance isencountered during the import procedure, then an error occurs.
This command also makes the cluster in which you run it the server cluster.
Note:
This command is only available with Oracle Clusterware.
Appendix FSRVCTL Command Reference
F-64

srvctl modify gnsModifies the IP address, domain, or other configuration parameters used by the grid namingservice (GNS).
Syntax
Use the srvctl modify gns command with one of the following syntax models:
srvctl modify gns -loglevel log_level
or
srvctl modify gns [-resolve name] [-verify name] [-parameter name:value[,name:value...]] [-vip {vip_name | ip} [-skip]] [-clientdata file_name] [-role {PRIMARY} [-force]] [-verbose]
Parameters
Table F-52 srvctl modify gns Command Parameters
Parameter Description
-loglevel log_level Specify the GNS diagnostic logging level (acceptable values are 1-6).
-resolve name Resolve the name you specify through GNS.
-verify name Check to see if the specified name is advertised through GNS.
-parametername:value[,name:value...]
Set the value of one or more configuration parameters.
-vip {vip_name | ip}[-skip]
Specify a VIP name or IP address on which GNS is to listen.
Note: You can modify this attribute using Online Resource AttributeModification.
Optionally, you can use the -skip parameter to skip the reachabilitycheck of the VIP address.
-clientdata file_name Modifies the GNS client data with client data contained in the specifiedfile.
-role {PRIMARY} [-force]
Convert a secondary GNS instance to primary.
Use the -force parameter to forcibly convert the secondary GNSinstance to primary.
Examples
An example of this command is:
$ srvctl modify gns -vip 192.0.2.15
Appendix FSRVCTL Command Reference
F-65

srvctl relocate gnsRelocates GNS from its current hosting node to another node within the cluster.
Note:
This command is only available with Oracle Clusterware.
Syntax
srvctl relocate gns [-node node_name] [-verbose]
Usage Notes
• Optionally, you can specify the name of a node to which you want to move GNS.
• Optionally, you can use the -verbose parameter to display verbose output.
• On Linux and UNIX systems, you must be logged in as root and on Windows, youmust be logged in as a user with Administrator privileges to run this command.
Example
An example of this command is:
# srvctl relocate gns -node node1
srvctl remove gnsRemoves GNS from the cluster.
Note:
This command is only available with Oracle Clusterware.
Syntax
srvctl remove gns [-force] [-verbose]
Usage Notes
• Optionally, you can use the -force parameter to forcibly remove GNS from thecluster, regardless of any errors that might occur.
• Optionally, you can use the -verbose parameter to display verbose output.
Appendix FSRVCTL Command Reference
F-66

Example
An example of this command is:
$ srvctl remove gns
srvctl start gnsStarts GNS on a specific node.
Syntax
srvctl start gns [-loglevel log_level] [-node node_name] [-verbose]
Parameters
Table F-53 srvctl start gns Command Parameters
Parameter Description
-loglevel log_level Optionally, you can specify the level of logging with which GNS shouldrun. Log levels vary between 1 (minimal tracing) and 6 (traces everythingand is time consuming).
-node node_name Optionally, you can specify the name of a node in the cluster where youwant to start GNS.
-verbose Optionally, you can use this parameter to display verbose output.
Usage Notes
You can only run this command in the server cluster. If you attempt to run this command in aclient cluster, then an error occurs.
Example
An example of this command to start the GNS on the cluster node named crmnode1 is:
$ srvctl start gns -node crmnode1
srvctl status gnsDisplays the current state of GNS.
Note:
This command is only available with Oracle Clusterware.
Appendix FSRVCTL Command Reference
F-67

Syntax
srvctl status gns [-node node_name] [-verbose]
Usage Notes
• Optionally, you can specify a node on which GNS is running for which you want todisplay the state.
• Optionally, you can use the -verbose parameter to display detailed output.
srvctl stop gnsStops GNS in the cluster.
Note:
This command is only available with Oracle Clusterware.
Syntax
srvctl stop gns [-node node_name] [-force] [-verbose]
Usage Notes
• Optionally, you can specify the name of a node on which GNS is running that youwant to stop.
• Optionally, you can use -force and -verbose to forcibly stop GNS and printdetailed output, respectively.
Example
An example of this command to stop GNS on the local node is:
$ srvctl stop gns
srvctl update gnsModifies a Grid Naming Service (GNS) instance.
Note:
This command is only available with Oracle Clusterware.
Appendix FSRVCTL Command Reference
F-68

Syntax
Use the srvctl update gns command with one of these syntax models:
srvctl update gns -advertise name -address ip_address [-timetolive time_to_live] [-verbose]
srvctl update gns -delete name [-address address] [-verbose]
srvctl update gns -alias alias -name name [-timetolive time_to_live] [-verbose]
srvctl update gns -deletealias alias [-verbose]
srvctl update gns -createsrv service -target target -protocol protocol [-weight weight] [-priority priority] [-port port_number] [-timetolive time_to_live] [-instance instance_name] [-verbose]
srvctl update gns -deletesrv service_name -target target -protocol protocol [-verbose]
srvctl update gns -createtxt name -target target [-timetolive time_to_live] [-namettl name_ttl] [-verbose]
srvctl update gns -deletetxt name -target target [-verbose]
srvctl update gns -createptr name -target target [-timetolive time_to_live] [-namettl name_ttl] [-verbose]
srvctl update gns -deleteptr name -target target [-verbose]
Parameters
Table F-54 srvctl update gns Command Parameters
Parameter Description
-advertise name Use this parameter to advertise a name through GNS.
-address ip_address Specify the IP address for an advertised name.
-timetolivetime_to_live
Optionally, you can specify, in seconds, an amount of time for the recordto live.
-delete name Use this parameter to remove the advertisement of a name from GNS.
-alias alias Use this parameter to create an alias for an advertised name.
-name name You must specify a name to associate with the alias.
-deletealias alias Use this parameter to delete an alias.
-createsrv service Use this parameter to create a service that is described by the record.
-target target Use this parameter to associate a name with the service.
Appendix FSRVCTL Command Reference
F-69

Table F-54 (Cont.) srvctl update gns Command Parameters
Parameter Description
-protocol protocol Use this parameter to specify which protocol is used to connect to theservice.
-weight weight Optionally, you can specify the weight of the record.
-priority priority Optionally, you can specify a priority of the record, with a value rangingfrom 0 to 65535.
-port port_number Optionally, you can specify a port number used to connect to the service,with a value ranging from 0 to 65535.
-instanceinstance_name
Optionally, you can specify an instance name for the service.
-deletesrvservice_name
Use this parameter to specify the name of the service record you want todelete.
-createtxt name Use this parameter to add a text (TXT) record using the specified name.
-namettl name_ttl Optionally, you can specify the time, in seconds, to live for the name.
-deletetxt name Use this parameter to delete a text (TXT) record for a specific name.
-createptr name Use this parameter to add a pointer (PTR) record for a specific name.
-deleteptr name Use this parameter to delete a pointer (PTR) record for a specific name.
Usage Notes
You must be logged in as the root user on Linux and UNIX platforms, or as anAdministrator user on Windows platforms, to run this command.
Example
The following command advertises a name with GNS:
# srvctl update gns -advertise myname -address 192.168.1.45
srvctl add havipAdds highly available VIPs (HAVIPs) (used for highly available NFS and SMB exports)to a cluster.
Syntax
srvctl add havip -id havip_name -address {host_name | ip_address} [-netnum network_number] [-description text] [-skip] [-homenode node_name]
Appendix FSRVCTL Command Reference
F-70

Parameters
Table F-55 srvctl add havip Command Parameters
Parameter Description
-id havip_name Specify a unique ID for the HAVIP resource.
-address {host_name |ip_address}
Specify either a host name or an IPv4 IP address for the HAVIP you aregoing to create.
Note: You must configure the IPv4 IP address with a non-DHCP, non-round robin DNS address.
-netnumnetwork_number
Optionally, you can specify a network resource upon which the HAVIPdepends. The default value for this parameter is 1.
-description text Optionally, you can specify a text description of the HAVIP.
-skip Optionally, you can specify this parameter to skip the reachability checkfor the IP address.
-homenode node_name Optionally, you can specify a preferred node or an empty string to clearthe home node.
Example
An example of this command is:
# srvctl add havip -id myhavip -address 192.0.2.1 -netnum 2 -description "My HA VIP" -skip -homenode myNode2
srvctl config havipDisplays configuration information for a specific highly available VIP (HAVIP) (used for highlyavailable NFS and SMB exports) or all HAVIP resources in a cluster.
Syntax
Use the srvctl config havip command with the following syntax:
srvctl config havip [-id havip_name]
Parameters
Table F-56 srvctl config havip Command Parameters
Parameter Description
-id havip_name Specify the unique name of the HAVIP resource you want to display. If you do notspecify this parameter, then SRVCTL displays the configuration information for allHAVIPs known to Oracle Clusterware.
Appendix FSRVCTL Command Reference
F-71
Example
This command returns output similar to the following:
$ srvctl config havip -id hrexports
VIP: /mjk-vm3-vip/10.149.237.196/10.149.236.0/255.255.252.0/eth0Description: HR Exports
srvctl disable havipPrevents a specific highly-available VIP (HAVIP) (used for highly-available NFS andSMB exports) resource from running on a number of specified nodes.
Syntax
srvctl disable havip -id havip_name [-node node1,node2,...,noden]
Parameters
Table F-57 srvctl disable havip Command Parameters
Parameter Description
-id havip_name Specify the unique name of the HAVIP resource you want todisable.
-nodenode1,node2,...,noden
Specify the name of a node or a comma-delimited list of nodenames on which you do not want the HAVIP resource to run.
If you specify all but one node in the cluster, then the HAVIP will notfail over.
Usage Notes
You must run this command as root user on Linux and UNIX platforms.
Example
An example of this command is:
# srvctl disable havip -id myhavip -node myNode1,myNode3
srvctl enable havipEnables a specific highly-available VIP (HAVIP) (used for highly-available NFS andSMB exports) to run on a number of specified nodes.
Syntax
srvctl enable havip -id havip_name [-node node_name]
Appendix FSRVCTL Command Reference
F-72

Parameters
Table F-58 srvctl enable havip Command Parameters
Parameter Description
-id havip_name Specify the unique name of the HAVIP resource you want to enable.
-node node_name Specify the name of a node on which you want the HAVIP resource to beable to run.
Usage Notes
You must run this command as root user on Linux and UNIX platforms.
Examples
An example of this command is:
# srvctl enable havip -id myhavip -node myNode1
srvctl modify havipModifies a highly-available VIP (HAVIP) (used for highly-available NFS and SMB exports).
Syntax
srvctl modify havip -id havip_name [-address {host_name | ip_address} [-netnum network_number] [-skip]] [-description text] [-homenode node_name]
Parameters
Table F-59 srvctl modify havip Command Parameters
Parameter Description
-id havip_name Specify the unique name for the HAVIP resource you want to modify.
-address {host_name |ip_address
Specify either a host name or an IPv4 IP or IPv6 address for the HAVIPyou want to modify.
Note: You must configure the IPv4 IP address with a non-DHCP, non-round robin DNS address.
-netnumnetwork_number
Optionally, you can change the network resource upon which the HAVIPdepends. The default value for this optional parameter is 1.
-skip Specify this parameter to skip checking the reachability of the IPaddress.
-description text Specify a text description for the HAVIP.
-homenode node_name Optionally, you can specify a preferred node or an empty string to clearthe home node.
Appendix FSRVCTL Command Reference
F-73

Usage Notes
You must run this command as root user on Linux and UNIX platforms.
Example
An example of this command is:
# srvctl modify havip -id myhavip -address 192.168.16.17 -netnum 2
srvctl relocate havipRelocates a highly-available VIP (HAVIP) (used for highly-available NFS and SMBexports) to another node in a cluster.
Syntax
srvctl relocate havip -id havip_name [-node node_name] [-force]
Parameters
Table F-60 srvctl relocate havip Command Parameters
Parameter Description
-id havip_name Specify the unique name of the HAVIP resource you want torelocate.
-node node_name Specify the name of the node to which you want to relocate theHAVIP resource.
-force Optionally, you can force the relocation of the HAVIP resource.
Example
An example of this command is:
$ srvctl relocate havip -id myhavip -node node3
srvctl remove havipRemoves a highly-available VIP (HAVIP) (used for highly-available NFS and SMBexports).
Syntax
srvctl remove havip -id havip_name [-force]
Appendix FSRVCTL Command Reference
F-74

Parameters
Table F-61 srvctl remove havip Command Parameters
Parameter Description
-id havip_name Specify the unique name of the HAVIP resource you want to remove.
–force Use this parameter to forcibly remove the resource from the cluster andignore any dependencies.
Usage Notes
• You must first stop the HAVIP resource before you attempt to remove it.
• You must run this command as root user on Linux and UNIX platforms.
Example
An example of this command is:
# srvctl remove havip -id myhavip -force
srvctl start havipStarts a specific highly-available VIP (HAVIP) (used for highly-available NFS and SMBexports) on a specific node.
Syntax
srvctl start havip -id havip_name [-node node_name]
Parameters
Table F-62 srvctl start havip Command Parameters
Parameter Description
-id havip_name Specify the unique name of the HAVIP resource you want to start.
-node node_name Optionally, you can use the -node parameter to specify the name of thenode on which the HAVIP resource starts.
Usage Notes
You must run this command as root user on Linux and UNIX platforms.
Example
An example of this command is:
# srvctl start havip -id myhavip -node myNode1
Appendix FSRVCTL Command Reference
F-75

srvctl status havipDisplays the status of all highly-available VIPs (HAVIPs) (used for highly-available NFSand SMB exports) in a cluster or one particular HAVIP.
Syntax
srvctl status havip [-id havip_name]
Usage Notes
Specify the unique name of the HAVIP resource you want to display. If you do notspecify this parameter, then SRVCTL displays the status of all HAVIPs known toOracle Clusterware.
Example
This command returns output similar to the following:
$ srvctl status havip
HAVIP ora.ha1.havip is enabledHAVIP ora.ha1.havip is not running
srvctl stop havipStops the highly-available VIPs (HAVIPs) (used for highly-available NFS and SMBexports) on a specific node.
Syntax
srvctl stop havip -id havip_name [-node node_name] [-force]
Parameters
Table F-63 srvctl stop havip Command Parameters
Parameter Description
-id havip_name Specify the unique name of the HAVIP resource to stop.
-node node_name Optionally, you can specify the name of the node on which theHAVIP resource to stop resides.
–force Use this parameter to forcibly stop the HAVIP.
Usage Notes
You must run this command as root user on Linux and UNIX platforms.
Appendix FSRVCTL Command Reference
F-76

Examples
An example of this command is:
# srvctl stop havip -id myhavip -node myNode1 -force
srvctl add ioserverAdds an Oracle ASM IOServer configuration to the cluster.
When you configure, upgrade, or convert from a standard cluster to an Oracle Flex Clusteryou can create Oracle ASM IOServers on the Hub nodes in the cluster.
Syntax
srvctl add ioserver [-spfile spfile] [-count number_of_ioserver_instances| ALL] [-listener listener_name]
Parameters
Table F-64 srvctl add ioserver Command Parameters
Parameter Description
-spfile spfileSpecify the path to the server parameter file.
-count number_of_ioserver_instances| ALL
Specify the number of Oracle ASM IOServerinstances you want to add or ALL to add instancesto all nodes.
-listener listener_nameSpecify the name of the listener.
Example
An example of this command is:
# srvctl add ioserver -count 2
srvctl config ioserverDisplays the configuration details of Oracle ASM IOServers.
Syntax
srvctl config ioserver
Appendix FSRVCTL Command Reference
F-77

Usage Notes
This command has no parameters.
Example
This command displays output similar to the following:
$ srvctl config ioserverASM I/O Server instance count: 3ASM I/O Server is enabled. ASM I/O server is enabled on nodes:ASM I/O server is disabled on nodes:
srvctl disable ioserverDisables an Oracle ASM IOServer.
Syntax
srvctl disable ioserver -node node_name
Usage Notes
Use the -node parameter to specify the name of a Hub node on which you want todisable an Oracle ASM IOServer.
srvctl enable ioserverEnable an Oracle ASM IOServer on a specific node.
Syntax
srvctl enable ioserver [-node node_name]
Usage Notes
Use the -node parameter to specify the name of a Hub node on which you want toenable an Oracle ASM IOServer.
srvctl getenv ioserverDisplays the values for environment variables associated with an Oracle ASMIOServer.
Syntax
srvctl getenv ioserver [-envs "name_list"]
Appendix FSRVCTL Command Reference
F-78

Usage Notes
Specify a comma-delimited list of the names of environment variables. If you do not specifythis parameter, then SRVCTL displays the values of all environment variables associated withthe database.
srvctl modify ioserverModifies an Oracle ASM IOServer configuration on a cluster.
Syntax
srvctl modify ioserver [-spfile spfile] [-count number_of_ioserver_instances | ALL] [-listener listener_name] [-force]
Parameters
Table F-65 srvctl modify ioserver Command Parameters
Parameter Description
-spfile spfile Optionally, specify the path to the server parameter file path.
-countnumber_of_ioserver_instances | ALL
Optionally, specify a number of instances or ALL (to modify instances onall nodes) that you want to modify. If you modify the count, then, becausethis results in a change in cardinality of the cluster resource, the changestake effect immediately.
-listenerlistener_name
Optionally, specify the name of the listener.
-force Optionally, you can ignore any dependencies and force the modificationof the Oracle ASM IOServer.
srvctl relocate ioserverRelocates an Oracle ASM IOServer instance from its current hosting node to another nodewithin the cluster.
Syntax
srvctl relocate ioserver -currentnode node_name [-targetnode node_name] [-force]
Parameters
Table F-66 srvctl relocate ioserver Command Parameters
Parameter Description
-currentnodenode_name
The name of the node on which the Oracle ASM IOServer instancecurrently resides
-targetnode node_name The name of the node to which to relocate the IOServer instance
Appendix FSRVCTL Command Reference
F-79

Table F-66 (Cont.) srvctl relocate ioserver Command Parameters
Parameter Description
-force Optionally, you can force the relocation of the Oracle ASM IOServerinstance
Example
The following command relocates the Oracle ASM IOServer from a node calledcrsNode2 to a node called crsNode5:
$ srvctl relocate ioserver -currentnode crsNode2 -targetnode crsNode5
srvctl remove ioserverUse this command to remove an Oracle ASM IOServer instance from the cluster.
Syntax
srvctl remove ioserver [-force]
Usage Notes
Use the -force parameter to forcibly remove the Oracle ASM IOServer instance,ignoring any dependencies.
srvctl setenv ioserverAdministers the environment configuration for an Oracle ASM IOServer.
Syntax
srvctl setenv ioserver {-envs "name=val[,name=val][...]" | -env "name=val"}
Parameters
Table F-67 srvctl setenv ioserver Command Parameters
Parameter Description
-envs "name=val,..." Comma-delimited list of name-value pairs of environmentvariables enclosed in double quotation marks ("").
-env "name=val" Alternatively, use this parameter to set a single environmentvariable to a value that contains commas or other specialcharacters, enclosed in double quotation marks ("").
Appendix FSRVCTL Command Reference
F-80

srvctl start ioserverStarts Oracle ASM IOServers in the cluster.
You can also start an Oracle ASM IOServer on a particular Hub Node by specifying the nodename.
Syntax
srvctl start ioserver [-node node_name]
Usage Notes
If you choose to start an Oracle ASM IOServer on a particular Hub Node, then use the -nodeparameter and specify the name of the node. If you do not specify a particular Hub Node,then SRVCTL starts all Oracle ASM IOServers in the cluster.
Example
The following command starts an Oracle ASM IOServer on a Hub node named mjkhub46:
$ srvctl start ioserver -node mjkhub46
srvctl status ioserverDisplays the status of Oracle ASM IOServers running in the cluster.
You can display the status of all Oracle ASM IOServers running a cluster, the status of anOracle ASM IOServer running on a particular Hub Node, or the information about clients froma specific database.
Syntax
srvctl status ioserver [-node node_name] [-detail]
Parameters
Table F-68 srvctl status ioserver Parameters
Parameter Description
—node node_name Specify a particular Hub node to display the status of the Oracle ASMIOServer resource instance running there. If you do not specify a Hubnode, then SRVCTL returns the status of all Oracle ASM IOServerresource instances running in the cluster.
-detail Use this parameter to display more detailed information about the statusof the Oracle ASM IOServer.
Appendix FSRVCTL Command Reference
F-81

Example
If you run the command with the -detail parameter, then SRVCTL displays outputsimilar to the following:
$ srvctl status ioserver -detailASM I/O Server is enabledASM I/O Server is running on nodes: mjk376, mjk377
ASM I/O Server instance +IOS1 running on node mjk376 is connected to ASM instance +ASM2:Number of clients connected: 2Names of clients: later14, alus16, later12, alus9, db0010
ASM I/O Server instance +IOS2 running on node mjk377 is connected to ASM instance +ASM3:Number of clients connected: 3Number of requests completed per sec: 110Names of networks: eth1, eth2Names of clients: later11, later3, later14, later15, later16, alus19, alus17, alus13
srvctl stop ioserverStops an Oracle ASM IOServer in the cluster.
Syntax
srvctl stop ioserver [-node node_name] [-force]
Usage Notes
• Use the -node parameter to stop an Oracle ASM IOServer on a particular HubNode. If you do not specify a particular Hub Node, then SRVCTL stops all of theOracle ASM IOServers in the cluster.
• Use the -force parameter to stop an Oracle ASM IOServer, regardless of anydependencies.
srvctl unsetenv ioserverUnsets the Oracle ASM IOServer environment configurations.
Syntax
srvctl unsetenv ioserver -envs "name_list"
Usage Notes
Use the -envs parameter to specify a comma-delimited list of the names ofenvironment variables enclosed in double quotation marks ("").
Appendix FSRVCTL Command Reference
F-82

srvctl add mgmtdbAdds a management database (CHM repository) resource to the cluster.
Syntax
srvctl add mgmtdb [-domain domain]
Usage Notes
Optionally, you can specify the domain for the database. If you have the DB_DOMAIN databaseinitialization parameter set, then you must provide a value for this parameter.
Example
To add a management database to the cluster:
$ srvctl add mgmtdb -domain example.com
srvctl config mgmtdbDisplays configuration information for the management database (CHM repository) resource.
Note:
Use this command only with Oracle Clusterware.
Syntax
srvctl config mgmtdb [-verbose] [-all]
Usage Notes
• Optionally, use the -verbose parameter to print detailed output.
• Optionally, use the -all parameter to print detailed configuration information.
srvctl disable mgmtdbDisables the management database (CHM repository) resource on the specified node.
Note:
This command is only available with Oracle Clusterware.
Appendix FSRVCTL Command Reference
F-83

Syntax
srvctl disable mgmtdb [-node node_name]
Usage Notes
Optionally, you can specify the name of a cluster node on which the managementdatabase you want to disable is running.
Example
An example of this command is:
$ srvctl disable mgmtdb
srvctl enable mgmtdbEnables a management database (CHM repository) resource.
Note:
This command is only available with Oracle Clusterware.
Syntax
srvctl enable mgmtdb [-node node_name]
Usage Notes
Optionally, you can specify the name of a cluster node on which you want to enable amanagement database resource.
Example
To enable a management database on the node named node5, use the followingcommand:
$ srvctl enable mgmtdb -node node5
srvctl getenv mgmtdbGets the environment variables for the management database (CHM repository).
Note:
This command is only available with Oracle Clusterware.
Appendix FSRVCTL Command Reference
F-84

Syntax
srvctl getenv mgmtdb [-envs "name_list"]
Usage Notes
Specify a comma-delimited list of the names of environment variables enclosed in doublequotation marks (""). If you do not use this parameter, then SRVCTL displays the values ofall environment variables associated with the listener.
Example
The following example lists all environment variables specified for the managementdatabase:
$ srvctl getenv mgmtdb
srvctl modify mgmtdbModifies the configuration for the management database (CHM repository).
Note:
This command is only available with Oracle Clusterware.
Syntax
srvctl modify mgmtdb [-pwfile password_file_path] [-spfile spfile_path] [-startoption start_option] [-stopoption stop_option] [-diskgroup "diskgroup_list"]
Parameters
Table F-69 srvctl modify mgmtdb Command Parameters
Parameter Description
-pwfilepassword_file_path
Modify the full path to the location of the password file for themanagement database.
-spfile spfile_path Modify the path name of the new spfile to be used by the managementdatabase.
-startoptionstart_option
Modify the startup options for the management database, such as OPEN,MOUNT, or NOMOUNT.
Note: For multi-word startup options, such as read only and readwrite, separate the words with a space and enclose in double quotationmarks (""). For example, "read only".
See Also: SQL*Plus User's Guide and Reference for more informationabout startup options
Appendix FSRVCTL Command Reference
F-85

Table F-69 (Cont.) srvctl modify mgmtdb Command Parameters
Parameter Description
-stopoptionstop_option
Modify the stop options for the management database, such as NORMAL,TRANSACTIONAL, IMMEDIATE, or ABORT.
See Also: SQL*Plus User's Guide and Reference for more informationabout shutdown options
-diskgroup"diskgroup_list"
Modify a comma-delimited list of Oracle ASM disk groups used by themanagement database, enclosed in double quotation marks ("").
Example
The following example directs the management database to use the SYSFILES OracleASM disk group:
$ srvctl modify mgmtdb -diskgroup "SYSFILES"
srvctl relocate mgmtdbRelocates the management database (CHM repository) resource from one node of thecluster to another.
Note:
This command is only available with Oracle Clusterware.
Syntax
srvctl relocate mgmtdb [-node node_name]
Usage Notes
Specify a node to which you want to relocate the management database.
Example
An example of this command is:
$ srvctl relocate mgmtdb -node crsNode2
Appendix FSRVCTL Command Reference
F-86
srvctl remove mgmtdbRemoves the management database (CHM repository) from Oracle Clusterwaremanagement.
Note:
This command is only available with Oracle Clusterware.
Syntax
srvctl remove mgmtdb [-force] [-noprompt] [-verbose]
Parameters
Table F-70 srvctl remove mgmtdb Command Parameters
Parameter Description
-force Optionally, you can use this parameter to forcibly remove themanagement database from the cluster regardless of any errors thatmight occur.
-noprompt Optionally, you can use this parameter to suppress prompts.
-verbose Optionally, you can use this parameter to display verbose output.
Usage Notes
You must first shut down the management database before you attempt to remove it.
Example
An example of this command is:
$ srvctl remove mgmtdb -noprompt
srvctl setenv mgmtdbAdministers the environment configuration for the management database (CHM repository).
Note:
This command is only available with Oracle Clusterware.
Appendix FSRVCTL Command Reference
F-87

Syntax
Use this command with one of these syntax models:
srvctl setenv mgmtdb -envs "name=val[,...]"
srvctl setenv mgmtdb -env "name=val"
Parameters
Table F-71 srvctl setenv mgmtdb Command Parameters
Parameter Description
-envs"name=val[,...]"
Specify a comma-delimited list of name-value pairs of environmentvariables enclosed in double quotation marks ("").
-env "name=val" Use this parameter to enable a single environment variable to beset to a value that contains commas or other special charactersenclosed in double quotation marks ("").
Example
The following example sets the language environment configuration for themanagement database:
$ srvctl setenv mgmtdb -env LANG=en
srvctl start mgmtdbStarts the management database (CHM repository) resource.
Note:
This command is only available with Oracle Clusterware.
Syntax
srvctl start mgmtdb [-startoption start_options] [-node node_name]
Appendix FSRVCTL Command Reference
F-88

Parameters
Table F-72 srvctl start mgmtdb Command Parameters
Parameter Description
-startoptionstart_options
Optionally, you can specify options to the startup command, such asOPEN, MOUNT, or NOMOUNT.
Note: For multi-word startup options, such as read only and readwrite, separate the words with a space and enclose in double quotationmarks (""). For example, "read only".
See Also: SQL*Plus User's Guide and Reference for more informationabout startup options
-node node_name Optionally, you can specify a particular node on which to start amanagement database resource.
Note: This parameter can be used only with Oracle Clusterware.
Example
An example of this command to start the management database on the crmnode1 node of thecluster is:
$ srvctl start mgmtdb -node crmnode1
srvctl status mgmtdbDisplays the current state of the management database (CHM repository) resource.
Note:
This command is only available with Oracle Clusterware.
Syntax
srvctl status mgmtdb [-verbose]
Usage Notes
Optionally, you can use the -verbose parameter to display detailed output.
Example
An example of this command to check the status of the management database is:
$ srvctl status mgmtdb
Appendix FSRVCTL Command Reference
F-89

srvctl stop mgmtdbStops the management database (CHM repository) resource.
Note:
This command is only available with Oracle Clusterware.
Syntax
srvctl stop mgmtdb [-stopoption stop_options] [-force]
Parameters
Table F-73 srvctl stop mgmtdb Command Parameters
Parameter Description
-stopoptionstop_options
Optionally, you can use this parameter to specify shutdowncommand options, such as NORMAL, TRANSACTIONAL, IMMEDIATE,or ABORT.
See Also: SQL*Plus User's Guide and Reference for moreinformation about shutdown options
-force Use this parameter to forcibly stop the database and anyassociated services and any dependent resources.
Example
An example of this command is:
$ srvctl stop mgmtdb -stopoption NORMAL
srvctl unsetenv mgmtdbUnsets the management database (CHM repository) environment configurations.
Note:
This command is only available with Oracle Clusterware.
Syntax
srvctl unsetenv mgmtdb -envs "name_list"
Appendix FSRVCTL Command Reference
F-90

Usage Notes
Use the -envs parameter to specify a comma-delimited list of the names of environmentvariables enclosed in double quotation marks ("").
Example
The following example unsets the environment configuration for a management databaseenvironment variable:
$ srvctl unsetenv mgmtdb -envs "LANG"
srvctl add mgmtlsnrAdds a management listener resource (for Cluster Health Monitor) to the cluster.
Syntax
srvctl add mgmtlsnr [-endpoints "[TCP:]port_list[/IPC:key][/NMP:pipe_name [/TCPS:s_port][/SDP:port][/EXADIRECT:port]"] [-skip]]
Parameters
Table F-74 srvctl add mgmtlsnr Command Parameters
Parameter Description
-endpoints "[TCP:]port_list [/IPC:key][/NMP:pipe_name [/TCPS:s_port][/SDP:port][/EXADIRECT:port]"]
Protocol specifications for the listener. port_list is a comma-delimitedlist of TCP ports or listener endpoints
-skipIndicates you want to skip the checking of ports.
Example
The following command adds a management listener that is listening on port 1341 to thecluster:
$ srvctl add mgmtlsnr -endpoints "TCP:1341"
Appendix FSRVCTL Command Reference
F-91

srvctl config mgmtlsnrDisplays configuration information for the management listener resource (for CHM).
Note:
Use this command only with Oracle Clusterware.
Syntax
srvctl config mgmtlsnr [-all]
Usage Notes
Use the -all parameter to print detailed configuration information.
srvctl disable mgmtlsnrDisables the management listener resource (for CHM) on the specified node.
Note:
This command is only available with Oracle Clusterware.
Syntax
srvctl disable mgmtlsnr [-node node_name]
Usage Notes
Optionally, you can specify the name of a cluster node on which the managementlistener you want to disable is running.
Example
An example of this command is:
$ srvctl disable mgmtlsnr
Appendix FSRVCTL Command Reference
F-92

srvctl enable mgmtlsnrEnables a management database listener resource (for CHM).
Note:
This command is only available with Oracle Clusterware.
Syntax
srvctl enable mgmtlsnr [-node node_name]
Usage Notes
Optionally, you can specify the name of a cluster node on which you want to enable amanagement listener.
Example
To enable a management listener on a node named node5, use the following command:
$ srvctl enable mgmtlsnr -node node5
srvctl getenv mgmtlsnrGets the environment variables for the management listener resource (for CHM).
Note:
This command is only available with Oracle Clusterware.
Syntax
srvctl getenv mgmtlsnr [-envs "name_list"]
Usage Notes
Optionally, you can specify a comma-delimited list of environment variable names. If you donot use this parameter, then SRVCTL displays the values of all environment variablesassociated with the listener.
Example
The following example lists all environment variables specified for the management listener:
$ srvctl getenv mgmtlsnr
Appendix FSRVCTL Command Reference
F-93

srvctl modify mgmtlsnrModifies the configuration for the management listener resource (for CHM).
Note:
This command is only available with Oracle Clusterware.
Syntax
srvctl modify mgmtlsnr [-endpoints "[TCP:]port_list[/IPC:key][/NMP:pipe_name] [/TCPS:s_port][/SDP:port]"]
Usage Notes
Optionally, you can specify protocol specifications for the management listener.port_list is comma-delimited list of port numbers. You can also modify this attributeusing Online Resource Attribute Modification.
Example
The following example changes the TCP ports for the management listener:
$ srvctl modify mgmtlsnr -endpoints "TCP:2521,2522"
srvctl remove mgmtlsnrRemoves the management listener resource (for CHM) from Oracle Clusterware.
Note:
This command is only available with Oracle Clusterware.
Syntax
srvctl remove mgmtlsnr [-force]
Usage Notes
Use the -force parameter to forcibly remove the management listener, ignoring anydependencies.
Appendix FSRVCTL Command Reference
F-94

Example
An example of this command is:
$ srvctl remove mgmtlsnr
srvctl setenv mgmtlsnrAdministers the environment configuration for the management listener resource (for CHM).
Note:
This command is only available with Oracle Clusterware.
Syntax
Use this command with one of the following syntax models:
srvctl setenv mgmtlsnr -envs "name=val[,...]"
srvctl setenv mgmtlsnr -env "name=val"
Parameters
Table F-75 srvctl setenv mgmtlsnr Command Parameters
Parameter Description
-envs"name=val[,...]"
Specify a comma-delimited list of name-value pairs of environmentvariables enclosed in double quotation marks ("") that you want to set.
-env "name=val" Use this parameter to enable a single environment variable to be set to avalue that contains commas or other special characters enclosed indouble quotation marks ("").
Example
The following example sets the language environment configuration for the managementlistener:
$ srvctl setenv mgmtlsnr -env LANG=en
Appendix FSRVCTL Command Reference
F-95

srvctl start mgmtlsnrStarts the management listener resource (for CHM).
Note:
This command is only available with Oracle Clusterware.
Syntax
srvctl start mgmtlsnr [-node node_name]
Usage Notes
Specify the node on which you want to start the management listener.
Example
To start the management listener on the crmnode1 node:
$ srvctl start mgmtlsnr -node crmnode1
srvctl status mgmtlsnrDisplays the status of the management listener resource (for CHM).
Note:
This command is only available with Oracle Clusterware.
Syntax
srvctl status mgmtlsnr [-node node_name] [-verbose]
Usage Notes
• Optionally, you can specify the name of a cluster node.
• Optionally, use the -verbose parameter to display detailed output.
Examples
To display the status of the management listener on the node node2, use the followingcommand:
$ srvctl status mgmtlsnr -node node2
Appendix FSRVCTL Command Reference
F-96

srvctl stop mgmtlsnrStops the management listener resource (for CHM) on all nodes or the specified node.
Note:
This command is only available with Oracle Clusterware.
Syntax
srvctl stop mgmtlsnr [-node node_name] [-force]
Usage Notes
• Optionally, you can specify the name of a single node on which the management listenerruns.
• Optionally, you can use the -force parameter to forcibly stop the management listener.
Example
The following command stops the management listener on the node mynode1:
$ srvctl stop mgmtlsnr -node mynode1
srvctl unsetenv mgmtlsnrUnsets the management listener resource (for CHM) environment configurations.
Note:
This command is only available with Oracle Clusterware.
Syntax
srvctl unsetenv mgmtlsnr -envs "name_list"
Usage Notes
Use the -envs parameter to specify a comma-delimited list of the names of environmentvariables enclosed in double quotation marks ("").
Appendix FSRVCTL Command Reference
F-97

Example
The following example unsets the environment configuration for a managementlistener environment variable:
$ srvctl unsetenv mgmtlsnr -envs "LANG"
srvctl add mountfsAdds Network Attached Storage (NAS) configuration to Oracle Clusterware.
Note:
Use this command only with Oracle Clusterware.
Syntax
srvctl add mountfs -name mountfs_name -path mount_path -exportserver server_name -exportpath path [-mountoptions mount_options] [-user user]
Parameters
Table F-76 srvctl add mountfs Command Parameters
Parameter Description
-name mountfs_name Specify a unique name for the NAS.
-path mount_path Specify a mount path for the NAS.
-exportserverserver_name
Specify a name for the export server.
-exportpath path Specify an export file path.
-mountoptionsmount_options
Optionally, you can specify mount options for the NAS.
-user user Optionally, you can specify a user authorized to mount anddismount the NAS.
srvctl config mountfsDisplays the configuration information for a specific NAS.
Note:
Use this command only with Oracle Clusterware.
Appendix FSRVCTL Command Reference
F-98

Syntax
srvctl config mountfs [-name mountfs_name]
Usage Notes
Specify the unique name of the NAS for which you want to display configuration information.
srvctl disable mountfsDisables the specified NAS from Oracle Clusterware management.
Note:
This command is only available with Oracle Clusterware.
Syntax
srvctl disable mountfs -name mountfs_name [-node node_list]
Parameters
Table F-77 srvctl disable mountfs Command Parameters
Parameter Description
-name mountfs_name Specify the unique name for the NAS you want to disable.
-node node_list Optionally, you can specify a comma-delimited list of nodes on which todisable NAS.
srvctl enable mountfsEnables the specified Network Attached Storage (NAS) for Oracle Clusterware management.
Note:
This command is only available with Oracle Clusterware.
Syntax
srvctl enable mountfs -name mountfs_name [-node node_list]
Appendix FSRVCTL Command Reference
F-99

Parameters
Table F-78 srvctl enable mountfs Command Parameters
Parameter Description
-name mountfs_name Specify the unique name for the NAS you want to enable.
-node node_list Optionally, you can specify a comma-delimited list of nodes onwhich to enable NAS.
srvctl modify mountfsModifies Network Attached Storage (NAS) configuration in Oracle Clusterware.
Note:
This command is available only with Oracle Clusterware.
Syntax
srvctl modify mountfs -name mountfs_name [-path mount_path] [-exportserver server_name] [-exportpath path] [-mountoptions mount_options] [-user user_name]
Parameters
Table F-79 srvctl modify mountfs Command Parameters
Parameter Description
-name mountfs_name Specify a unique name for the NAS you want to modify.
-path mount_path Modify the mount path for the NAS.
-exportserverserver_name
Modify the name of the export server.
-exportpath path Modify the export file path.
-mountoptionsmount_options
Modify mount options for the NAS.
-user user_name Modify the user authorized to mount and dismount the NAS.
Appendix FSRVCTL Command Reference
F-100

srvctl remove mountfsRemoves a specific NAS configuration.
Note:
This command is only available with Oracle Clusterware.
Syntax
srvctl remove mountfs -name mountfs_name [-force]
Usage Notes
• Specify the unique name for the NAS to mount.
• Optionally, you can use the -force parameter to ignore resource dependencies whileremoving the NAS.
srvctl start mountfsMounts a specific NAS.
Note:
This command is only available with Oracle Clusterware.
Syntax
srvctl start mountfs -name mountfs_name [-node node_list]
Parameters
Table F-80 srvctl start mountfs Command Parameters
Parameter Description
-name mountfs_name Specify the unique name for the NAS to mount.
-node node_list Optionally, you can specify a comma-delimited list of nodes on which tomount NAS.
Appendix FSRVCTL Command Reference
F-101

srvctl status mountfsDisplays the current state of a specific NAS.
Note:
This command is only available with Oracle Clusterware.
Syntax
srvctl status mountfs -name mountfs_name
Usage Notes
Specify the unique name of the NAS for which you want to display the status.
srvctl stop mountfsUnmounts a specific NAS.
Note:
This command is only available with Oracle Clusterware.
Syntax
srvctl stop mountfs -name mountfs_name [-node node_list] [-force]
Parameters
Table F-81 srvctl stop mountfs Command Parameters
Parameter Description
-name mountfs_name Specify the unique name for the NAS to unmount.
-node node_list Optionally, you can specify a comma-delimited list of nodes fromwhich to unmount NAS.
-force Optionally, you can use the -force parameter to ignore resourcedependencies while stopping NAS.
srvctl add netstorageserviceAdds the netstorageservice resource.
Appendix FSRVCTL Command Reference
F-102

Syntax
srvctl add netstorageservice -device volume_device
Parameters
Table F-82 srvctl add netstorageservice Command Parameters
Parameter Description
-device volume_device Specify the device and volume name to which youwant to add the netstorageservice resource.
Examples
To add the netstorageservice resource:
$ srvctl add netstorageservice -device /dev/asm/data_db1-68
srvctl config netstorageserviceDisplays the configuration details for the netstorageservice resource.
Syntax
srvctl config netstorageservice
Examples
To list the netstorageservice resource configuration details:
$ srvctl config netstorageservice
srvctl disable netstorageserviceDisables the netstorageservice resource.
Syntax
srvctl disable netstorageservice [-node node_name]
Appendix FSRVCTL Command Reference
F-103

Parameters
Table F-83 srvctl disable netstorageservice Command Parameters
Parameter Description
-node node_name Optionally, you can specify the name of thenode on which the netstorageservice resourceshould be disabled. If you do not specify thisparameter, then SRVCTL disables thenetstorageservice resource on all the availablenodes in the cluster.
Examples
To disable the netstorageservice resource on a specified node:
$ srvctl disable netstorageservice -node node1
srvctl enable netstorageserviceEnables the netstorageservice resource.
Syntax
srvctl enable netstorageservice [-node node_name]
Parameters
Table F-84 srvctl enable netstorageservice Command Parameters
Parameter Description
-node node_name Optionally, you can specify the name of thenode on which the netstorageservice resourceshould be enabled. If you do not specify thisparameter, then SRVCTL enables thenetstorageservice resource on all the availablenodes in the cluster.
Examples
To enable the netstorageservice resource on a specified node:
$ srvctl enable netstorageservice -node node1
srvctl remove netstorageserviceRemoves the netstorageservice resource.
Appendix FSRVCTL Command Reference
F-104

Syntax
srvctl remove netstorageservice [-force]
Parameters
Table F-85 srvctl remove netstorageservice Command Parameters
Parameter Description
-force Force a stop.
Examples
To remove the netstorageservice resource:
$ srvctl remove netstorageservice
srvctl start netstorageserviceStarts the netstorageservice resource.
Syntax
srvctl start netstorageservice [-node node_name]
Parameters
Table F-86 srvctl start netstorageservice Command Parameters
Parameter Description
-node node_name Optionally, you can specify the name of the nodeon which the netstorageservice resource shouldbe started. If you do not specify this parameter,then SRVCTL starts the netstorageserviceresource on all the available nodes in the cluster.
Examples
To start the netstorageservice resource on a specified node:
$ srvctl start netstorageservice -node node1
srvctl status netstorageservice
Appendix FSRVCTL Command Reference
F-105

Syntax
srvctl status netstorageservice
Examples
To display the status of the netstorageservice resource:
$ srvctl status netstorageservice
srvctl stop netstorageserviceStops the netstorageservice resource.
Syntax
srvctl stop netstorageservice [-node node_name] [-force]
Parameters
Table F-87 srvctl stop netstorageservice Command Parameters
Parameter Description
-node node_name Optionally, you can specify the name of thenode on which the netstorageservice resourceshould be stopped. If you do not specify thisparameter, then SRVCTL stops thenetstorageservice resource on all the availablenodes in the cluster.
-force Force a stop.
Examples
To stop the netstorageservice resource on a specified node:
$ srvctl stop netstorageservice -node node1
srvctl add ovmmAdds manager credentials to the credentials store for managing a virtual machine.
Syntax
srvctl add ovmm -wallet certificate_wallet_file -username user_name -ovmmhost host_name | ip_address -ovmmport port_number [-autologin]
Appendix FSRVCTL Command Reference
F-106

Parameters
Table F-88 srvctl add ovmm Command Parameters
Parameter Description
-walletcertificate_wallet_file
Specify the path to the certification wallet that contains the CA certificateused by the virtual machine manager.
-autologin Optionally, you can include this parameter to indicate automatic login forthe wallet credentials. If you choose not to specify this parameter, thenthe user will always be prompted to provide the password of the wallet.
-username user_name Specify a user name for whom you want to add manager credentials. Youmust provide a manager password when prompted.
-ovmmhost host_name |ip_address
Specify the host name or the IP address of the host designated as thevirtual machine manager.
-ovmmport port_number Specify the port number used by the virtual machine manager.
Usage Notes
You must run this command as root or equivalent user.
Example
An example of this command is:
# srvctl add ovmm -username scott -wallet /tmp/ovmmcred/cwallet.sso -ovmmhost node1 -ovmmport 80
srvctl config ovmmLists the current configuration of the virtual machine manager.
Syntax
srvctl config ovmm
Usage Notes
This command takes no parameters.
Example
This command returns output similar to the following:
$ srvctl config ovmm
OVMM Host: host1OVMM Port: 80
Appendix FSRVCTL Command Reference
F-107

srvctl modify ovmmModifies the virtual machine manager configuration.
Syntax
srvctl modify ovmm [-wallet certificate_wallet_file [-autologin]] [-username user_name] [-ovmmhost host_name | ip_address [-ovmmport port_number]
Parameters
Table F-89 srvctl modify ovmm Command Parameters
Parameter Description
-walletcertificate_wallet_file
Specify the path to the certification wallet that contains the CAcertificate used by the virtual machine manager.
-autologin Optionally, you can include this parameter to indicate automaticlogin for the wallet credentials. If you choose not to specify thisparameter, then the user will always be prompted to provide thepassword of the wallet.
-username user_name Specify a user name for whom you want to add managercredentials. You must provide a manager password whenprompted.
-ovmmhost host_ip Specify the host name or the IP address of the host designated asthe virtual machine manager.
-ovmmportport_number
Specify the port number used by the virtual machine manager.
Usage Notes
• You must run this command as root or equivalent user.
• The srvctl modify ovmm command deletes all credentials before writing newones.
Example
An example of this command is:
$ srvctl modify ovmm -username scott -ovmport 81
srvctl remove ovmmRemoves the current configuration of the virtual machine manager.
Syntax
srvctl remove ovmm
Appendix FSRVCTL Command Reference
F-108

Usage Notes
• You must run this command as root or equivalent user.
• This command takes no parameters.
Example
An example of this command is:
# srvctl remove ovmm
srvctl add qosmserverAdds an Oracle Database QoS Management Server instance to all the nodes in the cluster.
Syntax
srvctl add qosmserver [-verbose]
Usage Notes
Optionally, you can use the -verbose parameter to display verbose output.
Example
The following command adds an Oracle Database QoS Management Server instance:
$ srvctl add qosmserver
srvctl config qosmserverDisplays configuration information for the qosmserver resource.
Note:
This command is only available with Oracle Clusterware.
Syntax
srvctl config qosmserver
Parameters
This command has no parameters.
Appendix FSRVCTL Command Reference
F-109

Example
The following command displays the configuration information for the qosmserverresource.
$ srvctl config qosmserver
srvctl disable qosmserverDisables the Oracle Database QoS Management Server instance on all nodes or on aspecific node.
Syntax
srvctl disable qosmserver [-node node_name] [-verbose]
Usage Notes
With this command you can optionally specify a particular node on which to disable anOracle Database QoS Management Server instance, and you can also chooseverbose output.
Example
The following example disables the Oracle Database QoS Management Server on anode called crsNode3:
$ srvctl disable qosmserver -node crsNode3
srvctl enable qosmserverEnables an Oracle Database QoS Management Server instance on all nodes or on aspecific node.
Syntax
srvctl enable qosmserver [-node node_name] [-verbose]
Usage Notes
With this command you can optionally specify a particular node on which to enable anOracle Database QoS Management Server instance, and you can also chooseverbose output.
Example
The following command example enables an Oracle Database QoS ManagementServer instance on a node named crsNode3:
$ srvctl enable qosmserver -node crsNode3
Appendix FSRVCTL Command Reference
F-110

srvctl modify qosmserverModifies the RMI port for the Oracle Database QoS Management Server instances.
Syntax
srvctl modify qosmserver [-rmiport qosmserver_rmi_port][-httpport qosmserver_http_port][-secure '{YES|NO}'][-enableHTTPS '{YES|NO}'][-verbose][-force]
Table F-90 srvctl modify qosmserver Command Parameters
Parameter Description
-rmiportqosmserver_rmi_port
Specify the QoS Management RMI port number that the OracleDatabase QoS Management Server instance uses.
Note: You can modify this attribute using Online Resource AttributeModification.
-httpportqosmserver_http_port
Specify the HTTP port number.
-secure {YES|NO} Specify whether to enable QoS Management Server security.
-enableHTTPS {YES|NO} Specify whether to enable QoS Management Server Transport LayerSecurity.
-force Stops and restarts the resource to affect a change
-verbose Verbose output
Example
The following command example sets the QoS Management RMI port number to 5385:
$ srvctl modify qosmserver -rmiport 5385
srvctl predict qosmserverThe srvctl predict qosmserver command predicts the consequences of Oracle DatabaseQoS Management Server failure.
Syntax
srvctl predict qosmserver [-verbose]
This command has only one optional parameter to display verbose output.
Appendix FSRVCTL Command Reference
F-111

Example
This command returns output similar to the following:
$ srvctl predict qosmserver
Resource ora.qosmserver will be started on node crsNodel
srvctl relocate qosmserverRelocates an Oracle Database QoS Management Server instance from its currenthosting node to another node within the cluster.
Syntax
srvctl relocate qosmserver [-node node_name] [-verbose]
Usage Notes
• Optionally, you can specify a particular node to which you want to relocate anOracle Database QoS Management Server instance.
• Optionally, you can use the -verbose parameter to display verbose output.
Example
The following command example relocates the Oracle Database QoS ManagementServer instance to node crsNode1 and displays verbose output:
$ srvctl relocate qosmserver -node crsNode1 -verbose
srvctl remove qosmserverRemoves the Oracle Database QoS Management Server instance from the OracleClusterware configuration.
Syntax
srvctl remove qosmserver [-force] [-verbose]
Usage Notes
Optionally, you can use the -force and -verbose parameters that force the removal ofthe Oracle Database QoS Management Server instance and display verbose output,respectively.
Example
The following command forcibly removes the Oracle Database QoS ManagementServer instance:
$ srvctl remove qosmserver -force
Appendix FSRVCTL Command Reference
F-112

srvctl start qosmserverStarts an Oracle Database QoS Management Server instance.
Syntax
srvctl start qosmserver [-node node_name] [-verbose]
Usage Notes
• Optionally, you can specify a particular node on which to start an Oracle Database QoSManagement Server instance.
• Optionally, you can use the -verbose parameter to display verbose output.
Example
The following command example starts an Oracle Database QoS Management Serverinstance on a node called crsNode1:
$ srvctl start qosmserver -node crsNode1
srvctl status qosmserverDetermines which node is running the Oracle Database QoS Management Server instance.
Syntax
srvctl status qosmserver [-node node_name] [-verbose]
You can optionally specify a particular about which you can obtain the status of the OracleDatabase QoS Management Server instance, and you can also use the -verbose parameterto display verbose output.
Example
This command returns output similar to the following:
$ srvctl status qosmserver
QoS Management Server is enabled.QoS Management Server is running on node crsNode1.
srvctl stop qosmserverStops an Oracle Database QoS Management Server instance.
Syntax
srvctl stop qosmserver [-force] [-verbose]
Appendix FSRVCTL Command Reference
F-113

Usage Notes
• Optionally, you can specify a particular node on which to stop an Oracle DatabaseQoS Management Server instance.
• Optionally, you can use the -verbose parameter to display verbose output.
Example
The following command example forcibly stops an Oracle Database QoS ManagementServer instance:
$ srvctl stop qosmserver -force
srvctl add rhpclientAdds a Fleet Patching and Provisioning Client configuration file to the OracleClusterware configuration.
Syntax
srvctl add rhpclient -clientdata path_to_file [-diskgroup disk_group_name -storage base_path] [-email email_address -mailserver mail_server_address -mailserverport mail_server_port] [-verbose]
Parameters
Table F-91 srvctl add rhpclient Command Parameters
Parameter Description
-clientdatapath_to_file
Specify the path to the file that contains the Fleet Patching andProvisioning Client data.
-diskgroupdisk_group_name
Specify the Oracle ASM disk group from which to create the OracleACFS file system for image storage.
-storage base_path Specify a location that is available on all cluster nodes and that isused for mounting an Oracle ACFS that you create for imagestorage on the Fleet Patching and Provisioning Client.
-email email_address Specify an email address.
-mailservermail_server_address
Specify the mail server address.
-mailserverportmail_server_port
Specify the mail server port number.
–verbose Displays verbose output.
Usage Notes
• You cannot run this command on a Fleet Patching and Provisioning Server.
• You must run this command as root user on Linux and UNIX platforms.
• This command does not create an Oracle Clusterware resource.
Appendix FSRVCTL Command Reference
F-114

• To store working copies in RHP_MANAGED_STORAGE on the client, you must specify the -diskgroup and -storage parameters with this command (or with page F-117). Anadditional benefit of using these options applies to multi-node client clusters. When theFleet Patching and Provisioning Server provisions a working copy to the client cluster, theimage is transferred to one node, and the client distributes it, internally, to remainingnodes.
Example
The following command creates a Fleet Patching and Provisioning Client:
# srvctl add rhpclient -clientdata /tmp/gnsdata
srvctl config rhpclientDisplays configuration information for a Fleet Patching and Provisioning Client instance.
Note:
This command is only available with Oracle Clusterware.
Syntax
srvctl config rhpclient
Example
This command returns output similar to the following:
$ srvctl config rhpclient
Fleet Patching and Provisioning Client is configuredCluster name: mjk9394Storage base path: /scratch/aime/storageDisk group: MJKRHPCDGFleet Patching and Provisioning Server (RHPS): mjk8990clustFleet Patching and Provisioning Server discovery string: 198.51.100.191Port number: 8896Fleet Patching and Provisioning Client is enabledFleet Patching and Provisioning Client is individually enabled on nodes:Fleet Patching and Provisioning Client is individually disabled on nodes:
Appendix FSRVCTL Command Reference
F-115

srvctl disable rhpclientDisables a Fleet Patching and Provisioning Client instance on a specific node fromOracle Clusterware management.
Note:
This command is only available with Oracle Clusterware.
Syntax
srvctl disable rhpclient [-node node_name]
Usage Notes
Optionally, you can specify a particular node on which to disable a Fleet Patching andProvisioning Client.
Example
An example of this command is:
$ srvctl disable rhpclient -node clusterNode01
srvctl enable rhpclientEnables a Fleet Patching and Provisioning Client instance on a specific node.
Note:
This command is only available with Oracle Clusterware.
Syntax
srvctl enable rhpclient [-node node_name]
Usage Notes
Optionally, you can specify the node on which you want to enable the Fleet Patchingand Provisioning Client instance. If you do not specify a node, then SRVCTL enablesall of the Fleet Patching and Provisioning Clients in the Oracle Clusterwareconfiguration.
Appendix FSRVCTL Command Reference
F-116

Example
An example of this command is:
$ srvctl enable rhpclient -node clusterNode03
srvctl modify rhpclientChanges the locations of the client data and image storage for the Fleet Patching andProvisioning Client.
Syntax
srvctl modify rhpclient [-clientdata path_to_client_data] [-port rmi_port] [-diskgroup dg_name -storage base_path] [-email email_address -mailserver mail_server_address -mailserverport mail_server_port]
Parameters
Table F-92 srvctl modify rhpclient Command Parameters
Parameter Description
-clientdatapath_to_client_data
Modify the path to the Fleet Patching and Provisioning Client data.
-port rmi_port Modify the RMI port number used by the Fleet Patching and ProvisioningClient.
-diskgroup dg_name Modify the Oracle ASM disk group from which to create the Oracle ACFSfile systems for image storage.
-storage base_path Modify the location which is available on every cluster node but is notnecessarily shared. It is not required that this location exist when youadd a Fleet Patching and Provisioning Client. All images are mounted onbase_path/images for all local Oracle ACFS storage.
-email email_address Modify an email address.
-mailservermail_server_address
Modify the mail server address.
-mailserverportmail_server_port
Modify the mail server port number.
Usage Notes
• You must run this command as the root user on Linux and UNIX platforms.
• You run this command only on Fleet Patching and Provisioning Clients.
• After running this command, you must run srvctl stop rhpclient and srvctl startrhpclient on the Fleet Patching and Provisioning Client, so that it communicates thechanges to the Fleet Patching and Provisioning Server.
Appendix FSRVCTL Command Reference
F-117

srvctl relocate rhpclientRelocates a Fleet Patching and Provisioning Client instance to a different node.
Note:
This command is only available with Oracle Clusterware.
Syntax
srvctl relocate rhpclient -node node_name
Usage Notes
Specify a node to which you want to relocate the Fleet Patching and ProvisioningClient instance.
Example
An example of this command is:
$ srvctl relocate rhpclient -node crsNode03
srvctl remove rhpclientRemoves a Fleet Patching and Provisioning Client instance.
Note:
This command is only available with Oracle Clusterware.
Syntax
srvctl remove rhpclient [-force]
Usage Notes
Optionally, you can use the -force parameter to forcibly remove the Fleet Patchingand Provisioning Client instance, ignoring any dependencies.
Appendix FSRVCTL Command Reference
F-118

srvctl start rhpclientStart a Fleet Patching and Provisioning Client instance on one or more nodes.
Note:
This command is only available with Oracle Clusterware.
Syntax
srvctl start rhpclient [-node node_name]
Usage Notes
Specify the node on which you want to start the Fleet Patching and Provisioning Clientinstance. If you do not specify a node, then Oracle Clusterware determines the node wherethe Fleet Patching and Provisioning Client is to be started. The Fleet Patching andProvisioning Client resource has cardinality of 1 and Oracle Clusterware decides theplacement when the Fleet Patching and Provisioning Client resource is started.
Example
An example of this command to start the Fleet Patching and Provisioning Server on the nodenamed crs3:
$ srvctl start rhpclient -node crs3
srvctl status rhpclientDisplays the current state of a Fleet Patching and Provisioning Client instance.
Note:
This command is only available with Oracle Clusterware.
Syntax
srvctl status rhpclient
Usage Notes
This command does not accept any parameters except for -help.
Appendix FSRVCTL Command Reference
F-119

Example
This command displays output similar to the following:
$ srvctl status rhpclient
Fleet Patching and Provisioning Client is enabledFleet Patching and Provisioning Client is running on node mjk1270093
srvctl stop rhpclientStops a Fleet Patching and Provisioning Client instance that is in a running or startingstate.
Note:
This command is only available with Oracle Clusterware.
Syntax
srvctl stop rhpclient
Usage Notes
This command does not accept any parameter, except for -help.
srvctl add rhpserverAdds a Fleet Patching and Provisioning Server to the Oracle Clusterwareconfiguration.
Syntax
srvctl add rhpserver -storage base_path -diskgroup disk_group_name [-email email_address -mailserver mail_server_address -mailserverport mail_server_port] [-pl_port RHP_progress_listener_port] [-clport RHP_copy_listener_port] [-enableTLS {YES|NO}] [-enableHTTPS '{YES|NO}'] [-port_range low_val-high_val] [-usegnsvip]
Appendix FSRVCTL Command Reference
F-120

Parameters
Table F-93 srvctl add rhpserver Command Parameters
Parameter Description
-storage base_path Specify a location that is available on all cluster nodes. It is notnecessary that this location be shared. The catalog for the server is keptin this location and all the image file systems are mounted onbase_path/images.
-diskgroupdisk_group_name
Specify a particular Oracle ASM disk group from which to create theOracle ACFS file system for storing images.
-email email_address Specify an email address.
-mailservermail_server_address
Specify the mail server address.
-mailserverportmail_server_port
Specify the mail server port number.
-pl_portRHP_progress_listener_port
Specify the Fleet Patching and Provisioning progress listener portnumber.
-clportRHP_copy_listener_port
Specify the Fleet Patching and Provisioning copy listener port number.
-enableTLS {YES|NO} Enable Fleet Patching and Provisioning transport level security
-enableHTTPS '{YES|NO}'
Enable Fleet Patching and Provisioning transport layer security for HTTP.
-port_range low_val-high_val
Specify the lower and upper port values for the ports to use for filetransfer.
-usegnsvip Optionally, enable Oracle FPP server to communicate on a Virtual IPAddress (VIP), if the GNS port 53 is already in use.
Usage Notes
• You must be root user on Linux and UNIX platforms to run this command.
• The default user is the user that installed Oracle Clusterware, and this user gets added tothe user list for the Fleet Patching and Provisioning Server resource.
srvctl config rhpserverDisplays configuration information for a Fleet Patching and Provisioning Server.
Note:
This command is only available with Oracle Clusterware.
Syntax
srvctl config rhpserver
Appendix FSRVCTL Command Reference
F-121

Example
This command returns output similar to the following:
$ srvctl config rhpserver
Storage base path: /scratch/aime/storagedgDisk Groups: MJKRHPSDGPort number: 8896Fleet Patching and Provisioning Server is enabledFleet Patching and Provisioning Server is individually enabled on nodes:Fleet Patching and Provisioning Server is individually disabled on nodes:
srvctl disable rhpserverDisables a Fleet Patching and Provisioning Server on a specific node from OracleClusterware management.
Note:
This command is only available with Oracle Clusterware.
Syntax
srvctl disable rhpserver [-node node_name]
Usage Notes
Optionally, you can specify a node on which you want to disable the Fleet Patchingand Provisioning Server.
Example
An example of this command is:
$ srvctl disable rhpserver -node clusterNode01
srvctl enable rhpserverUse this command to enable a Fleet Patching and Provisioning Server on a specificnode.
Note:
This command is only available with Oracle Clusterware.
Appendix FSRVCTL Command Reference
F-122

Syntax
srvctl enable rhpserver [-node node_name]
Usage Notes
Optionally, you can specify a node on which you want to enable the Fleet Patching andProvisioning Server. If you do not specify a node, then SRVCTL enables all of the FleetPatching and Provisioning Servers in the Oracle Clusterware configuration.
Example
An example of this command is:
$ srvctl enable rhpserver -node clusterNode03
srvctl modify rhpserverModifies the storage for a Fleet Patching and Provisioning Server.
Syntax
srvctl modify rhpserver [-port rmi_port [-force]] [-email email_address -mailserver mail_server_address -mailserverport mail_server_port] [-pl_port RHP_progress_listener_port] [-clport RHP_copy_listener_port] [-enableTLS {YES|NO}] [-enableHTTPS '{YES|NO}'] [-port_range low_val-high_val] [-usegnsvip]
Parameters
Table F-94 srvctl modify rhpserver Command Parameters
Parameter Description
-port rmi_port Modify the RMI port number used by the Fleet Patching and ProvisioningServer.
-force Specify this parameter to stop and restart the resource to effect achange.
-email email_address Modify an email address.
-mailservermail_server_address
Modify the mail server address.
-mailserverportmail_server_port
Modify the mail server port number.
-pl_portRHP_progress_listener_port
Modify the Fleet Patching and Provisioning progress listener portnumber.
-clportRHP_copy_listener_port
Modify the Fleet Patching and Provisioning copy listener port number.
-enableTLS {YES|NO} Enable Fleet Patching and Provisioning transport level security
Appendix FSRVCTL Command Reference
F-123

Table F-94 (Cont.) srvctl modify rhpserver Command Parameters
Parameter Description
-enableHTTPS '{YES|NO}'
Enable Fleet Patching and Provisioning transport layer security for HTTP.
-port_range low_val-high_val
Modify the lower and upper port values for the ports to use for filetransfer.
-usegnsvip Optionally, enable Oracle FPP server to communicate on a Virtual IPAddress (VIP), if the GNS port 53 is already in use.
srvctl relocate rhpserverRelocates a Fleet Patching and Provisioning Server to a different node.
Note:
This command is only available with Oracle Clusterware.
Syntax
srvctl relocate rhpserver [-node node_name]
Usage Notes
Optionally, you can specify a node to which you want to relocate the Fleet Patchingand Provisioning Server.
Example
An example of this command is:
$ srvctl relocate rhpserver -node crsNode03
srvctl remove rhpserverRemoves a Fleet Patching and Provisioning Server instance configured for the cluster.
Syntax
srvctl remove rhpserver [-resource] [-force] [-verbose]
Appendix FSRVCTL Command Reference
F-124

Parameters
Table F-95 srvctl remove rhpserver Command Parameters
Parameter Description
-resource Optionally, you can remove the Fleet Patching and Provisioning Serverresource only, leaving its repository unaffected.
–force Forcibly remove the Fleet Patching and Provisioning Server, ignoring anydependencies.
–verbose Print verbose output.
srvctl start rhpserverStarts a Fleet Patching and Provisioning Server on a specific node.
Note:
This command is only available with Oracle Clusterware.
Syntax
srvctl start rhpserver [-node node_name]
Usage Notes
Optionally, you can specify a node on which you want to start the Fleet Patching andProvisioning Server.
Examples
The following example starts the Fleet Patching and Provisioning Server on a node namedclusterNode03:
$ srvctl start rhpserver -node clusterNode03
srvctl status rhpserverDisplays the current state of a Fleet Patching and Provisioning Server.
Note:
This command is only available with Oracle Clusterware.
Appendix FSRVCTL Command Reference
F-125

Syntax
srvctl status rhpserver
Usage Notes
This command does not accept any parameters except for -help.
Example
This command returns output similar to the following:
$ srvctl status rhpserver
Fleet Patching and Provisioning Server is enabledFleet Patching and Provisioning Server is running on node mjk1270089
srvctl stop rhpserverStops a Fleet Patching and Provisioning Server that is in a running or starting state.
Note:
This command is only available with Oracle Clusterware.
Syntax
srvctl stop rhpserver
Usage Notes
This command does not accept any parameter except for -help.
srvctl add vmAdds a virtual machine resource to Oracle Clusterware management.
Syntax
srvctl add vm -name resource_name -vm "list_of_vms" [-serverpool server_pool_name | -category server_category | -node "node_list"] [–stoptimeout stop_timeout] [-checkinterval check_interval]
Appendix FSRVCTL Command Reference
F-126

Parameters
Table F-96 srvctl add vm Command Parameters
Parameter Description
-name resource_name Specify a unique name for the virtual machine resource. If the name isnot unique, then the command results in an error.
-vm "list_of_vms" Specify a comma-delimited list of virtual machine names or virtualmachine IDs that you want to add to the virtual machine resource. A listmust be enclosed in double quotation marks ("").
Currently, Oracle Clusterware gives preference to virtual machines at thebeginning of this list, so you should list your most important virtualmachines first.
-serverpoolserver_pool_name | -categoryserver_category | -node "node_list"
Optionally, you can specify the name of a server pool, server category, orlist of nodes to which to add the virtual machine resource.
A list of nodes must be enclosed in double quotation marks ("").
If you choose to specify a list of nodes, then the number of nodes mustbe greater than or equal to the number of virtual machine resources youspecify.
–stoptimeoutstop_timeout
Optionally, you can specify a stop timeout, in seconds. The default is 180if you do not assign a value to the parameter.
-checkintervalcheck_interval
Optionally, you can specify an interval between checks, in seconds. Thedefault is 10 if you do not assign a value to the parameter.
Usage Notes
You must run srvctl add ovmm and add virtual machine manager credentials before you adda virtual machine resource.
Example
An example of this command is:
$ srvctl add vm -name vmres -vm vm1 -node node1
srvctl check vmChecks the status of a specific virtual machine or a virtual machine instance running on aspecific node.
Syntax
srvctl check vm -name resource_name [-vm vm_name | -node node_name]
Appendix FSRVCTL Command Reference
F-127

Parameters
Table F-97 srvctl check vm Command Parameters
Parameter Description
-name resource_name Specify the name of the virtual machine resource for which youwant to check the status.
-vm vm_name Specify the name or ID of the virtual machine on which the namedresource resides.
-node node_name Alternatively, specify the name of the node on which the virtualmachine resides.
srvctl config vmLists the current configuration of a particular virtual machine.
Syntax
srvctl config vm [-name unique_name]
Usage Notes
Specify the unique name of the virtual machine resource for which you want to displaythe configuration information. If you do not specify a particular virtual machineresource, then the command displays all of the virtual machine resources in thecluster.
Example
This command displays output similar to the following, depending on the commandsyntax used:
$ srvctl config vm -name vmres1
VM resource name: vmres1VMs: vm1, y, vm3VM Names: x, y, zVM IDs: vm1, vm2, vm3Server pool: vmpoolServer category:Nodes:Stop Timeout: 7Check Interval: 5VM resource "vmres1" is enabled.VM resource is individually enabled on nodes:VM resource is individually disabled on nodes:VM resource is individually disabed for VMs: vm2,vm3$
$ srvctl config vm
vmres1
Appendix FSRVCTL Command Reference
F-128

vmres2vmres3$
srvctl disable vmDisables a virtual machine resource.
Syntax
srvctl disable vm -name unique_name [-vm "vm_list" | -node node_name]
Parameters
Table F-98 srvctl disable vm Command Parameters
Parameter Description
-name unique_name Specify the unique name of the virtual machine resource you want todisable.
-vm "vm_list" Specify the name or ID, or a list of names or IDs enclosed in doublequotation marks ("") of the virtual machines on which the namedresource resides. If you specify this parameter, then SRVCTL enablesthe cardinality instance matching that name or ID.
-node node_name Alternatively, specify the name of the node on which the virtual machineresides. If you specify this parameter, then SRVCTL does not allow anyinstances of the specified resource to run on that node.
Usage Notes
If you do not specify any of the optional parameters, then SRVCTL disables the virtualmachine resource, and the enabled or disabled states of all the nodes are purged, but thestate of the virtual machines within the resource remains unchanged.
Example
An example of this command is:
$ srvctl disable vm -name vmres -vm "vm1,vm2,vm3"
srvctl enable vmEnables a virtual machine resource.
Syntax
srvctl enable vm -name unique_name [-vm "vm_list" | -node node_name]
Appendix FSRVCTL Command Reference
F-129

Parameters
Table F-99 srvctl enable vm Command Parameters
Parameter Description
-name unique_name Specify the name of the virtual machine resource you want toenable.
-vm vm_list Specify the name or ID, or a list of names or IDs enclosed in doublequotation marks ("") of the virtual machines on which the namedresource resides. If you specify this parameter, then SRVCTLdisables the cardinality instance matching that name or ID.
-node node_name Alternatively, specify the name of the node on which the virtualmachine resides. If you specify this parameter, then SRVCTL doesnot allow any instances of the specified resource to run on thatnode.
Usage Notes
If you do not specify any of the optional parameters, then SRVCTL enables the virtualmachine resource, and the enabled or disabled states of all the nodes are purged, butthe state of the virtual machines within the resource remains unchanged.
Example
An example of this command is:
$ srvctl enable -name vmres -node node3
srvctl modify vmModifies the virtual machine resource configuration.
Syntax
srvctl modify vm -name uniquee_name [-addvm "list_of_vms" | -removevm "list_of_vms" [-serverpool server_pool_name | -category server_category | -node "node_list"] [–stoptimeout stop_timeout] [-checkinterval check_interval]
Parameters
Table F-100 srvctl modify vm Command Parameters
Parameter Description
-name unique_name Specify the unique name of the virtual machine resource you wantto modify.
Appendix FSRVCTL Command Reference
F-130

Table F-100 (Cont.) srvctl modify vm Command Parameters
Parameter Description
-addvm "list_of_vms" Specify a comma-delimited list of virtual machine names or virtualmachine IDs, enclosed in double quotation marks (""), that youwant to add to the virtual machine resource. You can add virtualmachines to a virtual machine resource at any time regardless ofwhether the virtual machine resource instance is running. Addingvirtual machines creates new cardinality IDs.
-removevms"list_of_vms"
Specify a comma-delimited list of virtual machine names or virtualmachine IDs that you want to remove from the virtual machineresource. You cannot remove a virtual machine if there are existinginstances of the virtual machine resource still running. An attemptto do so results in an error.
-serverpoolserver_pool_name | -categoryserver_category | -node "node_list"
You can modify the server pool, server category, or list of nodes towhich the virtual machine resource belongs.
A list of nodes must be enclosed in double quotation marks ("").
If you choose to specify a list of nodes, then the number of nodesmust be greater than or equal to the number of virtual machineresources you specify.
–stoptimeoutstop_timeout
You can modify the stop timeout, in seconds. The default is 180 ifyou do not assign a value to the parameter.
-checkintervalcheck_interval
You can modify the interval between checks, in seconds. Thedefault is 10 if you do not assign a value to the parameter.
Example
An example of this command is:
$ srvctl modify vm -name vmres -addvm vm2 -removevm vm1 -stoptimeout 93
srvctl relocate vmRelocates a running virtual machine resource to another node, or relocates the virtualmachine resource running on the specified node to another node.
Syntax
srvctl relocate vm -name unique_name {-vm vm_name | -srcnode source_node_name} -node destination_node_name]
Parameters
Table F-101 srvctl relocate vm Command Parameters
Parameter Description
-name unique_name Specify the unique name of the virtual machine resource you want torelocate.
Appendix FSRVCTL Command Reference
F-131

Table F-101 (Cont.) srvctl relocate vm Command Parameters
Parameter Description
-vm vm_name Specify the name or ID of the virtual machine on which the namedresource resides to which you want to relocate the virtual machineresource, together with the name of the node to which you want torelocate the virtual machine resource.
-srcnodesource_node_name
Alternatively, you can specify a node from which you want to relocate avirtual machine resource.
-nodedestination_node_name
Optionally, you can specify the name of a destination node to which youwant to relocate the virtual machine resource.
Example
An example of this command is:
$ srvctl relocate -name vmres -vm vm1 -node node3
srvctl remove vmRemoves a specific virtual machine resource.
Syntax
srvctl remove vm -name unique_name [-force]
Usage Notes
Specify the unique name of the virtual machine resource you want to remove and,optionally, you can forcibly remove a running virtual machine resource.
srvctl start vmStarts a specific virtual machine resource on a node.
Syntax
srvctl start vm -name unique_name [-vm vm_name -node node_name]
Parameters
Table F-102 srvctl start vm Command Parameters
Parameter Description
-name resource_name Specify the unique name of the virtual machine resource you wantto start.
-vm vm_name Optionally, you can specify the virtual machine on which the virtualmachine resource resides that you want to start.
Appendix FSRVCTL Command Reference
F-132

Table F-102 (Cont.) srvctl start vm Command Parameters
Parameter Description
-node node_name Optionally, you can specify the name of a node on which a virtualmachine resides that contains the virtual machine resource youwant to start.
Usage Notes
You can use the -vm and -node parameters, together, to start a particular virtual machineresource on a particular node. You can also use either the -vm parameter or the -nodeparameter to start a particular virtual machine resource or the virtual machine resource thatresides on a particular node, respectively.
Example
An example of this command is:
$ srvctl start vm -name vmres -vm vm3 -node node3
srvctl status vmDisplays the currently known state of the virtual machine resource.
Syntax
srvctl status vm -name unique_name [-vm vm_name | -node node_name]
Parameters
Table F-103 srvctl status vm Command Parameters
Parameter Description
-name unique_name Specify the unique name of the virtual machine resource for which youwant to display the status.
-vm vm_name Optionally, you can specify the virtual machine on which the virtualmachine resource resides that you want to display the status.
-node node_name Optionally, you can specify the name of a node on which a virtualmachine resides that contains the virtual machine resource you want todisplay the status.
Examples
This command returns output similar to following, depending on which parameters youspecify:
$ srvctl status vm -name vmres1 -vm vm1
Virtual machine "vm1" of VM resource "vmres1" is running on node aime1.$
Appendix FSRVCTL Command Reference
F-133

$ srvctl status vm -name vmres1
Virtual machine "vm1" of VM resource “vmres1” is running on node aime1.Virtual machine "vm2" of VM resource “vmres1” is not running.Virtual machine "vm3" of VM resource “vmres1” is running on node aime3$
$ srvctl status vm -name vmres1 -vm vm1 -S 1
result: vm_resource={vmres1} inst_name={vm1} node_name={aime1} up={true}$
srvctl stop vmStops a specific virtual machine resource, or one on a specific virtual machine or node.
Syntax
srvctl stop vm -name unique_name [-vm vm_name | -node node_name]
Parameters
Table F-104 srvctl stop vm Command Parameters
Parameter Description
-name unique_name Specify the unique name of the virtual machine resource you wantto stop.
-vm vm_name Optionally, you can specify the virtual machine on which the virtualmachine resource resides that you want to stop.
-node node_name Optionally, you can specify the name of a node on which a virtualmachine resides that contains the virtual machine resource youwant to stop.
Example
An example of this command is:
$ srvctl stop vm -name vmres1 -node node1
Appendix FSRVCTL Command Reference
F-134

GOracle Clusterware Agent Framework CApplication Program Interfaces
Oracle Clusterware manages applications registered as resources with Oracle Clusterwareand must have access to application-specific primitives that have the ability to start, stop, andmonitor a specific resource. Oracle Clusterware runs all resource-specific commands throughan entity called an agent.
An agent is a program that contains the agent framework and user code to manageresources. The agent framework is a C library that enables you to plug in your application-specific code to manage customized applications. You program all of the actual applicationmanagement functions in C or C++, such as starting, stopping, and checking the health of anapplication, into the agent. These functions are referred to as entry points. The agentframework is responsible for invoking these entry point functions on behalf of OracleClusterware. Agent developers can use these entry points to plug in the required functionalityfor a specific resource regarding how to start, stop, and monitor a resource. Agents arecapable of managing multiple resources.
This appendix includes the following topics:
• Agent Framework Data Types
• Agent Framework Context Initialization and Persistence
• Prototype for C and C++ Entry Point Functions
• C and C++ Entry Point Types and Codes
• C and C++ Entry Point Function Return Values
• Multithreading Considerations
• Deprecated APIs
• API Reference
• Agent Example
Agent Framework Data TypesThe Oracle Clusterware agent framework uses Oracle-defined portable data types torepresent strings and numbers. By using these data types, you can build and execute agentprograms on multiple platforms. Table G-1 lists and describes the Oracle data types used inthe agent framework.
Table G-1 Oracle Data Types Used in the Agent Framework
Oracle Data Type Description
ub4 Unsigned 32-bit integer
sb4 Signed 32-bit integer
oratext* C style null-terminated strings, explicit cast to char * required
G-1

The agent framework APIs return a status value of type clsagfwret, as follows:
CLSAGFW_SUCCESS: Function executed successfullyCLSAGFW_FAIL: There was error in the parameters or in execution of the function
String values returned by an API are only accessible in the scope of the currentcommand entry point. Agents can copy the returned string value to its own buffers toretain the value.
Agent Framework Context Initialization and PersistenceThe agent framework is initialized by the clsagfw_init() function call. There is nocontext that you need to maintain. Action entry point functions are passed a pointer tothe agent framework context (type clsagfw_aectx). This context is specific to the entrypoint being called and cannot be used beyond the scope of the entry point. Otheragent framework APIs take this context pointer as a parameter. This is an opaque datastructure that the agent framework maintains but does not explicitly initialize or destroy.
Prototype for C and C++ Entry Point FunctionsThe agent implements the entry point functions for the resource managementcommands and registers these functions with the agent framework. The agentframework calls an entry point function to execute a command or action on a resource.The entry point functions need to conform to the following prototype and convention:
typedef ub4 (*clsagfw_action_entry) (const clsagfw_aectx *aectx)
The entry point function is called with a pointer to a context area that the agentframework maintains. This function should return a value indicating the status ofexecution of the entry point. For the CHECK entry point, the function returns thecurrent state of the resource.
If you develop the agent using C++, then you declare the entry point functionprototypes using the extern ‘C' keyword.
C and C++ Entry Point Types and CodesThe agent framework currently defines seven entry point types corresponding toresource management commands and operations performed on a resource. Agentsmust register entry points for START, STOP, CHECK, and CLEAN commands. Othercommand entry points are optional. The agent registers entry points by calling theclsagfw_set_entrypoint() API for each resource type and command. Table G-2 listsand describes entry point types and their equivalent type codes.
Table G-2 Entry Point Types
Name Description Type Code
START Start a resource and bring it online CLSAGFW_ACTION_START
STOP Stop a resource and take it offline CLSAGFW_ACTION_STOP
CLEAN Clean up after a failed command on theresource
CLSAGFW_ACTION_CLEAN
Appendix GAgent Framework Context Initialization and Persistence
G-2

Table G-2 (Cont.) Entry Point Types
Name Description Type Code
CHECK Check the state of the resource CLSAGFW_ACTION_CHECK
ABORT End an executing command that has timedout
CLSAGFW_ACTION_ABORT
DELETE Resource is about to be deleted CLSAGFW_ACTION_RES_DELETED
MODIFY Resource is modified CLSAGFW_RESATTR_MODIFIED
ACTION Invoke custom action on the resource CLSAGFW_RES_ACTION
See Also:
"Oracle Clusterware Resources and Agents" for more information about entry points
C and C++ Entry Point Function Return ValuesAll entry point functions, except for the CHECK entry point, return one of the following valuesto indicate the status of execution of the entry point:
• CLSAGFW_AE_SUCCESS: Entry point execution completed successfully
• CLSAGFW_AE_FAIL: Entry point execution failed
The agent framework calls the CHECK entry point function to monitor the state of theresource. This function returns one of the following values that represents the current state ofthe resource:
CLSAGFW_ONLINECLSAGFW_UNPLANNED_OFFLINECLSAGFW_PLANNED_OFFLINECLSAGFW_UNKNOWNCLSAGFW_PARTIALCLSAGFW_FAILED
See Also:
"Agents in Oracle Clusterware" for more information about evaluating and returningthe state of a resource
Multithreading ConsiderationsThe Oracle Clusterware agent framework is multithreaded by design. The agent code canalso start new threads to execute application-specific functionality, such as monitoringexternal event sources. The agent framework executes only one entry point of a resource at
Appendix GC and C++ Entry Point Function Return Values
G-3

a time, with the only exception being the ABORT entry point which is invoked to end acurrently active action on a resource. C and C++ developers must ensure that allagent code is multithread safe. Access to global variables and other resources mustbe serialized using locking mechanisms, such mutexes. Other external C or C++libraries included by the agent should also be multithread safe.
Deprecated APIsTable G-3 lists the deprecated agent framework APIs and the correspondingreplacement APIs for Oracle Clusterware.
Table G-3 Deprecated Agent Framework APIs
Deprecated API Replacement
clsagfw_exit() clsagfw_exit2()
clsagfw_send_status() clsagfw_send_status2()
API ReferenceThis section lists and describes the following functions:
• clsagfw_add_type()
• clsagfw_check_resource()
• clsagfw_create_attr_iterator()
• clsagfw_delete_cookie()
• clsagfw_exit2()
• clsagfw_get_attr_from_iterator()
• clsagfw_get_attrvalue()
• clsagfw_get_check_type()
• clsagfw_get_cmdid()
• clsagfw_get_cookie()
• clsagfw_get_request_action_name()
• clsagfw_get_resource_id()
• clsagfw_get_resource_name()
• clsagfw_get_retry_count()
• clsagfw_get_type_name()
• clsagfw_init()
• clsagfw_is_cmd_timedout()
• clsagfw_log()
• clsagfw_modify_attribute()
Appendix GDeprecated APIs
G-4

• clsagfw_reset_attr_iterator()
• clsagfw_send_status2()
• clsagfw_set_cookie()
• clsagfw_set_entrypoint()
• clsagfw_set_exitcb()
• clsagfw_set_resource_state_label()
• clsagfw_startup()
clsagfw_add_type()Registers a resource type that the agent manages.
Syntax
clsagfwret clsagfw_add_type(const oratext *type_name);
Input
type_name: Resource type name that the agent is to manage
Usage Notes
On startup, an agent must register all the resource types that it manages. A single agent canmanage multiple resource types and multiple resources.
clsagfw_check_resource()Initiates a check action on a specific resource.
Syntax
void clsagfw_check_resource(const oratext *pResId)
Input
pResId: Identification of the resource
Usage Notes
Agents can use this function in entry points or in other background threads to initiate a checkaction on a specific resource. The agent framework schedules and executes the check actionin another thread. This function has no effect if invoked from a CHECK entry point.
clsagfw_create_attr_iterator()Creates an iterator to access all the attributes of the current resource.
Appendix GAPI Reference
G-5

Syntax
clsagfwret clsagfw_create_attr_iterator(const clsagfw_aectx *pAeCtx, clsagfw_ai_flags flags);
Input
• pAeCtx: Agent framework context pointer that is passed to entry points
• flags:
CLSAGFW_ALL_ATTRS: All attributes of the resource
CLSAGFW_MODIFIED_ATTRS: Only modified attributes
Usage Notes
Agents call this function to create an iterator to navigate through all the attributes ofthe resource. This is useful for agents managing multiple resources of different types.The iterator is an internal iterator maintained in the agent framework context. Eachattribute is retrieved by calling the clsagfw_get_attr_from_iterator() API. Modifiedattributes can be accessed only in the MODIFY entry point. At any given time, an entrypoint can create only one iterator. All subsequent attempts to create an iterator getsthe pointer to the iterator that is already created.
clsagfw_delete_cookie()Deletes a cookie stored in the agent framework.
Syntax
clsagfwret clsagfw_delete_cookie(const oratext *key);
Input
key: Key of the cookie, null terminated string
Usage Notes
This function deletes the cookie and frees all the memory used by the cookie and itsvalue.
clsagfw_exit2()Terminates the agent process with resource retry feedback.
Syntax
void clsagfw_exit2(const oratext *rid, sb4 exitCode, bool retry);
Input
• rid: Resource ID of the resource causing the irrecoverable error
Appendix GAPI Reference
G-6

• exitCode: Process exit code
• retry: option to retry resource
Usage Notes
An agent can encounter a irrecoverable error when executing an entry point for a resourceand then must terminate the current process. An agent can use this API to end the agentprocess and provide feedback to the agent framework on the resource that is the cause forthe irrecoverable error. If the retry parameter is set to true, then the current command on theresource is retried when the agent process restarts. If the parameter is set to false, then thecurrent resource command is not retried and monitoring of the resource is disabled. Thisoption can be used when a particular resource is the cause of repeated failures of an agent.The Oracle Clusterware server keeps track of the resources causing agent exits andautomatically disables a resource if the failure rate is high. To re-enable a resource disableddue to high failure rate, must issue an explicit request to start the resource (for example,using CRSCTL).
The Oracle Clusterware server restarts the agent to continue monitoring resources managedby the agent.
clsagfw_get_attr_from_iterator()Returns the next attribute name and value from the created iterator.
Syntax
clsagfwret clsagfw_get_attr_from_iterator(const clsagfw_aectx *pAeCtx, const oratext **argName, const oratext **argValue);
Input
pAeCtx: Agent framework context pointer that is passed to entry points
Returns
• argname: Attribute name
• argValue: Attribute value
Usage Notes
Use this function to retrieve attributes after the iterator has been created in the agentframework context. The iterator is advanced to the next attribute when this function returns. Ifthe API returns CLSAGFW_FAIL, then there are no more attributes to retrieve for theresource.
clsagfw_get_attrvalue()Obtains the value of an attribute of the current resource.
Appendix GAPI Reference
G-7

Syntax
void clsagfw_get_attrvalue(const clsagfw_aectx *pAeCtx, const oratext *pAttrName, const oratext **pAttrValue);
Input
• pAeCtx: Agent framework context pointer that is passed to entry points
• pAttrName: Name of attribute to retrieve
Returns
pAttrValue: Value of the specified attribute
Usage Notes
Agents use this API to retrieve the value of a single attribute of the current commandresource.
clsagfw_get_check_type()Returns the type of the check command currently being executed.
Syntax
clsagfw_checktypeclsagfw_get_check_type(const clsagfw_aectx *pAeCtx);
Input
pAeCtx: Agent framework context pointer that is passed to entry points
Usage Notes
The agent framework invokes the CHECK entry point of a resource for multipleconditions. By using this function, the agent can identify the exact condition for thecurrent CHECK entry point and perform appropriate actions.
Possible conditions include:
• CLSAGFW_INITIAL_CHECK: Check entry point invoked as part of the initialprobe stage when the Oracle Clusterware server is started or restarted.
• CLSAGFW_CHECK_AFTER_CMD: Check entry point invoked to follow up theprior action (such as start or stop) to determine the resultant resource state afterthe action execution.
• CLSAGFW_PERIODIC_CHECK: Check entry point invoked by the agentframework at periodic intervals to monitor the state of a resource. The time intervalis specified in the CHECK_INTERVAL attribute of the resource.
• CLSAGFW_EXTERNAL_CHECK: Check entry point invoked by agent frameworkwhen it receives an explicit check request from external entities, such as CRSCTL.
Appendix GAPI Reference
G-8

• CLSAGFW_CHECKFROM_EP: Check action initiated by the agent itself by calling theclsagfw_check_resource() API.
clsagfw_get_cmdid()Returns the type of the command for which the entry point is invoked.
Syntax
clsagfw_aecode clsagfw_get_cmdid(const clsagfw_aectx *pAeCtx);
Input
pAeCtx: Agent framework context pointer that is passed to entry points
Usage Notes
The agent can call this API in the ABORT entry point to determine the resource commandthat is being aborted.
clsagfw_get_cookie()Retrieves the value of a cookie stored in the agent framework.
Syntax
clsagfwret clsagfwret clsagfw_set_cookie(const oratext *key, const void **value);
Input
key: Key of the cookie, null terminated string
Value: Pointer to the value of the cookie
clsagfw_get_request_action_name()Returns the name of the custom action to be executed on a resource.
Syntax
const oratext *clsagfw_get_request_action_name(const clsagfw_aectx *pAeCtx);
Input
pAeCtx: Agent framework context that is passed to user entry points
Usage Notes
This function is called in the ACTION entry point to retrieve the action name that youspecified in a request action command. You configure the list of actions for a resource in theACTION attribute of the resource.
Appendix GAPI Reference
G-9

clsagfw_get_resource_id()Retrieves the ID of the resource for which the entry point is being executed.
Syntax
const oratext* clsagfw_get_resource_id(const clsagfw_aectx *pAeCtx);
Input
pAeCtx: Agent framework context pointer that is passed to entry points
Usage Notes
This function returns the Oracle Clusterware-generated resource ID. To retrieve thepublic display name of the resource, use the clsagfw_get_resource_name() API.
clsagfw_get_resource_name()Retrieves the resource name of the current command.
Syntax
const oratext* clsagfw_get_resource_name(const clsagfw_aectx *pAeCtx);
Input
pAeCtx: Agent framework context pointer that is passed to entry points
Usage Notes
This function returns the name of the resource for which the current command andentry point are being executed.
clsagfw_get_retry_count()Returns the retry attempt number for the current command.
Syntax
ub4 clsagfw_get_retry_count(const clsagfw_aectx *pAeCtx)
Input
pAeCtx: Agent framework context that is passed to user entrypoints
Usage Notes
Agents can call this function in entrypoints to check if the current command is beingretried. An agent process or Oracle Clusterware server process can terminate in themiddle of executing a command on a resource. Oracle Clusterware retries the failedcommand when the agent or server process restarts. The command may have
Appendix GAPI Reference
G-10

successfully or partially executed in the previous attempt. The agent can perform resume orclean up actions when Oracle Clusterware retries the command. The number of times acommand can be retried is an internal parameter of Oracle Clusterware.
clsagfw_get_type_name()Retrieves the type name of the resource for which the entry point is being executed.
Syntax
const oratext* clsagfw_get_type_name(const clsagfw_aectx *pAeCtx);
Input
pAeCtx: Agent framework context pointer that is passed to entry points
Usage Notes
This function returns the Oracle Clusterware-generated resource ID. To retrieve the publicdisplay name of the resource, use the clsagfw_get_resource_name() API.
clsagfw_init()Initializes the agent framework.
Syntax
clsagfwret clsagfw_init(sb4 argc, oratext **argv, ub4 flags, const oratext *logName, void *reserved);
Input
argc: Number of command line arguments passed to the agent process
argv: Command line arguments passed to the agent process
flags:
logName: Name of the log file for this agent
reserved: Pass NULL
Usage Notes
Oracle Clusterware automatically starts the agent configured for a resource when actionsmust be performed on the resource. On startup, the agent process calls this function first toinitialize the agent framework run time. The command line arguments passed to the agentprocess by the Oracle Clusterware server must be passed to clsagfw_init(). Afterinitialization is complete, the agent can register resource types that are managed by theagent.
Appendix GAPI Reference
G-11

clsagfw_is_cmd_timedout()Returns the cause of the ABORT entry point.
Syntax
bool clsagfw_is_cmd_timedout(const clsagfw_aectx *pAeCtx);
Input
pAeCtx: Agent framework context pointer that is passed to entry points
Usage Notes
Agents can use this function in the ABORT entry point to identify the cause of theABORT entry point invocation. The ABORT entry point can either be invoked if acommand execution time exceeds its time out value or if the Oracle Clusterwareadministrator aborts the command.
clsagfw_log()Prints a diagnostic message to the agent log file.
Syntax
void clsagfw_log(const clsagfw_aectx *pAeCtx, const ub4 log_level, const oratext *fmtp, ...);
Input
pAeCtx: Agent framework context that is passed to user entry points
log_level: Log level of the message in the range of 1-5
fmtp: Message format string, according to Standard C library print specifications
...: Variable parameters corresponding to the format string
Usage Notes
Agents call this function to log diagnostic messages that help in debugging andunderstanding agent execution. You can use the LOG_LEVEL parameter to control thevolume of log messages. You can configure the current logging level of a resourceusing CRSCTL, as follows:
$ crsctl set log level res "myResource1=3"
The misusages are logged to the agent log file in the TODO directory. By default, thename of the log file is the same as the agent executable name. You can change this bypassing the logName parameter to the clsagfw_init() API.
Appendix GAPI Reference
G-12

clsagfw_modify_attribute()Modifies an attribute of the current resource.
Syntax
void clsagfw_modify_attribute(const clsagfw_aectx *pAeCtx, const oratext *pAttrName, const oratext *pAttrValue);
Input
pAeCtx: Agent framework context pointer that is passed to entry points
pAttrName: Name of attribute to be modified
pAttrValue: New value of attribute
Usage Notes
Agents can modify the value of an attribute of the current command resource by calling thisAPI. A resource modification request is sent to the Oracle Clusterware server for validationand the updated attribute value is reflected in the agent only after confirmation from theOracle Clusterware server. This function can be only called from the START, STOP, andCLEAN entry points.
clsagfw_reset_attr_iterator()Resets the attribute iterator.
Syntax
clsagfwret clsagfw_reset_attr_iterator(const clsagfw_aectx *pAeCtx, clsagfw_ai_flags flags);
Input
pAeCtx: Agent framework context pointer that is passed to entry points
flags: Which attributes to be accessed:
CLSAGFW_ALL_ATTRS: All attributes of the resource
CLSAGFW_MODIFIED_ATTRS: Only modified attributes
Usage Notes
This function resets the iterator in the agent framework context so that agents can restartattribute navigation.
clsagfw_send_status2()Reports progress, warning, and error messages to the Oracle Clusterware server and theuser.
Appendix GAPI Reference
G-13

Syntax
void clsagfw_send_status2(const clsagfw_aectx* pAeCtx, const oratext* pResId, clsagfw_status_type type, const oratext* fmtp,...);
Input
pAeCtx: Agent framework context pointer that is passed to entry points
pResId: Resource for which the message is being reported
type: One of the following types of messages:
CLSAGFW_STATUS_PROGRESS: Progress message
CLSAGFW_STATUS_WARNING: Warning message
CLSAGFW_STATUS_ERROR: Error message
fmtp: Message format string
...: Variables corresponding to positions in the message format string
Usage Notes
During execution of a command, the agent can send informational messages to theOracle Clusterware server and to the user performing operations on resources. Thesemessages can inform you about execution progress and if there are any warnings orerrors.
clsagfw_set_cookie()Stores a cookie and its value in the agent framework.
Syntax
clsagfwret clsagfwret clsagfw_set_cookie(const oratext *key, const void *value);
Input
key: Key of the cookie, null terminated string
Value: Pointer to the value of the cookie to be stored
Usage Notes
The value of the saved cookie can be later retrieved by calling clsagfw_get_cookie().
clsagfw_set_entrypoint()Sets the C/C++ entry point function to be executed for a particular action on theresource.
Appendix GAPI Reference
G-14

Syntax
void clsagfw_set_entrypoint(const oratext *type_name, clsagfw_action_entry action_entry, clsagfw_aecode action_entrycode)
Input
key: Key of the cookie, null terminated string
Value: Pointer to the value of the cookie to be stored
Usage Notes
The value of the saved cookie can be later retrieved by calling clsagfw_get_cookie().
clsagfw_set_exitcb()Registers a function to be called when the agent process exits.
Syntax
typedef void (*clsagfw_exit_callback) (sb4 exitCode);void clsagfw_set_exitcb(clsagfw_exit_callback exit_func)
Input
exit_func: Function to be invoked when agent process exits
Usage Notes
Agents can register a callback function to be invoked when the agent framework terminatesthe agent process. The callback function can perform proper clean up of any internalresources instantiated by the agent. If the agent process is exiting to recover from anirrecoverable error, then the Oracle Clusterware server does not restart the agent until the oldincarnation has exited.
clsagfw_set_resource_state_label()Sets a custom label on the current resource.
Syntax
void clsagfw_set_resource_state_label(const clsagfw_aectx *pAeCtx, const oratext *pLabel);
Input
pAeCtx: Agent framework context pointer that is passed to entry points
pLabel: Label to associate with the resource, null terminated string
Appendix GAPI Reference
G-15

Usage Notes
Agents can use this function to set a descriptive label associated with the state of theresource. This label is reported in the STATE_DETAILS attribute of the resource.
clsagfw_startup()Starts the agent framework.
Syntax
clsagfwret clsagfw_startup(void)
Usage Notes
After the agent framework is initialized and the resource types and their entry pointsare registered, the agent calls this API to start the agent framework, which, in turn,starts the multithreaded infrastructure to monitor and perform actions on theresources.
On success, this function never returns to the calling thread. Entry points for theresource actions are invoked by the agent framework threads as and when required.
Agent ExampleExample G-1 details an agent implementation to manage a resource that represents afile.
Example G-1 demoagent1.cpp
/* Copyright (c) 2004, 2012, Oracle and/or its affiliates.All rights reserved. */
/* * NAME * Demoagent1.cpp: Demonstrates agent to monitor a file * * DESCRIPTION * This is a sample program that demonstrates an agent to monitor * a file. The agent has the following tasks: * - On startup : Create the file. * - On shutdown : Delete the file. * - On check command : Detect whether the file is present or not. * - On clean command : Delete the file. * This program can be used as a basis to build up more complicated * agents that manage real-world resources. *
#include <stdlib.h>#include <stdio.h>#include <string.h>#include <clsagfw.h>
Include the agent framework clsagfw.h header file.
Appendix GAgent Example
G-16

#define TEST_TYPE1 (oratext *) "HOTFILE_TYPE"#define TEST_PATHNAME_ATTR (oratext *) "PATH_NAME"
/* * NAME * test_agent_exit * DESCRIPTION * Function to clean up, called by framework whenever the agent * process is about to terminate * PARAMS * exitCode, which is an sb4 describing the reason for exit. * RETURNS * void */voidtest_agent_exit(sb4 exitCode){ clsagfw_log(NULL, 1, (oratext *)"Demo Agent is exiting..\n");}
Exit callback function registered with the agent framework.
/* * NAME * type1_start * DESCRIPTION * Action entry point for the 'start' command. Creates the file for * monitoring. * PARAMS * Pointer to the agent framework context * RETURNS * ub4 which could be CLSAGFW_AE_FAIL or CLSAGFW_AE_SUCCESS * depending on whether the action failed or succeeded. */ub4type1_start(const clsagfw_aectx *ectx){ ub4 ret = CLSAGFW_AE_FAIL; const oratext *pResName = NULL; const oratext *pPathName = NULL; FILE *fp;
clsagfw_log(ectx, 1, (oratext *)"Start action called..");
/* Try to read the resource name */ if (clsagfw_get_attrvalue(ectx, (oratext *)"NAME", &pResName) != CLSAGFW_SUCCESS) { goto done; }
/* Try to read the PATH_NAME attribute */ if (clsagfw_get_attrvalue(ectx, TEST_PATHNAME_ATTR, &pPathName) != CLSAGFW_SUCCESS) { goto done; }
Retrieve the resource name and the value of the PATH_NAME attribute usingclsagfw_get_attrvalue().
Appendix GAgent Example
G-17

clsagfw_log(ectx, 1, (oratext *)"Start action arguments: resName = %s, pathName = %s", pResName, pPathName);
/* Try to create the file */ fp = fopen((char *)pPathName, "w");
if(!fp) { /* Could not create the file */ clsagfw_log(ectx, 1, (oratext *) "START action for resource %s: FAILED\n", pResName); ret = CLSAGFW_AE_FAIL; } else { /* Created the file successfully */ clsagfw_log(ectx, 1, (oratext *) "START action for resource %s: SUCCESS\n", pResName); ret = CLSAGFW_AE_SUCCESS; fclose(fp); }
done: return ret;}
Diagnostic and error messages are logged to the agent log file by callingclsagfw_log().
/* * NAME * type1_stop * DESCRIPTION * Action entry point for the 'stop' and 'clean' commands. Deletes * the file being monitored. * PARAMS * Pointer to agent framework context * RETURNS * ub4 which could be CLSAGFW_AE_FAIL or CLSAGFW_AE_SUCCESS * depending on whether the action failed or succeeded. */ub4type1_stop (const clsagfw_aectx *ectx){ ub4 ret = CLSAGFW_AE_FAIL; const oratext *pResName = NULL; const oratext *pPathName = NULL;
clsagfw_log(ectx, 1, (oratext *)"Stop action called..");
/* Try to read the resource name */ if (clsagfw_get_attrvalue(ectx, (oratext *)"NAME", &pResName) != CLSAGFW_SUCCESS) { clsagfw_log(ectx, 1, (oratext *)"STOP action: %s: Could not read attribute\n", pResName); goto done; }
/* Try to read the PATH_NAME attribute */
Appendix GAgent Example
G-18

if (clsagfw_get_attrvalue(ectx, TEST_PATHNAME_ATTR, &pPathName) != CLSAGFW_SUCCESS) { pPathName = pResName; }
clsagfw_log(ectx, 1, (oratext *)"Stop action arguments: resName = %s, pathName = %s", pResName, pPathName);
/* Try to delete the file */ if (remove((char *)pPathName)) { /* Could not delete the file */ clsagfw_log(ectx, 1, (oratext *)"STOP action for resource %s: FAILED\n", pResName); ret = CLSAGFW_AE_FAIL; } else { /* Deleted the file successfully */ clsagfw_log(ectx, 1, (oratext *)"STOP action for resource %s: SUCCESS\n", pResName); ret = CLSAGFW_AE_SUCCESS; }
done: return ret;}
/* * NAME * type1_check * DESCRIPTION * Action entry point for the 'check' command. Determines if the * file exists. * PARAMS * Pointer to agent framework context. * RETURNS * ub4 which gives the status of the resource. Check the * agent framework reference for details on this function's * return codes. */ub4 type1_check(const clsagfw_aectx *ectx){ ub4 ret = CLSAGFW_UNKNOWN; const oratext *pResName = NULL; const oratext *pPathName = NULL; FILE *fp;
clsagfw_log(ectx, 1, (oratext *)"Check action called..");
/* Try to read the resource name */ if (clsagfw_get_attrvalue(ectx, (oratext *) "NAME", &pResName) != CLSAGFW_SUCCESS) { goto done; }
/* Try to read the PATH_NAME attribute */
Appendix GAgent Example
G-19

if (clsagfw_get_attrvalue(ectx, TEST_PATHNAME_ATTR, &pPathName) != CLSAGFW_SUCCESS) { clsagfw_log(ectx, 1, (oratext *)"CHECK action: %s: Could not read attribute\n", pResName); goto done; }
clsagfw_log(ectx, 1, (oratext *)"Check action arguments: resName = %s, pathName = %s", pResName, pPathName);
/* Check if the file is accessible */ fp = fopen((char *)pPathName, "r"); if (!fp) { /* Could not open file */ clsagfw_log(ectx, 1, (oratext *)"CHECK action: %s status – UNPLANNED_OFFLINE\n", pResName); ret = CLSAGFW_UNPLANNED_OFFLINE; } else { /* Opened file successfully */ clsagfw_log(ectx, 1,(oratext *)"CHECK action: %s status – ONLINE\n", pResName); fclose(fp); ret = CLSAGFW_ONLINE; }
done: return ret;}
/* * Initialization of the agent framework and registration of types is * done in main. */int main(sb4 argc, oratext **argv){ clsagfw_log(NULL, 1, (oratext *)" *** Agent Framework Demo Agent Started *** \n");
/* * Initialize the agent framework */ if (clsagfw_init(argc, argv, 0, NULL, 0) != CLSAGFW_SUCCESS) { clsagfw_log(NULL, 1, (oratext *)"Failed to initilize the agent framework\n"); clsagfw_exit(-1); }
/* * Set the exit callback function */ clsagfw_set_exitcb(test_agent_exit);
/* * Add the type definition to the framework
Appendix GAgent Example
G-20

*/ if (clsagfw_add_type(TEST_TYPE1) != CLSAGFW_SUCCESS) { clsagfw_log(NULL, 1,(oratext *)"Failed in adding type %s to the framework\n", TEST_TYPE1); clsagfw_exit(-1); }
/* * Set all entry points for for HOTFILE_TYPE */ clsagfw_set_entrypoint(TEST_TYPE1, type1_start, CLSAGFW_ACTION_START); clsagfw_set_entrypoint(TEST_TYPE1, type1_stop, CLSAGFW_ACTION_STOP); clsagfw_set_entrypoint(TEST_TYPE1, type1_check, CLSAGFW_ACTION_CHECK); clsagfw_set_entrypoint(TEST_TYPE1, type1_stop, CLSAGFW_ACTION_CLEAN);
clsagfw_log(NULL, 1, (oratext *)"Added resource type [%s] to the agent framework\n", TEST_TYPE1);
/* * All set to go, Start the framework. This function does not * return if the framework starts successfully. */ clsagfw_startup();
/*** NOT REACHED **/
return 0;}
Appendix GAgent Example
G-21

HOracle Clusterware C Application ProgramInterfaces
This appendix describes the Oracle Clusterware C application program interfaces (APIs).This appendix contains the following topics:
• About the Programming Interface (C API) to Oracle Clusterware
• Interactive CLSCRS APIs
• Non-Interactive CLSCRS APIs
• Command Evaluation APIs
• Server Categorization APIs
• STAT3 API
• Miscellaneous APIs
See Also:
Making Applications Highly Available Using Oracle Clusterware for detailedinformation about using Oracle Clusterware to make applications highly available
About the Programming Interface (C API) to Oracle ClusterwareThis section contains information about using the programming interface (C API) to OracleClusterware (CLSCRS).
• Overview
• Operational Notes
• Deprecated CLSCRS APIs
• Changes to Existing CLSCRS APIs
OverviewCLSCRS is a set of C-based APIs for Oracle Clusterware. The CLSCRS APIs enable you tomanage the operation of entities that are managed by Oracle Clusterware. These entitiesinclude resources, resource types, servers, and server pools. You use the APIs to registeruser applications with Oracle Clusterware so that the clusterware can manage them andmaintain high availability. Once an application is registered, you can manage it and query theapplication's status. If you no longer need the application, then you can stop it and unregisterit from Oracle Clusterware.
Oracle Clusterware services are provided by Cluster Ready Services that runs as part ofOracle Clusterware. The CLSCRS API uses a context that is explicitly named in all function
H-1

calls. The API does not store anything at the process or thread level. You can use thecallbacks for diagnostic logging.
Note:
You can install the Oracle Clusterware high availability API from the OracleDatabase client installation media.
Operational NotesThis section includes the following topics:
• Context Initialization and Persistence
• Threading Support
• CLSCRS API Data Structures
• Memory Management
• Error Handling and Tracing
• Callback Mechanism
• Filters
• Script Agent Usage
• Help Interface
Context Initialization and Persistence
To use the CLSCRS APIs, you must first initialize the clscrs context. The calls tocreate and terminate this context are:
• clscrs_init_crs: Initializes the clscrs context
• clscrs_term_crs: Terminates the clscrs context
The caller is responsible for terminating the context when it is no longer needed.
Threading Support
If initialized with the CLSCRS_FLAG_USETHREADS flag, then the CLSCRS API may spawnthreads internally. Every API function executes in the context of the calling thread. TheAPI context object may not be used concurrently by multiple threads. However, nothread-affinity on the part of the client is required. A process may create multiple APIcontexts and use those on different threads, subject to the one-thread-per-one-context-at-a-time rule.
CLSCRS API Data Structures
The following entities are passed into the API calls and contain return values from theAPI call:
• clscrs_sp: A stringpair (sp) contains a name and a value string. The value can beNULL. It is created and destroyed, and its contents can be examined and thevalue replaced. A stringpair can be a member of exactly one stringpair list(splist).
Appendix HAbout the Programming Interface (C API) to Oracle Clusterware
H-2

• clscrs_splist: A stringpair list (splist) is a list of zero or more stringpairs used invarious contexts. An API can add stringpairs to or remove them from a stringpair list, orthe API can iterate stringpairs.
• clscrs_entity_type: The enumeration type you can use to identify the type of OracleClusterware entity.
The enumeration types are defined, as follows:
/* enum to specify the entity type */ typedef enum{ clscrs_entity_res = 1, /* resource */ clscrs_entity_restype = 2, /* resource type */ clscrs_entity_serverpool = 3, /* server pool */ clscrs_entity_server = 4, /* server */ clscrs_entity_resinst = 5, /* resource instances */ clscrs_entity_config_policy = 6, /* configuration policy */ clscrs_entity_config_policyset = 7, /* configuration policy set */ clscrs_entity_server_category = 8 /* server category */ } clscrs_entity_type;
• clscrs_crsentity: This data structure (crsentity) represents an Oracle Clusterwareentity, which contains the name and additional data appropriate to the context in whichthe Oracle Clusterware entity is used. Sometimes an API contains Oracle Clusterwareentity attribute data and other times it carries status and return messages about anoperation. A single entity can be a member of exactly one clscrs_crsentitylist.
• clscrs_crsentitylist: An entity list (crsentitylist) is a data structure that containszero or more instances of a clscrs_crsentity. An API can add entities to or removethem from an entity list, or the API can iterate entities.
Memory Management
The CLSCRS APIs work on elements and lists. The elements are added to lists. The memoryfor both elements and lists is allocated and released through explicit API calls. It is the caller'sresponsibility to release the memory that they allocate. However, when elements are addedto lists, only the list must be destroyed: the destruction of the list destroys its elementsimplicitly. The elements must be destroyed when they are not added to any list. For recursivelists, destroying the parent list also destroys any lists contained within it. The clscrs_sp andclscrs_crsentity elements must be destroyed by the caller. If they are part of aclscrs_splist or clscrs_crsentitylist, destroying the list destroys the respectiveclscrs_sp and clscrs_crsentity entities.
For example, when a resource is created and added to a resource list, only the resource listmust be destroyed, but not the individual resource. Destroying the resource list releases thememory for the individual resource, too.
Memory is allocated by the API through the following calls:
clscrs_sp_create()clscrs_crsentity_create()clscrs_serverpool_create()clscrs_type_create()clscrs_splist_create()
Appendix HAbout the Programming Interface (C API) to Oracle Clusterware
H-3

clscrs_crsentitylist_create()clscrs_entity_id_create()
Each of the calls in the preceding list has a corresponding clscrs_*_destroy() call.
Error Handling and Tracing
Interactive and non-interactive CLSCRS APIs each use a different error-handlingmechanism.
For non-interactive CLSCRS APIs, the error code is returned as the return value of thefunction call. For example:
clscrsret clscrs_sp_get_value(clscrs_sp *sp, oratext **value);
The error code is returned as a clscrsret value.
For interactive CLSCRS APIs, the output result is represented, as follows:
1. The return value of the function call provides a high-level output of the request. Didthe request reach the server? Was it completely successful, or completely or onlypartially unsuccessful? A successful return value means the request was received,processed, and the outcome was successful for all entities requested.
2. For each entity on which the request operated, there is a programmatic completioncode stored in the op_status list. If the value is not success, it indicates the high-level type of the problem specific to processing the request for the particularobject.
3. Optionally, the API might indicate that it wants to receive localized, human-readable error, warning, or status messages by using the callback mechanism.Each invocation of the callback provides the message, message type (severity),and the ID of the object to which the callback invocation pertains.
For example:
CLSCRS_STAT clscrs_register_resource2(clscrs_crsentitylist *in_crsentitylist, uword flags, clscrs_msgf2 msgf, void *msgarg, clscrs_crsentitylist *op_status);
1. The function returns an error code of value CLSCRS_STAT.
2. The CRSD sends error messages, warning messages, and progress messagesback to the client through the clscrs_msgf2 callback. The client must implementthe callback to process these messages returned by the CRSD.
3. In previous Oracle Clusterware releases, the API also contained results of eachoperation on the Oracle Clusterware entities as part of the op_status list. You canaccess that information using the following API:
clscrsret clscrs_entity_get_op_status(clscrs_entity *res, CLSCRS_STAT *status, oratext **msg);
Appendix HAbout the Programming Interface (C API) to Oracle Clusterware
H-4

The status argument contains a status code about the CRSD operation on the OracleClusterware entity. Additionally, the msg argument contains a message from the CRSDabout the result of the operation. Though the op_status list continues to contain theresults of the CRSD operation for each Oracle Clusterware entity in the msg argument,usage of the msg argument to get the error codes and messages has now beendeprecated and is not supported for any use of the API on a new entity. Only pre-existinguse cases (for acting on resources, specifically) are supported. Use the callback functionto process any messages returned by the CRSD.
Callback Mechanism
Interactive CLSCRS APIs provide a callback mechanism that the clients can use to processerror messages, warning messages, and progress messages sent by the CRSD.
The signature of the callback mechanism is:
typedef void (*clscrs_msgf2)(void *usrp, const oratext *id, const oratext *msg, clscrs_msgtype msgtype);
In the preceding syntax:
• usrp: Is a user-supplied pointer that probably contains the context of the call
• id: Is the identifier of the entity to which the message corresponds
• msg: Is the output text
• msgtype: Is the type of the message; either error, warning, or progress
Example H-1 describes an example of the callback mechanism.
Example H-1 Callback Mechanism
void myCallback(void *arg, const oratext *pId, const oratext *pMsg, clscrs_msgtype msgType){ if (pMsg != NULL) { cout << pMsg << endl; }}
Example H-2 describes how to use the callback mechanism in an interactive API.
Example H-2 Using the Callback Mechanism In an Interactive API
clscrs_start_resource2(pResIdList, NULL, env, myCallback, NULL, 0, pOpStatus);
Appendix HAbout the Programming Interface (C API) to Oracle Clusterware
H-5

You can also print debug trace messages for the API, itself by passing theCLSCRS_FLAG_TRACE flag when creating the context. The signature for context creationis:
CLSCRS_STAT clscrs_init_crs(clscrs_ctx **ctx, clscrs_msgf2 errf, void *errCtx, ub4 flags);
For the trace messages to work, you must specify both the CLSCRS_FLAG_TRACE flagand a clscrs_msgf2 callback mechanism in the clscrs_init_crs API.
The clscrs_msgf2 callback mechanism has the following signature:
typedef void (*clscrs_msgf)(void *usrp, const oratext *msg, sword msglen);
Filters
You can use filters to narrow down Oracle Clusterware entities upon which a CLSCRSAPI operates. Simple filters are attribute-value pairs with an operator. Operators mustbe surrounded by spaces, as shown in the examples. You can combine simple filtersinto expressions called expression filters using Boolean operators.
Supported filter operators are:
=><!=co: Containsst: Starts withen: Ends with
Supported Boolean operators are AND and OR.
Examples of filters are:
• TYPE = type1• ((TYPE = type1) AND (CHECK_INTERVAL > 50))• (TYPE = type1) AND ((CHECK_INTERVAL > 30) OR (AUTO_START co never))• NAME en network.res• TYPE st ora.db
See Also:
Use the clscrs_comparator enum and the clscrs_operator enum located inthe clscrsx.h file (which you can download from the Oracle Clusterwareweb page at http://www.oracle.com/goto/clusterware) to get the correcttype for the above comparators and operators, respectively, in the API calls
Appendix HAbout the Programming Interface (C API) to Oracle Clusterware
H-6

There are two types of filters and CLSCRS has a set of APIs to create these filters:
• Comparison filter: A simple filter that compares two values. For example:
TYPE = ora.db.type
Use the clscrs_compfilter_create API to create a comparison filter. For example, tocreate the (TYPE = ora.db.type) comparison filter:
clscrs_compfilter_create(ctx, clscrs_TYPE, clscrs_comparator_eq, (const oratext *)"ora.db.type", &myCompFilter);
• Expression filter: A filter that is created from either a set of comparison filters orexpression filters, or both. For example:
((TYPE = ora.db.type) AND (CHECK_INTERVAL > 50))
Use the clscrs_expfilter_create API to create a comparison filter. For example, tocreate an expression filter:
clscrs_exprfilter_create(myCompFilter1, clscrs_operator_or, myCompFilter2, &myExprFilter);
See Also:
The clscrsx.h file (which you can download from the Oracle Clusterware web pageat http://www.oracle.com/goto/clusterware) for usage information for theclscrs_compfilter_create and clscrs_expfilter_create APIs
Note:
Both the clscrs_compfilter_create and clscrs_expfilter_create APIs allocatememory that must be freed by calling clscrs_filter_destroy().
You can use filters in the following interactive CLSCRS APIs in place of an entity list:
clscrs_start_resource2clscrs_stat2clscrs_stop_resource2clscrs_check_resource2clscrs_relocate_resource2
Example H-3 describes using filters in an interactive CLSCRS API.
Appendix HAbout the Programming Interface (C API) to Oracle Clusterware
H-7

Example H-3 Filters In an Interactive CLSCRS API
clscrs_start_resource2(myCompFilter, NULL, env, msgf2, NULL, 0, pOpStatus);
Script Agent Usage
When you use CLSCRS APIs inside script agent entry points, keep the following inmind:
1. Some actions, such as start, stop, and clean, are executed under a lock on theresource instance. Thus, issuing a request to the server to act on the resourcedirectly or by extension of a relation results in a dead-lock.
2. Issuing read-only (clscrs_stat2) is generally safe unless it is an initial check,where the script agent must not call back on the server, because that results in adead-lock, as well. Use the clsagfw APIs to query the check entry point.
See Also:
Oracle Clusterware Resource Reference for examples of script agents
Help Interface
You can find the entire list of CLSCRS APIs, including usage information for each, inthe clscrsx.h file (which you can download from the Oracle Clusterware web page at http://www.oracle.com/goto/clusterware), along with a demo called crsapp.c.
Deprecated CLSCRS APIsTable H-1 lists the deprecated CLSCRS APIs and the corresponding replacement APIsfor Oracle Clusterware.
Table H-1 Deprecated CLSCRS APIs
Deprecated API Replacement
clscrs_check_resource clscrs_check_resource2
clscrs_entity clscrs_entity_type
clscrs_fail_resource No replacement
clscrs_msgf clscrs_msgf2
clscrs_register_resource clscrs_register_resource2
clscrs_relocate_resource clscrs_relocate_resource2
Appendix HAbout the Programming Interface (C API) to Oracle Clusterware
H-8

Table H-1 (Cont.) Deprecated CLSCRS APIs
Deprecated API Replacement
clscrs_res_attr_count clscrs_crsentity_attr_count
clscrs_res_create clscrs_crsentity_create
clscrs_res_create clscrs_crsentitylist_create
clscrs_res_destroy clscrs_crsentity_destroy
clscrs_res_get_attr clscrs_crsentity_get_attr
clscrs_res_get_attr_list clscrs_crsentity_get_attr_list
clscrs_res_get_name clscrs_crsentity_get_name
clscrs_res_get_node_list clscrs_crsentity_get_node_list
clscrs_res_get_op_status clscrs_crsentity_get_op_status
clscrs_res_get_reslist clscrs_crsentity_get_crsentitylist
clscrs_res_set_attr clscrs_crsentity_set_attr
clscrs_res_set_attr_list clscrs_crsentity_set_attr_list
clscrs_res_set_reslist clscrs_crsentity_set_crsentitylist
clscrs_reslist_append clscrs_crsentitylist_append
clscrs_reslist_count clscrs_crsentitylist_count
clscrs_reslist_delete_res clscrs_crsentitylist_delete_crsentity
clscrs_reslist_destroy clscrs_crsentitylist_destroy
clscrs_reslist_find clscrs_crsentitylist_find
clscrs_reslist_first clscrs_crsentitylist_first
clscrs_reslist_next clscrs_crsentitylist_next
clscrs_start_resource clscrs_start_resource2
Appendix HAbout the Programming Interface (C API) to Oracle Clusterware
H-9

Table H-1 (Cont.) Deprecated CLSCRS APIs
Deprecated API Replacement
clscrs_stat clscrs_stat2
clscrs_stop_resource clscrs_stop_resource2
clscrs_unregister_resource clscrs_unregister_resource2
Changes to Existing CLSCRS APIsOracle has added the following flags to the clscrs_stat2 API:
• CLSCRS_STATFLAG_SERVERBYCATEGORY: Use this flag to query the servers thatmatch a particular server category.
• CLSCRS_STATFLAG_CATEGORYBYSERVER: Use this flag to query the server categoriesthat match a particular server.
Oracle has added the following flags to the clscrs_start_resource2 andclscrs_stop_resource2 APIs:
• CLSCRS_FLAG_T_HA_PREPARE: Use this flag with Transparent HA (start2/stop2APIs) to instruct the Oracle Clusterware daemon (CRSD) to prepare for anexternal management interface to act on a resource. When the call comes back, ifsuccessful, then the interface then is expected to start or stop the resource andcall back with the other flag (CLSCRS_FLAG_T_HA_FINISH).
• CLSCRS_FLAG_T_HA_FINISH: Use this flag with Transparent HA withCLSCRS_FLAG_T_HA_PREPARE. You must use this flag in the second call to the CRSD(start2/stop2 APIs) when the start or stop action has finished. Note that clientsmust indicate resource instances and never resources with this flag, because theCRSD must know to which instances the invocation of the API applies.
• CLSCRS_NO_STATE_RESTORATION: This flag is available for use to start and stopresource APIs and to instruct the CRSD to skip resource state restoration of theresources whose state was affected. That procedure is usually attempted unlessyou use this flag.
Interactive CLSCRS APIsThese APIs make calls to the Cluster Ready Services daemon (CRSD) to runcommands.
The CRSD must be up and running for these APIs to function.
Table H-2 Summary of Interactive CLSCRS APIs for Oracle Clusterware
C API Description
clscrs_check_resource2 Notifies Oracle Clusterware to run the checkentry points for the identified resources.
Appendix HInteractive CLSCRS APIs
H-10

Table H-2 (Cont.) Summary of Interactive CLSCRS APIs for Oracle Clusterware
C API Description
clscrs_get_server_by_category Obtains a list of servers that match a particularserver category.
clscrs_is_crs_admin Checks whether the user is an OracleClusterware administrator.
clscrs_register_resource2 Registers the resources in the input resourcelist.
clscrs_register_servercategory Registers server categories in the input servercategory list.
clscrs_register_serverpool Registers a server pool for the input list ofservers.
clscrs_register_type Registers the resource types in the inputresource list.
clscrs_relocate_resource2 Relocates the list of resource identifiers.
clscrs_relocate_server Relocates a list of servers.
clscrs_request_action Notifies Oracle Clusterware to run a specificset of actions.
clscrs_restart_resource Instructs Oracle Clusterware to restart anamed set of resources.
clscrs_start_resource2 Notifies Oracle Clusterware to start a namedset of resources.
clscrs_stat2 Obtains information about specific resources.
clscrs_stat3 Obtains information about specific entities.
clscrs_stop_resource2 Notifies Oracle Clusterware to stop a namedset of resources.
clscrs_stop_resource_in_pools Instructs Oracle Clusterware to stop specificresources in server pools.
clscrs_start_resource_in_pools Instructs Oracle Clusterware to start specificresources in server pools.
clscrs_unregister_resource2 Unregisters the resources in the input list ofresource names.
clscrs_unregister_servercategory Unregisters server categories in the inputserver category list.
clscrs_unregister_serverpool Unregisters the given server pool.
clscrs_unregister_type Unregisters the resource types in the input list.
clscrs_whatif_add_server Simulates what happens if you add a server.
clscrs_whatif_delete_server Simulates what happens if you delete a server.
clscrs_whatif_fail_resource Simulates what happens if a resource fails.
clscrs_whatif_register_resource Simulates what happens if you register aresource.
clscrs_whatif_register_serverpool Simulates what happens if you register aserver pool.
Appendix HInteractive CLSCRS APIs
H-11

Table H-2 (Cont.) Summary of Interactive CLSCRS APIs for Oracle Clusterware
C API Description
clscrs_whatif_relocate_resource Simulates what happens if you relocate aresource.
clscrs_whatif_relocate_server Simulates what happens if you relocate aserver.
clscrs_whatif_set_activepolicy Simulates what happens if you activate apolicy.
clscrs_whatif_start_resource Simulates what happens if you start aresource.
clscrs_whatif_stop_resource Simulates what happens if you stop aresource.
clscrs_whatif_unregister_serverpool Simulates what happens if you unregister aserver pool.
Non-Interactive CLSCRS APIsYou can use non-interactive CLSCRS APIs for functions such as context initialization,preparing request payloads for interactive APIs, and post-processing output of theinteractive APIs. The non-interactive CLSCRS APIs do not call the CRSD.
A callback error reporting mechanism is not available for the non-interactive CLSCRSAPIs. All interactive CLSCRS APIs, except clscrs_stat2, clscrs_stat3, and allclscrs_whatif_* APIs, use this callback mechanism. Clients of these APIs also usethe callback mechanism to receive error, warning, and progress messages from theCRSD.
You can also use filters to reduce the list of Oracle Clusterware entities. You can alsouse filters in the interactive APIs to reduce the list of Oracle Clusterware entities.
Thread Safety
The routines provided to manage API data structures cannot be used with the sameAPI context in multiple threads concurrently; however, no thread-affinity on the part ofthe client is required. If a separate API context is used in each instance, then aprocess may invoke these routines on multiple threads.
The following table lists describes the non-interactive CLSCRS APIs.
Table H-3 Non-Interactive CLSCRS APIs
C API Description
clscrs_action_getentity Returns the entity for the action.
clscrs_action_getparams Returns the list of parameters for the action.
clscrs_action_gettype Returns the type for the action.
clscrs_actionlist_count Counts the number of actions in the action list.
clscrs_actionlist_create Creates an action list.
clscrs_actionlist_destroy Destroys the action list.
Appendix HNon-Interactive CLSCRS APIs
H-12

Table H-3 (Cont.) Non-Interactive CLSCRS APIs
C API Description
clscrs_actionlist_first Returns the first action in an action list.
clscrs_actionlist_next Returns the next action in an action list.
clscrs_actionlist_print Prints the action list.
clscrs_actionlist_seqid Returns the sequence ID for the action lists
clscrs_compfilter_create Constructs a simple filter that compares twovalues.
clscrs_crsentity_attr_count Counts the number of attributes for an entity.
clscrs_crsentity_create Creates a new entity (allocates memory).
clscrs_crsentity_destroy Destroys an entity and frees up memory.
clscrs_crsentity_get_attr Obtains the value of an entity, server pool, orserver attribute.
clscrs_crsentity_get_attr_list Obtains the attribute list for an entity, resourcetype, server pool, or server.
clscrs_crsentity_get_crsentitylist Obtains the entity list for an entity.
clscrs_crsentity_get_name Obtains the name of an entity.
clscrs_crsentity_get_node_list Obtains a list of nodes currently hosting theentity.
clscrs_crsentity_get_op_status Obtains the status of an operation for an entity.
clscrs_crsentity_get_registered Obtains the registration status of an entity.
clscrs_crsentity_set_attr Sets an attribute for an entity and a serverpool.
clscrs_crsentity_set_attr_list Sets the attribute list for an entity, resourcetype, server pool, or server.
clscrs_crsentity_set_crsentitylist Sets the resource list for an entity.
clscrs_crsentitylist_append Adds an entity to an entity list.
clscrs_crsentitylist_count Counts the number of entities in an entity list.
clscrs_crsentitylist_create Creates a list of entities.
clscrs_crsentitylist_delete_crsentity
Deletes an entity matching a given name froman entity list.
clscrs_crsentitylist_destroy Destroys an entity list and frees up memory.
clscrs_crsentitylist_find Finds an entity in an entity list matching agiven name.
clscrs_crsentitylist_first Obtains the first entity on an entity list.
clscrs_crslist_next Obtains the current next entity from an entitylist.
clscrs_entity_id_create Creates an entity identifier that identifies anOracle Clusterware entity such as a resource,resource type, server group, and so on.
clscrs_entity_id_destroy Frees the memory associated with an entityidentifier created fromclscrs_entity_id_create().
Appendix HNon-Interactive CLSCRS APIs
H-13

Table H-3 (Cont.) Non-Interactive CLSCRS APIs
C API Description
clscrs_exprfilter_create Constructs an expression filter fromcomparison or expression filters, or both.
clscrs_filter_destroy Frees the memory for a filter.
clscrs_get_entity_type Obtains the entity type corresponding to theentity identifier provided.
clscrs_get_fixed_attrlist Obtains the list of attributes that correspond toan attribute group identifier.
clscrs_get_resource_instance_details Obtains the resource instance details, such asresource name, cardinality, and degree, fromthe resource instance identifier that is used.
clscrs_getnodename Obtains the node name.
clscrs_init_crs Initializes a context for communications withOracle Clusterware.
clscrs_sp_get Obtains the name and value components of astringpair.
clscrs_sp_get_value Obtains the value component of a stringpair.
clscrs_sp_set Changes the value part of a stringpair.
clscrs_splist_append Adds a new stringpair (sp) to a stringpair list(splist).
clscrs_splist_count Counts the number of stringpairs (sp) in astringpair list (splist).
clscrs_splist_create Creates a new stringpair list.
clscrs_splist_create_and_set Creates a new stringpair list (splist) and setthe name and value for the first stringpair inthe list.
clscrs_splist_delete_sp Deletes a stringpair (sp) from a stringpair list(splist).
clscrs_splist_destroy Frees the memory for a stringpair list(splist).
clscrs_splist_find Finds the value for a stringpair (sp) in astringpair list (splist).
clscrs_splist_first Obtains the first stringpair (sp) from astringpair list (splist).
clscrs_splist_next Obtains the current next stringpair (sp) from astringpair list (splist). Current next stringpairis effectively the next stringpair in the stringpairlist. The list iterator is stored within the API andis not exposed.
clscrs_splist_replace Replaces the value for a stringpair (sp) in astringpair list (splist).
clscrs_term_crs Releases a context for communications withOracle Clusterware.
clscrs_type_create Creates a new resource type.
Appendix HNon-Interactive CLSCRS APIs
H-14

Table H-3 (Cont.) Non-Interactive CLSCRS APIs
C API Description
clscrs_type_get_attr Obtains the value/properties of a resourcetype attribute.
clscrs_type_set_attr Adds an attribute to a resource type.
Related Topics
• Error Handling and Tracing
• Callback Mechanism
• Filters
Command Evaluation APIsYou can use the command evaluation APIs to predict Oracle Clusterware's response to ahypothetical planned or unplanned event.
Oracle Clusterware can react to events in the system and produce a response action plan.This action plan consists of a series of resource state transitions or server poolreconfigurations, or both. The command evaluation APIs provide a mechanism to expose thisaction plan externally and to enable clients to predict the consequences of an event before itactually happens.
Additionally, by specifying a flag to the APIs listed in subsequent sections, you can obtainreasoned command evaluation information that explains why Oracle Clusterware made thedecisions it did to form a response action plan to the event.
Command evaluation response plans are available for the following event categories:
• Resources: Start, stop, relocate, add, and modify
• Server pools: Add, remove, and modify
• Servers: Add, remove, and relocate
• Policy: Change active policy
• Server category: Modify
Reasoned command evaluation response plans are available for the following eventcategories:
• Server pools: Add, remove, and modify
• Servers: Add and remove
• Policy: Change active policy
Oracle Clusterware provides command evaluation output as a list of actions, where eachaction represents a specific step performed by Oracle Clusterware. Each action isencapsulated by a clscrs_action structure, and the clscrs_actionlist structure representsthe entire sequence of actions. Oracle Clusterware also provides a set of functions(clscrs_action_* for action structures and clscrs_actionlist_* for action lists) to create,examine, iterate over, and destroy these structures. Their usage is identical to that of thecorresponding entity list and entity functions.
Appendix HCommand Evaluation APIs
H-15

The command evaluation APIs also provide clients with the ability to make a query onthe projected state of the system. The clscrs_querylist structure using the stat3format specifies the query, and the clscrs_crsentitylist structure provides theresult. Refer to the stat3 section for details on their usage.
Each command evaluation response that Oracle Clusterware provides includes asequence ID, which indicates the current state of Oracle Clusterware. The sequenceID is incremented for every new event that Oracle Clusterware manages. OracleClusterware guarantees that, as long the sequence ID has not changed, the actionplan provided will be executed, as is, for the event in question. For example, the actionplan that Oracle Clusterware provides for a whatif start resource FOO request willbe identical to the actions Oracle Clusterware takes take when an actual startresource FOO request is submitted, provided the sequence ID has not changed.
Example H-4 describes how you can use command evaluation APIs.
Example H-4 Sample Usage of Command Evaluation API
boolean tracectx = TRUE;oratext *resid;clscrs_ctx *ctx;clscrs_env env;clscrs_splist *resid_list;clscrs_action *cur_actn;clscrs_actionlist *alist;clscrs_splist *params;
// Init crsclscrs_init_crs(&ctx, (clscrs_msgf)clsuslztrace, &tracectx, (ub4)0);
// Init parameters to the callclscrs_entity_id_create(ctx, "MYRES", clscrs_entity_res, &resid);clscrs_splist_create(ctx, &resid_list);clscrs_splist_append(resid_list, resid, NULL);clscrs_actionlist_create(ctx, &alist);
// Make call into the what-if APIclscrs_whatif_start_resource(resid_list, nodename, flags, NULL, NULL, alist);
// Process the resulting list of actionsfor(clscrs_actionlist_first(alist,&cur_actn);cur_actn;clscrs_actionlist_next(alist,&cur_actn)) { params = clscrs_action_getparams(cur_actn); switch(clscrs_action_gettype(cur_actn)) { case clscrs_actiontype_resstate: // Read params and do something break; case clscrs_actiontype_srvmove: // Read params and do something break; case clscrs_actiontype_newgroup: // Read params and do something
Appendix HCommand Evaluation APIs
H-16

break; case clscrs_actiontype_errorcase: // Read params and do something break; } } clscrs_actionlist_destroy(alist); clscrs_splist_destroy(resid_list); clscrs_term_crs(&ctx);
Parameters for the APIs listed in this section are separated into those for which you provideinput and those that display information when the function completes successfully.
clscrs_whatif_set_activepolicyDetermines the actions that Oracle Clusterware takes if you activate a specific policy.
Syntax
clscrs_whatif_set_activepolicy(const oratext *name, uword flags, clscrs_querylist *qlist, clscrs_crsentitylist *status, clscrs_actionlist *alist);
Input
name: Name of the policy.flags: CLSCRS_FLAG_NONECLSCRS_FLAG_WHATIF_VERBOSECLSCRS_FLAG_WHYIF: Displays reasoned command evaluation informationCLSCRS_FLAG_FORCEqlist: Specifies the client query on Oracle Clusterware entity status. NULL indicates noquery specified.
Output
status: List containing the returned entity information.alist: Action list containing the actions that Oracle Clusterware will perform.
Returns
CLSCRS_STAT_SUCCESS: Indicates that Oracle Clusterware completed the requestsuccessfully or that no entities matched a filter.CLSCRS_STAT_AUTHORIZATION_FAILURE: Displays when authorization fails.CLSCRS_STAT_CONNECTION: Displays if there is a communication error.CLSCRS_STAT_WRONG_ACTIVE_VERSION: Displays if you use the API before you haveupgraded Oracle Clusterware.CLSCRS_STAT_INTERNAL_ERROR: Displays if an unexpected, non-user error occurs.CLSCRS_STAT_INVALID_ARGS: Displays if you provide incorrect arguments.
Appendix HCommand Evaluation APIs
H-17

clscrs_whatif_fail_resourceDetermines the actions that Oracle Clusterware takes if specific resources fail.
Syntax
clscrs_whatif_fail_resource(clscrs_splist *name, const oratext *server, uword flags, clscrs_querylist *qlist, clscrs_crsentitylist *status, clscrs_actionlist *alist);
Input
name: Resource or instance ID, or a filter.server: Name of the server on which the resource failure occurs. NULL is allowed.flags: CLSCRS_FLAG_NONECLSCRS_FLAG_WHATIF_VERBOSEqlist: Specifies the client query on Oracle Clusterware entity status. NULLindicates no query specified.
Output
status: List containing the returned entity information.alist: Action list containing the actions that Oracle Clusterware will perform.
Returns
CLSCRS_STAT_SUCCESS: Indicates that Oracle Clusterware completed the requestsuccessfully or that no entities matched a filter.CLSCRS_STAT_AUTHORIZATION_FAILURE: Displays when authorization fails.CLSCRS_STAT_CONNECTION: Displays if there is a communication error.CLSCRS_STAT_WRONG_ACTIVE_VERSION: Displays if you use the API before you haveupgraded Oracle Clusterware.CLSCRS_STAT_INTERNAL_ERROR: Displays if an unexpected, non-user error occurs.CLSCRS_STAT_INVALID_ARGS: Displays if you provide incorrect arguments.
clscrs_whatif_register_resourceDetermines the actions that Oracle Clusterware takes if you add or modify a specificresource.
Syntax
clscrs_whatif_register_resource(const oratext *name, clscrs_splist *attrs, uword flags, clscrs_querylist *qlist, clscrs_crsentitylist *status, clscrs_actionlist *alist);
Appendix HCommand Evaluation APIs
H-18

Input
name: Name of the resource.attrs: The attributes of the specified resource.flags: CLSCRS_FLAG_NONECLSCRS_FLAG_WHATIF_VERBOSECLSCRS_FLAG_FORCECLSCRS_FLAG_REG_UPDATE (to modify the resource)qlist: Specifies the client query on Oracle Clusterware entity status. NULL indicates noquery specified.
Output
status: List containing the returned entity information.alist: Action list containing the actions that Oracle Clusterware will perform.
Returns
CLSCRS_STAT_SUCCESS: Indicates that Oracle Clusterware completed the requestsuccessfully or that no entities matched a filter.CLSCRS_STAT_AUTHORIZATION_FAILURE: Displays when authorization fails.CLSCRS_STAT_CONNECTION: Displays if there is a communication error.CLSCRS_STAT_WRONG_ACTIVE_VERSION: Displays if you use the API before you haveupgraded Oracle Clusterware.CLSCRS_STAT_INTERNAL_ERROR: Displays if an unexpected, non-user error occurs.CLSCRS_STAT_INVALID_ARGS: Displays if you provide incorrect arguments.
clscrs_whatif_relocate_resourceDetermines the actions that Oracle Clusterware takes if you relocate specific resources.
Syntax
clscrs_whatif_relocate_resource(clscrs_splist *name, const oratext *destnode, uword flags, clscrs_querylist *qlist, clscrs_crsentitylist *status, clscrs_actionlist *alist);
Input
name: Resource or instance ID, or a filter.flags: CLSCRS_FLAG_NONECLSCRS_FLAG_WHATIF_VERBOSECLSCRS_FLAG_FORCEqlist: Specifies the client query on Oracle Clusterware entity status. NULL indicates noquery specified.
Output
status: List containing the returned entity information.alist: Action list containing the actions that Oracle Clusterware will perform.
Appendix HCommand Evaluation APIs
H-19

Returns
CLSCRS_STAT_SUCCESS: Indicates that Oracle Clusterware completed the requestsuccessfully or that no entities matched a filter.CLSCRS_STAT_AUTHORIZATION_FAILURE: Displays when authorization fails.CLSCRS_STAT_CONNECTION: Displays if there is a communication error.CLSCRS_STAT_WRONG_ACTIVE_VERSION: Displays if you use the API before you haveupgraded Oracle Clusterware.CLSCRS_STAT_INTERNAL_ERROR: Displays if an unexpected, non-user error occurs.CLSCRS_STAT_INVALID_ARGS: Displays if you provide incorrect arguments.
clscrs_whatif_start_resourceDetermines the actions that Oracle Clusterware takes if you start specific resources.
Syntax
clscrs_whatif_start_resource(clscrs_splist *name, const oratext *node, uword flags, clscrs_querylist *qlist, clscrs_crsentitylist *status, clscrs_actionlist *alist);
Input
name: Resource or instance ID, or a filter.node: Name of the node on which you want to start the resource. NULL is allowed.flags: CLSCRS_FLAG_NONECLSCRS_FLAG_WHATIF_VERBOSECLSCRS_FLAG_FORCEqlist: Specifies the client query on Oracle Clusterware entity status. NULLindicates no query specified.
Output
status: List containing the returned entity information.alist: Action list containing the actions that Oracle Clusterware will perform.
Returns
CLSCRS_STAT_SUCCESS: Indicates that Oracle Clusterware completed the requestsuccessfully or that no entities matched a filter.CLSCRS_STAT_AUTHORIZATION_FAILURE: Displays when authorization fails.CLSCRS_STAT_CONNECTION: Displays if there is a communication error.CLSCRS_STAT_WRONG_ACTIVE_VERSION: Displays if you use the API before you haveupgraded Oracle Clusterware.CLSCRS_STAT_INTERNAL_ERROR: Displays if an unexpected, non-user error occurs.CLSCRS_STAT_INVALID_ARGS: Displays if you provide incorrect arguments.
clscrs_whatif_stop_resourceDetermines the actions that Oracle Clusterware takes if you stop specific resources.
Appendix HCommand Evaluation APIs
H-20

Syntax
clscrs_whatif_stop_resource(clscrs_splist *name, uword flags, clscrs_querylist *qlist, clscrs_crsentitylist *status, clscrs_actionlist *alist);
Input
name: Resource or instance ID, or a filter.flags: CLSCRS_FLAG_NONECLSCRS_FLAG_WHATIF_VERBOSECLSCRS_FLAG_FORCEqlist: Specifies the client query on Oracle Clusterware entity status. NULL indicates noquery specified.
Output
status: List containing the returned entity information.alist: Action list containing the actions that Oracle Clusterware will perform.
Returns
CLSCRS_STAT_SUCCESS: Indicates that Oracle Clusterware completed the requestsuccessfully or that no entities matched a filter.CLSCRS_STAT_AUTHORIZATION_FAILURE: Displays when authorization fails.CLSCRS_STAT_CONNECTION: Displays if there is a communication error.CLSCRS_STAT_WRONG_ACTIVE_VERSION: Displays if you use the API before you haveupgraded Oracle Clusterware.CLSCRS_STAT_INTERNAL_ERROR: Displays if an unexpected, non-user error occurs.CLSCRS_STAT_INVALID_ARGS: Displays if you provide incorrect arguments.
clscrs_whatif_register_serverpoolDetermines the actions that Oracle Clusterware takes if you register a specific server pool.
Syntax
clscrs_whatif_register_serverpool(const oratext *pname, clscrs_splist *attrs, uword flags, clscrs_querylist *qlist, clscrs_crsentitylist *status, clscrs_actionlist *alist);
Input
name: Name of the server pool.attrs: The attributes of the specified server pool.flags: CLSCRS_FLAG_NONECLSCRS_FLAG_WHATIF_VERBOSECLSCRS_FLAG_WHYIF: Displays reasoned command evaluation informationCLSCRS_FLAG_FORCE
Appendix HCommand Evaluation APIs
H-21

CLSCRS_FLAG_REG_UPDATE (to modify the server pool)qlist: Specifies the client query on Oracle Clusterware entity status. NULLindicates no query specified.
Output
status: List containing the returned entity information.alist: Action list containing the actions that Oracle Clusterware will perform.
Returns
CLSCRS_STAT_SUCCESS: Indicates that Oracle Clusterware completed the requestsuccessfully or that no entities matched a filter.CLSCRS_STAT_AUTHORIZATION_FAILURE: Displays when authorization fails.CLSCRS_STAT_CONNECTION: Displays if there is a communication error.CLSCRS_STAT_WRONG_ACTIVE_VERSION: Displays if you use the API before you haveupgraded Oracle Clusterware.CLSCRS_STAT_INTERNAL_ERROR: Displays if an unexpected, non-user error occurs.CLSCRS_STAT_INVALID_ARGS: Displays if you provide incorrect arguments.
clscrs_whatif_unregister_serverpoolDetermines the actions that Oracle Clusterware takes if you unregister a specificserver pool.
Syntax
clscrs_whatif_unregister_serverpool(const oratext *poolname, uword flags, clscrs_querylist *qlist, clscrs_crsentitylist *status, clscrs_actionlist *alist);
Input
name: Name of the server pool.flags: CLSCRS_FLAG_NONECLSCRS_FLAG_WHATIF_VERBOSECLSCRS_FLAG_WHYIF: Displays reasoned command evaluation informationCLSCRS_FLAG_FORCEqlist: Specifies the client query on Oracle Clusterware entity status. NULLindicates no query specified.
Output
status: List containing the returned entity information.alist: Action list containing the actions that Oracle Clusterware will perform.
Returns
CLSCRS_STAT_SUCCESS: Indicates that Oracle Clusterware completed the requestsuccessfully or that no entities matched a filter.CLSCRS_STAT_AUTHORIZATION_FAILURE: Displays when authorization fails.
Appendix HCommand Evaluation APIs
H-22

CLSCRS_STAT_CONNECTION: Displays if there is a communication error.CLSCRS_STAT_WRONG_ACTIVE_VERSION: Displays if you use the API before you haveupgraded Oracle Clusterware.CLSCRS_STAT_INTERNAL_ERROR: Displays if an unexpected, non-user error occurs.CLSCRS_STAT_INVALID_ARGS: Displays if you provide incorrect arguments.
clscrs_whatif_add_serverDetermines the actions that Oracle Clusterware takes if you add a server.
Syntax
clscrs_whatif_add_server(const oratext *name, clscrs_splist *attrs, uword flags, clscrs_querylist *qlist, clscrs_crsentitylist *status, clscrs_actionlist *alist);
Input
name: Name of the server.attrs: The attributes of the specified server.flags: CLSCRS_FLAG_NONECLSCRS_FLAG_WHATIF_VERBOSECLSCRS_FLAG_WHYIF: Displays reasoned command evaluation informationCLSCRS_FLAG_FORCEqlist: Specifies the client query on Oracle Clusterware entity status. NULL indicates noquery specified.
Output
status: List containing the returned entity information.alist: Action list containing the actions that Oracle Clusterware will perform.
Returns
CLSCRS_STAT_SUCCESS: Indicates that Oracle Clusterware completed the requestsuccessfully or that no entities matched a filter.CLSCRS_STAT_AUTHORIZATION_FAILURE: Displays when authorization fails.CLSCRS_STAT_CONNECTION: Displays if there is a communication error.CLSCRS_STAT_WRONG_ACTIVE_VERSION: Displays if you use the API before you haveupgraded Oracle Clusterware.CLSCRS_STAT_INTERNAL_ERROR: Displays if an unexpected, non-user error occurs.CLSCRS_STAT_INVALID_ARGS: Displays if you provide incorrect arguments.
Appendix HCommand Evaluation APIs
H-23

clscrs_whatif_delete_serverDetermines the actions that Oracle Clusterware takes if you delete a server.
Syntax
clscrs_whatif_delete_server(const oratext *name, uword flags, clscrs_querylist *qlist, clscrs_crsentitylist *status, clscrs_actionlist *alist);
Input
name: Name of the server.flags: CLSCRS_FLAG_NONECLSCRS_FLAG_WHATIF_VERBOSECLSCRS_FLAG_WHYIF: Displays reasoned command evaluation informationCLSCRS_FLAG_FORCEqlist: Specifies the client query on Oracle Clusterware entity status. NULLindicates no query specified.
Ouput
status: List containing the returned entity information.alist: Action list containing the actions that Oracle Clusterware will perform.
Returns
CLSCRS_STAT_SUCCESS: Indicates that Oracle Clusterware completed the requestsuccessfully or that no entities matched a filter.CLSCRS_STAT_AUTHORIZATION_FAILURE: Displays when authorization fails.CLSCRS_STAT_CONNECTION: Displays if there is a communication error.CLSCRS_STAT_WRONG_ACTIVE_VERSION: Displays if you use the API before you haveupgraded Oracle Clusterware.CLSCRS_STAT_INTERNAL_ERROR: Displays if an unexpected, non-user error occurs.CLSCRS_STAT_INVALID_ARGS: Displays if you provide incorrect arguments.
clscrs_whatif_relocate_serverDetermines the actions that Oracle Clusterware takes if you relocate a server to adifferent server pool.
Syntax
clscrs_whatif_relocate_server(const oratext *name, const oratext *topool, uword flags, clscrs_querylist *qlist, clscrs_crsentitylist *status, clscrs_actionlist *alist);
Appendix HCommand Evaluation APIs
H-24

Input
name: Name of the server.topool: The name of the server pool to which you want to relocate the server.flags: CLSCRS_FLAG_NONECLSCRS_FLAG_WHATIF_VERBOSECLSCRS_FLAG_FORCEqlist: Specifies the client query on Oracle Clusterware entity status. NULL indicates noquery specified.
Output
status: List containing the returned entity information.alist: Action list containing the actions that Oracle Clusterware will perform.
Returns
CLSCRS_STAT_SUCCESS: Indicates that Oracle Clusterware completed the requestsuccessfully or that no entities matched a filter.CLSCRS_STAT_AUTHORIZATION_FAILURE: Displays when authorization fails.CLSCRS_STAT_CONNECTION: Displays if there is a communication error.CLSCRS_STAT_WRONG_ACTIVE_VERSION: Displays if you use the API before you haveupgraded Oracle Clusterware.CLSCRS_STAT_INTERNAL_ERROR: Displays if an unexpected, non-user error occurs.CLSCRS_STAT_INVALID_ARGS: Displays if you provide incorrect arguments.
Server Categorization APIsOracle Clusterware includes an entity called clsrcs_entity_server_category.
Parameters for the APIs listed in this section are separated into those for which you provideinput and those that display information when the function completes successfully.
clscrs_servercategory_createCreates a server category.
Syntax
clscrs_servercategory_create(clscrs_ctx *ctx, const oratext *sc_name, clscrs_crsentity **sc);
Input
ctx: CLSCRS context.sc_name: Name of the server category.
Output
sc: The newly created server category.
Appendix HServer Categorization APIs
H-25

Returns
clscrsretSUCC: Indicates that Oracle Clusterware completed the requestsuccessfully.clscrsretNOMEM: Displays if no memory can be allocated.clscrsretBADCTX: Displays if the context is NULL.clscrsretBADARG: Displays if the server name is NULL.
clscrs_servercategory_destroyFrees memory for a server category.
Syntax
clscrs_servercategory_destroy(clscrs_crsentity **sc);
Input
sc_name: Name of the server category you want to destroy to free up memory
Returns
clscrsretSUCC: Indicates that Oracle Clusterware completed the request successfully
clscrs_register_servercategoryRegisters the server categories that you specify in the input server category list.
Syntax
clscrs_register_servercategory(clscrs_crsentitylist *in_entitylist, uword flags, clscrs_msgf2 msgf, void *msgarg, clscrs_crsentitylist *op_status);
Input
in_entitylist: The list of server categories you want to register.flags: CLSCRS_FLAG_REG_UPDATECLSCRS_FLAG_QUEUECLSCRS_FLAG_FORCECLSCRS_FLAG_NONEmsgf: User message callback, which can be NULL.msgarg: User callback argument, which can be NULL.
Output
op_status: The entity list that holds the status of the register operation for each servercategory.
Appendix HServer Categorization APIs
H-26

Returns
CLSCRS_STAT_SUCCESS: Indicates that all input server categories are successfullyregistered.CLSCRS_STAT_FAILURE: Displays if at least one server category cannot be registered.CLSCRS_STAT_CONNECTION: Displays if there is a communication error.CLSCRS_STAT_WRONG_ACTIVE_VERSION: Displays if you use the API before you haveupgraded Oracle Clusterware.CLSCRS_STAT_INVALID_ARGS: Displays if any of the server categories in the input entity listdo not have attributes.
Usage Notes
• The attributes for the server category are contained in the input server category list.
• The op_status list contains the results of the register operation for each server categoryand contains no valid attributes.
• The caller must create and populate the in_entitylist and must create the op_statuslist. Both of these lists must be destroyed by the caller.
• The op_status list cannot be reused with another API call. It must be created anddestroyed for each API call.
• One or more attributes of an already registered server category can be modified bypassing the CLSCRS_FLAG_REG_UPDATE flag.
• The flags apply to all server categories in the input entity list.
clscrs_unregister_servercategoryUnregisters the server categories that you specify in the input list.
Syntax
clscrs_unregister_servercategory(clscrs_splist *sclist, uword flags, clscrs_msgf2 msgf, void *msgarg, clscrs_crsentitylist *op_status);
Input
sclist: The list of server categories you want to unregister.flags: Specify option flags.msgf: User message callback, which can be NULL.msgarg: User callback argument, which can be NULL.
Output
op_status: The entity list that holds the status of the unregister operation for each servercategory.
Returns
CLSCRS_STAT_SUCCESS: Indicates that all input server categories are successfullyregistered.
Appendix HServer Categorization APIs
H-27

CLSCRS_STAT_FAILURE: Displays if at least one server category cannot beunregistered.CLSCRS_STAT_CONNECTION: Displays if there is a communication error.CLSCRS_STAT_WRONG_ACTIVE_VERSION: Displays if you use the API before you haveupgraded Oracle Clusterware.
Usage Notes
• The op_status list contains the results of the unregister operation for each servercategory.
• The caller must create and populate the sclist and must create the op_statuslist. Both of these lists must be destroyed by the caller.
• The op_status list cannot be reused with another API call and must be createdand destroyed for each API call.
clscrs_get_server_by_categoryObtains a list of servers that match a particular server category.
Syntax
clscrs_get_server_by_category(clscrs_splist *in_list, clscrs_crsentitylist *out_entitylist);
Input
in_list: The list of server categories or a filter.
Output
out_entitylist: Lists the servers matching the server category.
Returns
CLSCRS_STAT_SUCCESS: Indicates that all input server categories are successfullyregistered.CLSCRS_STAT_FAILURE: Displays if at least one server category cannot beunregistered.CLSCRS_STAT_CONNECTION: Displays if there is a communication error.
clscrs_register_serverModifies the server attributes.
Syntax
clscrs_register_server(clscrs_crsentitylist *in_entitylist, uword flags, clscrs_msgf2 msgf, void *msgarg, clscrs_crsentitylist *op_status);
Appendix HServer Categorization APIs
H-28

Input
in_entitylist: The list of server categories you want to register.flags: CLSCRS_FLAG_QUEUECLSCRS_FLAG_FORCECLSCRS_FLAG_REG_UPDATECLSCRS_FLAG_NONEmsgf: User message callback, which can be NULL.msgarg: User callback argument, which can be NULL.
Output
op_status: The entity list that holds the status of the register operation for each server.
Returns
CLSCRS_STAT_SUCCESS: Indicates that all input server categories are successfullyregistered.CLSCRS_STAT_FAILURE: Displays if at least one server category cannot be registered.CLSCRS_STAT_CONNECTION: Displays if there is a communication error.CLSCRS_STAT_WRONG_ACTIVE_VERSION: Displays if you use the API before you haveupgraded Oracle Clusterware.CLSCRS_STAT_INVALID_ARGS: Displays if any of the server categories in the input entity listdo not have attributes.
Usage Notes
• The attributes for the server are contained in the input server list.
• The op_status list contains the results of the modify operation for each server butcontains no valid attributes.
• The caller must create and populate the in_entitylist and must create the op_statuslist. Both of these lists must be destroyed by the caller.
• The op_status list cannot be reused with another API call and it must be created anddestroyed for each API call.
Note:
Since Oracle currently supports, only, the CLSCRS_FLAG_REG_UPDATE flag mustalways be passed. The flags apply to all servers in the input entity list.
(Optional) Provide detailed information about using the API or subprogram here.
STAT3 APIOracle Clusterware manages several entities, such as resources, server pools, and so on.However, the clscrs_stat2 interface only allows retrieving (reading) entities by type, whichmeans that a single retrieval can only return entities of a single type. Therefore, clients thatneed to get different types of entities and need to have a consistent view of the datastructures to make further decisions have to rely on a work around using a special event
Appendix HSTAT3 API
H-29

sequence ID and, if necessary, reissue query requests several times. In theory, in asystem with ever changing state/configuration such a solution is time-unbounded.
Oracle Clusterware 12c and later releases provide a mechanism to perform aconsistent read of entities of several kinds. The mechanism works on entitiestransparently, such that addition of new managed entities do not require any changesto the mechanism.
This is achieved by the clscrs_stat3 API.
clscrs_stat3Obtains information about the Oracle Clusterware entities identified in qlist.
Syntax
clscrs_stat3(clscrs_querylist *qlist, uword flags, clscrs_crsentitylist *out_entitylist);
Input
qlist: The list of Oracle Clusterware entities you want to query.
Output
out_entitylist: The entity list that holds the returned entity information.
Returns
CLSCRS_STAT_SUCCESS: Indicates that the API successfully queried OracleClusterware.CLSCRS_STAT_FAILURE: Displays if there is an error querying Oracle Clusterware.CLSCRS_STAT_CONNECTION: Displays if there is a communication error.
Usage Notes
• Information is returned in out_entitylist. Queries are executed such that thesubsequent output set is consistent.
• You create clscrs_query objects and append them to the clscrs_querylistobject before passing the object to this function. Any attributes required for eachentity type must be present in the clscrs_query object. If the attribute list is empty,then Oracle Clusterware returns all attributes.
• The out_entitylist must be created and passed as an empty list. Any errors foran entity are returned in the out_entitylist.
• The output is returned as a nested entity list. Results for individual queries arereturned as respective entities in the out_entitylist. The output for individualqueries is returned as an entity list for that specific entity. The type of results in theentity can be verified by calling clscrs_crsentity_get_type, to get the OracleClusterware entity type of the entity that is part of the out_entitylist.
For example, if you have two queries, one for resources and the other for resourcetypes, then out_entitylist will contain two entity objects, one for each of theaforementioned Oracle Clusterware entity types. The entity list for each of these
Appendix HSTAT3 API
H-30

entity objects will contain the results of the queries. To determine what type of entityobject a particular object is, you must call the clscrs_crsentity_get_type function onthat entity object. If the query returns zero matches, then the size of the entity list for thatentity object will be zero.
Note:
Oracle supports only one clscrs_query object per entity type. If more than oneclscrs_query object is created for the same entity type, then Oracle does notguarantee the stat3 API behavior.
Miscellaneous APIsParameters for the APIs listed in this section are separated into those for which you provideinput and those that display information when the function completes successfully.
clscrs_get_error_detailsReturns the clsk exception stack if there are any failures while invoking other CLSCRS APIs.
Syntax
clscrs_get_error_details(oratext* error_buf, size_t* buf_size);
Input
error_buf: The buffer that will be populated with the error stack.buf_size: The size of the buffer for error_buf. If the size of the buffer given is smallerthan what is required, then the API returns a value for the necessary buffer size.
Returns
clscrsretSUCC: Indicates that the error stack printed successfully.clscrsretEMPTY: Displays if the error stack is empty.clscrsretBADARG: Displays if either error_buf or buf_size is NULL.clscrsretBUFFSMALL: Displays if the buffer size that you specify is smaller than what isrequired.
Usage Notes
The caller is responsible for allocating memory for error_buf.
clscrs_request_actionInstructs Oracle Clusterware to run an action on a named set of resources.
Appendix HMiscellaneous APIs
H-31

Syntax
clscrs_request_action(oratext *action_name, clscrs_splist *ridlist, clscrs_env env, clscrs_msgf2 msgf, void *msgarg, uword flag, clscrs_reslist *op_status);
Input
action_name: The name of the action to be performed.ridlist: The list of resources or resource instance IDs to stop, or a filter.env: Specify environment arguments to the stop operation.msgf: User message callback, which can be NULL.msgarg: User callback argument, which can be NULL.flag: Either async or queue options.
Output
op_status: The resource list that holds the status of the action operation for eachresource.
Returns
CLSCRS_STAT_INVALID_RESNAME: Displays if ridlist is empty.CLSCRS_STAT_AUTHORIZATION_FAILURE: Displays when authorization fails.CLSCRS_STAT_SUCCESS: Displays if the request completes successfully for allrequested entities or if no entities match a filter.CLSCRS_STAT_FAILURE: Displays if at least one resource or resource ID does notstop successfully.CLSCRS_STAT_CONNECTION: Displays if there is a communication error.
Usage Notes
• In the first argument, you can specify either a list of resource IDs or a filter.
• Specifying a filter enables the query and action to take place in a single call. Thefilter searches all registered resources.
clscrs_restart_resourceInstructs Oracle Clusterware to restart a named set of resources.
Syntax
clscrs_restart_resource(clscrs_splist *ridlist, clscrs_env env, clscrs_msgf2 msgf, void *msgarg, uword flag, clscrs_reslist *op_status);
Input
ridlist: The list of resources or resource instance IDs to restart, or a filter.
Appendix HMiscellaneous APIs
H-32

env: Specify environment arguments to the restart operation.msgf: User message callback, which can be NULL.msgarg: User callback argument, which can be NULL.flag: Either async, force, or event options.
Output
op_status: The resource list that holds the status of the restart operation for each resource.
Returns
CLSCRS_STAT_INVALID_RESNAME: Displays if ridlist is empty.CLSCRS_STAT_AUTHORIZATION_FAILURE: Displays when authorization fails.CLSCRS_STAT_SUCCESS: Displays if the request completes successfully for all requestedentities or if no entities match a filter.CLSCRS_STAT_FAILURE: Displays if at least one resource or resource ID does not startsuccessfully.CLSCRS_STAT_CONNECTION: Displays if there is a communication error.CLSCRS_STAT_WRONG_ACTIVE_VERSION: Displays if you use the API before you haveupgraded Oracle Clusterware.
Usage Notes
• If the flag is async, then the msgf callback function you specify is never called. The APIreturns an OK status after initiating the call to Oracle Clusterware, and asynchronouslyexecutes the restarts.
• If the flag is not async, and msgf is not NULL, then the API drives msgf one line at a timewith collected output from the restart programs. An optional event flag maybe passed toindicate that this is not a request to perform an action, but rather a notification that theaction has already started. The flag should only be used for a narrow set of co-managedresources.
• In the first argument, you can specify either a list of resource IDs or a filter. Specifying afilter enables the query and action to take place in a single call. The filter searches allregistered resources.
clscrs_start_resource_in_poolsInstructs Oracle Clusterware to start a named set of resources in server pools.
Syntax
clscrs_start_resource_in_pools(clscrs_splist *ridlist,clscrs_splist *spoollist, clscrs_env env,clscrs_msgf2 msgf2, void *msgarg, uword flags, clscrs_reslist *op_status);
Input
ridlist: The list of resources or resource instance IDs to start, or a filter.spoollist: The list of server pool names where a resource that you want to start isrunning, or a filter.
Appendix HMiscellaneous APIs
H-33

env: Specify environment arguments to the start operation.msgf: User message callback, which can be NULL.msgarg: User callback argument, which can be NULL.flag: Either async, force, or event options.
Output
op_status: The resource list that holds the status of the start operation for eachresource.
Returns
CLSCRS_STAT_INVALID_RESNAME: Displays if ridlist is empty.CLSCRS_STAT_AUTHORIZATION_FAILURE: Displays when authorization fails.CLSCRS_STAT_SUCCESS: Displays if the request completes successfully for allrequested entities or if no entities match a filter.CLSCRS_STAT_FAILURE: Displays if at least one resource or resource ID does notstart successfully.CLSCRS_STAT_CONNECTION: Displays if there is a communication error.
Usage Notes
• Functionality is similar to clscrs_start_resource2, except that this function takesan extra argument—spoollist—which is a list of server pool names or a filterbased on which a list of server pools is generated.
• This function does not take node as an argument.
clscrs_stop_resource_in_poolsInstructs Oracle Clusterware to stop a named set of resources in server pools.
Syntax
clscrs_stop_resource_in_pools(clscrs_splist *ridlist,clscrs_splist *spoollist, clscrs_env env,clscrs_msgf2 msgf2, void *msgarg, uword flags, clscrs_reslist *op_status);
Input
ridlist: The list of resources or resource instance IDs to stop, or a filter.spoollist: The list of server pool names where a resource that you want to stop isrunning, or a filter.env: Specify environment arguments to the stop operation.msgf: User message callback, which can be NULL.msgarg: User callback argument, which can be NULL.flag: Either async, force, or event options.
Appendix HMiscellaneous APIs
H-34

Output
op_status: The resource list that holds the status of the stop operation for each resource.
Returns
CLSCRS_STAT_INVALID_RESNAME: Displays if ridlist is empty.CLSCRS_STAT_AUTHORIZATION_FAILURE: Displays when authorization fails.CLSCRS_STAT_SUCCESS: Displays if the request completes successfully for all requestedentities or if no entities match a filter.CLSCRS_STAT_FAILURE: Displays if at least one resource or resource ID does not stopsuccessfully.CLSCRS_STAT_CONNECTION: Displays if there is a communication error.
Usage Notes
• Functionality is similar to clscrs_stop_resource2, except that this function takes anextra argument—spoollist—which is a list of server pool names or a filter based onwhich a list of server pools is generated.
• This function does not take node as an argument.
Appendix HMiscellaneous APIs
H-35

IOracle Cluster Registry Utility Reference
This appendix describes the syntax of the Oracle Cluster Registry (OCR) configuration utility,OCRCONFIG, and troubleshooting OCR, which includes descriptions and usage informationfor OCRCHECK and OCRDUMP.
This appendix contains the following topics:
• About OCRCONFIG
• OCRCONFIG Command Reference
• Troubleshooting Oracle Cluster Registry and Diagnostic Output
About OCRCONFIGUse the ocrconfig command to manage OCR. Using this utility you can import, export, add,delete, restore, overwrite, backup, repair, replace, move, upgrade, or downgrade OCR.
Usage Information
• The OCRCONFIG executable is located in the Grid_home/bin directory
• The ocrconfig command syntax is as follows:
ocrconfig -option
Using Utility Help
To display the help output for the OCRCONFIG utility:
ocrconfig -help
Privileges and Security
To use the OCRCONFIG utility you must be logged into the operating system as a user withadministrative privileges.
Log Files
The OCRCONFIG utility creates a log file in ORACLE_BASE/diag/crs/host_name/crs .
To change the amount of logging, edit the path in the ORACLE_BASE/crsdata/host_name/crsdiag/ocrconfig.ini file.
OCRCONFIG Command ReferenceThis section describes the following OCRCONFIG commands:
• ocrconfig -add
I-1

• ocrconfig -backuploc
• ocrconfig -copy
• ocrconfig -delete
• ocrconfig -export
• ocrconfig -import
• ocrconfig -manualbackup
• ocrconfig -overwrite
• ocrconfig -repair
• ocrconfig -replace
• ocrconfig -restore
• ocrconfig -showbackup
• ocrconfig -showbackuploc
ocrconfig -addAdds an OCR location to an Oracle Automatic Storage Management (Oracle ASM)disk group.
Syntax
ocrconfig -add +diskgroup_name
Usage Notes
• OCR locations that you add must exist, have sufficient permissions, and must bemounted before you can add them.
• You must run this command as root.
• The diskgroup_name variable is the name of an Oracle ASM disk group. Forexample:
– +newdg: Ensure that the disk group exists and is mounted
The name of the disk group must be preceded by a plus sign (+).
See Also:
– Oracle Grid Infrastructure Installation and Upgrade Guide forinformation about creating OCR locations and setting correctpermissions
– Oracle Automatic Storage Management Administrator's Guide formore information about Oracle ASM disk group management
Appendix IOCRCONFIG Command Reference
I-2

Example
To add an OCR location to the default location in Oracle ASM, data:
# ocrconfig -add +data
ocrconfig -backuplocSpecify an OCR backup directory location.
Syntax
ocrconfig -backuploc +disk_group_nameocrconfig -local -backuploc dir_name
Usage Notes
• You must run this command as root.
• Use the -local option to specify an OLR backup directory location.
• For an OCR backup location, the disk_group_name variable must be an Oracle ASM diskgroup. For example:
+bkupdg: Ensure that the Oracle ASM disk group exists and is mounted on all nodes
An Oracle ASM disk group name must be preceded by a plus sign (+).
• For an OLR backup location, the dir_name variable can be a full directory path name. Forexample:
– Grid_home/cdata/cluster3/: Ensure that the location exists
– d:\cdata\cluster3: Ensure that the location exists
The default location for generating OLR backups on Linux or UNIX systems isGrid_base/crsdata/host_name/olr/, where host_name is the name of the node onwhich the OLR resides that you want to back up. The Windows default location forgenerating OLR backups uses the same path structure.
Examples
To specify an OCR backup location in an Oracle ASM disk group:
# ocrconfig -backuploc +bkupdg
To specify an OLR backup location:
# ocrconfig -local -backuploc full_directory_path
ocrconfig -copyCopies an OCR backup file from one location to another.
Appendix IOCRCONFIG Command Reference
I-3

Syntax
ocrconfig -copy source_file_name destination_file_name
Usage Notes
• You must run this command as root.
• The source_file_name must be a valid OCR backup file. For example:
– /oradbocfs/crs/BACKUP00.ocr– d:\oracle\BACKUP01.ocr– +bkupdg:/aimev1/ocrbackup/day.ocr.260.739756845If you specify an Oracle ASM disk group, then ensure that the disk group existsand is mounted.
Examples of valid destination_file_name values are:
– /oradbocfs/crs/mybkp01.ocr– d:\oracle\mybkp01.ocr– +bkupdg:mybkp01Oracle ASM disk group names must be preceded by a plus sign (+).
Examples
To copy an OCR backup file from a file system to an Oracle ASM disk group:
# ocrconfig -copy /oradbocfs/crs/BACKUP00.ocr +bkupdg:mybkp01.ocr
To copy an OCR backup file from an Oracle ASM disk group to a file system:
# ocrconfig -copy +bkupdg:/aimev1/ocrbackup/day.ocr.260.739756845 /oradbocfs/crs/mybkp01.ocr
To copy an OCR backup file from one Oracle ASM disk group to another Oracle ASMdisk group:
# ocrconfig -copy +bkupdg01:/aimev1/ocrbackup/day.ocr.260.739756845 +bkupdg02:mybkp01.ocr
ocrconfig -deleteRemoves an OCR device or file.
Syntax
ocrconfig -delete +diskgroup_name
Appendix IOCRCONFIG Command Reference
I-4

Usage Notes
• You must run this command as root.
• The +diskgroup_name variable is the name of an Oracle ASM disk group. For example:+olddgThe name of the disk group must be preceded by a plus sign (+).
Example
To remove an OCR location:
# ocrconfig -delete +olddg
ocrconfig -exportExports the contents of OCR to a target file.
Syntax
ocrconfig [-local] -export file_name
Usage Notes
• You must run this command as root.
• Use the -local option to export the contents of OLR.
• The file_name variable can be a file name or the name of an Oracle ASM disk group(preceded by a plus sign (+)). For example:
– /oradbocfs/crs/data.ocr– d:\oracle\data.ocr– +bkupdg:data.ocr
Example
To export the contents of OCR to a file:
# ocrconfig -export d:\tmp\a
ocrconfig -importImports the contents of a target file into which you exported the contents of OCR back intoOCR.
Syntax
ocrconfig [-local] -import file_name
Appendix IOCRCONFIG Command Reference
I-5

Usage Notes
• You must run this command as root.
• Use the -local option to import the contents of OLR from a file.
• The file_name variable can be a file name or the name of an Oracle ASM diskgroup (preceded by a plus sign (+)). For example:
/oradbocfs/crs/data.ocrd:\oracle\data.ocr+bkupdg:/aimev1/ocrbackup/data.ocr.260.739756845
• You must shut down Oracle Clusterware before running this command.
Example
To import the contents a file back into OCR:
# ocrconfig -import d:\tmp\a
ocrconfig -manualbackupBacks up OCR on demand to a specific location.
Prerequisites
Determine the location of the on-demand backup using ocrconfig -backuploc.
Syntax
ocrconfig [-local] -manualbackup
Usage Notes
• You must run this command as root.
• Use the -local option to perform a manual backup of OLR.
ocrconfig -overwriteOverwrites an OCR configuration in the OCR metadata with the current OCRconfiguration information that is found on the node from which you run this command.
Syntax
ocrconfig -overwrite
Usage Notes
You must run this command as root.
Appendix IOCRCONFIG Command Reference
I-6

ocrconfig -repairRepairs an OCR configuration on the node from which you run this command.Use this command to add, delete, or replace an OCR location on a node that may have beenstopped while you made changes to the OCR configuration in the cluster. OCR locations thatyou add must exist, have sufficient permissions, and must be mounted before you can addthem.
Prerequisites
• Oracle High Availability Services must be started to successfully complete the repair.
• The Cluster Ready Services daemon must be stopped before running ocrconfig -repair.
Syntax
ocrconfig -repair -add +diskgroup_name | -delete +diskgroup_name | -replace +current_diskgroup_name -replacement +new_diskgroup_name
Usage Notes
• You must run this command as root.
• The +diskgroup_name variable is the name of an Oracle ASM disk group. For example:+newdg/mycluster/OCRFILE/registry.255.842574125If you specify an Oracle ASM disk group, then the name of the disk group must bepreceded by a plus sign (+).
To obtain the name of an Oracle ASM disk group, run the ocrcheck -config -detailscommand on a node where the OCR configuration does not need repair.
See Also:
– Oracle Grid Infrastructure Installation and Upgrade Guide for informationabout creating OCRs and setting correct permissions
– Oracle Automatic Storage Management Administrator's Guide for moreinformation about Oracle ASM disk group management
– "Using the OCRCHECK Utility" for information about the ocrcheck -config-details command
• You can only use one option with ocrconfig -repair at a time.
• Running this command only modifies the local configuration and it and only affects thecurrent node.
Example
To repair an OCR configuration:
# ocrconfig -repair -delete +olddg
Appendix IOCRCONFIG Command Reference
I-7

ocrconfig -replaceReplaces an OCR location to an Oracle Automatic Storage Management (OracleASM) disk group.
Prerequisites
• OCR locations that you add must exist, have sufficient permissions, and must bemounted before you can add them.
• You must have at least two OCR devices to use this command. If you do not haveat least two OCR devices, then you must run the ocrconfig -add command to add anew OCR device followed by the ocrconfig -delete command to delete the OCRdevice you want to replace.
Syntax
ocrconfig -replace +current_diskgroup_name -replacement +new_diskgroup_name
Usage Notes
• You must run this command as root.
• The +diskgroup_name variable is the name of an Oracle ASM disk group,preceded by a plus sign (+). For example: +newdg. The disk group must exist andbe mounted.
See Also:
– Oracle Grid Infrastructure Installation and Upgrade Guide forinformation about creating OCRs and setting correct permissions
– Oracle Automatic Storage Management Administrator's Guide formore information about Oracle ASM disk group management
Example
To replace an OCR device or file:
# ocrconfig -replace +olddg -replacement +newdg
ocrconfig -restoreRestores OCR from an automatically created OCR backup file.
Prerequisites
• Before running this command, ensure that the original OCR or OLR files exist. Ifthe original file does not exist, then you must create an empty file.
Appendix IOCRCONFIG Command Reference
I-8

Note:
You cannot use a file generated by the ocrconfig -export command to restoreOCR. The file must be a manual or automatic backup.
• If OCR is located on an Oracle ASM disk group, then ensure that the disk group existsand is mounted.
Syntax
ocrconfig [-local] -restore file_name
Usage Notes
• You must run this command as root.
• If the OCR backup file is located in an Oracle ASM disk group, then ensure that the diskgroup exists and is mounted.
• The name of an Oracle ASM disk group must be preceded by a plus sign (+).
• Use the -local option to restore a backup of OLR.
• Example file names are:
– /oradbocfs/crs/BACKUP00.ocr– d:\oracle\BACKUP01.ocr– +bkupdg:/aimev1/ocrbackup/day.ocr.260.739756845
Example
To restore OCR from a file:
# ocrconfig -restore /oradbocfs/crs/BACKUP00.ocr
ocrconfig -showbackupDisplays all available backups.
Syntax
ocrconfig [-local] -showbackup [auto | manual]
Usage Notes
• Use the -local option to show manual OLR backup information. The -local flagfunctions only with the manual option.
• You can optionally specify auto or manual to display information about only automaticbackups or only manual backups, respectively:
– auto: Displays information about automatic backups that Oracle Clusterware createdin the past 4 hours, 8 hours, 12 hours, and in the last day and week.
Appendix IOCRCONFIG Command Reference
I-9

– manual: Displays information for, at most, the last five manual backups thatyou invoke using the ocrconfig -manualbackup command.
Example
This command displays manual backup information for OLR, similar to the following:
$ ocrconfig -local -showbackup manualcc40524 2020/05/08 15:06:57 /gridbase/crsdata/dglnx6/olr/backup_20200508_150657.olr 0
ocrconfig -showbackuplocDisplays the backup location of the OCR and OLR backup files.
Syntax
ocrconfig [-local] -showbackuploc
Usage Notes
• You must run this command as root• Use the -local option to display the OLR backup location
Example
This command returns output similar to the following:
# ocrconfig -showbackuploc
The Oracle Cluster Registry backup location is [+bkupdg]
# ocrconfig -local -showbackuplocThe Oracle Local Registry backup location is [/gridbase/crsdata/dglnx6/olr]
Troubleshooting Oracle Cluster Registry and DiagnosticOutput
This section describes various methods for troubleshooting problems with OCR, andobtaining diagnostic information from the utilities used to manage OCR. You can usethese utilities to troubleshoot OLR.
This section contains the following topics:
• Troubleshooting Oracle Cluster Registry
• Using the OCRCHECK Utility
• Using the OCRDUMP Utility to View Oracle Cluster Registry Content
Appendix ITroubleshooting Oracle Cluster Registry and Diagnostic Output
I-10

Troubleshooting Oracle Cluster RegistryTable I-1 describes common OCR problems with corresponding resolution suggestions.
Table I-1 Common Oracle Cluster Registry Problems and Solutions
Problem Solution
Not currently using OCR mirroring and wouldlike to enable it.
Run the ocrconfig command with the -replaceoption.
OCR failed and you must replace it. Errormessages in Oracle Enterprise Manager orOCR log file.
Run the ocrconfig command with the -replaceoption.
OCR has a misconfiguration. Run the ocrconfig command with the -repairoption as described.
You are experiencing a severe performanceeffect from OCR processing or you want toremove OCR for other reasons.
Run the ocrconfig command with the -replaceoption as described.
OCR has failed and before you can fix it, thenode must be rebooted with only one OCR.
Run the ocrconfig with the -repair option toremove the bad OCR location. Oracle Clusterwarecannot start if it cannot find all OCRs defined.
Using the OCRCHECK UtilityThe OCRCHECK utility displays the version of the OCR's block format, total space availableand used space, OCRID, and the OCR locations that you have configured.
OCRCHECK performs a block-by-block checksum operation for all of the blocks in all of theOCRs that you have configured. It also returns an individual status for each file and a resultfor the overall OCR integrity check.
Note:
Oracle supports using the ocrcheck command when, at a minimum, the OracleCluster Ready Services stack is OFFLINE on all nodes in the cluster because thecommand will run even if the stack is ONLINE but it can falsely indicate that theOCR is corrupt if the check happens while an update to OCR is underway.
See Also:
"The Oracle Clusterware Technology Stack" for more information about the OracleCluster Ready Services stack
Syntaxocrcheck [-local] [-config | -backupfile <backup_file_name>] [-details] [-help]
Appendix ITroubleshooting Oracle Cluster Registry and Diagnostic Output
I-11

You can run the ocrcheck -help command to display usage information about thisutility.
The -details option displays detailed OCR configuration information, including namesfor Oracle ASM disk groups.
ExamplesThe following examples show sample OCRCHECK command output and commandusage.
Example I-1 OCRCHECK Utility Sample Output
# ocrcheck
Status of Oracle Cluster Registry is as follows : Version : 4 Total space (kbytes) : 491684 Used space (kbytes) : 99128 Available space (kbytes) : 392556 ID : 467263828 Device/File Name : +ocrdg1 Device/File integrity check succeeded Device/File Name : +ocrdg2 Device/File integrity check succeeded Device/File not configured Device/File not configured Device/File not configured Cluster registry integrity check succeeded Logical corruption check succeeded
Note:
The logical corruption check is only performed if you run the ocrcheckcommand as root.
Example I-2 shows using ocrcheck -local -config command to obtain OLRinformation.
Note:
Oracle supports using the ocrcheck -local command when both the OracleCluster Ready Services and Oracle High Availability Services stacks areOFFLINE on the local node.
Appendix ITroubleshooting Oracle Cluster Registry and Diagnostic Output
I-12

See Also:
"The Oracle Clusterware Technology Stack" for more information about the OracleCluster Ready Services and Oracle High Availability Services stacks
Example I-2 Using OCRCHECK to Obtain OLR Information
$ ocrcheck -local -config
Oracle Local Registry configuration is : Device/File Name : /oraclebase/crsdata/dglnx6/olr/dglnx6_21.olr
Example I-3 shows using the ocrcheck -config -details command to obtain the location ofOCR in an Oracle ASM disk group.
Example I-3 Using OCRCHECK to Obtain OCR Information
$ ocrcheck -config -details
Oracle Cluster Registry configuration is : Device/File Name : +ocrvd11/mjk_1/OCRFILE/registry.255.842574113 Device/File Name : +ocrdv2/mjk_1/OCRFILE/registry.255.842574125
Example I-4 shows using the ocrcheck -details command to obtain a greater level of detailfor the OCR configuration.
Example I-4 Using OCRCHECK to Obtain More OCR Information
$ ocrcheck -details
Status of Oracle Cluster Registry is as follows : Version : 4 Total space (kbytes) : 491684 Used space (kbytes) : 99128 Available space (kbytes) : 392556 ID : 467263828 Device/File Name : +OCRVD11/mycluster/OCRFILE/registry.255.842574113 Device/File integrity check succeeded Device/File Name : +OCRVD2/mycluster/OCRFILE/registry.255.842574125 Device/File integrity check succeeded Device/File not configured Device/File not configured Device/File not configured Cluster registry integrity check succeeded Logical corruption check succeeded
Appendix ITroubleshooting Oracle Cluster Registry and Diagnostic Output
I-13

Example I-5 shows using the ocrcheck -details command to obtain backup fileinformation.
Example I-5 Using OCRCHECK to Obtain Backup File Information
% ocrcheck -backupfile +bkupdg:/sbezawadhtest/OCRBACKUP/backup00.ocr.258.919047805
Status of backup file is as follows:Version : 4Used space (kbytes) : 17012Device/File Name : +bkupdg:/sbezawadhtest/OCRBACKUP/backup00.ocr.258.919047805Device/File integrity check succeededBackup file integrity check succeededLogical corruption check succeededConsistency check of entities managed by Cluster Ready Services succeeded.
OCRCHECK creates a log file in the ORACLE_BASE/diag/crs/host_name/crs directory.To change the log level, edit the ORACLE_BASE/crsdata/host_name/crsdiag/ocrcheck.ini file.
Using the OCRDUMP Utility to View Oracle Cluster Registry ContentThe OCRDUMP utility enables you to view OCR and OLR contents by writing thecontent to a file or stdout in a readable format.
This section explains how to use the OCRDUMP utility to view OCR and Oracle LocalRegistry (OLR) content for troubleshooting.
You can use several options for OCRDUMP. For example, you can limit the output to akey and its descendents. You can also write the contents to an XML file that you canview using a browser. OCRDUMP writes the OCR keys as ASCII strings and values ina data type format. OCRDUMP retrieves header information based on a best effortbasis.
OCRDUMP creates a log file in ORACLE_BASE/diag/crs/host_name/crs. To changethe log level, edit the ORACLE_BASE/crsdata/host_name/crsdiag/ocrlog.ini file.
To change the logging component, edit the entry containing the comploglvl= entry. Forexample, to change the log level of the OCRAPI component to 3 and to change the loglevel of the OCRRAW component to 5, make the following entry in the ocrlog.ini file:
comploglvl="OCRAPI:3;OCRRAW:5"
Note:
Make sure that you have file creation privileges in the Grid_home directorybefore using the OCRDUMP utility.
This section includes the following topics:
Appendix ITroubleshooting Oracle Cluster Registry and Diagnostic Output
I-14

• OCRDUMP Utility Syntax and Options
• OCRDUMP Utility Examples
• Sample OCRDUMP Utility Output
OCRDUMP Utility Syntax and OptionsThis section describes the OCRDUMP utility command syntax and usage. Run the ocrdumpcommand with the following syntax where file_name is the name of a target file to which youwant Oracle Database to write the Oracle Cluster Registry output and where key_name is thename of a key from which you want Oracle Database to write Oracle Cluster Registry subtreecontent:
$ ocrdump [file_name | -stdout] [-local] [-backupfile backup_file_name[-keyname key_name] [-xml] [-noheader]]
Table I-2 describes the OCRDUMP utility options and option descriptions.
Table I-2 OCRDUMP Options and Option Descriptions
Options Description
file_name The name of a file to which you want OCRDUMP to write output.
By default, OCRDUMP writes output to a predefined output file namedOCRDUMPFILE. The file_name option redirects OCRDUMP output to a file thatyou specify.
-stdout Use this option to redirect the OCRDUMP output to the text terminal that initiatedthe program.
If you do not redirect the output, OCRDUMP writes output to a predefined outputfile named OCRDUMPFILE.
-local Use this option to dump the contents of OLR.
-backupfile Use this option to view the contents of an OCR backup file. Use the -local optionwith this option to view the contents of an OLR backup file.
backup_file_name
The name of the backup file with the content you want to view. You can query thebackups using the ocrconfig -showbackup command. If the backup file islocated in an Oracle ASM disk group, then ensure that the disk group exists and ismounted.
-keynamekey_name
The name of an Oracle Cluster Registry key whose subtree is to be dumped.
-xml Use this option to write the output in XML format.
-noheader Does not print the time at which you ran the command and when the OracleCluster Registry configuration occurred.
OCRDUMP Utility ExamplesThe following ocrdump utility examples extract various types of OCR information and write itto various targets:
ocrdump
Writes OCR content to a file called OCRDUMPFILE in the current directory.
ocrdump MYFILE
Appendix ITroubleshooting Oracle Cluster Registry and Diagnostic Output
I-15

Writes OCR content to a file called MYFILE in the current directory.
ocrdump -stdout -keyname SYSTEM
Displays OCR content from the subtree of the key SYSTEM in the terminal window.
ocrdump -stdout -xml
Displays OCR content in the terminal window in XML format.
ocrdump -stdout -backupfile Grid_home/cdata/cluster_name/file_name
Displays the content of the in the Grid_home/cdata/cluster_name/file_namedirectory. You must run this command as root to be able to view all of the keys. Besure to name the file appropriately so that it can be recognized by anyone as an OCRbackup file, such as BACKUPOO.ocr.
Sample OCRDUMP Utility OutputThe following OCRDUMP examples show the KEYNAME, VALUE TYPE, VALUE, permissionset (user, group, world) and access rights for two sample runs of the ocrdumpcommand. The following shows the output for the SYSTEM.language key that has a textvalue of AMERICAN_AMERICA.WE8ASCII37.
[SYSTEM.language]ORATEXT : AMERICAN_AMERICA.WE8ASCII37SECURITY : {USER_PERMISSION : PROCR_ALL_ACCESS, GROUP_PERMISSION : PROCR_READ,OTHER_PERMISSION : PROCR_READ, USER_NAME : user, GROUP_NAME : group}
The following shows the output for the SYSTEM.version key that has integer value of 3:
[SYSTEM.version]UB4 (10) : 3SECURITY : {USER_PERMISSION : PROCR_ALL_ACCESS, GROUP_PERMISSION : PROCR_READ,OTHER_PERMISSION : PROCR_READ, USER_NAME : user, GROUP_NAME : group}
Appendix ITroubleshooting Oracle Cluster Registry and Diagnostic Output
I-16

JREST APIs for Oracle Clusterware
This appendix describes the REST application programming interfaces (APIs) for OracleClusterware.
The following topics are discussed:
• About REST APIs for Oracle Clusterware
See Also:
Oracle Database REST API Reference for information about using REST APIs forOracle Clusterware
About REST APIs for Oracle ClusterwareThe REST application programming interfaces (APIs) for Oracle Clusterware enable you toremotely execute commands on your cluster, whether in the Oracle Cloud, at remote physicallocations, or locally provisioned. With the remote execution of REST interface commands,you are able to retrieve information about that execution, including output, error codes, andexecution duration. In some cases a command generates a file as output. In these cases, theREST interface also provides a Uniform Resource Identifier (URI) through which the file canbe retrieved.
The REST interface provides secure support for Oracle Clusterware CLUVFY, CRSCTL, andSRVCTL command line interfaces (CLIs).
Note:
The REST APIs for Oracle Clusterware are not supported in Windowsenvironments.
Getting Started with REST APIs for Oracle Clusterware
REST APIs for Oracle Clusterware require that the CDP Cross Cluster Domain Protocol(CDP) daemon is running on all of the SCAN VIPs of the cluster. REST endpoints exist foryou to execute CLIs as asynchronous jobs. You can access the output of a command from aREST endpoint at later point of time, and get return codes and execution time.
To make the REST APIs secure by default, all requests that are not from IP addresses ofnodes in the cluster are rejected. The CDP daemon monitors the nodes in the cluster andrejects any request to the CLI endpoint that do not match one of the IPs. To support the abilityto make requests from outside the cluster, you can run the srvctl modify cdp command toprovide a list of IPs or networks in CIDR format.
J-1

To change the admin password, run the following commands.
$ srvctl stop cdp$ echo "myAdminPasswd" > /tmp/a$ srvctl modify cdp -passfile_admin /tmp/a...$ rm /tmp/a
To enable connections from outside the cluster, run the following commands.
$ srvctl start cdp$ srvctl modify cdp -allow "ip/network1,ip/network2,.."
You can view the configuration information with the following command:
$ srvctl config cdp
The password is not visible when you display the configuration information.
See Also:
• srvctl modify cdp
• srvctl config cdp
Using CLUVFY Commands with REST APIs
Noninteractive Cluster Verification Utility commands (CLUVFY), which apply to ClusterReady Services (CRS) post-installation, can be issued using the REST interface. If theissued command is not supported over the REST interface, then the CLUVFYcommand reports the following error as a response to the REST call.
PRVP-1070 "cluvfy command with the arguments \"{0}\" not supported through REST API call. \n[ Unsupported arguments = \"{1}\" ]"*Cause: cluvfy command was invoked with the indicated arguments which are not supported through a REST API call.*Action: Retry the command omitting the unsupported arguments.
REST Endpoints
• Delete a Specified Job
Method: Delete
Path: /grid/cmd/v1/cmd/jobs/jobId• Execute a CLI
Method: Post
Path: /grid/cmd/v1/cmd/exec• Return a List of the Job Resources
Method: Get
Path: /grid/cmd/v1/cmd/jobs• Return the Common Resource
Appendix JAbout REST APIs for Oracle Clusterware
J-2

Method: Get
Path: /grid/cmd/v1/cmd• Return the Status of the Current Job
Method: Get
Path: /grid/cmd/v1/cmd/jobs/jobId
Examples
The following are some examples of the use of REST APIs for Oracle Clusterware.
Example J-1 Get the list of all homes
curl -k -X GET https://scan-name:port/grid/cmd/v1/cmd/ --user admin:myAdminPasswd
Example J-2 Create a job (crsctl) and monitor the status
curl -k -X POST \ https://scan-name:port/grid/cmd/v1/cmd/exec \ '-H "accept: text/plain,text/javascript,application/json"' \ '-H "content-type: application/vnd.oracle.resource+json;type=singular"' \ --user admin:myAdminPasswd \ '-d {"command" : ["crsctl", "stat", "res", "-t"], "runAsUser":"osUser", "userPassword":"osPasswd"}'
curl -k -X GET https://scan-name:port/grid/cmd/v1/cmd/jobs/myJobId --user admin:myAdminPasswd
Example J-3 Create a job (srvctl) and monitor the status
curl -k -X POST \ https://scan-name:port/grid/cmd/v1/cmd/exec \ '-H "accept: text/plain,text/javascript,application/json"' \ '-H "content-type: application/vnd.oracle.resource+json;type=singular"' \ --user admin:myAdminPasswd \ '-d {"command" : ["srvctl", "config", "cdp"], "runAsUser" : "osUser", "userPassword" : "osPasswd"}'
curl -k -X GET https://scan-name:port/grid/cmd/v1/cmd/jobs/myJobId --user admin:myAdminPasswd
Example J-4 Monitor the status, get the job output, and get the CVU job output file
curl -k -X POST \ https://scan-name:port/grid/cmd/v1/cmd/exec \ '-H "accept: text/plain,text/javascript,application/json"' \ '-H "content-type: application/vnd.oracle.resource+json;type=singular"' \ --user admin:myAdminPasswd \ '-d {"command" : ["cluvfy", "comp", "healthcheck"], "runAsUser":"osUser", "userPassword":"osPasswd", "jobExpiry":300}'
Appendix JAbout REST APIs for Oracle Clusterware
J-3

curl -k -X GET https://scan-name:port/grid/cmd/v1/cmd/jobs/myJobId --user admin:myAdminPasswd
wget --user admin --password myAdminPassword https://scan-name:port/grid/cmd/v1/cmd/jobs/myJobId/outputFile
Example J-5 Monitor the status of all jobs
curl -k -X GET \ https://scan-name:port/grid/cmd/v1/cmd/jobs/ --user admin:myAdminPasswd
Example J-6 Delete a job
curl -k -X DELETE \ https://scan-name:port/grid/cmd/v1/cmd/jobs/myJobId --user admin:myAdminPasswd
Example J-7 Verify that a deleted job has been removed
curl -k -X GET \ https://scan-name:port/grid/cmd/v1/cmd/jobs/myJobId --user admin:myAdminPasswd
Appendix JAbout REST APIs for Oracle Clusterware
J-4

KTroubleshooting Oracle Clusterware
This appendix introduces monitoring the Oracle Clusterware environment and explains howyou can enable dynamic debugging to troubleshoot Oracle Clusterware processing, andenable debugging and tracing for specific components and specific Oracle Clusterwareresources to focus your troubleshooting efforts.
This appendix includes the following topics:
• Troubleshooting an Incompatible Fleet Patching and Provisioning Client Resource
• Using the Cluster Resource Activity Log to Monitor Cluster Resource Failures
• Oracle Clusterware Diagnostic and Alert Log Data
• Diagnostics Collection Script
• Storage Split in Oracle Extended Clusters
• Rolling Upgrade and Driver Installation Issues
• Testing Zone Delegation
• Oracle Clusterware Alerts
Troubleshooting an Incompatible Fleet Patching andProvisioning Client Resource
If you manually upgrade an Oracle Clusterware target that is registered as a Fleet Patchingand Provisioning target to a later version, then the result will be an incompatible FleetPatching and Provisioning Client resource.
To register a Fleet Patching and Provisioning Client resource with Fleet Patching andProvisioning, you must perform the following steps on the Fleet Patching and ProvisioningServer:
Note:
These same steps apply to upgrading an Oracle Clusterware 12c (12.2) FleetPatching and Provisioning Client cluster to a later version that results in connectivityissues.
1. Stop the Fleet Patching and Provisioning Client resource on the target if it is running.
2. Run the following commands on the Fleet Patching and Provisioning Server:
Update the Fleet Patching and Provisioning Client credential on the Fleet Patching andProvisioning Server:
$ rhpctl modify client -client client_name -password
K-1

Export data from the repository to the Fleet Patching and Provisioning Client datafile:
$ rhpctl export client -client client_name -clienetdata file_name.xml
3. Copy the xml file you created in the previous step to a node in the Fleet Patchingand Provisioning Client cluster, and run the following command to update the clientcredential:
$ srvctl modify rhpclient -clientdata file_name.xml
4. Start the Fleet Patching and Provisioning Client:
$ srvctl start rhpclient
5. Verify that the Fleet Patching and Provisioning Client started successfully:
$ srvctl status rhpclient
6. To verify that the Fleet Patching and Provisioning Client is properly registered withthe Fleet Patching and Provisioning Server, run the following command andsearch for the Fleet Patching and Provisioning Client-registered port reported inthe command output:
$ rhpctl query client -client client_cluster
Using the Cluster Resource Activity Log to Monitor ClusterResource Failures
The cluster resource activity log provides precise and specific information about aresource failure, separate from diagnostic logs.
If an Oracle Clusterware-managed resource fails, then Oracle Clusterware logsmessages about the failure in the cluster resource activity log located in the GridInfrastructure Management Repository. Failures can occur as a result of a problemwith a resource, a hosting node, or the network. The cluster resource activity logprovides a unified view of the cause of resource failure.
Writes to the cluster resource activity log are tagged with an activity ID and any relateddata gets the same parent activity ID, and is nested under the parent data. Forexample, if Oracle Clusterware is running and you run the crsctl stop clusterware-all command, then all activities get activity IDs, and related activities are tagged withthe same parent activity ID. On each node, the command creates sub-IDs under theparent IDs, and tags each of the respective activities with their corresponding activityID. Further, each resource on the individual nodes creates sub-IDs based on theparent ID, creating a hierarchy of activity IDs. The hierarchy of activity IDs enables youto analyze the data to find specific activities.
For example, you may have many resources with complicated dependencies amongeach other, and with a database service. On Friday, you see that all of the resourcesare running on one node but when you return on Monday, every resource is on adifferent node, and you want to know why. Using the crsctl query calog command,
Appendix KUsing the Cluster Resource Activity Log to Monitor Cluster Resource Failures
K-2

you can query the cluster resource activity log for all activities involving those resources andthe database service. The output provides a complete flow and you can query each sub-IDwithin the parent service failover ID, and see, specifically, what happened and why.
You can query any number of fields in the cluster resource activity log using filters. Forexample, you can query all the activities written by specific operating system users such asroot. The output produced by the crsctl query calog command can be displayed in eithera tabular format or in XML format.
The cluster resource activity log is an adjunct to current Oracle Clusterware logging and alertlog messages.
Note:
Oracle Clusterware does not write messages that contain security-relatedinformation, such as log-in credentials, to the cluster activity log.
Use the following commands to manage and view the contents of the cluster resource activitylog:
crsctl query calogQuery the cluster resource activity logs matching specific criteria.
Syntax
crsctl query calog [-aftertime "timestamp"] [-beforetime "timestamp"] [-duration "time_interval" | -follow] [-filter "filter_expression"] [-fullfmt | -xmlfmt]
Parameters
Table K-1 crsctl query calog Command Parameters
Parameter Description
-aftertime"timestamp"
Displays the activities logged after a specific time.
Specify the timestamp in the YYYY-MM-DD HH24:MI:SS[.FF][TZH:TZM] or YYYY-MM-DD or HH24:MI:SS[.FF][TZH:TZM] format.
TZH and TZM stands for time zone hour and minute, and FF stands formicroseconds.
If you specify [TZH:TZM], then the crsctl command assumes UTC astime zone. If you do not specify [TZH:TZM], then the crsctl commandassumes the local time zone of the cluster node from where the crsctlcommand is run.
Use this parameter with -beforetime to query the activities logged at aspecific time interval.
Appendix KUsing the Cluster Resource Activity Log to Monitor Cluster Resource Failures
K-3

Table K-1 (Cont.) crsctl query calog Command Parameters
Parameter Description
-beforetime"timestamp"
Displays the activities logged before a specific time.
Specify the timestamp in the YYYY-MM-DD HH24:MI:SS[.FF][TZH:TZM] or YYYY-MM-DD or HH24:MI:SS[.FF][TZH:TZM] format.
TZH and TZM stands for time zone hour and minute, and FF stands formicroseconds.
If you specify [TZH:TZM], then the crsctl command assumes UTC astime zone. If you do not specify [TZH:TZM], then the crsctl commandassumes the local time zone of the cluster node from where the crsctlcommand is run.
Use this parameter with -aftertime to query the activities logged at aspecific time interval.
-duration"time_interval" | -follow
Use -duration to specify a time interval that you want to query whenyou use the -aftertime parameter.
Specify the timestamp in the DD HH:MM:SS format.
Use -follow to display a continuous stream of activities as they occur.
-filter"filter_expression"
Query any number of fields in the cluster resource activity log using the -filter parameter.
To specify multiple filters, use a comma-delimited list of filter expressionssurrounded by double quotation marks ("").
-fullfmt | -xmlfmt To display cluster resource activity log data, choose full or XML format.
Cluster Resource Activity Log Fields
Query any number of fields in the cluster resource activity log using the -filterparameter.
Table K-2 Cluster Resource Activity Log Fields
Field Description Use Case
timestamp The time when the clusterresource activities were logged.
Use this filter to query all theactivities logged at a specifictime.
This is an alternative to -aftertime, -beforetime, and-duration commandparameters.
writer_process_id The ID of the process that iswriting to the cluster resourceactivity log.
Query only the activitiesspawned by a specific process.
writer_process_name The name of the process that iswriting to the cluster resourceactivity log.
When you query a specificprocess, CRSCTL returns all theactivities for a specific process.
writer_user The name of the user who iswriting to the cluster resourceactivity log.
Query all the activities written bya specific user.
Appendix KUsing the Cluster Resource Activity Log to Monitor Cluster Resource Failures
K-4

Table K-2 (Cont.) Cluster Resource Activity Log Fields
Field Description Use Case
writer_group The name of the group to whicha user belongs who is writing tothe cluster resource activity log.
Query all the activities written byusers belonging to a specificuser group.
writer_hostname The name of the host on whichthe cluster resource activity logis written.
Query all the activities written bya specific host.
writer_clustername The name of the cluster onwhich the cluster resourceactivity log is written.
Query all the activities written bya specific cluster.
nls_product The product of the NLSmessage, for example, CRS, ORA,or srvm.
Query all the activities that havea specific product name.
nls_facility The facility of the NLS message,for example, CRS or PROC.
Query all the activities that havea specific facility name.
nls_id The ID of the NLS message, forexample 42008.
Query all the activities that havea specific message ID.
nls_field_count The number of fields in the NLSmessage.
Query all the activities thatcorrespond to NLS messageswith more than, less than, orequal to nls_field_countcommand parameters.
nls_field1 The first field of the NLSmessage.
Query all the activities thatmatch the first parameter of anNLS message.
nls_field1_type The type of the first field in theNLS message.
Query all the activities thatmatch a specific type of the firstparameter of an NLS message.
nls_format The format of the NLS message,for example, Resource '%s'has been modified.
Query all the activities thatmatch a specific format of anNLS message.
nls_message The entire NLS message thatwas written to the clusterresource activity log, forexample, Resource'ora.cvu' has beenmodified.
Query all the activities thatmatch a specific NLS message.
actid The unique activity ID of everycluster activity log.
Query all the activities thatmatch a specific ID.
Also, specify only partial actidand list all activities where theactid is a subset of the activityID.
Appendix KUsing the Cluster Resource Activity Log to Monitor Cluster Resource Failures
K-5

Table K-2 (Cont.) Cluster Resource Activity Log Fields
Field Description Use Case
is_planned Confirms if the activity is plannedor not.
For example, if a user issues thecommand crsctl stop crs ona node, then the stack stops andresources bounce.
Running the crsctl stop crscommand generates activitiesand logged in the calog. Sincethis is a planned action, theis_planned field is set to true(1).
Otherwise, the is_planned fieldis set to false (0).
Query all the planned orunplanned activities.
onbehalfof_user The name of the user on behalfof whom the cluster activity log iswritten.
Query all the activities written onbehalf of a specific user.
entity_isoraentity Confirms if the entity for whichthe calog activities are beinglogged is an oracle entity or not.
If a resource, such as ora.***,is started or stopped, forexample, then all those activitiesare logged in the clusterresource activity log.
Since ora.*** is an Oracleentity, theentity_isoraentity field isset to true (1).
Otherwise theentity_isoraentity field isset to false (0).
Query all the activities logged byOracle or non-Oracle entities.
entity_type The type of the entity, such asserver, for which the clusteractivity log is written.
Query all the activities thatmatch a specific entity.
entity_name The name of the entity, forexample, foo for which thecluster activity log is written.
Query all the cluster activitiesthat match a specific entityname.
entity_hostname The name of the host, forexample, node1, associated withthe entity for which the clusteractivity log is written.
Query all the cluster activitiesthat match a specific host name.
entity_clustername The name of the cluster, forexample, cluster1 associatedwith the entity for which thecluster activity log is written.
Query all the cluster activitiesthat match a specific clustername.
.
Appendix KUsing the Cluster Resource Activity Log to Monitor Cluster Resource Failures
K-6

Usage Notes
Combine simple filters into expressions called expression filters using Boolean operators.
Enclose timestamps and time intervals in double quotation marks ("").
Enclose the filter expressions in double quotation marks ("").
Enclose the values that contain parentheses or spaces in single quotation marks ('').
If no matching records are found, then the Oracle Clusterware Control (CRSCTL) utilitydisplays the following message:
CRS-40002: No activities match the query.
Examples
Examples of filters include:
• "writer_user==root": Limits the display to only root user.
• "customer_data=='GEN_RESTART@SERVERNAME(rwsbi08)=StartCompleted~'" : Limits thedisplay to customer_data that has the specified valueGEN_RESTART@SERVERNAME(node1)=StartCompleted~.
To query all the resource activities and display the output in full format:
$ crsctl query calog -fullfmt
----ACTIVITY START----timestamp : 2016-09-27 17:55:43.152000writer_process_id : 6538writer_process_name : crsd.binwriter_user : rootwriter_group : rootwriter_hostname : node1writer_clustername : cluster1-mb1customer_data : CHECK_RESULTS=-408040060~nls_product : CRSnls_facility : CRSnls_id : 2938nls_field_count : 1nls_field1 : ora.cvunls_field1_type : 25nls_field1_len : 0nls_format : Resource '%s' has been modified.nls_message : Resource 'ora.cvu' has been modified.actid : 14732093665106538/1816699/1is_planned : 1onbehalfof_user : gridonbehalfof_hostname : node1entity_isoraentity : 1entity_type : resourceentity_name : ora.cvuentity_hostname : node1entity_clustername : cluster1-mb1----ACTIVITY END----
Appendix KUsing the Cluster Resource Activity Log to Monitor Cluster Resource Failures
K-7

To query all the resource activities and display the output in XML format:
$ crsctl query calog -xmlfmt
<?xml version="1.0" encoding="UTF-8"?><activities> <activity> <timestamp>2016-09-27 17:55:43.152000</timestamp> <writer_process_id>6538</writer_process_id> <writer_process_name>crsd.bin</writer_process_name> <writer_user>root</writer_user> <writer_group>root</writer_group> <writer_hostname>node1</writer_hostname> <writer_clustername>cluster1-mb1</writer_clustername> <customer_data>CHECK_RESULTS=-408040060~</customer_data> <nls_product>CRS</nls_product> <nls_facility>CRS</nls_facility> <nls_id>2938</nls_id> <nls_field_count>1</nls_field_count> <nls_field1>ora.cvu</nls_field1> <nls_field1_type>25</nls_field1_type> <nls_field1_len>0</nls_field1_len> <nls_format>Resource '%s' has been modified.</nls_format> <nls_message>Resource 'ora.cvu' has been modified.</nls_message> <actid>14732093665106538/1816699/1</actid> <is_planned>1</is_planned> <onbehalfof_user>grid</onbehalfof_user> <onbehalfof_hostname>node1</onbehalfof_hostname> <entity_isoraentity>1</entity_isoraentity> <entity_type>resource</entity_type> <entity_name>ora.cvu</entity_name> <entity_hostname>node1</entity_hostname> <entity_clustername>cluster1-mb1</entity_clustername> </activity></activities>
To query resource activities for a two-hour interval after a specific time and display theoutput in XML format:
$ crsctl query calog -aftertime "2016-09-28 17:55:43" -duration "0 02:00:00" -xmlfmt<?xml version="1.0" encoding="UTF-8"?><activities> <activity> <timestamp>2016-09-28 17:55:45.992000</timestamp> <writer_process_id>6538</writer_process_id> <writer_process_name>crsd.bin</writer_process_name> <writer_user>root</writer_user> <writer_group>root</writer_group> <writer_hostname>node1</writer_hostname> <writer_clustername>cluster1-mb1</writer_clustername> <customer_data>CHECK_RESULTS=1718139884~</customer_data> <nls_product>CRS</nls_product> <nls_facility>CRS</nls_facility>
Appendix KUsing the Cluster Resource Activity Log to Monitor Cluster Resource Failures
K-8

<nls_id>2938</nls_id> <nls_field_count>1</nls_field_count> <nls_field1>ora.cvu</nls_field1> <nls_field1_type>25</nls_field1_type> <nls_field1_len>0</nls_field1_len> <nls_format>Resource '%s' has been modified.</nls_format> <nls_message>Resource 'ora.cvu' has been modified.</nls_message> <actid>14732093665106538/1942009/1</actid> <is_planned>1</is_planned> <onbehalfof_user>grid</onbehalfof_user> <onbehalfof_hostname>node1</onbehalfof_hostname> <entity_isoraentity>1</entity_isoraentity> <entity_type>resource</entity_type> <entity_name>ora.cvu</entity_name> <entity_hostname>node1</entity_hostname> <entity_clustername>cluster1-mb1</entity_clustername> </activity></activities>
To query resource activities at a specific time:
$ crsctl query calog -filter "timestamp=='2016-09-28 17:55:45.992000'"
2016-09-28 17:55:45.992000 : Resource 'ora.cvu' has been modified. : 14732093665106538/1942009/1 :
To query resource activities using filters writer_user and customer_data:
$ crsctl query calog -filter "writer_user==root AND customer_data== 'GEN_RESTART@SERVERNAME(node1)=StartCompleted~'" -fullfmt
or
$ crsctl query calog -filter "(writer_user==root) AND (customer_data== 'GEN_RESTART@SERVERNAME(node1)=StartCompleted~')" -fullfmt
----ACTIVITY START----timestamp : 2016-09-15 17:42:57.517000writer_process_id : 6538writer_process_name : crsd.binwriter_user : rootwriter_group : rootwriter_hostname : node1writer_clustername : cluster1-mb1customer_data : GEN_RESTART@SERVERNAME(rwsbi08)=StartCompleted~nls_product : CRSnls_facility : CRSnls_id : 2938nls_field_count : 1nls_field1 : ora.testdb.dbnls_field1_type : 25nls_field1_len : 0
Appendix KUsing the Cluster Resource Activity Log to Monitor Cluster Resource Failures
K-9

nls_format : Resource '%s' has been modified.nls_message : Resource 'ora.devdb.db' has been modified.actid : 14732093665106538/659678/1is_planned : 1onbehalfof_user : oracleonbehalfof_hostname : node1entity_isoraentity : 1entity_type : resourceentity_name : ora.testdb.dbentity_hostname : node1entity_clustername : cluster1-mb1----ACTIVITY END----
To query all the calogs that were generated after UTC+08:00 time "2016-11-1522:53:08":
$ crsctl query calog -aftertime "2016-11-15 22:53:08+08:00"
To query all the calogs that were generated after UTC-08:00 time "2016-11-1522:53:08":
$ crsctl query calog -aftertime "2016-11-15 22:53:08-08:00"
To query all the calogs by specifying the timestamp with microseconds:
$ crsctl query calog -aftertime "2016-11-16 01:07:53.063000"
2016-11-16 01:07:53.558000 : Resource 'ora.cvu' has been modified. : 14792791129816600/2580/7 :2016-11-16 01:07:53.562000 : Clean of 'ora.cvu' on 'rwsam02' succeeded : 14792791129816600/2580/8 :
crsctl get calog maxsizeTo store Oracle Clusterware-managed resource activity information, query themaximum space allotted to the cluster resource activity log.
Syntax
crsctl get calog maxsize
Parameters
The crsctl get calog maxsize command has no parameters.
Example
The following example returns the maximum space allotted to the cluster resourceactivity log to store activities:
$ crsctl get calog maxsize
Appendix KUsing the Cluster Resource Activity Log to Monitor Cluster Resource Failures
K-10

CRS-6760: The maximum size of the Oracle cluster activity log is 1024 MB.
crsctl get calog retentiontimeQuery the retention time of the cluster resource activity log.
Syntax
crsctl get calog retentiontime
Parameters
The crsctl get calog retentiontime command has no parameters.
Examples
The following example returns the retention time of the cluster activity log, in number ofhours:
$ crsctl get calog retentiontime
CRS-6781: The retention time of the cluster activity log is 73 hours.
crsctl set calog maxsizeConfigure the maximum amount of space allotted to store Oracle Clusterware-managedresource activity information.
Syntax
crsctl set calog maxsize maximum_size
Usage Notes
Specify a value, in MB, for the maximum size of the storage space that you want to allot tothe cluster resource activity log.
Note:
If you reduce the amount of storage space, then the contents of the storage arelost.
Example
The following example sets maximum amount of space, to store Oracle Clusterware-managed resource activity information, to 1024 MB:
$ crsctl set calog maxsize 1024
Appendix KUsing the Cluster Resource Activity Log to Monitor Cluster Resource Failures
K-11

crsctl set calog retentiontimeConfigure the retention time of the cluster resource activity log.
Syntax
crsctl set calog retentiontime hours
Parameters
The crsctl set calog retentiontime command takes a number of hours as aparameter.
Usage Notes
Specify a value, in hours, for the retention time of the cluster resource activity log.
Examples
The following example sets the retention time of the cluster resource activity log to 72hours:
$ crsctl set calog retentiontime 72
Oracle Clusterware Diagnostic and Alert Log DataReview this content to understand clusterware-specific aspects of how OracleClusterware uses ADR.
Oracle Clusterware uses Oracle Database fault diagnosability infrastructure to managediagnostic data and its alert log. As a result, most diagnostic data resides in theAutomatic Diagnostic Repository (ADR), a collection of directories and files locatedunder a base directory that you specify during installation.
ADR Directory Structure
Oracle Clusterware ADR data is written under a root directory known as the ADRbase. Because components other than ADR use this directory, it may also be referredto as the Oracle base. You specify the file system path to use as the base duringOracle Grid Infrastructure installation and can only be changed if you reinstall theOracle Grid Infrastructure.
ADR files reside in an ADR home directory. The ADR home for Oracle Clusterwarerunning on a given host always has this structure:
ORACLE_BASE/diag/crs/host_name/crs
In the preceding example, ORACLE_BASE is the Oracle base path you specified whenyou installed the Oracle Grid Infrastructure and host_name is the name of the host. Ona Windows platform, this path uses backslashes (\) to separate directory names.
Under the ADR home are various directories for specific types of ADR data. Thedirectories of greatest interest are incident. The trace directory contains all normal(non-incident) trace files written by Oracle Clusterware daemons and command-line
Appendix KOracle Clusterware Diagnostic and Alert Log Data
K-12

programs as well as the simple text version of the Oracle Clusterware alert log. Thisorganization differs significantly from versions prior to Oracle Clusterware 12c release 1(12.1.0.2), where diagnostic log files were written under distinct directories per daemon.
To change the log level, edit the ORACLE_BASE/crsdata/host_name/crsdiag/ocrcheck.inifile.
Files in the Trace Directory
Starting with Oracle Clusterware 12c release 1 (12.1.0.2), diagnostic data files written byOracle Clusterware programs are known as trace files and have a .trc file extension, andappear together in the trace subdirectory of the ADR home. The naming convention forthese files generally uses the executable program name as the file name, possiblyaugmented with other data depending on the type of program.
Trace files written by Oracle Clusterware command-line programs incorporate the OperatingSystem process ID (PID) in the trace file name to distinguish data from multiple invocations ofthe same command program. For example, trace data written by CRSCTL uses this namestructure: crsctl_PID.trc. In this example, PID is the operating system process ID displayedas decimal digits.
Trace files written by Oracle Clusterware daemon programs do not include a PID in the filename, and they also are subject to a file rotation mechanism that affects naming. Rotationmeans that when the current daemon trace file reaches a certain size, the file is closed,renamed, and a new trace file is opened. This occurs a fixed number of times, and then theoldest trace file from the daemon is discarded, keeping the rotation set at a fixed size.
Most Oracle Clusterware daemons use a file size limit of 25 MB and a rotation set size of 10files, thus maintaining a total of 250 MB of trace data. The current trace file for a givendaemon simply uses the program name as the file name; older files in the rotation append anumber to the file name. For example, the trace file currently being written by the Oracle HighAvailability Services daemon (OHASD) is named ohasd.trc; the most recently rotated-outtrace file is named ohasd_n.trc, where n is an ever-increasing decimal integer. The file withthe highest n is actually the most recently archived trace, and the file with the lowest n is theoldest.
Oracle Clusterware agents are daemon programs whose trace files are subject to specialnaming conventions that indicate the origin of the agent (whether it was spawned by theOHASD or the Cluster Ready Services daemon (CRSD)) and the Operating System username with which the agent runs. Thus, the name structure for agents is:
origin_executable_user_name
Note:
The first two underscores (_) in the name structure are literal and are included inthe trace file name. The underscore in user_name is not part of the file namingconvention.
In the previous example, origin is either ohasd or crsd, executable is the executableprogram name, and user_name is the operating system user name. In addition, because theyare daemons, agent trace files are subject to the rotation mechanism previously described,so files with an additional _n suffix are present after rotation occurs.
Appendix KOracle Clusterware Diagnostic and Alert Log Data
K-13

The Oracle Clusterware Alert Log
Besides trace files, the trace subdirectory in the Oracle Clusterware ADR homecontains the simple text Oracle Clusterware alert log. It always has the namealert.log. The alert log is also written as an XML file in the alert subdirectory of theADR home, but the text alert log is most easily read.
The alert log is the first place to look when a problem or issue arises with OracleClusterware. Unlike the Oracle Database instance alert log, messages in the OracleClusterware alert log are identified, documented, and localized (translated). OracleClusterware alert messages are written for most significant events or errors that occur.
Note:
Messages and data written to Oracle Clusterware trace files generally arenot documented and translated and are used mainly by My Oracle Supportfor problem diagnosis.
Incident Trace Files
Certain errors occur in Oracle Clusterware programs that will raise an ADR incident. Inmost cases, these errors should be reported to My Oracle Support for diagnosis. Theoccurrence of an incident normally produces one or more descriptive messages in theOracle Clusterware alert log.
In addition to alert messages, incidents also cause the affected program to produce aspecial, separate trace file containing diagnostic data related to the error. Theseincident-specific trace files are collected in the incident subdirectory of the ADRhome rather than the trace subdirectory. Both the normal trace files and incident tracefiles are collected and submitted to Oracle when reporting the error.
See Also:
Oracle Database Administrator's Guide for more information on incidents anddata collection
Other Diagnostic Data
Besides ADR data, Oracle Clusterware collects or uses other data related to problemdiagnosis. Starting with Oracle Clusterware 12c release 1 (12.1.0.2), this data residesunder the same base path used by ADR, but in a separate directory structure with thisform: ORACLE_BASE/crsdata/host_name. In this example, ORACLE_BASE is the Oraclebase path you specified when you installed the Grid Infrastructure and host_name isthe name of the host.
In this directory, on a given host, are several subdirectories. The two subdirectories ofgreatest interest if a problem occurs are named core and output. The core directory iswhere Oracle Clusterware daemon core files are written when the normal ADRlocation used for core files is not available (for example, before ADR services areinitialized in a program). The output directory is where Oracle Clusterware daemons
Appendix KOracle Clusterware Diagnostic and Alert Log Data
K-14

redirect their C standard output and standard error files. These files generally use a namestructure consisting of the executable name with the characters OUT appended to a .trc fileextension (like trace files). For example, the redirected standard output from the Cluster TimeSynchronization Service daemon is named octssdOUT.trc. Typically, daemons write verylittle to these files, but in certain failure scenarios important data may be written there.
Related Topics
• Oracle Database Administrator's Guide
• Oracle Database Utilities
Diagnostics Collection ScriptWhen an Oracle Clusterware error occurs, run the diagcollection.pl diagnostics collectionscript to collect diagnostic information from Oracle Clusterware into trace files. Thediagnostics provide additional information so My Oracle Support can resolve problems. Runthis script as root from the Grid_home/bin directory.
Syntax
Use the diagcollection.pl script with the following syntax:
diagcollection.pl {--collect [--crs | --acfs | -all] [--chmos [--incidenttime time [--incidentduration time]]] [--adr location [--aftertime time [--beforetime time]]] [--crshome path | --clean | --coreanalyze}]
Note:
The diagcollection.pl script arguments are all preceded by two dashes (--).
Parameters
Table K-3 lists and describes the parameters used with the diagcollection.pl script.
Appendix KDiagnostics Collection Script
K-15

Table K-3 diagcollection.pl Script Parameters
Parameter Description
--collect Use this parameter with any of the following arguments:
• --crs: Use this argument to collect Oracle Clusterwarediagnostic information
• --acfs: Use this argument to collect Oracle ACFSdiagnostic information
Note: You can only use this argument on UNIX systems.• --all: Use this argument to collect all diagnostic
information except CHM (OS) data
Note: This is the default.• --chmos: Use this argument to collect the following CHM
diagnostic information
--incidenttime time: Use this argument to collect CHM(OS) data from the specified time
Note: The time format is MM/DD/YYYYHH24:MM:SS.
--incidentduration time: Use this argument with --incidenttime to collect CHM (OS) data for the durationafter the specified time
Note: The time format is HH:MM. If you do not use --incidentduration, then all CHM (OS) data after the timeyou specify in --incidenttime is collected.
• --adr location: The Automatic Diagnostic RepositoryCommand Interpreter (ADRCI) uses this argument tospecify a location in which to collect diagnostic informationfor ADR
See Also: Oracle Database Utilities for more informationabout ADRCI
• --aftertime time: Use this argument with the --adrargument to collect archives after the specified time
Note: The time format is YYYYMMDDHHMISS24.• --beforetime time: Use this argument with the --adr
argument to collect archives before the specified time
Note: The time format is YYYYMMDDHHMISS24.• --crshome path: Use this argument to override the
location of the Oracle Clusterware home
Note: The diagcollection.pl script typically derives thelocation of the Oracle Clusterware home from the systemconfiguration (either the olr.loc file or the Windowsregistry), so this argument is not required.
--clean Use this parameter to clean up the diagnostic informationgathered by the diagcollection.pl script.
Note: You cannot use this parameter with --collect.
--coreanalyze Use this parameter to extract information from core files andstore it in a text file.
Note: You can only use this parameter on UNIX systems.
Appendix KDiagnostics Collection Script
K-16

Storage Split in Oracle Extended ClustersA storage split occurs when the private network between two or more disparate sites isavailable and online, but the storage network has failed.
When Oracle Automatic Storage Management (Oracle ASM) detects a storage split in atypical extended cluster configuration with three sites (two data sites and a quorum site), oneof the data sites terminates and quarantines itself and the nodes it contains from the rest ofthe cluster. If Oracle ASM attempts to start on the quarantined site, then error CRS-2971occurs.
Resolve the issue, as follows:
1. Resolve the inter-site connectivity issue that resulted in the storage split.
2. Ensure that all Oracle ASM disk groups are mounted on the site that is not quarantined,as follows:
SELECT group_number, name, state FROM v$asm_diskgroup_stat;
3. Obtain a list of online disks belonging to these disk groups by running the followingcommand for each disk group:
SELECT path FROM v$asm_disk_stat WHERE group_number=group_number AND state = 'NORMAL' AND mode_status = 'ONLINE';
4. For each of the paths from you obtained in the previous step, ensure that the disk isaccessible from the quarantined site, as follows:
asmcmd lsdsk -I --member 'path'
5. If the preceding verification succeeds, then rejuvenate the quarantined site, as follows:
crsctl modify cluster site site_name -s rejuvenate
Rolling Upgrade and Driver Installation IssuesDuring an upgrade, while running the Oracle Clusterware root.sh script, you may see thefollowing messages:
• ACFS-9427 Failed to unload ADVM/ACFS drivers. A system restart is recommended.
• ACFS-9428 Failed to load ADVM/ACFS drivers. A system restart is recommended.
If you see these error messages during the upgrade of the initial (first) node, then do thefollowing:
1. Complete the upgrade of all other nodes in the cluster.
2. Restart the initial node.
3. Run the root.sh script on initial node again.
4. Run the Grid_home/gridSetup -executeConfigTools script as the user that installedOracle Grid Infrastructure to complete the upgrade.
Appendix KStorage Split in Oracle Extended Clusters
K-17

For nodes other than the initial node (the node on which you started the installation):
1. Restart the node where the error occurs.
2. Run the orainstRoot.sh script as root on the node where the error occurs.
3. Change directory to the Grid home, and run the root.sh script on the node wherethe error occurs.
Testing Zone DelegationTo test zone delegation, use this procedure.
See Also:
Oracle Clusterware Control (CRSCTL) Utility Reference for information aboutusing the CRSCTL commands referred to in this procedure
Use the following procedure to test zone delegation:
1. Start the GNS VIP by running the following command as root:
# crsctl start ip -A IP_name/netmask/interface_name
The interface_name should be the public interface and netmask of the publicnetwork.
2. Start the test DNS server on the GNS VIP by running the following command (youmust run this command as root if the port number is less than 1024):
# crsctl start testdns -address address [-port port]
This command starts the test DNS server to listen for DNS forwarded packets atthe specified IP and port.
3. Ensure that the GNS VIP is reachable from other nodes by running the followingcommand as root:
crsctl status ip -A IP_name4. Query the DNS server directly by running the following command:
crsctl query dns -name name -dnsserver DNS_server_address
This command fails with the following error:
CRS-10023: Domain name look up for name asdf.example.com failed. Operatingsystem error: Host name lookup failure
Look at Grid_home/log/host_name/client/odnsd_*.log to see if the query wasreceived by the test DNS server. This validates that the DNS queries are not beingblocked by a firewall.
5. Query the DNS delegation of GNS domain queries by running the followingcommand:
crsctl query dns -name name
Appendix KTesting Zone Delegation
K-18

Note:
The only difference between this step and the previous step is that you are notgiving the -dnsserver DNS_server_address option. This causes the commandto query name servers configured in /etc/resolv.conf. As in the previousstep, the command fails with same error. Again, look at odnsd*.log to ensurethat odnsd received the queries. If step 5, succeeds but step 6 does not, thenyou must check the DNS configuration.
6. Stop the test DNS server by running the following command:
crsctl stop testdns -address address7. Stop the GNS VIP by running the following command as root:
crsctl stop ip -A IP_name/netmask/interface_name
Oracle Clusterware AlertsOracle Clusterware writes messages to the ADR alert log file (as previously described) forvarious important events. Alert log messages generally are localized (translated) and carry amessage identifier that can be used to look up additional information about the message. Thealert log is the first place to look if there appears to be problems with Oracle Clusterware.
The following is an example of alert log messages from two different CRS daemonprocesses:
2014-07-16 00:27:22.074 [CTSSD(12817)]CRS-2403:The Cluster Time Synchronization Service on host stnsp014 is in observer mode.2014-07-16 00:27:22.146 [CTSSD(12817)]CRS-2407:The new Cluster Time Synchronization Service reference node is host stnsp013.2014-07-16 00:27:22.753 [CTSSD(12817)]CRS-2401:The Cluster Time Synchronization Service started on host stnsp014.2014-07-16 00:27:43.754 [CRSD(12975)]CRS-1012:The OCR service started on node stnsp014.2014-07-16 00:27:46.339 [CRSD(12975)]CRS-1201:CRSD started on node stnsp014.
The following example shows the start of the Oracle Cluster Time Synchronization Service(OCTSS) after a cluster reconfiguration:
2014-07-15 23:51:17.532 [CTSSD(12813)]CRS-2403:The Cluster Time Synchronization Service on host stnsp014 is in observer mode.2014-07-15 23:51:18.292 [CTSSD(12813)]CRS-2407:The new Cluster Time Synchronization Service reference node is host stnsp013.2014-07-15 23:51:18.961 [CTSSD(12813)]CRS-2401:The Cluster Time Synchronization Service started on host stnsp014.
Alert Messages Using Diagnostic Record Unique IDsBeginning with Oracle Database 11g release 2 (11.2), certain Oracle Clusterware messagescontain a text identifier surrounded by "(:" and ":)". Usually, the identifier is part of themessage text that begins with "Details in..." and includes an Oracle Clusterwarediagnostic log file path and name similar to the following example. The identifier is called a DRUID, or diagnostic record unique ID:
2014-07-16 00:18:44.472 [ORAROOTAGENT(13098)]CRS-5822:Agent '/scratch/12.1/grid/bin/orarootagent_root' disconnected from server. Details at
Appendix KOracle Clusterware Alerts
K-19

(:CRSAGF00117:) in /scratch/12.1/grid/log/stnsp014/agent/crsd/orarootagent_root/orarootagent_root.log.
DRUIDs are used to relate external product messages to entries in a diagnostic log fileand to internal Oracle Clusterware program code locations. They are not directlymeaningful to customers and are used primarily by My Oracle Support whendiagnosing problems.
Appendix KOracle Clusterware Alerts
K-20