System Update Solution Deployment Guide - Lenovo
90
System Update Solution Deployment Guide
-
Upload
khangminh22 -
Category
Documents
-
view
1 -
download
0
Transcript of System Update Solution Deployment Guide - Lenovo
System Update Solution Deployment Guide

Note: Before using this information and the product it supports, read the general information in Appendix B“Notices” on page 81.
Seventh Edition (July 2017)
© Copyright Lenovo 2009, 2017.
LIMITED AND RESTRICTED RIGHTS NOTICE: If data or software is delivered pursuant a General Services Administration“GSA” contract, use, reproduction, or disclosure is subject to restrictions set forth in Contract No. GS-35F-05925.

Contents
Preface . . . . . . . . . . . . . . . . iii
Chapter 1. Overview. . . . . . . . . . 1System Update . . . . . . . . . . . . . . 1Update Retriever . . . . . . . . . . . . . . 1Thin Installer . . . . . . . . . . . . . . . 1Managing the update process . . . . . . . . 1
System Update . . . . . . . . . . . . 2System Update and Update Retriever . . . . 2
Using System Update and Update Retriever onnon-Lenovo systems . . . . . . . . . . . . 5
Chapter 2. Installation . . . . . . . . . 7Installation requirements . . . . . . . . . . . 7
.Net . . . . . . . . . . . . . . . . . 7Installation components . . . . . . . . . . . 7
System Update languages . . . . . . . . 8Update Retriever languages. . . . . . . . 9
Installation considerations . . . . . . . . . . 9Installation procedures and command-lineparameters . . . . . . . . . . . . . . 10
A scenario of installing System Update and UpdateRetriever in an enterprise environment . . . . . 11Uninstall . . . . . . . . . . . . . . . . . 11
Silent uninstall on Windows 7 and lateroperating systems . . . . . . . . . . . 11
Chapter 3. Configurations. . . . . . . 13Connection configurations . . . . . . . . . . 13Configuring System Update . . . . . . . . . 13
Configuring System Update with the registry . 14Configuring System Update with ActiveDirectory . . . . . . . . . . . . . . . 27
Chapter 4.Working with SystemUpdate. . . . . . . . . . . . . . . . . 35About System Update . . . . . . . . . . . . 35
Extras tab . . . . . . . . . . . . . . . 35System Update billboard . . . . . . . . . 35
Working with update packages . . . . . . . . 35Downloading and installing updates . . . . 36Working with license agreements . . . . . 37
Using System Update . . . . . . . . . . . . 37Scheduling the search for updates . . . . . 38Viewing the download and installationhistory . . . . . . . . . . . . . . . . 39Hiding and restoring hidden updates . . . . 39Working with updates that force a reboot . . 39
Keyboard shortcuts . . . . . . . . . . . . . 39
Chapter 5.Working with UpdateRetriever . . . . . . . . . . . . . . . 41About Update Retriever . . . . . . . . . . . 41About update packages . . . . . . . . . . . 41Update Retriever first time setup . . . . . . . 42Using Update Retriever . . . . . . . . . . . 43
Manual searching for new updates . . . . . 43Scheduling the search for updates . . . . . 44Managing the repository . . . . . . . . . 45Modifying settings . . . . . . . . . . . 47Viewing history . . . . . . . . . . . . . 47Hiding updates. . . . . . . . . . . . . 48Exporting updates . . . . . . . . . . . 48
Keyboard shortcuts . . . . . . . . . . . . . 49
Chapter 6.Working with ThinInstaller . . . . . . . . . . . . . . . . 51About Thin Installer . . . . . . . . . . . . . 51Configuring Thin Installer . . . . . . . . . . 51Using Thin Installer . . . . . . . . . . . . . 54
Return error codes . . . . . . . . . . . 57Logs . . . . . . . . . . . . . . . . . 57Windows 7 and later operating systemsconsiderations . . . . . . . . . . . . . 57Web server configuration . . . . . . . . . 58
Best practices . . . . . . . . . . . . . . . 58Uninstalling Thin Installer . . . . . . . . . . 58
Chapter 7. Best practices . . . . . . . 59Scenario 1 - Managing the update process . . . 59
Step 1 - Installing the programs . . . . . . 59Step 2 - Customizing the programs . . . . . 60Step 3 - Working with the programs . . . . 60
Scenario 2 - Deploying specific update packages . 60Creating repository folders . . . . . . . . 60Configuring System Update on clientcomputers . . . . . . . . . . . . . . 61Working with Update Retriever . . . . . . 61Deploying the packages . . . . . . . . . 61
Scenario 3 - Deploying to non-Lenovo systems . . 62Scenario 4 - Disabling the Web upgrade for SystemUpdate. . . . . . . . . . . . . . . . . . 62Scenario 5 - Installing specific update packageswith the MSDOS prompt . . . . . . . . . . . 63Scenario 6 - Deploying update packages to clientcomputer repositories . . . . . . . . . . . . 63
© Copyright Lenovo 2009, 2017 i

Step 1 - Setting up the administrator system . 63Step 2 - Configuring System Update on clientcomputers . . . . . . . . . . . . . . 64
Scenario 7 - Working with firewalls and thescheduler function . . . . . . . . . . . . . 64Scenario 8 - Working with Thin Installer . . . . . 64
Deploying the packages using USB, CD, orDVD media . . . . . . . . . . . . . . 64Deploying the update packages using anetwork share repository . . . . . . . . . 65Deploying the update packages using asystem management tool. . . . . . . . . 65Integrating Thin Installer with the ImageUltraBuilder program . . . . . . . . . . . . 65Integrating Thin Installer with a SysprepImage . . . . . . . . . . . . . . . . 65
Appendix A. Command lineparameters . . . . . . . . . . . . . . 67Automatic search . . . . . . . . . . . . . 67Command line scripts . . . . . . . . . . . . 67Search modes . . . . . . . . . . . . . . . 75Notification parameters . . . . . . . . . . . 76MapDrv utility . . . . . . . . . . . . . . . 78
Command line interface . . . . . . . . . 79Using the MapDrv utility . . . . . . . . . 80
Appendix B. Notices. . . . . . . . . . 81Trademarks . . . . . . . . . . . . . . . . 82
ii System Update Solution Deployment Guide

Preface
Information presented in this guide is to support computers worked with the ThinkVantage® System Updateprogram (hereafter refer to as System Update), the Update Retriever program (hereafter refer to as UpdateRetriever), or the Thin Installer program (hereafter refer to as Thin Installer).
System Update is a program that you can use to help keep your system up-to-date. Update Retriever is anadministrative program that you can use to customize the update process for your enterprise. Thin Installeris a lighter version of System Update, and it does not require installation, does not create any registrykeys, and does not have any services.
This guide is intended for IT administrators or those who are responsible for deploying updates on computersin their organizations. If you have suggestions or comments, communicate with your Lenovo® authorizedrepresentative. This guide is updated periodically, and you can check the latest publication on the LenovoWeb site at:http://www.lenovo.com/thinkvantage
© Copyright Lenovo 2009, 2017 iii

iv System Update Solution Deployment Guide

Chapter 1. Overview
The programs documented in this deployment guide are System Update, Update Retriever, and Thin Installer.This deployment guide defines each program, explains the update process, and explains how each programcan be configured to fit your needs. In this deployment guide, you also will find installation procedures,application configurations, and best practices on how to use these programs in different environments.
System UpdateSystem Update is a program that helps you keep the software on your system up-to-date. Using SystemUpdate, the update packages that are stored on Lenovo servers can be downloaded from the LenovoHelp Center Web site. Update packages can be applications, device drivers, BIOS flashes, and softwareupdates. When System Update connects to the repository folder, System Update automatically recognizesyour computer machine type, model number, and other system information to determine whether yoursystem needs the available updates. System Update will display a pick list of update packages where youcan select update packages to download and install. System Update can be configured to install packageseither manually or automatically. System Update also provides a method to defer the installation of updatepackages. System Update can be configured to search for and download update packages from anycombination of the following locations:
• The Lenovo Help Center Web site
• The Repository folder on a local system
• The Repository folder on a network share
Update RetrieverUpdate Retriever is a program that enables you to search for and download updates from the Lenovo HelpCenter Web site to a repository folder on a network share. You can configure System Update to search forupdate packages from a repository folder on a network share instead of searching the Lenovo Help CenterWeb site. Update Retriever can help you with the following:
• Downloading updates for specific Lenovo systems according to machine types, languages, and operatingsystems
• Downloading update packages for more than one machine type
• Importing update packages
Thin InstallerThin Installer is a lighter version of System Update. Unlike System Update, Thin Installer does not requireinstallation, does not create any registry keys, and does not have any services. Thin Installer can search forupdate packages from the repository folder on a local hard disk drive, a network share, a Web share, orexternal media such as a CD, DVD, or USB hard disk drive.
Managing the update processThe update process is a method to obtain, configure, and install update packages.
To complete the update process, use one of the following options:
• System Update
© Copyright Lenovo 2009, 2017 1

If you use only System Update, System Update will connect to the Lenovo Help Center Web site throughan Internet connection, search for update packages, and generate a list of update packages for furtherinstallation.
• System Update and Update Retriever
If you use System Update and Update Retriever in an enterprise environment, Update Retriever willsearch the Lenovo Help Center Web site for update packages, download those packages to the networkshare folder, and enable you to customize the update content relevant to your enterprise; System Updatecan be configured to obtain updates from the shared folder and complete the installation of updateson a client computer.
• Thin Installer and Update Retriever
If you use Thin Installer and Update Retriever in an enterprise environment, Update Retriever will searchthe Lenovo Help Center Web site for update packages, download those packages to the network sharefolder, and enable you to customize the update content relevant to your enterprise; Thin Installer willsearch for updates on the shared folder and complete the installation of updates on a client computer.
System UpdateThe following illustration shows the communication path of update packages from the Lenovo Help Centerto a client computer using only System Update.
Internet Client systemLenovo
Help Center
SystemUpdate
Figure 1. Update process using only System Update
System Update and Update RetrieverIn an enterprise environment with multiple systems, you can use Update Retriever on an administrativesystem to download update packages from the Lenovo Help Center to a repository folder on your networkshare or a local system. System Update on a client computer can be configured to obtain updates from therepository folder on a network share or a local system. The repository folder provides the storage for updatepackages. This provides greater control of the updates that are available over your network.
Downloading update packages to the administrator systemThe following illustration provides the communication path of update packages from the Lenovo Help Centerto your administrator system using Update Retriever.
2 System Update Solution Deployment Guide

Figure 2. Communication path between Lenovo Help Center and the administrator system
Obtaining updates from the repository folder on a network shareThe following illustration provides the communication path of update packages from an administrator systemwith Update Retriever to client computers with System Update:
Figure 3. Communication path of update packages on a local area network
For more information on configuring repository locations for package storage, see Chapter 3 “Configurations”on page 13.
Deploying update packages to client computersInstead of using a network share on a local area network (LAN), you can use a local system such as theadministrator system to store update packages. Once you have created a repository folder, you can deploythe folder to client computers. The deployment of repository folder enables you to use Update Retrieveron an administrator system to download update packages to a repository folder and deploy the foldercontaining the update packages to client computers. When the client computer runs System Update,System Update will obtain updates directly from the folder you deployed to the client computer.
The following illustration provides the communication path of update packages from an administratorsystem to client computers.
Chapter 1. Overview 3

Figure 4. Communication path of update packages from the repository folder to client computers
Customizing update packages for client computersFor enterprises that need to create custom update packages for client computers, use both System Updateand Update Retriever to manage the update process. As an administrator, you can use Update Retriever todownload selected update packages from the Lenovo Help Center to a repository folder on a network share.You can use Update Retriever to edit an existing package or create a new package in the repository folder.Update Retriever uses an XML descriptor file to define when an update package is relevant and how to installthe update package. For example, you can create an XML descriptor file that enables a specific updateto be downloaded and installed on a client computer depending on the version of the software alreadyinstalled or existing hardware devices found in the system. After using Update Retriever to customize updatepackages to fit the needs of your enterprise, import the update packages into the repository folder on thenetwork share using Update Retriever.
On client computers, use System Update to search the network share repository folder for update packages.System Update can then download and install relevant packages from the network share repository folder toclient computers.
The following illustration shows the communication path among the Lenovo Help Center, System Update,and Update Retriever when using Update Retriever to manage the update process:
4 System Update Solution Deployment Guide

Figure 5. Update process for client computers managed by administrators using Update Retriever
Using System Update and Update Retriever on non-Lenovo systemsBy design, System Update and Update Retriever can be leveraged with non-Lenovo systems. Non-Lenovosystems are not configured to utilize the Lenovo Help Center Web site to download and install packages. Ifyou are using a non-Lenovo system with System Update installed, use Update Retriever to downloadupdate packages to a repository folder on you network or your local system, and use System Update tosearch for update packages from your network.
Chapter 1. Overview 5

6 System Update Solution Deployment Guide

Chapter 2. Installation
This chapter provides the installation instructions, installation requirements, components, and considerationsfor System Update and Update Retriever. You can download System Update and Update Retriever from thefollowing Web site:http://www.lenovo.com/support/site.wss/document.do?lndocid=TVAN-ADMIN#tvsu
You can also download Thin Installer from the Lenovo Support Web site and then use it directly. It requiresno installation. For information about Thin Installer, see Chapter 6 “Working with Thin Installer” on page 51.
Installation requirementsSystem Update 5.x is supported on the following operating systems:
• Microsoft® Windows® 7
• Windows 8
• Windows 8.1
• Windows 10
Update Retriever is supported on the following operating systems:
• Windows 7
• Windows 8
• Windows 8.1
• Windows 10
• Windows Server® 2008
• Windows Server 2012
Note: Unless otherwise stated, the supported operating systems refer to both the 32-bit version and the64-bit version.
.NetSystem Update requires Microsoft.NET Framework 4.5.2 or a later version. Update Retriever requiresMicrosoft.NET Framework 4.5.2 or a later version. You can download a compatible version of .NETFramework from the following Microsoft Web site:http://update.microsoft.com/windowsupdate
Note: When performing a silent installation of Update Retriever on a system without Microsoft.NetFramework 4.5.2 or a later version, the following message will be written to the %temp%\Setup LogY-M-D.txt file:“Before installing Update Retriever silently, you need to download and install Microsoft .Net Framework 4.5.2or a later version. To download and manually install Microsoft .Net Framework 4.5.2 or a later version, go tothe Microsoft Web site at http://www.microsoft.com/net/download.aspx.”
Installation componentsThis section provides information on installation components for System Update and Update Retriever.These programs are installed with the InstallShield software tool.
© Copyright Lenovo 2009, 2017 7

System Update languagesThe following table presents the languages and the corresponding language override codes for SystemUpdate.
Table 1. System Update language codes
Language Identifier Language override code
Danish 1030 DA
Dutch (Standard) 1043 NL
English 1033 EN
Finnish 1035 FI
French 1036 FR
German 1031 DE
Italian 1040 IT
Japanese 1041 JP
Korean 1042 KO
Norwegian (Bokmal) 1044 NO
Portuguese (Brazilian) 1046 PT
Spanish 1034 ES
Swedish 1053 SV
Simplified Chinese 2052 CHS
Traditional Chinese 1028 CHT
System Update supports all NLS (National Language Support) language packs. In normal cases, SystemUpdate loads the language pack set in the LanguageOverride field. That is, at startup, System Updatechecks the Windows registry for a valid language override code in the LanguageOverride field. If thelanguage override code in the LanguageOverride field is valid and the language pack is available on thesystem, System Update will load the language pack corresponding to the language override code specifiedin the LanguageOverride field, and display the rest of the session in that language.
The registry location for the LanguageOverride field is:HKEY_LOCAL_MACHINE\SOFTWARE\Lenovo\System Update\LanguageOverride
The following are scenarios in which System Update will load the substitute NLS language pack.
• Loading the language pack set in the Windows Regional and Language Options settings:
If the LanguageOverride field is empty or with an invalid value, or the value specified in theLanguageOverride field is not installed on the system, System Update will get the language overridecode of the operating system set in the Regional and Language Options settings. If System Updatesuccessfully loads the language pack corresponding to the language set in the Regional and LanguageOptions settings, System Update will display the rest of the session in that language.
• Loading the language pack set in the DefaultLanguage field:
If the language pack corresponding to the language set in the Regional and Language Options settingsis not available on the system, System Update will attempt to get the default language that has beenset in the DefaultLanguage field when the end user used the System Update installer and selected alanguage during the installation. System Update will load the language pack corresponding to the defaultlanguage set in the DefaultLanguage field, and display the rest of the session in that language. If the
8 System Update Solution Deployment Guide

language pack corresponding to the default language set in the DefaultLanguage field is on the system,System Update will load the default language pack and display the rest of the session.
The registry location for the DefaultLanguage field is:
HKEY_LOCAL_MACHINE\SOFTWARE\Lenovo\System Update\DefaultLanguage
• Loading the US English language pack:
If the DefaultLanguage field is empty or with an invalid value, or if the language pack corresponding tothe default language set in the DefaultLanguage field is not on the system, the default language will notbe used. System Update will attempt to load the US English language pack. If the US English languagepack is not on the system, an error message will be displayed, saying "System Update has found a criticalproblem and must close." This error message is in the US English language.
Update Retriever languagesThe following table presents the languages and the corresponding language override codes for UpdateRetriever.
Table 2. Update Retriever language codes
Language Identifier Language override code
English 1033 EN
French 1036 FR
German 1031 DE
Japanese 1041 JP
Simplified Chinese 2052 CHS
The registry location for the LanguageOverride field is:
HKEY_LOCAL_MACHINE\SOFTWARE\Lenovo\Update Retriever\LanguageOverride
Installation considerationsSystem Update and Update Retriever are installed as standalone applications and deployed with defaultpreferences for all configuration options. The installation scenarios listed below are supported:
• Clean installation: System Update and Update Retriever are installed with default preferences fortheir respective configurable options.
• Upgrade or over-installation (current version already exists): The Windows Installer will remove theold version of System Update or Update Retriever and install the new version. Your network sharerepository folder and contents will be preserved.
During installation, a shortcut is added to the following Start menu folder on ThinkPad® systems:
Start Menu\Programs\ThinkVantage
For Lenovo systems, the following shortcut is added to the Start menu folder:
Start Menu\Programs\Lenovo Care
Preferences are stored as settings in the following Windows registry keys:
Chapter 2. Installation 9

• For System Update:
HKLM\Software\Lenovo\System Update
• For Update Retriever:
HKLM\Software\Lenovo\Update Retriever
The default folders where application files are installed are the following:
• For System Update:
%PROGRAMFILES%\Lenovo\System Update
• For Update Retriever:
%PROGRAMFILES%\Lenovo\Update Retriever
Installation procedures and command-line parametersSystem Update and Update Retriever can use the same command line parameters for installation. Thefollowing example starts a non-silent command line installation for System Update or Update Retriever.
c:\>[System Update installation file name].exe
To do a silent command line extraction followed by an installation, use the /VERYSIELNT parameter. Theextract defaults to the Windows Temp folder, for example:
c:\>[System Update installation file name].exe/VERYSILENT /NORESTART
To silently extract to a specific folder followed by an installation, use the DIR parameter, for example:
[System Update installation file name].exe/VERYSILENT /NORESTART/DIR="C:\TVT\tvsut"
The /DIR parameter causes the files to be extracted to the c:\tvt\tvsut folder.
Installation log fileThe installation log file contains information that can be used to debug installation problems. For SystemUpdate, the log file name is tvsusetup.log; for Update Retriever, the log file name is tvursetup.log.
If you install the program by double-clicking the setup.exe file, the log file will be automatically generated andstored in the %temp% directory.
If you want to install the program silently and generate installation log files, use the following commands:
• For System Update:[System Update installation file name].exe/VERYSILENT /NORESTART/LOG=c:\tvsu.log
To specify the detailed log directory, use the /LOG command.
• For Update Retriever:[TVUR name].exe/VERYSILENT /NORESTART/LOG=c:\tvur.log
To specify the detailed log directory, use the /LOG command.
10 System Update Solution Deployment Guide
Windows 7 and later operating systems considerationsWith considerations for Windows 7 and later operating systems, the System Update silent installationprompts a User Account Control (UAC) message. You can find information on disabling and enabling theUser Account Control message on the following Web site:http://www.microsoft.com
Note: If the UAC is active, a silent uninstall will not work with Windows 7 and later operating systems.
A scenario of installing System Update and Update Retriever in anenterprise environmentComplete the following steps to install System Update and Update Retriever using a silent command:
1. Download Update Retriever to an administrator system from the following Lenovo Web site:http://www.lenovo.com/support/site.wss/document.do?lndocid=TVAN-ADMIN#tvsu
2. Download System Update to client computers from the following Lenovo Web site:http://www.lenovo.com/support/site.wss/document.do?lndocid=TVAN-ADMIN#tvsu
3. Perform a silent installation of System Update on client computers by using the following command atthe command prompt:
setup.exe/VERYSILENT /NORESTART
UninstallSystem Update and Update Retriever can be uninstalled by using the Add or Remove Programs applet inWindows operating systems. After the uninstall is complete, all program files and settings are deleted.
Alternatively, you can use command lines to perform a silent uninstall.
To silently uninstall System Update or Update Retriever, do the following:
• For System Update, use the following command:
[Your install dir]\unins000.exe /verysilent /norestart
• For Update Retriever, use the following command:
[Your install dir]\unins000.exe /verysilent /norestart
Silent uninstall on Windows 7 and later operating systemsThe User Account Control (UAC) function on Windows 7 or later operating systems is turned on by default toprevent unauthorized changes to the computer. You need to disable the UAC function before performinga silent uninstall.
To perform a silent uninstall of System Update on a Windows 7 or later operating system, do the following:
1. Navigate to Control Panel ➙ User Accounts ➙ Change User Account Control settings. The UserAccount Control Settings window is displayed.
2. Move the slider to Never notify, and then click OK.
3. Restart the computer.
4. Open the command prompt window and type the following command line:
Chapter 2. Installation 11

[Your install dir]\unins000.exe /verysilent /norestart
5. Press Enter. System Update will be uninstalled.
12 System Update Solution Deployment Guide

Chapter 3. Configurations
This chapter provides you with conceptual information and procedures to configure connectivity settings,repository locations, and the user interface.
Connection configurationsSystem Update and Update Retriever support three types of connectivity configuration: direct connection,static proxy connection, and automatic configuration script.
• Direct connectionThis type of configuration is used when no proxy is required to connect to the Internet. It means theapplication can connect directly to the Lenovo Help Center servers.
• Static proxy connectionSystem Update and Update Retriever support two types of proxies, HTTP (Hypertext Transfer Protocol)proxy and SOCKS (Socket Security) proxy.
– Connection through HTTP proxyIn this type of configuration, System Update and Update Retriever connect to an HTTP proxy server toaccess the Internet. The proxy server connects to the Lenovo Help Center.
Note: HTTP basic and NTLM (NT LAN Manager) authentications are supported.
The following elements are obtained from the system configuration:
– Proxy server name or IP address
– Proxy server port
The proxy server might require to authenticate each client before it can be granted access to theInternet. In that case, the end user must additionally provide a user name and password. The username and password values can be set for the end user by the administrator.
The HTTP proxy authenticator, an integrated component in System Update, displays a logon dialogwhenever System Update detects that the HTTP proxy server needs the end user to provide a username and password in order to successfully connect to the proxy serve. After providing the correctuser name and password, the end user will be authenticated to connect to the HTTP proxy server.SOCKS authentication is not supported.
– Connection through a SOCKS proxyIn this type of configuration, System Update and Update Retriever connect to a SOCKS server andthen the SOCKS server connects to the Lenovo Help Center.
The following elements must be configured:
– Server name or IP address
– Server port
Note: Only SOCKS 4 without authentication is supported.
• Automatic configuration scriptBy enabling Use automatic configuration script in the Internet Explorer® Web browser, System Updateand Update Retriever can access the Internet according to the automatic configuration script file.
Configuring System UpdateConfigurations for System Update can be done through the registry or Active Directory®. If you areconfiguring just one system, you can use the registry to configure System Update. If you are configuring
© Copyright Lenovo 2009, 2017 13

multiple systems, you can use Active Directory to configure policies for System Update. For additionalinformation about each configuration method, see the following sections:
• “Configuring System Update with the registry” on page 14
• “Configuring System Update with Active Directory” on page 27
Configuring System Update with the registryAttention: To edit registry configurations, exit System Update. If System Update is running while changesare made in the registry, the old registry entries will be recovered.
The following table lists the configurable and modifiable items for System Update and their registry locations,after the first launch of System Update.
Table 3. Registry locations
Setting Registry location
Disable the System Update billboard. See “UCSettingsconfigurable items” on page 15.
HKLM\SOFTWARE\Lenovo\SystemUpdate\Preferences\UCSettings\General
Disable registration on billboard HKLM\Software\Lenovo\Registration\RegStatus
Disable System Update user interface. See “UCSettingsconfigurable items” on page 15.
HKLM\SOFTWARE\Lenovo\SystemUpdate\Preferences\UCSettings\General
RetryLimit for HTTPSHelloSettings. See“\UCSettings\HTTPSHelloSettings” on page 16.
HKLM\SOFTWARE\Lenovo\SystemUpdate\Preferences\UCSettings\HTTPSHelloSettings
RetryWaitTime for HTTPSHelloSettings. See“\UCSettings\HTTPSHelloSettings” on page 16.
HKLM\SOFTWARE\Lenovo\SystemUpdate\Preferences\UCSettings\HTTPSHelloSettings
Disable System Update Web upgrade (Update Thyself).See “\UCSettings\HTTPSHelloSettings” on page 16.
HKLM\SOFTWARE\Lenovo\SystemUpdate\Preferences\UCSettings\HTTPSHelloSettings
RetryLimit for HTTPSPackageSettings. See“\UCSettings\HTTPSPackageSettings” on page 17.
HKLM\SOFTWARE\Lenovo\SystemUpdate\Preferences\UCSettings\HTTPSPackageSettings
RetryWaitTime for HTTPSPackageSettings. See“\UCSettings\HTTPSPackageSettings” on page 17.
HKLM\SOFTWARE\Lenovo\SystemUpdate\Preferences\UCSettings\HTTPSPackageSettings
Proxy server connection. See“\UserSettings\Connection” on page 17.
HKLM\Software\Lenovo\SystemUpdate\Preferences\UserSettings\Connection
DebugEnable. See “UserSettings configurable items” onpage 17.
HKLM\SOFTWARE\Lenovo\SystemUpdate\Preferences\UserSettings\General
DisplayInformationScreen. See “UserSettingsconfigurable items” on page 17.
HKLM\SOFTWARE\Lenovo\SystemUpdate\Preferences\UserSettings\General
DisplayLicenseNotice. See “UserSettings configurableitems” on page 17.
HKLM\SOFTWARE\Lenovo\SystemUpdate\Preferences\UserSettings\General
DisplayLicenseNoticeSU. See “UserSettings configurableitems” on page 17.
HKLM\SOFTWARE\Lenovo\SystemUpdate\Preferences\UserSettings\General
ExtrasTab. See “UserSettings configurable items” onpage 17.
HKLM\SOFTWARE\Lenovo\SystemUpdate\Preferences\UserSettings\General
IgnoreLocalLicense. See “UserSettings configurableitems” on page 17.
HKLM\SOFTWARE\Lenovo\SystemUpdate\Preferences\UserSettings\General
IgnoreRMLicCRCSize. See “UserSettings configurableitems” on page 17.
HKLM\SOFTWARE\Lenovo\SystemUpdate\Preferences\UserSettings\General
NotifyInterval. See “UserSettings configurable items” onpage 17.
HKLM\SOFTWARE\Lenovo\SystemUpdate\Preferences\UserSettings\General
14 System Update Solution Deployment Guide

Table 3. Registry locations (continued)
Setting Registry location
RepositoryLocation1. See “UserSettings configurableitems” on page 17.
HKLM\SOFTWARE\Lenovo\SystemUpdate\Preferences\UserSettings\General
UNCMaxAttempts. See “UserSettings configurable items”on page 17.
HKLM\SOFTWARE\Lenovo\SystemUpdate\Preferences\UserSettings\General
Scheduler Frequency. See “\UserSettings\Scheduler”on page 21.
HKLM\SOFTWARE\Lenovo\SystemUpdate\Preferences\UserSettings\Scheduler
Scheduler Notify Options. See “\UserSettings\Scheduler”on page 21.
HKLM\SOFTWARE\Lenovo\SystemUpdate\Preferences\UserSettings\Scheduler
Scheduler RunAt. See “\UserSettings\Scheduler” onpage 21.
HKLM\SOFTWARE\Lenovo\SystemUpdate\Preferences\UserSettings\Scheduler
Scheduler RunOn. See “\UserSettings\Scheduler” onpage 21.
HKLM\SOFTWARE\Lenovo\SystemUpdate\Preferences\UserSettings\Scheduler
SchedulerAbility. See “\UserSettings\Scheduler” on page21.
HKLM\SOFTWARE\Lenovo\SystemUpdate\Preferences\UserSettings\Scheduler
SchedulerLock. See “\UserSettings\Scheduler” on page21.
HKLM\SOFTWARE\Lenovo\SystemUpdate\Preferences\UserSettings\Scheduler
SearchMode. See “\UserSettings\Scheduler” on page 21. HKLM\SOFTWARE\Lenovo\SystemUpdate\Preferences\UserSettings\Scheduler
UCSettings configurable itemsThis section provides descriptions for the configurable items available in the UCSettings key.
\UCSettings\BillboardThe following table and example provides the setting and values for the Billboard key.
Table 4. \UCSettings\Billboard
Configurable item Description Value Action
Default: Lenovo Live FeedLiveFeed Disables the live feedto the System Updatebillboard. Possible values:
• Default
• Blank
• If Default, the live feedimage will be displayedon the System Updateuser interface.
• If Blank, the defaultbillboard image will notbe displayed on theSystem Update userinterface.
Example:
\Billboard\LiveFeed = Blank
\UCSettings\GeneralThe following table and example provides the setting and values for the General key.
Chapter 3. Configurations 15

Table 5. \UCSettings\General
Configurable item Description Value Action
Default value: NODisable Disables the SystemUpdate user interface.Use this setting whenyou want to configureSystem Update using thecommand prompt.
Possible values:
• YES
• NO
• If YES, the SystemUpdate user interfacewill not be displayed.
• If NO, the SystemUpdate user interfacewill be displayed.
Example:
\GENERAL\Disable = NO
\UCSettings\HTTPSHelloSettingsThe following table and example provides the settings and values for the HTTPSHelloSettings key.
Table 6. \UCSettings\HTTPSHelloSettings
Configurable item Description Value Action
Default value: 0RetryLimit Specifies the maximumnumber of times thatSystem Update will try toconnect to the LenovoHelp Center Web site.
Possible values: Any validinteger
System Update will stoptrying to connect to theLenovo Help Center Website after the connectionattempts reach themaximum number oftries.
Default value: 0RetryWaitTime Specifies the maximumamount of time (inseconds) that SystemUpdate will wait beforeit tries to connect to theLenovo Help Center Website for another time afterthe previous attempt fails.
Possible values: Any validinteger
System Update will waitthe number of secondswhen attempting toconnect to the LenovoHelp Center Web site afterthe previous attempt fails.
The default value ispre-configured. By default,System Update will connect tothe Lenovo Help Center Website to search for updates foritself.
ServerName Specifies the server namethat System Update willsearch for updates foritself. Changing thedefault value will disablethe Update Thyselffunction of SystemUpdate. Possible values: Server name
or empty
System Update searchesthe Lenovo Help CenterWeb site for updatesfor itself, even if it isconnected to a localsystem or network sharerepository. You candisable the Web upgradefor System Update byclearing this value.
Example:
\HTTPSHelloSettings\RetryLimit = 2\RetryWaitTime = 2\ServerName = https://
Note: When System Update connects to the Lenovo Help Center Web site, it communicates with differentservers. The RetryLimit and RetryWaitTime settings under the HTTPSHelloSettings key control the
16 System Update Solution Deployment Guide

connection between System Update and the server from which System Update downloads the self-updatepackage (If a new version exists).
\UCSettings\HTTPSPackageSettingsThe following table and example provides the settings and values for the HTTPSPackageSettings key.
Table 7. \UCSettings\HTTPSPackageSettings
Configurable item Description Value Action
Default value: 0RetryLimit Specifies the maximumnumber of times that SystemUpdate will try to connect tothe Lenovo Help Center Website.
Possible values: Any validinteger
System Update will stoptrying to connect to theLenovo Help Center Website after the connectionattempts reach themaximum number oftries.
Default value: 0RetryWaitTime Specifies the maximumamount of time (in seconds)that System Update will waitbefore it tries to connect tothe Lenovo Help Center Website for another time after theprevious attempt fails.
Possible values: Any validinteger
System Update will waitthe number of secondswhen attempting toconnect to the LenovoHelp Center Web siteafter the previous attemptfails.
Example:
\HTTPSPackageSettings\RetryLimit = 2\RetryWaitTime = 2
Note: The RetryLimit and RetryWaitTime settings under the HTTPSPackageSettings key control theconnection between System Update and the server from which System Update downloads update packages.
UserSettings configurable itemsThis section provides descriptions for the configurable items available in the UserSettings key.
\UserSettings\ConnectionThe following table and example provides the settings and values for the Connections key. Thoseconfigurable items are for proxy server connections.
Table 8. \UserSettings\Connection
Configurableitem Description Value Action
Default value: None
This setting is only used for theconnection type of proxy, the HTTPproxy, when the proxy server requiresauthentication.
User Specifies the username to use for theconnection.
Possible values: Any string
This setting is used forauthentication to access theHTTP proxy server.
Chapter 3. Configurations 17

Table 8. \UserSettings\Connection (continued)
Configurableitem Description Value Action
Default value: NonePassword Specifies thepassword to usefor the connection. Possible values: Any string
This setting is used forauthentication to access theHTTP proxy server.
System Update will connect tothe HTTP proxy server defined inServerName using the user namedefined in User. The end useris prompted for this informationwhen the information is needed.
Example:
\Connection\\User = Billek\Password = ************
\UserSettings\GeneralThe following table and example provides the settings and values for the General key.
Table 9. \UserSettings\General
Configurable item Description Value Action
Default value: ActiveContentMode Refers to the status ofthe update packages thatSystem Update will searchfor in the Update Retrieverrepository.
Possible values:
• Active
• Test
• If Active, System Updatewill search the UpdateRetriever repository forthe update packages inactive status.
• If Test, System Updatewill search the UpdateRetriever repository forthe update packages intest status.
Note: If there is nodatabase.xml file in theUpdate Retriever repositoryfolder, System Updatewill ignore the value ofContentMode and searchfor all the update packages.
Default value: NODebugEnable Enables you to log processresults to the log file namedApplicabilityRulesTrace.log. Possible values:
• YES
• NO
• If YES, System Updatewill log the processresults to the log file.
• If NO, System Updatewill not log the processresults.
Default value: YESDisplayInformationScreen Enables you to skip the UserInformation panel of SystemUpdate. Possible values:
• YES
• NO
• If YES, the UserInformation panel willbe displayed.
• If NO, the UserInformation panel willnot be displayed.
18 System Update Solution Deployment Guide

Table 9. \UserSettings\General (continued)
Configurable item Description Value Action
Default value: YESDisplayLicenseNotice Enables you to skip thelicense agreement that willbe displayed before theupdate packages pick list ispopulated.
Possible values:
• YES
• NO
• If YES, the licenseagreement screen willbe displayed prior to theupdate packages picklist.
• If NO, the licenseagreement screen willnot be displayed.
Default value: YESDisplayLicenseNoticeSU Enables you to skip thelicense agreement that isdisplayed in the Scheduleupdates panel of SystemUpdate.
Possible values:
• YES
• NO
• If YES, the licenseagreement will bedisplayed prior tosaving the changes inthe Schedule updatespanel.
• If NO, the licenseagreement will bedisplayed and thechanges will be saveddirectly to the WindowsRegistry subkey.
Default value: YESExtrasTab Enables you to show or hidethe Extras tab in the SystemUpdate workspace. Possible values:
• YES
• NO
• If YES, the Extras tabwill be displayed inthe System Updateworkspace.
• If NO, the Extras tabwill not be displayedin the System Updateworkspace.
Default value: NOIgnoreLocalLicenseNote: By implementingthis setting, you areaccepting the End UserLicense Agreementand the Terms andConditions on behalf ofthe end user for eachpackage to be installed.Do not use this settingif you do not have theauthority to acceptthe End User LicenseAgreement and theTerms and Conditionson behalf of the end user.
Enables you to show orhide the license dialogwhen System Update isdownloading and installingan update package locatedin a repository folder such asthe network share repository.
Possible values:
• YES
• NO
• If YES, the license dialogwill not be displayedwhen a repository isused to store updatepackages.
Note: If you obtainpackages directlyfrom the Lenovo HelpCenter and do not usea repository to storeupdate packages, theIgnoreLocalLicensevalue will be ignored andthe license dialog will bedisplayed.
• If NO, the license dialogwill be displayed whena repository is used tostore update packages.
Chapter 3. Configurations 19

Table 9. \UserSettings\General (continued)
Configurable item Description Value Action
Default value: YESIgnoreRMLicCRCSize Enables you to enableor disable the followingfunctions when SystemUpdate downloads updatepackages from the LenovoHelp Center Web site:
• CRC (CyclicRedundancy Check):checks for file corruptionof readme and licenseagreement files whenyou download updatepackages from the LenovoHelp Center Web site.
• File size: checks the filesize of readme and licenseagreement files.
Possible values:
• YES
• NO
• If YES, System Updatewill ignore these files andwill not check for the filecorruption and file size.
• If NO, System Updatewill check for the filecorruption and file size.
Note: System Updatedoes not check file sizeand corruption of readmefiles and license agreementfiles when you downloadupdate packages from alocal repository even if youset this value to NO.
Default value: 300 (seconds)NotifyInterval Specifies the amount of timebetween restart notificationswhen you download andinstall update packages thatrequire a reboot.
Possible values: Any valuebetween 60 seconds and 86400 seconds
You can specify any valuebetween 60 seconds and 86400 seconds. By default,you will be prompted with arestart notification every 300seconds when you beginto download and installan update package thatforces a reboot or defer thedownload and installationprocess.
System Update will usethe default value when aninvalid value is set. Forexample, if you set a valuegreater than 86 400 seconds(24 hours), System Updatewill use the default value of300 seconds.
Default value:SUPPORTCENTER
RepositoryLocation1 Specifies the repositoryfolder path. The key valuename should be RepositoryLocation%N% where N is anumber between 1 and 20,including 1 and 20.
Possible values:
• SUPPORTCENTER
• A folder path
System Update will searchfor update packages in thespecified repository folder.
Default value: 2UNCMaxAttempts Specifies the maximumnumber of tries that SystemUpdate will attempt whenconnecting to a networkshare folder before itcompletely fails.
Possible values: Any validinteger
System Update will attemptthe number of tries whenconnecting to a networkshare folder.
Example:
\GENERAL\CheckLocalCRC = YES
20 System Update Solution Deployment Guide

\DebugEnable = NO\DisplayInformationScreen = YES\DisplayLicenseNotice = YES\DisplayLicenseNoticeSU = YES\ExtrasTab = NO\IgnoreLocalLicense = NO\IgnoreRMLicCRCSize = NO\NotifyInterval = 300\RepositoryLocation1 = SUPPORTCENTER\UNCMaxAttempts = 2
\UserSettings\SchedulerUsing the scheduler function, you can configure System Update to search for update packages at designatedintervals. To increase the speed of downloading update packages from Lenovo servers, change the Run Onsetting to a day that fits the needs of your enterprise. Do this when you install System Update.
Note: System Update for Windows 7 and later operating systems provides a weekly schedulersetting. However, you also can use the Task Scheduler tool on Windows 7 and later operating systems tocreate a customized scheduler for System Update to provide more scheduler options to achieve the bestscheduling practice. To configure the scheduler function through the Task Scheduler tool on the Windows7 operating system, do the following:
1. Navigate to Control Panel ➙ Administrativetools ➙ Run task scheduler. The Task Schedulerprogram is launched and the Task Scheduler window is displayed.
2. Right-click Task Scheduler (Local) in the left pane of the window and select Create Basic Task. TheCreate Basic Task Wizard is displayed.
3. Type a name for the new task in the Name field, for example, “TVSU.”You can also add descriptions forthe task in the Description field (optional). Then click Next.
4. Select the desired frequency to run the scheduled update and click Next. It is recommended toselect Monthly or Weekly.
5. Configure the detailed settings of the frequency you selected on the previous screen to specify whenyou wish System Update will run to get updates.
Take Monthly as an example, if you select Select all months from the Months drop-down list box,System Update will run once every month. Then from the Days drop-down list box, select one day onwhich you wish to run the scheduled update. You can also select one day from the On drop-down listbox, and then System Update will run on the designated day of the month(s) you specified. Click Next.
6. Select Start a program, and then click Next.
7. Type the installation directory of System Update in the Program/script field, or click Browse tolocate the folder where System Update is installed. You can also type desired scheduler settings andvalues in the Add arguments field (optional) and the Start in field (optional). For detailed informationabout settings and values for the System Update scheduler, see Table 10 “\UserSettings\Scheduler”on page 22.
Note: The installation directories of System Update are different on computers with the 32-bit Windows7 operating system and computers with the 64-bit Windows 7 operating system.
8. Click Next to view the summary of your configuration.
9. Click Finish to confirm and complete your configuration.
The default settings and values for the System Update scheduler are provided in the following table.
Chapter 3. Configurations 21

Table 10. \UserSettings\Scheduler
Configurable item Description Value Action
Default value: YESSchedulerAbility Enables you to activate orinactivate the scheduler.
Possible values:
• YES
• NO
• If YES, System Update will runon the specified schedule.
• If NO, System Update will notrun on a schedule.
Default value: SHOWSchedulerLock Enables you to show,hide, disable, or lock theSchedule updates optionin the System Update userinterface.
Possible values:
• SHOW
• HIDE
• DISABLE
• LOCK
• If SHOW, the Scheduleupdates option is available inthe left navigation pane.
• If HIDE, the Scheduleupdates option is not visibleto the end user.
• If DISABLE, the Scheduleupdates option in the leftnavigation pane is displayedbut appears dimmed.
• If LOCK, the Scheduleupdates panel can beopened, but the settings in itare disabled and cannot bechanged.
Default value:RECOMMENDED
SearchMode Specifies the type ofupdates that SystemUpdate will be scheduledto search for. Possible values:
• CRITICAL
• RECOMMENDED
• ALL
• If CRITICAL, System Updatewill search for only criticalupdates.
• If RECOMMENDED, SystemUpdate will search for bothcritical and recommendedupdates.
• If ALL, System Update willsearch for all updates, and allupdates will be retrieved.
Default value: NOTIFYNotifyOptions Enables you to choose thenotification options that youwant to receive from theSystem Update scheduler.
Possible values:
• DOWNLOADANDINSTALL
• DOWNLOAD
• NOTIFY
• DOWNLOADANDINSTALL-INCLUDEREBOOT
Note: If you setSearchMode toRECOMMENDED, NOTIFYis the only value availablefor NotifyOptions. SystemUpdate cannot run if youselect any of the other valuesfor NotifyOptions.
• If DOWNLOADANDINSTALL,the scheduler will downloadand install the updates withoutend user intervention.
• If DOWNLOAD, the schedulerdownloads the updates andnotifies the end user when theupdates are ready to install.
• If NOTIFY, the schedulerwill search for new updatesand notify the end user whennew updates are available fordownload and installation.
• If DOWNLOADANDINSTALL-INCLUDEREBOOT, SystemUpdate will download andinstall update packages andthen prompt the end user torestart the system.
Note: Make sure that no spaceseparates those values.
22 System Update Solution Deployment Guide
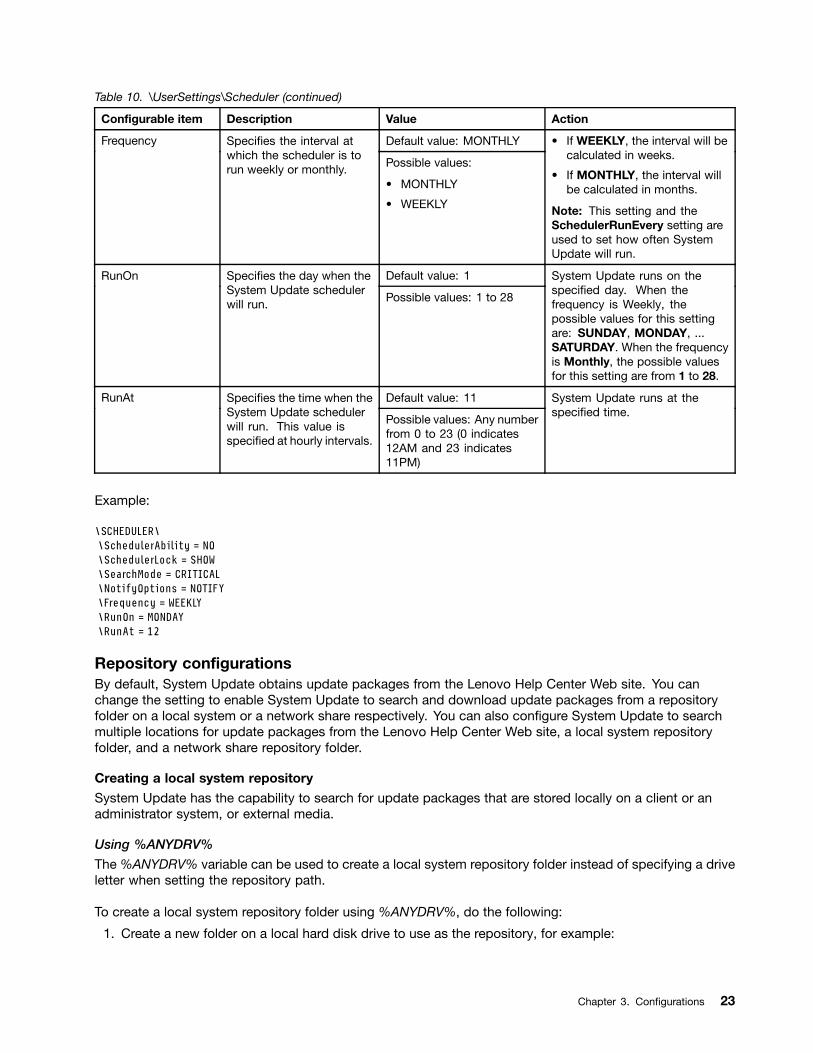
Table 10. \UserSettings\Scheduler (continued)
Configurable item Description Value Action
Default value: MONTHLYFrequency Specifies the interval atwhich the scheduler is torun weekly or monthly. Possible values:
• MONTHLY
• WEEKLY
• If WEEKLY, the interval will becalculated in weeks.
• If MONTHLY, the interval willbe calculated in months.
Note: This setting and theSchedulerRunEvery setting areused to set how often SystemUpdate will run.
Default value: 1RunOn Specifies the day when theSystem Update schedulerwill run. Possible values: 1 to 28
System Update runs on thespecified day. When thefrequency is Weekly, thepossible values for this settingare: SUNDAY, MONDAY, ...SATURDAY. When the frequencyis Monthly, the possible valuesfor this setting are from 1 to 28.
Default value: 11RunAt Specifies the time when theSystem Update schedulerwill run. This value isspecified at hourly intervals.
Possible values: Any numberfrom 0 to 23 (0 indicates12AM and 23 indicates11PM)
System Update runs at thespecified time.
Example:
\SCHEDULER\\SchedulerAbility = NO\SchedulerLock = SHOW\SearchMode = CRITICAL\NotifyOptions = NOTIFY\Frequency = WEEKLY\RunOn = MONDAY\RunAt = 12
Repository configurationsBy default, System Update obtains update packages from the Lenovo Help Center Web site. You canchange the setting to enable System Update to search and download update packages from a repositoryfolder on a local system or a network share respectively. You can also configure System Update to searchmultiple locations for update packages from the Lenovo Help Center Web site, a local system repositoryfolder, and a network share repository folder.
Creating a local system repositorySystem Update has the capability to search for update packages that are stored locally on a client or anadministrator system, or external media.
Using %ANYDRV%The %ANYDRV% variable can be used to create a local system repository folder instead of specifying a driveletter when setting the repository path.
To create a local system repository folder using %ANYDRV%, do the following:
1. Create a new folder on a local hard disk drive to use as the repository, for example:
Chapter 3. Configurations 23

%ANYDRV%\SystemUpdate3_x\
2. Navigate to the following registry entry:
HKLM\SOFTWARE\Lenovo\System Update\Preferences\UserSettings\General\RepositoryLocation1
3. Replace the default value, SUPPORTCENTER, with the file path of the repository that you createdin step 1, for example:
ANYDRV%\SystemUpdate3_x\
Using %XMEDIA%The %XMEDIA% variable can be used to detect the repository location path on external media connected tothe system, such as a CD, DVD, USB storage device, hard disk drive, or diskette. To create a local systemrepository folder using %XMEDIA%, do the following:
1. Create a new folder on a local hard disk drive to use as the repository, for example:
%XMEDIA%\SystemUpdate3_x\
2. Navigate to the following registry entry:
KLM\SOFTWARE\Lenovo\System Update\Preferences\UserSettings\General\RepositoryLocation1
3. Replace the default value, SUPPORTCENTER, with the file path of the repository that you createdin step 1, for example:
%XMEDIA%\SystemUpdate3_x\
Creating a network share repositoryTo create a network share repository folder that will be used to store update packages on a network share,do the following:
1. Create a new folder on a network share to use as the repository.
2. Share the new repository folder using the UNC (Universal Naming Convention) path. The UNC pathprovides connectivity to all computers that have been mapped to the repository. The format fora UNC path is:
\\Server\Share\
for example:
\Server_X\TVSU_repository\
3. Set the access permissions of the new repository folder to read-only access for end users. Administratorfunctions will require read and write access.
4. On client computers, navigate to the following registry entry:
HKLM\SOFTWARE\Lenovo\System Update\Preferences\UserSettings\General\RepositoryLocation1
24 System Update Solution Deployment Guide

Note: The default for this registry entry is SUPPORTCENTER. This default setting enables SystemUpdate to search for update packages on the Lenovo Help Center Web site. When you change thissetting to a network share repository folder that you have created on your network, client computerswith System Update will be able to search for update packages on your network.
5. Replace the default value, SUPPORTCENTER, with your server and share name, for example:
\Server_X\TVSU_repository\
Note: Distributed File System (DFS), a storage management solution, can be used to configure the networkshare repository.
Working with multiple repositoriesThis multiple repository capability ensures that you are getting the latest version of an update packagewhile being offered with greater flexibility of package storage. When using multiple repositories, SystemUpdate searches for update packages in the order of the repositories defined in the registry. System Updatesearches each repository location and retrieves the latest version of an update package. Packages on theLenovo Help Center Web site will be the most current version. If a repository location is not found, SystemUpdate will search the next numerical repository location. For example, if you remove the folder that pointsto RepositoryLocation1, System Update will search RepositoryLocation2, and then RepositoryLocation3.
The following illustration shows the relationship among the Lenovo Help Center, a local system, a networkshare, and System Update when using multiple repositories:
Local systemSystemUpdate
Internet
Lenovo Help Center
Network share
RepositoryLocation1
RepositoryLocation3
RepositoryLocation2
In this example, System Update will search the Lenovo Help Center Web site first, followed by the repositoryfolder on the local system, and then the repository folder on the network share:
• RepositoryLocation1 - Lenovo Help Center Web site
• RepositoryLocation2 - Local system
• RepositoryLocation3 - Network share
Creating and configuring multiple repositories with the registryTo create and configure multiple repository locations, do the following:
1. Create a new folder on a local hard disk drive to use as the repository, for example:
Chapter 3. Configurations 25

%ANYDRV%\SystemUpdate3_x\
2. Create a new folder on a network share to use as the repository.
3. Share the new repository folder using the UNC path. The UNC path provides connectivity to allcomputers that have been mapped to the repository. The format for the System Update UNC path is:
\\Server\Share\
for example:
\\Server_X\TVSU_repository\
4. Set the access permissions of the new repository folder to read-only access for end users. Administratorfunctions will require read and write access.
5. Navigate to the following registry location:
HKLM\SOFTWARE\Lenovo\System Update\Preferences\UserSettings\General\
Note: There will be a default key for the RepositoryLocation1 entry.
6. Create your local system repository as RepositoryLocation2 by doing the following:
a. From the Registry Editor main menu, click Edit and then click New.
b. Rename the string value as RepositoryLocation2.
c. Double-click the RepositoryLocation2 string.
d. Type the file path for the local system repository, for example:
%ANYDRV%\SystemUpdate3_x\
7. Create your network share repository as RepositoryLocation3 by doing the following:
a. From the Registry Editor main menu, click Edit and then click New.
b. Rename the string value as RepositoryLocation3.
c. Double-click the RepositoryLocation3 string.
d. Type the network share repository path of your server and share, for example:
\\Server_X\TVSU_repository\
UNCThe user name and password used by System Update and Update Retriever to access a network shareshould only be used by System Update and Update Retriever. If you map the repository location or log on toit using the same user name and password that is used by System Update or Update Retriever, the MapDrvutility used to connect to the network share will not be able to access the network share repository. If thisoccurs, System Update and Update Retriever will fail in the attempt to access the network share repository.
For more information, see “Using the MapDrv utility” on page 80.
Version control for System UpdateWhen a newer version of System Update is available, System Update connects to the Lenovo Help CenterWeb site, detects and downloads the newer version, and then installs that version. This process is doneautomatically, without user interaction, but can be disabled. For information about disabling the upgrade,see “\UCSettings\HTTPSHelloSettings” on page 16.
26 System Update Solution Deployment Guide

If you want to control the version of System Update available to your users, you can use your networkrepository to store specific versions of System Update. Storing packages locally will enable the SystemUpdate application to search for upgrades within your network repository.
Note: This version control function is compatible with System Update 3.02 and later versions.
To configure the registry for System Update version control, do the following:
1. Download the SSClientCommon.zip file from the following Lenovo Web site:http://www.lenovo.com/support/site.wss/document.do?lndocid=TVAN-ADMIN#tvsu
2. Create a folder to use as a repository that will store update packages, for example:
\\Server_X\TVSU_repository\
3. Extract the files from the SSClientCommon.zip file to your repository folder, for example:
\\Server_X\TVSU_repository\SSClientCommon\
4. Install System Update on the client computer.
5. Configure the registry keys on the client computer by doing the following:
a. Navigate to the following registry entry:
HKLM\SOFTWARE\Lenovo\System Update\Preferences\UCSettings\HTTPSHelloSettings
b. Double-click ServerName.
c. In the Value Data field in the Edit String dialog box, replace the HTTP server address with the UNCpath of your repository, for example:
\\Server_X\TVSU_repository\
d. Click OK.
e. Navigate to the following registry entry:
HKLM\SOFTWARE\Lenovo\System Update\Preferences\UserSettings\General
f. Double-click RepositoryLocation1.
g. In the Value Data field in the Edit String dialog box, replace the http server address with the UNCpath of your repository, for example:
\\Server_X\TVSU_repository\
h. Click OK.
Configuring System Update with Active DirectoryActive Directory is a directory service. The directory is where information about end users and resources isstored. The directory service allows access so that you can manipulate those resources. Active Directoryprovides a mechanism that gives administrators the ability to manage computers, groups, end users,domains, security policies, and any type of user-defined objects. The mechanism used by Active Directoryto accomplish this is known as Group Policy. With Group Policy, administrators define settings that canbe applied to computers or users in the domain.
The following examples are settings that Active Directory can manage for System Update:
Chapter 3. Configurations 27

• Scheduler settings
• Mapped Network Drive settings
Administrative template filesThe administrative template file (ADM file) defines policy settings used by applications on the clientcomputers. Policies are specific settings that govern the operation of applications. Policy settings alsodefine whether the end user will be allowed to set specific settings through an application.
Settings defined by an administrator on the server are defined as policies. Settings defined by an enduser on the client computer for an application are defined as preferences. As defined by Microsoft, policysettings take precedence over preferences. When System Update checks for a setting, it will look for thesetting in the following order:
1. Computer policies
2. Computer preferences
As described previously, computer and user policies are defined by the administrator. These settings can beinitialized through a Group Policy in Active Directory. Computer preferences are set by the end user on theclient computer through options in the application's interface.
Note: If you are using an ADM file and the Group Policy Editor to set policy settings for System Update,make sure that you are using the ADM file released specifically for each version. For example, if you arecustomizing policies for System Update 3.2, you must use the ADM file designed for System Update 3.2.
Adding administrative templatesTo add an ADM file to the Group Policy Editor, do the following:
1. On your server, launch Active Directory.
2. Click servername.com and then click Properties.
3. On the Group Policy tab, highlight New Group Policy Object and click Edit.
Note: You can also type gpedit.msc in the Open or Start Search box to launch the Group Policy Editor.
4. Under Computer Configuration, right-click Administrative Templates.
5. Click Add and then select the ADM file for System Update.
6. Click Close in the Add/Remove Templates dialog box.
7. Under Computer Configuration, click Administrative Templates. A new tab named System Update ispresent. Then, you will be able to configure all the available settings.
Note: For Windows 2000 operating systems, if the policies under User Configuration are not visible in theGroup Policy Editor when you add a new ADM file, close and then reopen the Group Policy Editor. ForWindows XP and Windows Vista operating systems, if the ThinkVantage policies for System Update areduplicated when you add a new ADM file, close and then reopen the Group Policy Editor.
Defining manageable settingsThe following example shows settings in the Group Policy Editor using the following hierarchy:
Computer Configuration > Administrative Templates > ThinkVantage >System Update > UserSettings > General > RepositoryLocation1
The ADM files indicate where in the registry the settings will be reflected. These settings will be in thefollowing registry locations:
• HKLM\Software\Lenovo\System Update
• HKLM\Software\Lenovo\Update Retriever
28 System Update Solution Deployment Guide

Applying group policy immediatelyTo apply policy settings immediately after you configure the settings for the ADM file, do the following:
1. From the Windows Start menu, click Run.
2. Type gpedit.msc /force and then click OK.
Group Policy settingsThe following tables provide policy settings for System Update.
User SettingsThis table provides the settings for the User Settings policies.
Table 11. Computer Configuration > Administrative Templates > ThinkVantage > System Update > User Settings
Policy Setting Description
User Name This setting specifies the user name for connection.
User Password This setting specifies the password for connection. Itstores the encrypted password of proxy.
Proxy/*/AutoConfigURLNote: * refers to the amountof proxy servers. Theamount must not exceedfive.
This setting stores the automatic configuration UniformResource Locator (URL) path such as file://c:/Proxy1.pacor http://10.10.1.1/Proxy1.pac.
Proxy/*/ProxyServerNote: * refers to the amountof proxy servers. Theamount must not exceedfive.
This setting stores the proxy server location such ashttp=10.10.1.1:8080 or socks=10.10.1.1:1080.
Connection
Proxy/*/ProxyEnableNote: * refers to the amountof proxy servers. Theamount must not exceedfive.
This setting specifies whether proxy is enabled. “0”stands for the disabled status and “1” stands for theenabled status.
Repository Location This setting specifies the repository location that updatepackages will be downloaded from and installed. Thedefault setting is SUPPORTCENTER and enablesSystem Update to download updates from the LenovoHelp Center. You can also specify a repository path on anetwork share drive, and this will enable System Updateto search for update packages in the network sharerepository folder. For more information on setting uprepositories, see “Repository configurations” on page 23.
General
UNC Max Attempts This setting specifies the maximum number of localrepository authentication attempts allowed.
Ignore Local License This setting enables you to show or hide the licensedialog when System Update is downloading and installingan update package located in a repository folder such asthe network share repository.
• If YES, the license dialog will not be displayed when arepository is used to store update packages.
Note: If you obtain packages directly from the LenovoHelp Center and do not use a repository for updatepackage storage, the IgnoreLocalLicense value willbe ignored and the license dialog will be displayed.
General
Chapter 3. Configurations 29

Table 11. Computer Configuration > Administrative Templates > ThinkVantage > System Update > User Settings(continued)
• If NO, the license dialog will be displayed when arepository is used to store update packages.
IgnoreRMLicCRCSize This setting enables you to enable or disable the followingfunctions when System Update downloads updatepackages from the Lenovo Help Center Web site:
• CRC: checks for file corruption of readme and licenseagreement files when you download update packagesfrom the Lenovo Help Center Web site.
• File size: checks the file size of readme and licenseagreement files.
You can set the value to YES or NO:
• If YES, System Update will ignore these files and willnot check for the file corruption and file size.
• If NO, System Update will check for the file corruptionand file size.
Note: System Update does not check file size andcorruption of readme files and license agreement fileswhen you download packages from a local repositoryeven if you set this value to NO.
NotifyInterval This setting specifies the amount of time between restartnotifications when you download and install updatepackages that require a reboot.
You can specify any value between 60 seconds and 86400 seconds. By default, you will be prompted with arestart notification every 300 seconds when you begin todownload and install an update package that forces areboot or defer the download and installation process.
System Update will use the default value when an invalidvalue is set. For example, if you set a value greater than86 400 seconds (24 hours), System Update will use thedefault value of 300 seconds.
Metrics Enabled This setting enables or disables the Metrics collection.
Administrator CommandLine
This setting enables the administrator to specify thedesired command line when launching the tvsu.exe filewith the parameter /CM.
SchedulerNote: System Updatefor Windows 7 and lateroperating systems providesa weekly schedulersetting. However, you alsocan use the Task Schedulertool on Windows 7 and lateroperating systems to createa customized schedulerfor System Update toprovide more scheduleroptions to achieve thebest scheduling practice.For detailed information
Scheduler Lock This setting enables you to show, hide, disable, or lockthe Schedule updates option in the System Update userinterface.
• If SHOW, the Schedule updates option is available inthe left navigation pane.
• If HIDE, the Schedule updates option is not visibleto the end user.
• If DISABLE, the Schedule updates option in the leftnavigation pane is displayed but appears dimmed.
• If LOCK, the Schedule updates panel can be opened,but the settings in it are disabled and cannot bechanged.
30 System Update Solution Deployment Guide

Table 11. Computer Configuration > Administrative Templates > ThinkVantage > System Update > User Settings(continued)
about using the TaskScheduler tool on Windows7 operating systems, see“\UserSettings\Scheduler”on page 21.
UNC This setting specifies the UNC location for the mappednetwork drive (format: \\server\share). The default valueis none.
User This setting enables you to use the mapdrv.exe /viewcommand to create an encrypted value for this field. Thedefault value is none.
Mapped Network Drive
Password This setting enables you to use the mapdrv.exe /viewcommand to create an encrypted value for this field. Thedefault value is none.
UCSettingsThis table provides the settings for the General policy of System Update.
Table 12. Computer Configuration > Administrative Templates > ThinkVantage > System Update > UCSettings > General
Policy Setting Description
Billboard LiveFeed This setting enables you to disable or enable System Update tocheck the Live Feed to get the billboard setting. You can remove thebillboard function from System Update by clearing this value.
General Disable This setting is used to determine if System Update should ignorerequests to run System Update.
• If NO, System Update will run normally.
• If YES, System Update will not run.
General Extras Tab The Extras tab enables you to easily find the right software,hardware, and solutions to help you keep your system up-to-dateand have your system to perform to its full capacity. System Updateanalyzes your system and then recommends solutions that can beused to enhance your system.
This setting enables you to show or hide the Extras tab on theSystem Update user interface.
• If YES, the Extras tab will be displayed in the System Updateworkspace.
• If NO, the Extras tab will not be displayed in the System Updateworkspace.
The default value is YES.
This table provides the policy setting for the Update Thyself function of System Update.
Chapter 3. Configurations 31

Table 13. Computer Configuration > Administrative Templates > ThinkVantage > System Update > UCSettings >HTTPSHelloSettings
Policy Setting Description
HTTPSHelloSettings Update Thyself System Update checks the Lenovo Help Center Web site forupdates for itself, even if it is connecting to a network sharerepository.
This setting is to enable or disable the Update Thyselffunction. You can remove the Update Thyself function fromSystem Update by clearing this value.
Managing network share repositories with Active DirectoryThis section provides a description of the policy settings for the network share repository. Setting thesepolicies will prompt an end user for a user name and password when the System Update end user interfaceis launched or when a scheduled update runs. When an end user authenticates into a domain and hasappropriate rights to access the network share repository, then no prompt for the user name and passwordis displayed on the System Update end user interface.
Active Directory enables you to edit policy settings with the Group Policy Editor. To customize the settingsfor network share repository folder, add the ADM file for System Update to the Group Policy Editor.
To add the ADM file and customize the settings, do the following:
1. Download the System Update ADM file from the Lenovo Web site at:http://www.lenovo.com/support/site.wss/document.do?lndocid=TVAN-ADMIN#tvsu
Note: If you are using an ADM file and the Group Policy Editor to set policy settings for System Update,make sure that you are using the ADM file released specifically for each version. For example, if you arecustomizing policies for System Update 3.2, you must use the ADM file designed for System Update 3.2.
2. On your server, launch Active Directory.
3. Click servername.com and then click Properties.
4. On the Group Policy tab, highlight New Group Policy Object and click Edit.
Note: You can also type gpedit.msc in the Open or Start Search box to launch the Group Policy Editor.
5. Right-click Administrative Templates.
6. Select Add/Remove Templates.
7. Click Add and then select the tvsu.adm file.
8. Click Close in the Add/Remove Template dialog box. The ThinkVantage tab is created.
Note: Under the ThinkVantage tab, there is a System Update tab. If you do not see the applicablepolicy, make sure that your Group Policy Editor is set to display all policy settings.
9. Navigate the Group Policy Editor to the following location:
Computer Configuration\Administrative Templates\ThinkVantage\System Update\User Settings\General\Repository Location
10. Double-click Repository Location.
11. In the Local Repository Location 1 field, change the value from SUPPORTCENTER to your networkrepository share, for example:
\\Server_X\TVSU_repository\
12. Click Apply.
32 System Update Solution Deployment Guide

Setting policies for multiple repositoriesTo set policies in the Group Policy Editor for multiple repositories, refer to the following example:
1. After adding the Administrative Template for System Update, navigate the Group Policy Editor to thefollowing location:
Computer Configuration\Administrative Templates\ThinkVantage\System Update\User Settings\General\Repository Location
2. Double-click Repository Location.
3. In the Local Repository 2 field, type the file path for your local system repository, for example:
%ANYDRV%\SystemUpdate3_x\
4. In the Local Repository 3 field, type the network share repository path of your server and share,for example:
\\Server_X\TVSU_repository\
5. Click Apply.
System Update version control using Active DirectoryIf you want to control the version of System Update available to your users, you can use your networkrepository to store specific versions of System Update. Storing packages locally will enable System Updateto search for upgrades within your network repository.
To configure Active Directory for System Update version control, do the following:
1. Download the SSClientCommon.zip file from the following Lenovo Web site:http://www.lenovo.com/support/site.wss/document.do?lndocid=TVAN-ADMIN#tvsu
2. Extract the SSClientCommon.zip file to your repository folder.
3. After adding the Administrative Template for System Update, navigate the Group Policy Editor to thefollowing location:
Computer Configuration\Administrative Templates\ThinkVantage\System Update\UCSettings\HTTPSHelloSettings
4. Double-click Update Thyself.
5. Click Enabled.
6. In the Update Thyself text box, type the UNC path of your repository, for example:
\\Server_X\TVSU_repository\
Note: If your repository folder requires authentication, set the polices for the Mapped Network Drive.For information about the Mapped Network Drive policies, see “Group Policy settings” on page 29.
7. Click OK.
8. Deploy these settings to client computers.
Note: System Update version control is compatible with System Update 3.02 and later versions.
Chapter 3. Configurations 33

34 System Update Solution Deployment Guide

Chapter 4. Working with System Update
This chapter provides information on working with update packages, using System Update, and downloadingthe Web upgrade for System Update.
About System UpdateWhen you search for updates using System Update, the request goes to a repository or the Lenovo HelpCenter, depending on how System Update is configured. In response, System Update provides a list ofnew candidate updates. Then System Update verifies which of the candidate updates are applicable to thehardware and software on your computer and displays a list of applicable updates. System Update willalso display update packages in order of severity that are related to other update packages. Once youselect updates of interest, System Update downloads the updates from the repository or the Lenovo HelpCenter, and then provides an installation method. If two or more update packages are related, SystemUpdate downloads and installs all update packages.
Designed to help you keep your system up-to-date, System Update provides the following functions:
• Get new updates
• Install deferred updates
• Schedule updates
Extras tabAs a feature of System Update, the Extras tab enables you to easily identify the applicable software,hardware, and solution offerings to help you keep your entire system performing to its full capacity.
System Update analyzes your system, and then recommends solutions that can be used to enhance yoursystem performance. Examples of what the Extras tab may recommend include:
• Memory upgrades
• Printer recommendations
• Warranty recommendations
System Update billboardIn various panels of the System Update user interface, there is a live feed billboard image provided byLenovo for customer registration. If you click this image, the registration process will begin. If you register,you will receive important information about your system from Lenovo. You can turn this live feed off byclearing the value in the registry. For more information on configuring this setting with the registry or theADM file, see Chapter 3 “Configurations” on page 13.
Note: The registration function is available to users in United States only.
Working with update packagesAn update package is made by bundling several files together. An updates package consists of aself-extracting installer program, an XML descriptor file that defines the update, one or more NLS readmefiles, any package license file, and any optional detection modules.
Applicable update packages must match the triplet of a client computer. A triplet is the combination of theoperating system, machine type (MT), and operating system language. An example of a triplet value is:
© Copyright Lenovo 2009, 2017 35
Windows XP, 2373, US English
Note: If you have multiple machine type/model numbers selected in the Update Retriever main window, allpackages common to the multiple systems that you select in the Applicable Updates window will resultin a check mark next to each system. Clearing the check box for one system will clear the check boxesfor all of the systems.
Downloading and installing updatesYou can download and install update packages from the following different locations:
• The Lenovo Help Center Web site
• The repository folder on a local system
• The repository folder on a network share
The following sections explain each location in detail, so that you can provide the best configuration foryour organization.
Using the Lenovo Help Center Web siteYou can manually initiate a search for new updates using System Update. System Update notifies you thatthe following information is communicated to determine the applicable update packages for your system:
• Operating system
• Machine type
• Operating system language
System Update will then provide a selectable list of updates. You will have the option to defer updates, soyou can download the update package and install it at a later time, or you can download the update packageand install it immediately. Once you select the updates to download and confirm the selections, the updateswill be downloaded and installed to your system.
Using the repository folder on a local systemYou can set up your computer to store update packages locally. Do this by creating a folder on yourcomputer to use as the repository, and then change the repository path in the registry that points to thatrepository on your local computer.
Using the repository folder on a network shareYou can download and install new updates from a repository that resides on a network share. SystemUpdate will retrieve the end user credentials (user name and password) needed for authentication from theapplication properties as encrypted strings. If a user name and password does not exist, System Update willstill attempt to connect to the network share but will prompt the user to provide a user name and password.
Note: The user name and password properties can be managed by Active Directory. As the user name andpassword must be encrypted when used as an application property, an administrator can use the Lenovosupplied utility called MapDrv to generate encrypted strings for the user name and password using asoftware key. For additional information about the MapDrv utility, see “MapDrv utility” on page 78.
The following keys are used to store the user name and password:
• HKLM\Software\Lenovo\MND\TVSUAPPLICATION\UNC=<network share>
• HKLM\Software\Policies\Lenovo\MND\TVSUAPPLICATION\UNC=<network share>
• HKLM\Software\Lenovo\MND\TVSUAPPLICATION\Pwd=<encrypted password>
36 System Update Solution Deployment Guide

If an Active Directory policy is used, these values are stored at:
• HKLM\Software\Policies\Lenovo\MND\TVSUAPPLICATION\UNC=<network share>
• HKLM\Software\Policies\Lenovo\MND\TVSUAPPLICATION\User=<encrypted username>
• HKLM\Software\Policies\Lenovo\MND\TVSUAPPLICATION\Pwd=<encrypted password>
Working with license agreementsUpon searching for update packages, System Update will provide update packages to download and install.Update packages can contain license agreements. If you store update packages in a repository, you cansave time and effort by using silent command scripts and by configuring System Update to recognizethese license agreements automatically. To configure System Update to recognize license agreementsautomatically, set the following registry value to YES:
HKEY_LOCAL_MACHINE\SOFTWARE\Lenovo\System Update\Preferences\UserSettings\General\IgnoreLocalLicense
Note: Using silent command scripts to recognize license agreements works only if you use a repositoryto store update packages. If you obtain packages directly from the Lenovo Help Center Web site, silentcommand scripts will not be effective.
Using System UpdateWhen using System Update to search for update packages, System Update will display search results in fourcategories: Critical, Recommended, Optional, and Extra. This categorization also defines the severity levelof the package. For a description of each category, see the following:
• Critical packages are considered mandatory for your system to function properly. Failure to install thesepackages could result in data loss, system malfunction, or hardware failure. You can choose to havecritical updates downloaded and installed automatically on a scheduled basis. A critical package canbe, for example:
– A hard disk drive firmware update that if not applied could result in hard disk drive failure.
– A BIOS upgrade that if not applied will result in system lags.
– A software patch to an application that if not applied could result in data loss on your system.
• Recommended packages are packages recommended by Lenovo to ensure your system working atoptimal performance. This severity level should be the default for most drivers. A recommended packagecan be, for example:
– A video driver that corrects an issue that may cause blue screen issues.
– A BIOS update that contains minor fixes that may impact a small group of customers.
– A power management driver that will allow a mobile system to get the most out of its battery life.
• Optional packages will improve your computing experience, but are not necessary. An optional packagecan be, for example:
– A tool that enables you to migrate files from one system to another such as the ThinkVantage® Rescueand Recovery® program. The Rescue and Recovery program is not needed for your system to operate,but provides benefit if you choose to install it.
– Any BIOS or driver upgrade that has been updated only to support newer systems and contains nofixes.
Chapter 4. Working with System Update 37

• Extra packages can consist of software, hardware, or solution offerings to help you keep your entiresystem performing to its full capacity. An extra package can be, for example:
– Memory upgrades
– Printer recommendations
– Warranty recommendations
Scheduling the search for updatesYou have the option to manually initiate the search for new updates or schedule an automatic search for newupdates at a specified time interval when System Update is configured to search from custom repositories.When you enable the automatic search for updates, you can define the package type, the search frequency,and the time of day when System Update searches for new updates.
Using System Update, you will be enabled to do the following automatic searches on a scheduled basis:
• “Automatic searching for new updates” on page 38
• “ Automatic searching for and downloading new updates” on page 39
• “ Automatic searching for, downloading, and installing new updates” on page 39
Configuring an automatic searchWhen you configure System Update to search for new updates automatically on a scheduled basis, thefollowing options are available:
• Schedule: You can choose to search for new updates weekly or monthly. For weekly checks, a day of theweek and time must be selected. For monthly checks, a date in the month and time must be selected.
• Notification: For recommended and optional updates, you can be notified when new updates are foundand have the choice to either download the updates or defer the download at a later time. For criticalupdates, you can configure the application to automatically download and notify you after the downloadis completed, or you can configure to download and install all new updates and to get notified after thedownload and installation is completed.
Configuring the notification option for an automatic searchIf performing an automatic search, you can configure the application with one of the following notificationoptions for critical, recommended, and optional updates:
• Provides notification when new updates are found so that you can manually initiate the download andinstallation.
• Downloads and installs the new updates and provides notification when completed.
• Automatically downloads updates and notifies you when the updates are ready to install.
The notification is in form of a balloon tooltip.
Automatic searching for new updatesYou can configure System Update to only search for updates from a custom repository on a specifiedschedule. If new updates are found, you are notified with a balloon tooltip from the application icon in thenotification area. When you click the balloon tooltip, System Update will display the new updates. You canalso launch System Update by double-clicking the application icon.
If you right-click the application icon, two options are available: Launch and Exit. Selecting Launch willstart System Update and display the new updates. Selecting Exit will remove the application icon, and youwill no longer be notified when new updates are found until the next scheduled search for new updates.
38 System Update Solution Deployment Guide

Automatic searching for and downloading new updatesYou can configure System Update to automatically search for and download new updates available to yoursystem on a specified schedule. New updates will be found and automatically downloaded to the localcache of deferred updates. When the download is completed, you will be notified with a balloon tooltip fromthe application icon in the notification area. If you click the balloon tooltip, System Update will be launchedand show the new updates that were downloaded and are ready to install. You can also launch SystemUpdate by double-clicking the application icon.
You can right-click and select Launch or Exit. Selecting Launch will launch System Update and displaythe new updates. Selecting Exit will remove the application icon, and you are no longer notified when newupdates were downloaded until the next scheduled search for new updates.
Automatic searching for, downloading, and installing new updatesYou can configure System Update to automatically search for, download, and install new updates availableto your system on a specified schedule. New updates will be found and automatically downloaded andinstalled to your system. When the installation is completed, you will be notified with a balloon tooltipfrom the application icon in the notification area. If you click the balloon tooltip, System Update will belaunched and show the updates that were installed and the results. You can also launch System Updateby double-clicking the application icon.
You can right-click and select Launch or Exit. Selecting Launch will launch System Update and display theresults screen. Selecting Exit will remove the application icon, and you are no longer notified when newupdates were installed until the next scheduled search for new updates.
Viewing the download and installation historyYou can view a history of updates that are downloaded and installed on your system. For each update, theresults of the download and installation are noted as either successful or failed.
Hiding and restoring hidden updatesUpdates can be hidden, which means those specific updates will not be displayed as applicable in thefuture. You can hide specific versions of an update.
Working with updates that force a rebootWhen installing multiple updates and one of the updates forces a reboot, System Update will automaticallycontinue the installation at the next update after the reboot.
Keyboard shortcutsThe following table provides the keyboard shortcuts for the main functions of System Update:
Table 14. Keyboard shortcuts
Function Shortcut
Get new updates CTRL+U
Install deferred updates CTRL+D
Schedule updates CTRL+S
View installation history CTRL+H
Restore hidden updates CTRL+R
Chapter 4. Working with System Update 39

Table 14. Keyboard shortcuts (continued)
Function Shortcut
Close CTRL+E
Context Help F1
40 System Update Solution Deployment Guide
Chapter 5. Working with Update Retriever
This chapter provides information about setting up and using Update Retriever.
About Update RetrieverUpdate Retriever enables you to download update packages from the Lenovo Help Center Web site to anetwork share repository folder. Your repository folder provides the storage for update packages. Onceconfigured, System Update can search your repository for update packages. This allows greater control ofthe updates that are available over your network.
You can manually initiate the search for updates or schedule an automatic search for new packages at aspecified time interval. If performing an automatic search, you can configure Update Retriever to providenotification when new updates are found so you can manually initiate the download or to automaticallydownload the new updates and provide notification when downloading is complete.
About update packagesUpdate Retriever enables you to modify or create update packages. An updates package consists of aself-extracting installer program, an XML descriptor file that defines the update, one or more NLS readmefiles, any package license file, and any optional detection modules. Each update package has an XMLdescriptor file that contains metadata used to describe the conditions that must exist on the client computerand how to install the update on the client computer. If an update meets the requirements you defined in theXML descriptor file, it is considered an applicable update for the targeted system. An XML descriptor filecontains the necessary information for an update package to be recognized and handled by System Update.
Note: To modify an update package, you must use Update Retriever to edit the XML descriptor file. Formore information, see the Update Retriever help system.
The following list provides the metadata of an update package that you can customize using UpdateRetriever:
• Package identity
– Package ID
– Name
– Version
– Vendor
– Release date
– Disk space needed to install the package
– Title, description, summary, and language of a package
– Version detection
– Target applications
• Installation detection
– Add/Remove programs
– BIOS
– BIOS date
– CPU address width
© Copyright Lenovo 2009, 2017 41

– Driver
– Embedded controller version
– External detection
– File date
– File existence
– File version
– Hard disk drive (HDD)
– Operating system and operating system languages
– OS
– OSLang
– OSNLang
– Plug-and-play adapter ID (PnPID)
– Registry key
– Registry key value
– Supported systems
– System vendor
• Assigning severity levels to update packages
– Critical
– Recommended
– Optional
• Installation setup and details
– Installation type
– Command
– Shell
– INF file
– One or more return codes indicating success or failure
– Reboot types
– Extract command
– Default language
– Manual installation details
– Uninstall details
• Defining the files that make up the update package
– Installer file
– External file
– Readme file
– License file and other system specific files
Update Retriever first time setupWhen you launch Update Retriever the first time, you need to set up Update Retriever. To do the firsttime setup of Update Retriever, do the following:
42 System Update Solution Deployment Guide

1. Launch Update Retriever.
Note: When you launch Update Retriever, you must be logged on as a user who belongs to a localadministrator group.
2. On the Welcome screen, specify a repository folder and set the logon information by doing the following:
a. Type or browse a repository path for the share drive used as the network share repository in theRepository path field.
Note: The Welcome screen will not open the next time you launch Update Retriever. However, youcan change the repository path and default status of updates by using the Modify settings option inthe Update Retriever navigation pane.
b. Type a user name and password for the share drive used as the network share repository in the username and password fields.
3. In the Get new updates panel, click Add.
4. In the Add new systems window, set the triplet information for a system by doing the following:
a. Type the applicable machine type. You can find the machine type on the bottom of a notebookcomputer or on the rear of a desktop computer.
b. Select the applicable operating system.
c. Select the applicable language.
d. Click Add and then click Save.
5. In the Get new updates panel, select the check box next to the applicable machine type you want tosearch for update packages.
Note: If you want to search for update packages for all machine types, select the Select all check box.
6. Click Next and then click Finish to search for the applicable update packages. Update Retriever willplace the update packages in the designated repository folder.
Attention: If you find duplicate update packages in the network share repository, and these updatepackages have different package contents, you can select all packages with corresponding names for agiven machine type when you are managing the contents of the network share repository.
Note: If you install Update Retriever on a notebook computer that is running the Windows 7 and lateroperating systems in one country and then download update packages in another country, the license fileswith those update packages may not be displayed correctly. To avoid this problem, do not download updatepackages in any country except the one where you installed Update Retriever.
Using Update RetrieverWith Update Retriever, you can manually initiate the search for update packages, or schedule an automaticsearch for new update packages at a specified time interval.
The following sections provide information on using Update Retriever to search for update packages,schedule an automatic search, view download history, and restore hidden updates.
Manual searching for new updatesYou can manually initiate a search for new updates using a wizard-like interface. Update packages arespecific to the triplet value of each client computer. A triplet is the combination of the operating system,machine type (MT), and operating system language. An example of a triplet value is:
Windows XP, 2373, US English
Chapter 5. Working with Update Retriever 43

For systems with various triplets, updates are assigned to matching machine types, operating systems, andlanguage values. The triplet value for an update is saved in the repository when the update is downloadedfrom the Lenovo Help Center Web site by Update Retriever.
Once a triplet value is specified, Update Retriever searches the Lenovo Help Center Web site and displays alist of packages targeted to the specified triplet value. After you search for updates, there will be a brieftime interval before you can select the applicable updates to download. Once you select the updates todownload, you can review your selections. After you confirm the selections, the updates will be downloadedto a specified repository.
Scheduling the search for updatesYou can configure Update Retriever to search for new updates automatically on a scheduled basis. Thescheduler initiates a search for new updates. The administrator is notified depending on how UpdateRetriever was configured, in the form of an e-mail or a balloon tooltip from the application icon in thenotification area.
Configuring an automatic searchWhen you configure Update Retriever to search for new updates automatically on a scheduled basis, thefollowing options are available:
• Schedule: You can choose to search for new updates weekly or monthly. For weekly checks, a day of theweek and time must be selected. For monthly checks, a date in the month and time must be selected.
• Notification: For recommended and optional updates, you can be notified when new updates are foundand have the choice to either download the updates or defer the download at a later time. For criticalupdates, you can configure the application to automatically download and notify you after the downloadis completed, or you can configure to download and install all new updates and to get notified after thedownload and installation is completed.
Configuring the notification option for an automatic searchIf performing an automatic search, you can configure the application with one of the following notificationoptions for critical, recommended, and optional updates:
• Provides notification when new updates are found so that you can manually initiate the download andinstallation.
• Downloads and installs the new updates and provides notification when completed.
• Automatically downloads updates and notifies you when the updates are ready to install.
The notification can be in the form of a balloon tooltip from the application icon in the notification area oran e-mail. The e-mail notification includes the date and time of the check, the number of packages found,and a list of updates.
Automatic searching for new updatesIf you are performing an automatic search for critical updates, you can configure the application to providenotification when new updates are found so that you can manually initiate the download later, or toautomatically download the new updates and provide notification when the downloading is complete.
If you are performing an automatic search for recommended updates, you can configure the application toprovide notification when new updates are found so that you can manually initiate the download later.
Note: System Update will only allow updates to be installed on systems for which the update was designated.
44 System Update Solution Deployment Guide

Managing the repositoryUpdate Retriever enables you to manage the updates in your repository.
Viewing updates in a repositoryYou can view updates in the repository by choosing Manage repository and then selecting Update view.
You can view updates by filtering by operating system, language, machine type, severity, and status. Inthe Update view panel, you can sort the list of updates by update ID, title, version, reboot type, severity,license, or status. You can select one or more packages and modify or delete them. You can also selectnon-Lenovo packages and modify the triplets.
Modifying an update packageYou can modify the reboot type, severity, license, and status of one or more update packages in therepository.
The following table provides the values that you can set for the selected update package(s).
Table 15. The values for an update package
Option Possible value
Reboot type • (Blank)
• No reboot: reboot type 0
• Forces a reboot: reboot type 1
• Reserved
• Requires a reboot: reboot type 3
• Shut down: reboot type 4
Severity • (Blank)
• Critical
• Recommended
• Optional
License • (Blank)
• Display
• No display
Status • (Blank)
• Test
• Active
Attention: You must change the value to Active to indicate that thepackage is in production, so that System Update can recognize it.
Note: The default value was set in the first time setup of Update Retriever. You can set the default valueby using the Modify settings option in the Update Retriever navigation pane. See “Modifying settings”on page 47.
Creating an update packageYou can create an update package by clicking Create an Update in the Update view panel.
To create an update package, do the following:
Chapter 5. Working with Update Retriever 45

1. Build a single executable for source files with an installer, such as 7zip, WinZip, WinRar, PackageFor The Web (PFTW), or MSI.
2. (Optional) Create a readme file that describes the update packages including the following:
• Reports with version history
• Minimum installation requirements
• Steps to install and uninstall
• Reports of changes from one version to a later version
• Issues that need to be communicated to the end user
Note: If a readme file does not exist in the update package, the update cannot be imported withUpdate Retriever.
3. (Optional) Create a file that documents the license or End-User Licence Agreement (EULA) which theend user must agree to before the package can be installed. System Update will present the contents ofthis file to the end user before the package can be downloaded and installed.
4. Test the executable you created in step 1.
5. Create the XML descriptor file with Update Retriever. For more information, see the Update Retrieverhelp system.
6. From the Define files panel, add the installer such as an executable, a license file, a readme file, andany optional or required files. Update Retriever automatically builds the package for you when youcomplete the XML descriptor.
7. Verify the package created in the Update Retriever repository.
8. Import the package to the network share repository using Update Retriever. See “Importing an updatepackage into a network share repository” on page 46.
Note: For more information on creating an update package, see the Update Retriever help system.
Importing an update package into a network share repositoryYou can import custom updates that are built manually or customized with Update Retriever into a networkshare repository using Update Retriever. When an update is imported, it is not assigned to a triplet. Thevalue for the triplet is listed as "Unassigned" for the machine type. You must assign custom updates to oneor more systems before they will be recognized by System Update.
To import an update package into the network share repository and reassign the triplet information, dothe following:
1. Launch Update Retriever.
2. Click Manage repository in the Update Retriever navigation pane.
3. Click Import updates.
4. Click Browse and navigate to your repository containing update packages.
5. Select your applicable update package and then click OK.
6. Select the check box to search subfolders (if the .xmls files are not in the root folder).
7. Click Next.
8. Review the updates that were found and then click Import.
9. Click Update view, and the imported updates are displayed as unassigned updates.
10. Select the check box for the updates and click Assign systems.
11. In the Assign system window, select the check box for the applicable triplets or select Select all.
12. Click Save.
46 System Update Solution Deployment Guide

Note: Each update must be in its own subfolder. If importing only one update, specify the folder thatcontains that update. If importing multiple updates, put each update subfolder under a wrapper folder andspecify the wrapper folder during the import operation.
Assigning triplets to an updateYou can assign custom updates to one or more systems. When viewing updates in the repository, you canselect one or more updates and assign those updates to one or more systems by selecting the relevanttriplets.
Generating a contents report of the network share repositoryYou can generate a report of the contents in the network share repository that will be in an Excel spreadsheetformat (CSV file). In this report, you can choose to include active updates, archived updates, hiddenupdates, and test updates.
Modifying settingsYou can set the default repository and the default update package status by using the Modify settingsoption in the Update Retriever navigation pane.
• Update default status: The status of updates will be set to a specified value when updates are retrievedfrom the Lenovo Help Center or imported to a local repository.
• Repositories: You can customize the location of the repository folder. If a network share is specifiedusing the UNC path, you can provide a user name and password to authenticate without requiring aprompt when making the actual connection.
Viewing historyThe View history function enables you to view the detailed information about the download history andexport history.
The download history provides detailed information about all updates that the ThinkVantage UpdateRetriever has downloaded to the update repository, as well as updates that are hidden.
To view the download history, do the following:
1. Click View history in the left pane of the main window. The View History window opens.
2. Click the View download history link to view the following information:
• Title: The title of the update.
• Version: The version number of the update.
• Name: The name of the update.
• Downloaded Time: The date and time when the update was downloaded (not displayed for currentresults).
The export history provides detailed information about updates that have been exported to the target folder.
To view the export history, do the following:
1. Click View history in the left pane of the main window. The View History window opens.
2. Click the View export history link to view the following information:
• Exported Time: The date and time when the update was exported.
• Status: Successful or Failed (followed by the cause of failure).
• Source Location: The directory where the driver update is saved in the repository.
• Target Location: The directory where the exported driver update is saved.
Chapter 5. Working with Update Retriever 47

• Subfolder Name: The name of subfolder where the exported driver update is saved. For the driverupdate that fails to be exported, the subfolder name just indicates its title and version number.
Hiding updatesYou can hide updates, which means that the hidden updates including the current and future versions willnot be displayed as relevant (from the Lenovo Help Center) in the future. You have two options:
• Hide just a specific version of an update
• Hide all future versions of an update
If in the future you want to have those updates displayed again, you can unhide them.
Exporting updatesThe ThinkVantage Update Retriever enables you to export driver updates in your repository to a designatedtarget folder. During the export process, Update Retriever will extract each driver update to a subfolder.Then, these extracted driver updates can be easily imported into common operating system deploymenttools such as Microsoft System Center Configuration Manager or LANDesk Management Suite for easyintegration and deployment.
Note: Before exporting updates, make sure you have downloaded the relevant driver updates for targetsystems from the Lenovo Help Center to your repository.
To export the driver updates, do the following:
1. Click Manage repository in the left pane of the main window. The menu expands to show severaloptions for managing the repository.
2. Click Export updates to begin the process of exporting driver updates in the right pane of the mainwindow.
3. Type the directory of the target folder in the Folder field, or click Browse to locate the target folder. Youcan create the target folder if it does not exist.
4. Click Next. Select a system from the Machine type/Operating system/Language list, and then select thedriver update(s) assigned to the system you selected, or select Select all to include all the updatesdisplayed.
5. Repeat step 4 for other systems if desired.
6. Click Finish. The export starts, and you can view the export progress in the right pane.
7. When the export completes, the results and the location link of the target folder are displayed. You canclick the results link to view the export history, and click the location link to open the target folder thatcontains the extracted driver updates.
Note: When exporting updates from a repository located on the network instead of a repository on a localdrive, an Open File - Security Warning dialog will be displayed for each update that is to be extracted duringthe export process. To prevent the dialog from being displayed, you can change the Local intranet settings inthe Microsoft Internet Explorer Web browser, either temporarily or permanently as you need.
To change the Local intranet settings in the Microsoft Internet Explorer Web browser, do the following:
1. Open the Microsoft Internet Explorer Web browser.
2. Click Tools and select Internet Options.
3. Click the Security tab.
4. Click the Local intranet icon and click Sites.
5. The Local intranet dialog box is displayed. If the Automatically detect intranet network check box isselected, clear it and then select Include all network paths (UNCs). It is recommended that you alsoselect Include all local (intranet) sites not listed in other zones and Include all sites that bypass theproxy server unless otherwise instructed by your system administrator.
48 System Update Solution Deployment Guide

6. Click OK to save the Local intranet settings.
7. On the Security tab, click Default level to view the default security level. If the security level is set toMedium-low or Low, no other changes are necessary. Otherwise, go to step 8.
8. If the security level is set to High, Medium-high, Medium, or Custom, change the security level toMedium-low (the default setting) by moving the security level slider. However, you can keep the securitylevel higher than Medium-low yet still be able to prevent the Open File - Security Warning dialog frombeing displayed by customizing the security setting. To customize the security setting, do the following:
a. Click Custom level. The Security Settings-Internet Zone dialog is displayed.
b. Locate the Launching applications and unsafe files option.
c. Select Enable.
d. Click OK. A dialog box for confirmation is displayed.
e. Click Yes to confirm your selection.
f. Click OK to exit the Internet Options dialog box.
Keyboard shortcutsThe following table provides the keyboard shortcuts for the main functions of Update Retriever:
Table 16. Keyboard shortcuts
Function Shortcut
Get new updates CTRL+G
Update view (Show updates) CTRL+U
Create reports CTRL+R
Import updates CTRL+I
Schedule updates CTRL+S
Update view (Restore hidden updates) CTRL+H
Update view (Manage archive) CTRL+A
Modify settings CTRL+E
View download history CTRL+T
Chapter 5. Working with Update Retriever 49

50 System Update Solution Deployment Guide

Chapter 6. Working with Thin Installer
This chapter provides information about using Thin Installer and configuring it to fit your needs.
About Thin InstallerThin Installer is designed to help IT administrators keep the systems in their environment up-to-date. Theprogram searches for the updates from a repository created by the user. The repository can be on a localhard disk drive, a network share, a Web share (HTTP), or external media such as a CD, DVD, or USB harddisk drive. The program automatically recognizes the machine type of your computer, model number, andother system information to determine whether the system needs the available updates. If two or moreupdates are related, the program downloads and installs all updates. The program can be configured toinstall updates either manually or automatically.
Thin Installer is a lighter version of System Update. Unlike System Update, Thin Installer does not requireinstallation, does not create any registry keys, and does not have any services. All the files related with ThinInstaller are located in a single folder.
Thin Installer is available on the Lenovo Support Web site at:http://www.lenovo.com/support/site.wss/document.do?lndocid=TVAN-ADMIN#tvsu
Thin Installer is supported on the following operating systems:
• Windows 10
• Windows 8
• Windows 8.1
• Windows 7
Note: Thin Installer requires Microsoft .NET Framework 3.5 or a later version.
Configuring Thin InstallerThin Installer provides an XML file, ThinInstaller.exe.configuration, to configure settings. The XML file islocated at the root of the Thin Installer folder.
The default configuration is shown as follows:
<Configuration><RepositoryPath></RepositoryPath><LogPath></LogPath><LanguageOverride>EN</LanguageOverride><BlockSize>4096</BlockSize><AskBeforeClosing>NO</AskBeforeClosing><DisplayLicenseNotice>NO</DisplayLicenseNotice><IgnoreLocalLicense>YES</IgnoreLocalLicense><IgnoreRMLicCRCSize>YES</IgnoreRMLicCRCSize><DebugEnable>NO</DebugEnable><ContentMode>Active</ContentMode></Configuration>
© Copyright Lenovo 2009, 2017 51

Table 17. Description of configurable items
Configurable item Description Value Action
RepositoryPath Specifies the repository path. Bydefault, Thin Installer searches forupdates in a subdirectory under theThin Installer folder.
Default value: blank If specified, Thin Installersearches for updates fromthe specified repositorypath.
LogPath Specifies the log path. By default,the log is created in a subdirectoryunder the Thin Installer folder.
Default value: blank If Thin Installer does nothave write access to thespecified log path, ThinInstaller will create the logat the default location.
Default value: ENLanguageOverride Specifies the language to be used.
Possible values:
• DA
• NL
• EN
• FI
• FR
• DE
• IT
• JP
• KO
• NO
• PT
• ES
• SV
• CHS
• CHT
Changes the language tothe specified one.
Default value: 4096BlockSize Specifies the number of bytes to beread each time data is downloaded.
Possible values:
• 4096
• 8192
Sets the number of bytesto the specified one.
Default value: NOAskBeforeClosing Prompts the user whether to closeThin Installer.
Possible values:
• YES
• NO
• If YES, a dialog box willprompt to ask whetherto close Thin Installer.
• If NO, no dialog box willprompt to ask whetherto close Thin Installer,and Thin Installer willclose directly.
Default value: NODisplayLicenseNotice Enables you to skip the licenseagreement that is displayed beforethe update package pick list ispopulated.
Possible values:
• YES
• NO
• If YES, the licenseagreement screen willbe displayed prior to theupdate package picklist.
• If NO, the licenseagreement screen willnot be displayed.
52 System Update Solution Deployment Guide

Table 17. Description of configurable items (continued)
Configurable item Description Value Action
Default value: YESIgnoreLocalLicense Shows or hides the license dialogwhen Thin Installer is downloadingand installing an update package. Possible values:
• YES
• NO
• If YES, the licensedialog will not bedisplayed when ThinInstaller is downloadingand installing an updatepackage.
• If NO, the licensedialog will be displayedwhen Thin Installeris downloading andinstalling an updatepackage.
Note: Some Microsoftupdates may requirethe end user to acceptthe license, and thiscannot be disabled bythe IgnoreLocalLicenseconfigurable item.
Default value: YESIgnoreRMLicCRCSize Use this setting to enable or disablethe following functions when ThinInstaller downloads packages:
• CRC - checks the file corruptionof readme and license agreementfiles when you downloadpackages.
• File size - checks the file size ofreadme and license agreementfiles.
Possible values:
• YES
• NO
• If YES, Thin Installerskips checking thecorruption or the size ofthese files.
• If NO, Thin Installerchecks the corruption orthe size of these files.
Default value: NODebugEnable Specifies whether Thin Installershould create the log file namedApplicabilityRulesTrace.log. See“ApplicabilityRulesTrace.log” onpage 57.
Possible values:
• YES
• NO
• If YES, Thin Installer willcreate the log file.
• If NO, Thin Installer willnot create the log file.
Default value: ActiveContentMode Refers to the status of the updatepackages. Set the value dependingon the status of update packages inthe repository.
Possible values:
• Active
• Test
• If Active, Thin Installerwill search the UpdateRetriever repository forupdate packages inactive status.
• If Test, Thin Installerwill search the UpdateRetriever repository forupdate packages in teststatus.
Note: If there is nodatabase.xml file inthe Update Retrieverrepository folder, ThinInstaller will ignore thevalue of ContentModeand search for all theupdate packages.
Chapter 6. Working with Thin Installer 53

Using Thin InstallerTo use Thin Installer, extract the executable from the Lenovo Support Web site and configure the path of therepository. To create the repository, see Chapter 5 “Working with Update Retriever” on page 41. By default,the program searches for updates in a subdirectory under the Thin Installer folder.
Figure 6. Default repository
To specify a different location, use the configuration file located in the Thin Installer folder or use thecommand line parameters.
Note: If the repository location is specified in both the configuration file and the command line, the commandline will take higher precedence.
Thin Installer requires administrative privileges. If Thin Installer is invoked by a software distributionagent, Thin Installer will run with the same privileges as the software distribution agent, which usuallyhas administrative privileges.
The following table provides the command line scripts for Thin Installer. %ANYPATH% denotes the directorieswhere the Thin Installer files are located.
Table 18. Command line scripts
Scripts Description
%ANYPATH%\Thininstaller.exe /CM –search C–action LIST
Searches the default repository for critical updatepackages and notifies you with a balloon tooltipfrom the application icon in the notification areaprior to installation.
%ANYPATH%\Thininstaller.exe /CM –search R–action INSTALL
Searches the default repository for critical andrecommended update packages and installs thosethat do not contain a license agreement.
If you do not set the value in theDisplayLicenseNotice configurable item toNO, you will be prompted to agree to a licenseagreement before the update package pick list isdisplayed.
You will be notified with a balloon tooltip from theapplication icon in the notification area after theupdate packages are installed.
54 System Update Solution Deployment Guide

Table 18. Command line scripts (continued)
Scripts Description
%ANYPATH%\Thininstaller.exe /CM –search A–action INSTALL -noicon
Installs all critical, recommended, and optionalpackages that have no reboot requirement andsuppresses the balloon tooltip from the notificationarea icon after the installation is completed.
%ANYPATH%\Thininstaller.exe /CM –search C–action INSTALL –noicon–includerebootpackages 1,3,4
Installs all critical packages with specified reboottypes without displaying a balloon tooltip from theapplication icon in the notification area after theinstallation is completed. Packages with a reboottype will force the system to reboot or shut down.
%ANYPATH%\Thininstaller.exe /CM –search R–action INSTALL –noicon–includerebootpackages 1,3,4 -noreboot
Installs all critical and recommended packageswith specified reboot types without displaying aballoon tooltip from the application icon in thenotification area after the installation is completed,and suppresses the system reboot for packageswith reboot type 3.
%ANYPATH%\Thininstaller.exe /CM –search A–action LIST –repository C:\MyRepository
Searches a repository for critical, recommended,and optional update packages and notifies youwith a balloon tooltip from the application icon inthe notification area prior to installation.
%ANYPATH%\Thininstaller.exe /CM –search C–action INSTALL –repository C:\MyRepository
Searches a repository for critical update packagesand installs those that do not contain a licenseagreement.
If you do not set the value in theDisplayLicenseNotice configurable item toNO, you will be prompted to agree to a licenseagreement before the update package pick list isdisplayed.
You will be notified with a balloon tooltip from theapplication icon in the notification area after theupdate packages are installed.
%ANYPATH%\Thininstaller.exe /CM -search A-action INSTALL -repository C:\MyRepository-noicon -includerebootpackages 1,3,4-noreboot
Searches a repository for critical, recommended,and optional update packages and then installsthose with specified reboot types that do notcontain a license agreement.
If you do not set the value in theDisplayLicenseNotice configurable item toNO, you will be prompted to agree to a licenseagreement before the update package pick list isdisplayed.
You will not be notified with a balloon tooltip fromthe application icon in the notification area afterthe update packages are installed. Reboot type 3will suppress a system reboot.
Chapter 6. Working with Thin Installer 55

Table 18. Command line scripts (continued)
Scripts Description
%ANYPATH%\ThinInstaller.exe /CM –search C–action INSTALL –repository C:\MyRepository–log "C:\MyLogFolder\MyLogFile.txt"
Searches a repository for critical update packagesand installs those that do not contain a licenseagreement.
If you do not set the value in theDisplayLicenseNotice configurable item toNO, you will be prompted to agree to a licenseagreement before the update package pick list isdisplayed.
You will be notified with a balloon tooltip from theapplication icon in the notification area after theupdate packages are installed. The log informationis written into a specified log file.
%ANYPATH%\ThinInstaller.exe /CM –search R–action INSTALL –repository C:\MyRepository–noicon –includerebootpackages 1,3,4-noreboot
Searches a repository for critical andrecommended update packages and then installsthose with specified reboot types that do notcontain a license agreement.
If you do not set the value in theDisplayLicenseNotice configurable item toNO, you will be prompted to agree to a licenseagreement before the update package pick list isdisplayed.
You will not be notified with a balloon tooltip fromthe application icon in the notification area afterthe update packages are installed. Reboot type 3will suppress a system reboot.
%ANYPATH%\Thininstaller.exe /CM -search A-action INSTALL -repository C:\MyRepository-includerebootpackages 1,3,4 -showprogress-noreboot
Searches a repository for critical, recommended,and optional update packages and then installsthose with specified reboot types that do notcontain a license agreement.
If you do not set the value in theDisplayLicenseNotice configurable item toNO, you will be prompted to agree to a licenseagreement after the search is completed.
Progress bars will be displayed to indicate theinstallation progress for each update and theoverall progress. Reboot type 3 will suppress asystem reboot.
%ANYPATH%\Thininstaller.exe /CM -search A-action LIST -repository C:\MyRepository-showprogress
Searches a repository for critical, recommended,and optional update packages and displays aprogress bar while searching the repository forupdates.
Notes:
1. The BIOS installation requires user’s attention and cannot be deployed in unattended mode.
2. The BIOS installation forces the system to reboot and cannot be suppressed by the command lineparameter –noreboot.
3. Thin Installer installs the BIOS updates after all other updates to reduce the number of reboots.
56 System Update Solution Deployment Guide

Return error codesThin Installer returns error code 0 for success and error code 1 for any of the following conditions duringthe deployment of the updates.
• The specified repository is not found.
• The XML schema validation fails for the update package.
• The CRC validation fails for the executable file of the update package.
• The update package installation fails.
• Thin Installer itself fails.
Example:
@echo offCMD /C Exit 0"%SystemDrive%\Program Files\Thininstaller\Thininstaller.exe" /CM -search A-action install -includerebootpackages 1,3,4 -repository "C:\MyRepository"–displayprogress –noreboot -noicon
if "%ERRORLEVEL%"=="1" @echo "Error Level 1...Fail"if "%ERRORLEVEL%"=="0" @echo "Error Level 0...Successful"
LogsThin Installer creates the following logs during the deployment:
• %Temp%Setup Log Y-M-D.txt
• ApplicabilityRulesTrace.log
• Update_log_YYMMDDHHMMSS.txt
%Temp%Setup Log Y-M-D.txtThis log is created by default under the %temp% directory and maintains the history of Thin Installer'sinstallation process.
ApplicabilityRulesTrace.logThis log is created when the DebugEnable configurable item in the configuration file is set to Yes. This loghelps to find why a particular update is not applicable to the client computer. For each update, there aretwo entries in this log:
• DetectInstall: If True, this indicates that the update already exists on the client computer. If False, thisindicates that the update does not exist and may be applicable to the client computer.
• Dependencies: If True, this indicates all dependencies are met. If False, this indicates one or moredependencies are not met. Dependencies can be the combination of the operating system, 32-bit or64-bit, registry keys, the version, or any prerequisites. This log is created in the subdirectory underthe Thin Installer folder.
Update_log_YYMMDDHHMMSS.txtBy default, this log is created in the subdirectory under the Thin Installer folder.
Windows 7 and later operating systems considerationsWhen Thin Installer finishes installing an update package with reboot type 1 or 4, the system rebootsautomatically. If there are any update packages remaining to be installed, the program continues to installthese update packages automatically after the reboot.
Chapter 6. Working with Thin Installer 57

With considerations for Windows 7 and later operating systems, after you log in to the Windows desktop,the UAC might stop the program from continuing to install the remaining update packages. To install theremaining update packages, you need to manually click the Windows has blocked some startup programsmessage on the system tray and select Run blocked program to run Thin Installer.
Note: If the Windows has blocked some startup programs message does not display on the system tray,you need to manually run Thin Installer, search for the remaining update packages, and install them.
Web server configurationThe IIS (Internet Information Server) 6.0 or above does not serve unknown MIME (Multipurpose Internet MailExtensions) types. When Thin Installer requests a MIME type that is not defined on the Web server, forexample, .sys, the MIME type needs to be added to the MIME type list on the Web server. To add the MIMEtype, refer to the detailed procedure available on the following Web site at:http://technet.microsoft.com/en-us/library/cc725608(WS.10).aspx
Best practicesFor best practices of working with Thin Installer, see “Scenario 8 - Working with Thin Installer” on page 64 inChapter 7 “Best practices” on page 59.
Uninstalling Thin InstallerNo registry keys or temporary files relating to Thin Installer are created when the program finishes installingupdate packages. Therefore, to uninstall Thin Installer, you only need to delete the repository folder and allrelated files.
58 System Update Solution Deployment Guide

Chapter 7. Best practices
This chapter provides step-oriented scenarios to help you understand the update process. The scenariosprovided in this chapter are:
“Scenario 1 - Managing the update process” on page 59
“Scenario 2 - Deploying specific update packages” on page 60
“Scenario 3 - Deploying to non-Lenovo systems” on page 62
“Scenario 4 - Disabling the Web upgrade for System Update” on page 62
“Scenario 5 - Installing specific update packages with the MSDOS prompt” on page 63
“Scenario 6 - Deploying update packages to client computer repositories” on page 63
“Scenario 7 - Working with firewalls and the scheduler function” on page 64
“Scenario 8 - Working with Thin Installer” on page 64
Scenario 1 - Managing the update processThe following steps provide the best practices for managing the update process using System Updateand Update Retriever. For conceptual information about the update process, see “Managing the updateprocess” on page 1 .
Step 1 - Installing the programsComplete the following steps to install System Update and Update Retriever:
1. Create a new folder on the server to use as the repository.
2. Share the new repository folder using the UNC path. The UNC path provides connectivity to allcomputers that have been mapped to the repository. The format for a UNC path is:
\\server\share
for example:
\\Server_X\TVSU_repository\
3. Set the access permissions of the new repository folder to read-only access for end users.
4. Download Update Retriever to the administrator computer. Update Retriever can be downloaded fromthe following Lenovo Web site:http://www.lenovo.com/support/site.wss/document.do?lndocid=TVAN-ADMIN#tvsu
5. Install Update Retriever silently by entering the following command for each program at the commandprompt:
[Update Retriever installation file name].exe/VERYSILENT /NORESTART
When you launch Update Retriever, you must be logged on as a user who belongs to a localadministrator group.
© Copyright Lenovo 2009, 2017 59
6. Download System Update from the following Lenovo Web site:http://www.lenovo.com/support/site.wss/document.do?lndocid=TVAN-ADMIN#tvsu
7. Install System Update silently by entering the following command at the command prompt:
[System Update installation file name].exe/VERYSILENT /NORESTART
Note: System Update for Windows 7 and later operating systems provides a weekly schedulersetting. However, you also can use the Task Scheduler tool on Windows 7 and later operating systemsto create a customized scheduler for System Update to provide more scheduler options to achieve thebest scheduling practice. For detailed information about using the Task Scheduler tool on Windows7 operating systems, see “\UserSettings\Scheduler” on page 21.
Step 2 - Customizing the programsCustomize the settings for System Update with Active Directory or the registry. For additional informationabout how to customize System Update with the registry, see “Configuring System Update with the registry”on page 14. For information about how to customize System Update using Active Directory, see “ConfiguringSystem Update with Active Directory” on page 27.
Step 3 - Working with the programsComplete the following steps to download packages to your network, edit XML descriptor files using UpdateRetriever, and then download and install packages using System Update:
1. Get update packages with Update Retriever.
2. Edit the XML descriptor file of the update packages using Update Retriever.
3. Import the update packages back into the network share repository using Update Retriever.
4. Use System Update to search the network share repository for update packages.
5. Download and install update packages to client computers.
Scenario 2 - Deploying specific update packagesFor enterprises that choose to deploy specific update packages to client computers, you can configureSystem Update, Update Retriever, and repository folders to deploy only the update packages that you haveselected. The following step-by-step instructions provides you with procedures to create repository folders,configure System Update, and work with Update Retriever to deploy specific update packages.
Creating repository foldersTo create repository folders to store update packages, do the following:
1. Create a new repository folder on a server that System Update will use to obtain specific updatepackages for client computers.
2. Share the repository folder using the UNC path. The UNC path provides connectivity to all computersthat have been mapped to the repository, for example:
\\Server_X\SystemUpdate_repository\
3. Set the access permissions of the new repository folder to read-only access for end users.
4. Create another new folder on a server to use as a repository for update packages downloaded from theLenovo Help Center Web site with Update Retriever.
5. Share the repository folder using the UNC path, for example:
60 System Update Solution Deployment Guide

\\Server_X\UpdateRetriever_repository\
Configuring System Update on client computersTo configure System Update to download specific update packages to client computers, do the following:
1. On client computers, navigate to the following registry entry:
HKLM\SOFTWARE\Lenovo\System Update\Preferences\UserSetting\General\RepositoryLocation1
2. Change this setting by replacing the default value, SUPPORTCENTER, with your server and share nameof the System Update repository folder that you created in step 1 of “Creating repository folders” onpage 60, for example:
\\Server_X\SystemUpdate_repository\
Note: You can also use Active Directory to deploy this registry change using Group Policy. For moreinformation about working with Active Directory and Group Policy, see “Configuring System Update withActive Directory” on page 27.
Working with Update RetrieverComplete the following steps to use Update Retriever to download update packages from the Lenovo HelpCenter Web site to your Update Retriever repository that you created in step 4 under “Creating repositoryfolders” on page 60:
1. Launch Update Retriever on an administrator system.
2. On the Welcome screen, complete the following First time setup requirements:
a. In the Repository path field, type the directory path for the new Update Retriever repository thatyou created in step 4.
b. In the User name and Password fields, type the user name and password for the network sharedrive used as Update Retriever repository.
3. In the Get new updates panel, click Add.
4. In the Add new systems window, complete the following steps for the triplet settings:
a. Type the applicable machine type. You can find the machine type on the bottom of a notebookcomputer or on the rear of a desktop machine.
b. Select the applicable operating system.
c. Select the applicable language.
d. Click Add and then click Save.
5. In the Get New Updates panel, select the check box for the applicable machine type. To import allmachine type update packages, select the Select all check box.
6. Click Next and then click Finish to search for applicable update packages. Update Retriever will placethe update packages in the designated repository folder.
Deploying the packagesAfter you have created your repository folders, configured System Update on client computers, anddownloaded update packages with Update Retriever, complete the following steps to deploy specificupdate packages to client computers:
1. In the Modify Settings panel of Update Retriever, change the Repository path to the System Updaterepository path that you created in step 1 under “Creating repository folders” on page 60.
Chapter 7. Best practices 61

2. Using Update Retriever, import your update packages into the System Update repository.
Note: For additional information about how to import update packages into a repository folder, see“Importing an update package into a network share repository” on page 46.
3. Launch System Update on client computers.
4. Use System Update to search the System Update repository for update packages.
Note: Make sure that you assign machine types to update packages after you import the updatepackages into a repository folder. This enables System Update to search for update packages specificto the machine type. For more information about importing update packages, see “Importing an updatepackage into a network share repository” on page 46.
5. Download and install update packages to client computers.
Scenario 3 - Deploying to non-Lenovo systemsUpdate packages originating from the Lenovo Web site cannot be deployed to a non-Lenovo system.Complete the following steps to create custom packages that can be deployed to non-Lenovo systems:
1. Install Update Retriever and System Update on an administrator computer.
2. Reboot the computer after installation.
3. Run the install.bat file to install the required hotfixes.
4. Launch System Update to get the machine type of the non-Lenovo systems, for example:
‘Machine type’ = ‘Presario R3000’
5. Launch Update Retriever and set the repository path.
Note: Enter user name and password if required for the repository.
6. Add systems for assigning the updates and save the machine information of the non-Lenovo systems.Enter the machine family information consisting of the first four letters or the last four letters of themachine type and model.
7. Create a package for the non-Lenovo systems using Update Retriever.
Note: Add the Supported Systems method in the Dependencies section of the XML descriptorfile to apply the updates to a particular model.
8. Save the XML descriptor.
9. Import the package to the Update Retriever repository and assign the updates to the triplets of thenon-Lenovo systems. See “Importing an update package into a network share repository” on page 46.
10. Configure the System Update repository.
Scenario 4 - Disabling the Web upgrade for System UpdateSystem Update checks the Lenovo Help Center Web site for upgrades of itself, even if it is connected to alocal repository on either the local system or a network share. If there is no internet connectivity, SystemUpdate will not check for its application upgrade.
To disable this feature, do the following to clear the registry value:
1. Navigate to the following registry entry:
HKEY_LOCAL_MACHINE\SOFTWARE\Lenovo\System Update\Preferences\UCSettings\HTTPSHelloSettings\ServerName
62 System Update Solution Deployment Guide

2. Delete the ServerName string value, for example:
https://download.lenovo.com/ibmdl/pub/pc/pcbs/agent/
3. Click OK.
Scenario 5 - Installing specific update packages with the MSDOS promptYou can install specific update packages for System Update using the MSDOS prompt. To install specificupdate packages, do the following:
1. Create a new folder named installtxt on your local hard disk drive, for example:
C:\installtxt
2. With Notepad, create a TXT file named installList.txt.
3. In the TXT file, type the package IDs for the target client computers, for example:
1rg807ww7ad123ww7bwc14wwbs09az00ibmcss7upgrade2_wwkb896613tc
4. Save the TXT file in the C:\installtxt folder.
5. From the MSDOS prompt, go to the System Update installation path:C:\Program Files\Lenovo\System Update\
6. Type the file path, the application executable file name, and the name of the TXT file, for example:
tvsu.exe /package "C:\installtxt\ installList.txt"
7. Press Enter.
Scenario 6 - Deploying update packages to client computer repositoriesAn alternative to using a network share drive repository is to deploy packages to client computer repositories.Complete the following steps to deploy update packages to client computer repositories:
Step 1 - Setting up the administrator systemTo set up your administrator system, do the following:
1. Create a new folder on a network share drive or your administrative system to use as a repositoryfor storing update packages.
2. Launch Update Retriever and set the repository path.
Note: Enter user name and password if required for the repository.
3. Get new updates from the Lenovo Help Center Web site.
4. Create another folder to use as the client computer repository.
5. Using Update Retriever, import your update packages into your client computer repository.
Note: For additional information about how to import packages into a repository folder, see “Importingan update package into a network share repository” on page 46.
Chapter 7. Best practices 63

6. Deploy the folder being used as the client computer repository to client computers.
Step 2 - Configuring System Update on client computersTo configure System Update to download specific packages to client computers, do the following:
1. On client computers, navigate to the following registry entry:
HKLM\SOFTWARE\Lenovo\System Update\Preferences\UserSetting\General\RepositoryLocation1
2. Change this setting by replacing the default value, SUPPORTCENTER, with your client computerrepository path, for example:
%ANYDRV%\SystemUpdate_repository\
Note: You can also use Active Directory to deploy this registry change using Group Policy. For moreinformation about working with Active Directory and Group Policy, see “Configuring System Update withActive Directory” on page 27.
Scenario 7 - Working with firewalls and the scheduler functionWhen you utilize security programs with a firewall, make sure that the security application enables Internetaccess to the System Update scheduler function. To enable the Internet access to the System Updatescheduler function, do the following:
1. Allow System Update to communicate through your firewall application.
2. Navigate to the following path: %PROGRAMFILES%\Lenovo\System Update
3. Enable the following programs:
• TvsuCommandLauncher.exe
• Tvsukernel.exe
Note: System Update for Windows 7 and later operating systems provides a weekly schedulersetting. However, you also can use the Task Scheduler tool on Windows 7 and later operating systems tocreate a customized scheduler for System Update to provide more scheduler options to achieve the bestscheduling practice. For detailed information about using the Task Scheduler tool on Windows 7 operatingsystems, see “\UserSettings\Scheduler” on page 21.
Scenario 8 - Working with Thin InstallerThin Installer always first checks for the database.xml file in the repository folder. If you have created arepository using Update Retriever, the database.xml file is created in the same folder. The database.xml fileassociates each machine type, operating system, and language with the update packages. In the absenceof the database.xml file in the repository, Thin Installer assumes all update packages in the repository arecandidate packages. Candidate packages are packages that may be applicable to client computers. Referto Chapter 5 “Working with Update Retriever” on page 41 to learn more about Update Retriever.
Deploying the packages using USB, CD, or DVD mediaThis method is ideal for standalone installation of update packages by a system administrator.
1. Create a repository folder with update packages that need to be installed on the client computer.
2. Install Thin Installer as a parent folder of the repository folder as created in step 1.
3. Copy the folder structure to any external media such as a USB key, a CD, or a DVD.
64 System Update Solution Deployment Guide

4. Launch the ThinInstaller.exe file and select the update packages that need to be installed.
Deploying the update packages using a network share repositoryThis is a convenient way of managing different types of systems using a central repository. The clientcomputer should have read access to the network share repository.
1. Create the repository folders and download the update packages with Update Retriever on the networkshare. For information about how to use Update Retriever, refer to “Step 1 - Installing the programs”on page 59.
2. Install Thin Installer on a client computer.
3. Push a command script to the client computers to run the ThinInstaller.exe file from the network share.For information about available options, refer to “Using Thin Installer” on page 54.
Deploying the update packages using a system management toolThis method is useful when the update packages for systems are already known.
1. Create a repository folder with system-specific update packages that need to be deployed.
2. Extract the Thin Installer executable as a parent folder of the repository folder as created in step 1.
3. Use the system management tool to build a module out of the above folder structure and deploy.
Note: The error code returned by Thin Installer can be used to track the status of the update packageson target systems.
Integrating Thin Installer with the ImageUltra Builder programThis is the ideal way to deploy common drivers and applications during an image rollout. The systemadministrator maintains one central repository and one image for different types of systems.
1. Create a network share repository and install Thin Installer. For information about how to create arepository folder on a network share, refer to “Creating repository folders” on page 60.
2. Create a batch file to run the Thin Installer executable file from the network share drive.
3. Create an ImageUltra Builder module, audit boot type, and use the batch file created in step 2.
4. Add the module to the ImageUltra Builder Base Map.
5. Deploy the image. Thin Installer will install the drivers and applications on the client computers.
Notes:
1. Network drivers still need to be installed before Thin Installer can access the network share repository.
2. You may be required to install some drivers using the ImageUltra Builder program.
The other option is to build the ImageUltra Builder module, audit boot type, use update packages and ThinInstaller, and deploy with the image. In this case, update packages will be run locally instead of from therepository.
To learn more about the ImageUltra Builder program, go to the following Web site:http://www.lenovo.com/support/site.wss/document.do?lndocid=MIGR-61432#image
Integrating Thin Installer with a Sysprep ImageThis scenario is the same as integrating Thin Installer with the ImageUltra Builder program except that theimage is rolled out without using the ImageUltra Builder program.
1. Create a network share repository and install Thin Installer. For information about how to create anetwork share repository, refer to “Creating repository folders” on page 60.
Chapter 7. Best practices 65

2. Create a batch file to run the Thin Installer executable file from the network share drive.
3. Deploy the image. Thin Installer will install the drivers and applications on the client computers.
66 System Update Solution Deployment Guide

Appendix A. Command line parameters
This chapter provides information about command line parameters, search modes, notification parameters,and the MapDrv utility.
Automatic searchThe following table provides the registry entries and values that an automatic search can use to search forupdates from a repository folder on a local system, a network share, a removable devices, or the LenovoHelp Center Web site.
Table 19. Repository location and command line
RepositoryLocation registry entry Command line Repository searched
RepositoryLocation<N> Where %N% isa number between 1 and 20.
SUPPORTCENTER Lenovo Help CenterWeb site
RepositoryLocation<N> Where %N% isa number between 1 and 20.
\\Server_X\TVSU_repository\ Network sharerepository
RepositoryLocation<N> Where %N% isa number between 1 and 20.
%ANYDRV%\SystemUpdate3_x Local system repository
RepositoryLocation<N> Where %N% isa number between 1 and 20.
%XMEDIA%\SystemUpdate3_x Repository on anyremovable device
Note: When you download or install update packages that have individual package license agreements,those update packages are not processed because you are not able to approve the individual packagelicense agreements. Further, if you have not previously indicated that you do not want to see the licenseagreement in the future, the license agreement will be displayed prior to the download.
Command line scriptsThe following table provides the command line scripts supported by System Update when using the defaultrepository location, SUPPORTCENTER.
Table 20. Command line scripts
Scripts Description
%PROGRAMFILES%\Lenovo\System Update\Tvsu.exe /CM-search C -action DOWNLOAD
Searches the repository for critical updates anddownloads those that do not contain a license agreement.
You are prompted to agree to the license agreementsbefore the download starts if you have not disabled thelicense agreement dialog box.
You are notified with a balloon tooltip from the applicationicon in the notification area after the updates have beendownloaded.
%PROGRAMFILES%\Lenovo\System Update\Tvsu.exe /CM-search C -action LIST
Searches the repository for critical updates.
You are notified with a balloon tooltip from the applicationicon in the notification area prior to downloading andinstallation.
© Copyright Lenovo 2009, 2017 67

Table 20. Command line scripts (continued)
Scripts Description
%PROGRAMFILES%\Lenovo\System Update\Tvsu.exe /CM-search C -action INSTALL
Searches the repository for critical updates and installsthose that do not contain a license agreement.
You are prompted to agree to the license agreementsbefore the download starts if you have not disabled thelicense agreement dialog box.
You are notified with a balloon tooltip from the applicationicon in the notification area after the updates have beeninstalled.
%PROGRAMFILES%\Lenovo\System Update\Tvsu.exe /CM-search R -action LIST
Searches the repository for critical and recommendedupdates.
You are notified with a balloon tooltip from the applicationicon in the notification area prior to downloading andinstallation.
%PROGRAMFILES%\Lenovo\System Update\Tvsu.exe /CM-search R -action DOWNLOAD
Searches the repository for critical and recommendedupdates and downloads those that do not contain alicense agreement.
You are prompted to agree to the license agreementsbefore the download starts if you have not disabled thelicense agreement dialog box.
You are notified with a balloon tooltip from the applicationicon in the notification area after the updates have beendownloaded.
%PROGRAMFILES%\Lenovo\System Update\Tvsu.exe /CM-search R -action INSTALL
Searches the repository for critical and recommendedupdates and installs those that do not contain a licenseagreement.
You are prompted to agree to the license agreementsbefore the download starts if you have not disabled thelicense agreement dialog box.
You are notified with a balloon tooltip from the applicationicon in the notification area after the updates have beeninstalled.
%PROGRAMFILES%\Lenovo\System Update\Tvsu.exe /CM-search A -action LIST
Searches the repository for critical, recommended, andoptional updates.
You are notified with a balloon tooltip from the applicationicon in the notification area prior to downloading andinstallation.
%PROGRAMFILES%\Lenovo\System Update\Tvsu.exe /CM-search A -action DOWNLOAD
Searches the repository for critical, recommended, andoptional updates and downloads those that do notcontain a license agreement.
You are prompted to agree to the license agreementsbefore the download starts if you have not disabled thelicense agreement dialog box.
You are notified with a balloon tooltip from the applicationicon in the notification area after the updates have beendownloaded.
68 System Update Solution Deployment Guide

Table 20. Command line scripts (continued)
Scripts Description
%PROGRAMFILES%\Lenovo\System Update\Tvsu.exe /CM-search A -action INSTALL
Searches the repository for critical, recommended, andoptional updates and installs those that do not contain alicense agreement and a reboot requirement.
You are prompted to agree to the license agreementsbefore the download starts if you have not disabled thelicense agreement dialog box.
You are notified with a balloon tooltip from the applicationicon in the notification area after the updates have beeninstalled.
%PROGRAMFILES%\Lenovo\System Update\Tvsu.exe /CM-search C -action INSTALL -noicon
Installs all critical packages that have no rebootrequirement and suppresses the balloon tooltip fromthe notification area icon after the installation has beencompleted.
%PROGRAMFILES%\Lenovo\System Update\Tvsu.exe /CM-search R -action INSTALL -noicon
Installs all critical and recommended packages that haveno reboot requirement and suppresses the balloon tooltipfrom the notification area icon after the installation hasbeen completed.
%PROGRAMFILES%\Lenovo\System Update\Tvsu.exe /CM-search A -action INSTALL -noicon
Installs all critical, recommended, and optional packagesthat have no reboot requirement and suppresses theballoon tooltip from the notification area icon after theinstallation has been completed.
%PROGRAMFILES%\Lenovo\System Update\Tvsu.exe /CM-search C -action INSTALL -noicon-includerebootpackages 1,3,4
Installs all critical packages with specified reboot typesand suppresses the balloon tooltip from the notificationarea icon after the installation has been completed.
Packages with a reboot type will force the system toreboot or shut down.
%PROGRAMFILES%\Lenovo\System Update\Tvsu.exe /CM-search R -action INSTALL -noicon-includerebootpackages 1,3,4
Installs all critical and recommended packages withspecified reboot types and suppresses the balloon tooltipfrom the notification area icon after the installation hasbeen completed.
Packages with a reboot type will force the system toreboot or shut down.
%PROGRAMFILES%\Lenovo\System Update\Tvsu.exe /CM-search A -action INSTALL -noicon-includerebootpackages 1,3,4
Installs all critical, recommended, and optional packageswith specified reboot types and suppresses the balloontooltip from the notification area icon after the installationhas been completed.
Packages with a reboot type will force the system toreboot or shut down.
%PROGRAMFILES%\Lenovo\System Update\Tvsu.exe /CM-search C -action INSTALL -noicon-includerebootpackages 1,3,4 -noreboot
Installs all critical packages with specified reboot types,suppresses the balloon tooltip from the notificationarea icon after the installation has been completed, andsuppresses the system reboot for packages with reboottype 3.
Appendix A. Command line parameters 69

Table 20. Command line scripts (continued)
Scripts Description
%PROGRAMFILES%\Lenovo\System Update\Tvsu.exe /CM-search R -action INSTALL -noicon-includerebootpackages 1,3,4 -noreboot
Installs all critical and recommended packages withspecified reboot types, suppresses the balloon tooltipfrom the notification area icon after the installation hasbeen completed, and suppresses the system reboot forpackages with reboot type 3.
%PROGRAMFILES%\Lenovo\System Update\Tvsu.exe /CM-search A -action INSTALL -noicon-includerebootpackages 1,3,4 -noreboot
Installs all critical, recommended, and optional packageswith specified reboot types, suppresses the balloontooltip from the notification area icon after the installationhas completed, and suppresses the system reboot forpackages with reboot type 3.
The following table provides the command line scripts supported by System Update when using a repositoryto store update packages. If you do not specify the repository, System Update will go to the defaultrepository.
Table 21. Command line scripts
Scripts Description
%PROGRAMFILES%\Lenovo\System Update\Tvsu.exe /CM-search C -action LIST -repositoryC:\MyRepository
Searches a repository for critical updates.
You are notified with a balloon tooltip from the applicationicon in the notification area prior to downloading andinstallation.
%PROGRAMFILES%\Lenovo\System Update\Tvsu.exe /CM-search C -action DOWNLOAD -repositoryC:\MyRepository
Searches a repository for critical updates and downloadsthose that do not contain a license agreement.
You are prompted to agree to the license agreementsbefore the download starts if you have not disabled thelicense agreement dialog box.
You are notified with a balloon tooltip from the applicationicon in the notification area after the updates have beendownloaded.
%PROGRAMFILES%\Lenovo\System Update\Tvsu.exe /CM-search C -action INSTALL -repositoryC:\MyRepository
Searches a repository for critical updates and installsthose that do not contain a license agreement.
You are prompted to agree to the license agreementsbefore the download starts if you have not disabled thelicense agreement dialog box.
You are notified with a balloon tooltip from the applicationicon in the notification area after the updates have beeninstalled.
%PROGRAMFILES%\Lenovo\System Update\Tvsu.exe /CM-search R -action LIST -repositoryC:\MyRepository
Searches a repository for critical and recommendedupdates.
You are notified with a balloon tooltip from the applicationicon in the notification area prior to downloading andinstallation.
70 System Update Solution Deployment Guide

Table 21. Command line scripts (continued)
Scripts Description
%PROGRAMFILES%\Lenovo\System Update\Tvsu.exe /CM-search R -action DOWNLOAD -repositoryC:\MyRepository
Searches a repository for critical and recommendedupdates and downloads those that do not contain alicense agreement.
You are prompted to agree to the license agreementsbefore the download starts if you have not disabled thelicense agreement dialog box.
You are notified with a balloon tooltip from the applicationicon in the notification area after the updates have beendownloaded.
%PROGRAMFILES%\Lenovo\System Update\Tvsu.exe /CM-search R -action INSTALL -repositoryC:\MyRepository
Searches a repository for critical and recommendedupdates and installs those that do not contain a licenseagreement.
You are prompted to agree to the license agreementsbefore the download starts if you have not disabled thelicense agreement dialog box.
You are notified with a balloon tooltip from the applicationicon in the notification area after the updates have beeninstalled.
%PROGRAMFILES%\Lenovo\System Update\Tvsu.exe /CM-search A -action LIST -repositoryC:\MyRepository
Searches a repository for critical, recommended, andoptional updates.
You are notified with a balloon tooltip from the applicationicon in the notification area prior to downloading andinstallation.
%PROGRAMFILES%\Lenovo\System Update\Tvsu.exe /CM-search A -action DOWNLOAD -repositoryC:\MyRepository
Searches a repository for critical, recommended, andoptional updates and downloads those that do notcontain a license agreement.
You are prompted to agree to the license agreementsbefore the download starts if you have not disabled thelicense agreement dialog box.
You are notified with a balloon tooltip from the applicationicon in the notification area after the updates have beendownloaded.
%PROGRAMFILES%\Lenovo\System Update\Tvsu.exe /CM-search A -action INSTALL -repositoryC:\MyRepository
Searches a repository for critical, recommended, andoptional updates and installs those that do not contain alicense agreement and a reboot requirement.
You are prompted to agree to the license agreementsbefore the download starts if you have not disabled thelicense agreement dialog box.
You are notified with a balloon tooltip from the applicationicon in the notification area after the updates have beeninstalled.
Appendix A. Command line parameters 71

Table 21. Command line scripts (continued)
Scripts Description
%PROGRAMFILES%\Lenovo\System Update\Tvsu.exe /CM-search C -action INSTALL -repositoryC:\MyRepository -noicon
Searches a repository for critical updates and installsthose that do not contain a license agreement and areboot requirement.
You are prompted to agree to the license agreementsbefore the download starts if you have not disabled thelicense agreement dialog box.
You will not be notified with a balloon tooltip from theapplication icon in the notification area after the updateshave been installed.
%PROGRAMFILES%\Lenovo\System Update\Tvsu.exe /CM-search R -action INSTALL -repositoryC:\MyRepository -noicon
Searches a repository for critical and recommendedupdates and installs those that do not contain a licenseagreement and a reboot requirement.
You are prompted to agree to the license agreementsbefore the download starts if you have not disabled thelicense agreement dialog box.
You will not be notified with a balloon tooltip from theapplication icon in the notification area after the updateshave been installed.
%PROGRAMFILES%\Lenovo\System Update\Tvsu.exe /CM-search A -action INSTALL -repositoryC:\MyRepository -noicon
Searches a repository for critical, recommended, andoptional updates, and installs those that do not contain alicense agreement and a reboot requirement.
You are prompted to agree to the license agreementsbefore the download starts if you have not disabled thelicense agreement dialog box.
You will not be notified with a balloon tooltip from theapplication icon in the notification area after the updateshave been installed.
%PROGRAMFILES%\Lenovo\System Update\Tvsu.exe /CM-search C -action INSTALL -repositoryC:\MyRepository -noicon-includerebootpackages 1,3,4
Searches a repository for critical updates and then installsthose that do not contain a license agreement withspecified reboot types.
You are prompted to agree to the license agreementsbefore the download starts if you have not disabled thelicense agreement dialog box.
You will not be notified with a balloon tooltip from theapplication icon in the notification area after the updateshave been installed.
Packages with a reboot type will force system to rebootor shut down.
72 System Update Solution Deployment Guide

Table 21. Command line scripts (continued)
Scripts Description
%PROGRAMFILES%\Lenovo\System Update\Tvsu.exe /CM-search R -action INSTALL -repositoryC:\MyRepository -noicon-includerebootpackages 1,3,4
Searches a repository for critical and recommendedupdate packages, and then installs those that do notcontain a license agreement with specified reboot types.
You are prompted to agree to the license agreementsbefore the download starts if you have not disabled thelicense agreement dialog box.
You will not be notified with a balloon tooltip from theapplication icon in the notification area after the updateshave been installed.
Packages with a reboot type will force system to rebootor shut down.
%PROGRAMFILES%\Lenovo\System Update\Tvsu.exe /CM-search A -action INSTALL -repositoryC:\MyRepository -noicon-includerebootpackages 1,3,4
Searches a repository for critical, recommended, andoptional update packages, and then installs those thatdo not contain a license agreement with specified reboottypes.
You are prompted to agree to the license agreementsbefore the download starts if you have not disabled thelicense agreement dialog box.
You will not be notified with a balloon tooltip from theapplication icon in the notification area after the updateshave been installed.
Packages with a reboot type will force system to rebootor shut down.
%PROGRAMFILES%\Lenovo\System Update\Tvsu.exe /CM-search C -action INSTALL -repositoryC:\MyRepository -noicon-includerebootpackages 1,3,4 -noreboot
Searches a repository for critical updates and installsthose that do not contain a license agreement withspecified reboot types.
You are prompted to agree to the license agreementsbefore the download starts if you have not disabled thelicense agreement dialog box.
You will not be notified with a balloon tooltip from theapplication icon in the notification area after the updateshave been installed.
Reboot type 3 will suppress a system reboot.
%PROGRAMFILES%\Lenovo\System Update\Tvsu.exe /CM-search R -action INSTALL -repositoryC:\MyRepository -noicon-includerebootpackages 1,3,4 -noreboot
Searches a repository for critical and recommendedupdates then installs those that do not contain a licenseagreement with specified reboot types.
You are prompted to agree to the license agreementsbefore the download starts if you have not disabled thelicense agreement dialog box.
You will not be notified with a balloon tooltip from theapplication icon in the notification area after the updateshave been installed.
Appendix A. Command line parameters 73

Table 21. Command line scripts (continued)
Scripts Description
Reboot type 3 will suppress a system reboot.
%PROGRAMFILES%\Lenovo\System Update\Tvsu.exe /CM-search A -action INSTALL -repositoryC:\MyRepository -noicon-includerebootpackages 1,3,4 -noreboot
Searches a repository for critical, recommended, andoptional updates and then installs those that do notcontain a license agreement with specified reboot types.
You are prompted to agree to the license agreementsbefore the download starts if you have not disabled thelicense agreement dialog box.
You will not be notified with a balloon tooltip from theapplication icon in the notification area after the updateshave been installed.
Reboot type 3 will suppress a system reboot.
When System Update is performing an automatic search through a proxy server with authentication andno user name or password has been saved, no dialogs will be displayed to the end user. An error will belogged to the System Update log file and System Update will shut down. If the user name and password hasbeen saved, System Update will try to connect the proxy server using the saved user name and passwordinformation. If there are errors with the connection or performing the automatic search, the errors will belogged to the System update log file and System Update will be shut down.
Whenever System Update is about to download and install a set of updates containing one or morepackages that require automatic reboot or shutdown of the target system, no warning message is displayedinforming the end user about the reboot or shutdown.
Note: Command line scripts may be changed in later releases. If you use silent command line scripts anda repository to store update packages, to recognize update packages with license agreements, set thefollowing registry value to YES:
HKEY_LOCAL_MACHINE\SOFTWARE\Lenovo\System Update\Preferences\UserSettings\General\IgnoreLocalLicense
For System Update 5.07.0032 and its later versions, users cannot run command lines directly on clientcomputers using administrative privileges. Users have to run command lines through Group Policy settingson the Active Directory server by doing the following:
1. Download the System Update Administrator Tools package from the following Web site and install thepackage to your Active Directory server:https://download.lenovo.com/pccbbs/thinkvantage_en/zb59_tvsu_win7_win8_admin029.exe
2. Do one of the following:
• For the administrative XML template (ADMX) file: Copy the tvsu.admx file fromC:\SWTOOLS\TOOLS\Admin to C:\Windows\PolicyDefinitions. Then Copy the tvsu.adml file fromC:\SWTOOLS\TOOLS\Admin\en-us to C:\Windows\PolicyDefinitions \en-US.
• For the ADM file: Right-click Administrator Templates to add the ADM file. For more information,see “Adding administrative templates” on page 28.
74 System Update Solution Deployment Guide

3. Run gpedit.msc on the Active Directory server to launch the Group Policy Editor and locateAdministrator Command Line as shown:
4. Enable and configure Administrator Command Line with desired command line and then click OK. Forexample, you can type /CM -search C -action INSTALL -includerebootpackages 1,3,4 -noicon -noreboot-nolicense -defaultupdate as shown:
5. Apply your group policy settings to client computers. For more information, see “Applying group policyimmediately” on page 29.
6. On client computers, run the command line tvsu.exe /CM.
Search modesThe following table provides a list of search modes supported by System Update.
Appendix A. Command line parameters 75

Table 22. Search modes
Search mode Description
-search CEnables System Update to search for critical updates.
-search REnables System Update to search for critical andrecommended updates.
-search AEnables System Update to search for critical,recommended, and optional updates when searchingthe Lenovo Help Center.Note: If you are using a network share repository, usethe -search A command. Then System Update willsearch for critical, recommended, and optional updatepackages from the network share repository folder.
Notification parametersThe notification parameter used on the command line specifies the way System Update handles updatepackages and then notifies you when packages have been processed.
The following table provides the parameters and their descriptions.
Table 23. Notification parameters
Parameter Description
-action LISTEnables System Update to notify you with a balloontooltip from the application icon in the notification areawhen update packages are available on the Lenovo HelpCenter Web site.
If you click the balloon tooltip, System Update displaysthe license agreement dialog box, or the Updates forYour System panel. If you select the Do not show againcheck box in the license agreement dialog box, SystemUpdate will not display this dialog box again.
-action DOWNLOADEnables System Update to notify you with a balloontooltip from the application icon in the notification areawhen update packages have been downloaded to yoursystem and are ready for installation.
If you have not selected the Do not show again checkbox, System Update will prompt you to approve a licenseagreement prior to downloading. After downloading,System Update notifies you with a balloon tooltip. Whenyou click the balloon tooltip, System Update will displaythe Install Deferred Updates panel and enable you toinstall updates of interest.
76 System Update Solution Deployment Guide

Table 23. Notification parameters (continued)
Parameter Description
-action INSTALLEnables System Update to notify you with a balloon tooltipfrom the application icon in the notification area whenupdate packages have been downloaded and installed.
If you have not selected the Do not show again checkbox, System Update will prompt you to approve a licenseagreement prior to downloading. After downloading andinstalling update packages, System Update notifies youwith a balloon tooltip. To view the status of the downloadand installation process, click the balloon tooltip andSystem Update displays the message, saying "Yoursystem has been updated."
If an update package has a reboot type 1 or 4, SystemUpdate prompts you with a balloon tooltip at designatedintervals to notify you that a package will restart yoursystem. The designated interval for the restart notificationis set in the registry with the NotifyInterval settingin Table 9 “\UserSettings\General” on page 18. If anupdate package has a reboot type 3, System Updatewill download and install the update package and thenprompts you with a restart notification but does notcontinue with restart notifications at designated intervals.Otherwise, it will download and install the updatepackages, and then display the result.
-SCHEDULEREnables System Update to run from the schedulerfunction.
Note: This parameter is a registry entry that has to beupdated in the registry and not on the user interface.
-repository <path>Enables you to specify the repository folder to storeupdate packages.
System Update will search for update packages stored inthe repository folder you specified.
-NoIconEnables you to turn off the balloon tooltip that will bedisplayed when packages are found, downloaded, orinstalled with System Update.
-IncludeRebootPackages 1,3,4Enables System Update to install update packages withthe specified reboot types.
The reboot type can be 1, 3, or 4. The following listprovides the value for reboot types supported by SystemUpdate:
• 1: The reboot that is forced by the package.
• 3: The reboot that is required for the package to takeeffect. The software distribution client will force areboot after all packages are installed.
• 4: The shutdown that is forced by the package.
-NoRebootEnables System Update to prevent a reboot after thesystem installs an update package with reboot type 3.However, this parameter cannot suppress a reboot orshutdown when packages have a reboot type 1 or 4.
Appendix A. Command line parameters 77

Table 23. Notification parameters (continued)
Parameter Description
-clearhistoryEnables you to control whether the history and sessionfolder are preserved or deleted during an upgrade orover-installation. The default is to preserve the historyand session folder.
-clearsettingsEnables you to control whether configurable settingsare preserved or deleted during an upgrade orover-installation. The default is to preserve your settings.
-showprogressEnables Thin Installer to display the progress bar duringthe process of searching and installing updates. Theupdates are preselected by the administrator, and userscannot deselect the updates. The update progress screenwill close when the installation is completed. No screensor icons will be displayed to indicate the results.
Note: System Update does not support this setting.
Example:
tvsu.exe /CM -search A -action INSTALL -IncludeRebootPackages 1,3,4
The following list provides a description of the search mode and notification methods used:
• -search A - searches for critical, recommended, and optional packages.
• -action INSTALL - installs the update packages.
• -IncludeRebootPackages 1,3,4 - downloads and installs update packages that require a reboot.
Notes:
1. If you do not include -IncludeRebootPackages 1,3,4, System Update will not detect packages thatrequire a reboot.
2. To configure System Update to recognize license agreements automatically when you are using a localrepository but not the Lenovo Help Center Web site, set the following registry value to YES:
HKEY_LOCAL_MACHINE\SOFTWARE\Lenovo\System Update\Preferences\UserSettings\General\IgnoreLocalLicenseFor more information about working with license agreements, see “Working with license agreements” onpage 37. If you do not set this registry setting to YES, System Update will not detect packages withlicense agreements when using command scripts.
MapDrv utilityThe MapDrv utility provides network share related functions for System Update. To define the network shareinformation, use the MapDrv utility to connect or disconnect network shares. The MapDrv utility maintainsnetwork share information in a registry key that is protected by administrator access only. The networkshare information includes the network share name (in UNC format), user name (saved in the registry as anencrypted string), and the password (saved in the registry as an encrypted string).
The MapDrv utility can be found in the System Update installation directory. The default installation directoryis located at c:\Program Files\Lenovo\System Update.
The network share information is stored in the following registry entry:HKLM\Software\Lenovo\MND\TVSUAPPLICATION
78 System Update Solution Deployment Guide

If an Active Directory policy is used, these values are stored in the following registry entry:HKLM\Software\Policies\Lenovo\MND\TVSUAPPLICATION
The strings stored in the TVSUAPPLICATION key are:
Table 24. The MapDrv settings and values
String Description
UNC The value of this string specifies the stored network share.
User The value of this string specifies the stored encrypted user namefor this share.
Pwd The value of this string specifies the stored encrypted passwordfor this share.
NetPath The value is generated by the MapDrv utility to indicate theactual connection path. It might be in IP dotted format if theServerName string is not working. The actual connection pathmay not be the same as the stored UNC value.
The MapDrv utility also enables an administrator to use the encryption engine to generate an encrypted username and password, which can be used to pre-populate network share information on multiple systems.Using the encryption engine in this manner does not update the registry on the system.
Command line interfaceThe command line interface to the MapDrv utility is as follows:
mapdrv /<function> <app id> /unc <sharename> /user <username> /pwd <password>[/timeout <seconds>] [ /s]
Table 25. Parameters
Parameter Description
/functionIdentifies the function to provide. Valid values are store, connect, disconnect, anddisplay.
app id Identifies the application. The value specified is used to form the registry key name thatcontains the network share information, for example: TVSUAPPLICATION.
/unc sharenameIdentifies the network share name to store. The share name should be in the UNCform, for example:
\\myserver\myshare
/user usernameSpecifies the user name to store.
/pw passwordSpecifies the password to store.
/timeout secondsSpecifies the connection timeout value to store. The default is 30 seconds.
/sEnables a silent operation.
The return code is 0 if an operation was successful. Otherwise, the return code is greater than 0.
Appendix A. Command line parameters 79

When the MapDrv utility is launched with no parameters, the end user will be prompted for the networkshare, user name and password, and then MapDrv will attempt to connect to the specified network shareusing the specified credentials.
Using the MapDrv utilityThe following sections provide ways that you can use the MapDrv command.
Displaying encrypted user name and password stringsThis function displays the registry key of the network share information where the encrypted user name andpassword is stored. Using the /display function will not store the user name and password in the registry.You need to copy the encrypted user name and password to the appropriate registry key.
mapdrv /view <app id> /user <username> /pwd <password>Example:
mapdrv /view TVSUAPPLICATION /user temp/pwd password
app id: TVSUAPPLICATIONuser: temppwd: passwordThis command captures the encrypted user name and password to set up the repository with UNC pathwith authentication.
Storing network share information for a ThinkVantage applicationThis function stores the network share information in the registry using <tvt> to define the subkey fromthe main MapDrv registry key:
mapdrv /store <app id> /unc <sharename> /user <username> /pwd <password>[/timeout <seconds>]This sets the UNC, user name, and password values in the registry.
Connecting to the network share for a ThinkVantage applicationConnect the network share for the specified ThinkVantage application:
mapdrv /connect <app id> [ /s]Connects to the share using the UNC, user name, and password values in the registry. The actualconnection UNC is output to the NetPath value.
Disconnecting the network share for a ThinkVantage applicationThe following command disconnects the network share for the specified ThinkVantage application if theapplication is currently connected:
mapdrv /disconnect <app id>Performs a net use /d [NetPath stored in registry] to disconnect the network connection.
80 System Update Solution Deployment Guide
Appendix B. Notices
Lenovo may not offer the products, services, or features discussed in this document in all countries. Consultyour local Lenovo representative for information on the products and services currently available in yourarea. Any reference to a Lenovo product, program, or service is not intended to state or imply that only thatLenovo product, program, or service may be used. Any functionally equivalent product, program, or servicethat does not infringe any Lenovo intellectual property right may be used instead. However, it is the user'sresponsibility to evaluate and verify the operation of any other product, program, or service.
Lenovo may have patents or pending patent applications covering subject matter described in thisdocument. The furnishing of this document does not give you any license to these patents. You can sendlicense inquiries, in writing, to:
Lenovo (United States), Inc.1009 Think Place - Building OneMorrisville, NC 27560U.S.A.Attention: Lenovo Director of Licensing
LENOVO PROVIDES THIS PUBLICATION “AS IS” WITHOUT WARRANTY OF ANY KIND, EITHER EXPRESSOR IMPLIED, INCLUDING, BUT NOT LIMITED TO, THE IMPLIED WARRANTIES OF NON-INFRINGEMENT,MERCHANTABILITY OR FITNESS FOR A PARTICULAR PURPOSE. Some jurisdictions do not allowdisclaimer of express or implied warranties in certain transactions, therefore, this statement may not applyto you.
This information could include technical inaccuracies or typographical errors. Changes are periodicallymade to the information herein; these changes will be incorporated in new editions of the publication.Lenovo may make improvements and/or changes in the product(s) and/or the program(s) described in thispublication at any time without notice.
The products described in this document are not intended for use in implantation or other life supportapplications where malfunction may result in injury or death to persons. The information contained in thisdocument does not affect or change Lenovo product specifications or warranties. Nothing in this documentshall operate as an express or implied license or indemnity under the intellectual property rights of Lenovoor third parties. All information contained in this document was obtained in specific environments and ispresented as an illustration. The result obtained in other operating environments may vary.
Lenovo may use or distribute any of the information you supply in any way it believes appropriate withoutincurring any obligation to you.
Any references in this publication to non-Lenovo Web sites are provided for convenience only and do not inany manner serve as an endorsement of those Web sites. The materials at those Web sites are not part ofthe materials for this Lenovo product, and use of those Web sites is at your own risk
Any performance data contained herein was determined in a controlled environment. Therefore, theresult in other operating environments may vary significantly. Some measurements may have been madeon development-level systems and there is no guarantee that these measurements will be the sameon generally available systems. Furthermore, some measurements may have been estimated throughextrapolation. Actual results may vary. Users of this document should verify the applicable data for theirspecific environment.
© Copyright Lenovo 2009, 2017 81

TrademarksThe following terms are trademarks of Lenovo in the United States, other countries, or both:
LenovoThe Lenovo logoRescue and RecoveryThinkPadThinkVantage
Intel is a trademark or registered trademark of Intel Corporation or its subsidiaries in the United States andother countries.
Microsoft, Active Directory, Internet Explorer, and Windows are trademarks of the Microsoft group ofcompanies.
Other company, product, or service names may be trademarks or service marks of others.
82 System Update Solution Deployment Guide