FortiManager Administration Guide - AWS
612
FortiManager - Administration Guide Version 6.4.0
-
Upload
khangminh22 -
Category
Documents
-
view
1 -
download
0
Transcript of FortiManager Administration Guide - AWS

FortiManager - Administration GuideVersion 6.4.0

FORTINET DOCUMENT LIBRARYhttps://docs.fortinet.com
FORTINET VIDEO GUIDEhttps://video.fortinet.com
FORTINET BLOGhttps://blog.fortinet.com
CUSTOMER SERVICE & SUPPORThttps://support.fortinet.com
FORTINET TRAINING & CERTIFICATION PROGRAMhttps://www.fortinet.com/training-certification
NSE INSTITUTEhttps://training.fortinet.com
FORTIGUARD CENTERhttps://www.fortiguard.com
END USER LICENSE AGREEMENThttps://www.fortinet.com/doc/legal/EULA.pdf
FEEDBACKEmail: [email protected]
May 16, 2022FortiManager 6.4.0 Administration Guide02-640-601884-20220516

TABLE OF CONTENTS
Change Log 13Setting up FortiManager 14Connecting to the GUI 14Security considerations 15
Restricting GUI access by trusted host 15Other security considerations 15
GUI overview 16Panes 18Color themes 19Full-screen mode 19Switching between ADOMs 19Using the right-click menu 19Avatars 19Showing and hiding passwords 20
FortiAnalyzer Features 20Enable or disable FortiAnalyzer features 21
Configuring FortiManager appliances 22Adding devices 22Installing to managed devices 23Monitoring managed devices 23Restarting and shutting down 24
FortiManager Key Concepts 26FortiManager modules 26
Modules for FortiAnalyzer feature set 27Object database and FortiManager modules 27Inside the FortiManager system 28
Communication protocols and devices 28Object database and devices 29ADOMs and devices 31Operations 32
Key features of the FortiManager system 33Security Fabric 33Configuration revision control and tracking 34Centralized management 34Administrative domains 34Local FortiGuard service provisioning 34Firmware management 34Scripting 34Logging and reporting 34Fortinet device life cycle management 35
Firewall Devices 36ADOMs 37Adding devices 37
Adding devices using the wizard 38
FortiManager 6.4.0 Administration Guide 3Fortinet Inc.

Authorizing devices 44Hiding unauthorized devices 45Add a VDOM to a device 46Adding a Security Fabric group 47Import policy wizard 48
Adding FortiAnalyzer devices 50Adding FortiAnalyzer devices with the wizard 51Viewing policy rules 54
Importing devices 54Importing detected devices 55Importing and exporting device lists 55
Configuring devices 56Configuring a device 57Out-of-Sync device 58Configuring VDOMs 58
Using the device dashboard 61View system dashboard for managed/logging devices 61View system interfaces 63CLI Configurations menu 63System dashboard widgets 63
Installing to devices 66Using the Install Wizard to install policy packages and device settings 67Using the Install Wizard to install device settings only 69View a policy package diff 69
Managing devices 70Using the quick status bar 71Customizing columns 71Refreshing a device 71Editing device information 72Deleting a device 73Replacing a managed device 74Setting unauthorized device options 74Using the CLI console for managed devices 75Displaying Security Fabric topology 75Manage Devices fromMap View 76
Managing device configurations 80View configurations for device groups 80Checking device configuration status 82Managing configuration revision history 84
Device groups 87Default device groups 87Add device groups 87Manage device groups 88
Firmware 88View firmware for device groups 88Upgrade firmware for device groups 89Firmware Management 89Automatic multi-step firmware upgrade on FortiGate 92
FortiManager 6.4.0 Administration Guide 4Fortinet Inc.

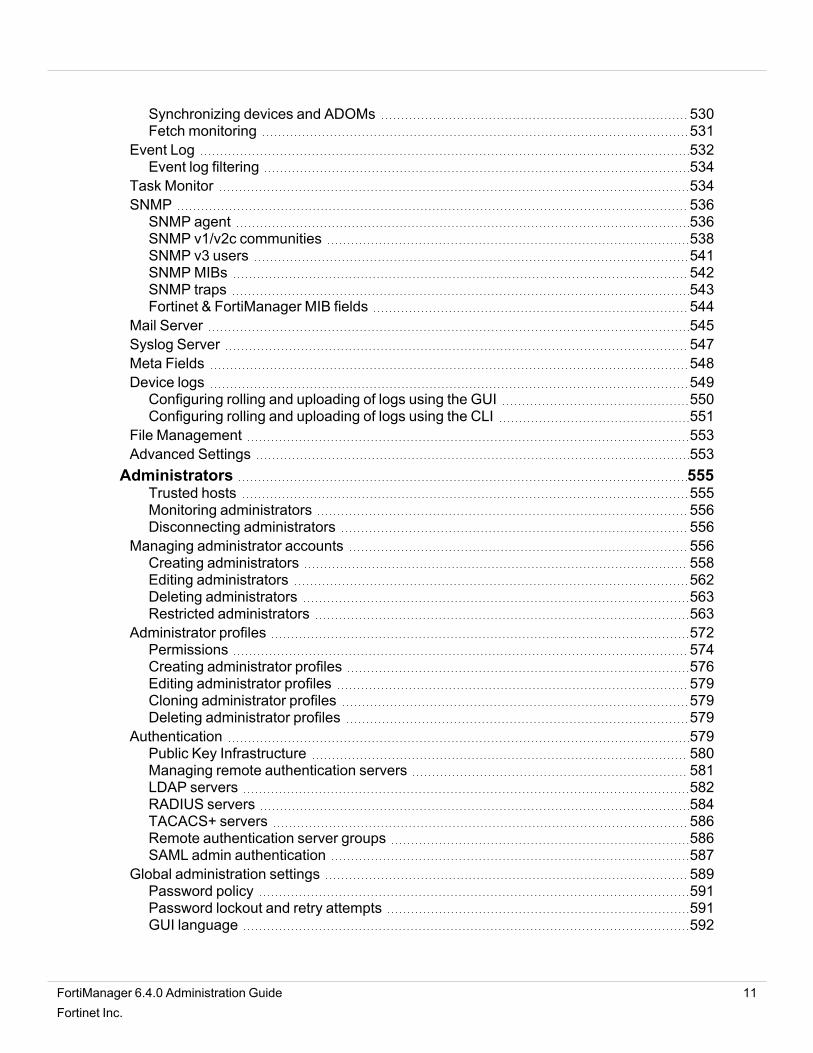
Managed devices pull firmware from FortiGuard 94License 96
License Management 96Add-on license 97
Provisioning Templates 98System templates 98Threat Weight templates 100Certificate templates 101
Scripts 102Enabling scripts 103Configuring scripts 103CLI script group 108Script syntax 109Script history 113Script samples 113
SD-WAN 134Enabling central SD-WANmanagement 134Interface members 135SD-WAN templates 137Health-Check Servers 144Assigned devices 146Monitor SD-WAN 147IPsec VPNWizard 148Configure BGP Neighbor 150
FortiExtender 152FortiMeter 154
Overview 154Points 155Authorizing metered VMs 155Monitoring VMs 156
FortiGate chassis devices 157Viewing chassis dashboard 158
Firewall Policy & Objects 162About policies 163
Policy theory 164Global policy packages 165
Policy workflow 165Provisioning new devices 165Day-to-day management of devices 166
Display options 166Managing policy packages 167
Create new policy packages 167Create new policy package folders 169Edit a policy package or folder 169Clone a policy package 169Remove a policy package or folder 170Assign a global policy package 170Install a policy package 171
FortiManager 6.4.0 Administration Guide 5Fortinet Inc.

Reinstall a policy package 171Schedule a policy package install 173Export a policy package 174Policy package installation targets 174Perform a policy consistency check 176View logs related to a policy rule 177Find and replace objects 178
Managing policies 179Policy Lookup 181Creating policies 182Editing policies 182Creating Policy Blocks 188IP policies 190Create New Firewall Policy 196Create New Security Policy 199Virtual wire pair policy 202NAT policies 204Proxy policy 205Central SNAT 208Central DNAT 209DoS policies 214Interface policies 216Multicast policy 217Local in policies 218Traffic shaping policy 219
Managing objects and dynamic objects 221Create a new object 221Creating an IPv6 Address Template 226Promote an Object to Global Database 227Map a dynamic ADOM object 228Map a dynamic device object 229Map a dynamic device group 231Remove an object 232Edit an object 232Push to device 233Clone an object 233Search objects 233Find unused objects 234Find and merge duplicate objects 234Export signatures to CSV file format 234CLI Configurations 235FortiToken configuration example 236FSSO user groups 236Interface mapping 239VIP mapping 240Modify existing interface-zone mapping 240Create a new shaping profile 241
ADOM revisions 243
FortiManager 6.4.0 Administration Guide 6Fortinet Inc.

Fabric View 247Security Fabric Topology 247Physical Topology 248Logical Topology 249Filter Topology Views 250Search Topology Views 250
Security Rating 251Enabling the Security Rating tab 252Viewing Security Fabric Ratings 252
Fabric Connectors 252SDN 253Threat Feeds 283SSO/Identity 284
FortiView 311Monitors 311
Device Status 311Using the Monitors dashboard 313Customizing the Monitors dashboard 313
VPN 315Overview 315Enabling central VPNmanagement 316DDNS support 317VPN Setup Wizard supports device groups 318IPsec VPN Communities 331
Managing IPsec VPN communities 331Creating IPsec VPN communities 332VPN community settings 334Monitoring IPsec VPN tunnels 340Map View 340
IPsec VPN gateways 342Managing VPN gateways 342Creating managed gateways 342Creating external gateways 346
VPN security policies 348Defining policy addresses 349Defining security policies 349
SSL VPN 350Manage SSL VPNs 350Portal profiles 352Monitor SSL VPNs 358
Access Points 360Managed APs 360
Quick status bar 361Managing APs 362FortiAP groups 367Authorizing and deauthorizing FortiAP devices 368Installing changes to FortiAP devices 368
FortiManager 6.4.0 Administration Guide 7Fortinet Inc.

Rogue APs 368Authorizing unknown APs 370Connected clients 371
Monitor 372Clients Monitor 372Health Monitor 373
Map view 374Google map 374Floor map 375
WiFi profiles for central management 377Enabling FortiAP central management 377AP profiles 378SSIDs 383WIDS profiles 391Bluetooth profiles 395QoS profiles 397Bonjour profiles 399Assigning profiles to FortiAP devices 401
WiFi profiles for per-device management 401Enabling FortiAP per-device management 402Creating profiles 402
FortiSwitch Manager 403Managed Switches 403
Quick status bar 404Managing FortiSwitches 404Authorizing and deauthorizing FortiSwitch devices 407Upgrading firmware for managed switches 407Using zero-touch deployment for FortiSwitch 408Installing changes to managed switches 409
Monitor 411FortiSwitch Templates for central management 412
Enabling FortiSwitch central management 412FortiSwitch Templates 413
FortiSwitch Profiles for per-device management 424Enabling per-device management 425FortiSwitch profiles 425Configuring a port on a single FortiSwitch 429
Endpoint Compliance 432How FortiManager fits into endpoint compliance 433FortiTelemetry 434
Viewing devices 434Enabling FortiTelemetry on interfaces 435Enabling endpoint control on interfaces 435Assigning FortiClient profile packages to devices 436
Monitor 436Monitoring FortiClient endpoints 436Monitoring FortiClient endpoints by compliance status 437
FortiManager 6.4.0 Administration Guide 8Fortinet Inc.

Monitoring FortiClient endpoints by interface 438Exempting non-compliant FortiClient endpoints 438
FortiClient profiles 438Viewing profile packages 439Viewing FortiClient profiles 439Creating FortiClient profile packages 440Creating FortiClient profiles 440Editing FortiClient profiles 444Deleting FortiClient profiles 444Importing FortiClient profiles 444Assigning profile packages 444
Device Firmware and Security Updates 446FDN third-party SSL validation and Anycast support 447Settings 448
Connecting the built-in FDS to the FDN 451Operating as an FDS in a closed network 451
Configuring devices to use the built-in FDS 453Matching port settings 454Handling connection attempts from unauthorized devices 454Configure a FortiManager without Internet connectivity to access a localFortiManager as FDS 455
Configuring FortiGuard services 455Enabling push updates 456Enabling updates through a web proxy 457Overriding default IP addresses and ports 457Scheduling updates 458Accessing public FortiGuard web and email filter servers 459
Logging events related to FortiGuard services 459Logging FortiGuard antivirus and IPS updates 459Logging FortiGuard web or email filter events 460
Restoring the URL or antispam database 461Licensing status 461Package management 462
Receive status 462Service status 463
Query server management 464Receive status 464Query status 465
Firmware images 465Locks for Restricting Configuration Changes 468Normal mode 468
Enable normal mode 469Locking an ADOM 469Locking a device 470Locking a policy package 471Lock an individual policy 472
Workflow mode 473
FortiManager 6.4.0 Administration Guide 9Fortinet Inc.

Enable workflow mode 473Workflow approval 474Workflow sessions 475
System Settings 482Dashboard 483
Customizing the dashboard 484System Information widget 485System Resources widget 491License Information widget 492Registering a device or VM license 493Unit Operation widget 494Alert Messages Console widget 494Log Receive Monitor widget 495Insert Rate vs Receive Rate widget 495Log Insert Lag Time widget 496Receive Rate vs Forwarding Rate widget 496Disk I/O widget 497
Logging Topology 497Network 498
Configuring network interfaces 498Disabling ports 500Changing administrative access 500Static routes 500Packet capture 501
RAID Management 502Supported RAID levels 502Configuring the RAID level 505Monitoring RAID status 505Checking RAID from command line 506Swapping hard disks 507Adding hard disks 508
Administrative Domains 508Enabling and disabling the ADOM feature 509ADOM device modes 510ADOMmodes 511Managing ADOMs 513Deleting ADOMs 518ADOM versions 519Concurrent ADOM access 520Locking an ADOM 521Upgrading an ADOM 522
Certificates 522Local certificates 522CA certificates 525Certificate revocation lists 526
Fetcher Management 527Fetching profiles 528Fetch requests 529
FortiManager 6.4.0 Administration Guide 10Fortinet Inc.
Synchronizing devices and ADOMs 530Fetch monitoring 531
Event Log 532Event log filtering 534
Task Monitor 534SNMP 536
SNMP agent 536SNMP v1/v2c communities 538SNMP v3 users 541SNMPMIBs 542SNMP traps 543Fortinet & FortiManager MIB fields 544
Mail Server 545Syslog Server 547Meta Fields 548Device logs 549
Configuring rolling and uploading of logs using the GUI 550Configuring rolling and uploading of logs using the CLI 551
File Management 553Advanced Settings 553
Administrators 555Trusted hosts 555Monitoring administrators 556Disconnecting administrators 556
Managing administrator accounts 556Creating administrators 558Editing administrators 562Deleting administrators 563Restricted administrators 563
Administrator profiles 572Permissions 574Creating administrator profiles 576Editing administrator profiles 579Cloning administrator profiles 579Deleting administrator profiles 579
Authentication 579Public Key Infrastructure 580Managing remote authentication servers 581LDAP servers 582RADIUS servers 584TACACS+ servers 586Remote authentication server groups 586SAML admin authentication 587
Global administration settings 589Password policy 591Password lockout and retry attempts 591GUI language 592
FortiManager 6.4.0 Administration Guide 11Fortinet Inc.

Idle timeout 592Two-factor authentication 593
Configuring FortiAuthenticator 593Configuring FortiManager 595
High Availability 597Configuring HA options 599
General FortiManager HA configuration steps 601GUI configuration steps 601
Monitoring HA status 603Upgrading the FortiManager firmware for an operating cluster 604FortiManager support for FortiAnalyzer HA 604
Management Extensions 607SD-WANOrchestrator 607Wireless Manager (FortiWLM) 607Enabling management extension applications 608
CLI for management extensions 608Appendix A - Supported RFC Notes 610
FortiManager 6.4.0 Administration Guide 12Fortinet Inc.

Change Log
Change Log
Date Change Description
2020-04-09 Initial release.
2020-04-15 Updated Synchronizing the FortiManager configuration and HA heartbeat onpage 597.
2020-05-22 Added Appendix B - Examples.
2020-08-06 Updated Management Extensions on page 607 andWireless Manager(FortiWLM) on page 607.
2020-12-17 Removed Appendix B - Examples and published it as a separate guide.
2021-04-29 Removed inaccurate topic about viewing licenses for device groups.
2022-05-16 Updated Central SNAT on page 208.
FortiManager 6.4.0 Administration Guide 13Fortinet Inc.

Setting up FortiManager
This chapter describes how to connect to the GUI for FortiManager and configure FortiManager. It also provides anoverview of adding devices to FortiManager as well as configuring and monitoring managed device. Some securityconsiderations are included as well as an introduction to the GUI and instructions for restarting and shutting downFortiManager units.
After you configure IP addresses and administrator accounts for the FortiManager unit, youshould log in again using the new IP address and your new administrator account.
This section contains the following topics:
l Connecting to the GUI on page 14l Security considerations on page 15l GUI overview on page 16l FortiAnalyzer Features on page 20l Configuring FortiManager appliances on page 22l Adding devices on page 22l Installing to managed devices on page 23l Monitoring managed devices on page 23l Restarting and shutting down on page 24
Connecting to the GUI
The FortiManager unit can be configured and managed using the GUI or the CLI. This section will step you throughconnecting to the unit via the GUI.
To connect to the GUI:
1. Connect the FortiManager unit to a management computer using an Ethernet cable.2. Configure the management computer to be on the same subnet as the internal interface of the FortiManager unit:
l IP address: 192.168.1.Xl Netmask: 255.255.255.0
3. On the management computer, start a supported web browser and browse to https://192.168.1.99.4. Type admin in the Name field, leave the Password field blank, and click Login.
The Change Password dialog box is displayed.5. Change the default password now, or click Later to change the password later:
a. In the New Password box, type a new password.b. In the Confirm Password box, type the new password again, and clickOK.
6. If ADOMs are enabled, the Select an ADOM pane is displayed. Click an ADOM to select it.The FortiManager home page is displayed.
FortiManager 6.4.0 Administration Guide 14Fortinet Inc.

Setting up FortiManager
7. Click a tile to go to that pane. For example, click the Device Manager tile to go to the Device Manager pane.See also GUI overview on page 16.
If the network interfaces have been configured differently during installation, the URLand/or permitted administrative access protocols (such as HTTPS) may no longer be intheir default state.
For information on enabling administrative access protocols and configuring IP addresses, see Configuring networkinterfaces on page 498.
If the URL is correct and you still cannot access the GUI, you may also need to configure staticroutes. For details, see Static routes on page 500.
When the system is busy during a database upgrade or rebuild, you will receive a message inthe GUI log-in pane. The message will include the estimated completion time.
After logging in for the first time, you should create an administrator account for yourself and assign the Super_Userprofile to it. Then you should log into the FortiManager unit by using the new administrator account. See Managingadministrator accounts on page 556 for information.
Security considerations
You can take steps to prevent unauthorized access and restrict access to the GUI. This section includes the followinginformation:
l Restricting GUI access by trusted host on page 15l Other security considerations on page 15
Restricting GUI access by trusted host
To prevent unauthorized access to the GUI you can configure administrator accounts with trusted hosts. With trustedhosts configured, the administrator user can only log into the GUI when working on a computer with the trusted host asdefined in the administrator account. You can configure up to ten trusted hosts per administrator account. SeeAdministrators on page 555 for more details.
Other security considerations
Other security consideration for restricting access to the FortiManager GUI include the following:
l Configure administrator accounts using a complex passphrase for local accountsl Configure administrator accounts using RADIUS, LDAP, TACACS+, or PKIl Configure the administrator profile to only allow read/write permission as required and restrict access using read-only or no permission to settings which are not applicable to that administrator
FortiManager 6.4.0 Administration Guide 15Fortinet Inc.

Setting up FortiManager
l Configure the administrator account to only allow access to specific ADOMs as requiredl Configure the administrator account to only allow access to specific policy packages as required.
When setting up FortiManager for the first time or after a factory reset, the password cannot beleft blank. You are required to set a password when the admin user tries to log in toFortiManager from GUI or CLI for the first time. This is applicable to a hardware device as wellas a VM. This is to ensure that administrators do not forget to set a password when setting upFortiManager for the first time.After the initial setup, you can set a blank password from System Settings > Administrators.
GUI overview
When you log into the FortiManager GUI, the following home page of tiles is displayed:
Select one of the following tiles to display the respective pane. The available tiles vary depending on the privileges of thecurrent user.
Device Manager Manage devices, VDOMs, groups, firmware images, device licenses, and scripts.You can also configure system, threat weight, and Certificate templates, and viewreal-time monitor data. See Firewall Devices on page 36.
Policy & Objects Configure policy packages and objects. For more information, see Firewall Policy& Objects on page 162.
AP Manager Configure and manage FortiAP access points. For more information, see AccessPoints on page 360.
FortiClient Manager Manage FortiClient profiles and monitor FortiClient endpoints that are registeredto FortiGate devices. See Endpoint Compliance on page 432.FortiClient Manager is available only for ADOM versions 6.0 and earlier.
VPN Manager Configure and manage VPN connections. You can create VPN topologies andmanaged/external gateways. For more information, see VPN on page 315.
FortiManager 6.4.0 Administration Guide 16Fortinet Inc.

Setting up FortiManager
Fabric View Configure fabric connectors and view Security Fabric Ratings. See Fabric Viewon page 247.
FortiGuard Manage communication between devices and the FortiManager using theFortiGuard protocol. See Device Firmware and Security Updates on page 446.
FortiSwitch Manager Configure and manage FortiSwitch devices. For more information, seeFortiSwitch Manager on page 403.
Management Extensions Enable and use management extension applications that are released and signedby Fortinet. See Management Extensions on page 607.
FortiView View device status information in real-time. When FortiAnalyzer features areenabled, FortiView and additional predefined Monitors are available. SeeFortiView on page 311
Log View View logs for managed devices. You can display, download, import, and deletelogs on this page. You can also define custom views and create log groups.This pane is only available when FortiAnalyzer features are enabled.
Incidents & Events Configure and view events for logging devices.This pane is only available when FortiAnalyzer features are enabled.
Reports Generate reports. You can also configure report templates, schedules, and outputprofiles, and manage charts and datasets.This pane is only available when FortiAnalyzer features are enabled.
System Settings Configure system settings such as network interfaces, administrators, systemtime, server settings, and others. You can also perform maintenance andfirmware operations. See System Settings on page 482.
The top-right corner of the home page includes a variety of possible selections:
HA status If HA is enabled, the status is shown.
ADOM If ADOMs are enabled, the required ADOM can be selected from the dropdown list.If enabled, ADOMs can also be locked or unlocked.The ADOMs available from the ADOMmenu will vary depending on the privileges of thecurrent user.
Full Screen Click to view only the content pane in the browser window. See Full-screen mode on page 19.
Help Click to open the FortiManager online help, or view the About information for your device(Product, Version, and Build Number).
CLI Console Click the CLI Console icon on the right side of the banner on any page.The CLI console is a terminal window that enables you to configure the FortiManager unitusing CLI commands directly from the GUI, without making a separate SSH, or local consoleconnection to access the CLI.When using the CLI console, you are logged in with the same administrator account that youused to access the GUI. You can enter commands by typing them, or you can copy and pastecommands into or out of the console.Click Detach in the CLI Console toolbar to open the console in a separate window.
FortiManager 6.4.0 Administration Guide 17Fortinet Inc.

Setting up FortiManager
Note: The CLI Console requires that your web browser support JavaScript.
Notification Click to display a list of notifications. Select a notification from the list to take action on theissue.
admin Click to change the password or log out of the GUI.
Panes
In general, panes have four primary parts: the banner, toolbar, tree menu, and content pane.
Banner Along the top of the page; includes the home button (Fortinet logo), tile menu,ADOMmenu (when enabled), admin menu, notifications, help button, andCLI console button.
Tree menu On the left side of the screen; includes the menus for the selected pane.
Content pane Contains widgets, lists, configuration options, or other information, depending onthe pane, menu, or options that are selected. Most management tasks arehandled in the content pane.
Toolbar Directly above the content pane; includes options for managing content in thecontent pane, such as Create New and Delete.
The Device Manager pane includes a quick status bar on the top of the content pane that provides quick information onthe state of the devices in the current device group. Clicking a status updates the content pane to display the relevantdevices. See Firewall Devices on page 36 for more information.
To switch between panes, either select the home button to return to the home page, or select the tile menu then select anew tile.
FortiManager 6.4.0 Administration Guide 18Fortinet Inc.

Setting up FortiManager
Color themes
You can choose a color theme for the FortiManager GUI. For example, you can choose a color, such as blue or plum, oryou can choose an image, such as summer or autumn. See Global administration settings on page 589.
Full-screen mode
You can view several panes in full-screen mode. When a pane is in full-screen mode, the tree menu on the left side of thescreen is hidden.
Click the Full Screen button in the toolbar to enter full-screen mode, and press the Esc key on your keyboard to exit full-screen mode.
Switching between ADOMs
When ADOMs are enabled, you can move between ADOMs by selecting an ADOM from the ADOMmenu in the banner.
ADOM access is controlled by administrator accounts and the profile assigned to the administrator account. Dependingon your account privileges, you might not have access to all ADOMs. See Managing administrator accounts on page 556for more information.
Using the right-click menu
Options are sometimes available using the right-click menu. Right-click an item in the content pane, or within some of thetree menus, to display the menu that includes various options similar to those available in the toolbar.
In the following example on the Device Manager pane, you can right-click a device in the content pane, and select InstallConfig, Import Policy, Edit, Run Script, and so on.
Avatars
When FortiClient sends logs to FortiManager with FortiAnalyzer features enabled, an avatar for each user can bedisplayed in the Source column in the FortiView > FortiView and Log View panes. FortiManager can display an avatarwhen FortiClient is managed by FortiGate or FortiClient EMS with logging to FortiManager enabled.
FortiManager 6.4.0 Administration Guide 19Fortinet Inc.

Setting up FortiManager
l When FortiClient Telemetry connects to FortiGate, FortiClient sends logs (including avatars) to FortiGate, and thelogs display in FortiManager under the FortiGate device as a sub-type of security.The avatar is synchronized from FortiGate to FortiManager by using the FortiOS REST API.
l When FortiClient Telemetry connects to FortiClient EMS, FortiClient sends logs (including avatars) directly toFortiManager, and logs display in a FortiClient ADOM.
If FortiManager cannot find the defined picture, a generic, gray avatar is displayed.
You can also optionally define an avatar for FortiManager administrators. SeeCreating administrators on page 558.
Showing and hiding passwords
In some cases you can show and hide passwords by using the toggle icon. When you can view the password, the Toggleshow password icon is displayed:
When you can hide the password, the Toggle hide password icon is displayed:
FortiAnalyzer Features
FortiAnalyzer features can be enabled either for a FortiManager unit or for managed FortiAnalyzer units, but not for bothat the same time. The features can be used to view and analyze logs from devices with logging enabled that aremanaged by the FortiManager.
When the features are enabled manually, logs are stored and FortiAnalyzer features are configured on theFortiManager.
When the features are enabled by adding a FortiAnalyzer to the FortiManager, logs are stored and log storage settingsare configured on the FortiAnalyzer device. Managed devices with logging enabled send logs to the FortiAnalyzer. TheFortiManager remotely accesses logs on the FortiAnalyzer unit and displays the information. See Adding FortiAnalyzerdevices on page 50.
When FortiAnalyzer features are enabled, the following modules are available:
FortiView Enables FortiView and additionalMonitors, including monitoring network traffic,WiFi security, and system performance. See the FortiAnalyzer AdministrationGuide.
Log View View log messages frommanaged devices with logging enabled. You can viewthe traffic log, event log, or security log information. See the FortiAnalyzerAdministration Guide.
FortiManager 6.4.0 Administration Guide 20Fortinet Inc.

Setting up FortiManager
Incidents & Events View events from logs that you want to monitor. You can specify what logmessages to display as events by configuring event handlers. See theFortiAnalyzer Administration Guide.
Reports Generate reports of data from logs. See the FortiAnalyzer Administration Guide.
When FortiAnalyzer features are manually enabled, the following options are available on the System Settingsmodule:
Dashboard widgets The following widgets can be added to the dashboard: Log Receive Monitor,Insert Rate vs Receive Rate, Log Insert Lag Time, Receive Rate vs ForwardingRate, and Disk I/O.The License Information widget will include a Logging section. See Dashboard onpage 483.
Logging Topology View the logging topology. See Logging Topology on page 497.
Storage Info View and configure log storage policies. See the FortiAnalyzer AdministrationGuide.This pane is only available when ADOMs are enabled.
Fetcher Management Configure log fetching. See Fetcher Management on page 527.
Device Log Settings Configure device log file size, log rolling, and scheduled uploads to a server. SeeDevice logs on page 549.
File Management Configure the automatic deletion of device log files, quarantined files, reports, andcontent archive files after a set period of time. See File Management on page 553.
Various other settings and information will be included on the FortiManager when FortiAnalyzer features are enabled.
Enable or disable FortiAnalyzer features
If FortiAnalyzer features are enabled, you cannot add a FortiAnalyzer units to the FortiManager. If a FortiAnalyzer isadded to the FortiManager, FortiAnalyzer features are automatically enabled to support the managed FortiAnalyzer unit,and cannot be disabled.
See Adding FortiAnalyzer devices on page 50 for more information.
To enable or disable the FortiAnalyzer features from the GUI:
1. Go to System Settings > Dashboard.2. In the System Information widget, click the FortiAnalyzer Features toggle switch.
The FortiManager will reboot to apply the change.
To enable or disable the FortiAnalyzer features from the CLI:
1. Log in to the FortiManager CLI.2. Enter the following commands:
config system globalset faz-status {enable | disable}
end
FortiManager 6.4.0 Administration Guide 21Fortinet Inc.

Setting up FortiManager
The FortiAnalyzer feature set is not available on the FortiManager 100C.
Configuring FortiManager appliances
Following is an overview of how to configure a FortiManager appliance.
To configure FortiManager appliances:
1. Connect to the GUI. See Connecting to the GUI on page 14.2. Configure IP addresses. See Configuring network interfaces on page 498.3. Configure the RAID level, if the FortiManager unit supports RAID. See RAID Management on page 502.
Adding devices
After you configure the FortiManager device, you should plan the network topology, configure ADOMs, configureadministrative accounts, and then add the devices that you want to manage.
The number of devices that can be managed depends on the device model and license. An add-on license can bepurchased for some high end devices to increase that number of device that can be managed. See Add-on license onpage 97 for more information.
It is recommended that you import the policy from the device when you add the device to FortiManager. FortiManageruses the imported policy to automatically create a policy package for that device.
To add devices:
1. Plan your network topology.2. Configure administrative domains. See Administrative Domains on page 508.3. Configure administrator accounts. See Managing administrator accounts on page 556.4. Add devices to FortiManager. See Adding devices on page 37.5. If not done when you added the device, import the policy from each online device to FortiManager. See Import
policy wizard on page 48.A policy package is automatically created for the device based on the policy. You can view the policy package onthe Policy & Objects pane.
After initially importing policies from the device, all changes related to policies and objectsshould be made in Policy & Objects on the FortiManager.Making changes directly on the FortiGate device will require reimporting policies toresynchronize the policies and objects.
When initially adding a device to a FortiManager, there are several steps that should be followed before the FortiGate isconsidered synchronized.
FortiManager 6.4.0 Administration Guide 22Fortinet Inc.

Setting up FortiManager
To synchronize FortiGate with FortiManager:
1. Ensure a policy package is assigned to this device using Import Policy.
2. Perform an Install Policy Package to ensure that FortiGate and FortiManager are properly synchronized.
As a result, the Config Status and Policy Package Status will show as Synchronized.
The above procedure does not apply to the Backup Mode.
Ensuring that a FortiGate is synchronized sets a good foundation for future configuration changes to be pushed to theFortiGate.
Installing to managed devices
After you add devices to FortiManager, you can configure objects and policies, and use policy packages to install theobjects and policies to one or more devices.
If you imported a policy from a device, you can edit and create policies for the imported policy package, and then installthe updated policy package back to the device. Alternately you can create and configure a new policy package. You caninstall a policy package to multiple devices.
If you want to install device-specific settings, you can configure the settings by using the device dashboard on the DeviceManager pane. When you install to the device, the device-specific settings are pushed to the device.
To install to devices:
1. Create or edit objects. See Create a new object on page 221 or Edit an object on page 232.2. Create or edit policies in a policy package to select the objects. See Creating policies on page 182 or Editing
policies on page 182.You can create or edit policies in the policy package that was automatically created for the device when youimported its policy. Alternately, you can create a new policy package in which to define policies. See Create newpolicy packages on page 167.
3. Ensure that the installation targets for the policy package include the correct devices. See Policy packageinstallation targets on page 174.
4. Edit device-specific settings by using the device dashboard on the Device Manager pane. See Using the devicedashboard on page 61.
5. Install the policy package and device settings to devices by using the Installation Wizard. See Installing to deviceson page 66.
Monitoring managed devices
FortiManager includes many options for monitoring managed devices. Following is a sample of panes that you can useto monitor managed devices:
FortiManager 6.4.0 Administration Guide 23Fortinet Inc.

Setting up FortiManager
l Quick status bar—see Using the quick status bar on page 71l Device dashboard—see Using the device dashboard on page 61l Device configurations—see Managing device configurations on page 80l Policy packages—see Managing policy packages on page 167l APManager pane—see Monitor on page 372l FortiClient Manager pane—see Monitoring FortiClient endpoints on page 436l FortiSwitch Manager pane—see Monitor on page 411
When optional centralized features are enabled, you can also use the following panes to monitor the centralized featuresfor managed devices:
l SD-WAN pane—see SD-WAN on page 134l VPNManager pane—see VPN on page 315
When FortiAnalyzer features are enabled on the FortiManager device, you can also view and analyze log messagesfrommanaged devices by using the FortiView > FortiView, Log View, Event Management, and Reports panes. SeeFortiAnalyzer Features on page 20.
Restarting and shutting down
Always use the operation options in the GUI or the CLI commands to reboot and shut down the FortiManager system toavoid potential configuration problems.
To restart the FortiManager unit from the GUI:
1. Go to System Settings > Dashboard.2. In the Unit Operation widget, click the Restart button.3. Enter a message for the event log, then clickOK to restart the system.
To restart the FortiManager unit from the CLI:
1. From the CLI, or in the CLI Consolemenu, enter the following command:execute rebootThe system will be rebooted.Do you want to continue? (y/n)
2. Enter y to continue. The FortiManager system will restart.
To shutdown the FortiManager unit from the GUI:
1. Go to System Settings > Dashboard.2. In the Unit Operation widget, click the Shutdown button.3. Enter a message for the event log, then clickOK to shutdown the system.
To shutdown the FortiManager unit from the CLI:
1. From the CLI, or in the CLI Consolemenu, enter the following command:execute shutdownThe system will be halted.Do you want to continue? (y/n)
FortiManager 6.4.0 Administration Guide 24Fortinet Inc.

Setting up FortiManager
2. Enter y to continue. The FortiManager system will shutdown.
To reset the FortiManager unit:
1. From the CLI, or in the CLI Consolemenu, enter the following command:execute reset all-settingsThis operation will reset all settings to factory defaultsDo you want to continue? (y/n)
2. Enter y to continue. The device will reset to factory default settings and restart.
To reset logs and re-transfer all SQL logs to the database:
1. From the CLI, or in the CLI Consolemenu, enter the following command:execute reset-sqllog-transferWARNING: This operation will re-transfer all logs into database.Do you want to continue? (y/n)
2. Enter y to continue. All SQL logs will be resent to the database.
FortiManager 6.4.0 Administration Guide 25Fortinet Inc.

FortiManager Key Concepts
FortiManager is an integrated platform for the centralized management of products in a Fortinet security infrastructure.FortiManager provides centralized policy-based provisioning and configuration management for FortiGate, FortiWiFi,FortiAP, and other devices. For a complete list of supported devices, see the FortiManager Release Notes.
FortiManager recognizes Security Fabric groups of devices and lets you display the Security Fabric topology as well asview Security Fabric Ratings.
To reduce network delays and to minimize external Internet usage, a FortiManager installation can also act as an on-siteFortiGuard Distribution Server (FDS) for your managed devices and FortiClient agents to download updates to their virusand attack signatures, and to use the built-in web filtering and email filter services.
You can also optionally enable the FortiAnalyzer features, which enables you to analyze logs for managed devices andgenerate reports.
FortiManager scales to manage 10000 or more devices and virtual domains (VDOMs) from a single FortiManagerinterface. It is primarily designed for medium to large enterprises and managed security service providers.
Using a FortiManager device as part of an organization’s Fortinet security infrastructure can help minimize both initialdeployment costs and ongoing operating expenses. It allows fast device provisioning, detailed revision tracking, andthorough auditing.
This section contains the following topics:
l FortiManager modules on page 26l Object database and FortiManager modules on page 27l Inside the FortiManager system on page 28l Key features of the FortiManager system on page 33
FortiManager modules
The FortiManager feature set includes the following modules:
l Device Managerl Policy & Objectsl APManagerl FortiClient Managerl VPNManagerl Fabric Viewl FortiGuardl FortiSwitch Managerl FortiViewl System Settings
FortiManager 6.4.0 Administration Guide 26Fortinet Inc.

FortiManager Key Concepts
Modules for FortiAnalyzer feature set
When the FortiAnalyzer feature set is enabled in FortiManager, additional modules are available. The FortiAnalyzerfeature set includes the following modules:
l FortiView (FortiView and additionalMonitors become available in this module)l Log Viewl Incidents & Eventsl Reports
The FortiAnalyzer feature set is disabled by default. To enable the features, turn it on from thedashboard (see System Information widget on page 485), or use the following CLI commands:
config system globalset faz-status enable
endChanging faz status will affect FAZ feature in FMG. If you continue,
system will reboot to add/remove FAZ feature.Do you want to continue? (y/n) y
The FortiAnalyzer feature set is also enabled when you use the Device Wizard to add aFortiAnalyzer device to FortiManager.
Object database and FortiManager modules
Following is a diagram that shows an overview of the main FortiManager modules: Device Manager, FortiGuard, andFortiAnalyzer features. FortiManager includes a central database that stores elements for Policy & Objects, APManager, VPNManager, FortiClient Manager, and FortiSwitch Manager, and you can install these elements to devicesthrough Device Manager.
FortiManager 6.4.0 Administration Guide 27Fortinet Inc.

FortiManager Key Concepts
Inside the FortiManager system
FortiManager is a robust system with multiple communication protocols and layers to help you effectively manage yourFortinet security infrastructure.
Communication protocols and devices
FortiManager communicates with managed devices by using several protocols. Device Manager, FortiGuard Manager,and FortiAnalyzer Features each use a different protocol to communicate with managed devices.
FortiManager 6.4.0 Administration Guide 28Fortinet Inc.

FortiManager Key Concepts
Device Manager
Device Manager contains all devices that are managed by the FortiManager unit. You can create new device groups,provision and add devices, and install policy packages and device settings. Device Manager communicates with devicesby using the FortiGate-FortiManager (FGFM) protocol. See Firewall Devices on page 36.
FortiGuard Manager
FortiGuard Manager communicates with devices by using the FortiGuard protocol.
FortiAnalyzer features
When FortiAnalyzer features are enabled for the FortiManager unit, the FortiView > FortiView, Log View, Incidents &Events, and Reports panes are available. FortiAnalyzer features include tools for viewing and analyzing log messages,and the feature communicates with devices by using the logging protocol.
Object database and devices
FortiManager includes an object database to store all of the objects that you create. You can use the objects in thefollowing panes and apply the objects to devices:
l Policy & Objectsl APManagerl VPNManagerl FortiClient Managerl FortiSwitch Manager
FortiManager 6.4.0 Administration Guide 29Fortinet Inc.

FortiManager Key Concepts
Policy & Objects
The Policy & Objects pane contains all of your global and local policy packages and objects as well as configurationrevisions. Objects created for the Policy & Objects pane are stored in the objects database. See Firewall Policy &Objects on page 162.
AP Manager
The APManager pane lets you view and configure FortiAP access points as well as FortiExtender wireless WANextenders. Objects created for the APManager pane are stored in the objects database. See Access Points on page360.
VPN Manager
The VPNManager pane lets you centrally manage IPsec VPN and SSL-VPN settings. Objects created for the VPNManager pane are stored in the objects database. See VPN on page 315.
FortiManager 6.4.0 Administration Guide 30Fortinet Inc.

FortiManager Key Concepts
FortiClient Manager
The FortiClient Manager pane lets you manage FortiClient profiles and monitor FortiClient endpoints that are registeredto FortiGate devices. Objects created for the FortiClient Manager pane are stored in the objects database. See EndpointCompliance on page 432.
FortiSwitch Manager
The FortiSwitch Manager pane lets you manage and monitor FortiSwitch devices, and configure FortiSwitch templatesand VLANs. Objects created for the FortiSwitch Manager pane are stored in the objects database. See FortiSwitchManager on page 403.
ADOMs and devices
The Device Manager pane is used to install policy packages to devices. When ADOMs are enabled, the Device Managerpane is used to install policy packages to the devices in an ADOM.
Policy packages can include header policies and footer policies. You can create header and footer policies by using theglobal ADOM. The global ADOM allows you to create header and footer policies once, and then assign the header andfooter policies to multiple policy packages in one or more ADOMs.
For example, a header policy might block all network traffic to a specific country, and a footer policy might start antivirussoftware. Although you have unique policy packages in each ADOM, you might want to assign the same header andfooter policies to all policy packages in all ADOMs.
Following is a visual summary of the process and a description of what occurs in the global ADOM layer, ADOM layer,and device manager layer.
FortiManager 6.4.0 Administration Guide 31Fortinet Inc.

FortiManager Key Concepts
Global ADOM layer
The global ADOM layer contains two key pieces: the global object database and all header and footer policies.
Header and footer policies are used to envelop policies within each individual ADOM. These are typically invisible tousers and devices in the ADOM layer. An example of where this would be used is in a carrier environment, where thecarrier would allow customer traffic to pass through their network but would not allow the customer to have access to thecarrier’s network assets.
ADOM layer
The ADOM layer is where FortiManager manages individual devices, VDOMs, or groups of devices. It is inside this layerwhere policy packages and folders are created, managed, and installed on managed devices. Multiple policy packagesand folders can be created here. The ADOM layer contains one common object database per ADOM, which containsinformation such as addresses, services, antivirus and attack definitions, and web filtering and email filter.
Device manager layer
The device manager layer records information on devices that are centrally managed by the FortiManager unit, such asthe name and type of device, the specific device model, its IP address, the current firmware installed on the unit, thedevice’s revision history, and its real-time status.
Operations
Install
The install operation pushes device configuration from the FortiManager to a FortiGate device.
The FortiManager compares the configuration information that it has with the current configuration on the FortiGate. Itthen pushes the necessary configuration changes to the FortiGate to ensure that the FortiGate is synchronized with theFortiManager.
The install operation can include only device settings, or device settings and policy packages.
For more information, see Installing to devices on page 66.
Re-install
The re-install operation reinstalls a policy package on a FortiGate device. For more information, see Reinstall a policypackage on page 171.
Import
The import operation copies policies and policy-related objects from the device database into the ADOM, creating apolicy package that reflects the current configuration of the FortiGate device.
For more information, see Import policy wizard on page 48.
FortiManager 6.4.0 Administration Guide 32Fortinet Inc.

FortiManager Key Concepts
Retrieve
The retrieve operation retrieves the FortiGate configuration and stores it in the device database on the FortiManager.
Auto-Update
When there is a change on the FortiGate that is not initiated by an install operation, the FortiGate automatically sends theconfiguration changes to the FortiManager.
The auto-update operation is enabled by default. To disable auto-update and allow the administrator to accept or refuseupdates, use the following CLI commands:
config system admin settingsset auto-update disable
end
Auto-Backup
The auto-backup operation is similar to auto-update, but only available when the FortiManager is in backup mode. TheFortiGate device will wait until the FortiGate admin user has logged out before performing the backup.
For more information, see ADOMmodes on page 511.
Auto-Retrieve
The auto-retrieve operation is only invoked if the FortiGate fails to initiate an auto-update operation. When theFortiManager detects a change on the FortiGate, it automatically retrieves the full configuration.
Refresh
The FortiManager queries the FortiGate to update that FortiGate's current synchronization status. For more information,see Refreshing a device on page 71.
Revert
The revert operation loads a saved configuration revision into the device database. For more information, see Managingconfiguration revision history on page 84.
Key features of the FortiManager system
Security Fabric
FortiManager can recognize a Security Fabric group of devices and display all units in the group on the Device Managerpane, and you can manage the units in the Security Fabric group as if they were a single device. See Adding a Security
FortiManager 6.4.0 Administration Guide 33Fortinet Inc.

FortiManager Key Concepts
Fabric group on page 47.You can also display the security fabric topology (see Displaying Security Fabric topology onpage 75) and view Security Fabric Ratings (see Fabric View on page 247).
Configuration revision control and tracking
Your FortiManager unit records and maintains the history of all configuration changes made over time. Revisions can bescheduled for deployment or rolled back to a previous configuration when needed.
Centralized management
FortiManager can centrally manage the configurations of multiple devices from a single console. Configurations can thenbe built in a central repository and deployed to multiple devices when required.
Administrative domains
FortiManager can segregate management of large deployments by grouping devices into geographic or functionalADOMs. See Administrative Domains on page 508.
Local FortiGuard service provisioning
A FortiGate device can use the FortiManager unit for antivirus, intrusion prevention, web filtering, and email filtering tooptimize performance of rating lookups, and definition and signature downloads. See Device Firmware and SecurityUpdates on page 446.
Firmware management
FortiManager can centrally manage firmware images and schedule managed devices for upgrade.
Scripting
FortiManager supports CLI or Tcl based scripts to simplify configuration deployments. See Scripts on page 102.
Logging and reporting
FortiManager can also be used to log traffic from managed devices and generate Structured Query Language (SQL)based reports. FortiManager also integrates FortiAnalyzer logging and reporting features.
FortiManager 6.4.0 Administration Guide 34Fortinet Inc.

FortiManager Key Concepts
Fortinet device life cycle management
The management tasks for devices in a Fortinet security infrastructure follow a typical life cycle:
l Deployment: An administrator completes configuration of the Fortinet devices in their network after initialinstallation.
l Monitoring: The administrator monitors the status and health of devices in the security infrastructure, includingresource monitoring and network usage. External threats to your network infrastructure can be monitored and alertsgenerated to advise.
l Maintenance: The administrator performs configuration updates as needed to keep devices up-to-date.l Upgrading: Virus definitions, attack and data leak prevention signatures, web and email filtering services, anddevice firmware images are all kept current to provide continuous protection for devices in the securityinfrastructure.
FortiManager 6.4.0 Administration Guide 35Fortinet Inc.

Firewall Devices
Use the Device Manager pane to add, configure, and manage devices.
This topic covers navigating the Device Manager pane, adding devices, and managing devices. It also covers managingFortiExtender wireless WAN extenders.
Additional configuration options and short-cuts are available using the right-click contentmenu. Right-click the mouse on different parts of the navigation panes on the GUI page toaccess these context menus.
If workspace or workflow is enabled, the ADOMmust be locked before changes can be made.See Locking an ADOM on page 521.
The Device Manager pane includes the following tabs in the blue banner:
Device & Groups Add, configure, and view managed and logging devices. Use the toolbar to adddevices, devices groups, and launch the install wizard. See Adding devices onpage 37. The Device & Groups tab also contains a quick status bar for a selecteddevice group. See Using the quick status bar on page 71.
Firmware View information about firmware for devices as well as upgrade firmware. SeeFirmware on page 88.
License View license information for devices as well as push license updates to devices.See License on page 96.
Provisioning Templates Configure provisioning templates. For information on system, Threat Weight,FortiClient, and certificate templates, see Provisioning Templates on page 98.
Scripts Create new or import scripts. Scripts is disabled by default. You can enable thisadvanced configuration option in System Systems > Admin > Admin Settings.Select Show Script to enable on this option in the Device Manager pane. SeeScripts on page 102.
FortiManager 6.4.0 Administration Guide 36Fortinet Inc.

Firewall Devices
SD-WAN Configure profiles for load balancing SD-WAN links and monitor load-balancingprofiles. The SD-WAN tab is displayed only when central SD-WAN Link loadbalancing is enabled. See SD-WAN on page 134.
Extender View and configure FortiExtender. See FortiExtender on page 152.
ADOMs
You can organize connected devices into ADOMs to better manage the devices. ADOMs can be organized by:
l Firmware version: group all 6.0 devices into one ADOM, and all 6.2 devices into another.l Geographic regions: group all devices for a specific geographic region into an ADOM, and devices for a separateregion into another ADOM.
l Administrator users: group devices into separate ADOMs based for specific administrators responsible for thegroup of devices.
l Customers: group all devices for one customer into an ADOM, and devices for another customer into anotherADOM.FortiAnalyzer, FortiAuthenticator, FortiCache, FortiClient, FortiDDos, FortiMail, FortiManager, FortiSandbox,FortiWeb, Chassis, and FortiCarrier devices are automatically placed in their own ADOMs.
Each administrator profile can be customized to provide read-only, read/write, or restrict access to various ADOMsettings. When creating new administrator accounts, you can restrict which ADOMs the administrator can access, forenhanced control of your administrator users. For more information on ADOM configuration and settings, seeAdministrative Domains on page 508.
For information on adding devices to an ADOM by using the Add Device wizard, see Addingdevices using the wizard on page 38.
Adding devices
You must add devices to the FortiManager system to use FortiManager to manage the devices. You must also enableCentral Management on the managed device by using FortiOS. You can add an existing, operational device or anunregistered device. You can also provision a new device.
You can add individual devices or multiple devices. Adding devices using the Add Device wizard gives you moreconfiguration options than using Add Multiple devices.
For a device that is currently online, use the Add Device wizard, select Discover, and follow the steps in the wizard.Adding an existing device does not result in an immediate connection to the device. Device connection happens onlywhen you successfully synchronize the device. To provision a new device which is not yet online, use the Add Devicewizard and select Add Model Device.
Adding an operating FortiGate HA cluster to the Device Manager pane is similar to adding a standalone device. Specifythe IP address of the primary device. FortiManager handles a cluster as a single managed device.
FortiManager 6.4.0 Administration Guide 37Fortinet Inc.

Firewall Devices
If you are using a HA cluster, you can promote a secondary device to a primary device. Go toDevice Manager > Device & Groups > Managed FortiGate > [HA_Cluster_Name]. TheSystem:Dashboard pane shows the cluster members under Cluster Members. Click Promoteto promote a secondary device to a primary device.
Adding devices using the wizard
You can add devices to the FortiManager unit by using the Add Device wizard. You can use the wizard to discoverdevices or add model devices to your FortiManager unit.
You cannot use the Add Device wizard to add FortiAnalyzer to FortiManager. You must usethe Add FortiAnalyzer wizard instead. See Adding FortiAnalyzer devices on page 50.
Use the Discover option for devices that are currently online and discoverable on your network. When the wizardcompletes, the devices is added to FortiManager and authorized.
Use the Add Model Device option to add a device that is not yet online. You can configure a model device toautomatically complete authorization with FortiManager when the device is online.
When configuring a model device to automatically complete authorization with FortiManager,add the model device to FortiManager by using a pre-shared key. When the device connectsto FortiManager, run the execute central-mgmt register-device command from theFortiGate console. The device is automatically authorized, and the configuration of thematched model device is applied.For FortiOS 5.4.1 or earlier, you must run the execute central-mgmt register-device command.
To confirm that a device model or firmware version is supported by current firmware versionrunning on FortiManager run the following CLI command:
diagnose dvm supported-platforms list
Adding a device using Discover mode
The following steps will guide you through the Add Device wizard phases to add a device using Discovermode.
FortiManager will not be able to communicate with the FortiGate if offline mode is enabled.Enabling offline mode will prevent FortiManager from discovering devices.
To add a device using Discover mode:
1. If using ADOMs, ensure that you are in the correct ADOM.2. Go to Device Manager > Device & Groups.
FortiManager 6.4.0 Administration Guide 38Fortinet Inc.

Firewall Devices
3. Click Add Device. The wizard opens.
4. Select Discover. Type the IP address, user name, and password for the device, then click Next.FortiManager probes the IP address on your network to discover device details, including:l IP addressl Host namel Serial numberl Device modell Firmware version and buildl High Availability statusl Administrator user name
FortiManager 6.4.0 Administration Guide 39Fortinet Inc.

Firewall Devices
5. Configure the following settings:
Name Type a unique name for the device. The device name cannot contain spacesor special characters.
Description Type a description of the device (optional).
System Template System templates can be used to centrally manage certain device-leveloptions from a central location. If required, assign a system template using thedropdown menu. Alternatively, you can select to configure all settings per-device inside Device Manager. For more information, see ProvisioningTemplates on page 98.
Add to Groups Select to add the device to any predefined groups.
6. Click Next.The wizard discovers the device, and performs some or all of the following checks:l Discovering devicel Creating device databasel Initializing configuration databasel Retrieving configurationl Retrieving support datal Updating group membershipl Successfully add devicel Check device status
After the wizard completes the checks, you are asked to choose whether to import policies and objects for thedevice now or later.
7. Click Import Later to finish adding the device and close the wizard.If you click Import Now, the wizard continues. The next step in the wizard depends on whether you are importing aFortiGate VDOM.If you are importing a FortiGate VDOM, the following page is displayed with import options for the VDOM. Select anoption, and click Next.
FortiManager 6.4.0 Administration Guide 40Fortinet Inc.

Firewall Devices
If you are not importing a FortiGate VDOM, the following page is displayed.
8. Set the following options, then click Next:a. In the Policy Selection section, select Import All or Select Policies and Profile Groups to Import.b. In theObject Selection section, select Import only policy dependent objects or Import all objects.c. Check the device interface mappings.d. Select or clear the Add mappings for all unused device interfaces checkbox.The list of objects that will be updated is displayed.
FortiManager 6.4.0 Administration Guide 41Fortinet Inc.

Firewall Devices
9. Click Next.A detailed summary of the import is shown. Click Download Import Report to download a report of the import. Thereport is only available on this page.
10. Click Finish to finish adding the device and close the wizard.
Adding a model device
The following instructions will guide you through the Add Device wizard phases to add a device using Add Model Devicemode.
To confirm that a device model or firmware version is supported by the FortiManager's currentfirmware version, run the following CLI command:
diagnose dvm supported-platforms list
When adding devices to product-specific ADOMs, you can only add that product type to theADOM. When selecting to add a non-FortiGate device to the root ADOM, the device willautomatically be added to the product specific ADOM.
FortiManager 6.4.0 Administration Guide 42Fortinet Inc.

Firewall Devices
To add a model device:
1. If ADOMs are enabled, select the ADOM to which you want to add the device.2. Go to Device Manager > Device & Groups.3. Click Add Device. The Add Device wizard displays.
4. Click Add Model Device and enter the following information:
Add Model Device Device will be added using the chosen model type and other explicitly enteredinformation.
Name Type a descriptive name for the device. This name is displayed in the DeviceName column. Each device must have a unique name, otherwise the wizardwill fail.
Link Device By The method by which the device will be added, either Serial Number or Pre-Shared Key.The serial number should be used if it is known. A pre-shared key can be usedif the serial number is not known when the model device is added.If using a pre-shared key, the following CLI command needs to be issued fromthe FortiGate device when it is installed in the field:
execute central-mgmt register-device <fmg-serial-number><preshared-key>
Serial Number or Pre-SharedKey
Type the device serial number or pre-shared key. This field is mandatory.If using a pre-shared key, each device must have a unique pre-shared key.You can change the pre-shared key after adding the model device. SeeEditing device information on page 72.
Device Model Select the device model from the list. If linking by serial number, the serialnumber must be entered before selecting a device model.
Enforce Firmware Version Select the check box to enforce the firmware version. The Firmware Versionshows the firmware that will be upgraded or downgraded on the device.
FortiManager 6.4.0 Administration Guide 43Fortinet Inc.

Firewall Devices
Assign Policy Package Select the check box and select a policy package from the drop-down toassign a particular policy package to the device.
Assign Device ProvisioningProfile
Select the check box and select a device provisioning profile from the drop-down to assign a particular provisioning profile to the device.
Device Group Click Device Group and select a group to assign the device to the group.
5. Click Next. The device is created in the FortiManager database.6. Click Finish to exit the wizard.
A device added using the Add Model Device option has similar dashboard options as a device added using theDiscover option. As the device is not yet online, some options are not available.
A configuration file needs to be associated with the model device so that FortiManager willautomatically install the configuration to the matching device when it connects to theFortiManager. FortiManager will not retrieve a configuration file from a real device thatmatches a model device.Use the Import Revision function to associate a configuration file with the model device. SeeManaging configuration revision history on page 84.
Authorizing devices
You can enable central management by using the operating system for supported units. For example, in FortiOS, youcan enable central management for the FortiGate unit by adding the IP address of the FortiManager unit. When centralmanagement is enabled, the device is displayed on the FortiManager GUI in the root ADOM on the Device Managerpane in the Unauthorized Devices list.
In FortiManager, you must authorize devices before you can use FortiManager to manage them. FortiManager cannotmanage unauthorized devices.
When ADOMs are enabled, you can assign the device to an ADOM. When authorizing multiple devices at one time, theyare all added to the same ADOM.
To authorize devices:
1. In the root ADOM, go to Device Manager > Device & Groups and click the Unauthorized Devices tree menu. Thecontent pane displays the unauthorized devices.
2. If necessary, select the Display Hidden Devices check box to display hidden unauthorized devices.3. Select the unauthorized device or devices, then click Authorize. The Authorize Device dialog box opens.
4. If ADOMs are enabled, select the ADOM in the Add the following device(s) to ADOM list. If ADOMs are disabled,select root.
5. ClickOK to authorize the device or devices.The device or devices are authorized and FortiManager can start managing the device or devices.
FortiManager 6.4.0 Administration Guide 44Fortinet Inc.

Firewall Devices
Hiding unauthorized devices
You can hide unauthorized devices from view, and choose when to view hidden devices. You can authorize or deletehidden devices.
To hide and display unauthorized devices:
1. In the root ADOM, go to Device Manager > Device & Groups and click the Unauthorized Devices tree menu. Thecontent pane displays the unauthorized devices.
2. Select the unauthorized device or devices, then click Hide.The unauthorized devices are hidden from view.You can view hidden devices by selecting the Display Hidden Devices check box.
Adding a model device by pre-shared key - example
This section describes how to add a FortiGate model by using the pre-shared key for FortiGate. You must perform somesteps using FortiManager and some steps using FortiOS.
To add a model device by pre-shared key:
1. If ADOMs are enabled, select the ADOM to which you want to add the device.2. Go to Device Manager > Device & Groups.3. Click Add Device. The Add Device wizard displays.4. Click Add Model Device and type a name for the model device.5. In the Link Device By list, select Pre-shared Key, and type the pre-shared key from FortiGate.6. Set the remaining options, and click Next. The device is created in the FortiManager database.7. Click Finish to exit the wizard.
After the device model is added to FortiManager, you can use FortiManager to configure the model device.8. In FortiOS, configure the FortiManager IP address or FQDN in device central management by using the following
command:config system central-management
set type fortimanagerset fmg {<ip address> | <FQDN>}
end
9. In FortiOS, use the following command to link the model device to the real device, and to install configurations to thereal device:
exe central-mgmt register-device <fmg-serial-number> <pre-shared key>
After the command is executed, FortiManager automatically links the model device to the real device, and installsconfigurations to the device.
Adding a model device by serial number - example
This section describes how to add a FortiGate model device to FortiManager by using the serial number for theFortiGate. You must perform some steps using FortiManager and some steps using FortiOS.
FortiManager 6.4.0 Administration Guide 45Fortinet Inc.

Firewall Devices
To add a model device by serial number:
1. If ADOMs are enabled, select the ADOM to which you want to add the device.2. Go to Device Manager > Device & Groups.3. Click Add Device. The Add Device wizard displays.4. Click Add Model Device and type a name for the model device.5. In the Link Device By list, select Serial Number and type the serial number for the FortiGate unit.6. Set the remaining options, and click Next. The device is created in the FortiManager database.7. Click Finish to exit the wizard.
After the device model is added to FortiManager, you can use FortiManager to configure the model device.8. In FortiOS GUI, configure the FortiManager IP address in device central management.
a. Go to System > Settings.b. In the Central Management area, type the FortiManager IP address in the IP/Domain Name box, and click
Apply.FortiManager automatically links the model device to the real device, and installs configurations to the device.
Add a VDOM to a device
To add a VDOM to a managed FortiGate device, right-click on the content pane for a particular device and select AddVDOM from the pop-up menu. There are two types of VDOMmodes available: Split-Task VDOM and Multi VDOM.
The number of VDOMs you can add is dependent on the device model. For more information,see theMaximum Values Table in the Fortinet Document Library.
Split-Task VDOM Mode
The Split-Task VDOMmode creates two VDOMs automatically: FG-traffic and root. Additional VDOMs cannot be added.
FG-traffic is a regular VDOM and can contain policies, UTM profiles and it will handle the traffic like the no-VDOMmode.The root VDOM is only for management and it cannot have policies or profiles.
To add a Split-Task VDOM to a FortiGate device:
1. Go to Device Manager > Device & Groups.2. In the tree menu, click the group. The devices in the group are displayed in the content pane.3. In the content pane, right-click a device and select Add VDOM.4. Click Split-Task VDOM.
Multi VDOM Mode
The Multi VDOMmode allows you to create multiple VDOMs as per your license.
FortiManager 6.4.0 Administration Guide 46Fortinet Inc.

Firewall Devices
To add a Multi VDOM to a FortiGate device:
1. Go to Device Manager > Device & Groups.2. In the tree menu, click the group. The devices in the group are displayed in the content pane.3. In the content pane, right-click a device and select Add VDOM.4. ClickMulti VDOM5. The Create New Virtual Domain window opens.
6. Configure the following options, and clickOK.
Name Type a name for the new virtual domain.
Description Optionally, enter a description of the VDOM.
Enable Select to enable the VDOM.
Operation Mode Select either NAT or Transparent.
Interface Members Click to select each port one by one.
Kubernetes Service must be enabled on the server side for AWS, Azure, OCI and, GCP forKubernetes to function for the particular cloud platform. Once the service is enabled,Kubernetes can be configured for the particular cloud platform in FortiManager.
Adding a Security Fabric group
Before you can add a Security Fabric group to FortiManager, you must create the Security Fabric group in FortiOS.
You must add to FortiManager the root FortiGate for the Security Fabric group. All the devices in the Security Fabricgroup are automatically added in Unauthorized Devices after you add the root FortiGate.
See also Displaying Security Fabric topology on page 75.
To add a Security Fabric group:
1. If using ADOMs, ensure that you are in the correct ADOM.2. Go to Device Manager > Device & Groups.3. Add the root FortiGate unit for the Security Fabric group. See Adding a device using Discover mode on page 38.
Alternatively, you can enable Central Management in the root FortiGate unit and specify the IP address of the
FortiManager 6.4.0 Administration Guide 47Fortinet Inc.

Firewall Devices
FortiManager. See Authorizing devices on page 44.All devices part of the Security Fabric group are automatically added in Unauthorized Devices.
4. Select all devices in Unauthorized Devices and click Add.5. Specify the credentials for each device in the Add Device dialog and clickOK.
The entire Security Fabric group with all the devices are added to FortiManager. FortiGate devices are listed underManaged Devices.
If the FortiManager is behind NAT, adding the root FortiGate will not add all the members ofthe Security Fabric Group automatically. If the FortiManager is behind NAT, the only way is toadd each member of the Security Fabric group manually.
Refresh the Security Fabric root after all the members of the group are added to FortiManager. FortiManager retrievesinformation about the Security Fabric group via the root FortiGate unit. All units are displayed in a Security Fabric group.The Security Fabric icon identifies the group, and the group name is the serial number for the root FortiGate in the group.Within the group, a * at the end of the device name identifies the root FortiGate in the group.
Import policy wizard
On the Device Manager > Device & Groups pane, right-click a device, and select Import Policy to launch the ImportDevice wizard. This wizard allows you to import interface maps, policy databases, and objects. Default or per-devicemapping must exist or the installation will fail.
After initially importing policies from the device, make all changes related to policies andobjects in Policy & Objects on the FortiManager.Making changes directly on the FortiGate device will require reimporting policies toresynchronize the policies and objects.
Device Interface
The Device Interface page allows you to choose an ADOM interface for each device interface. When importingconfiguration from a device, all enabled interfaces require a mapping.
Interface maps will be created automatically for unmapped interfaces.
FortiManager 6.4.0 Administration Guide 48Fortinet Inc.

Firewall Devices
Select Add mapping for all unused device interfaces to automatically create interface maps for unused interfaces.
Policy
The policy page allows you to create a new policy package for import.
Select a folder from the dropdown menu, specify a policy package name, then configure the following options:
Policy Package Name Type a name for the policy package.
Folder Select a folder on the dropdown menu.
Policy Selection Select to import all, or select specific policies and policies groups to import.
Object Selection Select Import only policy dependent objects to import policy dependent objectsonly for the device.Select Import all objects to import all objects for the selected device.
Object
The object page will search for dependencies, and reports any conflicts it detects.If conflicts are detected, you mustdecide whether to use the FortiGate value or the FortiManager value. If there are conflicts, you can select View Details toview details of each individual conflict, or you can download an HTML conflict file to view all the details about theconflicts. Duplicates will not be imported.
Click Next to view the objects that are ready to be imported, and then click Next again to proceed with importing.
Import
Objects are imported into the common database, and the policies are imported into the selected package. Click Next tocontinue to the summary.
The import process removes all policies that have FortiManager generated policy IDs, such as1073741825, that were previously learned by the FortiManager device. The FortiGate unitmay inherit a policy ID from the global header policy, global footer policy, or VPN console.
FortiManager 6.4.0 Administration Guide 49Fortinet Inc.

Firewall Devices
Summary
The summary page allows you to download the import device summary results. It cannot be downloaded from anywhereelse.
Adding FortiAnalyzer devices
Adding a FortiAnalyzer device to FortiManager gives FortiManager visibility into the logs on the FortiAnalyzer, providinga Single Pane of Glass on the FortiManager. It also enables FortiAnalyzer features, such as FortiView > FortiView, andLog View.
For information about FortiAnalyzer features, see FortiAnalyzer Features on page 20. See also Viewing policy rules onpage 54 and View logs related to a policy rule on page 177.
To add a FortiAnalyzer to FortiManager, they both must be running the same OS version, atleast 5.6 or later.
If FortiAnalyzer features are enabled, you cannot add a FortiAnalyzer unit to the FortiManager.See FortiAnalyzer Features on page 20.
In addition, you cannot add a FortiAnalyzer unit to the FortiManager when ADOMs areenabled and ADOM mode is set to Advanced.
ADOMs disabled
When you add a FortiAnalyzer device to FortiManager with ADOMs disabled, all devices with logging enabled can sendlogs to the FortiAnalyzer device. You can add only one FortiAnalyzer device to FortiManager, and the FortiAnalyzerdevice limit must be equal to or greater than the number of devices managed by FortiManager.
When you add additional devices with logging enabled to FortiManager, the managed devices can send logs to theFortiAnalyzer device. The new devices display in the Device Manager pane on FortiAnalyzer unit when FortiManagersynchronizes with the FortiAnalyzer unit.
ADOMs enabled
When you add a FortiAnalyzer device to FortiManager with ADOMs enabled, all devices with logging enabled in theADOM can send logs to the FortiAnalyzer device. Following are the guidelines for adding a FortiAnalyzer device toFortiManager when ADOMs are enabled:
l You can add one FortiAnalyzer device to each ADOM, and the FortiAnalyzer device limit must be equal to or greaterthan the number of devices in the ADOM.
l The same ADOM name and settings must exist on the FortiAnalyzer device and FortiManager. The wizardsynchronizes these settings for you if there is a mismatch.
l The logging devices in the FortiAnalyzer ADOM and FortiManager ADOMmust be the same. The wizardsynchronizes these settings for you.
l You cannot add the same FortiAnalyzer device to multiple ADOMs.
FortiManager 6.4.0 Administration Guide 50Fortinet Inc.

Firewall Devices
When you add additional devices with logging enabled to an ADOM in FortiManager, the managed devices can sendlogs to the FortiAnalyzer device in the ADOM. The new devices display in the Device Manager pane on the FortiAnalyzerunit when FortiManager synchronizes with the FortiAnalyzer unit.
Provisioning templates for log settings
After you add a FortiAnalyzer device to FortiManager, you can use FortiManager to enable logging for all FortiGates inthe root ADOM (when ADOMs are disabled) or the ADOM (when ADOMs are enabled) by using the log settings in asystem template. See System templates on page 98.
Legacy FortiAnalyzer ADOM
The FortiAnalyzer ADOM supports FortiAnalyzer units added to FortiManager before upgrading to FortiManager 5.6 andlater. If you want to use the new functionality, you must delete the FortiAnalyzer unit from FortiManager and add it byusing the Add FortiAnalyzer wizard.
Log storage and configuration
Logs are stored on the FortiAnalyzer device, not the FortiManager device. You configure log storage settings on theFortiAnalyzer device; you cannot change log storage settings using FortiManager.
Configuration and data for FortiAnalyzer features
When FortiManager manages a FortiAnalyzer unit, all configuration and data is kept on the FortiAnalyzer unit to supportthe following FortiAnalyzer features: FortiView > FortiView, Log View, Incidents & Events, and Reports. FortiManagerremotely accesses the FortiAnalyzer unit to retrieve requested information for FortiAnalyzer features. For example, if youuse the Reports pane in FortiManager to create a report, the report is created on the FortiAnalyzer unit and remotelyaccessed by FortiManager.
Adding FortiAnalyzer devices with the wizard
If the FortiAnalyzer unit is receiving logs from devices that are not managed by FortiManager, the wizard requires you toadd the devices to FortiManager by typing the IP address and login credentials for each device. Ensure that you have theIP addresses and login credentials for each device before you start the wizard.
The Add FortiAnalyzer option is hidden when you cannot add a FortiAnalyzer unit to theFortiManager unit. For example, the Add FortiAnalyzer option is hidden if you have alreadyadded a FortiAnalyzer unit to the FortiManager unit (when ADOMs are disabled) or to theADOM (when ADOMs are enabled). You also cannot add a FortiAnalyzer unit when you haveenabled FortiAnalyzer features for the FortiManager unit.
FortiManager and FortiAnalyzer must be running 5.6 or later, and the versions must be thesame on both devices.
FortiManager 6.4.0 Administration Guide 51Fortinet Inc.

Firewall Devices
To add a FortiAnalyzer device:
1. Confirm that the FortiAnalyzer device supports the number of devices managed by FortiManager.l If ADOMs are disabled, ensure that the FortiAnalyzer device limit is equal to or greater than the number ofdevices managed by FortiManager.
l If ADOMs are enabled, ensure that the FortiAnalyzer device limit is equal to or greater than the number ofdevices in the ADOM.
2. If ADOMs are enabled, select the ADOM to which you want to add the device.3. Go to Device Manager > Device & Groups.4. Click Add Device > Add FortiAnalyzer. The wizard opens.
The Add FortiAnalyzer option is hidden if you've already added a FortiAnalyzer device.
5. Type the IP address, user name, and password for the device, then click Next.FortiManager probes the IP address on your network to discover FortiAnalyzer device details, including:l IP addressl Host namel Serial numberl Device modell Firmware version (build)l High Availability statusl Administrator user name
FortiManager 6.4.0 Administration Guide 52Fortinet Inc.

Firewall Devices
6. Configure the following settings if desired, and click Next:
Name Type a unique name for the device. The device name cannot contain spacesor special characters (optional).
Description Type a description of the device (optional).
The wizard performs the following tasks:l Compares the ADOM name and configuration as well as devices between FortiAnalyzer and FortiManagerl Verifies the devices in the Device Manager pane for FortiAnalyzer with the devices in the Device Manager panefor FortiManager
If any discrepancies are found, information is displayed in the Status column, and you can resolve the discrepanciesby clicking the Synchronize ADOM and Devices button.
The following table describes the different statuses:
Status Description
FMG Only The device was located in FortiManager, but not FortiAnalyzer. If you proceed with thewizard, the device will be added to FortiAnalyzer too.
FAZ Only The device was located in FortiAnalyzer, but not FortiManager. If you proceed with thewizard, the device will be added to FortiManager too. The login and password for thedevice is required to complete the wizard.
Sync The device was located in both FortiAnalyzer and FortiManager without any differences,and the wizard will synchronize the device between FortiManager and FortiAnalyzer.
FortiManager 6.4.0 Administration Guide 53Fortinet Inc.

Firewall Devices
Status Description
Mismatched The device was located in both FortiAnalyzer and FortiManager with some differences,and the wizard will synchronize the device settings between FortiManager andFortiAnalyzer to remove the differences.
If the FortiManager ADOM does not exist on the FortiAnalyzer device, a warning is displayed. You can add theADOM and devices to FortiAnalyzer by clicking the Synchronize ADOM and Devices button.
7. Click Synchronize ADOM and Devices to continue.a. If you are synchronizing devices from FortiAnalyzer to FortiManager, type the IP address and login for each
device, and clickOK to synchronize the devices.b. After the devices successfully synchronize, clickOK to continue.The devices, ADOM name, and ADOM version are synchronized between FortiAnalyzer and FortiManager.
8. Click Finish to close the wizard.
The FortiAnalyzer device is displayed on the Device Manager pane as aManaged FortiAnalyzer, and FortiAnalyzerfeatures are enabled.
After completing the wizard, ensure that you enable logging on the devices, so the managed FortiAnalyzer can receivelogs from the devices. You can enable logging by using the log settings in a system template. See System templates onpage 98.
Viewing policy rules
When a FortiAnalyzer is managed by a FortiManager, you can view the logs that the FortiAnalyzer unit receives. In theLog Viewmodule, you can also view the policy rules by clicking a policy ID number.
See Adding FortiAnalyzer devices on page 50.
To view policy rules:
1. Go to Log View > Traffic.2. Click the number in the Policy ID column.
The View Policy window is displayed, showing the policy rules.3. Click Return to close the window.
Importing devices
You can import devices using the following methods:
l Importing detected devicesl Importing and exporting device lists
FortiManager 6.4.0 Administration Guide 54Fortinet Inc.

Firewall Devices
Importing detected devices
You can import detected devices for each device.
To import detected devices:
1. Ensure that you are in the correct ADOM.2. Go to the Device Manager tab, and from the Toolsmenu, clickGlobal Display Options.3. In the Detected Devices area, select Detected Devices, and clickOK.4. In the tree menu, select a device. The device dashboard is displayed.5. Click Detected Devices. The Detected Devices pane is displayed.6. Click Import.
Importing and exporting device lists
Using the Import Device List and Export Device List option, you can import or export a large number of devices, ADOMs,device VDOMs, and device groups. The device list is a compressed text file in JSON format.
You can also use the Export to CSV option to export a device list to CSV format. However, you cannot use theCSV format to import a device list to FortiManager. You can only import a device list that was exported to JSON format.
Advanced configuration settings such as dynamic interface bindings are not part ofimport/export device lists. Use the backup/restore function to backup the FortiManagerconfiguration.
The Import and Export Device List features are disabled by default. To enable, go to SystemSettings > Admin > Admin Settings, and select the Show Device List Import/Export checkboxunder Display Options on GUI.
Proper logging must be implemented when importing a list. If any add or discovery operationfails, there must be appropriate event logs generated so you can trace what occurred.
To export a device list to compressed JSON format:
1. Go to Device Manager > Device & Groups.2. Select a device group, such asManaged Devices.3. From theMoremenu, select Export Device List.
The Choose ADOM dialog box is displayed.
FortiManager 6.4.0 Administration Guide 55Fortinet Inc.

Firewall Devices
4. Click Current ADOM to export the device list from the current ADOM, or click All ADOM to export the device list fromall ADOMs.A device list in JSON format is exported in a compressed file (device_list.dat).
To export a device list to CSV format:
1. Go to Device Manager > Device & Groups.2. Select a device group, such asManaged Devices.3. From theMoremenu, select Export to CSV.
The Export to CSV dialog box is displayed.
4. (Optional) Change the file name.5. Select whether to export all columns or only customized columns.6. Click Download.
To import a device list:
1. Go to Device Manager > Device & Groups.2. Select a device group, such asManaged Devices.3. From theMoremenu, select Import Device List.4. Click Browse and locate the compressed device list file (device_list.dat) that you exported from FortiManager,
or drag and drop the file onto the dialog box.5. ClickOK.
Configuring devices
You can configure the FortiGate units in three ways:
l Per device, from the Device Manager dashboard toolbar.l Per VDOM, from the Device Manager dashboard toolbar.l Per provisioning template.
This section contains the following topics:
l Configuring a devicel Out-of-Sync devicel Configuring VDOMs
FortiManager 6.4.0 Administration Guide 56Fortinet Inc.

Firewall Devices
Configuring a device
Configuring a FortiGate unit using the Device Manager dashboard toolbar is very similar to configuring FortiGate unitsusing the FortiGate GUI. You can also save the configuration changes to the configuration repository and install them toother FortiGate units at the same time.
This document does not provide detailed procedures for configuring FortiGate units. See the FortiGate documentationfor complete information. The most up-to-date FortiGate documentation is also available in the Fortinet DocumentLibrary.
To configure a FortiGate unit:
1. Go to Device Manager > Device & Groups.2. In the tree menu, select a device group.3. In the content pane, select a device.4. From the Installmenu, select Install Config.5. When the installation configuration is complete, click Finish.
The configuration changes are saved to the FortiManager device database instead of the FortiManager repositoryrepresented by the Revision History window.
To view the history of the configuration installation, click the View History button in the Historycolumn to open the Install History dialog box. This can be particularly useful if the installationfails.
You can rename and reapply firewall objects after they are created and applied to a firewallpolicy. When you do so, the FortiManager system will: delete all dependencies, delete theobject, recreate a new object with the same value, and recreate the policy to reapply the newobject.
Firewall policy reordering on first installation
On the first discovery of a FortiGate unit, the FortiManager system will retrieve the unit's configuration and load it into theDevice Manager. After you make configuration changes and install them, you may see that the FortiManager systemreorders some of the firewall policies in the FortiGate unit’s configuration file.
This behavior is normal for the following reasons:
l The FortiManager systemmaintains the order of policies in the actual order you see them and manipulate them inthe GUI, whereas the FortiGate unit maintains the policies in a different order (such as order of creation).
l When loading the policy set, the FortiManager system re-organizes the policies according to the logical order asthey are shown in the user interface. In other words, FortiManager will group all policies that are organized withininterface pairs (internal -> external, port1 -> port3, etc.).
The FortiManager system does not move policies within interface pairs. It will only move the configuration elements sothat policies with the same source/destination interface pairs are grouped together.
This behavior would only be seen:
l On the first installation.l When the unit is first discovered by the FortiManager system. If using the FortiManager system to manage theFortiGate unit from the start, you will not observe the policy reordering behavior.
FortiManager 6.4.0 Administration Guide 57Fortinet Inc.

Firewall Devices
Out-of-Sync device
FortiManager is able to detect when the settings were changed on the FortiGate and synchronize back to the relatedpolicy and object settings. This allows you to know when the policy package is out-of-sync with what is installed on theFortiGate.
When a change is made to the FortiGate, FortiManager displays an out-of-sync dialog box.
Select the View Diff icon to view the changes between the FortiGate and FortiManager.
You can select to accept, revert the modification, or decide later.
When accepting remote changes, all local configurations will be replaced by remoteconfigurations. When reverting, the FortiGate will be reset to the latest revision.
You can view details of the retrieve device configuration action in the Task Monitor. See Task Monitor on page 534.
Configuring VDOMs
Virtual domains (VDOMs) enable you to partition and use your FortiGate unit as if it were multiple units.
VDOMs have their own dashboard and toolbar. You can configure the VDOM in the same waythat you can configure a device.
Delete Select to remove this virtual domain. This function applies to all virtual domainsexcept the root.
Create New Select to create a new virtual domain.
Management Virtual Domain Select the management VDOM and select Apply.
Name The name of the virtual domain and if it is the management VDOM.
Virtual Domain Virtual domain type.
IP/Netmask The IP address and mask. Normally used only for Transparent mode.
Type Either VDOM Link or Physical.
Access HTTP, HTTPS, SSH, PING, and/or SNMP.
Resource Limit Select to configure the resource limit profile for this VDOM.
Creating and editing virtual domains
Creating and editing virtual domains in the FortiManagersystem is very similar to creating and editing VDOMs using theFortiGate GUI.
You need to enable virtual domains before you can create one.
FortiManager 6.4.0 Administration Guide 58Fortinet Inc.

Firewall Devices
To enable virtual domains:
1. Go to Device Manager > Device & Groups.2. In the tree menu, select a device group.3. In the lower tree menu, select a device. The device dashboard displays.4. In the System Information widget, select the Enable link in the VDOM field.
To create a virtual domain:
1. In the Device Manager tab, display the device dashboard for the unit you want to configure.2. From the Systemmenu, select Virtual Domain.3. Click Create New to create a new VDOM.
The Virtual Domain tab may not be visible in the content pane tab bar. See View systemdashboard for managed/logging devices on page 61 for more information.
After the first VDOM is created you can create additional VDOMs by right-clicking on the existing VDOM andselecting Add VDOM from the right-click menu.
4. Complete the options, and clickOK to create the new VDOM.
Configuring inter-VDOM routing
By default, for two virtual domains to communicate it must be through externally connected physical interfaces. Inter-VDOM routing creates a link with two ends that act as virtual interfaces, internally connecting the two virtual domains.
Before configuring inter-VDOM routing:
l You must have at least two virtual domains configured.l The virtual domains must all be in NAT mode.l Each virtual domain to be linked must have at least one interface or subinterface assigned to it.
To create a VDOM link:
1. In the Device Manager pane, display the device dashboard for the device.2. From the Systemmenu, select Interface.
FortiManager 6.4.0 Administration Guide 59Fortinet Inc.

Firewall Devices
3. Click Create New > VDOM Link. The New VDOM Link pane opens.
4. Enter the following information:
Name Name of the VDOM link.
Interface #x The interface number, either 1 or 0.
VDOM Select the VDOM
IP/Netmask Type the IP address and netmask for the VDOM.
Administrative Access Select the allowed administrative service protocols: HTTPS, PING, FMG-Access, CAPWAP, SSH, and SNMP.Note: HTTP traffic will be automatically redirected to HTTPS.
Description Optionally, type a description for the link.
5. ClickOK to save your settings.
Deleting a virtual domain
Prior to deleting a VDOM, all policies must be removed from the VDOM. To do this, apply and install a blank, or empty,policy package to the VDOM (see Create new policy packages on page 167). All objects related to the VDOMmust alsobe removed, such as routes, VPNs, and admin accounts.
To delete a VDOM:
1. In the Device Manager tab, display the device dashboard for the unit you want to configure.2. From the Systemmenu, select Virtual Domain.3. Right-click on the VDOM and select Delete.4. ClickOK in the confirmation dialog box to delete the VDOM.
FortiManager 6.4.0 Administration Guide 60Fortinet Inc.

Firewall Devices
Using the device dashboard
You can view the dashboard and related information of all managed/logging and provisioned devices.
This section contains the following topics:
l View system dashboard for managed/logging devicesl View system interfaces on page 63l CLI Configurations menul System dashboard widgets
View system dashboard for managed/logging devices
You can view information about individual devices in the Device Manager pane on the dashboard for each device. Thissection describes the dashboard for a FortiGate unit.
To view the dashboard for managed/logging devices:
1. Go to Device Manager > Device & Groups.2. In the tree menu, select the device group, for example,Managed Devices. The list of devices display in the content
pane and in the bottom tree menu.
When the FortiAnalyzer feature set is enabled, the All FortiGates device group is replacedwithManaged Devices and Logging Devices. Managed devices include FortiGate devices,which are managed by FortiManager, but do not send logs. Logging device includeFortiGate devices, which are not managed, but do send logs to FortiManager.
3. In the bottom tree menu, select a device. The System: Dashboard for the device displays in the content pane.
4. In the dashboard toolbar, click the tabs to display different options that you can configure for the device. SeeDashboard toolbar on page 62.
5. You can control what tabs are displayed by clicking Display Options. See Display Options on page 62.
FortiManager 6.4.0 Administration Guide 61Fortinet Inc.

Firewall Devices
Dashboard toolbar
The dashboard toolbar displays tabs that you can use to configure the device. The available tabs depends on the device.You can choose what tabs to display by clicking display options.
The options available on the dashboard toolbar varies depending on what feature set thedevice supports. If a feature is not enabled on the device the corresponding tab is not availableon the toolbar.
Display Options
You can customize panels at both the ADOM and device levels. Select Tools > Global Display Options to open theDisplay Options dialog box to customize the available content at the ADOM level. Alternatively, you can select a device,and then select Display Options to customize device tabs. You can select to inherit from ADOM or customize.
The options available when customizing device tabs at the ADOM level will vary based on theADOM version.
To select all of the content panels in a particular category, select the checkbox beside the category name. To reset acategory selection, clear the checkbox.
To select all of the content panels, select Check All at the bottom of the window. To reset all of the selected panels,select Reset to Default at the bottom of the window.
The available device tabs are dependent on the device model and settings configured for thatmodel. The following tables provide an overview and descriptions of common dashboardtoolbar panels, and content options.
FortiManager 6.4.0 Administration Guide 62Fortinet Inc.

Firewall Devices
View system interfaces
You can view interface information about individual devices in the Device Manager tab.
To view interfaces for a device:
1. Go to Device Manager > Device & Groups.2. In the tree menu, select the device group, for example,Managed Devices. The list of devices is displayed in the
content pane and in the bottom tree menu.3. In the bottom tree menu, select a device. The dashboard for the device displays in the content pane.4. From the Systemmenu, select Interface. The System: Interface dashboard is displayed.
CLI Configurations menu
FortiManager includes a CLI Configurationsmenu in the Device Manager pane that allows you to configure devicesettings that are normally configured via the CLI on the device, as well as settings that are not available in theFortiManager GUI.
To access the CLI Configurations menu:
1. Go to Device Manager > Device & Groups.2. In the tree menu, select a device group.3. In the lower tree menu, select a device. The device dashboard is displayed in the content pane.4. Click Display Options. The Display Options dialog box is displayed.5. Select the CLI Configurations checkbox, and clickOK. The CLI Configurationsmenu is displayed in the toolbar.6. Click CLI Configurations.
The options available in the menu will vary from device to device depending on what featureset the device supports. The options will also vary depending on the device firmware version.
System dashboard widgets
The system dashboard widgets provide quick access to device information, and device connectivity with theFortiManager system. The following widgets are available in FortiManager:
l Configuration Revision History (available when the ADOM is in backup mode)l System Informationl License Informationl Connection Summaryl Configuration and Installation Status
The following table provide a description of these dashboard widgets. Note that not all of the listed options will beavailable on every device.
FortiManager 6.4.0 Administration Guide 63Fortinet Inc.

Firewall Devices
Configuration Revision History
View Config Click a configuration revision, and click View Config to view the configurationdetails.
View Install Log Click a configuration revision, and click View Install Log to display the installationlog.
Revision Diff Click a configuration revision, and click Revision Diff to view the differencebetween the current and previous revisions.
Retrieve Config Click to retrieve a configuration and create a new revision.
ID The identification number for the configuration revision.
Date &Time The date and time for the configuration revision.
Name The name of the device.
Created by The name of the administrator who created the configuration revision.
Installation The status of the installation for the configuration revision.
Comments Comments about the device.
System Information
Host Name The host name of the device.
Serial Number The device serial number.
Platform Type The platform type for the device.
HA Status FortiGate HA configuration on FortiManager is read-only. Standalone indicatesnon-HA mode. Active-Passive, Active-Active indicates the device is operating in acluster.
System Time The device system time and date information.
Firmware Version The device firmware version and build number.
System Configuration Displays the Last Backup. You can backup or restore.
Current Administrators Displays the number of administrators configured on this device.
Hardware Status The number of CPUs and the amount of RAM for the device.
Up Time Displays the duration the device has been up.
Administrative Domain Toggle the switchON orOFF to enable or disable ADOMs.
Analyzer Features Toggle the switchON orOFF to enable or disable FortiAnalyzer features.
License Information
VM License The VM license information.
FortiManager 6.4.0 Administration Guide 64Fortinet Inc.

Firewall Devices
License Information
Support Contract The support contract information and the expiry date. The support contractincludes the following: Registration, Hardware, Firmware, and Support Level e.g.Enhanced Support, Comprehensive Support.
FortiGuard Services The contract version, issue date and service status. FortiGuard Services includesthe following: Antivirus, Intrusion protection, Web filtering, and Email filtering.
VDOM The number of virtual domains that the device supports.
Connection Summary
IP The IP address of the device.
Interface The port used to connect to the FortiManager system.
Connecting User The user name for logging in to the device.
Connectivity The device connectivity status and the time it was last checked. A green arrowmeans that the connection between the device and the FortiManager system isup; a red arrow means that the connection is down.Select Refresh to test the connection between the device and the FortiManagersystem.
Connect to CLI via Select SSH.
Configuration and Installation Status
Enforce Firmware Version The firmware version enforced on the device. The firmware version is enforcedwhen FortiGate is connected to the network. Click the Edit icon to select thefirmware version. You can also select the firmware version in the Add Devicescreen when adding a model device.For more information, see Adding a model device on page 42.
System Template The system template installed on the device. The system template is installedwhen FortiGate is connected to the network. Click the Edit icon to select thesystem template. You can also select the system template in the Add Devicescreen when adding a model device.For more information, see Adding a model device on page 42.
Policy Package The policy package installed on the device. The policy package is installed whenFortiGate is connected to the network. Click the Edit icon to select the policypackage. You can also select the policy package in the Add Device screen whenadding a model device.For more information, see Adding a model device on page 42.
Database Configuration Select View to display the configuration file of the FortiGate unit.
Total Revisions Displays the total number of configuration revisions and the revision history.Select Revision History to view device history. Select the revision history icon toopen the Revision Diffmenu. You can view the diff from a previous revision or aspecific revision and select the output.
FortiManager 6.4.0 Administration Guide 65Fortinet Inc.

Firewall Devices
Configuration and Installation Status
Sync Status The synchronization status with the FortiManager:l Synchronized: The latest revision is confirmed as running on the device.l Out_of_sync: The configuration file on the device is not synchronized withthe FortiManager system.
l Unknown: The FortiManager system is unable to detect which revision (inrevision history) is currently running on the device.
Select Refresh to update the Installation Status.
Warning Displays any warnings related to configuration and installation status:l None: No warning.l Unknown configuration version running on FortiGate: FortiGate configurationhas been changed!: The FortiManager system cannot detect which revision(in Revision History) is currently running on the device.
l Unable to detect the FortiGate version: Connectivity error!l Aborted: The FortiManager system cannot access the device.
Installation Tracking
Device SettingsStatus
l Modified: Some configuration on the device has changed since the latestrevision in the FortiManager database. Select Save Now to install and savethe configuration.
l UnModified: All configuration displayed on the device is saved as the latestrevision in the FortiManager database.
Installation Preview Select the icon to display a set of commands that will be used in an actual deviceconfiguration installation in a new window.
Last Installation The FortiManager system sent a configuration to the device at the indicated dateand time.
ScheduledInstallation
A new configuration will be installed on the device at the indicated date and time.
Script Status Select Configure to view script execution history.
Last Script Run Displays the date when the last script was run against the managed device.
Scheduled Script Displays the date when the next script is scheduled to run against the manageddevice.
The information presented in the System Information, License Information, ConnectionSummary, and Configuration and Installation Status widgets will vary depending on themanaged device model.
Installing to devices
l To use the Install Wizard to install policy packages and device settings to one or more FortiGate devices, see Usingthe Install Wizard to install policy packages and device settings on page 67.
FortiManager 6.4.0 Administration Guide 66Fortinet Inc.

Firewall Devices
l To use the Install Wizard to install device settings only, see Using the Install Wizard to install device settings only onpage 69.
l To reinstall a policy package without using the Install Wizard, see Reinstall a policy package on page 171.
If auto-push is enabled, policy packages and device settings will be installed to offline deviceswhen they come back online. See Creating ADOMs on page 514 for information on enablingthis feature.
Using the Install Wizard to install policy packages and device settings
You can use the Install Wizard to install policy packages and device settings to one or more FortiGate devices, includingany device-specific settings for the devices associated with that package.
To use the Install Wizard to install policy packages and device settings:
1. If using ADOMs, ensure that you are in the correct ADOM.2. In the toolbar, select Install Wizard or Install > Install Wizard.3. Select Install Policy Package & Device Settings and specify the policy package and other parameters. Click Next.
Policy Package Select the policy package from the dropdown list.
Comment Type an optional comment.
Create ADOM Revision Select the checkbox to create an ADOM revision.
Revision Name Type the revision name.
RevisionComments
Type an optional comment.
Schedule Install Select the checkbox to schedule the installation.
FortiManager 6.4.0 Administration Guide 67Fortinet Inc.

Firewall Devices
Date Click the date field and select the date for the installation in the calendar pop-up.
Time Select the hour and minute from the dropdown lists.
4. On the next page, select one or more devices or groups to install, and click Next.The select devices are validated. Validation includes validating the policy and object, the interface, and installationpreparation. Devices with validation errors are skipped for installation. The validation results are displayed.If enabled, a policy consistency check will be performed and the results will be available (see Perform a policyconsistency check on page 176).
5. (Optional) Click the Install Preview button to view a preview of the installation. You can view multiple devices at thesame time.a. (Optional) Click Previous Page or Next Page to preview multiple devices.b. (Optional) Click Download to download a text file of the installation preview details.
6. (Optional) Click the Policy Package Diff button to view the differences between the current policy and the policy inthe device. See also View a policy package diff on page 69.
7. When validation is complete, click Install or Schedule Install (if you selected Schedule Install).FortiManager displays the status of the installation and then lists the devices onto which the settings were installedand any errors or warning that occurred during the installation process.
8. Click Finish to close the wizard.
FortiManager 6.4.0 Administration Guide 68Fortinet Inc.

Firewall Devices
Using the Install Wizard to install device settings only
You can use the Install Wizard to install device settings only to one or more FortiGate devices. The Install Wizardincludes a preview feature.
To use the Install Wizard to install device settings only:
1. If using ADOMs, ensure that you are in the correct ADOM.2. In the toolbar, select Install Wizard or Install > Install Wizard.3. Select Install Device Settings (only) and if you want, type a comment. Click Next.
4. In the Device Settings page, select one or more devices to install, and click Next.5. (Optional) Preview the changes:
a. Click Install Preview.The Install Preview window is displayed. You have the option to download a text file of the settings.
b. Click Close to return to the installation wizard.6. Click Install.
FortiManager displays the status of the installation and then lists the devices onto which the settings were installedand any errors or warning that occurred during the installation process.You can click the View History and View Log buttons for more information.
7. Click Finish to close the wizard.
View a policy package diff
You can view the difference between the policy package associated with (or last installed on) the device and the policiesand policy objects in the device.
The connection to the managed device must be up to view the policy package diff.
FortiManager 6.4.0 Administration Guide 69Fortinet Inc.

Firewall Devices
To view a policy package diff in Device Manager:
1. If using ADOMs, ensure that you are in the correct ADOM.2. Go to Device Manager> Device & Groups.3. Right-click a device and select Policy Package Diff.
The Policy Package Diff window is displayed after data is gathered.
4. Beside Policy, click the Details link to display details about the policy changes.5. In the Category row, click the Details link to display details about the specific policy changes.6. Beside Policy Object, click the Details link to display details about the policy object changes.7. Click Cancel to close the window.
Managing devices
Once a device has been added to the Device Manager pane, the configuration is available within other tabs in theFortiManager system, such as Policy & Objects.
This section includes the following topics:
l Using the quick status barl Customizing columnsl Refreshing a devicel Editing device informationl Replacing a managed devicel Setting unauthorized device optionsl Using the CLI console for managed devices
FortiManager 6.4.0 Administration Guide 70Fortinet Inc.

Firewall Devices
Using the quick status bar
You can quickly view the status of devices on the Device Manager pane by using the quick status bar, which contains thefollowing information:
l Devices Totall Devices Connectionl Devices Device Configl Devices Policy Package
You can click each quick status to display only the devices referenced in the quick status.
To view the quick status bar:
1. Go to Device Manager > Device & Groups. The quick status bar is displayed.
2. In the tree menu, select a group. The devices for the group are displayed in the content pane, and the quick statusbar updates.
3. Click the menu on each quick status to filter the devices displayed on the content pane.For example, click the menu for Device Config and selectModified. The content pane displays only devices in theselected group with modified configuration files.
4. Click Devices Total to return to the main view.
Customizing columns
You can choose what columns display on the content pane for the Device Manager > Device & Groups pane.
Column settings are not available for all device types. The default columns also vary by device type.
You can filter columns that have a Filter icon. Column filters are not available for all columns.
The columns available in the Column Settingsmenu depends on features enabled inFortiManager. When the FortiAnalyzer feature set is disabled, all related settings are hidden inthe GUI.
To customize columns:
1. Go to Device Manager > Device & Groups.2. Click Column Settings and select the columns you want to display.
Refreshing a device
Refreshing a device refreshes the connection between the selected devices and the FortiManager system. Thisoperation updates the device status and the FortiGate HA cluster member information.
FortiManager 6.4.0 Administration Guide 71Fortinet Inc.

Firewall Devices
To refresh a device:
1. In the content pane, select a device.2. SelectMore > Refresh Device. The Update Device dialog box opens to show the refresh progress.
Editing device information
Use the Edit Device page to edit information about a device. The information and options available on the Edit Devicepage depend on the device type, firmware version, and which features are enabled. Some settings are only displayedwhen FortiAnalyzer features are enabled.
To edit information for a device or model device:
1. Go to Device Manager > Device & Groups.2. In the tree menu, select the device group.3. In the content pane, select the device or model device and click Edit, or right-click on the device and select Edit. The
Edit Device pane displays.
4. Edit the device settings and clickOK.
Name The name of the device.
Description Descriptive information about the device.
IP Address Enter the IP address of the device.
Pre-Shared Key Enter the model device’s pre-shared key. Select Show Pre-shared Key to seethe key.This option is only available when editing a model device that was added witha pre-shared key.
Automatically link to realdevice
Select to automatically authorize the device to be managed by FortiManagerwhen the device is online.This option is only available when editing a model device.
Serial Number The serial number of the device.
FortiManager 6.4.0 Administration Guide 72Fortinet Inc.

Firewall Devices
For model devices added with a pre-shared key, this will show the devicemodel.
Firmware Version The firmware version.
Admin User Enter the administrator user name.
Password Enter the administrator user password.
Connected Interface The connected interface, if the connection is up.
HA Mode Displays whether the FortiGate unit is operating in standalone or highavailability mode.
Geographic Coordinates Identifies the latitude and longitude of the device location to support theinteractive maps.Click ShowMap to open a map showing the location of the device based onthe coordinates. Click and drag the map marker to adjust the device's location.
Company/Organization Optionally, enter the company or organization information.
Country Optionally, enter the country where the device is located.
Province/State Optionally, enter the province or state.
City Optionally, enter the city.
Contact Optionally, enter the contact information.
Deleting a device
Devices can be deleted in Device Manager. Deleting a device does not delete other management elements associatedwith it:
l If the device is a member of a group, the group will remain without the device in it (Device groups on page 87).l If a template is assigned to the device, the template will remain with no device assignment (Provisioning Templateson page 98).
l If the device is an installation target for a policy package, the package will remain with that device removed from theinstallation targets (Policy package installation targets on page 174).
l If there is a policy in a policy package that only installs on the device that is deleted, the policy will remain but will notbe installed on any devices (see Install policies only to specific devices on page 184).
l If there are VDOMs in other ADOMs, they will be deleted with the device (ADOM device modes on page 510).
To delete a device:
1. If using ADOMs, ensure that you are in the correct ADOM.2. Go to Device Manager > Device & Groups.3. In the content pane, select a device and then click Delete in the toolbar, or right click on a device and select Delete.4. ClickOK in the confirmation dialog box to delete the device.
FortiManager 6.4.0 Administration Guide 73Fortinet Inc.

Firewall Devices
Replacing a managed device
The serial number is verified before each management connection. If you replace a device, you must manually changethe serial number in the FortiManager system and re-deploy the configuration.
You can only reinstall a device that has a Retrieve button under the Revision History tab.
View all managed devices from the CLI
To view all devices that are managed by your FortiManager, use the following command:
diagnose dvm device list
The output lists the number of managed devices, device type, OID, device serial number, VDOMs, HA status, IPaddress, device name, and the ADOM to which the device belongs.
Changing the serial number from the CLI
If the device serial number was entered incorrectly using the Add Model Device wizard, you can replace the serialnumber from the CLI only. Use the command:
execute device replace sn <device name> <serial number>
This command is also useful when performing an RMA replacement.
Setting unauthorized device options
Type the following command lines to enable or disable unauthorized devices to be authorized with FortiManager.
config system admin settingset allow register [enable | disable]set unreg_dev_opt add_allow_serviceset unreg_dev_opt add_no_service
end
allow register[enable | disable]
When the set allow register command is set to enable, you will notreceive the Authorize device dialog box.
unreg_dev_opt Set the action to take when an unauthorized device connects to FortiManager.
add_allow_service Authorize unauthorized devices and allow service requests.
add_no_service Authorize unauthorized devices but deny service requests.
When the set allow register command is set to disable, you will not receive theAuthorize device dialog box.
FortiManager 6.4.0 Administration Guide 74Fortinet Inc.

Firewall Devices
Using the CLI console for managed devices
You can access the CLI console of managed devices.
To use the CLI console:
1. Go to Device Manager.2. In the tree menu, select a device group, and in the bottom of the tree menu, select a device. The device dashboard
displays.3. On the Connection Summary widget Connect to CLI via line, select SSH.
Connect to: Shows the device that you are currently connected to. Select the dropdownmenu to select another device.
IP The IP address of the connected device.
SSH Connect to the device via SSH.
Connect | Disconnect Connect to the device you select, or terminate the connection.
Close Exit the CLI console.
You can cut (CTRL+C) and paste (CTRL+V) text from the CLI console. You can also use CTRL+U to remove theline you are currently typing before pressing ENTER.
Displaying Security Fabric topology
For Security Fabric devices, you can display the Security Fabric topology.
To display the Security Fabric topology:
1. If using ADOMs, ensure that you are in the correct ADOM.2. Go to Device Manager and click the Devices Total tab in the quick status bar.3. Right-click a Security Fabric device and select Fabric Topology.
A pop-up window displays the Security Fabric topology for that device.If you selected Fabric Topology by right-clicking a device within the Security Fabric group, the device is highlightedin the topology. If you selected Fabric Topology by right-clicking the name of the Security Fabric group, no device ishighlighted in the topology.
FortiManager 6.4.0 Administration Guide 75Fortinet Inc.

Firewall Devices
Manage Devices from Map View
Automatically view the location of FortiGate devices on Google Maps using Map View. You can also manually configurethe location of the FortiGate from FortiManager. Manage devices by performing various actions on the devices directlyfrom the Map View.
To Manage devices from Map View:
1. Go to Device Manager and selectMap View from the menu options.
2. Map view shows device location on Google Maps and a combined status in Green, Orange, and Red colors.l Green - Shows devices are healthy. The policy package configuration and device configuration are in sync.l Orange - Shows a warning status. The device configuration status or policy package configuration status isOutof Sync. Or, there is no policy imported or no policy package installed.
FortiManager 6.4.0 Administration Guide 76Fortinet Inc.

Firewall Devices
l Red - Shows an error status. Copy has failed, installation has failed or device connection is down.
3. Select Show Problematic Devices Only to filter devices on the map and show it on the right pane withOrange orRed status.
FortiManager 6.4.0 Administration Guide 77Fortinet Inc.

Firewall Devices
4. To manually position a device, click the device shown on the smaller map on the right pane.
5. Enter the location of the device manually. You can drag the device to the accurate position.
FortiManager 6.4.0 Administration Guide 78Fortinet Inc.

Firewall Devices
6. Click Show Unpositioned Devices to filter devices that do not have any location.
7. Click View Details for the device to show device configuration status and policy package status.
8. Right-click the device menu to run various operations such asQuick Install, Install Wizard, Import Policy, Re-installPolicy, Policy Package Diff, Edit, Refresh Device, Add VDOM, and Run Script.
FortiManager 6.4.0 Administration Guide 79Fortinet Inc.

Firewall Devices
Managing device configurations
The FortiManager systemmaintains a configuration repository to manage device configuration revisions. After modifyingdevice configurations, you can save them to the FortiManager repository and install the modified configurations toindividual devices or device groups. You can also retrieve the current configuration of a device or revert a device’sconfiguration to a previous revision.
This section contains the following topics:
l View configurations for device groupsl Checking device configuration statusl Managing configuration revision history
View configurations for device groups
You can view configuration information for devices in a group on the Device Manager tab.
To view configurations:
1. Go to Device Manager > Device & Groups.2. In the tree menu, click the device group name, for example,Managed Devices. The devices in the group are
displayed in the content pane.The following columns are displayed. You can filter columns that have a Filter icon.
Device Name The name of the device and its connectivity status.
FortiManager 6.4.0 Administration Guide 80Fortinet Inc.

Firewall Devices
Config Status See the table below for config status details.
Policy Package Status See the table below for policy package status details.Click on the policy package name to go to view and manage the package (seeManaging policy packages on page 167).
Host Name The host name for the device (available for managed devices).
IP Address The IP address of the device.
Platform The platform of the device (available for managed devices).
Description Description of the device.
HA Status The HA status of the device.
FortiGuard License Status of the FortiGuard license for the device.
Firmware Version The firmware version.
Management Mode Management mode of the device.
SN The serial number of the device.
Controller Counter The number of each device type controlled by this device, such as FortiAPsand FortiSwitches.
Company/Organization The company or organization information.
Country The country where the device is located.
Province/State The province or state.
City The city.
Contact The contact information.
The following table identifies the different available config statuses.
Config Status Icon Description
Synchronized Green check Configurations are synchronizedbetween FortiManager and themanaged device.
Modified Yellow triangle Configurations are modified onFortiManager and not synchronizedbetween FortiManager and themanaged device.
Auto-update Green check Configurations modified on themanaged device are auto synced toFortiManager.
Modified (recent auto-updated)
Yellow triangle Configurations are modified onFortiManager and configurationsmodified on the managed device areauto synced to FortiManager.
FortiManager 6.4.0 Administration Guide 81Fortinet Inc.

Firewall Devices
Config Status Icon Description
Out of Sync Red X Configurations are modified on themanaged device and not synced toFortiManager.
Conflict Red X When one of the following happens:l Install failedl Configurations are modified onboth FortiManager and themanaged device, and not autosynced to FortiManager.
Unknown Gray question mark When one of the following happens:l Connection goes downl No revision is generated, likeadded model device
The following table identifies the different available policy package statuses.
Policy Package Status Icon Description
Imported Green check Policies and objects are imported intoFortiManager.
Synchronized Green check Policies and objects are synchronizedbetween FortiManager and themanaged device.
Modified Yellow triangle Policies or objects are modified onFortiManager.
Out of Sync Red X Policies or objects are modified on themanaged device.
Unknown with policypackage name
Gray question mark Configurations of the manageddevice are retrieved on FortiManagerafter being imported/installed.
Never Installed Yellow triangle The assigned policy package is notthe result of an import for this device,and the package has not beeninstalled since it has been assigned tothis device.
Checking device configuration status
In the Device Manager pane, when you select a device, you can view that device’s basic information under the devicedashboard. You can also check if the current configuration file of the device stored in the FortiManager repository is insync with the one running on the device.
FortiManager 6.4.0 Administration Guide 82Fortinet Inc.

Firewall Devices
If you make any configuration changes to a device directly, rather than using the FortiManager system, the configurationon the device and the configuration saved in the FortiManager repository will be out of sync. In this case, you can resynchronize with the device by retrieving the configuration from the device and saving it to the FortiManager repository.
You can use the following procedures when checking device configuration status on a FortiGate, FortiCarrier, orFortiSwitch.
To check the status of a configuration installation on a FortiGate unit:
1. Go to Device Manager > Device & Groups and select a device group.2. In the lower tree menu, select a device. The content pane displays the device dashboard.3. In the dashboard, locate the Configuration and Installation Status widget.
The Configuration and Installation Status widget shows the following information:
System Template Displays the name of the selected system template. Click Change to changethe system template.
Database Configuration Click View to display the database configuration file of the FortiGate unit.
Total Revisions Displays the total number of configuration revisions and the revision history.Click Revision History to view device history. For details, see Managingconfiguration revision history on page 84.Click Revision Diff to compare revisions. For details, see Comparing differentconfiguration files on page 86.
Sync Status The synchronization status with the FortiManager.l Synchronized: The latest revision is confirmed as running on the device.l Out_of_sync: The configuration file on the device is not synchronized withthe FortiManager system.
l Unknown: The FortiManager system is unable to detect which revision (inrevision history) is currently running on the device.
Click Refresh to update the synchronization status.
Warning Displays any warnings related to configuration and installation status.l None: No warning.l Unknown configuration version running on FortiGate: FortiGateconfiguration has been changed!: The FortiManager system cannotdetect which revision (in revision history) is currently running on thedevice.
l Unable to detect the FortiGate version: Connectivity error.l Aborted: The FortiManager system cannot access the device.
Installation Tracking
Device SettingsStatus
l Modified: Some configuration on the device has changed since the latestrevision in the FortiManager database. Click Save Now to install and savethe configuration.
l UnModified: All configuration displayed on the device is saved as thelatest revision in the FortiManager database.
InstallationPreview
Click Preview to preview an actual device configuration installation, includingany errors and warnings.
FortiManager 6.4.0 Administration Guide 83Fortinet Inc.

Firewall Devices
Last Installation Displays the last installation’s date, time, revision number, and the person whodid the installation.
ScheduledInstallation
Displays the data and time when a new configuration will be installed on thedevice.
Script Status
Last Script Run Displays the date and time when the last script was run. Click View History tosee the script execution history.
Scheduled Script Displays the date and time when the next script is scheduled to run.
Managing configuration revision history
The revision history repository stores all configuration revisions for a device. You can view the version history, viewconfiguration settings and changes, import files from a local computer, compare different revisions, revert to a previousrevision, and download configuration files to a local computer.
To view the revision history of a FortiGate unit:
1. Go to Device Manager > Device & Groups and select a device group.2. In the lower tree menu, select a device. The content pane displays the device dashboard.3. In the dashboard, locate the Configuration and Installation Status widget.4. In the Total Revisions row, click Revision History.
In the Configuration Revision History dialog box, the following buttons are in the toolbar:
View Config View the configuration for the selected revision.
View Install Log View the installation log for the selected revision.
Revision Diff Show only the changes or differences between two versions of a configurationfile. For details, see Comparing different configuration files on page 86.
Retrieve Config View the current configuration running on the device. If there are differencesbetween the configuration file on the device and the configuration file in therepository, a new revision is created and assigned a new ID number.
More From the More menu, you can select one of the following:l Download Factory Defaultl Revertl Deletel Renamel Import Revision
You can also right-click a revision to access the same options.
The following columns of information are displayed:
ID The revision number. Double-click an ID to view the configuration file. You canalso click Download to save the configuration file.
FortiManager 6.4.0 Administration Guide 84Fortinet Inc.

Firewall Devices
Date & Time The time and date when the configuration file was created.
Name A name assigned by the user to make it easier to identify specific configurationversions. You can rename configuration versions.
Created by The name of the administrator account used to create the configuration file.
Installation Display the status of the installation.N/A indicates that the revision was not sent to the device. The typical situation isthat the changes were part of a later revision that was sent out to the device. Forexample, you make some changes and commit the changes. Now you have arevision called ID1. Then you make more changes and commit the changesagain. Then you have a revision called ID2, which also includes the changes youmade in revision ID1. If you install revision ID2, then the status of revision ID1becomes N/A.
Comments Display the comment added to this configuration file when you rename therevision.
To view the configuration settings on a FortiGate unit:
1. Go to Device Manager > Device & Groups and select a device group.2. In the lower tree menu, select a device. The content pane displays the device dashboard.3. In the dashboard, locate the Configuration and Installation Status widget.4. In the Total Revisions row, click Revision History.5. Select the revision, and click View Config. The View Configuration pane is displayed.6. To download the configuration settings, click Download.7. Click Return when you finish viewing.
To add a tag (name) to a configuration version on a FortiGate unit:
1. Go to Device Manager > Device & Groups and select a device group.2. In the lower tree menu, select a device. The content pane displays the device dashboard.3. In the dashboard, locate the Configuration and Installation Status widget.4. In the Total Revisions row, click Revision History.5. Right-click the revision, and select Rename.6. Type a name in the Tag (Name) field.7. Optionally, type information in the Comments field.8. ClickOK.
Downloading and importing a configuration file
You can download a configuration file and a factory default configuration file. You can also import a configuration file intothe FortiManager repository.
You can only import a configuration file that is downloaded from the FortiManager repository,otherwise the import fails.
FortiManager 6.4.0 Administration Guide 85Fortinet Inc.

Firewall Devices
To download a configuration file:
1. Go to Device Manager > Device & Groups and select a device group.2. In the lower tree menu, select a device. The content pane displays the device dashboard.3. In the dashboard, locate the Configuration and Installation Status widget.4. In the Total Revisions row, click Revision History.5. Select the revision you want to download.6. Click View Config > Download.7. Select Regular Download or Encrypted Download. If you select Encrypted Download, type a password.8. ClickOK.
To download a factory default configuration file:
1. Go to Device Manager > Device & Groups and select a device group.2. In the lower tree menu, select a device. The content pane displays the device dashboard.3. In the dashboard, locate the Configuration and Installation Status widget.4. In the Total Revisions row, click Revision History.5. In the toolbar, click Download Factory Default.
To import a configuration file from a local computer:
1. Go to Device Manager > Device & Groups and select a device group.2. In the lower tree menu, select a device. The content pane displays the device dashboard.3. In the dashboard, locate the Configuration and Installation Status widget.4. In the Total Revisions row, click Revision History.5. Right-click a revision and select Import Revision.6. Click Browse and locate the revision file, or drag and drop the file onto the dialog box.7. If the file is encrypted, select File is Encrypted, and type the password.8. ClickOK.
Comparing different configuration files
You can compare the changes or differences between two versions of a configuration file by using the Diff function.
The Diff function behaves differently under certain circumstances.
For example, when a device is first added to the FortiManager system, the FortiManager system gets the configurationfile directly from the FortiGate unit and stores it as is. This configuration file is version/ID 1.
If you make changes to the device configuration in Device Manager and select Commit, the new configuration file issaved as version/ID 2. If you use the Diff icon to view the changes/differences between version/ID 1 and version/ID 2,you will be shown more changes than you have made.
This happens because the items in the file version/ID 1 are ordered as they are on the FortiGate unit. Configurations ofversion/ID 2 are sequenced differently when they are edited and committed in Device Manager. Therefore, when youcompare version/ID 1 and version/ID 2, the Diff function sees every item in the configuration file as changed.
If you take version/ID 2, change an item and commit it, the tag is changed to version/ID 3. If you use Diff with version/ID 2and version/ID 3, only the changes that you made are shown. This is because version/ID 2 and version/ID 3 have bothbeen sequenced in the same way in Device Manager.
FortiManager 6.4.0 Administration Guide 86Fortinet Inc.

Firewall Devices
To compare different configuration files:
1. Go to Device Manager > Device & Groups and select a device group.2. In the lower tree menu, select a device. The content pane displays the device dashboard.3. In the dashboard, locate the Configuration and Installation Status widget.4. In the Total Revisions row, click Revision History.5. Select a revision, and click Revision Diff in the toolbar.6. Select another version for the diff.7. In the Diff Output section, select Show Full File Diff, Show Diff Only, or Capture Diff to a Script.
Show Full File Diff shows the full configuration file and highlights all configuration differences.Show Diff Only shows only configuration differences.Capture Diff to a Script downloads the diff to a script.
8. Click Apply.If you selected show diff, the configuration differences are displayed in colored highlights. If you selected capture toa script, the script is saved in your downloads folder.
To revert to another configuration file:
1. Go to Device Manager > Device & Groups and select a device group.2. In the lower tree menu, select a device. The content pane displays the device dashboard.3. In the dashboard, locate the Configuration and Installation Status widget.4. In the Total Revisions row, click Revision History.5. Right-click the revision to which you want to revert, and click Revert.
The system immediately reverts to the selected revision.
Device groups
On the Device Manager > Device & Groups pane, you can create, edit, and delete device groups.
Default device groups
When you add devices to FortiManager, devices are displayed in default groups based on the type of device. Forexample, all FortiGate devices are displayed in theManaged Devices group. You can create custom groups.
Add device groups
You can create a group and add devices to the group.
To add device groups:
1. Go to Device Manager > Device & Groups.2. From the Device Groupmenu, select Create New.3. Enter a name for the group.
A group name can contain only numbers (0-9), letters (a-z, A-Z), and limited special characters (- and _).
FortiManager 6.4.0 Administration Guide 87Fortinet Inc.

Firewall Devices
4. Optionally, enter a description of the group.5. Add devices to the group as needed. Devices can also be added and removed after the group has been created.6. ClickOK to create the group.
FortiManager allows nested device groups. For example, you can create Device Group A andadd it under Device Group B.
Manage device groups
You can manage device groups from the Device Manager > Device & Groups pane. From the Device Groupmenu,select one of the following options:
Option Description
Create New Create a new device group.
Edit Edit the selected device group. You cannot edit default device groups.
Delete Delete the selected device group.
You must delete all devices from the group before you can delete the group. You must deleteall device groups from an ADOM before you can delete an ADOM.
Firmware
On the Device Manager > Firmware pane, you can view the firmware installed on managed devices. You can also viewwhether a firmware upgrade is available for managed devices as well as the upgrade history for managed devices.
This section contains the following topics:
l View firmware for device groups on page 88l Upgrade firmware for device groups on page 89l Firmware Management on page 89l Automatic multi-step firmware upgrade on FortiGate on page 92l Managed devices pull firmware from FortiGuard on page 94
View firmware for device groups
You can view firmware information for devices in a group.
FortiManager 6.4.0 Administration Guide 88Fortinet Inc.

Firewall Devices
To view firmware:
1. Go to Device Manager.2. In the tree menu, select the device group name, for example,Managed Devices.3. Click the Firmware tab.
For a description of the options, see Firmware Management on page 89.
Upgrade firmware for device groups
The firmware of the devices within a group can also be updated as a group.
To update device group firmware:
1. Go to Device Manager.2. In the tree menu, select the device group name, for example,Managed Devices.3. Click the Firmware tab.4. Locate an applicable firmware image in the Available Upgrade list, then click Upgrade to upgrade all of the devices
in the group to that image.The upgrade history is also shown and you can view more details by clicking All History.
Firmware Management
FortiGate device firmware can be updated from the Device Manager > Firmware pane. Upgrades can also be scheduledto occur at a later date.
When workspace is enabled, you must lock a device (or ADOM) to allow firmware upgrade.
The FortiGate device requires a valid firmware upgrade license. Otherwise a Firmware Upgrade License Not Founderror is displayed.
When Boot to Alternate Partition After Upgrade is selected, the inactive partition will beupgraded.
In the Device Manager pane, select theManaged Devices group, then click the Firmware tab.
The following information and options are available:
Upgrade Select to upgrade the selected device if the device can be upgraded.
View Release Notes Select to view the release notes for the FortiOS version of the selected device.
Imported Images Select to display the imported images where you can import or delete images.
FortiManager 6.4.0 Administration Guide 89Fortinet Inc.

Firewall Devices
Refresh Refresh the list.
Column Settings Click to select which columns to display or select Reset to Default to display thedefault columns.
Device Name The names of the FortiGate devices in the group, organized by firmware version.
Platform The device platform.
Current Build The build installed in the device.
Upgrade Available The current firmware version and build number of the firmware on the device. If anupdate is available and can be applied to the device, Upgrade can be selected toopen the Upgrade Firmware dialog box.
Status The status of the device's license. If the license has expired, the firmware cannotbe upgraded.
Upgrade History Right-click a device and select Show Upgrade History to view the device’supgrade history.
To upgrade a device’s firmware:
1. Go to Device Manager.2. In the tree menu, select a device group, and then click the Firmware tab.3. Select a device or device group with an upgrade available that is licensed for firmware upgrades, then click Upgrade
in either the toolbar or in the Upgrade Available column. The Upgrade Firmware dialog box opens.
4. Configure the following settings, then clickOK:
Upgrade to Select a firmware version from the drop-down list.
Boot From Alternate PartitionAfter Upgrade
Selecting this option causes the device to reboot twice during the upgradeprocess: first to upgrade the inactive partition, and second to boot back into theactive partition.
Let Device DownloadFirmware from FortiGuard
Select this option to download the firmware directly from FortiGuard. If thisoption is not selected, FortiManager will download the firmware fromFortiGuard. Alternatively, you can import the firmware into FortiManager.
Skip All Intermediate Stepsin Upgrade Path if Possible
FortiManager manages the most optimum upgrade path automatically. Selectthis option to install the selected version directly without going though theupgrade path.
FortiManager 6.4.0 Administration Guide 90Fortinet Inc.

Firewall Devices
Schedule Upgrade Select to schedule the upgrade, then enter the date and time for the upgrade.
FortiManager checks the FortiGate disk before upgrading. If the check fails, the following information is displayed,and the upgrade is not performed:
If the check passes, the upgrade proceeds:
FortiOS devices cannot be upgraded to a version that is higher than the FortiManager that ismanaging them. This rule is applicable only for major and minor versions. For example,FortiManager 6.2.0 cannot upgrade FortiOS devices to 6.3.0 or 7.0.0. When trying to upgradeFortiOS devices to a version higher than FortiManager, the upgrade process cannot becompleted and a warning is shown.
When upgrading FortiGate devices to a firmware version that is not part of the upgrade path(shown by the green check mark), the warning The firmware version is not on firmwareupgrade path of selected devices. Upgrading the image may cause the current syntax tobreak. is shown. Click Upgrade to Recommended X.X.X which shows the recommendedversion, or Continue to upgrade to the selected version. A warning is also shown whenupgrading FortiGate devices to a custom firmware.
FortiManager 6.4.0 Administration Guide 91Fortinet Inc.

Firewall Devices
The disk on the FortiGate is checked automatically before upgrade. To enable skip disk checkrun the set skip-disk-check from the command line.
To disable disk check:
1. Disable disk check by using the CLI:config fmupdate fwm-setting(fwm-setting)# set skip-disk-check enable
The default setting is disable, which will check the FortiGate disk before upgrading FortiOS.
The following diagnose commands are also available for diagnose fwmanager:
l show-dev-disk-check-status: Shows whether a device needs a disk check.l show-grp-disk-check-status: Shows whether device in a group needs a disk check.
In addition, when you log into FortiOS by using the CLI, you will be informed if you need to run a disk scan, for example:
$ ssh [email protected]: File System Check Recommended! Unsafe reboot may have caused inconsistency in disk
drive.It is strongly recommended that you check file system consistency before proceeding.Please run 'execute disk scan 17'Note: The device will reboot and scan during startup. This may take up to an hour
Automatic multi-step firmware upgrade on FortiGate
When using FortiManager to upgrade firmware on FortiGate, FortiManager can choose the shortest upgrade path basedon the FortiGate upgrade matrix.
You can use the CLI to view and check the shortest upgrade path for a managed device by using the diagnosefwmanager command:
# diagnose fwmanager show-dev-upgrade-path 318 6.2.0device FWF61ETK18003595(318), platform FWF61E, upgrade path from 5.6.10-1677 to 6.2.0-866
is: [6.0.0-76 --> 6.0.2-163 --> 6.0.3-200 --> 6.2.0-866]
In this example, the device ID is 318, and you want to upgrade the device to FortiOS 6.2.0. The device is currentlyrunning FortiOS 5.6.10 build 1677, and the shortest upgrade path to FortiOS 6.2.0 is displayed.
To upgrade using the GUI:
1. Go to Device Manager > Firmware.2. Select a device, and click Upgrade.
The Upgrade Firmware dialog box is displayed.
FortiManager 6.4.0 Administration Guide 92Fortinet Inc.

Firewall Devices
3. In the Upgrade to box, select an image.
In this example, the FortiGate is running FortiOS 5.6.10, and we are going to upgrade to 6.2.0 (0866).
4. ClickOK.FortiManager starts the upgrade. Each upgrade is a subtask.
When all the subtasks reach a status of 100%, the upgrade completes.
FortiManager 6.4.0 Administration Guide 93Fortinet Inc.
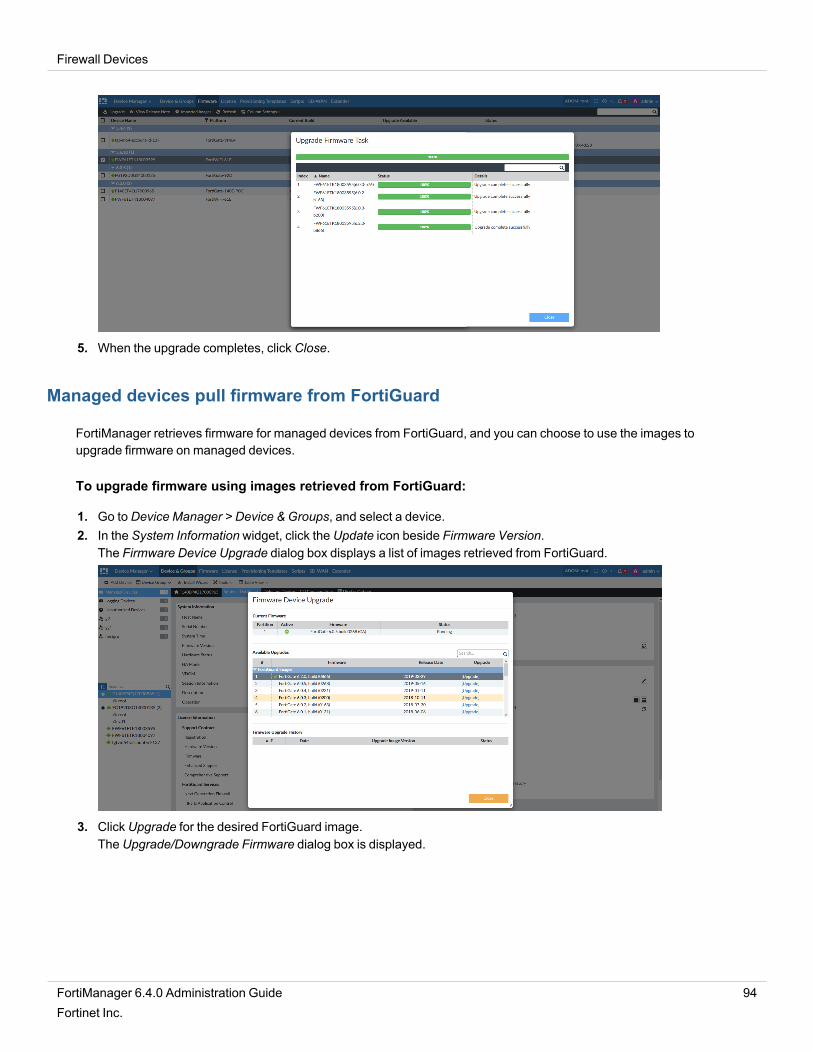
Firewall Devices
5. When the upgrade completes, click Close.
Managed devices pull firmware from FortiGuard
FortiManager retrieves firmware for managed devices from FortiGuard, and you can choose to use the images toupgrade firmware on managed devices.
To upgrade firmware using images retrieved from FortiGuard:
1. Go to Device Manager > Device & Groups, and select a device.2. In the System Information widget, click the Update icon beside Firmware Version.
The Firmware Device Upgrade dialog box displays a list of images retrieved from FortiGuard.
3. Click Upgrade for the desired FortiGuard image.The Upgrade/Downgrade Firmware dialog box is displayed.
FortiManager 6.4.0 Administration Guide 94Fortinet Inc.

Firewall Devices
4. Select the Let Device Download Firmware from FortiGuard check box, and clickOK.The firmware downloaded from FortiGuard is used, and the upgrade starts.
The firmware upgrade completes.
5. Click Close.
FortiManager 6.4.0 Administration Guide 95Fortinet Inc.

Firewall Devices
License
On the Device Manager > License pane, you can view license information for managed devices.
License count rules for FortiManager VM, Cloud (Fortinet, Azure, or AWS), and Hardware:
l VDOM disabled: 1 FortiGate = 1 license.l VDOM enabled: 1 VDOM = 1 license.l VDOM enabled but no VDOMs: root = 1 license.l FortiGate in HA mode: No license count for secondary FortiGate.l Unregistered device in root ADOM: 1 unregistered device = 1 ADOM. License is not counted for hidden devices.l FortiGate with FMGC contract: No license count for FortiManager VM. License is only counted for FortiManagerhardware.
FortiAP, FortiSwitch, and FortiExtender are not included in the license count. For moreinformation see the Fortinet Product Matrix.
License Management
You can check FortiGate device licenses in Device Manager > License.
In the Device Manager pane, select theManaged Devices group, then click the License tab.
The following columns are displayed. You can filter columns that have a Filter icon.
Device Name Name of the device
Serial Number Serial number for the device
Firmware Version Firmware version for the device
Support Contract License status of the support contract. Hover over the license status to displayexpiration details about the following support contracts: hardware, firmware,enhanced support, and comprehensive support. License status can include:l N/A: No support contractl 24/7: Support contract level that provides support 24 hours per day and 7days per week
l 8/5: Support contract level
FortiGuard Subscription License status of FortiGuard. The status reflects the worst license status of theindividual components of the FortiGuard license. Hover over the license status todisplay details about the following components: IPS & Application Control,Antivirus, Web Filtering, and Email Filtering. License status can include:
FortiManager 6.4.0 Administration Guide 96Fortinet Inc.

Firewall Devices
l All validl Expires in <time>l Expiredl Unknown
Service Status License status of antivirus and IPS service. Hover the mouse over the cell todisplay details about the service status. Licenses status can include:l Update Availablel Up to Datel Expiredl Unknown
Virtual Domains Number of virtual domains. Click the cart icon to go to the Fortinet support site(https://support.fortinet.com)
The following buttons are available on the toolbar:
Push Update Push a license update to the selected device in the group.
Refresh Refresh the list of devices in the group.
Export Click to export the device list, device update details, and license details to a PDFor CSV file format. A file in the selected format is downloaded to the managementcomputer.
Check License Click to launch the Check License screen. Select the FortiGuard license typesthat you want FortiManager to check expiry dates for and provide warnings whenit is expired or approaching expiry date.The FortiGuard Subscription status is updated based on the selection in theCheck License screen. If a license is expiring in 30 days, its license status is inorange (warning). If a license is expired already, the status is in red (error).
Column Settings Click to select which columns display on the License pane.
Add-on license
Add-on licenses can be purchased for high end FortiManager devices to increase the number of device that can bemanaged. An add-on license can only be added using the CLI.
The below table lists the device that can have add-on licenses added, the number of devices the FortiManager canmanage by default, and the maximum number of devices that can be managed by adding add-on licenses.
Model Normal license With add-on license
FMG-3900E 10000 100000
FMG-3000F 4000 8000
FMG-4000E 4000 8000
FortiManager 6.4.0 Administration Guide 97Fortinet Inc.

Firewall Devices
To add an add-on license:
1. Purchase an add-on license (https://support.fortinet.com).2. Open the license file in a text editor.3. Connect to the CLI and run the following command:
execute add-on-license <license>
Where <license> is the license text, copied and pasted from the text editor.4. After the system automatically reboots, check the License Information widget to confirm that the number of
Devices/VODMs that can be managed has increased. See License Information widget on page 492.
Provisioning Templates
Go to Device Manager > Provisioning Templates to access configuration options for the following templates:
l System templatesl Threat Weight templatesl Certificate templates
System templates
The Device Manager > Provisioning Templates > System Templates pane allows you to create and manage deviceprofiles. A system template is a subset of a model device configuration. Each device or device group can be linked with asystem template. When linked, the selected settings come from the template and not from the Device Managerdatabase.
By default, there is one generic profile defined. System templates are managed in a similar manner to policy packages.You can use the context menus to create new device profiles. You can configure settings in the widget or import settingsfrom a specific device.
Go to the Device Manager > Provisioning Templates > System Templates > default pane to configure system templates.
Some settings may not be available in all ADOM versions.
After making changes in a widget, click Apply to save your changes.
To close a widget, click the Close icon in the widget’s top right.
To select which widgets to display, click Toggle Widgets and select which widgets to display.
FortiManager 6.4.0 Administration Guide 98Fortinet Inc.

Firewall Devices
To import settings from another device, click the Import icon in the widget’s top right and select the device from which toimport.
The following widgets and settings are available:
Widget Description
DNS Primary DNS Server, Secondary DNS Server, Local Domain Name.
NTP Server Synchronize with NTP Server and Sync Interval settings. You can select to use theFortiGuard server or specify one or more other servers.
Alert Email SMTP Server settings including server, authentication, SMTP user ID, and password.
Admin Settings Web Administration Ports, Timeout Settings, andWeb Administration.
SNMP SNMP v1/v2 and SNMP v3 settings. In the toolbar, you can select to create, edit, ordelete the record.To create a new SNMP, click Create New and specify the community name, hosts,queries, traps, and SNMP events.
Replacement Messages You can customize replacement messages. Click Import to select a device and theobjects to import.
FortiGuard Select Enable FortiGuard Security Updates to retrieve updates from FortiGuard serversor from this FortiManager. You can define multiple servers and specify Update, Rating,or Updates and Rating. You can also select Include Worldwide FortiGuard Servers.
Log Settings Select Send Logs to FortiAnalyzer/FortiManager and/or Send Logs to Syslog.If selected, enter the requisite information for the option.
You can create, edit, or delete templates. Select System Templates in the tree to display the Create New, Edit, Delete,and Import options in the content pane. You can also select the devices to be associated with the template by selectingAssign to Device.
FortiManager 6.4.0 Administration Guide 99Fortinet Inc.

Firewall Devices
To assign a system template to a device:
1. Go to Device Manager > Provisioning Templates > System Templates.2. In the content pane, select a template and click Assign to Device.3. Select devices to assign to and clickOK.
The devices assigned to the template are shown in the Assign to Device column.
Threat Weight templates
User or client behavior can sometimes increase the risk of being attacked or becoming infected. For example, if one ofyour network clients receives email viruses on a daily basis while no other clients receive these attachments, extrameasures may be required to protect that client, or a discussion with the user about this issue may be warranted.
Before you can decide on a course of action, you need to know the problem is occurring. Threat weight can provide thisinformation by tracking client behavior and reporting on activities that you determine are risky or worth tracking.
Threat weight profiles can be created, edited, and assigned to devices. When Threat Weight Tracking is enabled, theLog Allowed Traffic setting is enabled on all policies.
To create a new threat weight profile:
1. Go to the Device Manager > Provisioning Templates > Threat Weight.2. Click Create New in the toolbar.3. In the Create New Threat Weight pane, type a name for the profile.4. ClickOK to create the new threat weight profile.
To edit a threat weight profile:
1. Select a threat weight profile and click Edit. The Edit Threat Weightpane opens.2. Adjust the threat levels as needed, then clickOK to save your changes:
Log Threat Weight Turn on threat weight tracking.
Reset Reset all the threat level definition values to their defaults.
Import Import threat level definitions from a device in the ADOM.
Application Protection Adjust the tracking levels for the different application types that can be tracked.
Intrusion Protection Adjust the tracking levels for the different attack types that can be tracked.
Malware Protection Adjust the tracking levels for the malware or botnet connections that can bedetected.
Packet Based Inspection Adjust the tracking levels for failed connection attempts and traffic blocked byfirewall policies.
Web Activity Adjust the tracking levels for various types of web activity.
Risk Level Values Adjust the values for the four risk levels.
FortiManager 6.4.0 Administration Guide 100Fortinet Inc.

Firewall Devices
To assign a threat weight profile to a device:
1. Select a threat weight profile and click Assign to Device.2. Select devices to assign to and clickOK.
The devices assigned to the template are shown in the Assign to Device column.
Certificate templates
The certificate templates menu allows you to create certificate templates for an external certificate authority (CA) or thelocal FortiManager CA.
FortiManager includes a certificate authority server for each ADOM. When you create an ADOM, the private and publickey pair is created for the ADOM. The key pair is automatically used when you use FortiManager to define IPsec VPNsor SSL-VPNs for a device.
When you add a device to an IPsec VPN or SSL-VPN topology with a certificate template that uses the FortiManagerCA, the local FortiManager CA is automatically used. No request for a pre-shared key (PSK) is generated. When theIPsec VPN or SSL-VPN topology is installed to the device, the following process completes automatically:
l The FortiGate device generates a certificate signing request (CSR) file.l FortiManager signs the CSR file and installs the CSR file on the FortiGate device.l The CA certificate with public key is installed on the FortiGate device.
Some settings may not be available in all ADOM versions.
The following options are available:
Create New Create a new certificate template.
Edit Edit a certificate template. Right-click a certificate template, and select Edit.
Delete Delete a certificate template. Right-click a certificate template, and select Delete.
Generate Create a new certificate from a device.
To create a new certificate template:
1. Go to Device Manager > Provisioning Templates > Certificate Templates.2. Click Create New. The Create New Certificate Template pane opens.3. Enter the following information, then clickOK to create the certificate template:
Type Specify whether the certificate uses an external or local certificate authority(CA).When you select External, you must specify details about online SCEPenrollment.When you select Local, you are using the FortiManager CA server.
Certificate Name Type a name for the certificate.
FortiManager 6.4.0 Administration Guide 101Fortinet Inc.

Firewall Devices
Optional Information Optionally, type the organization unit, organization, locality (city), province orstate, country or region, and email address.
Key Type RSA is the default key type. This field cannot be edited.
Key Size Select the key size from the dropdown list: 512 bit, 1024 bit, 1536 bit, or 2048bit.
Online SCEP Enrollment These options are only available when the certificate type is External.
CA Server URL Type the server URL for the external CA.
ChallengePassword
Type the challenge password for the external CA server.
To edit a certificate template:
1. Select a certificate template, and click Edit.2. Edit the settings as required in the Edit Certificate Template pane, and clickOK.
To delete a certificate template:
1. Select a certificate template, and click Delete.2. ClickOK in the confirmation dialog box.
Scripts
FortiManager scripts enable you to create, execute, and view the results of scripts executed on FortiGate devices, policypackages, the ADOM database, the global policy package, or the DB. Scripts can also be filtered based on differentdevice information, such as OS type and platform.
At least one FortiGate device must be configured in the FortiManager system for you to be able to use scripts.
Additional configuration options and short-cuts are available using the right-click menu. Right-click the mouse on different navigation panes in the GUI page to access these options.
Any scripts that are run on the global database must use complete commands. For example, ifthe full command is config system global, do not use conf sys glob.
Scripts can be written in one of two formats:
l A sequence of FortiGate CLI commands, as you would type them at the command line. A comment line starts withthe number sign (#). A comment line will not be executed.
l Tcl scripting commands to provide more functionality to your scripts including global variables and decisionstructures.
FortiManager 6.4.0 Administration Guide 102Fortinet Inc.

Firewall Devices
When writing your scripts, it is generally easier to write them in a context-sensitive editor, and then cut and paste theminto the script editor on your FortiManager system. This can help avoid syntax errors and can reduce the amount oftroubleshooting required for your scripts.
CLI scripts can be grouped together, allowing multiple scripts to be run on a target at the same time. See CLI script groupon page 108 for information.
For information about scripting commands, see the FortiGate CLI reference.
Before using scripts, ensure the console-output function has been set to standard in theFortiGate CLI. Otherwise, scripts and other output longer than a screen in length will notexecute or display correctly.
When pushing a script from the FortiManager to the FortiGate with workspace enabled, youmust save the changes in the Policy & Objects tab.
Enabling scripts
You must enable scripts to make the Scripts option visible in the GUI.
To enable scripts:
1. Go to System Settings > Admin > Admin Settings.2. In the Display Options on GUI section, select Show Scripts. For more information, see Global administration
settings on page 589.3. Select Apply to apply your changes.
Configuring scripts
To configure, import, export, or run scripts, go to Device Manager > Scripts, or Policy & Objects > Object Configuration >Advanced > Scripts if you are in the Global Database ADOM. The script list for your current ADOM displays.
The following information is displayed:
Name The user-defined script name.
Type The script type.
Target The script target.
Comments User defined comment for the script.
Last Modified The date and time the script was last modified.
The following options are available in the toolbar, in theMoremenu, or in the right-click menu.
Run Script / Run Run the selected script. See Run a script on page 104.
FortiManager 6.4.0 Administration Guide 103Fortinet Inc.

Firewall Devices
Schedule Script Schedule when the selected script will run. See Schedule a script on page 107.
Create New / New Create a new script. See Add a script on page 105.
Edit Edit the selected script. See Edit a script on page 106.
Delete Delete the selected script. See Delete a script on page 106.
Clone Clone the selected script. See Clone a script on page 106.
Import CLI Script /Import
Import a script from your management computer. See Import a script on page 107.
Export Export the selected script as a .txt file to your management computer. See Export a scripton page 106.
Select All Select all the scripts. This option is only available for Global Database scripts.
Search Enter a search term in the search field to search the scripts.
Run a script
You can select to enable automatic script execution or create a recurring schedule for the script (see Schedule a scripton page 107).
To run a script:
1. Go to Device Manager > Scripts.2. Select a script then click Run Script in the toolbar, or right-click on a script and select Run Script.
Scripts can also be re-run from the script execution history by selecting the run button. SeeScript history on page 113 for information.
The Run Script dialog box will open. This dialog box will vary depending on the script target. You will either be ableto select a device or devices, or a policy package.
3. Select a device group, devices, or a policy package.4. Click Run Now to run the script.
The progress of the operation will be shown, providing information on its success or failure.
Scripts can also be run directly on a device using the right-click menu in Device Manager >Device & Groups.
To run a script on the Global Database ADOM:
1. Ensure you are in the global database ADOM.2. Go to Policy & Objects > Object Configurations > Scripts. If it is not visible, enable it in the Display Options (Display
options on page 166).3. Select a script then click Run Script in the toolbar, or right-click on a script and select Run Script. The Run Script
dialog box will open.
FortiManager 6.4.0 Administration Guide 104Fortinet Inc.

Firewall Devices
4. Select the policy package from the drop-down list.5. Click Run Script to run the script.
The progress of the operation will be shown, providing information on its success or failure.
Add a script
To add a script to an ADOM:
1. Go to Device Manager > Scripts, or Policy & Objects > Object Configurations > Scripts for the Global DatabaseADOM.
2. Click Create New, or right-click anywhere in the script list and select New from the menu. The Create Script dialogbox.
3. Enter the required information, then selectOK to create the new script.
Script Name Type a unique name for the script.
View Sample Script This option points to the FortiManager online help.
Comments Optionally, type a comment for the script.
Type Specify the type of script.This option is not available for Global Database ADOM scripts.
Run Script on Select the script target. This settings will affect the options presented whenyou go to run a script. The options include:l Device Databasel Policy Package or ADOMDatabasel Remote FortiGate Directly (via CLI)
For Global Database ADOM scripts, this option is set to Policy Package orADOMDatabase and cannot be changed.
Script Detail Type the script itself, either manually using a keyboard, or by copying andpasting from another editor.
Advanced Device Filters Select to adjust the advanced filters for the script. The options include:
FortiManager 6.4.0 Administration Guide 105Fortinet Inc.

Firewall Devices
l Platform (select from the dropdown list)l Buildl Device (select from the dropdown list)l Host namel SN
These options are not available for Global Database ADOM scripts, or if Runscript on is set to Policy Package or ADOMDatabase.
Edit a script
All of the same options are available when editing a script as when creating a new script, except the name of the scriptcannot be changed.
To edit a script, either double click on the name of the script, or right-click on the script name and select Edit from themenu. The Edit Script dialog box will open, allowing you to edit the script and its settings.
Clone a script
Cloning a script is useful when multiple scripts that are very similar.
To clone a script:
1. Go to Device Manager > Scripts, or Policy & Objects > Object Configuration > Advanced > Scripts if you are in theGlobal Database ADOM.
2. Right-click a script, and select Clone.The Clone Script pane opens, showing the exact same information as the original, except copy_ is prepended to thescript name.
3. Edit the script and its settings as needed then clickOK to create the clone.
Delete a script
Scripts can be deleted from the script list as needed.
To delete a script or scripts:
1. Go to Device Manager > Scripts, or Policy & Objects > Object Configuration > Advanced > Scripts if you are in theGlobal Database ADOM.
2. Select the script to be deleted, or selected multiple scripts by holding down the Ctrl or Shift keys.3. Right-click anywhere in the script list window, and select Delete.4. ClickOK in the confirmation dialog box to delete the script or scripts.
Export a script
Scripts can be exported to text files on your local computer.
FortiManager 6.4.0 Administration Guide 106Fortinet Inc.

Firewall Devices
To export a script:
1. Go to Device Manager > Scripts, or Policy & Objects > Object Configuration > Advanced > Scripts if you are in theGlobal Database ADOM.
2. Right-click a script, and select Export.3. If prompted by your web browser, select a location to where save the file, or open the file without saving, then click
OK.
Import a script
Scripts can be imported as text files from your local computer.
To import a script:
1. Go to Device Manager > Scripts.2. Select Import CLI Script from the toolbar. The Import CLI Script window opens.3. Drag and drop the script file onto the dialog box, or click Add Files and locate the file to be imported on your local
computer.4. Click Import to import the script.
If the script cannot be read, due to an incorrect file type or other issue, an error message will be displayed and theimport process will be canceled.
To import a script in the Global Database ADOM:
1. Go to Policy & Objects > Object Configuration > Advanced > Scripts.2. Select Import from the toolbar. The Import Script dialog box opens.3. Enter a name for the script and, optionally, comments, in the requisite fields.4. Click Browse... and locate the file to be imported on your local computer.5. Click Import to import the script.
If the script cannot be read, due to an incorrect file type or other issue, an error message will be displayed and theimport process will be canceled.
Schedule a script
Scripts and script groups can be scheduled to run at a specific time or on a recurring schedule. This option must beenabled in the CLI before it is available in the GUI.
Schedules cannot be used on scripts with the target Policy Package or ADOMDatabase.
To enable script scheduling:
1. Go to System Settings > Dashboard and click in the CLI Console widget, or connect to the FortiManager withterminal emulation software.
2. Enter the following CLI commands:config system admin setting
FortiManager 6.4.0 Administration Guide 107Fortinet Inc.

Firewall Devices
set show_schedule_script enableend
To schedule a script or script group:
1. Go to Device Manager > Scripts, or Policy & Objects > Object Configuration > Advanced > Scripts if you are in theGlobal Database ADOM.
2. Right-click on the script or group and select Schedule Script, or select a script or group then click Schedule Script orMore > Schedule Script in the toolbar. The Schedule Script window opens.
3. Configure the following options, then clickOK to create the schedule:
Devices Select the devices that the script will be run on. If required, use the search fieldto find the devices in the list.
Enable Automatic executeafter each device install
Select to enable automatic execution of the script or script group after eachdevice install. If this is selected, no schedule can be created.This option is only available is the target is Remote FortiGate Directly (via CLI).
Enable Schedule Select to schedule when the script or groups runs.This option is only available is the target is Remote FortiGate Directly (via CLI).
Recurring Select how frequently the script or script group will run:l One Time- Set the date and time that script or group will run.l Daily - Set the time that the script or group will run everyday.l Weekly - Set the day of the week and the time of day that the script orgroup will run.
l Monthly - Set the day of the month and the time of day that the script orgroup will run.
CLI script group
CLI scripts can be put into groups so that multiple scripts can be run on a target at the same time.
To manage script groups, go to to Device Manager > Scripts > CLI Script Group.
The following information is displayed:
Name The user-defined script group name.
Members The scripts that are included in the script group.
Target The script group target.
Comments User defined comment for the group.
Last Modified The date and time the group was last modified.
The following options are available in the toolbar, or right-click menu.
Create New Create a new script group.
Edit Edit the selected group.
FortiManager 6.4.0 Administration Guide 108Fortinet Inc.

Firewall Devices
Delete Delete the selected group or groups.
Run Script Run the selected script group.If the target is Device Database or Remote FortiGate Directly (via CLI), select the device ordevices to run the scripts in the group on, then click Run Now.If the target is Policy Package or ADOMDatabase, select the policy package from the drop-down list, then click Run Now.
Search Enter a search term in the search field to search the script groups.
To create a new CLI script group:
1. Go to Device Manager > Scripts > CLI Script Group.2. Select Create New in the toolbar. The Create New CLI Script Group(s) pane opens.3. Configure the following settings, then clickOK to create the CLI script group.:
Script Group Name Enter a name for the script group.
Comments Optionally, type a comment for the script group.
Type CLI Script. This field is read-only.
Run Script on Select the script target. This settings will affect the options presented whenyou go to run a script. The options include:l Device Databasel Policy Package or ADOMDatabasel Remote FortiGate Directly (via CLI)
Members Use the directional arrows to move available scripts to member scripts.
Script syntax
Most script syntax is the same as that used by FortiOS. For information see the FortiOS CLI Reference, available in theFortinet Document Library.
Some special syntax is required by the FortiManager to run CLI scripts on devices.
Syntax applicable for address and address6
config firewall addressedit xxxx
...regular FOS command here...
config dynamic_mappingedit "<dev_name>"-"<vdom_name>"
set subnet x.x.x.x x.x.x.xnext
end
Syntax applicable for ippool and ippool6
config firewall ippool
FortiManager 6.4.0 Administration Guide 109Fortinet Inc.

Firewall Devices
edit xxxx
...regular FOS command here...
config dynamic_mappingedit "<dev_name>"-"<vdom_name>"
set startip x.x.x.xset endip x.x.x.x
nextend
Syntax applicable for vip, vip6, vip46, and vip64
config firewall vipedit xxxx
...regular FOS command here...
config dynamic_mappingedit "<dev_name>"-"<vdom_name>"
set extintf "any"set extip x.x.x.x-x.x.x.xset mappedip x.x.x.x-x.x.x.xset arp-reply enable|disable
nextend
Syntax applicable for dynamic zone
config dynamic interfaceedit xxxx
set single-intf disableset default-mapping enable|disableset defmap-intf xxxxconfig dynamic_mapping
edit "<dev_name>"-"<vdom_name>"set local-intf xxxxset intrazone-deny enable|disable
nextend
nextend
Syntax applicable for dynamic interface
config dynamic interfaceedit xxxx
set single-intf enableset default-mapping enable|disableset defmap-intf xxxxconfig dynamic_mapping
edit "<dev_name>"-"<vdom_name>"set local-intf xxxxset intrazone-deny enable|disable
nextend
FortiManager 6.4.0 Administration Guide 110Fortinet Inc.

Firewall Devices
nextend
Syntax applicable for dynamic multicast interface
config dynamic multicast interfaceedit xxx
set description xxxconfig dynamic_mapping
edit "fgtname"-"vdom"set local-intf xxx
nextend
nextend
Syntax applicable for local certificate (dynamic mapping)
config dynamic certificate localedit xxxx
config dynamic_mappingedit "<dev_name>"-"global"
set local-cert xxxxnext
end
Syntax applicable for vpn tunnel
config dynamic vpntunneledit xxxx
config dynamic_mappingedit "<dev_name>"-"<vdom_name>"
set local-ipsec "<tunnel_name>"next
end
Syntax applicable for vpn console table
config vpnmgr vpntableedit xxxx
set topology star|meshed|dialset psk-auto-generate enable|disableset psksecret xxxxset ike1proposal 3des-sha1 3des-md5 ...set ike1dhgroup XXXXset ike1keylifesec 28800set ike1mode aggressive|mainset ike1dpd enable|disableset ike1nattraversal enable|disableset ike1natkeepalive 10set ike2proposal 3des-sha1 3des-md5set ike2dhgroup 5set ike2keylifetype seconds|kbyte|bothset ike2keylifesec 1800set ike2keylifekbs 5120set ike2keepalive enable|disable
FortiManager 6.4.0 Administration Guide 111Fortinet Inc.

Firewall Devices
set replay enable|disableset pfs enable|disableset ike2autonego enable|disableset fcc-enforcement enable|disableset localid-type auto|fqdn|user-fqdn|keyid|addressasn1dnset authmethod psk|signatureset inter-vdom enable|disableset certificate XXXX
nextend
Syntax applicable for vpn console node
config vpnmgr nodeedit "1"
set vpntable "<table_name>"set role hub|spokeset iface xxxxset hub_iface xxxxset automatic_routing enable|disableset extgw_p2_per_net enable|disableset banner xxxxset route-overlap use-old|use-new|allowset dns-mode manual|autoset domain xxxxset local-gw x.x.x.xset unity-support enable|disableset xauthtype disable|client|pap|chap|autoset authusr xxxxset authpasswd xxxxset authusrgrp xxxxset public-ip x.x.x.xconfig protected_subnet
edit 1set addr xxxx xxxx ...
nextend
Syntax applicable for setting installation target on policy package
config firewall policyedit x
...regular policy command here...
set _scope "<dev_name>"-"<vdom_name>"next
end
Syntax applicable for global policy
config global header policy
...regular policy command here...
end
FortiManager 6.4.0 Administration Guide 112Fortinet Inc.

Firewall Devices
config global footer policy
...regular policy command here...
end
Script history
The execution history of scripts run on specific devices can be viewed from a device’s dashboard. The script log can beviewed in the Task Monitor. The script execution history table also allows for viewing the script history, and re-runningthe script.
To view the script execution history:
1. Go to Device Manager > Device & Groups.2. In the tree menu, select the device group, for example,Managed Devices. The list of devices display in the content
pane and in the bottom tree menu.3. In the bottom tree menu, select the device whose script history you want to view. The System: Dashboard for the
device displays in the content pane.4. In the Configuration and Installation Status widget, select View History in the Script Status field to open the Script
Execution History pane.5. To view the script history for a specific script, select the Browse icon in the far right column of the table to open the
Script History dialog box.6. To re-run a script, select the Run script now icon in the far right column of the table. The script is re-run. See Run a
script on page 104.7. Select Return to return to the device dashboard.
To view a script log:
1. Go to System Settings > Task Monitor.2. Locate the script execution task whose log you need to view, and expand the task.3. Select the History icon to open the script log window.
For more information, see Task Monitor on page 534.
Script samples
This section helps familiarize you with FortiManager scripts, provides some script samples, and provides sometroubleshooting tips.
The scripts presented in this section are in an easy to read format that includes:
l the purpose or title of the scriptl the script itselfl the output from the script (blank lines are removed from some output)l any variations that may be usefull which versions of FortiOS this script will execute on
FortiManager 6.4.0 Administration Guide 113Fortinet Inc.

Firewall Devices
Do not include \r in your scripts as this will cause the script to not process properly.
Script samples includes:
l CLI scriptsl Tcl scripts
CLI scripts
CLI scripts include only FortiOS CLI commands as they are entered at the command line prompt on a FortiGate device.CLI scripts do not include Tool Command Language (Tcl) commands, and the first line of the script is not “#!” as it is forTcl scripts.
CLI scripts are useful for specific tasks such as configuring a routing table, adding new firewall policies, or getting systeminformation. These example tasks easily apply to any or all FortiGate devices connected to the FortiManager system.
However, the more complex a CLI script becomes the less it can be used with all FortiGate devices - it quickly becomestied to one particular device or configuration. One example of this is any script that includes the specific IP address of aFortiGate device’s interfaces cannot be executed on a different FortiGate device.
Samples of CLI scripts have been included to help get you started writing your own scripts for your networkadministration tasks.
Error messages will help you determine the causes of any CLI scripting problems, and fix them. For more information,see Error Messages on page 118.
The troubleshooting tips section provides some suggestions on how to quickly locate and fix problems in your CLIscripts. For more information, see Troubleshooting Tips on page 118.
CLI script samples
There are two types of CLI scripts. The first type is getting information from your FortiGate device. The second type ischanging information on your FortiGate device.
Getting information remotely is one of the main purposes of your FortiManager system, and CLI scripts allow you toaccess any information on your FortiGate devices. Getting information typically involves only one line of script as thefollowing scripts show.
To view interface information for port1:
Script show system interface port1
Output config system interfaceedit "port1"
set vdom "root"set ip 172.20.120.148 255.255.255.0set allowaccess ping https sshset type physical
nextend
FortiManager 6.4.0 Administration Guide 114Fortinet Inc.

Firewall Devices
Variations Remove the interface name to see a list that includes all the interfaces on the FortiGate deviceincluding virtual interfaces such as VLANs.
Note This script does not work when run on a policy package.
If the preceding script is used to be run on the FortiGate Directly (via CLI) or run on devicedatabase on a FortiGate has the VDOM enabled. The script will have be modified to thefollowing:config global
show system interface port1end
Since running on device database does not yield any useful information.View the log of script running on device: FortiGate-VM64-70------- Executing time: 2013-10-15 13:27:32 ------Starting log (Run on database)config globalendRunning script on DB success------- The end of log ----------
The script should be run on the FortiGate Directly (via CLI).View the log of script running on device: FortiGate-VM64-70------- Executing time: 2013-10-15 13:52:02 ------Starting log (Run on device)FortiGate-VM64 $ config globalFortiGate-VM64 (global) $ show system interface port1config system interface
edit "port1"set vdom "root"set ip 10.2.66.181 255.255.0.0set allowaccess ping https ssh snmp http fgfm auto-ipsec radius-
acct probe-response capwapset type physicalset snmp-index 1
nextendFortiGate-VM64 (global) $ end------- The end of log ----------
To view the entries in the static routing table. To get any useful information, the script has tobe re-written for the following if the VDOM is enabled for FortiGate and has to be run on theFortiGate Directly (via CLI).config vdom
edit rootshow route static
nextend
Here is a sample run of the preceding script running on the FortiGate Directly (via CLI).View the log of script running on device: FortiGate-VM64-70------- Executing time: 2013-10-15 14:24:10 ------Starting log (Run on device)FortiGate-VM64 $ config vdomFortiGate-VM64 (vdom) $ edit root
FortiManager 6.4.0 Administration Guide 115Fortinet Inc.

Firewall Devices
current vf=root:0FortiGate-VM64 (root) $ show route staticconfig router static
edit 1set device "port1"set gateway 10.2.0.250
nextendFortiGate-VM64 (root) $ nextFortiGate-VM64 (vdom) $ end------- The end of log ----------
To view the entries in the static routing table:
Script show route static
Output config router staticedit 1
set device "port1"set gateway 172.20.120.2
nextedit 2
set device "port2"set distance 7set dst 172.20.120.0 255.255.255.0set gateway 172.20.120.2
nextend
Variations none
View information about all the configured FDN servers on this device:
Script config globaldiag debug rating
end
Output View the log of script running on device: FortiGate-VM64------- Executing time: 2013-10-15 14:32:15 ------Starting log (Run on device)FortiGate-VM64 $ config globalFortiGate-VM64 (global) $ diagnose debug ratingLocale : englishLicense : ContractExpiration : Thu Jan 3 17:00:00 2030-=- Server List (Tue Oct 15 14:32:49 2013) -=-IP Weight RTT Flags TZ Packets Curr Lost Total Lost192.168.100.206 35 2 DIF -8 4068 72 305192.168.100.188 36 2 F -8 4052 72 308FortiGate-VM64 (global) $ end------- The end of log ----------
Variations Output for this script will vary based on the state of the FortiGate device. The preceding outputis for a FortiGate device that has never been authorized.For an authorized FortiGate device without a valid license, the output would be similar to:Locale : english
FortiManager 6.4.0 Administration Guide 116Fortinet Inc.

Firewall Devices
License : UnknownExpiration : N/AHostname : guard.fortinet.net
-=- Server List (Tue Oct 3 09:34:46 2006) -=-
IP Weight Round-time TZ Packets Curr Lost Total Lost** None **
Setting FortiGate device information with CLI scripts gives you access to more settings and allows you more fine grainedcontrol than you may have in the Device Manager. Also CLI commands allow access to more advanced options that arenot available in the FortiGate GUI. Scripts that set information require more lines.
Any scripts that you will be running on the global database must include the full CLI commandsand not use short forms for the commands. Short form commands will not run on the globaldatabase.
Create a new account profile called policy_admin allowing read-only access to policy related areas:
Script config globalconfig system accprofile
edit "policy_admin"set fwgrp readset loggrp readset sysgrp read
nextend
end
Output View the log of script running on device:FortiGate-VM64------- Executing time: 2013-10-16 13:39:35 ------Starting log (Run on device)FortiGate-VM64 $ config globalFortiGate-VM64 (global) $ config system accprofileFortiGate-VM64 (accprofile) $ edit "prof_admin"FortiGate-VM64 (prof_admin) $ set fwgrp readFortiGate-VM64 (prof_admin) $ set loggrp readFortiGate-VM64 (prof_admin) $ set sysgrp readFortiGate-VM64 (prof_admin) $ nextFortiGate-VM64 (accprofile) $ endFortiGate-VM64 (global) $ end------- The end of log ----------
Variations This profile is read-only to allow a policy administrator to monitor this device’s configurationand traffic.Variations may include enabling other areas as read-only or write permissions based on thataccount type’s needs.
With the introduction of global objects/security console (global database), you can run a CLI script on the FortiManagerglobal database in addition to running it on a FortiGate unit directly. Compare the following sample scripts:
l Running a CLI script on a FortiGate unitconfig vdom
edit “root”config firewall policy
FortiManager 6.4.0 Administration Guide 117Fortinet Inc.

Firewall Devices
edit 10set srcintf “port5”set dstintf “port6”set srcaddr “all”set dstaddr “all”set status disableset schedule "always"set service "ALL"set logtraffic disable
nextend
l Running a CLI script on the global databaseconfig firewall policy
edit 10set srcintf “port5”set dstintf “port6”set srcaddr "all"set dstaddr "all"set status disableset schedule "always"set service "ALL"set logtraffic disable
nextend
Error Messages
Most error messages you will see are regular FortiGate CLI error messages. If you are familiar with the CLI you will likelyrecognize them.
Other error messages indicate your script encountered problems while executing, such as:
l command parse error: It was not possible to parse this line of your script into a valid FortiGate CLI command.Common causes for this are misspelled keywords or an incorrect command format.
l unknown action: Generally this message indicates the previous line of the script was not executed, especially ifthe previous line accesses an object such as “config router static”.
l Device XXX failed-1: This usually means there is a problem with the end of the script. XXX is the name of theFortiGate unit the script is to be executed on. If a script has no end statement or that line has an error in it you maysee this error message. You may also see this message if the FortiGate unit has not been synchronized bydeploying its current configuration.
Troubleshooting Tips
Here are some troubleshooting tips to help locate and fix problems you may experience with your scripts.
l Check the script output. Generally the error messages displayed here will help you locate and fix the problem.l See the FortiGate CLI Reference for more information on all CLI commands.l There is a limit to the number of scripts allowed on the FortiManager unit. Try removing an old script before trying tosave your current one.
l As mentioned at the start of this chapter, ensure the console more command is disabled on the FortiGate deviceswhere scripts execute. Otherwise a condition may occur where both the FortiGate device and the FortiManagersystem are waiting for each other to respond until they timeout.
l There should be no punctuation at the start or end of the lines.
FortiManager 6.4.0 Administration Guide 118Fortinet Inc.

Firewall Devices
l Only whitespace is allowed on the same line as the command. This is useful in lining up end and next commandsfor quick and easy debugging of the script.
l Keep your scripts short. They are easier to troubleshoot and it gives you more flexibility. You can easily execute anumber of scripts after each other.
l Use full command names. For example instead of “set host test” use “set hostname test”. This is required for anyscripts that are to be run on the global database.
l Use the number sign (#) to comment out a line you suspect contains an error.
Tcl scripts
Tcl is a dynamic scripting language that extends the functionality of CLI scripting. In FortiManager Tcl scripts, the firstline of the script is “#!” as it is for standard Tcl scripts.
TCL Scripts do not run through the FGFM tunnel like CLI Scripts do. TCL Scripts use SSH totunnel through FGFM and they require SSH authentication to do so. If FortiManager does notuse the correct administrative credentials in Device Manager, the TCL script will fail. CLIscripts use the FGFM tunnel and the FGFM tunnel is authenticated using the FortiManagerand FortiGate serial numbers.
Do not include the exit command that normally ends Tcl scripts; it will prevent the script fromrunning.
This guide assumes you are familiar with the Tcl language and regular expressions, and instead focuses on how to useCLI commands in your Tcl scripts. Where you require more information about Tcl commands than this guide contains,please refer to resources such as the Tcl newsgroup, Tcl reference books, and the official Tcl website athttps://www.tcl.tk.
Tcl scripts can do more than just get and set information. The benefits of Tcl come from:
l variables to store information,l loops to repeats commands that are slightly different each timel decisions to compare information from the device
The sample scripts in this section will contain procedures that you can combine to use your scripts. The samples willeach focus on one of four areas:
l Tcl variablesl Tcl loopsl Tcl decisionsl Tcl file IO
To enable Tcl scripting, use the following CLI commands:
config system admin settingset show_tcl_script enable
end
FortiManager 6.4.0 Administration Guide 119Fortinet Inc.

Firewall Devices
Limitations of FortiManager Tcl
FortiManager Tcl executes in a controlled environment. You do not have to know the location of the Tcl interpreter orenvironment variables to execute your scripts. This also means some of the commands normally found in Tcl are notused in FortiManager Tcl.
Depending on the CLI commands you use in your Tcl scripts, you may not be able to run some scripts on some versionsof FortiOS as CLI commands change periodically.
Before testing a new script on a FortiGate device, you should backup that device’sconfiguration and data to ensure it is not lost if the script does not work as expected.
Tcl variables
Variables allow you to store information from the FortiGate device, and use it later in the script. Arrays allow you to easilymanage information by storing multiple pieces of data under a variable name. The next script uses an array to store theFortiGate system information.
Example: Save system status information in an array.
Script:
#!proc get_sys_status aname {
upvar $aname aputs [exec "#This is an example Tcl script to get the system status of the FortiGate\n" "# "
15 ]set input [exec "get system status\n" "# " 15 ]
# puts $inputset linelist [split $input \n]
# puts $linelistforeach line $linelist {
if {![regexp {([^:]+):(.*)} $line dummy key value]} continueswitch -regexp -- $key {Version {regexp {FortiGate-([^ ]+) ([^,]+),build([\d]+),.*} $value dummy a(platform) a(version)
a(build)}
Serial-Number {set a(serial-number) [string trim $value]
}Hostname {
set a(hostname) [string trim $value]} }
}}get_sys_status statusputs "This machine is a $status(platform) platform."puts "It is running version $status(version) of FortiOS."puts "The firmware is build# $status(build)."puts "S/N: $status(serial-number)"puts "This machine is called $status(hostname)"
FortiManager 6.4.0 Administration Guide 120Fortinet Inc.

Firewall Devices
Output:
------- Executing time: 2013-10-21 09:58:06 ------Starting log (Run on device)
FortiGate-VM64 #
This machine is a VM64 platform.It is running version v5.0 of FortiOS.The firmware is build# 0228.S/N: FGVM02Q105060070This machine is called FortiGate-VM64
------- The end of log ----------
Variations:
Once the information is in the variable array, you can use it as part of commands you send to the FortiGate device or tomake decisions based on the information. For example:
if {$status(version) == 5.0} {# follow the version 5.0 commands} elseif {$status(version) == 5.0} {# follow the version 5.0 commands}
This script introduces the concept of executing CLI commands within Tcl scripts using the following method:
set input [exec "get system status\n" "# "]
This command executes the CLI command “get system status” and passes the result into the variable calledinput. Without the “\n” at the end of the CLI command, the CLI command will not execute to provide output.
In analyzing this script:
l line 1 is the required #! to indicate this is a Tcl scriptl lines 2-3 open the procedure declarationl lines 4-5 puts the output from the CLI command into a Tcl variable as a string, and breaks it up at each returncharacter into an array of smaller strings
l line 6 starts a loop to go through the array of stringsl line 7 loops if the array element is punctuation or continues if its textl line 8 takes the output of line 7’s regular expression command and based on a match, performs one of the actionslisted in lines 9 through 17
l lines 9-11 if regular expression matches ‘Version’ then parse the text and store values for the platform, version, andbuild number in the named array elements
l line 12-14 if regular expression matches ‘Serial-Number’ then store the value in an array element named that aftertrimming the string down to text only
l lines 15-17 is similar to line 12 except the regular expression is matched against ‘Hostname’l line 17-19 close the switch decision statement, the for each loop, and the procedurel line 20 calls the procedure with an array name of statusl lines 21-25 output the information stored in the status array
FortiManager 6.4.0 Administration Guide 121Fortinet Inc.

Firewall Devices
Tcl loops
Even though the last script used a loop, that script’s main purpose was storing information in the array. The next scriptuses a loop to create a preset number of users on the FortiGate device, in this case 10 users. The output is only shownfor the first two users due to space considerations.
Example: Create 10 users from usr0001 to usr0010:
Script:
#!proc do_cmd {cmd} {puts [exec "$cmd\n" "# " 15]}
set num_users 10do_cmd "config vdom"do_cmd "edit root"do_cmd "config user local"for {set i 1} {$i <= $num_users} {incr i} {
set name [format "usr%04d" $i]puts "Adding user: $name"do_cmd "edit $name"do_cmd "set status enable"do_cmd "set type password"do_cmd "next"
}do_cmd "end"do_cmd "end"
do_cmd "config vdom"do_cmd "edit root"do_cmd "show user local"do_cmd "end"
Output:
View the log of script running on device:FortiGate-VM64
------- Executing time: 2013-10-16 15:27:18 ------Starting log (Run on device)config vdomFortiGate-VM64 (vdom) #edit rootcurrent vf=root:0FortiGate-VM64 (root) #config user localFortiGate-VM64 (local) #Adding user: usr0001edit usr0001new entry 'usr0001' addedFortiGate-VM64 (usr0001) #set status enableFortiGate-VM64 (usr0001) #set type passwordFortiGate-VM64 (usr0001) #next
FortiManager 6.4.0 Administration Guide 122Fortinet Inc.

Firewall Devices
FortiGate-VM64 (local) #Adding user: usr0002edit usr0002new entry 'usr0002' addedFortiGate-VM64 (usr0002) #set status enableFortiGate-VM64 (usr0002) #set type passwordFortiGate-VM64 (usr0002) #next
Variations:
There are a number of uses for this kind of looping script. One example is to create firewall policies for each interface thatdeny all non-HTTPS and non-SSH traffic by default. Another example is a scheduled script to loop through the staticrouting table to check that each entry is still reachable, and if not remove it from the table.
This script loops 10 times creating a new user each time whose name is based on the loop counter. The formatcommand is used to force a four digit number.
In analyzing this script:
l line 1 is the required #! to indicate this is a Tcl scriptl lines 2-4 open CLI command wrapper procedurel line 5 declares the number of users to createl line 6 gets the FortiGate ready for entering local usersl line 7 opens the for loop that will loop ten timesl line 8 sets the user name based on the incremented loop counter variablel line 9 is just a comment to the administrator which user is being createdl lines 10-13 create and configure the user, leaving the CLI ready for the next user to be addedl line 14 ends the for loopl line 15 ends the adding of users in the CLIl line 16 executes a CLI command to prove the users were added properly
Tcl decisions
Tcl has a number of decision structures that allow you to execute different CLI commands based on what informationyou discover.
This script is more complex than the previous scripts as it uses two procedures that read FortiGate information, make adecision based on that information, and then executes one of the CLI sub-scripts based on that information.
Example: Add information to existing firewall policies.
Script:
#!# need to define procedure do_cmd# the second parameter of exec should be "# "# If split one command to multiple lines use "\" to continueproc do_cmd {cmd} {
puts [exec "$cmd\n" "# "]}foreach line [split [exec "show firewall policy\n" "# "] \n] {
if {[regexp {edit[ ]+([0-9]+)} $line match policyid]} {
FortiManager 6.4.0 Administration Guide 123Fortinet Inc.

Firewall Devices
continue} elseif {[regexp {set[ ]+(\w+)[ ]+(.*)\r} $line match key value]} {
lappend fw_policy($policyid) "$key $value"}
}do_cmd "config firewall policy"foreach policyid [array names fw_policy] {
if {[lsearch $fw_policy($policyid){diffservcode_forward 000011}] == -1} {do_cmd "edit $policyid"do_cmd "set diffserv-forward enable"do_cmd "set diffservcode-forward 000011"do_cmd "next"
}}do_cmd "end"
Variations:
This type of script is useful for updating long lists of records. For example if the FortiOS version adds new keywords touser accounts, you can create a script similar to this one to get the list of user accounts and for each one edit it, add thenew information, and move on to the next.
This script uses two decision statements. Both are involved in text matching. The first decision is checking each line ofinput for the policy ID and if its not there it skips the line. If it is there, all the policy information is saved to an array forfuture use. The second decision searches the array of policy information to see which polices are miss
In analyzing this script:
l line 1 is the required #! to indicate this is a Tcl scriptl line 2-8 is a loop that reads each policy’s information and appends only the policy ID number to an array variablecalled fw_policy
l line 9 opens the CLI to the firewall policy section to prepare for the loopl line 10 starts the for each loop that increments through all the firewall policy names stored in fw_policyl line 11 checks each policy for an existing differvcode_forward 000011 entry - if its not found lines 12-15 areexecuted, otherwise they are skipped
l line 12 opens the policy determined by the loop counterl line 13-14 enable diffserv_forward, and set it to 000011l line 15 saves this entry and prepares for the next onel line 16 closes the if statementl line 17 closes the for each loopl line 18 saves all the updated firewall policy entries
Additional Tcl Scripts
Example: Get and display state information about the FortiGate device:
Script:
#!#Run on FortiOS v5.00#This script will display FortiGate's CPU states,#Memory states, and Up timeputs [exec "# This is an example Tcl script to get the system performance of the
FortiGate\n" "# " 15 ]set input [exec "get system status\n" "# " 15]
FortiManager 6.4.0 Administration Guide 124Fortinet Inc.

Firewall Devices
regexp {Version: *([^ ]+) ([^,]+),build([0-9]+),[0-9]+} $input dummy status(Platform) status(Version) status(Build)
if {$status(Version) eq "v5.0"} {puts -nonewline [exec "config global\n" "# " 30]puts -nonewline [exec "get system performance status\n" "# " 30]puts -nonewline [exec "end\n" "# " 30]
} else {puts -nonewline [exec "get system performance\n" "#" 30]
}
Output:
------- Executing time: 2013-10-21 16:21:43 ------Starting log (Run on device)
FortiGate-VM64 #config globalFortiGate-VM64 (global) # get system performance status
CPU states: 0% user 0% system 0% nice 90% idleCPU0 states: 0% user 0% system 0% nice 90% idleCPU1 states: 0% user 0% system 0% nice 90% idleMemory states: 73% usedAverage network usage: 0 kbps in 1 minute, 0 kbps in 10 minutes, 0 kbps in 30 minutesAverage sessions: 1 sessions in 1 minute, 2 sessions in 10 minutes, 2 sessions in 30 minutesAverage session setup rate: 0 sessions per second in last 1 minute, 0 sessions per second in
last 10 minutes, 0 sessions per second in last 30 minutesVirus caught: 0 total in 1 minuteIPS attacks blocked: 0 total in 1 minuteUptime: 6 days, 1 hours, 34 minutes
FortiGate-VM64 (global) # endFortiGate-VM64 #------- The end of log ----------
------- Executing time: 2013-10-21 16:16:58 ------
Example: Configure common global settings.
Script:
#!#Run on FortiOS v5.00#This script will configure common global, user group and ntp settings#if you do not want to set a parameter, comment the#corresponding set command#if you want to reset a parameter to it's default#value, set it an empty stringputs [exec "# This is an example Tcl script to configure global, user group and ntp setting
of FortiGate\n" "# " 15 ]
# globalset sys_global(admintimeout) ""
# user groupset sys_user_group(authtimeout) 20
# ntpset sys_ntp(source-ip) "0.0.0.0"set sys_ntp(ntpsync) "enable"
FortiManager 6.4.0 Administration Guide 125Fortinet Inc.

Firewall Devices
#procedure to execute FortiGate commandproc fgt_cmd cmd {puts -nonewline [exec "$cmd\n" "# " 30]}#config system global---beginfgt_cmd "config global"fgt_cmd "config system global"foreach key [array names sys_global] {if {$sys_global($key) ne ""} {fgt_cmd "set $key $sys_global($key)"} else {fgt_cmd "unset $key"}}fgt_cmd "end"fgt_cmd "end"#config system global---end
#config system user group---beginfgt_cmd "config vdom"fgt_cmd "edit root"fgt_cmd "config user group"fgt_cmd "edit groupname"foreach key [array names sys_user_group] {if {$sys_user_group($key) ne ""} {fgt_cmd "set $key $sys_user_group($key)"} else {fgt_cmd "unset $key"}}fgt_cmd "end"fgt_cmd "end"#config system user group---end
#config system ntp---beginfgt_cmd "config global"fgt_cmd "config system ntp"foreach key [array names sys_ntp] {if {$sys_ntp($key) ne ""} {fgt_cmd "set $key $sys_ntp($key)"} else {fgt_cmd "unset $key"}}fgt_cmd "end"fgt_cmd "end"#config system ntp---end
Output:
------- Executing time: 2013-10-22 09:12:57 ------Starting log (Run on device)
FortiGate-VM64 # config globalFortiGate-VM64 (global) # config system globalFortiGate-VM64 (global) # unset admintimeoutFortiGate-VM64 (global) # endFortiGate-VM64 (global) # end
FortiManager 6.4.0 Administration Guide 126Fortinet Inc.

Firewall Devices
FortiGate-VM64 # config vdomFortiGate-VM64 (vdom) # edit rootcurrent vf=root:0FortiGate-VM64 (root) # config user groupFortiGate-VM64 (group) # edit groupnameFortiGate-VM64 (groupname) # set authtimeout 20FortiGate-VM64 (groupname) # endFortiGate-VM64 (root) # endFortiGate-VM64 # config globalFortiGate-VM64 (global) # config system ntpFortiGate-VM64 (ntp) # set ntpsync enableFortiGate-VM64 (ntp) # set source-ip 0.0.0.0FortiGate-VM64 (ntp) # endFortiGate-VM64 (global) # endFortiGate-VM64 #------- The end of log ----------
Example: Configure syslogd settings and filters.
Script:
#!#Run on FortiOS v5.00#This script will configure log syslogd setting and#filter#key-value pairs for 'config log syslogd setting', no#value means default value.
set setting_list {{status enable} {csv enable}{facility alert} {port} {server 1.1.1.2}}#key-value pairs for 'config log syslogd filter', no#value means default value.puts [exec "# This is an example Tcl script to configure log syslogd setting and filter
setting of FortiGate\n" "# " 15 ]set filter_list {{attack enable} {email enable} {severity} {traffic enable} {virus
disable}{web enable}}#set the number of syslogd server, "", "2" or "3"
set syslogd_no "2"#procedure to execute FortiGate CLI commandproc fgt_cmd cmd {puts -nonewline [exec "$cmd\n" "# "]}#procedure to set a series of key-value pairsproc set_kv kv_list {foreach kv $kv_list {
set len [llength $kv]if {$len == 0} {continue} elseif {$len == 1} {fgt_cmd "unset [lindex $kv 0]"} else {fgt_cmd "set [lindex $kv 0] [lindex $kv 1]"} } }#configure log syslogd setting---beginfgt_cmd "config global"fgt_cmd "config log syslogd$syslogd_no setting"
set_kv $setting_list
FortiManager 6.4.0 Administration Guide 127Fortinet Inc.

Firewall Devices
fgt_cmd "end"#configure log syslogd setting---end#configure log syslogd filter---beginfgt_cmd "config log syslogd$syslogd_no filter"
set_kv $filter_listfgt_cmd "end"#configure log syslogd filter---end
Output:
Starting log (Run on device)
FortiGate-VM64 # config globalFortiGate-VM64 (global) # config log syslogd2 settingFortiGate-VM64 (setting) # set status enableFortiGate-VM64 (setting) # set csv enableFortiGate-VM64 (setting) # set facility alertFortiGate-VM64 (setting) # unset portFortiGate-VM64 (setting) # set server 1.1.1.2FortiGate-VM64 (setting) # end
FortiGate-VM64 (global) # config log syslogd2 filterFortiGate-VM64 (filter) # set attack enableFortiGate-VM64 (filter) # set email enableFortiGate-VM64 (filter) # unset severityFortiGate-VM64 (filter) # set traffic enableFortiGate-VM64 (filter) # set virus disableFortiGate-VM64 (filter) # set web enableFortiGate-VM64 (filter) # endFortiGate-VM64 (global) #
------- The end of log ----------
Example: Configure the FortiGate device to communicate with a FortiAnalyzer unit:
Script:
#!#This script will configure the FortiGate device to#communicate with a FortiAnalyzer unit#Enter the following key-value pairs for 'config#system fortianalyzer'
set status enableset enc-algorithm high
#localid will be set as the hostname automatically#laterputs [exec "# This is an example Tcl script to configure the FortiGate to communicate with a
FortiAnalyzer\n" "# " 15 ]set server 1.1.1.1
#for fortianalyzer, fortianalyzer2 or#fortianalyzer3, enter the corresponding value "",#"2", "3"
set faz_no ""#keys used for 'config system fortianalyzer', if you#do not want to change the value of a key, do not put#it in the list
set key_list {status enc-algorithm localid server }##procedure to get system status from a FortiGate
FortiManager 6.4.0 Administration Guide 128Fortinet Inc.

Firewall Devices
proc get_sys_status aname {upvar $aname aset input [split [exec "get system status\n" "# "] \n]foreach line $input {if {![regexp {([^:]+):(.*)} $line dummy key value]} continue
set a([string trim $key]) [string trim $value]}}#procedure to execute FortiGate commandproc fgt_cmd cmd {puts -nonewline [exec "$cmd\n" "# "]}#set the localid as the FortiGate's hostnameget_sys_status sys_statusset localid $sys_status(Hostname)#config system fortianalyzer---beginfgt_cmd "config global"fgt_cmd "config log fortianalyzer$faz_no setting"foreach key $key_list {if [info exists $key] {
fgt_cmd "set $key [set $key]"} else {
fgt_cmd "unset $key"}}fgt_cmd "end"fgt_cmd "end"#config system fortianalyzer---end
Output:
Starting log (Run on device)FortiGate-VM64 # config globalFortiGate-VM64 (global) # config log fortianalyzer settingFortiGate-VM64 (setting) # set status enableFortiGate-VM64 (setting) # set enc-algorithm highFortiGate-VM64 (setting) # set localid FortiGate-VM64FortiGate-VM64 (setting) # set server 1.1.1.1FortiGate-VM64 (setting) # endFortiGate-VM64 (global) # endFortiGate-VM64 #------- The end of log ---------
Example: Create custom IPS signatures and add them to a custom group.
Script:
#!#Run on FortiOS v5.00#This script will create custom ips signatures and#change the settings for the custom ips signatures
puts [exec "# This is an example Tcl script to create custom ips signatures and change thesettings for the custom ips signatures on a FortiGate\n" "# " 15 ]
#Enter custom ips signatures, signature names are the#names of array elements
set custom_sig(c1) {"F-SBID(--protocol icmp;--icmp_type 10; )"}set custom_sig(c2) {"F-SBID(--protocol icmp;--icmp_type 0; )"}
FortiManager 6.4.0 Administration Guide 129Fortinet Inc.

Firewall Devices
#Enter custom ips settingsset custom_rule(c1) {{status enable} {action block} {log enable} {log-packet} {severity
high}}set custom_rule(c2) {{status enable} {action pass} {log} {log-packet disable} {severity
low}}#procedure to execute FortiGate commandproc fgt_cmd cmd {puts -nonewline [exec "$cmd\n" "# "]}#procedure to set a series of key-value pairsproc set_kv kv_list {foreach kv $kv_list {set len [llength $kv]if {$len == 0} {
continue} elseif {$len == 1} {
fgt_cmd "unset [lindex $kv 0]"} else {
fgt_cmd "set [lindex $kv 0] [lindex $kv 1]"}} }#config ips custom---beginfgt_cmd "config vdom"fgt_cmd "edit root"fgt_cmd "config ips custom"foreach sig_name [array names custom_sig] {fgt_cmd "edit $sig_name"fgt_cmd "set signature $custom_sig($sig_name)"fgt_cmd "next"}fgt_cmd "end"#config ips custom settings---beginforeach rule_name [array names custom_rule] {fgt_cmd "config ips custom"fgt_cmd "edit $rule_name"set_kv $custom_rule($rule_name)fgt_cmd "end"}fgt_cmd "end"#config ips custom settings---end
Output:
Starting log (Run on device)FortiGate-VM64 # config vdomFortiGate-VM64 (vdom) # edit rootcurrent vf=root:0FortiGate-VM64 (root) # config ips customFortiGate-VM64 (custom) # edit c1set signature "F-SBID(--protocol icmp;--icmp_type 10; )"FortiGate-VM64 (c1) # set signature "F-SBID(--protocol icmp;--icmp_type 10; )"FortiGate-VM64 (c1) # nextFortiGate-VM64 (custom) # edit c2FortiGate-VM64 (c2) # set signature "F-SBID(--protocol icmp;--icmp_type 0; )"FortiGate-VM64 (c2) # nextFortiGate-VM64 (custom) # endFortiGate-VM64 (root) # config ips customFortiGate-VM64 (custom) # edit c1
FortiManager 6.4.0 Administration Guide 130Fortinet Inc.

Firewall Devices
FortiGate-VM64 (c1) # set status enableFortiGate-VM64 (c1) # set action blockFortiGate-VM64 (c1) # set log enableFortiGate-VM64 (c1) # unset log-packetFortiGate-VM64 (c1) # set severity highFortiGate-VM64 (c1) # endFortiGate-VM64 (root) # config ips customFortiGate-VM64 (custom) # edit c2FortiGate-VM64 (c2) # set status enableFortiGate-VM64 (c2) # set action passFortiGate-VM64 (c2) # unset logFortiGate-VM64 (c2) # set log-packet disableFortiGate-VM64 (c2) # set severity lowFortiGate-VM64 (c2) # endFortiGate-VM64 (root) # endFortiGate-VM64 #------- The end of log ----------
Variations:
None.
Tcl file IO
You can write to and read from files using Tcl scripts. For security reasons there is only one directory on theFortiManager where scripts can access files. For this reason, there is no reason to include the directory in the file nameyou are accessing. For example “/var/temp/myfile” or “~/myfile” will cause an error, but “myfile” or “/myfile” is OK.
The Tcl commands that are supported for file IO are: file, open, gets, read, tell, seek, eof, flush, close,fcopy, fconfigure, and fileevent.
The Tcl file command only supports delete subcommand, and does not support the -force option.
There is 10MB of diskspace allocated for Tcl scripts. An error will be reported if this size is exceeded.
These files will be reset when the following CLI commands are run: exec format, exec reset partition, or execreset all. The files will not be reset when the firmware is updated unless otherwise specified.
To write to a file:
Script #!set somefile [open “tcl_test” w]puts $somefile "Hello, world!"close $somefile
To read from a file:
Script #!set otherfile [open “tcl_test” r]while {[gets $otherfile line] >= 0} {puts [string length $line]}close $otherfile
Output Hello, world!
These two short scripts write a file called tcl_test and then read it back.
FortiManager 6.4.0 Administration Guide 131Fortinet Inc.

Firewall Devices
Line 3 in both scripts opens the file either for reading (r) or writing (w) and assigns it to a filehandle (somefile or otherfile).Later in the script when you see these filehandles, its input or output passing to the open file.
When reading from the file, lines 4 and 5 loop through the file line by line until it reaches the end of the file. Each line thatis read is put to the screen.
Both scripts close the file before they exit.
Troubleshooting Tips
This section includes suggestions to help you find and fix problems you may be having with your scripts.
l Make sure the commands you are trying to execute are valid for the version of FortiOS running on your targetFortiGate device.
l You should always use braces when evaluating code that may contain user input, to avoid possible securitybreaches. To illustrate the danger, consider this interactive session:
% set userinput {[puts DANGER!]}[puts DANGER!]% expr $userinput == 1DANGER!0% expr {$userinput == 1}0
In the first example, the code contained in the user-supplied input is evaluated, whereas in the second the bracesprevent this potential danger. As a general rule, always surround expressions with braces, whether using exprdirectly or some other command that takes an expression.
l A number that includes a leading zero or zeros, such as 0500 or 0011, is interpreted as an octal number, not adecimal number. So 0500 is actually 320 in decimal, and 0011 is 9 in decimal.
l There is a limit to the number of scripts allowed on the FortiManager unit. Try removing an old script before trying tosave your current one.
l Using the Tcl command “catch” you can add custom error messages in your script to alert you to problems duringthe script execution. When catch encounters an error it will return 1, but if there is no error it will return 0. Forexample:
if { [catch {open $someFile w} fid] } {puts stderr "Could not open $someFile for writing\n$fid"exit 1 ;# error opening the file!} else {
# put the rest of your script here}
Use Tcl script to access FortiManager’s device database or ADOM database
You can use Tcl script to access FortiManager’s device database or ADOM database (local database). The option to runa TCL script on remote FortiGate directly (via CLI) should be still used. However, for any portion of a script that needs tobe run on a local database, FortiManager uses a syntax within the TCL script exec_ondb to define it.
Example 1:
Run the Tcl script on an ADOM database for a specify policy package. For example, creating new a policy or object:
FortiManager 6.4.0 Administration Guide 132Fortinet Inc.

Firewall Devices
Syntax puts [exec_ondb "/adom/<adom_name>/pkg/<pkg_fullpath>" "embedded clicommands" "# "]
Usage puts [exec_ondb "/adom/52/pkg/default" "config firewall addressedit port5_addressnextend" "# "]
Example 2:
Run the Tcl script on the current ADOM database for a specify policy package. For example, creating a new policy andobject:
Syntax puts [exec_ondb "/adom/./pkg/<pkg_fullpath>" "embedded cli commands" "#"]
orputs [exec_ondb "/pkg/<pkg_fullpath>" "embeded cli commands" "# "]
Usage puts [exec_ondb "/adom/./pkg/default" "config firewall addressedit port5_addressnextend" "# "]
Example 3:
Run Tcl script on a specific device in an ADOM:
Syntax puts [exec_ondb "/adom/<adom_name>/device/<dev_name>" "embedded clicommands" "# "]
Usage puts [exec_ondb "/adom/v52/device/FGT60CA" "config globalconfig system globalset admintimeout 440endend" "# "]
Example 4:
Run Tcl script on current devices in an ADOM:
Syntax puts [exec_ondb "/adom/<adom_name>/device/." "embedded cli commands" "#"]
Usage puts [exec_ondb "/adom/v52/device/." "config globalconfig system globalset admintimeout 440endend" "# "]
FortiManager 6.4.0 Administration Guide 133Fortinet Inc.

Firewall Devices
exec_ondb cannot be run on the Global ADOM.
SD-WAN
Go to Device Manager > SD-WAN to configure SD-WAN templates and assign FortiGate devices to the templates.
SD-WAN templates help you do the following:
l Deploy a single SD-WAN template from FortiManager across multiple FortiGate devices.l Perform a zero-touch deployment without manual configuration locally at the FortiGate devices.l Roll out a uniform SD-WAN configuration across your network.l Eliminate errors in SD-WAN configuration across multiple FortiGate devices since the SD-WAN template is appliedcentrally from FortiManager.
l Monitor network Performance SLA across multiple FortiGate devices centrally from FortiManager.l Monitor the performance of your SD-WAN with multiple views.
Using SD-WAN templates consists of the following steps:
1. Specify the ports where the SD-WAN settings will be applied. See Interface members on page 135.2. Specify the health-check servers that will monitor the network parameters. See Health-Check Servers on page 144.3. Create an SD-WAN template that includes the following:
a. Add Interface Members - add the Interface Members created in step 1.b. Performance SLA - create a Performance SLA. Add the Interface Member and Health Check Servers.c. SD-WAN Rules - create rules and configure advanced options on network traffic management.See SD-WAN templates on page 137.
4. Assign a FortiGate device to the SD-WAN template. See Assigned devices on page 146.5. Install device settings using the Install Wizard. See Using the Install Wizard to install device settings only on page
69.6. Go to SD-WAN > Monitor to monitor the FortiGate devices. See Monitor SD-WAN on page 147.
The SD-WAN template takes effect on the FortiGate device only after it is installed using theInstall Wizard. After installing the SD-WAN template on the FortiGate device, changingsettings in SD-WAN, Performance SLA, or SD-WAN Rules locally on the FortiGate device willresult in the SD-WAN template on the FortiManager being out of sync with the FortiGatedevice. You must configure the same settings on the FortiManager SD-WAN template andinstall it again using the Install Wizard to be in sync with the settings on the FortiGate.
Enabling central SD-WAN management
Central SD-WANmanagement can be enabled per ADOM. When enabled, the SD-WAN tab shows the following itemson the left pane:
l Assigned Devicesl SD-WAN Templates
FortiManager 6.4.0 Administration Guide 134Fortinet Inc.

Firewall Devices
l Interface Membersl Health-Check Serversl Monitor
To enable central SD-WAN management:
1. Go to System Settings > All ADOMs.2. Select the ADOM and click Edit in the toolbar, or right-click the ADOM and select Edit from the pop-up menu.
The Edit ADOM window opens. (See Editing an ADOM on page 518.)3. Next to Central Management, select the SD-WAN check box.4. ClickOK.
Interface members
Create newWAN interface members.
To create a new interface member:
1. Ensure that you are in the correct ADOM and that central SD-WANmanagement is enabled.2. Go to Device Manager > SD-WAN > Interface Members.3. Click Create New in the content pane toolbar, or right-click and select Create New. The Create NewWAN Interface
page opens.
4. Enter the following information, then clickOK to create the newWAN interface:
Name Enter the name of the WAN detect server.
Description Enter a description of the server.
Default Interface Specify the default interface for the WAN link.
Gateway The default gateway for this interface. Usually the default gateway of theInternet service provider that this interface is connected to.
Weight Weight of this interface for weighted load balancing (0 - 255). More traffic isdirected to interfaces with higher weights.
Volume Ratio Measured volume ratio (this value / sum of all values = percentage of linkvolume, 0 - 255).
FortiManager 6.4.0 Administration Guide 135Fortinet Inc.

Firewall Devices
Per-Device Mapping Enable per-device mapping. See Per-device mapping on page 136.
Advanced Options
gateway6 IPv6 gateway address.
ingress-spillover-threshold
Ingress spillover threshold for this interface (0 - 16776000 kbit/s). When thistraffic volume threshold is reached, new sessions spill over to other interfacesin the SD-WAN.
priority Priority of the interface (0 - 4294967295). Used for SD-WAN rules or priorityrules.
source Source IPv4 address.
source6 Source IPv6 address.
spillover-threshold Egress spillover threshold for this interface (0 - 16776000 kbit/s). When thistraffic volume threshold is reached, new sessions spill over to other interfacesin the SD-WAN.
status Enable/disable the interface.
To edit an interface member:
1. If using ADOMs, ensure that you are in the correct ADOM.2. Go to Device Manager > SD-WAN > Interface Members.3. Select the interface member from the list and click Edit in the toolbar, or right-click the interface then select Edit. The
Edit WAN Interface page opens.4. Edit the interface as required, and clickOK to apply your changes.
To delete an interface member or members:
1. If using ADOMs, ensure that you are in the correct ADOM.2. Go to Device Manager > SD-WAN > Interface Members.3. Select the interface or interfaces from the list and click Delete in the toolbar, or right-click the interface and select
Delete.4. ClickOK in the confirmation dialog box to delete the interface or interfaces.
Per-device mapping
To add WAN interface per-device mapping:
1. If using ADOMs, ensure that you are in the correct ADOM.2. Go to Device Manager > SD-WAN > Interface Members.3. Click Create New in the content pane toolbar, or right-click and select Create New. The Create NewWAN Interface
page opens.4. Enable Per-Device Mapping.
FortiManager 6.4.0 Administration Guide 136Fortinet Inc.

Firewall Devices
5. Click Create New in the per-device mapping toolbar. The Create New Interface Member dialog-box opens.
6. Select aMapped Device then an Interface from the drop-down lists.7. Enter theGateway IP address,Weight, Volume, and Advanced Options.8. ClickOK.
To edit WAN interface per-device mapping:
1. If using ADOMs, ensure that you are in the correct ADOM.2. Go to Device Manager > SD-WAN > Interface Members.3. Click Create New in the content pane toolbar, or right-click and select Create New. The Create NewWAN Interface
page opens.4. Select a per device mapping then click Edit in the per-device mapping toolbar. The Edit Interface Member dialog-
box opens.5. Edit the settings as required, then clickOK.
To delete WAN interface per-device mappings:
1. If using ADOMs, ensure that you are in the correct ADOM.2. Go to Device Manager > SD-WAN > Interface Members.3. Click Create New in the content pane toolbar, or right-click and select Create New. The Create NewWAN Interface
page opens.4. Select one or more per device mapping, then click Delete in the per-device mapping toolbar.5. ClickOK in the confirmation dialog box to delete the mapping or mappings.
SD-WAN templates
Create an SD-WAN template with the required network parameters.
Before creating SD-WAN templates:
l Create the interface members. See Interface members on page 135.l Create health-check servers. See Health-Check Servers on page 144.l Create BGP Neighbors. See Configure BGP Neighbor on page 150.
To create a new SD-WAN template:
1. Ensure that you are in the correct ADOM and that central SD-WANmanagement is enabled.2. Go to Device Manager > SD-WAN > SD-WAN Template.
FortiManager 6.4.0 Administration Guide 137Fortinet Inc.

Firewall Devices
3. Click Create New in the content pane toolbar, or right-click and select Create New. The Create New page opens.
4. Enter the following information and clickOK to create the new SD-WAN template:
Name Enter the name of the template.
Description Enter a description of the template.
SD-WAN Status SelectOn orOff.
Interface Members Interface members can be added, edited, and removed. An interface membermust be created before it can be added to a template, see Interface memberson page 135.
Performance SLA See Performance SLA on page 140.
Neighbor See Configure BGP Neighbor on page 150.
SD-WAN Rules See SD-WAN rules on page 142.
Advanced Options Configure the following advanced options:
fail-detect Enable/disable fail detection features for this interface.
neighbor-hold-boot-time
Specify the interval.
neighbor-hold-down
Enable/disable neighbor hold down for this interface.
FortiManager 6.4.0 Administration Guide 138Fortinet Inc.

Firewall Devices
neighbor-hold-down-time
Specify the interval.
To edit an SD-WAN template:
1. If using ADOMs, ensure that you are in the correct ADOM.2. Go to Device Manager > SD-WAN > SD-WAN Template.3. Select the template from the list and click Edit in the toolbar, or right-click the template and select Edit. The Edit
page opens.4. Edit the template as required, and clickOK to apply your changes.
To delete an SD-WAN template:
1. If using ADOMs, ensure that you are in the correct ADOM.2. Go to Device Manager > SD-WAN > SD-WAN Template.3. Select the template from the list and click Delete in the toolbar, or right-click the template and select Delete.4. Click OK in the confirmation dialog box to delete the template or templates.
To import an SD-WAN template or templates:
1. If using ADOMs, ensure that you are in the correct ADOM.2. Go to Device Manager > SD-WAN > SD-WAN Template.3. Click Import. The Import SD-WAN templates screen is shown.
4. Configure the following settings and click OK:l Name - specify a name for the SD-WAN template.l Device - select the FortiGate device from where to select the SD-WAN template.l Description - optionally provide a description.
The SD-WAN template is imported and now visible in Device Manager > SD-WAN > SD-WAN Template.
A prefix Import is automatically added to SD-WAN templates that are imported from theFortiGate devices.
FortiManager 6.4.0 Administration Guide 139Fortinet Inc.

Firewall Devices
Performance SLA
Create a Performance SLA in FortiManager that can be used to monitor the SD-WAN performance in FortiGate devices.You can also create a Performance SLA in FortiManager. If all links meet the SLA criteria, the FortiGate uses the firstlink, even if that link isn’t the best quality. If at any time, the link in use doesn’t meet the SLA criteria, and the next link inthe configuration meets the SLA criteria, the FortiGate changes to that link. If the next link doesn’t meet the SLA criteria,the FortiGate uses the next link in the configuration if it meets the SLA criteria, and so on.
To create a new performance SLA:
1. Ensure that you are in the correct ADOM and that central SD-WANmanagement is enabled.2. Go to Device Manager > SD-WAN > SD-WAN Template.3. Click Create New in the content pane toolbar, or right-click and select Create New. The Create New page opens.4. In the Performance SLA toolbar, click Create New. The Create Performance SLA dialog-box opens
5. Enter the following information, and clickOK to create the performance SLA:
Name Enter the name of the performance SLA.
Detect Protocol Select the detection method for the profile check:l Pingl TCP ECHOl UDP ECHOl HTTPl TWAMP
Detect Server Enter the IP address of the WAN interface that you want to monitor.
Member Select available interface members. The interfaces must already be added tothe template.
FortiManager 6.4.0 Administration Guide 140Fortinet Inc.

Firewall Devices
SLA Click Create New to create a new SLA. Enable and enter the Jitter Threshold(in milliseconds), Latency Threshold (in milliseconds), and Packet LossThreshold (in percent), then clickOK to create the SLA.SLAs can also be edited and deleted as required.
Link Status
Interval Status check interval, or the time between attempting to connect to the server,in seconds (1 - 3600, default = 1).
Failure BeforeInactive
Specify the number of failures before the link becomes inactive (1 - 10, default= 5).
Restore Link After Specify the number of successful responses received before server isconsidered recovered (1 - 10, default = 5).
Action When Inactive Specify what happens with the WAN link becomes inactive.
Update StaticRoute
Select to update the static route when the WAN link becomes inactive.
CascadeInterfaces
Select to cascade interfaces when the WAN link becomes inactive.
Advanced Options
addr-mode Address mode (IPv4 or IPv6).
http-get URL used to communicate with the server if the protocol if the protocol isHTTP.
http-match Response string expected from the server if the protocol is HTTP.
interval Status check interval, or the time between attempting to connect to the server,in seconds (1 - 3600, default = 5).
packet-size Packet size of a TWAMP test session (64 - 1024).
threshold-alert-jitter
Alert threshold for jitter (ms, default = 0), range [0-4294967295].
threshold-alert-latency
Alert threshold for latency, in milliseconds (0 - 4294967295, default = 0).
threshold-alert-packetloss
Alert threshold for packet loss, in percent (0 - 100, default = 0).
threshold-warning-jitter
Warning threshold for jitter, in milliseconds (0 - 4294967295, default = 0).
threshold-warning-latency
Warning threshold for latency, in milliseconds (0 - 4294967295, default = 0).
threshold-warning-packetloss
Warning threshold for packet loss, in percent (0 - 100, default = 0).
FortiManager 6.4.0 Administration Guide 141Fortinet Inc.

Firewall Devices
SD-WAN rules
Configure SD-WAN rules for WAN links by specifying the required network parameters. The SD-WAN rules are appliedto the FortiGate device when the SD-WAN template is applied.
To create a new SD-WAN rule:
1. Ensure that you are in the correct ADOM and that central SD-WANmanagement is enabled.2. Go to Device Manager > SD-WAN > SD-WAN Template.3. Click Create New in the content pane toolbar, or right-click and select Create New. The Create New page opens.4. In the SD-WAN Rules toolbar, click Create New. The Create New SD-WAN Rule dialog-box opens.
5. Enter the following information, then clickOK to create the new SD-WAN rule:
Name Enter the name of the rule.
Source
Address Add one or more address from the drop-down.
Users Add one or more users from the drop-down.
User Groups Add one or more groups from the drop-down.
Destination
Address Select an address or addresses from the drop-down list. This option is onlyavailable when Destination is Address.
Internet Service Select a service or services from the drop-down list. This option is onlyavailable when Destination is Internet Service.
Internet ServiceGroup
Select a service group or groups from the drop-down list. This option is onlyavailable when Destination is Internet Service.
Custom InternetService
Select a service or services from the drop-down list. This option is onlyavailable when Destination is Internet Service.
FortiManager 6.4.0 Administration Guide 142Fortinet Inc.

Firewall Devices
Custom InternetService Group
Select a service group or groups from the drop-down list. This option is onlyavailable when Destination is Internet Service.
Application Select an application or applications from the drop-down list. This option isonly available when Destination is Internet Service.
Application Group Select an application group or groups from the drop-down list. This option isonly available when Destination is Internet Service.
Protocol Select the protocol, of specify the protocol number.
Port Range Enter the port range. This option is only available when the protocol is TCP orUDP.
Type of Service Specify the type of service and bit mask. This option is only available theprotocol is set to Specify.
Outgoing Interface Select Best Quality orMinimumQuality (SLA).
Interface Members Select interface members.
Status Check This option is only available when the outgoing interface is Best Quality.
Require SLA Target This option is only available when the outgoing interface isMinimumQuality(SLA).
Advanced Options
addr-mode Address mode (IPv4 or IPv6).
bandwidth-weight Coefficient of reciprocal of available bidirectional bandwidth in the formula ofcustom-profile-1, range [0-10000000].
dscp-forward Enable/disable forward traffic DSCP tag.
dscp-forward-tag Forward traffic DSCP tag.
dscp-reverse Enable/disable reverse traffic DSCP tag.
dscp-reverse-tag verse traffic DSCP tag.
dst-negate Enable/disable negation of destination address match.
dst6 Destination IPv6 address name.
input-device Source interface name.
internet-service-ctrl
Control-based Internet Service ID list.
internet-service-ctrl-group
Control-based Internet Service ID, range [0-4294967295].
internet-service-custom-group
Custom Internet Service group list.
internet-service-group
Internet Service group list.
jitter-weight Coefficient of jitter in the formula of custom-profile-1, range [0-10000000].
FortiManager 6.4.0 Administration Guide 143Fortinet Inc.

Firewall Devices
latency-weight Coefficient of latency in the formula of custom-profile-1, range[0-10000000].
link-cost-threshold Percentage threshold change of link cost values that will result in policy routeregeneration (0 - 10000000, default = 10).
packet-loss-weight Coefficient of packet-loss in the formula of custom-profile-1, range[0-10000000].
route-tag IPv4 route map route-tag, range [0-4294967295].
src-negate Enable/disable negation of source address match.
src6 Source IPv6 address name.
status Enable/disable SD-WAN service.
Health-Check Servers
Configure health-check servers for the FortiGate unit to verify that real servers are able respond to network connectionattempts. If a real server responds to connection attempts, the load balancer continues to send sessions to it. If a realserver stops responding to connection attempts, the load balancer assumes that the server is down and does not sendsessions to it. The health-check servers configuration determines how the load balancer tests the real servers. You canuse a single health-check servers for multiple load balancing configurations.
To add a health-check server:
1. Ensure that you are in the correct ADOM and that central SD-WANmanagement is enabled.2. Go to Device Manager > SD-WAN > Health-Check Servers.3. Click Create New in the content pane toolbar. The Create NewWAN Detect Server page opens.
4. Enter the following information, then clickOK to add the server:
Name Enter the name of the WAN detect server.
Description Enter a description of the server.
Detect Server Enter the IP address of the WAN interface that you want to monitor. Click theplus icon to add more interfaces.
Per-Device Mapping Enable per-device mapping. See Per-device mapping on page 145.
FortiManager 6.4.0 Administration Guide 144Fortinet Inc.

Firewall Devices
To edit a health-check server:
1. If using ADOMs, ensure that you are in the correct ADOM.2. Go to Device Manager > SD-WAN > Health-Check Servers.3. Select the server from the list and click Edit in the toolbar, or right-click the server then select Edit. The Edit WAN
Detect Server page opens.4. Edit the server as required, then clickOK to apply your changes.
To delete a health-check server or servers:
1. If using ADOMs, ensure that you are in the correct ADOM.2. Go to Device Manager > SD-WAN > Health-Check Servers.3. Select the server or server s from the list and click Delete in the toolbar, or right-click the server then select Delete.4. ClickOK in the confirmation dialog box to delete the server or servers.
Per-device mapping
Adding a Health-Check Server makes it the default server for all VDOMs on the FortiGate device. With per-devicemapping, you can add a different Health-Check Server for each VDOM on the FortiGate device.
To add health-check per-device mapping:
1. Ensure that you are in the correct ADOM and that central SD-WANmanagement is enabled.2. Go to Device Manager > SD-WAN > Health-Check Servers.3. Click Create New in the content pane toolbar. The Create NewWAN Detect Server page opens.4. Enable Per-Device Mapping.5. Click Create New in the per-device mapping toolbar.
6. Select aMapped Device from the drop-down list.7. Enter the Detect Server IP address, and add additional detect servers as needed.8. ClickOK.
To edit health-check per-device mapping:
1. If using ADOMs, ensure that you are in the correct ADOM.2. Go to Device Manager > SD-WAN > Health-Check Servers.3. Click Create New in the content pane toolbar, or right-click and select Create New. The Create NewWAN Detect
Server page opens.4. Select a per device mapping then click Edit in the per-device mapping toolbar.5. Edit the settings as required, then clickOK.
FortiManager 6.4.0 Administration Guide 145Fortinet Inc.

Firewall Devices
To delete health-check per-device mappings:
1. If using ADOMs, ensure that you are in the correct ADOM.2. Go to Device Manager > SD-WAN > Health-Check Servers.3. Click Create New in the content pane toolbar, or right-click and select Create New. The Create NewWAN Detect
Server page opens.4. Select one or more per device mapping, then click Delete in the per-device mapping toolbar.5. ClickOK in the confirmation dialog box to delete the mapping or mappings.
Assigned devices
Assign a FortiGate device to an SD-WAN template. The network parameters specified in the SD-WAN template are usedto measure the performance of the WAN link on the FortiGate device.
To assign a FortiGate device to the SD-WAN template:
1. Ensure that you are in the correct ADOM and that central SD-WANmanagement is enabled.2. Go to Device Manager > SD-WAN > Assigned Devices.3. Click Create New in the content pane toolbar, or right-click and select Create New.
The Create New page opens.
4. Select a FortiGate andWAN Template from the drop-down lists.The Interface Mapping table will be populated with the interface members that are in the selected template.
5. ClickOK.
To edit an assigned device:
1. If using ADOMs, ensure that you are in the correct ADOM.2. Go to Device Manager > SD-WAN > Assigned Devices.3. Select the assigned device from the list, and click Edit in the toolbar, or right-click the device and select Edit.
The Edit page opens.4. Edit the FortiGate andWAN template as required, and clickOK to apply your changes.
To delete an assigned device or devices:
1. If using ADOMs, ensure that you are in the correct ADOM..2. Go to Device Manager > SD-WAN > Assigned Devices.3. Select the assigned device or devices from the list and click Delete in the toolbar, or right-click the device and select
Delete.4. ClickOK in the confirmation dialog box to delete the assigned device or devices.
FortiManager 6.4.0 Administration Guide 146Fortinet Inc.

Firewall Devices
Monitor SD-WAN
After adding the Interface Members, Health-Check Servers, creating SD-WAN templates, and assigning devices to theSD-WAN template, go to SD-WAN > Monitor to monitor the FortiGate devices.
The FortiGate devices can be monitored from two views,Map View and Table View.
Map View
To monitor SD-WAN with Map View:
1. ClickMap View to view the SD-WAN link on Google Maps.2. Hover over the SD-WAN icon. The following information is shown:
<Name of the FortiGate device> (<Model>)
Interface Interface members.
Performance SLA Shows whether the interface is meeting the performance SLA criteria.
Jitter (ms) Actual value of Jitter.
Latency (ms) Actual value of Latency.
Packet Loss (ms) Actual value of Packet loss.
Bandwidth (TX/RX) Bandwidth of data transmitted and received.
Volume (TX/RX) Volume of data transmitted and received.
Session Number of active sessions.
Select Show Unhealthy Devices only to show only the devices that do not meet thePerformance SLA criteria.
Table View
To monitor SD-WAN with Table View:
1. Click Table View to view the SD-WAN parameters for each device.The following information is shown for each device:
Device Name of the device.
SD-WAN Interface members.
Internet Services Add or remove the Internet Services from the Services Settings drop-down.The data is shown for the selected Internet Services. The Internet Services arespecified in SD-WAN Rules > Destination type > Internet Service in FortiGate.
FortiManager 6.4.0 Administration Guide 147Fortinet Inc.

Firewall Devices
Applications Add or remove the Applications from the Services Settings drop-down. Thedata is shown for the selected applications. The applications are specified inSD-WAN Rules > Destination type > Internet Service in FortiGate.
Upload Volume of data transmitted up stream
Download Volume of data transmitted down stream.
Automatic Refresh FortiManager extracts the data from FortiGate devices based on the refreshsettings. Select the automatic refresh interval from Every 5 Minutes to Every30 Minutes. Alternatively, you can selectManual Refresh to refresh the datamanually.
Hover over a service for a device that is shown in red. A pop-up shows the parameters thathave failed the SLA criteria.
SD-WAN Monitoring History
FortiManager provides an option to collect and store SD-WANMonitor data. Go to SD-WAN > Monitor > Table Viewto view the following drill-down data:l Click each FortiGate device to view drill-down values for the particular device. The graphs available areBandwidth Overview, Traffic Overview, Jitter, Latency, and Packet Loss.
l Click each application to view drill-down values for the particular application. The graphs available are Jitter,Latency, and Packet Loss.
By default, SD-WANMonitoring History is disabled. When this feature is disabled, data for only the last 10 minutesis displayed. You can refresh to view the data directly from FortiGate devices. No historical data is stored inFortiManager when this feature is disabled.You can enable the SD-WANMonitoring history using the following command line:config system admin setting
set sdwan-monitor-history enableend
When this feature is enabled, you can view the SD-WANMonitoring history in the following ways:l SD-WANMonitoring data can be viewed for the past 24, 12, 6, 1, and N hours.l SD-WANMonitoring history is stored in FortiManager for 8 days.
IPsec VPN Wizard
The SD-WAN Interface page in FortiManager now includes an IPsec VPN creation wizard. Administrators can configurea VPN using a wizard when configuring the SD-WAN.
To configure the IPsec VPN in SD-WAN:
1. Go to System Settings > All ADOMs and edit the ADOM. Disable SD-WAN in Central Management. ClickOK.2. Go to Device Manager > SD-WAN. Select any device or VDOM and click Edit. If no device is available, click Create
New.
FortiManager 6.4.0 Administration Guide 148Fortinet Inc.

Firewall Devices
3. Click Create VPN under Interface Members in the Create New SD-WAN or Edit SD-WAN page.
4. Configure the following settings and clickOK to auto-generate IPsec VPNs:
Name Specify a name for the VPN.
Remote Device Select IP Address or Dynamic DNS.
IP Address Specify the IP address if IP Address is selected for Remote Device.
FQDN Specify the FQDN if Dynamic DNS is selected for Remote Device.
Outgoing Interface Select the outgoing interface.
Authentication Method Select Pre-shared key or Signature.
Certificate Name Select the certificate (if Signature was selected as the AuthenticationMethod)
Peer Certificate CA Select the Peer Certificate CA (if Signature was selected as theAuthentication Method)
Pre-shared Key Select the pre-shared key (if Pre-shared key was selected as theAuthentication Method)
FortiManager 6.4.0 Administration Guide 149Fortinet Inc.

Firewall Devices
5. The auto-generated VPN interface are automatically added to the list of SD-WANmembers.
6. Edit the VPN in Interface Members to configureGateway IP, Estimated Upstream Bandwidth (Kbps), and EstimatedDownstream Bandwidth (Kbps).
Configure BGP Neighbor
Create SD-WAN rules to include Border Gateway Protocol (BGP) neighbors that are added in FortiGate devices.
To configure BGP Neighbor for per-device management:
1. Go to Device Manager > [FortiGate] > Router > BGP.2. Under Neighbors, click Create New.3. In the Create New Neighbor screen, specify the IP and Remote AS. ClickOK. Repeat this step to add multiple
neighbors.4. Go to System Settings > All ADOMs.5. Double-click [ADOM_Name].6. In Central Management, clear the SD-WAN check box. ClickOK.7. Go to Device Manager > SD-WAN.8. Click Create New.9. In the Create New SD-WAN screen, select the FortiGate from the Device drop-down.The BGP Neighbors added in
the FortiGate (Device Manager) automatically appear under Neighbor.
FortiManager 6.4.0 Administration Guide 150Fortinet Inc.
Firewall Devices
10. Toggle the SD-WAN Status toON.11. Configure the following Advanced Options:
fail-alert-interfaces Select the port from the drop-down.
fail-detect Select enable or disable.
neighbor-hold-boot-time Specify in seconds.
neighbor-hold-down Select enable or disable.
neighbor-hold-down-time Specify in seconds.
12. ClickOK.
To configure BGP Neighbor for central management:
1. Go to Device Manager > [FortiGate] > Router > BGP.2. Under Neighbors, click Create New.3. In the Create New Neighbor screen, specify the IP and Remote AS. ClickOK. Repeat this step to add multiple
neighbors.4. Go to System Settings > All ADOMs.5. Double-click [ADOM_Name].6. In Central Management, select the SD-WAN check box. ClickOK.7. Go to Device Manager > Device & Groups.8. Click the FortiGate device to view the device database.9. Go to Device Manager > SD-WAN.10. Click Create New.
FortiManager 6.4.0 Administration Guide 151Fortinet Inc.

Firewall Devices
11. The Create NewWAN BGP Neighbor screen is shown:
12. Configure the following:
13. Name Enter the name of the WAN BGP neighbor.
Description Enter a description of the template.
Neighbor IP Enter an IP for the neighbor.
Role Select standalone, primary, or secondary.
Per-Device Mapping Switch per-device mapping to ON and click Create New. Configure thefollowing:
Mapped Device Enable/disable fail detection features for this interface.
Description Specify a description.
IP Specify the IP.
Role Select standalone, primary, or secondary.
14. ClickOK.
FortiExtender
FortiExtender is centrally managed from the Device Manager pane. When a FortiGate in the ADOM has managedFortiExtender devices, they are listed in an All FortiExtender group.
To view managed FortiExtender devices, go to Device Manager > Extender.
The following information is displayed:
Device Name The name of the FortiGate device that is managing the FortiExtender.
Serial Number The serial number of the FortiExtender.
Priority The FortiExtender priority, either Primary or Secondary.
FortiManager 6.4.0 Administration Guide 152Fortinet Inc.

Firewall Devices
Model The FortiExtender model.
Management Status The FortiExtender management status, either Authorized or Deauthorized.
Status The FortiExtender status, either Up or Down.
Network The FortiExtender network status and carrier name.
Current Usage The current data usage.
Last Month Usage The data usage for the last month.
Version The FortiExtender firmware version.
IP The FortiExtender IP address.
The right-click menu and toolbar options include:
Refresh Select a FortiExtender in the list, right-click, and select Refresh in the menu torefresh the information displayed.
Edit Select a FortiExtender in the list, right-click, and select Edit in the menu to edit theFortiExtender modem settings, PPP authentication, general, GSM/LTE, andCDMA settings.
Upgrade Select a FortiExtender in the list, right-click, and select Upgrade in the menu toupgrade the FortiExtender firmware.
Authorize Select a FortiExtender in the list, right-click, and select Authorize in the menu toauthorize the unit for management.
Deauthorize Select a FortiExtender in the list, right-click, and select Deauthorize in the menu todeauthorize the unit for management.
Restart Select a FortiExtender in the list, right-click, and select Restart in the menu torestart the unit.
Set Primary Select a FortiExtender in the list, right-click, and select Set Primary in the menu toset the unit as the primary device.
Status Select a FortiExtender in the list, right-click, and select Status in the menu to viewstatus information including system status, modem status, and data usage.
To edit a FortiExtender:
1. Go to Device Manager > Extender.2. Select a FortiExtender and click Edit in the toolbar, or right-click the FortiExtender device, and select Edit. The Edit
FortiExtender page opens.3. Configure the following settings, then clickOK to save the setting:
Modem Settings Configure the dial mode, redial limit, and quota limit.
PPP Authentication Configure the user name, password, and authentication protocol.
General Configure the usage cycle reset day, AT dial script, modem password, andenable/disable allowing network initiated updates to modem setting.
FortiManager 6.4.0 Administration Guide 153Fortinet Inc.

Firewall Devices
GSM / LTE Configure the access point name (APN), SIM PIN, and LTE multiple mode.
CDMA Configure the NAI, AAA shared secret, HA shared secret, primary HA,secondary HA, AAA SPI, and HA SPI.
FortiMeter
FortiMeter allows you turn FortiOS-VMs and FortiWebOS-VMs on and off as needed, paying only for the volume andconsumption of traffic that you use. These VMs are also sometimes called pay-as-you-go VMs.
You must meet the following requirements to use metered VMs:
l You must have a FortiMeter license.l The FortiMeter license must be linked with the FortiManager unit by using FortiCare.
FortiOS VMs
FortiManager supports the following types of licenses for FortiMeter:
l Prepaid: FortiOS VM usage is prepaid by purchasing points.l Postpaid: The FortiOS VM is billed monthly based on usage.
The license determines whether FortiMeter is prepaid or postpaid.
The VM deployment packages are included with firmware images on the Customer Service & Support site, and have thefollowing format: FOS_VMxx-vX-buildXXXX-Fortinet.out. In FortiManager, the VM will be listed as a FortiOS VM.
FortiManager also supports metering for FortiOS VM HA clusters.
FortiWeb VMs
FortiManager supports FortiWeb devices as logging devices. FortiWeb VMs are billed monthly based on usage.
The VM deployment packages are included with firmware images on the Customer Service & Support site, and have thefollowing format: FWB_OS1-vXxx-buildXXXX-FORTINET.out. In FortiManager, the VM will be listed as a FBV0X.
Overview
The following is an overview of how to use metered VMs:
1. Purchase a FortiMeter license. Contact your sales representative for more information.2. Go to FortiCare (https://support.fortinet.com/) and log into your account.
You can also access FortiCare from FortiManager:l From System Settings > Dashboard, in the License Information widget, click the Purchase icon in the VMMeterService field.
l From Device Manager > VMMeter, click the Purchase Points icon in the toolbar.3. Go to Asset > Manage/View Products, and locate the FortiMeter license.
FortiManager 6.4.0 Administration Guide 154Fortinet Inc.

Firewall Devices
4. Link the FortiMeter license with your FortiManager by using the Link Device option.You can only link FortiManager to one metering group at a time.
5. If you are prepaying (FortiOS VMs only), purchase a point package and add it to the FortiMeter license using theAdd Licenses option. See Points on page 155.
6. Ensure that the VM is authorized for central management by FortiManager. See Adding devices on page 37.7. Authorize the metered VMs in FortiManager. See Authorizing metered VMs on page 155.
If connectivity between the VM and FortiManager is lost, FortiManager will invalidate the VMinstance after fifteen days. If the VM reconnects before fifteen days have elapsed, it willautomatically synchronize with the FortiManager database.
Points
Points can be purchased in packages of 1000 or 10000 from the FortiMeter product information page on FortiCare usingthe Add Licenses button.
Points are used based on the type of service and the volume of traffic sent to FortiGuard.
Type Service Code Points
VOLUME (1TB) FW 4
VOLUME (1TB) FWURL 10
VOLUME (1TB) UTM 25
For prepaid FortiOS VMs, after the point balance has become negative, VMs can continue to be used for up to 15 daysbefore the account is frozen or more points are purchased to restore a positive point balance.
With a negative point balance, the FortiMeter status will show the number of days until it is frozen, or FREZ when it isalready frozen. FortiMeter will be unfrozen when a positive point balance is restored.
For FortiOS VM HA clusters, only the primary unit sends traffic to FortiMeter.
Authorizing metered VMs
You must authorize all metered VMs in FortiManager before you can use them.
Authorizing FortiOS VMs
FortiOS VMs must be authorized for central management by FortiManager before they can be authorized for metering.See Adding devices on page 37.
To authorize metered FortiOS VMs:
1. Ensure that the VM is authorized for central management by FortiManager. See Adding devices on page 37.2. Ensure you are in the correct ADOM.3. Go to Device Manager > VMMeter.
FortiManager 6.4.0 Administration Guide 155Fortinet Inc.

Firewall Devices
4. Select a device then click Authorize in the toolbar, right-click on a device then select Authorize, or double-click on adevice. The Authorize Device(s) dialog box opens.An unauthorized device can use firewall services for up to 48 hours.
5. Select the License Type:
Trial Maximum of two devices can have a trial license at any one time.No traffic data are sent to FortiGuard, so no points are used.Can be used for up to 30 days.
Regular Regular license.Points used based on the service level and volume of traffic going to FortiGuard.
6. Select the Services:
Firewall Firewall only. This option cannot be deselected.
IPS IPS servies.
Web Filter Web filtering services.
AntiVirus Antivirus services.
App Control Application control services.
Full UTM All services are selected.
7. ClickOK to authorize the device.
Authorizing FortiWeb VMs
FortiWeb VMs must be authorized for central management by FortiManager before they can be authorized for metering.See Authorizing devices on page 44.
To authorize metered FortiWeb VMs:
1. Ensure that the FortiWeb VM is authorized for central management by FortiManager. See Adding devices on page37.
2. In the FortiWeb ADOM, go to Device Manager > VMMeter.3. Select a device then click Authorize in the toolbar, right-click on a device then select Authorize, or double-click on a
device. The Authorize Device(s) dialog box opens.4. On the Authorize Device pane, confirm the devices name and serial number.
The License Type is Regular - points are used based on the volume of traffic. The Services - Security, Antivirus, IPReputation - cannot be deselected.
5. ClickOK to authorize the device.
Monitoring VMs
Go to Device Manager > VMMeter. For prepaid licenses (FortiOS VMs only), your total remaining point balance isshown in the toolbar. For postpaid licenses, the total points used and the billing period are shown.
You can also view details about the individual VMs, including: the device name and serial number, number of virtualCPUs, amount of RAM, service level, license status, volume of traffic used today, and more.
FortiManager 6.4.0 Administration Guide 156Fortinet Inc.

Firewall Devices
FortiGate chassis devices
Select FortiManager systems can work with the Shelf Manager to manage FortiGate 5050, 5060, 5140, and 5140Bchassis. The Shelf Manager runs on the Shelf Management Mezzanine hardware platform included with the FortiGate5050, 5060, 5140, and 5140B chassis. You can install up to five FortiGate 5000 series blades in the five slots of theFortiGate 5050 ATCA chassis and up to 14 FortiGate 5000 series blades in the 14 slots of the FortiGate 5140 ATCAchassis. For more information on FortiGate 5000 series including Chassis and Shelf manager, see the FortinetDocument Library.
You need to enable chassis management before you can work with the Shelf Manager through the FortiManagersystem.
To enable chassis management:
1. Go to System Settings > Advanced > Advanced Settings. See Advanced Settings on page 553 for more information.2. Under Advanced Settings, select Chassis Management.3. Set the Chassis Update Interval, from 4 to 1440 minutes.4. Click Apply.
To add a chassis:
1. Go to Device Manager > Device & Groups,2. Right-click in the tree menu and select Chassis > Add. The Create Chassis window opens.3. Complete the following fields, then clickOK:
Name Type a unique name for the chassis.
Description Optionally, type any comments or notes about this chassis.
Chassis Type Select the chassis type: Chassis 5050, 5060, 5140 or 5140B.
IP Address Type the IP address of the Shelf Manager running on the chassis.
Authentication Type Select Anonymous, MD5, or Password from the dropdown list.
Admin User Type the administrator user name.
Password Type the administrator password.
Chassis Slot Assignment You cannot assign FortiGate-5000 series blades to the slot until after thechassis has been added.
To edit a chassis and assign FortiGate 5000 series blade to the slots:
1. Go to Device Manager > Device & Groups.2. Right-click the chassis, and select Edit.3. Modify the fields, except Chassis Type.4. For Chassis Slot Assignment, from the dropdown list of a slot, select a FortiGate 5000 series blade to assign it to the
FortiManager 6.4.0 Administration Guide 157Fortinet Inc.

Firewall Devices
slot. You can select a FortiGate, FortiCarrier, or FortiSwitch unit.
You can only assign FortiSwitch units to slot 1 and 2.
5. ClickOK.
Viewing chassis dashboard
You can select a chassis from the chassis list in the content pane, and view the status of the FortiGate blades in theslots, power entry module (PEM), fan tray (FortiGate-5140 only), Shelf Manager, and shelf alarm panel (SAP).
Viewing the status of the FortiGate blades
In the Device Manager tab, select the Blades under the chassis whose blade information you would like to view.
The following is displayed:
Refresh Select to update the current page.If there are no entries, Refresh is not displayed.
Slot # The slot number in the chassis.l The FortiGate 5050 chassis contains five slots numbered 1 to 5.l The FortiGate 5060 chassis contains six slots numbered 1 to 6.l The FortiGate 5140 and 5140B chassis contains fourteen slots numbered 1to 14.
Extension Card If there is an extension card installed in the blade, this column displays an arrowyou can select to expand the display. The expanded display shows details aboutthe extension card as well as the blade.
Slot Info Indicates whether the slot contains a node card (for example, a FortiGate 5001SXblade) or a switch card (for example, a FortiSwitch 5003 blade) or is empty.
State Indicates whether the card in the slot is installed or running, or if the slot is empty.
Temperature Sensors Indicates if the temperature sensors for the blade in each slot are detecting atemperature within an acceptable range.l OK: All monitored temperatures are within acceptable ranges.l Critical: A monitored temperature is too high (usually about 75°C or higher) ortoo low (below 10°C).
Current Sensors Indicates if the current sensors for the blade in each slot are detecting a currentwithin an acceptable range.l OK: All monitored currents are within acceptable ranges.l Critical: A monitored current is too high or too low.
Voltage Sensors Indicates if the voltage sensors for the blade in each slot are detecting a voltagewithin an acceptable range.l OK: All monitored voltages are within acceptable ranges.
FortiManager 6.4.0 Administration Guide 158Fortinet Inc.

Firewall Devices
l Critical: A monitored voltage is too high or too low.
Power Allocated Indicates the amount of power allocated to each blade in the slot.
Action Select Activate to turn the state of a blade from Installed into Running.Select Deactivate to turn the state of a blade from Running into Installed.
Edit Select to view the detailed information on the voltage and temperature of a slot,including sensors, status, and state. You can also edit some voltage andtemperature values.
Update Select to update the slot.
To edit voltage and temperature values:
1. Go to [chassis name] > Blades and, in the content pane, select the Edit icon of a slot.The detailed information on the voltage and temperature of the slot including sensors, status, and state is displayed.
2. Select the Edit icon of a voltage or temperature sensor.3. For a voltage sensor, you can modify the Upper Non-critical, Upper Critical, Lower Non-critical, and Lower Critical
values.4. For a temperature sensor, you can modify the Upper Non-critical and Upper Critical values.5. SelectOK.
Viewing the status of the power entry modules
You can view the status of the PEMs by going to [chassis name] > PEM. The FortiGate 5140 chassis displays more PEMinformation than the FortiGate 5050.
The following is displayed:
Refresh Select to update the current page.
PEM The order numbers of the PEM in the chassis.
Presence Indicates whether the PEM is present or absent.
Temperature The temperature of the PEM.
Temperature State Indicates whether the temperature of the PEM is in the acceptable range.l OK: The temperature is within acceptable range.
Threshold PEM temperature thresholds.
Feed -48V Number of PEM fuses. There are four pairs per PEM.
Status PEM fuse status: present or absent.
Power Feed The power feed for each pair of fuses.
Maximum External Current Maximum external current for each pair of fuses.
Maximum Internal Current Maximum internal current for each pair of fuses.
Minimum Voltage Minimum voltage for each pair of fuses.
FortiManager 6.4.0 Administration Guide 159Fortinet Inc.

Firewall Devices
Power Available Available power for each pair of fuses.
Power Allocated Power allocated to each pair of fuses.
Used By The slot that uses the power.
Viewing fan tray status (FG-5140 and FG-5140B chassis only)
Go to [chassis name] > Fan Tray to view the chassis fan tray status.
The following is displayed:
Refresh Select to update the current page.
Thresholds Displays the fan tray thresholds.
Fan Tray The order numbers of the fan trays in the chassis.
Model The fan tray model.
24V Bus Status of the 24V Bus: present or absent.
-48V Bus A Status of the -48V Bus A: present or absent.
-48V Bus B Status of the -48V Bus B: present or absent.
Power Allocated Power allocated to each fan tray.
Fans Fans in each fan tray.
Status The fan status.l OK: It is working normally.
Speed The fan speed.
Viewing shelf manager status
Go to [chassis name] > Shelf Manager to view the shelf manager status.
The following is displayed:
Refresh Select to update the current page.
Shelf Manager The order numbers of the shelf managers in the chassis.
Model The shelf manager model.
State The operation status of the shelf manager.
Temperature The temperature of the shelf manager.
-48V Bus A Status of the -48V Bus A: present or absent.
-48V Bus B Status of the -48V Bus B: present or absent.
Power Allocated Power allocated to each shelf manager.
FortiManager 6.4.0 Administration Guide 160Fortinet Inc.

Firewall Devices
Voltage Sensors Lists the voltage sensors for the shelf manager.
State Indicates if the voltage sensors for the shelf manager are detecting a voltagewithin an acceptable range.l OK: All monitored voltages are within acceptable ranges.l Below lower critical: A monitored voltage is too low.
Voltage Voltage value for a voltage sensor.
Edit Select to modify the thresholds of a voltage sensor.
Viewing shelf alarm panel (SAP) status
You can view the shelf alarm panel (SAP) status for a chassis. The shelf alarm panel helps you monitor the temperatureand state of various sensors in the chassis.
Go to [chassis name] > SAP to view the chassis SAP status.
The following is displayed:
Presence Indicates if the SAP is present or absent.
Telco Alarm Telco form-c relay connections for minor, major and critical power faults providedby the external dry relay Telco alarm interface (48VDC).
Air Filter Indicates if the air filter is present or absent.
Model The SAPmodel.
State The operation status of the shelf manager.
Power Allocated Power allocated to the SAP.
Temperature Sensors The temperature sensors of the SAP
Temperature The temperature of the SAP read by each sensor.
State Indicates if the temperature sensors for the SAP are detecting a temperaturebelow the set threshold.
Edit Select to modify the thresholds of a temperature sensor.
FortiManager 6.4.0 Administration Guide 161Fortinet Inc.

Firewall Policy & Objects
The Policy & Objects pane enables you to centrally manage and configure the devices that are managed by theFortiManager unit. This includes the basic network settings to connect the device to the corporate network, antivirusdefinitions, intrusion protection signatures, access rules, and managing and updating firmware for the devices.
All changes related to policies and objects should be made on the FortiManager device, and not on the manageddevices.
If the administrator account you logged on with does not have the appropriate permissions,you will not be able to edit or delete settings, or apply any changes. Instead you are limited tobrowsing. To modify these settings, see Administrator profiles on page 572.
If Display Policy & Objects in Dual Pane is enabled, the Policy Packages andObjectConfigurations tabs will be shown on the same pane, withObject Configurations on the lowerhalf of the screen. See Display options on page 166.
If workspace is enabled, the ADOMmust be locked before changes can be made. SeeLocking an ADOM on page 521.If workflow is enabled, the ADOMmust be locked and a session must be started beforechanges can be made. SeeWorkflow mode on page 473.
The following tabs are available on the Policy & Objects pane by default:
Policy Packages Click to display the Policy Packages pane.
Object Configurations Click to display theObject Configurations pane.
If Display Policy & Objects in Dual Pane is enabled, both tabs will be shown on the same pane.
The following options are available on the Policy Packages tab:
FortiManager 6.4.0 Administration Guide 162Fortinet Inc.

Firewall Policy & Objects
Policy Package Click to access the policy package menu. The menu options are the same as theright-click menu options.
Install Wizard Click to access the Install menu. You can start the Install Wizard where you caninstall policy packages and device settings. You can also re-install a policy.
ADOM Revisions Click to create, edit, delete, restore, lock, and unlock ADOMRevisions.
Tools Click to select one of the following tools from the menu: Display Options, FindUnused Objects, or Find Duplicate Objects.
Collapse/Expand All Collapse or expand all the categories in the policy list.
Object Selector Open the object selector pane on the bottom or right side of the content pane.This option is not available when dual pane is enabled.
Search The tree menu can be searched and sorted using the search field and sortingbutton at the top of the menu.
The following options are available on theObjects Configurations tab:
ADOM Revisions Click to create, edit, delete, restore, lock, and unlock ADOMRevisions.
Tools Click to select one of the following tools from the menu: Display Options, FindUnused Objects, or Find Duplicate Objects.
If workspace is enabled, you can select to lock and edit the policy package in the right-click menu. You do not need tolock the ADOM first. The policy package lock status is displayed in the toolbar.
The following options are available:
Lock | Unlock Select to lock or unlock the ADOM.
Sessions Click to display the sessions list where you can save, submit, or discard changesmade during the session.
About policies
FortiManager provides administrators the ability to customize policies within their organization as they see fit. Typically,administrators may want to customize access and policies based on factors such as geography, specific securityrequirements, or legal requirements.
Within a single ADOM, administrators can create multiple policy packages. FortiManager provides you the ability tocustomize policy packages per device or VDOMwithin a specific ADOM, or to apply a single policy package for alldevices within an ADOM. These policy packages can be targeted at a single device, multiple devices, all devices, asingle VDOM, multiple VDOMs, or all devices within a single ADOM. By defining the scope of a policy package, anadministrator can modify or edit the policies within that package and keep other policy packages unchanged.
FortiManager can help simplify provisioning of new devices, ADOMs, or VDOMs by allowing you to copy or cloneexisting policy packages.
FortiManager 6.4.0 Administration Guide 163Fortinet Inc.

Firewall Policy & Objects
Policy theory
Security policies control all traffic attempting to pass through a unit between interfaces, zones, and VLAN subinterfaces.
Security policies are instructions that units use to decide connection acceptance and packet processing for trafficattempting to pass through. When the firewall receives a connection packet, it analyzes the packet’s source address,destination address, and service (by port number), and attempts to locate a security policy matching the packet.
Security policies can contain many instructions for the unit to follow when it receives matching packets. Someinstructions are required, such as whether to drop or accept and process the packets, while other instructions, such aslogging and authentication, are optional.
Policy instructions may include Network Address Translation (NAT), or Port Address Translation (PAT), or they can usevirtual IPs or IP pools to translate source and destination IP addresses and port numbers.
Policy instructions may also include Security Profiles, which can specify application-layer inspection and other protocol-specific protection and logging, as well as IPS inspection at the transport layer.
You configure security policies to define which sessions will match the policy and what actions the device will performwith packets frommatching sessions.
Sessions are matched to a security policy by considering these features of both the packet and policy:
l Policy Type and Subtypel Incoming Interfacel Source Addressl Outgoing Interfacel Destination Addressl Schedule and time of the session’s initiationl Service and the packet’s port numbers.
If the initial packet matches the security policy, the device performs the configured action and any other configuredoptions on all packets in the session.
Packet handling actions can be ACCEPT, DENY, IPSEC, or SSL-VPN.
l ACCEPT policy actions permit communication sessions, and may optionally include other packet processinginstructions, such as requiring authentication to use the policy, or specifying one or more Security Profiles to applyfeatures such as virus scanning to packets in the session. An ACCEPT policy can also apply interface-mode IPsecVPN traffic if either the selected source or destination interface is an IPsec virtual interface.
l DENY policy actions block communication sessions, and you can optionally log the denied traffic. If no securitypolicy matches the traffic, the packets are dropped, therefore it is not required to configure a DENY security policy inthe last position to block the unauthorized traffic. A DENY security policy is needed when it is required to log thedenied traffic, also called “violation traffic”.
l IPSEC and SSL VPN policy actions apply a tunnel mode IPsec VPN or SSL VPN tunnel, respectively, and mayoptionally apply NAT and allow traffic for one or both directions. If permitted by the firewall encryption policy, atunnel may be initiated automatically whenever a packet matching the policy arrives on the specified networkinterface, destined for the local private network.
Create security policies based on traffic flow. For example, in a policy for POP3, where the email server is outside of theinternal network, traffic should be from an internal interface to an external interface rather than the other way around. It istypically the user on the network requesting email content from the email server and thus the originator of the openconnection is on the internal port, not the external one of the email server. This is also important to remember whenviewing log messages, as the source and destination of the packets can seem backwards.
FortiManager 6.4.0 Administration Guide 164Fortinet Inc.

Firewall Policy & Objects
Global policy packages
Global policies and objects function in a similar fashion to local policies and objects, but are applied universally to allADOMs and VDOMs inside your FortiManager installation. This allows users in a carrier, service provider, or largeenterprise to support complex installations that may require their customers to pass traffic through their own network.
For example, a carrier or host may allow customers to transit traffic through their network, but do not want their customerto have the ability to access the carrier’s internal network or resources. Creating global policy header and footerpackages to effectively surround a customer’s policy packages can help maintain security.
Global policy packages must be explicitly assigned to specific ADOMs to be used. When configuring global policies, ablock of space in the policy table is reserved for Local Domain Policies. All of the policies in an ADOM’s policy table areinserted into this block when the global policy is assigned to an ADOM.
Display options for policies and objects can be configured in Policy & Objects > Tools > Display Options.
Global policies and objects are not supported on all FortiManager platforms. Please review theproducts’ data sheets to determine support.
A global policy license is not required to use global policy packages.
Policy workflow
An administrator will typically carry out two main functions with their devices through FortiManager: provisioning newdevices or VDOMs on the network and managing the day-to-day operations of managed devices and VDOMs.
Provisioning new devices
There are multiple steps to provision a new device or VDOM to be managed by the FortiManager unit:
1. In the Device Manager pane, create a new VDOM or add a new device.2. Assign a system template to the provisioned device (optional).3. In the Policy & Objects pane, configure any dynamic objects you wish to assign to the new VDOM or device.4. Determine how a policy will be defined for the new device: does the new device or VDOM have a new policy
package unique to itself, or will the device or VDOM use a package that is implemented elsewhere?5. Run the Install Wizard to install any objects and policies for the new device, or create a new policy package.6. If the new device uses an existing policy package, modify the installation targets of that package to include the new
device.
FortiManager 6.4.0 Administration Guide 165Fortinet Inc.

Firewall Policy & Objects
Day-to-day management of devices
An administrator will often have to modify various objects for the devices they are responsible for managing. A typical setof tasks to manage an already provisioned device will include:
1. Adding, deleting, or editing various objects, such as firewall information, security profiles, user access rights,antivirus signatures, etc.
2. Adding, deleting, or editing all of the policy packages or individual policies within a policy package. This can includechanging the order of operation, adding new policies, or modifying information or access permissions in the policypackage.
3. Installing updates to devices.
Display options
The policy and objects that are displayed on the Policy & Objects pane can be customized, and the Policy Packages andObject Configurations tabs can be combined onto a single pane.
To adjust the policies and objects that are displayed, go to Tools > Display Options.
You can turn the options on or off (visible or hidden). To turn on an option, select the checkbox beside the option name.To turn off an option, clear the checkbox beside the option name. You can turn on all of the options in a category byselecting the checkbox beside the category name. For example, you can turn on all firewall objects by selecting thecheckbox beside Firewall Objects. You can also turn on all of the categories by clicking the Check All button at thebottom of the window.
Various display options are enabled by default and cannot be turned off.
Once turned on, you can configure the corresponding options from the appropriate location on the Policy & Objects >Object Configurations pane.
Reset all of the options by clicking the Reset to Default button at the bottom of the screen, or reset only the options in acategory by clicking the Reset to Default button beside the category name.
To convert the module to a single pane:
1. Go to System Settings > Advanced > Advanced Settings.2. Enable Display Policy & Objects in Dual Pane.3. Click Apply.
The Policy & Objects pane will now be a single pane that includes both tabs.
FortiManager 6.4.0 Administration Guide 166Fortinet Inc.

Firewall Policy & Objects
Managing policy packages
Policy packages can be created and edited, and then assigned to specific devices in the ADOM. Folders can be createdfor the policy packages to aid in the organization and management of the packages.
Not all policy and object options are enabled by default. To configure the enabled options, goto Policy & Objects > Tools > Display Options and select your required options.
All of the options available from the Policy Packagesmenu can also be accessed by right-clicking anywhere in the policy tree menu.
FortiManager shows the last opened Policy Package for easy navigation. After opening aPolicy Package, log off and log on in the same browser. Navigate to Policy and Objects in thesame ADOM. The last opened Policy Package is shown.
Create new policy packages
To create a new global policy package:
1. Ensure that you are in theGlobal ADOM.2. Go to Policy & Objects > Policy Packages.3. From the Policy Packagemenu select New Package or right-click in the tree menu and select New Package. The
Create New Policy Package window opens.
FortiManager 6.4.0 Administration Guide 167Fortinet Inc.

Firewall Policy & Objects
4. Enter a name for the new global policy package.5. (Optional) Click the In Folder button to select a folder.6. (Optional) Select the Central NAT checkbox to enable Central SNAT and Central DNAT policy types.7. ClickOK to add the policy package.
To create a new policy package:
1. Ensure that you are in the correct ADOM.2. Go to Policy & Objects > Policy Packages.3. From the Policy Packagemenu select New Package or right-click in the tree menu and select New Package. The
Create New Policy Package window opens.
4. Configure the following details, then clickOK to create the policy package.
Name Enter a name for the new policy package.
In Folder Optionally, click the In Folder button to select a folder for the package.
Central NAT Select the Central NAT check box to enable Central SNAT and Central DNATpolicy types.
NGFW Mode Select the NGFWmode, Profile-based (default) or Policy-based.
SSL/SSH Inspection Select an SSL/SSH inspection type from the dropdown list.This option is only available for version 5.6 and later ADOMs when NGFWMode is Policy-based.
Consolidated Firewall Mode Toggle the Consolidated Firewall Mode button toON to create a consolidatedIPv4 and IPv6 policy. By default, the button is turned toOFF.
The Consolidated Firewall Mode option is not available in the Global Database.
After turning the Consolidated Firewall Mode option toON, and creating a consolidated IPv4and IPv6 policy, turning the Consolidated Firewall Mode to OFF will make the consolidatedIPv4 and IPv6 policy inaccessible. To access the consolidated IPv4 and IPv6 policy, you mustkeep the Consolidated Firewall Mode optionON.
FortiManager 6.4.0 Administration Guide 168Fortinet Inc.

Firewall Policy & Objects
Create new policy package folders
You can create new policy package folders within existing folders to help you better organize your policy packages.
To create a new policy package folder:
1. Ensure you are in the correct ADOM.2. Go to Policy & Objects > Policy Packages.3. From the Policy Packagemenu select New Folder or right-click in the tree menu and select New Folder. The Create
New Policy Folder window opens.4. Enter a name for the new policy folder.5. (Optional) Click the In Folder button to nest the new folder inside another folder.6. ClickOK. The new policy folder is displayed in the tree menu.
Edit a policy package or folder
Policy packages and policy package folders can be edited and moved as required.
To edit a policy package or folder:
1. Ensure you are in the correct ADOM.2. Go to Policy & Objects > Policy Packages.3. Select the package or folder in the tree menu then select Policy Package > Edit from the toolbar, or right-click on the
package or folder and select Edit from the menu.4. Edit the settings as required, then clickOK to apply your changes.
Deselecting Central NAT does not delete Central SNAT or Central DNAT entries.
To move a policy package or folder:
1. Ensure you are in the correct ADOM.2. Go to Policy & Objects > Policy Packages.3. Select the package or folder in the tree menu then select Policy Package > Move from the toolbar, or right-click on
the package or folder and selectMove from the menu.4. Change the location of the package or folder as required, then clickOK.
Clone a policy package
To clone a policy package:
1. Ensure you are in the correct ADOM.2. Go to Policy & Objects > Policy Packages.3. Select the package or folder in the tree then select Policy Package > Clone Package from the toolbar, or right-click
on the package or folder and select Clone Package from the menu.
FortiManager 6.4.0 Administration Guide 169Fortinet Inc.
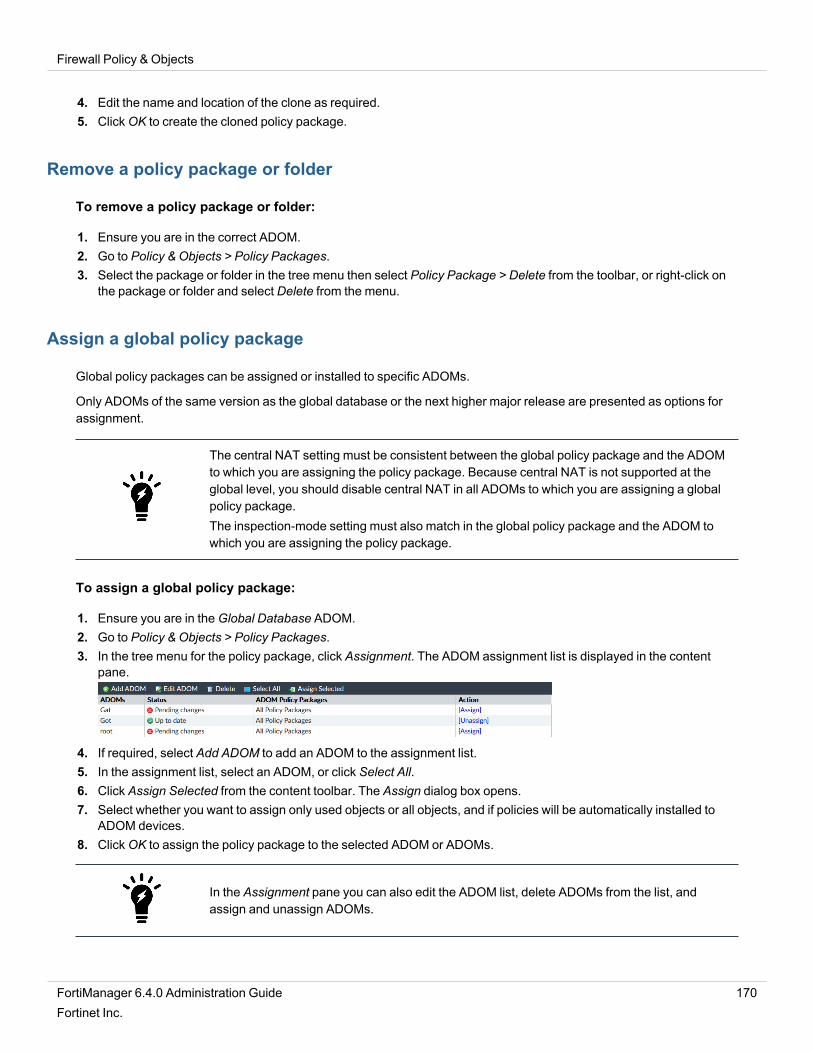
Firewall Policy & Objects
4. Edit the name and location of the clone as required.5. ClickOK to create the cloned policy package.
Remove a policy package or folder
To remove a policy package or folder:
1. Ensure you are in the correct ADOM.2. Go to Policy & Objects > Policy Packages.3. Select the package or folder in the tree menu then select Policy Package > Delete from the toolbar, or right-click on
the package or folder and select Delete from the menu.
Assign a global policy package
Global policy packages can be assigned or installed to specific ADOMs.
Only ADOMs of the same version as the global database or the next higher major release are presented as options forassignment.
The central NAT setting must be consistent between the global policy package and the ADOMto which you are assigning the policy package. Because central NAT is not supported at theglobal level, you should disable central NAT in all ADOMs to which you are assigning a globalpolicy package.The inspection-mode setting must also match in the global policy package and the ADOM towhich you are assigning the policy package.
To assign a global policy package:
1. Ensure you are in theGlobal Database ADOM.2. Go to Policy & Objects > Policy Packages.3. In the tree menu for the policy package, click Assignment. The ADOM assignment list is displayed in the content
pane.
4. If required, select Add ADOM to add an ADOM to the assignment list.5. In the assignment list, select an ADOM, or click Select All.6. Click Assign Selected from the content toolbar. The Assign dialog box opens.7. Select whether you want to assign only used objects or all objects, and if policies will be automatically installed to
ADOM devices.8. ClickOK to assign the policy package to the selected ADOM or ADOMs.
In the Assignment pane you can also edit the ADOM list, delete ADOMs from the list, andassign and unassign ADOMs.
FortiManager 6.4.0 Administration Guide 170Fortinet Inc.

Firewall Policy & Objects
Install a policy package
When installing a policy package, objects that are referenced in the policy will be installed to the target device. Default orper-device mapping must exist or the installation will fail.
Some objects that are not directly referenced in the policy will also be installed to the targetdevice, such as FSSO polling objects, address and profile groups, and CA certificates.Some objects that are not referenced will be removed from the FortiGate. This may beparticularly noticeable when installing a policy package for the first time after adding a deviceto FortiManager.If you anticipate needing those objects in the future, make sure those objects are present inPolicy & Objects before proceeding with the installation. To ensure that those objects arepresent in Policy & Objects you can use the Add ALL Objects option when importing a policy.
Policies within a policy package can be configured to install only on specified target devices.See Install policies only to specific devices on page 184.
To install a policy package to a target device:
1. Ensure you are in the ADOM that contains the policy package.2. Go to Policy & Objects > Policy Packages.3. Select a policy package and from the Installmenu or right-click menu select Install Wizard. The Install Wizard
opens.4. Follow the steps in the install wizard to install the policy package. You can select to install policy package and
device settings or install the interface policy only.For more information on the install wizard, see Using the Install Wizard to install policy packages and devicesettings on page 67. For more information on editing the installation targets, see Policy package installation targetson page 174.
Reinstall a policy package
You can reinstall a policy package in Policy & Objects or Device Manager.
To reinstall a policy package:
1. If using ADOMs, ensure that you are in the correct ADOM.2. Perform one of the following actions:
l Go to Policy & Objects > Policy Packages, and select a policy package.l Go to Device Manager, and select devices or VDOMs. You can select more than one device at a time.
3. In the toolbar, select Install > Re-install Policy.After data is gathered, the Re-install Policy Package window is displayed.
FortiManager 6.4.0 Administration Guide 171Fortinet Inc.

Firewall Policy & Objects
4. (Optional) View policy consistency check results (see Perform a policy consistency check on page 176).a. Click the Policy Check Result button.
b. Click the Close button to close the page and return to the wizard.5. (Optional) View a preview of the installation. You can preview multiple devices at the same.
a. Click the Install Preview button.After data is gathered, the Install Preview page is displayed.
FortiManager 6.4.0 Administration Guide 172Fortinet Inc.

Firewall Policy & Objects
b. Click Next Page or Previous page to view multiple devicesc. Click the Download button to download a text file of the preview information.d. Click the Close button to close the page and return to the wizard.
6. (Optional) View the difference between the current policy package and the policy in the device.a. Click the Policy Package Diff button.
After data is gathered, the Policy Package Diff page is displayed.
b. Click the Details links to view details about the changes to the policy, specific policies, and policy objects.c. Click Close to close the page and return to the wizard.
7. Click Next.8. Click Install.
The policy package is reinstalled to the target devices.
Schedule a policy package install
In FortiManager you can create, edit, and delete install schedules for policy packages. The Schedule Installmenu optionhas been added to the Install wizard when selecting to install policy package and device settings. You can specify thedate and time to install the latest policy package changes.
Select the clock icon which is displayed beside the policy package name to create an install schedule. Select this icon to
FortiManager 6.4.0 Administration Guide 173Fortinet Inc.

Firewall Policy & Objects
edit or cancel the schedule. When a scheduled install has been configured and is active, hover the mouse over the iconto view the scheduled date and time.
To schedule the install of a policy package to a target device:
1. Ensure you are in the ADOM that contains the policy package.2. Go to Policy & Objects > Policy Packages.3. From the Installmenu, select Install Wizard. The Install Wizard opens.4. Select Schedule Install, and set the install schedule date and time.5. Select Next. In the device selection screen, edit the installation targets as required.6. Select Next. In the interface validation screen, edit the interface mapping as required.7. Select Schedule Install to continue to the policy and object validation screen. In the ready to install screen you can
copy the log and download the preview text file.
To edit or cancel an install schedule:
1. Ensure you are in the ADOM that contains the policy package.2. Go to Policy & Objects > Policy Packages.3. Click the clock icon next to the policy package name in the Policy Package tree. The Edit Install Schedule dialog box
is displayed.4. Select Cancel Schedule to cancel the install schedule, then selectOK in the confirmation dialog box to cancel the
schedule. Otherwise, edit the install schedule as required and selectOK to save your changes.
Export a policy package
You can export a policy package as a Microsoft Excel or CSV file.
To export a policy package:
1. Ensure you are in the correct ADOM.2. Go to Policy & Objects > Policy Packages.3. Select a policy package or folder then, from the Policy Packagemenu, select Export to Excel or Export to CSV.
The policy package is downloaded to your management computer.
Policy package installation targets
The Installation Targets pane allows you to view the installation target, config status, policy package status, andschedule install status, as well as edit installation targets for policy package installs.
To view installation targets, go to Policy & Objects > Policy Packages. In the tree menu for the policy package, selectInstallation Targets.
The following information is displayed:
Installation Target The installation target and connection status.
Config Status See the table below for config status details.
Policy Package Status See the table below for policy package status details.
FortiManager 6.4.0 Administration Guide 174Fortinet Inc.

Firewall Policy & Objects
The following table identifies the different available config statuses.
Config Status Icon Description
Synchronized Green check Configurations are synchronizedbetween FortiManager and themanaged device.
Modified Yellow triangle Configurations are modified onFortiManager and not synchronizedbetween FortiManager and themanaged device.
Auto-update Green check Configurations modified on themanaged device are auto synced toFortiManager.
Modified (recent auto-updated)
Yellow triangle Configurations are modified onFortiManager and configurationsmodified on the managed device areauto synced to FortiManager.
Out of Sync Red X Configurations are modified on themanaged device and not synced toFortiManager.
Conflict Red X When one of the following happens:l Install failedl Configurations are modified onboth FortiManager and themanaged device, and not autosynced to FortiManager.
Unknown Gray question mark When one of the following happens:l Connection goes downl No revision is generated, likeadded model device
The following table identifies the different available policy package statuses.
Policy Package Status Icon Description
Imported Green check Policies and objects are imported intoFortiManager.
Synchronized Green check Policies and objects are synchronizedbetween FortiManager and themanaged device.
Modified Yellow triangle Policies or objects are modified onFortiManager.
Out of Sync Red X Policies or objects are modified on themanaged device.
FortiManager 6.4.0 Administration Guide 175Fortinet Inc.

Firewall Policy & Objects
Policy Package Status Icon Description
Unknown with policy packagename
Gray question mark Configurations of the managed deviceare retrieved on FortiManager afterbeing imported/installed.
Never Installed Yellow triangle No policy package is imported orinstalled.
When importing a device with agentless FSSO configured (that is, the device polls the ADservers), the status of all policy packages that reference user fsso-polling isModified. This isbecause FortiManager sends all fsso-polling objects to all devices that are using agentlessFSSO.
The following options are available:
Add Select to add installation targets (device/group) for the policy package selected.Select the add icon beside Device/Group to select devices.
Delete Select to delete the selected entries from the installation target for the policypackage selected.
Install Select an entry in the table and, from the Installmenu, select Install Wizard or Re-install Policy.
Search Use the search field to search installation targets. Entering text in the search fieldwill highlight matches.
Perform a policy consistency check
The policy check tool allows you to check all policy packages within an ADOM to ensure consistency and eliminateconflicts that may prevent your devices from passing traffic. This allows you to optimize your policy sets and potentiallyreduce the size of your databases.
The check will verify:
l Object duplication: two objects that have identical definitionsl Object shadowing: a higher priority object completely encompasses another object of the same typel Object overlap: one object partially overlaps another object of the same typel Object orphaning: an object has been defined but has not been used anywhere.
The policy check uses an algorithm to evaluate policy objects, based on the following attributes:
l The source and destination interface policy objectsl The source and destination address policy objectsl The service and schedule policy objects.
A policy consistency check can be automatically performed during every install. When doingthe install, only modified or added policies are checked, decreasing the performance impactwhen compared to a full consistency check.This function can be enabled when editing the ADOM (see Editing an ADOM on page 518).
FortiManager 6.4.0 Administration Guide 176Fortinet Inc.

Firewall Policy & Objects
To perform a policy check:
1. Ensure you are in the correct ADOM.2. Go to Policy & Objects > Policy Packages.3. Select a policy package or folder, and from the Policy Packagemenu, select Policy Check. The Policy Consistency
Check dialog box opens.4. To perform a new consistency check, select Perform Policy Consistency Check, then clickOK.
A policy consistency check is performed, and the results screen is shown.
To view the results of the last policy consistency check:
1. Select the ADOM for which you performed a consistency check.2. Go to Policy & Objects > Policy Packages.3. Select a policy package or folder, and from the Policy Packagemenu, select Policy Check. The Policy Consistency
Check dialog box opens.4. To view the results of the most recent consistency check, select View Last Policy Consistency Check Result, then
clickOK.The Policy Consistency Check window opens, showing the results of the last policy consistency check.
View logs related to a policy rule
After you add a FortiAnalyzer device to FortiManager by using the Add FortiAnalyzer wizard, you can view the logs that itreceives. In the Policy & Objects pane, you can view logs related to the UUID for a policy rule. You can also use theUUID to search related policy rules.
See also Adding FortiAnalyzer devices on page 50.
FortiManager 6.4.0 Administration Guide 177Fortinet Inc.

Firewall Policy & Objects
To view logs related to a policy rule:
1. Ensure you are in the correct ADOM.2. Go to Policy & Objects > Policy Packages.3. From the Column Settingsmenu in the toolbar, select UUID.
The UUID column is displayed.4. Select a policy package.5. In the content pane, right click a number in the UUID column, and select View Log.
The View Log by UUID: <UUID> window is displayed and lists all of the logs associated with the policy ID.
Find and replace objects
You can find and replace objects used in multiple policies and policy packages. Some objects can be replaced withmultiple objects.
To find and replace objects:
1. If using ADOMs, ensure that you are in the correct ADOM.2. Go to Policy & Objects > Policy Packages.3. Select a policy package, and then select a policy.
Details for the policy are displayed in the content pane.4. In the content pane, right-click an object, and select Find and Replace.
All policies in all policy packages are searched, and all occurrences of the found object are displayed in the Find andReplace dialog box.
5. Select the checkbox for the entries that include the object you want to replace.6. In the Replace with box, select one or more objects to use instead.7. Click Replace.
The objects are replaced, and the results are displayed.8. (Optional) Click Export to PDF to download a PDF summary of what objects were replaced.
FortiManager 6.4.0 Administration Guide 178Fortinet Inc.

Firewall Policy & Objects
Managing policies
Policies in policy packages can be created and managed by selecting an ADOM, and then selecting the policy packagewhose policies you are configuring. For some policy types, sections can be added to the policy list to help organize yourpolicies, and the policies can be listed in sequence, or by interface pairs.
On the Policy & Objects > Policy Packages pane, the tree menu lists the policy packages and the policies in each policypackage. The policies that are displayed for each policy package are controlled by the display options. See Displayoptions on page 166 for more information.
You can configure the following policies for a policy package:
IP policiesVirtual wire pair policyNAT policiesProxy policy
Central SNATCentral DNATDoS policiesInterface policies
Multicast policyLocal in policiesTraffic shaping policy
Various options are also available from column specific right-click menus, for more information see Column options onpage 180.
If workspace or workflow is enabled, the ADOMmust be locked before changes can be made.See Locking an ADOM on page 521.
Not all policy and object options are enabled by default. To configure the enabled options, fromthe Toolsmenu, select Display Options.
Section view will be disabled if one or more policies are using the Any interface, or if one ormore policies are configured with multiple source or destination interfaces.
FortiManager 6.4.0 Administration Guide 179Fortinet Inc.

Firewall Policy & Objects
Column options
The visible columns can be adjusted, where applicable, using the Column Settingsmenu in the content pane toolbar.The columns and columns filters available are dependent on the policy and the ADOM firmware version.
Click and drag an applicable column to move it to another location in the table.
Policy search and filter
Go to Policy & Objects > Policy Packages, and use the search box to search or filter policies for matching rules orobjects.
The default Simple Search will highlight text that matches the string entered in the search field.
To add column filters:
1. Select Column Filter from the search field dropdown menu.2. Do either of the following:
a. Right-click on a specific value in any column and select Add Filter (equals or not equals) from the menu.ora. Click Add Filter, then select a column heading from the list.b. Select from the available values in the provided list. SelectOr to add multiple values, or select Not to remove
any policies that contain the selected value from the results.Multiple filters can be added.
3. ClickGo to filter the list.
Policy hit count
You can use FortiManager to view FortiGate policy hit counters. You must enable policy hit counts before you can viewthe information.
In FortiManager, the policy hit counts are aggregated across all managed FortiGate units for the policy.
The hit count is collected frommanaged FortiGate units every 300 seconds (5 minutes) by default. You can configure thefrequency by using the config system global command with the hitcount_interval variable and thehitcount_concurrent variable. For more information, see the FortiManager CLI Reference available on the FortinetDocument Library.
When the policy hit counter is reset on the FortiGate, FortiManager subtracts the amount from its hit counters too.
The hit count information is excluded from the FortiManager event log, but it's included in the debug log fortroubleshooting purposes.
To enable policy hits:
1. Go to System Settings > Advanced Settings.2. Beside Policy Hit Count, select Enable.
FortiManager 6.4.0 Administration Guide 180Fortinet Inc.

Firewall Policy & Objects
To view policy hit counts:
1. Ensure you are in the correct ADOM.2. Go to Policy & Objects > Policy Package.3. In the tree menu for a policy package, select a policy. The content pane for the policy is displayed.4. View the Hit Count, Bytes, Packets, First Used, and Last Used columns.5. Hover the mouse over the cells in the columns to view the Session Count, Session First Used, and Session Last
Used fields of information.The Session Count field reports the total number of completed sessions from the FortiGate. The Session Count fieldexcludes incomplete sessions, such as sessions where TCP three-way handshakes are incomplete, UDP sessionsare pending replies, and SCTP sessions that have not reached an established state.The Session First Used and Session Last Used fields are session aware and triggered when return traffic isgenerated. They indicate when a policy rule is being used not just hit.
Policy Lookup
Policy Lookup allows you to search for policies on a FortiGate device or a VDOM based on certain parameters.
To perform a Policy Lookup:
1. Ensure you are in the correct ADOM.2. Go to Policy & Objects > Policy Packages.3. In the tree menu for a policy package, select a policy type. For example, select IPv4 policy.4. Click Policy Lookup. The IPv4 Policy lookup from remote device dialog is displayed.
5. Select or specify the values for the following fields and clickOK to search for a policy.
Device/VDOM Select the FortiGate device or the VDOM from the drop-down.
Source Interface Select the source interface from the drop-down.
Protocol Select the protocol from the drop-down.
Protocol Number Specify a number between 1 to 255.
Source Specify the source IP address.
Destination Specify the destination IP address or a Fully Qualified Domain Name (FQDN).
The Policy Lookup feature is available only for IPv4 and IPv6 policies.
FortiManager must be in sync with the FortiGate devices or VDOMs either by installing orimporting the policy. If FortiManager is not in sync with the FortiGate devices, a message willbe shown that the device is out of sync. You can still perform the policy lookup, but the resultsmay not be accurate.
FortiManager 6.4.0 Administration Guide 181Fortinet Inc.

Firewall Policy & Objects
Creating policies
To create a new policy:
Policy creation varies depending on the type of policy that is being created. See the following section that corresponds tothe type of policy you are creating for specific instructions on creating that type of policy.
Policy creation will vary by ADOM version.
To insert a policy:
Generic policies can be inserted above or below the currently selected policy. From the Create Newmenu, select InsertAbove or Insert Below. By default, new policies will be inserted at the bottom of the list.
Editing policies
Policies can be edited in a variety of different way, often directly on the policy list.
To edit a policy:
Select a policy and select Edit from the Editmenu, or double-click on a policy, to open the Edit Policy pane.
You can also edit a policy inline using the object pane (either theObject Selector frame or theObject Configurationspane when dual pane is enabled), the right-click menu, and by dragging and dropping objects. See Object selector onpage 183 and Drag and drop objects on page 184.
The right-click menu changes based on the cell or object that is clicked on. When available, selecting Add Object(s)opens the Add Object(s) dialog box, where one or more objects can be selected to add to the policy, or new objects canbe created and then added. Selecting Remove Object(s) removes the object from the policy.
To clone a policy:
Select a policy, and from the Editmenu, select Clone. The Clone Policy dialog box opens with all of the settings of theoriginal policy. Edit the settings as required and selectOK to create the clone.
To Clone Reverse a policy:
Select a policy, and from the Editmenu, select Clone Reverse. Alternatively, you can also select Clone Reverse from theright-click context menu.
The policy is cloned with the Incoming Interface andOutgoing Interface switched with each other. The Source andDestination are also switched with each other.
The policy is cloned without a name. Click the Name for the policy and specify a name.
A policy cloned using the Clone Reverse option is disabled for security. The administrator canenable the policy after reviewing the settings.When NAT is enabled for a policy, Clone Reverse is disabled.
FortiManager 6.4.0 Administration Guide 182Fortinet Inc.

Firewall Policy & Objects
To copy, cut, or paste a policy or object:
You can copy, cut, and paste policies. Select a policy, and from the Editmenu, select Cut or Copy. When pasting acopied or cut policy, you can insert it above or below the currently selected policy.
You can also copy, cut, and paste objects within a policy. Select an object in a cell, or select multiple objects using thecontrol key, then right-click and select Copy or Cut. Copied or cut objects can only be pasted into appropriate cells; anaddress cannot be pasted into a service cell for example.
A copied or cut policy or object can be pasted multiple times without having to be recopied.
To delete a policy:
You can delete a policy. Select a policy, and from the Editmenu, select Delete.
To add a section:
You can use sections to help organize your policy list. Policies can also be appended to sections.
Select a policy, and from the Sectionmenu, click Add. Type a section name, and clickOK to add a section to thecurrently selected policy.
Object selector
TheObject Selector frame opens when a cell in the policy list is selected.
TheObject Selector frame is only available when Display Policy & Objects in Dual Pane isdisabled. See Display options on page 166.
Create New Click the create new dropdown list, then select the object type to make a newobject. See Create a new object on page 221.
Collapse / Expand All Expand or collapse all of the object groups shown in the pane.
Dock to bottom / right Move theObject Selector frame to the bottom or right side of the content pane.
Close Close theObject Selector frame.
FortiManager 6.4.0 Administration Guide 183Fortinet Inc.

Firewall Policy & Objects
Search Enter a search term to search the object list.
Refresh Refresh the list.
Select All Select all objects in the list.
Deselect All Deselect all objects in the list.
Sort Sort the object list alphabetically.
Objects can be added or removed from the selected cell by clicking on them, and then selecting OK to apply the changeand close theObject Selection pane.
Objects can also be dragged and dropped from the pane to applicable, highlighted cells in the policy list.
Right-click on an object in the pane to Edit or Clone the object, and to see where it is used. See Edit an object on page232 and Clone an object on page 233.
Drag and drop objects
On the Policy & Objects > Policy Packages pane, objects can be dragged and dropped from the object pane, and canalso be dragged from one cell to another, without removing the object from the original cell.
One or more objects can be dragged at the same time. When dragging a single object, a box beside the pointer willdisplay the name of the object being dragged. When dragging multiple objects, the box beside the pointer will show acount of the number of objects that are being dragged. To select multiple objects, click them while holding the control keyon your keyboard.
The cells or columns that the object or objects can be dropped into will be highlighted in the policy package pane. Afterdropping the object or objects into a cell or column, the object will immediately appear in the cell as part of the policy, orin all the cells of that column.
Install policies only to specific devices
Policies can be configured to install only to specific installation targets within the policy package. This allows a singlepolicy package to be applied to multiple different types of devices. For example, FortiGate and FortiWiFi devices canshare the same policy, even though FortiGate devices do not have WiFi interfaces.
To install a policy only to specific devices:
1. Ensure you are in the ADOM that contains the policy package.2. Go to Policy & Objects > Policy Packages.3. In the tree menu, select the policy package4. Select Column Settings > Install On from the content pane toolbar. The Install On column is not shown by default.5. Click Installation Targets in the Install On column of the policy that will be applied to specific devices.6. In theObject Selector frame, select the devices that the policy will be installed on (see Policy package installation
targets on page 174), then clickOK.The policy will now be installed only on the selected installation targets, and not the other devices to which the policypackage is assigned.
FortiManager 6.4.0 Administration Guide 184Fortinet Inc.

Firewall Policy & Objects
Configuring policy details
Various policy details can be configured directly from the policy tables, such as the policy schedule, service, action,security profiles, and logging.
To edit a policy schedule with dual pane disabled:
1. Ensure you are in the correct ADOM.2. Go to Policy & Objects > Policy Packages.3. In the tree menu for a policy package, select a policy type. The policies are displayed in the content pane.4. In the Schedule column, click the cell in the policy that you want to edit. TheObject Selector frame is displayed.5. In theObject Selector frame, locate the schedule object, then drag and drop the object onto the cell in the Schedule
column for the policy that you want to change.6. ClickOK to close theObject Selector frame.
To edit a policy schedule with dual pane enabled:
1. Ensure you are in the correct ADOM.2. Go to Policy & Objects.3. In the tree menu for a policy package, select a policy type. The policies are displayed in the content pane.4. In the object pane, go to Firewall Objects > Schedules.5. Locate the schedule object, then drag and drop the object onto the cell in the Schedule column for the policy that
you want to change.
To edit a policy service with dual pane disabled:
1. Ensure you are in the correct ADOM.2. Go to Policy & Objects > Policy Packages.3. In the tree menu for a policy package, select a policy type. The policies are displayed in the content pane.4. In the Service column, click the cell in the policy that you want to edit. TheObject Selector frame opens.5. In theObject Selector frame, locate the service object, and then drag and drop the object onto the cell in the Service
column for the policy that you want to change.6. ClickOK to close theObject Selector frame.
To edit a policy service with dual pane enabled:
1. Ensure you are in the correct ADOM.2. Go to Policy & Objects.3. In the tree menu for a policy package, select a policy type. The policies are displayed in the content pane.4. In the object pane, go to Firewall Objects > Services. The services objects are displayed in the content pane.5. Locate the service object, then drag and drop the object onto the cell in the Service column for the policy that you
want to change.
To edit a services object:
1. Go to Policy & Objects > Object Configuration.2. In the tree menu, go to Firewall Objects > Services. The services objects are displayed in the content pane.3. Select a services object, and click Edit. The Edit Service dialog box is displayed.
FortiManager 6.4.0 Administration Guide 185Fortinet Inc.

Firewall Policy & Objects
4. Configure the following settings, then clickOK to save the service. The custom service will be added to the availableservices.
Name Edit the service name as required.
Comments Type an optional comment.
Service Type Select Firewall or Explicit Proxy.
Show in service list Select to display the object in the services list.
Category Select a category for the service.
Protocol Type Select the protocol from the dropdown list. Select one of the following:TCP/UDP/SCTP, ICMP, ICMP6, or IP.
IP/FQDN Type the IP address or FQDN.This menu item is available when Protocol is set to TCP/UDP/SCTP. You canthen define the protocol, source port, and destination port in the table.
Type Type the service type in the text field.This menu item is available when Protocol is set to ICMP or ICMP6.
Code Type the code in the text field.This menu item is available when Protocol is set to ICMP or ICMP6.
Protocol Number Type the protocol number in the text field.This menu item is available when Protocol Type is set to IP.
Advanced Options For more information on advanced option, see the FortiOS CLI Reference.
check-reset-range Configure ICMP error message verification.l disable: The FortiGate unit does not validate ICMP error messages.l strict: If the FortiGate unit receives an ICMP error packet that containsan embedded IP(A,B) | TCP(C,D) header, then if FortiManager can locatethe A:C->B:D session it checks to make sure that the sequence numberin the TCP header is within the range recorded in the session. If thesequence number is not in range then the ICMP packet is dropped. If it isenabled, the FortiGate unit logs that the ICMP packet was dropped. Strictchecking also affects how the anti-replay option checks packets.
l default: Use the global setting defined in system global.This field is available when Protocol is TCP/UDP/SCTP.This field is not available if explicit-proxy is enabled.
Color Click the icon to select a custom, colored icon to display next to the servicename.
session-ttl Type the default session timeout in seconds.The valid range is from 300 - 604 800 seconds. Type 0 to use either the per-policy session-ttl or per-VDOM session-ttl, as applicable.This is available when Protocol is TCP/UDP/SCTP.
FortiManager 6.4.0 Administration Guide 186Fortinet Inc.

Firewall Policy & Objects
tcp-halfclose-timer Type how many seconds the FortiGate unit should wait to close a session afterone peer has sent a FIN packet but the other has not responded.The validrange is from 1 to 86400 seconds. Type 0 to use the global setting defined insystem global.This is available when Protocol is TCP/UDP/SCTP.
tcp-halfopen-timer Type how many seconds the FortiGate unit should wait to close a session afterone peer has sent an open session packet but the other has not responded.The valid range is from 1 to 86400 seconds. Type 0 to use the global settingdefined in system global.This is available when Protocol is TCP/UDP/SCTP.
tcp-timewait-timer Set the length of the TCP TIME-WAIT state in seconds.As described in RFC793, the “...TIME-WAIT state represents waiting for enough time to pass to besure the remote TCP received the acknowledgment of its connectiontermination request.”Reducing the length of the TIME-WAIT state means the FortiGate unit canclose terminated sessions faster, which means that more new sessions can beopened before the session limit is reached.The valid range is 0 to 300 seconds. A value of 0 sets the TCP TIME-WAIT to0 seconds. Type 0 to use the global setting defined in system global.This is available when Protocol is TCP/UDP/SCTP.
udp-idle-timer Type the number of seconds before an idle UDP connection times out.Thevalid range is from 1 to 86400 seconds.Type 0 to use the global setting defined in system global.This is available when Protocol is TCP/UDP/SCTP.
To edit a policy action:
1. Select desired policy type in the tree menu.2. Select the policy, and from the Editmenu, select Edit.3. Set the Action option, and clickOK.
To edit policy logging:
1. Select desired policy type in the tree menu.2. Right-click the Log column, and select options from the menu.
To edit policy security profiles with dual pane disabled:
1. Ensure you are in the correct ADOM.2. Go to Policy & Objects > Policy Packages.3. In the tree menu for a policy package, select a policy type. The policies are displayed in the content pane.4. In the Security Profiles column, click the cell in the policy that you want to edit. TheObject Selector frame is
displayed.5. In theObject Selector frame, locate the profiles, then drag and drop the object onto the cell in the Security Profiles
column for the policy that you want to change.6. ClickOK to close theObject Selector frame.
FortiManager 6.4.0 Administration Guide 187Fortinet Inc.

Firewall Policy & Objects
To edit policy security profiles with dual pane enabled:
1. Ensure you are in the correct ADOM.2. Go to Policy & Objects.3. In the tree menu for a policy package, select a policy type. The policies are displayed in the content pane.4. In the object pane, go to Security Profiles.5. Locate the profile object, then drag and drop the object onto the cell in the Security Profiles column for the policy that
you want to change.
The policy action must be Accept to add security profiles to the policy.
Creating Policy Blocks
Policy Blocks are created to store multiple policies. Policy Blocks can be appended to a Policy Package. When creatinga Policy Package, the administrator does not need to add one policy at a time. By appending a Policy Block to a PolicyPackage, the administrator can ensure that all policies in the Policy Block are added to the policy package together.
To create a new Policy Block:
1. Ensure that you are in the correct ADOM.2. Go to Policy & Objects.3. Right-click Policy Blocks and click New. The Create New Policy Block window opens.
4. Configure the following details, then clickOK to create the Policy Block.
Name Enter a name for the new Policy Block.
Central NAT Select the Central NAT check box to enable Central SNAT and Central DNATpolicy types.
NGFW Mode Select the NGFWmode, Profile-based (default) or Policy-based.
SSL/SSH Inspection Select an SSL/SSH inspection type from the dropdown list.This option is only available for version 5.6 and later ADOMs when NGFWMode is Policy-based.
FortiManager 6.4.0 Administration Guide 188Fortinet Inc.

Firewall Policy & Objects
Adding policies to a Policy Block
Policies can be added to a Policy Block in two ways. Create a new policy within a Policy Block or append an existingpolicy from a Policy Package to a Policy Block.
To create a new policy in a Policy Block:
1. Ensure that you are in the correct ADOM.2. Go to Policy & Objects.3. Go to Policy Blocks > [Policy_Block_Name]> IPv4 or IPv6.4. Click Create New. See IP policies on page 190 on how to create an IPv4 or IPv6 policy.
To copy a policy into a Policy Block:
1. Ensure that you are in the correct ADOM.2. Go to Policy & Objects.3. Click [Policy_Package_Name]. For example, click Default.4. Click IPv4 or IPv6.5. Select one or more policies.6. Right-click and select Copy.7. Go to Policy Blocks > [Policy_Block_Name]> IPv4 or IPv6.8. Right-click and select Paste.
Once a policy is copied from an existing Policy Package (source) to a Policy Block(destination), it becomes an independent policy with no link to the original policy. Modifying ordeleting the original policy will not affect the policy in the Policy Block.
Appending a Policy Block to a Policy Package
Once a Policy Block is created, it can be appended to a Policy Package. After appending the Policy Block to a PolicyPackage, assigning installation targets and installing the Policy Package to the installation targets, all the policies in thePolicy Block are installed to the target.
After a Policy Block is appended to a Policy Package, you can add or remove policies from thePolicy Block. You need to append the Policy Block to the Policy Package only once. It is notrequired to append the Policy Block to the Policy Package again after adding or removingpolicies from the Policy Block.
To append an existing policy to a Policy Block:
1. Ensure that you are in the correct ADOM.2. Go to Policy & Objects.3. Click [Policy_Package_Name]. For example, click Default.
FortiManager 6.4.0 Administration Guide 189Fortinet Inc.

Firewall Policy & Objects
4. Select Policy Block > Append Policy Block.
5. Select the Policy Block from the drop-down and clickOK.
Deleting a Policy Block after it is appended to a Policy Package will automatically remove thePolicy Block (and the included policies) from the Policy Package.
IP policies
The section describes how to create new IPv4 and IPv6 policies.
IPv6 security policies are created both for an IPv6 network and a transitional network. A transitional network is a networkthat is transitioning over to IPv6, but must still have access to the Internet or must connect over an IPv4 network. IPv6policies allow for this specific type of traffic to travel between the IPv6 and IPv4 networks.
On the Policy & Objects tab, from the Toolsmenu, select Display Options. In the Policysection, select the IPv6 Policy checkbox to display this option.
To create a new IPv4 or IPv6 policy:
1. Ensure that you are in the correct ADOM.2. Go to Policy & Objects > Policy Packages.3. In the tree menu for the policy package in which you will be creating the new policy, select IPv4 Policy or IPv6
Policy. If you are in the Global Database ADOM, select IPv4 Header Policy, IPv4 Footer Policy, IPv6 Header Policy,or IPv6 Footer Policy.
4. Click Create New, or, from the Create Newmenu, select Insert Above or Insert Below. By default, policies will beadded to the bottom of the list, but above the implicit policy. The Create New Policy pane opens.
FortiManager 6.4.0 Administration Guide 190Fortinet Inc.

Firewall Policy & Objects
5. Enter the following information:
Name Enter a unique name for the policy. Each policy must have a unique name.
Incoming Interface Click the field then select interfaces from theObject Selector frame, or dragand drop the address from the object pane.Select the remove icon to remove values.New objects can be created by clicking the Create New icon in theObjectSelector frame. See Create a new object on page 221 for more information.
Outgoing Interface Select outgoing interfaces.
Source Internet Service Turn source internet service on or off, then select services.This option is only available for IPv4 policies.
Source Address Select source addresses.This option is only available when Source Internet Service is off.
Source User Select source users.This option is only available when Source Internet Service is off.
Source User Group Select source user groups.This option is only available when Source Internet Service is off.
Source Device Select source devices, device groups, and device categories.This option is only available when Source Internet Service is off.
Destination Internet Service Turn destination internet service on or off, then select services.This option is only available for IPv4 policies.
Destination Address Select destination addresses, address groups, virtual IPs, and virtual IPgroups.
FortiManager 6.4.0 Administration Guide 191Fortinet Inc.

Firewall Policy & Objects
This option is only available when Destination Internet Service is off.
Service Select services and service groups.This option is only available when Destination Internet Service is off.
Schedule Select schedules, one time or recurring, and schedule groups.
Application Select applications.This option is only available when NGFWMode is Policy-based for the policypackage; see Create new policy packages on page 167.
URL Category Select URL categories.This option is only available when NGFWMode is Policy-based for the policypackage; see Create new policy packages on page 167.
Action Select an action for the policy to take: ACCEPT, DENY, or IPSEC.IPSEC is not available for IPv6 policies.
Log Traffic When the Action is DENY, select Log Violation Traffic to log violation traffic.When the Action is ACCEPT or IPSEC, select one of the following options:l No Logl Log Security Eventsl Log All Sessions
Generate Logs when SessionStarts
Select to generate logs when the session starts.
Capture Packets Select to capture packets.This option is available when the Action is ACCEPT or IPSEC, and LogSecurity Events or Log All Sessions is selected
NAT Select to enable NAT.If enabled, select Use Destination Interface Address or Dynamic IP Pool, andselect Fixed Port if required. If Dynamic IP Pool is selected, select pools.This option is available when the Action is ACCEPT, and when NGFWMode isProfile-based; see Create new policy packages on page 167.
VPN Tunnel Select a VPN tunnel dynamic object from the dropdown list. Select to allowtraffic to be initiated from the remote site.This option is available when the Action is IPSEC.
Security Profiles Select to add security profiles or profile groups.This option is available when the Action is ACCEPT or IPSEC.The following profile types can be added:l AntiVirus Profilel Web Filter Profilel Application Controll IPS Profilel Email Filter Profilel DLP Sensorl VoIP Profile
FortiManager 6.4.0 Administration Guide 192Fortinet Inc.

Firewall Policy & Objects
l ICAP Profilel SSL/SSH Inspectionl Web Application Firewalll DNS Filterl Proxy Optionsl Profile Group (available when Use Security Profile Group is selected)
Shared Shaper Select traffic shapers.This option is available if the Action is ACCEPT or IPSEC.
Reverse Shaper Select traffic shapers.This option is available if the Action is ACCEPT or IPSEC and at least oneforward traffic shaper is selected.
Per-IP Shaper Select per IP traffic shapers.This option is available if the Action is ACCEPT or IPSEC.
Comments Add a description of the policy, such as its purpose, or the changes that havebeen made to it.
Advanced Options Configure advanced options, see Advanced options below.For more information on advanced option, see the FortiOS CLI Reference.
6. ClickOK to create the policy. You can select to enable or disable the policy in the right-click menu. When disabled, adisabled icon will be displayed in the Seq.# column to the left of the number.
Advanced options
Option Description Default
auth-cert HTTPS server certificate for policy authentication (IPv4 only). none
auth-path Enable or disable authentication-based routing (IPv4 only). disable
auth-redirect-addr HTTP-to-HTTPS redirect address for firewall authentication (IPv4 only). none
auto-asic-offload Enable or disable policy traffic ASIC offloading. enable
block-notification Enable or disable block notification (IPv4 only). disable
captive-portal-exempt Enable or disable exemption of captive portal (IPv4 only). disable
custom-log-fields Select the custom log fields from the dropdown list. none
delay-tcp-npu-session Enable or disable TCP NPU session delay in order to guarantee packetorder of 3-way handshake (IPv4 only).
disable
diffserv-forward Enable or disable application of the differentiated services code point(DSCP) value to the DSCP field of forward (original) traffic.
disable
diffserv-reverse Enable or disable application of the DSCP value to the DSCP field ofreverse (reply) traffic. If enabled, also configure diffservcode-rev.
disable
FortiManager 6.4.0 Administration Guide 193Fortinet Inc.

Firewall Policy & Objects
Option Description Default
diffservcode-forward Type the DSCP value that the FortiGate unit will apply to the field oforiginating (forward) packets. The value is 6 bits binary. The valid range is000000-111111.
000000
diffservcode-rev Type the DSCP value that the FortiGate unit will apply to the field of reply(reverse) packets. The value is 6 bits binary. The valid range is 000000-111111.
000000
disclaimer Enable or disable user authentication disclaimer (IPv4 only). disable
dscp-match Enable or disable DSCP check. disable
dscp-negate Enable or disable negate DSCPmatch. disable
dscp-value Enter the DSCP value. 000000
dsri Enable or disable DSRI (Disable Server Response Inspection) to ignoreHTTP server responses.
disable
dstaddr-negate Enable or disable negated destination address match. disable
firewall-session-dirty Packet session management, either check-all or check-new. check-all
fsso-agent-for-ntlm Select the FSSO agent for NTLM from the dropdown list (IPv4 only). none
identity-based-route Name of identity-based routing rule (IPv4 only). none
internet-service-negate When enabled, Internet services match against any Internet serviceEXCEPT the selected Internet service (IPv4 only).
disable
internet-service-src-negate
Enables or disables the use of Internet Services in source for this policy. Ifenabled, internet-service-src specifies what the service must NOTbe (IPv4 only).
disable
learning-mode Enable or disable learning mode for policy (IPv4 only). disable
match-vip Enable or disable match DNATed packet (IPv4 only). disable
natinbound Enable or disable policy NAT inbound. disable
natip Type the NAT IP address in the text field (IPv4 only). 0.0.0.0
natoutbound Enable or disable policy NAT outbound. disable
np-acceleration Enable or disable UTM Network Processor acceleration. enable
ntlm Enable or disable NTLM authentication (IPv4 only). disable
ntlm-enabled-browsers Type a value in the text field (IPv4 only). none
ntlm-guest Enable or disable NTLM guest (IPv4 only). disable
outbound Enable or disable policy outbound. disable
permit-any-host Enable to accept UDP packets from any host (IPv4 only). disable
permit-stun-host Enable to accept UDP packets from any STUN host (IPv4 only). disable
FortiManager 6.4.0 Administration Guide 194Fortinet Inc.

Firewall Policy & Objects
Option Description Default
radius-mac-auth-bypass Enable MAC authentication bypass. The bypassed MAC address must bereceived from RADIUS server.
disable
redirect-url URL redirection after disclaimer/authentication (IPv4 only). none
replacemsg-override-group
Specify authentication replacement message override group. none
rtp-addr Select the RTP address from the dropdown list (IPv4 only). none
rtp-nat Enable to apply source NAT to RTP packets received by the firewall policy(IPv4 only).
disable
scan-botnet-connections Enable or disable scanning of connections to Botnet servers (IPv4 only). disable
schedule-timeout Enable to force session to end when policy schedule end time is reached(IPv4 only).
disable
send-deny-packet Enable to send a packet in reply to denied TCP, UDP or ICMP traffic. disable
service-negate Enable or disable negated service match. disable
session-ttl Type a value for the session time-to-live (TTL) from 300 to 604800, or type0 for no limitation.
0
srcaddr-negate Enable or disable negated source address match. disable
ssh-filter-profile Select an SSH filter profile from the dropdown list. None
ssl-mirror Enable or disable SSL mirror. disable
ssl-mirror-intf Mirror interface name. none
tcp-mss-receiver Type a value for the receiver’s TCP MSS. 0
tcp-mss-sender Type a value for the sender’s TCP MSS. 0
tcp-session-without-syn Enable or disable creation of TCP session without SYN flag.l all - Enable TCP session without SYN.l data-only - Enable TCP session data only.l disable - Disable TCP session without SYN.
disable
timeout-send-rst Enable sending a TCP reset when an application session times out. disable
vlan-cos-fwd Type the VLAN forward direction user priority. 255
vlan-cos-rev Type the VLAN reverse direction user priority. 255
vlan-filter Set VLAN filters.
wanopt Enable or disable WAN optimization (IPv4 only). disable
wanopt-detection WAN optimization auto-detection mode (IPv4 only). active
wanopt-passive-opt WAN optimization passive mode options. This option decides what IPaddress will be used to connect server (IPv4 only).
default
FortiManager 6.4.0 Administration Guide 195Fortinet Inc.

Firewall Policy & Objects
Option Description Default
wanopt-peer WAN optimization peer (IPv4 only). none
wanopt-profile WAN optimization profile (IPv4 only). none
wccp Enable or disable Web Cache Communication Protocol (WCCP) (IPv4only).
disable
webcache Enable or disable web cache (IPv4 only). disable
webcache-https Enable or disable web cache for HTTPS (IPv4 only). disable
wsso Enable or disable WiFi Single Sign-On (IPv4 only). enable
Create New Firewall Policy
The section describes how to create a new Firewall Policy. The firewall policy is the axis around which most features ofthe FortiGate firewall revolve. Many settings in the firewall end up relating to or being associated with the firewall policiesand the traffic that they govern. Any traffic going through a FortiGate unit has to be associated with a policy. Thesepolicies are essentially discrete compartmentalized sets of instructions that control the traffic flow going through thefirewall. These instructions control where the traffic goes, how it’s processed, if it’s processed, and even whether or notit’s allowed to pass through the FortiGate.
The Firewall Policy is visible only if the NGFWMode is selected as Policy-based in the policypackage.
To create a new Firewall Policy:
1. Ensure that you are in the correct ADOM.2. Go to Policy & Objects > Policy Packages.3. In the tree menu for the policy package in which you will be creating the new policy, select Firewall Policy.4. Click Create New, or, from the Create Newmenu, select Insert Above or Insert Below. By default, policies will be
added to the bottom of the list, but above the implicit policy. The Create New Firewall Policy pane opens.
FortiManager 6.4.0 Administration Guide 196Fortinet Inc.

Firewall Policy & Objects
5. Enter the following information:
Name Enter a unique name for the policy. Each policy must have a unique name.
Incoming Interface Click the field then select interfaces from theObject Selector frame, or dragand drop the address from the object pane.Select the remove icon to remove values.New objects can be created by clicking the Create New icon in theObjectSelector frame. See Create a new object on page 221 for more information.
Outgoing Interface Select outgoing interfaces.
Source Internet Service Turn source internet service on or off, then select services.This option is only available for IPv4 policies.
FSSO Groups Select the FSSO groups added via Fortinet Single Sign-On. For moreinformation about FSSO groups, see FSSO user groups on page 236.
IPv4 Source Address Select the IPv4 source addresses.This option is only available when Source Internet Service is off.
IPv6 Source Address Select the IPv6 source addresses.This option is only available when Source Internet Service is off.
Source User Select source users.This option is only available when Source Internet Service is off.
Source User Group Select source user groups.
FortiManager 6.4.0 Administration Guide 197Fortinet Inc.

Firewall Policy & Objects
This option is only available when Source Internet Service is off.
Source Device Select source devices, device groups, and device categories.This option is only available when Source Internet Service is off.
Destination Internet Service Turn destination internet service on or off, then select services.This option is only available for IPv4 policies.
IPv4 Destination Address Select destination addresses, address groups, virtual IPs, and virtual IPgroups.This option is only available when Destination Internet Service is off.
IPv6 Destination Address Select destination addresses, address groups, virtual IPs, and virtual IPgroups.This option is only available when Destination Internet Service is off.
Service Select services and service groups.This option is only available when Destination Internet Service is off.
Firewall / Network Options Central NAT is enabled by default so NAT settings frommatching CentralSNAT policies will be applied.
Security Profiles Select one of the following options for SSL/SSH Inspection:l certificate-inspectionl custom-deep-inspectionl deep-inspectionl no-inspection
New objects can be created by clicking the Create New icon in theObjectSelector frame. See Create a new object on page 221 for more information.
Comments Add a description of the policy, such as its purpose, or the changes that havebeen made to it.
Advanced Options Configure advanced options, see Advanced options below.For more information on advanced option, see the FortiOS CLI Reference.
6. ClickOK to create the policy. You can select to enable or disable the policy in the right-click menu. When disabled, adisabled icon will be displayed in the Seq.# column to the left of the number.
Advanced options
Option Description Default
auto-asic-offload Enable or disable policy traffic ASIC offloading. enable
cifs-profile Enable or disable authentication-based routing (IPv4 only). disable
diffserv-forward Enable or disable application of the differentiated services code point(DSCP) value to the DSCP field of forward (original) traffic.
disable
diffserv-reverse Enable or disable application of the DSCP value to the DSCP field ofreverse (reply) traffic. If enabled, also configure diffservcode-rev.
disable
FortiManager 6.4.0 Administration Guide 198Fortinet Inc.

Firewall Policy & Objects
Option Description Default
diffservcode-forward Type the DSCP value that the FortiGate unit will apply to the field oforiginating (forward) packets. The value is 6 bits binary. The valid range is000000-111111.
000000
diffservcode-rev Type the DSCP value that the FortiGate unit will apply to the field of reply(reverse) packets. The value is 6 bits binary. The valid range is 000000-111111.
000000
http-policy-redirect Select the custom log fields from the dropdown list. none
inspection-mode Enable or disable TCP NPU session delay in order to guarantee packetorder of 3-way handshake (IPv4 only).
disable
outbound Enable or disable application of the differentiated services code point(DSCP) value to the DSCP field of forward (original) traffic.
disable
session-ttl Type a value for the session time-to-live (TTL) from 300 to 604800, or type0 for no limitation.
0
ssh-filter-profile Select an SSH filter profile from the drop-down list. None
ssh-policy-redirect Enable or disable SSH policy redirect. disable
tcp-mss-receiver Type a value for the receiver’s TCP MSS. 0
tcp-mss-sender Type a value for the sender’s TCP MSS. 0
wanopt Enable or disable WAN optimization (IPv4 only). disable
wanopt-detection Select the WAN optimization as active, passive, or off. active
wanopt-passive-opt WAN optimization passive mode options. This option decides what IPaddress will be used to connect server (IPv4 only).
default
wanopt-peer WAN optimization peer (IPv4 only). none
wanopt-profile WAN optimization profile (IPv4 only). none
webcache Enable or disable web cache (IPv4 only). disable
webcache-https Select the FSSO agent for NTLM from the drop-down list (IPv4 only). none
webproxy-forward-server
Name of identity-based routing rule (IPv4 only). none
webproxy-profile When enabled, Internet services match against any Internet serviceexcept the selected Internet service (IPv4 only).
disable
Create New Security Policy
The section describes how to create a new Security Policy. A Security Policy consists of rules related to proxy, antivirus,IPS, Email, and DLP sensor.
FortiManager 6.4.0 Administration Guide 199Fortinet Inc.

Firewall Policy & Objects
The Security Policy is visible only if the NGFWMode is selected as Policy-based in the policypackage.
On the Policy & Objects tab, from the Toolsmenu, select Display Options. In the Policysection, select the Security Policy check box to display this option.
To create a new Security Policy:
1. Ensure that you are in the correct ADOM.2. Go to Policy & Objects > Policy Packages.3. In the tree menu for the policy package in which you will be creating the new policy, select Security Policy.4. Click Create New, or, from the Create Newmenu, select Insert Above or Insert Below. By default, policies will be
added to the bottom of the list, but above the implicit policy. The Create New Security Policy pane opens.
5. Enter the following information:
Name Enter a unique name for the policy. Each policy must have a unique name.
Incoming Interface Click the field then select interfaces from theObject Selector frame, or dragand drop the address from the object pane.Select the remove icon to remove values.New objects can be created by clicking the Create New icon in theObjectSelector frame. See Create a new object on page 221 for more information.
Outgoing Interface Select outgoing interfaces.
Source Select source addresses.
FortiManager 6.4.0 Administration Guide 200Fortinet Inc.

Firewall Policy & Objects
Destination Address Select destination addresses, address groups, virtual IPs, and virtual IPgroups.
Service Select the service. Select App Default or Specify. Select the Service from theObjector Selector if Specify is selected.
Schedule Select schedules, one time or recurring, and schedule groups.
Application Select applications.
URL Category Select URL categories.
Action Select an action for the policy to take: ACCEPT or DENY.
Log Traffic When the Action is DENY, select Log Violation Traffic to log violation traffic.When the Action is ACCEPT or IPSEC, select one of the following options:l No Logl Log Security Eventsl Log All Sessions
Generate Logs when SessionStarts
Select to generate logs when the session starts.
Security Profiles Select to add security profiles or profile groups.This option is available when the Action is ACCEPT.The following profile types can be added:l Proxy Optionsl AntiVirus Profilel IPS Profilel Email Filter Profilel DLP Sensor
Comments Add a description of the policy, such as its purpose, or the changes that havebeen made to it.
Advanced Options Configure advanced options, see Advanced options below.For more information on advanced option, see the FortiOS CLI Reference.
6. ClickOK to create the policy. You can select to enable or disable the policy in the right-click menu. When disabled, adisabled icon will be displayed in the Seq.# column to the left of the number.
Advanced options
Option Description Default
application-list Select from the drop-down list. None
cifs-profile Enable or disable authentication-based routing (IPv4 only). None
dnsfilter-profile Select from the drop-down list. None
icap-profile Select from the drop-down list. None
custom-log-fields Select the custom log fields from the drop-down list. none
FortiManager 6.4.0 Administration Guide 201Fortinet Inc.

Firewall Policy & Objects
Option Description Default
internet-service-negate When enabled, Internet services match against any Internet serviceexcept the selected Internet service (IPv4 only).
disable
internet-service-src-negate
Enables or disables the use of Internet Services in source for this policy.If enabled, internet-service-src specifies what the service mustNOT be (IPv4 only).
disable
service-negate Enable or disable negated service match. disable
ssh-filter-profile Select an SSH filter profile from the drop-down list. None
ssl-ssh-profile Select an SSL SSH profile from the drop-down list. no-inspection
utm-status Enable or disable the Unified Threat Management status. disable
voip-profile Select the VOIP profile. None
webfilter-profile Select the web filter profile. None
Virtual wire pair policy
The section describes how to create virtual wire pair policies. Before you can create a policy, you must create a virtualwire pair. See Configuring virtual wire pairs on page 270.
You must display the option before you can set it. On the Policy & Objects pane, from theToolsmenu, select Display Options, and then select the IPv4 Virtual Wire Pair Policycheckbox to display this option.
To create a virtual wire pair policy:
1. If using ADOMs, ensure that you are in the correct ADOM.2. Go to Policy & Objects > Policy Packages.3. In the tree menu for the policy package in which you will be creating the new policy, select IPv4 Virtual Wire Pair
Policy.4. Click Create New, or, from the Create Newmenu, select Insert Above or Insert Below. By default, policies will be
added to the bottom of the list. The Create New Policy pane opens.5. Enter the following information, then clickOK to create the policy:
Name Enter a unique name for the policy. Each policy must have a unique name.
Virtual Wire Pair Interface Select an interface. You can type the name of the interface to search for it inthe list.
Virtual Wire Pair Select an arrow to indicate the flow of traffic between ports.
Source Internet Service Turn source internet service on or off, then select services from theObjectSelector frame, or drag and drop them from the object pane.
Source Address Select source addresses.
FortiManager 6.4.0 Administration Guide 202Fortinet Inc.

Firewall Policy & Objects
This option is only available when Source Internet Service is off.
Source User Select source users.This option is only available when Source Internet Service is off.
Source User Group Select source user groups.This option is only available when Source Internet Service is off.
Source Device Select source devices, device groups, and device categories.This option is only available when Source Internet Service is off.
Internet Service ToggleON to enable Internet service. ToggleOFF to disable Internet service.
Destination Internet Service Turn destination internet service on or off, then select services.
Destination Address Select destination addresses, address groups, virtual IPs, and virtual IPgroups.This option is available when Destination Internet Service isOFF.
Service Select services and service groups.This option is available when Destination Internet Service isOFF.
Schedule Select schedules, one time or recurring, and schedule groups.
Action Select an action for the policy to take: Deny or Accept.
Log Traffic When the Action is DENY, select Log Violation Traffic to log violation traffic.When the Action is ACCEPT, select one of the following options:l No Logl Log Security Eventsl Log All Sessions
Generate Logs when SessionStarts
Select to generate logs when the session starts.
Capture Packets Select to capture packets.This option is available when the Action is ACCEPT and Log Security Eventsor Log All Sessions is selected
Security Profiles Select to add security profiles or profile groups.This option is available when Action is Accept.The following profile types can be added:l Antivirus Profilel Web Filter Profilel Application Controll IPS Profilel Email Filter Profilel DLP Sensorl VoIP Profilel ICAP Profilel SSL/SSH Inspectionl Web Application Firewalll DNS Filter
FortiManager 6.4.0 Administration Guide 203Fortinet Inc.

Firewall Policy & Objects
l Proxy Optionsl Profile Group (available when Use Security Profile Group is selected)
Shared Shaper Select traffic shapers.This option is available if the Action is ACCEPT or IPSEC.
Reverse Shaper Select traffic shapers.This option is available if the Action is ACCEPT or IPSEC and at least oneforward traffic shaper is selected.
Per-IP Shaper Select per IP traffic shapers.This option is available if the Action is ACCEPT or IPSEC.
Description Add a description of the policy, such as its purpose, or the changes that havebeen made to it.
Advanced Options Configure advanced options, see Advanced options on page 193.For more information on advanced option, see the FortiOS CLI Reference.
NAT policies
Use NAT46 policies for IPv6 environments where you want to expose certain services to the public IPv4 Internet. Youwill need to configure a virtual IP to permit the access.
Use NAT64 policies to perform network address translation (NAT) between an internal IPv6 network and an externalIPv4 network.
The NAT46 Policy tab allows you to create, edit, delete, and clone NAT46 policies. The NAT64 Policy tab allows you tocreate, edit, delete, and clone NAT64 policies.
On the Policy & Objects pane, from the Toolsmenu, select Display Options, and then selectthe NAT46 Policy and NAT64 Policy checkboxes to display these options.
To create a NAT46 or NAT64 policy:
1. Ensure you are in the correct ADOM.2. Go to Policy & Objects > Policy Packages.3. In the tree menu for the policy package, click NAT46 Policy or NAT64 Policy.4. Click Create New, or, from the Create Newmenu, select Insert Above or Insert Below. By default, policies will be
added to the bottom of the list. The Create New Policy pane opens.5. Configure the following settings, then clickOK to create the policy:
Incoming Interface Click the field then select interfaces from theObject Selector frame, or dragand drop the address from the object pane.
Outgoing Interface Select outgoing interfaces.
Source Address Select source addresses.
FortiManager 6.4.0 Administration Guide 204Fortinet Inc.

Firewall Policy & Objects
Destination Address Select destination addresses, address groups, virtual IPs, and virtual IPgroups.
Service Select services and service groups.
Schedule Select schedules, one time or recurring, and schedule groups.
Action Select an action for the policy to take: ACCEPT, or DENY.
Log Allowed Traffic Select to log allowed traffic.
NAT NAT is enabled by default for this policy type when the Action is ACCEPT.Use Destination Interface Address is selected by default. Select Fixed Port ifrequired.
Dynamic IP Pool Select to use dynamic IP pools. Select Fixed Port if required, and the IP PoolName from the available IP pool objects.This option is only available for NAT64 policies.
Traffic Shaping Select traffic shapers.This option is available if the Action is ACCEPT.
Reverse Traffic Shaping Select traffic shapers.This option is available if at least one forward traffic shaper is selected.
Per-IP Traffic Shaping Select per IP traffic shapers.This option is available if the Action is ACCEPT.
Description Add a description of the policy, such as its purpose, or the changes that havebeen made to it.
Advanced Options
ippool Enable IP pools. This option is only available for NAT46 policies.
permit-any-host Enable to accept UDP packets from any host.
poolname Select a firewall IP pool from the dropdown list (default = None). This option isonly available for NAT46 policies.
tcp-mss-receiver Enter a value for the receiver’s TCP MSS.
tcp-mss-sender Enter a value for the sender’s TCP MSS.
Proxy policy
The section describes how to create web, FTP, andWANOpt proxy policies.
On the Policy & Objects pane, go to Tools > Display Options, and then select the Explicit ProxyPolicy checkbox in the Policy section to display this option.
FortiManager 6.4.0 Administration Guide 205Fortinet Inc.

Firewall Policy & Objects
To create a new proxy policy:
1. Go to Policy & Objects > Policy Packages.2. In the tree menu for the policy package in which you will be creating the new policy, select Explicit Proxy Policy.3. Click Create New, or, from the Create Newmenu, select Insert Above or Insert Below. By default, policies will be
added to the bottom of the list. The Create New Policy pane opens.
4. Enter the following information, then clickOK to create the policy:
Explicit Proxy Type Select the explicit proxy type: Explicit Web, Transparent Web, FTP, orWANOptimize.
Incoming Interface Select incoming interfaces from theObject Selector frame, or drag and dropthe address from the object pane.This option is only available when the proxy type is set to Transparent Web.
Outgoing Interface Select outgoing interfaces.
Source Select source addresses.
Destination Select destination addresses, address groups, virtual IPs, and virtual IPgroups.
Service Select services and service groups from the object selector pane.
Schedule Select schedules, one time or recurring, and schedule groups.
Action Select an action for the policy to take: Deny, Accept, or Redirect.Redirect is only available when the proxy type is set to Explicit Web, orTransparent Web.
Log Traffic Select one of the following options:l No Log
FortiManager 6.4.0 Administration Guide 206Fortinet Inc.

Firewall Policy & Objects
l Log Security Eventsl Log All Sessions
When Log All Sessions is selected, you can select to generate logs when thesession starts.This option is available when the Action is Accept.
Log Violation Traffic Select to log violation traffic.This option is available when the Action is Deny.
Disclaimer Options Set the Display Disclaimer: Disable, By Domain, By Policy, or By User.Optionally, select a custommessage in the Customize Messages field if notdisabled.These options are available when the Action is Accept.
Security Profiles Select to add security profiles or profile groups.The following profile types can be added:l Antivirus Profilel Web Filter Profile - not available when the proxy type is set to FTPl Application Control - not available when the proxy type is set to FTPl IPS Profile - not available when the proxy type is set to FTPl DLP Sensorl ICAP - not available when the proxy type is set to FTPl Web Application Firewall - not available when the proxy type is set to FTPl Proxy Optionsl SSL/SSH Inspectionl Profile Group (available when Use Security Profile Group is selected)
This option is available when the Action is Accept.
Redirect URL Enter the redirect URL.This option is only available when the Action is Redirect.
Web Proxy ForwardingServer
Select a web proxy forwarding server from the dropdown list.This option is not available when the proxy type is set to FTP.
Comments Add a description of the policy, such as its purpose, or the changes that havebeen made to it.
Advanced Options Configure advanced options, see Advanced options below.For more information on advanced option, see the FortiOS CLI Reference.
Advanced options
Option Description Default
dstaddr-negate Enable or disable negated destination address match. disable
global-label Enter a global label. -
http-tunnel-auth Enableor disable HTTP tunnel authentication disable
internet-service-negate Enable or disable negated internet service. disable
FortiManager 6.4.0 Administration Guide 207Fortinet Inc.

Firewall Policy & Objects
Option Description Default
label Enter a label -
poolname Select a firewall IP pool from the dropdown list. None
scan-botnet-connections
Enable or disable scanning of connections to Botnet servers. disable
service-negate Enable or disable negated service match. disable
session-ttl Session TTL for sessions accepted by this policy (300 - 6040800 seconds,0 = use system default).
0
srcaddr-negate Enable or disable negated source address match. disable
ssh-filter-profile Name of an existing SSH filter profile. None
transparent Use IP address of client to connect to server. disable
webcache Enable or disable web cache. disable
webcache-https Enable or disable web cache for HTTPS. disable
webproxy-profile Select a webproxy profile from the dropdown list. None
Central SNAT
The Central SNAT (Secure NAT) table enables you to define and control (with more granularity) the address translationperformed by the FortiGate unit. With the NAT table, you can define the rules which dictate the source address oraddress group, and which IP pool the destination address uses.
While similar in functionality to IP pools, where a single address is translated to an alternate address from a range of IPaddresses, with IP pools there is no control over the translated port. When using the IP pool for source NAT, you candefine a fixed port to guarantee the source port number is unchanged. If no fixed port is defined, the port translation israndomly chosen by the FortiGate unit. With the central NAT table, you have full control over both the IP address andport translation.
The FortiGate unit reads the NAT rules in a top-down methodology, until it hits a matching rule for the incoming address.This enables you to create multiple NAT policies that dictate which IP pool is used based on the source address. TheNAT policies can be rearranged within the policy list as well. NAT policies are applied to network traffic after a securitypolicy.
The Central SNAT table allows you to create, edit, delete, and clone central SNAT entries.
Central SNAT does not support Section View.
Central NATmust be enabled when creating or editing the policy package for this option to beavailable in the tree menu. See Create new policy packages on page 167.Central SNATmust be enabled in Tools > Display Options as well for the option to be visible inthe tree menu. See Display options on page 166.
FortiManager 6.4.0 Administration Guide 208Fortinet Inc.

Firewall Policy & Objects
To create a new central SNAT entry:
1. Ensure you are in the correct ADOM.2. Go to Policy & Objects > Policy Packages.3. In the tree menu for the policy package, click Central SNAT.4. Click Create New, or, from the Create Newmenu, select Insert Above or Insert Below. By default, policies will be
added to the bottom of the list. The Create New Central SNAT pane opens.5. Configure the following settings, then clickOK to create the policy:
Incoming Interface Click the field then select interfaces from theObject Selector frame, or dragand drop the address from the object pane.Select the remove icon to remove values.
Outgoing Interface Select outgoing interfaces.
Source Address Select source addresses.
Destination Address Select destination addresses, address groups, virtual IPs, and virtual IPgroups.
NAT Select to enable NAT.
IP Pool Configuration Select either Use Outgoing Interface Address, or Use Dynamic IP Pool. Ifusing a dynamic IP pool, select the pool from theObject Selector frame.This option is only available when NAT is selected.
Protocol Select the protocol: ANY, TCP, UDP, SCTP, or Specify. If Specify is selected,specify the protocol number.This option is only available when NAT is selected.
Comments Add a description of the policy, such as its purpose, or the changes that havebeen made to it.
Meta Fields If configured, enter values for the required meta fields, and optionally for theoptional fields. See Meta Fields on page 548.
Advanced Options Enable or disable nat.
Central DNAT
The FortiGate unit checks the NAT table and determines if the destination IP address for incoming traffic must bechanged using DNAT. DNAT is typically applied to traffic from the Internet that is going to be directed to a server on anetwork behind the FortiGate device. DNAT means the actual address of the internal network is hidden from the Internet.This step determines whether a route to the destination address actually exists.
DNAT must take place before routing so that the unit can route packets to the correct destination.
DNAT policies can be created, or imported from Virtual IP (VIP) objects. Virtual servers can also be imported fromADOM objects to DNAT policies. DNAT policies are automatically added to the VIP object table (Object Configurations >Firewall Objects > Virtual IPs) when they are created.
VIPs can be edited from either the DNAT or VIP object tables by double-clicking on the VIP, right-clicking on the VIP andselected Edit, or selecting the VIP and clicking Edit in the toolbar. The network type cannot be changed. DNAT policiescan also be copied, pasted, cloned, and moved from the right-click or Editmenus.
FortiManager 6.4.0 Administration Guide 209Fortinet Inc.

Firewall Policy & Objects
Deleting a DNAT policy does not delete the corresponding VIP object, and a VIP object cannot be deleted if it is in theDNAT table.
DNAT policies support overlapping IP address ranges; VIPs do not. DNAT policies do not support VIP groups.
Central DNAT does not support Section View.
Central NATmust be enabled when creating or editing the policy package for this option to beavailable in the tree menu. See Create new policy packages on page 167.
To create a new central DNAT entry:
1. Ensure you are in the correct ADOM.2. Go to Policy & Objects > Policy Packages.3. In the tree menu for the policy package, click Central DNAT.4. Click Create New, or, from the Create Newmenu, select Insert Above or Insert Below. By default, policies will be
added to the bottom of the list. The Create New Virtual IP pane opens.5. Configure the following settings, then clickOK to create the VIP:
Name Enter a unique name for the DNAT.
Comments Optionally, enter comments about the DNAT, such as its purpose, or thechanges that have been made to it.
Color Select a color.
Interface Select an interface.
Network Type Select the network type: Static NAT, DNS Translation, or FQDN.
External IP Address/Range Enter the start and end external IP addresses in the fields. If there is only oneaddress, enter it in both fields.This option is not available when the network type is FQDN.
Mapped IP Address/Range Enter the mapped IP address.This option is not available when the network type is FQDN.
External IP Address Enter the external IP address.This option is only available when the network type is FQDN.
Mapped Address Select the mapped address.This option is only available when the network type is FQDN.
Source Interface Filter Select a source interface filter.
Optional Filters Enable or disable optional filters.
Source Address Add source IP, range, or subnet filters. Multiple filters can be added using theAdd icon.
FortiManager 6.4.0 Administration Guide 210Fortinet Inc.

Firewall Policy & Objects
Services Enable and add services.
Port Forwarding Enable or disable port forwarding.
Protocol Select the protocol: TCP, UDP, SCTP, or ICMP.
External ServicePort
Enter the external service port.This option is not available when Protocol is ICMP.
Map to Port Enter the map to port.This option is not available when Protocol is ICMP.
Enable ARP Reply Select to enable ARP reply.
Add To Groups Optionally, select groups to add the virtual IP to from the list.
Advanced Options Configure advanced options, see Advanced options.For more information on advanced option, see the FortiOS CLI Reference.
Per-Device Mapping Enable or disable per-device mapping.If multiple imported VIP objects have the same name but different details, theobject type will become Dynamic Virtual IP, and the per-device mappings willbe listed here.Mappings can also be manually added, edited, and deleted as needed.
To import VIPs from the Virtual IP object table:
1. Ensure you are in the correct ADOM.2. Go to Policy &Objects > Policy Packages.3. In the tree menu for the policy package, click Central DNAT.4. Click Import in the toolbar. The Import dialog box will open.5. Select the VIP object or objects that need to be imported. If necessary, use the search box to locate specific objects.6. ClickOK to import the VIPs to the Central DNAT table.
Advanced options
Option Description Default
dns-mapping-ttl Enter time-to-live for DNS response, from 0 to 604 800. 0 means use theDNS server's response time.
0
extaddr Select an address. None
gratuitous-arp-interval Set the time interval between sending of gratuitous ARP packets by avirtual IP. 0 disables this feature.
0
http-cookie-age Set how long the browser caches cooking, from 0 to 525600 seconds. 60
http-cookie-domain Enter the domain name to restrict the cookie to. none
http-cookie-domain-from-host
If enabled, when the unit adds a SetCookie to the HTTP(S) response, theDomain attribute in the SetCookie is set to the value of the Host: header, ifthere is one.
disable
FortiManager 6.4.0 Administration Guide 211Fortinet Inc.

Firewall Policy & Objects
Option Description Default
http-cookie-generation The exact value of the generation is not important, only that it is differentfrom any generation that has already been used.
0
http-cookie-path Limit the cookies to a particular path. none
http-cookie-share Configure HTTP cookie persistence to control the sharing of cookiesacross more than one virtual server.The default setting means that any cookie generated by one virtual servercan be used by another virtual server in the same virtual domain.Disable to make sure that a cookie generated for a virtual server cannotbe used by other virtual servers.
same-ip
http-ip-header-name Enter a name for the custom HTTP header that the original client IPaddress is added to.
none
https-cookie-secure Enable or disable using secure cookies for HTTPS sessions. disable
id Custom defined ID. 0
max-embryonic-connections
The maximum number of partially established SSL or HTTP connections,from 0 to 100000.
1000
nat-source-vip Enable to prevent unintended servers from using a virtual IP. Disable touse the actual IP address of the server (or the destination interface if usingNAT) as the source address of connections from the server that passthrough the device.
disable
outlook-web-access If enabled, the Front-End-Https: on header is inserted into the HTTPheaders, and added to all HTTP requests.
disable
ssl-algorithm Set the permitted encryption algorithms for SSL sessions according toencryption strength:l high: permit only high encryption algorithms: AES or 3DES.l medium: permit high or medium (RC4) algorithms.l low: permit high, medium, or low (DES) algorithms.l custom: only allow some preselected cipher suites to be used.
high
ssl-client-fallback Enable to prevent Downgrade Attacks on client connections. enable
ssl-client-renegotiation Select the SSL secure renegotiation policy.l allow: allow, but do not require secure renegotiation.l deny: do not allow renegotiation.l secure: require secure renegotiation.
allow
ssl-client-session-state-max
The maximum number of SSL session states to keep for the segment ofthe SSL connection between the client and the unit, from 0 to 100000.
1000
ssl-client-session-state-timeout
The number of minutes to keep the SSL session states for the segment ofthe SSL connection between the client and the unit, from 1 to 14400.
30
ssl-client-session-state-type
The method to use to expire SSL sessions for the segment of the SSLconnection between the client and the FortiGate.
both
FortiManager 6.4.0 Administration Guide 212Fortinet Inc.

Firewall Policy & Objects
Option Description Default
l both: expire SSL session states when either ssl-client-session-state-max or ssl-client-session-state-timeout is exceeded, regardless of which occurs first.
l count: expire SSL session states when ssl-client-session-state-max is exceeded.
l disable: expire all SSL session states.l time: expire SSL session states when ssl-client-session-state-timeout is exceeded.
ssl-dh-bits The number of bits used in the Diffie-Hellman exchange for RSAencryption of the SSL connection: 768, 1024, 1536, 2048, 3072, or4096.
2048
ssl-hpkp Enable or disable including HPKP header in response. disable
ssl-hpkp-age The number of seconds that the client should honor the HPKP setting (60- 157680000).
5184000
ssl-hpkp-backup Certificate to generate the backup HPKP pin from (size = 35, datasource(s) = vpn.certificate.local.name,vpn.certificate.ca.name).
None
ssl-hpkp-include-subdomains
Enable or disable indicating that the HPKP header applies to allsubdomains.
disable
ssl-hpkp-primary Certificate to generate the primary HPKP pin from (size = 35, datasource(s) = vpn.certificate.local.name,vpn.certificate.ca.name).
None
ssl-hpkp-report-uri URL to report HPKP violations to (size = 255).
ssl-hsts Enable or disable including HSTS header in response. disable
ssl-hsts-age The number of seconds that the client should honour the HSTS setting (60- 157680000).
5184000
ssl-hsts-include-subdomains
Enable or disable indicating that the HSTS header applies to allsubdomains.
disable
ssl-http-location-conversion
Enable to replace http with https in the reply’s Location HTTP header field. disable
ssl-http-match-host Enable to apply Location conversion to the reply’s HTTP header only if thehost name portion of Location matches the request’s Host field or, if theHost field does not exist, the host name portion of the request’s URI.
disable
ssl-max-version The highest version of SSL/TLS to allow in SSL sessions: ssl-3.0,tls-1.0, tls-1.1, or tls-1.2.
tls-1.2
ssl-min-version The lowest version of SSL/TLS to allow in SSL sessions: ssl-3.0, tls-1.0, tls-1.1, or tls-1.2.
tls-1.0
ssl-pfs Select the handling of Perfect Forward Secrecy (PFS) by controlling thecipher suites that can be selected.l allow: allow use of any cipher suite so PFS may or may not be useddepending on the cipher suite selected.
allow
FortiManager 6.4.0 Administration Guide 213Fortinet Inc.

Firewall Policy & Objects
Option Description Default
l deny: allow only non-Diffie-Hellman cipher-suites, so PFS is notapplied.
l require: allow only Diffie-Hellman cipher-suites, so PFS is applied.
ssl-send-empty-frags Enable to precede the record with empty fragments to thwart attacks onCBC IV.Disable this option if SSL acceleration will be used with an old or buggySSL implementation which cannot properly handle empty fragments.
enable
ssl-server-algorithm Set the permitted encryption algorithms for SSL server sessionsaccording to encryption strength:l high: permit only high encryption algorithms: AES or 3DES.l medium: permit high or medium (RC4) algorithms.l low: permit high, medium, or low (DES) algorithms.l custom: only allow some preselected cipher suites to be used.
client
ssl-server-max-version The highest version of SSL/TLS to allow in SSL server sessions: client,ssl-3.0, tls-1.0, tls-1.1, or tls-1.2.
client
ssl-server-min-version The lowest version of SSL/TLS to allow in SSL server sessions: client,ssl-3.0, tls-1.0, tls-1.1, or tls-1.2.
client
ssl-server-session-state-max
The maximum number of SSL session states to keep for the segment ofthe SSL connection between the client and the unit, from 0 to 100000.
100
ssl-server-session-state-timeout
The number of minutes to keep the SSL session states for the segment ofthe SSL connection between the client and the unit, from 1 to 14400.
60
ssl-server-session-state-type
The method to use to expire SSL sessions for the segment of the SSLconnection between the server and the FortiGate.l both: expire SSL session states when either ssl-client-session-state-max or ssl-client-session-state-timeout is exceeded, regardless of which occurs first.
l count: expire SSL session states when ssl-client-session-state-max is exceeded.
l disable: expire all SSL session states.l time: expire SSL session states when ssl-client-session-state-timeout is exceeded.
both
weblogic-server Enable or disable adding an HTTP header to indicate SSL offloading for aWebLogic server.
disable
websphere-server Enable or disable adding an HTTP header to indicate SSL offloading for aWebSphere server.
disable
DoS policies
The IPv4 DoS Policy and IPv6 DoS Policy panes allow you to create, edit, delete, and clone DoS policies.
FortiManager 6.4.0 Administration Guide 214Fortinet Inc.

Firewall Policy & Objects
On the Policy & Objects pane, from the Toolsmenu, select Display Options, and then selectthe IPv4 DoS Policy and IPv6 DoS Policy checkboxes to display these option.
To create a DoS policy:
1. Ensure you are in the correct ADOM.2. Go to Policy & Objects > Policy Packages.3. In the tree menu for the policy package, click IPv4 DoS Policy or IPv6 DoS Policy.4. Click Create New, or, from the Create Newmenu, select Insert Above or Insert Below. By default, policies will be
added to the bottom of the list. The Create New Policy pane opens.5. Configure the following settings, then clickOK to create the policy:
Incoming Interface Select the incoming interface from theObject Selector frame, or drag and dropthe address from the object pane.
Source Address Select the source address.
Destination Address Select the destination address.
Service Select the service.
L3 Anomalies
ip_src_session Select to enable the DoS status and logging, select the action to pass, block orproxy, and configure the threshold.The default threshold is 5000.
ip_dst_session Select to enable the DoS status and logging, select the action to pass, block orproxy, and configure the threshold.The default threshold is 5000.
L4 Anomalies
tcp_syn_flood Select to enable the DoS status and logging, select the action to pass, block orproxy, and configure the threshold.The default threshold is 2000.
tcp_port_scan Select to enable the DoS status and logging, select the action to pass, block orproxy, and configure the threshold.The default threshold is 1000.
tcp_src_session Select to enable the DoS status and logging, select the action to pass, block orproxy, and configure the threshold.The default threshold is 5000.
tcp_dst_session Select to enable the DoS status and logging, select the action to pass, block orproxy, and configure the threshold.The default threshold is 5000.
udp_flood Select to enable the DoS status and logging, select the action to pass, block orproxy, and configure the threshold.
FortiManager 6.4.0 Administration Guide 215Fortinet Inc.

Firewall Policy & Objects
The default threshold is 2000.
udp_scan Select to enable the DoS status and logging, select the action to pass, block orproxy, and configure the threshold.The default threshold is 2000.
udp_src_session Select to enable the DoS status and logging, select the action to pass, block orproxy, and configure the threshold.The default threshold is 5000.
udp_dst_session Select to enable the DoS status and logging, select the action to pass, block orproxy, and configure the threshold.The default threshold is 5000.
icmp_flood Select to enable the DoS status and logging, select the action to pass, block orproxy, and configure the threshold.The default threshold is 250.
icmp_sweep Select to enable the DoS status and logging, select the action to pass, block orproxy, and configure the threshold.The default threshold is 100.
icmp_src_session Select to enable the DoS status and logging, select the action to pass, block orproxy, and configure the threshold.The default threshold is 300.
icmp_dst_session Select to enable the DoS status and logging, select the action to pass, block orproxy, and configure the threshold.The default threshold is 1000.
sctp_flood Select to enable the DoS status and logging, select the action to pass, block orproxy, and configure the threshold.The default threshold is 2000.
sctp_scan Select to enable the DoS status and logging, select the action to pass, block orproxy, and configure the threshold.The default threshold is 1000.
sctp_src_session Select to enable the DoS status and logging, select the action to pass, block orproxy, and configure the threshold.The default threshold is 5000.
sctp_dst_session Select to enable the DoS status and logging, select the action to pass, block orproxy, and configure the threshold.The default threshold is 5000.
Advanced Options Optionally, add a description of the policy, such as its purpose, or the changesthat have been made to it.
Interface policies
The IPv4 Interface Policy and IPv6 Interface Policy panes allow you to create, edit, delete, and clone interface policies.
FortiManager 6.4.0 Administration Guide 216Fortinet Inc.

Firewall Policy & Objects
On the Policy & Objects pane, from the Toolsmenu, select Display Options, and then selectthe IPv4 Interface Policy and IPv6 Interface Policy check boxes to display these options.
To create a new interface policy:
1. Ensure you are in the correct ADOM.2. Go to Policy & Objects > Policy Packages.3. In the tree menu for the policy package, click IPv4 Interface Policy or IPv6 Interface Policy.4. Click Create New, or, from the Create Newmenu, select Insert Above or Insert Below. By default, policies will be
added to the bottom of the list. The Create New Policy pane opens.5. Configure the following settings, then clickOK to create the policy:
Source
Interface Select the source zone from theObject Selector frame, or drag and drop theaddress from the object pane.
Address Select the source address.
Destination
Address Select the destination address.
Service Select the service.
Log Traffic Select the traffic to log: No Log, Log Security Events, or Log All Sessions.
AntiVirus Profile Select to enable antivirus and select the profile from the dropdown list.
Web Filter Profile Select to enable Web Filter and select the profile from the dropdown list.
Application Control Select to enable Application Control and select the profile from the dropdownlist.
IPS Profile Select to enable IPS and select the profile from the dropdown list.
Email Filter Profile Select to enable Email Filter and select the profile from the dropdown list.
DLP Sensor Select to enable DLP Sensor and select the profile from the dropdown list.
Advanced Options
comments Add comments about the policy.
dsri Enable or disable DSRI (default = disable).
scan-botnet-connections
Enable or disable scanning of connections to Botnet servers (default =disable).
Multicast policy
Multicasting consists of using a single source to send data to many receivers simultaneously, while conservingbandwidth and reducing network traffic.
FortiManager 6.4.0 Administration Guide 217Fortinet Inc.

Firewall Policy & Objects
On the Policy & Objects pane, from the Toolsmenu, select Display Options, and then selecttheMulitcast Policy checkbox to display this option.
To create a new multicast policy:
1. Ensure you are in the correct ADOM.2. Go to Policy & Objects > Policy Packages.3. In the tree menu for the policy package, clickMulticast Policy.4. Click Create New, or, from the Create Newmenu, select Insert Above or Insert Below. By default, policies will be
added to the bottom of the list. The Create New Policy pane opens.5. Configure the following settings, then clickOK to create the policy:
Incoming Interface Click in the field and select incoming interfaces from the multicast interface liston theObject Selector frame, or drag and drop the interface from the objectpane.If no multicast interfaces are configured, click the Create New Object button toopen the Create New Dynamic Multicast Interface window, and then create anew multicast interface.
Outgoing Interface Click in the field and select outgoing interfaces from the multicast interface list.If no multicast interfaces are configured, one must be created.
Source Address Click the field and select the source firewall addresses.
Source NAT Enable source NAT.
Source NAT Address Enter the source NAT IP address.
Destination Interface Click the field and select the destination firewall addresses.
Destination NAT Enter the destination NAT IP address.
Protocol Option Select a protocol option from the dropdown list: ANY, ICMP, IGMP, TCP, UDP,OSFP, orOthers.
Port Range Set the port range. This option is only available when Protocol Option is TCPor UDP.
Protocol Number Enter the protocol number, from 1 to 256. This option is only available whenProtocol Option isOthers.
Log Traffic Select to log traffic.
Advanced Options Enable or disable auto-asic-offload (default = enable).
Local in policies
The section describes how to create new IPv4 and IPv6 Local In policies.
FortiManager 6.4.0 Administration Guide 218Fortinet Inc.

Firewall Policy & Objects
On the Policy & Objects pane, from the Toolsmenu, select Display Options, and then selectthe IPv4 Local In Policy and IPv6 Local In Policy checkboxes to display these options.
To create a new Local In policy:
1. Ensure that you are in the correct ADOM.2. Go to Policy & Objects > Policy Packages.3. In the tree menu for the policy package in which you will be creating the new policy, select IPv4 Local In Policy or
IPv6 Local In Policy.4. Click Create New, or, from the Create Newmenu, select Insert Above or Insert Below. By default, policies will be
added to the bottom of the list. The Create New Policy pane opens.5. Enter the following information, then clickOK to create the policy:
Interface Click the field then select an interface from the object selector frame, or dragand drop the interface from the object pane.
Source Address Select source addresses.
Destination Address Select destination addresses, address groups,. virtual IPs, and virtual IPgroups.
Service Select services and service groups.
Schedule Select schedules, one time or recurring, and schedule groups.
Action Select an action for the policy to take: ACCEPT or DENY.
HA Management InterfaceOnly
Select to enable. This option is only available for IPv4 policies.
Traffic shaping policy
The section describes how to create new traffic shaping policies.
On the Policy & Objects pane, from the Toolsmenu, select Display Options, and then selectthe Traffic Shaping Policy checkbox to display this option.
To create a traffic shaping policy:
1. Ensure that you are in the correct ADOM.2. Go to Policy & Objects > Policy Packages.3. In the tree menu for the policy package in which you will be creating the new policy, select Traffic Shaping Policy. If
you are in the Global Database ADOM, select Traffic Shaping Header Policy or Traffic Shaping Footer Policy.4. Click Create New, or, from the Create Newmenu, select Insert Above or Insert Below. By default, policies will be
FortiManager 6.4.0 Administration Guide 219Fortinet Inc.

Firewall Policy & Objects
added to the bottom of the list. The Create New Policy pane opens.5. Enter the following information, then clickOK to create the policy:
IP Version Select the IP address version: IPv4 or IPv6.
Matching Criteria
Source InternetService
Turn source internet service on or off, then select services.
Source Address Select source addresses from theObject Selector frame, or drag and dropthem from the object pane..This option is only available when Source Internet Service is off.
DestinationInternet Service
Turn destination internet service on or off, then select services.
DestinationAddress
Select destination addresses, address groups, virtual IPs, and virtual IPgroups.This option is only available when Destination Internet Service is off.
Service Select services and service groups.This option is only available when Destination Internet Service is off.
ApplicationCategory
Select application categories.
Application Select applications.
URL Category Select URL categories.
Users Select users.
User Groups Select user groups.
Apply Shaper
Outgoing Interface Select outgoing interfaces.
Traffic Shaping Select traffic shapers.
Reverse TrafficShaping
Select traffic shapers.
Per-IP TrafficShaping
Select per IP traffic shapers.
Advanced Options
class-id Set the class ID (2 - 31, default = 0).
schedule Set the schedule (default = None).
FortiManager 6.4.0 Administration Guide 220Fortinet Inc.

Firewall Policy & Objects
Managing objects and dynamic objects
All objects within an ADOM are managed by a single database unique to that ADOM. Objects inside that database caninclude items such as addresses, services, intrusion protection definitions, antivirus signatures, web filtering profiles, etc.
Many objects now include the option to enable dynamic mapping. You can create new dynamic maps. When this featureis enabled, a table is displayed which lists the dynamic mapping information. You can also choose to add the object togroups, when available, and add tags.
When making changes to an object within the object database, changes are reflected immediately within the policy tablein the GUI; no copying to the database is required. If partial install is enabled, the edited object can be pushed to all thedevices that currently use it.
Dynamic objects are used to map a single logical object to a unique definition per device. Addresses, interfaces, virtualIPs, and an IP pool can all be addressed dynamically.
Not all policy and object options are enabled by default. See Display options on page 166.
Objects and dynamic objects are managed in the Policy & Objects > Object Configurations pane (on the bottom half ofthe screen when dual pane is enabled). The available objects vary, depending on the specific ADOM selected.
Objects are used to define policies, and policies are assembled into policy packages that you can install on devices.
Policy packages are managed in the Policy & Objects > Policy Packages pane (on the top half of the screen when dualpane is enabled). When you view a policy in a policy package, you edit the policy by dragging objects from othercolumns, policies, or the object selector frame and dropping the objects in cells in the policy. For more information seeDrag and drop objects on page 184.
On the Policy & Objects > Object Configuration pane, you can see whether an object is used inthe Used column, and you can right-click on an object to find out where the object is used(Where Used) or to add the object to a group (Grouping).
FortiManager objects are defined either per ADOM or at a global level.
FortiManager shows the last opened object for easy navigation. After opening an object, logoff and log on in the same browser. Navigate to Policy and Objects > Object Configurations inthe same ADOM. The last opened object is shown.
Create a new object
Objects can be created as global objects, or for specific ADOMs.
To create a new object:
1. Ensure you are in the correct ADOM.2. Go to Policy & Objects > Object Configurations.
FortiManager 6.4.0 Administration Guide 221Fortinet Inc.

Firewall Policy & Objects
3. Select the object type that you will be creating. For example, view the firewall addresses by going to FirewallObjects > Address.The firewall address list is displayed in the content pane. The available address or address group lists areselectable on the content pane toolbar.
4. From the Create Newmenu, select the type of address. In this example, Address was selected. The Create NewAddress pane opens.
You can select to add the object to groups and enable dynamic mapping. These optionsare not available for all objects.
5. Enter the required information, then clickOK to create the new object.
If you create Security Profiles that include Application Signature or Custom IPS Signature withthe same ID for multiple VDOMs, FortiManager will automatically change the ID. For example,multiple VDOMs in a FortiGate device having the same Custom IPS Signature will havedifferent IDs assigned by FortiManager while installing the policy. The Custom IPS Signaturename will remain the same, but the ID will be different for each VDOM.The automatic change of ID affects the attack_id in Custom IPS Signature and attack_idor vuln_id in Application Signature. The change in ID may occur even when importing apolicy from FortiGate device and re-installing the policy.You can view the modified ID in the Install Wizard by clicking Install Preview. Alternatively, youcan also go to Device Manager > [FortiGate_Name] > CLI Configurations> ips or DeviceManager > [FortiGate_Name] > CLI Configurations> application to view the modified ID forthe particular VDOM.
If you create an object in the Global Database, and assign the object to a regular ADOM, youcannot delete the object from the Global Database. You must unassign the object from theregular ADOM before deleting it from the Global Database.
If a 6.0 ADOM contains a Wildcard FQDN addresses, upgrading to a 6.2 ADOMwill assign aunique FQDN address to each wildcard object. This is only applicable if the FortiGate devicesthat are upgraded from FortiOS 6.0 to FortiOS 6.2.
FortiManager 6.4.0 Administration Guide 222Fortinet Inc.

Firewall Policy & Objects
Color code an object
Objects can be color coded for easy identification.
For objects other than the Dynamic Interface and Zone, the color coding option is available inAdvanced Options.
To color code an object:
1. Ensure you are in the correct ADOM.2. Go to Policy & Objects > Object Configurations .3. Select the object type that you will be creating. For example, view the interface by going to Zone/Interface >
Interface.The interface list is displayed in the content pane. The available interfaces are selectable on the content panetoolbar.
4. From the Create Newmenu, select the type of interface. In this example, Zone was selected. The Create New Zonepane opens.
5. Select or specify the values for the following fields:l Name - specify a name for the object.l Description - enter a brief description.l Color - select a color for this object from the drop-down.l Default Mapping - select the check box to configure the default mapping for this object. See Map a dynamicADOM object on page 228
l Per-Device Mapping - switch the slider toON for mapping this interface to a FortiGate device. See Interfacemapping on page 239
6. ClickOK.
If a color code is not selected while creating an object, black is assigned as the default color.The color coding for Dynamic Interface and Zone cannot be installed to the FortiGate devicesand can only be viewed in FortiManager. The color coding for other objects can be installed toFortiGate devices.
FortiManager 6.4.0 Administration Guide 223Fortinet Inc.

Firewall Policy & Objects
Support FQDN address objects in firewall policies
FortiManager 6.0 ADOMs contain firewall addresses of type Wildcard FQDN. In FortiManager 6.2 ADOMs, the firewalladdress type changed from Wildcard FQDN to FQDN. However ADOM upgrade from 6.0 to 6.2 continues to supportfirewall address objects of typeWildcard FQDN.
After upgrading a 6.0 ADOM to a 6.2 ADOM, firewall addresses with typeWildcard FQDN change to type FQDN, forexample:
After upgrading a 6.0 ADOM to a 6.2 ADOM, new _upg_wild_fqdn firewall address are automatically created for anyfirewall addresses of type FQDN in proxy policies that existed before the upgrade, for example:
When you view the proxy policy in the 6.2 ADOM after the upgrade, the proxy policy references the original firewalladdress object and the newly created _upg_wild_fqdn firewall address object, for example:
FortiManager 6.4.0 Administration Guide 224Fortinet Inc.

Firewall Policy & Objects
After upgrading to 6.2 ADOMs, you can create new firewall addresses with type FQDN, for example:
You can also select firewall addresses with type FQDN in firewall policies:
FortiManager 6.4.0 Administration Guide 225Fortinet Inc.

Firewall Policy & Objects
Creating an IPv6 Address Template
Create an IPv6 address template with predefined parameters. The template can then be applied when creating a newIPv6 address.
To create an IPv6 address template:
1. Ensure you are in the correct ADOM.2. Go to Policy & Objects > Object Configurations .3. Go to Firewall Objects> Addresses.
The address list is displayed in the content pane. The available interfaces are selectable on the content panetoolbar.
4. From the Create Newmenu, select IPv6 Address Template. The IPv6 Address Template pane opens.
5. Select or specify the values for the following and clickOK:
Name Specify the name for the IPv6 address template.
IPv6 Address Prefix Specify a prefix for the IPv6 address.
Subnet Segments There can only be six subnet segments. These can either be predefined or usercreated subnet segments.Select one of the following predefined subnet segments:l countryl statel cityl sitel lanl vlan
Create New To create a new segment, you must delete one of the existing predefinedsegments if you already have six subnet segments. Click Create New. Specify theSegment Name, Bits, and toggle Exclusive to Enable or Disable. ClickOK.
Edit Segment Click Edit Segment. Edit the Segment Name, Bits, and toggle Exclusive to Enableor Disable. ClickOK.
FortiManager 6.4.0 Administration Guide 226Fortinet Inc.

Firewall Policy & Objects
Edit Values for Segment Click Edit values for Segment. Click + to add a row. Specify the Name, select theFormat, and specify the Value. ClickOK.
Delete Select one or more subnet segments and click Delete.
The administrator can only define 6 segments and each segment can have a maximum of 16bits. The administrator can toggle Exclusive to Enable to only choose from the predefinedsegments.
The length of the IPv6 address prefix must be greater than 1 bit.
Promote an Object to Global Database
Objects from an ADOM can be promoted to the Global Database for reuse.
Existing objects or newly created objects can be promoted to the Global Database.
To promote an object:
1. Ensure you are in the correct ADOM.2. Go to Policy & Objects > Object Configurations .3. Select the object type that you want to promote. For example, view the interface by going to Zone/Interface >
Interface.The interface list is displayed in the content pane. The available interfaces are selectable on the content panetoolbar.
FortiManager 6.4.0 Administration Guide 227Fortinet Inc.

Firewall Policy & Objects
4. Right-click the object and select Promote to Global.5. If you want to rename the object, specify a new name in the New Name field. Leave the New Name field blank to
keep the original name for the object.6. Click Promote.
The object is now promoted to the Global Database.
Map a dynamic ADOM object
The devices and VDOMs to which a global object is mapped can also be viewed from the object list. You can add anobject to groups and enable dynamic mapping. These options are not available for all objects.
When the Dynamic Mapping option is available, select Create New to configure the dynamic mapping.
To configure a dynamic mapping via a CLI script, the configuration for the mapping must be defined in the dynamicobject under the config dynamic_mapping sub-tree. The CLI script must be run on a policy package instead of the devicedatabase. For information on running CLI scripts, see Scripts on page 102
Default mapping is only used when there is no per-device mapping for a particular device. Youmust have either a per-device mapping or a default mapping in a policy package. Otherwise,the policy package installation will fail.When you import a policy package, a per-device mapping is usually added when the object isalready used by a FortiGate.
Examples:
Example 1: Dynamic VIP
config firewall vipedit "vip1"…config dynamic_mapping
edit "FW60CA3911000089"-"root"set extintf "any"set extip 172.18.26.100set mappedip 192.168.3.100set arp-reply disable
nextend
end
Example 2: Dynamic Address
config firewall addressedit "address1"…config dynamic_mapping
edit "FW60CA3911000089"-"root"set subnet 192.168.4.0 255.255.255.0
nextend
end
FortiManager 6.4.0 Administration Guide 228Fortinet Inc.

Firewall Policy & Objects
Example 3: Dynamic Interface
config dynamic interface…
config dynamic_mappingedit "FW60CA3911000089"-"root"
set local-intf internalset intrazone-deny disable
nextend
end
Map a dynamic device object
Dynamic device objects can be mapped to FortiGate devices using per-device mapping.
To view the dynamic device objects:
1. Ensure you are in the correct ADOM.2. Go to Policy & Objects > Object Configurations.3. Go to Tools > Display Options.4. Select Dynamic Object and clickOK.
The following device objects are available:
l Create a Local Certificate on page 229l Create a VPN Tunnel on page 230l Create Multicast Interface on page 231
When an object is added to a policy package and assigned to an ADOM, the object is availablein all devices that are part of the ADOM. If the object is renamed on a device locally,FortiManager automatically syncs the object to the ADOM.
Create a Local Certificate
Create a local certificate to sync with devices using per-device mapping.
To create a local certificate:
1. Ensure you are in the correct ADOM.2. Go to Policy & Objects > Object Configurations.3. Go to Dynamic Object > Local Certificate.4. Click Create New. The Create New Dynamic Local Certificate pane opens.
FortiManager 6.4.0 Administration Guide 229Fortinet Inc.

Firewall Policy & Objects
5. Select or specify the values for the following and clickOK:
Name Specify the name for the Dynamic Local Certificate.
Description Specify a description.
Per-Device Mapping Toggle Per-Device Mapping toON. Click Create New. Select theMappedDevice and VPN Local Certificate. ClickOK.
Create a VPN Tunnel
Create a VPN tunnel to sync with devices using per-device mapping.
To create a VPN tunnel:
1. Ensure you are in the correct ADOM.2. Go to Policy & Objects > Object Configurations.3. Go to Dynamic Object > VPN Tunnel.4. Click Create New. The Create New Dynamic VPN Tunnel pane opens.
5. Select or specify the values for the following and clickOK:
Name Specify the name for the Dynamic VPN Tunnel.
Description Specify a description.
Per-Device Mapping Toggle Per-Device Mapping toON. Click Create New. Select theMappedDevice and VPN Tunnel. ClickOK.
FortiManager 6.4.0 Administration Guide 230Fortinet Inc.

Firewall Policy & Objects
Create Multicast Interface
Create a Multicast Interface to sync with devices using per-device mapping.
To create a Multicast Interface:
1. Ensure you are in the correct ADOM.2. Go to Policy & Objects > Object Configurations.3. Go to Dynamic Object > Multicast Interface.4. Click Create New. The Create New Dynamic Multicast Interface pane opens.
5. Select or specify the values for the following and clickOK:
Name Specify the name for the Dynamic Multicast Interface.
Description Specify a description.
Default Mapping Toggle Per-Device Mapping toON and specify the interface for defaultmapping.
Per-Device Mapping Toggle Per-Device Mapping toON. Click Create New. Select theMappedDevice and Interface. ClickOK.
Map a dynamic device group
When you create and edit a device group, you can choose whether to use the FortiManager ADOM or the FortiGatedevice to manage members for the device group.
To create a dynamic device group:
1. Ensure you are in the correct ADOM.2. Go to Policy & Objects > Object Configurations > User & Device > Customer Devices & Groups.3. From the Create Newmenu, select Device Group.4. Complete the following options, then clickOK.
Group Name Type a name for the device group.
FortiManager 6.4.0 Administration Guide 231Fortinet Inc.

Firewall Policy & Objects
Managed on ADOM Specify whether to use the FortiManager ADOM or the FortiGate device tomanage members for the device group. When you select theManaged onADOM checkbox, the FortiManager ADOMmanages members for the object,and you must specify members for the object. When you clear theManage onADOM checkbox, the FortiGate device manages members for the object, andyou must specify members by using FortiGate, not FortiManager.
Members Select members for the device group.
Comments (Optional) Type a comment.
Per-Device Mapping Select to enable dynamic mapping for a device.
Remove an object
To remove an object:
1. Ensure you are in the correct ADOM.2. Go to Policy & Objects > Object Configurations.3. In the tree menu, select an object type. The content pane displays the objects for the object type.4. Select the object, and click Delete.
Edit an object
After editing an object in the object database, the changes are immediately reflected within the policy table in the GUI; nocopying to the database is required. If partial install is enabled, the edited object can be manually pushed to all devicescurrently using that object, see Push to device on page 233.
To edit an object:
1. Ensure you are in the correct ADOM.2. Go to Policy & Objects > Object Configurations.3. In the tree menu, select an object type. The content pane displays the objects for the object type.4. Select an object, then click Edit.5. Edit the information as required, and clickOK.
Objects can also be edited directly from the policy list andObject Selector frame by right-clicking on the object and selecting Edit.
When an object is added to a policy package and assigned to an ADOM, the object is availablein all devices that are part of the ADOM. If the object is renamed on a device locally,FortiManager automatically syncs the object to the ADOM and applies the change to alldevices in the ADOM.
FortiManager 6.4.0 Administration Guide 232Fortinet Inc.

Firewall Policy & Objects
Push to device
An object can be manually pushed to all devices that are currently using that object. Partial install must be enabled in theCLI for this option to be available.
To enable partial install:
In the CLI Console widget, or any terminal emulation software, enter the following commands:
config system globalset partial-install enable
end
To push an object or objects to devices:
1. In theObject Configurations pane, locate the objects to push.2. Select the objects then clickMore > Push To Device in the toolbar, or right-click on the objects and select Push To
Device.The Push To Device dialog box opens, and the selected object or objects are pushed to all of the devices thatcurrently use them.
After an object is pushed to a device, policy packages will be flagged as modified until the nexttime the packages are installed.
Global database objects cannot be pushed to devices.
Clone an object
If a new object that you are creating is similar to a previously created object, the new object can be created by cloning theprevious object.
To clone an object:
1. Ensure you are in the correct ADOM.2. Go to Policy & Objects > Object Configurations.3. In the tree menu, select an object type. The content pane displays the objects for the object type.4. Right-click an object, and select Clone. The Clone pane is displayed.5. Adjust the information as required, and clickOK to create the new object.
Search objects
The search objects tool allows you to search objects based on keywords.
FortiManager 6.4.0 Administration Guide 233Fortinet Inc.

Firewall Policy & Objects
To dynamically search objects:
1. Ensure you are in the correct ADOM.2. Go to Policy & Objects > Object Configurations.3. In the tree menu, select an object type. The content pane displays the objects for the object type.4. In the search box on the right side lower content frame toolbar type a search keyword. The results of the search are
updated as you type and displayed in the object list.
Select View > Icon View to view the objects as icons. Select View > Table View to view theobjects in a table format.
Find unused objects
To find unused objects:
1. Ensure you are in the correct ADOM.2. Go to Policy & Objects.3. From the Toolsmenu, select Unused Objects. The Unused Objects dialog box is displayed.4. When you are done, click Close.
The Used column on theObject Configurations pane will also show you if an object is used ornot.
Find and merge duplicate objects
Duplicate objects have the same definition, but different names. You can find duplicate objects and review them. Youthen have the option to merge duplicate objects into one object.
To find duplicate objects:
1. Go to Policy & Objects.2. From the Toolsmenu, select Find Duplicate Objects. The Duplicate Objects dialog box is displayed.3. Review the groups of duplicate objects.4. ClickMerge to merge a group of duplicate objects into one object.5. When you are done, click Close.
Export signatures to CSV file format
You can export Intrusion Prevention signatures (IPS) and Application Control signatures to a file CSV format.
FortiManager 6.4.0 Administration Guide 234Fortinet Inc.

Firewall Policy & Objects
To export signatures to CSV format:
1. If using ADOMs, ensure that you are in the correct ADOM.2. Go to Policy & Objects > Object Configurations.3. In the tree menu, select Application Control or Intrusion Prevention.4. Click Create New to create a new object, or double-click an exiting object to open it for editing.5. Click Add Signatures.
The Add Signatures dialog box is displayed.
6. Click Export to CSV.The Export to CSV dialog box is displayed.
7. (Optional) Change the file name.8. Select whether to export all columns or only customized columns.9. Click Download.
CLI Configurations
FortiManager adds the ability to configure objects that are available only via the FortiOS command line interface, as wellas settings that are not available in the FortiManager GUI.
FortiManager 6.4.0 Administration Guide 235Fortinet Inc.

Firewall Policy & Objects
FortiToken configuration - example
To configure FortiToken objects for FortiToken management:
1. Ensure you are in the correct ADOM.2. Go to Policy & Objects > Object Configurations.3. Go to User & Device > FortiTokens.4. Click Create New.5. Type the serial number or serial numbers of the FortiToken unit or units and clickOK. Up to ten serial numbers can
be entered.6. Go to User & Device > User Definition to create a new user.7. When creating the new user, select FortiToken, and then select the FortiToken from the dropdown menu.8. Go to User & Device > User Groups, create a new user group, and add the previously created user to this group.9. Install a policy package to the FortiGate, as described in Install a policy package on page 171.10. On the FortiGate, select User > FortiToken. Select one of the newly created FortiTokens, then selectOK to activate
the FortiToken unit.
FSSO user groups
FSSO user groups can be retrieved directly from FSSO, from an LDAP server, via a remote FortiGate device, or bypolling the active directory server. Groups can also be entered manually.
When user groups are retrieved from an LDAP server, the information is cached on FortiManager for 24 hours by default.After the time expires, the information is deleted from the cache. You can change the default setting by using theconfig system global command with the ldap-cache-timeout variable. For more information, see theFortiManager CLI Reference.
When you upgrade an ADOM from 5.4 or 5.6 to 6.0.0 and later, objects are automaticallymoved from Policy & Objects > Object Configurations > User & Device > Single Sign-On toPolicy & Objects > Object Configurations > Fabric Connectors > SSO/Identity.
To get groups from FSSO:
1. Ensure you are in the correct ADOM.2. Go to Policy & Objects > Object Configurations.3. Expand Fabric Connectors, and select SSO/Identity.4. Click Create New > Fortinet Single Sign-On Agent from the drop-down list.5. Enter a unique name for the agent in the Name field.6. Enter the IP address or name, password, and port number of the FSSO servers in the FSSO Agent field. Add and
remove servers as needed by clicking the Add and Remove icons at the end of the rows.7. Select Collector Agent in the User Group Source field.
FortiManager 6.4.0 Administration Guide 236Fortinet Inc.

Firewall Policy & Objects
8. Click Apply & Refresh. The Retrieve FSSO User Groups dialog box will open.
9. Click Next. The groups are retrieved from the FSSO.10. ClickOK. The groups can now be used in user groups, which can then be used in policies.
To get groups from an LDAP server:
1. Ensure you are in the correct ADOM.2. Go to Policy & Objects > Object Configurations.3. Expand Fabric Connectors, and select SSO/Identity.4. Click Create New > Fortinet Single Sign-On Agent from the drop-down list.
5. Enter a unique name for the agent in the Name field.6. Select Local in the User Group Source.7. Select an LDAP server from the drop-down list. LDAP Servers can be added and configured from User & Device >
LDAP Servers.8. Toggle Proactively Retrieve from LDAP Server to ON.9. Specify the value for the Search Filter and the Interval in minutes.10. For the Select LDAP Groups option, select Remote Server. Alternatively, selectManually Specify and specify the
group names.11. SelectOK.
To get groups via a remote FortiGate:
The FortiGate device configuration must be synchronized or retrieving the FSSO user groupswill fail. See Checking device configuration status on page 82.
FortiManager 6.4.0 Administration Guide 237Fortinet Inc.

Firewall Policy & Objects
1. Go to Policy & Objects > Object Configurations.2. Expand Fabric Connectors, and select SSO/Identity.3. Click Create New > Fortinet Single Sign-On Agent from the drop-down list. The Create New Fortinet Single Sign-On
Agent window opens.
4. Enter a unique name for the agent in the Name field.5. Enter the IP address or name, password, and port number of the FSSO servers in the FSSO Agent field. Add and
remove servers as needed by clicking the Add and Remove icons at the end of the rows.6. Select Via FortiGate in the Select FSSO Groups field.7. Click Apply & Refresh. The Retrieve FSSO User Groups wizard will open.
8. Click Next to proceed with the wizard.9. Select the device that the FSSO groups will be imported from. This device must be authorized for central
management by FortiManager, its configuration must be synchronized, and it must be able to communicate with theFSSO server.
10. Click Next. The FSSO agent is installed on the FortiGate, the FortiGate retrieves the groups, and then the groupsare imported to the FortiManager.
FortiManager 6.4.0 Administration Guide 238Fortinet Inc.

Firewall Policy & Objects
11. After the groups have been imported, click Finish. The imported groups will be listed in the User Groups field.
12. ClickOK. The groups can now be used in user groups, which can then be used in policies.
You must rerun the wizard to update the group list. It is not automatically updated.
To get groups from AD:
1. Ensure you are in the correct ADOM.2. Go to Policy & Objects > Object Configurations.3. Expand Fabric Connectors, and select SSO/Identity.4. Click Create New > Poll Active Directory Server from the drop-down list.5. Configure the server name, local user, password, and polling.6. Select an LDAP server from the drop-down list. LDAP Servers can be added and configured from User & Device >
LDAP Servers.7. Select groups from theGroups tab, then select Add Selected to add the groups.
You can also selectManually Specify in the Select LDAP Groups field, and then manually enter the group names.8. SelectOK.
Interface mapping
After creating an interface on the FortiManager, an interface mapping must be created so that the new interface can beused when creating policies. To do this, create a new dynamic interface with per-device mapping.
To create a new dynamic interface with per-device mapping:
1. Ensure you are in the correct ADOM.2. Go to Policy & Objects > Object Configurations.3. Go to Zone/Interface > Interface and click Create New > Dynamic interface.4. Enter a name and description for the dynamic interface.5. Turn on Per-Device Mapping.6. Click Add. The Per-Device Mapping dialog box opens.
FortiManager 6.4.0 Administration Guide 239Fortinet Inc.

Firewall Policy & Objects
7. Select the device or VDOM in theMapped Device field, select the interface in the Device Interface field, then clickOK.
8. ClickOK to create the new dynamic interface object.The mapped interface can now be used when creating policies.
VIP mapping
Normally, Virtual IP (VIP) objects map to a single interface, or ANY, just as with FortiOS. In the special case where theinterface that the VIP is bound to belongs to a zone, FortiManager handles importing and installing the object in a uniqueway.
When importing a policy package, the VIP is bound to the zone instead of the interface. If per-device mapping is enabledfor the VIP, FortiManager automatically adds dynamic mapping for that device that maps the VIP to the specificinterface. To use the VIP on another FortiGate, you can add an interface mapping entry for the other FortiGate. The zoneacts as filter, limiting the interfaces that can be selected. That is, you can only select an external interface that is amember of the selected zone.
FortiManager binds the VIP to a zone because it needs to know which policies the VIP could be applied to. FortiGatedevices use different logic because they already know the zone membership.
In FortiOS, VIPs can only by bound to an interface, and not a zone. Consequently, if there is no matching per-devicemapping, FortiManager will convert the binding to ANY when installing configuration changes to FortiGate. Dependingon the circumstance, this can be avoided by:
l Leaving per-device mapping enabled on the VIP at the ADOM, and letting FortiManager add the required per-device mappings.
l If you are configuring FortiManager to start using the VIP on other FortiGates, adding the per-device mappingsmanually.
Modify existing interface-zone mapping
Interfaces mapped to a zone locally on FortiGate devices are not visible in Device Manager on FortiManager. It isrecommended to create objects in FortiManager instead of creating it on FortiGate devices locally. If an interface isalready mapped to a zone in FortiGate, it must be unmapped first. A zone must be created in FortiManager, added to apolicy and installed to FortiGate. For convenience and ease of use, it is better to manage Object Configuration andInterface Mapping from FortiManager.
If an Interface is mapped to a Zone in FortiGate:
1. Log on to the FortiGate device.2. Delete the Interface/Zone mapping from Interfaces > [Interface_Name] > Delete.3. Log on to FortiManager.4. Go to Policy & Objects >Object Configurations.5. Click Create New > Zone. Configure the settings and create a zone named Zone_One. Enable Per-Device Mapping
and select theMapped Device and Device Interface.6. Go to Policy & Objects > Policy Packages. Select Create New from the Policy Package drop-down.7. In the Create New Policy Package dialog, specify the name as New_Policy_Package.8. Click the New_Policy_Package and click Create New. Specify the name as New_IPv4_Policy and include Zone_
One in the policy.
FortiManager 6.4.0 Administration Guide 240Fortinet Inc.

Firewall Policy & Objects
9. Click New_IPv4_Policy and click Installation Target. Assign the FortiGate device to this policy.10. Right-click New Policy Package and select Install Wizard. Select Install Policy Package & Device Settings and
select the New Policy Package from the drop-down. Complete the installation as per the Install Wizard.Zone_One is now available on the FortiGate device and mapped as specified in step 5.
A zone is installed to a FortiGate device only if it is created, mapped to an interface, included inthe Policy Package, assigned to a device, and installed using the Install Wizard.
An interface cannot be reused if it is already mapped to a zone. To reuse an interface, firstunmap it from the zone inObject Configurations, and then reinstall to the FortiGate device.
After a Virtual IP is created, it must be mapped to interfaces. If per-device mapping is used, themapping will be visible immediately in Device Manager > [ Device_Name] > Interface.
Create a new shaping profile
Create a new shaping profile to manage traffic. After the profile is created, you can assign it to an interface.
To create a new shaping profile:
1. Ensure you are in the correct ADOM.2. Go to Policy & Objects > Object Configurations.3. Go to Firewall Objects > Shaping Profile.4. Click Create New. The Create New Shaping Profile pane opens.
FortiManager 6.4.0 Administration Guide 241Fortinet Inc.

Firewall Policy & Objects
5. Select or specify the values for the following and clickOK:
Name Specify the name for the shaping profile.
Default Shaping Group Specify a default shaping group between 2-31.
Comments Optionally enter comments about the shaping profile.
Additional Shaping Groups Click Create New. Specify the Shaping Group,Guaranteed Bandwidth(%),Maximum Bandwidth(%) and Priority. ClickOK.
6. Assign the shaping profile to an interface. See Assigning a shaping profile on page 242.
After shaping profiles are defined, they can be assigned to each ADOM interface you want todo traffic shaping for egress. The shaping profile can be set as default as well as in dynamicmapping. Any changes to the shaping profile is applied to the FortiGate devices dynamically.
Assigning a shaping profile
You can assign an interface-based shaping profile for each device.
To display this option, go to Device Manager > Device & Groups. From the dashboard toolbar,select Display Options, and then select the Interface checkbox.
To assign a shaping profile:
1. Go to Device Manager > Device & Groups.a. In the tree menu, select the device group.b. Below the tree menu, select a device.
2. In the dashboard toolbar, go to System > Interface.3. Select an interface from the list. The Edit Interface page opens.4. Toggle Shaping Profile toON. The Egress and Ingress dropdowns are displayed.5. Select a shaping profile from the dropdown, and then clickOK.
Viewing the traffic shaping monitor
You can view the Traffic Shapingmonitor in the Device & Groups pane of the Device Manager.
To display this option, go to Device Manager > Device & Groups. From the dashboard toolbar,select Display Options, and then select the Traffic Shaping checkbox.
FortiManager 6.4.0 Administration Guide 242Fortinet Inc.

Firewall Policy & Objects
To view the Traffic Shaping monitor:
1. Go to Device Manager > Device & Groups.a. In the tree menu, select the device group.b. Below the tree menu, select a device.
2. In the dashboard toolbar, go toMonitor > Traffic Shaping.3. From the dropdown, select an interface.
l The Bandwidth chart shows the bandwidth for each class.l The Dropped Bytes chart shows the statistics for bytes dropped after shaping is applied.l The table below the charts contains a legend for all class IDs and shows which applications are affected.
ADOM revisions
ADOM revision history allows you to maintain a revision of the policy packages, objects, and VPN console settings in anADOM. Revisions also include templates for SD-WAN, FortiAP, and FortiSwitch modules when central management isenabled for SD-WAN, FortiAP, and FortiSwitch.
Revisions can be automatically deleted based on given variables, and individual revisions can be locked to prevent thembeing automatically deleted.
To configure ADOM revisions, go to Policy & Objects, and click ADOMRevisions.
This page displays the following:
ID The ADOM revision identifier.
Name The name of the ADOM revision. This field is user-defined when creating theADOM revision.
FortiManager 6.4.0 Administration Guide 243Fortinet Inc.

Firewall Policy & Objects
A green lock icon will be displayed beside the ADOM revision name when youhave selected Lock this revision from auto deletion.
Created by The administrator that created the ADOM revision.
Created Time The ADOM revision creation date and time.
Comment Optional comments typed in the Description field when the ADOM revision wascreated.
The following options are available:
Create New Select to create a new ADOM revision.
Edit Right-click on a revision in the table and select Edit in the menu to edit the ADOMrevision.
Delete Right-click on a revision in the table and select Delete in the menu to delete theADOM revision.When Lock this revision from auto deletion is selected, you are not able to deletethe ADOM revision.
Restore Right-click on a revision in the table and select Restore in the menu to restore theADOM revision. Restoring a revision will revert policy packages, objects and VPNconsole to the selected version. SelectOK to continue.
More > Lock Revision Right-click on a revision in the table and select Lock from theMoremenu to lockthis revision from auto deletion.
More > Unlock Revision Right-click on a revision in the table and select Unlock from theMoremenu tounlock this revision. When the ADOM revision is in an unlocked state, autodeletion will occur in accordance with your auto deletion settings.
View Revision Diff Right-click on a revision in the table and select View Revision Diff in the menu.The Summary page will be displayed. This page shows the revision differencesbetween the selected revision and the current database.
Settings Select to configure the automatic deletion settings for ADOM revisions.
Close Select to close the ADOMRevision dialog box and return to the Policy & Objectstab.
To create a new ADOM revision:
1. Go to Policy & Objects, and click ADOMRevisions. The ADOMRevision dialog box opens.2. Click Create New. The Create New Revision dialog box opens.3. Type a name for the revisions in the Name field.4. Optionally, type a description of the revision in the Description field.5. To prevent the revision from being automatically deleted, select Lock this revision from auto deletion.6. ClickOK to create the new ADOM revision.
FortiManager 6.4.0 Administration Guide 244Fortinet Inc.

Firewall Policy & Objects
To edit an ADOM revision:
1. Open the ADOMRevisions dialog box.2. Select a revision, and click Edit. The Edit Revision dialog box opens.3. Edit the revision details as required, then clickOK to apply your changes.
To delete ADOM revisions:
1. Open the ADOMRevisions dialog box.2. Select a revision, and click Delete.
You can select multiple revisions by selecting the checkbox beside each revision.3. ClickOK in the confirmation dialog box to delete the selected revision or revisions.
To configure automatic deletion:
1. Open the ADOMRevisions dialog box, and click Settings.2. Select Auto delete revision to enable to automatic deletion of revisions.3. Select one of the two available options for automatic deletion of revisions:4. Keep last x revisions: Only keep the entered numbered of revisions, deleting the oldest revision when a new
revision is created.5. Delete revisions older than x days: Delete all revisions that are older than the entered number of days.6. ClickOK to apply the changes.
To restore a previous ADOM revision:
1. Open the ADOMRevisions window.2. Select a revision, and click Restore. A confirmation dialog box will appear.3. ClickOK to continue.
The Restore Revision dialog box opens. Restoring a revision will revert policy packages, objects and VPN consoleto the selected version.
4. ClickOK to continue.
To lock or unlock an ADOM revision:
1. Open the ADOMRevisions window.2. Do one of the following:
l Select a revision, and select Lock or Unlock from theMoremenu.l Edit the revision, and select or clear the Lock this revision from auto deletion checkbox in the Edit ADOMRevision dialog box.
FortiManager 6.4.0 Administration Guide 245Fortinet Inc.

Firewall Policy & Objects
To view ADOM revision diff:
1. Open the ADOMRevisions window.2. Select a revision, and click View Revision Diff. The Revision Diffs Between dialog box opens.
This page displays allGlobal Policy, Policy Package, and Policy Objects changes between the revision selectedand the current database.
3. Select [Details] to view all details on the changes made to policies and objects.4. You can select to download this information as a CSV file to your management computer.5. Click Close to return to the ADOMRevisions window.
FortiManager 6.4.0 Administration Guide 246Fortinet Inc.

Fabric View
The Fabric Viewmodule enables you to view Security Fabric Ratings of configurations for FortiGate Security Fabricgroups as well as create fabric connectors. The Fabric View tab is available in version 6.0 ADOMs and later.
This section contains the following topics:
l Security Fabric Topology on page 247l Physical Topology on page 248l Logical Topology on page 249l Filter Topology Views on page 250l Search Topology Views on page 250l Security Rating on page 251l Fabric Connectors on page 252
Security Fabric Topology
You can see the Security Fabric topology in the FortiManager GUI, in the Fabric Viewmenu. You can choose thePhysical Topology or Logical Topology views. In both topology views, you can hover over device icons and use filteringand sorting options to see more information about devices and your organization's network. Go to Fabric View and selectthe Fabric group to see the whole topology for that Fabric group.
WAN Cloud Icon
TheWAN cloud icon, in the Physical and Logical Topology views, allows you to receive destination data from thefollowing options in the drop-down menu: Internet, owner IP address, and country/region. These options are available inthe Physical Topology and the Logical Topology view, when you select Device Traffic in the menu in the top right corner.
When you set the WAN cloud icon to Owner, the destination hosts are simplified to a fixed size donut chart. This chartshows the percentage division between Internal hosts (with private IP addresses) and Internet hosts. To see which colorrepresents each host, hover over either color. To zoom in on the total number of hosts, click on the donut graph.
Switch stacking
FortiAP and FortiSwitch links are enhanced in the Security Fabric’s Logical and Topological views to show LinkAggregation Groups for the Inter-switch Link (ISL-LAG). This makes it easier to identify which links are physical links andwhich links are ISL-LAG. To quickly understand connectivity when you look at multiple link connections, ISL-LAG is
FortiManager 6.4.0 Administration Guide 247Fortinet Inc.

Fabric View
identified with a thicker single line. To identify ISL-LAG groups with more than two links, you can also look at the portendpoint circles as references.
Physical Topology
The Physical Topology view shows the devices in the Security Fabric and the devices they are connected to. You canalso select whether or not to view access layer devices in this topology. To see the Physical Topology, in FortiManagerGUI, select Fabric View > Physical Topology.
The Physical Topology view displays your network as a bubble chart of interconnected devices. These devices aregrouped based on the upstream device they are connected to. The bubbles appear smaller or larger, based on theirtraffic volume. You can double-click any bubble to resize it and view more information about the device. FortiGatedevices and other networking devices are depicted as boxes.
You can hover over the icon for each FortiGate to see information, such as serial number, hostname, and firmwareversion. You can hover over the bubbles of other devices to see information about them, such as name, IP address, andtraffic volume data.
FortiManager 6.4.0 Administration Guide 248Fortinet Inc.

Fabric View
Security Fabric Rating recommendations are also shown in the topology, beside the icon of the device therecommendations apply to.
Logical Topology
The Logical Topology view is similar to the Physical Topology view, but it shows the network interfaces, logical orphysical, that are used to connect devices in the Security Fabric.
To see the Logical Topology, in FortiManager GUI, select Fabric View > Logical Topology.
The Logical Topology view displays your network as a bubble chart of network connection endpoints. These devices aregrouped based on the upstream device interface they are connected to. The bubbles appear smaller or larger, based ontheir traffic volume. You can double-click any bubble to re-size it. FortiGate devices and other networking devices aredepicted as boxes.
You can hover over the icon for each FortiGate to see information, such as serial number, hostname, and firmwareversion. You can also see each FortiGate interface that has upstream and downstream devices connected to it. You canhover over the name of an interface to see its IP address, network (subnet), and role.
FortiManager 6.4.0 Administration Guide 249Fortinet Inc.

Fabric View
Security Fabric Rating recommendations are also shown in the topology, beside the icon of the device therecommendations apply to.
Filter Topology Views
You can use filters to narrow down the data on the topology views to find specific information.
To filter the topology views by device or vulnerability:
In the drop-down menu to the right of the Search field, select one of the following:
l Device Trafficl Device Countl Device Typel Vulnerabilityl No Device
To filter the topology views by traffic options:
To sort the topology by traffic options, in the Sort By drop-down menu, select one of the following:
l Bytes (Sent/Received)l Packets (Sent/Received)l Bandwidthl Session
Search Topology Views
The search bar, located above the Physical and Logical Topology views, can help you easily find what you're looking forin the network topology and quickly resolve security issues. The search highlights devices that match your searchcriteria, and grays out devices that don't match.
To see a list of items that you can search for, mouse over the search bar and a tool tip appears that shows SearchableInformation list, organized by host and by Fortinet device type. The following image shows the search bar and theSearchable Information list:
FortiManager 6.4.0 Administration Guide 250Fortinet Inc.

Fabric View
l For hosts, you can search for host information, such as status, host name, and server.l For FortiGate, you can search for device information, such as serial number, host name, and management IPaddress.
l For FortiSwitch and FortiAP, you can search for device information, such as serial number, name and OS version.
Security Rating
The Fabric View > Security Rating pane displays Security Fabric Ratings of configurations for FortiGate Security Fabricgroups. You can view the results for multiple FortiGate Security Fabric groups. You must generate the Security FabricRatings by using FortiOS before you can view the information in FortiManager.
The following information is available on the Security Rating pane:
Tree menu Displays the list of Security Fabric groups. Each group is identified by its rootFortiGate unit.
Security Score The results of the Security Fabric Rating. For information about each of thechecks that are performed, see the Fortinet Recommended Security BestPractices document.
Failed <number> Click to filter the content pane to display only failed results. The number of failuresis displayed in brackets.
All Results <number> Click to filter the content pane to display all results. The total number of results isdisplayed in brackets.
FortiManager 6.4.0 Administration Guide 251Fortinet Inc.

Fabric View
All FortiGates Click to view results for all FortiGate units in the selected Security Fabric group, orclick individual FortiGate units to view only its results.
Issues You can expand and contract the list of issues. For example, click Fabric SecurityHardening to expand and contract the rows of information about that issue.
FortiGate Displays the name of the FortiGate unit. Hover your mouse over the name todisplay more information about the device.
Result Displays the result of the Security Fabric Rating for the specific issue.
Recommendation Displays the recommended action for the issue.
Enabling the Security Rating tab
The Security Rating tab is displayed when FortiManager is managing FortiGate units that have Security Fabric enabledand are part of a Security Fabric group.
If ADOMs are enabled in FortiManager, the Security Rating tab is only available in FortiGate ADOMs that contain aSecurity Fabric group.
Viewing Security Fabric Ratings
You can view Security Fabric Ratings of configurations for all FortiGate units in a Security Fabric Group or for individualFortiGate units in a Security Fabric group.
You cannot use FortiManager to generate Security Fabric Ratings; you must use FortiOS togenerate Security Fabric Ratings for a FortiGate Security Fabric group, and then you can seethe Security Fabric Ratings in FortiManager.For more information about each of the checks that are performed, see the FortinetRecommended Security Best Practices document.
To view Security Fabric Ratings:
1. If using ADOMs, ensure that you are in the correct ADOM.2. Go to Fabric View > Security Rating.3. In the tree menu, select the Security Fabric group.
The Security Fabric Rating results are displayed in the content pane for the selected Security Fabric group.You can filter the results. For example, you can view only failed results by clicking the Failed <number> button, andyou can click the All Results <number> button to view all results again.
4. In the content pane, select All FortiGates to view results for all FortiGates in the group, or select individual FortiGateunits to display results for only the selected unit.
Fabric Connectors
You can use FortiManager to create the following types of fabric connectors:
FortiManager 6.4.0 Administration Guide 252Fortinet Inc.

Fabric View
l SDNl Threat Feedsl SSO/Identity
You can create multiple fabric connectors of the same type in FortiManager. This is applicableonly for ADOM version 6.2.
SDN
You can use the Fabric Connectors tab to create SDN fabric connectors for the following products:
l Cisco Application Centric Infrastructure (ACI)l AmazonWeb Services (AWS)l Microsoft Azurel VMware NSXl VMware NSX-Tl Nuage Virtualized Services Platforml Horizon (OpenStack)l Oracle Cloud Infrastructurel VMWare ESXil VMware vCentre
The fabric connectors in FortiManager define the type of connector and include information for FortiGate tocommunicate with and authenticate with the products. In some cases FortiGate units must communicate with productsthrough the Fortinet SDN Connector, and in other cases FortiGate units communicate directly with the products.
FortiGate works with Fortinet SDN Connector to communicate with the following products:
l Cisco Application Centric Infrastructure (ACI)l Nuage Virtualized Services Platform
For more information about Fortinet SDN Connector, see the Fortinet Document Library.
You cannot import a policy package for Fortinet SDN Connector from FortiGate toFortiManager.
FortiGate works without Fortinet SDN Connector to communicate directly with the following products:
l AmazonWeb Services (AWS)l Microsoft Azurel VMware NSXl Horizon (OpenStack)l Oracle Cloud Infrastructurel VMWare ESXi
This section contains the following topics:
FortiManager 6.4.0 Administration Guide 253Fortinet Inc.

Fabric View
l Creating ACI fabric connectors on page 254l Creating AWS fabric connectors on page 255l Creating Microsoft Azure fabric connectors on page 256l Creating VMware NSX fabric connectors on page 257l Creating VMware NSX-T connector example on page 259l Creating Nuage fabric connectors on page 267l Creating Horizon connector on page 270l Creating Oracle Cloud Infrastructure (OCI) connector on page 272l Creating VMWare ESXi connector on page 273l Creating VMware vCenter connectors example on page 279l Importing address names to fabric connectors on page 268l Configuring dynamic firewall addresses for fabric connectors on page 269l Configuring virtual wire pairs on page 270
Creating ACI fabric connectors
With FortiManager, you can create a fabric connector for Application Centric Infrastructure (ACI), and then importaddress names from ACI to automatically create dynamic objects that you can use in policies. When you install thepolicies to one or more FortiGate units, FortiGate uses the information and Fortinet SDN Connector to communicate withACI and dynamically populate the objects with IP addresses.
When you create a fabric connector for ACI, you are specifying how FortiGate can communicate with ACI throughFortinet SDN Connector. As a result, you are configuring communication and authentication information for FortinetSDN Connector.
If ADOMs are enabled, you can create multiple fabric connectors per ADOM; however, each fabric connector requires aunique IP address.
Requirements:
l FortiManager version 5.6 ADOM or laterThe method described in this topic for creating fabric connectors requires version 6.0 ADOM or later.
l FortiGate is managed by FortiManager.l The managed FortiGate unit is configured to work with Application Centric Infrastructure (ACI).
To create a fabric connector object for ACI:
1. Go to Fabric View > Fabric Connectors.2. Click Create New. The Create New Fabric Connector wizard is displayed.3. Under SDN, select ACI, and click Next.4. Configure the following options, and then clickOK:
Name Type a name for the fabric connector object.
Type Displays Application Centric Infrastructure (ACI).
IP Type the IP address for Fortinet SDN Connector.
Port Identify the port used for Fortinet SDN Connector.
FortiManager 6.4.0 Administration Guide 254Fortinet Inc.

Fabric View
Perform one of the following options:l Click Use Default to use the default port.l Click Specify and type the port number.
User Name Type the user name for Fortinet SDN Connector.
Password Type the password for Fortinet SDN Connector.
Status ToggleOn to enable the fabric connector object. ToggleOFF to disable thefabric connector object.
To complete the fabric connector setup:
1. Import address names from ACI to the fabric connector object. See Importing address names to fabric connectorson page 268.The address names are imported and converted to dynamic firewall address objects. The objects do not yet includeIP addresses. The objects are displayed on the Firewall Objects > Addresses pane.
2. In the policy package in which you will be creating the new policy, create an IPv4 policy and include the firewalladdress objects for ACI. See IP policies on page 190.
3. Install the policy package to FortiGate. See Install a policy package on page 171.FortiGate uses the information and Fortinet SDN Connector to communicate with ACI and dynamically populate thefirewall address objects with IP addresses.
If the address names change in ACI after you import them to FortiManager, you must import the address names again.
Creating AWS fabric connectors
With FortiManager, you can create a fabric connector for AmazonWeb Services (AWS), and then import address namesfrom AWS to automatically create dynamic objects that you can use in policies. When you install the policies to one ormore FortiGate units, FortiGate uses the information to communicate with AWS and dynamically populate the objectswith IP addresses. Fortinet SDN Connector is not required for this configuration.
When you create a fabric connector for AWS, you are specifying how FortiGate can communicate directly with AWS.
If ADOMs are enabled, you can create one fabric connector per ADOM.
Requirements:
l FortiManager version 5.6 ADOM or laterThe method described in this topic for creating fabric connectors requires version 6.0 ADOM or later.
l FortiGate is managed by FortiManager.l The managed FortiGate unit is configured to work with AWS.
Following is a high-level overview of the configuration procedure:
To create a fabric connector object for AWS:
1. Go to Fabric View > Fabric Connectors.2. Click Create New. The Create New Fabric Connector wizard is displayed.
FortiManager 6.4.0 Administration Guide 255Fortinet Inc.

Fabric View
3. Under SDN, select AWS, and click Next.4. Configure the following options, and then clickOK:
Name Type a name for the fabric connector object.
Type Displays AmazonWeb Services (AWS).
AWS access key ID Type the access key ID from AWS.
AWS secret access key Type the secret access key from AWS.
AWS region name Type the region name from AWS.
AWS VPC ID Type the AWS VPC ID.
Update Interval (s) Specify how often in seconds that the dynamic firewall objects should beupdated.
Status ToggleOn to enable the fabric connector object. ToggleOFF to disable thefabric connector object.
To complete the fabric connector setup:
1. Import address names from AWS to the fabric connector object. See Importing address names to fabric connectorson page 268.The address names are imported and converted to firewall address objects. The objects do not yet includeIP addresses. The objects are displayed on the Firewall Objects > Addresses pane.
2. In the policy package in which you will be creating the new policy, create an IPv4 policy and include the firewalladdress objects for AWS. See IP policies on page 190.
3. Install the policy package to FortiGate. See Install a policy package on page 171.FortiGate communicates with AWS to dynamically populate the firewall address objects with IP addresses.
If the filter names change in AWS after you import them to FortiManager, you must modify the filter again.
Creating Microsoft Azure fabric connectors
With FortiManager, you can create a fabric connector for Microsoft Azure. You cannot import address names fromMicrosoft Azure to the fabric connector. Instead you must manually create dynamic firewall objects that you can use inpolicies. When you install the policies to one or more FortiGate units, FortiGate uses the information to communicatewith Microsoft Azure and dynamically populate the objects with IP addresses. Fortinet SDN Connector is not required forthis configuration.
When you create a fabric connector for Microsoft Azure, you are specifying how FortiGate can communicate directly withMicrosoft Azure.
If ADOMs are enabled, you can create one fabric connector per ADOM.
Requirements:
l FortiManager version 5.6 ADOM or laterThe method described in this topic for creating fabric connectors requires version 6.0 ADOM or later.
l FortiGate is managed by FortiManager.l The managed FortiGate unit is configured to work with Microsoft Azure.
FortiManager 6.4.0 Administration Guide 256Fortinet Inc.

Fabric View
To create a fabric connector object for Microsoft Azure:
1. Go to Fabric View > Fabric Connectors.2. Click Create New. The Create New Fabric Connector wizard is displayed.3. Under SDN, select Azure, and click Next.4. Configure the following options, and then clickOK:
Name Type a name for the fabric connector object.
Type Displays Microsoft Azure.
Azure tenant ID Type the tenant ID from Azure.
Azure client ID Type the client ID from Azure.
Azure client secret Type the client secret from Azure.
Azure subscription ID Type the subscription ID for Azure.
Azure resource group Type the resource group for Azure.
Update Interval (s) Specify how often in seconds that the dynamic firewall objects should beupdated.
Status ToggleOn to enable the fabric connector object. ToggleOFF to disable thefabric connector object.
Advanced Options Expand to specify advanced options for Azure.
azure-region Select an Azure region.
To complete the fabric connector setup:
1. Create dynamic firewall address objects. See Configuring dynamic firewall addresses for fabric connectors on page269.You cannot import address names fromMicrosoft Azure to FortiManager.
2. In the policy package in which you will be creating the new policy, create an IPv4 policy and include the dynamicfirewall address objects for Microsoft Azure. See IP policies on page 190.
3. Install the policy package to FortiGate. See Install a policy package on page 171.FortiGate communicates with Microsoft Azure to dynamically populate the firewall address objects with IPaddresses.
Creating VMware NSX fabric connectors
With FortiManager, you can create a fabric connector for VMware NSX, and then import address names fromVMware NSX to automatically create dynamic objects that you can use in policies. When you install the policies to one ormore FortiGate units, FortiGate uses the information to communicate with VMware NSX and dynamically populate theobjects with IP addresses. Fortinet SDN Connector is not required for this configuration.
When you create a fabric connector for VMware NSX, you are specifying how FortiGate can communicate directly withVMware NSX.
If ADOMs are enabled, you can create one fabric connector per ADOM.
Requirements:
FortiManager 6.4.0 Administration Guide 257Fortinet Inc.

Fabric View
l FortiManager version 5.6 ADOM or laterThe method described in this topic for creating fabric connectors requires version 6.0 ADOM or later.
l FortiGate unit or FortiGate VMX Service Manager is managed by FortiManager.l The managed FortiGate or FortiGate VMX Service Manager is configured to work with VMware NSX .l IPv4 virtual wire pair policyFortiGate or FortiGate VMX Service Manager requires the use of an IPv4 virtual wire pair policy.
To create a fabric connector object for NSX:
1. Go to Fabric View > Fabric Connectors.2. Click Create New. The Create New Fabric Connector wizard is displayed.3. Under SDN, select NSX, and click Next.4. Configure the following options, and then clickOK:
Name Type a name for the fabric connector object.
Type Displays VMware NSX.
IP Type the IP address for VMware NSX.
User Name Type the user name for VMware NSX.
Password Type the password for VMware NSX.
Update Interval (s) Specify how often in seconds that the dynamic firewall objects should beupdated.
Status ToggleOn to enable the fabric connector object. ToggleOFF to disable thefabric connector object.
VMX The VMX options identify settings used by the FortiGate VMX ServiceManager to communicate with the REST API for NSX Manager.
Service Name Type the name of the FortiGate VMX service defined on NSXManager.
Image Location Type the location of the FortiGate VMX deployment template used by NSXManager to deploy the FortiGate VMX service.
REST API The REST API options specify how the FortiGate VMX Service Managercommunicates with the REST API for NSX Manager.
Port Type the port used by the FortiGate VMX Service Manager to communicatewith NSX Manager.
Interface Select the interface used by the FortiGate VMX Service Manager tocommunicate with NSX Manager. Choose between Mgmt and Sync.
Password Type the password that FortiGate VMX Service Manager uses with the RESTAPI to communicate with NSX Manager.Note: This is not the admin password for FortiGate VMX Service Manager.
To complete the fabric connector setup:
1. Import address names from VMware NSX to the fabric connector object. See Importing address names to fabricconnectors on page 268.
FortiManager 6.4.0 Administration Guide 258Fortinet Inc.

Fabric View
The address names are imported and converted to firewall address objects. The objects do not yet includeIP addresses. The objects are displayed on the Firewall Objects > Addresses pane.
2. Create a virtual wire pair. See Configuring virtual wire pairs on page 270.3. In the policy package in which you will be creating the new policy, create an IPv4 virtual wire pair policy, select the
virtual wire pair, and add the firewall address objects for the VMware NSX. See Virtual wire pair policy on page 202.4. Install the policy package to FortiGate or FortiGate VMX Service Manager. See Install a policy package on page
171.The ForitGate unit or FortiGate VMX Service Manager communicates with VMware NSX to dynamically populatethe firewall address objects with IP addresses.
If the address names change in VMware NSX after you import them to FortiManager, you must import the addressnames again.
Creating VMware NSX-T connector - example
FortiManager supports VMware NSX-T connectors.
After configuration is complete, FortiManager can retrieve groups from VMware NSX-T manager and store them asdynamic firewall address objects, and a FortiGate that is deployed by the registered VMware NSX-T service can connectto FortiManager to receive dynamic objects for VMware NSX-T.
Following is an overview of the steps required to set up a VMware NSX-T connector:
1. Enabling read-write JSON API access on page 2592. Creating a fabric connector for VMware NSX-T on page 2603. Downloading the FortiGate VM deployment image on page 2634. Registering a service from FortiManager to VMware NSX-T on page 2635. Deploying a FortiGate VM from VMware NSX-T on page 2656. Creating and installing policy packages on page 266
Enabling read-write JSON API access
A VMware NSX-T connector requires read-write access to the FortiManager JSON API.
The JSON API registers a service with VMware NSX-T manager and retrieves object updates from VMware NSX-Tmanager.
To enable read-write JSON API access:
1. On FortiManager, go to System Settings > Administrators.2. Double-click an administrator account to open it for editing.
FortiManager 6.4.0 Administration Guide 259Fortinet Inc.
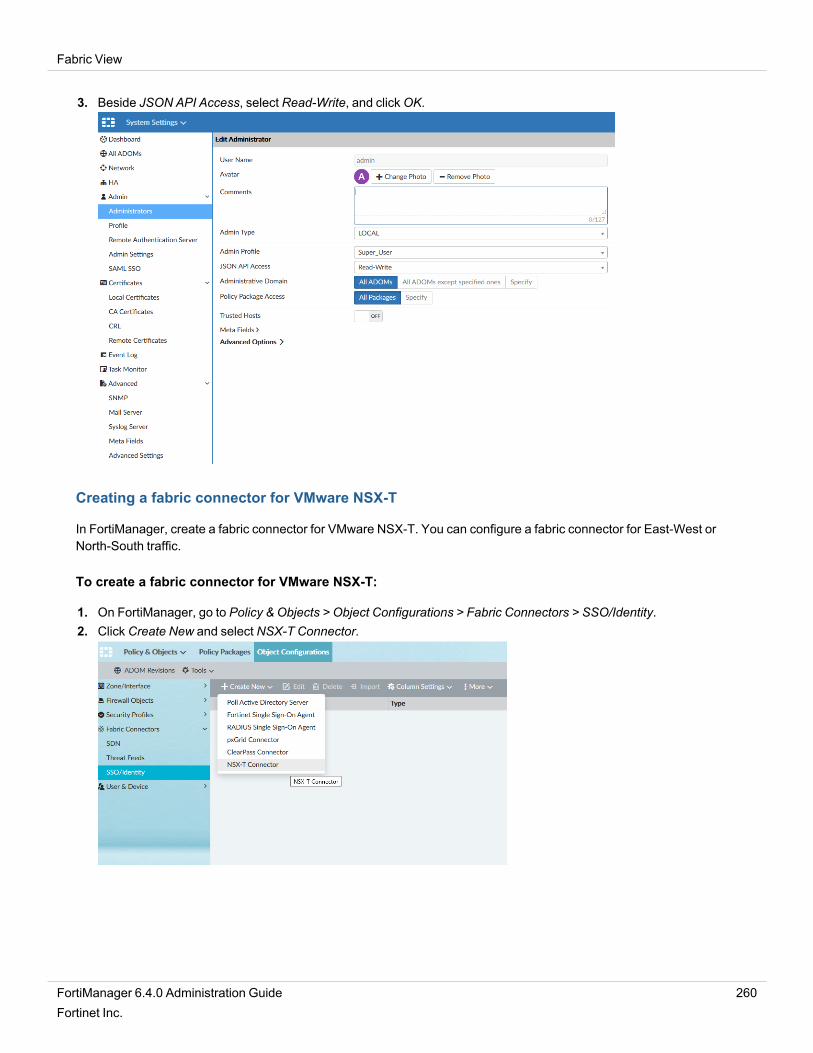
Fabric View
3. Beside JSON API Access, select Read-Write, and clickOK.
Creating a fabric connector for VMware NSX-T
In FortiManager, create a fabric connector for VMware NSX-T. You can configure a fabric connector for East-West orNorth-South traffic.
To create a fabric connector for VMware NSX-T:
1. On FortiManager, go to Policy & Objects > Object Configurations > Fabric Connectors > SSO/Identity.2. Click Create New and select NSX-T Connector.
FortiManager 6.4.0 Administration Guide 260Fortinet Inc.

Fabric View
3. Complete the options, and clickOK.
A fabric connector for VMware NSX-T is created and a connection to VMware NSX-T manager is established.
4. Double-click the VMware NSX-T connector to open it for editing.
FortiManager 6.4.0 Administration Guide 261Fortinet Inc.

Fabric View
5. Toggle Status toOn and clickOK.
FortiManager retrieves the groups from VMware NSX-T manager and stores them as dynamic firewall addressobjects.
FortiManager 6.4.0 Administration Guide 262Fortinet Inc.

Fabric View
Downloading the FortiGate VM deployment image
You must download from the Fortinet Technical Support site a preconfigured deployment image for FortiGate VM andVMware NSX-T, and then place the image on a server that VMware NSX-T manager can access.
To download the FortiGate VM deployment image:
1. Go to the Fortinet Support site (https://support.fortinet.com), and download the following preconfigured FortiGateVM image to use for deployment:fortigate-vm64-nsxt.ovf
2. Place the deployment image on a server that VMware NSX-T manager can access.3. Identify the URL for the image. You will need to add the URL to FortiManager.
Registering a service from FortiManager to VMware NSX-T
Before you can deploy a FortiGate VM from VMware NSX-T manager, you must register a service from FortiManager tothe VMware NSX-T manager. The service includes the location of the preconfigured deployment image for the FortiGateVM.
The FortiManager JSON API registers the service with VMware NSX-T manager.
To register a service from FortiManager to VMware NSX-T:
1. Ensure that you know the URL for the location of the preconfigured deployment image for FortiGate VM andVMware NSX-T.
2. On FortiManager, go to Policy & Objects > Object Configurations > Fabric Connectors > SSO/Identity.3. Double-click the VMware NSX-T connector to open it for editing, and click Add Service.
FortiManager 6.4.0 Administration Guide 263Fortinet Inc.

Fabric View
4. Complete the following options, and clickOK:l In the Name box, type a name for the service.l Beside Integration, select East-West or North-South to identify the flow of traffic.l In the Image Location box, type the URL of the location where the preconfigured FortiGate VM deploymentimage is located.
The service is added and registered with the VMware NSX-T manager.
You can add multiple services.
FortiManager 6.4.0 Administration Guide 264Fortinet Inc.

Fabric View
Deploying a FortiGate VM from VMware NSX-T
You must deploy the preconfigured FortiGate VM image from the VMware NSX-T manager, and then authorizeFortiManager to centrally manage the FortiGate VM.
To deploy a FortiGate VM from VMware NSX-T:
1. On VMware NSX-T, ensure that the service is registered, and the Deploy option is available for FortiGate VMs viathe image link.
2. On VMware NSX-T, deploy a FortiGate VM.The FortiGate VM image is preconfigured to automatically enable central management by FortiManager.
3. When prompted by the deployment of FortiGate VM, enter the IP address of the FortiManager used for centralmanagement.The FortiGate VM is deployed and displays in FortiManager on the Device Manager pane as an unauthorizeddevice.
FortiManager 6.4.0 Administration Guide 265Fortinet Inc.

Fabric View
4. On FortiManager, go to Device Manager, and authorize the FortiGate VM for management by FortiManager.
FortiManager can now manage FortiGate.
Creating and installing policy packages
You must create an IPv4 virtual wire pair policy that contains the dynamic firewall address objects, and install the policyto FortiGate. Then FortiGate can use the dynamic address objects.
To create and install policy packages:
1. In FortiManager, go to Policy & Objects > Object Configuration > Firewall Objects > Addresses, and double-click anaddress to view the dynamic firewall address objects in the FSSO Group.
2. In the policy package in which you will be creating the new policy, create an IPv4 virtual wire pair policy and includethe firewall address objects for VMware NSX-T.
FortiManager 6.4.0 Administration Guide 266Fortinet Inc.

Fabric View
3. Install the policy package to FortiGate.FortiGate uses the information and FortiManager to communicate with VMware NSX-T to dynamically populate thefirewall address objects with IP addresses.
Creating Nuage fabric connectors
With FortiManager, you can create a fabric connector for Nuage Virtualized Services Platform. You cannot importaddress names from Nuage Virtualized Services Platform to the fabric connector. Instead you must manually createdynamic firewall objects that you can use in policies. When you install the policies to one or more FortiGate units,FortiGate uses the information and Fortinet SDN Connector to communicate with Nuage Virtualized Services Platformand dynamically populate the objects with IP addresses.
When you create a fabric connector for Nuage Virtualized Services Plan, you are specifying how FortiGate cancommunicate with Nuage through Fortinet SDN Connector. As a result, you are configuring communication andauthentication information for Fortinet SDN Connector.
If ADOMs are enabled, you can create multiple fabric connectors per ADOM; however, each fabric connector requires aunique IP address.
Requirements:
l FortiManager version 5.6 ADOM or laterThe method described in this topic for creating fabric connectors requires version 6.0 ADOM or later.
l FortiGate is managed by FortiManager.l The managed FortiGate unit is configured to work with Nuage Virtualized Services Platform.
To create a fabric connector object for Nuage:
1. Go to Fabric View > Fabric Connectors.2. Click Create New. The Create New Fabric Connector wizard is displayed.3. Under SDN, select Nuage, and click Next.4. Configure the following options, and then clickOK:
Name Type a name for the fabric connector object.
Type Displays Nuage Virtualized Services Platform.
IP Type the IP address for Fortinet SDN Connector.
Port Identify the port used for Fortinet SDN Connector.Perform one of the following options:l Click Use Default to use the default port.l Click Specify and type the port number.
User Name Type the user name for Fortinet SDN Connector.
FortiManager 6.4.0 Administration Guide 267Fortinet Inc.

Fabric View
Password Type the password for Fortinet SDN Connector.
Status ToggleOn to enable the fabric connector object. ToggleOFF to disable thefabric connector object.
To complete the fabric connector setup:
1. Create dynamic firewall address objects. See Configuring dynamic firewall addresses for fabric connectors on page269.You cannot import address names from Nuage Virtualized Services Platform to FortiManager.
2. In the policy package in which you will be creating the new policy, create an IPv4 policy and include the firewalladdress objects for Nuage Virtualized Services Platform. See IP policies on page 190.
3. Install the policy package to FortiGate. See Install a policy package on page 171.FortiGate communicates with Nuage Virtualized Services Platform to dynamically populate the firewall addressobjects with IP addresses.
Importing address names to fabric connectors
After you configure a fabric connector, you can import address names from products, such as NSX and ACI, to the fabricconnector, and dynamic firewall address objects are automatically created.
When you are importing address names from AWS, you must add filters to display the correct instances before importingaddress names.
You cannot import address names to fabric connectors created for Microsoft Azure and NuageVirtualized Services Platform. You must manually create dynamic firewall address objects forthese types of fabric connectors. See Configuring dynamic firewall addresses for fabricconnectors on page 269.
To import address names for NSX and ACI:
1. Go to Policy & Objects > Object Configurations.2. In the tree menu, go to Security Fabric > Fabric Connectors.3. In the content pane, right-click the fabric connector, and select Import.
The Import SDN Connector dialog box is displayed.4. Select the address names, and click Import.
The address names are imported and converted to dynamic firewall address objects that are displayed on theFirewall Objects > Addresses pane.
To import address names for AWS:
1. Go to Policy & Objects > Object Configurations.2. In the tree menu, go to Security Fabric > Fabric Connectors.3. In the content pane, right-click the fabric connector, and select Import.
The Import SDN Connector dialog box is displayed.
FortiManager 6.4.0 Administration Guide 268Fortinet Inc.

Fabric View
4. Create a filter to select the correct AWS instances:a. Click Add Filter.
The Filter Generator dialog box is displayed.
b. Click Add Filter, and select a filter.A filtered list of instances is displayed.
c. ClickOK.The Import SDN Connector dialog box is displayed, and it contains the filter.You can add additional filters, or edit and delete filters.
d. (Optional) Repeat this procedure to add additional filters.5. Select the filters, and click Import.
The address names are imported and converted to dynamic firewall address objects that are displayed on theFirewall Objects > Addresses pane. The name of the dynamic firewall address uses the following namingconvention: AWS-<random identifier>. Use the Details column and the instance ID to identify the object.
Configuring dynamic firewall addresses for fabric connectors
You cannot import address names to fabric connectors created for Microsoft Azure and Nuage Virtualized ServicesPlatform. Instead you must create dynamic firewall objects that can be dynamically populated when FortiGatecommunicates with Microsoft Azure and Nuage Virtualized Services Platform.
To configure dynamic firewall addresses for Microsoft Azure fabric connectors:
1. Go to Policy & Objects > Object Configurations.2. In the tree menu, go to Firewall Objects > Addresses.3. In the content pane, click Create New and select Address.4. Complete the following options for Microsoft Azure fabric connectors:
Address Name Type a name for the firewall address object.
Type Select Fabric Connector Address.
SDN Select the Microsoft Azure fabric connector.
Filter Type the name of the filter for the AWS instance.
5. Set the remaining options as required, and clickOK
FortiManager 6.4.0 Administration Guide 269Fortinet Inc.

Fabric View
To configure dynamic firewall addresses for Nuage fabric connectors:
1. Go to Policy & Objects > Object Configurations.2. In the tree menu, go to Firewall Objects > Addresses.3. In the content pane, click Create New and select Address.4. Complete the following options for Nuage fabric connectors:
Address Name Type a name for the firewall address object.
Type Select Fabric Connector Address.
SDN Select the Nuage Virtualized Services Platform fabric connector.
Organization Type the name of the organization for the Nuage Virtualized ServicesPlatform.
Subnet Name Type the name of the subnet for the Nuage Virtualized Services Platform.
Policy Group Type the name of the policy group for the Nuage Virtualized Services Platform.
5. Set the remaining options as required, and clickOK
Configuring virtual wire pairs
Before you create an IPv4 virtual wire pair policy, you must create a virtual wire pair.
ADOM version 5.4, 5.6, or later is required. Earlier ADOM versions are not supported.
To configure virtual wire pairs:
1. Go to Policy & Objects > Object Configurations.2. In the tree menu, go to Zone/Interface > Interface.3. In the content pane, click Create New and select Virtual Wire Pair.4. Complete the following options, and clickOK.
Name Type a name for the virtual wire pair.
Interface Members Select two interface members.
Wildcard VLAN ToggleON to enable wildcard VLANs for the virtual wire pair. When enabled,all VLAN-tagged traffic can pass through the virtual wire pair, if allowed by thevirtual wire pair firewall policies.ToggleOFF to disable wildcard VLANs for the virtual wire pair.
Creating Horizon connector
With FortiManager, you can create a fabric connector for Horizon (OpenStack), and then import address names fromHorizon (OpenStack) to automatically create dynamic objects that you can use in policies. When you install the policies
FortiManager 6.4.0 Administration Guide 270Fortinet Inc.

Fabric View
to one or more FortiGate units, FortiGate uses the information and Fortinet SDN Connector to communicate with Horizon(OpenStack) and dynamically populate the objects with IP addresses.
When you create a fabric connector for Horizon (OpenStack), you are specifying how FortiGate can communicate withHorizon (OpenStack) through Fortinet SDN Connector. As a result, you are configuring communication andauthentication information for Fortinet SDN Connector.
If ADOMs are enabled, you can create multiple fabric connectors per ADOM; however, each fabric connector requires aunique IP address.
Requirements:
l FortiManager version 6.0 ADOM or later.The method described in this topic for creating fabric connectors requires version 6.0 ADOM or later.
l FortiGate is managed by FortiManager.l The managed FortiGate unit is configured to work with Horizon (OpenStack).
To create a fabric connector object for Horizon (OpenStack):
1. Go to Fabric View > Fabric Connectors.2. Click Create New. The Create New Fabric Connector wizard is displayed.3. Under SDN, select Horizon, and click Next. The Horizon (OpenStack) screen is displayed.
4. Configure the following options, and then clickOK:
Name Type a name for the fabric connector object.
Type Displays OpenStack (Horizon).
Domain Type the Domain for Fortinet SDN Connector.
Server Type the IP address for the SDN Connector.
User Name Type the user name for Fortinet SDN Connector.
Password Type the password for Fortinet SDN Connector.
Update Interval (s) Specify the update interval for the Fortinet SDN Connector.Select one of the following options:l Click Use Default to use the default interval.l Click Specify and specify the interval.
FortiManager 6.4.0 Administration Guide 271Fortinet Inc.

Fabric View
Status ToggleOn to enable the fabric connector object. ToggleOFF to disable thefabric connector object.
5. Go to Policy & Objects > Security Fabric > Fabric Connectors. Select the connector and click Import.6. The Horizon (OpenStack) connector is imported. Click Close to close the import dialog.7. Create a Policy Package and install it to a FortiGate device. The Horizon (OpenStack) connector object is synced
with the FortiGate device.
Creating Oracle Cloud Infrastructure (OCI) connector
With FortiManager, you can create a fabric connector for Oracle (OCI), and then import address names from Oracle(OCI) to automatically create dynamic objects that you can use in policies. When you install the policies to one or moreFortiGate units, FortiGate uses the information and Fortinet SDN Connector to communicate with Oracle (OCI) anddynamically populate the objects with IP addresses.
When you create a fabric connector for Oracle (OCI), you are specifying how FortiGate can communicate with Oracle(OCI) through Fortinet SDN Connector. As a result, you are configuring communication and authentication informationfor Fortinet SDN Connector.
If ADOMs are enabled, you can create multiple fabric connectors per ADOM; however, each fabric connector requires aunique IP address.
Requirements:
l FortiManager with ADOM version 6.0 or later.The method described in this topic for creating fabric connectors requires ADOM version 6.0 or later.
l FortiGate is managed by FortiManager.l The managed FortiGate unit is configured to work with Oracle (OCI).
To create a fabric connector object for Oracle (OCI):
1. Go to Fabric View > Fabric Connectors.2. Click Create New. The Create New Fabric Connector wizard is displayed.3. Under SDN, selectOracle, and click Next. TheOracle Cloud Infrastructure (OCI) screen is displayed.
4. Configure the following options, and then clickOK:
Name Type a name for the fabric connector object.
FortiManager 6.4.0 Administration Guide 272Fortinet Inc.

Fabric View
Type Displays Oracle Cloud Infrastructure (OCI).
User ID Type the User ID for the Fortinet SDN Connector.
OCI Tenant ID Type the OCI Tenant ID.
OCI Compartment ID Type the OCI Compartment ID.
OCI Server Region Select the OCI Server Region from the drop-down.
OCI Certificate Select the OCI Certificate from the drop-down.
Update Interval (s) Specify the update interval for the Fortinet SDN Connector.Select one of the following options:l Click Use Default to use the default interval.l Click Specify and specify the interval.
Status ToggleOn to enable the fabric connector object. ToggleOFF to disable thefabric connector object.
5. Go to Policy & Objects > Security Fabric > Fabric Connectors. Select the connector and click Import.6. The Oracle (OCI) connector is imported. Click Close to close the import dialog.7. Create a Policy Package and install it to a FortiGate device. The Oracle (OCI) connector object is synced with the
FortiGate device.
Creating VMWare ESXi connector
With FortiManager, you can create a fabric connector for VMWare ESXi, and then import address names from VMWareESXi to automatically create dynamic objects that you can use in policies. When you install the policies to one or moreFortiGate units, FortiGate uses the information and Fortinet SDN Connector to communicate with VMWare ESXi anddynamically populate the objects with IP addresses.
When you create a fabric connector for VMWare ESXi, you are specifying how FortiGate can communicate withVMWare ESXi through Fortinet SDN Connector. As a result, you are configuring communication and authenticationinformation for Fortinet SDN Connector.
If ADOMs are enabled, you can create multiple fabric connectors per ADOM; however, each fabric connector requires aunique IP address.
Requirements:
l FortiManagerwith ADOM version 6.2 or later.The method described in this topic for creating fabric connectors requires ADOM version 6.2 or later.
l FortiGate is managed by FortiManager.l The managed FortiGate unit is configured to work with VMWare ESXi.
To create a fabric connector object for VMWare ESXi:
1. Go to Fabric View > Fabric Connectors.2. Click Create New. The Create New Fabric Connector wizard is displayed.
FortiManager 6.4.0 Administration Guide 273Fortinet Inc.

Fabric View
3. Under SDN, select VMWare ESXi, and click Next. The VMWare ESXi screen is displayed.
4. Configure the following options, and then clickOK:
Name Type a name for the fabric connector object.
Type Displays VMWare ESXi.
Server Type the IP address for the SDN Connector.
User Name Type the user name for Fortinet SDN Connector.
Password Type the password for Fortinet SDN Connector.
Update Interval (s) Specify the update interval for the Fortinet SDN Connector.Select one of the following options:l Click Use Default to use the default interval.l Click Specify and specify the interval.
Status ToggleOn to enable the fabric connector object. ToggleOFF to disable thefabric connector object.
5. Go to Policy & Objects > Security Fabric > Fabric Connectors. Select the connector and click Import.6. The VMWare ESXi connector is imported. Click Close to close the import dialog.7. Create a Policy Package and install it to a FortiGate device. The VMWare ESXi connector object is synced with the
FortiGate device.
Creating Kubernetes connector
With FortiManager, you can create a fabric connector for Kubernetes, and then import address names from Kubernetesto automatically create dynamic objects that you can use in policies. When you install the policies to one or moreFortiGate units, FortiGate uses the information and Fortinet SDN Connector to communicate with Kubernetes anddynamically populate the objects with IP addresses.
When you create a fabric connector for Kubernetes, you are specifying how FortiGate can communicate withKubernetes through Fortinet SDN Connector. As a result, you are configuring communication and authenticationinformation for Fortinet SDN Connector.
If ADOMs are enabled, you can create multiple fabric connectors per ADOM; however, each fabric connector requires aunique IP address.
Requirements:
FortiManager 6.4.0 Administration Guide 274Fortinet Inc.

Fabric View
l FortiManagerwith ADOM version 6.2 or later.The method described in this topic for creating fabric connectors requires ADOM version 6.2 or later.
l FortiGate is managed by FortiManager.l The managed FortiGate unit is configured to work with Kubernetes.
To create a fabric connector object for Kubernetes:
1. Go to Fabric View > Fabric Connectors.2. Click Create New. The Create New Fabric Connector wizard is displayed.3. Under SDN, select Kubernetes, and click Next. The Kubernetes screen is displayed.
4. Configure the following options, and then clickOK:
Name Type a name for the fabric connector object.
Type Displays Kubernetes.
IP Type the IP address for the SDN Connector.
Port Specify the port for the Fortinet SDN Connector.Select one of the following options:l Click Use Default to use the default port.l Click Specify and specify the port.
Secret Token Specify a secret token for the Fortinet SDN Connector.
Update Interval (s) Specify the update interval for the Fortinet SDN Connector.Select one of the following options:l Click Use Default to use the default interval.l Click Specify and specify the interval.
Status ToggleOn to enable the fabric connector object. ToggleOFF to disable thefabric connector object.
5. Go to Policy & Objects > Security Fabric > Fabric Connectors. Select the connector and click Import.
FortiManager 6.4.0 Administration Guide 275Fortinet Inc.

Fabric View
6. The Kubernetes connector is imported. Click Close to close the import dialog.7. Create a Policy Package and install it to a FortiGate device. The Kubernetes connector object is synced with the
FortiGate device.
Kubernetes Service must be enabled on the server side for AWS, Azure, OCI and, GCP forKubernetes to function for the particular cloud platform. Once the service is enabled,Kubernetes can be configured for the particular cloud platform on FortiManager.
Creating Alibaba Cloud Service connector
With FortiManager, you can create a fabric connector for Alibaba Cloud Service (ACS), and then import address namesfrom Alibaba Cloud Service to automatically create dynamic objects that you can use in policies. When you install thepolicies to one or more FortiGate units, FortiGate uses the information and Fortinet SDN Connector to communicate withAlibaba Cloud Service and dynamically populate the objects with IP addresses.
When you create a fabric connector for Alibaba Cloud Service, you are specifying how FortiGate can communicate withAlibaba Cloud Service through Fortinet SDN Connector. As a result, you are configuring communication andauthentication information for Fortinet SDN Connector.
If ADOMs are enabled, you can create multiple fabric connectors per ADOM; however, each fabric connector requires aunique IP address.
Requirements:
l FortiManagerwith ADOM version 6.2 or later.The method described in this topic for creating fabric connectors requires ADOM version 6.2 or later.
l FortiGate is managed by FortiManager.l The managed FortiGate unit is configured to work with Alibaba Cloud Service.
To create a fabric connector object for Alibaba Cloud Service:
1. Go to Fabric View > Fabric Connectors.2. Click Create New. The Create New Fabric Connector wizard is displayed.
FortiManager 6.4.0 Administration Guide 276Fortinet Inc.

Fabric View
3. Under SDN, select Alibaba Cloud Service, and click Next. The Alibaba Cloud Service screen is displayed.
4. Configure the following options, and then clickOK:
Name Type a name for the fabric connector object.
Type Displays Alibaba Cloud Service (ACS).
AccessKey ID Specify the AccessKey ID for the SDN Connector.
AccessKey Secret Specify the AccessKey Secret for the SDN Connector.
Region ID Specify the Region ID for the Fortinet SDN Connector.
Update Interval (s) Specify the update interval for the Fortinet SDN Connector.Select one of the following options:l Click Use Default to use the default interval.l Click Specify and specify the interval.
Status ToggleOn to enable the fabric connector object. ToggleOFF to disable thefabric connector object.
5. Go to Policy & Objects > Security Fabric > Fabric Connectors. Select the connector and click Import.6. The Alibaba Cloud Service connector is imported. Click Close to close the import dialog.7. Create a Policy Package and install it to a FortiGate device. The Alibaba Cloud Service connector object is synced
with the FortiGate device.
Creating Google Cloud Platform connector
With FortiManager, you can create a fabric connector for Google Cloud Platform (GCP), and then import address namesfrom Google Cloud Platform to automatically create dynamic objects that you can use in policies. When you install thepolicies to one or more FortiGate units, FortiGate uses the information and Fortinet SDN Connector to communicate withGoogle Cloud Platform and dynamically populate the objects with IP addresses.
FortiManager 6.4.0 Administration Guide 277Fortinet Inc.

Fabric View
When you create a fabric connector for Google Cloud Platform, you are specifying how FortiGate can communicate withGoogle Cloud Platform through Fortinet SDN Connector. As a result, you are configuring communication andauthentication information for Fortinet SDN Connector.
If ADOMs are enabled, you can create multiple fabric connectors per ADOM; however, each fabric connector requires aunique IP address.
Requirements:
l FortiManagerwith ADOM version 6.2 or later.The method described in this topic for creating fabric connectors requires ADOM version 6.2 or later.
l FortiGate is managed by FortiManager.l The managed FortiGate unit is configured to work with Google Cloud Platform.
To create a fabric connector object for Google Cloud Platform:
1. Go to Fabric View > Fabric Connectors.2. Click Create New. The Create New Fabric Connector wizard is displayed.3. Under SDN, selectGoogle Cloud Platform, and click Next. TheGoogle Cloud Platform screen is displayed.
4. Configure the following options, and then clickOK:
Name Type a name for the fabric connector object.
Type Displays Google Cloud Platform (GCP).
Project Name Specify the Project Name for the SDN Connector.
Service Account Email Specify the Service Account Email for the SDN Connector.
Private Key Specify the Private Key for the Fortinet SDN Connector.
Update Interval (s) Specify the update interval for the Fortinet SDN Connector.Select one of the following options:l Click Use Default to use the default interval.l Click Specify and specify the interval.
FortiManager 6.4.0 Administration Guide 278Fortinet Inc.

Fabric View
Status ToggleOn to enable the fabric connector object. ToggleOFF to disable thefabric connector object.
5. Go to Policy & Objects > Security Fabric > Fabric Connectors. Select the connector and click Import.6. The Google Cloud Platform connector is imported. Click Close to close the import dialog.7. Create a Policy Package and install it to a FortiGate device. The Google Cloud Platform connector object is synced
with the FortiGate device.
Creating VMware vCenter connectors - example
You can create SDN connectors for VMware vCentre to allow FortiGate to retrieve dynamic addresses from VMwarevCenter via FortiManager.
Following is an overview of how to configure an SDN connector for VMware vCenter:
1. Create an SDN connector for VMware vCenter. See Creating SDN connectors for VMware vCenter on page 279.2. Create a dynamic address object that references the SDN connector for VMware vCenter. See Creating dynamic
addresses on page 280.3. Create a firewall policy. See Creating firewall policies on page 281.4. Install the changes to FortiGate. See Installing changes to FortiGate on page 282.
FortiGate can retrieve dynamic addresses from VMware vCenter via FortiManager.This example assumes that VMware vCenter is already set up.
Creating SDN connectors for VMware vCenter
To create SDN connectors for VMware vCenter:
1. Go to Policy & Objects > Object Configurations > Fabric Connectors > SSO/Identity.2. Click Create New > vCenter Connector.
The pane opens.
3. Complete the following options, and click Apply & Refresh:
The Rule section is displayed.4. Under Rule, click Create New.
FortiManager 6.4.0 Administration Guide 279Fortinet Inc.

Fabric View
5. Complete the following options, and clickOK.
FortiManager retrieves IP addresses from the VMware vCenter server.
Creating dynamic addresses
To create dynamic addresses:
1. Go to Policy & Objects > Object Configurations > Firewall Objects > Addresses.2. Click Create New > Address, or double-click an existing address object to open it for editing.
FortiManager 6.4.0 Administration Guide 280Fortinet Inc.

Fabric View
3. Complete the following options, and clickOK.a. In the Address Name box, type a name.b. In the Type box, select Dynamic.c. Beside Sub Type, select FSSO.d. In the FSSO Group box, select the SDN connector that you created.e. Set the remaining objects as desired.
The dynamic address is created.
Creating firewall policies
To create firewall policies:
1. Go to Policy & Objects > Policy Packages.2. In the tree menu, click IPv4 Policy under the target FortiGate.
FortiManager 6.4.0 Administration Guide 281Fortinet Inc.

Fabric View
3. Click Create New , or double-click an existing policy to open it for editing.
4. Complete the options, and clickOK.The policy package is created.
Installing changes to FortiGate
To install changes to FortiGate:
1. Go to Policy & Objects > Policy Packages.2. In the tree menu, right-click Installation Targets under the target FortiGate, and select Install Wizard.
The Install Wizard dialog box opens.3. Select Install Policy Package & Device Settings.
FortiManager 6.4.0 Administration Guide 282Fortinet Inc.

Fabric View
4. In the Policy Package list, select the policy package, and click Next.
5. Complete the options, and click Next.The policy package is installed.FortiGate can retrieve dynamic addresses from VMware vCenter via FortiManager.
Threat Feeds
You can use the Fabric Connectors tab to create the following types of threat feed connectors:
l Categoryl Addressl Domain
FortiManager 6.4.0 Administration Guide 283Fortinet Inc.

Fabric View
Threat feed connectors dynamically import an external block list. The block list is a text file that contains a list of eitheraddresses or domains and resides on an HTTP server. You use block lists to deny access to source or destination IPaddresses in web filter and DNS filter profiles, SSL inspection exemptions, and as sources or destinations in proxypolicies.
This section contains the following topic:
l Creating threat feed connectors on page 284
Creating threat feed connectors
You can create threat feed connectors for FortiGuard categories, firewall IP addresses, and domain names.
To create threat feed connectors:
1. Go to Fabric View > Fabric Connectors.2. Click Create New. The Create New Fabric Connector wizard is displayed.3. Under Threat Feeds, select Category, Address, or Domain, and click Next.4. Configure the following options, and then clickOK:
Type Displays URL List if you selected Category.Displays IP List if you selected Address.Displays Domain List if you selected Domain.
Name Type a name for the fabric connector object.
URI of external resource Type the link to an external text file. The path must start with http://,https://, or fmg://, for example, http://example.com/url.
Category ID Type the category ID. The ID is between 192 and 221.Available only when Type displays Domain List.
Refresh Rate The time in minutes to refresh the external resource.
Comments (Optional) Type comments about the connector.
Status ToggleOn to enable the fabric connector object. ToggleOFF to disable thefabric connector object.
SSO/Identity
You can use the Fabric Connectors tab to create the following types of SSO/identity connectors:
l AD Pollingl FSSOl RADIUSl Cisco pxGridl Aruba ClearPassl VMware NSX-T
SSO connectors integrate single sign-on (SSO) authentication in networks. SSO allows users to enter their credentialsonce and have those credentials reused when they access other network resources through FortiGate.
FortiManager 6.4.0 Administration Guide 284Fortinet Inc.

Fabric View
This section contains the following topics:
l Creating Active Directory connectors on page 285l Creating FSSO connectors on page 285l Creating RADIUS connectors on page 286l Creating Cisco pxGrid connector on page 286l Creating ClearPass connector on page 293l Creating VMware NSX-T connector on page 308
Creating Active Directory connectors
You can create SSO/identity connectors for Active Directory servers. This connector configures polling of ActiveDirectory servers for FSSO.
To create Active Directory connectors:
1. Go to Fabric View > Fabric Connectors.2. Click Create New. The Create New Fabric Connector wizard is displayed.3. Under SSO/Identity, select AD Polling, and click Next.4. Configure the following options, and then clickOK:
Server Name/IP Type the name or IP address for the Active Directory server.
Local User Type the user name required to log into the Active Directory server.
Password Type the password required to log into the Active Directory server.
Enable Polling ToggleOn to enable polling of the Active Directory server. ToggleOFF todisable this feature.
LDAP Server Select the LDAP server name from the list. The LDAP server name is used inLDAP connection strings.
Creating FSSO connectors
You can create SSO/identity connectors for Fortinet single sign-on (FSSO) agents.
FSSO is the authentication protocol by which users can transparently authenticate to FortiGate, FortiClient EMS,FortiAuthenticator, and FortiCache devices.
To create FSSO connectors:
1. Go to Fabric View > Fabric Connectors.2. Click Create New. The Create New Fabric Connector wizard is displayed.3. Under SSO/Identity, select FSSO, and click Next.4. Configure the following options, and then clickOK:
Name Type a name for the connector object.
FortiManager 6.4.0 Administration Guide 285Fortinet Inc.

Fabric View
FSSO Agent Complete the IP/Name, Password, and Port options for eachFortiAuthenticator unit that will act as an SSO agent.
Select FSSO Groups Specify whether to get FSSO groups from FSSO agents or via FortiGate.
User Groups LDAP Server Select the name of the LDAP server to be used to get group information fromthe Directory Service.
Per-Device Mapping (Optional) ToggleOn to set per-device mappings between FortiGate units andFSSO agents, and then create the mappings. ToggleOFF to disable thisfeature.
Advanced Options Expand to view and configure advanced options for Fortinet single sign-onagents. For details, see the FortiOS CLI Reference.
To configure the FSSO connector as a FortiClient EMS Connector, select the Type asFortiClient EMS, IP/Name as the Windows Server's IP and turn SSL toON. Click Apply andRefresh. The connector gets a list of tags from the EMS server and shows them as UserGroups. This is similar to the Active Directory groups in Windows Server.
Creating RADIUS connectors
You can create an SSO/identity connector for RADIUS single sign-on (RSSO) agents. Only one RADIUS connector canexist at one time.
To create RADIUS connectors:
1. Go to Fabric View > Fabric Connectors.2. Click Create New. The Create New Fabric Connector wizard is displayed.3. Under SSO/Identity, select RADIUS, and click Next.4. Configure the following options, and then clickOK:
Name Type the name of the RADIUS SSO agent.
Use RADIUS Shared Secret ToggleOn to enable the use of a RADIUS shared secret between collectoragent and RADIUS server, and then enter the shared secret. ToggleOFF todisable this feature.
Send RADIUS Responses ToggleOn to send RADIUS response packets after receiving start and stoprecords. ToggleOFF to disable this feature.
Advanced Options Expand to view and configure advanced options for RADIUS single sign-onagents. For details, see the FortiOS CLI Reference.
Creating Cisco pxGrid connector
Cisco pxGrid for FortiManager centralizes the updates from pxGrid for all FortiGate devices, and leverages the efficientFSSO protocol to apply dynamic policy updates to FortiGate.
Requirements:
FortiManager 6.4.0 Administration Guide 286Fortinet Inc.

Fabric View
l FortiManager version 5.6 ADOM or later.The method described in this topic for creating fabric connectors requires version 6.0 ADOM or later.
l FortiGate is managed by FortiManager.l The managed FortiGate unit is configured to work with Cisco pxGrid.l Configure the Cisco ISE server and download the certificate.
To configure Cisco ISE server:
1. Create a Security Group: Go to ISE >Work Centers > TrustSec > Components > Security Groups. Click Add.
2. Create a User Identity Group: Go to ISE > Administration > Identity Management > Groups > User Identity Groups.Click Add.
3. Create a user and add it to User Identity Group: Go to ISE > Administration > Identity Management > Identities. ClickAdd.
FortiManager 6.4.0 Administration Guide 287Fortinet Inc.

Fabric View
4. Match the Security Group with User Identity Group in the policy: Go to ISE >Work Centers >TrustSec >Components > Policy Sets. Right-click and go to Authorization policy > Basic_Authenticatied _Access and click Editto match the Security Group with the User Identity Group.
5. Generate the pxGrid certificate and download it to the local computer: Go to ISE > Administration > pxGrid Services> Certificate and selectGenerate pxGrid Certificates.
FortiManager 6.4.0 Administration Guide 288Fortinet Inc.

Fabric View
6. See log for current users: Go to ISE > Operations > RADIUS > Live Logs.
7. See live sessions of current users: Go to ISE > Operations > RADIUS > Live Sessions.
To configure FortiManager:
1. Go to System Settings > Local Certificates > Import. Import the downloaded certificate.
2. Go to Fabric View > Fabric Connectors.3. Click Create New.
FortiManager 6.4.0 Administration Guide 289Fortinet Inc.

Fabric View
4. Select Cisco pxGrid and click Next.5. Configure the following options and clickOK to create the Cisco pxGrid connector:
6.
Name Type a name for the fabric connector object.
Status ToggleOn to enable the fabric connector object. ToggleOFF to disable thefabric connector object.
Server Type the IP address for Cisco ISE server.
CA Certificate Select the imported CA Certificate.
Client Certificate Select the imported Client Certificate.
7. Go to Policy & Objects > Object Configuration > Single Sign-On. Select the connector and click Import.
FortiManager 6.4.0 Administration Guide 290Fortinet Inc.

Fabric View
8. The pxGrid connector is imported. Click Close to close the import dialog.
9. Click User Groups and create a new group. Set the type as FSSO/Cisco TrustSec, and select pxGrid user as amember.
10. Create a policy with the ISEgroup user group and install the policy to FortiGate.
FortiManager 6.4.0 Administration Guide 291Fortinet Inc.

Fabric View
11. Go to Fabric View > Fabric Connectors. ClickMonitor to see the users currently logged in.
12. Log on to FortiGate to view the ISE user group.
13. On the FortiGate command line, use the diagnose debug authd fsso list to monitor the current user list.
CLI Commands for FortiManager and FortiGate
Command line for FortiManager:
config system connectorsetfsso-refresh-interval FSSO refresh interval (60 - 1800 seconds).fsso-sess-timeout FSSO session timeout (30 - 600 seconds).px-refresh-interval pxGrid refresh interval (60 - 1800 seconds).px-svr-timeout pxGrid server timeout (30 - 600 seconds).
Realtime monitor debug to watch server connection:
diag debug application connector 255
Show retrieved Active Directory group:
diag system print connector (adom name) (user group name)
FortiManager 6.4.0 Administration Guide 292Fortinet Inc.

Fabric View
Command line for FortiGate:
diag debug authd fsso server-statusdiag debug authd fsso list-------> show connected users----FSSO logons----IP: 192.168.1.19 User: test2 Groups: px_fc1_security_grp1 Workstation: MemberOf: fscs1IP: 192.168.1.20 User: test2 Groups: px_fc1_security_grp1 Workstation: MemberOf: fscs1Total number of logons listed: 2, filtered: 0----end of FSSO logons----diag debug authd fsso refresh-logondiag debug authd fsso refresh-group
Creating ClearPass connector
ClearPass Policy Manager (CCPM) is a network access system that can send information about authenticated users tothird party systems, such as a FortiGate or FortiManager. ClearPass connector for FortiManager centralizes updatesfrom ClearPass for all FortiGate devices and leverages the efficient FSSO protocol to apply dynamic policy updates toFortiGate.
You can create multiple ClearPass connectors per ADOM.
Requirements:
l FortiManager version 5.6 or later ADOMThis example applies to version 6.0 or later ADOMs.
l FortiGate is managed by FortiManager and configured to work with ClearPassl JSON API is exposed, allowing ClearPass to call it
To configure ClearPass:
1. Log in to ClearPass Policy Manager..2. Create roles:
a. Go to Configuration > Identity > Roles.b. Click Add.c. For the name, entermytest1.
FortiManager will get this group as an Active Directory group.The Description field is optional.
FortiManager 6.4.0 Administration Guide 293Fortinet Inc.

Fabric View
d. Click Save.3. Create local users:
a. Go to Configuration > Identity > Local Users.b. Click Add.c. Configure the following:
l Set User ID to test1.l Set Name to testUser1.l Set Password to qa1234.l Select Enable.l Set Role tomytest1.
d. Click Add.
FortiManager 6.4.0 Administration Guide 294Fortinet Inc.

Fabric View
4. Add an Ubuntu simulator:a. Go to Configuration > Network > Devices.b. Click Add.c. Configure the following settings:
l Set Name to Ubuntu_test.l Set IP or Subnet Address to 10.3.113.61.l Set RADIUS Shared Secret to qa1234.l Set Vendor Name to Unix.
d. Click Add.5. Configure FortiManager to get packets from ClearPass:
a. Add FortiManager as the Endpoint Context Server:i. Go to Administration > External Servers > Endpoint Context Servers.ii. Click Add.iii. Configure the following:
l Set Server Type toGeneric HTTP.l Set Server Name to 10.3.113.57 (the FortiManager IP address).l Set Authentication Method to Basic.l Set Username to admin (the administrator on FortiManager).
b. Create Endpoint Context Server Login action for FortiManager:i. Go to Administration > Dictionaries > Context Server Actionsii. Click Add.iii. On the Action tab, configure the following:
l Set Server Type toGeneric HTTP.l Set Server Name to 10.3.113.57 (the FortiManager IP address).l Set Action Name to Frank-FMG-login.l Set Description to Inform FortiManager that the user logged on.l Set HTTPMethod to POST.l Set Authentication Method to Basic.l Set URL to /jsonrpc/connector/user/login
FortiManager 6.4.0 Administration Guide 295Fortinet Inc.

Fabric View
iv. On the Header tab, configure the following:l Set Header Name to Content-Type.l Set Header Value to application/json.
v. On the Content tab, configure the following:l Set Content-Type to JSON.l Set Content to:
{
FortiManager 6.4.0 Administration Guide 296Fortinet Inc.

Fabric View
"adom": "root","connector": "test", <--------the connector name created on FortiManager"user": "%{Authentication:Username}","role": "%{Tips:Role}","ip-addr": "%{ip}"
}
vi. Click Save.c. Create Endpoint Context Server Logout action for FortiManager:
i. Go to Administration > Dictionaries > Context Server Actionsii. Click Add.iii. On the Action tab, configure the following:
l Set Server Type toGeneric HTTP.l Set Server Name to 10.3.113.57 (the FortiManager IP address).l Set Action Name to Frank-FMG-logout.l Set Description to Inform FortiManager that the user logged out.l Set HTTPMethod to POST.l Set Authentication Method to Basic.l Set URL to /jsonrpc/connector/user/logout
FortiManager 6.4.0 Administration Guide 297Fortinet Inc.

Fabric View
iv. On the Header tab, configure the following:l Set Header Name to Content-Type.l Set Header Value to application/json.
v. On the Content tab, configure the following:l Set Content-Type to JSON.l Set Content to:
{
"adom": "root","connector": "test","user": "%{Authentication:Username}","role": "%{Tips:Role}","ip-addr": "%{ip}"
}
vi. Click Save.
FortiManager 6.4.0 Administration Guide 298Fortinet Inc.

Fabric View
d. Check that the actions are added to the server:i. Go to Administration > External Servers > Endpoint Context Servers > 10.3.113.57 > Actions.ii. Locate the two just created actions.
6. Create a profile:a. Go to Configuration > Enforcement > Profiles.b. Click Add.c. On the Profile tab, configure the following:
l Set Template to Session Notification Management.l Set Name to FortiManager Login and Logout.l Set Description to FortiManager - Initial SSO integration testing.l Set Type to Post_Authentication.
FortiManager 6.4.0 Administration Guide 299Fortinet Inc.

Fabric View
d. On the Attributes tab, configure the following attributes:
Type Name Value
Session-Notify Server Type Generic HTTP
Session-Notify Login Action Frank-FMG-login
Session-Notify Logout Action Frank-FMG-logout
Session-Notify Server IP 10.3.113.57
e. Click Save.7. Create a policy:
a. Go to Configuration > Enforcement > Policies.b. Click Add.c. On the Enforcement tab, configure the following:
l Set Name to FortiManager testing.l Set Enforcement Type to RADIUS.l Set Default Profile to Allow Access Profile.
FortiManager 6.4.0 Administration Guide 300Fortinet Inc.

Fabric View
d. On the Rules tab, configure the following:l Set Type to Date.l Set Name to Date-Time.l SetOperation to EXISTS.l Set Profile Names to [Post Authentication][FortiManager - Login and Logout].
e. Click Save.8. Create services:
a. Go to Configuration > Services.b. Click Add.c. On the Service tab, configure the following:
l Set Name to API Test Access OAuth2 API User Access.l Set Description to Authentication service for API access using OAuth2.
FortiManager 6.4.0 Administration Guide 301Fortinet Inc.

Fabric View
l Set Type to Aruba Application Authentication.l Set Status to Enabled.
d. On the Authentication tab, set Authentication Sources to:[Local User Repository] [Local SQL DB][Admin User Repository] [Local SQL DB]
e. On the Enforcement tab, configure the following:l Set Enforcement Policy to [Guest Operator Logins].l Set Description to Enforcement policy controlling access to Guest application.l Set Default Profile to [Deny Application Access Profile].
FortiManager 6.4.0 Administration Guide 302Fortinet Inc.

Fabric View
l Set Rules Evaluation Algorithm to first-applicable.l Create the following two conditions:
Conditions Enforcement Profiles
1. (Tips:Role EQUALS [User Authenticated])AND (Authentication:Source EQUALS [Local UserRepository])
[Operator Login - Local Users]
2. (Tips:Role EQUALS [User Authenticated])AND (Authentication:Source EQUALS [AdminUser Repository])
[Operator Login - Admin Users]
f. Click Save.g. Click Add again to add another service.h. On the Service tab, configure the following:
l Set Name to AuthN user for Fortimanager Testing.l Set Description to Authorization service for AirGroup device access.l Set Type to RADIUS Enforcement ( Generic ).l Set Status to Enabled.l Create the following service rule:
Type Name Operator Value
Radius:IEFT NAS-IP-Address EQUALS 10.0.0.1
i. On the Authentication tab, configure the following:l Set Authentication Methods to [PAP].l Set Authentication Sources to [Local User Repository] [Local SQL DB].
j. On the Enforcement tab, configure the following:l Set Enforcement Policy to fortimanager testing .l Set Default Profile to [AllowAccess Profile].
FortiManager 6.4.0 Administration Guide 303Fortinet Inc.

Fabric View
l Set Rules Evaluation Algorithm to evaluate-all.l Create the following condition:
Conditions Enforcement Profiles
1. (GuestUser:Company Name NOT_EQUALSABCDE)
[FortiManager-login and Logout]
k. Click Save.9. Configure the administrator the FortiManager fabric connector uses to access CPPM APIs:
a. Go to Administration > Admin Users.b. Click Add.c. Configure the following:
l Set User ID to admin.l Set Name to admin.l Set Password to qa987654.l In Verify Password enter the password again.l Select Enable User.l Set Privilege Level to API Administrator.
d. Click Save.
FortiManager 6.4.0 Administration Guide 304Fortinet Inc.

Fabric View
10. Create an API Client:a. Log in to ClearPass Guest.
b. Go to Administration > API Services > API Clients.c. Click Create API Client.d. Configure the following:
l Set Client ID to test.l Set Desciption to FMG login from it.l Select Enable API client.l SetOperator Profile to Super Administrator.l SetGrand Type to Username and password credentials (grant_type=password).l In Public Client select This client is public (trusted) client.l In Refresh Token select Allow the use of refresh tokens for this client.
e. Click Save.
FortiManager 6.4.0 Administration Guide 305Fortinet Inc.

Fabric View
To configure FortiManager:
1. Log in to FortiManager.2. Run the following CLI command:
config system admin useredit admin
set rpc-permit read-writenext
end
3. Go to Fabric View > Fabric Connectors.4. Click Create New.
5. Select ClearPass, then click Next.6. Configure the following:
l Set Name to test. This name must be same as the one used in the ClearPass actions.l Set Status toOn.l Set Server to 10.3.113.102 (the ClearPass IP address).l Set Client to test (the previously created ClearPass API client).l Set User to admin (the ClearPass login name).l Set Password to qa1234 (the ClearPass login password).
FortiManager 6.4.0 Administration Guide 306Fortinet Inc.

Fabric View
7. ClickOK.8. Get the role and user from ClearPass:
a. Go to Policy & Objects > Object Configurations > Fabric Connectors >SSO/Identity.b. Edit the ClearPass connector and click Apply & Refresh.
FortiManager retrieves the roles and users from ClearPass. Users with green icons are currently logged in.
9. Install the address group from ClearPass to FortiGate:a. On the FortiManager, go to Policy & Objects > Object Configurations > User & Devices > User Groups.b. Click Create New.c. Configure the following:
l SetGroup Name to cpp1.l Set Type to FSSO/SSO Connectors.l SelectMembers as ClearPass adgrp.
FortiManager 6.4.0 Administration Guide 307Fortinet Inc.

Fabric View
10. Use the new user group in a policy to install it to FortiGate.11. To check that the group was installed on the FortiGate:
a. On the FortiGate, go to User & Device > User Groups. The group will be in the user group list.b. Edit the group to view its members.c. In the CLI console, enter the following:
# diagnose debug authd fsso list----FSSO logons----IP: 10.210.15.185 User: user1 Groups: cp_test_Finance Workstation: MemberOf: cpp1Total number of logons listed: 1, filtered: 0----end of FSSO logons----
Creating VMware NSX-T connector
With FortiManager, you can create a fabric connector for VMware NSX-T. You can create multiple VMware NSX-T connectors per ADOM.
Requirements:
l FortiManagerwith ADOM version 6.2 or later.The method described in this topic for creating fabric connectors requires ADOM version 6.2 or later.
l FortiGate is managed by FortiManager.
To enable read-write JSON API access:
1. Go to System Settings > Administrators.2. Double-click the admin account to open it for editing.3. Beside JSON API Access, select Read-Write, and clickOK.
To create a fabric connector for VMware NSX-T:
1. Go to Fabric View > Fabric Connectors.2. Click Create New. The Create New Fabric Connector wizard is displayed.
FortiManager 6.4.0 Administration Guide 308Fortinet Inc.

Fabric View
3. Under SSO/Identity, select NSX NSX-T, and click Next. The NSX VMware NSX-T screen is displayed.
4. Configure the following options, and then clickOK:
Name Type a name for the fabric connector object.
Status ToggleOn to enable the fabric connector object. ToggleOFF to disable thefabric connector object.
NSX-T ManagerConfiguration
Server Type the IP address of the NSX-T server.
User Name Type the user name for the NSX-T server.
Password Type the password for the NSX-T server.
FortiManager Configurations
IP Address Type the IP address for FortiManager.
User Name Type the user name for FortiManager.
Password Type the password for FortiManager.
A fabric connector for VMware NSX-T is created and a connection to VMware NSX-T manager is established5. Edit the connector to set Status toOn.
FortiManager retrieves the groups from VMware NSX-T and stores them as dynamic firewall objects.
To download the FortiGate VM deployment image:
1. Download the preconfigured deployment image from the Fortinet Support Site for(https://support.fortinet.com) FortiGate VM for VMware NSX-T:fortigate-vm64-nsxt.ovf
2. Place the deployment image on a server that VMware NSX-T and FortiManager can access.3. Note the URL for the deployment image. You will need to add the URL to FortiManager.
FortiManager 6.4.0 Administration Guide 309Fortinet Inc.

Fabric View
To register a service from FortiManager to VMware NSX-T:
1. Ensure that you know the URL for the location of the preconfigured deployment image for FortiGate VM andVMware NSX-T.
2. On the Fabric View pane, edit the connector for VMware NSX-T, and click Add Service.3. In the Service Name box, type a name for the service.4. In the Integration box, select East-West or North-South to specify the direction of network traffic.5. In the Image Location box, type the URL for the location of the preconfigured deployment file for FortiGate VM.6. ClickOK.
The service is added and registered with the VMware NSX-T manager.
To deploy a FortiGate VM from VMware NSX-T and enable central management:
1. Go to VMware NSX-T manager, and deploy the FortiGate VM.The deployment file is configured to automatically enable central management.
2. When prompted by the deployment of FortiGate VM, enter the IP address of the FortiManager used for centralmanagement.The FortiGate is displayed in FortiManager on the Device Manager pane as an unauthorized device.
3. On FortiManager, go to Device Manager and authorize the FortiGate.
To complete the fabric connector setup:
1. In the policy package in which you will be creating the new policy, create an IPv4 virtual wire pair policy and includethe firewall address objects for VMware NSX-T. See IP policies on page 190.
2. Install the policy package to FortiGate. See Install a policy package on page 171.FortiGate communicates with NSX-T via FortiManager to dynamically populate the firewall address objects with IPaddresses.
FortiManager 6.4.0 Administration Guide 310Fortinet Inc.

FortiView
Use FortiView to view the configuration status of managed devices.
l Monitors on page 311
If FortiAnalyzer features are enabled, the FortiView pane and additional monitors are available. For more information,see the FortiAnalyzer Administration Guide.
Monitors
FortiViewMonitors include a predefined dashboard for Device Status.
l Device Status on page 311l Using the Monitors dashboard on page 313l Customizing the Monitors dashboard on page 313
To prevent timeout, ensure Idle Timeout is greater than the widget's Refresh Interval. See Idletimeout on page 592 and Settings icon on page 313.
Device Status
The Device Status dashboard communicates the configuration status between FortiManager and managed devices.
The center of the Device Status dashboard includes a circular chart that automatically rotates to communicateconfiguration status about managed devices. You can control what information displays by using the following controls at
FortiManager 6.4.0 Administration Guide 311Fortinet Inc.

FortiView
the top of the widget:
Playing andPaused
Click to start and pause the automatic rotation of the circle chart.
Zoom in and out Use the Zoom in and Zoom out tools to enlarge and shrink areas of the circle chart. Whenzoomed in, use the scroll bar to move across the circle chart.
Rotate Options Specify whether the chart automatically displays information about Next Problematic DeviceorOne by One.
Search Devices Select a device and display its information.
Settings icon Change the settings of the widget. Widgets have settings applicable to that widget, such ashow many of the top items to display, Time Period, Refresh Interval, and Chart Type.
Remove widgeticon
Delete the widget from a predefined or custom dashboard.
The Device Status dashboard includes the following information:
Overall DeviceStatus
A summary of the status of all devices. The following colors are used to communicate status:l Red indicates action is required now.l Orange indicates action is required soon.l Blue indicates no action is required.
Each device is represented by a segment in the circle. Click each segment to display thefollowing information about the selected device in the middle of the circle:l Host namel IP addressl Firmware version
Information about the following statuses of the selected device is also displayed on the right:l Connectivity statusl Support Contractsl Licensesl Configuration Status and Policy Package Status
The colored rings in the circle correspond to the status information on the right. The outer ringin the circle corresponds with the Connectivity status. The second most outer ringcorresponds to the Supports Contracts status, and so on.
Require Action The number of devices that require configuration changes. The number is displayed in a redbox.
Will Soon RequireAction
The number of devices that will require configuration changes in the near future. The numberis displayed in an orange box.
Total Number ofDevices
The total number of devices displayed on the dashboard. The number is displayed in a bluebox.
Connectivity Displays the connectivity status for the selected device. Click the Connectivity link to displaythe selected device on the Device Manager > Device & Groups pane.
Support Contracts Displays the expiration date of the support contracts for the selected device. Click the SupportContracts link to display the selected device on the Device Manager > License pane.
FortiManager 6.4.0 Administration Guide 312Fortinet Inc.

FortiView
Licenses Displays the expiration date of the licenses for the selected device. Click the Licenses link todisplay the selected device on the Device Manager > License pane.
ConfigurationStatus
Displays the configuration status for the selected device. Click the Configuration Status link todisplay the selected device on the Device Manager > Device & Groups pane.
Policy PackageStatus
Displays the policy package status for the selected device. Click the Policy Package Statuslink to display the selected device on the Device Manager > Device & Groups pane.
Using the Monitors dashboard
FortiView Monitors dashboards contain widgets that provide network and security information. Use the controls in thedashboard toolbar to work with a dashboard.
Edit Dashboard Add, remove, resize, or move widgets on a predefined dashboard. For details, seeCustomizing the Monitors dashboard on page 313.
Devices Select the devices to include in the widget data.
Time Period Select a time period from the dropdown menu, or set a custom time period.
Refresh Refresh the data in the widgets.
Background theme Change the background color of the dashboard to make widgets easier to view in differentroom lighting.l Day shows a brighter gray background color.l Night shows a black background.l Ocean shows a blue background color.
Hide Side-menu orShow Side-menu
Hide or show the tree menu on the left. In a typical SOC environment, the side menu ishidden and dashboards are displayed in full screen mode.
Use the controls in the widget title bar to work with widgets.
Settings icon Change the settings of the widget.
Customizing the Monitors dashboard
You can add any widget to a custom or predefined dashboard. You can also move, resize, or delete widgets. You cannotrename or delete a predefined dashboard. To reset a predefined dashboard to its default settings, click Dashboard >Reset.
To create a dashboard:
1. In the Monitors tree-menu, right-click and select Create New.2. Specify the Name and whether you want to create a blank dashboard or use a template.
If you select From Template, specify which predefined dashboard you want to use as a template.3. ClickOK. The new dashboard appears In the tree menu.
Select widgets to include on the dashboard, and click Done.
FortiManager 6.4.0 Administration Guide 313Fortinet Inc.

FortiView
To add a widget:
1. Select the predefined or custom dashboard where you want to add a widget.2. Click Edit Dashboard and click the plus icon to see a list of available widgets.
Click on the widget you'd like to add.3. When you have finished adding widgets, click Done to close the AddWidget pane.
FortiManager 6.4.0 Administration Guide 314Fortinet Inc.

VPN
Use the VPNManager pane to enable and use central VPNmanagement. You can view and configure IPsec VPN andSSL-VPN settings that you can install to one or more devices.
Additional configuration options and short-cuts are available using the right-click contentmenu. Right-click the mouse on different parts of the navigation panes on the GUI page toaccess these context menus.
The VPNManager pane includes the following tabs:
IPsec VPN Displays all of defined IPsec VPN communities and associated devices for theselected ADOM. You can create, monitor, and manage VPN settings. See IPsecVPN Communities on page 331
Monitor Displays a list of IPsec VPN tunnels, and allows you to bring the tunnels up ordown. See Monitoring IPsec VPN tunnels on page 340.
Map View Displays a world map showing IPsec VPN tunnels. See Map View on page 340
SSL-VPN Create, monitor, and manage SSL-VPN settings. You can also create, edit, anddelete portal profiles for SSL-VPN settings. See SSL VPN on page 350.
Overview
When central VPNmanagement is enabled, you can use the VPNManager pane to configure IPsec VPN settings thatyou can install to one or more devices. The settings are stored as objects in the objects database. You can then selectthe objects in policies for policy packages on the Policy & Objects pane. You install the IPsec VPN settings to one ormore devices by installing the policy package to the devices.
You must enable central VPNmanagement to access the settings on the VPNManager >IPsec VPN pane. However, you can access the settings on the VPNManager > SSL-VPNpane without enabling central VPNmanagement. See Enabling central VPNmanagement onpage 316.
You can also configure VPN settings directly on a FortiGate by using Device Manager, and the configuration is stored inthe device database. When you create a VPN configuration by using VPN Manager, FortiManager copies the VPNconfiguration from the objects database to the device database before installing the configuration to FortiGates. Inaddition, FortiManager checks for differences between the configuration in the device database and the configuration onFortiGate. If any differences are found, FortiManager only installs the configuration differences to FortiGate. Thisprocess helps avoid conflicts.
FortiManager 6.4.0 Administration Guide 315Fortinet Inc.

VPN
If you are using both Device Manager and VPNManager to configure VPN settings, youshould avoid using Device Manager to modify the settings created by VPNManager, becausewhen installing a policy package again, the settings from VPNManager will override theprevious changes to those settings from Device Manager. Device Manager should only beused to create or modify VPN configurations that are not created by VPNManager.
To create IPsec VPN settings:
1. Enable central VPNmanagement. See Enabling central VPNmanagement on page 316.2. Create a VPN community, sometimes called a VPN topology. See Creating IPsec VPN communities on page 332.3. Create a managed gateway. See Creating managed gateways on page 342.
To create SSL-VPN settings:
1. Create custom profiles. See Creating SSL VPN portal profiles on page 353.Alternately, you can skip this step, and use the default portal profiles.
2. Add an SSL VPN to a device, and select a portal profile. See Creating SSL VPNs on page 350.
To install VPN objects to devices:
1. Plan the VPN security policies. See VPN security policies on page 348.2. In a policy package, create VPN security policies, and select the VPN settings. See Creating policies on page 182.3. Edit the installation targets for the policy package to add all of the devices onto which you want to install the policy
defined VPN settings. See Policy package installation targets on page 174.4. Install the policy package to the devices. See Install a policy package on page 171.
Enabling central VPN management
You can enable centralized VPNmanagement from the VPNManager > IPsec VPN pane.
You can also enable centralized VPNmanagement by editing an ADOM. When ADOMs are disabled, you can enablecentralized VPNmanagement by using the System Settings > Dashboard pane.
Regardless of how you enable centralized VPNmanagement, you use the VPNManagermodule for centralized VPNmanagement.
To enable central VPN management:
1. Go to VPNManager > IPsec VPN.2. Select Enable.3. ClickOK in the confirmation dialog box.
To enable central VPN management for an ADOM:
1. Ensure that you are in the correct ADOM.2. Go to System Settings > All ADOMs.3. Right-click an ADOM, and select Edit.
FortiManager 6.4.0 Administration Guide 316Fortinet Inc.

VPN
4. In the Central Management field, select the VPN checkbox.5. ClickOK. Centralized VPNmanagement is enabled for the ADOM.
To enable central VPN management when ADOMs are disabled:
1. Go to System Settings > Dashboard.2. In the System Information widget, in the VPNManagement Mode field, select Change VPNManagement Mode.
The Change VPNManagement Mode dialog box is displayed.3. ClickOK.
DDNS support
When Dynamic DNS (DDNS) is enabled on FortiGates, VPN Manager supports DDNS. First VPNManager searches forthe interface IP for IPsec Phase2. If no IP is found, then VPN Manager searches for DDNS.
You can use FortiManager and the CLI Configurations menu to enable DDNS on each FortiGate device. The CLIConfigurations menu is available in the Device Manager pane. See CLI Configurations menu on page 63.
With the CLI Configurations menu, you can use the config system ddns command to enable DDNS on a per-devicebasis. The selected monitoring interface must be the interface that supports your tunnel, for example:
config system ddnsedit 1
set ddns-server FortiGuardDDNSset ddns-domain "<HOST1>.fortiddns.com"set monitor-interface "port14"
nextend
You can also use the CLI Configurations menu to configure DDNS on multiple FortiGate interfaces. Once configured,you can use FortiManager to view all the DDNS entries, but you cannot edit the entries.
Following is an example of how to configure DDNS on multiple FortiGates by using the CLI Configurations menu:
config system ddnsedit 1
set ddns-server FortiGuardDDNSset ddns-domain "<HOST1>.fortiddns.com"set use-public-ip enableset monitor-interface "wan"
nextedit 2
set ddns-server FortiGuardDDNSset ddns-domain "<HOST2>.fortiddns.com"set use-public-ip disableset monitor-interface "wwan"
nextend
Multiple DDNS entries are useful when using SDWAN and multiple broadband links.
FortiManager 6.4.0 Administration Guide 317Fortinet Inc.

VPN
VPN Setup Wizard supports device groups
FortiManager VPN Setup Wizard supports device groups, allowing you to optimize a large number of firewalls as spokesin a VPN community.
When a device group is used in a VPN topology, FortiManager resolves the device group to individual members, andthen applies the same logic to generate Phase1/Phase2 information. Keep the following restrictions in mind:
l VPNManager only supports the use of device groups for the following hub and spoke topologies: star and dialup.l VPNmanager only supports the use of device groups for devices in the spoke role.
This document provide a sample configuration of hub and spoke (star topology) with VPNManager and a device group.
Following is a summary of how to use device groups:
1. Create device groups. See Creating device groups on page 319.2. Create protected subnet firewall addresses for hub and spoke devices. See Creating protected subnet firewall
addresses on page 319.3. Create a VPN community. See Creating VPN communities on page 321.4. Add spoke FortiGate units to the VPN community. See Adding spoke FortiGate units to the VPN community on
page 322.5. Add the hub FortiGate units to the VPN community. See Adding the hub FortiGate unit to the VPN community on
page 324.The hub and spokes are created.
6. Install VPN configuration and firewall policies to hub and spoke devices. See Installing firewall policies to hub andspoke devices on page 327
This topic also covers how to:
l Remove a spoke member from a VPN community. See Removing a spoke member from a VPN community onpage 328
l Add a spoke member to a VPN community. See Adding a spoke member to a VPN community on page 330
FortiManager 6.4.0 Administration Guide 318Fortinet Inc.

VPN
Creating device groups
To create device groups:
1. Go to Device Manager > Device & Groups.2. From the Device Groupmenu, select Create New.
The Create New Device Group dialog box opens.3. In theGroup Name box, type a name, such as spoke_group.4. Click Add Member, and add FortiGate units to the group.
In this example, we are adding 5 FortiGate units.
5. ClickOK to save the group.
Creating protected subnet firewall addresses
Create protected subnet firewall addresses for hub and spoke devices. VPN Manager can use the protected subnetfirewall address to create static routes on FortiGate units to allow traffic destined for the remote protected network topass through the VPN tunnel.
To create protected subnet firewall addresses:
1. Go to Policy & Objects > Object Configurations > Addresses.2. From the Create Newmenu, select Address.
The Create New Address pane opens.
FortiManager 6.4.0 Administration Guide 319Fortinet Inc.

VPN
3. Create a protected subnet firewall address for the hub FortiGate, and clickOK.
4. From the Create Newmenu, select Address.The Create New Address pane opens.
5. Create a protected subnet firewall address with per-device mapping for spoke FortiGate units, and clickOK.
FortiManager 6.4.0 Administration Guide 320Fortinet Inc.

VPN
Creating VPN communities
To create a VPN community:
1. Go to VPNManager > IPsec VPN, and click Create New.The VPN Topology Setup Wizard opens.
2. In the Name box, type a name, such as star.3. Under Choose VPN Topology, select Star, and click Next.
4. Specify the Authentication & Encryption Settings, and click Next.
FortiManager 6.4.0 Administration Guide 321Fortinet Inc.

VPN
5. Configure VPN Phase 1 and Phase 2 settings, and click Next.
Adding spoke FortiGate units to the VPN community
To add spoke FortiGate units to the VPN community:
1. Go to VPNManager > IPsec VPN, and click the community that you created.The community opens in the content pane.
2. Click Create New > Managed Gateway.The VPN Gateway Setup Wizard opens for the community.
3. Set the Protected Network options, and then click Next:a. Beside Protected Subnet, click Click here to select, and select the protected subnet.
FortiManager 6.4.0 Administration Guide 322Fortinet Inc.

VPN
4. Set the Device options, and then click Next:a. Beside Role, select Spoke.b. Beside Device, select the device group you created named spoke_group.
5. Set the Default VPN Interface options, and click Next.a. Beside Default VPN Interface, select the interface for spokes, which is often the internet-facing interface.
FortiManager 6.4.0 Administration Guide 323Fortinet Inc.

VPN
6. Set the Local Gateway options, and click Next.a. Beside Local Gateway, type the IP address for the gateway.
7. Set the Advanced options, and clickOK.a. Beside Routing, selectManual (via Device Manager) or Automatic.
Adding the hub FortiGate unit to the VPN community
To add a hub FortiGate unit to the VPN community:
1. Go to VPNManager > IPsec VPN, and click the community that you created.The community opens in the content page.
2. Click Create New > Managed Gateway.The VPN Gateway Setup Wizard opens for the community.
FortiManager 6.4.0 Administration Guide 324Fortinet Inc.

VPN
3. Set the Protected Network options, and then click Next:a. Beside Protected Subnet, click Click here to select, and select the protected subnet.
4. Set the Device options, and then click Next:a. Beside Role, select Hub.b. Beside Device, select the device for the hub.
FortiManager 6.4.0 Administration Guide 325Fortinet Inc.

VPN
5. Set the Default VPN Interface options, and click Next.a. Beside Default VPN Interface, select the interface for the hub, which is often the internet-facing interface.
6. Set the Local Gateway options, and click Next.a. Beside Local Gateway, type the IP address for the gateway.
FortiManager 6.4.0 Administration Guide 326Fortinet Inc.

VPN
7. Set the Advanced options, and clickOK.a. Beside Routing, selectManual (via Device Manager) or Automatic.
The hub and spoke are created.
Installing firewall policies to hub and spoke devices
Create firewall policies for hub and spoke FortiGates, and then install the configurations by using the Install Wizard.
To install configurations to hub and spoke devices:
1. Go to Policy & Object > Policy Packages.2. Create firewall policies for hub and spoke FortiGates.
3. From the Installmenu, select Install Wizard.
FortiManager 6.4.0 Administration Guide 327Fortinet Inc.

VPN
4. Select Install Policy Package & Device Settings, and then click Next.
5. Complete the wizard to install the configurations.
Removing a spoke member from a VPN community
You can remove a spoke member from a VPN community by removing the device from the device group, and theninstalling the configuration change to the FortiGates.
To remove a spoke member from a VPN community:
1. Remove the device from the device group:a. Go to Device Manager > Device & Groups.b. In the tree menu, right-click the group name, and select Edit Group.
The Edit Device Group dialog box opens.
FortiManager 6.4.0 Administration Guide 328Fortinet Inc.

VPN
c. Select a device, for example, vlan171_0085, and click Remove Member.
d. ClickOK to save the changes. 2. Execute Policy package installation to purge VPN configuration from FortiGates.
Install preview page shows that FortiManager will purge the related configuration on the hub FortiGate.
The Install Preview page shows that FortiManager will delete related configurations on the spoke FortiGate namedvlan181_0085.
FortiManager 6.4.0 Administration Guide 329Fortinet Inc.

VPN
Adding a spoke member to a VPN community
You can add a spoke member to a VPN community by adding the device to the device group, and then installing theconfiguration change to the FortiGates.
To add a new spoke member to a VPN community:
1. Add a device to the device group:a. Go to Device Manager > Device & Groups.b. In the tree menu, right-click the group name, and select Edit Group.
The Edit Device Group dialog box opens.c. Click Add Member, select the device, for example BranchOffice6, and click Add.d. ClickOK to save the changes.
2. Go to VPNmanager community summary page, the new spoke member is displayed.In the following example, the member named BranchOffice6 is displayed.
FortiManager 6.4.0 Administration Guide 330Fortinet Inc.

VPN
3. Execute Policy package installation to push VPN config to HUB and newly added spoke devices.For example, the Install Preview page shows that FortiManager will install IPsec VPN configuration to the newspoke member. In this example, the new spoke member is named BranchOffice6.
IPsec VPN Communities
You can use the VPNManagement > IPsec VPN pane to create and monitor full-meshed, star, and dial-up IPsec VPNcommunities. IPsec VPN communities are also sometimes called VPN topologies.
Managing IPsec VPN communities
Go to VPNManager > IPsec VPN to manage IPsec VPN communities.
The following options are available:
VPN Community Select to create a new VPN community, edit the selected VPN community, ordelete the selected VPN community.
Install Wizard Launch the Install Wizard to install IPsec VPN settings to devices.
FortiManager 6.4.0 Administration Guide 331Fortinet Inc.

VPN
Create New Create a new VPN community. See Creating IPsec VPN communities on page332
Edit Edit the selected VPN community. See Editing an IPsec VPN community on page339.
Delete Delete the selected VPN community or communities. See Deleting VPNcommunities on page 340.
Column Settings Configure which columns are displayed, or click Reset to Default to reset thedisplay to the default columns.
Search Enter a search term to search the communities list.
Configure Gateways Go to the gateway list for the community. This option is only available from theright-click menu. See IPsec VPN gateways on page 342.
Add Managed Gateway Start the VPN Gateway Setup Wizard. This option is only available from the right-click menu. See Creating managed gateways on page 342.
Creating IPsec VPN communities
You can create one or more IPsec VPN communities. An IPsec VPN community is also sometimes called a VPNtopology. A VPN Topology Wizard is available to help you set up topologies.
After you create the IPsec VPN community, you can create the VPN gateway. See IPsec VPN gateways on page 342.
To create a new IPsec VPN community:
1. Go to the VPNManager > IPsec VPN tab.2. Do one of the following:
l From the VPN Communitymenu select Create New.l Click Create New in the content pane toolbar.l Right-click in the tree menu or on an existing community and select Create New.
The VPN Topology Setup Wizard is displayed.
FortiManager 6.4.0 Administration Guide 332Fortinet Inc.

VPN
3. Enter a name for the topology in the Name field.4. Optionally, enter a brief description of the topology in the Description field.5. Choose a topology type: Full Meshed, Star, or Dial up.
l Full Meshed: Each gateway has a tunnel to every other gateway.l Star: Each gateway has one tunnel to a central hub gateway.l Dial up: Some gateways, often mobile users, have dynamic IP addresses and contact the gateway to establisha tunnel.
6. Click Next.
7. Configure the Authentication and Encryption information for the topology
FortiManager 6.4.0 Administration Guide 333Fortinet Inc.

VPN
8. Click Next.9. Configure the VPN Zone, IKE Security Phase 1 Advanced Properties, IPsec Security Phase 2 Advanced Properties,
and Advanced Options.10. Click Next.11. Review the topology information on the Summary page, then clickOK to create the topology.
After you have created the VPN topology, you can create managed and external gateways for the topology.
For descriptions of the options in the wizard, see VPN community settings on page 334.
VPN community settings
The following table describes the options available in the VPN Topology Setup Wizard and on the Edit VPN Communitypage.
Name Type a name for the VPN topology.
Description Type an optional description.
Choose VPN Topology Choose a topology type. Select one of:l Full Meshed: Each gateway has a tunnel to every other gateway.l Star: Each gateway has one tunnel to a central hub gateway.l Dial up: Some gateways, often mobile users, have dynamic IPaddresses and contact the gateway to establish a tunnel.
Authentication Select Certificates or Pre-shared Key.When you select Pre-shared Key, FortiGate implements the EncapsulatedSecurity Payload (ESP) protocol. Internet Key Exchange (IKE) isperformed automatically based on pre-shared keys or X.509 digitalcertificates.
Certificates If you selected Certificates, select a certificate template. Fortinet providesseveral default certificate templates. You can also create certificatetemplates on the Device Manager > Provisioning Templates > CertificateTemplates pane.
Pre-shared Key If you selected Pre-shared Key, selectGenerate or Specify.When you select Specify, type the pre-shared key that the FortiGate unitwill use to authenticate itself to the remote peer or dialup client duringphase 1 negotiations. You must define the same key at the remote peer orclient. The key must contain at least 6 printable characters. For optimumprotection against currently known attacks, the key must consist of aminimum of 16 randomly chosen alphanumeric characters.Alternatively, you can select to generate a random pre-shared key.
Encryption Define the IKE Profile. Configure IKE Phase 1 and IKE Phase 2 settings.
FortiManager 6.4.0 Administration Guide 334Fortinet Inc.

VPN
IKE Security (Phase 1)Properties
Define the Phase 1 proposal settings.
IKE Version Select IKE version 1 or 2 (default = 2).For more information about IKE v2, refer to RFC 4306.
EncryptionAuthentication
Select the encryption and authentication algorithms used to generate keysfor protecting negotiations and add encryption and authenticationalgorithms as required.You need to select at least one combination. The remote peer or clientmust be configured to use at least one of the proposals that you define.Select one of the following symmetric-key encryption algorithms:l 3DES: Triple-DES, in which plain text is encrypted three times bythree keys.
l AES128: A 128-bit block Cipher Block Chaining (CBC) algorithm thatuses a 128-bit key.
l AES128GCM: AES128 Galois/Counter Mode (GCM).l AES192: A 128-bit block Cipher Block Chaining (CBC) algorithm thatuses a 192-bit key.
l AES256: A 128-bit block Cipher Block Chaining (CBC) algorithm thatuses a 256-bit key.
l AES256GCMl ARIA128: A 128-bit block size that uses a 128-bit key.l ARIA192: A 128-bit block size that uses a 192- bit key.l ARIA256: A 128-bit block size that uses a 256-bit key.l CHACHA20POLY1305: Arbitrary length, 96-bit nonce, and 256-bitkey.
l DES: Digital Encryption Standard, a 64-bit block algorithm that uses a56-bit key.
l SEED: A 16-round Feistel network with 128-bit blocks and a 128-bitkey.
Select either of the following authentication message digests to check theauthenticity of messages during phase 1 negotiations:l MD5: Message Digest 5, the hash algorithm developed by RSA DataSecurity.
l SHA1: Secure Hash Algorithm 1, which produces a 160-bit messagedigest.
l SHA256: Secure Hash Algorithm 2, which produces a 256-bitmessage digest.
l SHA384: Secure Hash Algorithm 3, which produces a 384-bitmessage digest.
l SHA512: Secure Hash Algorithm 3, which produces a 512-bitmessage digest.
Note: If the encryption is GCM or CHACHA20POLY1305, theauthentication options are PRFSHA1, PRFSHA256, PRFSHA384, andPRFSHA512.To specify more combinations, use the Add button beside any of the tablerows.
FortiManager 6.4.0 Administration Guide 335Fortinet Inc.

VPN
IPsec Security (Phase 2)Properties
Define the Phase 2 proposal settings.When you define phase 2 parameters, you can choose any set of phase 1parameters to set up a secure connection for the tunnel and authenticatethe remote peer. Auto Key configuration applies to both tunnel-mode andinterface-mode VPNs.
EncryptionAuthentication
Select the encryption and authentication algorithms used to generate keysfor protecting negotiations and add encryption and authenticationalgorithms as required.You need to select at least one combination. The remote peer or clientmust be configured to use at least one of the proposals that you define.It is invalid to set both Encryption and Authentication to NULL.Select one of the following symmetric-key encryption algorithms:l 3DES: Triple-DES, in which plain text is encrypted three times bythree keys.
l AES128: A 128-bit block Cipher Block Chaining (CBC) algorithm thatuses a 128-bit key.
l AES128GCM: AES128 Galois/Counter Mode (GCM).l AES192: A 128-bit block Cipher Block Chaining (CBC) algorithm thatuses a 192-bit key.
l AES256: A 128-bit block Cipher Block Chaining (CBC) algorithm thatuses a 256-bit key.
l AES256GCMl ARIA128: A 128-bit block size that uses a 128-bit key.l ARIA192: A 128-bit block size that uses a 192- bit key.l ARIA256: A 128-bit block size that uses a 256-bit key.l CHACHA20POLY1305: Arbitrary length, 96-bit nonce, and 256-bitkey.
l DES: Digital Encryption Standard, a 64-bit block algorithm that uses a56-bit key.
l NULL: Do not use an encryption algorithm.l SEED: A 16-round Feistel network with 128-bit blocks and a 128-bitkey.
Select either of the following authentication message digests to check theauthenticity of messages during phase 1 negotiations:l NULL: Do not use a message digest.l MD5: Message Digest 5, the hash algorithm developed by RSA DataSecurity.
l SHA1: Secure Hash Algorithm 1, which produces a 160-bit messagedigest.
l SHA256: Secure Hash Algorithm 2, which produces a 256-bitmessage digest.
l SHA384: Secure Hash Algorithm 3, which produces a 384-bitmessage digest.
l SHA512: Secure Hash Algorithm 3, which produces a 512-bitmessage digest.
FortiManager 6.4.0 Administration Guide 336Fortinet Inc.

VPN
Note: If the encryption is GCM or CHACHA20POLY1305, noauthentication options can be selected.To specify more combinations, use the Add button beside any of the tablerows.
VPN Zone Select to create VPN zones. When enabled, you can select to createdefault or custom zones. When disabled, no VPN zones are created.
Create Default Zones Select to have default zones created for you.
Use Custom Zone Select to choose what zones to create.
IKE Security Phase 1 Advanced Properties
Diffie HellmanGroup(s)
Select one or more of the following Diffie-Hellman (DH) groups: 1, 2, 5, 14,15, 16, 17, 18, 19, 20, 21, 27, 28, 29, 30, 31.At least one of the DH group settings on the remote peer or client mustmatch one the selections on the FortiGate unit. Failure to match one ormore DH groups will result in failed negotiations.Only one DH group is allowed for static and dynamic DNS gateways inaggressive mode.
Exchange Mode Select either Aggressive orMain (ID Protection).The FortiGate unit and the remote peer or dialup client exchange phase 1parameters in eitherMain (ID Protection) or Aggressivemode. This choicedoes not apply if you use IKE version 2, which is available only for route-based configurations.l In Main mode, the Phase 1 parameters are exchanged in multiplerounds with encrypted authentication information
l In Aggressive mode, the Phase 1 parameters are exchanged in singlemessage with authentication information that is not encrypted.
Although Main mode is more secure, you must select Aggressive mode ifthere is more than one dialup Phase 1 configuration for the interface IPaddress, and the remote VPN peer or client is authenticated using anidentifier local ID). Descriptions of the peer options in this guide indicatewhether Main or Aggressive mode is required.
Key Life Type the time (in seconds) that must pass before the IKE encryption keyexpires. When the key expires, a new key is generated without interruptingservice. The keylife can be from 120 to 172800 seconds.
Dead PeerDetection
Select this checkbox to reestablish VPN tunnels on idle connections andclean up dead IKE peers if required. You can use this option to receivenotification whenever a tunnel goes up or down, or to keep the tunnelconnection open when no traffic is being generated inside the tunnel. Forexample, in scenarios where a dialup client or dynamic DNS peer connectsfrom an IP address that changes periodically, traffic may be suspendedwhile the IP address changes.
IPsec Security Phase 2 Advanced Properties
FortiManager 6.4.0 Administration Guide 337Fortinet Inc.

VPN
Diffie HellmanGroup(s)
Select one or more of the following Diffie-Hellman (DH) groups: 1, 2, 5, 14,15, 16, 17, 18, 19, 20, 21, 27, 28, 29, 30, 31.At least one of the DH group settings on the remote peer or client mustmatch one the selections on the FortiGate unit. Failure to match one ormore DH groups will result in failed negotiations.Only one DH group is allowed for static and dynamic DNS gateways inaggressive mode.
Replay detection Select to enable or disable replay detection. Replay attacks occur when anunauthorized party intercepts a series of IPsec packets and replays themback into the tunnel.
Perfect forwardsecrecy (PFS)
Select to enable or disable perfect forward secrecy (PFS).Perfect forward secrecy (PFS) improves security by forcing a new Diffie-Hellman exchange whenever keylife expires.
Key Life Select the PFS key life. Select Second, Kbytes, or Both from the dropdownlist and type the value in the text field.
Autokey KeepAlive
Select to enable or disable autokey keep alive.The phase 2 SA has a fixed duration. If there is traffic on the VPN as theSA nears expiry, a new SA is negotiated and the VPN switches to the newSA without interruption. If there is no traffic, the SA expires and the VPNtunnel goes down. A new SA will not be generated until there is traffic.The Autokey Keep Alive option ensures that a new SA is negotiated even ifthere is no traffic so that the VPN tunnel stays up.
Auto-Negotiate Select to enable or disable auto-negotiation.
NAT Traversal Select the checkbox if a NAT device exists between the local FortiGate unitand the VPN peer or client. The local FortiGate unit and the VPN peer orclient must have the same NAT traversal setting (both selected or bothcleared) to connect reliably.
Keep-alive Frequency If NAT traversal is enabled or forced, type a keep-alive frequency setting(10-900 seconds).
Advanced-Options For more information on advanced options, see the FortiOS CLIReference.
fcc-enforcement Enable or disable FCC enforcement.
inter-vdom Enable or disable the inter-vdom setting.
loccalid-type Select the local ID type from the dropdown list. Select one of:l address: IP Addressl asn1dn: ASN.1 Distinguished Namel auto: Select type automaticallyl fqdn: Fully Qualified Domain namel keyid: Key Identifier IDl user-fqdn: User Fully Qualified Domain Name
FortiManager 6.4.0 Administration Guide 338Fortinet Inc.

VPN
negotiate-timeout Enter the negotiation timeout value. The default is 30 seconds.
npu-offload Enable (default) or disable offloading of VPN session to a networkprocessing unit (NPU).
View IPsec VPN community details
The VPN community information pane includes a quick status bar showing the community settings and the list ofgateways in the community. Gateways can also be managed from this pane. See IPsec VPN gateways on page 342 forinformation.
To view IPsec VPN community details:
1. Go to VPNManager > IPsec VPN.2. Select a community from the tree menu, or double-click on a community in the content pane. The community
information pane opens.
3. Select All VPN Communities in the tree menu to return to the VPN community list.
Editing an IPsec VPN community
To edit a VPN community, you must be logged in as an administrator with sufficient privileges. The community name andtopology cannot be edited.
To edit IPsec VPN communities:
1. Go to VPNManager > IPsec VPN.2. Do one of the following:
l Double-click on a community or select it in the tree menu, then click Edit in the quick status bar or select VPNCommunity > Edit.
l Right-click on a community and select Edit from the menu.l Select a community, then click Edit in the toolbar.
The Edit VPN Community page is displayed.3. Edit the settings as required, and then selectOK to apply the changes.
For descriptions of the settings, see VPN community settings on page 334.
FortiManager 6.4.0 Administration Guide 339Fortinet Inc.

VPN
Deleting VPN communities
To delete a VPN community or communities, you must be logged in as an administrator with sufficient privileges.
To delete VPN communities:
1. Go to VPNManager > IPsec VPN.2. Do one of the following:
l Select the community in the tree, then select VPN Community > Delete.l Select the community or communities from the content pane list, then click Delete in the toolbar.l Select the community or communities from the content pane list or tree menu, then right-click and selectDelete.
3. SelectOK in the confirmation box to delete the VPN community or communities.
Monitoring IPsec VPN tunnels
Go to VPNManager > Monitor to view the list of IPsec VPN tunnels. You can also bring the tunnels up or down on thispane. Select a specific community from the tree menu to show only that community's tunnels.
To bring tunnels up or down:
1. Go to VPNManager > Monitor.2. Find and select the tunnel or tunnels that you need to bring up or down in the list.3. Click Bring Tunnel Up or Bring Tunnel Down from the toolbar or right-click menu4. SelectOK in the confirmation dialog box to apply the change.
Map View
TheMap View pane shows IPsec VPN connections on an interactive world map (Google Maps). Select a specificcommunity from the tree menu to show only that community's tunnels.
FortiManager 6.4.0 Administration Guide 340Fortinet Inc.

VPN
Hovering the cursor over a connection will highlight the connection and show the gateway, ADOM, and city names foreach end of the tunnel.
The following options are available:
Topology View The topology view shows the configured VPN gateways. See IPsec VPNgateways on page 342.
Traffic View The traffic view shows network traffic through the tunnels between protectedsubnets.
Show Table Select to show the connection table on the bottom of the pane. In the topologyview, this option is only available when a specific community is selected.l The topology table shows the VPN gateway list and toolbar, with a columnadded for location. See Managing VPN gateways on page 342 forinformation.
l The traffic table shows the same information and options as theMonitor tab.See Monitoring IPsec VPN tunnels on page 340 for information.
Show Tunnel Down Only Select to show only tunnels that are currently down.This option is only available on the traffic view.
Refresh Click to refresh the map view, or click the down arrow and select a refresh ratefrom the dropdown menu.
Toggle Full Screen Click to view the map in full screen mode. Press Esc to return to the windowedview.
If necessary, the location of a device can be manually configured when editing the device; seeEditing device information on page 72.
FortiManager 6.4.0 Administration Guide 341Fortinet Inc.

VPN
IPsec VPN gateways
A VPN gateway functions as one end of a VPN tunnel. It receives incoming IPsec packets, decrypts the encapsulateddata packets, then passes the data packets to the local network. It also encrypts, encapsulates, and sends the IPsecdata packets to the gateway at the other end of the VPN tunnel.
The IP address of a VPN gateway is usually the IP address of the network interface that connects to the Internet. Youcan also define a secondary IP address for the interface, and use that address as the local VPN gateway address, sothat your existing setup is not affected by the VPN settings.
Once you have created the IPsec VPN topology, you can create managed and external gateways.
Managing VPN gateways
Go to VPNManager > IPsec VPN, then select a community from the tree menu, or double-click on a community in thelist, to manage the VPN gateways in that community.
The following options are available:
Create New Create a new managed or external gateway. See Creating managed gateways onpage 342 and Creating external gateways on page 346 for more information.
Edit Edit the selected gateway. See Editing an IPsec VPN gateway on page 348.
Delete Delete the selected gateway or gateways. See Deleting VPN gateways on page348.
Column Settings Configure which columns are displayed, or click Reset to Default to reset thedisplay to the default columns.
Search Enter a search term to search the gateway list.
Creating managed gateways
The settings available when creating a managed gateway depend on the VPN topology type, and how the gateway isconfigured.
Managed gateways are managed by FortiManager in the current ADOM. Devices in a different ADOM can be treated asexternal gateways. VPN configuration must be handled manually by the administrator in that ADOM. See Creatingexternal gateways on page 346.
FortiManager 6.4.0 Administration Guide 342Fortinet Inc.

VPN
To create a managed gateway:
1. Go to VPNManager > IPsec VPN.2. Select a community from the tree menu, or double-click on a community in the list.3. On the community information content pane, in the toolbar, select Create New > Managed Gateway.
The VPN Gateway Setup Wizard opens.
4. Proceed through the five pages of the wizard, filling in the following values as required, then clickOK to create themanaged gateway.
Protected Subnet Select a protected subnet from the drop-down list.
Role Select the role of this gateway: Hub or Spoke.This option is only available for star and dial up VPN topologies.
Device Select a Device or Device Group from the drop-down list.
Default VPN Interface Select the interface to use for this gateway from the drop-down list.
Hub-to-Hub Interface Select the interface to use for hub to hub communication. This is required ifthere are multiple hubs.This option is only available for star and dial up topologies with the role set toHub.
Local Gateway Enter the local gateway IP address.
Local ID Enter a local ID.
Routing Select the routing method:Manual (via Device Manager), or Automatic.
Summary Network(s) Select the network from the dropdown list and select the priority. Click the addicon to add more entries.This option is only available for star and dial up topologies with the role set toHub.
Peer Type Select one of the following:l Accept any peer IDl Accept this peer ID: Enter the peer ID in the text field
FortiManager 6.4.0 Administration Guide 343Fortinet Inc.

VPN
l Accept a dialup group: Select a group from the drop-down listl Accept peer: Select a peer from the dropdown listl Accept peer group: Select a peer group from the drop-down list
A Local ID is an alphanumeric value assigned in the Phase 1 configuration.The local ID of a peer is called a Peer ID. The Local ID or peer ID can be usedto uniquely identify one end of a VPN tunnel, enabling a more secureconnection. If you have multiple VPN tunnels negotiating, this ensures theproper remote and local ends connect.When you configure the ID on your end, it is your local ID. When the remoteend connects to you, they see it as your peer ID. If you are debugging a VPNconnection, the local ID is part of the VPN negotiations. You can use it to helptroubleshoot connection problems.The default configuration is to accept all local IDs (peer IDs). If your local ID isset, the remote end of the tunnel must be configured to accept your ID.This option is only available for dial up topologies.
XAUTH Type Select the XAUTH type: Disable, PAP Server, CHAP Server, or AUTO Server.This option is only available for dial up topologies.
User Group Select the authentication user group from the dropdown list.This field is available when XAUTH Type is set to PAP Server, CHAP Server,or AUTO Server.When the FortiGate unit is configured as an XAuth server, enter the usergroup to authenticate remote VPN peers. The user group can contain localusers, LDAP servers, and RADIUS servers. The user group must be added tothe FortiGate configuration before the group name can be cross referenced.
Enable IKE ConfigurationMethod ("mode config")
Select to enable or disable IKE configuration method.This option is only available for dial up topologies.
Enable IP Assignment Select to enable or disable IP assignment.This option is only available for dial up topologies. When the role is set to Hub,this option is only available when Enable IKE Configuration Method is on.
IP AssignmentMode
Select the IP assignment mode: Range or User Group.This option is only available for dial up topologies with the role set to Hub andEnable IP Assignment turned on.
IP AssignmentType
Select the IP assignment type: IP or Subnet.This option is only available for dial up topologies with the role set to Hub andEnable IP Assignment turned on.
IPv4 Start IP Enter the IPv4 start IP address.This option is only available for dial up topologies with the role set to Hub andEnable IP Assignment turned on.
IPv4 End IP Enter the IPv4 end IP address.This option is only available for dial up topologies with the role set to Hub andEnable IP Assignment turned on.
IPv4 Netmask Enter the IPv4 netmask.
FortiManager 6.4.0 Administration Guide 344Fortinet Inc.

VPN
This option is only available for dial up topologies with the role set to Hub andEnable IP Assignment turned on.
Add Route Select to enable or disable adding a route for this gateway.This option is only available for dial up topologies.
DNS Server #1 to #3 Enter the DNS server IP addresses to provide IKE Configuration Method toclients.This option is only available for dial up topologies with the role set to Hub andeither Enable IKE Configuration Method turned on, or DNS Service is set toSpecify.
WINS Server #1 and #2 Enter the WINS server IP addresses to provide IKE Configuration Method toclients.This option is only available for dial up topologies with the role set to Hub andEnable IKE Configuration Method turned on.
IPv4 Split include Select the address or address group from the dropdown list.This option is only available for dial up topologies with the role set to Hub andEnable IKE Configuration Method turned on.
Exclusive IP Range Enter the start and end IP addresses of the exclusive IP address range. Clickthe add icon to add more entries.This option is only available for dial up topologies with the role set to Hub andeither Enable IKE Configuration Method and Enable IP Assignment turned on,or Enable IKE Configuration Method turned off.
DHCP Server Select to enable or disable DHCP server.This option is only available for dial up topologies with the role set to Hub andEnable IKE Configuration Method is off.
Default Gateway Enter the default gateway IP address.This option is only available for dial up topologies with the role set to Hub andEnable IKE Configuration Method turned off.
DNS Service Select Use System DNS setting to use the system's DNS settings, or Specifyto specify DNS servers #1 to #3.This option is only available for dial up topologies with the role set to Hub andEnable IKE Configuration Method turned off.
Netmask Enter the netmask.This option is only available for dial up topologies with the role set to Hub andEnable IKE Configuration Method turned off.
IPsec Lease Hold Enter the IPsec lease hold time.This option is only available for dial up topologies with the role set to Hub andEnable IKE Configuration Method turned off.
Auto-Configuration Select to enable or disable automatic configuration.This option is only available for dial up topologies with the role set to Hub andEnable IKE Configuration Method turned off.
FortiManager 6.4.0 Administration Guide 345Fortinet Inc.

VPN
DHCP Server IP Range Enter the start and end IP addresses of the DHCP server range. Click the addicon to add more entries.This option is only available for dial up topologies with the role set to Hub andEnable IKE Configuration Method turned off.
Advanced Options
authpasswd Enter the XAuth client password for the FortiGate.
authusr Enter the XAuth client user name for the FortiGate.
banner Enter the banner value.Specify the message to send to IKE Configuration Method clients. Someclients display this message to users.
dns-mode Select the DNSmode from the dropdown list:l auto: Assign DNS servers in the following order:
a. Servers assigned to interfaces by DHCPb. Per-VDOM assigned DNS serversc. Global DNS servers
l manual: Use the DNS servers specified in DNS Server #1 to #3.
domain Enter the domain value.
public-ip Enter the public IP address.Use this field to configure a VPN with dynamic interfaces. The value is thedynamically assigned PPPoE address that remains static and does notchange over time.
route-overlap Select the route overlap method from the dropdown list: allow, use-new, oruse-old.
spoke-zone Select a spoke zone from the dropdown list.
unity-support Enable or disable unity support.
vpn-interface-priority
Set the VPN gateway interface priority. The default value is 1.
vpn-zone Select a VPN zone from the dropdown list.
Creating external gateways
External gateways are not managed by the FortiManager device.
To create an external gateway:
1. Go to VPNManager > IPsec VPN.2. Select a community from the tree menu, or double-click on a community in the list.3. On the community information content pane, in the toolbar, select Create New > External Gateway. The New VPN
External Gateway pane opens.
FortiManager 6.4.0 Administration Guide 346Fortinet Inc.

VPN
4. Configure the following settings, then clickOK to create the external gateway:
Node Type Select either HUB or Spoke from the dropdown list.This option is only available for star and dial up VPN topologies.
Gateway Name Enter the gateway name.
Gateway IP Select the gateway IP address from the dropdown list.
Hub IP Select the hub IP address from the dropdown list.This option is only available for star and dial up topologies with the role set toHub.
Create Phase2 per ProtectedSubnet Pair
Toggle the switch toOn to create a phase2 per protected subnet pair.
Routing Select the routing method:Manual (via Device Manager, or Automatic.This option is only available for full meshed and star topologies.
Peer Type Select one of the following:l Accept any peer IDl Accept this peer ID: Enter the peer ID in the text fieldl Accept a dialup group: Select a group from the dropdown list
A Local ID is an alphanumeric value assigned in the Phase 1 configuration.The local ID of a peer is called a Peer ID. The Local ID or peer ID can be usedto uniquely identify one end of a VPN tunnel, enabling a more secureconnection. If you have multiple VPN tunnels negotiating, this ensures theproper remote and local ends connect.When you configure the ID on your end, it is your local ID. When the remoteend connects to you, they see it as your peer ID. If you are debugging a VPNconnection, the local ID is part of the VPN negotiations. You can use it to helptroubleshoot connection problems.The default configuration is to accept all local IDs (peer IDs). If your local ID isset, the remote end of the tunnel must be configured to accept your ID.This option is only available for dial up topologies.
Protected Subnet Select a protected subnet from the list. You can add multiple subnets.
Local Gateway Enter the local gateway IP address.
FortiManager 6.4.0 Administration Guide 347Fortinet Inc.

VPN
Editing an IPsec VPN gateway
To edit a VPN gateway, you must be logged in as an administrator with sufficient privileges. The gateway role and device(if applicable) cannot be edited.
To edit IPsec VPN communities:
1. Go to VPNManager > IPsec VPN.2. Select a community from the tree menu, or double-click on a community in the list.3. Double-click on a gateway, right-click on a gateway and then select Edit from the menu, or select the gateway then
click Edit in the toolbar. The Edit VPN Gateway pane opens.4. Edit the settings as required, and then selectOK to apply the changes.
Deleting VPN gateways
To delete a VPN gateway or gateways, you must be logged in as an administrator with sufficient privileges.
To delete VPN gateways:
1. Go to VPNManager > IPsec VPN.2. Select a community from the tree menu, or double-click on a community in the list.3. Select the gateway or gateways you need to delete.4. Click Delete in the toolbar, or right-click and select Delete.5. SelectOK in the confirmation box to delete the gateway or gateways.
VPN security policies
Once you have defined the IP source and destination addresses, the phase 1 authentication parameters, and the phase2 parameters, you must define the VPN security policies.
FortiGate unit VPNs can be policy-based or route-based. There is little difference between the two types. In both cases,you specify phase 1 and phase 2 settings. However there is a difference in implementation. A route-based VPN createsa virtual IPsec network interface that applies encryption or decryption as needed to any traffic that it carries. That is whyroute-based VPNs are also known as interface-based VPNs. A policy-based VPN is implemented through a specialsecurity policy that applies the encryption you specified in the phase 1 and phase 2 settings.
An IPsec security policy enables the transmission and reception of encrypted packets, specifies the permitted directionof VPN traffic, and selects the VPN tunnel. In most cases, only a single policy is needed to control both inbound andoutbound IP traffic through a VPN tunnel.
For a route-based VPN, you create two security policies between the virtual IPsec interface and the interface thatconnects to the private network. In one policy, the virtual interface is the source. In the other policy, the virtual interface isthe destination. The Action for both policies is Accept. This creates bidirectional policies that ensure traffic will flow inboth directions over the VPN.
For a policy-based VPN, one security policy enables communication in both directions. You must select IPSEC as theAction and then select the VPN tunnel dynamic object you have mapped to the phase 1 settings. You can then enable
FortiManager 6.4.0 Administration Guide 348Fortinet Inc.

VPN
inbound and outbound traffic as needed within that policy, or create multiple policies of this type to handle different typesof traffic differently. For example HTTPS traffic may not require the same level of scanning as FTP traffic.
Defining policy addresses
A VPN tunnel has two end points. These end points may be VPN peers, such as two FortiGate gateways. Encryptedpackets are transmitted between the end points. At each end of the VPN tunnel, a VPN peer intercepts encryptedpackets, decrypts the packets, and forwards the decrypted IP packets to the intended destination.
You need to define firewall addresses for the private networks behind each peer. You will use these addresses as thesource or destination address depending on the security policy.
In general:
l In a gateway-to-gateway, hub-and-spoke, dynamic DNS, redundant-tunnel, or transparent configuration, you needto define a policy address for the private IP address of the network behind the remote VPN peer.
l In a peer-to-peer configuration, you need to define a policy address for the private IP address of a server or hostbehind the remote VPN peer.
Defining security policies
Security policies allow IP traffic to pass between interfaces on a FortiGate unit. You can limit communication to particulartraffic by specifying source and destination addresses. Then only traffic from those addresses will be allowed.
Policy-based and route-based VPNs require different security policies.
A policy-based VPN requires an IPsec security policy. You specify the interface to the private network, the interface tothe remote peer and the VPN tunnel. A single policy can enable traffic inbound, outbound, or in both directions.
A route-based VPN requires an Accept security policy for each direction. As source and destination interfaces, youspecify the interface to the private network and the virtual IPsec interface of the VPN. The IPsec interface is thedestination interface for the outbound policy and the source interface for the inbound policy. One security policy must beconfigured for each direction of each VPN interface.
If the security policy that grants the VPN connection is limited to certain services, DHCPmust be included, otherwise theclient will not be able to retrieve a lease from the FortiGate’s (IPsec) DHCP server because the DHCP request (comingout of the tunnel) will be blocked.
Before you define the IPsec policy, you must:
l Define the IP source and destination addresses.l Specify the phase 1 authentication parameters.l Specify the phase 2 parameters.l Create a VPN Tunnel dynamic object (policy-based VPNs only).
You must define at least one IPsec policy for each VPN tunnel. If the same remote server or client requires access tomore than one network behind a local FortiGate unit, the FortiGate unit must be configured with an IPsec policy for eachnetwork. Multiple policies may be required to configure redundant connections to a remote destination or control accessto different services at different times.
To ensure a secure connection, the FortiGate unit must evaluate IPSEC policies before ACCEPT and DENY securitypolicies. Because the FortiGate unit reads policies starting at the top of the list, you must move all IPsec policies to the
FortiManager 6.4.0 Administration Guide 349Fortinet Inc.

VPN
top of the list. When you define multiple IPsec policies for the same tunnel, you must reorder the IPsec policies that applyto the tunnel so that specific constraints can be evaluated before general constraints.
When you define a route-based VPN, you create a virtual IPsec interface on the physical interface that connects to theremote peer. You create ordinary Accept security policies to enable traffic between the IPsec interface and the interfacethat connects to the private network. This makes configuration simpler than for policy-based VPNs, which require IPsecsecurity policies.
See Managing policies on page 179 for information on creating policies on your FortiManager.
SSL VPN
You can use the VPNManager > SSL-VPN pane to create and monitor Secure Sockets Layer (SSL) VPNs. You can alsocreate and manage SSL VPN portal profiles.
Manage SSL VPNs
Go to VPNManager > SSL VPN to manage SSL VPNs.
The following options are available:
Add SSL VPN Create a new SSL VPN with the Create SSL VPN dialog box. See Creating SSLVPNs on page 350.
Install Wizard Launch the Install Wizard to install SSL VPN settings to devices.
Create New Create a new SSL VPN with the Create SSL VPN pane. This option is alsoavailable from the right-click menu. See Creating SSL VPNs on page 350.
Edit Edit the selected VPN. This option is also available from the right-click menu. SeeEditing SSL VPNs on page 352.
Delete Delete the selected VPN or VPNs. This option is also available from the right-clickmenu. See Deleting SSL VPNs on page 352.
Search Enter a search term to search the VPN list.
Creating SSL VPNs
To create SSL VPNs, you must be logged in as an administrator with sufficient privileges. Multiple VPNs can be created.
To add SSL-VPN:
1. Go to VPNManager > SSL-VPN.2. Click Add SSL VPN, or click Create New in the content toolbar. The Create SSL VPN dialog box or pane is
displayed.
FortiManager 6.4.0 Administration Guide 350Fortinet Inc.

VPN
3. Configure the following settings, then clickOK to create the VPN.
Device Select a FortiGate device or VDOM.
Connection Settings Specify the connection settings.
Listen onInterface(s)
Define the interface the FortiGate will use to listen for SSL VPN tunnelrequests. This is generally your external interface.
Listen on Port Enter the port number for HTTPS access.
Restrict Access Allow access from any hosts, or limit access to specific hosts. If limitingaccess, select the hosts that have access in the Hosts field.
Idle Logout Select to enable idle timeout. When enabled, enter the amount of time thatthe connection can remain inactive before timing out in theInactive Forfield, in seconds(10 - 28800, default = 300).This setting applies to the SSL VPN session. The interface does not timeout when web application sessions or tunnels are up.
Server Certificate Select the signed server certificate to use for authentication. Alternately,select a certificate template that is configured to use the FortiManager CA.See Certificate templates on page 101.
Require ClientCertificate
Select to use group certificates for authenticating remote clients. When theremote client initiates a connection, the FortiGate unit prompts the client forits client-side certificate as part of the authentication process. Forinformation on using PKI to provide client certificate authentication, see theAuthentication Guide.
Tunnel Mode Client Settings Specify tunnel mode client settings. These settings determine how tunnelmode clients are assigned IP addresses.
Address Range Either automatically assign address, or specify custom IP ranges.
DNS Server Select to use the same DNS as the client system, or to specify DNSservers. Enter up to two DNS servers to be provided for the use of clients.
FortiManager 6.4.0 Administration Guide 351Fortinet Inc.

VPN
Specify WINSServers
Select to specify WINS servers. Enter up to twoWINS servers to beprovided for the use of clients.
Allow EndpointRegistration
Select to allow endpoint registration.
Authentication/Portal Mapping Select the users and groups that can access the tunnel.Note: the default portal cannot be empty.
Create New Create a new authentication/portal mapping entry. Select the Users,Groups, Realm, and Portal, then clickOK.
Edit Edit the selected mapping.
Delete Delete the selected mapping or mappings.
Advanced Options Configure advanced SSL VPN options. For information, see the FortiOSCLI Reference.
Editing SSL VPNs
To edit an SSL VPN, you must be logged in as an administrator with sufficient privileges. The device cannot be edited.
To edit an SSL VPN:
1. Go to VPNManager > SSL VPN.2. Double-click on a VPN, right-click on a VPN and then select Edit from the menu, or select the VPN then click Edit in
the toolbar. The Create SSL VPN pane opens.3. Edit the settings as required, and then selectOK to apply the changes.
Deleting SSL VPNs
To delete an SSL VPN or VPNs, you must be logged in as an administrator with sufficient privileges.
To delete SSL VPNs:
1. Go to VPNManager > SSL VPN.2. Select the VPN or VPNs you need to delete.3. Click Delete in the toolbar, or right-click and select Delete.4. SelectOK in the confirmation box to delete the selected VPN or VPNs.
Portal profiles
The SSL VPN portal enables remote users to access internal network resources through a secure channel using a webbrowser. FortiGate administrators can configure login privileges for system users as well as the network resources thatare available to the users.
FortiManager 6.4.0 Administration Guide 352Fortinet Inc.

VPN
There are three pre-defined default portal profiles:
l Full-accessl Tunnel-accessl Web-access
Each portal type includes similar configuration options. You can also create custom portal profiles.
To manage portal profiles, go to VPNManager > SSL VPN and select Portal Profiles in the tree menu.
The following options are available:
Create New Create a new portal profile.
Edit Edit the selected profile.
Delete Delete the selected profile or profiles.
Column Settings Adjust the visible columns.
Search Enter a search term to search the portal profile list.
Creating SSL VPN portal profiles
To create SSL VPN portal profiles, you must be logged in as an administrator with sufficient privileges. Multiple profilescan be created.
FortiManager 6.4.0 Administration Guide 353Fortinet Inc.

VPN
To create portal profiles:
1. Go to VPNManager > SSL-VPN and select Portal Profiles in the tree menu.2. Click Create New in the toolbar, or right-click and select Create New. The Create New pane is displayed.
3. Configure the following settings, then selectOK to create the profile.
Name Enter a name for the portal.
Limit Users to One SSL VPNConnection at a Time
Set the SSL VPN tunnel so that each user can only be logged in to the tunnelone time per user log in. Once they are logged in to the portal, they cannot goto another system and log in with the same credentials until they log out of thefirst connection.
Tunnel Mode Select to configure and enable tunnel mode access. These settings determinehow tunnel mode clients are assigned IPv4 addresses.
Enable SplitTunneling
Select so that the VPN carries only the traffic for the networks behind theFortiGate unit. The user’s other traffic follows its normal route.
Routing Address If you enable split tunneling, you are required to set the address that yourcorporate network is using. Traffic intended for the routing address will not besplit from the tunnel.
FortiManager 6.4.0 Administration Guide 354Fortinet Inc.

VPN
Source IP Pools Select an IPv4 pool for users to acquire an IP address when connecting to theportal. There is always a default pool available if you do not create your own.
IPv6 Tunnel Mode Select to configure and enable tunnel mode access. These settings determinehow tunnel mode clients are assigned IPv6 addresses.
Enable IPv6 SplitTunneling
Select so that the VPN carries only the traffic for the networks behind theFortiGate unit. The user’s other traffic follows its normal route.
IPv6 RoutingAddress
If you enable split tunneling, you are required to set the address that yourcorporate network is using. Traffic intended for the routing address will not besplit from the tunnel.
Source IP Pools Select an IPv6 pool for users to acquire an IP address when connecting to theportal. There is always a default pool available if you do not create your own.
Tunnel Mode Client Options These options affect how the FortiClient application behaves when connectedto the FortiGate VPN tunnel. When enabled, a checkbox for the correspondingoption appears on the VPN log in screen in FortiClient, and is disabled bydefault.
Allow client tosave password
The user's password is stored on the user’s computer and will automaticallypopulate each time they connect to the VPN.
Allow client toconnectautomatically
When the FortiClient application is launched, for example after a reboot orsystem start up, FortiClient will automatically attempt to connect to the VPNtunnel.
Allow client tokeep connectionsalive
The FortiClient connection will not shut down. When not selected, duringperiods of inactivity, FortiClient will attempt to stay connected every threeminutes for a maximum of 10 minutes.
Enable Web Mode Select to enable web mode access.
Portal Message The text header that appears on the top of the web portal.
Theme A color styling specifically for the web portal: blue, green,mariner,melongene,or red.
Show SessionInformation
Display the Session Information widget on the portal page. The widgetdisplays the log in name of the user, the amount of time the user has beenlogged in, and the inbound and outbound traffic statistics.
Show ConnectionLauncher
Display the Connection Launcher widget on the portal page. Use the widget toconnect to an internal network resource without adding a bookmark to thebookmark list. You select the type of resource and specify the URL or IPaddress of the host computer.
Show LoginHistory
Include user log in history on the web portal, then specify the number of historyentries.
User Bookmarks Include bookmarks on the web portal.Bookmarks are used as links to internal network resources. When a bookmarkis selected from a bookmark list, a pop-up window opens with the web page.VNC and RDP require a browser plugin. FTP and Samba replace thebookmarks page with an HTML file-browser.
FortiManager 6.4.0 Administration Guide 355Fortinet Inc.

VPN
Pre-DefinedBookmarks
The list of predefined bookmarks.Click Create New to add a bookmark. See Predefined bookmarks on page 356for information.
Enable FortiClientDownload
Select to enable FortiClient downloads.
Download Method Select the method to use for downloading FortiClient from the SSL VPN portal.Choose between Direct and SSL-VPN Proxy.This option is only available when Enable FortiClient Download isOn.
CustomizeDownloadLocation
Select to specify a custom location to use for downloading FortiClient. You canspecify a location for FortiClient (Windows) and FortiClient (Mac). Type theURL in theWindows box and/orMac box.This option is only available when Enable FortiClient Download isOn.
Advanced Options Configure advanced options. For information, see the FortiOS CLI Reference.
Predefined bookmarks
Bookmarks are used as links to specific resources on the network. When a bookmark is selected from a bookmark list, awindow opens with the requested web page. RDP and VNC open a window that requires a browser plug-in. FTPreplaces the bookmark page with an HTML file-browser.
A web bookmark can include log in credentials to automatically log the SSL VPN user into the web site. When theadministrator configures bookmarks, the web site credentials must be the same as the user’s SSL VPN credentials.Users configuring their own bookmarks can specify alternative credentials for the web site.
Predefined bookmarks can be added to portal profiles when creating or editing a profile.
To create a predefined bookmark:
1. Go to VPNManager > SSL-VPN and select Portal Profiles in the tree menu.2. Edit an existing profile, or create a new profile. See Editing portal profiles on page 358 or Creating SSL VPN portal
profiles on page 353.3. Click Create New in the Pre-Defined Bookmark field. Enable Web Modemust be selected for this field to be
available. The Create New Bookmark dialog box opens. The available options will vary depending on the selectedtype.
FortiManager 6.4.0 Administration Guide 356Fortinet Inc.

VPN
4. Configure the following settings, then selectOK to create the bookmark.
Name Enter a name for the bookmark.
Type Select the bookmark type: CITRIX, FTP, HTTP/HTTPS, Port Forward, RDP,SMB, SSH, Telnet, or VNC.
URL Enter the bookmark URL. This option is only available when Type is Citrix, orHTTP/HTTPS.
Folder Enter the bookmark folder.This option is only available when Type is FTP or SMB.
Host Enter the host name.This option is only available when Type is Port Forward, RDP, SSH, TELNET,or VNC.
Remote Port Enter the remote port.This option is only available when Type is Port Forward.
Listening Port Enter the listening port.This option is only available when Type is Port Forward.
Show Status Window Enable to show the status window.This option is only available when Type is Port Forward.
Port Enter the port number.This option is only available when Type is RDP or VNC.
Username Enter the user name.This option is only available when Type is RDP.
Password Enter the password.This option is only available when Type is RDP or VNC.
Keyboard Layout Select the keyboard layout:German (QWERTZ), English (US), Unknown,French (AZERTY), Italian, or Swedish.This option is only available when Type is RDP.
Security Select the security type: Allow the server to choose the type of security,Network Level Authentication, Standard RDP encryption, or TLS encryption.This option is only available when Type is RDP.
Description Optionally, enter a description of the bookmark.
Single Sign-on Select the SSO setting for links that require authentication: Disabled,Automatic, or Static.If Static is selected, click the add icon, then enter the Name and Value to addSSO Form Data. Multiple fields can be added. Click Remove to remove a field.When including a link using SSO use the entire URL, not just the IP address.This option is only available when Type is Citrix, FTP, HTTP/HTTPS, RDP, orSMB.The Static option is only available when Type is Citrix, HTTP/HTTPS, or RDP.
FortiManager 6.4.0 Administration Guide 357Fortinet Inc.

VPN
To edit a bookmark:
1. Go to VPNManager > SSL-VPN and select Portal Profiles in the tree menu.2. Edit and existing profile, or create a new profile. See Editing portal profiles on page 358 or Creating SSL VPN portal
profiles on page 353.3. Click the Edit icon in the bookmark row. The Bookmark dialog box opens.4. Edit the bookmark as required, then clickOK to apply your changes.
To delete a bookmark:
1. Go to VPNManager > SSL-VPN and select Portal Profiles in the tree menu.2. Edit and existing profile, or create a new profile. See Editing portal profiles on page 358 or Creating SSL VPN portal
profiles on page 353.3. Click the Delete icon in the bookmark row.
Editing portal profiles
To edit a portal profile, you must be logged in as an administrator with sufficient privileges. The device cannot be edited.
To edit a portal profile:
1. Go to VPNManager > SSL-VPN and select Portal Profiles in the tree menu.2. Double-click on a profile, right-click on a profile and then select Edit from the menu, or select the profile then click
Edit in the toolbar. The Edit Portal Profile pane opens.3. Edit the settings as required, and then selectOK to apply the changes.
Deleting portal profiles
To delete a portal profile or profiles, you must be logged in as an administrator with sufficient privileges.
To delete portal profiles:
1. Go to VPNManager > SSL-VPN and select Portal Profiles in the tree menu.2. Select the profile or profiles you need to delete.3. Click Delete in the toolbar, or right-click and select Delete.4. SelectOK in the confirmation box to delete the selected profile or profiles.
Monitor SSL VPNs
SSL VPNs can be monitored by going to VPNManager > SSL VPN and selectingMonitor from the tree menu.
The following information is shown:
Device The device or VDOM name.
User The user name.
FortiManager 6.4.0 Administration Guide 358Fortinet Inc.

VPN
Remote Host The remote host.
Last Login The time of the last log in.
Active Connections The number of active connections on the VPN.
FortiManager 6.4.0 Administration Guide 359Fortinet Inc.

Access Points
The APManager pane allows you to manage FortiAP access points that are controlled by FortiGate devices that aremanaged by FortiManager. You can use APManager for the following modes of management:
l Central management of managed access pointsl Per-device management of managed access points
The APManager pane includes the following tabs:
Managed APs Displays unauthorized and authorized FortiAP devices. You can view, authorize, and editauthorized FortiAP devices.
Monitor Monitor FortiAP devices and the clients connected to them.
Map view View the locations of FortiAP devices on Google Maps. You can create a floor map, add animage of a floor map, and place the FortiAP devices on the map.
WiFi profiles forcentralmanagement onpage 377
When central management is enabled, you can view, create, edit, and import profiles. WiFiprofiles share a common database. You can apply profiles to any device, regardless of whichFortiGate controller it is connected to.
WiFi profiles forper-devicemanagement onpage 401
When per-device management is enabled, you can change settings for each managedaccess point. All FortiAP devices andWiFi profiles are managed at the device level with noshared objects.
Managed APs
TheManaged APs pane allows you to manage FortiAP devices that are controlled by FortiGate devices that aremanaged by the FortiManager.
FortiAP devices, listed in the tree menu, are grouped based on the controller that they are connected to. The devices canalso be further divided into platform based groups within a controller.
FortiAP devices can be managed centrally, or per-device (see Creating ADOMs on page 514). In per-device mode, allWiFi profiles (SSIDs, AP profiles, and others), as well as managed FortiAP devices, are managed at the device level –there are no shared objects.
Additional configuration options and short-cuts are available using the right-click contentmenu. Right-click on the mouse on different parts of the navigation panes on the GUI page toaccess these context menus.
If workspace or workflow is enabled, the ADOMmust be locked before changes can be made.See Locking an ADOM on page 521.
FortiManager 6.4.0 Administration Guide 360Fortinet Inc.

Access Points
Go to APManager > Managed APs to manage FortiAP devices. Managed APs are organized by their FortiGatecontroller and group. In per-device mode, there is no All_FortiGate group.
Quick status bar
You can quickly view the status of devices on theManaged AP pane by using the quick status bar, which contains thefollowing options:
l Managed APsl Onlinel Offlinel Unauthorizedl Rogue APsl Client Connected
You can click each quick status to display in the content pane, or in a pop-up window, only the devices referenced in thequick status.
To view the quick status bar:
1. Ensure that you are in the correct ADOM.2. Go to APManager > Managed APs. The quick status bar is displayed above the content pane.
3. In the tree menu, select a FortiGate, group, or All_FortiGate if central management is enabled. The devices for thegroup are displayed in the content pane, and the quick status bar updates.
4. Click on each quick status to filter the devices displayed on the content pane. For example, clickOffline, and thecontent pane will display only devices that are currently offline.
5. Click Rogue APs to open the rogue AP list in a pop-up window.6. Click Client Connected to open a list of WiFi clients in a pop-up window.
FortiManager 6.4.0 Administration Guide 361Fortinet Inc.

Access Points
Managing APs
FortiAP devices can be managed from the content pane below the quick status bar on the APManager > Managed APspane.
The following options are available from the toolbar and right-click menu:
Create New Add an AP.
Edit Edit the selected AP.
Delete Delete the selected AP.
Assigned Profile Assign a profile from the list to the AP. Only applicable profiles will be listed. SeeAssigning profiles to FortiAP devices on page 401.
Column Settings Click to select which columns to display or select Reset to Default to display thedefault columns.
Authorize Authorize an AP. See Authorizing and deauthorizing FortiAP devices on page368.This option is also available in the toolbar by selectingMore.
Deauthorize Deauthorize an AP. See Authorizing and deauthorizing FortiAP devices on page368.This option is also available in the toolbar by selectingMore.
Grouping Move the selected FortiAP devices into a new group. The APs must be the samemodel to be grouped. See FortiAP groups on page 367.This option is only available in the right-click menu.
Upgrade Upgrade the AP. The AP must already be authorized.You can also select two or more AP devices of the same model and upgrade thedevices at the same time.Before upgrading FortiAP, go to FortiGuard > Firmware Images > Product:FortiAP and click the download icon to manually download the firmware images.
Restart Restart the AP.This option is only available in the toolbar, by selectingMore.
Refresh Refresh the AP list, or refresh the selected FortiAP devices.
FortiManager 6.4.0 Administration Guide 362Fortinet Inc.

Access Points
View Clients View the clients connected to the AP. See Connected clients on page 371.
View Rogue APs View the Rogue APs. See Rogue APs on page 368.This option is only available in the toolbar, by selectingMore.
Show on Google Map Show the selected AP on Google Map. See Google map on page 374.This option is only available in the right-click menu.
Show on Floor Map Show the selected AP on the floor map. See Floor map on page 375.This option is only available in the right-click menu.
Search Enter a search string into the search field to search the AP list.This option is only available in the toolbar.
The following information is available in the content pane:
FortiGate The FortiGate unit that is managing the AP.
Access Point The serial number of the AP.
Connected Via The IP address of the AP.
SSIDs The SSIDs associated with the AP.
Channel The wireless radio channels that the access point uses.
Clients The number of clients connected to the AP.Select a value to open the ViewWiFi Clients window to view more details aboutthe clients connected to that radio. See Connected clients on page 371.
OS Version The OS version on the FortiAP.
AP Profile The AP Profile assigned to the device, if any.
Comments User entered comments.
Country The Country code that the FortiAP is using.
Join Time The date and time that the FortiAP joined.
LLDP The Link Layer Discovery Protocol
Operating TX Power The transmit power of the wireless radios.
Serials # The serial number of the device
WTP Mode TheWireless Transaction Protocol (WTP) mode, or 0 if none.
FortiManager 6.4.0 Administration Guide 363Fortinet Inc.

Access Points
To add a FortiAP:
1. Click Create New on the content pane toolbar. The Add FortiAP dialog box opens.
2. Enter the following information, then clickOK to add the device:
FortiGate Select the FortiGate that the AP will be added to from the dropdown list. If youhave already selected a FortiGate in the tree menu, this field will contain thatFortiGate.
Serials Number Enter the device's serial number.
Name Enter a name for the device.
AP Profile Select an AP profile to apply to the device from the dropdown list. See APprofiles on page 378.
Enforce Firmware Version ToggleON to enforce a firmware version and select the firmware version fromthe drop-down menu. ToggleOFF to disable this feature.
To edit FortiAP devices:
1. In the tree menu, select the group or FortiGate that contains the FortiAP device to be edited.2. Locate the FortiAP device in the list in the content pane, or refine the list by selecting an option from the quick status
bar.3. Either select the FortiAP and click Edit from the toolbar, double-click on the FortiAP, or right-click on the FortiAP and
select Edit. The Config FortiAP window opens.
FortiManager 6.4.0 Administration Guide 364Fortinet Inc.

Access Points
4. Edit the following options, then click Apply to apply your changes:
Serial Number The device’s serial number. This field cannot be edited.
Name The name of the AP.
Comments Comments about the AP, such as its location or function.
Managed AP Status Various information about the AP.
Status The status of the AP, such as Connected, or Idle.Click Retart to restart the AP.
Connected Via The method by which the device is connected to the controller.
FortiManager 6.4.0 Administration Guide 365Fortinet Inc.

Access Points
Base MACAddress
The MAC address of the device.
Join Time The time that the AP joined.
Clients The number of clients currently connected to the AP.
State The state of the AP, such as Authorized, or Discovered.
Current The AP's current firmware version. Select Upgrade to upgrade the firmware toa newer version if you have one available. See Firmware Management onpage 89
FortiAP Profile Select a profile from the dropdown list (see AP profiles on page 378)
Bonjour Profile Select a profile from the dropdown list (see Bonjour profiles on page 399)
Override Radio Override the selected profiles settings.
Band If applicable, select the wireless band, and select the wireless protocol fromthe dropdown list. The available options depend on the selected platform.In two radio devices, both radios cannot use the same band.
Channels Select the channel or channels to include, or let them be automaticallyassigned. The available channels depend on the selected platform and band.
TX Power Control Enable/disable automatic adjustment of transmit power.l Auto: Enter the TX power low and high values, in dBm.l Manual: Enter the TX power in the form of the percentage of the totalavailable power.
SSIDs Manually choose the SSIDs that APs using this profile will carry, or let them beselected automatically.
Override AP Login Password Enable/disable overriding the login password:l Set: Set the AP login password.l Leave Unchanged: Leave the password unchanged.l Set Empty: Remove the password.
Advanced Options Configure advanced options. For information, see the FortiOS CLI Reference.https://help.fortinet.com/cli/fos60hlp/60/index.htm.
To delete FortiAP devices:
1. In the tree menu, select the group or FortiGate that contains the FortiAP device to be deleted.2. Locate the FortiAP device in the list in the content pane, or refine the list by selecting an option from the quick status
bar.3. Either select the FortiAP and click Delete from the toolbar, or right-click on the FortiAP and select Delete.4. ClickOK in the confirmation dialog box to delete the AP.
A FortiAP device cannot be deleted if it is currently being used. For example, if a firewall profilehas been assigned to it.
FortiManager 6.4.0 Administration Guide 366Fortinet Inc.

Access Points
To upgrade multiple FortiAP devices:
1. In the tree menu, select the group or FortiGate that contains the FortiAP device to be upgraded.2. Select two or more FortiAP devices of the same model in the list in the content pane.3. Right-click on the selected FortiAP devices and select Upgrade.
The Upgrade Firmware dialog box is displayed.4. Select the firmware version for upgrade, and click Upgrade Now.
Before upgrading FortiAP, go to FortiGuard > Firmware Images > Product: FortiAP and clickthe download icon to manually download the firmware images.
FortiAP groups
FortiAP devices can be organized into groups based on FortiAP platforms. A group can only contain one model ofFortiAP. A FortiAP can only belong to one group.
Groups are listed in the tree menu under the FortiGate they were created in. They can be created, edited, and deleted asneeded.
To create a FortiAP group:
1. In theManaged APs pane, select FortiAP Group > Create New from the toolbar. The Create New FortiAP Groupdialog box opens.
2. Configure the following:
Name Enter a name for the group.
FortiGate Select the FortiGate under which the group will be created.
Platform Select the FortiAP platform that the group will apply to.
FortiAPs Select FortiAPs to add to the group. Only FortiAPs in the selected FortiGate of theselected platform will be available for selection.
3. SelectOK to create the group.
To edit a group:
1. In theManaged APs pane, select a group from the tree menu, then select FortiAP Group > Edit from the toolbar.2. Edit the group name and devices in the group as needed. The FortiGate and the platform cannot be changed.3. SelectOK to apply your changes.
FortiManager 6.4.0 Administration Guide 367Fortinet Inc.

Access Points
To delete a group:
1. In theManaged APs pane, select a group from the tree menu.2. Select FortiAP Group > Delete from the toolbar.3. SelectOK in the confirmation dialog box to delete the group.
Authorizing and deauthorizing FortiAP devices
To authorize FortiAP devices:
1. In the tree menu, select the group or FortiGate that contains the unauthorized FortiAP devices.2. In the quick status bar, click Unauthorized. The unauthorized FortiAP devices are displayed in the content pane.3. Select the FortiAP devices and either clickMore > Authorize from the toolbar, or right-click and select Authorize.4. SelectOK in the confirmation dialog box to authorize the selected devices.
To deauthorize FortiAP devices:
1. In the tree menu, select the group or FortiGate that contains the FortiAP devices to be deauthorized.2. Select the FortiAP devices and either clickMore > Deauthorize from the toolbar, or right-click and select
Deauthorize.3. SelectOK in the confirmation dialog box to deauthorize the selected devices.
Installing changes to FortiAP devices
To install changes to FortiAP devices:
1. Go to the Device Manager pane.2. Select the FortiGate device that controls the FortiAP device3. Right click and select Install Config, or select Install > Install Config from the toolbar.4. ClickOK in the confirmation dialog box to install the configuration to the device. See Configuring a device on page
57 for more information.
Rogue APs
A rogue AP is an unauthorized AP connected to your wired network. This can enable unauthorized access.
Click Rogue APs in the quick status bar to open the rogue AP list in a pop-up window.
FortiManager 6.4.0 Administration Guide 368Fortinet Inc.

Access Points
The following options are available:
Mark As Mark a rogue AP as:l Accepted: for APs that are an authorized part of your network or areneighboring APs that are not a security threat.
l Rogue: for unauthorized APs that On-wire status indicates are attached toyour wired networks.
l Unclassified: the initial status of a discovered AP. You can change an APback to unclassified if you have mistakenly marked it as Rogue or Accepted.
Suppress AP Suppress the selected APs. This will prevent users from connecting to the AP.When suppression is activated against an AP, the controller sendsdeauthentication messages to the rogue AP’s clients posing as the rogue AP, andalso sends deauthentication messages to the rogue AP posing as its clients.Before enabling this feature, verify that operation of Rogue Suppression iscompliant with the applicable laws and regulations of your region.
Unsuppress AP Turn of suppression for the selected rogue APs.
Refresh Refresh the rogue AP list.
Column Settings Click to select which columns to display or select Reset to Default to display thedefault columns.
The following columns are available:
FortiManager 6.4.0 Administration Guide 369Fortinet Inc.

Access Points
State The state of the AP:l Suppressed: red suppressed iconl Rogue: orange rogue iconl Accepted: green wireless signal markl Unclassified: gray question mark
Status Whether the AP is active (green) or inactive (orange).
SSID The wireless service set identifier (SSID) or network name for the wirelessinterface.
Security Type The type of security currently being used.
Channel The wireless radio channel that the access point uses.
MAC Adddess The MAC address of the wireless interface.
Vendor Info The name of the vendor.
Signal Strength The relative signal strength of the AP.
Detected By The name or serial number of the AP unit that detected the signal.
On-Wire A green up-arrow indicates a suspected rogue, based on the on-wire detectiontechnique. An orange down-arrow indicates AP is not a suspected rogue.
First Seen How long ago this AP was first detected. This column is not visible by default.
Last Seen How long ago this AP was last detected. This column is not visible by default.
Rate The data rate in, bps. This column is not visible by default.
Authorizing unknown APs
FortiManager can now authorize unknown APs that are connected to a managed FortiGate.
To authorize unknown APs:
1. Enable JSON API access to Read-Write. See To enable read-write JSON API access.2. In the tree menu, select the group or FortiGate that contains the unknown FortiAP devices to be authorized.
3. Select the unknown FortiAP devices and either clickMore > Authorize from the toolbar, or right-click and selectAuthorize.
4. Wait awhile and then select the APs and clickMore > Refresh.APs are now online and displayed.
FortiManager 6.4.0 Administration Guide 370Fortinet Inc.

Access Points
You must enable JSON API access to Read-Write to be able to authorize unknown FortiAPdevices.
Connected clients
To view connected wireless clients, click Client Connected in the quick status bar to open the WiFi client list in a pop-upwindow that lists all the clients in the selected FortiGate or group.
To view the clients connected to specific APs, select the APs in the content pane, then right-click on them and selectView Clients.
The following columns are available:
SSID The SSID that the client connected to.
FortiAP The serial number of the FortiAP unit that the client connected to.
IP The IP address assigned to the wireless client.
Device The type of device that the client is using.
Channel The wireless radio channel that is used.
Bandwidth Tx/Rx Client received and transmitted bandwidth, in Kbps.
Signal Strength/Noise The signal-to-noise ratio in dBs calculated from signal strength and noise level.
Signal Strength The relative signal strength of the AP.
Association Time How long the client has been connected to this access point.
Authentication The type of authentication used.
Bandwidth RX Client received bandwidth, in Kbps.
FortiManager 6.4.0 Administration Guide 371Fortinet Inc.

Access Points
Bandwidth TX Client transmitted bandwidth, in Kbps.
Device OS The OS version on the FortiAP.
Host Information The host name of the WiFi client, if available.
Idle Time The amount of time that the client has been idle.
Manufacturer The manufacturer of the client device.
Rate The connection rate between the WiFi client and the AP.
Name The name of the FortiGate device that the FortiAP is attached to.
Monitor
TheMonitor pane includes a listing of connected clients, and a health monitor that display information about all the APsfor the selected FortiGate or group in widgets.
Clients Monitor
The client monitor lists information about connected clients. Go to APManager > Monitor and select the Clients Monitortab in the content pane to view the list. Select a specific FortiGate or group in the tree menu to filter the listed clients.
You can search the table by entering a search term in the search field in the toolbar. The visible columns can be adjustedby selecting Column Settings in the toolbar. The following columns are available:
SSID The SSID that the client connected to.
FortiAP The serial number of the FortiAP unit that the client connected to.
IP The IP address assigned to the wireless client.
Device The type of device that the client is using.
Channel The wireless radio channel that is used.
Bandwidth TX/RX Client received and transmitted bandwidth, in Kbps.
Signal Strength/Noise The signal-to-noise ratio in dBs calculated from signal strength and noise level.
Signal Strength The relative signal strength of the AP.
Association Time How long the client has been connected to this access point.
Authentication The type of authentication used.
Bandwidth RX Client received bandwidth, in Kbps.
Bandwidth TX Client transmitted bandwidth, in Kbps.
Device OS The OS version on the FortiAP.
Host Information The host name of the WiFi client, if available.
FortiManager 6.4.0 Administration Guide 372Fortinet Inc.

Access Points
Idle Time The amount of time that the client has been idle.
Manufacturer The manufacturer of the client device.
Rate The connection rate between the WiFi client and the AP.
Name The name of the FortiGate device that the FortiAP is attached to.
Health Monitor
Go to APManager > Monitor, select a FortiGate or group from the tree menu, and select the Health Monitor tab in thecontent pane to open the health monitor.
Widgets can be moved by clicking and dragging their title bar into different locations on the screen. The information in thewidgets can be refreshed by clicking the refresh icon in the widget title bar. Widgets with tables can be sorted by anycolumn by clicking the column name.
The following widgets are shown:
Widget Description
AP Status Displays a bar graph of:l Uptime > 24 hours: The number of APs that have been up for over24 hours.
l Rebooted within 24 hours: the number of APs that have beenrebooted within the past 24 hours.
l Down/Missing: Down or missing APs.Select a specific column to view a table of the APs represented in thatcolumn, along with other relevant information, such as the APs' IPaddress, and the time of its last reboot.
FortiManager 6.4.0 Administration Guide 373Fortinet Inc.

Access Points
Widget Description
Select the name of a column in the legend to add or remove it from thegraph.This widget is only available when the All FortiAPs group is selected inthe tree menu.
Client Count Over Time A graph of the number of connected clients over the specified timeperiod: 1 hour, 1 day, or 30 days.This widget is only available when the All FortiAPs group is selected inthe tree menu.
Top Client Count Per-AP (2.4 GHz or 5GHz Band)
Lists the number of clients in the 2.4GHz and 5GHz band for eachFortiAP. Also includes columns for the channel and bandwidth of theAP.
Top Wireless Interference (2.4 GHz or 5GHz Band)
Lists the number of interfering APs in the 2.4GHz and 5GHz band foreach FortiAP. Also includes columns for the channel and the numberof MAC Errors for each AP.
Login Failures Information Lists the time of a log in failure, the SSID involved, the HostName/MAC, and the User Name.
Map view
The Map View shows the FortiAP devices in two ways:
l Google Map - shows the FortiAP devices placed on Google Maps. See Google map on page 374l Floor Map - create a floor map, add an image of a floor map, and place the FortiAP devices on the map. See Floormap on page 375
Google map
Google Map shows all of the FortiGate devices on an interactive world map. Each FortiGate is designated by a map pinin its geographic location on the map. The number of APs connected to the FortiGate is listed in the pin.
FortiManager 6.4.0 Administration Guide 374Fortinet Inc.

Access Points
Clicking on a map pin opens a list of the APs connected to that FortiGate. Clicking on the name of an AP from the list willzoom the map into that location and provide further information about the AP, including the serial number, IP address,number of clients, usage, and the last time the AP was seen if it is offline.
Click on the number of client to open the ViewWiFi Clients window (see Connected clients on page 371). Click on theAP's serial number to open the Config FortiAP window, where you can edit the AP settings (see Managing APs on page362).
Floor map
Floor Map allows you to create a customized map of your building, add an image of the floor layout, and place FortiAPdevices on the map.
FortiManager 6.4.0 Administration Guide 375Fortinet Inc.

Access Points
To create a Floor Map:
1. Click Add Floor Map.2. In the Add Floor Map screen, specify the following and click Next:
l Location - select a location or specify a new one.l Building - select a building or specify a new one.
3. Specify the Address and click Next.4. Specify the following and click Finish:
l Floor Description - specify a description for the floor. This is displayed as the name of the floor map.l Floor Index - specify a numeric value. The floors are sorted from highest to lowest based on the Floor Index.l Contact - specify a contact name.l Phone Number - specify a phone number for this location.l Floor Map - upload a file by dragging and dropping here or click Browse to select an image of your floor map.
To position FortiAP devices on the floor map:
1. Click Floor Map > [Floor Map name].2. Click the image of the floor map.3. Click Edit Mode to list the FortiAP devices in the Positioning APs pane.4. Drag and drop the FortiAP devices from the Positioning APs pane to the image of the floor map.5. Click Save and Return.
The FortiAP device is now shown on the floor map.
To view the properties of a FortiAP device:
1. Click Floor Map > [Floor Map name].2. Click the image of the floor map.
FortiManager 6.4.0 Administration Guide 376Fortinet Inc.

Access Points
3. Hover over the FortiAP device to view the following details:l FortiAP Serial Numberl IP Addressl Number of Clients connectedl Usagel Base MAC Addressl Statel Rogue APs
To remove FortiAP devices from the floor map:
1. Click Floor Map > [Floor Map name].2. Click the image of the floor map.3. Click Edit Mode .4. Right-click the FortiAP device and select Remove from Floor Map.5. Click Save and Return.
The FortiAP device is now removed from the Floor Map and added to the Positioning APs pane.
WiFi profiles for central management
TheWiFi Profiles pane allows you to create and manage SSIDs, and AP, Wireless Intrusion Detection System (WIDS),Bluetooth, Quality of Service (QoS), and Bonjour profiles that can be assigned to managed FortiAP devices.
Settings may vary for different ADOM versions.
1. Enable central management of access points.See Enabling FortiAP central management on page 377.
2. Create AP profiles.SeeWiFi profiles for central management on page 377.
3. Assign profiles to FortiAP devices.See Assigning profiles to FortiAP devices on page 401.
4. Install FortiAP profiles to devices.On the Device Manager pane, select the FortiGate device that controls the FortiAP device, then select Install >Install Config from the toolbar, and follow the prompts in the wizard. See Installing changes to FortiAP devices onpage 368.
Enabling FortiAP central management
When central management is enabled, you can create templates for a variety of FortiAP configurations, and assigntemplates to multiple managed access points.
FortiManager 6.4.0 Administration Guide 377Fortinet Inc.

Access Points
To enable central management:
1. Go to System Settings > All ADOMs.2. Double-click the ADOM to open it for editing.3. Beside Central Management, select the FortiAP checkbox, and clickOK.
Central management is enabled for FortiAP.
AP profiles
AP profiles define radio settings for FortiAP models. The profile specifies details such as the operating mode of thedevice, SSIDs, and transmit power. Custom AP profiles can be created as needed for new devices.
To view AP profiles, ensure that you are in the correct ADOM, go to APManager > WiFi Profiles, and select AP Profile inthe tree menu.
The following options are available in the toolbar and right-click menu:
Create New Create a new AP profile.
Edit Edit the selected AP profile.
Delete Delete the selected AP profile.
Clone Clone the selected AP profile.
Import Import AP profiles from a connected FortiGate (toolbar only).
To create custom AP profiles:
1. On the AP Profile pane, click Create New in the toolbar, or select it from the right-click menu. The Create New APProfile windows opens.
FortiManager 6.4.0 Administration Guide 378Fortinet Inc.

Access Points
FortiManager 6.4.0 Administration Guide 379Fortinet Inc.

Access Points
2. Enter the following information:
Name Type a name for the profile.
Comment Optionally, enter comments.
Platform Select the platform that the profile will apply to from the dropdown list.
Country/ Region Select the country or region from the drop-down list.
AP Login Password Set, leave unchanged (default), or empty the AP login password.
Administrative Access Allow management access to the managed AP via telnet, http, https, and/orssh.
Radio 1 & 2 Configure the radio settings. The Radio 2 settings will only appear if theselected platform has two radios.
Mode Select the radio operation mode:l Disabled: The radio is disabled. No further radio settings are available.l Access Point: The device is an access point.l Dedicated Monitor: The device is a dedicated monitor. Only theWIDSProfile setting is available.
WIDS Profile Select a WIDS profile from the dropdown list. SeeWIDS profiles on page 391.
Radio ResourceProvision
Select to enable radio resource provisioning.This feature measures utilization and interference on the available channelsand selects the clearest channel at each access point.
Client LoadBalance
Select the client load balancing methods to use: Frequency Handoff and/orAP Handoff.
Band Select the wireless protocol from the dropdown list. The available bandsdepend on the selected platform.In two radio devices, both radios cannot use the same band.
Channel Width Select 20MHz or 40MHz channel width. This option is only available for 5GHz802.11n bands.
Short GuardInterval
Select to enable the short guard interval.
Channels Select the channel or channels to include. The available channels depend onthe selected platform and band.
TX Power Control Optionally, enable automatic adjustment of transmit power, then specify theminimum and maximum power levels, dBm.
TX Power If TX Power Control isManual, enter the TX power in the form of thepercentage of the total available power.If TX Power Control is Auto, enter the TX power low and high values, in dBm.
SSIDs Manually choose the SSIDs that APs using this profile will carry, or let them beselected automatically.
FortiManager 6.4.0 Administration Guide 380Fortinet Inc.

Access Points
Monitor ChannelUtilization
Enable/disable monitoring channel utilization.
FortiPresence
Mode Select the FortiPresence mode:l Disablel Foreign channels onlyl Foreign and home channels
Project name The FortiPresence project name.
Password FortiPresence secret password.
FortiPresenceserver IP
FortiPresence server IP address.
FortiPresenceserver port
FortiPresence server UDP listening port (default = 3000).
Report rogue APs Enable/disable FortiPresence reporting of Rogue APs.
Reportunassociatedclients
Enable/disable FortiPresence reporting of unassociated devices.
Report transmitfrequency (inseconds)
FortiPresence report transmit frequency, in seconds (5 - 65535, default = 30).
Ekahau blink Enable/disable Ekahau blink location based services.
RTLS controllerserver IP
Enter the realtime location services (RTLS) controller server IP address.
RTLS controllerserver port
The RTLS controller server port (default = 8569).
Ekahau tag MACaddress
Enter the Ekahau tag MAC address.
AeroScout Enable/disable AeroScout location based services.
AeroScout serverIP
Enter the AeroScout server IP address.
AeroScout serverport
Enter the AeroScout server port.
MU mode dilutionfactor
Enter the MUmode dilution factor (default = 20).
MU mode dilutiontimeout
Enter the MUmode dilution timeout (default = 5).
Locate WiFi clients when notconnected
Enable/disable locating WiFi client when they are not connected.
FortiManager 6.4.0 Administration Guide 381Fortinet Inc.

Access Points
Advanced Options Configure advanced options for the SSID:l control-message-offload: Configure CAPWAP control message datachannel offload: aeroscout-mu, aeroscout-tag, ap-list, ebp-frame, sta-list,sta-cap-list, stats.
l dtsl-in-kernal: Enable/disable data channel DTLS in kernel.l dtls-policy: Select the WTP data channel DTLS policy: clear-text,dtls-enabled, and/or ipsec-vpn.
l energy-efficient-ethernet: Enable/disable use of energy efficient Etherneton WTP.
l ext-info-enable: Enable/disable station/VAP/radio extension information,providing more detailed statistics for troubleshooting purposes.
l handoff-roaming: Enable/disable handoff when a client is roaming.l handoff-rssi: Enter the minimum RSSI handoff value.l handoff-sta-thresh: Enter the threshold value for AP handoff.l ip-fragment-preventing: Prevent IP fragmentation for CAPWAP tunneledcontrol and data packets. Select tcp-mss-adjust and/or icmp-unreachable.
l led-schedules: Recurring firewall schedules for illuminating LEDs on theFortiAP. If led-state is enabled, LEDs will be visible when at least one ofthe schedules is valid.
l led-state: Enable/disable use of LEDs onWTP.l lldp: Enable/disable LLDP.l max-clients: Enter the maximum number of STAs supported by the WTP.l poe-mode: Set the WTP, FortiAP, or AP's PoE mode: auto, 8023af,8023at, or power-adapter (use the power adapter to control the mode).
l split-tunneling-acl-local-ap-subnet: Enable/disable split tunneling ACLlocal AP subnet.
l tun-mtu-downlink: Enter the downlink tunnel MTU.l tun-mtu-uplink: Enter the uplink tunnel MTU.l wan-port-mode: Set the WAN port mode: wan-only or wan-lan.
3. ClickOK to create the new AP profile.
To edit a custom AP profile:
1. Either double-click a profile name, right-click a profile name and select Edit, or select a profile then click Edit in thetoolbar. The Edit AP Profile pane opens.
2. Edit the settings as required. The profile name cannot be edited.3. ClickOK to apply your changes.
To delete custom AP profiles:
1. Select the AP profile or profiles that will be deleted. Default profiles cannot be deleted.2. Either select Delete from the toolbar, or right-click and select Delete.3. ClickOK in the confirmation dialog box to delete the profile.
FortiManager 6.4.0 Administration Guide 382Fortinet Inc.

Access Points
To clone a custom AP profile:
1. Either select a profile and click Clone in the toolbar, or right-click a profile and select Clone. The Clone AP Profilepane opens.
2. Edit the name of the profile, then edit the remaining settings as required.3. ClickOK to clone the profile.
To import a AP profile:
1. Click Import in the toolbar. The Import dialog box opens.2. Select a FortiGate from the dropdown list. The list will include all of the devices in the current ADOM.3. Select the profile or profiles to be imported from the dropdown list.4. ClickOK to import the profile or profiles.
SSIDs
To view SSIDs and SSID groups, go to APManager > WiFi Profiles, and select SSID in the tree menu.
The following options are available in the toolbar and right-click menu:
Create New Create a new SSID (see Creating SSIDs on page 384) or SSID group.
Edit Edit the selected SSID or group.
Clone Clone the selected SSID or group.
Delete Delete the selected SSID or group.
Import Import SSIDs from a connected FortiGate (toolbar only).
Where Used View where the SSID is used.
Column Settings Adjust the visible columns.
To create a new SSID group:
1. On the SSID pane, click Create New > SSID Group in the toolbar. The Create New SSID Group windows opens.2. Enter a name for the group in the Name field.3. Optionally, enter a brief description of the group in the Comment box.4. Optionally, add SSIDs to the group in the Members field.5. ClickOK to create the SSID group.
To edit an SSID or groups:
1. Either double-click on an SSID, select as SSID and then click Edit in the toolbar, or right-click then select Edit fromthe menu. The Edit SSIDor Edit SSID Group window opens.
2. Edit the settings as required. The SSID name and traffic mode cannot be edited.3. ClickOK to apply your changes.
FortiManager 6.4.0 Administration Guide 383Fortinet Inc.

Access Points
To delete SSIDs or groups:
1. Select the SSIDs and groups that you would like to delete.2. Either click Delete in the toolbar, or right-click and select Delete.3. ClickOK in the confirmation dialog box to delete the selected SSIDs and groups.
Deleting a group does not delete the SSIDs that are in the group.
To clone an SSID or group:
1. Either select an SSID or group and click Clone in the toolbar, or right-click on the SSID or group name, and selectClone. The Clone SSID or Clone SSID Group dialog box opens.
2. Edit the settings as required. An SSID's traffic mode cannot be edited.3. ClickOK to clone the SSID.
To import an SSID:
1. Click Import in the toolbar. The Import dialog box opens.2. Select a FortiGate from the dropdown list. The list will include all of the devices in the current ADOM.3. Select the SSID or SSIDs to be imported from the Profile dropdown list.4. ClickOK to import the SSID or SSIDs.
Creating SSIDs
When creating a new SSID, the available options will change depending on the selected traffic mode: Tunnel , Bridge, orMesh.
To create a new SSID:
1. On the SSID pane, click Create New > SSID in the toolbar, or select it from the right-click menu. The Create NewSSID Profile windows opens.
FortiManager 6.4.0 Administration Guide 384Fortinet Inc.

Access Points
2. Enter the following information, then clickOK to create the new tunnel to wireless controller SSID:
Interface Name Type a name for the SSID.
Alias Set the alias for SSID.
Traffic Mode Select the traffic mode: Tunnel, Bridge, orMesh.
Address These options are only available when Traffic Mode is Tunnel.
IP/Network Mask Enter the IP address and netmask.
IPv6 Address Enter the IPv6 address.
AdministrativeAccess
Select the allowed administrative service protocols from: AUTO-IPSEC,CAPWAP, FGFM, HTTP, HTTPS, PING, PROBE-RESPONSE, RADIUS-ACCT, SNMP, SSH, and TELNET.
IPv6AdministrativeAccess
Select the allowed administrative service protocols from: ANY, CAPWAP,FGFM, HTTP, HTTPS, PING, SNMP, SSH, and TELNET.
DHCP Server Turn the DHCP server on or off.
WiFi Settings
FortiManager 6.4.0 Administration Guide 385Fortinet Inc.

Access Points
SSID Type the wireless service set identifier (SSID), or network name, for thiswireless interface. Users who want to use the wireless network must configuretheir computers with this network name.
Security Mode Select a security mode:Captive Portal WPA Only PersonalOPEN WPA Only Personal Captive PortalOsen OWEWPA Personal WEP 128WPA Personal Captive Portal WEP 64WPA2 Only Enterprise WPA EnterpriseWPA2 Only Personal WPA Only EnterpriseWPA2 Only Personal CaptivePortal
WPA3 Enterprise
WPA3 SAE WPA3 SAE TransitionOnly WPA andWPA2 Personal modes are available when the traffic mode isMesh.
Pre-shared Key Enter the pre-shared key for the SSID.This option is only available when the security mode includes WPA or WPA2personal.
Local Standalone Enable/disable AP local standalone (default = disable).This option is only available when the traffic mode is Bridge.
LocalAuthentication
Enable/disable AP local authentication.This option is only available when the traffic mode is Bridge.
Client Limit The maximum number of clients that can simultaneously connect to the AP (0- 4294967295, default = 0, meaning no limitation).
Client Limit perRadio
The maximum number of clients that can simultaneously connect to eachradio (0 - 4294967295, default = 0, meaning no limitation).This option is only available when Local Standalone is enabled.
Multiple Pre-Shared Keys
Enable/disable multiple pre-shared keys.In the table, click Create to create a new key. Enter the key name, value, clientlimit, and comments (optional), then clickOK. Click Edit to edit the selectedkey. Click Delete to delete the selected key or keys.This option is only available when the security mode includes WPA or WPA2personal and the traffic mode is notMesh.
Default ClientLimit Per Key
Enable/disable a maximum number of clients that can simultaneously connectusing each pre-shared key, then enter the maximum number.This option is only available when theMultiple Pre-Shared Keys is enabled.
Portal Type Select the portal type: Authentication (default), Disclaimer + Authentication,Disclaimer Only, or Email Collection.This option is only available when the security mode includes captive portal.
FortiManager 6.4.0 Administration Guide 386Fortinet Inc.

Access Points
AuthenticationPortal
Select Local or External. If External is selected, enter the URL of the portal.This option is only available when the portal type includes authentication.
User Groups Select the user group to add from the dropdown list. Select the plus symbol toadd multiple groups.This option is only available when the portal type includes authentication.
Exempt Sources Select exempt sources to add from the dropdown list.This option is only available when the portal type includes authentication.
Devices Select exempt devices to add from the dropdown list.This option is only available when the portal type includes authentication.
ExemptDestinations
Select exempt destinations to add from the dropdown list.This option is only available when the portal type includes authentication.
Exempt Services Select exempt services to add from the dropdown list.This option is only available when the portal type includes authentication.
Customize PortalMessages
Select to allow for customized portal messages. Portal messages cannot becustomized until after the interface has been created.This option is only available when the portal type includes disclaimer, emailcollection, or CMCC without MAC authentication.
Redirect afterCaptive Portal
SelectOriginal Request or Specific URL. If Specific URL is selected, enter theredirect URL.This option is only available when the security mode includes captive portal.
Authentication Select the authentication method for the SSID, either Local or RADIUS Server,then select the requisite server or group from the dropdown list.This option is only available when the security mode is includes WPA or WPA2enterprise.
Broadcast SSID Enable/disable broadcasting the SSID (default = enable).Broadcasting enables clients to connect to the wireless network without firstknowing the SSID. For better security, do not broadcast the SSID.
Schedule Select a schedule to control the availability of the SSID. For information oncreating a schedule object, see Create a new object on page 221.
Block Intra-SSIDTraffic
Enable/disable blocking communication between clients of the same AP(default = disable).
BroadcastSuppression
Optional suppression of broadcast message types:l All other broadcast: All other broadcast messagesl All other multicast: All other multicast messagesl ARP poison: ARP poison messages from wireless clientsl ARP proxy: ARP requests for wireless clients as a proxyl ARP replies: ARP replies from wireless clientsl ARPs for known clients: ARP for known messagesl ARPs for unknown clients: ARP for unknown messagesl DHCP downlink: Downlink DHCPmessages
FortiManager 6.4.0 Administration Guide 387Fortinet Inc.

Access Points
l DHCP starvation: DHCP starvation req messagesl DHCP uplink: Uplink DHCPmessagesl IPv6: IPv6 packetsl NetBIOS datagram service: NetBIOS datagram services packetsl NetBIOS name service: NetBIOS name services packets
Filter Clients byMAC Address
Enable/disable using a RADIUS server to filter clients be MAC address, thenselect the server from the drop-down list. See RADIUS servers on page 584for information on adding a RADIUS server.
VLAN Pooling Enable/disable VLAN pooling, allowing you to group multiple wirelesscontroller VLANs into VLAN pools. These pools are used to load-balancesessions evenly across multiple VLANs.l Managed AP Group: Select devices to include in the group.l Round Robinl Hash
This option is not available when the traffic mode isMesh.
Quarantine Host Enable/disable station quarantine (default = enable).This option is only available when the security mode includes WPA or WPA2.
Encrypt Select the data encryption protocol:l TKIP: Temporal Key Integrity Protocol, used by the older WPA standard.l AES: Advanced Encryption Standard, commonly used with the newerWPA2 standard (default).
l TKIP-AES: Use both protocols to provide backward compatibility forlegacy devices. This option is not recommended, as attackers will onlyneed to breach the weaker encryption of the two (TKIP).
This option is only available when the security mode includes WPA or WPA2.
QoS Profile Select the QoS profile from the drop-down list.
Advanced Options Configure advanced options. For information, see the FortiOS CLI Reference.
Per-Device Mapping Enable per-device mapping to override the SSID profile settings for selecteddevices. See Adding SSID per-device mapping on page 388.
If you select WPA Enterprise, WPA Only Enterprise, or WPA2 Only Enterprise, you can add adifferent RADIUS server using per-device mapping. See Adding SSID per-device mapping onpage 388.
Adding SSID per-device mapping
To add SSID per-device mapping:
1. Click Create New in the per-device mapping toolbar. The Per-Device Mapping dialog-box opens. Configure thefollowing settings and clickOK.
FortiManager 6.4.0 Administration Guide 388Fortinet Inc.

Access Points
Mapped Device Select the device to be mapped from the drop-down.
Mapped IP/NetMask Specify the Mapped IP/NetMask.
Mapped DHCP Server Set the DHCP Server toON if you want to map a DHCP Server to this device.
Address Range Configure address ranges for DHCP. Click Create to create a new range.Ranges can also be edited and deleted as required.This option is only available when DHCP Server isON andMode is Server.
Netmask Enter the netmask.This option is only available when DHCP Server isON andMode is Server.
Default Gateway Configure the default gateway: Same as Interface IP, or Specify. If set toSpecify, enter the gateway IP address in the field.This option is only available when DHCP Server isON andMode is Server.
DNS Server Configure the DNS server: Same as System DNS, Same as Interface IP, orSpecify.This option is only available when DHCP Server isON andMode is Server.
Mode Select the DHCPmode: Server or Relay.This option is only available when DHCP Server isON.
NTP Server Configure the NTP server: Local, Same as System NTP, or Specify. If set toSpecify, enter the NTP server IP address in the field.This option is only available when DHCP Server isON andMode is Server.
FortiManager 6.4.0 Administration Guide 389Fortinet Inc.

Access Points
Time Zone Configure the timezone: Disable, Same as System, or Specify. If set toSpecify, select the timezone from the dropdown list.This option is only available when DHCP Server isON andMode is Server.
Next BootstrapServer
Enter the IP address of the next bootstrap server.This option is only available when DHCP Server isON andMode is Server.
Additional DHCPOptions
In the Lease Time field, enter the lease time, in seconds (default = 604800 (7days)).Add DHCP options to the table. For details, see Adding additional DHCPoptions on page 390. Options can also be edited and deleted as required.This option is only available when DHCP Server isON andMode is Server.
MAC Reservation+ Access Control
Select the action to take with unknown MAC addresses: assign or block.Add MAC address actions to the table. For details, see Adding a MAC addressreservation on page 390. Reservations can also be edited and deleted asrequired.This option is only available when DHCP Server isON andMode is Server.
DHCP Server IP Enter the DHCP server IP address.This option is only available when DHCP Server isON andMode is Relay.
Type Select the type: Regular, or IPsec.This option is only available when DHCP Server isON.
Adding additional DHCP options
To add additional DHCP options:
1. Click Create in the Additional DHCP Options table toolbar. The Additional DHCP Options dialog box opens.
2. Enter theOption Code.3. Select the Type: hex, ip, or string.4. Enter the corresponding value.5. ClickOK to create the option.
Adding a MAC address reservation
To add a MAC address reservation:
1. Click Create in theMAC Reservation + Access Control table toolbar. TheMAC Reservation + Access Control dialogbox opens.
FortiManager 6.4.0 Administration Guide 390Fortinet Inc.

Access Points
2. Enter theMAC Address.3. Select the End IP: Assign IP, Block, or Reserve IP. If reserving the IP address, enter it in the field.4. Optionally, enter a description.5. ClickOK to create the reservation.
WIDS profiles
TheWIDS monitors wireless traffic for a wide range of security threats by detecting and reporting on possible intrusionattempts. When an attack is detected, a log message is recorded.
To viewWIDS profiles, ensure that you are in the correct ADOM, go to APManager > WiFi Profiles, and selectWIDSProfile in the tree menu.
The following options are available in the toolbar and right-click menu:
Create New Create a newWIDS profile.
Edit Edit the selected WIDS profile.
Delete Delete the selected WIDS profile.
Clone Clone the selected WIDS profile.
Import Import WIDS profiles from a connected FortiGate (toolbar only).
To create a new WIDS profile:
1. On the WIDS Profile pane, click Create New in the toolbar, or select it from the right-click menu. The Create NewWIDS Profile window opens.
FortiManager 6.4.0 Administration Guide 391Fortinet Inc.

Access Points
2. Enter the following information, then clickOK to create the newWIDS profile:
Name Enter a name for the profile.
Comments Optionally, enter comments.
Sensor Mode
Enable Rogue AP Detection Select to enable rogue AP detection.
Background ScanEvery
Enter the number of seconds between background scans.
Enable PassiveScan Mode
Enable/disable passive scan mode.
Auto SuppressRouge APs inForeground Scan
Enable/disable automatically suppressing rogue APs in foreground scans.This options is only available when the sensor mode is not disabled.
FortiManager 6.4.0 Administration Guide 392Fortinet Inc.

Access Points
DisableBackground ScanDuring SpecifiedTime
Enable/disable background scanning during the specified time. Specify thedays of week, and the start and end times.
Intrusion Type The intrusion types that can be detected.
Enable Select to enable the intrusion type.
Threshold If applicable, enter a threshold for reporting the intrusion, in seconds exceptwhere specified.
Interval (Seconds) If applicable, enter the interval for reporting the intrusion, in seconds.
Advanced Options
ap-bgscan-duration
Listening time on a scanning channel, in milliseconds (10 - 1000, default = 20).
ap-bgscan-idle Waiting time for channel inactivity before scanning this channel, inmilliseconds (0 - 1000, default = 0).
ap-bgscan-intv Period of time between scanning two channels, in seconds (1 - 600, default =1).
ap-bgscan-report-intv
Period of time between background scan reports, in seconds (15 - 600, default= 30).
ap-fgscan-report-intv
Period of time between foreground scan reports, in seconds (15 - 600, default= 15).
deauth-broadcast Enable/disable broadcasting deauthentication detection (default = disable).
deauth-unknown-src-thresh
Threshold value per second to deauthenticate unknown sources for DoSattacks, in seconds (0 - 65535, 0 = no limit, default = 10).
invalid-mac-oui Enable/disable invalid MAC OUI detection (default = disable).
Intrusion types
Intrusion Type Description
Asleap Attack ASLEAP is a tool used to perform attacks against LEAP authentication.
Association Frame Flooding A Denial of Service attack using association requests. The default detectionthreshold is 30 requests in 10 seconds.
Authentication FrameFlooding
A Denial of Service attack using association requests. The default detectionthreshold is 30 requests in 10 seconds.
BroadcastingDeauthentication
This is a type of Denial of Service attack. A flood of spoofed de-authenticationframes forces wireless clients to de-authenticate, then re-authenticate with theirAP.
EAPOL Packet Flooding(to AP)
Extensible Authentication Protocol over LAN (EAPOL) packets are used in WPAandWPA2 authentication. Flooding the AP with these packets can be a denial ofservice attack.
FortiManager 6.4.0 Administration Guide 393Fortinet Inc.

Access Points
Intrusion Type Description
Several types of EAPOL packets can be detected:l EAPOL-FAILl EAPOL-LOGOFFl EAPOL-STARTl EAPOL-SUCC
Invalid MAC OUI Some attackers use randomly-generated MAC addresses. The first three bytes ofthe MAC address are the Organizationally Unique Identifier (OUI), administeredby IEEE. Invalid OUIs are logged.
Long Duration Attack To share radio bandwidth, WiFi devices reserve channels for brief periods of time.Excessively long reservation periods can be used as a denial of service attack.You can set a threshold between 1000 and 32 767 microseconds. The default is8200µ.
Null SSID Probe Response When a wireless client sends out a probe request, the attacker sends a responsewith a null SSID. This causes many wireless cards and devices to stopresponding.
Premature EAPOL PacketFlooding (to client)
Extensible Authentication Protocol over LAN (EAPOL) packets are used in WPAandWPA2 authentication. Flooding the client with these packets can be a denialof service attack.Two types of EAPOL packets can be detected:l EAPOL-FAILl EAPOL-SUCC
Spoofed Deauthentication Spoofed de-authentication frames form the basis for most denial of serviceattacks.
Weak WEP IV Detection A primary means of cracking WEP keys is by capturing 802.11 frames over anextended period of time and searching for patterns of WEP initialization vectors(IVs) that are known to be weak. WIDS detects known weakWEP IVs in on-airtraffic.
Wireless Bridge WiFi frames with both the FromDS and ToDS fields set indicate a wireless bridge.This will also detect a wireless bridge that you intentionally configured in yournetwork.
To edit a WIDS profile:
1. Either double-click on a profile name, select a profile and then click Edit in the toolbar, or right-click on the namethen select Edit from the menu. The Edit WIDS window opens.
2. Edit the settings as required.3. ClickOK to apply your changes.
To delete WIDS profiles:
1. Select the profile or profiles that will be deleted from the profile list.2. Either click Delete from the toolbar, or right-click then select Delete.3. ClickOK in the confirmation dialog box to delete the profile or profiles.
FortiManager 6.4.0 Administration Guide 394Fortinet Inc.

Access Points
To clone a WIDS profile:
1. Either select a profile and click Clone in the toolbar, or right-click a profile and select Clone. The CloneWIDS paneopens.
2. Edit the name of the profile, then edit the remaining settings as required.3. ClickOK to clone the profile.
To import a WIDS profile:
1. Click Import in the toolbar. The Import dialog box opens.2. Select a FortiGate from the dropdown list. The list will include all of the devices in the current ADOM.3. Select the profile or profiles to be imported from the dropdown list.4. ClickOK to import the profile or profiles.
Bluetooth profiles
To view and configure Bluetooth profiles, ensure that you are in the correct ADOM, go to APManager > WiFi Profiles,and select Bluetooth Profile in the tree menu (or from the tabs in version 5.6 ADOMs).
Bluetooth profiles are not available in version 5.4 ADOMs.
The following options are available in the toolbar and right-click menu:
Create New Create a new Bluetooth profile.
Edit Edit the selected Bluetooth profile.
Delete Delete the selected Bluetooth profile.
Clone Clone the selected Bluetooth profile.
Import Import Bluetooth profiles from a connected FortiGate (toolbar only).
To create a new Bluetooth profile:
1. On the Bluetooth Profile pane, click Create New in the toolbar, or select it from the right-click menu. The Create NewBluetooth Profile window opens.
FortiManager 6.4.0 Administration Guide 395Fortinet Inc.

Access Points
2. Enter the following information:
Name Enter a name for the profile.
Comments Optionally, enter comments.
Advertising Select the advertising types: iBeacon, Eddystone-UID, and Eddystone-URL.
iBeacon UUID The iBeacon Universally Unique Identifier (UUID) is automatically assigned,but can be manually reset (63 characters).
Major ID The major ID (1 - 65535, default = 1000).
Minor ID The minor ID (1 - 65535, default = 2000).
Eddystone Namespace The eddystone namespace ID (10 characters).
Eddystone Instance The eddystone instance ID (6 characters).
Eddystone URL The eddystone URL (127 characters).
TX Power Transmit power level:0 = -21 dBm1 = -18 dBm2 = -15 dBm3 = -12 dBm4 = -9 dBm
5 = -6 dBm6 = -3 dBm7 = 0 dBm8 = 1 dBm9 = 2 dBm
10 = 3 dBm11 = 4 dBm12 = 5 dBm
Beacon Interval The beacon interval, in milliseconds (40 - 3500, default = 100).
BLE Scanning Enable/disable Bluetooth Low Energy (BLE) scanning.
Advanced Options Enter the eddystone encoded URL hexadecimal string size (54 characters) inthe eddystone-url-encode-hex field.
3. ClickOK to create the new Bluetooth profile.
To edit a Bluetooth profile:
1. Either double-click on a profile name, select a profile and then click Edit in the toolbar, or right-click on the namethen select Edit from the menu. The Edit Bluetooth Profile window opens.
FortiManager 6.4.0 Administration Guide 396Fortinet Inc.

Access Points
2. Edit the settings as required.3. ClickOK to apply your changes.
To delete Bluetooth profiles:
1. Select the profile or profiles that will be deleted from the profile list.2. Either click Delete from the toolbar, or right-click then select Delete.3. ClickOK in the confirmation dialog box to delete the profile or profiles.
To clone a Bluetooth profile:
1. Either select a profile and click Clone in the toolbar, or right-click a profile and select Clone. The Clone BluetoothProfile pane opens.
2. Edit the name of the profile, then edit the remaining settings as required.3. ClickOK to clone the profile.
To import a Bluetooth profile:
1. Click Import in the toolbar. The Import dialog box opens.2. Select a FortiGate from the dropdown list. The list will include all of the devices in the current ADOM.3. Select the profile or profiles to be imported from the dropdown list.4. ClickOK to import the profile or profiles.
QoS profiles
To view and configure Quality of Service (QoS) profiles, ensure that you are in the correct ADOM, go to APManager >WiFi Profiles, and selectQoS Profile in the tree menu (or from the tabs in version 5.6 ADOMs).
QoS profiles are not available in version 5.4 ADOMs.
The following options are available in the toolbar and right-click menu:
Create New Create a new QoS profile.
Edit Edit the selected QoS profile.
Delete Delete the selected QoS profile.
Clone Clone the selected QoS profile.
Import Import QoS profiles from a connected FortiGate (toolbar only).
To create a new QoS profile:
1. On the QoS Profile pane, click Create New in the toolbar, or select it from the right-click menu. The Create New QoSProfile window opens.
FortiManager 6.4.0 Administration Guide 397Fortinet Inc.

Access Points
2. Enter the following information:
Name Enter a name for the profile.
Comments Optionally, enter comments.
Max Uplink Speed (VAPs) The maximum uplink speed (VAPs), in Kbps (0 - 2097152, default = 0).
Max Downlink Speed (VAPs) The maximum downlink speed (VAPs), in Kbps (0 - 2097152, default = 0).
Max Uplink Speed (Clients) The maximum uplink speed (Clients), in Kbps (0 - 2097152, default = 0).
Max Downlink Speed(Clients)
The maximum downlink speed (Clients), in Kbps (0 - 2097152, default = 0).
Client Rate Burst Enable/disable client rate burst (default = disable).
Wi-Fi MultiMedia Enable/disable WiFi Multimedia (WMM) control (default = enable).
U-APSD Power Save Mode Enable/disable WMMUnscheduled Automatic Power Save Delivery (U-APSD) power save mode (default = enable).This option is only available ifWi-Fi MultiMedia is enabled.
Call Admission Control Enable/disable WMM call admission control (default = disable).This option is only available ifWi-Fi MultiMedia is enabled.
Call Capacity The maximum number of VoWLAN phones allowed (0 - 60, default = 10).This option is only available if Call Admission Control is enabled.
Bandwidth AdmissionControl
Enable/disable WMM bandwidth admission control (default = disable).This option is only available if Call Admission Control is enabled.
BandwidthCapacity
The maximum bandwidth capacity allowed, in Kbps (1 - 600000, default =2000).This option is only available if Bandwidth Admission Control is enabled.
DSCP Mapping Enable/disable differentiated Services Code Point (DSCP) mapping (default =disable).
FortiManager 6.4.0 Administration Guide 398Fortinet Inc.

Access Points
Voice Access DSCPmapping for voice access category (default = 48, 56).This option is only available if DSCPMapping is enabled.
Video Access DSCPmapping for video access category (default = 32, 40).This option is only available if DSCPMapping is enabled.
Best Effort Access DSCPmapping for best effort access category (default = 0, 24).This option is only available if DSCPMapping is enabled.
BackgroundAccess
DSCPmapping for background access category (default = 8, 16).This option is only available if DSCPMapping is enabled.
3. ClickOK to create the new QoS profile.
To edit a QoS profile:
1. Either double-click on a profile name, select a profile and then click Edit in the toolbar, or right-click on the namethen select Edit from the menu. The Edit QoS Profile window opens.
2. Edit the settings as required.3. ClickOK to apply your changes.
To delete QoS profiles:
1. Select the profile or profiles that will be deleted from the profile list.2. Either click Delete from the toolbar, or right-click then select Delete.3. ClickOK in the confirmation dialog box to delete the profile or profiles.
To clone a QoS profile:
1. Either select a profile and click Clone in the toolbar, or right-click a profile and select Clone. The Clone QoS Profilepane opens.
2. Edit the name of the profile, then edit the remaining settings as required.3. ClickOK to clone the profile.
To import a QoS profile:
1. Click Import in the toolbar. The Import dialog box opens.2. Select a FortiGate from the dropdown list. The list will include all of the devices in the current ADOM.3. Select the profile or profiles to be imported from the dropdown list.4. ClickOK to import the profile or profiles.
Bonjour profiles
To view and configure Bonjour profiles, ensure that you are in the correct ADOM, go to APManager > WiFi Profiles, andselect Bonjour Profile in the tree menu (or from the tabs in version 5.6 ADOMs).
Bonjour profiles are not available in version 5.4 ADOMs.
FortiManager 6.4.0 Administration Guide 399Fortinet Inc.

Access Points
The following options are available in the toolbar and right-click menu:
Create New Create a new Bonjour profile.
Edit Edit the selected Bonjour profile.
Delete Delete the selected Bonjour profile.
Clone Clone the selected Bonjour profile.
Import Import Bonjour profiles from a connected FortiGate (toolbar only).
To create a new Bonjour profile:
1. On the Bonjour Profile pane, click Create New in the toolbar, or select it from the right-click menu. The Create NewBonjour Profile window opens.
2. Enter the following information:
Name Enter a name for the profile.
Comments Optionally, enter comments.
Policy List Configure the policy list.
Create New Create a new policy list entry. Select the following, then clickOK:l Description: Description of the Bonjour profile policy.l From VLAN: The VLAN ID that the Bonjour service will be advertised from(0 - 4094, default = 0).
l To VLAN: The VLAN ID that the Bonjour service will be made available to(0 - 4094, default = all).
l Services: Services for the VLAN.
Edit Edit the selected entry.
Delete Delete the selected entries.
3. ClickOK to create the new Bonjour profile.
To edit a Bonjour profile:
1. Either double-click on a profile name, select a profile and then click Edit in the toolbar, or right-click on the namethen select Edit from the menu. The Edit Bonjour Profile window opens.
2. Edit the settings as required.3. ClickOK to apply your changes.
FortiManager 6.4.0 Administration Guide 400Fortinet Inc.

Access Points
To delete Bonjour profiles:
1. Select the profile or profiles that will be deleted from the profile list.2. Either click Delete from the toolbar, or right-click then select Delete.3. ClickOK in the confirmation dialog box to delete the profile or profiles.
To clone a Bonjour profile:
1. Either select a profile and click Clone in the toolbar, or right-click a profile and select Clone. The Clone BonjourProfile pane opens.
2. Edit the name of the profile, then edit the remaining settings as required.3. ClickOK to clone the profile.
To import a Bonjour profile:
1. Click Import in the toolbar. The Import dialog box opens.2. Select a FortiGate from the dropdown list. The list will include all of the devices in the current ADOM.3. Select the profile or profiles to be imported from the dropdown list.4. ClickOK to import the profile or profiles.
Assigning profiles to FortiAP devices
You use the AP Manager pane to assign profiles to FortiAP devices, and you use the Device Manager pane to installprofiles to FortiAP devices when you install a configuration to the FortiGate that controls the FortiAP device.
For more information about creating and managing AP profiles, see AP profiles on page 378.
To assign profiles to FortiAP devices:
1. In the tree menu, select the group or FortiGate that contains the FortiAP device the profile will be applied to.2. Locate the FortiAP device in the list in the content pane, or refine the list by selecting an option from the quick status
bar.3. Either select the FortiAP and click Assigned Profile from the toolbar, or right-click on the FortiAP and select
Assigned Profile. The Assign AP Profile window opens.4. Select a FortiAP profile from the dropdown list, then clickOK to assign the profile.
WiFi profiles for per-device management
When per-device management is enabled, you can configure changes on each managed access point. The followingsteps provide an overview of using per-device access point management:
1. Enable per-device management.See Enabling FortiAP per-device management on page 402.
2. Configure profiles for each managed access point.See Creating profiles on page 402.
3. Install changes to managed access points.See Installing changes to FortiAP devices on page 368.
FortiManager 6.4.0 Administration Guide 401Fortinet Inc.
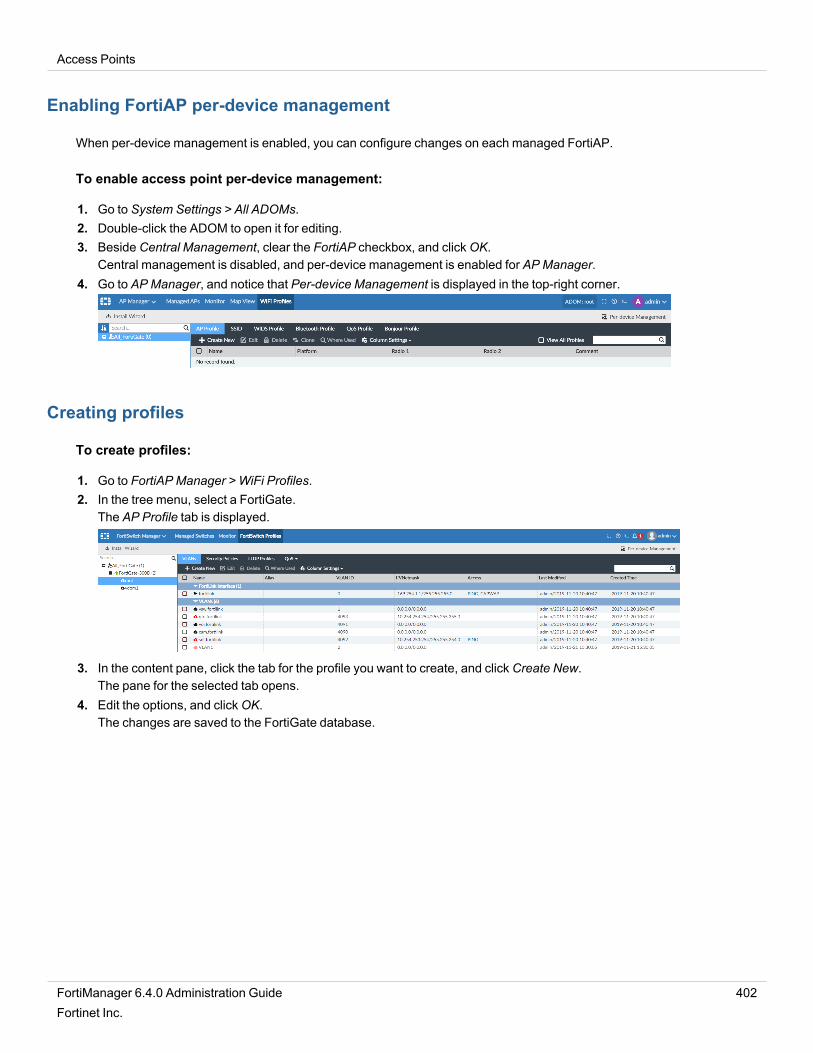
Access Points
Enabling FortiAP per-device management
When per-device management is enabled, you can configure changes on each managed FortiAP.
To enable access point per-device management:
1. Go to System Settings > All ADOMs.2. Double-click the ADOM to open it for editing.3. Beside Central Management, clear the FortiAP checkbox, and clickOK.
Central management is disabled, and per-device management is enabled for APManager.4. Go to APManager, and notice that Per-device Management is displayed in the top-right corner.
Creating profiles
To create profiles:
1. Go to FortiAP Manager > WiFi Profiles.2. In the tree menu, select a FortiGate.
The AP Profile tab is displayed.
3. In the content pane, click the tab for the profile you want to create, and click Create New.The pane for the selected tab opens.
4. Edit the options, and clickOK.The changes are saved to the FortiGate database.
FortiManager 6.4.0 Administration Guide 402Fortinet Inc.

FortiSwitch Manager
The FortiSwitch Manager pane allows you to manage FortiSwitch devices that are controlled by FortiGate devices thatare managed by FortiManager. You can use FortiSwitch Manager for the following modes of management:
l Central management of managed switchesl Per-device management of managed switches
The tabs available on the FortiSwitch Manager pane depend on whether you have central management or per-devicemanagement enabled. When central management is enabled, the FortiSwitch Managermodule includes the followingtabs:
Managed Switches Displays unauthorized and authorized FortiSwitch devices. You can view, authorize, and editauthorized switches, as well as apply templates to switches.
Monitor Monitor FortiSwitch devices with a graphical representation of the connected switches.
FortiSwitchTemplates
View, create, and edit FortiSwitch templates, VLANs, and security policies. Templates canalso be imported.
When per-device management is enabled, the FortiSwitch Managermodule includes the following tabs:
Managed Switches Displays unauthorized and authorized FortiSwitch devices. You can view, authorize, and editauthorized switches as well as configure ports for each managed switch.
Monitor Monitor FortiSwitch devices with a graphical representation of the connected switches.
FortiSwitch Profiles View, create, and edit VLANs, security policies, LLDP profiles, and QoS policies settings foreach managed switch.
Managed Switches
Go to FortiSwitch Manager > Managed Switches to access managed FortiSwitch devices. Managed switches areorganized by their FortiGate controller.
FortiManager 6.4.0 Administration Guide 403Fortinet Inc.

FortiSwitch Manager
Additional configuration options and short-cuts are available using the right-click contentmenu. Right-click on the mouse on different parts of the navigation panes on the GUI page toaccess these context menus.
If workspace or workflow is enabled, the ADOMmust be locked before changes can be made.See Locking an ADOM on page 521.
Quick status bar
You can quickly view the status of devices on theManaged Switches pane by using the quick status bar, which containsthe following options:
l Managed FortiSwitchl Onlinel Offlinel Unauthorized
You can click each quick status to display in the content pane only the devices referenced in the quick status.
To view the quick status bar:
1. If using ADOMs, ensure that you are in the correct ADOM.2. Go to FortiSwitch Manager > Managed Switches. The quick status bar is displayed above the content pane.
3. In the tree menu, select a FortiGate or All_FortiGate. The devices for the group are displayed in the content pane,and the quick status bar updates.
4. Click on each quick status to filter the devices displayed on the content pane. For example, clickOffline, and thecontent pane will display only devices that are currently offline.
Managing FortiSwitches
FortiSwitch devices can be managed from the content pane below the quick status bar on the FortiSwitch Manager >Managed Switches pane.
The following options are available from the toolbar and right-click menu:
Ports Configuration Available when per-device management is enabled for FortiSwitch Manager.
FortiManager 6.4.0 Administration Guide 404Fortinet Inc.

FortiSwitch Manager
Configure ports for the selected FortiSwitch. See Configuring a port on a singleFortiSwitch on page 429.
Edit Edit the selected FortiSwitch.
Delete Delete the switch or switches.
Assign Template Available when central management is enabled for FortiSwitch Manager.Assign a template to the switch. Only applicable templates will be listed. SeeAssigning templates to FortiSwitch devices on page 424.
Upgrade Upgrade the switch. The FortiSwitch must already be authorized.This option is also available in the toolbar by selectingMore.Before upgrading FortiSwitch, you can optionally go to FortiGuard > FirmwareImages > Product: FortiSwitch, and click the download icon to manually downloadthe firmware images.
Authorize Authorize a switch. See Authorizing and deauthorizing FortiSwitch devices onpage 407.This option is also available in the toolbar by selectingMore.
Deauthorize Deauthorize a switch. See Authorizing and deauthorizing FortiSwitch devices onpage 407.This option is also available in the toolbar by selectingMore.
Restart Restart the switch.This option is also available in the toolbar by selectingMore.
Connect to CLI Connect to FortiSwitch device's CLI, if available.This option is also available in the toolbar by selectingMore.
Refresh Refresh the switch list.This option is also available in the toolbar by selectingMore.
Column Settings Click to select which columns to display or select Reset to Default to display thedefault columns.This option is only available in the toolbar.
Search Enter a search string into the search field to search the switch list.This option is only available in the toolbar.
The following information is available in the content pane:
FortiGate The FortiGate that the FortiSwitch is connected to.
FortiSwitch Name The name assigned to the switch.
Serial Number The serial number of the switch.
Platform The FortiSwitch model.
Connected Via The IP address of the switch.
OS Version The OS version on the switch.
FortiManager 6.4.0 Administration Guide 405Fortinet Inc.

FortiSwitch Manager
Template The FortiSwitch template assigned to the device, if any.
Join Time The date and time that the switch joined.
Comments User entered comments.
Editing switches
FortiSwitch devices can be edited from the FortiSwitch Manager > Managed Switches pane.
To edit FortiSwitch devices:
1. In the tree menu, select the FortiGate that contains the FortiSwitch device to be edited, or select All_FortiGate to listall of the switches.
2. Select the appropriate option from the quick status bar, and locate the switch in the content pane.3. Double-click on the switch, select the switch and click Edit from the toolbar, or right-click on the switch and select
Edit. The Edit Managed FortiSwitch window opens.The following example is of FortiSwitch Manager with central management enabled.
4. Edit the following options, then click Apply to apply your changes.
Serial Number The device’s serial number. This field cannot be edited.
Name The name of the FortiSwitch.
Description A description of the FortiSwitch, such as its model.
Template Available when central management is enabled for FortiSwitch Manager.Select the template that will be applied to the FortiSwitch from the dropdownlist. Only applicable templates are available.
Status The status of the FortiSwitch, such as Connected.Click Restart to restart the switch.
Connecting From The IP address of the switch.
Join Time The date and time that the switch joined.
State The state of the AP, such as Authorized.
FortiManager 6.4.0 Administration Guide 406Fortinet Inc.

FortiSwitch Manager
If the switch is authorized, click De-authorize to deauthorize the switch. If theswitch is not authorized, click Authorize to authorize it. See Authorizing anddeauthorizing FortiSwitch devices on page 407.
FortiSwitch OS Version The OS version on the switch.Click Upgrade to upgrade the firmware to a newer version if you have oneavailable. See Firmware Management on page 89
Deleting switches
FortiSwitch devices can be deleted from the FortiSwitch Manager > Managed Switches pane.
To delete FortiSwitch devices:
1. In the tree menu, select the FortiGate that contains the switch or switches to be deleted, or select All_FortiGate tolist all of the switches.
2. Select the appropriate option from the quick status bar, and locate the switch in the list in the content pane.3. Select the switch or switches that you need to delete.4. Click Delete from the toolbar, or right-click and select Delete.5. ClickOK in the confirmation dialog box to delete the switch or switches.
Authorizing and deauthorizing FortiSwitch devices
FortiSwitch devices can be authorized and deauthorized from theManaged Switches tab, or from the Edit ManagedFortiSwitch pane (see Editing switches on page 406).
To authorize FortiSwitch devices:
1. In the tree menu, select FortiGate that contains the unauthorized FortiSwitch devices, or select All_FortiGate to listall of the switches.
2. In the quick status bar, click Unauthorized. The unauthorized FortiSwitch devices are displayed in the content pane.3. Select the switches and either clickMore > Authorize from the toolbar, or right-click and select Authorize.4. SelectOK in the confirmation dialog box to authorize the selected devices.
To deauthorize FortiSwitch devices:
1. In the tree menu, select FortiGate that contains the FortiSwitch devices to be deauthorized2. Select the FortiSwitch devices and either clickMore > Deauthorize from the toolbar, or right-click and select
Deauthorize.3. SelectOK in the confirmation dialog box to deauthorize the selected devices.
Upgrading firmware for managed switches
You can use FortiManager to upgrade firmware for FortiSwitch units. By default, FortiManager retrieves the firmwarefrom FortiGuard.
FortiManager 6.4.0 Administration Guide 407Fortinet Inc.

FortiSwitch Manager
You can also optionally import special firmware images for FortiSwitch to the FortiGuard module, and then use them toupgrade FortiSwitch units.
To upgrade firmware for managed switches:
1. Go to FortiSwitch Manager > Managed Switches.2. In the tree menu, select a FortiGate.
The managed FortiSwitches are displayed in the content pane.3. Right-click a FortiSwitch, and select Upgrade.
The FortiSwitch Firmware Upgrade dialog box is displayed.
4. Select the firmware, and click Upgrade Now.
Using zero-touch deployment for FortiSwitch
Configure FortiSwitch on FortiManager using its serial number and deploy FortiSwitch devices across the network usingzero touch deployment. After configuring FortiSwitch on FortiManager, you can deploy remote FortiSwitch devices byjust plugging them into remote FortiGate devices.
Requirements:
l FortiManager version 5.6 ADOM or later.l FortiGate is managed by FortiManager.l The managed FortiGate unit is configured to work with FortiSwitch.l The FortiSwitch serial number is available.
FortiManager 6.4.0 Administration Guide 408Fortinet Inc.

FortiSwitch Manager
To enable zero touch deployment:
1. Go to FortiSwitch Manager >Managed Switches.2. Click Create New. The Add Model FortiSwitch pane is displayed.
3. Configure the following settings, and clickOK:
FortiGate Select the FortiGate device or VDOM from the drop-down.
Device Interface Select the port where the FortiSwitch will be connected.
Serial Number Specify the FortiSwitch serial number.
Name Specify a name.
Enforce Firmware Version ToggleON to enforce a firmware version and select the firmware version fromthe drop-down menu. ToggleOFF to disable this feature.
A model FortiSwitch is created and added to the managed FortiGate.4. Click Close to close the Add Model FortiSwitch pane.5. Configure the switch.
l For FortiSwitch Manager with central management enabled, see Assigning templates to FortiSwitch devices onpage 424.
l For FortiSwitch Manager with per-device management enabled, see Configuring a port on a single FortiSwitchon page 429.
Because this is a model device, FortiManager saves the changes to the FortiGate database.6. Connect FortiSwitch to FortiGate.
The FortiSwitch settings are deployed to FortiSwitch. You can view the progress on the notification toolbar inFortiManager.
You can also use the Zero Touch Deployment process to deploy FortiGate devices. For moreinformation, see Adding a model device on page 42.
Installing changes to managed switches
On the FortiSwitch Manager pane, you can use the Install Wizard to install changes to managed FortiSwitch devices.Alternately you can install changes when you install a configuration to the FortiGate that manages the switch.
To install changes to managed switches:
1. Go to FortiSwitch Manager > Managed Switches.2. In the tree menu, select the FortiGate device that controls the FortiSwitch, and click Install Wizard.
The managed switches are displayed in the content pane.
FortiManager 6.4.0 Administration Guide 409Fortinet Inc.

FortiSwitch Manager
3. In the content pane, select the switch, and click Install Wizard.The Install Wizard is displayed.
4. Select Install Device Settings (only), and click Next.The Device Settings only pane is displayed.
5. Select the device, and click Next.The Device Settings pane is displayed.
FortiManager 6.4.0 Administration Guide 410Fortinet Inc.

FortiSwitch Manager
6. (Optional) Click Install Preview to review the changes.7. Click Install.
Monitor
The FortiSwitch Manager > Monitor pane shows a graphical representation of the connected FortiSwitch devices. Usethe Refresh button to refresh the view, the search box to find a specific device or filter the view, and the zoom buttons toenlarge or shrink the view.
Ports that are transmitting and receiving data are highlighted in green. Port groups, such as PoE or SFP+ ports, areencircled in different colored boxes.
Hovering the cursor over the edge of a port group will open a pop-up showing the type of port in the group. Hovering thecursor over a port will open a pop-up showing information about the port, including:
Port The port number.
Peer Device The device that this switch is connected to. The current port, as well as the portthat it is connected to on the connected, and the connection between the twodevices, will be highlighted.
FortiManager 6.4.0 Administration Guide 411Fortinet Inc.

FortiSwitch Manager
This item is only displayed when the port is connected to another FortiSwitchdevice.
Native VLAN The native VLAN of the port.
PoE Whether or not the port is currently providing PoE power.This item is only displayed on PoE ports.
Link The state of the link, either up or down.
Speed The speed of the port, such as 1000Mbps/Full Duplex. The value is 0Mbps if thelink is down.
Bytes Sent The total number of bytes sent by the port.
Bytes Received The total number of bytes received by the port.
FortiSwitch Templates for central management
When central management is enabled, you can create templates for a variety of switch configurations, and assigntemplates to multiple managed switches. The following steps provide an overview of using centralized FortiSwitchmanagement to configure and install templates:
1. Enable central management of switches. See Enabling FortiSwitch central management on page 412.2. Create FortiSwitch VLANs. See Creating VLANs on page 425.3. Create or import FortiSwitch templates. See FortiSwitch Templates on page 413.4. Assign templates to FortiSwitch devices. See Assigning templates to FortiSwitch devices on page 424.5. Install the templates to the devices. See Installing changes to managed switches on page 409.
Enabling FortiSwitch central management
When central management is enabled, you can create templates for a variety of switch configurations, and assigntemplates to multiple managed switches.
To enable central management:
1. Go to System Settings > All ADOMs.2. Double-click the ADOM to open it for editing.
FortiManager 6.4.0 Administration Guide 412Fortinet Inc.

FortiSwitch Manager
3. Beside Central Management, select the FortiSwitch checkbox, and clickOK.
Central management is enabled for FortiSwitch.
FortiSwitch Templates
The FortiSwitch Manager > FortiSwitch Templates tab is available when central management is enabled. You can usethe FortiSwitch Templates tab to create and manage FortiSwitch templates, VLANs, security policies, LLDP profiles, andQoS policies that can be assembled into templates, and then the template assigned to FortiSwitch devices. You can alsoimport templates from FortiSwitch devices, and then apply the template to other FortiSwitch devices of the same model.
Accessing FortiSwitch templates
FortiSwitch templates define VLAN and PoE assignments for a FortiSwitch platform.
To view FortiSwitch templates:
1. Ensure that you are in the correct ADOM.2. Go to FortiSwitch Manager > FortiSwitch Templates, and select FortiSwitch Templates in the tree menu.
The following options are available in the toolbar and right-click menu:
Create New Create a new FortiSwitch template. See Creating FortiSwitch templates on page414.
Edit Edit the selected template.
Delete Delete the selected template or templates.
FortiManager 6.4.0 Administration Guide 413Fortinet Inc.

FortiSwitch Manager
Import Import a FortiSwitch template. See Importing FortiSwitch templates on page 416.
Column Settings Adjust the visible columns.
Search Enter a search string into the search field to search the template list.
To edit a template:
1. Double-click a template name.Alternately you can right-click a template, and click Edit in the toolbar.The Edit FortiSwitch Template pane opens.
2. Edit the settings as required.3. ClickOK to apply your changes.
To delete templates:
1. Select the template or templates that will be deleted.2. Either click Delete from the toolbar, or right-click and select Delete.3. ClickOK in the confirmation dialog box to delete the selected template or templates.
Creating FortiSwitch templates
When creating a new FortiSwitch template, the platform must be selected before configuring VLAN assignments.
To create a FortiSwitch template:
1. Go to FortiSwitch Manager > FortiSwitch Templates.2. In the tree menu, select FortiSwitch Templates.3. In the content pane, click Create New in the toolbar. The Create New FortiSwitch Template window opens.
4. Enter the following information, then clickOK to create the new template.
Template Name Type a name for the template.
Comments Optionally, enter comments.
Platforms Select the platform that the template will apply to from the dropdown list.
FortiManager 6.4.0 Administration Guide 414Fortinet Inc.

FortiSwitch Manager
Switch VLAN Assignments Configure VLAN assignments. A platform must be selected before VLANassignments can be configured.
Add Port Add a port to the table.
Create Trunk Create a trunk. See To create a trunk group: on page 415.
Edit Edit the selected trunk.
Delete Delete the selected ports or trunks.
Port Select a port profile from the dropdown list.
Native VLAN Select the native VLAN from the available VLAN objects. See CreatingFortiSwitch VLANs on page 416.
Allowed VLAN Select the allowed VLAN from the available VLAN objects. See CreatingFortiSwitch VLANs on page 416.
Security Policy Select the security policies from the available switch controller securitypolicies. See FortiSwitch security policies on page 422.
POE If applicable, right-click to enable or disable PoE for the port.
DHCP Blocking Right-click to enable or disable DHCP blocking for the port or trunk.If the port is in a trunk, then DHCP blocking can only be enabled for the trunk,and not the individual ports.
IGMP Snooping Right-click to enable or disable IGMP snooping for the port or trunk.If the port is in a trunk, then IGMP snooping can only be enabled for the trunk,and not the individual ports.
Loop Guard Right-click to enable or disable Loop Guard for the port.Loop Guard cannot be applied to trunks, or ports that are in trunks.
STP Right-click to enable or disable STP for the port or trunk.If the port is in a trunk, then STP can only be enabled for the trunk, and not theindividual ports.
Edge Port Right-click to enable or disable Edge Port for the port or trunk.If the port is in a trunk, then STP can only be enabled for the trunk, and not theindividual ports.
STP BPDU Guard Right-click to enable or disable STP BPDUGuard for the port or trunk.If the port is in a trunk, then STP BPDUGuard can only be enabled for thetrunk, and not the individual ports.
STP Root Guard Right-click to enable or disable STP Root Guard for the port or trunk.If the port is in a trunk, then STP Root Guard can only be enabled for the trunk,and not the individual ports.
To create a trunk group:
1. On the Create New FortiSwitch Template pane, click Create Trunk in the Switch VLAN Assignments toolbar. TheNew Trunk Group dialog box opens.
2. Enter a name for the trunk group in the Name field.
FortiManager 6.4.0 Administration Guide 415Fortinet Inc.

FortiSwitch Manager
3. In theMembers field, select all the ports that will be in the group from the drop-down list.4. Select the mode: lacp-active (active link aggregation), lacp-passive (passive link aggregation), or static.5. ClickOK to create the trunk group.
Importing FortiSwitch templates
FortiSwitch templates can be imported from connected devices, and then applied to other FortiSwitch devices of thesame model.
To import a FortiSwitch template:
1. Go to FortiSwitch Manager > FortiSwitch Templates.2. In the tree menu, select FortiSwitch Templates.3. In the content pane, click Import in the toolbar. The Import window opens.
4. Select a FortiGate from the drop-down list.5. Select the FortiSwitch whose template will be imported from the drop-down list.6. (Optional) Enter a name for the template in the New Name field.7. ClickOK.
The template is imported from the device.
Creating FortiSwitch VLANs
To create a FortiSwitch VLAN:
1. Go to FortiSwitch Manager > FortiSwitch Templates.2. In the tree menu, select VLANs.
FortiManager 6.4.0 Administration Guide 416Fortinet Inc.

FortiSwitch Manager
3. In the content pane, click Create New in the toolbar. The Create New VLAN Definition window opens.
FortiManager 6.4.0 Administration Guide 417Fortinet Inc.

FortiSwitch Manager
4. Enter the following information, then clickOK to add the new VLAN.
Interface Name Enter a name for the interface.
VLAN ID Enter the VLAN ID
Role Select the role for the interface: DMZ, LAN, UNDEFINED, orWAN.
Estimated Bandwidth Enter the estimated upstream and downstream bandwidths.This option is only available when Role isWAN.
Address
Addressing mode The addressing mode.
IP/Network Mask Enter the IP address and netmask.
IPv6 Addressing mode Select the IPv6 addressing mode:Manual or DHCP.
IPv6Address/Prefix
Enter the IPv6 address.This option is only available when IPv6 Addressing mode isManual.
Restrict Access
Administrative Access Select the allowed administrative service protocols from:CAPWAP, DNP, FGFM,FTM,HTTP, HTTPS, PING, PROBE-RESPONSE, RADIUS-ACCT, SNMP, SSH, and TELNET.
IPv6 Administrative Access Select the allowed administrative service protocols from:CAPWAP, FGFM, HTTP, HTTPS, PING, SNMP, SSH, andTELNET.
DHCP Server Turn the DHCP server on or off.This option is only available when Role is LAN or UNDEFINED.
DHCP Server IP Enter the DHCP server IP address.This option is only available when DHCP Server isON andModeis Relay.
Address Range Configure address ranges for DHCP. Click Create to create a newrange. Ranges can also be edited and deleted as required.This option is only available when DHCP Server isON andModeis Server.
Netmask Enter the netmask.This option is only available when DHCP Server isON andModeis Server.
Default Gateway Configure the default gateway: Same as Interface IP, or Specify. Ifset to Specify, enter the gateway IP address in the field.This option is only available when DHCP Server isON andModeis Server.
FortiManager 6.4.0 Administration Guide 418Fortinet Inc.

FortiSwitch Manager
DNS Server Configure the DNS server: Same as System DNS, Same asInterface IP, or Specify.This option is only available when DHCP Server isON andModeis Server.
DNS Server 1 - 3 Enter the DNS server IP addresses.This option is only available when DHCP Server isON,Mode isServer, and DNS Server is Specify.
Mode Select the DHCPmode: Server or Relay.This option is only available when DHCP Server isON.
NTP Server Configure the NTP server: Local, Same as System NTP, orSpecify. If set to Specify, enter the NTP server IP address in thefield.This option is only available when DHCP Server isON andModeis Server.
Time Zone Configure the timezone: Disable, Same as System, or Specify. Ifset to Specify, select the timezone from the dropdown list.This option is only available when DHCP Server isON andModeis Server.
Next BootstrapServer
Enter the IP address of the next bootstrap server.This option is only available when DHCP Server isON andModeis Server.
Additional DHCPOptions
In the Lease Time field, enter the lease time, in seconds. Default:604800 seconds (7 days).Add DHCP options to the table. See To add additional DHCPoptions: on page 421 for details. Options can also be edited anddeleted as required.This option is only available when DHCP Server isON andModeis Server.
MAC Reservation+ Access Control
Select the action to take with unknown MAC addresses: assign orblock.Add MAC address actions to the table. See To add a MACaddress reservation: on page 421 for details. Reservations canalso be edited and deleted as required.This option is only available when DHCP Server isON andModeis Server.
Type Select the type: Regular, or IPsec.This option is only available when DHCP Server isON.
Networked Devices These options are only available when Role is DMZ, LAN, orUNDEFINED.
Device Detection Turn device detection on or off.
Active Scanning Turn active scanning on or off.
FortiManager 6.4.0 Administration Guide 419Fortinet Inc.

FortiSwitch Manager
This option is only available when Device Detection is on.
Admission Control These options are only available when Role is LAN orUNDEFINED.
Security Mode Select the security mode: CAPTIVE-PORTAL, or NONE.
AuthenticationPortal
Configure the authentication portal: Local or External. If External isselected, enter the portal in the field.This option is only available when Security Mode is CAPTIVE-PORTAL.
User Access Select Restricted to Groups or Allow All.This option is only available when Security Mode is CAPTIVE-PORTAL.
User Groups Select user groups from the available groups.This option is available when Security Mode is CAPTIVE-PORTALand User Access is Restricted to Groups.
Exempt Sources Select sources that are exempt from the available firewalladdresses.This option is only available when Security Mode is CAPTIVE-PORTAL.
Device Select user devices, device categories, and/or device groups.This option is only available when Security Mode is CAPTIVE-PORTAL.
ExemptDestinations
Select destinations that are exempt from the available firewalladdresses.This option is only available when Security Mode is CAPTIVE-PORTAL.
Exempt Services Select services that are exempt from the available firewallservices.This option is only available when Security mode is CAPTIVE-PORTAL.
Miscellaneous
Scan Outgoing Connectionsto Botnet Sites
Select Block, Disable, orMonitor.
Secondary IP Address Turn secondary IP addresses on or off.Add IP addresses to the table. See To add a secondary IPaddress: on page 421 for details. Addresses can also be editedand deleted as required.
Status
Comments Optionally, enter comments.
Interface State Select if the interface is Enabled or Disabled.
FortiManager 6.4.0 Administration Guide 420Fortinet Inc.

FortiSwitch Manager
Advanced Options
color Change the color of the interface to one of the 32 options.
Per-Device Mapping Enable per-device mapping.Add mappings to the table. See To add per device mapping: onpage 422 for details. Mappings can also be edited and deleted asrequired.
To add additional DHCP options:
1. Click Create in the Additional DHCP Options table toolbar. The Additional DHCP Options dialog box opens.
2. Enter theOption Code.3. Select the Type: hex, ip, or string.4. Enter the corresponding value.5. ClickOK to create the option.
To add a MAC address reservation:
1. Click Create in theMAC Reservation + Access Control table toolbar. TheMAC Reservation + Access Control dialogbox opens.
2. Enter theMAC Address.3. Select the End IP: Assign IP, Block, or Reserve IP. If reserving the IP address, enter it in the field.4. Optionally, enter a description.5. ClickOK to create the reservation.
To add a secondary IP address:
1. Click Create New in the Secondary IP address table toolbar. A dialog box opens.2. Enter the IP address and netmask in the IP/Network Mask field.3. Select the allowed administrative service protocols from: CAPWAP, DNP, FGFM, FTM, HTTP, HTTPS, PING,
FortiManager 6.4.0 Administration Guide 421Fortinet Inc.

FortiSwitch Manager
PROBE-RESPONSE, RADIUS-ACCT, SNMP, SSH, and TELNET.4. ClickOK to add the address.
To add per device mapping:
1. Click Create New in the Per-Device Mapping table toolbar. The Per-Device Mapping dialog box opens.
2. Select the device to be mapped from theMapped Device drop-down list.3. Enter the VLAN ID.4. Enter the mapped IP address and netmask in theMapped IP/Netmask field.5. If required, enable DHCP Server and configure the options (options are the same as when creating a new VLAN
definition).6. ClickOK to add the device mapping.
FortiSwitch security policies
To view FortiSwitch security policies:
1. Ensure that you are in the correct ADOM.2. Go to FortiSwitch Manager > FortiSwitch Templates.3. In the tree menu, select Security Policies.
FortiSwitch Security Policies are not available in version 5.4 ADOMs.
The following options are available in the toolbar and right-click menu:
Create New Create a new FortiSwitch security policy. See Creating FortiSwitch securitypolicies on page 423.
Edit Edit the selected policy.
Delete Delete the selected policy or policies.
FortiManager 6.4.0 Administration Guide 422Fortinet Inc.

FortiSwitch Manager
Import Import security policies from a managed FortiGate device.
Search Enter a search string into the search field to search the policy list.
To edit a security policy:
1. Either double-click a policy, right-click a policy and select Edit, or select a policy then click Edit in the toolbar. TheEdit Security Policies pane opens. The name cannot be edited.
2. Edit the settings as required, then clickOK to apply your changes.
To delete security policies:
1. Select the policy or policies that will be deleted.2. Either click Delete from the toolbar, or right-click and select Delete.3. ClickOK in the confirmation dialog box to delete the selected policy or policies.
To import security policies:
1. Click Import on the toolbar. The Import dialog box opens.2. Select the FortiGate that the policies will be imported from in the drop-down list.3. Select the policies that will be imported.4. If only one policy is being imported, and its name is already used by a policy on the FortiManager, you can optionally
enter a new name for the policy. If a new name is not entered, or if you are importing multiple policies, existingpolicies will be overwritten by imported policies.
5. ClickOK in the confirmation dialog box to import the policies.
Creating FortiSwitch security policies
To create a FortiSwitch security policy:
1. Go to FortiSwitch Manager > FortiSwitch Templates.2. In the tree menu, select Security Policies.3. In the content pane, click Create New in the toolbar. The Create New Security Policies window opens.
4. Enter the following information, then clickOK to create the new security policy.
Name Type a name for the template.
Security mode Select the security mode, Port-based orMAC-based.
FortiManager 6.4.0 Administration Guide 423Fortinet Inc.

FortiSwitch Manager
User groups Select the user groups that the security policy will apply to.
Guest VLAN Enable a guest VLAN, and select the VLAN from the available VLAN objects.See Creating FortiSwitch VLANs on page 416.
Guest authentication delay Set the guest authentication delay, in seconds (1 - 900, default = 30).
Authentication fail VLAN Enable an authentication failure VLAN, and select the VLAN from the availableVLAN objects. See Creating FortiSwitch VLANs on page 416.This option is not available when Security mode isMAC-based.
MAC authentication bypass Enable MAC Authentication Bypass (MAB).
EAP pass-through Enable EAP pass-through.
Override RADIUS timeout Enable overriding the RADIUS timeout.
Assigning templates to FortiSwitch devices
When central management is enabled for FortiSwitch Manager, you can assign templates to switches. For moreinformation about creating and managing FortiSwitch templates, see FortiSwitch Templates on page 413.
To assign a templates:
1. Go to FortiSwitch Manager > Managed Switches.2. In the tree menu, select a FortiGate to list its managed switches, or select All_FortiGate to list all switches.
The list of managed FortiSwitch units is displayed in the content pane.3. Use the quick status bar to filter the list of switches in the content pane and help locate the switch.4. Select the switch, and click Assign Template from the toolbar.5. Select a FortiSwitch template from the dropdown list, then clickOK to assign it.6. Install the changes. See Installing changes to managed switches on page 409.
Only templates that apply to the specific device model will be available for selection.
Templates can also be applied when editing a device. See Editing switches on page 406.
FortiSwitch Profiles for per-device management
When per-device management is enabled, you can configure changes on each managed switch. The following stepsprovide an overview of using per-device FortiSwitch management:
FortiManager 6.4.0 Administration Guide 424Fortinet Inc.

FortiSwitch Manager
1. Enable per-device management. See Enabling per-device management on page 425.2. Configure policies and profiles for managed switches.
You can configure VLANs, security policies, LLDP profiles, and QoS policies, and the changes are saved to theFortiGate database. See FortiSwitch profiles on page 425.
3. Configure ports for each managed switch.When you configure ports, you can assign the profiles and policies that you created. See Configuring a port on asingle FortiSwitch on page 429.
4. Install changes to managed switches. See Installing changes to managed switches on page 409.
Enabling per-device management
When per-device management is enabled, you can configure changes on each managed switch.
To enable FortiSwitch per-device management:
1. Go to System Settings > All ADOMs.2. Double-click the ADOM to open it for editing.3. Beside Central Management, clear the FortiSwitch checkbox, and clickOK.
Central management is disabled, and per-device management is enabled for FortiSwitch.4. Go to FortiSwitch Manager, and notice that Per-device Management is displayed in the top-right corner.
FortiSwitch profiles
The FortiSwitch Manager > FortiSwitch Profiles tab is available when per-device management is enabled for FortiSwitchManager. You can use the FortiSwitch Profiles tab to create and manage VLANs, security profiles, LLDP profiles, andQoS profiles that you can assign to individual switches.
Creating VLANs
To create VLANs:
1. Go to FortiSwitch Manager > FortiSwitch Profiles.2. In the tree menu, select a FortiGate.
The VLAN tab is displayed.
FortiManager 6.4.0 Administration Guide 425Fortinet Inc.

FortiSwitch Manager
3. Click Create New.4. The Create New VLAN Definition pane opens.5. Edit the options, and clickOK.
The changes are saved to the FortiGate database.
Creating security policies
To create security policies:
1. Go to FortiSwitch Manager > FortiSwitch Profiles.2. In the tree menu, select a FortiGate.
The VLAN tab is displayed.3. Click the Security Policies tab.
The security policies are displayed.
4. Click Create New.The Create New Security Policies pane opens.
5. Edit the options, and clickOK.The changes are saved to the FortiGate database.
Creating LLDP profiles
To create LLDP profiles:
1. Go to FortiSwitch Manager > FortiSwitch Profiles.2. In the tree menu, select a FortiGate.
The VLAN tab is displayed.3. Click the LLDP Profiles tab.
The LLDP profiles are displayed.
FortiManager 6.4.0 Administration Guide 426Fortinet Inc.

FortiSwitch Manager
4. Click Create New.The Create New FortiSwitch LLDP Profiles pane opens.
5. Edit the options, and clickOK.The changes are saved to the FortiGate database.
Creating QoS policies
You can set the following types of QoS policies for each managed switch:
l QoS policiesl QoS egress queue policiesl QoS IP precedence/DSCP policiesl QoS 802.1 policies
To create QoS policies:
1. Go to FortiSwitch Manager > FortiSwitch Profiles.2. In the tree menu, select a FortiGate.3. From theQoSmenu, selectQoS policy.
The QoS policies are displayed in the content pane.4. Click Create New.
The Create New QoS Policy pane opens.
FortiManager 6.4.0 Administration Guide 427Fortinet Inc.

FortiSwitch Manager
5. Set the options, and clickOK.The changes are saved to the FortiGate database.
To create QoS egress queue policies:
1. Go to FortiSwitch Manager > FortiSwitch Profiles.2. In the tree menu, select a FortiGate.3. From theQoSmenu, selectQoS Egress Queue Policy.
The QoS egress queued policies are displayed in the content pane.4. Click Create New.
The Create New Egress Queue Policy pane opens.
5. Set the options, and clickOK.The changes are saved to the FortiGate database.
To create QoS IP precedence/DSCP policies:
1. Go to FortiSwitch Manager > FortiSwitch Profiles.2. In the tree menu, select a FortiGate.3. From theQoSmenu, selectQoS IP precedence/DSCP.
The QoS IP precedence/DSCP policies are displayed in the content pane.4. Click Create New.
The Create New QoS IP precedence/DSCP pane opens.
FortiManager 6.4.0 Administration Guide 428Fortinet Inc.

FortiSwitch Manager
5. Set the options, and clickOK.The changes are saved to the FortiGate database.
To create QoS 802.1p policies:
1. Go to FortiSwitch Manager > FortiSwitch Profiles.2. In the tree menu, select a FortiGate.3. From theQoSmenu, selectQoS 802.1p.
TheQoS 802.1p policies are displayed in the content pane.4. Click Create New.
The Create New 802.1 pane opens.
5. Set the options, and clickOK.The changes are saved to the FortiGate database.
Configuring a port on a single FortiSwitch
When per-device management is enabled, you can use the FortiSwitch Manager pane to configure ports for eachmanaged switch.
FortiManager 6.4.0 Administration Guide 429Fortinet Inc.

FortiSwitch Manager
To configure ports on a managed FortiSwitch:
1. Go to FortiSwitch Manager > Managed Switches.2. In the tree menu, select a FortiGate.
The list of managed switches is displayed in the content pane.3. Double-click a switch.
The FortiSwitch Ports pane opens.
4. Double-click a port to open it for editing.The Edit Port dialog box is displayed.
FortiManager 6.4.0 Administration Guide 430Fortinet Inc.

FortiSwitch Manager
5. Edit the options, and clickOK.The changes are saved to the FortiGate database.
Right-click each port to modify POE, DHCP Blocking, IGMP Snooping, IGMP Snooping, STP,Loop Guard, Edge Port, STP BPDUGuard, and STP Root Guard directly from the context-menu.
FortiManager 6.4.0 Administration Guide 431Fortinet Inc.

Endpoint Compliance
The FortiClient Manager pane is available for ADOM versions 6.0 and earlier, and you mustenable the module by using the CLI. The FortiClient Manager pane is not available for ADOMversions 6.2 and later because FortiClient endpoints no longer send FortiTelemetry toFortiGate devices.
The FortiClient Manager pane enables you to centrally manage FortiClient profiles for multiple FortiGate devices andmonitor FortiClient endpoints that are connected to FortiGate devices.
The FortiClient Manager pane is available for ADOM version 6.0 and earlier, and you must enable the module by usingthe CLI.
Endpoint control ensures that workstation computers (endpoints) and other network devices meet security requirements.Otherwise they are not permitted access. Endpoint control enforces the use of FortiClient Endpoint Security and pushesa FortiClient profile to the FortiClient application.
For information about FortiClient, see the FortiClient Administration Guide.
Additional configuration options and shortcuts are available using the right-click menu. Right-click on different parts of the navigation panes in the GUI to access these menus.
The FortiClient Manager pane includes the following tabs in the blue banner:
FortiTelemetry View managed FortiGate devices with central FortiClient management enabled.You can enable or disable FortiTelemetry for interfaces, enable or disableFortiClient enforcement on interfaces, and assign FortiClient profile packages todevices.
Monitor Monitor FortiClient endpoints by compliance status or interface. You can performthe following actions on FortiClient endpoints: block, unblock, quarantine, releasequarantine, and unregister. You can also exempt non-compliant FortiClientendpoints from compliance rules.
FortiClient profiles View and create profile packages and FortiClient profiles. You can also importFortiClient profiles from FortiGate devices.
Centralized FortiClient management is enabled by default. You use the FortiClient Manager pane to enableFortiTelemetry and FortiClient enforcement on FortiGate interfaces as well as create and assign FortiClient profilepackages to one or more FortiGate devices or VDOMs. Profile packages are installed to devices when you installconfigurations to the devices.
The following steps provide an overview of using centralized FortiClient management to configure, assign, and installFortiClient profiles:
FortiManager 6.4.0 Administration Guide 432Fortinet Inc.

Endpoint Compliance
To enable FortiClient Manager:
1. Ensure that you are using ADOM version 6.0 or earlier.2. Enable FortiClient Manager by using the CLI:
config system admin setting(setting)# set show-fct-manager enable(setting)# end
To create and assign FortiClient profile packages:
1. Create a FortiClient profile package. See Creating FortiClient profile packages on page 440.2. Select the profile package, and create one or more FortiClient profiles. See Creating FortiClient profiles on page
440.3. Enable FortiTelemetry on FortiGate interfaces. See Enabling FortiTelemetry on interfaces on page 435.4. Enable FortiClient enforcement on FortiGate interfaces. See Enabling endpoint control on interfaces on page 435.5. Assign profile packages to FortiGate interfaces. See Assigning profile packages on page 444.
To install configuration changes to devices:
1. On the FortiClient Manager > FortiClient Profiles pane, click Install Wizard.2. Follow the prompts in the wizard. See Using the Install Wizard to install policy packages and device settings on
page 67.
How FortiManager fits into endpoint compliance
The FortiClient settings available in FortiManager are intended to complement FortiClient support that is available withFortiClient EMS and FortiGate. Each product performs specific functions:
l FortiClient EMS is used to deploy FortiClient (Windows) endpoints and FortiClient profiles, and the endpoints canconnect FortiClient Telemetry to FortiGate or to FortiClient EMS. You can import FortiClient profiles from FortiGatedevices to FortiClient EMS, and use FortiClient EMS to deploy the profiles. Alternately, you can use FortiClient EMSto create and deploy profiles. When FortiClient endpoints connect FortiClient Telemetry to EMS, you can useFortiClient EMS to monitor FortiClient endpoints.
l FortiManager provides central FortiClient management for FortiGate devices that are managed by FortiManager. InFortiManager, you can create one or more FortiClient profiles that you can assign to multiple FortiGate devices. Youcan also import FortiClient profiles from one FortiGate device and assign the FortiClient profile to other FortiGatedevices. When FortiClient endpoints are registered to managed FortiGate devices, you can use FortiManager tomonitor FortiClient endpoints from multiple FortiGate devices.
l FortiGate provides compliance rules for network access control. FortiGate devices enforce network compliance forconnected FortiClient endpoints. FortiGate devices communicate between FortiClient endpoints and FortiManager.
FortiManager 6.4.0 Administration Guide 433Fortinet Inc.

Endpoint Compliance
FortiTelemetry
On the FortiClient Manager > FortiTelemetry pane, you can enable and disable FortiTelemetry and FortiClientenforcement on FortiGate interfaces to use for FortiClient communication. You can also assign FortiClient profilepackages to FortiGate devices.
After you make configuration changes, install the changes to the device. See Installing to devices on page 66.
Viewing devices
The FortiClient Manager > FortiTelemetry pane displays FortiGate devices with central FortiClient managementenabled.
To view devices:
1. If using ADOMs, ensure that you are in the correct ADOM.2. Go to FortiClient Manager > FortiTelemetry. The list of FortiGate devices is displayed in the tree menu.3. Select a device.
The following options are available in the toolbar for the selected device:
Add Interface Click to enable FortiTelemetry on interfaces for the selected device to use forFortiClient communication.
Remove Interface Click to disable FortiTelemetry on the selected interface.
Assign Profile Click to assign a FortiClient profile package to the FortiGate.
The following information is displayed in the content pane for the selected device:
FortiManager 6.4.0 Administration Guide 434Fortinet Inc.

Endpoint Compliance
Virtual Domain Displays the name of the virtual domain for the selected FortiGate device ifapplicable.
Interface Displays the interfaces with FortiTelemetry enabled for the FortiGate device. Theinterfaces are used for FortiClient communication, and FortiClient endpoints usethe interface to connect or register to FortiGate.
IP Displays the IP address for the interface.
Enforce FortiClient Displays whether FortiClient is enforced on the interface. A green checkmarkindicates FortiClient is enforced. An x in a circle indicates that FortiClient is notenforced.
Profile Package Displays the name of the FortiClient profile package that is assigned to theFortiGate interface.
Enabling FortiTelemetry on interfaces
When you add an interface on the FortiClient Manager > FortiTelemetry pane, you are enabling FortiTelemetry for theinterface, and the interface is used for connection and communication with FortiClient endpoints.
When you remove an interface on the FortiClient Manager > FortiTelemetry pane, you are disabling FortiTelemetry forthe interface.
To enable FortiTelemetry on interfaces:
1. Go to FortiClient Manager > FortiTelemetry. The list of FortiGate devices is displayed in the tree menu.2. Select a FortiGate device, and click Add Interface.3. Select one or more interfaces to use for FortiClient communication, and clickOK. The selected interfaces are
displayed in the Interface column, and FortiTelemetry is enabled for the interfaces.
Enabling endpoint control on interfaces
When you enable FortiClient enforcement on an interface, you are enabling endpoint control, and all FortiClientendpoints using the interface are required to adhere to the FortiGate compliance rules that are specified in the profilethat is applied to the endpoint.
When you disable FortiClient enforcement on an interface, you are disabling endpoint control, and FortiClient endpointsare not required to adhere to FortiGate compliance rules.
To enable FortiClient enforcement on interfaces:
1. Go to FortiClient Manager > FortiTelemetry. The list of FortiGate devices is displayed in the tree menu.2. Click a FortiGate device.3. Right-click an interface, and select Enable Enforce FortiClient.
You can disable FortiClient enforcement for the interface by selecting Disable Enforce FortiClient.
FortiManager 6.4.0 Administration Guide 435Fortinet Inc.

Endpoint Compliance
Assigning FortiClient profile packages to devices
You can use the FortiClient Manager > FortiTelemetry pane to assign FortiClient profile packages to interfaces forFortiGate devices, and you can use the Install Wizard to install profile packages to FortiGate devices when you install aconfiguration to the FortiGate device.
To assign FortiClient profile packages:
1. In the left pane, select a device.2. In the content pane, click Assign Profile. The Assign Profile dialog box is displayed.3. Select a profile package, and clickOK. The selected profile package is assigned to the added interface(s).4. Install the configuration changes to the FortiGate device.
Monitor
On the FortiClient Manager > Monitor pane, you can monitor FortiClient endpoints that are registered to FortiGatedevices.
Monitoring FortiClient endpoints
The list of FortiClient endpoints updates automatically when new endpoints are registered to the FortiGate device. Youcan also click Refresh to update the list of FortiClient endpoints.
To monitor FortiClient endpoints:
1. If using ADOMs, ensure that you are in the correct ADOM.2. Go to FortiClient Manager > Monitor.3. In the tree menu, select a FortiGate device.
The following buttons are available on the toolbar for the selected device:
Refresh Click to refresh the list of FortiClient endpoints for the selected device.
Action Click to select one of the following actions for the selected FortiClient endpoint:
l Blockl Unblockl Quarantinel Release Quarantinel Unregister
Column Settings Click to select which columns to display or select Reset to Default to displaythe default columns.
By Interface Click to organize the display of FortiClient endpoints by the undetectedinterfaces and interface name. In the Device column, click Undetected or theinterface name to hide and display its list of FortiClient endpoints.
FortiManager 6.4.0 Administration Guide 436Fortinet Inc.

Endpoint Compliance
By Compliance Status Click to organize the display of FortiClient endpoints by the followingcompliance statuses: Noncompliant and Exempt. In the Device column, clickNoncompliant or Exempt to hide and display its list of FortiClient endpoints.
The following default columns of information are available for the selected device:
Device Displays the name of the FortiClient endpoint that is registered to the selectedFortiGate device. It also displays an icon that represents the operating systemon the FortiClient endpoint. You can hover over each device to view devicedetails.
User Displays the name of the user logged into the FortiClient endpoint.
IP address Displays the IP address of the FortiClient endpoint.
Status Displays one of the following statuses for the FortiClient endpoint:l Onlinel Offlinel Registered-Onlinel Registered-Offlinel Un-Registered
FortiClient Version Displays the version of FortiClient software installed on the FortiClientendpoint.
FortiClient Profile Displays the name of the FortiClient profile that is assigned to the FortiClientendpoint.
Compliance Displays one of the following icons of compliance statuses for the FortiClientendpoint:l Compliantl Endpoint is not compliant with FortiClient profilel Quarantinedl FortiTelemetry is disabledl ExemptHover the mouse over the compliance status icon to view more information.Additional information about why the endpoint is not compliant may also bedisplayed.
Monitoring FortiClient endpoints by compliance status
To monitor FortiClient endpoints by compliance status:
1. Go to FortiClient Manager > Monitor.2. In the tree menu, select a FortiGate device.3. Click By Compliance Status.
The list of FortiClient endpoints is displayed by compliance status.4. In the Device column, click the compliance status to hide and display its list of FortiClient endpoints.
For example, click Noncompliant to hide and display the list of FortiClient endpoints with a status of noncompliant.5. In the Compliance column, hover the mouse over the compliance status to view more details.
FortiManager 6.4.0 Administration Guide 437Fortinet Inc.

Endpoint Compliance
Monitoring FortiClient endpoints by interface
To monitor FortiClient endpoints by interface:
1. Go to FortiClient Manager > Monitor.2. In the tree menu, select a FortiGate device.3. Click By Interface.
The list of FortiClient endpoints is displayed by compliance status.4. In the Device column, click Undetected or the name of the interface to hide and display its list of FortiClient
endpoints.
Exempting non-compliant FortiClient endpoints
You can exempt FortiClient endpoints that are non-compliant from the compliance rules to allow the endpoints to accessthe network.
To exempt non-compliant FortiClient endpoints:
1. Go to FortiClient Manager > Monitor.2. In the tree menu, select a FortiGate device.3. Select one or more FortiClient endpoints.4. Right-click the selected FortiClient endpoint, and select Exempt this device or Exempt all devices of this type.
The FortiClient endpoint is exempt from the compliance rules.5. Install the configuration changes to the FortiGate device.
FortiClient profiles
The FortiClient Manager > Profiles pane allows you to create and manage FortiClient profile packages and profiles forendpoints. You can create profile packages of profiles for endpoints that are running the following operating systems:Windows, Mac, iOS, and Android.
The following information is displayed on the FortiClient Manager > FortiClient Profiles pane:
Profile Package In the Profile Packagemenu, you can select to create, rename, or delete aFortiClient profile package.
Assign Profile Package Assigns the selected FortiClient profile package to a device.
Install Wizard Click to launch the Install Wizard to install device settings to devices. This processinstalls the FortiClient profile package that is assigned to the device.
FortiManager 6.4.0 Administration Guide 438Fortinet Inc.

Endpoint Compliance
Viewing profile packages
To view profile packages:
1. Go to FortiClient Manager > FortiClient Profiles.2. Click All Profile Packages.
The following options are available in the toolbar:
Create New Click to create a new FortiClient profile package.
Rename Click to rename the selected profile package.
Delete Click to delete the selected profile package and all of its profiles.
The following information is displayed in the content pane:
Package Name Displays the name of the profile package.
Device Targets Displays the name of the device to which the profile package has been assigned.
Viewing FortiClient profiles
To view FortiClient profiles:
1. Go to FortiClient Manager > FortiClient Profiles.2. In the All Profile Packages tree menu, click a profile.
The following options are available in the toolbar:
Create New Click to create a new FortiClient profile for the selected FortiClient profilepackage.
Edit Select a profile, and click Edit to edit the profile. Alternatively, double click theprofile to open the Edit FortiClient Profile pane.
Delete Select a profile, and click Delete to delete the profile from the ed FortiClient profilepackage. Alternately, right-click a profile, and select Delete.
Move Change the order of the profiles.
Import Select to import a FortiClient profile from an existing device or VDOM into theselected FortiClient profile package.
Column Settings Click to select which columns to display or select Reset to Default to display thedefault columns.
The following information is displayed in the content pane:
Seq.# Displays the sequence number of the FortiClient profile.
FortiClient Profile Displays the name of the FortiClient profile for the selected FortiClient profilepackage.
FortiManager 6.4.0 Administration Guide 439Fortinet Inc.

Endpoint Compliance
Assign To Displays the device groups, user groups, and users associated with theFortiClient profile.
Comments Displays any comments about the FortiClient profile.
Non-Compliance Action Displays the selected non-compliance action settings from the FortiClient profile.The settings include:Warning, Block, or Auto-Update.
Last Modified Shows the last modified date.
Creating FortiClient profile packages
FortiClient profile packages contain one or more FortiClient profiles. You assign FortiClient profile packages to devicesor VDOMs.
FortiManager includes a default FortiClient profile package, and you can create multiple profiles for the profile package.
You can also create custom FortiClient profile packages and profiles.
To create profile packages:
1. Go to FortiClient Manager > FortiClient Profiles.2. From the Profile Packagemenu, select Create New.3. Type a name, and clickOK.
Creating FortiClient profiles
You can create one or more FortiClient profiles in a FortiClient profile package. The FortiClient profile identifies theFortiGate compliance rules and the non-compliance action to apply to endpoints that fail to meet the compliance rules.
The FortiClient profile does not contain any configuration information for FortiClient. TheFortiClient profile only identifies the compliance rules that FortiClient endpoints must meet tomaintain access to the network.
You can enable compliance rules for the following categories in a FortiClient profile:
l Endpoint Vulnerability Scan on Clientl System Compliancel Security Posture Check
For each category, you can specify how to handle endpoints that fail to meet the compliance rules. You can choose toblock not-compliant endpoints from network access, or you can warn not-compliant endpoints, but allow network access.For example, you could set the non-compliance action to Block for Endpoint Vulnerability Scan on Client, and you canset the non-compliance action toWarning for Security Posture Check.
FortiClient profiles can be created, edited, deleted, and imported from devices using the right-click menu and toolbarselections.
In FortiOS, this feature is found at Security Profiles > FortiClient Profiles.
FortiManager 6.4.0 Administration Guide 440Fortinet Inc.

Endpoint Compliance
To create a new FortiClient profile:
1. Go to FortiClient Manager > FortiClient Profiles.2. In the tree menu, select the FortiClient profile package in which to create profiles.3. In the content pane, click Create New.
The Create New FortiClient Profile pane opens.
4. Enter the following information:
Profile Name Type a name for the new FortiClient profile.When creating a new FortiClient profile, XSS vulnerability characters are notallowed.
Comments (Optional) Type a profile description.
Assign Profile To Identify where to assign the profile:l Device Groups: Select device groups from the list.l User Groups: Select user groups from the list.l Users: Select users from the list.l Address: Select addresses from the list.
You can assign the profile to user groups and users when using ActiveDirectory authentication or RADIUS authentication for VPN.
On-Net Detection By Address Identify whether to use an address to detect when endpoints are on-net. Selectthe address(es) from the list.
FortiManager 6.4.0 Administration Guide 441Fortinet Inc.

Endpoint Compliance
5. Set the compliance rules and non-compliance action for Endpoint Vulnerability Scan on Client:
Endpoint Vulnerability Scanon Client
ToggleON to add a rule about Vulnerability Scanning on Client. When toggledON, the Vulnerability Scanning module must be enabled in FortiClient onendpoints.ToggleOFF to exclude Vulnerability Scanning on Client from the compliancerules.
Non-complianceaction
Specify how to handle endpoints that fail to meet the compliance rules forEndpoint Vulnerability Scan on Client. Select Block to block not-compliantendpoints from network access. SelectWarning to warn not-compliantendpoints, but allow network access.
Vulnerabilityquarantine level
When Endpoint Vulnerability Scan on Client is toggled toON, you can select aminimum quarantine level from the Vulnerability quarantine level list.Endpoints with detected vulnerabilities that hit the minimum severity level orhigher are quarantined.
6. Set the compliance rules and non-compliance action for System Compliance:
System compliance ToggleON to enable compliance rules for System compliance anddisplay options for rules.ToggleOFF to exclude system compliance from the compliance rules.
Minimum FortiClient Version ToggleON to add a rule about minimum FortiClient version. WhentoggledON, endpoints must have the minimum version or higher ofFortiClient installed to remain compliant. Specify the minimum versionin theWindows endpoints andMac endpoints boxes.ToggleOFF to remove a rule about minimum FortiClient version fromthe compliance rules.
Windowsendpoints
WhenMinimum FortiClient Version is toggledON, you can type theminimum version of FortiClient that is required on endpoints running aWindows operating system.
Mac endpoints WhenMinimum FortiClient Version is toggledON, you can type theminimum version of FortiClient that is required on endpoints running aMacintosh operating system.
Upload logs to FortiAnalyzer ToggleON to add a rule about logging. When toggledON, FortiClientmust send logs to FortiAnalyzer for the endpoint to remain compliant.Select which of the following FortiClient logs must be sent toFortiAnalyzer:l Trafficl Vulnerabilityl Event
ToggleOFF to remove a rule about logging from the compliance rules.
Non-compliance action Specify how to handle endpoints that fail to meet the compliance rulesfor System Compliance. Select Block to block not-compliant endpointsfrom network access. SelectWarning to warn not-compliant endpoints,but allow network access.
FortiManager 6.4.0 Administration Guide 442Fortinet Inc.

Endpoint Compliance
7. Set the compliance rules and non-compliance action for Security Posture Check:
Security Posture Check ToggleON to enable compliance rules for Security Posture Check anddisplay more options. When toggledON, select which modules must beenabled in FortiClient for endpoints to remain compliant.ToggleOFF to remove rules about Security Posture Check from thecompliance rules.
Real-time Protection ToggleON to add a rule about real-time protection to the compliancerules. When toggledON, FortiClient must have real-time protectionenabled for endpoints to remain compliant.ToggleOFF to remove a rule about real-time protection from thecompliance rules.
Up-to-datesignatures
ToggleON to add a rule about up-to-date signatures to the compliancerules. When toggledON, FortiClient real-time protection must have up-to-date signatures for endpoints to remain compliant.ToggleOFF to remove a rule about up-to-date signatures from thecompliance rules.
Scan withFortiSandbox
ToggleON to add a rule about FortiSandbox scanning to the compliancerules. When toggledON, FortiClient real-time protection must haveFortiSandbox scanning enabled for endpoints to remain compliant.Note: A FortiSandbox devices is required, and the device must beconfigured to work with FortiClient.ToggleOFF to remove a rule about FortiSandbox scanning from thecompliance rules.
Third party AntiVirus onWindows
ToggleON to add a rule about third-party antivirus software for endpointsrunning aWindows operating system to the compliance rules. WhentoggledON, endpoints running a Windows operating systemmust haverecognized third-party antivirus software installed for endpoints to remaincompliant.Note: Real-time Protectionmust be toggledOFF before you can toggle onThird party AntiVirus on Windows.ToggleOFF to remove the rule about third-party antivirus software fromthe compliance rules.
Web Filter ToggleON to add a rule aboutWeb Filter to the compliance rules anddisplay more options.ToggleOFF to exclude a rule aboutWeb Filter from the compliance rules.
Profile WhenWeb Filter is toggledON, you can select a web filter profile. Adefault profile is selected by default.
Application Firewall ToggleON to add a rule about Application Firewall to the compliancerules and display more options.ToggleOFF to exclude the setting from the compliance rules.
ApplicationControl Sensor
When Application Firewall is toggledON, you can select an applicationcontrol sensor. A default application control sensor is selected by default.
FortiManager 6.4.0 Administration Guide 443Fortinet Inc.

Endpoint Compliance
Non-compliance action Specify how to handle endpoints that fail to meet the compliance rules forSecurity Posture Check. Select Block to block not-compliant endpointsfrom network access. SelectWarning to warn not-compliant endpoints,but allow network access.
8. ClickOK.
Editing FortiClient profiles
To edit a FortiClient profile:
1. Right-click a profile, and select Edit. The Edit FortiClient Profile <name> pane is displayed.2. Edit the settings, and clickOK.
Deleting FortiClient profiles
To delete a FortiClient profile:
1. Right-click a profile, and select Delete.2. ClickOK in the confirmation dialog box to delete the profile.
Importing FortiClient profiles
You can import FortiClient profiles from FortiGate.
To import a FortiClient profile:
1. Go to FortiClient Manager > FortiClient Profiles.2. Select a profile package, and click Import. The Import dialog box is displayed.3. Enter the following information:
Import From Device Select a device from which to import the profile or profiles from the dropdownlist. This list will include all the devices available in the ADOM.
Profile Select the profile to import.
New Name Select to create a new name for the profile being imported, and then type thename in the field.
4. ClickOK. The profile is imported into the selected profile package.
Assigning profile packages
To assign profile packages:
1. Go to FortiClient Manager > FortiClient Profiles.2. Select a profile package, and click Assign Profile Package. The Assign Profile Package dialog box is displayed.
FortiManager 6.4.0 Administration Guide 444Fortinet Inc.

Endpoint Compliance
3. Select one or more devices, and clickOK. The profile package is assigned to the device(s).4. Install the configuration changes to the FortiGate device. See Configuring a device on page 57 for more information.
FortiManager 6.4.0 Administration Guide 445Fortinet Inc.

Device Firmware and Security Updates
The FortiGuard Distribution Network (FDN) provides FortiGuard services for your FortiManager system and its manageddevices and FortiClient agents. The FDN is a world-wide network of FortiGuard Distribution Servers (FDS), which updatethe FortiGuard services on your FortiManager system on a regular basis so that your FortiManager system is protectedagainst the latest threats.
The FortiGuard services available on the FortiManager system include:
l Antivirus and IPS engines and signaturesl Web filtering and email filtering rating databases and lookupsl Vulnerability scan and management support for FortiAnalyzer
To view and configure these services, go to FortiGuard > Settings.
In FortiGuard Management, you can configure the FortiManager system to act as a local FDS, or use a web proxy serverto connect to the FDN. FortiManager systems acting as a local FDS synchronize their FortiGuard service updatepackages with the FDN, then provide FortiGuard these updates and look up replies to your private network’s FortiGatedevices. The local FDS provides a faster connection, reducing Internet connection load and the time required to applyfrequent updates, such as antivirus signatures, to many devices.
As an example, you might enable FortiGuard services to FortiGate devices on the built-in FDS, then specify theFortiManager system’s IP address as the override server on your devices. Instead of burdening your Internet connectionwith all the devices downloading antivirus updates separately, the FortiManager system would use the Internetconnection once to download the FortiGate antivirus package update, then redistribute the package to the devices.
FortiGuard Management also includes firmware revision management. To view and configure firmware options, go toFortiGuard > Firmware Images. You can download these images from the Customer Service & Support portal to installon your managed devices or on the FortiManager system.
Before you can use your FortiManager system as a local FDS, you must:
l Register your devices with Fortinet Customer Service & Support and enable the FortiGuard service licenses. Seeyour device documentation for more information on registering your products.
l If the FortiManager system’s Unregistered Device Options do not allow service to unauthorized devices, add yourdevices to the device list, or change the option to allow service to unauthorized devices. For more information, seethe FortiManager CLI Reference.For information about FDN service connection attempt handling or adding devices, see Firewall Devices on page36.
l Enable and configure the FortiManager system’s built-in FDS. For more information, see Configuring networkinterfaces on page 498.
l Connect the FortiManager system to the FDN.The FortiManager systemmust retrieve service update packages from the FDN before it can redistribute them todevices and FortiClient agents on the device list. For more information, see Connecting the built-in FDS to the FDNon page 451.
l Configure each device or FortiClient endpoint to use the FortiManager system’s built-in FDS as their overrideserver. You can do this when adding a FortiGate system. For more information, see Adding devices on page 37.
FortiManager 6.4.0 Administration Guide 446Fortinet Inc.

Device Firmware and Security Updates
This section contains the following topics:
l Settingsl Configuring devices to use the built-in FDSl Configuring FortiGuard servicesl Logging events related to FortiGuard servicesl Restoring the URL or antispam databasel Licensing statusl Package managementl Query server managementl Firmware images
For information on current security threats, virus and spam sample submission, andFortiGuard service updates available through the FDN, including antivirus, IPS, web filtering,and email filtering, see the FortiGuard Center website, https://fortiguard.com.
FDN third-party SSL validation and Anycast support
You can enable Anycast to optimize the routing performance to FortiGuard servers. Relying on Fortinet DNS servers,FortiManager obtains a single IP address for the domain name of each FortiGuard service. BGP routing optimization istransparent to FortiManager. The domain name of each FortiGuard service is the common name in that service'scertificate. The certificate is signed by a third-party intermediate CA. The FortiGuard server uses the Online CertificateStatus Protocol (OCSP) stapling technique, enabling FortiManager to always validate the FortiGuard server certificateefficiently.
When Anycast is enabled, FortiManager only completes the TLS handshake with a FortiGuard server that provides agoodOCSP status for its certificate. Any other status will result in a failed SSL connection. OCSP stapling is reflected onthe signature interval (currently, 24 hours), and good means that the certificate is not revoked at that timestamp. TheFortiGuard servers query the CA's OCSP responder every four hours and update its OCSP status. If the FortiGuardserver is unable to reach the OCSP responder, it keeps the last known OCSP status for seven days. This cached OCSPstatus is immediately sent out when a client connection request is made, which optimizes the response time.
To enable Anycast support:
1. Enable Anycast supportconfig fmupdate fds-setting(fds-setting)# set fortiguard-anycast enable(fds-setting)# end
2. (Optional) Specify an authorized mirror server hosted by AWS for better performance.config fmupdate fds-setting(fds-setting)# set fortiguard-anycast-source {aws | fortinet}(fds-setting)# end
FortiManager 6.4.0 Administration Guide 447Fortinet Inc.

Device Firmware and Security Updates
Settings
FortiGuard > Settings provides a central location for configuring and enabling your FortiManager system’s built-in FDSas an FDN override server.
By default, this option is enabled. After configuring FortiGuard and configuring your devices to use the FortiManagersystem as their FortiGuard server, you can view overall and per device statistics on FortiGuard service benefits.
To operate in a closed network, disable communication with the FortiGuard server. See Operating as an FDS in a closednetwork on page 451.
Enable Communication withFortiGuard Server
When toggledOFF, you must manually upload packages, databases, andlicenses to your FortiManager. See Operating as an FDS in a closed network onpage 451.
Communication withFortiGuard Server
Select Servers Located in the US Only to limit communication to FortiGuardservers located in the USA. SelectGlobal Servers to communicate with serversanywhere.
Enable Antivirus and IPSService
ToggleON to enable antivirus and intrusion protection service.When on, select what versions of FortiGate, FortiClient, FortiAnalyzer, andFortiMail to download updates for.
Enable Web Filter and Service ToggleON to enable web filter services. When uploaded to FortiManager, theWeb Filter database version is displayed.
Enable Email Filter Service ToggleON to enable email filter services. When uploaded to FortiManager, theEmail Filter databases versions are displayed.
Server Override Mode Select Strict (Access Override Server Only) or Loose (Allow Access OtherServers) override mode.
FortiGuard Antivirus and IPSSettings
Configure antivirus and IPS settings. See FortiGuard antivirus and IPS settingson page 449.
FortiGuard Web Filter andEmail Filter Settings
Configure web and email filter settings. See FortiGuard web and email filtersettings on page 449.
Override FortiGuard Server(Local FortiManager)
Configure web and email filter settings. See Override FortiGuard server (LocalFortiManager) on page 450.
FortiManager 6.4.0 Administration Guide 448Fortinet Inc.

Device Firmware and Security Updates
FortiGuard antivirus and IPS settings
In this section you can enable settings for FortiGuard Antivirus and IPS settings. The following settings are available:
Use Override Server Addressfor FortiClient
Configure to override the default built-in FDS so that you can use a port or specificFDN server. Select the add icon to add additional override servers, up to amaximum of ten. Select the delete icon to remove entries.To override the default server for updating FortiClient device’s FortiGuardservices, see Overriding default IP addresses and ports on page 457.
Use Override Server Addressfor FortiGate/FortiMail
Configure to override the default built-in FDS so that you can use a port or specificFDN server. Select the add icon to add additional override servers, up to amaximum of ten. Select the delete icon to remove entries.To override the default server for updating FortiGate/FortiMail device’s FortiGuardservices, see Overriding default IP addresses and ports on page 457.
Allow Push Update Configure to allow urgent or critical updates to be pushed directly to theFortiManager system when they become available on the FDN. The FortiManagersystem immediately downloads these updates.To enable push updates, see Enabling push updates on page 456.
Use Web Proxy Configure the FortiManager system’s built-in FDS to connect to the FDN througha web proxy.To enable updates using a web proxy, see Enabling updates through a web proxyon page 457.
Scheduled Regular Updates Configure when packages are updated without manually initiating an updaterequest.To schedule regular service updates, see Scheduling updates on page 458.
Advanced Enables logging of service updates and entries.If either option is not turned on, you will not be able to view these entries andevents when you select View FDS and FortiGuard Download History.
FortiGuard web and email filter settings
In this section you can enable settings for FortiGuard Web Filter and Email Filter.
FortiManager 6.4.0 Administration Guide 449Fortinet Inc.

Device Firmware and Security Updates
The following settings are available:
Connection to FortiGuardDistribution Server(s)
Configure connections for overriding the default built-in FDS or web proxy serverfor web filter and email filter settings.To override an FDS server for web filter and email filter services, see Overridingdefault IP addresses and ports on page 457.To enable web filter and email filter service updates using a web proxy server, seeEnabling updates through a web proxy on page 457.
Use Override Server Addressfor FortiClient
Configure to override the default built-in FDS so that you can use a port or specificFDN server. Select the add icon to add additional override servers, up to amaximum of ten. Select the delete icon to remove entries.
Use Override Server Addressfor FortiGate/FortiMail
Configure to override the default built-in FDS so that you can use a port or specificFDN server. Select the add icon to add additional override servers, up to amaximum of ten. Select the delete icon to remove entries.To override the default server for updating FortiGate device’s FortiGuardservices, see Overriding default IP addresses and ports on page 457.
Use Web Proxy Configure the FortiManager system’s built-in FDS to connect to the FDN througha web proxy. IPv4 and IPv6 are supported.To enable updates using a web proxy, see Enabling updates through a web proxyon page 457.
Polling Frequency Configure how often polling is done.
Log Settings Configure logging of FortiGuard server update, web filtering, email filter, andantivirus query events.l Log FortiGuard Server Update Events: enable or disablel FortiGuard Web Filtering: Choose from Log URL disabled, Log non-URLevents, and Log all URL lookups.
l FortiGuard Anti-spam: Choose from Log Spam disabled, Log non-spamevents, and Log all Spam lookups.
l FortiGuard Anti-virus Query: Choose from Log Virus disabled, Log non-virusevents, and Log all Virus lookups.
To configure logging of FortiGuard web filtering and email filtering events, seeLogging FortiGuard web or email filter events on page 460.
Override FortiGuard server (Local FortiManager)
Configure and enable alternate FortiManager FDS devices, rather than using the local FortiManager system. You canset up as many alternate FDS locations, and select what services are used. The following settings are available:
Additional number of PrivateFortiGuard Servers (ExcludingThis One)
Select the add icon to add a private FortiGuard server. Select the delete icon toremove entries.When adding a private server, you must type its IP address and time zone.
Enable Antivirus and IPSUpdate Service for PrivateServer
When one or more private FortiGuard servers are configured, update antivirus andIPS through this private server instead of using the default FDN.This option is available only when a private server has been configured.
FortiManager 6.4.0 Administration Guide 450Fortinet Inc.

Device Firmware and Security Updates
Enable Web Filter and EmailFilter Update Service forPrivate Server
When one or more private FortiGuard servers are configured, update the web filterand email filter through this private server instead of using the default FDN.This option is available only when a private server has been configured.
Allow FortiGates to AccessPublic FortiGuard ServersWhen Private ServersUnavailable
When one or more private FortiGuard servers are configured, managed FortiGateunits will go to those private servers for FortiGuard updates. Enable this feature toallow those FortiGate units to then try to access the public FDN servers if theprivate servers are unreachable.This option is available only when a private server has been configured.
The FortiManager system’s network interface settings can restrict which network interfacesprovide FDN services. For more information, see Configuring network interfaces on page 498.
Connecting the built-in FDS to the FDN
When you enable the built-in FDS and initiate an update either manually or by a schedule, the FortiManager systemattempts to connect to the FDN.
If all connection attempts to the server list fail, the connection status will be Disconnected.
If the connection status remains Disconnected, you may need to configure the FortiManager system’s connection to theFDN by:
l overriding the default IP address and/or portl configuring a connection through a web proxy.
After establishing a connection with the FDN, the built-in FDS can receive FortiGuard service update packages, such asantivirus engines and signatures or web filtering database updates, from the FDN.
To enable the built-in FDS:
1. Go to FortiGuard > Settings.2. Enable the types of FDN services that you want to provide through your FortiManager system’s built-in FDS. For
more information, see Configuring FortiGuard services on page 455.3. Click Apply.
The built-in FDS attempts to connect to the FDN.
If the built-in FDS is unable to connect, you may need to enable the selected services on anetwork interface. For more information, see Configuring network interfaces on page 498.If you still cannot connect to the FDN, check routes, DNS, and any intermediary firewalls orNAT devices for policies that block necessary FDN ports and protocols.
Operating as an FDS in a closed network
The FortiManager can be operated as a local FDS server when it is in a closed network with no internet connectivity.
FortiManager 6.4.0 Administration Guide 451Fortinet Inc.

Device Firmware and Security Updates
Without a connection to a FortiGuard server, update packages and licenses must be manually downloaded fromsupport, and then uploaded to the FortiManager.
As databases can be large, we recommend uploading them using the CLI. See Uploadingpackages with the CLI on page 453.
Go to FortiGuard > Settings to configure FortiManager as a local FDS server and to upload update packages andlicense.
Enable Communication withFortiGuard Servers
ToggleOFF to disable communication with the FortiGuard servers.
Enable Antivirus and IPSService
ToggleON to enable antivirus and intrusion protection service.When on, select what versions of FortiGate, FortiClient, FortiAnalyzer, andFortiMail to download updates for.
Enable Web Filter Services ToggleON to enable web filter services. When uploaded to FortiManager, theWeb Filter database is displayed.
Enable Email Filter Services ToggleON to enable email filter services. When uploaded to FortiManager, theEmail Filter database is displayed.
Upload Options for FortiGate/FortiMail
AntiVirus/IPS Packages Select to upload antivirus and IPS packages. Browse for the file you downloadedfrom the Customer Service & Support portal on your management computer, ordrag and drop the file onto the dialog box.ClickOK to upload the package to FortiManager.
Web Filter Database Select to upload the web filter database. Browse for the file you downloaded fromthe Customer Service & Support portal on your management computer, or dragand drop the file onto the dialog box.
FortiManager 6.4.0 Administration Guide 452Fortinet Inc.

Device Firmware and Security Updates
ClickOK to upload the package to FortiManager.As the database can be large, uploading with the CLI is recommended. SeeUploading packages with the CLI on page 453.
Email Filter Database Select to upload the email filter database. Browse for the file you downloadedfrom the Customer Service & Support portal on your management computer.ClickOK to upload the package to FortiManager.As the database can be large, uploading with the CLI is recommended. SeeUploading packages with the CLI on page 453.
Service License Select to import the FortiGate license. Browse for the file on your managementcomputer, or drag and drop the file onto the dialog box.ClickOK to upload the package to FortiManager.A license file can be obtained from support by requesting your accountentitlement for the device.
Upload Options for FortiClient
AntiVirus/IPS Packages Select to upload the FortiClient AntiVirus/IPS packages. Browse for the file youdownloaded from the Customer Service & Support portal on your managementcomputer, or drag and drop the file onto the dialog box.ClickOK to upload the package to FortiManager.
Uploading packages with the CLI
Packages and licenses can be uploaded using the CLI. This should be used when the packages being uploaded arelarge, like database packages.
To upload packages and license files using the CLI:
1. If not already done, disable communications with the FortiGuard server and enable a closed network with thefollowing CLI commands:
config fmupdate publicnetworkset status disable
end
2. Upload an update package or license:a. Load the package or license file to an FTP, SCP, or TFTP serverb. Run the following CLI command:
execute fmupdate {ftp | scp | tftp} import <av-ips | fct-av | url | spam |file-query | license-fgt | license-fct | custom-url | domp> <remote_file> <ip> <port> <remote_path> <user> <password>
Configuring devices to use the built-in FDS
After enabling and configuring the FortiManager system’s built-in FDS, you can configure devices to use the built-in FDSby providing the FortiManager system’s IP address and configured port as their override server.
FortiManager 6.4.0 Administration Guide 453Fortinet Inc.

Device Firmware and Security Updates
Devices are not required to be authorized by FortiManager in Device Manager to use the built-in FDS for FortiGuardupdates and services.
Procedures for configuring devices to use the built-in FDS vary by device type. See the documentation for your devicefor more information.
If you are connecting a device to a FortiManager system’s built-in FDS, some types ofupdates, such as antivirus engine updates, require you to enable SSH and HTTPSAdministrative Access on the network interface which will receive push updates. See Networkon page 498 for details.
Matching port settings
When configuring a device to override default FDN ports and IP addresses with that of a FortiManager system, thedefault port settings for the device’s update or query requests may not match the listening port of the FortiManagersystem’s built-in FDS. If this is the case, the device’s requests will fail. To successfully connect them, you must match thedevices’ port settings with the FortiManager system’s built-in FDS listening ports.
For example, the default port for FortiGuard antivirus and IPS update requests is TCP 443 on FortiOS v4.0 and higher,but the FortiManager system’s built-in FDS listens for those requests on TCP 8890. In this case, the FortiGate unit’supdate requests would fail until you configure the unit to send requests on TCP 8890.
In some cases, the device may not be configurable; instead, you must configure the FortiManager system to listen on analternate port.
Handling connection attempts from unauthorized devices
The built-in FDS replies to FortiGuard update and query connections from devices authorized for central managementby FortiManager. If the FortiManager is configured to allow connections from unauthorized devices, unauthorizeddevices can also connect.
For example, you might choose to manage a FortiGate unit’s firmware and configuration locally (from its GUI), but usethe FortiManager system when the FortiGate unit requests FortiGuard antivirus and IPS updates. In this case, theFortiManager system considers the FortiGate unit to be an unauthorized device, and must decide how to handle theconnection attempt. The FortiManager system will handle the connection attempt based on how it is configured.Connection attempt handling is only configurable via the CLI.
To configure connection attempt handling:
1. Go to the CLI Console widget in the System Settings > Dashboard pane. For information on widget settings, seeCustomizing the dashboard on page 484.
2. Click inside the console to connect.3. To configure the system to add unauthorized devices and allow service requests, type the following CLI command
lines:config system admin setting
set unreg_dev_opt add_allow_serviceend
4. To configure the system to add unauthorized devices but deny service requests, type the following CLI commandlines:
config system admin setting
FortiManager 6.4.0 Administration Guide 454Fortinet Inc.

Device Firmware and Security Updates
set unreg_dev_opt add_no_serviceend
For more information, see the FortiManager CLI Reference.
Configure a FortiManager without Internet connectivity to access a localFortiManager as FDS
By default, FortiManager connects to the public FDN to download security feature updates, including databases andengines for security feature updates such as Antivirus and IPS. Your FortiManager can be configured to use a second,local FortiManager for FDS updates.
To use a second FortiManager as the FDS:
1. Go to FortiGuard > Settings.2. Ensure that Communication with FortiGuard Server is set toGlobal Servers.3. Under FortiGuard Antivirus and IPS Settings:
a. Turn on Use Override Server Address for FortiGate/FortiMail and enter the IP address of the FortiManager unitbeing used as the FDS, and port number 8890.
b. If required, turn on Use Override Server Address for FortiClient and enter the IP address of the FortiManagerunit being used as the FDS, and port number 8891.
4. Under FortiGuard Web Filter and Email Filter Settings:a. Turn on Use Override Server Address for FortiGate/FortiMail and enter the IP address of the FortiManager unit
being used as the FDS, and port number 8900.b. If required, turn on Use Override Server Address for FortiClient and enter the IP address of the FortiManager
unit being used as the FDS, and port number 8901.5. Click Apply.
The FortiManager will use the second FortiManager unit as the FDS.
Configuring FortiGuard services
FortiGuard Management provides a central location for configuring how the FortiManager system accesses the FDN andFDS, including push updates. The following procedures explain how to configure FortiGuard services and configuringoverride and web proxy servers, if applicable.
If you need to host a custom URL list that are rated by the FortiGate unit, you can import a list using the CLI.
l Enabling push updatesl Enabling updates through a web proxyl Overriding default IP addresses and portsl Scheduling updatesl Accessing public FortiGuard web and email filter servers
FortiManager 6.4.0 Administration Guide 455Fortinet Inc.

Device Firmware and Security Updates
Enabling push updates
When an urgent or critical FortiGuard antivirus or IPS signature update becomes available, the FDN can push updatenotifications to the FortiManager system’s built-in FDS. The FortiManager system then immediately downloads theupdate.
To use push update, you must enable both the built-in FDS and push updates. Push update notifications will be ignored ifthe FortiManager system is not configured to receive them. If TCP port 443 downloads must occur through a web proxy,you must also configure the web proxy connection. See Enabling updates through a web proxy on page 457.
If push updates must occur through a firewall or NAT device, you may also need to override the default push IP addressand port.
For example, overriding the push IP address can be useful when the FortiManager system has a private IP address, andpush connections to a FortiManager systemmust traverse NAT. Normally, when push updates are enabled, theFortiManager system sends its IP address to the FDN; this IP address is used by the FDN as the destination for pushmessages; however, if the FortiManager system is on a private network, this IP address may be a private IP address,which is not routable from the FDN – causing push updates to fail.
To enable push through NAT, type a push IP address override, replacing the default IP address with an IP address ofyour choice such as the NAT device’s external or virtual IP address. This causes the FDN to send push packets to theoverride IP address, rather than the FortiManager system’s private IP address. The NAT device can then forward theconnection to the FortiManager system’s private IP address.
The built-in FDS may not receive push updates if the external IP address of any intermediaryNAT device is dynamic (such as an IP address from PPPoE or DHCP). When the NATdevice’s external IP address changes, the FortiManager system’s push IP addressconfiguration becomes out-of-date.
To enable push updates to the FortiManager system:
1. Go to FortiGuard > Settings.2. Click the arrow to expand FortiGuard Antivirus and IPS Settings; see FortiGuard antivirus and IPS settings on page
449.3. ToggleON beside Allow Push Update.4. If there is a NAT device or firewall between the FortiManager system and the FDN which denies push packets to the
FortiManager system’s IP address on UDP port 9443, type the IP Address and/or Port number on the NAT devicewhich will forward push packets to the FortiManager system. The FortiManager system will notify the FDN to sendpush updates to this IP address and port number.l IP Address is the external or virtual IP address on the NAT device for which you will configure a static NAT orport forwarding.
l Port is the external port on the NAT device for which you will configure port forwarding.5. Click Apply.6. If you performed step 4, also configure the device to direct that IP address and/or port to the FortiManager system.
l If you entered a virtual IP address, configure the virtual IP address and port forwarding, and use static NATmapping.
l If you entered a port number, configure port forwarding; the destination port must be UDP port 9443, theFortiManager system’s listening port for updates.
FortiManager 6.4.0 Administration Guide 456Fortinet Inc.

Device Firmware and Security Updates
To enable push through NAT in the CLI:
Enter the following commands:
config fmupdate fds-settingconfig push-override-to-client
set status enableconfig announce-ip
edit 1set ip <override IP that FortiGate uses to download updates from FortiManager>set port <port that FortiManager uses to send the update announcement>
endend
end
Enabling updates through a web proxy
If the FortiManager system’s built-in FDS must connect to the FDN through a web (HTTP or HTTPS) proxy, you canspecify the IP address and port of the proxy server.
If the proxy requires authentication, you can also specify a user name and password.
To enable updates to the FortiManager system through a proxy:
1. Go to FortiGuard > Settings.2. If configuring a web proxy server to enable web and email filtering updates, expand FortiGuard Web Filter and Email
Filter Settings.3. If configuring a web proxy to enable antivirus and IPS updates, expand FortiGuard Antivirus and IPS Settings.4. ToggleON beside UseWeb Proxy and enter the IP address and port number of the proxy.5. If the proxy requires authentication, enter the user name and password.6. Click Apply.
If the FDN connection status is Disconnected, the FortiManager system is unable to connect through the web proxy.
Overriding default IP addresses and ports
The FortiManager device’s built-in FDS connects to the FDN servers using default IP addresses and ports. You canoverride these defaults if you want to use a port or specific FDN server that is different from the default.
To override default IP addresses and ports:
1. Go to FortiGuard > Settings.2. If you need to override the default IP address or port for synchronizing with available FortiGuard antivirus and IPS
updates, click the arrow to expand FortiGuard Antivirus and IPS Settings, then toggleON beside Use OverrideServer Address for FortiGate/FortiMail and/or Use Override Server Address for FortiClient.
3. If you need to override the FortiManager system’s default IP address or port for synchronizing with availableFortiGuard web and email filtering updates, click the arrow to expand FortiGuard Web Filter and Email FilterSettings, then toggleON beside Use Override Server Address for FortiGate/FortiMail and/or Use Override ServerAddress for FortiClient.
4. Enter the IP address and/or port number.
FortiManager 6.4.0 Administration Guide 457Fortinet Inc.

Device Firmware and Security Updates
5. Click Apply.If the FDN connection status remains disconnected, the FortiManager system is unable to connect with theconfigured override.
FDN port numbers and protocols
Both the built-in FDS and devices use certain protocols and ports to successfully request and receive updates from theFDN or override server. Any intermediary proxies or firewalls must allow these protocols and ports, or the connection willfail.
After connecting to the FDS, you can verify connection status on the FortiGuard Management page. For moreinformation about connection status, see Connecting the built-in FDS to the FDN on page 451.
Scheduling updates
Keeping the built-in FDS up-to-date is important to provide current FortiGuard update packages and rating lookups torequesting devices. This is especially true as new viruses, malware, and spam sources pop-up frequently. Byconfiguring a scheduled update, you are guaranteed to have a recent version of database updates.
A FortiManager system acting as an FDS synchronizes its local copies of FortiGuard update packages with the FDNwhen:
l you manually initiate an update request by selecting Update Nowl it is scheduled to poll or update its local copies of update packagesl if push updates are enabled, it receives an update notification from the FDN.
If the network is interrupted when the FortiManager system is downloading a large file, it downloads all files again whenthe network resumes.
To schedule antivirus and IPS updates:
1. Go to FortiGuard > Settings.2. Click the arrow to expand FortiGuard Antivirus and IPS Settings; see FortiGuard antivirus and IPS settings on page
449.3. In Polling Frequency, select the number of hours and minutes of the polling interval.4. Click Apply.
To schedule Web Filtering and Email Filter polling:
1. Go to FortiGuard > Settings.2. Click the arrow to expand FortiGuard Web Filter and Email Filter Settings.3. In Polling Frequency, select the number of hours and minutes of the polling interval.4. Click Apply.
If you have formatted your FortiManager system’s hard disk, polling and lookups will fail untilyou restore the URL and email filter databases. For more information, see Restoring the URLor antispam database on page 461.
FortiManager 6.4.0 Administration Guide 458Fortinet Inc.

Device Firmware and Security Updates
Accessing public FortiGuard web and email filter servers
You can configure the FortiManager system to allow the managed FortiGate units to access public FortiGuard web filteror email filter network servers in the event local FortiGuard web filter or email filter server URL lookups fail. You canspecify private servers where the FortiGate units can send URL queries.
To access public FortiGuard web and email filter servers:
1. Go to FortiGuard > Settings.2. Click the arrow besideOverride FortiGuard Server (Local FortiManager).3. Click the add icon next to Additional number of private FortiGuard servers (excluding this one). Select the delete
icon to remove entries.4. Type the IP Address for the server and select its Time Zone.5. Repeat step 4 as often as required. You can include up to ten additional servers.6. Select the additional options to set where the FDS updates come from, and if the managed FortiGate units can
access these servers if the local FDS is not available.l ToggleON beside Enable Antivirus and IPS update Service for Private Server if you want the FDS updates tocome from a private server.
l ToggleON beside Enable Web Filter and Email Filter Service for Private Server if you want the updates tocome from a private server.
l ToggleON beside Allow FortiGates to Access Public FortiGuard Servers when Private Servers are Unavailableif you want the updates to come from public servers in case the private servers are unavailable.
7. Click Apply.
Logging events related to FortiGuard services
You can log a variety of events related to FortiGuard services.
Logging events from the FortiManager system’s built-in FDS requires that you also enablelocal event logging.
Logging FortiGuard antivirus and IPS updates
You can track FortiGuard antivirus and IPS updates to both the FortiManager system’s built-in FDS and any authorizedFortiGate devices which use the FortiManager system’s FDS.
To log updates and histories to the built-in FDS:
1. Go to FortiGuard > Settings.2. Click the arrow to expand FortiGuard Antivirus and IPS Settings; see FortiGuard antivirus and IPS settings on page
449.3. Under the Advanced heading, toggleON beside Log Update Entries from FDS Server.4. Click Apply.
FortiManager 6.4.0 Administration Guide 459Fortinet Inc.

Device Firmware and Security Updates
To log updates to FortiGate devices:
1. Go to FortiGuard > Settings.2. Click the arrow to expand FortiGuard Antivirus and IPS Settings.3. Under the Advanced heading, toggleON beside Log Update Histories for Each FortiGate.4. Click Apply.
Logging FortiGuard web or email filter events
You can track FortiGuard web filtering and email filtering lookup and non-events occurring on any authorized FortiGatedevice which uses the FortiManager system’s FDS.
Before you can view lookup and non-event records, you must enable logging for FortiGuard web filtering or email filterevents.
To log rating queries:
1. Go to FortiGuard > Settings.2. Click the arrow to expand FortiGuard Web Filtering and Email Filter Settings.3. Configure the log settings, the click Apply:
Log FortiGuard Server UpdateEvents
Enable or disable logging of FortiGuard server update events.
FortiGuard Web Filtering
Log URL disabled Disable URL logging.
Log non-URL events Logs only non-URL events.
Log all URL lookups Logs all URL lookups (queries) sent to the FortiManager system’s built-inFDS by FortiGate devices.
FortiGuard Anti-spam
Log Spam disabled Disable spam logging.
Log non-spam events Logs email rated as non-spam.
Log all Spam lookups Logs all spam lookups (queries) sent to the FortiManager system’s built-inFDS by FortiGate devices.
FortiGuard Anti-virus Query
Log Virus disabled Disable virus logging.
Log non-virus events Logs only non-virus events.
Log all Virus lookups Logs all virus queries sent to the FortiManager system’s built-in FDS byFortiGate devices.
FortiManager 6.4.0 Administration Guide 460Fortinet Inc.

Device Firmware and Security Updates
Restoring the URL or antispam database
Formatting the hard disk or partition on FortiManager 3000 units and higher deletes the URL and antispam databasesrequired to provide FortiGuard email filter and web filtering services through the built-in FDS. The databases will re-initialize when the built-in FDS is scheduled next, to synchronize them with the FDN.
Before formatting the hard disk or partition, you can back up the URL and antispam database using the CLI, whichencrypts the file. You can also back up licenses as well. The databases can be restored by importing them using the CLI.If you have created a custom URL database, you can also backup or restore this customized database (for FortiGateunits).
Licensing status
FortiManager includes a licensing overview page that allows you to view license information for all managed FortiGatedevices. To view the licensing status, go to FortiGuard > Licensing Status.
This page displays the following information:
Refresh Select the refresh icon to refresh the information displayed on this page.
Hide/Show license expireddevices only
Toggle to hide and display devices with an expired license only.
Search Use the search field to find a specific device in the table.
Device Name The device name or host name. You can change the order that devices are listedby clicking the column title.
Serial Number The device serial number
Platform The device type, or platform.
ADOM ADOM information. You can change the order that ADOMs are listed by clickingthe column title.
Antivirus The license status and expiration date. You can change the order that devices arelisted by clicking the column title.
IPS The license status and expiration date. You can change the order that devices arelisted by clicking the column title.
Email Filtering The license status and expiration date. You can change the order that devices arelisted by clicking the column title.
Web Filtering The license status and expiration date. You can change the order that devices arelisted by clicking the column title.
Mobile Malware The license status and expiration date. You can change the order that devices arelisted by clicking the column title.
Support The license status and expiration date. You can change the order that devices arelisted by clicking the column title.
FortiManager 6.4.0 Administration Guide 461Fortinet Inc.

Device Firmware and Security Updates
Icon states:
l Green: License OKl Orange: License will expire soonl Red: License has expired
Package management
Antivirus and IPS signature packages are managed in FortiGuard > Package Management. Packages received fromFortiGuard and the service status of managed devices are listed in Receive Status and Service Status, respectively.
Receive status
To view packages received from FortiGuard, go to FortiGuard > Package Management > Receive Status. This page listsreceived packages, grouped by platform.
The following information is displayed:
Refresh Select to refresh the table.
Show Used Object Only Clear to show all package information. Select to show only relevant packageinformation.
Search Use the search field to find a specific object in the table.
Package Name The name of the package downloaded from FortiGuard.
Product What product the package is for.
Version The version of the package if applicable.
Latest Version (ReleaseDate/Time)
The package version.
Size The size of the package.
To Be Deployed Version The package version that is to be deployed. Select Change to change the version.
Update History Select the icon to view the package update history.
Deployed version
To change the to be deployed version of a received packaged, click Change in the To Be Deployed Version column forthe package.
The Change Version dialog box is displayed, allowing you to select an available version from the dropdown list.
Update history
When you click the Update History button for a package, the Update History pane is displayed for the package.
It shows the update times, the events that occurred, the statuses of the updates, and the versions downloaded.
FortiManager 6.4.0 Administration Guide 462Fortinet Inc.

Device Firmware and Security Updates
Service status
To view service statuses, go to FortiGuard > Package Management > Service Status. The service status information canbe displayed by installed package name or by device name.
The following options are available in the toolbar:
Push Pending Select the device or devices in the list, then click Push Pending in the toolbar topush pending updates to the device or devices.
Push All Pending Select Push All Pending in the toolbar to push pending updates to all of thedevices in the list.
Refresh Select to refresh the list.
By Package Displays the service status information by installed package name.
By Device Displays the service status information by device name.
Search Use the search field to find a specific device or package in the table.
Service status by Device
When you click the By Device button in the toolbar, the Service Status page displays a list of all the managed FortiGatedevices, their last update time, and their status.
You can pushing pending updates to the devices, either individually or all at the same time. You can refresh the list byclicking Refresh in the toolbar.
Device The device serial number or host name is displayed.
Status The service update status. A device's status can be one of the following:l Up to Date: The latest package has been received by the FortiGate unit.l Never Updated: The FortiGate unit has never requested or received thepackage.
l Pending: The FortiGate unit has an older version of the package due to anacceptable reason (such as the scheduled update time having not come yet).Hover the mouse over a pending icon to view the package to be installed.
l Problem: The FortiGate unit missed the scheduled query, or did not correctlyreceive the latest package.
l Unknown: The FortiGate unit’s status is not currently known.
Last Update Time The date and time of the last update.
Service status by Package
When you click the By Package button, the Service Status page shows a list of all the installed packages, the applicablefirmware version, the package version, and the progress on package installation to devices. You can drill-down to viewthe installed device list.
FortiManager 6.4.0 Administration Guide 463Fortinet Inc.

Device Firmware and Security Updates
The content pane displays the following information:
Installed Packages Name The name of the installed package.
Applicable Firmware Version The firmware version of the device for which the installed package is created.
Package Version The version of the installed package.
Installed Devices The package installation progress for the devices. Click the <number> of<number> link to view the installed device list.
To view the installed device list:
1. Go to FortiGuard > Package Management > Service Status.2. In the toolbar, click By Package.
The list of installed packages is displayed.3. In the Installed Devices column, click the <number> of <number> link for the installed package.
Device details are displayed.
Device Name The name of the device.
Current Version The version of the package.
Status The device update status.
Last Update Time The time of the last package update.
4. Click the Back arrow to return to the previous page.
Query server management
The query server manager shows when updates are received from the server, the update version, the size of the update,and the update history. It also has graphs showing the number of queries from all the managed FortiGate units made tothe FortiManager device.
Receive status
The view the received packages, go to FortiGuard > Query Server Management > Receive Status.
The following information is displayed:
Refresh Select to refresh the table.
Search Use the search field to find a specific entry in the table.
History The record of received packages.
Package Received The name of the received package.
Latest Version (ReleaseDate/Time)
The latest version of the received package.
FortiManager 6.4.0 Administration Guide 464Fortinet Inc.

Device Firmware and Security Updates
Size The size of the package.
Update History Click to view the package update history.
Update history
When you click the Update History button for a package, the Update History pane is displayed for the package.
It shows the update times, the events that occurred, the statuses of the updates, and the versions downloaded.
Query status
Go to FortiGuard > Query Server Management > Query Status to view graphs that show:
l The number of queries made from all managed devices to the FortiManager unit over a user selected time periodl The top ten unrated sitesl The top ten devices for a user selected time period
The following information is displayed:
Top 10 Unrated Sites Displays the top 10 unrated sites and the number of events.Hover the cursor over a row to see the exact number of queries.
Top 10 Devices Displays the top 10 devices and number of sessions.Hover the cursor over a row to see the exact number of queries. Click a row to seea graph of the queries for that device.
Number of Queries Displays the number of queries over a period of time.
Firmware images
Go to FortiGuard > Firmware Images to manage the firmware images stored on the FortiManager device. You can importfirmware images for FortiGate, FortiCarrier, FortiAnalyzer, FortiManager, FortiAP, FortiExtender, FortiSwitch, andFortiClient.
You can download only those images that are needed from the FDS systems, and customize which firmware images areavailable for deployment.
FortiManager 6.4.0 Administration Guide 465Fortinet Inc.

Device Firmware and Security Updates
The following information and settings are available:
Import Images Select to open the firmware image import list.
Models From the dropdown list, select All to show all the available models on theFortiGuard server, or selectManaged to show only the models that are currentlybeing managed by the FortiManager device.
Product Select a managed product type from the dropdown list.
Search Use the search field to find a specific entry in the table.
Seq.# The sequence number.
Model The device model number that the firmware is applicable to.
Latest Version (ReleaseDate/Time)
The latest version of the firmware that is available.
Preferred Version The firmware version that you would like to use on the device. Click Change toopen the Change Version dialog box, then select the desired version from thedropdown list and selectOK to change the preferred version.
Size The size of the firmware image.
Status The status of the image, that is, from where it is available.
Action Status The status of the current action being taken.
Release Notes A link to a copy of the release for the firmware image that has been downloaded.
Download/Delete Download the firmware image from the FDS if it is available. If the firmwareimages has already been downloaded, then delete the firmware image from theFortiManager device.
For information about upgrading your FortiManager device, see the FortiManager Release Notes or contact FortinetCustomer Service & Support.
To import a firmware image:
1. Go to FortiGuard > Firmware Images, and click Import Images in the toolbar.2. Select a device in the list, and click Import in the toolbar. The Firmware Upload dialog box, opens.3. Click Browse to browse to the desired firmware image file, or drag and drop the file onto the dialog box.4. ClickOK to import the firmware image.
Firmware images can be downloaded from the Fortinet Customer Service & Support site athttps://support.fortinet.com/ (support account required).
To delete firmware images:
1. Go to FortiGuard > Firmware Images, and click Import Images in the toolbar.2. Select the firmware images you would like to delete.
FortiManager 6.4.0 Administration Guide 466Fortinet Inc.

Device Firmware and Security Updates
3. Click Delete in the toolbar. A confirmation dialog box appears.4. ClickOK to delete the firmware images.
FortiManager 6.4.0 Administration Guide 467Fortinet Inc.

Locks for Restricting Configuration Changes
Workspace enables locking ADOMs, devices, or policy packages so that an administrator can prevent otheradministrators from making changes to the elements that they are working in. It can only be enabled or disabled from theCLI.
In Normal mode, ADOMs, or individual devices or policy packages must be locked before policy, object, or devicechanges can be made. Multiple administrators can lock devices and policy packages within a single, unlocked ADOM atthe same time. When an individual device or policy package is locked, other administrators can only lock the ADOM thatcontains the locked device or policy package by disconnecting the administrator that locked it.
In Workflow mode, only the entire ADOM can be locked. The ADOMmust be locked before changes can be made, and aworkflow session must be started before policy changes can be made. SeeWorkflow mode on page 473.
In both modes, the ADOMmust be locked before changes can be made in AP Manager, FortiClient Manager, VPNManager, and FortiSwitch Manager, and some settings in System Settings.
To enable or disable workspace:
1. Go to System Settings > Dashboard.2. In the CLI Console widget enter the following CLI commands:
config system globalset workspace-mode {workflow | normal | disable}
end
A green padlock icon indicates that the current administrator locked the element. A redpadlock icon indicates that another administrator locked the element.
Normal mode
Normal mode is used to control the creation, configuration, and installation of devices, policies, and objects. It helps toensure that only one administrator can make changes to an element at one time.
When normal mode is enabled, individual devices and policy packages can be locked, as well as entire ADOMs. Whenan individual device or policy package is locked, other administrators can only lock the ADOM that contains the lockeddevice or policy package by disconnecting the administrator that locked it and thus breaking the lock.
Devices and policy packages can only be added if the entire ADOM is locked.
Individual devices cannot be locked if ADOMs are in advanced mode (ADOM device modeson page 510).
FortiManager 6.4.0 Administration Guide 468Fortinet Inc.

Locks for Restricting Configuration Changes
The entire ADOM must be locked to create a script, but the script can be run directly on adevice when only the device is locked. See Run a script on page 104.
Enable normal mode
Normal mode can only be enabled or disabled from the CLI.
After changing the workspace mode, your session will end, and you will be required to log backin to the FortiManager.
To enable normal mode:
1. Go to System Settings > Dashboard.2. In the CLI Console widget enter the following CLI commands in their entirety:
config system globalset workspace-mode normal
end
When workspace-mode is normal, Device Manager and Policy & Objects are read-only.You must lock the ADOM, a device, or a policy package before you can make any changes.
Locking an ADOM
In normal workspace mode, an ADOMmust be locked before you can make changes to it or add devices, policypackages, or objects.
When an ADOM is locked, other administrators are unable to make changes to devices, policies, and objects in thatADOM until you either unlock the ADOM, or log out of the FortiManager.
Policy packages and devices can also be locked individually. See Locking a device on page470 and Locking a policy package on page 471.
To lock the ADOM you are in:
1. Ensure you are in the ADOM that will be locked.2. Click Lock in the banner, next to the ADOM name.
The padlock icon changes to a locked state, and the ADOM is locked.
FortiManager 6.4.0 Administration Guide 469Fortinet Inc.

Locks for Restricting Configuration Changes
To lock an ADOM from System Settings:
1. Go to System Settings > All ADOMs.2. Right-click on the ADOM and select Lock, or select the ADOM then click Lock in the toolbar. You do not need to be
in that ADOM to lock it.The padlock icon next to the ADOM's name changes to a locked state, and the ADOM is locked.
Locking an ADOM automatically removes locks on devices and policy packages that you havelocked within that ADOM.If you have unsaved changes, a confirmation dialog box will give you the option to save ordiscard them.If another administrator has locked devices or policy packages within the ADOM, you will begiven the option of forcibly disconnecting them, thus removing the locks, before you can lockthe ADOM.
To unlock the ADOM you are in:
1. Ensure you are in the locked ADOM.2. Ensure that you have saved any changes by clicking Save in the toolbar.3. Click Unlock in the banner, next to the ADOM name. Only the administrator who locked the ADOM can unlock it. If
you have not saved your changes, a confirmation dialog box will give you the option to save or discard yourchanges.The padlock icon changes to an unlocked state, and the ADOM is unlocked.
To unlock an ADOM from System Settings:
1. Go to System Settings > All ADOMs.2. Right-click on the locked ADOM and select unlock, or select the ADOM then click Unlock in the toolbar. You do not
need to be in that ADOM to unlock it, but you must be the administrator that locked it. If you have not saved yourchanges, a confirmation dialog box will give you the option to save or discard your changes.The padlock icon next to the ADOM's name changes to a locked state, and the ADOM is unlocked.
All elements are unlocked when you log out of the FortiManager. If you have unsavedchanges, a confirmation dialog box will give you the option to save or discard your changes.
Locking a device
In normal workspace mode, a device must be locked before changes can be made to it. Other administrators will beunable to make changes to that device until you unlock it, log out of the FortiManager, or they forcibly disconnect youwhen they are locking the ADOM that the device is in.
Individual device locks will be removed if you lock the ADOM that the device is in.
To lock a device:
1. Ensure you are in the correct ADOM.2. Go to Device Manager > Device & Groups.
FortiManager 6.4.0 Administration Guide 470Fortinet Inc.

Locks for Restricting Configuration Changes
3. In the device list, right-click on the device and select Lock. A padlock icon in the locked state is shown next to thedevice name to indicate that the device is locked.Other administrators are now unable to make changes to the device, and cannot lock the ADOMwithout first forcingyou to disconnect.
Individual devices cannot be locked if ADOMs are in advanced mode (ADOM device modeson page 510).
To unlock a device:
1. Ensure you are in the correct ADOM.2. Go to Device Manager > Device & Groups.3. Ensure that you have saved any changes by clicking Save in the toolbar.4. In the device list, right-click on the locked device and select Unlock. If you have not saved your changes, a
confirmation dialog box will give you the option to save or discard your changes.After unlocking, the padlock icon next to the device name is removed, and the device is unlocked. The device willalso be unlocked when you log out of the FortiManager.
All devices are unlocked when you log out of the FortiManager. If you have unsaved changes,a confirmation dialog box will give you the option to save or discard them.
Locking a policy package
In normal workspace mode, a policy package must be locked before changes can be made to it. Other administrators willbe unable to make changes to that policy package until you unlock it, log out of the FortiManager, or they forciblydisconnect you when they are locking the ADOM that the package is in.
Individual device locks will be removed if you lock the ADOM that the package is in.
To lock a policy package:
1. Ensure you are in the correct ADOM.2. Go to Policy & Objects > Policy Packages.3. In the policy package list, right-click on the package and select Lock. A padlock icon in the locked state is shown
next to the package name to indicate that it is locked.Other administrators are now unable to make changes to the policy package, and cannot lock the ADOMwithoutfirst forcing you to disconnect.
To unlock a policy package:
1. Ensure you are in the correct ADOM.2. Go to Policy & Objects > Policy Packages.3. Ensure that you have saved any changes by clicking Save in the toolbar.4. In the policy package list, right-click on the locked package and select Unlock. If you have not saved your changes,
a confirmation dialog box will give you the option to save or discard your changes.
FortiManager 6.4.0 Administration Guide 471Fortinet Inc.

Locks for Restricting Configuration Changes
After unlocking, the padlock icon next to the package name is removed, and the package is unlocked. The packagewill also be unlocked when you log out of the FortiManager.
All policy packages are unlocked when you log out of the FortiManager. If you have unsavedchanges, a confirmation dialog box will give you the option to save or discard them.
Lock an individual policy
In normal workspace mode, administrators can lock individual policies.
If you want to modify a policy, you don't need to lock the entire policy package. Once you lock a policy, a padlock iconappears beside the policy. Others are now unable to modify your policy or lock the policy package where the lockedpolicy is in, and unable to lock the ADOM.
If you move your cursor to the padlock icon, you can see who locked the policy and the time atwhich it was locked.
To enable per policy lock:
Per policy lock can only be enabled via the CLI.
1. In the CLI Console widget enter the following CLI commands:config system global
set per-policy-lock enableend
To lock a policy:
1. Ensure you are in the correct ADOM.2. Go to Policy & Objects > Policy Packages.3. In the policy package list, select the policy package, and right-click on the policy and select Edit.
The Edit IPv4 Policy pane opens.4. In the Edit IPv4 Policy pane, modify the name and then clickOK.
A padlock icon in the locked state is shown next to the policy name to indicate that it is locked.You can still lock the policy package or the whole ADOMwith confirmation.Other administrators are now unable to make changes to this policy or the policy package, and cannot lock theADOMwithout first forcing you to disconnect.
5. Click Save in the toolbar to save your changes.
A green padlock icon next to the sequence number of the policy indicates that the currentadministrator locked the policy. A red padlock icon indicates that another administrator lockedthe policy.
FortiManager 6.4.0 Administration Guide 472Fortinet Inc.

Locks for Restricting Configuration Changes
Sequence lock:
If you add two or more policies, a sequence lock appears at the top. The sequence lock ensures that the order of thepolicies is managed by one administrator at any given time, other administrators see a red padlock icon at the top.
Once you save your changes, the sequence lock disappears allowing other administrators to change the order of thepolicies.
If an administrator sets up a sequence lock, other administrators can neither create a newpolicy nor insert a policy. They can however, edit an existing policy.
Workflow mode
Workflow mode is used to control the creation, configuration, and installation of policies and objects. It helps to ensure allchanges are reviewed and approved before they are applied.
When workflow mode is enabled, the ADOMmust be locked and a session must be started before policy or objectchanges can be made in an ADOM. Workflow approvals must be configured for an ADOM before any sessions can bestarted in it.
Once the required changes have been made, the session can either be discarded and the changes deleted, or it can besubmitted for approval. The session can also be saved and continued later, but no new sessions can be created until thesaved session has been submitted or discarded.
When a session is submitted for approval, email messages are sent to the approvers, who can then approve or reject thechanges directly from the email message. Sessions can also be approved or rejected by the approvers from within theADOM itself.
Sessions must be approved in the order they were created.
If one approver from each approval group approves the changes, then another email message is sent, and the changesare implemented. If any of the approvers reject the changes, then the session can be repaired and resubmitted as a newsession, or discarded. When a session is discarded, all later sessions are also discarded. After multiple sessions havebeen approved, a previous session can be reverted to, undoing all the later sessions.
The changes made in a session can be viewed at any time from the session list in the ADOM by selecting View Diff. TheADOM does not have to be locked to view the differences.
Enable workflow mode
Workflow mode can only be enabled or disabled from the CLI.
After changing the workspace mode, your session will end, and you will be required to log backin to the FortiManager.
FortiManager 6.4.0 Administration Guide 473Fortinet Inc.

Locks for Restricting Configuration Changes
To enable workflow mode:
1. Go to System Settings > Dashboard.2. In the CLI Console widget enter the following CLI commands in their entirety:
config system globalset workspace-mode workflow
end
When workspace-mode is workflow, Device Manager and Policy & Objects are read-only.You must lock the ADOM to create a new workflow session.
Workflow approval
Workflow approval matrices specify which users must approve or reject policy changes for each ADOM.
Up to eight approval groups can be added to an approval matrix. One user from each approval group must approve thechanges before they are accepted. An approval email will automatically be sent to each member of each approval groupwhen a change request is made.
Email notifications are automatically sent to each approver, as well as other administrators as required. A mail servermust be configured, see Mail Server on page 545, and each administrator must have a contact email addressconfigured, see Managing administrator accounts on page 556.
This menu is only available when workspace-mode is set to workflow.
To create a new approval matrix:
1. Go to System Settings > Admin > Approval Matrix.2. Click Create New.
FortiManager 6.4.0 Administration Guide 474Fortinet Inc.

Locks for Restricting Configuration Changes
3. Configure the following settings:
ADOM Select the ADOM from the dropdown list.
Approval Group Select to add approvers to the approval group. Select the add icon to create anew approval group. Select the delete icon to remove an approval group.At least one approver from each group must approve the change for it to beadopted.
Send an Email Notification to Select to add administrators to send email notifications to.
Mail Server Select the mail server from the dropdown list.A mail server must already be configured. See Mail Server on page 545.
4. ClickOK to create the approval matrix.
Workflow sessions
Administrators use workflow sessions to make changes to policies and objects. The session is then submitted for reviewand approval or rejection by the administrators defined in the ADOMs workflow approval matrix.
Administrators with the appropriate permissions will be able to approve or reject any pending requests. When viewingthe session list, they can choose any pending sessions, and click the approve or reject buttons. They can also add acomment to the response. A notification will then be sent to the administrator that submitted the session and all of theapprovers.
You cannot prevent administrators from approving their own workflow sessions.
If the session was approved, no further action is required. If the session was rejected, the administrator will need to eitherrepair or discard the session.
The Global Database ADOM includes the Assignment option, for assigning the global policy package to an ADOM.Assignments can only be created and edited when a session is in progress. After a global database session is approved,the policy package can be assigned to the configured ADOM. A new session will be created on the assigned ADOM andautomatically submitted; it must be approved for the changes to take effect.
A session can be discarded at any time before it is approved.
After multiple sessions have been submitted or approved, a previously approved session can be reverted to, undoing allthe later sessions. This creates a new session at the top of the session list that is automatically submitted for approval.
A workflow approval matrix must be configure for the ADOM to which the session appliesbefore a workflow session can be started. SeeWorkflow approval on page 474.
FortiManager 6.4.0 Administration Guide 475Fortinet Inc.

Locks for Restricting Configuration Changes
Starting a workflow session
A workflow session must be started before changes can be made to the policies and objects. A session can be savedand continued at a later time, discarded, or submitted for approval.
While a session is in progress, devices cannot be added or installed.
To start a workflow session:
1. Ensure that you are in the correct ADOM.2. Go to Policy & Objects.3. Click Lock in the banner. The padlock icon changes to a locked state and the ADOM is locked.4. From the Sessionsmenu, select Session List. The Session List dialog box opens; see The session list on page 480.5. Click Create New Session.
6. Enter a name for session, add a comment describing the session, then clickOK to start the session. You can nowmake the required changes to the policy packages and objects. See Firewall Policy & Objects on page 162.
Saved sessions
A session can be saved and continued later.
A new session cannot be started until the in-progress or saved session has either beensubmitted for approval or discarded.
To save your session:
While currently working in a session, click Save in the toolbar. After saving the session, the ADOMwill remain locked,and you can continue to edit it.
To continue a saved session:
1. Ensure you are in the correct ADOM.2. Go to Policy & Objects and lock the ADOM.3. Go to Sessions > Session List. The Session List dialog box opens.4. Click Continue Session In Progress to continue the session.
FortiManager 6.4.0 Administration Guide 476Fortinet Inc.

Locks for Restricting Configuration Changes
View session diff
A session diff can be viewed prior to submitting the session for approval.
To view the session diff:
1. While currently working in a session, ensure that the session has been saved. See Saved sessions on page 476.2. Click Sessions > View Diff. The Revisions Diff dialog box opens.
3. Select Details to view specific changes within a policy package or the policy objects.
4. Click Download to download a CSV file of the changes to your management computer.5. Click Close to close the dialog box and return to the session.
Discarding a session
A session can be discarded at any time before it is approved. A session cannot be recovered after it is discarded.
When a session is discarded, all sessions after it in the session list will also be discarded.
FortiManager 6.4.0 Administration Guide 477Fortinet Inc.

Locks for Restricting Configuration Changes
To discard an in-progress session:
1. Select Session > Discard.2. Enter comments in the Discard Session dialog box.3. ClickOK. The changes are deleted and the session is discarded.
To discard saved, submitted, or rejected sessions:
1. Ensure you are in the correct ADOM.2. Go to Policy & Objects and lock the ADOM.3. Go to Sessions > Session List. The Session List dialog box opens.4. Select the session that is to be discarded, then click Discard.5. SelectOK in the Discard Session pop-up.
Submitting a session
When all the required changes have been made, the session can be submitted for approval. A session must be open tobe submitted for approval.
When the session is submitted, email messages are sent to all of the approvers and other administrators defined in theapproval matrix (see Workflow approval on page 474), and the ADOM is automatically unlocked.
To submit a session for approval:
1. Select Sessions > Submit.2. Enter the following in the Submit for Approval dialog box:
Comments Enter a comment describing the changes that have been made in this session.
Attach configuration changedetails
Select to attach configuration change details to the email message.
3. ClickOK to submit the session.
Approving or rejecting a session
Sessions can be approved or rejected by the members of the approval groups either directly from the email messagethat is generated when the session is submitted, or from the session list. A session that has been rejected must berepaired or discarded before the next session can be approved.
When a session is approved or rejected, new email messages are sent out.
To approve or reject a session from the email message:
1. If the configuration changes HTML file is attached to the email message, open the file to review the changes.2. Select Approve this request or Reject this request to approve or reject the request. You can also Select Login
FortiManager to process this request to log in to the FortiManager and approve or reject the session from thesession list.A web page will open showing the basic information, approval matrix, and session log for the session, highlighting ifthe session was approved or rejected. A new email message will also be sent containing the same information.
FortiManager 6.4.0 Administration Guide 478Fortinet Inc.

Locks for Restricting Configuration Changes
3. On the last line of the session log on the web page, select Click here to add comments to add a comment about whythe session was approved or rejected.
To approve a session from the session list:
1. Ensure you are in the correct ADOM.2. Go to Policy & Objects and lock the ADOM.3. Go to Sessions > Session List. The Session List dialog box opens; see The session list on page 480.4. Select a session that can be approved from the list.5. Optionally, click View Diff to view the changes that you are approving.6. Click Approve.7. Enter a comment in the Approve Session pop-up, then clickOK to approve the session.
To reject a session from the session list:
1. Ensure you are in the correct ADOM.2. Go to Policy & Objects and lock the ADOM.3. Go to Sessions > Session List. The Session List dialog box opens; see The session list on page 480.4. Select a session that can be rejected from the list.5. Optionally, click View Diff to view the changes that you are rejecting.6. Click Reject.7. Enter a comment in the Reject Session pop-up, then clickOK to reject the session.
Repairing a rejected session
When a session is rejected, it can be repaired to correct the problems with it.
To repair a workflow session:
1. Ensure you are in the correct ADOM.2. Go to Policy & Objects and lock the ADOM.3. Go to Sessions > Session List. The Session List dialog box opens; see The session list on page 480.4. Select a rejected session, then click Repair.
A new session is created and started, with the changes from the rejected session, so it can be corrected.
Reverting a session
A session can be reverted to after other sessions have been submitted or approved. If this session is approved, it willundo all the changes made by later sessions, though those sessions must be approved before the reverting session canbe approved. You can still revert to any of those sessions without losing their changes.
When a session is reverted, a new session is created and automatically submitted for approval.
To revert a session:
1. Ensure you are in the correct ADOM.2. Go to Policy & Objects and lock the ADOM.
FortiManager 6.4.0 Administration Guide 479Fortinet Inc.

Locks for Restricting Configuration Changes
3. Go to Sessions > Session List. The Session List dialog box opens; see The session list on page 480.4. Select the session, then click Revert.
The session list
To view the session list, In Policy & Objects, go to Sessions > Session List. Different options will be available dependingon the various states of the sessions (in progress, approved, etc.). When an ADOM is unlocked, only the comments andView Diff command are available.
The following options and information are available:
Approve Approve the selected session. Enter comments in the Approve Session dialog box asrequired.
Reject Reject the selected session. Enter comments in the Reject Session dialog box asrequired. A rejected session must be repaired before the next session in the list can beapproved.
Discard Discard the selected session. If a session is discarded, all later sessions are alsodiscarded.
Repair Repair the selected rejected session. A new session will be created and added to thetop of the session list with the changes from the rejected session so they can berepaired as needed.
Revert Revert back to the selected session, undoing all the changes made by later sessions. Anew session will be created, added to the top of the session list, and automaticallysubmitted for approval.
View Diff View the changes that were made prior to approving or rejecting the session. SelectDetails to view specific changes within a policy package.
ID A unique number to identify the session.
FortiManager 6.4.0 Administration Guide 480Fortinet Inc.

Locks for Restricting Configuration Changes
Name The user-defined name to identify the session. The icon shows the status of thesession: waiting for approval, approved, rejected, repaired, or in progress. Hover thecursor over the icon to see a description.
User The administrator who created the session.
Date Submitted The date and time the session was submitted for approval.
Approved/... The number of approval groups that have approved the session out of the number ofgroups that have to approve the session. Hover the cursor over the table cell to view thegroup members.
Comments The comments for the session. All the comments are shown on the right of the dialogbox for the selected session. Session approvers can also add comments to the selectedsession without having to approve or reject the session.
Create New Session Select to create a new workflow session. This option is not available when a sessionhas been saved or is already in progress.
Continue Session inProgress
Select to continue a session that was previously saved or is already in progress. Thisoption is only available when a session is in progress or saved.
Continue WithoutSession
Select to continue without starting a new session. When a new session is not started, allpolicy and objects are read-only.
FortiManager 6.4.0 Administration Guide 481Fortinet Inc.

System Settings
System Settings allows you to manage system options for your FortiManager device.
Additional configuration options and short-cuts are available using the right-click menu. Right-click the mouse on different navigation panes on the GUI page to access these options.
This section contains the following topics:
l Dashboard on page 483l Logging Topology on page 497l Network on page 498l RAID Management on page 502l Administrative Domains on page 508l Certificates on page 522l Fetcher Management on page 527l Event Log on page 532l Task Monitor on page 534l SNMP on page 536l Mail Server on page 545l Syslog Server on page 547l Meta Fields on page 548l Device logs on page 549l File Management on page 553l Advanced Settings on page 553
FortiManager 6.4.0 Administration Guide 482Fortinet Inc.

System Settings
Dashboard
The Dashboard contains widgets that provide performance and status information and enable you to configure basicsystem settings.
The following widgets are available:
Widget Description
System Information Displays basic information about the FortiManager system, such as up time andfirmware version. You can also enable or disable Administrative Domains andFortiAnalyzer features. For more information, see System Information widget onpage 485.From this widget you can manually update the FortiManager firmware to adifferent release. For more information, see Updating the system firmware onpage 487.The widget fields will vary based on how the FortiManager is configured, forexample, if ADOMs are enabled.
System Resources Displays the real-time and historical usage status of the CPU, memory and harddisk. For more information, see System Resources widget on page 491.
License Information Displays the devices being managed by the FortiManager unit and the maximumnumbers of devices allowed. For more information, see License Informationwidget on page 492.From this widget you can manually upload a license for VM systems.
FortiManager 6.4.0 Administration Guide 483Fortinet Inc.

System Settings
Widget Description
Unit Operation Displays status and connection information for the ports of the FortiManager unit.It also enables you to shutdown and restart the FortiManager unit or reformat ahard disk. For more information, see Unit Operation widget on page 494.
Alert Message Console Displays log-based alert messages for both the FortiManager unit and connecteddevices. For more information, see Alert Messages Console widget on page 494.
Log Receive Monitor Displays a real-time monitor of logs received. You can view data per device or perlog type. For more information, see Log Receive Monitor widget on page 495.The Log Receive Monitor widget is available when FortiAnalyzer Features isenabled.
Insert Rate vs Receive Rate Displays the log insert and receive rates. For more information, see Insert Rate vsReceive Rate widget on page 495.The Insert Rate vs Receive Rate widget is available when FortiAnalyzer Featuresis enabled.
Log Insert Lag Time Displays how many seconds the database is behind in processing the logs. Formore information, see Log Insert Lag Time widget on page 496.The Log Insert Lag Time widget is available when FortiAnalyzer Features isenabled.
Receive Rate vs ForwardingRate
Displays the Receive Rate, which is the rate at which FortiManager is receivinglogs. When log forwarding is configured, the widget also displays the logforwarding rate for each configured server. For more information, see ReceiveRate vs Forwarding Rate widget on page 496.The Receive Rate vs Forwarding Rate widget is available when FortiAnalyzerFeatures is enabled.
Disk I/O Displays the disk utilization, transaction rate, or throughput as a percentage overtime. For more information, see Disk I/O widget on page 497.The Disk I/Owidget is available when FortiAnalyzer Features is enabled.
Customizing the dashboard
The FortiManager system dashboard can be customized. You can select which widgets to display, where they arelocated on the page, and whether they are minimized or maximized. It can also be viewed in full screen by selecting thefull screen button on the far right side of the toolbar.
Action Steps
Move a widget Move the widget by clicking and dragging its title bar, then dropping it in its new location
Add a widget Select Toggle Widgets from the toolbar, then select the name widget you need to add.
Delete a widget Click the Close icon in the widget's title bar.
Customize a widget For widgets with an edit icon, you can customize the widget by clicking the Edit icon andconfiguring the settings.
FortiManager 6.4.0 Administration Guide 484Fortinet Inc.

System Settings
Action Steps
Reset thedashboard
Select Toggle Widgets > Reset to Default from the toolbar. The dashboards will be reset to thedefault view.
System Information widget
The information displayed in the System Information widget is dependent on the FortiManager model and devicesettings. The following information is available on this widget:
Host Name The identifying name assigned to this FortiManager unit. Click the edit host namebutton to change the host name. For more information, see Changing the hostname on page 486.
Serial Number The serial number of the FortiManager unit. The serial number is unique to theFortiManager unit and does not change with firmware upgrades. The serialnumber is used for identification when connecting to the FortiGuard server.
Platform Type Displays the FortiManager platform type, for example FMGVM64 (virtualmachine).
HA Status Displays if FortiManager unit is in High Availability mode and whether it is theprimary or secondary unit in the HA cluster. For more information see HighAvailability on page 597.
System Time The current time on the FortiManager internal clock. Click the edit system timebutton to change system time settings. For more information, see Configuring thesystem time on page 486.
Firmware Version The version number and build number of the firmware installed on theFortiManager unit.You can access the latest firmware version available on FortiGuard fromFortiManager.Alternately you can manually download the latest firmware from the CustomerService & Support website at https://support.fortinet.com. Click the update button,then select the firmware image to load from the local hard disk or network volume.For more information, see Updating the system firmware on page 487.
System Configuration The date of the last system configuration backup. The following actions areavailable:l Click the backup button to backup the system configuration to a file; seeBacking up the system on page 490.
l Click the restore to restore the configuration from a backup file; seeRestoring the configuration on page 490. You can also migrate theconfiguration to a different FortiManager model by using the CLI. SeeMigrating the configuration on page 491.
Current Administrators The number of administrators currently logged in. Click the current session listbutton to view the session details for all currently logged in administrators.
FortiManager 6.4.0 Administration Guide 485Fortinet Inc.

System Settings
Up Time The duration of time the FortiManager unit has been running since it was laststarted or restarted.
Administrative Domain Displays whether ADOMs are enabled. Toggle the switch to change theAdministrative Domain state. See Enabling and disabling the ADOM feature onpage 509.
FortiAnalyzer Features Displays whether FortiAnalyzer features are enabled. Toggle the switch tochange the FortiAnalyzer features state. FortiAnalyzer Features are not availableon the FortiManager 100C.See FortiAnalyzer Features on page 20 for information.
Changing the host name
The host name of the FortiManager unit is used in several places.
l It appears in the System Information widget on the dashboard.l It is used in the command prompt of the CLI.l It is used as the SNMP system name.
The System Information widget and the get system status CLI command will display the full host name. However, ifthe host name is longer than 16 characters, the CLI and other places display the host name in a truncated form endingwith a tilde ( ~ ) to indicate that additional characters exist, but are not displayed. For example, if the host name isFortiManager1234567890, the CLI prompt would be FortiManager123456~#.
To change the host name:
1. Go to System Settings > Dashboard.2. In the System Information widget, click the edit host name button next to the Host Name field.3. In the Host Name box, type a new host name.
The host name may be up to 35 characters in length. It may include US-ASCII letters, numbers, hyphens, andunderscores. Spaces and special characters are not allowed.
4. Click the checkmark to change the host name.
Configuring the system time
You can either manually set the FortiManager system time or configure the FortiManager unit to automatically keep itssystem time correct by synchronizing with a Network Time Protocol (NTP) server.
For many features to work, including scheduling, logging, and SSL-dependent features, theFortiManager system time must be accurate.
To configure the date and time:
1. Go to System Settings > Dashboard.2. In the System Information widget, click the edit system time button next to the System Time field.
FortiManager 6.4.0 Administration Guide 486Fortinet Inc.

System Settings
3. Configure the following settings to either manually configure the system time, or to automatically synchronize theFortiManager unit’s clock with an NTP server:
System Time The date and time according to the FortiManager unit’s clock at the time thatthis pane was loaded or when you last clicked the Refresh button.
Time Zone Select the time zone in which the FortiManager unit is located and whether ornot the system automatically adjusts for daylight savings time.
Update Time By Select Set time to manually set the time, or Synchronize with NTP Server toautomatically synchronize the time.
Set Time Manually set the data and time.
Select Date Set the date from the calendar or by manually entering it in the format:YYYY/MM/DD.
Select Time Select the time.
Synchronize with NTP Server Automatically synchronize the date and time.
Sync Interval Enter how often, in minutes, the device should synchronize its time with theNTP server. For example, entering 1440 causes the Fortinet unit tosynchronize its time once a day.
Server Enter the IP address or domain name of an NTP server. Click the plus icon toadd more servers. To find an NTP server that you can use, go tohttp://www.ntp.org.
4. Click the checkmark to apply your changes.
Updating the system firmware
To take advantage of the latest features and fixes, you can update FortiManager firmware. From the System Settingsmodule in FortiManager, you can access firmware images on FortiGuard and update FortiManager. Alternately you canmanually download the firmware image from the Customer Service & Support site, and then upload the image toFortiManager.
For information about upgrading your FortiManager device, see the FortiManager Upgrade Guide, or contact FortinetCustomer Service & Support.
Back up the configuration and database before changing the firmware of FortiManager.Changing the firmware to an older or incompatible version may reset the configuration anddatabase to the default values for that firmware version, resulting in data loss. For informationon backing up the configuration, see Backing up the system on page 490.
Before you can download firmware updates for FortiManager, you must first register yourFortiManager unit with Customer Service & Support. For details, go tohttps://support.fortinet.com/ or contact Customer Service & Support.
FortiManager 6.4.0 Administration Guide 487Fortinet Inc.

System Settings
Installing firmware replaces the current network vulnerability management engine with theversion included with the firmware release that you are installing. After you install the newfirmware, make sure that your vulnerability definitions are up-to-date. For more information,see Device Firmware and Security Updates on page 446.
To update FortiManager firmware using FortiGuard:
1. Go to System Settings.2. In the System Information widget, beside Firmware Version, click Update Firmware.
The Firmware Management dialog box opens.
3. From the FortiGuard Firmware box, select the version of FortiManager for the upgrade, and clickOK.The FortiGuard Firmware box displays all FortiManager firmware images available for upgrade. A green checkmarkdisplays beside the recommended image for FortiManager upgrade.
If you select an image without a green checkmark, a confirmation dialog box is displayed. ClickOK to continue.
FortiManager downloads the firmware image from FortiGuard.
FortiManager 6.4.0 Administration Guide 488Fortinet Inc.

System Settings
FortiManager uses the downloaded image to update its firmware, and then restarts.
After FortiManager restarts, the upgrade is complete.
To manually update FortiManager firmware:
1. Download the firmware (the .out file) from the Customer Service & Support website, https://support.fortinet.com/.2. Go to System Settings > Dashboard.3. In the System Information widget, in the Firmware Version field, click Upgrade Firmware. The Firmware Upload
dialog box opens.4. Drag and drop the file onto the dialog box, or click Browse to locate the firmware package (.out file) that you
downloaded from the Customer Service & Support portal and then clickOpen.5. ClickOK. Your device will upload the firmware image and you will receive a confirmation message noting that the
upgrade was successful.
Optionally, you can upgrade firmware stored on an FTP or TFTP server using the followingCLI command:
execute restore image {ftp | tftp} <file path to server> <IP ofserver> <username on server> <password>
For more information, see the FortiManager CLI Reference.
6. Refresh the browser and log back into the device.
FortiManager 6.4.0 Administration Guide 489Fortinet Inc.
System Settings
7. Launch the Device Managermodule and make sure that all formerly added devices are still listed.8. Launch other functional modules and make sure they work properly.
You can also update FortiManager firmware images by using the FortiGuardmodule. For more information, seeFirmware images on page 465.
Backing up the system
Fortinet recommends that you back up your FortiManager configuration to your management computer on a regularbasis to ensure that, should the system fail, you can quickly get the system back to its original state with minimal affect tothe network. You should also back up your configuration after making any changes to the FortiManager configuration orsettings that affect connected devices.
If any management extensions, such as SD-WANOrchestrator, are enabled, the backup file includes the configurationfor each enabled management extension.
You can perform backups manually or at scheduled intervals. You can also create backups - called checkpoints - thatdefine a point where the FortiManager and network management is stable and functioning. Should any futureconfigurations cause issues, you have a point where the system is stable.
Fortinet recommends backing up all configuration settings from your FortiManager unit before upgrading theFortiManager firmware.
To back up the FortiManager configuration:
1. Go to System Settings > Dashboard.2. In the System Information widget, click the backup button next to System Configuration. The Backup System dialog
box opens3. If you want to encrypt the backup file, select the Encryption box, then type and confirm the password you want to
use. The password can be a maximum of 63 characters.4. SelectOK and save the backup file on your management computer.
Restoring the configuration
You can use the following procedure to restore your FortiManager configuration from a backup file on your managementcomputer.
If your FortiManager unit is in HA mode, switch to Standalone mode.
If your FortiManager has management extensions enabled, the configuration for the enabled management extension,such as SD-WAN Orchestrator, is restored too.
The restore operation will temporarily disable the communication channel betweenFortiManager and all managed devices. This is a safety measure, in case any devices arebeing managed by another FortiManager. To re-enable the communication, please go toSystem Settings >Advanced >Advanced Settings and disableOffline Mode.
FortiManager 6.4.0 Administration Guide 490Fortinet Inc.

System Settings
To restore the FortiManager configuration:
1. Go to System Settings > Dashboard.2. In the System Information widget, click the restore button next to System Configuration. The Restore System dialog
box opens.3. Configure the following settings then selectOK.
Choose Backup File Select Browse to find the configuration backup file you want to restore, or dragand drop the file onto the dialog box.
Password Type the encryption password, if applicable.
Overwrite current IP, routingand HA settings
Select the checkbox to overwrite the current IP, routing, and HA settings.
Restore in Offline Mode Informational checkbox. Hover over the help icon for more information.
Migrating the configuration
You can back up the system of one FortiManager model, and then use the CLI and the FTP, SCP, or SFTP protocol tomigrate the settings to another FortiManager model.
If you encrypted the FortiManager configuration file when you created it, you need the password to decrypt theconfiguration file when you migrate the file to another FortiManager model.
To migrate the FortiManager configuration:
1. In one FortiManager model, go to System Settings > Dashboard.2. Back up the system. See Backing up the system on page 490.3. In the other FortiManager model, go to System Settings > Dashboard.4. In the CLI Console widget, type the following command:
execute migrate all-settings <ftp | scp | sftp> <server> <filepath> <user> <password>[cryptpasswd]
System Resources widget
The System Resources widget displays the usage status of the CPUs, memory, and hard disk. You can view systemresource information in real-time or historical format, as well as average or individual CPU usage.
On VMs, warning messages are displayed if the amount of memory or the number of CPUs assigned are too low, or if theallocated hard drive space is less than the licensed amount. These warnings are also shown in the notification list (seeGUI overview on page 16). Clicking on a warning opens the FortiManager VM Install Guide.
FortiManager 6.4.0 Administration Guide 491Fortinet Inc.

System Settings
To toggle between real-time and historical data, click Edit in the widget toolbar, select Historical or Real-time, edit theother settings as required, then clickOK.
To view individual CPU usage, from the Real-Time display, click on the CPU chart. To go back to the standard view, clickthe chart again.
License Information widget
The License Information widget displays the number of devices connected to the FortiManager.
FortiCloud The license registration status and the FortiCloud account.
VM License VM license information and status.Click the upload license button to upload a new VM license file.This field is only visible for FortiManager VM.The Duplicate status appears when users try to upload a license that is alreadyin use. Additionally, the following message will be displayed in the Notifications:Duplicate License has been found! Your VM license will expire in XX hours(Grace time: 24 hours)Users will have 24 hours to upload a valid license before the duplicate license isblocked.
Management
Device/VDOMs The total number of devices and VDOMs connected to the FortiManager andthe total number of device and VDOM licenses.
FortiGates/LoggingDevices
The number of connected FortiGates and other logging devices.
FortiAPs The number of connected FortiAPs.
Logging This section is only shown when FortiAnalyzer Features is enabled. For moreinformation, see FortiAnalyzer Features on page 20.
Device/VDOMs The total number of devices and VDOMs connected to the FortiManager andthe total number of device and VDOM licenses.
GB/Day The gigabytes per day of logs allowed and used for this FortiManager. Click theshow details button to view the GB per day of logs used for the previous 6 days.The GB/Day log volume can be viewed per ADOM through the CLI using:diagnose fortilogd logvol-adom <name>.
VM Storage The amount of VM storage used and remaining.
FortiManager 6.4.0 Administration Guide 492Fortinet Inc.

System Settings
This field is only visible for FortiManager VM.
FortiGuard
VM Meter Service The license status.Click the purchase button to go to the Fortinet Customer Service & Supportwebsite, where you can purchase a license.
Secure DNS Server The SDNS server license status.Click the upload image button to upload a license key.
Server Location The locations of the FortiGuard servers, either global or US only.Click the edit icon to adjust the location. Changing the server location will causethe FortiManager to reboot.
Update Server
AntiVirus and IPS The IP address and physical location of the Antivirus and IPS update server.
Web and Email Filter The IP address and physical location of the web and email filter update server.
FortiClient Update The IP address and physical location of the FortiClient update server.
Registering a device or VM license
Register your device with FortiCloud to receive customer services, such as firmware updates and customer support.Users are required to register a VM license the first time they log in to FortiManager VM.
To view a list of registered devices, log in to FortiCloud, and go to Asset >Manage/ViewProducts.
To register a FortiManager device:
1. Go to System Settings > Dashboard.2. In the License Information widget, click Register Now. The registration window opens.3. Enter the device details, and clickOK. FortiManager connects to FortiCloud and registers the device.
A confirmation message appears at the top of the content pane, and the Status field changes to Registered.
To register a FortiManager VM license:
1. Go to the FortiManager login page.2. Take one of the following actions:
Action Description
Upload License 1. Click Browse to upload the license file, or drag it onto the field.2. Click Upload. After the license file is uploaded, the system will restart to verify it. This
FortiManager 6.4.0 Administration Guide 493Fortinet Inc.

System Settings
Action Description
may take a few moments.
To download the license file, log in to FortiCloud, and go to Asset >Manage/View Products, then click the product serial number.
Login withFortCloud
If a valid license is not associated with the account, you can start a free trial license for upthree devices.1. Click Login with FortiCloud.2. Log in with our account credentials or create a new account.
FortiManager connects to FortiCloud to get the trial license. The system will restart toapply the trial license.
Unit Operation widget
The Unit Operation widget graphically displays the status of each port. The port name indicates its status by its color.Green indicates the port is connected. Grey indicates there is no connection.
Hover the cursor over the ports to view a pop-up that displays the full name of the interface, the IP address and netmask,the link status, the speed of the interface, and the amounts of sent and received data.
Alert Messages Console widget
The Alert Message Console widget displays log-based alert messages for both the FortiManager unit itself andconnected devices.
Alert messages help you track system events on your FortiManager unit such as firmware changes, and network eventssuch as detected attacks. Each message shows the date and time the event occurred.
Alert messages can also be delivered by email, syslog, or SNMP.
FortiManager 6.4.0 Administration Guide 494Fortinet Inc.

System Settings
Click Edit from the widget toolbar to view the Alert Message Console Settings, where you can adjust the number ofentries that are visible in the widget, and the refresh interval.
To view a complete list of alert messages, click ShowMore from the widget toolbar. The widget will show the completelist of alerts. To clear the list, click Delete All Messages. Click Show Less to return to the previous view.
Log Receive Monitor widget
The Log Receive Monitor widget displays the rate at which the FortiManager unit receives logs over time. Log data canbe displayed by either log type or device.
Hover the cursor over a point on the graph to see the exact number of logs that were received at a specific time. Click thename of a device or log type to add or remove it from the graph. Click Edit in the widget toolbar to modify the widget'ssettings.
This widget is only available when the FortiAnalyzer features are manually enabled. For moreinformation, see FortiAnalyzer Features on page 20.
Insert Rate vs Receive Rate widget
The Insert Rate vs Receive Rate widget displays the log insert and log receive rates over time.
l Log receive rate: how many logs are being received.l Log insert rate: how many logs are being actively inserted into the database.
If the log insert rate is higher than the log receive rate, then the database is rebuilding. The lag is the number of logswaiting to be inserted.
Hover the cursor over a point on the graph to see the exact number of logs that were received and inserted at a specifictime. Click Receive Rate or Insert Rate to remove those data from the graph. Click the edit icon in the widget toolbar toadjust the time interval shown on the graph and the refresh interval.
FortiManager 6.4.0 Administration Guide 495Fortinet Inc.

System Settings
This widget is only available when the FortiAnalyzer features are manually enabled. For moreinformation, see FortiAnalyzer Features on page 20.
Log Insert Lag Time widget
The Log Insert Lag Time widget displays how many seconds the database is behind in processing the logs.
Click the edit icon in the widget toolbar to adjust the time interval shown on the graph and the refresh interval (0 todisable) of the widget.
This widget is only available when the FortiAnalyzer features are manually enabled. For moreinformation, see FortiAnalyzer Features on page 20.
Receive Rate vs Forwarding Rate widget
The Receive Rate vs Forwarding Rate widget displays the rate at which the FortiManager is receiving logs. When logforwarding is configured, the widget also displays the log forwarding rate for each configured server.
Click the edit icon in the widget toolbar to adjust the time period shown on the graph and the refresh interval, if any, of thewidget.
This widget is only available when the FortiAnalyzer features are manually enabled. For moreinformation, see FortiAnalyzer Features on page 20.
FortiManager 6.4.0 Administration Guide 496Fortinet Inc.

System Settings
Disk I/O widget
The Disk I/O widget shows the disk utilization (%), transaction rate (requests/s), or throughput (KB/s), versus time.
Click the edit icon in the widget toolbar to select which chart is displayed, the time period shown on the graph, and therefresh interval (if any) of the chart.
This widget is only available when the FortiAnalyzer features are manually enabled. For moreinformation, see FortiAnalyzer Features on page 20.
Logging Topology
The Logging Topology pane shows the physical topology of devices in the Security Fabric. Click, hold, and drag to adjustthe view in the content pane, and double-click or use the scroll wheel to change the zoom.
The visualization can be filtered to show only FortiAnalyzer devices or all devices by device count or traffic.
Hovering the cursor over a device in the visualization will show information about the device, such as the IP address anddevice name. Right-click on a device and select View Related Logs to go to the Log View pane, filtered for that device.
FortiManager 6.4.0 Administration Guide 497Fortinet Inc.
System Settings
This pane is only available when the FortiAnalyzer features are manually enabled. For moreinformation, see FortiAnalyzer Features on page 20.
Network
The network settings are used to configure ports for the FortiManager unit. You should also specify what port andmethods that an administrators can use to access the FortiManager unit. If required, static routes can be configured.
The default port for FortiManager units is port 1. It can be used to configure one IP address for the FortiManager unit, ormultiple ports can be configured with multiple IP addresses for improved security.
You can configure administrative access in IPv4 or IPv6 and include settings for HTTPS, HTTP, PING, SSH, SNMP, andWeb Service.
You can prevent unauthorized access to the GUI by creating administrator accounts with trusted hosts. With trustedhosts configured, the administrator can only log in to the GUI when working on a computer with the trusted host asdefined in the administrator account. For more information, see Trusted hosts on page 555 and Managing administratoraccounts on page 556.
Configuring network interfaces
Fortinet devices can be connected to any of the FortiManager unit's interfaces. The DNS servers must be on thenetworks to which the FortiManager unit connects, and should have two different IP addresses.
If the FortiManager unit is operating as part of an HA cluster, it is recommended to configure interfaces dedicated for theHA connection / synchronization. However, it is possible to use the same interfaces for both HA and devicemanagement. The HA interface will have /HA appended to its name.
The following port configuration is recommended:
l Use port 1 for device log traffic, and disable unneeded services on it, such as SSH, Web Service, and so on.l Use a second port for administrator access, and enable HTTPS, Web Service, and SSH for this port. Leave otherservices disabled.
FortiManager 6.4.0 Administration Guide 498Fortinet Inc.

System Settings
To configure port 1:
1. Go to System Settings > Network. The System Network Management Interface pane is displayed.
2. Configure the following settings for port1, then click Apply to apply your changes.
Name Displays the name of the interface.
IP Address/Netmask The IP address and netmask associated with this interface.
IPv6 Address The IPv6 address associated with this interface.
Administrative Access Select the allowed administrative service protocols from: HTTPS, HTTP,PING, SSH, SNMP, andWeb Service.
IPv6 Administrative Access Select the allowed IPv6 administrative service protocols from: HTTPS, HTTP,PING, SSH, SNMP, andWeb Service.
Service Access Select the Fortinet services that are allowed access on this interface. Theseinclude FortiGate Updates andWeb Filtering. By default all service access isenabled on port1, and disabled on port2.Select Bind to IP Address and specify the IP address. The IP addressspecified in Bind to IP address must be on the same subnet as the IP addressof the interface. This IP address is only for FortiGate 443 requests.
Default Gateway The default gateway associated with this interface.
Primary DNS Server The primary DNS server IP address.
Secondary DNS Server The secondary DNS server IP address.
To configure additional ports:
1. Go to System Settings > Network and click All Interfaces. The interface list opens.2. Double-click on a port, right-click on a port then select Edit from the pop-up menu, or select a port then click Edit in
the toolbar. The Edit System Interface pane is displayed.3. Configure the settings as required.4. ClickOK to apply your changes.
FortiManager 6.4.0 Administration Guide 499Fortinet Inc.

System Settings
The port name, default gateway, and DNS servers cannot be changed from the Edit SystemInterface pane. The port can be given an alias if needed.
Disabling ports
Ports can be disabled to prevent them from accepting network traffic
To disable a port:
1. Go to System Settings > Network and click All Interfaces. The interface list opens.2. Double-click on a port, right-click on a port then select Edit from the pop-up menu, or select a port then click Edit in
the toolbar. The Edit System Interface pane is displayed.3. In the Status field, click Disable4. ClickOK to disable the port.
Changing administrative access
Administrative access defines the protocols that can be used to connect to the FortiManager through an interface. Theavailable options are: HTTPS, HTTP, PING, SSH, SNMP, andWeb Service.
To change administrative access:
1. Go to System Settings > Network and click All Interfaces. The interface list opens.2. Double-click on a port, right-click on a port then select Edit from the pop-up menu, or select a port then click Edit in
the toolbar. The Edit System Interface pane is displayed.3. Select one or more access protocols for the interface for IPv4 and IPv6, if applicable.4. ClickOK to apply your changes.
Static routes
Static routes can be managed from the routing tables for IPv4 and IPv6 routes.
The routing tables can be accessed by going to System Settings > Network and clicking Routing Table and IPv6 RoutingTable.
To add a static route:
1. From the IPv4 or IPv6 routing table, click Create New in the toolbar. The Create New Network Route pane opens.2. Enter the destination IP address and netmask, or IPv6 prefix, and gateway in the requisite fields.3. Select the network interface that connects to the gateway from the dropdown list.4. ClickOK to create the new static route.
FortiManager 6.4.0 Administration Guide 500Fortinet Inc.

System Settings
To edit a static route:
1. From the IPv4 or IPv6 routing table: double-click on a route, right-click on a route then select Edit from the pop-upmenu, or select a route then click Edit in the toolbar. The Edit Network Route pane opens.
2. Edit the configuration as required. The route ID cannot be changed.3. ClickOK to apply your changes.
To delete a static route or routes:
1. From the IPv4 or IPv6 routing table, right-click on a route then select Delete from the pop-up menu, or select a routeor routes then click Delete in the toolbar.
2. ClickOK in the confirmation dialog box to delete the selected route or routes.
Packet capture
Packets can be captured on configured interfaces by going to System > Network > Packet Capture.
The following information is available:
Interface The name of the configured interface for which packets can be captured.For information on configuring an interface, see Configuring network interfaces onpage 498.
Filter Criteria The values used to filter the packet.
# Packets The number of packets.
Maximum Packet Count The maximum number of packets that can be captured on a sniffer.
Progress The status of the packet capture process.
Actions Allows you to start and stop the capturing process, and download the mostrecently captured packets.
To start capturing packets on an interface, select the Start capturing button in the Actions column for that interface. TheProgress column changes to Running, and the Stop capturing and Download buttons become available in the Actionscolumn.
To add a packet sniffer:
1. From the Packet Capture table, click Create New in the toolbar. The Create New Sniffer pane opens.2. Configure the following options:
Interface The interface name (non-changeable).
Max. Packets to Save Enter the maximum number of packets to capture, between 1-10000. Thedefault is 4000 packets.
Include IPv6 Packets Select to include IPv6 packets when capturing packets.
Include Non-IP Packets Select to include non-IP packets when capturing packets.
Enable Filters You can filter the packet by Host(s), Port(s), VLAN(s), and Protocol.
FortiManager 6.4.0 Administration Guide 501Fortinet Inc.

System Settings
3. ClickOK.
To download captured packets:
1. In the Actions column, click the Download button for the interface whose captured packets you want to download.If no packets have been captured for that interface, click the Start capturing button.
2. When prompted, save the packet file (sniffer_[interface].pcap) to your management computer.The file can then be opened using packet analyzer software.
To edit a packet sniffer:
1. From the Packet Capture table, click Edit in the toolbar. The Edit Sniffer pane opens.2. Configure the packet sniffer options3. ClickOK.
RAID Management
RAID helps to divide data storage over multiple disks, providing increased data reliability. For FortiManager devicescontaining multiple hard disks, you can configure the RAID array for capacity, performance, and/or availability.
The RAID Management tree menu is only available on FortiManager devices that supportRAID.
Supported RAID levels
FortiManager units with multiple hard drives can support the following RAID levels:
See the FortiManager datasheet to determine your devices supported RAID levels.
Linear RAID
A Linear RAID array combines all hard disks into one large virtual disk. The total space available in this option is thecapacity of all disks used. There is very little performance change when using this RAID format. If any of the drives fails,the entire set of drives is unusable until the faulty drive is replaced. All data will be lost.
FortiManager 6.4.0 Administration Guide 502Fortinet Inc.

System Settings
RAID 0
A RAID 0 array is also referred to as striping. The FortiManager unit writes information evenly across all hard disks. Thetotal space available is that of all the disks in the RAID array. There is no redundancy available. If any single drive fails,the data on that drive cannot be recovered. This RAID level is beneficial because it provides better performance, sincethe FortiManager unit can distribute disk writing across multiple disks.
l Minimum number of drives: 2l Data protection: No protection
RAID 0 is not recommended for mission critical environments as it is not fault-tolerant.
RAID 1
A RAID 1 array is also referred to as mirroring. The FortiManager unit writes information to one hard disk, and writes acopy (a mirror image) of all information to all other hard disks. The total disk space available is that of only one hard disk,as the others are solely used for mirroring. This provides redundant data storage with no single point of failure. Shouldany of the hard disks fail, there are backup hard disks available.
l Minimum number of drives: 2l Data protection: Single-drive failure
One write or two reads are possible per mirrored pair. RAID 1 offers redundancy of data. A re-build is not required in the event of a drive failure. This is the simplest RAID storage designwith the highest disk overhead.
RAID 1s
A RAID 1 with hot spare array uses one of the hard disks as a hot spare (a stand-by disk for the RAID). If a hard disk fails,within a minute of the failure the hot spare is substituted for the failed drive, integrating it into the RAID array andrebuilding the RAID’s data. When you replace the failed hard disk, the new hard disk is used as the new hot spare. Thetotal disk space available is the total number of disks minus two.
RAID 5
A RAID 5 array employs striping with a parity check. Similar to RAID 0, the FortiManager unit writes information evenlyacross all drives but additional parity blocks are written on the same stripes. The parity block is staggered for each stripe.The total disk space is the total number of disks in the array, minus one disk for parity storage. For example, with fourhard disks, the total capacity available is actually the total for three hard disks. RAID 5 performance is typically betterwith reading than with writing, although performance is degraded when one disk has failed or is missing. With RAID 5,one disk can fail without the loss of data. If a drive fails, it can be replaced and the FortiManager unit will restore the dataon the new disk by using reference information from the parity volume.
l Minimum number of drives: 3l Data protection: Single-drive failure
FortiManager 6.4.0 Administration Guide 503Fortinet Inc.

System Settings
RAID 5s
A RAID 5 with hot spare array uses one of the hard disks as a hot spare (a stand-by disk for the RAID). If a hard disk fails,within a minute of the failure, the hot spare is substituted for the failed drive, integrating it into the RAID array, andrebuilding the RAID’s data. When you replace the failed hard disk, the new hard disk is used as the new hot spare. Thetotal disk space available is the total number of disks minus two.
RAID 6
A RAID 6 array is the same as a RAID 5 array with an additional parity block. It uses block-level striping with two parityblocks distributed across all member disks.
l Minimum number of drives: 4l Data protection: Up to two disk failures.
RAID 6s
A RAID 6 with hot spare array is the same as a RAID 5 with hot spare array with an additional parity block.
RAID 10
RAID 10 (or 1+0), includes nested RAID levels 1 and 0, or a stripe (RAID 0) of mirrors (RAID 1). The total disk spaceavailable is the total number of disks in the array (a minimum of 4) divided by 2, for example:
l 2 RAID 1 arrays of two disks each,l 3 RAID 1 arrays of two disks each,l 6 RAID1 arrays of two disks each.
One drive from a RAID 1 array can fail without the loss of data; however, should the other drive in the RAID 1 array fail,all data will be lost. In this situation, it is important to replace a failed drive as quickly as possible.
l Minimum number of drives: 4l Data protection: Up to two disk failures in each sub-array.
Alternative to RAID 1 when additional performance is required.
RAID 50
RAID 50 (or 5+0) includes nested RAID levels 5 and 0, or a stripe (RAID 0) and stripe with parity (RAID 5). The total diskspace available is the total number of disks minus the number of RAID 5 sub-arrays. RAID 50 provides increasedperformance and also ensures no data loss for the same reasons as RAID 5. One drive in each RAID 5 array can failwithout the loss of data.
l Minimum number of drives: 6l Data protection: Up to one disk failure in each sub-array.
Higher fault tolerance than RAID 5 and higher efficiency than RAID 0.
FortiManager 6.4.0 Administration Guide 504Fortinet Inc.

System Settings
RAID 50 is only available on models with 9 or more disks. By default, two groups are usedunless otherwise configured via the CLI. Use the diagnose system raid status CLIcommand to view your current RAID level, status, size, groups, and hard disk driveinformation.
RAID 60
A RAID 60 (6+ 0) array combines the straight, block-level striping of RAID 0 with the distributed double parity of RAID 6.
l Minimum number of drives: 8l Data protection: Up to two disk failures in each sub-array.
High read data transaction rate, medium write data transaction rate, and slightly lowerperformance than RAID 50.
Configuring the RAID level
Changing the RAID level will delete all data.
To configure the RAID level:
1. Go to System Settings > RAID Management.2. Click Change in the RAID Level field. The RAID Settings dialog box is displayed.3. From the RAID Level list, select a new RAID level, then clickOK.
The FortiManager unit reboots. Depending on the selected RAID level, it may take a significant amount of time togenerate the RAID array.
Monitoring RAID status
To view the RAID status, go to System Settings > RAID Management. The RAID Management pane displays the RAIDlevel, status, and disk space usage. It also shows the status, size, and model of each disk in the RAID array.
The Alert Message Console widget, located in System Settings > Dashboard, providesdetailed information about RAID array failures. For more information see Alert MessagesConsole widget on page 494.
FortiManager 6.4.0 Administration Guide 505Fortinet Inc.

System Settings
Summary Shows summary information about the RAID array.
Graphic Displays the position and status of each disk in the RAID array. Hover the cursorover each disk to view details.
RAID Level Displays the selected RAID level.Click Change to change the selected RAID level. When you change the RAIDsettings, all data is deleted.
Status Displays the overall status of the RAID array.
Disk Space Usage Displays the total size of the disk space, how much disk space is used, and howmuch disk space is free.
Disk Management Shows information about each disk in the RAID array.
Disk Number Identifies the disk number for each disk.
Disk Status Displays the status of each disk in the RAID array.l Ready: The hard drive is functioning normally.l Rebuilding: The FortiManager unit is writing data to a newly added hard drivein order to restore the hard drive to an optimal state. The FortiManager unit isnot fully fault tolerant until rebuilding is complete.
l Initializing: The FortiManager unit is writing to all the hard drives in the devicein order to make the array fault tolerant.
l Verifying: The FortiManager unit is ensuring that the parity data of aredundant drive is valid.
l Degraded: The hard drive is no longer being used by the RAID controller.l Inoperable: One or more drives are missing from the FortiManager unit. Thedrive is no longer available to the operating system. Data on an inoperabledrive cannot be accessed.
Size (GB) Displays the size, in GB, of each disk.
Disk Model Displays the model number of each disk.
Checking RAID from command line
Use command line to check if your device uses hardware or software RAID.
FortiManager 6.4.0 Administration Guide 506Fortinet Inc.

System Settings
To check RAID type from the command line:
1. Select the CLI Console from the GUI banner.2. Type the command diagnose system raid status and press Enter.3. The following information is shown in the output:l Mega RAID - this output shows that the device uses hardware RAID.l Software RAID - this output shows that the device uses software RAID.
Sample command line output showing hardware RAID:
[Product_Name_Model] # diagnose system raid statusMega RAID: <-- this is hardware RAIDRAID Level: Raid-50RAID Status: OKRAID Size: 11175GBGroups: 2
[Product_Name_Model] # diagnose system raid statusSoftware RAID: <-- this is software RAIDRAID Level: Raid-50RAID Status: OKRAID Size: 11175GBGroups: 2
Swapping hard disks
If a hard disk on a FortiManager unit fails, it must be replaced. On FortiManager devices that support hardware RAID, thehard disk can be replaced while the unit is still running - known as hot swapping. On FortiManager units with softwareRAID, the device must be shutdown prior to exchanging the hard disk.
To identify which hard disk failed, read the relevant log message in the Alert Message Console widget. See AlertMessages Console widget on page 494.
Electrostatic discharge (ESD) can damage FortiManager equipment. Only perform theprocedures described in this document from an ESD workstation. If no such station isavailable, you can provide some ESD protection by wearing an anti-static wrist or ankle strapand attaching it to an ESD connector or to a metal part of a FortiManager chassis.
When replacing a hard disk, you need to first verify that the new disk is the same size as thosesupplied by Fortinet and has at least the same capacity as the old one in the FortiManagerunit. Installing a smaller hard disk will affect the RAID setup and may cause data loss. Due topossible differences in sector layout between disks, the only way to guarantee that two diskshave the same size is to use the same brand and model.The size provided by the hard drive manufacturer for a given disk model is only anapproximation. The exact size is determined by the number of sectors present on the disk.
FortiManager 6.4.0 Administration Guide 507Fortinet Inc.

System Settings
To hot swap a hard disk on a device that supports hardware RAID:
1. Remove the faulty hard disk.2. Install a new disk.
The FortiManager unit automatically adds the new disk to the current RAID array. The status appears on theconsole. The RAID Management pane displays a green checkmark icon for all disks and the RAID Status areadisplays the progress of the RAID re-synchronization/rebuild.
Adding hard disks
Some FortiManager units have space to add more hard disks to increase your storage capacity.
Fortinet recommends you use the same disks as those supplied by Fortinet. Disks of otherbrands will not be supported by Fortinet. For information on purchasing extra hard disks,contact your Fortinet reseller.
To add more hard disks:
1. Obtain the same disks as those supplied by Fortinet.2. Back up the log data on the FortiManager unit.
You can also migrate the data to another FortiManager unit, if you have one. Data migration reduces system downtime and the risk of data loss.
3. Install the disks in the FortiManager unit.If your unit supports hot swapping, you can do so while the unit is running. Otherwise the unit must be shut downfirst. See Unit Operation widget on page 494 for information.
4. Configure the RAID level. See Configuring the RAID level on page 505.5. If you backed up the log data, restore it.
Administrative Domains
Administrative domains (ADOMs) enable administrators to manage only those devices that they are specificallyassigned, based on the ADOMs to which they have access. When the ADOMmode is advanced, FortiGate devices withmultiple VDOMs can be divided among multiple ADOMs.
Administrator accounts can be tied to one or more ADOMs, or denied access to specific ADOMs. When a particularadministrator logs in, they see only those devices or VDOMs that have been enabled for their account. Super useradministrator accounts, such as the admin account, can see and maintain all ADOMs and the devices within them.
When FortiAnalyzer features are enabled, each ADOM specifies how long to store and how much disk space to use forits logs. You can monitor disk utilization for each ADOM and adjust storage settings for logs as needed.
The maximum number of ADOMs you can add depends on the FortiManager systemmodel. Please refer to theFortiManager data sheet for more information.
FortiManager 6.4.0 Administration Guide 508Fortinet Inc.

System Settings
By default, ADOMs are disabled. Enabling and configuring ADOMs can only be done by administrators with the Super_User profile. See Administrators on page 555.
Non-FortiGate devices, except for FortiAnalyzer devices, are automatically located in specificADOMs for their device type. They cannot be moved to other ADOMs.One FortiAnalyzer device can be added to each ADOM. For more information, see AddingFortiAnalyzer devices on page 50.
Default ADOMs
FortiManager includes default ADOMs for specific types of devices. When you add one or more of these devices to theFortiManager, the devices are automatically added to the appropriate ADOM, and the ADOM becomes selectable.When a default ADOM contains no devices, the ADOM is not selectable.
For example, when you add a FortiClient EMS device to the FortiManager, the FortiClient EMS device is automaticallyadded to the default FortiClient ADOM. After the FortiClient ADOM contains a FortiClient EMS device, the FortiClientADOM is selectable when you log into FortiManager or when you switch between ADOMs.
You can view all of the ADOMs, including default ADOMs without devices, on the System Settings > All ADOMs pane.
Organizing devices into ADOMs
You can organize devices into ADOMs to allow you to better manage these devices. Devices can be organized bywhatever method you deem appropriate, for example:
l Firmware version: group all devices with the same firmware version into an ADOM.l Geographic regions: group all devices for a specific geographic region into an ADOM, and devices for a differentregion into another ADOM.
l Administrative users: group devices into separate ADOMs based for specific administrators responsible for thegroup of devices.
l Customers: group all devices for one customer into an ADOM, and devices for another customer into anotherADOM.
Enabling and disabling the ADOM feature
By default, ADOMs are disabled. Enabling and configuring ADOMs can only be done by super user administrators.
When ADOMs are enabled, the Device Manager, Policy & Objects, APManager, FortiClient Manager, and VPNManager panes are displayed per ADOM. If FortiAnalyzer features are enabled, the FortiView, Log View, Incidents& Events, and Reports panes are also displayed per ADOM. You select the ADOM you need to work in when you log intothe FortiManager unit. Switching between ADOMs on page 19.
ADOMs must be enabled to support FortiMail and FortiWeb logging and reporting. When aFortiMail or FortiWeb device is promoted to the DVM table, the device is added to theirrespective default ADOM and will be visible in the left-hand tree menu.
FortiManager 6.4.0 Administration Guide 509Fortinet Inc.

System Settings
FortiGate and FortiCarrier devices cannot be grouped into the same ADOM. FortiCarrierdevices are added to a specific default FortiCarrier ADOM.
To enable the ADOM feature:
1. Log in to the FortiManager as a super user administrator.2. Go to System Settings > Dashboard.3. In the System Information widget, toggle the Administrative Domain switch toON.
You will be automatically logged out of the FortiManager and returned to the log in screen.
To disable the ADOM feature:
1. Remove all the devices from all non-root ADOMs. That is, add all devices to the root ADOM.2. Delete all non-root ADOMs. See Deleting ADOMs on page 518.
Only after removing all the non-root ADOMs can ADOMs be disabled.3. Go to System Settings > Dashboard.4. In the System Information widget, toggle the Administrative Domain switch toOFF.
You will be automatically logged out of the FortiManager and returned to the log in screen.
The ADOMs feature cannot be disabled if ADOMs are still configured and have manageddevices in them.
ADOM device modes
An ADOM has two device modes: Normal (default) and Advanced.
In Normalmode, you cannot assign different FortiGate VDOMs to different ADOMs. The FortiGate unit can only beadded to a single ADOM.
In Advancedmode, you can assign a VDOM from a single device to a different ADOM. This allows you to analyze datafor individual VDOMs, but will result in more complicated management scenarios. It is recommended only for advancedusers.
FortiManager does not support splitting FortiGate VDOMs between multiple ADOMs indifferent device modes.
To change from Advancedmode back to Normalmode, you must ensure no FortiGate VDOMs are assigned to anADOM.
To change the ADOM device mode:
1. Go to System Settings > Advanced > Advanced Settings.2. In the ADOMMode field, select either Normal or Advanced.3. Select Apply to apply your changes.
FortiManager 6.4.0 Administration Guide 510Fortinet Inc.

System Settings
ADOM modes
When creating an ADOM, the mode can be set to Normal or Backup.
Normal mode ADOMs
When creating an ADOM in Normal Mode, the ADOM is considered Read/Write, where you are able to make changes tothe ADOM and managed devices from the FortiManager. FortiGate units in the ADOMwill query their own configurationevery 5 seconds. If there has been a configuration change, the FortiGate unit will send a diff revision on the change tothe FortiManager using the FGFM protocol.
Backup mode ADOMs
When creating an ADOM in Backup Mode, the ADOM is considered Read Only, where you cannot make changes to theADOM and managed devices from FortiManager. Changes are made via scripts, which are run on the managed device,or through the device’s GUI or CLI directly. Revisions are sent to the FortiManager when specific conditions are met:
l Configuration change and session timeoutl Configuration change and log outl Configuration change and rebootl Manual configuration backup from the managed device.
When you add a device to an ADOM in backup mode, you can import firewall address and service objects toFortiManager, and FortiManager stores the objects in the Device Manager database. You can view the objects on thePolicy & Objects pane. Although you can view the objects on the Policy & Objects pane, the objects are not stored in thecentral database. This lets you maintain a repository of objects used by all devices in the backup ADOM that is separatefrom the central database.
All devices that are added to the ADOMwill only have their configuration backed up. Configuration changes cannot bemade to the devices in a backup ADOM. You can push any existing revisions to managed devices. You can still monitorand review the revision history for these devices, and scripting is still allowed for pushing scripts directly to FortiGateunits.
Creating backup ADOMs
You can create an ADOM with backup mode enabled, and then add devices to the ADOM.
When an ADOM is in backup mode, the following panes are available:
l Device Managerl Policy & Objectsl FortiGuardl FortiViewl System Settings
FortiManager 6.4.0 Administration Guide 511Fortinet Inc.

System Settings
To create backup ADOMs:
1. Go to System Settings > All ADOMs, and click Create New.2. Set the following options, and clickOK:
Name Type a name for the ADOM.
Type Select the type of device and ADOM version.
Devices Select a device. Alternately, you can add a device to the ADOM later by usingthe Add Device wizard.
Mode Select Backup.
The ADOM in backup mode is created.
Importing objects to backup ADOMs
You can use the Add Device wizard to add FortiGate devices to an ADOM in backup mode. The wizard also lets youimport Firewall address and service objects. Policies are not imported.
Alternately, you can import objects after adding devices by using the Import Policy button on the Device Manager pane.
All imported objects are stored in the Device Manager database. They are not stored in the central database, which isused to store objects used in policies.
To import objects when adding devices:
1. Go to Device Manager > Device & Groups, and click Add Device.2. Follow the Add Device wizard, until the Import button is displayed.3. Click Import to import firewall address and service objects to the Device Manager database.
The objects are imported into the Device Manager database.Alternately you can import the objects after you add the device.
4. Go to the Policy & Objects pane to view the objects.You can also create, edit, and delete objects.
To import objects after adding devices:
1. Go to Device Manager > Device & Groups.2. Select a device and click Import Policy.
The objects are imported into the Device Manager database.3. Go to the Policy & Objects pane to view the objects.
You can also create, edit, and delete objects.
Viewing read-only polices in backup ADOMs
When an ADOM is in backup mode, you can view information about read-only policies
FortiManager 6.4.0 Administration Guide 512Fortinet Inc.

System Settings
To view read-only polices:
1. Ensure you are in an ADOM with backup mode enabled.2. Go to Device Manager > Device & Groups.3. In the tree menu, select the device group, for example,Managed Devices. The list of devices display in the content
pane and in the bottom tree menu.4. In the bottom tree menu, select a device. The System dashboard is displayed.
For a description of the widgets, see System dashboard widgets on page 63.
5. In the dashboard toolbar, click CLI Configurations to view information about policies. The policies are read-only.
Managing ADOMs
The ADOMs feature must be enabled before ADOMs can be created or configured. See Enabling and disabling theADOM feature on page 509.
To create and manage ADOMs, go to System Settings > All ADOMs.
FortiManager 6.4.0 Administration Guide 513Fortinet Inc.

System Settings
Create New Create a new ADOM. See Creating ADOMs on page 514.
Edit Edit the selected ADOM. This option is also available from the right-click menu.See Editing an ADOM on page 518.
Delete Delete the selected ADOM or ADOMs. You cannot delete default ADOMs. Thisoption is also available from the right-click menu. See Deleting ADOMs on page518.
Enter ADOM Switch to the selected ADOM. This option is also available from the right-clickmenu.
More Select Expand Devices to expand all of the ADOMs to show the devices in eachADOM. Select Collapse Devices to collapses the device lists. Select Upgrade toupgrade the ADOM; see ADOM versions on page 519. These options are alsoavailable from the right-click menu.
Search Enter a search term to search the ADOM list.
Name The name of the ADOM.ADOMs are listed in the following groups: Central Management, Backup Mode (ifthere are any backup mode ADOMs), andOther Device Types. A group can becollapsed or expanded by clicking the triangle next to its name.
Firmware Version The firmware version of the ADOM. Devices in the ADOM should have the samefirmware version.See ADOM versions on page 519 for more information.
Central VPN Whether or not central VPNmanagement is enabled for the ADOM.
Allocated Storage The amount of hard drive storage space allocated to the ADOM.
Devices The number of devices and VDOMs that the ADOM contains.The device list can be expanded or by clicking the triangle.
Creating ADOMs
To create a new ADOM, you must be logged in as a super user administrator.
Consider the following when creating ADOMs:
l The maximum number of ADOMs that can be created depends on the FortiManager model. For more information,see the FortiManager data sheet at https://www.fortinet.com/products/management/fortimanager.html.
l You must use an administrator account that is assigned the Super_User administrative profile.l You can add a device to only one ADOM. You cannot add a device to multiple ADOMs.l You cannot add FortiGate and FortiCarrier devices to the same ADOM. FortiCarrier devices are added to a specific,default FortiCarrier ADOM.
l You can add one or more VDOMs from a FortiGate device to one ADOM. If you want to add individual VDOMs froma FortiGate device to different ADOMs, you must first enable advanced device mode. See ADOM device modes onpage 510.
l When FortiAnalyzer features are enabled, you can configure how an ADOM handles log files from its devices. Forexample, you can configure how much disk space an ADOM can use for logs, and then monitor how much of theallotted disk space is used. You can also specify how long to keep logs indexed in the SQL database and how longto keep logs stored in a compressed format.
FortiManager 6.4.0 Administration Guide 514Fortinet Inc.

System Settings
To create an ADOM
1. Ensure that ADOMs are enabled. See Enabling and disabling the ADOM feature on page 509.2. Go to System Settings > All ADOMs.3. Click Create New in the toolbar. The Create New ADOM pane is displayed.
4. Configure the following settings, then clickOK to create the ADOM.
Name Type a name that allows you to distinguish this ADOM from your otherADOMs. ADOM names must be unique.
Type Select either FortiGate or FortiCarrier from the dropdown menu. The ADOMtype cannot be edited.Other device types are added to their respective default ADOMwhenauthorized for central management with FortiManager.
Version Select the version of the devices in the ADOM. The ADOM version cannot beedited.
Devices Add a device or devices with the selected versions to the ADOM. The searchfield can be used to find specific devices. See Assigning devices to an ADOMon page 517.
Central Management Select the VPN checkbox to enable central VPNmanagement.Select the SD-WAN checkbox to enable central SD-WANmanagement.Select the FortiAP checkbox to enable central FortiAP management. Thischeckbox is selected by default.This option is only available when theMode is Normal.
FortiManager 6.4.0 Administration Guide 515Fortinet Inc.

System Settings
Mode Select Normalmode if you want to manage and configure the connectedFortiGate devices from the FortiManager GUI. Select Backupmode if you wantto backup the FortiGate configurations to the FortiManager, but configure eachFortiGate locally.See ADOMmodes on page 511 for more information.
Default Device Selection forInstall
Select either Select All or Unselect All.This option is only available when theMode is Normal.
Perform Policy Check BeforeEvery Install
TurnOn to perform a policy consistency check before every install. Only addedor modified policies are checked. See Perform a policy consistency check onpage 176.
Action WhenConflicts OccurDuring PolicyCheck
Select an action to take when a conflict occurs during the automatic policyconsistency check , either Continue Installation or Stop Installation.
Auto-Push Policy PackagesWhen Device Back Online
Automatically push policy package updates to currently offline manageddevices when the devices come back online.
Data Policy Specify how long to keep logs in the indexed and compressed states.This section is only available when FortiAnalyzer features are enabled. SeeFortiAnalyzer Features on page 20.
Keep Logs forAnalytics
Specify how long to keep logs in the indexed state.During the indexed state, logs are indexed in the SQL database for thespecified amount of time. Information about the logs can be viewed in theFortiView > FortiView, Incidents & Events/FortiSoC, and Reportsmodules.After the specified length of time expires, Analytics logs are automaticallypurged from the SQL database.
Keep Logs forArchive
Specify how long to keep logs in the compressed state.During the compressed state, logs are stored in a compressed format on theFortiManager unit. When logs are in the compressed state, information aboutthe log messages cannot be viewed in the FortiView > FortiView, Incidents &Events/FortiSoC, or Reportsmodules. After the specified length of timeexpires, Archive logs are automatically deleted from the FortiManager unit.
Disk Utilization Specify how much disk space to use for logs.This section is only available when FortiAnalyzer features are enabled. SeeFortiAnalyzer Features on page 20.
Maximum Allowed Specify the maximum amount of FortiManager disk space to use for logs, andselect the unit of measure.The total available space on the FortiManager unit is shown.
Analytics : Archive Specify the percentage of the allotted space to use for Analytics and Archivelogs.Analytics logs require more space than Archive logs. For example, a setting of70% and 30% indicates that 70% of the allotted disk space will be used forAnalytics logs, and 30% of the allotted space will be used for Archive logs.Select theModify checkbox to change the setting.
FortiManager 6.4.0 Administration Guide 516Fortinet Inc.

System Settings
Alert and DeleteWhen UsageReaches
Specify at what data usage percentage an alert messages will be generatedand logs will be automatically deleted. The oldest Archive log files or Analyticsdatabase tables are deleted first.
Assigning devices to an ADOM
To assign devices to an ADOM you must be logged in as a super user administrator. Devices cannot be assigned tomultiple ADOMs.
To assign devices to an ADOM:
1. Go to System Settings > All ADOMs.2. Double-click on an ADOM, right-click on an ADOM and then select the Edit from the menu, or select the ADOM then
click Edit in the toolbar. The Edit ADOM pane opens.3. Click Select Device. The Select Device list opens on the right side of the screen.4. Select the devices that you want to add to the ADOM. Only devices with the same version as the ADOM can be
added. The selected devices are displayed in the Devices list.If the ADOMmode is Advanced you can add separate VDOMs to the ADOM as well as units.
5. When done selecting devices, click Close to close the Select Device list.6. ClickOK.
The selected devices are removed from their previous ADOM and added to this one.
Assigning VDOMs to an ADOM
To assign VDOMs to an ADOM you must be logged in as a super user administrator and the ADOMmode must beAdvanced (see ADOM device modes on page 510). VDOMs cannot be assigned to multiple ADOMs.
To assign VDOMs to an ADOM:
1. Go to System Settings > All ADOMs.2. Double-click on an ADOM, right-click on an ADOM and then select the Edit from the menu, or select the ADOM then
click Edit in the toolbar. The Edit ADOM pane opens.3. Click Select Device. The Select Device list opens on the right side of the screen.4. Select the VDOMs that you want to add to the ADOM. Only VDOMs on devices with the same version as the ADOM
can be added. The selected VDOMs are displayed in the Devices list.5. When done selecting VDOMs, click Close to close the Select Device list.6. ClickOK.
The selected VDOMs are removed from their previous ADOM and added to this one.
FortiManager 6.4.0 Administration Guide 517Fortinet Inc.

System Settings
Assigning administrators to an ADOM
Super user administrators can create other administrators and either assign ADOMs to their account or exclude themfrom specific ADOMs, constraining them to configurations and data that apply only to devices in the ADOMs they canaccess.
By default, when ADOMs are enabled, existing administrator accounts other than admin areassigned to the root domain, which contains all devices in the device list. For more informationabout creating other ADOMs, see Creating ADOMs on page 514.
To assign an administrator to specific ADOMs:
1. Log in as a super user administrator. Other types of administrators cannot configure administrator accounts whenADOMs are enabled.
2. Go to System Settings > Admin > Administrator.3. Double-click on an administrator, right-click on an administrator and then select the Edit from the menu, or select the
administrator then click Edit in the toolbar. The Edit Administrator pane opens.4. Edit the Administrative Domain field as required, either assigning or excluding specific ADOMs.5. SelectOK to apply your changes.
The admin administrator account cannot be restricted to specific ADOMs.
Editing an ADOM
To edit an ADOM you must be logged in as a super user administrator. The ADOM type and version cannot be edited.For the default ADOMs, the name cannot be edited.
To edit an ADOM:
1. Go to System Settings > All ADOMs.2. Double-click on an ADOM, right-click on an ADOM and then select Edit from the menu, or select the ADOM then
click Edit in the toolbar. The Edit ADOM pane opens.3. Edit the settings as required, and then selectOK to apply the changes.
Deleting ADOMs
To delete an ADOM, you must be logged in as a super-user administrator (see Administrator profiles on page 572), suchas the admin administrator.
Prior to deleting an ADOM:
l All devices must be removed from the ADOM. Devices can be moved to another ADOM, or to the root ADOM. SeeAssigning devices to an ADOM on page 517.
FortiManager 6.4.0 Administration Guide 518Fortinet Inc.

System Settings
To delete an ADOM:
1. Go to System Settings > All ADOMs.2. Ensure that the ADOM or ADOMs being deleted have no devices in them.3. Select the ADOM or ADOMs you need to delete.4. Click Delete in the toolbar, or right-click and select Delete.5. ClickOK in the confirmation box to delete the ADOM or ADOMs.6. If there are users or policy packages referring to the ADOM, they are displayed in the ADOMReferences Detected
dialog. Click Delete Anyway to delete the ADOM or ADOMs. The references to the ADOMs are also deleted.
Default ADOMs cannot be deleted.
ADOM versions
ADOMs can concurrently manage FortiGate units running the same FortiOS version as the ADOM plus the next highermaintenance release (provided the FortiManager version supports one-click ADOM upgrade to that next highermaintenance release). This lets you manage an ADOMwhile upgrading the devices within that ADOM.
When adding a new FortiGate unit to an ADOM, the FortiGate unit should have the same FortiOS version as the ADOM.
This feature can be used to facilitate upgrading to new firmware.Importing policies from devices running higher versions than the ADOM is not supported.Installation to devices running higher versions is supported.
For a complete list of supported devices and firmware versions, see the FortiManager ReleaseNotes.
Each ADOM is associated with a specific FortiOS version, based on the firmware version of the devices that are in thatADOM. This version is selected when creating a new ADOM (see Creating ADOMs on page 514), and can be updatedonly after all of the devices within the ADOM have been updated to the same FortiOS firmware version.
The general steps for upgrading an ADOM containing multiple devices running FortiOS 6.2 from 6.2 to 6.4 are as follows:
1. In the ADOM, upgrade one of the FortiGate units to FortiOS 6.4, and then resynchronize the device. See Firmwareon page 88 for more information.All of the ADOM objects, including Policy Packages, remain as 6.2 objects.
2. Upgrade the rest of the FortiGate units in the ADOM to FortiOS 6.4.3. Upgrade the ADOM to 6.4. See Upgrading an ADOM on page 522 for more information.
All of the database objects will be converted to 6.4 format, and the GUI content for the ADOMwill change to reflect6.4 features and behavior.
An ADOM can only be upgraded after all the devices within the ADOM have been upgraded.
FortiManager 6.4.0 Administration Guide 519Fortinet Inc.

System Settings
Global database version
The global database ADOM supports its own version plus one version. For example, if the global databaseADOM version is 6.0, the global database ADOM can manage version 6.0 and 6.2, but not 6.4 or 5.6.
The global database is reset when the database version is edited. The database is not reset when the global databaseADOM is upgraded using the Upgrade command.
The global database ADOM should only be upgraded after all the ADOMs that are using aglobal policy package have been upgraded.
To upgrade the global database ADOM:
1. Go to System Settings > All ADOMs.2. SelectGlobal Database then clickMore > Upgrade in the toolbar, or right-clickGlobal Database and select
Upgrade.If the ADOM has already been upgraded to the latest version, this option will not be available.
3. ClickOK in the Upgrade ADOM dialog box.4. After the upgrade finishes, click Close to close the dialog box.
To edit the global database version:
Editing the global database version will reset the database. All global policy packages will belost. This should only be used when starting to use the global database for the first time, orwhen resetting the database is required.
1. Go to System Settings > All ADOMs.2. SelectGlobal Database then click Edit in the toolbar, or right-clickGlobal Database and select Edit. The Edit Global
Database window opens.3. Select the version.4. ClickOK to save the setting.5. A confirmation dialog box will be displayed. ClickOK to continue.
Concurrent ADOM access
Concurrent ADOM access is controlled by enabling or disabling the workspace function. Concurrent access is enabledby default. To prevent multiple administrators from making changes to the FortiManager database at the same time andcausing conflicts, the workspace function must be enabled.
When workspace mode is enabled, concurrent ADOM access is disabled. An administrator must lock the ADOM beforethey can make device-level changes to it, and only one administrator can hold the lock at a time, while otheradministrators have read-only access. Optionally, ADOM lock override can be enabled, allowing an administrator tounlock an ADOM that is locked by another administrator. See Locking an ADOM on page 521
When workspace is disabled, concurrent ADOM access is enabled, and multiple administrators can log in and makechanges to the same ADOM at the same time.
FortiManager 6.4.0 Administration Guide 520Fortinet Inc.

System Settings
To enable workspace mode, and disable concurrent ADOM access:
1. Enter the following CLI commands:config system global
set workspace-mode normalend
To disable workspace mode, and enable concurrent ADOM access:
1. Enter the following CLI commands:config system global
set workspace-mode disabledWarning: disabling workspaces may cause some logged in users to lose their unsaved
data. Do you want to continue? (y/n) yend
After changing the workflow mode, your session will end and you will be required to log back into the FortiManager.
Locking an ADOM
If workspace is enabled, you must lock an ADOM prior to performing device-level changes to it, such as upgradingfirmware for a device. If you are making changes at the ADOM level, you can leave the ADOM unlocked and lock policypackages or objects independently.
The padlock icon, shown next to the ADOM name on the banner and in the All ADOMs list, will turn from gray to greenwhen you lock an ADOM. If it is red, it means that another administrator has locked the ADOM.
Optionally, ADOM lock override can be enabled, allowing an administrator to unlock an ADOM that has been locked byanother administrator and discard all of their unsaved changes.
To lock an ADOM:
l Ensure that you are in the specific ADOM that you will be editing (top right corner of the GUI), then select Lock fromthe banner.
l Or, go to System Settings > All ADOMs, right-click on an ADOM, and select Lock from the right-click menu.
The ADOMwill now be locked, allowing you to make changes to it and preventing other administrators from makingchanges unless lock override is enabled. The lock icon will turn into a green locked padlock. For other administrators
To unlock an ADOM:
l Ensure you have saved any changes you may have made to the ADOM then select Unlock ADOM from the banner.l Or, go to System Settings > All ADOMs, right-click on an ADOM, and select Lock from the right-click menu.
If there are unsaved changes to the ADOM, a dialog box will give you the option of saving or discarding your changesbefore unlocking the ADOM. The ADOMwill now be unlocked, allowing any administrator to lock the ADOM and makechanges.
FortiManager 6.4.0 Administration Guide 521Fortinet Inc.

System Settings
To enable or disable ADOM lock override:
Enter the following CLI commands:
config system globalset lock-prempt {enable | disable}
end
Upgrading an ADOM
To upgrade an ADOM, you must be logged in as a super user administrator.
An ADOM can only be upgraded after all the devices within the ADOM have been upgraded.See ADOM versions on page 519 for more information.
To upgrade an ADOM:
1. Go to System Settings > All ADOMs.2. Right-click on an ADOM and select Upgrade, or select an ADOM and then selectMore > Upgrade from the toolbar.
If the ADOM has already been upgraded to the latest version, this option will not be available.3. SelectOK in the confirmation dialog box to upgrade the device.
If all of the devices within the ADOM are not already upgraded, the upgrade will be aborted and an error messagewill be shown. Upgrade the remaining devices within the ADOM, then return to step 1 to try upgrading the ADOMagain.
Certificates
The FortiManager generates a certificate request based on the information you entered to identify the FortiManager unit.After you generate a certificate request, you can download the request to a management computer and then forward therequest to a CA.
Local certificates are issued for a specific server, or website. Generally they are very specific, and often for an internalenterprise network.
CA root certificates are similar to local certificates, however they apply to a broader range of addresses or to an entirecompany.
The CRL is a list of certificates that have been revoked and are no longer usable. This list includes expired, stolen, orotherwise compromised certificates. If your certificate is on this list, it will not be accepted. CRLs are maintained by theCA that issues the certificates and include the date and time when the next CRL will be issued, as well as a sequencenumber to help ensure you have the most current versions.
Local certificates
The FortiManager unit generates a certificate request based on the information you enter to identify the FortiManagerunit. After you generate a certificate request, you can download the request to a computer that has management access
FortiManager 6.4.0 Administration Guide 522Fortinet Inc.

System Settings
to the FortiManager unit and then forward the request to a CA.
The certificate window also enables you to export certificates for authentication, importing, and viewing.
The FortiManager has one default local certificate: Fortinet_Local.
You can manage local certificates from the System Settings > Certificates > Local Certificates page. Some options areavailable in the toolbar and some are also available in the right-click menu.
Creating a local certificate
To create a certificate request:
1. Go to System Settings > Certificates > Local Certificates.2. Click Create New in the toolbar. TheGenerate Certificate Signing Request pane opens.3. Enter the following information as required, then clickOK to save the certificate request:
Certificate Name The name of the certificate.
Subject Information Select the ID type from the dropdown list:l Host IP: Select if the unit has a static IP address. Enter the public IPaddress of the unit in the Host IP field.
l Domain Name: Select if the unit has a dynamic IP address andsubscribes to a dynamic DNS service. Enter the domain name of the unitin the Domain Name field.
l Email: Select to use an email address. Enter the email address in theEmail Address field.
Optional Information
Organization Unit(OU)
The name of the department. You can enter a series of OUs up to a maximumof 5. To add or remove an OU, use the plus (+) or minus (-) icons.
Organization (O) Legal name of the company or organization.
Locality (L) Name of the city or town where the device is installed.
State/Province(ST)
Name of the state or province where the FortiGate unit is installed.
Country (C) Select the country where the unit is installed from the dropdown list.
E-mail Address(EA)
Contact email address.
SubjectAlternative Name
Optionally, enter one or more alternative names for which the certificate is alsovalid. Separate names with a comma.A name can be:l e-mail addressl IP addressl URIl DNS name (alternatives to the Common Name)l directory name (alternatives to the Distinguished Name)
FortiManager 6.4.0 Administration Guide 523Fortinet Inc.

System Settings
You must precede the name with the name type. Examples:l IP:1.1.1.1l email:[email protected] email:[email protected] URI:http://my.url.here/
Key Type The key type can be RSA or Elliptic Curve.
Key Size Select the key size from the dropdown list: 512 Bit, 1024 Bit, 1536 Bit, or 2048Bit. This option is only available when the key type is RSA.
Curve Name Select the curve name from the dropdown list: secp256r1 (default),secp384r1, or secp521r1. This option is only available when the key type isElliptic Curve.
Enrollment Method The enrollment method is set to File Based.
Importing local certificates
To import a local certificate:
1. Go to System Settings > Certificates > Local Certificates.2. Click Import in the toolbar or right-click and select Import. The Import dialog box opens.3. Enter the following information as required, then clickOK to import the local certificate:
Type Select the certificate type from the dropdown list: Local Certificate, PKCS #12Certificate, or Certificate.
Certificate File Click Browse... and locate the certificate file on the management computer, ordrag and drop the file onto the dialog box.
Key File Click Browse... and locate the key file on the management computer, or dragand drop the file onto the dialog box.This option is only available when Type is Certificate.
Password Enter the certificate password.This option is only available when Type is PKCS #12 Certificate or Certificate.
Certificate Name Enter the certificate name.This option is only available when Type is PKCS #12 Certificate or Certificate.
Deleting local certificates
To delete a local certificate or certificates:
1. Go to System Settings > Certificates > Local Certificates.2. Select the certificate or certificates you need to delete.3. Click Delete in the toolbar, or right-click and select Delete.4. ClickOK in the confirmation dialog box to delete the selected certificate or certificates.
FortiManager 6.4.0 Administration Guide 524Fortinet Inc.

System Settings
Viewing details of local certificates
To view details of a local certificate:
1. Go to System Settings > Certificates > Local Certificates.2. Select the certificates that you would like to see details about, then click View Certificate Detail in the toolbar or
right-click menu. The View Local Certificate page opens.
3. ClickOK to return to the local certificates list.
Downloading local certificates
To download a local certificate:
1. Go to System Settings > Certificates > Local Certificates.2. Select the certificate that you need to download.3. Click Download in the toolbar, or right-click and select Download, and save the certificate to the management
computer.
When an object is added to a policy package and assigned to an ADOM, the object is availablein all devices that are part of the ADOM. If the object is renamed on a device locally,FortiManager automatically syncs the renamed object to the ADOM.
CA certificates
The FortiManager has one default CA certificate, Fortinet_CA. In this sub-menu you can delete, import, view, anddownload certificates.
Importing CA certificates
To import a CA certificate:
1. Go to System Settings > Certificates > CA Certificates.2. Click Import in the toolbar, or right-click and select Import. The Import dialog box opens.3. Click Browse... and locate the certificate file on the management computer, or drag and drop the file onto the dialog
box.4. ClickOK to import the certificate.
FortiManager 6.4.0 Administration Guide 525Fortinet Inc.

System Settings
Viewing CA certificate details
To view a CA certificate's details:
1. Go to System Settings > Certificates > CA Certificates.2. Select the certificates you need to see details about.3. Click View Certificate Detail in the toolbar, or right-click and select View Certificate Detail. The View CA Certificate
page opens.4. ClickOK to return to the CA certificates list.
Downloading CA certificates
To download a CA certificate:
1. Go to System Settings > Certificates > CA Certificates.2. Select the certificate you need to download.3. Click Download in the toolbar, or right-click and select Download, and save the certificate to the management
computer.
Deleting CA certificates
To delete a CA certificate or certificates:
1. Go to System Settings > Certificates > CA Certificates.2. Select the certificate or certificates you need to delete.3. Click Delete in the toolbar, or right-click and select Delete.4. ClickOK in the confirmation dialog box to delete the selected certificate or certificates.
The Fortinet_CA certificate cannot be deleted.
Certificate revocation lists
When you apply for a signed personal or group certificate to install on remote clients, you can obtain the correspondingroot certificate and Certificate Revocation List (CRL) from the issuing CA.
The CRL is a list of certificates that have been revoked and are no longer usable. This list includes expired, stolen, orotherwise compromised certificates. If your certificate is on this list, it will not be accepted. CRLs are maintained by theCA that issues the certificates and includes the date and time when the next CRL will be issued as well as a sequencenumber to help ensure you have the most current version of the CRL.
When you receive the signed personal or group certificate, install the signed certificate on the remote client(s) accordingto the browser documentation. Install the corresponding root certificate (and CRL) from the issuing CA on theFortiManager unit according to the procedures given below.
FortiManager 6.4.0 Administration Guide 526Fortinet Inc.

System Settings
Importing a CRL
To import a CRL:
1. Go to System Settings > Certificates > CRL.2. Click Import in the toolbar, or right-click and select Import. The Import dialog box opens.3. Click Browse... and locate the CRL file on the management computer, or drag and drop the file onto the dialog box.4. ClickOK to import the CRL.
Viewing a CRL
To view a CRL:
1. Go to System Settings > Certificates > CRL.2. Select the CRL you need to see details about.3. Click View Certificate Detail in the toolbar, or right-click and select View Certificate Detail. The Result page opens.4. ClickOK to return to the CRL list.
Deleting a CRL
To delete a CRL or CRLs:
1. Go to System Settings > Certificates > CRL.2. Select the CRL or CRLs you need to delete.3. Click Delete in the toolbar, or right-click and select Delete.4. ClickOK in the confirmation dialog box to delete the selected CRL or CRLs.
Fetcher Management
Log fetching is used to retrieve archived logs from one FortiManager device to another. This allows administrators to runqueries and reports against historic data, which can be useful for forensic analysis.
The fetching FortiManager can query the server FortiManager and retrieve the log data for a specified device and timeperiod, based on specified filters. The retrieved data are then indexed, and can be used for data analysis and reports.
Log fetching can only be done on two FortiManager devices running the same firmware. A FortiManager device can beeither the fetch server or the fetching client, and it can perform both roles at the same time with different FortiManagerdevices. Only one log fetching session can be established at a time between two FortiManager devices.
The basic steps for fetching logs are:
1. On the client, create a fetching profile. See Fetching profiles on page 528.2. On the client, send the fetch request to the server. See Fetch requests on page 529.3. If this is the first time fetching logs with the selected profile, or if any changes have been made to the devices and/or
ADOMs since the last fetch, on the client, sync devices and ADOMs with the server. See Synchronizing devices andADOMs on page 530.
4. On the server, review the request, then either approve or reject it. See Request processing on page 531.
FortiManager 6.4.0 Administration Guide 527Fortinet Inc.

System Settings
5. Monitor the fetch process on either FortiManager. See Fetch monitoring on page 531.6. On the client, wait until the database is rebuilt before using the fetched data for analysis.
This pane is only available when the FortiAnalyzer features are manually enabled. For moreinformation, see FortiAnalyzer Features on page 20.
Fetching profiles
Fetching profiles can be managed from the Profiles tab on the System Settings > Fetcher Management pane.
Profiles can be created, edited, and deleted as required. The profile list shows the name of the profile, as well as the IPaddress of the server it fetches from, the server and local ADOMs, and the administrator name on the fetch server.
To create a new fetching profile:
1. On the client, go to System Settings > Fetcher Management.2. Select the Profiles tab, then click Create New in the toolbar, or right-click and select Create New from the menu. The
Create New Profile dialog box opens.
3. Configure the following settings, then clickOK to create the profile.
Name Enter a name for the profile.
Server IP Enter the IP address of the fetch server.
User Enter the username of an administrator on the fetch server, which, togetherwith the password, authenticates the fetch client's access to the fetch server.
Password Enter the administrator's password, which, together with the username,authenticates the fetch client's access to the fetch server.
The fetch server administrator user name and password must be for an administrator witheither a Standard_User or Super_User profile.
To edit a fetching profile:
1. Go to System Settings > Fetching Management.2. Double-click on a profile, right-click on a profile then select Edit, or select a profile then click Edit in the toolbar. The
FortiManager 6.4.0 Administration Guide 528Fortinet Inc.

System Settings
Edit Profile pane opens.3. Edit the settings as required, then clickOK to apply your changes.
To delete a fetching profile or profiles:
1. Go to System Settings > Fetching Management.2. Select the profile or profiles you need to delete.3. Click Delete in the toolbar, or right-click and select Delete.4. ClickOK in the confirmation dialog box to delete the selected profile or profiles.
Fetch requests
A fetch request requests archived logs from the fetch server configured in the selected fetch profile. When making therequest, the ADOM on the fetch server the logs are fetched frommust be specified. An ADOM on the fetching client mustbe specified or, if needed, a new one can be created. If logs are being fetched to an existing local ADOM, you mustensure the ADOM has enough disk space for the incoming logs.
The data policy for the local ADOM on the client must also support fetching logs from the specified time period. It mustkeep both archive and analytics logs long enough so they will not be deleted in accordance with the policy. For example:Today is July 1, the ADOM's data policy is configured to keep analytics logs for 30 days (June 1 - 30), and you need tofetch logs from the first week of May. The data policy of the ADOMmust be adjusted to keep analytics and archive logsfor at least 62 days to cover the entire time span. Otherwise, the fetched logs will be automatically deleted after they arefetched.
To send a fetch request:
1. On the fetch client, go to System Settings > Fetcher Management and select the Profiles tab2. Select the profile then click Request Fetch in the toolbar, or right-click and select Request Fetch from the menu. The
Fetch Logs dialog box opens.
3. Configure the following settings, then click Request Fetch.The request is sent to the fetch server. The status of the request can be viewed in the Sessions tab.
FortiManager 6.4.0 Administration Guide 529Fortinet Inc.

System Settings
Name Displays the name of the fetch server you have specified.
Server IP Displays the IP address of the server you have specified.
User Displays the username of the server administrator you have provided.
Secure Connection Select to use SSL connection to transfer fetched logs from the server.
Server ADOM Select the ADOM on the server the logs will be fetched from. Only one ADOMcan be fetched from at a time.
Local ADOM Select the ADOM on the client where the logs will be received.Either select an existing ADOM from the dropdown list, or create a new ADOMby entering a name for it into the field.
Devices Add the devices and/or VDOMs that the logs will be fetched from. Up to 256devices can be added.Click Select Device, select devices from the list, then clickOK.
Enable Filters Select to enable filters on the logs that will be fetched.Select All or Any of the Following Conditions in the Log messages that matchfield to control how the filters are applied to the logs.Add filters to the table by selecting the Log Field,Match Criteria, and Value foreach filter.
Time Period Specify what date and time range of log messages to fetch.
Index Fetch Logs If selected, the fetched logs will be indexed in the SQL database of the clientonce they are received. Select this option unless you want to manually indexthe fetched logs.
Synchronizing devices and ADOMs
If this is the first time the fetching client is fetching logs from the device, or if any changes have been made the devices orADOMs since the last fetch, then the devices and ADOMs must be synchronized with the server.
To synchronize devices and ADOMs:
1. On the client, go to System Settings > Fetcher Management and select the Profiles tab2. Select the profile then click Sync Devices in the toolbar, or right-click and select Sync Devices from the menu. The
Sync Server ADOM(s) & Device(s) dialog box opens and shows the progress of the process.Once the synchronization is complete, you can verify the changes on the client. For example, newly added devicesin the ADOM specified by the profile.
If a new ADOM is created, the new ADOMwill mirror the disk space and data policy of thecorresponding server ADOM. If there is not enough space on the client, the client will create anADOMwith the maximum allowed disk space and give a warning message. You can thenadjust disk space allocation as required.
FortiManager 6.4.0 Administration Guide 530Fortinet Inc.

System Settings
Request processing
After a fetching client has made a fetch request, the request will be listed on the fetch server in the Received Requestsection of the Sessions tab on the Fetcher Management pane. It will also be available from the notification center in theGUI banner.
Fetch requests can be approved or rejected.
To process the fetch request:
1. Go to the notification center in the GUI banner and click the log fetcher request, or go to the Sessions tab on theSystem Settings > Fetcher Management pane.
2. Find the request in the Received Request section. You may have to expand the section, or select Expand All in thecontent pane toolbar. The status of the request will beWaiting for approval.
3. Click Review to review the request. The Review Request dialog box will open.
4. Click Approve to approve the request, or click Reject to reject the request.If you approve the request, the server will start to retrieve the requested logs in the background and send them tothe client. If you reject the request, the request will be canceled and the request status will be listed as Rejected onboth the client and the server.
Fetch monitoring
The progress of an approved fetch request can be monitored on both the fetching client and the fetch server.
Go to System Settings > Fetcher Management and select the Sessions tab to monitor the fetch progress. A fetch sessioncan be paused by clicking Pause, and resumed by clicking Resume. It can also be canceled by clicking Cancel.
Once the log fetching is completed, the status changes to Done and the request record can be deleted by clickingDelete. The client will start to index the logs into the database.
It can take a long time for the client to finish indexing the fetched logs and make the analyzeddata available. A progress bar is shown in the GUI banner; for more information, click on it toopen the Rebuild Log Database dialog box.Log and report features will not be fully available until the rebuilding process is complete.
FortiManager 6.4.0 Administration Guide 531Fortinet Inc.

System Settings
You may need to rebuild the ADOM after the transfer is complete depending on the Log Fetch settings.
To perform post fetch actions:
Is Index FetchedLogs enabled in theLog Fetch settings?
Yes The ADOM is rebuilt automatically and the log fetch workflow is complete.
No You will need to rebuild ADOMmanually from the CLI.
Event Log
The Event Log pane provides an audit log of actions made by users on FortiManager. It allows you to view log messagesthat are stored in memory or on the internal hard disk drive. You can use filters to search the messages and downloadthe messages to the management computer.
See the FortiManager Log Message Reference, available from the Fortinet Document Library, for more informationabout the log messages.
Go to System Settings > Event Log to view the local log list.
The following options are available:
Add Filter Filter the event log list based on the log level, user, sub type, or message. SeeEvent log filtering on page 534.
Last... Select the amount of time to show from the available options, or select a customtime span or any time.
Download Download the event logs in either CSV or the normal format to the managementcomputer.
Raw Log / Formatted Log Click on Raw Log to view the logs in their raw state.Click Formatted Log to view them in the formatted into a table.
Historical Log Click to view the historical logs list.
Back Click the back icon to return to the regular view from the historical view.
FortiManager 6.4.0 Administration Guide 532Fortinet Inc.

System Settings
View View the selected log file. This option is also available from the right-click menu,or by double-clicking on the log file.This option is only available when viewing historical event logs.
Delete Delete the selected log file. This option is also available from the right-click menu.This option is only available when viewing historical event logs.
Clear Clear the selected file of logs. This option is also available from the right-clickmenu.This option is only available when viewing historical event logs.
Type Select the type from the dropdown list:l Event Logl FDS Upload Log: Select the device from the dropdown list.l FDS Download Log: Select the service (FDS or FCT) from the Servicedropdown list, select the event type (All Event, Push Update, Poll Update, orManual Update) from the Event dropdown list, and then clickGo to browsethe logs.
This option is only available when viewing historical logs.
Search Enter a search term to search the historical logs.This option is only available when viewing historical event logs.
Pagination Browse the pages of logs and adjust the number of logs that are shown per page.
The following information is shown:
# The log number.
Date/Time The date and time that the log file was generated.
Device ID The ID of the related device.
Sub Type The log sub-type:
Systemmanager event HA event
FG-FM protocol event Firmware manager event
Device configuration event FortiGuard service event
Global database event FortiClient manager event
Script manager event FortiMail manager event
Web portal event Debug I/O log event
Firewall objects event Configuration change event
Policy console event Device manager event
VPN console event Web service event
Endpoint manager event FortiAnalyzer event
FortiManager 6.4.0 Administration Guide 533Fortinet Inc.

System Settings
Revision history event Log daemon event
Deployment manager event FIPS-CC event
Real-time monitor event Managered devices event
Log and report manager event
User The user that the log message relates to.
Description A description of the event.
Message Log message details. A Session ID is added to each log message. The usernameof the administrator is added to log messages wherever applicable for bettertraceability.
Event log filtering
The event log can be filtered using the Add Filter box in the toolbar.
To filter FortiView summaries using the toolbar:
1. Specify filters in the Add Filter box.l Regular Search: In the selected summary view, click in the Add Filter box, select a filter from the dropdown list,then type a value. Click NOT to negate the filter value. You can add multiple filters at a time, and connect themwith an "or".
l Advanced Search: Click the Switch to Advanced Search icon at the right end of the Add Filter box to switch toadvanced search mode. In this mode, you type in the whole search criteria (log field names and values). Clickthe Switch to Regular Search icon to return to regular search.
2. ClickGo to apply the filter.
Task Monitor
Use the task monitor to view the status of the tasks you have performed.
Go to System Settings > Task Monitor to view the task monitor. The task list size can also be configured; see AdvancedSettings on page 553.
To filter the information in the monitor, enter a text string in the search field.
FortiManager 6.4.0 Administration Guide 534Fortinet Inc.

System Settings
The following options are available:
Group Error Devices Create a group of the failed devices, allowing for re-installations to be done onlyon the failed devices.
Delete Remove the selected task or tasks from the list.This changes to Cancel Running Task(s) when View is Running.
View Task Detail View the task Index, Name, Status, Time Used, and History, in a new window.Click the icons in the History column to view the following information:l Historyl Promotion of device in FortiManager with autolinkl Upgrade remote device firmwarel Retrieve remote device configurationl Installation of device templatesl Installation of policy packagesl Execution of additional scripts
To filter the information in the task details, enter a text string in the search field.This can be useful when troubleshooting warnings and errors.
Show Status Select which tasks to view from the dropdown list, based on their status. Theavailable options are: All, Pending, Running, Canceling, Canceled , Done, Error,Aborting, Aborted, andWarning.
Column Settings Select the columns you want to display from the dropdown.
The following information is available:
ID The identification number for a task.
Source The platform from where the task is performed.
Description The nature of the task. Double-click the task to display the specific actions takenunder this task.
User The user or users who performed the tasks.
FortiManager 6.4.0 Administration Guide 535Fortinet Inc.

System Settings
Status The status of the task:l Success: Completed with success.l Error: Completed without success.l Canceled: User canceled the task.l Canceling: User is canceling the task.l Aborted: The FortiManager system stopped performing this task.l Aborting: The FortiManager system is stopping performing this task.l Running: Being processed. In this status, a percentage bar appears in theStatus column.
l Pendingl Warning
Time Used The number of seconds to complete the task.
ADOM The ADOM associated with the task.
Start Time The time that the task was started.
End Time The time that the task was completed.
SNMP
Enable the SNMP agent on the FortiManager device so it can send traps to and receive queries from the computer that isdesignated as its SNMPmanager. This allows for monitoring the FortiManager with an SNMPmanager.
SNMP has two parts - the SNMP agent that is sending traps, and the SNMPmanager that monitors those traps. TheSNMP communities on monitored FortiGate devices are hard coded and configured by the FortiManager system - theyare not user configurable.
The FortiManager SNMP implementation is read-only — SNMP v1, v2c, and v3 compliant SNMPmanager applications,such as those on your local computer, have read-only access to FortiManager system information and can receiveFortiManager system traps.
SNMP agent
The SNMP agent sends SNMP traps originating on the FortiManager system to an external monitoring SNMPmanagerdefined in a SNMP community. Typically an SNMPmanager is an application on a local computer that can read theSNMP traps and generate reports or graphs from them.
The SNMPmanager can monitor the FortiManager system to determine if it is operating properly, or if there are anycritical events occurring. The description, location, and contact information for this FortiManager system will be part ofthe information an SNMPmanager will have— this information is useful if the SNMPmanager is monitoring manydevices, and it will enable faster responses when the FortiManager system requires attention.
FortiManager 6.4.0 Administration Guide 536Fortinet Inc.

System Settings
Go to System Settings > Advanced > SNMP to configure the SNMP agent.
The following information and options are available:
SNMP Agent Select to enable the SNMP agent. When this is enabled, it sends FortiManagerSNMP traps.
Description Optionally, type a description of this FortiManager system to help uniquely identifythis unit.
Location Optionally, type the location of this FortiManager system to help find it in the eventit requires attention.
Contact Optionally, type the contact information for the person in charge of thisFortiManager system.
SNMP v1/2c The list of SNMP v1/v2c communities added to the FortiManager configuration.
Create New Select Create New to add a new SNMP community. If SNMP agent is notselected, this control will not be visible.For more information, see SNMP v1/v2c communities on page 538.
Edit Edit the selected SNMP community.
Delete Delete the selected SNMP community or communities.
Community Name The name of the SNMP community.
Queries The status of SNMP queries for each SNMP community. The enabled iconindicates that at least one query is enabled. The disabled icon indicates that allqueries are disabled.
Traps The status of SNMP traps for each SNMP community. The enabled icon indicatesthat at least one trap is enabled. The disabled icon indicates that all traps aredisabled.
Enable Enable or disable the SNMP community.
SNMP v3 The list of SNMPv3 users added to the configuration.
FortiManager 6.4.0 Administration Guide 537Fortinet Inc.

System Settings
Create New Select Create New to add a new SNMP user. If SNMP agent is not selected, thiscontrol will not be visible.For more information, see SNMP v3 users on page 541.
Edit Edit the selected SNMP user.
Delete Delete the selected SNMP user or users.
User Name The user name for the SNMPv3 user.
Security Level The security level assigned to the SNMPv3 user.
Notification Hosts The notification host or hosts assigned to the SNMPv3 user.
Queries The status of SNMP queries for each SNMP user. The enabled icon indicatesqueries are enabled. The disabled icon indicates they are disabled.
SNMP v1/v2c communities
An SNMP community is a grouping of equipment for network administration purposes. You must configure yourFortiManager to belong to at least one SNMP community so that community’s SNMPmanagers can query theFortiManager system information and receive SNMP traps from it.
These SNMP communities do not refer to the FortiGate devices the FortiManager system ismanaging.
Each community can have a different configuration for SNMP traps and can be configured to monitor different events.You can add the IP addresses of up to eight hosts to each community. Hosts can receive SNMP device traps andinformation.
FortiManager 6.4.0 Administration Guide 538Fortinet Inc.

System Settings
To create a new SNMP community:
1. Go to System Settings > Advanced > SNMP and ensure the SNMP agent is enabled.2. In the SNMP v1/v2c section, click Create New in the toolbar. The New SNMP Community pane opens.
3. Configure the following options, then clickOK to create the community.
Name Enter a name to identify the SNMP community. This name cannot be editedlater.
Hosts The list of hosts that can use the settings in this SNMP community to monitorthe FortiManager system.When you create a new SNMP community, there are no host entries. SelectAdd to create a new entry that broadcasts the SNMP traps and information tothe network connected to the specified interface.
IPAddress/Netmask
Enter the IP address and netmask of an SNMPmanager.By default, the IP address is 0.0.0.0 so that any SNMPmanager can use thisSNMP community.
Interface Select the interface that connects to the network where this SNMPmanageris located from the dropdown list. This must be done if the SNMPmanager ison the Internet or behind a router.
Delete Click the delete icon to remove this SNMPmanager entry.
FortiManager 6.4.0 Administration Guide 539Fortinet Inc.

System Settings
Add Select to add another entry to the Hosts list. Up to eight SNMPmanagerentries can be added for a single community.
Queries Enter the port number (161 by default) the FortiManager system uses to sendv1 and v2c queries to the FortiManager in this community. Enable queries foreach SNMP version that the FortiManager system uses.
Traps Enter the Remote port number (162 by default) the FortiManager systemuses to send v1 and v2c traps to the FortiManager in this community. Enabletraps for each SNMP version that the FortiManager system uses.
SNMP Event Enable the events that will cause SNMP traps to be sent to the community.l Interface IP changedl Log disk space lowl CPUOverusel Memory Lowl System Restartl CPU usage exclude NICE thresholdl HA Failoverl RAID Event (only available for devices that support RAID)l Power Supply Failed (only available on supported hardware devices)l Fan Speed Out of Rangel Temperature Out of Rangel Voltage Out of Range
FortiAnalyzer feature set SNMP events:l High licensed device quotal High licensed log GB/dayl Log Alertl Log Ratel Data Rate
To edit an SNMP community:
1. Go to System Settings > Advanced > SNMP.2. In the SNMP v1/v2c section, double-click on a community, right-click on a community then select Edit, or select a
community then click Edit in the toolbar. The Edit SNMP Community pane opens.3. Edit the settings as required, then clickOK to apply your changes.
To delete an SNMP community or communities:
1. Go to System Settings > Advanced > SNMP.2. In the SNMP v1/v2c section, select the community or communities you need to delete.3. Click Delete in the toolbar, or right-click and select Delete.4. ClickOK in the confirmation dialog box to delete the selected community or communities.
FortiManager 6.4.0 Administration Guide 540Fortinet Inc.

System Settings
SNMP v3 users
The FortiManager SNMP v3 implementation includes support for queries, traps, authentication, and privacy. SNMP v3users can be created, edited, and deleted as required.
To create a new SNMP user:
1. Go to System Settings > Advanced > SNMP and ensure the SNMP agent is enabled.2. In the SNMP v3 section, click Create New in the toolbar. The New SNMP User pane opens.
3. Configure the following options, then clickOK to create the community.
User Name The name of the SNMP v3 user.
Security Level The security level of the user. Select one of the following:l No Authentication, No Privacyl Authentication, No Privacy: Select the Authentication Algorithm (SHA1,MD5) and enter the password.
l Authentication, Privacy: Select the Authentication Algorithm (SHA1,MD5), the Private Algorithm (AES, DES), and enter the passwords.
Queries Select to enable queries then enter the port number. The default port is 161.
Notification Hosts The IP address or addresses of the host. Click the add icon to add multiple IPaddresses.
FortiManager 6.4.0 Administration Guide 541Fortinet Inc.

System Settings
SNMP Event Enable the events that will cause SNMP traps to be sent to the SNMPmanager.l Interface IP changedl Log disk space lowl CPUOverusel Memory Lowl System Restartl CPU usage exclude NICE thresholdl HA Failoverl RAID Event (only available for devices that support RAID)l Power Supply Failed (only available on supported hardware devices)l Fan Speed Out of Rangel Temperature Out of Rangel Voltage Out of Range
FortiAnalyzer feature set SNMP events:l High licensed device quotal High licensed log GB/dayl Log Alertl Log Ratel Data Rate
To edit an SNMP user:
1. Go to System Settings > Advanced > SNMP.2. In the SNMP v3 section, double-click on a user, right-click on a user then select Edit, or select a user then click Edit
in the toolbar. The Edit SNMP User pane opens.3. Edit the settings as required, then clickOK to apply your changes.
To delete an SNMP user or users:
1. Go to System Settings > Advanced > SNMP.2. In the SNMP v3 section, select the user or users you need to delete.3. Click Delete in the toolbar, or right-click and select Delete.4. ClickOK in the confirmation dialog box to delete the selected user or users.
SNMP MIBs
The Fortinet and FortiManager MIBs, along with the two RFCMIBs, can be obtained from Customer Service & Support(https://support.fortinet.com). You can download the FORTINET-FORTIMANAGER-FORTIANALYZER-MIB.mibMIB filein the firmware image file folder. The FORTINET-CORE-MIB.mib file is located in the main FortiManager 5.00 file folder.
RFC support for SNMP v3 includes Architecture for SNMP Frameworks (RFC 3411), and partial support of User-basedSecurity Model (RFC 3414).
To be able to communicate with the SNMP agent, you must include all of these MIBs into your SNMPmanager.Generally your SNMPmanager will be an application on your local computer. Your SNMPmanager might already
FortiManager 6.4.0 Administration Guide 542Fortinet Inc.

System Settings
include standard and private MIBs in a compiled database that is ready to use. You must add the Fortinet andFortiManager proprietary MIBs to this database.
MIB file name or RFC Description
FORTINET-CORE-MIB.mib The proprietary Fortinet MIB includes all system configuration information andtrap information that is common to all Fortinet products.Your SNMPmanager requires this information to monitor Fortinet unitconfiguration settings and receive traps from the Fortinet SNMP agent.
FORTINET-FORTIMANAGER-MIB.mib
The proprietary FortiManager MIB includes system information and trapinformation for FortiManager units.
RFC-1213 (MIB II) The Fortinet SNMP agent supports MIB II groups with the following exceptions.l No support for the EGP group fromMIB II (RFC 1213, section 3.11 and 6.10).l Protocol statistics returned for MIB II groups (IP/ICMP/TCP/UDP/etc.) do notaccurately capture all Fortinet traffic activity. More accurate information canbe obtained from the information reported by the Fortinet MIB.
RFC-2665 (Ethernet-like MIB) The Fortinet SNMP agent supports Ethernet-like MIB information with thefollowing exception.No support for the dot3Tests and dot3Errors groups.
SNMP traps
Fortinet devices share SNMP traps, but each type of device also has traps specific to that device type. For exampleFortiManager units have FortiManager specific SNMP traps. To receive Fortinet device SNMP traps, you must load andcompile the FORTINET-CORE-MIB into your SNMPmanager.
Traps sent include the trap message as well as the unit serial number (fnSysSerial) and host name (sysName). The TrapMessage column includes the message that is included with the trap, as well as the SNMPMIB field name to help locatethe information about the trap.
Trap message Description
ColdStart, WarmStart, LinkUp,LinkDown
Standard traps as described in RFC 1215.
CPU usage high(fnTrapCpuThreshold)
CPU usage exceeds the set percent. This threshold can be set in the CLIusing the following commands:config system snmp sysinfo
set trap-high-cpu-threshold <percentage value>end
CPU usage excluding NICEprocesses(fmSysCpuUsageExcludedNice)
CPU usage excluding NICE processes exceeds the set percentage. Thisthreshold can be set in the CLI using the following commands:config system snmp sysinfo
set trap-cpu-high-exclude-nice-threshold <percentagevalue>
end
Memory low Memory usage exceeds 90 percent. This threshold can be set in the CLI usingthe following commands:
FortiManager 6.4.0 Administration Guide 543Fortinet Inc.

System Settings
Trap message Description
(fnTrapMemThreshold) config system snmp sysinfoset trap-low-memory-threshold <percentage value>
end
Log disk too full(fnTrapLogDiskThreshold)
Log disk usage has exceeded the configured threshold. Only available ondevices with log disks.
Temperature too high(fnTrapTempHigh)
A temperature sensor on the device has exceeded its threshold. Not alldevices have thermal sensors. See manual for specifications.
Voltage outside acceptable range(fnTrapVoltageOutOfRange)
Power levels have fluctuated outside of normal levels. Not all devices havevoltage monitoring instrumentation.
Power supply failure(fnTrapPowerSupplyFailure)
Power supply failure detected. Available on some devices that supportredundant power supplies.
Interface IP change(fnTrapIpChange)
The IP address for an interface has changed. The trap message includes thename of the interface, the new IP address and the serial number of theFortinet unit. You can use this trap to track interface IP address changes forinterfaces with dynamic IP addresses set using DHCP or PPPoE.
HA switch(fmTrapHASwitch)
FortiManager HA cluster has been re-arranged. A new primary device hasbeen selected and asserted.
Fortinet & FortiManager MIB fields
The Fortinet MIB contains fields reporting current Fortinet unit status information. The below tables list the names of theMIB fields and describe the status information available for each one. You can view more details about the informationavailable from all Fortinet MIB fields by compiling the fortinet.3.00.mib file into your SNMPmanager and browsingthe Fortinet MIB fields.
System MIB fields:
MIB field Description
fnSysSerial Fortinet unit serial number.
Administrator accounts:
MIB field Description
fnAdminNumber The number of administrators on the Fortinet unit.
FortiManager 6.4.0 Administration Guide 544Fortinet Inc.

System Settings
MIB field Description
fnAdminTable Table of administrators.
fnAdminIndex Administrator account index number.
fnAdminName The user name of the administrator account.
fnAdminAddr An address of a trusted host or subnet fromwhich this administrator account can be used.
fnAdminMask The netmask for fnAdminAddr.
Custom messages:
MIB field Description
fnMessages The number of custommessages on the Fortinet unit.
MIB fields and traps
MIB field Description
fmModel A table of all FortiManager models.
fmTrapHASwitch The FortiManager HA cluster has been re-arranged. A new primary device hasbeen selected and asserted.
Mail Server
Amail server allows the FortiManager to sent email messages, such as notifications when reports are run or specificevents occur. Mail servers can be added, edited, deleted, and tested.
Go to System Settings > Advanced > Mail Server to configure SMTPmail server settings.
If an existing mail server is in use, the delete icon is removed and the mail server entry cannotbe deleted.
FortiManager 6.4.0 Administration Guide 545Fortinet Inc.

System Settings
To add a mail server:
1. Go to System Settings > Advanced > Mail Server.2. Click Create New in the toolbar. The Create NewMail Server Settings pane opens.
3. Configure the following settings and then selectOK to create the mail server.
SMTP Server Name Enter a name for the SMTP server.
Mail Server Enter the mail server information.
SMTP Server Port Enter the SMTP server port number. The default port is 25.
Enable Authentication Select to enable authentication.
Email Account Enter an email account. This option is only accessible when authentication isenabled.
Password Enter the email account password. This option is only accessible whenauthentication is enabled.
To edit a mail server:
1. Go to System Settings > Advanced > Mail Server.2. Double-click on a server, right-click on a server and then select Edit from the menu, or select a server then click Edit
in the toolbar. The Edit Mail Server Settings pane opens.3. Edit the settings as required, and then clickOK to apply the changes.
To test the mail server:
1. Go to System Settings > Advanced > Mail Server.2. Select the server you need to test.3. Click Test from the toolbar, or right-click and select Test.4. Type the email address you would like to send a test email to and clickOK. A confirmation or failure message will be
displayed.5. ClickOK to close the confirmation dialog box.
To delete a mail server or servers:
1. Go to System Settings > Advanced > Mail Server.2. Select the server or servers you need to delete.3. Click Delete in the toolbar, or right-click and select Delete.4. ClickOK in the confirmation box to delete the server.
FortiManager 6.4.0 Administration Guide 546Fortinet Inc.

System Settings
Syslog Server
Go to System Settings > Advanced > Syslog Server to configure syslog server settings. Syslog servers can be added,edited, deleted, and tested.
If an existing syslog server is in use, the delete icon is removed and the server entry cannot bedeleted.
To add a syslog server:
1. Go to System Settings > Advanced > Syslog Server.2. Click Create New in the toolbar. The Create New Syslog Server Settings pane opens.
3. Configure the following settings and then selectOK to create the mail server.
Name Enter a name for the syslog server.
IP address (or FQDN) Enter the IP address or FQDN of the syslog server.
Syslog Server Port Enter the syslog server port number. The default port is 514.
To edit a syslog server:
1. Go to System Settings > Advanced > Syslog Server.2. Double-click on a server, right-click on a server and then select Edit from the menu, or select a server then click Edit
in the toolbar. The Edit Syslog Server Settings pane opens.3. Edit the settings as required, and then clickOK to apply the changes.
To test the syslog server:
1. Go to System Settings > Advanced > Syslog Server.2. Select the server you need to test.3. Click Test from the toolbar, or right-click and select Test.
A confirmation or failure message will be displayed.
To delete a syslog server or servers:
1. Go to System Settings > Advanced > Syslog Server.2. Select the server or servers you need to delete.3. Click Delete in the toolbar, or right-click and select Delete.4. ClickOK in the confirmation box to delete the server or servers.
FortiManager 6.4.0 Administration Guide 547Fortinet Inc.

System Settings
Meta Fields
Meta fields allow administrators to add extra information when configuring, adding, or maintaining FortiGate units oradding new administrators. You can make the fields mandatory or optional, and set the length of the field.
With the fields set as mandatory, administrators must supply additional information when they create a new FortiGateobject, such as an administrator account or firewall policy. Fields for this new information are added to the FortiGate unitdialog boxes in the locations where you create these objects. You can also provide fields for optional additionalinformation.
The one exception to this is the System Administrators object. This object applies only to administrators on theFortiManager unit. All other objects are related to FortiGate units.
Go to System Settings > Advanced > Meta Fields to configure meta fields. Meta fields can be added, edited, and deleted.
Select Expand All or Contract All from the toolbar or right-click menu to view all of or none ofthe meta fields under each object.
To create a new meta field:
1. Go to System Settings > Advanced > Meta Fields.2. Click Create New in the toolbar. The Create NewMeta Field pane opens.
3. Configure the following settings and then selectOK to create the meta field.
Object The object this metadata field applies to: System Administrators, Devices,Device Groups, Chassis, Administrative Domain, Firewall Addresses, FirewallAddress Groups, Firewall Services, Firewall Service Groups, or FirewallPolicy.
FortiManager 6.4.0 Administration Guide 548Fortinet Inc.

System Settings
Name Enter the label to use for the field.
Length Select the maximum number of characters allowed for the field from thedropdown list: 20, 50, or 255.
Importance Select Required to make the field compulsory, otherwise selectOptional.
Status Select Disabled to disable this field. The default selection is Enabled.This field is only available for non-firewall objects.
To edit a meta field:
1. Go to System Settings > Advanced > Meta Fields.2. Double-click on a field, right-click on a field and then select Edit from the menu, or select a field then click Edit in the
toolbar. The Edit Meta Fields pane opens.3. Edit the settings as required, and then clickOK to apply the changes.
TheObject and Name fields cannot be edited.
To delete a meta field or fields:
1. Go to System Settings > Advanced > Meta Fields.2. Select the field or fields you need to delete.3. Click Delete in the toolbar, or right-click and select Delete.4. ClickOK in the confirmation box to delete the field or fields.
The default meta fields cannot be deleted.
Device logs
The FortiManager allows you to log system events to disk. You can control device log file size and the use of theFortiManager unit’s disk space by configuring log rolling and scheduled uploads to a server.
As the FortiManager unit receives new log items, it performs the following tasks:l Verifies whether the log file has exceeded its file size limit.l Checks to see if it is time to roll the log file if the file size is not exceeded.
When a current log file (tlog.log) reaches its maximum size, or reaches the scheduled time, the FortiManager unitrolls the active log file by renaming the file. The file name will be in the form of xlog.N.log (for example,tlog.1252929496.log), where x is a letter indicating the log type and N is a unique number corresponding to the timethe first log entry was received. The file modification time will match the time when the last log was received in the log file.
FortiManager 6.4.0 Administration Guide 549Fortinet Inc.

System Settings
Once the current log file is rolled into a numbered log file, it will not be changed. New logs will be stored in the newcurrent log called tlog.log. If log uploading is enabled, once logs are uploaded to the remote server or downloaded viathe GUI, they are in the following format:
FG3K6A3406600001-tlog.1252929496.log-2017-09-29-08-03-54.gz
If you have enabled log uploading, you can choose to automatically delete the rolled log file after uploading, therebyfreeing the amount of disk space used by rolled log files. If the log upload fails, such as when the FTP server isunavailable, the logs are uploaded during the next scheduled upload.
Log rolling and uploading can be enabled and configured using the GUI or CLI.
This pane is only available when the FortiAnalyzer features are manually enabled. For moreinformation, see FortiAnalyzer Features on page 20.
Configuring rolling and uploading of logs using the GUI
Go to System Settings > Advanced > Device Log Setting to configure device log settings.
Configure the following settings, and then select Apply:
Registered Device Logs
Roll log file when size exceeds Enter the log file size, from 10 to 500MB. Default: 200MB.
Roll log files at scheduled time Select to roll logs daily or weekly.l Daily: select the hour and minute value in the dropdown lists.l Weekly: select the day, hour, and minute value in the dropdownlists.
FortiManager 6.4.0 Administration Guide 550Fortinet Inc.

System Settings
Upload logs using a standard filetransfer protocol
Select to upload logs and configure the following settings.
Upload Server Type Select one of FTP, SFTP, or SCP.
Upload Server IP Enter the IP address of the upload server.
User Name Enter the username used to connect to the upload server.
Password Enter the password used to connect to the upload server.
Remote Directory Enter the remote directory on the upload server where the log will beuploaded.
Upload Log Files Select to upload log files when they are rolled according to settingsselected under Roll Logs, or daily at a specific hour.
Upload rolled files ingzip file format
Select to gzip the logs before uploading. This will result in smaller logsand faster upload times.
Delete files afteruploading
Select to remove device log files from the FortiManager system afterthey have been uploaded to the Upload Server.
Local Device Log
Send the local event logs toFortiAnalyzer / FortiManager
Select to send local event logs to another FortiAnalyzer orFortiManager device.
IP Address Enter the IP address of the FortiAnalyzer or FortiManager.
Upload Option Select to upload logs in real time or at a scheduled time.When selecting a scheduled time, you can specify the hour and minuteto upload logs each day.
Severity Level Select the minimum log severity level from the dropdown list. Thisoption is only available when Upload Option is Realtime.
Reliable logtransmission
Select to use reliable log transmission.
Secure connection Select to use a secure connection for log transmission. This option isonly available when Reliable log transmission is selected.
Configuring rolling and uploading of logs using the CLI
Log rolling and uploading can be enabled and configured using the CLI. For more information, see the FortiManager CLIReference.
Enable or disable log file uploads
Use the following CLI commands to enable or disable log file uploads.
To enable log uploads:
config system log settings
FortiManager 6.4.0 Administration Guide 551Fortinet Inc.

System Settings
config rolling-regularset upload enable
end
To disable log uploads:
config system log settingsconfig rolling-regular
set upload disableend
Roll logs when they reach a specific size
Use the following CLI commands to specify the size, in MB, at which a log file is rolled.
To roll logs when they reach a specific size:
config system log settingsconfig rolling-regular
set file-size <integer>end
Roll logs on a schedule
Use the following CLI commands to configure rolling logs on a set schedule, or never.
To disable log rolling:
config system log settingsconfig rolling-regular
set when noneend
To enable daily log rolling:
config system log settingsconfig rolling-regular
set upload enableset when dailyset hour <integer>set min <integer>
end
To enable weekly log rolling:
config system log settingsconfig rolling-regular
set when weeklyset days {mon | tue | wed | thu | fri | sat | sun}set hour <integer>set min <integer>
end
FortiManager 6.4.0 Administration Guide 552Fortinet Inc.
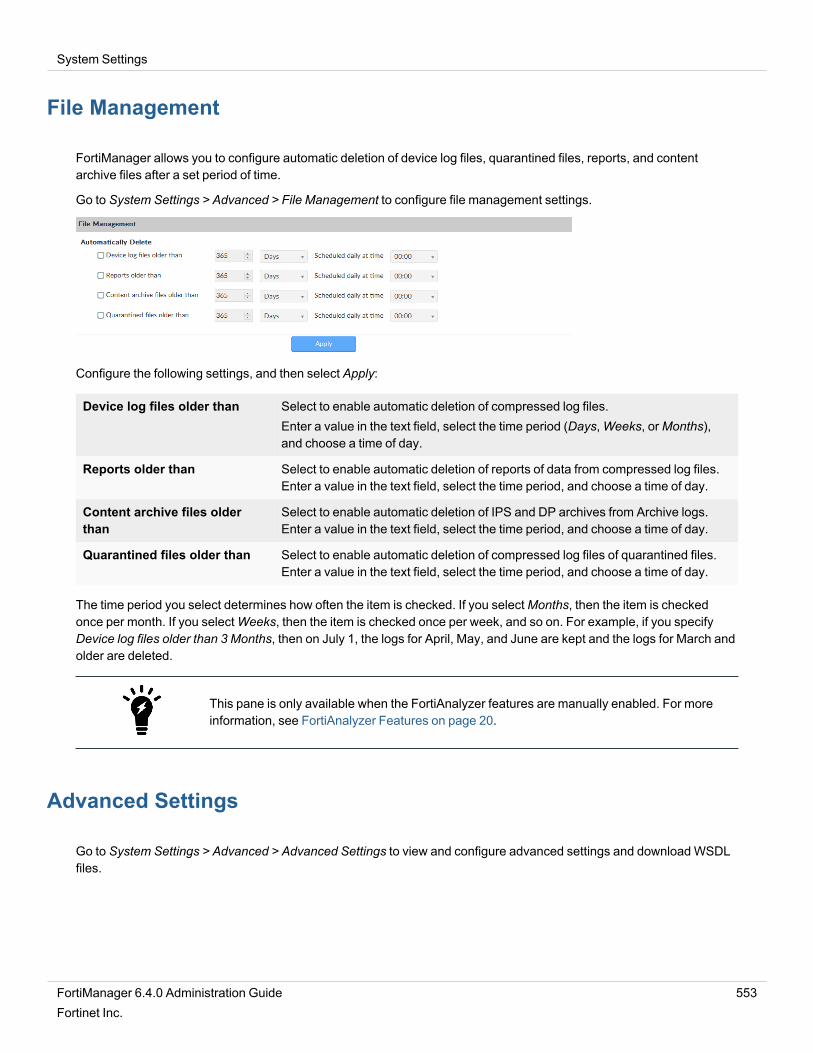
System Settings
File Management
FortiManager allows you to configure automatic deletion of device log files, quarantined files, reports, and contentarchive files after a set period of time.
Go to System Settings > Advanced > File Management to configure file management settings.
Configure the following settings, and then select Apply:
Device log files older than Select to enable automatic deletion of compressed log files.Enter a value in the text field, select the time period (Days,Weeks, orMonths),and choose a time of day.
Reports older than Select to enable automatic deletion of reports of data from compressed log files.Enter a value in the text field, select the time period, and choose a time of day.
Content archive files olderthan
Select to enable automatic deletion of IPS and DP archives from Archive logs.Enter a value in the text field, select the time period, and choose a time of day.
Quarantined files older than Select to enable automatic deletion of compressed log files of quarantined files.Enter a value in the text field, select the time period, and choose a time of day.
The time period you select determines how often the item is checked. If you selectMonths, then the item is checkedonce per month. If you selectWeeks, then the item is checked once per week, and so on. For example, if you specifyDevice log files older than 3 Months, then on July 1, the logs for April, May, and June are kept and the logs for March andolder are deleted.
This pane is only available when the FortiAnalyzer features are manually enabled. For moreinformation, see FortiAnalyzer Features on page 20.
Advanced Settings
Go to System Settings > Advanced > Advanced Settings to view and configure advanced settings and downloadWSDLfiles.
FortiManager 6.4.0 Administration Guide 553Fortinet Inc.

System Settings
Configure the following settings and then select Apply:
Offline Mode EnablingOffline Mode shuts down the protocol used to communicate withmanaged devices. This allows you to configure, or troubleshoot, the FortiManagerwithout affecting managed devices.The FortiManager cannot automaticallyconnect to a FortiGate if offline mode is enabled.
ADOM Mode Select the ADOMmode, either Normal or Advanced.Advanced mode will allow you to assign a VDOM from a single device to adifferent ADOM, but will result in more complicated management scenarios. It isrecommended only for advanced users.
Download WSDL file Select the required WSDL functions then click the Download button to downloadthe WSDL file to your management computer.When selecting Legacy Operations, no other options can be selected.Web services is a standards-based, platform independent, access method forother hardware and software APIs. The file itself defines the format of commandsthe FortiManager will accept as well as the responses to expect. Using the WSDLfile, third-party or custom applications can communicate with the FortiManagerunit and operate it or retrieve information, just as an administrator can from theGUI or CLI.
Chassis Management Enable chassis management, then enter the chassis update interval, from 4 to1440 minutes. Default: 15 minutes.
Configuration ChangesReceived from FortiGate
Select to either automatically accept changes (default) or to prompt theadministrator to accept the changes.
Task List Size Set a limit on the size of the task list. Default: 2000.
Verify Installation Select to preview the installation before proceeding.
Allow Install Interface PolicyOnly
Select to manage and install only interface based policies, instead of all deviceand policy configuration.
Policy Hit Count Enable or disable policy hit counting.
Display Policy & Objects inDual Pane
Enable to display both the Policy Packages andObject Configurations tabs on asingle pane in the Policy & Objectsmodule. See Display options on page 166.
Display Device/Group treeview in Device Manager
Enable to display devices and groups within a single tree menu and include AddDevice and Install Wizard commands in the right click menu.
FortiManager 6.4.0 Administration Guide 554Fortinet Inc.

Administrators
The System Settings > Adminmenu enables you to configure administrator accounts, access profiles, remoteauthentication servers, and adjust global administrative settings for the FortiManager unit.
Administrator accounts are used to control access to the FortiManager unit. Local and remote authentication issupported, as well as two-factor authentication. Administrator profiles define different types of administrators and thelevel of access they have to the FortiManager unit, as well as its authorized devices.
If you use ServiceNow apps for FortiManager, we recommend creating an account to use for integration with the app.This account does not need to be a Super_User account and you don't need to set trusted hosts for this account.
Global administration settings, such as the GUI language and password policies, can be configured on the AdminSettings pane. See Global administration settings on page 589 for more information.
In workflow mode, approval matrices can be create and managed on the Approval Matrix pane. SeeWorkflow approvalon page 474 for more information.
This section contains the following topics:
l Trusted hosts on page 555l Monitoring administrators on page 556l Disconnecting administrators on page 556l Managing administrator accounts on page 556l Administrator profiles on page 572l Authentication on page 579l Global administration settings on page 589l Two-factor authentication on page 593
Trusted hosts
Setting trusted hosts for all of your administrators increases the security of your network by further restrictingadministrative permissions. In addition to knowing the password, an administrator must connect only through the subnetor subnets you specify. You can even restrict an administrator to a single IP address if you define only one trusted hostIP address with a netmask of 255.255.255.255.
When you set trusted hosts for all administrators, the FortiManager unit does not respond to administrative accessattempts from any other hosts. This provides the highest security. If you leave even one administrator unrestricted, theunit accepts administrative access attempts on any interface that has administrative access enabled, potentiallyexposing the unit to attempts to gain unauthorized access.
The trusted hosts you define apply to both the GUI and to the CLI when accessed through SSH. CLI access through theconsole connector is not affected.
If you set trusted hosts and want to use the Console Access feature of the GUI, you must alsoset 127.0.0.1/255.255.255.255 as a trusted host.
FortiManager 6.4.0 Administration Guide 555Fortinet Inc.

Administrators
Monitoring administrators
The Admin Session List lets you view a list of administrators currently logged in to the FortiManager unit.
To view logged in administrators:
1. Go to System Settings > Dashboard.2. In the System Information widget, in the Current Administrators field, click the Current Session List button. The
Admin Session List opens in the widget.The following information is available:
User Name The name of the administrator account. Your session is indicated by (current).
IP Address The IP address where the administrator is logging in from. This field also displays thelogon type (GUI, jsconsole, or SSH).
Start Time The date and time the administrator logged in.
Time Out (mins) The maximum duration of the session in minutes (1 to 480 minutes).
Disconnecting administrators
Administrators can be disconnected from the FortiManager unit from the Admin Session List.
To disconnect administrators:
1. Go to System Settings > Dashboard.2. In the System Information widget, in the Current Administrators field, click the Current Session List button. The
Admin Session List opens in the widget.3. Select the administrator or administrators you need to disconnect.4. Click Delete in the toolbar, or right-click and select Delete.
The selected administrators will be automatically disconnected from the FortiManager device.
Managing administrator accounts
Go to System Settings > Admin > Administrator to view the list of administrators and manage administrator accounts.
FortiManager 6.4.0 Administration Guide 556Fortinet Inc.

Administrators
Only administrators with the Super_User profile can see the complete administrators list. If you do not have certainviewing permissions, you will not see the administrator list. When ADOMs are enabled, administrators can only accessthe ADOMs they have permission to access.
The following options are available:
Create New Create a new administrator. See Creating administrators on page 558.
Edit Edit the selected administrator. See Editing administrators on page 562.
Clone Clone the selected administrator.
Delete Delete the selected administrator or administrators. See Deleting administratorson page 563.
Table View/Tile View Change the view of the administrator list.Table view shows a list of the administrators in a table format. Tile view shows aseparate card for each administrator in a grid pattern.
Column Settings Change the displayed columns.
Search Search the administrators.
Change Password Change the selected administrator's password. This option is only available fromthe right-click menu. See Editing administrators on page 562.
The following information is shown:
Seq.# The sequence number.
Name The name the administrator uses to log in.
Type The user type, as well as if the administrator uses a wildcard.
Profile The profile applied to the administrator. See Administrator profiles on page 572
ADOMs The ADOMs the administrator has access to or is excluded from.
Policy Packages The policy packages the administrator can access.
Comments Comments about the administrator account. This column is hidden by default.
Trusted IPv4 Hosts The IPv4 trusted host(s) associated with the administrator. See Trusted hosts onpage 555.
FortiManager 6.4.0 Administration Guide 557Fortinet Inc.

Administrators
Trusted IPv6 Hosts The IPv6 trusted host(s) associated with the administrator. See Trusted hosts onpage 555. This column is hidden by default.
Contact Email The contact email associated with the administrator. This column is hidden bydefault.
Contact Phone The contact phone number associated with the administrator. This column ishidden by default.
Creating administrators
To create a new administrator account, you must be logged in to an account with sufficient privileges, or as a super useradministrator.
You need the following information to create an account:
l Which authentication method the administrator will use to log in to the FortiManager unit. Local, remote, and PublicKey Infrastructure (PKI) authentication methods are supported.
l What administrator profile the account will be assigned, or what system privileges the account requires.l If ADOMs are enabled, which ADOMs the administrator will require access to.l If using trusted hosts, the trusted host addresses and network masks.
For remote or PKI authentication, the authentication must be configured before you create theadministrator. See Authentication on page 579 for details.
FortiManager 6.4.0 Administration Guide 558Fortinet Inc.

Administrators
To create a new administrator:
1. Go to System Settings > Admin > Administrators.2. In the toolbar, click Create New to display the New Administrator pane.
3. Configure the following settings, and then clickOK to create the new administrator.
User Name Enter the name of the administrator will use to log in.
Avatar Apply a custom image to the administrator.Click Add Photo to select an image already loaded to the FortiManager, or toload an new image from the management computer.If no image is selected, the avatar will use the first letter of the user name.
Comments Optionally, enter a description of the administrator, such as their role, location,or the reason for their account.
Admin Type Select the type of authentication the administrator will use when logging intothe FortiManager unit. One of: LOCAL, RADIUS, LDAP, TACACS+, PKI, orGroup. See Authentication on page 579 for more information.
FortiManager 6.4.0 Administration Guide 559Fortinet Inc.

Administrators
Server or Group Select the RADIUS server, LDAP server, TACACS+ server, or group, asrequired.The server must be configured prior to creating the new administrator.This option is not available if the Admin Type is LOCAL or PKI.
Match all users on remoteserver
Select this option to automatically add all users from a LDAP server specifiedin Admin>Remote Authentication Server. All users specified in theDistinguished Name field in the LDAP server will be added as FortiManagerusers with the selected Admin Profile.If this option is not selected, the User Name specified must exactly match theLDAP user specified on the LDAP server.This option is not available if the Admin Type is LOCAL or PKI.
Subject Enter a comment for the PKI administrator.This option is only available if the Admin Type is PKI.
CA Select the CA certificate from the dropdown list.This option is only available if the Admin Type is PKI.
Required two-factorauthentication
Select to enable two-factor authentication.This option is only available if the Admin Type is PKI.
New Password Enter the password.This option is not available ifWildcard is selected.If the Admin Type is PKI, this option is only available when Require two-factorauthentication is selected.If the Admin Type is RADIUS, LDAP, or TACACS+, the password is only usedwhen the remote server is unreachable.
Confirm Password Enter the password again to confirm it.This option is not available ifWildcard is selected.If the Admin Type is PKI, this option is only available when Require two-factorauthentication is selected.
Force this administrator tochange password upon nextlog on.
Force the administrator to change their password the next time that they log into the FortiManager.This option is only available if Password Policy is enabled in Admin Settings.See Password policy on page 591.
Admin Profile Select an administrator profile from the list. The profile selected determinesthe administrator’s access to the FortiManager unit’s features. SeeAdministrator profiles on page 572.
JSON API Access Select the permission for JSON API Access. Select Read-Write, Read, orNone. The default is None.
Administrative Domain Choose the ADOMs this administrator will be able to access.l All ADOMs: The administrator can access all the ADOMs.l All ADOMs except specified ones: The administrator cannot access theselected ADOMs.
l Specify: The administrator can access the selected ADOMs. Specifying
FortiManager 6.4.0 Administration Guide 560Fortinet Inc.

Administrators
the ADOM shows the Specify Device Group to Access check box. Selectthe Specify Device Group to Access check box and select the DeviceGroup this administrator is allowed to access. The newly createdadministrator will only be able to access the devices within the DeviceGroup and sub-groups.
If the Admin Profile is Super_User, then this setting is All ADOMs.This field is available only if ADOMs are enabled. See Administrative Domainson page 508.
Policy Package Access Choose the policy packages this administrator will have access to.l All Packages: The administrator can access all the packages.l Specify: The administrator can access the selected packages or packagefolder. If you specify a policy package folder, the administrator can accessthe policy packages in the selected folder and all sub-folders.
This option is only available when the Admin Profile is not a Restricted Adminprofile. See Restricted administrators on page 563.
Web Filter Profile Select the web filter profiles that the restricted administrator will be able to edit.This option is only available when the Admin Profile is set to a RestrictedAdmin profile. Security profiles can be configured by going to Policy & Objects> Object Configuration. See Managing objects and dynamic objects on page221.
IPS Sensor Select the IPS profiles that the restricted administrator will be able to edit.This option is only available when the Admin Profile is set to a RestrictedAdmin profile. Security profiles can be configured by going to Policy & Objects> Object Configuration. See Managing objects and dynamic objects on page221.
Application Sensor Select the application control profiles that the restricted administrator will beable to edit.This option is only available when the Admin Profile is set to a RestrictedAdmin profile. Security profiles can be configured by going to Policy & Objects> Object Configuration. See Managing objects and dynamic objects on page221.
Trusted Hosts Optionally, turn on trusted hosts, then enter their IP addresses and netmasks.Up to ten IPv4 and ten IPv6 hosts can be added.See Trusted hosts on page 555 for more information.
Meta Fields Optionally, enter the new administrator's email address and phone number.The email address is also used for workflow session approval notifications, ifenabled. SeeWorkflow mode on page 473.
Advanced Options Configure advanced options, see Advanced options below.For more information on advanced options, see the FortiManager CLIReference.
FortiManager 6.4.0 Administration Guide 561Fortinet Inc.

Administrators
Advanced options
Option Description Default
change-password Enable or Disable changing password. disable
ext-auth-accprofile-override
Enable or Disable overriding the account profile by administratorsconfigured on a Remote Authentication Server.
disable
ext-auth-adom-override Enable or Disable overriding the ADOM by administrators configuredon a Remote Authentication Server.
disable
ext-auth-group-match Specify the group configured on a Remote Authentication Server. -
first-name Specify the first name. -
last-name Specify the last name. -
mobile-number Specify the mobile number. -
pager-number Specify the pager number. -
restrict-access Enable or Disable restricted access. disable
Editing administrators
To edit an administrator, you must be logged in as a super user administrator. The administrator's name cannot beedited. An administrator's password can be changed using the right-click menu, if the password is not a wildcard.
To edit an administrator:
1. Go to System Settings > Admin > Administrators.2. Double-click on an administrator, right-click on an administrator and then select Edit from the menu, or select the
administrator then click Edit in the toolbar. The Edit Administrator pane opens.3. Edit the settings as required, and then selectOK to apply the changes.
To change an administrator's password:
1. Go to System Settings > Admin > Administrators.2. Right-click on an administrator and select Change Password from the menu. The Change Password dialog box
opens.3. If you are editing the admin administrator's password, enter the old password in theOld Password field.4. Enter the new password for the administrator in the New Password and Confirm Password fields.5. SelectOK to change the administrator's password.
The current administrator's password can also be changed from the admin menu in the GUIbanner. See GUI overview on page 16 for information.
FortiManager 6.4.0 Administration Guide 562Fortinet Inc.

Administrators
Deleting administrators
To delete an administrator or administrators, you must be logged in as a super user administrator.
You cannot delete an administrator that is currently logged in to the device.
The admin administrator can only be deleted using the CLI.
To delete an administrator or administrators:
1. Go to System Settings > Admin > Administrators.2. Select the administrator or administrators you need to delete.3. Click Delete in the toolbar, or right-click and select Delete.4. SelectOK in the confirmation box to delete the administrator or administrators.
To delete an administrator using the CLI:
1. Open a CLI console and enter the following command:config system admin user
delete <username>end
Restricted administrators
Restricted administrator accounts are used to delegate management of Web Filter, IPS, and Application Control profiles,and then install those objects to their assigned ADOM.
Restricted administrators cannot be used when workflow mode is enabled. SeeWorkflowmode on page 473.
FortiManager 6.4.0 Administration Guide 563Fortinet Inc.

Administrators
When a restricted administrators logs in to the FortiManager, they enter the Restricted Admin Mode. This mode consistsof a simplified GUI where they can make changes to the profiles that they have access to, and then install those changesusing the Install command in the toolbar, to their designated ADOM.
To create a restricted administrator:
1. Create an administrator profile with the Type set to Restricted Admin and the required permissions selected. SeeCreating administrator profiles on page 576.
2. Create a new administrator and select the restricted administrator profile for the Admin Profile, then select thespecific ADOM and profiles that the administrator can manage. See Creating administrators on page 558
Restricted administrators can create new custom signatures for Intrusion Prevention andApplication Control.
To create a custom signature for Intrusion Prevention:
1. Log on as a Restricted Administrator.2. Go to Intrusion Prevention > Custom Signatures.
FortiManager 6.4.0 Administration Guide 564Fortinet Inc.

Administrators
3. Click Create New. The Create New Custom Signature screen appears.
4. Specify the values for the following and clickOK.l Name - specify a name for the custom signature.l Signature - add a custom signature.l Status - toggle the status to ON.
To create a custom signature for Application Control:
1. Log on as a Restricted Administrator.2. Go to Application Control > Custom Signatures.3. Click Create New. The Create New Custom Application Signature screen appears.
4. Specify the values for the following and clickOK.l Name - specify a name for the custom signature.l Signature - add a custom signature.l Comment - toggle the status to ON.
Web Filter
Web filtering restricts or controls user access to web resources.
To create a profile:
1. Log in as a Restricted Administrator.2. In the tree menu, selectWeb Filter, and then select a profile category.3. In the toolbar, click Create New.4. Configure the profile settings, and clickOK.
FortiManager 6.4.0 Administration Guide 565Fortinet Inc.

Administrators
To clone an existing profile, right-click the profile in the content pane, and select Clone.
To edit a profile:
1. Log in as a Restricted Administrator.2. In the tree menu, selectWeb Filter, and then select a profile category.3. In the content pane select a profile and take one of the following actions:
l In the toolbar, click Edit.l Right-click the profile, and select Edit.
4. Edit the settings, and clickOK.
Name The profile name.
Comment Optionally, enter a description of the profile.
Advanced Options Configure advanced options, including:l https-replacemsg: enable/disablel replacemsg-group: select a group from the listl web-filter-activex-log: enable/disablel web-filter-command-block-log: enable/disablel web-filter-cookie-removal-log: enable/disablel web-filter-js-log: enable/disablel web-filter-jscript-log: enable/disablel web-filter-referer-log: enable/disablel web-filter-unknown-log: enable/disablel web-filter-vbs-log: enable/disable
FortiManager 6.4.0 Administration Guide 566Fortinet Inc.

Administrators
l wisp: enable/disablel wisp-algorithm: auto-learning, primary-secondary, or round-robin
Inspection Mode Select Proxy or Flow Based.
Log all URLs Select to log all URLs.
FortiGuard Categories Select FortiGuard categories.Right-click on a category to change the action: Allow, Block,Warning,Monitor,Authenticate, or, if available, Disable.Use the filter drop-down menu to filter the categories shown in the table based onthe action.
Allow Users to overrideblocked categories
Select to allow users to override blocked categories.This option is only available if Inspection Mode is Proxy.
Override Permit Select the override permits: bannedword-override, contenttype-check-override,fortiguard-wf-override, and urlfilter-override.
Groups that canoverride
Select groups that can override blocked categories.
Profile can switchto
Select profiles that the user can switch to.
Switch applies to Select what the switch applies to: ask, browser, ip, user, or user-group.
Switch Duration Select the switch duration, either ask or constant.
Duration Enter the duration of the switch.This option is only available if Switch Duration is constant.
Enforce 'Safe Search' onGoogle, Yahoo!, Bing, Yandex
Select to enforce Safe Search.This option is only available if Inspection Mode is Proxy.
Restrict YouTube Access Select to restrict access to YouTube. Select Strict orModerate.This option is only available if Inspection Mode is Proxy.
Log all search keywords Select to log all search keywords.This option is only available if Inspection Mode is Proxy.
Block Invalid URLs Select to block invalid URLs.This option is only available if Inspection Mode is Proxy.
URL Filter Select to enable URL filters.Select URL filters from the dropdown list, and/or create and manage filters in thetable.
Block malicious URLsdiscovered by FortiSandbox
Select to block URLs that FortiSandbox deems malicious.
Web Content Filter Select to apply web content filters. Click Add to add filters to the table. Edit anddelete filters as required.
FortiManager 6.4.0 Administration Guide 567Fortinet Inc.

Administrators
Allow Websites When a RatingError Occurs
Select to allow access to websites if a rating error occurs.
Rate URLs by Domain and IPAddress
Select to rate URLs by both their domain and IP address.
Block HTTP Redirects byRating
Select to block HTTP redirects based on the site's rating.This option is only available if Inspection Mode is Proxy.
Rate Images by URL (Blockedimages will be replaced withblanks)
Select to rate images based on the URL.This option is only available if Inspection Mode is Proxy.
Restrict Google accountusage to specific domains
Select to restrict Google account usage to specific domains. Click Add to add thedomains to the table.This option is only available if Inspection Mode is Proxy.
Provide Details for BlockedHTTP 4xx and 5xx Errors
Select to receive details about blocked HTTP errors.This option is only available if Inspection Mode is Proxy.
HTTP POST Action: Block Select to set the HTTP POST action to block.This option is only available if Inspection Mode is Proxy.
Remove Java Applet Filter Select to remove the Java applet filter.This option is only available if Inspection Mode is Proxy.
Remove ActiveX Filter Select to remove the ActiveX filter.This option is only available if Inspection Mode is Proxy.
Remove Cookie Filter Select to remove the cookie filter.This option is only available if Inspection Mode is Proxy.
Intrusion Prevention
Use intrusion prevention to detect and block network-based attacks.
To create a profile:
1. Log in as a Restricted Administrator.2. In the tree menu, select Intrusion Prevention, and then select a profile category.3. In the toolbar, click Create New.4. Configure the profile settings, and clickOK.
To clone an existing profile, right-click the profile in the content pane, and select Clone.
To edit a profile:
1. Log in as a Restricted Administrator.2. In the tree menu, select Intrusion Prevention, and then select a profile category.
FortiManager 6.4.0 Administration Guide 568Fortinet Inc.

Administrators
3. In the content pane, select a profile, and take one of the following actions:l In the toolbar, click Edit.l Right-click the profile, and select Edit.
4. Edit the settings, and clickOK.
Name The profile name.
Comment Optionally, enter a description of the profile.
IPS Signatures Click Add Signatures to add IPS signatures to the table. The signatures list can befiltered to simplify adding them.To add or edit a signature's IP exemptions, select a signature then click Edit IPExemptions.
FortiManager 6.4.0 Administration Guide 569Fortinet Inc.

Administrators
Right-click on a signature to change the action (Pass,Monitor, Block, Reset,Default, orQuarantine), and to enable or disable Packet Logging.
IPS Filters Click Add Filter to add IPS filters to the table. The filters list can be searched andfiltered to simplify adding them.Right-click on a signature to change the action (Pass,Monitor, Block, Reset,Default, orQuarantine), and to enable or disable Packet Logging.
Rate Based Signatures Enable the required rate based signatures, then configure its options: Threshold,Duration, Track By, Action, and Block Duration.
Advanced Options Enable or disable blocking malicious URLs.
Application Control
Application control sensors specify what action to take with network traffic generated by a large number of applications.
To create a profile:
1. Log in as a Restricted Administrator.2. In the tree menu, select Application Control, and then select a profile category.3. In the toolbar, click Create New.4. Configure the profile settings, and clickOK.
To clone an existing profile, right-click the profile in the content pane, and select Clone.
To edit a profile:
1. Log in as a Restricted Administrator.2. In the tree menu, select Application Control, and then select a profile category.3. In the content pane select a profile, and take one of the following actions:
l In the toolbar, click Edit.l Right-click the profile, and select Edit.
4. Edit the settings, and clickOK.
FortiManager 6.4.0 Administration Guide 570Fortinet Inc.

Administrators
Name The profile name.
Comment Optionally, enter a description of the profile.
Categories Select the action to take for each of the available categories: Allow,Monitor,Block, Traffic Shaping,Quarantine, or Reset.
Application Overrides Click Add Signatures to add application override signatures to the table. Thesignatures list can be filtered to simplify adding them.Right-click on a signature to change the action (Allow,Monitor, Block, TrafficShaping,Quarantine, or Reset).
Filter Overrides Click Add Filter to add filter overrides to the table. The filters list can be searchedand filtered to simplify adding them.Right-click on an override to change the action (Allow,Monitor, Block, TrafficShaping,Quarantine, or Reset).
Deep Inspection of CloudApplications
Select to enable deep inspections of cloud applications.
Allow and Log DNS Traffic Select to allow and log DNS traffic.
Replacement Messages forHTTP-based Applications
Select to enable replacement messages for HTTP based applications.
Logging of Other Applications Select to enable the logging of other applications.
Logging of UnknownApplications
Select to enable the logging of unknown applications.
Advanced Options Configure advanced options:l p2p-block-list: Select from bittorent, edonkey, and skype.l replacemsg-group: Select an option from the dropdown list.
FortiManager 6.4.0 Administration Guide 571Fortinet Inc.

Administrators
Installing profiles
Restricted administrators can install the profiles they can access to their designated devices. Administrators can alsoview where a profile is used.
Restricted administrators must have Allow to Install enabled to install a profile. See Creatingadministrator profiles on page 576.
To view where a profile is used:
1. Log in as a Restricted Administrator.2. In the tree menu, select a profile.3. In the content pane, right-click a profile, and selectWhere Used.4. Click Close.
To install a profile:
Use this option to install a modified profile to specified devices, such as a test environment.
1. Log in as a Restricted Administrator.2. In the tree menu, select a profile.3. In the content pane, right-click a profile, and select Install. The Select Installation Targets window opens.4. In the Available Entries pane, double-click a device to add it to the Selected Entries pane.5. ClickOK. The Install window opens and a progress bar appears at the top of the page.6. Click Close.
To install all modified profiles:
1. Log in as a Restricted Administrator.2. At the top-left side of the page, clickQuick Install3. ClickOK. The Install window opens and a progress bar appears at the top of the page.4. Click Close.
Administrator profiles
Administrator profiles are used to control administrator access privileges to devices or system features. Profiles areassigned to administrator accounts when an administrator is created. The profile controls access to both theFortiManager GUI and CLI.
FortiManager 6.4.0 Administration Guide 572Fortinet Inc.

Administrators
There are four predefined system profiles:
Restricted_User Restricted user profiles have no system privileges enabled, and have read-onlyaccess for all device privileges.
Standard_User Standard user profiles have no system privileges enabled, and have read/writeaccess for all device privileges.
Super_User Super user profiles have all system and device privileges enabled. It cannot beedited.
Package_User Package user profile have read/write policy and objects privileges enabled, andhave read-only access for system and other privileges.
These profiles cannot be deleted, but standard and restricted profiles can be edited. New profiles can also be created asrequired. Only super user administrators can manage administrator profiles. Package user administrators can view theprofile list.
Go to System Settings > Admin > Profile to view and manage administrator profiles.
The following options are available:
Create New Create a new administrator profile. See Creating administrator profiles on page576.
Edit Edit the selected profile. See Editing administrator profiles on page 579.
Clone Clone the selected profile. See Cloning administrator profiles on page 579.
Delete Delete the selected profile or profiles. See Deleting administrator profiles on page579.
Search Search the administrator profiles list.
The following information is shown:
Name The name the administrator uses to log in.
Type The profile type, either System Admin or Restricted Admin.
Description A description of the system and device access permissions allowed for theselected profile.
FortiManager 6.4.0 Administration Guide 573Fortinet Inc.

Administrators
Permissions
The below table lists the default permissions for the predefined administrator profiles.
When Read-Write is selected, the user can view and make changes to the FortiManager system. When Read-Only isselected, the user can only view information. When None is selected, the user can neither view or make changes to theFortiManager system.
Setting Predefined Administrator Profile
Super User Standard User Restricted User Package User
System Settingssystem-setting
Read-Write None None Read-Only
Administrative Domainadom-switch
Read-Write Read-Write None Read-Write
FortiGuard Centerfgd_center
Read-Write None None Read-Only
License Managementfgd-center-licensing
Read-Write None None Read-Only
FirmwareManagementfgd-center-fmw-mgmt
Read-Write None None Read-Only
Advancedfgd-center-advanced
Read-Write None None Read-Only
Device Managerdevice-manager
Read-Write Read-Write Read-Only Read-Write
Add/Delete/EditDevices/Groupsdevice-op
Read-Write Read-Write None Read-Write
RetrieveConfiguration fromDevicesconfig-retrieve
Read-Write Read-Write Read-Only Read-Only
Revert Configurationfrom Revision Historyconfig-revert
Read-Write Read-Write Read-Only Read-Only
Delete DeviceRevision
Read-Write Read-Write Read-Only Read-Write
FortiManager 6.4.0 Administration Guide 574Fortinet Inc.

Administrators
Setting Predefined Administrator Profile
Super User Standard User Restricted User Package User
device-revision-deletion
Terminal Accessterm-access
Read-Write Read-Write Read-Only Read-Only
Manage DeviceConfigurationsdevice-config
Read-Write Read-Write Read-Only Read-Write
ProvisioningTemplatesdevice-profile
Read-Write Read-Write Read-Only Read-Write
SD-WANdevice-wan-link-load-balance
Read-Write Read-Write Read-Only Read-Write
Policy & Objectspolicy-objects
Read-Write Read-Write Read-Only Read-Write
Global PolicyPackages & Objectsglobal-policy-packages
Read-Write Read-Write None Read-Write
Assignmentassignment
Read-Write None None Read-Only
Policy Packages &Objectsadom-policy-packages
Read-Write Read-Write Read-Only Read-Write
Policy Checkconsistency-check
Read-Write Read-Write Read-Only Read-Only
Edit InstallationTargetsset-install-targets
Read-Write Read-Write Read-Only Read-Write
Lock/Unlock ADOMadom-lock
Read-Write Read-Write Read-Only Read-Write
Lock/Unlock Device/PolicyPackagedevice-policy-package-lock
Read-Write Read-Write Read-Only Read-Write
FortiManager 6.4.0 Administration Guide 575Fortinet Inc.

Administrators
Setting Predefined Administrator Profile
Super User Standard User Restricted User Package User
Install Policy Package or DeviceConfigurationdeploy-management
Read-Write Read-Write Read-Only Read-Write
Import Policy Packageimport-policy-packages
Read-Write Read-Write Read-Only Read-Write
Interface Mappingintf-mapping
Read-Write Read-Write Read-Only Read-Write
AP Managerdevice-ap
Read-Write Read-Write Read-Only Read-Write
FortiClient Managerdevice-forticlient
Read-Write Read-Write Read-Only Read-Write
FortiSwitch Managerdevice-fortiswitch
Read-Write Read-Write Read-Only Read-Write
VPN Managervpn-manager
Read-Write Read-Write Read-Only Read-Write
FortiViewlog-viewer
Read-Write Read-Write Read-Only Read-Only
Log View/FortiViewlog-viewer
Read-Write Read-Write Read-Only Read-Only
Incidents & Eventsevent-management
Read-Write Read-Write Read-Only Read-Only
Reportsreport-viewer
Read-Write Read-Write Read-Only Read-Only
CLI only settings
realtime-monitor Read-Write Read-Write Read-Only Read
read-passwd Read-Write None None Read-Only
The FortiView setting is only available when FortiAnalyzer features are disabled. The LogView/FortiView, Incidents & Events, and Reports settings are only available whenFortiAnalyzer features are enabled. See FortiAnalyzer Features on page 20.
Creating administrator profiles
To create a new administrator profile, you must be logged in to an account with sufficient privileges, or as a super useradministrator.
FortiManager 6.4.0 Administration Guide 576Fortinet Inc.

Administrators
To create a custom administrator profile:
1. Go to System Settings > Admin > Profile.2. Click Create New in the toolbar. The New Profile pane is displayed.
FortiManager 6.4.0 Administration Guide 577Fortinet Inc.

Administrators
3. Configure the following settings:
Profile Name Enter a name for this profile.
Description Optionally, enter a description for this profile. While not arequirement, a description can help to know what the profiles is for,or the levels it is set to.
Type Select the type of profile, either System Admin or RestrictedAdmin.
Permission Select which permissions to enable fromWeb Filter , ApplicationControl, and Intrusion Prevention.This option is only available when Type is Restricted Admin. SeeRestricted administrators on page 563 for information.
Allow to Install Allows restricted administrators to install Web Filters, IntrusionPrevention, and Application Control profiles. See Installing profileson page 572.
Permissions Select None, Read Only, or Read-Write access for the categoriesas required.This option is only available when Type is System Admin.
Privacy Masking Enable/disable privacy masking.This option is only available when FortiAnalyzer features areenabled.
Masked Data Fields Select the fields to mask: Destination Name, Source IP,Destination IP, User, Source Name, Email,Message, and/orSource MAC.
Data Mask Key Enter the data masking encryption key. You need the Data MaskKey to see the original data.
Data Unmasked Time(0-365 Days)
Enter the number of days the user assigned to this profile can seeall logs without masking.The logs are masked if the time period in the Log View toolbar isgreater than the number of days in the Data Masked Time field.
l Only integers between 0-365 are supported.l Time frame masking does not apply to real time logs.
l Time frame masking applies to custom view and drill-down data.
4. ClickOK to create the new administrator profile.
To apply a profile to an administrator:
1. Go to System Settings > Administrators.2. Create a new administrator or edit an existing administrator. The Edit Administrator pane is displayed.
FortiManager 6.4.0 Administration Guide 578Fortinet Inc.

Administrators
3. From the Admin Profile list, select a profile.
Editing administrator profiles
To edit an administrator profile, you must be logged in to an account with sufficient privileges, or as a super useradministrator. The profile's name cannot be edited. The Super_User profile cannot be edited, and the predefined profilescannot be deleted.
To edit an administrator:
1. Go to System Settings > Admin > Profile.2. Double-click on a profile, right-click on a profile and then select Edit from the menu, or select the profile then click
Edit in the toolbar. The Edit Profile pane opens.3. Edit the settings as required, and then selectOK to apply the changes.
Cloning administrator profiles
To clone an administrator profile, you must be logged in to an account with sufficient privileges, or as a super useradministrator.
To edit an administrator:
1. Go to System Settings > Admin > Profile.2. Right-click on a profile and select Clone from the menu, or select the profile then click Clone in the toolbar. The
Clone Profile pane opens.3. Edit the settings as required, and then selectOK to apply the changes.
Deleting administrator profiles
To delete a profile or profiles, you must be logged in to an account with sufficient privileges, or as a super useradministrator. The predefined profiles cannot be deleted.
To delete a profile or profiles:
1. Go to System Settings > Admin > Profile.2. Select the profile or profiles you need to delete.3. Click Delete in the toolbar, or right-click and select Delete.4. SelectOK in the confirmation box to delete the profile or profiles.
Authentication
The FortiManager system supports authentication of administrators locally, remotely with RADIUS, LDAP, or TACACS+servers, and using PKI. Remote authentication servers can also be added to authentication groups that administratorscan use for authentication.
FortiManager 6.4.0 Administration Guide 579Fortinet Inc.

Administrators
To use PKI authentication, you must configure the authentication before you create the administrator accounts. SeePublic Key Infrastructure on page 580 for more information.
To use remote authentication servers, you must configure the appropriate server entries in the FortiManager unit foreach authentication server in your network. New LDAP remote authentication servers can be added and linked to allADOMs or specific ADOMs. See LDAP servers on page 582, RADIUS servers on page 584, TACACS+ servers on page586, and Remote authentication server groups on page 586 for more information.
Public Key Infrastructure
Public Key Infrastructure (PKI) authentication uses X.509 certificate authentication library that takes a list of peers, peergroups, and user groups and returns authentication successful or denied notifications. Administrators only need a validX.509 certificate for successful authentication; no username or password is necessary.
To use PKI authentication for an administrator, you must configure the authentication before you create the administratoraccounts. You will also need the following certificates:
l an X.509 certificate for the FortiManager administrator (administrator certificate)l an X.509 certificate from the Certificate Authority (CA) which has signed the administrator’s certificate (CACertificate)
To get the CA certificate:
1. Log into your FortiManager.2. Go to Certificate Management > Certificate Authorities > Local CAs.3. Select the certificate and select Export in the toolbar to save the ca_fortinet.com CA certificate to your
management computer. The saved CA certificate’s filename is ca_fortinet.com.crt.
To get the administrator certificate:
1. Log into your FortiManager.2. Go to Certificate Management > End Entities > Users.3. Select the certificate and select Export in the toolbar to save the administrator certificate to your management
computer. The saved CA certificate’s filename is admin_fortinet.com.p12. This PCKS#12 file is passwordprotected. You must enter a password on export.
To import the administrator certificate into your browser:
1. In Mozilla Firefox, go toOptions > Advanced > Certificates > View Certificates > Import.2. Select the file admin_fortinet.com.p12 and enter the password used in the previous step.
To import the CA certificate into the FortiManager:
1. Log into your FortiManager.2. Go to System Settings > Certificates > CA Certificates.3. Click Import, and browse for the ca_fortinet.com.crt file you saved to your management computer, or drag
and drop the file onto the dialog box. The certificate is displayed as CA_Cert_1.
FortiManager 6.4.0 Administration Guide 580Fortinet Inc.

Administrators
To create a new PKI administrator account:
1. Go to System Settings > Admin > Administrator.2. Click Create New. The New Administrator dialog box opens.
See Creating administrators on page 558 for more information.3. Select PKI for the Admin Type.4. Enter a comment in the Subject field for the PKI administrator.5. Select the CA certificate from the dropdown list in the CA field.6. ClickOK to create the new administrator account.
PKI authentication must be enabled via the FortiManager CLI with the following commands:config system global
set clt-cert-req enableend
When connecting to the FortiManager GUI, you must use HTTPS when using PKI certificateauthentication.
When clt-cert-req is set to optional, the user can use certificate authentication or usercredentials for GUI login.
Managing remote authentication servers
The FortiManager system supports remote authentication of administrators using LDAP, RADIUS, and TACACS+remote servers. To use this feature, you must configure the appropriate server entries for each authentication server inyour network, see LDAP servers on page 582, RADIUS servers on page 584, and TACACS+ servers on page 586 formore information.
Remote authentication servers can be added, edited, deleted, and added to authentication groups (CLI only).
Go to System Settings > Admin > Remote Authentication Server to manage remote authentication servers.
The following options are available:
Create New Add an LDAP, RADIUS, or TACACS+ remote authentication server. See LDAPservers on page 582, RADIUS servers on page 584, and TACACS+ servers onpage 586.
FortiManager 6.4.0 Administration Guide 581Fortinet Inc.

Administrators
Edit Edit the selected remote authentication server. See Editing remote authenticationservers on page 582.
Delete Delete the selected remote authentication server or servers. See Deleting remoteauthentication servers on page 582.
The following information is displayed:
Name The name of the server.
Type The server type: LDAP, RADIUS, or TACACS+.
ADOM The administrative domain(s) which are linked to the remote authenticationserver.
Details Details about the server, such as the IP address.
Editing remote authentication servers
To edit a remote authentication server, you must be logged in to an account with sufficient privileges, or as a super useradministrator. The server's name cannot be edited.
To edit a remote authentication server:
1. Go to System Settings > Admin > Remote Authentication Server.2. Double-click on a server, right-click on a server and then select Edit from the menu, or select the server then click
Edit in the toolbar. The Edit Server pane for that server type opens.3. Edit the settings as required, and then selectOK to apply the changes.
See LDAP servers on page 582, RADIUS servers on page 584, and TACACS+ servers on page 586 for moreinformation.
Deleting remote authentication servers
To delete a remote authentication server or servers, you must be logged in to an account with sufficient privileges, or asa super user administrator.
To delete a remote authentication server or servers:
1. Go to System Settings > Admin > Remote Authentication Server.2. Select the server or servers you need to delete.3. Click Delete in the toolbar, or right-click and select Delete.4. SelectOK in the confirmation box to delete the server or servers.
LDAP servers
Lightweight Directory Access Protocol (LDAP) is an Internet protocol used to maintain authentication data that mayinclude departments, people, groups of people, passwords, email addresses, and printers. LDAP consists of a data-representation scheme, a set of defined operations, and a request/response network.
FortiManager 6.4.0 Administration Guide 582Fortinet Inc.

Administrators
If you have configured LDAP support and an administrator is required to authenticate using an LDAP server, theFortiManager unit sends the administrator’s credentials to the LDAP server for authentication. If the LDAP server canauthenticate the administrator, they are successfully authenticated with the FortiManager unit. If the LDAP server cannotauthenticate the administrator, the FortiManager unit refuses the connection.
To use an LDAP server to authenticate administrators, you must configure the server before configuring theadministrator accounts that will use it.
To add an LDAP server:
1. Go to System Settings > Admin > Remote Authentication Server.2. Select Create New > LDAP Server from the toolbar. The New LDAP Server pane opens.
3. Configure the following settings, and then clickOK to add the LDAP server.
Name Enter a name to identify the LDAP server.
Server Name/IP Enter the IP address or fully qualified domain name of the LDAP server.
Port Enter the port for LDAP traffic. The default port is 389.
Common Name Identifier The common name identifier for the LDAP server. Most LDAP servers use cn.However, some servers use other common name identifiers such as UID.
Distinguished Name The distinguished name is used to look up entries on the LDAP server.The distinguished name reflects the hierarchy of LDAP database objectclasses above the common name identifier. Clicking the query distinguishedname icon will query the LDAP server for the name and open the LDAPDistinguished Name Query window to display the results.
Bind Type Select the type of binding for LDAP authentication: Simple, Anonymous, orRegular.
User DN When the Bind Type is set to Regular, enter the user DN.
Password When the Bind Type is set to Regular, enter the password.
Secure Connection Select to use a secure LDAP server connection for authentication.
Protocol When Secure Connection is enabled, select either LDAPS or STARTTLS.
FortiManager 6.4.0 Administration Guide 583Fortinet Inc.

Administrators
Certificate When Secure Connection is enabled, select the certificate from the dropdownlist.
Administrative Domain Choose the ADOMs that this server will be linked to for reporting: All ADOMs(default), or Specify for specific ADOMs.
Advanced Options
adom-attr Specify an attribute for the ADOM.
attributes Specify the attributes such asmember, uniquemember, ormemberuid.
connect-timeout Specify the connection timeout in millisecond.
filter Specify the filter in the format (objectclass=*)
group Specify the name of the LDAP group.
memberof-attr Specify the value for this attribute. This value must match the attribute of thegroup in LDAP Server. All users part of the LDAP group with the attributematching thememberof-attr will inherit the administrative permissionsspecified for this group.
profile-attr Specify the attribute for this profile.
secondary-server Specify a secondary server.
tertiary-server Specify a tertiary server.
RADIUS servers
Remote Authentication Dial-in User (RADIUS) is a user authentication and network-usage accounting system. Whenusers connect to a server they type a user name and password. This information is passed to a RADIUS server, whichauthenticates the user and authorizes access to the network.
You can create or edit RADIUS server entries in the server list to support authentication of administrators. When anadministrator account’s type is set to RADIUS, the FortiManager unit uses the RADIUS server to verify the administratorpassword at log on. The password is not stored on the FortiManager unit.
To use a RADIUS server to authenticate administrators, you must configure the server before configuring theadministrator accounts that will use it.
FortiManager 6.4.0 Administration Guide 584Fortinet Inc.

Administrators
To add a RADIUS server:
1. Go to System Settings > Admin > Remote Authentication Server.2. Select Create New > RADIUS Server from the toolbar. The New RADIUS Server pane opens.
3. Configure the following settings, and then clickOK to add the RADIUS server.
Name Enter a name to identify the RADIUS server.
Server Name/IP Enter the IP address or fully qualified domain name of the RADIUS server.
Port Enter the port for RADIUS traffic. The default port is 1812. Some RADIUSservers use port 1645.
Server Secret Enter the RADIUS server secret. Click the eye icon to Show or Hide the serversecret.
Test Connectivity Click Test Connectivity to test the connectivity with the RADIUS server. Showssuccess or failure.
Test User Credentials Click Test User Credentials to test the user credentials. Shows success orfailure.
Secondary Server Name/IP Enter the IP address or fully qualified domain name of the secondary RADIUSserver.
Secondary Server Secret Enter the secondary RADIUS server secret.
Authentication Type Select the authentication type the RADIUS server requires. If you select thedefault ANY, FortiManager tries all authentication types.
Advanced Options
nas-ip Specify the IP address for the Network Attached Storage (NAS).
FortiManager 6.4.0 Administration Guide 585Fortinet Inc.

Administrators
TACACS+ servers
Terminal Access Controller Access-Control System (TACACS+) is a remote authentication protocol that providesaccess control for routers, network access servers, and other network computing devices via one or more centralizedservers. It allows a client to accept a user name and password and send a query to a TACACS authentication server.The server host determines whether to accept or deny the request and sends a response back that allows or deniesnetwork access to the user. The default TCP port for a TACACS+ server is 49.
If you have configured TACACS+ support and an administrator is required to authenticate using a TACACS+ server, theFortiManager unit contacts the TACACS+ server for authentication. If the TACACS+ server can authenticate theadministrator, they are successfully authenticated with the FortiManager unit. If the TACACS+ server cannotauthenticate the administrator, the connection is refused by the FortiManager unit.
To use a TACACS+ server to authenticate administrators, you must configure the server before configuring theadministrator accounts that will use it.
To add a TACACS+ server:
1. Go to System Settings > Admin > Remote Authentication Server.2. Select Create New > TACACS+ Server from the toolbar. The New TACACS+ Server pane opens.
3. Configure the following settings, and then clickOK to add the TACACS+ server.
Name Enter a name to identify the TACACS+ server.
Server Name/IP Enter the IP address or fully qualified domain name of the TACACS+ server.
Port Enter the port for TACACS+ traffic. The default port is 49.
Server Key Enter the key to access the TACACS+ server. The server key can be amaximum of 16 characters in length.
Authentication Type Select the authentication type the TACACS+ server requires. If you select thedefault ANY, FortiManager tries all authentication types.
Remote authentication server groups
Remote authentication server groups can be used to extend wildcard administrator access. Normally, a wildcardadministrator can only be created for a single server. If multiple servers of different types are grouped, a wildcardadministrator can be applied to all of the servers in the group.
Multiple servers of the same type can be grouped to act as backups - if one server fails, the administrator can still beauthenticated by another server in the group.
To use a server group to authenticate administrators, you must configure the group before configuring the administratoraccounts that will use it.
FortiManager 6.4.0 Administration Guide 586Fortinet Inc.

Administrators
Remote authentication server groups can only be managed using the CLI. For more information, see the FortiManagerCLI Reference.
To create a new remote authentication server group:
1. Open the admin group command shell:config system admin group
2. Create a new group, or edit an already create group:edit <group name>
3. Add remote authentication servers to the group:set member <server name> <server name> ...
4. Apply your changes:end
To edit the servers in a group:
1. Enter the following CLI commands:config system admin group
edit <group name>set member <server name> <server name> ...
end
Only the servers listed in the command will be in the group.
To remove all the servers from the group:
1. Enter the following CLI commands:config system admin group
edit <group name>unset member
end
All of the servers in the group will be removed.
To delete a group:
1. Enter the following CLI commands:config system admin group
delete <group name>end
SAML admin authentication
SAML can be enabled across devices, enabling smooth movement between devices for the administrator. FortiManagercan play the role of the identity provider (IdP) or the service provider (SP) when an external identity provider is available.
Devices configured to the IdP can be accessed through the Quick Access menu which appears in the top-right corner ofthe main menu. The current device is indicated with an asterisk (currently only supported between FAZ/FMG).
Logging into an SP device will redirect you to the IdP login page. By default, it is a Fortinet login page. After successfulauthentication, you can access other SP devices from within the same browser without additional authentication.
FortiManager 6.4.0 Administration Guide 587Fortinet Inc.

Administrators
The admin user must be created on both the IdP and SP, otherwise you will see an errormessage stating that the admin doesn't exist.
When accessing FortiGate from theQuick Accessmenu, if FGT is set up to use the defaultlogin page with SSO options, you must select the via Single Sign-On button to beautomatically authenticated.
To configure FortiManager as the identity provider:
1. Go to System Settings > SAML SSO.2. Select Identity Provider (IdP).3. In the IdP Certificate dropdown, choose a certificate where IdP is used.4. Select Download to get the IdP certificate, used later to configure SPs.5. Select Apply.6. In the SP Settings table, select Create to add a service provider.7. In the Edit Service Provider window:
l Enter a name for the SP.l Select Fortinet as the SP Type.
l If the SP is not a Fortinet product, select Custom as the SP Type and copy the SP Entity ID, SP ACS (Login) URL, and SP SLS (Logout) URL from your SPs configuration page.
l Enter the SP IP address.l Copy down the IdP Prefix. It is required when configuring SPs.
8. SelectOK.9. A custom login page can be created by moving the Login Page Template toggle to theOn position and selecting
Customize.
To configure FortiManager as a service provider:
1. Go to System Settings > SAML SSO.2. Select Service Provider (SP).3. Select Fortinet as the IdP Type.4. Enter the IdP IP address and the IdP prefix that you obtained while configuring the IdP device.5. Select the IdP certificate.
If this is a first-time set up, you can import the IdP certificate that you downloaded while configuring the IdP device.6. Confirm that the information is correct and select Apply.7. Repeat the steps for each FAZ/FMG that is to be set as a service provider.
FortiManager 6.4.0 Administration Guide 588Fortinet Inc.

Administrators
Global administration settings
The administration settings page provides options for configuring global settings for administrator access to theFortiManager device. Settings include:
l Ports for HTTPS and HTTP administrative accessTo improve security, you can change the default port configurations for administrative connections to theFortiManager. When connecting to the FortiManager unit when the port has changed, the port must be included,such as https://<ip_address>:<port>. For example, if you are connecting to the FortiManager unit usingport 8080, the URL would be https://192.168.1.99:8080. When you change to the default port number forHTTP, HTTPS, or SSH, ensure that the port number is unique.
l Idle timeout settingsBy default, the GUI disconnects administrative sessions if no activity occurs for five minutes. This preventssomeone from using the GUI if the management computer is left unattended.
l GUI languageThe language the GUI uses. For best results, you should select the language used by the management computer.
l GUI themeThe default color theme of the GUI is Blueberry. You can choose another color or an image.
l Password policyEnforce password policies for administrators.
l Display optionsDisplay or hide advanced configuration options in the GUI. Only the admin administrator can configure theseoptions.
Only super user administrators can access and configure the administration settings. Thesettings are global and apply to all administrators of the FortiManager unit.
FortiManager 6.4.0 Administration Guide 589Fortinet Inc.

Administrators
To configure the administration settings:
1. Go to System Settings > Admin > Admin Settings.
2. Configure the following settings as needed, then click Apply to save your changes to all administrator accounts:
Administration Settings
HTTP Port Enter the TCP port to be used for administrative HTTP access. Default: 80.Select Redirect to HTTPS to redirect HTTP traffic to HTTPS.
HTTPS Port Enter the TCP port to be used for administrative HTTPS access. Default: 443.
HTTPS & WebService ServerCertificate
Select a certificate from the dropdown list.
Idle Timeout Enter the number of minutes an administrative connection can be idle beforethe administrator must log in again, from 1 to 480 (8 hours). See Idle timeouton page 592 for more information.
View Settings
Language Select a language from the dropdown list. See GUI language on page 592 formore information.
Theme Select a theme for the GUI. The selected theme is not applied until you clickApply, allowing to you to sample different themes. Default: Blueberry.
Password Policy Click to enable administrator password policies. See Password policy on page591 and Password lockout and retry attempts on page 591 for moreinformation.
Minimum Length Select the minimum length for a password, from 8 to 32 characters. Default: 8.
Must Contain Select the types of characters a password must contain.
FortiManager 6.4.0 Administration Guide 590Fortinet Inc.

Administrators
Admin PasswordExpires after
Select the number of days a password is valid for, after which it must bechanged.
Display Options on GUI Click to expand the display options.
Show Script Display the Scriptmenu item.This menu is located on the Device Manager pane. This is an advancedFortiManager feature.
Show Add MultipleButton
Display the Add Multiple Devices option.This option is located on the Device Manager > Devices & Groups pane,under theMore option in the toolbar. This is an advanced FortiManagerfeature.
Show Device ListImport/Export
Select to display the Import Device List and Export Device List buttons. Thisoption is located on the Device Manager > Devices & Groups pane, under theMore option in the toolbar. This is an advanced FortiManager feature.
Password policy
You can enable and configure password policy for the FortiManager.
To configure the password policy:
1. Go to System Settings > Admin > Admin Settings.2. Click to enable Password Policy.3. Configure the following settings, then click Apply to apply to password policy.
Minimum Length Specify the minimum number of characters that a password must be, from 8 to 32.Default: 8.
Must Contain Specify the types of characters a password must contain: uppercase and lowercaseletters, numbers, and/or special characters.
Admin PasswordExpires after
Specify the number of days a password is valid for. When the time expires, anadministrator will be prompted to enter a new password.
Password lockout and retry attempts
By default, the number password retry attempts is set to three, allowing the administrator a maximum of three attemptsat logging in to their account before they are locked out for a set amount of time (by default, 60 seconds).
The number of attempts and the default wait time before the administrator can try to enter a password again can becustomized. Both settings can be configured using the CLI.
To configure the lockout duration:
1. Enter the following CLI commands:config system global
set admin-lockout-duration <seconds>end
FortiManager 6.4.0 Administration Guide 591Fortinet Inc.

Administrators
To configure the number of retry attempts:
1. Enter the following CLI commands:config system global
set admin-lockout-threshold <failed_attempts>end
Example
To set the lockout threshold to one attempt and set a five minute duration before the administrator can try to log in again,enter the following CLI commands:
config system globalset admin-lockout-duration 300set admin-lockout-threshold 1
end
GUI language
The GUI supports multiple languages, including:
l Englishl Simplified Chinesel Spanishl Traditional Chinesel Japanesel Korean
By default, the GUI language is set to Auto Detect, which automatically uses the language used by the managementcomputer. If that language is not supported, the GUI defaults to English. For best results, you should select the languageused by the operating system on the management computer.
For more information about language support, see the FortiManager Release Notes.
To change the GUI language:
1. Go to System Settings > Admin > Admin Settings.2. Under the View Settings, In the Language field, select a language, or Auto Detect, from the dropdown list.3. Click Apply to apply the language change.
Idle timeout
To ensure security, the idle timeout period should be short. By default, administrative sessions are disconnected if noactivity takes place for five minutes. This idle timeout is recommended to prevent anyone from using the GUI on a PCthat was logged in to the GUI and then left unattended. The idle timeout period can be set from 1 to 480 minutes.
To change the idle timeout:
1. Go to System Settings > Admin > Admin Settings.2. Change the Idle Timeout period as required.
FortiManager 6.4.0 Administration Guide 592Fortinet Inc.

Administrators
3. Click Apply.
Two-factor authentication
To configure two-factor authentication for administrators you will need the following:
l FortiManagerl FortiAuthenticatorl FortiToken
Configuring FortiAuthenticator
On the FortiAuthenticator, you must create a local user and a RADIUS client.
Before proceeding, ensure you have configured your FortiAuthenticator, created a NAS entryfor your FortiManager, and created or imported FortiTokens.For more information, see the Two-Factor Authenticator Interoperability Guide andFortiAuthenticator Administration Guide in the Fortinet Document Library.
Create a local user:
1. Go to Authentication > User Management > Local Users.2. Click Create New in the toolbar.3. Configure the following settings:
Username Enter a user name for the local user.
Password creation Select Specify a password from the dropdown list.
Password Enter a password. The password must be a minimum of 8 characters.
Password confirmation Re-enter the password. The passwords must match.
Allow RADIUS authentication Enable to allow RADIUS authentication.
Role Select the role for the new user.
Enable account expiration Optionally, select to enable account expiration. For more information see theFortiAuthenticator Administration Guide.
FortiManager 6.4.0 Administration Guide 593Fortinet Inc.

Administrators
4. ClickOK to continue to the Change local user page.
5. Configure the following settings, then clickOK.
Disabled Select to disable the local user.
Password-basedauthentication
Leave this option selected. Select [Change Password] to change thepassword for this local user.
Token-based authentication Select to enable token-based authentication.
Deliver token codeby
Select to deliver token by FortiToken, email, or SMS.Click Test Token to test the token.
Allow RADIUS authentication Select to allow RADIUS authentication.
Enable account expiration Optionally, select to enable account expiration. For more information see theFortiAuthenticator Administration Guide.
User Role
Role Select either Administrator or User.
Full Permission Select to allow Full Permission, otherwise select the admin profiles to apply tothe user. This option is only available when Role is Administrator.
Web service Select to allowWeb service, which allows the administrator to access the webservice via a REST API or by using a client application. This option is onlyavailable when Role is Administrator.
Restrict adminlogin from trustedmanagementsubnets only
Select to restrict admin login from trusted management subnets only, thenenter the trusted subnets in the table. This option is only available when Roleis Administrator.
Allow LDAPBrowsing
Select to allow LDAP browsing. This option is only available when Role isUser.
Create a RADIUS client:
1. Go to Authentication > RADIUS Service > Clients.2. Click Create New in the toolbar.
FortiManager 6.4.0 Administration Guide 594Fortinet Inc.

Administrators
3. Configure the following settings, then clickOK.
Name Enter a name for the RADIUS client entry.
Client name/IP Enter the IP address or Fully Qualified Domain Name (FQDN) of theFortiManager.
Secret Enter the server secret. This value must match the FortiManager RADIUSserver setting at System Settings > Admin > Remote Authentication Server.
First profile name See the FortiAuthenticator Administration Guide.
Description Enter an optional description for the RADIUS client entry.
Apply this profile based onRADIUS attributes
Select to apply the profile based on RADIUS attributes.
Authentication method Select Enforce two-factor authentication from the list of options.
Username input format Select specific user name input formats.
Realms Configure realms.
Allow MAC-basedauthentication
Optional configuration.
Check machineauthentication
Select to check machine based authentication and apply groups based on thesuccess or failure of the authentication.
Enable captive portal Enable various portals.
EAP types Optional configuration.
For more information, see the FortiAuthenticator Administration Guide, available in theFortinet Document Library.
Configuring FortiManager
On the FortiManager, you need to configure the RADIUS server and create an administrator that uses the RADIUSserver for authentication.
Configure the RADIUS server:
1. Go to System Settings > Admin > Remote Authentication Server.2. Click Create New > RADIUS in the toolbar.3. Configure the following settings, then clickOK.
Name Enter a name to identify the FortiAuthenticator.
Server Name/IP Enter the IP address or fully qualified domain name of your FortiAuthenticator.
Server Secret Enter the FortiAuthenticator secret.
FortiManager 6.4.0 Administration Guide 595Fortinet Inc.

Administrators
Secondary Server Name/IP Enter the IP address or fully qualified domain name of the secondaryFortiAuthenticator, if applicable.
Secondary Server Secret Enter the secondary FortiAuthenticator secret, if applicable.
Port Enter the port for FortiAuthenticator traffic.
Authentication Type Select the authentication type the FortiAuthenticator requires. If you select thedefault ANY, FortiManager tries all authentication types.Note: RADIUS server authentication for local administrator users stored inFortiAuthenticator requires the PAP authentication type.
Create the administrator:
1. Go to System Settings > Admin > Administrator.2. Click Create New from the toolbar.3. Configure the settings, selecting the previously added RADIUS server from the RADIUS Server dropdown list. See
Creating administrators on page 558.4. ClickOK to save the settings.
Test the configuration:
1. Attempt to log in to the FortiManager GUI with your new credentials.2. Enter your user name and password and click Login.3. Enter your FortiToken pin code and click Submit to log in to the FortiManager.
FortiManager 6.4.0 Administration Guide 596Fortinet Inc.

High Availability
FortiManager high availability (HA) provides a solution for a key requirement of critical enterprise management andnetworking components: enhanced reliability. Understanding what’s required for FortiManager reliability begins withunderstanding what normal FortiManager operations are and how to make sure normal operations continue if aFortiManager unit fails.
Most of the FortiManager operations involve storing FortiManager and FortiGate configuration and related information inthe FortiManager database on the FortiManager unit hard disk. A key way to enhance reliability of FortiManager is toprotect the data in the FortiManager database from being lost if the FortiManager unit fails. This can be achieved bydynamically backing up FortiManager database changes to one or more backup FortiManager units. Then, if theoperating FortiManager unit fails, a backup FortiManager unit can take the place of the failed unit.
A FortiManager HA cluster can have a maximum of four units: one primary unit with up to three backup or secondaryunits. All units in the cluster must be of the same FortiManager series. All units are visible on the network.
The primary unit and the backup units can be in the same location or different locations. FortiManager HA supportsgeographic redundancy so the primary unit and backup units can be in different locations attached to different networksas long as communication is possible between them (for example, on the Internet, on a WAN, or in a private network).
Administrators connect to the primary unit GUI or CLI to perform FortiManager operations. Managed devices connectwith the primary unit for normal management operations (configuration push, auto-update, firmware upgrade, and soon). If FortiManager is used to distribute FortiGuard updates to managed devices, managed devices can connect to theprimary FortiManager unit or one of the backup units.
If the primary FortiManager unit fails you must manually configure one of the backup units to become the primary unit.The new primary unit will keep its IP address. FortiManager's IP address registered on FortiGate will be automaticallychanged when new primary unit is selected.
You don't need to reboot the FortiManager device when it is promoted from a backup to theprimary unit.
When FortiManager Primary and Secondary units both have FortiAnalyzer features enabledon them, all the FortiAnalyzer features available on the Primary unit are also available on theSecondary unit.
When devices with different licenses are used to create an HA cluster, the license that allowsfor the smallest number of managed devices is used.
Synchronizing the FortiManager configuration and HA heartbeat
All changes to the FortiManager database are saved on the primary unit, and then these changes are synchronized tothe backup units. The FortiManager configuration of the primary unit is also synchronized to the backup units, except forthe following settings:
FortiManager 6.4.0 Administration Guide 597Fortinet Inc.

High Availability
l Hostnamel System time and NTP serverl FortiCloudl FortiGuard database downloaded by FortiManagerl Networkl HAl Local certificatesl SNMPl Mail serverl Syslog serverl FortiGuard settings (FortiManager CM database also known as CMDB)
Aside from these settings, the backup units always match the primary unit. So if the primary unit fails, a backup unit canbe configured to take the place of the primary unit and continue functioning as a standalone FortiManager unit.
While the FortiManager cluster is operating, all backup units in the cluster exchange HA heartbeat packets with theprimary unit so the primary unit can verify the status of the backup units and the backup units can verify the status of theprimary unit. The HA heartbeat packets use TCP port 5199. HA heartbeat monitoring, as well as FortiManager databaseand configuration synchronization takes place using the connections between the FortiManager units in the cluster. Aspart of configuring the primary unit you add peer IPs and peer serial numbers of each of the backup FortiManager units inthe cluster. You also add the peer IP of the primary unit and the primary unit serial number to each of the backup units.
Depending on the peer IPs that you use, you can isolate HA traffic to specific FortiManagerinterfaces and connect those interfaces together so they function as synchronizationinterfaces between the FortiManager units in the cluster. Communication between the units inthe cluster must be maintained for the HA cluster to operate.
The interfaces used for HA heartbeat and synchronization communication can be connected to your network. However,if possible you should isolate HA heartbeat and synchronization packets from your network to save bandwidth.
If the primary or a backup unit fails
If the primary unit fails, the backup units stop receiving HA heartbeat packets from the primary unit. If one of the backupunits fails, the primary unit stops receiving HA heartbeat packets from the backup unit. In either case, the cluster isconsidered down until it is reconfigured.
When the cluster goes down, the cluster units still operating send SNMP traps and write log messages to alert thesystem administrator that a failure has occurred. You can also see the failure on the HA Status page.
Reconfigure the cluster by removing the failed unit from the cluster configuration. If the primary unit has failed, thismeans configuring one of the backup units to be the primary unit and adding peer IPs for all of the remaining backupunits to the new primary unit configuration.
If a backup unit has failed, reconfigure the cluster by removing the peer IP of the failed backup unit from the primary unitconfiguration.
Once the cluster is reconfigured, it will continue to operate as before but with fewer cluster units. If the failed unit isrestored you can reconfigure the cluster again to add the failed unit back into the cluster. In the same way you can add anew unit to the cluster by changing the cluster configuration to add it.
FortiManager 6.4.0 Administration Guide 598Fortinet Inc.

High Availability
FortiManager HA cluster startup steps
FortiManager units configured for HA start up begin sending HA heartbeat packets to their configured peer IP addressesand also begin listening for HA heartbeat packets from their configured peer IP addresses.
When the FortiManager units receive HA heartbeat packets with a matching HA cluster ID and password from a peer IPaddress, the FortiManager unit assumes the peer is functioning.
When the primary unit is receiving HA heartbeat packets from all of the configured peers or backup units, the primary unitsets the cluster status to up. Once the cluster is up the primary unit then synchronizes its configuration to the backupunit. This synchronization process can take a few minutes depending on the size of the FortiManager database. Duringthis time database and configuration changes made to the primary unit are not synchronized to the backup units. Oncesynchronization is complete, if changes were made during synchronization, they are re-synchronized to the backupunits.
Most of the primary unit configuration, as well as the entire FortiManager database, are synchronized to the backup unit.For settings that are not synchronized, you must configure the settings on each cluster unit. For a list of settings notsynchronized, see Synchronizing the FortiManager configuration and HA heartbeat on page 597.
Once the synchronization is complete, the FortiManager HA cluster begins normal operation.
Configuring HA options
To configure HA options go to System Settings > HA. Use the Cluster Settings pane to configure FortiManager units tocreate an HA cluster or change cluster configuration.
To configure a cluster, set theOperation Mode of the primary unit to Primary and the modes of the backup units toSecondary. Then add the IP addresses and serial numbers of each backup unit to primary unit peer list. The IP addressand serial number of the primary unit must be added to each backup unit's HA configuration. The primary unit and allbackup units must have the same Cluster ID andGroup Password.
You can connect to the primary unit GUI to work with FortiManager. Using configuration synchronization, you canconfigure and work with the cluster in the same way as you work with a standalone FortiManager unit.
Configure the following settings:
Cluster Status Monitor FortiManager HA status. See Monitoring HA status on page 603.
SN The serial number of the device.
Mode The high availability mode, either Primary or Secondary.
IP The IP address of the device.
Enable Shows if the peer is currently enabled.
Module DataSynchronized
Module data synchronized in bytes.
Pending ModuleData
Pending module data in bytes.
Cluster Settings
FortiManager 6.4.0 Administration Guide 599Fortinet Inc.

High Availability
Operation Mode Select Primary to configure the FortiManager unit to be the primary unit in acluster.Select Secondary to configure the FortiManager unit to be a backup unit in acluster.Select Standalone to stop operating in HA mode.
Peer IP Select the peer IP version from the dropdown list, either IPv4 or IPv6. Then, typethe IP address of another FortiManager unit in the cluster. For the primary unit youcan add up to four Peer IP addresses for up to four backup units. For a backupunit you can only add the IP address of the primary unit.Type the IP address of another FortiManager unit in the cluster. For the primaryunit you can add up to four Peer IP addresses for up to four backup units. For abackup unit you can only add the IP address of the primary unit.
Peer SN Type the serial number of the FortiManager unit corresponding to the entered IPaddress.
Cluster ID A number between 1 and 64 that identifies the HA cluster. All members of the HAcluster must have the same cluster ID. If you have more than one FortiManagerHA cluster on the same network, each HA cluster must have a different cluster ID.The FortiManager GUI browser window title changes to include the cluster IDwhen FortiManager unit is operating in HA mode.
Group Password A password for the HA cluster. All members of the HA cluster must have the samepassword.If you have more than one FortiManager HA cluster on the same network, eachHA cluster must have a different password. The maximum password length is 19characters.
File Quota Enter the file quota, from 2048 to 20480 MB (default: 4096 MB).You cannot configure the file quota for backup units.
Heart Beat Interval The time the primary unit waits between sending heartbeat packets, in seconds.The heartbeat interval is also the amount of time that backup units waits beforeexpecting to receive a heartbeat packet from the primary unit.The default heartbeat interval is 5 seconds. The heartbeat interval range is 1 to255 seconds. You cannot configure the heartbeat interval on the backup units.
Failover Threshold The number of heartbeat intervals that one of the cluster units waits to receive HAheartbeat packets from other cluster units before assuming that the other clusterunits have failed. The default failover threshold is 3. The failover threshold rangeis 1 to 255. You cannot configure the failover threshold of the backup units.In most cases you do not have to change the heartbeat interval or failoverthreshold. The default settings mean that if the a unit fails, the failure is detectedafter 3 x 5 or 15 seconds; resulting in a failure detection time of 15 seconds.
FortiManager 6.4.0 Administration Guide 600Fortinet Inc.

High Availability
If the failure detection time is too short, the HA cluster may detect a failure whennone has occurred. For example, if the primary unit is very busy it may notrespond to HA heartbeat packets in time. In this situation, the backup unit mayassume the primary unit has failed when the primary unit is actually just busy.Increase the failure detection time to prevent the backup unit from detecting afailure when none has occurred.If the failure detection time is too long, administrators will be delayed in learningthat the cluster has failed. In most cases, a relatively long failure detection timewill not have a major effect on operations. But if the failure detection time is toolong for your network conditions, then you can reduce the heartbeat interval orfailover threshold.
Download DebugLog
Select to download the HA debug log file to the management computer.
General FortiManager HA configuration steps
1. Configure the FortiManager units for HA operation:l Configure the primary unit.l Configure the backup units.
2. Change the network configuration so the remote backup unit and the primary unit can communicate with each other.3. Connect the units to their networks.4. Add basic configuration settings to the cluster:
l Add a password for the admin administrative account.l Change the IP address and netmask of the port1 interface.l Add a default route.
GUI configuration steps
Use the following procedures to configure the FortiManager units for HA operation from the FortiManager unit GUI. Itassumes you are starting with three FortiManager units with factory default configurations. The primary unit and the firstbackup unit are connected to the same network. The second backup unit is connected to a remote network andcommunicates with the primary unit over the Internet. Sample configuration settings are also shown.
To configure the primary unit for HA operation:
1. Connect to the primary unit GUI.2. Go to System Settings > HA.3. Configure HA settings.
Example HA primary configuration:
Operation Mode Primary
Peer IP 172.20.120.23
Peer SN <serial_number>
FortiManager 6.4.0 Administration Guide 601Fortinet Inc.

High Availability
Peer IP 192.268.34.23
Peer SN <serial_number>
Cluster ID 15
Group Password password
File Quota 4096
Heartbeat Interval 5 (Keep the default setting.)
Failover Threshold 3 (Keep the default setting.)
4. Click Apply.
To configure the backup unit on the same network for HA operation:
1. Connect to the backup unit GUI.2. Go to System Settings > HA.3. Configure HA settings.
Example local backup configuration:
Operation Mode Secondary
Priority 5 (Keep the default setting.)
Peer IP 172.20.120.45
Peer SN <serial_number>
Cluster ID 15
Group Password password
File Quota 4096
Heartbeat Interval 5 (Keep the default setting.)
Failover Threshold 3 (Keep the default setting.)
4. Click Apply.
To configure a remote backup unit for HA operation:
1. Connect to the backup unit GUI.2. Go to System Settings > HA.3. Configure HA settings.
Example remote backup configuration:
Operation Mode Secondary
Priority 5 (Keep the default setting.)
Peer IP 192.168.20.23
Peer SN <serial_number>
FortiManager 6.4.0 Administration Guide 602Fortinet Inc.

High Availability
Cluster ID 15
Group Password password
File Quota 4096
Heartbeat Interval 5 (Keep the default setting.)
Failover Threshold 3 (Keep the default setting.)
4. Click Apply.
To change the network configuration so that the remote backup unit and the primary unit cancommunicate with each other:
Configure the appropriate firewalls or routers to allow HA heartbeat and synchronization traffic to pass between theprimary unit and the remote backup unit using the peer IPs added to the primary unit and remote backup unitconfigurations.
HA traffic uses TCP port 5199.
To connect the cluster to the networks:
1. Connect the cluster units.No special network configuration is required for the cluster.
2. Power on the cluster units.The units start and use HA heartbeat packets to find each other, establish the cluster, and synchronize theirconfigurations.
To add basic configuration settings to the cluster:
Configure the cluster to connect to your network as required.
Monitoring HA status
Go to System Settings > HA to monitor the status of the FortiManager units in an HA cluster. The FortiManager HAstatus pane displays information about the role of each cluster unit, the HA status of the cluster, and the HA configurationof the cluster.
The FortiManager GUI browser window title changes to indicate that the FortiManager unit isoperating in HA mode. The following text is added to the title HA (Group ID: <group_id>).Where <group_id> is the HA Group ID.
You can use the CLI command get system ha to display the same HA status information.
FortiManager 6.4.0 Administration Guide 603Fortinet Inc.

High Availability
The following information is displayed:
Cluster Status The cluster status can be Up if this unit is received HA heartbeat packets from allof its configured peers. The cluster status will be Down if the cluster unit is notreceiving HA heartbeat packets from one or more of its configured peers.
Mode The role of the FortiManager unit in the cluster. The role can be:l Primary: for the primary unit.l Secondary: for the backup units.
Module Data Synchronized The amount of data synchronized between this cluster unit and other cluster units.
Pending Module Data The amount of data waiting to be synchronized between this cluster unit and othercluster units.
Upgrading the FortiManager firmware for an operating cluster
You can upgrade the firmware of an operating FortiManager cluster in the same way as upgrading the firmware of astandalone FortiManager unit.
To do the upgrade, connect to the primary unit GUI or CLI to upgrade the firmware. Similar to upgrading the firmware of astandalone FortiManager unit, normal FortiManager operations are temporarily interrupted while the cluster firmwareupgrades. Because of this interruption, you should upgrade cluster firmware during a maintenance period.
To upgrade FortiManager HA cluster firmware:
1. Log into the primary unit GUI.2. Upgrade the primary unit firmware.
The firmware is sent to all backup units, and then all units (primary and backup) are rebooted.See the FortiManager Release Notes and FortiManager Upgrade Guide in the Fortinet Document Library for moreinformation.
You might not be able to connect to the FortiManager GUI until the upgrade synchronizationprocess is complete. During the upgrade, using SSH or telnet to connect to the CLI might beslow. If necessary, use the console to connect to the CLI.
FortiManager support for FortiAnalyzer HA
You can manage FortiAnalyzer HA via FortiManager. FortiManager retrieves the cluster member list and updates theinformation whenever it changes, including FortiAnalyzer HA failover or a change in members.
FortiManager 6.4.0 Administration Guide 604Fortinet Inc.

High Availability
To enable support for FortiAnalyzer HA:
1. Go to Device Manager > Device and Groups.2. Click the down arrow next to Add Devices. Select Add FortiAnalyzer.
The Add FortiAnalyzer dialog opens.
3. From the Add FortiAnalyzer box, add FortiAnalyzer HA to FortiManager DVM by HA cluster's VIP, and click Next.The FortiAnalyzer HA is discovered with its HA status information. Click Next to continue.
FortiAnalyzer HA is added successfully. Click Finish.
4. In the tree menu, selectManaged FortiAnalyzer. The device status icon is shown as the HA cluster and the SN isshown as the primary SN.
FortiManager DVM gets an update after the failover on FortiAnalyzer in 300 seconds. Here, the previous primary"FAZ-VMTM20001379" becomes the secondary and the new primary is "FAZ-VMTM20001378".
FortiManager 6.4.0 Administration Guide 605Fortinet Inc.

High Availability
You can get the HA status update immediately, select the FortiAnalyzer device and either clickRefresh Device from the toolbar, or right-click and select Refresh.
To check the DVM device list in the CLI:
1. View the DVM device list once FortiAnalyzer HA is added to FortiManager:diagnose dvm device list
It will have correct HA cluster information, including member list and role.2. View the DVM device list after the failover on FortiAnalyzer:
diagnose dvm device list
It will have the updated HA cluster information. The previous primary changes to secondary and vice versa.
FortiManager 6.4.0 Administration Guide 606Fortinet Inc.

Management Extensions
Management Extensions
TheManagement Extensions pane allows you to enable licensed applications that are released and signed by Fortinet.The following applications are available as management extensions to FortiManager:
l SD-WANOrchestratorl Wireless Manager (FortiWLM) on page 607
If ADOMs are enabled, you must be in the root ADOM to access theWireless Manager(FortiWLM) application in theManagement Extensions pane.
The applications are installed and run on FortiManager.
See also Enabling management extension applications on page 608.
SD-WAN Orchestrator
You can use SD-WAN Orchestrator to configure, manage, and monitor FortiGates in an SD-WAN network. For detailsabout using SD-WAN Orchestrator, see the SD-WANOrchestrator Administration Guide on the Document Library.
When SD-WANOrchestrator is enabled, the FortiManager configuration backup includes the configuration for SD-WANOrchestrator too. See Backing up the system on page 490.
When SD-WANOrchestrator is enabled, you should use SD-WANOrchestrator for all configuration of your SD-WANnetwork. You should not configure the SD-WAN network by using SD-WAN Orchestrator and the SD-WAN optionsavailable in the Device Managermodule of FortiManager.
Wireless Manager (FortiWLM)
You can useWireless Manager (FortiWLM) to monitor, operate, and administer wireless networks on FortiGates that aremanaged by FortiManager. For details about using Wireless Manager (FortiWLM), see theWireless Manager(FortiWLM) Administration Guide on the Document Library.
WhenWireless Manager (FortiWLM) is enabled, the FortiManager configuration backup includes the configuration forWireless Manager (FortiWLM) too. See Backing up the system on page 490.
WhenWireless Manager (FortiWLM) is enabled, you can useWireless Manager (FortiWLM) to monitor your wirelessnetwork. You must configure the wireless network by using the Device Manager and APManagermodules ofFortiManager.
FortiManager 6.4.0 Administration Guide 607Fortinet Inc.

Management Extensions
Enabling management extension applications
FortiManager provides access to applications that are released and signed by Fortinet.
Only administrators with a Super_User profile can enable management extensions.A CA certificate is required to install management extensions on FortiManager. See CAcertificates on page 525.
To enable management extensions:
1. Go toManagement Extensions.TheWireless Manager (FortiWLM) application is available only in the root ADOM, if ADOMs are enabled.
2. Click a grayed out tile to enable the application.Grayed out tiles represent disabled applications. In the following example, SD-WANOrchestrator is enabled, andWireless Manager (FortiWLM) is disabled.
3. ClickOK in the dialog that appears. It might take some time to install the application.
CLI for management extensions
You can use the CLI console to enable, disable, update, debug, and check the management extension.
To enable management extensions:
1. Enable the production registry:FMG-VM64 # config system docker(docker)# set statusenable Enable production registry.
2. Enable the management application.(docker)# setstatus Enable and set registry.sdwancontroller Enable/disable container.
To disable management extensions:
config system docker(docker)# get(docker)# set {fortiportal|sdwancontroller} disable
To update management extensions:
diagnose docker upgrade {fortiportal|sdwancontroller}
FortiManager 6.4.0 Administration Guide 608Fortinet Inc.

Management Extensions
To debug management extensions:
diagnose debug application docker
To clean up or check management extensions:
diagnose docker {cleanup|status}
FortiManager 6.4.0 Administration Guide 609Fortinet Inc.

Appendix A - Supported RFC Notes
This section identifies the request for comment (RFC) notes supported by FortiManager.
RFC 3414
Description:
User-Based Security Model (USM) for version 3 of the Simple Network Management Protocol
(SNMPv3).
Category:
SNMP
Webpage:
http://tools.ietf.org/html/rfc3414
RFC 2665
Description:
Ethernet-like MIB parts that apply to FortiManager units.
Category:
FortiManager (SNMP)
Webpage:
http://tools.ietf.org/html/rfc2665
RFC 1213
Description:
MIB II parts that apply to FortiManager units.
Category:
FortiManager (SNMP)
FortiManager 6.4.0 Administration Guide 610Fortinet Inc.

Appendix A - Supported RFC Notes
Webpage:
http://tools.ietf.org/html/rfc1213
Notes
RFC support for SNMP v3 includes Architecture for SNMP Frameworks (as described in RFC 3411). Generic
Fortinet traps : ColdStart, WarmStart, LinkUp, LinkDown (as described in RFC 1215).
FortiManager 6.4.0 Administration Guide 611Fortinet Inc.

Copyright© 2022 Fortinet, Inc. All rights reserved. Fortinet®, FortiGate®, FortiCare® and FortiGuard®, and certain other marks are registered trademarks of Fortinet, Inc., in theU.S. and other jurisdictions, and other Fortinet names herein may also be registered and/or common law trademarks of Fortinet. All other product or company names may betrademarks of their respective owners. Performance and other metrics contained herein were attained in internal lab tests under ideal conditions, and actual performance andother results may vary. Network variables, different network environments and other conditions may affect performance results. Nothing herein represents any bindingcommitment by Fortinet, and Fortinet disclaims all warranties, whether express or implied, except to the extent Fortinet enters a binding written contract, signed by Fortinet’sGeneral Counsel, with a purchaser that expressly warrants that the identified product will perform according to certain expressly-identified performance metrics and, in suchevent, only the specific performance metrics expressly identified in such binding written contract shall be binding on Fortinet. For absolute clarity, any such warranty will belimited to performance in the same ideal conditions as in Fortinet’s internal lab tests. In no event does Fortinet make any commitment related to future deliverables, features ordevelopment, and circumstances may change such that any forward-looking statements herein are not accurate. Fortinet disclaims in full any covenants, representations, andguarantees pursuant hereto, whether express or implied. Fortinet reserves the right to change, modify, transfer, or otherwise revise this publication without notice, and the mostcurrent version of the publication shall be applicable.