AWS App Runner - Developer Guide
144
AWS App Runner Developer Guide
-
Upload
khangminh22 -
Category
Documents
-
view
2 -
download
0
Transcript of AWS App Runner - Developer Guide

AWS App RunnerDeveloper Guide

AWS App Runner Developer Guide
AWS App Runner: Developer GuideCopyright © Amazon Web Services, Inc. and/or its affiliates. All rights reserved.
Amazon's trademarks and trade dress may not be used in connection with any product or service that is notAmazon's, in any manner that is likely to cause confusion among customers, or in any manner that disparages ordiscredits Amazon. All other trademarks not owned by Amazon are the property of their respective owners, who mayor may not be affiliated with, connected to, or sponsored by Amazon.

AWS App Runner Developer Guide
Table of ContentsWhat is AWS App Runner? .... . . . . . . . . . . . . . . . . . . . . . . . . . . . . . . . . . . . . . . . . . . . . . . . . . . . . . . . . . . . . . . . . . . . . . . . . . . . . . . . . . . . . . . . . . . . . . . . . . . . . . . . . . . . . . . 1
Who is App Runner for? ... . . . . . . . . . . . . . . . . . . . . . . . . . . . . . . . . . . . . . . . . . . . . . . . . . . . . . . . . . . . . . . . . . . . . . . . . . . . . . . . . . . . . . . . . . . . . . . . . . . . . . . . . . . . 1Accessing App Runner .... . . . . . . . . . . . . . . . . . . . . . . . . . . . . . . . . . . . . . . . . . . . . . . . . . . . . . . . . . . . . . . . . . . . . . . . . . . . . . . . . . . . . . . . . . . . . . . . . . . . . . . . . . . . . . 1Pricing for App Runner .... . . . . . . . . . . . . . . . . . . . . . . . . . . . . . . . . . . . . . . . . . . . . . . . . . . . . . . . . . . . . . . . . . . . . . . . . . . . . . . . . . . . . . . . . . . . . . . . . . . . . . . . . . . . 2What's next ... . . . . . . . . . . . . . . . . . . . . . . . . . . . . . . . . . . . . . . . . . . . . . . . . . . . . . . . . . . . . . . . . . . . . . . . . . . . . . . . . . . . . . . . . . . . . . . . . . . . . . . . . . . . . . . . . . . . . . . . . . . . . 2
Setting up .... . . . . . . . . . . . . . . . . . . . . . . . . . . . . . . . . . . . . . . . . . . . . . . . . . . . . . . . . . . . . . . . . . . . . . . . . . . . . . . . . . . . . . . . . . . . . . . . . . . . . . . . . . . . . . . . . . . . . . . . . . . . . . . . . . . . . . 3Create an AWS account .... . . . . . . . . . . . . . . . . . . . . . . . . . . . . . . . . . . . . . . . . . . . . . . . . . . . . . . . . . . . . . . . . . . . . . . . . . . . . . . . . . . . . . . . . . . . . . . . . . . . . . . . . . . . 3Create an IAM user ... . . . . . . . . . . . . . . . . . . . . . . . . . . . . . . . . . . . . . . . . . . . . . . . . . . . . . . . . . . . . . . . . . . . . . . . . . . . . . . . . . . . . . . . . . . . . . . . . . . . . . . . . . . . . . . . . . . 3Create an access key for your IAM user ... . . . . . . . . . . . . . . . . . . . . . . . . . . . . . . . . . . . . . . . . . . . . . . . . . . . . . . . . . . . . . . . . . . . . . . . . . . . . . . . . . . . . . . 4What's next ... . . . . . . . . . . . . . . . . . . . . . . . . . . . . . . . . . . . . . . . . . . . . . . . . . . . . . . . . . . . . . . . . . . . . . . . . . . . . . . . . . . . . . . . . . . . . . . . . . . . . . . . . . . . . . . . . . . . . . . . . . . . . 5
Getting started .... . . . . . . . . . . . . . . . . . . . . . . . . . . . . . . . . . . . . . . . . . . . . . . . . . . . . . . . . . . . . . . . . . . . . . . . . . . . . . . . . . . . . . . . . . . . . . . . . . . . . . . . . . . . . . . . . . . . . . . . . . . . . . . 6Prerequisites ... . . . . . . . . . . . . . . . . . . . . . . . . . . . . . . . . . . . . . . . . . . . . . . . . . . . . . . . . . . . . . . . . . . . . . . . . . . . . . . . . . . . . . . . . . . . . . . . . . . . . . . . . . . . . . . . . . . . . . . . . . . . 6Step 1: Create an App Runner service .... . . . . . . . . . . . . . . . . . . . . . . . . . . . . . . . . . . . . . . . . . . . . . . . . . . . . . . . . . . . . . . . . . . . . . . . . . . . . . . . . . . . . . . . 7Step 2: Change your service code .... . . . . . . . . . . . . . . . . . . . . . . . . . . . . . . . . . . . . . . . . . . . . . . . . . . . . . . . . . . . . . . . . . . . . . . . . . . . . . . . . . . . . . . . . . . . 12Step 3: Make a configuration change .... . . . . . . . . . . . . . . . . . . . . . . . . . . . . . . . . . . . . . . . . . . . . . . . . . . . . . . . . . . . . . . . . . . . . . . . . . . . . . . . . . . . . . . 13Step 4: View logs for your service .... . . . . . . . . . . . . . . . . . . . . . . . . . . . . . . . . . . . . . . . . . . . . . . . . . . . . . . . . . . . . . . . . . . . . . . . . . . . . . . . . . . . . . . . . . . 15Step 5: Clean up .... . . . . . . . . . . . . . . . . . . . . . . . . . . . . . . . . . . . . . . . . . . . . . . . . . . . . . . . . . . . . . . . . . . . . . . . . . . . . . . . . . . . . . . . . . . . . . . . . . . . . . . . . . . . . . . . . . . 16What's next ... . . . . . . . . . . . . . . . . . . . . . . . . . . . . . . . . . . . . . . . . . . . . . . . . . . . . . . . . . . . . . . . . . . . . . . . . . . . . . . . . . . . . . . . . . . . . . . . . . . . . . . . . . . . . . . . . . . . . . . . . . . 17
Architecture and concepts .... . . . . . . . . . . . . . . . . . . . . . . . . . . . . . . . . . . . . . . . . . . . . . . . . . . . . . . . . . . . . . . . . . . . . . . . . . . . . . . . . . . . . . . . . . . . . . . . . . . . . . . . . . . . . . 18App Runner concepts .... . . . . . . . . . . . . . . . . . . . . . . . . . . . . . . . . . . . . . . . . . . . . . . . . . . . . . . . . . . . . . . . . . . . . . . . . . . . . . . . . . . . . . . . . . . . . . . . . . . . . . . . . . . . . 18App Runner resources .... . . . . . . . . . . . . . . . . . . . . . . . . . . . . . . . . . . . . . . . . . . . . . . . . . . . . . . . . . . . . . . . . . . . . . . . . . . . . . . . . . . . . . . . . . . . . . . . . . . . . . . . . . . . 19App Runner resource quotas .... . . . . . . . . . . . . . . . . . . . . . . . . . . . . . . . . . . . . . . . . . . . . . . . . . . . . . . . . . . . . . . . . . . . . . . . . . . . . . . . . . . . . . . . . . . . . . . . . . . 20
Image-based service .... . . . . . . . . . . . . . . . . . . . . . . . . . . . . . . . . . . . . . . . . . . . . . . . . . . . . . . . . . . . . . . . . . . . . . . . . . . . . . . . . . . . . . . . . . . . . . . . . . . . . . . . . . . . . . . . . . . . . . 22Image repository providers ... . . . . . . . . . . . . . . . . . . . . . . . . . . . . . . . . . . . . . . . . . . . . . . . . . . . . . . . . . . . . . . . . . . . . . . . . . . . . . . . . . . . . . . . . . . . . . . . . . . . . . 22
Using an image stored in Amazon ECR in your AWS account . . . . . . . . . . . . . . . . . . . . . . . . . . . . . . . . . . . . . . . . . . . . . . . . . . . 22Using an image stored in Amazon ECR in a different AWS account . . . . . . . . . . . . . . . . . . . . . . . . . . . . . . . . . . . . . . . . . . . 23Using an image stored in Amazon ECR Public ... . . . . . . . . . . . . . . . . . . . . . . . . . . . . . . . . . . . . . . . . . . . . . . . . . . . . . . . . . . . . . . . . . . . 23
Image example .... . . . . . . . . . . . . . . . . . . . . . . . . . . . . . . . . . . . . . . . . . . . . . . . . . . . . . . . . . . . . . . . . . . . . . . . . . . . . . . . . . . . . . . . . . . . . . . . . . . . . . . . . . . . . . . . . . . . . 24Code-based service .... . . . . . . . . . . . . . . . . . . . . . . . . . . . . . . . . . . . . . . . . . . . . . . . . . . . . . . . . . . . . . . . . . . . . . . . . . . . . . . . . . . . . . . . . . . . . . . . . . . . . . . . . . . . . . . . . . . . . . . . 25
Source code repository providers ... . . . . . . . . . . . . . . . . . . . . . . . . . . . . . . . . . . . . . . . . . . . . . . . . . . . . . . . . . . . . . . . . . . . . . . . . . . . . . . . . . . . . . . . . . . . . . 25Deploying from GitHub .... . . . . . . . . . . . . . . . . . . . . . . . . . . . . . . . . . . . . . . . . . . . . . . . . . . . . . . . . . . . . . . . . . . . . . . . . . . . . . . . . . . . . . . . . . . . . . . . . . 25
App Runner managed platforms .... . . . . . . . . . . . . . . . . . . . . . . . . . . . . . . . . . . . . . . . . . . . . . . . . . . . . . . . . . . . . . . . . . . . . . . . . . . . . . . . . . . . . . . . . . . . . 26Python platform ..... . . . . . . . . . . . . . . . . . . . . . . . . . . . . . . . . . . . . . . . . . . . . . . . . . . . . . . . . . . . . . . . . . . . . . . . . . . . . . . . . . . . . . . . . . . . . . . . . . . . . . . . . . . . . . . . . . 26
Python runtime configuration .... . . . . . . . . . . . . . . . . . . . . . . . . . . . . . . . . . . . . . . . . . . . . . . . . . . . . . . . . . . . . . . . . . . . . . . . . . . . . . . . . . . . . . . . . 27Python runtime examples .... . . . . . . . . . . . . . . . . . . . . . . . . . . . . . . . . . . . . . . . . . . . . . . . . . . . . . . . . . . . . . . . . . . . . . . . . . . . . . . . . . . . . . . . . . . . . . . 27Release information .... . . . . . . . . . . . . . . . . . . . . . . . . . . . . . . . . . . . . . . . . . . . . . . . . . . . . . . . . . . . . . . . . . . . . . . . . . . . . . . . . . . . . . . . . . . . . . . . . . . . . . . 29
Node.js platform ..... . . . . . . . . . . . . . . . . . . . . . . . . . . . . . . . . . . . . . . . . . . . . . . . . . . . . . . . . . . . . . . . . . . . . . . . . . . . . . . . . . . . . . . . . . . . . . . . . . . . . . . . . . . . . . . . . . 29Node.js runtime configuration .... . . . . . . . . . . . . . . . . . . . . . . . . . . . . . . . . . . . . . . . . . . . . . . . . . . . . . . . . . . . . . . . . . . . . . . . . . . . . . . . . . . . . . . . . 30Node.js runtime examples .... . . . . . . . . . . . . . . . . . . . . . . . . . . . . . . . . . . . . . . . . . . . . . . . . . . . . . . . . . . . . . . . . . . . . . . . . . . . . . . . . . . . . . . . . . . . . . 31Release information .... . . . . . . . . . . . . . . . . . . . . . . . . . . . . . . . . . . . . . . . . . . . . . . . . . . . . . . . . . . . . . . . . . . . . . . . . . . . . . . . . . . . . . . . . . . . . . . . . . . . . . . 33
Java platform ..... . . . . . . . . . . . . . . . . . . . . . . . . . . . . . . . . . . . . . . . . . . . . . . . . . . . . . . . . . . . . . . . . . . . . . . . . . . . . . . . . . . . . . . . . . . . . . . . . . . . . . . . . . . . . . . . . . . . . . 34Java runtime configuration .... . . . . . . . . . . . . . . . . . . . . . . . . . . . . . . . . . . . . . . . . . . . . . . . . . . . . . . . . . . . . . . . . . . . . . . . . . . . . . . . . . . . . . . . . . . . . 35Java runtime examples .... . . . . . . . . . . . . . . . . . . . . . . . . . . . . . . . . . . . . . . . . . . . . . . . . . . . . . . . . . . . . . . . . . . . . . . . . . . . . . . . . . . . . . . . . . . . . . . . . . 35Release information .... . . . . . . . . . . . . . . . . . . . . . . . . . . . . . . . . . . . . . . . . . . . . . . . . . . . . . . . . . . . . . . . . . . . . . . . . . . . . . . . . . . . . . . . . . . . . . . . . . . . . . . 38
Developing for App Runner .... . . . . . . . . . . . . . . . . . . . . . . . . . . . . . . . . . . . . . . . . . . . . . . . . . . . . . . . . . . . . . . . . . . . . . . . . . . . . . . . . . . . . . . . . . . . . . . . . . . . . . . . . . . . 39Runtime information .... . . . . . . . . . . . . . . . . . . . . . . . . . . . . . . . . . . . . . . . . . . . . . . . . . . . . . . . . . . . . . . . . . . . . . . . . . . . . . . . . . . . . . . . . . . . . . . . . . . . . . . . . . . . . 39Code development guidelines .... . . . . . . . . . . . . . . . . . . . . . . . . . . . . . . . . . . . . . . . . . . . . . . . . . . . . . . . . . . . . . . . . . . . . . . . . . . . . . . . . . . . . . . . . . . . . . . . . 40
App Runner console .... . . . . . . . . . . . . . . . . . . . . . . . . . . . . . . . . . . . . . . . . . . . . . . . . . . . . . . . . . . . . . . . . . . . . . . . . . . . . . . . . . . . . . . . . . . . . . . . . . . . . . . . . . . . . . . . . . . . . . 41Overall console layout .... . . . . . . . . . . . . . . . . . . . . . . . . . . . . . . . . . . . . . . . . . . . . . . . . . . . . . . . . . . . . . . . . . . . . . . . . . . . . . . . . . . . . . . . . . . . . . . . . . . . . . . . . . . 41The Services page .... . . . . . . . . . . . . . . . . . . . . . . . . . . . . . . . . . . . . . . . . . . . . . . . . . . . . . . . . . . . . . . . . . . . . . . . . . . . . . . . . . . . . . . . . . . . . . . . . . . . . . . . . . . . . . . . . 41The service dashboard page .... . . . . . . . . . . . . . . . . . . . . . . . . . . . . . . . . . . . . . . . . . . . . . . . . . . . . . . . . . . . . . . . . . . . . . . . . . . . . . . . . . . . . . . . . . . . . . . . . . . 42The GitHub connections page .... . . . . . . . . . . . . . . . . . . . . . . . . . . . . . . . . . . . . . . . . . . . . . . . . . . . . . . . . . . . . . . . . . . . . . . . . . . . . . . . . . . . . . . . . . . . . . . . . 42
Managing your service .... . . . . . . . . . . . . . . . . . . . . . . . . . . . . . . . . . . . . . . . . . . . . . . . . . . . . . . . . . . . . . . . . . . . . . . . . . . . . . . . . . . . . . . . . . . . . . . . . . . . . . . . . . . . . . . . . . . 44Creation .... . . . . . . . . . . . . . . . . . . . . . . . . . . . . . . . . . . . . . . . . . . . . . . . . . . . . . . . . . . . . . . . . . . . . . . . . . . . . . . . . . . . . . . . . . . . . . . . . . . . . . . . . . . . . . . . . . . . . . . . . . . . . . . 44
iii

AWS App Runner Developer Guide
Prerequisites ... . . . . . . . . . . . . . . . . . . . . . . . . . . . . . . . . . . . . . . . . . . . . . . . . . . . . . . . . . . . . . . . . . . . . . . . . . . . . . . . . . . . . . . . . . . . . . . . . . . . . . . . . . . . . . . . . . 44Create a service .... . . . . . . . . . . . . . . . . . . . . . . . . . . . . . . . . . . . . . . . . . . . . . . . . . . . . . . . . . . . . . . . . . . . . . . . . . . . . . . . . . . . . . . . . . . . . . . . . . . . . . . . . . . . 44When service creation fails ... . . . . . . . . . . . . . . . . . . . . . . . . . . . . . . . . . . . . . . . . . . . . . . . . . . . . . . . . . . . . . . . . . . . . . . . . . . . . . . . . . . . . . . . . . . . . . 54
Deployment .... . . . . . . . . . . . . . . . . . . . . . . . . . . . . . . . . . . . . . . . . . . . . . . . . . . . . . . . . . . . . . . . . . . . . . . . . . . . . . . . . . . . . . . . . . . . . . . . . . . . . . . . . . . . . . . . . . . . . . . . . . 55Deployment methods .... . . . . . . . . . . . . . . . . . . . . . . . . . . . . . . . . . . . . . . . . . . . . . . . . . . . . . . . . . . . . . . . . . . . . . . . . . . . . . . . . . . . . . . . . . . . . . . . . . . . 55Manual deployment .... . . . . . . . . . . . . . . . . . . . . . . . . . . . . . . . . . . . . . . . . . . . . . . . . . . . . . . . . . . . . . . . . . . . . . . . . . . . . . . . . . . . . . . . . . . . . . . . . . . . . . . 56
Configuration .... . . . . . . . . . . . . . . . . . . . . . . . . . . . . . . . . . . . . . . . . . . . . . . . . . . . . . . . . . . . . . . . . . . . . . . . . . . . . . . . . . . . . . . . . . . . . . . . . . . . . . . . . . . . . . . . . . . . . . . . 57Configure your service using the App Runner API or AWS CLI ... . . . . . . . . . . . . . . . . . . . . . . . . . . . . . . . . . . . . . . . . . . . . . . 57Configure your service using the App Runner console .... . . . . . . . . . . . . . . . . . . . . . . . . . . . . . . . . . . . . . . . . . . . . . . . . . . . . . . . 57Configure your service using an App Runner configuration file .... . . . . . . . . . . . . . . . . . . . . . . . . . . . . . . . . . . . . . . . . . . . 58Observability configuration .... . . . . . . . . . . . . . . . . . . . . . . . . . . . . . . . . . . . . . . . . . . . . . . . . . . . . . . . . . . . . . . . . . . . . . . . . . . . . . . . . . . . . . . . . . . . . 58Configuration resources .... . . . . . . . . . . . . . . . . . . . . . . . . . . . . . . . . . . . . . . . . . . . . . . . . . . . . . . . . . . . . . . . . . . . . . . . . . . . . . . . . . . . . . . . . . . . . . . . . . 60Health check configuration .... . . . . . . . . . . . . . . . . . . . . . . . . . . . . . . . . . . . . . . . . . . . . . . . . . . . . . . . . . . . . . . . . . . . . . . . . . . . . . . . . . . . . . . . . . . . . 61
Connections .... . . . . . . . . . . . . . . . . . . . . . . . . . . . . . . . . . . . . . . . . . . . . . . . . . . . . . . . . . . . . . . . . . . . . . . . . . . . . . . . . . . . . . . . . . . . . . . . . . . . . . . . . . . . . . . . . . . . . . . . . . 62Manage connections .... . . . . . . . . . . . . . . . . . . . . . . . . . . . . . . . . . . . . . . . . . . . . . . . . . . . . . . . . . . . . . . . . . . . . . . . . . . . . . . . . . . . . . . . . . . . . . . . . . . . . . 63
Auto scaling .... . . . . . . . . . . . . . . . . . . . . . . . . . . . . . . . . . . . . . . . . . . . . . . . . . . . . . . . . . . . . . . . . . . . . . . . . . . . . . . . . . . . . . . . . . . . . . . . . . . . . . . . . . . . . . . . . . . . . . . . . 64Manage auto scaling .... . . . . . . . . . . . . . . . . . . . . . . . . . . . . . . . . . . . . . . . . . . . . . . . . . . . . . . . . . . . . . . . . . . . . . . . . . . . . . . . . . . . . . . . . . . . . . . . . . . . . . 64
Custom domain names .... . . . . . . . . . . . . . . . . . . . . . . . . . . . . . . . . . . . . . . . . . . . . . . . . . . . . . . . . . . . . . . . . . . . . . . . . . . . . . . . . . . . . . . . . . . . . . . . . . . . . . . . . . 65Manage custom domains .... . . . . . . . . . . . . . . . . . . . . . . . . . . . . . . . . . . . . . . . . . . . . . . . . . . . . . . . . . . . . . . . . . . . . . . . . . . . . . . . . . . . . . . . . . . . . . . . 67Troubleshooting custom domain names .... . . . . . . . . . . . . . . . . . . . . . . . . . . . . . . . . . . . . . . . . . . . . . . . . . . . . . . . . . . . . . . . . . . . . . . . . . . 71
Pausing / resuming .... . . . . . . . . . . . . . . . . . . . . . . . . . . . . . . . . . . . . . . . . . . . . . . . . . . . . . . . . . . . . . . . . . . . . . . . . . . . . . . . . . . . . . . . . . . . . . . . . . . . . . . . . . . . . . . . 73Pausing and deleting compared .... . . . . . . . . . . . . . . . . . . . . . . . . . . . . . . . . . . . . . . . . . . . . . . . . . . . . . . . . . . . . . . . . . . . . . . . . . . . . . . . . . . . . . 74When your service is paused .... . . . . . . . . . . . . . . . . . . . . . . . . . . . . . . . . . . . . . . . . . . . . . . . . . . . . . . . . . . . . . . . . . . . . . . . . . . . . . . . . . . . . . . . . . . 74Pause and resume your service .... . . . . . . . . . . . . . . . . . . . . . . . . . . . . . . . . . . . . . . . . . . . . . . . . . . . . . . . . . . . . . . . . . . . . . . . . . . . . . . . . . . . . . . 74
Deletion .... . . . . . . . . . . . . . . . . . . . . . . . . . . . . . . . . . . . . . . . . . . . . . . . . . . . . . . . . . . . . . . . . . . . . . . . . . . . . . . . . . . . . . . . . . . . . . . . . . . . . . . . . . . . . . . . . . . . . . . . . . . . . . . 75Pausing and deleting compared .... . . . . . . . . . . . . . . . . . . . . . . . . . . . . . . . . . . . . . . . . . . . . . . . . . . . . . . . . . . . . . . . . . . . . . . . . . . . . . . . . . . . . . 76What does App Runner delete? .... . . . . . . . . . . . . . . . . . . . . . . . . . . . . . . . . . . . . . . . . . . . . . . . . . . . . . . . . . . . . . . . . . . . . . . . . . . . . . . . . . . . . . . 76Delete your service .... . . . . . . . . . . . . . . . . . . . . . . . . . . . . . . . . . . . . . . . . . . . . . . . . . . . . . . . . . . . . . . . . . . . . . . . . . . . . . . . . . . . . . . . . . . . . . . . . . . . . . . . 76
Networking .... . . . . . . . . . . . . . . . . . . . . . . . . . . . . . . . . . . . . . . . . . . . . . . . . . . . . . . . . . . . . . . . . . . . . . . . . . . . . . . . . . . . . . . . . . . . . . . . . . . . . . . . . . . . . . . . . . . . . . . . . . . . . . . . . . . 78VPC access .... . . . . . . . . . . . . . . . . . . . . . . . . . . . . . . . . . . . . . . . . . . . . . . . . . . . . . . . . . . . . . . . . . . . . . . . . . . . . . . . . . . . . . . . . . . . . . . . . . . . . . . . . . . . . . . . . . . . . . . . . . . 78
VPC Connector ... . . . . . . . . . . . . . . . . . . . . . . . . . . . . . . . . . . . . . . . . . . . . . . . . . . . . . . . . . . . . . . . . . . . . . . . . . . . . . . . . . . . . . . . . . . . . . . . . . . . . . . . . . . . . . . 78Subnet .... . . . . . . . . . . . . . . . . . . . . . . . . . . . . . . . . . . . . . . . . . . . . . . . . . . . . . . . . . . . . . . . . . . . . . . . . . . . . . . . . . . . . . . . . . . . . . . . . . . . . . . . . . . . . . . . . . . . . . . . . 78Security group .... . . . . . . . . . . . . . . . . . . . . . . . . . . . . . . . . . . . . . . . . . . . . . . . . . . . . . . . . . . . . . . . . . . . . . . . . . . . . . . . . . . . . . . . . . . . . . . . . . . . . . . . . . . . . . 79Manage VPC access .... . . . . . . . . . . . . . . . . . . . . . . . . . . . . . . . . . . . . . . . . . . . . . . . . . . . . . . . . . . . . . . . . . . . . . . . . . . . . . . . . . . . . . . . . . . . . . . . . . . . . . . 79
VPC endpoints ... . . . . . . . . . . . . . . . . . . . . . . . . . . . . . . . . . . . . . . . . . . . . . . . . . . . . . . . . . . . . . . . . . . . . . . . . . . . . . . . . . . . . . . . . . . . . . . . . . . . . . . . . . . . . . . . . . . . . . . 83Setting up a VPC endpoint for App Runner .... . . . . . . . . . . . . . . . . . . . . . . . . . . . . . . . . . . . . . . . . . . . . . . . . . . . . . . . . . . . . . . . . . . . . . 83VPC network privacy considerations .... . . . . . . . . . . . . . . . . . . . . . . . . . . . . . . . . . . . . . . . . . . . . . . . . . . . . . . . . . . . . . . . . . . . . . . . . . . . . . . . . 83Using endpoint policies to control access with VPC endpoints ... . . . . . . . . . . . . . . . . . . . . . . . . . . . . . . . . . . . . . . . . . . . . . 84
Observability ... . . . . . . . . . . . . . . . . . . . . . . . . . . . . . . . . . . . . . . . . . . . . . . . . . . . . . . . . . . . . . . . . . . . . . . . . . . . . . . . . . . . . . . . . . . . . . . . . . . . . . . . . . . . . . . . . . . . . . . . . . . . . . . . . 85Activity ... . . . . . . . . . . . . . . . . . . . . . . . . . . . . . . . . . . . . . . . . . . . . . . . . . . . . . . . . . . . . . . . . . . . . . . . . . . . . . . . . . . . . . . . . . . . . . . . . . . . . . . . . . . . . . . . . . . . . . . . . . . . . . . . . 85
Track App Runner service activity ... . . . . . . . . . . . . . . . . . . . . . . . . . . . . . . . . . . . . . . . . . . . . . . . . . . . . . . . . . . . . . . . . . . . . . . . . . . . . . . . . . . . . 85Logs (CloudWatch Logs) ... . . . . . . . . . . . . . . . . . . . . . . . . . . . . . . . . . . . . . . . . . . . . . . . . . . . . . . . . . . . . . . . . . . . . . . . . . . . . . . . . . . . . . . . . . . . . . . . . . . . . . . . . . 86
App Runner log groups and streams .... . . . . . . . . . . . . . . . . . . . . . . . . . . . . . . . . . . . . . . . . . . . . . . . . . . . . . . . . . . . . . . . . . . . . . . . . . . . . . . . 86Viewing App Runner logs in the console .... . . . . . . . . . . . . . . . . . . . . . . . . . . . . . . . . . . . . . . . . . . . . . . . . . . . . . . . . . . . . . . . . . . . . . . . . . 88
Metrics (CloudWatch) ... . . . . . . . . . . . . . . . . . . . . . . . . . . . . . . . . . . . . . . . . . . . . . . . . . . . . . . . . . . . . . . . . . . . . . . . . . . . . . . . . . . . . . . . . . . . . . . . . . . . . . . . . . . . . . 89App Runner metrics ... . . . . . . . . . . . . . . . . . . . . . . . . . . . . . . . . . . . . . . . . . . . . . . . . . . . . . . . . . . . . . . . . . . . . . . . . . . . . . . . . . . . . . . . . . . . . . . . . . . . . . . . 90Viewing App Runner metrics in the console .... . . . . . . . . . . . . . . . . . . . . . . . . . . . . . . . . . . . . . . . . . . . . . . . . . . . . . . . . . . . . . . . . . . . . . 90
Event handling (EventBridge) ... . . . . . . . . . . . . . . . . . . . . . . . . . . . . . . . . . . . . . . . . . . . . . . . . . . . . . . . . . . . . . . . . . . . . . . . . . . . . . . . . . . . . . . . . . . . . . . . . . . 92Creating an EventBridge rule to act on App Runner events .... . . . . . . . . . . . . . . . . . . . . . . . . . . . . . . . . . . . . . . . . . . . . . . . . 93App Runner event examples .... . . . . . . . . . . . . . . . . . . . . . . . . . . . . . . . . . . . . . . . . . . . . . . . . . . . . . . . . . . . . . . . . . . . . . . . . . . . . . . . . . . . . . . . . . . 93App Runner event pattern examples .... . . . . . . . . . . . . . . . . . . . . . . . . . . . . . . . . . . . . . . . . . . . . . . . . . . . . . . . . . . . . . . . . . . . . . . . . . . . . . . . 94App Runner event reference .... . . . . . . . . . . . . . . . . . . . . . . . . . . . . . . . . . . . . . . . . . . . . . . . . . . . . . . . . . . . . . . . . . . . . . . . . . . . . . . . . . . . . . . . . . . 95
API actions (CloudTrail) .. . . . . . . . . . . . . . . . . . . . . . . . . . . . . . . . . . . . . . . . . . . . . . . . . . . . . . . . . . . . . . . . . . . . . . . . . . . . . . . . . . . . . . . . . . . . . . . . . . . . . . . . . . . . 96App Runner information in CloudTrail .. . . . . . . . . . . . . . . . . . . . . . . . . . . . . . . . . . . . . . . . . . . . . . . . . . . . . . . . . . . . . . . . . . . . . . . . . . . . . . . . 96Understanding App Runner log file entries ... . . . . . . . . . . . . . . . . . . . . . . . . . . . . . . . . . . . . . . . . . . . . . . . . . . . . . . . . . . . . . . . . . . . . . . . 97
Tracing (X-Ray) ... . . . . . . . . . . . . . . . . . . . . . . . . . . . . . . . . . . . . . . . . . . . . . . . . . . . . . . . . . . . . . . . . . . . . . . . . . . . . . . . . . . . . . . . . . . . . . . . . . . . . . . . . . . . . . . . . . . . . . . 99Instrument your application for tracing .... . . . . . . . . . . . . . . . . . . . . . . . . . . . . . . . . . . . . . . . . . . . . . . . . . . . . . . . . . . . . . . . . . . . . . . . . . 100
iv

AWS App Runner Developer Guide
Add X-Ray permissions to your App Runner service instance role .... . . . . . . . . . . . . . . . . . . . . . . . . . . . . . . . . . . . . . . . 101Enable X-Ray tracing for your App Runner service .... . . . . . . . . . . . . . . . . . . . . . . . . . . . . . . . . . . . . . . . . . . . . . . . . . . . . . . . . . . . 101View X-Ray tracing data for your App Runner service .... . . . . . . . . . . . . . . . . . . . . . . . . . . . . . . . . . . . . . . . . . . . . . . . . . . . . . . 101
App Runner configuration file .... . . . . . . . . . . . . . . . . . . . . . . . . . . . . . . . . . . . . . . . . . . . . . . . . . . . . . . . . . . . . . . . . . . . . . . . . . . . . . . . . . . . . . . . . . . . . . . . . . . . . . . 103Examples .... . . . . . . . . . . . . . . . . . . . . . . . . . . . . . . . . . . . . . . . . . . . . . . . . . . . . . . . . . . . . . . . . . . . . . . . . . . . . . . . . . . . . . . . . . . . . . . . . . . . . . . . . . . . . . . . . . . . . . . . . . . . 103
Configuration file examples .... . . . . . . . . . . . . . . . . . . . . . . . . . . . . . . . . . . . . . . . . . . . . . . . . . . . . . . . . . . . . . . . . . . . . . . . . . . . . . . . . . . . . . . . . . 103Reference .... . . . . . . . . . . . . . . . . . . . . . . . . . . . . . . . . . . . . . . . . . . . . . . . . . . . . . . . . . . . . . . . . . . . . . . . . . . . . . . . . . . . . . . . . . . . . . . . . . . . . . . . . . . . . . . . . . . . . . . . . . . 104
Structure overview .... . . . . . . . . . . . . . . . . . . . . . . . . . . . . . . . . . . . . . . . . . . . . . . . . . . . . . . . . . . . . . . . . . . . . . . . . . . . . . . . . . . . . . . . . . . . . . . . . . . . . . . 105Top section .... . . . . . . . . . . . . . . . . . . . . . . . . . . . . . . . . . . . . . . . . . . . . . . . . . . . . . . . . . . . . . . . . . . . . . . . . . . . . . . . . . . . . . . . . . . . . . . . . . . . . . . . . . . . . . . . . 105Build section .... . . . . . . . . . . . . . . . . . . . . . . . . . . . . . . . . . . . . . . . . . . . . . . . . . . . . . . . . . . . . . . . . . . . . . . . . . . . . . . . . . . . . . . . . . . . . . . . . . . . . . . . . . . . . . . 105Run section .... . . . . . . . . . . . . . . . . . . . . . . . . . . . . . . . . . . . . . . . . . . . . . . . . . . . . . . . . . . . . . . . . . . . . . . . . . . . . . . . . . . . . . . . . . . . . . . . . . . . . . . . . . . . . . . . . 106
App Runner API ... . . . . . . . . . . . . . . . . . . . . . . . . . . . . . . . . . . . . . . . . . . . . . . . . . . . . . . . . . . . . . . . . . . . . . . . . . . . . . . . . . . . . . . . . . . . . . . . . . . . . . . . . . . . . . . . . . . . . . . . . . . . 109Using the AWS CLI to work with App Runner .... . . . . . . . . . . . . . . . . . . . . . . . . . . . . . . . . . . . . . . . . . . . . . . . . . . . . . . . . . . . . . . . . . . . . . . . . . 109Using AWS CloudShell ... . . . . . . . . . . . . . . . . . . . . . . . . . . . . . . . . . . . . . . . . . . . . . . . . . . . . . . . . . . . . . . . . . . . . . . . . . . . . . . . . . . . . . . . . . . . . . . . . . . . . . . . . . . 109
Obtaining IAM permissions for AWS CloudShell ... . . . . . . . . . . . . . . . . . . . . . . . . . . . . . . . . . . . . . . . . . . . . . . . . . . . . . . . . . . . . . . . 110Interacting with App Runner using AWS CloudShell ... . . . . . . . . . . . . . . . . . . . . . . . . . . . . . . . . . . . . . . . . . . . . . . . . . . . . . . . . . 110Verifying your App Runner service using AWS CloudShell ... . . . . . . . . . . . . . . . . . . . . . . . . . . . . . . . . . . . . . . . . . . . . . . . . . . 112
Security ... . . . . . . . . . . . . . . . . . . . . . . . . . . . . . . . . . . . . . . . . . . . . . . . . . . . . . . . . . . . . . . . . . . . . . . . . . . . . . . . . . . . . . . . . . . . . . . . . . . . . . . . . . . . . . . . . . . . . . . . . . . . . . . . . . . . . . . 113Data protection .... . . . . . . . . . . . . . . . . . . . . . . . . . . . . . . . . . . . . . . . . . . . . . . . . . . . . . . . . . . . . . . . . . . . . . . . . . . . . . . . . . . . . . . . . . . . . . . . . . . . . . . . . . . . . . . . . . . 113
Data encryption .... . . . . . . . . . . . . . . . . . . . . . . . . . . . . . . . . . . . . . . . . . . . . . . . . . . . . . . . . . . . . . . . . . . . . . . . . . . . . . . . . . . . . . . . . . . . . . . . . . . . . . . . . . 114Internetwork privacy .... . . . . . . . . . . . . . . . . . . . . . . . . . . . . . . . . . . . . . . . . . . . . . . . . . . . . . . . . . . . . . . . . . . . . . . . . . . . . . . . . . . . . . . . . . . . . . . . . . . . 115
Identity and access management .... . . . . . . . . . . . . . . . . . . . . . . . . . . . . . . . . . . . . . . . . . . . . . . . . . . . . . . . . . . . . . . . . . . . . . . . . . . . . . . . . . . . . . . . . . . 115Audience .... . . . . . . . . . . . . . . . . . . . . . . . . . . . . . . . . . . . . . . . . . . . . . . . . . . . . . . . . . . . . . . . . . . . . . . . . . . . . . . . . . . . . . . . . . . . . . . . . . . . . . . . . . . . . . . . . . . . 115Authenticating with identities ... . . . . . . . . . . . . . . . . . . . . . . . . . . . . . . . . . . . . . . . . . . . . . . . . . . . . . . . . . . . . . . . . . . . . . . . . . . . . . . . . . . . . . . . 116Managing access using policies ... . . . . . . . . . . . . . . . . . . . . . . . . . . . . . . . . . . . . . . . . . . . . . . . . . . . . . . . . . . . . . . . . . . . . . . . . . . . . . . . . . . . . . . 117App Runner and IAM ..... . . . . . . . . . . . . . . . . . . . . . . . . . . . . . . . . . . . . . . . . . . . . . . . . . . . . . . . . . . . . . . . . . . . . . . . . . . . . . . . . . . . . . . . . . . . . . . . . . . 119Identity-based policy examples .... . . . . . . . . . . . . . . . . . . . . . . . . . . . . . . . . . . . . . . . . . . . . . . . . . . . . . . . . . . . . . . . . . . . . . . . . . . . . . . . . . . . . 125Using service-linked roles ... . . . . . . . . . . . . . . . . . . . . . . . . . . . . . . . . . . . . . . . . . . . . . . . . . . . . . . . . . . . . . . . . . . . . . . . . . . . . . . . . . . . . . . . . . . . . . 128AWS managed policies ... . . . . . . . . . . . . . . . . . . . . . . . . . . . . . . . . . . . . . . . . . . . . . . . . . . . . . . . . . . . . . . . . . . . . . . . . . . . . . . . . . . . . . . . . . . . . . . . . . 133Troubleshooting .... . . . . . . . . . . . . . . . . . . . . . . . . . . . . . . . . . . . . . . . . . . . . . . . . . . . . . . . . . . . . . . . . . . . . . . . . . . . . . . . . . . . . . . . . . . . . . . . . . . . . . . . . . 134
Logging and monitoring .... . . . . . . . . . . . . . . . . . . . . . . . . . . . . . . . . . . . . . . . . . . . . . . . . . . . . . . . . . . . . . . . . . . . . . . . . . . . . . . . . . . . . . . . . . . . . . . . . . . . . . . 135Compliance validation .... . . . . . . . . . . . . . . . . . . . . . . . . . . . . . . . . . . . . . . . . . . . . . . . . . . . . . . . . . . . . . . . . . . . . . . . . . . . . . . . . . . . . . . . . . . . . . . . . . . . . . . . . . 136Resilience .... . . . . . . . . . . . . . . . . . . . . . . . . . . . . . . . . . . . . . . . . . . . . . . . . . . . . . . . . . . . . . . . . . . . . . . . . . . . . . . . . . . . . . . . . . . . . . . . . . . . . . . . . . . . . . . . . . . . . . . . . . . 136Infrastructure security ... . . . . . . . . . . . . . . . . . . . . . . . . . . . . . . . . . . . . . . . . . . . . . . . . . . . . . . . . . . . . . . . . . . . . . . . . . . . . . . . . . . . . . . . . . . . . . . . . . . . . . . . . . . 137Shared responsibility model ... . . . . . . . . . . . . . . . . . . . . . . . . . . . . . . . . . . . . . . . . . . . . . . . . . . . . . . . . . . . . . . . . . . . . . . . . . . . . . . . . . . . . . . . . . . . . . . . . . . 137Security best practices .... . . . . . . . . . . . . . . . . . . . . . . . . . . . . . . . . . . . . . . . . . . . . . . . . . . . . . . . . . . . . . . . . . . . . . . . . . . . . . . . . . . . . . . . . . . . . . . . . . . . . . . . . 137
Preventive security best practices .... . . . . . . . . . . . . . . . . . . . . . . . . . . . . . . . . . . . . . . . . . . . . . . . . . . . . . . . . . . . . . . . . . . . . . . . . . . . . . . . . . 137Detective security best practices .... . . . . . . . . . . . . . . . . . . . . . . . . . . . . . . . . . . . . . . . . . . . . . . . . . . . . . . . . . . . . . . . . . . . . . . . . . . . . . . . . . . . 138
AWS glossary .... . . . . . . . . . . . . . . . . . . . . . . . . . . . . . . . . . . . . . . . . . . . . . . . . . . . . . . . . . . . . . . . . . . . . . . . . . . . . . . . . . . . . . . . . . . . . . . . . . . . . . . . . . . . . . . . . . . . . . . . . . . . . . 139
v

AWS App Runner Developer GuideWho is App Runner for?
What is AWS App Runner?AWS App Runner is an AWS service that provides a fast, simple, and cost-effective way to deploy fromsource code or a container image directly to a scalable and secure web application in the AWS Cloud. Youdon't need to learn new technologies, decide which compute service to use, or know how to provisionand configure AWS resources.
App Runner connects directly to your code or image repository. It provides an automatic integration anddelivery pipeline with fully managed operations, high performance, scalability, and security.
Who is App Runner for?If you're a developer, you can use App Runner to simplify the process of deploying a new version of yourcode or image repository.
For operations teams, App Runner enables automatic deployments each time a commit is pushed to thecode repository or a new container image version is pushed to the image repository.
Accessing App RunnerYou can define and configure your App Runner service deployments using any one of the followinginterfaces:
• App Runner console – Provides a web interface for managing your App Runner services.
• App Runner API – Provides a RESTful API for performing App Runner actions. For more information,see AWS App Runner API Reference.
• AWS Command Line Interface (AWS CLI) – Provides commands for a broad set of AWS services,including Amazon VPC, and is supported on Windows, macOS, and Linux. For more information, seeAWS Command Line Interface.
1

AWS App Runner Developer GuidePricing for App Runner
• AWS SDKs – Provides language-specific APIs and takes care of many of the connection details, suchas calculating signatures, handling request retries, and error handling. For more information, see AWSSDKs.
Pricing for App RunnerApp Runner provides a cost-effective way to run your application. You only pay for resources that yourApp Runner service consumes. Your service scales down to fewer compute instances when requesttraffic is lower. You have control over scalability settings: the lowest and highest number of provisionedinstances, and the highest load an instance handles.
For more information about App Runner automatic scaling, see the section called “Autoscaling” (p. 64).
For pricing information, see AWS App Runner pricing.
What's nextLearn how to get started with App Runner in the following topics:
• Setting up (p. 3) – Complete the prerequisite steps for using App Runner.• Getting started (p. 6) – Deploy your first application to App Runner.
2

AWS App Runner Developer GuideCreate an AWS account
Setting up for App RunnerIf you're a new AWS customer, complete the setup prerequisites that are listed on this page before youstart using AWS App Runner.
For these setup procedures, you use the AWS Identity and Access Management (IAM) service. Forcomplete information about IAM, see the following reference materials:
• AWS Identity and Access Management (IAM)• IAM User Guide
Create an AWS accountWhen you sign up with AWS, you get an account number with access to all of the services that AWSoffers, including AWS App Runner.
If you already have an AWS account, skip to the next prerequisite.
If you do not have an AWS account, complete the following steps to create one.
To sign up for an AWS account
1. Open https://portal.aws.amazon.com/billing/signup.2. Follow the online instructions.
Part of the sign-up procedure involves receiving a phone call and entering a verification code on thephone keypad.
Create an IAM userTo access an AWS service, you provide credentials. These credentials determine authentication (who youare) and authorization (which permissions you have to perform actions on AWS resources).
When you first create an Amazon Web Services (AWS) account, you begin with a single sign-in identity.That identity has complete access to all AWS services and resources in the account. This identity is calledthe AWS account root user. When you sign in, enter the email address and password that you used tocreate the account.
ImportantWe strongly recommend that you do not use the root user for your everyday tasks, even theadministrative ones. Instead, adhere to the best practice of using the root user only to createyour first IAM user. Then securely lock away the root user credentials and use them to performonly a few account and service management tasks. To view the tasks that require you to sign inas the root user, see Tasks that require root user credentials.
For more information about the root user and IAM user credentials, see AWS account root usercredentials and IAM user credentials in the AWS General Reference.
To create an administrator user for yourself and add the user to an administrators group(console)
1. Sign in to the IAM console as the account owner by choosing Root user and entering your AWSaccount email address. On the next page, enter your password.
3

AWS App Runner Developer GuideCreate an access key for your IAM user
NoteWe strongly recommend that you adhere to the best practice of using the AdministratorIAM user that follows and securely lock away the root user credentials. Sign in as the rootuser only to perform a few account and service management tasks.
2. In the navigation pane, choose Users and then choose Add users.3. For User name, enter Administrator.4. Select the check box next to AWS Management Console access. Then select Custom password, and
then enter your new password in the text box.5. (Optional) By default, AWS requires the new user to create a new password when first signing in. You
can clear the check box next to User must create a new password at next sign-in to allow the newuser to reset their password after they sign in.
6. Choose Next: Permissions.7. Under Set permissions, choose Add user to group.8. Choose Create group.9. In the Create group dialog box, for Group name enter Administrators.10. Choose Filter policies, and then select AWS managed - job function to filter the table contents.11. In the policy list, select the check box for AdministratorAccess. Then choose Create group.
NoteYou must activate IAM user and role access to Billing before you can use theAdministratorAccess permissions to access the AWS Billing and Cost Managementconsole. To do this, follow the instructions in step 1 of the tutorial about delegating accessto the billing console.
12. Back in the list of groups, select the check box for your new group. Choose Refresh if necessary tosee the group in the list.
13. Choose Next: Tags.14. (Optional) Add metadata to the user by attaching tags as key-value pairs. For more information
about using tags in IAM, see Tagging IAM entities in the IAM User Guide.15. Choose Next: Review to see the list of group memberships to be added to the new user. When you
are ready to proceed, choose Create user.
You can use this same process to create more groups and users and to give your users access to your AWSaccount resources. To learn about using policies that restrict user permissions to specific AWS resources,see Access management and Example policies.
ImportantProtect your AWS account. Never send or share your credentials with anyone outside of yourorganization. No one who legitimately represents Amazon will ever ask you for your credentials.
After you've created your IAM user, use its credentials to sign in to the AWS Management Console. Formore information, see How IAM users sign in to your AWS account in the IAM User Guide.
Create an access key for your IAM userAccess keys consist of an access key ID and secret access key, which are used to sign programmaticrequests that you make to AWS. If you don't have access keys, you can create them from the AWSManagement Console. As a best practice, do not use the AWS account root user access keys for any taskwhere it's not required. Instead, create a new administrator IAM user with access keys for yourself.
The only time that you can view or download the secret access key is when you create the keys. Youcannot recover them later. However, you can create new access keys at any time. You must also have
4

AWS App Runner Developer GuideWhat's next
permissions to perform the required IAM actions. For more information, see Permissions required toaccess IAM resources in the IAM User Guide.
To create access keys for an IAM user
1. Sign in to the AWS Management Console and open the IAM console at https://console.aws.amazon.com/iam/.
2. In the navigation pane, choose Users.3. Choose the name of the user whose access keys you want to create, and then choose the Security
credentials tab.4. In the Access keys section, choose Create access key.5. To view the new access key pair, choose Show. You will not have access to the secret access key again
after this dialog box closes. Your credentials will look something like this:
• Access key ID: AKIAIOSFODNN7EXAMPLE• Secret access key: wJalrXUtnFEMI/K7MDENG/bPxRfiCYEXAMPLEKEY
6. To download the key pair, choose Download .csv file. Store the keys in a secure location. You willnot have access to the secret access key again after this dialog box closes.
Keep the keys confidential in order to protect your AWS account and never email them. Do not sharethem outside your organization, even if an inquiry appears to come from AWS or Amazon.com. Noone who legitimately represents Amazon will ever ask you for your secret key.
7. After you download the .csv file, choose Close. When you create an access key, the key pair is activeby default, and you can use the pair right away.
Related topics
• What is IAM? in the IAM User Guide• AWS security credentials in AWS General Reference
What's nextYou completed the prerequisite steps. To deploy your first application to App Runner, see Gettingstarted (p. 6).
5

AWS App Runner Developer GuidePrerequisites
Getting started with App RunnerAWS App Runner is an AWS service that provides a fast, simple, and cost-effective way to turn an existingcontainer image or source code directly into a running web service in the AWS Cloud.
This tutorial covers how you can use AWS App Runner to deploy your application to an App Runnerservice. It walks through configuring the source code and deployment, the service build, and the serviceruntime. It also shows how to deploy a code version, make a configuration change, and view logs.Last, the tutorial shows how to clean up the resources that you created while following the tutorial'sprocedures.
Topics• Prerequisites (p. 6)• Step 1: Create an App Runner service (p. 7)• Step 2: Change your service code (p. 12)• Step 3: Make a configuration change (p. 13)• Step 4: View logs for your service (p. 15)• Step 5: Clean up (p. 16)• What's next (p. 17)
PrerequisitesBefore you start the tutorial, be sure to take the following actions:
1. Complete the setup steps in Setting up (p. 3).2. Create a GitHub account, if you don't already have one. If you're new to GitHub, see Getting started
with GitHub in the GitHub Docs.3. Create a repository in your GitHub account. This tutorial uses the repository name python-hello.
Create files in the root directory of the repository, with the names and content specified in thefollowing examples.
Files for the python-hello example repository
Example requirements.txt
pyramid==2.0
Example server.py
from wsgiref.simple_server import make_serverfrom pyramid.config import Configuratorfrom pyramid.response import Responseimport os
def hello_world(request): name = os.environ.get('NAME') if name == None or len(name) == 0: name = "world" message = "Hello, " + name + "!\n"
6

AWS App Runner Developer GuideStep 1: Create an App Runner service
return Response(message)
if __name__ == '__main__': port = int(os.environ.get("PORT")) with Configurator() as config: config.add_route('hello', '/') config.add_view(hello_world, route_name='hello') app = config.make_wsgi_app() server = make_server('0.0.0.0', port, app) server.serve_forever()
Step 1: Create an App Runner serviceIn this step, you create an App Runner service based on the example source code repository that youcreated on GitHub as part of the section called “Prerequisites” (p. 6). The example contains a simplePython website. These are the main steps you take to create a service:
1. Configure your source code.2. Configure source deployment.3. Configure application build.4. Configure your service.5. Review and confirm.
The following diagram outlines the steps for creating an App Runner service:
To create an App Runner service based on a source code repository
1. Configure your source code.
a. Open the App Runner console, and in the Regions list, select your AWS Region.b. If the AWS account doesn't have any App Runner services yet, the console home page is
displayed. Choose Create an App Runner service.
7

AWS App Runner Developer GuideStep 1: Create an App Runner service
If the AWS account has existing services, the Services page with a list of your services isdisplayed. Choose Create service.
c. On the Source and deployment page, in the Source section, for Repository type, chooseSource code repository.
d. Under Connect to GitHub choose Add new, and then, if prompted, provide your GitHubcredentials.
NoteThe following steps to install the AWS Connector for GitHub to your GitHub accountare one-time steps. You can reuse the connection for creating multiple App Runnerservices based on repositories in this account. When you have an existing connection,choose it and skip to repository selection.
e. In the Install AWS Connector for GitHub dialog box, if prompted, choose your GitHub accountname.
f. If prompted to authorize the AWS Connector for GitHub, choose Authorize AWS Connections.
g. Choose Install.
Your account name appears as the selected GitHub account/organization. You can now choosea repository in your account.
h. For Repository, choose the example repository you created, python-hello. For Branch,choose the default branch name of your repository (for example, main).
2. Configure your deployments: In the Deployment settings section, choose Automatic, and thenchoose Next.
NoteWith automatic deployment, each new commit to your repository automatically deploys anew version of your service.
8

AWS App Runner Developer GuideStep 1: Create an App Runner service
3. Configure application build.
a. On the Configure build page, for Configuration file, choose Configure all settings here.
b. Provide the following build settings:
• Runtime – Choose Python 3.
• Build command – Enter pip install -r requirements.txt.
• Start command – Enter python server.py.
• Port – Enter 8080.
c. Choose Next.
NoteThe Python 3 runtime builds a Docker image using a base Python 3 image and yourexample Python code. It then launches a service that runs a container instance of thisimage.
9

AWS App Runner Developer GuideStep 1: Create an App Runner service
4. Configure your service.
a. On the Configure service page, in the Service settings section, enter a service name.
b. Under Environment variables, add a single environment variable. For Key, enter NAME, and forValue, enter any name (for example, your first name).
NoteThe example application reads the name you set in this environment variable anddisplays the name on its webpage.
c. Choose Next.
10

AWS App Runner Developer GuideStep 1: Create an App Runner service
5. On the Review and create page, verify all the details you've entered, and then choose Create anddeploy.
If the service is successfully created, the console shows the service dashboard, with a Serviceoverview of the new service.
11

AWS App Runner Developer GuideStep 2: Change your service code
6. Verify that your service is running.
a. On the service dashboard page, wait until the service Status is Running.
b. Choose the Default domain value—it's the URL to the website of your service.
A webpage displays: Hello, your name!
Step 2: Change your service codeIn this step, you make a change to your source code repository. The App Runner CI/CD capabilityautomatically builds and deploys the change to your service.
To make a change to your service code
1. Navigate to your example GitHub repository.
2. Choose the file name server.py to navigate to that file.
3. Choose Edit this file (the pencil icon).
4. In the expression assigned to the variable message, change the text Hello to Good morning.
12

AWS App Runner Developer GuideStep 3: Make a configuration change
5. Choose Commit changes.
The new commit starts to deploy. On the service dashboard page, the service Status changes toOperation in progress.
6. Wait for the deployment to end. On the service dashboard page, the service Status should changeback to Running.
7. Verify that the deployment is successful: refresh the browser tab where the webpage of your serviceis displayed.
The page now displays the modified message: Good morning, your name!
Step 3: Make a configuration changeIn this step, you make a change to the NAME environment variable value, to demonstrate a serviceconfiguration change.
To view logs for your service
1. Open the App Runner console, and in the Regions list, select your AWS Region.
2. In the navigation pane, choose Services, and then choose your App Runner service.
The console displays the service dashboard with a Service overview.
13

AWS App Runner Developer GuideStep 3: Make a configuration change
3. On the service dashboard page, choose the Configuration tab.
The console displays your service configuration settings in several sections.
4. In the Configure service section, choose Edit.
5. For the environment variable with the key NAME, change the value to a different name.
6. Choose Apply changes.
App Runner starts the update process. On the service dashboard page, the service Status changes toOperation in progress.
14

AWS App Runner Developer GuideStep 4: View logs for your service
7. Wait for the update to end. On the service dashboard page, the service Status should change backto Running.
8. Verify that the update is successful: refresh the browser tab where the webpage of your service isdisplayed.
The page now displays the modified name: Good morning, new name!
Step 4: View logs for your serviceIn this step, you use the App Runner console to view logs for your App Runner service. App Runnerstreams logs to Amazon CloudWatch Logs (CloudWatch Logs) and displays them on your service'sdashboard. For information about App Runner logs, see the section called “Logs (CloudWatchLogs)” (p. 86).
To view logs for your service
1. Open the App Runner console, and in the Regions list, select your AWS Region.
2. In the navigation pane, choose Services, and then choose your App Runner service.
The console displays the service dashboard with a Service overview.
3. On the service dashboard page, choose the Logs tab.
The console displays a few types of logs in several sections:
• Event log – Activity in the lifecycle of your App Runner service. The console displays the latestevents.
• Deployment logs – Source repository deployments to your App Runner service. The consoledisplays a separate log stream for each deployment.
• Application logs – The output of the web application that's deployed to your App Runner service.The console combines the output from all running instances into a single log stream.
15

AWS App Runner Developer GuideStep 5: Clean up
4. To find specific deployments, scope down the deployment log list by entering a search term. You cansearch for any value that appears in the table.
5. To view a log's content, choose View full log (event log) or the log stream name (deployment andapplication logs).
6. Choose Download to download a log. For a deployment log stream, select a log stream first.
7. Choose View in CloudWatch to open the CloudWatch console and use its full capabilities to exploreyour App Runner service logs. For a deployment log stream, select a log stream first.
NoteThe CloudWatch console is particularly useful if you want to view application logs ofspecific instances instead of the combined application log.
Step 5: Clean upYou've now learned how to create an App Runner service, view logs, and make some changes. In thisstep, you delete the service to remove resources that you don't need anymore.
To delete your service
1. On the service dashboard page, choose Actions, and then choose Delete service.
2. In the confirmation dialog, enter the requested text, and then choose Delete.
16

AWS App Runner Developer GuideWhat's next
Result: The console navigates to the Services page. The service that you just deleted shows a statusof DELETING. A short time later it disappears from the list.
Consider also deleting the GitHub connection that you created as part of this tutorial. For moreinformation, see the section called “Connections” (p. 62).
What's nextNow that you've deployed your first App Runner service, learn more in the following topics:
• Architecture and concepts (p. 18) – The architecture, main concepts, and AWS resources related toApp Runner.
• Image-based service (p. 22) and Code-based service (p. 25) – The two types of application sourcethat App Runner can deploy.
• Developing for App Runner (p. 39) – Things you should know when developing or migratingapplication code for deployment to App Runner.
• App Runner console (p. 41) – Manage and monitor your service using the App Runner console.• Managing your service (p. 44) – Manage the lifecycle of your App Runner service.• Observability (p. 85) – Get visibility into your App Runner service operations by monitoring metrics,
reading logs, handling events, tracking service action calls, and tracing application events like HTTPcalls.
• App Runner configuration file (p. 103) – A configuration-based way to specify options for the buildand runtime behavior of your App Runner service.
• App Runner API (p. 109) – Use the App Runner application programming interface (API) to create,read, update, and delete App Runner resources.
• Security (p. 113) – The different ways that AWS and you ensure cloud security while you use AppRunner and other services.
17

AWS App Runner Developer GuideApp Runner concepts
App Runner architecture andconcepts
AWS App Runner takes your source code or source image from a repository, and creates and maintainsa running web service for you in the AWS Cloud. Typically, you need to call just one App Runner action,CreateService, to create your service.
With a source image repository, you provide a ready-to-use container image that App Runner can deployto run your web service. With a source code repository, you provide your code and instructions forbuilding and running a web service, and you target a specific runtime environment. App Runner supportsseveral programming platforms, each with one or more managed runtimes for platform major versions.
At this time, App Runner can retrieve your source code from a GitHub repository, or retrieve your sourceimage from Amazon Elastic Container Registry (Amazon ECR) in your AWS account.
The following diagram shows an overview of the App Runner service architecture. In the diagram, thereare two example services: one deploys source code from GitHub, and the other deploys a source imagefrom Amazon ECR.
App Runner conceptsThe following are key concepts related to your web service that's running in App Runner:
• App Runner service – An AWS resource that App Runner uses to deploy and manage your applicationbased on its source code repository or container image. An App Runner service is a running
18

AWS App Runner Developer GuideApp Runner resources
version of your application. For more information about creating a service, see the section called“Creation” (p. 44).
• Source type – The type of source repository that you provide for deploying your App Runner service:source code (p. 25) or source image (p. 22).
• Repository provider – The repository service that contains your application source (for example,GitHub (p. 25) or Amazon ECR (p. 22)).
• App Runner connection – An AWS resource that lets App Runner access a repository provider account(for example, a GitHub account or organization). For more information about connections, see thesection called “Connections” (p. 62).
• Runtime – A base image for deploying a source code repository. App Runner provides a variety ofmanaged runtimes for different programming platforms and versions. For more information, see Code-based service (p. 25).
• Deployment – An action that applies a version of your source repository (code or image) to anApp Runner service. The first deployment to the service occurs as part of service creation. Laterdeployments can occur in one of two ways:
• Automatic deployment – A CI/CD capability. You can configure an App Runner service toautomatically build (for source code) and deploy each version of your application as it appears in therepository. This can be a new commit in a source code repository or a new image version in a sourceimage repository.
• Manual deployment – A deployment to your App Runner service that you explicitly start.
• Custom domain – A domain that you associate with your App Runner service. Users of your webapplication can use this domain to access your web service instead of the default App Runnersubdomain. For more information, see the section called “Custom domain names” (p. 65).
• Maintenance – An activity that App Runner occasionally performs on the infrastructure that runsyour App Runner service. When maintenance is in progress, service status temporarily changes toOPERATION_IN_PROGRESS (Operation in progress in the console) for a few minutes. Actions on yourservice (for example, deployment, configuration update, pause/resume, or deletion) are blocked duringthis time. Try the action again a few minutes later, when the service status returns to RUNNING.
NoteIf your action fails, it doesn't mean that your App Runner service is down. Your application isactive and keeps handling requests. It's unlikely for your service to experience any downtime.
In particular, App Runner migrates your service if it detects issues in the underlying hardware hostingthe service. To prevent any service downtime, App Runner deploys your service to a new set ofinstances and shifts traffic to them (a blue-green deployment). You might occasionally see a slighttemporary increase in charges.
App Runner resourcesWhen you use App Runner, you create and manage a few types of resources in your AWS account. Theseresources are used to access your code and manage your services.
The following table provides an overview of these resources:
Resource name Description
Service Represents a running version of your application. Much of the rest of thisguide describes service types, management, configuration, and monitoring.
ARN: arn:aws:apprunner:region:account-id:service/service-name[/service-id]
19
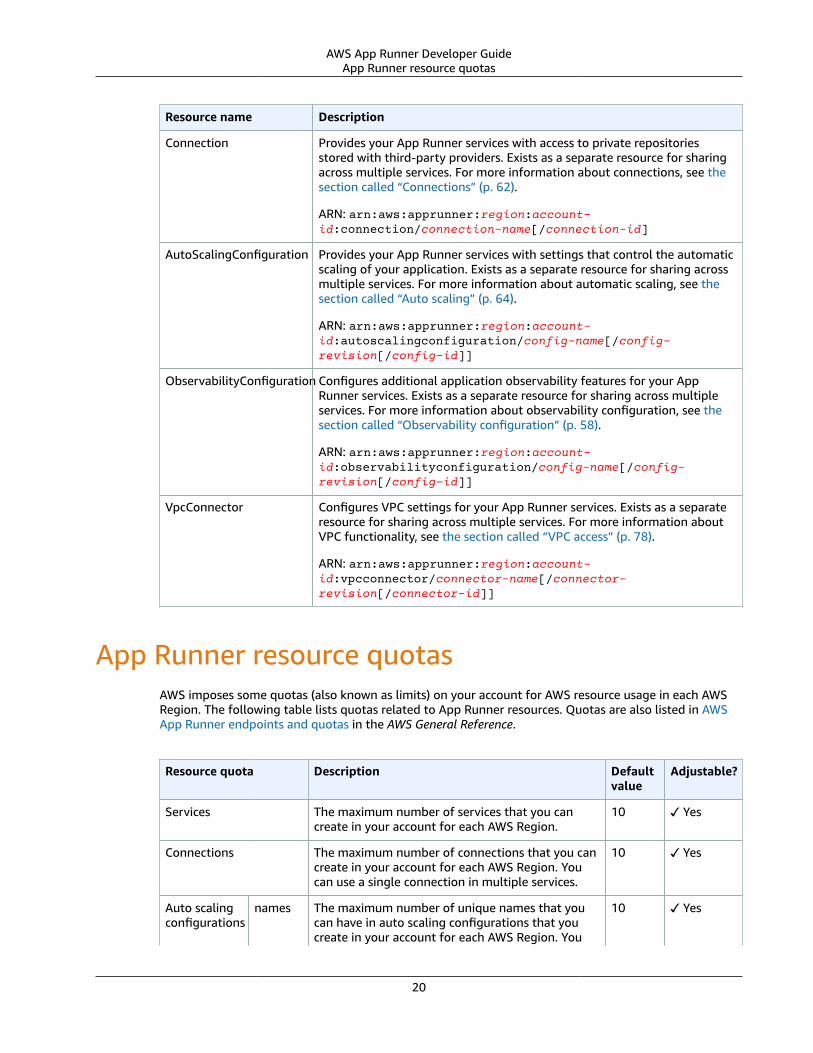
AWS App Runner Developer GuideApp Runner resource quotas
Resource name Description
Connection Provides your App Runner services with access to private repositoriesstored with third-party providers. Exists as a separate resource for sharingacross multiple services. For more information about connections, see thesection called “Connections” (p. 62).
ARN: arn:aws:apprunner:region:account-id:connection/connection-name[/connection-id]
AutoScalingConfiguration Provides your App Runner services with settings that control the automaticscaling of your application. Exists as a separate resource for sharing acrossmultiple services. For more information about automatic scaling, see thesection called “Auto scaling” (p. 64).
ARN: arn:aws:apprunner:region:account-id:autoscalingconfiguration/config-name[/config-revision[/config-id]]
ObservabilityConfiguration Configures additional application observability features for your AppRunner services. Exists as a separate resource for sharing across multipleservices. For more information about observability configuration, see thesection called “Observability configuration” (p. 58).
ARN: arn:aws:apprunner:region:account-id:observabilityconfiguration/config-name[/config-revision[/config-id]]
VpcConnector Configures VPC settings for your App Runner services. Exists as a separateresource for sharing across multiple services. For more information aboutVPC functionality, see the section called “VPC access” (p. 78).
ARN: arn:aws:apprunner:region:account-id:vpcconnector/connector-name[/connector-revision[/connector-id]]
App Runner resource quotasAWS imposes some quotas (also known as limits) on your account for AWS resource usage in each AWSRegion. The following table lists quotas related to App Runner resources. Quotas are also listed in AWSApp Runner endpoints and quotas in the AWS General Reference.
Resource quota Description Defaultvalue
Adjustable?
Services The maximum number of services that you cancreate in your account for each AWS Region.
10 ✓ Yes
Connections The maximum number of connections that you cancreate in your account for each AWS Region. Youcan use a single connection in multiple services.
10 ✓ Yes
Auto scalingconfigurations
names The maximum number of unique names that youcan have in auto scaling configurations that youcreate in your account for each AWS Region. You
10 ✓ Yes
20

AWS App Runner Developer GuideApp Runner resource quotas
Resource quota Description Defaultvalue
Adjustable?
can use a single auto scaling configuration inmultiple services.
revisionspername
The maximum number of auto scalingconfiguration revisions that you can create inyour account for each AWS Region for eachunique name. You can use a single auto scalingconfiguration revision in multiple services.
10 ☓ No
names The maximum number of unique names that youcan have in observability configurations that youcreate in your account for each AWS Region. Youcan use a single observability configuration inmultiple services.
10 ✓ YesObservabilityconfigurations
revisionspername
The maximum number of observabilityconfiguration revisions that you can create inyour account for each AWS Region for eachunique name. You can use a single observabilityconfiguration revision in multiple services.
10 ☓ No
VPC connectors The maximum number of VPC connectors that youcan create in your account for each AWS Region.You can use a single VPC connector in multipleservices.
10 ✓ Yes
Most quotas are adjustable, and you can request a quota increase for them. For more information, seeRequesting a quota increase in the Service Quotas User Guide.
21

AWS App Runner Developer GuideImage repository providers
App Runner service based on asource image
You can use AWS App Runner to create and manage services based on two fundamentally differenttypes of service source: source code and source image. Regardless of the source type, App Runner takescare of starting, running, scaling, and load balancing your service. You can use the CI/CD capability ofApp Runner to track changes to your source image or code. When App Runner discovers a change, itautomatically builds (for source code) and deploys the new version to your App Runner service.
This chapter discusses services based on a source image. For information about services based on sourcecode, see Code-based service (p. 25).
A source image is a public or private container image stored in an image repository. You point AppRunner to an image, and it starts a service running a container based on this image. No build stage isnecessary. Rather, you provide a ready-to-deploy image.
Image repository providersApp Runner supports the following image repository providers:
• Amazon Elastic Container Registry (Amazon ECR) – Stores images that are private to an AWSaccount.
• Amazon Elastic Container Registry Public (Amazon ECR Public) – Stores images that are publiclyreadable.
Provider use cases
• Using an image stored in Amazon ECR in your AWS account (p. 22)
• Using an image stored in Amazon ECR in a different AWS account (p. 23)
• Using an image stored in Amazon ECR Public (p. 23)
Using an image stored in Amazon ECR in your AWSaccountAmazon ECR stores images in repositories. There are private and public repositories. To deploy yourimage to an App Runner service from a private repository, App Runner needs permission to read yourimage from Amazon ECR. To give that permission to App Runner, you need to provide App Runner withan access role. This is an AWS Identity and Access Management (IAM) role that has the necessary AmazonECR action permissions. When you use the App Runner console to create the service, you can choose anexisting role in your account. Alternatively, you can use the IAM console to create a new custom role. Or,you can choose for the App Runner console to create a role for you based on managed policies.
When you use the App Runner API or the AWS CLI, you complete a two-step process. First, you usethe IAM console to create an access role. You can use a managed policy that App Runner provides or
22

AWS App Runner Developer GuideUsing an image stored in Amazon
ECR in a different AWS account
enter your own custom permissions. Then, you provide the access role during service creation using theCreateService API action.
For information about App Runner service creation, see the section called “Creation” (p. 44).
Using an image stored in Amazon ECR in a differentAWS accountWhen you create an App Runner service, you can use an image stored in an Amazon ECR repositorythat belongs to an AWS account other than the one that your service is in. There are a few additionalconsiderations to keep in mind when using a cross-account image, in addition to those listed in theprevious section about a same-account image.
• The cross-account repository should have a policy attached to it. The repository policy provides youraccess role with permissions to read images in the repository. Use the following policy for this purpose.Replace access-role-arn with the Amazon Resource Name (ARN) of your access role.
{ "Version": "2008-10-17", "Statement": [ { "Effect": "Allow", "Principal": { "AWS": "access-role-arn" }, "Action": [ "ecr:BatchGetImage", "ecr:DescribeImages", "ecr:GetDownloadUrlForLayer" ] } ]}
For information about attaching a repository policy to an Amazon ECR repository, see Setting arepository policy statement in the Amazon Elastic Container Registry User Guide.
• App Runner doesn't support automatic deployment for Amazon ECR images in a different accountthan the one that your service is in.
Using an image stored in Amazon ECR PublicAmazon ECR Public stores publicly readable images. These are the main differences between AmazonECR and Amazon ECR Public that you should be aware of in the context of App Runner services:
• Amazon ECR Public images are publicly readable. You don't need to provide an access role whenyou create a service based on an Amazon ECR Public image. The repository doesn't need any policyattached to it.
• App Runner doesn't support automatic (continuous) deployment for Amazon ECR Public images.
Launch a service directly from Amazon ECR PublicYou can directly launch container images of compatible web applications that are hosted on the AmazonECR Public Gallery as web services running on App Runner. When browsing the gallery, look for Launchwith App Runner on the gallery page for an image. An image with this option is compatible with App
23

AWS App Runner Developer GuideImage example
Runner. For more information about the gallery, see Using the Amazon ECR Public Gallery in the AmazonECR Public user guide.
To launch a gallery image as an App Runner service
1. On the gallery page of an image, choose Launch with App Runner.
Result: The App Runner console opens in a new browser tab. The console displays the Create servicewizard, with most of the required new service details pre-filled.
2. If you want to create your service in an AWS Region other than the one that the console is showing,choose the Region displayed on the console header. Then, select another Region.
3. For Port, enter the port number that the image application listens on. You can typically find it onthe gallery page for the image.
4. Optionally, change any other configuration details.5. Choose Next, review the settings, and then choose Create & deploy.
Image exampleThe App Runner team maintains the hello-app-runner example image in an Amazon ECR Public Gallery.You can use this example to get started with creating an image-based App Runner service. For moreinformation, see hello-app-runner.
24

AWS App Runner Developer GuideSource code repository providers
App Runner service based on sourcecode
You can use AWS App Runner to create and manage services based on two fundamentally differenttypes of service source: source code and source image. Regardless of the source type, App Runner takescare of starting, running, scaling, and load balancing your service. You can use the CI/CD capability ofApp Runner to track changes to your source image or code. When App Runner discovers a change, itautomatically builds (for source code) and deploys the new version to your App Runner service.
This chapter discusses services based on source code. For information about services based on a sourceimage, see Image-based service (p. 22).
Source code is application code that App Runner builds and deploys for you. You point App Runner toa source code repository and choose a suitable runtime that corresponds to a programming platformversion. App Runner builds an image that's based on the base image of the runtime and your applicationcode. It then starts a service that runs a container based on this image.
App Runner provides convenient platform-specific managed runtimes. Each one of these runtimes buildsa container image from your source code, and adds language runtime dependencies into your image. Youdon't need to provide container configuration and build instructions such as a Dockerfile.
Subtopics of this chapter discuss the various platforms that App Runner supports— managed platformsthat provide managed runtimes for different programming environments and versions.
Topics• Source code repository providers (p. 25)• App Runner managed platforms (p. 26)• Using the Python platform (p. 26)• Using the Node.js platform (p. 29)• Using the Java platform (p. 34)
Source code repository providersApp Runner deploys your source code by reading it from a source code repository. App Runner supportsone source code repository provider: GitHub.
Deploying from GitHubTo deploy your source code to an App Runner service from a GitHub repository, App Runner establishesa connection to GitHub. If your repository is private (that is, it isn't publicly accessible on GitHub), youmust provide App Runner with connection details. When you use the App Runner console to create aservice (p. 44), you provide connection details as part of the service creation procedure.
When you use the App Runner API or the AWS CLI, a connection is a separate resource. First, you createthe connection using the CreateConnection API action. Then, you provide the connection's ARN duringservice creation using the CreateService API action.
For more information about App Runner service creation, see the section called “Creation” (p. 44). Formore information about App Runner connections, see the section called “Connections” (p. 62).
25

AWS App Runner Developer GuideApp Runner managed platforms
App Runner managed platformsApp Runner managed platforms provide managed runtimes for various programming environments.Each managed runtime makes it easy to build and run containers based on a version of a programminglanguage or runtime environment. When you use a managed runtime, App Runner starts with a managedruntime image. This image is based on the Amazon Linux Docker image and contains a language runtimepackage as well as some tools and popular dependency packages. App Runner uses this managedruntime image as a base image, and adds your application code to build a Docker image. It then deploysthis image to run your web service in a container.
You specify a runtime for your App Runner service when you create a service (p. 44) using the AppRunner console or the CreateService API. You can also specify a runtime as part of your source code.Use the runtime keyword in a App Runner configuration file (p. 103) that you include in your coderepository. The naming convention of a managed runtime is <language-name><major-version>.
App Runner updates the runtime for your service to the latest version on every deployment or serviceupdate. If your application requires a specific version of a managed runtime, you can specify it using theruntime-version keyword in the App Runner configuration file (p. 103). You can lock to any level ofversion (for example, major or minor), and App Runner only makes lower-level updates to the runtime ofyour service.
Using the Python platformThe AWS App Runner Python platform provides managed runtimes. Each runtime makes it easy tobuild and run containers with web applications based on a Python version. When you use a Pythonruntime, App Runner starts with a managed Python runtime image. This image is based on the AmazonLinux Docker image and contains the runtime package for a version of Python and some tools andpopular dependency packages. App Runner uses this managed runtime image as a base image, and addsyour application code to build a Docker image. It then deploys this image to run your web service in acontainer.
You specify a runtime for your App Runner service when you create a service (p. 44) using the AppRunner console or the CreateService API. You can also specify a runtime as part of your source code.Use the runtime keyword in a App Runner configuration file (p. 103) that you include in your coderepository. The naming convention of a managed runtime is <language-name><major-version>.
For valid Python runtime names and versions, see the section called “Release information” (p. 29).
App Runner updates the runtime for your service to the latest version on every deployment or serviceupdate. If your application requires a specific version of a managed runtime, you can specify it using theruntime-version keyword in the App Runner configuration file (p. 103). You can lock to any level ofversion (for example, major or minor), and App Runner only makes lower-level updates to the runtime ofyour service.
Version syntax for Python runtimes: major[.minor[.patch]]
For example: 3.8.5
The following examples demonstrate version locking:
• 3.8 – Lock the major and minor versions. App Runner updates only patch versions.
• 3.8.5 – Lock to a specific patch version. App Runner doesn't update your runtime version.
Topics
26

AWS App Runner Developer GuidePython runtime configuration
• Python runtime configuration (p. 27)• Python runtime examples (p. 27)• Python runtime release information (p. 29)
Python runtime configurationWhen you choose a managed runtime, you must also configure, as a minimum, build and run commands.You configure them while creating (p. 44) or updating (p. 57) your App Runner service. There are afew ways to do it:
• Using the App Runner console – Specify the commands in the Configure build section of the creationprocess or configuration tab.
• Using the App Runner API – Call CreateService or UpdateService. Specify the commands using theBuildCommand and StartCommand members of the CodeConfigurationValues data type.
• Using a configuration file (p. 103) – Specify one or more build commands in up to three buildphases, and a single run command that serves to start your application. There are additional optionalconfiguration settings.
Providing a configuration file is optional. When creating an App Runner service using the console orthe API, you specify if App Runner gets your configuration settings directly during creation or from aconfiguration file.
Python runtime examplesThe following examples show App Runner configuration files for building and running a Python service.The last example is the source code for a complete Python application that you can deploy to a Pythonruntime service.
NoteThe runtime version that's used in these examples is 3.7.7. You can replace it with a versionyou want to use. For latest supported Python runtime version, see the section called “Releaseinformation” (p. 29).
Minimal Python configuration file
This example shows a minimal configuration file that you can use with a Python managed runtime.For the assumptions that App Runner makes with a minimal configuration file, see the section called“Configuration file examples” (p. 103).
Example apprunner.yaml
version: 1.0runtime: python3 build: commands: build: - pip install pipenv - pipenv install run: command: python app.py
Extended Python configuration file
This example shows the use of all configuration keys with a Python managed runtime.
27
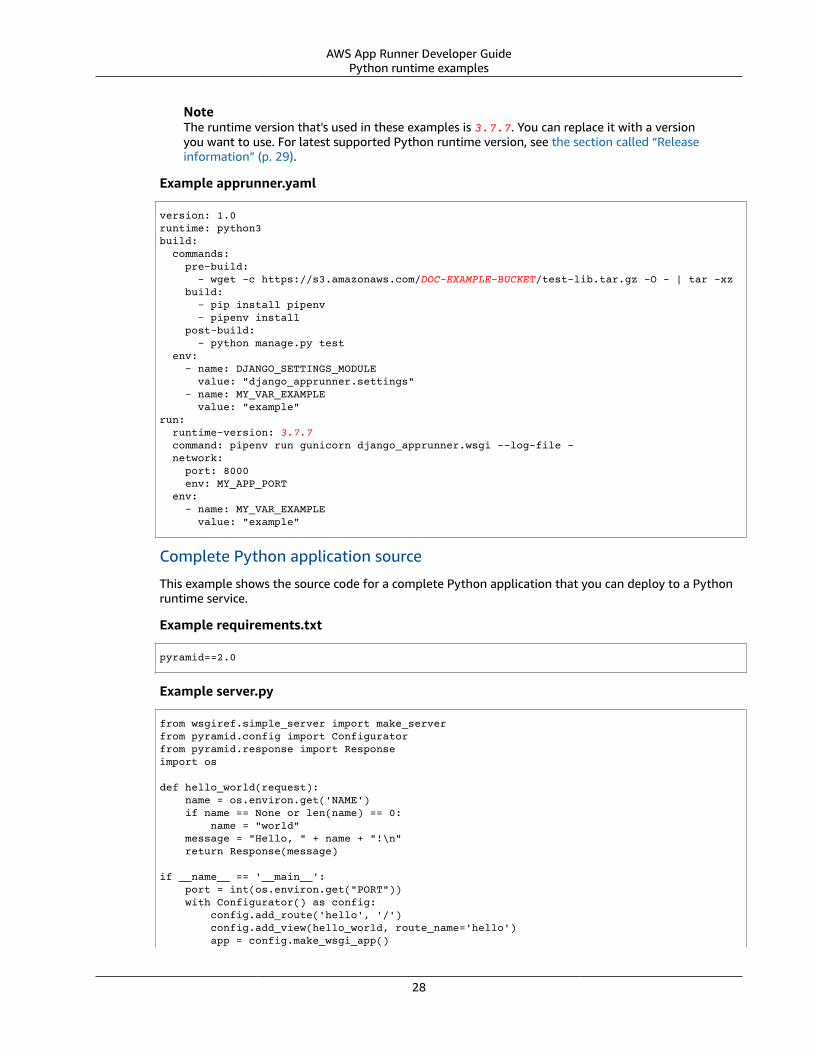
AWS App Runner Developer GuidePython runtime examples
NoteThe runtime version that's used in these examples is 3.7.7. You can replace it with a versionyou want to use. For latest supported Python runtime version, see the section called “Releaseinformation” (p. 29).
Example apprunner.yaml
version: 1.0runtime: python3 build: commands: pre-build: - wget -c https://s3.amazonaws.com/DOC-EXAMPLE-BUCKET/test-lib.tar.gz -O - | tar -xz build: - pip install pipenv - pipenv install post-build: - python manage.py test env: - name: DJANGO_SETTINGS_MODULE value: "django_apprunner.settings" - name: MY_VAR_EXAMPLE value: "example"run: runtime-version: 3.7.7 command: pipenv run gunicorn django_apprunner.wsgi --log-file - network: port: 8000 env: MY_APP_PORT env: - name: MY_VAR_EXAMPLE value: "example"
Complete Python application source
This example shows the source code for a complete Python application that you can deploy to a Pythonruntime service.
Example requirements.txt
pyramid==2.0
Example server.py
from wsgiref.simple_server import make_serverfrom pyramid.config import Configuratorfrom pyramid.response import Responseimport os
def hello_world(request): name = os.environ.get('NAME') if name == None or len(name) == 0: name = "world" message = "Hello, " + name + "!\n" return Response(message)
if __name__ == '__main__': port = int(os.environ.get("PORT")) with Configurator() as config: config.add_route('hello', '/') config.add_view(hello_world, route_name='hello') app = config.make_wsgi_app()
28
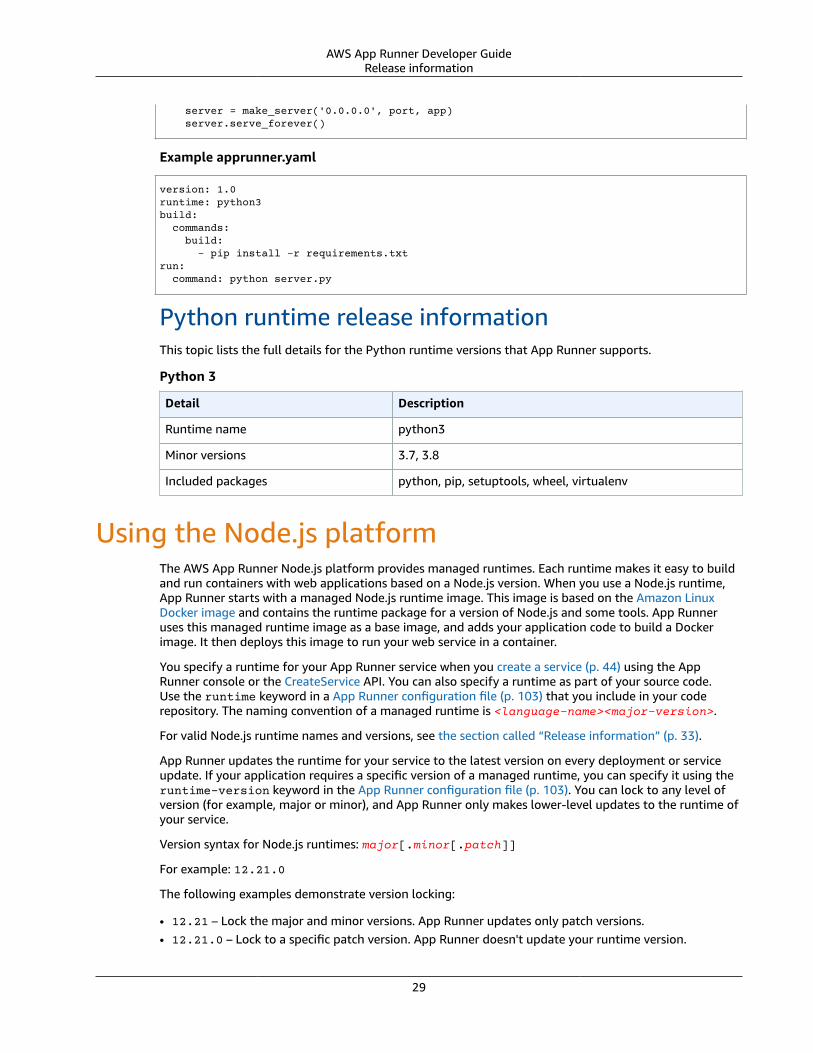
AWS App Runner Developer GuideRelease information
server = make_server('0.0.0.0', port, app) server.serve_forever()
Example apprunner.yaml
version: 1.0runtime: python3build: commands: build: - pip install -r requirements.txtrun: command: python server.py
Python runtime release informationThis topic lists the full details for the Python runtime versions that App Runner supports.
Python 3
Detail Description
Runtime name python3
Minor versions 3.7, 3.8
Included packages python, pip, setuptools, wheel, virtualenv
Using the Node.js platformThe AWS App Runner Node.js platform provides managed runtimes. Each runtime makes it easy to buildand run containers with web applications based on a Node.js version. When you use a Node.js runtime,App Runner starts with a managed Node.js runtime image. This image is based on the Amazon LinuxDocker image and contains the runtime package for a version of Node.js and some tools. App Runneruses this managed runtime image as a base image, and adds your application code to build a Dockerimage. It then deploys this image to run your web service in a container.
You specify a runtime for your App Runner service when you create a service (p. 44) using the AppRunner console or the CreateService API. You can also specify a runtime as part of your source code.Use the runtime keyword in a App Runner configuration file (p. 103) that you include in your coderepository. The naming convention of a managed runtime is <language-name><major-version>.
For valid Node.js runtime names and versions, see the section called “Release information” (p. 33).
App Runner updates the runtime for your service to the latest version on every deployment or serviceupdate. If your application requires a specific version of a managed runtime, you can specify it using theruntime-version keyword in the App Runner configuration file (p. 103). You can lock to any level ofversion (for example, major or minor), and App Runner only makes lower-level updates to the runtime ofyour service.
Version syntax for Node.js runtimes: major[.minor[.patch]]
For example: 12.21.0
The following examples demonstrate version locking:
• 12.21 – Lock the major and minor versions. App Runner updates only patch versions.• 12.21.0 – Lock to a specific patch version. App Runner doesn't update your runtime version.
29

AWS App Runner Developer GuideNode.js runtime configuration
Topics• Node.js runtime configuration (p. 30)• Node.js runtime examples (p. 31)• Node.js runtime release information (p. 33)
Node.js runtime configurationWhen you choose a managed runtime, you must also configure, as a minimum, build and run commands.You configure them while creating (p. 44) or updating (p. 57) your App Runner service. There are afew ways to do it:
• Using the App Runner console – Specify the commands in the Configure build section of the creationprocess or configuration tab.
• Using the App Runner API – Call CreateService or UpdateService. Specify the commands using theBuildCommand and StartCommand members of the CodeConfigurationValues data type.
• Using a configuration file (p. 103) – Specify one or more build commands in up to three buildphases, and a single run command that serves to start your application. There are additional optionalconfiguration settings.
Providing a configuration file is optional. When creating an App Runner service using the console orthe API, you specify if App Runner gets your configuration settings directly during creation or from aconfiguration file.
With Node.js runtimes specifically, you can also configure the build and runtime using a JSON file namedpackage.json in the root of your source repository. Using this file, you can configure the Node.jsengine version, dependency packages, and various commands (command line applications). Packagemanagers such as npm or yarn interpret this file as input for their commands.
For example:
• npm install installs packages defined by the dependencies and devDependencies node inpackage.json.
• npm start or npm run start runs the command defined by the scripts/start node inpackage.json.
The following is an example package.json file.
package.json
{ "name": "node-js-getting-started", "version": "0.3.0", "description": "A sample Node.js app using Express 4", "engines": { "node": "12.21.0" }, "scripts": { "start": "node index.js", "test": "node test.js" }, "dependencies": { "cool-ascii-faces": "^1.3.4", "ejs": "^2.5.6", "express": "^4.15.2" },
30

AWS App Runner Developer GuideNode.js runtime examples
"devDependencies": { "got": "^11.3.0", "tape": "^4.7.0" }}
For more information about package.json, see The package.json guide on the Node.js website.
Tips
• If your package.json file defines a start command, you can use it as a run command in yourApp Runner configuration file, as the following example shows.
Example
package.json
{ "scripts": { "start": "node index.js" }}
apprunner.yaml
run: command: npm start
• When you run npm install in your development environment, npm creates the file package-lock.json. This file contains a snapshot of the package versions npm just installed.Thereafter, when npm installs dependencies, it uses these exact versions. Similarly, yarncreates yarn.json. Commit these files to your source code repository to ensure that yourapplication is installed with the versions of dependencies that you developed and tested itwith.
• You can also use an App Runner configuration file to configure the Node.js version and startcommand. When you do this, these definitions override the ones in package.json. A conflictbetween the node version in package.json and the runtime-version value in the AppRunner configuration file causes the App Runner build phase to fail.
Node.js runtime examplesThe following examples show App Runner configuration files for building and running a Node.js service.
NoteThe runtime version that's used in these examples is 12.21.0. You can replace it with a versionyou want to use. For latest supported Node.js runtime version, see the section called “Releaseinformation” (p. 33).
Minimal Node.js configuration file
This example shows a minimal configuration file that you can use with a Node.js managed runtime.For the assumptions that App Runner makes with a minimal configuration file, see the section called“Configuration file examples” (p. 103).
Example apprunner.yaml
version: 1.0
31
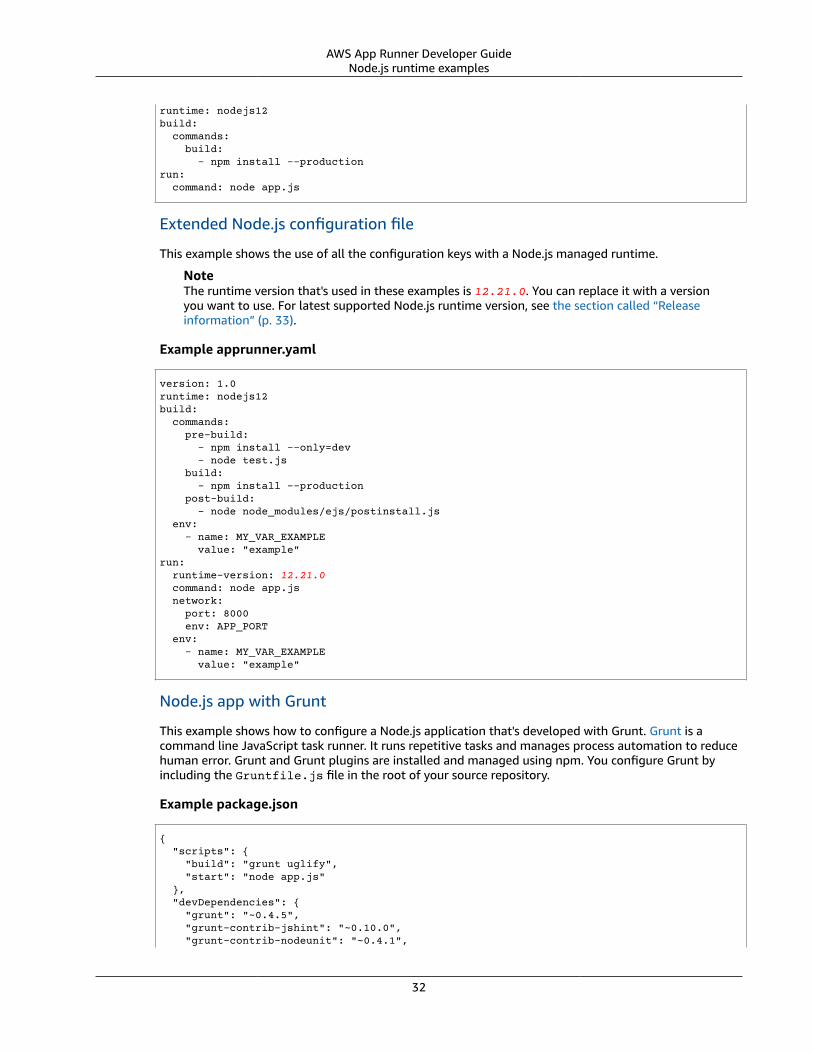
AWS App Runner Developer GuideNode.js runtime examples
runtime: nodejs12build: commands: build: - npm install --production run: command: node app.js
Extended Node.js configuration file
This example shows the use of all the configuration keys with a Node.js managed runtime.
NoteThe runtime version that's used in these examples is 12.21.0. You can replace it with a versionyou want to use. For latest supported Node.js runtime version, see the section called “Releaseinformation” (p. 33).
Example apprunner.yaml
version: 1.0runtime: nodejs12build: commands: pre-build: - npm install --only=dev - node test.js build: - npm install --production post-build: - node node_modules/ejs/postinstall.js env: - name: MY_VAR_EXAMPLE value: "example"run: runtime-version: 12.21.0 command: node app.js network: port: 8000 env: APP_PORT env: - name: MY_VAR_EXAMPLE value: "example"
Node.js app with Grunt
This example shows how to configure a Node.js application that's developed with Grunt. Grunt is acommand line JavaScript task runner. It runs repetitive tasks and manages process automation to reducehuman error. Grunt and Grunt plugins are installed and managed using npm. You configure Grunt byincluding the Gruntfile.js file in the root of your source repository.
Example package.json
{ "scripts": { "build": "grunt uglify", "start": "node app.js" }, "devDependencies": { "grunt": "~0.4.5", "grunt-contrib-jshint": "~0.10.0", "grunt-contrib-nodeunit": "~0.4.1",
32

AWS App Runner Developer GuideRelease information
"grunt-contrib-uglify": "~0.5.0" }, "dependencies": { "express": "^4.15.2" },}
Example Gruntfile.js
module.exports = function(grunt) {
// Project configuration. grunt.initConfig({ pkg: grunt.file.readJSON('package.json'), uglify: { options: { banner: '/*! <%= pkg.name %> <%= grunt.template.today("yyyy-mm-dd") %> */\n' }, build: { src: 'src/<%= pkg.name %>.js', dest: 'build/<%= pkg.name %>.min.js' } } });
// Load the plugin that provides the "uglify" task. grunt.loadNpmTasks('grunt-contrib-uglify');
// Default task(s). grunt.registerTask('default', ['uglify']);
};
Example apprunner.yaml
NoteThe runtime version that's used in these examples is 12.21.0. You can replace it with a versionyou want to use. For latest supported Node.js runtime version, see the section called “Releaseinformation” (p. 33).
version: 1.0runtime: nodejs12build: commands: pre-build: - npm install grunt grunt-cli - npm install --only=dev - npm run build build: - npm install --productionrun: runtime-version: 12.21.0 command: node app.js network: port: 8000 env: APP_PORT
Node.js runtime release informationThis topic lists the full details for the Node.js runtime versions that App Runner supports.
33

AWS App Runner Developer GuideJava platform
Node.js 14
Detail Description
Runtime name nodejs14
Minor versions 14.19.0
Included packages nodejs (including npm), yarn
Node.js 12
Detail Description
Runtime name nodejs12
Minor versions 12.21.0
Included packages nodejs (including npm), yarn
Using the Java platformThe AWS App Runner Java platform provides managed runtimes. Each runtime makes it easy to buildand run containers with web applications based on a Java version. When you use a Java runtime, AppRunner starts with a managed Java runtime image. This image is based on the Amazon Linux Dockerimage and contains the runtime package for a version of Java and some tools. App Runner uses thismanaged runtime image as a base image, and adds your application code to build a Docker image. Itthen deploys this image to run your web service in a container.
You specify a runtime for your App Runner service when you create a service (p. 44) using the AppRunner console or the CreateService API. You can also specify a runtime as part of your source code.Use the runtime keyword in a App Runner configuration file (p. 103) that you include in your coderepository. The naming convention of a managed runtime is <language-name><major-version>.
At this time, all the supported Java runtimes are based on Amazon Corretto. For valid Java runtimenames and versions, see the section called “Release information” (p. 38).
App Runner updates the runtime for your service to the latest version on every deployment or serviceupdate. If your application requires a specific version of a managed runtime, you can specify it using theruntime-version keyword in the App Runner configuration file (p. 103). You can lock to any level ofversion (for example, major or minor), and App Runner only makes lower-level updates to the runtime ofyour service.
Version syntax for Amazon Corretto runtimes:
Runtime Syntax Example
corretto11 11.0[.openjdk-update[.openjdk-build[.corretto-specific-revision]]]
11.0.13.08.1
corretto8 8[.openjdk-update[.openjdk-build[.corretto-specific-revision]]]
8.312.07.1
34

AWS App Runner Developer GuideJava runtime configuration
The following examples demonstrate version locking:
• 11.0.13 – Lock the Open JDK update version. App Runner updates only Open JDK and AmazonCorretto lower-level builds.
• 11.0.13.08.1 – Lock to a specific version. App Runner doesn't update your runtime version.
Topics• Java runtime configuration (p. 35)
• Java runtime examples (p. 35)
• Java runtime release information (p. 38)
Java runtime configurationWhen you choose a managed runtime, you must also configure, as a minimum, build and run commands.You configure them while creating (p. 44) or updating (p. 57) your App Runner service. There are afew ways to do it:
• Using the App Runner console – Specify the commands in the Configure build section of the creationprocess or configuration tab.
• Using the App Runner API – Call CreateService or UpdateService. Specify the commands using theBuildCommand and StartCommand members of the CodeConfigurationValues data type.
• Using a configuration file (p. 103) – Specify one or more build commands in up to three buildphases, and a single run command that serves to start your application. There are additional optionalconfiguration settings.
Providing a configuration file is optional. When creating an App Runner service using the console orthe API, you specify if App Runner gets your configuration settings directly during creation or from aconfiguration file.
Java runtime examplesThe following examples show App Runner configuration files for building and running a Java service.The last example is the source code for a complete Java application that you can deploy to a Corretto 11runtime service.
NoteThe runtime version that's used in these examples is 11.0.13.08.1. You can replace it witha version you want to use. For latest supported Java runtime version, see the section called“Release information” (p. 38).
Minimal Corretto 11 configuration file
This example shows a minimal configuration file that you can use with a Corretto 11 managed runtime.For the assumptions that App Runner makes with a minimal configuration file, see .
Example apprunner.yaml
version: 1.0runtime: corretto11build: commands: build: - mvn clean package
35

AWS App Runner Developer GuideJava runtime examples
run: command: java -jar target/MyApp-1.0-SNAPSHOT.jar -Xms256m .
Extended Corretto 11 configuration file
This example shows how you can use all the configuration keys with a Corretto 11 managed runtime.
NoteThe runtime version that's used in these examples is 11.0.13.08.1. You can replace it witha version you want to use. For latest supported Java runtime version, see the section called“Release information” (p. 38).
Example apprunner.yaml
version: 1.0runtime: corretto11build: commands: pre-build: - yum install some-package - scripts/prebuild.sh build: - mvn clean package post-build: - mvn clean test env: - name: M2 value: "/usr/local/apache-maven/bin" - name: M2_HOME value: "/usr/local/apache-maven/bin"run: runtime-version: 11.0.13.08.1 command: java -jar target/MyApp-1.0-SNAPSHOT.jar -Xms256m . network: port: 8000 env: APP_PORT env: - name: MY_VAR_EXAMPLE value: "example"
Complete Corretto 11 application source
This example shows the source code for a complete Java application that you can deploy to a Corretto 11runtime service.
Example src/main/java/com/HelloWorld/HelloWorld.java
package com.HelloWorld;
import org.springframework.web.bind.annotation.RequestMapping;import org.springframework.web.bind.annotation.RestController;
@RestControllerpublic class HelloWorld {
@RequestMapping("/") public String index(){ String s = "Hello World"; return s; }}
36

AWS App Runner Developer GuideJava runtime examples
Example src/main/java/com/HelloWorld/Main.java
package com.HelloWorld;
import org.springframework.boot.SpringApplication;import org.springframework.boot.autoconfigure.SpringBootApplication;
@SpringBootApplicationpublic class Main {
public static void main(String[] args) {
SpringApplication.run(Main.class, args); }}
Example apprunner.yaml
version: 1.0runtime: corretto11build: commands: build: - mvn clean packagerun: command: java -jar target/HelloWorldJavaApp-1.0-SNAPSHOT.jar -Xms256m . network: port: 8080
Example pom.xml
<?xml version="1.0" encoding="UTF-8"?><project xmlns="http://maven.apache.org/POM/4.0.0" xmlns:xsi="http://www.w3.org/2001/XMLSchema-instance" xsi:schemaLocation="http://maven.apache.org/POM/4.0.0 http://maven.apache.org/xsd/maven-4.0.0.xsd"> <modelVersion>4.0.0</modelVersion> <parent> <groupId>org.springframework.boot</groupId> <artifactId>spring-boot-starter-parent</artifactId> <version>2.3.1.RELEASE</version> <relativePath/> </parent> <groupId>com.HelloWorld</groupId> <artifactId>HelloWorldJavaApp</artifactId> <version>1.0-SNAPSHOT</version>
<properties> <java.version>11</java.version> </properties>
<dependencies> <dependency> <groupId>org.springframework.boot</groupId> <artifactId>spring-boot-starter-data-rest</artifactId> </dependency>
<dependency> <groupId>org.springframework.boot</groupId> <artifactId>spring-boot-starter-test</artifactId> <scope>test</scope> <exclusions>
37

AWS App Runner Developer GuideRelease information
<exclusion> <groupId>org.junit.vintage</groupId> <artifactId>junit-vintage-engine</artifactId> </exclusion> </exclusions> </dependency> </dependencies>
<build> <plugins> <plugin> <groupId>org.springframework.boot</groupId> <artifactId>spring-boot-maven-plugin</artifactId> </plugin> <plugin> <groupId>org.apache.maven.plugins</groupId> <artifactId>maven-compiler-plugin</artifactId> <version>3.8.0</version> <configuration> <release>11</release> </configuration> </plugin> </plugins> </build></project>
Java runtime release informationThis topic lists the full details for the Java runtime versions that App Runner supports.
Corretto 11
Detail Description
Runtime name corretto11
Minor versions 11.0.13.08.1
Included packages Amazon Corretto 11, Maven 3.6.3, Gradle 6.5
Corretto 8
Detail Description
Runtime name corretto8
Minor versions 8.312.07.1
Included packages Amazon Corretto 8, Maven 3.6.3, Gradle 6.5
38

AWS App Runner Developer GuideRuntime information
Developing application code for AppRunner
This chapter discusses runtime information and development guidelines that you should consider whendeveloping or migrating application code for deployment to AWS App Runner.
Runtime informationWhether you provide a container image or App Runner builds one for you, App Runner runs yourapplication code in a container instance. Here are a few key aspects of the container instance runtimeenvironment.
• Framework support – App Runner supports any image that implements a web application. It'sagnostic to the programming language that you choose and to the web application server orframework that you use, if you use any. For your convenience, we provide platform-specific managedruntimes for various programming platforms, to streamline the application build process and abstractimage creation.
• Web requests – App Runner provides support for HTTP1.1 to the container instances. Your containerinstance must listen to HTTP requests, on port 8080 by default. For more information aboutconfiguring your service, see the section called “Configuration” (p. 57). You don't need toimplement handling of HTTPS secure traffic. App Runner requires incoming HTTPS traffic andterminates HTTPS before passing requests to your container instance.
Note• Currently there is a thirty second timeout limit on HTTP requests.• You don't need to configure TLS cipher suites or any other parameters as App Runner being
a fully managed service, manages the TLS termination for you.• Stateless apps – Currently App Runner doesn't support a stateful app. Hence, App Runner doesn't
guarantee state persistence beyond the duration of processing a single incoming web request.• Storage – App Runner implements the file system in your container instance as ephemeral storage.
Files are transient. For example, they don't persist when you pause and resume your App Runnerservice. More generally, files aren't guaranteed to persist beyond the processing of a single request, aspart of the stateless nature of your application. Stored files do, however, take up part of the storageallocation of your App Runner service for the duration of their lifespan.
NoteAlthough ephemeral storage files might not persist across requests, they sometimes dopersist. This can be useful in certain situations. For example, when handling a request, you cancache files that your application downloads if future requests might need them. This mightspeed up future request handling, but can't guarantee the speed gains. Your code shouldn'tassume that a file that has been downloaded in a previous request still exists.For guaranteed caching using a high throughput, low latency in-memory data store, use aservice such as Amazon ElastiCache.
• Environment variables – By default, App Runner makes the PORT environment variable available inyour container instance. You can configure the variable value with port information, and add customenvironment variables and values. For more information about configuring your service, see thesection called “Configuration” (p. 57).
• Instance role – If your application code makes calls to any AWS services, using the service APIs or oneof the AWS SDKs, create an instance role using AWS Identity and Access Management (IAM). Then,
39

AWS App Runner Developer GuideCode development guidelines
attach it to your App Runner service when you create it. Include all AWS service action permissionsthat your code requires in your instance role. For more information, see the section called “Instancerole” (p. 124).
Code development guidelinesConsider these guidelines when developing code for an App Runner web application.
• Design stateless code – Design the web application you deploy to your App Runner service to bestateless. Your code should assume that no state persists beyond the duration of processing a singleincoming web request.
• Delete temporary files – When you create files, they're stored on a file system, and take up partof the storage allocation of your service. To avoid out-of-storage errors, don't keep temporary filesfor extended periods. Balance storage size with request handling speed when making file cachingdecisions.
40

AWS App Runner Developer GuideOverall console layout
Using the App Runner consoleUse the AWS App Runner console to create, manage, and monitor your App Runner services and relatedresources, such as connections. You can view existing services, create new ones, and configure a service.You can view the status of an App Runner service as well as view logs, monitor activity, and track metrics.You can also navigate to the website of your service or to your source repository.
The following sections describe the layout and functionality of the console, and point you to relatedinformation.
Overall console layoutThe App Runner console has three areas. From left to right:
• Navigation pane – A side pane that can be collapsed or expanded. Use it to choose the top-levelconsole page you want to use.
• Content pane – The main part of the console page. Use it to view information and perform your tasks.• Help pane – A side pane for more information. Expand it to get help about the page you're on. Or
choose any Info link on a console page to get contextual help.
The Services pageThe Services page lists App Runner services in your account. You can scope the list down by using thefilter text box.
To get to the Services page
1. Open the App Runner console, and in the Regions list, select your AWS Region.2. In the navigation pane, choose Services.
Things you can do here:
• Create an App Runner service. For more information, see the section called “Creation” (p. 44).
41

AWS App Runner Developer GuideThe service dashboard page
• Choose a service name to go to the service dashboard console page.• Choose a service domain to open the service web app page.
The service dashboard pageYou can view information about an App Runner service and manage it from the service dashbaord page.At the top of the page, you can see the service name.
To get to the service dashboard, navigate to the Services page (see previous section), and then chooseyour App Runner service.
The Service overview section provides basic details about the App Runner service and your application.Things you can do here:
• View service details such as status, health, and ARN.• Navigate to the Default domain—the domain that App Runner provides for the web application
running in your service. This is a subdomain in the awsapprunner.com domain owned by App Runner.• Navigate to the source repository deployed to the service.• Start a source repository deployment to your service.• Pause, resume, and delete your service.
The tabs below the service overview are for service management (p. 44) and observability (p. 85).
The GitHub connections pageThe GitHub connections page lists App Runner connections to GitHub in your account. You can scopethe list down by using the filter text box. For more information about connections, see the section called“Connections” (p. 62).
42

AWS App Runner Developer GuideThe GitHub connections page
To get to the GitHub connections page
1. Open the App Runner console, and in the Regions list, select your AWS Region.2. In the navigation pane, choose GitHub connections.
Things you can do here:
• View a list of GitHub connections in your account. To scope the list down, enter any text in the filtertext box.
• Choose a connection name to go to the related GitHub account or organization.• Select a connection to complete the handshake for a connection that you just established (as part of
creating a service), or to delete the connection.
43

AWS App Runner Developer GuideCreation
Managing your App Runner serviceThis chapter describes how to manage your AWS App Runner service. In this chapter, you learn how tomanage the lifecycle of your service: create, configure, and delete a service, deploy new applicationversions to your service, and control the availability of your web service by pausing and resuming yourservice. You also learn how to manage other aspects of your service, like connections and auto scaling.
Topics• Creating an App Runner service (p. 44)• Deploying a new application version to App Runner (p. 55)• Configuring an App Runner service (p. 57)• Managing App Runner connections (p. 62)• Managing App Runner automatic scaling (p. 64)• Managing custom domain names for an App Runner service (p. 65)• Pausing and resuming an App Runner service (p. 73)• Deleting an App Runner service (p. 75)
Creating an App Runner serviceAWS App Runner automates the process of going from a container image or a source code repositoryto a running web service that scales automatically. You point App Runner to your source image or code,specifying only a small number of required settings. App Runner builds your application if needed,provisions compute resources, and deploys your application to run on them.
When you create a service, App Runner creates a service resource. In some cases, you might need toprovide a connection resource. If you use the App Runner console, the console implicitly creates theconnection resource. For details about App Runner resource types, see the section called “App Runnerresources” (p. 19). These resource types have quotas that are associated with your account in each AWSRegion. For more information, see the section called “App Runner resource quotas” (p. 20).
There are subtle differences in the procedure for creating a service depending on the source type andprovider. This topic shows entirely separate procedures for creating these different source types so thatyou can follow whichever one best matches your situation. For a basic starting procedure with a codeexample, see Getting started (p. 6).
PrerequisitesBefore you create your App Runner service, be sure to complete the following actions:
• Complete the setup steps in Setting up (p. 3).• Have your application source ready. You can use either a code repository in GitHub or a container
image in Amazon Elastic Container Registry (Amazon ECR) to create an App Runner service.
Create a serviceThis section walks through the creation process for the two App Runner service types: based on sourcecode, and based on a container image.
44

AWS App Runner Developer GuideCreate a service
Create a service from a GitHub code repository
The following sections show how to create an App Runner service when your source is a code repositoryin GitHub. When you use GitHub, App Runner has to connect to the GitHub organization or account.Therefore, you need to help establish this connection. For more information about App Runnerconnections, see the section called “Connections” (p. 62).
When you create the service, App Runner builds a Docker image containing your application code anddependencies. It then launches a service that runs a container instance of this image.
Topics
• Creating a service from code using the App Runner console (p. 45)
• Creating a service from code using the App Runner API or AWS CLI (p. 49)
Creating a service from code using the App Runner console
To create an App Runner service using the console
1. Configure your source code.
a. Open the App Runner console, and in the Regions list, select your AWS Region.
b. If the AWS account doesn't have any App Runner services yet, the console home page isdisplayed. Choose Create an App Runner service.
If the AWS account has existing services, the Services page with a list of your services isdisplayed. Choose Create service.
c. On the Source and deployment page, in the Source section, for Repository type, chooseSource code repository.
45

AWS App Runner Developer GuideCreate a service
d. For Connect to GitHub, select a GitHub account or organization that you've used before, orchoose Add new. Then, go through the process of providing your GitHub credentials andchoosing a GitHub account or organization to connect to.
e. For Repository, select the repository that contains your application code.
f. For Branch, select the branch that you want to deploy.
2. Configure your deployments.
a. In the Deployment settings section, choose Manual or Automatic.
For more information about deployment methods, see the section called “Deploymentmethods” (p. 55).
b. Choose Next.
3. Configure the application build.
46

AWS App Runner Developer GuideCreate a service
a. On the Configure build page, for Configuration file, choose Configure all settings here if yourrepository doesn't contain an App Runner configuration file, or Use a configuration file if itdoes.
NoteAn App Runner configuration file is a way to maintain your build configuration as partof your application source. When you provide one, App Runner reads some values fromthe file and doesn't let you set them in the console.
b. Provide the following build settings:
• Runtime – Choose a specific managed runtime for your application.
• Build command – Enter a command that builds your application from its source code. Thismight be a language-specific tool or a script provided with your code.
• Start command – Enter the command that starts your web service.
• Port – Enter the IP port that your web service listens to.
c. Choose Next.
4. Configure your service.
a. On the Configure service page, in the Service settings section, enter a service name.
47

AWS App Runner Developer GuideCreate a service
NoteAll other service settings are either optional or have console-provided defaults.
b. Optionally change or add other settings to meet your application requirements.
c. Choose Next.
5. On the Review and create page, verify all the details you've entered, and then choose Create anddeploy.
Result: If service creation succeeds, the console should show the service dashboard, with a Serviceoverview of the new service.
48

AWS App Runner Developer GuideCreate a service
6. Verify that your service is running.
a. On the service dashboard page, wait until the service Status is Running.
b. Choose the Default domain value—it's the URL to your service's website.
c. Use your website and verify that it's running properly.
Creating a service from code using the App Runner API or AWS CLI
To create a service using the App Runner API or AWS CLI, call the CreateService API action. For moreinformation and an example, see CreateService. If this is the first time you're creating a service using aspecific GitHub organization or account, start by calling CreateConnection. This establishes a connectionbetween App Runner and the GitHub organization or account. For more information about App Runnerconnections, see the section called “Connections” (p. 62).
Your service creation starts if the call returns a successful response with a Service object showing"Status": "CREATING".
For an example call, see Create a source code repository service in the AWS App Runner API Reference
Create a service from an Amazon ECR image
The following sections show how to create an App Runner service when your source is a container imagestored in Amazon ECR. Amazon ECR is an AWS service. Therefore, to create a service based on an AmazonECR image, you provide App Runner with an access role containing the necessary Amazon ECR actionpermissions.
NoteAn access role isn't required if your image is stored in Amazon ECR Public, where images arepublicly available.
During service creation, App Runner launches a service that runs a container instance of the image youprovide. There is no build phase in this case.
For more information, see Image-based service (p. 22).
Topics
49
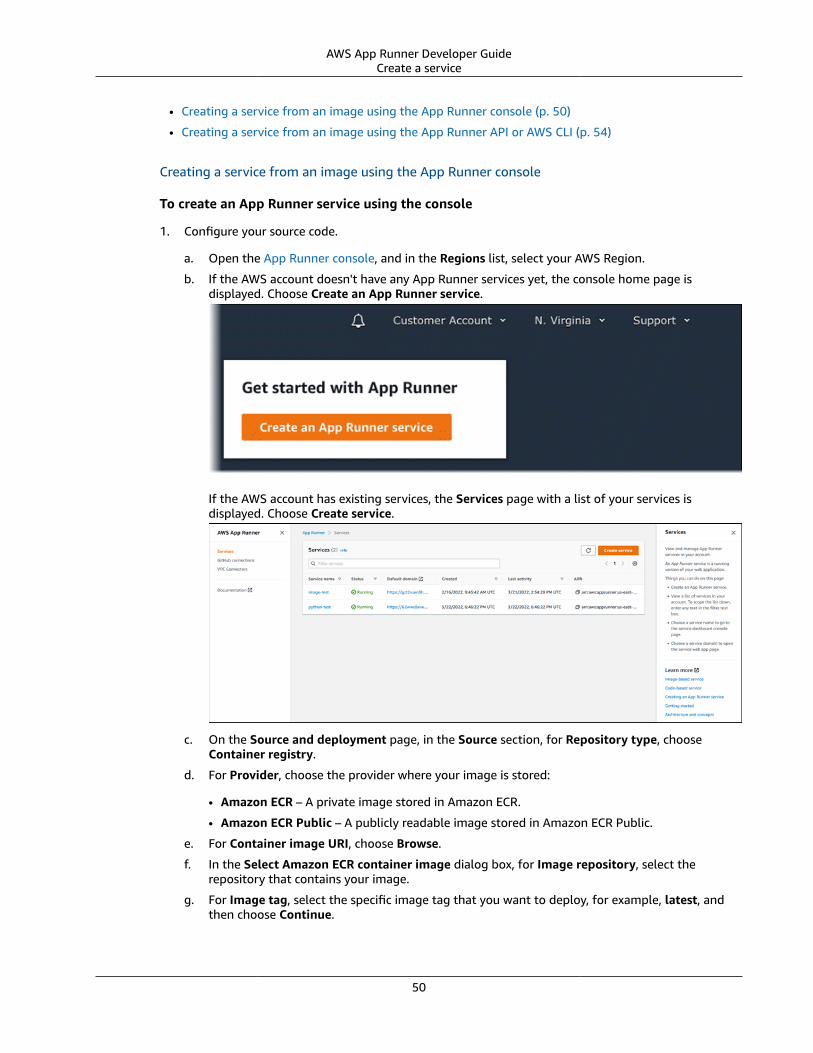
AWS App Runner Developer GuideCreate a service
• Creating a service from an image using the App Runner console (p. 50)
• Creating a service from an image using the App Runner API or AWS CLI (p. 54)
Creating a service from an image using the App Runner console
To create an App Runner service using the console
1. Configure your source code.
a. Open the App Runner console, and in the Regions list, select your AWS Region.
b. If the AWS account doesn't have any App Runner services yet, the console home page isdisplayed. Choose Create an App Runner service.
If the AWS account has existing services, the Services page with a list of your services isdisplayed. Choose Create service.
c. On the Source and deployment page, in the Source section, for Repository type, chooseContainer registry.
d. For Provider, choose the provider where your image is stored:
• Amazon ECR – A private image stored in Amazon ECR.
• Amazon ECR Public – A publicly readable image stored in Amazon ECR Public.
e. For Container image URI, choose Browse.
f. In the Select Amazon ECR container image dialog box, for Image repository, select therepository that contains your image.
g. For Image tag, select the specific image tag that you want to deploy, for example, latest, andthen choose Continue.
50
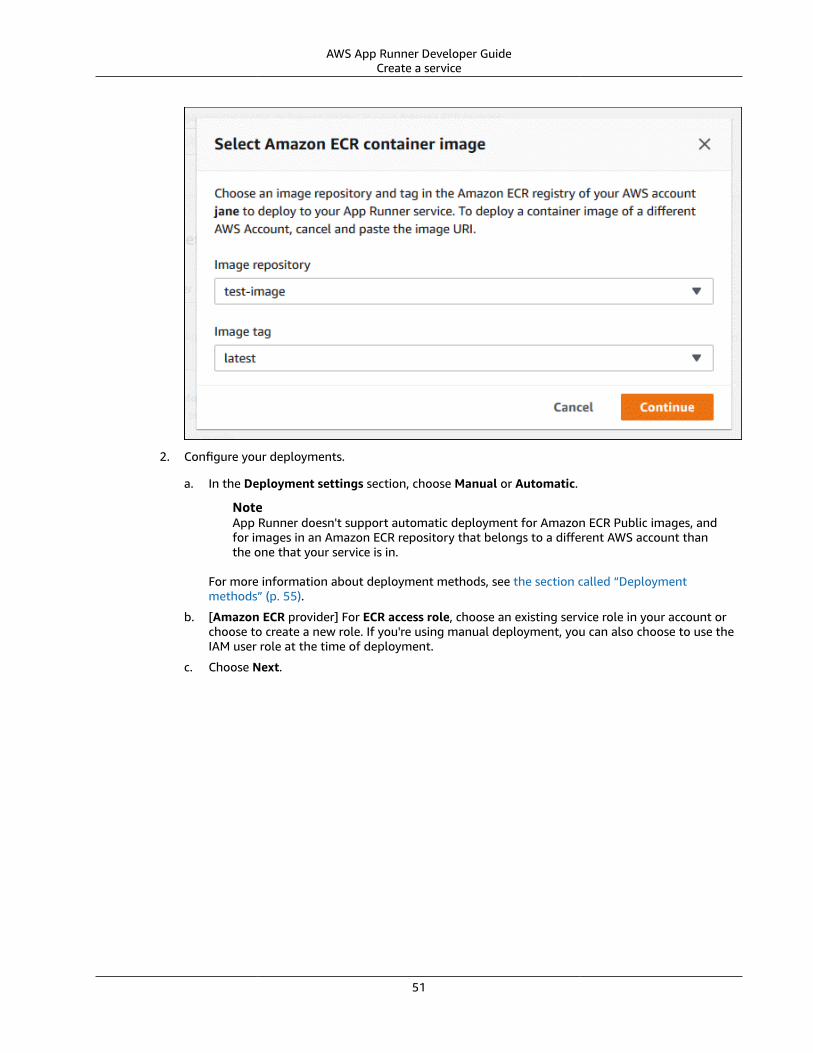
AWS App Runner Developer GuideCreate a service
2. Configure your deployments.
a. In the Deployment settings section, choose Manual or Automatic.
NoteApp Runner doesn't support automatic deployment for Amazon ECR Public images, andfor images in an Amazon ECR repository that belongs to a different AWS account thanthe one that your service is in.
For more information about deployment methods, see the section called “Deploymentmethods” (p. 55).
b. [Amazon ECR provider] For ECR access role, choose an existing service role in your account orchoose to create a new role. If you're using manual deployment, you can also choose to use theIAM user role at the time of deployment.
c. Choose Next.
51

AWS App Runner Developer GuideCreate a service
3. Configure your service.
a. On the Configure service page, in the Service settings section, enter a service name and the IPport that your service web site listens to.
NoteAll other service settings are either optional or have console-provided defaults.
b. (Optional) Change or add other settings to suit your application's needs.
c. Choose Next.
52

AWS App Runner Developer GuideCreate a service
4. On the Review and create page, verify all the details that you entered, and then choose Create anddeploy.
Result: If service creation succeeds, the console should show the service dashboard, with a Serviceoverview of the new service.
53

AWS App Runner Developer GuideWhen service creation fails
5. Verify that your service is running.
a. On the service dashboard page, wait until the service Status is Running.
b. Choose the Default domain value—it's the URL to your service's website.
c. Use your website and verify that it's running properly.
Creating a service from an image using the App Runner API or AWS CLI
To create a service using the App Runner API or AWS CLI, call the CreateService API action.
Your service creation starts if the call returns a successful response with a Service object showing"Status": "CREATING".
For an example call, see Create a source image repository service in the AWS App Runner API Reference
When service creation failsIf your attempt to create an App Runner service fails, the service shows a status of CREATE_FAILED(Create failed on the console).
Your attempt to create a service might fail because of issues in your application code, build process, orconfiguration, because you reached resource quotas, or because of temporary issues with the underlyingAWS services that your service needs to use. To troubleshoot a failure, we recommend that you take thefollowing actions. First, read the service events and logs to find out what caused the failure. Next, makeany necessary changes to your code or configuration. Last, delete one or more services if you reachedyour service quota. Then, after completing all these steps, try creating the service again.
ImportantThe failed service isn't usable. You don't incur any additional charges for it beyond the initialcreation attempt. However, App Runner doesn't automatically delete the failed service, and itstill counts towards your service quota. When you're done analyzing the failure, make sure thatyou delete the failed service.
54

AWS App Runner Developer GuideDeployment
Deploying a new application version to AppRunner
When you create a service (p. 44) in AWS App Runner, you configure an application source—acontainer image or a source repository. App Runner provisions resources to run your service and deploysyour application to them.
This topic describes ways to redeploy your application source to your App Runner service when a newversion becomes available. This can be a new image version in the image repository or a new commit inthe code repository. App Runner provides two methods to deploy to a service: automatic and manual.
Deployment methodsApp Runner provides the following methods for you to control how application deployments areinitiated.
Automatic deployment
Use automatic deployment when you want continuous integration and deployment (CICD) behaviorfor your service. App Runner monitors your image or code repository. Whenever you push a newimage version to your image repository, or a new commit to your code repository, App Runnerautomatically deploys it to your service without further action on your side.
NoteApp Runner doesn't support automatic deployment for Amazon ECR Public images, and forimages in an Amazon ECR repository that belongs to a different AWS account than the onethat your service is in.
Manual deployment
Use manual deployment when you want to explicitly initiate each deployment to your service. Youinitiate a deployment if the repository that you configured for your service has a new version thatyou want to deploy. For more information, see the section called “Manual deployment” (p. 56).
You can configure the deployment method for your service in the following ways:
• Console – For a new service you're creating or for an existing service, in the Deployment settingssection of the Source and deployment configuration page, choose Manual or Automatic.
• API or AWS CLI – In a call to either the CreateService or UpdateService action, set theAutoDeploymentsEnabled member of the SourceConfiguration parameter to False for manualdeployment or True for automatic deployment.
55

AWS App Runner Developer GuideManual deployment
Manual deploymentWith manual deployment, you need to explicitly initiate each deployment to your service. When you havea new version of your application image or code ready to deploy, you can refer to the following sectionsto learn how to perform a deployment using the console and the API.
Deploy a version of your application using one of the following methods:
App Runner console
To deploy using the App Runner console
1. Open the App Runner console, and in the Regions list, select your AWS Region.
2. In the navigation pane, choose Services, and then choose your App Runner service.
The console displays the service dashboard with a Service overview.
3. Choose Deploy.
Result: Deployment of the new version starts. On the service dashboard page, the service Statuschanges to Operation in progress.
4. Wait for the deployment to end. On the service dashboard page, the service Status shouldchange back to Running.
5. To verify that the deployment is successful, on the service dashboard page, choose theDefault domain value—it's the URL to your service's website. Inspect or interact with your webapplication and verify your version change.
App Runner API or AWS CLI
To deploy using the App Runner API or AWS CLI, call the StartDeployment API action. The onlyparameter to pass is your service ARN. You already configured your application source location whenyou created the service, and App Runner can find the new version. Your deployment starts if the callreturns a successful response.
56

AWS App Runner Developer GuideConfiguration
Configuring an App Runner serviceWhen you create an AWS App Runner service (p. 44), you set various configuration values. You canchange some of these configuration settings after you create the service. Other settings can be appliedonly while creating the service and cannot be changed thereafter. This topic discusses the configurationof your service using the App Runner API, the App Runner console, and an App Runner configuration file.
Topics• Configure your service using the App Runner API or AWS CLI (p. 57)
• Configure your service using the App Runner console (p. 57)
• Configure your service using an App Runner configuration file (p. 58)
• Configuring observability for your service (p. 58)
• Configuring service settings using sharable resources (p. 60)
• Configuring health checks for your service (p. 61)
Configure your service using the App Runner API orAWS CLIThe API defines which settings can be changed after service creation. The following list discusses therelevant actions, types, and limitations.
• UpdateService action – Can be called after creation to update some configuration settings.
• Can be updated – You can update settings in the SourceConfiguration,InstanceConfiguration, and HealthCheckConfiguration parameters. However, inSourceConfiguration, you can't switch your source type from code to image or the other wayaround. You must provide the same repositoryparameter as you provided when you created theservice. It's either CodeRepository or ImageRepository.
You can also update the following ARNs of separate configuration resources associated with theservice:
• AutoScalingConfigurationArn
• VpcConnectorArn
• Cannot be updated – You can't change the ServiceName and EncryptionConfigurationparameters that are available in the CreateService action. They can't be changed after they'recreated. The UpdateService action doesn't include these parameters.
• API vs. file – You can set the ConfigurationSource parameter of the CodeConfiguration type(used for source code repositories as part of SourceConfiguration) to Repository. In this case,App Runner ignores the configuration settings in CodeConfigurationValues, and reads thesesettings from a configuration file (p. 103) in your repository. If you set ConfigurationSource toAPI, App Runner gets all configuration settings from the API call and ignores the configuration file,even if one exists.
• TagResource action – Can be called after your service is created to add tags to the service or updatevalues of existing tags.
• UntagResource action – Can be called after your service is created to remove tags from the service.
Configure your service using the App Runner consoleThe console uses the App Runner API to apply configuration updates. The update rules that the APIimposes, as defined in the previous section, determine what you can configure using the console. Some
57

AWS App Runner Developer GuideConfigure your service using anApp Runner configuration file
settings that were available during service creation aren't available for modification later on. In addition,if you decide to use a configuration file (p. 103), additional settings are hidden in the console, and AppRunner reads them from the file.
To configure your service
1. Open the App Runner console, and in the Regions list, select your AWS Region.
2. In the navigation pane, choose Services, and then choose your App Runner service.
The console displays the service dashboard with a Service overview.
3. On the service dashboard page, choose the Configuration tab.
Result: The console displays the current configuration settings of your service in several sections:Source and deployment, Configure build, and Configure service.
4. To update settings in any category, choose Edit.
5. On the configuration edit page, make any desired changes, and then choose Save changes.
Configure your service using an App Runnerconfiguration fileWhen you create or update an App Runner service, you can instruct App Runner to read someconfiguration settings from a configuration file that you provide as part of your source repository. Bydoing this, you can manage the settings that are related to your source code under source control,together with the code itself. The configuration file also provides certain advanced settings that you can'tset using the console or the API. For more information, see App Runner configuration file (p. 103).
Configuring observability for your serviceAWS App Runner integrates with several AWS services to provide you with an extensive observabilitysuite of tools for your App Runner service. For more information, see Observability (p. 85).
58

AWS App Runner Developer GuideObservability configuration
App Runner supports enabling some observability features and configuring their behavior by usinga sharable resource called ObservabilityConfiguration. You can provide an observability configurationresource when you create or update a service. The App Runner console creates one for you when youcreate a new App Runner service. Providing an observability configuration is optional. If you don'tprovide one, App Runner provides a default observability configuration.
You can share a single observability configuration across multiple App Runner services to ensure theyhave the same observability behavior. For more information, see the section called “Configurationresources” (p. 60).
You can configure the following observability features using observability configurations:
• Trace configuration – Settings for tracing requests that your application serves and downstream callsthat it makes. For more information about tracing, see the section called “Tracing (X-Ray)” (p. 99).
Manage observability
Manage observability for your App Runner services using one of the following methods:
App Runner console
When you create a service (p. 44) using the App Runner console, or when you update itsconfiguration later (p. 57), you can configure observability features for your service. Look for theObservability configuration section on the console page.
App Runner API or AWS CLI
When you call the CreateService or UpdateService App Runner API actions, you can use theObservabilityConfiguration parameter object to enable observability features and specify anobservability configuration resource for your service.
Use the following App Runner API actions to manage your observability configuration resources.
• CreateObservabilityConfiguration – Creates a new observability configuration or a revision to anexisting one.
• ListObservabilityConfigurations – Returns a list of the observability configurations that areassociated with your AWS account, with summary information.
• DescribeObservabilityConfiguration – Returns a full description of an observability configuration.
• DeleteObservabilityConfiguration – Deletes an observability configuration. You can delete aspecific revision or the latest active revision. You might need to delete unnecessary observabilityconfigurations if you reach the observability configuration quota for your AWS account.
59

AWS App Runner Developer GuideConfiguration resources
Configuring service settings using sharable resourcesFor some features, it makes sense to share configuration across AWS App Runner services. For example,you might want a set of services to have the same auto scaling behavior. Or you might want identicalobservability settings for all of your services. App Runner lets you share settings by using separatesharable resources. You create a resource that defines a set of configuration settings for a feature, andthen you provide the Amazon Resource Name (ARN) of this configuration resource to one or more AppRunner services.
App Runner implements sharable configuration resources for the following features:
• Auto scaling (p. 64)
• Observability (p. 58)
• VPC access (p. 78)
The document page for each of these features provides information about the available settings and themanagement procedures.
Features using separate configuration resources share some design traits and considerations.
• Revisions – Some configuration resources can have revisions. In these cases, each configuration has aname and a numeric revision. Multiple revisions of a configuration have the same name and differentrevision numbers. You can use different configuration names for different scenarios. For each name,you can add multiple revisions to fine-tune the settings for a specific scenario.
The first configuration that you create with a name gets the revision number 1. Subsequentconfigurations with the same name get consecutive revision numbers (starting with 2). You canassociate your App Runner service with a specific configuration revision or with the latest revision ofconfiguration.
• Shared – You can share a single configuration resource across multiple App Runner services. Thisis useful if you want to maintain identical configurations across these services. In particular, forresources that support revisions, you can configure multiple services to all use the latest version of aconfiguration by specifying the configuration name but not specifying a revision. By doing this, any ofthe services that you configured this way receives configuration updates when you update the service.For more information about configuration changes, see the section called “Configuration” (p. 57).
• Resource management – You can use App Runner to create and delete configurations. You can'tdirectly update a configuration. Instead, for resources that support revisions, you can create a newrevision to an existing configuration name to effectively update the configuration.
NoteAt this time, you can only create a configuration with a single revision in the App Runnerconsole. To create more revisions, and to delete configurations, use the App Runner API.
• Resource quota – There are set quotas for the number of unique configuration names and revisionsthat you can have for your configuration resources in each AWS Region. If you reach these quotas, youmust either delete a configuration name or at least some of its revisions before you can create more.Use the App Runner API to delete them. For more information, see the section called “App Runnerresource quotas” (p. 20).
• No resource cost – You don't incur additional cost for creating a configuration resource. You mightincur cost for the feature itself (for example, you are charged for normal AWS X-Ray cost when youturn on X-Ray tracing), but not for the App Runner configuration resource that configures the featurefor your App Runner service.
60

AWS App Runner Developer GuideHealth check configuration
Configuring health checks for your serviceAWS App Runner monitors the health of your service by performing health checks. The default healthcheck protocol is TCP. App Runner pings the domain assigned to your service. By using the App RunnerAPI or the AWS CLI you can alternatively set the health check protocol to HTTP. App Runner sends healthcheck HTTP requests to your web application.
You can configure a few settings related to health checks. The following table describes the health checksettings and their default values.
Setting Description Default
Protocol The IP protocol that App Runner uses to perform health checks foryour service.
If you set the protocol to TCP, App Runner pings the default domainassigned to your service at the port that your application is listeningto.
If you set the protocol to HTTP, App Runner sends health checkrequests to the configured path.
TCP
Path The URL that App Runner sends HTTP health check requests to.Applicable only to HTTP checks.
/
Interval The time interval, in seconds, between health checks. 5
Timeout The time, in seconds, to wait for a health check response beforedeciding it failed.
2
Healthy threshold The number of consecutive checks that must succeed before AppRunner decides that the service is healthy.
1
Unhealthy threshold The number of consecutive checks that must fail before App Runnerdecides that the service is unhealthy.
5
Configure health checks
Configure health checks for your App Runner service using one of the following methods:
App Runner console
When you create your App Runner service using the App Runner console, or when you update itsconfiguration later, you can configure health check settings. For full console procedures, see thesection called “Creation” (p. 44) and the section called “Configuration” (p. 57). In both cases,look for the Health check configuration section on the console page.
61

AWS App Runner Developer GuideConnections
NoteWhen you use the App Runner console, you can configure only TCP health checks. Use AppRunner API or AWS CLI for the complete health check options.
App Runner API or AWS CLI
When you call the CreateService or UpdateService API actions, you can use theHealthCheckConfiguration parameter to specify health check settings.
For information about the parameter's structure, see HealthCheckConfiguration in the AWS AppRunner API Reference.
Managing App Runner connectionsWhen you create a service (p. 44) in AWS App Runner, you configure an application source—acontainer image or a source repository that's stored with a provider. If a repository that's stored witha third-party provider is private (not publicly readable), App Runner has to establish an authenticatedand authorized connection with the provider. Then, App Runner can read your repository and deploy itto your service. App Runner doesn't require connection establishment when you create a service thataccesses code stored in your AWS account or in a public code location.
App Runner maintains connection information in a resource called a connection. App Runner requiresa connection resource when you create a service that needs third-party connection information. Thefollowing is some important information about connections:
• Providers – App Runner currently requires connection resources with GitHub.
62

AWS App Runner Developer GuideManage connections
• Shared – You can use a connection resource to create multiple App Runner services that use the samerepository provider account.
• Resource management – In App Runner, you can create and delete connections. However, you can'tmodify an existing connection.
• Resource quota – Connection resources have a set quota that's associated with your AWS accountin each AWS Region. If you reach this quota, you might need to delete a connection before you canconnect to a new provider account. You can delete a connection using the App Runner console or APIas described in the following section, the section called “Manage connections” (p. 63). For moreinformation, see the section called “App Runner resource quotas” (p. 20).
Manage connectionsManage your App Runner connections using one of the following methods:
App Runner console
When you use the App Runner console to create a service (p. 44), you provide connection details.You don't have to explicitly create a connection resource. In the console, you can choose to connectto a GitHub account that you've connected to before, or connect to a new account. When necessary,App Runner creates a connection resource for you. For a new connection, some providers (forexample, GitHub) require you to complete an authentication handshake before you can use theconnection. The console takes you through this process.
The console also has a page for managing your existing connections. You can complete theauthentication handshake for a connection if you didn't do it when you created your service. You canalso delete connections that you're no longer using. The following procedure shows how you canmanage GitHub connections.
To manage GitHub connections in your account
1. Open the App Runner console, and in the Regions list, select your AWS Region.
2. In the navigation pane, choose GitHub connections.
The console then displays a list of GitHub connections in your account.
3. You can now do one of the following actions with any connection on the list:
• Open GitHub account or organization – Choose the name of the connection.
• Complete authentication handshake – Select the connection, and then choose Completehandshake. The console takes you through the authentication handshake process.
• Delete connection – Select the connection, and then choose Delete. Follow the instructions onthe deletion prompt.
63

AWS App Runner Developer GuideAuto scaling
App Runner API or AWS CLI
You can use the following App Runner API actions to manage your connections.
• CreateConnection – Creates a connection to a repository provider account. After the connectionis created, you must manually complete the authentication handshake using the App Runnerconsole. This process is explained in the previous section.
• ListConnections – Returns a list of App Runner connections associated with your AWS account.• DeleteConnection – Deletes a connection. You might need to delete unnecessary connections if
you reach the connection quota for your AWS account.
Managing App Runner automatic scalingAWS App Runner automatically scales compute resources (instances) up or down for your App Runnerapplication. Automatic scaling provides adequate request handling when incoming traffic is high, andreduces your cost when traffic slows down. You can configure a few parameters to adjust auto scalingbehavior for your service.
App Runner maintains auto scaling settings in a sharable resource called AutoScalingConfiguration.You can provide an auto scaling configuration resource when you create or update a service. The AppRunner console creates one for you when you create a new App Runner service. Providing an autoscaling configuration is optional. If you don't provide one, App Runner provides a default auto scalingconfiguration with recommended values.
An auto scaling configuration has a name and a numeric revision. Multiple revisions of a configurationhave the same name and different revision numbers. You can use different configuration names fordifferent auto scaling scenarios, such as high availability or low cost. For each name, you can addmultiple revisions to fine-tune the settings for a specific scenario.
You can share a single auto scaling configuration across multiple App Runner services to ensure theyhave the same auto scaling behavior. For more information, see the section called “Configurationresources” (p. 60).
You can configure the following auto scaling settings:
• Max concurrency – The maximum number of concurrent requests that an instance processes. When thenumber of concurrent requests exceeds this quota, App Runner scales up the service.
• Max size – The maximum number of instances that your service scales up to. At most this number ofinstances are actively serving traffic for your service.
• Min size – The minimum number of instances that App Runner provisions for your service. The servicealways has at least this number of provisioned instances. Some of them actively serve traffic. The restof them (provisioned and inactive instances) stand by as a cost-effective compute capacity reserve,which is ready to be quickly activated. You pay for the memory usage of all provisioned instances. Youpay for the CPU usage of only the active subset.
App Runner temporarily doubles the number of provisioned instances during deployments, tomaintain the same capacity for both old and new code.
Manage auto scalingManage auto scaling for your App Runner services using one of the following methods:
App Runner console
When you create a service (p. 44) using the App Runner console, or when you update itsconfiguration later (p. 57), you can choose an auto scaling configuration for your service. Look
64

AWS App Runner Developer GuideCustom domain names
for the Auto scaling configuration section on the console page. You can use the default auto scalingconfiguration or a custom configuration. To use a custom configuration, either choose an existingconfiguration or provide a new name and settings. If it's a new configuration, App Runner creates anew auto scaling configuration resource for you, and then associates it with your new service.
App Runner API or AWS CLI
When you call the CreateService or UpdateService App Runner API actions, you can use theAutoScalingConfigurationArn parameter to specify an auto scaling configuration resource foryour service.
Use the following App Runner API actions to manage your auto scaling configuration resources.
• CreateAutoScalingConfiguration – Creates a new auto scaling configuration or a revision to anexisting one.
• ListAutoScalingConfigurations – Returns a list of the auto scaling configurations that areassociated with your AWS account, with summary information.
• DescribeAutoScalingConfiguration – Returns a full description of an auto scaling configuration.
• DeleteAutoScalingConfiguration – Deletes an auto scaling configuration. You can delete aspecific revision or the latest active revision. You might need to delete unnecessary auto scalingconfigurations if you reach the auto scaling configuration quota for your AWS account.
Managing custom domain names for an AppRunner service
When you create an AWS App Runner service, App Runner allocates a domain name for it. This is asubdomain in the awsapprunner.com domain that's owned by App Runner. It can be used to access theweb application that's running in your service.
If you own a domain name, you can associate it to your App Runner service. After App Runner validatesyour new domain, it can be used to access your application in addition to the App Runner domain. Youcan associate up to five custom domains.
65

AWS App Runner Developer GuideCustom domain names
NoteYou can optionally include the www subdomain of your domain. However, this is currently onlysupported in the API. The App Runner console doesn't support it.
When you associate a custom domain with your service, App Runner provides you with a set of CNAMErecords to add to your Domain Name System (DNS). Add certificate validation records to your DNS.This way, App Runner can validate that you own or control the domain. App Runner uses ACM to verifythe domain. If you're using CAA records in your DNS records, make sure that at least one CAA recordreferences to amazon.com. Otherwise, ACM can't verify the domain and successfully create your domain.
NoteFor auto-renewal of your custom domain certificates, ensure that you do not delete thecertificate validation records from your DNS server. For information on how to resolve issuesrelated to the renewal of the certificate, see the section called “Custom domain certificaterenewal” (p. 72).
For information about how to resolve CAA errors, see:
• Certification Authority Authorization (CAA) problems
• How do I resolve CAA errors for issuing or renewing an ACM certificate?
• Troubleshooting custom domain names for an App Runner service (p. 71)
In addition, add DNS target records to your DNS to target the App Runner domain. Add one record forthe custom domain, and another for the www subdomain, if you chose this option. Then, wait for thecustom domain status to become Active in the App Runner console. This typically takes several minutes,but might take up to 24—48 hours (1—2 days). At this point, your custom domain is validated, and AppRunner starts routing traffic from this domain to your web application.
NoteIf you're using Amazon Route 53 as your DNS provider, you can add a subdomain, but supportfor adding a root domain isn't available at this time.
You can specify a domain to associate with your App Runner service in the following ways:
• A root domain – For example, example.com. You can optionally associate www.example.com too aspart of the same operation.
• A subdomain – For example, login.example.com or admin.login.example.com. You canoptionally associate the www subdomain too as part of the same operation.
• A wildcard – For example, *.example.com. You can't use the www option in this case. You can specifya wildcard only as the immediate subdomain of a root domain and only on its own. These aren't validspecifications: login*.example.com, *.login.example.com. This wildcard specification associatesall immediate subdomains, and doesn't associate the root domain itself. The root domain must beassociated in a separate operation.
A more specific domain association overrides a less specific one. For example, login.example.comoverrides *.example.com. The certificate and CNAME of the more specific association are used.
The following example shows how you can use multiple custom domain associations:
1. Associate example.com with the home page of your service. Enable the www to associatewww.example.com.
2. Associate login.example.com with the login page of your service.
3. Associate *.example.com with a custom "not found" page.
66
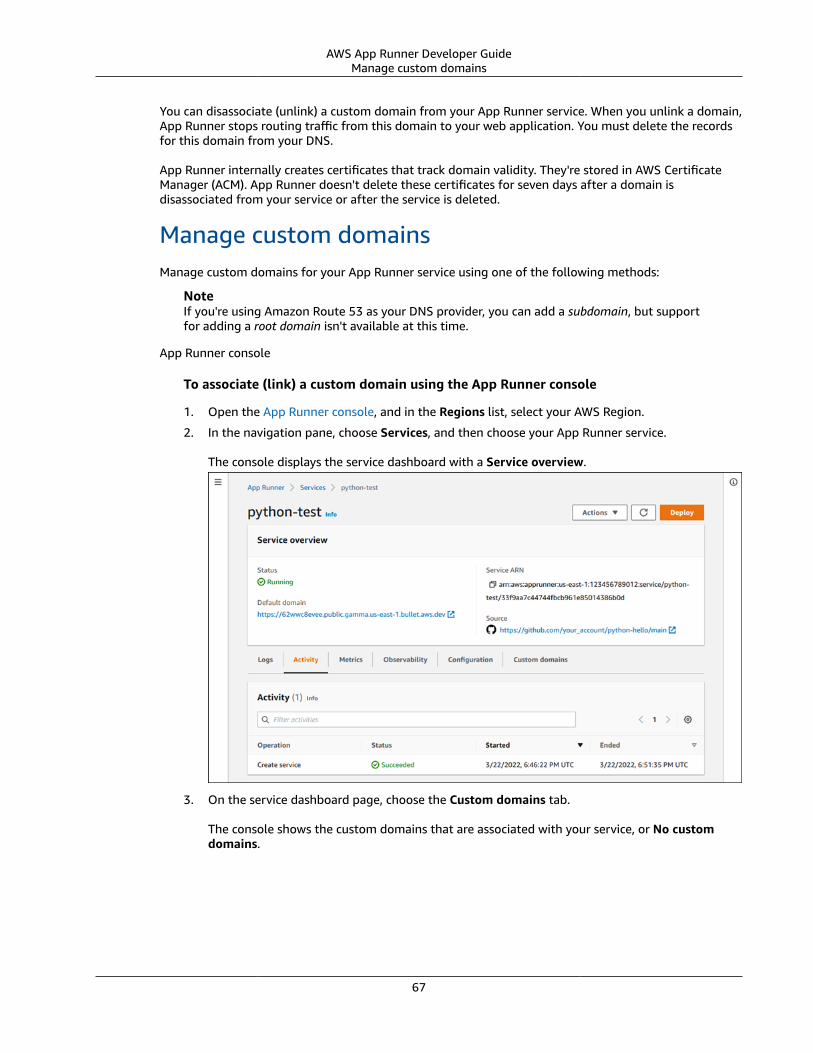
AWS App Runner Developer GuideManage custom domains
You can disassociate (unlink) a custom domain from your App Runner service. When you unlink a domain,App Runner stops routing traffic from this domain to your web application. You must delete the recordsfor this domain from your DNS.
App Runner internally creates certificates that track domain validity. They're stored in AWS CertificateManager (ACM). App Runner doesn't delete these certificates for seven days after a domain isdisassociated from your service or after the service is deleted.
Manage custom domainsManage custom domains for your App Runner service using one of the following methods:
NoteIf you're using Amazon Route 53 as your DNS provider, you can add a subdomain, but supportfor adding a root domain isn't available at this time.
App Runner console
To associate (link) a custom domain using the App Runner console
1. Open the App Runner console, and in the Regions list, select your AWS Region.
2. In the navigation pane, choose Services, and then choose your App Runner service.
The console displays the service dashboard with a Service overview.
3. On the service dashboard page, choose the Custom domains tab.
The console shows the custom domains that are associated with your service, or No customdomains.
67

AWS App Runner Developer GuideManage custom domains
4. On the Custom domains tab, choose Link domain.
5. In the Link custom domain dialog, enter a domain name, and then choose Link customdomain.
6. Follow the instructions on the Configure DNS page to start the domain validation process. Formore information about DNS validation, see DNS Validation in the AWS Certificate Manager UserGuide.
68

AWS App Runner Developer GuideManage custom domains
7. Choose Close
The console shows the dashboard again. The Custom domains tab has a new tile showing thedomain that you just linked in the Pending certificate DNS validation status.
69

AWS App Runner Developer GuideManage custom domains
8. When the domain status changes to Active, verify that the domain works for routing traffic bybrowsing to it.
To disassociate (unlink) a custom domain using the App Runner console
1. On the Custom domains tab, select the tile for the domain you want to disassociate, and thenchoose Unlink domain.
2. In the Unlink domain dialog, verify the action by choosing Unlink domain.
70

AWS App Runner Developer GuideTroubleshooting custom domain names
App Runner API or AWS CLI
To associate a custom domain with your service using the App Runner API or AWS CLI, call theAssociateCustomDomain API action. When the call succeeds, it returns a CustomDomain objectthat describes the custom domain that's being associated with your service. The object shows aCREATING status, and contains a list of CertificateValidationRecord objects. It also returns the targetalias that you can use to configure the DNS target. These are records that you can add to your DNS.
To disassociate a custom domain from your service using the App Runner API or AWS CLI, call theDisassociateCustomDomain API action. When the call succeeds, it returns a CustomDomain objectthat describes the custom domain that's being disassociated from your service. The object shows aDELETING status.
Troubleshooting custom domain names for an AppRunner serviceThis section includes information on how to troubleshoot and resolve various errors that you might runinto while linking to a custom domain.
Getting Create Fail error for custom domain• Check if this error is due to CAA records. If there are no CAA records anywhere in the DNS tree, you
receive a message fail open and ACM will issue a certificate to verify the custom domain. This allowsApp Runner to successfully accept the custom domain. If you are using CAA certifications in the DNSrecords, make sure that at least one domain's CAA records include amazon.com. Else, ACM will fail toissue a certificate. As a result the custom domain creation for App Runner fails.
The following example is using the DNS lookup tool DiG to show CAA records missing a required entry.The example uses example.com as the custom domain. Run the following commands to check theCAA records:
...;; QUESTION SECTION:;example.com. IN CAA
;; ANSWER SECTION:example.com. 7200 IN CAA 0 iodef "mailto:[email protected]"example.com. 7200 IN CAA 0 issue "letsencrypt.org"...note absence of "amazon.com" in any of the above CAA records...
• Correct the domain records and ensure that at least one CAA record includes amazon.com.• Retry to link the custom domain with App Runner.
For more information on resolving CAA errors, see:
• Certification Authority Authorization (CAA) problems• How do I resolve CAA errors for issuing or renewing an ACM certificate?
Getting DNS certificate validation pending error for customdomain• Check if you have skipped an important step in the custom domain setup, or have incorrectly
configured a DNS record by using a DNS lookup tool, such as DiG. Check for the following mistakes:
71

AWS App Runner Developer GuideTroubleshooting custom domain names
• Any missed steps.
• Unsupported characters such as double quotations in the DNS records.
• Correct the mistakes.
• Retry to link the custom domain with App Runner.
For more information on resolving CAA validation errors, see:
• DNS Validation
• the section called “Custom domain names” (p. 65)
Basic troubleshooting commands• Confirm that a service exists.
aws apprunner list-services
• Describe a service and check its status.
aws apprunner describe-service --service-arn
• Check status of custom domain.
aws apprunner describe-custom-domains --service-arn
• List all operations in progress.
aws apprunner list-operations --service-arn
Custom domain certificate renewal
When you add a custom domain to your service, App Runner provides you with a set of CNAME records,including certificate records, that you add to your DNS server. App Runner uses AWS Certificate Manager(ACM) to verify the domain. App Runner validates these DNS records to ensure continued ownership ofthis domain. If you remove the CNAME records from your DNS zone, App Runner can no longer validatethe DNS records, and the custom domain certificate fails to renew automatically.
This section covers how to resolve the following custom domain certificate renewal issues:
• the section called “The CNAME is removed from the DNS server” (p. 73).
• the section called “The certificate has expired” (p. 73).
72

AWS App Runner Developer GuidePausing / resuming
The CNAME is removed from the DNS server
• Retrieve your CNAME records using the DescribeCustomDomains API or from the Custom Domainsettings in the App Runnerconsole of your service. For information on stored CNAMEs, seeCertificateValidationRecords.
• Add the certificate validation CNAME records to your DNS server. App Runner can then validatethat you own the domain. After adding the CNAME records, it can take up to 30 minutes for theDNS records to be propagated. It can also take several hours for App Runner and ACM to retry thecertificate renewal process. For information on how to add CNAME records, see the section called“Manage custom domains” (p. 67).
The certificate has expired
• Disassociate (unlink) and then associate (link) the custom domain for your App Runner service usingthe App Runner console or API. App Runner will create a new certificate validation CNAME records.
• Add the new certificate validation CNAME records to your DNS server.
For information on how to disassociate (unlink) and associate (link) the custom domain, see the sectioncalled “Manage custom domains” (p. 67).
How do I verify that the certificate renewal has succeeded
A status check of your certificate records can verify their successful renewal. You can check the status ofthe certificates by using tools like curl.
For more information on certificate renewal, see the following links:
• Why is my ACM certificate marked as ineligible for renewal?• Managed renewal for ACM certificates• DNS validation
Pausing and resuming an App Runner serviceIf you need to disable your web application temporarily and stop the code from running, you can pauseyour AWS App Runner service. App Runner reduces the compute capacity for the service to zero.
When you're ready to run your application again, you can resume your App Runner service. AppRunner provisions new compute capacity, deploys your application to it, and runs the application. Yourapplication source isn't redeployed, and no build is necessary. Rather, App Runner resumes with yourcurrently deployed version. Your application retains its App Runner domain.
Important
• When you pause your service, your application loses its state. For example, any ephemeralstorage that your code used is lost. For your code, pausing and resuming your service is theequivalent of deploying to a new service.
• If you pause a service due to a flaw in your code (for example, a discovered bug or securityissue), you can't deploy a new version before resuming the service.
Therefore, we recommend that you keep the service running and roll back to your last stableapplication version instead.
• When you resume your service, App Runner deploys the last application version that wasused before you paused the service. If you added any new source versions since pausing yourservice, App Runner doesn't automatically deploy them even if automatic deployment is
73

AWS App Runner Developer GuidePausing and deleting compared
selected. For example, assume you have new image versions in the image repository or newcommits in the code repository. These versions aren't automatically deployed .
To deploy a newer version, perform a manual deployment or add another version to yoursource repository after resuming your App Runner service.
Pausing and deleting comparedPause your App Runner service to temporarily disable it. Only compute resources are terminated, andyour stored data (for example, the container image with your application version) remains intact.Resuming your service is quick—your application is ready to be deployed to new compute resources. YourApp Runner domain remains the same.
Delete your App Runner service to permanently remove it. Your stored data is deleted. If you need torecreate the service, App Runner needs to fetch your source again, and also to build it if it's a coderepository. Your web application gets a new App Runner domain.
When your service is pausedWhen you pause your service and it's in the Paused status, it responds differently to action requests,including API calls or console operations. When a service is paused, you can still perform App Runneractions that don't modify the definition or configuration of the service in a way that affects its runtime.In other words, if an action changes the behavior, scale, or other characteristics of a running service, youcannot perform that action on a paused service.
The following lists provide information about API actions that you can and cannot perform on a pausedservice. The equivalent console operations are similarly allowed or denied.
Actions you can perform on a paused service
• List* and Describe* actions – Actions that only read information.• DeleteService – You can always delete a service.• TagResource, UntagResource – Tags are associated with a service, but aren't part of its definition
and don't affect its runtime behavior.
Actions you cannot perform on a paused service
• StartDeployment actions (or a manual deployment (p. 56) using the console)• UpdateService (or a configuration change using the console, except for tagging changes)• CreateCustomDomainAssociations, DeleteCustomDomainAssociations• CreateConnection, DeleteConnection
Pause and resume your servicePause and resume your App Runner service using one of the following methods:
App Runner console
To pause your service using the App Runner console
1. Open the App Runner console, and in the Regions list, select your AWS Region.2. In the navigation pane, choose Services, and then choose your App Runner service.
The console displays the service dashboard with a Service overview.
74

AWS App Runner Developer GuideDeletion
3. Choose Actions, and then choose Pause.
On the service dashboard page, the service Status changes to Operation in progress, and thenchanges to Paused. Your service is now paused.
To resume your service using the App Runner console
1. Choose Actions, and then choose Resume.
On the service dashboard page, the service Status changes to Operation in progress.2. Wait for the service to resume. On the service dashboard page, the service Status changes back
to Running.3. To verify that resuming the service is successful, on the service dashboard page, choose the App
Runner domain value. It's the URL for your service's website. Verify that your web application isrunning correctly.
App Runner API or AWS CLI
To pause your service using the App Runner API or AWS CLI, call the PauseService APIaction. If the call returns a successful response with a Service object showing "Status":"OPERATION_IN_PROGRESS", App Runner starts pausing your service.
To resume your service using the App Runner API or AWS CLI, call the ResumeService APIaction. If the call returns a successful response with a Service object showing "Status":"OPERATION_IN_PROGRESS", App Runner starts resuming your service.
Deleting an App Runner serviceWhen you want to terminate the web application that's running in your AWS App Runner service, you candelete the service. Deleting a service stops the running web service, removes the underlying resources,and deletes your associated data.
You might want to delete an App Runner service for one or more of the following reasons:
75

AWS App Runner Developer GuidePausing and deleting compared
• You don't need the web application anymore – For example, it's retired, or it's a development versionthat you're done using.
• You've reached the App Runner service quota – You want to create a new service in the same AWSRegion and you've reached the quota associated with your account. For more information, see thesection called “App Runner resource quotas” (p. 20).
• Security or privacy considerations – You want App Runner to delete the data that it stores for yourservice.
Pausing and deleting comparedPause your App Runner service to temporarily disable it. Only compute resources are terminated, andyour stored data (for example, the container image with your application version) remains intact.Resuming your service is quick—your application is ready to be deployed to new compute resources. YourApp Runner domain remains the same.
Delete your App Runner service to permanently remove it. Your stored data is deleted. If you need torecreate the service, App Runner needs to fetch your source again, and also to build it if it's a coderepository. Your web application gets a new App Runner domain.
What does App Runner delete?When you delete your service, App Runner deletes some associated items, and doesn't delete others. Thefollowing lists provide the details.
Items that App Runner deletes:
• Container image – A copy of the image that you deployed or the image that App Runner built fromyour source code. It's stored in Amazon Elastic Container Registry (Amazon ECR) using internal AWSaccounts that are owned by App Runner.
• Service configuration – The configuration settings that are associated with your App Runner service.They're stored in Amazon DynamoDB using internal AWS accounts that are owned by App Runner.
Items that App Runner doesn't delete:
• Connection – You might have a connection that's associated with your service. An App Runnerconnection is a separate resource that might be shared among several App Runner services. If youdon't need the connection anymore, you can explicitly delete it. For more information, see the sectioncalled “Connections” (p. 62).
• Custom domain certificates – If you link custom domains to an App Runner service, App Runnerinternally creates certificates that track domain validity. They're stored in AWS Certificate Manager(ACM). App Runner doesn't delete the certificate for seven days after a domain is unlinked from yourservice or after the service is deleted. For more information, see the section called “Custom domainnames” (p. 65).
Delete your serviceDelete your App Runner service using one of the following methods:
App Runner console
To delete your service using the App Runner console
1. Open the App Runner console, and in the Regions list, select your AWS Region.
76
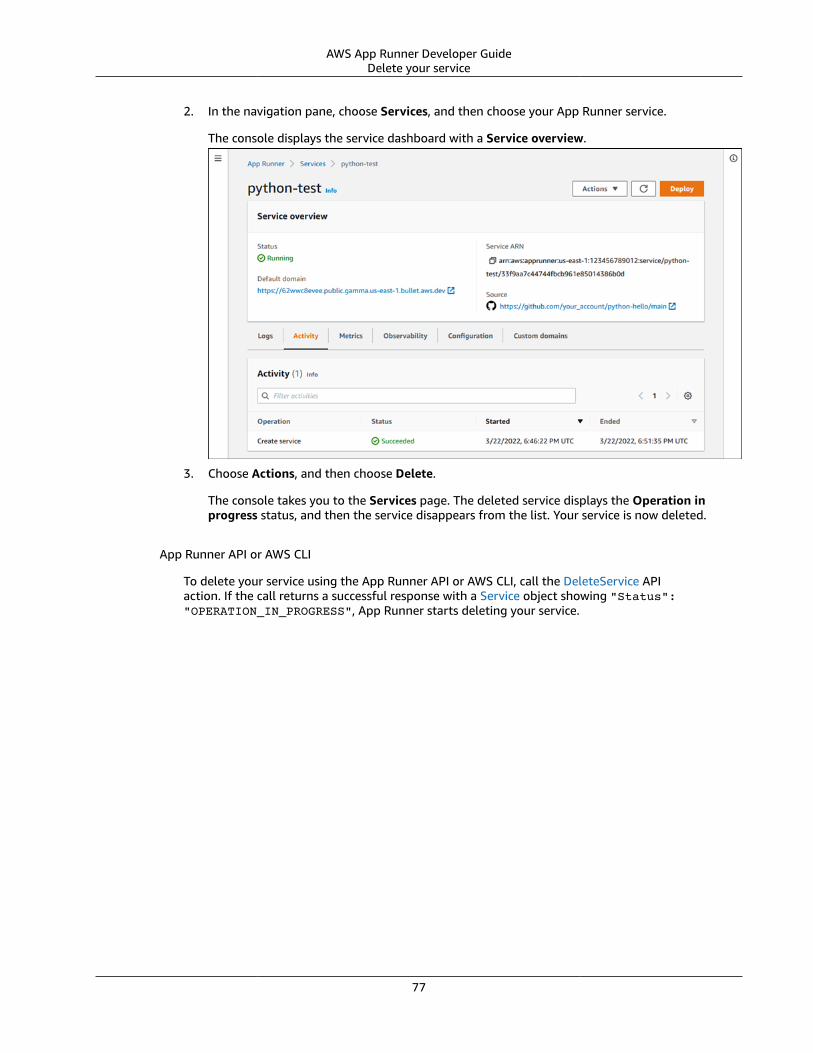
AWS App Runner Developer GuideDelete your service
2. In the navigation pane, choose Services, and then choose your App Runner service.
The console displays the service dashboard with a Service overview.
3. Choose Actions, and then choose Delete.
The console takes you to the Services page. The deleted service displays the Operation inprogress status, and then the service disappears from the list. Your service is now deleted.
App Runner API or AWS CLI
To delete your service using the App Runner API or AWS CLI, call the DeleteService APIaction. If the call returns a successful response with a Service object showing "Status":"OPERATION_IN_PROGRESS", App Runner starts deleting your service.
77

AWS App Runner Developer GuideVPC access
Networking with App RunnerThis chapter describes aspects of networking with AWS App Runner and with your App Runner services.Associate your service with a VPC from Amazon Virtual Private Cloud (Amazon VPC) to gain access toapplications running in a private VPC. Learn how to define a VPC endpoint to App Runner in your VPC forincreased message security.
NoteApp Runner currently only provides support for IPv4.
Topics• Enabling VPC access for outgoing traffic (p. 78)• Using App Runner with VPC endpoints (p. 83)
Enabling VPC access for outgoing trafficBy default, your AWS App Runner application can send messages to public endpoints. This includes yourown solutions, AWS services, and any other public website or web service. Your application can even sendmessages to public endpoints of applications that run in a public VPC from Amazon Virtual Private Cloud(Amazon VPC). If you don't configure a VPC when you launch your environment, App Runner uses thedefault VPC, which is public.
You can choose to launch your environment in a custom VPC to customize networking and securitysettings for outgoing traffic. You can enable your AWS App Runner service to access applications that runin a private VPC from Amazon Virtual Private Cloud (Amazon VPC). After you do this, your applicationcan connect with and send messages to other applications that are hosted in an Amazon Virtual PrivateCloud (Amazon VPC). Examples are an Amazon RDS database, Amazon ElastiCache, and other privateservices that are hosted in a private VPC.
VPC ConnectorYou can associate your service with a VPC by creating a VPC endpoint, called VPC Connector, from theApp Runner console. To create a VPC Connector, specify the VPC, one or more subnets, and optionallyone or more security groups. After you configure a VPC Connector, you can use it with one or more AppRunner services.
The VPC connectors in App Runner are based on AWS Hyperplane, the internal Amazon networkfunction virtualization system that's behind several AWS services and resources. These include NetworkLoad Balancer, NAT Gateway, and AWS PrivateLink. The AWS Hyperplane technology provides highthroughput and low latency network function virtualization capabilities. With Hyperplane ENIs, a higherdegree of sharing can be achieved than the regular ENIs. Hyperplane ENIs are tied to a combination ofone or more subnets and security groups. As the Hyperplane ENI is shared, fewer ENIs are required foreach service, even as you scale up the number of tasks required to handle the request load. You canalso choose to reference the same VPC Connector across multiple App Runner services, the underlyingHyperplane ENIs are shared across these services. This results in more efficient utilization of the IP spacein your VPC.
SubnetEach subnet is in a specific Availability Zone. For high availability, we recommend that you selectsubnets across at least three Availability Zones. If the Region has less than three Availability Zones, werecommend you select your subnets across all the supported Availability Zones.
78

AWS App Runner Developer GuideSecurity group
When selecting a subnet for your VPC, ensure that you choose a private subnet, not a public subnet. Thisis because, when you create a VPC Connector, the App Runner service creates a Hyperplane ENI in eachof the subnets. Each Hyperplane ENI is assigned a private IP address only and is tagged with a tag ofthe AWSAppRunnerManaged key. If you choose a public subnet, errors will occur when running your AppRunner service. However, if your service needs to access some services that are on the internet or otherpublic AWS services, seethe section called “Considerations when selecting a subnet ” (p. 79).
Considerations when selecting a subnet• When you connect your service to a VPC, the outbound traffic doesn't have access to the public
internet. All outbound traffic from your application is directed through the VPC that your service isconnected to. All networking rules for the VPC apply to the outbound traffic of your application. Thismeans that your services can't access the public internet and AWS APIs. To gain access, do one of thefollowing:• Connect the subnets to the internet through a NAT Gateway.• Set up VPC endpoints for the AWS services that you want to access. Your service stays within the
Amazon VPC by using AWS PrivateLink.• Some Availability Zones in some AWS Regions don't support the subnets that can be used with
App Runner services. If you choose subnets in these Availability Zones, your service fails to becreated or updated. For these situations, App Runner provides a detailed error message pointing tothe unsupported subnets and Availability Zones. When this occurs, troubleshoot by removing theunsupported subnets from your request, and then try again.
Security groupYou can optionally specify the security groups that App Runner uses to access AWS under the specifiedsubnets. If you don't specify security groups, App Runner uses the default security group of the VPC. Thedefault security group allows all outbound traffic.
Adding a security group provides an additional layer of security to the VCP Connectors, giving you morecontrol over the network traffic. The VPC Connector is only used for outbound communication fromyour application. You use outbound rules to allow communication to the desired destination endpoints.You must also ensure that any security groups that are associated with the destination resource havethe appropriate inbound rules. Otherwise, these resources can't accept traffic that comes from the VPCConnector security groups.
NoteWhen you associate your service with a VPC, the following traffic isn't affected:
• Inbound traffic – Incoming messages that your application receives are unaffected by anassociated VPC. The messages are routed through the public domain name that's associatedwith your service and don't interact with the VPC.
• App Runner traffic – App Runner manages several actions on your behalf, such as pullingsource code and images, pushing logs, and retrieving secrets. The traffic that these actionsgenerate isn't routed through your VPC.
To know more about how AWS App Runner integrates with Amazon VPC, see AWS App Runner VPCNetworking.
NoteApp Runner currently only supports IPv4.
Manage VPC accessManage VPC access for your App Runner services using one of the following methods:
79

AWS App Runner Developer GuideManage VPC access
App Runner console
When you create a service (p. 44) using the App Runner console, or when you update itsconfiguration later (p. 57), you can choose to configure your outgoing traffic. Look for theNetworking configuration section on the console page. For Outgoing network traffic, choose in thefollowing:
• Public access: To associate your service with public endpoints of other AWS services.
• Custom VPC: To associate your service with a VPC from Amazon VPC. Your application can connectwith and send messages to other applications that are hosted in an Amazon VPC.
To enable Custom VPC
1. Open the App Runner console, and in the Regions list, select your AWS Region.
2. Go to Networking section under Configure service.
3. Choose Custom VPC, for Outgoing network traffic.
4. In the navigation pane, choose VPC connector.
If you created the VPC connectors, the console displays a list of VPC connectors in your account.You can choose an existing VPC connector and choose Next to review your configuration. Then,move to the last step. Alternatively, you can add a new VPC connector using the following steps.
5. Choose Add new to create a new VPC connector for your service.
Then, the Add new VPC connector dialog box opens.
80

AWS App Runner Developer GuideManage VPC access
6. Enter a name for your VPC connector and select the required VPC from the available list.
7. For Subnets select one subnet for each Availability Zone that you plan to access the AppRunner service from. For better availability, choose three subnets. Or, if there are less than threesubnets, choose all available subnets.
8. (Optional) For Security group, select the security groups to associate with the endpoint networkinterfaces.
9. (Optional) To add a tag, choose Add new tag and enter the tag key and the tag value.
81
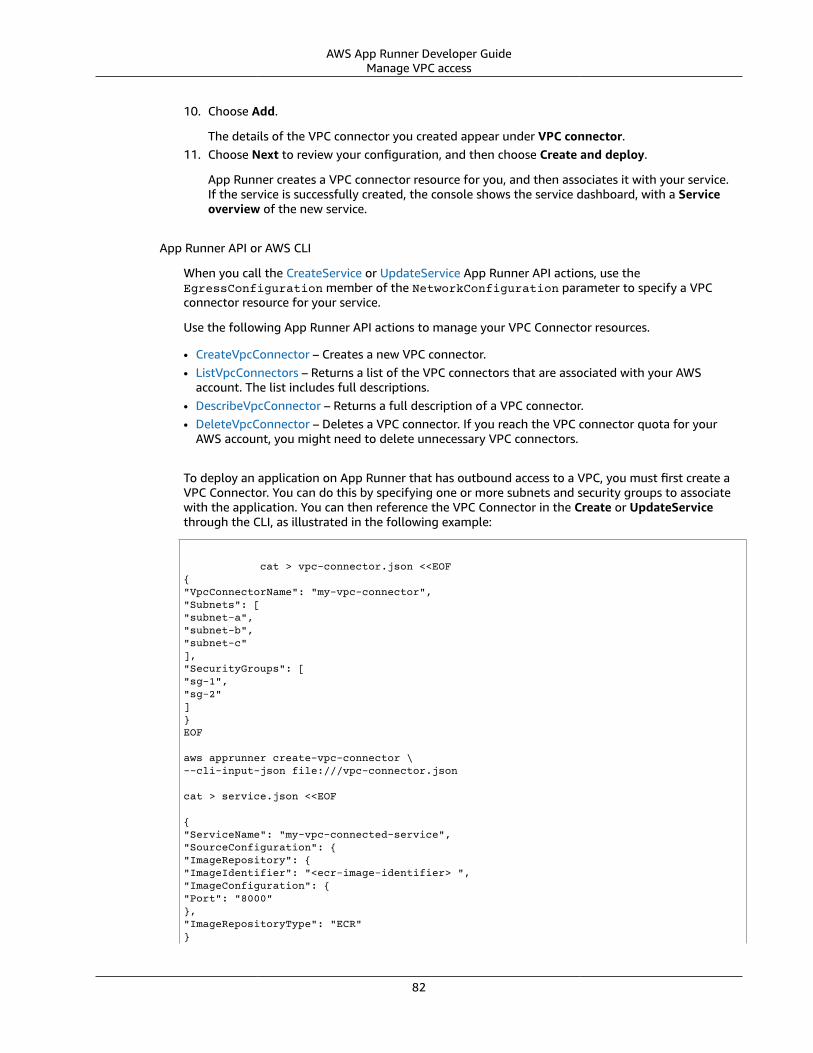
AWS App Runner Developer GuideManage VPC access
10. Choose Add.
The details of the VPC connector you created appear under VPC connector.11. Choose Next to review your configuration, and then choose Create and deploy.
App Runner creates a VPC connector resource for you, and then associates it with your service.If the service is successfully created, the console shows the service dashboard, with a Serviceoverview of the new service.
App Runner API or AWS CLI
When you call the CreateService or UpdateService App Runner API actions, use theEgressConfiguration member of the NetworkConfiguration parameter to specify a VPCconnector resource for your service.
Use the following App Runner API actions to manage your VPC Connector resources.
• CreateVpcConnector – Creates a new VPC connector.• ListVpcConnectors – Returns a list of the VPC connectors that are associated with your AWS
account. The list includes full descriptions.• DescribeVpcConnector – Returns a full description of a VPC connector.• DeleteVpcConnector – Deletes a VPC connector. If you reach the VPC connector quota for your
AWS account, you might need to delete unnecessary VPC connectors.
To deploy an application on App Runner that has outbound access to a VPC, you must first create aVPC Connector. You can do this by specifying one or more subnets and security groups to associatewith the application. You can then reference the VPC Connector in the Create or UpdateServicethrough the CLI, as illustrated in the following example:
cat > vpc-connector.json <<EOF{"VpcConnectorName": "my-vpc-connector","Subnets": ["subnet-a","subnet-b","subnet-c"],"SecurityGroups": ["sg-1","sg-2"]}EOF
aws apprunner create-vpc-connector \--cli-input-json file:///vpc-connector.json
cat > service.json <<EOF
{"ServiceName": "my-vpc-connected-service","SourceConfiguration": {"ImageRepository": {"ImageIdentifier": "<ecr-image-identifier> ","ImageConfiguration": {"Port": "8000"},"ImageRepositoryType": "ECR"}
82

AWS App Runner Developer GuideVPC endpoints
},"NetworkConfiguration": {"EgressConfiguration": {"EgressType": "VPC","VpcConnectorArn": "arn:aws:apprunner:..../my-vpc-connector"}}}EOF
aws apprunner create-service \--cli-input-json file:///service.js
Using App Runner with VPC endpointsYour AWS application might integrate AWS App Runner services with other AWS services that run in aVPC from Amazon Virtual Private Cloud (Amazon VPC). Parts of your application might make requests toApp Runner from within the VPC. For example, you might use AWS CodePipeline to continuously deployto your App Runner service. One way to improve the security of your application is to send these AppRunner requests (and requests to other AWS services) over a VPC endpoint.
Using a VPC endpoint, you can privately connect your VPC to supported AWS services and VPC endpointservices that are powered by AWS PrivateLink. You don't need an internet gateway, NAT device, VPNconnection, or AWS Direct Connect connection.
Resources in your VPC don't use public IP addresses to interact with App Runner resources. Trafficbetween your VPC and App Runner doesn't leave the Amazon network. For more information about VPCendpoints, see VPC endpoints in the AWS PrivateLink Guide.
NoteYou can configure your services to access the internet, including AWS APIs, even when yourservice is connected to a VPC. For instructions on how to enable public internet access for VPCoutbound traffic, see the section called “Considerations when selecting a subnet ” (p. 79).
App Runner supports AWS PrivateLink, which provides private connectivity to App Runner and eliminatesexposure of traffic to the internet. To enable your application to send requests to App Runner using AWSPrivateLink, configure a type of VPC endpoint known as an interface VPC endpoint (interface endpoint).For more information, see Interface VPC endpoints (AWS PrivateLink) in the AWS PrivateLink Guide.
NoteBy default, the web application in your App Runner service runs in a VPC that App Runnerprovides and configures. This VPC is public. That means that it's connected to the internet. Youcan optionally associate your application with a custom VPC. For more information, see thesection called “VPC access” (p. 78).App Runner doesn't support creating a VPC endpoint for your application.
Setting up a VPC endpoint for App RunnerTo create the interface VPC endpoint for the App Runner service in your VPC, follow the Createan interface endpoint procedure in the AWS PrivateLink Guide. For Service Name, choosecom.amazonaws.region.apprunner.
VPC network privacy considerationsImportantUsing a VPC endpoint for App Runner doesn't ensure that all traffic from your VPC stays off ofthe internet. The VPC might be public. Moreover, some parts of your solution might not use
83

AWS App Runner Developer GuideUsing endpoint policies to control
access with VPC endpoints
VPC endpoints to make AWS API calls. For example, AWS services might call other services usingtheir public endpoints. If traffic privacy is required for the solution in your VPC, read this section.
To ensure privacy of network traffic in your VPC, consider the following:
• Enable DNS name – Parts of your application might still send requests to App Runner over the internetusing the apprunner.region.amazonaws.com public endpoint. If your VPC is configured withinternet access, these requests succeed with no indication to you. You can prevent this by ensuring thatEnable DNS name is enabled when you create the endpoint. By default, it's set to true. This adds aDNS entry in your VPC that maps the public service endpoint to the interface VPC endpoint.
• Configure VPC endpoints for additional services – Your solution might send requests to other AWSservices. For example, AWS CodePipeline might send requests to AWS CodeBuild. Configure VPCendpoints for these services, and enable DNS names on these endpoints.
• Configure a private VPC – If possible (if your solution doesn't need internet access at all), set up yourVPC as private, which means that it has no internet connection. This ensures that a missing VPCendpoint causes a visible error, so that you can add the missing endpoint.
Using endpoint policies to control access with VPCendpointsBy default, a VPC endpoint allows full access to the service that it's associated with. When you create ormodify a VPC endpoint for App Runner, you can attach an endpoint policy to it.
An endpoint policy is an AWS Identity and Access Management (IAM) resource policy that controls accessfrom the endpoint to the specified service. The endpoint policy is specific to the endpoint. It's separatefrom any user or instance IAM policies that your environment might have and doesn't override or replacethem. For more information about authoring and using VPC endpoint policies, see Controlling Access toServices with VPC Endpoints in the AWS PrivateLink Guide.
The following example allows read-only access from the VPC endpoint to App Runner. These are minimalaccess rights when using the VPC endpoint. Principals might have additional permissions through otherpolicies.
{ "Statement": [ { "Effect": "Allow", "Action": [ "apprunner:List*", "apprunner:Describe*" ], "Resource": "*" } ]}
84

AWS App Runner Developer GuideActivity
Observability for your App Runnerservice
AWS App Runner integrates with several AWS services to provide you with an extensive observabilitysuite of tools for your App Runner service. Topics in this chapter describe these capabilities.
Topics
• Tracking App Runner service activity (p. 85)
• Viewing App Runner logs streamed to CloudWatch Logs (p. 86)
• Viewing App Runner service metrics reported to CloudWatch (p. 89)
• Handling App Runner events in EventBridge (p. 92)
• Logging App Runner API calls with AWS CloudTrail (p. 96)
• Tracing for your App Runner application with X-Ray (p. 99)
Tracking App Runner service activityAWS App Runner uses a list of operations to keep track of activity in your App Runner service. Anoperation represents an asynchronous call to an API action, such as creating a service, updating aconfiguration, and deploying a service. The following sections show you how to track activity in the AppRunner console and using the API.
Track App Runner service activityTrack your App Runner service activity using one of the following methods:
App Runner console
The App Runner console displays your App Runner service activity and provides more ways toexplore operations.
To view activity of your service
1. Open the App Runner console, and in the Regions list, select your AWS Region.
2. In the navigation pane, choose Services, and then choose your App Runner service.
The console displays the service dashboard with a Service overview.
85

AWS App Runner Developer GuideLogs (CloudWatch Logs)
3. On the service dashboard page, choose the Activity tab, if it isn't already chosen.
The console displays a list of operations.4. To find specific operations, scope down the list by entering a search term. You can search for any
value that appears in the table.5. Choose any listed operation to see or download the related log.
App Runner API or AWS CLI
The ListOperations action, given the Amazon Resource Name (ARN) of an App Runner service,returns a list of operations that occurred on this service. Each list item contains an operation ID andsome tracking details.
Viewing App Runner logs streamed to CloudWatchLogs
You can use Amazon CloudWatch Logs to monitor, store, and access log files that your resources invarious AWS services generate. For more information, see Amazon CloudWatch Logs User Guide.
AWS App Runner collects the output of your application deployments and of your active service andstreams it to CloudWatch Logs. The following sections list App Runner log streams and show you how toview them in the App Runner console.
App Runner log groups and streamsCloudWatch Logs keeps log data in log streams that it further organizes in log groups. A log stream is asequence of log events from a specific source. A log group is a group of log streams that share the sameretention, monitoring, and access control settings.
App Runner defines two CloudWatch Logs log groups, each with multiple log streams, for each one ofyour App Runner services in your AWS account.
86
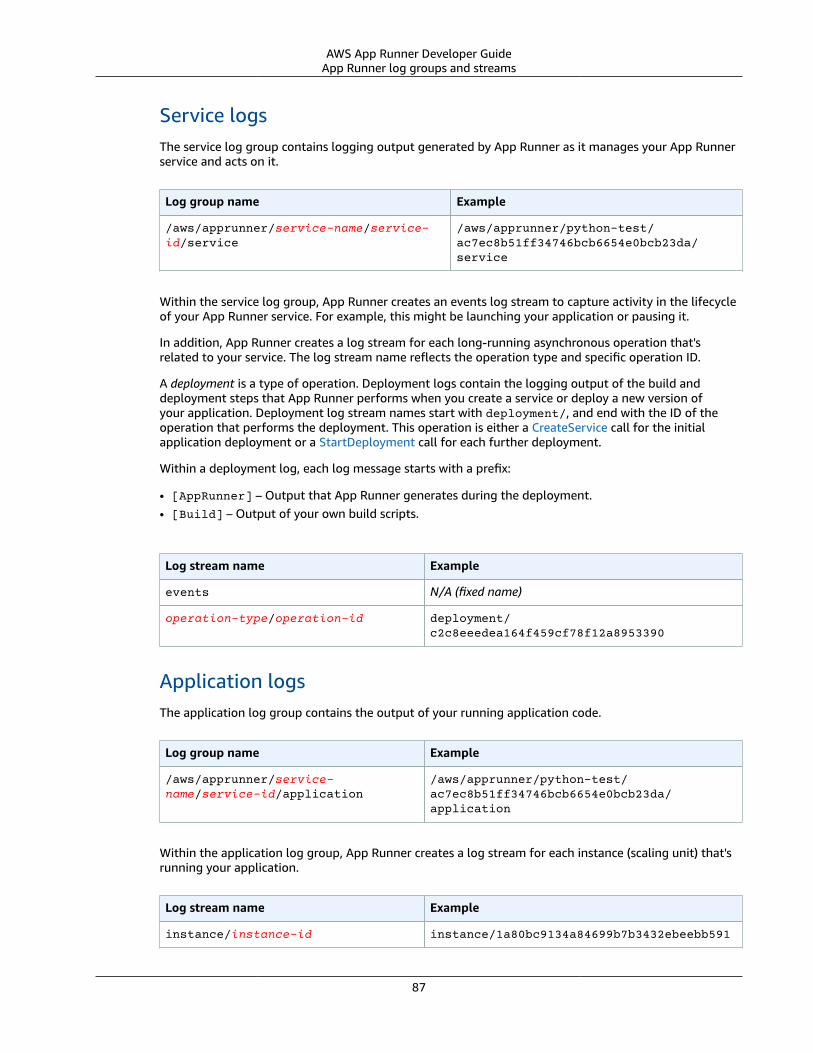
AWS App Runner Developer GuideApp Runner log groups and streams
Service logsThe service log group contains logging output generated by App Runner as it manages your App Runnerservice and acts on it.
Log group name Example
/aws/apprunner/service-name/service-id/service
/aws/apprunner/python-test/ac7ec8b51ff34746bcb6654e0bcb23da/service
Within the service log group, App Runner creates an events log stream to capture activity in the lifecycleof your App Runner service. For example, this might be launching your application or pausing it.
In addition, App Runner creates a log stream for each long-running asynchronous operation that'srelated to your service. The log stream name reflects the operation type and specific operation ID.
A deployment is a type of operation. Deployment logs contain the logging output of the build anddeployment steps that App Runner performs when you create a service or deploy a new version ofyour application. Deployment log stream names start with deployment/, and end with the ID of theoperation that performs the deployment. This operation is either a CreateService call for the initialapplication deployment or a StartDeployment call for each further deployment.
Within a deployment log, each log message starts with a prefix:
• [AppRunner] – Output that App Runner generates during the deployment.• [Build] – Output of your own build scripts.
Log stream name Example
events N/A (fixed name)
operation-type/operation-id deployment/c2c8eeedea164f459cf78f12a8953390
Application logsThe application log group contains the output of your running application code.
Log group name Example
/aws/apprunner/service-name/service-id/application
/aws/apprunner/python-test/ac7ec8b51ff34746bcb6654e0bcb23da/application
Within the application log group, App Runner creates a log stream for each instance (scaling unit) that'srunning your application.
Log stream name Example
instance/instance-id instance/1a80bc9134a84699b7b3432ebeebb591
87

AWS App Runner Developer GuideViewing App Runner logs in the console
Viewing App Runner logs in the consoleThe App Runner console displays a summary of all logs for your service and allows you to view, explore,and download them.
To view logs for your service
1. Open the App Runner console, and in the Regions list, select your AWS Region.
2. In the navigation pane, choose Services, and then choose your App Runner service.
The console displays the service dashboard with a Service overview.
3. On the service dashboard page, choose the Logs tab.
The console displays a few types of logs in several sections:
• Event log – Activity in the lifecycle of your App Runner service. The console displays the latestevents.
• Deployment logs – Source repository deployments to your App Runner service. The consoledisplays a separate log stream for each deployment.
• Application logs – The output of the web application that's deployed to your App Runner service.The console combines the output from all running instances into a single log stream.
88

AWS App Runner Developer GuideMetrics (CloudWatch)
4. To find specific deployments, scope down the deployment log list by entering a search term. You cansearch for any value that appears in the table.
5. To view a log's content, choose View full log (event log) or the log stream name (deployment andapplication logs).
6. Choose Download to download a log. For a deployment log stream, select a log stream first.
7. Choose View in CloudWatch to open the CloudWatch console and use its full capabilities to exploreyour App Runner service logs. For a deployment log stream, select a log stream first.
NoteThe CloudWatch console is particularly useful if you want to view application logs ofspecific instances instead of the combined application log.
Viewing App Runner service metrics reported toCloudWatch
Amazon CloudWatch monitors your Amazon Web Services (AWS) resources and the applications you runon AWS in real time. You can use CloudWatch to collect and track metrics, which are variables you canmeasure for your resources and applications. You can also use it to create alarms that watch metrics.When a certain threshold is reached, CloudWatch sends notifications, or automatically makes changes tothe monitored resources. For more information, see Amazon CloudWatch User Guide.
89
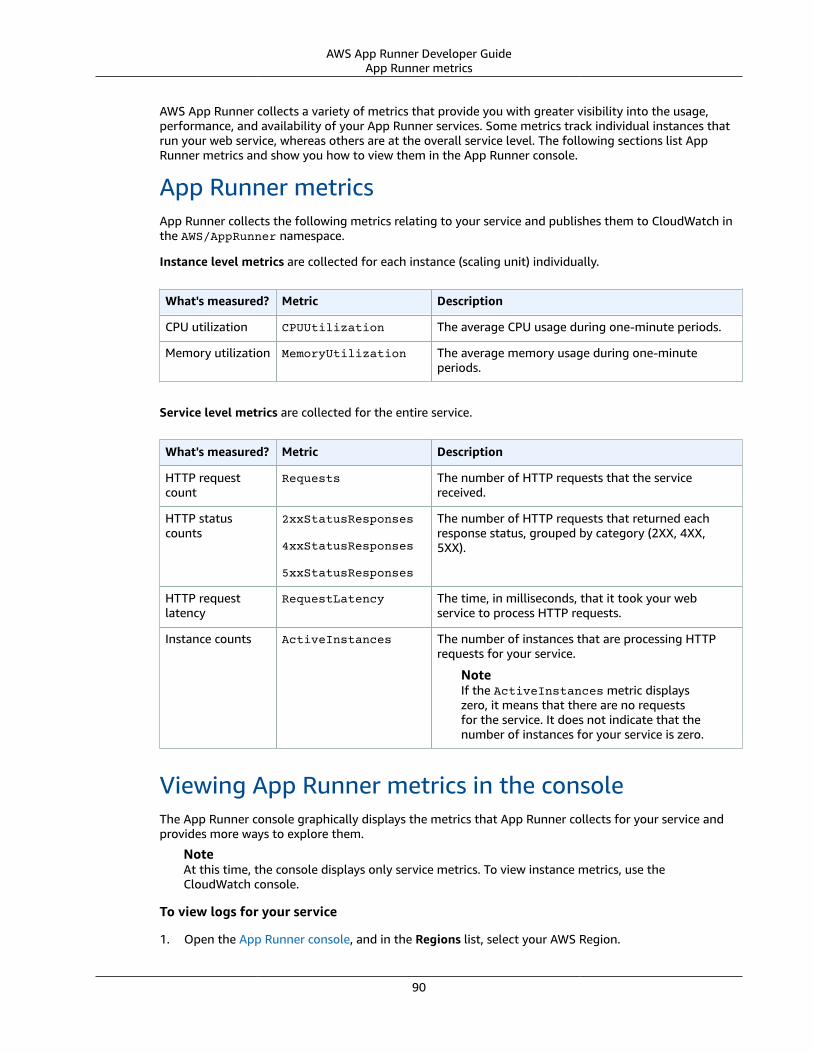
AWS App Runner Developer GuideApp Runner metrics
AWS App Runner collects a variety of metrics that provide you with greater visibility into the usage,performance, and availability of your App Runner services. Some metrics track individual instances thatrun your web service, whereas others are at the overall service level. The following sections list AppRunner metrics and show you how to view them in the App Runner console.
App Runner metricsApp Runner collects the following metrics relating to your service and publishes them to CloudWatch inthe AWS/AppRunner namespace.
Instance level metrics are collected for each instance (scaling unit) individually.
What's measured? Metric Description
CPU utilization CPUUtilization The average CPU usage during one-minute periods.
Memory utilization MemoryUtilization The average memory usage during one-minuteperiods.
Service level metrics are collected for the entire service.
What's measured? Metric Description
HTTP requestcount
Requests The number of HTTP requests that the servicereceived.
HTTP statuscounts
2xxStatusResponses
4xxStatusResponses
5xxStatusResponses
The number of HTTP requests that returned eachresponse status, grouped by category (2XX, 4XX,5XX).
HTTP requestlatency
RequestLatency The time, in milliseconds, that it took your webservice to process HTTP requests.
Instance counts ActiveInstances The number of instances that are processing HTTPrequests for your service.
NoteIf the ActiveInstances metric displayszero, it means that there are no requestsfor the service. It does not indicate that thenumber of instances for your service is zero.
Viewing App Runner metrics in the consoleThe App Runner console graphically displays the metrics that App Runner collects for your service andprovides more ways to explore them.
NoteAt this time, the console displays only service metrics. To view instance metrics, use theCloudWatch console.
To view logs for your service
1. Open the App Runner console, and in the Regions list, select your AWS Region.
90

AWS App Runner Developer GuideViewing App Runner metrics in the console
2. In the navigation pane, choose Services, and then choose your App Runner service.
The console displays the service dashboard with a Service overview.
3. On the service dashboard page, choose the Metrics tab.
The console displays a set of metrics graphs.
91

AWS App Runner Developer GuideEvent handling (EventBridge)
4. Choose a duration (for example, 12h) to scope metrics graphs to the recent period of that duration.
5. Choose Add to dashboard at the top of one of the graph sections, or use the menu on any graph, toadd the relevant metrics to a dashboard in the CloudWatch console for further investigation.
Handling App Runner events in EventBridgeUsing Amazon EventBridge, you can set up event-driven rules that monitor a stream of real-timedata from your AWS App Runner service for certain patterns. When a pattern for a rule is matched,EventBridge initiates an action in a target such as AWS Lambda, Amazon ECS, AWS Batch, and AmazonSNS. For example, you can set a rule for sending out email notifications by signaling an Amazon SNStopic whenever a deployment to your service fails. Or, you can set a Lambda function to notify aSlack channel whenever a service update fails. For more information about EventBridge, see AmazonEventBridge User Guide.
App Runner sends the following event types to EventBridge
• Service status change – A change in the status of an App Runner service. For example, a service statuschanged to DELETE_FAILED.
92

AWS App Runner Developer GuideCreating an EventBridge rule to act on App Runner events
• Service operation status change – A change in the status of a long, asynchronous operation on an AppRunner service. For example, a service started to create, a service update successfully completed, or aservice deployment completed with errors.
Creating an EventBridge rule to act on App RunnereventsAn EventBridge event is an object that defines some standard EventBridge fields, such as the source AWSservice and the detail (event) type, and an event-specific set of fields with the event details. To create anEventBridge rule, you use the EventBridge console to define an event pattern (which events should bettracked) and specify a target action (what should be done on a match). An event pattern is similar to theevents that it matches. You specify a subset of fields to match, and for each field, you specify a list ofpossible values. This topic provides examples of App Runner events and event patterns.
For more information about creating EventBridge rules, see Creating a rule for an AWS service in theAmazon EventBridge User Guide.
NoteSome services support pre-defined patterns in EventBridge. This simplifies how an event patternis created. You select field values on a form, and EventBridge generates the pattern for you. Atthis time, App Runner doesn't support pre-defined patterns. You have to enter the pattern as aJSON object. You can use the examples in this topic as a starting point.
App Runner event examplesThese are some examples to events that App Runner sends to EventBridge.
• A service status change event. Specifically, a service that changed from theOPERATION_IN_PROGRESS to the RUNNING status.
{ "version": "0", "id": "6a7e8feb-b491-4cf7-a9f1-bf3703467718", "detail-type": "AppRunner Service Status Change", "source": "aws.apprunner", "account": "111122223333", "time": "2021-04-29T11:54:23Z", "region": "us-east-2", "resources": [ "arn:aws:apprunner:us-east-2:123456789012:service/my-app/8fe1e10304f84fd2b0df550fe98a71fa" ], "detail": { "PreviousStatus": "OPERATION_IN_PROGRESS", "CurrentStatus": "RUNNING", "ServiceName": "my-app", "ServiceId": "8fe1e10304f84fd2b0df550fe98a71fa", "Message": "Service status is set to RUNNING.", "Severity": "INFO" }}
• An operation status change event. Specifically, an UpdateService operation that completedsuccessfully.
{ "version": "0",
93

AWS App Runner Developer GuideApp Runner event pattern examples
"id": "6a7e8feb-b491-4cf7-a9f1-bf3703467718", "detail-type": "AppRunner Service Operation Status Change", "source": "aws.apprunner", "account": "111122223333", "time": "2021-04-29T18:43:48Z", "region": "us-east-2", "resources": [ "arn:aws:apprunner:us-east-2:123456789012:service/my-app/8fe1e10304f84fd2b0df550fe98a71fa" ], "detail": { "Status": "UpdateServiceCompletedSuccessfully", "ServiceName": "my-app", "ServiceId": "8fe1e10304f84fd2b0df550fe98a71fa", "Message": "Service update completed successfully. New application and configuration is deployed.", "Severity": "INFO" }}
App Runner event pattern examplesThe following examples demonstrate event patterns that you can use in EventBridge rules to match oneor more App Runner events. An event pattern is similar to an event. Include only the fields that you wantto match, and provide a list instead of a scalar to each one.
• Match all service status change events for services of a specific account, where the service is no longerin RUNNING status.
{ "detail-type": [ "AppRunner Service Status Change" ], "source": [ "aws.apprunner" ], "account": [ "111122223333" ], "detail": { "PreviousStatus": [ "RUNNING" ] }}
• Match all operation status change events for services of a specific account, where the operation failed.
{ "detail-type": [ "AppRunner Service Operation Status Change" ], "source": [ "aws.apprunner" ], "account": [ "111122223333" ], "detail": { "Status": [ "CreateServiceFailed", "DeleteServiceFailed", "UpdateServiceFailed", "DeploymentFailed", "PauseServiceFailed", "ResumeServiceFailed" ] }}
94

AWS App Runner Developer GuideApp Runner event reference
App Runner event referenceService status changeA service status change event has detail-type set to AppRunner Service Status Change. It hasthe following detail fields and values:
"PreviousStatus": "any valid service status","CurrentStatus": "any valid service status","ServiceName": "your service name","ServiceId": "your service ID","Message": "Service status is set to CurrentStatus.","Severity": "varies"
Operation status changeAn operation status change event has detail-type set to AppRunner Service Operation StatusChange. It has the following detail fields and values:
"Status": "see following table","ServiceName": "your service name","ServiceId": "your service ID","Message": "see following table","Severity": "varies"
The following table lists all possible status codes and related messages.
Status Message
CreateServiceStarted Service creation started.
CreateServiceCompletedSuccessfullyService creation completed successfully.
CreateServiceFailed Service creation failed. For details, see service logs.
DeleteServiceStarted Service deletion started.
DeleteServiceCompletedSuccessfullyService deletion completed successfully.
DeleteServiceFailed Service deletion failed.
UpdateServiceStarted
Service update completed successfully. New application andconfiguration is deployed.
UpdateServiceCompletedSuccessfully
Service update completed successfully. New configuration isdeployed.
UpdateServiceFailed Service update failed. For details, see service logs.
DeploymentStarted Deployment started.
DeploymentCompletedSuccessfullyDeployment completed successfully.
DeploymentFailed Deployment failed. For details, see service logs.
PauseServiceStarted Service pause started.
95

AWS App Runner Developer GuideAPI actions (CloudTrail)
Status Message
PauseServiceCompletedSuccessfullyService pause completed successfully.
PauseServiceFailed Service pause failed.
ResumeServiceStarted Service resume started.
ResumeServiceCompletedSuccessfullyService resume completed successfully.
ResumeServiceFailed Service resume failed.
Logging App Runner API calls with AWS CloudTrailApp Runner is integrated with AWS CloudTrail, a service that provides a record of actions taken by auser, role, or an AWS service in App Runner. CloudTrail captures all API calls for App Runner as events.The calls captured include calls from the App Runner console and code calls to the App Runner APIoperations. If you create a trail, you can enable continuous delivery of CloudTrail events to an Amazon S3bucket, including events for App Runner. If you don't configure a trail, you can still view the most recentevents in the CloudTrail console in Event history. Using the information collected by CloudTrail, you candetermine the request that was made to App Runner, the IP address from where the request was made,who made the request, when it was made, and additional details.
To learn more about CloudTrail, see the AWS CloudTrail User Guide.
App Runner information in CloudTrailCloudTrail is enabled on your AWS account when you create the account. When activity occurs in AppRunner, that activity is recorded in a CloudTrail event along with other AWS service events in Eventhistory. You can view, search, and download recent events in your AWS account. For more information,see Viewing Events with CloudTrail Event History.
For an ongoing record of events in your AWS account, including events for App Runner, create a trail.A trail enables CloudTrail to deliver log files to an Amazon S3 bucket. By default, when you create atrail in the console, the trail applies to all AWS Regions. The trail logs events from all Regions in theAWS partition and delivers the log files to the Amazon S3 bucket that you specify. Additionally, you canconfigure other AWS services to further analyze and act upon the event data collected in CloudTrail logs.For more information, see the following:
• Overview for Creating a Trail• CloudTrail Supported Services and Integrations• Configuring Amazon SNS Notifications for CloudTrail• Receiving CloudTrail Log Files from Multiple Regions and Receiving CloudTrail Log Files from Multiple
Accounts
All App Runner actions are logged by CloudTrail and are documented in the AWS App Runner APIReference. For example, calls to the CreateService, DeleteConnection, and StartDeploymentactions generate entries in the CloudTrail log files.
Every event or log entry contains information about who generated the request. The identityinformation helps you determine the following:
• Whether the request was made with root or AWS Identity and Access Management (IAM) usercredentials.
96

AWS App Runner Developer GuideUnderstanding App Runner log file entries
• Whether the request was made with temporary security credentials for a role or federated user.
• Whether the request was made by another AWS service.
For more information, see the CloudTrail userIdentity Element.
Understanding App Runner log file entriesA trail is a configuration that enables delivery of events as log files to an Amazon S3 bucket that youspecify. CloudTrail log files contain one or more log entries. An event represents a single request fromany source and includes information about the requested action, the date and time of the action, andrequest parameters. CloudTrail log files aren't an ordered stack trace of the public API calls, so they don'tappear in any specific order.
The following example shows a CloudTrail log entry that demonstrates the CreateService action.
NoteFor security reasons, some property values are redacted in the logs and replaced with thetext HIDDEN_DUE_TO_SECURITY_REASONS. This prevents unintended exposure of secretinformation. However, you can still see that these properties were passed in the request orreturned in the response.
Example CloudTrail log entry for the CreateService App Runner action
{ "eventVersion": "1.08", "userIdentity": { "type": "IAMUser", "principalId": "AIDACKCEVSQ6C2EXAMPLE", "arn": "arn:aws:iam::123456789012:user/aws-user", "accountId": "123456789012", "accessKeyId": "AKIAIOSFODNN7EXAMPLE", "userName": "aws-user", }, "eventTime": "2020-10-02T23:25:33Z", "eventSource": "apprunner.amazonaws.com", "eventName": "CreateService", "awsRegion": "us-east-2", "sourceIPAddress": "192.0.2.0", "userAgent": "Mozilla/5.0 (Macintosh; Intel Mac OS X 10_15_6) AppleWebKit/537.36 (KHTML, like Gecko) Chrome/77.0.3865.75 Safari/537.36", "requestParameters": { "serviceName": "python-test", "sourceConfiguration": { "codeRepository": { "repositoryUrl": "https://github.com/github-user/python-hello", "sourceCodeVersion": { "type": "BRANCH", "value": "main" }, "codeConfiguration": { "configurationSource": "API", "codeConfigurationValues": { "runtime": "python3", "buildCommand": "HIDDEN_DUE_TO_SECURITY_REASONS", "startCommand": "HIDDEN_DUE_TO_SECURITY_REASONS", "port": "8080", "runtimeEnvironmentVariables": "HIDDEN_DUE_TO_SECURITY_REASONS" } } },
97

AWS App Runner Developer GuideUnderstanding App Runner log file entries
"autoDeploymentsEnabled": true, "authenticationConfiguration": { "connectionArn": "arn:aws:apprunner:us-east-2:123456789012:connection/your-connection/e7656250f67242d7819feade6800f59e" } }, "healthCheckConfiguration": { "protocol": "HTTP" }, "instanceConfiguration": { "cpu": "256", "memory": "1024" } }, "responseElements": { "service": { "serviceName": "python-test", "serviceId": "dfa2b7cc7bcb4b6fa6c1f0f4efff988a", "serviceArn": "arn:aws:apprunner:us-east-2:123456789012:service/python-test/dfa2b7cc7bcb4b6fa6c1f0f4efff988a", "serviceUrl": "generated domain", "createdAt": "2020-10-02T23:25:32.650Z", "updatedAt": "2020-10-02T23:25:32.650Z", "status": "OPERATION_IN_PROGRESS", "sourceConfiguration": { "codeRepository": { "repositoryUrl": "https://github.com/github-user/python-hello", "sourceCodeVersion": { "type": "Branch", "value": "main" }, "codeConfiguration": { "codeConfigurationValues": { "configurationSource": "API", "runtime": "python3", "buildCommand": "HIDDEN_DUE_TO_SECURITY_REASONS", "startCommand": "HIDDEN_DUE_TO_SECURITY_REASONS", "port": "8080", "runtimeEnvironmentVariables": "HIDDEN_DUE_TO_SECURITY_REASONS" } } }, "autoDeploymentsEnabled": true, "authenticationConfiguration": { "connectionArn": "arn:aws:apprunner:us-east-2:123456789012:connection/your-connection/e7656250f67242d7819feade6800f59e" } }, "healthCheckConfiguration": { "protocol": "HTTP", "path": "/", "interval": 5, "timeout": 2, "healthyThreshold": 3, "unhealthyThreshold": 5 }, "instanceConfiguration": { "cpu": "256", "memory": "1024" }, "autoScalingConfigurationSummary": { "autoScalingConfigurationArn": "arn:aws:apprunner:us-east-2:123456789012:autoscalingconfiguration/DefaultConfiguration/1/00000000000000000000000000000001", "autoScalingConfigurationName": "DefaultConfiguration", "autoScalingConfigurationRevision": 1
98

AWS App Runner Developer GuideTracing (X-Ray)
} } }, "requestID": "1a60af60-ecf5-4280-aa8f-64538319ba0a", "eventID": "e1a3f623-4d24-4390-a70b-bf08a0e24669", "readOnly": false, "eventType": "AwsApiCall", "recipientAccountId": "123456789012"}
Tracing for your App Runner application with X-Ray
AWS X-Ray is a service that collects data about requests that your application serves, and providestools you can use to view, filter, and gain insights into that data to identify issues and opportunitiesfor optimization. For any traced request to your application, you can see detailed information not onlyabout the request and response, but also about calls that your application makes to downstream AWSresources, microservices, databases and HTTP web APIs.
X-Ray uses trace data from the AWS resources that power your cloud applications to generate a detailedservice graph. The service graph shows the client, your front-end service, and backend services that yourfront-end service calls to process requests and persist data. Use the service graph to identify bottlenecks,latency spikes, and other issues to solve to improve the performance of your applications.
For more information about X-Ray, see the AWS X-Ray Developer Guide.
99

AWS App Runner Developer GuideInstrument your application for tracing
Instrument your application for tracingInstrument your App Runner service application for tracing using OpenTelemetry, a portable telemetryspecification. At this time, App Runner supports the AWS Distro for OpenTelemetry (ADOT), anOpenTelemetry implementation that collects and presents telemetry information using AWS services. X-Ray implements the tracing component.
Depending on the specific ADOT SDK that you use in your application, ADOT supports up to twoinstrumentation approachs: automatic and manual. For more information about instrumentation withyour SDK, see the ADOT documentation, and choose your SDK on the navigation pane.
The following example demonstrates auto-instrumenting your application with the ADOT Python SDK.The SDK automatically produces spans with telemetry data describing the values used by the Pythonframeworks in your application without adding a single line of Python code. You need to add or modifyjust a few lines in two source files.
First, add some dependencies, as shown in the following example.
Example requirements.txt
opentelemetry-distro[otlp]>=0.24b0opentelemetry-sdk-extension-aws~=2.0opentelemetry-propagator-aws-xray~=1.0
Then, instrument your application. The way to do it depends on your service source—source image orsource code.
Source image
When your service source is an image, you can directly instrument the Dockerfile that controlsbuilding your container image and running the application in the image. The following exampleshows an instrumented Dockerfile for a Python application. Instrumentation additions areemphasized in bold.
Example Dockerfile
FROM public.ecr.aws/amazonlinux/amazonlinux:latestRUN yum install python3.7 -y && curl -O https://bootstrap.pypa.io/get-pip.py && python3 get-pip.py && yum update -yCOPY . /appWORKDIR /appRUN pip3 install -r requirements.txtRUN opentelemetry-bootstrap --action=installENV OTEL_PYTHON_DISABLED_INSTRUMENTATIONS=urllib3ENV OTEL_RESOURCE_ATTRIBUTES='service.name=example_app'CMD OTEL_PROPAGATORS=xray OTEL_PYTHON_ID_GENERATOR=xray opentelemetry-instrument python3 app.pyEXPOSE 8080
Source code repository
When your service source is a repository containing your application source, you indirectlyinstrument your image using App Runner configuration file settings. These settings control theDockerfile that App Runner generates and uses to build the image for your application. Thefollowing example shows an instrumented App Runner configuration file for a Python application.Instrumentation additions are emphasized in bold.
Example apprunner.yaml
version: 1.0
100

AWS App Runner Developer GuideAdd X-Ray permissions to your
App Runner service instance role
runtime: python3 build: commands: build: - pip install -r requirements.txt - opentelemetry-bootstrap --action=installrun: command: opentelemetry-instrument python app.py network: port: 8080 env: - name: OTEL_PROPAGATORS value: xray - name: OTEL_PYTHON_ID_GENERATOR value: xray - name: OTEL_PYTHON_DISABLED_INSTRUMENTATIONS value: urllib3 - name: OTEL_RESOURCE_ATTRIBUTES value: 'service.name=example_app'
Add X-Ray permissions to your App Runner serviceinstance roleTo use X-Ray tracing with your App Runner service, you have to provide the service's instanceswith permissions to interact with the X-Ray service. You do this by associating an instance rolewith your service and adding a managed policy with X-Ray permissions. For more informationabout an App Runner instance role, see the section called “Instance role” (p. 124). Add theAWSXRayDaemonWriteAccess managed policy to your instance role and assign it to your service duringcreation.
Enable X-Ray tracing for your App Runner serviceWhen you create a service (p. 44), App Runner disables tracing by default. You can enable X-Ray tracingfor your service as part of configuring observability. For more information, see the section called“Manage observability” (p. 59).
If you use the App Runner API or the AWS CLI, the TraceConfiguration object within theObservabilityConfiguration resource object contains tracing settings. To keep tracing disabled, don'tspecify a TraceConfiguration object.
In both the console and API cases, be sure to associate your instance role discussed in the previoussection with your App Runner service.
View X-Ray tracing data for your App Runner serviceOn the Observability tab of the service dashboard page (p. 42) in the App Runner console, choose Viewservice map to navigate to the Amazon CloudWatch console.
101

AWS App Runner Developer GuideView X-Ray tracing data for your App Runner service
Use the Amazon CloudWatch console to view service maps and traces for requests that your applicationserves. Service maps show information like request latency and interactions with other applications andAWS services. The custom annotations that you add to your code allow you to easily search for traces.For more information, see Using ServiceLens to monitor the health of your applications in the AmazonCloudWatch User Guide.
102

AWS App Runner Developer GuideExamples
Setting App Runner service optionsusing a configuration file
NoteConfiguration files are applicable only to services that are based on source code (p. 25). Youcan't use configuration files with image-based services (p. 22).
When you create an AWS App Runner service using a source code repository, AWS App Runner requiresinformation about building and starting your service. You can provide this information each time youcreate a service using the App Runner console or API. Alternatively, you can set service options by usinga configuration file. The options that you specify in a file become part of your source repository, and anychanges to these options are tracked similarly to how changes to the source code are tracked. You canuse the App Runner configuration file to specify more options than the API supports. You don't need toprovide a configuration file if you only need the basic options that the API supports.
The App Runner configuration file is a YAML file that's named apprunner.yaml in the root directoryof your application’s repository. It provides build and runtime options for your service. Values in this fileinstruct App Runner how to build and start your service, and provide runtime context such as networksettings and environment variables.
The App Runner configuration file doesn’t include operational settings, such as CPU and memory.
For examples of App Runner configuration files, see the section called “Examples” (p. 103). For acomplete reference guide, see the section called “Reference” (p. 104).
Topics• App Runner configuration file examples (p. 103)• App Runner configuration file reference (p. 104)
App Runner configuration file examplesNoteConfiguration files are applicable only to services that are based on source code (p. 25). Youcan't use configuration files with image-based services (p. 22).
The following examples demonstrate AWS App Runner configuration files. Some are minimal andcontain only required settings. Others are complete, including all configuration file sections. For anoverview of App Runner configuration files, see App Runner configuration file (p. 103).
Configuration file examplesMinimal configuration file
With a minimal configuration file, App Runner makes the following assumptions:
• No custom environment variables are necessary during build or run.• The latest runtime version is used.• The default port number and port environment variable are used.
103

AWS App Runner Developer GuideReference
Example apprunner.yaml
version: 1.0runtime: python3 build: commands: build: - pip install pipenv - pipenv install run: command: python app.py
Complete configuration file
This example shows the use of all configuration keys with a managed runtime.
Example apprunner.yaml
version: 1.0runtime: python3 build: commands: pre-build: - wget -c https://s3.amazonaws.com/DOC-EXAMPLE-BUCKET/test-lib.tar.gz -O - | tar -xz build: - pip install pipenv - pipenv install post-build: - python manage.py test env: - name: DJANGO_SETTINGS_MODULE value: "django_apprunner.settings" - name: MY_VAR_EXAMPLE value: "example"run: runtime-version: 3.7.7 command: pipenv run gunicorn django_apprunner.wsgi --log-file - network: port: 8000 env: MY_APP_PORT env: - name: MY_VAR_EXAMPLE value: "example"
For examples of specific managed runtime configuration files, see the specific runtime subtopic underCode-based service (p. 25).
App Runner configuration file referenceNoteConfiguration files are applicable only to services that are based on source code (p. 25). Youcan't use configuration files with image-based services (p. 22).
This topic is a comprehensive reference guide to the syntax and semantics of an AWS App Runnerconfiguration file. For an overview of App Runner configuration files, see App Runner configurationfile (p. 103).
The App Runner configuration file is a YAML file. Name it apprunner.yaml, and place it in the rootdirectory of your application’s repository.
104

AWS App Runner Developer GuideStructure overview
Structure overviewThe App Runner configuration file is a YAML file. Name it apprunner.yaml, and place it in the rootdirectory of your application’s repository.
The App Runner configuration file contains these main parts:
• Top section – Contains top-level keys• Build section – Configures the build stage• Run section – Configures the runtime stage
Top sectionThe keys at the top of the file provide general information about the file and your service runtime. Thefollowing keys are available:
• version – Required. The App Runner configuration file version. Ideally, use the latest version.
Syntax
version: version
Example
version: 1.0
• runtime – Required. The name of the runtime that your application uses. To learn about availableruntimes for the different programming platforms that App Runner offers, see Code-basedservice (p. 25).
NoteThe naming convention of a managed runtime is <language-name><major-version>.
Syntax
runtime: runtime-name
Example
runtime: python3
Build sectionThe build section configures the build stage of the App Runner service deployment. You can specify buildcommands and environment variables. Build commands are required.
The section starts with the build: key, and has the following subkeys:
• commands – Required. Specifies the commands that App Runner runs during various build phases.Includes the following subkeys:• pre-build – Optional. The commands that App Runner runs before the build. For example, install
npm dependencies or test libraries.
105

AWS App Runner Developer GuideRun section
• build – Required. The commands that App Runner runs to build your application. For example, usepipenv.
• post-build – Optional. The commands that App Runner runs after the build. For example, useMaven to package build artifacts into a JAR or WAR file, or run a test.
Syntax
build: commands: pre-build: - command - … build: - command - … post-build: - command - …
Example
build: commands: pre-build: - yum install openssl build: - pip install -r requirements.txt post-build: - python manage.py test
• env – Optional. Specifies custom environment variables for the build stage. Defined as name-valuescalar mappings. You can refer to these variables by name in your build commands.
Syntax
build: env: - name: name1 value: value1 - name: name2 value: value2 - …
Example
build: env: - name: DJANGO_SETTINGS_MODULE value: "django_apprunner.settings" - name: MY_VAR_EXAMPLE value: "example"
Run sectionThe run section configures the container running stage of the App Runner application deployment. Youcan specify runtime version, start command, network port, and environment variables.
106

AWS App Runner Developer GuideRun section
The section starts with the run: key, and has the following subkeys:
• runtime-version – Optional. Specifies a runtime version that you want to lock for your App Runnerservice.
By default, only the major version is locked. App Runner uses the latest minor and patch versions thatare available for the runtime on every deployment or service update. If you specify major and minorversions, both become locked, and App Runner updates only patch versions. If you specify major,minor, and patch versions, your service is locked on a specific runtime version and App Runner neverupdates it.
Syntax
run: runtime-version: major[.minor[.patch]]
NoteThe runtimes of some platforms have different version components. See specific platformtopics for details.
Example
runtime: python3run: runtime-version: 3.7
• command – Required. The command that App Runner uses to run your application after it completesthe application build.
Syntax
run: command: command
• network – Optional. Specifies the port that your application listens to. It includes the following:
• port – Optional. If specified, this is the port number that your application listens to. The default is8080.
• env – Optional. If specified, App Runner passes the port number to the container in this environmentvariable, in addition to (not instead of) passing the same port number in the default environmentvariable, PORT. In other words, if you specify env, App Runner passes the port number in twoenvironment variables.
Syntax
run: network: port: port-number env: env-variable-name
Example
run: network: port: 8000 env: MY_APP_PORT
107

AWS App Runner Developer GuideRun section
• env – Optional. Definition of custom environment variables for the run stage. Defined as name-valuescalar mappings. You can refer to these variables by name in your runtime environment.
Syntax
run: env: - name: name1 value: value1 - name: name2 value: value2 - …
Example
run: env: - name: MY_VAR_EXAMPLE value: "example"
108

AWS App Runner Developer GuideUsing the AWS CLI to work with App Runner
The App Runner APIThe AWS App Runner application programming interface (API) is a RESTful API for making requests tothe App Runner service. You can use the API to create, list, describe, update, and delete App Runnerresources in your AWS account.
You can call the API directly in your application code, or you can use one of the AWS SDKs.
For complete API reference information, see the AWS App Runner API Reference.
For more information about AWS developer tools, see Tools to Build on AWS.
Topics
• Using the AWS CLI to work with App Runner (p. 109)
• Using AWS CloudShell to work with AWS App Runner (p. 109)
Using the AWS CLI to work with App RunnerFor command line scripts, use the AWS CLI to make calls to the App Runner service. For complete AWSCLI reference information, see the apprunner in the AWS CLI Command Reference.
AWS CloudShell allows you to skip installing the AWS CLI in your development environment, and useit in the AWS Management Console instead. In addition to avoiding installation, you also don't need toconfigure credentials, and you don't need to specify region. Your AWS Management Console sessionprovides this context to the AWS CLI. For more information about CloudShell, and for a usage example,see the section called “Using AWS CloudShell” (p. 109).
Using AWS CloudShell to work with AWS AppRunner
AWS CloudShell is a browser-based, pre-authenticated shell that you can launch directly from theAWS Management Console. You can run AWS CLI commands against AWS services (including AWS AppRunner) using your preferred shell (Bash, PowerShell or Z shell). And you can do this without needing todownload or install command line tools.
You launch AWS CloudShell from the AWS Management Console, and the AWS credentials you used tosign in to the console are automatically available in a new shell session. This pre-authentication of AWSCloudShell users allows you to skip configuring credentials when interacting with AWS services such asApp Runner using AWS CLI version 2 (pre-installed on the shell's compute environment).
Topics
• Obtaining IAM permissions for AWS CloudShell (p. 110)
• Interacting with App Runner using AWS CloudShell (p. 110)
• Verifying your App Runner service using AWS CloudShell (p. 112)
109

AWS App Runner Developer GuideObtaining IAM permissions for AWS CloudShell
Obtaining IAM permissions for AWS CloudShellUsing the access management resources provided by AWS Identity and Access Management,administrators can grant permissions to IAM users so they can access AWS CloudShell and use theenvironment's features.
The quickest way for an administrator to grant access to users is through an AWS managed policy. AnAWS managed policy is a standalone policy that's created and administered by AWS. The following AWSmanaged policy for CloudShell can be attached to IAM identities:
• AWSCloudShellFullAccess: Grants permission to use AWS CloudShell with full access to allfeatures.
If you want to limit the scope of actions that an IAM user can perform with AWS CloudShell, you cancreate a custom policy that uses the AWSCloudShellFullAccess managed policy as a template. Formore information about limiting the actions that are available to users in CloudShell, see Managing AWSCloudShell access and usage with IAM policies in the AWS CloudShell User Guide.
NoteYour IAM identity also requires a policy that grants permission to make calls to App Runner. Formore information, see the section called “App Runner and IAM” (p. 119).
Interacting with App Runner using AWS CloudShellAfter you launch AWS CloudShell from the AWS Management Console, you can immediately start tointeract with App Runner using the command line interface.
In the following example, you retrieve information about one of your App Runner services using the AWSCLI in CloudShell.
NoteWhen using AWS CLI in AWS CloudShell, you don't need to download or install any additionalresources. Moreover, because you're already authenticated within the shell, you don't need toconfigure credentials before making calls.
Example Retrieving App Runner service information using AWS CloudShell
1. From the AWS Management Console, you can launch CloudShell by choosing the following optionsavailable on the navigation bar:
• Choose the CloudShell icon.• Start typing cloudshell in the search box, and then choose the CloudShell option when you see
it in the search results.2. To list all current App Runner services in your AWS account in the console session's AWS Region,
enter the following command in the CloudShell command line:
$ aws apprunner list-services
The output lists summary information for your services.
{ "ServiceSummaryList": [ { "ServiceName": "my-app-1", "ServiceId": "8fe1e10304f84fd2b0df550fe98a71fa", "ServiceArn": "arn:aws:apprunner:us-east-2:123456789012:service/my-app-1/8fe1e10304f84fd2b0df550fe98a71fa",
110

AWS App Runner Developer GuideInteracting with App Runner using AWS CloudShell
"ServiceUrl": "psbqam834h.us-east-1.awsapprunner.com", "CreatedAt": "2020-11-20T19:05:25Z", "UpdatedAt": "2020-11-23T12:41:37Z", "Status": "RUNNING" }, { "ServiceName": "my-app-2", "ServiceId": "ab8f94cfe29a460fb8760afd2ee87555", "ServiceArn": "arn:aws:apprunner:us-east-2:123456789012:service/my-app-2/ab8f94cfe29a460fb8760afd2ee87555", "ServiceUrl": "e2m8rrrx33.us-east-1.awsapprunner.com", "CreatedAt": "2020-11-06T23:15:30Z", "UpdatedAt": "2020-11-23T13:21:22Z", "Status": "RUNNING" } ]}
3. To get a detailed description of a particular App Runner service, enter the following command in theCloudShell command line, using one of the ARNs retrieved in the previous step:
$ aws apprunner describe-service --service-arn arn:aws:apprunner:us-east-2:123456789012:service/my-app-1/8fe1e10304f84fd2b0df550fe98a71fa
The output lists a detailed description of the service you specified.
{ "Service": { "ServiceName": "my-app-1", "ServiceId": "8fe1e10304f84fd2b0df550fe98a71fa", "ServiceArn": "arn:aws:apprunner:us-east-2:123456789012:service/my-app-1/8fe1e10304f84fd2b0df550fe98a71fa", "ServiceUrl": "psbqam834h.us-east-1.awsapprunner.com", "CreatedAt": "2020-11-20T19:05:25Z", "UpdatedAt": "2020-11-23T12:41:37Z", "Status": "RUNNING", "SourceConfiguration": { "CodeRepository": { "RepositoryUrl": "https://github.com/my-account/python-hello", "SourceCodeVersion": { "Type": "BRANCH", "Value": "main" }, "CodeConfiguration": { "CodeConfigurationValues": { "BuildCommand": "[pip install -r requirements.txt]", "Port": "8080", "Runtime": "PYTHON_3", "RuntimeEnvironmentVariables": [ { "NAME": "Jane" } ], "StartCommand": "python server.py" }, "ConfigurationSource": "API" } }, "AutoDeploymentsEnabled": true, "AuthenticationConfiguration": { "ConnectionArn": "arn:aws:apprunner:us-east-2:123456789012:connection/my-github-connection/e7656250f67242d7819feade6800f59e" }
111

AWS App Runner Developer GuideVerifying your App Runner service using AWS CloudShell
}, "InstanceConfiguration": { "CPU": "1 vCPU", "Memory": "3 GB" }, "HealthCheckConfiguration": { "Protocol": "TCP", "Path": "/", "Interval": 10, "Timeout": 5, "HealthyThreshold": 1, "UnhealthyThreshold": 5 }, "AutoScalingConfigurationSummary": { "AutoScalingConfigurationArn": "arn:aws:apprunner:us-east-2:123456789012:autoscalingconfiguration/DefaultConfiguration/1/00000000000000000000000000000001", "AutoScalingConfigurationName": "DefaultConfiguration", "AutoScalingConfigurationRevision": 1 } }}
Verifying your App Runner service using AWSCloudShellWhen you create an App Runner service (p. 44), App Runner creates a default domain for your service'swebsite, and shows it in the console (or returns it in the API call result). You can use CloudShell to makecalls to your website and verify that it's working correctly.
For example, after you create an App Runner service as described in Getting started (p. 6), run thefollowing command in CloudShell:
$ curl https://qxuadi4qwp.us-east-2.awsapprunner.com/; echo
The output should show the expected page content.
112

AWS App Runner Developer GuideData protection
Security in App RunnerCloud security at AWS is the highest priority. As an AWS customer, you benefit from data centersand network architectures that are built to meet the requirements of the most security-sensitiveorganizations.
Security is a shared responsibility between AWS and you. The shared responsibility model describes thisas security of the cloud and security in the cloud:
• Security of the cloud – AWS is responsible for protecting the infrastructure that runs AWS services inthe AWS Cloud. AWS also provides you with services that you can use securely. Third-party auditorsregularly test and verify the effectiveness of our security as part of the AWS Compliance Programs. Tolearn about the compliance programs that apply to AWS App Runner, see AWS Services in Scope byCompliance Program.
• Security in the cloud – Your responsibility is determined by the AWS service that you use. You are alsoresponsible for other factors including the sensitivity of your data, your company’s requirements, andapplicable laws and regulations.
This documentation helps you understand how to apply the shared responsibility model when usingApp Runner. The following topics show you how to configure App Runner to meet your security andcompliance objectives. You also learn how to use other AWS services that help you to monitor and secureyour App Runner resources.
Topics• Data protection in App Runner (p. 113)• Identity and access management for App Runner (p. 115)• Logging and monitoring in App Runner (p. 135)• Compliance validation for App Runner (p. 136)• Resilience in App Runner (p. 136)• Infrastructure security in AWS App Runner (p. 137)• Configuration and vulnerability analysis in App Runner (p. 137)• Security best practices for App Runner (p. 137)
Data protection in App RunnerThe AWS shared responsibility model applies to data protection in AWS App Runner. As described inthis model, AWS is responsible for protecting the global infrastructure that runs all of the AWS Cloud.You are responsible for maintaining control over your content that is hosted on this infrastructure. Thiscontent includes the security configuration and management tasks for the AWS services that you use. Formore information about data privacy, see the Data Privacy FAQ. For information about data protection inEurope, see the AWS Shared Responsibility Model and GDPR blog post on the AWS Security Blog.
For data protection purposes, we recommend that you protect AWS account credentials and set upindividual user accounts with AWS Identity and Access Management (IAM). That way each user is givenonly the permissions necessary to fulfill their job duties. We also recommend that you secure your datain the following ways:
• Use multi-factor authentication (MFA) with each account.• Use SSL/TLS to communicate with AWS resources. We recommend TLS 1.2 or later.• Set up API and user activity logging with AWS CloudTrail.
113

AWS App Runner Developer GuideData encryption
• Use AWS encryption solutions, along with all default security controls within AWS services.• Use advanced managed security services such as Amazon Macie, which assists in discovering and
securing personal data that is stored in Amazon S3.• If you require FIPS 140-2 validated cryptographic modules when accessing AWS through a command
line interface or an API, use a FIPS endpoint. For more information about the available FIPS endpoints,see Federal Information Processing Standard (FIPS) 140-2.
We strongly recommend that you never put confidential or sensitive information, such as yourcustomers' email addresses, into tags or free-form fields such as a Name field. This includes when youwork with App Runner or other AWS services using the console, API, AWS CLI, or AWS SDKs. Any datathat you enter into tags or free-form fields used for names may be used for billing or diagnostic logs.If you provide a URL to an external server, we strongly recommend that you do not include credentialsinformation in the URL to validate your request to that server.
For other App Runner security topics, see Security (p. 113).
Topics• Protecting data using encryption (p. 114)• Internetwork traffic privacy (p. 115)
Protecting data using encryptionAWS App Runner reads your application source (source image or source code) from a repository thatyou specify and stores it for deployment to your service. For more information, see Architecture andconcepts (p. 18).
Data protection refers to protecting data while in transit (as it travels to and from App Runner) and atrest (while it is stored in AWS data centers).
For more information about data protection, see the section called “Data protection” (p. 113).
For other App Runner security topics, see Security (p. 113).
Encryption in transitYou can achieve data protection in transit in two ways: encrypt the connection using Transport LayerSecurity (TLS), or use client-side encryption (where the object is encrypted before it is sent). Bothmethods are valid for protecting your application data. To secure the connection, encrypt it using TLSwhenever your application, its developers and administrators, and its end users send or receive anyobjects. App Runner sets up your application to receive traffic over TLS.
Client-side encryption isn't a valid method for protecting the source image or code that you provideto App Runner for deployment. App Runner needs access to your application source, so it can't beencrypted. Therefore, be sure to secure the connection between your development or deploymentenvironment and App Runner.
Encryption at rest and key managementTo protect your application's data at rest, App Runner encrypts all stored copies of your applicationsource image or source bundle. When you create an App Runner service, you can provide an AWS KMSkey. If you provide one, App Runner uses your provided key to encrypt your source. If you don't provideone, App Runner uses an AWS managed key instead.
For details about App Runner service creation parameters, see CreateService. For information about AWSKey Management Service (AWS KMS), see the AWS Key Management Service Developer Guide.
114
AWS App Runner Developer GuideInternetwork privacy
Internetwork traffic privacyApp Runner uses Amazon Virtual Private Cloud (Amazon VPC) to create boundaries between resourcesin your App Runner application and control traffic between them, your on-premises network, and theinternet. For more information about Amazon VPC security, see Internetwork traffic privacy in AmazonVPC in the Amazon VPC User Guide.
For information about associating your App Runner application with a custom Amazon VPC, see thesection called “VPC access” (p. 78).
For information about securing requests to App Runner using a VPC endpoint, see the section called“VPC endpoints” (p. 83).
For more information about data protection, see the section called “Data protection” (p. 113).
For other App Runner security topics, see Security (p. 113).
Identity and access management for App RunnerAWS Identity and Access Management (IAM) is an AWS service that helps an administrator securelycontrol access to AWS resources. IAM administrators control who can be authenticated (signed in) andauthorized (have permissions) to use App Runner resources. IAM is an AWS service that you can use withno additional charge.
For other App Runner security topics, see Security (p. 113).
Topics
• Audience (p. 115)
• Authenticating with identities (p. 116)
• Managing access using policies (p. 117)
• How App Runner works with IAM (p. 119)
• App Runner identity-based policy examples (p. 125)
• Using service-linked roles for App Runner (p. 128)
• AWS managed policies for AWS App Runner (p. 133)
• Troubleshooting App Runner identity and access (p. 134)
AudienceHow you use AWS Identity and Access Management (IAM) differs, depending on the work that you do inApp Runner.
Service user – If you use the App Runner service to do your job, then your administrator provides youwith the credentials and permissions that you need. As you use more App Runner features to do yourwork, you might need additional permissions. Understanding how access is managed can help yourequest the right permissions from your administrator. If you cannot access a feature in App Runner, seeTroubleshooting App Runner identity and access (p. 134).
Service administrator – If you're in charge of App Runner resources at your company, you probablyhave full access to App Runner. It's your job to determine which App Runner features and resourcesyour employees should access. You must then submit requests to your IAM administrator to change thepermissions of your service users. Review the information on this page to understand the basic concepts
115
AWS App Runner Developer GuideAuthenticating with identities
of IAM. To learn more about how your company can use IAM with App Runner, see How App Runnerworks with IAM (p. 119).
IAM administrator – If you're an IAM administrator, you might want to learn details about how you canwrite policies to manage access to App Runner. To view example App Runner identity-based policies thatyou can use in IAM, see App Runner identity-based policy examples (p. 125).
Authenticating with identitiesAuthentication is how you sign in to AWS using your identity credentials. For more information aboutsigning in using the AWS Management Console, see Signing in to the AWS Management Console as anIAM user or root user in the IAM User Guide.
You must be authenticated (signed in to AWS) as the AWS account root user, an IAM user, or by assumingan IAM role. You can also use your company's single sign-on authentication or even sign in using Googleor Facebook. In these cases, your administrator previously set up identity federation using IAM roles.When you access AWS using credentials from another company, you are assuming a role indirectly.
To sign in directly to the AWS Management Console, use your password with your root user emailaddress or your IAM user name. You can access AWS programmatically using your root user or IAMusers access keys. AWS provides SDK and command line tools to cryptographically sign your requestusing your credentials. If you don't use AWS tools, you must sign the request yourself. Do this usingSignature Version 4, a protocol for authenticating inbound API requests. For more information aboutauthenticating requests, see Signature Version 4 signing process in the AWS General Reference.
Regardless of the authentication method that you use, you might also be required to provide additionalsecurity information. For example, AWS recommends that you use multi-factor authentication (MFA) toincrease the security of your account. To learn more, see Using multi-factor authentication (MFA) in AWSin the IAM User Guide.
AWS account root userWhen you first create an AWS account, you begin with a single sign-in identity that has complete accessto all AWS services and resources in the account. This identity is called the AWS account root user andis accessed by signing in with the email address and password that you used to create the account. Westrongly recommend that you do not use the root user for your everyday tasks, even the administrativeones. Instead, adhere to the best practice of using the root user only to create your first IAM user. Thensecurely lock away the root user credentials and use them to perform only a few account and servicemanagement tasks.
IAM users and groupsAn IAM user is an identity within your AWS account that has specific permissions for a single person orapplication. An IAM user can have long-term credentials such as a user name and password or a set ofaccess keys. To learn how to generate access keys, see Managing access keys for IAM users in the IAMUser Guide. When you generate access keys for an IAM user, make sure you view and securely save the keypair. You cannot recover the secret access key in the future. Instead, you must generate a new access keypair.
An IAM group is an identity that specifies a collection of IAM users. You can't sign in as a group. Youcan use groups to specify permissions for multiple users at a time. Groups make permissions easier tomanage for large sets of users. For example, you could have a group named IAMAdmins and give thatgroup permissions to administer IAM resources.
Users are different from roles. A user is uniquely associated with one person or application, but a roleis intended to be assumable by anyone who needs it. Users have permanent long-term credentials, butroles provide temporary credentials. To learn more, see When to create an IAM user (instead of a role) inthe IAM User Guide.
116

AWS App Runner Developer GuideManaging access using policies
IAM rolesAn IAM role is an identity within your AWS account that has specific permissions. It is similar to an IAMuser, but is not associated with a specific person. You can temporarily assume an IAM role in the AWSManagement Console by switching roles. You can assume a role by calling an AWS CLI or AWS APIoperation or by using a custom URL. For more information about methods for using roles, see Using IAMroles in the IAM User Guide.
IAM roles with temporary credentials are useful in the following situations:
• Temporary IAM user permissions – An IAM user can assume an IAM role to temporarily take ondifferent permissions for a specific task.
• Federated user access – Instead of creating an IAM user, you can use existing identities from AWSDirectory Service, your enterprise user directory, or a web identity provider. These are known asfederated users. AWS assigns a role to a federated user when access is requested through an identityprovider. For more information about federated users, see Federated users and roles in the IAM UserGuide.
• Cross-account access – You can use an IAM role to allow someone (a trusted principal) in a differentaccount to access resources in your account. Roles are the primary way to grant cross-account access.However, with some AWS services, you can attach a policy directly to a resource (instead of using a roleas a proxy). To learn the difference between roles and resource-based policies for cross-account access,see How IAM roles differ from resource-based policies in the IAM User Guide.
• Cross-service access – Some AWS services use features in other AWS services. For example, when youmake a call in a service, it's common for that service to run applications in Amazon EC2 or store objectsin Amazon S3. A service might do this using the calling principal's permissions, using a service role, orusing a service-linked role.• Principal permissions – When you use an IAM user or role to perform actions in AWS, you are
considered a principal. Policies grant permissions to a principal. When you use some services, youmight perform an action that then triggers another action in a different service. In this case, youmust have permissions to perform both actions. To see whether an action requires additionaldependent actions in a policy, see Actions, resources, and condition keys for AWS App Runner in theService Authorization Reference.
• Service role – A service role is an IAM role that a service assumes to perform actions on your behalf.An IAM administrator can create, modify, and delete a service role from within IAM. For moreinformation, see Creating a role to delegate permissions to an AWS service in the IAM User Guide.
• Service-linked role – A service-linked role is a type of service role that is linked to an AWS service.The service can assume the role to perform an action on your behalf. Service-linked roles appearin your IAM account and are owned by the service. An IAM administrator can view, but not edit thepermissions for service-linked roles.
• Applications running on Amazon EC2 – You can use an IAM role to manage temporary credentialsfor applications that are running on an EC2 instance and making AWS CLI or AWS API requests.This is preferable to storing access keys within the EC2 instance. To assign an AWS role to an EC2instance and make it available to all of its applications, you create an instance profile that is attachedto the instance. An instance profile contains the role and enables programs that are running on theEC2 instance to get temporary credentials. For more information, see Using an IAM role to grantpermissions to applications running on Amazon EC2 instances in the IAM User Guide.
To learn whether to use IAM roles or IAM users, see When to create an IAM role (instead of a user) in theIAM User Guide.
Managing access using policiesYou control access in AWS by creating policies and attaching them to IAM identities or AWS resources. Apolicy is an object in AWS that, when associated with an identity or resource, defines their permissions.
117

AWS App Runner Developer GuideManaging access using policies
You can sign in as the root user or an IAM user, or you can assume an IAM role. When you then makea request, AWS evaluates the related identity-based or resource-based policies. Permissions in thepolicies determine whether the request is allowed or denied. Most policies are stored in AWS as JSONdocuments. For more information about the structure and contents of JSON policy documents, seeOverview of JSON policies in the IAM User Guide.
Administrators can use AWS JSON policies to specify who has access to what. That is, which principal canperform actions on what resources, and under what conditions.
Every IAM entity (user or role) starts with no permissions. In other words, by default, users cando nothing, not even change their own password. To give a user permission to do something, anadministrator must attach a permissions policy to a user. Or the administrator can add the user to agroup that has the intended permissions. When an administrator gives permissions to a group, all usersin that group are granted those permissions.
IAM policies define permissions for an action regardless of the method that you use to perform theoperation. For example, suppose that you have a policy that allows the iam:GetRole action. A user withthat policy can get role information from the AWS Management Console, the AWS CLI, or the AWS API.
Identity-based policiesIdentity-based policies are JSON permissions policy documents that you can attach to an identity, suchas an IAM user, group of users, or role. These policies control what actions users and roles can perform,on which resources, and under what conditions. To learn how to create an identity-based policy, seeCreating IAM policies in the IAM User Guide.
Identity-based policies can be further categorized as inline policies or managed policies. Inline policiesare embedded directly into a single user, group, or role. Managed policies are standalone policies thatyou can attach to multiple users, groups, and roles in your AWS account. Managed policies include AWSmanaged policies and customer managed policies. To learn how to choose between a managed policy oran inline policy, see Choosing between managed policies and inline policies in the IAM User Guide.
Resource-based policiesResource-based policies are JSON policy documents that you attach to a resource. Examples of resource-based policies are IAM role trust policies and Amazon S3 bucket policies. In services that support resource-based policies, service administrators can use them to control access to a specific resource. For theresource where the policy is attached, the policy defines what actions a specified principal can performon that resource and under what conditions. You must specify a principal in a resource-based policy.Principals can include accounts, users, roles, federated users, or AWS services.
Resource-based policies are inline policies that are located in that service. You can't use AWS managedpolicies from IAM in a resource-based policy.
Access control lists (ACLs)Access control lists (ACLs) control which principals (account members, users, or roles) have permissions toaccess a resource. ACLs are similar to resource-based policies, although they do not use the JSON policydocument format.
Amazon S3, AWS WAF, and Amazon VPC are examples of services that support ACLs. To learn more aboutACLs, see Access control list (ACL) overview in the Amazon Simple Storage Service Developer Guide.
Other policy typesAWS supports additional, less-common policy types. These policy types can set the maximumpermissions granted to you by the more common policy types.
118

AWS App Runner Developer GuideApp Runner and IAM
• Permissions boundaries – A permissions boundary is an advanced feature in which you set themaximum permissions that an identity-based policy can grant to an IAM entity (IAM user or role).You can set a permissions boundary for an entity. The resulting permissions are the intersection ofentity's identity-based policies and its permissions boundaries. Resource-based policies that specifythe user or role in the Principal field are not limited by the permissions boundary. An explicit denyin any of these policies overrides the allow. For more information about permissions boundaries, seePermissions boundaries for IAM entities in the IAM User Guide.
• Service control policies (SCPs) – SCPs are JSON policies that specify the maximum permissions foran organization or organizational unit (OU) in AWS Organizations. AWS Organizations is a service forgrouping and centrally managing multiple AWS accounts that your business owns. If you enable allfeatures in an organization, then you can apply service control policies (SCPs) to any or all of youraccounts. The SCP limits permissions for entities in member accounts, including each AWS accountroot user. For more information about Organizations and SCPs, see How SCPs work in the AWSOrganizations User Guide.
• Session policies – Session policies are advanced policies that you pass as a parameter when youprogrammatically create a temporary session for a role or federated user. The resulting session'spermissions are the intersection of the user or role's identity-based policies and the session policies.Permissions can also come from a resource-based policy. An explicit deny in any of these policiesoverrides the allow. For more information, see Session policies in the IAM User Guide.
Multiple policy typesWhen multiple types of policies apply to a request, the resulting permissions are more complicated tounderstand. To learn how AWS determines whether to allow a request when multiple policy types areinvolved, see Policy evaluation logic in the IAM User Guide.
How App Runner works with IAMBefore you use IAM to manage access to AWS App Runner, you should understand what IAM features areavailable to use with App Runner. To get a high-level view of how App Runner and other AWS serviceswork with IAM, see AWS Services That Work with IAM in the IAM User Guide.
For other App Runner security topics, see Security (p. 113).
Topics
• App Runner identity-based policies (p. 119)
• App Runner resource-based policies (p. 121)
• Authorization based on App Runner tags (p. 121)
• App Runner user permissions (p. 122)
• App Runner IAM roles (p. 123)
App Runner identity-based policiesWith IAM identity-based policies, you can specify allowed or denied actions and resources as well as theconditions under which actions are allowed or denied. App Runner supports specific actions, resources,and condition keys. To learn about all of the elements that you use in a JSON policy, see IAM JSON PolicyElements Reference in the IAM User Guide.
Actions
Administrators can use AWS JSON policies to specify who has access to what. That is, which principal canperform actions on what resources, and under what conditions.
119
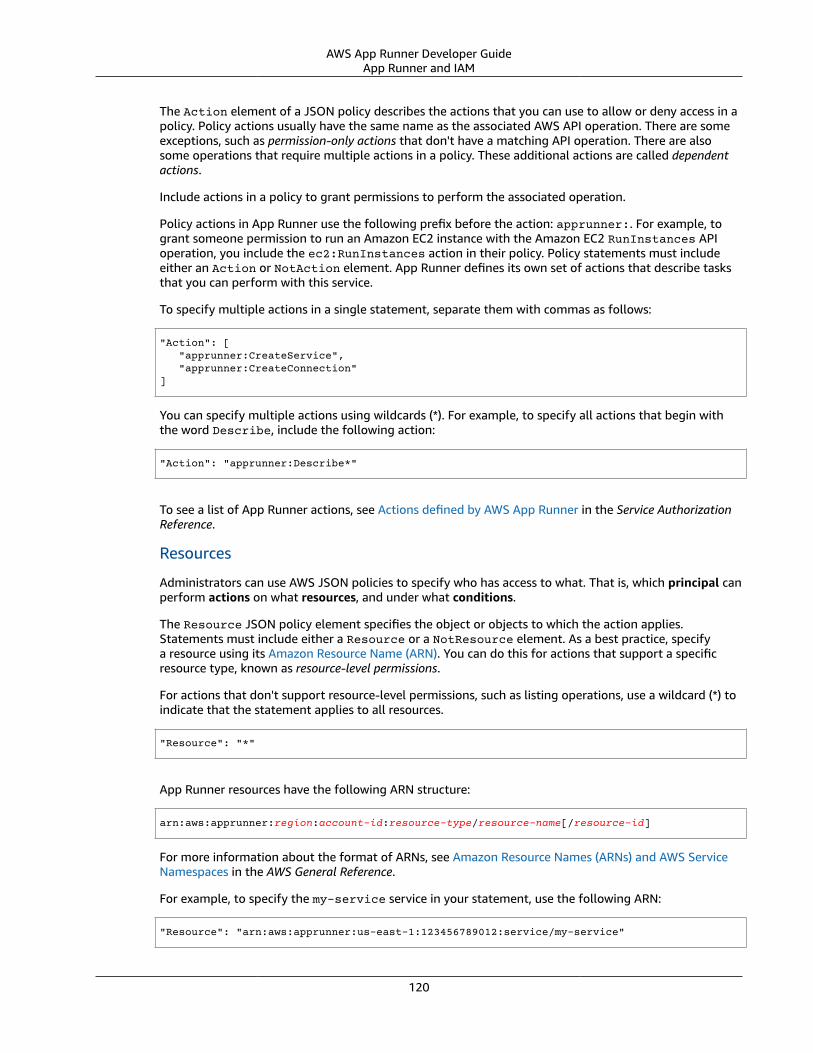
AWS App Runner Developer GuideApp Runner and IAM
The Action element of a JSON policy describes the actions that you can use to allow or deny access in apolicy. Policy actions usually have the same name as the associated AWS API operation. There are someexceptions, such as permission-only actions that don't have a matching API operation. There are alsosome operations that require multiple actions in a policy. These additional actions are called dependentactions.
Include actions in a policy to grant permissions to perform the associated operation.
Policy actions in App Runner use the following prefix before the action: apprunner:. For example, togrant someone permission to run an Amazon EC2 instance with the Amazon EC2 RunInstances APIoperation, you include the ec2:RunInstances action in their policy. Policy statements must includeeither an Action or NotAction element. App Runner defines its own set of actions that describe tasksthat you can perform with this service.
To specify multiple actions in a single statement, separate them with commas as follows:
"Action": [ "apprunner:CreateService", "apprunner:CreateConnection"]
You can specify multiple actions using wildcards (*). For example, to specify all actions that begin withthe word Describe, include the following action:
"Action": "apprunner:Describe*"
To see a list of App Runner actions, see Actions defined by AWS App Runner in the Service AuthorizationReference.
Resources
Administrators can use AWS JSON policies to specify who has access to what. That is, which principal canperform actions on what resources, and under what conditions.
The Resource JSON policy element specifies the object or objects to which the action applies.Statements must include either a Resource or a NotResource element. As a best practice, specifya resource using its Amazon Resource Name (ARN). You can do this for actions that support a specificresource type, known as resource-level permissions.
For actions that don't support resource-level permissions, such as listing operations, use a wildcard (*) toindicate that the statement applies to all resources.
"Resource": "*"
App Runner resources have the following ARN structure:
arn:aws:apprunner:region:account-id:resource-type/resource-name[/resource-id]
For more information about the format of ARNs, see Amazon Resource Names (ARNs) and AWS ServiceNamespaces in the AWS General Reference.
For example, to specify the my-service service in your statement, use the following ARN:
"Resource": "arn:aws:apprunner:us-east-1:123456789012:service/my-service"
120

AWS App Runner Developer GuideApp Runner and IAM
To specify all services that belong to a specific account, use the wildcard (*):
"Resource": "arn:aws:apprunner:us-east-1:123456789012:service/*"
Some App Runner actions, such as those for creating resources, cannot be performed on a specificresource. In those cases, you must use the wildcard (*).
"Resource": "*"
To see a list of App Runner resource types and their ARNs, see Resources defined by AWS App Runnerin the Service Authorization Reference. To learn with which actions you can specify the ARN of eachresource, see Actions defined by AWS App Runner.
Condition keys
Administrators can use AWS JSON policies to specify who has access to what. That is, which principal canperform actions on what resources, and under what conditions.
The Condition element (or Condition block) lets you specify conditions in which a statement is ineffect. The Condition element is optional. You can create conditional expressions that use conditionoperators, such as equals or less than, to match the condition in the policy with values in the request.
If you specify multiple Condition elements in a statement, or multiple keys in a single Conditionelement, AWS evaluates them using a logical AND operation. If you specify multiple values for a singlecondition key, AWS evaluates the condition using a logical OR operation. All of the conditions must bemet before the statement's permissions are granted.
You can also use placeholder variables when you specify conditions. For example, you can grant an IAMuser permission to access a resource only if it is tagged with their IAM user name. For more information,see IAM policy elements: variables and tags in the IAM User Guide.
AWS supports global condition keys and service-specific condition keys. To see all AWS global conditionkeys, see AWS global condition context keys in the IAM User Guide.
App Runner supports using some global condition keys. To see all AWS global condition keys, see AWSGlobal Condition Context Keys in the IAM User Guide.
App Runner defines a set of service-specific condition keys. In addition, App Runner supports tag-based access control, which is implemented using condition keys. For details, see the section called“Authorization based on App Runner tags” (p. 121).
To see a list of App Runner condition keys, see Condition keys for AWS App Runner in the ServiceAuthorization Reference. To learn with which actions and resources you can use a condition key, seeActions defined by AWS App Runner.
Examples
To view examples of App Runner identity-based policies, see App Runner identity-based policyexamples (p. 125).
App Runner resource-based policiesApp Runner does not support resource-based policies.
Authorization based on App Runner tagsYou can attach tags to App Runner resources or pass tags in a request to App Runner. To controlaccess based on tags, you provide tag information in the condition element of a policy using the
121

AWS App Runner Developer GuideApp Runner and IAM
apprunner:ResourceTag/key-name, aws:RequestTag/key-name, or aws:TagKeys condition keys.For more information about tagging App Runner resources, see the section called “Configuration” (p. 57).
To view an example identity-based policy for limiting access to a resource based on the tags on thatresource, see Controlling access to App Runner services based on tags (p. 127).
App Runner user permissionsTo use App Runner, IAM users need permissions to App Runner actions. A common way to grantpermissions to users is by attaching a policy to IAM users or groups. For more information aboutmanaging user permissions, see Changing permissions for an IAM user in the IAM User Guide.
App Runner provides two managed policies that you can attach to your users.
• AWSAppRunnerReadOnlyAccess – Grants permissions to list and view details about App Runnerresources.
• AWSAppRunnerFullAccess – Grants permissions to all App Runner actions.
For more granular control of user permissions, you can create a custom policy and attach it to your users.For details, see Creating IAM policies in the IAM User Guide.
For examples of user policies, see the section called “User policies” (p. 126).
AWSAppRunnerReadOnlyAccess
{ "Version": "2012-10-17", "Statement": [ { "Effect": "Allow", "Action": [ "apprunner:List*", "apprunner:Describe*" ], "Resource": "*" } ]}
AWSAppRunnerFullAccess
{ "Version": "2012-10-17", "Statement": [ { "Effect": "Allow", "Action": "iam:CreateServiceLinkedRole", "Resource": [ "arn:aws:iam::*:role/aws-service-role/apprunner.amazonaws.com/AWSServiceRoleForAppRunner", "arn:aws:iam::*:role/aws-service-role/networking.apprunner.amazonaws.com/AWSServiceRoleForAppRunnerNetworking" ], "Condition": { "StringLike": { "iam:AWSServiceName": [ "apprunner.amazonaws.com", "networking.apprunner.amazonaws.com" ]
122

AWS App Runner Developer GuideApp Runner and IAM
} } }, { "Effect": "Allow", "Action": "iam:PassRole", "Resource": "*", "Condition": { "StringLike": { "iam:PassedToService": "apprunner.amazonaws.com" } } }, { "Sid": "AppRunnerAdminAccess", "Effect": "Allow", "Action": "apprunner:*", "Resource": "*" } ]}
App Runner IAM rolesAn IAM role is an entity within your AWS account that has specific permissions.
Service-linked roles
Service-linked roles allow AWS services to access resources in other services to complete an action onyour behalf. Service-linked roles appear in your IAM account and are owned by the service. An IAMadministrator can view but not edit the permissions for service-linked roles.
App Runner supports service-linked roles. For information about creating or managing App Runnerservice-linked roles, see the section called “Using service-linked roles” (p. 128).
Service roles
This feature allows a service to assume a service role on your behalf. This role allows the service toaccess resources in other services to complete an action on your behalf. Service roles appear in yourIAM account and are owned by the account. This means that an IAM administrator can change thepermissions for this role. However, doing so might break the functionality of the service.
App Runner supports a few service roles.
Access role
The access role is a role that App Runner uses for accessing images in Amazon Elastic ContainerRegistry (Amazon ECR) in your account. It's required to access an image in Amazon ECR, and isn'trequired with Amazon ECR Public. Before creating a service based on an image in Amazon ECR, useIAM to create a service role and use the AWSAppRunnerServicePolicyForECRAccess managedpolicy in it. You can then pass this role to App Runner when you call the CreateService API in theAuthenticationConfiguration member of the SourceConfiguration parameter, or when you use the AppRunner console to create a service.
AWSAppRunnerServicePolicyForECRAccess
{ "Version": "2012-10-17", "Statement": [
123
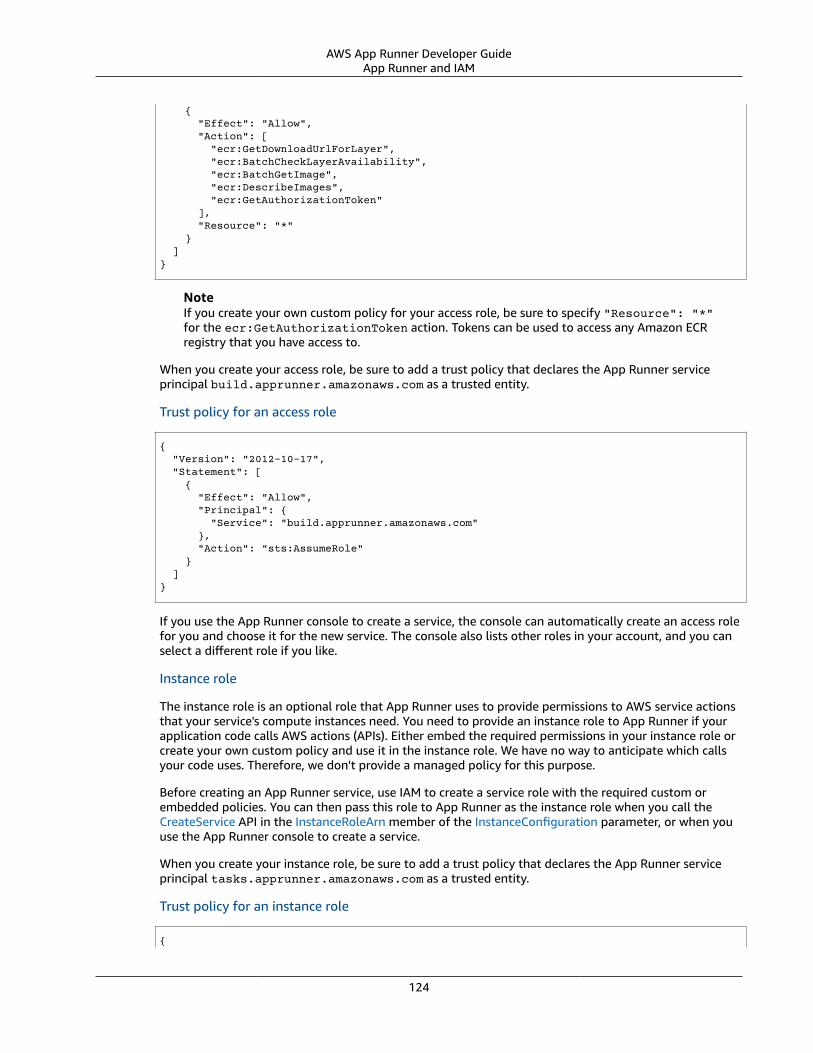
AWS App Runner Developer GuideApp Runner and IAM
{ "Effect": "Allow", "Action": [ "ecr:GetDownloadUrlForLayer", "ecr:BatchCheckLayerAvailability", "ecr:BatchGetImage", "ecr:DescribeImages", "ecr:GetAuthorizationToken" ], "Resource": "*" } ]}
NoteIf you create your own custom policy for your access role, be sure to specify "Resource": "*"for the ecr:GetAuthorizationToken action. Tokens can be used to access any Amazon ECRregistry that you have access to.
When you create your access role, be sure to add a trust policy that declares the App Runner serviceprincipal build.apprunner.amazonaws.com as a trusted entity.
Trust policy for an access role
{ "Version": "2012-10-17", "Statement": [ { "Effect": "Allow", "Principal": { "Service": "build.apprunner.amazonaws.com" }, "Action": "sts:AssumeRole" } ]}
If you use the App Runner console to create a service, the console can automatically create an access rolefor you and choose it for the new service. The console also lists other roles in your account, and you canselect a different role if you like.
Instance role
The instance role is an optional role that App Runner uses to provide permissions to AWS service actionsthat your service's compute instances need. You need to provide an instance role to App Runner if yourapplication code calls AWS actions (APIs). Either embed the required permissions in your instance role orcreate your own custom policy and use it in the instance role. We have no way to anticipate which callsyour code uses. Therefore, we don't provide a managed policy for this purpose.
Before creating an App Runner service, use IAM to create a service role with the required custom orembedded policies. You can then pass this role to App Runner as the instance role when you call theCreateService API in the InstanceRoleArn member of the InstanceConfiguration parameter, or when youuse the App Runner console to create a service.
When you create your instance role, be sure to add a trust policy that declares the App Runner serviceprincipal tasks.apprunner.amazonaws.com as a trusted entity.
Trust policy for an instance role
{
124

AWS App Runner Developer GuideIdentity-based policy examples
"Version": "2012-10-17", "Statement": [ { "Effect": "Allow", "Principal": { "Service": "tasks.apprunner.amazonaws.com" }, "Action": "sts:AssumeRole" } ]}
If you use the App Runner console to create a service, the console lists the roles in your account, and youcan select the role that you created for this purpose.
For information about creating a service, see the section called “Creation” (p. 44).
App Runner identity-based policy examplesBy default, IAM users and roles don't have permission to create or modify AWS App Runner resources.They also can't perform tasks using the AWS Management Console, AWS CLI, or AWS API. An IAMadministrator must create IAM policies that grant users and roles permission to perform specific APIoperations on the specified resources they need. The administrator must then attach those policies tothe IAM users or groups that require those permissions.
To learn how to create an IAM identity-based policy using these example JSON policy documents, seeCreating Policies on the JSON Tab in the IAM User Guide.
For other App Runner security topics, see Security (p. 113).
Topics
• Policy best practices (p. 125)
• User policies (p. 126)
• Controlling access to App Runner services based on tags (p. 127)
Policy best practicesIdentity-based policies are very powerful. They determine whether someone can create, access, or deleteApp Runner resources in your account. These actions can incur costs for your AWS account. When youcreate or edit identity-based policies, follow these guidelines and recommendations:
• Get started using AWS managed policies – To start using App Runner quickly, use AWS managedpolicies to give your employees the permissions they need. These policies are already available inyour account and are maintained and updated by AWS. For more information, see Get started usingpermissions with AWS managed policies in the IAM User Guide.
• Grant least privilege – When you create custom policies, grant only the permissions requiredto perform a task. Start with a minimum set of permissions and grant additional permissions asnecessary. Doing so is more secure than starting with permissions that are too lenient and then tryingto tighten them later. For more information, see Grant least privilege in the IAM User Guide.
• Enable MFA for sensitive operations – For extra security, require IAM users to use multi-factorauthentication (MFA) to access sensitive resources or API operations. For more information, see Usingmulti-factor authentication (MFA) in AWS in the IAM User Guide.
• Use policy conditions for extra security – To the extent that it's practical, define the conditions underwhich your identity-based policies allow access to a resource. For example, you can write conditions tospecify a range of allowable IP addresses that a request must come from. You can also write conditions
125

AWS App Runner Developer GuideIdentity-based policy examples
to allow requests only within a specified date or time range, or to require the use of SSL or MFA. Formore information, see IAM JSON policy elements: Condition in the IAM User Guide.
User policiesTo access the App Runner console, IAM users must have a minimum set of permissions. Thesepermissions must allow you to list and view details about the App Runner resources in your AWS account.If you create an identity-based policy that is more restrictive than the minimum required permissions,the console won't function as intended for users with that policy.
App Runner provides two managed policies that you can attach to your users.
• AWSAppRunnerReadOnlyAccess – Grants permissions to list and view details about App Runnerresources.
• AWSAppRunnerFullAccess – Grants permissions to all App Runner actions.
To ensure that users can use the App Runner console, attach, at a minimum, theAWSAppRunnerReadOnlyAccess managed policy to the users. You can attach theAWSAppRunnerFullAccess managed policy instead, or add specific additional permissions, to allowusers to create, modify, and delete resource. For more information, see Adding Permissions to a User inthe IAM User Guide.
You don't need to allow minimum console permissions for users that are making calls only to the AWSCLI or the AWS API. Instead, allow access to only the actions that match the API operation that you wantto allow users to perform.
The following examples demonstrate custom user policies. You can use them as starting points todefining your own custom user policies. Copy the example, and or remove actions, scope down resources,and add conditions.
Example: console and connection management user policy
This example policy enables console access and allows connection creation and management. It doesn'tallow App Runner service creation and management. It can be attached to a user whose role is tomanage App Runner service access to source code assets.
{ "Version": "2012-10-17", "Statement": [ { "Effect": "Allow", "Action": [ "apprunner:List*", "apprunner:Describe*", "apprunner:CreateConnection", "apprunner:DeleteConnection" ], "Resource": "*" } ]}
Example: user policies that use condition keys
The examples in this section demonstrate conditional permissions that depend on some resourceproperties or action parameters.
126
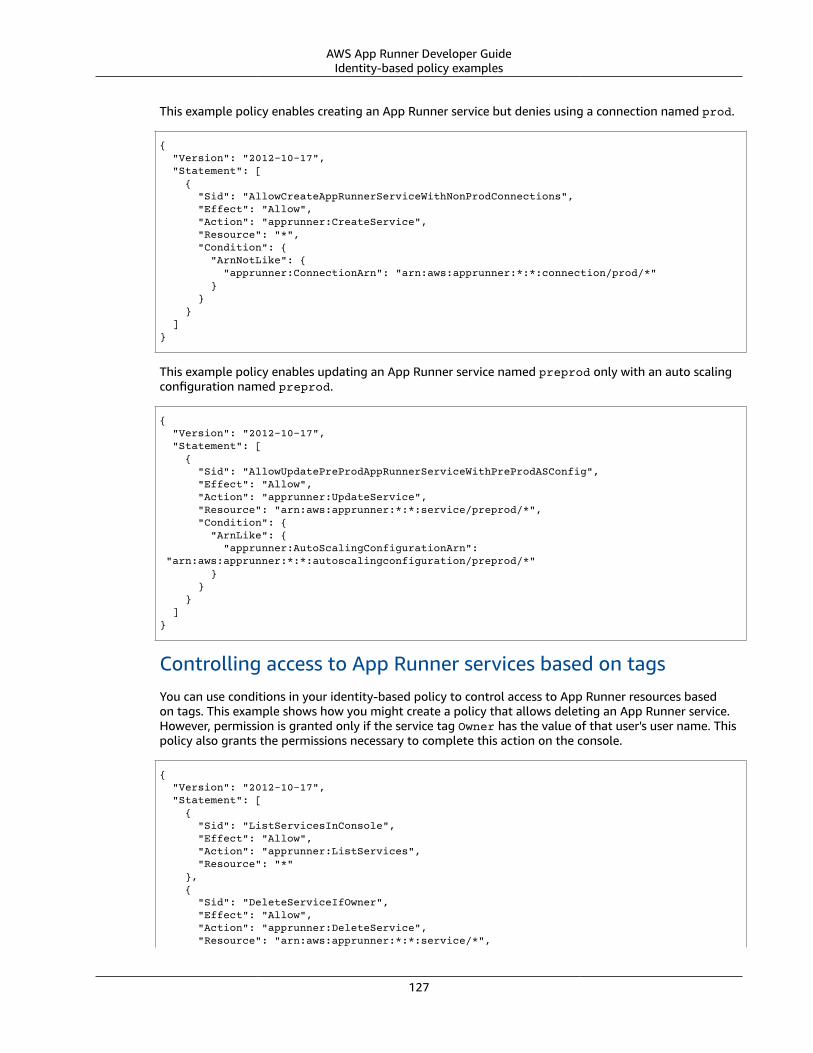
AWS App Runner Developer GuideIdentity-based policy examples
This example policy enables creating an App Runner service but denies using a connection named prod.
{ "Version": "2012-10-17", "Statement": [ { "Sid": "AllowCreateAppRunnerServiceWithNonProdConnections", "Effect": "Allow", "Action": "apprunner:CreateService", "Resource": "*", "Condition": { "ArnNotLike": { "apprunner:ConnectionArn": "arn:aws:apprunner:*:*:connection/prod/*" } } } ]}
This example policy enables updating an App Runner service named preprod only with an auto scalingconfiguration named preprod.
{ "Version": "2012-10-17", "Statement": [ { "Sid": "AllowUpdatePreProdAppRunnerServiceWithPreProdASConfig", "Effect": "Allow", "Action": "apprunner:UpdateService", "Resource": "arn:aws:apprunner:*:*:service/preprod/*", "Condition": { "ArnLike": { "apprunner:AutoScalingConfigurationArn": "arn:aws:apprunner:*:*:autoscalingconfiguration/preprod/*" } } } ]}
Controlling access to App Runner services based on tagsYou can use conditions in your identity-based policy to control access to App Runner resources basedon tags. This example shows how you might create a policy that allows deleting an App Runner service.However, permission is granted only if the service tag Owner has the value of that user's user name. Thispolicy also grants the permissions necessary to complete this action on the console.
{ "Version": "2012-10-17", "Statement": [ { "Sid": "ListServicesInConsole", "Effect": "Allow", "Action": "apprunner:ListServices", "Resource": "*" }, { "Sid": "DeleteServiceIfOwner", "Effect": "Allow", "Action": "apprunner:DeleteService", "Resource": "arn:aws:apprunner:*:*:service/*",
127

AWS App Runner Developer GuideUsing service-linked roles
"Condition": { "StringEquals": {"apprunner:ResourceTag/Owner": "${aws:username}"} } } ]}
You can attach this policy to the IAM users in your account. If a user named richard-roe attempts todelete an App Runner service, the service must be tagged Owner=richard-roe or owner=richard-roe. Otherwise he is denied access. The condition tag key Owner matches both Owner and ownerbecause condition key names are not case-sensitive. For more information, see IAM JSON PolicyElements: Condition in the IAM User Guide.
Using service-linked roles for App RunnerAWS App Runner uses AWS Identity and Access Management (IAM) service-linked roles. A service-linkedrole is a unique type of IAM role that is linked directly to App Runner. Service-linked roles are predefinedby App Runner and include all the permissions that the service requires to call other AWS services onyour behalf.
Topics• Using roles for management (p. 128)• Using roles for networking (p. 130)
Using roles for managementAWS App Runner uses AWS Identity and Access Management (IAM) service-linked roles. A service-linkedrole is a unique type of IAM role that is linked directly to App Runner. Service-linked roles are predefinedby App Runner and include all the permissions that the service requires to call other AWS services onyour behalf.
A service-linked role makes setting up App Runner easier because you don’t have to manually add thenecessary permissions. App Runner defines the permissions of its service-linked roles, and unless definedotherwise, only App Runner can assume its roles. The defined permissions include the trust policy andthe permissions policy, and that permissions policy cannot be attached to any other IAM entity.
You can delete a service-linked role only after first deleting their related resources. This protects yourApp Runner resources because you can't inadvertently remove permission to access the resources.
For information about other services that support service-linked roles, see AWS Services That Work withIAM and look for the services that have Yes in the Service-Linked Role column. Choose a Yes with a linkto view the service-linked role documentation for that service.
Service-linked role permissions for App Runner
App Runner uses the service-linked role named AWSServiceRoleForAppRunner.
The role allows App Runner to perform the following tasks:
• Push logs to Amazon CloudWatch Logs log groups.• Create Amazon CloudWatch Events rules to subscribe to Amazon Elastic Container Registry (Amazon
ECR) image pushes.• Send tracing information to AWS X-Ray.
The AWSServiceRoleForAppRunner service-linked role trusts the following services to assume the role:
128

AWS App Runner Developer GuideUsing service-linked roles
• apprunner.amazonaws.com
The permissions policies of the AWSServiceRoleForAppRunner service-linked role contain all of thepermissions that App Runner needs to complete actions on your behalf.
AppRunnerServiceRolePolicy managed policy
{ "Version": "2012-10-17", "Statement": [ { "Action": [ "logs:CreateLogGroup", "logs:PutRetentionPolicy" ], "Effect": "Allow", "Resource": "arn:aws:logs:*:*:log-group:/aws/apprunner/*" }, { "Effect": "Allow", "Action": [ "logs:CreateLogStream", "logs:PutLogEvents", "logs:DescribeLogStreams" ], "Resource": [ "arn:aws:logs:*:*:log-group:/aws/apprunner/*:log-stream:*" ] }, { "Effect": "Allow", "Action": [ "events:PutRule", "events:PutTargets", "events:DeleteRule", "events:RemoveTargets", "events:DescribeRule", "events:EnableRule", "events:DisableRule" ], "Resource": "arn:aws:events:*:*:rule/AWSAppRunnerManagedRule*" } ]}
Policy for X-Ray tracing
{ "Version": "2012-10-17", "Statement": [ { "Effect": "Allow", "Action": [ "xray:PutTraceSegments", "xray:PutTelemetryRecords", "xray:GetSamplingRules", "xray:GetSamplingTargets", "xray:GetSamplingStatisticSummaries" ], "Resource": [ "*" ]
129

AWS App Runner Developer GuideUsing service-linked roles
} ]}
You must configure permissions to allow an IAM entity (such as a user, group, or role) to create, edit, ordelete a service-linked role. For more information, see Service-Linked Role Permissions in the IAM UserGuide.
Creating a service-linked role for App Runner
You don't need to manually create a service-linked role. When you create an App Runner service in theAWS Management Console, the AWS CLI, or the AWS API, App Runner creates the service-linked role foryou.
If you delete this service-linked role, and then need to create it again, you can use the same processto recreate the role in your account. When you create an App Runner service, App Runner creates theservice-linked role for you again.
Editing a service-linked role for App Runner
App Runner does not allow you to edit the AWSServiceRoleForAppRunner service-linked role. After youcreate a service-linked role, you cannot change the name of the role because various entities mightreference the role. However, you can edit the description of the role using IAM. For more information, seeEditing a Service-Linked Role in the IAM User Guide.
Deleting a service-linked role for App Runner
If you no longer need to use a feature or service that requires a service-linked role, we recommendthat you delete that role. That way you don’t have an unused entity that is not actively monitored ormaintained. However, you must clean up your service-linked role before you can manually delete it.
Cleaning up a service-linked role
Before you can use IAM to delete a service-linked role, you must first delete any resources used by therole.
In App Runner, this means deleting all App Runner services in your account. To learn about deleting AppRunner services, see the section called “Deletion” (p. 75).
NoteIf the App Runner service is using the role when you try to delete the resources, then thedeletion might fail. If that happens, wait for a few minutes and try the operation again.
Manually delete the service-linked role
Use the IAM console, the AWS CLI, or the AWS API to delete the AWSServiceRoleForAppRunner service-linked role. For more information, see Deleting a Service-Linked Role in the IAM User Guide.
Supported regions for App Runner service-linked roles
App Runner supports using service-linked roles in all of the regions where the service is available. Formore information, see AWS App Runner endpoints and quotas in the AWS General Reference.
Using roles for networkingAWS App Runner uses AWS Identity and Access Management (IAM) service-linked roles. A service-linkedrole is a unique type of IAM role that is linked directly to App Runner. Service-linked roles are predefined
130

AWS App Runner Developer GuideUsing service-linked roles
by App Runner and include all the permissions that the service requires to call other AWS services onyour behalf.
A service-linked role makes setting up App Runner easier because you don’t have to manually add thenecessary permissions. App Runner defines the permissions of its service-linked roles, and unless definedotherwise, only App Runner can assume its roles. The defined permissions include the trust policy andthe permissions policy, and that permissions policy cannot be attached to any other IAM entity.
You can delete a service-linked role only after first deleting their related resources. This protects yourApp Runner resources because you can't inadvertently remove permission to access the resources.
For information about other services that support service-linked roles, see AWS Services That Work withIAM and look for the services that have Yes in the Service-Linked Role column. Choose a Yes with a linkto view the service-linked role documentation for that service.
Service-linked role permissions for App Runner
App Runner uses the service-linked role named AWSServiceRoleForAppRunnerNetworking.
The role allows App Runner to perform the following tasks:
• Attach a VPC to your App Runner service and manage network interfaces.
The AWSServiceRoleForAppRunnerNetworking service-linked role trusts the following services to assumethe role:
• networking.apprunner.amazonaws.com
The role permissions policy named AppRunnerNetworkingServiceRolePolicy contains all of thepermissions that App Runner needs to complete actions on your behalf.
AppRunnerNetworkingServiceRolePolicy
{ "Version": "2012-10-17", "Statement": [ { "Effect": "Allow", "Action": [ "ec2:DescribeNetworkInterfaces", "ec2:DescribeVpcs", "ec2:DescribeDhcpOptions", "ec2:DescribeSubnets", "ec2:DescribeSecurityGroups" ], "Resource": "*" }, { "Effect": "Allow", "Action": "ec2:CreateNetworkInterface", "Resource": "*", "Condition": { "ForAllValues:StringEquals": { "aws:TagKeys": [ "AWSAppRunnerManaged" ] } } }, { "Effect": "Allow",
131

AWS App Runner Developer GuideUsing service-linked roles
"Action": "ec2:CreateTags", "Resource": "arn:aws:ec2:*:*:network-interface/*", "Condition": { "StringEquals": { "ec2:CreateAction": "CreateNetworkInterface" }, "StringLike": { "aws:RequestTag/AWSAppRunnerManaged": "*" } } }, { "Effect": "Allow", "Action": "ec2:DeleteNetworkInterface", "Resource": "*", "Condition": { "Null": { "ec2:ResourceTag/AWSAppRunnerManaged": "false" } } } ]}
You must configure permissions to allow an IAM entity (such as a user, group, or role) to create, edit, ordelete a service-linked role. For more information, see Service-Linked Role Permissions in the IAM UserGuide.
Creating a service-linked role for App Runner
You don't need to manually create a service-linked role. When you create a VPC connector in the AWSManagement Console, the AWS CLI, or the AWS API, App Runner creates the service-linked role for you.
If you delete this service-linked role, and then need to create it again, you can use the same process torecreate the role in your account. When you create a VPC connector, App Runner creates the service-linked role for you again.
Editing a service-linked role for App Runner
App Runner does not allow you to edit the AWSServiceRoleForAppRunnerNetworking service-linkedrole. After you create a service-linked role, you cannot change the name of the role because variousentities might reference the role. However, you can edit the description of the role using IAM. For moreinformation, see Editing a Service-Linked Role in the IAM User Guide.
Deleting a service-linked role for App Runner
If you no longer need to use a feature or service that requires a service-linked role, we recommendthat you delete that role. That way you don’t have an unused entity that is not actively monitored ormaintained. However, you must clean up your service-linked role before you can manually delete it.
Cleaning Up a Service-Linked Role
Before you can use IAM to delete a service-linked role, you must first delete any resources used by therole.
In App Runner, this means disassociating VPC connectors from all App Runner services in your account,and deleting the VPC connectors. For more information, see the section called “VPC access” (p. 78).
NoteIf the App Runner service is using the role when you try to delete the resources, then thedeletion might fail. If that happens, wait for a few minutes and try the operation again.
132

AWS App Runner Developer GuideAWS managed policies
Manually Delete the Service-Linked Role
Use the IAM console, the AWS CLI, or the AWS API to delete theAWSServiceRoleForAppRunnerNetworking service-linked role. For more information, see Deleting aService-Linked Role in the IAM User Guide.
Supported regions for App Runner service-linked roles
App Runner supports using service-linked roles in all of the regions where the service is available. Formore information, see AWS App Runner endpoints and quotas in the AWS General Reference.
AWS managed policies for AWS App Runner
To add permissions to users, groups, and roles, it is easier to use AWS managed policies than to writepolicies yourself. It takes time and expertise to create IAM customer managed policies that provide yourteam with only the permissions they need. To get started quickly, you can use our AWS managed policies.These policies cover common use cases and are available in your AWS account. For more informationabout AWS managed policies, see AWS managed policies in the IAM User Guide.
AWS services maintain and update AWS managed policies. You can't change the permissions in AWSmanaged policies. Services occasionally add additional permissions to an AWS managed policy tosupport new features. This type of update affects all identities (users, groups, and roles) where the policyis attached. Services are most likely to update an AWS managed policy when a new feature is launchedor when new operations become available. Services do not remove permissions from an AWS managedpolicy, so policy updates won't break your existing permissions.
Additionally, AWS supports managed policies for job functions that span multiple services. For example,the ViewOnlyAccess AWS managed policy provides read-only access to many AWS services andresources. When a service launches a new feature, AWS adds read-only permissions for new operationsand resources. For a list and descriptions of job function policies, see AWS managed policies for jobfunctions in the IAM User Guide.
App Runner updates to AWS managed policies
View details about updates to AWS managed policies for App Runner since this service began trackingthese changes. For automatic alerts about changes to this page, subscribe to the RSS feed on the AppRunner Document history page.
Change Description Date
AWSAppRunnerReadOnlyAccess (p. 122) –New policy
App Runner added a new policy to allowusers to list and view details about AppRunner resources.
Feb 24,2022
AWSAppRunnerFullAccess (p. 122) –Update to an existing policy
App Runner updated the resource list forthe iam:CreateServiceLinkedRoleaction to allow creation ofAWSServiceRoleForAppRunnerNetworkingservice-linked role.
Feb 8,2022
133

AWS App Runner Developer GuideTroubleshooting
Change Description Date
AppRunnerNetworkingServiceRolePolicy (p. 130)– New policy
App Runner added a new policy to allowApp Runner to make calls to AmazonVirtual Private Cloud to attach a VPC toyour App Runner service and managenetwork interfaces on behalf of AppRunner services. The policy is used in theAWSServiceRoleForAppRunnerNetworkingservice-linked role.
Feb 8,2022
AWSAppRunnerFullAccess (p. 122) – Newpolicy
App Runner added a new policy to allowusers to perform all App Runner actions.
Jan 10,2022
AppRunnerServiceRolePolicy (p. 128) –New policy
App Runner added a new policy toallow App Runner to make calls toAmazon CloudWatch Logs and AmazonCloudWatch Events on behalf of AppRunner services. The policy is used in theAWSServiceRoleForAppRunner service-linked role.
Mar 1,2021
AWSAppRunnerServicePolicyForECRAccess (p. 123)– New policy
App Runner added a new policy to allowApp Runner to access Amazon ElasticContainer Registry (Amazon ECR) images inyour account.
Mar 1,2021
App Runner started tracking changes App Runner started tracking changes for itsAWS managed policies.
Mar 1,2021
Troubleshooting App Runner identity and accessUse the following information to help you diagnose and fix common issues that you might encounterwhen working with AWS App Runner and IAM.
For other App Runner security topics, see Security (p. 113).
Topics
• I'm not authorized to perform an action in App Runner (p. 134)
• I'm an administrator and want to allow others to access App Runner (p. 135)
• I want to allow people outside of my AWS account to access my App Runner resources (p. 135)
I'm not authorized to perform an action in App Runner
If the AWS Management Console tells you that you're not authorized to perform an action, contact youradministrator for assistance. Your administrator is the person that provided you with your AWS username and password.
The following example error occurs when an IAM user named marymajor tries to use the console to viewdetails about an App Runner service but doesn't have apprunner:DescribeService permissions.
User: arn:aws:iam::123456789012:user/marymajor is not authorized to perform: apprunner:DescribeService on resource: my-example-service
134

AWS App Runner Developer GuideLogging and monitoring
In this case, Mary asks her administrator to update her policies to allow her to access the my-example-service resource using the apprunner:DescribeService action.
I'm an administrator and want to allow others to access AppRunnerTo allow others to access App Runner, you must create an IAM entity (user or role) for the person orapplication that needs access. They will use the credentials for that entity to access AWS. You must thenattach a policy to the entity that grants them the correct permissions in App Runner.
To get started right away, see Creating your first IAM delegated user and group in the IAM User Guide.
I want to allow people outside of my AWS account to access myApp Runner resourcesYou can create a role that users in other accounts or people outside of your organization can use toaccess your resources. You can specify who is trusted to assume the role. For services that supportresource-based policies or access control lists (ACLs), you can use those policies to grant people access toyour resources.
To learn more, consult the following:
• To learn whether App Runner supports these features, see How App Runner works with IAM (p. 119).• To learn how to provide access to your resources across AWS accounts that you own, see Providing
access to an IAM user in another AWS account that you own in the IAM User Guide.• To learn how to provide access to your resources to third-party AWS accounts, see Providing access to
AWS accounts owned by third parties in the IAM User Guide.• To learn how to provide access through identity federation, see Providing access to externally
authenticated users (identity federation) in the IAM User Guide.• To learn the difference between using roles and resource-based policies for cross-account access, see
How IAM roles differ from resource-based policies in the IAM User Guide.
Logging and monitoring in App RunnerMonitoring is an important part of maintaining the reliability, availability, and performance of your AWSApp Runner service. Collecting monitoring data from all parts of your AWS solution allows you to moreeasily debug a failure if one occurs. App Runner integrates with several AWS tools for monitoring yourApp Runner services and responding to potential incidents.
Amazon CloudWatch alarms
With Amazon CloudWatch alarms, you can watch a service metric over a time period that youspecify. If the metric exceeds a given threshold for a given number of periods, you receive anotification.
App Runner collects a variety of metrics about the service as a whole and the instances (scalingunits) that run your web service. For more information, see Metrics (CloudWatch) (p. 89).
Application logs
App Runner collects the output of your application code and streams it to Amazon CloudWatch Logs.What's in this output is up to you. For example, you could include detailed records of requests madeto your web service. These log records might prove useful in security and access audits. For moreinformation, see Logs (CloudWatch Logs) (p. 86).
135

AWS App Runner Developer GuideCompliance validation
AWS CloudTrail action logs
App Runner is integrated with AWS CloudTrail, a service that provides a record of actions taken bya user, role, or an AWS service in App Runner. CloudTrail captures all API calls for App Runner asevents. You can view the most recent events in the CloudTrail console, and you can create a trail toenable continuous delivery of CloudTrail events to an Amazon Simple Storage Service (Amazon S3)bucket. For more information, see API actions (CloudTrail) (p. 96).
Compliance validation for App RunnerThird-party auditors assess the security and compliance of AWS App Runner as part of multiple AWScompliance programs. These include SOC, PCI, FedRAMP, HIPAA, and others.
To learn whether App Runner or other AWS services are within the scope of specific complianceprograms, see AWS Services in Scope by Compliance Program. For general information, see AWSCompliance Programs.
You can download third-party audit reports using AWS Artifact. For more information, see DownloadingReports in AWS Artifact.
Your compliance responsibility when using AWS services is determined by the sensitivity of your data,your company's compliance objectives, and applicable laws and regulations. AWS provides the followingresources to help with compliance:
• Security and Compliance Quick Start Guides – These deployment guides discuss architecturalconsiderations and provide steps for deploying baseline environments on AWS that are security andcompliance focused.
• Architecting for HIPAA Security and Compliance on Amazon Web Services – This whitepaper describeshow companies can use AWS to create HIPAA-eligible applications.
NoteNot all AWS services are HIPAA eligible. For more information, see the HIPAA Eligible ServicesReference.
• AWS Compliance Resources – This collection of workbooks and guides might apply to your industryand location.
• Evaluating Resources with Rules in the AWS Config Developer Guide – The AWS Config service assesseshow well your resource configurations comply with internal practices, industry guidelines, andregulations.
• AWS Security Hub – This AWS service provides a comprehensive view of your security state within AWSthat helps you check your compliance with security industry standards and best practices.
• AWS Audit Manager – This AWS service helps you continuously audit your AWS usage to simplify howyou manage risk and compliance with regulations and industry standards.
For other App Runner security topics, see Security (p. 113).
Resilience in App RunnerThe AWS global infrastructure is built around AWS Regions and Availability Zones. AWS Regions providemultiple physically separated and isolated Availability Zones, which are connected with low-latency,high-throughput, and highly redundant networking. With Availability Zones, you can design and operateapplications and databases that automatically fail over between Availability Zones without interruption.Availability Zones are more highly available, fault tolerant, and scalable than traditional single ormultiple data center infrastructures.
136

AWS App Runner Developer GuideInfrastructure security
For more information about AWS Regions and Availability Zones, see AWS Global Infrastructure.
AWS App Runner manages and automates the use of the AWS global infrastructure on your behalf. Whenusing App Runner, you benefit from the availability and fault tolerance mechanisms that AWS offers.
For other App Runner security topics, see Security (p. 113).
Infrastructure security in AWS App RunnerAs a managed service, AWS App Runner is protected by the AWS global network security procedures thatare described in the Amazon Web Services: Overview of Security Processes whitepaper.
You use AWS published API calls to access App Runner through the network. Clients must supportTransport Layer Security (TLS) 1.0 or later. We recommend TLS 1.2 or later. Clients must also supportcipher suites with perfect forward secrecy (PFS) such as Ephemeral Diffie-Hellman (DHE) or Elliptic CurveEphemeral Diffie-Hellman (ECDHE). Most modern systems such as Java 7 and later support these modes.
Additionally, requests must be signed by using an access key ID and a secret access key that is associatedwith an IAM principal. Or you can use the AWS Security Token Service (AWS STS) to generate temporarysecurity credentials to sign requests.
For other App Runner security topics, see Security (p. 113).
Configuration and vulnerability analysis in AppRunner
AWS and our customers share responsibility for achieving a high level of software component securityand compliance. For more information, see the AWS shared responsibility model.
For other App Runner security topics, see Security (p. 113).
Security best practices for App RunnerAWS App Runner provides several security features to consider as you develop and implement yourown security policies. The following best practices are general guidelines and don’t represent acomplete security solution. Because these best practices might not be appropriate or sufficient for yourenvironment, treat them as helpful considerations, not prescriptions.
For other App Runner security topics, see Security (p. 113).
Preventive security best practicesPreventive security controls attempt to prevent incidents before they occur.
Implement least privilege accessApp Runner provides AWS Identity and Access Management (IAM) managed policies for IAMusers (p. 126) and the access role (p. 123). These managed policies specify all permissions that mightbe necessary for the correct operation of your App Runner service.
137

AWS App Runner Developer GuideDetective security best practices
Your application might not require all the permissions in our managed policies. You can customize themand grant only the permissions that are required for your users and your App Runner service to performtheir tasks. This is particularly relevant to user policies, where different user roles might have differentpermission needs. Implementing least privilege access is fundamental in reducing security risk and theimpact that could result from errors or malicious intent.
Detective security best practicesDetective security controls identify security violations after they have occurred. They can help you detecta potential security threat or incident.
Implement monitoringMonitoring is an important part of maintaining the reliability, security, availability, and performanceof your App Runner solutions. AWS provides several tools and services to help you monitor your AWSservices.
The following are some examples of items to monitor:
• Amazon CloudWatch metrics for App Runner – Set alarms for key App Runner metrics and for yourapplication's custom metrics. For details, see Metrics (CloudWatch) (p. 89).
• AWS CloudTrail entries – Track actions that might impact availability, like PauseService orDeleteConnection. For details, see API actions (CloudTrail) (p. 96).
138

AWS App Runner Developer Guide
AWS glossaryFor the latest AWS terminology, see the AWS glossary in the AWS General Reference.
139