
Android Developer Fundamentals Course – Practicals
566
-
Upload
khangminh22 -
Category
Documents
-
view
3 -
download
0
Transcript of Android Developer Fundamentals Course – Practicals


1.1
1.2
1.2.1
1.2.1.1
1.2.1.2
1.2.1.3
1.2.1.4
1.2.1.5
1.2.2
1.2.2.1
1.2.2.2
1.2.2.3
1.2.3
1.2.3.1
1.2.3.2
1.2.3.3
1.3
1.3.1
1.3.1.1
1.3.1.2
1.3.1.3
1.3.1.4
1.3.2
1.3.2.1
1.3.2.2
1.3.2.3
1.3.3
1.3.3.1
1.4
1.4.1
1.4.1.1
1.4.1.2
1.4.1.3
1.4.2
1.4.2.1
1.4.2.2
1.4.2.3
1.5
1.5.1
TableofContentsIntroduction
Unit1.GetStarted
Lesson1:BuildYourFirstApp
1.1:InstallAndroidStudioandRunHelloWorld
1.2A:MakeYourFirstInteractiveUI
1.2B:UsingLayouts
1.3:WorkingwithTextViewElements
1.4:LearningAboutAvailableResources
Lesson2:Activities
2.1:CreateandStartActivities
2.2:ActivityLifecycleandState
2.3:ActivitiesandImplicitIntents
Lesson3:Testing,Debugging,andUsingSupportLibraries
3.1:UsingtheDebugger
3.2:TestingyourApp
3.3:UsingSupportLibraries
Unit2.UserExperience
Lesson4:UserInteraction
4.1:UsingKeyboards,InputControls,Alerts,andPickers
4.2:UsinganOptionsMenuandRadioButtons
4.3:UsingtheAppBarandTabsforNavigation
4.4:CreatingaRecyclerView
Lesson5:DelightfulUserExperience
5.1:Drawables,Styles,andThemes
5.2:MaterialDesign:Lists,Cards,andColors
5.3:SupportingLandscape,MultipleScreenSizes,andLocalization
Lesson6:TestingyourUI
6.1:UsingEspressotoTestYourUI
Unit3.WorkingintheBackground
Lesson7:BackgroundTasks
7.1:CreateanAsyncTask
7.2:ConnecttotheInternetwithAsyncTaskandAsyncTaskLoader
7.3:BroadcastReceivers
Lesson8:Triggering,Scheduling,andOptimizingBackgroundTasks
8.1:Notifications
8.2:AlarmManager
8.3:JobScheduler
Unit4.AllAboutData
Lesson9:PreferencesandSettings
2

1.5.1.1
1.5.1.2
1.5.2
1.5.2.1
1.5.2.2
1.5.3
1.5.3.1
1.5.3.2
1.5.3.3
1.5.4
1.5.4.1
1.6
1.6.1
1.6.2
1.6.3
1.6.4
1.6.5
1.6.6
1.7
9.1:SharedPreferences
9.2:AddingSettingstoanApp
Lesson10:StoringDataUsingSQLite
10.1A:SQLiteDatabase
10.1B:SearchingaSQLiteDatabase
Lesson11:SharingDatawithContentProviders
11.1A:ImplementingaMinimalistContentProvider
11.1B:AddingaContentProvidertoYourDatabase
11.1C:SharingContentwithOtherApps
Lesson12:LoadingDataUsingLoaders
12.1:LoadingandDisplayingFetchedData
Appendix:Homework
HomeworkLesson1
HomeworkLesson2
HomeworkLessons3,4
HomeworkLessons5,6
HomeworkLessons7,8
HomeworkLessons9,10,11
Appendix:Utilities
3

AndroidDeveloperFundamentalsCourse–PracticalsAndroidDeveloperFundamentalsisatrainingcoursecreatedbytheGoogleDeveloperTrainingteam.YoulearnbasicAndroidprogrammingconceptsandbuildavarietyofapps,startingwithHelloWorldandworkingyourwayuptoappsthatusecontentprovidersandloaders.
AndroidDeveloperFundamentalspreparesyoutotaketheexamfortheAssociateAndroidDeveloperCertification.
Thiscourseisintendedtobetaughtinaclassroom,butallthematerialsareonline,soifyouliketolearnbyyourself,goahead!
PrerequisitesAndroidDeveloperFundamentalsisintendedfornewandexperienceddeveloperswhoalreadyhaveJavaprogrammingexperienceandnowwanttolearntobuildAndroidapps.
CoursematerialsThecoursematerialsinclude:
Thispracticalworkbook,whichguidesyouthroughcreatingAndroidappstopracticeandperfecttheskillsyou'relearningAconceptreference:AndroidDeveloperFundamentalsCourse—ConceptsSlidedecks(foroptionalusebyinstructors)Videosoflectures(forreferencebyinstructorsandstudents)
Whattopicsarecovered?
AndroidDeveloperFundamentalsincludesfiveteachingunits,whicharedescribedinWhatdoesthecoursecover?
DevelopedbytheGoogleDeveloperTrainingTeam
Introduction
4

Lastupdated:February2017
ThisworkislicensedunderaCreativeCommonsAttribution-NonCommercial4.0InternationalLicense
Introduction
5

1.1:InstallAndroidStudioandRunHelloWorldContents:
WhatyoushouldalreadyKNOWWhatyouwillNEEDWhatyouwillLEARNWhatyouwillDOAppoverviewTask1.InstallAndroidStudioTask2:Create"HelloWorld"appTask3:ExploretheprojectstructureandlayoutTask4:CreateavirtualdeviceTask5:RunyourapponanemulatorTask6.AddlogstatementstoyourappTask7:ExploretheAndroidManifest.xmlfileTask8.Explorethebuild.gradlefileTask9.RunyourapponadeviceCodingchallengeSummaryRelatedconceptsLearnmore
Welcometothepracticalexercises.Youwilllearnto:
InstallAndroidStudio,theAndroiddevelopmentenvironment.LearnabouttheAndroiddevelopmentprocess.CreateandrunyourfirstAndroidHelloWorldapponanemulatorandonaphysicaldevice.Addloggingtoyourappfordebuggingpurposes.
WhatyoushouldalreadyKNOWForthispracticalyoushouldbeableto:
Understandthegeneralsoftwaredevelopmentprocessforobject-orientedapplicationsusinganIDE(IntegratedDevelopmentEnvironment).Demonstratethatyouhaveatleast1-3yearsofexperienceinobject-orientedprogramming,withsomeofitfocusedontheJavaprogramminglanguage.(Thesepracticalswillnotexplainobject-orientedprogrammingortheJavalanguage.)
WhatyouwillNEEDForthesepracticals,youwillneed:
AMac,Windows,orLinuxcomputer.SeethebottomoftheAndroidStudiodownloadpageforup-to-datesystemrequirements.InternetaccessoranalternativewayofloadingthelatestAndroidStudioandJavainstallationsontoyourcomputer.
WhatyouwillLEARNYouwilllearnto:
InstallandusetheAndroidIDE.
Introduction
6

UnderstandthedevelopmentprocessforbuildingAndroidapps.CreateanAndroidprojectfromabasicapptemplate.
WhatyouwillDOInstalltheAndroidStudiodevelopmentenvironment.Createaanemulator(virtualdevice)torunyourapponyourcomputer.CreateandruntheHelloWorldapponthevirtualandphysicaldevices.Exploretheprojectlayout.Generateandviewlogstatementsfromyourapp.ExploretheAndroidManifest.xmlfile.
AppOverviewAfteryousuccessfullyinstalltheAndroidStudioIDE,youwillcreate,fromatemplate,anewAndroidprojectforthe'HelloWorld'app.Thissimpleappdisplaysthestring"HelloWorld"onthescreenoftheAndroidvirtualorphysicaldevice.
Here'swhatthefinishedappwilllooklike:
Introduction
7

Introduction
8

Task1.InstallAndroidStudioAndroidStudioisGoogle'sIDEforAndroidapps.AndroidStudiogivesyouanadvancedcodeeditorandasetofapptemplates.Inaddition,itcontainstoolsfordevelopment,debugging,testing,andperformancethatmakeitfasterandeasiertodevelopapps.Youcantestyourappswithalargerangeofpreconfiguredemulatorsoronyourownmobiledevice,andbuildproductionAPKsforpublication.
Note:AndroidStudioiscontinuallybeingimproved.Forthelatestinformationonsystemrequirementsandinstallationinstructions,refertothedocumentationatdeveloper.android.com.TogetupandrunningwithAndroidStudio:
YoumayneedtoinstalltheJavaDevelopmentKit-Java7orbetter.InstallAndroidStudio
AndroidStudioisavailableforWindows,Mac,andLinuxcomputers.Theinstallationissimilarforallplatforms.Anydifferenceswillbenotedinthesectionsbelow.
1.1.InstallingtheJavaDevelopmentKit
1. Onyourcomputer,openaterminalwindow.2. Typejava-version
Theoutputincludesaline:
Java(™)SERuntimeEnvironment(build1.X.0_05-b13)
Xistheversionnumbertolookat.
Ifthisis7orgreater,youcanmoveontoinstallingAndroidStudio.IfyouseeaJavaSEversionisbelow7orifJavaisnotinstalled,youneedtoinstallthelatestversionoftheJavaSEdevelopmentkitbeforeinstallingAndroidStudio.
TodownloadtheJavaStandardEdition()DevelopmentKit(JDK):
1. GototheOracleJavaSEdownloadspage.2. ClicktheJavaSEDownloadsicontoopentheJavaSEDevelopmentKit8Downloadspage.3. IntheboxforthelatestJavaSEDevelopmentkit,youneedtoaccepttheLicenseAgreementinordertoproceed.
Thendownloadtheversionappropriateforthecomputeryouaredevelopingon.Important:Donotgotothedemosandsamples(themenuslookverysimilar,somakesuretoreadtheheadingatthetop).
4. Installthedevelopmentkit.OncetheinstallationoftheJDKiscompleted—itshouldonlytakeafewminutes—youcanconfirmit'scorrectbycheckingtheJavaversionfromthecommandline.
5. OpenaterminalwindowandenterTypejava-versionagaintoverifythatinstallationhasbeensuccessful.6. SettheJAVA_HOMEenvironmentvariabletotheinstallationdirectoryoftheJDK.
Windows:
1. SetJAVA_HOMEtotheinstallationlocation.2. Start>ControlPanel>System>AdvancedSystemSettings>EnvironmentVariablesSystemVariables>New
Variablename:JAVA_HOMEVariablevalue:C:\ProgramFiles\Java\jdk1.7.0_80(orwhateverversionyourinstallationis!)
3. Ifthevariablealreadyexists,updateittothisversionoftheJDK.4. VerifyyourJAVA_HOMEvariablefromacmd.exeterminal:echo%JAVA_HOME%
Seealso:https://docs.oracle.com/cd/E19182-01/820-7851/inst_cli_jdk_javahome_t/
Mac:
Introduction
9

1. OpenTerminal.2. ConfirmyouhaveJDKbytyping"whichjava".3. CheckthatyouhavetheneededversionofJava,bytyping"java-version".4. SetJAVA_HOMEusingthiscommandinTerminal:exportJAVA_HOME=`whichjava`5. enterecho$JAVA_HOMEtoconfirmthepath.
Linux:
See:https://docs.oracle.com/cd/E19182-01/820-7851/inst_cli_jdk_javahome_t/
Important:Don'tinstallAndroidStudiountilaftertheJavaJDKisinstalled.WithoutaworkingcopyofJava,therestoftheprocesswillnotwork.Ifyoucan'tgetthedownloadtowork,lookforerrormessages,andsearchonlinetofindasolution.BasicTroubleshooting:
ThereisnoUI,ControlPanel,orStartupiconassociatedwiththeJDK.VerifythatyouhavecorrectlyinstalledtheJDKbygoingtothedirectorywhereyouinstalledit.ToidentifywheretheJDKis,,lookatyourPATHvariableand/orsearchyourcomputerforthe"jdk"directoryorthe"java"or"javac"executable.
1.2.InstallingAndroidStudio1. NavigatetotheAndroiddeveloperssiteandfollowtheinstructionstodownloadandinstallAndroidStudio.
Acceptthedefaultconfigurationsforallsteps.Makesurethatallcomponentsareselectedforinstallation.
2. Afterfinishingtheinstall,theSetupWizardwilldownloadandinstallsomeadditionalcomponents.Bepatient,thismighttakesometimedependingonyourInternetspeed,andsomeofthestepsmayseemredundant.
3. Whenthedownloadcompletes,AndroidStudiowillstart,andyouarereadytocreateyourfirstproject.Troubleshooting:Ifyourunintoproblemswithyourinstallation,checkthelatestdocumentation,programmingforums,orgethelpfromyouinstructors.
Task2:Create"HelloWorld"appInthistask,youwillimplementthe"HelloWorld"apptoverifythatAndroidstudioiscorrectlyinstalledandlearnthebasicsofdevelopingwithAndroidStudio.
2.1Createthe"HelloWorld"app1. LaunchAndroidStudioifitisnotalreadyopened.2. InthemainWelcometoAndroidStudiowindow,click"StartanewAndroidStudioproject".3. IntheNewProjectwindow,giveyourapplicationanApplicationName,suchas"HelloWorld".4. VerifytheProjectlocation,orchooseadifferentdirectoryforstoringyourproject.5. ChooseauniqueCompanyDomain.
AppspublishedtotheGooglePlayStoremusthaveauniquepackagename.Sincedomainsareunique,prependingyourapp'snamewithyouroryourcompany'sdomainnameisgoingtoresultinauniquepackagename.Ifyouarenotplanningtopublishyourapp,youcanacceptthedefaultexampledomain.Beawarethatchangingthepackagenameofyourapplaterisextrawork.
6. VerifythatthedefaultProjectlocationiswhereyouwanttostoreyourHelloWorldappandotherAndroidStudioprojects,orchangeittoyourpreferreddirectory.ClickNext.
7. OntheTargetAndroidDevicesscreen,"PhoneandTablet"shouldbeselected.AndyoushouldensurethatAPI15:Android4.0.3IceCreamSandwichissetastheMinimumSDK.(Fixthisifnecessary.)
Atthewritingofthisbook,choosingthisAPIlevelmakesyour"HelloWorld"appcompatiblewith97%ofAndroiddevicesactiveontheGooglePlayStore.Thesearethesettingsusedbytheexamplesinthisbook.
8. ClickNext.
Introduction
10
9. IfyourprojectrequiresadditionalcomponentsforyourchosentargetSDK,AndroidStudiowillinstallthemautomatically.ClickNext.
10. CustomizetheActivitywindow.Everyappneedsatleastoneactivity.AnactivityrepresentsasinglescreenwithauserinterfaceandAndroidStudioprovidestemplatestohelpyougetstarted.FortheHelloWorldproject,choosethesimplesttemplate(asofthiswriting,the"EmptyActivity"projecttemplateisthesimplesttemplate)available.
11. ItisacommonpracticetocallyourmainactivityMainActivity.Thisisnotarequirement.12. MakesuretheGenerateLayoutfileboxischecked(ifvisible).13. MakesuretheBackwardsCompatibility(AppCompat)boxischecked.14. LeavetheLayoutNameasactivity_main.Itiscustomarytonamelayoutsaftertheactivitytheybelongto.Acceptthe
defaultsandclickFinish.
Afterthesesteps,AndroidStudio:
CreatesafolderforyourAndroidStudioProjects.BuildsyourprojectwithGradle(thismaytakeafewmoments).AndroidStudiousesGradleasit'sbuildsystem.SeetheConfigureyourbuilddeveloperpageformoreinformation.Opensthecodeeditorwithyourproject.Displaysatipoftheday.
AndroidStudiooffersmanykeyboardshortcuts,andreadingthetipsisagreatwaytolearnthemovertime.
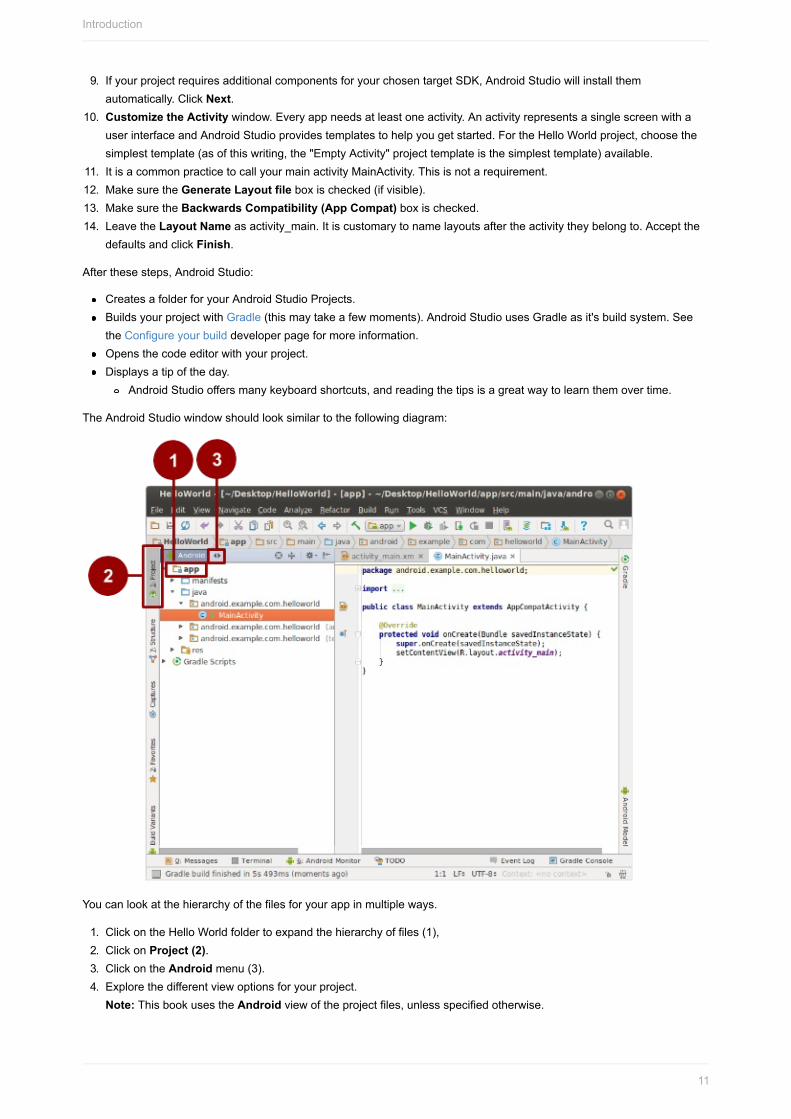
TheAndroidStudiowindowshouldlooksimilartothefollowingdiagram:
Youcanlookatthehierarchyofthefilesforyourappinmultipleways.
1. ClickontheHelloWorldfoldertoexpandthehierarchyoffiles(1),2. ClickonProject(2).3. ClickontheAndroidmenu(3).4. Explorethedifferentviewoptionsforyourproject.
Note:ThisbookusestheAndroidviewoftheprojectfiles,unlessspecifiedotherwise.
Introduction
11

Task3:ExploretheprojectstructureInthispractical,youwillexplorehowtheprojectfilesareorganizedinAndroidStudio.
ThesestepsassumethatyourHelloWorldprojectstartsoutasshowninthediagramabove.
3.1ExploretheprojectstructureandlayoutIntheProject>Androidviewofyourprevioustask,therearethreetop-levelfoldersbelowyourappfolder:manifests,java,andres.
1. Expandthemanifestsfolder.
ThisfoldercontainsAndroidManifest.xml.ThisfiledescribesallofthecomponentsofyourAndroidappandisreadbytheAndroidrun-timesystemwhenyourprogramisexecuted.
2. Expandthejavafolder.AllyourJavalanguagefilesareorganizedinthisfolder.Thejavafoldercontainsthreesubfolders:
com.example.hello.helloworld(orthedomainnameyouhavespecified):Allthefilesforapackageareinafoldernamedafterthepackage.ForyourHelloWorldapplication,thereisonepackageanditonlycontainsMainActivity.java(thefileextensionmaybeomittedintheProjectview).com.example.hello.helloworld(androidTest):Thisfolderisforyourinstrumentedtests,andstartsoutwithaskeletontestfile.com.example.hello.helloworld(test):Thisfolderisforyourunittestsandstartsoutwithanautomaticallycreatedskeletonunittestfile.
3. Expandtheresfolder.Thisfoldercontainsalltheresourcesforyourapp,includingimages,layoutfiles,strings,icons,andstyling.Itincludesthesesubfolders:
drawable.Storeallyourapp'simagesinthisfolder.layout.EveryactivityhasatleastonelayoutfilethatdescribestheUIinXML.ForHelloWorld,thisfoldercontainsactivity_main.xml.mipmap.Storeyourlaunchericonsinthisfolder.Thereisasub-folderforeachsupportedscreendensity.Androidusesthescreendensity,thatis,thenumberofpixelsperinchtodeterminetherequiredimageresolution.Androidgroupsallactualscreendensitiesintogeneralizeddensities,suchasmedium(mdpi),high(hdpi),orextra-extra-extra-high(xxxhdpi).Theic_launcher.pngfoldercontainsthedefaultlaunchericonsforallthedensitiessupportedbyyourapp.values.Insteadofhardcodingvalueslikestrings,dimensions,andcolorsinyourXMLandJavafiles,itisbestpracticetodefinethemintheirrespectivevaluesfile.Thismakesiteasiertochangeandbeconsistentacrossyourapp.
4. Expandthevaluessubfolderwithintheresfolder.Itincludesthesesubfolders:colors.xml.Showsthedefaultcolorsforyourchosentheme,andyoucanaddyourowncolorsorchangethembasedonyourapp'srequirements.dimens.xml.Storethesizesofviewsandobjectsfordifferentresolutions.strings.xml.Createresourcesforallyourstrings.Thismakesiteasytotranslatethemtootherlanguages.styles.xml.Allthestylesforyourappandthemegohere.StyleshelpgiveyourappaconsistentlookforallUIelements.
3.2TheGradlebuildsystem
AndroidStudiousesGradleasitsbuildsystem.Asyouprogressthroughthesepracticals,youwilllearnmoreaboutgradleandwhatyouneedtobuildandrunyourapps.
1. ExpandtheGradleScriptsfolder.Thisfoldercontainsallthefilesneededbythebuildsystem.2. Lookforthebuild.gradle(Module:app)file.Whenyouareaddingapp-specificdependencies,suchasusingadditional
libraries,theygointothisfile.
Introduction
12

Task4:Createavirtualdevice(emulator)Inthistask,youwillusetheAndroidVirtualDevice(AVD)managertocreateavirtualdeviceoremulatorthatsimulatestheconfigurationforaparticulartypeofAndroiddevice.
UsingtheAVDManager,youdefinethehardwarecharacteristicsofadeviceanditsAPIlevel,andsaveitasavirtualdeviceconfiguration.
WhenyoustarttheAndroidemulator,itreadsaspecifiedconfigurationandcreatesanemulateddevicethatbehavesexactlylikeaphysicalversionofthatdevice,butitresidesonyourcomputer.
Why:Withvirtualdevices,youcantestyourappsondifferentdevices(tablets,phones)withdifferentAPIlevelstomakesureitlooksgoodandworksformostusers.Youdonotneedtodependonhavingaphysicaldeviceavailableforappdevelopment.
4.1CreateavirtualdeviceInordertorunanemulatoronyourcomputer,youhavetocreateaconfigurationthatdescribesthevirtualdevice.
1. InAndroidStudio,selectTools>Android>AVDManager,orclicktheAVDManagericon inthetoolbar.2. Clickthe+CreateVirtualDevice….(Ifyouhavecreatedavirtualdevicebefore,thewindowshowsallofyourexisting
devicesandthebuttonisatthebottom.)
TheSelectHardwarescreenappearsshowingalistofpreconfiguredhardwaredevices.Foreachdevice,thetableshowsitsdiagonaldisplaysize(Size),screenresolutioninpixels(Resolution),andpixeldensity(Density).
FortheNexus5device,thepixeldensityisxxhdpi,whichmeansyourappusesthelaunchericonsinthexxhdpifolderofthemipmapfolder.Likewise,yourappwilluselayoutsanddrawablesfromfoldersdefinedforthatdensityaswell.
3. ChoosetheNexus5hardwaredeviceandclickNext.4. OntheSystemImagescreen,fromtheRecommendedtab,choosewhichversionoftheAndroidsystemtorunonthe
virtualdevice.Youcanselectthelatestsystemimage.
TherearemanymoreversionsavailablethanshownintheRecommendedtab.Lookatthex86ImagesandOtherImagestabstoseethem.
5. IfaDownloadlinkisvisiblenexttoasystemimageversion,itisnotinstalledyet,andyouneedtodownloadit.Ifnecessary,clickthelinktostartthedownload,andclickFinishwhenit'sdone.
6. OnSystemImagescreen,chooseasystemimageandclickNext.7. Verifyyourconfiguration,andclickFinish.(IftheYourAndroidDevicesAVDManagerwindowstaysopen,youcan
goaheadandcloseit.)
Task5.RunyourapponanemulatorInthistask,youwillfinallyrunyourHelloWorldapp.
5.1Runyourapponanemulator
1. InAndroidStudio,selectRun>RunapporclicktheRunicon inthetoolbar.2. IntheSelectDeploymentTargetwindow,underAvailableEmulators,selectNexus5API23andclickOK.
Theemulatorstartsandbootsjustlikeaphysicaldevice.Dependingonthespeedofyourcomputer,thismaytakeawhile.Yourappbuilds,andoncetheemulatorisready,AndroidStudiowilluploadtheapptotheemulatorandrunit.
YoushouldseetheHelloWorldappasshowninthefollowingscreenshot.
Introduction
13

Introduction
14

Note:Whentestingonanemulator,itisagoodpracticetostartituponce,attheverybeginningofyoursession.Youshouldnotclosetheemulatoruntilyouaredonetestingyourapp,sothatyourappdoesn'thavetogothroughthebootprocessagain.
CodingchallengeNote:Allcodingchallengesareoptional,andarenotrequirementsforsubsequentpracticals.
Challenge:Youcanfullycustomizeyourvirtualdevices.
StudytheAVDManagerdocumentation.Createoneorseveralcustomvirtualdevices.
Youmaynoticethatnotallcombinationsofdevicesandsystemversionsworkwhenyourunyourapp.Thisisbecausenotallsystemimagescanrunonallhardwaredevices.
Task6.AddlogstatementstoyourappInthispractical,youwilladdlogstatementstoyourapp,whicharedisplayedintheloggingwindowoftheAndroidMonitor.
Why:Logmessagesareapowerfuldebuggingtoolthatyoucanusetocheckonvalues,executionpaths,andreportexceptions.
TheAndroidMonitordisplaysinformationaboutyourapp.
1. ClicktheAndroidMonitorbuttonatthebottomofAndroidStudiotoopentheAndroidMonitor.
Bydefault,thisopenstothelogcattab,whichdisplaysinformationaboutyourappasitisrunning.Ifyouaddlogstatementstoyourapp,theyareprintedhereaswell.
YoucanalsomonitortheMemory,CPU,GPU,andNetworkperformanceofyourappfromtheothertabsoftheAndroidMonitor.Thiscanbehelpfulfordebuggingandperformancetuningyourcode.
2. ThedefaultloglevelisVerbose.Inthedrop-downmenu,changethelogleveltoDebug.
Introduction
15

LogstatementsthatyouaddtoyourappcodeprintamessagespecifiedbyyouinthelogcattaboftheAndroidMonitor.Forexample:
Log.d("MainActivity","HelloWorld");
Thepartsofthemessageare:
Log–TheLogclass.APIforsendinglogmessages.d–TheLoglevel.Usedtofilterlogmessagedisplayinlogcat."d"isfordebug.Otherloglevelsare"e"forerror,"w"forwarning,and"i"forinfo."MainActivity"–Thefirstargumentisatagwhichcanbeusedtofiltermessagesinlogcat.Thisiscommonlythenameoftheactivityfromwhichthemessageoriginates.However,youcanmakethisanythingthatisusefultoyoufordebugging.
Byconvention,logtagsaredefinedasconstants:
privatestaticfinalStringLOG_TAG=MainActivity.class.getSimpleName();
"Helloworld"–Thesecondargumentistheactualmessage.
6.1Addlogstatementstoyourapp1. OpenyourHelloWorldappinAndroidstudio,andopenMainActivityfile.2. File>Settings>Editor>General>AutoImport(Mac:AndroidStudio>Preferences>Editor>General>Auto
Import).SelectallcheckboxesandsetInsertimportsonpastetoAll.Unambiguousimportsarenowaddedautomaticallytoyourfiles.Notethe"addunambiguousimportsonthefly"optionisimportantforsomeAndroidfeaturessuchasNumberFormat.Ifnotchecked,NumberFormatshowsanerror.Clickon'Apply'followedbyclickingonthe'Ok'button.
3. IntheonCreatemethod,addthefollowinglogstatement:
Log.d("MainActivity","HelloWorld");
Introduction
16
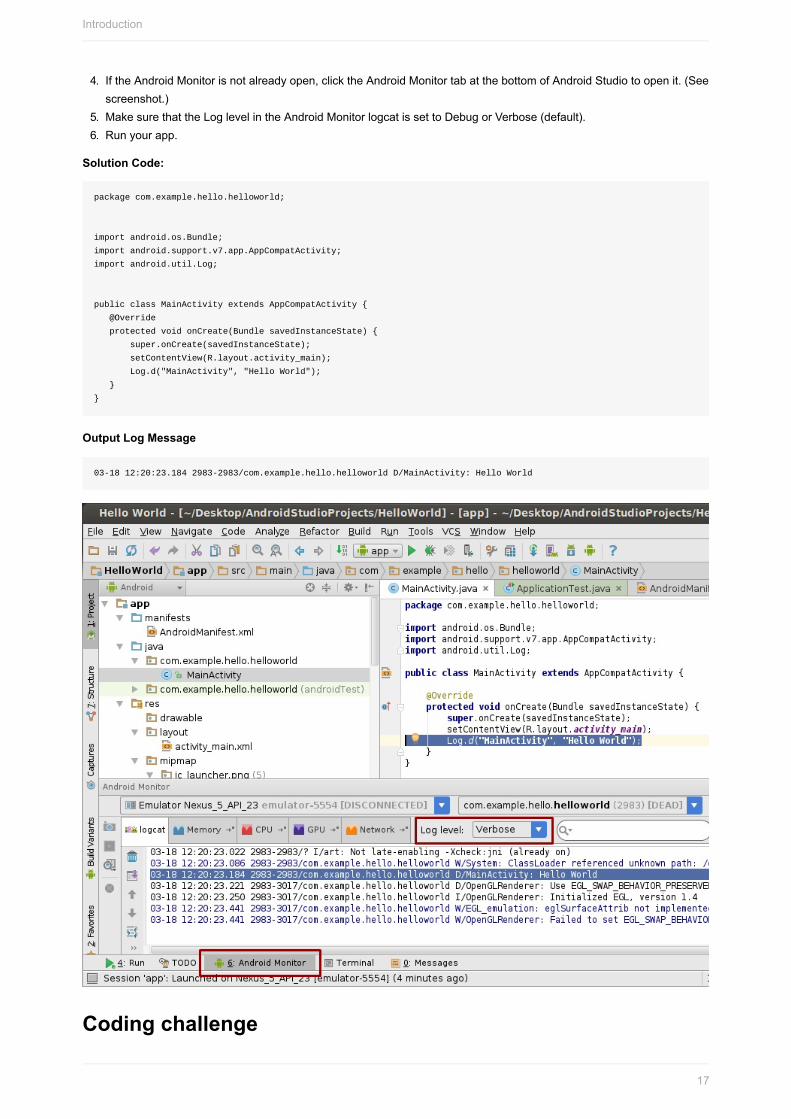
4. IftheAndroidMonitorisnotalreadyopen,clicktheAndroidMonitortabatthebottomofAndroidStudiotoopenit.(Seescreenshot.)
5. MakesurethattheLoglevelintheAndroidMonitorlogcatissettoDebugorVerbose(default).6. Runyourapp.
SolutionCode:
packagecom.example.hello.helloworld;
importandroid.os.Bundle;
importandroid.support.v7.app.AppCompatActivity;
importandroid.util.Log;
publicclassMainActivityextendsAppCompatActivity{
@Override
protectedvoidonCreate(BundlesavedInstanceState){
super.onCreate(savedInstanceState);
setContentView(R.layout.activity_main);
Log.d("MainActivity","HelloWorld");
}
}
OutputLogMessage
03-1812:20:23.1842983-2983/com.example.hello.helloworldD/MainActivity:HelloWorld
Codingchallenge
Introduction
17

Note:Allcodingchallengesareoptionalandarenotaprerequisiteforthenextchapter.Challenge:AcommonuseoftheLogclassistologJavaexceptionswhentheyoccurinyourprogram.TherearesomeusefulmethodsintheLogclassthatyoucanuseforthispurpose.UsetheLogclassdocumentationtofindoutwhatmethodsyoucanusetoincludeanexceptionwithalogmessage.Then,writecodeintheMainActivity.javafiletotriggerandloganexception.
Task7:ExploretheAndroidManifest.xmlfileEveryappincludesanAndroidManifestfile(AndroidManifest.xml).ThemanifestfilecontainsessentialinformationaboutyourappandpresentsthisinformationtotheAndroidruntimesystem.Androidmusthavethisinformationbeforeitcanrunanyofyourapp'scode.
InthispracticalyouwillfindandreadtheAndroidManifest.xmlfilefortheHelloWorldapp.
Why:Asyourappsaddmorefunctionalityandtheuserexperiencebecomesmoreengagingandinteractive,theAndroidManifest.xmlfilecontainsmoreandmoreinformation.Inlaterlessons,youwillmodifythisfiletoaddfeaturesandfeaturepermissions.
7.1ExploretheAndroidManifest.xmlfile1. OpenyourHelloWorldappinAndroidstudio,andinthemanifestsfolder,openAndroidManifest.xml.2. Readthefileandconsiderwhateachlineofcodeindicates.Thecodebelowisannotatedtogiveyousomehints.
Annotatedcode:
Introduction
18

<!--XMLversionandcharacterencoding-->
<?xmlversion="1.0"encoding="utf-8"?>
<!--Requiredstartingtagforthemanifest-->
<manifest
<!--Definestheandroidnamespace.Donotchange.-->
xmlns:android="http://schemas.android.com/apk/res/android"
<!--Uniquepackagenameofyourapp.Donotchangeonceappis
published.-->
package="com.example.hello.helloworld">
<!--Requiredapplicationtag-->
<application
<!--Allowtheapplicationtobebackedupandrestored.–>
android:allowBackup="true"
<!--Iconfortheapplicationasawhole,
anddefaulticonforapplicationcomponents.–>
android:icon="@mipmap/ic_launcher"
<!--User-readablefortheapplicationasawhole,
anddefaulticonforapplicationcomponents.NoticethatAndroid
Studiofirstshowstheactuallabel"HelloWorld".
Clickonit,andyouwillseethatthecodeactuallyreferstoastring
resource.Ctrl-click@string/app_nametoseewheretheresourceis
specified.Thiswillbecoveredinalaterpractical.–>
android:label="@string/app_name"
<!--Whethertheappiswillingtosupportright-to-leftlayouts.–>
android:supportsRtl="true"
<!--Defaultthemeforstylingallactivities.–>
android:theme="@style/AppTheme">
<!--Declaresanactivity.Oneisrequired.
Allactivitiesmustbedeclared,
otherwisethesystemcannotseeandrunthem.–>
<activity
<!--Nameoftheclassthatimplementstheactivity;
subclassofActivity.–>
android:name=".MainActivity">
<!--Specifiestheintentsthatthisactivitycanrespondto.–>
<intent-filter>
<!--Theactionandcategorytogetherdeterminewhat
happenswhentheactivityislaunched.–>
<!--Startactivityasthemainentrypoint.
Doesnotreceivedata.–>
<actionandroid:name="android.intent.action.MAIN"/>
<!--Startthisactivityasatop-levelactivityin
thelauncher.–>
<categoryandroid:name="android.intent.category.LAUNCHER"/>
<!--Closingtags–>
</intent-filter>
</activity>
</application>
</manifest>
CodingchallengeNote:Allcodingchallengesareoptional.Challenge:TherearemanyotherelementsthatcanbesetintheAndroidManifest.ExploretheAndroidManifestdocumentationandlearnaboutadditionalelementsintheAndroidManifest.
Task8.Explorethebuild.gradlefileAndroidStudiousesabuildsystemcalledGradle.Gradledoesincrementalbuilds,whichallowsforshorteredit-testcycles.
TolearnmoreaboutGradle,see:
GradlesiteConfigureyourbuilddeveloperdocumentation
Introduction
19

Searchtheinternetfor"gradletutorial".
Inthistask,youwillexplorethebuild.gradlefile.
Why:WhenyouaddnewlibrariestoyourAndroidproject,youmayalsohavetoupdateyourbuild.gradlefile.It'susefultoknowwhereitisanditsbasicstructure.
8.1Explorethebuild.gradle(Moduleapp)file1. Inyourprojecthierarchy,findGradleScriptsandexpandit.Thereseveralbuild.gradlefiles.Onewithdirectivesfor
yourwholeproject,andoneforeachappmodule.Themoduleforyourappiscalled"app".IntheProjectview,itisrepresentedbytheappfolderatthetop-leveloftheProjectview.
2. Openbuild.gradle(Module.app).3. Readthefileandlearnwhateachlineofcodeindicates.
Solution:
//AddAndroid-specificbuildtasks
applyplugin:'com.android.application'
//ConfigureAndroidspecificbuildoptions.
android{
//SpecifythetargetSDKversionforthebuild.
compileSdkVersion23
//Theversionofthebuildtoolstouse.
buildToolsVersion"23.0.2"
//Coresettingsandentries.Overridesmanifestsettings!
defaultConfig{
applicationId"com.example.hello.helloworld"
minSdkVersion15
targetSdkVersion23
versionCode1
versionName"1.0"
}
//Controlshowappisbuiltandpackaged.
buildTypes{
//Anothercommonoptionisdebug,whichisnotsignedbydefault.
release{
//Codeshrinker.Turnthisonforproductionalongwith
//shrinkResources.
minifyEnabledfalse
//UseProGuard,aJavaoptimizer.
proguardFilesgetDefaultProguardFile('proguard-android.txt'),'proguard-rules.pro'
}
}
}
//Thisisthepartyouaremostlikelytochangeasyoustartusing
//otherlibraries.
dependencies{
//Localbinarydependency.IncludeanyJARfileinsideapp/libs.
compilefileTree(dir:'libs',include:['*.jar'])
//Configurationforunittests.
testCompile'junit:junit:4.12'
//Remotebinarydependency.SpecifyMavencoordinatesoftheSupport
//Libraryneeded.UsetheSDKManagertodownloadandinstallsuch
//packages.
compile'com.android.support:appcompat-v7:23.2.1'
}
ForadeeperlookintoGradlecheckouttheBuildSystemOverviewandConfiguringGradleBuildsdocumentation.Therearetoolstohelpyoushrinkyourcode,removeunnecessarylibraries/resourceandevenobfuscateyourprogramtopreventunwantedreverse-engineering.AndroidStudioitselfprovidessomeusefulfeatures.Learnmoreaboutavaluableopen-sourcetoolcalledProGuard.
Task9.[Optional]Runyourapponadevice
Introduction
20

Inthisfinaltask,youwillrunyourapponaphysicalmobiledevicesuchasaphoneortablet.
Why:Youruserswillrunyourapponphysicaldevices.Youshouldalwaystestyourappsonbothvirtualandphysicaldevices.
Whatyouneed:
AnAndroiddevicesuchasaphoneortablet.AdatacabletoconnectyourAndroiddevicetoyourcomputerviatheUSBport.IfyouareusingaLinuxorWindowsOS,youmayneedtoperformadditionalstepstorunonahardwaredevice.ChecktheUsingHardwareDevicesdocumentation.OnWindows,youmayneedtoinstalltheappropriateUSBdriverforyourdevice.SeeOEMUSBDrivers.
9.1[Optional]Runyourapponadevice
ToletAndroidStudiocommunicatewithyourdevice,youmustturnonUSBDebuggingonyourAndroiddevice.ThisisenabledintheDeveloperoptionssettingsofyourdevice.Notethisisnotthesameasrootingyourdevice.
OnAndroid4.2andhigher,theDeveloperoptionsscreenishiddenbydefault.ToshowDeveloperoptionsandenableUSBDebugging:
1. Onyourdevice,openSettings>AboutphoneandtapBuildnumberseventimes.2. Returntothepreviousscreen(Settings).Developeroptionsappearsatthebottomofthelist.ClickDeveloper
options.3. ChooseUSBDebugging.
NowyoucanconnectyourdeviceandruntheappfromAndroidStudio.
1. ConnectyourdevicetoyourdevelopmentmachinewithaUSBcable.2. InAndroidStudio,atthebottomofthewindow,clicktheAndroidMonitortab.Youshouldseeyourdevicelistedinthe
top-leftdrop-downmenu.
3. ClicktheRunbutton inthetoolbar.TheSelectDeploymentTargetwindowopenswiththelistofavailableemulatorsandconnecteddevices.
4. Selectyourdevice,andclickOK.
AndroidStudioshouldinstallandrunstheapponyourdevice.
Troubleshooting
IfyouAndroidStudiodoesnotrecognizeyourdevice,trythefollowing:
Unplugandreplugyourdevice.RestartAndroidStudio.Ifyourcomputerstilldoesnotfindthedeviceordeclaresit"unauthorized":
1. Unplugthedevice.
2. Onthedevice,openSettings->DeveloperOptions.
3. TapRevokeUSBDebuggingauthorizations.
4. Reconnectthedevicetoyourcomputer.
5. Whenprompted,grantauthorizations.
YoumayneedtoinstalltheappropriateUSBdriverforyourdevice.SeetheUsingHardwareDevicesdocumentation.Checkthelatestdocumentation,programmingforums,orgethelpfromyourinstructors.
Codingchallenge
Introduction
21

Note:Allcodingchallengesareoptional.
Challenge:Nowthatyouaresetupandfamiliarwiththebasicdevelopmentworkflow,dothefollowing:
1. CreateanewprojectinAndroidStudio.2. Changethegreetingto"HappyBirthdayto"andsomeonewitharecentbirthday.3. Changethebackgroundoftheappusingabirthday-themedimage.4. Takeascreenshotofyourfinishedappandemailittosomeonewhosebirthdayyouforgot.
SummaryInthischapter,youlearnedto:
InstallAndroidStudioObtainabasicunderstandingofthedevelopmentworkflowonceyouhavelaunchedinAndroidStudio.HavebasiccomprehensionofthestructureofanAndroidappinthebuildenvironment.HaveabasicunderstandingoftheAndroidManifest,andwhatitisusedfor.Addlogstatementstothecodethatgiveyouabasictoolfordebugging.
DeploytheHelloWorldappontheAndroidemulatorand[optionally]onamobiledevice.
RelatedconceptsTherelatedconceptdocumentationisinAndroidDeveloperFundamentals:Concepts.
CreateYourFirstAndroidApp
LearnmoreAndroidStudiodownloadpageHowdoIinstallJava?AndroidStudiodocumentationSupportingMultipleScreensGradleWikipediapageReadingandWritingLogs
Introduction
22

1.2A:MakeYourFirstInteractiveUIContents:
WhatyoushouldalreadyKNOWWhatyouwillLEARNWhatyouwillDOAppoverviewTask1.Createthe"HelloToast"projectTask2:Addviewsto"HelloToast"intheLayoutEditorTask3:Editthe"HelloToast"LayoutinXMLTask4:Addon-clickhandlersforthebuttonsCodingchallengeSummaryRelatedconceptLearnmore
TheuserinterfacedisplayedonthescreenofamobileAndroiddeviceconsistsofahierarchyof"views".ViewsareAndroid'sbasicuserinterfacebuildingblocks.YouspecifytheviewsinXMLlayoutfiles.Forexample,viewscanbecomponentsthat:
displaytext(TextViewclass)allowyoutoedittext(EditTextclass)representclickablebuttons(Buttonclass)andotherinteractivecomponentscontainscrollabletext(ScrollView)andscrollableitems(RecyclerView)showimages(ImageView)containotherviewsandpositionthem(LinearLayout).popupmenusandotherinteractivecomponents.
YoucanexploretheviewhierarchyofyourappintheLayoutEditor'sComponentTreepane.
TheJavacodethatdisplaysanddrivestheuserinterfaceiscontainedinaclassthatextendsActivityandcontainsmethodstoinflateviews,thatis,taketheXMLlayoutofviewsanddisplayitonthescreen.Forexample,theMainActivityintheHelloWorldappinflatesatextviewandprintsHelloWorld.Inmorecomplexapps,anactivitymightimplementclickandothereventhandlers,requestdatafromadatabaseortheinternet,ordrawgraphicalcontent.
AndroidmakesitstraightforwardtoclearlyseparateUIelementsanddatafromeachother,andusetheactivitytobringthembacktogether.ThisseparationisanimplementationofanMVP(Model-View-Presenter)pattern.
YouwillworkwithActivitiesandViewsthroughoutthisbook.
WhatyoushouldalreadyKNOWForthispracticalyoushouldbefamiliarwith:
HowtocreateaHelloWorldappwithAndroidStudio.
WhatyouwillLEARNYouwilllearn:
HowtocreateinteractiveuserinterfacesintheLayoutEditor,inXML,andprogrammatically.Alotofnewterminology.CheckouttheVocabularywordsandconceptsglossaryforfriendlydefinitions.
Introduction
23

WhatyouwillDOInthispractical,youwill:
CreateanappandadduserinterfaceelementssuchasbuttonsintheLayoutEditor.Edittheapp'slayoutinXML.Addabuttontotheapp.Useastringresourceforthelabel.Implementaclickhandlermethodforthebuttontodisplayamessageonthescreenwhentheuserclicks.Changetheclickhandlermethodtochangethemessageshownonthescreen.
AppOverviewThe"HelloToast"appwillconsistoftwobuttonsandonetextview.Whenyouclickonthefirstbutton,itwilldisplayashortmessage,ortoast,onthescreen.Clickingonthesecondbuttonwillincreaseaclickcounter;thetotalcountofmouseclickswillbedisplayedinthetextview.
Here'swhatthefinishedappwilllooklike:
Introduction
24

Introduction
25

Task1.Createanew"HelloToast"projectInthispractical,youwilldesignandimplementaprojectforthe"HelloToast"app.
1.1.Createthe"HelloToast"project
StartAndroidStudioandcreateanewprojectwiththefollowingparameters:
Attribute Value
ApplicationName HelloToast
CompanyName com.example.androidoryourowndomain
PhoneandTabletMinimumSDK API15:Android4.0.3IceCreamSandwich
Template EmptyActivity
GenerateLayoutfilebox Checked
BackwardsCompatibilitybox Checked
SelectRun>RunapporclicktheRunicon inthetoolbartobuildandexecutetheappontheemulatororyourdevice.
Task2:Addviewsto"HelloToast"intheLayoutEditorInthistask,youwillcreateandconfigureauserinterfaceforthe"HelloToast"appbyarrangingviewUIcomponentsonthescreen.
Why:Everyappshouldstartwiththeuserexperience,eveniftheinitialimplementationisverybasic.
ViewsusedforHelloToastare:
TextView-Aviewthatdisplaystext.Button-Abuttonwithalabelthatisusuallyassociatedwithaclickhandler.LinearLayout-Aviewthatactsasacontainertoarrangeotherview.ThistypeofviewextendstheViewGroupclassandisalsocalledaviewgroup.LinearLayoutisabasicviewgroupthatarrangesitscollectionofviewsinahorizontalorverticalrow.
Introduction
26

HereisaroughsketchoftheUIyouwillbuildinthisexercise.SimpleUIsketchescanbeveryusefulfordecidingwhichviewstouseandhowtoarrangethem,especiallywhenyourlayoutsbecomemoresophisticated.
2.1ExploretheLayoutEditor
UsetheLayoutEditortocreatethelayoutoftheuserinterfaceelements,andtopreviewyourappusingdifferentdevicesandappthemes,resolutions,andorientations.
Refertothescreenshotbelowtomatch
1. Intheapp>res>layoutfolder,opentheactiviy_main.xmlfile(1).
TheAndroidStudioScreenshouldlooksimilartothescreenshotbelow.IfyouseetheXMLcodefortheUIlayout,clicktheDesigntabbelowtheComponentTree(8).
2. Usingtheannotatedscreenshotbelowasaguideline,exploretheLayoutEditor.
Introduction
27

3. Findthedifferentwaysinwhichthe"HelloWorld"string'sUIelement,aTextView,isrepresented.InthePaletteofUIelements(2)developerscancreateatextviewbydraggingitintothedesignpane.Visually,intheDesignpane(6).IntheComponentTree(7),asacomponentinahierarchyofUIelementscalledtheViewHierarchy.Thatis,viewsareorganizedintoatreehierarchyofparentsandchildren,wherechildreninheritpropertiesoftheirparents.InthePropertiespane(4),asalistofitsproperties,where"HelloToast"isthevalueofthetextpropertyoftheTextView(5).
4. Usetheselectorsabovethevirtualdevice(3)todothefollowing:
Changethethemeforyourapp.Changetherotationtolandscape.UseadifferentversionoftheSDK.Previewlayoutvariantssuchasaright-to-leftlayoutdirection.
Usethetooltipsontheiconstohelpyoudiscovertheirfunction.
5. SwitchbetweentheDesignandTexttabs(8).SomeUIchangescanonlybemadeincode,andsomearequickertoaccomplishinthevirtualdevice.
6. Whenyou'redone,undothechanges(forUIchanges,useEdit>Undoorthekeyboardshortcutfortheoperatingsystem).
SeetheAndroidStudioUserGuideforthefullAndroidStudiodocumentation.
Note:IfyougetanerroraboutamissingAppTheme,tryFile>InvalidateCaches/Restartorchooseathemethatdoesnotgeneratetheerror.Additionalhelpcanbefoundinthisstackoverflowpost.
2.2ChangetheviewgrouptoaLinearLayoutTherootoftheviewhierarchyisaviewgroup,whichasimpliedbythename,isaviewthatcontainsotherviews.
Averticallinearlayoutisoneofthemostcommonlayouts.Itissimple,fast,andalwaysagoodstartingpoint.Changetheviewgrouptoavertical,LinearLayoutasfollows:
1. IntheComponentTreepane(7inthepreviousscreenshot),findthetoporrootviewdirectlybelowtheDeviceScreen.
Introduction
28

2. ClicktheTexttab(8)toswitchtothecodeviewofthelayout.3. Inthesecondlineofthecode,changetherootviewgrouptoLinearLayout.Thesecondlineofcodenowlooks
somethinglikethis:
<LinearLayoutxmlns:android="http://schemas.android.com/apk/res/android"
4. Makesuretheclosingtagattheendofthecodehaschangedto</LinearLayout>.Ifithasn'tchangedautomatically,changeitmanually.
5. Theandroid:layout_heightisdefinedaspartofthetemplate.Thedefaultlayoutorientationahorizontalrow.Tochangethelayouttobevertical,addthefollowingcodeinsideLinearLayout,belowandroid:layout_height.
android:orientation="vertical"
6. Fromthemenubar,select:Code>ReformatCode…
Itmaysay"Nolineschanged:codeisalreadyproperlyformatted".
7. Runthecodetomakesureitstillworks.8. SwitchbacktoDesign.9. VerifyintheComponentTreepanethatthetopelementisnowaLinearLayoutwithitsorientationattributesetto
"vertical".
SolutionCode:DependingonyourversionofAndroidStudio,yourcodewilllooksomethinglikethefollowing.
<?xmlversion="1.0"encoding="utf-8"?>
<LinearLayoutxmlns:android="http://schemas.android.com/apk/res/android"
xmlns:tools="http://schemas.android.com/tools"
android:layout_width="match_parent"
android:layout_height="match_parent"
android:orientation="vertical"
tools:context="hellotoast.android.example.com.hellotoast.MainActivity">
<TextView
android:layout_width="wrap_content"
android:layout_height="wrap_content"
android:text="HelloWorld!"/>
</LinearLayout>
2.3AddviewstotheLinearLayoutintheLayoutEditor
InthistaskyouwilldeletethecurrentTextView(forpractice),andaddanewTextViewandtwobuttonstotheLinearLayoutasshownintheUIsketchforthistask.RefertotheUIdiagramabove,ifnecessary.
AddUIElements
1. ClicktheDesigntab(8)toshowthevirtualdevicelayout.2. ClicktheTextViewwhosetextvalueis"HelloWorld"inthevirtualdevicelayoutortheComponentTreepane(7).3. PresstheDeletekeytoremovethatTextView.4. FromthePalettepane(2),draganddropaButtonelement,aTextView,andanotherButtonelement,inthatorder,one
belowtheotherintothevirtualdevicelayout.
AdjusttheUIElements
1. Toidentifyeachviewuniquelywithinanactivity,eachviewneedsauniqueID.Andtobeofanyuse,thebuttonsneedlabelsandthetextviewneedstoshowsometext.Double-clickeachelementintheComponentTreetoseeitspropertiesandchangethetextandIDstringsasfollows:
Introduction
29

Element Text ID
Topbutton Toast button_toast
Textview 0 show_count
Bottombutton Count button_count
1. Runyourapp.
SolutionLayout:
ThereshouldbethreeViewsonyourscreen.Theywon'tmatchtheimagebelow,butaslongasyouhavethreeViewsina
verticallayout,youaredoingfine!
Challenge:ThinkofanappyoumightwantandcreateaprojectandlayoutforitusingLayoutEditor.ExploremoreofthefeaturesofLayoutEditor.Asmentionedbefore,theLayoutEditorhasarichsetoffeaturesandcodingshortcuts.ChecktheAndroidStudiodocumentationtodivedeeper.
Task3:Editthe"HelloToast"layoutinXMLInthispractical,youwilledittheXMLcodefortheHelloToastappUIlayout.Youwillalsoeditthepropertiesoftheviewsyouhavecreated.YoucanfindthepropertiescommontoallviewsintheViewclassdocumentation.
Why:WhiletheLayoutEditorisapowerfultool,somechangesareeasiertomakedirectlyintheXMLsourcecode.ItisapersonalpreferencetouseeitherthegraphicalLayoutEditororedittheXMLfiledirectly.
1. Openres/layout/activity_main.xmlinTextmode.2. InthemenubarselectCode>ReformatCode3. ExaminethecodecreatedbytheLayoutEditor.
Notethatyourcodemaynotbeanexactmatch,dependingonwhatchangesyoumadeintheLayoutEditor.Usethesamplesolutionsasguidelines.
3.1ExamineLinearLayoutpropertiesALinearLayoutisrequiredtohavetheseproperties:
layout_widthlayout_heightorientation
Introduction
30

Thelayout_widthandlayout_heightcantakeoneofthreevalues:
Thematch_parentattributeexpandstheviewtofillitsparentbywidthorheight.WhentheLinearLayoutistherootview,itexpandstothesizeoftheparentview.Thewrap_contentattributeshrinkstheviewdimensionsjustbigenoughtoencloseitscontent.(Ifthereisnocontent,theviewbecomesinvisible.)Useafixednumberofdp(deviceindependentpixels)tospecifyafixedsize,adjustedforthescreensizeofthedevice.Forexample,"16dp"means16deviceindependentpixels.
Theorientationcanbe:
horizontal:viewsarearrangedfromlefttoright.vertical:viewsarearrangedfromtoptobottom.
ChangetheLinearLayoutof"HelloToast"asfollows:
Property Value
layout_width match_parent(tofillthescreen)
layout_height match_parent(tofillthescreen)
orientation vertical
3.2Createstringresources
Insteadofhard-codingstringsintotheXMLcode,itisabestpracticetousestringresources,whichrepresentthestrings
Why:Havingthestringsinaseparatefilemakesiteasiertomanagethem,especiallyifyouusethesestringsmorethanonce.Also,stringresourcesaremandatoryfortranslatingandlocalizingyourappasyouwillcreateonestringresourcefileforeachlanguage.
1. Placethecursorontheword"Toast".2. PressAlt-Enter(Option-EnterontheMac).3. SelectExtractstringresources.4. SettheResourcenametobutton_label_toastandclickOK.(Ifyoumakeamistake,undothechangewithCtrl-Z.)
Thiscreatesastringresourceinthevalues/res/string.xmlfile,andthestringinyourcodeisreplacedwithareferencetotheresource,
@string/button_label_toast
5. Extractandnametheremainingstringsfromtheviewsasfollows:
View ResourceValue/String Resourcename
Button HelloToast! button_label_toast
TextView 0 count_initial_value
Button Count button_label_count
6. IntheProjectview,navigatetovalues/strings.xmltofindyourstrings.Now,youcaneditallyourstringsinoneplace.
3.3ResizeSimilartostrings,itisabestpracticetoextractviewdimensionsfromthemainlayoutXMLfileintoadimensionsresourcelocatedinafile.
Introduction
31

Why:Thismakesiteasiertomanagedimensions,especiallyifyouneedtoadjustyourlayoutfordifferentdeviceresolutions.Italsomakesiteasytohaveconsistentsizing,andchangethesizeofmultipleobjectsbychangingoneproperty.
Dothefollowing:
1. Lookatthedimens.xmlresourcefile.Thereshouldbevaluesforthedefaultscreenmarginsdefined.Forthedimensionsofviews,itisbetternottousehard-codedvalues,becausethatpreventsviewsfromadjustingtothescreensize.
2. Ifnecessary,changethelayout_widthofallelementsinsidetheLinearLayoutto"match_parent".
IfyouwanttousethegraphicalLayoutEditor,clickontheDesigntab,selecteachelementintheComponentTreepaneandchangethelayout:widthpropertyinthePropertiespane.IfyouwanttodirectlyedittheXMLfile,clickontheTexttab,changetheandroid:layout_widthforthefirstButton,theTextView,andthelastButton.
3. Ifnecessary,changethelayout_heightofallelementsinsidetheLinearLayoutto"wrap_content".
3.4SetcolorsandbackgroundsStylesandcolorsareadditionalpropertiesthatcanbeextractedintoresources.Allviewscanhavebackgroundsthatcanbecolorsorimages.
Why:Extractingstylesandcolorsmakesiteasytousethemconsistentlythroughouttheapp,andstraightforwardtochangeacrossallUIelements.
Experimentwiththefollowingchanges:
1. Changethetextsizeoftheshow_countTextView."sp"standsforscale-independentpixel,andlikedp,isaunitthatscaleswiththescreendensityanduser'sfontsizepreference.Itisrecommendyouusethisunitwhenspecifyingfontsizes,sotheywillbeadjustedforboththescreendensityandtheuser'spreference.
android:textSize="160sp"
2. ExtractthetextsizeoftheTextViewasadimensionresourcenamedcount_text_size,asfollows:
i. ClicktheTexttabtoshowtheXMLcode,ifyouhaven'talreadydoneso.
ii. Placethecursoron"160sp".
iii. PressAlt-Enter(Option-EnterontheMac).
iv. ClickExtractdimensionresource.
v. SettheResourcenametocount_text_size,andclickOK.(Ifyoumakeamistake,youcanundothechangewithCtrl-Z).
vi. IntheProjectview,navigatetovalues/dimens.xmltofindyourdimensions.Thedimens.xmlfileappliestoalldevices.Thedimens.xmlfileforw820dpappliesonlytodevicesthatarewiderthan820dp.
3. ChangethetextStyleoftheshow_countTextViewtobold.
android:textStyle="bold"
4. Changethetextcolorintheshow_counttextviewtotheprimarycolorofthetheme.Lookatthecolors.xmlresourcefiletoseehowtheyaredefined.
ThecolorPrimaryisoneofthepredefinedthemebasecolorsandisusedfortheappbar.Forexample,Inaproductionapp,youcouldcustomizethistofityourbrand.UsingthebasecolorsforotherUIelementscreatesauniformUI.SeeUsingtheMaterialTheme.Youwilllearnmoreaboutappthemesandmaterialdesigninalaterpractical.
Introduction
32

android:textColor="@color/colorPrimary"
5. Changethecolorofboththebuttonstotheprimarycolorofthetheme.
android:background="@color/colorPrimary"
6. Changethecolorofthetextinbothbuttonstowhite.WhiteisoneofthecolorsprovidedasanAndroidPlatformResource.SeeAccessingResources.
android:textColor="@android:color/white"
7. AddabackgroundcolortotheTextView.
android:background="#FFFF00"
8. IntheLayoutEditor(Texttab),placeyourmousecursoroverthiscolorandpressAlt-Enter(Option-EnterontheMac).
9. SelectChoosecolor,whichbringsupthecolorpicker,pickacoloryoulike,orgowiththecurrentyellow,thenclickChoose.
10. Openvalues/colors.xml.NoticethatcolorPrimarythatyouusedearlierisdefinedhere.11. Usingthecolorsinvalues/colors.xmlasanexample,addaresourcenamedmyBackgroundColorforyourbackground
color,andthenuseittosetthebackgroundofthetextview.
<colorname="myBackgroundColor">#FFF043</color>
3.5Gravityandweight
Specifyinggravityandweightpropertiesgivesyouadditionalcontroloverarrangingviewsandcontentinlinearlayouts.
1. Theandroid:layout_gravityattributespecifieshowaviewisalignedwithinitsparentView.Becausetheviewsmatchtheirparentinwidth,itisnotnecessarytosetthisexplicitly.Youcancenteraviewthatisnarrowhorizontallyinitsparent:android:layout_gravity="center_horizontal"
2. Theandroid:layout_weightattributeindicateshowmuchoftheextraspaceintheLinearLayoutwillbeallocatedtotheviewsthathavethisparameterset.Ifonlyoneviewhasthisattribute,itgetsalltheextrascreenestate.Formultiple
Introduction
33

views,thespaceispro-rated.Forexample,ifthebuttonshaveaweightof1andthetextview2,totalling4,thebuttonsget¼ofthespaceeach,andthetextviewhalf.
3. Theandroid:gravityattributespecifiesthealignmentofthecontentofaViewwithintheViewitself.Thecounteriscenteredinitsviewwith:android:gravity="center"
Dothefollowing:
1. Centerthetextinatheshow_countTextViewhorizontallyandvertically:android:gravity="center"2. Maketheshow_countTextViewadjusttothesizeofthescreen:
android:layout_weight="2"
SampleSolution:strings.xml
<resources>
<stringname="app_name">HelloToast</string>
<stringname="button_label_count">Count</string>
<stringname="button_label_toast">Toast</string>
<stringname="count_initial_value">0</string>
</resources>
SampleSolution:dimens.xml
<resources>
<!--Defaultscreenmargins,pertheAndroidDesignguidelines.-->
<dimenname="activity_horizontal_margin">16dp</dimen>
<dimenname="activity_vertical_margin">16dp</dimen>
<dimenname="count_text_size">160sp</dimen>
</resources>
SampleSolution:colors.xml
<resources>
<colorname="colorPrimary">#3F51B5</color>
<colorname="colorPrimaryDark">#303F9F</color>
<colorname="colorAccent">#FF4081</color>
<colorname="myBackgroundColor">#FFF043</color>
</resources>
SampleSolution:activity_main.xml
Introduction
34

<?xmlversion="1.0"encoding="utf-8"?>
<LinearLayoutxmlns:android="http://schemas.android.com/apk/res/android"
xmlns:tools="http://schemas.android.com/tools"
android:layout_width="match_parent"
android:layout_height="match_parent"
android:orientation="vertical"
android:paddingBottom="@dimen/activity_vertical_margin"
android:paddingLeft="@dimen/activity_horizontal_margin"
android:paddingRight="@dimen/activity_horizontal_margin"
android:paddingTop="@dimen/activity_vertical_margin"
tools:context="hellotoast.android.example.com.hellotoast.MainActivity">
<Button
android:id="@+id/button_toast"
android:layout_width="match_parent"
android:layout_height="wrap_content"
android:text="@string/button_label_toast"
android:background="@color/colorPrimary"
android:textColor="@android:color/white"/>
<TextView
android:id="@+id/show_count"
android:layout_width="match_parent"
android:layout_height="wrap_content"
android:gravity="center"
android:text="@string/count_initial_value"
android:textSize="@dimen/count_text_size"
android:textStyle="bold"
android:textColor="@color/colorPrimary"
android:background="@color/myBackgroundColor"
android:layout_weight="2"/>
<Button
android:id="@+id/button_count"
android:layout_width="match_parent"
android:layout_height="wrap_content"
android:text="@string/button_label_count"
android:background="@color/colorPrimary"
android:textColor="@android:color/white"/>
</LinearLayout>
CodingchallengeNote:Allcodingchallengesareoptionalandarenotprerequisitesforlaterchapters.
Createanewprojectwith5views.Haveoneviewusethetop-halfofthescreen,andtheother4viewssharethebottomhalfofthescreen.UseonlyaLinearLayout,gravity,andweightstoaccomplishthis.UseanimageasthebackgroundoftheHelloToastapp.Addanimagetothedrawablefolder,thensetitasthebackgroundoftherootview.Foradeepdiveintodrawables,seetheDrawableResourcesdocumentation.
Task4:AddonClickhandlersforthebuttonsInthistask,youwilladdmethodstoyourMainActivitythatexecutewhentheuserclicksoneachbutton.
Why:Interactiveappsmustrespondtouserinput.
Toconnectauseractioninaviewtoapplicationcode,youneedtodotwothings:
Writeamethodthatperformsaspecificactionwhenauseruserclicksanon-screenbutton.Associatethismethodtotheview,sothismethodiscalledwhentheuserinteractswiththeview.
Introduction
35

4.1AddanonClickpropertytoabutton
Aclickhandlerisamethodthatisinvokedwhentheuserclicksonauserinterfaceelement.InAndroid,youcanspecifythenameoftheclickhandlermethodforeachviewintheXMLlayoutfilewiththeandroid:onClickproperty.
1. Openres/layout/activity_main.xml.2. Addthefollowingpropertytothebutton_toastbutton.
android:onClick="showToast"
3. Addthefollowingattributetothebutton_countbutton.
android:onClick="countUp"
4. Insideofactivity_main.xml,placeyourmousecursorovereachofthesemethodnames.5. PressAlt-Enter(Option-EnterontheMac),andselectCreateonClickeventhandler.6. ChoosetheMainActivityandclickOK.
ThiscreatesplaceholdermethodstubsfortheonClickmethodsinMainActivity.java.
Note:Youcanalsoaddclickhandlerstoviewsprogrammatically,whichyouwilldoinalaterpractical.WhetheryouaddclickhandlersinXMLorprogrammaticallyislargelyapersonalchoice;though,therearesituationswhereyoucanonlydoitprogrammatically.SolutionMainActivity.java:
packagehellotoast.android.example.com.hellotoast;
importandroid.support.v7.app.AppCompatActivity;
importandroid.os.Bundle;
importandroid.view.View;
publicclassMainActivityextendsAppCompatActivity{
@Override
protectedvoidonCreate(BundlesavedInstanceState){
super.onCreate(savedInstanceState);
setContentView(R.layout.activity_main);
}
publicvoidcountUp(Viewview){
//Whathappenswhenuserclicksonthebutton_countButtongoeshere.
}
publicvoidshowToast(Viewview){
//Whathappenswhenuserclicksonthebutton_toastButtongoeshere.
}
}
4.2ShowatoastwhentheToastbuttonisclicked
Atoastprovidessimplefeedbackaboutanoperationinasmallpopup.Itonlyfillstheamountofspacerequiredforthemessageandthecurrentactivityremainsvisibleandinteractive.Toastsprovideanotherwayforyoutotesttheinteractivityofyourapp.
InMainActivity.java,addcodetotheshowToast()methodtoshowatoastmessage.
Introduction
36

TocreateaninstanceofaToast,youcallthemakeText()factorymethodontheToastclass,supplyingacontext(seebelow),themessagetodisplay,andthedurationofdisplay.Youdisplaythetoastcallingshow().Thisisacommonpatternthatyoucanreusethecodeyouaregoingtowrite.
1. Getthecontextoftheapplication.
DisplayingaToastmessagerequiresacontext.Thecontextofanapplicationcontainsglobalinformationabouttheapplicationenvironment.SinceatoastdisplaysontopofthevisibleUI,thesystemneedsinformationaboutthecurrentactivity.Contextcontext=getApplicationContext();
Whenyouarealreadyinthecontextoftheactivitywhosecontextyouneed,youcanalsousethisastheshortcuttothecontext.
2. Thelengthofatoaststringcanbeeithershortorlong,andyouspecifywhichonebyusingaToastconstant.
Toast.LENGTH_LONG
Toast.LENGTH_SHORT
Theactuallengthsareabout3.5sforthelongtoastand2sfortheshorttoast.ThevaluesarespecifiedintheAndroidsourcecode.SeethisStackoverflowpostdetails.
3. CreateaninstanceoftheToastclasswiththecontext,message,andduration.Thecontextistheapplicationcontextwegotearlier.ThemessageisthestringyouwanttodisplayThedurationisoneofthepredefinedconstantsToast.LENGTH_LONGorToast.LENGTH_SHORT.
Toasttoast=Toast.makeText(context,"HelloToast",Toast.LENGTH_LONG);
4. Extractthe"HelloToast"stringintoastringresourceandcallittoast_message.
i. Placethecursoronthestring"HelloToast!".
ii. PressAlt-Enter(Option-EnterontheMac).
iii. SelectExtractstringresources.
iv. SettheResourcenametotoast_messageandclickOK.
Thiswillstore"HelloWorld"asastringresourcenametoast_messageinthestringresourcesfileres/values/string.xml.Thestringparameterinyourmethodcallisreplacedwithareferencetotheresource.
R.identifiestheparameterasaresource.stringreferencesthenameoftheXMLfilewheretheresourcesisdefined.toast_messageisthenameoftheresource.
Toasttoast=Toast.makeText(context,R.string.toast_message,duration);
5. Displaythetoast.
toast.show();
6. RunyourappandverifythetoastshowswhentheToastbuttonistapped.
Solution:
Introduction
37

/*
*WhentheTOASTbuttonisclicked,showatoast.
*
*@paramviewTheviewthattriggersthisonClickhandler.
*Sinceatoastalwaysshowsonthetop,viewisnotused.
**/
publicvoidshowToast(Viewview){
//Createatoastshowit.
Toasttoast=Toast.makeText(this,R.string.toast_message,Toast.LENGTH_LONG;);
toast.show();
}
4.3IncreasethecountinthetextviewwhentheCountbuttonisclickedTodisplaythecurrentcountinthetextview:
Keeptrackofthecountasitchanges.Sendtheupdatedcounttothetextviewtodisplayitontheuserinterface.
Implementthisasfollows:
1. InMainActivity.java,addaprivatemembervariablemCounttotrackthecountandstartitat0.2. InMainActivity.java,addaprivatemembervariablemShowCounttogetthereferenceoftheshow_countTextView.3. InthecountUp()method,increasethevalueofthecountvariableeachtimethebuttonisclicked.4. GetareferencetothetextviewusingtheIDyousetinthelayoutfile.
Views,likestringsanddimensions,areresourcesthatcanhaveanid.ThefindViewById()calltakestheIDofaviewasitsparameterandreturnstheview.BecausethemethodreturnsaView,youhavetocasttheresulttotheviewtypeyouexpect,inthiscase(TextView).
Inordertogetthisresourceonlyonce,useamembervariableandsetitinonCreate().
mShowCount=(TextView)findViewById(R.id.show_count);
5. Setthetextinthetextviewtothevalueofthecountvariable.
if(mShowCount!=null)
mShowCount.setText(Integer.toString(mCount));
6. RunyourapptoverifythatthecountincreaseswhentheCountbuttonispressed.
Solution:
Classdefinitionandinitializingcountvariable:
publicclassMainActivityextendsAppCompatActivity{
privateintmCount=0;
privateTextViewmShowCount;
inonCreate():
mShowCount=(TextView)findViewById(R.id.show_count);
countUpMethod:
publicvoidcountUp(Viewview){
mCount++;
if(mShowCount!=null)
mShowCount.setText(Integer.toString(mCount));
}
Introduction
38

Resources:
LearnmoreabouthandlingAndroidInputEvents.Contextclassdocumentation
SolutioncodeAndroidStudioproject:HelloToast
CodingchallengeNote:Allcodingchallengesareoptionalandarenotaprerequisiteforlaterchapters.
Challenge:EvenasimpleapplikeHelloToastcanbethefoundationofmanyscoringorproductorderingapps.Writeoneappthatwouldbeofusetoyou,ortryoneoftheseexamples:
Createacoffeeorderingapp.Addbuttonstochangethenumberofcoffeesordered.Calculateanddisplaythetotalprice.Createascoringappforyourfavoriteteamsport.Makethebackgroundanimagethatrepresentsthatsport.Createbuttonstocountthescoresforeachteam.
SummaryInthischapter,you:
AddedUIelementstoanappintheLayoutEditorandusingXML.MadetheUIinteractivewithbuttons.andclicklistenersAddclicklistenersthatupdateatextviewinresponsetouserinput.Displayedinformationtousersusingatoast.
RelatedconceptTherelatedconceptdocumentationisinAndroidDeveloperFundamentals:Concepts.
Layouts,Views,andResources
LearnmoreAllViewsaresubclassesoftheViewclassandthereforeinheritmanypropertiesoftheViewsuperclass.YoucanfindinformationonallButtonpropertiesintheButtonclassdocumentation,andalltheTextViewpropertiesintheTextViewclassdocumentation.YoucanfindinformationonalltheLinearLayoutpropertiesintheLinearLayoutclassdocumentation.TheAndroidresourcesdocumentationwilldescribeothertypesofresources.Androidcolorconstants:AndroidstandardR.colorresourcesMoreinformationaboutdpandspunitscanbefoundatSupportingDifferentDensities
DeveloperDocumentation:
AndroidStudiodocumentationVocabularywordsandconceptsglossarydeveloper.android.comLayoutsViewclassdocumentation
Introduction
39

deviceindependentpixelsButtonclassdocumentationTextViewclassdocumentationAndroidresourcesdocumentationCompletecodefortheHelloToastappArchitecturalPatterns(overview)
Introduction
40

1.2B:UsingLayoutsContents:
WhatyoushouldalreadyKNOWWhatyouwillLEARNWhatyouwillDOAppOverviewTask1:ChangethelayouttoRelativeLayoutTask2:ChangethelayouttoConstraintLayoutTask3:CreatelayoutvariantsCodingChallengeSummaryRelatedconceptsLearnmore
WhenyoustartanAndroidStudioproject,thetemplateyouchooseprovidesabasiclayoutwithviews.Asyoulearnedinapreviouspractical,youcanlineviewsupquicklyandeasilyinalayoutusingLinearLayout,whichisaviewgroupthatalignschildviewswithinithorizontallyorvertically.
Thispracticalexplorestwootherlayoutviewgroups:
RelativeLayout:Agroupofchildviewsinwhicheachviewispositionedandalignedrelativetootherviewswithintheviewgroup.Positionsofthechildviewsaredescribedinrelationtoeachotherortotheparentviewgroup.ConstraintLayout:AlayoutsimilartoRelativeLayoutbutmoreflexible.Itgroupschildviewsusinganchorpoints(aconnectiontoanotherview),edges,andguidelinestocontrolhowviewsarepositionedrelativetootherelementsinthelayout.ConstraintLayoutwasdesignedtomakeiteasytodraganddropviewsinthelayouteditorofAndroidStudio
WhatyoushouldalreadyKNOWFromthepreviouspracticals,youshouldbeableto:
CreateaHelloWorldappwithAndroidStudio.Runanappontheemulatororadevice.ImplementaTextViewinalayoutforanapp.Createandusingstringresources.Convertlayoutdimensionstoresources.
WhatyouwillLEARNYouwilllearnto:
UsethelayouteditorinAndroidStudioPositionviewswithinaRelativeLayoutPositionviewswithinaConstraintLayoutCreatevariantsofthelayoutforlandscapeorientationandlargerdisplays
WhatyouwillDOInthispracticalyouwill:
ExperimentwithusingRelativeLayoutandConstraintLayout.
Introduction
41

CopyandrefactortheHelloToastapptocreatetheHelloRelativeapp.ChangetherootviewgroupinthemainlayouttobeaRelativeLayout.Rearrangetheviewsinthemainlayouttoberelativetoeachother.CopyandrefactortheHelloRelativeapptocreateHelloConstraint.ChangetherootviewgroupinthemainlayouttobeConstraintLayout.Modifythelayouttoaddconstraintstotheviews.Modifytheviewsforlayoutvariantsforlandscapeorientationandlargerdisplays.
AppOverviewTheHelloToastappinapreviouspracticalusesaLinearLayouttoarrangetheviewsintheactivitylayout,asshowninthefigurebelow.
Introduction
42

Introduction
43

Inordertopracticeusingthelayouteditor,youwillcopytheHelloToastappandcallthenewcopyHelloRelative,inordertoexperimentwithaRelativeLayout.YouwillusethelayouteditortoarrangetheviewsinadifferentUIlayoutasshownbelow.
Finally,youwillmakeanothercopyoftheappandcallitHelloConstraint,andreplaceLinearLayoutwithConstraintLayout.ConstraintLayoutoffersmorevisualaidsandpositioningfeaturesinthelayouteditor.YouwillcreateanentirelydifferentUIlayout,andalsolayoutvariantsforlandscapeorientationandlargerdisplays,asshownbelow.
AndroidStudioproject:HelloToast
Task1:ChangethelayouttoRelativeLayoutARelativeLayoutisaviewgroupinginwhicheachviewispositionedandalignedrelativetootherviewswithinthegroup.Inthistask,youwillinvestigateusingRelativeLayout.
Introduction
44

1.1CopyandrefactortheHelloToastapp
1. CopytheHelloToastprojectfolder,renameittoHelloRelative,andrefactorit.(SeetheAppendixforinstructionsoncopyingaproject.)
2. Afterrefactoring,changethe<stringname="app_name">valueinthestrings.xmlfile(withinapp>res>values)toHelloRelative(withaspace)astheapp'sname.
1.2ChangeLinearLayouttoRelativeLayout
1. Opentheactivity_main.xmllayoutfile,andclicktheTexttabatthebottomoftheeditingpanetoseetheXMLcode.2. Changethe<LinearLayoutatthetopto<RelativeLayoutsothatthestatementlookslikethis:
<RelativeLayoutxmlns:android="http://schemas.android.com/apk/res/android"
3. Scrolldowntomakesurethattheendingtag</LinearLayout>hasalsochangedto</RelativeLayout>;ifithasn't,changeitmanually.
1.3RearrangeviewswiththeDesigntab1. ClicktheDesigntabatthebottomoftheeditingpane.2. Theeditingpaneshouldnowlooklikethefigurebelow,withthelayoutdesignanditsblueprint.Ifyouseeonlyalayout
design,oronlyablueprint,clicktheShowDesign+Blueprintbutton(#1inthefigurebelow).
3. WiththechangetoRelativeLayout,thelayouteditoralsochangedsomeoftheviewattributes.Forexample:
Thebutton_countviewfortheCOUNTbuttonisoverlayingthebutton_toastviewfortheTOASTbutton,whichiswhyyoucan'tseetheTOASTbutton.However,intheblueprint,youcanseethatthetwobuttonsareoccupying
Introduction
45

thesamespace.Thetoppartoftheshow_countview(showing0)isalsooverlayingtheCOUNTandTOASTbuttons.
4. Dragthebutton_countview(fortheCOUNTbutton)toanareabelowtheshow_countview(showing0),andthendragituptothebottomoftheshow_countviewuntilitsnapsintoplaceasshownbelow.Alsodragtheshow_countviewsothatthetopoftheviewsnapstothebottomofthebutton_toastviewfortheTOASTbutton.
Tip:Whenselectingaviewinthelayout,itspropertiesappearinthePropertiespaneontherightsideoftheeditingpane.ThesepropertiescorrespondtoXMLattributesintheXMLcodeforthelayout,whichyouwillexamineinthenextstep.
1.4ExaminetheXMLcodeintheTexttabFollowthesestepstoseehowtheapplooks:
1. Runtheapp.Theappworksthesamewayasbefore.TheonlydifferenceisthatthelayoutusesaRelativeLayouttopositiontheelements,ratherthanaLinearLayout.Inthenexttask,youwillchangethelayoutoftheUI.
2. Changethedeviceoremulatororientationtolandscape.Notethatthebutton_countviewdisappearsbecausethescreenlayoutdoesnotaccommodatethelandscapeorientation.Youwillfixthisprobleminasubsequenttaskinthispractical.
3. ClicktheTexttabatthebottomoftheeditingpane.4. ExaminethechangestotheXMLcodeintheeditingpaneasaresultofchangingLinearLayouttoRelativeLayout.
StartbyexaminingthesecondButton(button_count):
<Button
android:id="@+id/button_count"
android:layout_width="match_parent"
android:layout_height="wrap_content"
android:layout_gravity="center_horizontal"
android:background="@color/colorPrimary"
android:onClick="countUp"
android:text="@string/button_label_count"
android:textColor="@android:color/white"
android:layout_below="@+id/show_count"
android:layout_centerHorizontal="true"/>
Introduction
46

TwonewXMLattributeswereautomaticallyaddedbythelayouteditorafteryoumovedtheButton(button_count)inthelayout:
android:layout_below="@+id/show_count"
android:layout_centerHorizontal="true"
Theandroid:layout_belowattributeplacesthebutton_countviewdirectlybelowtheshow_countview.ThisattributeisoneofseveralattributesforpositioningviewswithinaRelativeLayout—youplaceviewsinrelationtoTheXMLcodeforshow_countview,whichyoualsomovedinthelayouteditor,isnowinapositionbelowthetwobuttonsintheTextview.ThisisduetothechangefromLinearLayouttoRelativeLayout.Theshow_countviewalsonowincludesthefollowingattributes,asaresultofmovingtheviewinthelayouteditor:
android:layout_below="@+id/button_toast"
android:layout_alignParentLeft="true"
android:layout_alignParentStart="true"
Theandroid:layout_alignParentLeftalignstheviewtotheleftsideoftheRelativeLayoutparentviewgroup.Whilethisattributebyitselfisenoughtoaligntheviewtotheleftside,youmaywanttheviewtoaligntotherightsideiftheappisrunningonadevicethatisusingaright-to-leftlanguage.Thus,theandroid:layout_alignParentStartattributemakesthe"start"edgeofthisviewmatchthestartedgeoftheparent.Thestartistheleftedgeofthescreenifthepreferenceisleft-to-right,oritistherightedgeofthescreenifthepreferenceisright-to-left.
1.5RearrangeelementsintheRelativeLayout
1. ToexperimentmorewithRelativeLayout,selecttheactivity_main.xmllayoutagainforediting(ifit'snotalreadyselected),andclicktheDesigntabatthebottomoftheeditingpane.
Introduction
47

2. Selecttheshow_countviewinthelayoutortheComponentTree,andchangeitslayout_widthinthePropertiespaneontherightsideofthewindowtowrap_contentasshowninthefigurebelow.
Introduction
48

Thelayouteditordisplaysathinnershow_countviewalignedtotheleftsideoftheparentview,asshowninthefigurebelow.
3. Dragtheshow_countviewhorizontallytothecenterofthelayout.Asyoudragtheview,acenterguideappears—theview'scentershouldsnapintoplacewiththeguideasshownbelow.
Introduction
49

4. Selectthebutton_toastviewandchangeitslayout_widthtowrap_contentinthePropertiespane,andthenchangethelayout_widthofthebutton_countviewtowrap_content.Thelayoutshouldnowlooklikethefigurebelow.
5. Dragthebutton_countviewuptojustbelowthebutton_toastviewsothatitsnapstothebottomofthe
Introduction
50

button_toastview,anddragtheshow_countviewupnexttotherightedgeofthebutton_toastviewsothatitsnapstotherightedgeofthebutton.Thelayoutshouldnowlooklikethefigurebelow:
6. ClicktheTexttabatthebottomoftheeditingpane,andexaminethechangestotheXMLcodeasaresultofmovingtheviewsinthelayout:
Theshow_countviewnowusesthefollowingattributestopositionittotherightofandtheendofthebutton_toastview:
android:layout_toRightOf="@+id/button_toast"
android:layout_toEndOf="@+id/button_toast"
Thebutton_countviewnowusesthefollowingattributestopositionitbelowthebutton_toastview:
android:layout_below="@+id/button_toast"
7. Runtheapp.Theappworksthesamewayasbefore(sincewedidn'tchangeanyJavacode).However,thelayoutisdifferent,asshowninthefigurebelow.Changethedeviceoremulatororientationtolandscapetoseethatthenewlayoutworksforbothorientations.
Introduction
51

Tip:TolearnmoreabouthowtopositionviewsinaRelativeLayout,see"PositioningViews"inthe"RelativeLayout"topicoftheAPIGuide.
Solutioncode:AndroidStudioproject:HelloRelative
Task2:ChangethelayouttoConstraintLayoutConstraintLayoutisaviewgroupavailableintheConstraintLayoutlibrary,whichisincludedwithAndroidStudio2.2andhigher.Theconstraint-basedlayoutletsadeveloperbuildcomplexlayoutswithouthavingtonestviewgroups,whichcanimprovetheperformanceoftheapp.Itisbuiltintothelayouteditor,sothattheconstrainingtoolsareaccessiblefromtheDesigntabwithouthavingtoedittheXMLbyhand.
InthistaskyouwillcopyandrefactortheHelloToastapptocreatetheHelloConstraintapp.YouwillthenchangetherootLinearLayoutviewgroupinthemainlayouttobeConstraintLayout.Afterchangingtherootviewgroup,youwillrearrangetheviewsinthemainlayouttohaveconstraintsthatgoverntheirappearance.
2.1CopyandrefactortheHelloToastapp
1. CopytheHelloToastprojectfolder,renameittoHelloConstraint,andrefactorit.(SeetheAppendixforinstructionsoncopyingaproject.)
2. Afterrefactoring,changethestringname="app_name"valueinthestrings.xmlfile(withinapp>res>values)toHelloConstraint(withaspace)astheapp'sname.
2.2AddConstraintLayouttoyourproject
ChecktobesurethatConstraintLayoutisavailableinyourproject:
1. InAndroidStudio,chooseTools>Android>SDKManager.2. Intheleftpane,clickAndroidSDK.3. Intherightpane,clicktheSDKToolstabatthetopofthepane.4. ExpandSupportRepositoryandseeifConstraintLayoutforAndroidandSolverforConstraintLayoutarealready
checked.
If"Installed"appearsintheStatuscolumn,you'reallset.ClickCancel.If"Notinstalled"appears,or"Update"appears:
Introduction
52

i. ClickthecheckboxnexttoConstraintLayoutforAndroidandSolverforConstraintLayout.Adownloadiconshouldappearnexttoeachcheckbox.
ii. Clickoneofthefollowing:
ApplytostartinstallingthecomponentsandremaininSDKManagertomakeotherchanges.OKtoinstallthecomponents.
iii. Afterinstallingthecomponents(andmakingotherchangesifneeded),clickFinishtofinishusingtheSDKManager.
2.3ConvertalayouttoConstraintLayoutAndroidStudiohasabuilt-inconvertertohelpyouconvertalayouttoConstraintLayout.Followthesesteps:
1. Openthelayoutfile(activity_main.xml)inAndroidStudioandclicktheDesigntabatthebottomoftheeditorwindow.2. IntheComponentTreewindow,right-clickLinearLayoutandthenchooseConvertlayouttoConstraintLayoutfrom
thecontextmenu.3. Theconverterdisplaysanalertwithtwocheckboxesalreadychecked.Don'tuncheckthem—makesurebothoptions
remainchecked:
i. FlattenLayoutHierarchy:Thisoptionremovesallothernestedlayoutsinthehierarchy.Theresultisasingle,flatlayout,whichmaybemoreefficientforthesepurposes.
ii. Don'tflattenlayoutsreferencedfromotherfiles:Ifaparticularlayoutdefinesanandroid:idattributethatisreferencedinyourJavacode,youmaynotwanttoflattenthatlayoutbecauseyourcodemaynolongerwork.However,inHelloConstraint,youdon'thaveanandroid:idattributeforalayout,onlyforviews.
4. IntheAddProjectDependencyalert,clickOKtoaddtheconstraint-layoutlibrary.AndroidStudioautomaticallycopiestheappropriatedependencytoyourproject'sbuild.gradle(Module:app)fileandsyncsthechangeforyou.ThelayouteditorreappearswithConstraintLayoutastherootviewgroup.
Note:Ifthelayouteditorhasaproblemwiththechange,youseeaRenderingProblemswarning.ClickbuildinthemessageTip:Trytobuildtheproject.Thiswillre-syncyourproject'sbuild.gradle(Module:app)filewiththenewdependency.
5. Thelayouteditor'sComponentTreepanenowshowsConstraintLayoutastherootviewgroupforthelayoutwiththeotherviewsbeneathit,asshowninthefigurebelow.Clicktheshow_countviewintheComponentTreepane.Theshow_countviewisalsoselectedintheblueprint,anditspropertiesappearinthePropertiespaneontherightside.
Introduction
53

2.4Explorethelayouteditor
ThelayouteditoroffersmorefeaturesintheDesigntabwhenyouuseaConstraintLayout,includingmorevisuallayouttoolsandasecondrowoficonsformoretools.
Thevisuallayoutandblueprintofferhandlesfordefiningconstraints.Aconstraintisaconnectionoralignmenttoanotherview,totheparentlayout,ortoaninvisibleguideline.FollowthesestepstoexploretheconstraintsthatAndroidStudiocreatedwhenyouconvertedtheLinearLayouttoConstraintLayout:
1. Clicktheshow_countviewintheComponentTreepane.2. Hoverthecursorovertheshow_countviewinthelayout,asshowninthefigurebelow.
Eachconstraintappearsasalineextendingfromacircularhandle.Eachviewhasacircularconstrainthandleinthemiddleofeachside.AfterselectingaviewintheComponentTreepaneorclickingonitinthelayout,theviewalsoshowsresizinghandlesoneachcorner.
Introduction
54

Intheabovefigure:
1. Resizinghandle.2. Constraintlineandhandle.Inthefigure,theconstraintalignstheleftsideoftheshow_countviewtotheleftsideof
thebutton_toastbutton.3. Baselinehandle.Thebaselinehandlealignsthetextbaselineofaviewtothetextbaselineofanotherview.4. Constrainthandlewithoutaconstraintline.
Thelayouteditoralsooffersarowofbuttonsthatletyouconfiguretheappearanceofthelayout:
Inthefigureabove:
1. Design,Blueprint,andBoth:ClicktheDesignicon(firsticon)todisplayacolorpreviewofyourlayout.ClicktheBlueprinticon(middleicon)toshowonlyoutlinesforeachview.Youcanseebothviewssidebysidebyclickingthethirdicon.
2. Screenorientation:Clicktorotatethedevicebetweenlandscapeandportrait.3. Devicetypeandsize:Selectthedevicetype(phone/tablet,AndroidTV,orAndroidWear)andscreenconfiguration
(sizeanddensity).4. APIversion:SelecttheversionofAndroidonwhichtopreviewthelayout.5. Apptheme:SelectwhichUIthemetoapplytothepreview.6. Language:SelectthelanguagetoshowforyourUIstrings.Thislistdisplaysonlythelanguagesavailableinthestring
resources.7. LayoutVariants:Switchtooneofthealternativelayoutsforthisfile,orcreateanewone.
Tip:Tolearnmoreaboutusingthelayouteditor,seeBuildaUIwithLayoutEditor.TolearnmoreabouthowtobuildalayoutwithConstraintLayout,seeBuildaResponsiveUIwithConstraintLayout.
Introduction
55

2.5Clearconstraints
AndroidStudioautomaticallyinferstheconstraintsforlayoutelementswhenyouconvertalayouttouseConstraintLayout.However,theguessesmaynotbewhatyouwant.Followthesestepstocleartheconstraintsinordertofreelypositiontheelementsinthelayout:
1. Right-click(orControl-click)ConstraintLayoutintheComponentTreepane,andchooseClearAllConstraints.
Tip:Youcanalsodeleteasingleconstraintlinebyhoveringthecursorovertheconstrainthandleuntilaredcircleappears,andthenclickingthehandle.TheClearAllConstraintscommandisfasterforremovingallconstraints.
2. Withconstraintsremoved,youcannowmovetheviewsonthelayoutfreely.Dragthebutton_toastviewdowntoanypositionbelowthebutton_countview,sothattheyellowshow_countviewisatthetop,asshowninthefigurebelow.
2.6ResizeaviewThelayouteditoroffersresizinghandlesonallfourcornersofaviewtoresizetheviewquickly.Youcandragthehandlesoneachcorneroftheviewtoresizeit,butdoingsohard-codesthewidthandheightdimensions,whichyoushouldavoidformostviewsbecausehard-codedviewdimensionscannotadapttodifferentcontentandscreensizes.
Introduction
56

Instead,usethePropertiespaneontherightsideofthelayouteditortoselectasizingmodethatdoesn'tusehard-codeddimensions.ThePropertiespaneincludesasquaresizingpanelatthetop.Thesymbolsinsidethesquarerepresentthe
heightandwidthsettingsasfollows:
Intheabovefigure:
1. Horizontalviewsizecontrol.Thehorizontalsizecontrol,whichappearsintwosegmentsontheleftandrightsidesofthesquare,specifiesthelayout_width.Thestraightlinesindicatethatthedimensionisfixedandsetinthelayout_widthpropertybelowthesquare.
2. Verticalviewsizecontrol.Theverticalsizecontrol,whichappearsintwosegmentsonthetopandbottomsidesofthesquare,specifiesthelayout_heightproperty.Theanglesindicatethatthissizecontrolissettowrap_content,whichmeanstheviewwillexpandexactlyasneededtofititscontents.
Followthesestepstoresizetheshow_countview:
1. Clicktheshow_countviewintheComponentTreepane.2. ClickthehorizontalviewsizecontrolinthePropertiespane.Thestraightlineschangetospringcoils,asshowninthe
figurebelow,whichrepresents"anysize".Thelayout_widthpropertyissettozerobecausethereisnosetdimension,buttheviewcanexpandasmuchaspossibletomeetconstraintsandmarginsettings.
Introduction
57

Youwillusethissettingtoanchorthesizeoftheviewtoconstraints,butfirst,continuetoexperimentwithsettings.
3. Clickthehorizontalviewsizecontrolagain(eitherleftorrightside),justtoseewhatotherchoicesyouhave.Thespringcoilschangetoangles,asshowninthefigurebelow,indicatingthatthelayout_widthissettowrap_content.
4. Clickthehorizontalviewsizecontrolagain,andittogglesbacktothestraightlines,indicatingafixeddimension.Clickitagainsothatthelineschangetospringcoils,asshowninthefigurebelow,whichrepresents"anysize".
2.7AddconstraintstoviewsYouwilladdaconstrainttotheshow_countviewsothatitstretchestotherightedgeofthelayout,andanotherconstraintsothattheviewispositionedjustbelowthetopedgeofthelayout.Sincetheviewwassetto"anysize"inthepreviousstep,theviewwillexpandasneededtomatchtheconstraints.
Youwillalsomovethetwobuttonsintopositionontheleftsideoftheshow_countview,constrainthebutton_toastbuttontothetopandleftedgesofthelayout,andconstrainthebutton_countbuttonsothatitstextbaselinematchesthetextbaselineoftheshow_countview.
Introduction
58

1. Tocreatearight-sideconstraintfortheshow_countview,clicktheviewinthelayout,andthenhoverovertheviewtoseeitsconstrainthandles.Click-and-holdtheconstrainthandleontherightsideoftheview,anddragtheconstraintlinethatappearstotherightedgeofthelayout,asshowninthefigurebelow.
Asyoureleasefromtheclick-and-hold,theconstraintismade,andtheshow_countviewjumpstotherightedgeofthelayout.
Introduction
59

2. Click-and-holdtheconstrainthandleonthetopsideoftheview,anddragtheconstraintlinethatappearstothetopedgeofthelayoutundertheappbar,asshowninthefigurebelow.
Thisconstrainstheviewtothetopedge.Afterdraggingtheconstraint,theshow_countviewjumpstothetoprightedgeofthelayout,becauseitisanchoredtoboththetopandrightedges.
3. Clickthebutton_toastview,andusethePropertiespanelasshownpreviouslytoresizetheviewtowrap_contentforboththelayout_widthandlayout_height.Alsoresizethebutton_countviewtowrap_contentforboththelayout_widthandlayout_height.
Youusewrap_contentforthebuttonssothatifthebuttontextislocalizedintoadifferentlanguage,thebuttonwillappearwiderorthinnertoaccommodatethewordinthedifferentlanguage.
4. Dragthebutton_toastviewintopositionontheleftsideoftheshow_countviewasshowninthefigurebelow.Guidesappearsothatyoucansnaptheviewintopositionagainstthetopandleftmargins.
Introduction
60

5. Selectthebutton_toastviewinthelayout,clicktheconstrainthandlethatappearsonthetopoftheview,anddragittothetopedgeofthelayoutundertheappbarasshowninthefigurebelow.Thenclicktheconstrainthandlethatappearsontheleftsideoftheview,anddragittotheleftedgeofthelayout.
6. Selectthebutton_countview,clicktheconstrainthandlethatappearsontheleftsideoftheview,anddragittotheleft
Introduction
61

edgeofthelayout.7. Tocreateabaselineconstraintbetweenthebutton_countview'stextbaselineandtheshow_countview'stext
baseline,selectthebutton_countview,andthenhoverovertheview'sbaselinehandlefortwosecondsuntilthehandleblinkswhite.Thenclickanddragtheconstraintlinethatappearstothebaselineoftheshow_countview,asshowninthefigurebelow.
Younowhavealayoutinwhicheachviewissettonon-specificdimensionsandconstrainedtothelayout.Onebutton'stextisalignedtoaTextView'sbaseline,sothatifyoumovetheTextView,thebuttonmoveswithit.
Introduction
62

Tip:Ifaviewdoesn'thaveatleasttwoconstraints,itappearsatthetopofthelayout.
8. Althoughtheshow_countviewalreadyhastwoconstraints,youcanaddanotherconstrainttoit.Dragaconstraintlinefromtheconstrainthandleontheleftsideoftheviewtotherightsideofthebutton_countview,asshowninthe
figuresbelow.
9. Runtheapp.Thelayoutconformstoitsconstraints.
Introduction
63

Introduction
64

Solutioncode:AndroidStudioproject:HelloConstraint
Task3:CreatelayoutvariantsYoucancreatevariantsofyourlayoutforlandscapeorientationandlargerdisplays.Youwillcreateanalternativeversionoftheprevioustask'slayouttooptimizeitforlandscapeorientation:
1. OpenyourlayoutfilefortheHelloConstraintapp,andbesureyou'reviewingtheDesigneditor(clicktheDesigntabatthebottomofthewindow).
2. ClicktheLayoutVariantsiconinthesecondrowoficons(refertothefigureinTask2Step4)andchooseCreateLandscapeVariation.The"land/activity_main.xml"tabappearsshowingthelayoutforthelandscape(horizontal)
orientation,asshowninthefigurebelow.
Youcanchangethelayoutforthelandscape(horizontal)versionwithoutchangingtheoriginalportrait(vertical)orientation,therebytakingadvantageofthewiderscreen.
3. InProject:AndroidviewintheleftmostpaneofAndroidStudio,lookinsidetheres>layoutdirectory,andyouwillseethatAndroidStudioautomaticallycreatedthevariantforyou,calledactivity_main.xml(land).
4. The"land/activity_main.xml"tabshouldstillbeopeninthelayouteditor;ifnot,double-clicktheactivity_main.xml(land)fileinthelayoutdirectory.
5. ClicktheTexttabtoviewthelayoutinXML.Findtheconstraintforthebutton_toastviewthatalignsitstopedgetotheparentview:
<Button
android:id="@+id/button_toast"
...
app:layout_constraintTop_toTopOf="parent"
...
6. Changethisconstraintsothatthebutton_toastview'sbottomedgeisalignedtothetopedgeofthebutton_countview.
Introduction
65

Hint:Iftheconstrainttoalignthetopofaviewtoanotherviewisapp:layout_constraintTop_toTopOf,whatdoyouthinktheconstraintistoalignthebottomofaviewtothetopofanotherview?Answer:
app:layout_constraintBottom_toTopOf="@id/button_count"
7. Runtheapp,andswitchtolandscapemodetoseethedifferentlayout.Thelayoutsshouldappearasshownbelow.
SolutioncodeAndroidStudioproject:HelloToast
AndroidStudioproject:HelloRelative
AndroidStudioproject:HelloConstraint
CodingchallengeNote:Allcodingchallengesareoptionalandarenotprerequisitesforlaterchapters.
Challenge:Addanotherlayoutvariantforalargedisplay.Thelayoutvariantshouldtakeadvantageofthelargerscreensizetoshowlargerelements.
Hint:ClicktheLayoutVariantsiconinthetoolbarandchooseCreatelayout-xlargeVariation.Resizeandpositiontheelementsinthelayout.
SummaryInthisexerciseyoulearnedhowto:
RearrangeviewsinaRelativeLayoutusingtheDesigntabofthelayouteditor.Viewthelayoutdesignanditsblueprint.Changeaview'sproperties(XMLattributes)inthelayouteditor.AlignaviewwiththeparentRelativeLayoutusing:
android:layout_alignParentToptoaligntheviewtothetopoftheparent.
Introduction
66

android:layout_alignParentLefttoaligntheviewtotheleftsideoftheparent.android:layout_alignParentStarttomakethestartedgeoftheviewmatchthestartedgeoftheparent.Thisattributeisusefulifyourappshouldworkondevicesinwhichthelanguageorlocalepreferencemaybedifferent.Thestartistheleftedgeofthescreenifthepreferenceisleft-to-right,oritistherightedgeofthescreenifthepreferenceisright-to-left.
Useandroid:layout_belowtopositionaviewunderneathanotherviewinaRelativeLayout.AddConstraintLayouttoyourproject.ConvertalayouttoConstraintLayoutbyright-clickingtherootviewgroupintheComponentTreepane,andthenclickingConvertlayouttoConstraintLayout.ClearallconstraintsinaConstraintLayoutbyright-clicking(orControl-clicking)ConstraintLayoutintheComponentTreepane,andchoosingClearAllConstraints.AddconstraintstoviewsintheConstraintLayoutlayout,andresizingviews.Changethepropertiesofviews,suchastextAppearanceandtextSize.Createvariantsofthelayoutforlandscapeorientationandforlargerscreensizes.
RelatedconceptsTherelatedconceptdocumentationisinAndroidDeveloperFundamentals:Concepts.
Layouts,Views,andResources
LearnmoreDeveloperDocumentation:
ViewRelativeLayoutBuildaUIwithLayoutEditorBuildaResponsiveUIwithConstraintLayout
Other:
Codelabs:UsingConstraintLayouttodesignyourviews
Introduction
67

1.3:WorkingwithTextViewElementsContents:
WhatyoushouldalreadyKNOWWhatyouwillLEARNWhatyouwillDOAppoverviewTask1:AddseveraltextviewsTask2:AddactiveweblinksandaScrollViewTask3:ScrollmultipleelementsCodingchallengeSummaryRelatedconceptLearnmore
TheTextViewclassisasubclassoftheViewclassthatdisplaystextonthescreen.YoucancontrolhowthetextappearswithTextViewattributesintheXMLlayoutfile.ThispracticalshowshowtoworkwithmultipleTextViewelements,includingoneinwhichtheusercanscrollitscontentsvertically.
Ifyouhavemoreinformationthanfitsonthedevice'sdisplay,youcancreateascrollingviewsothattheusercanscrollverticallybyswipingupordown,orhorizontallybyswipingrightorleft.
Youwouldtypicallyuseascrollingviewfornewsstories,articles,oranylengthytextthatdoesn'tcompletelyfitonthedevicedisplay.Youcanalsouseascrollingviewtoenableuserstoentermultiplelinesoftext,ortocombineUIelements(suchasatextfieldandabutton)withinascrollingview.
TheScrollViewclassprovidesthelayoutforthescrollingview.ScrollViewisasubclassofFrameLayout,anddevelopersshouldplaceonlyoneviewasachildwithinit,wherethechildviewcontainstheentirecontentstoscroll.Thischildviewmayitselfbeaviewgroup(suchasalayoutmanagerlikeLinearLayout)withacomplexhierarchyofobjects.Notethatcomplexlayoutsmaysufferperformanceissueswithchildviewssuchasimages.AgoodchoiceforaviewwithinaScrollViewisaLinearLayoutthatisarrangedinaverticalorientation,presentingtop-levelitemsthattheusercanscrollthrough.
WithaScrollView,alloftheviewsareinmemoryandintheviewhierarchyeveniftheyaren'tdisplayedonscreen.ThismakesScrollViewidealforscrollingpagesoffree-formtextsmoothly,becausethetextisalreadyinmemory.However,ScrollViewcanuseupalotofmemory,whichcanaffecttheperformanceoftherestofyourapp.Todisplaylonglistsofitemsthatuserscanaddto,deletefrom,oredit,considerusingaRecyclerView,whichisdescribedinaseparatepractical.
WhatyoushouldalreadyKNOWFrompreviouspracticals,youshouldbeableto:
CreateaHelloWorldappwithAndroidStudio.Runanapponanemulatororadevice.ImplementaTextViewinalayoutforanapp.Createandusestringresources.Convertlayoutdimensionstoresources.
WhatyouwillLEARNYouwilllearnto:
UseXMLcodetoaddmultipleTextViewelements.
Introduction
68

UseXMLcodetodefineascrollingview.Displayfree-formtextwithsomeHTMLformattingtags.StyletheTextViewbackgroundcolorandtextcolor.Includeaweblinkinthetext.
WhatyouwillDOInthispractical,youwill:
CreatetheScrollingTextapp.AddtwoTextViewelementsforthearticleheadingandsubheading.UseTextAppearancestylesandcolorsforthearticleheadingandsubheading.UseHTMLtagsinthetextstringtocontrolformatting.UsethelineSpacingExtraattributetoaddlinespacingforreadability.AddaScrollViewtothelayouttoenablescrollingaTextViewelement.AddtheautoLinkattributetoenableURLsinthetexttobeactiveandclickable.
AppoverviewTheScrollingTextappdemonstratestheScrollViewUIcomponent.ScrollViewisaviewgroupthatinthisexamplecontainsaTextView.Itshowsalengthypageoftext—inthiscase,amusicalbumreview—thattheusercanscrollverticallytoreadbyswipingupanddown.Ascrollbarappearsintherightmargin.TheappshowshowyoucanusetextformattedwithminimalHTMLtagsforsettingtexttoboldoritalic,andwithnew-linecharacterstoseparateparagraphs.Youcanalsoincludeactiveweblinksinthetext.
Intheabovefigure,thefollowingappear:
Introduction
69

1. Anactiveweblinkembeddedinfree-formtext2. Thescrollbarthatappearswhenscrollingthetext
Task1:AddseveraltextviewsInthispractical,youwillcreateanAndroidprojectfortheScrollingTextapp,addTextViewstothelayoutforanarticletitleandsubtitle,andchangetheexisting"HelloWorld"TextViewelementtoshowalengthyarticle.Thefigurebelowisadiagramofthelayout.
YouwillmakeallthesechangesintheXMLcodeandinthestrings.xmlfile.YouwilledittheXMLcodeforthelayoutintheTextpane,whichyoushowbyclickingtheTexttab,ratherthanclickingtheDesigntabfortheDesignpane.SomechangestoUIelementsandattributesareeasiertomakedirectlyintheTextpaneusingXMLsourcecode.
1.1CreatetheprojectandTextViewelements1. InAndroidStudiocreateanewprojectwiththefollowingparameters:
Attribute Value
ApplicationName ScrollingText
CompanyName android.example.com(oryourowndomain)
PhoneandTabletMinimumSDK API15:Android4.0.3IceCreamSandwich
Template EmptyActivity
GenerateLayoutFilecheckbox Checked
2. Intheapp>res>layoutfolder,opentheactivity_main.xmlfile,andclicktheTexttabtoseetheXMLcodeifitisnotalreadyselected.
Introduction
70

Atthetop,orroot,oftheviewhierarchyisaviewgroupsuchasConstraintLayout.ChangethisviewgrouptoRelativeLayout.Thesecondlineofcodenowlookssomethinglikethis:
<RelativeLayoutxmlns:android="http://schemas.android.com/apk/res/android"
RelativeLayoutallowsyoutopositionitschildViewsrelativetoeachotherorrelativetotheparentRelativeLayoutitself.Thedefault"HelloWorld"TextViewelementthatiscreatedbytheEmptyLayouttemplateisachildViewwithintheRelativeLayoutviewgroup.FormoreinformationaboutusingaRelativeLayout,seetheRelativeLayoutAPIGuide.
3. AddaTextViewelementabovethe"HelloWorld"TextView.AddthefollowingattributestotheTextView:
TextView#1attribute Value
android:id "@+id/article_heading"
layout_width "match_parent"
layout_height "wrap_content"
android:background "@color/colorPrimary"
android:textColor "@android:color/white"
android:padding "10dp"
android:textAppearance "@android:style/TextAppearance.Large"
android:textStyle "bold"
android:text "ArticleTitle"
Tip:TheattributesforstylingthetextandbackgroundaresummarizedintheTextViewclassdocumentation.
4. Extractthestringresourcefortheandroid:textattribute'shard-codedstring"ArticleTitle"intheTextViewtocreateanentryforitinstrings.xml.
Placethecursoronthehard-codedstring,pressAlt-Enter(Option-EnterontheMac),andselectExtractstringresource.Thenedittheresourcenameforthestringvaluetoarticle_title.
Tip:StringresourcesaredescribedindetailintheStringResourcesdocumentation.
5. Extractthedimensionresourcefortheandroid:paddingattribute'shard-codedstring"10dp"intheTextViewtocreateanentryindimens.xml.
Placethecursoronthehard-codedstring,pressAlt-Enter(Option-EnterontheMac),andselectExtractdimensionresource.ThenedittheResourcenametopadding_regular.
6. AddanotherTextViewelementabovethe"HelloWorld"TextViewandbelowtheTextViewyoucreatedintheprevioussteps.AddthefollowingattributestotheTextView:
TextView#2Attribute Value
android:id "@+id/article_subheading"
layout_width "match_parent"
layout_height "wrap_content"
android:layout_below "@id/article_heading"
android:padding "@dimen/padding_regular"
android:textAppearance "@android:style/TextAppearance"
android:text "ArticleSubtitle"
Notethatsinceyouextractedthedimensionresourceforthe"10dp"stringtopadding_regularinthepreviouslycreatedTextView,youcanuse"@dimen/padding_regular"fortheandroid:paddingattributeinthisTextView.
Introduction
71

7. Extractthestringresourcefortheandroid:textattribute'shard-codedstring"ArticleSubtitle"intheTextViewtoarticle_subtitle.
8. Inthe"HelloWorld"TextViewelement,removethelayout_constraintattributes,iftheyarepresent.9. AddthefollowingTextViewattributestothe"HelloWorld"TextViewelement,andchangetheandroid:textattribute:
TextViewAttribute Value
android:id "@+id/article"
android:lineSpacingExtra "5sp"
android:layout_below "@id/article_subheading"
android:text Changeto"Articletext"
10. Extractthestringresourcefor"Articletext"toarticle_text,andextractthedimensionresourcefor"5sp"toline_spacing.
11. ReformatandalignthecodebychoosingCode>ReformatCode.Itisagoodpracticetoreformatandalignyourcodesothatitiseasierforyouandotherstounderstand.
1.2AddthetextofthearticleInarealappthataccessesmagazineornewspaperarticles,thearticlesthatappearwouldprobablycomefromanonlinesourcethroughacontentprovider,ormightbesavedinadvanceinadatabaseonthedevice.
Forthispractical,youwillcreatethearticleasasinglelongstringinthestrings.xmlresource.
1. Intheapp>res>valuesfolder,openstrings.xml.2. Enterthevaluesforthestringsarticle_titleandarticle_subtitlewithamade-uptitleandasubtitleforthearticle
youareadding.Thestringvaluesforeachshouldbesingle-linetextwithoutHTMLtagsormultiplelines.3. Enterorcopyandpastetextforthearticle_textstring.
Usethetextprovidedforthearticle_textstringinthestrings.xmlfileofthefinishedScrollingTextapp,oruseyourowngenerictext.Youcancopyandthenpastethesamesentenceoverandover,aslongastheresultisalongsectionoftextthatwillnotfitentirelyonthescreen.Keepinmindthefollowing(refertothefigurebelowforanexample):
i. Asyouenterorpastetextinthestrings.xmlfile,thetextlinesdon'twraparoundtothenextline—theyextendbeyondtherightmargin.Thisisthecorrectbehavior—eachnewlineoftextstartingattheleftmarginrepresentsanentireparagraph.
ii. Enter\ntorepresenttheendofaline,andanother\ntorepresentablankline.
Why?Youneedtoaddend-of-linecharacterstokeepparagraphsfromrunningintoeachother.
Tip:Ifyouwanttoseethetextwrappedinstrings.xml,youcanpressReturntoenterhardlineendings,orformatthetextfirstinatexteditorwithhardlineendings.
iii. Ifyouhaveanapostrophe(')inyourtext,youmustescapeitbyprecedingitwithabackslash(\').Ifyouhaveadouble-quoteinyourtext,youmustalsoescapeit(\").Youmustalsoescapeanyothernon-ASCIIcharacters.Seethe"FormattingandStyling"sectionofStringResourcesformoredetails.
iv. EntertheHTMLand</b>tagsaroundwordsthatshouldbeinbold.
v. EntertheHTMLand</i>tagsaroundwordsthatshouldbeinitalics.Note,however,thatifyouusecurledapostropheswithinanitalicphrase,youshouldreplacethemwithstraightapostrophes.
vi. Youcancombineboldanditalicsbycombiningthetags,asin...words...</i></b>.OtherHTMLtagsareignored.
vii. EncloseTheentiretextwithin<stringname="article_text"></string>inthestrings.xmlfile.
Introduction
72

viii. Includeaweblinktotest,suchaswww.google.com(theexamplebelowuseswww.rockument.com).Don'tuseanHTMLtag—anyHTMLtagsexcepttheboldanditalictagswillbeignoredandpresentedastext,whichisnotwhatyouwant.
4. Runtheapp.
Thearticleappears,andyoucanevenscrollit,butthescrollingisnotsmoothandthereisnoscrollbarbecauseyouhaven'tyetincludedaScrollView(whichyouwilldointhenexttask).Notealsothattappingaweblinkdoesnotcurrentlydoanything.Youwillalsofixthatinthenexttask.
SolutioncodeDependingonyourversionofAndroidStudio,theactivity_main.xmllayoutfilewilllooksomethinglikethefollowing:
Introduction
73

<?xmlversion="1.0"encoding="utf-8"?>
<RelativeLayoutxmlns:android="http://schemas.android.com/apk/res/android"
xmlns:tools="http://schemas.android.com/tools"
android:layout_width="match_parent"
android:layout_height="match_parent"
android:paddingBottom="@dimen/activity_vertical_margin"
android:paddingLeft="@dimen/activity_horizontal_margin"
android:paddingRight="@dimen/activity_horizontal_margin"
android:paddingTop="@dimen/activity_vertical_margin"
tools:context="com.example.android.scrollingtext.MainActivity">
<TextView
android:id="@+id/article_heading"
android:layout_width="match_parent"
android:layout_height="wrap_content"
android:background="@color/colorPrimary"
android:textColor="@android:color/holo_orange_light"
android:textColorHighlight="@color/colorAccent"
android:padding="10dp"
android:textAppearance="@android:style/TextAppearance.Large"
android:textStyle="bold"
android:text="@string/article_title"/>
<TextView
android:id="@+id/article_subheading"
android:layout_width="match_parent"
android:layout_height="wrap_content"
android:layout_below="@id/article_heading"
android:padding="10dp"
android:textAppearance="@android:style/TextAppearance"
android:text="@string/article_subtitle"/>
<TextView
android:id="@+id/article"
android:layout_width="wrap_content"
android:layout_height="wrap_content"
android:layout_below="@id/article_subheading"
android:lineSpacingExtra="5sp"
android:text="@string/article_text"/>
</RelativeLayout>
Task2:AddactiveWeblinksandaScrollViewIntheprevioustaskyoucreatedtheScrollingTextappwithTextViewsforanarticletitle,subtitle,andlengthyarticletext.Youalsoincludedaweblink,butthelinkisnotyetactive.Youwilladdthecodetomakeitactive.
Also,theTextViewbyitselfcan'tenableuserstoscrollthearticletexttoseeallofit.YouwilladdanewviewgroupcalledScrollViewtotheXMLlayoutthatwillmaketheTextViewscrollable.
2.1AddtheautoLinkattributeforactiveweblinks
Addtheandroid:autoLink="web"attributetothearticleTextView.TheXMLcodeforthisTextViewshouldnowlooklikethis:
<TextView
android:id="@+id/article"
...
android:autoLink="web"
.../>
2.2AddaScrollViewtothelayout
Tomakeaview(suchasaTextView)scrollable,embedtheviewinsideaScrollView.
Introduction
74

1. AddaScrollViewbetweenthearticle_subheadingTextViewandthearticleTextView.Asyouenter<ScrollView,AndroidStudioautomaticallyadds</ScrollView>attheend,andpresentstheandroid:layout_widthandandroid:layout_heightattributeswithsuggestions.Choosewrap_contentfromthesuggestionsforbothattributes.Thecodeshouldnowlooklikethis:
<TextView
android:id="@+id/article_subheading"
android:layout_width="match_parent"
android:layout_height="wrap_content"
android:layout_below="@id/article_heading"
android:padding="10dp"
android:textAppearance="@android:style/TextAppearance"
android:text="@string/article_subtitle"/>
<ScrollView
android:layout_width="wrap_content"
android:layout_height="wrap_content"
android:layout_below="@id/article_subheading"></ScrollView>
<TextView
android:id="@+id/article"
android:layout_width="wrap_content"
android:layout_height="wrap_content"
android:layout_below="@id/article_subheading"
android:lineSpacingExtra="5sp"
android:autoLink="web"
android:text="@string/article_text"/>
2. Movetheending</ScrollView>codeafterthearticleTextViewsothatthearticleTextViewattributesareinsidetheScrollViewXMLelement.
3. RemovethefollowingattributefromthearticleTextView,becausetheScrollViewitselfwillbeplacedbelowthearticle_subheadingelement,andthisattributeforTextViewwouldconflictwiththeScrollView:
android:layout_below="@id/article_subheading"
Introduction
75

Thelayoutshouldnowlooklikethis:
4. ChooseCode>ReformatCodetoreformattheXMLcodesothatthearticleTextViewnowappearsindentedinsidethe<Scrollviewcode.
5. Runtheapp.
Swipeupanddowntoscrollthearticle.Thescrollbarappearsintherightmarginasyouscroll.
Taptheweblinktogotothewebpage.Theandroid:autoLinkattributeturnsanyrecognizableURLintheTextView(suchaswww.rockument.com)intoaweblink.
6. Rotateyourdeviceoremulatorwhilerunningtheapp.Noticehowthescrollingviewwidenstousethefulldisplayandstillscrollsproperly.
7. Runtheapponatabletortabletemulator.Noticehowthescrollingviewwidenstousethefulldisplayandstillscrollsproperly.
Introduction
76

Intheabovefigure,thefollowingappear:
1. Anactiveweblinkembeddedinfree-formtext2. Thescrollbarthatappearswhenscrollingthetext
Introduction
77

DependingonyourversionofAndroidStudio,theactivity_main.xmllayoutfilewillnowlooksomethinglikethefollowing:
Introduction
78

<?xmlversion="1.0"encoding="utf-8"?>
<RelativeLayoutxmlns:android="http://schemas.android.com/apk/res/android"
xmlns:tools="http://schemas.android.com/tools"
android:layout_width="match_parent"
android:layout_height="match_parent"
android:paddingBottom="@dimen/activity_vertical_margin"
android:paddingLeft="@dimen/activity_horizontal_margin"
android:paddingRight="@dimen/activity_horizontal_margin"
android:paddingTop="@dimen/activity_vertical_margin"
tools:context="com.example.android.scrollingtext.MainActivity">
<TextView
android:id="@+id/article_heading"
android:layout_width="match_parent"
android:layout_height="wrap_content"
android:background="@color/colorPrimary"
android:textColor="@android:color/white"
android:paddingTop="10dp"
android:paddingBottom="10dp"
android:paddingLeft="10dp"
android:paddingRight="10dp"
android:textAppearance="@android:style/TextAppearance.Large"
android:textStyle="bold"
android:text="@string/article_title"/>
<TextView
android:id="@+id/article_subheading"
android:layout_width="match_parent"
android:layout_height="wrap_content"
android:layout_below="@id/article_heading"
android:paddingTop="10dp"
android:paddingBottom="10dp"
android:paddingLeft="10dp"
android:paddingRight="10dp"
android:textAppearance="@android:style/TextAppearance"
android:text="@string/article_subtitle"/>
<ScrollView
android:layout_width="wrap_content"
android:layout_height="wrap_content"
android:layout_below="@id/article_subheading">
<TextView
android:id="@+id/article"
android:layout_width="wrap_content"
android:layout_height="wrap_content"
android:lineSpacingExtra="5sp"
android:autoLink="web"
android:text="@string/article_text"/>
</ScrollView>
</RelativeLayout>
SolutioncodeAndroidStudioproject:ScrollingText
Task3:ScrollmultipleelementsAsnotedbefore,theScrollViewviewgroupcancontainonlyonechildview(suchasthearticleTextViewyoucreated);however,thatViewcanbeanotherviewgroupthatcontainsViews,suchasLinearLayout.YoucannestaviewgroupsuchasLinearLayoutwithintheScrollViewviewgroup,therebyscrollingeverythingthatisinsidetheLinearLayout.
Forexample,ifyouwantthesubheadingofthearticletoscrollalongwiththearticle,addaLinearLayoutwithintheScrollView,andmovethesubheading,alongwiththearticle,intotheLinearLayout.TheLinearLayoutviewgroupbecomesthesinglechildViewintheScrollViewasshowninthefigurebelow,andtheusercanscrolltheentireviewgroup:the
Introduction
79

subheadingandthearticle.
3.1AddaLinearLayouttotheScrollView
1. Onyourcomputer,makeacopyofAndroidStudio'sprojectfolderforScrollingText,andrenametheprojecttobeScrollingText2.Tocopyandrenameaproject,followthe"Copyandrenameaproject"instructionsintheAppendix.
2. OpenScrollingText2inAndroidStudio,andopentheactivity_main.xmlfiletochangetheXMLlayoutcode.3. AddaLinearLayoutabovethearticleTextViewintheScrollView.Asyouenter<LinearLayout,AndroidStudio
automaticallyadds</LinearLayout>totheend,andpresentstheandroid:layout_widthandandroid:layout_heightattributeswithsuggestions.Choosematch_parentandwrap_contentfromthesuggestionsforitswidthandheight,respectively.Thecodeshouldnowlooklikethis:
<LinearLayout
android:layout_width="match_parent"
android:layout_height="wrap_content"></LinearLayout>
Youusematch_parenttomatchthewidthoftheparentviewgroup,andwrap_contenttomaketheviewgrouponlybigenoughtoencloseitscontentsandpadding.
4. Movetheending</LinearLayout>codeafterthearticleTextViewbutbeforetheclosing</ScrollView>sothattheLinearLayoutincludesthearticleTextViewandiscompletelyinsidetheScrollView.
5. Addtheandroid:orientation="vertical"attributetotheLinearLayoutinordertosettheorientationoftheLinearLayouttovertical.TheLinearLayoutwithintheScrollViewshouldnowlooklikethis(chooseCode>ReformatCodetoindenttheviewgroupscorrectly):
Introduction
80

<ScrollView
android:layout_width="wrap_content"
android:layout_height="wrap_content"
android:layout_below="@id/article_subheading">
<LinearLayout
android:layout_width="match_parent"
android:layout_height="wrap_content"
android:orientation="vertical">
<TextView
android:id="@+id/article"
android:layout_width="wrap_content"
android:layout_height="wrap_content"
android:autoLink="web"
android:lineSpacingExtra="5sp"
android:text="@string/article_text"/>
</LinearLayout>
</ScrollView>
6. Movethearticle_subheadingTextViewtoapositioninsidetheLinearLayoutabovethearticleTextView.7. Removetheandroid:layout_below="@id/article_heading"attributefromthearticle_subheadingTextView.Sincethis
TextViewisnowwithintheLinearLayout,thisattributewouldconflictwiththeLinearLayoutattributes.8. ChangetheScrollViewlayoutattributefromandroid:layout_below="@id/article_subheading"to
android:layout_below="@id/article_heading".NowthatthesubheadingispartoftheLinearLayout,theScrollViewmustbeplacedbelowtheheading,notthesubheading.
9. Runtheapp.
Swipeupanddowntoscrollthearticle,andnoticethatthesubheadingnowscrollsalongwiththearticlewhiletheheadingstaysinplace.
SolutioncodeAndroidStudioproject:ScrollingText2
CodingchallengeNote:Allcodingchallengesareoptionalandarenotaprerequisiteforlaterlessons.
Challenge:AddanotherUIelement—aButton—totheLinearLayoutviewgroupthatiscontainedwithintheScrollView.MaketheButtonappearbelowthearticle.Theuserwouldhavetoscrolltotheendofthearticletoseethebutton.Usethetext"AddComment"fortheButton,foruserstoclicktoaddacommenttothearticle.Forthischallenge,thereisnoneedtocreateabutton-handlingmethodtoactuallyaddacomment;itissufficienttojustplacetheButtonelementintheproperplaceinthelayout.
Introduction
81

Introduction
82

ChallengeSolutioncodeAndroidStudioproject:ScrollingText3
SummaryInthispractical,youlearnedaboutAndroidStudio'sviewelementsandhowtoscrollandnestcode.Youworkedto:
AddmultipleTextViewelementstotheXMLlayout.Displayfree-formtextinaTextViewwithHTMLformattingtagsforboldanditalics.Use\nasanend-of-linecharacterinfree-formtexttokeepaparagraphfromrunningintothenextparagraph.Usetheandroid:autoLink="web"attributetomakeweblinksinthetextclickable.
AddaScrollViewviewgrouptothelayouttodefineascrollingviewwithoneoftheTextViewelements.AddaLinearLayoutviewgroupwithinaScrollViewinordertoscrollseveralTextViewelementstogether.Extractstringvaluesintostringnamesinthestrings.xmlfileforeasierlocalizationofstringresources.
RelatedconceptsTherelatedconceptdocumentationisinAndroidDeveloperFundamentals:Concepts.
TextandScrollingViews
LearnmoreDeveloperDocumentation:
TextViewScrollViewStringResourcesViewRelativeLayout
Other:
AndroidDevelopersBlog:LinkifyyourText!Codepath:WorkingwithaTextView
Introduction
83

1.4:LearningAboutAvailableResourcesContents:
WhatyoushouldalreadyKNOWWhatyouwillLEARNWhatyouwillDOAppoverviewTask1.ExploretheofficialAndroiddocumentationTask2:UseprojecttemplatesTask3:LearnfromexamplecodeTask4:ManymoreresourcesSummaryRelatedconceptLearnmore
Inthispracticalyouwill:
ExploresomeofthemanyresourcesavailabletoAndroiddevelopersofalllevels.AddahomescreenicontoyourWordListapp;tappingtheiconwilllaunchtheapp.
WhatyoushouldalreadyKNOWFrompreviouspracticals,youshouldbeableto:
UnderstandthebasicworkflowofAndroidStudio.
WhatyouwillLEARNWheretofinddeveloperresources:
WithinAndroidStudio.IntheofficialAndroiddeveloperdocumentationontheweb.ElsewhereontheInternet.
WhatyouwillDOInthispracticalyouwill:
ExploreanduseAndroiddeveloperresources.Usedeveloperresourcestofigureouthowtoaddanicontothehomescreenofyourdevice.Whenthisiconisclicked,yourapplaunches.
AppOverviewYouwillusetheexistingHelloToastappandaddalaunchericontoit.
Task1.ExploretheofficialAndroiddeveloperdocumentationYoucanfindtheofficialAndroiddeveloperdocumentationat:
Introduction
84

http://developer.android.com/index.html
ThisdocumentationcontainsawealthofinformationthatiskeptcurrentbyGoogle.
1.1.ExploretheofficialAndroiddocumentation
1. Gotohttp://developer.android.com/index.html.2. Atthetopofthepage,lookfortheDesign,Develop,andDistributelinks.Followeachofthelinksandfamiliarize
yourselfwiththenavigationstructure.DesignisallaboutMaterialDesign,whichisaconceptualdesignphilosophythatoutlineshowappsshouldlookandworkonmobiledevices.Scrolltothebottomofthelandingpageforlinkstoresourcessuchasstickersheetsandcolorpalettes.DevelopiswhereyoucanfindAPIinformation,referencedocumentation,tutorials,toolguides,andcodesamples.Youcanusethesitenavigationorsearchtofindwhatyouneed.Distributeisabouteverythingthathappensafteryou'vewrittenyourapp:puttingitonthePlayStore,growingyouruserbase,andearningmoney.
3. Usesearchornavigatethedocumentationtocompletethefollowingtasks:AddalaunchericontotheWordListapp.SeetheAPIGuidetoLauncherIconstolearnmoreabouthowtodesigneffectivelaunchericons.Learnhowtomonitoryourapp'sresourceusageinAndroidStudio.
Task2.UseprojecttemplatesAndroidStudioprovidestemplatesforcommonandrecommendedappandactivitydesigns.Usingbuilt-intemplatessavestime,andhelpsyoufollowdesignbestpractices.
Eachtemplateincorporatesanskeletonactivityanduserinterface.You'vealreadyusedtheEmptyActivitytemplate.TheBasicActivitytemplatehasmorefeaturesandincorporatesrecommendedappfeatures,suchastheoptionsmenu.
2.1.ExploretheBasicActivityarchitectureTheBasicActivitytemplateisaversatiletemplateprovidedbyAndroidStudiotoassistyouinjump-startingyourappdevelopment.
1. InAndroidStudio,createanewprojectwiththeBasicActivitytemplate.2. Buildandruntheapp.
Introduction
85

3. Identifythelabelledpartsonthescreenshotandtablebelow.Findtheirequivalentsonyourdeviceoremulatorscreen.
ArchitectureoftheBasicActivitytemplate
Introduction
86

# UIDescription Codereference
1StatusbarThisbarisprovidedandcontrolledbytheAndroidsystem.
Notvisibleinthetemplatecode.It'spossibletoaccessitfromyouractivity.Forexample,youcanhidethestatusbar,ifnecessary.
2
AppBarLayout>ToolbarAppbar(alsocalledActionbar)providesvisualstructure,standardizedvisualelements,andnavigation.Forbackwardscompatibility,theAppBarLayoutinthetemplateembedsaToolbarwidgetwiththesamefunctionality.
ActionBarclass
Challenge:AppBarTutorial
activity_main.xmlLookforandroid.support.v7.widget.Toolbar
insideandroid.support.design.widget.AppBarLayout.
Changethetoolbartochangetheappearanceofitsparent,theappbar.
3ApplicationnameThisisderivedfromyourpackagename,butcanbeanythingyouchoose.
AndroidManifest.xmlandroid:label="@string/app_name"
4
OptionsmenuoverflowbuttonMenuitemsfortheactivity,aswellasglobaloptions,suchas"Search"and"Settings"forthesettingsmenu.Yourappmenuitemsgointothismenu.
MainActivity.javaonOptionsItemSelected()implementswhathappenswhenamenuitemisselected.
res>menu>menu_main.xml
Resourcethatspecifiesthemenuitemsfortheoptionsmenu.
5
CoordinatorLayoutCoordinatorLayoutisafeature-richlayoutthatprovidesmechanismsforviewstointeract.Yourapp'suserinterfacegoesinsidethisviewgroup.
activity_main.xmlNoticethattherearenoviewsspecifiedinthislayout;rather,itincludesanotherlayoutwith
<includelayout="@layout/content_main"/>
wheretheviewsarespecified.Thisseparatessystemviewsfromtheviewsuniquetoyourapp.
6TextViewIntheexample,usedtodisplay"HelloWorld".Replacethiswiththeviewsforyourapp.
content_main.xmlAllyourapp'sviewsaredefinedinthisfile.
7 FloatingActionbutton(FAB)activity_main.xmlMainActivity.java>onCreatehasastubthatsetsanonClicklistenerontheFAB.
4. AlsoinspectthecorrespondingJavacodeandXMLconfigurationfiles.
BeingfamiliarwiththeJavasourcecodeandXMLfileswillhelpyouextendandcustomizethistemplateforyourownneeds.
SeeAccessingResourcesfordetailsontheXMLsyntaxforaccessingresources.
5. Afteryouunderstandthetemplatecode,trythefollowing:Changethecoloroftheappbar(toolbar).Lookatthestylesassociatedwiththeappbar(toolbar).Changethenameofyourappthat'sdisplayedintheappbar(toolbar).
2.2.Explorehowtoaddanactivityusingtemplates
Introduction
87
Forthepracticalssofar,you'veusedtheEmptyActivityandBasicActivitytemplates.Inlaterlessons,thetemplatesusewillvary,dependingonthetask.
Theseactivitytemplatesarealsoavailablefrominsideyourproject,sothatyoucanaddmoreactivitiestoyourappaftertheinitialprojectsetup.(Youwilllearnmoreaboutthisthisinalaterchapter.)
1. Createanewprojectorchooseanexistingproject.2. Inyourprojectdirectory,intheAndroidview,right-clickthefolderwithyourjavafiles.3. ChooseNew>Activity>Gallery.4. Addoneofthoseactivities,forexample,theNavigationDrawerActivity.FindthelayoutfilesfortheNavigationDrawer
ActivityanddisplaytheminDesign.
Task3.LearnfromexamplecodeAndroidStudio,aswellastheAndroiddocumentationprovidemanycodesamplesthatyoucanstudy,copy,andincorporatewithyourprojects.
3.1.AndroidcodesamplesYoucanexplorehundredsofcodesamplesdirectlyfromAndroidStudio.
1. InAndroidStudio,chooseFile>New>ImportSample.2. Browsethesamples.3. LookattheDescriptionandPreviewtabstolearnmoreabouteachsample.4. ChooseasampleandclickNext.5. AcceptthedefaultsandclickFinish.
Note:Thesamplescontainedherearemeantasastartingpointforfurtherdevelopment.Weencourageyoutodesignandbuildyourownideasintothem.
3.2.UsetheSDKManagertoinstallofflinedocumentationInstallingAndroidStudioalsoinstallsessentialsoftheAndroidSDK(SoftwareDevelopmentKit).However,additionallibrariesanddocumentationareavailable,andyoucaninstallthemusingtheSDKManager.
1. ChooseTools>Android>SDKManager.ThisopenstheDefaultPreferencessettings.2. Intheleft-handnavigation,findandopenthesettingsforAndroidSDK.3. ClickSDKPlatformsinthesettingswindow.YoucaninstalladditionalversionsoftheAndroidsystemfromhere.4. ClickonSDKUpdateSites.AndroidStudiochecksthelistedandcheckedsitesregularlyforupdates.5. ClickontheSDKToolstab.HereyoucaninstalladditionalSDKToolsthatarenotinstalledbydefault,aswellasan
offlineversionoftheAndroiddeveloperdocumentation.Thisgivesyouaccesstodocumentationevenwhenyouarenotconnectedtotheinternet.
6. Check"DocumentationforAndroidSDK",clickApply,andfollowtheprompts.7. NavigatetotheAndroid/sdkdirectoryandopenthedocsfolder.8. Findindex.htmlandopenit.
Task4.ManymoreresourcesTheAndroidDeveloperYouTubechannelisagreatsourceoftutorialsandtips.TheAndroidteampostsnewsandandtipsontheOfficialAndroidBlog.StackOverflowisacommunityofmillionsofprogrammershelpingeachother.Ifyourunintoaproblem,chancesare,someoneelsehasalreadypostedanansweronthisforum.OnStackOverflow,youcanevenask,"HowdoIsetupanduseADBoverWiFi?",or"WhatarethemostcommonmemoryleaksinAndroiddevelopment?"Andlastbutnotleast,typeyourquestionsintoGooglesearch,andtheGooglesearchenginewillcollectrelevant
Introduction
88

resultsfromalloftheseresources.Forexample,"WhatisthemostpopularAndroidOSversioninIndia?"
4.1.SearchonStackOverflowusingtags
1. GotoStackOverflow2. Inthesearchbox,type[android].
The[]bracketsindicatethatyouwanttosearchforpoststhathavebeentaggedasbeingaboutAndroid.
3. Youcancombinetagsandsearchtermstomakeyoursearchmorespecific.Searchfor[android]and[layout][android]"helloworld"
4. ReadmoreaboutthemanywaysinwhichyoucansearchonStackoverflow.
SummaryOfficialAndroidDeveloperDocumentation-http://developer.android.comMaterialDesignisaconceptualdesignphilosophythatoutlineshowappsshouldlookandworkonmobiledevices.TheGooglePlaystoreisGoogle'sdigitaldistributionsystemforappsdevelopedwiththeAndroidSDK.AndroidStudioprovidestemplatesforcommonandrecommendedappandactivitydesigns.Thesetemplatesofferworkingcodeforcommonusecases.Whenyoucreateaproject,youcanchooseatemplateforyourfirstactivity.Whileyouarefurtherdevelopingyourapp,activitiesandotherappcomponentscanbecreatedfrombuilt-intemplates.AndroidStudiocontainsmanycodesamplesthatyoucanstudy,copy,andincorporatewithyourprojects.
RelatedconceptTherelatedconceptdocumentationisinAndroidDeveloperFundamentals:Concepts.
ResourcestoHelpYouLearn
LearnmoreDeveloperDocumentation:
OfficialAndroiddocumentationImageAssetStudioAndroidMonitorpageOfficialAndroidblogAndroidDevelopersblogGoogleI/OCodelabsStackOverflowAndroidvocabularyGoogleDeveloperTrainingwebsite
Code
SourcecodeforexercisesonGitHubAndroidcodesamplesfordevelopers
Videos
AndroidDeveloperYouTubechannelUdacityonlinecourses
Introduction
89

Introduction
90

2.1:CreateandStartActivitiesContents:
WhatyoushouldalreadyKNOWWhatyouwillLEARNWhatyouwillDOAppoverviewTask1.CreatetheTwoActivitiesprojectTask2.CreateandlaunchthesecondactivityTask3.SenddatafromthemainactivitytothesecondactivityTask4.ReturndatabacktothemainactivityCodingchallengeSummaryRelatedconceptLearnmore
Anactivityrepresentsasinglescreeninyourappwithwhichyourusercanperformasingle,focussedtasksuchasdialthephone,takeaphoto,sendanemail,orviewamap.Activitiesareusuallypresentedtotheuserasfull-screenwindows.
Anappusuallyconsistsofmultipleactivitiesthatarelooselyboundtoeachother.Typically,oneactivityinanapplicationisspecifiedasthe"main"activity,whichispresentedtotheuserwhentheappislaunched.Eachactivitycanthenstartotheractivitiesinordertoperformdifferentactions.
Eachtimeanewactivitystarts,thepreviousactivityisstopped,butthesystempreservestheactivityinastack(the"backstack").Whenanewactivitystarts,thatnewactivityispushedontothebackstackandtakesuserfocus.Thebackstackabidestothebasic"lastin,firstout"stackmechanism,so,whentheuserisdonewiththecurrentactivityandpressestheBackbutton,thatcurrentactivityispoppedfromthestack(anddestroyed)andthepreviousactivityresumes.
Androidactivitiesarestartedoractivatedwithanintent.Intentsareasynchronousmessagesthatyoucancanuseinyouractivitytorequestanactionfromanotheractivity(orotherappcomponent).Youuseintentstostartoneactivityfromanotherandtopassdatabetweenactivities.
Therearetwokindsofintents:explicitandimplicit.Anexplicitintentisoneinwhichyouknowthetargetofthatintent,thatis,youalreadyknowthefully-qualifiedclassnameofthatspecificactivity.Animplicitintentisoneinwhichyoudonothavethenameofthetargetcomponent,buthaveageneralactiontoperform.Inthispracticalyou'lllearnaboutexplicitintents.You'llfindoutaboutimplicitintentsinalaterpractical.
WhatyoushouldalreadyKNOWFromthepreviouspracticals,youshouldbeableto:
CreateandrunappsinAndroidStudio.CreateandeditUIelementswiththegraphicalLayoutEditor,ordirectlyinanXMLlayoutfile.AddonClickfunctionalitytoabutton.
WhatyouwillLEARNYouwilllearnto:
CreateanewactivityinAndroidstudio.Defineparentandchildactivitiesfor"Up"navigation.Startactivitieswithexplicitintents.Passdatabetweenactivitieswithintentextras.
Introduction
91

WhatyouwillDOInthispractical,youwill:
CreateanewAndroidappwithtwoactivities.Passsomedata(astring)fromthemainactivitytothesecondusinganintent,anddisplaythatdatainthesecondactivity.Sendaseconddifferentbitofdatabacktothemainactivity,alsousingintents.
AppOverviewInthischapteryouwillcreateandbuildanappcalledTwoActivitiesthat,unsurprisingly,containstwoactivities.Thisappwillbebuiltinthreestages.
Inthefirststage,createanappwhosemainactivitycontainsonlyonebutton(Send).Whentheuserclicksthisbutton,yourmainactivityusesanintenttostartthesecondactivity.
Inthesecondstage,you'lladdanEditTextviewtothemainactivity.TheuserentersamessageandclicksSend.Themainactivityusesanintenttobothstartthesecondactivity,andtosendtheuser'smessagetothethatactivity.Thesecondactivitydisplaysthemessageitreceived.
Introduction
92

InfinalstageoftheTwoActivitiesapp,addanEditTextviewandaReplybuttontothesecondactivity.TheusercannowtypeareplymessageandclickReply,andthereplyisdisplayedonthemainactivity.Atthispoint,useanintentheretopassthereplymessagebackfromthesecondactivitytothemainactivity.
Introduction
93

Task1.CreatetheTwoActivitiesprojectInthistaskyou'llsetuptheinitialprojectwithamainactivity,definethelayout,anddefineaskeletonmethodfortheonClickbuttonevent.
1.1CreatetheTwoActivitiesproject
1. StartAndroidStudioandcreateanewAndroidStudioproject.
Callyourapplication"TwoActivities"andchangethecompanydomainto"android.example.com."ChoosethesameMinimumSDKthatyouusedinthepreviousprojects.
2. ChooseEmptyActivityfortheprojecttemplate.ClickNext.3. Acceptthedefaultactivityname(MainActivity).MakesuretheGenerateLayoutfileboxischecked.ClickFinish.
1.2Definethelayoutforthemainactivity
1. Openres/layout/activity_main.xml.IntheLayoutEditor,clicktheTexttabatthebottomofthescreenandchangetherootviewgrouptoRelativeLayout,asyou'vedoneinpreviousexercises.
2. ClicktheDesigntabatthebottomofthescreenanddeletetheTextViewthatsays"HelloWorld."3. AddaButtontothelayoutinanyposition.4. SwitchtotheXMLEditor(clicktheTexttab)andmodifytheseattributesintheButton:
Attribute Value
android:id "@+id/button_main"
android:layout_width wrap_content
android:layout_height wrap_content
android:layout_alignParentRight "true"
android:layout_alignParentBottom "true"
android:layout_alignParentEnd "true"
android:text "Send"
android:onClick "launchSecondActivity"
Thismaygenerateanerrorthat"MethodlaunchSecondActivityismissinginMainActivity."Pleaseignorethiserrorfornow.Itwillbeaddresseditinthenexttask.
5. Placethecursorontheword"Send".6. PressAlt-Enter(Option-EnterontheMac)andselectExtractstringresources.7. SettheResourcenametobutton_mainandclickOK.
Thiscreatesastringresourceinthevalues/res/string.xmlfile,andthestringinyourcodeisreplacedwithareferencetothatstringresource.
8. ChooseCode>ReformatCodetoformattheXMLcode,ifnecessary.9. PreviewthelayoutofthemainactivityusingtheLayoutEditor.Thelayoutshouldlooklikethis:
Introduction
94

Introduction
95

Solutioncode:DependingonyourversionofAndroidStudio,yourcodewilllooksomethinglikethefollowing.
<?xmlversion="1.0"encoding="utf-8"?>
<RelativeLayoutxmlns:android="http://schemas.android.com/apk/res/android"
xmlns:tools="http://schemas.android.com/tools"
android:layout_width="match_parent"
android:layout_height="match_parent"
android:paddingBottom="@dimen/activity_vertical_margin"
android:paddingLeft="@dimen/activity_horizontal_margin"
android:paddingRight="@dimen/activity_horizontal_margin"
android:paddingTop="@dimen/activity_vertical_margin"
tools:context="com.example.android.twoactivities.MainActivity">
<Button
android:layout_width="wrap_content"
android:layout_height="wrap_content"
android:text="@string/button_main"
android:id="@+id/button_main"
android:layout_alignParentBottom="true"
android:layout_alignParentRight="true"
android:layout_alignParentEnd="true"
android:onClick="launchSecondActivity"/>
</RelativeLayout>
1.3Definethebuttonaction
Inthistask,youwillimplementtheonClickmethodyoudefinedinthelayout.
1. IntheXMLEditor,placethecursorontheword"launchSecondActivity".2. PressAlt-Enter(Option-EnterontheMac)andselectCreate'launchSecondActivity(View)'in'MainActivity.
TheMainActivity.javafilesopens,andAndroidStudiogeneratesaskeletonmethodfortheonClickhandler.
3. InsidelaunchSecondActivity,addalogstatementthatsays"ButtonClicked!"
Log.d(LOG_TAG,"Buttonclicked!");
LOG_TAGwillshowasred.Thedefinitionsforthatvariablewillbeaddedinalaterstep.
4. Placethecursorontheword"Log"andpressAlt-Enter(Option-EnterontheMac).AndroidStudioaddsanimportstatementforandroid.util.Log.
5. Atthetopoftheclass,addaconstantfortheLOG_TAGvariable:
privatestaticfinalStringLOG_TAG=
MainActivity.class.getSimpleName();
Thisconstantusesthenameoftheclassitselfasthetag.
6. Runyourapp.Whenyouclickthe"Send"buttonyouwillseethe"ButtonClicked!"messageintheAndroidMonitor(logcat).Ifthere'stoomuchoutputinthemonitor,typeMainActivityintothesearchboxandthelogwillonlyshowlinesthatmatchthattag.
Solutioncode:
Introduction
96

packagecom.example.android.twoactivities;
importandroid.support.v7.app.AppCompatActivity;
importandroid.os.Bundle;
importandroid.util.Log;
importandroid.view.View;
publicclassMainActivityextendsAppCompatActivity{
privatestaticfinalStringLOG_TAG=MainActivity.class.getSimpleName();
@Override
protectedvoidonCreate(BundlesavedInstanceState){
super.onCreate(savedInstanceState);
setContentView(R.layout.activity_main);
}
publicvoidlaunchSecondActivity(Viewview){
Log.d(LOG_TAG,"Buttonclicked!");
}
}
Task2.CreateandlaunchthesecondactivityEachnewactivityyouaddedtoyourprojecthasitsownlayoutandJavafiles,separatefromthoseofthemainactivity.Theyalsohavetheirown<activity>elementsintheAndroidmanifest.Aswiththemainactivity,newactivitiesyoucreateinAndroidStudioalsoextendfromtheAppCompatActivityclass.
Alltheactivitiesinyourappareonlylooselyconnectedwitheachother.However,youcandefineanactivityasaparentofanotheractivityintheAndroidManifest.xmlfile.Thisparent-childrelationshipenablesAndroidtoaddnavigationhintssuchasleft-facingarrowsinthetitlebarforeachactivity.
Activitiescommunicatewitheachother(bothinthesameappandacrossdifferentapps)withintents.Therearetwotypesofintents,explicitandimplicit.Anexplicitintentisoneinwhichthetargetofthatintentisknown,thatis,youalreadyknowthefully-qualifiedclassnameofthatspecificactivity.Animplicitintentisoneinwhichyoudonothavethenameofthetargetcomponent,buthaveageneralactiontoperform.You'lllearnaboutimplicitintentsinalaterpractical.
Inthistaskyou'lladdasecondactivitytoourapp,withitsownlayout.You'llmodifytheAndroidmanifesttodefinethemainactivityastheparentofthesecondactivity.Thenyou'llmodifytheonClickeventmethodinthemainactivitytoincludeanintentthatlaunchesthesecondactivitywhenyouclickthebutton.
2.1Createthesecondactivity1. ClicktheappfolderforyourprojectandchooseFile>New>Activity>EmptyActivity.2. Namethenewactivity"SecondActivity."MakesureGenerateLayoutFileischecked,andlayoutnamewillbefilledin
asactivity_second.3. ClickFinish.AndroidStudioaddsbothanewactivitylayout(activity_second)andanewJavafile(SecondActivity)to
yourprojectforthenewactivity.ItalsoupdatestheAndroidmanifesttoincludethenewactivity.
2.2ModifytheAndroidmanifest1. Openmanifests/AndroidManifest.xml.2. Findthe<activity>elementthatAndroidStudiocreatedforthesecondactivity.
<activityandroid:name=".SecondActivity"></activity>
3. Addtheseattributestothe<activity>element:
Introduction
97

Attribute Value
android:label "SecondActivity"
android:parentActivityName ".MainActivity"
Thelabelattributeaddsthetitleoftheactivitytotheactionbar.
TheparentActivityNameattributeindicatesthatthemainactivityistheparentofthesecondactivity.Thisparentactivityrelationshipisusedfor"upward"navigationwithinyourapp.Bydefiningthisattribute,theactionbarforthesecondactivitywillappearwithaleft-facingarrowtoenabletheusertonavigate"upward"tothemainactivity.
4. Placethecursoron"SecondActivity"andpressAlt-Enter(Option-EnterontheMac).5. ChooseExtractstringresource,nametheresource"activity2_name",andclickOK.AndroidStudioaddsastring
resourcefortheactivitylabel.6. Adda<meta-data>elementinsidethe<activity>elementforthesecondactivity.Usetheseattributes:
Attribute Value
android:name "android.support.PARENT_ACTIVITY"
android:value "com.example.android.twoactivities.MainActivity"
The<meta-data>elementprovidesadditionalarbitraryinformationabouttheactivityaskey-valuepairs.Inthiscasetheseattributesaccomplishthesamethingastheandroid:parentActivityNameattribute--theydefinearelationshipbetweentwoactivitiesforthepurposeofupwardnavigation.TheseattributesarerequiredforolderversionsofAndroid.android:parentActivityNameisonlyavailableforAPIlevels16andhigher.
Solutioncode:
<?xmlversion="1.0"encoding="utf-8"?>
<manifestxmlns:android="http://schemas.android.com/apk/res/android"
package="com.example.android.twoactivities">
<application
android:allowBackup="true"
android:icon="@mipmap/ic_launcher"
android:label="@string/app_name"
android:supportsRtl="true"
android:theme="@style/AppTheme">
<activityandroid:name=".MainActivity">
<intent-filter>
<actionandroid:name="android.intent.action.MAIN"/>
<categoryandroid:name="android.intent.category.LAUNCHER"/>
</intent-filter>
</activity>
<activityandroid:name=".SecondActivity"
android:label="@string/activity2_name"
android:parentActivityName=".MainActivity">
<meta-data
android:name="android.support.PARENT_ACTIVITY"
android:value="com.example.android.twoactivities.MainActivity"/>
</activity>
</application>
</manifest>
2.3Definethelayoutforthesecondactivity
1. Openres/layout/activity_second.xmlandchangetherootviewgrouptoRelativeLayout,asyou'vedoneinpreviousexercises.
2. AddaTextView("PlainTextview"intheLayoutEditor).GivetheTextViewtheseattributes:
Introduction
98

Attribute Value
android:id "@+id/text_header"
android:layout_width wrap_content
android:layout_height wrap_content
android:layout_marginBottom "@dimen/activity_vertical_margin"
android:text "MessageReceived"
android:textAppearance "?android:attr/textAppearanceMedium"
android:textStyle "bold"
ThevalueoftextAppearanceisaspecialAndroidthemeattributethatdefinesbasicfontstylesforsmall,medium,andlargefonts.You'lllearnmoreaboutthemesinalaterlesson.
3. Extractthe"MessageReceived"stringintoaresourcenamedtext_header.4. PreviewthelayoutintheLayoutEditor.Thelayoutshouldlooklikethis:
Introduction
99

Introduction
100

Solutioncode:DependingonyourversionofAndroidStudio,yourcodewilllooksomethinglikethefollowing.
<?xmlversion="1.0"encoding="utf-8"?>
<RelativeLayoutxmlns:android="http://schemas.android.com/apk/res/android"
xmlns:tools="http://schemas.android.com/tools"
android:layout_width="match_parent"
android:layout_height="match_parent"
android:paddingBottom="@dimen/activity_vertical_margin"
android:paddingLeft="@dimen/activity_horizontal_margin"
android:paddingRight="@dimen/activity_horizontal_margin"
android:paddingTop="@dimen/activity_vertical_margin"
tools:context=".SecondActivity">
<TextView
android:id="@+id/text_header"
android:layout_width="wrap_content"
android:layout_height="wrap_content"
android:layout_marginBottom="@dimen/activity_vertical_margin"
android:text="@string/text_header"
android:textAppearance="?android:attr/textAppearanceMedium"
android:textStyle="bold"/>
</RelativeLayout>
2.4Addanintenttothemainactivity
Inthistaskyou'lladdanexplicitintenttothemainactivity.ThisintentisusedtoactivatethesecondactivitywhentheSendbuttonisclicked.
1. OpentheJavafileforMainActivity(java/com.example.android.twoactivities/MainActivity).2. CreateanewintentinthelaunchSecondActivity()method.
TheIntentconstructortakestwoargumentsforanexplicitintent:anapplicationContextandthespecificcomponentthatwillreceivethatintent.Hereyoushouldusethisasthecontext,andSecondActivity.classasthespecificclass.
Intentintent=newIntent(this,SecondActivity.class);
3. PlacethecursoronIntentandpressAlt-Enter(Option-EnterontheMac)toaddanimportfortheIntentclass.4. CallthestartActivity()methodwiththenewintentastheargument.
startActivity(intent);
5. Runtheapp.
WhenyouclicktheSendbuttonthemainactivitysendstheintentandtheAndroidsystemlaunchesthesecondactivity.Thatsecondactivityappearsonthescreen.Toreturntothemainactivity,clicktheAndroidBackbuttonatthebottomleftofthescreen,oryoucanusetheleftarrowatthetopofthesecondactivitytoreturntothemainactivity.
CodingchallengeNote:Allcodingchallengesareoptional.Challenge:Whathappensifyouremovetheandroid:parentActivityNameandthe<meta-data>elementsfromthemanifest?Makethischangeandrunyourapp.
Task3.SenddatafromthemainactivitytothesecondactivityInthelasttask,youaddedanexplicitintenttothemainactivitythatactivatedthesecondactivity.Youcanalsouseintentstosenddatafromoneactivitytoanother.
Introduction
101

Inthistask,you'llmodifytheexplicitintentinthemainactivitytoincludeadditionaldata(inthiscase,auser-enteredstring)intheintentextras.You'llthenmodifythesecondactivitytogetthatdatabackoutoftheintentextrasanddisplayitonthescreen.
3.1AddanEditTexttothemainactivitylayout
1. Openres/layout/activity_main.xml.2. AddanEditTextview(PlainTextintheLayoutEditor.)GivetheEditTexttheseattributes:
Attribute Value
android:id "@+id/editText_main"
android:layout_width match_parent
android:layout_height wrap_content
android:layout_toLeftOf "@+id/button_main"
android:layout_toStartOf "@+id/button_main"
android:layout_alignParentBottom "true"
android:hint "EnterYourMessageHere"
3. Deletetheandroid:textattribute.4. Extractthe"EnterYourMessageHere"stringintoaresourcenamededitText_main.
Thenewlayoutforthemainactivitylookslikethis:
Introduction
102
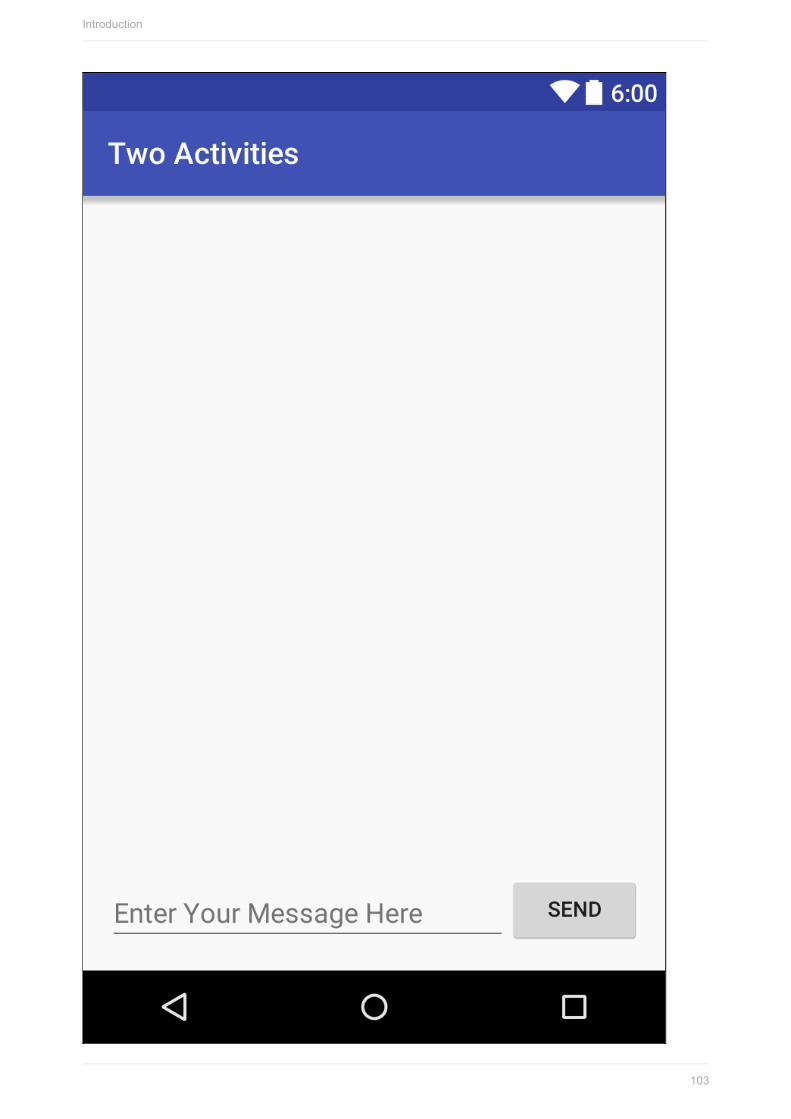
Introduction
103

Solutioncode:DependingonyourversionofAndroidStudio,yourcodewilllooksomethinglikethefollowing.
<?xmlversion="1.0"encoding="utf-8"?>
<RelativeLayoutxmlns:android="http://schemas.android.com/apk/res/android"
xmlns:tools="http://schemas.android.com/tools"
android:layout_width="match_parent"
android:layout_height="match_parent"
android:paddingBottom="@dimen/activity_vertical_margin"
android:paddingLeft="@dimen/activity_horizontal_margin"
android:paddingRight="@dimen/activity_horizontal_margin"
android:paddingTop="@dimen/activity_vertical_margin"
tools:context="com.example.android.twoactivities.MainActivity">
<Button
android:layout_width="wrap_content"
android:layout_height="wrap_content"
android:text="@string/button_main"
android:id="@+id/button_main"
android:layout_alignParentBottom="true"
android:layout_alignParentRight="true"
android:layout_alignParentEnd="true"
android:onClick="launchSecondActivity"/>
<EditText
android:id="@+id/editText_main"
android:layout_width="match_parent"
android:layout_height="wrap_content"
android:layout_alignParentBottom="true"
android:layout_toLeftOf="@+id/button_main"
android:layout_toStartOf="@+id/button_main"
android:hint="@string/editText_main"/>
</RelativeLayout>
3.2Addastringtothemainactivity'sintentextras
Yourintentobjectcanpassdatatothetargetactivityintwoways:inthedatafield,orintheintentextras.Theintent'sdataisaURIindicatingthespecificdatatobeactedon.IftheinformationyouwanttopasstoanactivitythroughanintentisnotaURI,oryouhavemorethanonepieceofinformationyouwanttosend,youcanputthatadditionalinformationintotheintentextrasinstead.
Theintentextrasarekey/valuepairsinaBundle.Abundleisacollectionofdata,storedaskey/valuepairs.Topassinformationfromoneactivitytoanother,youputkeysandvaluesintotheintentextrabundlefromthesendingactivity,andthengetthembackoutagaininthereceivingactivity.
1. Openjava/com.example.android.twoactivities/MainActivity.2. Addapublicconstantatthetopoftheclasstodefinethekeyfortheintentextra:
publicstaticfinalStringEXTRA_MESSAGE=
"com.example.android.twoactivities.extra.MESSAGE";
3. AddaprivatevariableatthetopoftheclasstoholdtheEditTextobject.ImporttheEditTextclass.
privateEditTextmMessageEditText;
4. IntheonCreate()method,usefindViewByIDtogetareferencetotheEditTextinstanceandassignittothatprivatevariable:
mMessageEditText=(EditText)findViewById(R.id.editText_main);
5. InthelaunchSecondActivity()method,justunderthenewintent,getthetextfromtheEditTextasastring:
Stringmessage=mMessageEditText.getText().toString();
Introduction
104

6. AddthatstringtotheintentasanextrawiththeEXTRA_MESSAGEconstantasthekeyandthestringasthevalue:
intent.putExtra(EXTRA_MESSAGE,message);
Solutioncode:
packagecom.example.android.twoactivities;
importandroid.content.Intent;
importandroid.support.v7.app.AppCompatActivity;
importandroid.os.Bundle;
importandroid.util.Log;
importandroid.view.View;
importandroid.widget.EditText;
publicclassMainActivityextendsAppCompatActivity{
privatestaticfinalStringLOG_TAG=MainActivity.class.getSimpleName();
publicstaticfinalStringEXTRA_MESSAGE=
"com.example.android.twoactivities.extra.MESSAGE";
privateEditTextmMessageEditText;
@Override
protectedvoidonCreate(BundlesavedInstanceState){
super.onCreate(savedInstanceState);
setContentView(R.layout.activity_main);
mMessageEditText=(EditText)findViewById(R.id.editText_main);
}
publicvoidlaunchSecondActivity(Viewview){
Log.d(LOG_TAG,"Buttonclicked!");
Intentintent=newIntent(this,SecondActivity.class);
Stringmessage=mMessageEditText.getText().toString();
intent.putExtra(EXTRA_MESSAGE,message);
startActivity(intent);
}
}
3.3AddaTextViewtothesecondactivityforthemessage
1. Openres/layout/activity_second.xml.2. AddasecondTextView.GivetheTextViewtheseattributes:
Attribute Value
android:id "@+id/text_message"
android:layout_width wrap_content
android:layout_height wrap_content
android:layout_below "@+id/text_header"
android:layout_marginLeft "@dimen/activity_horizontal_margin"
android:layout_marginStart "@dimen/activity_horizontal_margin"
android:textAppearance "?android:attr/textAppearanceMedium"
3. Deletetheandroid:textattribute(ifitexists).
Thenewlayoutforthesecondactivitylooksthesameasitdidintheprevioustask,becausethenewTextViewdoesnot(yet)containanytext,andthusdoesnotappearonthescreen.
Introduction
105
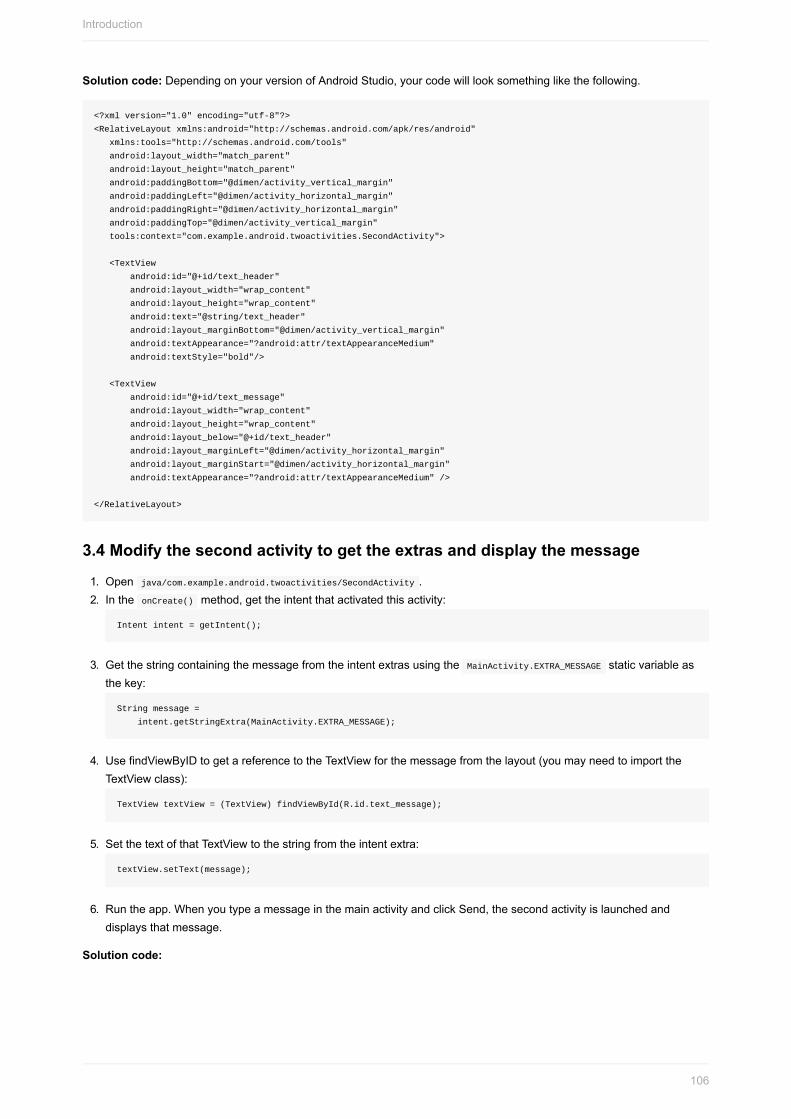
Solutioncode:DependingonyourversionofAndroidStudio,yourcodewilllooksomethinglikethefollowing.
<?xmlversion="1.0"encoding="utf-8"?>
<RelativeLayoutxmlns:android="http://schemas.android.com/apk/res/android"
xmlns:tools="http://schemas.android.com/tools"
android:layout_width="match_parent"
android:layout_height="match_parent"
android:paddingBottom="@dimen/activity_vertical_margin"
android:paddingLeft="@dimen/activity_horizontal_margin"
android:paddingRight="@dimen/activity_horizontal_margin"
android:paddingTop="@dimen/activity_vertical_margin"
tools:context="com.example.android.twoactivities.SecondActivity">
<TextView
android:id="@+id/text_header"
android:layout_width="wrap_content"
android:layout_height="wrap_content"
android:text="@string/text_header"
android:layout_marginBottom="@dimen/activity_vertical_margin"
android:textAppearance="?android:attr/textAppearanceMedium"
android:textStyle="bold"/>
<TextView
android:id="@+id/text_message"
android:layout_width="wrap_content"
android:layout_height="wrap_content"
android:layout_below="@+id/text_header"
android:layout_marginLeft="@dimen/activity_horizontal_margin"
android:layout_marginStart="@dimen/activity_horizontal_margin"
android:textAppearance="?android:attr/textAppearanceMedium"/>
</RelativeLayout>
3.4Modifythesecondactivitytogettheextrasanddisplaythemessage
1. Openjava/com.example.android.twoactivities/SecondActivity.2. IntheonCreate()method,gettheintentthatactivatedthisactivity:
Intentintent=getIntent();
3. GetthestringcontainingthemessagefromtheintentextrasusingtheMainActivity.EXTRA_MESSAGEstaticvariableasthekey:
Stringmessage=
intent.getStringExtra(MainActivity.EXTRA_MESSAGE);
4. UsefindViewByIDtogetareferencetotheTextViewforthemessagefromthelayout(youmayneedtoimporttheTextViewclass):
TextViewtextView=(TextView)findViewById(R.id.text_message);
5. SetthetextofthatTextViewtothestringfromtheintentextra:
textView.setText(message);
6. Runtheapp.WhenyoutypeamessageinthemainactivityandclickSend,thesecondactivityislaunchedanddisplaysthatmessage.
Solutioncode:
Introduction
106

packagecom.example.android.twoactivities;
importandroid.content.Intent;
importandroid.support.v7.app.AppCompatActivity;
importandroid.os.Bundle;
importandroid.widget.TextView;
publicclassSecondActivityextendsAppCompatActivity{
@Override
protectedvoidonCreate(BundlesavedInstanceState){
super.onCreate(savedInstanceState);
setContentView(R.layout.activity_second);
Intentintent=getIntent();
Stringmessage=
intent.getStringExtra(MainActivity.EXTRA_MESSAGE);
TextViewtextView=(TextView)findViewById(R.id.text_message);
textView.setText(message);
}
}
Task4.ReturndatabacktothemainactivityNowthatyouhaveanappthatlaunchesanewactivityandsendsdatatoit,thefinalstepistoreturndatafromthesecondactivitybacktothemainactivity.You'llalsouseintentsandintentextrasforthistask.
4.1AddanEditTextandaButtontothesecondactivitylayout1. CopytheEditTextandButtonfromthemainactivitylayoutfileandpastethemintothesecondlayout.2. Intheactivity_second.xmlfile,modifytheattributevaluesforboththeButtonandEditTextviews.Usethesevalues:
Oldattribute(Button) Newattribute(Button)
android:id="@+id/button_main" android:id="@+id/button_second"
android:onClick="launchSecondActivity" android:onClick="returnReply"
android:text="@string/button_main" android:text="@string/button_second"
Oldattribute(EditText) Newattribute(EditText)
android:id="@+id/editText_main" android:id="@+id/editText_second"
android:layout_toLeftOf="@+id/button_main" android:layout_toLeftOf="@+id/button_second"
android:layout_toStartOf="@+id/button_main" android:layout_toStartOf="@+id/button_second"
android:hint="@string/editText_main" android:hint="@string/editText_second"
3. Openres/values/strings.xmlandaddstringresourcesforthebuttontextandthehintintheEditText:
<stringname="button_second">Reply</string>
<stringname="editText_second">EnterYourReplyHere</string>
4. IntheXMLlayouteditor,placethecursoron"returnReply",pressAlt-Enter(Option-EnterontheMac)andselectCreate'returnReply(View)'in'SecondActivity'.
TheSecondActivity.javafilesopen,andAndroidStudiogeneratesaskeletonmethodfortheonClickhandler.Youwillimplementthismethodinthenexttask.
Thenewlayoutforthesecondactivitylookslikethis:
Introduction
107

Introduction
108
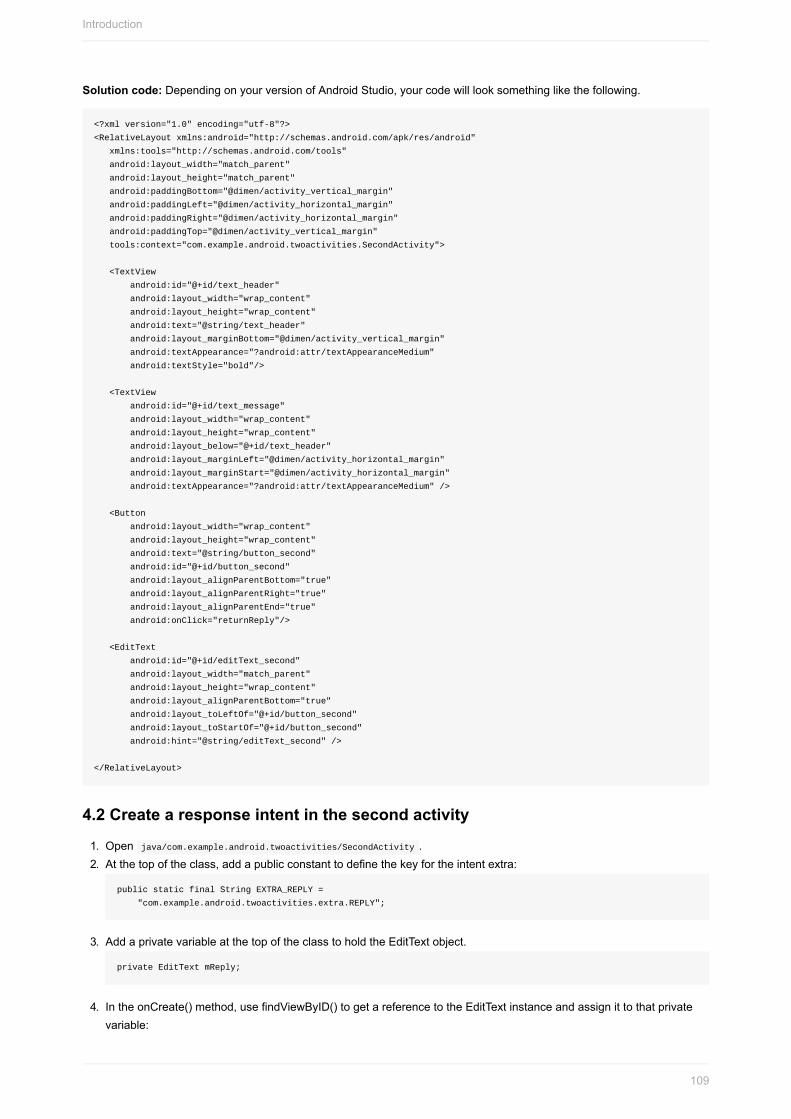
Solutioncode:DependingonyourversionofAndroidStudio,yourcodewilllooksomethinglikethefollowing.
<?xmlversion="1.0"encoding="utf-8"?>
<RelativeLayoutxmlns:android="http://schemas.android.com/apk/res/android"
xmlns:tools="http://schemas.android.com/tools"
android:layout_width="match_parent"
android:layout_height="match_parent"
android:paddingBottom="@dimen/activity_vertical_margin"
android:paddingLeft="@dimen/activity_horizontal_margin"
android:paddingRight="@dimen/activity_horizontal_margin"
android:paddingTop="@dimen/activity_vertical_margin"
tools:context="com.example.android.twoactivities.SecondActivity">
<TextView
android:id="@+id/text_header"
android:layout_width="wrap_content"
android:layout_height="wrap_content"
android:text="@string/text_header"
android:layout_marginBottom="@dimen/activity_vertical_margin"
android:textAppearance="?android:attr/textAppearanceMedium"
android:textStyle="bold"/>
<TextView
android:id="@+id/text_message"
android:layout_width="wrap_content"
android:layout_height="wrap_content"
android:layout_below="@+id/text_header"
android:layout_marginLeft="@dimen/activity_horizontal_margin"
android:layout_marginStart="@dimen/activity_horizontal_margin"
android:textAppearance="?android:attr/textAppearanceMedium"/>
<Button
android:layout_width="wrap_content"
android:layout_height="wrap_content"
android:text="@string/button_second"
android:id="@+id/button_second"
android:layout_alignParentBottom="true"
android:layout_alignParentRight="true"
android:layout_alignParentEnd="true"
android:onClick="returnReply"/>
<EditText
android:id="@+id/editText_second"
android:layout_width="match_parent"
android:layout_height="wrap_content"
android:layout_alignParentBottom="true"
android:layout_toLeftOf="@+id/button_second"
android:layout_toStartOf="@+id/button_second"
android:hint="@string/editText_second"/>
</RelativeLayout>
4.2Createaresponseintentinthesecondactivity
1. Openjava/com.example.android.twoactivities/SecondActivity.2. Atthetopoftheclass,addapublicconstanttodefinethekeyfortheintentextra:
publicstaticfinalStringEXTRA_REPLY=
"com.example.android.twoactivities.extra.REPLY";
3. AddaprivatevariableatthetopoftheclasstoholdtheEditTextobject.
privateEditTextmReply;
4. IntheonCreate()method,usefindViewByID()togetareferencetotheEditTextinstanceandassignittothatprivatevariable:
Introduction
109

mReply=(EditText)findViewById(R.id.editText_second);
5. InthereturnReply()method,getthetextoftheEditTextasastring:
Stringreply=mReply.getText().toString();
6. Createanewintentfortheresponse.Note:Donotreusetheintentobjectyoureceivedfromtheoriginalrequest.Createanewintentfortheresponse.
IntentreplyIntent=newIntent();
7. AddthereplystringfromtheEditTexttothenewintentasanintentextra.Sinceextrasarekey/valuepairs,herethekeyisEXTRA_REPLYandthethevalueisthereply:
replyIntent.putExtra(EXTRA_REPLY,reply);
8. SettheresulttoRESULT_OKtoindicatetheresponsewassuccessful.Resultcodes(includingRESULT_OKandRESULT_CANCELLED)aredefinedbytheActivityclass.
setResult(RESULT_OK,replyIntent);
9. Callfinish()toclosetheactivityandreturntothemainactivity.
finish();
Solutioncode:
Introduction
110

packagecom.example.android.twoactivities;
importandroid.content.Intent;
importandroid.support.v7.app.AppCompatActivity;
importandroid.os.Bundle;
importandroid.view.View;
importandroid.widget.EditText;
importandroid.widget.TextView;
publicclassSecondActivityextendsAppCompatActivity{
publicstaticfinalStringEXTRA_REPLY=
"com.example.android.twoactivities.extra.REPLY";
privateEditTextmReply;
@Override
protectedvoidonCreate(BundlesavedInstanceState){
super.onCreate(savedInstanceState);
setContentView(R.layout.activity_second);
mReply=(EditText)findViewById(R.id.editText_second);
Intentintent=getIntent();
Stringmessage=
intent.getStringExtra(MainActivity.EXTRA_MESSAGE);
TextViewtextView=(TextView)findViewById(R.id.text_message);
textView.setText(message);
}
publicvoidreturnReply(Viewview){
Stringreply=mReply.getText().toString();
IntentreplyIntent=newIntent();
replyIntent.putExtra(EXTRA_REPLY,reply);
setResult(RESULT_OK,replyIntent);
finish();
}
}
4.3AddTextViewstothemainactivitylayouttodisplaythereplyThemainactivityneedsawaytodisplaythereplysentbackfromthesecondactivity.Inthistaskyou'lladdTextViewstothemainactivitylayouttodisplaythatreply.Tomakethiseasier,youwillcopytheTextViewsyouusedinthesecondactivity.
1. CopythetwoTextViewsforthemessagedisplayfromthesecondactivitylayoutfileandpastethemintothemainlayoutabovetheexistingEditTextandButtonviews.
2. ModifytheattributevaluesforbothofthesenewTextViews.Usethesevalues:
Oldattribute(headerTextView) Newattribute(headerTextView)
android:id="@+id/text_header" android:id="@+id/text_header_reply"
android:text="@string/text_header" android:text="@string/text_header_reply"
Oldattribute(messageTextView) Newattribute(messageTextView)
android:id="@+id/text_message" android:id="@+id/text_message_reply"
android:layout_below="@+id/text_header" android:layout_below="@+id/text_header_reply"
3. Addtheandroid:visibilityattributetoeachoftheTextViewstomaketheminitiallyinvisible.(Havingthemvisibleonthescreen,butwithoutanycontent,canbeconfusingtotheuser.)YouwillmaketheseTextViewsvisibleaftertheresponsedataispassedbackfromthesecondactivity.
android:visibility="invisible"
Introduction
111

4. Openres/values/strings.xmlandaddastringresourceforthereplyheader:
<stringname="text_header_reply">ReplyReceived</string>
Thelayoutforthemainactivitylooksthesameasitdidintheprevioustask--althoughyouhaveaddedtwonewTextViewstothelayout.However,sinceyousettheTextViewstoinvisible,theydonotappearonthescreen.
Solutioncode:DependingonyourversionofAndroidStudio,yourcodewilllooksomethinglikethefollowing.
<?xmlversion="1.0"encoding="utf-8"?>
<RelativeLayoutxmlns:android="http://schemas.android.com/apk/res/android"
xmlns:tools="http://schemas.android.com/tools"
android:layout_width="match_parent"
android:layout_height="match_parent"
android:paddingBottom="@dimen/activity_vertical_margin"
android:paddingLeft="@dimen/activity_horizontal_margin"
android:paddingRight="@dimen/activity_horizontal_margin"
android:paddingTop="@dimen/activity_vertical_margin"
tools:context="com.example.android.twoactivities.MainActivity">
<TextView
android:id="@+id/text_header_reply"
android:layout_width="wrap_content"
android:layout_height="wrap_content"
android:text="@string/text_header_reply"
android:visibility="invisible"
android:layout_marginBottom="@dimen/activity_vertical_margin"
android:textAppearance="?android:attr/textAppearanceMedium"
android:textStyle="bold"/>
<TextView
android:id="@+id/text_message_reply"
android:layout_width="wrap_content"
android:layout_height="wrap_content"
android:layout_below="@+id/text_header_reply"
android:visibility="invisible"
android:layout_marginLeft="@dimen/activity_horizontal_margin"
android:layout_marginStart="@dimen/activity_horizontal_margin"
android:textAppearance="?android:attr/textAppearanceMedium"/>
<Button
android:layout_width="wrap_content"
android:layout_height="wrap_content"
android:text="@string/button_main"
android:id="@+id/button_main"
android:layout_alignParentBottom="true"
android:layout_alignParentRight="true"
android:layout_alignParentEnd="true"
android:onClick="launchSecondActivity"/>
<EditText
android:id="@+id/editText_main"
android:layout_width="match_parent"
android:layout_height="wrap_content"
android:layout_alignParentBottom="true"
android:layout_toLeftOf="@+id/button_main"
android:layout_toStartOf="@+id/button_main"
android:hint="@string/editText_main"/>
</RelativeLayout>
4.4GetthereplyfromtheintentextraanddisplayitWhenyouuseanexplicitintenttostartanotheractivity,youmaynotexpecttogetanydataback--you'rejustactivatingthatactivity.Inthatcase,youusestartActivity()tostartthenewactivity,asyoudidearlierinthislesson.Ifyouwanttogetdatabackfromtheactivatedactivity,however,you'llneedtostartitwithstartActivityFromResult().
Inthistaskyou'llmodifytheapptostartthesecondactivityandexpectaresult,toextractthatreturndatafromtheintent,andtodisplaythatdataintheTextViewsyoucreatedinthelasttask.
Introduction
112

1. Openjava/com.example.android.twoactivities/MainActivity.2. Addapublicconstantatthetopoftheclasstodefinethekeyforaparticulartypeofresponseyou'reinterestedin:
publicstaticfinalintTEXT_REQUEST=1;
3. AddtwoprivatevariablestoholdthereplyheaderandreplyTextViews:
privateTextViewmReplyHeadTextView;
privateTextViewmReplyTextView;
4. IntheonCreate()method,usefindViewByIDtogetreferencesfromthelayouttothereplyheaderandreplyTextView.Assignthoseviewinstancestotheprivatevariables:
mReplyHeadTextView=(TextView)findViewById(R.id.text_header_reply);
mReplyTextView=(TextView)findViewById(R.id.text_message_reply);
5. InthelaunchSecondActivity()method,modifythecalltostartActivity()tobestartActivityForResult(),andincludetheTEXT_REQUESTkeyasanargument:
startActivityForResult(intent,TEXT_REQUEST);
6. CreatetheonActivityResult()callbackmethodwiththissignature:
publicvoidonActivityResult(intrequestCode,intresultCode,
Intentdata){}
7. InsideonActivityResult(),callsuper.onActivityResult():
super.onActivityResult(requestCode,resultCode,data);
8. AddcodetotestforbothTEXT_REQUEST(toprocesstherightintentresult,incasetherearemultipleones)andtheRESULT_CODE(tomakesuretherequestwassuccessful):
if(requestCode==TEXT_REQUEST){
if(resultCode==RESULT_OK){
}
}
9. Insidetheinnerifblock,gettheintentextrafromtheresponseintent(data).HerethekeyfortheextraistheEXTRA_REPLYconstantfromSecondActivity:
Stringreply=data.getStringExtra(SecondActivity.EXTRA_REPLY);
10. Setthevisibilityofthereplyheadertotrue:
mReplyHeadTextView.setVisibility(View.VISIBLE);
11. Setthereplytextviewtexttothereply,andsetitsvisibilitytotrue:
mReplyTextView.setText(reply);
mReplyTextView.setVisibility(View.VISIBLE);
12. Runtheapp.
Now,whenyousendamessagetothesecondactivityandgetareplyback,themainactivityupdatestodisplaythereply.
Introduction
113

Introduction
114

Solutioncode:
packagecom.example.android.twoactivities;
importandroid.content.Intent;
importandroid.support.v7.app.AppCompatActivity;
importandroid.os.Bundle;
importandroid.util.Log;
importandroid.view.View;
importandroid.widget.EditText;
importandroid.widget.TextView;
publicclassMainActivityextendsAppCompatActivity{
privatestaticfinalStringLOG_TAG=MainActivity.class.getSimpleName();
publicstaticfinalStringEXTRA_MESSAGE=
"com.example.android.twoactivities.extra.MESSAGE";
publicstaticfinalintTEXT_REQUEST=1;
privateEditTextmMessageEditText;
privateTextViewmReplyHeadTextView;
privateTextViewmReplyTextView;
@Override
protectedvoidonCreate(BundlesavedInstanceState){
super.onCreate(savedInstanceState);
setContentView(R.layout.activity_main);
mMessageEditText=(EditText)findViewById(R.id.editText_main);
mReplyHeadTextView=(TextView)findViewById(R.id.text_header_reply);
mReplyTextView=(TextView)findViewById(R.id.text_message_reply);
}
publicvoidlaunchSecondActivity(Viewview){
Log.d(LOG_TAG,"Buttonclicked!");
Intentintent=newIntent(this,SecondActivity.class);
Stringmessage=mMessageEditText.getText().toString();
intent.putExtra(EXTRA_MESSAGE,message);
startActivityForResult(intent,TEXT_REQUEST);
}
publicvoidonActivityResult(intrequestCode,intresultCode,
Intentdata){
super.onActivityResult(requestCode,resultCode,data);
if(requestCode==TEXT_REQUEST){
if(resultCode==RESULT_OK){
Stringreply=
data.getStringExtra(SecondActivity.EXTRA_REPLY);
mReplyHeadTextView.setVisibility(View.VISIBLE);
mReplyTextView.setText(reply);
mReplyTextView.setVisibility(View.VISIBLE);
}
}
}
}
SolutioncodeAndroidStudioproject:TwoActivities
Codingchallenge
Introduction
115

Note:Allcodingchallengesareoptionalandarenotprerequisitesforlaterlessons.
Challenge:Createanappwiththreebuttonslabelled:TextOne,TextTwo,andTextThree.Whenanyofthosebuttonsareclicked,launchasecondactivity.ThatsecondactivityshouldcontainaScrollViewthatdisplaysoneofthreetextpassages(youcanincludeyourchoiceofpassages).Useintentstobothlaunchthesecondactivityandintentextrastoindicatewhichofthethreepassagestodisplay.
SummaryInthispractical,youhavelearnedthat:
AnActivityisanapplicationcomponentthatprovidesasinglescreenfocussedonasingleusertask.Eachactivityhasitsownuserinterfacelayoutfile.Youcanassignyouractivitiesaparent/childrelationshiptoenable"upward"navigationwithinyourapp.Toimplementanactivityinyourapp,dothefollowing:
CreateanactivityJavaclass.Implementauserinterfaceforthatactivity.Declarethatnewactivityintheappmanifest.Whenyoucreateanewprojectforyourapp,oraddanewactivitytoyourapp,inAndroidStudio(withFile>New>Activity),templatecodeforeachofthesetasksisprovidedforyou.Intentsallowyoutorequestanactionfromanothercomponentinyourapp,forexample,tostartoneactivityfromanother.Intentscanbeexplicitorimplicit.
Withexplicitintentsyouindicatethespecifictargetcomponenttoreceivethedata.Withimplicitintentsyouspecifythefunctionalityyouwantbutnotthetargetcomponent.Intentscanincludedataonwhichtoperformanaction(asaURI)oradditionalinformationasintentextras.Intentextrasarekey/valuepairsinabundlethataresentalongwiththeintent.
Viewscanbemadevisibleorinvisiblewiththeandroid:visibilityattribute
RelatedconceptTherelatedconceptdocumentationisinAndroidDeveloperFundamentals:Concepts.
ActivitiesandIntents
LearnmoreAndroidApplicationFundamentalsStartingAnotherActivityActivity(APIGuide)Activity(APIReference)IntentsandIntentFilters(APIGuide)Intent(APIReference)
Introduction
116

2.2:ActivityLifecycleandInstanceStateContents:
WhatyoushouldalreadyKNOWWhatyouwillLEARNWhatyouwillDOAppoverviewTask1.AddlifecyclecallbackstoTwoActivitiesTask2.SaveandrestoreactivitystateCodingchallengeSummaryRelatedconceptLearnmore
Inthispracticalyou'lllearnmoreabouttheactivitylifecycle.Theactivitylifecycleisthesetofstatesanactivitycanbeinduringitsentirelifetime,fromthetimeitisinitiallycreatedtowhenitisdestroyedandthesystemreclaimsthatactivity'sresources.Asausernavigatesbetweenactivitiesinyourapp(aswellasintoandoutofyourapp),thoseactivitieseachtransitionbetweendifferentstatesintheactivitylifecycle.
Eachstageinthelifecycleofanactivityhasacorrespondingcallbackmethod(onCreate(),onStart(),onPause(),andsoon).Whenanactivitychangesstate,theassociatedcallbackmethodisinvoked.You'vealreadyseenoneofthesemethods:onCreate().Byoverridinganyofthelifecyclecallbackmethodsinyouractivityclasses,youcanchangethedefaultbehaviorofhowyouractivitybehavesinresponsetodifferentuserorsystemactions.
Changestotheactivitystatecanalsooccurinresponsetodeviceconfigurationchangessuchasrotatingthedevicefromportraittolandscape.Theseconfigurationchangesresultintheactivitybeingdestroyedandentirelyrecreatedinitsdefaultstate,whichmaycausethelossofinformationtheuserhasenteredinthatactivity.It'simportanttodevelopyourapptopreventthistoavoiduserconfusion.Laterinthispracticalwe'llexperimentwithconfigurationchangesandlearnhowtopreservethestateofyouractivitiesinresponsetodeviceconfigurationchangesorotherActivitylifecycleevents.
Inthispracticalyou'lladdloggingstatementstotheTwoActivitiesappandobservethelifecyclechangesasyouusetheappinvariousways.Youwillthenbeginworkingwiththesechangesandexploringhowtohandleuserinputundertheseconditions..
WhatyoushouldalreadyKNOW
Introduction
117

Fromthepreviouspracticals,youshouldbeableto:
CreateandrunninganappprojectinAndroidStudio.AddlogstatementstoyourappandviewingthoselogsintheAndroidMonitor(logcat).Understandandworkwithactivitiesandintents,andbecomfortableinteractingwiththem.
WhatyouwillLEARNYouwilllearnto:
Understandtheactivitylifecycle,andwhenactivitiesarecreated,pause,stop,andaredestroyed.Understandthelifecyclecallbackmethodsassociatedwithactivitychanges.Understandtheeffectofactionssuchasconfigurationchangesthatcanresultinactivitylifecycleevents.Retainactivitystateacrosslifecycleevents.
WhatyouwillDOInthispractical,youwill:
ExtendtheTwoActivitiesappfromthepreviouspracticaltoimplementthevariousactivitylifecyclecallbackstoincludeloggingstatements.Observethestatechangesasyourapprunsandasyouinteractwiththeactivitiesinyourapp.Modifyyourapptoretaintheinstancestateofanactivitythatisunexpectedlyrecreatedinresponsetouserbehaviororconfigurationchangeonthedevice.
AppOverviewForthispracticalyou'lladdontotheTwoActivitiesapp.Theapplooksandbehavesroughlythesameasitdidinthelastsection:withtwoactivitiesandtwomessagesyoucansendbetweenthem.Thechangesyoumaketotheappinthispracticalwillnotaffectitsvisibleuserbehavior.
Task1.AddLifecycleCallbackstoTwoActivitiesInthistaskyouwillimplementalloftheactivitylifecyclecallbackmethodstoprintmessagestologcatwhenthosemethodsareinvoked.Theselogmessageswillallowyoutoseewhentheactivitylifecyclechangesstate,andhowthoselifecyclestatechangesaffectyourappasitruns.
1.1(Optional)CopytheTwoActivitiesProject
Forthetasksinthispractical,youwillmodifytheexistingTwoActivitiesprojectthatyoubuiltinthelastpractical.Ifyou'dprefertokeepthepreviousTwoActivitiesprojectintact,followthestepsintheAppendixtomakeacopyoftheproject.
1.2ImplementcallbacksintoMainActivity
1. Openjava/com.example.android.twoactivities/MainActivity.2. IntheonCreate()method,addthefollowinglogstatements:
Log.d(LOG_TAG,"-------");
Log.d(LOG_TAG,"onCreate");
3. AddanewmethodfortheonStart()callback,withastatementtothelogforthatevent:
Introduction
118

@Override
publicvoidonStart(){
super.onStart();
Log.d(LOG_TAG,"onStart");
}
TIP:SelectCode>OverrideMethodsinAndroidStudio.Adialogappearswithallofthepossiblemethodsyoucanoverrideinyourclass.Choosingoneormorecallbackmethodsfromthelistinsertsacompletetemplateforthosemethods,includingtherequiredcalltothesuperclass.
4. UsetheonStart()methodasatemplatetoimplementtheotherlifecyclecallbacks:
onPause()onRestart()onResume()onStop()onDestroy()
Allthecallbackmethodshavethesamesignatures(exceptforthename).IfyoucopyandpasteonStart()tocreatetheseothercallbackmethods,don'tforgettoupdatethecontentstocalltherightmethodinthesuperclass,andtologthecorrectmethod.
5. Buildandrunyourapp.
SolutionCode(nottheentireclass):
Introduction
119

@Override
protectedvoidonCreate(BundlesavedInstanceState){
super.onCreate(savedInstanceState);
setContentView(R.layout.activity_main);
Log.d(LOG_TAG,"-------");
Log.d(LOG_TAG,"onCreate");
mMessageEditText=(EditText)findViewById(R.id.editText_main);
mReplyHeadTextView=(TextView)findViewById(R.id.text_header_reply);
mReplyTextView=(TextView)findViewById(R.id.text_message_reply);
}
@Override
publicvoidonStart(){
super.onStart();
Log.d(LOG_TAG,"onStart");
}
@Override
publicvoidonRestart(){
super.onRestart();
Log.d(LOG_TAG,"onRestart");
}
@Override
publicvoidonResume(){
super.onResume();
Log.d(LOG_TAG,"onResume");
}
@Override
publicvoidonPause(){
super.onPause();
Log.d(LOG_TAG,"onPause");
}
@Override
publicvoidonStop(){
super.onStop();
Log.d(LOG_TAG,"onStop");
}
@Override
publicvoidonDestroy(){
super.onDestroy();
Log.d(LOG_TAG,"onDestroy");
}
1.3ImplementlifecyclecallbacksinSecondActivityNowthatyou'veimplementedthelifecyclecallbackmethodsforMainActivity,dothesameforSecondActivity.
1. Openjava/com.example.android.twoactivities/SecondActivity.2. Atthetopoftheclass,addaconstantfortheLOG_TAGvariable:
privatestaticfinalStringLOG_TAG=
SecondActivity.class.getSimpleName();
3. Addthelifecyclecallbacksandlogstatementstothesecondactivity.(YoucanalsojustcopyandpastethecallbackmethodsfromMainActivity)
4. AddalogstatementtothereturnReply()method,justbeforethefinish()method:
Log.d(LOG_TAG,"EndSecondActivity");
SolutionCode(nottheentireclass):
Introduction
120

privatestaticfinalStringLOG_TAG=SecondActivity.class.getSimpleName();
publicvoidreturnReply(Viewview){
Stringreply=mReply.getText().toString();
IntentreplyIntent=newIntent();
replyIntent.putExtra(EXTRA_REPLY,reply);
setResult(RESULT_OK,replyIntent);
Log.d(LOG_TAG,"EndSecondActivity");
finish();
}
@Override
protectedvoidonStart(){
super.onStart();
Log.d(LOG_TAG,"onStart");
}
@Override
publicvoidonRestart(){
super.onRestart();
Log.d(LOG_TAG,"onRestart");
}
@Override
publicvoidonResume(){
super.onResume();
Log.d(LOG_TAG,"onResume");
}
@Override
publicvoidonPause(){
super.onPause();
Log.d(LOG_TAG,"onPause");
}
@Override
publicvoidonStop(){
super.onStop();
Log.d(LOG_TAG,"onStop");
}
@Override
publicvoidonDestroy(){
super.onDestroy();
Log.d(LOG_TAG,"onDestroy");
}
1.4Observethelogastheappruns1. Runyourapp.2. ClickAndroidMonitoratthebottomofAndroidStudiotoopentheAndroidMonitor.3. Selectthelogcattab.4. Type"Activity"intheAndroidMonitorsearchbox.
Introduction
121

TheAndroidlogcatcanbeverylongandcluttered.BecausetheLOG_TAGvariableineachclasscontainseitherthewordsMainActivityorSecondActivity,thiskeywordletsyoufilterthelogforonlythethingsyou'reinterestedin.
5. Experimentusingyourappandnotethatthelifecycleeventsoccurinresponsetodifferentactions.Inparticular,trythesethings:
Usetheappnormally(sendamessage,replywithanothermessage.)Usethebackbuttontogobackfromthesecondactivitytothemainactivity.Usetheleftarrowintheactionbartogobackfromthesecondactivitytothemainactivity.Rotatethedeviceonboththemainandsecondactivityatdifferenttimesinyourappandobservewhathappensinthelogandonthescreen.TIP:Ifyou'rerunningyourappinanemulator,youcansimulaterotationwithCtrl-F11orCtrl-Fn-F11.Presstheoverviewbutton(thesquarebuttontotherightofHome)andclosetheapp(taptheX).Returntothehomescreenandrestartyourapp.
CodingchallengeNote:Allcodingchallengesareoptionalandarenotprerequisitesforlaterlessons.
Challenge:WatchforonDestroy()inparticular.WhyisonDestroy()calledsometimes(afterclickingthebackbutton,orondevicerotation)andnotothers(manuallystoppingandrestartingtheapp)?
Task2.SaveandrestoretheactivityinstancestateDependingonsystemresourcesanduserbehavior,theactivitiesinyourappmaybedestroyedandreconstructedfarmorefrequentlythanyoumightthink.Youmayhavenoticedthissetofactivitiesinthelastsectionwhenyourotatedthedeviceoremulator.Rotatingthedeviceisoneexampleofadeviceconfigurationchange.Althoughrotationisthemostcommonone,allconfigurationchangesresultinthecurrentactivitybeingdestroyedandrecreatedasifitwerenew.Ifyoudon'taccountforthisbehaviorinyourcode,whenaconfigurationchangeoccurs,youractivity'slayoutmayreverttoitsdefaultappearanceandinitialvalues,andyourusermaylosetheirplace,theirdata,orthestateoftheirprogressinyourapp.
Introduction
122

Thestateofeachactivityisstoredasasetofkey/valuepairsinaBundleobjectcalledtheactivityinstancestate.Thesystemsavesdefaultstateinformationtoinstancestatebundlejustbeforetheactivityisstopped,andpassesthatbundletothenewactivityinstancetorestore.
Tokeepfromlosingdatainyouractivitieswhentheyareunexpectedlydestroyedandrecreated,youneedtoimplementtheonSaveInstanceState()method.Thesystemcallsthismethodonyouractivity(betweenonPause()andonStop())whenthereisapossibilitytheactivitymaybedestroyedandrecreated.
Thedatayousaveintheinstancestateisspecifictoonlythisinstanceofthisspecificactivityduringthecurrentappsession.Whenyoustopandrestartanewappsession,theactivityinstancestateislostandyouractivitieswillreverttotheirdefaultappearance.Ifyouneedtosaveuserdatabetweenappsessions,usesharedpreferencesoradatabase.You'lllearnaboutbothoftheseinalaterpractical.
2.1SavetheactivityinstancestatewithonSaveInstanceState()Youmayhavenoticedthatrotatingthedevicedoesnotaffectthestateofthesecondactivityatall.Thisisbecausethesecondactivity'slayoutandstatearegeneratedfromthelayoutandtheintentthatactivatedit.Eveniftheactivityisrecreated,theintentisstillthereandthedatainthatintentisstillusedeachtimethesecondactivity'sonCreate()iscalled.
Inaddition,youmaynoticethatinbothactivities,anytextyoutypedintomessageorreplyEditTextsisretainedevenwhenthedeviceisrotated.Thisisbecausethestateinformationofsomeoftheviewsinyourlayoutareautomaticallysavedacrossconfigurationchanges,andthecurrentvalueofanEditTextisoneofthosecases.
Theonlyactivitystatesyou'reinterestedinaretheTextViewsforthereplyheaderandthereplytextinthemainactivity.BothTextViewsareinvisiblebydefault;theyonlyappearonceyousendamessagebacktothemainactivityfromthesecondactivity.
Inthistaskyou'lladdcodetopreservetheinstancestateofthesetwoTextViewsusingonSaveInstanceState().
1. Openjava/com.example.android.twoactivities/MainActivity.2. AddthisskeletonimplementationofonSaveInstanceState()totheactivity,oruseCode>OverrideMethodstoinsert
askeletonoverride.
@Override
publicvoidonSaveInstanceState(BundleoutState){
super.onSaveInstanceState(outState);
}
3. Checktoseeiftheheaderiscurrentlyvisible,andifsoputthatvisibilitystateintothestatebundlewiththeputBoolean()methodandthekey"reply_visible".
if(mReplyHeadTextView.getVisibility()==View.VISIBLE){
outState.putBoolean("reply_visible",true);
}
Rememberthatthereplyheaderandtextaremarkedinvisibleuntilthereisareplyfromthesecondactivity.Iftheheaderisvisible,thenthereisreplydatathatneedstobesaved.We'reonlyinterestedinthatvisibilitystate--theactualtextoftheheaderdoesn'tneedtobesaved,becausethattextneverchanges.
4. Insidethatsamecheck,addthereplytextintothebundle.
outState.putString("reply_text",mReplyTextView.getText().toString());
Iftheheaderisvisibleyoucanassumethatthereplymessageitselfisalsovisible.Youdon'tneedtotestfororsavethecurrentvisibilitystateofthereplymessage.Onlytheactualtextofthemessagegoesintothestatebundlewiththekey"reply_text".
Weonlysavethestateofthoseviewsthatmightchangeaftertheactivityiscreated.
Introduction
123

Theotherviewsinyourapp(theEditText,theButton)canberecreatedfromthedefaultlayoutatanytime.
Note:Thesystemwillsavethestateofsomeviews,suchasthecontentsoftheEditText.
SolutionCode(nottheentireclass):
@Override
publicvoidonSaveInstanceState(BundleoutState){
super.onSaveInstanceState(outState);
//Iftheheadingisvisible,wehaveamessagethatneedstobesaved.
//Otherwisewe'restillusingdefaultlayout.
if(mReplyHeadTextView.getVisibility()==View.VISIBLE){
outState.putBoolean("reply_visible",true);
outState.putString("reply_text",mReplyTextView.getText().toString());
}
}
2.2RestoretheactivityinstancestateinonCreate()Onceyou'vesavedtheactivityinstancestate,youalsoneedtorestoreitwhentheactivityisrecreated.YoucandothiseitherinonCreate(),orbyimplementingtheonRestoreInstanceState()callback,whichiscalledafteronStart()aftertheactivityiscreated.
MostofthetimethebetterplacetorestoretheactivitystateisinonCreate(),toensurethatyouruserinterfaceincludingthestateisavailableassoonaspossible.ItissometimesconvenienttodoitinonRestoreInstanceState()afteralloftheinitializationhasbeendone,ortoallowsubclassestodecidewhethertouseyourdefaultimplementation.
1. IntheonCreate()method,addatesttomakesurethebundleisnotnull.
if(savedInstanceState!=null){
}
Whenyouractivityiscreated,thesystempassesthestatebundletoonCreate()asitsonlyargument.ThefirsttimeonCreate()iscalledandyourappstarts,thebundleisnull-there'snoexistingstatethefirsttimeyourappstarts.SubsequentcallstoonCreate()haveabundlepopulatedwithanythedatayoustoredinonSaveInstanceState().
2. Insidethatcheck,getthecurrentvisibility(trueorfalse)outofthebundlewiththekey"reply_visible"
if(savedInstanceState!=null){
booleanisVisible=
savedInstanceState.getBoolean("reply_visible");
}
3. AddatestbelowthatpreviouslinefortheisVisiblevariable.
if(isVisible){
}
Ifthere'sareply_visiblekeyinthestatebundle(andisVisibleisthustrue),wewillneedtorestorethestate.
4. InsidetheisVisibletest,maketheheadervisible.
mReplyHeadTextView.setVisibility(View.VISIBLE);
5. Getthetextreplymessagefromthebundlewiththekey"reply_text",andsetthereplyTextViewtoshowthatstring.
mReplyTextView.setText(savedInstanceState.getString("reply_text"));
6. MakethereplyTextViewvisibleaswell:
Introduction
124

mReplyTextView.setVisibility(View.VISIBLE);
7. Runtheapp.Tryrotatingthedeviceortheemulatortoensurethatthereplymessage(ifthereisone)remainsonthescreenaftertheactivityisrecreated.
SolutionCode(nottheentireclass):
@Override
protectedvoidonCreate(BundlesavedInstanceState){
super.onCreate(savedInstanceState);
setContentView(R.layout.activity_main);
Log.d(LOG_TAG,"-------");
Log.d(LOG_TAG,"onCreate");
//Initializealltheviewvariables.
mMessageEditText=(EditText)findViewById(R.id.editText_main);
mReplyHeadTextView=(TextView)findViewById(R.id.text_header_reply);
mReplyTextView=(TextView)findViewById(R.id.text_message_reply);
//Restorethesavedstate.SeeonSaveInstanceState()forwhatgetssaved.
if(savedInstanceState!=null){
booleanisVisible=savedInstanceState.getBoolean("reply_visible");
//Showboththeheaderandthemessageviews.IfisVisibleis
//falseormissingfromthebundle,usethedefaultlayout.
if(isVisible){
mReplyHeadTextView.setVisibility(View.VISIBLE);
mReplyTextView.setText(savedInstanceState.getString("reply_text"));
mReplyTextView.setVisibility(View.VISIBLE);
}
}
}
SolutioncodeAndroidStudioProject:TwoActivitiesLifecycle
CodingchallengeNote:Allcodingchallengesareoptionalandarenotprerequisitesforlaterlessons.
Challenge:Createasimpleshoppinglistbuilderappwithtwoactivities.Themainactivitycontainsthelistitself,whichismadeupoften(empty)textviews.Abuttononthemainactivitylabelled"AddItem"launchesasecondactivitythatcontainsalistofcommonshoppingitems(Cheese,Rice,Apples,andsoon).UseButtonstodisplaytheitems.Choosinganitemreturnsyoutothemainactivity,andupdatesanemptyTextViewtoincludethechosenitem.
Useintentstopassinformationbetweenthetwoactivities.Makesurethatthecurrentstateoftheshoppinglistissavedwhenyourotatethedevice.
SummaryTheActivitylifecycleisasetofstatesanactivitymigratesthrough,beginningwhenitisfirstcreatedandendingwhentheAndroidsystemreclaimsthatactivity'sresources.Astheusernavigatesbetweenactivitiesandinsideandoutsideofyourapp,eachactivitymovesbetweenstatesintheactivitylifecycle.EachstateintheactivitylifecyclehasacorrespondingcallbackmethodyoucanoverrideinyourActivityclass.Thoselifecyclemethodsare:
Introduction
125

onCreate()onStart()onPause()onRestart()onResume()onStop()onDestroy()
Overridingalifecyclecallbackmethodallowsyoutoaddbehaviorthatoccurswhenyouractivitytransitionsintothatstate.YoucanaddskeletonoverridemethodstoyourclassesinAndroidStudiowithCode>Override.Deviceconfigurationchangessuchasrotationresultsintheactivitybeingdestroyedandrecreatedasifitwerenew.Aportionoftheactivitystateispreservedonaconfigurationchange,includingthecurrentvaluesofofEditTexts.Forallotherdata,youmustexplicitlysavethatdatayourself.SaveactivityinstancestateintheonSaveInstanceState()method.Instancestatedataisstoredassimplekey/valuepairsinaBundle.UsetheBundlemethodstoputdataintoandgetdatabackoutofthebundle.RestoretheinstancestateinonCreate(),whichisthepreferredway,oronRestoreInstanceState().
RelatedconceptTherelatedconceptdocumentationisinAndroidDeveloperFundamentals:Concepts.
ActivityLifecycleandSavingState
LearnmoreActivity(APIGuide)Activity(APIReference)ManagingtheActivityLifecycleRecreatinganActivityHandlingRuntimeChanges
Introduction
126

2.3:StartActivitieswithImplicitIntentsContents:
WhatyoushouldalreadyKNOWWhatyouwillLEARNWhatyouwillDOAppoverviewTask1.CreatenewprojectandlayoutTask2.ImplementopenwebsiteTask3.ImplementopenlocationTask4.ImplementsharethistextTask5.ReceiveimplicitintentsCodingchallengeSummaryRelatedconceptLearnmore
Inaprevioussectionyoulearnedaboutexplicitintents--activatingaspecificactivityinyourapporadifferentappbysendinganintentwiththefully-qualifiedclassnameofthatactivity.Inthissectionyou'lllearnmoreaboutimplicitintents,andhowyoucanusethemtoactivateactivitiesaswell.
Implicitintentsallowyoutoactivateanactivityifyouknowtheaction,butnotthespecificapporactivitythatwillhandlethataction.Forexample,ifyouwantyourapptotakeaphoto,orsendemail,ordisplayalocationonamap,youtypicallydonotcarewhichspecificapporactivityactuallyperformstheseactions.
Conversely,youractivitiescandeclareoneormoreintentfiltersintheAndroidmanifestthatadvertisethatactivity'sabilitytoacceptimplicitintentsandtodefinetheparticulartypeofintentsitwillaccept.
Tomatchyourrequestwithaspecificappinstalledonthedevice,theAndroidsystemmatchesyourimplicitintentwithanactivitywhoseintentfiltersindicatethattheycanperformthataction.Iftherearemultipleappsinstalledthatmatch,theuserispresentedwithanappchooserthatletsthemselectwhichapptheywanttousetohandlethatintent.
Inthispracticalyou'llbuildanappthatsendsthreeimplicitintents:toopenaURLinawebbrowser,toopenalocationonamap,andtoshareabitoftext.Sharing--sendingapieceofinformationtootherpeoplethroughemailorsocialmedia--isacommonandpopularfeatureinmanyapps.Forthesharingactionwe'llusetheShareCompat.IntentBuilderclass,whichmakesiteasytobuildintentsforsharingdata.
Finally,we'llcreateasimpleintentreceiverappthatacceptsimplicitintentsforaspecificaction.
WhatyoushouldalreadyKNOWFromthepreviouspracticals,youshouldbeableto:
Createanduseactivities.Createandsendintentsbetweenactivities.
WhatyouwillLEARNYouwilllearnto:
Createimplicitintents,andusetheiractionsandcategories.UsetheShareCompat.IntentBuilderhelperclasstoeasilycreateimplicitintentsforsharingdata.AdvertisethatyourappcanacceptimplicitintentsbydeclaringintentfiltersintheAndriodmanifest
Introduction
127

WhatyouwillDOInthispracticalyouwill:
Createanewapptosendimplicitintents.Implementtwoimplicitintentsthatopenawebpageandopenalocationonamap.Implementanactiontoshareasnippetoftext.Createanewappthatcanacceptimplicitintentsforopeningawebpage.
AppoverviewInthissectionyou'llcreateanewappwithoneactivityandthreeoptionsforactions:openawebsite,openalocationonamap,andshareasnippetoftext.Allofthetextfieldsareeditable(EditText),butcontaindefaultvalues.
Introduction
128

Introduction
129

Task1.CreatenewprojectandlayoutForthisexercise,you'llcreateanewprojectandappcalledImplicitIntentswithanewlayout.
1.1Createtheproject
1. StartAndroidStudioandcreateanewAndroidStudioproject.Callyourapplication"ImplicitIntents."2. ChooseEmptyActivityfortheprojecttemplate.ClickNext.3. Acceptthedefaultactivityname(MainActivity).MakesuretheGenerateLayoutfileboxischecked.ClickFinish.
1.2Createthelayout
Inthistask,createthelayoutfortheapp.UseaLinearLayout,threeButtons,andthreeEditTexts,likethis:
1. Editres/values/strings.xmltoincludethesestringresources:
<stringname="edittext_uri">http://developer.android.com</string>
<stringname="button_uri">OpenWebsite</string>
<stringname="edittext_loc">GoldenGateBridge</string>
<stringname="button_loc">OpenLocation</string>
<stringname="edittext_share">\'Twasbrilligandtheslithytoves</string>
<stringname="button_share">ShareThisText</string>
2. ChangethelayouttoLinearLayout.Addtheandroid:orientationattributeandgiveitthevalue"vertical."
Introduction
130

<LinearLayoutxmlns:android="http://schemas.android.com/apk/res/android"
xmlns:tools="http://schemas.android.com/tools"
android:layout_width="match_parent"
android:layout_height="match_parent"
android:paddingBottom="@dimen/activity_vertical_margin"
android:paddingLeft="@dimen/activity_horizontal_margin"
android:paddingRight="@dimen/activity_horizontal_margin"
android:paddingTop="@dimen/activity_vertical_margin"
tools:context="com.example.android.implicitintents.MainActivity"
android:orientation="vertical">
3. Removethe"HelloWorld"TextView.4. AddanEditTextandaButtontothelayoutfortheOpenWebsitefunction.Usetheseattributevalues:
Attribute(EditText) Value(EditText)
android:id "@+id/website_edittext"
android:layout_width "match_parent"
android:layout_height "wrap_content"
android:text "@string/edittext_uri"
Attribute(Button) Value(Button)
android:id "@+id/open_website_button"
android:layout_width "wrap_content"
android:layout_height "wrap_content"
android:layout_marginBottom "24dp"
android:text "@string/button_uri"
android:onClick "openWebsite"
5. AddasecondEditTextandaButtonfortheOpenWebsitefunction.6. Usethesameattributesasthoseinthepreviousstep,butmodifytheseattributesasnotedbelow:
Attribute(EditText) Value(EditText)
android:id "@+id/location_edittext"
android:text "@string/edittext_loc"
Attribute(Button) Value(Button)
android:id "@+id/open_location_button"
android:text "@string/button_loc"
android:onClick "openLocation"
7. AddathirdEditTextandaButtonfortheShareThisfunction.Makethesechanges:
Introduction
131
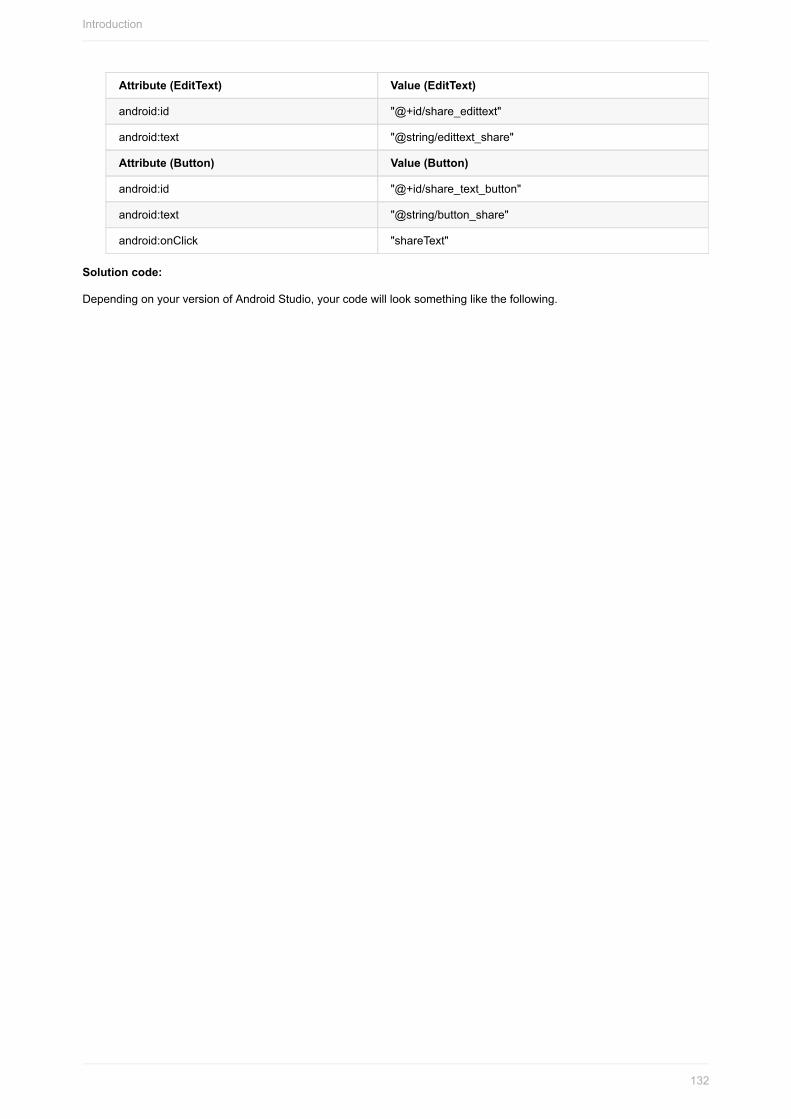
Attribute(EditText) Value(EditText)
android:id "@+id/share_edittext"
android:text "@string/edittext_share"
Attribute(Button) Value(Button)
android:id "@+id/share_text_button"
android:text "@string/button_share"
android:onClick "shareText"
Solutioncode:
DependingonyourversionofAndroidStudio,yourcodewilllooksomethinglikethefollowing.
Introduction
132

<?xmlversion="1.0"encoding="utf-8"?>
<LinearLayoutxmlns:android="http://schemas.android.com/apk/res/android"
xmlns:tools="http://schemas.android.com/tools"
android:layout_width="match_parent"
android:layout_height="match_parent"
android:paddingBottom="@dimen/activity_vertical_margin"
android:paddingLeft="@dimen/activity_horizontal_margin"
android:paddingRight="@dimen/activity_horizontal_margin"
android:paddingTop="@dimen/activity_vertical_margin"
tools:context="com.example.android.implicitintents.MainActivity"
android:orientation="vertical">
<EditText
android:id="@+id/website_edittext"
android:layout_width="match_parent"
android:layout_height="wrap_content"
android:text="@string/edittext_uri"/>
<Button
android:id="@+id/open_website_button"
android:layout_width="wrap_content"
android:layout_height="wrap_content"
android:layout_marginBottom="24dp"
android:onClick="openWebsite"
android:text="@string/button_uri"/>
<EditText
android:id="@+id/location_edittext"
android:layout_width="match_parent"
android:layout_height="wrap_content"
android:text="@string/edittext_loc"/>
<Button
android:id="@+id/open_location_button"
android:layout_width="wrap_content"
android:layout_height="wrap_content"
android:layout_marginBottom="24dp"
android:onClick="openLocation"
android:text="@string/button_loc"/>
<EditText
android:id="@+id/share_edittext"
android:layout_width="match_parent"
android:layout_height="wrap_content"
android:text="@string/edittext_share"/>
<Button
android:id="@+id/share_text_button"
android:layout_width="wrap_content"
android:layout_height="wrap_content"
android:layout_marginBottom="24dp"
android:onClick="shareText"
android:text="@string/button_share"/>
</LinearLayout>
Task2.Implement"openwebsite"Inthistaskyou'llimplementtheon-clickhandlermethodforthefirstbuttoninthelayout("OpenWebsite.")ThisactionusesanimplicitintenttosendthegivenURItoanactivitythatcanhandlethatImplicitIntent(suchasawebbrowser).
2.1DefinetheopenWebsitemethod1. OpenMainActivity.java.2. AddaprivatevariableatthetopoftheclasstoholdtheEditTextobjectforthewebsiteURI.
privateEditTextmWebsiteEditText;
Introduction
133
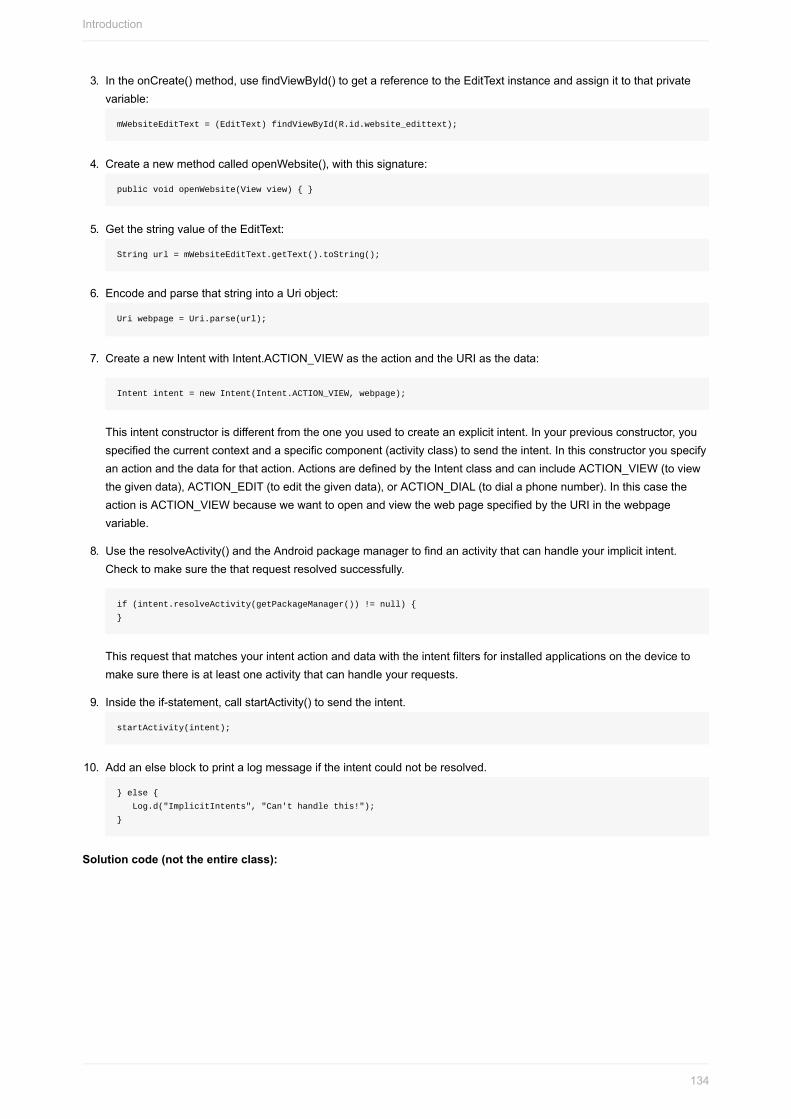
3. IntheonCreate()method,usefindViewById()togetareferencetotheEditTextinstanceandassignittothatprivatevariable:
mWebsiteEditText=(EditText)findViewById(R.id.website_edittext);
4. CreateanewmethodcalledopenWebsite(),withthissignature:
publicvoidopenWebsite(Viewview){}
5. GetthestringvalueoftheEditText:
Stringurl=mWebsiteEditText.getText().toString();
6. EncodeandparsethatstringintoaUriobject:
Uriwebpage=Uri.parse(url);
7. CreateanewIntentwithIntent.ACTION_VIEWastheactionandtheURIasthedata:
Intentintent=newIntent(Intent.ACTION_VIEW,webpage);
Thisintentconstructorisdifferentfromtheoneyouusedtocreateanexplicitintent.Inyourpreviousconstructor,youspecifiedthecurrentcontextandaspecificcomponent(activityclass)tosendtheintent.Inthisconstructoryouspecifyanactionandthedataforthataction.ActionsaredefinedbytheIntentclassandcanincludeACTION_VIEW(toviewthegivendata),ACTION_EDIT(toeditthegivendata),orACTION_DIAL(todialaphonenumber).InthiscasetheactionisACTION_VIEWbecausewewanttoopenandviewthewebpagespecifiedbytheURIinthewebpagevariable.
8. UsetheresolveActivity()andtheAndroidpackagemanagertofindanactivitythatcanhandleyourimplicitintent.Checktomakesurethethatrequestresolvedsuccessfully.
if(intent.resolveActivity(getPackageManager())!=null){
}
Thisrequestthatmatchesyourintentactionanddatawiththeintentfiltersforinstalledapplicationsonthedevicetomakesurethereisatleastoneactivitythatcanhandleyourrequests.
9. Insidetheif-statement,callstartActivity()tosendtheintent.
startActivity(intent);
10. Addanelseblocktoprintalogmessageiftheintentcouldnotberesolved.
}else{
Log.d("ImplicitIntents","Can'thandlethis!");
}
Solutioncode(nottheentireclass):
Introduction
134

publicvoidopenWebsite(Viewview){
//GettheURLtext.
Stringurl=mWebsiteEditText.getText().toString();
//ParsetheURIandcreatetheintent.
Uriwebpage=Uri.parse(url);
Intentintent=newIntent(Intent.ACTION_VIEW,webpage);
//Findanactivitytohandtheintentandstartthatactivity.
if(intent.resolveActivity(getPackageManager())!=null){
startActivity(intent);
}else{
Log.d("ImplicitIntents","Can'thandlethisintent!");
}
}
Task3.Implement"openlocation"Inthistaskyou'llimplementtheon-clickhandlermethodforthesecondbuttonintheUI("OpenLocation.")ThismethodisalmostidenticaltotheopenWebsite()method.ThedifferenceistheuseofageoURItoindicateamaplocation.YoucanuseageoURIwithlatitudeandlongitude,oruseaquerystringforagenerallocation.Inthisexamplewe'veusedthelatter.
3.1DefinetheopenLocationmethod1. OpenMainActivity.java(java/com.example.android.implicitintents/MainActivity).2. AddaprivatevariableatthetopoftheclasstoholdtheEditTextobjectforthelocationURI.
privateEditTextmLocationEditText;
3. IntheonCreate()method,usefindViewByID()togetareferencetotheEditTextinstanceandassignittothatprivatevariable:
mLocationEditText=(EditText)findViewById(R.id.location_edittext);
4. CreateanewmethodcalledopenLocationtouseastheonClickmethodfortheOpenLocationbutton.UsethesamemethodsignatureasopenWebsite().
5. GetthestringvalueofthemLocationEditTextEditText.
Stringloc=mLocationEditText.getText().toString();
6. ParsethatstringintoaUriobjectwithageosearchquery:
UriaddressUri=Uri.parse("geo:0,0?q="+loc);
7. CreateanewIntentwithIntent.ACTION_VIEWastheactionandlocasthedata.
Intentintent=newIntent(Intent.ACTION_VIEW,addressUri);
8. Resolvetheintentandchecktomakesuretheintentresolvedsuccessfully.Ifso,startActivity(),otherwiseloganerrormessage.
if(intent.resolveActivity(getPackageManager())!=null){
startActivity(intent);
}else{
Log.d("ImplicitIntents","Can'thandlethisintent!");
}
Solutioncode(nottheentireclass):
Introduction
135

publicvoidopenLocation(Viewview){
//Getthestringindicatingalocation.Inputisnotvalidated;itis
//passedtothelocationhandlerintact.
Stringloc=mLocationEditText.getText().toString();
//Parsethelocationandcreatetheintent.
UriaddressUri=Uri.parse("geo:0,0?q="+loc);
Intentintent=newIntent(Intent.ACTION_VIEW,addressUri);
//Findanactivitytohandletheintent,andstartthatactivity.
if(intent.resolveActivity(getPackageManager())!=null){
startActivity(intent);
}else{
Log.d("ImplicitIntents","Can'thandlethisintent!");
}
}
Task4.ImplementsharethistextSharingactionsareaneasywayforuserstoshareitemsinyourappwithsocialnetworksandotherapps.Althoughyoucouldbuildashareactioninyourownappusingimplicitintents,AndroidprovidestheShareCompat.IntentBuilderhelperclasstomakeimplementingsharingeasy.YoucanuseShareCompat.IntentBuildertobuildanintentandlaunchachoosertolettheuserchoosethedestinationappforsharing.
Inthisfinaltaskwe'llimplementsharingabitoftextinatexteditwiththeShareCompat.IntentBuilderclass.
4.1ImplementtheshareTextmethod
1. OpenMainActivity.java.2. AddaprivatevariableatthetopoftheclasstoholdtheEditTextobjectforthewebsiteURI.
privateEditTextmShareTextEditText;
3. IntheonCreate()method,usefindViewById()togetareferencetotheEditTextinstanceandassignittothatprivatevariable:
mShareTextEditText=(EditText)findViewById(R.id.share_edittext);
4. CreateanewmethodcalledshareThis()touseastheonClickmethodfortheShareThisTextbutton.UsethesamemethodsignatureasopenWebsite().
5. GetthestringvalueofthemShareTextEditTextEditText.
Stringtxt=mShareTextEditText.getText().toString();
6. Definethemimetypeofthetexttoshare:
StringmimeType="text/plain";
7. CallShareCompat.IntentBuilderwiththesemethods:
ShareCompat.IntentBuilder
.from(this)
.setType(mimeType)
.setChooserTitle("Sharethistextwith:")
.setText(txt)
.startChooser();
ThiscalltoShareCompat.IntentBuilderusesthesemethods:
Introduction
136

</tr></table>Thisformat,withallthebuilder'ssettermethodsstrungtogetherinonestatement,isaneasyshorthandwaytocreateandlaunchtheintent.Youcanaddanyoftheadditionalmethodstothislist.
Method Description
from() Theactivitythatlaunchesthisshareintent(this).
setType() TheMIMEtypeoftheitemtobeshared.
setChooserTitle() Thetitlethatappearsonthesystemappchooser.
setText() Theactualtexttobeshared
startChooser() Showthesystemappchooserandsendtheintent.
Solutioncode(nottheentireclass):
publicvoidshareText(Viewview){
Stringtxt=mShareTextEditText.getText().toString();
StringmimeType="text/plain";
ShareCompat.IntentBuilder
.from(this)
.setType(mimeType)
.setChooserTitle("Sharethistextwith:")
.setText(txt)
.startChooser();
}
Task5.ReceiveimplicitintentsSofar,you'vecreatedappsthatusebothexplicitandimplicitintentsinordertolaunchsomeotherapp'sactivity.Inthistaskwe'lllookattheproblemfromtheotherwayaround:allowinganactivityinyourapptorespondtoimplicitintentssentfromsomeotherapp.
Activitiesinyourappcanalwaysbeactivatedfrominsideoroutsideyourappwithexplicitintents.Toallowanactivitytoreceiveimplicitintents,youdefineanintentfilterinyourmanifesttoindicatewhichimplicitintentsyouractivityisinterestedinhandling.
Tomatchyourrequestwithaspecificappinstalledonthedevice,theAndroidsystemmatchesyourimplicitintentwithanactivitywhoseintentfiltersindicatethattheycanperformthataction.Iftherearemultipleappsinstalledthatmatch,theuserispresentedwithanappchooserthatletsthemselectwhichapptheywanttousetohandlethatintent.
Whenanapponthedevicesendsanimplicitintent,theAndroidsystemmatchesthatintent'sactionanddatawithavailableactivitiesthatincludetherightintentfilters.Ifyouractivity'sintentfiltersmatchtheintent,youractivitycaneitherhandletheintentitself(ifitistheonlymatchingactivity),or(iftherearemultiplematches)anappchooserappearstoallowtheusertopickwhichappthey'dprefertoexecutethataction.
Inthistaskyou'llcreateaverysimpleappthatreceivesimplicitintentstoopentheURIforawebpage.Whenactivatedbyanimplicitintent,thatappdisplaystherequestedURIasastringinaTextView.
5.1Createtheprojectandlayout
1. StartAndroidStudioandcreateanewAndroidStudioproject.2. Callyourapplication"ImplicitIntentsReceiver."3. ChooseEmptyActivityfortheprojecttemplate.4. Acceptthedefaultactivityname(MainActivity).ClickNext.5. MakesuretheGenerateLayoutfileboxischecked.ClickFinish.6. Openres/layout/activity_main.xml.7. Changetheexisting("HelloWorld")TextViewtheseattributes:
Introduction
137

Attribute Value
android:id "@+id/text_uri_message"
android:layout_width wrap_content
android:layout_height wrap_content
android:textSize "18sp"
android:textStyle "bold"
8. Deletetheandroid:textattribute.There'snotextinthisTextViewbydefault,butyou'lladdtheURIfromtheintentinonCreate().
5.2ModifytheAndroidmanifesttoaddanintentfilter
1. Openmanifests/AndroidManifest.xml.2. Notethatthemainactivityalreadyhasthisintentfilter:
<intent-filter>
<actionandroid:name="android.intent.action.MAIN"/>
<categoryandroid:name="android.intent.category.LAUNCHER"/>
</intent-filter>
Thisintentfilter,whichispartofthedefaultprojectmanifest,indicatesthatthisactivityisthemainentrypointforyourapp(ithasanintentactionof"android.intent.action.MAIN"),andthatthisactivityshouldappearasatop-leveliteminthelauncher(itscategoryis"android.intent.category.LAUNCHER")
3. Addasecond<intent-filter>taginside<activity>,andincludetheseelements:
<actionandroid:name="android.intent.action.VIEW"/>
<categoryandroid:name="android.intent.category.DEFAULT"/>
<categoryandroid:name="android.intent.category.BROWSABLE"/>
<dataandroid:scheme="http"android:host="developer.android.com"/>
Theselinesdefineanintentfilterfortheactivity,thatis,thekindofintentsthattheactivitycanhandle.Thisintentfilterdeclarestheseelements:
Filtertype Value Matches
action "android.intent.action.VIEW" Allintentswithviewactions.
category "android.intent.category.DEFAULT" Allimplicitintents.Thiscategorymustbeincludedforyouractivitytoreceiveanyimplicitintents.
category "android.intent.category.BROWSABLE" Requestsforbrowsablelinksfromwebpages,email,orothersources.
data android:scheme="http"android:host="developer.android.com"
URIsthatcontainaschemeofhttpANDahostnameofdeveloper.android.com.
NotethatthedatafilterhasarestrictiononboththekindoflinksitwillacceptandthehostnameforthoseURIs.Ifyou'dpreferyourreceivertobeabletoacceptanylinks,youcanleavethe<data>elementoutaltogether.
Solutioncode
Introduction
138

<?xmlversion="1.0"encoding="utf-8"?>
<manifestxmlns:android="http://schemas.android.com/apk/res/android"
package="com.example.android.implicitintentsreceiver">
<application
android:allowBackup="true"
android:icon="@mipmap/ic_launcher"
android:label="@string/app_name"
android:supportsRtl="true"
android:theme="@style/AppTheme">
<activityandroid:name=".MainActivity">
<intent-filter>
<actionandroid:name="android.intent.action.MAIN"/>
<categoryandroid:name="android.intent.category.LAUNCHER"/>
</intent-filter>
<intent-filter>
<actionandroid:name="android.intent.action.VIEW"/>
<categoryandroid:name="android.intent.category.DEFAULT"/>
<categoryandroid:name="android.intent.category.BROWSABLE"/>
<dataandroid:scheme="http"
android:host="developer.android.com"/>
</intent-filter>
</activity>
</application>
</manifest>
5.3ProcesstheintentIntheonCreate()methodforyouractivity,youprocesstheincomingintentforanydataorextrasitincludes.Inthiscase,theincomingimplicitintenthastheURIstoredintheIntentdata.
1. OpenMainActivity.java.2. IntheonCreate()method,gettheincomingintentthatwasusedtoactivatetheactivity:
Intentintent=getIntent();
3. Gettheintentdata.IntentdataisalwaysaURIobject:
Uriuri=intent.getData();
4. Checktomakesuretheurivariableisnotnull.Ifthatcheckpasses,createastringfromthatURIobject:
if(uri!=null){
Stringuri_string="URI:"+uri.toString();
}
5. Insidethatsameifblock,getthetextviewforthemessage:
TextViewtextView=(TextView)findViewById(R.id.text_uri_message);
6. Alsoinsidetheif-block,setthetextofthatTextViewtotheURI:
textView.setText(uri_string);
7. Runthereceiverapp.
Runningtheapponitsownshowsablankactivitywithnotext.Thisisbecausetheactivitywasactivatedfromthesystemlauncher,andnotwithanintentfromanotherapp.
8. RuntheImplicitIntentsapp,andclickOpenWebsitewiththedefaultURI.
Introduction
139

AnappchooserappearsaskingifyouwanttousethedefaultbrowserortheImplicitIntentsReceiverapp.Choose"JustOnce"forthereceiverapp.TheImplicitIntentsReceiverapplaunchesandthemessageshowstheURIfromtheoriginalrequest.
9. TapthebackbuttonandenteradifferentURI.ClickOpenWebsite.
ThereceiverapphasaveryrestrictiveintentfilterthatmatchesonlyexactURIprotocol(http)andhost(developer.android.com).AnyotherURIopensinthedefaultwebbrowser.
SolutioncodeAndroidStudioproject:ImplicitIntents
CodingchallengeNote:Allcodingchallengesareoptionalandarenotprerequisitesforlaterlessons.
Challenge:Inthelastsection'schallengeyoucreatedashoppinglistappbuilderwithtwoactivities:onetodisplaythelist,andonetopickanitem.AddanEditTextandaButtontotheshoppinglistactivitytolocateaparticularstoreonamap.
SummaryImplicitintentsallowyoutoactivateanactivityifyouknowtheaction,butnotthespecificapporactivitythatwillhandlethataction.ActivitiesthatcanreceiveimplicitintentsmustdefineintentfiltersintheirAndroidmanifestthatmatchoneormoreintentactionsandcategories.TheAndroidsystemmatchesthecontentofanimplicitintentandtheintentfiltersofallavailableactivitiestodeterminewhichactivitytoactivate.Ifthereismorethanoneavailableactivity,thesystemprovidesachoosersotheusercanpickone.TheShareCompat.IntentBuilderclassmakesiteasytobuildimplicitintentsforsharingdatatosocialmediaoremail.
RelatedconceptTherelatedconceptdocumentationisinAndroidDeveloperFundamentals:Concepts.
ActivitiesandImplicitIntents
LearnmoreActivity(APIGuide)Activity(APIReference)IntentsandIntentFilters(APIGuide)Intent(APIReference)UriGoogleMapsIntentsShareCompat.IntentBuilder(APIReference)
Introduction
140

3.1P:UsingtheDebuggerContents:
WhatyoushouldalreadyKNOWWhatyouwillLEARNWhatyouwillDOAppoverviewTask1.CreatetheSimpleCalcProjectandAppTask2.RunSimpleCalcintheDebuggerTask3.ExploreDebuggerFeaturesCodingchallengeSummaryRelatedconceptLearnmore
InpreviouspracticalsyouusedtheLogclasstoprintinformationtothesystemlog(logcat)whenyourappruns.Addingloggingstatementstoyourappisonewaytofinderrorsandimproveyourapp'soperation.AnotherwayistousethedebuggerbuiltintoAndroidStudio.
Inthispracticalyou'lllearnhowtodebugyourappinanemulatorandonthedevice,setandviewbreakpoints,stepthroughyourcode,andexaminevariables.
WhatyoushouldalreadyKNOWFromthepreviouspracticalsyoushouldbeableto:
CreateanAndroidStudioproject,andworkwithEditTextandButtonviews.BuildandrunyourappinAndroidStudio,onbothanemulatorandonadevice.Readandanalyzeastacktrace,includinglaston,firstoff.Addlogstatementsandviewthesystemlog(logcat)inAndroidMonitor.
WhatyouwillLEARNYouwilllearnto:
Runyourappindebugmodeinanemulatororonadevice.Stepthroughtheexecutionofyourapp.Setandorganizebreakpoints.Examineandmodifyvariablesinthedebugger.
WhatyouwillDOInthispractical,youwill:
BuildtheSimpleCalcapp.SetandviewbreakpointsinthecodeforSimpleCalc.Stepthroughyourcodeasitruns.Examinevariablesandevaluateexpressions.Identifyandfixproblemsinthesampleapp.
Introduction
141

AppOverviewTheSimpleCalcapphastwoedittextsandfourbuttons.Whenyouentertwonumbersandclickabutton,theappperformsthecalculationforthatbuttonanddisplaystheresult.
Introduction
142

Introduction
143

Task1.CreatetheSimpleCalcProjectandAppForthispracticalyouwon'tbuildtheSimpleCalcappyourself.ThecompleteprojectisavailableatSimpleCalc.InthistaskyouwillopentheSimpleCalcprojectintoAndroidStudioandexploresomeoftheapp'skeyfeatures.
1.1DownloadandOpentheSimpleCalcProject
1. DownloadandunziptheSimpleCalcprojectfolder.2. StartAndroidStudioandselectFile>Open.3. NavigatetothefolderforSimpleCalc,selectthatfolderfile,andclickOK.
TheSimpleCalcprojectbuilds.Opentheprojectviewifitisnotalreadyopen.
Warning:Thisappcontainserrorsthatyouwillfindandfix.Ifyouruntheapponadeviceoremulatoryoumightrunintounexpectedbehaviorwhichmayincludecrashesintheapp.
1.2ExploretheLayout1. Openres/layout/activity_main.xml.2. PreviewthelayoutintheLayoutEditor.3. Examinethelayoutcodeanddesignandnotethefollowing:
ThelayoutcontainstwoEditTextsfortheinput,fourButtonviewsforthecalculations,andoneTextViewstodisplaytheresult.Eachcalculationbuttonhasit'sownonClickhandler(onAdd,OnSub,andsoon.)TheTextViewfortheresultdoesnothaveanytextinitbydefault.ThetwoEditTextviewshavethepropertyandroid:inputTypeandthevalue"numberDecimal".ThispropertyindicatesthattheEditTextonlyacceptsnumbersasinput.Thekeyboardthatappearsonscreenwillonlycontainnumbers.YouwilllearnmoreaboutinputtypesforEditTextsinalaterpractical.
Introduction
144

Introduction
145

1.3Exploretheappcode
1. Expandtheapp/javafolderintheAndroidprojectview.InadditiontotheMainActivityclass,thisprojectalsoincludesautilityCalculatorclass.
2. OpenCalculator(java/com.example.android.simplecalc/Calculator.java).Examinethecode.Uponexamination,youcanmakethefollowingobservations:
TheoperationsthecalculatorcanperformaredefinedbytheOperatorenum.Alloftheoperationmethodsarepublic.
3. OpenMainActivity(java/com.example.android.simplecalc/MainActivity).Examinethecode.Whatobservationscanyoumakeaboutthecodeandactivity?Thinkaboutyouranswerandconfirmthefollowing:
AlloftheonClickhandlerscalltheprivatecompute()method,withtheoperationnameasoneofthevaluesfromtheCalculator.Operatorenumeration.Thecompute()methodcallstheprivatemethodgetOperand()(whichinturncallsgetOperandText())toretrievethenumbervaluesfromtheEditTexts.Thecompute()methodthenusesaswitchontheoperandnametocalltheappropriatemethodintheCalculatorclass.ThecalculationmethodsintheCalculatorclassperformtheactualarithmeticandreturnavalue.Thelastpartofthecompute()methodupdatestheTextViewwiththeresultofthecalculation.
4. Runtheapp.Trythesethings:Enterbothintegerandfloating-pointvaluesforthecalculation.Enterfloating-pointvalueswithlargedecimalfractions(forexample,1.6753456)Divideanumberbyzero.LeaveoneorbothoftheEditTextviewsempty,andtryanycalculation.
5. ExaminethestacktraceinAndroidStudiowhentheappreportsanerror.
Ifthestacktraceisnotvisible,clicktheAndroidMonitorbuttonatthebottomoftheAndroidStudio,andthenclicklogcat.
IfoneorbothoftheEditTextviewsinSimpleCalcisempty,theappreports"Error"andthesystemlogdisplaysthestateoftheexecutionstackatthetimetheappproducedtheerror.Thestacktraceusuallyprovidesimportantinformationaboutwhyanerroroccurred.
Introduction
146

CodingChallengeNote:Allcodingchallengesareoptionalandarenotprerequisitesforlaterlessons.Challenge:Examinethestacktraceandtrytofigureoutwhatcausedtheerror(butdon'tfixityet.)
Task2.RunSimpleCalcintheDebuggerInthistaskyou'llgetanintroductiontothedebuggerinAndroidStudio,andlearnhowtorunyourappindebugmode.
2.1StartandRunyourappindebugmode
1. InAndroidStudio,selectRun>DebugapporclicktheDebugicon inthetoolbar.
Ifyourappisalreadyrunning,youwillbeaskedifyouwanttorestartyourappindebugmode.ClickRestartapp.
AndroidStudiobuildsandrunsyourappontheemulatororonthedevice.Debuggingisthesameineithercase.WhileAndroidStudioisinitializingthedebugger,youmayseeamessagethatsays"Waitingfordebugger"onthedevicebeforeyoucanuseyourapp.
IftheDebugviewdoesnotautomaticallyappearinAndroidStudio,clicktheDebugtabatthebottomofthescreen,andthentheDebuggertab.
2. OpentheMainActivity.javafileandclickinthefourthlineofthecompute()method(thelinejustafterthetrystatement).3. Clickintheleftgutteroftheeditorwindowatthatline,nexttothelinenumbers.Areddotappearsatthatline,
indicatingabreakpoint.
YoucanalsouseRun>ToggleLineBreakpointorControl-F8(Command-F8onOSX)tosetorclearabreakpointataline.
4. IntheSimpleCalcapponadevice,enternumbersintheEditTextviewsandclickoneofthecalculatebuttons.
Introduction
147

Theexecutionofyourappstopswhenitreachesthebreakpointyouset,andthedebuggershowsthecurrentstateofyourappatthatbreakpoint.
5. ExaminethetheDebugwindow.Itincludestheseparts:6. Framespanel:showsthecurrentexecutionstackframesforagiventhread.Theexecutionstackshowseachclass
andmethodthathavebeencalledinyourappandintheAndroidruntime,withthemostrecentmethodatthetop.Threadsappearinadropdownmenu.Yourappiscurrentlyrunninginthemainthread,andthattheappisexecutingthecompute()methodinMainActivity.
7. Variablespanel:displaysthevariablesinthecurrentscopeandtheirvalues.Atthisstageofyourapp'sexecution,theavailablevariablesare:this(fortheactivity),operator(theoperatornamefromCalculator.Operatorthatthemethodwascalledfrom),aswellastheglobalvariablesfortheEditTextsandtheTextView.Eachvariableinthispanelhasadisclosuretriangletoallowyoutoviewthepropertiesoftheobjectscontainedinthosevariables.Tryexpandingavariabletoexploreitsproperties.
8.Watchespanel:displaysthevaluesforanyvariablewatchesyouhaveset.Watchesallowyoutokeeptrackofaspecificvariableinyourprogram,andseehowthatvariablechangesasyourprogramruns.
9. Resumeyourapp'sexecutionwithRun>ResumeProgramorclicktheResume iconontheleftsideofthedebuggerwindow.
TheSimpleCalcappcontinuesrunning,andyoucaninteractwiththeappuntilthenexttimecodeexecutionarrivesatthebreakpoint.
2.2DebugarunningappIfyourappisalreadyrunningonadeviceoremulator,andyoudecideyouwanttodebugthatapp,youcanswitchanalreadyrunningapptodebugmode.
1. RuntheSimpleCalcappnormally,withtheRun icon.
2. SelectRun>AttachdebuggertoAndroidprocessorclicktheAttach iconinthetoolbar.
Introduction
148

3. Selectyourapp'sprocessfromthedialogthatappears.ClickOK.
TheDebugwindowappears,andyoucannowdebugyourappasifyouhadstarteditindebugmode.
Note:IftheDebugwindowdoesnotautomaticallyappear,clicktheDebugtabatthebottomofthescreen,andthentheDebuggertab.
Task3.ExploreDebuggerFeaturesInthistaskwe'llexplorethevariousfeaturesintheAndroidStudiodebugger,includingexecutingyourapplinebyline,workingwithbreakpoints,andexaminingvariables.
3.1Stepthroughyourapp'sexecutionAfterabreakpoint,youcanusethedebuggertoexecuteeachlineofcodeinyourapponeatatime,andexaminethestateofvariablesastheappruns.
1. DebugyourappinAndroidStudio,withthebreakpointyousetinthelasttask.2. Intheapp,enternumbersinbothEditTextviewsandclicktheAddbutton.
Yourapp'sexecutionstopsatthebreakpointthatyousetearlier,andthedebuggershowsthecurrentstateoftheapp.Thecurrentlineishighlightedinyourcode.
3. ClicktheStepOver buttonatthetopofthedebuggerwindow.
Thedebuggerexecutesthecurrentlineinthecompute()method(wherethebreakpointis,theassignmentforoperandOne),andthehighlightmovestothenextlineinthecode(theassignmentforoperandTwo).TheVariablespanelupdatestoreflectthenewexecutionstate,andthecurrentvaluesofvariablesalsoappearsaftereachlineofyoursourcecodeinitalics.
Introduction
149

YoucanalsouseRun>StepOver,orF8,tostepoveryourcode.
4. Atthenextline(theassignmentforoperandTwo),clicktheStepInto icon.
StepIntojumpsintotheexecutionofamethodcallinthecurrentline(versusjustexecutingthatmethodandremainingonthesameline).Inthiscase,becausethatassignmentincludesacalltogetOperand(),thedebuggerscrollstheMainActivitycodetothatmethoddefinition.
Whenyoustepintoamethod,theFramespanelupdatestoindicatethenewframeinthecallstack(here,getOperand()),andtheVariablespanelshowstheavailablevariablesinthenewmethodscope.YoucanclickanyofthelinesintheFramespaneltoseethepointinthepreviousstackframewherethemethodwasinvoked.
YoucanalsouseRun>StepInto,orF7,tostepintoamethod.
5. ClickStepOver toruneachofthelinesingetOperand().Notethatwhenthemethodcompletesthedebuggerreturnsyoutothepointwhereyoufirststeppedintothemethod,andallthepanelsupdatewiththenewinformation.
6. UseStepOvertwicetomovetheexecutionpointtothefirstlineinsidethecasestatementforADD.
7. ClickStepInto .
ThedebuggerexecutestheappropriatemethoddefinedintheCalculatorclass,openstheCalculator.javafile,andscrollstotheexecutionpointinthatclass.Again,thevariouspanelsupdatetoreflectthenewstate.
8. UsetheStepOut icontoexecutetheremainderofthatcalculationmethodandpopbackouttothecompute()methodinMainActivity.Youcanthencontinuedebuggingthecompute()methodfromwhereyouleftoff.
YoucanalsouseRun>StepOutorShift-F8tostepoutofamethodexecution.
3.2WorkwithBreakpoints
Usebreakpointstoindicatewhereinyourcodeyouwanttointerruptyourapp'sexecutiontodebugthatportionofthatapp.
1. Findthebreakpointyousetinthelasttaskatthestartofthecompute()methodinMainActivity.
Introduction
150

2. Addabreakpointtothestartoftheswitchstatement.3. Right-clickonthatnewbreakpointandenterthefollowingtestintheConditionfield:
(operandOne==42)||(operandTwo==42)
4. ClickDone.
Thissecondbreakpointisaconditionalbreakpoint.Theexecutionofyourappwillonlystopatthisbreakpointifthetestintheconditionistrue.Inthiscase,theexpressionisonlytrueifoneortheotheroperandsyouenteredis42.YoucanenteranyJavaexpressionasaconditionaslongasitreturnsaboolean.
5. Runyourappindebugmode(Run>Debug),orclickResume ifitisalreadyrunning.Intheapp,entertwonumbersotherthan42andclicktheAddbutton.Executionhaltsatthefirstbreakpointinthecompute()method.
6. ClickResumetocontinuedebuggingtheapp.Observethatexecutiondidnotstopatyoursecondbreakpoint,becausetheconditionwasnotmet.
7. RightclickthefirstbreakpointanduncheckEnabled.ClickDone.Observethatthebreakpointiconnowhasagreendotwitharedborder.
Disablingabreakpointenablesyoutotemporarily"mute"thatbreakpointwithoutactuallyremovingitfromyourcode.Ifyouremoveabreakpointaltogetheryoualsoloseanyconditionsyoucreatedforthatbreakpoint,sodisablingitisoftenabetterchoice.
YoucanalsomuteallbreakpointsinyourappatoncewiththeMuteBreakpoints icon.
8. Intheapp,enter42inthefirstEditTextandclickanybutton.Observethattheconditionalbreakpointattheswitchstatementhaltsexecution(theconditionwasmet.)
9. ClicktheViewBreakpoints iconontheleftedgeofthedebuggerwindow.TheBreakpointswindowappears.
TheBreakpointswindowenablesyoutoviewallthebreakpointsinyourapp,enableordisableindividualbreakpoints,andaddadditionalfeaturesofbreakpointsincludingconditions,dependenciesonotherbreakpoints,andlogging.
10. ClickDonetoclosethebreakpointswindow.
3.3Examineandmodifyvariables
TheAndroidStudiodebuggerletsyouexaminethestateofthevariablesinyourappasthatappruns.
1. RuntheSimpleCalcappindebugmodeifitisnotalreadyrunning.2. Intheapp,entertwonumbers,oneofthem42,andclicktheAddbutton.
Thefirstbreakpointincompute()isstillmuted.Executionstopsatthesecondbreakpoint(attheswitchstatement),andthedebuggerappears.
3. ObserveintheVariablespanelthattheoperandOneandoperandTwovariableshavethevaluesyouenteredintotheapp.
4. ObservethatthethisvariableisaMainActivityobject.Clickthedisclosurearrowtoviewthemembervariablesofthatobject.
5. Right-clicktheoperandOnevariableintheVariablespanel,andselectSetValue.YoucanalsouseF2.6. ChangethevalueofoperandOneto10andpressReturn.7. ModifythevalueofoperandTwoto10inthesamewayandpressReturn.8. ClicktheResumeicontocontinuerunningyourapp.Observethattheresultintheappisnow20,basedonthe
variablevaluesyouchangedinthedebugger.9. Intheapp,clicktheAddbutton.Executionhaltsatthebreakpoint.
10. ClicktheEvaluateExpression icon,orselectRun>EvaluateExpression.TheEvaluateCodeFragmentwindowappears.Youcanalsoright-clickonanyvariableandchooseEvaluateExpression.
Introduction
151

UseEvaluateExpressiontoexplorethestateofvariablesandobjectsinyourapp,includingcallingmethodsonthoseobjects.Youcanenteranycodeintothiswindow.
11. TypemOperandOneEditText.getHint()intotheExpressionwindowandclickEvaluate.12. TheEvaluateExpressionwindowupdateswiththeresultofthatexpression.ThehintforthisEditTextisthestring
"TypeOperand1",aswasoriginallydefinedintheXMLforthatEditText.
Theresultyougetfromevaluatinganexpressionisbasedontheapp'scurrentstate.Dependingonthevaluesofthevariablesinyourappatthetimeyouevaluateexpressions,youmaygetdifferentresults.
NotealsothatifyouuseEvaluateExpressiontochangethevaluesofvariablesorobjectproperties,youchangetherunningstateoftheapp.
13. ClickClosetohidetheEvaluateExpressionwindow.
CodingchallengeNote:Allcodingchallengesareoptionalandnotprerequisitesforlaterlessons.
Challenge:InTask1.3,youtriedrunningtheSimpleCalcappwithnovaluesineitheroftheEditTextviews,resultinginanerrormessage.Usethedebuggertostepthroughtheexecutionofthecodeanddeterminepreciselywhythiserroroccurs.Fixthebugthatcausesthiserror.
SummaryViewlogginginformationinAndroidStudiowiththelogcattaboftheAndroidMonitorpane.RunyourappindebugmodebyclickingthedebugiconorchoosingRun>Debugapp.Abreakpointisaplaceinyourcodewhereyouwanttopausenormalexecutionofyourapptoperformotheractions.SetorclearadebuggingbreakpointbyclickingintheleftgutteroftheeditorwindowimmediatelynexttothetargetlineTheDebugwindowinAndroidStudioshows(stack)Frames,VariablesinthatframeandWatches(activetrackingofavariablewhiletheprogramruns).
RelatedconceptTherelatedconceptdocumentationisinAndroidDeveloperFundamentals:Concepts.
DebuggingYourApp
LearnmoreDebugYourApp(AndroidStudioUserGuide)DebuggingandTestinginAndroidStudio(video)
Introduction
152

3.2:TestingAppsWithUnitTestsContents:
WhatyoushouldalreadyKNOWWhatyouwillLEARNWhatyouwillDOAppoverviewTask1.ExploreandrunSimpleCalcinAndroidStudioTask2.AddmoreunitteststoCalculatorTestCodingchallengesSummaryRelatedConceptLearnMore
Testingyourcodecanhelpyoucatchbugsearlyonindevelopment—whentheyaretheleastexpensivetoaddress—andimprovetherobustnessofyourcodeasyourappgetslargerandmorecomplex.Withtestsinyourcode,youcanexercisesmallportionsofyourappinisolation,andinanautomatableandrepeatablemanner.
AndroidStudioandtheAndroidTestingSupportLibrarysupportseveraldifferentkindsoftestsandtestingframeworks.Inthispracticalyou'llexploreAndroidStudio'sbuilt-infunctionalityfortesting,andlearnhowtowriteandrunlocalunittests.
LocalunittestsareteststhatarecompiledandrunentirelyonyourlocalmachinewiththeJavaVirtualMachine(JVM).Uselocalunitteststotestthepartsofyourapp(suchastheinternallogic)thatdonotneedaccesstotheAndroidframeworkoranAndroiddeviceoremulator,orthoseforwhichyoucancreatefake("mock"orstub)objectsthatpretendtobehaveliketheframeworkequivalents.UnittestsarewrittenwithJUnit,acommonunittestingframeworkforJava.
WhatyoushouldalreadyKNOWFromthepreviouspracticalsyoushouldbefamiliarwith:
HowtocreateprojectsinAndroidStudio.ThemajorcomponentsofyourAndroidStudioproject(manifest,resources,Javafiles,gradlefiles).Howtobuildandrunapps.
WhatyouwillLEARNHoworganizingandrunningtestsworksinAndroidStudioWhataunittestis,andhowtowriteunittestsforyourcode.HowtocreateandrunlocalunittestsinAndroidStudio.
WhatyouwillDORuntheinitialtestsintheSimpleCalcapp.AddmoreteststotheSimpleCalcapp.Runthoseunitteststheseetheresults.
AppOverviewThispracticalusesthesameSimpleCalcappfromthelastpractical.Youcanmodifythatappinplace,orcopyyourprojectintoanewapp.
Introduction
153

Task1.ExploreandrunSimpleCalcinAndroidStudioYoubothwriteandrunyourtests(bothunittestsandinstrumentedtests)insideAndroidStudio,alongsidethecodeforyourapp.EverynewAndroidprojectincludesbasicsampleclassesfortestingthatyoucanextendorreplaceforyourownuses.
Inthistaskwe'llreturntotheSimpleCalcapp,whichincludesabasicunittestingclass.
1.1ExploresourcesetsandSimpleCalcSourcesetsareacollectionofrelatedcodeinyourprojectthatarefordifferentbuildtargetsorother"flavors"ofyourapp.WhenAndroidStudiocreatesyourproject,itcreatesthreesourcesets:
Themainsourceset,foryourapp'scodeandresources.Thetestsourceset,foryourapp'slocalunittests.TheandroidTestsourceset,forAndroidinstrumentedtests.
Inthistaskyou'llexplorehowsourcesetsaredisplayedinAndroidStudio,examinethegradleconfigurationfortesting,andruntheunittestsfortheSimpleCalcapp.You'llusetheandroidTestsourcesetinmoredetailinalaterpractical.
1. OpentheSimpleCalcprojectinAndroidStudioifyouhavenotalreadydoneso.Ifyoudon'thaveSimpleCalcyoucanfinditatthisdownloadlink.
2. OpentheProjectview,andexpandtheappandjavafolders.
ThejavafolderintheAndroidviewlistsallthesourcesetsintheappbypackagename(com.android.example.simplecalc),withtestandandroidTestshowninparenthesesafterthepackagename.IntheSimpleCalcapp,onlythemainandtestsourcesetsareused.
3. Expandthecom.android.example.simplecalc(test)folder.
Thisfolderiswhereyouputyourapp'slocalunittests.AndroidStudiocreatesasampletestclassforyouinthisfolderfornewprojects,butforSimpleCalcthetestclassiscalledCalculatorTest.
4. OpenCalculatorTest.java.5. Examinethecodeandnotethefollowing:
Theonlyimportsarefromtheorg.junit,org.hamcrest,andandroid.testpackages.TherearenodependenciesontheAndroidframeworkclasseshere.The@RunWith(JUnit4.class)annotationindicatestherunnerthatwillbeusedtorunthetestsinthisclass.Atestrunnerisalibraryorsetoftoolsthatenablestestingtooccurandtheresultstobeprintedtoalog.Fortestswithmorecomplicatedsetuporinfrastructurerequirements(suchasEspresso)you'llusedifferenttestrunners.Forthis
Introduction
154

examplewe'reusingthebasicJUnit4testrunner.The@SmallTestannotationindicatesthatallthetestsinthisclassareunitteststhathavenodependencies,andruninmilliseconds.The@SmallTest,@MediumTest,and@LargeTestannotationsareconventionsthatmakeiteasiertobundlegroupsoftestsintosuitesofsimilarfunctionality.ThesetUp()methodisusedtosetuptheenvironmentbeforetesting,andincludesthe@Beforeannotation.InthiscasethesetupcreatesanewinstanceoftheCalculatorclassandassignsittothemCalculatormembervariable.TheaddTwoNumbers()methodisanactualtest,[email protected]@Testannotationareconsideredteststothetestrunner.Notethatbyconventiontestmethodsdonotincludetheword"test."ThefirstlineofaddTwoNumbers()callstheadd()methodfromtheCalculatorclass.Youcanonlytestmethodsthatarepublicorpackage-protected.InthiscasetheCalculatorisapublicclasswithpublicmethods,soalliswell.Thesecondlineistheassertionforthetest.Assertionsareexpressionsthatmustevaluateandresultintrueforthetesttopass.Inthiscasetheassertionisthattheresultyougotfromtheaddmethod(1+1)matchesthegivennumber2.You'lllearnmoreabouthowtocreateassertionslaterinthispractical.
1.2RuntestsinAndroidStudio
Inthistaskyou'llruntheunittestsinthetestfolderandviewtheoutputforbothsuccessfulandfailedtests.
1. Intheprojectview,right-clicktheCalculatorTestclassandselectRun'CalculatorTest'.
Theprojectbuilds,ifnecessary,andthetestingviewappearsatthebottomofthescreen.Atthetopofthescreen,thedropdown(foravailableexecutionconfigurations)alsochangestoCalculatorTest.
AllthetestsintheCalculatorTestclassrun,andifthosetestsaresuccessful,theprogressbaratthetopoftheviewturnsgreen.(Inthiscase,thereiscurrentlyonlytheonetest.)Astatusmessageinthefooteralsoreports"TestsPassed."
2. IntheCalculatorTestclass,changetheassertioninaddTwoNumbers()to:
assertThat(resultAdd,is(equalTo(3d)));
3. Intherunconfigurationsdropdownatthetopofthescreen,selectCalculatorTest(ifitisnotalreadyselected)and
clickRun .
Introduction
155

Thetestrunsagainasbefore,butthistimetheassertionfails(3isnotequalto1+1.)Theprogressbarintherunviewturnsred,andthetestinglogindicateswherethetest(assertion)failedandwhy.
4. ChangetheassertioninaddTwoNumbers()backtothecorrecttestandrunyourtestsagaintoensuretheypass.5. Intherunconfigurationsdropdown,selectapptorunyourappnormally.
Task2.AddmoreunitteststoCalculatorTestWithunittesting,youtakeasmallbitofcodeinyourappsuchasamethodoraclass,andisolateitfromtherestofyourapp,sothatthetestsyouwritemakessurethatonesmallbitofthecodeworksinthewayyou'dexpect.Typicallyunittestscallamethodwithavarietyofdifferentinputs,andverifiesthattheparticularmethoddoeswhatyouexpectandreturnswhatyouexpectittoreturn.
Inthistaskyou'lllearnmoreabouthowtoconstructunittests.You'llwriteadditionalunittestsforthemethodsintheCalculatorutilitymethodsintheSimpleCalcapp,andrunthoseteststomakesuretheyproducetheoutputyouexpect.
Note:Unittesting,test-drivendevelopmentandtheJUnit4APIarealllargeandcomplextopicsandoutsidethescopeofthiscourse.SeetheResourcesforlinkstomoreinformation.
2.1Addmoretestsfortheadd()method
Althoughitisimpossibletotesteverypossiblevaluethattheadd()methodmayeversee,it'sagoodideatotestforinputthatmightbeunusual.Forexample,considerwhathappensiftheadd()methodgetsarguments:
Withnegativeoperands.Withfloating-pointnumbers.Withexceptionallylargenumbers.Withoperandsofdifferenttypes(afloatandadouble,forexample)Withanoperandthatiszero.Withanoperandthatisinfinity.
Inthistaskwe'lladdmoreunittestsfortheadd()methodtotestdifferentkindsofinputs.
1. AddanewmethodtoCalculatorTestcalledaddTwoNumbersNegative().Usethisskeleton:
@Test
publicvoidaddTwoNumbersNegative(){
}
ThistestmethodhasasimilarstructuretoaddTwoNumbers:itisapublicmethod,withnoparameters,thatreturnsvoid.Itisannotatedwiththe@Testannotation,whichindicatesitisasingleunittest.
WhynotjustaddmoreassertionstoaddTwoNumbers?Groupingmorethanoneassertionintoasinglemethodcanmakeyourtestshardertodebugifonlyoneassertionfails,andobscurestheteststhatdosucceed.Thegeneralruleforunittestsistoprovideatestmethodforeveryindividualassertion.
2. RunalltestsinCalculatorTests,asbefore.
InthetestwindowbothaddTwoNumbersandaddTwoNumbersNegativearelistedasavailable(andpassing)testsintheleftpanel.TheaddTwoNumbersNegativeteststillpasseseventhoughitdoesn'tcontainanycode--atestthatdoesnothingisstillconsideredasuccessfultest.
3. Addalinetoinvoketheadd()methodintheCalculatorclasswithanegativeoperand.
doubleresultAdd=mCalculator.add(-1d,2d);
Introduction
156

The"d"notationaftereachoperandindicatesthatthesearenumbersoftypedouble.Sincetheadd()methodisdefinedwithdoubleparameters,floatsorintswillalsowork.Indicatingthetypeexplicitlyenablesyoutotestothertypesseparately,ifyouneedto.
4. AddanassertionwithassertThat().
assertThat(resultAdd,is(equalTo(1d)));
TheassertThat()methodisaJUnit4assertionthatclaimstheexpressioninthefirstargumentisequaltotheoneinthesecondargument.OlderversionsofJUnitusedmorespecificassertionmethods(assertEquals(),assertNull(),assertTrue()),butassertThat()isamoreflexible,moredebuggableandofteneasiertoreadformat.
TheassertThat()methodisusedwithmatchers.Matchersarethechainedmethodcallsinthesecondoperandofthisassertion(is(equalto()).Theavailablematchersyoucanusetobuildanassertionaredefinedbythehamcrestframework(Hamcrestisananagramformatchers.)Hamcrestprovidesmanybasicmatchersformostbasicassertions.Youcanalsodefineyourowncustommatchersformorecomplexassertions.
Inthiscasetheassertionisthattheresultoftheadd()operation(-1+2)isequalto1.
5. AddanewunittesttoCalculatorTestforfloating-pointnumbers:
@Test
publicvoidaddTwoNumbersFloats(){
doubleresultAdd=mCalculator.add(1.111f,1.111d);
assertThat(resultAdd,is(equalTo(2.222d)));
}
Again,averysimilartesttotheprevioustestmethod,butwithoneargumenttoadd()thatisexplicitlytypefloatratherthandouble.Theadd()methodisdefinedwithparametersoftypedouble,soyoucancallitwithafloattype,andthatnumberispromotedtoadouble.
6. RunalltestsinCalculatorTests,asbefore.
7. ClickRun torunallthetestsagain.
Thistimethetestfailed,andtheprogressbarisred.Thisistheimportantpartoftheerrormessage:
java.lang.AssertionError:
Expected:is<2.222>
but:was<2.2219999418258665>
Arithmeticwithfloating-pointnumbersisinexact,andthepromotionresultedinasideeffectofadditionalprecision.Theassertioninthetestistechnicallyfalse:theexpectedvalueisnotequaltotheactualvalue.
Thequestionhereis:whenyouhaveaprecisionproblemwithpromotingfloatargumentsisthataproblemwithyourcode,oraproblemwithyourtest?Inthisparticularcasebothinputargumentstotheadd()methodfromtheCalculatorappwillalwaysbetypedouble,sothisisanarbitraryandunrealistictest.However,ifyourappwaswrittensuchthattheinputtotheadd()methodcouldbeeitherdoubleorfloatandyouonlycareaboutsomeprecision,youneedtoprovidesomewiggleroomtothetestsothat"closeenough"countsasasuccess.
8. ChangetheassertThat()methodtousethecloseTo()matcher:
assertThat(resultAdd,is(closeTo(2.222,0.01)));
Forthistest,ratherthattestingforexactequalityyoucantestforequalitywithinaspecificdelta.InthiscasethecloseTo()matchermethodtakestwoarguments:theexpectedvalueandtheamountofdelta.Herethatdeltaisjusttwodecimalpointsofprecision.
Introduction
157

2.2Addunittestsfortheothercalculationmethods
UsewhatyoulearnedintheprevioustasktofillouttheunittestsfortheCalculatorclass.
1. AddaunittestcalledsubTwoNumbers()thatteststhesub()method.2. AddaunittestcalledsubWorksWithNegativeResults()thatteststhesub()methodwherethegivencalculationresults
inanegativenumber.3. AddaunittestcalledmulTwoNumbers()thatteststhemul()method.4. AddaunittestcalledmulTwoNumbersZero()thatteststhemulmethodwithatleastoneargumentaszero.5. AddaunittestcalleddivTwoNumbers()thatteststhediv()methodwithtwonon-zeroarguments.
Challenge:AddaunittestcalleddivByZero()thatteststhediv()methodwithasecondargumentof0.Hint:Trythisintheappfirsttoseewhattheresultis.
SolutionCode:
@Test
publicvoidaddTwoNumbers(){
doubleresultAdd=mCalculator.add(1d,1d);
assertThat(resultAdd,is(equalTo(2d)));
}
@Test
publicvoidaddTwoNumbersNegative(){
doubleresultAdd=mCalculator.add(-1d,2d);
assertThat(resultAdd,is(equalTo(1d)));
}
@Test
publicvoidaddTwoNumbersFloats(){
doubleresultAdd=mCalculator.add(1.111f,1.111d);
assertThat(resultAdd,is(closeTo(2.222,0.01)));
}
@Test
publicvoidsubTwoNumbers(){
doubleresultSub=mCalculator.sub(1d,1d);
assertThat(resultSub,is(equalTo(0d)));
}
@Test
publicvoidsubWorksWithNegativeResult(){
doubleresultSub=mCalculator.sub(1d,17d);
assertThat(resultSub,is(equalTo(-16d)));
}
@Test
publicvoidmulTwoNumbers(){
doubleresultMul=mCalculator.mul(32d,2d);
assertThat(resultMul,is(equalTo(64d)));
}
@Test
publicvoiddivTwoNumbers(){
doubleresultDiv=mCalculator.div(32d,2d);
assertThat(resultDiv,is(equalTo(16d)));
}
@Test
publicvoiddivTwoNumbersZero(){
doubleresultDiv=mCalculator.div(32d,0);
assertThat(resultDiv,is(equalTo(Double.POSITIVE_INFINITY)));
}
SolutioncodeAndroidStudioproject:SimpleCalcTest
Codingchallenges
Introduction
158

Note:Allcodingchallengesareoptionalandarenotprerequisitesforlaterlessons.
Challenge1:Dividingbyzeroisalwaysworthtestingfor,becauseitaspecialcaseinarithmetic.IfyoutrytodividebyzerointhecurrentversionoftheSimpleCalcapp,itbehavesthewayJavadefined:Dividinganumberbyreturnsthe"Infinity"constant(Double.POSITIVE_INFINITY).Dividing0by0returnsthenotanumberconstant(Double.NaN).AlthoughthesevaluesarecorrectforJava,they'renotnecessarilyusefulvaluesfortheuserintheappitself.Howmightyouchangetheapptomoregracefullyhandledividebyzero?Toaccomplishthischallenge,startwiththetestfirst--considerwhattherightbehavioris,andthenwritethetestsasifthatbehavioralreadyexisted.Thenchangeoraddtothecodesothatitmakesthetestscomeupgreen.
Challenge2:Sometimesit'sdifficulttoisolateaunitofcodefromallofitsexternaldependencies.Ratherthanartificiallyorganizeyourcodeincomplicatedwaysjustsoitcanbemoreeasilytested,youcanuseamockframeworktocreatefake("mock")objectsthatpretendtobedependencies.ResearchtheMockitoframework,andlearnhowtosetitupinAndroidStudio.WriteatestclassforthecalcButton()methodinSimpleCalc,anduseMockitototosimulatetheAndroidcontextinwhichyourtestswillrun.
SummaryAndroidStudiohasbuilt-infeaturesforrunninglocalunittests.
LocalunittestsusetheJVMofyourlocalmachineanddonotusetheAndroidframework.UnittestsarewrittenwithJUnit,acommonunittestingframeworkforJava.The"test"folder(AndroidStudio'sProjectView)iswhereJUnittestsarelocated.Localunittestsonlyneedthepackages:org.junit,org.hamcrestandandroid.testThe@RunWith(JUnit4.class)annotationtellsthetestrunnertoruntestsinthisclass.@SmallTest,@MediumTest,and@LargeTestannotationsareconventionsthatmakeiteasiertobundlesimilargroupsoftestsThe@SmallTestannotationindicatesallthetestsinaclassareunitteststhathavenodependenciesandruninmilliseconds.
InstrumentedtestsareteststhatrunonanAndroiddeviceoremulator.InstrumentedtestshaveaccesstotheAndroidframework.
Atestrunnerisalibraryorsetoftoolsthatenablestestingtooccurandtheresultstobeprintedtothelog.
RelatedConceptTherelatedconceptdocumentationisinAndroidDeveloperFundamentals:Concepts.
TestingYourApp
LearnMoreBestPracticesforTestingGettingStartedwithTestingBuildingLocalUnitTestsJUnit4HomePageJUnit4APIReferenceMockitoHomePageAndroidTestingSupport-TestingPatterns(video)AndroidTestingCodelabAndroidToolsProtip:TestSizeAnnotationsTheBenefitsofUsingassertThatoverotherAssertMethodsinUnitTests
Introduction
159

Introduction
160

3.3:UsingTheAndroidSupportLibrariesContents:
WhatyoushouldalreadyKNOWWhatyouwillLEARNWhatyouwillDOAppoverviewTask1.SetupyourprojecttousesupportlibrariesTask2.ImplementbuttonbehaviorCodingchallengeSummaryRelatedconceptLearnmore
TheAndroidSDKincludesseverallibrariescollectivelycalledtheAndroidsupportlibrary.TheselibrariesprovideanumberoffeaturesthatarenotbuiltintotheAndroidframework,including:
Backward-compatibleversionsofframeworkcomponents:thesupportlibraryallowsappsrunningonolderversionsoftheAndroidplatformtosupportfeaturesmadeavailableonnewerversions.AdditionallayoutanduserinterfaceelementsSupportfordifferentdeviceformfactors,suchasTVorwearablesComponentstosupportmaterialdesignelementsVariousotherfeaturessuchaspalettesupport,annotations,percentage-basedlayoutdimensions,andpreferences.
WhatyoushouldalreadyKNOWFromthepreviouspracticalsyoushouldbefamiliarwith:
HowtocreateprojectsinAndroidStudio.ThemajorcomponentsofyourAndroidStudioproject(manifest,resources,Javafiles,gradlebuildfiles).
WhatyouwillLEARNHowtoverifythatthetheAndroidsupportlibrariesareavailableinAndroidStudio.Howtoindicatesupportlibraryclassesinyourapp.HowtotellthedifferencebetweenthevaluesforcompileSdkVersion,targetSdkVersion,andminSdkVersion.HowtorecognizedeprecatedorunavailableAPIsinyourcode.WheretofindmoreinformationontheAndroidsupportlibraries.
WhatyouwillDOInthispractical,youwill:
Createanewappwithonetextviewandonebutton.VerifythattheAndroidSupportLibraryisavailableonyoursystem.Explorethebuild.gradleforyourapp.ManageclassormethodcallsthatareunavailablefortheversionofAndroidyourappsupports.Useacompatibilityclassfromthesupportlibrarytoprovidebackward-compatibilityforyourapp.
Appoverview
Introduction
161

Inthispracticalyou'llcreateanappcalledHelloCompatwithonetextviewthatdisplays"HelloWorld"onthescreen,andonebutton,thatchangesthecolorofthetext.Thereare20possiblecolors,definedasresourcesinthecolor.xmlfile,andeachbuttonclickrandomlypicksoneofthosecolors.
Introduction
162

Introduction
163

Themethodstogetacolorvaluefromtheapp'sresourceshavechangedwithdifferentversionsfortheAndroidframework.ThisexampleusestheContextCompatclass,partoftheAndroidsupportlibrary,whichallowsyoutouseamethodthatworksforallversions.
Task1.SetupyourprojecttousesupportlibrariesForthistaskyou'llsetupanewprojectfortheHelloCompatappandimplementthelayoutandbasicbehavior.
1.1VerifythattheAndroidSupportLibraryisavailable
TheAndroidsupportlibrariesaredownloadedaspartoftheAndroidSDK,andavailableintheAndroidSDKmanager.InAndroidStudio,you'llusetheAndroidSupportRepository—thelocalrepositoryforthesupportlibraries—togetaccesstothelibraryfromwithinyourgradlebuildfiles.Inthistaskyou'llverifythattheAndroidSupportRepositoryisdownloadedandavailableforyourprojects.
1. InAndroidStudio,selectTools>Android>SDKManager,orclicktheSDKManager icon.
TheSDKManagerpreferencepaneappears.
2. ClicktheSDKToolstabandexpandSupportRepository.3. LookforAndroidSupportRepositoryinthelist.4. IfInstalledappearsintheStatuscolumn,you'reallset.ClickCancel.5. IfNotinstalledorUpdateAvailableappears,clickthecheckboxnexttoAndroidSupportRepository.Adownloadicon
shouldappearnexttothecheckbox.ClickOK.6. ClickOKagain,andthenFinishwhenthesupportrepositoryhasbeeninstalled.
Introduction
164

1.2Setuptheprojectandexaminebuild.gradle
1. CreateanewprojectcalledHelloCompat,andchoosetheEmptyActivitytemplate.
OntheTargetAndroidDevicespage,notethatAPI15:Android4.0.3(IceCreamSandwich)isselectedfortheminimumSDK.Asyou'velearnedinpreviouslessons,thisistheoldestversionoftheAndroidplatformyourappwillsupport.
2. InAndroidStudio,makesuretheProjectpaneisopenandtheAndroidtabisselected.3. ExpandGradleScripts,ifnecessary,andopenthebuild.gradle(Module:app)file.
Notethatbuild.gradlefortheoverallproject(build.gradle(Project:app_name))isadifferentfilefromthebuild.gradlefortheappmodule.
4. LocatethecompileSdkVersionlinenearthetopofthefile.Forexample:
compileSdkVersion24
ThecompileversionistheAndroidframeworkversionyourappiscompiledwithinAndroidStudio.FornewprojectsthecompileversionisthemostrecentsetofframeworkAPIsyouhaveinstalled.ThisvalueaffectsonlyAndroidStudioitselfandthewarningsorerrorsyougetinAndroidStudioifyouuseolderornewerAPIs.
5. LocatetheminSdkVersionlineinthedefaultConfigsectionafewlinesdown.
minSdkVersion15
Introduction
165

TheminimumversionistheoldestAndroidAPIversionyourapprunsunder.It'sthesamenumberyouchoseinStep1whenyoucreatedyourproject.TheGooglePlaystoreusesthisnumbertomakesureyourappcanrunonagivenuser'sdevice.AndroidStudioalsousesthisnumbertowarnyouaboutusingdeprecatedAPIs.
6. LocatethetargetSdkVersionlineinthedefaultConfigsection.Forexample:
targetSdkVersion24
ThetargetversionindicatestheAPIversionyourappisdesignedandtestedfor.IftheAPIoftheAndroidplatformishigherthanthisnumber(thatis,yourappisrunningonanewerdevice),theplatformmayenablecompatibilitybehaviorstomakesureyourappcontinuestoworkthewayitwasdesignedto.Forexample,Android6.0(API23)providesanewruntimepermissionsmodel.IfyourapptargetsalowerAPIlevel,theplatformfallsbacktotheolderinstall-timepermissionsmodel.
AlthoughthetargetSDKcanbethesamenumberasthecompileSDK,itisoftenalowernumberthatindicatesthemostrecentversionoftheAPIforwhichyouhavetestedyourapp.
7. Locatethedependenciessectionofbuild.gradle,neartheendofthefile.Forexample:
dependencies{
compilefileTree(dir:'libs',include:['*.jar'])
androidTestCompile(
'com.android.support.test.espresso:espresso-core:2.2.2',{
excludegroup:'com.android.support',
module:'support-annotations'
})
compile'com.android.support:appcompat-v7:24.2.1'
testCompile'junit:junit:4.12'
}
ThedependenciessectionforanewprojectincludesseveraldependenciestoenabletestingwithEspresso,JUnit,aswellasthev7appcompatsupportlibrary.Notethattheversionnumbersfortheselibrariesinyourprojectmaybedifferentthanthoseshownhere.
Thev7appcompatsupportlibraryprovidesbackward-compatibilityforolderversionsofAndroidallthewaybacktoAPI9.Itincludesthev4compatlibraryaswell,soyoudon'tneedtoaddbothasadependency.
8. Updatetheversionnumbers,ifnecessary.
Ifthecurrentversionnumberforalibraryislowerthanthecurrentlyavailablelibraryversionnumber,AndroidStudiowillhighlightthelineandwarnyouthatanewversionisavailable.("anewerversionofcom.android.support:appcompat-v7isavailable").Edittheversionnumbertotheupdatedversion.
Tip:YoucanalsoclickanywhereinthehighlightlineandtypeAlt-Enter(Option-EnterontheMac).Select"ChangetoXX.X.X"fromthemenu,whereXX.X.Xisthemostup-to-dateversionavailable.
9. UpdatethecompileSdkVersionnumber,ifnecessary.
Themajorversionnumberofthesupportlibrary(thefirstnumber)mustmatchyourcompileSdkVersion.WhenyouupdatethesupportlibraryversionyoumayalsoneedtoupdatecompileSdkVersiontomatch.
10. ClickSyncNowtosyncyourupdatedgradlefileswiththeproject,ifprompted.11. InstallmissingSDKplatformfiles,ifnecessary.
IfyouupdatecompileSdkVersionyoumayneedtoinstalltheSDKplatformcomponentstomatch.ClickInstallmissingplatform(s)andsyncprojecttostartthisprocess.
1.3Addthelayoutandcolors
Inthistask,modifythelayoutfortheapp.
1. Openres/layout/activity_main.xml.IntheLayoutEditor,clicktheTexttabatthebottomofthescreenandchange
Introduction
166

therootviewgrouptoRelativeLayout,asyou'vedoneinpreviousexercises.2. IftheTextViewelementincludesanylayout-contraintattributes,removethem.3. ModifytheTextViewelementtohavetheseattributes:
Attribute Value
android:id "@+id/hello_textview"
android:layout_width "match_parent"
android:layout_height "wrap_content"
android:padding "@dimen/activity_horizontal_margin"
android:gravity "center"
android:textSize "100sp"
android:textStyle "bold"
android:text "HelloWorld!"
4. Extractthestringfor"HelloWorld"intoastringresource.5. AddaButtonviewundertheTextView,andaddtheseattributes:
Attribute Value
android:id "@+id/color_button"
android:layout_width "match_parent"
android:layout_height "wrap_content"
android:layout_alignParentBottom "true"
android:paddingTop "@dimen/activity_vertical_margin"
android:text "ChangeColor"
android:onClick "changeColor"
6. Extractthestringfor"ChangeColor"intoastringresource.7. Openres/values/colors.xml.8. Addthesecolorresourcestothefile:
<colorname="red">#F44336</color>
<colorname="pink">#E91E63</color>
<colorname="purple">#9C27B0</color>
<colorname="deep_purple">#673AB7</color>
<colorname="indigo">#3F51B5</color>
<colorname="blue">#2196F3</color>
<colorname="light_blue">#03A9F4</color>
<colorname="cyan">#00BCD4</color>
<colorname="teal">#009688</color>
<colorname="green">#4CAF50</color>
<colorname="light_green">#8BC34A</color>
<colorname="lime">#CDDC39</color>
<colorname="yellow">#FFEB3B</color>
<colorname="amber">#FFC107</color>
<colorname="orange">#FF9800</color>
<colorname="deep_orange">#FF5722</color>
<colorname="brown">#795548</color>
<colorname="grey">#9E9E9E</color>
<colorname="blue_grey">#607D8B</color>
<colorname="black">#000000</color>
ThesecolorvaluesandnamescomefromtherecommendedcolorpalettesforAndroidappsdefinedatMaterialDesign-Style-Color.ThecodesindicatecolorRGBvaluesinhexadecimal.
Introduction
167

Solutioncode(activity_main.xml)DependingonyourversionofAndroidStudio,yourcodewilllooksomethinglikethefollowing.
<RelativeLayoutxmlns:android="http://schemas.android.com/apk/res/android"
xmlns:tools="http://schemas.android.com/tools"
android:id="@+id/activity_main"
android:layout_width="match_parent"
android:layout_height="match_parent"
android:paddingBottom="@dimen/activity_vertical_margin"
android:paddingLeft="@dimen/activity_horizontal_margin"
android:paddingRight="@dimen/activity_horizontal_margin"
android:paddingTop="@dimen/activity_vertical_margin"
tools:context="com.example.android.hellocompat.MainActivity">
<TextView
android:id="@+id/hello_textview"
android:layout_width="match_parent"
android:layout_height="wrap_content"
android:gravity="center"
android:padding="@dimen/activity_horizontal_margin"
android:text="@string/hello_text_string"
android:textSize="100sp"
android:textStyle="bold"/>
<Button
android:id="@+id/color_button"
android:layout_width="match_parent"
android:layout_height="wrap_content"
android:layout_alignParentBottom="true"
android:onClick="changeColor"
android:paddingTop="@dimen/activity_vertical_margin"
android:text="@string/button_label"/>
</RelativeLayout>
1.4AddbehaviortoMainActivity
Inthistaskyou'llfinishsettinguptheprojectbyaddingprivatevariablesandimplementingonCreate()andonSaveInstanceState().
1. OpenMainActivity.java.2. AddaprivatevariableatthetopoftheclasstoholdtheTextViewobjectfortheHelloWorldtextview.
privateTextViewmHelloTextView;
3. Addthefollowingcolorarrayjustaftertheprivatevariable:
privateString[]mColorArray={"red","pink","purple","deep_purple",
"indigo","blue","light_blue","cyan","teal","green",
"light_green","lime","yellow","amber","orange","deep_orange",
"brown","grey","blue_grey","black"
};
Eachofthesecolornamescorrespondtothenamesofthecolorresourcesfromcolor.xml.
4. IntheonCreate()method,usefindViewById()togetareferencetotheTextViewinstanceandassignittothatprivatevariable:
mHelloTextView=(TextView)findViewById(R.id.hello_textview);
5. AlsoinonCreate(),restorethesavedinstancestate,ifany:
Introduction
168

//restoresavedinstancestate(thetextcolor)
if(savedInstanceState!=null){
mHelloTextView.setTextColor(savedInstanceState.getInt("color"));
}
6. AddtheonSaveInstanceState()methodtoMainActivitytosavethetextcolor:
@Override
publicvoidonSaveInstanceState(BundleoutState){
super.onSaveInstanceState(outState);
//savethecurrenttextcolor
outState.putInt("color",mHelloTextView.getCurrentTextColor());
}
Solutioncode(notthewholeclass)
//TextviewforHelloWorld.
privateTextViewmHelloTextView;
//arrayofcolornames,thesematchthecolorresourcesincolor.xml
privateString[]mColorArray={"red","pink","purple","deep_purple",
"indigo","blue","light_blue","cyan","teal","green",
"light_green","lime","yellow","amber","orange","deep_orange",
"brown","grey","blue_grey","black"
};
...
@Override
protectedvoidonCreate(BundlesavedInstanceState){
super.onCreate(savedInstanceState);
setContentView(R.layout.activity_main);
//Initializethemaintextview
mHelloTextView=(TextView)findViewById(R.id.hello_textview);
//restoresavedinstancestate(thetextcolor)
if(savedInstanceState!=null){
mHelloTextView.setTextColor(savedInstanceState.getInt("color"));
}
}
...
@Override
publicvoidonSaveInstanceState(BundleoutState){
super.onSaveInstanceState(outState);
//savethecurrenttextcolor
outState.putInt("color",mHelloTextView.getCurrentTextColor());
}
Task2.ImplementbuttonbehaviorTheChangeColorbuttonintheHelloCompatapppicksoneofthe20colorsfromthecolor.xmlresourcefileatrandomandsetsthecolorofthetexttothatcolor.Inthistaskyou'llimplementtheonClick()behaviorforthishandler.
2.1AddthechangeButton()onClickhandler
1. Openres/layout/activity_main.xml,ifitisnotalreadyopen.2. Clickanywhereintheandroid:onClickattribute,insidetheButtonelement.3. PressAlt-Enter(Option-EnterontheMac),andselectCreateonClickeventhandler.4. ChooseMainActivityandclickOK.
ThiscreatesaplaceholdermethodstubforthechangeColor()methodinMainActivity.java.
Introduction
169

2.2Implementthebuttonaction
1. OpenMainActivity.java,ifitisnotalreadyopen.2. InthechangeColor()method,createarandomnumberobject.
Randomrandom=newRandom();
UsetheRandomclass(aJavaclass)togeneratesimplerandomnumbers.
3. UsetherandominstancetopickarandomcolorfromthemColorArrayarray:
StringcolorName=mColorArray[random.nextInt(20)];
ThenextInt()methodwiththeargument20getsanotherrandomintegerbetween0and19.Usethatintegerastheindexofthearraytogetacolorname.
4. Gettheresourceidentifier(aninteger)forthecolornameoutoftheresources:
intcolorResourceName=getResources().getIdentifier(colorName,
"color",getApplicationContext().getPackageName());
Whenyourappiscompiled,theAndroidsystemconvertsthedefinitionsinyourXMLfilesintoresourceswithinternalintegerIDs.ThereareseparateIDsforboththenamesandthevalues.ThislinematchesthecolorstringsfromthecolorNamearraywiththecorrespondingcolornameIDsintheXMLresourcefile.ThegetResources()methodgetsalltheresourcesforyourapp.ThegetIdentifier()methodlooksupthecolorname(thestring)inthecolorresources("color")forthecurrentpackagename.
5. GettheintegerIDfortheactualcolorfromtheresourcesandassignittoacolorResvariable:
intcolorRes=getResources().getColor(colorResourceName);
ThegetResources()methodgetsthesetofresourcesforyourapp,andthegetColor()methodretrievesaspecificcolorfromthoseresourcesbytheIDofthecolorname.
NotethatthegetColor()methodappearswithastrikethroughintheAndroidStudioeditor.IfyouhoveryourmouseovergetColor(),theerror"getColor(int)isdeprecated"appears.InAPI23,thegetColor()methodwasmodifiedtoincludeasecondargumentfortheapp'stheme.SinceyourapphasacompileSdkVersionof24(orhigher),AndroidStudioprovidesthiswarningthatyou'reusinganolder,deprecatedmethod.
YoucanstillcompileyourappanditwouldstillrunonbothnewandoldAndroiddevices--thedeprecationwarningisawarning,notanerror.Butit'sbestnottoignorewarningswheretheyexist,asdeprecatedmethodscanresultinunexpectedbehavior.
6. ChangethecolorResassignmentlinetoincludethesecondargumenttogetColor():
intcolorRes=
getResources().getColor(colorResourceName,this.getTheme());
YoucanusethegetTheme()methodtogetthethemeforthecurrentapplicationcontext.Onlynowwiththischangeyou'llnotethatgetColor()hasaredunderlinedhighlight.IfyouhoverovergetColor()AndroidStudioreports:"CallrequiresAPI23(currentminis15)".SinceyourminSdkVersionis15,you'llgetthismessageifyoutrytouseanyAPIsthatwereintroducedafterAPI15.Youcanstillcompileyourapp,butbecausethisnewversionofgetColor()withtwoargumentsisnotavailableondevicespriortoAPI23,yourappwillcrashwhentheusertapstheChangebutton.
AtthisstageyoucouldcheckfortheplatformversionandusetherightversionofgetColor()dependingonwheretheappisrunning.(youwillstillgetawarningforbothcallsinAndroidStudio).ThebetterwaytosupportbotholderandnewerAndroidAPIswithoutwarningsistouseoneofthecompatibilityclassesinthesupportlibrary.
Introduction
170

7. ChangethecolorResassignmentlinetousetheContextCompatclass:
intcolorRes=ContextCompat.getColor(this,colorResourceName);
ContextCompatprovidesmanycompatibilitymethodstoaddressAPIdifferencesintheapplicationcontextandappresources.ThegetColor()methodinContextCompattakestwoarguments:thecurrentcontext(here,theactivityinstance,this),andthenameofthecolor.
TheimplementationofthismethodinthesupportlibraryhidestheimplementationdifferencesindifferentversionsoftheAPI.YoucancallthismethodregardlessofyourcompileSDKorminimumSDKversionswithnowarnings,errors,orcrashes.
8. SetthecoloroftheHelloWorldtextviewtothecolorresourceID:
mHelloTextView.setTextColor(colorRes);
9. Compileandruntheapponadeviceoremulator.
TheChangeColorbuttonshouldnowchangethecolorofthetextinHelloWorld.
Solutioncode(changeColor()methodonly)
publicvoidchangeColor(Viewview){
//getarandomcolornamefromthecolorarray(20colors)
Randomrandom=newRandom();
StringcolorName=mColorArray[random.nextInt(20)];
//getthecoloridentifierthatmatchesthecolorname
intcolorResourceName=getResources().getIdentifier(colorName,"color",
getApplicationContext().getPackageName());
//getthecolorIDfromtheresources
intcolorRes=ContextCompat.getColor(this,colorResourceName);
//Setthetextcolor
mHelloTextView.setTextColor(colorRes);
}
SolutioncodeAndroidStudioproject:HelloCompat
CodingchallengeNote:Allcodingchallengesareoptionalandarenotprerequisitesforlaterlessons.Challenge:InsteadofusingContextCompatfortogetthecolorresource,useatestofthevaluesintheBuildclasstoperformadifferentoperationiftheappisrunningonadevicethatsupportslessthanAPI23.
SummaryInthispractical,youlearnedthat:
AndroidusesthreedirectivestoindicatehowyourappshouldbehavefordifferentAPIversions:minSdkVersion:theminimumAPIversionyourappsupports.compileSdkVersion:theAPIversionyourappshouldbecompiledwith.targetSdkVersion:theAPIversionyourappwasdesignedfor.
TheAndroidSupportLibrarycanbeinstalledintheSDKmanager
Introduction
171

Youcanaddlibrarydependenciesforsupportlibrariesinthegradle.buildfileTheContextCompatclassprovidesmethodsforcompatibilitywithcontextandresource-relatedmethodsforbotholdandnewAPIlevels.
RelatedconceptTherelatedconceptdocumentationisinAndroidDeveloperFundamentals:Concepts.
TheAndroidSupportLibrary
LearnmoreAndroidSupportLibrary(introduction)SupportLibrarySetupSupportLibraryFeaturesSupportingDifferentPlatformVersionsPickingyourcompileSdkVersion,minSdkVersion,andtargetSdkVersionAllthethingsCompatAPIReference(allpackagesthatstartwithandroid.support)
Introduction
172

4.1:UsingKeyboards,InputControls,Alerts,andPickersContents:
WhatyoushouldalreadyKNOWWhatyouwillLEARNWhatyouwillDOAppoverviewTask1:ExperimentwithtextentrykeyboardattributesTask2:ChangethekeyboardtypeTask3:AddaspinnerinputcontrolforselectingaphonelabelTask4:UseadialogforanalertrequiringadecisionTask5:UseapickerforuserinputTask6:UseimageviewsasbuttonsTask7:UseradiobuttonsCodingchallengeSummaryRelatedconceptLearnmore
Youcancustomizeinputmethodstomakeenteringdataeasierforusers.
Inthispractical,you'lllearnto:
Usedifferenton-screenkeyboardsandcontrolsforuserinput.Showanalertmessagethatuserscaninteractwith.Provideinterfaceelementsforselectingatimeanddate.Useimagesasbuttonstolaunchanactivity.Addradiobuttonsfortheusertoselectoneitemfromasetofitems.
WhatyoushouldalreadyKNOWForthispracticalyoushouldbeableto:
CreateanAndroidStudioprojectfromatemplateandgeneratingthemainlayout.Runappsontheemulatororaconnecteddevice.Makeacopyofanappproject,andrenamingtheapp.CreateandeditingUIelementsusingtheLayoutEditorandXMLcode.AccessUIelementsfromyourcodeusingfindViewById().ConvertthetextinaviewtoastringusinggetText().toString().Handleabuttonclick.Displayatoastmessage.Startanactivitywithanotherappusinganimplicitintent.Useanadaptertoconnectyourdatatoaview,suchastheRecyclerViewinapreviouslesson.
WhatyouwillLEARNInthispractical,youwilllearnto:
Changetheinputmethodstoenablespellingsuggestions,auto-capitalization,andpasswordobfuscation.Changethegenericon-screenkeyboardtoaphonekeypadorotherspecializedkeyboards.Addaspinnerinputcontroltoshowadropdownmenuwithvalues,fromwhichtheusercanselectone.AddanalertwithOKandCancelforauserdecision.
Introduction
173
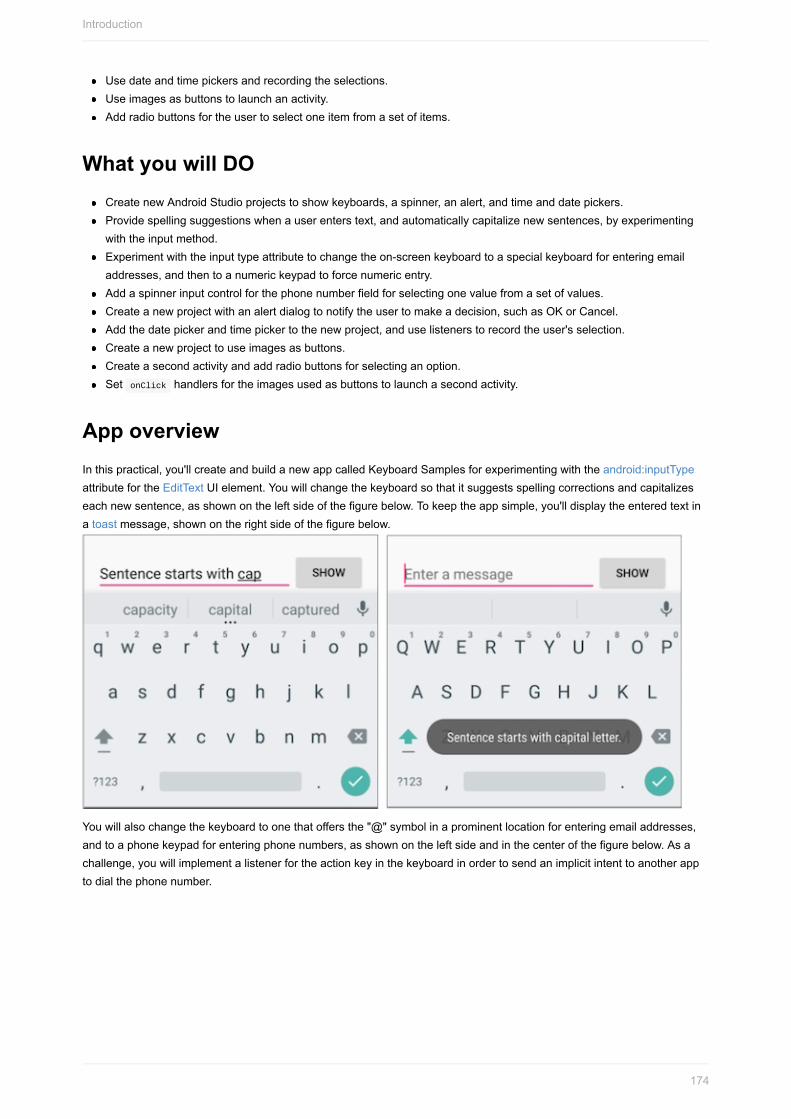
Usedateandtimepickersandrecordingtheselections.Useimagesasbuttonstolaunchanactivity.Addradiobuttonsfortheusertoselectoneitemfromasetofitems.
WhatyouwillDOCreatenewAndroidStudioprojectstoshowkeyboards,aspinner,analert,andtimeanddatepickers.Providespellingsuggestionswhenauserenterstext,andautomaticallycapitalizenewsentences,byexperimentingwiththeinputmethod.Experimentwiththeinputtypeattributetochangetheon-screenkeyboardtoaspecialkeyboardforenteringemailaddresses,andthentoanumerickeypadtoforcenumericentry.Addaspinnerinputcontrolforthephonenumberfieldforselectingonevaluefromasetofvalues.Createanewprojectwithanalertdialogtonotifytheusertomakeadecision,suchasOKorCancel.Addthedatepickerandtimepickertothenewproject,anduselistenerstorecordtheuser'sselection.Createanewprojecttouseimagesasbuttons.Createasecondactivityandaddradiobuttonsforselectinganoption.SetonClickhandlersfortheimagesusedasbuttonstolaunchasecondactivity.
AppoverviewInthispractical,you'llcreateandbuildanewappcalledKeyboardSamplesforexperimentingwiththeandroid:inputTypeattributefortheEditTextUIelement.Youwillchangethekeyboardsothatitsuggestsspellingcorrectionsandcapitalizeseachnewsentence,asshownontheleftsideofthefigurebelow.Tokeeptheappsimple,you'lldisplaytheenteredtextinatoastmessage,shownontherightsideofthefigurebelow.
Youwillalsochangethekeyboardtoonethatoffersthe"@"symbolinaprominentlocationforenteringemailaddresses,andtoaphonekeypadforenteringphonenumbers,asshownontheleftsideandinthecenterofthefigurebelow.Asachallenge,youwillimplementalistenerfortheactionkeyinthekeyboardinordertosendanimplicitintenttoanotherapptodialthephonenumber.
Introduction
174

YouwillthencopytheapptocreatePhoneNumberSpinnerthatoffersaspinnerinputcontrolforselectingthelabel(Home,Work,Other,Custom)forthephonenumber,asshownontherightsideofthefigurebelow.
Thefigureaboveshowsthefollowing:
1. Theemailkeyboardwiththe"@"symbolinaneasy-to-findlocation2. Thephonekeypad3. Thespinner
You'llalsocreateAlertSampletoexperimentwithanalertdialog,shownontheleftsideofthefigurebelow,andDateTimePickerstoexperimentwithadatepickerandatimepicker,showninthecenterandontherightsideofthefigurebelow,andusethetimeanddateselectionsinyourapp.
ThelasttasksinvolvecreatinganappfromtheBasicActivitytemplatethatletsausertapimagebuttonstolaunchanactivity,asshownontheleftsideofthefigurebelow,andchooseasingledeliveryoptionfromradio-buttonchoicesforafoodorder,asshownontherightsideofthefigurebelow.
Introduction
175

Task1.ExperimentwithtextentrykeyboardattributesTouchinganEditTexteditabletextfieldplacesthecursorinthetextfieldandautomaticallydisplaystheon-screenkeyboard.Youwillchangeattributesofthetextentryfieldsothatthekeyboardsuggestsspellingcorrectionswhileyoutype,andautomaticallystartseachnewsentencewithcapitalletters.Forexample:
android:inputType="textCapSentences":Setsthekeyboardtocapitallettersatthebeginningofsentences.android:inputType="textAutoCorrect":Setsthekeyboardtoshowautomaticspellingcorrectionsasyouentercharacters.android:inputType="textMultiLine":EnablestheReturnkeyonthekeyboardtoendlinesandcreatenewblanklineswithoutclosingthekeyboard.android:inputType="textPassword":Setsthecharacterstheuserentersintodotstoconcealtheenteredpassword.
1.1CreatethemainlayoutandtheshowTextmethod
YouwilladdaButton,andchangetheTextViewelementtoanEditTextelementsothattheusercanentertext.Theapp'slayoutwilllooklikethefollowingfigure.
Introduction
176

Introduction
177

1. CreateanewprojectcalledKeyboardSamples,andchoosetheEmptyActivitytemplate.2. Opentheactivity_main.xmllayoutfile.IntheLayoutEditor,clicktheTexttabatthebottomofthescreenandchange
therootviewgrouptoRelativeLayout,asyou'vedoneinpreviousexercises.3. AddaButtonabovetheexistingTextViewelementwiththefollowingattributes:
Buttonattribute Newvalue
android:id "@+id/button_main"
android:layout_width "wrap_content"
android:layout_height "wrap_content"
android:layout_alignParentBottom "true"
android:layout_alignParentRight "true"
android:onClick "showText"
android:text "Show"
4. Extractthestringresourcefortheandroid:textattributevaluetocreateandentryforitinstrings.xml:Placethecursoron"Show",pressAlt-Enter(Option-EnterontheMac),andselectExtractstringresources.ThenchangetheResourcenameforthestringvaluetoshow.
Youextractstringresourcesbecauseitmakestheappprojectmoreflexibleforchangingstrings.Thestringresourceassignmentsarestoredinthestrings.xmlfile(underapp>res>values).Youcaneditthisfiletochangethestringassignmentssothattheappcanbelocalizedwithadifferentlanguage.Forexample,the"Show"valuefortheresourcenamedshowcouldbechangedto"Montrer"fortheFrenchversionoftheapp.
5. ChangetheexistingTextViewelementasfollows:i. Deletetheandroid:textattributethatspecified"HelloWorld!".ii. IftheTextViewelementincludesanylayout-constraintattributes,removethem.iii. ChangetheTextViewtagtoanEditTexttag,andmakesuretheendingtagis/>.iv. Addorchangethefollowingattributes:
EditTextattribute TextViewoldvalue EditTextnewvalue
android:id "@+id/editText_main"
android:layout_width "wrap_content" "match_parent"
android:layout_height "wrap_content" "wrap_content"
android:layout_alignParentBottom "true"
android:layout_toLeftOf "@id/button_main"
android:hint "Enteramessage"
Youlearnedabouttheandroid:layout_toLeftOfandandroid:layout_alignParentBottomattributesinapreviouslesson.Theselayout-relatedattributesworkwiththeRelativeLayoutviewgrouptopositionchildviewsrelativetoeachotherortotheparent.Theandroid:hintattributesetsthetexttoappearinthefieldthatprovidesahintfortheusertoprovideinput,suchas"Enteramessage"
6. Extractthestringresourcefortheandroid:hintattributevalue"Enteramessage"totheresourcenameenter.DependingonyourversionofAndroidStudio,youractivity_main.xmllayoutfilewilllooksomethinglikethefollowing:
Introduction
178

<RelativeLayout
xmlns:android="http://schemas.android.com/apk/res/android"
xmlns:tools="http://schemas.android.com/tools"
android:layout_width="match_parent"
android:layout_height="match_parent"
android:paddingBottom="@dimen/activity_vertical_margin"
android:paddingLeft="@dimen/activity_horizontal_margin"
android:paddingRight="@dimen/activity_horizontal_margin"
android:paddingTop="@dimen/activity_vertical_margin"
tools:context="com.example.android.keyboardsamples.MainActivity">
<Button
android:id="@+id/button_main"
android:layout_width="wrap_content"
android:layout_height="wrap_content"
android:layout_alignParentBottom="true"
android:layout_alignParentRight="true"
android:onClick="showText"
android:text="@string/show"/>
<EditText
android:id="@+id/editText_main"
android:layout_width="match_parent"
android:layout_height="wrap_content"
android:layout_alignParentBottom="true"
android:layout_toLeftOf="@id/button_main"
android:hint="@string/enter"/>
</RelativeLayout>
7. OpenMainActivity.javaandenterthefollowingshowTextmethod,whichretrievestheinformationenteredintotheEditTextelementandshowsitinatoastmessage:
publicvoidshowText(Viewview){
EditTexteditText=(EditText)findViewById(R.id.editText_main);
if(editText!=null){
StringshowString=editText.getText().toString();
Toast.makeText(this,showString,Toast.LENGTH_SHORT).show();
}
}
8. Openstrings.xml(inapp>res>values),andedittheapp_namevalueto"KeyboardSamples"(besuretoincludeaspacebetween"Keyboard"and"Samples").
9. Runtheappandexaminehowthekeyboardworks.
TappingtheShowbuttonshowsthetoastmessageofthetextentry.
Toclosetheon-screenkeyboard,tapthedown-pointingarrowinthebottomrowoficons.
Inthestandardkeyboardlayout,acheckmarkiconinagreencircle,shownbelow,appearsinthelowerrightcornerofthe
keypad.ThisisknownastheReturn(orEnter)key,anditisusedtoenteranewline:
WiththedefaultattributesfortheEditTextelement,tappingtheReturnkeyaddsanotherlineoftext.Inthenextsection,youwillchangethekeyboardsothatitcapitalizessentencesasyoutype.Asaresultofsettingtheandroid:inputTypeattribute,thedefaultattributefortheReturnkeychangestoshiftfocusawayfromtheEditTextelementandclosethekeyboard.
1.2Setthekeyboardtocapitalizesentences
1. Addtheandroid:inputTypeattributetotheEditTextelementusingthetextCapSentencesvaluetosetthekeyboardtocapitallettersatthebeginningofasentence,sothatuserscanautomaticallystartasentencewithacapitalletter:
android:inputType="textCapSentences"
Introduction
179
2. Runyourapp.
Capitalletterswillnowappearonthekeyboardatthebeginningofsentences.WhenyoutaptheReturnkeyonthekeyboard,thekeyboardclosesandyourtextentryisfinished.Youcanstilltapthetextentryfieldtoaddmoretextoreditthetext.TapShowtoshowthetextinatoastmessage.
Fordetailsabouttheandroid:inputTypeattribute,seeSpecifyingtheInputMethodType.
1.3Setthekeyboardtohideapasswordwhenenteringit1. ChangetheEditTextelementtousethetextPasswordvaluefortheandroid:inputTypeattribute.
android:inputType="textPassword"
2. Changetheandroid:hintto"Enteryourpassword".3. Runtheapp.
Thecharacterstheuserentersturnintodotstoconcealtheenteredpassword.Forhelp,seeTextFields.
Solutioncode:
AndroidProject:KeyboardSamples
Task2.ChangethekeyboardtypeEverytextfieldexpectsacertaintypeoftextinput,suchasanemailaddress,phonenumber,password,orjustplaintext.It'simportanttospecifytheinputtypeforeachtextfieldinyourappsothatthesystemdisplaystheappropriatesoftinputmethod,suchas:
Thestandardon-screenkeyboardforplaintextThekeyboardforanemailaddresswhichincludesthe"@"symbolinaprominentlocationThephonekeypadforaphonenumber
2.1UseanemailkeyboardModifythemainactivity'sEditTextelementtoshowanemailkeyboardratherthanastandardkeyboard:
1. IntheEditTextelementintheactivity_main.xmllayoutfile,changetheandroid:inputTypeattributetothefollowing:
android:inputType="textEmailAddress"
2. Changetheandroid:hintattributeto"Enteranemailaddress".3. Extractthestringresourcefortheandroid:hintvaluetoenter_email.4. Runtheapp.Tappingthefieldbringsuptheon-screenemailkeyboardwiththe"@"symbollocatednexttothespace
key.
2.2Useaphonekeypad
Modifythemainactivity'sEditTextelementtoshowaphonekeypadratherthanastandardkeyboard:
1. IntheEditTextelementintheactivity_main.xmllayoutfile,changetheandroid:inputTypeattributetothefollowing:
android:inputType="phone"
2. Changetheandroid:hintattributeto"Enteraphonenumber".3. Extractthestringresourcefortheandroid:hintvaluetoenter_phone.4. Runtheapp.
Introduction
180

Tappingthefieldnowbringsuptheon-screenphonekeypadinplaceofthestandardkeyboard.
Note:Whenrunningtheappontheemulator,thefieldwillstillaccepttextratherthannumbersifyoutypeonthecomputer'skeyboard.However,whenrunonthedevice,thefieldonlyacceptsthenumbersofthekeypad.
Task3.AddaspinnerinputcontrolforselectingaphonelabelInputcontrolsaretheinteractivecomponentsinyourapp'suserinterface.AndroidprovidesawidevarietyofcontrolsyoucanuseinyourUI,suchasbuttons,seekbars,checkboxes,zoombuttons,togglebuttons,spinners,andmanymore.(Formoreinformationaboutinputcontrols,seeInputControls.)
Aspinnerprovidesaquickwaytoselectonevaluefromaset.Touchingthespinnerdisplaysadrop-downlistwithallavailablevalues,fromwhichtheusercanselectone.Ifyouareprovidingonlytwoorthreechoices,youmightwanttouseradiobuttonsforthechoicesifyouhaveroominyourlayoutforthem;however,withmorethanthreechoices,aspinnerworksverywell,scrollsasneededtodisplayitems,andtakesuplittleroominyourlayout.
Formoreinformationaboutspinners,seeSpinners.
Toprovideawaytoselectalabelforaphonenumber(suchasHome,Work,Mobile,andOther),youcanaddaspinnertothelayouttoappearrightnexttothephonenumberfield.
3.1CopytheKeyboardSamplesprojectandmodifythelayoutUsethefollowingfigureasasaguideforthemainactivity'slayout:
Intheabovefigure:
1. ThefirstLinearLayoutwithanEditTextview,aspinnericon,andtheShowbutton.2. ThesecondLinearLayoutwithtwoTextViews.
Followthesesteps:
Introduction
181

1. CopytheKeyboardSamplesprojectfolder,renameittoPhoneNumberSpinner,andrefactorittopopulatethenewnamethroughouttheappproject.(SeetheAppendixforinstructionsoncopyingaproject.)
2. Afterrefactoring,changethe<stringname="app_name">valueinthestrings.xmlfile(withinapp>res>values)toPhoneNumberSpinner(withspaces)astheapp'sname.
3. Opentheactivity_main.xmllayoutfile.4. EnclosetheexistingEditTextandButtonelementsfromthepreviouslessonwithinaLinearLayoutwithahorizontal
orientation,placingtheEditTextelementabovetheButton:
<LinearLayout
android:layout_width="match_parent"
android:layout_height="match_parent"
android:layout_marginTop="@dimen/activity_vertical_margin"
android:orientation="horizontal">
<EditText
…
<Button
…
</LinearLayout>
5. MakethefollowingchangestotheEditTextandButtonelements:i. RemovethefollowingattributesfromtheEditTextelement:
android:layout_toLeftOf
android:layout_alignParentBottom
ii. RemovethefollowingattributesfromtheButtonelement:android:layout_alignParentRight
android:layout_alignParentBottom
iii. ChangethreeotherattributesoftheEditTextelementasfollows:
EditTextattribute Value
android:layout_width "wrap_content"
android:inputType "phone"
android:hint "Enterphonenumber"
6. AddaSpinnerelementbetweentheEditTextelementandtheButtonelement:
<Spinner
android:id="@+id/label_spinner"
android:layout_width="wrap_content"
android:layout_height="wrap_content">
</Spinner>
TheSpinnerelementprovidesthedrop-downlist.Inthenexttaskyouwilladdcodethatwillfillthespinnerlistwithvalues.ThelayoutcodefortheEditText,Spinner,andButtonelementswithintheLinearLayoutshouldnowlooklikethis:
Introduction
182

<LinearLayout
android:layout_width="match_parent"
android:layout_height="match_parent"
android:layout_marginTop="@dimen/activity_vertical_margin"
android:orientation="horizontal">
<EditText
android:id="@+id/editText_main"
android:layout_width="wrap_content"
android:layout_height="wrap_content"
android:inputType="phone"
android:hint="Enterphonenumber"/>
<Spinner
android:id="@+id/label_spinner"
android:layout_width="wrap_content"
android:layout_height="wrap_content">
</Spinner>
<Button
android:id="@+id/button_main"
android:layout_width="wrap_content"
android:layout_height="wrap_content"
android:onClick="showText"
android:text="Show"/>
</LinearLayout>
7. AddanotherLinearLayoutbelowtheLinearLayoutyoujustcreated,withahorizontalorientationtoenclosetwoTextViewelementsside-by-side—atextdescription,andatextfieldtoshowthephonenumberandthephonelabel—andaligntheLinearLayouttotheparent'sbottom(refertothefigureabove):
<LinearLayout
android:layout_width="wrap_content"
android:layout_height="wrap_content"
android:orientation="horizontal"
android:layout_alignParentBottom="true">
<TextView
…
<TextView
…
</LinearLayout>
8. AddthefollowingTextViewelementswithintheLinearLayout:
TextViewattribute Value
android:id "@+id/title_phonelabel"
android:layout_width "wrap_content"
android:layout_height "wrap_content"
android:text "PhoneNumber:"
TextViewattribute Value
android:id "@+id/text_phonelabel"
android:layout_width "wrap_content"
android:layout_height "wrap_content"
android:text "Nothingentered."
9. CheckyourlayoutbyclickingthePreviewtabontherightsideofthelayoutwindow.
Introduction
183

Youshouldnowhaveascreen(refertothefigureabove)withthephoneentryfieldatthetopontheleft,askeletalspinnernexttothefield,andtheShowbuttonontheright.Atthebottomshouldappearthetext"PhoneNumber:"followedby"Nothingentered."
10. Extractyourstringsintostringresources:Placethecursoronthehard-codedstring,pressAlt-Enter(Option-EnterontheMac),andselectExtractstringresources.ThenedittheResourcenameforthestringvalue.Extractasfollows:
Element String Stringresource
EditText "Enterphonenumber" "@string/hint_phonenumber"
Button "Show" "@string/show_button"
TextView "PhoneNumber:" "@string/phonenumber_label"
TextView "Nothingentered." "@string/nothing_entered"
3.2Addcodetoactivatethespinneranditslistener
Thechoicesforthisphonelabelspinnerarewell-definedstaticstrings("Home","Work",etc),soyoucanuseatextarraydefinedinstrings.xmltoholdthevaluesforit.
Toactivatethespinneranditslistener,implementtheAdapterView.OnItemSelectedListenerinterface,whichrequiresalsoaddingtheonItemSelected()andonNothingSelected()callbackmethods.
1. Openstrings.xmltodefinetheselectablevalues(Home,Work,Mobile,andOther)forthespinnerasthestringarraylabels_array:
<string-arrayname="labels_array">
<item>Home</item>
<item>Work</item>
<item>Mobile</item>
<item>Other</item>
</string-array>
2. Todefinetheselectioncallbackforthespinner,changeyourMainActivityclasstoimplementthe
Introduction
184

AdapterView.OnItemSelectedListenerinterfaceasshown:
publicclassMainActivityextendsAppCompatActivityimplements
AdapterView.OnItemSelectedListener{
AsyoutypeAdapterView.intheabovestatement,AndroidStudioautomaticallyimportstheAdapterViewwidget.ThereasonwhyyouneedtheAdapterViewisbecauseyouneedanadapter—specificallyanArrayAdapter—toassignthearraytothespinner.Anadapterconnectsyourdata—inthiscase,thearrayofspinneritems—tothespinnerview.Youwilllearnmoreaboutthispatternofusinganadaptertoconnectdatainanotherlesson.Thislineshouldappearinyourblockofimportstatements:
importandroid.widget.AdapterView;
AftertypingOnItemSelectedListenerintheabovestatement,waitafewsecondsforaredlightbulbtoappearintheleftmargin.
3. ClickthebulbandchooseImplementmethods.TheonItemSelected()andonNothingSelected()methods,whicharerequiredforOnItemSelectedListener,shouldalreadybehighlighted,andthe"Insert@Override"optionshouldbechecked.ClickOK.
ThisstepautomaticallyaddsemptyonItemSelected()andonNothingSelected()callbackmethodstothebottomoftheMainActivityclass.BothmethodsusetheparameterAdapterView<?>.The<?>isaJavatypewildcard,enablingthemethodtobeflexibleenoughtoacceptanytypeofAdapterViewasanargument.
4. InstantiateaspinnerobjectintheonCreate()methodusingtheSpinnerelementinthelayout(label_spinner),andsetitslistener(spinner.setOnItemSelectedListener)intheonCreate()method.AddthecodetotheonCreate()method:
@Override
protectedvoidonCreate(BundlesavedInstanceState){
...
//Createthespinner.
Spinnerspinner=(Spinner)findViewById(R.id.label_spinner);
if(spinner!=null){
spinner.setOnItemSelectedListener(this);
}
...
5. ContinuingtoedittheonCreate()method,addastatementthatcreatestheArrayAdapterwiththestringarray(labels_array)usingtheAndroid-suppliedsimplespinnerlayoutforeachitem(layout.simple_spinner_item):
...
//CreateArrayAdapterusingthestringarrayanddefaultspinnerlayout.
ArrayAdapter<CharSequence>adapter=ArrayAdapter.createFromResource(this,
R.array.labels_array,android.R.layout.simple_spinner_item);
...
Thesimple_spinner_itemlayoutusedinthisstep,andthesimple_spinner_dropdown_itemlayoutusedinthenextstep,arethedefaultpre-definedlayoutsprovidedbyAndroidintheR.layoutclass.Youshouldusetheselayoutsunlessyouwanttodefineyourownlayoutsfortheitemsinthespinnerandthespinner'sappearance.
6. Specifythelayoutforthespinner'schoicestobesimple_spinner_dropdown_item,andthenapplytheadaptertothespinner:
...
//Specifythelayouttousewhenthelistofchoicesappears.
adapter.setDropDownViewResource
(android.R.layout.simple_spinner_dropdown_item);
//Applytheadaptertothespinner.
if(spinner!=null){
spinner.setAdapter(adapter);
}
...
Introduction
185

3.3Addcodetorespondtotheuser'sselections
Whentheuserselectsaniteminthespinner,theSpinnerobjectreceivesanon-item-selectedevent.Tohandlethisevent,youalreadyimplementedtheAdapterView.OnItemSelectedListenerinterfaceinthepreviousstep,addingemptyonItemSelected()andonNothingSelected()callbackmethods.
InthisstepyouwillfirstdeclaremSpinnerLabelasthestringtoholdtheselecteditem.YouwillthenfillinthecodefortheonItemSelected()methodtoretrievetheselectediteminthespinner,usinggetItemAtPosition(),andassigntheitemtomSpinnerLabel:
1. DeclarethemSpinnerLabelstringatthebeginningoftheMainActivityclassdefinition:
publicclassMainActivityextendsAppCompatActivityimplements
AdapterView.OnItemSelectedListener{
privateStringmSpinnerLabel="";
...
}
2. AddcodetotheemptyonItemSelected()callbackmethod,asshownbelow,toretrievetheuser'sselecteditemusinggetItemAtPosition,andassignittomSpinnerLabel.YoucanalsoaddacalltotheshowText()methodyoualreadyaddedtothepreviousversionoftheapp:
publicvoidonItemSelected(AdapterView<?>adapterView,Viewview,int
i,longl){
mSpinnerLabel=adapterView.getItemAtPosition(i).toString();
showText(view);
}
Tip:ByaddingtheshowText()methodtotheaboveonItemSelected()method,youhaveenabledthespinnerselectionlistenertodisplaythespinnerchoicealongwiththephonenumber,sothatyounolongerneedtheShowbuttonthatcalledtheshowText()method.
3. AddcodetotheemptyonNothingSelected()callbackmethod,asshownbelow,todisplayalogcatmessageifnothingisselected:
publicvoidonNothingSelected(AdapterView<?>adapterView){
Log.d(TAG,"onNothingSelected:");
}
TheTAGintheabovestatementisinredbecauseithasn'tbeendefined.
4. Extractthestringresourcefor"onNothingSelected:"tonothing_selected.
5. ClickTAG,clicktheredlightbulb,andchooseCreateconstantfield'TAG'fromthepop-upmenu.AndroidStudioaddsthefollowingundertheMainActivityclassdeclaration:
privatestaticfinalStringTAG=;
1. AddMainActivity.class.getSimpleName()tousethesimplenameoftheclassforTAG:
privatestaticfinalStringTAG=MainActivity.class.getSimpleName();
1. ChangetheStringshowStringstatementintheshowTextmethodtoshowboththeenteredstringandtheselectedspinneritem(mSpinnerLabel):
StringshowString=(editText.getText().toString()+"-"+mSpinnerLabel);
1. Runtheapp.
Introduction
186

Thespinnerappearsnexttothephoneentryfieldandshowsthefirstchoice(Home).Tappingthespinnerrevealsallthechoices,asshownontheleftsideofthefigurebelow.Afterenteringaphonenumberandchoosingaspinneritem,amessageappearsatthebottomofthescreenwiththephonenumberandtheselectedspinneritem,asshownontherightsideofthefigurebelow.(YoucanalsotaptheShowbuttontoshowboththephonenumberandthespinneritem,butsincethisisredundant,youcannowremovetheShowbutton.)
Solutioncode:
AndroidStudioproject:PhoneNumberSpinner
Task4.UseadialogforanalertrequiringadecisionYoucanprovideadialogforanalerttorequireuserstomakeadecision.Adialogisawindowthatappearsontopofthedisplayorfillsthedisplay,interruptingtheflowofactivity.
Forexample,analertdialogmightrequiretheusertoclickContinueafterreadingit,orgivetheuserachoicetoagreewithanactionbyclickingapositivebutton(suchasOKorAccept),ortodisagreebyclickinganegativebutton(suchasCancel).InAndroid,youusetheAlertDialogsubclassoftheDialogclasstoshowastandarddialogforanalert.
Tip:Usedialogssparinglyastheyinterrupttheuser'sworkflow.ReadtheDialogsdesignguideforbestdesignpractices,andDialogsintheAndroiddeveloperdocumentationforcodeexamples.
Inthispractical,youwilluseabuttontotriggerastandardalertdialog.Inarealworldapp,youmighttriggeranalertdialogbasedonsomecondition,orbasedontheusertappingsomething.
AndroidStudioproject:AlertSample
4.1Createanewprojectwithalayouttoshowanalertdialog
Introduction
187

Inthisexercise,you'llbuildanalertwithOKandCancelbuttons,whichwillbetriggeredbytheuserclickingabutton.
1. CreateanewprojectcalledAlertSamplebasedontheEmptyActivitytemplate.2. Opentheactivity_main.xmllayoutfile.IntheLayoutEditor,clicktheTexttabatthebottomofthescreenandchange
therootviewgrouptoRelativeLayout,asyou'vedoneinpreviousexercises.3. IftheTextViewelementincludesanylayout-constraintattributes,removethem.4. MakethefollowingchangestotheTextView:
TextViewattribute Value
android:id "@+id/top_message"
android:text "Taptotestthealert:"
5. Extracttheandroid:textstringaboveintotheresourcetap_testtomakeiteasiertotranslate.6. AddaButtonwiththefollowingattributes:
Buttonattribute Value
android:id "@+button1"
android:layout_width wrap_content
android:layout_height wrap_content
android:layout_below "@id/top_message"
android:layout_marginTop "36dp"
android:text "Alert"
android:onClick "onClickShowAlert"
7. Extracttheandroid:textstringaboveintotheresourcealert_buttontomakeiteasiertotranslate.8. Extractthedimensionvalueforandroid:layout_marginTopthesameway:Placethecursoron"36dp",pressAlt-Enter
(Option-EnterontheMac),andselectExtractdimensionresource.ThenedittheResourcenameforthevaluetobutton_top_margin.
Thedimensionresourceassignmentsarestoredinthedimens.xmlfile(underapp>res>values>dimens).Youcaneditthisfiletochangetheassignmentssothattheappcanbechangedfordifferentdisplaysizes.
4.2AddanalertdialogtothemainactivityThebuilderdesignpatternmakesiteasytocreateanobjectfromaclassthathasalotofrequiredandoptionalattributesandwouldthereforerequirealotofparameterstobuild.Withoutthispattern,youwouldhavetocreateconstructorsforcombinationsofrequiredandoptionalattributes;withthispattern,thecodeiseasiertoreadandmaintain.Formoreinformationaboutthebuilderdesignpattern,seeBuilderpattern.
Thebuilderclassisusuallyastaticmemberclassoftheclassitbuilds.YouuseAlertDialog.Buildertobuildastandardalertdialog,usingsetTitletosetitstitle,setMessagetosetitsmessage,andsetPositiveButtonandsetNegativeButtontosetitsbuttons.
Tomakethealert,youneedtomakeanobjectofAlertDialog.Builder.YouwilladdtheonClickShowAlert()method,whichmakesthisobjectasitsfirstorderofbusiness.
Note:Tokeepthisexamplesimpletounderstand,thealertdialogiscreatedintheonClickShowAlert()method.ThisoccursonlyiftheonClickShowAlert()methodiscalled,whichiswhathappenswhentheuserclicksthebutton.Thismeanstheappbuildsanewdialogonlywhenthebuttonisclicked,whichisusefulifthedialogisseenonlyrarely(whentheusertakesacertainpaththroughtheapp).However,ifthedialogappearsoften,youmaywanttobuildthedialogonceintheonCreate()method,andtheninvokethedialogintheonClickShowAlert()method.1. AddtheonClickShowAlert()methodtoMainActivity.javaasfollows:
Introduction
188

publicvoidonClickShowAlert(Viewview){
AlertDialog.BuildermyAlertBuilder=new
AlertDialog.Builder(MainActivity.this);
Note:IfAlertDialog.Builderisnotrecognizedasyouenterit,clicktheredlightbulbicon,andchoosethesupportlibraryversion(android.support.v7.app.AlertDialog)forimportingintoyouractivity.
2. SetthetitleandthemessageforthealertdialoginsideonClickShowAlert()afterthecodeinthepreviousstep:
...
//Setthedialogtitle.
myAlertBuilder.setTitle("Alert");
//Setthedialogmessage.
myAlertBuilder.setMessage("ClickOKtocontinue,orCanceltostop:");
...
3. Extractthetitleandmessageintostringresources.Thepreviouslinesofcodeshouldnowbe:
...
//Setthedialogtitle.
myAlertBuilder.setTitle(R.string.alert_title);
//Setthedialogmessage.
myAlertBuilder.setMessage(R.string.alert_message);
...
4. AddtheOKbuttontothealertwithsetPositiveButton()andusingonClickListener():
...
//Addthebuttons.
myAlertBuilder.setPositiveButton("OK",newDialogInterface.OnClickListener(){
publicvoidonClick(DialogInterfacedialog,intwhich){
//UserclickedOKbutton.
Toast.makeText(getApplicationContext(),"PressedOK",
Toast.LENGTH_SHORT).show();
}
});
...
Yousetthepositive(OK)andnegative(Cancel)buttonsusingthesetPositiveButton()andsetNegativeButton()methods.AftertheusertapstheOKbuttoninthealert,youcangrabtheuser'sselectionanduseitinyourcode.Inthisexample,youdisplayatoastmessageiftheOKbuttonisclicked.
5. Extractthestringresourcefor"OK"andfor"PressedOK".Thestatementshouldnowbe:
...
//Addthebuttons.
myAlertBuilder.setPositiveButton(R.string.ok,new
DialogInterface.OnClickListener(){
publicvoidonClick(DialogInterfacedialog,intwhich){
//UserclickedOKbutton.
Toast.makeText(getApplicationContext(),R.string.pressed_ok,
Toast.LENGTH_SHORT).show();
}
});
...
6. AddtheCancelbuttontothealertwithsetNegativeButton()andonClickListener(),displayatoastmessageifthebuttonisclicked,andthencancelthedialog:
Introduction
189

...
myAlertBuilder.setNegativeButton("Cancel",new
DialogInterface.OnClickListener(){
publicvoidonClick(DialogInterfacedialog,intwhich){
//Usercancelledthedialog.
Toast.makeText(getApplicationContext(),"PressedCancel",
Toast.LENGTH_SHORT).show();
}
});
...
7. Extractthestringresourcefor"Cancel"and"PressedCancel".Thestatementshouldnowbe:
...
myAlertBuilder.setNegativeButton(R.string.cancel,new
DialogInterface.OnClickListener(){
publicvoidonClick(DialogInterfacedialog,intwhich){
//Usercancelledthedialog.
Toast.makeText(getApplicationContext(),R.string.pressed_cancel,
Toast.LENGTH_SHORT).show();
}
});
...
8. Addshow(),whichcreatesandthendisplaysthealertdialog,totheendofonClickShowAlert():
...
//CreateandshowtheAlertDialog.
myAlertBuilder.show();
}
Tip:TolearnmoreaboutonClickListenerandotherlisteners,seeUserInterface:InputEvents.
9. Runtheapp.
YoushouldbeabletotaptheAlertbutton,shownontheleftsideofthefigurebelow,toseethealertdialog,showninthecenterofthefigurebelow.ThedialogshowsOKandCancelbuttons,andatoastmessageappearsshowingwhichoneyoupressed,asshownontherightsideofthefigurebelow.
Solutioncode:
Introduction
190

AndroidStudioproject:AlertSample
Task5.UseapickerforuserinputAndroidprovidesready-to-usedialogs,calledpickers,forpickingatimeoradate.Youcanusethemtoensurethatyouruserspickavalidtimeordatethatisformattedcorrectlyandadjustedtotheuser'slocaltimeanddate.Eachpickerprovidescontrolsforselectingeachpartofthetime(hour,minute,AM/PM)ordate(month,day,year).YoucanreadallaboutsettinguppickersinPickers.
Inthistaskyou'llcreateanewproject,andaddthedatepickerandtimepicker.Youwillalsolearnhowtousefragments.Afragmentisabehaviororaportionofuserinterfacewithinanactivity.It'slikeamini-activitywithinthemainactivity,withitsownownlifecycle,andit'susedforbuildingapicker.Alltheworkisdoneforyou.Tolearnaboutfragments,seeFragmentsintheAPIGuide.
Onebenefitofusingfragmentsforthepickersisthatyoucanisolatethecodesectionsformanagingthedateandthetimeforvariouslocalesthatdisplaydateandtimeindifferentways.ThebestpracticetoshowapickeristouseaninstanceofDialogFragment,whichisasubclassofFragment.ADialogFragmentdisplaysadialogwindowfloatingontopofitsactivity'swindow.Inthisexercise,you'lladdafragmentforeachpickerdialoganduseDialogFragmenttomanagethedialoglifecycle.
Tip:Anotherbenefitofusingfragmentsforthepickersisthatyoucanimplementdifferentlayoutconfigurations,suchasabasicdialogonhandset-sizeddisplaysoranembeddedpartofalayoutonlargedisplays.
5.1Createthemainactivitylayout
Tostartthistask,createthemainactivitylayouttoprovidebuttonstoaccessthetimeanddatepickers.RefertotheXMLlayoutcodebelow:
1. StartanewprojectcalledDateTimePickersusingtheEmptyActivitytemplate.2. Openactivity_main.xmltoeditthelayoutcode.3. ChangethelayouttoLinearLayoutandaddandroid:orientation="vertical"toorientthelayoutvertically.Don'tworry
abouttheappearanceofthelayoutyet.ThegoalistousealayoutthatembedsaRelativeLayoutwithinthe
Introduction
191

LinearLayout:4. ChangethefirstTextViewelement'stextto"Choosethedateandtime:"andextractthetexttothestringresource
choose_datetime.
TextViewattribute Oldvalue Newvalue
android:text "HelloWorld" "@string/choose_datetime"
5. Addtheandroid:textSizeattributeandenteratextsizeof20sp.Extracttheandroid:textSizedimensiontotext_size.
TextViewattribute Oldvalue Newvalue
android:textSize "@dimen/text_size"
6. AddaRelativeLayoutchildinsidetheLinearLayouttocontaintheButtonelements,andacceptthe"matchparent"defaultwidthandheight.
7. AddthefirstButtonelementwithintheRelativeLayoutwiththefollowingattributes:
FirstButtonattribute Value
android:layout_width "wrap_content"
android:layout_height "wrap_content"
android:id "@+id/button_date"
android:layout_marginTop "12dp"
android:text "Date"
android:onClick "showDatePickerDialog"
Don'tworrythattheshowDatePickerDialogreferenceisinred.Themethodhasn'tbeendefinedyet—youdefineitlater.8. Extractthestring"Date"intothestringresourcedate_button.9. Extractthedimension"12dp"forandroid:layout_marginToptobutton_top_margin.10. AddthesecondButtonelementinsidetheRelativeLayoutchildwiththefollowingattributes:
Introduction
192

SecondButtonattribute Value
android:layout_width "wrap_content"
android:layout_height "wrap_content"
android:id "@+id/button_time"
android:layout_marginTop "@dimen/button_top_margin"
android:layout_alignBottom "@id/button_date"
android:layout_toRightOf "@id/button_date"
android:text "Time"
android:onClick "showTimePickerDialog"
TheshowTimePickerDialogreferenceisinred.Themethodhasn'tbeendefinedyet—youdefineitlater.11. Extractthestring"Time"intothestringresourcetime_button.12. Ifyouhaven'talreadydoneso,clickthePreviewtabtoshowapreviewofthelayout.Itshouldlooklikethecodeand
figurebelow.
Solutioncodeforthemainlayout:
DependingonyourversionofAndroidStudio,yourcodewilllooksomethinglikethefollowing.
<?xmlversion="1.0"encoding="utf-8"?>
<LinearLayoutxmlns:android="http://schemas.android.com/apk/res/android"
xmlns:tools="http://schemas.android.com/tools"
android:orientation="vertical"
android:layout_width="match_parent"
android:layout_height="match_parent"
android:paddingBottom="@dimen/activity_vertical_margin"
android:paddingLeft="@dimen/activity_horizontal_margin"
android:paddingRight="@dimen/activity_horizontal_margin"
android:paddingTop="@dimen/activity_vertical_margin"
tools:context="com.example.android.DateTimePickers.MainActivity">
<TextView
android:layout_width="wrap_content"
android:layout_height="wrap_content"
android:textSize="@dimen/text_size"
android:text="@string/choose_datetime"/>
<RelativeLayout
android:layout_width="match_parent"
android:layout_height="match_parent">
<Button
android:layout_width="wrap_content"
android:layout_height="wrap_content"
android:id="@+id/button_date"
android:layout_marginTop="@dimen/button_top_margin"
android:text="@string/date_button"
android:onClick="showDatePickerDialog"/>
<Button
android:layout_width="wrap_content"
android:layout_height="wrap_content"
android:id="@+id/button_time"
android:layout_marginTop="@dimen/button_top_margin"
android:layout_alignBottom="@id/button_date"
android:layout_toRightOf="@id/button_date"
android:text="@string/time_button"
android:onClick="showTimePickerDialog"/>
</RelativeLayout>
</LinearLayout>
Introduction
193

5.2Createanewfragmentforthedatepicker
Inthisexercise,you'lladdafragmentforthedatepicker.Afragmentislikeamini-activitywithinthemainactivity,withitsownownlifecycle.
1. Expandapp>java>com.example.android.DateTimePickersandselectMainActivity.2. ChooseFile>New>Fragment>Fragment(Blank),andnamethefragmentDatePickerFragment.Uncheckallthree
checkboxoptionssothatyoudonotcreatealayoutXML,donotincludefragmentfactorymethods,anddonotincludeinterfacecallbacks.Youdon'tneedtocreatealayoutforastandardpicker.ClickFinishtocreatethefragment.
3. OpenDatePickerFragmentandedittheDatePickerFragmentclassdefinitiontoextendDialogFragmentandimplementDatePickerDialog.OnDateSetListenertocreateastandarddatepickerwithalistener.SeePickerformoreinformationaboutextendingDialogFragmentforadatepicker:
publicclassDatePickerFragmentextendsDialogFragment
implementsDatePickerDialog.OnDateSetListener{
AsyoutypeDialogFragmentandDatePickerDialog.OnDateSetListener,AndroidStudioautomaticallyaddsthefollowingintheimportblockatthetop:
importandroid.app.DatePickerDialog;
importandroid.support.v4.app.DialogFragment;
Inaddition,aredbulbiconappearsintheleftmarginafterafewseconds.4. ClicktheredbulbiconandchooseImplementmethodsfromthepop-upmenu.AdialogappearswithonDateSet()
alreadyselectedandthe"Insert@Override"optionchecked.ClickOKtocreatetheemptyonDateSet()method.Thismethodwillbecalledwhentheusersetsthedate.AfteraddingtheemptyonDateSet()method,AndroidStudioautomaticallyaddsthefollowingintheimportblockatthetop:
importandroid.widget.DatePicker;
TheonDateSet()method'sparametersshouldbeintyear,intmonth,andintdayOfMonth.ChangethedayOfMonthparametertodayforbrevity:
publicvoidonDateSet(DatePickerview,intyear,intmonth,intday)
5. RemovetheemptypublicconstructorforDatePickerFragment.6. ReplaceonCreateView()withonCreateDialog()thatreturnsDialog,andannotateonCreateDialog()with@NonNull
toindicatethatthereturnvalueDialogcan'tbenull—anyattempttorefertothereturnvalueDialogmustbenull-checked.
@NonNull
@Override
publicDialogonCreateDialog(BundlesavedInstanceState){
...
}
7. AddthefollowingcodetoonCreateDialog()toinitializetheyear,month,anddayfromCalendar,andreturnthedialogandthesevaluestothemainactivity.AsyouenterCalendar,specifytheimporttobejava.util.Calendar.
Introduction
194

@NonNull
@Override
publicDialogonCreateDialog(BundlesavedInstanceState){
//Usethecurrentdateasthedefaultdateinthepicker.
finalCalendarc=Calendar.getInstance();
intyear=c.get(Calendar.YEAR);
intmonth=c.get(Calendar.MONTH);
intday=c.get(Calendar.DAY_OF_MONTH);
//CreateanewinstanceofDatePickerDialogandreturnit.
returnnewDatePickerDialog(getActivity(),this,year,month,day);
}
SolutioncodeforDatePickerFragment:
publicclassDatePickerFragmentextendsDialogFragment
implementsDatePickerDialog.OnDateSetListener{
@NonNull
@Override
publicDialogonCreateDialog(BundlesavedInstanceState){
//Usethecurrentdateasthedefaultdateinthepicker.
finalCalendarc=Calendar.getInstance();
intyear=c.get(Calendar.YEAR);
intmonth=c.get(Calendar.MONTH);
intday=c.get(Calendar.DAY_OF_MONTH);
//CreateanewinstanceofDatePickerDialogandreturnit.
returnnewDatePickerDialog(getActivity(),this,year,month,day);
}
publicvoidonDateSet(DatePickerview,intyear,intmonth,intday){
//Dosomethingwiththedatechosenbytheuser.
}
}
5.3Createanewfragmentforthetimepicker
AddafragmenttotheDateTimePickersprojectforthetimepicker:
1. SelectMainActivityagain.2. ChooseFile>New>Fragment>Fragment(Blank),andnamethefragmentTimePickerFragment.Uncheckallthree
optionssoyoudonotcreatealayoutXML,donotincludefragmentfactorymethods,anddonotincludeinterfacecallbacks.ClickFinishtocreatethefragment.
3. OpenTimePickerFragmentandfollowthesameproceduresaswithDatePickerFragment,implementingtheonTimeSet()blankmethod,replacingonCreateView()withonCreateDialog(),andremovingtheemptypublicconstructorforTimePickerFragment.TimePickerFragmentperformsthesametasksastheDatePickerFragment,butwithtimevalues:
ItextendsDialogFragmentandimplementsTimePickerDialog.OnTimeSetListenertocreateastandardtimepickerwithalistener.SeePickerformoreinformationaboutextendingDialogFragmentforatimepicker.ItusestheonCreateDialog()methodtoinitializethehourandminutefromCalendar,andreturnsthedialogandthesevaluestothemainactivityusingthe24-hourdateformat.AsyouenterCalendar,specifytheimporttobejava.util.Calendar.ItalsodefinestheemptyonTimeSet()methodforyoutoaddcodetousethehourOfDayandminutetheuserselects.Thismethodwillbecalledwhentheusersetsthetime:
publicvoidonTimeSet(TimePickerview,
inthourOfDay,intminute){
//Dosomethingwiththetimechosenbytheuser.
}
Introduction
195

Note:Asyoumakethechanges,AndroidStudioautomaticallyaddsthefollowingintheimportblockatthetop:
importandroid.support.v4.app.DialogFragment;
importandroid.app.TimePickerDialog;
importandroid.widget.TimePicker;
importjava.util.Calendar;
SolutioncodeforTimePickerFragment:
publicclassTimePickerFragmentextendsDialogFragment
implementsTimePickerDialog.OnTimeSetListener{
@NonNull
@Override
publicDialogonCreateDialog(BundlesavedInstanceState){
//Usethecurrenttimeasthedefaultvaluesforthepicker.
finalCalendarc=Calendar.getInstance();
inthour=c.get(Calendar.HOUR_OF_DAY);
intminute=c.get(Calendar.MINUTE);
//CreateanewinstanceofTimePickerDialogandreturnit.
returnnewTimePickerDialog(getActivity(),this,hour,minute,
DateFormat.is24HourFormat(getActivity()));
}
publicvoidonTimeSet(TimePickerview,inthourOfDay,intminute){
//Dosomethingwiththetimechosenbytheuser.
}
}
5.4Modifythemainactivity
Whilemuchofthecodeinthemainactivitystaysthesame,youneedtoaddmethodsthatcreateinstancesofFragmentManagertomanageeachfragmentandshoweachpicker.
1. Createstringresourcesinstrings.xml:
<stringname="date_picker">datePicker</string>
<stringname="time_picker">timePicker</string>
2. OpenMainActivity.3. AddtheshowDatePickerDialog()andshowTimePickerDialog()methods,referringtothecodebelow.Itcreatesan
instanceofFragmentManagertomanagethefragmentautomatically,andtoshowthepicker.Formoreinformationaboutfragments,seeFragments.
Introduction
196

publicclassMainActivityextendsAppCompatActivity{
@Override
protectedvoidonCreate(BundlesavedInstanceState){
super.onCreate(savedInstanceState);
setContentView(R.layout.activity_main);
}
publicvoidshowDatePickerDialog(Viewv){
DialogFragmentnewFragment=newDatePickerFragment();
newFragment.show(getSupportFragmentManager(),
getString(R.string.date_picker));
}
publicvoidshowTimePickerDialog(Viewview){
DialogFragmentnewFragment=newTimePickerFragment();
newFragment.show(getSupportFragmentManager(),
getString(R.string.time_picker));
}
}
4. Runtheapp.Youshouldseethedateandtimepickersaftertappingthebuttons.
5.5Usethechosendateandtime
Inthisexerciseyou'llpassthedateandtimebacktoMainActivity,andconvertthedateandtimetostringsthatyoucanshowinatoastmessage.
1. OpenMainActivityandaddtheprocessDatePickerResult()methodsignaturethattakestheyear,month,anddayasarguments:
publicvoidprocessDatePickerResult(intyear,intmonth,intday){
}
2. AddthefollowingcodetotheprocessDatePickerResult()methodtoconvertthemonth,day,andyeartoseparatestrings:
Stringmonth_string=Integer.toString(month+1);
Stringday_string=Integer.toString(day);
Stringyear_string=Integer.toString(year);
Introduction
197

Tip:Themonthintegerreturnedbythedatepickerstartscountingat0forJanuary,soyouneedtoadd1toittostartshowmonthsstartingat1.
3. AddthefollowingaftertheabovecodetoconcatenatethethreestringsandincludeslashmarksfortheU.S.dateformat:
StringdateMessage=(month_string+"/"+
day_string+"/"+year_string);
4. Addthefollowingaftertheabovestatementtodisplayatoastmessage:
Toast.makeText(this,"Date:"+dateMessage,
Toast.LENGTH_SHORT).show();
5. Extractthehard-codedstring"Date:"intoastringresourcenameddate.Thisautomaticallyreplacesthehard-codedstringwithgetString(R.string.date).ThecodefortheprocessDatePickerResult()methodshouldnowlooklikethis:
publicvoidprocessDatePickerResult(intyear,intmonth,intday){
Stringmonth_string=Integer.toString(month+1);
Stringday_string=Integer.toString(day);
Stringyear_string=Integer.toString(year);
//AssigntheconcatenatedstringstodateMessage.
StringdateMessage=(month_string+"/"+
day_string+"/"+year_string);
Toast.makeText(this,getString(R.string.date)+dateMessage,
Toast.LENGTH_SHORT).show();
}
6. OpenDatePickerFragment,andaddthefollowingtotheonDateSet()methodtoinvoketheprocessDatePickerResult()methodinMainActivityandpassittheyear,month,andday:
publicvoidonDateSet(DatePickerview,intyear,intmonth,intday){
//SettheactivitytotheMainActivity.
MainActivityactivity=(MainActivity)getActivity();
//InvokeMainActivity'sprocessDatePickerResult()method.
activity.processDatePickerResult(year,month,day);
}
YouusegetActivity()which,whenusedinafragment,returnstheactivitythefragmentiscurrentlyassociatedwith.Youneedthisbecauseyoucan'tcallamethodinMainActivitywithoutthecontextofMainActivity(youwouldhavetouseanintentinstead,asyoulearnedinapreviouslesson).Theactivityinheritsthecontext,soyoucanuseitasthecontextforcallingthemethod(asinactivity.processDatePickerResult).
7. TheTimePickerFragmentusesthesamelogic.OpenMainActivityandaddtheprocessTimePickerResult()methodsignaturethattakesthehourOfDayandminuteasarguments:
publicvoidprocessTimePickerResult(inthourOfDay,intminute){
}
8. AddthefollowingcodetotheprocessTimePickerResult()methodtoconvertthehourOfDayandminutetoseparatestrings:
Stringhour_string=Integer.toString(hourOfDay);
Stringminute_string=Integer.toString(minute);
9. Addthefollowingaftertheabovecodetoconcatenatethestringsandincludeacolonforthetimeformat:
StringtimeMessage=(hour_string+":"+minute_string);
10. Addthefollowingaftertheabovestatementtodisplayatoastmessage:
Introduction
198

Toast.makeText(this,"Time:"+timeMessage,
Toast.LENGTH_SHORT).show();
11. Extractthehard-codedstring"Time:"intoastringresourcenamedtime.Thisautomaticallyreplacesthehard-codedstringwithgetString(R.string.time).ThecodefortheprocessDatePickerResult()methodshouldnowlooklikethis:
publicvoidprocessTimePickerResult(inthourOfDay,intminute){
//Converttimeelementsintostrings.
Stringhour_string=Integer.toString(hourOfDay);
Stringminute_string=Integer.toString(minute);
//AssigntheconcatenatedstringstotimeMessage.
StringtimeMessage=(hour_string+":"+minute_string);
Toast.makeText(this,getString(R.string.time)+timeMessage,
Toast.LENGTH_SHORT).show();
}
12. OpenTimePickerFragmentandaddthefollowingtotheonTimeSet()methodtoinvoketheprocessTimePickerResult()methodinMainActivityandpassitthehourOfDayandminute:
publicvoidonTimeSet(TimePickerview,inthourOfDay,intminute){
//SettheactivitytotheMainActivity.
MainActivityactivity=(MainActivity)getActivity();
//InvokeMainActivity'sprocessTimePickerResult()method.
activity.processTimePickerResult(hourOfDay,minute);
}
13. Youcannowruntheapp.Afterselectingthedateortime,thedateortimeappearsinatoastmessageatthebottom,
asshowninthefigurebelow.
Solutioncode:
AndroidStudioproject:DateTimePickers
Task6:UseimageviewsasbuttonsYoucanmakeaviewclickable,asabutton,byaddingtheandroid:onClickattributeintheXMLlayout.Forexample,youcanmakeanimageactlikeabuttonbyaddingandroid:onClicktotheImageView.
Introduction
199

Tip:Ifyouareusingmultipleimagesasclickableimages,arrangetheminaviewgroupsothattheyaregroupedtogether.
Inthistaskyou'llcreateaprototypeofanappfororderingdessertsfromacafé.AfterstartinganewprojectbasedontheBasicActivitytemplate,you'llmodifythe"HelloWorld"TextViewwithappropriatetext,andaddimagestouseforthe"Addtoorder"buttons.
6.1Startthenewproject
1. StartanewAndroidStudioprojectwiththeappnameDroidCafe.ChoosetheBasicActivitytemplate,acceptthedefaultsettings,andclickFinish.Theprojectopenswithtwolayoutsintheres>layoutfolder:activity_main.xml,andcontent_main.xml.
2. Openthecontent_main.xmllayoutfile.IntheLayoutEditor,clicktheTexttabatthebottomofthescreenandchangetherootviewgrouptoRelativeLayout,asyou'vedoneinpreviousexercises.
3. Opencontent_main.xml.IftheTextViewelementincludesanylayout-constraintattributes,removethem.Extractthe"HelloWorld"stringintheTextViewtousetheintro_textresourcename.
4. Openstrings.xmlandredefinetheintro_textresourcetousemoredescriptivetext,suchas"DroidDesserts":
<stringid="intro_text">DroidDesserts</string>
5. ChangetheTextViewinthelayouttousealargertextsizeof24spandpaddingof10dp,andaddtheandroid:idattributewiththeidsettotextintro.
6. Extractthedimensionresourcefortheandroid:paddingattributetotheresourcenamepadding_regular,andtheandroid:textSizeattributetotheresourcenametext_heading.Youwillusetheseresourcenamesinsubsequentsteps.
7. AddanotherTextViewunderthetextintroTextViewwiththefollowingattributes:
TextViewattribute Value
android:layout_width "wrap_content"
android:layout_height "wrap_content"
android:padding "@dimen/padding_regular"
android:id "@+id/choose_dessert"
android:layout_below "@id/textintro"
android:text "Chooseadessert."
8. Extractthestringresourcefortheandroid:textattributetotheresourcenamechoose_a_dessert.
6.2Addtheimages
1. Theimagesnameddonut_circle.jpg,froyo_circle.jpg,andicecream_circle.jpgareprovidedwiththestarterappsinthe4_1_P_starter_images.zipfile,whichyoucanunziponyourcomputer.Tocopytheimagestoyourproject,followthesesteps:i. Closeyourproject.ii. Copytheimagefilesintoyourproject'sdrawablefolder.Findthedrawablefolderinaprojectbyusingthispath:
project_name>app>src>main>res>drawableiii. Reopenyourproject.
2. Opencontent_main.xmlfileagainandaddanImageViewforthedonutimagetothelayoutunderthechoose_dessertview,usingthefollowingattributes:
Introduction
200

ImageViewattributefordonut Value
android:layout_width "wrap_content"
android:layout_height "wrap_content"
android:padding "@dimen/padding_regular"
android:id "@+id/donut"
android:layout_below "@id/choose_dessert"
android:contentDescription "Donutsareglazedandsprinkledwithcandy."
android:src "@drawable/donut_circle"
3. Extracttheandroid:contentDescriptionattributevaluetothestringresourcedonuts.Youwillusethisstringresourceinthenextstep.
4. AddaTextViewthatwillappearnexttothedonutimageasadescription,withthefollowingattributes:
TextViewattribute Value
android:layout_width "wrap_content"
android:layout_height "wrap_content"
android:padding "35dp"
android:layout_below "@+id/choose_dessert"
android:layout_toRightOf "@id/donut"
android:text "@string/donuts"
5. Extractthedimensionresourcefortheandroid:paddingattributetotheresourcenamepadding_wide.Youwillusethisresourcenameinsubsequentsteps.
6. AddasecondImageViewtothelayoutfortheicecreamsandwich,usingthefollowingattributes:
ImageViewattributeforice_cream Value
android:layout_width "wrap_content"
android:layout_height "wrap_content"
android:padding "@dimen/padding_regular"
android:id "@+id/ice_cream"
android:layout_below "@id/donut"
android:contentDescription "Icecreamsandwicheshavechocolatewafersandvanillafilling."
android:src "@drawable/icecream_circle"
7. Extracttheandroid:contentDescriptionattributevaluetothestringresourceice_cream_sandwiches.8. AddaTextViewthatwillappearnexttotheicecreamsandwichasadescription,withthefollowingattributes:
TextViewattribute Value
android:layout_width "wrap_content"
android:layout_height "wrap_content"
android:padding "@dimen/padding_wide"
android:layout_below "@+id/donut"
android:layout_toRightOf "@id/ice_cream"
android:text "@string/ice_cream_sandwiches"
Introduction
201

9. AddathirdImageViewtothelayoutforthefroyo,usingthefollowingattributes:
ImageViewattributeforice_cream Value
android:layout_width "wrap_content"
android:layout_height "wrap_content"
android:padding "@dimen/padding_regular"
android:id "@+id/froyo"
android:layout_below "@id/ice_cream"
android:contentDescription "FroYoispremiumself-servefrozenyogurt."
android:src "@drawable/froyo_circle"
10. Extracttheandroid:contentDescriptionattributevaluetothestringresourcefroyo.11. AddaTextViewthatwillappearnexttothefroyoasadescription,withthefollowingattributes:
TextViewattribute Value
android:layout_width "wrap_content"
android:layout_height "wrap_content"
android:padding "@dimen/padding_wide"
android:layout_below "@+id/ice_cream"
android:layout_toRightOf "@id/froyo"
android:text "@string/froyo"
6.3AddonClickmethodsfortheimageviews
Youcanaddtheandroid:onClickattributetoanyViewtomakeitclickableasabutton.Inthisstepyouwilladdandroid:onClicktotheimagesinthecontent_main.xmllayout.Youneedtoalsoaddamethodfortheandroid:onClickattributetocall.Themethod,forthistask,displaysatoastmessageshowingwhichimagewastapped.(Inalatertask,youwillmodifythemethodtolaunchanotheractivitycalledOrderActivity.)
1. Addthefollowingstringresourcestothestrings.xmlfileforthestringstobeshowninthetoastmessage:
<stringname="donut_order_message">Youorderedadonut.</string>
<stringname="ice_cream_order_message">Youorderedanicecreamsandwich.</string>
<stringname="froyo_order_message">YouorderedaFroYo.</string>
2. AddthefollowingdisplayToast()methodfordisplayingatoastmessage:
publicvoiddisplayToast(Stringmessage){
Toast.makeText(getApplicationContext(),message,
Toast.LENGTH_SHORT).show();
}
3. AddthefollowingshowFoodOrder()methodtotheendofMainActivity(beforetheclosingbracket).Forthistask,usethedisplayToast()methodtodisplayatoastmessage:
/**
*Displaysatoastmessageforthefoodorder
*andstartstheOrderActivityactivity.
*@parammessageMessagetodisplay.
*/
publicvoidshowFoodOrder(Stringmessage){
displayToast(message);
}
Introduction
202

Tip:ThefirstfourlinesareacommentintheJavadocformat,whichmakesthecodeeasiertounderstandandalsohelpsgeneratedocumentationforyourcodeifyouuseJavadoc.Itisabestpracticetoaddsuchacommenttoeverynewmethodyoucreate.Formoreinformationabouthowtowritecomments,seeHowtoWriteDocCommentsfortheJavadocTool.
AlthoughyoucouldhaveaddedthismethodinanypositionwithinMainActivity,itisbestpracticetoputyourownmethodsbelowthemethodsalreadyprovidedinMainActivitybythetemplate.
1. AddthefollowingmethodstotheendofMainActivity(youcanaddthembeforeshowFoodOrder()):
/**
*Showsamessagethatthedonutimagewasclicked.
*/
publicvoidshowDonutOrder(Viewview){
showFoodOrder(getString(R.string.donut_order_message));
}
/**
*Showsamessagethattheicecreamsandwichimagewasclicked.
*/
publicvoidshowIceCreamOrder(Viewview){
showFoodOrder(getString(R.string.ice_cream_order_message));
}
/**
*Showsamessagethatthefroyoimagewasclicked.
*/
publicvoidshowFroyoOrder(Viewview){
showFoodOrder(getString(R.string.froyo_order_message));
}
2. Addtheandroid:onClickattributetothethreeImageViewsincontent_main.xml:
<ImageView
android:layout_width="wrap_content"
android:layout_height="wrap_content"
android:padding="10dp"
android:id="@+id/donut"
android:layout_below="@id/choose_dessert"
android:contentDescription="@string/donut"
android:src="@drawable/donut_circle"
android:onClick="showDonutOrder"/>
...
<ImageView
android:layout_width="wrap_content"
android:layout_height="wrap_content"
android:padding="10dp"
android:id="@+id/ice_cream"
android:layout_below="@id/donut"
android:contentDescription="@string/ice_cream_sandwich"
android:src="@drawable/icecream_circle"
android:onClick="showIceCreamOrder"/>
...
<ImageView
android:layout_width="wrap_content"
android:layout_height="wrap_content"
android:padding="10dp"
android:id="@+id/froyo"
android:layout_below="@id/ice_cream"
android:contentDescription="@string/froyo"
android:src="@drawable/froyo_circle"
android:onClick="showFroyoOrder"/>
3. Runtheapp.
Clickingthedonut,icecreamsandwich,orfroyoimagedisplaysatoastmessageabouttheorder,asshowninthefigurebelow.
Introduction
203

Introduction
204

Task7:UseradiobuttonsRadiobuttonsareinputcontrolsthatareusefulforselectingonlyoneoptionfromasetofoptions.Youshoulduseradiobuttonsifyouwanttheusertoseeallavailableoptionsside-by-side.Ifit'snotnecessarytoshowalloptionsside-by-side,youmaywanttouseaspinnerinstead.
Laterinthispracticalyouwilladdanotheractivityandscreenlayoutforsettingthedeliveryoptionsforafoodorder,anduseradiobuttonsforthedeliverychoices.
Foranoverviewandmoresamplecodeforradiobuttons,seeRadioButtons.
7.1AddanotheractivityAsyoulearnedinapreviouslesson,anactivityrepresentsasinglescreeninyourappinwhichyourusercanperformasingle,focusedtask.Youalreadyhaveoneactivity,MainActivity.java.Youwillnowaddanotheractivityforsettingthedeliveryoptionsforanorder,anduseanexplicitintenttolaunchthesecondactivity.
1. Right-clickthecom.example.android.droidcafefolderintheleftcolumnandchooseNew>Activity>EmptyActivity.EdittheActivityNametobeOrderActivity,andtheLayoutNametobeactivity_order.Leavetheotheroptionsalone,andclickFinish.
TheOrderActivityclassshouldnowbelistedunderMainActivityinthejavafolder,andactivity_order.xmlshouldnowbelistedinthelayoutfolder.TheEmptyActivitytemplateaddedthesefiles.
2. Opentheactivity_order.xmllayoutfile.IntheLayoutEditor,clicktheTexttabatthebottomofthescreenandchangetherootviewgrouptoRelativeLayout,asyou'vedoneinpreviousexercises.
3. OpenMainActivity.ChangetheshowFoodOrder()methodtomakeanexplicitintenttostartOrderActivity:
publicvoidshowFoodOrder(Stringmessage){
displayToast(message);
Intentintent=newIntent(this,OrderActivity.class);
startActivity(intent);
}
4. Runtheapp.Clickinganimagebuttonnowlaunchesthesecondactivity,whichisablankscreen.(Thetoastmessageappearsbrieflyontheblankscreen.)
7.2Addthelayoutforradiobuttons
Tocreateeachradiobuttonoption,youwillcreateRadioButtonelementsintheactivity_order.xmllayoutfile,whichislinkedtoOrderActivity.Aftereditingthelayoutfile,thelayoutfortheradiobuttonsinOrderActivitywilllooksomethinglikethe
figurebelow,dependingonyourversionofAndroidStudio.
Sinceradiobuttonselectionsaremutuallyexclusive,youwillgroupthemtogetherinsideaRadioGroup.Bygroupingthemtogether,theAndroidsystemensuresthatonlyoneradiobuttoncanbeselectedatatime.
Note:TheorderinwhichyoulisttheRadioButtonelementsdeterminestheorderthattheyappearonthescreen.1. Openactivity_order.xml_acandaddaTextViewelementwiththeidsettoorder_intro_text:
Introduction
205

TextViewattribute Value
android:id "@+id/order_intro_text"
android:layout_width "match_parent"
android:layout_height "wrap_content"
android:layout_marginTop "24dp"
android:layout_marginBottom "6dp"
android:textSize "18sp"
android:text "Chooseadeliverymethod:"
2. Extractthestringresourcefor"Chooseadeliverymethod:"tobechoose_delivery_method.3. Extractthedimensionresourcesforthemarginvalues:4. "24dp"totext_margin_top5. "6dp"totext_margin_bottom6. "18sp"tointro_text_size7. AddaRadioGrouptothelayoutunderneaththeTextViewyoujustadded:
<RadioGroup
android:layout_width="match_parent"
android:layout_height="wrap_content"
android:orientation="vertical"
android:layout_below="@id/order_intro_text">
</RadioGroup>
8. AddthefollowingthreeRadioButtonelementswithintheRadioGroup,usingthefollowingattributes.The"onRadioButtonClicked"entryfortheonClickattributewillbehighlighteduntilyouaddthatmethodinthenexttask.
RadioButton#1attribute Value
android:id "@+id/sameday"
android:layout_width "wrap_content"
android:layout_height "wrap_content"
android:text "Samedaymessengerservice"
android:onClick "onRadioButtonClicked"
RadioButton#2attribute Value
android:id "@+id/nextday"
android:layout_width "wrap_content"
android:layout_height "wrap_content"
android:text "Nextdaygrounddelivery"
android:onClick "onRadioButtonClicked"
RadioButton#3attribute Value
android:id "@+id/pickup"
android:layout_width "wrap_content"
android:layout_height "wrap_content"
android:text "Pickup"
android:onClick "onRadioButtonClicked"
Introduction
206

9. Extractthethreestringresourcesfortheandroid:textattributestothefollowingnames,sothatthestringscanbeeasilytranslated:
same_day_messenger_service
next_day_ground_delivery
pick_up
7.3Addtheradiobuttonclickhandler
Theandroid:onClickattributeforeachradiobuttonelementspecifiestheonRadioButtonClicked()methodtohandletheclickevent.Therefore,youneedtoaddanewonRadioButtonClicked()methodintheOrderActivityclass.
Ordinarilyyourappwoulddisplaysomemessageregardingwhichtypeofdeliverywaschosen.YouwillaccomplishthiswithatoastmessagebycreatingamethodcalleddisplayToast()inOrderActivity.
IntheonRadioButtonClicked()methodyouwilluseaswitchcaseblocktocheckifaradiobuttonhasbeenclicked.Attheendoftheswitchcaseblock,youwilladdadefaultstatementthatdisplaysalogmessageifnoneoftheradiobuttonswerechecked.
1. Openstrings.xmlandcreatethefollowingstringresources:i. Aresourcenamedchosenforthestring"Chosen:"(includethespaceafterthecolonandthequotationmarks).ii. Aresourcenamednothing_clickedforthestring"onRadioButtonClicked:Nothingclicked."
2. OpenOrderActivityandaddthefollowingstatementtodefineTAG_ACTIVITYforthelogmessage:
privatestaticfinalStringTAG_ACTIVITY=
OrderActivity.class.getSimpleName();
3. AddthefollowingdisplayToastmethodtoOrderActivity:
publicvoiddisplayToast(Stringmessage){
Toast.makeText(getApplicationContext(),message,
Toast.LENGTH_SHORT).show();
}
4. AddthefollowingonRadioButtonClicked()method,whichcheckstoseeifaradiobuttonhasbeenchecked,andusesaswitchcaseblocktodeterminewhichradiobuttonitemwasselected,inordertosettheappropriatemessageforthatitemtousewithdisplayToast():
Introduction
207

publicvoidonRadioButtonClicked(Viewview){
//Isthebuttonnowchecked?
booleanchecked=((RadioButton)view).isChecked();
//Checkwhichradiobuttonwasclicked
switch(view.getId()){
caseR.id.sameday:
if(checked)
//Samedayservice
displayToast(getString(R.string.chosen)+
getString(R.string.same_day_messenger_service));
break;
caseR.id.nextday:
if(checked)
//Nextdaydelivery
displayToast(getString(R.string.chosen)+
getString(R.string.next_day_ground_delivery));
break;
caseR.id.pickup:
if(checked)
//Pickup
displayToast(getString(R.string.chosen)+
getString(R.string.pick_up));
break;
default:
Log.d(TAG_ACTIVITY,getString(R.string.nothing_clicked));
break;
}
}
5. Runtheapp.TapanimagetoseetheOrderActivityactivity,whichshowsthedeliverychoices.Tapadeliverychoice,andyouwillseeatoastmessageatthebottomofthescreenwiththechoice,asshowninthefigurebelow.
Introduction
208

Introduction
209

SolutioncodeAndroidStudioproject:DroidCafePart1
CodingchallengeNote:Allcodingchallengesareoptionalandarenotprerequisitesforlaterlessons.
Challenge:YoucanalsoperformanactiondirectlyfromthekeyboardandreplacetheReturn(Enter)keywitha"send"key,
suchasfordialingaphonenumber:
Forthischallenge,usetheandroid:imeOptionsattributefortheEditTextcomponentwiththeactionSendvalue:
android:imeOptions="actionSend"
IntheonCreate()methodforthismainactivity,youcanusesetOnEditorActionListener()tosetthelistenerfortheEditTextviewtodetectifthekeyispressed:
EditTexteditText=(EditText)findViewById(R.id.editText_main);
if(editText!=null)
editText.setOnEditorActionListener(newTextView.OnEditorActionListener(){
...
});
Forhelpsettingthelistener,see"SpecifyingtheInputAction"inHandlingKeyboardInputand"SpecifyingKeyboardActions"inTextFields.
ThenextstepistooverrideonEditorAction()andusetheIME_ACTION_SENDconstantintheEditorInfoclasstorespondtothepressedkey.Intheexamplebelow,thekeyisusedtocallthedialNumber()methodtodialthephonenumber:
@Override
publicbooleanonEditorAction(TextViewtextView,intactionId,KeyEventkeyEvent){
booleanmHandled=false;
if(actionId==EditorInfo.IME_ACTION_SEND){
dialNumber();
mHandled=true;
}
returnmHandled;
}
Tofinishthechallenge,createthedialNumber()method,whichusesanimplicitintentwithACTION_DIALtopassthephonenumbertoanotherappthatcandialthenumber.Itshouldlooklikethis:
privatevoiddialNumber(){
EditTexteditText=(EditText)findViewById(R.id.editText_main);
StringmPhoneNum=null;
if(editText!=null)mPhoneNum="tel:"+editText.getText().toString();
Log.d(TAG,"dialNumber:"+mPhoneNum);
Intentintent=newIntent(Intent.ACTION_DIAL);
intent.setData(Uri.parse(mPhoneNum));
if(intent.resolveActivity(getPackageManager())!=null){
startActivity(intent);
}else{
Log.d("ImplicitIntents","Can'thandlethis!");
}
}
Introduction
210

SummaryInthispractical,youlearnedhowto:
SetupXMLlayoutattributestocontrolthekeyboardforanEditTextelement:UsethetextAutoCorrectvaluefortheandroid:inputTypeattributetochangethekeyboardsothatitsuggestsspellingcorrections.UsethetextCapSentencesvaluefortheandroid:inputTypeattributetostarteachnewsentencewithacapitalletter.UsethetextPasswordvaluefortheandroid:inputTypeattributetohideapasswordwhenenteringit.UsethetextEmailAddressvaluefortheandroid:inputTypeattributetoshowanemailkeyboardratherthanastandardkeyboard.Usethephonevaluefortheandroid:inputTypeattributetoshowaphonekeypadratherthanastandardkeyboard.Challenge:Usetheandroid:imeOptionsattributewiththeactionSendvaluetoperformanactiondirectlyfromthekeyboardandreplacetheReturnkeywithanactionkey,suchasanimplicitintenttoanotherapptodialaphonenumber.
UseaSpinnerinputcontroltoprovideadrop-downmenu,andwritecodetocontrolit:UseanArrayAdaptertoassignanarrayoftextvaluesasthespinnermenuitems.ImplementtheAdapterView.OnItemSelectedListenerinterface,whichrequiresalsoaddingtheonItemSelected()andonNothingSelected()callbackmethodstoactivatethespinneranditslistener.UsetheonItemSelected()callbackmethodtoretrievetheselectediteminthespinnermenuusinggetItemAtPosition.
UseAlertDialog.Builder,asubclassofAlertDialog,tobuildastandardalertdialog,usingsetTitletosetitstitle,setMessagetosetitsmessage,andsetPositiveButtonandsetNegativeButtontosetitsbuttons.Usethestandarddateandtimepickers:
Addafragmentforadatepicker,andextendtheDialogFragmentclasstoimplementDatePickerDialog.OnDateSetListenerforastandarddatepickerwithalistener.Addafragmentforatimepicker,andextendtheDialogFragmentclasstoimplementTimePickerDialog.OnTimeSetListenerforastandardtimepickerwithalistener.ImplementtheonDateSet(),onTimeSet(),andonCreateDialog()methods.UsetheonFinishDateDialog()andonFinishTimeDialog()methodstoretrievetheselecteddateandtime.
Useimagesinaproject:Copyanimageintotheproject,anddefineanImageViewelementtouseit.Addtheandroid:onClickattributetomaketheImageViewelementsclickablelikebuttons.YoucanmakeanyViewclickablewiththeandroid:onClickattribute.
Useradiobuttons:Createasecondactivity.AddRadioButtonelementswithinaRadioGroupinthesecondactivity.Createradiobuttonhandlers.Launchthesecondactivityfromanimageclick.
RelatedconceptTherelatedconceptdocumentationisinAndroidDeveloperFundamentals:Concepts.
UserInputControls
LearnmoreAndroidAPIGuide,"Develop"section:
SpecifyingtheInputMethodType
Introduction
211

TextFieldsInputControlsSpinnersDialogsFragmentsInputEventsPickersDateFormatImageViewRadioButtons(UserInterfacesection)
MaterialDesignSpecification:Dialogsdesignguide
Introduction
212

4.2:UsinganOptionsMenuContents:
WhatyoushouldalreadyKNOWWhatyouwillLEARNWhatyouwillDOAppoverviewTask1:AdditemstotheoptionsmenuTask2:AddiconsformenuitemsCodingchallenge#1Task3:HandletheselectedmenuitemCodingchallenge#2SummaryRelatedconceptLearnmore
Theappbar(alsocalledtheactionbar)isadedicatedspaceatthetopofeachactivityscreen.Whenyoucreateanactivityfromatemplate(suchasBasicActivityTemplate),anappbarisautomaticallyincludedfortheactivityinaCoordinatorLayoutrootviewgroupatthetopoftheviewhierarchy.
Theoptionsmenuintheappbarprovidesnavigationtootheractivitiesintheapp,ortheprimaryoptionsthataffectusingtheappitself—butnotonesthatperformanactiononanelementonthescreen.Forexample,youroptionsmenumightprovidetheuserchoicesfornavigatingtootheractivities,suchasplacinganorder,orforactionsthathaveaglobalimpactontheapp,suchaschangingsettingsorprofileinformation.
Inthispracticalyou'lllearnaboutsettinguptheappbarandoptionsmenuinyourapp(showninthefigurebelow).
Introduction
213

Intheabovefigure:
1. Appbar.Theappbarincludestheapptitle,theoptionsmenu,andtheoverflowbutton.2. Optionsmenuactionicons.Thefirsttwooptionsmenuitemsappearasiconsintheappbar.3. Overflowbutton.Theoverflowbutton(threeverticaldots)opensamenuthatshowsmoreoptionsmenuitems.4. Optionsoverflowmenu.Afterclickingtheoverflowbutton,moreoptionsmenuitemsappearintheoverflowmenu.
Optionsmenuitemsappearintheoptionsoverflowmenu(seefigureabove).However,youcanplacesomeitemsasicons—asmanyascanfit—intheappbar.UsingtheappbarfortheoptionsmenumakesyourappconsistentwithotherAndroidapps,allowinguserstoquicklyunderstandhowtooperateyourappandhaveagreatexperience.
Tip:Toprovideafamiliarandconsistentuserexperience,youshouldusetheMenuAPIstopresentuseractionsandotheroptionsinyouractivities.SeeMenusfordetails.
WhatyoushouldalreadyKNOWFromthepreviouschapters,youshouldbefamiliarwithhowtodothefollowing:
CreatingandrunningappsinAndroidStudio.CreatingandeditingUIelementsusingtheLayoutEditor,enteringXMLcodedirectly,andaccessingelementsfromyourJavacode.AddingonClickfunctionalitytoabutton.
WhatyouwillLEARNAddingmenuitemstotheoptionsmenu.Addingiconsforitemsintheoptionsmenu.Settingmenuitemstoshowintheactionbar.Addingtheeventhandlersformenuitemclicks.
WhatyouwillDOContinueaddingfeaturestotheDroidCafeprojectfromthepreviouspractical.Addmenuitemstotheoptionsmenu.Addiconsformenuitemstoappearintheactionbar.Connectmenuitemclickstoeventhandlersthatprocesstheclickevents.
AppoverviewInthepreviouspracticalyoucreatedanappcalledDroidCafe,showninthefigurebelow,usingtheBasicActivitytemplate.Thistemplatealsoprovidesaskeletaloptionsmenuintheappbaratthetopofthescreen.Youwilllearnhowto:
Setuptheappbar.Modifytheoptionsmenu.Addiconsforsomeofthemenuitems.Showtheiconforthemenuitemintheappbarratherthantheoverflowmenu.Showtheitemintheoverflowmenu,dependingonthescreensizeandorientation.
Introduction
214

Forthisexerciseyouareusingthev7appcompatsupportlibrary'sToolbarasanappbar.Thereareotherwaystoimplementanappbar.Forexample,somethemessetupanActionBarasanappbarbydefault.ButusingtheappcompatToolbarmakesiteasytosetupanappbarthatworksonthewidestrangeofdevices,andalsogivesyouroomtocustomizeyourappbarlateronasyourappdevelops.
Toreadmoreaboutdesignconsiderationsforusingtheappbar,seeAppBarintheMaterialDesignspecification.
Tostarttheprojectfromwhereyouleftoffinthepreviouspractical,download:
AndroidStudioproject:DroidCafePart1
Task1.AdditemstotheoptionsmenuYouwillopentheDroidCafeprojectfromthepreviouspractical,andaddmenuitemstotheoptionsmenuintheappbaratthetopofthescreen.
1.1Examinetheappbarcode1. OpentheDroidCafeprojectfromthepreviouspractical.Theprojectincludesthefollowinglayoutfilesintheres>
layoutfolder:
i. activity_main.xml:ThemainlayoutforMainActivity,thefirstscreentheusersees.
ii. content_main.xml:ThelayoutforthecontentoftheMainActivityscreen,which(asyouwillseeshortly)isincludedwithinactivity_main.xml.
Introduction
215

iii. activity_order.xml:ThelayoutforOrderActivity,whichyouaddedinthepreviouspractical.
2. Opencontent_main.xml.Inthepreviouspractical,youaddedTextViewsandImageViewstotherootviewgroup(whichyouchangedtoRelativeLayout).
ThelayoutbehaviorfortheRelativeLayoutissetto@string/appbar_scrolling_view_behavior,whichcontrolsthescrollingbehaviorofthescreeninrelationtotheappbaratthetop.Right-click(Control-click)thisstringresourceandchooseGoTo>Declarationtoseethestringresource'sactualvalue,whichisdefinedinafilecalled"values.xml".ThisfileisgeneratedbyAndroidStudio,notvisibleintheProject:Androidviewandshouldnotbeedited.Theactualvalueof@string/appbar_scrolling_view_behaviorinvalues.xmlis"android.support.design.widget.AppBarLayout$ScrollingViewBehavior".
Formoreaboutscrollingbehavior,seetheAndroidDesignSupportLibraryblogentryintheAndroidDevelopersBlog.Fordesignpracticesinvolvingscrollingmenus,seeScrollingTechniquesintheMaterialDesignspecification.
3. Openactivity_main.xmltoseethemainlayout,whichusesaCoordinatorLayoutlayoutwithanembeddedAppBarLayoutlayout.TheCoordinatorLayoutandtheAppBarLayouttagsrequirefullyqualifiednamesthatspecifyandroid.support.design,whichistheAndroidDesignSupportLibrary.
AppBarLayoutisaverticalLinearLayoutwhichusestheToolbarclassinthesupportlibrary,insteadofthenativeActionBar,toimplementanappbar.Theappbarisasectionatthetopofthedisplaythatcandisplaytheactivitytitle,navigation,andotherinteractiveitems.ThenativeActionBarbehavesdifferentlydependingontheversionofAndroidrunningonthedevice.Forthisreason,ifyouareaddinganoptionsmenu,youshouldusethev7appcompatsupportlibrary'sToolbarasanappbar.UsingtheToolbarmakesiteasytosetupanappbarthatworksonthewidestrangeofdevices,andalsogivesyouroomtocustomizeyourappbarlateronasyourappdevelops.Toolbarincludesthemostrecentfeatures,andworksforanydevicethatcanusethesupportlibrary.
TheToolbarwithinthislayouthastheidtoolbar,andisalsospecified,liketheAppBarLayout,withafullyqualifiedname(android.support.v7.widget):
<android.support.design.widget.AppBarLayout
android:layout_width="match_parent"
android:layout_height="wrap_content"
android:theme="@style/AppTheme.AppBarOverlay">
<android.support.v7.widget.Toolbar
android:id="@+id/toolbar"
android:layout_width="match_parent"
android:layout_height="?attr/actionBarSize"
android:background="?attr/colorPrimary"
app:popupTheme="@style/AppTheme.PopupOverlay"/>
</android.support.design.widget.AppBarLayout>
FormoredetailsabouttheAppBarLayoutclass,seeAppBarLayoutintheAndroidDeveloperReference.Formoredetailsabouttoolbars,seeToolbarintheAndroidDeveloperReference.
Tip:Theactivity_main.xmllayoutalsousesanincludelayoutstatementtoincludetheentirelayoutdefinedincontent_main.xml.Thisseparationoflayoutdefinitionsmakesiteasiertochangethelayout'scontentapartfromthelayout'stoolbardefinitionandcoordinatorlayout.Thisisabestpracticeforseparatingyourcontent(whichmayneedtobetranslated)fromtheformatofyourlayout.
4. Runtheapp.Noticethebaratthetopofthescreenshowingthenameoftheapp(DroidCafe).Italsoshowstheactionoverflowbutton(threeverticaldots)ontherightside.Taptheoverflowbuttontoseetheoptionsmenu,whichatthispointhasonlyonemenuoption,Settings.
5. ExaminetheAndroidManifest.xmlfile.The.MainActivityactivityissettousetheNoActionBartheme:
android:theme="@style/AppTheme.NoActionBar"
Introduction
216

TheNoActionBarthemeisdefinedinthestyles.xmlfile(expandapp>res>values>styles.xmltoseeit).Stylesarecoveredinanotherlesson,butyoucanseethattheNoActionBarthemesetsthewindowActionBarattributetofalse(nowindowactionbar),andthewindowNoTitleattributetotrue(notitle).
Thereasonthesevaluesaresetisbecauseyouaredefiningtheappbarinyourlayout(activity_main.xml)withAppBarLayout,ratherthanusinganActionBar.UsingoneoftheNoActionBarthemespreventstheappfromusingthenativeActionBarclasstoprovidetheappbar.ThenativeActionBarclassbehavesdifferentlydependingonwhatversionoftheAndroidsystemadeviceisusing.Bycontrast,themostrecentfeaturesareaddedtothesupportlibrary'sversionofToolbarandavailableonanydevicethatcanusethesupportlibrary.Forthisreason,youshouldusethesupportlibrary'sToolbarclasstoimplementyouractivities'appbarsinsteadofActionBar.Usingthesupportlibrary'sToolbarensuresthatyourapphasconsistentbehavioracrossthewidestrangeofdevices.
6. LookatMainActivity,whichextendsAppCompatActivityandstartswiththeonCreate()method:
@Override
protectedvoidonCreate(BundlesavedInstanceState){
super.onCreate(savedInstanceState);
setContentView(R.layout.activity_main);
Toolbartoolbar=(Toolbar)findViewById(R.id.toolbar);
setSupportActionBar(toolbar);
...
Aftersettingthecontentviewtotheactivity_main.xmllayout,theonCreate()methodsetstoolbartobetheToolbardefinedintheactivity_main.xmllayout.Itthencallstheactivity'ssetSupportActionBar()method,andpassestoolbartoit,settingthetoolbardefinedinactivity_main.xmlastheappbarfortheactivity.
Forbestpracticesaboutaddingtheappbartoyourapp,seeAddingtheAppBarinBestPracticesforUserInterface.
1.2Addmoremenuitemstotheoptionsmenu
YouwilladdthefollowingmenuitemstotheoptionsmenuoftheDroidCafeapp:
Order:GototheOrderActivityscreentoseethefoodorder.Status:Checkthestatusofafoodorder.Favorites:Showfavoritefoods.Contact:Contactingtherestaurant.Sinceyoudon'tneedtheexistingSettingsitem,youwillchangeSettingstoContact.
AndroidprovidesastandardXMLformattodefinemenuitems.Insteadofbuildingamenuinyouractivity'scode,youcandefineamenuandallofitsmenuitemsinanXMLmenuresource.Youcantheninflatethemenuresource(loaditasaMenuobject)inyouractivityorfragment:
1. Takealookatmenu_main.xml(expandres>menuintheProjectview).Itdefinesmenuitemswiththe<item></item>tagwithinthe<menu></menu>block.Theonlymenuitemprovidedfromthetemplateisaction_settings(theSettingschoice),whichisdefinedas:
<item
android:id="@+id/action_settings"
android:orderInCategory="100"
android:title="@string/action_settings"
app:showAsAction="never"/>
InAndroidStudio,theandroid:titleattributeshowsthestringvalue"Settings"eventhoughthestringisdefinedasaresource.AndroidStudiodisplaysthevaluesothatyoucanseeat-a-glancewhatthevalueiswithouthavingtoopenthestrings.xmlresourcefile.Ifyouclickonthisstring,itchangestoshowthestringresource"@string/action_settings".
2. Changethefollowingattributesoftheaction_settingsitemtomakeittheaction_contactitem(don'tchangetheexistingandroid:orderInCategoryattribute):
Introduction
217

Attribute Value
android:id "@+id/action_contact"
android:title "Contact"
app:showAsAction "never"
3. Extractthehard-codedstring"Contact"intothestringresourceaction_contact.4. Addanewmenuitemusingthe<item></item>tagwithinthe<menu></menu>block,andgivetheitemthefollowing
attributes:
Attribute Value
android:id "@+id/action_order"
android:orderInCategory "10"
android:title "Order"
app:showAsAction "never"
Theandroid:orderInCategoryattributespecifiestheorderinwhichthemenuitemsappearinthemenu,withthelowestnumberappearinghigherinthemenu.TheContactitemissetto100,whichisabignumberinordertospecifythatitshowsupatthebottomratherthanthetop.YousettheOrderitemto10,whichputsitaboveContact,andleavesplentyofroominthemenuformoreitems.
5. Extractthehard-codedstring"Order"intothestringresourceaction_order.6. Addtwomoremenuitemsthesamewaywiththefollowingattributes:
Statusitemattribute Value
android:id "@+id/action_status"
android:orderInCategory "20"
android:title "Status"
app:showAsAction "never"
Favoritesitemattribute Value
android:id "@+id/action_favorites"
android:orderInCategory "40"
android:title "Favorites"
app:showAsAction "never"
7. Extract"Status"intotheresourceaction_status,and"Favorites"intotheresourceaction_favorites.8. Youwilldisplayatoastmessagewithanactionmessagedependingonwhichmenuitemtheuserselects.Addthe
followingstringnamesandvaluesinstrings.xmlforthesemessages:
<stringname="action_order_message">YouselectedOrder.</string>
<stringname="action_status_message">YouselectedStatus.</string>
<stringname="action_favorites_message">YouselectedFavorites.</string>
<stringname="action_contact_message">YouselectedContact.</string>
9. OpenMainActivity,andchangetheifstatementintheonOptionsItemSelected()methodreplacingtheidaction_settingswiththenewidaction_order:
if(id==R.id.action_order)
Introduction
218
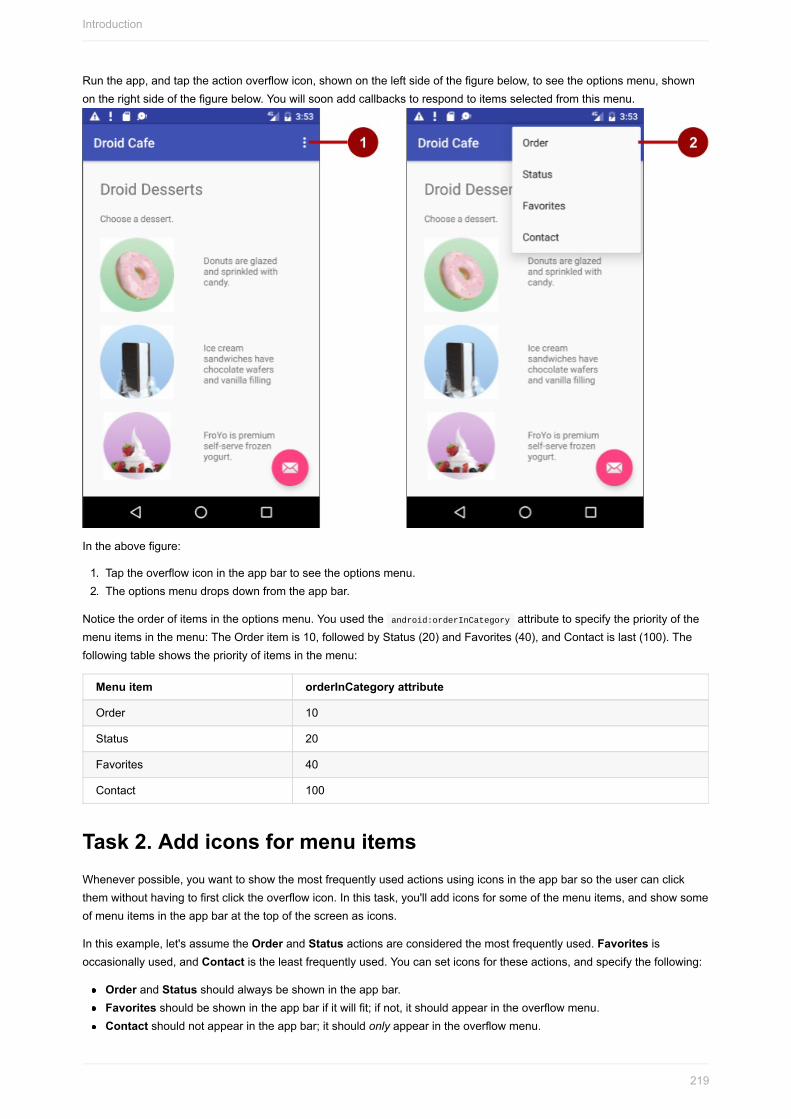
Runtheapp,andtaptheactionoverflowicon,shownontheleftsideofthefigurebelow,toseetheoptionsmenu,shownontherightsideofthefigurebelow.Youwillsoonaddcallbackstorespondtoitemsselectedfromthismenu.
Intheabovefigure:
1. Taptheoverflowiconintheappbartoseetheoptionsmenu.2. Theoptionsmenudropsdownfromtheappbar.
Noticetheorderofitemsintheoptionsmenu.Youusedtheandroid:orderInCategoryattributetospecifythepriorityofthemenuitemsinthemenu:TheOrderitemis10,followedbyStatus(20)andFavorites(40),andContactislast(100).Thefollowingtableshowsthepriorityofitemsinthemenu:
Menuitem orderInCategoryattribute
Order 10
Status 20
Favorites 40
Contact 100
Task2.AddiconsformenuitemsWheneverpossible,youwanttoshowthemostfrequentlyusedactionsusingiconsintheappbarsotheusercanclickthemwithouthavingtofirstclicktheoverflowicon.Inthistask,you'lladdiconsforsomeofthemenuitems,andshowsomeofmenuitemsintheappbaratthetopofthescreenasicons.
Inthisexample,let'sassumetheOrderandStatusactionsareconsideredthemostfrequentlyused.Favoritesisoccasionallyused,andContactistheleastfrequentlyused.Youcanseticonsfortheseactions,andspecifythefollowing:
OrderandStatusshouldalwaysbeshownintheappbar.Favoritesshouldbeshownintheappbarifitwillfit;ifnot,itshouldappearintheoverflowmenu.Contactshouldnotappearintheappbar;itshouldonlyappearintheoverflowmenu.
Introduction
219

2.1Addiconsformenuitems
Tospecifyiconsforactions,youneedtofirstaddtheiconsasimageassetstothedrawablefolder.
1. ExpandresintheProjectview,andright-click(orControl-click)drawable.2. ChooseNew>ImageAsset.TheConfigureImageAssetdialogappears.3. ChooseActionBarandTabItemsinthedrop-downmenu.4. Changeic_action_nametoic_order_white(fortheOrderaction).TheConfigureImageAssetscreenshouldlookas
follows(seeCreateAppIconswithImageAssetStudioforacompletedescription.)
5. Clicktheclipartimage(theAndroidlogonextto"Clipart:")toselectaclipartimageastheicon.Apageoficonsappears.ClicktheiconyouwanttousefortheOrderaction(forexample,theshoppingcarticonmaybeappropriate).
6. ChooseHOLO_DARKfromtheThemedrop-downmenu.Thissetstheicontobewhiteagainstadark-colored(orblack)background.ClickNext.
7. ClickFinishintheConfirmIconPathdialog.8. RepeattheabovestepsfortheStatusandFavoritesicons,namingthemic_status_whiteandic_favorites_white
respectively.Youmaywanttousethecircled-iiconforStatus(typicallyusedforInfo),andthehearticonforFavorites.
2.2ShowthemenuitemsasiconsintheappbarToshowmenuitemsasiconsintheappbar,usetheapp:showAsActionattributeinmenu_main.xml.Thefollowingvaluesfortheattributespecifywhetherornottheactionshouldappearintheappbarasanicon:
Introduction
220

"always":Alwaysappearsintheappbar.(Ifthereisn'tenoughroomitmayoverlapwithothermenuicons.)"ifRoom":Appearsintheappbarifthereisroom."never":Neverappearsintheappbar;it'stextappearsintheoverflowmenu.
Followthesestepstoshowsomeofthemenuitemsasicons:
1. Openmenu_main.xmlagain,andaddthefollowingattributestotheOrder,Status,andFavoritesitemssothatthefirsttwo(OrderandStatus)alwaysappear,andtheFavoritesitemappearsonlyifthereisroomforit:
Orderitemattribute Oldvalue Newvalue
android:icon "@drawable/ic_order_white"
app:showAsAction "never" "always"
Statusitemattribute Oldvalue Newvalue
android:icon "@drawable/ic_status_white"
app:showAsAction "never" "always"
Favoritesitemattribute Oldvalue Newvalue
android:icon "@drawable/ic_favorites_white"
app:showAsAction "never" "ifRoom"
2. Runtheapp.Youshouldnowseeatleasttwoiconsintheappbar:theiconforOrderandtheiconforStatusasshowninthefigurebelowIfyourdeviceortheemulatorisdisplayinginverticalorientation,theFavoritesandContactoptionsappearintheoverflowmenu.
3. Rotateyourdevicetothehorizontalorientation,orifyou'rerunningintheemulator,clicktheRotateLeftorRotateRighticonstorotatethedisplayintothehorizontalorientation.YoushouldthenseeallthreeiconsintheappbarforOrder,Status,andFavorites.
Tip:Howmanyactionbuttonswillfitintheappbar?Itdependsontheorientationandthesizeofthedevicescreen.Fewerbuttonsappearinaverticalorientation,asshownontheleftsideofthefigurebelow,comparedtoahorizontalorientationasshownontherightsideofthefigurebelow.Actionbuttonsmaynotoccupymorethanhalfofthemainappbar'swidth.
Introduction
221

Codingchallenge#1Note:Allcodingchallengesareoptionalandarenotprerequisitesforlaterlessons.
Challenge1:Whenyouclickthefloatingactionbuttonwiththeemailiconthatappearsatthebottomofthescreen,thecodeinMainActivitydisplaysadrawerthatopensandcloses,calledasnackbar.Asnackbarprovidesfeedbackaboutanoperation—itshowsabriefmessageatthebottomofthescreenonasmartphone,orinthelowerleftcorneronlargerdevices.Formoreinformation,seeSnackbar.
Lookathowotherappsimplementthefloatingactionbutton.Forexample,theGmailappprovidesafloatingactionbuttontocreateanewemailmessage,andtheContactsappprovidesonetocreateanewcontact.Formoreinformationaboutfloatingactionbuttons,seeFloatingActionButton.
Nowthatyouknowhowtoaddiconsformenuitems,usethesametechniquetoaddanothericon,andassignthaticontothefloatingactionbutton,replacingtheemailicon.Forexample,youmightwantthefloatingactionbuttontostartachatsession;inwhichcaseyoumightwanttouseaniconshowingahuman.
Hint:Thefloatingactionbuttonisdefinedinactivity_main.xml.
Whileaddingtheicon,alsochangethetextthatappearsinthesnackbaraftertappingthefloatingactionbutton.YouwillfindthistextintheSnackbar.makestatementinthemainactivity.Extractthestringresourceforthistexttobesnackbar_text.
Task3.HandletheselectedmenuitemInthistask,you'lladdamethodtodisplayamessageaboutwhichmenuitemistapped,andusetheonOptionsItemSelected()methodtodeterminewhichmenuitemwastapped.
3.1Createamethodtodisplaythemenuchoice
1. OpenMainActivity.2. Ifyouhaven'talreadyaddedthefollowingmethod(inthepreviouslesson)fordisplayingatoastmessage,additnow:
publicvoiddisplayToast(Stringmessage){
Toast.makeText(getApplicationContext(),message,
Toast.LENGTH_SHORT).show();
}
ThedisplayToast()methodgetsthemessagefromtheappropriatestring(suchasaction_contact_message).
3.2UsetheonOptionsItemSelectedeventhandlerTheonOptionsItemSelected()methodhandlesselectionsfromtheoptionsmenu.Youwilladdaswitchcaseblocktodeterminewhichmenuitemwasselected,andwhatmessagetocreateforeachselecteditem.(Ratherthancreatingamessageforeachitem,youcouldimplementaneventhandlerforeachitemthatperformsanaction,suchasstartinganotheractivity,asshownlaterinthislesson.)
1. FindtheonOptionsItemSelected()method.Theifstatementinthemethod,providedbythetemplate,determinesifacertainmenuitemwasclicked,usingthemenuitem'sid(action_orderinthebelowexample):
Introduction
222

@Override
publicbooleanonOptionsItemSelected(MenuItemitem){
intid=item.getItemId();
if(id==R.id.action_order){
returntrue;
}
returnsuper.onOptionsItemSelected(item);
}
2. Replacetheifstatementandtheassignmenttoidwiththefollowingswitchcaseblockthatsetstheappropriatemessagebasedonthemenuitem'sid:
@Override
publicbooleanonOptionsItemSelected(MenuItemitem){
switch(item.getItemId()){
caseR.id.action_order:
displayToast(getString(R.string.action_order_message));
returntrue;
caseR.id.action_status:
displayToast(getString(R.string.action_status_message));
returntrue;
caseR.id.action_favorites:
displayToast(getString(R.string.action_favorites_message));
returntrue;
caseR.id.action_contact:
displayToast(getString(R.string.action_contact_message));
returntrue;
default:
//Donothing
}
returnsuper.onOptionsItemSelected(item);
}
3. Runtheapp.Youshouldnowseeadifferenttoastmessageonthescreen,asshownontherightsideofthefigurebelow,basedonwhichmenuitemyouchoose.
Intheabovefigure:
1. SelectingtheContactitemintheoptionsmenu.2. Thetoastmessagethatappears.
Solutioncode(includescodingchallenge#1)
Introduction
223

AndroidStudioproject:DroidCafePart2
Codingchallenge#2Note:Allcodingchallengesareoptionalandarenotprerequisitesforlaterlessons.
Challenge2:Inthepreviouschallenge,youchangedtheiconforthefloatingactionbuttonthatappearsatthebottomoftheMainActivityscreeninyourapp.
Forthischallenge:
1. Changetheiconforthefloatingactionbuttonagain,butthistimetoanappropriateiconforamap,suchastheworldicon.
2. InMainActivity,replacetheactiontodisplayasnackbarwithanimplicitintenttolaunchtheMapsappwhenthefloatingactionbuttonistapped.
3. Addthefollowingspecificcoordinates(forGoogleheadquarters)andthezoomlevel(12)toastringresourcecalledgoogle_mtv_coord_zoom12:
<stringname="google_mtv_coord_zoom12">geo:37.422114,-122.086744?z=12</string>
4. AddthefollowingmethodtostarttheMapsapp,whichpassestheabovestringasdatausinganimplicitintent:
publicvoiddisplayMap(){
Intentintent=newIntent();
intent.setAction(Intent.ACTION_VIEW);
//UsingthecoordinatesforGoogleheadquarters.
Stringdata=getString(R.string.google_mtv_coord_zoom12);
intent.setData(Uri.parse(data));
if(intent.resolveActivity(getPackageManager())!=null){
startActivity(intent);
}
}
Forexamplesofimplicitintents,includingopeningtheMapsapp,seeCommonImplicitIntentsongithub.
Introduction
224

AftertappingthefloatingactionbuttontogototheMapsapp,asshowninthefigurebelow,theusercantaptheBackbuttonbelowthescreentoreturntoyourapp.
Solutioncode(includescodingchallenge#2)AndroidStudioProject:DroidCafePart3
YouwillfinishtheDroidCafeappinthenextlesson.
SummaryInthispractical,youlearnedhowtodothefollowing:
Setupanoptionsmenuintheappbar:UsingtheBasicActivitytemplatetoautomaticallysetuptheoptionsmenuandafloatingactionbutton.Using@string/appbar_scrolling_view_behaviortoprovidethestandardscrollingbehavioroftheappbar'soptionsmenu.UsingaCoordinatorLayoutviewgroupwiththeAppBarLayoutclasstocreateanoptionsmenuintheappbar.UsinganincludelayoutstatementinanXMLlayoutfiletoincludeanentirelayoutdefinedinanotherXMLfile.UsingtheNoActionBarthemetopreventtheappfromusingthenativeActionBarclassattributesfortheappbar,inordertosetthewindowActionBarattributetofalse(nowindowactionbar),andthewindowNoTitleattributetotrue(notitle).Usinganactivity'sonCreate()methodtocalltheactivity'ssetSupportActionBar()methodtosetthetoolbardefinedinthelayoutastheappbarfortheactivity.DefiningamenuandallitsitemsinanXMLmenuresource,andtheninflatingthemenuresourceinanactivityor
Introduction
225

fragmenttoloaditasaMenuobject.Usingtheandroid:orderInCategoryattributetospecifytheorderinwhichthemenuitemsappearinthemenu,withthelowestnumberappearinghigherinthemenu.Usingtheapp:showAsActionattributetoshowmenuitemsasiconsintheappbar.Addingeventhandlersforoptionsmenuitems,andusingtheonOptionsItemSelected()methodtoretrievetheselectionfromtheoptionsmenu.
Useiconsinaproject:Addingiconstoaprojectandusingthemtoshowmenuitemsintheappbar.Challenge:Changingtheiconforafloatingactionbutton,andchangingtheSnackbar.makecode.
Challenge:MakinganimplicitintenttolaunchtheMapsappwithspecificcoordinates.
RelatedconceptTherelatedconceptdocumentationisinAndroidDeveloperFundamentals:Concepts.
Menus
LearnmoreAndroidDeveloperReference:
AppBarLayoutToolbarMenus
AndroidDevelopersBlog:AndroidDesignSupportLibraryMaterialDesignSpec:
AppBarScrollingTechniques
BestPracticesforUserInterface:AddingtheAppBarGithub:CommonImplicitIntentsImagesandicons:
ImageAssetStudioCompareIconsforDrawablesIconsandotherdownloadableresources
Introduction
226

4.3:UsingtheAppBarandTabsforNavigationContents:
WhatyoushouldalreadyKNOWWhatyouwillLEARNWhatyouwillDOAppoverviewTask1:AddanUpbuttonforancestralnavigationTask2:UsetabnavigationwithswipeviewsCodingchallengesSummaryRelatedconceptLearnmore
Intheearlystagesofdevelopinganapp,youshoulddeterminethepathsusersshouldtakethroughyourappinordertodosomething,suchasplacinganorderorbrowsingthroughcontent.Eachpathenablesuserstonavigateacross,into,andbackoutfromthedifferenttasksandpiecesofcontentwithintheapp.
Inthispractical,you'lllearnhowtoaddanUpbutton(aleft-facingarrow)totheappbarofyourapp,asshownbelow,tonavigatefromachildscreenuptotheparentscreen.
TheUpbuttonisalwaysusedtonavigatetotheparentscreeninthehierarchy.ItdiffersfromtheBackbutton(thetriangleatthebottomofthescreen),whichprovidesnavigationtowhateverscreentheuserviewedpreviously.
Thispracticalalsointroducestabnavigation,inwhichtabsappearacrossthetopofascreen,providingnavigationtootherscreens.Tabnavigationisaverypopularsolutionforlateralnavigationfromonechildscreentoanotherchildscreenthatisasibling,asshowninthediagrambelow.TabsprovidenavigationtoandfromthesiblingscreensTopStories,TechNews,andCookingwithouthavingtonavigateuptotheparent.Tabscanalsoprovidenavigationtoandfromstories,whicharesiblingscreensundertheTopStoriesparent.
Introduction
227

Tabsaremostappropriateforfourorfewersiblingscreens.Theusercantapatabtoseeadifferentscreen,orswipeleftorrighttoseeadifferentscreen.
Intheabovefigure:
1. Lateralnavigationfromonecategoryscreentoanother2. Lateralnavigationfromonestoryscreentoanother
WhatyoushouldalreadyKNOWFromthepreviouschapters,youshouldbeableto:
CreateandrunappsinAndroidStudio.CreateandeditUIelementsusingtheLayoutEditor,enteringXMLcodedirectly,andaccessingelementsfromyourJavacode.Addmenuitemsandiconstotheoptionsmenuintheappbar.
WhatyouwillLEARNInthispractical,youwilllearnto:
AddtheUpbuttontotheappbar.Setupanappwithtabnavigationandswipeviews.
WhatyouwillDOContinueaddingfeaturestotheDroidCafeprojectfromthepreviouspractical.ProvidetheUpbuttonintheappbartonavigatetothepreviousscreenwithinanactivity.Createanewappwithtabsfornavigatingactivityscreensthatcanalsobeswiped.
Appoverview
Introduction
228

InthepreviouspracticalyoucreatedanappcalledDroidCafeinthreeparts,usingtheBasicActivitytemplate.Thistemplatealsoprovidesanappbaratthetopofthescreen.YouwilllearnhowtoaddanUpbutton(aleft-facingarrow)totheappbarforupnavigationfromthesecondactivity(OrderActivity)tothemainactivity(MainActivity).ThiswillcompletetheDroidCafeapp.
Tostarttheprojectfromwhereyouleftoffinthepreviouspractical,downloadtheAndroidStudioprojectDroidCafePart3.
Thesecondappyouwillcreatefortabnavigationwillshowthreetabsbelowtheappbartonavigatetosiblingscreens.Astheusertapsatab,thescreenshowsacontentscreendependingonwhichtabistapped.Theusercanalsoswipeleftandrighttovisitthecontentscreens.SwipingviewsishandledautomaticallybytheViewPagerclass.
Introduction
229

Task1.AddanUpbuttonforancestralnavigationYourappshouldmakeiteasyforuserstofindtheirwaybacktotheapp'smainscreen,whichistheparentactivity.OnewaytodothisistoprovideanUpbuttonontheappbarforallactivitiesthatarechildrenoftheparentactivity.
TheUpbuttonprovidesancestral"up"navigation,enablingtheusertogoupfromachildpagetotheparentpage.TheUpbuttonistheleft-facingarrowontheleftsideoftheappbar,asshownontheleftsideofthefigurebelow.
WhentheusertouchestheUpbutton,theappnavigatestotheparentactivity.ThediagramontherightsideofthefigurebelowshowshowtheUpbuttonisusedtonavigatewithinanappbasedonthehierarchicalrelationshipsbetweenscreens.
Intheabovefigure:
1. Navigatingfromthefirst-levelsiblingstotheparent.2. Navigatingfromsecond-levelsiblingstothefirst-levelchildscreenactingasaparentscreen
Tip:TheBackbutton(thetriangleatthebottomofthescreen)differsfromtheUpbutton.TheBackbuttonprovidesnavigationtowhateverscreenyouviewedpreviously.Ifyouhaveseveralchildscreensthattheusercannavigatethroughusingalateralnavigationpattern(asdescribedinthenextsection),theBackbuttonwouldsendtheuserbacktothepreviouschildscreen,nottotheparentscreen.UseanUpbuttonifyouwanttoprovideancestralnavigationfromachildscreenbacktotheparentscreen.FormoreinformationaboutUpnavigation,seeProvidingUpNavigation.
Introduction
230

Asyoulearnedpreviously,whenaddingactivitiestoanapp,youcanaddUp-buttonnavigationtoachildactivitysuchasOrderActivitybydeclaringtheactivity'sparenttobeMainActivityintheAndroidManifest.xmlfile.Youcanalsosettheandroid:labelattributeforatitlefortheactivityscreen,suchas"OrderActivity":
1. Ifyoudon'talreadyhavetheDroidCafeappopenfromthepreviouspractical,downloadtheAndroidStudioprojectDroidCafePart3andrenametheprojecttoDroidCafe.
2. OpentheDroidCafeproject.3. OpenAndroidManifest.xml.4. ChangetheactivityelementforOrderActivitytothefollowing:
<activityandroid:name=".OrderActivity"
android:label="OrderActivity"
android:parentActivityName="com.example.android.
droidcafe.MainActivity">
<meta-data
android:name="android.support.PARENT_ACTIVITY"
android:value=".MainActivity"/>
</activity>
5. Extracttheandroid:labelvalue"OrderActivity"toastringresourcenamedtitle_activity_order.6. Runtheapp.
Introduction
231

TheOrderActivityscreennowincludestheUpbutton(highlightedinthefigurebelow)intheappbartonavigatebacktothe
parentactivity.
Solutioncode:
AndroidStudioproject:DroidCafe
Task2.UsetabnavigationwithswipeviewsWithlateralnavigation,youenabletheusertogofromonesiblingtoanother(atthesamelevelinamultitierhierarchy).Forexample,ifyourappprovidesseveralcategoriesofstories(suchasTopStories,TechNews,andCooking,asshowninthefigurebelow),youwouldwanttoprovideyouruserstheabilitytonavigatefromonecategorytothenext,withouthavingto
Introduction
232

navigatebackuptotheparentscreen.AnotherexampleoflateralnavigationistheabilitytoswipeleftorrightinaGmailconversationtoviewanewerorolderoneinthesameInbox.
Intheabovefigure:
1. Lateralnavigationfromonecategoryscreentoanother2. Lateralnavigationfromonestoryscreentoanother
Youcanimplementlateralnavigationwithtabsthatrepresenteachscreen.Tabsappearacrossthetopofascreen,asshownontheleftsideofthefigureabove,inordertoprovidenavigationtootherscreens.Tabnavigationisaverypopularsolutionforlateralnavigationfromonechildscreentoanotherchildscreenthatisasibling—inthesamepositioninthehierarchyandsharingthesameparentscreen.Tabnavigationisoftencombinedwiththeabilitytoswipechildscreensleft-to-rightandright-to-left.
TheprimaryclassusedfordisplayingtabsisTabLayoutintheAndroidDesignSupportLibrary.Itprovidesahorizontallayouttodisplaytabs.Youcanshowthetabsbelowtheappbar,andusethePagerAdapterclasstopopulatescreens"pages"insideofaViewPager.ViewPagerisalayoutmanagerthatletstheuserflipleftandrightthroughscreens.Thisisacommonpatternforpresentingdifferentscreensofcontentwithinanactivity—useanadaptertofillthecontentscreentoshowintheactivity,andalayoutmanagerthatchangesthecontentscreensdependingonwhichtabisselected.
YousupplyanimplementationofaPagerAdaptertogeneratethescreensthattheviewshows.ViewPagerismostoftenusedinconjunctionwithFragment.Byusingfragments,youhaveaconvenientwaytomanagethelifecycleofeachscreen"page".
TouseclassesintheAndroidSupportLibrary,addcom.android.support:design:xx.xx.x(inwhichxx.xx.xisthenewestversion)tothebuild.gradle(Module:app)file.
ThefollowingarestandardadaptersforusingfragmentswiththeViewPager:
FragmentPagerAdapter:Designedfornavigatingbetweensiblingscreens(pages)representingafixed,smallnumberofscreens.FragmentStatePagerAdapter:Designedforpagingacrossacollectionofscreens(pages)forwhichthenumberofscreensisundetermined.Itdestroysfragmentsastheusernavigatestootherscreens,minimizingmemoryusage.TheappforthispracticalchallengeusesFragmentStatePagerAdapter.
2.1Createthelayoutfortabnavigation
1. CreateanewprojectusingtheEmptyActivitytemplate.NametheappTabExperiment.
Introduction
233

2. Editthebuild.gradle(Module:app)file,andaddthefollowinglines(iftheyarenotalreadyadded)tothedependenciessection:
compile'com.android.support:design:25.0.1'
compile'com.android.support:support-v4:25.0.1'
IfAndroidStudiosuggestsaversionwithahighernumber,edittheabovelinestoupdatetheversion.Also,ifAndroidStudiosuggestsanewerversionofcompileSdkVersion,buildToolsVersion,and/ortargetSdkVersion,editthemtoupdatetheversion.
3. InordertouseaToolbarratherthananactionbarandapptitle,addthefollowingstatementstotheres>values>styles.xmlfiletohidetheactionbarandthetitle:
<stylename="AppTheme"parent="Theme.AppCompat.Light.DarkActionBar">
...
<itemname="windowActionBar">false</item>
<itemname="windowNoTitle">true</item>
</style>
4. Opentheactivity_main.xmllayoutfile.IntheLayoutEditor,clicktheTexttabatthebottomofthescreenandchangetherootviewgrouptoRelativeLayout,asyou'vedoneinpreviousexercises.
5. Intheactivity_main.xmllayout,removetheTextViewsuppliedbythetemplate,andaddaToolbar,aTabLayout,andaViewPagerwithintherootlayout.
Asyoutypetheapp:popupThemeattributeforToolbarasshownbelow,appwillbeinredifyoudidn'taddthefollowingstatementtoRelativeLayout:
<RelativeLayoutxmlns:app="http://schemas.android.com/apk/res-auto"
YoucanclickonappandpressOption-Return,andAndroidStudioautomaticallyaddsthestatement.
DependingonyourversionofAndroidStudio,yourlayoutcodewilllooksomethinglikethefollowing:
Solutioncode:
Introduction
234

<?xmlversion="1.0"encoding="utf-8"?>
<RelativeLayoutxmlns:android="http://schemas.android.com/apk/res/android"
xmlns:tools="http://schemas.android.com/tools"
xmlns:app="http://schemas.android.com/apk/res-auto"
android:id="@+id/activity_main"
android:layout_width="match_parent"
android:layout_height="match_parent"
android:paddingBottom="@dimen/activity_vertical_margin"
android:paddingLeft="@dimen/activity_horizontal_margin"
android:paddingRight="@dimen/activity_horizontal_margin"
android:paddingTop="@dimen/activity_vertical_margin"
tools:context="com.example.android.tabexperiment.MainActivity">
<android.support.v7.widget.Toolbar
android:id="@+id/toolbar"
android:layout_width="match_parent"
android:layout_height="wrap_content"
android:layout_alignParentTop="true"
android:background="?attr/colorPrimary"
android:minHeight="?attr/actionBarSize"
android:theme="@style/ThemeOverlay.AppCompat.Dark.ActionBar"
app:popupTheme="@style/ThemeOverlay.AppCompat.Light"/>
<android.support.design.widget.TabLayout
android:id="@+id/tab_layout"
android:layout_width="match_parent"
android:layout_height="wrap_content"
android:layout_below="@id/toolbar"
android:background="?attr/colorPrimary"
android:minHeight="?attr/actionBarSize"
android:theme="@style/ThemeOverlay.AppCompat.Dark.ActionBar"/>
<android.support.v4.view.ViewPager
android:id="@+id/pager"
android:layout_width="match_parent"
android:layout_height="fill_parent"
android:layout_below="@id/tab_layout"/>
</RelativeLayout>
2.2Createalayoutandclassforeachfragment1. Addafragmentrepresentingeachtabbedscreen:TabFragment1,TabFragment2,andTabFragment3.Toaddeach
fragment:
i. Clickcom.example.android.tabexperimentintheprojectview.
ii. ChooseFile>New>Fragment>Fragment(Blank).
iii. NamethefragmentTabFragment1.
iv. Checkthe"CreatelayoutXML?"option,andchangetheFragmentLayoutNamefortheXMLfiletotab_fragment1.
v. Uncheckthe"Includefragmentfactorymethods?"andthe"includeinterfacecallbacks?"options.Youdon'tneedthesemethods.
vi. ClickFinish.
vii. Repeattheabovesteps,usingTabFragment2andTabFragment3forStepC,andtab_fragment2andtab_fragment3forStepD.
Eachfragment(TabFragment1,TabFragment2,andTabFragment3)iscreatedwithitsclassdefinitionsettoextendFragment.Also,eachfragmentinflatesthelayoutassociatedwiththescreen(tab_fragment1,tab_fragment2,andtab_fragment3),usingthefamiliarresource-inflatedesignpatternyoulearnedinapreviouschapterwiththeoptionsmenu.
Introduction
235

Forexample,TabFragment1lookslikethis:
publicclassTabFragment1extendsFragment{
@Override
publicViewonCreateView(LayoutInflaterinflater,
ViewGroupcontainer,BundlesavedInstanceState){
returninflater.inflate(R.layout.tab_fragment1,container,false);
}
}
AndroidStudioautomaticallyincludesthefollowingimportstatements:
importandroid.os.Bundle;
importandroid.support.v4.app.Fragment;
importandroid.view.LayoutInflater;
importandroid.view.View;
importandroid.view.ViewGroup;
2. EditeachfragmentlayoutXMLfile(tab_fragment1,tab_fragment2,andtab_fragment3):
i. ChangetheRootTagtoRelativeLayout.
ii. AddaTextViewwithtextsuchas"Thesearethetopstories".
iii. Setthetextappearancewithandroid:textAppearance="?android:attr/textAppearanceLarge".
iv. RepeattheabovestepsforeachfragmentlayoutXMLfile,enteringdifferenttextfortheTextViewinstepB.
3. ExamineeachfragmentlayoutXMLfile.Forexample,tab_fragment1shouldlooklikethis:
<?xmlversion="1.0"encoding="utf-8"?>
<RelativeLayoutxmlns:android="http://schemas.android.com/apk/res/android"
android:layout_width="match_parent"
android:layout_height="match_parent">
<TextView
android:layout_width="wrap_content"
android:layout_height="wrap_content"
android:text="Thesearethetopstories:"
android:textAppearance="?android:attr/textAppearanceLarge"/>
</RelativeLayout>
4. InthefragmentlayoutXMLfiletab_fragment1,extractthestringfor"Thesearethetopstories:"intothestringresourcetab_1.Dothesameforthestringsintab_fragment2,andtab_fragment3.
2.3AddaPagerAdapter
Theadapter-layoutmanagerpatternletsyouprovidedifferentscreensofcontentwithinanactivity—useanadaptertofillthecontentscreentoshowintheactivity,andalayoutmanagerthatchangesthecontentscreensdependingonwhichtabisselected.
1. AddanewPagerAdapterclasstotheappthatextendsFragmentStatePagerAdapteranddefinesthenumberoftabs(mNumOfTabs):
publicclassPagerAdapterextendsFragmentStatePagerAdapter{
intmNumOfTabs;
publicPagerAdapter(FragmentManagerfm,intNumOfTabs){
super(fm);
this.mNumOfTabs=NumOfTabs;
}
}
Introduction
236

Whileenteringtheabovecode,AndroidStudioautomaticallyimports:
importandroid.support.v4.app.Fragment;
importandroid.support.v4.app.FragmentManager;
importandroid.support.v4.app.FragmentStatePagerAdapter;
IfFragmentManagerintheabovecodeisinred,aredlightbulbiconshouldappearwhenyouclickonit.ClickthelightbulbiconandchooseImportclass.Importchoicesappear.Selectthefollowingimportchoice:
FragmentManager(android.support.v4)
Choosingtheaboveimportsthefollowing:
importandroid.support.v4.app.FragmentManager;
Also,AndroidStudiounderlinestheclassdefinitionforPagerAdapterand,ifyouclickonPagerAdapter,displaysaredbulbicon.ClicktheiconandchooseImplementMethods,andthenclickOKtoimplementthealreadyselectedgetItem()andgetCount()methods.
2. ChangethenewlyaddedgetItem()methodtothefollowing,whichusesaswitchcaseblocktoreturnthefragmenttoshowbasedonwhichtabisclicked
@Override
publicFragmentgetItem(intposition){
switch(position){
case0:
returnnewTabFragment1();
case1:
returnnewTabFragment2();
case2:
returnnewTabFragment3();
default:
returnnull;
}
}
3. ChangethenewlyaddedgetCount()methodtothefollowingtoreturnthenumberoftabs:
@Override
publicintgetCount(){
returnmNumOfTabs;
}
2.4InflatetheToolbarandTabLayout
Sinceyouareusingtabsthatfitunderneaththeappbar,youhavesetuptheappbarandToolbarintheactivity_main.xmllayoutinthefirststepofthistask.NowyouneedtoinflatetheToolbar(usingthesamemethoddescribedinapreviouschapterabouttheoptionsmenu),andcreateaninstanceofTabLayouttopositionthetabs.
1. InflatetheToolbarintheonCreate()methodinMainActivity.java:
@Override
protectedvoidonCreate(BundlesavedInstanceState){
...
Toolbartoolbar=(Toolbar)findViewById(R.id.toolbar);
setSupportActionBar(toolbar);
//Createaninstanceofthetablayoutfromtheview.
...
}
Introduction
237

Intheabovecode,Toolbarisinred,andaredlightbulbiconshouldappear.ClicktheiconandchooseImportclass.Importchoicesappear.SelectToolbar(android.support.v7.widget.Toolbar),andthefollowingimportstatementappearsinyourcode:
importandroid.support.v7.widget.Toolbar;
2. Openstrings.xml,andcreatethefollowingstringresources:
<stringname="tab_label1">TopStories</string>
<stringname="tab_label2">TechNews</string>
<stringname="tab_label3">Cooking</string>
3. AttheendoftheonCreate()method,createaninstanceofthetablayoutfromthetab_layoutelementinthelayout,andsetthetextforeachtabusingaddTab():
...
//Createaninstanceofthetablayoutfromtheview.
TabLayouttabLayout=(TabLayout)findViewById(R.id.tab_layout);
//Setthetextforeachtab.
tabLayout.addTab(tabLayout.newTab().setText(R.string.tab_label1));
tabLayout.addTab(tabLayout.newTab().setText(R.string.tab_label2));
tabLayout.addTab(tabLayout.newTab().setText(R.string.tab_label3));
//Setthetabstofilltheentirelayout.
tabLayout.setTabGravity(TabLayout.GRAVITY_FILL);
//UsePagerAdaptertomanagepageviewsinfragments.
...
2.5UsePagerAdaptertomanagescreenviews
1. BelowthecodeyouaddedtotheonCreate()methodintheprevioustask,addthefollowingcodetousePagerAdaptertomanagescreen(page)viewsinthefragments:
...
//UsingPagerAdaptertomanagepageviewsinfragments.
//Eachpageisrepresentedbyitsownfragment.
//Thisisanotherexampleoftheadapterpattern.
finalViewPagerviewPager=(ViewPager)findViewById(R.id.pager);
finalPagerAdapteradapter=newPagerAdapter
(getSupportFragmentManager(),tabLayout.getTabCount());
viewPager.setAdapter(adapter);
//Settingalistenerforclicks.
...
2. AttheendoftheonCreate()method,setalistener(TabLayoutOnPageChangeListener)todetectifatabisclicked,andcreatetheonTabSelected()methodtosettheViewPagertotheappropriatetabbedscreen.Thecodeshouldlookasfollows:
Introduction
238

...
//Settingalistenerforclicks.
viewPager.addOnPageChangeListener(new
TabLayout.TabLayoutOnPageChangeListener(tabLayout));
tabLayout.addOnTabSelectedListener(newTabLayout.OnTabSelectedListener(){
@Override
publicvoidonTabSelected(TabLayout.Tabtab){
viewPager.setCurrentItem(tab.getPosition());
}
@Override
publicvoidonTabUnselected(TabLayout.Tabtab){
}
@Override
publicvoidonTabReselected(TabLayout.Tabtab){
}
});
}
3. Runtheapp.Tapeachtabtoseeeach"page"(screen).Youshouldalsobeabletoswipeleftandrighttovisitthedifferent"pages".
e
SolutioncodeAndroidStudioProject:TabExperiment(includingcodingchallenge1)
AndroidStudioProject:NavDrawerExperiment(codingchallenge2)
CodingchallengesNote:Allcodingchallengesareoptionalandarenotprerequisitesforlaterlessons.
Challenge1:Whenyoucreatedthelayoutfortabnavigationinthefirststepofthepreviouslesson,youestablishedaToolbarfortheappbarintheactivity_main.xmllayoutfile.Addanoptionsmenutotheappbarasachallenge.
Tostart,youwillwanttocreatethemenu_main.xmlfile,andaddmenuitemsfortheoptionsmenu.Youmustaddatleastonemenuitem,suchasSettings.
YoucaninflatetheoptionsmenuintheToolbarbyaddingtheonCreateOptionsMenu()method,asyoudidinapreviouslessononusingtheoptionsmenu.
FinallyyoucandetectwhichoptionsmenuitemischeckedbyusingtheonOptionsItemSelected()method.
Challenge2:Createanewappwithanavigationdrawer.Whentheusertapsanavigationdrawerchoice,closethedraweranddisplayatoastmessageshowingwhichchoicewasselected.
Anavigationdrawerisapanelthatusuallydisplaysnavigationoptionsontheleftedgeofthescreen,asshownontherightsideofthefigurebelow.Itishiddenmostofthetime,butisrevealedwhentheuserswipesafingerfromtheleftedgeofthescreenortouchesthenavigationiconintheappbar,asshownontheleftsideofthefigurebelow.
Introduction
239

Intheabovefigure:
1. Navigationiconintheappbar2. Navigationdrawer3. Navigationdrawermenuitem
Tomakeanavigationdrawerinyourapp,youneedtodothefollowing:
1. Createthefollowinglayouts:Anavigationdrawerastheactivitylayout'srootview.Anavigationviewforthedraweritself.Anappbarlayoutthatwillincludeanavigationiconbutton.Acontentlayoutfortheactivitythatdisplaysthenavigationdrawer.Alayoutforthenavigationdrawerheader.
2. Populatethenavigationdrawermenuwithitemtitlesandicons.3. Setupthenavigationdraweranditemlistenersintheactivitycode.4. Handlethenavigationmenuitemselections.
Tocreateanavigationdrawerlayout,usetheDrawerLayoutAPIsavailableintheSupportLibrary.Fordesignspecifications,followthedesignprinciplesfornavigationdrawersintheNavigationDrawerdesignguide.
Toaddanavigationdrawer,useaDrawerLayoutastherootviewofyouractivity'slayout.InsidetheDrawerLayout,addoneviewthatcontainsthemaincontentforthescreen(yourprimarylayoutwhenthedrawerishidden)andanotherview,typicallyaNavigationView,thatcontainsthecontentsofthenavigationdrawer.
Introduction
240

Tip:Tomakeyourlayoutssimplertounderstand,usetheincludetagtoincludeanXMLlayoutwithinanotherXMLlayout.Thefigurebelowisavisualrepresentationoftheactivity_main.xmllayoutanditsincludedXMLlayouts:
Intheabovefigure:
1. DrawerLayoutistherootviewoftheactivity'slayout.2. Theincludedapp_bar_mainusesaCoordinatorLayoutasitsroot,anddefinestheappbarlayoutwithaToolbarwhich
willincludethenavigationicontoopenthedrawer.3. TheNavigationViewdefinesthenavigationdrawerlayoutanditsheader,andaddsmenuitemstoit.
SummaryAddUp-buttonnavigationtoachildactivitybydeclaringtheactivity'sparentintheAndroidManifest.xmlfile.Setuptabnavigation:
Tabsareagoodsolutionfor"lateralnavigation"betweensiblingviews.TheprimaryclassusedfortabsisTabLayoutinthedesignsupportlibrary.Youshouldusetheadapterpatternwhenpopulatingtabs(pages)withdata.AViewPagerisalayoutmanagerthatallowstheusertoflipleftandrightthroughpagesofdata.ViewPagerismostoftenusedinconjunctionwithfragments.TherearetwostandardadaptersforusingViewPager:FragmentPagerAdapterandFragmentStatePagerAdapter.
RelatedconceptTherelatedconceptdocumentationisinAndroidDeveloperFundamentals:Concepts.
ScreenNavigation
Introduction
241

LearnmoreAndroiddeveloperdocumentation:
ProvidingUpNavigationTabLayoutCreatingSwipeViewswithTabsNavigationDrawerDrawerLayoutSupportLibrary
AndroidDevelopersBlog:AndroidDesignSupportLibraryOther
AndroidHive:AndroidMaterialDesignworkingwithTabsTruiton:AndroidTabsExample–WithFragmentsandViewPager
Introduction
242

4.4:CreateaRecyclerViewContents:
WhatyoushouldalreadyKNOWWhatyouwillLEARNWhatyouwillDOAppOverviewTask1.CreateandconfigureaWordListprojectTask2:CreateadatasetTask3:CreateaRecyclerViewTask4:AddonClicktolistitemsTask5:AddaFABtoinsertitemsCodingchallengeSummaryRelatedconceptLearnmore
Displayingandmanipulatingascrollablelistofsimilardataitems,asyoudidinthescrollingviewpractical,isacommonfeatureofapps.Forexample,contacts,playlists,photos,dictionaries,shoppinglists,anindexofdocuments,oralistingofsavedgamesareallexamplesofscrollablelists.
Earlierinthisclass,youusedScrollViewtoperformscrollingofotherViews.ScrollViewiseasytouse,butitisnotrecommendedforproductionuse,especiallyforlonglistsofscrollableitems.
RecyclerViewisasubclassofViewGroupandisamoreresource-efficientwaytodisplayscrollablelists.Insteadofcreatingaviewforeachitem,whetherornotit'svisible,RecyclerViewcreatesalimitednumberoflistitemsandreusesthemforvisiblecontent.
InthisseriesofpracticalsyouwilluseaRecyclerViewto:
Displayascrollablelistofitems.Addaclickhandlertoeachitem.Additemstothelistusingafloatingactionbutton(FAB),thepinkbuttoninthescreenshotbelow.Afloatingactionbuttonscanbeusedforcommonactions,orapromotedaction,thatis,anactionthatyouwanttheusertotake.
WhatyoushouldalreadyKNOWForthispracticalyoushouldbefamiliarwithhowto:
CreateaHelloWorldappwithAndroidStudio.Implementdifferentlayoutsforapps.Createandusingstringresources.AddanonClickhandlertoaview.
WhatyouwillLEARNInthispractical,youwilllearnto:
UsetheRecyclerViewclasstodisplayitemsinascrollablelist.DynamicallyadditemstotheRecyclerViewastheybecomevisiblethroughscrolling.Performanactionwhentheusertapsaspecificitem.Showafloatingactionbuttonandperformanactionwhentheusertapsit.
Introduction
243

WhatyouwillDOCreateanewapplicationthatusesaRecyclerViewtodisplayalistofitemsasascrollablelistandassociateclickbehaviorwiththelistitems.UseafloatingactionbuttontolettheuseradditemstotheRecyclerView.
AppOverviewThe"RecyclerView"appwilldisplayalonglistofwords.
Introduction
244

Introduction
245

Tappinganitemmarksitclicked.Tappingthefloatingactionbuttonaddsanitem.Thereisnouserinputofwordsforthisapp.
Task1.CreateandconfigureanewprojectInthistask,youwillcreateandconfigureanewprojectfortheRecyclerViewsampleapp.
1.1.Createtheproject
1. StartAndroidStudioandcreateanewprojectwiththefollowingparameters:
Attribute Value
ApplicationName RecyclerView
CompanyName com.example.androidoryourowndomain
PhoneandTabletMinimumSDK API15:Android4.0.3IceCreamSandwich
Template EmptyActivity
GenerateLayoutfilebox Checked
2. Runyourapponanemulatororhardwaredevice.Youshouldseethe"RecyclerView"titleand"HelloWorld"inablankview.
1.2.AddsupportlibrariestothebuildfileInordertousetheRecyclerViewandthefloatingactionbutton(FAB),youneedtoaddtherespectiveAndroidSupportLibrariestoyourbuild.
Why:AndroidSupportlibrariesprovidebackward-compatibleversionsofAndroidframeworkAPIs,additionalUIcomponentsandasetofusefulutilities.TheRecyclerViewclassislocatedintheAndroidSupportpackage;twodependenciesmustbeincludedintheGradlebuildprocesstouseit.
Followthesestepsandrefertothescreenshot:
1. InAndroidStudio,inyournewproject,makesureyouareintheProjectpane(1)andintheAndroidview(2).2. Inthehierarchyoffiles,findtheGradleScriptsfolder(3).3. ExpandGradleScripts,ifnecessary,andopenthebuild.gradle(Module:app)file(4).
Introduction
246

4. Towardstheendofthebuild.gradle(Module:app)file,findthedependenciessection.5. Addthesetwodependenciesasthelasttwolinesinsidethedependenciessection:
compile'com.android.support:recyclerview-v7:23.1.1'
compile'com.android.support:design:23.1.1'
Thereisprobablyanexistinglinelikethisone,butthenumbermaybedifferent:compile'com.android.support:appcompat-v7:23.1.1'
Addyourlinesbelowthatline.Matchtheversionnumberofyourlinestotheversionnumberofthatexistingline.MakesuretheversionnumbersofallthelibrariesarethesameandmatchupwiththecompiledSdkVersionatthetopofthefile.Ifthesedon'tmatch,youwillgetabuildtimeerror.
6. Ifprompted,syncyourappnow.7. Runyourapp.Youshouldseethesame"RecyclerView"appdisplaying"HelloWorld".Ifyougetgradleerrors,sync
yourproject.Youdonotneedtoinstalladditionalplugins.
Solution:
Thisisanexampleofthedependenciessectionofthebuild.gradlefile.Yourfilemaybeslightlydifferentandyourentriesmayhaveadifferentversionnumber.
dependencies{
compilefileTree(dir:'libs',include:['*.jar'])
testCompile'junit:junit:4.12'
compile'com.android.support:appcompat-v7:23.1.1'
compile'com.android.support:recyclerview-v7:23.1.1'
compile'com.android.support:design:23.1.1'
}
Task2.Createadataset
Introduction
247

Beforeyoucandisplayanything,youneeddatatodisplay.Inamoresophisticatedapp,yourdatacouldcomefrominternalstorage(afile,SQLitedatabase,savedpreferences),fromanotherapp(Contacts,Photos),orfromtheinternet(cloudstorage,GoogleSheets,oranydatasourcewithanAPI).Forthisexercise,youwillsimulatedatabycreatingitinthemainactivitiesonCreate()method.
Why:Storingandretrievingdataisatopicofitsowncoveredinthedatastoragechapter.Youwillhaveanopportunitytoextendyourapptouserealdatainthatlaterlesson.
2.1.Addcodetocreatedata
Inthistaskyouwilldynamicallycreatealinkedlistoftwentywordstringsthatendinincreasingnumbers,suchthat["Word1","Word2","Word3",….].
YoumustuseaLinkedListforthispractical.Refertothesolutioncode,ifyouneedhelp.
1. OpentheMainActivity.javafile.2. AddaprivatemembervariableforthemWordListlinkedlist.3. AddanintegercountermCountvariabletotracktheword'snumber.4. AddcodethatpopulatesmWordListwithwords.Concatenatethestring"Word"withthevalueofmCount,then
increasethecount.5. Sinceyoucannotdisplaythewordsyetfortesting,addalogstatementthatverifiesthatwordsarecorrectlyaddedto
thelinkedlist.6. Runyourapptomakesuretherearenoerrors.
TheappUIhasnotchanged,butyoushouldseealistoflogmessagesinlogcat,suchas:android.example.com.wordlistD/WordList:Word1
Solution:
Classvariables:
privatefinalLinkedList<String>mWordList=newLinkedList<>();
privateintmCount=0;
IntheonCreatemethodofMainActivity:
for(inti=0;i<20;i++){
mWordList.addLast("Word"+mCount++);
Log.d("WordList",mWordList.getLast());
}
Task3.CreateaRecyclerViewInthispractical,youwilldisplaydatainaRecyclerView.SincethereareseveralpartstocreatingaworkingRecyclerView,makesureyouimmediatelyfixanyerrorsthatyouseeinAndroidStudio.
TodisplayyourdatainaRecyclerView,youneedthefollowingparts:
Data.YouwillusethemWordList.ARecyclerView.Thescrollinglistthatcontainsthelistitems.Layoutforoneitemofdata.Alllistitemslookthesame.Alayoutmanager.Thelayoutmanagerhandlestheorganization(layout)ofuserinterfacecomponentsinaview.YouhavealreadyusedtheLinearLayoutinapreviouspracticalwheretheAndroidsystemhandlesthelayoutforyou.RecyclerViewrequiresanexplicitlayoutmanagertomanagethearrangementoflistitemscontainedwithinit.Thislayoutcouldbevertical,horizontal,oragrid.YouwilluseaverticallinearlayoutmanagerprovidedbyAndroid.Anadapter.TheadapterconnectsyourdatatotheRecyclerView.Itpreparesthedatainaviewholder.Youwillcreateanadapterthatinsertsintoandupdatesyourgeneratedwordsinyourviews.
Introduction
248

Aviewholder.Insideyouradapter,youwillcreateaViewHolderclassthatcontainstheviewinformationfordisplayingoneitemfromtheitem'slayout.
Thediagrambelowshowstherelationshipbetweenthedata,theadapter,theviewholder,andthelayoutmanager.
Implementationstepsoverview
Toimplementthesepieces,youwillneedto:
1. CreatetheXMLlayoutforthe"RecyclerView"app(activity_main.xml).2. CreatetheXMLlayoutusedtolayoutonelistitem,whichisWordListItem(wordlist_item.xml).3. Createanadapter(WordListAdapter)withaviewholder(WordViewHolder).Implementthemethodthattakesthedata,
placesitinaviewholder,andlet'sthelayoutmanagerknowtodisplayit.4. IntheonCreatemethodofMainActivity,createaRecyclerViewandinitializeitwiththeadapterandastandardlayout
manager.Let'sdotheseoneatatime.
3.1.Createthemainlayoutinactivity_main.xmlInthepreviousapps,youusedLinearLayouttoarrangeyourviews.InordertoaccommodatetheRecyclerViewandthefloatingactionbuttonthatyouwilladdlater,youneedtouseadifferentviewgroupcalledacoordinatorlayout.CoordinatorLayoutismoreflexiblethanLinearLayoutwhenarrangingviews.Forexample,viewslikethefloatingactionbuttoncanoverlayotherviews.
Inmain_activity.xml,replacethecodecreatedbytheEmptyActivitywithcodeforaCoordinatorLayout,andthenaddaRecyclerView:
1. Openbuild.gradle(Module:app)andverifythattherecyclerviewdependencyexists.
compile'com.android.support:recyclerview-v7:24.1.1'
2. Openactivity_main.xml.3. Selectallthecodeinactivity_main.xmlandreplaceitwiththiscode:
<?xmlversion="1.0"encoding="utf-8"?>
<android.support.design.widget.CoordinatorLayout
xmlns:android="http://schemas.android.com/apk/res/android"
android:layout_width="match_parent"
android:layout_height="match_parent"
android:orientation="vertical">
</android.support.design.widget.CoordinatorLayout>
4. Inspectthecodeandnotethefollowing:ThepropertiesspecifiedforthisviewgrouparethesameasforLinearLayout,becausesomebasicproperties,suchaslayout_widthandlayout_height,arerequiredforallviewsandviewgroups.BecauseCoordinatorLayoutisinthesupportlibrary,youhavetospecifythefullpathtothesupportlibrary.YouwillhavetodothesamefortheRecyclerView.
5. AddtheRecyclerViewcodeinsidetheCoordinatorLayout:
Introduction
249
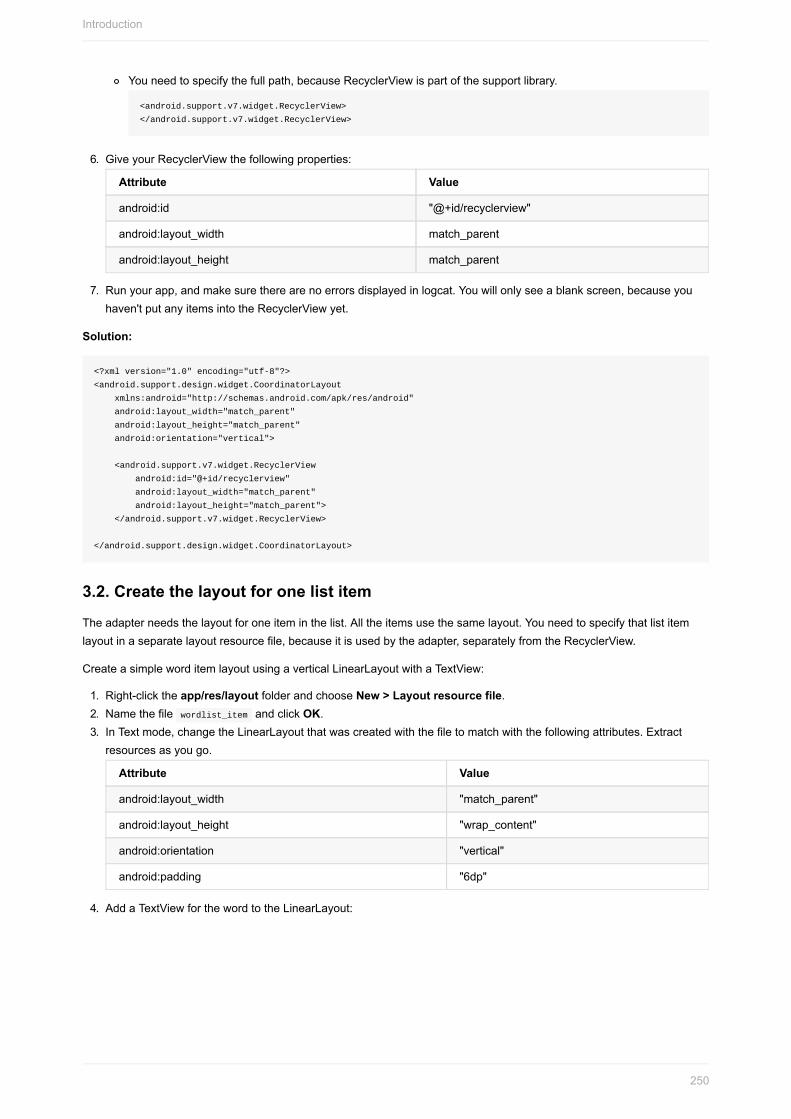
Youneedtospecifythefullpath,becauseRecyclerViewispartofthesupportlibrary.
<android.support.v7.widget.RecyclerView>
</android.support.v7.widget.RecyclerView>
6. GiveyourRecyclerViewthefollowingproperties:
Attribute Value
android:id "@+id/recyclerview"
android:layout_width match_parent
android:layout_height match_parent
7. Runyourapp,andmakesuretherearenoerrorsdisplayedinlogcat.Youwillonlyseeablankscreen,becauseyouhaven'tputanyitemsintotheRecyclerViewyet.
Solution:
<?xmlversion="1.0"encoding="utf-8"?>
<android.support.design.widget.CoordinatorLayout
xmlns:android="http://schemas.android.com/apk/res/android"
android:layout_width="match_parent"
android:layout_height="match_parent"
android:orientation="vertical">
<android.support.v7.widget.RecyclerView
android:id="@+id/recyclerview"
android:layout_width="match_parent"
android:layout_height="match_parent">
</android.support.v7.widget.RecyclerView>
</android.support.design.widget.CoordinatorLayout>
3.2.Createthelayoutforonelistitem
Theadapterneedsthelayoutforoneiteminthelist.Alltheitemsusethesamelayout.Youneedtospecifythatlistitemlayoutinaseparatelayoutresourcefile,becauseitisusedbytheadapter,separatelyfromtheRecyclerView.
CreateasimpleworditemlayoutusingaverticalLinearLayoutwithaTextView:
1. Right-clicktheapp/res/layoutfolderandchooseNew>Layoutresourcefile.2. Namethefilewordlist_itemandclickOK.3. InTextmode,changetheLinearLayoutthatwascreatedwiththefiletomatchwiththefollowingattributes.Extract
resourcesasyougo.
Attribute Value
android:layout_width "match_parent"
android:layout_height "wrap_content"
android:orientation "vertical"
android:padding "6dp"
4. AddaTextViewforthewordtotheLinearLayout:
Introduction
250

Attribute Value
android:id "@+id/word"
android:layout_width "match_parent"
android:layout_height "wrap_content"
android:textSize "24sp"
android:textStyle "bold"
3.3CreateastylefromtheTextViewattributes
Youcanusestylestoallowelementstosharegroupsofdisplayattributes.AneasywaytocreateastyleistoextractthestyleofaUIelementthatyoualreadycreated.Extractthestyleinformationforthewordtextview:
1. Whileyouhavewordlist_item.xmlopen,hoverthemouseovertheTextViewsectionyoujustcreatedandRight-click>Refactor>Extract>Style.
2. IntheExtractAndroidStyledialog,Nameyourstyleword_title.Leaveallboxeschecked.ChecktheLaunch'UseStyleWherePossible'box.ClickOK.
3. Whenprompted,applythestyletotheWholeProject.4. Findandexaminetheword_titlestyleinvalues/styles.xml.5. Gobacktowordlist_item.xml.Thetextviewnowreferencesthestyleinsteadofusingindividualstylingproperties.6. Runyourapp.Sinceyouhaveremovedthedefault"HelloWorld"textview,youshouldseethe"RecyclerView"titleand
ablankview.
Solution:
<?xmlversion="1.0"encoding="utf-8"?>
<LinearLayoutxmlns:android="http://schemas.android.com/apk/res/android"
android:layout_width="match_parent"
android:layout_height="wrap_content"
android:orientation="vertical"
android:padding="6dp">
<TextView
android:id="@+id/word"
style="@style/word_title"/>
</LinearLayout>
3.4.CreateanadapterwithaviewholderAndroidusesadapters(fromtheAdapterclass)toconnectdatawiththeirviews.Therearemanydifferentkindsofadaptersavailable.Youcanalsowriteyourowncustomadapters.Inthistaskyouwillcreateanadapterthatassociatesyourlistofwordswithwordlistitemviews.
Toconnectdatawithviews,theadapterneedstoknowabouttheviewsintowhichitwillplacethedata.Therefore,theadaptercontainsaviewholder(fromtheViewHolderclass)thatdescribesanitemviewanditspositionwithintheRecyclerView.
InthistaskyouwillbuildanadapterwithaviewholderthatbridgesthegapbetweenthedatainyourwordlistandtheRecyclerViewthatdisplaysit.
1. Right-clickjava/com.android.example.recyclerviewandselectNew>JavaClass.2. NametheclassWordListAdapter.3. GiveWordListAdapterthefollowingsignature:
Introduction
251

publicclassWordListAdapterextends
RecyclerView.Adapter<WordListAdapter.WordViewHolder>{}
WordListAdapterextendsagenericadapterforRecyclerViewtouseaviewholderthatisspecificforyourappanddefinedinsideWordListAdapter.WordViewHoldershowsanerror,becauseyouhavenotdefinedityet.
4. Clickontheclassdeclaration(WordListAdapter)andthenclickontheredlightbulbontheleftsideofthepane.ChooseImplementmethods.Thisbringsupadialogboxthatasksyoutochoosewhichmethodstoimplement.SelectallthreemethodsandclickOK.Thiscreatesemptyplaceholdersforallthemethodsthatyoumustimplement.NotehowonCreateViewHolderandonBindViewHolderbothreferencetheWordViewHolder,whichhasn'tbeenimplementedyet.
3.5Createtheviewholder
1. InsidetheWordListAdapterclass,addanewWordViewHolderinnerclasswiththissignature:
classWordViewHolderextendsRecyclerView.ViewHolder{}
2. Youwillseeanerroraboutamissingdefaultconstructor.Youcanseedetailsabouttheerrorsbyhoveringyourmousecursoroverthered-underlinedsourcecodeoroveranyredhorizontallineontherightmarginoftheopen-filespane.
3. AddvariablestotheWordViewHolderinnerclassforthetextviewandtheadapter:
publicfinalTextViewwordItemView;
finalWordListAdaptermAdapter;
4. IntheinnerclassWordViewHolder,addaconstructorthatinitializestheviewholder'stextviewfromtheXMLresourcesandsetsitsadapter:
publicWordViewHolder(ViewitemView,WordListAdapteradapter){
super(itemView);
wordItemView=(TextView)itemView.findViewById(R.id.word);
this.mAdapter=adapter;
}
5. Runyourapptomakesureyouhavenoerrors.Yourwillstillseeonlyablankview.TakenoteoftheE/RecyclerView:Noadapterattached;skippinglayoutwarninginlogcat.
3.6Storingyourdataintheadapter
1. Toholdyourdataintheadapter,createaprivatelinkedlistofstringsinWordListAdapterandcallitmWordList.
privatefinalLinkedList<String>mWordList;
2. YoucannowfillinthegetItemCount()methodtoreturnthesizeofmWordList.
@Override
publicintgetItemCount(){
returnmWordList.size();
}
Next,WordListAdapterneedsaconstructorthatinitializesthewordlistfromthedata.Tocreateaviewforalistitem,theWordListAdapterneedstoinflatetheXMLforalistitem.Youusealayoutinflaterforthatjob.ALayoutInflatorreadsalayoutXMLdescriptionandconvertsitintothecorrespondingviews.
3. CreateamembervariablefortheinflaterinWordListAdapter.
privateLayoutInflatermInflater;
4. ImplementtheconstructorforWordListAdapter.Theconstructorneedstohavehaveacontextparameter,andalinkedlistofwordswiththeapp'sdata.ThemethodneedstoinstantiatealayoutinflaterformInflaterandsetmWordListto
Introduction
252

thepassedindata.
publicWordListAdapter(Contextcontext,LinkedList<String>wordList){
mInflater=LayoutInflater.from(context);
this.mWordList=wordList;
}
5. FillouttheonCreateViewHolder()methodwiththecodebelow.TheonCreateViewHoldermethodissimilartotheonCreatemethod.Itinflatestheitemlayout,andreturnsaviewholderwiththelayoutandtheadapter.
@Override
publicWordViewHolderonCreateViewHolder(ViewGroupparent,intviewType){
ViewmItemView=mInflater.inflate(R.layout.wordlist_item,parent,false);
returnnewWordViewHolder(mItemView,this);
}
6. FillouttheonBindViewHoldermethodwiththecodebelow.TheonBindViewHoldermethodconnectsyourdatatotheviewholder.
@Override
publicvoidonBindViewHolder(WordViewHolderholder,intposition){
StringmCurrent=mWordList.get(position);
holder.wordItemView.setText(mCurrent);
}
7. Runyourapptomakesuretherearenoerrors.Youwillstillseethe"E/RecyclerView:Noadapterattached;skippinglayout"warning.Youwillfixthatinthenexttask.
3.7.CreatetheRecyclerViewintheMainActivityNowthatyouhaveanadapterwithaviewholder,youcanfinallycreateaRecyclerViewandconnectallthepiecestodisplayyourdata.
1. OpenMainActivity.java2. AddmembervariablestoMainActivityfortheRecyclerViewandtheadapter.
privateRecyclerViewmRecyclerView;
privateWordListAdaptermAdapter;
3. IntheonCreatemethodofMainActivity,addthefollowingcodethatcreatestheRecyclerViewandconnectsitwithanadapterandthedata.Readthecodecomments!NotethatyoumustinsertthiscodeafterthemWordListinitialization.
//GetahandletotheRecyclerView.
mRecyclerView=(RecyclerView)findViewById(R.id.recyclerview);
//Createanadapterandsupplythedatatobedisplayed.
mAdapter=newWordListAdapter(this,mWordList);
//ConnecttheadapterwiththeRecyclerView.
mRecyclerView.setAdapter(mAdapter);
//GivetheRecyclerViewadefaultlayoutmanager.
mRecyclerView.setLayoutManager(newLinearLayoutManager(this));
4. Runyourapp.Youshouldseeyourlistofwordsdisplayed,andyoucanscrollthelist.
Task4.MakethelistinteractiveLookingatlistsofitemsisinteresting,butit'salotmorefunandusefulifyourusercaninteractwiththem.
ToseehowtheRecyclerViewcanrespondtouserinput,youwillprogrammaticallyattachaclickhandlertoeachitem.Whentheitemistapped,theclickhandlerisexecuted,andthatitem'stextwillchange.
Introduction
253

4.1.Makeitemsrespondtoclicks
1. OpentheWordListAdapter.javafile.2. ChangetheWordViewHolderclasssignaturetoimplementView.onClickListener.
classWordViewHolderextendsRecyclerView.ViewHolderimplementsView.OnClickListener
3. Clickontheclassheaderandontheredlightbulbtoimplementstubsfortherequiredmethods,whichinthiscaseisjusttheonClick()method.
4. AddthefollowingcodetothebodyoftheonClick()method.
//Getthepositionoftheitemthatwasclicked.
intmPosition=getLayoutPosition();
//UsethattoaccesstheaffectediteminmWordList.
Stringelement=mWordList.get(mPosition);
//ChangethewordinthemWordList.
mWordList.set(mPosition,"Clicked!"+element);
//Notifytheadapter,thatthedatahaschangedsoitcan
//updatetheRecyclerViewtodisplaythedata.
mAdapter.notifyDataSetChanged();
5. ConnecttheonClickListenerwiththeview.AddthiscodetotheWordViewHolderconstructor(belowthe"this.mAdapter=adapter"line):
itemView.setOnClickListener(this);
6. Runyourapp.Clickonitemstoseetheirtextchange.
Solutioncode:WordListAdapter.javaandMainActivity.java
Task5.AddaFABtoinsertitemsTherearemultiplewaysinwhichyoucanaddadditionalbehaviorstothelistandlistitems.Onewayistouseafloatingactionbutton(FAB).Forexample,inGmail,theFABisusedtocomposeanewemail.InthistaskyouwillimplementaFABtoaddanitemtothewordlist.
Why?Youhavealreadyseenthatyoucanchangethecontentoflistitems.ThelistofitemsthataRecyclerViewdisplayscanbemodifieddynamically--it'snotjustastaticlistofitems.
Forthispractical,youwillgenerateanewwordtoinsertintothelist.Foramoreusefulapplication,youwouldgetdatafromyourusers.
5.1.AddaFloatingActionButton(FAB)
TheFABisastandardcontrolfromtheMaterialDesignSpecificationandispartoftheAndroidDesignSupportLibrary.YouwilllearnmoreinthechapteraboutMaterialDesign.TheseUIcontrolshavepredefinedproperties.TocreateaFABforyourapp,addthefollowingcodeinsidethecoordinatorlayoutofactivity_main.xml.
<android.support.design.widget.FloatingActionButton
android:id="@+id/fab"
android:layout_width="wrap_content"
android:layout_height="wrap_content"
android:layout_gravity="bottom|end"
android:layout_margin="16dp"
android:clickable="true"
android:src="@drawable/ic_add_24dp"/>
Notethefollowing:
<code>@+id/fab</code>ItiscustomarytogivetheFABthe"fab"id.
Introduction
254

android:layout_gravity="bottom|end".TheFABiscommonlyplacedatthebottomandattheendofthereading/writingflow.android:src="@drawable/ic_add_black_24dp".IsmarkedredbyAndroidStudiobecausetheresourceismissing.
AndroidprovidesaniconlibraryforstandardAndroidicons.ic_add_black_24dpisoneofthestandardicons.Youhavetoaddittoyourdrawableresourcestouseit.
1. Right-clickyourdrawablefolder.2. SelectNew>VectorAsset3. MakesuretheAssetTypeisMaterialIcon.4. ClicktheiconbuttonnexttoIcon.5. IntheContentsectionfindthe+sign.Theresourcenameisic_add_black_24dp.6. LeaveeverythingelseuncheckedandclickNext.7. ClickFinish.8. Runyourapp.
Note:Becausethisisavectordrawing,itisstoredasanXMLfile.Vectordrawingsareautomaticallyscaled,soyoudonotneedtokeeparoundabitmapforeachscreenresolution.Learnmore:AndroidVectorAssetStudio.
5.2.AddbehaviortotheFABInthistaskyou'lladdtotheFABanonClicklistenerthatdoesthefollowing:
Addsawordtotheendofthelistofwords.Notifiestheadapterthatthedatahaschanged.Scrollstotheinserteditem.InMainActivity.java,attheendoftheonCreate()method,addthefollowingcode:
//Addafloatingactionclickhandlerforcreatingnewentries.
FloatingActionButtonfab=(FloatingActionButton)findViewById(R.id.fab);
fab.setOnClickListener(newView.OnClickListener(){
@Override
publicvoidonClick(Viewview){
intwordListSize=mWordList.size();
//AddanewwordtotheendofthewordList.
mWordList.addLast("+Word"+wordListSize);
//Notifytheadapter,thatthedatahaschangedsoitcan
//updatetheRecyclerViewtodisplaythedata.
mRecyclerView.getAdapter().notifyItemInserted(wordListSize);
//Scrolltothebottom.
mRecyclerView.smoothScrollToPosition(wordListSize);
}
});
Runyourapp.Totestyourappdothefollowing:1. Scrollthelistofwords.2. Clickonitems.3. AdditemsbyclickingontheFAB.4. Whathappensifyourotatethescreen?Youwilllearninalaterlessonhowtopreservethestateofanappwhen
thescreenisrotated.
SolutioncodeAndroidStudioproject:RecyclerView
CodingchallengeNote:Allcodingchallengesareoptionalandarenotprerequisitesforlaterlessons.
Introduction
255

Challenge:Creatingaclicklistenerforeachiteminthelistiseasy,butitcanhurttheperformanceofyourappifyouhavealotofdata.Researchhowyoucouldimplementthismoreefficiently.Thisisanadvancedchallenge.Startbythinkingaboutitconceptually,andthensearchforanimplementationexample.
SummaryRecyclerViewisaresource-efficientwaytodisplayascrollablelistofitems.TouseRecyclerView,youassociatethedatatotheAdapter/ViewHolderthatyoucreateandtothelayoutmanagerofyourchoice.ClicklistenerscanbecreatedtodetectmouseclicksinaRecyclerView.Androidsupportlibrariescontainbackward-compatibleversionsoftheAndroidframework.Androidsupportlibrariescontainarangeofusefulutilitiesforyourapps.Builddependenciesareaddedtothebuild.gradle(Moduleapp)file.Layoutscanbespecifiedasaresourcefile.ALayoutInflaterreadsalayoutresourcefileandcreatestheViewobjectsfromthatfile.AFloatingActionButton(FAB)candynamicallymodifytheitemsinaRecyclerView.
RelatedconceptTherelatedconceptdocumentationisinAndroidDeveloperFundamentals:Concepts.
RecyclerView
LearnmoreCoordinatorLayoutRecyclerViewAndroidSupportLibrary.CreatingListsandCardsRecyclerViewAnimationsandBehindtheScenes(AndroidDevSummit2015)
Introduction
256

5.1:Drawables,Styles,andThemesContents:
WhatyoushouldalreadyKNOWWhatyouwillLEARNWhatyouwillDOAppoverviewTask1:CreatetheScorekeeperProjectTask2:CreateaDrawableresourceTask3:ApplystylestoyourviewsTask4:UpdatethethemefromthemenubarCodingchallengeSummaryRelatedconceptsLearnmore
Inthischapter,youwilllearnhowtoreduceyourcode,increaseitsreadabilityandeaseofmaintenancebyapplyingcommonstylestoyourviews,usedrawableresources,andapplythemestoyourapplication.
WhatyoushouldalreadyKNOWFromthepreviouschaptersyoushouldbefamiliarwithbasicconceptsoftheActivitylifecycle,andhowto:
CreateandrunappsinAndroidStudio.CreateandeditUIelementsusingtheLayoutEditor,XML,andcode.AddonClickfunctionalitytoabutton.Updateviewsatruntime.AddmenuitemswithonClickfunctionality.PassdatabetweenactivitiesusingIntents.
WhatyouwillLEARNInthispractical,youwilllearnto:
Defineastyle.Applyastyletoaview.ApplyathemetoanactivityorapplicationbothinXMLandprogrammatically.Usedrawableresources.
WhatyouwillDOCreateanewAndroidappandaddbuttonsandTextViewviewstothelayout.CreatedrawableresourcesinXMLandusethemasbackgroundsforyourbuttons.ApplystylestotheUIelementsoftheapplication.Addamenuitemthatchangesthethemeoftheapplicationtoalowcontrast"nightmode."
AppOverview
Introduction
257

The"Scorekeeper"applicationconsistsoftwosetsofbuttonsandtwotextviewsusedtokeeptrackofthescoreforanypoint-basedgamewithtwoplayers.
Introduction
258

Introduction
259

Introduction
260

Task1:CreateTheScorekeeperAppInthissection,youwillcreateyourAndroidStudioproject,modifythelayout,andaddonClickfunctionalitytoitsbuttons.
1.1Createthe"Scorekeeper"Project
1. StartAndroidStudioandcreateanewAndroidStudioProject.Nameyourproject"Scorekeeper".AcceptthedefaultsfortheCompanyDomainandProjectlocation.
2. AcceptthedefaultMinimumSDK.3. ChoosetheEmptyActivitytemplate.4. Acceptthedefaultnamefortheactivity,makesureGenerateLayoutFileischeckedandclickFinish.
1.2Createthelayoutforthemainactivity
Definetherootview:
1. Openthelayoutfileforthemainactivity.2. DeletetheTextViewthatsays"HelloWorld."3. ChangetherootviewtoaLinearLayoutandaddthefollowingattributes(withoutremovingtheexistingattributes):
Attribute Value
android:orientation "vertical"
Definethescorecontainers:
1. InsidetheLinearLayout,addtwoRelativeLayoutviewgroups(onetocontainthescoreforeachteam)withthefollowingattributes:
Attribute Value
android:layout_width "match_parent"
android:layout_height "0dp"
android:layout_weight "1"
Youmaybesurprisedtoseethatthelayout_heightattributeissetto0dpintheseviews.Thisisbecauseweareusingthe"layout_weight"attributetodeterminehowmuchspacetheseviewstakeupintheparentlayout.SeetheLinearLayoutDocumentationformoreinformation.
AddviewstoyourUI
1. AddtwoImageButtonviews(oneforincreasingthescoreandonefordecreasingthescore)andaTextViewfordisplayingthescoreinbetweenthebuttonstoeachRelativeLayout.
2. Addandroid:idattributestothescoreTextViewsandalloftheImageButtons.3. AddonemoreTextViewtoeachRelativeLayoutabovethescoretorepresenttheTeamNames.
Introduction
261

Addvectorassets
1. SelectFile>New>VectorAssettoopentheVectorAssetStudio.2. Clickontheicontochangeittoalistofmaterialiconfiles.SelecttheContentcategory.3. ChoosetheplusiconandclickOK.4. Renametheresourcefile"ic_plus"andchecktheOverridecheckboxnexttosizeoptions.5. Changethesizeoftheiconto40dpx40dp.6. ClickNextandthenFinish.7. Repeatthisprocesstoadda"minus"iconandnamethefile"ic_minus".
Addattributestoyourviews
1. Changethescoretextviewstoread"0"andtheteamtextviewstoread"Team1"and"Team2".2. Addthefollowingattributestoyourleftimagebuttons:
android:src="@drawable/ic_minus"
android:contentDescription="MinusButton"
3. Addthefollowingattributestoyourrightimagebuttons:
android:src="@drawable/ic_plus"
android:contentDescription="PlusButton"
4. Extractallofyourstringresources.ThisprocessremovesallofyourstringsfromtheJavacodeandputstheminthestring.xmlfile.Thisallowsforyourapptobeeasilylocalizedintodifferentlanguages.Tolearnhowtoextractstringresources,seetheExtractingResourcessectionintheAppendix.
Introduction
262

Introduction
263

SolutionCode:
Note:Yourcodemaybealittledifferentastherearemultiplewaystoachievethesamelayout.
<?xmlversion="1.0"encoding="utf-8"?>
<LinearLayoutxmlns:android="http://schemas.android.com/apk/res/android"
xmlns:tools="http://schemas.android.com/tools"
android:layout_width="match_parent"
android:layout_height="match_parent"
android:orientation="vertical"
android:paddingBottom="@dimen/activity_vertical_margin"
android:paddingLeft="@dimen/activity_horizontal_margin"
android:paddingRight="@dimen/activity_horizontal_margin"
android:paddingTop="@dimen/activity_vertical_margin"
tools:context="com.example.android.scorekeeper.MainActivity">
<RelativeLayout
android:layout_width="match_parent"
android:layout_height="0dp"
android:layout_weight="1">
<TextView
android:layout_width="wrap_content"
android:layout_height="wrap_content"
android:layout_alignParentTop="true"
android:layout_centerHorizontal="true"
android:text="@string/team_1"/>
<ImageButton
android:id="@+id/decreaseTeam1"
android:layout_width="wrap_content"
android:layout_height="wrap_content"
android:layout_alignParentLeft="true"
android:layout_alignParentStart="true"
android:layout_centerVertical="true"
android:contentDescription="@string/minus_button"
android:src="@drawable/ic_minus"/>
<TextView
android:id="@+id/score_1"
android:layout_width="wrap_content"
android:layout_height="wrap_content"
android:layout_centerHorizontal="true"
android:layout_centerVertical="true"
android:text="@string/initial_count"/>
<ImageButton
android:id="@+id/increaseTeam1"
android:layout_width="wrap_content"
android:layout_height="wrap_content"
android:layout_alignParentEnd="true"
android:layout_alignParentRight="true"
android:layout_centerVertical="true"
android:contentDescription="@string/plus_button"
android:src="@drawable/ic_plus"/>
</RelativeLayout>
<RelativeLayout
android:layout_width="match_parent"
android:layout_height="0dp"
android:layout_weight="1">
<TextView
android:layout_width="wrap_content"
android:layout_height="wrap_content"
android:layout_alignParentTop="true"
android:layout_centerHorizontal="true"
android:text="@string/team_2"/>
<ImageButton
android:id="@+id/decreaseTeam2"
Introduction
264

android:layout_width="wrap_content"
android:layout_height="wrap_content"
android:layout_alignParentLeft="true"
android:layout_alignParentStart="true"
android:layout_centerVertical="true"
android:contentDescription="@string/minus_button"
android:src="@drawable/ic_minus"/>
<TextView
android:id="@+id/score_2"
android:layout_width="wrap_content"
android:layout_height="wrap_content"
android:layout_centerHorizontal="true"
android:layout_centerVertical="true"
android:text="@string/initial_count"/>
<ImageButton
android:id="@+id/increaseTeam2"
android:layout_width="wrap_content"
android:layout_height="wrap_content"
android:layout_alignParentEnd="true"
android:layout_alignParentRight="true"
android:layout_centerVertical="true"
android:contentDescription="@string/plus_button"
android:src="@drawable/ic_plus"/>
</RelativeLayout>
</LinearLayout>
1.3InitializeyourTextViewsandscorecountvariablesInordertokeeptrackofthescores,youwillneedtwothings:
Integervariablessoyoucankeeptrackofthescores.AreferencetoyourscoreTextViewsinMainActivitysoyoucanupdatethescores.IntheonCreate()methodofMainActivity,findyourscoreTextViewsbyidandassignthemtomembervariables.Createtwointegermembervariables,representingthescoreofeachteam,andinitializethemto0.
1.4ImplementtheonClickfunctionalityforyourbuttons
1. InyourMainActivityimplementtwoonClickmethods:increaseScore()anddecreaseScore().
Note:onClickmethodsallhavethesamesignature-theyreturnvoidandtakeaViewasanargument.2. TheleftbuttonsshoulddecrementthescoreTextView,whiletherightonesshouldincrementit.
SolutionCode:
Note:Youmustalsoaddtheandroid:onClickattributetoeverybuttonintheactivity_main.xmlfile.Youcanidentifywhichbuttonwasclickedbycallingview.getId()intheonClickmethods.
Introduction
265

/**
*MethodthathandlestheonClickofboththedecrementbuttons
*@paramviewThebuttonviewthatwasclicked
*/
publicvoiddecreaseScore(Viewview){
//GettheIDofthebuttonthatwasclicked
intviewID=view.getId();
switch(viewID){
//IfitwasonTeam1
caseR.id.decreaseTeam1:
//DecrementthescoreandupdatetheTextView
mScore1--;
mScoreText1.setText(String.valueOf(mScore1));
break;
//IfitwasTeam2
caseR.id.decreaseTeam2:
//DecrementthescoreandupdatetheTextView
mScore2--;
mScoreText2.setText(String.valueOf(mScore2));
}
}
/**
*MethodthathandlestheonClickofboththeincrementbuttons
*@paramviewThebuttonviewthatwasclicked
*/
publicvoidincreaseScore(Viewview){
//GettheIDofthebuttonthatwasclicked
intviewID=view.getId();
switch(viewID){
//IfitwasonTeam1
caseR.id.increaseTeam1:
//IncrementthescoreandupdatetheTextView
mScore1++;
mScoreText1.setText(String.valueOf(mScore1));
break;
//IfitwasTeam2
caseR.id.increaseTeam2:
//IncrementthescoreandupdatetheTextView
mScore2++;
mScoreText2.setText(String.valueOf(mScore2));
}
}
Task2:CreateaDrawableresourceYounowhaveafunctioningscorekeeperapplication!However,thelayoutisdullanddoesnotcommunicatethefunctionofthebuttons.Inordertomakeitmoreclear,thestandardgreybackgroundofthebuttonscanbechanged.
InAndroid,graphicsareoftenhandledbyaresourcecalledaDrawable.InthefollowingexerciseyouwilllearnhowtocreateacertaintypeofdrawablecalledaShapeDrawable,andapplyittoyourbuttonsasabackground.
FormoreinformationonDrawables,seeDrawableResourceDocumentation.
2.1CreateaShapeDrawable
AShapeDrawableisaprimitivegeometricshapedefinedinanxmlfilebyanumberofattributesincludingcolor,shape,paddingandmore.Itdefinesavectorgraphic,whichcanscaleupanddownwithoutlosinganydefinition.
1. Rightclickonthedrawablefolderinyourresourcesdirectory.2. ChooseNew>Drawableresourcefile.3. Namethefile"button_background"andclickOK.4. Removeallofthecodeexcept:
Introduction
266

<?xmlversion="1.0"encoding="utf-8"?>
5. Addthefollowingcodewhichcreatesanovalshapewithanoutline:
<shape
xmlns:android="http://schemas.android.com/apk/res/android"
android:shape="oval">
<stroke
android:width="2dp"
android:color="@color/colorPrimary"/>
</shape>
2.2Applytheshapedrawableasabackground1. Openthelayoutfileforyourmainactivity.2. Forallofthebuttons,addthedrawableasthebackground:android:background="@drawable/button_background".Note
thatthebackgroundautomaticallyscalestofitthesizeoftheview.3. Thesizeofthebuttonsneedstobesuchthatitrendersproperlyonalldevices.Changethe"layout_height"and
"layout_width"attributesforeachbuttonto70dp,whichisagoodsizeonmostdevices.Itisnotbestpracticetousehard-codeddimensions,butusingweightswithnestedlinearlayoutstoachievethedesiredsizeistoomuchdetailforthispractical.
android:layout_width="70dp"
android:layout_height="70dp"
4. Extractthedimensionresourcesoyoucanaccessitinonelocation.Forinformationonhowtodothis,seetheAppendix.
5. Runyourapp.
Task3:StyleyourviewsAsyoucontinuetoaddviewsandattributestoyourlayout,yourcodewillstarttobecomelargeandrepetitive,especiallywhenyouapplythesameattributestomanysimilarelements.Astylecanspecifycommonpropertiessuchaspadding,fontcolor,fontsize,andbackgroundcolor.Attributesthatarelayout-orientedsuchasheight,widthandrelativelocationshouldremaininthelayoutresourcefile.
Inthefollowingexercise,youwilllearnhowtocreatestylesandapplythemtomultipleviewsandlayouts,allowingcommonattributestobeupdatedsimultaneouslyfromonelocation.
Note:Stylesaremeantforattributesthatmodifythelookoftheview.Layoutparameterssuchasheight,weightandrelativelocationshouldstayinthelayoutfile.
3.1Createbuttonstyles
InAndroid,stylescaninheritpropertiesfromotherstyles.Youcandeclareaparentforyourstyleusinganoptional"parent"parameterandhasthefollowingproperties:
Anystyleattributesdefinedbytheparentstyleareautomaticallyincludedinthechildstyle.Astyleattributedefinedinboththeparentandchildstyleusesthechildstyle'sdefinition(thechildoverridestheparent).Achildstylecanincludeadditionalattributesthattheparentdoesnotdefine.
Forexample,allfourbuttonsinthisexampleshareacommonbackgrounddrawablebutwithdifferenticonsforplusandminus.Furthermore,thetwoincrementbuttonssharethesameicon,asdothetwodecrementbuttons.Youcanthereforecreate3styles:
1. Ascorebuttonstyleforallofthebuttons,whichincludesthedefaultpropertiesofanImageButtonviewandalsothe
Introduction
267

drawablebackground.2. Aminusbuttonstyleforthedecrementbuttons,whichinheritstheattributesofthepreviousstyleandalsoincludesthe
minusicon.3. Aplusbuttonstyleforthedecrementbuttons,againinheritingfromthescorebuttonstyleandalsoincludestheplus
icon.
Thesestylesarerepresentedinthefigurebelow.
Dothefollowing:
1. Inyourresourcesdirectory,locateandopenthe"values/styles.xml"file.Thisiswhereallofyourstylecodewillbelocated.The"AppTheme"styleisalwaysautomaticallyadded,andyoucanseethatitextendsfrom"Theme.AppCompat.Light.DarkActionBar".
Introduction
268
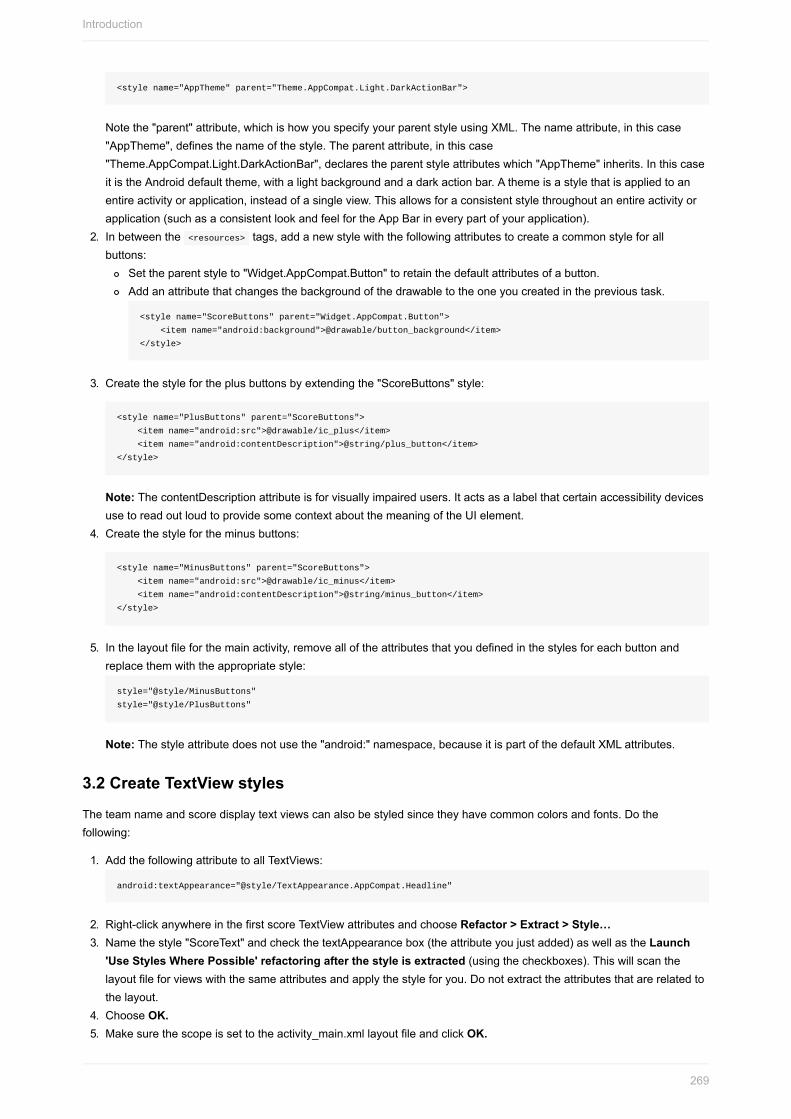
<stylename="AppTheme"parent="Theme.AppCompat.Light.DarkActionBar">
Notethe"parent"attribute,whichishowyouspecifyyourparentstyleusingXML.Thenameattribute,inthiscase"AppTheme",definesthenameofthestyle.Theparentattribute,inthiscase"Theme.AppCompat.Light.DarkActionBar",declarestheparentstyleattributeswhich"AppTheme"inherits.InthiscaseitistheAndroiddefaulttheme,withalightbackgroundandadarkactionbar.Athemeisastylethatisappliedtoanentireactivityorapplication,insteadofasingleview.Thisallowsforaconsistentstylethroughoutanentireactivityorapplication(suchasaconsistentlookandfeelfortheAppBarineverypartofyourapplication).
2. Inbetweenthe<resources>tags,addanewstylewiththefollowingattributestocreateacommonstyleforallbuttons:
Settheparentstyleto"Widget.AppCompat.Button"toretainthedefaultattributesofabutton.Addanattributethatchangesthebackgroundofthedrawabletotheoneyoucreatedintheprevioustask.
<stylename="ScoreButtons"parent="Widget.AppCompat.Button">
<itemname="android:background">@drawable/button_background</item>
</style>
3. Createthestylefortheplusbuttonsbyextendingthe"ScoreButtons"style:
<stylename="PlusButtons"parent="ScoreButtons">
<itemname="android:src">@drawable/ic_plus</item>
<itemname="android:contentDescription">@string/plus_button</item>
</style>
Note:ThecontentDescriptionattributeisforvisuallyimpairedusers.ItactsasalabelthatcertainaccessibilitydevicesusetoreadoutloudtoprovidesomecontextaboutthemeaningoftheUIelement.
4. Createthestylefortheminusbuttons:
<stylename="MinusButtons"parent="ScoreButtons">
<itemname="android:src">@drawable/ic_minus</item>
<itemname="android:contentDescription">@string/minus_button</item>
</style>
5. Inthelayoutfileforthemainactivity,removealloftheattributesthatyoudefinedinthestylesforeachbuttonandreplacethemwiththeappropriatestyle:
style="@style/MinusButtons"
style="@style/PlusButtons"
Note:Thestyleattributedoesnotusethe"android:"namespace,becauseitispartofthedefaultXMLattributes.
3.2CreateTextViewstyles
Theteamnameandscoredisplaytextviewscanalsobestyledsincetheyhavecommoncolorsandfonts.Dothefollowing:
1. AddthefollowingattributetoallTextViews:
android:textAppearance="@style/TextAppearance.AppCompat.Headline"
2. Right-clickanywhereinthefirstscoreTextViewattributesandchooseRefactor>Extract>Style…3. Namethestyle"ScoreText"andcheckthetextAppearancebox(theattributeyoujustadded)aswellastheLaunch
'UseStylesWherePossible'refactoringafterthestyleisextracted(usingthecheckboxes).Thiswillscanthelayoutfileforviewswiththesameattributesandapplythestyleforyou.Donotextracttheattributesthatarerelatedtothelayout.
4. ChooseOK.5. Makesurethescopeissettotheactivity_main.xmllayoutfileandclickOK.
Introduction
269

6. ApaneatthebottomofAndroidStudiowillopenifthesamestyleisfoundinotherviews.SelectDoRefactortoapplythenewstyletotheviewswiththesameattributes.
7. Runyourapp.Thereshouldbenochangeexceptthatallofyourstylingcodeisnowinyourresourcesfileandyourlayoutfileisshorter.
SolutionCode:
styles.xml
<resources>
<!--Baseapplicationtheme.-->
<stylename="AppTheme"parent="Theme.AppCompat.Light.DarkActionBar">
<!--Customizeyourthemehere.-->
<itemname="colorPrimary">@color/colorPrimary</item>
<itemname="colorPrimaryDark">@color/colorPrimaryDark</item>
<itemname="colorAccent">@color/colorAccent</item>
</style>
<stylename="ScoreButtons"parent="AppTheme">
<itemname="android:background">@drawable/button_background</item>
</style>
<stylename="PlusButtons"parent="ScoreButtons">
<itemname="android:src">@drawable/ic_plus</item>
<itemname="android:contentDescription">@string/plus_button</item>
</style>
<stylename="MinusButtons"parent="ScoreButtons">
<itemname="android:src">@drawable/ic_minus</item>
<itemname="android:contentDescription">@string/minus_button</item>
</style>
<stylename="ScoreText">
<itemname="android:textAppearance">@style/TextAppearance.AppCompat.Headline</item>
</style>
</resources>
activity_main.xml
<?xmlversion="1.0"encoding="utf-8"?>
<LinearLayoutxmlns:android="http://schemas.android.com/apk/res/android"
xmlns:tools="http://schemas.android.com/tools"
android:layout_width="match_parent"
android:layout_height="match_parent"
android:orientation="vertical"
android:paddingBottom="@dimen/activity_vertical_margin"
android:paddingLeft="@dimen/activity_horizontal_margin"
android:paddingRight="@dimen/activity_horizontal_margin"
android:paddingTop="@dimen/activity_vertical_margin"
android:weightSum="2"
tools:context="com.example.android.scorekeeper.MainActivity">
<RelativeLayout
android:layout_width="match_parent"
android:layout_height="0dp"
android:layout_weight="1">
<TextView
android:layout_height="wrap_content"
android:layout_width="wrap_content"
android:layout_alignParentTop="true"
android:layout_centerHorizontal="true"
android:text="@string/team_1"
style="@style/ScoreText"/>
<ImageButton
android:id="@+id/decreaseTeam1"
android:layout_height="@dimen/button_size"
android:layout_width="@dimen/button_size"
Introduction
270

android:layout_alignParentLeft="true"
android:layout_alignParentStart="true"
android:layout_centerVertical="true"
android:onClick="decreaseScore"
style="@style/MinusButtons"/>
<TextView
android:layout_height="wrap_content"
android:layout_width="wrap_content"
android:layout_centerVertical="true"
android:layout_centerHorizontal="true"
android:id="@+id/score_1"
android:text="@string/initial_count"
style="@style/ScoreText"/>
<ImageButton
android:id="@+id/increaseTeam1"
android:layout_height="@dimen/button_size"
android:layout_width="@dimen/button_size"
android:layout_alignParentRight="true"
android:layout_alignParentEnd="true"
android:layout_centerVertical="true"
android:onClick="increaseScore"
style="@style/PlusButtons"/>
</RelativeLayout>
<RelativeLayout
android:layout_width="match_parent"
android:layout_height="0dp"
android:layout_weight="1">
<TextView
android:layout_height="wrap_content"
android:layout_width="wrap_content"
android:layout_alignParentTop="true"
android:layout_centerHorizontal="true"
android:text="@string/team_2"
style="@style/ScoreText"/>
<ImageButton
android:id="@+id/decreaseTeam2"
android:layout_height="@dimen/button_size"
android:layout_width="@dimen/button_size"
android:layout_alignParentLeft="true"
android:layout_alignParentStart="true"
android:layout_centerVertical="true"
android:onClick="decreaseScore"
style="@style/MinusButtons"/>
<TextView
android:layout_height="wrap_content"
android:layout_width="wrap_content"
android:layout_centerVertical="true"
android:layout_centerHorizontal="true"
android:id="@+id/score_2"
android:text="@string/initial_count"
style="@style/ScoreText"/>
<ImageButton
android:id="@+id/increaseTeam2"
android:layout_height="@dimen/button_size"
android:layout_width="@dimen/button_size"
android:layout_alignParentRight="true"
android:layout_alignParentEnd="true"
android:layout_centerVertical="true"
android:onClick="increaseScore"
style="@style/PlusButtons"/>
</RelativeLayout>
</LinearLayout>
Introduction
271

3.3Updatingthestyles
Thepowerofusingstylesbecomesapparentwhenyouwanttomakechangestoseveralelementsofthesamestyle.Youcanmakethetextbigger,bolderandbrighter,andchangetheiconstothecolorofthebuttonbackgrounds.
Makethefollowingchangesinyourstyles.xmlfile:
1. Addormodifyeachofthefollowingattributesinthespecifiedstyleblock:
Attribute StyleBlock
@color/colorPrimary ScoreButtons
@style/TextAppearance.AppCompat.Display3 ScoreText
Note:ThecolorPrimaryvalueisautomaticallygeneratedbyAndroidStudiowhenyoucreatetheprojectandcanbefoundinthevalues/colors.xmlfile.TheTextAppearance.AppCompat.Display3attributeisapredefinedtextstylesuppliedbyAndroid.
2. Createanewstylecalled"TeamText"withthefollowingattribute:
<itemname="android:textAppearance">@style/TextAppearance.AppCompat.Display1</item>
3. ChangethestyleattributeoftheteamnameTextViewstothenewlycreatedTeamTextstyleinactivity_main.xml.4. Runyourapp.Withonlytheseadjustmentstothestyle.xmlfile,alloftheviewsupdatedtoreflectthechanges.
Task4:ThemesandFinalTouchesYou'veseenthatviewswithsimilarcharacteristicscanbestyledtogetherinthe"styles.xml"file.Butwhatifyouwanttodefinestylesforanentireactivity,orevenapplication?It'spossibletoaccomplishthisbyusing"Themes".TosetathemeforanActivityorsetofActivities,youneedtomodifytheAndroidManifest.xmlfile.
Inthistask,youwilladdthe"nightmode"themetoyourapp,whichwillallowtheuserstousealowcontrastversionofyourappthatiseasierontheeyesatnighttime,aswellasmakeafewpolishingtouchestotheUserInterface.
4.1Explorethemes1. IntheAndroidmanifestfile,findthe<application>tagandchangetheandroid:themeattributeto:
android:theme="@style/Theme.AppCompat.Light.NoActionBar"
Thisisapredefinedthemethatremovestheactionbarfromyouractivity.
2. Runyourapp.Thetoolbardisappears!
3. ChangethethemeoftheapplicationbacktoAppTheme,whichisachildoftheTheme.Appcompat.Light.DarkActionBarthemeascanbeseeninstyles.xml.
Toapplyathemetoanactivityinsteadoftheentireapplication,placethethemeattributeintheactivitytaginsteadoftheapplicationtag.FormoreinformationonThemesandStyles,seetheStyleandThemeGuide.
4.2AddthemebuttontothemenuOneuseforsettingathemeforyourapplicationistoprovideanalternatevisualexperienceforbrowsingatnight.Insuchconditions,itisoftenbettertohavealowcontrast,darklayout.TheAndroidframeworkprovidesathemethatisdesignedexactlyforthis:TheDayNighttheme.Thisthemehasseveralbuiltinoptionsthatallowyoutocontrolthecolorsinyourappprogrammatically:eitherbysettingittochangeautomaticallybytime,orbyusercommand.Inthisexerciseyouwilladdamenubuttonthatwilltoggletheapplicationbetweentheregularthemeanda"night-mode"theme.
Introduction
272

1. Rightclickonthe"res"directoryandchooseNew>Androidresourcefile.2. Namethefile"main_menu",changetheResourceTypetoMenu,andclickOK.3. Addamenuitemwiththefollowingattributes:
<item
android:id="@+id/night_mode"
android:title="@string/night_mode"/>
4. Navigateto"strings.xml"andcreatetwostringresources:
<stringname="night_mode">NightMode</string>
<stringname="day_mode">DayMode</string>
5. PressCtrl-OtoopentheOverrideMethodmenuinyourmainactivityJavafile,andselecttheonCreateOptionsMenumethodlocatedunderthe"android.app.Activity"category.ClickOK.
6. InflatethemenuyoujustcreatedwithintheonCreateOptionsMenu()method:
getMenuInflater().inflate(R.menu.main_menu,menu);
4.3Changethethemefromthemenu
TheDayNightthemeusestheAppCompatDelegateclasstosetthenightmodeoptionsinyouractivity.Tolearnmoreaboutthistheme,visitthisblogpost.
1. Inyourstyles.xmlfile,modifytheparentofAppThemeto"Theme.AppCompat.DayNight.DarkActionBar.2. OverridetheonOptionsItemSelected()methodinMainActivity,andcheckwhichmenuitemwasclicked:
@Override
publicbooleanonOptionsItemSelected(MenuItemitem){
//Checkifthecorrectitemwasclicked
if(item.getItemId()==R.id.night_mode){}
}
3. Inresponsetoaclickonthemenubutton,youcanverifythecurrentnightmodesettingbycallingAppCompatDelegate.getDefaultNightMode().
4. Ifthenightmodeisenabled,changeittothedisabledstate:
//Getthenightmodestateoftheapp
intnightMode=AppCompatDelegate.getDefaultNightMode();
//Setthethememodefortherestartedactivity
if(nightMode==AppCompatDelegate.MODE_NIGHT_YES){
AppCompatDelegate.setDefaultNightMode(AppCompatDelegate.MODE_NIGHT_NO);
}
5. Otherwise,enableit:
else{
AppCompatDelegate.setDefaultNightMode(AppCompatDelegate.MODE_NIGHT_YES);
}
6. Thethemecanonlychangewhiletheactivityisbeingcreated,socallrecreate()forthethemechangetotakeeffect.7. YouronOptionsItemSelected()methodshouldreturntrue,sincetheitemclickwashandled.8. Runyourapp.The"NightMode"menuitemshouldnowtogglethethemeofyouractivity.Youmaynoticethatthelabel
foryourmenuitemalwaysreads"NightMode",whichmaybeconfusingtoyouruseriftheappisalreadyinthedarktheme.
9. AddthefollowingcodeintheonCreateOptionsMenumethod:
Introduction
273

@Override
publicbooleanonCreateOptionsMenu(Menumenu){
//InflatethemenufromXML
getMenuInflater().inflate(R.menu.main_menu,menu);
//Changethelabelofthemenubasedonthestateoftheapp
intnightMode=AppCompatDelegate.getDefaultNightMode();
if(nightMode==AppCompatDelegate.MODE_NIGHT_YES){
menu.findItem(R.id.night_mode).setTitle(R.string.day_mode);
}else{
menu.findItem(R.id.night_mode).setTitle(R.string.night_mode);
}
returntrue;
}
10. Runyourapp.Themenubuttonlabelnowchangeswiththetheme.
4.4SaveInstanceState
Youlearnedinpreviouslessonsthatyoumustbepreparedforyouractivitytobedestroyedandrecreatedatunexpectedtimes,forexamplewhenyourscreenisrotated.Inthisapplication,theTextViewscontainingthescoresareresettotheinitialvalueof0whenthedeviceisrotated.Tofixthis,Dothefollowing:
1. OverridetheonSaveInstanceState()methodinMainActivitytopreservethevaluesofthetwoscoreTextViews:
@Override
protectedvoidonSaveInstanceState(BundleoutState){
//Savethescores
outState.putInt(STATE_SCORE_1,mScore1);
outState.putInt(STATE_SCORE_2,mScore2);
super.onSaveInstanceState(outState);
}
2. IntheonCreate()methodofMainActivity.java,checkifthereisasavedInstanceState.Ifthereis,restorethescorestothetextviews:
if(savedInstanceState!=null){
mScore1=savedInstanceState.getInt(STATE_SCORE_1);
mScore2=savedInstanceState.getInt(STATE_SCORE_2);
//Setthescoretextviews
mScoreText1.setText(String.valueOf(mScore1));
mScoreText2.setText(String.valueOf(mScore2));
}
That'sit!Congratulations,younowhaveastyledScorekeeperApplication.
SolutioncodeAndroidStudioproject:Scorekeeper
CodingchallengeNote:Allcodingchallengesareoptionalandarenotprerequisitesforlaterlessons.
Challenge:Rightnow,yourbuttonsdonotbehaveintuitivelybecausetheydonotchangetheirappearancewhentheyarepressed.AndroidhasanothertypeofdrawablecalledStateListDrawablewhichallowsforadifferentgraphictobeuseddependingonthestateoftheobject.
Introduction
274

Forthischallengeproblem,createadrawableresourcethatchangesthebackgroundofthebuttontothesamecolorastheborderwhenthestateofthebuttonis"pressed".Youshouldalsosetthecolorofthetextinsidethebuttonstoaselectorthatmakesitwhitewhenthebuttonis"pressed".
SummaryAShapeDrawableisaprimitivegeometricshapedefinedinanxmlfilebyanumberofattributesincludingcolor,shape,paddingandmore.
Drawablesenhancethelookofanapplication.AStylecanspecifycommonpropertiessuchasheight,padding,fontcolor,fontsize,backgroundcolor,etal.
UsingstylescanreducetheamountofcommoncodeforyourUIcomponents.Styleshouldnotincludelayout-relatedinformation.StylescanbeappliedtoView,ActivitiesorApplications.
StyleappliedtoActivitiesorApplicationsmustbedefinedintheAndroidManifestXMLfile.StylescanbeinheritedbyidentifyingtheparentstyleusingXML.
WhenyouapplyastyletoacollectionofViewsinanActivityorinyourentireapplication,thatisknownasaThemeAndroid:themeistheattributeyouneedtosetastyleonacollectionofViewsinanActivityorApplication.TheAndroidplatformsuppliesalargecollectionofstylesandthemes.
RelatedconceptsTherelatedconceptdocumentationisinAndroidDeveloperFundamentals:Concepts.
Drawables,StylesandThemes
LearnmoreDeveloperDocumentation:
LinearLayoutGuideDrawableResourceGuideStylesandThemesGuideDayNightThemeGuide
Videos
Udacity-ThemesandStyles
Introduction
275

5.2:MaterialDesign:Lists,CardsandColorsContents:
WhatyoushouldalreadyKNOWWhatyouwillLEARNWhatyouwillDOAppoverviewTask1:DownloadthestartercodeTask2:AddaCardViewandimagesTask3:MakeyourCardViewswipeable,movable,andclickableTask4:AddtheFABandchooseaMaterialDesigncolorpaletteCodingchallengeSummaryRelatedconceptLearnmore
ThischapterintroducesconceptsfromGoogle'sMaterialDesignguidelines,aseriesofbestpracticesforcreatingvisuallyappealingandintuitiveapplications.YouwilllearnhowtoaddandusetheCardViewandFloatingActionButtonViews,efficientlyuseimages,aswellasemploydesignbestpracticestomakeyouruser'sexperiencedelightful.
WhatyoushouldalreadyKNOWFromthepreviouschaptersyoushouldbeableto:
CreateandrunappsinAndroidStudio.CreateandeditelementsusingtheLayoutEditor,XML,andprogrammatically.UseaRecyclerViewtodisplayalist.
WhatyouwillLEARNRecommendeduseofmaterialwidgets(FloatingActionButton,CardView).Howtoefficientlyuseimagesinyourapp.Recommendedbestpracticesfordesigningintuitivelayoutsusingboldcolors.
WhatyouwillDOModifyanapplicationtofollowMaterialDesignguidelines.AddimagesandstylingtoaRecyclerViewlist.ImplementanItemTouchHelpertoaddDragandDropfunctionalitytoyourapp.
AppoverviewThe"MaterialMe!"appisamocksportsnewsapplicationwithverypoordesignimplementation.Youwillfixituptomeetthedesignguidelinestocreateadelightfuluserexperience!BelowaresomescreenshotsoftheappbeforeandaftertheMaterialDesignimprovements.
Introduction
276

Introduction
277

Introduction
278

Task1:DownloadthestartercodeThecompletestarterappprojectforthispracticalisavailableatMaterialMe-Starter.InthistaskyouwillloadtheprojectintoAndroidStudioandexploresomeoftheapp'skeyfeatures.
1.1OpenandruntheMaterialMeproject
1. DownloadandunziptheMaterialMe-Starterfile.2. OpentheappinAndroidStudio.3. Buildandruntheapp.
Theappshowsalistofsportsnameswithsomeplaceholdernewstextforeachsport.Thecurrentlayoutandstyleoftheappmakesitnearlyunusable:eachrowofdataisnotclearlyseparatedandthereisnoimageryorcolortoengagetheuser.
1.2Exploretheapp
1. Beforemakingmodificationstotheapp,exploreitscurrentstructure.Itcontainsthefollowingelements:
Sport.java
ThisclassrepresentsthedatamodelforeachrowofdataintheRecyclerView.Rightnowitcontainsafieldforthetitleofthesportandafieldforsomeinformationaboutthesport.
SportsAdapter.java
ThisistheadapterfortheRecyclerView.ItusesanArrayListofSportobjectsasitsdataandpopulateseachrowwiththisdata.
MainActivity.java
TheMainActivityinitializestheRecyclerViewandadapter,andcreatesthedatafromresourcefiles.
strings.xml
Thisresourcefilecontainsallofthedatafortheapplication,includingthetitlesandinformationforeachsport.
list_item.xml
ThislayoutfiledefineseachrowoftheRecyclerView.ItconsistsofthreeTextViews,oneforeachpieceofdata(thetitleandtheinfoforeachsport)andoneusedasalabel.
Task2:AddaCardViewandimagesOneofthefundamentalprinciplesofMaterialDesignistheuseofboldimagerytoenhancetheuserexperience.AddingimagestotheRecyclerViewlistitemsisagoodstartforcreatingadynamicandcaptivatinguserexperience.
Whenpresentinginformationthathasmixedmedia(likeimagesandtext),theMaterialDesignguidelinesrecommendusingaCardView,whichisaFrameLayoutwithsomeextrafeatures(suchaselevationandroundedcorners)thatgiveitaconsistentlookandfeelacrossmanydifferentapplicationsandplatforms.CardViewisaUIcomponentfoundintheAndroidSupportLibraries.
Inthissection,youwillmoveeachlistitemintoaCardViewandaddanImagetomaketheappcomplywithMaterialguidelines.
2.1AddtheCardView
Introduction
279

CardViewisnotincludedinthedefaultAndroidSDK,soyoumustbeadditasabuild.gradledependency.Dothefollowing:
1. Inyourapplevelbuild.gradlefile,addthefollowinglinetothedependenciesblock:
compile'com.android.support:cardview-v7:24.1.1'
Note:Theversionofthesupportlibrarymayhavechangedsincethewritingofthispractical.Updateittoit'smostcurrentversionandsyncyourgradlefiles.
2. Inthelist_item.xmlfile,surroundtherootLinearLayoutwithaCardViewwiththefollowingattributes:
Attribute Value
android:layout_width "match_parent"
android:layout_height "wrap_content"
android:layout_margin "8dp"
Note:Youwillneedtomovetheschemadeclaration(xmlns:android="http://schemas.android.com/apk/res/android")fromtheLinearLayouttotheCardviewwhichisnowthetoplevelViewofyourlayoutfile.
3. Runtheapp.NoweachrowitemiscontainedinsideaCardView,whichiselevatedabovethebottomlayerandcastsashadow.
2.2Downloadtheimages
TheCardViewisnotintendedtobeusedexclusivelywithplaintext:itisbestfordisplayingamixtureofcontent.Youhaveisagoodopportunitytomakethissportsinformationappmoreexcitingbyaddingbannerimagestoeveryrow!
Usingimagesisresourceintensiveforyourapp:theAndroidframeworkhastoloadtheentireimageintomemoryatfullresolution,eveniftheapponlydisplaysasmallthumbnailoftheimage.
InthissectionyouwilllearnhowtousetheGlidelibrarytoloadlargeimagesefficiently,withoutdrainingyourresourcesorevencrashingyourappdueto'OutofMemory'exceptions.
1. Downloadthebannerimageszipfile.2. Copythesefilesintotheres>drawabledirectoryofyourapp.
Note:Copythefilesusingyourfileexplorer,notAndroidStudio.NavigatetothedirectorywhereallyourAndroidProjectsarestored(It'scalled/AndroidStudioProjects),andgotoMaterialMe/app/src/main/res/drawableandpastetheimageshere.YouwillneedanarraywiththepathtoeachimagesothatyoucanincludeitintheSportsjavaobject.Todothis:
3. Defineanarraythatcontainsallofthepathstothedrawablesasitemsinyourstring.xmlfile.Besuretothattheyareinthesameorderasthesportstitlesarray:
<arrayname="sports_images">
<item>@drawable/img_baseball</item>
<item>@drawable/img_badminton</item>
<item>@drawable/img_basketball</item>
<item>@drawable/img_bowling</item>
<item>@drawable/img_cycling</item>
<item>@drawable/img_golf</item>
<item>@drawable/img_running</item>
<item>@drawable/img_soccer</item>
<item>@drawable/img_swimming</item>
<item>@drawable/img_tabletennis</item>
<item>@drawable/img_tennis</item>
</array>
2.3ModifytheSportobject
TheSport.javaobjectwillneedtoincludethedrawableresourcethatcorrepsondstothesport.Toachievethat:
1. AddanintegermembervariabletotheSportobjectthatwillcontainthedrawableresource:
Introduction
280
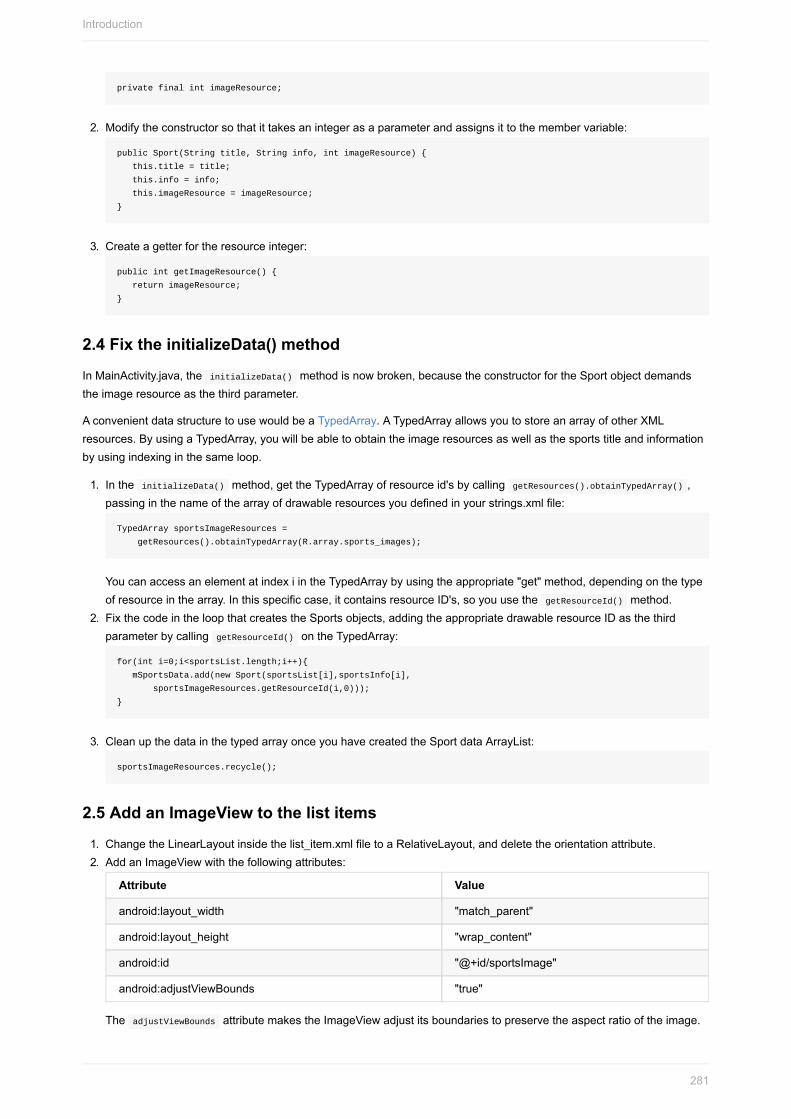
privatefinalintimageResource;
2. Modifytheconstructorsothatittakesanintegerasaparameterandassignsittothemembervariable:
publicSport(Stringtitle,Stringinfo,intimageResource){
this.title=title;
this.info=info;
this.imageResource=imageResource;
}
3. Createagetterfortheresourceinteger:
publicintgetImageResource(){
returnimageResource;
}
2.4FixtheinitializeData()method
InMainActivity.java,theinitializeData()methodisnowbroken,becausetheconstructorfortheSportobjectdemandstheimageresourceasthethirdparameter.
AconvenientdatastructuretousewouldbeaTypedArray.ATypedArrayallowsyoutostoreanarrayofotherXMLresources.ByusingaTypedArray,youwillbeabletoobtaintheimageresourcesaswellasthesportstitleandinformationbyusingindexinginthesameloop.
1. IntheinitializeData()method,gettheTypedArrayofresourceid'sbycallinggetResources().obtainTypedArray(),passinginthenameofthearrayofdrawableresourcesyoudefinedinyourstrings.xmlfile:
TypedArraysportsImageResources=
getResources().obtainTypedArray(R.array.sports_images);
YoucanaccessanelementatindexiintheTypedArraybyusingtheappropriate"get"method,dependingonthetypeofresourceinthearray.Inthisspecificcase,itcontainsresourceID's,soyouusethegetResourceId()method.
2. FixthecodeintheloopthatcreatestheSportsobjects,addingtheappropriatedrawableresourceIDasthethirdparameterbycallinggetResourceId()ontheTypedArray:
for(inti=0;i<sportsList.length;i++){
mSportsData.add(newSport(sportsList[i],sportsInfo[i],
sportsImageResources.getResourceId(i,0)));
}
3. CleanupthedatainthetypedarrayonceyouhavecreatedtheSportdataArrayList:
sportsImageResources.recycle();
2.5AddanImageViewtothelistitems
1. ChangetheLinearLayoutinsidethelist_item.xmlfiletoaRelativeLayout,anddeletetheorientationattribute.2. AddanImageViewwiththefollowingattributes:
Attribute Value
android:layout_width "match_parent"
android:layout_height "wrap_content"
android:id "@+id/sportsImage"
android:adjustViewBounds "true"
TheadjustViewBoundsattributemakestheImageViewadjustitsboundariestopreservetheaspectratiooftheimage.
Introduction
281

3. AddthefollowingattributestotheexistingTextViews:
TextViewid:title Attribute Value
android:layout_alignBottom "@id/sportsImage"
android:theme "@style/ThemeOverlay.AppCompat.Dark"
TextViewid:newsTitle Attribute Value
android:layout_below "@id/sportsImage"
android:textColor "?android:textColorSecondary"
TextViewid:subTitle android:layout_below "@id/newsTitle"
Note:ThequestionmarkintheabovetextColorattribute("?android:textColorSecondary")meansthattheframeworkwillapplythevaluefromthecurrentlyappliedtheme.Inthiscase,thisattributeisinheritedfromthe"Theme.AppCompat.Light.DarkActionBar"theme,whichdefinesitasalightgraycolor,oftenusedforsubheadings.
2.6LoadtheimagesusingGlide
AfterdownloadingtheimagesandsettinguptheImageView,thenextstepistomodifytheSportsAdaptertoloadanimageintotheImageViewinonBindViewHolder().Ifyoutakethisapproach,youwillfindthatyourappcrashesdueto"OutofMemory"errors.TheAndroidframeworkhastoloadtheimageintomemoryeachtimeatfullresolution,nomatterwhatthedisplaysizeoftheImageViewis.
Thereareanumberofwaystoreducethememoryconsumptionwhenloadingimages,butoneoftheeasiestapproachesistouseanImageLoadingLibrarylikeGlide,whichyouwilldointhisstep.Glideusesbackgroundprocessing,aswellsomeothercomplexprocessing,toreducethememoryrequirementsofloadingimages.Italsoincludessomeusefulfeatureslikeshowingplaceholderimageswhilethedesiredimagesareloaded.
Note:YoucanlearnmoreaboutreducingmemoryconsumptioninyourappintheDisplayingBitmapsguide.1. AddthefollowingdependencyforGlide,inyourapplevelbuild.gradlefile:
compile'com.github.bumptech.glide:glide:3.5.2'
2. AddavariableintheSportsAdapterclass,ViewHolderclassfortheImageView,andinitializeitintheViewHolderconstructor:
mSportsImage=(ImageView)itemView.findViewById(R.id.sportsImage);
3. AddthefollowinglineofcodetoonBindViewHolder()togettheimageresourcefromtheSportobjectandloaditintotheImageViewusingGlide:
Glide.with(mContext).load(currentSport.getImageResource()).into(holder.mSportsImage);
That'salltakestoloadanimagewithGlide.Glidealsohasseveraladditionalfeaturesthatletyouresize,transformandloadimagesinavarietyofways.HeadovertotheGlidegithubpagetolearnmore.
4. Runtheapp,yourlistitemsshouldnowhaveboldgraphicsthatmaketheuserexperiencedynamicandexciting!
Task3:MakeyourCardViewswipeable,movable,andclickableWhenusersseecardsinanapp,theyhaveexpectationsaboutthewaythecardsbehave.TheMaterialDesignguidelinessaythat:
Acardcanbedismissed,usuallybyswipingitaway.Alistofcardscanbereorderedbyholdingdownanddraggingthecards.
Introduction
282

Tappingoncardwillprovidefurtherdetails.
Youwillnowimplementthesebehaviorsinyourapp.
3.1Implementswipetodismiss
TheAndroidSDKincludesaclasscalledItemTouchHelperthatisusedtodefinewhathappenstoRecyclerViewlistitemswhentheuserperformsvarioustouchactions,suchasswipe,ordraganddrop.SomeofthecommonusecasesarealreadyimplementedinasetofmethodsinItemTouchHelper.SimpleCallback.
ItemTouchHelper.SimpleCallbackletsyoudefinewhichdirectionsaresupportedforswipingandmovinglistitems,andimplementtheswipingandmovingbehavior.
Dothefollowing:
1. CreateanewItemTouchHelperobject,intheonCreate()methodofMainActivity.java.Foritsargument,createanewinstanceofItemTouchHelper.SimpleCallbackandpressEntertomakeAndroidStudiofillintherequiredmethods:onMove()andonSwiped().
Note:Iftherequiredmethodswerenotautomaticallyadded,clickontheredlightbulbandselectImplementmethods.
2. TheSimpleCallbackconstructorwillbeunderlinedinredbecauseyouhavenotyetprovidedtherequiredparameters:thedirectionthatyouplantosupportformovingandswipinglistitems,respectively.
Becauseweareonlyimplementingswipetodismissatthemoment,youshouldpassin0forthesupportedmovedirectionsandItemTouchHelper.LEFT|ItemTouchHelper.RIGHTforthesupportedswipedirections:
ItemTouchHelperhelper=newItemTouchHelper(newItemTouchHelper
.SimpleCallback(0,ItemTouchHelper.LEFT|ItemTouchHelper.RIGHT){}
3. YoumustnowimplementthedesiredbehaviorinonSwiped().Inthiscase,swipingthecardleftorrightshoulddeleteitfromthelist.Callremove()onthedataset,passingintheappropriateindexbygettingthepositionfromtheViewHolder:
mSportsData.remove(viewHolder.getAdapterPosition());
4. ToallowtheRecyclerViewtoanimatethedeletionproperly,youmustalsocallnotifyItemRemoved(),againpassingintheappropriateindexbygettingthepositionfromtheViewHolder:
mAdapter.notifyItemRemoved(viewHolder.getAdapterPosition());
5. AftercreatingthenewItemTouchHelperobjectintheMainActivity'sonCreate()method,callattachToRecyclerView()ontheItemTouchHelperinstancetoaddittoyourRecyclerView:
helper.attachToRecyclerView(mRecyclerView);
6. Runyourapp,youcannowswipelistitemsleftandrighttodeletethem!
3.2ImplementdraganddropYoucanalsoimplementdraganddropfunctionalityusingthesameSimpleCallback.ThefirstargumentoftheSimpleCallbackdetermineswhichdirectionstheItemTouchHelpersupportsformovingtheobjectsaround.Dothefollowing:
1. ChangethefirstargumentoftheSimpleCallbackfrom0toincludeeverydirection,sincewewanttobeabletodraganddropanywhere:
Introduction
283
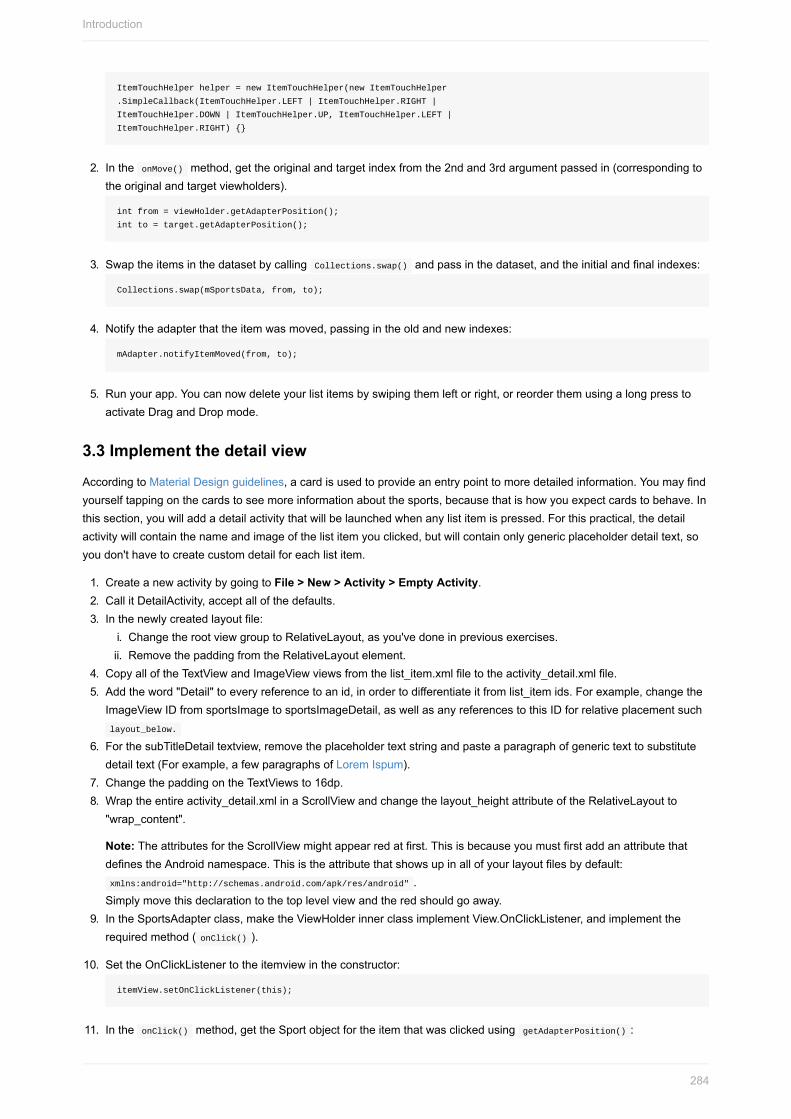
ItemTouchHelperhelper=newItemTouchHelper(newItemTouchHelper
.SimpleCallback(ItemTouchHelper.LEFT|ItemTouchHelper.RIGHT|
ItemTouchHelper.DOWN|ItemTouchHelper.UP,ItemTouchHelper.LEFT|
ItemTouchHelper.RIGHT){}
2. IntheonMove()method,gettheoriginalandtargetindexfromthe2ndand3rdargumentpassedin(correspondingtotheoriginalandtargetviewholders).
intfrom=viewHolder.getAdapterPosition();
intto=target.getAdapterPosition();
3. SwaptheitemsinthedatasetbycallingCollections.swap()andpassinthedataset,andtheinitialandfinalindexes:
Collections.swap(mSportsData,from,to);
4. Notifytheadapterthattheitemwasmoved,passingintheoldandnewindexes:
mAdapter.notifyItemMoved(from,to);
5. Runyourapp.Youcannowdeleteyourlistitemsbyswipingthemleftorright,orreorderthemusingalongpresstoactivateDragandDropmode.
3.3Implementthedetailview
AccordingtoMaterialDesignguidelines,acardisusedtoprovideanentrypointtomoredetailedinformation.Youmayfindyourselftappingonthecardstoseemoreinformationaboutthesports,becausethatishowyouexpectcardstobehave.Inthissection,youwilladdadetailactivitythatwillbelaunchedwhenanylistitemispressed.Forthispractical,thedetailactivitywillcontainthenameandimageofthelistitemyouclicked,butwillcontainonlygenericplaceholderdetailtext,soyoudon'thavetocreatecustomdetailforeachlistitem.
1. CreateanewactivitybygoingtoFile>New>Activity>EmptyActivity.2. CallitDetailActivity,acceptallofthedefaults.3. Inthenewlycreatedlayoutfile:
i. ChangetherootviewgrouptoRelativeLayout,asyou'vedoneinpreviousexercises.ii. RemovethepaddingfromtheRelativeLayoutelement.
4. CopyalloftheTextViewandImageViewviewsfromthelist_item.xmlfiletotheactivity_detail.xmlfile.5. Addtheword"Detail"toeveryreferencetoanid,inordertodifferentiateitfromlist_itemids.Forexample,changethe
ImageViewIDfromsportsImagetosportsImageDetail,aswellasanyreferencestothisIDforrelativeplacementsuchlayout_below.
6. ForthesubTitleDetailtextview,removetheplaceholdertextstringandpasteaparagraphofgenerictexttosubstitutedetailtext(Forexample,afewparagraphsofLoremIspum).
7. ChangethepaddingontheTextViewsto16dp.8. Wraptheentireactivity_detail.xmlinaScrollViewandchangethelayout_heightattributeoftheRelativeLayoutto
"wrap_content".
Note:TheattributesfortheScrollViewmightappearredatfirst.ThisisbecauseyoumustfirstaddanattributethatdefinestheAndroidnamespace.Thisistheattributethatshowsupinallofyourlayoutfilesbydefault:xmlns:android="http://schemas.android.com/apk/res/android".Simplymovethisdeclarationtothetoplevelviewandtheredshouldgoaway.
9. IntheSportsAdapterclass,maketheViewHolderinnerclassimplementView.OnClickListener,andimplementtherequiredmethod(onClick()).
10. SettheOnClickListenertotheitemviewintheconstructor:
itemView.setOnClickListener(this);
11. IntheonClick()method,gettheSportobjectfortheitemthatwasclickedusinggetAdapterPosition():
Introduction
284

SportcurrentSport=mSportsData.get(getAdapterPosition());
12. CreateanIntentthatlaunchestheDetailactivity,andputthetitleandimageresourceasextrasintheIntent:
IntentdetailIntent=newIntent(mContext,DetailActivity.class);
detailIntent.putExtra("title",currentSport.getTitle());
detailIntent.putExtra("image_resource",currentSport.getImageResource());
13. CallstartActivity()onthemContextvariable,passinginthenewIntent.14. InDetailActivity.java,initializetheImageViewandtitleTextViewinonCreate():
TextViewsportsTitle=(TextView)findViewById(R.id.titleDetail);
ImageViewsportsImage=(ImageView)findViewById(R.id.sportsImageDetail);
15. GetthetitlefromtheincomingIntentandsetittotheTextView:
sportsTitle.setText(getIntent().getStringExtra("title"));
16. UseGlidetoloadtheimageintotheImageView:
Glide.with(this).load(getIntent().getIntExtra("image_resource",0))
.into(sportsImage);
17. Runtheapp.Tappingonalistitemnowlaunchesthedetailactivity.
Task4:AddtheFABandchooseaMaterialDesigncolorpaletteOneoftheprinciplesbehindMaterialDesignisusingconsistentelementsacrossapplicationsandplatformssothatusersrecognizepatternsandknowhowtousethem.Youhavealreadyusedonesuchelement:theFloatingActionButton.TheFABisacircularbuttonthatfloatsabovetherestoftheUI.Itisusedtopromoteaparticularactiontotheuser,onethatisverylikelytobeusedinagivenactivity.Inthistask,youwillcreateaFABthatresetsthedatasettoit'soriginalstate.
4.1AddtheFAB
TheFloatingActionButtonispartoftheDesignSupportLibrary.
1. Addthefollowinglineofcodetotheapplevelbuild.gradlefiletoaddthedesignsupportlibrarydependency:
compile'com.android.support:design:24.2.1'
2. UsethevectorassetstudiotodownloadanicontouseintheFAB.Thebuttonwillresetthecontentsofthe
RecyclerViewsothisiconshoulddo: .Changethenametoic_reset.3. Inactivity_main.xml,addaFloatingActionButtonviewwiththefollowingparameters:
Introduction
285

Attribute Value
android:layout_width "wrap_content"
android:layout_height "wrap_content"
android:layout_alignParentBottom "true"
android:layout_alignParentRight "true
android:layout_margin "16dp"
android:src "@drawable/ic_reset"
android:onClick resetSports
4. DefinetheresetSports()methodinMainActivity.javatosimplycallinitializeData()toresetthedata.5. Runtheapp.YoucannowresetthedatabypushingtheFAB.
Note:Becausetheactivityisdestroyedandrecreatedwhentheconfigurationchanges,rotatingthedeviceresetsthedatainthisimplementation.Inorderforthechangestobepersistent(asinthecaseofreorderingorremovingdata),youwouldhavetoimplementonSaveInstanceState()orwritethechangestoapersistentsource(likeadatabaseorSharedPreferences).
4.2ChooseaMaterialDesignpalette
IfyourunyourappyoumaynoticethattheFABhasacolorthatyoudidn'tdefineanywhere.Also,theAppbar(thebarthatcontainsthetitleofyourapp)hasacolorthatyoudidnotexplicitlyset.Wherearethesecolorsdefined?
1. Navigatetoyourstyles.xmlfile(locatedinthevaluesdirectory).TheAppThemestyledefinesthreecolorsbydefault:colorPrimary,colorPrimaryDarkandcolorAccent.Thesestylesaredefinedbyvaluesfromthecolors.xmlfile.MaterialDesignrecommendspickingatleastthesethreecolorsforyourapp:
2. Aprimarycolor.ThisoneisautomaticallyusedtocoloryourAppbar.3. Aprimarydarkcolor.Adarkershadeofthesamecolor.Thisisusedforthestatusbarabovetheappbar,amongother
things.4. Anaccentcolor.Acolorthatcontrastswellwiththeprimarycolor.Thisisusedforvarioushighlights,butitisalsothe
defaultcoloroftheFAB.YoucanusetheMaterialColorGuidetopicksomecolorstoexperimentwith.5. Pickacolorfromtheguidetouseasyourprimarycolor.Itshouldbewithinthe300-700rangesothatyoucanstillpick
aproperaccentanddarkcolor.ModifythecolorPrimaryhexvalueinyourcolors.xmlfiletomatchthecoloryoupicked.6. Pickadarkershadeofthesamecolortouseasyourprimarydarkcolor.Again,modifythecolors.xmlhexvaluefor
colorPrimaryDarktomatch.7. PickanaccentcolorforyourFABfromthecolorswhosevaluesstartwithanA,andwhosecolorcontrastswellwiththe
primarycolor(likeOrangeA200).ChangethecolorAccentvalueincolors.xmltomatch.8. Addtheandroid:tintattributetotheFABandsetitequalto#FFFFFF(white)inordertochangetheiconcolortowhite.9. Runtheapp.TheAppBarandFABchangedtoreflectthenewcolorpalette!
Note:IfyouwanttochangethecoloroftheFABtosomethingotherthanthemecolors,usetheapp:backgroundTintattribute.Notethatthisusestheapp:namespaceandAndroidStudiowillpromptyoutoaddastatementtodefinethenamespace.
SolutioncodeAndroidStudioproject:MaterialMe
CodingchallengeNote:Allcodingchallengesareoptionalandarenotprerequisitesforlaterlessons.
Introduction
286

Challenge1:Thischallengeconsistsofseveralsmallimprovementstoyourapplication:
AddrealdetailstotheSportobjectandpassthedetailstothedetailview.Implementawaytoensurethatthestateoftheappispersistentacrossorientationchanges.
Challenge2:Createanapplicationwith4imagesarrangedinagridinthecenterofyourlayout.Makethefirstthreesolidcoloredbackgroundswithdifferentshapes(square,circle,line),andthefourththeAndroidMaterialDesignIcon.Makeeachoftheseimagesrespondtoclicksasfollows:
1. OneofthecoloredblocksrelaunchestheActivityusingtheExplodeanimationforboththeenterandexittransitions.2. RelaunchtheActivityfromanothercoloredblock,thistimeusingtheFadetransition.3. Touchingthethirdcoloredblockstartsaninplaceanimationoftheview(suchasarotation).4. Finally,touchingtheandroidiconstartsasecondaryactivitywithaSharedElementTransitionswappingtheAndroid
blockwithoneoftheotherblocks.
Introduction
287

Introduction
288

Note:YoumustsetyourminimumSDKlevelto21orhigherinordertoimplementsharedelementtransitions.
SummaryACardViewisagoodlayoutwhenpresentinginformationthathasmixedmedia(suchasimagesandtext)CardViewisaUIcomponentfoundintheAndroidSupportLibrariesCardViewwasnotdesignedjustfortextchildViews.LoadingimagesdirectlyintoImageViewisverymemoryintensive.Allimagesareloadedatfull-resolution.Useanimageloadinglibrary,suchasGlide,toefficientlyloadimagesintoyourappTheAndroidSDKhasaclasscalledItemTouchHelperwhichassistsinobtainingtap,swipeordrag-and-dropinformationforyourUI.AFloatingActionButton(FAB)focusestheuseronaparticularactionand"floats"aboutyourUI.MaterialDesignsuggest3colorsforyourapp:aprimarycolor,aprimarydarkcolorandanaccentcolor.TheMaterialDesignguidelinesareasetofguidingprinciplesthataimtocreateconsistent,intuitiveandplayfulapplications.MaterialDesignpromotestheuseofboldimageryandcolorstoenhanceuserexperience.Italsopromotesconsistentelementsacrossplatforms(suchasCardViewandtheFAB).MaterialDesignshouldbeusedformeaningful,intuitivemotionlikedismissableorrearrangeablecards.
RelatedconceptTherelatedconceptdocumentationisinAndroidDeveloperFundamentals:Concepts.
MaterialDesign
LearnmoreMaterialDesignGuidelinesMaterialPaletteGeneratorCardsandListsGuideFloatingActionButtonReferenceDefiningCustomAnimationsViewAnimation
Introduction
289

5.3:SupportingLandscape,MultipleScreenSizesandLocalizationContents:
WhatyoushouldalreadyKNOWWhatyouwillLEARNWhatyouwillDOAppoverviewTask1:SupportLandscapeOrientationTask2:SupportTabletsTask3:LocalizeyourAppCodingchallengesSummaryRelatedconceptLearnmore
AfterusingtheMaterialMe!applicationyoucreatedinthelastpractical,youmaynoticethatitisnotoptimizedforusewhentheorientationforthedeviceisrotatedfromportraitmodetolandscapemode.Likewise,ifyouaretestingonatablet,thefont-sizesaretoosmallandthespaceisnotusedefficiently.TheAndroidframeworkhasawaytosolvebothoftheseissues.ResourcequalifiersallowtheAndroidRuntimetousealternateresourcefiles(.xml)dependingonthedeviceconfiguration,suchas,theorientation,thelocaleandother"qualifiers".Forafulllistofavailablequalifiers,visittheProvidingResourcesguide.InthispracticalyouwilloptimizetheuseofspaceintheMaterialsportsappsothatyourappworkswellinlandscapemode,aswellasonatablet.
WhatyoushouldalreadyKNOWFromthepreviouschaptersyoushouldbeableto:
Locateandeditresourcefiles.Extractresources.Instantiateavirtualphoneortabletusingtheemulator.
WhatyouwillLEARNInthispractical,youwilllearnto:
Providealternateresourcesforlandscapemode.Providealternateresourcesfortablets.Providealternateresourcesfordifferentlocales.
WhatyouwillDOInthispracticalyouwill:
UpdatetheMaterialMe!applicationforbetteruseofspaceinlandscapemode.Addanalternativelayoutfortablets.Localizethecontentofyourapp.
AppOverview
Introduction
290

TheimprovedMaterialMe!applicationwillincludeimprovedlayoutswhenusedinlandscapemode,onatablet,andofferlocalizedcontentforusersoutsideoftheUS.
Introduction
291

Thispracticalbuildsonthe"MaterialMe!"appfromthepreviouspractical.
1. Continueonyourversionofthe"MaterialMe!"application,ordownloadithere.
Task1:SupportLandscapeOrientation
Introduction
292

Youmayrecallthatwhentheuserchangestheorientationofthedevice,theAndroidframeworkdestroysandrecreatesthecurrentactivity.Theneworientationoftenhasdifferentlayoutrequirementsthantheoriginalone.Forexample,theMaterialMe!applicationlooksgoodinportraitmode,butdoesnotmakeoptimaluseofthescreeninlandscapemode.Withthelargerwidthinlandscapemode,theimageineachlistitemoverwhelmsthetextprovidingapooruserexperience.
Inthistask,youwillcreateanalternativeresourcefilethatwillchangetheappearanceoftheappwhenitisusedinlandscapeorientation.
1.1ChangetoaGridLayoutManagerLayoutsthatcontainlistitemsoftenlookunbalancedinlandscapemodewhenthelistitemsincludefull-widthimages.Onegoodsolutionistouseagrid,insteadofalinearlistwhendisplayingtheCardViewsinlandscapemode.RecallthattheitemsinaRecyclerViewlistareplacedusingaLayoutManager;untilnow,youhavebeenusingtheLinearLayoutManagerwhichlaysouteachiteminaverticalorhorizontalscrollinglist.GridLayoutManagerisanotherlayoutmanagerthatdisplaysitemsinagrid,ratherthanalist.WhenyoucreateaGridLayoutManager,yousupplytwoparameters:theapplicationcontext,andanintegerrepresentingthenumberofcolumns.Youcanchangethenumberofcolumnsprogrammatically,whichgivesyouflexibilityindesigningresponsivelayouts.Inthiscase,thenumberofcolumnsintegershouldbe1inportraitorientation(singlecolumn)and2wheninlandscapemode.Noticewhenthenumberofcolumnsis1,aGridLayoutManagerbehavessimilartoaLinearLayoutManager.
1. Createanewresourcesfilecalledintegers.xml.Navigatetoyourresourcesdirectory,right-clickonthevaluesdirectorynameandselectNew>Valuesresourcefile.
2. Namethefileintegers.xmlandclickOK.3. Createanintegerconstantbetweenthe<resources>tagscalled"grid_column_count"andsetitequalto1:
<integername="grid_column_count">1</integer>
4. Createanothervaluesresourcefile,againcalledintegers.xmlbutwithdifferentcharacteristics.
Notethe"Availablequalifiers"optioninthedialogforcreatingtheresourcefile.Thesecharacteristicsarecalled"resourcequalifiers"andareusedtolabelresourceconfigurationsforvarioussituations.
5. SelectOrientation,andpressthe>>symbolinthemiddleofthedialogtoaccessthisqualifier.6. ChangetheScreenorientationselectortoLandscape,andnoticehowthedirectoryname"values-land"is
automaticallychanged.Thisistheessenceofresourcequalifiers:thedirectorynametellsAndroidwhentousethatspecificlayoutfile.Inthiscase,thatiswhenthephoneisrotatedtolandscapemode.
Introduction
293

7. ClickOKtogeneratethenewlayoutfile.8. Copytheintegerconstantyoucreatedintothisnewresourcefile,butchangethevalueto2.
Youshouldnowhavetwoindividualintegers.xmlfiles.Inthe"Android"projectviewinAndroidStudio,theseshouldbegroupedintoan"integers.xml"folder,witheachfileinsidelabeledwiththequalifieryouselected("land"inthiscase).
1.2ModifyMainActivity
1. InonCreate()inMainActivity,gettheintegerfromtheintegers.xmlresourcefile:
intgridColumnCount=getResources().getInteger(R.integer.grid_column_count);
TheAndroidRuntimewilltakecareofdecidingwhichintegers.xmlfiletouse,dependingonthestateofthedevice.
2. ChangetheLinearLayoutManagertoaGridLayoutManager,passinginthecontextandthenewlycreatedinteger:
mRecyclerView.setLayoutManager(newGridLayoutManager(this,gridColumnCount));
3. Runtheappandrotatethedevice.Thenumberofcolumnschangesautomaticallywiththeorientationofthedevice.
Whenusingtheapplicationinlandscapemode,youwillnoticethattheswipetodismissfunctionalityisnolongerintuitive,sincetheitemsarenowinagridandnotalist.YoucanusethegridColumnCountvariabletodisabletheswipeactionwhenthereismorethanonecolumn:
intswipeDirs;
if(gridColumnCount>1){
swipeDirs=0;
}else{
swipeDirs=ItemTouchHelper.LEFT|ItemTouchHelper.RIGHT;
}
ItemTouchHelperhelper=newItemTouchHelper(newItemTouchHelper.SimpleCallback
(ItemTouchHelper.LEFT|ItemTouchHelper.RIGHT|ItemTouchHelper.DOWN
|ItemTouchHelper.UP,swipeDirs)
Task2:SupportTablets
Introduction
294

2.1MaketheLayoutAdapttoTablets
Inthisstep,youwillcreatedifferentresourcequalifierstomaximizescreenusefortabletsizeddevices,increasingthecolumncountto2forportraitorientationand3forlandscapeorientation.Theresourcequalifieryouneeddependsonyourspecificrequirements.Thereareseveralqualifiersthatyoucanusetoselectthecorrectconditions:
"smallestwidth"-Thisqualifierisusedmostfrequentlytoselectfortablets.Itisdefinedbythesmallestwidthofthedevice(regardlessoforientation),whichremovestheambiguitywhentalkingabout"height"and"width"sincesomedevicesaretraditionallyheldinlandscapemode,andothersinportrait.Anythingwithasmallestwidthofatleast600dpisconsideredatablet."availablewidth"-Theavailablewidthistheeffectivewidthofthedevice,regardlessoftheorientation.Theavailablewidthchangeswhenthedeviceisrotated,sincetheeffectiveheightandwidthofthedeviceareswitched."availableheight"-Sameas"availablewidth",exceptitusestheeffectiveheightinsteadoftheeffectivewidth.
Tostartthistask:
1. Createanintegers.xmlfilewhichusesthe"smallestwidth"qualifierwiththevaluesetto600.Androidusesthisfilewhenevertheapprunsonatablet.
2. Copythecodefromtheintegers.xmlfilewiththelandscaperesourcequalifier(ithasagridcountof2)andpasteitinthenewintegers.xmlfile.
3. Createathirdintegers.xmlfilethatincludesboththesmallestscreenwidthof600dpqualifier,andthelandscapeorientationqualifier.Androidusesthisfilewhentheapprunsonatabletinlandscapemode.
Note:Androidwilllookfortheresourcefilewiththemostspecificresourcequalifierfirst,thenmoveontoamoregenericone.Forexample,ifavalueisdefinedintheintegers.xmlfilewithboththelandscapeandsmallestwidthqualifier,itwilloverridethevalueintheintegers.xmlfilewithjustthelandscapequalifier.Formoreinformationaboutresourcequalifiers,visittheProvidingResourcesGuide.
4. Changethegrid_column_countvariableto3inthelandscape,tabletintegers.xmlfile.
Introduction
295

genericone.Forexample,ifavalueisdefinedintheintegers.xmlfilewithboththelandscapeandsmallestwidthqualifier,itwilloverridethevalueintheintegers.xmlfilewithjustthelandscapequalifier.Formoreinformationaboutresourcequalifiers,visittheProvidingResourcesGuide.
4. Changethegrid_column_countvariableto3inthelandscape,tabletintegers.xmlfile.
5. Createavirtualtabletemulator.Runtheapponatabletemulatoraswellasaphoneemulatorandrotatebothofthedevicesintolandscapemode.Withtheseresourcequalifierfiles,theappusesthescreenrealestatemuchmoreeffectively.
2.2Updatethetabletlistitemstyles
Atthispoint,yourappchangesthenumberofcolumnsinaGridLayoutManagertofittheorientationofthedeviceandmaximizetheuseofthescreen.However,alltheTextViewsthatappearedcorrectly-sizedonaphone'sscreennowappeartoosmallforthelargerscreenofatablet.Tofixthis,youwillextracttheTextAppearancestylesfromthelayoutresourcefilesintothestylesresourcefile.Youwillalsocreateadditionalstyles.xmlfilesfortabletsusingresourcequalifiers.
Note:Youcouldalsocreatealternativelayoutfileswiththeproperresourcequalifiers,andchangethestylesoftheTextViewsinthose.However,thiswouldrequiremorecodeduplication,sincemostofthelayoutinformationisthesamenomatterwhatdeviceyouuse,soyouwillonlyextracttheattributesthatwillchange.CreatetheStyles
1. Inthestyles.xmlfile,createthefollowingstyles:
Name Parent
SportsTitle TextAppearance.AppCompat.Headline
SportsDetailText TextAppearance.AppCompat.Subhead
Createastyles.xmlfilefortablets
Nowyouwillcreatethefilewhereyouwilldefinestylesfortablets.
1. Createanewstyles.xmlresourcefilethatusestheSmallestScreenWidthqualifierwithavalueof600.2. Copythe"SportsTitle"and"SportsDetailText"stylesfromtheoriginalstyles.xmlfileintothenew,qualifiedstyles.xml
file.3. Changetheparentofthe"SportsTitle"styleto"TextAppearance.AppCompat.Display1"4. TheAndroidpre-definedDisplay1styleusesthetextColorSecondaryvaluefromthecurrenttheme
(ThemeOverlay.AppCompat.Dark),whichinthiscaseisalightgraycolor.Thelightgraycolordoesnotshowupwellonthebannerimagesinyourapp.Tocorrectthisaddan"android:textColor"attributetothe"SportsTitle"styleandsetitto"?android:textColorPrimary".'
Note:ThequestionmarktellsAndroidRuntimetofindthevalueinthethemeappliedtotheView.InthisexamplethethemeisThemeOverlay.AppCompat.DarkinwhichthetextColorPrimaryattributeiswhite.
5. Changetheparentof"SportsDetailText"styleto"TextAppearance.AppCompat.Headline".
Updatethestyleofthetextviewsinlist_item.xml
1. Backinthelist_item.xmlfile,changethestyleattributeofthe"title"Textviewto"@style/SportsDetailTitle"2. Changethestyleattributeofthe"newsTitle"and"subTitle"TextViewsto"@style/SportsDetailText".3. Runyourapp.Eachlistitemnowhasalargertextsizeonthetablet.
2.3UpdatethetabletsportsdetailstylesYouhavenowfixedthedisplayfortheMainActivity,whichlistsalltheSportsCardViews.TheDetailActivitystillhasthesamefontsizesontabletsandphones.
1. Createthefollowingstyleineachstyles.xmlfile:
Introduction
296

styles.xml(sw600dp)
Name Parent
SportsDetailTitle TextAppearance.AppCompat.Display3
styles.xml(notqualified)
Name Parent
SportsDetailTitle TextAppearance.AppCompat.Headline
2. Changethestyleofboththe"newsTitleDetail"and"subTitleDetail"TextViewsintheactivity_detail.xmllayoutfiletothe"SportsDetailText"styleyoucreatedinthepreviousstep.
3. Runyourapp.Allofthetextisnowlargeronthetablet,whichgreatlyimprovestheuserexperienceofyourapplication.
Task3:LocalizeyourAppA"locale"representsaspecificgeographic,politicalorculturalregionoftheworld.Resourcequalifierscanbeusedtoprovidealternateresourcesbasedontheusers'locale.Justasfororientationandscreenwidth,Androidprovidestheabilitytoincludeseparateresourcefilesfordifferentlocales.Inthisstep,youwillmodifyyourstrings.xmlfiletobealittlemoreinternational.
3.1Addalocalizedstrings.xmlfile
YoumayhavenoticedthatthesportsinformationcontainedinthisappisdesignedforusersfromtheUS.Itusestheterm"soccer"torepresentasportknownas"football"everywhereelseintheworld.Inordertomakeyourappmoreinternationalized,youcanprovidealocalespecificstrings.xmlfiletotheUSuserswhichuses"soccer",whileallotherlocaleswilluse"football".
1. Createanewvaluesresourcefile.2. Callthefilestrings.xmlandselectLocalefromthelistofavailablequalifiers.3. Inthe"Language:"section,selecten:English.4. Inthe"SpecificRegionOnly:"section,selectUS:UnitedStates.ThiswillcreateaspecificvaluesdirectoryfortheUS
locale,called"values-en-rUS".5. Copytheentiretyofthegenericstrings.xmlfiletothenewlocalespecificstrings.xmlfile.6. Inthegenericstrings.xmlfile,changethe"Soccer"iteminthesports_titlesarrayto"Football",aswellaschangingthe
relevantitemin"sports_info"array.7. Runtheapp.Dependingonthelanguagesettingonyourdevice,youwillseeeither"Soccer"or"Football".
Note:Tochangethelocalesettingonyourdevice,gotothedevicesettings,thenchooseLanguage&inputandchangetheLanguagesetting.IfyoupickEnglish(UnitedStates)theappwillhave"Soccer"asthestring,otherwiseitwillsay"Football".
SolutioncodeAndroidStudioproject:MaterialMe-Resource
CodingchallengesNote:Allcodingchallengesareoptionalandarenotprerequisitesforlaterlessons.
Challenge1:ItturnsoutthatseveralcountriesotherthantheUSuse"soccer"insteadof"football".Researchthesecountriesandaddlocalizedstringsresourcesforthem.
Introduction
297

Challenge2:UsethelocalizationtechniquesyoulearnedinTask3incombinationwithGoogletranslatetotranslateallofthestringsinyourappintoadifferentlanguage.
SummaryGridLayoutManagerisalayoutmanagerthathandles2-dimensionalscrollinglists.YoucandynamicallychangethenumberofcolumnsinaGridLayoutManager.TheAndroidRuntimeusesalternativeconfigurationfilesforvariousruntimeenvironmentssuchasdevicelayout,screendimensions,locale,country,keyboard,etc.Alternativeresourcesarelocatedinfilesnamedwithresourcequalifiersaspartoftheirnames.Theformatforthesedirectoriesis<resources_name>-<qualifier>.Anyfileinyour"res"directorycanbequalifiedthisway.Somecommonqualifiersare:
orientation:land,portraitsmallestwidth:sw600dplocale:en-rGB,frscreendensity:ldpi,mpdi,xhdpi,xxhdpi,xxxhdpimobilecountrycode:mcc310(US),mcc208(France)andmore!
RelatedconceptsTherelatedconceptdocumentationisinAndroidDeveloperFundamentals:Concepts.
ProvidingResourcesforAdaptiveLayouts
LearnmoreDeveloperDocumentation:
SupportingMultipleScreensProvidingResources
Introduction
298

6.1:UseEspressototestyourUIContents:
WhatyoushouldalreadyKNOWWhatyouwillLEARNWhatyouwillDOAppOverviewTask1:SetupEspressoinyourprojectTask2:TestforswitchingactivitiesandenteringtextTask3:TestthedisplayofspinnerselectionsTask4:RecordatestofaRecyclerViewCodingchallengeSummaryRelatedconceptLearnmore
Whenyou,asadeveloper,testuserinteractionswithinyourapp,ithelpstoensurethatyourapp'susersdon'tencounterunexpectedresultsorhaveapoorexperiencewheninteractingwithyourapp.
Youcantesttheuserinterfaceforacomplexappmanuallybyrunningtheappandtryingtheuserinterface.Butyoucan'tpossiblycoverallpermutationsofuserinteractionsandalloftheapp'sfunctionality.Youwouldalsohavetorepeatthesemanualtestsonmanydifferentdeviceconfigurationsinanemulator,andonmanydifferenthardwaredevices.
WhenyouautomatetestsofUIinteractions,youfreeyourselfupforotherwork.YoucanusesuitesofautomatedteststoperformalloftheUIinteractionsautomatically,whichmakesiteasiertoruntestsfordifferentdeviceconfigurations.Itisagoodideatogetintothehabitofcreatinguserinterface(UI)testsasyoucodetoverifythattheUIofyourappisfunctioningcorrectly.
EspressoisatestingframeworkforAndroidthatmakesiteasytowritereliableuserinterface(UI)testsforanapp.Theframework,whichispartoftheAndroidSupportRepository,providesAPIsforwritingUIteststosimulateuserinteractionswithintheapp—everythingfromclickingbuttonsandnavigatingviewstochoosingmenuselectionsandenteringdata.
WhatyoushouldalreadyKNOWYoushouldbeableto:
CreateandrunappsinAndroidStudio.CreateandeditUIelementsusingtheLayoutEditor,enteringXMLcodedirectly,andaccessingUIelementsfromyourJavacode.AddonClickfunctionalitytoabutton.BuildtheTwoActivitiesappfromapreviouslesson.BuildthePhoneNumberSpinnerappfromapreviouslesson.BuildtheRecyclerViewappfromapreviouslesson.
WhatyouwillLEARNDuringthispractical,youwilllearnto:
SetupEspressoinyourappproject.WriteanEspressotestthattestsforuserinputandchecksforthecorrectoutput.WriteanEspressotesttofindaspinner,clickoneofitsitems,andcheckforthecorrectoutput.UsetheRecordEspressoTestfunctioninAndroidStudio.
Introduction
299

WhatyouwillDOInthispracticalapplicationyouwill:
ModifyaprojecttocreateEspressotests.Testtheapp'stextinputandoutput.Testclickingaspinneritemandcheckitsoutput.RecordanEspressotestofaRecyclerView.
AppOverviewYouwillmodifytheTwoActivitiesprojecttosetupEspressointheprojectfortesting.Youwillthentesttheapp’sfunctionality,whichenablesausertoentertextintoatextfieldandclicktheSendbutton,asshownontheleftsideofthefigurebelow,andviewthattextinasecondactivity,asshownontherightsideofthefigurebelow.
Tip:ForanintroductiontotestingAndroidapps,seeTestYourApp.
AndroidStudioproject:TwoActivities
Task1:SetupEspressoinyourprojectTouseEspresso,youmustalreadyhavetheAndroidSupportRepositoryinstalledwithAndroidStudio.YoumustalsoconfigureEspressoinyourproject.
Inthistaskyouchecktoseeiftherepositoryisinstalled.Ifitisnot,youwillinstallit.YouthenwillconfigureEspressointheTwoActivitiesprojectcreatedpreviously.
1.1CheckfortheAndroidSupportRepository
1. StartAndroidStudio,andchooseTools>Android>SDKManager.2. ClicktheSDKToolstab,andlookfortheSupportRepository.
If"Installed"appearsintheStatuscolumn,you'reallset.ClickCancel.If"Notinstalled"appears,oranupdateisavailable:
i. ClickthecheckboxnexttoAndroidSupportRepository.Adownloadiconshouldappearnexttothecheckbox.
ii. Clickoneofthefollowing:
ApplytostartinstallingtherepositoryandremaininSDKManagertomakeotherchanges.OKtoinstalltherepositoryandquittheSDKManager.
1.2ConfigureEspressofortheprojectWhenyoustartaprojectforthephoneandtabletformfactorusingAPI15:Android4.0.3(IceCreamSandwich)astheminimumSDK,AndroidStudioversion2.2andnewerautomaticallyincludesthedependenciesyouneedtouseEspresso.Toexecutetests,EspressoandUIAutomatoruseJUnitastheirtestingframework.JUnitisthemostpopularand
Introduction
300

widely-usedunittestingframeworkforJava.YourtestclassusingEspressoorUIAutomatorshouldbewrittenasaJUnit4testclass.IfyoudonothaveJUnit,youcangetitathttp://junit.org/junit4/.
Note:ThemostcurrentJunitrevisionisJUnit5.HoweverforthepurposesofusingEspressoorUIAutomator,version4.12isrecommended.IfyouhavecreatedyourprojectinapreviousversionofAndroidStudio,youmayhavetoaddthedependenciesandinstrumentationyourself.Toaddthedependenciesyourself,followthesesteps:
1. OpentheTwoActivitiesproject,orifyouprefer,makeacopyoftheprojectfirstandthenopenthecopy.SeeCopyandrenameaprojectintheAppendixforinstructions.
2. Openyourbuild.gradle(Module:app)file.
Note:Donotmakechangestothebuild.gradle(Project:yourappname)file.3. Checkifthefollowingisincluded(alongwithotherdependencies)inthedependenciessectionoftheproject's
build.gradle(Module:app)file:
androidTestCompile
('com.android.support.test.espresso:espresso-core:2.2.2',{
excludegroup:'com.android.support',module:'support-annotations'
})
testCompile'junit:junit:4.12'
Note:Ifthefiledoesn'tincludetheabovedependencystatements,enterthemintothedependenciessection.4. AndroidStudio2.2alsoaddsthefollowinginstrumentationstatementtotheendofthedefaultConfigsectionofanew
project:
testInstrumentationRunner
"android.support.test.runner.AndroidJUnitRunner"
Note:Ifthefiledoesn'tincludetheaboveinstrumentationstatement,enteritattheendofthedefaultConfigsection.Instrumentationisasetofcontrolmethods,orhooks,intheAndroidsystem.ThesehookscontrolanAndroidcomponentindependentlyofthecomponent'snormallifecycle.TheyalsocontrolhowAndroidloadsapps.Usinginstrumentationmakesitpossibleforteststoinvokemethodsintheapp,andmodifyandexaminefieldsintheapp,independentlyoftheapp'snormallifecycle.
5. Ifyoumodifiedthebuild.gradle(Module:app)file,clicktheSyncNowlinkinthenotificationaboutGradlefilesintoprightcornerofthewindow.
1.3Turnoffanimationsonyourtestdevice
ToletAndroidStudiocommunicatewithyourdevice,youmustfirstturnonUSBDebuggingonyourdevice,asdescribedinanearlierchapter.
Androidphonesandtabletsdisplayanimationswhenmovingbetweenappsandscreens.Theanimationsareattractivewhenusingthedevice,buttheyslowdownperformance,andmayalsocauseunexpectedresultsormayleadyourtesttofail.Soit'sagoodideatoturnoffanimationsonyourphysicaldevice.Toturnoffanimationsonyourtestdevice,tapontheSettingsicononyourphysicaldevice.LookforDeveloperOptions.NowlookfortheDrawingsection.Inthissection,turnoffthefollowingoptions:
WindowanimationscaleTransitionanimationscaleAnimatordurationscale
Tip:Youshouldalsokeepinmindthatinstrumentingasystem,suchasinexecutingunittests,canalterthetimingofspecificfunctions.Forthisreason,itisusefultokeepunittestingandactualdebuggingseparate.UnittestingusesanAPIbasedEspressoFrameworkwithhooksforinstrumentation.Debuggingusesbreakpointsandothermethodsintheactualcodingstatementswithinyourapp'scode,asdescribedinapreviouslesson.</div>
Introduction
301
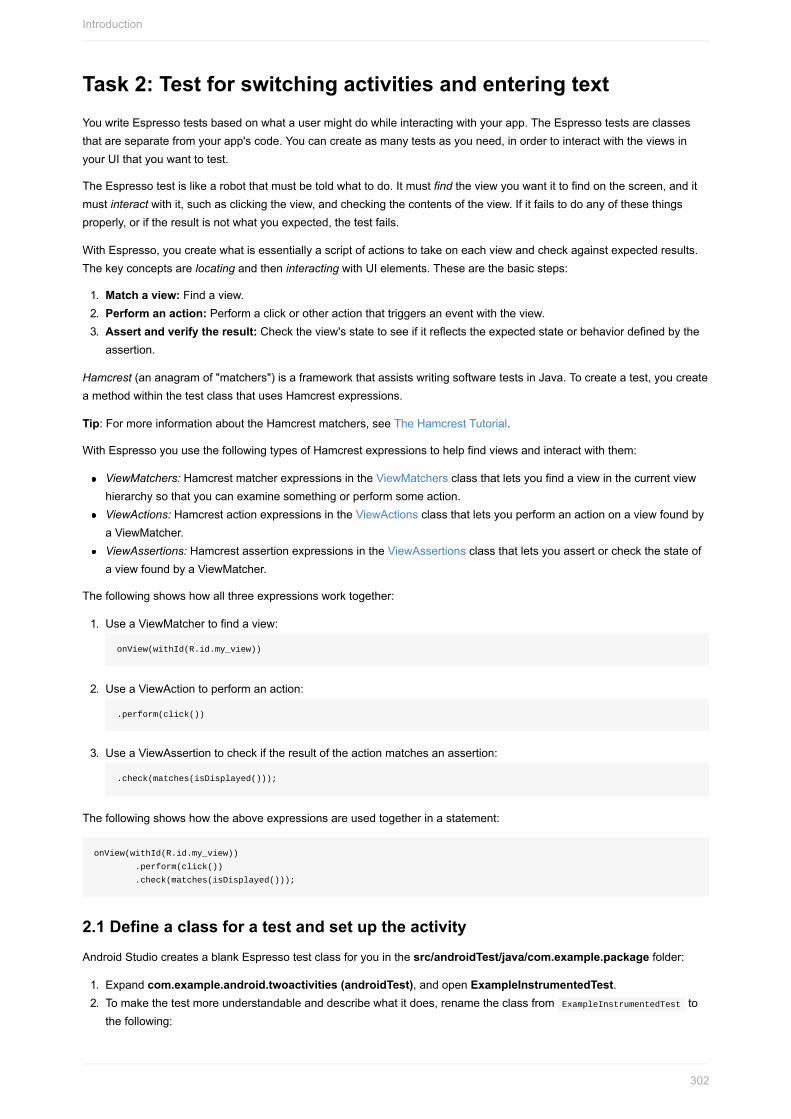
Task2:TestforswitchingactivitiesandenteringtextYouwriteEspressotestsbasedonwhatausermightdowhileinteractingwithyourapp.TheEspressotestsareclassesthatareseparatefromyourapp'scode.Youcancreateasmanytestsasyouneed,inordertointeractwiththeviewsinyourUIthatyouwanttotest.
TheEspressotestislikearobotthatmustbetoldwhattodo.Itmustfindtheviewyouwantittofindonthescreen,anditmustinteractwithit,suchasclickingtheview,andcheckingthecontentsoftheview.Ifitfailstodoanyofthesethingsproperly,oriftheresultisnotwhatyouexpected,thetestfails.
WithEspresso,youcreatewhatisessentiallyascriptofactionstotakeoneachviewandcheckagainstexpectedresults.ThekeyconceptsarelocatingandtheninteractingwithUIelements.Thesearethebasicsteps:
1. Matchaview:Findaview.2. Performanaction:Performaclickorotheractionthattriggersaneventwiththeview.3. Assertandverifytheresult:Checktheview'sstatetoseeifitreflectstheexpectedstateorbehaviordefinedbythe
assertion.
Hamcrest(ananagramof"matchers")isaframeworkthatassistswritingsoftwaretestsinJava.Tocreateatest,youcreateamethodwithinthetestclassthatusesHamcrestexpressions.
Tip:FormoreinformationabouttheHamcrestmatchers,seeTheHamcrestTutorial.
WithEspressoyouusethefollowingtypesofHamcrestexpressionstohelpfindviewsandinteractwiththem:
ViewMatchers:HamcrestmatcherexpressionsintheViewMatchersclassthatletsyoufindaviewinthecurrentviewhierarchysothatyoucanexaminesomethingorperformsomeaction.ViewActions:HamcrestactionexpressionsintheViewActionsclassthatletsyouperformanactiononaviewfoundbyaViewMatcher.ViewAssertions:HamcrestassertionexpressionsintheViewAssertionsclassthatletsyouassertorcheckthestateofaviewfoundbyaViewMatcher.
Thefollowingshowshowallthreeexpressionsworktogether:
1. UseaViewMatchertofindaview:
onView(withId(R.id.my_view))
2. UseaViewActiontoperformanaction:
.perform(click())
3. UseaViewAssertiontocheckiftheresultoftheactionmatchesanassertion:
.check(matches(isDisplayed()));
Thefollowingshowshowtheaboveexpressionsareusedtogetherinastatement:
onView(withId(R.id.my_view))
.perform(click())
.check(matches(isDisplayed()));
2.1DefineaclassforatestandsetuptheactivityAndroidStudiocreatesablankEspressotestclassforyouinthesrc/androidTest/java/com.example.packagefolder:
1. Expandcom.example.android.twoactivities(androidTest),andopenExampleInstrumentedTest.2. Tomakethetestmoreunderstandableanddescribewhatitdoes,renametheclassfromExampleInstrumentedTestto
thefollowing:
Introduction
302

publicclassActivityInputOutputTest
3. Changetheclassdefinitiontothefollowing:
@RunWith(AndroidJUnit4.class)
publicclassActivityInputOutputTest{
@Rule
publicActivityTestRulemActivityRule=newActivityTestRule<>(
MainActivity.class);
}
Theclassdefinitionnowincludesseveralannotations:
@RunWith:TocreateaninstrumentedJUnit4testclass,addthe@RunWith(AndroidJUnit4.class)annotationatthebeginningofyourtestclassdefinition.@Rule:The@Ruleannotationletsyouaddorredefinethebehaviorofeachtestmethodinareusableway,usingoneofthetestruleclassesthattheAndroidTestingSupportLibraryprovides,suchasActivityTestRuleorServiceTestRule.TheruleaboveusesanActivityTestRuleobject,whichprovidesfunctionaltestingofasingleActivity—inthiscase,MainActivity.class.DuringthedurationofthetestyouwillbeabletomanipulateyourActivitydirectly,usingViewMatchers,ViewActions,andViewAssertions.
Intheabovestatement,ActivityTestRulemayturnredatfirst,butthenAndroidStudioaddsthefollowingimportstatementautomatically:
importandroid.support.test.rule.ActivityTestRule;
2.2Testswitchingactivities
TheTwoActivitiesapphastwoactivities:
Main:Includesthebutton_mainbuttonforswitchingtotheSecondactivityandthetext_header_replyviewthatservesasatextheadingfortheMainactivity.Second:Includesthebutton_secondbuttonforswitchingtotheMainactivityandthetext_headerviewthatservesasatextheadingfortheSecondactivity.
Whenyouhaveanappthatswitchesactivities,youshouldtestthatcapability.TheTwoActivitiesappprovidesatextentryfieldandaSendbutton(thebutton_mainid).ClickingSendlaunchestheSecondactivitywiththeenteredtextshowninthetext_headerviewoftheSecondactivity.
Butwhathappensifnotextisentered?WilltheSecondactivitystillappear?
TheActivityInputOutputTestclassoftestswillshowthattheviewsappearregardlessofwhethertextisentered.FollowthesestepstoaddyourteststoActivityInputOutputTest:
1. AddanactivityLaunch()methodtoActivityInputOutputTesttotestwhethertheviewsappearwhenclickingthebuttons,andincludethe@Testnotationonalineimmediatelyabovethemethod:
@Test
publicvoidactivityLaunch(){…}
The@TestannotationtellsJUnitthatthepublicvoidmethodtowhichitisattachedcanberunasatestcase.Atestmethodbeginswiththe@Testannotationandcontainsthecodetoexerciseandverifyasinglefunctioninthecomponentthatyouwanttotest.
2. AddacombinedViewMatcherandViewActionexpressiontotheactivityLaunch()methodtolocatetheviewcontainingthebutton_mainbutton,andincludeaViewActionexpressiontoperformaclick:
onView(withId(R.id.button_main)).perform(click());
Introduction
303

TheonView()methodletsyouuseViewMatcherargumentstofindviews.ItsearchestheviewhierarchytolocateacorrespondingViewinstancethatmeetssomegivencriteria—inthiscase,thebutton_mainview.The.perform(click())expressionisaViewActionexpressionthatperformsaclickontheview.
3. IntheaboveonViewstatement,onView,withID,andclickmayturnredatfirst,butthenAndroidStudioaddsimportstatementsforonView,withID,andclick.
4. AddanotherViewMatcherexpressiontotheactivityLaunch()methodtofindthetext_headerview(whichisintheSecondactivity),andaViewActionexpressiontoperformachecktoseeiftheviewisdisplayed:
onView(withId(R.id.text_header)).check(matches(isDisplayed()));
ThisstatementusestheonView()methodtolocatethetext_headerviewfortheSecondactivityandchecktoseeifitisdisplayedafterclickingthebutton_mainview.
5. IntheaboveonViewstatement,thecheck()methodmayturnredatfirst,butthenAndroidStudioaddsanimportstatementforit.
6. Addsimilarstatementstotestwhetherclickingthebutton_secondbuttonintheSecondactivityswitchestotheMainactivity:
onView(withId(R.id.button_second)).perform(click());
onView(withId(R.id.text_header_reply)).check(matches(isDisplayed()));
7. ReviewtheactivityLaunch()methodyoujustcreatedintheActivityInputOutputTestclass.Itshouldlooklikethis:
@Test
publicvoidactivityLaunch(){
onView(withId(R.id.button_main)).perform(click());
onView(withId(R.id.text_header)).check(matches(isDisplayed()));
onView(withId(R.id.button_second)).perform(click());
onView(withId(R.id.text_header_reply)).check(matches(isDisplayed()));
}
8. Torunthetest,right-click(orControl-click)ActivityInputOutputTestandchooseRunActivityInputOutputTestfromthepop-upmenu.Youcanthenchoosetorunthetestontheemulatororonyourdevice.
Asthetestruns,watchthetestautomaticallystarttheappandclickthebutton.TheSecondactivity'sviewappears.ThetestthenclickstheSecondactivity'sbutton,andtheMainactivityviewappears.
TheRunwindow(thebottompaneofAndroidStudio)showstheprogressofthetest,andwhenfinishes,itdisplays"Testsrantocompletion."IntheleftcolumnAndroidStudiodisplays"AllTestsPassed".
2.3TesttextinputandoutputWriteatestfortextinputandoutput.TheTwoActivitiesappusestheeditText_mainviewforinput,thebutton_mainbuttonforsendingtheinputtotheSecondactivity,andtheSecondactivityviewthatshowstheoutputinthefieldwiththeidtext_message.
1. Addanother@TestannotationandanewtextInputOutput()methodtotheApplicationTestclasstotesttextinputandoutput:
@Test
publicvoidtextInputOutput(){
onView(withId(R.id.editText_main)).perform(typeText("Thisisatest."));
onView(withId(R.id.button_main)).perform(click());
}
TheabovemethodusesaViewMatchertolocatetheviewcontainingtheeditText_mainview,andaViewActiontoenterthetext"Thisisatest."ItthenusesanotherViewMatchertofindtheviewwiththebutton_mainbutton,andanotherViewActiontoclickthebutton.
Introduction
304

2. AddaViewMatchertolocatetheSecondactivity'stext_messageview,andaViewAssertiontoseeiftheoutputmatchestheinputtotestthatthemessagewascorrectlysent:
onView(withId(R.id.text_message)).check(matches(withText("Thisisatest.")));
3. Runthetest.
Asthetestruns,theappstartsandthetextisautomaticallyenteredasinput;thebuttonisclicked,andthetextappearsonthesecondactivity'sscreen.
ThebottompaneofAndroidStudioshowstheprogressofthetest,andwhenfinished,itdisplays"Testsrantocompletion."IntheleftcolumnAndroidStudiodisplays"AllTestsPassed".Youhavesuccessfullytestedthetextinputfield,theSendbutton,andthetextoutputfield.
Solutioncode:
AndroidStudioProject:TwoActivitiesEspressoTest
SeeActivityInputOutputTest.java.
2.4Introduceanerrortoshowatestfailing
Introduceanerrorinthetesttoseewhatafailedtestlookslike.
1. Changethematchcheckonthetext_messageviewfrom"Thisisatest."to"Thisisafailingtest.":
onView(withId(R.id.text_message)).check(matches(withText("Thisisafailingtest.")));
2. Runthetestagain.Thistimeyouwillseethemessageinred,"1testfailed",abovethebottompane,andaredexclamationpointnexttotextInputOutputintheleftcolumn.Scrollthebottompanetothemessage"Testrunningstarted"andseethatalloftheresultsafterthatpointareinred.Theverynextstatementafter"Testrunningstarted"is:
android.support.test.espresso.base.DefaultFailureHandler$AssertionFailedWithCauseError:'withtext:is"Thisis
afailingtest."'doesn'tmatchtheselectedview.
Expected:withtext:is"Thisisafailingtest."
Got:"AppCompatTextView{id=2131427417,res-name=text_message...
Otherfatalerrormessagesappearaftertheabove,duetothecascadingeffectofafailureleadingtootherfailures.Youcansafelyignorethemandfixthetestitself.
Task3:TestthedisplayofspinnerselectionsTheEspressoonView()methodfindsaviewthatyoucantest.Thismethodwillfindaviewinthecurrentviewhierarchy.Butyouneedtobecareful—inanAdapterViewsuchasaspinner,theviewistypicallydynamicallypopulatedwithchildviewsatruntime.Thismeansthereisapossibilitytheviewthatyouwanttotestmaynotbeintheviewhierarchyatthattime.
TheEspressoAPIhandlesthisproblembyprovidingaseparateonData()entrypoint,whichisabletofirstloadtheadapteritemandbringitintofocuspriortolocatingandperformingactionsonanyofitschildren.
PhoneNumberSpinnerisanappfromapreviouslessonthatshowsaspinner,withtheidlabel_spinner,forchoosingthelabelofaphonenumber(Home,Work,Mobile,andOther).Theappdisplaysthechoiceinatextfield,concatenatedwiththeenteredphonenumber.
Introduction
305

wordscouldbeinadifferentlanguage.
AndroidStudioProject:PhoneNumberSpinner
3.1Createthetestmethod
1. OpenthePhoneNumberSpinnerproject,orifyouprefer,makeacopyoftheprojectfirstandthenopenthecopy.SeeCopyandrenameaprojectintheAppendixforinstructions.
2. ConfigureEspressoinyourprojectasdescribedpreviously.3. Expandcom.example.android.phonenumberspinner(androidTest),andopenExampleInstrumentedTest.4. RenameExampleInstrumentedTesttoSpinnerSelectionTestintheclassdefinition,andaddthefollowing:
@RunWith(AndroidJUnit4.class)
publicclassSpinnerSelectionTest{
@Rule
publicActivityTestRulemActivityRule=newActivityTestRule<>(
MainActivity.class);
}
5. CreatetheiterateSpinnerItems()methodaspublicreturningvoid.
3.2AccessthearrayusedforthespinneritemsYouwantthetesttoclickeachiteminthespinnerbasedonthenumberofelementsinthearray.Buthowdoyouaccessthearray?
1. AssignthearrayusedforthespinneritemstoanewarraytousewithintheiterateSpinnerItems()method:
publicvoiditerateSpinnerItems(){
String[]myArray=
mActivityRule.getActivity().getResources()
.getStringArray(R.array.labels_array);
}
Inthestatementabove,thetestaccessestheapplication'sarray(withtheidlabels_array)byestablishingthecontextwiththegetActivity()methodoftheActivityTestRuleclass,andgettingaresourcesinstanceintheapplication'spackageusinggetResources().
2. Assignthelengthofthearraytosize,andconstructaforloopusingthesizeasthemaximumnumberforacounter.
intsize=myArray.length;
for(inti=0;i<size;i++){
}
3.3Locatespinneritemsandclickonthem1. AddanonView()statementwithintheforlooptofindthespinnerandclickonit:
Introduction
306

3.3Locatespinneritemsandclickonthem
1. AddanonView()statementwithintheforlooptofindthespinnerandclickonit:
//Findthespinnerandclickonit.
onView(withId(R.id.label_spinner)).perform(click());
Ausermustclickthespinneritselfinorderclickanyiteminthespinner,soyourtestmustalsoclickthespinnerfirstbeforeclickingtheitem.
2. WriteanonData()statementtofindandclickaspinneritem:
//Findthespinneritemandclickonit.
onData(is(myArray[i])).perform(click());
Theabovestatementmatchesiftheobjectisaspecificiteminthespinner,asspecifiedbythemyArray[i]arrayelement.
IfonDataappearsinred,clicktheword,andthenclicktheredlightbulbiconthatappearsintheleftmargin.Choosethefollowinginthepop-upmenu:
Staticimportmethod'android.support.test.espresso.Espresso.onData'
Ifisappearsinred,clicktheword,andthenclicktheredlightbulbiconthatappearsintheleftmargin.Choosethefollowinginthepop-upmenu:
Staticimportmethod…>Matchers.is(org.hamcrest)
3. AddtwomoreonView()statementstotheforloop:
//FindtheSubmitbuttonandclickonit.
onView(withId(R.id.button_main)).perform(click());
//Findthetextviewandcheckthatthespinneritem
//ispartofthestring.
onView(withId(R.id.text_phonelabel))
.check(matches(withText(containsString(myArray[i]))));
Thefirststatementlocatesthebutton_mainandclicksit.Thesecondstatementcheckstoseeiftheresultingtext_phonelabelmatchesthespinneritemspecifiedbymyArray[i].
IfcontainsStringappearsinred,clicktheword,andthenclicktheredlightbulbiconthatappearsintheleftmargin.Choosethefollowinginthepop-upmenu:
Staticimportmethod…>Matchers.containsString(org.hamcrest)
4. Torunthetest,right-click(orControl-click)SpinnerSelectionTestandchooseRunSpinnerSelectionTestfromthepop-upmenu.Youcanthenchoosetorunthetestontheemulatororonyourdevice.
Thetestrunstheapp,clicksthespinner,and"exercises"thespinner—itclickseachspinneritemfromtoptobottom,checkingtoseeiftheitemappearsinthetextfield.Itdoesn'tmatterhowmanyspinneritemsaredefinedinthearray,orwhatlanguageisusedforthespinner'sitems—thetestperformsallofthemandcheckstheiroutputagainstthearray.
ThebottompaneofAndroidStudioshowstheprogressofthetest,andwhenfinished,itdisplays"Testsrantocompletion."IntheleftcolumnAndroidStudiodisplays"AllTestsPassed".
Solutioncode:
AndroidStudioproject:PhoneNumberSpinnerEspressoTest
SeeSpinnerSelectionTest.java.
Introduction
307

YoulearnedhowtocreateaRecyclerViewinapreviouschapter.LikeanAdapterView(suchasaspinner),aRecyclerViewdynamicallypopulateschildviewsatruntime.ButaRecyclerViewisnotanAdapterView,soyoucan'tuseonData()tointeractwithlistitemsasyoudidintheprevioustaskwithaspinner.WhatmakesaRecyclerViewcomplicatedfromthepointofviewofEspressoisthatonView()can'tfindthechildviewifitisoffthescreen.
Fortunately,youhavetwohandytoolstocircumventthesecomplications:
AclasscalledRecyclerViewActionsthatexposesasmallAPItooperateonaRecyclerView.AnAndroidStudiofeature(inversion2.2andnewer)thatletsyourecordanEspressotest.Useyourappasanormaluser.AsyouclickthroughtheappUI,editabletestcodeisgeneratedforyou.Youcanalsoaddassertionstocheckifaviewholdsacertainvalue.
RecordingEspressotests,ratherthancodingthetestsbyhand,ensuresthatyourappgetsUItestcoverageonareasthatmighttaketoomuchtimeorbetoodifficulttocodebyhand.
Solutioncode:
AndroidStudioproject:RecyclerView
4.1Openandruntheapp
1. OpentheRecyclerViewproject,orifyouprefer,makeacopyoftheprojectfirstandthenopenthecopy.SeeCopyandrenameaprojectintheAppendixforinstructions.
2. ConfigureEspressoinyourprojectasdescribedpreviously.3. Runtheapptoensurethatitrunsproperly.YoucanusetheemulatororanAndroiddevice.
Theappletsyouscrollalistofwords.WhenyouclickonawordsuchasWord15thewordinthelistchangesto"Clicked!Word15".
4.2Recordthetest
1. ChooseRun>RecordEspressoTest,selectyourdeploymenttarget(anemulatororadevice),andclickOK.2. Scrollthewordlistintheappontheemulatorordevice,andtaponWord15.TheRecordYourTestwindowshowsthe
actionthatwasrecorded("TapRecyclerViewwithelementposition15").
Introduction
308

3. ClickAddAssertionintheRecordYourTestwindow.Ascreenshotoftheapp'sUIappearsinapaneontherightsideofthewindow.SelectClicked!Word15inthescreenshotastheUIelementyouwanttocheck.
Introduction
309

4. Choosetextisfromtheseconddrop-downmenu.Thetextyouexpecttoseeisalreadyenteredinthefieldbelowthedrop-downmenu.
5. ClickSaveAssertion,andthenclickCompleteRecording.
Introduction
310

6. Inthedialogthatappears,editthenameofthetesttoRecyclerViewTestsothatitiseasytounderstandthetest'spurpose.
7. AndroidStudiomaydisplayarequesttoaddmoredependenciestoyourGradleBuildfile.ClickYestoaddthedependencies.
8. Expandcom.example.android.recyclerview(androidTest)toseethetest,andrunthetest.Itshouldpass.
Thefollowingisthetest,asrecordedintheRecyclerViewTest.javafile:
Introduction
311

@RunWith(AndroidJUnit4.class)
publicclassRecyclerViewTest{
@Rule
publicActivityTestRule<MainActivity>mActivityTestRule=
newActivityTestRule<>(MainActivity.class);
@Test
publicvoidrecyclerViewTest(){
ViewInteractionrecyclerView=onView(
allOf(withId(R.id.recyclerview),isDisplayed()));
recyclerView.perform(actionOnItemAtPosition(15,click()));
ViewInteractiontextView=onView(
allOf(withId(R.id.word),withText("Clicked!Word15"),
childAtPosition(
childAtPosition(
withId(R.id.recyclerview),
11),
0),
isDisplayed()));
textView.check(matches(withText("Clicked!Word15")));
}
privatestaticMatcher<View>childAtPosition(
finalMatcher<View>parentMatcher,finalintposition){
returnnewTypeSafeMatcher<View>(){
@Override
publicvoiddescribeTo(Descriptiondescription){
description.appendText("Childatposition"+position+"inparent");
parentMatcher.describeTo(description);
}
@Override
publicbooleanmatchesSafely(Viewview){
ViewParentparent=view.getParent();
returnparentinstanceofViewGroup&&parentMatcher.matches(parent)
&&view.equals(((ViewGroup)parent).getChildAt(position));
}
};
}
}
ThetestusesaRecyclerViewobjectoftheViewInteractionclass,whichistheprimaryinterfaceforperformingactionsorassertionsonviews,providingbothcheck()andperform()methods.Examinethetestcodetoseehowitworks:
Perform:Thecodebelowusestheperform()methodandtheactionOnItemAtPosition()methodoftheRecyclerViewActionsclasstoscrolltotheposition(15)andclicktheitem:
ViewInteractionrecyclerView=onView(
allOf(withId(R.id.recyclerview),isDisplayed()));
recyclerView.perform(actionOnItemAtPosition(15,click()));
Checkwhetheritmatchestheassertion:Thecodebelowcheckstoseeiftheclickeditemmatchestheassertionthatitshouldbe"Clicked!Word15":
ViewInteractiontextView=onView(
allOf(withId(R.id.word),withText("Clicked!Word15"),
childAtPosition(
childAtPosition(
withId(R.id.recyclerview),
11),
0),
isDisplayed()));
textView.check(matches(withText("Clicked!Word15")));
Introduction
312

ThecodeaboveusesamethodcalledchildAtPosition(),whichisdefinedasacustomMatcher:
privatestaticMatcher<View>childAtPosition(
finalMatcher<View>parentMatcher,finalintposition){
//TypeSafeMatcher()returned
...
}
Implementacustommatcher:ThecustommatcherextendstheabstractTypeSaveMatcherclassandrequiresthatyouimplementthefollowing:
ThematchesSafely()method,shownbelow,todefinehowtocheckforaviewinaRecyclerView.ThedescribeTo()method,shownbelow,todefinehowEspressodescribestheoutput'smatcherintheRunpaneatthebottomofAndroidStudioifafailureoccurs.
...
//TypeSafeMatcher()returned
returnnewTypeSafeMatcher<View>(){
@Override
publicvoiddescribeTo(Descriptiondescription){
description.appendText("Childatposition"
+position+"inparent");
parentMatcher.describeTo(description);
}
@Override
publicbooleanmatchesSafely(Viewview){
ViewParentparent=view.getParent();
returnparentinstanceofViewGroup&&
parentMatcher.matches(parent)
&&view.equals(((ViewGroup)
parent).getChildAt(position));
}
};
}
}
YoucanrecordmultipleinteractionswiththeUIinonerecordingsession.Youcanalsorecordmultipletests,andedittheteststoperformmoreactions,usingtherecordedcodeasasnippettocopy,paste,andedit.
SolutioncodeAndroidStudioproject:RecyclerViewEspressoTest
CodingchallengeNote:Allcodingchallengesareoptionalandarenotprerequisitesforlaterlessons.
Challenge:WriteanEspressotextfortheScorekeeperappfromapreviouslessonthattestswhethertheDayModebuttonappearsafterclickingNightMode,andwhethertheNightModebuttonappearsafterclickingDayMode.
SummaryInthispractical,youlearnedhowtodothefollowing:
SetupEspressototestanAndroidStudioproject:CheckingforandInstallingtheAndroidSupportRepository.Addinginstrumentationanddependenciestothebuild.gradle(Module:app)file.
Introduction
313

Turningoffanimationsinyourtestdevice.Definingthetestclass.
Testtoseewhetheranactivityislaunched:UsingtheonView()methodwithViewMatcherargumentstofindviews.UsingaViewActionexpressiontoperformaclick.UsingaViewAssertionexpressiontocheckiftheviewisdisplayed.UsingaViewAssertionexpressiontoseeiftheoutputmatchestheinput.
Testaspinneranditsselections:UsingtheonData()methodwithaviewthatisdynamicallypopulatedbyanadapteratruntime.Gettingitemsfromanapp'sarraybyestablishingthecontextwithgetActivity()andgettingaresourcesinstanceusinggetResources().UsinganonData()statementtofindandclickeachspinneritem.UsingtheonView()methodwithaViewActionandViewAssertiontocheckiftheoutputmatchestheselectedspinneritem.
RecordatestofaRecyclerView:UsingtheRecyclerViewActionsclassthatexposesmethodstooperateonaRecyclerView.RecordinganEspressotesttoautomaticallygeneratethetestcode.
RelatedconceptTherelatedconceptdocumentationisinAndroidDeveloperFundamentals:Concepts.
TestingYourUserInterface
LearnmoreAndroidStudioDocumentation:
TestYourAppEspressobasicsEspressocheatsheet
AndroidDeveloperDocumentation:
BestPracticesforTestingGettingStartedwithTestingTestingUIforaSingleAppBuildingInstrumentedUnitTestsEspressoAdvancedSamplesTheHamcrestTutorialHamcrestAPIandUtilityClassesTestSupportAPIs
AndroidTestingSupportLibrary:
EspressodocumentationEspressoSamples
Videos
AndroidTestingSupport-AndroidTestingPatterns#1(introduction)AndroidTestingSupport-AndroidTestingPatterns#2(onViewviewmatching)AndroidTestingSupport-AndroidTestingPatterns#3(onDataandadapterviews)
Other:
GoogleTestingBlog:AndroidUIAutomatedTesting
Introduction
314

AtomicObject:"Espresso–TestingRecyclerViewsatSpecificPositions"StackOverflow:"HowtoassertinsideaRecyclerViewinEspresso?"GitHub:AndroidTestingSamplesGoogleCodelabs:AndroidTestingCodelab
Introduction
315

7.1:CreateanAsyncTaskContents:
WhatyoushouldalreadyKNOWWhatyouwillLEARNWhatyouwillDOAppoverviewTask1:SetuptheSimpleAsyncTaskprojectTask2:CreatetheAsyncTasksubclassTask3:ImplementthefinalstepsCodingchallengeSummaryRelatedconceptLearnmore
Athreadisanindependentpathofexecutioninarunningprogram.WhenanAndroidprogramislaunched,theAndroidRuntimesystemcreatesathreadcalledthe"Main"thread.Asyourprogramruns,eachlineofcodeisexecutedinaserialfashion,linebyline.ThismainthreadishowyourapplicationinteractswithcomponentsfromtheAndroidUIToolkit,andit'swhythemainthreadissometimescalledthe"UIthread".However,sometimesanapplicationneedstoperformresource-intensivework,suchasdownloadingfiles,databasequeries,playingmedia,orcomputingcomplexanalytics.ThistypeofintensiveworkcanblocktheUIthreadifallofthecodeexecutesseriallyonasinglethread.Whentheappisperformingresourcesintensivework,theappdoesnotrespondtotheuserordrawonthescreenbecauseitiswaitingforthatworktobedone.Thiscanyieldpoorperformance,whichnegativelyaffectstheuserexperience.UsersmaygetfrustratedanduninstallyourAndroidappiftheperformanceoftheappisslow.
Tokeeptheuserexperience(UX)runningsmoothlyandrespondingquicklytousergestures,theAndroidFrameworkprovidesahelperclasscalledAsyncTaskwhichprocessesworkoffoftheUIthread.AnAsyncTaskisanabstractJavaclassthatprovidesonewaytomovethisintensiveprocessingontoaseparatethread,therebyallowingtheUIthreadtoremainveryresponsive.Sincetheseparatethreadisnotsynchronizedwiththecallingthread,itiscalledanasynchronousthread.AnAsyncTaskalsocontainsacallbackthatallowsyoutodisplaytheresultsofthecomputationbackintheUIthread.
Inthispractical,youwilllearnhowtoaddabackgroundtasktoyourAndroidappusinganAsyncTask.
WhatyoushouldalreadyKNOWYoushouldbeableto:
CreateanActivity.AddaTextViewtothelayoutfortheactivity.ProgrammaticallygettheidfortheTextViewandsetitscontent.UseButtonviewsandtheironClickfunctionality.
WhatyouwillLEARNDuringthispractical,youwilllearnto:
AddanAsyncTasktoyourappinordertorunataskinthebackground,offoftheUIthread.IdentifyandunderstandthebenefitsanddrawbacksofusingAsyncTaskforbackgroundtasks.
WhatyouwillDO
Introduction
316

Duringthispractical,youwill:
CreateasimpleapplicationthatexecutesabackgroundtaskusinganAsyncTask.Runtheappandseewhathappenswhenyourotatethescreen.
AppoverviewYouwillbuildanappthathasoneTextViewandonebutton.Whentheuserclicksthebutton,theappsleepsforarandomamountoftime,andthendisplaysamessageintheTextViewwhenitwakesup.
Here'swhatthefinishedappwilllooklike:
Introduction
317

Introduction
318

Task1.SetuptheSimpleAsyncTaskprojectTheSimpleAsyncTaskUIisstraightforward.ItcontainsabuttonthatlaunchestheAsyncTask,andaTextViewthatdisplaysthestatusoftheapplication.
1.1Createthelayout
1. CreateanewprojectcalledSimpleAsyncTaskusingtheEmptyActivitytemplate.(Acceptthedefaultsfortheotheroptions.)
2. Opentheactivity_main.xmllayoutfile.
i. ChangetherootviewtoLinearLayout.ii. Inthe"HelloWorld"TextViewelement,removethelayout_constraintattributes,iftheyarepresent.iii. AddthefollowingessentialUIelementstothelayout:
View Attributes Values
LinearLayout android:orientation vertical
TextViewandroid:textandroid:id
Iamreadytostartwork!@+id/textView1
Buttonandroid:textandroid:onClick
StartTaskstartTask
Note:Youcansetthelayoutheightandwidthofeachviewtowhateveryouwant,aslongtheviewsremainonthescreenindependentofthescreensize(usingwrap_contentensuresthatthisisthecase).
3. TheonClickattributeforthebuttonwillbehighlightedinyellow,sincethestartTask()methodisnotyetimplementedintheMainActivity.Placeyourcursorinthehighlightedtext,pressAlt+Enter(Option+EnteronaMac)andchooseCreate'startTask(View)in'MainActivity'tocreatethemethodstubinMainActivity.
DependingonyourversionofAndroidStudio,theactivity_main.xmllayoutfilewilllooksomethinglikethefollowing:
<?xmlversion="1.0"encoding="utf-8"?>
<LinearLayoutxmlns:android="http://schemas.android.com/apk/res/android"
android:layout_width="match_parent"
android:layout_height="match_parent"
android:paddingLeft="@dimen/activity_horizontal_margin"
android:paddingRight="@dimen/activity_horizontal_margin"
android:paddingTop="@dimen/activity_vertical_margin"
android:paddingBottom="@dimen/activity_vertical_margin"
android:orientation="vertical">
<TextView
android:layout_width="wrap_content"
android:layout_height="wrap_content"
android:text="@string/ready_to_start"
android:id="@+id/textView1"
android:textSize="24sp"/>
<Button
android:layout_width="wrap_content"
android:layout_height="wrap_content"
android:text="@string/start_task"
android:id="@+id/button"
android:layout_marginTop="56dp"
android:onClick="startTask"/>
</LinearLayout>
Task2.CreatetheAsyncTasksubclass
Introduction
319

SinceAsyncTaskisanabstractclass,youneedtosubclassitinordertouseit.InthisexampletheAsyncTaskwillexecuteaverysimplebackgroundtask:itjustsleepsforarandomamountoftime.Inarealapp,thebackgroundtaskcouldperformallsortsofwork,fromqueryingadatabase,toconnectingtotheInternet,tocalculatingthenextGomovesothatyoucanbeatthecurrentGochampion.
AnAsyncTaskhasthefollowingmethodsforperformingworkoffofthemainthread:
onPreExecute():ThismethodrunsontheUIthread,andisusedforsettingupyourtask(likeshowingaprogressbar).doInBackground():Thisiswhereyouimplementthecodetoexecutetheworkthatistobeperformedontheseparatethread.onProgressUpdate():ThisisinvokedontheUIthreadandusedforupdatingprogressintheUI(suchasfillingupaprogressbar)onPostExecute():AgainontheUIthread,thisisusedforupdatingtheresultstotheUIoncetheAsyncTaskhas
finishedloading.Note:AbackgroundorworkerthreadisanythreadwhichisnotthemainorUIthread.
WhenyoucreateanAsyncTask,youmayneedtogiveitinformationabouttheworkwhichitistoperform,whetherandhowtoreportitsprogress,andinwhatformtoreturntheresult.
InthisexerciseyouwilluseanAsyncTasksubclasstodefineworkthatwillruninadifferentthreadthantheUIthread,whichwillavoidanyperformanceissues.
WhenyoucreateanAsyncTask,youcanconfigureitusingtheseparameters:
Params:ThedatatypeoftheparameterssenttothetaskuponexecutingthedoInBackground()overridemethod.Progress:ThedatatypeoftheprogressunitspublishedusingtheonProgressUpdated()overridemethod.Result:ThedatatypeoftheresultdeliveredbytheonPostExecute()overridemethod.
Forexample,anAsyncTaskwiththefollowingclassdeclarationwouldtakeaStringasaparameterindoInBackground()(touseinaquery,forexample),anIntegerforonProgressUpdate()(percentageofjobcomplete),andaBitmapforthetheresultinonPostExecute()(thequeryresult):
publicclassMyAsyncTaskextendsAsyncTask<String,Integer,Bitmap>{}
2.1SubclasstheAsyncTaskInyourfirstAsyncTaskimplementation,theAsyncTasksubclasswillbeverysimple.Itdoesnotrequireaqueryparameterorpublishitsprogress.YouwillonlybeusingthedoInBackground()andonPostExecute()methods.
1. CreateanewJavaclasscalledSimpleAsyncTaskthatextendsAsyncTaskandtakesthreegenerictypeparameters:Voidfortheparams,sincethisAsyncTaskdoesnotrequireanyinputs.Voidfortheprogresstype,sincetheprogressisnotpublished.AStringastheresulttype,sinceyouwillupdatetheTextViewwithastringwhentheAsyncTaskhascompleted
Introduction
320

execution.
publicclassSimpleAsyncTaskextendsAsyncTask<Void,Void,String>{}
Note:Theclassdeclarationwillbeunderlinedinred,sincetherequiredmethoddoInBackground()hasnotyetbeenimplemented.TheAsyncTaskwillneedtoupdatetheTextViewonceithascompletedsleeping.TheconstructorwillthenneedtoincludetheTextView,sothatitcanbeupdatedinonPostExecute().
2. DefineamembervariablemTextView.3. ImplementaconstructorforAsyncTaskthattakesaTextViewandsetsmTextViewtotheonepassedinTextView:
publicSimpleAsyncTask(TextViewtv){
mTextView=tv;
}
2.2ImplementdoInBackground()1. AddtherequireddoInBackground()method.Placeyourcursoronthehighlightedclassdeclaration,pressAlt+Enter
(Option+EnteronaMac)andselectImplementmethods.ChoosedoInBackground()andclickOK:
@Override
protectedStringdoInBackground(Void...voids){
returnnull;
}
2. ImplementdoInBackground()to:
Generatearandomintegerbetween0and10Multiplythatnumberby200Putthecurrentthreadtosleep.(UseThread.sleep())inatry/catchblock.ReturntheString"Awakeatlastafterxxmilliseconds"(wherexxisthenumberofmillisecondstheappslept)
@Override
protectedStringdoInBackground(Void...voids){
//Generatearandomnumberbetween0and10
Randomr=newRandom();
intn=r.nextInt(11);
//Makethetasktakelongenoughthatwehave
//timetorotatethephonewhileitisrunning
ints=n*200;
//Sleepfortherandomamountoftime
try{
Thread.sleep(s);
}catch(InterruptedExceptione){
e.printStackTrace();
}
//ReturnaStringresult
return"Awakeatlastaftersleepingfor"+s+"milliseconds!";
}
2.3ImplementonPostExecute()WhenthedoInBackground()methodcompletes,thereturnvalueisautomaticallypassedtotheonPostExecute()callback.
1. ImplementonPostExecute()totakeaStringargument(thisiswhatyoudefinedinthethirdparameterofAsyncTaskandwhatyourdoInBackground()methodreturned)anddisplaythatstringintheTextView:
Introduction
321

protectedvoidonPostExecute(Stringresult){
mTextView.setText(result);
}
Note:YoucanupdatetheUIinonPostExecute()becauseitisrunonthemain(UI)thread.YoucannotcallmTextView.setText()indoInBackground(),becausethatmethodisexecutedonaseparatethread.
Task3.Implementthefinalsteps
3.1ImplementthemethodthatstartstheAsyncTaskYourappnowhasanAsyncTaskthatperformsworkinthebackground(oritwouldifyoudidn'tcallsleep()asthesimulatedwork.)YoucannowimplementthemethodthatgetscalledwhentheStartTaskbuttonisclicked,totriggerthebackgroundtask.
1. IntheMainActivity.javafile,addamembervariabletostoretheTextView.
privateTextViewmTextView;
2. IntheonCreate()method,initializemTextViewtotheTextViewintheUI.3. AddcodetothestartTask()methodtocreateaninstanceofSimpleAsyncTask,passingtheTextViewmTextViewto
theconstructor.4. Callexecute()onthatSimpleAsyncTaskinstance.
Note:Theexecute()methodiswhereyoupassintheparameters(separatedbycommas)thatarethenpassedintodoInBackground()bythesystem.SincethisAsyncTaskhasnoparameters,youwillleaveitblank.
5. UpdatetheTextViewtoshowthetext"Napping…"
publicvoidstartTask(Viewview){
//Putamessageinthetextview
mTextView.setText("Napping...");
//StarttheAsyncTask.
//TheAsyncTaskhasacallbackthatwillupdatethetextview.
newSimpleAsyncTask(mTextView).execute();
}
SolutioncodeforMainActivity:
Introduction
322

packageandroid.example.com.simpleasynctask;
importandroid.os.Bundle;
importandroid.support.v7.app.AppCompatActivity;
importandroid.view.View;
importandroid.widget.TextView;
publicclassMainActivityextendsAppCompatActivity{
//TheTextViewwherewewillshowresults
TextViewmTextView;
@Override
protectedvoidonCreate(BundlesavedInstanceState){
super.onCreate(savedInstanceState);
setContentView(R.layout.activity_main);
//InitializemTextView
mTextView=(TextView)findViewById(R.id.textView1);
}
publicvoidstartTask(Viewview){
//Putamessageinthetextview
mTextView.setText("Napping...");
//StarttheAsyncTask.
//TheAsyncTaskhasacallbackthatwillupdatethetextview.
newSimpleAsyncTask(mTextView).execute();
}
}
3.2ImplementonSaveInstanceState()1. RuntheappandclicktheStartTaskbutton.Howlongdoestheappnap?2. ClicktheStartTaskbuttonagain,andwhiletheappisnapping,rotatethedevice.Ifthebackgroundtaskcompletes
beforeyoucanrotatethephone,tryagain.Alternatively,youcanupdatethecodeandmakeitsleepforalongertimeperiod.
Note:You'llnoticethatwhenthedeviceisrotated,theTextViewresetstoitsinitialcontentandtheAsyncTaskdoesn'tseemabletoupdatetheTextView.Thereareseveralthingsgoingonhere:
Whenyourotatethedevice,thesystemrestartstheapp,callingonDestroy()andthenonCreate(),whichrestartstheactivitylifecycle.SincetheAsyncTasksarenolongerconnectedtothelifecycleofyourapp,andcannotreconnecttotheactivity.TheAsyncTaskswillcontinuerunningtocompletioninthebackground,consumingsystemresources,butnevershowingtheresultsintheUI,whichgetsresetinonCreate().ItwillneverbeabletoupdatetheTextViewthatwaspassedtoit,sincethatparticularTextViewhasalsobeendestroyed.Eventually,thesystemrunoutofresources,andwillfail.EvenwithouttheAsyncTask,therotationofthedeviceresetsalloftheUIelementstotheirdefaultstate,whichfortheTextViewimpliesaparticularstringthatyousetintheactivity_main.xmlfile.
Forthesereasons,AsyncTasksarenotwellsuitedtotaskswhichmaybeinterruptedbythedestructionoftheActivity.InusecaseswherethisiscriticalyoucanuseadifferenttypeofclasscalledaLoader,whichyouwillimplementinalaterpractical.
InordertopreventtheTextViewfromresettingtotheinitialstring,youneedtosaveitsstate.You'vealreadylearnedhowtomaintainthestateofviewsinapreviouspractical,usingtheSavedInstanceStateclass.
YouwillnowimplementonSaveInstanceState()topreservethecontentofyourTextViewwhentheactivityisspontaneouslydestroyed.
Note:NotallusesofAsyncTaskrequireyoutohandlethestateoftheviewsonrotation.ThisappusesaTextViewto
Introduction
323

displaytheresultsoftheapp,sopreservingthestateisuseful.Inothercases,suchasuploadingafile,youmaynotneedanypersistentinformationintheUI,soretainingthestateisnotcritical.
3. OverridetheonSaveInstanceState()methodinMainActivitytopreservethetextinsidetheTextViewwhentheactivityisdestroyed:
outState.putString(TEXT_STATE,mTextView.getText().toString());
4. RetrievethevalueoftheTextViewwhentheactivityisrestoredintheonCreate()method.
//RestoreTextViewifthereisasavedInstanceState
if(savedInstanceState!=null){
mTextView.setText(savedInstanceState.getString(TEXT_STATE));
}
SolutioncodeforMainActivity:
Introduction
324

packageandroid.example.com.simpleasynctask;
importandroid.os.Bundle;
importandroid.support.v7.app.AppCompatActivity;
importandroid.view.View;
importandroid.widget.TextView;
/**
*TheSimpleAsyncTaskappcontainsabuttonthatlaunchesanAsyncTask
*whichsleepsintheasynchronousthreadforarandomamountoftime.
*/
publicclassMainActivityextendsAppCompatActivity{
//KeyforsavingthestateoftheTextView
privatestaticfinalStringTEXT_STATE="currentText";
//TheTextViewwherewewillshowresults
privateTextViewmTextView=null;
/**
*Initializestheactivity.
*@paramsavedInstanceStateThecurrentstatedata
*/
@Override
protectedvoidonCreate(BundlesavedInstanceState){
super.onCreate(savedInstanceState);
setContentView(R.layout.activity_main);
//InitializemTextView
mTextView=(TextView)findViewById(R.id.textView1);
//RestoreTextViewifthereisasavedInstanceState
if(savedInstanceState!=null){
mTextView.setText(savedInstanceState.getString(TEXT_STATE));
}
}
/**`
*HandlestheonCLickforthe"StartTask"button.LaunchestheAsyncTask
*whichperformsworkoffoftheUIthread.
*
*@paramviewTheview(Button)thatwasclicked.
*/
publicvoidstartTask(Viewview){
//Putamessageinthetextview
mTextView.setText(R.string.napping);
//StarttheAsyncTask.
//TheAsyncTaskhasacallbackthatwillupdatethetextview.
newSimpleAsyncTask(mTextView).execute();
}
/**
*SavesthecontentsoftheTextViewtorestoreonconfigurationchange.
*@paramoutStateThebundleinwhichthestateoftheactivityissavedwhenitisspontaneouslydestroye
d.
*/
@Override
protectedvoidonSaveInstanceState(BundleoutState){
super.onSaveInstanceState(outState);
//SavethestateoftheTextView
outState.putString(TEXT_STATE,mTextView.getText().toString());
}
}
SolutioncodeAndroidStudioproject:SimpleAsyncTask
Introduction
325

CodingchallengeNote:Allcodingchallengesareoptionalandarenotprerequisitesforlaterlessons.
Challenge:AsyncTaskprovidesanotherveryusefuloverridemethod:onProgressUpdate(),whichallowsyoutoupdatetheUIwhiletheAsyncTaskisrunning.UsethismethodtoupdatetheUIwiththecurrentsleeptime.LooktotheAsyncTaskdocumentationtoseehowonProgressUpdate()isproperlyimplemented.RememberthatintheclassdefinitionofyourAsyncTask,youwillneedtospecifythedatatypetobeusedintheonProgressUpdate()method.
SummaryAvoidresource-intensiveworkintheUIthreadwhichmaymakeyourUIsluggishorerratic.
AnycodethatdoesnotinvolvedrawingtheUIorrespondingtotheuserinputshouldbemovedfromtheUIthreadtoanother,separatethread.
AnAsyncTaskisanabstractJavaclassthatmovesintensiveprocessingontoaseparatethread.AsyncTaskmustbesubclassedtobeused.AsyncTaskhas4usefulmethods:onPreExecute(),doInBackground(),onPostExecute()andonProgressUpdate().
doInBackground()istheonlymethodthatisrunonaseparateworkerthread.YoushouldnotcallUImethodsinyourAsyncTaskmethod.TheothermethodsofAsyncTaskrunintheUIthreadandallowcallingmethodsofUIcomponents.
RotatinganAndroiddevicedestroysandrecreatesanActivity.ThiscandisassociatetheUIfromthebackgroundthread,whichwillcontinuetorun.
RelatedconceptTherelatedconceptdocumentationisinAndroidDeveloperFundamentals:Concepts.
AsyncTaskandAsyncTaskLoader
LearnmoreAndroiddeveloperdocumentation:
ProcessesandThreadsProcessingbitmapsofftheUIthreadusingAsyncTaskAsyncTask
Otherresources:
https://realm.io/news/android-threading-background-tasks/
Videos:
ThreadingPerformance101byPerformanceGuruColtMcAnlis.Learnmoreaboutthemainthreadandwhyit'sbadtorunlong-runningtasksonthemainthread.GoodAsyncTaskHuntingbyColtMcAnlis.LearnmoreaboutAsyncTasks.
Introduction
326

7.2:ConnecttotheInternetwithAsyncTaskandAsyncTaskLoaderContents:
WhatyoushouldalreadyKNOWWhatyouwillLEARNWhatyouwillDOTask1.ExploretheBooksAPITask2.Createthe"WhoWroteIt?"appTask3.ImplementUIbestpracticesTask4.MigratetoAsyncTaskLoaderCodingchallengesSummaryRelatedconceptLearnmore
InthispracticalyouwilluseanAsyncTasktostartabackgroundtaskwhichgetsdatafromtheInternetusingasimpleRESTAPI.YouwillusetheGoogleAPIExplorertolearnhowtoquerytheBookSearchAPI,implementthisqueryinaworkerthreadusingAsyncTask,anddisplaytheresultinyourUI.ThenyouwillreimplementthesamebackgroundtaskusingAsyncTaskLoader,whichwillbemoreefficientinupdatingyourUI,handlingperformanceissues,andimprovingtheoverallUX.
WhatyoushouldalreadyKNOWFromthepreviouspracticalsyoushouldbeableto:
Createanactivity.AddaTextViewtothelayoutfortheactivity.ImplementonClickfunctionalitytoabuttoninyourlayout.ImplementanAsyncTaskanddisplaytheresultinyourUI.Passinformationbetweenactivitiesasextras.
WhatyouwillLEARNInthispractical,youwilllearnto:
UsetheGoogleAPIExplorertoinvestigateGoogleAPIsandtoviewJSONresponsestohttprequests.UsetheBooksAPIasanexampleAPIretrievingdataovertheInternetandkeeptheUIfastandresponsive.Youwon'tlearntheBooksAPIindetailinthispractical.Yourappwillonlyusethesimplebooksearchfunction.TolearnmoreabouttheBooksAPIseetheBooksAPIreferencedocumentation.ParsetheJSONresultsreturnedfromyourAPIquery.ImplementanAsyncTaskLoaderthatpreservesdatauponconfigurationchanges.UpdateyourUIusingtheLoadercallbacks.
WhatyouwillDOInthispractical,youwill:
UsetheGoogleAPIExplorertolearnaboutthesimplesearchfeatureoftheBooksAPI.Createthe"WhoWroteIt?"applicationthatqueriestheBooksAPIusingaworkerthreadanddisplaystheresultinthe
Introduction
327

UI.Modifythe"WhoWroteit?"apptouseanAsyncTaskLoaderinsteadofanAsyncTask.
AppOverviewYouwillbuildanappthatcontainsanEditTextfieldandaButton.TheuserentersthenameofthebookintheEditTextfieldandclicksthebutton.ThebuttonexecutesanAsyncTaskwhichqueriestheGoogleBookSearchAPItofindtheauthorandtitleofthebooktheuserislookingfor.TheresultsareretrievedanddisplayedinaTextViewfieldbelowthebutton.Oncetheappisworking,youwillthenmodifytheapptouseAsyncTaskLoaderinsteadoftheAsyncTaskclass.
Introduction
328

Introduction
329

Task1.ExploretheBooksAPIInthispracticalyouwillusetheGoogleBooksAPItosearchforinformationaboutabook,suchastheauthor(s)andthetitle.TheGoogleBooksAPIprovidesprogrammaticaccesstotheGoogleBookSearchserviceusingRESTAPIs.ThisisthesameserviceusedbehindthesceneswhenyoumanuallyexecuteasearchonGoogleBooks.YoucanusetheGoogleAPIExplorerandGoogleBookSearchinyourbrowsertoverifythatyourAndroidappisgettingtheexpectedresults.
1.1SendaBooksAPIRequest
1. GototheGoogleAPIsExplorer(foundathttps://developers.google.com/apis-explorer/).2. ClickBooksAPI.3. Find(Ctrl-ForCmd-F)books.volumes.listandclickthatfunctionname.Youshouldseeawebpagethatliststhe
variousparametersoftheBooksAPIfunctionthatperformsthebooksearches.4. Intheqfieldenterabookname,orpartialbookname.Theqparameteristheonlyrequiredfield.5. UsethemaxResultsandprintTypefieldstolimittheresultstothetop10matchingbooksthatwereprinted.The
maxResultsfieldtakesanintegervaluethatlimitstheamountofresultsperquery.TheprintTypefieldtakesoneofthreestringarguments:all,whichdoesnotlimittheresultsbytypeatall;books,whichreturnsonlybooksinprint;andmagazineswhichreturnsonlymagazines.
6. Makesurethatthe"AuthorizerequestsusingOAuth2.0"switchatthetopoftheformisturnedoff.ClickExecutewithoutOAuthatthebottomoftheform.
7. ScrolldowntoseetheRequestandResponse.
TheRequestfieldisanexampleofaUniformResourceIdentifier(URI).AURIisastringthatnamesorlocatesaparticularresource.URLsareacertaintypeofURIforidentifyingandlocatingawebresource.FortheBooksAPI,therequestisaURLthatcontainsyoursearchasaparameter(followingtheqparameter).NoticetheAPIkeyfieldafterthequeryfield.Forsecurityreasons,whenaccessingapublicAPI,youusuallyneedtogetanAPIkeyandincludeitinyourRequest.However,thisspecificAPIdoesnotrequireakey,soyoucanleaveoutthatportionoftheRequestURIinyourapp.
1.2AnalyzetheBooksAPIResponse
TowardsthebottomofthepageyoucanseetheResponsetothequery.TheresponseusestheJSONformat,whichisacommonformatforAPIqueryresponses.IntheAPIExplorerwebpage,theJSONcodeisnicelyformattedsothatitishumanreadable.Inyourapplication,theJSONresponsewillbereturnedfromtheAPIserviceasasinglestring,andyouwillneedtoparsethatstringtoextracttheinformationyouneed.
1. IntheResponsesection,findthevalueforthe"title"key.Noticethatthisresulthasasinglekeyandvalue.2. Findthevalueforthe"authors"key.Noticethatthisonecancontainanarrayofvalues.3. Inthispractical,youwillonlyreturnthetitleandauthorsofthefirstitem.
Task2.Createthe"WhoWroteIt?"AppNowthatyouarefamiliarwiththeBooksAPImethodthatyouwillbeusing,it'stimetosetupthelayoutofyourapplication.
2.1Createtheprojectanduserinterface1. CreateanappprojectcalledWhoWroteIt?withoneActivity,usingtheEmptyActivityTemplate.2. AddthefollowingUIelementsintheXMLfile,usingaverticalLinearLayoutasrootview—theviewthatcontainsallthe
otherviewsinsidealayoutXMLfile.MakesuretheLinearLayoutusesandroid:orientation="vertical":
Introduction
330

View Attributes Values
TextView
android:layout_width
android:layout_height
android:id
android:text
android:textAppearance
wrap_content
wrap_content
@+id/instructions
@string/instructions
@style/TextAppearance.AppCompat.Title
EditText
android:layout_width
android:layout_height
android:id
android:inputType
android:hint
match_parent
wrap_content
@+id/bookInput
text
@string/input_hint
Button
android:layout_width
android:layout_height
android:id
android:text
android:onClick
wrap_content
wrap_content
@+id/searchButton
@string/button_text
searchBooks
TextView
android:layout_width
android:layout_height
android:id
android:textAppearance
wrap_content
wrap_content
@+id/titleText
@style/TextAppearance.AppCompat.Headline
TextView
android:layout_width
android:layout_height
android:id
android:textAppearance
wrap_content
wrap_content
@+id/authorText
@style/TextAppearance.AppCompat.Headline
3. Inthestrings.xmlfile,addthesestringresources:
<stringname="instructions">Enterabookname,orpartofa
bookname,orjustsometextfromabooktofind
thefullbooktitleandwhowrotethebook!</string>
<stringname="button_text">SearchBooks</string>
<stringname="input_hint">EnteraBookTitle</string>
4. CreateamethodcalledsearchBooks()inMainActivity.javatohandletheonClickbuttonaction.AswithallonClickmethods,thisonetakesaViewasaparameter.
2.2SetuptheMainActivityToquerytheBooksAPI,youneedtogettheuserinputfromtheEditText.
1. InMainActivity.java,createmembervariablesfortheEditText,theauthorTextViewandthetitleTextView.2. InitializethesevariablesinonCreate().3. InthesearchBooks()method,getthetextfromtheEditTextwidgetandconverttoaString,assigningittoastring
variable.
StringqueryString=mBookInput.getText().toString();
Introduction
331

Note:mBookInput.getText()returnsan"Editable"datatypewhichneedstobeconvertedintoastring.
2.3CreateanemptyAsyncTask
YouarenowreadytoconnecttotheInternetandusetheBookSearchRESTAPI.Networkconnectivitycanbesometimesbesluggishorexperiencedelays.Thismaycauseyourapptobehaveerraticallyorbecomeslow,soyoushouldnotmakeanetworkconnectionontheUIthread.IfyouattemptanetworkconnectionontheUIthread,theAndroidRuntimemayraiseaNetworkOnMainThreadExceptiontowarnyouthatit'sabadidea.
UseanAsyncTasktomakenetworkconnections:
1. CreateanewJavaclasscalledFetchBookinapp/javathatextendsAsyncTask.AnAsyncTaskrequiresthreearguments:
Theinputparameters.Theprogressindicator.Theresulttype.
Thegenerictypeparametersforthetaskwillbe<String,Void,String>sincetheAsyncTasktakesaStringasthefirstparameter(thequery),Voidsincethereisnoprogressupdate,andStringsinceitreturnsastringasaresult(theJSONresponse).
2. Implementtherequiredmethod,doInBackground(),byplacingyourcursorontheredunderlinedtext,pressingAlt+Enter(Opt+EnteronaMac)andselectingImplementmethods.ChoosedoInBackground()andclickOK.Makesuretheparametersandreturntypesarethecorrecttype(IttakesaStringarrayandreturnsaString).i. ClicktheCodemenuandchooseOverridemethods(orpressCtrl+O).SelecttheonPostExecute()method.TheonPostExecute()methodtakesaStringasaparameterandreturnsvoid.
3. TodisplaytheresultsintheTextViews,youmusthaveaccesstothoseTextViewsinsidetheAsyncTask.CreatemembervariablesintheFetchBookAsyncTaskforthetwoTextViewsthatshowtheresults,andinitializetheminaconstructor.YouwillusethisconstructorinyourMainActivitytopassalongtheTextViewstoyourAsyncTask.
SolutioncodeforFetchBook:
publicclassFetchBookextendsAsyncTask<String,Void,String>{
privateTextViewmTitleText;
privateTextViewmAuthorText;
publicFetchBook(TextViewmTitleText,TextViewmAuthorText){
this.mTitleText=mTitleText;
this.mAuthorText=mAuthorText;
}
@Override
protectedStringdoInBackground(String...params){
returnnull;
}
@Override
protectedvoidonPostExecute(Strings){
super.onPostExecute(s);
}
}
2.4CreatetheNetworkUtilsclassandbuildtheURI
Inthisstep,youwillopenanInternetconnectionandquerytheBooksAPI.Thissectionhasquitealotofcode,soremembertovisitthedeveloperdocumentationforConnectingtotheNetworkifyougetstuck.YouwillwritethecodeforconnectingtotheinternetinahelperclasscalledNetworkUtils.
1. CreateanewJavaclasscalledNetworkUtilsbyclickingFile>New>JavaClassandonlyfillinginthe"Name"field.2. CreateauniqueLOG_TAGvariabletousethroughoutNetworkUtilsclassforlogging:
Introduction
332

privatestaticfinalStringLOG_TAG=NetworkUtils.class.getSimpleName();
3. CreateanewstaticmethodcalledgetBookInfo()thattakesaStringasaparameter(whichwillbethesearchterm)andreturnsaString(theJSONStringresponsefromtheAPIyouexaminedearlier).
staticStringgetBookInfo(StringqueryString){}
4. CreatethefollowingtwolocalvariablesingetBookInfo()thatwillbeneededlatertohelpconnectandreadtheincomingdata.
HttpURLConnectionurlConnection=null;
BufferedReaderreader=null;
5. CreateanotherlocalvariableattheendofgetBookInfo()tocontaintherawresponsefromthequeryandreturnit:
StringbookJSONString=null;
returnbookJSONString;
IfyouremembertherequestfromtheBooksAPIwebpage,youwillnoticethatalltherequestsbeginwiththesameURI.Tospecifythetypeofresource,youappendqueryparameterstothebaseURI.Itiscommonpracticetoseparateallofthesequeryparametersintoconstants,andcombinethemusingaUri.BuildersotheycanbereusedfordifferentURI's.TheUriclasshasaconvenientmethod,Uri.buildUpon()thatreturnsaURI.Builderthatwecanuse.
Forthisapplication,youwilllimitthenumberandtypeofresultsreturnedtoincreasethequeryspeed.Torestrictthequery,youwillonlylookforbooksthatareprinted.
6. CreatethefollowingmemberconstantsintheNetworkUtilsclass:
privatestaticfinalStringBOOK_BASE_URL="https://www.googleapis.com/books/v1/volumes?";//BaseURIforthe
BooksAPI
privatestaticfinalStringQUERY_PARAM="q";//Parameterforthesearchstring
privatestaticfinalStringMAX_RESULTS="maxResults";//Parameterthatlimitssearchresults
privatestaticfinalStringPRINT_TYPE="printType";//Parametertofilterbyprinttype
7. Createaskeletontry/catch/finallyblockingetBookInfo().ThisiswhereyouwillmakeyourHTTPrequest.ThecodetobuildtheURIandissuethequerywillgointhetryblock.ThecatchblockisusedtohandleanyproblemswithmakingtheHTTPrequestandthefinallyblockisforclosingthenetworkconnectionafteryou'vefinishedreceivingtheJSONdataandreturningtheresult.
try{
...
}catch(Exceptionex){
...
}finally{
returnbookJSONString;
}
8. BuildupyourrequestURIinthetryblock:
//BuildupyourqueryURI,limitingresultsto10itemsandprintedbooks
UribuiltURI=Uri.parse(BOOK_BASE_URL).buildUpon()
.appendQueryParameter(QUERY_PARAM,queryString)
.appendQueryParameter(MAX_RESULTS,"10")
.appendQueryParameter(PRINT_TYPE,"books")
.build();
9. ConvertyourURItoaURL:
URLrequestURL=newURL(builtURI.toString());
Introduction
333

2.5MaketheRequest
ItisfairlycommontomakeanAPIrequestviatheinternet.Sinceyouwillprobablyusethisfunctionalityagain,youmaywanttocreateautilityclasswiththisfunctionalityordevelopausefulsubclassforyourownconvenience.ThisAPIrequestusestheHttpURLConnectionclassincombinationwithanInputStreamandaStringBuffertoobtaintheJSONresponsefromtheweb.IfatanypointtheprocessfailsandInputStreamorStringBufferareempty,itreturnsnullsignifyingthatthequeryfailed.
1. InthetryblockofthegetBookInfo()method,opentheURLconnectionandmaketherequest:
urlConnection=(HttpURLConnection)requestURL.openConnection();
urlConnection.setRequestMethod("GET");
urlConnection.connect();
2. ReadtheresponseusinganInputStreamandaStringBuffer,thenconvertittoaString:
InputStreaminputStream=urlConnection.getInputStream();
StringBufferbuffer=newStringBuffer();
if(inputStream==null){
//Nothingtodo.
returnnull;
}
reader=newBufferedReader(newInputStreamReader(inputStream));
Stringline;
while((line=reader.readLine())!=null){
/*Sinceit'sJSON,addinganewlineisn'tnecessary(itwon'taffect
parsing)butitdoesmakedebugginga*lot*easierifyouprintoutthe
completedbufferfordebugging.*/
buffer.append(line+"\n");
}
if(buffer.length()==0){
//Streamwasempty.Nopointinparsing.
returnnull;
}
bookJSONString=buffer.toString();
3. Closethetryblockandlogtheexceptioninthecatchblock.
catch(IOExceptione){
e.printStackTrace();
returnnull;
}
4. CloseboththeurlConnectionandthereadervariablesinthefinallyblock:
finally{
if(urlConnection!=null){
urlConnection.disconnect();
}
if(reader!=null){
try{
reader.close();
}catch(IOExceptione){
e.printStackTrace();
}
}
}
Note:Eachtimetheconnectionfails,thiscodereturnsnull.ThismeansthatonPostExecute()willhavetocheckitsinputparameterforanullstringandlettheuserknowtheconnectionfailed.Thiserrorhandlingstrategyissimplistic,astheuserhasnoideawhytheconnectionfailed.Abettersolutionforaproductionapplicationwouldbetohandleeachpointoffailuredifferentlysothattheusercangettheappropriatefeedback.
5. LogthevalueofthebookJSONStringvariablebeforereturningit.YouarenowdonewiththegetBookInfo()method.
Introduction
334

Log.d(LOG_TAG,bookJSONString);
6. InyourAsyncTaskdoInBackground()method,callthegetBookInfo()method,passinginthesearchtermwhichyouobtainedfromtheparamsargumentpassedinbythesystem(itisthefirstvalueintheparamsarray).ReturntheresultofthismethodinthedoInBackground()method:
returnNetworkUtils.getBookInfo(params[0]);
7. NowthatyourAsyncTaskissetup,youneedtolaunchitfromtheMainActivityusingtheexecute()method.AddthefollowingcodetoyoursearchBooks()methodinMainActivity.javatolaunchtheAsyncTask:
newFetchBook(mTitleText,mAuthorText).execute(mQueryString);
8. Runyourapp.Executeasearch.Yourappwillcrash.LookatyourLogstoseewhatiscausingtheerror.Youshouldseethefollowingline:
Causedby:java.lang.SecurityException:Permissiondenied(missingINTERNETpermission?)
ThiserrorindicatesthatyouhavenotincludedthepermissiontoaccesstheinternetinyourAndroidManifest.xmlfile.Connectingtotheinternetintroducesnewsecurityconcerns,whichiswhyyourappsdonothaveconnectivitybydefault.Youmustaddpermissionsmanuallyintheformofa<uses-permission>;tagintheAndroidManifest.xml.
2.6AddtheInternetpermissions
1. OpentheAndroidManifest.xmlfile.2. AllpermissionsofyourappneedtobeputintheAndroidManifest.xmlfileoutsideofthe<application>;tag.You
shouldbesuretofollowtheorderinwhichtagsaredefinedinAndroidManifest.xml.3. Addthefollowingxmltagsoutsideofthe<application>tag:
<uses-permissionandroid:name="android.permission.INTERNET"/>
<uses-permissionandroid:name="android.permission.ACCESS_NETWORK_STATE"/>
4. Buildandrunyourappagain.RunningaqueryshouldnowresultinaJSONstringbeingprintedtotheLog.
2.7ParsetheJSONstring
Nowthatyouhavethecorrectresponsetoyourquery,youmustparsetheresultstoextracttheinformationyouwanttodisplayintheUI.Fortunately,JavahasexistingclassesthataidsintheparsingandhandlingofJSONtypedata.Thisprocess,aswellasupdatingtheUI,willhappenintheonPostExecute()method.
ThereischancethatthedoInBackground()methodmightnotreturntheexpectedJSONstring.Forexample,thetrycatchmightfailandthrowanexception,thenetworkmighttimeoutorotherunhandlederrorsmightoccur.Inthosecases,theJavaJSONmethodswillfailtoparsethedataandwillthrowexceptions.Thisiswhyyouhavetodotheparsinginthetryblock,andthecatchblockmusthandlethecasewhereincorrectorincompletedataisreturned.
ToparsetheJSONdataandhandlepossibleexceptions,dothefollowing:
1. InonPostExecute(),addatry/catchblockbelowthecalltosuper.2. Usethebuilt-inJavaJSONclasses(JSONObjectandJSONArray)toobtaintheJSONarrayofresultsitemsinthetry
block.
JSONObjectjsonObject=newJSONObject(s);
JSONArrayitemsArray=jsonObject.getJSONArray("items");
3. IteratethroughtheitemsArray,checkingeachbookfortitleandauthorinformation.Ifbotharenotnull,exittheloopandupdatetheUI;otherwisecontinuelookingthroughthelist.Thisway,onlyentrieswithbothatitleandauthorswillbedisplayed.
Introduction
335

//Iteratethroughtheresults
for(inti=0;i<itemsArray.length();i++){
JSONObjectbook=itemsArray.getJSONObject(i);//Getthecurrentitem
Stringtitle=null;
Stringauthors=null;
JSONObjectvolumeInfo=book.getJSONObject("volumeInfo");
try{
title=volumeInfo.getString("title");
authors=volumeInfo.getString("authors");
}catch(Exceptione){
e.printStackTrace();
}
//Ifbothatitleandauthorexist,updatetheTextViewsandreturn
if(title!=null&&authors!=null){
mTitleText.setText(title);
mAuthorText.setText(authors);
return;
}
}
4. Iftherearenoresultswhichmeetthecriteriaofhavingbothavalidauthorandatitle,andtheloophasstopped,setthetitleTextViewtoread"NoResultsFound",andcleartheauthorsTextView.
5. Inthecatchblock,printtheerrortothelog,setthetitleTextViewto"NoResultsFound",andcleartheauthorsTextView.
Solutioncode:
Introduction
336

//MethodforhandlingtheresultsontheUIthread
@Override
protectedvoidonPostExecute(Strings){
super.onPostExecute(s);
try{
JSONObjectjsonObject=newJSONObject(s);
JSONArrayitemsArray=jsonObject.getJSONArray("items");
for(inti=0;i<itemsArray.length();i++){
JSONObjectbook=itemsArray.getJSONObject(i);
Stringtitle=null;
Stringauthors=null;
JSONObjectvolumeInfo=book.getJSONObject("volumeInfo");
try{
title=volumeInfo.getString("title");
authors=volumeInfo.getString("authors");
}catch(Exceptione){
e.printStackTrace();
}
if(title!=null&&authors!=null){
mTitleText.setText(title);
mAuthorText.setText(authors);
return;
}
}
mTitleText.setText("NoResultsFound");
mAuthorText.setText("");
}catch(Exceptione){
mTitleText.setText("NoResultsFound");
mAuthorText.setText("");
e.printStackTrace();
}
}
Task3.ImplementUIBestPracticesYounowhaveafunctioningappthatusestheBooksAPItoexecuteabooksearch.However,thereareafewthingsthattodonotbehaveasexpected:
WhentheuserclicksSearchBooks,thekeyboarddoesnotdisappear,andthereisnoindicationtotheuserthatthequeryisactuallybeingexecuted.Ifthereisnonetworkconnection,orthesearchfieldisempty,theappstilltriestoquerytheAPIandfailswithoutproperlyupdatingtheUI.Ifyourotatethescreenduringaquery,theAsyncTaskbecomesdisconnectedfromtheActivity,anditisnotabletoupdatetheUIwiththeresults.
Youwillfixtheseissuesinthefollowingsection.
3.1HidetheKeyboardandUpdatetheTextView
Theuserexperienceofsearchingisnotintuitive.Whenthebuttonispushed,thekeyboardremainsvisibleandthereisnowaytoknowthatthequeryisinprogress.OnesolutionistoprogrammaticallyhidethekeyboardandupdateoneoftheresultTextViewstoread"Loading…"whilethequeryisbeingperformed.Tousethissolution,youcan:
1. AddthefollowingcodetothesearchBooks()methodtohidethekeyboardwhenthebuttonispressed:
Introduction
337

InputMethodManagerinputManager=(InputMethodManager)
getSystemService(Context.INPUT_METHOD_SERVICE);
inputManager.hideSoftInputFromWindow(getCurrentFocus().getWindowToken(),
InputMethodManager.HIDE_NOT_ALWAYS);
2. AddalineofcodebeneaththecalltoexecutetheFetchBooktaskthatchangesthetitleTextViewtoread"Loading…"andclearstheauthorTextView.
3. ExtractyourStringresources.
3.2Managethenetworkstateandtheemptysearchfieldcase
Wheneveryourapplicationusesthenetwork,itneedstohandlethepossibilitythatanetworkconnectionisunavailable.BeforeattemptingtoconnecttothenetworkinyourAsyncTaskorAsyncTaskLoader,yourappshouldcheckthestateofthenetworkconnection.
1. ModifyyoursearchBooks()methodtocheckboththenetworkconnectionandifthereisanytextinthesearchfieldbeforeexecutingtheFetchBooktask.
2. UpdatetheUIinthecasethatthereisnointernetconnectionornotextinthesearchfield.DisplaythecauseoftheerrorintheTextView.
Solutioncode:
publicvoidsearchBooks(View,view){
StringqueryString=mBookInput.getText().toString();
InputMethodManagerinputManager=(InputMethodManager)
getSystemService(Context.INPUT_METHOD_SERVICE);
inputManager.hideSoftInputFromWindow(getCurrentFocus().getWindowToken(),
InputMethodManager.HIDE_NOT_ALWAYS);
ConnectivityManagerconnMgr=(ConnectivityManager)
getSystemService(Context.CONNECTIVITY_SERVICE);
NetworkInfonetworkInfo=connMgr.getActiveNetworkInfo();
if(networkInfo!=null&&networkInfo.isConnected()&&queryString.length()!=0){
newFetchBook(mTitleText,mAuthorText).execute(queryString);
mAuthorText.setText("");
mTitleText.setText(R.string.loading);
}
else{
if(queryString.length()==0){
mAuthorText.setText("");
mTitleText.setText("Pleaseenterasearchterm");
}else{
mAuthorText.setText("");
mTitleText.setText("Pleasecheckyournetworkconnectionandtryagain.");
}
}
}
Task4.MigratetoAsyncTaskLoaderWhenusinganAsyncTask,itcannotupdatetheUIifaconfigurationchangeoccurswhilethebackgroundtaskisrunning.Toaddressthissituation,theAndroidSDKprovidesasetofclassescalledloadersdesignedspecificallyforloadingdataintotheUIasynchronously.Ifyouusealoader,youdon'thavetoworryabouttheloaderlosingtheabilitytoupdatetheUIintheactivitythatinitiallycreatedit.TheLoaderframeworkdoestheworkforyoubyreassociatingtheloaderwiththeappropriateActivitywhenthedevicechangesitsconfiguration.Thismeansthatifyourotatethedevicewhilethetaskisstillrunning,theresultswillbedisplayedcorrectlyintheActivityoncethedataisreturned.
Introduction
338

InthistaskyouwilluseaspecificloadercalledanAsyncTaskLoader.AnAsyncTaskLoaderisanabstractsubclassofLoaderandusesanAsyncTasktoefficientlyloaddatainthebackground.
Note:WhenyouusedanAsyncTask,youimplementedtheonPostExecute()methodintheAsyncTasktodisplaytheresultsonthescreen.WhenyouuseanAsyncTaskLoader,youdefinecallbackmethodsintheActivitytodisplaytheresults.LoadersprovidealotofadditionalfunctionalitybeyondjustrunningtasksandreconnectingtotheActivity.Forexample,youcanattachaloadertoadatasourceandhaveitautomaticallyupdatetheUIelementswhentheunderlyingdatachanges.Loaderscanalsobeprogrammedtoresumeloadingifinterrupted.
SowhyshouldyouuseanAsyncTaskifanAsyncTaskLoaderissomuchmoreuseful?Theansweristhatitdependsonthesituation.Ifthebackgroundtaskislikelytofinishbeforeanyconfigurationchangesoccur,anditisnotcrucialthatitupdatestheUI,anAsyncTaskmaybesufficient.TheLoaderframeworkactuallyusesanAsyncTaskbehindthescenestoworkitsmagic.
AgoodruleofthumbistouseanAsyncTaskLoaderinsteadofanAsyncTaskiftheusermightrotatethescreenwhilethejobisrunning,orwhenit'scriticaltoupdatetheUIwhenthejobfinishes.
InthisexerciseyouwilllearnhowtouseaAsyncTaskLoaderinsteadofanAsyncTasktorunyourBooksAPIquery.Youwilllearnmoreabouttheusesofotherloadersinalaterlesson.
ImplementingaLoaderrequiresthefollowingcomponents:
AclassthatextendsaLoaderclass(inthiscase,AsyncTaskLoader).AnActivitythatimplementstheLoaderManager.LoaderCallbacksclass.AninstanceoftheLoaderManager.
1. TheActivity.2. TheLoaderManager.LoaderCallbacks.3. TheLoadersubclass.4. TheLoaderImplementation.
TheLoaderManagerautomaticallymovestheloaderthroughitslifecycledependingonthestateofthedataandtheActivity.Forexample,theLoaderManagercallsonStartLoading()whentheloaderisinitializedanddestroystheloaderwhentheActivityisdestroyed.
TheLoaderManager.LoaderCallbacksareasetofmethodsintheActivitythatarecalledbytheLoaderManagerwhenloaderisbeingcreated,whenthedatahasfinishedloading,andwhentheloaderisreset.TheLoaderCallbackscantaketheresultsofthetaskandpassthembacktotheActivity'sUI.
Introduction
339

TheLoadersubclasscontainsthedetailsofloadingthedata,usuallyoverridingatleastonStartLoading().Itcanalsocontainadditionalfeaturessuchasobservingthedatasourceforchangesandcachingdatalocally.
YourLoadersubclassimplementsLoaderlifecyclecallbackmethodssuchasonStartLoading(),onStopLoading()andonReset().TheloadersubclassalsocontainstheforceLoad()methodwhichinitiatestheloadingofthedata.Thismethodisnotcalledautomaticallywhentheloaderisstartedbecausesomesetupisusuallyrequiredbeforealoadisperformed.ThesimplestimplementationwouldcallforceLoad()inonStartLoading()whichresultsinaloadeverytimetheLoaderManagerstartstheloader.
4.1CreateanAsyncTaskLoader
1. CopytheWhoWroteItproject,inordertopreservetheresultsofthepreviouspractical.RenamethecopiedprojectWhoWroteItLoader.
2. CreateanewclassinyourJavadirectorycalledBookLoader.3. HaveyourBookLoaderclassextendAsyncTaskLoaderwithparameterizedtype<String>.4. Makesureyouimporttheloaderfromthev4SupportLibrary.5. Implementtherequiredmethod(loadInBackground()).Noticethesimilaritybetweenthismethodandtheinitial
doInBackground()methodfromAsyncTask.6. Createtheconstructorforyournewclass.InAndroidStudio,it'slikelytheclassdeclarationwillstillbeunderlinedinred
becauseyourconstructordoesnotmatchthesuperclassimplementation.Withyourtextcursorontheclassdeclarationline,pressAlt+Enter(Option+EnteronaMac)andchooseCreateconstructormatchingsuper.Thiswillcreateaconstructorwiththecontextasaparameter.
DefineonStartLoading()
1. PressCtrl+OtoopentheOverridemethodsmenu,andselectonStartLoading.Thismethodiscalledbythesystemwhenyoustartyourloader.
2. TheloaderwillnotactuallystartloadingthedatauntilyoucalltheforceLoad()method.InsidetheonStartLoading()methodstub,callforceLoad()tostarttheloadInBackground()methodoncetheLoaderiscreated.
DefineloadInBackground()
1. CreateamembervariablemQueryStringthatwillholdthequeryString,andmodifytheconstructortotakeaStringasanargumentandassignittothemQueryStringvariable.
2. IntheloadInBackground()method,callthegetBookInfo()methodpassinginmQueryString,andreturntheresulttodownloadtheinformationfromtheBooksAPI:
@Override
publicStringloadInBackground(){
returnNetworkUtils.getBookInfo(mQueryString);
}
4.2ModifyMainActivityYoumustnowimplementtheLoaderCallbacksinyourMainActivitytohandletheresultsoftheloadInBackground()AsyncTaskLoadermethod.
1. AddtheLoaderManager.LoaderCallbacksimplementationtoyourMainActivityclassdeclaration,parameterizedwiththeStringtype:
publicclassMainActivityextendsAppCompatActivity
implementsLoaderManager.LoaderCallbacks<String>{
2. Implementalltherequiredmethods:onCreateLoader(),onLoadFinished(),onLoaderReset().PlaceyourtextcursorontheclasssignaturelineandenterAlt+Enter(Option+EnteronaMac).Makesureallthemethodsareselected.
Note:IftheimportsforLoaderandLoaderManagerinMainActivitydonotmatchtheimportfortheAsyncTaskLoaderfortheBookLoaderclass,youwillhavesometypeerrorsinthecallbacks.Makesurethatallimportsarefromthe
Introduction
340
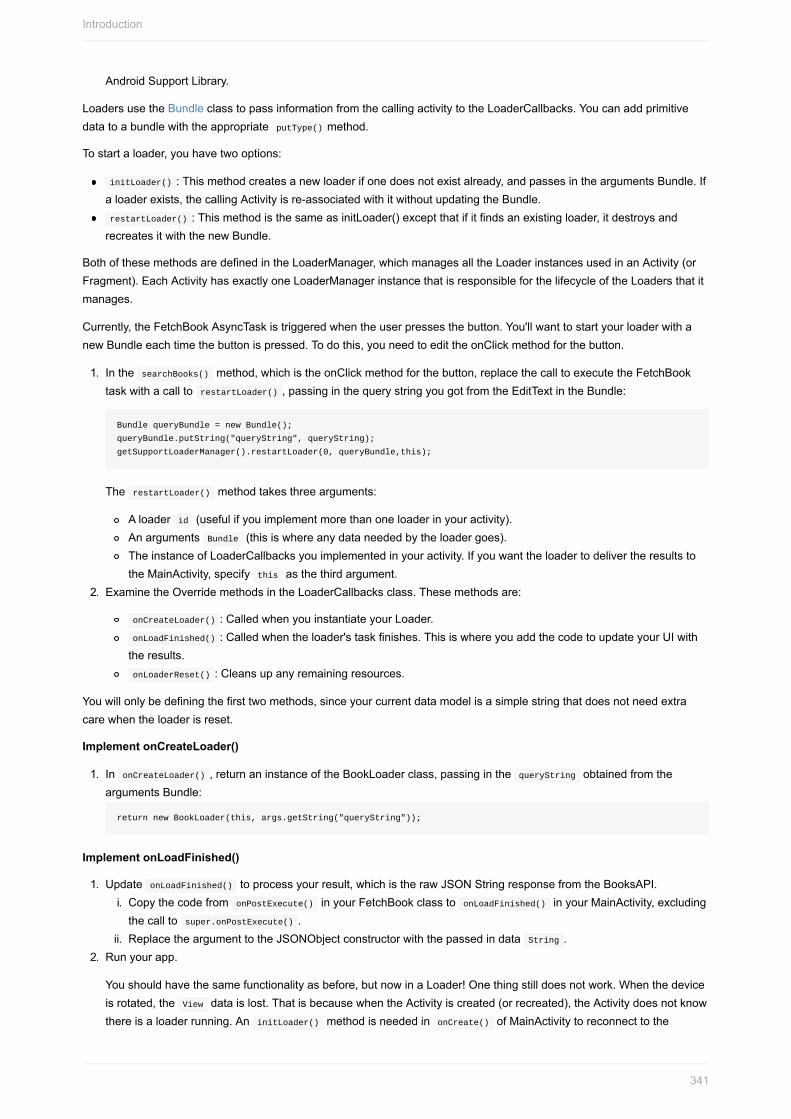
AndroidSupportLibrary.
LoadersusetheBundleclasstopassinformationfromthecallingactivitytotheLoaderCallbacks.YoucanaddprimitivedatatoabundlewiththeappropriateputType()method.
Tostartaloader,youhavetwooptions:
initLoader():Thismethodcreatesanewloaderifonedoesnotexistalready,andpassesintheargumentsBundle.Ifaloaderexists,thecallingActivityisre-associatedwithitwithoutupdatingtheBundle.restartLoader():ThismethodisthesameasinitLoader()exceptthatifitfindsanexistingloader,itdestroysandrecreatesitwiththenewBundle.
BothofthesemethodsaredefinedintheLoaderManager,whichmanagesalltheLoaderinstancesusedinanActivity(orFragment).EachActivityhasexactlyoneLoaderManagerinstancethatisresponsibleforthelifecycleoftheLoadersthatitmanages.
Currently,theFetchBookAsyncTaskistriggeredwhentheuserpressesthebutton.You'llwanttostartyourloaderwithanewBundleeachtimethebuttonispressed.Todothis,youneedtoedittheonClickmethodforthebutton.
1. InthesearchBooks()method,whichistheonClickmethodforthebutton,replacethecalltoexecutetheFetchBooktaskwithacalltorestartLoader(),passinginthequerystringyougotfromtheEditTextintheBundle:
BundlequeryBundle=newBundle();
queryBundle.putString("queryString",queryString);
getSupportLoaderManager().restartLoader(0,queryBundle,this);
TherestartLoader()methodtakesthreearguments:
Aloaderid(usefulifyouimplementmorethanoneloaderinyouractivity).AnargumentsBundle(thisiswhereanydataneededbytheloadergoes).TheinstanceofLoaderCallbacksyouimplementedinyouractivity.IfyouwanttheloadertodelivertheresultstotheMainActivity,specifythisasthethirdargument.
2. ExaminetheOverridemethodsintheLoaderCallbacksclass.Thesemethodsare:
onCreateLoader():CalledwhenyouinstantiateyourLoader.onLoadFinished():Calledwhentheloader'staskfinishes.ThisiswhereyouaddthecodetoupdateyourUIwiththeresults.onLoaderReset():Cleansupanyremainingresources.
Youwillonlybedefiningthefirsttwomethods,sinceyourcurrentdatamodelisasimplestringthatdoesnotneedextracarewhentheloaderisreset.
ImplementonCreateLoader()
1. InonCreateLoader(),returnaninstanceoftheBookLoaderclass,passinginthequeryStringobtainedfromtheargumentsBundle:
returnnewBookLoader(this,args.getString("queryString"));
ImplementonLoadFinished()
1. UpdateonLoadFinished()toprocessyourresult,whichistherawJSONStringresponsefromtheBooksAPI.i. CopythecodefromonPostExecute()inyourFetchBookclasstoonLoadFinished()inyourMainActivity,excludingthecalltosuper.onPostExecute().
ii. ReplacetheargumenttotheJSONObjectconstructorwiththepassedindataString.2. Runyourapp.
Youshouldhavethesamefunctionalityasbefore,butnowinaLoader!Onethingstilldoesnotwork.Whenthedeviceisrotated,theViewdataislost.ThatisbecausewhentheActivityiscreated(orrecreated),theActivitydoesnotknowthereisaloaderrunning.AninitLoader()methodisneededinonCreate()ofMainActivitytoreconnecttothe
Introduction
341

loader.
3. AddthefollowingcodeinonCreate()toreconnecttotheLoaderifitalreadyexists:
if(getSupportLoaderManager().getLoader(0)!=null){
getSupportLoaderManager().initLoader(0,null,this);
}
Note:Iftheloaderexists,initializeit.YouonlywanttoreassociatetheloadertotheActivityifaqueryhasalreadybeenexecuted.Intheinitialstateoftheapp,nodataisloadedsothereisnonetopreserve.
4. Runyourappagainandrotatethedevice.TheLoaderManagernowpreservesyourdataacrossdeviceconfigurations!
5. RemovetheFetchBookclassasitisnolongerused.
SolutioncodeAndroidStudioproject:WhoWroteItLoader
CodingchallengesNote:Allcodingchallengesareoptionalandarenotprerequisitesforlaterlessons.
Challenge1:ExplorethethespecificAPIyouareusingingreaterdetailandfindasearchparameterthatrestrictstheresultstobooksthataredownloadableintheepubformat.Addthisparametertoyourrequestandviewtheresults.
Challenge2:TheresponsefromtheBooksAPIcontainsasmanyresultsasyousetwiththemaxResultsparameter,butinthisimplementationyouareonlyreturningthefirstvalidBookresult.ModifyyourappsothatthedataisdisplayedinaRecyclerViewthathasamaxResultsamountofentries.
SummaryTasksthatconnecttothenetwork,orrequireextratimeprocessing,shouldnotbeexecutedontheUIthread.
TheAndroidRuntimeusuallydefaultstoStrictModewhichwillraiseanexceptionifyouattemptnetworkconnectivityorfileaccessontheUIthread.
TheGoogleAPIExplorerisatoolthathelpsyouexplorenumerousGoogleAPIsinteractively.TheBooksSearchAPIisasetofRESTfulAPIstoaccessGoogleBooksprogrammatically.AnAPIrequesttoGoogleBooksisintheformofaURL.TheresponsetothatAPIrequestreturnsaJSONstring.
UsegetText()toretrievetextfromanEditTextview.ItcanbeconvertedintoasimpleStringbyusingtoString().TheURIclasshasaconvenientmethod,Uri.buildUpon()thatreturnsaURI.BuilderthatcanbeusedtoconstructaURIstring.AnAsyncTaskisaclassthatallowsyoutoruntasksinthebackground,asynchronously,insteadofontheUIthread.
AnAsyncTaskcanbestartedviaexecute().AnAsyncTaskwillnotbeabletoupdatetheUIiftheActivityitiscontrollingterminates(suchasinaconfigurationchangeonthedevice).AnAsyncTaskmustbesubclassedtobeused.ThesubclasswilloverrideatleastonemethoddoInBackground(Params),andmostoftenwilloverrideasecondoneonPostExecute(Result)aswell.
WheneveranAsyncTaskisexecuted,itgoesthroughthefollowing4steps:
1. onPreExecute().InvokedontheUIthreadbeforethetaskisexecuted.Thisstepisnormallyusedtosetupthetask.
2. doInBackground(Params).InvokedonthebackgroundthreadimmediatelyafteronPreExecute()finishesexecuting.Thisstepisusedtoperformbackgroundcomputationthatcantakealongtime.
Introduction
342

3. onProgressUpdate(Progress).InvokedontheUIthreadafteryouacallindoInBackgroundtopublishProgress(Progress).
4. onPostExecute(Result).InvokedontheUIthreadafterthebackgroundcomputationhasfinished.Theresultofthebackgroundcomputationgetspassedintothismethodasaparameter.
AsyncTaskLoaderistheLoaderequivalentofanAsyncTask.Itprovidesamethod,loadInBackground(),thatrunsonaseparatethreadandwhoseresultsareautomaticallydeliveredtotheUIthread(totheonLoadFinished()LoaderManagercallback).YoumustconfigurenetworkpermissionsintheAndroidmanifestfiletoconnecttotheInternet:
<uses-permissionandroid:name="android.permission.INTERNET">
UsethebuiltinJavaJSONclasses(JSONObjectandJSONArray)tocreateandparseJSONstrings.
ALoaderallowsasynchronousloadingofdatainanActivity.ALoadercanbeusedtore-establishcommunicationtotheUIwhenanActivityisterminatedbeforethetaskfinishes(suchasbydevicerotation).AnAsyncTaskLoaderisaLoaderthatusesanAsyncTaskhelperclassbehindthescenestodoworkinthebackgroundoffthemainthread.LoadersaremanagedbyaLoaderManager;oneormoreLoaderscanbeassignedandmanagedbyasingleLoadManager.TheLoaderManagerallowsyoutoassociateanewlycreatedActivitywithaLoaderusinggetSupportLoaderManager().initLoader().
RelatedconceptTherelatedconceptdocumentationisinAndroidDeveloperFundamentals:Concepts.
ConnecttotheInternetwithAsyncTaskandAsyncTaskLoader
LearnmoreAndroidDeveloperDocumentation
Guides
ConnectingtotheNetworkManagingNetworkStateLoaders
Reference
AsyncTaskAsyncTaskLoader
Introduction
343

7.3:BroadcastReceiversContents:
WhatyoushouldalreadyKNOWWhatyouwillLEARNWhatyouwillDOTask1.SetupthePowerReceiverProjectTask2.SendandReceiveaCustomBroadcastCodingchallengeSummaryRelatedconceptLearnmore
CertaineventsthatcanhappenintheAndroidsystemmightaffectthefunctionalityofapplicationsinstalledonthedevice.Forexample,ifthesystemhasfinishedbooting,youmightlikeyourweatherapptoupdateitsinformation.TheAndroidframeworkhandlesthisbysendingoutsystembroadcastscontainingIntentsthataremeanttobereceivedusingBroadcastReceivers.ABroadcastReceiveristhebaseclassforcodethatwillreceiveIntentssentbysendBroadcast().Therearetwomajorclassesofbroadcaststhatcanbereceived:
Normalbroadcasts(sentwithContext.sendBroadcast())arecompletelyasynchronous.Allreceiversofthebroadcastareruninanundefinedorder,oftenatthesametime.Thisismoreefficient,butmeansthatreceiverscannotusetheresultorabortAPIsincludedhere.Orderedbroadcasts(sentwithContext.sendOrderedBroadcast)aredeliveredtoonereceiveratatime.Aseachreceiverexecutesinturn,itcanpropagatearesulttothenextreceiver,oritcancompletelyabortthebroadcastsothatitwon'tbepassedtootherreceivers.Theorderreceiversrunincanbecontrolledwiththeandroid:priorityattributeofthematchingintent-filter;receiverswiththesameprioritywillberuninanarbitraryorder.
Eveninthecaseofnormalbroadcasts,thesystemmayinsomesituationsreverttodeliveringthebroadcastonereceiveratatime.Inparticular,forreceiversthatmayrequirethecreationofaprocess,onlyonewillberunatatimetoavoidoverloadingthesystemwithnewprocesses.Inthissituation,however,thenon-orderedsemanticshold:thesereceiversstillcannotreturnresultsoraborttheirbroadcast.
Additionally,youcancreateIntentswithcustomactionsandbroadcastthemyourselffromyourapplicationusingthesendBroadcast()method.ThebroadcastwillbereceivedbyallapplicationswithaBroadcastReceiverregisteredforthataction.TolearnmoreaboutbroadcastIntentsandBroadcastreceivers,visittheIntentdocumentation.
ItisusefultonotethatwhiletheIntentclassisusedforsendingandreceivingbroadcasts,theIntentbroadcastmechanismiscompletelyseparatefromIntentsthatareusedtostartActivities.
Inthispractical,you'llcreateanappthatrespondstoachangeinthechargingstateofyourdevice,aswellassendsandreceivesacustomBroadcastIntent.
WhatyoushouldalreadyKNOWPriortothispractical,youshouldbeableto:
IdentifykeypartsoftheAndroidManifest.xmlfile.CreateImplicitIntents.
WhatyouwillLEARNDuringthispractical,youwilllearnto:
Introduction
344

SubclassandimplementaBroadcastReceiver.RegisterforsystemBroadcastintents.CreateandsendcustomBroadcastintents.
WhatyouwillDOInthispractical,youwill:
SubclassaBroadcastReceivertoshowaToastwhenabroadcastisreceived.Registeryourreceivertolistentosystembroadcasts.Sendandreceiveacustombroadcastintent.
AppoverviewThePowerReceiverapplicationwillregisteraBroadcastReceiverthatdisplaysaToastmessagewhenthedeviceisconnectedordisconnectedfrompower.ItwillalsosendandreceiveacustomBroadcastIntenttodisplayadifferentToastmessage.
Introduction
345

Introduction
346

Task1.SetupthePowerReceiverProject
1.1CreatetheProject1. CreateanewprojectcalledPowerReceiver,acceptthedefaultoptionsandusetheEmptytemplate.2. CreateanewBroadcastReceiver.SelectthepackagenameintheAndroidProjectViewandnavigatetoFile>New>
Other>BroadcastReceiver.3. NametheclassCustomReceiverandmakesure"Exported"and"Enabled"arechecked.
Note:The"Exported"featureallowsyourapplicationtorespondtooutsidebroadcasts,while"Enabled"allowsittobeinstantiatedbythesystem.
4. NavigatetoyourAndroidmanifestfile.NotethatAndroidStudioautomaticallygeneratesa<receiver>tagwithyourchosenoptionsasattributes.BroadcastReceiverscanalsoberegisteredprogrammatically,butitiseasiesttodefinetheminthemanifest.
1.2RegisteryourReceiverforsystembroadcasts
Inordertoreceiveanybroadcasts,youmustfirstdeterminewhichbroadcastintentsyouareinterestedin.IntheIntentdocumentation,under"StandardBroadcastActions",youcanfindsomeofthecommonbroadcastintentssentbythesystem.Inthisapp,youwillbeinterestedintwoparticularbroadcasts:ACTION_POWER_CONNECTEDandACTION_POWER_DISCONNECTED.BroadcastReceiversregisterforbroadcastthesamewayyouregisteredyouractivitiesforimplicitIntents:youuseanintentfilter.Youlearnedaboutimplicitintentsinanearlierpractical.
1. IntheAndroidManifest.xmlfile,addthefollowingcodebetweenthe<receiver>tagstoregisteryourReceiverforthesystemIntents:
<intent-filter>
<actionandroid:name="android.intent.action.ACTION_POWER_CONNECTED"/>
<actionandroid:name="android.intent.action.ACTION_POWER_DISCONNECTED"/>
</intent-filter>
1.3ImplementonReceive()inyourBroadcastReceiver
OncetheBroadcastReceiverinterceptsabroadcastthatitisregisteredfor,theIntentisdeliveredtothereceiver'sonReceive()method,alongwiththecontextinwhichthereceiverisrunning.
1. NavigatetoyourCustomReceiverfile,anddeletethedefaultimplementationinsidetheonReceive()method.2. ObtaintheactionfromtheintentandstoreitinaStringvariablecalledintentAction:
@Override
publicvoidonReceive(Contextcontext,Intentintent){
StringintentAction=intent.getAction();
}
3. CreateaswitchstatementwiththeintentActionstring,sothatyourappcandisplayadifferenttoastmessageforeachspecificactionyourreceiverisregisteredfor:
switch(intentAction){
caseIntent.ACTION_POWER_CONNECTED:
break;
caseIntent.ACTION_POWER_DISCONNECTED:
break;
}
4. InitializeaStringvariablecalledtoastMessagebeforetheswitchstatement,andmakeit'svaluenullsothatitcanbesetdependingonthebroadcastactionyoureceive.
5. AssigntoastMessageto"Powerconnected!"iftheactionisACTION_POWER_CONNECTED,and"Powerdisconnected!"ifitis
Introduction
347

ACTION_POWER_DISCONNECTED.Extractyourstringresources.6. Displayatoastmessageforashortdurationaftertheswitchstatement:
Toast.makeText(context,toastMessage,Toast.LENGTH_SHORT).show();
7. Runyourapp.Afteritisinstalled,unplugyourdevice.Itmaytakeamomentthefirsttime,butsureenough,atoastisdisplayedeachtimeyouplugin,orunplugyourdevice.Note:Ifyouareusinganemulator,youcantogglethepowerconnectionstatebyselectingtheellipsesiconforthemenu,chooseBatteryontheleftbar,andtoggleusingtheChargerconnectionsetting.
1.4RestrictyourBroadcastReceiver
BroadcastReceiversarealwaysactive,andthereforeyourappdoesnotevenneedtoberunningforitsonReceive()methodtobecalled.
1. Goahead,tryitout:closeyourapp,andplugorunplugyourdevice.
Thetoastmessageisstilldisplayed!
Thereisalotofresponsibilityonyou,asthedeveloper,tonotoverwhelmyouruserwithnotificationsorunwantedfunctionalityeverytimeabroadcastoccurs.Inthisexample,havingaToastmessagepopupeverytimethepowerstatechangescouldquicklyannoytheuser.Tolimitthis,youwilladdsomecodetoensurethatthebroadcastreceiverisonlyactivewhentheappisshowing.
ThePackageManagerclassisresponsibleforenablinganddisablingaparticularandroidcomponent(suchasaservice,activityorbroadcastreceiver).ThisisaccomplishedusingthesetComponentEnabledSetting()methodwhichtakesthreearguments:
TheComponentName(anidentifierforthecomponentyouwanttoenableordisable).OneofthePackageManagerclassconstantsthatrepresenttheenabledstateofacomponent.InthisappwewillusePackageManager.COMPONENT_ENABLED_STATE_ENABLEDandPackageManager.COMPONENT_ENABLED_STATE_DISABLED.SeethePackageManagerreferencefortheotherconstants.Anoptionalflagconstantthattellsthesystemnottokilltheappwhenchangingthestateofthecomponent:PackageManager.DONT_KILL_APP.
2. Forthebroadcastreceivertoonlybeactivewhentheappisshowing,enableitinonStart()anddisableitinonStop().
3. Createtwomembervariables:aPackageManagerandaComponentName.4. InitializebothoftheminonCreate().
InstantiatethePackageManagerwithgetPackageManager().TheconstructorforComponentNametakestheapplicationcontextandtheclassnameofthecomponent:
mReceiverComponentName=newComponentName(this,CustomReceiver.class);
mPackageManager=getPackageManager();
5. OverridebothonStart()andonStop():
@Override
protectedvoidonStart(){
super.onStart();
}
@Override
protectedvoidonStop(){
super.onStop();
}
6. CallsetComponentEnabledSetting()onthePackageManagerinonStart().PassintheComponentname,thePackageManager.COMPONENT_ENABLED_STATE_ENABLEDconstant,andtheDONT_KILL_APPflag:
Introduction
348

mPackageManager.setComponentEnabledSetting
(mReceiverComponentName,PackageManager.COMPONENT_ENABLED_STATE_ENABLED,
PackageManager.DONT_KILL_APP);
7. InonStop(),usethePackageManagertodisabletheCustomReceiver,usingthePackageManager.COMPONENT_ENABLED_STATE_DISABLEDconstant:
mPackageManager.setComponentEnabledSetting
(mReceiverComponentName,PackageManager.COMPONENT_ENABLED_STATE_DISABLED,
PackageManager.DONT_KILL_APP);
Task2.SendandReceiveaCustomBroadcastInadditiontorespondingtosystembroadcasts,yourapplicationcanalsosendandreceivecustomBroadcastIntents.AcustombroadcastintentisexactlythesameasystemoneexceptyoumustdefineyourownIntentactionforit(auniquestring)andit'sdeliveredusingthesendBroadcast()method.Inthistask,youwilladdabuttontoyouractivitythatsendsacustomBroadcastIntent,whichwillberegisteredbyyourreceiveranddisplayedinaToastmessage.
2.1DefineyourcustomBroadcastActionstringBoththesenderandreceiverofacustombroadcastmustagreeonauniqueactionstringfortheBroadcastIntent.ItisacommonpracticetocreateuniqueactionstringsbyprependingyourActionNamewithyourpackagename.
1. CreateaconstantStringvariableinbothyourMainActivityandyourCustomReceiverclasstobeusedastheBroadcastIntentAction(thisisyourcustomactionstring):
privatestaticfinalStringACTION_CUSTOM_BROADCAST=
"com.example.android.powerreceiver.ACTION_CUSTOM_BROADCAST";
2.2Adda"SendCustomBroadcast"Button
1. Inyouractivity_main.xmlfile,addaButtonviewwiththefollowingattributes:
Attribute Value
android:id "@+id/sendBroadcast"
android:layout_width wrap_content
android:layout_height wrap_content
android:text "SendCustomBroadcast"
android:layout_margin "8dp"
android:onClick "sendCustomBroadcast"
2. Extractyourstringresources.3. CreatethestubforthesendCustomBroadcast()method:ClickintheyellowhighlightedonClickmethodname.Press
Alt(OptionforMacusers)+Enterandchoose'Create'sendCustomBroadcast(View)'in'MainActivity'.
2.3ImplementsendCustomBroadcast()
Introduction
349

Becausethisbroadcastismeanttobeusedsolelybyyourapplication,youshoulduseLocalBroadcastManagertomanagethebroadcastsinyourapplication.LocalBroadcastManagerisaclassthatallowsyoutoregisterforandsendbroadcastsofIntentstolocalobjectswithinyourapp.Bykeepingbroadcastslocal,yourapplicationdatawillnotbesharedwithotherAndroidapplications,keepingyourinformationmoresecureandmaintainingsystemefficiency.
1. InthesendCustomBroadcast()methodinMainActivity,createanewIntent,withyourcustomactionstringastheargument.
IntentcustomBroadcastIntent=newIntent(ACTION_CUSTOM_BROADCAST);
2. SendthebroadcastusingtheLocalBroadcastManagerclass:LocalBroadcastManager.getInstance(this).sendBroadcast(customBroadcastIntent);
2.4RegisteryourCustomBroadcastForsystembroadcasts,youregisteredyourreceiverintheAndroidManifest.xmlfile.Itisalsopossibletoregisteryourreceiverforspecificactionsprogrammatically.ForbroadcastssentusingLocalBroadcastManager,staticregistrationsinthemanifestisnotallowed.
Ifyouprogrammaticallyregisterthebroadcastreceiver,youmustalsounregisterthereceiverwhenitisnolongerneeded.Inyourapplication,thereceiverwillonlyneedtorespondtothecustombroadcastwhenitisrunning,sowecanthereforeregistertheactioninonCreate()andunregisteritinonDestroy().
1. CreateamembervariableinMainActivityforyourReceiverandinitializeit:
privateCustomReceivermReceiver=newCustomReceiver();
2. InonCreate(),getaninstanceofLocalBroadcastManagerandregisteryourreceiverwiththecustomintentaction:
LocalBroadcastManager.getInstance(this)
.registerReceiver(mReceiver,newIntentFilter(ACTION_CUSTOM_BROADCAST));
3. OverridetheonDestroy()methodandunregisteryourreceiverfromtheLocalBroadcastManager:
@Override
protectedvoidonDestroy(){
LocalBroadcastManager.getInstance(this).unregisterReceiver(mReceiver);
super.onDestroy();
}
2.5RespondtotheCustomBroadcast1. InonReceive()inyourCustomReceiverclass,addacasestatementforthecustomIntentAction.2. Modifythetoastmessageto"CustomBroadcastReceived",extractitintoyourstrings.xmlandcallit
custom_broadcast_toast(pressAlt+EnterorOption+EnteronaMacandchooseextractstringresource):
caseACTION_CUSTOM_BROADCAST:
toastMessage=context.getString(R.string.custom_broadcast_toast);
break;
Note:BroadcastReceiversthatareregisteredprogrammaticallyarenotaffectedbytheenablingordisablingdonebythePackageManagerclass,whichismeantforcomponentslistedintheAndroidManifestfile.Enablingordisablingsuchreceiversisdonebyregisteringorunregisteringthem,respectively.Inthiscase,turningoffthe"ReceiverEnabled"togglewillstopthepowerconnectedordisconnectedtoastmessages,butnottheCustomBroadcastIntentToastmessages.
That'sit!YourappnowdeliverscustomBroadcastintentsandisabletoreceivebothsystemandcustomBroadcasts.
Introduction
350

SolutioncodeAndroidStudioproject:PowerReceiver
CodingchallengeNote:Allcodingchallengesareoptionalandarenotprerequisitesforlaterlessons.
Challenge:Acommonpatternforbroadcastreceiversisstartingsomeupdateoractiononcethedevicehasbooted.ImplementaBroadcastReceiverthatwillshowatoastmessagehalfanhourafterthedevicehasbooted.
SummaryBroadcastReceiversareoneofthefundamentalcomponentsofanandroidapplication.BroadcastReceiverscanreceiveIntentsbroadcastedbyboththesystemandapplication.TheIntentbroadcastmechanismiscompletelyseparatefromIntentsthatareusedtostartActivities.YouneedtosubclasstheBroadcastReceiverclassandimplementonReceive()toprocesstheincomingIntentassociatedwiththebroadcast.AbroadcastreceivercanberegisteredintheAndroidmanifestfileorprogrammatically.UseLocalBroadcastManagertoregisterandsendforBroadcaststhatareprivatetoyourapplication.LocalBroadcastManagerismoreefficientandsecurethansystembroadcasts.ForbroadcastssentusingLocalBroadcastManager,youcanonlyregisterinterestforspecificactionsprogrammatically.AcommonpracticetocreateuniqueIntentactionnamesforbroadcastsistoprependyourActionNamewithyourpackagename.
RelatedconceptTherelatedconceptdocumentationisinAndroidDeveloperFundamentals:Concepts.
BroadcastReceivers
LearnmoreAndroidDeveloperDocumentation
Guides
IntentsandIntentFiltersManipulatingBroadcastReceiversOnDemand
Reference
BroadcastReceiver
Introduction
351

8.1:NotificationsContents:
WhatyoushouldalreadyKNOWWhatyouwillLEARNWhatyouwillDOAppoverviewTask1.CreateabasicnotificationTask2.UpdateandcancelyournotificationTask3.AddnotificationactionsCodingchallengeSummaryRelatedconceptLearnmore
Untilnow,theappsyouhavebuiltusedUIelementsthatarevisibleonlywhenyourappisrunning.TheonlyexceptiontothisistheBroadcastReceiveryouimplementedthatshowedaToastmessagewhenthedevicewasconnectedordisconnectedfrompower.Therearemanytimeswhenyouwanttoshowyouruserinformationevenwhenyourapplicationisnotrunning.Forexample,youmightletthemknowthatnewcontentisavailable,orupdatethemontheirfavoriteteamscore.TheAndroidframeworkprovidesamechanismforyourapptonotifyusersevenwhentheappisnotintheforeground:theNotificationframework.
ANotificationisamessageyoucandisplaytotheuseroutsideofyourapplication'snormalUI.WhenAndroidissuesanotification,itwillfirstappearasaniconinthenotificationareaofthedevice.Toseethespecificdetailsofthenotification,theuseropensthenotificationdrawer.Boththenotificationareaandthenotificationdraweraresystem-controlledareasthattheusercanviewatanytime.
Introduction
352

Introduction
353

Inthispracticalyou'llcreateanappthattriggersanotificationwhenabuttonispressedandprovidestheabilitytoupdatethenotificationorcancelit.
WhatyoushouldalreadyKNOWForthispractical,youshouldbeableto:
ImplementtheonClick()methodforbuttons.CreateImplicitIntents.SendCustomBroadcastIntents.UseBroadcastReceivers.
WhatyouwillLEARNDuringthispractical,youwilllearnto:
CreateaNotificationusingtheNotificationBuilder.UsePendingIntentstorespondtoNotificationactions.UpdateorcancelexistingNotifications.
WhatyouwillDOInthispractical,youwill:
Sendanotificationwhenabuttonispushed.Updatethenotificationbothfromabuttonandanactionlocatedinthenotification.Launchanimplicitintenttoawebpagefromthenotification.
AppoverviewNotifyMe!isanapplicationthatcantrigger,updateandcancelanotification.Italsoexperimentswithnotificationstyles,actionsandpriorities.
Introduction
354

Introduction
355

Introduction
356

Task1.Createabasicnotification
1.1Createtheproject1. Createanewprojectcalled"NotifyMe!",acceptthedefaultoptions,andusetheemptytemplate.2. Inyouractivity_main.xmlfile,changetherootviewelementtoaverticalLinearLayoutwithitsgravityattributesetto
"center".3. AddabuttonwiththefollowingattributestoreplacethedefaultTextView:
Attribute Value
android:id "@+id/notify"
android:layout_width "wrap_content"
android:layout_height "wrap_content"
android:text "NotifyMe!"
android:layout_margin "4dp"
4. CreateamethodstubforthesendNotification()method.Themethodshouldtakenoargumentsandreturnvoid:
publicvoidsendNotification(){}
5. CreateamembervariablefortheNotifyButton.6. InitializethebuttoninonCreate()andcreateanonClickListenerforit:
mNotifyButton=(Button)findViewById(R.id.notify);
mNotifyButton.setOnClickListener(newView.OnClickListener(){
@Override
publicvoidonClick(Viewview){
}
});
7. CallsendNotification()fromtheonClickmethod.
1.2BuildyourfirstnotificationNotificationsarecreatedusingtheNotificationCompat.Builderclass,whichallowsyoutosetthecontentandbehavioroftheNotification.Anotificationmustcontainthefollowingelements:
Atitle,setbysetContentTitle().Detailtext,setbysetContentText().Anicon,setbysetSmallIcon().
AnAndroidNotificationisdeployedbytheNotificationManager.Ifyouneedtoupdateorcancelthenotificationinthefuture,youshouldassociateanotificationIDwithyourNotification.
CreatetheNotificationIcon
1. GotoFile>New>ImageAsset.2. FromtheIconTypedropdown,selectNotificationIcons.3. ClickontheiconnexttotheClipArtitemtoselectamaterialiconthatyouwilluseastheiconforyournotification.In
thisexample,youcanusetheAndroidicon.4. Renametheresourceic_androidandclickNextandFinish.Thiswillcreateanumberofdrawablefileswithdifferent
Introduction
357

resolutionsfordifferentAPIlevels.5. CreateamembervariableinMainActivitytostoretheNotificationManager:
privateNotificationManagermNotifyManager;
6. CreateaconstantvariableforthenotificationID.Sincetherewillbeonlyoneactivenotificationatatime,wecanusethesameIDforallnotifications:
privatestaticfinalintNOTIFICATION_ID=0;
7. InstantiatetheNotificationManagerinonCreateusinggetSystemService():
mNotifyManager=(NotificationManager)getSystemService(NOTIFICATION_SERVICE);
8. CreateandinstantiatetheNotificationBuilderinthesendNotification()method:
NotificationCompat.BuildernotifyBuilder=newNotificationCompat.Builder(this)
Note:MakesuretheNotificationCompatclassisimportedfromthev4supportlibrary.9. SettheNotificationTitleto"You'vebeennotified!".10. SettheNotificationTextto"Thisisyournotificationtext."11. SettheNotificationicontotheandroidiconyouadded.
NotificationCompat.BuildernotifyBuilder=newNotificationCompat.Builder(this)
.setContentTitle("You'vebeennotified!")
.setContentText("Thisisyournotificationtext.")
.setSmallIcon(R.drawable.ic_android);
12. Callnotify()ontheNotificationManagerattheendofthesendNotification()method,passinginthenotificationIDandthenotification:
NotificationmyNotification=notifyBuilder.build();
mNotifyManager.notify(NOTIFICATION_ID,myNotification);
13. Runyourapp.The"NotifyMe!"buttonnowissuesanotification(lookfortheiconinthestatusbar),butit'smissingsomeessentialfeatures:thereisnonotificationsoundorvibration,clickingonthenotificationdoesn'tdoanything.Let'saddsomeadditionalfunctionalitytothenotification.
1.3Addacontentintent
Inordertoimproveyournotification,youwilladdafewmorefeaturesavailablethroughtheNotificationCompat.Builderclass:
Acontentintent,whichislaunchedwhenthenotificationistapped,andissetbysetContentIntent().Apriority,whichdetermineshowthesystemdisplaysthenotificationwithrespecttoothernotifications,andissetbysetPriority().Thedefaultoptions,suchassounds,vibrationandLEDlights(ifavailable),andissetbysetDefaults().
TappinganotificationlaunchesanIntent.ContentIntentsfornotificationsareverysimilartotheIntentsyou'vebeenusingthroughoutthiscourse.Theycanbeexplicitintentstolaunchanactivity,implicitintentstoperformanaction,orbroadcastintentstonotifythesystemofasystemorcustomevent.ThemajordifferencewithanIntentinanotificationisthatitmustbewrappedinaPendingIntent,whichallowsthenotificationtoperformtheactionevenifyourapplicationisnotrunning.APendingIntentisgiventoanexternalcomponent(e.g.NotificationManager)whichallowstheexternalapplicationtouseyourapplication'spermissionstoexecuteapredefinedpieceofcode.Ineffect,itauthorizesthenotificationtosendtheintentontheapplication'sbehalf.
Forthisexample,thecontentintentofthenotification(thatis,theintentthatislaunchedwhenthenotificationispressed)willlaunchtheMainActivityoftheapplication(ifyouarealreadyintheapplicationthiswillhavenoeffect).
Introduction
358

1. CreateanexplicitintentinthesendNotification()methodtolaunchtheMainActivityclass:
IntentnotificationIntent=newIntent(this,MainActivity.class);
2. GetaPendingIntentusinggetActivity(),passinginthenotificationIDconstantfortherequestCodeandusingtheFLAG_UPDATE_CURRENTflag:
PendingIntentnotificationPendingIntent=PendingIntent.getActivity(this,
NOTIFICATION_ID,notificationIntent,PendingIntent.FLAG_UPDATE_CURRENT);
3. AddthePendingIntenttotheNotificationusingsetContentIntent()intheNotificationCompat.Builder:
.setContentIntent(notificationPendingIntent)
4. Runtheapp.ClicktheNotifyMe!buttontosendthenotification.Quittheapp.Nowviewthenotificationandclickit.NoticetheappwillopenbackupattheMainActivity.
1.4Addpriorityanddefaultstoyournotification
Whenyouruserclicksthe"NotifyMe!"button,thenotificationisissuedbuttheonlyvisualthattheuserseesistheiconinthenotificationbar.Inordertocatchtheuser'sattention,thenotificationdefaultsandprioritymustbeproperlyset.
PriorityisanintegervaluefromPRIORITY_MIN(-2)toPRIORITY_MAX(2)thatrepresentshowimportantyournotificationistotheuser.Notificationswithahigherprioritywillbesortedabovelowerpriorityonesinthenotificationdrawer.HIGHorMAXprioritynotificationswillbedeliveredas"Heads-Up"Notifications,whichdropdownontopoftheuser'sactivescreen.
1. AddthefollowinglinetotheNotificationBuildertosetthepriorityofthenotificationtoHIGH:
.setPriority(NotificationCompat.PRIORITY_HIGH)
2. ThedefaultsoptionintheBuilderisusedtosetthesounds,vibration,andLEDcolorpatternforyournotification(iftheuser'sdevicehasanLEDindicator).Inthisexample,youwillusethedefaultoptionsbyaddingthefollowinglinetoyourBuilder:
.setDefaults(NotificationCompat.DEFAULT_ALL)
3. Youneedtoquittheapplicationandstartitagaintoseethechanges.Note:Thehighprioritynotificationwillnotdropdowninfrontoftheactivescreenunlessboththepriorityandthedefaultsareset.Thepriorityaloneisnotenough.
Task2.UpdateandcancelyournotificationAfterissuinganotification,itisusefultobeabletoupdateorcancelthenotificationiftheinformationchangesorbecomesnolongerrelevant.
Inthistask,youwilllearnhowtoupdateandcancelyournotification.
2.1Addupdateandcancelbuttons
1. Inyourlayoutfile,createtwocopiesofthe"NotifyMe!"button.2. Changethetextattributeinthecopiesto"UpdateMe!"and"CancelMe!".3. Changetheid'sto"update"and"cancel",respectively.4. AddamembervariableforeachofthenewbuttonsandinitializetheminonCreate().5. CreatetwomethodsintheMainActivitythattakenoparametersandreturnvoid:
Introduction
359

publicvoidupdateNotification(){}
publicvoidcancelNotification(){}
6. CreateonClickListenersforthenewbuttonsandcallupdateNotification()in"update"buttononClickmethodandcancelNotification()inthe"cancel"buttononClickmethod.
2.2Implementthecancelandupdatenotificationmethods
CanceltheNotification
Cancelinganotificationisstraightforward:callcancel()ontheNotificationManager,passinginthenotificationID:
mNotifyManager.cancel(NOTIFICATION_ID);
UpdatetheNotification
Updatinganotificationismorecomplex.Androidnotificationscomewithalternativestylesthatcanhelpcondenseinformationorrepresentitmoreefficiently.Forexample,theGmailappuses"InboxStyle"notificationsifthereismorethanasingleunreadmessage,condensingtheinformationintoasinglenotification.
Inthisexample,youwillupdateyournotificationtousetheBigPictureStylenotification,whichallowsyoutoincludeanimageinyournotification.
1. Downloadthisimagetouseinyournotification,andrenameittomascot_1.2. Putitintheres/drawablefolder.3. InyourupdateNotification()method,convertyourdrawableintoabitmap:
BitmapandroidImage=BitmapFactory
.decodeResource(getResources(),R.drawable.mascot_1);
4. CopytheIntentandPendingIntentyoucreateinsendNotification()toupdateNotification(),asyouwillusethesamePendingIntentasaContentIntent.
5. CopytheNotificationCompat.BuildercodefromsendNotification()toupdateNotification(),tohavethesamebasicnotificationoptionsinyourupdatednotification.
6. ChangethestyleofyournotificationinthesameNotificationCompat.Builder,settingtheimageandthe"BigContentTitle":
.setStyle(newNotificationCompat.BigPictureStyle()
.bigPicture(androidImage)
.setBigContentTitle("NotificationUpdated!"));
Note:TheBigPictureStyleisasubclassofNotificationCompat.Stylewhichprovidesalternativelayoutsfornotifications.Seethedocumentationforotherdefinedsubclasses.
7. ChangethepriorityoftheBuildertothedefault,sothatyoudon'tgetanotherheadsupnotificationwhenitisupdated(headsupnotificationscanonlybeshowninthedefaultstyle).
.setPriority(NotificationCompat.PRIORITY_DEFAULT)
8. Callnotify()ontheNotificationManager,passinginthesamenotificationIDasbefore.
mNotifyManager.notify(NOTIFICATION_ID,notifyBuilder.build());
9. Runyourapp.Afterclickingupdate,checkthenotificationagain.Itnowhastheimageandupdatedtitle!Youcanshrinkbacktotheregularnotificationstylebypinchingontheextendedone.
2.3Togglethebuttonstate
Introduction
360

Inthisapplication,theusercangetconfusedbecausethestateofthenotificationisnottrackedinsidetheactivity.Forexample,theusermaytap"CancelMe!"whennonotificationisshowing.Youcanfixthisbyenablinganddisablingthevariousbuttonsdependingonthestateofthenotification.Whentheappisfirstrun,the"NotifyMe!"buttonshouldbetheonlyoneenabledasthereisnonotificationyettoupdateorcancel.Afteranotificationissent,thecancelandupdatebuttonsshouldbeenabled,andthenotificationbuttonshoulddisabledsincethenotificationhasalreadybeendelivered.Afterthenotificationisupdated,theupdateandnotifybuttonsshouldbedisabled,leavingonlythecancelbuttonenabled.Finally,ifthenotificationiscancelled,thebuttonsshouldreturntotheinitialconditionwiththenotifybuttonbeingtheonlyoneenabled.
Hereistheenabledstatetogglecodeforeachmethod:
onCreate():
mNotifyButton.setEnabled(true);
mUpdateButton.setEnabled(false);
mCancelButton.setEnabled(false);
sendNotification():
mNotifyButton.setEnabled(false);
mUpdateButton.setEnabled(true);
mCancelButton.setEnabled(true);
updateNotification():
mNotifyButton.setEnabled(false);
mUpdateButton.setEnabled(false);
mCancelButton.setEnabled(true);
cancelNotification():
mNotifyButton.setEnabled(true);
mUpdateButton.setEnabled(false);
mCancelButton.setEnabled(false);
Task3.AddnotificationactionsSometimes,anotificationrequiresimmediateinteraction:snoozinganalarm,replyingtoatextmessage,andsoon.Whenthesetypesofnotificationsoccur,theusermighttapyournotificationtorespondtotheevent.AndroidthenloadstheproperActivityinyourapplicationfortheusertorespond.Toavoidopeningyourapplication,thenotificationframeworkletsyouembedanotificationactiondirectlyinthenotificationitself.Thisallowstheusertoactonthenotificationwithoutopeningyourapplication.
Thecomponentsneededforanactionare:
Anicon,tobeplacedinthenotification.Alabelstring,placednexttotheicon.APendingIntent,tobesentwhenthenotificationactionisclicked.
Forthisexample,youwilladdtwoactionstoyournotification.Firstyou'lladda"LearnMore"actionwithanimplicitintentthatlaunchesawebpage,thenan"Update"actionwithabroadcastintentthatupdatesyournotificationwithoutlaunchingtheapplication.
3.1Implementthe"LearnMore"action
Asafirstexampleofnotificationactions,youwillimplementonethatlaunchesanimplicitintenttoopenawebsite.
Introduction
361

1. CreateamemberStringvariablethatcontainstheURLtotheMaterialDesignguidefornotifications:https://developer.android.com/design/patterns/notifications.html.
2. CreateanimplicitIntentthatopensthesavedURLinthesendNotification()methodbeforeyoubuildthenotification.3. CreateaPendingIntentfromtheimplicitintent,usingtheflagFLAG_ONE_SHOTsothatthePendingIntentcannotbe
reused:
IntentlearnMoreIntent=newIntent(Intent.ACTION_VIEW,Uri
.parse(NOTIFICATION_GUIDE_URL));
PendingIntentlearnMorePendingIntent=PendingIntent.getActivity
(this,NOTIFICATION_ID,learnMoreIntent,PendingIntent.FLAG_ONE_SHOT);
4. AddthisiconusingtheImageAssetStudio,andcallitic_learn_more:5. AddthefollowinglineofcodetoyourbuilderinbothsendNotification()andupdateNotification()toaddtheaction
toboththeoriginalandupdatednotification:
.addAction(R.drawable.ic_learn_more,"LearnMore",learnMorePendingIntent);
6. Runyourapp.Younotificationwillnowhaveaclickableiconthattakesyoutotheweb!
3.2Implementthe"Update"action
You'veseenthatanotificationactionusesaPendingIntenttorespondtouserinteraction.Inthelaststep,youaddedanactionthatusesaPendingIntentcreatedusingthegetActivity()method.YoucanalsocreateaPendingIntentwhichdeliversabroadcastintentbycallinggetBroadcast()onthePendingIntentclass.BroadcastIntentsareveryusefulinnotifications,sinceabroadcastreceivercanregisteritsinterestintheintentandrespondaccordingly,entirelywithoutlaunchingaspecificactivity.
YouwillnowimplementaBroadcastReceiverthatwillcalltheupdateNotification()methodwhenthe"Update"actioninthenotificationispressed.Itisacommonpatterntoaddfunctionalitytoanotificationthatalreadyexistsintheapp,sotheuserdoesnotneedtolaunchanyapptoperformtheaction.
1. SubclassaBroadcastReceiverasaninnerclassinMainActivityandoverridetheonReceive()method.Don'tforgettoincludeanemptyconstructor:
publicclassNotificationReceiverextendsBroadcastReceiver{
publicNotificationReceiver(){
}
@Override
publicvoidonReceive(Contextcontext,Intentintent){
}
}
2. IntheonReceive()method,callupdateNotification().3. CreateaconstantmembervariableinMainActivitytorepresenttheupdatenotificationactionforyourBroadcastIntent.
Makesureitbeginswithyourpackagenametoinsureit'suniqueness:
privatestaticfinalStringACTION_UPDATE_NOTIFICATION=
"com.example.android.notifyme.ACTION_UPDATE_NOTIFICATION";
4. Createamembervariableforyourreceiverandinitializeitusingthedefaultconstructor.5. IntheonCreate()method,registeryourBroadcastReceivertoreceivetheACTION_UPDATE_NOTIFICATIONintent:
registerReceiver(mReceiver,newIntentFilter(ACTION_UPDATE_NOTIFICATION));
6. OverridetheonDestroy()methodofyourActivitytounregisteryourreceiver:
Introduction
362

@Override
protectedvoidonDestroy(){
unregisterReceiver(mReceiver);
super.onDestroy();
}
Note:InthisexampleyouareregisteringyourBroadcastReceiverprogrammaticallybecauseyourreceiverisdefinedasaninnerclass.Whenreceiversaredefinedthisway,theycannotberegisteredintheAndroidManifestsincetheyaredynamicandhavethepossibilityofchangingduringthelifeoftheapplication.
ItmayseemthebroadcastsentbythenotificationonlyconcernsyourappandshouldbedeliveredwithaLocalBroadcastManager.However,theuseofPendingIntentsdelegatestheresponsibilityofdeliveringthenotificationtotheAndroidFramework.BecausetheAndroidruntimeishandlingthebroadcast,LocalBroadcastManagercannotbeused.
CreatetheUpdateAction
1. CreateabroadcastIntentinthesendNotification()methodusingthecustomupdateaction.2. GetaPendingIntentusinggetBroadcast():
IntentupdateIntent=newIntent(ACTION_UPDATE_NOTIFICATION);
PendingIntentupdatePendingIntent=PendingIntent.getBroadcast
(this,NOTIFICATION_ID,updateIntent,PendingIntent.FLAG_ONE_SHOT);
3. CreatethisiconusingtheImageAssetStudio,callitic_update.4. AddtheactiontothebuilderinthesendNotification()method,givingitthetitle"Update":
.addAction(R.drawable.ic_update,"Update",updatePendingIntent)
5. Runyourapp.Youcannowupdateyournotificationwithoutopeningtheapp!
SolutioncodeAndroidStudioproject:NotifyMe
CodingchallengeNote:Allcodingchallengesareoptionalandarenotprerequisitesforlaterlessons.
Challenge:Enablinganddisablingthevariousbuttonsisacommonwaytoensuretheuserdoesnotperformanyactionsthatarenotsupportedinthecurrentstateoftheapp(thinkofdisablinga"Sync"buttonwhenthereisnonetwork").Inthisapplication,however,thereisoneusecaseinwhichthestateofyourbuttonsdoesnotmatchthestateoftheapplication:whenauserdismissesanotificationbyswipingitawayorclearingthewholenotificationdrawer.Inthiscase,yourapphasnowayofknowingthatthenotificationwascancelled,andthatthebuttonstatemustbechanged.
Createanotherbroadcastintentthatwilllettheapplicationknowthattheuserhasdismissedthenotification,andtogglethebuttonstatesaccordingly.
Hint:CheckouttheNotificationCompat.BuilderclassforamethodthatdeliversanIntentwhenthenotificationhasbeendismissedbytheuser.
Summary
Introduction
363

ANotificationisamessageyoucandisplaytotheuseroutsideofyourapplication'snormalUI.Notificationsprovideawayforyourapptointeractwiththeuserevenwhentheappisnotrunning.WhenAndroidissuesanotification,itwillfirstappearasaniconinthenotificationareaofthedevice.TheUIandactionsforanotificationarespecifiedusingNotificationCompat.Builder.TocreateanotificationuseNotificationCompat.Builder.build().Toissuethenotification,passtheNotificationobjecttotheAndroidruntimesystemwithNotificationManager.notify().Toupdateorcancelanotification,youneedtoassociateanotificationIDwithyourNotification.AnIntentcanbepartofanotification(Explicit,ImplicitorBroadcast).Intentsinanotificationmustbe"wrapped"inaPendingIntent,whichreallyisn'tanIntent.APendingIntentisanimplementationofthedecoratorpattern.Therequiredcomponentsofanotificationare:smallicon(setSmallIcon()),title(setContentTitle())andsomedetailedtext(setContentText()).Someoptionalcomponentsofanotificationare:intent,expandedstyles,priority,etal.SeeNotificationCompat.Builderformoreinfo.
RelatedconceptTherelatedconceptdocumentationisinAndroidDeveloperFundamentals:Concepts.
Notifications
LearnmoreGuides
NotificationsNotificationDesignGuide
Reference
NotificationCompat.BuilderNotificationCompat.Style
Introduction
364

8.2:AlarmManagerContents:
WhatyoushouldalreadyKNOWWhatyouwillLEARNWhatyouwillDOAppoverviewTask1.SetuptheStandUp!projectandviewsTask2.SetupthenotificationTask3.CreatetherepeatingalarmCodingchallengeSummaryRelatedconceptLearnmore
Inyourpreviouspracticals,you'velearnedhowtomakeyourapprespondtouserinteractionbypushingabuttonortappinganotification.You'vealsolearnedhowtomakeyourapprespondtosystemeventsusingBroadcastReceivers.Butwhatifyourappneedstotakeactionataspecifictime,suchasisthecasewithacalendarnotification?Inthatcase,youwoulduseAlarmManager,aclassthatallowsyoutolaunchandrepeataPendingIntentataspecifictimeandinterval.
Inthispractical,youwillcreateatimerthatwillremindyoutostandupifyouhavebeensittingfortoolong.
WhatyoushouldalreadyKNOWFrompreviouspracticals,youshouldbeableto:
ImplementonCheckChangedlistenersfortogglebuttons.Setupcustombroadcastintents.Usebroadcastreceivers.Sendnotifications.
WhatyouwillLEARNYouwilllearnto:
SchedulerepeatingalarmswithAlarmManager.CheckifanAlarmisalreadysetup.Cancelarepeatingalarm.
WhatyouwillDOSetarepeatingalarmtonotifyyoueveryfifteenminutes.UseaToggleButtontosetandkeeptrackofthealarm.UseToastmessagestonotifytheuserwhentheAlarmisturnedonoroff.
AppoverviewStandUp!isanappthathelpsyoustayhealthybyremindingyoutostandupandwalkaroundeveryfifteenminutes.Itusesanotificationtoletyouknowwhenfifteenminuteshavepassed.TheappincludesatogglebuttonthatcanturntheAlarmonandoff.
Introduction
365

Introduction
366

Introduction
367

Task1.SetuptheStandUp!projectandviews
1.1CreatetheStandUp!projectlayout1. Createanewprojectcalled"StandUp!",acceptthedefaultoptionsandusetheemptyactivitytemplate.2. Opentheactivity_main.xmllayoutfile.
i. ChangetherootviewtoRelativeLayout.ii. Removetheentire"HelloWorld"TextViewandaddthefollowingelements:
TextView Attribute Value
android:layout_width "wrap_content"
android:layout_height "wrap_content"
android:layout_above "@+id/alarmToggle"
android:layout_centerHorizontal "true"
android:layout_margin "8dp"
android:text "StandUpAlarm"
android:textAppearance "@style/TextAppearance.AppCompat.Headline"
ToggleButton Attribute Value
android:id "@+id/alarmToggle"
android:layout_width "wrap_content"
android:layout_height "wrap_content"
android:layout_centerHorizontal "true"
android:layout_centerVertical "true"
1.2SetupthesetOnCheckedChangeListener()methodTheStandUp!appincludesatogglebuttonthatisusedtosetandcancelthealarm,aswellasvisiblyrepresentthealarm'scurrentstatus.Tosetthealarmwhenthetoggleisturnedon,youwillusetheonCheckedChangeListener()method:
1. InyourMainActivityonCreate()method,findtheAlarmTogglebyid.2. CallsetOnCheckedChangeListener()onthetogglebuttoninstance,andbegintyping"newOnCheckedChangeListener".
AndroidStudiowillautocompletethemethodforyou,includingtherequiredonCheckedChanged()overridemethod.Thismethodhastwoparameters:theCompoundButtonthatwasclicked(inthiscaseit'stheAlarmTogglebutton),andabooleanrepresentingthecurrentstateoftheToggleButton(i.e.,whetherthetoggleisnowsetonoroff.
Introduction
368
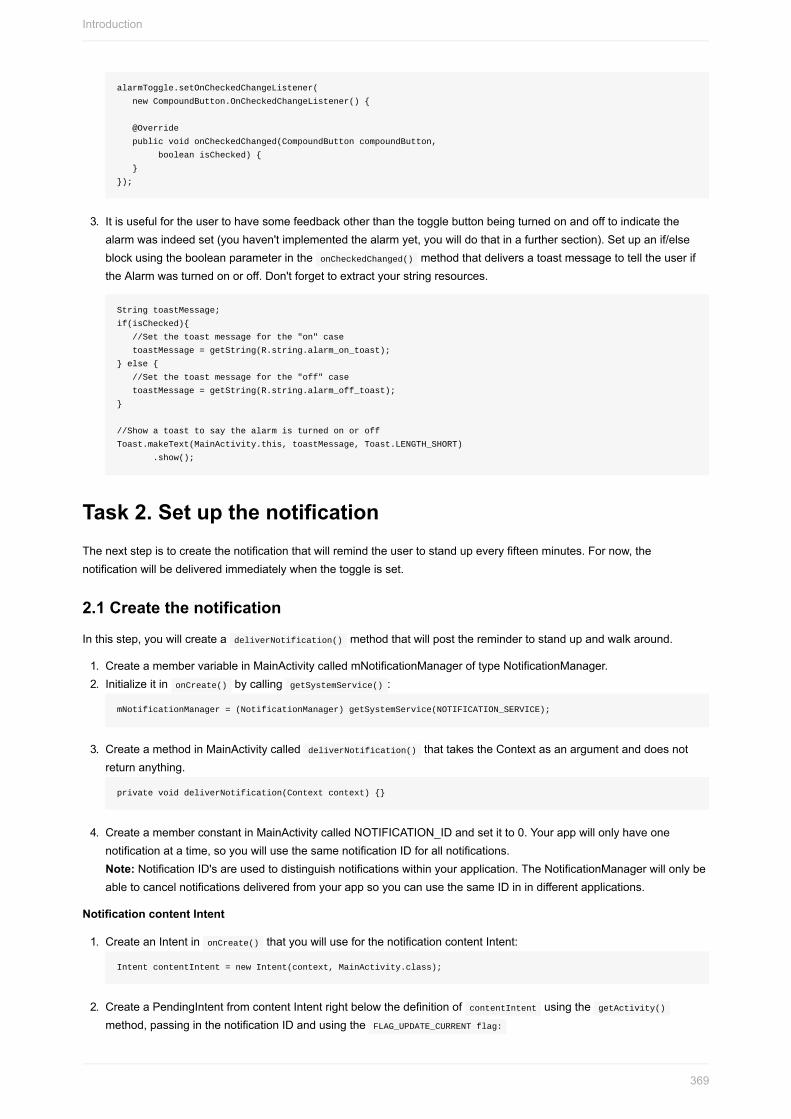
alarmToggle.setOnCheckedChangeListener(
newCompoundButton.OnCheckedChangeListener(){
@Override
publicvoidonCheckedChanged(CompoundButtoncompoundButton,
booleanisChecked){
}
});
3. Itisusefulfortheusertohavesomefeedbackotherthanthetogglebuttonbeingturnedonandofftoindicatethealarmwasindeedset(youhaven'timplementedthealarmyet,youwilldothatinafurthersection).Setupanif/elseblockusingthebooleanparameterintheonCheckedChanged()methodthatdeliversatoastmessagetotelltheuseriftheAlarmwasturnedonoroff.Don'tforgettoextractyourstringresources.
StringtoastMessage;
if(isChecked){
//Setthetoastmessageforthe"on"case
toastMessage=getString(R.string.alarm_on_toast);
}else{
//Setthetoastmessageforthe"off"case
toastMessage=getString(R.string.alarm_off_toast);
}
//Showatoasttosaythealarmisturnedonoroff
Toast.makeText(MainActivity.this,toastMessage,Toast.LENGTH_SHORT)
.show();
Task2.SetupthenotificationThenextstepistocreatethenotificationthatwillremindtheusertostandupeveryfifteenminutes.Fornow,thenotificationwillbedeliveredimmediatelywhenthetoggleisset.
2.1Createthenotification
Inthisstep,youwillcreateadeliverNotification()methodthatwillposttheremindertostandupandwalkaround.
1. CreateamembervariableinMainActivitycalledmNotificationManageroftypeNotificationManager.2. InitializeitinonCreate()bycallinggetSystemService():
mNotificationManager=(NotificationManager)getSystemService(NOTIFICATION_SERVICE);
3. CreateamethodinMainActivitycalleddeliverNotification()thattakestheContextasanargumentanddoesnotreturnanything.
privatevoiddeliverNotification(Contextcontext){}
4. CreateamemberconstantinMainActivitycalledNOTIFICATION_IDandsetitto0.Yourappwillonlyhaveonenotificationatatime,soyouwillusethesamenotificationIDforallnotifications.Note:NotificationID'sareusedtodistinguishnotificationswithinyourapplication.TheNotificationManagerwillonlybeabletocancelnotificationsdeliveredfromyourappsoyoucanusethesameIDinindifferentapplications.
NotificationcontentIntent
1. CreateanIntentinonCreate()thatyouwilluseforthenotificationcontentIntent:
IntentcontentIntent=newIntent(context,MainActivity.class);
2. CreateaPendingIntentfromcontentIntentrightbelowthedefinitionofcontentIntentusingthegetActivity()method,passinginthenotificationIDandusingtheFLAG_UPDATE_CURRENTflag:
Introduction
369

PendingIntentcontentPendingIntent=PendingIntent.getActivity
(context,NOTIFICATION_ID,contentIntent,PendingIntent.FLAG_UPDATE_CURRENT);
Note:PendingIntentflagstellthesystemhowtohandlethesituationwhenmultipleinstancesofthesamePendingIntentarecreated(meaningtheycontainthesameintent).TheFLAG_UPDATE_CURRENTflagtellsthesystemtousetheoldIntentbutreplacetheextrasdata.Sinceyoudon'thaveanyextrasinthisIntent,youreusethesamePendingIntentoverandover.
Notificationtitleandtext
1. Createastringresourceinyourstrings.xmlfilecallednotification_title.Setitequalto"StandUpAlert".2. Createastringresourceinyourstrings.xmlfilecallednotification_text.Setitequalto"Youshouldstandupandwalk
aroundnow!".
Notificationicon
1. Addanimageassettouseasthenotificationicon(usetheImageAssetStudio).Chooseanyiconyoufindappropriate
forthisalarm:
Buildthenotification
1. UsetheNotificationCompat.BuildertobuildanotificationinthedeliverNotification()methodusingtheabovenotificationtitle,text,iconandcontentintent.
NotificationCompat.Builderbuilder=newNotificationCompat.Builder(context)
.setSmallIcon(R.drawable.ic_stand_up)
.setContentTitle(context.getString(R.string.notification_title))
.setContentText(context.getString(R.string.notification_text))
.setContentIntent(contentPendingIntent)
2. SettheNotificationprioritytoPRIORITY_HIGH:
.setPriority(NotificationCompat.PRIORITY_HIGH)
3. AddanoptiontothebuildertosetAutoCanceltotrue,andanotheroptiontousethedefaultlight,soundandvibrationpattern:
.setAutoCancel(true)
.setDefaults(NotificationCompat.DEFAULT_ALL);
Deliverthenotification
1. UsetheNotificationManagertodeliverthenotification:
mNotificationManager.notify(NOTIFICATION_ID,builder.build());
2. CalldeliverNotification()whenthealarmtogglebuttonisturnedon,passingintheactivitycontext:3. CallcancelAll()ontheNotificationManagerifthetoggleisturnedofftoremovethenotification.
Introduction
370

if(isChecked){
deliverNotification(MainActivity.this);
//Setthetoastmessageforthe"on"case
toastMessage=getString(R.string.alarm_on_toast);
}else{
//Cancelnotificationifthealarmisturnedoff
mNotificationManager.cancelAll();
//Setthetoastmessageforthe"off"case
toastMessage=getString(R.string.alarm_off_toast);
}
4. Runtheapp,andcheckthatthenotificationisdeliveredwithallthedesiredoptions.
Atthispointthereisnoalarmatall:thenotificationisimmediatelydeliveredwhenthealarmtoggleisturnedon.InthenextsectionyouwillimplementtheAlarmManagertoscheduleanddeliverthenotificationevery15minutes.
Task3.CreatetherepeatingalarmNowthatyourappcansendanotificationitistimetoimplementthemaincomponentofyourapplication:theAlarmManager.Thisistheclassthatwillberesponsibleforperiodicallydeliveringtheremindertostandup.AlarmManagerhasmanykindsofalarmsbuiltintoit,bothone-timeandperiodic,exactandinexact.Tolearnmoreaboutthedifferentkindsofalarms,seeSchedulingRepeatingAlarms.
AlarmManager,likenotifications,usesaPendingIntentthatitdeliverswiththespecifiedoptions.Becauseofthis,itcandelivertheIntentevenwhentheapplicationisnolongerrunning.Inthisapplication,yourPendingIntentwilldeliveranIntentbroadcastwithacustom"Notify"action.
Thebroadcastintentwillbereceivedbyabroadcastreceiverthattakestheappropriateaction(deliversthenotification).
TheAlarmManagercantriggerone-timeorrecurringeventswhichoccurevenwhenthedeviceisindeepsleeporyourapplicationisnotrunning.EventsmaybescheduledwithyourchoiceofcurrentTimeMillis()whenusingtherealtimeversion(RTC)orelapsedRealtime()whenusingtheelapsedtimeversion(ELAPSED_REALTIME),anddeliveraPendingIntentwhentheyoccur.Formoreinformationonthedifferentclocksavailableandinformationonhowtocontrolthetimingofevents,seetheSystemClockDeveloperReference.
3.1Setupthebroadcastpendingintent
Introduction
371

TheAlarmManagerisresponsiblefordeliveringyourPendingIntentataspecifiedinterval.ThisPendingIntentwilldeliverabroadcastintentlettingtheapplicationknowitistimetoupdatetheremainingtimeinthenotification.
1. CreateastringconstantasamembervariableinMainActivitytobeusedasthebroadcastintentactionwhichwilldeliverthenotification:
privatestaticfinalStringACTION_NOTIFY=
"com.example.android.standup.ACTION_NOTIFY";
Note:usethefully-qualifiedpackagenamefortheIntentstring,toensurethatyourBroadcastisunique,andcannotaccidentallybeusedbyotherapplicationswithsimilaractions.
2. CreateanIntentcallednotifyIntentinonCreate()withthecustomstringasitsaction:
IntentnotifyIntent=newIntent(ACTION_NOTIFY);
3. CreatethenotifyPendingIntentusingthecontext,theNOTIFICATION_IDvariable,thenewnotifyintent,andthePendingIntentflagUPDATE_CURRENT:
PendingIntentnotifyPendingIntent=PendingIntent.getBroadcast
(this,NOTIFICATION_ID,notifyIntent,PendingIntent.FLAG_UPDATE_CURRENT);
3.2Settherepeatingalarm
YouwillnowusetheAlarmManagertodeliverthisbroadcastIntentevery15minutes.Forthistask,theappropriatetypeofalarmisaninexact,repeatingalarmthatuseselapsedtimeandwillwakethedeviceupifitisasleep.Therealtimeclockisnotrelevanthere,sincewewanttodeliverthenotificationeveryfifteenminutes.
1. InitializetheAlarmManagerinonCreate()bycallinggetSystemService():
AlarmManageralarmManager=(AlarmManager)getSystemService(ALARM_SERVICE);
2. IntheonCheckedChanged()method,callsetInexactRepeating()onthealarmmanagerinstancewhentheuserclickstheAlarm"ON"(Thesecondparameteristrue).YouwillusethesetInexactRepeating()alarmsinceitismoreresourceefficienttouseinexacttiming(thesystemcanbundlealarmsfromdifferentappstogether)anditisacceptableforyouralarmtodeviatealittlebitfromtheexact15minuterepeatinterval.ThesetInexactRepeating()methodtakes4arguments:
3. Thealarmtype.Inthiscaseyouwillusetheelapsedtimesinceboottype,sinceonlytherelativetimeisimportant.Youalsowanttowakeupthedeviceifit'sasleep,sothealarmtypeisELAPSED_REALTIME_WAKEUP.
4. Thetriggertimeinmilliseconds.Forthis,usethecurrentelapsedtime,plus15minutes.Togetthecurrentelapsedtime,youcancallSystemClock.elapsedRealtime().Youcanthenuseabuilt-inAlarmManagerconstanttoadd15minutestotheelapsedtime:AlarmManager.INTERVAL_FIFTEEN_MINUTES.
5. Thetimeintervalinmilliseconds.Youwantthenotificationpostedevery15minutes.YoucanusetheAlarmManager.INTERVAL_FIFTEEN_MINUTESconstantagain.
6. ThePendingIntenttobedelivered.YoucreatedthePendingIntentintheprevioustask.
longtriggerTime=SystemClock.elapsedRealtime()
+AlarmManager.INTERVAL_FIFTEEN_MINUTES;
longrepeatInterval=AlarmManager.INTERVAL_FIFTEEN_MINUTES;
//IftheToggleisturnedon,settherepeatingalarmwitha15minuteinterval
alarmManager.setInexactRepeating(AlarmManager.ELAPSED_REALTIME_WAKEUP,
triggerTime,repeatInterval,notifyPendingIntent);
Note:BecauseyouareaccessingtheAlarmManagerandnotifyPendingIntentinstancesfromananonymousinnerclass,AndroidStudiomaymaketheseinstancesfinal.Ifitdoesn't,youhavetomakethemfinalyourself.
7. RemovethecalltodeliverNotification()intheonCheckedChanged()method.
Introduction
372

8. Ifthealarmtoggleisturnedoff(byclickingthetoggleintheONstate),cancelthealarmbycallingcancel()ontheAlarmManager,passinginthependingintentusedtocreatethealarm.
alarmManager.cancel(notifyPendingIntent);
KeepthecalltocancelAll()ontheNotificationManager,sinceturningthetoggleoffshouldstillremoveanyexistingnotification.
TheAlarmManagerwillnowstartdeliveringyourBroadcastIntentstartingfifteenminutesfromwhentheAlarmwasset,andeveryfifteenminutesafterthat.Yourapplicationneedstobeabletorespondtotheseintentsbydeliveringthenotification.InthenextstepyouwillsubclassaBroadcastReceivertoreceivethebroadcastintentsanddeliverthenotification.
3.3CreatetheBroadcastReceiverTheBroadcastReceiverisresponsibleforreceivingthebroadcastintentsfromtheAlarmManagerandreactingappropriately.
1. InAndroidStudio,clickonFile>New>Other>BroadcastReceiver.2. EnterAlarmReceiverforthename,makesuretheExportedcheckboxisunchecked(toensurethatotherappswillnot
beabletoinvokethisBroadcastReceiver).YoucanalsochangethissettingintheAndroidManifestbysettingtheandroid:exportedattributetofalse.AndroidStudiowillcreatethesubclassofBroadcastReceiverwiththerequiredmethod(onReceive()),aswellasaddthereceivertoyourAndroidManifest.YouneedtoaddanIntentFiltertoyourthe<receiver>tagintheAndroidManifesttoselecttheproperincomingBroadcastIntents.
3. IntheAndroidManifest,createan<intent-filter>openingandclosingtagbetweenthe<receiver>tags.Createan<action>itemintheintentfilterwithandroid:nameattributesettothecustomACTION_NOTIFYactionstringyoucreated:
<intent-filter>
<actionandroid:name="com.example.android.standup.ACTION_NOTIFY"/>
</intent-filter>
4. CutandpastethedeliverNotification()methodtotheonReceive()methodintheBroadcastReceiverandcallitfromonReceive().ThenotificationmanagerandnotificationIDhasnotbeeninitializedintheBroadcastReceiverclasssoitwillbehighlightedinred.
5. CopytheNOTIFICATION_IDvariablefromtheMainActivityintotheBroadcastReceiverclass.6. InitializetheNotificationManageratthebeginningoftheonReceive()method.YouhavetocallgetSystemService()
fromthepassedinContext:
NotificationManagernotificationManager=(NotificationManager)
context.getSystemService(Context.NOTIFICATION_SERVICE);
7. RemovethelinethatraisestheUnsupportedOperationException.8. Runyourapp.Ifyoudon'twanttowaitforfifteenminutestoseethenotification,youcanchangethetriggertimeto
SystemClock.elapsedRealtime()toseethenotificationimmediately.Youcanalsochangetheintervaltoashortertimetomakesurethattherepeatedalarmisworking.
Younowhaveanappthatcanscheduleandperformarepeatedoperation,eveniftheapplicationisnolongerrunning.Goahead,exittheapplicationcompletely,thenotificationwillstillbedelivered.Thereisonefinalcomponentmissingthatwouldensureaproperuserexperience:iftheapplicationisexited,thetogglebuttonwillresettotheoffstate,evenifthealarmhasalreadybeenset.Tofixthis,youwillneedtocheckthestateofthealarmeverytimetheapplicationislaunched.
3.5Checkthestateofthealarm
Totrackthestateofthealarm,youwillneedabooleanvariablethatistrueiftheAlarmalreadyexists,andfalseotherwise.Tosetthisboolean,youcancallPendingIntent.getBroadcast()withtheFLAG_NO_CREATEPendingIntentflag.Inthiscase,thePendingIntentisreturnedifitalreadyexists,otherwisethecallreturnsnull.Thisisextremelyusefulfor
Introduction
373

checkingwhetherthealarmhasalreadybeenset.
Note:WhenyoucreateaPendingIntent,thesystemusestheIntent.filterEquals()methodtodetermineifaPendingIntentwiththesameIntentalreadyexists.ThismeansthattohavetwodistinctPendingIntents,thecontainedIntentshavetodifferinoneofaction,data,type,class,orcategories.Intentextrasarenotincludedinthecomparison.
ThePendingIntentflagdetermineswhathappenswhenaPendingIntentwhoseIntentmatchestheoneyouaretryingtocreatealreadyexists.InthecaseoftheNO_CREATEflag,itwillreturnnullunlessaPendingIntentwithamatchingIntentalreadyexists.1. CreateabooleanthatistrueifPendingIntentisnotnull,andfalseotherwise,usingthisstrategy.Usethisbooleanto
correctlysetthestateoftheToggleButtonwhenyourappstarts.ThiscodehastocomebeforethePendingIntenthasbeencreated,otherwiseitwillalwaysreturntrue:
booleanalarmUp=(PendingIntent.getBroadcast(this,NOTIFICATION_ID,notifyIntent,
PendingIntent.FLAG_NO_CREATE)!=null);
2. SetthecheckedstateofthetogglerightafteryoudefinethealarmUpboolean:
alarmToggle.setChecked(alarmUp);
ThisensuresthatthetogglewillalwaysbeturnedoniftheAlarmisset,andoffotherwise.That'sit,Younowhavearepeatedscheduledalarmtoremindyoutostandupeveryfifteenminutes.
3. Runyourapp.Switchonthealarm.Exittheapp.Opentheappagain.Thealarmbuttonwillshowthatthealarmison.
Solutioncode**AndroidStudioproject:StandUp
CodingchallengeNote:Allcodingchallengesareoptionalandarenotprerequisitesforlaterlessons.
TheAlarmManagerclassalsohandlesalarmclocksintheusualsense,thekindthatwakeyouupinthemorning.OndevicesrunningAPI21+,youcangetinformationaboutthenextalarmclockofthiskindbycallinggetNextAlarmClock()onthealarmmanager.
AddabuttontoyourapplicationthatdisplaysthetimeofnextalarmclockthattheuserhassetinaToastmessage.
SummaryAlarmManagerallowsyoutoscheduletasksbasedontherealtimeclockortheelapsedtimesinceboot.AlarmManagerprovidesavarietyofalarmtypes,bothperiodicandonetime,withoptionstowakeupyourdeviceifitisasleep.AlarmManagerismeantforsituationswhereprecisetimingiscritical(suchasacalendarevent).Otherwise,considertheJobSchedulerframeworkformoreresource-efficienttimingandscheduling.UsetheinexacttimingversionoftheAlarmManagerwheneverpossible,tominimizetheloadcausedbymultipleusers'devicesormultipleapplicationsperformingataskattheexactsametime.AlarmManagerusesPendingIntentstoperformtheoperations,soyoucanschedulebroadcasts,servicesandactivitiesusingtheappropriatePendingIntent.
Relatedconcept
Introduction
374

TherelatedconceptdocumentationisinAndroidDeveloperFundamentals:Concepts.
SchedulingAlarms
LearnmoreAndroiddeveloperdocumentation:
SchedulingRepeatingAlarmsAlarmManagerSystemClock
Otherresources:
BlogPostonchoosingthecorrectalarmtype
Introduction
375

8.3:JobSchedulerContents:
WhatyoushouldalreadyKNOWWhatyouwillLEARNWhatyouwillDOTask1.ImplementaJobServiceTask2.ImplementthejobconditionsCodingchallengeSummaryRelatedconceptLearnmore
You'veseenthatyoucantriggereventsbasedonthereal-timeclock,ortheelapsedtimesincebootusingtheAlarmManagerclass.Mosttasks,however,donotrequireanexacttime,butshouldbescheduledbasedonacombinationofsystemanduserrequirements.Forexample,anewsappmightliketoupdatethenewsinthemorning,butcouldwaituntilthedeviceischargingandconnectedtowifitoupdatethenews,topreservetheuser'sdataandsystemresources.
TheJobSchedulerclassismeantforthiskindofscheduling;itallowsyoutosettheconditions,orparametersofrunningyourtask.Giventheseconditions,theJobSchedulercalculatesthebesttimetoscheduletheexecutionofthejob.Someexamplesoftheseparametersare:persistanceofthejobacrossreboots,theintervalthatthejobshouldrunat,whetherornotthedeviceispluggedin,orwhetherornotthedeviceisidle.
ThetasktoberunisimplementedasaJobServicesubclassandexecutedaccordingtothespecifiedconstraints.
JobSchedulerisonlyavailableondevicesrunningAPI21+,andiscurrentlynotavailableinthesupportlibrary.Forbackwardcompatibility,usetheGcmNetworkManager(soontobeFirebaseJobDispatcher).
Inthispractical,youwillcreateanappthatschedulesanotificationtobepostedwhentheparameterssetbytheuserarefulfilled,andthesystemrequirementsaremet.
WhatyoushouldalreadyKNOWFromthepreviouspracticals,youshouldbeableto:
Deliveranotification.GetanintegervaluefromaSpinnerview.UseSwitchviewsforuserinput.CreatePendingIntents.
WhatyouwillLEARNYouwilllearnto:
ImplementaJobService.ConstructaJobInfoobjectwithspecificconstraints.ScheduleaJobServicebasedontheJobInfoobject.
WhatyouwillDOInthispractical,youwill:
Introduction
376

ImplementaJobServicethatdeliversasimplenotificationtolettheuserknowthejobisrunning.Getuserinputtoconfiguretheconstraints(suchaswaitinguntilthedeviceischarging)ontheJobServiceyouarescheduling.SchedulethejobusingJobScheduler.
AppOverviewForthispracticalyouwillcreateanappcalled"NotificationScheduler".YourappwilldemonstratetheJobSchedulerframeworkbyallowingtheusertoselectconstraintsandscheduleajob.Whenthatjobisexecuted,itwillpostanotification(inthisapp,yournotificationiseffectivelyyour"job").
Introduction
377

Introduction
378

TousetheJobScheduler,youneedtwoadditionalparts:JobServiceandJobInfo.AJobInfoobjectcontainsthesetofconditionsthatwilltriggerthejobtorun.AJobServiceistheimplementationofthejobthatistorununderthoseconditions.
Task1.ImplementaJobServiceTobeginwith,youmustcreateaservicethatwillberunatthetimedeterminedbytheconditions.TheJobServiceisautomaticallyexecutedbythesystem,andtheonlypartsyouneedtoimplementare:
onStartJob()callback
calledwhenthesystemdeterminesthatyourtaskshouldberun.Youimplementthejobtobedoneinthismethod.Note:onStartJob()isexecutedonthemainthread,andthereforeanylong-runningtasksmustbeoffloadedtoadifferentthread.Inthiscase,youaresimplypostinganotification,whichcanbedonesafelyonthemainthread.returnsabooleanindicatingwhetherthejobneedstocontinueonaseparatethread.Iftrue,theworkisoffloadedtoadifferentthread,andyourappmustcalljobFinished()explicitlyinthatthreadtoindicatethatthejobiscomplete.Ifthereturnvalueisfalse,theframeworkknowsthatthejobiscompletedbytheendofonStartJob()anditwillautomaticallycalljobFinished()onyourbehalf.
onStopJob()callback
callediftheconditionsarenolongermet,meaningthatthejobmustbestopped.returnsabooleanthatdetermineswhattodoifthejobisnotfinished.Ifthereturnvalueistrue,thejobwillberescheduled,otherwise,itwillbedropped.
1.1CreatetheProjectandtheNotificationJobService
VerifythattheminimumSDKyouareusingisAPI21.PriortoAPI21,JobSchedulerdoesnotwork,asitismissingsomeoftherequiredAPIs.
1. Usetheemptytemplate,andcreateanewprojectcalled"NotificationScheduler".2. CreateanewJavaclasscalledNotificationJobServicethatextendsJobService.3. Addtherequiredmethods:onStartJob()andonStopJob().4. InyourAndroidManfiest.xmlfile,registeryourJobServicewiththefollowingpermissioninsidethe<application>tag:
<service
android:name=".NotificationJobService"
android:permission="android.permission.BIND_JOB_SERVICE"/>
1.2ImplementonStartJob()
1. Addanotificationiconforthe"JobRunning"notification.2. InonStartJob(),createaPendingIntenttolaunchtheMainActivityofyourapptobeusedasthecontentintentfor
yournotification.3. InonStartJob(),constructanddeliveranotificationwiththefollowingattributes:
Introduction
379

Attribute Title
ContentTitle "JobService"
ContentText "YourJobisrunning!"
ContentIntent contentPendingIntent
SmallIcon R.drawable.ic_job_running
Priority NotificationCompat.PRIORITY_HIGH
Defaults NotificationCompat.DEFAULT_ALL
AutoCancel true
4. MakesureonStartJob()returnsfalse,becausealloftheworkiscompletedinthatcallback.5. MakeonStopJob()returntrue,sothatthejobisrescheduledifitfails.
@Override
publicbooleanonStartJob(JobParametersjobParameters){
//Setupthenotificationcontentintenttolaunchtheappwhenclicked
PendingIntentcontentPendingIntent=PendingIntent.getActivity
(this,0,newIntent(this,MainActivity.class),
PendingIntent.FLAG_UPDATE_CURRENT);
NotificationManagermanager=
(NotificationManager)getSystemService(NOTIFICATION_SERVICE);
NotificationCompat.Builderbuilder=newNotificationCompat.Builder(this)
.setContentTitle(getString(R.string.job_service))
.setContentText(getString(R.string.job_running))
.setContentIntent(contentPendingIntent)
.setSmallIcon(R.drawable.ic_job_running)
.setPriority(NotificationCompat.PRIORITY_HIGH)
.setDefaults(NotificationCompat.DEFAULT_ALL)
.setAutoCancel(true);
manager.notify(0,builder.build());
returnfalse;
}
Task2.ImplementthejobconditionsNowthatyouhaveyourJobService,itistimetoidentifythecriteriaforrunningthejob.Forthis,usetheJobInfocomponent.Youwillcreateaseriesofparameterizedconditionsforrunningajobusingavarietyofnetworkconnectivitytypesanddevicestatus.
Tobegin,youwillcreateagroupofradiobuttonstodeterminethenetworktyperequiredforthisjob.
2.1Implementthenetworkconstraint
OneofthepossibleconditionsforrunningaJobisthestatusofyourdevice'snetworkconnectivity.YoucanlimittheJobServicetobeexecutedonlywhencertainnetworkconditionsaremet.Theoptionsare:
NETWORK_TYPE_NONE:thejobwillrunwithorwithoutanetworkconnection.Thisisthedefaultvalue.NETWORK_TYPE_ANY:thejobwillrunaslongasanetwork(cellular,wifi)isavailable.NETWORK_TYPE_UNMETERED:thejobwillrunaslongasthedeviceisconnectedtowifithatdoesnotuseaHotSpot.
Introduction
380
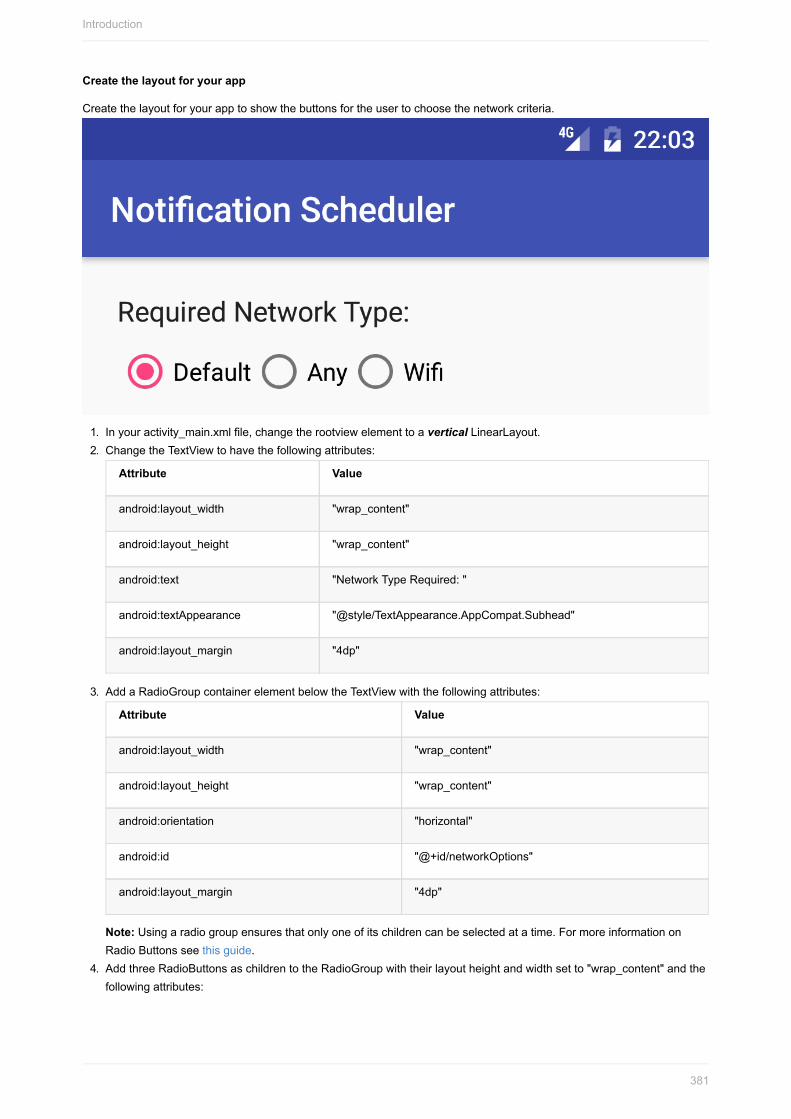
Createthelayoutforyourapp
Createthelayoutforyourapptoshowthebuttonsfortheusertochoosethenetworkcriteria.
1. Inyouractivity_main.xmlfile,changetherootviewelementtoaverticalLinearLayout.2. ChangetheTextViewtohavethefollowingattributes:
Attribute Value
android:layout_width "wrap_content"
android:layout_height "wrap_content"
android:text "NetworkTypeRequired:"
android:textAppearance "@style/TextAppearance.AppCompat.Subhead"
android:layout_margin "4dp"
3. AddaRadioGroupcontainerelementbelowtheTextViewwiththefollowingattributes:
Attribute Value
android:layout_width "wrap_content"
android:layout_height "wrap_content"
android:orientation "horizontal"
android:id "@+id/networkOptions"
android:layout_margin "4dp"
Note:Usingaradiogroupensuresthatonlyoneofitschildrencanbeselectedatatime.FormoreinformationonRadioButtonsseethisguide.
4. AddthreeRadioButtonsaschildrentotheRadioGroupwiththeirlayoutheightandwidthsetto"wrap_content"andthefollowingattributes:
Introduction
381

RadioButton1
android:text "None"
android:id "@+id/noNetwork"
android:checked true
RadioButton2
android:text "Any"
android:id "@+id/anyNetwork"
RadioButton3
android:text "Wifi"
android:id "@+id/wifiNetwork"
5. Addtwobuttonsbelowtheradiobuttongroupwithheightandwidthsetto"wrapcontent"withthefollowingattributes:
Button1
android:text "ScheduleJob"
android:onClick "scheduleJob"
android:layout_gravity "center_horizontal"
android:layout_margin "4dp"
Button2
android:text "CancelJobs"
android:onClick "cancelJobs"
android:layout_gravity "center_horizontal"
android:layout_margin "4dp"
6. AddthemethodstubsforbothoftheonClick()methodsinMainActivity.
Gettheselectednetworkoption
1. InscheduleJob(),findtheRadioGroupbyidandsaveitinaninstancevariablecallednetworkOptions.2. Gettheselectednetworkidandsaveitinaintegervariable:
intselectedNetworkID=networkOptions.getCheckedRadioButtonId();
3. Createaselectednetworkoptionintegervariableandsetitequaltothedefaultnetworkoption(nonetworkrequired):
intselectedNetworkOption=JobInfo.NETWORK_TYPE_NONE;
4. Createaswitchstatementwiththeselectednetworkid,andaddacaseforeachofthepossibleid's:
Introduction
382

switch(selectedNetworkID){
caseR.id.noNetwork:
break;
caseR.id.anyNetwork:
break;
caseR.id.wifiNetwork:
break;
}
5. AssigntheselectednetworkoptiontheappropriateJobInfonetworkconstant,dependingonthecase:
switch(selectedNetworkID){
caseR.id.noNetwork:
selectedNetworkOption=JobInfo.NETWORK_TYPE_NONE;
break;
caseR.id.anyNetwork:
selectedNetworkOption=JobInfo.NETWORK_TYPE_ANY;
break;
caseR.id.wifiNetwork:
selectedNetworkOption=JobInfo.NETWORK_TYPE_UNMETERED;
break;
}
CreatetheJobSchedulerandtheJobInfoobject
1. InMainActivity,createamembervariablefortheJobScheduler,andinitializeitinscheduleJob()usinggetSystemService():
mScheduler=(JobScheduler)getSystemService(JOB_SCHEDULER_SERVICE);
2. CreateamemberconstantfortheJOB_ID,andsetitequalto0.3. CreateaJobInfo.BuilderobjectinscheduleJob().TheconstructorfortheJobInfo.Builderclasstakestwo
parameters:TheJOB_ID.TheComponentNamefortheJobServiceyoucreated.AComponentNameisusedtoidentifytheJobServicewiththeJobInfoobject.
ComponentNameserviceName=newComponentName(getPackageName(),
NotificationJobService.class.getName());
JobInfo.Builderbuilder=newJobInfo.Builder(JOB_ID,serviceName)
4. CallsetRequiredNetworkType()ontheJobInfo.Builderobject,passingintheselectednetworkoption:
.setRequiredNetworkType(selectedNetworkOption);
5. Callschedule()ontheJobSchedulerobject,passingintheJobInfoobjectwiththebuild()method:
JobInfomyJobInfo=builder.build();
mScheduler.schedule(myJobInfo);
6. ShowaToastmessage,lettingtheuserknowthejobwasscheduled.7. InthecancelJobs()method,checkiftheJobSchedulerobjectisnull,andifnot,callcancelAll()onittoremoveall
pendingjobs,resettheJobSchedulertobenull,andshowaToastmessagetolettheuserknowthejobwascanceled:
if(mScheduler!=null){
mScheduler.cancelAll();
mScheduler=null;
Toast.makeText(this,"JobsCanceled",Toast.LENGTH_SHORT).show();
}
8. Runtheapp.Youcannowsettasksthathavenetworkrestrictionsandseehowlongittakesforthemtobeexecuted.Inthiscase,thetaskistodeliveranotification.Todismissthenotification,eitherswipeitawayortaponittoopenthe
Introduction
383

notification.
Youmaynoticethatifyoudonotchangethenetworkconstrainttoeither"Any"or"Wifi",theappwillcrashwiththefollowingexception:
java.lang.IllegalArgumentException:
You'retryingtobuildajobwithnoconstraints,thisisnotallowed.
Thisisbecausethe"NoNetworkRequired"conditionisthedefaultanddoesnotactuallycountasaconstraint.TheJobSchedulerneedsatleastoneconstrainttoproperlyscheduletheJobService.Inthefollowingsectionyouwillcreateaconditionalthatistruewhenatleastoneconstraintisset,andfalseotherwise.Youwillthenschedulethetaskifit'strue,andshowaToasttotelltheusertosetaconstraintifitisn't.
2.2Checkforconstraints
JobSchedulerrequiresatleastoneconstrainttobeset.Inthistaskyouwillcreateabooleanthatwilltrackifthisrequirementhasbeenmet,sothatyoucannotifytheusertosetatleastoneconstraintiftheyhaven'talready.Asyoucreateadditionaloptionsinthefurthersteps,youwillneedtomodifythisbooleansoitisalwaystrueifatleastoneconstraintisset,andfalseotherwise.
1. CreateabooleanvariablecalledconstraintSetthatistrueifselectednetworkoptionisnotthedefaultJobInfo.NETWORK_TYPE_NONE:
booleanconstraintSet=selectedNetworkOption!=JobInfo.NETWORK_TYPE_NONE;
2. Createanif/elseblockusingtheconstraintSetboolean.3. MovethecodethatschedulesthetaskandshowstheToastmessageintotheifblock.4. IfconstraintSetisfalse,showaToastmessagetotheusertosetatleastoneconstraint.Don'tforgettoextract
yourstringresources:
if(constraintSet){
//Schedulethejobandnotifytheuser
JobInfomyJobInfo=builder.build();
mScheduler.schedule(myJobInfo);
Toast.makeText(this,R.string.job_scheduled,Toast.LENGTH_SHORT).show();
}else{
Toast.makeText(this,R.string.no_constraint_toast,Toast.LENGTH_SHORT).show();
}
2.3ImplementtheDeviceIdleandDeviceChargingconstraints
JobSchedulerincludestheabilitytowaituntilthedeviceischarging,orinanidlestate(thescreenisoff,andtheCPUhasgonetosleep)toexecuteyourJobService.YouwillnowaddswitchestoyourapptotoggletheseconstraintsonyourJobService.
Introduction
384

AddtheUIelementsforthenewconstraints
1. Inyouractivity_main.xmlfile,copythenetworktypelabelTextViewandpasteitbelowtheRadioGroup.2. Changetheandroid:textattributeto"Requires:".3. Belowthistextview,insertahorizontalLinearLayoutwitha4dpmargin.4. CreatetwoSwitchviewsaschildrentothehorizontalLinearLayoutwithheightandwidthsetto"wrap_content"andthe
followingattributes:
Switch1
android:text "DeviceIdle"
android:id "@+id/idleSwitch"
Switch2
android:text "DeviceCharging"
android:id "@+id/chargingSwitch"
Addthecodeforthenewconstraints
1. InMainActivity,createmembervariables,mDeviceIdleandmDeviceCharging,fortheswitchesandinitializetheminonCreate().
2. InthescheduleJob()method,addthefollowingcallstosettheconstraintsontheJobSchedulerbasedontheuserselectionintheswitches:
builder.setRequiresDeviceIdle(mDeviceIdle.isChecked());
builder.setRequiresCharging(mDeviceCharging.isChecked());
3. UpdatethecodethatsetsconstraintSettoconsiderthesenewconstraints:
booleanconstraintSet=(selectedNetworkOption!=JobInfo.NETWORK_TYPE_NONE)
||mDeviceChargingSwitch.isChecked()||mDeviceIdleSwitch.isChecked();
Introduction
385

4. Runyourapp,nowwiththeadditionalconstraints.Trythedifferencecombinationsofswitchestoseewhenthenotificationgetssent(thatindicatesthatthejobran).Youcantestthechargingstateconstraintinanemulatorbyopeningthemenu(theellipsesiconnexttotheemulateddevice),gototheBatterypaneandtoggletheBatteryStatusdropdown.ThereisnowaytomanuallyputtheemulatorinIdlemodeasofthewritingofthispractical.
Waitinguntilthedeviceisidleandpluggedinisacommonpatternforbatteryintensivetaskssuchasdownloadingoruploadinglargefiles.
2.4ImplementtheOverrideDeadlineconstraint
Uptothispoint,thereisnowaytoknowpreciselywhentheframeworkwillexecuteyourtask.Thesystemtakesintoaccounteffectiveresourcemanagementwhichmaydelayyourtaskdependingonthestateofthedevice,anddoesnotguaranteethatyourtaskwillrunontime.Forexample,anewsappmaywanttodownloadthelatestnewsonlywhenwifiisavailableandthedeviceispluggedinandcharging;butausermayinadvertentlyforgettoenabletheirwifiorchargetheirdevice.Ifyoudon'taddatimeparametertoyourscheduledJob,thatuserwillbedisappointedwhentheywakeuptoyesterday'snews.Forthisreason,theJobSchedulerAPIincludestheabilitytosetaharddeadlinethatwilloverridethepreviousconstraints.
AddthenewUIforsettingthedeadlinetorunthetask
Introduction
386

Introduction
387

InthisstepyouwilluseanewUIcomponent,aSeekbar,toallowtheusertosetadeadlinebetween0and100secondstoexecuteyourtask.
TheusersetsthevaluebydraggingtheSeekBar.
1. CreateahorizontalLinearLayoutbelowtheexistingLinearLayoutwiththeswitches,whichwillcontainthelabelsfortheSeekBar.
2. TheSeekBarwillhavetwolabels:astaticonejustlikethelabelfortheRadioGroupofbuttons,andadynamiconethatwillbeupdatedwiththevaluefromtheSeekBar.AddtwoTextViewstotheLinearLayoutwiththefollowingattributes:
TextView1
android:layout_width "wrap_content"
android:layout_height "wrap_content"
android:text "OverrideDeadline:"
android:id "@+id/seekBarLabel"
android:textAppearance "@style/TextAppearance.AppCompat.Subhead"
TextView2
android:layout_width "wrap_content"
android:layout_height "wrap_content"
android:text "NotSet"
android:id "@+id/seekBarProgress"
android:textAppearance "@style/TextAppearance.AppCompat.Subhead"
3. AddaSeekBarviewbelowtheLinearLayoutwiththefollowingattributes:
Attribute Value
android:layout_width "match_parent"
android:layout_height "wrap_content"
android:id "@+id/seekBar"
android:layout_margin "4dp"
Writethecodeforaddingthedeadline
1. InMainActivity,createamembervariablefortheSeekBarandinitializeitinonCreate():
mSeekBar=(SeekBar)findViewById(R.id.seekBar);
2. CreatefinalvariablesforbothTextViews(theywillbeaccessedfromaninnerclass)andinitializetheminonCreate():
finalTextViewlabel=(TextView)findViewById(R.id.seekBarLabel);
finalTextViewseekBarProgress=(TextView)findViewById(R.id.seekBarProgress);
Introduction
388

3. InonCreate(),callsetOnSeekBarChangeListener()ontheSeekBar,passinginanewOnSeekBarChangeListener(AndroidStudioshouldgeneratetherequiredmethods):
mSeekBar.setOnSeekBarChangeListener(newSeekBar.OnSeekBarChangeListener(){
@Override
publicvoidonProgressChanged(SeekBarseekBar,inti,booleanb){}
@Override
publicvoidonStartTrackingTouch(SeekBarseekBar){}
@Override
publicvoidonStopTrackingTouch(SeekBarseekBar){}
});
4. ThesecondargumentofonProgressChanged()isthecurrentvalueoftheSeekBar.IntheonProgressChanged()callback,checkiftheintegervalueisgreaterthan0(meaningavaluehasbeensetbytheuser),andifitis,settheSeekBarprogresslabeltotheintegervalue,followedby"s"toindicateseconds:
if(i>0){
mSeekBarProgress.setText(String.valueOf(i)+"s");
}
5. Otherwise,settheTextViewtoread"NotSet":
else{
mSeekBarProgress.setText("NotSet");
}
6. TheoverridedeadlineshouldonlybesetiftheintegervalueoftheSeekBarisgreaterthan0.InthescheduleJob()method,createanintegertostoretheSeekBarprogressandabooleanvariablethatistrueiftheSeekBarhasanintegervaluegreaterthan0:
intseekBarInteger=mSeekBar.getProgress();
booleanseekBarSet=seekBarInteger>0;
7. Ifthisbooleanistrue,callsetOverrideDeadline()ontheJobInfo.Builder,passingintheintegervaluefromtheSeekBarmultipliedby1000(theparameterisinmilliseconds,youwanttheusertosetthedeadlineinseconds):
if(seekBarSet){
builder.setOverrideDeadline(seekBarInteger*1000);
}
8. ModifytheconstraintSetbooleantoincludethevalueofseekBarSetasapossibleconstraint:
booleanconstraintSet=selectedNetworkOption!=JobInfo.NETWORK_TYPE_NONE
||mDeviceChargingSwitch.isChecked()||mDeviceIdleSwitch.isChecked()
||seekBarSet;
9. Runtheapp.TheusercannowsetaharddeadlineinsecondsbywhichtimetheJobServicemustberun!
2.5ImplementthePeriodicconstraintJobScheduleralsoallowsyoutoschedulearepeatedtask,muchlikeAlarmManager.Thisoptionhasafewcaveats:
Thetaskisnotguaranteedtoruninagivenperiod(theotherconditionsmaynotbemet,ortheremightnotbeenoughsystemresources).Usingthisconstraintpreventsyoufromalsosettinganoverridedeadlineoraminimumlatency(),sincetheseoptionsdonotmakesenseforrepetitivetasks.SeeJobInfo.Builder)documentationformoreinformation.
AddthePeriodicSwitchtothelayout
Introduction
389

YouwilladdaSwitchtoallowtheusertoswitchbetweenhavingthejobrunonceorrepeatedlyatperiodicintervals.
1. Inactivity_main.xml,addaSwitchviewbetweenthetwohorizontalLinearLayouts.Usethefollowingattributes:
Attribute Value
android:layout_width "wrap_content"
android:layout_height "wrap_content"
android:text "Periodic"
android:id "@+id/periodicSwitch"
android:layout_margin "4dp"
2. CreateamembervariablefortheswitchandinitializeitinonCreate():
mPeriodicSwitch=(Switch)findViewById(R.id.periodicSwitch);
WritethecodetousethePeriodicSwitch
Theoverridedeadlineandperiodicconstraintsaremutuallyexclusive.YouwillusetheswitchtotogglethefunctionalityandlabeloftheSeekBartorepresenteithertheoverridedeadline,ortheperiodicinterval.
1. CallsetOnCheckedChangeListener()ontheperiodicswitch,passinginanewOnCheckedChangeListener.2. Ifchecked,setthelabelto"PeriodicInterval:",otherwiseto"OverrideDeadline:":
mPeriodicSwitch.setOnCheckedChangeListener(
newCompoundButton.OnCheckedChangeListener(){
@Override
publicvoidonCheckedChanged(CompoundButtoncompoundButton,booleanisChecked){
if(isChecked){
label.setText(R.string.periodic_interval);
}else{
label.setText(R.string.override_deadline);
}
}
});
AllthatremainsnowistoimplementthelogicinthescheduleJob()methodtoproperlysettheconstraintsontheJobInfoobject.
Iftheperiodicoptionison:
IftheSeekBarhasanon-zerovalue,settheconstraintbycallingsetPeriodic()ontheJobInfo.Builderobject.IftheSeekBarhasavalueof0,showaToastmessageaskingtheusertosetaperiodicintervalwiththeSeekBar.
Iftheperiodicoptionisoff:
IftheSeekBarhasanon-zerovalue,theuserhassetanoverridedeadline.ApplytheoverridedeadlineusingthesetOverrideDeadline()option.IftheSeekBarhasavalueof0,theuserhassimplynotspecifiedanoverridedeadlineoraperiodictask,soaddnothingtotheJobInfo.Builderobject.ReplacethecodethatsetstheoverridedeadlinetotheJobInfo.BuilderinscheduleJob()withthefollowingcodetoimplementthislogic:
Introduction
390

if(mPeriodicSwitch.isChecked()){
if(seekBarSet){
builder.setPeriodic(seekBarInteger*1000);
}else{
Toast.makeText(MainActivity.this,
"Pleasesetaperiodicinterval",Toast.LENGTH_SHORT).show();
}
}else{
if(seekBarSet){
builder.setOverrideDeadline(seekBarInteger*1000);
}
}
SolutioncodeAndroidStudioproject:NotificationScheduler
CodingchallengeNote:Allcodingchallengesareoptionalandarenotprerequisitesforlaterlessons.
Challenge:Upuntilnow,yourtasksscheduledbytheJobServicefocusedondeliveringanotification.Mostofthetime,however,JobSchedulerisusedformorerobustbackgroundtaskssuchasupdatingtheweatherorsyncingwithadatabase.Sincebackgroundtaskscanbemorecomplexinnature,bothfromaprogrammaticandfromafunctionalitystandpoint,thejobofnotifyingtheframeworkwhenthetaskiscompletefallsonthedeveloper.Fortunately,thedevelopercandothisbycallingjobFinished().
1. ImplementaJobServicethatstartsanAsyncTaskwhenthegivenconstraintsaremet.TheAsyncTaskshouldsleepfor5seconds.ThiswillrequireyoutocalljobFinished()oncethetaskiscomplete.Iftheconstraintsarenolongermetwhilethethreadissleeping,showaToastmessagesayingthatthejobfailedandalsoreschedulethejob.
SummaryJobSchedulerprovidesaflexibleframeworktointelligentlyaccomplishbackgroundservices.JobSchedulerisonlyavailableondevicesrunningAPI21+TousetheJobScheduler,youneedtwoparts:JobServiceandJobInfo.JobInfoisasetofconditionsthatwilltriggerthejobtorun.JobServiceimplementsthejobtorunundertheconditionsspecifiedbyJobInfo.YouonlyhavetoimplementtheonStartJob()andonStopJob()callbackmethodsinyourJobService.Theimplementationofyourjoboccurs(orisstarted)inonStartJob().onStartJob()returnsabooleanthatindicateswhethertheserviceneedstoprocesstheworkinaseparatethread.IfonStartJob()returnstrue,youmustexplicitlycalljobFinished().IfonStartJob()returnsfalse,theruntimewillcalljobFinished()onyourbehalf.JobServiceisprocessedonthemainthread,soavoidlengthycalculationsorI/O.JobScheduleristhemanagerclassresponsibleforschedulingthetask.JobSchedulerbatchestaskstogethertomaximizetheefficiencyofsystemresources,whichmeansyoudonothaveexactcontrolofwhenitwillbeexecuted.
RelatedconceptTherelatedconceptdocumentationisinAndroidDeveloperFundamentals:Concepts.
TransferringDataEfficiently
Introduction
391

Learnmore
AndroidDeveloperDocumentation
Reference
JobSchedulerJobInfoJobInfo.BuilderJobServiceJobParameters
Introduction
392

9.1:SharedPreferencesContents:
WhatyoushouldalreadyKNOWWhatyouwillLEARNWhatyouwillDOAppoverviewTask1.ExploreHelloSharedPrefsTask2.SaveandrestoredatatosharedpreferencesCodingchallengeSummaryRelatedconceptLearnmore
Sharedpreferencesallowyoutoreadandwritesmallamountsofprimitivedata(askey/valuepairs)toafileonthedevicestorage.TheSharedPreferenceclassprovidesAPIsforgettingahandletoapreferencefileandforreading,writing,andmanagingthisdata.ThesharedpreferencesfileitselfismanagedbytheAndroidframework,andaccessibleto(sharedwith)allthecomponentsofyourapp.Thatdataisnot,however,sharedwithoraccessibletoanyotherapps.
Thedatayousavetosharedpreferencesisdifferentfromthedatainthesavedactivitystateyoulearnedaboutinanearlierchapter.Thedataintheactivityinstancestateisretainedacrossactivityinstancesinthesameusersession.Sharedpreferencespersistacrossusersessions,evenifyourappiskilledandrestartedorifthedeviceisrebooted.
Usesharedpreferencesonlywhenyouneedtosaveasmallamountdataassimplekey/valuepairs.TomanagelargeramountsofpersistentappdatausetheothermethodssuchasSQLdatabases,whichyouwilllearnaboutinalaterchapter.
WhatyoushouldalreadyKNOWFromthepreviouspracticalsyoushouldbefamiliarwith:
Creating,building,andrunningappsinAndroidStudio.Designinglayoutswithbuttonsandtextviews.Usingstylesandthemes.Savingandrestoringactivityinstancestate.
WhatyouwillLEARNYouwilllearnto:
Identifywhatsharedpreferencesare.Createasharedpreferencesfileforyourapp.Savedatatosharedpreferences,andreadthosepreferencesbackagain.Clearthedatainthesharedpreferences.
WhatyouwillDOInthispractical,youwill:
Addtheabilitytosave,retrieve,andresetsharedpreferencestoanapp.
Introduction
393

AppOverviewTheHelloSharedPrefsappisanothervariationoftheHelloToastappyoucreatedinLesson1.Itincludesbuttonstoincrementthenumber,tochangethebackgroundcolor,andtoresetboththenumberandcolortotheirdefaults.Theappalsousesthemesandstylestodefinethebuttons.
Introduction
394
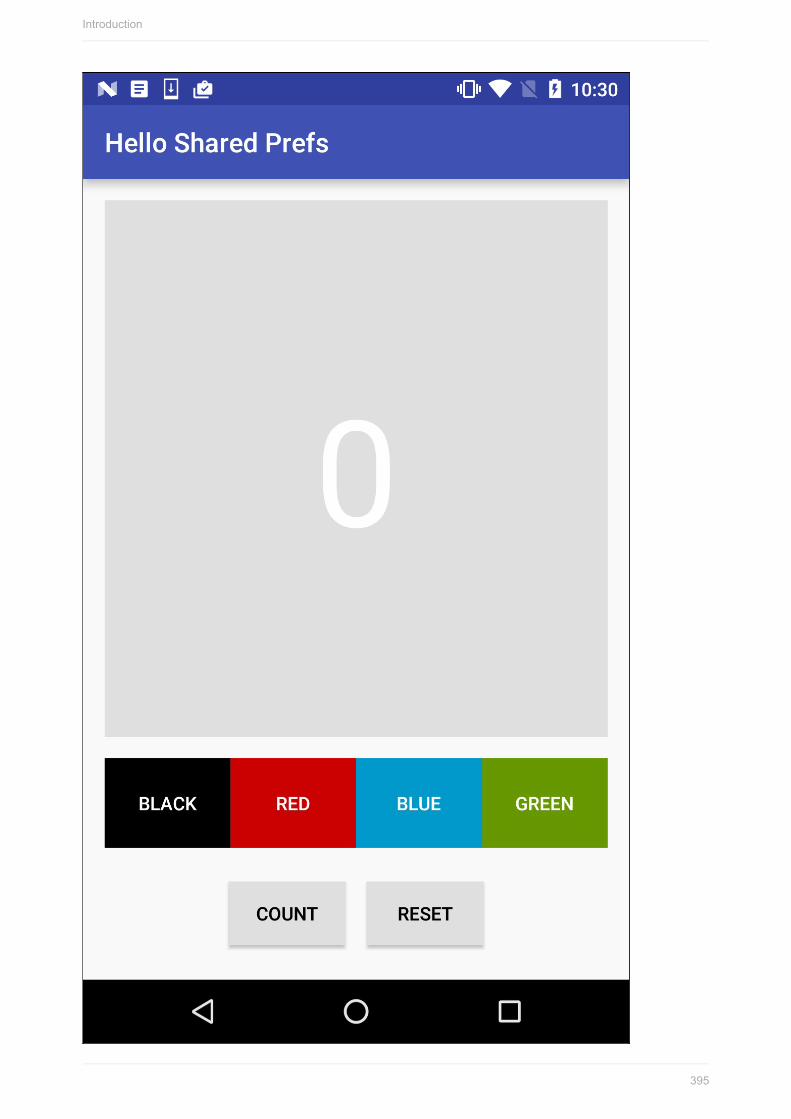
Introduction
395

You'llstartwiththestarterappinthispracticalandaddsharedpreferencestothemainactivitycode.You'llalsoaddaresetbuttonthatsetsboththecountandthebackgroundcolortothedefault,andclearsthepreferencesfile.
Task1.ExploreHelloSharedPrefsThecompletestarterappprojectforthispracticalisavailableatHelloSharedPrefs-Start.InthistaskyouwillloadtheprojectintoAndroidStudioandexploresomeoftheapp'skeyfeatures.
1.1OpenandRuntheHelloSharedPrefsProject
1. DownloadtheHelloSharedPrefs-Startappandunzipthefile.2. OpentheappinAndroidStudio.3. BuildandruntheprojectinAndroidStudio.Trythesethings:
ClicktheCountbuttontoincrementthenumberinthemaintextview.Clickanyofthecolorbuttonstochangethebackgroundcolorofthemaintextview.Rotatethedeviceandnotethatbothbackgroundcolorandcountarepreserved.ClicktheResetbuttontosetthecolorandcountbacktothedefaults.
4. Force-quittheappusingoneofthesemethods:
InAndroidStudio,selectRun>Stop'app'orclicktheStopIcon inthetoolbar.Onthedevice,clicktheRecentsbutton(thesquarebuttoninthelowerrightcorner).SwipethecardfortheHelloSharedPrefsapptoquit,orclicktheXintherightcorner.Ifyouquittheappinthismanner,waitafewsecondsbeforestartingitagainsothesystemcancleanup.
5. Re-runtheapp.
Theapprestartswiththedefaultappearance--thecountis0,andthebackgroundcolorisgrey.
1.2ExploretheActivitycode1. OpenMainActivity(java/com.example.android.simplecalc/MainActivity).2. Examinethecodeandnotethesethings:
Thecount(mCount)isdefinedbyaninteger.ThecountUp()clickhandlermethodincrementsthisvalueandupdatesthemaintextview.Thecolor(mColor)isalsoanintegerthatisinitiallydefinedasgreyinthecolors.xmlresourcefileasdefault_background.ThechangeBackground()clickhandlermethodgetsthebackgroundcolorofthebuttonthatwasclickedandthensetsthebackgroundcolorofthemaintextview.BoththecountandcolorintegersaresavedtotheinstancestatebundleinonSaveInstanceState(),andrestoredinonCreate().Thebundlekeysforcountandcoloraredefinedbyprivatevariables(COUNT_KEY)and(COLOR_KEY).
Task2.SaveandrestoredatatoasharedpreferencesfileInthistaskyou'llsavethestateoftheapptoasharedpreferencesfile,andreadthatdatabackinwhentheappisrestarted.Becausethestatedatayou'resavingtothesharedpreferences(thecurrentcountandcolor)arethesamedatayoupreserveintheinstancestate,youdon'thavetodoittwice--youcanreplacetheinstancestatealtogetherwiththesharedpreferencestate.
2.1Initializethepreferences1. AddmembervariablestotheMainActivityclasstoholdthenameofthesharedpreferencesfile,andareferencetoa
SharedPreferencesobject.
Introduction
396

privateSharedPreferencesmPreferences;
privateStringsharedPrefFile="com.example.android.hellosharedprefs";
Youcannameyoursharedpreferencesfileanythingyouwantto,butconventionallyithasthesamenameasthepackagenameofyourapp.
2. IntheonCreate()method,initializethesharedpreferences.Makesureyouinsertthiscodebeforetheifstatement.:
mPreferences=getSharedPreferences(sharedPrefFile,MODE_PRIVATE);
ThegetSharedPreferences()methodopensthefileatthegivenfilename(sharedPrefFile)withthemodeMODE_PRIVATE.
Note:OlderversionsofAndroidhadothermodesthatallowedyoutocreateaworld-readableorworld-writablesharedpreferencesfile.ThesemodesweredeprecatedinAPI17,andarenowstronglydiscouragedforsecurityreasons.Ifyouneedtosharedatawithotherapps,useaserviceoracontentprovider.
SolutionCode(MainActivity-partial)
publicclassMainActivityextendsAppCompatActivity{
privateintmCount=0;
privateTextViewmShowCount;
privateintmColor;
privateSharedPreferencesmPreferences;
privateStringsharedPrefFile="com.example.android.hellosharedprefs";
@Override
protectedvoidonCreate(BundlesavedInstanceState){
super.onCreate(savedInstanceState);
setContentView(R.layout.activity_main);
mShowCount=(TextView)findViewById(R.id.textview);
mColor=ContextCompat.getColor(this,R.color.default_background);
mPreferences=getSharedPreferences(sharedPrefFile,MODE_PRIVATE);
//…
}
}
2.2SavepreferencesinonPause()
Savingpreferencesisalotlikesavingtheinstancestate--bothoperationssetasidethedatatoaBundleobjectasakey/valuepair.Forsharedpreferences,however,yousavethatdataintheonPause()lifecyclecallback,andyouneedasharededitorobject(SharedPreferences.Editor)towritetothesharedpreferencesobject.
1. ClickthelastlineoftheMainActivityclass,justbeforetheclosingbracket.2. SelectCode>Generate,thenselectOverrideMethods.3. Type"onPause",selectthemethodsignaturefortheonPause()method,andclickOK.
AskeletononPause()methodisaddedtotheinsertionpoint.
4. GetaneditorfortheSharedPreferencesobject:
SharedPreferences.EditorpreferencesEditor=mPreferences.edit();
Asharedpreferenceseditorisrequiredtowritetothesharedpreferencesobject.AddthislinetoonPause()afterthecalltosuper.onPause().
5. UsetheputInt()methodtoputboththemCountandmColorintegersintothesharedpreferenceswiththeappropriatekeys:
Introduction
397

preferencesEditor.putInt(COUNT_KEY,mCount);
preferencesEditor.putInt(COLOR_KEY,mColor);
TheSharedPreferences.Editorclassincludesmultipleputmethodsfordifferentdatatypes,includingputInt()andputString().
6. Callapply()tosavethepreferences:
preferencesEditor.apply();
Theapply()methodsavesthepreferencesasynchronously,offoftheUIthread.Thesharedpreferenceseditoralsohasacommit()methodtosynchronouslysavethepreferences.Thecommit()methodisdiscouragedasitcanblockotheroperations.
7. DeletetheentireonSaveInstanceState()method.Sincetheactivityinstancestatecontainsthesamedataasthesharedpreferences,youcanreplacetheinstancestatealtogether.
SolutionCode(MainActivity-onPause()method)
@Override
protectedvoidonPause(){
super.onPause();
SharedPreferences.EditorpreferencesEditor=mPreferences.edit();
preferencesEditor.putInt(COUNT_KEY,mCount);
preferencesEditor.putInt(COLOR_KEY,mColor);
preferencesEditor.apply();
}
2.3RestorepreferencesinonCreate()
Aswiththeinstancestate,yourappreadsanysavedsharedpreferencesintheonCreate()method.Again,sincethesharedpreferencescontainthesamedataastheinstancestate,wecanreplacethestatewiththepreferenceshereaswell.EverytimeonCreate()iscalled--whentheappstarts,onconfigurationchanges--thesharedpreferencesareusedtorestorethestateoftheview.
1. LocatethepartoftheonCreate()methodthattestsifthesavedInstanceStateargumentisnullandrestorestheinstancestate:
if(savedInstanceState!=null){
mCount=savedInstanceState.getInt(COUNT_KEY);
if(mCount!=0){
mShowCountTextView.setText(String.format("%s",mCount));
}
mColor=savedInstanceState.getInt(COLOR_KEY);
mShowCountTextView.setBackgroundColor(mColor);
}
2. Deletethatentireblock.3. IntheonCreate()method,inthesamespotwherethesaveinstancestatecodewas,getthecountfromthe
preferenceswiththeCOUNT_KEYkeyandassignittothemCountvariable.
mCount=mPreferences.getInt(COUNT_KEY,0);
Whenyoureaddatafromthepreferencesyoudon'tneedtogetasharedprefrenceseditor.Useanyofthegetmethodsonasharedpreferencesobjecttoretrievepreferencedata.
NotethatthegetInt()methodtakestwoarguments:oneforthekey,andtheotherforthedefaultvalueifthekeycannotbefound.Inthiscasethedefaultvalueis0,whichisthesameastheinitialvalueofmCount.
Introduction
398

4. Updatethevalueofthemaintextviewwiththenewcount.
mShowCountTextView.setText(String.format("%s",mCount));
5. GetthecolorfromthepreferenceswiththeCOLOR_KEYkeyandassignittothemColorvariable.
mColor=mPreferences.getInt(COLOR_KEY,mColor);
Asbefore,thesecondargumenttogetInt()isthedefaultvaluetouseincasethekeydoesn'texistinthesharedpreferences.InthiscaseyoucanjustreusethevalueofmColor,whichwasjustinitializedtothedefaultbackgroundfurtherupinthemethod.
6. Updatethebackgroundcolorofthemaintextview.
mShowCountTextView.setBackgroundColor(mColor);
7. Runtheapp.Clickthecountbuttonandchangethebackgroundcolortoupdatetheinstancestateandthepreferences.
8. Rotatethedeviceoremulatortoverifythatthecountandcoloraresavedacrossconfigurationchanges.9. Force-quittheappusingoneofthesemethods:
InAndroidStudio,selectRun>Stop'app.'Onthedevice,clicktheRecentsbutton(thesquarebuttoninthelowerrightcorner).SwipethecardfortheHelloSharedPrefsapptoquit,orclicktheXintherightcorner.
10. Re-runtheapp.Theapprestartsandloadsthepreferences,maintainingthestate.
SolutionCode(MainActivity-onCreate())
@Override
protectedvoidonCreate(BundlesavedInstanceState){
super.onCreate(savedInstanceState);
setContentView(R.layout.activity_main);
//Initializeviews,color,preferences
mShowCountTextView=(TextView)findViewById(R.id.count_textview);
mColor=ContextCompat.getColor(this,R.color.default_background);
mPreferences=getSharedPreferences(mSharedPrefFile,MODE_PRIVATE);
//Restorepreferences
mCount=mPreferences.getInt(COUNT_KEY,0);
mShowCountTextView.setText(String.format("%s",mCount));
mColor=mPreferences.getInt(COLOR_KEY,mColor);
mShowCountTextView.setBackgroundColor(mColor);
}
2.4Resetpreferencesinthereset()clickhandler
Theresetbuttoninthestarterappresetsboththecountandcolorfortheactivitytotheirdefaultvalues.Sincethepreferencesholdthestateoftheactivity,it'simportanttoalsoclearthepreferencesatthesametime.
1. Inthereset()clickhandlermethod,afterthecolorandcountarereset,getaneditorfortheSharedPreferencesobject:
SharedPreferences.EditorpreferencesEditor=mPreferences.edit();
2. Deleteallthesharedpreferences:
preferencesEditor.clear();
3. Applythechanges:
preferencesEditor.apply();
Introduction
399

SolutionCode(reset()method):
publicvoidreset(Viewview){
//Resetcount
mCount=0;
mShowCountTextView.setText(String.format("%s",mCount));
//Resetcolor
mColor=ContextCompat.getColor(this,R.color.default_background);
mShowCountTextView.setBackgroundColor(mColor);
//Clearpreferences
SharedPreferences.EditorpreferencesEditor=mPreferences.edit();
preferencesEditor.clear();
preferencesEditor.apply();
}
SolutioncodeAndroidStudioproject:HelloSharedPrefs
CodingchallengeNote:Allcodingchallengesareoptionalandnotprerequisiteforthematerialinthenextchapter.
Challenge:ModifytheHelloSharedPrefsappsothatinsteadofautomaticallysavingthestatetothepreferencesfile,addasecondactivitytochange,reset,andsavethosepreferences.AddabuttontotheappnamedSettingstolaunchthatactivity.Includetogglebuttonsandspinnerstomodifythepreferences,andSaveandResetbuttonsforsavingandclearingthepreferences.
SummaryTheSharedPreferencesclassallowsanapptostoresmallamountsofprimitivedataaskey-valuepairs.Sharedpreferencespersistacrossdifferentusersessionsofthesameapp.Towritetothesharedpreferences,getaSharedPreferences.Editorobject.Usethevariousput*methodsinaSharedPreferences.Editorobject,suchasputInt()orputString(),toputdataintothesharedpreferenceswithakeyandavalue.Usethevariousget*methodsinaSharedPreferencesobject,suchasgetInt()orgetString(),togetdataoutofthesharedpreferenceswithakey.Usetheclear()methodinaSharedPreferences.Editorobjecttoremoveallthedatastoredinthepreferences.Usetheapply()methodinaSharedPreferences.Editorobjecttosavethechangestothepreferencesfile.
RelatedconceptTherelatedconceptdocumentationisinAndroidDeveloperFundamentals:Concepts.
SharedPreferences
LearnmoreSavingData(AndroidGuides)StorageOptions(AndroidGuides)
Introduction
400

SavingKey-ValueSets(AndroidTraining)SharedPreferences(AndroidAPIReference)SharedPreferences.Editor(AndroidAPIReference)HowtouseSharedPreferencesinAndroidtostore,fetchandeditvalues(StackOverflow)onSavedInstanceStatevs.SharedPreferences(StackOverflow)
Introduction
401

9.2:AddingSettingstoanAppContents:
WhatyoushouldalreadyKNOWWhatyouwillLEARNWhatyouwillDOAppoverviewTask1:AddaswitchsettingtoanappTask2:UsingtheSettingsActivitytemplateCodingchallengesSummaryRelatedConceptLearnmore
Appsoftenincludesettingsthatallowuserstomodifyappfeaturesandbehaviors.Forexample,someappsallowuserstosettheirhomelocations,defaultunitsformeasurements,diningoptions,andothersettingsthatapplytotheentireapp.Settingsareusuallyaccessedinfrequently,becauseonceauserchangesasetting,suchasahomelocation,theyrarelyneedtogobackandchangeitagain.
UsersexpecttonavigatetoappsettingsbytappingSettingsinsidenavigation,suchasanavigationdrawerasshownontheleftsideofthefigurebelow,orintheoptionsmenuintheappbar,shownontherightsideofthefigurebelow.
Inthefigureabove:
1. Settingsinsidenavigation(anavigationdrawer)2. Settingsintheoptionsmenuoftheappbar
Inthispracticalyouwilladdasettingsactivitytoanapp.UserswillbeabletonavigatetotheappsettingsbytappingSettings,whichwillbelocatedintheoptionsmenuintheappbar.
Introduction
402

WhatyoushouldalreadyKNOWFromthepreviouspracticals,youshouldbeableto:
Addanactivitytoanapp.Designlayoutswithbuttonsandtextviews.Extractstringresourcesandeditstringandstringarrayvalues.Createanoptionsmenuintheappbar.Addandeditthemenuitemsintheoptionsmenu.Addtheeventhandlerformenuitemclicks.EdittheAndroidManifest.xmlfiletoaddUpnavigationforasecondactivity.ReadpreferencesfromsharedPreferences.
WhatyouwillLEARNYouwilllearnto:
Addanactivityandunderstandtheuseoffragmentsformanagingsettings.CreateanXMLresourcefileofsettingswiththeirattributes.Createnavigationtothesettingsactivity.Setthedefaultvaluesofsettings.Readthesettingsvalueschangedbytheuser.CustomizetheSettingsActivitytemplateforyourownuse.
WhatyouwillDOInthispractical,youwill:
CreateanappthatincludesSettingsintheoptionsmenu.Add"Settingsoption"asatoggleswitch.Addcodetosetthedefaultvalueforthesetting,andaccessthesettingvalueafterithaschanged.UseandcustomizetheAndroidStudioSettingsActivitytemplate.
AppoverviewAndroidStudioprovidesashortcutforsettingupanoptionsmenuwithSettings.IfyoustartanAndroidStudioprojectforasmartphoneortabletusingtheBasicActivitytemplate,thenewappincludesSettingsasshownbelow:
Introduction
403

Introduction
404

Thetemplatealsoincludesafloatingactionbuttoninthelowerrightcornerofthescreenwithanenvelopeicon.Youcanignorethisbuttonforthispractical,asyouwon'tbeusingit.
You'llstartbycreatinganappnamedAppWithSettingsusingtheBasicActivitytemplate,andaddasettingsactivitythatprovidesonetoggleswitchsettingthattheusercanturnonoroff:
Introduction
405

Introduction
406

Youwilladdcodetoreadthesettingandperformanactionbasedonitsvalue.Forthesakeofsimplicity,theactionwillbetodisplayatoastmessagewiththevalueofthesetting.
Inthesecondtask,youwilladdthestandardSettingsActivitytemplateprovidedbyAndroidStudiototheDroidCafeappyoucreatedinapreviouslesson.TheSettingsActivitytemplateispre-populatedwithsettingsyoucancustomizeforanapp,andprovidesadifferentlayoutforsmartphonesandtablets:
Smartphones:AmainSettingsscreenwithaheaderlinkforeachgroupofsettings,suchasGeneralforgeneralsettings,asshownbelow.
Introduction
407

Tablets:Amaster/detailscreenlayoutwithaheaderlinkforeachgroupontheleft(master)side,andthegroupofsettingsontheright(detail)side,asshowninthefigurebelow.
Allyouneedtodotocustomizethetemplateischangetheheaders,settingtitles,settingdescriptions,andvaluesforthesettings,andwritethecodeyouwouldnormallywritetousethevaluesofthesettings.
TheDroidCafeappwascreatedinapreviouslessonfromtheBasicActivitytemplate,whichprovidesanoptionsmenuintheappbarforplacingtheSettingsoption.YouwillcustomizethesuppliedSettingsActivitytemplatebychangingasinglesetting'stitle,description,values,anddefaultvalues.Youwilladdcodetoreadthesetting'svalueaftertheuserchangesit,anddisplaythatvalue.
Task1:AddaswitchsettingtoanappInthistask,youwill:
CreateanewprojectbasedontheBasicActivitytemplate(whichprovidesanoptionsmenu).AddatoggleswitchsettingwithattributesinapreferenceXMLfile.Addanactivityforsettingsandafragmentforaspecificsetting.YouwillusethePreferenceFragmentCompatversionofPreferenceFragmentinordertomaintaincompatibilitywithAppCompatActivity.Youwillalsoaddtheandroid.support:preference-v7library.ConnecttheSettingsitemintheoptionsmenutothesettingsactivity.
1.1Createtheprojectandaddthexmldirectoryandresourcefile
1. InAndroidStudio,createanewprojectwiththefollowingparameters:
Introduction
408

Attribute Value
ApplicationName AppWithSettings
CompanyName android.example.com(oryourowndomain)
PhoneandTabletMinimumSDK API15:Android4.0.3IceCreamSandwich
UseaFragment? Leaveunchecked
Template BasicActivity
2. Runtheapp,andtaptheoverflowiconintheappbartoseetheoptionsmenu,asshowninthefigurebelow.TheonlyitemintheoptionsmenuisSettings.
3. CreateanewresourcedirectorytoholdtheXMLfilecontainingthesettings:i. SelecttheresdirectoryintheProject:Androidview,andchooseFile>New>AndroidResourceDirectory.TheNewResourceDirectorydialogappears.
ii. IntheResourcetypedrop-downmenu,choosexml.TheDirectorynameautomaticallychangestoxml.iii. ClickOK.
4. ThexmldirectoryappearsintheProject:Androidviewinsidetheresdirectory.SelectthexmldirectoryandchooseFile>New>XMLresourcefile(orright-clickthexmldirectoryandchooseNew>XMLresourcefile).
5. EnterthenameoftheXMLfile,preferences,intheFilenamefield,andclickOK.Thepreferences.xmlfileappearsinsidethexmldirectory,andthelayouteditorappears,asshowninthefigurebelow.
Introduction
409
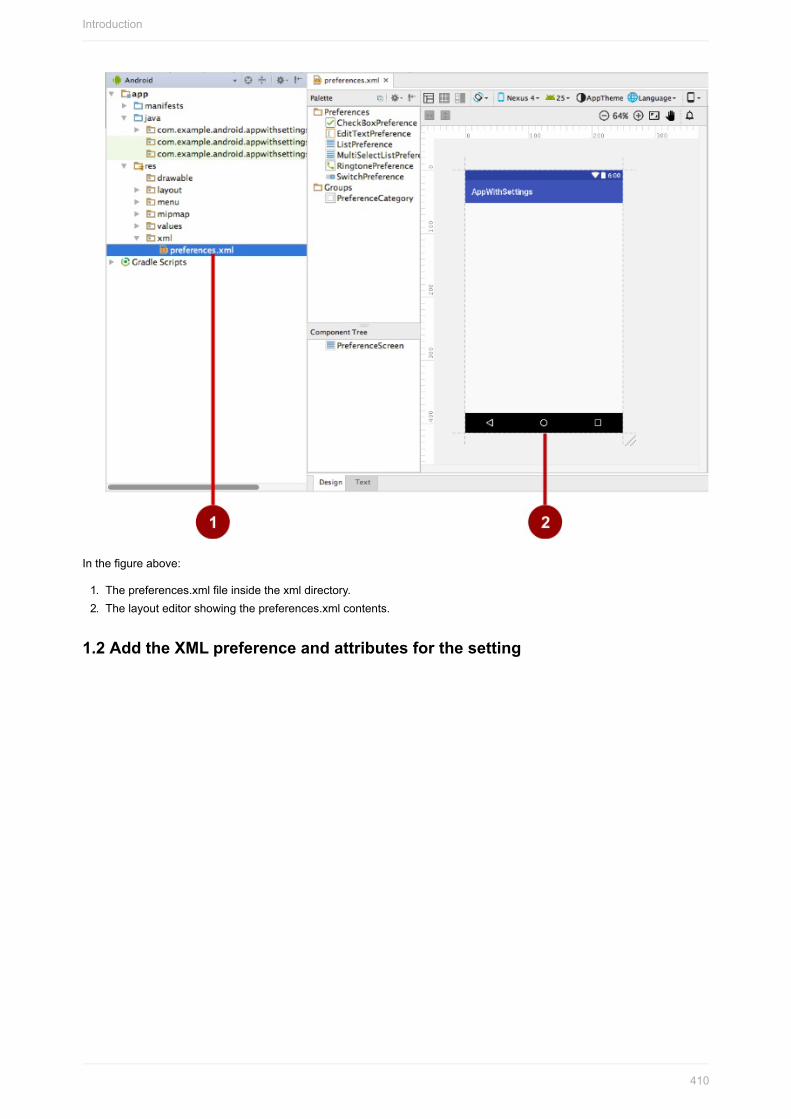
Inthefigureabove:
1. Thepreferences.xmlfileinsidethexmldirectory.2. Thelayouteditorshowingthepreferences.xmlcontents.
1.2AddtheXMLpreferenceandattributesforthesetting
Introduction
410

1. DragaSwitchPreferencefromthePalettepaneontheleftsidetothetopofthelayout,asshowninthefigurebelow.
2. ChangethevaluesinthePropertiespaneontherightsideofthelayouteditorasfollows(refertothefigurebelow):
i. defaultValue:trueii. key:example_switchiii. title:Settingsoptioniv. summary:Turnthisoptiononoroff
Introduction
411

3. ClicktheTexttabatthebottomofthelayouteditortoedittheXMLcode:
<PreferenceScreenxmlns:android="http://schemas.android.com/apk/res/android">
<SwitchPreference
android:defaultValue="true"
android:title="Settingsoption"
android:key="example_switch"
android:summary="Turnthisoptiononoroff"/>
</PreferenceScreen>
ThePropertiesvaluesyouenteredrepresentXMLattributes:
android:defaultValue:Thedefaultvalueofthesettingwhentheappstartsforthefirsttime.android:title:Thetitleofthesetting.ForaSwitchPreference,thetitleappearstotheleftofthetoggleswitch.android:key:Thekeytouseforstoringthesettingvalue.Eachsettinghasacorrespondingkey-valuepairthatthesystemusestosavethesettinginadefaultSharedPreferencesfileforyourapp'ssettings.android:summary:Thetextsummaryappearsunderneaththesetting.
4. Extractthestringresourcesfortheandroid:titleandandroid:summaryattributevaluesto@string/switch_titleand@string/switch_summary.
5. Change<SwitchPreferenceinthecodeto<android.support.v7.preference.SwitchPreferenceCompat:
<PreferenceScreenxmlns:android="http://schemas.android.com/apk/res/android">
<android.support.v7.preference.SwitchPreferenceCompat
.../>
</PreferenceScreen>
InordertousethePreferenceFragmentCompatversionofPreferenceFragment,youmustalsousetheandroid.support.v7versionofSwitchPreference(SwitchPreferenceCompat).
TheSwitchPreferenceCompatlineabovemayshowayellowlightbulbiconwithawarning,butyoucanignoreit.
Introduction
412
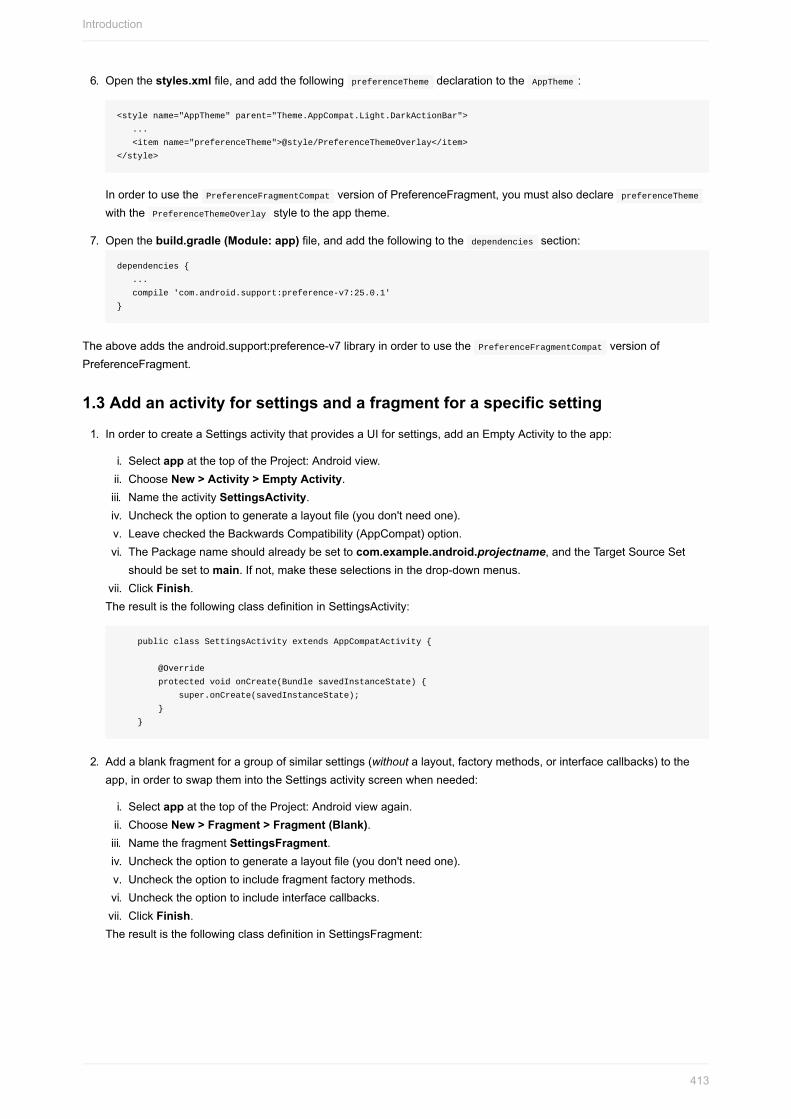
6. Openthestyles.xmlfile,andaddthefollowingpreferenceThemedeclarationtotheAppTheme:
<stylename="AppTheme"parent="Theme.AppCompat.Light.DarkActionBar">
...
<itemname="preferenceTheme">@style/PreferenceThemeOverlay</item>
</style>
InordertousethePreferenceFragmentCompatversionofPreferenceFragment,youmustalsodeclarepreferenceThemewiththePreferenceThemeOverlaystyletotheapptheme.
7. Openthebuild.gradle(Module:app)file,andaddthefollowingtothedependenciessection:
dependencies{
...
compile'com.android.support:preference-v7:25.0.1'
}
Theaboveaddstheandroid.support:preference-v7libraryinordertousethePreferenceFragmentCompatversionofPreferenceFragment.
1.3Addanactivityforsettingsandafragmentforaspecificsetting
1. InordertocreateaSettingsactivitythatprovidesaUIforsettings,addanEmptyActivitytotheapp:
i. SelectappatthetopoftheProject:Androidview.ii. ChooseNew>Activity>EmptyActivity.iii. NametheactivitySettingsActivity.iv. Unchecktheoptiontogeneratealayoutfile(youdon'tneedone).v. LeavecheckedtheBackwardsCompatibility(AppCompat)option.vi. ThePackagenameshouldalreadybesettocom.example.android.projectname,andtheTargetSourceSet
shouldbesettomain.Ifnot,maketheseselectionsinthedrop-downmenus.vii. ClickFinish.TheresultisthefollowingclassdefinitioninSettingsActivity:
publicclassSettingsActivityextendsAppCompatActivity{
@Override
protectedvoidonCreate(BundlesavedInstanceState){
super.onCreate(savedInstanceState);
}
}
2. Addablankfragmentforagroupofsimilarsettings(withoutalayout,factorymethods,orinterfacecallbacks)totheapp,inordertoswapthemintotheSettingsactivityscreenwhenneeded:
i. SelectappatthetopoftheProject:Androidviewagain.ii. ChooseNew>Fragment>Fragment(Blank).iii. NamethefragmentSettingsFragment.iv. Unchecktheoptiontogeneratealayoutfile(youdon'tneedone).v. Unchecktheoptiontoincludefragmentfactorymethods.vi. Unchecktheoptiontoincludeinterfacecallbacks.vii. ClickFinish.TheresultisthefollowingclassdefinitioninSettingsFragment:
Introduction
413

publicclassSettingsFragmentextendsFragment{
publicSettingsFragment(){
//Requiredemptypublicconstructor
}
@Override
publicViewonCreateView(LayoutInflaterinflater,
ViewGroupcontainer,BundlesavedInstanceState){
TextViewtextView=newTextView(getActivity());
textView.setText(R.string.hello_blank_fragment);
returntextView;
}
}
3. ChangetheclassdefinitionofSettingsFragmenttoextendPreferenceFragmentCompat:
publicclassSettingsFragmentextendsPreferenceFragmentCompat{
...
}
YouuseaspecializedFragmentsubclasstodisplayalistofsettings.ThebestpracticeistousearegularActivitythathostsaPreferenceFragmentthatdisplaystheappsettings.FragmentslikePreferenceFragmentprovideamoreflexiblearchitectureforyourapp,comparedtousingactivitiesalone.Afragmentislikeamodularsectionofanactivity—ithasitsownlifecycleandreceivesitsowninputevents,andyoucanaddorremoveafragmentwhiletheactivityisrunning.
UsethePreferenceFragmentCompatversionofPreferenceFragmentwithanactivitythatextendsAppCompatActivity.Inordertoextendthefragment,youmayhavetoaddthefollowingimportstatement:
importandroid.support.v7.preference.PreferenceFragmentCompat;
4. ReplacetheentireonCreateView()methodinthefragmentwiththisonCreate()method:
@Override
publicvoidonCreatePreferences(BundlesavedInstanceState,
StringrootKey){
}
ThereasonwhyyoureplaceonCreateView()withonCreatePreferences()inSettingsFragmentisbecauseyouwillbeaddingthisfragmenttotheexistingSettingsActivitytodisplaypreferences,ratherthanshowingaseparatefragmentscreen.Addingittotheexistingactivitymakesiteasytoaddorremoveafragmentwhiletheactivityisrunning.ThepreferencefragmentisrootedatthePreferenceScreenusingrootKey.
Youcansafelyremovetheemptyconstructorfromthefragmentaswell,sincethefragmentisnotdisplayedbyitself:
publicSettingsFragment(){
//Requiredemptypublicconstructor
}
5. AttheendoftheonCreatePreferences()methodinSettingsFragment,youneedtoassociatewiththisfragmentthepreferences.xmlsettingsresourceyoujustcreated.AddacalltosetPreferencesFromResource()passingtheidoftheXMLfile(R.xml.preferences)andtherootKeytoidentifythepreferencerootinPreferenceScreen:
setPreferencesFromResource(R.xml.preferences,rootKey);
TheonCreatePreferences()methodshouldnowlooklikethis:
Introduction
414

@Override
publicvoidonCreatePreferences(BundlesavedInstanceState,
StringrootKey){
setPreferencesFromResource(R.xml.preferences,rootKey);
}
6. AddthefollowingcodetotheendoftheSettingsActivityonCreate()methodsothatthefragmentisdisplayedasthemaincontent:
getSupportFragmentManager().beginTransaction()
.replace(android.R.id.content,newSettingsFragment())
.commit();
Theabovecodeisthetypicalpatternusedtoaddafragmenttoanactivitysothatthefragmentappearsasthemaincontentoftheactivity.Youuse:
getFragmentManager()iftheclassextendsActivityandthefragmentextendsPreferenceFragment.getSupportFragmentManager()iftheclassextendsAppCompatActivityandthefragmentextendsPreferenceFragmentCompat.
TheentireonCreate()methodinSettingsActivityshouldnowlooklikethefollowing:
@Override
protectedvoidonCreate(BundlesavedInstanceState){
super.onCreate(savedInstanceState);
getSupportFragmentManager().beginTransaction()
.replace(android.R.id.content,newSettingsFragment())
.commit();
}
1.4ConnecttheSettingsmenuitemtothesettingsactivity
UseanintenttolaunchtheSettingsActivityfromtheMainActivity.
1. FindtheifblockintheonOptionsItemSelected()methodinMainActivity,whichhandlesthetaponSettingsintheoptionsmenu:
if(id==R.id.action_settings){
returntrue;
}
2. AddanintenttotheifblocktolaunchtheSettingsActivity:
if(id==R.id.action_settings){
Intentintent=newIntent(this,SettingsActivity.class);
startActivity(intent);
returntrue;
}
3. AddUp-buttonnavigationtoSettingsActivitybyeditingitsdeclarationintheAndroidManifest.xmlfiletodefinetheactivity'sparentasMainActivity.i. FindtheSettingsActivitydeclarationinAndroidManifest.xml:
<activityandroid:name=".SettingsActivity"></activity>
ii. Changethedeclarationtothefollowing:
Introduction
415

<activityandroid:name=".SettingsActivity"
android:label="Settings"
android:parentActivityName=".MainActivity">
<meta-data
android:name="android.support.PARENT_ACTIVITY"
android:value=".MainActivity"/>
</activity>
4. Runtheapp.Taptheoverflowiconfortheoptionsmenu(asshownontheleftsideofthefigurebelow),andtapSettingstoseethesettingsactivity(asshowninthecenterofthefigurebelow).TaptheUpbuttonintheappbarofthesettingsactivity,shownontherightsideofthefigurebelow,toreturntothemainactivity.
1.5Savethedefaultvaluesinsharedpreferences
Althoughthedefaultvalueforthetoggleswitchsettinghasalreadybeensetintheandroid:defaultValueattribute(inStep1.2ofthistask),theappmustsavethedefaultvalueintheSharedPreferencesfileforeachsettingwhentheuserfirstopenstheapp.Followthesestepstosetthedefaultvalueforthetoggleswitch:
1. InMainActivity,addthefollowingtotheendoftheexistingonCreate()method:
protectedvoidonCreate(BundlesavedInstanceState){
...
PreferenceManager.setDefaultValues(this,R.xml.preferences,false);
}
Theabovecodeensuresthatthesettingsareproperlyinitializedwiththeirdefaultvalues.ThesetDefaultValues()methodtakesthreearguments:
2. Theappcontext,suchasthis.3. TheresourceID(preferences)fortheXMLresourcefilewithoneormoresettings.4. Abooleanindicatingwhetherthedefaultvaluesshouldbesetmorethanonce.Whenfalse,thesystemsetsthe
defaultvaluesonlyifthismethodhasneverbeencalledinthepast.Aslongasyousetthisthirdargumenttofalse,youcansafelycallthismethodeverytimethemainactivitystartswithoutoverridingtheuser'ssavedsettingsvalues.However,ifyousetittotrue,themethodwilloverrideanypreviousvalueswiththedefaults.
1.6Readthechangedsettingsvaluefromsharedpreferences
Introduction
416

Whentheappstarts,theMainActivity'sonCreate()methodcanreadsettingvaluesthathavechanged,andusethechangedvaluesratherthanthedefaultvalues.
Eachsettingisidentifiedusingakey-valuepair.TheAndroidsystemusesthiskey-valuepairwhensavingorretrievingsettingsfromaSharedPreferencesfileforyourapp.Whentheuserchangesasetting,thesystemupdatesthecorrespondingvalueintheSharedPreferencesfile.Tousethevalueofthesetting,theappcanusethekeytogetthesettingfromtheSharedPreferencesfile.
Followthesestepstoaddthatcode:
1. Beforeaddingcodetoreadthesettingvalue,createastaticstringvariableinSettingsActivitytoholdthekeyforthevalue:
publicclassSettingsActivityextendsAppCompatActivity{
publicstaticfinalString
KEY_PREF_EXAMPLE_SWITCH="example_switch";
...
}
2. IntheonCreate()methodinMainActivity,andaddthefollowingatendofthemethod:
protectedvoidonCreate(BundlesavedInstanceState){
...
SharedPreferencessharedPref=
PreferenceManager.getDefaultSharedPreferences(this);
BooleanswitchPref=sharedPref.getBoolean
(SettingsActivity.KEY_PREF_EXAMPLE_SWITCH,false);
}
Theabovecodesnippetuses
PreferenceManager.getDefaultSharedPreferences(this)togetthesettingasaSharedPreferencesobject(sharedPref).getBoolean()togettheBooleanvalueofthesettingthatusesthekey(KEY_PREF_EXAMPLE_SWITCHdefinedinSettingsActivity)andassignittoswitchPref.Ifthereisnovalueforthekey,thegetBoolean()methodsetsthesettingvalue(switchPref)tofalse.Forothervaluessuchasstrings,integers,orfloatingpointnumbers,youcanusethegetString(),getInt(),orgetFloat()methodsrespectively.
3. AddaToast.makeText()methodtoonCreate()thatdisplaysthevalueoftheswitchPrefsettinginatoast:
Toast.makeText(this,switchPref.toString(),Toast.LENGTH_SHORT).show();
4. Runtheappandthenfollowthesesteps:i. TapSettingstoseethesettingsactivity.ii. Tapthesettingtochangethetogglefromontooff,asshownontheleftsideofthefigurebelow.iii. TaptheUpbuttoninthesettingsactivitytoreturntothemainactivity.Thetoastmessageshouldappearinthe
mainactivitywiththevalueofthesetting,asshownontherightsideofthefigurebelow.iv. Repeatthesestepstoseethetoastmessagechangeasyouchangethesetting.
Introduction
417

WhenevertheMainActivitystartsorrestarts,theonCreate()methodshouldreadthesettingvaluesinordertousethemintheapp.TheToast.makeText()methodwouldbereplacedwithamethodthatinitializesthesettings.
Younowhaveaworkingsettingsactivityinyourapp.
Solutioncode:
AndroidStudioproject:AppWithSettings
Task2:UsingtheSettingsActivitytemplateIfyouneedtobuildseveralsub-screensofsettingsandyouwanttotakeadvantageoftablet-sizedscreensaswellasmaintaincompatibilitywitholderversionsofAndroidfortablets,AndroidStudioprovidesashortcut:theSettingsActivitytemplate.
Intheprevioustaskyoulearnedhowtouseanemptysettingsactivityandablankfragmentinordertoaddasettingtoanapp.Task2willnowshowyouhowtousetheSettingsActivitytemplatesuppliedwithAndroidStudioto:
Dividemultiplesettingsintogroups.Customizethesettingsandtheirvalues.DisplayamainSettingsscreenwithaheaderlinkforeachgroupofsettings,suchasGeneralforgeneralsettings,asshowninthefigurebelow.
Introduction
418
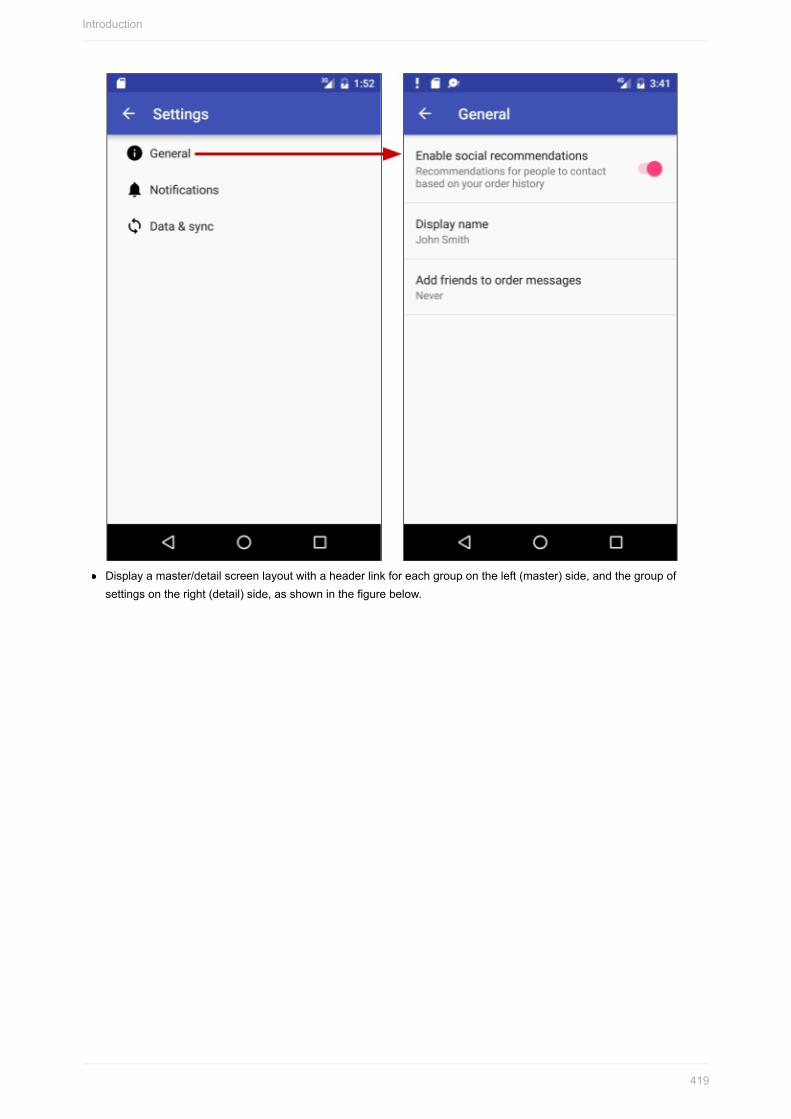
Displayamaster/detailscreenlayoutwithaheaderlinkforeachgroupontheleft(master)side,andthegroupofsettingsontheright(detail)side,asshowninthefigurebelow.
Introduction
419

Introduction
420

InapreviouspracticalyoucreatedanappcalledDroidCafeusingtheBasicActivitytemplate,whichprovidesanoptionsmenuintheappbarasshownbelow.
Intheabovefigure:
1. Appbar.2. Optionsmenuactionicons.3. Overflowbutton.4. Optionsoverflowmenu.
AndroidStudioproject:Tostarttheprojectfromwhereyouleftoffinthepreviouspractical,downloadtheAndroidStudioprojectDroidCafe.
2.1ExploretheSettingsActivitytemplate
ToincludetheSettingsActivitytemplateinyourappprojectinAndroidStudio,followthesesteps:
1. CopytheDroidCafeprojectfolder,renameittoDroidCafeWithSettings,andrefactorit.(SeetheAppendixforinstructionsoncopyingaproject.)Runtheapptomakesureitrunsproperly.
2. SelectappatthetopoftheProject:Androidview,andchooseNew>Activity>SettingsActivity.3. Inthedialogthatappears,accepttheActivityName(SettingsActivityisthesuggestedname)andtheTitle(Settings).4. ClickthethreedotsattheendoftheHierarchicalParentfieldandchooseMainActivityastheparentactivity,sothat
theUpbuttonintheSettingsActivityreturnstheusertotheMainActivity.ChoosingtheparentactivityautomaticallyupdatestheAndroidManifest.xmlfiletosupportUpbuttonnavigation.
5. ClickFinish.
TheSettingsActivitytemplatenotonlyprovideslayoutsforsmartphone-sizedandtablet-sizedscreens,butalsoprovidesthefunctionoflisteningtoasettingschange,andchangingthesummarytoreflectthesettingschange.Forexample,ifyouchangethe"Addfriendstomessages"setting(thechoicesareAlways,Whenpossible,orNever),thechoiceyoumake
Introduction
421

appearsinthesummaryunderneaththesetting:
Ingeneral,youneednotchangetheSettingsActivitytemplatecodeinordertocustomizetheactivityforthesettingsyouwantinyourapp.Youcancustomizethesettingstitles,summaries,possiblevalues,anddefaultvalueswithoutchangingthetemplatecode,andevenaddmoresettingstothegroupsthatareprovided.
YouusetheSettingsActivitytemplatecodeas-is.Tomakeitworkforyourapp,addcodetotheMainActivitytosetthedefaultsettingsvalues,andtoreadandusethesettingsvalues,asshownlaterinthistask.
TheSettingsActivitytemplatecreatesthefollowingforyou:
XMLfilesintheres>xmldirectory,whichyoucanaddtoorcustomizeforthesettingsyouwant.
pref_data_sync.xml:PreferenceScreenlayoutfor"Data&sync"settings.pref_general.xml:PreferenceScreenlayoutfor"General"settings.pref_headers.xml:LayoutofheadersfortheSettingsmainscreen.pref_notification.xml:PreferenceScreenlayoutfor"Notifications"settings.
TheaboveXMLlayoutsusevarioussubclassesofthePreferenceclassratherthanViewobjects,anddirectsubclassesprovidecontainersforlayoutsinvolvingmultiplesettings.Forexample,PreferenceScreenrepresentsatop-levelPreferencethatistherootofaPreferencehierarchy.TheabovefilesusePreferenceScreenatthetopofeachscreenofsettings.OtherPreferencesubclassesforsettingsprovidetheappropriateUIforuserstochangethesetting.Forexample:
CheckBoxPreference:Acheckboxforasettingthatiseitherenabledordisabled.ListPreference:Adialogwithalistofradiobuttons.SwitchPreference:Atwo-statetoggleableoption(suchason/offortrue/false).EditTextPreference:AdialogwithanEditTextwidget.RingtonePreference:Adialogwithringtonesonthedevice.
Tip:YoucanedittheXMLfilestochangethedefaultsettingstosettingsyouneedforyourapp.
Stringresourcesinthestrings.xmlfileintheres>valuesdirectory,whichyoucancustomizeforthesettingsyouwant.
AllstringsusedintheSettingsActivity,suchasthetitlesforsettings,stringarraysforlists,anddescriptionsforsettings,aredefinedasstringresourcesattheendofthisfile.Theyaremarkedbycommentssuchas<!--StringsrelatedtoSettings-->and<!--ExampleGeneralsettings-->.
Tip:Youcaneditthesestringstocustomizethesettingsyouneedforyourapp.
SettingsActivityinthejava>com.example.android.projectnamedirectory,whichyoucanuseasis.
Thisistheactivitythatdisplaysthesettings.SettingsActivityextendsAppCompatPreferenceActivityformaintainingcompatibilitywitholderversionsofAndroid.
AppCompatPreferenceActivityinthejava>com.example.android.projectnamedirectory,whichyouuseasis.
Introduction
422

ThisactivityisahelperclassthatSettingsActivityusestomaintainbackwardscompatibilitywithpreviousversionsofAndroid.
2.2AddtheSettingsmenuitemandconnectittotheactivity
Asyoulearnedinapreviouspractical,youcaneditthemenu_main.xmlfileintheres>menudirectoryfortheoptionsmenutoaddorremovemenuitems.
1. Editthemenu_main.xmlfiletoaddanothermenuitemcalledSettingswiththenewresourceidaction_settings:
<item
android:id="@+id/action_settings"
android:orderInCategory="50"
android:title="Settings"
app:showAsAction="never"/>
Specify"never"fortheapp:showAsActionattributesothatSettingsappearsonlyintheoverflowoptionsmenuandnotintheappbaritself,sinceitshouldnotbeusedoften.
Specify"50"fortheandroid:orderInCategoryattributesothatSettingsappearsbelowFavorites(setto"40")but
aboveContact(setto"100").
2. Extractthestringresourcefor"Settings"intheandroid:titleattributetotheresourcenamesettings.3. InMainActivity,findtheswitch-caseblockintheonOptionsItemSelected()methodwhichhandlesthetaponitemsin
theoptionsmenu:
publicbooleanonOptionsItemSelected(MenuItemitem){
switch(item.getItemId()){
caseR.id.action_order:
displayToast(getString(R.string.action_order_message));
returntrue;
caseR.id.action_status:
displayToast(getString(R.string.action_status_message));
returntrue;
caseR.id.action_favorites:
displayToast(getString(R.string.action_favorites_message));
returntrue;
caseR.id.action_contact:
displayToast(getString(R.string.action_contact_message));
returntrue;
}
returnsuper.onOptionsItemSelected(item);
}
Introduction
423

4. UseanintenttolaunchtheSettingsActivityfromtheMainActivity.Addtheintenttotheendoftheswitchcaseblock:
...
caseR.id.action_settings:
Intentintent=newIntent(this,SettingsActivity.class);
startActivity(intent);
returntrue;
}
returnsuper.onOptionsItemSelected(item);
}
5. RuntheappusingasmartphoneorsmartphoneemulatorsothatyoucanseehowtheSettingsActivitytemplatehandlesthesmartphonescreensize,andfollowthesesteps:
i. Taptheoverflowiconfortheoptionsmenu,andtapSettingstoseethesettingsactivity,asshownontheleftsideofthefigurebelow.
ii. Tapeachsettingheader(General,Notifications,andData&sync),asshowninthecenterofthefigurebelow,toseethegroupofsettingsoneachchildscreenoftheSettingsscreen,shownontherightsideofthefigurebelow.
iii. TaptheUpbuttoninthesettingsactivitytoreturntothemainactivity.
2.3CustomizethesettingsprovidedbythetemplateTocustomizethesettingsprovidedbytheSettingsActivitytemplate,editthestringandstringarrayresourcesinthestrings.xmlfileandthelayoutattributesforeachsettinginthefilesinthexmldirectory.Inthisstepyouwillchangethe"Data&sync"settings.
1. Openthestrings.xmlfileintheres>valuesdirectory,andscrollthecontentstothe<!--ExamplesettingsforData&Sync-->comment:
Introduction
424

<!--ExamplesettingsforData&Sync-->
<stringname="pref_header_data_sync">Data&sync</string>
<stringname="pref_title_sync_frequency">Syncfrequency</string>
<string-arrayname="pref_sync_frequency_titles">
<item>15minutes</item>
<item>30minutes</item>
<item>1hour</item>
<item>3hours</item>
<item>6hours</item>
<item>Never</item>
</string-array>
<string-arrayname="pref_sync_frequency_values">
<item>15</item>
<item>30</item>
<item>60</item>
<item>180</item>
<item>360</item>
<item>-1</item>
</string-array>
...
2. Editthepref_header_data_syncstringresource,whichissettoData&sync(the&isHTMLcodeforanampersand).ChangethevaluetoAccount(withoutquotationmarks).
3. Refactortheresourcenamebyfollowingthesesteps(theappwillstillworkwithoutrefactoringthenames,butrefactoringmakesthecodeeasiertounderstand):
i. Control-click(orright-click)thepref_header_data_syncresourcenameandchooseRefactor>Rename.ii. Changethenametopref_header_account,clicktheoptiontosearchincommentsandstrings,andclick
Refactor.4. Editthepref_title_sync_frequencystringresource(whichissettoSyncfrequency)toMarket.
5. Refactor>Renametheresourcenametopref_title_accountasyoudidpreviously.6. Refactor>Renamethestringarrayresourcenamepref_sync_frequency_titlestopref_market_titles.7. Changeeachvalueinthepref_market_titlesstringarray(15minutes,30minutes,1hour,etc.)tobethetitlesof
markets,suchasUnitedStates,Canada,etc.,ratherthanfrequencies:
<string-arrayname="pref_market_titles">
<item>UnitedStates</item>
<item>Canada</item>
<item>UnitedKingdom</item>
<item>India</item>
<item>Japan</item>
<item>Other</item>
</string-array>
8. Refactor>Renamethestringarrayresourcenamepref_sync_frequency_valuestopref_market_values.9. Changeeachvalueinthepref_market_valuesstringarray(15,30,60,etc.)tobevaluesforthemarkets—
abbreviationssuchasUS,CA,etc.:
<string-arrayname="pref_market_values">
<item>US</item>
<item>CA</item>
<item>UK</item>
<item>IN</item>
<item>JA</item>
<item>-1</item>
</string-array>
10. Scrolldowntothepref_title_system_sync_settingsstringresource,andedittheresource(whichissettoSystemsyncsettings)toAccountsettings.
11. Refactor>Renamethestringarrayresourcenamepref_title_system_sync_settingstopref_title_account_settings.
Introduction
425

12. Openthepref_data_sync.xmlfile.TheListPreferenceinthislayoutdefinesthesettingyoujustchanged.Notethatthestringresourcesfortheandroid:entries,android:entryValuesandandroid:titleattributesarenowchangedtothevaluesyousuppliedintheprevioussteps:
<ListPreference
android:defaultValue="180"
android:entries="@array/pref_market_titles"
android:entryValues="@array/pref_market_values"
android:key="sync_frequency"
android:negativeButtonText="@null"
android:positiveButtonText="@null"
android:title="@string/pref_title_account"/>
13. Changetheandroid:defaultValueattribute:
android:defaultValue="US"
Sincethekeyforthissettingpreference("sync_frequency")ishard-codedelsewhereintheJavacode,don'tchangetheandroid:keyattribute—keepusing"sync_frequency"asthekeyforthissettinginthisexample.Ifyouarethoroughlycustomizingthesettingsforareal-worldapp,youwouldspendthetimechangingthehard-codedkeysthroughoutthecode.
Note:Whynotuseastringresourceforthekey?Becausestringresourcescanbelocalizedfordifferentlanguagesusingmultiple-languageXMLfiles,andthekeystringmightbeinadvertentlytranslatedalongwiththeotherstrings,whichwouldcausetheapptocrash.
2.4AddcodetosetthedefaultvaluesforthesettingsFindtheonCreate()methodinMainActivity,andaddthefollowingPreferenceManager.setDefaultValuesstatementsattheendofthemethod:
@Override
protectedvoidonCreate(BundlesavedInstanceState){
...
PreferenceManager.setDefaultValues(this,R.xml.pref_general,false);
PreferenceManager.setDefaultValues(this,R.xml.pref_notification,false);
PreferenceManager.setDefaultValues(this,R.xml.pref_data_sync,false);
}
ThedefaultvaluesarealreadyspecifiedintheXMLfilewiththeandroid:defaultValueattribute,buttheabovestatementsensurethattheSharedPreferencesfileisproperlyinitializedwiththedefaultvalues.ThesetDefaultValues()methodtakesthreearguments:
Theappcontext,suchasthis.TheresourceIDforthesettingslayoutXMLfilewhichincludesthedefaultvaluessetbytheandroid:defaultValueattribute.Abooleanindicatingwhetherthedefaultvaluesshouldbesetmorethanonce.Whenfalse,thesystemsetsthedefaultvaluesonlyifthismethodhasneverbeencalledinthepast.Aslongasyousetthisthirdargumenttofalse,youcansafelycallthismethodeverytimeyouractivitystartswithoutoverridingtheuser'ssavedsettingsvaluesbyresettingthemtothedefaultvalues.However,ifyousetittotrue,themethodwilloverrideanypreviousvalueswiththedefaults.
2.5Addcodetoreadvaluesforthesettings
1. AddthefollowingcodeattheendoftheMainActivityonCreate()method.Youcanadditimmediatelyafterthecodeyouaddedintheprevioussteptosetthedefaultsforthesettings:
Introduction
426

...
SharedPreferencessharedPref=
PreferenceManager.getDefaultSharedPreferences(this);
StringmarketPref=sharedPref.getString("sync_frequency","-1");
Toast.makeText(this,marketPref,Toast.LENGTH_SHORT).show();
}
Asyoulearnedintheprevioustask,youusePreferenceManager.getDefaultSharedPreferences(this)togetthesettingasaSharedPreferencesobject(marketPref).YouthenusegetString()togetthestringvalueofthesettingthatusesthekey(sync_frequency)andassignittomarketPref.Ifthereisnovalueforthekey,thegetString()methodsetsthesettingvalueofmarketPrefto-1,whichisthevalueofOtherinthepref_market_valuesarray.
2. Runtheapp,againusingasmartphoneorsmartphoneemulator.Whentheapp'smainscreenfirstappears,youseeatoastmessageatthebottomofthescreen.Thefirsttimeyouruntheapplication,youshouldsee"-1"displayedinthetoastbecauseyouhaven'tchangedthesettingyet.
3. TapSettingsintheoptionsmenu,andtapAccountintheSettingsscreen.ChooseCanadaunder"Market"asshownbelow:
Introduction
427

Introduction
428

4. TaptheUpbuttonintheappbartoreturntotheSettingsscreen,andtapitagaintoreturntothemainscreen.Youshouldseeatoastmessagewith"CA"(forCanada):
YouhavesuccessfullyintegratedtheSettingsActivitywiththeDroidCafeapp.
5. Nowruntheapponatabletortabletemulator.Becauseatablethasaphysicallylargerscreen,theAndroidruntimetakesadvantageoftheextraspace.Onatablet,thesettingsanddetailsaredisplayedonthesamescreenmakingiteasierforuserstomanagetheirsettings.
SolutioncodeAndroidStudioproject:DroidCafeWithSettings(Includescodingchallenge#1.)
AndroidStudioproject:DroidCafeWithSettingsChallenge(Includescodingchallenge#2.)
Codingchallenges
Introduction
429
Note:Allcodingchallengesareoptionalandnotprerequisiteforthematerialinthenextchapter.
Challenge1:AddcodetoDroidCafeWithSettingsthatreadsthevalueofthetoggleswitch"Enablesocialrecommendations"ontheGeneralchildscreenofSettings,anddisplaysitsvaluealongwiththe"Market"settinginthesametoastmessageonthemainscreen.
Hint:UseaBooleanvariablewithshared.Pref.getBooleanandthekey"example_switch".
Challenge2:TheDroidCafeWithSettingsappdisplaysthesettingsonatablet-sizedscreenproperly,buttheUpbuttonintheappbardoesn'treturntheusertotheMainActivityasitdoesonasmartphone-sizedscreen.ThisisduetotheonOptionsItemSelected()methodineachfragmentinSettingsActivity.ItusesthefollowingtorestarttheSettingsActivitywhentheusertapstheUpbutton:
startActivity(newIntent(getActivity(),SettingsActivity.class));
TheaboveistheappropriateactiononsmartphonescreensinwhichSettingsheaders(General,Notifications,andAccount)appearinaseparatescreen.Afterchangingasetting,youwanttheuser'stapontheUpbuttontotakethembacktotheSettingsheaders.
However,onatablet,theheadersarealwaysvisibleintheleftpane(whilethesettingsareintherightpane).Asaresult,tappingtheUpbuttondoesn'ttaketheusertoMainActivity.
FindawaytomaketheUpbuttonworkproperlyinSettingsActivityontablet-sizedscreens.
Hint:Thereareseveralwaystofixthisproblem.Considerthefollowing:
Youcanusemultipledimens.xmlfilesinyourapptoaccommodatedifferentscreensizes.Whentheapprunsonaspecificdevice,theappropriatedimens.xmlfileischosenbasedonthequalifiersforthedimens.xmlfiles.Forexample,theappalreadyhasadimens.xml(w820dp)fileintheres>valuesdirectory,usingthe(w820dp)qualifiertospecifyadevicewithan820dpscreenwidthorlarger.Youcanaddanotherdimens.xmlfilewiththeLargequalifiertospecifyanydevicewithalargescreen,suchasatablet.Theappalsoincludesadimens.xmlfileintheres>valuesdirectoryforallotherdevices,suchassmartphones.Youcanaddthefollowingboolresourcebetweenthe<resources>and</resources>tagsinthedimens.xml(large)file,whichisautomaticallychosenfortablets:
<resources>
<boolname="isTablet">true</bool>
</resources>
Youcanaddthefollowingboolresourcetothedimens.xmlfile,whichischosenwhentheapprunsonanydevicethatisnotlarge:
<boolname="isTablet">false</bool>
Nowyoucanaddanif-elseblocktotheonOptionsItemSelected()methodineachfragmentinSettingsActivitythatcheckstoseeifisTabletistrue.Ifitis,yourcodecanredirecttheUpbuttonactiontoMainActivity.
SummaryInthispracticalyoulearnedto:
Addatoggleswitchsetting(SwitchPreference)withattributesinapreferenceXMLfile,andsetitsattributes:android:defaultValue:Thesettingdefaultvalue.android:title:Thesettingtitle.android:key:Thesettingkey.android:summary:Thesettingsummary.
Addasettingsactivitytoviewsettings,andafragmentthatextendsPreferenceFragmentforeachspecificsetting.
Introduction
430

UsegetFragmentManager()toaddthefragmenttothesettingsactivityUseaddPreferencesFromResource()ineachfragmenttoloadtheappropriatepreferencesXMLfileforthatfragment.
UseanintenttoconnecttheSettingsitemintheoptionsmenutothesettingsactivity.SetthedefaultvaluesforsettingsusingPreferenceManager.setDefaultValues().ReadthesettingsvaluesfromSharedPreferencesusingPreferenceManager.getDefaultSharedPreferences(),andobtaineachsettingvalueusing.getString,.getBoolean,etc.
RelatedconceptsTherelatedconceptdocumentationisinAndroidDeveloperFundamentals:Concepts.
AppSettings
LearnmoreAndroidStudiodocumentation:
AndroidStudioUserGuideAndroidAPIGuide,"Develop"section:
Settings(coding)PreferenceclassPreferenceFragmentFragmentSharedPreferencesSavingKey-ValueSetsSupportingDifferentScreenSizes
MaterialDesignSpecification:Settings(design)
Other:StackOverflow:Howdoesonegetdimens.xmlintoAndroidStudio?StackOverflow:Determineifthedeviceisasmartphoneortablet?
Introduction
431

10.1A:SQLiteDatabaseContents:
WhatyoushouldalreadyKNOWWhatyouwillLEARNWhatyouwillDOAppoverviewTask0.DownloadandrunthebasecodeTask1.CreateadatamodelforwordlistdataTask2:ExtendSQLiteOpenHelpertocreateandpopulatethedatabaseTask3:DisplaythedataintheRecyclerViewTask4:EditwordsintheUIandstorechangesinthedatabaseTask5:CreateUIElementsTask6:HandleClicksCodingchallengesSummaryRelatedConceptLearnMore
ASQLitedatabaseisagoodstoragesolutionwhenyouhavestructureddatathatyouneedtostorepersistentlyandaccess,search,andchangefrequently.
WhenyouuseaSQLitedatabase,allinteractionswiththedatabasearethroughaninstanceoftheSQLiteOpenHelperclasswhichexecutesyourrequestsandmanagesyourdatabaseforyou.
Inthispractical,youwillcreateaSQLitedatabaseforasetofdata,displayretrieveddatainaRecyclerView,addfunctionalitytoadd,delete,andeditthedataintheRecyclerViewandstoreitinthedatabase.
Note:AdatabasethatpersistentlystoresyourdataandabstractsyourdataintoadatamodelissufficientforsmallAndroidappswithminimalcomplexity.Inlaterchapters,youwilllearntoarchitectyourappusingloadersandcontentproviderstofurtherseparatedatafromtheuserinterface.TheseclasseswillhelptomoveworkofftheUIthreadtoassistinmakingtheuser'sexperienceassmoothandnaturalaspossible.Inadditiontoimprovingtheuserexperiencebyremovingapotentialperformanceissue,theyimproveyourabilitytoextendandmaintainyourapp.Important:Inthispractical,theSQLiteOpenHelperexecutesdatabaseoperationsinthemainthread.Inaproductionapp,wheredatabaseoperationsmighttakequitesometime,youwouldperformtheseoperationsonabackgroundthread,forexample,usingaloadersuchasAsyncTaskLoaderandCursorLoader.
WhatyoushouldalreadyKNOWForthispracticalyoushouldbefamiliarwith:
Creating,building,andrunningappsinAndroidStudio.DisplayingdatainaRecyclerView.Usingadaptersasintermediariesbetweendataandviews.AddingonClickeventhandlerstoviewsanddynamicallycreatingonClickhandlers.Startingasecondactivityandreturningdatafromait.Passingdatabetweenactivitiesusingintentextras.UsinganEditTextviewtogetdataenteredbytheuser.
YoualsoneedabasicunderstandingofSQLdatabases,howtheyareorganizedintotablesofrowsandcolumns,andtheSQLlanguage.SeetheSQLitePrimer
Introduction
432

WhatyouwillLEARNInthispracticalyouwilllearnto:
CreateandmanageaSQLitedatabasewithanSQLiteOpenHelper.Implementinsert,delete,update,andqueryfunctionalitythroughyouropenhelper.Useanadapterandcustomclickhandlertoletusersinteractwiththedatabasefromtheuserinterface.
WhatyouwillDOYoustartwithanappthatisthesameastheRecyclerViewwordlistappyoucreatedpreviously,withadditionaluserinterfaceelementsalreadyaddedforyou,sothatyoucanfocusonthedatabasecode.
Youwillextendandmodifythebaseappto:
Implementacustomclasstomodelyourdata.CreateasubclassofSQLiteOpenHelperthatcreatesandmanagesyourapp'sdatabase.DisplaydatafromthedatabaseintheRecyclerView.Implementfunctionalitytoadd,modify,anddeletedataintheUI,andstorethechangesinthedatabase.
AppOverviewStartingfromaskeletonapp,youwilladdfunctionalityto:
DisplaywordsfromaSQLitedatabaseinaRecyclerView.Eachwordcanbeeditedordeleted.Youcanaddnewwordsandstoretheminthedatabase.
Introduction
433

MinimumSDKVersionisAPI15:Android4.0.3IceCreamSandwichand*target*SDKisthecurrentversionofAndroid(version23asofthewritingofthisbook).
Task0.DownloadandrunthestartercodeInordertosaveyousomework,inparticularwritingdatabase-unrelatedactivitiesanduserinterfacecode,youneedtogetthestartercodeforthispractical.
1. DownloadtheWordListSqlStarterCodestartercode.
2. OpentheappinAndroidStudio.
3. Runtheapp.YoushouldseetheUIasshowninthepreviousscreenshot.Allthedisplayedwordsshouldbe"placeholder".Clickingthebuttonsdoesnothing.
Task1.ExtendSQLiteOpenHelpertocreateandpopulateadatabaseAndroidappscanusestandardSQLitedatabasestostoredata.ThispracticaldoesnotteachSQLite,butshowshowtouseitinanAndroidapp.ForinfoonlearningaboutSQLite,seetheSQLPrimerinthepreviouschapter.
Introduction
434

SQLOpenHelperisautilityclassintheAndroidSDKforinteractingwithaSQLitedatabaseobject.ItincludesonCreate()andonUpdate()methodsthatyoumustimplement,andinsert,delete,update,andqueryconveniencemethodsforallyourdatabaseinteractions.
TheSQLOpenHelperclasstakescareofopeningthedatabaseifitexists,creatingitifitdoesnot,andupgradingitasnecessary.
Note:Youcanhavemorethanonedatabaseperapp,andmorethanoneopenhelpermanagingthem.Howeverconsidercreatingmultipletablesinthesamedatabaseinsteadofusingmultipledatabasesforperformanceandarchitecturalsimplicity
1.1CreateaskeletonWordListOpenHelperclassThefirststepinaddingadatabasetoyourcodeisalwaystocreateasubclassofSQLiteOpenHelperandimplementitsmethods.
1. CreateanewJavaclassWordListOpenHelperwiththefollowingsignature.
publicclassWordListOpenHelperextendsSQLiteOpenHelper{}
2. Inthecodeeditor,hoverovertheerror,thenclickthelightbulbimageandselectImplementmethods.MakesurebothmethodsarehighlightedandclickOK.
3. AddthemissingconstructorforWordListOpenHelper.(Youwilldefinetheundefinedconstantsnext.)
publicWordListOpenHelper(Contextcontext){
super(context,DATABASE_NAME,null,DATABASE_VERSION);
}
1.2.AdddatabaseconstantstoWordListOpenHelper
1. AtthetopoftheWordListOpenHelperclass,definetheconstantsforthetables,rows,andcolumnsasshowninthecodebelow.Thisshouldgetridofalltheerrors.
//It'sagoodideatoalwaysdefinealogtaglikethis.
privatestaticfinalStringTAG=WordListOpenHelper.class.getSimpleName();
//hastobe1firsttimeorappwillcrash
privatestaticfinalintDATABASE_VERSION=1;
privatestaticfinalStringWORD_LIST_TABLE="word_entries";
privatestaticfinalStringDATABASE_NAME="wordlist";
//Columnnames...
publicstaticfinalStringKEY_ID="_id";
publicstaticfinalStringKEY_WORD="word";
//...andastringarrayofcolumns.
privatestaticfinalString[]COLUMNS={KEY_ID,KEY_WORD};
2. Runyourcodetomakesureithasnomoreerrors.
1.3.BuildtheSQLqueryandcodetocreatethedatabaseSQLqueriescanbecomequitecomplex.Itisabestpracticetoconstructthequeriesseparatelyfromthecodethatusesthem.Thisincreasescodereadabilityandhelpswithdebugging.
ContinueaddingcodetoWordListOpenHelper.java:
1. Belowtheconstants,addthefollowingcodetoconstructthequery.RefertotheSQLitePrimerifyouneedhelpunderstandingthisquery.
Introduction
435

//BuildtheSQLquerythatcreatesthetable.
privatestaticfinalStringWORD_LIST_TABLE_CREATE=
"CREATETABLE"+WORD_LIST_TABLE+"("+
KEY_ID+"INTEGERPRIMARYKEY,"+
//idwillauto-incrementifnovaluepassed
KEY_WORD+"TEXT);";
2. Addinstancevariablesforthereferencestowritableandreadabledatabases.Storingthesereferencessavesyoutoworkofgettingadatabasereferenceeverytimeyouneedtoreadorwrite.
privateSQLiteDatabasemWritableDB;
privateSQLiteDatabasemReadableDB;
3. IntheonCreatemethod,addcodetocreateadatabaseandthetable(Thehelperclassdoesnotcreateanotherdatabase,ifonealreadyexists.)
@Override
publicvoidonCreate(SQLiteDatabasedb){
db.execSQL(WORD_LIST_TABLE_CREATE);
}
4. FixtheerrorbyrenamingthemethodargumentfromSQLiteDatabasetodb.
1.4CreatethedatabaseinonCreateoftheMainActivityTocreatethedatabase,createaninstanceoftheWordListOpenHelperclassyoujustwrote.
1. OpenMainActivity.javaandaddaninstancevariablefortheopenhelper:
privateWordListOpenHelpermDB;
2. InonCreate,initializemDBwithaninstanceofWordListOpenHelper.ThiscallsonCreateoftheWordListOpenHelper,whichcreatesthedatabase.
mDB=newWordListOpenHelper(this);
3. Addabreakpoint,runtheappwiththedebugger,andcheckthatmDBisaninstanceforWordListOpenHelper.
1.5AdddatatothedatabaseThelistofwordsforyourappcouldcomefrommanysources.Itcouldbecompletelyusercreated,ordownloadedfromtheinternet,orgeneratedfromafilethat'spartofyourAPK.Forthispractical,youwillseedyourdatabasewithasmallamountofhard-codeddata.
Notethatacquiring,creating,andformattingdataisawholeseparatetopicthatisnotcoveredinthiscourse.
1. OpenWordListOpenHelper.java.2. InonCreate,aftercreatingthedatabase,addafunctioncallto
fillDatabaseWithData(db);
Next,implementthefillDatabaseWithData()methodinWordListOpenHelper.
3. Implementthemethodstub.
privatevoidfillDatabaseWithData(SQLiteDatabasedb){}
4. Insidethemethod,declareastringofwordsasyourmockdata.
Introduction
436
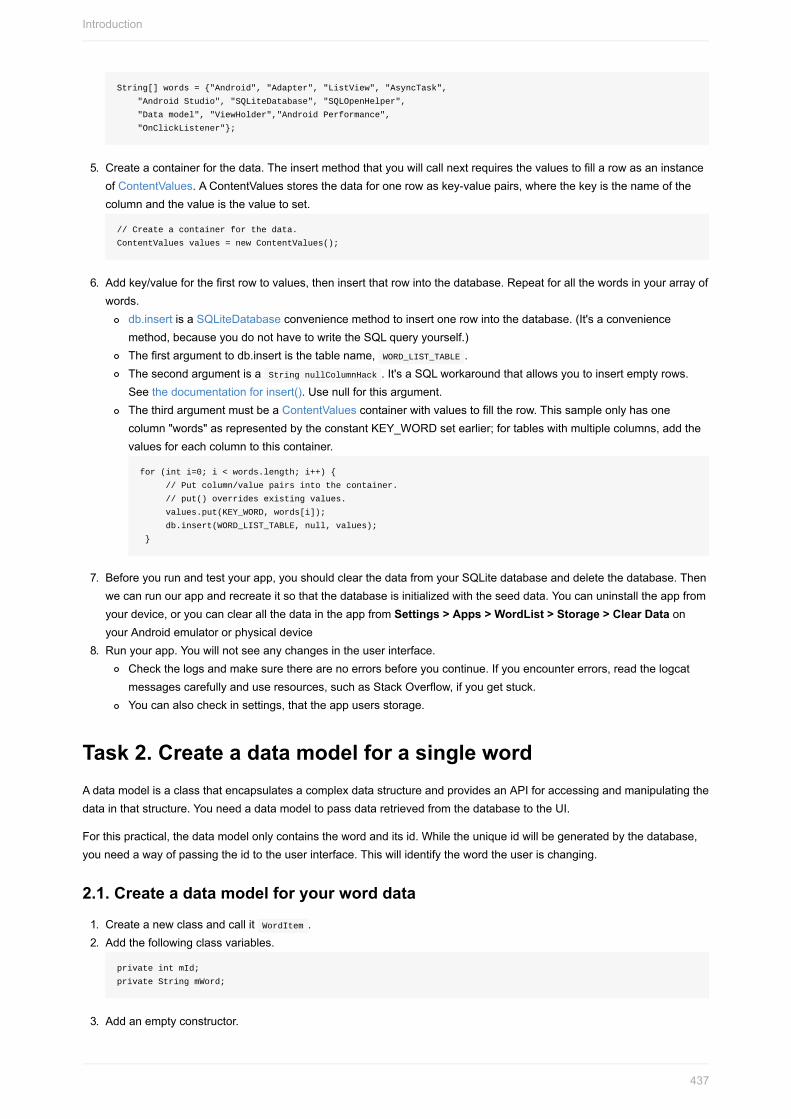
String[]words={"Android","Adapter","ListView","AsyncTask",
"AndroidStudio","SQLiteDatabase","SQLOpenHelper",
"Datamodel","ViewHolder","AndroidPerformance",
"OnClickListener"};
5. Createacontainerforthedata.TheinsertmethodthatyouwillcallnextrequiresthevaluestofillarowasaninstanceofContentValues.AContentValuesstoresthedataforonerowaskey-valuepairs,wherethekeyisthenameofthecolumnandthevalueisthevaluetoset.
//Createacontainerforthedata.
ContentValuesvalues=newContentValues();
6. Addkey/valueforthefirstrowtovalues,theninsertthatrowintothedatabase.Repeatforallthewordsinyourarrayofwords.
db.insertisaSQLiteDatabaseconveniencemethodtoinsertonerowintothedatabase.(It'saconveniencemethod,becauseyoudonothavetowritetheSQLqueryyourself.)Thefirstargumenttodb.insertisthetablename,WORD_LIST_TABLE.ThesecondargumentisaStringnullColumnHack.It'saSQLworkaroundthatallowsyoutoinsertemptyrows.Seethedocumentationforinsert().Usenullforthisargument.ThethirdargumentmustbeaContentValuescontainerwithvaluestofilltherow.Thissampleonlyhasonecolumn"words"asrepresentedbytheconstantKEY_WORDsetearlier;fortableswithmultiplecolumns,addthevaluesforeachcolumntothiscontainer.
for(inti=0;i<words.length;i++){
//Putcolumn/valuepairsintothecontainer.
//put()overridesexistingvalues.
values.put(KEY_WORD,words[i]);
db.insert(WORD_LIST_TABLE,null,values);
}
7. Beforeyourunandtestyourapp,youshouldclearthedatafromyourSQLitedatabaseanddeletethedatabase.Thenwecanrunourappandrecreateitsothatthedatabaseisinitializedwiththeseeddata.Youcanuninstalltheappfromyourdevice,oryoucanclearallthedataintheappfromSettings>Apps>WordList>Storage>ClearDataonyourAndroidemulatororphysicaldevice
8. Runyourapp.Youwillnotseeanychangesintheuserinterface.Checkthelogsandmakesuretherearenoerrorsbeforeyoucontinue.Ifyouencountererrors,readthelogcatmessagescarefullyanduseresources,suchasStackOverflow,ifyougetstuck.Youcanalsocheckinsettings,thattheappusersstorage.
Task2.CreateadatamodelforasinglewordAdatamodelisaclassthatencapsulatesacomplexdatastructureandprovidesanAPIforaccessingandmanipulatingthedatainthatstructure.YouneedadatamodeltopassdataretrievedfromthedatabasetotheUI.
Forthispractical,thedatamodelonlycontainsthewordanditsid.Whiletheuniqueidwillbegeneratedbythedatabase,youneedawayofpassingtheidtotheuserinterface.Thiswillidentifythewordtheuserischanging.
2.1.Createadatamodelforyourworddata
1. CreateanewclassandcallitWordItem.2. Addthefollowingclassvariables.
privateintmId;
privateStringmWord;
3. Addanemptyconstructor.
Introduction
437

4. Addgettersandsettersfortheidandword.5. Runyourapp.YouwillnotseeanyvisibleUIchanges,butthereshouldbenoerrors.
Solution:
publicclassWordItem{
privateintmId;
privateStringmWord;
publicWordItem(){}
publicintgetId(){returnthis.mId;}
publicStringgetWord(){returnthis.mWord;}
publicvoidsetId(intid){this.mId=id;}
publicvoidsetWord(Stringword){this.mWord=word;}
}
Task3.Implementthequery()methodinWordListOpenHelperThequery()methodretrievesrowsfromthedatabaseasselectedbyaSQLquery.
Forthissample,inordertodisplaywordsintheRecyclerView,weneedtogetthemfromthedatabase,oneatatime,asneeded.Thewordneededisidentifiedbyitspositionintheview.
Assuch,thequerymethodhasaparameterfortherequestedpositionandreturnsaWordItem.
3.1.Implementthequery()method
1. CreateaquerymethodthattakesanintegerpositionargumentandreturnsaWordItem.
publicWordItemquery(intposition){
}
2. Constructaquerythatreturnsonlythenthrowoftheresult.UseLIMITwithpositionastherow,and1asthenumberofrows.
Stringquery="SELECT*FROM"+WORD_LIST_TABLE+
"ORDERBY"+KEY_WORD+"ASC"+
"LIMIT"+position+",1";
3. InstantiateaCursorvariabletonulltoholdtheresultfromthedatabase.
Cursorcursor=null;
TheSQLiteDatabasealwayspresentstheresultsasaCursorinatableformatthatresemblesofaSQLdatabase.
Acursorisapointerintoarowofstructureddata.Youcanthinkofitasanarrayofrows.TheCursorclassprovidesmethodsformovingthecursorthroughthatstructure,andmethodstogetthedatafromthecolumnsofeachrow.
4. InstantiateaWordItementry.
WordItementry=newWordItem();
5. Addatry/catch/finallyblock.
try{}catch(Exceptione){}finally{}
Introduction
438

6. Insidethetryblock,
i. getareadabledatabaseifitdoesn'texist.
if(mReadableDB==null){
mReadableDB=getReadableDatabase();
}
ii. sendarawquerytothedatabaseandstoretheresultinacursor.
cursor=mReadableDB.rawQuery(query,null);
TheopenhelperquerymethodcanconstructaSQLquerystringandsenditasarawQuerytothedatabasewhichreturnsacursor.Ifyourdataissuppliedbyyourapp,andunderyourfullcontrol,youcanuserawquery().
i. Movethecursortothefirstitem.
cursor.moveToFirst();
ii. SetthetheidandwordoftheWordItementrytothevaluesreturnedbythecursor.
entry.setId(cursor.getInt(cursor.getColumnIndex(KEY_ID)));
entry.setWord(cursor.getString(cursor.getColumnIndex(KEY_WORD)));
7. Inthecatchblock,logtheexception.
Log.d(TAG,"EXCEPTION!"+e);
8. Inthefinallyblock,closethecursorandreturntheWordItementry.
cursor.close();
returnentry;
Solution:
publicWordItemquery(intposition){
Stringquery="SELECT*FROM"+WORD_LIST_TABLE+
"ORDERBY"+KEY_WORD+"ASC"+
"LIMIT"+position+",1";
Cursorcursor=null;
WordItementry=newWordItem();
try{
if(mReadableDB==null){
mReadableDB=getReadableDatabase();
}
cursor=mReadableDB.rawQuery(query,null);
cursor.moveToFirst();
entry.setId(cursor.getInt(cursor.getColumnIndex(KEY_ID)));
entry.setWord(cursor.getString(cursor.getColumnIndex(KEY_WORD)));
}catch(Exceptione){
Log.d(TAG,"QUERYEXCEPTION!"+e.getMessage());
}finally{
cursor.close();
returnentry;
}
}
3.2.TheonUpgrademethod
Introduction
439

EverySQLiteOpenHelpermustimplementtheonUpgrade()method,whichdetermineswhathappensifthedatabaseversionnumberchanges.Thismayhappenifyouhaveexistingusersofyourappthatuseanolderversionofthedatabase.Thismethodistriggeredwhenadatabaseisfirstopened.Thecustomarydefaultactionistodeletethecurrentdatabaseandrecreateit.
Important:Whileit'sOKtodropthetableinasampleapp,Inaproductionappyouneedtocarefullymigratetheuser'svaluabledata.YoucanusethecodebelowtoimplementtheonUpgrade()methodforthissample.
BoilerplatecodeforonUpgrade():
@Override
publicvoidonUpgrade(SQLiteDatabasedb,intoldVersion,intnewVersion){
Log.w(WordListOpenHelper.class.getName(),
"Upgradingdatabasefromversion"+oldVersion+"to"
+newVersion+",whichwilldestroyallolddata");
db.execSQL("DROPTABLEIFEXISTS"+WORD_LIST_TABLE);
onCreate(db);
}
Task4.DisplaydataintheRecyclerViewYounowhaveadatabase,withdata.Next,youwillupdatetheWordListAdapterandMainActivitytofetchanddisplaythisdata.
4.1.UpdateWordListAdaptertodisplayWordItems1. OpenWordListAdapter.2. InonBindViewHolderreplacethecodethatdisplaysmockdatawithcodetogetanitemfromthedatabaseanddisplay
it.YouwillnoticeanerroronmDB.
WordItemcurrent=mDB.query(position);
holder.wordItemView.setText(current.getWord());
3. DeclaremDBasaninstancevariable.
WordListOpenHelpermDB;
4. TogetthevalueformDB,changetheconstructorforWordListAdapterandaddasecondparameterfortheWordListOpenHelper.
5. AssignthevalueoftheparametertomDB.Yourconstructorshouldlooklikethis:
publicWordListAdapter(Contextcontext,WordListOpenHelperdb){
mInflater=LayoutInflater.from(context);
mContext=context;
mDB=db;
}
ThisgeneratesanerrorinMainActivity,becauseyouaddedanargumenttotheWordListAdapterconstructor.
6. OpenMainActivityandaddthemissingmDBargument.
mAdapter=newWordListAdapter(this,mDB);
7. Runyourapp.Youshouldseeallthewordsfromthedatabase.
Task5.Addnewwordstothedatabase
Introduction
440

WhentheuserclickstheFAB,anactivityopensthatletsthementerawordthatgetsaddedtothedatabasewhentheyclicksave.
ThestartercodeprovidesyouwiththeclicklistenerandtheEditWordActivitystartedbyclickingtheFAB.Youwilladdthedatabasespecificcodeandtiethepiecestogether,fromthebottomup,likeyoujustdidwiththequerymethod.
5.1.Writetheinsert()method
InWordListOpenHelper:
1. Createtheinsert()methodwiththefollowingsignature.Theusersuppliesaword,andthemethodreturnstheidforthenewentry.Generatedid'scanbebig,soinsertreturnsanumberoftypelong.
publiclonginsert(Stringword){}
2. Declareavariablefortheid.Iftheinsertoperationfails,themethodreturns0.
longnewId=0;
3. Asbefore,createaContentValuesvaluefortherowdata.
ContentValuesvalues=newContentValues();
values.put(KEY_WORD,word);
4. Putyourdatabaseoperationintoatry/catchblock.
try{}catch(Exceptione){}
5. Getawritabledatabaseifonedoesn'talreadyexist.
if(mWritableDB==null){
mWritableDB=getWritableDatabase();
}
6. Inserttherow.
newId=mWritableDB.insert(WORD_LIST_TABLE,null,values);
7. Logtheexception.
Log.d(TAG,"INSERTEXCEPTION!"+e.getMessage());
8. Returntheid.
returnnewId;
Solution:
Introduction
441

publiclonginsert(Stringword){
longnewId=0;
ContentValuesvalues=newContentValues();
values.put(KEY_WORD,word);
try{
if(mWritableDB==null){
mWritableDB=getWritableDatabase();
}
newId=mWritableDB.insert(WORD_LIST_TABLE,null,values);
}catch(Exceptione){
Log.d(TAG,"INSERTEXCEPTION!"+e.getMessage());
}
returnnewId;
}
5.2.GetthewordtoinsertfromtheuserandupdatethedatabaseThestartercodecomeswithanEditWordActivitythatgetsawordfromtheuserandreturnsittothemainactivity.InMainActivity,youjusthavetofillintheonActivityResult()method.
1. Checktoensuretheresultisfromthecorrectactivityandgetthewordthattheuserenteredfromtheextras.
if(requestCode==WORD_EDIT){
if(resultCode==RESULT_OK){
Stringword=data.getStringExtra(EditWordActivity.EXTRA_REPLY);
2. Ifthewordisnotempty,checkwhetherwehavebeenpassedanidwiththeextras.Ifthereisnoid,insertanewword.Inthenexttask,youwillupdatetheexistingwordifanidispassed.
if(!TextUtils.isEmpty(word)){
intid=data.getIntExtra(WordListAdapter.EXTRA_ID,-99);
if(id==WORD_ADD){
mDB.insert(word);
}
3. ToupdatetheUI,notifytheadapterthattheunderlyingdatahaschanged.
mAdapter.notifyDataSetChanged();
4. Ifthewordisemptybecausetheuserdidn'tenteranything,showatoastlettingthemknow.Anddon'tforgettoclosealltheparentheses.
}else{
Toast.makeText(
getApplicationContext(),
R.string.empty_not_saved,
Toast.LENGTH_LONG).show();
}
}
}
Solution:
Introduction
442

if(requestCode==WORD_EDIT){
if(resultCode==RESULT_OK){
Stringword=data.getStringExtra(EditWordActivity.EXTRA_REPLY);
//Updatethedatabase
if(!TextUtils.isEmpty(word)){
intid=data.getIntExtra(WordListAdapter.EXTRA_ID,-99);
if(id==WORD_ADD){
mDB.insert(word);
}
//UpdatetheUI
mAdapter.notifyDataSetChanged();
}else{
Toast.makeText(
getApplicationContext(),
R.string.empty_not_saved,
Toast.LENGTH_LONG).show();
}
}
}
5.3.ImplementgetItemCount()Inorderforthenewitemstobedisplayedproperly,getItemCountinWordListAdapterhastoreturntheactualnumberofentriesinthedatabaseinsteadofthenumberofwordsinthestarterlistofwords.
1. ChangegetItemCounttothecodebelow,whichwilltriggeranerror.
return(int)mDB.count();
2. OpenWordListOpenHelperandimplementcount()toreturnthenumberofentriesinthedatabase.
publiclongcount(){
if(mReadableDB==null){
mReadableDB=getReadableDatabase();
}
returnDatabaseUtils.queryNumEntries(mReadableDB,WORD_LIST_TABLE);
}
3. Runyourappandaddsomewords.
Task6.DeletewordsfromthedatabaseToimplementthedeletefunctionalityyouneedto:
Implementthedelete()methodinWordListOpenHelperAddaclickhandlertotheDELETEbuttoninWordListAdapter
6.1.Writethedelete()method
Youusethedelete()methodonSQLiteDatabasetodeleteanentryinthedatabase.
AddamethoddeletetotheWordListOpenHelperthat:
1. Createthemethodstubfordelete(),whichtakesanintargumentfortheidoftheitemtodelete,andreturnsthenumberofrowsdeleted.
publicintdelete(intid){}
2. Declareavariabletoholdtheresult.
intdeleted=0;
Introduction
443

3. Asforinsert,addatryblock.
try{}catch(Exceptione){}
4. Getawritabledatabase,ifnecessary.
if(mWritableDB==null){
mWritableDB=getWritableDatabase();
}
5. CalldeleteontheWORD_LIST_TABLE,selectingbyKEY_IDandpassingthevalueoftheidastheargument.The"?"isaplaceholderthatgetsfilledwiththestring.Thisisamoresecurewayofbuildingqueries.
deleted=mWritableDB.delete(WORD_LIST_TABLE,
KEY_ID+"=?",newString[]{String.valueOf(id)});
6. Printalogmessageforexceptions.
Log.d(TAG,"DELETEEXCEPTION!"+e.getMessage());
7. Returnthenumberofrowsdeleted.
returndeleted;
Solution:
publicintdelete(intid){
intdeleted=0;
try{
if(mWritableDB==null){
mWritableDB=getWritableDatabase();
}
deleted=mWritableDB.delete(WORD_LIST_TABLE,//tablename
KEY_ID+"=?",newString[]{String.valueOf(id)});
}catch(Exceptione){
Log.d(TAG,"DELETEEXCEPTION!"+e.getMessage());
}
returndeleted;
}
6.2.AddaclickhandlertoDELETEbutton
YoucannowaddaclickhandlertotheDELETEbuttonthatcallsthedelete()methodyoujustwrote.
TakealookattheMyButtonOnClickListenerclassinyourstartercode.TheMyButtonOnClickListenerclassimplementsaclicklistenerthatstorestheid,andthewordthatyouneedtomakechangestothedatabase.
Eachviewholder,whenattached(bound)totheRecyclerViewintheonBindViewHoldermethodofWordListAdapter,needstoalsoattachaclicklistenertotheDELETEbutton,passingtheid,andwordtotheMyButtonOnClickListenerconstructor.ThesevaluesarethenusedbytheonClickhandlertodeletethecorrectitemandnotifytheadapter,whichitemhasbeenremoved.
NotethatyoucannotusethepositionargumentpassedintoonBindViewHolder,becauseitmaybestalebythetimetheclickhandleriscalled.YouhavetokeepareferencetotheviewholderandgetthepositionwithgetAdapterPosition().
Solution:
Introduction
444

//Keepareferencetotheviewholderfortheclicklistener
finalWordViewHolderh=holder;//needstobefinalforuseincallback
//AttachaclicklistenertotheDELETEbutton.
holder.delete_button.setOnClickListener(
newMyButtonOnClickListener(current.getId(),null){
@Override
publicvoidonClick(Viewv){
intdeleted=mDB.delete(id);
if(deleted>=0)
notifyItemRemoved(h.getAdapterPosition());
}
});
Task7.UpdatewordsinthedatabaseToupdateexistingwordsyouhaveto:
Addanupdate()methodtoWordListOpenHelper.AddaclickhandlertotheEDITbuttonofyourview.
7.1.Writetheupdate()method
Youusetheupdate()methodonSQLiteDatabasetoupdateanexistingentryinthedatabase.
1. AddamethodtotheWordListOpenHelperthat:TakesanintegeridandaStringwordforitsargumentsandreturnsaninteger.
publicintupdate(intid,Stringword)
InitializesintmNumberOfRowsUpdatedto-1.
intmNumberOfRowsUpdated=-1;
2. Insideatryblock,dothefollowingsteps:3. GetawritableSQLiteDatabasedbifthereisn'tonealready.
if(mWritableDB==null){
mWritableDB=getWritableDatabase();
}
4. CreateanewinstanceofContentValuesandattheKEY_WORDwordtoit.
ContentValuesvalues=newContentValues();
values.put(KEY_WORD,word);
5. Calldb.updateusingthefollowingarguments:
mNumberOfRowsUpdated=db.update(WORD_LIST_TABLE,
values,//newvaluestoinsert
//selectioncriteriaforrow(the_idcolumn)
KEY_ID+"=?",
//selectionargs;valueofid
newString[]{String.valueOf(id)});
6. Inthecatchblock,printalogmessageifanyexceptionsareencountered.
Log.d(TAG,"UPDATEEXCEPTION:"+e.getMessage());
7. Returnthenumberofrowsupdated,whichshouldbe-1(fail),0(nothingupdated),or1(success).
Introduction
445
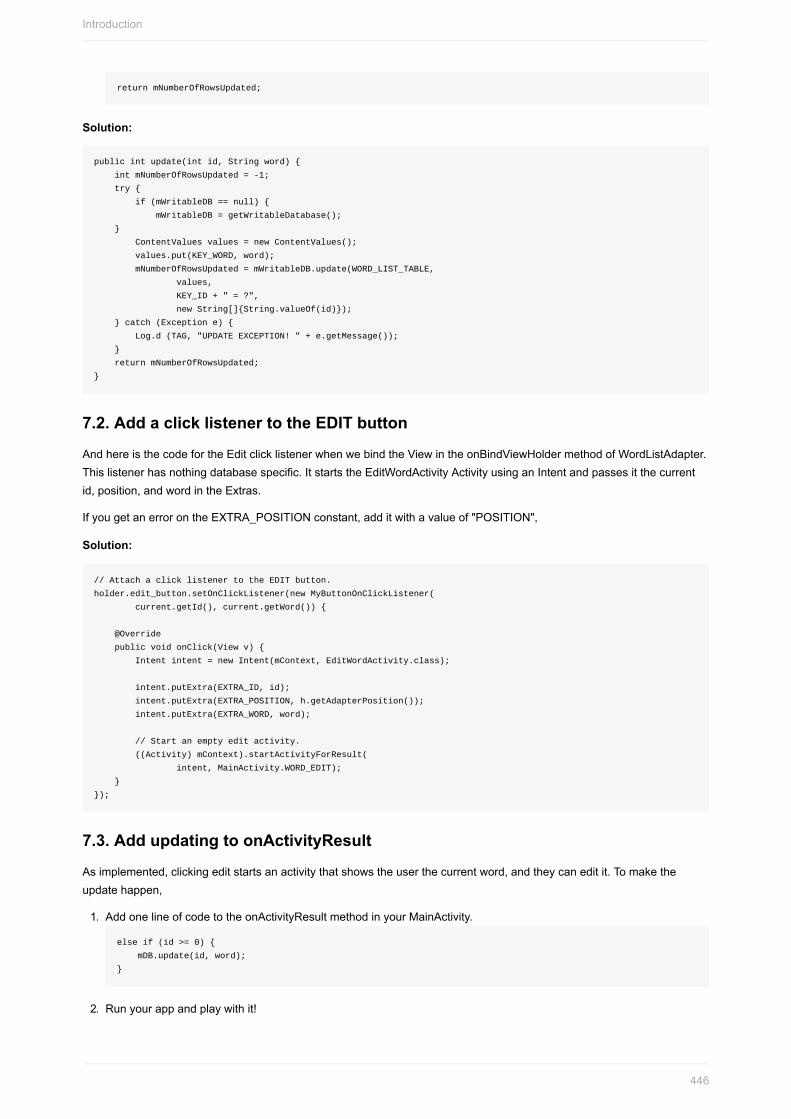
returnmNumberOfRowsUpdated;
Solution:
publicintupdate(intid,Stringword){
intmNumberOfRowsUpdated=-1;
try{
if(mWritableDB==null){
mWritableDB=getWritableDatabase();
}
ContentValuesvalues=newContentValues();
values.put(KEY_WORD,word);
mNumberOfRowsUpdated=mWritableDB.update(WORD_LIST_TABLE,
values,
KEY_ID+"=?",
newString[]{String.valueOf(id)});
}catch(Exceptione){
Log.d(TAG,"UPDATEEXCEPTION!"+e.getMessage());
}
returnmNumberOfRowsUpdated;
}
7.2.AddaclicklistenertotheEDITbutton
AndhereisthecodefortheEditclicklistenerwhenwebindtheViewintheonBindViewHoldermethodofWordListAdapter.Thislistenerhasnothingdatabasespecific.ItstartstheEditWordActivityActivityusinganIntentandpassesitthecurrentid,position,andwordintheExtras.
IfyougetanerrorontheEXTRA_POSITIONconstant,additwithavalueof"POSITION",
Solution:
//AttachaclicklistenertotheEDITbutton.
holder.edit_button.setOnClickListener(newMyButtonOnClickListener(
current.getId(),current.getWord()){
@Override
publicvoidonClick(Viewv){
Intentintent=newIntent(mContext,EditWordActivity.class);
intent.putExtra(EXTRA_ID,id);
intent.putExtra(EXTRA_POSITION,h.getAdapterPosition());
intent.putExtra(EXTRA_WORD,word);
//Startanemptyeditactivity.
((Activity)mContext).startActivityForResult(
intent,MainActivity.WORD_EDIT);
}
});
7.3.AddupdatingtoonActivityResult
Asimplemented,clickingeditstartsanactivitythatshowstheuserthecurrentword,andtheycaneditit.Tomaketheupdatehappen,
1. AddonelineofcodetotheonActivityResultmethodinyourMainActivity.
elseif(id>=0){
mDB.update(id,word);
}
2. Runyourappandplaywithit!
Introduction
446

7.4.Designanderrorconsiderations
Themethodsyouwrotetoadd,updateanddeleteentriesinthedatabaseallassumethattheirinputisvalid.ThisisacceptableforsamplecodebecausethepurposeofthissamplecodeistoteachyouthebasicfunctionalityofaSQLitedatabase,andsonoteveryedgecaseisconsidered,noteveryvalueistested,andeverybodyisassumedtobewellbehaved.Ifthiswereaproductionapp,youwouldhavegreatersecurityconsiderations,andcontentwouldneedtobetestedforvalidityuntilyouknowitisnotmalicious.Inaproductionapp,youmustcatchspecificexceptionsandhandlethemappropriately.Youtestedthecorrectfunctioningoftheappbyrunningit.Foraproductionappwithrealdata,youwillneedmorethoroughtesting,forexample,usingunitandinterfacetesting.Forthispractical,youcreatedthethedatabaseschema/tablesfromtheSQLiteOpenHelperclass.Thisissufficientforasimpleexample,likethisone.Foramorecomplexapp,itisabetterpracticetoseparatetheschemadefinitionsfromtherestofthecodeinahelperclassthatcannotbeinstantiated.Youwilllearnhowtodothatinthechapteroncontentproviders.Asmentionedabove,somedatabaseoperationscanbelengthyandshouldbedoneonabackgroundthread.UseAsyncTaskforoperationsthattakealongtime.Useloaderstoloadlargeamountsofdata.
SolutioncodeAndroidStudioproject:WordListSqlfinished
CodingchallengesNote:Allcodingchallengesareoptionalandarenotprerequisitesforlaterlessons.
Challenge1:Extendtheapptohaveaneditabledefinitionforeachwordinthedatabase.
Challenge2:Addaconfirmationdialogtothedeletefunctionality.
SummaryInthischapter,youlearnedhowto
UseaSQLiteDatabasetostoreuserdatapersistently.WorkwithaSQLiteOpenHelpertomanageyourdatabase.RetrieveanddisplaydatafromthedatabaseEditdataintheuserinterfaceandreflectthosechangesinthedatabase
RelatedconceptsTherelatedconceptdocumentationisinAndroidDeveloperFundamentals:Concepts.
SQLiteDatabase
LearnmoreDeveloperDocumentation:
StorageOptionsSavingDatainSQLDatabases
Introduction
447

Introduction
448

10.1B:SearchingaSQLiteDatabaseContents:
WhatyoushouldalreadyKNOWWhatyouwillLEARNWhatyouwillDOAppoverviewTask0.DownloadandrunthebasecodeTask1.AddaSearchMenuItemCodingchallengeSummaryRelatedConceptLearnMore
WhatyoushouldalreadyKNOWForthispracticalyoushouldbefamiliarwith:
SQLitedatabasesWritingbasicSQLitequeries
WhatyouwillLEARNYouwilllearnto:
AddsearchfunctionalitytoyourappviatheoptionsmenuBuildsearchqueriesfortheSQLitedatabasefromuserinput.
WhatyouwillDOInthispracticalyouwilladdanitemtotheoptionsmenuforsearchingthedatabase,andanactivitythatallowsuserstoenterasearchstringanddisplaystheresultofthesearchinatextview.
Why:Usersshouldalwaysbeabletosearchthedataontheirownterms.
Note:ThefocusofthispracticalisnotoptimizingtheUXofthesearchrequest,butshowingyouhowtoquerythedatabase.
AppOverviewYouwillmakeacopyofthefinishedWordListSQLInteractiveapp(orWordListSqlStarterCodeifyoudidn'trenameit;fromapreviouspractical),callitWordListSQLInteractiveWithSearch,andaddanactivitythatletsuserssearchforpartialandfullwordsinthedatabase.Forexample,entering"Android"willreturnallentriesthatcontainthesubstring"Android".
Introduction
449

Task0.DownloadandrunthebasecodeInordertosaveyousomework,thispracticalwillbuildonanappyouhavealreadybuilt.Inaproductionenvironment,buildingonexistingapplicationcodeisacommondevelopertasktoaddfeaturesorfixproblems.
1.Createyourproject
1. DownloadtheWordListSQLfinishedapp.
Youcanuseyourownapp,ordownloadthebaseapp.AslongastheappusesaSQLitedatabase,youcanusetheseinstructionstoextendit.
2. LoadacopyoftheappintoAndroidStudio.RefertotheAppendixforinformationoncopyingaproject.3. RenamethepackageusingRefactor>Rename.4. Changethepackagenameinyourbuild.gradlefile.5. Runtheapptoensureitbuildsandfunctionscorrectly.
Task1.AddSearch
1.1.AddanOptionsMenuwithSearchitem
UsetheOptionsMenuSamplecodefromyourpreviouspracticalsifyouneedanexampleofhowtodothis.
1. Inyourproject,createanAndroidResourcedirectoryandcallitmenuwith"menu"astheresourcetype(res>menu).2. Addamain_menu.xmlmenuresourcefiletores>menu.3. CreateamenuwithoneitemSearch.Referencethecodesnippetforvalues.
Introduction
450

<menu
xmlns:android="http://schemas.android.com/apk/res/android"
xmlns:app="http://schemas.android.com/apk/res-auto"
xmlns:tools="http://schemas.android.com/tools"
tools:context="com.android.example.wordlistsqlsearchable.MainActivity">
<item
android:id="@+id/action_search"
android:title="Search..."
android:orderInCategory="1"
app:showAsAction="never"/>
</menu>
4. InMainAcvitiy,inflatethemenubyoverridingonCreateOptionsMenu.
@Override
publicbooleanonCreateOptionsMenu(Menumenu){
getMenuInflater().inflate(R.menu.menu_main,menu);
returntrue;
}
5. OverrideonOptionsItemSelectedmethod.Switchonaction_search,andjustreturntrue.
@Override
publicbooleanonOptionsItemSelected(MenuItemitem){
switch(item.getItemId()){
caseR.id.action_search:
returntrue;
}
returnsuper.onOptionsItemSelected(item);
}
6. Runyourapp.Youshouldseethedotsfortheoptionsmenu.Whenyouclickit,youshouldseeonemenuitemforsearchthatdoesnothing.
1.2.CreatethelayoutforthesearchactivityThislayoutissimilartoactivity_edit_word,soyoucantakeadvantageofexistingcodeandcopyit.
1. Createacopyofactivity_editwordandcallitactivity_search.xml.2. Inactivity_search.xml,changetheid'sandstringstoberepresentativeofsearching.3. ChangetheonClickmethodforthebuttontoshowResult.4. AddaTextViewwithanidofsearch_result,atleast300dpheight,and18spfontsize.5. Runyourapp.Youshouldnoticenodifference.
1.3.AddanActivityforsearching
1. Createanewactivity,SearchActivity.IfyourcreateitbyNew>Android>ActivitythenDON'Tgeneratethelayoutfilebecausewecreateditintheprevioustask.
2. AddaprivateTextViewclassvariablemTextView.3. AddaprivateEditTextclassvariablemEditWordView.4. AddaprivateWordListOpenHelpervariablemDB.5. InonCreate,initializemDBwithanewWordListOpenHelper(this).6. InonCreate,initializemTextViewandmEditWordViewtotheirrespectiveviews.
Introduction
451

publicclassSearchActivityextendsAppCompatActivity{
privatestaticfinalStringTAG=EditWordActivity.class.getSimpleName();
privateTextViewmTextView;
privateEditTextmEditWordView;
privateWordListOpenHelpermDB;
@Override
publicvoidonCreate(BundlesavedInstanceState){
super.onCreate(savedInstanceState);
setContentView(R.layout.activity_search);
mEditWordView=((EditText)findViewById(R.id.search_word));
mTextView=((TextView)findViewById(R.id.search_result));
mDB=newWordListOpenHelper(this);
}
}
7. AddtheactivitytotheAndroidManifest.
<activity
android:name="com.android.example.wordlistsqlsearchable.SearchActivity">
</activity>
1.4.TriggerSearchActivityfromthemenu1. TostartSearchActivitywhenthemenuitemisselected,insertcodetostartSearchActivityintotheswitchstatementin
theonOptionSelected()methodinMainActivity.
Intentintent=newIntent(getBaseContext(),SearchActivity.class);
startActivity(intent);
2. BuildandrunyourapptomakesureSearchActivityislaunchedwhenthe"Search"menuitemisselectedfromtheOptionsMenu.
3. Enterasearchstringandpress"Search".Yourappcrashes.4. Findoutwhytheapphascrashed,thenmovetothenexttask.
1.5.ImplementtheonClickhandlerfortheSearchbuttonintheSearchActivity
Yourappcrashed,becausetheonClickhandlersetfortheSearchbuttonintheXMLcodedoesn'texistyet.SoyouwillbuildshowResultnext.
WhentheSearchbuttonispressed,severalthingsneedtohappen:
TheeventhandlercallspublicvoidshowResult(Viewview)inSearchActivity.YourapphastogetthecurrentvaluefromthemEditWordView,whichisyoursearchstring.Youprintthe"Resultfor"andthewordinmTextView.Youcallthe(notyetwritten)searchfunctiononmDB(mDB.search(word)andgetbackaSQlitedatabasecursor.Youwillimplementthesearchfunctioninthenexttask.YouprocessthecursorandaddtheresulttomTextView.
1. InSearchActivity,createtheshowResultfunction.Itispublic,takesaViewargument,andreturnsnothing.2. CreateaStringvariablecalledwordandinitializeitwiththecontentsoftheinputedittextview,mEditWordView.3. ShowthesearchterminthesearchresultsTextView;somethinglike
"Searchterm:"+word
4. Searchthedatabaseandgetthecursor.
Cursorcursor=mDB.search(word);
Introduction
452

5. Toprocessthecursor,youneedtododothefollowing:
i. Makesurethecursorisnotnull.
ii. Movethecursortothefirstentry.
iii. Iterateoverthecursorprocessingthecurrententry,thenadvancingthecursor.
iv. Extracttheword.
v. Displaythewordinthetextview.
6. Closethecursor.7. Ifnoresultsarefound,theuserseesablankscreenwithnoresults.Youwouldwantthistobehandledinaproduction
app.8. Checktheannotatedcodeforadditionaldetails.
publicvoidshowResult(Viewview){
Stringword=mEditWordView.getText().toString();
mTextView.setText("Resultfor"+word+":\n\n");
//Searchforthewordinthedatabase.
Cursorcursor=mDB.search(word);
//Onlyprocessanon-nullcursorwithrows.
if(cursor!=null&cursor.getCount()>0){
//Youmustmovethecursortothefirstitem.
cursor.moveToFirst();
intindex;
Stringresult;
//Iterateoverthecursor,whilethereareentries.
do{
//Don'tguessatthecolumnindex.
//Gettheindexforthenamedcolumn.
index=cursor.getColumnIndex(WordListOpenHelper.KEY_WORD);
//Getthevaluefromthecolumnforthecurrentcursor.
result=cursor.getString(index);
//Addresulttowhat'salreadyinthetextview.
mTextView.append(result+"\n");
}while(cursor.moveToNext());//Returnstrueorfalse
cursor.close();
}//Youshouldaddsomehandlingofnullcase.Rightnow,nothinghappens.
}
Yourappwillnotrunwithoutatleastastubforsearch()implemented.AndroidStudiowillcreatethestubforyou.Inthelightbulb,choosecreatemethod.
9. OpenWordListOpenHelper.10. Implementastubforsearch,withaStringparameter,thatreturnsanullcursor.11. Runyourappandfixanyerrorsyoumayhave.NotethatmostofthecodeinshowResult()isnotexercisedyet.
1.6.ImplementthesearchmethodinWordListOpenHelper
Thefinalstepistoimplementtheactualsearchingofthedatabase.
Insidethesearch()method,youneedtobuildaquerywiththesearchstringandsendthequerytothedatabase.
Amoresecurewaytodothisisbyusingparametersforeachpartofthequery.
WHY:Inthepreviouspractical,forthequeryinWordListOpenHelper,youcouldbuildthequerystringdirectlyandsubmititasarawQuery(),becauseyouhadfullcontroloverthecontentsofthequery.Assoonasyouarehandlinguserinput,youmustassumethatitcouldbemalicious.
Important:Forsecurityreasons,youshouldalwaysvalidateuserinputbeforeyoubuildyourquery!YouwilllearnmoreaboutsecurityintheSecuritychapterandSecurityTips.
Introduction
453

TheSQLqueryforsearchingforallentriesinthewordlistmatchingasubstringhasthisform:
SELECT*FROMWORD_LIST_TABLEWHEREKEY_WORDLIKE%searchString%;
Theparametrizedformofthequerymethodyouwillcalllookslikethis:
Cursorquery(Stringtable,//Thetabletoquery
String[]columns,//Thecolumnstoreturn
Stringselection,//WHEREstatement
String[]selectionArgs,//ArgumentstoWHERE
StringgroupBy,//Groupingfilter.Notused.
Stringhaving,//Additionalconditionfilter.Notused.
StringorderBy)//Ordering.Settingtonullusesdefault.
SeetheSQLiteDatabaseAndroidandthedocumentationforvariousquery())methods.
Forthequeryinthesearch()method,youneedtoassignonlythefirstfourarguments.
1. ThetableisalreadydefinedastheWORD_LIST_TABLEconstant.2. Insearch(),createavariableforthecolumns.YouneedonlythevaluefromtheKEY_WORDcolumn.
String[]columns=newString[]{KEY_WORD};
3. Addthe%tothesearchStringparameter.
searchString="%"+searchString+"%";
4. Createthewhereclause.Omit"WHERE"asit'simplied.UseaquestionmarkfortheargumenttoLIKE.Makesureyouhavethecorrectspacing.
Stringwhere=KEY_WORD+"LIKE?";
5. Specifytheargumenttothewhereclause,whichisthesearchString.
String[]whereArgs=newString[]{searchString};
6. AddaCursorcursorvariableandinitializeittonull.7. Inatry/catchblock.
i. GetareadabledatabaseifmReadableisnotsetyet.
ii. Querythedatabaseusingtheaboveformofthequery.Passnullfortheunusedparameters.
iii. Handletheexception.Youcanjustlogit.
8. Returnthecursor.9. Runyourappandsearchforsomestrings.
Hereisthesolutionforthecompletemethod:
Introduction
454

publicCursorsearch(StringsearchString){
String[]columns=newString[]{KEY_WORD};
searchString="%"+searchString+"%";
Stringwhere=KEY_WORD+"LIKE?";
String[]whereArgs=newString[]{searchString};
Cursorcursor=null;
try{
if(mReadableDB==null){mReadableDB=getReadableDatabase();}
cursor=mReadableDB.query(WORD_LIST_TABLE,columns,where,whereArgs,null,null,null);
}catch(Exceptione){
Log.d(TAG,"SEARCHEXCEPTION!"+e);
}
returncursor;
}
SolutioncodeAndroidStudioproject:WordListSqlSearchable
CodingchallengesNote:Allcodingchallengesareoptionalandarenotprerequisitesforlaterlessons.
Handlethecasewherenoresultsarefoundinamoreuser-friendlyway.MostofthecodesamplesusethedefaultAppBarthatcomeswiththeEmptyTemplate.Insomeofthepreviouschapters,youlearnedabouttheToolbar,forexample,whenusingtheBasicTemplate.
ChangetheapptousetheToolbarandSearchViewandshowthesearchicononthetoolbar.
https://developer.android.com/training/search/setup.html
https://developer.android.com/training/appbar/setting-up.html
Aswritten,thisappisnotverysecure.Considerhowtoaddbasicinputvalidationforthesearchstring.SeeSecurityTips.
SummaryAnoptionsmenucanbeaneffectiveUIforsearchingaSQlitedatabaseAseparateactivitytohandletheUXforsearchcanhelpfocustheuserInaproductionapplication,SQlitequeriesshouldbemanagedcarefullytoavoiddatacorruptionorsecurityissuesSQLitesearchqueriescanbeconstructeddynamicallyusinguserinputforthequeryparameters.Thequery()methodsearchesadatabaseformatchingwords.Thequery()methodreturnsadatabasecursorwhichcantraversetheresultsetefficientlyThecursorcanbeusedtodisplaytheresultstotheuser.
RelatedconceptTherelatedconceptdocumentationisinAndroidDeveloperFundamentals:Concepts.
SQLiteDatabase
Introduction
455

LearnmoreDeveloperDocumentation:
StorageOptionsSavingDatainSQLDatabases
Introduction
456

11.1A:ImplementaMinimalistContentProviderContents:
WhatyoushouldalreadyKNOWWhatyouwillLEARNWhatyouwillDOAppoverviewTask1:CreatetheMinimalistContentProviderprojectTask2:CreateaContractclass,aURIscheme,andmockdataTask3:ImplementtheMiniContentProviderclassTask4:UseaContentResolvertogetdataCodingchallengesSummaryRelatedconceptLearnmore
Acontentproviderisacomponentthatsecurelymanagesaccesstoasharedrepositoryofdata.Itprovidesaconsistentinterfaceforapplicationstoaccesstheshareddata.Applicationsdonotaccesstheproviderdirectlybutuseacontentresolverobjectthatprovidesaninterfacetoandmanagestheconnectionwiththecontentprovider.
Contentprovidersareusefulbecause:
AppscannotsharedatainAndroid—exceptthroughcontentproviders.Contentprovidersallowmultipleappstosecurelyaccess,use,andmodifyasingledatasource.Examples:Contacts,gamescores,spell-checkingdictionary.Youcanspecifylevelsofaccesscontrol(permissions)foryourcontentprovider.Youcanstoredataindependentlyfromtheapp.Havingacontentproviderallowsyoutochangehowthedataisstoredwithoutneedingtochangetheuserinterface.Forexample,youcanbuildaprototypeusingmockdata,thenuseanSQLdatabasefortherealapp.Youcouldevenstoresomeofyourdatainthecloudandsomedatalocally,andtheuserinterfacewouldremainthesametoyourapplication.Thisarchitectureseparatesdatafromtheuserinterfacesodevelopmentteamscanworkindependentlyontheclient-facingapplicationandserver-sidecomponentsofyourapp.Forlarger,complexappsitisverycommonthattheuserinterfaceandthedataservicesaredevelopedbydifferentteams.Theycanevenbeseparateapps.Itisnotevenrequiredthatanappwithacontentproviderhasauserinterface.YoucanuseCursorLoaderandotherclassesthatexpecttointeractwithacontentprovider.Note:Ifyourappdoesnotsharedatawithotherapps,thenyourappdoesnotrequireacontentprovider.However,becausethecontentprovidercleanlyseparatestheimplementationofyourbackendfromtheuserinterface,itcanalsobeusefulforarchitectingmorecomplexapplications.
Introduction
457

Thefollowingdiagramsummarizesthepartsofthecontentproviderarchitecture.
Data:Theappthatcreatesthecontentproviderownsthedataandspecifieswhatpermissionsotherappshavetoworkwiththedata.
ThedataisoftenstoredinaSQLitedatabase,butthisisnotmandatory.Typically,thedataismadeavailabletothecontentproviderastables,similartodatabasetables,whereeachrowrepresentsoneentry,andeachcolumnrepresentsanattributeforthatentry.Forexample,eachrowinacontactdatabasecontainsoneentryandthatentrymayhavecolumnsforemailaddressesandphonenumbers.
ContentProvider:Thecontentproviderprovidesapublicandsecureinterfacetothedata,sothatotherappscanaccessthedatawiththeappropriatepermissions.
ContentResolver:UsedbytheActivitytoquerythecontentprovider.ThecontentresolverreturnsdataasaCursorobjectwhichcanthenbeused,forexample,byanadapter,todisplaythedata.
Contractclass(notshown):Thecontractisapublicclassthatexposesimportantinformationaboutthecontentprovidertootherapps.ThisusuallyincludestheURIstoaccessthedata,importantconstants,andthestructureofthedatathatwillbereturned.
AppssendrequeststothecontentproviderusingcontentUniformResourceIdentifiersorURIs.AcontentURIforcontentprovidershasthisgeneralform:
scheme://authority/path-to-data/dataset-name
scheme(forcontentURI,thisisalwayscontent://)authority(representsthedomain,andforcontentproviderscustomarilyendsin.provider)path(thisrepresentsthepathtothedata)ID(uniquelyidentifiesthedatasettosearch;suchasafilenameortablename)
ThefollowingURIcouldbeusedtorequestalltheentriesinthe"words"table:
content://com.android.example.wordcontentprovider.provider/words
DesigningURIschemesisatopicinandofitselfandisnotcoveredinthiscourse.
Introduction
458

ContentResolver:TheContentResolverobjectprovidesquery(),insert(),update(),anddelete()methodsforaccessingdatafromacontentproviderandmanagesallinteractionwiththecontentproviderforyou.Inmostsituations,youcanjustusethedefaultcontentresolverprovidedbytheAndroidsystem.
Inthispractical,youwillbuildabasiccontentproviderfromscratch.Youwillcreateandprocessmockdatasothatyoucanfocusonunderstandingcontentproviderarchitecture.Likewise,theuserinterfacetodisplaythedataisminimal.Inthenextpractical,youwilladdacontentprovidertotheWordListapp,usingthisminimalistappasyourtemplate.
WhatyoushouldalreadyKNOWForthispracticalyoushouldunderstandhowto:
Create,buildandruninteractiveappsinAndroidStudio.DisplaydatainaRecyclerViewusinganadapter.Abstractandencapsulatedatawithdatamodels.Create,manage,andinteractwithaSQLitedatabaseusingaSQLiteOpenHelper.
WhatyouwillLEARNYouwilllearn:
Thearchitectureandanatomyofacontentprovider.Whatyouneedtodotobuildaminimalcontentproviderthatyoucanuseasatemplateforcreatingothercontentproviders.
WhatyouwillDOYouwillbuildastand-aloneapptolearnthemechanicsofbuildingacontentprovider.
AppOverviewThisappgeneratesmockdataandstoresitinalinkedlistcalled"words".Theapprequestsdatathroughacontentresolveranddisplaysit.TheUIconsistsofoneactivitywithaTextViewandtwoButtons.The"Listallwords"buttondisplaysallthewords,andthe"Listfirstword"buttondisplaysthefirstwordinthetextview.Thecontentproviderabstractsandmanagestheinteractionbetweenthedatasourceandtheuserinterface.TheContractdefinesURIsandpublicconstants.
Introduction
459

Introduction
460
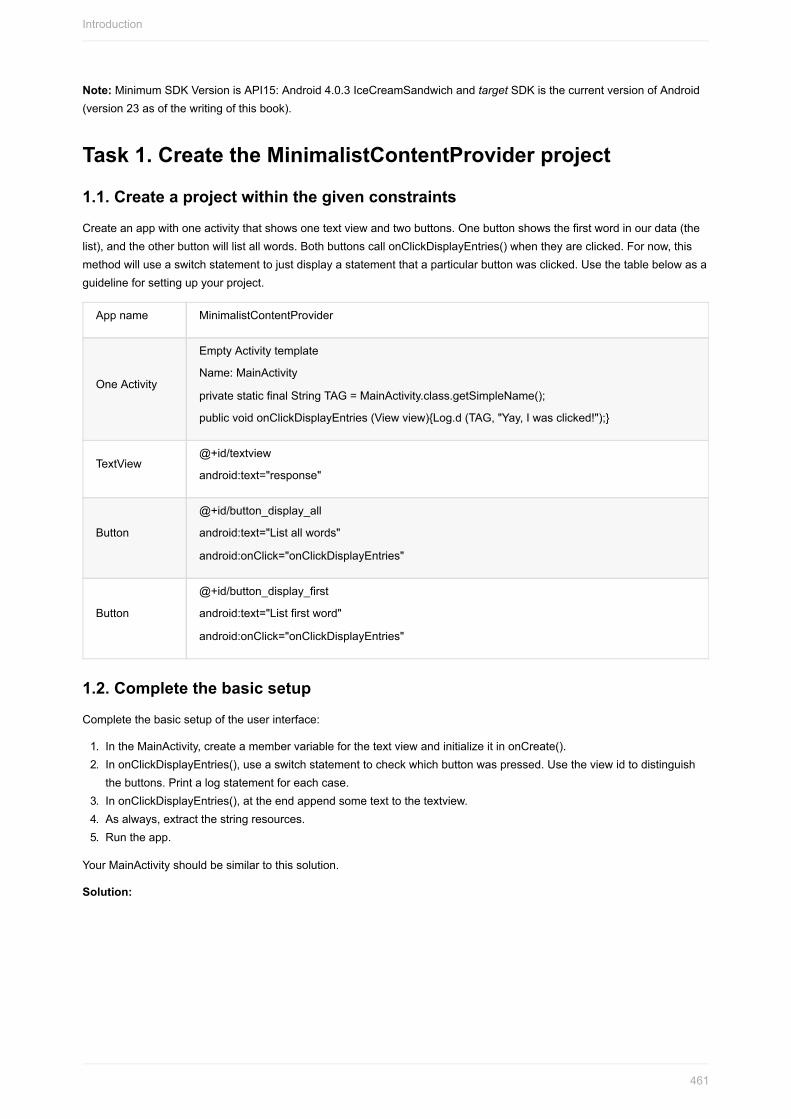
Note:MinimumSDKVersionisAPI15:Android4.0.3IceCreamSandwichandtargetSDKisthecurrentversionofAndroid(version23asofthewritingofthisbook).
Task1.CreatetheMinimalistContentProviderproject
1.1.Createaprojectwithinthegivenconstraints
Createanappwithoneactivitythatshowsonetextviewandtwobuttons.Onebuttonshowsthefirstwordinourdata(thelist),andtheotherbuttonwilllistallwords.BothbuttonscallonClickDisplayEntries()whentheyareclicked.Fornow,thismethodwilluseaswitchstatementtojustdisplayastatementthataparticularbuttonwasclicked.Usethetablebelowasaguidelineforsettingupyourproject.
Appname MinimalistContentProvider
OneActivity
EmptyActivitytemplate
Name:MainActivity
privatestaticfinalStringTAG=MainActivity.class.getSimpleName();
publicvoidonClickDisplayEntries(Viewview){Log.d(TAG,"Yay,Iwasclicked!");}
TextView@+id/textview
android:text="response"
Button
@+id/button_display_all
android:text="Listallwords"
android:onClick="onClickDisplayEntries"
Button
@+id/button_display_first
android:text="Listfirstword"
android:onClick="onClickDisplayEntries"
1.2.Completethebasicsetup
Completethebasicsetupoftheuserinterface:
1. IntheMainActivity,createamembervariableforthetextviewandinitializeitinonCreate().2. InonClickDisplayEntries(),useaswitchstatementtocheckwhichbuttonwaspressed.Usetheviewidtodistinguish
thebuttons.Printalogstatementforeachcase.3. InonClickDisplayEntries(),attheendappendsometexttothetextview.4. Asalways,extractthestringresources.5. Runtheapp.
YourMainActivityshouldbesimilartothissolution.
Solution:
Introduction
461

packageandroid.example.com.minimalistcontentprovider;
[...imports]
publicclassMainActivityextendsAppCompatActivity{
privatestaticfinalStringTAG=MainActivity.class.getSimpleName();
TextViewmTextView;
@Override
protectedvoidonCreate(BundlesavedInstanceState){
super.onCreate(savedInstanceState);
setContentView(R.layout.activity_main);
mTextView=(TextView)findViewById(R.id.textview);
}
publicvoidonClickDisplayEntries(Viewview){
Log.d(TAG,"Yay,Iwasclicked!");
switch(view.getId()){
caseR.id.button_display_all:
Log.d(TAG,"Yay,"+R.id.button_display_all+"wasclicked!");
break;
caseR.id.button_display_first:
Log.d(TAG,"Yay,"+R.id.button_display_first+"wasclicked!");
break;
default:
Log.d(TAG,"Error.Thisshouldneverhappen.");
}
mTextView.append("Thuswego!\n");
}
}
Task2.CreateaContractclass,aURI,andmockdataThecontractcontainsinformationaboutthedatathatappsneedtobuildqueries.
Contractisapublicclassandincludesimportantinformationforotherappsthatwanttoconnecttothiscontentproviderandaccessyourdata.TheURIshowshowtobuildURIstoaccessthedata.TheURIschemebehavesasanAPItoaccessthedata.It'sverysimilartodesigningRESTcallsforCRUD.OtherapplicationswillusetheseContentURIs.
2.1.CreatetheContractclass
1. CreateanewpublicJavaclassContractwiththefollowingsignature.Itmustbefinal.
publicfinalclassContract{}
2. TopreventsomeonefromaccidentallyinstantiatingtheContractclass,giveitanemptyprivateconstructor.
privateContract(){}
2.2.CreatetheURI
AcontentURIforcontentprovidershasthisgeneralform:
scheme://authority/path/id
schemeisalwayscontent://forcontentURIs.authorityrepresentsthedomain,andforcontentproviderscustomarilyendsin.provider
Introduction
462

pathisthepathtothedataiduniquelyidentifiesthedatasettosearch
ThefollowingURIcouldbeusedtorequestalltheentriesinthe"words"table:
content://com.android.example.wordcontentprovider.provider/words
TheURIforaccessingthecontentproviderisdefinedintheContractsothatitisavailabletoanyappthatwantstoquerythiscontentprovider.Customarily,thisisdonebydefiningconstantsforAUTHORITY,CONTENT_PATH,andCONTENT_URI.
1. IntheContractclass,createaconstantforAUTHORITY.TomakeAuthorityunique,usethepackagenameextendedwith"provider."publicstaticfinalStringAUTHORITY="com.android.example.minimalistcontentprovider.provider";
2. CreateaconstantfortheCONTENT_PATH.Thecontentpathidentifiesthedata.Youshouldusesomethingdescriptive,forexample,thenameofatableorfile,orthekindofdata,suchas"words".publicstaticfinalStringCONTENT_PATH="words";
3. CreateaconstantfortheCONTENT_URI.Thisisacontent://styleURIthatpointstoonesetofdata.Ifyouhavemultiple"datacontainers"inthebackend,youwouldcreateacontentURIforeach.
UriisahelperclassforbuildingandmanipulatingURIs.SinceitisaneverchangingstringforallinstancesoftheContractclass,youcaninitializeitstatically.publicstaticfinalUriCONTENT_URI=Uri.parse("content://"+AUTHORITY+"/"+CONTENT_PATH);
4. CreateaconvenienceconstantforALL_ITEMS.Thisisthedatasetnameyouwillusewhenretrievingallthewords.Thevalueis-2becausethat'sthefirstlowestvaluenotreturnedbyamethodcall.staticfinalintALL_ITEMS=-2;
5. CreateaconvenienceconstantforWORD_ID.Thisistheidyouwillusewhenretrievingasingleword.staticfinalStringWORD_ID="id";
2.3.AddtheMIMEType
Contentprovidersprovidecontent,andyouneedtospecifywhattypeofcontenttheyprovide.Appsneedtoknowthestructureandformatofthereturneddata,sothattheycanproperlyhandleit.
MIMEtypesareoftheformtype/subtype,suchastext/htmlforHTMLpages.Foryourcontentprovider,youneedtodefineavendor-specificMIMEtypeforthekindofdatayourcontentproviderreturns.Thetypeofvendor-specificAndroidMIMEtypesisalways:
vnd.android.cursor.itemforonedataitem(arecord)vnd.android.cursor.dirforssetofdata(multiplerecords).
Thesubtypecanbeanything,butitisagoodpracticetomakeitinformative.Forexample:
vnd—avendorMIMEtypecom.example—thedomainprovider—it'sforacontentproviderwords—thenameofthetable
ReadImplementingContentProviderMIMEtypesfordetails.
1. DeclaretheMIMEtimeforonedataitem.
staticfinalStringSINGLE_RECORD_MIME_TYPE="vnd.android.cursor.item/vnd.com.example.provider.words";
2. DeclaretheMIMEtypeformultiplerecords.
staticfinalStringMULTIPLE_RECORD_MIME_TYPE="vnd.android.cursor.dir/vnd.com.example.provider.words";
2.4.Createthemockdata
Introduction
463

ThecontentprovideralwayspresentstheresultsasaCursorinatableformatthatresemblesaSQLdatabase.Thisisindependentofhowthedataisactuallystored.Thisappusesastringarrayofwords.
Instrings.xml,addashortlistofwords:
<string-arrayname="words">
<item>Android</item>
<item>Activity</item>
<item>ContentProvider</item>
<item>ContentResolver</item>
</string-array>
Task3.ImplementtheMiniContentProviderclass
3.1.CreatetheMiniContentProviderclass
1. CreateaJavaclassMiniContentProviderextendingContentProvider.(Forthispractical,tonotusetheCreateClass>Other>ContentProvidermenuoption.)
2. Implementthemethods(Code>Implementmethods).3. Addalogtag.4. Addamembervariableforthemockdata.
publicString[]mData;
5. InonCreate(),initializemDatafromthearrayofwords,andreturntrue.
@Override
publicbooleanonCreate(){
Contextcontext=getContext();
mData=context.getResources().getStringArray(R.array.words);
returntrue;
}
6. Addanappropriateloggingmessagetotheinsert,delete,andupdatemethods.Youwillnotimplementthesemethodsforthispractical.
Log.e(TAG,"Notimplemented:updateuri:"+uri.toString());
3.2.PublishthecontentproviderbyaddingittotheAndroidmanifest
Inordertoaccessthecontentprovider,yourappandotherappsneedtoknowthatitexists.AddadeclarationforthecontentprovidertotheAndroidmanifestinsidea<provider>tag.
Thedeclarationcontainsthenameofthecontentproviderandtheauthorities(itsuniqueidentifier).
1. IntheAndroidManifest,insidetheapplicationtag,aftertheactivityclosingtag,add:
<provider
android:name=".MiniContentProvider"
android:authorities="com.android.example.minimalistcontentprovider.provider"/>
2. Runyourcodetomakesureitcompiles.
3.3.SetupURImatching
AContentProviderneedstorespondtodatarequestsfromappsusinganumberofdifferentURIs.TotakeappropriateactiondependingonaparticularrequestURI,thecontentproviderneedstoanalyzetheURItoseeifitmatches.UriMatcherisahelperclassthatyoucanuseforprocessingtheacceptedURIschemesforagivencontentprovider.
Introduction
464

BasicstepstouseUriMatcher:
CreateaninstanceofUriMatcher.AddeachURIthatyourcontentproviderrecognizestotheUriMatcher.AssigneachURIanumericconstant.HavinganumericconstantforeachURIisconvenientwhenyouareprocessingincomingURIsbecauseyoucanuseaswitch/casestatementonthenumericvaluestoworkthroughtheURIs.
MakethefollowingchangesintheMiniContentProviderclass.
1. IntheMiniContentProviderclass,createaprivatestaticvariableforanewUriMatcher.
Theargumenttotheconstructorspecifiesthevaluetoreturnifthereisnomatch.Asabestpractice,useUriMatcher.NO_MATCH.
privatestaticUriMatchersUriMatcher=newUriMatcher(UriMatcher.NO_MATCH);
2. CreateyourownmethodforinitializingtheURImatcher.
privatevoidinitializeUriMatching(){}
3. CallinitializeUriMatchinginonCreate()oftheMiniContentProviderclass.4. IntheinitializeUriMatching()method,addtheURIsthatyourcontentprovideracceptstothematcherandassignthem
anintegercode.ThesearetheURIsbasedontheauthorityandcontentpathsspecifiedinthecontract.
The#symbolmatchesastringofnumericcharactersofanylength.Inthisapp,itreferstotheindexofthewordinthestringarray.Inaproductionapp,thiscouldbetheidofanentryinadatabase.AssignthisURIanumericvalueof1.
sUriMatcher.addURI(Contract.AUTHORITY,Contract.CONTENT_PATH+"/#",1);
5. ThesecondURIistheoneyouspecifiedinthecontractforreturningallitems.Assignitanumericvalueof0.sUriMatcher.addURI(Contract.AUTHORITY,Contract.CONTENT_PATH,0);
NotethatifyourappismorecomplexandusesmoreURIs,usenamedconstantsforthecodes,asshownintheUriMatcherdocumentation.
Solution:
privatevoidinitializeUriMatching(){
sUriMatcher.addURI(Contract.AUTHORITY,Contract.CONTENT_PATH+"/#",1);
sUriMatcher.addURI(Contract.AUTHORITY,Contract.CONTENT_PATH,0);
}
3.4.ImplementthegetType()method
ThegetType()methodofthecontentproviderreturnstheMIMEtypeforeachofthespecifiedURIs.
Unlessyouaredoingsomethingspecialinyourcode,thismethodimplementationisgoingtobeverysimilarforanycontentprovider.Itdoesthefollowing:
1. MatchtheURI.2. Switchonthereturnedcode.3. ReturntheappropriateMIMEtype.
LearnmoreintheUriMatcherdocumentation.
Solution:
Introduction
465

publicStringgetType(Uriuri){
switch(sUriMatcher.match(uri)){
case0:
returnContract.MULTIPLE_RECORD_MIME_TYPE;
case1:
returnContract.SINGLE_RECORD_MIME_TYPE;
default:
//Alternatively,throwanexception.
returnnull;
}
}
3.5Implementthequery()methodThepurposeofthequery()methodistomatchtheURI,convertittoayourinternaldataaccessmechanism(forexampleaSQlitequery),executeyourinternaldataaccesscode,andreturntheresultinaCursorobject.
Thequery()methodThequerymethodhasthefollowingsignature:
publicCursorquery(Uriuri,String[]projection,Stringselection,String[]selectionArgs,StringsortOrder){}
TheargumentstothismethodrepresentthepartsofaSQLquery.Evenifyouareusinganotherkindofdatastoragemechanism,youmuststillacceptaqueryinthisstyleandhandletheargumentsappropriately.(InthenexttaskyouwillbuildaqueryintheMainActivitytoseehowtheargumentsareused.)ThemethodreturnsaCursorofanykind.
uri ThecompleteURI.Thiscannotbenull.
projection Indicateswhichcolumns/attributestoaccess.
selection Indicateswhichrows/recordsoftheobjectstoaccess.
selectionArgsThebindingparameterstothepreviousselectionargument.
Forsecurityreasons,theargumentsareprocessedseparately.
sortOrderWhethertosort,andifso,whetherascending,descendingorby.
Ifthisisnull,thedefaultsortornosortisapplied.
Analyzethequery()method1. Identifythefollowingprocessingstepsinthequery()methodcodeshownbelowinthesolutionssection.
Queryprocessingalwaysconsistsofthesesteps:
i. MatchtheURI.
ii. Switchonthereturnedcode.
iii. Processtheargumentsandbuildaqueryappropriateforthebackend.
iv. Getthedataand(ifnecessary)dropitintoaCursor.
v. Returnthecursor.
2. Identifyportionsofthecodethatneedtobedifferentinareal-worldapplication.
Thequeryimplementationforthisbasicapptakessomeshortcuts.
Introduction
466

Errorhandlingisminimal.Becausetheappisusingmockdata,theCursorcanbedirectlypopulated.BecausetheURIschemeissimple,thismethodisrathershort.
3. Identifyatleastonedesigndecisionthatmakesiteasiertounderstandandmaintainthecode.Analyzingthequeryandexecutingittopopulateacursorareseparatedintotwomethods.Thecodecontainsmorecommentsthanexecutablecode.
4. Addthecodetoyourapp.
Note:YouwillgetanerrorforthepopulateCursor()method,andwilladdressthisinthenextstep.
AnnotatedSolutionCodeforthequery()methodinMiniContentProvider.java
@Nullable
@Override
publicCursorquery(Uriuri,String[]projection,Stringselection,String[]selectionArgs,StringsortOrder){
intid=-1;
switch(sUriMatcher.match(uri)){
case0:
//MatchesURItogetalloftheentries.
id=Contract.ALL_ITEMS;
//Lookattheremainingarguments
//toseewhetherthereareconstraints.
//Inthisexample,weonlysupportgetting
//aspecificentrybyid.Notfullsearch.
//Forareal-lifeapp,youneederror-catchingcode;
//hereweassumethatthe
//valueweneedisactuallyinselectionArgsandvalid.
if(selection!=null){
id=parseInt(selectionArgs[0]);
}
break;
case1:
//TheURIendsinanumericvalue,whichrepresentsanid.
//ParsetheURItoextractthevalueofthelast,
//numericpartofthepath,
//andsettheidtothatvalue.
id=parseInt(uri.getLastPathSegment());
//Withadatabase,youwouldthenusethisvalueand
//thepathtobuildaquery.
break;
caseUriMatcher.NO_MATCH:
//Youshoulddosomeerrorhandlinghere.
Log.d(TAG,"NOMATCHFORTHISURIINSCHEME.");
id=-1;
break;
default:
//Youshoulddosomeerrorhandlinghere.
Log.d(TAG,"INVALIDURI-URINOTRECOGNIZED.");
id=-1;
}
Log.d(TAG,"query:"+id);
returnpopulateCursor(id);
}
3.6.ImplementthepopulateCursor()methodOncethequery()methodhasidentifiedtheURI,itcallsyourpopulateCursor()withthelastsegmentofthepath,whichistheid(index)ofthewordtoretrieve.ThepopulateCursor()methodseparatesthequerymatchingfromgettingthedataandcreatingtheresultcursor.Thisisagoodpracticeasinarealapp,thequery()methodcanbecomeverylarge.
ThequerymethodmustreturnaCursortype,sothepopulateCursor()methodhastocreate,fillin,andreturnacursor.
IfyourdatawerestoredinaSQLitedatabase,executingthequerywouldreturnaCursor.Ifyouarenotusingadatastoragemethodthatreturnsacursor,suchasfilesorthemockdata,youcanusea
Introduction
467

MatrixCursortoholdthedatatoreturn.AMatrixCursorisageneralpurposecursorintoanarrayofobjectsthatgrowsasneeded.TocreateaMatrixCursor,yousupplyitwithastringarrayofcolumnnames.
ThepopulateCursor()methoddoesthefollowing:
1. ReceivestheidextractedfromtheURI.2. CreatesaMatrixCursortostorereceiveddata(becausethemockdatareceivedisnotacursor).3. Createsandexecutesaquery.Forthisapp,thisgetsthestringattheindexidfromthestringarray.Inamore
realisticapp,thiscouldexecuteaquerytoadatabase.4. Addstheresulttothecursor.5. Returnsthecursor.
privateCursorpopulateCursor(intid){
MatrixCursorcursor=newMatrixCursor(newString[]{Contract.CONTENT_PATH});
//Ifthereisavalidquery,executeitandaddtheresulttothecursor.
if(id==Contract.ALL_ITEMS){
for(inti=0;i<mData.length;i++){
Stringword=mData[i];
cursor.addRow(newObject[]{word});
}
}elseif(id>=0){
//Executethequerytogettherequestedword.
Stringword=mData[id];
//Addtheresulttothecursor.
cursor.addRow(newObject[]{word});
}
returncursor;
}
Task4.UseaContentResolvertogetdataWiththecontentproviderinplace,theonClickDisplayEntries()methodintheMainActivitycanbeexpandedtoqueryanddisplaydatatotheUI.Thisrequiresthefollowingsteps:
1. CreatetheSQL-stylequery,dependingonwhichbuttonwaspressed.2. UseacontentresolvertointeractwiththecontentprovidertoexecutethequeryandreturnaCursor.3. ProcesstheresultsintheCursor.
4.1.GetthecontentresolverThecontentresolverinteractswiththecontentprovideronyourbehalf.
ThecontentresolverexpectsaparsedContentURIalongwithqueryparametersthatassistinretrievingthedata.
Youdon'thavetocreateyourowncontentresolver.YoucanusetheoneprovidedinyourapplicationcontextbytheAndroidframeworkbycallinggetContentResolver().
1. InMainActivity,removeallcodefrominsideonClickDisplayEntries().2. AddthiscodetoonClickDisplayEntries()inMainActivity.
Cursorcursor=getContentResolver().query(Uri.parse(queryUri),projection,selectionClause,selectionArgs,sort
Order);
Note:theargumentstogetContentResolver.query()areidenticaltotheparametersofContentProvider.query().
NextyoumustdefinetheargumentstogetContentResolver.query().
4.2.DefinethequeryargumentsInorderforgetContentResolver.query()towork,youneedtodeclareandassignvaluestoallitsarguments.
Introduction
468

1. URI:DeclaretheContentURIthatidentifiesthecontentproviderandthetable.GettheinformationforthecorrectURIfromthecontract.
StringqueryUri=Contract.CONTENT_URI.toString();
2. Projection:Astringarraywiththenamesofthecolumnstoreturn.Settingthistonullreturnsallcolumns.Whenthereisonlyonecolumn,asinthecaseofthisexample,settingthisexplicitlyisoptional,butcanbehelpfulfordocumentationpurposes.//Onlygetwords.String[]projection=newString[]{Contract.CONTENT_PATH};
3. selectionClause:Argumentclausefortheselectioncriteria,thatis,whichrowstoreturn.FormattedasanSQLWHEREclause(excludingthe"WHERE"keyword).PassingnullreturnsallrowsforthegivenURI.Sincethiswillvarydependingonwhichbuttonwaspressed,declareitnowandsetitlater.
StringselectionClause;
4. selectionArgs:Argumentvaluesfortheselectioncriteria.Ifyouinclude?sintheselectionString,theyarereplacedbyvaluesfromselectionArgs,intheorderthattheyappear.IMPORTANT:ItissecuritybestpracticestoalwaysseparateselectionandselectionArgs.StringselectionArgs[];
5. sortOrder:Theorderinwhichtosorttheresults.FormattedasaSQLORDERBYclause(excludingtheORDERBYkeyword).UsuallyASCorDESC;nullrequeststhedefaultsortorder,whichcouldbeunordered.
//Forthisexample,accepttheorderreturnedbytheresponse.
StringsortOrder=null;
4.3.Decideonselectioncriteria
TheselectionClauseandselectionArgsvaluesdependonwhichbuttonwaspressedinourUI.
Todisplayallthewords,setbothargumentstonull.Togetthefirstword,queryforthewordwiththeIDof0.(ThisassumesthatwordIDsstartat0andarecreatedinorder.Youknowthis,becausetheinformationisexposedinthecontract.Foradifferentcontentprovider,youmaynotknowtheids,andmayhavetosearchinadifferentway.)
1. ReplacetheexistingswitchblockwiththefollowingcodeinonClickDisplayEntries,beforeyougetthecontentresolver.
switch(view.getId()){
caseR.id.button_display_all:
selectionClause=null;
selectionArgs=null;
break;
caseR.id.button_display_first:
selectionClause=Contract.WORD_ID+"=?";
selectionArgs=newString[]{"0"};
break;
default:
selectionClause=null;
selectionArgs=null;
}
4.4.ProcesstheCursorAftergettingthecontentresolver,youhavetoprocesstheresultfromtheCursor.
Ifthereisdata,displayitinthetextview.Ifthereisnodata,reporterrors.
1. Examinethefollowingcodeandmakesureyouunderstandeverything.
Introduction
469

if(cursor!=null){
if(cursor.getCount()>0){
cursor.moveToFirst();
intcolumnIndex=cursor.getColumnIndex(projection[0]);
do{
Stringword=cursor.getString(columnIndex);
mTextView.append(word+"\n");
}while(cursor.moveToNext());
}else{
Log.d(TAG,"onClickDisplayEntries"+"Nodatareturned.");
mTextView.append("Nodatareturned."+"\n");
}
cursor.close();
}else{
Log.d(TAG,"onClickDisplayEntries"+"Cursorisnull.");
mTextView.append("Cursorisnull."+"\n");
}
2. InsertthiscodeattheendofonClickDisplayEntry().3. Runyourapp.4. Clickthebuttonstoseetheretrieveddatainthetextview.
SolutioncodeAndroidStudioproject:MinimalistContentProvider
CodingchallengesNote:Allcodingchallengesareoptionalandarenotprerequisitesforlaterlessons.
Implementmissingmethods
CodingChallenge1:Implementtheinsert,delete,andupdatemethodsfortheMinimalistContentProviderapp.Providetheuserwithawaytoinsert,delete,andupdatedata.
Hint:Ifyoudon'twanttobuildouttheuserinterface,createabuttonforeachactionandhardwirethedatathatisinserted,updated,anddeleted.Thepointofthisexerciseistoworkonthecontentprovider,nottheuserinterface.
Why:YouwillimplementthefullyfunctioningcontentproviderwithUIinthenextpractical,whenyouwilladdacontentprovidertotheWordListSQLapp.
AddUnitTestsforthecontentprovider
CodingChallenge2:Afteryouimplementedthecontentprovider,therewasnowayforyoutoknowwhetherornotthecodewouldwork.Inthissample,youbuiltoutthefront-endandbywatchingitwork,assumedtheappworkedcorrectly.Inareal-lifeapp,thisisnotsufficient,andyoumaynotevenhaveaccesstoafront-end.Theappropriatewayfordeterminingthateachmethodactsasexpected,writeasetofunittestsforMiniContentProvider.
SummaryInthischapter,youlearned
Contentprovidersarehigh-leveldataabstractionsthatmanagesaccesstoasharedrepositoryContentprovidersareprimarilyintendedtobeusedbyappsotherthanyourown.Contentproviders(server-side)areaccessedbyContentresolvers(app-side)
Introduction
470

AContractisapublicclassthatexposesimportantinformationaboutacontentprovider.contractscanbeusefulbeyondcontentproviders,AcontentproviderneedstodefineasetofcontentURIssoappscanaccessdatathroughyourcontentprovider.ThecontentURIconsistsofseveralcomponents:"content://",auniquecontentauthoriity(typicallyafully-qualifiedpackagename)andthecontent-path.Useacontentresolvertorequestdatafromacontentprovideranddisplayittotheuser.Ifyourappdoesnotsharedatawithotherapps,thenyourappdoesnotrequireacontentprovider.ContentprovidersmustimplementthegetType()methodwhichreturnstheMIMEtypeforeachcontenttype.ContentProvidersneedtobe"published"intheAndroidmanifestusingtheelementwithintheelementContentProvidersneedtoinspecttheincomingURItodetermineURIpatternmatchesinordertoaccessanydataYoumustaddtargetURIpatternstoyourcontentprovider.TheUriMatcherclassisahelpfulclassforthispurpose.Theessenceofacontentproviderisimplementedinitsquery()method.Themethodsignatureofthequery()methodinacontentresolver(datarequester)matchesthemethodsignatureofthequery()methodinacontentprovider(datasource).Thequery()methodreturnsadatabase-stylecursorobjectregardlessifthedataisrelationalornot.
RelatedconceptsTherelatedconceptdocumentationisinAndroidDeveloperFundamentals:Concepts.
ContentProviders
LearnmoreDeveloperDocumentation:
UniformResourceIdentifiersorURIsMIMEtypeMatrixCursorandCursorsContentProviders
Introduction
471

11.1B:AddacontentprovidertoyourdatabaseContents:
WhatyoushouldalreadyKNOWWhatyouwillLEARNWhatyouwillDOAppOverviewTask1.DownloadandrunthebasecodeTask2:AddaContractclasstoWordListSQLInteractiveTask3:CreateaContentProviderTask4:ImplementContentProvidermethodsCodingchallengeSummaryRelatedconceptLearnmore
Contentprovidersinrealappsaremorecomplexthanthebasicversionyoubuiltinthepreviouspractical.
Intherealworld:
Thebackendisadatabase,filesystem,orotherpersistentstorageoption.Thefront-enddisplaysthedatainapleasingUIandallowsuserstomanipulatethedata.
Youwillrarelybuildanappfromscratch.Moreoften,youwilldebug,refactor,orextendanexistingapplication.
Inthispractical,youwilltaketheWordListSQLappandrefactorandextendittouseacontentproviderasalayerbetweentheSQLdatabaseandtheRecyclerView.
Youcangoaboutthisintwoways.
RefactorandextendtheWordListSQLapp.Thisinvolveschangingtheapparchitectureandrefactoringcode.Startfromscratchandre-usecodefromWordListSQLandMinimalistContentProvider.
ThepracticalwilldemonstratehowtorefactortheexistingWordListSQLapp,becauseit'swhatyouaremorelikelytoencounteronthejob.
WhatyoushouldalreadyKNOWForthispracticalyoushouldbefamiliarwithhowto:
DisplaydatainaRecyclerView.StartandreturnfromanActivity.Create,change,andinteractwithaSQLitedatabaseusingaSQLiteOpenHelper.Understandthearchitecturetheminimalcontentprovideryoubuiltinthepreviouspractical.
WhatyouwillLEARNYouwilllearnhowto:
Createafullydevelopedcontentproviderforanexistingapplication.Refactoranapplicationtoaccommodateacontentprovider.
WhatyouwillDO
Introduction
472

Thispracticalrequiressetupthatismoretypicalforreal-wordappdevelopment.
YoustartwiththeWordListSQLInteractiveappyoucreatedinapreviouspractical,whichdisplayswordsfromaSQLitedatabaseinaRecyclerView,anduserscancreate,edit,anddeletewords.
Youwillextendandmodifythisapp:
ImplementaContractclasstoexposeyourapp'sinterfacetootherapps.ImplementaContentProviderandqueryitusingaContentResolver.RefactortheMainActivity,WordListAdapter,andWordListOpenHelperclassestoworkwiththecontentprovider.
AppOverviewThecompletedWordListSQLWithContentProviderappwillhavethefollowingfeatures:
Acontentproviderthatcaninsert,delete,update,andquerythedatabase.Acontractandpermissionssetthatallowotherappstoaccessthiscontentprovider.Acontentresolverthatinteractswiththecontentprovidertoinsert,delete,update,andquerydata.Unchangeduserinterfaceandfunctionality.
Yourappwilllookthatsameasattheendofthedatastoragepractical.
Introduction
473
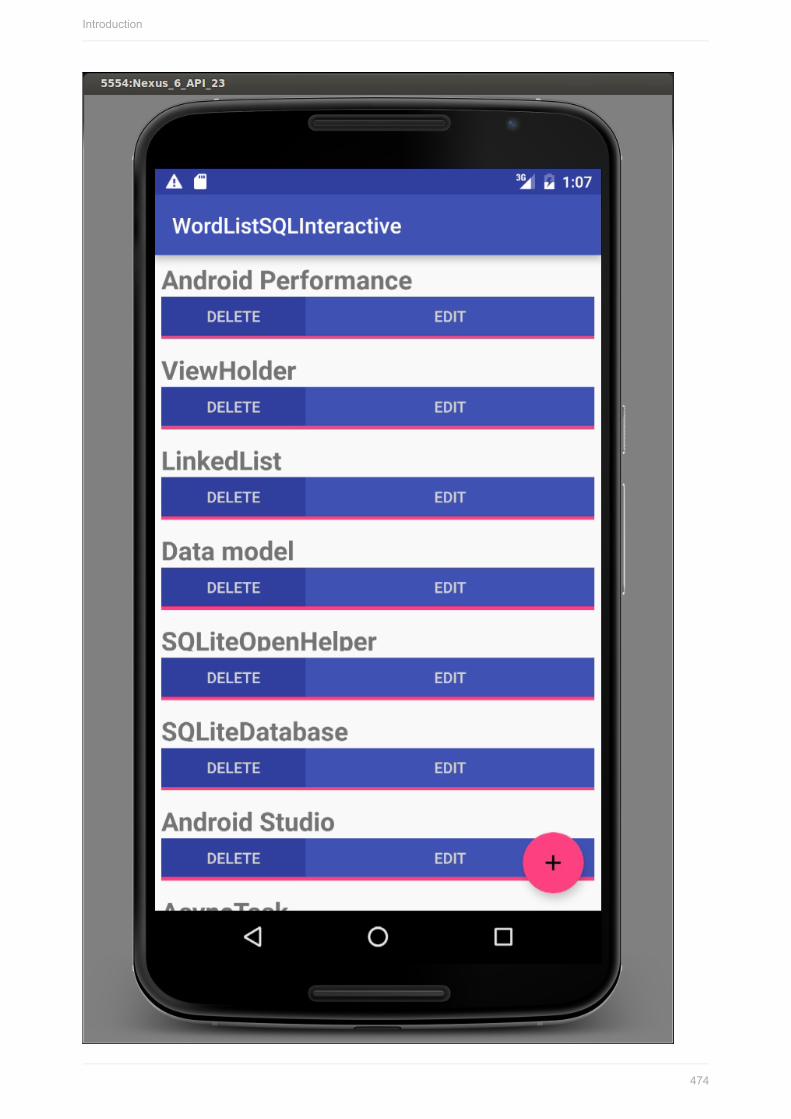
Introduction
474

Appcomponentoverview
ThefollowingdiagramshowsanoverviewofthecomponentsofanappthatusesaSQLiteDatabasewithacontentprovider.Theonlydifferencefromtheminimalcontentproviderappisthatthecontentproviderfetchesthedatafromadatabasethroughanopenhelper.
ThediagrambelowshowsthearchitectureoftheWorldListSQLInteractiveappwithacontentprovideradded;thisistheWordListSQLWithContentProviderappthatyouwillbuildinthispractical.
Seetheconceptschapterforadetailedexplanationofallthecomponentsandhowtheyinteract.
ChangesoverviewThisisasummaryofthechangesyouwillmaketoWordListInteractivetoaddacontentprovider.
NewClasses:Contract,ContentProvider,ContentResolverClassesthatchange:WordListOpenHelper,MainActivity,WordListAdapterClassesthatshouldnotchange:WordItem,MyButtonOnClickListener,ViewHolder
Introduction
475

Task1.DownloadandrunthebasecodeThispracticalbuildsontheWordListSQLInteractiveandMinimalistContentProviderappsthatyoubuiltpreviously.YouwillextendacopyofWordListSQLInteractive.Youcanstartfromyourowncode,ordownloadtheapps.
WordListSQLInteractiveMinimalistContentProvider
MakeacopyofWordListSQLInteractiveandloaditintoAndroidStudio.
Changethepackagenametowordlistsqlwithcontentprovider.
Task2.AddaContractclasstoWordListSQLInteractiveYouwillstartbycreatingacontractclassthatdefinespublicdatabaseconstants,URIconstants,andtheMIMEtypes.Youwillusetheseconstantsinalltheotherclasses.
2.1AddaContractclass1. StudytheDefineaSchemaandContractdocumentation.2. AddanewpublicfinalclasstoyourprojectandcallitContract.
ThisContractclasscontainsalltheinformationthatanotherappneedstouseyourapp'scontentprovider.Youcouldnametheclassanything,butitiscustomarilycalled"Contract".
publicfinalclassContract{}
3. TopreventtheContractclassfrombeinginstantiated,addaprivate,emptyconstructor.
Thisisastandardpatternforclassesthatareusedtoholdmetainformationandconstantsforanapp.
privateContract(){}
Introduction
476

2.2MovedatabaseconstantsintoContract
MovetheconstantsforthedatabasethatanotherappwouldneedtoknowoutofWordListOpenHelperintothecontractandmakethempublic.
1. MoveDATABASE_NAMEandmakeitpublic.
publicstaticfinalStringDATABASE_NAME="wordlist";
Createastaticabstractinnerclassforeachtablewiththecolumnnames.ThisinnerclasscommonlyimplementstheBaseColumnsinterface.ByimplementingtheBaseColumnsinterface,yourclasscaninheritaprimarykeyfieldcalled_IDthatsomeAndroidclasses,suchascursoradapters,expecttoexist.Theseinnerclassesarenotrequired,butcanhelpyourdatabaseworkwellwiththeAndroidframework.
2. CreateaninnerclassWordListthatimplementsBaseColumns.
publicstaticabstractclassWordListimplementsBaseColumns{
}
3. MoveWORD_LIST_TABLEname,aswellasKEY_IDandKEY_WORDcolumnnamesfromWordListOpenHelperintotheWordListclassinContract,andmakethempublic.
4. GobacktoWorldListOpenHelperandwaitforAndroidStudiotoimporttheconstantsfromtheContract;orimportthemmanually,ifyouarenotsetupforauto-imports.
UseFile>Settings>Editor>General>AutoImportonWindows/LinuxorAndroidStudio>Preferences>Editor>General>AutoImportonMactoconfigureautomatedimports.)
2.3DefineURIConstants1. DeclaretheURIschemeforyourcontentprovider.
UsingtheContractinMinimalistContentProviderasanexample,declareAUTHORITY,CONTENT_PATH.AddCONTENT_PATH_URItoreturnallitems,andROW_COUNT_URIthatreturnsthenumberofentries.IntheAUTHORITY,useyourapp'sname.
publicstaticfinalintALL_ITEMS=-2;
publicstaticfinalStringCOUNT="count";
publicstaticfinalStringAUTHORITY=
"com.android.example.wordlistsqlwithcontentprovider.provider";
publicstaticfinalStringCONTENT_PATH="words";
publicstaticfinalUriCONTENT_URI=
Uri.parse("content://"+AUTHORITY+"/"+CONTENT_PATH);
publicstaticfinalUriROW_COUNT_URI=
Uri.parse("content://"+AUTHORITY+"/"+CONTENT_PATH+"/"+COUNT);
2.4DeclaretheMIMEtypes
TheMIMEtypedescribesthetypeandformatofdata.TheMIMEtypesisusedtoprocessthedataappropriately.CommonMIMEtypesincludetext/htmlforwebpages,andapplication/json.ReadmoreaboutMIMEtypesforcontentprovidersintheAndroiddocumentation.
1. DeclareMIMEtypesforsingleandmultiplerecordresponses:
staticfinalStringSINGLE_RECORD_MIME_TYPE=
"vnd.android.cursor.item/vnd.com.example.provider.words";
staticfinalStringMULTIPLE_RECORDS_MIME_TYPE=
"vnd.android.cursor.item/vnd.com.example.provider.words";
Introduction
477

2. Runyourapp.Itshouldrunandlookandactexactlyasbeforeyouchangedit.
Task3.CreateaContentProvider
Inthistaskyouwillcreateacontentprovider,implementitsquerymethod,andhookitupwiththeWordListAdapterandtheWordListOpenHelper.InsteadofqueryingtheWordListOpenHelper,theWordListAdapterwilluseacontentresolvertoquerythecontentprovider,whichinturnwillqueryWordListOpenHelperwhichwillquerythedatabase.
3.1CreateaWordListContentProviderclass
1. CreateanewclassthatextendsContentProviderandcallitWordListContentProvider.2. InAndroidStudio,clickontheredlightbulb,select"Implementmethods",andclickOKtoimplementalllistedmethods.3. SpecifyalogTAG.4. DeclareaUriMatcher.
ThiscontentproviderusesanUriMatcher,autilityclassthatmapsURIstonumbers,soyoucanswitchonthem.
privatestaticUriMatchersUriMatcher=newUriMatcher(UriMatcher.NO_MATCH);
5. DeclareaWordListOpenHelperclassvariable,mDB.
privateWordListOpenHelpermDB;
6. DeclarethecodesfortheURImatcherasconstants.
Thisputsthecodesinoneplaceandmakesthemeasytochange.Usetens,sothatinsertingadditionalcodesisstraightforward.
Introduction
478
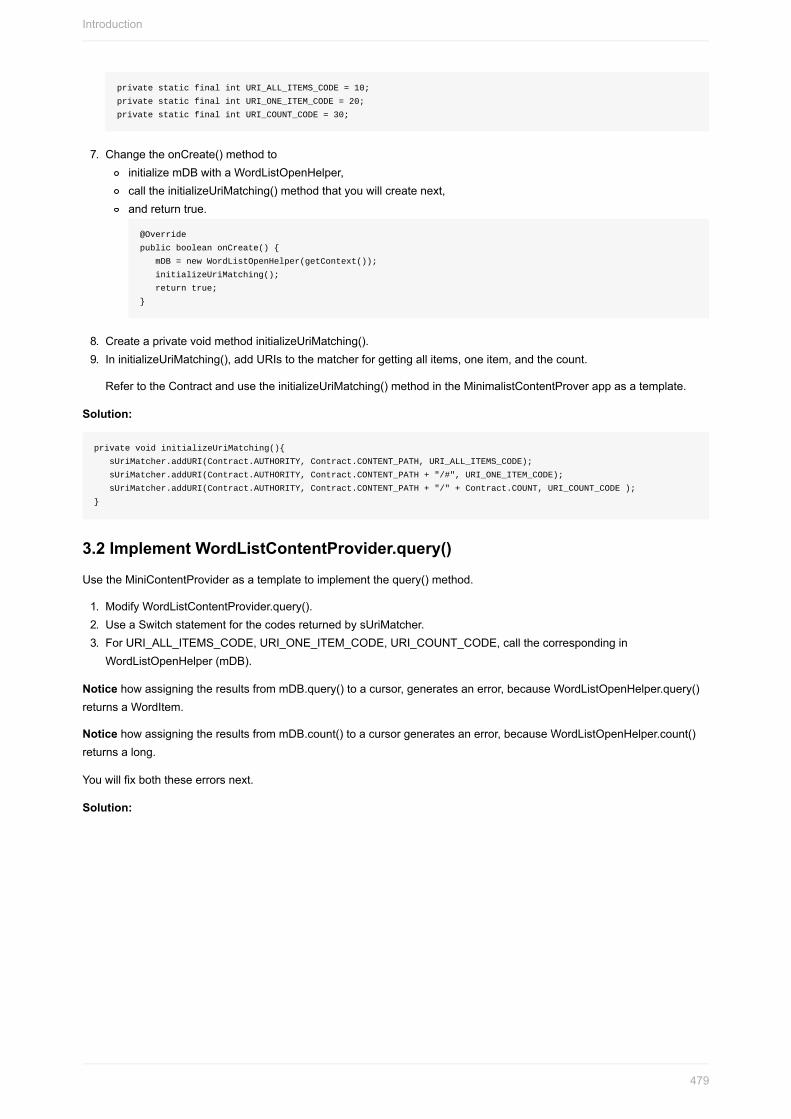
privatestaticfinalintURI_ALL_ITEMS_CODE=10;
privatestaticfinalintURI_ONE_ITEM_CODE=20;
privatestaticfinalintURI_COUNT_CODE=30;
7. ChangetheonCreate()methodtoinitializemDBwithaWordListOpenHelper,calltheinitializeUriMatching()methodthatyouwillcreatenext,andreturntrue.
@Override
publicbooleanonCreate(){
mDB=newWordListOpenHelper(getContext());
initializeUriMatching();
returntrue;
}
8. CreateaprivatevoidmethodinitializeUriMatching().9. IninitializeUriMatching(),addURIstothematcherforgettingallitems,oneitem,andthecount.
RefertotheContractandusetheinitializeUriMatching()methodintheMinimalistContentProverappasatemplate.
Solution:
privatevoidinitializeUriMatching(){
sUriMatcher.addURI(Contract.AUTHORITY,Contract.CONTENT_PATH,URI_ALL_ITEMS_CODE);
sUriMatcher.addURI(Contract.AUTHORITY,Contract.CONTENT_PATH+"/#",URI_ONE_ITEM_CODE);
sUriMatcher.addURI(Contract.AUTHORITY,Contract.CONTENT_PATH+"/"+Contract.COUNT,URI_COUNT_CODE);
}
3.2ImplementWordListContentProvider.query()
UsetheMiniContentProviderasatemplatetoimplementthequery()method.
1. ModifyWordListContentProvider.query().2. UseaSwitchstatementforthecodesreturnedbysUriMatcher.3. ForURI_ALL_ITEMS_CODE,URI_ONE_ITEM_CODE,URI_COUNT_CODE,callthecorrespondingin
WordListOpenHelper(mDB).
NoticehowassigningtheresultsfrommDB.query()toacursor,generatesanerror,becauseWordListOpenHelper.query()returnsaWordItem.
NoticehowassigningtheresultsfrommDB.count()toacursorgeneratesanerror,becauseWordListOpenHelper.count()returnsalong.
Youwillfixboththeseerrorsnext.
Solution:
Introduction
479

@Nullable
@Override
publicCursorquery(Uriuri,String[]projection,Stringselection,
String[]selectionArgs,StringsortOrder){
Cursorcursor=null;
switch(sUriMatcher.match(uri)){
caseURI_ALL_ITEMS_CODE:
cursor=mDB.query(ALL_ITEMS);
break;
caseURI_ONE_ITEM_CODE:
cursor=mDB.query(parseInt(uri.getLastPathSegment()));
break;
caseURI_COUNT_CODE:
cursor=mDB.count();
break;
caseUriMatcher.NO_MATCH:
//Youshoulddosomeerrorhandlinghere.
Log.d(TAG,"NOMATCHFORTHISURIINSCHEME:"+uri);
break;
default:
//Youshoulddosomeerrorhandlinghere.
Log.d(TAG,"INVALIDURI-URINOTRECOGNIZED:"+uri);
}
returncursor;
}
3.3FixWordListOpenHelper.query()toreturnaCursorandhandlereturningallitems
Sincethecontentproviderworkswithcursors,youcansimplifytheWordListOpenHelper.query()methodtoreturnacursor.
1. Addcodewithaquerytoreturnallitemsfromthedatabasetohandlethecursor=mDB.query(ALL_ITEMS)casefromtheaboveswitchstatement.
2. SimplifyWordListOpenHelper.query()toreturnacursor.
Introduction
480

ThisfixestheerrorinWordListContentProvider.query().
However,thisbreaksWordListAdapter.OnBindViewHolder(),whichexpectsaWordItemfromWordListOpenHelper.
Toresolvethis,WordListAdapter.onBindViewHolder()needstouseacontentresolverinsteadofcallingthedatabasedirectly,whichyouwilldoafterfixingWordListContentProvider.count().
Note:Thiskindofcascadingerrorsandfixesistypicalforworkingwithreal-lifeapplications.Ifanappyouareworkingwithiswellarchitected,youcanfixtheerrorsonebyone.Solution:
/**
*Queriesthedatabaseforanentryatagivenposition.
*
*@parampositionTheNthrowinthetable.
*@returnaWordItemwiththerequesteddatabaseentry.
*/
publicCursorquery(intposition){
Stringquery;
if(position!=ALL_ITEMS){
position++;//Becausedatabasestartscountingat1.
query="SELECT"+KEY_ID+","+KEY_WORD+"FROM"
+WORD_LIST_TABLE
+"WHERE"+KEY_ID+"="+position+";";
}else{
query="SELECT*FROM"+WORD_LIST_TABLE
+"ORDERBY"+KEY_WORD+"ASC";
}
Cursorcursor=null;
try{
if(mReadableDB==null){
mReadableDB=this.getReadableDatabase();
}
cursor=mReadableDB.rawQuery(query,null);
}catch(Exceptione){
Log.d(TAG,"QUERYEXCEPTION!"+e);
}finally{
returncursor;
}
}
3.4FixWordListOpenHelper.count()toreturnaCursor
Sincethecontentproviderworkswithcursors,youmustalsochangetheWordListOpenHelper.count()methodtoreturnacursor.
UseaMatrixCursor,whichisacursorofchangeablerowsandcolumns.
1. CreateaMatrixCursorusingContract.CONTENT_PATH.2. Insideatryblock,getthecountandadditasarowtothecursor.3. Returnthecursor.
Solution:
Introduction
481
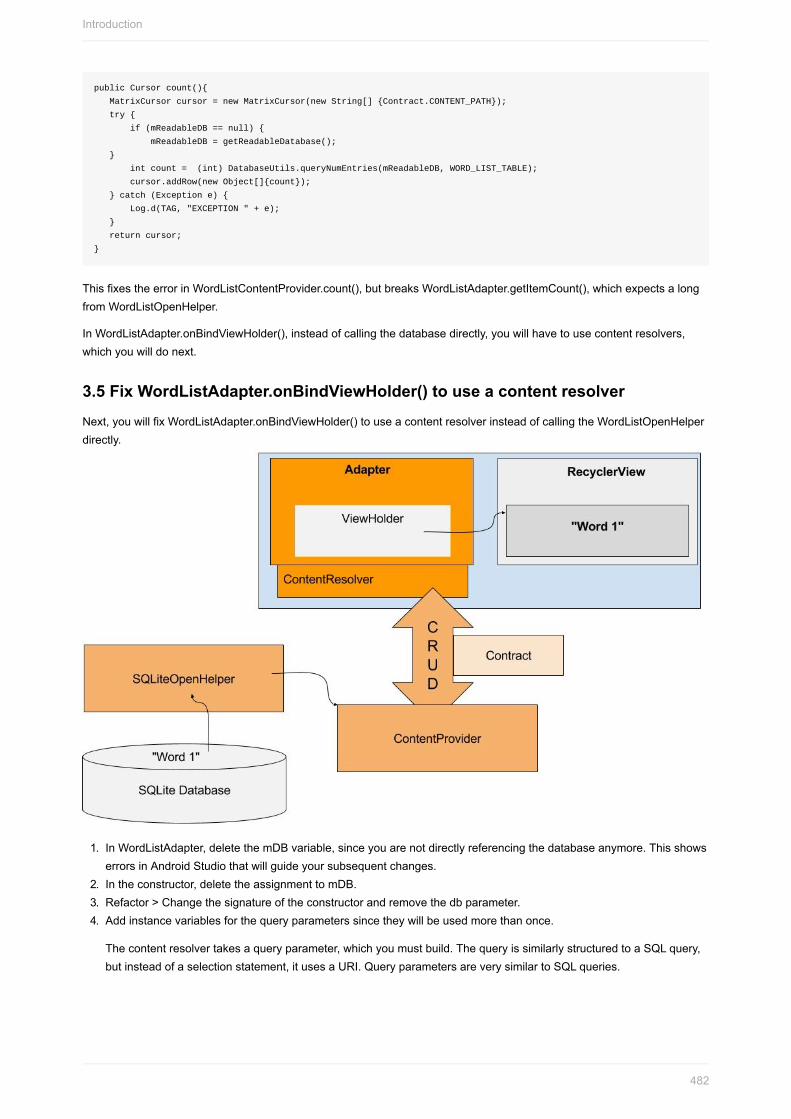
publicCursorcount(){
MatrixCursorcursor=newMatrixCursor(newString[]{Contract.CONTENT_PATH});
try{
if(mReadableDB==null){
mReadableDB=getReadableDatabase();
}
intcount=(int)DatabaseUtils.queryNumEntries(mReadableDB,WORD_LIST_TABLE);
cursor.addRow(newObject[]{count});
}catch(Exceptione){
Log.d(TAG,"EXCEPTION"+e);
}
returncursor;
}
ThisfixestheerrorinWordListContentProvider.count(),butbreaksWordListAdapter.getItemCount(),whichexpectsalongfromWordListOpenHelper.
InWordListAdapter.onBindViewHolder(),insteadofcallingthedatabasedirectly,youwillhavetousecontentresolvers,whichyouwilldonext.
3.5FixWordListAdapter.onBindViewHolder()touseacontentresolverNext,youwillfixWordListAdapter.onBindViewHolder()touseacontentresolverinsteadofcallingtheWordListOpenHelperdirectly.
1. InWordListAdapter,deletethemDBvariable,sinceyouarenotdirectlyreferencingthedatabaseanymore.ThisshowserrorsinAndroidStudiothatwillguideyoursubsequentchanges.
2. Intheconstructor,deletetheassignmenttomDB.3. Refactor>Changethesignatureoftheconstructorandremovethedbparameter.4. Addinstancevariablesforthequeryparameterssincetheywillbeusedmorethanonce.
Thecontentresolvertakesaqueryparameter,whichyoumustbuild.ThequeryissimilarlystructuredtoaSQLquery,butinsteadofaselectionstatement,itusesaURI.QueryparametersareverysimilartoSQLqueries.
Introduction
482

privateStringqueryUri=Contract.CONTENT_URI.toString();//baseuri
privatestaticfinalString[]projection=newString[]{Contract.CONTENT_PATH};//table
privateStringselectionClause=null;
privateStringselectionArgs[]=null;
privateStringsortOrder="ASC";
5. InonBindViewholder(),deletethefirsttwolinesofcode.WordItemcurrent-mDB.query(position);holder.wordItemView.setText(current.getWord());
6. DefineanemptyStringvariablenamedword.7. Defineanintegervariablecalledidandsetitto-1.8. CreateacontentresolverwiththespecifiedqueryparametersandstoretheresultsinaCursorcalledcursor.(See
MainActivityofMinimalistContentProviderappforanexample.)
Stringword="";
intid=-1;
Cursorcursor=mContext.getContentResolver().query(Uri.parse(
queryUri),null,null,null,sortOrder);
9. InsteadofjustgettingaWordItemdelivered,WordListAdapter.onBindViewHolder()hastodotheextraworkofextractingthewordfromthecursorreturnedbythecontentresolver.
Ifthereturnedcursorcontainsdata,extractthewordandsetthetextoftheviewholder.Extracttheid,becauseyou'llneeditfortheclicklisteners.Closethecursor.RememberthatyoudidnotclosethecursorinWordListOpenHelper.query(),becauseyoureturnedit.Handlethecaseofnodatainthecursor.Implementanyreferencedstringresources.
if(cursor!=null){
if(cursor.moveToPosition(position)){
intindexWord=cursor.getColumnIndex(Contract.WordList.KEY_WORD);
word=cursor.getString(indexWord);
holder.wordItemView.setText(word);
intindexId=cursor.getColumnIndex(Contract.WordList.KEY_ID);
id=cursor.getInt(indexId);
}else{
holder.wordItemView.setText(R.string.error_no_word);
}
cursor.close();
}else{
Log.e(TAG,"onBindViewHolder:Cursorisnull.");
}
1. Fixtheparametersfortheclicklistenersforthetwobuttons:
current.getId()⇒idcurrent.getWord()⇒word
TheupdatedclicklistenerfortheDELETEbuttonlookslikethis:
Introduction
483

@Override
publicvoidonClick(Viewv){
selectionArgs=newString[]{Integer.toString(id)};
intdeleted=mContext.getContentResolver().delete(
Contract.CONTENT_URI,Contract.CONTENT_PATH,selectionArgs);
if(deleted>0){
//Needbothcalls
notifyItemRemoved(h.getAdapterPosition());
notifyItemRangeChanged(
h.getAdapterPosition(),getItemCount());
}else{
Log.d(TAG,mContext.getString(R.string.not_deleted)+deleted);
}
}
2. ReplacethecalltomDB.delete(id)intheDELETEbuttoncallbackwithacontentresolvercalltodelete.
selectionArgs=newString[]{Integer.toString(id)};
intdeleted=mContext.getContentResolver().delete(
Contract.CONTENT_URI,Contract.CONTENT_PATH,selectionArgs);
3.6ChangeWordListAdapter.getItemCount()touseacontentresolverInsteadofrequestingthecountfromthedatabase,getItemCount()hastoconnecttothecontentresolverandrequestthecount.IntheContract,youdefinedaURIforgettingthatcount:
publicstaticfinalStringCOUNT="count";
publicstaticfinalUriROW_COUNT_URI=
Uri.parse("content://"+AUTHORITY+"/"+CONTENT_PATH+"/"+COUNT
ChangeWordListAdaptergetItemCount()to:
UseacontentresolverquerytogettheitemcountUsetheROW_COUNT_URIinyourqueryThecountisanintegertypeandisthefirstelementofthereturnedCursorExtractcountfromthecursorandreturnitReturn-1otherwiseClosethecursor
UsethecodeyoujustwroteforonBindViewHolderasaguideline.
Solution:
@Override
publicintgetItemCount(){
Cursorcursor=mContext.getContentResolver().query(
Contract.ROW_COUNT_URI,newString[]{"count(*)AScount"},
selectionClause,selectionArgs,sortOrder);
try{
cursor.moveToFirst();
intcount=cursor.getInt(0);
cursor.close();
returncount;
}catch(Exceptione){
Log.d(TAG,"EXCEPTIONgetItemCount:"+e);
return-1;
}
}
3.7AddthecontentprovidertotheAndroidManifest1. Runyourapp.
Introduction
484

2. Examinelogcatforthe(verycommon)causeoftheerror.3. AddthecontentprovidertotheAndroidManifestinsidethe<application>tag.
<provider
android:name=".WordListContentProvider"android:authorities="com.android.example.wordlistsqlwithcontentprovi
der.provider">
</provider>
4. Runyourapp.
Yourappshouldrunandbefullyfunctional.Ifitisnot,compareyourcodetothesuppliedsolutioncode,andusethedebuggerandloggingtofindtheproblem.
3.8What'snext?Youhaveimplementedacontentprovideranditsquery()method.
YoufollowedtheerrorstoupdatemethodsintheWordListOpenHelperandWordListAdapterclassestoworkwiththecontentprovider.
Whenyourunyourapp,forqueries,themethodcallsgothroughthecontentprovider.
Fortheinsert,delete,andupdateoperations,yourappisstillcallingWordListOpenHelper.
Withtheinfrastructureyouhavebuilt,implementingtheremainingmethodswillbealotlesswork.
Task4.ImplementContentProvidermethods
4.1getType()ThegetType()methodiscalledbyotherappsthatwanttousethiscontentprovider,todiscoverwhatkindofdatayourappreturns.
UseaswitchstatementtoreturntheappropriateMIMEtypes.
TheMIMEtypesarelistedinthecontract.SINGLE_RECORD_MIME_TYPEisforURI_ALL_ITEMS_CODEMULTIPLE_RECORDS_MIME_TYPEisforURI_ONE_ITEM_CODE
Solution:
@Nullable
@Override
publicStringgetType(Uriuri){
switch(sUriMatcher.match(uri)){
caseURI_ALL_ITEMS_CODE:
returnMULTIPLE_RECORDS_MIME_TYPE;
caseURI_ONE_ITEM_CODE:
returnSINGLE_RECORD_MIME_TYPE;
default:
returnnull;
}
}
Challenge:Howcanyoutestthismethod,asitisnotcalledbyyourapp.Canyouthinkofthreedifferentwaysoftestingthatthismethodworkscorrectly?
4.2CallthecontentprovidertoinsertandupdatewordsinMainActivityTofixinsertoperationsMainActivity().onActivityResultneedstocallthecontentproviderinsteadofthedatabaseforinsertingandupdatingwords.
Introduction
485

1. InMainActivity,deletethedeclarationofmDBanditsinstantiation.
InOnActivityResult()
Inserting:
1. Ifthewordlengthisnotzero,createaContentValuesvariablenamed"values"andaddtheuser-inputtedwordtoitusingthestring"word"asakey.
2. ReplacemDB.insert(word);withaninsertrequesttoatoacontentresolver.
Updating:
1. ReplacemDB.update(id,word);withanupdaterequesttoatoacontentresolver.
Solutionsnippet:
//Updatethedatabase
if(word.length()!=0){
ContentValuesvalues=newContentValues();
values.put(Contract.WordList.KEY_WORD,word);
intid=data.getIntExtra(WordListAdapter.EXTRA_ID,-99);
if(id==WORD_ADD){
getContentResolver().insert(Contract.CONTENT_URI,values);
}elseif(id>=0){
String[]selectionArgs={Integer.toString(id)};
getContentResolver().update(Contract.CONTENT_URI,values,Contract.WordList.KEY_ID,selectionArgs
);
}
//UpdatetheUI
mAdapter.notifyDataSetChanged();
4.3Implementinsert()inthecontentprovider
Theinsert()methodinthecontentproviderisapass-through.Soyou
1. calltheOpenHelperinsert()method,2. convertthereturnedlongidtoacontentURItotheinserteditem,3. andreturnthatURI.
AndroidStudioreportsanerrorforthevaluesparameter,whichyouwillfixinthenextsteps.
Solution:
publicUriinsert(Uriuri,ContentValuesvalues){
longid=mDB.insert(values);
returnUri.parse(CONTENT_URI+"/"+id);
}
4.4Fixinsert()inWordListOpenHelperAndroidStudioreportsanerrorforthevaluesparameter.
1. OpenWordListOpenHelper.Theinsert()methodiswrittentotakeaStringparameter.2. ChangetheparametertobeoftypeContentValues.3. Deletethedeclarationandassignmentofvaluesinthebodyofthemethod.
4.5Implementupdate()inthecontentprovider
Fixtheupdatemethodsinthesamewayasyoufixedtheinsertmethods.
1. InWordListContentProvider,Implementupdate(),whichisonelineofcodethatpassestheidandthewordasarguments.
Introduction
486

returnmDB.update(parseInt(selectionArgs[0]),
values.getAsString(Contract.WordList.KEY_WORD));
2. Youdon'tneedtomakeanychangestoupdateinWordListOpenHelper.
4.6Implementdelete()inthecontentprovider
InWordListContentProvider,Implementthedelete()methodbycallingthedelete()methodinWordListOpenHelperwiththeidofthewordtodelete.
returnmDB.delete(parseInt(selectionArgs[0]));
4.7Runyourapp
Yup.That'sit.Runyourappandmakesureeverythingworks.
Andifyourappstilldoesn'twork,youshouldcorrectanyissues.Youwillneedtheworkingcodeinalaterpractical.Inthatlessonyouwillwriteanappthatusesthiscontentprovidertoloadwordlistdataintoitsuserinterface.
SolutioncodeAndroidStudioproject:word_list_sql_with_content_provider
CodingchallengeNote:Allcodingchallengesareoptionalandarenotprerequisitesforlaterlessons.
Thewordlistisjustalistofsinglewords,whichisn'tterriblyuseful.Extenttheapptodisplaydefinitions,aswellasalinktousefulinformation,suchasdeveloper.android.com,stackoverflow,orwikipedia.Addanactivitythatallowsuserstosearchforwords.AddbasictestsforallthefunctionsinWordListContentProvider.
SummaryInproduction,mostapplicationdeveloperswilltypicallyrefactorappstoaccommodateacontentprovider.Duringrefactoring,developerswilltypicallyexperiencecascadingchangesanderrorsYouneedtoseparatetheUIfromthedatabaseusingacontentproviderandacontentresolverTheUIshouldnotchangeduringtherefactorfromanembeddeddatabasetoanexternaldatasource.TheContractclassdefinesthecommonconstantsforallthecomponentsintherefactoredapplication.TheContractclasslocalizesallthecommonconstantsforeaseofmaintenance.Whenrefactoring,itisveryusefultohavediagramsofthedatabaseaccessclassesCarefulthoughtshouldbegiventodesigningthedatabaseaccessURIsthatotherapplicationsneedtoaccessthedata.AllaccesstoyourdatabasemustbechangedtouseaContentResolverinsteadofdirectlyaccessingahelperclass(forexample:WordListOpenHelper)Iftheunderlyingdatahaschanged,itisimportanttosignaltheUItorefreshusingnotifyDataSetChanged().
RelatedconceptsTherelatedconceptdocumentationisinAndroidDeveloperFundamentals:Concepts.
Introduction
487

ContentProviders
LearnmoreDeveloperDocumentation:
UniformResourceIdentifiersorURIsMIMEtypeMatrixCursorandCursorsContentProviders
Videos:
AndroidApplicationArchitectureAndroidApplicationArchitecture:TheNextBillionUsers
Introduction
488

11.1C:SharingcontentwithotherappsContents:
WhatyoushouldalreadyKNOWWhatyouwillLEARNWhatyouwillDOAppoverviewTask1.MakeyourcontentprovideravailabletootherappsSummaryRelatedconceptLearnmore
Toprotectappanduserdata,appscannotsharedatawithotherappsdirectly.However,appscanmakedataavailabletootherappsbyusingacontentprovider.Clientappscanthenuseacontentresolvertoaccessthedataviathecontentprovider'spublicinterface.
Thefollowingdiagramshowshowahatwholesalermightuseacontentprovidertoshareinformationaboutitsinventorytoappsthatsellhats.
InthispracticalyouwillmodifyWordListSQLWithContentProvidertoallowotherappstoaccessthedatainitscontentprovider.Thenyouwillcreateasecondapp,WordListClient,thathasnodataofitsown,butinstead,fetchesdatafromWordListSQLWithContentProvider'scontentprovider.
WhatyoushouldalreadyKNOWForthispracticalyoushouldbefamiliarwith:
ContentprovidersandresolversHowtorenamepackagesTheWordListSQLWithContentProviderappfromthepreviouspractical
WhatyouwillLEARNYouwilllearnhowto:
Introduction
489

Setpermissions,sootherappscanuseyourapp'scontentprovider.Buildaclientappthatfetchesdatafromyourapp'scontentprovider.
WhatyouwillDOYouwill:
EnableWordListSQLWithContentProvidertoshareitsdata.CreateaclientappthatgetsdatafromthecontentproviderofWordListSQLWithContentProvider.
AppsOverviewYouwillusetwoappsinthispractical.
TheexistingWordListSQLWithContentProviderappthatyoubuiltinthepreviouspractical.AnewWordListClientappthatwillquerythecontentproviderofWordListSQLWithContentProvider.TheUIforthisappisthesameasWordListInteractive.
Introduction
490

Introduction
491

Task1.MakeyourcontentprovideravailabletootherappsBydefault,appscannotaccessthedataofotherapps.
Tomakeyourcontentprovideravailabletootherapps,youmustspecifypermissionsintheAndroidManifestofyourapp.Thisistrueforanyappthathasacontentprovider.EachcontentproviderneedspermissionsspecifiedinitsAndroidManifest.
Permissionsarenotcoveredindetailinthesepracticals.YoucanlearnmoreinImplementingContentProviderPermissions.
1.1.ModifyWordListWithContentProvidertoallowappsaccess1. OpenWordListSQLWithContentProviderinAndroidStudio.2. OpentheAndroidManifest.xmlfile.3. Addanexportstatementinsidethe<provider>.
android:exported="true"
4. Atthetoplevel,insidethe<manifest>tagaddapermissionforthecontentprovider.
Itisgoodpracticetouseyouruniquepackagenameinordertokeepthepermissionunique.
<permission
android:name="com.android.example.wordlistsqlwithcontentprovider.PERMISSION"/>
5. Runtheapptomakesuretherearenoerrors,andleaveitinstalledonthedevice.
InorderforanotherapptoaccessWordListWithContentProvider'scontentprovider,theappwiththecontentproviderhastobeinstalledonthedevice.Itisnotnecessaryforittoberunning.
Younowhaveacontentprovideronyourdevicethatanotherappcanaccess.Next,youaregoingtobuildanapp,WordListClient,thatgetswordsfromthecontentprovideranddisplaysthem.
1.2.CreatetheWordListClientapp
Insteadofbuildingaclientappfromscratch,youwillcreateWordListClientfromacopyofWordListSQLWithContentProvider.Youwillkeeptheuserinterfaceandtheadaptertodisplaythedata.Youwillremovethecontentproviderandthedatabase,andinsteadgetdatafromthecontentproviderofWordListSQLWithContentProvider.
1. CreateacopyoftheWordListSQLWithContentProviderfolderandcallitWordListClient.2. OpenthecopiedappintheWordListClientfolderinAndroidStudio.3. Renamethepackage(Refactor>Rename)towordlistclient.4. Openbuild.gradle(Module:app)andchangetheappidtowordlistclient.5. Instrings.xml,changetheappnametoWordListClient.6. IntheAndroidManifestofWordListClient,removethe<provider>declarationastherewon'tbeaproviderin
WordListClient.7. Atthetoplevel,insidethe<manifest>tag,adda<uses-permission>permissiontousethecontentproviderof
WordListSQLWithContentProvider.
<uses-permissionandroid:name="com.android.example.wordlistsqlwithcontentprovider.PERMISSION"/>
8. DeletetheWordListContentProviderclass,becausetheappwillaccessthecontentproviderofWordListSQLWithContentProvider.
9. DeletetheWordListOpenHelperclass,becauseyourappdoesnotneedadatabaseoranopenhelperofitsown.10. LookatMainActivityandWordListAdapter.Notethatthecodeforinserting,deleting,andupdatingwordsremains
Introduction
492
unchanged,callingthecontentproviderofWordListSQLWithContentProviderusingtheURIsspecifiedintheContractclass.
11. RunWordListClient.Inspiteofnothavingdataofitsown,WordListClientdisplaysdata,whichisthedataitfetchesfromtheWordListSQLWithContentProviderapp'scontentprovider.
12. InsertafewwordsonWordListClient.13. StartWordListSQLWithContentProvider.
NoticethatthewordyouinsertedwithWordListClient,displaysalsoinWordListSQLWithContentProvider,becausetheyshareonedatasource.DeletethewordinWordListSQLWithContentProviderandnoticethewordalsobeingdeletedfromthedisplayofWordListClient.(Youmayneedtoscrolltomakethechangeappear.)
14. Asyouinteractwithothertheotherapp,changesmadebyoneapparereflectedintheotherapp.
Intheprevioushatstoreexample,thewarehouseownercanupdatethehatinventorywithnewredorfancyhats,andthestoreappswillimmediatelybeabletoshowthesenewhatstotheircustomers.Andiftheredhatstoresellsalltheredfancyhats,thefancyhatstorewillknowthattheinventoryoffancyredhatsissoldout.
SolutioncodeAndroidStudioproject:WordListClient
SummaryYourappcanpermitotherappstointeractwithitscontentproviderandgetoreditdata.Youcanbuildaclientappthatinsteadofprovidingit'sowndata,fetchesdatafromanotherapp'scontentprovider.Youcanseparatemanagementofthedatafromdisplayingthedata.Thatis,youcanhaveoneappthatmanagesthecontentprovider,andmanyclientappsthatusethedataprovidedbythecontentprovider.
RelatedconceptTherelatedconceptdocumentationisinAndroidDeveloperFundamentals:Concepts.
ContentProviders
LearnmoreDeveloperDocumentation:
WorkingwithSystemPermissionsImplementingContentProviderPermissions
Introduction
493

12.1:LoadanddisplaydatafetchedfromacontentproviderContents:
WhatyoushouldalreadyKNOWWhatyouwillLEARNWhatyouwillDOAppoverviewTask1.CreatethebaseappforWordListLoaderTask2:MainActivity:AddingaLoaderManagerandLoaderCallbacksTask3:WordListAdapter:ImplementsetData(),getItemCount(),andonBindViewHolder()SummaryRelatedconceptLearnmore
Inthispracticalyouwilllearnhowtoloaddataprovidedbyanotherapp'scontentproviderinthebackgroundanddisplayittotheuser,whenitisready.
AskingaContentProviderfordatayouwanttodisplaymaytaketime.IfyourequestdatafromthecontentproviderfromanActivity(andrunitontheUIthread),theappmaygetblockedlongenoughtocauseavisibledelayfortheuser,andthesystemmayevenissuean"ApplicationNotResponding"message.Therefore,youshouldloaddataonaseparatethread,inthebackground,anddisplaytheresultsafterloadingisfinished.
Torunaqueryonaseparatethread,youuseloaderthatrunsasynchronouslyinthebackgroundandreconnectstotheActivitywhenfinished.Specifically,CursorLoaderrunsaqueryinthebackground,andautomaticallyre-runsitwhendataassociatedwiththequerychanges.
YouhaveusedanAsyncTaskLoaderinapreviouspractical.CursorLoaderextendsAsyncTaskLoadertoworkwithcontentproviders.
Atahighlevel,youneedthefollowingpiecestousealoadertodisplaydatafromacontentprovider:
AnActivityorfragment.AninstanceoftheLoaderManagerintheActivity.ACursorLoadertoloaddatabackedbyaContentProvider.AnimplementationforLoaderManager.LoaderCallbacks,anabstractcallbackinterfacefortheclienttointeractwiththeLoaderManager.Awayofdisplayingtheloader'sdata,commonlyusinganadapter.Forexample,youcoulddisplaythedatainaRecyclerView.
Thefollowingdiagramshowsacompleteapparchitecturewithaloader.
Theloaderperformsqueryingforitemsinthebackground.Ifthedatachanges,itautomaticallygetsanewsetofdatafortheadapter.Theinsert,delete,andupdateoperationsdonotusetheloader.However,afterthedatachangesbecauseofaninsert,delete,orupdateoperation,theloaderfetchestheupdateddataandnotifiestheadapter.
Introduction
494

WhatyoushouldalreadyKNOWForthispracticalyoushouldbeableto:
DisplaydatainaRecyclerView.WorkwithsimpleAdapters.UnderstandCursors(seepreviouspracticalandconcepts).WorkwithAsyncTaskLoader.UnderstandhowtoworkwithaContentProviders.
WhatyouwillLEARNYouwilllearnto:
LoaddatafromacontentproviderusingaCursorLoader.Usecodefromafinishedapptoquicklybuildanewappwithrelatedfunctionality.
WhatyouwillDOYouwillcreateabasicappthatusesaCursorLoadertoquerythecontentproviderofWordListSQLWithContentProvideranddisplaythedatainaRecyclerView.UseWordListClientasareferenceforsomeofthecode.Inparticular,youcanreusetheContractandWordItemClasses,aswellaspartsoftheMainActivityandWordListAdapterclasses.TheappyouwillcreatewillhaveaverybasicUI.UnlikeWordListClient,itwillnothaveinsert,delete,orupdatefunctionality.
Introduction
495

AppOverviewUsingWordListClientfromthepreviouspracticalasasourceforsomeofthecode,youwillcreateanewapp,WordListLoaderthatloadsanddisplaysdatafromthecontentproviderforWordListSQLWithContentProvider.Thefollowingscreenshotshowshowthefinishedappwilldisplaythewords.
Introduction
496

Introduction
497
IMPORTANT:YoumustinstallaWordListWithContentProviderappthatsharesitscontentprovidersothatthereisacontentprovideravailableforWordListLoader.UsetheWordListClientappthatyoubuiltinthepreviouspracticalasareferenceandtoreusecode.
Task1.CreatethebaseappforWordListLoaderInthistaskyouwillcreateaprojectandpartsoftheappthatarenotspecifictoloaders.YouneedtheWordListClientapploadedinAndroidStudio,soyoucancopycodefromit.
1.1CreateaprojectwithContractandWordListItemclassesandlayoutfiles
1. StartAndroidStudioandloadthefinishedWordListClientappfromthepreviouspractical.2. CreateanewprojectwiththeEmptyActivitytemplateandcallitWordListLoader.3. AddthepermissionforWordListSQLWithContentProvider'scontentprovidertotheAndroidManifest.
<uses-permissionandroid:name=
"com.android.example.wordlistsqlwithcontentprovider.PERMISSION"/>
4. CreateanewJavaclassandcallitContract.5. CopytheContractclassfromWordListClientintothenewContractclassofWordListLoader.Makesurenottocopythe
packagename.6. InWordListLoader,createanewJavaclassandcallitWordListItem.7. CopytheWordItemclassfromWordListClientintothenewWordItemclassofWordListLoader.8. Copythelayoutfortherecyclerviewfromactity_main.xmlfromWordListClienttoWordListLoader.Removethefloating
actionbutton.9. CreateanewlayoutforWordListItem,wordlist_item.xml.10. Usingwordlist_item.xmlfromWordListClientasyourreference,createaLinearLayoutwithasingleTextView.
TheidoftheTextViewmustbeandroid:id="@+id/word".Resolvestrings,dimensions,andstylesthatyouarereusing.Notethatyoucancopy/pastefilesbetweenprojects.OverwritetheexistingXMLfilesinWordListLoader.Changetheapp_nametoWordListLoaderinstrings.xml.
11. Atthispoint,youshouldseenoerrorsinAndroidStudio.
1.2AddaRecyclerViewtoMainActivityTodisplaythedata,addaRecyclerViewtoyourMainActivity.Youcandothisonyourown,orreusecodefromWordListClient.
1. AddtheRecyclerViewandCoordinatorLayoutfromthesupportlibrarytoyourbuild.gradlefile.
compile'com.android.support:recyclerview-v7:24.1.1'
compile'com.android.support:design:24.1.1'
2. ImportthesupportlibraryversionsofRecyclerViewandLinearLayoutManagerintoyourMainActivity.
importandroid.support.v7.widget.LinearLayoutManager;
importandroid.support.v7.widget.RecyclerView;
3. CreateaTAGforMainActivity.4. CreateaprivatevariablemRecyclerViewfortheRecyclerView.5. CreateaprivatevariablemWordListAdapterfortheadapter.Thiswillremainred,untilyoucreatetheadapterclass.6. InonCreate()ofMainActivity,createaRecyclerView,createaWordListAdapter,settheadapterontheRecyclerview,
andattachaLinearLayoutManger.SeeWordListClientforsamplecode.
Introduction
498

//Createrecyclerview.
mRecyclerView=(RecyclerView)findViewById(R.id.recyclerview);
//Createanadapterandsupplythedatatobedisplayed.
mAdapter=newWordListAdapter(this);
//Connecttheadapterwiththerecyclerview.
mRecyclerView.setAdapter(mAdapter);
//Givetherecyclerviewadefaultlayoutmanager.
mRecyclerView.setLayoutManager(newLinearLayoutManager(this));
7. Ifyoubuildyourappnow,onlyWordListAdaptershouldbered.Theappdoesnotrunyet.
1.3CreateWordListAdapter
UseWorldListAdapterfromWordListClientandthesnippetsbelowasareferenceforcreatingthisadapter.Ifyouneedarefresher,revisittheRecyclerViewchapterofthiscourse.
1. CreateanewJavaclassWordListAdapterthatextendsRecyclerview.Adapter.
publicclassWordListAdapter
extendsRecyclerView.Adapter<WordListAdapter.WordViewHolder>{}
UsingWordListAdapterasareference,addthefollowing:
2. AddaninnerViewHolderclasswithoneTextView,calledwordItemViewandinflateitfromthetextviewwiththeid"word".
classWordViewHolderextendsRecyclerView.ViewHolder{
publicfinalTextViewwordItemView;
publicWordViewHolder(ViewitemView){
super(itemView);
wordItemView=(TextView)itemView.findViewById(word);
}
}
3. AddaTAGforlogmessages.
privatestaticfinalStringTAG=WordListAdapter.class.getSimpleName();
4. AddmembervariablesfortheLayoutInflatorandthecontext.
privatefinalLayoutInflatermInflater;
privateContextmContext;
5. ImplementtheconstructorforWordListAdapter.
publicWordListAdapter(Contextcontext){
mInflater=LayoutInflater.from(context);
this.mContext=context;
}
6. Implement(orcopy)theonCreateViewHoldermethodtoinflateawordlist_itemview.
@Override
publicWordViewHolderonCreateViewHolder(
ViewGroupparent,intviewType){
ViewmItemView=mInflater.inflate(
R.layout.wordlist_item,parent,false);
returnnewWordViewHolder(mItemView);
}
7. PressAlt-Enterontheadapter'sclassheaderand"chooseimplementmethods"tocreatemethodstubsforthe
Introduction
499

getItemCount()andonBindViewHolder()methods.8. Atthispoint,thereshouldbenoredunderlinesorwordsinyourcode.9. Runyourapp,anditshouldshowablankactivityasshowninthefollowingscreenshot,sinceyouhaven'tloadedany
datayet.Youwilladddatainthenexttask.
Introduction
500

Introduction
501

Task2.MainActivity:AddingaLoaderManagerandLoaderCallbacksWhenyouusealoadertoloadyourdataforyou,youusealoadermanagertotakecareofthedetailsofrunningtheloader.
TheLoaderManagerisaconvenienceclassthatmanagesallyourloaders.Youonlyneedoneloadermanagerperactivity.Forexample,theloadermanagertakescareofregisteringanobserverwiththecontentprovider,whichreceivescallbackswhendatainthecontentproviderchanges.
2.1AddtheLoaderManager
1. OpenMainActivity.java2. ExtendtheclasssignaturetoimplementLoaderManager.LoaderCallbacks.Importthesupportlibraryversion.
publicclassMainActivityextendsAppCompatActivityimplementsLoaderManager.LoaderCallbacks<Cursor>
3. ImplementmethodstubsforonCreateLoader(),onLoadFinished(),andonLoaderReset().4. InonCreate(),createaLoaderManagerfromthesupportlibraryandregisteraloaderwithit.
Thefirstargumentisanumerictag;sinceyouonlyhaveoneloader,itdoesn'tmatterwhatnumberyouchoose.Youarenotpassinginanydata,sothesecondargumentisnull.AndyoubindtheloadertothecurrentMainActivity(this).
getSupportLoaderManager().initLoader(0,null,this);
2.2ImplementonCreateLoader()
TheLoaderManagercallstheonCreateLoader()methodtocreatetheloader,ifitdoesnotalreadyexist.
Youcreatealoaderbysupplyingitwithacontext,andtheURIfromwhichtoloaddata—inthiscase,forcontentproviderofWordListSQLWithContentProvider,theURIspecifiedintheContract.
1. InonCreateLoader(),createaqueryUriandprojection.UsethesameURIthatthecontentresolverisusingtoquerythecontentprovider.YoucanfinditintheContractanditisusedinWordListClient.
2. CreateandreturnanewCursorLoaderfromthesearguments.ImporttheCursorLoaderfromthesupportlibrary.
@Override
publicLoader<Cursor>onCreateLoader(intid,Bundleargs){
StringqueryUri=Contract.CONTENT_URI.toString();
String[]projection=newString[]{Contract.CONTENT_PATH};
returnnewCursorLoader(this,Uri.parse(queryUri),projection,null,null,null);
}
2.3ImplementonLoadFinished()Whenloadinghasfinished,youneedtosendthedatatotheadapter.
1. CallsetData()inonLoadFinished().Thecodewillturnred,andyouwillimplementitinthenexttask.TheargumentforsetData()isthecursorwith"data"returnedbytheloaderwhenitisfinishedloading.
@Override
publicvoidonLoadFinished(Loader<Cursor>loader,Cursordata){
mAdapter.setData(data);
}
2.4ImplementonLoaderReset()
Introduction
502

Onresettingtheloader,lettheadapterknowthatthedatahasbecomeunavailablebypassingnulltosetData().
@Override
publicvoidonLoaderReset(Loader<Cursor>loader){
mAdapter.setData(null);
}
Task3.WordListAdapter:ImplementsetData(),getItemCount(),andonBindViewHolder()Asyourfinaltasks,youneedtoimplementthesetData()methodreferencedabove,andimplementonBindViewHolder()toworkwiththeloadertodisplaythedata.Hereishowthishappens:
Whentheloaderfinishesloadingneworchangeddatainthebackground,theonLoadFinished()methodthatyouimplementedintheMainActivityisexecuted.onLoadFinished()callsWordListAdapter.setData(),whichupdatesthemCursorvariableintheadapterwiththeloader'slatestdataandnotifiestheadapterthatthedatahaschanged.TheadapterupdatestheUIwiththenewdata,bybindingviewstothedatainonBindViewHolder().
3.1.ImplementsetData()
Youneedawaytosetandstorethelatestloadedversionofthedatawiththeadapter.Forthisapp,theloaderreturnsdataasacursor,soyouneedtocreateaCursormembervariablemCursorthatwillalwaysholdthelatestdataset.
ThesetData()methodiscalledbytheloaderwhenitfinishedloadingorisreset,anditneedstoupdatemCursor.
1. CreateaprivatemembervariableoftypeCursor.Callit"mCursor"andinitializeittonull.2. ImplementthepublicmethodsetData().IttakesaCursorargumentandreturnsnothing.3. Inthebody,setmCursortothepassedinCursorargumentandcallnotifyDataSetChanged(),sothattheadapter
updatesthedisplay.
publicvoidsetData(Cursorcursor){
mCursor=cursor;
notifyDataSetChanged();
}
3.2.ImplementgetItemCount()
Insteadof0,getItemCount()needstoreturnthenumberofitemsinmCursor.IfmCursorisnull,return-1.
@Override
publicintgetItemCount(){
if(mCursor!=null){
returnmCursor.getCount();
}else{
return-1;
}
}
3.3ImplementonBindViewHolder()
InWordListClient,theonBindViewHolder()methodusesacontentresolvertofetchdatafromWordListSQLWithContentProvider'scontentprovider.Inthisapp,onBindViewHolder()usesthedataprovidedbytheloaderandstoredinmCursor.
InonBindViewHolder,handlethefollowingsituations.
1. IfmCursorisnull,donothing,butdisplayalogmessage.Inarealapplication,youwouldneedtoalsonotifytheuserin
Introduction
503

ameaningfulway.2. IfmCursorisnotnullbutcontainsnoword,setthetextoftheTextViewtoERROR:NOWORD.Again,inareal
application,youwouldhandlethisdependingonthetypeofappyouhave.3. Otherwise,getthecolumnindexforthe"word"column(youcannotassumethecolumnisinafixedlocationinthe
cursor'srow),andusingtheindex,retrievetheword.Setthetextofthetextviewtotheword.
@Override
publicvoidonBindViewHolder(WordViewHolderholder,intposition){
Stringword="";
if(mCursor!=null){
if(mCursor.moveToPosition(position)){
intindexWord=mCursor.getColumnIndex(Contract.WordList.KEY_WORD);
word=mCursor.getString(indexWord);
holder.wordItemView.setText(word);
}else{
holder.wordItemView.setText(R.string.error_no_word);
}
}else{
Log.e(TAG,"onBindViewHolder:Cursorisnull.");
}
}
3.4Runandtestyourapp
YourWordListLoaderappshouldexactlyworkthesameastheWordListClientappfordisplayingalistofwords.Totestyourapp,dothefollowing.
1. MakesureWordListSQLWithContentProvderisinstalledonthedevice,sothatyourapphasacontentprovidertoloadfrom.Otherwise,yourappwilldisplayablanktextview.
2. RunWordListLoader.YoushouldseethesamelistofwordsasinWordListSQLWithContentProvider.
SolutioncodeAndroidStudioproject:WordListLoader
SummaryInthischapter,youlearnedhowtousealoadertoloaddatafromacontentproviderthatisnotpartofyourapp.
RelatedconceptTherelatedconceptdocumentationisinAndroidDeveloperFundamentals:Concepts.
Loaders
LearnmoreLoadersRunningaquerywithaCursorLoaderCursorLoader
Introduction
504

Introduction
505

Appendix:HomeworkAssignmentsThisappendixlistspossiblehomeworkassignmentsthatstudentscancompleteattheendofeachpractical.Itistheinstructor'sresponsibilityto:
assignhomeworkifrequiredcommunicatetostudentshowtosubmitthehomeworkassignmentsgradethehomeworkassignments
Instructorscanusethesesuggestionsaslittleorasmuchastheywant,andshouldfeelfreetoassignanyotherhomeworktheyfeelisappropriate.
Appendix:Homework
506

HomeworkAssignments:Lesson1Contents:
1.1:InstallAndroidStudioandRunHelloWorld1.2A,B:MakeYourFirstInteractiveUI/UsingLayouts1.3:TextandScrollingViews1.4:Resources
1.1:InstallAndroidStudioandRunHelloWorld
Buildandrunanapp
1. CreateanewAndroidprojectfromtheEmptyTemplate.2. AddloggingstatementsforvariousloglevelsinonCreate()inthemainactivity.3. Createanemulatorforadevice,targetinganyversionofAndroidyoulike,andruntheapp.4. Usefilteringinlogcattofindtheyourlogstatementsandadjustthelevelstoonlydisplaydebugorerrorlogging
statements.
Answerthesequestions
Question1Whatisthenameofthelayoutfileforthemainactivity?
Question2Whatisthenameofthestringresourcethatspecifiestheapplication'sname?
Question3Whichtooldoyouusetocreateanewemulator?
AndroidDeviceMonitorAVDManagerSDKManagerThemeEditor
Question4
Whichdeviceshavethefollowingspecifications?Youcanseethedifferentdevicespecificationswhilecreatinganewdeviceemulator.
Whatisdevice1?
Size=4.7inchesResolution=768x1280
Whatisdevice2?
Size=8.86inchesResolution=2048x1536
Question5
HomeworkLesson1
507

Assumethatyourappincludesthisloggingstatement:
Log.i("MainActivity","MainActivitylayoutiscomplete");
Youseethestatement"MainActivitylayoutiscomplete"inthelogcatconsoleiftheLoglevelmenuissettowhichofthefollowing?(Hint:multipleanswersareOK.)
VerboseDebugInfoWarnErrorAssert
Question6
Ifyourapplogsthemessage"XXActivitylayoutiscomplete"eachtimeanewactivityisdisplayed,howcanyoumakethelogcatconsoledisplayONLYstatementsthatinclude"layoutiscomplete?"
Submityourappforgrading
Noapptosubmitforthishomeworkassignment.
1.2A,B:MakeYourFirstInteractiveUI/UsingLayouts
BuildandrunanappOpentheHelloConstraintappthatyoucreatedintheUsingLayoutslesson.
1. Modifytheactivity_main.xmllayouttoincludeathirdbuttoncalledZerothatappearsbetweenthe"Toast"and"Count"buttons.
2. InitiallytheZerobuttonhasagraybackground.3. Displayallthreebuttonsontheleftoftheshow_countTextView.Distributethebuttonsverticallybetweenthetopand
bottomoftheshow_countTextView.4. MakesurethatyouincludetheZerobuttonforthelandscapeorientationinactivity_main.xml(land),andalsofora
tablet-sizedscreeninactivity_main(xlarge).5. MaketheZerobuttonchangethevalueintheshow_countTextViewto0.6. UpdatetheclickhandlerfortheCountbuttonsothatitchangesitsownbackgroundcolor,dependingonwhetherthe
newcountisoddoreven.Hint:Don'tusefindViewByIdtofindtheCountbutton.Istheresomethingelseyoucanuse?FeelfreetotouseconstantsontheColorclassforthetwodifferentbackgroundcolors.
7. AlsoupdatetheclickhandlerfortheCountbuttontosetthebackgroundcolorfortheZerobuttontosomethingother
HomeworkLesson1
508
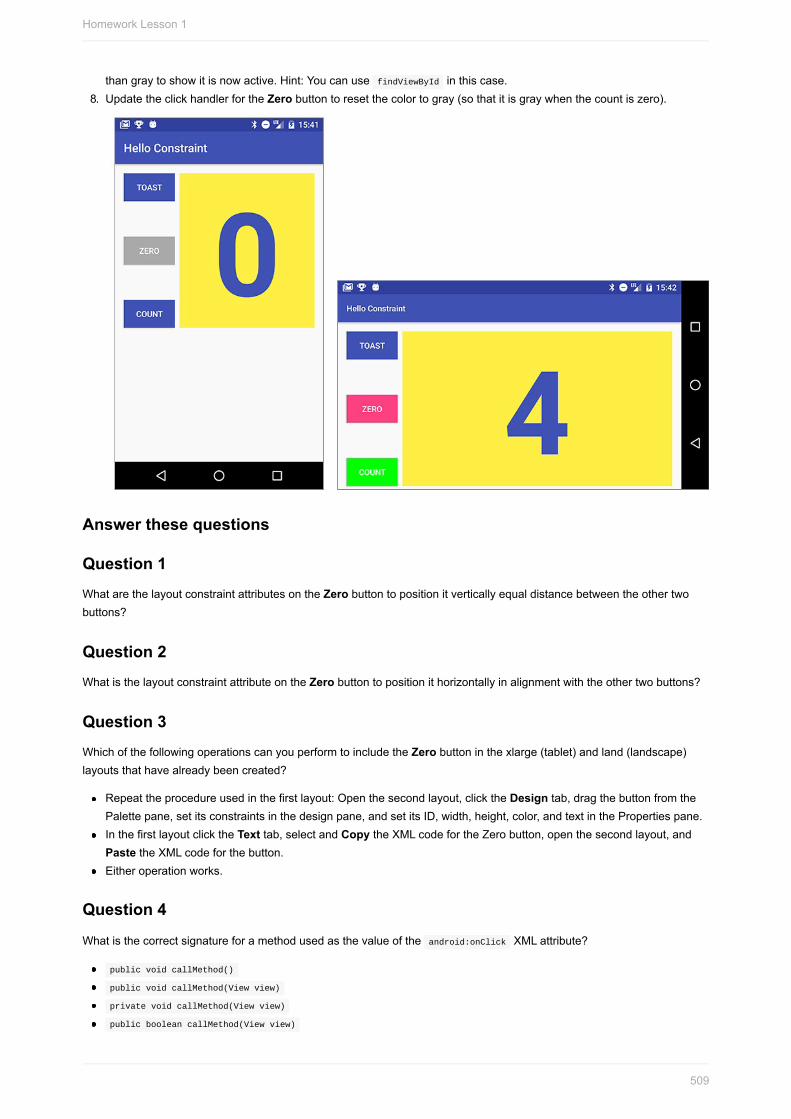
thangraytoshowitisnowactive.Hint:YoucanusefindViewByIdinthiscase.8. UpdatetheclickhandlerfortheZerobuttontoresetthecolortogray(sothatitisgraywhenthecountiszero).
Answerthesequestions
Question1WhatarethelayoutconstraintattributesontheZerobuttontopositionitverticallyequaldistancebetweentheothertwobuttons?
Question2WhatisthelayoutconstraintattributeontheZerobuttontopositionithorizontallyinalignmentwiththeothertwobuttons?
Question3WhichofthefollowingoperationscanyouperformtoincludetheZerobuttoninthexlarge(tablet)andland(landscape)layoutsthathavealreadybeencreated?
Repeattheprocedureusedinthefirstlayout:Openthesecondlayout,clicktheDesigntab,dragthebuttonfromthePalettepane,setitsconstraintsinthedesignpane,andsetitsID,width,height,color,andtextinthePropertiespane.InthefirstlayoutclicktheTexttab,selectandCopytheXMLcodefortheZerobutton,openthesecondlayout,andPastetheXMLcodeforthebutton.Eitheroperationworks.
Question4
Whatisthecorrectsignatureforamethodusedasthevalueoftheandroid:onClickXMLattribute?
publicvoidcallMethod()
publicvoidcallMethod(Viewview)
privatevoidcallMethod(Viewview)
publicbooleancallMethod(Viewview)
HomeworkLesson1
509

Question5
TheclickhandlerfortheCountbuttonstartswiththefollowingmethodsignature:
publicvoidcountUp(Viewview)
Whichofthefollowingtechniquesismoreefficienttousewithinthishandlertochangethebutton'sbackgroundcolor?Chooseone:
UsefindViewByIdtofindtheCountbuttonview.AssigntheresulttoaViewvariable,andthenusesetBackgroundColor().UsetheviewparameterthatispassedtotheclickhandlerwithsetBackgroundColor().
Submityourappforgrading
Guidanceforgraders
Checkthattheapphasthefollowingfeatures:
ItdisplaystheZerobutton.TheZerobuttonuseslayoutconstraintstopositionitselfbetweentheToastandCountbuttons.Itincludesanimplementationofactivity_main.xml,activity_main.xml(land),andactivity_main.xml(xlarge),includinganadjustmenttothetoastbuttoninactivity_main.xml(land).ItincludesanimplementationoftheclickhandlermethodfortheZerobuttontoresetthecountto0.Themethodmustshowthezerocountintheshow_countview.TheclickhandlermustalsoresettheZerobutton'sownbackgroundcolortogray.TheclickhandlermethodfortheCountbuttonhasbeenupdatedtochangeitsownbackgroundcolordependingonwhetherthenewcountisoddoreven.Thismethodmustusetheviewparametertoaccessthebutton.ThismethodmustalsochangethebackgroundoftheZerobuttontoacolorotherthangray.
1.3:TextandScrollingViews
Buildandrunanapp
OpentheScrollingText2appthatyoucreatedintheWorkingwithTextViewElementslesson.
1. Changethesubheadingsothatitwrapswithinacolumnontheleftthatis100dpwide,asshownbelow.2. Placethetextofthearticletotherightofthesubheadingasshownbelow.
HomeworkLesson1
510

HomeworkLesson1
511

Answerthesequestions
Question1HowmanyViewscanaScrollViewcontain?Chooseone:
OneViewonlyOneVieworoneViewGroupAsmanyasyouneed
Question2
WhichXMLattributedoyouuseinaLinearLayouttoshowviewsside-by-side?Chooseone:
android:orientation="horizontal"
android:orientation="vertical"
android:layout_width="wrap_content"
Question3
WhichXMLattributedoyouusetodefinethewidthoftheLinearLayoutinsidethescrollingview?Chooseone:
android:layout_width="wrap_content"
android:layout_width="match_parent"
android:layout_width="200dp"
Submityourappforgrading
Guidanceforgraders
Checkthattheapphasthefollowingfeatures:
Thelayoutshowsthesubheadingintheleftcolumnandthearticletextintherightcolumn,asshownintheabovefigure.TheScrollViewincludesaLinearLayoutwithtwoTextViews.TheLinearLayoutorientationissettohorizontal.
1.4:Resources
Loadandrunanexistingapp,exploreresources
1. LoadoneofthesampleappsintoAndroidStudio.2. OpenoneoftheJavaactivityfilesintheapp.Lookforaclass,type,orprocedurethatyou'renotfamiliarwithandlook
itupintheAndroidDeveloperdocumentation.3. GotoStackoverflowandsearchforquestionsandanswerstothesametopic.4. FindtheGoogleDeveloperschannelonYouTube.FindaplaylistorvideoaboutAndroidStudioandwatchoneofthe
videos.
Answerthesequestions
Question1
HomeworkLesson1
512

InAndroidStudio,whatismenucommandtoopenthelistofsampleapps?
Question2
Whatdidyoulookup,andwhataretheURLstothedocumentationyoufound?
Question3
Whatare2differencesbetweenthekindofinformationyoufindintheAndroidDeveloperdocumentationandonStackoverflow?WhenwouldyouusetheAndroidDeveloperdocumentation?WhenwouldyouuseStackoverflow?
Question4
WhatistheURLtotheAndroidStudioPlaylistorvideothatyouwatched?Whatdidyoulearn?
Submityourappforgrading
GuidanceforgradersNoapptosubmitforthishomeworkassignment.
HomeworkLesson1
513

HomeworkAssignments:Lesson2Contents:
2.1:CreateandStartActivities2.2:TheActivityLifecycleandManagingState2.3:StartActivitieswithImplicitIntents
2.1:CreateandStartActivities
Buildandrunanapp
OpentheHelloToastappthatyoucreatedintheMakeYourFirstInteractiveUIlesson.
1. Modifythetoastbuttonsothatitlaunchesanewactivitytodisplaytheword"Hello!"andthecurrentcount,asshownbelow.
2. Changethetextonthetoastbutton.
Answerthesequestions
Question1
HomeworkLesson2
514

Whatmenucommanddoyouusetoaddanewactivitytoyourapp?
Question2
WhatfilesareaddedwhenyouaddanewactivitycalledHelloActivitytoyourapp?Whatchangesaremadetoexistingfiles?
Question3
Whichconstructormethoddoyouusetocreateanewexplicitintent?
newIntent()
newIntent(Contextcontext,Class<?>class)
newIntent(Stringaction,Uriuri)
newIntent(Stringaction)
Question4
Howdoyouaddthecurrentvalueofthecounttotheintent?
AstheintentdataAsanintentactionAsanintentextra
Question5HowdoyouupdatethecountinHelloActivitytodisplaythecurrentcount?
Gettheintenttheactivitywaslaunchedwith.Getthecurrentcountvalueoutoftheintent.Updatethetextviewforthecount.Alloftheabove.
Submityourappforgrading
GuidanceforgradersCheckthattheapphasthefollowingfeatures:
ItdisplaystheHellobuttoninsteadoftheHelloToastbutton.TheHelloActivitystartswhentheHellobuttonispressed,andthenewactivitydisplaysthemessage"Hello!"andthecurrentcountfromthemainactivity.TheHelloActivity.javaandactivity_hello.xmlfileshavebeenaddedtotheproject.Theactivity_hello.xmlfilecontainstwotextviewobjects,onewiththestringHello!andthesecondwiththecount.ItincludesanimplementationofaclickhandlermethodfortheHellobutton(inMainActivity).ItincludesanimplementationoftheonCreate()methodfortheHelloActivityandupdatesthecountTextViewwiththecountfromMainActivity.
2.2:TheActivityLifecycleandManagingState
Buildandrunanapp1. Createanappwithalayoutthatholdsacounter,abuttontoincrementthecounter,andanedittext.Seethe
screenshotbelowasasample.Youdon'thavetopreciselyduplicatethelayout.
HomeworkLesson2
515

2. Addaclickhandlerforthebuttonthatincrementsthecounter.3. Runtheappandincrementthecounter.Entersometextintotheedittext.4. Rotatethedevice.Notethatthecounterisreset,butthecontentsoftheedittextisnot.5. ImplementonSaveInstanceState()tosavethecurrentstateoftheapp.6. UpdateonCreate()torestorethestateoftheapp.7. Rotatethedeviceandensurethattheappstateispreserved.
HomeworkLesson2
516

HomeworkLesson2
517

Answerthesequestions
Question1Whenyourotatethedevice(beforeyouimplementonSaveInstanceState()),thecounterisresetto0butthecontentsoftheedittextispreserved.Why?
Question2WhatActivitylifecyclemethodsarecalledwhenadevice-configurationchange(suchasrotation)occurs?
Question3WhenintheActivitylifecycleisonSaveInstanceState()called?
Question4WhichisthecorrectmethodsignatureforonSaveInstanceState():
voidonSaveInstanceState(BundleoutState)
voidonSaveInstanceState()
voidonSaveInstanceState(BundleoutState,PersistableBundleoutPersistentState)
Question5
WhatisthedifferencebetweenrestoringyouractivitystateinonCreate()versusinonRestoreInstanceState()?
Question6
Ifyouquitandrestartyourapp,whathappenstotheActivitystate?
Submityourappforgrading
GuidanceforgradersCheckthattheapphasthefollowingfeatures:
Itdisplaysacounter,abuttontoincrementthatcounter,andanedittext.Clickingthebuttonincrementsthecounterby1.Whenthedeviceisrotated,boththecounterandedittextstateareretained.TheimplementationofMainActivity.javausestheonSaveInstanceState()methodtostorethecountervalue.TheimplementationofonCreate()testsfortheexistenceoftheoutStatebundle.Ifthatbundleexists,thecountervalueisrestoredandsavedtothetextview.
2.3:StartActivitieswithImplicitIntents
BuildandrunanappOpentheImplicitIntentsappthatyoucreatedintheStartActivitieswithImplicitIntentslesson.
1. Addanotherbuttonatthebottomofthescreen.2. Whenthebuttonisclicked,launchacameraapptotakeapicture.(Youdon'tneedtoreturnthepicturetotheoriginal
HomeworkLesson2
518

app.)Note:IfyouusetheAndroidemulatortotestthecamera,opentheemulatorconfigurationintheAndroidAVDmanager,chooseAdvancedSettings,andthenchoose"Emulated"forbothfrontandbackcameras.Restartyouremulatorifnecessary.
HomeworkLesson2
519

HomeworkLesson2
520

Answerthesequestions
Question1Whichconstructormethoddoyouusetocreateanimplicitintenttolaunchacameraapp?
newIntent()
newIntent(Contextcontext,Class<?>class)
newIntent(Stringaction,Uriuri)
newIntent(Stringaction)
Question2
Whichintentactiondoyouusetorequestacameraapp?
Submityourappforgrading
GuidanceforgradersCheckthattheapphasthefollowingfeatures:
Itdisplaysa"TakeaPicture"buttonatthebottomoftheapp.Whenclicked,thebuttonlaunchesacameraapponthedevice.TheonclickmethodfortheTakeaPicturebuttonensuresthereisanavailableapponthedevice(withtheresolveActivity()andgetPackageManager()methods)beforesendingtheintent.
HomeworkLesson2
521

HomeworkAssignments:Lesson3&4Contents:
3.1:Debugging3.2:Testing3.3:SupportLibrariesandBackwardsCompatibility4.1:UserInputControls4.2:Menus4.3:ScreenNavigation4.4:RecyclerView
3.1:Debugging
Buildandrunanapp
OpentheSimpleCalcappfromtheUsingtheDebuggerlesson.
1. InMainActivity,placeabreakpointonthefirstlineoftheonAdd()method.2. Runtheappinthedebugger.Performanaddoperationintheapp.Theexecutionstopsatthebreakpoint.3. UsetheStepIntobuttontofollowtheexecutionoftheappstepbystep.NotethatStepIntoopensandexecutesfiles
fromtheAndroidframework,enablingyoutoseehowAndroiditselfoperatesonyourcode.4. Examinehowthedebuggerwindowschangeasyoustepthroughthecodeforthecurrentstackframeandlocal
variables.5. Examinehowthecodeitselfintheeditorwindowsisannotatedaseachlineisexecuted.6. UsetheStepOutbuttontoreturnbacktoyourappiftheexecutionstackgetstoodeeptounderstand.
Answerthesequestions
Question1
WhatisthedifferencebetweenStepOverandStepInto?
Question2
Howdoeseachpartofthedebuggerviewchangewhenyoustepintoanewmethod?
Submityourappforgrading
GuidanceforgradersNoapptosubmitforthishomeworkassignment.
3.2:Testing
Buildandrunanapp
OpentheSimpleCalcTestappthatyoucreatedintheTestingAppswithUnitTestslesson.You'regoingtoaddanPOWbuttontothelayout.Thisbuttoncalculatesthefirstoperandraisedtothepowerofthesecondoperand.Forexample,givenoperandsof5and4,theappcalculates5raisedtothepowerof4,or625.
HomeworkLessons3,4
522

BEFOREyouwritetheimplementationofyourpowerbutton,considerthekindoftestsyoumightwanttoperformwiththiscalculation.Whatunusualvaluesmayoccurinthiscalculation?
1. UpdatetheCalculatorclassintheapptoincludeapow()method.(Hint:Consultthedocumentationforthejava.lang.Mathclass.)
2. UpdatetheMainActivityclasstoconnectthePOWbuttontothecalculation.3. Writeeachofthefollowingtestsforyourpow()method.Runyourtestsuiteeachtimeyouwriteatest,andfixthe
originalcalculationinyourappifnecessary.Atestwithpositiveintegeroperands.Atestwithanegativeintegerasthefirstoperand.Atestwithanegativeintegerasthesecondoperand.Atestwith0asthefirstoperandandapositiveintegerasthesecondoperand.Atestwith0asthesecondoperand.Atestwith0asthefirstoperandand-1asthesecondoperand.(Hint:consultthedocumentationforDouble.POSITIVE_INFINITY.)Atestwith-0asthefirstoperandandanynegativenumberasthesecondoperand.
Answerthesequestions
Noquestions.
Submityourappforgrading
Guidanceforgraders
Checkthattheapphasthefollowingfeatures:
ItdisplaysaPOWbuttonthatprovidesanexponential("powerof")calculation.TheimplementationofMainActivityincludesanonclickmethodforthePOWbutton.TheimplementationofCalculatorincludesapow()methodthatperformsthecalculation.TheCalculatorTestmethodincludesseparatetestmethodsforthepow()methodintheCalculatorclassthatperformtestsfornegativeand0operands,andforthecaseof0and-1astheoperands.
3.3:SupportLibrariesandBackwardsCompatibility
RunanappOpentheHelloCompatappcreatedintheUsingtheAndroidSupportLibrarieslesson.
1. SetadebuggerbreakpointonthelineinthechangeColor()methodthatactuallychangesthecolor:
intcolorRes=ContextCompat.getColor(this,colorResourceName);
2. Runtheappindebugmodeonadeviceoremulatorthat'srunninganAPIversion23orhigher.StepintothegetColor()method,followingthemethodcallsdeeperintothestack.ExaminehowtheContextCompatclassdetermineshowtogetthecolorfromtheresources,andwhichotherframeworkclassesituses.
Note:Someclassesmayproduceawarningthatthe"sourcecodedoesnotmatchthebytecode."ClickStepOuttoreturntoaknownsourcefile,orkeepclickingStepIntountilthedebuggerreturnsonitsown.
3. RepeatthepreviousstepforadeviceoremulatorrunninganAPIversionlowerthan23.Notethedifferentpathsthattheframeworktakestoaccomplishgettingthecolor.
Answerthesequestions
HomeworkLessons3,4
523

Question1
Basedonyourexplorationinthedebugger,howdoestheAndroidplatformdecidewhichimplementationtouseintheCompatclasses?
Question2
Besidesthedifferencesinthemethodsignatures,whatisthedifferencebetweentheimplementations?Whyisacompatibilityclassrequiredatall?
Submityourappforgrading
Guidanceforgraders
Noapptosubmitforthishomeworkassignment.
4.1:UserInputControls
Buildandrunanapp
1. Createanappwith5checkboxesandaShowToastbutton,asshownbelow.2. WhentheuserclicksasinglecheckboxandthenShowToast,displayatoastmessageshowingthecheckbox
selected.3. IftheuserselectsmorethanonecheckboxandthenShowToast,showatoastthatincludesthemessagesforall
selectedcheckboxes,asshowninthefigurebelow.
HomeworkLessons3,4
524

HomeworkLessons3,4
525

Answerthesequestions
Question1What'sthemostimportantdifferencebetweencheckboxesandaRadioGroupofradiobuttons?Chooseone:
Theonlydifferencesishowtheyappear:checkboxesshowacheckmarkwhenselected,whilecircular"radio"buttonsappearfilledwhenselected.CheckBoxelementsinthelayoutcanusetheandroid:onClickattributetocallahandlerwhenselected.Themajordifferenceisthatcheckboxesenablemultipleselections,whileaRadioGroupallowsonlyoneselection.
Question2
WhichlayoutgroupisthepreferredwaytoalignasetofCheckBoxelementsvertically?Chooseone:
RelativeLayoutLinearLayoutScrollView
Question3
WhatmethodoftheCheckableinterfacedoyouusetocheckthestateofacheckbox(thatis,whetherithasbeencheckedornot)?
Submityourappforgrading
Guidanceforgraders
Checkthattheapphasthefollowingfeatures:
ThelayoutincludesfiveCheckBoxviewsverticallyalignedonthescreen,andaShowToastbutton.TheonSubmit()methoddetermineswhichcheckboxischeckedbyusingfindViewById()withisChecked().Thestringsdescribingtoppingsareconcatenatedintoatoastmessage.
4.2:Menus
Buildandrunanapp
OpentheScrollingTextappthatyoucreatedintheWorkingwithTextViewElementslesson.
1. Addafloatingcontextmenutoshowthreemenuoptions:Edit,Share,andDelete,asshowninthefigurebelow.ThemenuappearswhentheuserperformsalongclickontheTextView.
2. Addlogmessagestoshowwhichmenuitemwasclicked.
HomeworkLessons3,4
526

HomeworkLessons3,4
527

Answerthesequestions
Question1Whatisthenameandlocationofthefileinwhichyoucreatecontextmenuitems?
Question2Whathappenswhenalongtap(alsoknownasalongclick)occurs?Chooseone:
Whenaviewreceivesalong-clickevent,thesystemcallstheonCreateContextMenu()method,whichyoucan'tchange.Whenaregisteredviewreceivesalong-clickevent,thesystemcallstheonCreateContextMenu()method,whichyoucanoverrideinyouractivityorfragment.Whenaregisteredviewreceivesalong-clickevent,thesystemcallstheonContextItemSelected()method,whichyoucanoverrideinyouractivityorfragment.
Question3
Wheredoyouregisteracontextmenuforaview?Chooseone:
UseregisterForContextMenu()intheonCreate()method.UseregisterForContextMenu()intheonCreateContextMenu()method.UsegetMenuInflater()intheonCreateContextMenu()method.
Question4
WheredoyouinflatethecontextmenuusingMenuInflater?Chooseone:
IntheonCreate()method.IntheonCreateContextMenu()method.IntheonContextItemSelected()method.
Submityourappforgrading
GuidanceforgradersCheckthattheapphasthefollowingfeatures:
TheonCreateContextMenu()methodisimplementedintheMainActivityclassandusesaMenuInflatertoinflatethecontextmenu.Themenu_context.xmlfilecontainsthreeoptions:Edit,Share,andDelete.TheonContextItemSelected()methodisimplementedandusesgetItemId()todeterminewhichmenuitemisselected.
4.3:ScreenNavigation
Buildandrunanapp
Createanappwithamainactivityandatleastthreeotheractivities.AllactivitieshaveabasicOptionsmenuandusethev7appcompatsupportlibraryToolbarastheappbar,asshownbelow.
1. Inthemainactivity,buildagridlayoutwithimagesofyourownchoosing(orusetheimagesin
HomeworkLessons3,4
528

4_1_P_starter_images.zip).Resizetheimagessothatthreeofthemfithorizontallyonthescreeninthegridlayout.2. Enableeachimagetoprovidenavigationtoanotheractivity.
Whentheusertapstheimage,itstartstheotheractivity.Fromanyoftheotheractivities,theusercantaptheUpbuttonintheappbar(highlightedinthefigurebelow)to
returntothemainactivity.
Answerthesequestions
Question1Whichtemplateprovidesanactivitywithanoptionsmenu,theUpbutton,andthev7appcompatsupportlibraryToolbarastheappbar?
Question2WhywouldyouuseaGridLayoutcomparedtoaLinearLayoutoraRelativeLayouttoprovidenavigationusingimages?
Question3WheredoyouputtheGridLayoutofimages?Chooseone:
Inactivity_main.xmlfortheMainActivity.Incontent_main.xmlfortheMainActivity.Inthe"main"XMLlayoutfilesforeachotheractivity.Inthe"content"XMLlayoutfilesforeachotheractivity.
Question4
Wheredoyoudefinetheapp'sactivitiesandparentactivitytoprovideUpnavigation?Chooseone:
ToprovidetheUpbuttonforachildscreenactivity,declarethechildactivity'sparentintheactivity_main.xmlfile.ToprovidetheUpbuttonforachildscreenactivity,declaretheactivity'sparentintheAndroidManifest.xmlfile.ToprovidetheUpbuttonforachildscreenactivity,declarethechildactivity'sparentinthe"main"XMLlayoutfileforthechildscreenactivity.
Question5
Whichtechniquedoyouusetolaunchanotheractivityfromanavigationimage?Chooseone:
Usetheandroid:onClickattributewiththeImageViewintheXMLlayouttocallapublicmethodintheactivityassociatedwiththelayout.Usethefollowingcodeinapublicmethod(assumingtheotheractivityiscalledOtherActivity):Intentintent=newIntent(this,OtherActivity.class);startActivity(intent);
Bothoftheabove.
Submityourappforgrading
Guidanceforgraders
HomeworkLessons3,4
529

Checkthattheapphasthefollowingfeatures:
AGridLayoutinthecontent_main.xmlfile.AnewIntentandstartActivity()methodforeachnavigationelementinthegrid.Aseparateactivityclassforeachnavigationelementinthegrid.
4.4:RecyclerView
Buildandrunanapp1. CreateanappthatusesaRecyclerViewtodisplayalistofrecipes.
Eachlistitemshowsthenameoftherecipewithashortdescription.UseseparateTextViewviewsandstylingfortherecipenameanddescription.
2. Whentheusertapsarecipe(aniteminthelist),startanactivitythatshowsthefullrecipetext.Youmayuseplaceholdertextforthefullrecipes.Optionally,addanimageforthefinisheddishtoeachrecipe.Clickingtheupbuttontakestheuserbacktothelistofrecipes.
Thescreenshotbelowshowsanexampleforasimpleimplementation.Yourappcanlookverydifferent,aslongasithastherequiredfunctionality.
Answerthesequestions
HomeworkLessons3,4
530

Question1
Whataretheprimarycomponentsyouneedtodisplaytherecipeslist?Checkallthatapply.
RecyclerView
RecyclerView.Adapter
RecyclerView.ViewHolder
AppCompatActivity
Question2Whatclassdoyouneedtoimplementinordertolistenandrespondtouserclicks?
Submityourappforgrading
Guidanceforgraders
Checkthattheapphasthefollowingfeatures:
ImplementsaRecyclerViewthatshowsascrollablelistofrecipetitlesandshortdescriptions.ThecodeextendsorimplementsRecyclerView,RecyclerView.Adapter,RecyclerView.ViewHolder,andView.OnClickListener.Clickingonalistitemstartsanactivitythatshowsthefullrecipe.ThemanifestfiledefinesaparentrelationshipsothatclickingtheUpbuttoninarecipeviewgoesbacktothelistofrecipes.ViewHoldercontainsalayoutwithtwoTextViews;forexample,aLinearLayoutwithtwoTextViews.
HomeworkLessons3,4
531
HomeworkAssignments:Lesson5&6Contents:
5.1:Drawables,Themes,Styles5.2:MaterialDesign5.3:ProvidingResourcesforAdaptiveLayouts6.1:TestingtheUserInterface
5.1:Drawables,Themes,Styles
Buildandrunanapp
CreateanappthatdisplaysanImageViewandplusandminusbuttons,asshownbelow.TheImageViewcontainsalevellistdrawablethatisabatterylevelindicator.Pressingtheplusorminusbuttonchangestheleveloftheindicator.UsethebatteryiconsfromtheVectorAssetStudiotorepresent7differentvaluesforthebatterylevel.
Theapphasthefollowingproperties:
Theplusbuttonincrementsthelevel,causingthebatteryindicatortoappearmorefull.Theminusbuttondecrementsthelevel,causingtheindicatortoemptyonelevel.
HomeworkLessons5,6
532

HomeworkLessons5,6
533

Answerthesequestions
Question1Whattwotypesofdrawablesdoyouusetocreateabuttonthatdisplaystext,wherethebuttonhasonebackgroundwhenitisactiveandadifferentbackgroundwhenitisdisabled,andbothbackgroundsarestretchedwhenthesizeofthebuttonislargerthanthetextitcontains?
LevelListDrawable
TransitionDrawable
StateListDrawable
NinePatchDrawable
Question2
Supposeyoucreateanappthathasadarkbackgroundandlighttext,andtheappdoesn'tneedanActionBar.Whichbasestyledoesyourapplicationstyleinheritfrom?
Theme.AppCompat.Light
Theme.AppCompat.Dark.NoActionBar
Theme.AppCompat.NoActionBar
Theme.NoActionBar
Submityourappforgrading
Guidanceforgraders
ThebuttonsincrementacountvariablewhichisusedtosetthelevelontheImageViewusingthesetImageLevel()method.ThelevelsintheLevelListdrawablegofrom0to6.Thebuttons'onClickmethodschecktoseeifthecountvariableiswithintherangeofthelevellistdrawable(0-6)beforeincrementingordecrementingtheimagelevel,sothatyoucan'tsetalevelthatdoesn'texist.
5.2:MaterialDesign
BuildandrunanappOpentheMaterialMeappthatyoucreatedintheLessonSupportingLandscape,MultipleScreenSizesandLocalizationlesson.
1. CreateasharedelementtransitionbetweentheMainActivityandtheDetailActivity,withthebannerimageforthesportasthesharedelement.
2. ClickingonalistitemintheMaterialMeapptriggersthetransition.ThebannerimagefromthecardmovestothetopofthescreenintheDetailview.
Answerthesequestions
Question1Whichcolorattributeinyourstyledefinesthecolorofthestatusbar?
colorPrimary
HomeworkLessons5,6
534

colorPrimaryDark
colorAccent
colorAccentDark
Question2
WhichsupportlibrarydoestheFloatingActionButtonbelongto?
v4SupportLibrary
v7SupportLibrary
DesignSupportLibrary
CustomButtonSupportLibrary
Submityourappforgrading
Guidanceforgraders
Checkthattheapphasthefollowingfeatures:
Window-contenttransitionsareenabledintheapptheme.Asharedelementtransitionisspecifiedintheappstyle.ThetransitionisdefinedasanXMLresource.Acommonnameisassignedtothesharedelementsinbothlayoutswiththeandroid:transitionNameattribute.ThecodeusestheActivityOptions.makeSceneTransitionAnimation()method.
5.3:ProvidingResourcesforAdaptiveLayouts
BuildandrunanappOpentheRecyclerViewappthatyoucreatedintheCreateaRecyclerViewlesson.ModifytheapptouseaGridLayoutManagerwiththefollowingcolumncounts:
1. Foraphone:
i. 1columninportrait
ii. 2columnsinlandscape
2. Foratablet:
i. 2columnsinportrait
ii. 3columnsinlandscape
HomeworkLessons5,6
535

HomeworkLessons5,6
536

Answerthesequestions
Question1Whatresourcequalifierisusedtospecifyresourcestobeusedwhenyourappisinnightmode?
Submityourappforgrading
Guidanceforgraders
HomeworkLessons5,6
537

Checkthattheapphasthefollowingfeatures:
Forphonesandtabletsinbothlandscapeandportraitmodes,thecodeincludesresource-qualifiedvaluesfilesthatcontaintheintegerforthecolumncount.TheappusesusesgetResources().getInteger()toretrieveavaluefromaresourcefile,thenusesthevalueasthecolumncountforgridlayout.
6.1:TestingtheUserInterfaceWriteanEspressotestfortheDroidCafeapp(createdinChapter4.3P)thatteststheimagesinthemainactivitytomakesurethattheytaketheusertothesecondactivity.
Buildandrunanapp
OpentheDroidCafeappthatyoucreatedinpreviouslessons.
1. CreateanEspressotestasaJavaclassinthecom.example.android.droidcafe(androidTest)folder(showninProject:Androidviewinthejavafolder).
2. CreateatestforeachimageintheMainActivitythat:
i. Clickstheimage.
ii. CheckstoseeiftheOrderActivityappears.
Answerthesequestions
Question1
Whichstepsdoyouperformtotestaninteraction,andinwhatorder?Enteranumberforeachstep,from1to3,tospecifytheorder:
Matchaview:Findaviewtorunthetest.Assertandverifytheresult:Checktheview'sstatetoseeifitreflectstheexpectedstateorbehaviordefinedbytheassertion.Performanaction:Performaclickorotheractionthattriggersaneventwiththeview.
Question2WhichofthefollowingannotationsenablesaninstrumentedJUnit4testclass?Chooseone:
@RunWith
@Rule
@Test
Question3
Whichofthefollowingannotationsestablishesthecontextforthetestingcode?Chooseone:
@RunWith
@Rule
@Test
Question4
HomeworkLessons5,6
538

Inthisassignment,youneedtotesteachimageviewusedfornavigationontheDroidCafeappmainscreenbyclickingit.WouldyouuseonView()tofindeachimageview,oronData(),andwhy?Chooseone:
IwoulduseonData()becausetheviewIwanttofindisanimageview.IwoulduseonView()becausetheviewIwanttofindisinthecurrentviewhierarchyandappearsonthescreen.TheonData()methodisforfindingachildviewinanAdapterViewbyfirstloadingtheview'sadapterandthenenablingthechildviewtoappearonthescreen.Iwoulduseneitherbecausetheviewisalreadyinthecurrentviewhierarchy.
Submityourappforgrading
Guidanceforgraders
Checkthattheapphasthefollowingfeatures:
Includesatestclassinthecom.example.android.droidcafe(androidTest)folderwiththe@RunWith(AndroidJUnit4.class)annotation.Includesaseparatetest(annotatedwith@Test)foreachimage.UsestheonView(),check(),andperform()methods.Passesalltests.
HomeworkLessons5,6
539

HomeworkAssignments:Lesson7&8Contents:
7.1:CreateanAsyncTask7.2:ConnecttotheInternet7.3:BroadcastReceivers8.1:Notifications8.2:AlarmManager8.3:JobScheduler
7.1:CreateanAsyncTask
Buildandrunanapp
OpentheSimpleAsyncTaskappthatyoucreatedintheCreateanAsyncTasklesson.AddaProgressBarthatdisplaysthepercentageofsleeptimecompleted.TheprogressbarfillsupastheAsyncTaskthreadsleepsfromavalueof0to100(percent).
Hint:Breakupthesleeptimeintochunks.
HomeworkLessons7,8
540

AsyncTaskreference:developer.android.com/reference/android/os/AsyncTask.html
Answerthesequestions
Question1ForaProgressBar:
1. HowdoyoudeterminetherangeofvaluesthataProgressBarcanshow?2. Howdoyouchangehowmuchoftheprogressbarisfilledin?
Question2
IfanAsyncTaskisdefinedasfollows:
privateclassDownloadFilesTaskextendsAsyncTask<URL,Integer,Long>
1. WhatisthetypeofthevaluethatispassedtodoInBackground()intheAsyncTask?2. Whatisthetypeofthevaluethatispassedtothecallbackthatreportstheprogressofthetask?3. Whatisthetypeofthevaluethatispassedtothecallbackthatisexecutedwhenthetaskcompletes?
Question3
HomeworkLessons7,8
541
ToreportprogressoftheworkexecutedbyanAsyncTask,whatcallbackmethoddoyouimplement,andwhatmethoddoyoucallinyourAsyncTasksubclass?
ImplementpublishProgress().CallpublishProgress().ImplementpublishProgress().CallonProgressUpdate().ImplementonProgressUpdate().CallpublishProgress().ImplementonProgressUpdate().CallonProgressUpdate().
Submityourappforgrading
Guidanceforgraders
Checkthattheapphasthefollowingfeatures:
ThelayoutincludesaProgressBarthatsetstheappropriateattributestodeterminetherangeofvalues.TheAsyncTaskbreaksthetotalsleeptimeintochunksandupdatestheprogressbaraftereachchunk.TheAsyncTaskcallstheappropriatemethodandimplementstheappropriatecallbacktoupdatetheprogressbar.TheAsyncTaskneedstoknowwhichviewstoupdate.DependingonwhethertheAsyncTaskisimplementedasaninnerclassornot,theviewscaneitherbepassedtotheconstructoroftheAsyncTaskordefinedasmembervariablesontheActivity.
7.2:ConnecttotheInternet
BuildandrunanappCreateanappthatretrievesanddisplaysthecontentsofawebpageataURL.Theappdisplays:
AfieldwheretheuserentersaURLAfieldsuchasamenuorspinnerthatallowstheusertochoosetheprotocol(HTTPorHTTPS)AbuttonthatexecutesthetaskwhenclickedAscrollingdisplayofthesourcecodeofthewebpageattheURL
UseanAsyncTaskLoadertoretrievethesourcecodeofthewebpageattheURL.YouneedtoimplementasubclassofAsyncTaskLoader.
IfconnectiontotheInternetisnotavailablewhentheuserclicksthebutton,theappmustshowtheuseranappropriateresponse.Forexample,itmightdisplayamessagesuchas"CheckyourInternetconnectionandtryagain."
ThedisplaymustcontainaTextViewinaScrollViewthatdisplaysthesourcecode,buttheexactappearanceoftheinterfaceisuptoyou.Yourscreencanlookdifferentfromthescreenshotsbelow.Youcanuseapop-upmenu,spinner,orcheckboxestoallowtheusertoselectHTTPorHTTPS.
HomeworkLessons7,8
542
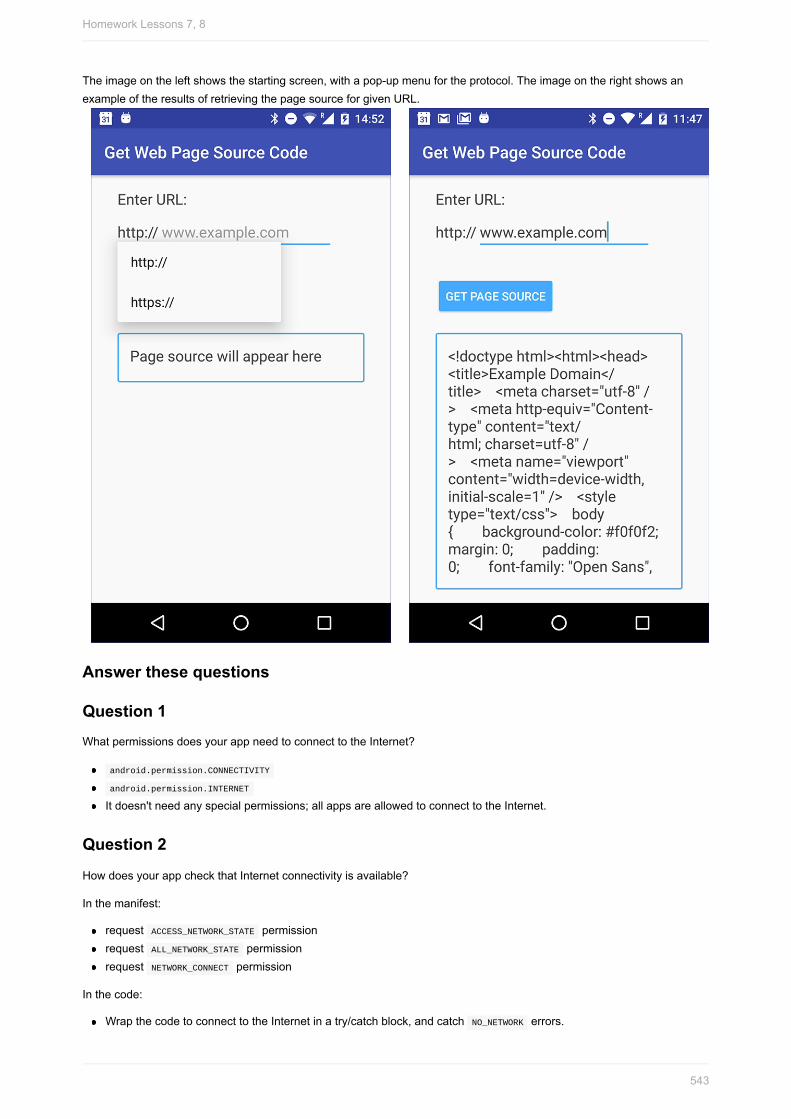
Theimageontheleftshowsthestartingscreen,withapop-upmenufortheprotocol.TheimageontherightshowsanexampleoftheresultsofretrievingthepagesourceforgivenURL.
Answerthesequestions
Question1WhatpermissionsdoesyourappneedtoconnecttotheInternet?
android.permission.CONNECTIVITY
android.permission.INTERNET
Itdoesn'tneedanyspecialpermissions;allappsareallowedtoconnecttotheInternet.
Question2
HowdoesyourappcheckthatInternetconnectivityisavailable?
Inthemanifest:
requestACCESS_NETWORK_STATEpermissionrequestALL_NETWORK_STATEpermissionrequestNETWORK_CONNECTpermission
Inthecode:
WrapthecodetoconnecttotheInternetinatry/catchblock,andcatchNO_NETWORKerrors.
HomeworkLessons7,8
543

UseConnectivityManagertocheckforanactivenetworkbeforeconnectingtothenetwork.PresentadialogtotheuserremindingthemtomakesurethatInternetconnectivityisavailablebeforeattemptingtoconnecttotheInternet.
Question3
Wheredoyouimplementtheloadercallbackmethodthat'striggeredwhentheloaderfinishesexecutingitstask?
IntheAsyncTaskLoadersubclass.TheAsyncTaskLoadermustimplementLoaderManager.LoaderCallbacks.IntheActivitythatdisplaystheresultsofthetask.TheActivitymustimplementLoaderManager.LoaderCallbacks.InaUtilityclassthatextendsObjectandimplementsLoaderManager.LoaderCallbacks.
Question4
Whentheuserrotatesthedevice,howdoAsyncTaskandAsyncTaskLoaderbehavedifferentlyiftheyareintheprocessofrunningataskinthebackground?
Option1ArunningAsyncTaskbecomesdisconnectedfromtheActivityeventhoughitkeepsexecuting.ArunningAsyncTaskLoaderbecomesdisconnectedfromtheActivitybutstopsrunning,preservingsystemresources.
Option2ArunningAsyncTaskbecomesdisconnectedfromtheActivitybutstopsrunning,preservingsystemresources.ArunningAsyncTaskLoaderautomaticallyrestartsexecutionofitstaskfromthebeginning.TheActivitydisplaystheresults.
Option3ArunningAsyncTaskbecomesdisconnectedfromtheActivityeventhoughitkeepsexecuting.ArunningAsyncTaskLoaderautomaticallyreconnectstotheActivityafterthedevicerotation.TheActivitydisplaystheresults.
Question5HowdoyouinitializeanAsyncTaskLoadertoperformthesteps,suchasinitializingvariables,thatmustbedonebeforetheloaderstartsperformingitsbackgroundtask?
InonCreateLoader()intheActivity,createaninstanceoftheAsyncTaskLoadersubclass.Intheloader'sconstructorperforminitializationtasks.InonCreateLoader()intheActivity,createaninstanceoftheAsyncTaskLoadersubclass.Intheloader'sinit()method,performinitializationtasks.IntheActivity,implementinitLoader()toinitializetheloader.PerforminitializationtasksfortheloaderatthestartofloadInBackgroud()intheLoader.
Question6
WhatmethodsmustanAsyncTaskLoaderimplement?
Submityourappforgrading
GuidanceforgradersCheckthattheapphasthefollowingfeatures:
Themanifestincludesrequestsfortheappropriatepermissions.UsesasubclassofAsyncTaskLoader.Respondsappropriatelyifthedevicecan'tconnecttotheInternet.CombinestheprotocolandthewebpagetocreateavalidURLthattheappusestoconnecttotheInternet.
HomeworkLessons7,8
544

ImplementstherequiredLoadercallbackmethods.DisplaystheresultsofretrievingthesourceofthewebpageinTextViewinaScrollView.(It'sOKtodoitinthesameActivity,ortostartanewActivity.)
7.3:BroadcastReceivers
Buildandrunanapp
1. CreateanappcalledBroadcastCounterusingtheEmptyActivitytemplate.2. UseaBroadcastReceivertocounthowmanytimestheACTION_POWER_CONNECTEDbroadcastwasreceived.Hint:Define
yourBroadcastReceiverasaninnerclassandregisteritdynamically.3. DisplaythecountinaTextViewview.
HomeworkLessons7,8
545

HomeworkLessons7,8
546

Answerthesequestions
Question1Whatarethedifferencesbetweenregisteringabroadcastreceiverstaticallyordynamically?
Registeringabroadcastreceiverdynamicallytiesitsoperationtothelifecycleofyouractivity.Ifyouregisteryourreceivertoreceiveonlylocalbroadcasts,youmustregisteritdynamically;staticregistrationisn'tanoption.Registeringabroadcastreceiverstaticallycreatesanewprocesstorunyourbroadcastreceiverifnoprocessesassociatedwithyourapplicationarerunning.Alloftheabove.
Question2
Trueorfalse?Ifabroadcastreceiverisregisteredstatically,itrespondstobroadcasteventsevenifyourappisnotrunning.
Question3
WhichclassisusedtomitigatethesecurityrisksofBroadcastReceiverswhenthebroadcastsarenotcross-application(thatis,theyaresentandreceivedbythesameapp)?
SecureBroadcastLocalBroadcastManagerOrderedBroadcastSecureBroadcastManager
Submityourappforgrading
Guidanceforgraders
Checkthattheapphasthefollowingfeatures:
Thebroadcastreceiverregistersandunregistersdynamicallyinoneofthefollowinglifecyclemethodpairs:OnResume/OnPause,OnCreate/OnDestroy,orOnStart/OnStop.Thecounterisdisplayedandisincrementedwhenthephoneispluggedin.
8.1:Notifications
Buildandrunanapp
OpentheNotifyMeappthatyoucreatedintheNotificationslesson.ChangetheupdatednotificationintheapptousetheInboxStyleexpandedlayoutinsteadofBigPictureStyle.Usefakestringdataforeachlineandsummarytext.
HomeworkLessons7,8
547

HomeworkLessons7,8
548

Note:Thenotificationmightlookalittledifferent,dependingontheAPIlevelofthedevice.
Answerthesequestions
Question1
Supposeyoucreateanapplicationthatdownloadsaworkofarteveryday.Oncetheartworkisavailable,theappshowsanotificationtotheuser,andtheusercaneitherdownloadorskiptheday'sworkofart.WhatPendingIntentmethodwouldyouusetostartaservicetodownloadtheimage?
Activity.startService()
PendingIntent.getBroadcast()
PendingIntent.getActivity()
PendingIntent.getService()
Submityourappforgrading
Guidanceforgraders
Checkthattheapphasthefollowingfeatures:
Whentheusertapstheupdatebutton,thenotificationbecomesanInboxStylenotificationwithseveralrowsoftextrepresentinglineitems.Thescreenhasasummaryandtitletextline,whichchangesitspositiondependingontheAPIlevel.(SeeNotificationsinthematerialdesignguidelines.)UsestheNotificationCompat.InboxStyleclasssothatit'sbackwardscompatible.
8.2:AlarmManager
BuildandrunanappMakeanappthatdeliversanotificationwhenthetimeis11:11(AM).Thescreendisplaysatoggleswitchthatturnsthealarmonandoff.
HomeworkLessons7,8
549

HomeworkLessons7,8
550

Note:Thenotificationmightlookalittledifferent,dependingontheAPIlevelofthedevice.
Answerthesequestions
Question1
InwhichAPIleveldidinexacttimingbecomethedefaultforAlarmManager?(Allset()methodsuseinexacttiming,unlessexplicitlystated.)
APIlevel16APIlevel18APIlevel19APIlevel17
Submityourappforgrading
Guidanceforgraders
Checkthattheapphasthefollowingfeatures:
Thealarmusesexacttiming.ThismeansthatthecodeincludesastatementcheckingthatthedevicesAPIlevelis>19,andusingthesetExact()methodifitis.Appshowsanotificationwhenthetimeis11:11AM.
8.3:JobScheduler
BuildandrunanappCreateanappthatsimulatesalargedownloadscheduledwithbatteryanddataconsumptioninmind.Itcontainsabuttonthatsays"DownloadNow"andhasthefollowingfeatures:
Itdeliversanotificationinplaceofperforminganactualdownload.The"download"isperformedonceaday,whenthephoneisidlebutconnectedtopowerandtoWiFi,orwhenthebuttonispressed.WhentheusertapstheDownloadNowbutton,ittriggersa"downloading"notification.Hint:DefinetheJobServiceclassasaninnerclass.Thatway,theDownloadNowbuttonandtheJobServicecancallthesamemethodtodeliverthenotification.
HomeworkLessons7,8
551

HomeworkLessons7,8
552

Note:Thenotificationmightlookalittledifferent,dependingontheAPIlevelofthedevice.
Answerthesequestions
Question1
WhatclassdoyouuseifyouwantfeaturesliketheonesprovidedbyJobScheduler,butyouwantthefeaturestoworkfordevicesrunningAPIlevel20andbelow?
JobSchedulerCompatFirebaseJobDispatcherAlarmManager
Submityourappforgrading
Guidanceforgraders
Checkthattheapphasthefollowingfeatures:
TheJobInfoobjecthas4criteriaset:setRequiresCharging(),setPeriodic(),setRequiresDeviceIdle(),setRequiredNetworkType()
TheappcrashesiftheJobServiceclassdoesnothaveanemptyconstructor.
HomeworkLessons7,8
553

HomeworkAssignments:Lesson9&10&11Contents:
9.1:SharedPreferences9.2:AppSetting10.1:SQLiteDatabase11.1:ContentProviders11.2:Loaders
9.1:SharedPreferences
Buildandrunanapp
OpentheScoreKeeperappthatyoucreatedintheDrawables,Styles,andThemeslesson.
1. Replacethesavedinstancestatewithsharedpreferencesforeachofthescores.2. Testtheapp:
Rotatethedevicetoensurethatconfigurationchangesreadthesavedpreferencesandupdatetheuserinterface.Stoptheappandrestartittoensurethatthepreferencesaresaved.
3. AddaResetbuttonthatresetsthescorevaluesto0andclearsthesharedpreferences.
Answerthesequestions
Question1
Inwhichlifecyclemethoddoyousavetheappstatetosharedpreferences?
Question2
Inwhichlifecyclemethoddoyourestoretheappstate?
Question3
Canyouthinkofacasewhereitmakessensetohavebothsharedpreferencesandinstancestate?
Submityourappforgrading
GuidanceforgradersCheckthattheapphasthefollowingfeatures:
Theappretainsthescoresonrotation.Theappretainsthecurrentscoresafterbeingstoppedandrestarted.TheappsavesthecurrentscorestothesharedpreferencesintheonPause()method.TheapprestoressharedpreferencesintheonCreate()method.TheappdisplaysaResetbuttonthatresetsthescoresto0.Theimplementationoftheonclickhandlermethodfortheresetbutton:
Resetsbothscorevariablesto0.UpdatesbothtextviewsClearsthesharedpreferences.
HomeworkLessons9,10,11
554

9.2:AppSettings
Buildandrunanapp
OpentheDroidCafeWithSettingsappthatyoucreatedintheAddingSettingstoanApplesson.
1. AddaListPreference(adialogwithradiobuttons)tothe"General"groupofsettings.Putitinthe"Generalsettings"screenlayout,belowthe"Addfriendstoordermessages"ListPreference.
2. EditthestringarraysusedfortheListPreferencetoincludetheListPreferencetitle"Chooseadeliverymethod."UsethesamedeliverychoicesthatareusedintheradiobuttonsintheOrderActivity.
3. Maketheuser'schosenDeliverysettingappearinthesametoastmessageasthechosenMarketandRecommendationssettings.
4. Extracredit:ShowtheselecteddeliverymethodasthesettingsummarytextthatappearsunderneaththeListPreferencetitle.Enablethistexttochangewitheachupdate.
Answerthesequestions
Question1
InwhichfiledoyoudefinethearrayofentriesandthearrayofvaluesfortheListPreference?Chooseone:
pref_general.xmlstrings.xmlmenu_main.xmlcontent_main.xml
HomeworkLessons9,10,11
555

Question2
InwhichfiledoyouusethearrayofentriesandthearrayofvaluesinsettinguptheListPreference,andalsosettheListPreferencekeyanddefaultvalue?Chooseone:
pref_general.xmlstrings.xmlmenu_main.xmlSettingsActivity.java
Question3Howdoyousetthedefaultvaluesforsettingsthefirsttimeanactivityruns?
Assignthedefaultvalueusingtheandroid:defaultValueattributeforeachsettingpreferenceinthepreferencesXMLfile.SetthedefaultvalueintheonCreate()methodfortheactivityusingPreferenceManager.setDefaultValues().Bothoftheabove.
Question4
ForanappthatsupportsAndroid3.0andnewerversions,thebestpracticeforsettingsistouseaSettingsActivitythatextendsActivity,andafragmentforeachpreferenceXMLfilethatextendsPreferenceFragment.Buthowdoyouremaincompatiblewiththev7appcompatlibrarywhenextendinganActivitywithAppCompatActivity?
Question5
WhenusingtheSharedPreferencesinterfaceforaccessingandmodifyingpreferencedatasuchassettings,thefollowingstatementreadsthesettingpreferencedefinedbythedeliverykey:
StringdeliveryPref=sharedPref.getString("delivery","1");
Trueorfalse?The"1"stringargumentisthevaluetoreturnifthesettingpreferencedoesnotexist.Itisusuallyastringforthedefaultvalueofthesetting,whichforthisexampleis"1".
Submityourappforgrading
GuidanceforgradersCheckthattheapphasthefollowingfeatures:
TheonCreate()methodreadsthedeliveryPrefsettingusingsharedPref.getString().Thepref_general.xmlfileincludesaListPreferencethatusesforitsentriesanarrayofdeliverychoices.Extracredit:ThestatementbindPreferenceSummaryToValue(findPreference("delivery"))hasbeenaddedtotheonCreate()methodoftheGeneralPreferenceFragmentclassintheSettingsActivityinordertoshowthedeliverychoiceinthepreferencesummary.
10.1:SQLiteDatabaseREADME:Inthenextgroupofhomeworkassignments(10.1,11.1,11.2),youbuild2apps.Theyrelatetoeachotherinthesamewayastheappsyoubuiltinthecorrespondingpracticals,asfollows:
1. Thefirstapp,in10.1,isaTODOlistthatusesaSQLitedatabasetostoreitems.Theappalsoincludesawaytoadd,display,andedititems.
HomeworkLessons9,10,11
556

2. In11.1,youextendtheTODOlistapptouseacontentprovidertoservedatafromtheSQLitedatabasetotheuserinterface.
3. In11.2,youbuildanappcalledShowToDoItemsthataccessestheTODOlist'scontentproviderandloadsto-doitemsusingaloader.
BuildandrunanappthatusesaSQLitedatabase
CreateanappcalledTODOwithaSQLitedatabasewheretheusercancreateandeditto-dolistitemsthatarestoredinthedatabase.
1. ExtendtheSQLiteOpenHelperclasswithquery(),insert(),andupdate()methodsimplemented.2. Includetheappfeaturesdescribedbelow.
Features:
Theusercanaddnewitemstothelist.Eachiteminthedatabaseincludesatasktodo,creationandcompletiondates,andwhetherornotthetaskhasbeencompleted.Whentheappstarts,thescreenshowsalistofincompleteto-doitemssortedbycreationdate.TheUIincludesanOptionsmenuitemtostartanactivitythatshowsthecompletedtasks.Theusercanchangeanitem'scompletionstatus.Whentheusermarksataskascompleted,itismarkedcompleteandthecreationdateisreplacedwiththecompletiondate.Whentheusertapsanincompleteitem,editmodeistriggered,andtheusercanedittheitem.Whentheappisrestarted,thelateststateofitemsisvisible,whichdemonstratesthatthedatawassavedandreloaded.
Tips:
OnewaytoimplementtheUIistouseaRecyclerViewthatstartsaneditactivitywhenanitemisclicked.YouwillnotbegradedonthewayinwhichyouimplementtheUI,orhowtheUIlooks,aslongastheUIdemonstratesthefunctionality.AppsthatuseRecyclerViewandtheSQLitedatabasefollowapattern.ExamineandreusecodethatyouwrotefortheSQLiteDatabaselessonandtheSearchingaSQLiteDatabaselesson.Makesureyoucleanlyseparatedatafromtheuserinterface.Youwillextendthisto-doapptocompletefuturehomeworkassignmentsaboutcontentprovidersandloaders.
HomeworkLessons9,10,11
557

Answerthesequestions
Question1Howmuchcodewereyouabletoreusefromotherapps?Howmuchtimedoyouthinkthatsavedyou?Howmuchdidusinganotherappasanexamplehelpyoustructureyourapp?Therearenorightorwronganswers.
Question2WhataresomeofthebenefitsofusingaSQLiteOpenHelperclass?Checkallthatapply.
Providesutilitiestosimplifythetasksofcreatingandinitializingthedatabase.ProvidestheonUpgrade()method.Mostimportantly,iftheupgradefails,itdoestherollbackforyou.Usingarecommendedpatternmakesiteasiertounderstand,maintain,andextendtheapp.
Question3
WhichofthefollowingarebenefitsofusingaSQLitedatabasetostoreyourdata?Checkallthatapply.
UsesSQLqueriestoretrievedata,allowingyoutomatchgivenconstraintsandconditions.Dataisstoredpersistentlyandsecurely,andcanberetrievedefficiently.Otherappscanuseyourdata.
HomeworkLessons9,10,11
558

Submityourappforgrading
Guidanceforgraders
TherearenorightorwronganswerstoQuestion1.It'simportantthatstudentsreflectandrealizethebenefitsofbuildingontheirownandothers'work.
TheUIthatthestudentchoosesisn'tafactorforgrading,aslongastheappdemonstratesdatabasefunctionality.Studentshavealotoffreedominhowtoimplementthisfunctionality.
Checkthattheapphasthefollowingfeatures:
IncludesaSQLiteOpenHelperclasswithquery(),insert(),andupdate()methodsimplementedtosupporttherequiredfunctionality.Whentheappsstarts,thescreenshowsalistofto-doitemssortedbycreationdate.Whentheuserinteractswithanitem,editmodeistriggered,andtheusercanedittheitem.Theusercanchangeanitem'scompletionstatus.IncludesanOptionsmenuitemthatletstheuserseecompleteditems.Whenanitemischanged,theUIreflectsthechange.Whentheappisrestarted,thelateststateoftheitemsisvisible,whichdemonstratesthatthedatawassavedandreloaded.
11.1:ContentProvidersExtendtheTODOlistappfromhomework10.1touseacontentprovider.
1. AddaContractclassforthecommonandpublicconstants,URIs,andthedatabaseschema.2. AddaContentProviderclassthathandlesURIsandimplementsquery(),insert(),andupdate()methods.3. AddthecontentprovidertotheAndroidManifest.xmlfile.
Features:
Fromtheuser'sperspective,theappshouldhaveexactlythesamefunctionalityastheTODOappthatyoubuiltforthe10.1homeworkassignment.Allqueriesgothroughthecontentprovider,andfromtheretotheSQLitedatabase.
Tips:
Ifyouneedhelp,seetheword_list_sql_with_content_providerappfromtheSharingContentwithOtherAppslesson.
Answerthesequestions
Question1Whataretheprimarypurposesofacontentprovider?
Separatedatafromtheuserinterface.Makedataavailabletootherapps.Separatethebackendfromtheuserinterface.
Question2
WhataresomeofthebenefitsofusingaContractclass?
Contractcanbepublicsootherappscanfindouthowtoaccessacontentprovider.Youonlyneedtodefinecommonconstantsonce.
HomeworkLessons9,10,11
559

Itdefinespartsofanappthatcannotbechanged.Forlargerandmorecomplexapps,itcollectsconstantsintooneplaceforeasiermaintenance.
Question3
WhydoesthecontentproviderneedtobedeclaredintheAndroidManifest?
TotelltheAndroidFrameworkwhattheuniqueIDofthecontentprovideris.Tomakesurethereisonlyonecontentproviderforeachapp.TotelltheAndroidFrameworktheproperties,suchaspermissionsforthiscontentprovider.
Submityourappforgrading
Guidanceforgraders
TheUIthatthestudentchoosesisnotafactorforgrading,aslongasitdemonstratesappfunctionality.
Checkthattheappimplementsthefollowing:
UsestheContractclassfortheURIsandotherconstants.IncludesaContentProviderclassthathandlesURIsandimplementsquery(),insert(),andupdate()methodsthatinteractwiththedatabase.Appisarchitectedsothatactivitiesusethecontentprovider'squery(),insert(),andupdate()methodstointeractwiththedatabase.Whentheappisrestarted,thelateststateoftheitemsisvisible,whichdemonstratesthatthedatawassavedandreloaded.
11.2:LoadersBuildandrunanappcalledShowToDoItemsthatusesaloadertofetchanddisplaydatafromthecontentproviderthatyouusedintheTODOappfromhomework11.1.
1. CreateabasicUItodisplayincompleteTODOlistitems.2. ImplementaContractclassforconstantsfortheTODOapp'scontentprovider.3. ImplementLoaderManager.LoaderCallbacks<>toloaddatafromthecontentprovider.4. Addaloadermanagertomanageyourloader.
Features:
Whentheappsstarts,thescreenshowsalistofto-doitemsfetchedfromtherunningcontentprovideroftheTODOapp.WhenthedataintheTODOapp'sdatabasechanges,italsoupdatesintheShowToDoItemsapp.
Tips:
Re-useUIelementsfrompreviousapps.Don'tforgettoaddpermissionstothemanifestfile.Ifyouneedhelp,seetheWordListClientandWordListLoaderappsonGitHub.
Answerthesequestions
Question1
Whichofthefollowingarebenefitsofusingloaders?
Loadersarefast.
HomeworkLessons9,10,11
560

LoadersrunonseparatethreadstopreventjankyorunresponsiveUI.Loaderssimplifythreadmanagementbyprovidingcallbackmethodswheneventsoccur.Loaderspersistandcacheresultsacrossconfigurationchangestopreventduplicatequeries.Loaderscanimplementanobservertomonitorforchangesintheunderlyingdatasource.
Question2
InbuildingtheShowToDoItemsapp,whydon'tyouhavetoimplementacontentobserver?
Theloadermanagerhandlesdataobservationforyou.CursorLoaderautomaticallyregistersaContentObservertotriggerareloadwhendatachanges.TheTODOlistappsendsnewdatatotheShowToDoItemsappiftheitemsinthedatabasechange.
Submityourappforgrading
Guidanceforgraders
TheUIthatthestudentchoosesisnotafactorforgrading,aslongasitdemonstratesappfunctionality.
Checkthattheapphasthefollowingfeatures:
UsestheContractclass.ImplementsLoaderManager.LoaderCallbacks<>andusesaloadermanager.Whentheappsstarts,thescreenshowsalistofto-doitemsfetchedfromtherunningcontentprovideroftheTODOapp.WhenthedataintheTODOapp'sdatabasechanges,italsoupdatesintheShowToDoItemsapp.
HomeworkLessons9,10,11
561

Appendix:Utilities
TableofContents:CopyandrenameaprojectDeleteaprojectExtractResourcesAddsupportlibrariesCreateimagesinAssetStudioComparecustomobjectsSavestateofcustomobjects
Thisappendixisacollectionoftasksyoumayneedtododuringdevelopmentoftheappsinthepracticals.Theyarenotspecifictoonepractical.
CopyandrenameaprojectForsomelessons,youwillneedtomakeacopyofaprojectbeforemakingnewchanges.Youmayalsowanttocopyaprojecttousesomeofitscodeinanewproject.Ineithercaseyoucancopytheexistingproject(ExistingProject),andthenrenameandrefactorthenewproject's(NewProject)componentstousethenewproject'sname.(Intheinstructionsbelow,substituteyouractualprojectnamesforExistingProjectandNewProject.
1.Copytheproject1. Onyourcomputer'sfilesystem(notinAndroidStudio),makeacopyoftheExistingProjectdirectory.2. RenamethecopieddirectorytoNewProject.
2.RenameandrefactortheprojectcomponentsTheoldnameoftheproject,ExistingProject,stillappearsthroughoutthepackagesandfilesinthenewcopyofyourproject.Changethefileandthepackagereferencesinyourapptothenewname,asfollows:
1. StartAndroidStudio2. ClickOpenanexistingAndroidStudioproject.3. NavigatetotheNewProjectdirectory,selectit,andclickOK.4. SelectBuild>CleanProjecttoremovetheauto-generatedfiles.5. Clickthe1:Projectside-tabandchooseAndroidfromthedrop-downmenutoseeyourfilesintheProjectview.6. Expandapp>java.7. Right-clickcom.example.android.existingprojectandchooseRefactor>Rename.ThisopenstheRenamedialog.8. Changeexistingprojecttonewproject.9. CheckSearchincommentsandstringsandSearchfortextoccurrencesandclickRefactor.10. TheFindRefactoringPreviewpaneappears,showingthecodetoberefactored.11. ClickDoRefactor.12. Expandres>valuesanddouble-clickthestrings.xmlfile.13. Changethename="app_name"stringtoNewProject.
3.Updatethebuild.gradleandAndroidManifest.xmlfiles
EachappyoucreatemusthaveauniqueapplicationID,asdefinedintheapp'sbuild.gradlefile.Eventhoughtheabovestepsshouldhavechangedthebuild.gradlefile,youshouldcheckittomakesure,andalsosynctheprojectwiththegradlefile:
Appendix:Utilities
562

1. ExpandGradleScriptsanddouble-clickbuild.gradle(Module:app).2. UnderdefaultConfig,checktomakesurethatthevalueoftheapplicationIDkeyhasbeenchangedto
"com.example.android.newproject".Ifithasnotchanged,changeitmanuallnow.3. ClickSyncNowinthetoprightcorneroftheAndroidStudiowindow.
Tip:YoucanalsochooseTools>Android>SyncProjectwithGradleFiletosyncyourgradlefiles.
Inaddition,someappsincludetheappnameinreadableform(suchas"NewProject"ratherthannewproject)asalabelintheAndroidManifest.xmlfile.
1. Expandapp>manifestsanddouble-clickAndroidManifest.xml.2. Findthestatementbelow,andifnecessary,changethelabeliftothestringresourceforthenewappname:
android:label="@string/app_name"
DeleteaprojectAllthefilesforanAndroidprojectarecontainedintheproject'sfolderonthecomputer'sfilesystem.Todeleteaproject,deleteitsfolder.
AndroidStudioalsokeepsalistofrecentprojectsthatyouhaveopened.YoucandeleteaprojectfromthelistofrecentprojectsinAndroidStudio.(Deletingaprojectfromtherecentprojectslistdoesnotaffecttheactualprojectfiles.)
Toremoveaprojectfromtherecentprojectslist,dooneofthefollowing:
OntheAndroidStudiosstartupscreenscreen,clickthenameoftheprojectandpressthedeletekey.SelectFile>OpenRecent>ManageProjects,clickthenameoftheprojectandpressthedeletekey.
ExtractStringsandDimensions
ExtractingStringsInorderforyourapptobetranslatableintomultiplelanguagesyoumustkeepallofyourstringresourcesintheres/values/strings.xmlfile.
CreatingstringresourcesThereareseveralwaystocreatestringresources:
Addthemmanuallyinthestrings.xmlfileusingthefollowingsyntax:
<stringname="string_name">StringValue</string>
Whereverthestringwillbeused,suchasthetextattributeofaTextView:
1. Typeinthedesirednameforastringresourceinthefollowingformat:@string/string_name.Itwillbehighlightedinredsincetheresourcedoesnotyetexist.
2. Makesureyourcursorisinthehighlightedtext.
3. PressAlt+EnterandselectCreatestringvalueresource.
4. EnteryourdesiredstringandpressOKandhestringgetsaddedtoyourstrings.xmlfile.
Youcanselectanyexisting,hard-codedstringineitherXMLorJava,pressAlt+Enter,andselectExtractstringresource.
Accessingstringresources:
Appendix:Utilities
563

InXML,referencesstringresourceusingthefollowingsyntax:@string/string_nameInJava,referencestringresourcesusingthefollowingsyntax:getString(R.string.string_name)
2.ExtractDimensions
Dimensionsshouldingeneralnotbehard-codedbutkeptinthedimens.xmlfile.Thisallowsforyoutospecifydifferentdimensionsusingresourcequalifiers.
Extractdimensionsinthesamewayasstrings(Alt-Enter),andtheywillbestoredinthedimens.xml.
3.ExtractStyles
Ifyouhaveseveralelementsthatshareattributes,youcancreateastyleinthestyle.xmlfile.Tolearnmoreaboutstyles,seetheStylesandThemeslesson.
Toextractexistingattributesintoastyle,dothefollowing:
1. Placeyourcursorintheviewwhoseattributesyouwanttoturnintoastyle.2. RightclickandselectRefactor>Extract>Style.3. Namethestyleandselectattributes.IfLaunch'UseStyleWherePossible'refactoringafterthestyleisextracted
ischecked,AndroidStudiowillsearchtherestofthefilefortheselectedattributesandapplythestyletoviewswheretheattributesmatch.
4. ClickOK.
AddAndroidsupportlibrariestothebuildfileAndroidSupportLibrariesprovidebackward-compatibleversionsofAndroidframeworkAPIs,additionalUIcomponentsandasetofusefulutilities.
Forexample,tousetheRecyclerViewclass,whichislocatedintheAndroidSupportpackage,youmustincludetwodependenciesinyourproject'sbuild.gradlefile.Theprocessisthesameforothersupportlibrarycomponents.
Followthesestepsandrefertothescreenshotbelow:
1. InAndroidStudio,inyourproject,makesureyouareintheProjectpane(1)andintheAndroidview(2).2. Inthehierarchyoffiles,findtheGradleScriptsfolder(3).3. ExpandGradleScripts,ifnecessary,andopenthebuild.gradle(Module:app)file(4).
4. Towardstheendofthebuild.gradle(Module:app)file,findthedependenciessection.5. Addthesetwolibrarydependenciesasthelasttwolines(insidethecurlybraces):
compile'com.android.support:recyclerview-v7:23.1.1'
compile'com.android.support:design:23.1.1'
Thereisprobablyanexistinglinesimilartothisone:
compile'com.android.support:appcompat-v7:23.1.1'
Addyourlinesbelowthatline.Matchtheversionnumberofyourlinestotheversionnumberofthatexistingline.MakesuretheversionnumbersofallthelibrariesarethesameandmatchupwiththecompiledSdkVersionatthetopofthefile.(Ifthesedon'tmatch,youwillgetabuildtimeerror.)
6. Ifprompted,syncyourappnow.7. Buildandrunyourapp.
Thefollowingisanexampleofthedependenciessectionofthebuild.gradlefilewithsupportlibrariesadded.
Appendix:Utilities
564

dependencies{
compilefileTree(dir:'libs',include:['*.jar'])
testCompile'junit:junit:4.12'
compile'com.android.support:appcompat-v7:23.1.1'
compile'com.android.support:recyclerview-v7:23.1.1'
compile'com.android.support:design:23.1.1'
}
CreateimagesinAssetStudioUseImageAssetStudiotocreateandaddalaunchericon.
1. OpenyourappinAndroidStudio.2. Right-clicktheresfolderofyourprojectandselectNew>ImageAssetfrommenu.
ThisopenstheImageAssetStudiowindow,whereyoucancreateatexticon,choosefromavailableclipart,oraddyourowncustomicon.
Notethatthepanelonthetop-leftisscrollable;scrolltoseeadditionalcustomizations.
Toaddacustomtexticon:
1. ChangetheNameoftheicontoic_launcher_text,ifyoudon'twanttooverwritethedefaultAndroidic_launchericonthatcomeswithyourproject.
2. IntheAssetTyperow,selectText.3. Type"HelloWorld!"intothetextbox.4. Experimentwithadjustingthefont.5. Scrolldownandchangefontandbackgroundcolors.6. ClickNext.7. TheConfirmIconPathwindowshowshowaniconwithyourspecifiedtextwillbecreatedforeachresolution,aswell
asthedefaultstoragelocationandpathinyourapp.8. ClickFinish.9. Gotthetheres/mipmapfolder.Ifnowcontainsyournewicon,withadefaultversionatthetoplevel,andsize-adjusted
versionsfordifferentresolutions.10. Tousethenewicon,opentheAndroidmanifest.Changetheandroidiconlinefromreferencingic_launcherto
ic_launcher_text.
android:icon="@mipmap/ic_launcher_text"
11. Runyourapp.12. Aftertheapphaslaunched,gotothehomescreenandopenthelistofapps.13. Scrollandyoushouldseeyouriconlistedalongwiththeotherinstalledapps.
Toaddacliparticon:
Followthepreviousstepsexcept:
1. ChangetheNametoic_launcher_clipart.2. ChooseClipArtastheAssetType.3. IntheClipArtrow,clickthebuttonshowingthecurrenticon,thedefaultAndroid.4. Chooseaniconfromthepopupwindowofclipart.
Toaddacustomicon:
Followthepreviousstepsexcept:
1. ChangetheNametoic_launcher_image.2. ChooseImageastheAssetType.3. InthePathrow,chooseanimage.Thiscanbeanimagethatyou'veaddedtoyourprojectoranimageonyour
Appendix:Utilities
565

computer.
ComparecustomobjectsWheneveryourdatamodelcallsforobjectstobesorted,itbecomesnecessarytodefinehowtheseobjectscanbecomparedtoeachother.
TheComparableinterfaceallowsyoutospecifyhowtocomparetwoobjectsanddeterminewhetheroneisbiggers,smaller,orthesameastheother.
TheComparableinterfacerequiresthatyouimplementasinglemethod:compareTo(<T>another)whereistheparameterizedtypeyouimplementedComparablewith,andthetypeofobjectyouarecomparingto(i.eifyouwanttocompareyourFoobarinstancetootherFoobarinstances,youwouldimplementComparable<Foobar>andyourcompareTomethodwouldtakeFoobarasaparameter).
Thecomparemethodshoulddothefollowing:
Returnanegativeintegeriftheobjectislessthantheparameter.Returnapositiveintegeriftheobjectisgreaterthantheparameter.Returnzeroiftheobjectsareequal.
Forexample,tocomparealistofbooksbypublicationdate:
@Override
publicintcompareTo(Bookbook){
if(this.publication==book.publication){return0;}
else{returnthis.publication>book.publication?1:-1;}
}
SavestateofcustomobjectsInAndroid,youwillfrequentlycreatecustomobjectstorepresentyourparticulardatamodel.Inordertopreservethestateoftheseobjects,youmustbeabletopassthemintothesavedInstanceStatebundle.Inordertodoso,yourcustomclassmustimplementtheParcelableinterface.Thisallowsforprimitivetypes(int,string,byte,etc)tobesavedinthesavedInstanceStatecallback.
Dothefollowing:
1. Aftersettingupthedatainyourcustomclass(onlytheprimitivedatatypeswillbesaved),addtheParcelableimplementationtoyourclassdeclaration.
2. Thedeclarationwillbeunderlinedinred,sinceyouhavetoimplementtheinterfacemethods.Withyourcursorontheunderlinedtext,pressAlt+EnterandselectImplementmethods.
3. ChoosebothdescribeContents()andwriteToParcel(Parceldest,intflags).ClickOK.4. Theclassnamewillstillbeunderlined,indicatingthattheinterfaceisnotfullyimplementedyet.Selecttheclassname,
andagainpressAlt+EnterandchooseAddParcelableimplementation.Androidstudiowillautomaticallyaddtherequiredcode.Notethevariablesforwhichyouwanttopreservethestate(primitivetypes)arewrittentotheParcelinthewriteToParcelmethod.
5. YoucannowsavethestateoftheseobjectsusingthesavedInstanceStatebundlesmethods:putParcelable,putParcelableArray,andputParcelableArrayListandtherespectivegetters.
Appendix:Utilities
566