
Administration Guide - - CMOD.wiki
452
Content Manager OnDemand for Multiplatforms Version 10 Release 1 Administration Guide IBM SC19-3352-02
-
Upload
khangminh22 -
Category
Documents
-
view
1 -
download
0
Transcript of Administration Guide - - CMOD.wiki

Content Manager OnDemand forMultiplatformsVersion 10 Release 1
Administration Guide
IBM
SC19-3352-02

Note
Before using this information and the product it supports, read the information in “Notices” on page421.
This edition applies to the following products and to all subsequent releases and modifications until otherwise indicatedin new editions:
• Version 10 Release 1 of IBM® Content Manager OnDemand for Multiplatforms (product number 5724-J33)© Copyright 2017 - 2018 All Rights Reserved. UNICOM Systems, Inc. – a division of UNICOM Global.© Copyright International Business Machines Corporation 1993, 2018.US Government Users Restricted Rights – Use, duplication or disclosure restricted by GSA ADP Schedule Contract withIBM Corp.

Contents
Chapter 1. Database concepts................................................................................1System..........................................................................................................................................................1Instance........................................................................................................................................................1Database...................................................................................................................................................... 1Table............................................................................................................................................................. 2Table space.................................................................................................................................................. 2Container...................................................................................................................................................... 2
Illustration of relationship between database objects......................................................................... 2Index.............................................................................................................................................................3System catalog tables..................................................................................................................................3Buffer pool....................................................................................................................................................4Configuration parameters............................................................................................................................ 4Log files........................................................................................................................................................ 4Recovery history file.....................................................................................................................................5Backup files.................................................................................................................................................. 5
Chapter 2. Table spaces and storage volumes.........................................................7
Chapter 3. Managing database growth................................................................... 9
Chapter 4. Database maintenance........................................................................11Collecting statistics....................................................................................................................................11
How to collect statistics....................................................................................................................... 11Removing index data................................................................................................................................. 12
How to remove index data................................................................................................................... 13Migrating indexes.......................................................................................................................................14
Chapter 5. Migrating and importing index data..................................................... 17Configuring the system.............................................................................................................................. 17
System log messages...........................................................................................................................17System log user exit program.............................................................................................................. 17Tivoli Storage Manager.........................................................................................................................18Storage sets..........................................................................................................................................18Application groups............................................................................................................................... 18
What happens when a user queries migrated data.................................................................................. 19Message to the user............................................................................................................................. 19Message to the system log...................................................................................................................19
Importing index data................................................................................................................................. 19Verify temporary work space............................................................................................................... 19Verify database storage space.............................................................................................................19Verify database log file space.............................................................................................................. 20Run the ARSADMIN program............................................................................................................... 20
After you import index data.......................................................................................................................20Querying data....................................................................................................................................... 20Expiring imported migrated indexes....................................................................................................20Configuring index migration................................................................................................................. 21
Chapter 6. Monitoring database performance....................................................... 23
iii

Chapter 7. Tuning an Oracle database.................................................................. 25
Chapter 8. Database backup and recovery............................................................29
Chapter 9. Document storage...............................................................................33
Chapter 10. Managing Tivoli Storage Manager storage.......................................... 41
Chapter 11. Other external storage managers.......................................................55
Chapter 12. Storage backup and recovery.............................................................57
Chapter 13. Installing the administrative client.................................................... 59System requirements.................................................................................................................................59Installing the administrative client............................................................................................................59Running Setup............................................................................................................................................59To install on a user's PC.............................................................................................................................59To install on a network file server..............................................................................................................60To use automated install........................................................................................................................... 60Excluding the administrative client from the client installation package................................................ 60To uninstall.................................................................................................................................................60Updating the administrative client software.............................................................................................61
Chapter 14. Administrative client introduction..................................................... 63How does the administrative client help me do my job?..........................................................................63Getting started........................................................................................................................................... 63
Starting the administrative client.........................................................................................................63Using online help.................................................................................................................................. 64Adding a server.....................................................................................................................................64Logging on a server...............................................................................................................................65Changing passwords............................................................................................................................ 65
System parameters....................................................................................................................................66Setting system parameters.................................................................................................................. 66Annotations.......................................................................................................................................... 66Check Previously Used Passwords...................................................................................................... 67Disable or Lock Out After Failed Logins............................................................................................... 67Session Inactivity Time Out................................................................................................................. 67LDAP Authentication............................................................................................................................ 67Login Processing...................................................................................................................................67Maximum Password Age...................................................................................................................... 68Minimum Password Length.................................................................................................................. 68Password Expiration Notification.........................................................................................................68System Logging.....................................................................................................................................68System log comments..........................................................................................................................68User Login Inactivity.............................................................................................................................69
Administrative client start up parameters................................................................................................ 69Changing start up parameters............................................................................................................. 70Displaying the Content Manager OnDemand splash screen or About window.................................. 71Examples.............................................................................................................................................. 71
Default directory for administrative client temporary files...................................................................... 72Adding items to a server............................................................................................................................ 72Report Wizard............................................................................................................................................ 73
Starting the Report Wizard...................................................................................................................74Report Wizard screens......................................................................................................................... 74
iv

Chapter 15. Examples of using the administrative client....................................... 77Overview.................................................................................................................................................... 77
About the examples............................................................................................................................. 77System configuration............................................................................................................................77
Adding a user............................................................................................................................................. 78Adding a group........................................................................................................................................... 79Adding a printer......................................................................................................................................... 82Adding a storage set and storage node.....................................................................................................84Adding a report.......................................................................................................................................... 86Adding a field to an existing application group......................................................................................... 96
Chapter 16. Administration concepts................................................................... 99Introduction............................................................................................................................................... 99
Users.....................................................................................................................................................99Groups................................................................................................................................................ 101Printers............................................................................................................................................... 101Storage sets and storage nodes........................................................................................................ 102Application groups............................................................................................................................. 102Applications........................................................................................................................................103Folders................................................................................................................................................103Cabinets..............................................................................................................................................104Holds...................................................................................................................................................104
About application groups, applications, and folders..............................................................................104Content Manager OnDemand permissions............................................................................................. 106
Folder permissions.............................................................................................................................106Application group permissions.......................................................................................................... 107Specifying permissions...................................................................................................................... 107
Chapter 17. Advanced system administration..................................................... 111Overview.................................................................................................................................................. 111User types................................................................................................................................................ 111Authority.................................................................................................................................................. 112Permissions..............................................................................................................................................114
Users...................................................................................................................................................114Groups................................................................................................................................................ 114Applications........................................................................................................................................114Application Groups.............................................................................................................................115Folders................................................................................................................................................115Storage sets........................................................................................................................................116Printers............................................................................................................................................... 116Cabinets..............................................................................................................................................117Holds...................................................................................................................................................117
System administration.............................................................................................................................117Object Type model............................................................................................................................. 118Object Owner model.......................................................................................................................... 119
Summary..................................................................................................................................................120Helpful hints.............................................................................................................................................120
Chapter 18. Document constructor.....................................................................121Implementation and configuration......................................................................................................... 121Client and server workflows....................................................................................................................122Constructor classes, interfaces, and methods....................................................................................... 123Document filtering................................................................................................................................... 125Exception and message handling............................................................................................................125
v

Chapter 19. LDAP (Lightweight Directory Access Protocol) authenticationsupport..........................................................................................................127LDAP authentication processes.............................................................................................................. 128
OnDemand logon with the LDAP authentication and anonymous binding.......................................128Content Manager OnDemand logon with the LDAP authentication and non-anonymous binding..129Bypassing the LDAP server authentication....................................................................................... 131Sample LDAP configurations..............................................................................................................131
Chapter 20. Loading AFP™ and line data..............................................................133Overview.................................................................................................................................................. 133Before you begin loading input data....................................................................................................... 134
Estimating storage space...................................................................................................................134Defining the application group...........................................................................................................134Defining the application..................................................................................................................... 134Accessing reports, index data, and resources.................................................................................. 135Configuring the ARSLOAD program................................................................................................... 135
Indexing input data..................................................................................................................................137Indexing reports on Content Manager OnDemand servers.............................................................. 138Indexing reports on z/OS® systems................................................................................................... 139
Processing the input data........................................................................................................................140Processing index data........................................................................................................................ 140Processing reports and resources..................................................................................................... 140
Loading index data...................................................................................................................................141Loading storage objects...........................................................................................................................141
Cache storage.....................................................................................................................................141Archive storage...................................................................................................................................142Copy storage pool...............................................................................................................................142Resources...........................................................................................................................................142
Verifying processing................................................................................................................................ 142Backing up databases..............................................................................................................................143
Backup the Content Manager OnDemand database.........................................................................143Backup the Tivoli Storage Manager database................................................................................... 144
Protecting cache storage.........................................................................................................................144Loading a previously indexed AFP file.....................................................................................................144Loading documents in large object format............................................................................................. 144
Chapter 21. Loading image files......................................................................... 145Overview.................................................................................................................................................. 145Defining the application group................................................................................................................ 145Defining the application...........................................................................................................................146Defining the folder................................................................................................................................... 147Accessing the input files..........................................................................................................................148Creating index data..................................................................................................................................148Configuring the ARSLOAD program.........................................................................................................150Processing the input data........................................................................................................................150
Chapter 22. Loading user-defined data...............................................................153Overview.................................................................................................................................................. 153Defining the application group................................................................................................................ 153Defining the application...........................................................................................................................154Defining the folder................................................................................................................................... 155Accessing the input files..........................................................................................................................156Creating the index data........................................................................................................................... 156Configuring the ARSLOAD program.........................................................................................................157Processing the input data........................................................................................................................158
vi

Chapter 23. Restarting a load process................................................................ 161
Chapter 24. Deleting a report............................................................................. 163
Chapter 25. Download exits and processing........................................................165
Chapter 26. Importing and exporting administrative objects through an XMLinterface........................................................................................................167Overview.................................................................................................................................................. 167Installing batch system administration.................................................................................................. 168Importing an XML file into a Content Manager OnDemand system....................................................... 169
Preparing an XML file for the import process.................................................................................... 169Creating an XML file........................................................................................................................... 170Importing the XML file by using the ARSXML command...................................................................176
Exporting Content Manager OnDemand administrative objects to an XML file.....................................176
Chapter 27. Command overview.........................................................................179Reading a syntax diagram....................................................................................................................... 179Using quotes in commands..................................................................................................................... 181Removing trailing blank characters.........................................................................................................181Using the h and I parameters..................................................................................................................182Working with instances............................................................................................................................182
Chapter 28. ARSADMIN..................................................................................... 187Purpose.................................................................................................................................................... 187Description and syntax............................................................................................................................ 187Parameters...............................................................................................................................................189Examples..................................................................................................................................................193Notes........................................................................................................................................................193Files..........................................................................................................................................................193
Chapter 29. ARSAFPD........................................................................................195Purpose.................................................................................................................................................... 195Syntax...................................................................................................................................................... 195Description...............................................................................................................................................195Parameters...............................................................................................................................................195Examples..................................................................................................................................................196
Chapter 30. ARSDATE........................................................................................ 199Purpose.................................................................................................................................................... 199Syntax...................................................................................................................................................... 199Description...............................................................................................................................................199Parameters...............................................................................................................................................200Examples..................................................................................................................................................203Notes........................................................................................................................................................203Files..........................................................................................................................................................204
Chapter 31. ARSDB............................................................................................205Purpose.................................................................................................................................................... 205Syntax...................................................................................................................................................... 205Description...............................................................................................................................................205Parameters...............................................................................................................................................206Examples..................................................................................................................................................213Notes........................................................................................................................................................214Using the ARSDB program with Oracle................................................................................................... 214
vii

Files..........................................................................................................................................................215
Chapter 32. ARSDOC..........................................................................................217Purpose.................................................................................................................................................... 217Description and syntax............................................................................................................................ 217
GET function.......................................................................................................................................217QUERY function.................................................................................................................................. 219ADD function...................................................................................................................................... 221UPDATE function................................................................................................................................ 223DELETE function.................................................................................................................................225PRINT function...................................................................................................................................226HOLD_ADD function........................................................................................................................... 227HOLD_RELEASE function................................................................................................................... 229CFSOD_FED function..........................................................................................................................230FTI_ADD function...............................................................................................................................231FTI_RELEASE function.......................................................................................................................232
Parameters...............................................................................................................................................233Examples..................................................................................................................................................246Exit codes used by ARSDOC.................................................................................................................... 252Notes........................................................................................................................................................252Files..........................................................................................................................................................253
Chapter 33. ARSJESD........................................................................................ 255
Chapter 34. ARSLOAD........................................................................................ 259Purpose.................................................................................................................................................... 259Syntax...................................................................................................................................................... 260Description...............................................................................................................................................260Parameters...............................................................................................................................................261Examples..................................................................................................................................................269Notes........................................................................................................................................................270
Chapter 35. ARSMAINT......................................................................................271Purpose.................................................................................................................................................... 271Syntax...................................................................................................................................................... 271Description...............................................................................................................................................271Parameters...............................................................................................................................................272Examples..................................................................................................................................................276Notes........................................................................................................................................................276Using the ARSMAINT program with Oracle............................................................................................ 277Files..........................................................................................................................................................277
Chapter 36. ARSRPT.......................................................................................... 279Purpose.................................................................................................................................................... 279Syntax...................................................................................................................................................... 279Description...............................................................................................................................................279Parameters...............................................................................................................................................279Examples..................................................................................................................................................281Notes........................................................................................................................................................282Files..........................................................................................................................................................282
Chapter 37. ARSSLU.......................................................................................... 283Purpose.................................................................................................................................................... 283Syntax...................................................................................................................................................... 283Parameters...............................................................................................................................................283Examples..................................................................................................................................................284
viii

Chapter 38. ARSSOCKD..................................................................................... 285Purpose.................................................................................................................................................... 285Syntax...................................................................................................................................................... 285Description...............................................................................................................................................285Parameters...............................................................................................................................................285Examples..................................................................................................................................................286Notes........................................................................................................................................................288
Chapter 39. ARSSTASH...................................................................................... 289Purpose.................................................................................................................................................... 289Syntax...................................................................................................................................................... 289Description...............................................................................................................................................289Parameters...............................................................................................................................................289Examples..................................................................................................................................................290Files..........................................................................................................................................................290
Chapter 40. ARSTBLSP...................................................................................... 293Purpose.................................................................................................................................................... 293Syntax...................................................................................................................................................... 293Description...............................................................................................................................................293Parameters...............................................................................................................................................293Examples..................................................................................................................................................295Notes........................................................................................................................................................295Files..........................................................................................................................................................295
Chapter 41. ARSXAFP........................................................................................297Purpose.................................................................................................................................................... 297Syntax...................................................................................................................................................... 297Description...............................................................................................................................................297Parameters...............................................................................................................................................298Examples..................................................................................................................................................299Files..........................................................................................................................................................299
Chapter 42. ARSXLINE.......................................................................................301Purpose.................................................................................................................................................... 301Syntax...................................................................................................................................................... 301Description...............................................................................................................................................301Parameters...............................................................................................................................................301Examples..................................................................................................................................................304
Chapter 43. ARSXML..........................................................................................305Purpose.................................................................................................................................................... 305Syntax...................................................................................................................................................... 305Description...............................................................................................................................................306Parameters for ARSXML add, update, delete......................................................................................... 307Parameters for ARSXML export...............................................................................................................310Parameters for ARSXML validate............................................................................................................ 312Examples..................................................................................................................................................312
Example 1: Adding users................................................................................................................... 312Example 2: Updating users................................................................................................................313Example 3: Deleting users................................................................................................................. 313Example 4: Exporting multiple objects..............................................................................................313Example 5: Adding groups................................................................................................................. 314Example 6: Exporting a group............................................................................................................314Example 7: Updating groups..............................................................................................................314
ix

Example 8: Exporting all of the users................................................................................................314Example 9: Validating input XML file schema................................................................................... 315Example 10: Adding printers............................................................................................................. 315
Appendix A. Appendixes to the Administration Guide......................................... 317Accessibility features.............................................................................................................................. 317ARSSUPPORT utility.................................................................................................................................318Monitoring servers................................................................................................................................... 319Monitoring performance with the system dashboard............................................................................ 323Configuration changes for Content Manager OnDemand client applications in an FDCC
environment........................................................................................................................................324System control tables..............................................................................................................................325
List of tables....................................................................................................................................... 325Application group table (ARSAG).......................................................................................................326Application group to folder field mapping table (ARSAG2FOL)........................................................328Application group field table (ARSAGFLD)........................................................................................ 328Application group field alias table (ARSAGFLDALIAS)......................................................................329Application group composite index table (ARSAGINDEX)................................................................329Application group permissions table (ARSAGPERMS)......................................................................330Annotation table (ARSANN)...............................................................................................................330Application table (ARSAPP)............................................................................................................... 331User logical views table (ARSAPPUSR)............................................................................................. 333Cabinet table (ARSCAB).....................................................................................................................333Cabinet to folder mapping table (ARSCAB2FOL).............................................................................. 334Cabinet permissions table (ARSCABPERMS).................................................................................... 334CFS-CMOD work table (ARSCFSODWORK)....................................................................................... 334Folder table (ARSFOL)........................................................................................................................335Folder field table (ARSFOLFLD)......................................................................................................... 336Folder user fields table (ARSFOLFLDUSR)........................................................................................ 336Folder permissions table (ARSFOLPERMS)....................................................................................... 337FTI work table (ARSFTIWORK)..........................................................................................................338Group table (ARSGROUP).................................................................................................................. 338Hold table (ARSHOLD)....................................................................................................................... 339Hold mapping table (ARSHOLDMAP).................................................................................................339Hold permissions table (ARSHOLDPERMS).......................................................................................340Hold work table (ARSHOLDWORK)....................................................................................................340Load table (ARSLOAD)........................................................................................................................341Named query table (ARSNAMEQ)......................................................................................................342Node table (ARSNODE)...................................................................................................................... 342ODF distribution definition table (ARSDFDCT)..................................................................................343ODF distribution request table (ARSDFDRT).....................................................................................344ODF document status table (ARSDFDST)..........................................................................................345ODF print processor table (ARSDFPPT).............................................................................................345ODF recipient list table (ARSDFLIS).................................................................................................. 347ODF recipient/list table (ARSDFUOT)................................................................................................ 347ODF report bundle definition table (ARSDFBDT).............................................................................. 348ODF report ID table (ARSDFCRT)...................................................................................................... 350Printer table (ARSPRT).......................................................................................................................350Printer options table (ARSPRTOPTS).................................................................................................351Printer user table (ARSPRTUSR)........................................................................................................351Resources table (ARSRES).................................................................................................................352Segment table (ARSSEG)................................................................................................................... 352Storage set table (ARSSET)................................................................................................................354System parameters table (ARSSYS).................................................................................................. 355User table (ARSUSER)........................................................................................................................356Users in groups table (ARSUSRGRP)................................................................................................. 358User group ID table (ARSUSRGRPID)................................................................................................358
x

Application group data table............................................................................................................. 358Objects and data model used in the Content Manager OnDemand XML file......................................... 359
XML objects in the Content Manager OnDemand XML file............................................................... 359System Parameters object.................................................................................................................361User object......................................................................................................................................... 364Group object.......................................................................................................................................368Printer object......................................................................................................................................369Storage set object.............................................................................................................................. 370Application group object....................................................................................................................371Application object.............................................................................................................................. 380Folder object...................................................................................................................................... 395Cabinet object.................................................................................................................................... 404Hold object......................................................................................................................................... 406ODF recipient object.......................................................................................................................... 408ODF recipient list object.....................................................................................................................409ODF report ID object.......................................................................................................................... 410ODF distribution object with report bundle object............................................................................410
Data field limitations................................................................................................................................413Troubleshooting.......................................................................................................................................414
Logging............................................................................................................................................... 414Identifying a load ID from a user folder query.................................................................................. 414Troubleshooting scenario 1: Cannot find data when using a mm/dd/yy date format in search......415Troubleshooting scenario 2: Error occurred during the CD-ROM mastering process......................415Troubleshooting scenario 3: ARSLOAD daemon cannot load an application group with multiple
applications...................................................................................................................................415Troubleshooting scenario 4: The load process is slowed down by a .lst file....................................416Troubleshooting scenario 5: You received the error that connection cannot be established
while using ARSLOAD....................................................................................................................416Troubleshooting scenario 6: ARSLOAD cannot find the TIFF images when using generic index.... 416Troubleshooting scenario 7: Buffer overrun problem while exporting application groups to a
local server or another Content Manager OnDemand server...................................................... 417Troubleshooting scenario 8: The ARSLOAD program with a generic indexer does not load my
AFP documents with inline resources correctly...........................................................................417Troubleshooting scenario 9: Why Content Manager OnDemand does not support query result
modifier SQL clauses.................................................................................................................... 418Troubleshooting scenario 10: AFP™ file loading failed with invalid user ID or password................419Hints and tips about using an XML interface to import and export administrative objects.............419
Notices..............................................................................................................421Trademarks.............................................................................................................................................. 422Terms and conditions for product documentation................................................................................. 423IBM Online Privacy Statement................................................................................................................ 423Privacy policy considerations ................................................................................................................. 424
Index................................................................................................................ 425
xi

xii

ibm.com® and related resources
Product support and documentation are available from ibm.com®.
Support and assistance
From ibm.com, click Support & downloads and select the type of support that you need. From theSupport Portal, you can search for product information, download fixes, open service requests, andaccess other tools and resources.
IBM Knowledge Center
See your online product information in IBM Knowledge Center at https://www.ibm.com/support/knowledgecenter/SSEPCD_10.1.0/com.ibm.ondemandtoc.doc/ondemandmp_10.1.0.htm .
PDF publications
See the following PDF publications for your product at http://www.ibm.com/support/docview.wss?uid=swg27050851.
Contacting IBMFor general inquiries, call 800-IBM-4YOU (800-426-4968). To contact IBM customer service in the UnitedStates or Canada, call 1-800-IBM-SERV (1-800-426-7378).
For more information about how to contact IBM, including TTY service, see the Contact IBM website athttp://www.ibm.com/contact/us/.
© Copyright IBM Corp. 1993, 2018 xiii

xiv Content Manager OnDemand for Multiplatforms: Administration Guide

Chapter 1. Database concepts
Note: This section describes database objects in DB2®. If you plan to use some other databasemanagement product with Content Manager OnDemand, then see your database management productinformation for detailed information about the database objects.
This section provides an overview of the key database objects:
• System• Instance• Database• Table• Index• Table space• Containers• System catalog tables• Buffer pool• Configuration parameters• Log files• Recovery history file• Backup files
SystemA database system represents a physical machine that contains a copy of the database manager,sometimes called an instance. In Content Manager OnDemand, the library server is the physical machinethat contains the instance.
InstanceA copy of the database manager and the data that it manages. An instance has its own data, which otherinstances cannot access, and also has separate security from other instances on the same machine. Partof the initial installation and configuration of the database manager is to create an instance. For ContentManager OnDemand, you should name your primary production, or only, instance archive to takeadvantage of default configuration options and to help with problem determination and support.
DatabaseA collection of data that is stored in tables. In Content Manager OnDemand, generally speaking, there aretwo types of tables:
• System tables, which contain information about the objects you define to the system, such as users,groups, application groups, applications, holds, folders, storage sets, printers, and cabinets. There arealso system tables that contain information Content Manager OnDemand uses to control and maintainthe system.
• Application group tables, which contain the index data for the reports that you load on the system
A database is organized into parts called table spaces.
© Copyright IBM Corp. 1993, 2018 1

TableA table consists of data logically arranged in columns and rows. For example, when you create anapplication group, the system creates a table definition that contains one column for each field that youdefine. When you load a report into an application group, the system adds one row to an application grouptable for each document contained in the report.
Table spaceA database is organized into table spaces. A table space is a place to store tables. Content ManagerOnDemand supports the following types of table spaces:Automatic storage table spaces
The DB2 database manager creates and extends containers and controls the storage space.System Managed Space (SMS) table spaces.
Each container is a directory in the file space of the operating system. The file manager for theoperating system controls the storage space.
Content Manager OnDemand system and application group tables, by default, exist in a table space calledUSERSPACE1. However, to improve performance, enable more efficient backup and recovery options, andprovide a more flexible configuration, define one or more table space file systems to Content ManagerOnDemand. Content Manager OnDemand then stores the application group tables in the table space filesystems that you defined.
ContainerA container is a physical storage device. It can be identified by a directory name, a device name, or a filename.
A container is assigned to a table space. All database and table data is assigned to table spaces.
A single table space can span several containers, but each container can belong to only one table space.It is possible for multiple containers (from one or more table spaces) to be created on the same physicaldisk.
The database manager attempts to balance the load of data across the containers.
For automatic storage table spaces, DB2 decides on the number and locations of the containers, theirnames, and manages the containers.
For SMS table spaces, Content Manager OnDemand decides on the number and locations of thecontainers, the database manager controls their names, and the file system is responsible for managingthem.
Illustration of relationship between database objectsFigure 1 on page 3 illustrates the relationship between system, instance, database, table, and tablespace. You can define the table space as either SMS or automatic storage.
2 Content Manager OnDemand for Multiplatforms: Administration Guide

Figure 1: Database objects and relationships
IndexIn Content Manager OnDemand, an index points to a document. An index allows more efficient access todocuments by creating a direct path to a document through pointers. You can index all of the content indocuments.
You define indexes when you create an application group. The indexes should contain information thatuniquely identify a document, such as date, account number, and customer name. Indexes are populatedby values extracted from a report when you load a report on the system. Each row in an application grouptable identifies one document.
However, keep in mind that you do not want lots of indexes on a report just to have indexes. You shouldhave a good business reason to have an index. While indexes can help you find documents faster, havingtoo many of them can slow you down when you load reports on the system. Every time you add a new row(document) to a table, you have to add a row to each and every one of the indexes for that table. So themore indexes that you have, the longer it may take when you load a report.
The SQL optimizer automatically chooses the most efficient way to access data in tables. The optimizertakes indexes into consideration when determining the fastest access path to data.
System catalog tablesEach database includes a set of system catalog tables, which describe the logical and physical structureof the data. The database manager creates and maintains an extensive set of system catalog tables foreach database. These tables contain information about the definitions of the database objects, such asuser tables, views, and indexes, as well as security information about the authority that users have forthese objects. They are created when the database is created, and are updated in the course of normaloperation. You cannot explicitly create or drop them, but you can query and view their contents using thecatalog views.
Database concepts 3

Buffer poolA buffer pool is an allocation of main memory allocated to cache table and index data pages as they arebeing read from disk or being modified. The purpose of buffer pools is to improve database systemperformance. Data can be accessed much faster from memory than from a disk; therefore, the fewertimes the database manager needs to read from or write to a disk, the better the performance.
The configuration of the buffer pool is the single most important tuning area, since you can reduce thedelay caused by slow physical I/O.
Configuration parametersWhen a database instance or a database is created, a corresponding configuration file is created withdefault parameter values. You can modify the parameter values to improve performance. Configurationfiles contain parameters that define values such as the resources allocated to the database manager andto individual databases, and the diagnostic level. There are two types of configuration files: the databasemanager configuration file for each instance and the database configuration file for each database.
The database manager configuration file is created when an instance is created. The parameters itcontains affect system resources at the instance level, independent of any one database that is part ofthat instance. Many of these parameters can be changed from the system default values to improveperformance or increase capacity, depending on your system's configuration.
A database configuration file is created when a database is created, and resides where the databasephysically resides. There is one configuration file per database. Its parameters specify, among otherthings, the amount of resources to be allocated to that database. Many of the parameters can be changedto improve performance or increase capacity. Different changes may be required depending on the type ofactivity in that specific database.
Log filesEach database includes recovery logs, which are used to recover from application or system errors. Incombination with database backups, logs are used to recover the consistency of the database right up to apoint in time when an error occurred.
All databases have logs associated with them. These logs keep records of database changes. Some logs,called active logs, prevent a failure (system power, application error) from leaving a database in aninconsistent state. They restore the state of a database to the point before the change. Other logs, calledarchived logs, enable forward recovery to any point in time before the failure.
Active and archive logging
Active logs contain transactions which have not yet been committed or rolled back, or whose changeshave not yet been written to disk. Active logs are located in the database log path directory (seeARS_PRIMARY_LOG_PATH in the ARS.CFG file).
Archive logging enables forward recovery using active and archived logs to any point in time before afailure, rather than only to the point in time of a full backup. With archive logging, active logs are retainedand become online, archived logs. In addition, archived logs can be moved off line and still used for roll-forward recovery.
With archive logging, it becomes necessary to pay more attention to the handling of the logs and to ensuretheir safety. The ability to perform roll-forward recovery of your database is dependent on the integrity ofthe logs. Performance factors such as the location and size of the logs needs to be evaluated for theimpact on overall system performance. In planning for disaster recovery, be sure to remember that logdata must be stored off site, or at least safely away from the disaster, in order to recover your databasebeyond the point of the last full, off line backup.
4 Content Manager OnDemand for Multiplatforms: Administration Guide

When all changes in the active log are no longer needed for normal processing, the log is closed andbecomes an archived log. An archived log is said to be online when it is stored in the database log pathdirectory.
You also have the ability to store archived logs in a location other than the database log path directory, byusing DB2 Database logging.
Configuration parameters for database logging
Content Manager OnDemand uses two main configuration parameters for database logging:
• Log file size. Determines the size of a log file, in 4 KB blocks. The default value (see ARS_LOGFILE_SIZEin the ARS.CFG file) is 1000, which means that each log file is about 4 MB in size.
• The number of active log files. The maximum number of active log files that can be allocated to thedatabase at one time. The default value (see ARS_LOG_NUMBER in the ARS.CFG file) is 40.
These values provide approximately 160 MB of active log file space.
Important: The database manager will stop if there is not enough active log file space to complete atransaction.
Backing up the file system
Recommendation: Back up your database file systems using the data recovery facilities provided by DB2or Oracle. See the SQL Server documentation for details on a backup strategy.
You can also use the standard Tivoli® Storage Manager backup commands to do file system backups. Seethe Tivoli Storage Manager Administrator's Reference for detailed information about the commands thatyou can use and to schedule backups.
If you use the standard Tivoli Storage Manager backup commands to backup file systems on the server, itis recommended that you exclude the database file systems and the cache file systems from the backup.
While you can store the file system backups in the same optical library as the Content ManagerOnDemand data, you should define different client nodes to hold the file system backups. The clientnodes should be assigned to a different domain than the Content Manager OnDemand data. The retentionperiod of the file system backups will likely be different than the retention period for the Content ManagerOnDemand data.
File system backups generally require re-writable media.
You should plan a library with at least two drives:
• One for the file system backup.• One for the Content Manager OnDemand data.
If you plan to run the file system backups at the same time when you load data into Content ManagerOnDemand, plan a library with four drives, or you may store the file system backups in a different librarythan the Content Manager OnDemand data.
Recovery history fileA recovery history file contains a summary of the backup information that can be used in case all or partof the database must be recovered to a given point in time. A recovery history file is created with eachdatabase and is automatically updated when certain actions are performed, such as backups andrestores.
Backup filesBackup files contain a copy of the database or table spaces that can be used to recover the database.
Database concepts 5

The following are general guidelines for planning what types of backup files you might need:
• Databases that contain read-only data do not need to be protected through archive logging if full, offlinebackups are run following each new data load activity. For most customers, the table spaces thatcontain application group data is probably read only.
• With continuously updated data that is deemed important to your business, you must use archivelogging. If you use the audit feature of Content Manager OnDemand to update documents throughoutthe day, then you probably need to use archive logging.
• If your database must be continuously available, you must take online backups. This requires the use ofarchive logs.
• If in the event of a failure your database must be recovered in a short time, you will need to run morefrequent backups. In this case, you need to establish how long it would take to recover from a failure(the sum of the time to restore the database from a backup plus the time needed to roll the logforward).
Note: Storing application group data in table spaces may reduce the time required to recover from afailure of a single device.
Consideration should also be given to keeping the database on disk arrays or mirrored volumes.
Probably the most common type of failure is caused by media problems. This is not limited to diskproblems, but can extend to other I/O devices, including disk controllers and tape devices. As a startingpoint, do not back up your database to the same disk on which the production version exists: use either aseparate disk or external media. The handling of your logs should be similar: consider directing these to aseparate physical disk from that of the database. In addition to protecting against a disk failure affectingboth, this may also result in performance improvements.
Though unlikely, it is possible that your backup media could suffer a problem just when it is needed to letyou recover from a disk failure. Consider the impact of a tape going bad. If your data is absolutely critical,you should consider having duplicate tape media. Another strategy is to minimize the potential for impactcaused by a bad disk. This applies to the disks that both the database and logs reside upon. Using diskarrays for your database volumes or logs (or both) is perhaps the best defense against disk media failures.If you extend redundancy to disk controllers as well, it is highly unlikely that your database will ever beunavailable or that logs will be lost due to a media failure.
6 Content Manager OnDemand for Multiplatforms: Administration Guide

Chapter 2. Table spaces and storage volumes
If you choose not to use a table space for an application group, Content Manager OnDemand createstables into the default table space of the database.
The following list describes the types of table spaces that Content Manager OnDemand supports for eachdatabase:DB2
Content Manager OnDemand supports Automatic storage and System Managed Space (SMS) tablespaces. For Automatic storage, the DB2 database manager creates and extends containers andcontrols the storage space. This is the default. For more information about automatic storage, seeAutomatic storage table spaces. For an SMS table space, each container is a directory in the file spaceof the operating system. The operating system's file manager controls the storage space.
OracleContent Manager OnDemand supports table spaces with AUTOEXTEND.
Microsoft SQL ServerContent Manager OnDemand creates tables into filegroups.
If you define one or more table space file systems to Content Manager OnDemand, then the applicationgroup data tables can be stored in those table space file systems instead of the default table space.Defining table space file systems instead of using the database default table space can:
• improve performance• enable more efficient backup and recovery options• provide a more flexible configuration
When you define more than one table space file system to Content Manager OnDemand, during loadoperations, if Content Manager OnDemand has to create a new table and its table space, Content ManagerOnDemand uses the statvfs system function to get the file system information. Then, the ContentManager OnDemand server uses the database block size to determine which container has the mostavailable space for the table space (DB2, Oracle) or filegroup (Microsoft SQL Server).
Figure 2 on page 7 shows the placement of containers and table data with one table space file systemdefined to Content Manager OnDemand. The file system contains one storage volume. All of the data iswritten to a single container and storage volume.
Figure 2: Defining table space file systems.
Figure 3 on page 8 shows an example of the relationship between tables and table spaces within thedatabase and the containers, disks, and file systems associated with the database. When ContentManager OnDemand creates a table, it first creates a table space and then it creates the table in the table
© Copyright IBM Corp. 1993, 2018 7

space. Content Manager OnDemand attempts to balance the placement of table spaces across containersby choosing a container that has the most space in which to create the table space and tables.
Figure 3: Tables and table spaces within a database. File System 2 has the most space and it is whereContent Manager OnDemand creates the table space of this table.
8 Content Manager OnDemand for Multiplatforms: Administration Guide

Chapter 3. Managing database growth
As a database administrator, you need to estimate the size of tables and indexes, and to check theamount of space available in a table space, adding more space to an existing table space when it gets full.You should use the database manager tools to monitor table and table space growth to make sure thatspace allocation does not become a critical issue. You should also monitor the space used by thedatabase and the space that is available on the system.
This section describes how to:
• Estimate the size of tables and indexes• Check the amount of space available in a table space• Add more space to an existing table space when it starts to get full
Version 9.5 and later supports Automatic storage table spaces in DB2.
Estimating table and index size
You can estimate the amount of storage space required for new or existing tables or indexes by using theworksheets provided with the IBM Content Manager OnDemand for Multiplatforms: Introduction andPlanning Guide. For DB2, you can also estimate the size of existing tables and indexes by invoking theEstimate Size dialog. You can invoke this dialog by selecting a table or index in the Control Center, clickingmouse button two, and selecting Estimate Size. The size is estimated on the definition of the particulartable and its dependent indexes. The estimate is the projected amount of storage space that would beused when the table has a given number of rows. See the online help for the Control Center for moreinformation.
Estimating the size of a table or index is helpful if you want to:
• Create a new table and you want to know how large to make the table space• Create a new table based on the size estimate of an existing table• Know how much space is used by different table and index objects in a table space because the system
is running out of storage space• Estimate the projected size of a table prior to loading a report into the system
Checking space available in a table space
In DB2, to check the amount of space available in an SMS table space, use the facilities provided by youroperating system to monitor space usage and to ensure that available room in the directory for the tablespace is not exhausted.
Adding more space to a table space
In general, you cannot extend the size of an SMS table space very easily because SMS capacity dependson the space available in the file system and the maximum size of the file supported by the operatingsystem. However, depending on your operating system, you may be able to increase the size of a filesystem using the operating system facilities. For an SMS table space on a UNIX-based file system, you canincrease the size of the table spaces by using the appropriate UNIX-based system commands. See thedocumentation for the UNIX system that you are running. If the file system containing the SMS tablespace also contains non-DB2 files, then you may be able to move these files to another file system, thusmaking more room available in the file system for DB2's use. You can also perform a redirected restore,which involves restoring a table space into a larger number of containers than it was backed up from. Seethe DB2 Page, table and table space size for help with a redirected restore process.
© Copyright IBM Corp. 1993, 2018 9

10 Content Manager OnDemand for Multiplatforms: Administration Guide

Chapter 4. Database maintenance
You need to maintain the Content Manager OnDemand database to keep it performing in an optimalmanner. Run the following database maintenance tasks on a regular basis:
• Collect statistics on tables to keep optimization information up-to-date• Remove index data that has reached its life of data and indexes period• Migrate indexes to archive storage, if your organization needs to keep indexes for some period of time
after users no longer need to retrieve the documents to which they point
Collecting statistics
About this task
Statistics describe the physical and logical characteristics of a table and its indexes. You should collecttable and index statistics periodically for each active table. These statistics are used by the databasemanager to determine a good way to access the data. If the data has changed significantly, to the extentthat the information last collected no longer reflects the actual table data, then performance may begin todeteriorate when users are accessing data.
Collect statistics at least once a week. You may also want to collect statistics after loading data on thesystem. For example, when you load data into an application group that uses Multiple Loads per DatabaseTable, Content Manager OnDemand may add rows to an existing table. After the load completes, theinformation used by the SQL query optimizer does not reflect the latest updates to the table. Before youallow users to access the data, you should collect statistics on the table.
Content Manager OnDemand lets you collect statistics for all of the tables in the database with theARSMAINT program. When you run the ARSMAINT program to collect statistics, it collects statistics on allof the tables in the database that have changed since the last time that you collected statistics. You canautomate the collection of statistics by scheduling the ARSMAINT program to run with the appropriateoptions.
The IBM Content Manager OnDemand for Multiplatforms: Installation and Configuration Guide provideshelp with scheduling tasks.
You can also manually collect statistics by running the ARSMAINT program from the prompt. See Chapter35, “ARSMAINT,” on page 271 for details about the parameters and options that you can specify.
How to collect statisticsYou can control the automatic collecting of statistics by scheduling the ARSMAINT program to run withthe appropriate options.
The IBM Content Manager OnDemand for Multiplatforms: Installation and Configuration Guide provideshelp with scheduling tasks.
You can also manually collect statistics by running the ARSMAINT program from the prompt. For example,to collect statistics on all tables in the database that have changed since the last time that statistics werecollected:
arsmaint -r
When the ARSMAINT program collects statistics on a table, it saves the following message in the systemlog:
164 ApplGrp Segment Maintenance (ApplGrp) (Segment)
© Copyright IBM Corp. 1993, 2018 11

One message is saved in the system log for each table on which statistics were collected.
Removing index data
About this task
Indexes expire (are eligible for removal) because their life of data period has passed. The indexes, and thedocuments that they point to, can then be removed from the system. When you remove an index,information about the document to which it points is removed from the database (the document can nolonger be retrieved). However, because indexes are eligible to be removed does not mean that they will bedeleted from the database. Content Manager OnDemand does not delete expired index data from thedatabase until expiration processing runs.
The application group expiration policy determines when index data is eligible for deletion from thedatabase. You define the expiration policy when you create the application group. The followingproperties on the Storage Management page comprise the expiration policy:
• Life of Data and Indexes. The length of time in days to maintain index data and documents on thesystem. After the index data has been on the system for this number of days, it is eligible to be deleted.
Note: If you specify Never Expire, then expiration processing is disabled for the application group. (Thatis, index data will not be removed from the database.)
• Expiration Type. Determines whether individual indexes or an entire table of index data is deleted at atime. When Content Manager OnDemand deletes index data, it either deletes a row (if the ExpirationType is Document) or drops a table (if the Expiration Type is Segment) or deletes all the rows associatedwith the load (if the Expiration Type is Load). The amount of index data in a table and the number ofreports the data represents is determined by the Database Organization. If the Database Organization isMultiple Loads per Database Table, then by default, a table of index data can hold up to 10 millionindexes. These types of tables usually hold the indexes for many reports.
A table of index data is not eligible to be deleted until the latest date in any of its rows reaches the Life ofData and Indexes period. For example, suppose that the Life Of Data and Indexes is set to 365 days, theExpiration Type is set to Segment, and the Database Organization is set to Multiple Loads per DatabaseTable. By default, a table will contain approximately 10 million rows. Further, suppose that a report isloaded into the application group once every month and that each report adds one million rows to thedatabase. Each table can hold the index data from approximately ten reports. Using these assumptions,the data that is loaded into the application group in January will not be eligible to be deleted by expirationprocessing until November of the following year. If you need to remove the index data for a report as soonas it reaches its Life of Data and Indexes period, then set the Database Organization to Single Load perDatabase Table and set the Expiration Type to Segment or Load. (And run expiration processing at leastonce a month.)
Content Manager OnDemand and the archive storage manager delete the documents that expired indexdata points to independently of each other. Content Manager OnDemand uses the application group'sexpiration policy to determine when indexes and documents expire and should be removed from thesystem. The archive storage manager marks documents for removal based on the criteria specified in thearchive copy group. However, you should specify the same criteria to Content Manager OnDemand andthe archive storage manager. The Life of Data and Indexes, which is used by Content Manager OnDemand,and the Retention Period, which is used by the archive storage manager, should specify the same value.
Content Manager OnDemand does not explicitly delete data stored with segment or document expirationfrom Tivoli Storage Manager, however, the data might still expire in the storage manager based on itsexpiration settings.
The following pictures show an example of expiration processing. For purposes of the example, assumethat the Life of Data and Indexes is 365 days, the Database Organization is Single Load per DatabaseTable, and the Expiration Type is Load. Further, assume that one report is loaded into the applicationgroup every month, beginning on January 15, 1999, and that expiration processing has never been run onthis particular application group.
12 Content Manager OnDemand for Multiplatforms: Administration Guide

Figure 4 on page 13 shows an example of the application group index data before expiration processingbegins. The table on the left represents the segment table for the application group. A segment tablecontains one row for each table of application group data. In the example, a table of application groupdata contains the index records for one report. A row in the segment table contains the latest date foundin the report (or the load date, if the report does not contain a date). For expiration processing, ContentManager OnDemand uses the date from the segment table to determine when to drop a table.
Figure 4: Removing index data. Part 1 of 2
Figure 5 on page 13 shows an example of the application group index data after expiration processingends. For purposes of the example, assume that expiration processing ran on March 4, 2000. That date,along with the criteria specified in the expiration policy (specifically, the Life of Data and Indexes is 365days) causes the ARSMAINT program to drop two tables of application group index data: 1RBA, which hasa date of January 15, 1999, and 2RBA, which was has a date of February 15, 1999. Content ManagerOnDemand also deleted the rows in the segment table that pointed to the application group tables thatwere dropped.
Figure 5: Removing index data. Part 2 of 2
How to remove index dataContent Manager OnDemand does not delete expired index data from the database until expirationprocessing runs. The ARSMAINT program is the expiration utility. You can schedule the ARSMAINTprogram to run automatically or you can run it manually. You should make sure that the ARSMAINTprogram command runs periodically so that Content Manager OnDemand deletes indexes when it is timeto do so (so that expired documents can no longer be retrieved). See Chapter 35, “ARSMAINT,” on page271 for details about the parameters and options that you can specify.
Database maintenance 13

You can control automatic expiration processing by scheduling the ARSMAINT program to run with theappropriate options.
The IBM Content Manager OnDemand for Multiplatforms: Installation and Configuration Guide provideshelp with scheduling tasks.
You can also manually start expiration processing by running the ARSMAINT program from the prompt.For example, to run expiration processing, enter the following command at the prompt:
arsmaint -d
When the ARSMAINT program removes indexes, it saves the following message in the system log:
128 ApplGrp Segment Expire (ApplGrp) (Segment)
One message is saved in the system log for each table that was dropped during expiration processing.
Migrating indexes
About this task
Note: This section provides an overview of the process of migrating index data from the database toarchive storage. See "Migrating and importing index data" for information about configuring the system formigration processing.
Content Manager OnDemand provides automatic migration to move indexes from the database to archivestorage to maintain seldom used indexes for long periods of time.
Important: If you use migration to move indexes to archive storage, make sure that you migrate themafter there is no longer a need to retrieve the documents to which they point.
The ARSMAINT program uses an application group's migration policy to control when migration of indexesfor an application group occurs:
• Migration of Indexes. If you specify No Migration, then migration of indexes is disabled for theapplication group. (That is, index data will not be migrated.) If you specify Migrate After n Days, thenindex data is eligible to be migrated after reaching the specified number of days. Indexes will bemigrated the next time that the ARSMAINT program runs.
• Life of Data and Indexes. The length of time in days to maintain index data on the system. For migration,this value must be greater than the Migrate After n Days value.
Content Manager OnDemand does not migrate index data from the database to archive media untilmigration processing runs. The ARSMAINT program is the migration utility. You can control automaticmigration processing by scheduling the ARSMAINT program to run with the appropriate options. You canalso manually start migration processing by running the ARSMAINT program from the prompt. SeeChapter 35, “ARSMAINT,” on page 271 for more information about the ARSMAINT program.
The IBM Content Manager OnDemand for Multiplatforms: Installation and Configuration Guide provideshelp with scheduling tasks.
The ARSMAINT program migrates indexes from each file system listed in the table space file system file.
After a migrated table is successfully loaded into the System Migration application group, the table isdropped from the database. However, Content Manager OnDemand keeps track of all migrated tables.That way, if index data in a migrated table is needed, then Content Manager OnDemand can alert anadministrator to take action (such as manually import the table back into the database).
You can control automatic migration processing by scheduling the ARSMAINT program to run with theappropriate options. See Chapter 35, “ARSMAINT,” on page 271 for more information about theARSMAINT program.
14 Content Manager OnDemand for Multiplatforms: Administration Guide

The IBM Content Manager OnDemand for Multiplatforms: Installation and Configuration Guide provideshelp with scheduling tasks.
You can also manually start migration processing by running the ARSMAINT program from the prompt. Forexample, to run migration processing, enter the following command at the prompt:
arsmaint -e
When the ARSMAINT program migrates indexes, it saves the following messages in the system log. A setof three messages should be saved in the system log for each table that is migrated from the database toarchive storage:
166 ApplGroup Segment Export (ApplGrp) (Segment) 14 DB Info Exported (SQL Code) 87 ApplGrp Load (System Migration)
The first message identifies a segment of application group index data that is to be migrated from thedatabase to archive storage. The second message reports the status of exporting the table from thedatabase to temporary storage. The third message reports the status of loading the migrated table intothe System Migration application group. The System Migration application group must be assigned to astorage set that identifies a client node that is maintained by the archive storage manager.
Database maintenance 15

16 Content Manager OnDemand for Multiplatforms: Administration Guide

Chapter 5. Migrating and importing index data
About this task
Migration is the process by which Content Manager OnDemand moves index data from the database toarchive storage. This process optimizes database storage space while allowing you to maintain index datafor a very long time. You typically migrate index data after users no longer need to access the information,but for legal or other business requirements, you still need to maintain the data for some number of years.If a user queries index data that has been migrated, an administrator must import a copy of the migratedtable into the database. After maintaining the imported table in the database for a specified number ofdays, Content Manager OnDemand deletes it from the database.
This section provides information about importing index data into the database, including how toconfigure your system to migrate index data from the database to archive storage, what happens when auser queries for migrated data, how to import the index table or tables required by the query, and whathappens after you import a table into the database.
IBM assumes that an experienced Content Manager OnDemand administrator will use the informationprovided in this section. If you have questions about any of the topics in this section or if you would likehelp configuring your system to support migrating and importing of index data, please contact the IBMsupport center.
Configuring the system
About this task
System log messagesContent Manager OnDemand provides the system log for administrators to monitor the system. When youinstall and configure Content Manager OnDemand, you initialize the system log tables. The system log iscritical to the operation of the system.
When Content Manager OnDemand processes a query for application group data that has been migratedto archive storage, it saves a message in the system log, sends the message to the system log user exitprogram, and prints the message at the /dev/console (UNIX servers) or saves the message in the Event log(Windows servers).
You can configure the system to examine the messages that Content Manager OnDemand sends to thesystem log user exit and mail them to an administrator or send them to another program, such as theTivoli system management console. You can also configure the system log user exit program to determinewhat action to take when a user queries for data that has been migrated to archive storage.
System log user exit programWhen a client queries index data that has been migrated to archive storage, Content Manager OnDemandsaves message number 168 ApplGrp Segment Not Available in the system log. Content ManagerOnDemand also sends the message to the system log user exit. If you have written your own system loguser exit program, you can determine the action to take when Content Manager OnDemand sends themessage to the system log user exit. For example, you may want the user-written program to notify anadministrator that a request for a table of migrated index data has occurred.
See the IBM Content Manager OnDemand for Multiplatforms: Installation and Configuration Guide for moreinformation about the system log user exit.
© Copyright IBM Corp. 1993, 2018 17

Tivoli Storage ManagerBefore Content Manager OnDemand can migrate index data to archive storage, you must configure TivoliStorage Manager to maintain Content Manager OnDemand data. You must define the library in whichTivoli Storage Manager will maintain the index data, define a device class and storage pool for the library,and configure a policy domain with the management information that Tivoli Storage Manager uses tomaintain the data. The policy domain should maintain the data indefinitely. If you need the system tomaintain a backup copy of the index data, you should configure a copy storage pool in Tivoli StorageManager. See your Tivoli Storage Manager information for assistance with defining libraries, policyinformation, and configuring a copy storage pool.
Storage setsContent Manager OnDemand uses the System Migration application group to manage all index data that ismigrated to archive storage. You must assign the System Migration application group to a storage set thatidentifies a client node in Tivoli Storage Manager. You must also configure the System Migrationapplication group to maintain the data indefinitely. See the IBM Content Manager OnDemand forMultiplatforms: Installation and Configuration Guide for help with configuring the System Migrationapplication group.
The storage set must identify a client node in Tivoli Storage Manager. The client node must be registeredin a policy domain that stores the System Migration data on archive media and maintains the dataindefinitely. See the IBM Content Manager OnDemand for Multiplatforms: Installation and ConfigurationGuide for help with defining Tivoli Storage Manager client nodes and policy domains.
Application groupsWhen you define an application group, you specify the storage management information that determineshow long Content Manager OnDemand maintains data stored in the application group and when ContentManager OnDemand takes certain actions. For example:
• Life of Data and Indexes. Determines the length of time that Content Manager OnDemand maintainsindex data and report data stored in the application group.
• Migration of Indexes. Determines the number of days before Content Manager OnDemand moves indexdata from the database to archive storage.
You should plan to migrate index data only after users no longer need to access the reports to which itrefers. Only in exceptional situations should users need to access index data that has been migrated. Ifa user needs to access index data that has been migrated to archive storage, the process of importingthe table back into the database requires manual actions by an administrator, and usually results in asignificant delay in completing the query. The import process also requires additional space in thedatabase to hold the imported tables, additional log file storage, and temporary storage on the server torun the import process.
• Keep Imported Migrated Indexes. Determines how long that Content Manager OnDemand maintains theimported index data in the database before it is scheduled for deletion.
To migrate data from one application group to another application group, you must reload the data. Youcannot associate data from one ApplGroup to another ApplGroup.
If you need to maintain index data in archive storage, then you must configure the Migration of Indexes inyour application groups. If you want Content Manager OnDemand to maintain the imported index data inthe database for longer than thirty days, then you must specify the number of days in Keep ImportedMigrated Indexes. Content Manager OnDemand will schedule imported index data for deletion from thedatabase after it resides in the database for the number of days specified in Keep Imported MigratedIndexes or Life of Data and Indexes, whichever occurs first.
You can use the administrative client to configure your application groups.
18 Content Manager OnDemand for Multiplatforms: Administration Guide

What happens when a user queries migrated data
Message to the userWhen the server determines that the index data required to complete a query has been migrated toarchive storage, it sends a message to the client program. The message states that the data required tocomplete the query is not available and that the user should contact an administrator.
Message to the system logWhen Content Manager OnDemand determines that the index data required to complete a query has beenmigrated to archive storage, it saves a message in the system log. An administrator can open the SystemLog folder to search for and display messages in the system log.
Content Manager OnDemand also sends a message to /dev/console (UNIX servers) or the Event log(Windows servers) and the system log user exit. If you provide a user-written program to be invoked bythe system log user exit, you can configure the system to examine the message and send an alert to anadministrator or call another program to take some action.
If you do not use some other facility that routes messages to an administrator or another program (suchas the Tivoli system management console), you should provide a user-written program to process themessage. The function of the program can vary, however at a minimum, the program should notify asystem administrator when a query for migrated index data occurs.
Importing index data
About this task
Verify temporary work space
About this task
Importing migrated index data from archive storage back into the database requires temporary storage.Before you import the index data, you should verify that sufficient free space is available in the file systemthat Content Manager OnDemand uses for temporary storage. The ARS_TMP parameter in the ARS.CFGfile (UNIX servers) determines the location that Content Manager OnDemand uses for temporary storage.For Windows servers, you can use the configurator program to define temporary storage locations toContent Manager OnDemand.
Verify database storage space
About this task
Importing migrated index data from archive storage back into the database requires additional databasestorage. Before you import the index data, you should verify that sufficient free space is available in thedatabase file systems. For example, for DB2, the ARS_DB2_DATABASE_DRIVE parameter in the ARS.CFGfile (UNIX servers) determines the location of the base database file system. If you store applicationgroup index data in table spaces, the ARS.DBFS file identifies the table space file systems. For Windowsservers, you can use the configurator program to determine the drives and directories used by thedatabase.
Migrating and importing index data 19

Verify database log file space
About this task
Importing migrated index data from archive storage back into the database requires database log filestorage. Before you import the index data, you should verify that sufficient free space is available in thelog file directories. For example, for DB2, the ARS_PRIMARY_LOGPATH and ARS_ARCHIVE_LOGPATHparameters in the ARS.CFG file (UNIX servers) determine the locations for the log files. For Windowsservers, you can use the configurator program to determine the drives and directories used to hold the logfiles.
Run the ARSADMIN program
About this task
Content Manager OnDemand provides the ARSADMIN program to import tables of index data from archivestorage back into the database. The following examples shows how to run the ARSADMIN program on aUNIX server to copy a migrated index table from archive storage back into the database. The name of theapplication group and the index table to import can be obtained from the message that Content ManagerOnDemand saved in the system log.
arsadmin import -g Credit -h ARCHIVE -u admin SL27
To run the ARSADMIN program on a Windows server:
Procedure
1. Start > Programs > IBM OnDemand Server V10.1 > OnDemand Command Window V10.1.2. Enter the command and runtime parameters at the prompt.
For example: arsadmin import -g Credit -h ARCHIVE -u admin SL27
Results
After the ARSADMIN program completes the import operation, you can open the System Log folder to seethe messages that were generated by the import process.
Related referenceARSADMIN
After you import index data
Querying data
About this task
After you import index data from archive storage back into the database, you should notify the user toretry the query.
Expiring imported migrated indexes
About this task
Content Manager OnDemand schedules an imported index table for deletion after it resides in thedatabase for the number of days specified in the Length of Time to Keep Imported Indexes property inapplication groups. After an imported index data reaches the specified value, the next time that the
20 Content Manager OnDemand for Multiplatforms: Administration Guide

ARSMAINT program runs, the imported index table is deleted from the database. (However, the table stillexists in archive storage.)
You typically configure the ARSMAINT program to run automatically on a regular schedule, using theCRON facility (UNIX servers) or the configurator program (Windows servers). See the IBM ContentManager OnDemand for Multiplatforms: Installation and Configuration Guide for information aboutscheduling the ARSMAINT program. You can also run the ARSMAINT program command from the prompt.
Related referenceARSMAINT
Configuring index migration
About this task
If you find that your users are often querying for index data that has been migrated to archive storage,configure your application groups to increase the length of time that Content Manager OnDemandmaintains the index data in the database. This should reduce the number of queries that need migratedindex data.
Keeping imported migrated indexes
About this task
Content Manager OnDemand schedules imported index data for deletion after the index data resides inthe database for the number of days specified in Keep Imported Migrated Indexes or Life of Data andIndexes, whichever occurs first. The default value for Keep Imported Migrated Indexes is thirty days. Ifyou want Content Manager OnDemand to maintain imported index data in the database for longer thanthirty days, then you must change the value of Keep Imported Migrated Indexes for your applicationgroups.
Migrating and importing index data 21

22 Content Manager OnDemand for Multiplatforms: Administration Guide
Chapter 6. Monitoring database performance
One of the major tasks involved in administering the Content Manager OnDemand database is to monitorthe database performance and tune the system to keep optimization information up-to-date.
This section briefly describes the tools that are available to do these tasks in DB2. For more detailedinformation, see the DB2 Administration Guide. If you are using some other database managementproduct, please see your product information for help with doing these tasks.
Administration tools
DB2 provides GUI tools to help you administer the database from one central location called the "ControlCenter". From the Control Center, you get a clear overview of all the objects that make up the ContentManager OnDemand database. The Command Center enables you to issue DB2 database commands, SQLstatements, and operating system commands. The Alert Center notifies you when thresholds that youhave set have been exceeded. The Journal allows you to view the status of jobs and to view the messageslog. The Knowledge Center gives you quick access to the information in the DB2 product manuals andsample programs and provides access to other sources of DB2 information on the Web.
For some functions that you can perform with the GUI tools, you are given the option of using aSmartGuide. SmartGuides are invoked from the pop-up menus in the Control Center. They provide agreater level of help by prompting you step-by-step on how to enter the information necessary for thetask that you are doing and even making calculations and recommendations based on information thatyou supply. SmartGuides are very useful if you are a new database administrator or someone who onlyadministers a database occasionally. See the online help for Control Center for a list of availableSmartGuides and how to use them.
From Control Center, you can administer database objects for the DB2 family of products for UNIX, andWindows. You can also administer DB2 for z/OS® subsystems from the Control Center if an AdministrationServer (DAS) is running on the DB2 for z/OS system and if a DB2 Connect™ product is available to theclient on which the Control Center is running. See your DB2 information for details.
You can administer the following database objects from the Control Center:
• Systems• Instances• Databases• Tables• Indexes• Users and Groups
You can do the following tasks from the Control Center:
• Manage database objects. For example, you can create, alter, and drop table spaces; you can alsomanage users.
• Manage data. For example, you can import, export, and reorganize data and gather statistics.• Schedule jobs.• Perform preventative maintenance by backing up the database.• Monitor performance and perform troubleshooting.• Configure and tune instances and databases.
Monitoring database performance
The Performance Monitor provides information about the state of DB2 and the data that it controls. It is agraphical utility that you can customize for your database environment. You can define thresholds or
© Copyright IBM Corp. 1993, 2018 23

zones that trigger warnings or alarms when the values being collected by the Performance Monitor are notwithin acceptable ranges. When a threshold is reached, you can specify that you want any or all of thefollowing actions to occur:
• You are notified through the Alert Center• You receive an audible alarm• A program is run• A message is displayed• No notification is given
You can monitor DB2 objects such as instances, databases, tables, table spaces, and connections byselecting the object in the Control Center and clicking mouse button two. From there, you can choose tostart monitoring activity.
When an object is being monitored, its color represents the severity of a problem as defined by thethresholds that you have defined. Green signifies that the monitor is running and everything is fine. Yellowis a warning and signifies that the monitor is reaching the thresholds that you have set. Red indicates analarm and that the monitor has reached the threshold. You can use the predefined monitors that areincluded with DB2 or you can create your own monitors. See the DB2 Administration Guide for a list of thepredefined monitors. See the online help for examples of how to use the predefined monitors and how tocreate your own monitors.
You can use the Performance Monitor when you need to monitor an existing problem or when you want toobserve the performance of your system. It lets you take a snapshot of database activity and performancedata at a point in time. These snapshots are used for comparison over time. The information can help youto identify and analyze potential problems, or identify exception conditions which are based on thresholdsthat you set. You should use the Performance Monitor if you need to know the performance of thedatabase manager and the Content Manager OnDemand database at a single point in time and look attrends over time. You can also use it to get a visual overview of what elements are in a state of alarm. Thishelps you to identify which parameters may need tuning. You can then look closely at the parameters thathave been set for that element and change them to improve performance.
You can use the Performance Monitor to see if bottlenecks are hardware related. For example, you maywant to monitor database connection activity or table space, buffer pool, and I/O activity. To see ifbottlenecks are hardware related, you would analyze the information collected by the PerformanceMonitor if:
• Too many database tasks are scheduled during peak time• There is a high number of user connections• Database partitioning (hardware load balancing) is not well optimized• The server is being used for more than just a database server
24 Content Manager OnDemand for Multiplatforms: Administration Guide
Chapter 7. Tuning an Oracle database
This section briefly describes the tools that are available to tune the Content Manager OnDemanddatabase when using Oracle. For more detailed information, see your Oracle technical productinformation.
In general, most customers use Content Manager OnDemand in one of two ways:
• Long-term archive for larger reports. These customers create table spaces for each application groupthat they add to the system, load many rows into the database at one time, maintain data on the systemfor many months or years, and delete a report at a time from the system. These parameters usuallyresult in very static data and a low maintenance operation.
– A table space contains data from one application group.– Inserts are done by a high-volume batch process.– After a table reaches its Maximum Rows value, OnDemand closes the table and no additional inserts
are made to the table. Closed tables remain available for queries until the data is removed from thesystem.
– Data is removed from the system by dropping a table or deleting a large number of consecutive rowsat a time.
Because of the low rate of change within the tables, these customers should seldom or never need totune their database.
• Short-term archive for smaller reports. These customers store all application group data in the SYSTEMtable space (or in one or more DATA table spaces), load very few rows into the database at one time,maintain data on the system for a short period of time, or use the Delete Document method to removedata from the system. These parameters usually result in very dynamic data and a high maintenanceoperation.
– A table space contains data from more than one application group.– Inserts are done by a low-volume batch process.– Inserts and deletes happen frequently.– Data is removed from the system by deleting one row at a time.
Because of the high rate of change within the tables, these customers should plan to tune theirdatabase on a time-based schedule, such as a weekly or nightly process. Note: Some customers tunetheir database every day. However, most customers do not tune their database until the optimizerignores the current set of statistics or generates an inefficient plan. Those customers should tune thedatabase just before they plan to take an offline backup of the database. This schedule keeps theoptimization information up to date and minimizes the impact to system availability, because a systemoutage is already planned.
Tuning the database is done by collecting statistics on the tables, which can provide faster access to thedata, thereby improving performance. Statistics on tables are gathered by using the ANALYZE command.When you analyze a table, its associated indexes are automatically analyzed as well. The frequency withwhich you analyze the tables depends on the rate of change within the tables. Note: If you collectstatistics and do not notice a visible performance improvement, then dropping and re-creating theindexes to your tables may help. Customers in a high maintenance operation may need to periodicallyrebuild the indexes on their most active tables. See your Oracle information for details about rebuildingindexes.
Content Manager OnDemand provides two programs to collect statistics on database tables: the ARSDBprogram and the ARSMAINT program.
© Copyright IBM Corp. 1993, 2018 25

Using the ARSDB program
You can use the ARSDB program to collect statistics on the Content Manager OnDemand system tables.The Content Manager OnDemand system tables include the user table, the group table, and theapplication group table. For a complete list of the Content Manager OnDemand system tables, see SystemControl Tables. For most customers, the Content Manager OnDemand system tables require very littlemaintenance. You can probably schedule the ARSDB program to collect statistics once a month (or lessoften).
The syntax is:
/opt/IBM/ondemand/V10.1/bin/arsdb <options>
The options are:–e
Drop configuration indexes–r
Create configuration indexes–s
Collect statistics
Using the ARSMAINT program
You can use the ARSMAINT program to maintain the tables that contain user-defined application groupdata. User-defined application groups are the application groups that you define to the system.Customers in a high maintenance operation should run the ARSMAINT program on a regular schedule.
The syntax is:
/opt/IBM/ondemand/V10.1/bin/arsmaint <options>
The options are:–d, –i
Expire index data from the database. The –i parameter expires index data that has been importedfrom archive storage. If you do not migrate index data to archive storage, then you do not need tospecify the –i parameter.
–eMigrate index data from the database to archive storage. If you do not migrate index data to archivestorage, then you do not need to specify the –e parameter.
–rCollect statistics. Note: The ARSMAINT program collects statistics only on the tables that havechanged since the last time that statistics were collected. OnDemand keeps information about all ofits tables, including the last time that it modified a table and the last time that it collected statistics ona table.
–g applGroupProcess the tables for the specified application group. If you do not specify this parameter and namean application group, then the ARSMAINT program processes all of the user-defined applicationgroups.
Recommended practice for managing table space for Oracle
The following list describes the advantage and disadvantage to using one table per table space if you useOracle for the Content Manager OnDemand database:
• Advantage: Having one table per table space enables you to move tables among volumes easily. Tomove tables among volumes, you should take the table space offline, move the table space's datafile toa new location, rename the datafile in the database, and then bring the table space back online. Youmight also notice a small performance improvement when each table has its own table space.
26 Content Manager OnDemand for Multiplatforms: Administration Guide

• Disadvantage: Having one table per table space requires more frequent updates to the ars.dbfs file.Also, if each OnDemand application group has its own data table, after a new application group iscreated, a new application group data table and an associated table space are created.
Therefore, in most cases, it is recommended that you bundle the table space into one single logical unitand spread that logical unit over as many devices as possible by using striping or a logical volumemanager. This method provides equal or faster performance than manually separating table spaces.However, with one table per tablespace, other DBA tasks, especially monitoring the growth of tablespaces, can become more difficult, because there are more table spaces.
Note: Oracle allows a maximum of 1023 data files per tablespace. If your operating system allows amaximum size of 2 GB per file, the maximum size for a tablespace is 2 TB (terabytes) minus 2 GB. Forexample, if you want to add 2 GB to tablespace "ROOT_DBA12", use this command: ALTER TABLESPACE"ROOT_DBA12" ADD DATAFILE '/a099' SIZE 2048M;
Also, you can resize a datafile if you use Oracle, for example:
ALTER DATABASE foo DATAFILE '/mydatafile' resize 2048M;
Tuning an Oracle database 27

28 Content Manager OnDemand for Multiplatforms: Administration Guide

Chapter 8. Database backup and recovery
Note: The information in this section is specific to DB2. If you use a different database manager product,please see the information provided with the product for details about database backup and recovery.
DB2 table spaces
DB2 table space support provides enhanced flexibility and improved performance for your applicationgroup data. For example, after you store a report in Content Manager OnDemand, you can create a backupimage of the table that changed during the load process, rather than creating a backup image of the entiredatabase. You can also create an incremental backup image of the database, which contains only thosetables that changed since the last backup image. Because the backup image only contains the changesmade to the database, the backup process typically runs much faster than a full backup.
Content Manager OnDemand creates one table space for each segment of application group data. AfterContent Manager OnDemand closes the segment and you back up the table space, you do not need toback up the table space again, unless it is recovered or restored.
When you use the incremental table space backup capability, backup the Content Manager OnDemanddatabase each time that you load a report into the system. If your schedule does not permit you to run thebackup command after each load, backup the database once a day (assuming that you load multiplereports each day). While you can use incremental backup images to recover the database, you shouldperiodically create a full backup image of the database. A full backup image of the database is thequickest way to recover the database in the event that you need to do so. However, if your ContentManager OnDemand database is very large and cannot be backed up in a reasonable amount of time orrequires many storage volumes to back up, then you may find that maintaining full backup images of thedatabase is not possible.
The IBM Content Manager OnDemand for Multiplatforms: Installation and Configuration Guide providesinformation to help you configure the system for table spaces.
Database backup
Back up your database file systems using the data recovery facilities provided by DB2 or Oracle. See theSQL Server documentation for details on a backup strategy.
Backup to a tape device
If you plan to backup the database to a tape device, then you may need to configure the Buffer Size Limitin DB2. If you plan to backup the database to a tape device and specify a variable block size, then youmust configure the DB2 buffer size to a value that is less than or equal to the maximum block size limit forthe backup device. For maximum performance, you should set the buffer size to the maximum block sizefor the backup device. See the DB2 documentation for details. Contact the IBM support center if you havequestions.
Database backup in Windows
The Content Manager OnDemand configurator program that is provided for Windows servers allows forthe scheduling of database backups. You can perform a backup while the database is either online oroffline.
• If the backup is to be performed online, other applications or processes can continue to connect to thedatabase, as well as read and modify data while the backup operation is running.
• If the backup is to be performed offline, only the backup operation can be connected to the database;other Content Manager OnDemand services and the rest of your organization cannot connect to thedatabase while the backup task is running.
To schedule an offline backup with the configurator program, you must do the following:
© Copyright IBM Corp. 1993, 2018 29

1. Manually disconnect all other processes from the database before the backup task is scheduled tobegin. This includes stopping the Content Manager OnDemand LibSrvr, MVSD Server, Load Data, andDistribution Facility services on the library server. In addition, if you load data to the library server fromanother object server, then you should manually stop the Content Manager OnDemand ObjSrvr andLoad Data services on the object server.
2. Run the offline backup.3. Verify that the offline backup completed successfully.4. Manually restart the Content Manager OnDemand LibSrvr service and the Content Manager OnDemand
MVSD Server and Content Manager OnDemand Load Data services on the library server. If you stoppedContent Manager OnDemand services on an object server, manually restart the services.
Database logging
DB2 uses transaction logging to record changes to the Content Manager OnDemand database. Theinformation in the log file is used to recover from corruption of data in the database. Logging ensures thatno data is lost. By combining the information in the log files with a backup copy of the database, theContent Manager OnDemand database can be recovered to any point in time.
The Content Manager OnDemand database and the DB2 log files should reside on different physicalvolumes. The database backup image should be written to removable media. Unless multiple disk andtape volumes are damaged or lost at the same time, there is no possibility of losing the informationcontained in the Content Manager OnDemand database.
The DB2 Administration Guide provides details about the database logs.
Database recovery
This section provides an overview of the different recovery methods that you can use in the event thatthere is a problem involving the database.
Note: Before you begin using the system, ask your IBM representative about the strategies that areavailable to you when there are problems with the database. You should also speak with a DB2 specialistto help implement a backup and recovery plan that is best suited to your business and operatingenvironment. The DB2 Administration Guide provides details about database backup and recovery.
Typically you will need to recover the Content Manager OnDemand database because of media andstorage problems, power interruptions, and application failures. When a problem occurs that damages orcorrupts the database in some way, you must rebuild the database. The rebuilding of the database iscalled recovery. There are two types of database recovery:
• The first type recovers from failures that occur while update transactions are taking place. For example,a system failure occurs while update transactions are taking place. The database is left in aninconsistent and unusable state and must be moved to a consistent and usable state before you canpermit users to access the system.
The log files help correct this type of failure by allowing the transactions received before the failure toeither be reapplied to the database or to be rolled-out. Rolling-out transactions is a way to return thedatabase to the state it was in before the transaction that caused the failure.
This type of recovery is done with the DB2 RESTART DATABASE command. If you want this type ofrecovery to occur in every case of a failure, you can use the AUTOMATIC RESTART ENABLE databaseconfiguration parameter. The default for this configuration parameter is that the RESTART DATABASEroutine will be started every time it is needed. Once enabled, you do not need to do anything to havethis command done at the time of a failure.
• The second type of recovery deals with corruption of the Content Manager OnDemand database and isusually caused by media failure. For example, one of the disk storage volumes that belongs to thedatabase volume group becomes damaged and unusable. To recover from this type of failure, anadministrator must intervene to recover the database.
The combination of the DB2 log files and a full backup copy of the database can be used to re-create theContent Manager OnDemand database to any particular point in time. First, the latest full backup image
30 Content Manager OnDemand for Multiplatforms: Administration Guide

of the database rebuilds the database to a point in time. Then, a roll-forward recovery restores all of theunits of work that occurred since the backup image was created. This allows you to restore the databaseto a state identical to the time of the failure.
The Content Manager OnDemand database and the DB2 log files should reside on different physicalvolumes. The database backup image should be written to removable media. Unless multiple disk andtape volumes are damaged or lost at the same time, there is no possibility of losing the informationcontained in the Content Manager OnDemand database.
Factors affecting recovery
To decide which database recovery method to use, you should consider the following:
• How near to the time of failure you will need to recover the database?
When you restore a full backup copy of the database, the database is only as current as the time thatthe last backup was made.
To restore the database to the time of a failure, you must use the log files to reapply changes that weremade to the database since the backup copy was created. You can reapply the changes to the end of thelogs or to a point in time. A point in time recovery may be useful if an application corrupts the databaseand you do not want to reapply its changes.
• How much time is spent associated with recovery?
Your recovery plan should allow for regularly scheduled backups, since backing up the databaserequires time and system resource.
You can take a backup while the database is either online or offline. If it is online, users can access thesystem and other processes can connect to the database and read and modify data while the backuptask is running. If the backup is performed offline, only the backup task can be connected to thedatabase. Users cannot access the system and other processes cannot connect to the database whilethe offline backup task is running.
• How much storage space can you allocate for backup copies and archived log files?
To restore the database, you must allocate enough free disk space to hold the backup copy of thedatabase and the restored database. To roll-forward transactions, you must allocate enough space tohold the backup copy of the database, the restored database, and all of the archived log files createdbetween backup copies of the database.
• Table space level or full database level backup.
With a table space backup, you can specify one or more tables spaces to be backed up, rather than theentire database. You can then restore selected table spaces to a state identical to the time the backupwas made. However, those table spaces not selected at the time of the backup will not be in the samestate as those that were restored.
IBM strongly encourages you to contact the IBM support center to help you with a backup and recoveryplan that includes table space backup and recovery.
The DB2 Administration Guide provides details about recovering a database.
Database backup and recovery 31

32 Content Manager OnDemand for Multiplatforms: Administration Guide

Chapter 9. Document storage
This section is organized as follows:
• Defining document storage management• Migrating documents• Removing documents
Note: This section describes how to do some of the storage management tasks, but you will need otherContent Manager OnDemand information and your archive storage manager product information to doothers.
Defining document storage management
The document storage management definitions that you create on the library server determine where andwhen Content Manager OnDemand stores documents and how it maintains them.
Figure 6 on page 33 shows how the components of document storage management work together toload documents and migrate them from one storage location to another.
Figure 6: Document storage management
When you load a document into Content Manager OnDemand, you assign it to an application group. Theapplication group is the last document storage management component that you define, because itrequires a storage set and storage manager definitions, which you must create first. The load policyidentifies the storage set and determines where documents should be loaded. You assign eachapplication group to a storage set. The nodes in the storage set identify the object server on whichdocuments are loaded. You can load documents into cache storage, into archive media, or into both cachestorage and archive storage. The cache storage manager maintains documents temporarily on disk. Thecache storage manager uses a list of file systems to determine the devices available to store and maintaindocuments. The archive storage manager maintains documents on optical and tape storage. The archivestorage manager uses devices, a device class, a storage pool, a management class, and an archive copygroup to determine where to store documents and how long to maintain them. Depending on the loadpolicy, documents may remain where the loading program put them for the number of days that arespecified by the migration policy. After a document ages for the specified number of days, the migrationprocess can move it from cache storage to archive storage.
© Copyright IBM Corp. 1993, 2018 33

Application groups
The application group is the last component that you must define because it requires a storage set andstorage manager definitions. The application group provides a way to group related documents. Alldocuments in the application group are loaded in the storage nodes that are part of the storage set towhich the application group is assigned. All documents in the application group migrate according to therules that are defined for the application group's migration policy.
Use the administrative client to create the application groups that determine the document storage foryour documents. You typically define one application group for each set of your documents that havesimilar storage requirements. For example, documents that must be retained for a specific length of time,in specific storage locations and stored on specific types of media.
Load policy
A load policy contains the rules for loading documents into an application group. It requires one or morestorage sets, which you must create first. The load policy determines if documents are loaded into cachestorage, archive storage, or both. If the load policy causes documents to be stored only in cache storage,then the migration policy specifies when (or if) documents are copied to archive storage.
You define the load policy when you create the application group. The following properties on the StorageManagement page comprise the load policy:
• Storage Set. Determines where documents will be loaded.
Note: If you specify Cache Only, then documents can be loaded into cache storage only.• Cache Data. Determines if documents will be loaded into cache storage.
Note: If the storage set is a cache-only storage set, then documents must be loaded into cache storage.• Migrate Data from Cache. If you specify When Data is Loaded, then documents will be loaded into
archive storage. (Migration is disabled for the application group.)
Migration policy
Migration is the process of copying documents from cache storage to archive storage as controlled by therules of the application group's migration policy. However, because a document is eligible to be migrateddoes not mean that it will be migrated. Other factors affect migration, such as the frequency with whichyou run migration processing (migration cannot take place until you run migration processing).
A migration policy contains the rules for migrating the documents in an application group. Migrationrequires an archive storage manager and its associated devices, storage pools, and so forth, which youmust install and configure before you begin migrating documents.
The migration policy determines how long a document stays in cache storage and, through the storageset, where the document will be copied to next. The client node in the storage set identifies the nextlocation.
You define the migration policy when you create the application group. The following settings on theStorage Management page comprise the migration policy:
• Storage Set. Determines the next location for documents.
Note: If you specify Cache Only, then migration is disabled for the application group.• Migrate Data From Cache. Determines when documents are eligible to be migrated.
Note: If you specify No or When Data is Loaded, then migration is disabled for the application group.
Cache storage manager
The cache storage manager is the interface between the object server and the disk storage system. Thecache storage manager maintains documents temporarily on disk. Before loading documents, you mustidentify the file systems that the cache storage manager can use to store and maintain documents. Youmust define at least one storage set for each object server. Documents migrate from cache storage to
34 Content Manager OnDemand for Multiplatforms: Administration Guide

archive storage based on the migration policy that is defined for the application group. The cache storagemanager can delete documents after they exceed the Cache Document Data for n Days or Life of Data,whichever occurs first. See “Removing documents” on page 37 for more information.
Archive storage manager
The archive storage manager is the interface between the object server and an optical or tape storagesystem. The archive storage manager maintains a backup or long-term copy of documents. Before loadingdocuments, you must configure your archive storage devices and define storage pools, client nodes, andmanagement classes to the archive storage manager. The management class determines how longdocuments remain in archive storage. The archive storage manager can delete documents after theyexceed the Retention Value specified for the management class. See “Removing documents” on page37 for more information.
Migrating documents
Content Manager OnDemand provides automatic migration to copy documents from cache storage toarchive storage (for documents that were not loaded to archive storage) and to make documents eligiblefor deletion to maintain free space in cache storage file systems. Migration helps to ensure that there issufficient free space in the cache storage file systems, where faster devices can provide the most benefitto your users.
Important: If you use migration to copy documents to archive storage (that is, you do not load documentsto archive storage), then you should run migration processing on a regular schedule to make sure that abackup copy of your documents gets created as soon as practically possible. If you defer the migration ofdocuments to archive storage and cache storage were to become corrupted, then you could be leftwithout a backup copy of your documents.
You control automatic migration processing by scheduling the ARSMAINT program to run with theappropriate options. See ARSMAINT for details about the options. See your operating system informationfor details about how to schedule tasks. You can also manually start migration processing by running theARSMAINT program from the prompt.
The ARSMAINT program uses an application group's migration policy to control when migration for anapplication group occurs:
• If you use Next Cache Migration to control when migration for an application group occurs, then thecache storage manager runs migration processing each time that you start the ARSMAINT program withthe appropriate options.
• If you use After n Days in Cache to control when migration for an application group occurs, then adocument must be stored in cache storage for at least the specified number of days before it is eligibleto be migrated.
The ARSMAINT program migrates documents from each cache storage file system listed in the cachestorage file system file.
The cache storage space that migrated documents occupy can be reclaimed by the cache storagemanager after expiration processing completes. After you run migration processing, you should runexpiration processing so that the cache storage manager can reclaim the cache storage space occupiedby migrated documents.
Figure 7 on page 36 shows an example of migration processing.
Document storage 35

Figure 7: Migration Processing
In the example, assume that you have never run migration processing on this particular cache storage filesystem. The box on the left shows the cache storage file system before migration processing begins – it isquite full. (You would have ignored all of the "full cache file system" messages in the Content ManagerOnDemand system log.) The box in the middle shows what happens during migration – the process ofcopying documents that are eligible to be migrated to archive storage. The box on the right shows thecache storage file system when migration processing completes. The cache storage file system is still full,however, some two-thirds of the documents are eligible to be removed. You need to run expirationprocessing to remove documents from the cache storage file system, reclaiming at least some of thespace occupied by migrated documents. After expiration processing completes, you will have free storageavailable in the cache storage file system to load additional documents.
Migration processing in the system log
When you run the ARSMAINT program, it saves messages about its activities in the system log. The typesof messages saved in the system log depend on the options that you specify when you run the ARSMAINTprogram. The number of messages saved in the system log during a migration process depend on theoptions that you specify for the ARSMAINT program, the number of application groups and segments ofdata processed, and the number of cache storage file systems defined on the server. You will see one setof messages for each object server on which you run the ARSMAINT program. Table 1 on page 36 liststhe messages you could see in the system log following migration processing.
Table 1: Messages from the ARSMAINT program in the Content Manager OnDemand System Log
Message Number MessageInformation
Explanation
110 CacheMigration
(Date)(Server)
About to begin cache migration on the specified server.Migration processing uses the specified date (the default is"today").
197 CacheMigration
(ApplGrp)(ObjName)(Server)
One of these messages for each storage object migrated toarchive storage. Migration copies a storage object if its "Aftern Days in Cache" period has passed or the application groupuses the "Next Cache Migration" migration method.
124 FilesystemStatistics
(filesystem)(% full)(server)
One of these messages for each cache file system on theserver. Information only to report the percentage of spaceused in the file system.
Important: In addition to the messages listed in Table 1 on page 36, you should monitor the system logevery day for messages that indicate your cache storage file systems are becoming full. The ARSMAINTprogram automatically saves a message in the system log when the amount of space used in a cache
36 Content Manager OnDemand for Multiplatforms: Administration Guide

storage file system exceeds a threshold. The default threshold is 95%. You can specify a differentthreshold by using the -f parameter when you run the ARSMAINT program.
Removing documents
Documents expire (are eligible for removal) because their cache expiration date or archive retentionperiod has passed. Expired documents can then be removed by the storage managers. The cache storagemanager identifies documents for removal by using the application group's expiration policy and high andlow expiration thresholds. The archive storage manager marks documents for removal based on thecriteria defined in the archive copy group.
Documents expire from cache storage when they reach their cache expiration date. If a document's cacheexpiration date is less than its Life of Data period, then the document is simply removed from cachestorage. Subsequent requests for the document are satisfied by the archive storage manager. When thedocument reaches its Life of Data period, information about it is removed from the Content ManagerOnDemand database (the document can no longer be retrieved). When the document's archive retentionperiod has passed, information about it is removed from the archive storage manager database.
Because a document is eligible to be removed does not mean that it will be deleted from storage. Thecache storage manager does not delete expired documents from storage until expiration processing runs.During expiration processing, the archive storage manager deletes information about expired documentsfrom its database. However, the actual documents remain on archive media until such time that the spacethat they occupy is reclaimed.
Important: Content Manager OnDemand and the archive storage manager delete documentsindependently of each other. Each uses their own criteria to determine when documents expire andshould be removed from the system. Each uses their own utilities to remove documents. However, forfinal removal of documents from the system, you should specify the same criteria to Content ManagerOnDemand and the archive storage manager. The Life of Data, which is used by Content ManagerOnDemand, and the Retention Period, which is used by the archive storage manager, should be the samevalue.
Removing documents from cache storage
The expiration policy determines when documents are eligible for deletion from cache storage. You definethe expiration policy when you create the application group. The following properties on the StorageManagement page comprise the expiration policy:
• Cache Document Data For n Days. The length of time in days to keep documents in cache storage. Thedocuments include documents that are already in the cache and any documents that are subsequentlyloaded. After a document reaches this value, it is eligible to be deleted from cache storage.
• Life of Data. The length of time in days to maintain documents on the system.
Note: If you specify Never Expire, then expiration processing is disabled for the application group.• Expiration Type. Determines whether one or more documents are eligible to be deleted at a time. For
example, the Segment expiration type means that a segment of data (unless you specify otherwise, 10million documents) can be deleted at a time.
Note: This is the first time that segment has been mentioned. Up to now, documents and reports havebeen discussed, which are the data objects that most people associate with the Content ManagerOnDemand system. However, administrators who maintain the system work primarily with segments,which represent many documents, and storage objects, which are containers of compressed documentsthat are maintained by the storage managers.
The cache storage manager does not delete expired documents from cache storage until expirationprocessing runs. The ARSMAINT program is the expiration utility. You can schedule the ARSMAINTprogram to run automatically or you can run it manually. You should make sure that the ARSMAINTprogram runs periodically so that the cache storage manager can reclaim the space that is occupied byexpired documents.
Document storage 37

You control automatic expiration processing by scheduling the ARSMAINT program to run with theappropriate options. For details about the options, see ARSMAINT. For details about how to scheduletasks, see your operating system information. You can also manually start expiration processing byrunning the ARSMAINT program from the prompt.
The ARSMAINT program uses expiration thresholds to control when expiration processing begins andends. The thresholds are set as levels of the space that is used in a cache storage file system, expressedas a percent of total space available in the file system. For each cache storage file system, the ARSMAINTprogram compares the high threshold with a calculation of the amount of data stored in the file system asa percent of the actual data capacity of the storage volumes that belong to the file system. When theamount of data stored in a cache storage file system exceeds the high threshold, expiration begins. TheARSMAINT program deletes documents from the file system until the amount of space used in the cachestorage file system falls below the low expiration threshold. The ARSMAINT program expires documentsfrom each cache storage file system listed in the cache storage file system file. You can use the defaultsfor the expiration thresholds, or you can change the threshold values to identify the minimum andmaximum amount of space for your cache storage file systems.
Figure 8 on page 38 shows an example of expiration processing.
Figure 8: Expiration Processing
This example uses the cache storage file system from the migration example in Figure 7 on page 36.Some two-thirds of the file system contains documents that are eligible to be removed. When you run theARSMAINT program, it first determines that the cache storage file system's capacity is equal to orexceeds the high threshold. The ARSMAINT program can then begin deleting documents from the filesystem, beginning with the oldest documents. After the ARSMAINT program deletes the documents thathave the oldest date, it checks the low migration threshold. If the amount of space that is used in the filesystem is now below the low expiration threshold, then expiration ends. If not, then the ARSMAINTprogram deletes the next oldest documents, and the process continues. In the example, expirationprocessing ends before all of the eligible documents have been removed. That's typically OK for tworeasons:
• The expiration process has probably reclaimed enough space to load new documents. (In our example,that is certainly true; some 40 percent of the cache storage file system is now free space.) If not, youneed to check your high and low thresholds or add more storage volumes to the cache storage filesystem.
• Because a document is eligible to be removed from cache storage does not always mean that it is agood thing to do so. For example, suppose you copy a document to cache storage for 60 days and toarchive media for two years. After 60 days, the document is eligible to be removed from cache storage.However, your users continue to access the document on a regular basis for 90, or even 120, days. Withthe correct set of high and low thresholds, you can probably guarantee that the document will remain incache storage for another 30 or more days beyond its expiration date, where faster devices can providethe most benefit to your users. (Of course, you could just change the load policy, but that's anotherstory.)
Expiration processing in the system log
When you run the ARSMAINT program, it saves messages about its activities in the system log. The typesof messages saved in the system log depend on the options that you specify when you run the ARSMAINTprogram. The number of messages saved in the system log each time that expiration processing runs
38 Content Manager OnDemand for Multiplatforms: Administration Guide

depends on the options that you specify for the ARSMAINT program, the number of application groupsand segments of data processed, and the number of cache storage file systems defined on the server. Youwill see one set of messages for each object server on which you run the ARSMAINT program. Table 2 onpage 39 lists the messages you could see in the system log following expiration processing.
Table 2: Messages from the ARSMAINT program in the Content Manager OnDemand System Log
Message Number MessageInformation
Explanation
109 CacheExpiration
(Date)(Min%)(Max%)(Server)
About to begin cache expiration processing on the specifiedserver. Migration processing uses the specified date (thedefault is "today"). Expiration processing begins on eachcache file system that exceeds the Max% (default 80%) andends when the free space available in the file system fallsbelow the Min% (default 80%).
196 CacheMigration
(ApplGrp)(ObjName)(Server)
One of these messages for each storage object deleted fromcache storage. A storage object is eligible to be deleted whenits "Cache Document Data for n Days" or "Life of Data" periodhas passed, whichever occurs first.
124 FilesystemStatistics
(filesystem)(% full)(server)
One of these messages for each cache storage file system onthe server. Information only to report the percentage of spaceused in the file system.
Important: In addition to the messages listed in Table 2 on page 39, you should monitor the system logevery day for messages that indicate that your cache storage file systems are becoming full. TheARSMAINT program automatically saves a message in the system log when the amount of space used in acache storage file system exceeds a threshold. The default threshold is 95%. You can specify a differentthreshold by using the -f parameter when you run the ARSMAINT program.
Removing documents from archive storage
Important: Removing a document from archive storage means that the backup or long-term copy of thedocument will be deleted from the system. You typically remove documents from archive storage whenyou no longer have a business or legal requirement to keep them.
A management class contains an archive copy group that specifies the criteria that makes a documenteligible for deletion. Documents become eligible for deletion under the following conditions:
• Administrators delete documents from client nodes• An archived document exceeds the time criteria in the archive copy group (how long archived copies are
kept)
The archive storage manager does not delete information about expired documents from its databaseuntil expiration processing runs. You can run expiration processing either automatically or manually bycommand. You should make sure that expiration processing runs periodically to allow the archive storagemanager to reuse storage pool space that is occupied by expired documents. When expiration processingruns, the archive storage manager deletes documents from its database. The storage space that thesedocuments occupy then becomes reclaimable. See “Reclaiming space in storage pools” on page 40 formore information.
You control automatic expiration processing by using the expiration processing interval (EXPINTERVAL) inthe server options file (dsmserv.opt). You can set the option by editing the dsmserv.opt file (see theInstallation and Configuration Guide for details).
If you use the server option to control when expiration processing occurs, the archive storage managerruns expiration processing each time that you start the server. After that, it runs expiration processing atthe interval that you specified with the option, measured from the start time of the server.
Document storage 39

You can manually start expiration processing by issuing the EXPIRE INVENTORY command. Expirationprocessing then deletes information about expired files from the database. You can schedule thiscommand by using the DEFINE SCHEDULE command. If you schedule the EXPIRE INVENTORY command,set the expiration interval to 0 (zero) in the server options so that the archive storage manager does notrun expiration processing when you start the server. You can control how long the expiration process runsby using the DURATION parameter with the EXPIRE INVENTORY command.
Reclaiming space in storage pools
Space on a storage pool volume becomes reclaimable as documents expire or are deleted from thevolume. For example, documents become obsolete because of aging.
The archive storage manager reclaims the space in storage pools based on a reclamation threshold thatyou can set for each storage pool. When the percentage of space that can be reclaimed on a volume risesabove the reclamation threshold, the archive storage manager reclaims the volume. The archive storagemanager rewrites documents on the volume to other volumes in the storage pool, making the originalvolume available for new documents.
The archive storage manager checks whether reclamation is needed at least once per hour and beginsspace reclamation for eligible volumes. You can set a reclamation threshold for each storage pool whenyou define or update the storage pool.
During reclamation, the archive storage manager copies the files to volumes in the same storage poolunless you have specified a reclamation storage pool. Use a reclamation storage pool to allow automaticreclamation for a storage pool with only one drive. See your archive storage manager documentation fordetails.
After the archive storage manager moves all documents to other volumes, one of the following occurs forthe reclaimed volume:
• If you have explicitly defined the volume to the storage pool, the volume becomes available for reuse bythat storage pool
• If the volume was acquired as a scratch volume, the archive storage manager deletes the volume fromits database
Important: See your archive storage manager documentation for more information about reclamationprocessing, including choosing a reclamation threshold, reclaiming volumes in a storage pool with onedrive, reclamation for WORM optical media, reclamation for copy storage pools, and reclamation of off-site volumes.
40 Content Manager OnDemand for Multiplatforms: Administration Guide

Chapter 10. Managing Tivoli Storage Manager storage
This part of the book provides information about tasks required to maintain Tivoli Storage Managerstorage, such as preparing storage volumes, managing storage volumes in an automated library, managingmedia mount operations, automating operations, and registering client nodes. Tivoli Storage Manager isalso known as IBM Spectrum Protect.
Overview
This part of the book provides a brief overview of tasks that Tivoli Storage Manager administrators need todo to manage Tivoli Storage Manager storage. The Tivoli Storage Manager Administrator's Guide presentsthe details of the tasks and the concepts that you need to understand to complete them. The Installationand Configuration Guide is another important source of information. When you installed and configured aContent Manager OnDemand server with Tivoli Storage Manager, you completed many of the tasksdescribed here: configuring devices and defining them to Tivoli Storage Manager, defining policymanagement information, preparing storage volumes, registering client nodes, and increasing the size ofthe database and recovery log.
The following topics provide more information:
• Using magnetic disk devices with Tivoli Storage Manager• Using removable media devices with Tivoli Storage Manager• Managing removable media operations• Defining drives and libraries• Defining device classes• Managing storage pools• Managing storage pool volumes• Managing policies• Managing client nodes• Automating server operations• Managing server operations• Managing the database and recovery log• Monitoring the server• Protecting and recovering your data
Using magnetic disk devices
In a Content Manager OnDemand system, the primary use of magnetic disk devices with Tivoli StorageManager is the storage of the database and recovery log. The Tivoli Storage Manager database containsinformation needed for server operations and information about data that has been backed up, archived,and space-managed. The database contains pointers to the locations of all client files in the Tivoli StorageManager storage pools. Changes to the database are recorded in the recovery log in order to maintain aconsistent database image. The recovery log contains information about updates that have not yet beencommitted to the database. If the database is unusable, the entire Tivoli Storage Manager server isunavailable. If a database is lost and cannot be recovered, the backup, archive, and space-managed datafor that server is lost. Refer to “Managing the database and recovery log” on page 44 and “Protectingand recovering data” on page 45 for steps that you can take to protect your database.
Using removable media devices
In a Content Manager OnDemand system, removable media devices can be used with Tivoli StorageManager for the following purposes:
© Copyright IBM Corp. 1993, 2018 41

• Storage of application group data, including migrated index data. Application group data is typicallystored in optical libraries, but can also be stored in automated tape libraries.
• Storage of Tivoli Storage Manager database backups. Database backups are typically stored onmanually operated devices, such as an 8mm tape drive, but can also be stored in optical or automatedtape libraries.
• Storage of DB2 archived log files and backup image files. DB2 files must be stored on rewriteable opticalmedia (not WORM) or tape.
Tivoli Storage Manager allows you to use and reuse removable media to store data. You must prepareremovable media for initial use by Tivoli Storage Manager. You also control how and when media arereused. The IBM Content Manager OnDemand for Multiplatforms: Installation and Configuration Guideshows examples of labeling removable media for initial use and checking storage volumes into a library.For detailed guidance and scenarios on configuring your removable media devices, see the Tivoli StorageManager Administrator's Guide.
Managing removable media operations
Tivoli Storage Manager allows you to use and reuse removable media to store data. You must prepareremovable media for initial use by Tivoli Storage Manager. You also control how and when media arereused.
Volumes must be mounted in response to mount requests from Tivoli Storage Manager. For manuallibraries, you can monitor the mount requests by using an administrative client in mount mode or consolemode. Someone you designate as the operator must respond to the mount requests by putting in tapevolumes as requested. For devices in automated libraries, Tivoli Storage Manager interacts with thelibrary to mount volumes, but sends messages when the library needs attention from an operator. TivoliStorage Manager also tracks the inventory of media in each automated library.
For automated libraries, Tivoli Storage Manager works with the operating system and the library toaccomplish volume mounts. Mount messages are not sent to an operator. However, information aboutproblems with the library are still sent to the mount message queue. You can see these messages onadministrative clients that have been started with either the mount mode or console mode parameter.However, you cannot use the Tivoli Storage Manager REPLY command to respond to these messages. Youcan get information about pending operator requests either by using the QUERY REQUEST command or bychecking the mount message queue on an administrative client started in mount mode.
In many cases, an operator request has a time limit. If the requested action is not performed within thetime limit, the operation times out and fails.
For most types of requests, such as volume mounts, the server detects when the operator performs theaction. The operator does not usually need to respond to the Tivoli Storage Manager server carrying outthe requested activity. However, sometimes the server cannot detect the completion of the requestedaction. When the server requires a reply, the message that is displayed by the server requests that theoperator reply when the activity has been completed. For example, a request to mount a scratch volumerequires that the operator reply when a scratch volume has been placed in the drive. Tivoli StorageManager waits for a reply to prevent the use of the wrong volume.
For information about managing removable media operations, see the Tivoli Storage ManagerAdministrator's Guide.
Defining drives and libraries
To use removable media devices with Tivoli Storage Manager, you must define the libraries and drives toTivoli Storage Manager.
The IBM Content Manager OnDemand for Multiplatforms: Installation and Configuration Guide providesexamples of defining drives and libraries. For detailed information about defining drives and libraries, seethe Tivoli Storage Manager Administrator's Guide.
42 Content Manager OnDemand for Multiplatforms: Administration Guide

Defining device classes
A device class represents a set of storage devices with similar availability, performance, and storagecharacteristics. You must define devices classes for the types of drives available to a Tivoli StorageManager server. You specify a device class when you define a storage pool, which is a named collection ofvolumes for storing data.
The IBM Content Manager OnDemand for Multiplatforms: Installation and Configuration Guide providesexamples of defining device classes. See the Tivoli Storage Manager Administrator's Guide for detailedinformation about device classes.
Managing storage pools
Content Manager OnDemand data is stored in groups of volumes called storage pools. The data on theseprimary storage pools can be backed up to copy storage pools for disaster recovery purposes. Becauseeach storage pool is assigned to a device class, you can logically group your storage devices to meet yourstorage management needs.
The IBM Content Manager OnDemand for Multiplatforms: Installation and Configuration Guide providesexamples of defining primary storage pools. For more information about copy storage pools, see the TivoliStorage Manager Administrator's Guide.
Managing storage pool volumes
You manage storage volumes by defining, updating, and deleting volumes, and by monitoring the use ofserver storage. Monitoring volumes can reveal inconsistencies between information in the database andclient node files in storage pools. You can also move files within and across storage pools to optimize theuse of server storage.
For each automated library, Tivoli Storage Manager tracks in its volume inventory for the library whether avolume has scratch or private status:
• A scratch volume is a labeled volume that is empty or contains no valid data, and can be used to satisfyany request to mount a scratch volume. To support Content Manager OnDemand, you typically definescratch volumes to Tivoli Storage Manager. Tivoli Storage Manager uses scratch volumes as needed,and returns the volumes to scratch when they become empty (for example, when all data on the volumeexpires).
• A private volume is a volume that is in use or owned by an application, and may contain valid data.Volumes that you define to Tivoli Storage Manager are private volumes. A private volume is used tosatisfy only a request to mount that volume by name. When Tivoli Storage Manager uses a scratchvolume, it changes the volume's status to private by defining it. Tivoli Storage Manager tracks whetherdefined volumes were originally scratch volumes. Volumes that were originally scratch volumes returnto scratch status when they become empty.
In addition to preparing removable media for Tivoli Storage Manager, you need to maintain a supply ofscratch volumes and manage the volume inventory in an automated library. Managing a library may meanthat you need to remove volumes from a library, return volumes to a library, and manage a full library.Other chapters in this part of the book provide examples of preparing storage volumes and adding storagevolumes to and removing storage volumes from automated libraries. For details about these tasks, seethe Tivoli Storage Manager Administrator's Guide.
Managing policies
Content Manager OnDemand documents, application group index data, and DB2 files can be backed up tothe server. This process ensures that the information can be retrieved when needed. Recall of documentsand DB2 files is transparent and automatic when a client retrieves a document or DB2 needs to retrieve abackup image file or archived log file to restore the database. Importing migrated index data requiresadministrator intervention.
Managing Tivoli Storage Manager storage 43

You define policies based on your requirements for archiving, backing up, or migrating data. You do this bydefining policy objects, which identify archive, backup, and migration criteria, and by scheduling clientoperations.
The IBM Content Manager OnDemand for Multiplatforms: Installation and Configuration Guide providesexamples of defining policies to support archiving documents, backing up DB2 files, and migrating indexdata. See the Tivoli Storage Manager Administrator's Guide for more information about establishing andmanaging policies.
Managing client nodes
You register Content Manager OnDemand primary storage nodes as client nodes in Tivoli StorageManager. You provide client/server authentication by requiring the use of passwords to ensure that theclient and the server are authorized to communicate with each other. You can also set the length ofpasswords and determine when passwords expire.
You can define sets of client options for clients to use. For example, you typically define one set of clientoptions for Content Manager OnDemand application group data and another set of client options for DB2files.
You can control access to the server by administrators. An organization may name a single administratoror may distribute the workload among a number of administrators and grant them different levels ofauthority.
The IBM Content Manager OnDemand for Multiplatforms: Installation and Configuration Guide providesexamples of registering client nodes, defining client options for Content Manager OnDemand primarystorage nodes, and registering administrators. See the Tivoli Storage Manager Administrator's Guide formore information about managing clients.
Automating server operations
You can define schedules for the automatic processing of most administrative commands, such asbacking up primary storage pool data to a copy storage pool and backing up the database.
See the Tivoli Storage Manager Administrator's Guide for information about scheduling Tivoli StorageManager commands and operations.
Managing server operations
You can manage server operations such as starting and stopping the server, maintaining and suspendingclient sessions with the server, and controlling server processes.
In a Content Manager OnDemand system, after you initially set up the Tivoli Storage Manager Server andScheduler services to start automatically and define schedules for specific server operations (such asbacking up the database and copying data from primary storage pools to copy storage pools), there is verylittle you need to do to manage the server operations on a day-to-day basis.
See the Tivoli Storage Manager Administrator's Guide for details about the day-to-day tasks involved inadministering the server and about reports and information available to help you manage the server.
Managing the database and recovery log
The Tivoli Storage Manager database contains information about Content Manager OnDemand data instorage pools, registered client nodes, Tivoli Storage Manager policies, and Tivoli Storage Managerschedules. The server recovery log, which records changes made to the database, is used to restore thedatabase to a consistent state and to maintain consistency across server start-up operations.
After your system is operational, you should monitor the database and recovery log to see if you shouldadd space. You can reset the maximum utilization counters for the database and recovery log to monitordaily utilization. To set the maximum utilization percentage equal to the current utilization, you mightwant to reset the utilization statistics each day. The IBM Content Manager OnDemand for Multiplatforms:Installation and Configuration Guide shows how to increase the size of the database and the recovery log.
44 Content Manager OnDemand for Multiplatforms: Administration Guide

See the Tivoli Storage Manager Administrator's Guide for information about monitoring the database andrecovery log.
Monitoring the server
Tivoli Storage Manager provides you with many sources of information about server and client status andactivity, the state of the database, and resource usage. By monitoring this information, you can providereliable services to users while making the best use of available resources.
You can use Tivoli Storage Manager queries and SQL queries to get information about the server. You canalso set up logging of information about Tivoli Storage Manager clients and server events. See the TivoliStorage Manager Administrator's Guide for more information about these tasks.
Protecting and recovering data
Tivoli Storage Manager provides a number of ways to protect and recover your data from media failure orfrom the loss of the Tivoli Storage Manager database or storage pools due to a disaster. These recoverymethods are based on the following preventive measures:
• Mirroring, by which the server maintains one or more copies of the database or recovery log, allowingthe system to continue when one of the mirrored disks fails. IBM recommends that you mirror at leastone copy of the database and the recovery log to different physical storage volumes.
• Periodic backup of the database. IBM recommends that you schedule frequent backups of thedatabase, after every load or system configuration change, or once a day. If you do not load reportsevery day or your system configuration does not change very often, you may be able to schedulebackups less frequently, perhaps once a week.
• Periodic backup of the storage pools. To protect Content Manager OnDemand data stored in TivoliStorage Manager, you may want to backup data in a primary storage pool to a copy storage pool. Seeyour Tivoli Storage Manager information for assistance with configuring a copy storage pool.
• Recovery of damaged files.
Disaster Recovery Manager (DRM) is an optional feature of Tivoli Storage Manager that assists anadministrator with preparing a disaster recovery plan. The disaster recovery plan can be used to guide anadministrator through disaster recovery as well as for audit procedures to certify the recoverability of theTivoli Storage Manager server. DRM's disaster recovery methods are based on the following measures:
• Enabling Disaster Recovery Manager• Creating a backup copy of server primary storage pools and database• Sending server backup volumes offsite• Moving reclaimed or expired volumes back onsite• Create the Tivoli Storage Manager server disaster recovery plan file• Storing client machine information• Defining and tracking client recovery media
For more information about protecting your data and for details about recovering from a disaster, see theTivoli Storage Manager Administrator's Guide.
Mapping Tivoli Storage Manager objects to Content Manager OnDemand application group objects
You might need to reload data with files that are obtained from the Tivoli Storage Manager volume. Forexample, here is some typical Tivoli Storage Manager volume content:
OD6YNODE Arch /JCA 12 /RES/ 27120 OD6YNODE Arch /JCA 12 /DOC/ 39072FAAA OD6YNODE Arch /LCA 15 /RES/ 7268 OD6YNODE Arch /LCA 15 /DOC/ 31844FAA1
Managing Tivoli Storage Manager storage 45

In some instances, you might not be able to determine the application group name, or know how tosearch in the application group tables. You might also miss system log records to find out the load ID toextract the object file name. The challenge here is to determine and verify the object file name from theexisting data.
The Tivoli Storage Manager file space names (for example, /JCA) correspond to the Content ManagerOnDemand application group three-letter identifier. With the three letter application group identifier, youcan obtain the application group ID (AGID) by querying the ARSAG table.
You can use the application group ID to query the ARSSEG table for the corresponding application grouptable name or names. The table name is TABLE_NAME. The application group table name is somethinglike AGIDn, where n is an integer. For example, JCA1.
The object file names are recorded in the DOC_NAME field of the application group table.
Important: If you delete an application group, the Tivoli Storage Manager filespace is also deleted, and allof the objects for that application group are removed regardless of their expiration parameters.
Exception: If you use data retention protection, the Tivoli Storage Manager filespace is not deleted,instead, Content Manager OnDemand deletes all application group objects.
Starting, halting, and restarting the server
Tivoli Storage Manager administrators can manage server operations. These operations include suchtasks as starting and halting the server, adding or updating server options, defining devices and policies,managing removable media, and monitoring server information.
Starting the server
To start the server, complete the following steps:
1. Change to the Tivoli Storage Manager server program directory.2. Start the server:
dsmserv
When the server is started, Tivoli Storage Manager displays information about product licensing, serveroptions, the database and recovery log, storage pools, and progress messages and any errorsencountered during server initialization.
Important: You can capture Tivoli Storage Manager server console messages to a user log file with theTivoli Storage Manager dsmulog utility. See the Tivoli Storage Manager documentation for moreinformation.
Starting the Tivoli Storage Manager server command line interface
In this part of the book, most examples illustrate how to perform tasks by using the Tivoli StorageManager server command line interface. To start the Tivoli Storage Manager server command lineinterface, type the following command:
dsmadmc
Tivoli Storage Manager provides you with ways to monitor processes and messages:
• Use the console mode from an administrative client to monitor processes and messages:
dsmadmc -consolemode
While the system is running in console mode, you cannot enter any administrative commands from theclient session. You can, however, start another administrative client session for entering commands.
46 Content Manager OnDemand for Multiplatforms: Administration Guide

• Specify the OUTFILE option to write all terminal output to a file. For example:
dsmadmc -consolemode -outfile=adsm.out
• From the command line interface, query the activity log for status information and possible errormessages:
query actlog
Refer to the Tivoli Storage Manager documentation for more information about managing client sessions.
Halting the server
When you halt the server, all processes are abruptly stopped and client sessions are canceled, even if theyare not completed. Any in-progress transactions are rolled back when the server is restarted. When theserver is halted, administrator activity is not possible. If possible, halt the server only after currentadministrative and client node sessions have completed or canceled. To shut down the server withoutseverely impacting administrative and client node activity with the server, follow the instructions in theTivoli Storage Manager documentation.
To halt the server and shut down all server operations, enter halt at the Tivoli Storage Manager Servercommand line interface.
Restarting the server
To start the server after it has been halted, follow the instructions in “Starting the server” on page 46.
When you restart the server after it has been halted, Tivoli Storage Manager rolls back any operations thathad been in process to ensure that the database remains in a consistent state.
Using scratch and private volumes
A scratch volume is a labeled volume that is empty or contains no valid data, and can be used to satisfyany request to mount a scratch volume. A private volume is a volume that is in use or owned by anapplication, and may contain valid data. Volumes that you define to Tivoli Storage Manager are privatevolumes. A private volume is used to satisfy only a request to mount that volume by name. For eachstorage pool, you must decide whether to use scratch volumes.
If you use scratch volumes, Tivoli Storage Manager uses volumes as needed, and returns the volumes toscratch when they become empty (for example, when all of the data on the volume expires). If you do notuse scratch volumes, you must define each volume you want Tivoli Storage Manager to use. Volumes thatyou define to Tivoli Storage Manager are private volumes, and do not return to scratch when they becomeempty.
For each automated library, Tivoli Storage Manager tracks in its volume inventory for the library whether avolume has a scratch or private status. If you allow scratch volumes to be used for a storage pool, TivoliStorage Manager chooses a scratch volume from the scratch volumes that are checked in for the library.
When Tivoli Storage Manager uses a scratch volume, Tivoli Storage Manager changes the volume's statusto private by defining it. Tivoli Storage Manager tracks whether defined volumes were originally scratchvolumes. Volumes that were originally scratch volumes return to scratch status when they become empty.
One of the benefits of using scratch volumes is that different storage pools that share the sameautomated library can dynamically acquire volumes from the library's pool of scratch volumes. Thevolumes need not be preallocated to the different storage pools.
Another benefit of using scratch volumes, even if only a single storage pool is associated with anautomated library, is that you need not explicitly define all of the volumes for the storage pool usingDEFINE VOLUME commands. Volumes are automatically added to and deleted from the storage pool bythe server.
If a scratch volume is used for a Tivoli Storage Manager database backup or export operation, then TivoliStorage Manager changes the volume's status to private. The volume returns to the scratch pool only
Managing Tivoli Storage Manager storage 47

when a Tivoli Storage Manager administrator determines that the volume's data is no longer needed, anduses the UPDATE LIBVOL command to change the status of the volume to scratch.
Labeling storage volumes
All removable media must be labeled before it can be used by Tivoli Storage Manager. When the serveraccesses a volume, it checks the volume name in the header to make sure that the correct volume isbeing used. Any tape storage volumes must be labeled before the server can use them.
For storage pools in automated libraries, use the CHECKIN LIBVOL command to check labeled volumesinto a library.
Use the LABEL LIBVOL command with drives in an automated library to label and check in the volumeswith one command. To use the LABEL LIBVOL command, there must be a drive that is not in use byanother Tivoli Storage Manager process. This includes volumes that are mounted but idle. If necessary,use the UNMOUNT VOLUME command to unmount the idle volume to make that drive available.
Overwriting volume labels
By default, the label command does not overwrite an existing label on a volume. However, if you want tooverwrite existing volume labels, you can specify the OVERWRITE=YES parameter when you use theLABEL LIBVOL command.
Important: By overwriting a volume label, you destroy all of the data that resides on the volume. Usecaution when overwriting volume labels to avoid destroying important data.
Identifying volume labels
Use the LABEL LIBVOL command to specify the volume for labeling. You can use the VOLRANGEparameter of the LABEL command for a large number of volumes. For automated libraries, you areprompted to mount the volume in the entry/exit port of the library. If no entry/exit port is available, mountthe volume in an empty slot within the library. For manual libraries, you are prompted to load the volumedirectly into the library.
Labeling volumes one at a time
The LABEL LIBVOL command assumes that you will insert volumes into the library when prompted to doso. The label process then mounts each inserted volume into a drive and writes a label to it using a namethat you enter at a prompt. This is the default mode of operation when you specify a library for use withthe LABEL LIBVOL command.
If the library does not have an entry/exit port, you are prompted to remove the volume from a specifiedslot number. If the library has an entry/exit port, the command by default returns each labeled volume tothe entry/exit port of the library.
To label one volume in the odlib0 library, enter:
label libvol odlib0 od5000 search=no
Where od5000 is the volume label.
Searching the library
The LABEL LIBVOL command searches all of the storage slots in the library for volumes and tries to labeleach one that it finds. You choose this mode when you specify the SEARCH parameter. After a volume islabeled, the volume is returned to its original location in the library.
For an automated SCSI library, you can simply open the library access door, place all of the new volumesin unused storage slots, close the door, and issue the LABEL LIBVOL command with the SEARCH=YESparameter.
48 Content Manager OnDemand for Multiplatforms: Administration Guide

To label all of the volumes in the odlib0 library by searching the library and specifying a range of volumelabels, enter:
label libvol odlib0 search=yes volrange=od5000
Tivoli Storage Manager labels the first volume od5000 and increments the number 5000 for the label ofeach additional volume you label with this command.
Adding storage volumes
You inform the server that a new volume is available in an automated library by checking in the volumewith the CHECKIN LIBVOL command. When a volume is checked in, the server adds the volume to itslibrary volume inventory. You can also use the LABEL LIBVOL command to label and check in volumes inone operation.
Because the CHECKIN LIBVOL command involves device access, it may take a long time to complete.
When you check in a volume, you must supply the name of the library and the status of the volume(private or scratch).
To check in one or just a few volumes, you can specify the name of the volume with the command, andissue the command for each volume.
To check in a larger number of volumes, you can use the search capability of the CHECKIN command oryou can use the VOLRANGE parameter of the CHECKIN command.
Checking in volumes one at a time
Use this option if you want to check in only a single volume that is not currently in the library. TivoliStorage Manager requests that the volume be placed in the entry/exit port of the library.
If the library does not have an entry/exit port, Tivoli Storage Manager requests that the volume be loadedinto a slot within the library. The mount request specifies the location with an element address. Elementaddresses are listed on the device configuration worksheets for the libraries supported by Tivoli StorageManager. See the Tivoli Storage Manager Administrator's Guide or the documentation provided with thelibrary.
To check in a private volume:
checkin libvol odlib0 od1092 status=private search=no
Where odlib0 is the name of the library and od1092 is the volume label.
To check in a scratch volume:
checkin libvol odlib0 od2001 status=scratch search=no
Where odlib0 is the name of the library and od2001 is the volume label.
Searching the library
Use this option if you want Tivoli Storage Manager to automatically search the library for new volumesthat have not already been added to the library volume inventory. Use this mode when you have a largenumber of volumes to check in, and you want to avoid issuing an explicit CHECKIN LIBVOL command foreach volume.
With this option, you cannot specify a volume name because the server searches for new volumes in thelibrary.
Managing Tivoli Storage Manager storage 49

For an automated SCSI library, you can simply open the library access door, place all of the new volumesin unused storage slots, close the door, and issue the CHECKIN LIBVOL command with SEARCH=YES. Forexample:
checkin libvol odlib0 search=yes status=scratch
Where odlib0 is the name of the library. Tivoli Storage Manager will label the new volumes, check theminto the library, and add them to the library volume inventory.
Allowing swapping of volumes
If no empty slots are available in the library when you are checking in volumes, the check-in fails unlessyou allow swapping. If you allow swapping and the library is full, Tivoli Storage Manager selects a volumeto eject before checking in the volume you requested.
Tivoli Storage Manager selects the volume to eject by checking first for any available scratch volume, thenfor the least frequently mounted volume.
Removing storage volumes
Tivoli Storage Manager tracks the scratch and private volumes available in an automated library through alibrary volume inventory. Tivoli Storage Manager maintains an inventory for each automated library. Thelibrary volume inventory is separate from the inventory of volumes for each storage pool. To add a volumeto a library's volume inventory, you check in a volume to that library.
To make sure that the Tivoli Storage Manager library volume inventory remains accurate, you must checkout volumes when you need to physically remove them from a SCSI or 3494 library device. When youcheck out a volume that is being used by a storage pool, the volume remains in the storage pool. If TivoliStorage Manager requires the volume to be mounted while it is checked out, a message to mount thevolume is displayed with a request to check in the volume. If the check in is not successful, Tivoli StorageManager marks the volume as unavailable.
To check whether the Tivoli Storage Manager library volume inventory is consistent with the volumes thatare physically in the library, you can audit the library. The inventory can become inaccurate if volumes aremoved in and out of the library without informing the server (by using check-in and check-out commands).
Removing volumes from a library
You may need to remove a volume from a library because all of the volumes in the library are full, and youwant to remove some that are not likely to be accessed in order to make room for new volumes that canbe used to store more data.
To remove a volume from an automated library, use the CHECKOUT LIBVOL command. By default, theserver mounts the volume being checked out and verifies the internal label. When the label is verified, theserver removes the volume from the library volume inventory, and then moves it to the entry/exit port ofthe library. If the library does not have an entry/exit port, Tivoli Storage Manager requests that the volumebe removed from a slot within the library.
If you check out a volume that is defined in a storage pool, the server may attempt to access it later toread or write data. If this happens, the server requests that the volume be checked in.
Returning volumes to a library
When you check out a volume that is defined to a storage pool, to make the volume available again, youmust do the following:
1. Check in the volume for the library, with private status. Use the CHECKIN LIBVOL command with theSTATUS=PRIVATE parameter.
2. Update the volume's ACCESS value. You must change the access from unavailable to read/write orread-only. Use the UPDATE VOL command with the ACCESS parameter.
50 Content Manager OnDemand for Multiplatforms: Administration Guide

Managing a full library
As Tivoli Storage Manager fills volumes in a storage pool, the number of volumes needed for the pool mayexceed the physical capacity of the automated library. To make room for new volumes while keeping trackof existing volumes, you can define an overflow location near the library for the storage pool. You thenremove media to the overflow location as needed.
The following shows a typical sequence of steps to manage a full library:
1. Define or update the storage pool associated with the automated library, including the overflowlocation parameter. For example, you have a storage pool named odaix1 associated with anautomated library. To update the storage pool to add an overflow location of room2948, enter:
update stgpool odaix1 ovflocation=room2948
2. When the library becomes full, use the MOVE MEDIA command.
Tivoli Storage Manager records the location of the volumes that you move with the MOVE MEDIAcommand. The location of the volumes is the overflow location that you defined for the storage pool.For example, to move all full volumes in the specified storage pool out of the library, enter:
move media * stgpool=odaix1
3. Check in new scratch volumes, if needed.4. As requested through Tivoli Storage Manager mount messages, check in volumes that Tivoli Storage
Manager needs for operations. The mount messages include the overflow location of the volumes.
To find the location of volumes in a storage pool that has an overflow location, you can use the QUERYMEDIA command. You can also use the QUERY MEDIA command to generate the commands required tocheck in all of the volumes into the library.
Offline storage of storage volumes
Refer to the documentation provided by the library manufacturer for instructions that describe how tohandle physical storage volumes and remove them from the library.
Refer to your organization's media storage guide for instructions about documentation you may need tocomplete when you remove a storage volume from a library and where to store them for safekeeping.
Protecting data with the data retention protection (DRP) protocol
To avoid the accidental erasure or overwriting of critical data, Content Manager OnDemand now supportsthe Tivoli Storage Manager Version 5.2.2 or later APIs related to data retention. Specifically:data retention protection (DRP)
Prohibits the explicit deletion of documents until their specified retention criterion is met. Althoughdocuments can no longer be explicitly deleted, they can still expire. Attention: DRP is permanent.Once it is turned on, it cannot be turned off.
Event-based retention policyRetention based on an external event other than the storage of data. For Content Manager OnDemand,the retention event is the call to delete the data. A load, unload, application group delete, or expirationof data triggers the retention event.
Restriction: Content Manager OnDemand does not support deletion hold, a feature that prevents storeddata from being deleted until the hold is released.
If you decide to use these policies in Tivoli Storage Manager, then the following scenarios result:
Managing Tivoli Storage Manager storage 51

Table 3: Scenarios of using creation-based object expiration policy and event-based retention objectexpiration policy
Creation-based objectexpiration policy
Event-based retention objectexpiration policy
Data retention protection off Content Manager OnDemandissues a delete object commandthrough the TSM API. Objects aredeleted during the next inventoryexpiration. If a Content ManagerOnDemand application group isbeing deleted, a deletefilespace command is issuedinstead, and the objects areimmediately deleted along withthe filespace.
Content Manager OnDemandissues an event trigger commandthrough the TSM API. The statusof the objects affected arechanged from PENDING toSTARTED, and will be expired byTSM based on their retentionparameters. If the retentionparameters are set to NOLIMIT,then the objects never expire. If aContent Manager OnDemandapplication group is beingdeleted, a delete filespacecommand is issued instead, andthe objects are immediatelydeleted along with the filespace.
Data retention protection on Content Manager OnDemandissues no commands to TSM. Theobjects are effectively orphanedby Content Manager OnDemandand will be expired by TSM basedon their retention parameters. Ifthe retention parameters are setto NOLIMIT, then the objectsnever expire.
Content Manager OnDemandissues an event trigger commandthrough the TSM API. The eventstatus of the objects affected arechanged from PENDING toSTARTED and will be expired byTSM based on their retentionparameters. If the retentionparameters are set to NOLIMIT,then the objects never expire. If aContent Manager OnDemandapplication group is beingdeleted, then a deletefilespace cannot be used withDRP on so the operation istreated the same as if a deletewere indicated. The status of allthe affected objects is changedfrom PENDING to STARTED, andthey will be expired by TSMbased on their retentionparameters. Because this leavesthe filespace entries in TSM, youmust manually delete theseentries when the filespace isempty (even with DRP on).
Recommendations:
• Set up the application groups to expire by load.• Define the Tivoli Storage Manager archive copy groups to be event-based, and retain data for 0 days.• Run the Tivoli Storage Manager inventory expiration regularly to ensure that expired data is cleaned up.
Additionally, Content Manager OnDemand supports the following devices:
52 Content Manager OnDemand for Multiplatforms: Administration Guide

IBM DR450 and DR550Disk-based system that contains a Tivoli Storage Manager running DRP.
EMC CenteraDisk-based system, treated as a device by Tivoli Storage Manager. Tivoli Storage Manager must berunning DRP.
Managing Tivoli Storage Manager storage 53

54 Content Manager OnDemand for Multiplatforms: Administration Guide

Chapter 11. Other external storage managers
Content Manager OnDemand supports external cloud storage managers such as Amazon Simple StorageService (S3), Apache Hadoop Distributed File System (HDFS), IBM Cloud Object Storage, and OpenStackSwift. Content Manager OnDemand can also store data to external file systems.
Cloud storage options
The Content Manager OnDemand server can be configured to maintain copies of its stored data in bothcache storage, managed by Content Manager OnDemand, and in archive storage, now referred to asexternal storage. Historically, IBM Tivoli Storage Manager (TSM) has been the only option used by ContentManager OnDemand to maintain data stored in external storage. The addition of Amazon S3, ApacheHDFS, IBM Cloud Object Storage, and OpenStack Swift support augments the storage capabilities ofContent Manager OnDemand by providing multiple external cloud storage solution options. Cloud storagesolutions allow Content Manager OnDemand users to leverage the advantages that such storage providessuch as cost savings, data replication, and disaster recovery. This functionality is configured in ContentManager OnDemand and behaves much in the same way that communicating with TSM does. This meansthat data in Content Manager OnDemand can be stored in cache as well as stored in Amazon S3, ApacheHDFS, IBM Cloud Object Storage, or OpenStack Swift. The storing of data to any external cloud storagemanager can take place at the same time that data is written to the Content Manager OnDemand cache orcan be scheduled to migrate at a later date.
Amazon S3, Apache HDFS, IBM Cloud Object Storage, and OpenStack Swift storage options complementthe functionality provided by TSM. Content Manager OnDemand servers can be configured to use anycombination of Amazon S3, Apache HDFS, IBM Cloud Object Storage, OpenStack Swift, and TSM.
Additional information for each cloud storage solution can be found on the web at the following locations:
Amazon S3https://aws.amazon.com/s3/
Apache HDFShttps://hadoop.apache.org/
IBM Cloud Object Storagehttps://www.ibm.com/cloud-computing/infrastructure/object-storage/
OpenStack Swifthttp://docs.openstack.org/developer/swift/
Using a file system for external storage
The Content Manager OnDemand server can be configured to maintain copies of its stored data in a filesystem accessible to Content Manager OnDemand. As with the cloud storage options, the storing of datato an external file system can take place at the same time that data is written to the Content ManagerOnDemand cache or can be scheduled to migrate at a later date.
Detailed configuration information can be found in the Content Manager OnDemand for MultiplatformsInstallation and Configuration Guide.
© Copyright IBM Corp. 1993, 2018 55

56 Content Manager OnDemand for Multiplatforms: Administration Guide

Chapter 12. Storage backup and recovery
Reports
Content Manager OnDemand can store copies of reports and resources in the cache storage and archivestorage:
• The primary purpose of cache storage is short-term, high-speed storage and retrieval of reports. Cachestorage consists of disk storage volumes maintained by Content Manager OnDemand on one or moreobject servers.
• The primary purpose of archive storage is long-term storage and retrieval of reports. The reports inarchive storage can also be used as backup copies in the event that cache storage becomes corruptedor unavailable. Archive storage consists of optical or tape storage volumes managed by Tivoli StorageManager.
Most customers configure the system to copy reports to cache storage and archive media at the sametime, when they load a report into the system.
Content Manager OnDemand can retrieve a copy of a report from archive storage after the report has beendeleted from cache storage or if the copy on cache storage is unavailable. However, you must configurethe system to maintain multiple copies of reports. You must install and configure Tivoli Storage Manager,define storage devices to Tivoli Storage Manager, define policy management information to Tivoli StorageManager, and configure Content Manager OnDemand to use archive storage. You configure ContentManager OnDemand to use archive storage by registering client nodes in Tivoli Storage Manager, definingstorage sets that identify client nodes in Tivoli Storage Manager, assigning application groups to thestorage sets, and configuring other storage management parameters in application groups.
Note: If you do not plan to copy reports to archive storage, then IBM recommends that you take regularbackups of the file systems that comprise cache storage. However, if a media failure occurs or cachestorage becomes corrupted, users cannot retrieve reports until the file systems are restored.
Cache storage
Cache storage is the primary, short-term storage location for reports.
If you do not copy reports to archive storage when you store them in Content Manager OnDemand, thenyou need to consider how you can recover the reports in the event that you need to do so (for example, if acache storage device fails).
Cache storage can be protected by maintaining it on high-availability storage devices. If no high-availability storage is available, IBM recommends that backups of reports in cache storage (the filesystems) be taken on a regular basis.
Archive storage
The Content Manager OnDemand storage node identifies the object server and the client node in TivoliStorage Manager where the primary copy of a report is maintained. Content Manager OnDemand retrievesthe primary copy of the report from archive storage after the report has been deleted from cache storage.Customers with special business, legal, or performance reasons may want to configure the system tomaintain a backup (second) copy of their reports in archive storage. The backup copy can be used if theprimary copy becomes corrupted or unavailable.
You must configure Tivoli Storage Manager to maintain multiple copies of reports. For example, you candefine a copy storage pool to Tivoli Storage Manager. With a copy storage pool, Tivoli Storage Managermanages a backup copy of files that are stored in a primary storage pool independently and transparentlyto Content Manager OnDemand. The backup copy is stored in a copy storage pool that can be used torestore the original files if they become damaged, lost, or unusable. The copy storage pool can beassigned to the same library as the primary storage pool. However, most customers assign the copy
© Copyright IBM Corp. 1993, 2018 57

storage pool to a different library. You can copy data from one or more primary storage pools to the samecopy storage pool. Copy storage pools require additional space in the Tivoli Storage Manager database. Acopy storage pool must reside on the object server where the primary storage pool resides.
Tivoli Storage Manager includes a central scheduling component that allows the automatic processing ofadministrative commands, such as copying data from a primary storage pool to a copy storage pool. Eachadministrative command is called an event. Each scheduled event is tracked by the server and recorded inthe database. You set up an administrative command schedule by defining schedule parameters, such asthe start day, date, and time, specifying the command to be executed, such as the BACKUP STGPOOLcommand, and activating the schedule.
The Tivoli Storage Manager Administrator's Guide provides details about defining and managing a copystorage pool, storage pool backup and recovery, and scheduling operations.
58 Content Manager OnDemand for Multiplatforms: Administration Guide

Chapter 13. Installing the administrative client
System requirementsThe list of administrative client system requirements is available at http://www.ibm.com.
Related informationHardware and software requirements for IBM Content Manager OnDemand (URL: http://www.ibm.com/support/docview.wss?uid=swg27049168)
Installing the administrative client
About this task
You can install all of the Content Manager OnDemand client features at once, or individual features as youneed them.
Running Setup
About this task
When you run the Setup program, the Setup screens show the names of the Content Manager OnDemandclient directories so you know where the files are being placed.
Information about network installations is available in the IBM Content Manager OnDemand: WindowsClient Customization Guide.
To install on a user's PC
About this task
To install, follow these instructions:
Procedure
1. From the Windows taskbar, click Start, and then choose Run.2. Type x:\client\win32\setup (where x is the letter of the clients install image).3. Click OK.
Results
After the Setup program starts, click Next to continue.
On the Setup Type and Working Directory dialog box, select Custom and then click Next to continue.
On the Installation Components dialog box, select Administrator. (You can also select othercomponents that you want to install on the PC.)
Click Next to continue. Follow the instructions on the screen to complete the installation.
© Copyright IBM Corp. 1993, 2018 59

To install on a network file server
About this task
For instructions on how to install the administrative client on a network file server, see the "Installingclient software on a network" in IBM Content Manager OnDemand: Windows Client Customization Guide.
To use automated install
About this task
Automated install allows administrators to standardize the Content Manager OnDemand installation for allusers in an organization. It also allows administrators to install Content Manager OnDemand clientswithout the presence of users at their PCs. To read more about automated install, see the IBM ContentManager OnDemand: Windows Client Customization Guide.
Excluding the administrative client from the client installation package
About this task
Prerequisite: You need a file extraction and archiving utility, such as PKZIP or INFOZIP.
To exclude the administrative client from the client installation package, follow these steps:
Procedure
1. Download the odwin32.zip (32-bit clients) or odwin64.zip (64-bit clients) file from the ftp://service.software.ibm.com/software/ondemand/fixes directory to a temporary directory, such asc:\temp.
2. Extract the files from the odwin32.zip or odwin64.zip file to a new working directory, such asd:\ondemand.
3. Delete the arsadm.exe file from the ars32 or ars64 subdirectory of the working directory (forexample, d:\ondemand\ars32 or d:\ondemand\ars64).
4. Create a new ZIP file from the files in the working directory. Make sure that you use a file archivingutility that preserves the directory and file structure of the working directory.
5. Distribute the new ZIP file to your users. When your users run the setup.exe file, the installationprogram recognizes that the main administrative client file is not present. The option to install theadministrative client will not be available to the user.
To uninstall
About this task
You can remove the Content Manager OnDemand client from your PC by using the program removalfunction of Windows. The program removal function removes the directories for Content ManagerOnDemand and any references to Content Manager OnDemand in system files.
Procedure
Do the following steps:1. From the Windows taskbar, click Start. Choose Settings, and then choose Control Panel.2. Select the appropriate program removal function.
60 Content Manager OnDemand for Multiplatforms: Administration Guide

• For Windows 7, select Uninstall a program from Control Panel > Programs > Programs andFeatures.
• For other versions of Windows, double-click Add/Remove Programs.3. From the list, select the appropriate Content Manager OnDemand program to remove.
• For Windows 7, select IBM OnDemand Clients V10.1• For other versions of Windows, select Content Manager OnDemand Clients V10.1.
4. Click on the appropriate program removal function.
• For Windows 7, click Uninstall.• For other versions of Windows, click Add/Remove.
5. Click OK.
Updating the administrative client software
About this task
Note: When upgrading the administrative client, the Setup program automatically replaces all out-of-datefiles with new ones; the user is not permitted to add or remove components. To add or removecomponents, the user must run the Setup program after successfully upgrading the administrative client.
The following information can be used to obtain and install the latest version of the Content ManagerOnDemand client software from IBM service on the Web.
To get the latest version of the Content Manager OnDemand client software, see http://www.ibm.com/support/fixcentral/
Results
After the download is complete, you can expand the ZIP file or store the ZIP file in a shared location,depending on how you plan to distribute the administrative client software:
• A user can expand the ZIP file to a temporary directory and then run the Setup program to upgrade theadministrative client on a PC. After installing the administrative client, the user can delete thetemporary directory and the ZIP file.
• An administrator can store the ZIP file in a shared location so that other users can access it.• An administrator can expand the ZIP file to a shared location so that other users can run the Setup
program from the shared location.• If your organization shares a copy of the Content Manager OnDemand administrative client software
from a network server, then an administrator can expand the ZIP file and run the Setup program toupgrade the administrative client on the network server.
• If your organization distributes user-defined files with the Content Manager OnDemand client software,an administrator must expand the ZIP file to a shared location and then copy the user-defined files tothat location. Users can then run the Setup program from the shared location to upgrade the clientsoftware and the user-defined files on their PCs.
Installing the administrative client 61

62 Content Manager OnDemand for Multiplatforms: Administration Guide

Chapter 14. Administrative client introduction
How does the administrative client help me do my job?Welcome to the Content Manager OnDemand administrative client, a powerful and flexible programdesigned to help you maintain your Content Manager OnDemand system.
The administrative client provides tools to:
• Define reports to the system• Add and maintain Content Manager OnDemand users and groups• Add and maintain server printers• Add and maintain storage sets and storage nodes• Create summaries about users, groups, applications, application groups, storage sets, folders, printers,
holds, and cabinets• Add and maintain servers• Set system parameters for Content Manager OnDemand servers and client programs• Copy items from one Content Manager OnDemand server to another• Track changes made to the system. When you use the administrative client to add or update an object in
Content Manager OnDemand, information about the object is saved in the system log. The informationincludes the changes that you made.
Getting started
Starting the administrative client
About this task
To start the administrative client:
Procedure
1. Click Start.2. Select Programs, then choose IBM OnDemand Clients V10.1.3. Click OnDemand Administrator V10.1.
When you start the administrative client, Content Manager OnDemand opens the administratorwindow that contains a menu bar, toolbar, navigator pane, list pane, and status bar.
• You can collapse and expand areas in the navigator pane (on the left) to make it easier to see. A plussign next to an area means there are items inside.
• When you click on an area in the navigator pane, the items appear in the list pane (on the right).• To make the panes narrower or wider, point to the vertical bar between the two panes of the window
until the pointer turns into a two-headed arrow. Then click and hold the left mouse button and drag itin either direction.
• Use buttons on the toolbar to switch between the different ways to look at items: large or smallicons, a list, or details.
• To query the server for a new list of items, press the F5 key or select Refresh List from the Viewmenu.
© Copyright IBM Corp. 1993, 2018 63

• After you log on to a server, the status bar shows the Content Manager OnDemand user ID and thename and version number of the Content Manager OnDemand server.
Using online help
About this task
Online help provides information to assist you with completing tasks. The administrative client online helpcontains information about the options, fields, and commands on the windows, dialog boxes, and propertysheets that you see when using the program.
To display the online help, press F1 any time the administrative client is active in Windows. Help isavailable for dialog box commands and options. The main help topic for each dialog box usually containsinformation about the kinds of tasks you can perform. For example, the online help about Logical Viewslets you learn how to create public and private logical views. The online help provides brief proceduresrather than lengthy descriptions.
To display an index of help topics, select the Index tab from the Help window. You can type keywords tolocate topics in the help file.
To search the index of help topics, select the Search tab from the Help window. You can type searchwords to locate related topics in the help file.
Adding a server
About this task
You can use the New Server command to add a server.
Procedure
1. Select Content Manager OnDemand Servers.2. From the File menu, select New Server to open the Add a Server window.3. Type the name of the server in the Server field. The server name identifies the server in the navigator
pane of the administrator window. You can use an alias, the actual computer or network name of theworkstation, or any other identifier you choose. By default, the administrative client copies what youtype to the Host Name field.
4. Verify the value of the Host Name field. (By default, the Host Name field contains the same value asthe Server field.) The host name can be a host name alias, fully-qualified host name, or IP address ofthe server.
5. Verify the Protocol. Choose from TCP/IP and Local:
• TCP/IP. Use TCP/IP (Transmission Control Protocol/Internet Protocol) as the network protocol. Touse TCP/IP, the server and the client must include TCP/IP in the protocol stack.
• Local. Define a server that uses the file system on this workstation. After you define a local server,you must use the Setup command to initialize the database on the local server.
6. For TCP/IP, verify the Port Number over which the library server and the client communicate.The default value, 0 (zero), means that the server and client communicate over the port numberassigned to the Content Manager OnDemand TCP/IP service. If the Content Manager OnDemandTCP/IP service is not assigned a port number, the server and client will attempt to communicate overport number 1445. If the Content Manager OnDemand TCP/IP service is not assigned a port numberand you plan to use a port number other than 1445, then you must enter a valid port number. Thevalue range is from 0 to 65535.
7. If you are adding a Windows server, you should select Attempt Unified Logon; otherwise, you shouldclear the Attempt Unified Logon check box. See the IBM Content Manager OnDemand forMultiplatforms: Installation and Configuration Guide for more information about unified logon.
8. If you are adding a Local server, specify a Directory and select an Operating System and a Database.See the online help for assistance.
64 Content Manager OnDemand for Multiplatforms: Administration Guide

9. If you are adding a server that supports Secure Sockets Layer (SSL), select User Secure SocketsLayer. If your server does not support SSL, SSL is not used even if you select this check box.
10. Click OK to add the server.
Logging on a server
Procedure
1. Point to the library server and double click the left mouse button to open the Logon dialog box.2. Type your Content Manager OnDemand userid and password in the spaces provided. Then click OK.
Note: For a Local server, the built-in userid is admin; no password is assigned to the admin userid.
Results
Note: If the Content Manager OnDemand system is configured for unified logon and you are running theadministrative client on a Windows system, the client attempts to automatically log on to the server byusing the Windows logon account username. If the Windows logon account username exists in theContent Manager OnDemand user table, then the log on is successful. Otherwise, the client opens theLogon dialog box and you must enter a valid Content Manager OnDemand userid and password tocontinue. If you need to log on to a Windows server using a Content Manager OnDemand userid that isdifferent than the Windows logon account username, you must use the Logon As command. To access theLogon As command, point to the server and click the right mouse button. If you are currently logged on tothe server, you must log off the server before you can select the Logon As command. See IBM ContentManager OnDemand for Multiplatforms: Installation and Configuration Guide for more information aboutunified logon.
Related conceptsLDAP authentication processesYou can use LDAP (Lightweight Directory Access Protocol) to authenticate to the Content ManagerOnDemand server.
Changing passwords
About this task
Note: Depending on how you set the Login Processing system parameters, the case of a password may besignificant. See “System parameters” on page 66 for details.
Changing a password
Procedure
To change a user's password:1. Select and expand the library server.2. Select Users.3. In the User ID list, point to the userid and click the right mouse button.4. From the pop-up menu, select Update to open the Update a User dialog box.5. Type the new password in the Password field.
6. Verify the new password by retyping it into the Verify Password field.7. Click OK. Content Manager OnDemand updates the database and returns to the main window.
Changing an expired password
About this task
Content Manager OnDemand provides password expiration processing to help you manage security on thesystem. You can set a value that represents the time in days that passwords assigned to users remain
Administrative client introduction 65

valid. After a user's password reaches the value that you specify, the user must change the password. See“System parameters” on page 66 for information about how Content Manager OnDemand expirespasswords.
After a password reaches the expiration value, the next time the userid is used to log on to a server,Content Manager OnDemand prompts the user to enter a new password.
The user must enter the current password for the userid, a new password, and verify the new password byretyping the new password
System parametersContent Manager OnDemand system parameters allow you to establish the operational settings for clientprograms and servers.
Setting system parametersTo set the system parameters for a Content Manager OnDemand server:
1. Log on to the library server.2. Point to the library server and click the right mouse button.3. From the pop-up menu, select System Parameters to open the System Parameters dialog box.4. Type information in the fields and make selections for each page.5. When you have finished making changes to the system parameters, click Update. Content Manager
OnDemand stores the changes in the database and returns to the administrator window. (Click Cancelto close the System Parameters dialog box without saving your changes.)
AnnotationsSpecify the following options:
• Which types of annotations (referred to as "notes" in the Content Manager OnDemand client) can beadded by a user.
• The default for the viewing scope for all annotations.• Whether annotations can expire. If they can expire, specify the number of days to keep the annotation.
Afterward, Content Manager OnDemand removes the annotation.
These options apply to all users with authority to add annotations in the system.
There are three types of annotations that a user can add:Allow Public
Allows the user to add public annotations. Public annotations to a document can be viewed by anyonewho opens that document.
Allow Private to UserAllows the user to add private annotations to a document, and those annotations can be viewed onlyby the user that created the note, application group administrators, and system administrators.
Allow Private to GroupAllows the user to add annotations to a document, and those annotations can be viewed only by aspecific group of users.
The Default Annotation Type section specifies the default for the viewing scope for annotations.
The Life of Annotations section specifies whether annotations can expire. If you want annotations to beremoved, select Expire After, then specify the number of days to keep an annotation. After the number ofdays passes, Content Manager OnDemand removes all of the annotations.
66 Content Manager OnDemand for Multiplatforms: Administration Guide

Check Previously Used PasswordsSpecify whether you want users to be able to reuse a previous password. You can make users create up to10 unique passwords before they can reuse a previous password.
Disable or Lock Out After Failed LoginsSpecify whether you want to limit the number of login attempts by a user. If you do want to limit thenumber of login attempts, specify how many attempts you want to permit and whether to disable or lockout the user after the user exceeds that number of attempts. If you choose to disable a user, the usermust request that the system administrator enable the user ID. If you choose to lock out the user, theuser must wait to attempt another log in. You specify how many minutes to wait in the Number OfMinutes To Lock Out User field.
Session Inactivity Time OutDetermines when Content Manager OnDemand terminates sessions between inactive clients and theserver. The default setting, Never Time Out, means that Content Manager OnDemand does notterminate a session, regardless of how long the client remains inactive. To set a specific inactivity timeout, select Time Out In __ Minutes and enter the number of minutes in the space provided. Thevalue can be from 1 (one) to 1440 (24 hours).
The period of inactivity is measured between requests to a server. For example, when a user enters aquery, Content Manager OnDemand searches the database and builds the document list. This completesa request to the server. If the user does not work with the items in the document list, open another folder,or invoke another query before the inactivity timeout occurs, Content Manager OnDemand automaticallyterminates the session with the client.
Use caution when you set the inactivity time out. For example, assume that you set the inactivity time outto 10 (ten). You log on to Content Manager OnDemand to add an application group. Creating theapplication group takes you 15 minutes to complete. After entering all of the information about theapplication group, you click OK to create the application group. Content Manager OnDemand issues amessage that shows a timeout has occurred. You must logoff the server, and you cannot save theinformation you entered about the application group.
LDAP AuthenticationSpecify whether you want to use LDAP (Lightweight Directory Access Protocol) authentication in yourOnDemand server.
Select the Enable check box to use LDAP authentication. After LDAP authentication is enabled,OnDemand server makes an authentication request to the LDAP server every time it receives a loginrequest from the client, and processes the client request only after the user information is verified by theLDAP server.
Clear the Enable check box to disable LDAP authentication.
Login ProcessingThe login processing system parameters allow you to specify whether userids and passwords are casesensitive.
By default, userids and passwords are case insensitive. When you add a user, Content ManagerOnDemand converts lowercase letters in the userid to uppercase. A person can type letters in a userid inuppercase, lowercase, or mixed case letters. For example, if you add the userid LaGuarde, a person canenter LAGUARDE, laguarde, or LaGuarde to log on to the server.
If you select UserID Case Sensitive, then a user must type the userid exactly as it was entered when theuser was added. For example, if you add the userid LaGuarde, then the user must enter LaGuarde to logon to the server.
Administrative client introduction 67

If you select Password Case Sensitive, then a user must type the password exactly as it was entered whenthe user was added. For example, if you set the password to Spring2Far, then the user must enterSpring2Far to log on to the system.
Important: You should decide whether to make userids and passwords case sensitive when you installthe system, change the defaults if necessary, and do not change the settings again. Otherwise:
• If userids are initially case insensitive and you later choose UserID Case Sensitive, then userids thatwere added before you changed the parameter must be entered in uppercase. The same is true forpasswords.
• If userids are initially case sensitive and you later clear UserID Case Sensitive, then the userids thatwere added before you changed the parameter that contain mixed or lowercase letters will no longer bevalid. The same is true for passwords.
If users log on to Content Manager OnDemand with the CICS® client program, you should configure thesystem to ignore the case of userids and passwords.
Maximum Password AgeSets a time limit for passwords and determines when Content Manager OnDemand prompts users tochange passwords. The default setting is Password Never Expires, meaning that passwords do notexpire and Content Manager OnDemand never prompts users to change passwords. If you selectPassword Always Expires, then users must change to new passwords each time that they log on to aserver. To set a specific time limit for passwords, select Expires In __ Days and enter the number ofdays that passwords are valid in the space provided. The value can be from 1 (one) to 365.
Minimum Password LengthDetermines whether passwords are required. If passwords are required, also determines the fewestnumber of characters that passwords can contain. The default value is At Least 8 Characters,meaning that passwords must contain at least eight characters.
When a user changes a password, the client checks the number of characters that the user typed. Thenew password must contain the minimum number of characters. Otherwise, the client issues an errormessage. If your organization has not implemented the security user exit and the user types more thaneight characters, then the client issues an error message.
Password Expiration NotificationSpecify whether to notify users that their password expires within the specified number of days.
System LoggingDetermines the messages that Content Manager OnDemand saves in the system log. Content ManagerOnDemand provides the system log to help you track activity and monitor the system. Content ManagerOnDemand save messages that are generated by the various programs, such as the ARSLOAD program.Content Manager OnDemand can save a message in the system log when the following events occur:
• A user logs on to the system• A user logs off the system• A user logon fails• Application group data is queried, retrieved, loaded, updated, deleted, or maintained
System log commentsThe system log comments specify whether the administrative client displays the System Log Commentswindow when you perform an add, update, or delete operation.Enable comments
Select this option to display the System Log Comments window when you perform an add, update, ordelete operation.
68 Content Manager OnDemand for Multiplatforms: Administration Guide
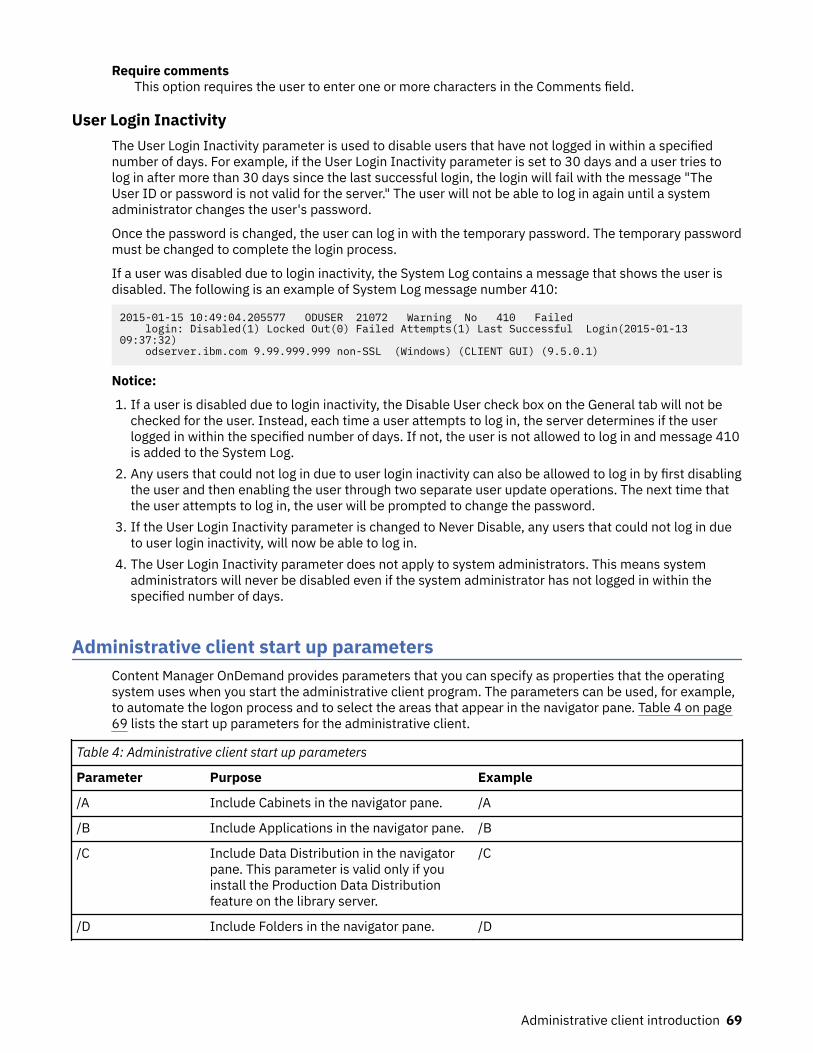
Require commentsThis option requires the user to enter one or more characters in the Comments field.
User Login InactivityThe User Login Inactivity parameter is used to disable users that have not logged in within a specifiednumber of days. For example, if the User Login Inactivity parameter is set to 30 days and a user tries tolog in after more than 30 days since the last successful login, the login will fail with the message "TheUser ID or password is not valid for the server." The user will not be able to log in again until a systemadministrator changes the user's password.
Once the password is changed, the user can log in with the temporary password. The temporary passwordmust be changed to complete the login process.
If a user was disabled due to login inactivity, the System Log contains a message that shows the user isdisabled. The following is an example of System Log message number 410:
2015-01-15 10:49:04.205577 ODUSER 21072 Warning No 410 Failed login: Disabled(1) Locked Out(0) Failed Attempts(1) Last Successful Login(2015-01-13 09:37:32) odserver.ibm.com 9.99.999.999 non-SSL (Windows) (CLIENT GUI) (9.5.0.1)
Notice:
1. If a user is disabled due to login inactivity, the Disable User check box on the General tab will not bechecked for the user. Instead, each time a user attempts to log in, the server determines if the userlogged in within the specified number of days. If not, the user is not allowed to log in and message 410is added to the System Log.
2. Any users that could not log in due to user login inactivity can also be allowed to log in by first disablingthe user and then enabling the user through two separate user update operations. The next time thatthe user attempts to log in, the user will be prompted to change the password.
3. If the User Login Inactivity parameter is changed to Never Disable, any users that could not log in dueto user login inactivity, will now be able to log in.
4. The User Login Inactivity parameter does not apply to system administrators. This means systemadministrators will never be disabled even if the system administrator has not logged in within thespecified number of days.
Administrative client start up parametersContent Manager OnDemand provides parameters that you can specify as properties that the operatingsystem uses when you start the administrative client program. The parameters can be used, for example,to automate the logon process and to select the areas that appear in the navigator pane. Table 4 on page69 lists the start up parameters for the administrative client.
Table 4: Administrative client start up parameters
Parameter Purpose Example
/A Include Cabinets in the navigator pane. /A
/B Include Applications in the navigator pane. /B
/C Include Data Distribution in the navigatorpane. This parameter is valid only if youinstall the Production Data Distributionfeature on the library server.
/C
/D Include Folders in the navigator pane. /D
Administrative client introduction 69

Table 4: Administrative client start up parameters (continued)
Parameter Purpose Example
/D 2 Include Folders in the navigator pane, butdisplay only the Permissions and FieldInformation pages.
/D 2
/E Include Storage Sets in the navigator pane. /E
/I Include Users in the navigator pane. /I
/N Include IBM Content Manager OnDemandReport Distribution for Multiplatforms inthe navigator pane.
/N
/O Include Groups in the navigator pane. /O
/P password The password for the Content ManagerOnDemand user identified with the /Uparameter. Use with the /S and /Uparameters to log on to a specific server,without displaying the Logon dialog box. Ifthe logon is not successful, then ContentManager OnDemand opens the Logondialog box to allow the user to log on to thesystem.
/P password
/Q Include Application Groups in the navigatorpane.
/Q
/R Include Printers in the navigator pane. /R
/S server Identifies the logon server. Use with the /Uand /P parameters to log on to a specificserver, without displaying the Logon dialogbox. If the logon is not successful, theContent Manager OnDemand opens theLogon dialog box to allow the user to log onto the system.
/S broncos
/T Determines the name that appears on thetitle bar of the administrator window. Thedefault name is Content ManagerOnDemand Administrator.
/T Customer Service
/U userid Identifies the Content Manager OnDemanduser. Use with the /S and /P parameters tolog on to a specific server, withoutdisplaying the Logon dialog box. If thelogon is not successful, Content ManagerOnDemand opens the Logon dialog box toallow the user to log on to the system.
/U admin
Changing start up parameters
About this task
To change start up parameters, you need to change the shortcut you use to start the administrative client.
70 Content Manager OnDemand for Multiplatforms: Administration Guide

Procedure
To change start up parameters, do the following tasks. Remember that the specific steps vary betweendifferent levels of Windows.1. Right-click on the administrative client shortcut.2. From the pop-up menu, select Properties.3. Click the Shortcut tab.4. In the Target field, enter the startup parameters.5. Click OK.
Results
The next time that you start the administrative client, Windows uses the start up parameters and valuesthat you specified.
Displaying the Content Manager OnDemand splash screen or About window
About this task
When the administrative client is first started, a Content Manager OnDemand splash screen is displayed.
To disable the splash screen, set the SHOWLOGO parameter to 0.
To change the display time, locate the section My Computer\HKEY_CURRENT_USER\Software\IBM\OnDemand32\Preferences. Add a new string under Preferences called SHOWLOGO. Set the string valueto a value of zero or more seconds.
For more information about customizing the Content Manager OnDemand administrative client, read thetechnical document Customizing the IBM Content Manager OnDemand Administrative Client.
ExamplesThe following program properties could be used to set up the administrative client so that when a personstarts the program, the name Customer Service is displayed in the title bar of the administratorwindow.
"C:\Program Files\IBM\OnDemand Clients\V10.1\bin\ARSADM.EXE" /T "Customer Service"
The following program properties could be used to set up the administrative client so that when a personstarts the program, Content Manager OnDemand displays only users and folders in the navigator pane.When the user selects folders, Content Manager OnDemand displays only the Permissions and FieldInformation pages.
"C:\Program Files\IBM\OnDemand Clients\V10.1\bin\ARSADM.EXE" /I /D 2
The following program properties could be used to set up the administrative client so that when a personstarts the program, Content Manager OnDemand attempts to log on to the specified server, withoutdisplaying the Logon dialog box. If the logon attempt is not successful, then Content Manager OnDemandopens the Logon dialog box to allow the user to log on to the system.
"C:\Program Files\IBM\OnDemand Clients\V10.1\bin\ARSADM.EXE" /S peak /U admin /P pw
Administrative client introduction 71

Default directory for administrative client temporary filesThis topic introduces the default directory for administrative client temporary files.
The administrative client creates temporary files such as summaries for users, groups, and folders.
The administrative client stores these temporary files in the following default directory: %APPDATA%\IBM\OnDemand Client\REPORT, where %APPDATA% is an environment variable that resolves to differentvalues depending on the operating system and user name.
Each user in a multiple user environment has a temporary directory for summaries. The summary windowincludes a text field that contains a default value for the name of the file that contains the summary. If adifferent directory or file name is required, you can edit the text field before you create the summary.
Adding items to a serverThis section explains how to add items to a server. You can use commands or a drag-and-drop operationto add items to a server.
Note: When you use the administrative client to add or update the database, Content Manager OnDemandadds a record to the system log that shows the changes you made.
New command
After logging on to a server, select the area, for example, Users. From the File menu, select the Newcommand to open the Add dialog box.
Copy command
After logging on to a server, select the area. In the list pane, point to the item that you want to copy andclick the right mouse button. From the pop-up menu, select Copy to open the Add dialog box. The fields inthe Add dialog box contain information copied from the item you selected. Before you can add the item,you must change the item name. Depending on the item you want to add, you may need to change otherfields.
Export command
The Export command is like the Copy command, except Content Manager OnDemand adds the item to adifferent library server. You can use the Export command to export items from one library server (thesource server) and add them to another (the destination server).
After logging on to the server that contains the item you want to export, select the area. In the list pane,point to the item that you want to export and click the right mouse button. From the pop-up menu, selectExport to open the Export dialog box. Verify the destination server. Then click Export to add the item tothe server.
Note: If the item exists on the destination server, the export fails.
To retain permissions when you export users or groups from one library server to another library server,export them in the following order:
1. Printers2. Users3. Groups4. Storage sets5. Application groups6. Folders7. Cabinets
72 Content Manager OnDemand for Multiplatforms: Administration Guide

8. Holds
If you have added users or groups to an application group or folder that you want to export, you shouldexport the users and groups first. Otherwise, OnDemand issues a warning and does not export the data.However, if you want to export the application group or folder without the users or groups, click theIgnore Warnings check box. OnDemand generates a warning message for each user or group that cannotbe added.
If you export applications to a target server, note the following:
• You can export an application only to an application group with the same name as the application groupthat is associated with the application being exported.
• An application group with the same name as the application group that is associated with theapplication to be exported must already exist on the target server.
• The application group on the target server must have the same database fields as the application groupthat is associated with the application to be exported.
• The application to be exported does not already exist in the application group on the target server.• The application identifier of the application that is being exported is not already used by an application
in the application group on the target server.• If the application identifier of the application being exported is not already defined in the application
group, the Displayed Value and Database Value pair is added to the application group as part ofthe export process.
Drag and drop operation
You can copy and export items using a drag-and-drop operation. For example, to export items from onelibrary server and add them to another, select one or more items from the list pane and, while holding theleft mouse button down, point to the destination server. Then release the mouse button. If you are loggedon to the destination server, then Content Manager OnDemand opens the Export dialog box. If you are notlogged on to the destination server, then Content Manager OnDemand opens the Logon dialog box. Afterverifying options in the Export dialog box, click Export to copy the items to the server.
Note: If the item exists on the destination server, the export fails.
You can also use a drag-and-drop operation to copy an item. For example, to copy a user, select the useridfrom the User ID list and, while holding the left mouse button down, point to the same server on whichthe user is listed. Then release the mouse button to open the Add dialog box.
Report WizardContent Manager OnDemand provides user assistance and easy-to-use tools to help you administer thesystem. The Report Wizard assists you in adding reports to the system. The Report Wizard helps you add areport to the system by asking questions, which allows you to progress in an organized manner towardcompleting an application group, application, and folder. The Report Wizard assists you in addingapplications to an application group.
Here are a few things to remember about the Report Wizard:
• You move through the Report Wizard by answering questions that appear on the screen.• You can return to the previous screen at any time by clicking Previous.• You can advance to the next screen at any time by clicking Next.• You can advance to the final screen by clicking Finish. By choosing Finish, you permit the Report Wizard
to make all remaining decisions for you.• You can obtain online help for a screen at any time by clicking Help or pressing F1.
You can use the Report Wizard to add an application group, application, and folder for a report. Theseactions include defining indexing information, defining database and folder fields, configuring data and
Administrative client introduction 73

storage management, specifying whether the application group can contain more than one application,and naming the application group, application, and folder.
You can also use the Report Wizard to add an application to an existing application group. This actionincludes defining indexing information, specifying storage information, and identifying the applicationwithin the application group. To add an application to an application group, the application group musthave a database field to hold the values that uniquely identify an application within the application group.The field must contain at least one unassigned application identifier. For more information aboutapplication identifiers, see the Field Information page in application groups.
Starting the Report Wizard
About this task
From the administrative client, log on to the library server to which you want to add the report.
• To define a new application group, application, and folder, click Report Wizard on the toolbar.• To add an application to an existing application group:
– Under the server, select Application Groups.– Select the name of the application group to which you want to add the application.– Click Report Wizard on the toolbar.
Follow the on-screen instructions to add the report.
Report Wizard screensAs you move through the Report Wizard, standard options are selected for you. Unless you have a clearreason not to, accept the defaults. Depending on how you use the Report Wizard, you might not see all ofthe screens described.
Introduction screen
Provides a brief explanation of the Report Wizard. Your first step is to select the indexer that you want toindex the data. For all indexers, you specify the type of data you want to store. For indexers other thanGeneric and XML, you specify the location of sample data.
Report window
Displays the sample data and provides easy-to-use tools to help you define indexing information,database fields, and folder fields. Press F1 to display the online help for options and commands availablefrom the Report window. Use the online help to learn how to define triggers, fields, and indexes, databasefields, and folder fields.
Important: When you finish defining the indexing, database, and folder information, save your changes.
View information screen
If you specify User Defined as the data type, specify a file extension. If you specify Line as the data type,specify the code page, carriage control, and record format.
Managing fields screen
When you select the Generic indexer or XML indexer, you add and remove database and folder fields onthis page.
When you click on Add or Properties, the Report Wizard displays a window where you specify theproperties of a field.
74 Content Manager OnDemand for Multiplatforms: Administration Guide

Managing data screen
When you load a report into the system, you can specify that you want report data to be stored using largeobject support. You also need to specify how you want Content Manager OnDemand to manageannotations that users attach to pages of the report.
Application identifier screen
When you use the Report Wizard to add an application to an existing application group, you must specifythe name of the application and select a value that uniquely identifies the application within theapplication group.
Storage management screen
Determines where the storage manager maintains copies of reports, and how and when Content ManagerOnDemand deletes report data from the system.
Applications in the application group screen
If the report that you are defining is one of several that will be stored in the same application group, thenyou can use the Report Wizard to define the database field that contains the values that identify anapplication within the application group, define the folder field that users use to search a specificapplication, and specify the length of the application ID field.
If you select the check box for Document Size Field, Content Manager OnDemand adds a field to theapplication group and folder. Content Manager OnDemand stores the size of the document in theapplication group field when data is loaded. If you select the check box for Page Count Field, ContentManager OnDemand adds a field to the application group and folder. Content Manager OnDemand storesthe number of pages in the document in the application group field when data is loaded. You must providethe folder names for the two fields. You do not need to specify names for the application group fieldsbecause they are predefined.
Enhanced Retention Management and Interoperate with FileNet P8 Platform screen
Configure the application group to work with the following features:
• Enhanced Retention Management feature of Content Manager OnDemand• Interoperability between Content Manager OnDemand and FileNet® P8
Full text search screen
Specify the name of the Content Manager OnDemand full text indexing server, if installed, and, optionally,add Full Text Index folder fields.
Name screen
Specify the names of the application group, application, and folder. After you enter the names, ContentManager OnDemand queries the library server to make sure that the names are valid and unique.
Wizard complete screen
Confirms the selections that you made for the report. Click Display to view a summary of the applicationgroup, application, and folder definitions. From the summary window, choose the Print icon from thetoolbar to print a copy of the definitions.
Note: When you are satisfied with the selections that you made for the report, click Finish to completedefining the report. Content Manager OnDemand adds the application group, application, and folder to thelibrary server, closes the Report Wizard, and returns to the administrator window.
Administrative client introduction 75

76 Content Manager OnDemand for Multiplatforms: Administration Guide

Chapter 15. Examples of using the administrativeclient
Overview
About the examplesThe examples that follow demonstrate how to use the administrative client to:
• Add users and groups to the system. Users on the system obtain permission to open folders and accessapplication group data from a group.
• Define a server printer that can be used as the default printer for an application.• Define a storage set that contains a primary storage node. Content Manager OnDemand caches data on
the object server identified by the primary storage node. The primary storage node also identifies aclient node in archive storage that is managed by Tivoli Storage Manager.
• Add a report to the system. To add a report, you must add an application group, an application, and afolder.
System configurationHere are the assumptions about the system:
• Two groups of users: the customer service department and users at Customer XYZ.
Note: This example assumes that customers access the system by using the Content ManagerOnDemand Web Enablement Kit (ODWEK) feature. However, for purposes of demonstrating how thesystem works and how to use the administrative client to implement the requirements, these userscould easily represent another department within the organization.
• Add the telephone bill report to the system. The telephone report is generated by an applicationprogram running on a z/OS system. Download is used to transmit the report data to the ContentManager OnDemand server. The report is indexed on the server.
• Content Manager OnDemand servers. The library server and the object server reside on the sameworkstation.
• Database. Use table spaces and create incremental backups each time that a report is loaded into thesystem. The database resides on RAID storage devices. Use Tivoli Storage Manager to maintain thedatabase log files and backup image files. Tivoli Storage Manager maintains the files in an automatedtape library.
• Cache storage. When a report is loaded into the system, Content Manager OnDemand stores a copy incache storage and maintains the report for 60 days. Reports are cached on RAID storage devicesattached to the object server.
• Archive storage. When a report is loaded into the system, Content Manager OnDemand stores a copy ofthe report in archive storage. Tivoli Storage Manager maintains the report in an optical storage library forfive years.
• System parameters. Users must log on to the system with a password. Set the minimum passwordlength to six characters. Accept the defaults for the other system parameters.
© Copyright IBM Corp. 1993, 2018 77

Adding a user
About the example
First, review the requirements of the users that need to access the telephone bill reports.
• One set of userids for the customer service department. Identify one user as a user administrator. Theuser administrator can add other users and reset passwords.
• One userid for Customer XYZ.
On the example system, users obtain permissions from groups. That means that the users are not addedto application groups and folders. When groups are defined, the users are added to the groups.
The basics
In general, here is how you work in the administrative client to add a user. See the online help for details.
1. Choose a library server and select Users.2. Pick one of two ways to add a user.3. Define the properties of the user by completing fields in the Add a User dialog box.4. Optionally add the user to groups.5. Optionally add the user to application groups and set application group permissions.6. Optionally add the group to folders and set folder permissions.7. When finished, add the user by clicking OK in the Add a User dialog box.
Note: To add a user, the logon userid must be a user with create users authority, a user administrator, or asystem administrator.
Choose a server
1. On the left side of the administrator window, click the name of the library server to which you want toadd the user.
2. Expand the areas of the library server. Double click the server name or click the + (plus) to the left ofthe server name.
3. Select Users.
Two ways to add a user
You can add a user by using the New User command. You can also add a user by copying an existing userdefinition.New User command
From the File menu, select New User to open the Add a User dialog box.Copy command
You can use the copy command to add a user. In the User ID list, point to the user that you want tocopy and click the right mouse button. Select Copy from the pop-up menu to open the Add a Userdialog box. The fields in the dialog box contain information copied from the user you selected. At aminimum, you need to change the User ID (userids must be unique to the library server).
Adding the user
In the Add a User dialog box, click OK. The administrative client adds the user to the database and returnsto the main window.
Adding the customer service users
Note: The following shows how to add two of the users. You can repeat the steps to add the others.
78 Content Manager OnDemand for Multiplatforms: Administration Guide
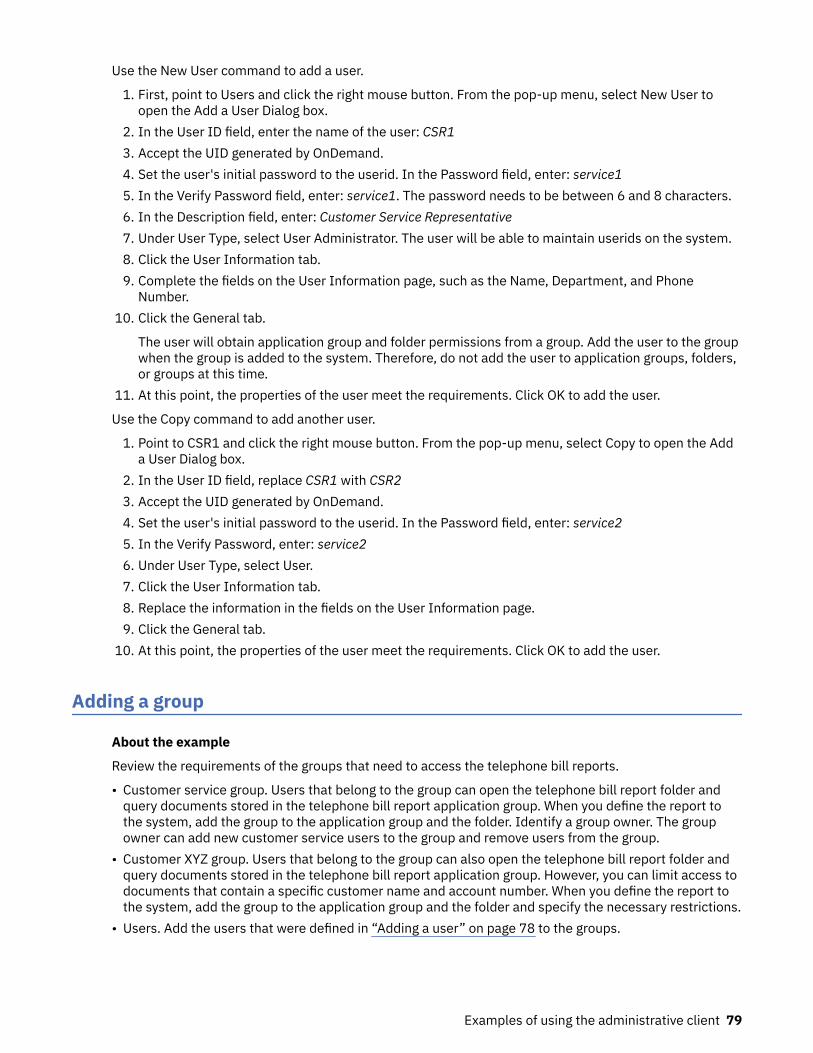
Use the New User command to add a user.
1. First, point to Users and click the right mouse button. From the pop-up menu, select New User toopen the Add a User Dialog box.
2. In the User ID field, enter the name of the user: CSR13. Accept the UID generated by OnDemand.4. Set the user's initial password to the userid. In the Password field, enter: service15. In the Verify Password field, enter: service1. The password needs to be between 6 and 8 characters.6. In the Description field, enter: Customer Service Representative7. Under User Type, select User Administrator. The user will be able to maintain userids on the system.8. Click the User Information tab.9. Complete the fields on the User Information page, such as the Name, Department, and Phone
Number.10. Click the General tab.
The user will obtain application group and folder permissions from a group. Add the user to the groupwhen the group is added to the system. Therefore, do not add the user to application groups, folders,or groups at this time.
11. At this point, the properties of the user meet the requirements. Click OK to add the user.
Use the Copy command to add another user.
1. Point to CSR1 and click the right mouse button. From the pop-up menu, select Copy to open the Adda User Dialog box.
2. In the User ID field, replace CSR1 with CSR23. Accept the UID generated by OnDemand.4. Set the user's initial password to the userid. In the Password field, enter: service25. In the Verify Password, enter: service26. Under User Type, select User.7. Click the User Information tab.8. Replace the information in the fields on the User Information page.9. Click the General tab.
10. At this point, the properties of the user meet the requirements. Click OK to add the user.
Adding a group
About the example
Review the requirements of the groups that need to access the telephone bill reports.
• Customer service group. Users that belong to the group can open the telephone bill report folder andquery documents stored in the telephone bill report application group. When you define the report tothe system, add the group to the application group and the folder. Identify a group owner. The groupowner can add new customer service users to the group and remove users from the group.
• Customer XYZ group. Users that belong to the group can also open the telephone bill report folder andquery documents stored in the telephone bill report application group. However, you can limit access todocuments that contain a specific customer name and account number. When you define the report tothe system, add the group to the application group and the folder and specify the necessary restrictions.
• Users. Add the users that were defined in “Adding a user” on page 78 to the groups.
Examples of using the administrative client 79

The basics
In general, here is how you work in the administrative client to add a group. See the online help fordetails.
1. Choose a library server and select Groups.2. Pick one of two ways to add a group.3. Define the properties of the group by completing fields in the Add a Group dialog box.4. Optionally assign a group owner.5. Optionally add users to the group.6. Optionally add the group to application groups and set application group permissions.7. Optionally add the group to folders and set folder permissions.8. When finished, add the group by clicking OK in the Add a Group dialog box.
Note: To add a group, the logon userid must be a user with create groups authority or a systemadministrator.
Choose a library server
1. On the left side of the window, click the name of the library server to which you want to add the group.2. Expand the areas of the library server. Double-click the server name or click the + (plus) to the left of
the server name.3. Select Groups.
Two ways to add a group
This section explains how to add a group by using the New Group command. You can also add a group bycopying an existing group definition.New Group command
From the File menu, select New Group to open the Add a Group dialog box.Copy command
You can use the Copy command to add a group. In the Name list, point to the group that you want tocopy and click the right mouse button. Select Copy from the pop-up menu to open the Add a Groupdialog box. The fields in the dialog box contain information copied from the group you selected. At aminimum, you need to change the group name (group names must be unique to the library server).
Adding users
You can add one or more users to the group. Complete the following steps to add a user to a group.
1. From the List of Users list, select the user.2. Click Add. The administrative client moves the user to the Users in the Group list.
To remove a user from the group, select the user in the Users in the Group list and click Remove.
Adding the group
In the Add a Group dialog box, click OK. The administrative client adds the group to the database andreturns to the main window.
Adding the customer service group
Use the New Group command to add the group.
1. First, point to Groups and click the right mouse button. From the pop-up menu, select New Group toopen the Add a Group Dialog box.
80 Content Manager OnDemand for Multiplatforms: Administration Guide

2. In the Name field, enter the name of the group: CustomerService. Do not include any blank in the groupname.
3. Accept the GID generated by OnDemand.4. From the Group Owner list, select the user that can add users to and remove users from the group:
CSR1
Note: The user that you select does not obtain permissions from the group unless you add the user tothe group (see step “6” on page 81). However, a group owner can add their userid to the group at anytime.
5. In the Description field, enter: Access to Telephone Bill Reports; call Leonard Little, x90565, for moreinformation
6. From the List of Users list, select and add users to the group: CSR1, CSR2, CSR3, CSR4, and CSR5
Figure 9 on page 81 shows the Add a Group dialog box with the basic information completed.
Figure 9: Add a Group dialog box7. At this point, the properties of the group meet the requirements. Click OK to add the group.
Adding the Customer XYZ group
Use the Copy command to add the group.
1. Point to Customer Service and click the right mouse button. From the pop-up menu, select Copy toopen the Add a Group Dialog box.
2. In the Name field, replace CustomerService with CustomerXYZ
Examples of using the administrative client 81

3. Accept the GID generated by OnDemand.4. Use a system administrator to maintain the group. Therefore, do not assign a group owner. In the
Group Owner list, replace CSR1 with *NONE.5. Replace the contents of the Description field with: Access to Telephone Bill Reports by Customer XYZ6. From the Users in the Group list, remove CSR1, CSR2, CSR3, CSR4, and CSR5.7. From the List of Users list, add XYZ1.
Figure 10 on page 82 shows the Add a Group dialog box with the basic information completed.
Figure 10: Add a Group dialog box8. Click OK to add the group.
Adding a printer
About the example
Add a printer that can be used as the default server printer for the application that will be defined in“Adding a report” on page 86. The physical printer resides in the customer service department. Bydefault, when users of the telephone bill report application select a document and choose the printercommand, OnDemand sends the document to this print device.
82 Content Manager OnDemand for Multiplatforms: Administration Guide
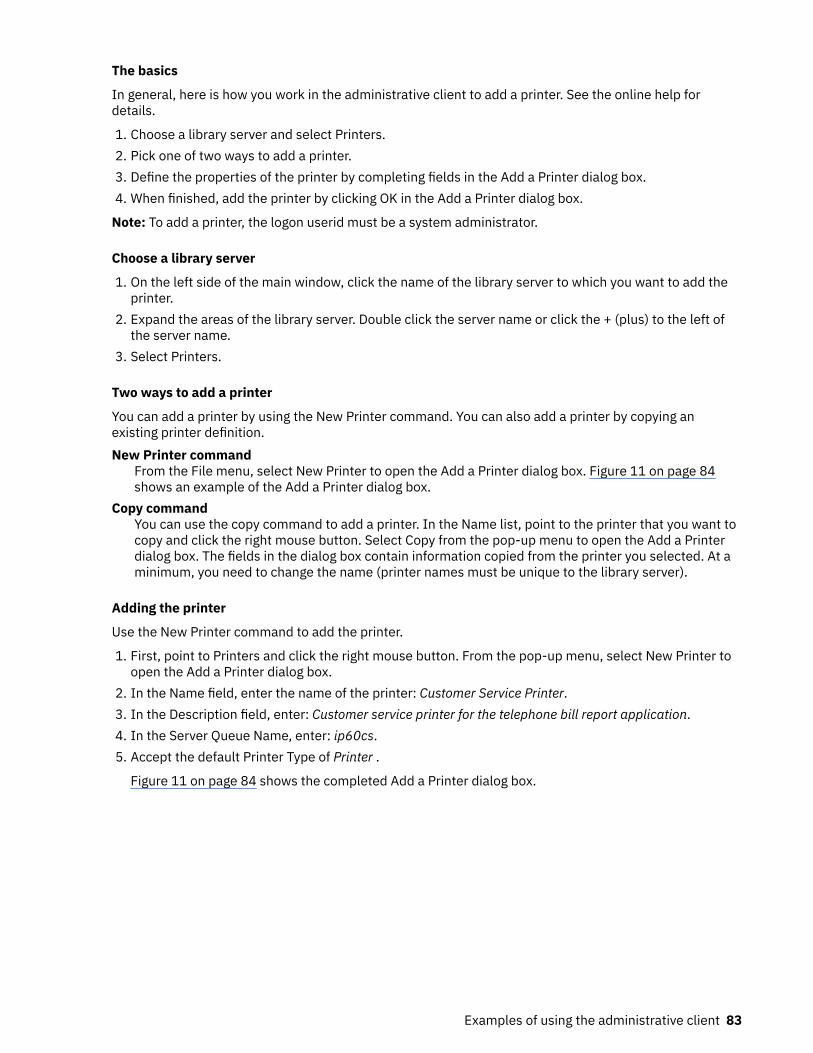
The basics
In general, here is how you work in the administrative client to add a printer. See the online help fordetails.
1. Choose a library server and select Printers.2. Pick one of two ways to add a printer.3. Define the properties of the printer by completing fields in the Add a Printer dialog box.4. When finished, add the printer by clicking OK in the Add a Printer dialog box.
Note: To add a printer, the logon userid must be a system administrator.
Choose a library server
1. On the left side of the main window, click the name of the library server to which you want to add theprinter.
2. Expand the areas of the library server. Double click the server name or click the + (plus) to the left ofthe server name.
3. Select Printers.
Two ways to add a printer
You can add a printer by using the New Printer command. You can also add a printer by copying anexisting printer definition.New Printer command
From the File menu, select New Printer to open the Add a Printer dialog box. Figure 11 on page 84shows an example of the Add a Printer dialog box.
Copy commandYou can use the copy command to add a printer. In the Name list, point to the printer that you want tocopy and click the right mouse button. Select Copy from the pop-up menu to open the Add a Printerdialog box. The fields in the dialog box contain information copied from the printer you selected. At aminimum, you need to change the name (printer names must be unique to the library server).
Adding the printer
Use the New Printer command to add the printer.
1. First, point to Printers and click the right mouse button. From the pop-up menu, select New Printer toopen the Add a Printer dialog box.
2. In the Name field, enter the name of the printer: Customer Service Printer.3. In the Description field, enter: Customer service printer for the telephone bill report application.4. In the Server Queue Name, enter: ip60cs.5. Accept the default Printer Type of Printer .
Figure 11 on page 84 shows the completed Add a Printer dialog box.
Examples of using the administrative client 83

Figure 11: Add a Printer dialog box6. At this point, the properties of the printer meet the requirements. Click OK to add the printer. The
administrative client adds the printer to the database and returns to the main window.
Adding a storage set and storage node
About the example
Review the storage requirements for the telephone bill report that will be defined in “Adding a report” onpage 86. Each report that is loaded into the system must be copied to cache storage. In addition, for longterm storage, the system must maintain a copy of the report in archive storage.
• Cache storage. Content Manager OnDemand can automatically copy report data to cache storage on theobject server identified by the primary storage node. However, you need to do two things to make surethat this happens. First, define cache storage file systems to Content Manager OnDemand. (The IBMContent Manager OnDemand for Multiplatforms: Installation and Configuration Guide describes how todefine cache storage file systems.) Second, specify the correct storage management information whenyou define the application group. For example, specify that the data stored in the application group iscopied to cache storage and specify the number of days that you want the system to maintain the datain cache storage.
• Archive storage. This is the storage set to which report data is copied for long term storage. Define oneprimary storage node in the storage set. The primary storage node will identify the object server onwhich the data is stored. In this example, the object server is on the same workstation as the libraryserver. Tivoli Storage Manager is used to maintain data in archive storage. The primary storage nodeidentifies a client node in Tivoli Storage Manager.
84 Content Manager OnDemand for Multiplatforms: Administration Guide
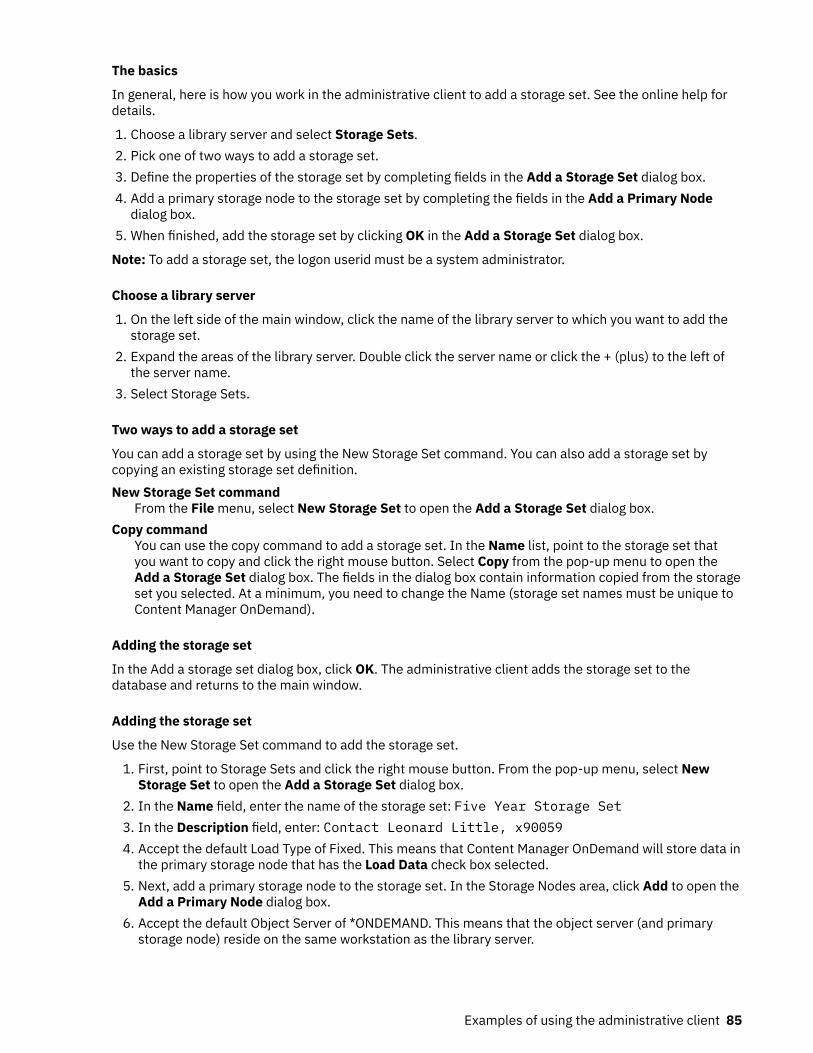
The basics
In general, here is how you work in the administrative client to add a storage set. See the online help fordetails.
1. Choose a library server and select Storage Sets.2. Pick one of two ways to add a storage set.3. Define the properties of the storage set by completing fields in the Add a Storage Set dialog box.4. Add a primary storage node to the storage set by completing the fields in the Add a Primary Node
dialog box.5. When finished, add the storage set by clicking OK in the Add a Storage Set dialog box.
Note: To add a storage set, the logon userid must be a system administrator.
Choose a library server
1. On the left side of the main window, click the name of the library server to which you want to add thestorage set.
2. Expand the areas of the library server. Double click the server name or click the + (plus) to the left ofthe server name.
3. Select Storage Sets.
Two ways to add a storage set
You can add a storage set by using the New Storage Set command. You can also add a storage set bycopying an existing storage set definition.New Storage Set command
From the File menu, select New Storage Set to open the Add a Storage Set dialog box.Copy command
You can use the copy command to add a storage set. In the Name list, point to the storage set thatyou want to copy and click the right mouse button. Select Copy from the pop-up menu to open theAdd a Storage Set dialog box. The fields in the dialog box contain information copied from the storageset you selected. At a minimum, you need to change the Name (storage set names must be unique toContent Manager OnDemand).
Adding the storage set
In the Add a storage set dialog box, click OK. The administrative client adds the storage set to thedatabase and returns to the main window.
Adding the storage set
Use the New Storage Set command to add the storage set.
1. First, point to Storage Sets and click the right mouse button. From the pop-up menu, select NewStorage Set to open the Add a Storage Set dialog box.
2. In the Name field, enter the name of the storage set: Five Year Storage Set3. In the Description field, enter: Contact Leonard Little, x900594. Accept the default Load Type of Fixed. This means that Content Manager OnDemand will store data in
the primary storage node that has the Load Data check box selected.5. Next, add a primary storage node to the storage set. In the Storage Nodes area, click Add to open the
Add a Primary Node dialog box.6. Accept the default Object Server of *ONDEMAND. This means that the object server (and primary
storage node) reside on the same workstation as the library server.
Examples of using the administrative client 85

7. In the Storage Node field, enter: FiveYearPSN1. This is the name of the primary storage node. Byconvention, use the same name for the primary storage node and its associated client node in TivoliStorage Manager.
8. In the Description field, enter: Five year storage node.9. In the Logon field, enter: FiveYearPSN1. This is the name of the client node in Tivoli Storage
Manager. The logon name must be the same as the client node in Tivoli Storage Manager.10. In the Password field, enter: FiveYearPSN1. This is the password for the client node in Tivoli
Storage Manager.11. In the Verify Password, enter: FiveYearPSN112. Select the Load Data check box to identify this node as the primary storage node in which Content
Manager OnDemand will load data for the application groups that are assigned to the storage set.13. At this point, the properties of the primary storage node meet the requirements. Click OK to add the
primary storage node to the storage set and return to the Add a Storage Set window.14. Figure 12 on page 86 shows the completed Add a Storage Set dialog box.
Figure 12: Add a Storage Set dialog box - completed
At this point, the properties of the storage set meet the requirements. Click OK. The administrativeclient adds the storage set to the database and returns to the main window.
Adding a report
About the example report
This section provides an overview of the sample telephone bill report that will be added to the system.
A telephone bill report typically contains hundreds of pages of line data. The report is logically segmentedinto statements. Users search for statements using a date and any combination of account number and
86 Content Manager OnDemand for Multiplatforms: Administration Guide

customer name. The line data will be formatted into pages and the appearance of the output will beenhanced with images and fonts.
Most queries about a statement occur in the first sixty days after it is mailed to the customer. Little or noactivity occurs a year after a statement is generated. For legal reasons, statements are kept for five years.The system must maintain index information in the most efficient way possible.
Two groups of users need to access the telephone bill reports. The customer service department isresponsible for handling queries from customers. They answer questions about the statements, attachannotations to statements, and reprint statements. As part of a customer self-service initiative, CustomerXYZ is permitted to access the system and retrieve and view their statements.
The basics
In general, here is how you work in the administrative client to add a report to the system:
1. Choose a library server. On the left side of the main window, click the name of the library server onwhich you want to define the report.
2. Select the area. First expand the areas of the library server. Double click the server name or click the +(plus) to the left of the server name. Then select the area.
When you define a report to the system, you typically add an application group, an application, and afolder.
• The application group identifies database and storage management information.• The application identifies viewing, indexing, loading, and printing information.• The folder provides users the ability to search for, retrieve, view, and print report data.
3. Pick one of two ways to add an application group, an application, and a folder. For example, use one ofthe following methods to add an application group:
• Add a new application group. From the File menu, select New Application Group to open the Add anApplication Group dialog box.
• Copy an existing application group. In the Name list, point to the application group that you want tocopy and click the right mouse button. Select Copy from the pop-up menu to open the Add anApplication Group dialog box. The fields in the dialog box contain information copied from theapplication group you selected. At a minimum, you need to change the Name (application groupnames must be unique to the library server).
4. Define the properties of the application group, application, and folder.5. When finished, add the application group, application, and folder by clicking OK in the add dialog box.
Note: To add an application group, the logon userid must be a system administrator, an application group/folder/cabinet administrator, or a user with create application groups authority.
To add an application, the logon userid must be a system administrator, an application group/folder/cabinet administrator, or a user with create application groups authority.
To add a folder, the logon userid must be a system administrator, an application group/folder/cabinetadministrator, or a user with create folders authority.
About the application group
Before adding the application group, review the database and storage management requirements.
Database requirements
Database requirements can be grouped in two categories: database tables and the database fields.
Database tables
• Index data is stored in table spaces
Examples of using the administrative client 87

• A database table contains index data from one or more reports• Data is managed by OnDemand• An annotation field is not required in the database• The date field is the segment field for the application group
Database fields
• Three database fields: account number, customer name, and report date• Account number is the index, data type string, 16 bytes. However, plan to store only 13 bytes in the
database, removing the - (dash) characters from the account number string.• Customer name is a filter, data type string, 30 bytes• Report date is a filter, data type date
Storage management requirements
The storage management requirements determine where, how, and how long OnDemand maintains thereport and index data.
• Maintain a report for five years• Copy documents to cache storage and maintain them for sixty days• Copy documents to archive storage when the report is loaded into the system• Delete a table of index data at a time
Adding the application group
Use the New Application Group command to add the application group. First, point to Application Groupsand click the right mouse button. From the pop-up menu, select New Application Group to open the Addan Application Group dialog box.
The pages of the Add an Application Group dialog box organize information about the application groupinto sections. The tabs show which page you are on: General, Message Logging, Storage Management,Permissions, Field Definition, Field Information, and Advanced Index Information.
General page
Start by completing the General page.
1. In the Name field, type the name of the application group.2. In the Description field, type up to 120 characters of descriptive information about the application
group.3. Based on the database requirements, accept the recommended defaults for the rest of the fields on
the General page. (You can click Advanced to see the other options.)
Message Logging page
1. Select the Message Logging tab to specify the types of application group messages that you wantOnDemand to save in the system log. You can use the information in the system log messages togenerate system usage reports.
2. Select Retrieval, Database Queries, and Server Printing. Clear all of the other check boxes.
Storage Management page
1. Select the Storage Management tab to provide information that OnDemand uses to manage datastored in the application group.
2. From the Storage Set Name list, select the name of the storage set that the system will use to maintainthe report in cache storage and in archive storage. The storage set was added to the system in "Adding
88 Content Manager OnDemand for Multiplatforms: Administration Guide

a storage set and storage node". The storage set can contain one or more primary storage nodes. Aprimary storage node identifies an object server and archive storage node in Tivoli Storage Manager.The system caches the report on the object server on which the primary storage node resides.
3. Under Cache Data, select Cache Data for __ Days and type 60 in the space provided. The systemshould maintain the report in cache storage for 60 days. After that time, when a user views or printsthe report, the system retrieves the report from archive storage.
4. Under Life of Data and Indexes, select Expire in ____ Days and type 1825 in the space provided.This is the number of days (1825, or five years) that the system should maintain index data,documents, and resources related to the report. After that number of days, the system can delete thereport from the system.
Permissions page
1. Select the Permissions tab to specify the types of report and application group functions that users canperform. For example, you can let users query report data, create logical views, print pages of thereport, and maintain the application group. You can specify default permissions and permissions forspecific groups and users. By default, the person that creates the application group is given allapplication group permissions; no other users can access report data or maintain the applicationgroup. On the example system, other users obtain permissions from a group. The groups were addedin “Adding the customer service group” on page 80 and “Adding the Customer XYZ group” on page 81.
2. First, add the customer service group. From the User/Groups list, select +CustomerService.3. Select the Access check box.4. Click Add.5. Next, add the Customer XYZ group. From the User/Groups list, select +CustomerXYZ.6. In the Annotation area, clear the View check box. The client also clears the Add check box. Customer
XYZ users can view, print, and copy documents but do not have permission to use the annotation toolsprovided by the system.
7. Click Add.
Field Definition page
1. Select the Field Definition tab to define the database fields.2. Define three database fields for the sample telephone bill report:
• Account number• Customer name• Report date
To define a database field, type the name of the field in the Database Field Name field and click Add.
Field Information page
1. Select the Field Information tab to define the attributes of the database fields.2. First, define field information for the account number field.
• From the Type list, select Index• Type the string length (13)
3. Next, define field information for the customer name field.
• From the Name list, select custname• From the Type list, select Variable• In the Length field, type 30
4. Next, define field information for the report date field.
• From the Name list, select rdate
Examples of using the administrative client 89

• From the Data Type list, select Date• Select the Segment check box
For this example, leave the Advanced Index Information tab as default.
At this point, the properties of the application group meet the requirements. Click OK in the Add anApplication Group window. The administrative client adds the application group to the database andreturns to the main window.
About the application
Before adding the application, review the viewing, indexing, loading, and printing requirements.
Viewing requirements
• Source (line) data stored in OnDemand as AFP data• Format data into pages and enhance the appearance with images and fonts• Retrieve statements of one or more pages• Define a default printer for the application. The default printer is where OnDemand sends documents
when users select the server print command.
Indexing requirements
• Source data is EBCDIC, code page 500• Segment report into groups of pages, one statement in each group• Identify the beginning of a statement using:
Skip-to-channel one (X'F1')PAGE 1 (X'D7C1C7C5404040F1')
• Generate three indexes for each statement: statement date, account number, and customer name• Collect resources
Loading requirements
• Compress and store data in the most efficient method possible• Application group database field names and index names match• Date format is Mth d, yyyy• Remove embedded - (dash) character from account number before storing value in the database
Adding the application
Use the New Application command to add the application. First, point to Applications and click the rightmouse button. From the pop-up menu, select New Application to open the Add an Application dialog box.
The pages of the Add an Application dialog box organize information about the application into sections.The tabs show which page you are on: General, View Information, Indexer Information, Load Information,Logical View Fields, Logical Views, and Miscellaneous Options.
General page
Start by completing the General page.
1. In the Name field, type the name of the application.2. In the Description field, type information about the application.3. Click Select to open the Application Groups dialog box.4. From the Names list, select Telephone Bill Reports.
90 Content Manager OnDemand for Multiplatforms: Administration Guide
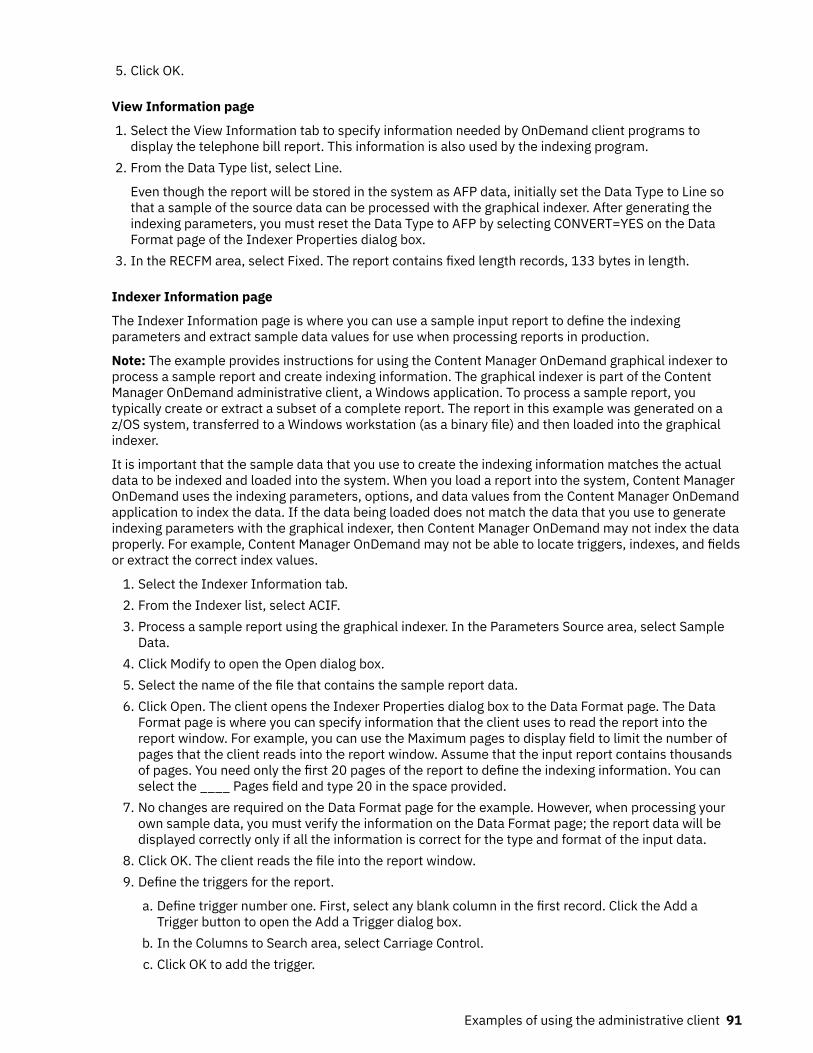
5. Click OK.
View Information page
1. Select the View Information tab to specify information needed by OnDemand client programs todisplay the telephone bill report. This information is also used by the indexing program.
2. From the Data Type list, select Line.
Even though the report will be stored in the system as AFP data, initially set the Data Type to Line sothat a sample of the source data can be processed with the graphical indexer. After generating theindexing parameters, you must reset the Data Type to AFP by selecting CONVERT=YES on the DataFormat page of the Indexer Properties dialog box.
3. In the RECFM area, select Fixed. The report contains fixed length records, 133 bytes in length.
Indexer Information page
The Indexer Information page is where you can use a sample input report to define the indexingparameters and extract sample data values for use when processing reports in production.
Note: The example provides instructions for using the Content Manager OnDemand graphical indexer toprocess a sample report and create indexing information. The graphical indexer is part of the ContentManager OnDemand administrative client, a Windows application. To process a sample report, youtypically create or extract a subset of a complete report. The report in this example was generated on az/OS system, transferred to a Windows workstation (as a binary file) and then loaded into the graphicalindexer.
It is important that the sample data that you use to create the indexing information matches the actualdata to be indexed and loaded into the system. When you load a report into the system, Content ManagerOnDemand uses the indexing parameters, options, and data values from the Content Manager OnDemandapplication to index the data. If the data being loaded does not match the data that you use to generateindexing parameters with the graphical indexer, then Content Manager OnDemand may not index the dataproperly. For example, Content Manager OnDemand may not be able to locate triggers, indexes, and fieldsor extract the correct index values.
1. Select the Indexer Information tab.2. From the Indexer list, select ACIF.3. Process a sample report using the graphical indexer. In the Parameters Source area, select Sample
Data.4. Click Modify to open the Open dialog box.5. Select the name of the file that contains the sample report data.6. Click Open. The client opens the Indexer Properties dialog box to the Data Format page. The Data
Format page is where you can specify information that the client uses to read the report into thereport window. For example, you can use the Maximum pages to display field to limit the number ofpages that the client reads into the report window. Assume that the input report contains thousandsof pages. You need only the first 20 pages of the report to define the indexing information. You canselect the ____ Pages field and type 20 in the space provided.
7. No changes are required on the Data Format page for the example. However, when processing yourown sample data, you must verify the information on the Data Format page; the report data will bedisplayed correctly only if all the information is correct for the type and format of the input data.
8. Click OK. The client reads the file into the report window.9. Define the triggers for the report.
a. Define trigger number one. First, select any blank column in the first record. Click the Add aTrigger button to open the Add a Trigger dialog box.
b. In the Columns to Search area, select Carriage Control.c. Click OK to add the trigger.
Examples of using the administrative client 91

d. Define trigger number two. First, select the string PAGE 1. Click the right mouse button. From thepop-up menu, select Trigger to open the Add a Trigger dialog box.
e. Click OK to add the trigger.10. Define the fields for the report.
a. Define field number one. First, select the string Customer XYZ and enough blank characters to theright of the string to reserve enough space to hold the largest index value (30 characters) the fieldcan contain. (The selected string length guide, which appears above the field, displays the numberof selected characters.) Then click the right mouse button. From the pop-up menu, select Field toopen the Add a Field dialog box.
b. From the Trigger list, select Trigger2.c. Click OK to add the field.d. Define field number two. First, select the string May 11, 1996. Then click the right mouse button.
From the pop-up menu, select Field to open the Add a Field dialog box.e. From the Trigger list, select Trigger2.f. Click OK to add the field.
g. Define field number three. First, select the string 303-555-1212-95B. Then click the right mousebutton. From the pop-up menu, select Field to open the Add a Field dialog box.
h. From the Trigger list, select Trigger2.i. Click OK to add the field.
11. Define the indexes for the report.
a. First, clear any selected areas of the report. Right-click and select Index to open the Add anIndex dialog box.
b. From the Attribute list, select custname.c. In the Break area, select No.d. In the Fields list, double-click Field1.e. Click Add to add the index.f. From the Attribute list, select rdate
g. In the Break area, select No.h. In the Fields list, double-click Field2.i. Click Add to add the index.j. From the Attribute list, select acct.
k. In the Fields list, double-click Field3.l. Click Add to add the index.
m. Click Done to close the Add an Index dialog box.12. In the toolbar, click the Indexer Properties button to open the Indexer Properties dialog box.13. On the Data Format page, change the Data Conversion field to Yes so that ACIF converts the input line
data to AFP.
When you change Data Conversion to Yes, the administrative client automatically changes the DataType on the View Information page to AFP.
14. Define the resources for the report.
a. Click the Resource Information tab to specify the resources required to view the report.b. Type the name of the form definition. This is the AFP object that determines how data is placed on
a page.c. Type the name of the page definition. This is the AFP object that determines other resources
required to view a page.
92 Content Manager OnDemand for Multiplatforms: Administration Guide

d. In the Resource File Contents area, select the Form Definitions, Page Segments, and Overlayscheck boxes. These are the resources that ACIF should collect.
e. In the Search Paths area, type the full path names of the directories in which the indexing programcan locate the resources.
15. Click OK to close the Indexer Properties dialog box.16. Close the report window, saving the changes.
Load Information page
1. Select the Load Information tab to specify information that OnDemand uses to process the index databefore storing it in the database.
2. In the Application Group Database Name list, select rdate to specify the format of the date as itappears in the report.
3. From the format list, select %b %d, %Y.4. In the Application Group Database Name list, select acct. To conserve space in the database,
OnDemand will remove the - (dash) character from index values before storing the values in thedatabase.
5. In the Embedded field, type the - (dash) character.
Miscellaneous Options page
1. Select the Miscellaneous Options tab to specify client and server processing options for theapplication.
2. Under Client Options, in the Default Server Printer list, select Customer Service Printer. This is theprinter that was defined in “Adding a printer” on page 82.
At this point, the properties of the application meet the requirements. Click OK in the Add an Applicationwindow. The administrative client adds the application to the database and returns to the main window.
About the folder
Before adding the folder, review the data access requirements, the types of permissions that should bespecified, and the search and display fields that should be defined.
Data access requirements
The folder allows users to access the telephone bill report application group and the telephone bill reportapplication.
Permissions
Who needs access to the folder and what types of permissions do the users need?
• Users in the customer service department can open the folder to search for and retrieve statements.• Users at Customer XYZ can open the folder to search for and retrieve statements that contain their
account number and customer name.• Define a set of folder fields for the Customer XYZ users. The folder fields will limit access to specific
statements.
Search and display fields
Define two sets of folder fields:
• One set at the folder level. These folder fields allow users in the customer service department to accessany statement in the database.
• One set for the CustomerXYZ group. These folder fields allow users at Customer XYZ to access specificstatements.
Examples of using the administrative client 93

Adding the folder
Use the New Folder command to add the folder. First, point to Folders and click the right mouse button.From the pop-up menu, select New Folder to open the Add a Folder dialog box.
The pages of the Add a Folder dialog box organize information about the folder into sections. The tabsshow which page you are on: General, Permissions, Field Definition, Field Information, and Field Mapping.
General page
Start by completing the General page.
1. In the Name field, type the name of the folder.2. In the Description field, type up to 120 characters of descriptive information about the folder.3. Select the Display Document Location check box. This provides users with a visual clue about the type
of media on which a statement is stored.4. In the Application Groups list, select Telephone Bill Reports.
Permissions page
1. Select the Permissions tab to specify the types of folder functions that users can perform. Forexample, you can let users open the folder, create private named queries, and maintain folder fields.You can specify default permissions and permissions for specific groups and users. By default, theperson that creates the folder is given all folder permissions; no other users can open or maintain thefolder. On our system, other users obtain permissions from a group. You need to add two groups to thefolder. The groups were added in “Adding the customer service group” on page 80 and “Adding theCustomer XYZ group” on page 81.
2. From the Users and Group list, select +CustomerService.3. Select the Access check box.4. Click Add, to add the Customer Service group to the folder.5. From the Users and Group list, select +CustomerXYZ.6. Click Add, to add the CustomerXYZ group to the folder.
Field Definition page
1. Select the Field Definition tab to define the folder fields. Define four folder fields to allow users tosearch for statements:
• Account Number, a string field• Customer Name, a string field• Report Date, a date field• Other Information, a text search field
2. Complete the following steps to define a folder field:
a. In the Name field, type the name of the folder field.b. In the Description field, type up to 120 characters of descriptive information about the folder field.c. From the Field Type list, select the data type of the field.d. Select the Mapping Type. All of the fields in this example use the Single mapping type.e. Click Add.
Field Information page
1. Select the Field Information tab to specify the properties of the folder fields. Using the *PUBLICidentifier, you can specify field information that is used by all users that can open the folder. You canalso specify field information for specific users and groups. The public field information will be usedunless it is overridden by field information for a specific user or group. For this folder, do the following:
94 Content Manager OnDemand for Multiplatforms: Administration Guide

• Specify public field information. For the Account Number, Customer Name, and Other Informationfields, accept the default values. For the Report Date field, you must specify field information.
• Specify field information for the CustomerXYZ group. For the Other Information and Report Datefields, accept the default values. For the Account Number and Customer Name fields, specify fieldinformation.
2. First, specify the public field information for the Report Date field.
a. From the Name list, select Report Dateb. From the ID list, select *PUBLICc. Select the Default check boxd. From the Display Format list, select %m-%d-%Ye. From the Defaults Format list, select %m-%d-%Yf. In the Interval area, select Last, type a 3 (three) in the entry field, and select Months
3. Next, specify the field information for the CustomerXYZ group. First, make a copy of the folder fields.Click the Permissions tab.
4. From the Selected List, select +CustomerXYZ.5. In the User/Group Fields area, click Yes.6. Click the Field Information Tab.7. Specify the Customer XYZ field information for the Account Number field.
a. From the Name list, select Account Numberb. From the ID list, select +CustomerXYZc. From the Default list, select Equald. Clear the Like check boxe. Select the Default check boxf. Select the Fixed check box
g. In the first Defaults entry field, type 1234567890123h. Clear the Append check box
8. Next, specify the Customer XYZ field information for the Customer Name field.
a. From the Name list, select Customer Nameb. From the Default list, select Equalc. Clear the Like check boxd. Select the Default check boxe. Select the Fixed check boxf. In the first Defaults entry field, type Customer XYZ
g. Clear the Append check box
Field Mapping page
1. Select the Field Mapping tab to map the folder fields to application group database fields. OnDemanduses the values that users type in folder fields to construct queries against the Content ManagerOnDemand database.
2. Map the following folder fields to their corresponding application group fields:
• Account Number to acct• Customer Name to custname• Report Date to rdate
At this point, the properties of the folder meet the requirements. Click OK in the Add a Folder window. Theadministrative client adds the folder to the database and returns to the main window.
Examples of using the administrative client 95

Summary
The example shows the basic requirements for adding a report to the system. Hopefully the scenario thatwas described and developed is similar to how you plan to use OnDemand at your company. The exampleshould have enough variations to show the flexibility of OnDemand to meet a range of business andoperational requirements. Of course, there are several tasks that were not shown. For example, logicalviews of the report were not created. The system log user exit was not explored. And all of the ways tocomplete a given task or implement a specific requirement were not shown. As with most administrativesoftware, there is more than one way to accomplish a task. Hopefully, the example showed you the moststraightforward way to get things done with the administrative client.
You can use reference information provided with the product and the online help to find out more abouthow to use OnDemand. If you have questions and can't find the answers, please contact the IBM supportcenter. IBM also offers classes that further explore how to administer the system. Finally, you can let IBMknow how well the information in this book was presented and if you found the book helpful. The sectiontitled How to Send Your Comments explains how to let IBM know.
Adding a field to an existing application group
About the example
After working with the system for several months, the customer service department wants the followinginformation displayed on the hit list, for each telephone bill:
• The number of pages• The size, in bytes• The format (for example, PDF or Line)
In addition, to help monitor data loads, the system administrator wants to add a Load Date & Time fieldthat displays the date and time the telephone bill was loaded into the system. This information isavailable through the system log; however, adding it to the hit list makes it easier to find.
To implement these changes, you add the following fields to the Telephone Bill Reports application group:Page Count
The number of pages in a telephone bill. Only new data loaded into this applicationdisplays a page count. Previously loaded data displays 0 for page count.
Document SizeThe size (in bytes) of a telephone bill.
Load Date & TimeDisplay the time (according to the object server clock) that the telephone bill was loadedinto the system.
Overview
In general, here is how you work in the administrative client to add fields to an existing application group.See the online help for details.
1. Update the Telephone Bill Reports application group to add the Page Count, Document Size, and LoadDate & Time fields.
2. Update the Telephone Bill Reports application to indicate the format of the Load Date & Time field.3. Make a new folder that displays these changes by copying the previous folder and adding new field
definitions and mapping.
Note: To update an application group, the logon user ID must be one of the following types:
• A system administrator• An application group/folder/cabinet administrator
96 Content Manager OnDemand for Multiplatforms: Administration Guide

To update an application, the logon user ID must be one of the following types:
• A system administrator• An application group/folder/cabinet administrator
To update a folder, the logon user ID must be one of the following types:
• A system administrator• An application group/folder/cabinet administrator
Update the application group
1. Click Application Groups.2. Point to Telephone Bill Reports and click the right mouse button.3. From the menu, select Update.4. Click the Field Definition tab.5. Add the following fields by typing in the name of the field in Database Field Name, then clicking Add:
Table 5: Values to add to fields.
Field name as it will appear in the hit list Name to type into Database Field Name
Page Count pagecnt
Document Size docsize
Load Date & Time loaddatetime
6. Click the Field Information tab.7. For each field that you added, select the corresponding data type and values:
Table 6: Values to add and data types to select for fields.
Field name Field Type Data typeSelect the followingcheck box
pagecnt Filter Integer Page Count
docsize Filter Integer Document Size
loaddatetime Filter Date/Time (TZ) Log
For loaddatetime, select Date/Time (TZ) to ensure that the application adjusts for differences in timezone.
Always define the Field Type for new fields as Filter. Content Manager OnDemand always provides asingle, default value for the new field as it updates existing application groups, as described in thefollowing list:
• For numeric data types (for example, INTEGER), the default value is 0.• For fixed-length string data types, the default value is a string made of blanks.• For varying-length strings, the default value is a string of length 0.
8. Click OK to save the changes to the application group.
Update the application
1. Click Applications.2. Point to Telephone Bill Reports and click the right mouse button.3. From the menu, select Update.4. Click the Load Information tab.
Examples of using the administrative client 97

5. In the Application Group Database Name list, select loaddatetime.6. In the Default Value field, type in a lowercase t. This field instructs the application to get the system
date and time.7. In the Format list, select %m/%d/%y %H:%M.8. Click OK to save the changes to the application.
Create a folder
1. Click Folders.2. Point to the folder you created when you added a report and click the right mouse button.3. From the menu, select Copy.4. Type in a new name in the Name field.5. Click the Field Definition tab.6. For each field, type in or select the values described in the following table and click Add:
Table 7: Values to add to fields.
Name Description Field Type Mapping Type
Page Cnt Number of pages in thetelephone bill.
Integer Single
Doc Size Number of bytes. Integer Single
Doc Type Format of thetelephone bill. (Forexample, PDF.)
Document Type
Load Date Date and time thattelephone bill wasloaded into system.
Date/Time (TZ) Single
7. Click the Field Information tab.8. Select Load Date from the Name list.9. Click the Field Mapping tab.
10. Select Page Cnt from the Name list. Click pagecnt in the Application Group Fields box. Click Add.11. Select Doc Size from the Name list. Click docsize in the Application Group Fields box. Click Add.12. Select Load Date from the Name list. Click loaddatetime in the Application Group Fields box. Click
Add.13. Click OK to save this new folder.
98 Content Manager OnDemand for Multiplatforms: Administration Guide

Chapter 16. Administration concepts
IntroductionYou can use the administrative client to maintain a variety of Content Manager OnDemand objects such asusers, groups, printers, storage sets, storage nodes, application groups, applications, folders, cabinets,and holds.
An object cannot be updated by multiple users at the same time. If the same object is updated bymultiple users simultaneously, changes might be overridden, and invalid data might be created in thedatabase.
UsersWhen you define a Content Manager OnDemand user, you create a userid with which a person in yourorganization logs on to the Content Manager OnDemand library server. You can optionally add the useridto folders and application groups, which is one way to let the user open folders and access data.
Each person in your organization logs on to the library server using a Content Manager OnDemand userid.Content Manager OnDemand authenticates the userid and determines the usage and administrativeauthority available to that person, based on the userid.
Content Manager OnDemand can store a maximum of 1,080,000 separate user IDs.
A Content Manager OnDemand userid does not necessarily have to identify an individual by name.However, for accounting purposes, most customers assign a Content Manager OnDemand userid to eachperson that will use the system. When you initialize the system, Content Manager OnDemandautomatically creates the ADMIN userid. The ADMIN userid has system administrator authority. A systemadministrator can do the basic user functions, such as logging on the system and opening folders. Asystem administrator can also do administrative functions, such as maintaining users and groups andcreating, updating, and deleting application groups, applications, folders, storage sets, printers, holds,and cabinets.
Note: The ADMIN userid does not have an initial password assigned. Because the ADMIN userid hassystem authority, IBM recommends that you assign a password to the ADMIN userid immediately afterinstallation.
When naming Content Manager OnDemand users, the name that you specify:
• Can contain one to 128 characters (bytes)• Cannot include the ' (apostrophe), *, %, +, [ (left bracket), ] (right bracket), " (double quotation mark), or
blank character• Must be unique to the library server
You can specify a userid in mixed case. By default, Content Manager OnDemand ignores the case (forexample, LaGuarde is the same as laguarde). Content Manager OnDemand converts lowercase lettersin a user name to uppercase (LaGuarde is stored as LAGUARDE). However, depending on how youconfigure the Login Processing system parameters, userid processing on your system may be different(the case may be significant). See “System parameters” on page 66 for more information.
User types
When you add a user to Content Manager OnDemand, you specify the User Type. The User Type and theAuthority determines the types of tasks that the user can do when logged on to the system. You canchoose from the following User Types:
© Copyright IBM Corp. 1993, 2018 99

UserUsers can log on to Content Manager OnDemand, open folders that they are authorized to access, andsearch for and retrieve data from application groups that they are authorized to access. Users can begiven authority to do other things on the system.
User AdministratorA user that can also add, update, and delete users and user administrators. A user administrator canbe given authority to do other things on the system.
Application Group/Folder/Cabinet AdministratorA user that can also add, update, and delete application groups, applications, folders, and cabinets.An application group/folder/cabinet administrator is automatically given Logical Views permission toall application groups. An application group/folder/cabinet administrator can be given authority to doother things on the system.
Hold AdministratorA user that can add, update, delete, or view hold objects.
System AdministratorA user that can also add, update, and delete any user, group, application group, application, folder,holds, or cabinet on the system. A system administrator is automatically given Logical Viewspermission to all application groups. A system administrator is also the only user that can maintainstorage sets and printers.
Note: When adding or updating a user, you are not permitted to set the User Type or Authority to a levelthat exceeds your own. For example, a user with Create Users and Create Groups authority cannot createa user with Create Folders authority.
By default, only the user, the user that created the user, user administrators, and system administratorscan view or maintain the user. See the User Permissions page for more information
Only a system administrator, an application group/folder/cabinet administrator, a user with administratorauthority for an application group, or a user with add document permission can store data in anapplication group.
Only a system administrator, an application group/folder/cabinet administrator, or a user with deletedocument permission can delete data from an application group.
Authority
The Authority optionally lets the user do other things on the system. For example, A User Type of User canbe permitted to create users. The authority options that you can select depend on the User Type. Forexample, if the User Type is Application Group/Folder/Cabinet Administrator, then by definition, the usercan create application groups and folders. Therefore, the only additional authorities that the user can begiven are Create Users and Create Groups. Choose from the following:Create Users
An optional authority for users and application group/folder/cabinet administrators:
• If the User Type is User, lets the user create users with a User Type of User.• If the User Type is Application Group/Folder/Cabinet Administrator, lets the user create users with a
User Type of User or a User Type of Application Group/Folder/Cabinet Administrator.
Note: Users with Create Users authority can maintain the users that they create, as long as theyremain an administrator of the user.
Create GroupsAn optional authority for users, user administrators, and application group/folder/cabinetadministrators. Lets the user create groups. Users with Create Groups authority can maintain thegroups they create, as long as they remain a group owner.
Create Application GroupsAn optional authority for users and user administrators. Lets the user create application groups. Userswith Create Application Groups authority can maintain the application groups that they create, as longas they remain an administrator of the application groups.
100 Content Manager OnDemand for Multiplatforms: Administration Guide

Create FoldersAn optional authority for users and user administrators. Lets the user create folders. Users with CreateFolders authority can maintain the folders that they create, as long as they remain an administrator ofthe folders.
Create CabinetsAn optional authority for users and user administrators. Lets the user create cabinets. Users withCreate Cabinets authority can maintain the cabinets that they create, as long as they remain anadministrator of the cabinets.
Create HoldsAn optional authority for users and user administrators. Lets the user create holds. Users with CreateHolds authority can maintain the holds they create, as long as they remain an administrator of theholds.
Note: When adding or updating a user, you are not permitted to set the User Type or Authority to a levelthat exceeds your own. For example, a user with Create Users and Create Groups authority cannot createa user with Create Folders authority.
GroupsContent Manager OnDemand groups are a means to organize users of the system by function,authorization, or any other purpose that you might require. You do not have to assign a user to a group,however doing so can simplify administration of users with similar requirements and capabilities.
When you define a group, you can add users to the group and specify folder and application grouppermissions that are common to all of the users that belong to the group. The permissions determine thetypes of actions users assigned to the group can perform on the system.
When naming groups, the name that you specify:
• Can contain one to 128 characters (bytes)• Cannot include the ' (apostrophe), * (asterisk), % (percent), + (plus), [ (left bracket), ] (right bracket),
" (double quotation mark), or blank character• Can be mixed case. However, the case does not create a unique name (LaGuarde is the same aslaguarde)
• Must be unique to the library server
You can assign a group owner. The group owner can add users to and remove users from the group. Tomaintain a group's application group and folder permissions, the group owner must have administratorauthority for the application groups, folders, cabinets, or be an application group/folder/cabinetadministrator or a system administrator. If you do not assign a group owner, only a system administratoruser can maintain the group.
PrintersAn Content Manager OnDemand printer is an interface between the user and a print device that iscontrolled by a server.
The Content Manager OnDemand server print function is the highest performance print option that isavailable to end-users of the system. The server print function is designed to allow many documents to beselected for reprint from the document list, without retrieving the documents to the user's PC.
The Content Manager OnDemand server print function supports printing by submitting a print job to anIBM Infoprint Server print queue. Infoprint is an intelligent printer driver that provides AFP capabilities forContent Manager OnDemand servers. These capabilities mean that you can use electronic forms, images,graphics, and typographical fonts in the documents that you print. Infoprint accepts input data streams,such as AFP and S/390® line data, prepares the data for the destination print device, and manages printjobs that are queued for printing, in process, or on the output device.
When a user selects an item and chooses the server print command, Content Manager OnDemandretrieves a copy of the item and places it on the queue (or printer) identified by the server printer. The
Administration concepts 101

data stream can include application print options. Infoprint processes the item and the print options,sending the data to the appropriate physical device. While Infoprint makes no distinction between printand FAX devices, Content Manager OnDemand manages these devices differently. When the user choosesa server printer that identifies a Printer with Information, the user can specify information that ContentManager OnDemand uses to generate a header page that is sent to the printer along with the document.When the user chooses a server printer that identifies a FAX device, Content Manager OnDemandgenerates a FAX cover page and places the cover page and the item on the appropriate queue (or printer).
If your application group contains multiple applications, and your document list contains a documentfrom each of the applications, when you use the server print function to print all of the documents, oneprint request is generated for each document.
Content Manager OnDemand supports two types of server print devices: a FAX machine and a physicalprinter. A server print device can be physically connected to the library server or attached to anotherworkstation on the network. Server print devices are managed by Infoprint.
A server printer names a queue in the AIX® operating system. For AIX servers, the queue must be definedon the library server. The queue must be connected to an Infoprint print queue. For Sun Solaris andWindows servers, in addition to identifying the queue name when you define the printer with theadministrative client, you must also configure the ARSPRT file on Sun Solaris servers or the ARSPRT.BATfile on Windows servers with the TCP/IP host name or TCP/IP address of the workstation on whichInfoprint is running. See IBM Content Manager OnDemand for Multiplatforms: Installation andConfiguration Guide for information about configuring Content Manager OnDemand server printing.
Storage sets and storage nodesA storage set is a named collection of primary storage nodes that support application groups with similarstorage management requirements, such as the length of time that files are maintained in the applicationgroup and the type of media on which the files are stored.
You typically define one or two storage sets for an Content Manager OnDemand system, based on thestorage requirements of the reports that you plan to store in Content Manager OnDemand. For example,you might define one storage set to maintain reports for a period of ten years and another storage set tomaintain reports for a period of 180 days.
A storage set can contain one or more primary storage nodes. A primary storage node identifies an objectserver on which Content Manager OnDemand copies data to cache storage. A storage set can write data toone and only one primary storage node at a time.
When you add an application group to the system, you assign the application group to a storage set. Thestorage set must support the storage requirements of the data that you plan to store in the applicationgroup.
If the data will be stored in archive storage, then the primary storage node must identify a client node instorage that is managed by Tivoli Storage Manager. The client node must be registered in a Tivoli StorageManager policy domain. The policy domain determines the archive storage devices that will hold the dataand how long Tivoli Storage Manager will maintain the data. In addition, the retention period of the files inTivoli Storage Manager must be the same as the life of the data and indexes in Content ManagerOnDemand.
If you use Tivoli Storage Manager to maintain data stored in the system and you need the system tomaintain two copies of reports that are stored in archive storage, IBM recommends that you configure acopy storage pool in Tivoli Storage Manager. See your Tivoli Storage Manager information for assistancewith configuring a copy storage pool.
Application groupsAn application group represents the data that you store in Content Manager OnDemand and thedocuments that you query, view, print, and FAX using Content Manager OnDemand client programs. Forexample, the data can be reports generated by a z/OS application program, index data generated by ACIF,and annotations created by users.
102 Content Manager OnDemand for Multiplatforms: Administration Guide

When you define an application group, you specify properties of the application group, such as theorganization of the database and the storage characteristics for the files that are to be stored in theapplication group. You also define the database fields that will hold index data extracted from the reportsthat you store in the application group.
Content Manager OnDemand extracts index data from the reports that you load into an application groupand places the data in the database fields that you define. Content Manager OnDemand uses the indexvalues to identify the documents that meet the search criteria entered by a user.
When you define an application group, you can also select the types of application group messages thatContent Manager OnDemand saves in the system log.
When you define an application group, you specify permissions that let users access and maintain theapplication group and application group data. You can identify the groups and users that can access datastored in the application group with Content Manager OnDemand client programs. You can specify thetypes of functions that users can perform, such as viewing, printing, and annotating reports. You canassign administrator authority to a user or a group. Administrator authority allows a user to update theapplication group, for example, to authorize other users to access data stored in the application group.
Content Manager OnDemand organizes information about an application group into sections: General,Message Logging, Storage Management, Permissions, Field Definition, Field Information, and AdvancedIndex Information. Each section contains options, fields that you can use to enter information about theapplication group, and command buttons.
ApplicationsYou typically define an application for each different type of report or source of data that you plan to storein Content Manager OnDemand.
When you define an application, you assign the application to an application group and specify thephysical and logical characteristics of the report. The physical characteristics of a report include the codepage, the type of data found in the input file, and information about carriage control characters. Thelogical characteristics of a report include the different ways that you want to present the informationcontained in the report to your users.
The Content Manager OnDemand data indexing, loading, and viewing programs process the report byusing the information that you specify to the application. For example, you can specify the parametersthat the Content Manager OnDemand indexing program uses to locate and extract index data from thereport. You can create logical views for the application. Logical views represent different ways to displaypages of the report. You can set up printing options, such as defining a default printer for users andprinting options for AFP and line data documents.
Content Manager OnDemand organizes information about an application into sections: General, ViewInformation, Indexer Information, Load Information, Logical View Fields, Logical Views, andMiscellaneous Options. Each section contains options, fields that you can use to enter information aboutthe application, and command buttons.
FoldersA folder provides users with the means to access the reports that you store in Content ManagerOnDemand. A user opens a folder to construct a query and search for documents in one or more of theapplication groups that can be accessed from the folder. The user can also view, print, annotate, and e-mail documents from the folder.
When you define a folder, you specify the properties of the folder, such as the name and description of thefolder, create the search and display fields that appear when the user opens the folder, and map thefolder fields to application group database fields.
You can also specify the groups and users that can open the folder with Content Manager OnDemandclient programs and other folder permissions. For example, you can authorize a user to be the folderadministrator. The folder administrator can authorize other users to open the folder and make changes tothe folder fields.
Administration concepts 103

Content Manager OnDemand organizes information about a folder into sections: General, Permissions,Field Definition, Field Information, and Field Mapping. Each section contains options, fields that you canuse to enter information about the folder, and command buttons.
CabinetsA cabinet is a container for folders. You can use cabinets to manage folders and enable users to navigateto folders more easily. A folder can belong to one or more cabinets. The following diagram describes therelationship between two cabinets and five folders. The Monthly Report cabinet contains three folders:Fund balance, Fund transactions, and Fund performance. The Client Report cabinet alsocontains three folders: Fund performance, Bond performance, and Stock performance. The twocabinets share the Fund performance folder. In this example, you can use the Client Reportcabinet to quickly retrieve information about a client's portfolio, and use the Monthly Report cabinet toobtain fund information for internal analysis.
Figure 13: Cabinets and folders
HoldsIn Content Manager OnDemand, documents are stored and retained for a specified period of time. Afterthat specified period of time, the documents are removed from the system. In certain situations, youmight need to keep one or more documents beyond the expiration date by using hold objects. You can putdocuments on hold in several ways:
• Placing a hold on a single document• Placing a hold on a load of documents
You can also add one or more documents to existing hold objects.
About application groups, applications, and foldersBefore you can load a report into the system, you must create an application group and an application.Before users can search for and retrieve data, you must create a folder.
• Users open a folder to search for the reports that you load into the system. You define one or moresearch fields for the folder. A folder search field is mapped to an application group database field.
104 Content Manager OnDemand for Multiplatforms: Administration Guide

• Each database field that you define represents a category of information in the report, such as acustomer name, invoice number, or balance. When you add an application group, Content ManagerOnDemand creates a database table. The database fields that you define are columns in the table.
• You define an application for each report that you plan to store in Content Manager OnDemand. Whenyou add an application to the system, you define information for the Content Manager OnDemandviewing, indexing, and loading programs. When you define indexing information, you identify the name,location, and length of each category of index information that you want to extract from the report.When you define loading information, you map index fields in the report to application group databasefields.
• When you load a report into the system, Content Manager OnDemand stores the index values that areextracted from the report into database fields in records that are added to an application group table.
• Content Manager OnDemand uses the index values to identify the documents that meet the searchcriteria that the user entered into the folder search fields.
When you want to define a report to Content Manager OnDemand, your first task is to identify theapplication group from which Content Manager OnDemand obtains information about the index fields andhow documents are to be maintained on the system. When you define an application group, you specifyhow you want Content Manager OnDemand to structure information in the database and define thedatabase fields. When you define an application group, you also specify how you want Content ManagerOnDemand to maintain data on the system. For example, you might specify that report data should bemaintained in cache storage for 60 days and in archive storage for five years. Content Manager OnDemandmaintains all of the data stored in the application group the same way. Content Manager OnDemandmaintains each report that you store in the application group for the same length of time.
• You can store the report in an existing application group. However, you must be able to index the reportusing the database fields that are already defined in the application group. The storage managementinformation for the application group must support the length of time that you want Content ManagerOnDemand to maintain the report on the system and how and where that you want Content ManagerOnDemand to store and maintain the report data.
You can verify information about an existing application group with the Properties command. TheGeneral page shows the database organization for the application group. The Storage Management pageshows the data caching and migration information. The Field Definition page shows the applicationgroup database fields.
• If there are no application groups defined to Content Manager OnDemand or there are no applicationgroups that support the database and storage management requirements of the report, then you mustadd an application group to the system.
After you add an application group, you must define an application for the report. Most customers create aContent Manager OnDemand application for each different type of report or source of data that they planto store in Content Manager OnDemand. When you create an application, you must assign it to anapplication group. The application group determines where Content Manager OnDemand will store thereport data. When you create an application, you also specify information that the Content ManagerOnDemand client programs use to view and print pages of the report and you specify instructions for thedata indexing and loading programs.
The last step in the process of adding a report to Content Manager OnDemand is to create a folder. Usersopen the folder to search for, display, and print reports. When you define a folder, you select theapplication group that contains the data that you want users to search when they open the folder. Bycreating folders that can search specific application groups, you can determine the reports that areavailable to users when they open a folder.
When you define a folder, you define search and display fields. You specify characteristics of the folderfields, such as default search operators and whether Content Manager OnDemand displays default searchvalues for the fields when a user opens the folder. You also map the folder fields to application groupdatabase fields.
Administration concepts 105

Content Manager OnDemand permissionsPermissions are the means by which Content Manager OnDemand determines who can open folders andsearch for documents stored in application groups. Content Manager OnDemand also uses permissions todetermine who can maintain folders, application groups, and other objects with the administrative client.
By default, only the person that adds the folder, an application group/folder/cabinet administrator, or asystem administrator can open and maintain the folder. By default, only the person that adds theapplication group, an application group/folder/cabinet administrator, or a system administrator canaccess data stored in the application group or maintain the application group.
Content Manager OnDemand provides several ways for you to specify permissions. You can specifypermissions when you add or update a folder or an application group. You can also add, remove, or updatea user's or group's folder or application group permissions when you add or update the user or group.
As both a convenience and security measure, you can assign a user to a group. Content ManagerOnDemand groups allow you to organize users by function, authorization, or any other logical groupingthat you might require. When you assign a user to a group, the user obtains the permissions that are ineffect for the group. For example, suppose that you create a group and authorize the group to open theStudent Information folder. Any user that you assign to the group automatically obtains permission toopen the Student Information folder. If you assign a user to more than one group, the user normallyobtains the permissions of all of the groups. However, there are exceptions. See “Specifying permissions”on page 107 for details.
You can specify a default set of permissions for folders and application groups. Content ManagerOnDemand uses the default permissions when users and groups do not have specific permissions for thefolder or application group. If you specify permissions for a group, then the group permissions takeprecedence over the default permissions. If you specify permissions for a user, then the user permissionstake precedence, regardless of any group that the user may belong to or the default permissions that youspecified.
Folder permissionsYou can specify default folder permissions and folder permissions for specific groups and users. Thedefault permissions provide every user and group defined to the library server with the permissions thatyou specify. Permissions for a group provide the users that you add to the group with the permissions thatyou specify for the group. Permissions for a user provide the user with the permissions that you specify.By default, only the person that adds the folder, an application group/folder/cabinet administrator, or asystem administrator can open the folder or maintain the folder.
You can specify the following types of folder permissions:Authority
Determines the types of folder functions that users can perform. For example, Access lets users openthe folder with Content Manager OnDemand client programs. To search for and retrieve data from theapplication groups referenced by the folder, the user must be given access permission to theapplication groups.
Named QueriesA named query is a set of search criteria, saved by name, that can be selected and restored into foldersearch fields. Content Manager OnDemand supports two types of named queries: public and private.A public named query is available to any user that can access the folder. A private named query isavailable to the user that created the named query. A system administrator or application group/folder/cabinet administrator can also access private named queries. A user can be given authority toview, create, modify, and delete named queries.
User/Group FieldsLets users open the folder with Content Manager OnDemand client programs and modify the folderfield information with the administrative client.
106 Content Manager OnDemand for Multiplatforms: Administration Guide

Maximum HitsDetermines the maximum number of documents that Content Manager OnDemand displays in thedocument list, regardless of the number that match the query. By default, Content ManagerOnDemand lists all of the documents that match the query. The Content Manager OnDemand CICSclient program lists a maximum of 200 documents that match a query, regardless of the number thatmatch a query or the value that you specify.
Secondary FolderUse to mark the folder as a secondary folder. When a user logs on to a server, the client lists theprimary folders that a user can open. A user can list all of the folders that they can open, includingthose marked as secondary, by choosing the All Folders option from the Open a Folder dialog box.
Full Report BrowseUse to allow a user of the Content Manager OnDemand client to select a document, retrieve thatdocument, and view the entire report (load) to which the document belongs.
Application group permissionsYou can specify default application group permissions and application group permissions for specificgroups and users. The default permissions provide every user and group defined to the library server withthe permissions that you specify. Permissions for a group provide the users that you add to the group withthe permissions that you specify for the group. Permissions for a user provide the user with thepermissions that you specify. By default, only the person that adds the application group, an applicationgroup/folder/cabinet administrator, or a system administrator can access data stored in the applicationgroup or maintain the application group.
You can specify the following types of application group permissions:Authority
Determines the types of application group functions that users can perform. For example, Access letsusers search for and retrieve data stored in the application group using Content Manager OnDemandclient programs.
DocumentFor users that can access the application group, determines the types of document functions thatusers can perform.
AnnotationFor users that can access the application group, determines the types of annotation functions thatusers can perform.
Query RestrictionLimits access to application group data. You typically set up a query restriction to limit the data that aspecific user or group of users can access.
Specifying permissions
About this task
To ease the administration of Content Manager OnDemand, most customers organize their users intogroups, add the groups to folders and application groups, and specify permissions for the groups. Youshould plan your groups before you begin creating them. After you start using the system, you may find itdifficult to change the organization of your groups.
When you add a user to a group, the user automatically obtains the permissions that were specified forthe group. When you add a user to more than one group, the user normally obtains the permissions of allof the groups. For example, using the group properties listed in Table 8 on page 107, a user that belongsto both groups can open the Student Bills and Student Transcripts folders.
Table 8: Group permissions
Group GID Folders Permission
Admissions 1080100 Student Transcripts Access
Administration concepts 107

Table 8: Group permissions (continued)
Group GID Folders Permission
Accounting 1080101 Student Bills Access
Most situations involve adding a group to a folder, specifying permissions for the group, and then addingusers to the group. However, there may be situations when you need to deny a group of users access to afolder. When you use groups to deny access to a folder, you must understand how Content ManagerOnDemand determines folder permissions for a group (and users assigned to the group). For example,consider the group properties listed in Table 9 on page 108.
Table 9: Group permissions
Group GID Folders Permission
Admissions 1080100 Student Bills None
Admissions 1080100 Student Transcripts Access
Accounting 1080101 Student Bills Access
Accounting 1080101 Student Transcripts Access
A user that belongs to both groups can not open the Student Bills folder.
When a user belongs to more than one group, Content Manager OnDemand uses the group identifier (GID)to determine the user's permissions. When two (or more) groups provide permissions for the same folder,the user obtains the permissions of the group with the lowest GID. In the example depicted in Table 9 onpage 108, both groups have been added to the Student Bills folder. Since the Admissions group has alower GID than the Accounting group, Content Manager OnDemand uses the permissions specified for theAdmissions group to determine the permissions of a user that is assigned to both groups. Consequently,users assigned to both groups cannot access the Student Bills folder.
You're probably asking yourself, "why would I assign a user to more than one group" or "why would Icreate a group with no access to a folder?" Perhaps some examples will help answer these questions (andclarify the Content Manager OnDemand permission hierarchy). As you review the examples, pleaseremember the following rules:
• By default, the person that created the folder, a system administrator, and an application group/folder/cabinet administrator can access the folder
• You can use the *PUBLIC name to specify default permissions for all other users• You can specify permissions for specific groups and users:
– All of the users that belong to a group that you add to a folder will obtain the permissions that youspecify for the group
– A user that belongs to two (or more) groups that have been added to the same folder will obtain thepermissions of the group that has the lowest GID
– The permissions that you specify for a user override all other permissions, including any defaultpermissions (*PUBLIC) and any groups to which the user belongs and that are added to the folder
Examples
The examples that follow show how to add groups to folders and specify folder permissions. The sameconsiderations hold true for adding groups to application groups and specifying application grouppermissions.
Providing a group of users access to a folder
Let's say that you want to provide a single group of users access to a folder. Complete the following steps:
1. With *PUBLIC selected, clear all of the permissions check boxes (this is the default).
108 Content Manager OnDemand for Multiplatforms: Administration Guide

2. Add the group to the folder.3. Select the Access check box.
Users assigned to the group automatically obtain permission to open the folder.
Denying a group of users access to a folder
Let's say that you want to prohibit a single group of users from accessing a folder, while allowing all otherusers defined to the library server to open the folder. Complete the following steps:
1. With *PUBLIC selected, select the Access check box (this lets all users open the folder).2. Add the group to the folder.3. Clear all of the permissions check boxes.
Users assigned to the group cannot open the folder.
Providing one group of users access and denying another group of users access to the same folder
Let's say that you want to allow a group of users to access a folder. However, you need to prohibit certainusers in the group from accessing the folder. You could exclude the users from the group that can accessthe folder. However, there may be other folders that you want the users to access as part of the group. Tosolve this, create two groups, one without access to the folder and the other with access to the folder, andassign the users to the respective groups. For example:
1. Create the "no access" group. This group must have a lower GID than the "access" group. Add users tothe group.
2. Create the "access" group. Add users to the group.3. With *PUBLIC selected, clear all of the permissions check boxes (this is the default).4. Add the "access" group to the folder.5. Select the Access check box.6. Add the "no access" group to the folder.7. Clear all of the permissions check boxes.
If you later need to deny other users access to the folder, simply add the users to the "no access" group.You can also move users from one group to the other.
Denying one user in a group access to a folder
Assume that you want to prohibit one user in a group from accessing a folder. After adding the group tothe folder and specifying the access permission, all users assigned to the group can open the folder. Tooverride the group permissions, add an individual user to the folder and set permissions at the user level.Complete the following steps.
1. With *PUBLIC selected, clear all of the permissions check boxes (this is the default).2. Add the group to the folder.3. Select the Access check box.4. Add the user to the folder.5. Clear all of the permissions check boxes.
Even though the user belongs to the group, the user cannot open the folder.
Providing one user in a group administrator authority
Let's say that you want to provide one user in a group the ability to administer the folder. Complete thefollowing steps.
1. With *PUBLIC selected, clear all of the permissions check boxes (this is the default).2. Add the group to the folder.
Administration concepts 109

3. Select the Access check box.4. Add the user to the folder.5. Select the Administrator check box.
Only the user that you added can administer the folder; the other users in the group can open the folder.
Specifying default permissions
The default permissions that you specify for an application group or a folder will apply to every user orgroup defined to the library server who is not provided with specific permissions.
For example, suppose that you specify Access as the default permission for an application group. Everyuser and group that is not provided with specific permissions can access the data that is stored in theapplication group. Then, you specify Access as the default permission for a folder. Every user and groupthat is not provided with specific permissions can open the folder. Later, you add a user, withoutspecifying application group or folder permissions. The user can open the folder and access the datastored in the application group.
While default permissions do provide flexibility to maintain your system, you must make sure that usingthe default permissions does not circumvent your security strategy. Rather than specifying defaultpermissions for application groups and folders, you may want to use groups as a means to implementyour security strategy. For example, you can clear all of the permissions under *PUBLIC and then addgroups to a folder and specify the appropriate permissions for each group. When you add a user to thesystem, you can assign the user to a group. The user automatically obtains the permissions of the group.If the group does not have access to a particular application group or folder, then neither does the user.With this strategy, until you assign the user to a group, or provide the user with specific permissions, theuser cannot access the folder.
110 Content Manager OnDemand for Multiplatforms: Administration Guide

Chapter 17. Advanced system administration
OverviewApplications, application groups, folders, printers, storage sets, and cabinets are the objects thatrepresent how Content Manager OnDemand stores, manages, prints, retrieves, and views reports andindex data. Controlling and limiting access to the reports and index data is accomplished by defining usersand groups and giving them the level of authority that is required to meet the data security strategy of anorganization.
User typesContent Manager OnDemand provides the ability to centralize or decentralize the administration of thesystem. Content Manager OnDemand also provides the flexibility to control access to objects fromdifferent levels. The most basic level of control is how the user is defined to the system. When a user isadded, a user type is specified. Each user type has a different level of authority:System Administrator
A system administrator has the highest level of authority on the system. A system administrator canperform all tasks on all of the objects that are defined to a Content Manager OnDemand system. Theobjects are users, groups, applications, application groups, folders, printers, storage sets, andcabinets. The tasks are add, update, delete, copy, export, create a summary, and view properties. Asystem administrator also has the authority to modify the system parameters.
System Administrator (Read-Only)A read-only system administrator can log on to the OnDemand Administrator client and the ARSXMLbatch administration program with read-only access to all Content Manager OnDemand objects. In theOnDemand Administrator client, objects can be viewed and summarized. Add, Update, Delete, Copy,and Export options are not available; Trace Parameters and System Parameters can be viewed but notupdated. With ARSXML, all objects can be exported, including Trace Parameters and SystemParameters.
Application Group/Folder/Cabinet administratorAn application group/folder/cabinet administrator has the authority to perform all tasks on all of theapplications, application groups, folders, and cabinets that are defined to a Content ManagerOnDemand system. The tasks are add, update, delete, copy, export, create a summary, and viewproperties.
Hold AdministratorA user that can add, update, delete, or view hold objects.
User AdministratorA user administrator has the authority to perform all tasks on all of the users that are defined to aContent Manager OnDemand system. The tasks are add, update, delete, copy, export, create asummary, and view properties. Note: A user administrator cannot create or delete a systemadministrator or an application group/folder/cabinet administrator or change the user type of asystem administrator or an application group/folder/cabinet administrator.
UserA user has the lowest level of authority on the system. A user does not have access to any object onthe system and therefore, cannot perform any tasks. The user must be given the authority to accessan object and to perform a task on the object.
© Copyright IBM Corp. 1993, 2018 111

AuthorityA user's authority can be extended beyond the authority that is built into the user type of the user.Depending on the user type, up to six additional levels of authority can be given:Create Users
An application group/folder/cabinet administrator or a user can be given the authority to add users tothe system. By default, when a user is added to the system, the user that performs the add taskautomatically has the authority to perform all other tasks on the user. The tasks are update, delete,create a summary, and view properties. When a user is added, the system automatically gives the userwith Create Users authority the permission to access and administer the newly created user. (See“Permissions” on page 114 for information about permissions at the user level.) If the permissionsare later taken away, then the user with Create Users authority no longer has access to the user or theauthority to administer the user.
A user with Create Users authority is similar to a user administrator in that both can create users.However, they differ because a user with Create Users authority can access and administer only theusers that they create, so long as their access and administrator authority is not taken away. Note: Auser with Create Users authority cannot create or delete a system administrator, an application group/folder/cabinet administrator, or a user administrator or change the user type of a systemadministrator, an application group/folder/cabinet administrator, or a user administrator.
A user with Create Users authority also has the authority to perform copy and export tasks on a userbecause both tasks add a user. An export task involves two userids: one on the server where the userexists and one on the server where the user will be added. The userid on the server where the userwill be added must have the authority to add a user.
Create GroupsA user administrator, an application group/folder/cabinet administrator, or a user can be given theauthority to add groups to the system. The only other type of user that can add groups is a systemadministrator
By default, when a group is added to the system, the user with Create Groups authority is designatedas the group owner. The group owner has the authority to perform all other tasks on the group. Thetasks are update, delete, create a summary, and view properties. If the owner is changed to a differentuser or group, then the system automatically takes the authority to perform tasks on the group awayfrom the user that originally created the group.
In general, a user has access to a group if the user is a system administrator, the owner of the group, amember of the group that has been designated as the owner, or a member of the group.
A user with Create Groups authority also has the authority to perform copy and export tasks on agroup because both tasks add a group. An export task involves two userids: one on the server wherethe group exists and one on the server where the group will be added. The userid on the server wherethe group will be added must have the authority to add a group.
Create Application GroupsA user administrator or a user can be given the authority to add application groups to the system. Bydefault, when an application group is added to the system, the user that performs the add taskautomatically has the authority to perform all other tasks on the application group. The tasks areupdate, delete, create a summary, and view properties. When the application group is added, thesystem automatically gives the user with Create Application Groups authority the permission toaccess and administer the newly created application group. (See “Permissions” on page 114 forinformation about permissions at the application group level.) If the permissions are later taken away,then the user with Create Application Groups authority no longer has access to the application groupor the authority to administer the application group.
A user with Create Application Groups authority is similar to an application group/folder/cabinetadministrator in that both can create application groups. However, they differ because a user withCreate Application Groups authority can access and administer only those application groups thatthey create, so long as their access and administrator authority is not taken away. An application
112 Content Manager OnDemand for Multiplatforms: Administration Guide

group/folder/cabinet administrator can access and administer all of the application groups that aredefined to the system.
Because applications are considered by Content Manager OnDemand to be part of an applicationgroup, the permissions for accessing and administering applications are defined by the permission forthe application group. For this reason too, a user with Create Application Groups authority can alsocreate applications for the application group.
A user with Create Application Groups authority also has the authority to perform copy and exporttasks on an application group because both tasks add an application group. An export operationinvolves two userids: one on the server where the application group exists and one on the serverwhere the application group will be added. The userid on the server where the application group willbe added must have the authority to add an application group.
Create FoldersA user administrator or a user can be given the authority to add folders to the system. By default,when a folder is added to the system, the user that performs the add task automatically has theauthority to perform all of the other tasks on the folder. The tasks are update, delete, create asummary, and view properties. When a folder is added, the system automatically gives the user withCreate Folders authority the permission to access and administer the newly created folder. (See“Permissions” on page 114 for information about permissions at the folder level.) If the permissionsare later taken away, then the user with Create Folders authority no longer has access to the folder orthe authority to administer the folder.
A user with Create Folders authority is similar to an application group/folder/cabinet administrator inthat both can create folders. However, they differ because a user with Create Folders authority canaccess and administer only the folders that they create, so long as their access and administratorauthority is not taken away. An application group/folder/cabinet administrator can access andadminister all of the folders that are defined to the system.
A user with Create Folders authority also has the authority to perform copy and export tasks on afolder because both tasks add a folder. An export task involves two userids: one on the server wherethe folder exists and one on the server where the folder will be added. The userid on the server wherethe folder will be added must have the authority to add a folder.
Create CabinetsA user administrator or a user can be given the authority to add cabinets to the system. By default,when a cabinet is added to the system, the user that performs the add task automatically has theauthority to perform all of the other tasks on the cabinet. The tasks are update, delete, create asummary, and view properties. When a cabinet is added, the system automatically gives the user withCreate Cabinets authority the permission to access and administer the newly created cabinet. (See“Permissions” on page 114 for information about permissions at the cabinet level.) If the permissionsare later taken away, then the user with Create Cabinets authority no longer has access to the cabinetor the authority to administer the cabinet.
A user with Create Cabinets authority is similar to an application group/cabinet administrator in thatboth can create cabinets. However, they differ because a user with Create Cabinets authority canaccess and administer only the cabinets that they create, so long as their access and administratorauthority is not taken away. An application group/cabinet administrator can access and administer allof the cabinets that are defined to the system.
A user with Create Cabinets authority also has the authority to perform copy and export tasks on acabinet because both tasks add a cabinet. An export task involves two user IDs: one on the serverwhere the cabinet exists and one on the server where the cabinet will be added. The user ID on theserver where the cabinet will be added must have the authority to add a cabinet.
Create HoldsA user administrator or a user can be given the authority to add holds to the system. By default, whena hold is added to the system, the user that performs the add task automatically has the authority toperform all of the other tasks on the hold. The tasks are update, delete, create a summary, and viewproperties. When a hold is added, the system automatically gives the user with Create Holds authoritythe permission to access and administer the newly created hold. (See “Permissions” on page 114 for
Advanced system administration 113

information about permissions at the hold level.) If the permissions are later taken away, then theuser with Create Holds authority no longer has access to the hold or the authority to administer thehold.
A user with Create Holds authority also has the authority to perform copy and export tasks on a holdbecause both tasks add a hold. An export task involves two user IDs: one on the server where the holdexists and one on the server where the hold will be added. The user ID on the server where the holdwill be added must have the authority to add a hold.
PermissionsAccess and control of users, groups, applications, application groups, folders, printers, and storage setscan be given at various levels. In “User types” on page 111, the level of control was determined by theuser type of the user. In this section, a different level of control is described. Permissions on an object canbe set from the Permissions page of the object. The following topics describe the objects and thepermissions that can be set.
UsersA user can be given the authority to view documents that have been archived. A user can also be given theauthority to perform administrative tasks on the system. A user can retrieve a list of users from the serverwith the administrative client. The list contains the users that the user has the authority to access. If theuser is a system administrator or a user administrator, then the user also has the authority to administerany user in the list.
Access authority means the user can see the user in any list that contains users and can print or view theproperties of the user. Access authority can be given to an individual user or to a group.
Access authority is especially helpful to application group/folder/cabinet administrators, because theycan give any user in the list access to application groups and folders. This is also true for group owners;access authority allows them to add users to the groups that they own.
Administrator authority of a user can be given to another user or to a group. Having administratorauthority for a user means that the user or group given the authority can delete or update the user.
GroupsGroups can be created by a system administrator or a user that has Create Groups authority. Updating ordeleting a group can be performed by a system administrator or the group owner. A group owner can be auser or another group. Allowing the group owner to be another group provides the ability to allow multipleusers to administer the group.
To see a group in a list, a user must be a member of the group, the owner of the group, or a systemadministrator. For example, an application group/folder/cabinet administrator can give groups access toapplication groups and folders. However, the application group/folder/cabinet administrator must be ableto see the groups in the list on the Permissions page of the application group, folder, or cabinet. Thismeans that the application group/folder/cabinet administrator must be a member of any group thatrequires access authority to an application group or a folder.
A system administrator, a group owner, or a member of the group can view the properties of the group andcreate a summary.
ApplicationsBecause applications are considered by Content Manager OnDemand to be part of an application group,the permissions for accessing and administering applications are defined by the permission for theapplication group. (See “Application Groups” on page 115.)
114 Content Manager OnDemand for Multiplatforms: Administration Guide

Application GroupsApplication Groups can be created by system administrators, application group/folder/cabinetadministrators, and users with Create Application Groups authority. After an application group is created,only a system administrator, an application group/folder/cabinet administrator, a user with administratorauthority for the application group, or a member of a group that has administrator authority for theapplication group can update or delete the application group. When a user with Create Application Groupsauthority creates an application group, the system automatically gives the user the authority to administerthe application group. The user can update or delete the application group, so long as the administratorauthority is not taken away.
To allow other users to see an application group in a list with the administrative client or to search fordocuments with the end-user client, the users must be given access authority to the application group. Auser with access authority can also print or view the properties of the application group. Access is givenon the Permissions page of an application group. There are three ways to give a user access to anapplication group:
1. Add the user's userid to the access list.2. Add the name of a group to which the user belongs to the access list. The user and all of the other
members of the group will have access to the application group.3. Set the access permission for the reserved name *PUBLIC. All users on the system will have access to
the application group. (The *PUBLIC name is used to set permissions for all users on the system.)
The levels of authority within the application group have a precedence order in which the permissions areenforced. The permissions that have been set for a user take precedence over any permissions that havebeen set for any groups that the user may belong to. User permissions also take precedence overpermissions that have been set using the *PUBLIC name.
A user can also be given the authority to save a specific set of viewing attributes such as zoom,background color, and so forth. The viewing attributes can be used when a document is viewed with theend-user client. The set of viewing attributes, called a logical view, is accessible only to the user thatcreated the logical view.
Document and Annotation permissions can also be set for users by using the *PUBLIC name, groupnames, and userids. Document permissions include add, delete, update, view, copy, print, and FAX.Annotation permissions include add, delete, update, view, and copy.
Adding fields to an existing application group
To add fields to an application group, do the following tasks:
1. Identify the tables that will be affected by the addition of the field or fields. You will need to know thenames of the tables to be able to run the REORG utilities at the end of these instructions.
2. Choose a time to make this change that follows these requirements:
• The Content Manager OnDemand server is not loading data to the application group.• You have enough time to run the REORG utility against all the tables affected by this change.
3. Start the administrative client, then add the fields.4. After you click on OK to save your changes, the Content Manager OnDemand server updates all the
existing data tables and supplies the default values for the fields. After the Content ManagerOnDemand server completes the update, the server returns control of the administrative client to you.
5. Run the REORG utility on the tables you identified in step 1. After the utility completes the update, itdisplays a message indicating success or failure.
FoldersFolders can be created by system administrators, application group/folder/cabinet administrators, andusers with Create Folders authority. After a folder is created, only a system administrator, an applicationgroup/folder/cabinet administrator, a user with administrator authority for the folder, or a member of agroup that has administrator authority for the folder can update or delete the folder. When a user with
Advanced system administration 115

Create Folders authority creates a folder, the system automatically gives the user the authority toadminister the folder. The user can update or delete the folder, so long as the administrator authority isnot taken away.
To allow other users to see a folder in a list with the administrative client or to open a folder with the end-user client, the users must be given access authority to the folder. A user with access authority can alsoprint or view the properties of the folder. Access is given on the Permissions page of a folder. There arethree ways to give a user access to a folder:
1. Add the user's userid to the access list.2. Add the name of a group to which the user belongs to the access list. The user and all of the other
members of the group will have access to the folder.3. Set the access permission for the reserved name *PUBLIC. All users on the system will have access to
the folder. (The *PUBLIC name is used to set permissions for all users on the system.)
The levels of authority within the folder have a precedence order in which the permissions are enforced.The permissions that have been set for a user take precedence over any permissions that have been setfor any groups that the user may belong to. The user permissions also take precedence over permissionsthat have been set using the *PUBLIC name.
In addition to allowing a user to access or administer a folder, a user can also be given the authority tocustomize the appearance of the folder search and display fields with the administrative client. Theauthority can be given to a specific user or to a group. If the authority is given to a group, then anymember of the group has the authority to customize the appearance of the search and display fields. Onlythe authorized user or members of the group see the customized search and display fields with the end-user client. All other users will see the search and display fields that have been defined using the *PUBLICname in the folder.
A user can also be given the authority to save a specific set of search criteria when using the end-userclient. The user can restore the set of search criteria when needed, into the search fields of a folder. Theset of search criteria, called a named query, can be made available to all of the users that have access tothe folder (a public named query) or it can be made available only to the user that created the namedquery (a private named query). When giving Named Query authority to a user, the user can be given theauthority to view named queries, but not create them; the user can also be given the authority to createpublic named queries, private named queries, or both. A user can get Named Query authority from agroup, if the group has been given Named Query authority for the folder.
Storage setsAny user on the system can view the properties of a storage set and create a summary. However, only asystem administrator can add, delete, update, copy, or export a storage set.
PrintersPrinters are maintained by system administrators. Only a system administrator can add, delete, update,copy, or export a printer. By default, only system administrators can see printers in a list and therefore,only a system administrator can view the properties of a printer or create a summary. However, it isalmost always necessary for other users to have access to printers. For this reason, a user or group can begiven access to a particular printer. A printer's access list is maintained on the Permissions page underprinters, by using the administrative client. Access to a printer can be given to all users and groupsdefined to the system, individual groups, and individual users.
Limiting access to printers provides the ability to control which printers can be used to print archiveddocuments by Content Manager OnDemand users. For example, suppose that there is a printer in thecustomer service department. Only people in the customer service department should be permitted toprint on the printer. You can accomplish this by creating a Content Manager OnDemand group thatcontains only the department members and giving only that group access to the printer.
116 Content Manager OnDemand for Multiplatforms: Administration Guide

CabinetsYou must have Create Cabinets authority, or be an application group/folder/cabinet administrator orsystem administrator to work with a cabinet.
If you have the appropriate permission, you can add, update, delete, copy, export, summarize, find,explore, or view the properties of a cabinet.
You can also give a user one of the following two types of authority:Access
Access authority enables the user to see the cabinet in a list of cabinets and view the contents of thecabinet.
AdministratorAdministrator authority enables the user to update and delete the cabinet in addition to the authoritythat is provided by Access.
HoldsYou must have Create Holds authority, or be a hold administrator or system administrator to work with ahold.
If you have the appropriate permission, you can add, update, delete, copy, export, summarize, find,explore, or view the properties of a hold.
You can also give a user one of the following two types of authority:Access
Access authority enables the user to see the hold in a list of holds and view the contents of the hold.Administrator
Administrator authority enables the user to update and delete the hold in addition to the authoritythat is provided by Access.
System administrationContent Manager OnDemand provides the ability to centralize or decentralize the administration of thesystem. A centralized environment means that one type of user, a system administrator, controls thecreation and access to all of the objects defined on the system. A decentralized environment means thatthe tasks of the system administrator are divided and assigned to other users. The responsibilities of theother users may vary from user administration, group administration, application group administration,folder administration, or any combination of the administrative tasks.
The decision to centralize or decentralize the administration of the system should be made before objectsare added to the system. While the decision is reversible, the amount of work required to change from onetype of administration to the other can be significant if a large number of users, groups, folders, andapplication groups have already been added.
There are many ways to decentralize the administration of the system, because of the various user typesand the additional authority levels that can be specified for users. Two specific models will be discussedin this section: the Object Type model and the Object Owner model.
• In the Object Type model, all of the objects on the system are logically grouped into administrativedomains according to the type of the object. The administrator of a domain maintains all of the objectswithin the domain. For example, an application group/folder/cabinet administrator maintains all of theapplication, application group, folder, and cabinet objects on the system.
• In the Object Owner model, the objects on the system are logically grouped into administrative domainsaccording to the creator/owner of the object. An administrator maintains only the objects that theycreate. For example, a user with create application groups and create folders authority can maintainonly the applications, application groups, and folders that they created. The Object Owner model can beused to separate the objects on the system into logical parts, such as a department, a company, orsome other entity. Each part is independent of the other and should be maintained separately. Each part
Advanced system administration 117

typically requires two administrative users. One user has the responsibility for creating and maintainingusers and groups. The other user has the responsibility for creating and maintaining applications,application groups, and folders. However, you can also define one user with the authority to create andmaintain users, groups, applications, application groups, and folders. In effect, the one user would bethe system administrator for a logical part of the system.
Object Type modelIn the Object Type model, the system administrator defines two new users. One user is responsible foradministering applications, application groups, and folders and is defined as an application group/folder/cabinet administrator. The second user is responsible for administering users and groups and is definedas a user administrator with Create Groups authority. Table 10 on page 118 shows the administrativeusers and the tasks assigned to the users.
Table 10: Administrator Roles in the Object Type Model
User Type Tasks
System Administrator Create an application group/folder/cabinetadministratorCreate a user administrator with Create GroupsauthorityCreate and maintain storage setsCreate and maintain system printersCreate and maintain cabinets
User Administrator with Create Groups authority Create and maintain usersCreate and maintain groups
Application Group/Folder/Cabinet Administrator Create and maintain application groupsCreate and maintain applicationsCreate and maintain foldersCreate and maintain cabinets
When maintaining application groups and folders, the application group/folder/cabinet administratormust give other users access to the application groups, folders, and cabinets. The recommended andsimplest way to do this task is to give access to a group, rather than to individual users. No additionalwork is required by the application group/folder/cabinet administrator when another user needs access tothe application group, folder, or cabinet. When a new user is added to the group, the user automaticallygets access to the application group, folder, or cabinet. Adding the user to the group is the responsibilityof the user administrator since the user administrator owns all of the groups in this model.
Another reason for giving groups rather than individual users access to application groups and folders isthat the application group/folder/cabinet administrator does not have access to the users and groups inthis model. Because the application group/folder/cabinet administrator must first be given access to anyusers or groups that require access to application groups, folders, or cabinets, it is simpler and less timeconsuming to give access to a few groups rather than hundreds or even thousands of users. Theapplication group/folder/cabinet administrator is given access to a group by adding the application group/folder/cabinet administrator to the group. This task is done by the user administrator with Create Groupsauthority. As a group member, the application group/folder/cabinet administrator will be able to see thegroup in the list and will therefore be able to give the group access to any application groups and folderson the system.
To give an application group/folder/cabinet administrator access to a user, the user administrator withCreate Groups authority must update each user and give the application group/folder/cabinetadministrator access to the user. Once access has been given, the application group/folder/cabinetadministrator will be able to see the user in the list and will therefore be able to grant the user access to
118 Content Manager OnDemand for Multiplatforms: Administration Guide

any application groups, folders, and cabinets on the system. Again, this is not the recommended approachbecause this task will have to be repeated each time that a user is added to the system.
Object Owner modelIn the Object Owner model, the system administrator defines two users for each logical part of thesystem. One user is responsible for maintaining the users and groups for a logical part of the system. Theother user is responsible for maintaining the applications, application groups, folders, and cabinets for alogical part of the system. The Object Owner model allows you to store data from several sources on oneContent Manager OnDemand system and let only one set of users access each set of data. Table 11 onpage 119 shows the administrative users and the tasks assigned to the users.
Table 11: Administrator Roles in the Object Owner Model
User Type Tasks
System Administrator Create a user with Create Users and CreateGroups authorityCreate a user with Create Application Groupsand Create Folders authorityCreate and maintain storage setsCreate and maintain system printers
User with Create Users and Create Groupsauthority
Create and maintain usersCreate and maintain groups
User with Create Application Groups, CreateFolders, and Create Cabinets authority
Create and maintain application groupsCreate and maintain applicationsCreate and maintain foldersCreate and maintain cabinets
In addition to the tasks listed in Table 11 on page 119 under System Administrator, it is also necessary forthe system administrator to give the user with Create Users and Groups authority access to the user withCreate Application Groups, Create Folders, and Create Cabinets authority. Otherwise, the user thatcreates groups will not be able to add the user that creates application groups, folders, and cabinets toany groups. To simplify the explanation that follows, the user with Create Users and Groups authority willbe called the user administrator and the user with Create Application Groups and Folders authority will becalled the application group/folder/cabinet administrator.
When maintaining application groups folders, and cabinets, the application group/folder/cabinetadministrator must give access to application groups, folders, and cabinets to other users on the system.The recommended and simplest way to do this task is to give access to a group, rather than to individualusers. No additional work is required by the application group/folder/cabinet administrator when anotheruser needs access to the application group, folder, or cabinet. When a new user is added to the group, theuser automatically gets access to the application group, folder, or cabinet. Adding the user to the group isthe responsibility of the user administrator since the user administrator owns the groups in this model.
Another reason for providing access to application groups, folders, and cabinets from a group rather thanto an individual user is that the application group/folder/cabinet administrator does not have access tothe users and groups in this model. Since the application group/folder/cabinet administrator must first begiven access to any users or groups that require access to application groups, folders, or cabinets, it issimpler and less time consuming to give access to a few groups rather than hundreds or even thousandsof users. The application group/folder/cabinet administrator is given access to a group by adding theapplication group/folder/cabinet administrator to the group. This is done by the user administrator in thismodel. As a group member, the application group/folder/cabinet administrator will be able to see thegroup in the list and will therefore be able to grant the group access to the application groups, folders, andcabinets that have been defined by the application group/folder/cabinet administrator in this model.
Advanced system administration 119
To give an application group/folder/cabinet administrator access to a user, the user administrator mustupdate each user and give the application group/folder/cabinet administrator access to the user. Onceaccess has been given, the application group/folder/cabinet administrator will be able to see the user inthe list and will therefore be able to grant the user access to the application groups, folders, and cabinets.Again, this is not the recommended approach because this task will have to be repeated each time that auser is added to the system.
To illustrate how the Object Owner model can be used, assume that a company installs a ContentManager OnDemand system to provide data archival and retrieval services for other organizations. Thecompany provides the hardware and software required to administer the system and archive and retrievethe data. An administrator from each organization defines application groups and folders for their data.Another administrator defines the users that can access the data. The system must be able to limit accessto an organization's application groups and folders. Only users defined by an organization should haveaccess to the application groups and folders that are owned by the organization. The system must also beable to limit access to the data. Only users defined by an organization should have access to the data thatis owned by the organization. By using the Object Owner model, both requirements can be met.
SummaryThere can be many different variations of the two models that have been described. For example, in theObject Owner model, rather than one user administering both application groups and folders, one usercan be defined to administer application groups and another user can be defined to administer folders.Choosing the right model or variation is an important decision that should be made early in the planningprocess. Changing to a different model later is not impossible but may require additional work if there area large number of objects defined on the system.
Helpful hints1. To simplify the task of providing access to application groups, folders, and cabinets, give access to a
group rather than a user. When a new user needs access, add the user to the group.2. To allow an application group/folder/cabinet administrator to see groups in the permissions list, add
the application group/folder/cabinet administrator to the groups that require access to applicationgroups, folders, and cabinets.
3. To allow multiple users to administer the same groups, create a group of users and make that groupthe group owner for any groups that need to be administered by multiple users.
4. The Create Groups authority is most effectively used if it is combined with the Create Users authorityor added to a user administrator. Because the purpose of a group is to give a set of users permissionsto another object, it is not very useful if the user that creates the group does not have access to anyusers. Otherwise, the user that creates a group must be given access to each user that needs to beadded to the group.
120 Content Manager OnDemand for Multiplatforms: Administration Guide

Chapter 18. Document constructorThe document constructor is a plug-in that retrieves documents or document components from arepository and returns them to the Content Manager OnDemand server for further processing. Forexample, the document constructor can retrieve a document from DB2 and return it to the ContentManager OnDemand server.
Using the document constructor to submit documents to Content Manager OnDemand can be moreefficient than sending entire documents to the client API, especially when preprocessing threads aredistributed across multiple computers. In addition, the constructor API supports additional use casessuch as combining multiple document components (possibly binary) into a single XML file by eitherconcatenating them or as separate textual fields.
For example, the constructor can perform the following actions:
1. Retrieve body text and attachments from an email in DB2 or Content Manager OnDemand.2. Extract the text by using the text filter that is provided with Content Manager OnDemand.3. Compose an XML file that contains the email body and attachment text.4. Return the XML file to the Content Manager OnDemand server for further processing.
Implementation and configurationThe document constructor is implemented as an SPI (Service Provider Interface) that is invoked as part ofthe Content Manager OnDemand indexing pipeline.
The constructor publishes an IConstructor Java™ interface and the application registers a constructoras the name of a Java class that implements this interface. The created instance receives customconfiguration information and can also consume services from the host server such as document filtering(that is, extracting text from binary documents) and logging.
There are three layers of configuration that the constructor instance can use:
• System wide configuration through custom data that is provided in a server configuration file(constructors.xml). Custom data is passed to the constructor instance during initialization.
• Runtime configuration by using the setConstructorConfig method. This can be applied percollection.
• Per-document configuration by using the IndexableDocument.setConstructedDocumentDatamethod to send additional data.
The constructor must be registered by applications in the constructors.xml file. You must provide thefollowing information:
• Constructor name (must be unique)• Class name (including package)• Chunk size (defines the maximum number of documents that can be sent to the constructor in one
request)• CustomConfig data (sent to the constructor at run time during initialization)CustomConfig data can contain a string value or an XML fragment. When CustomConfig contains specialcharacters, use the CDATA tag.
The JAR file that contains the constructor class name and any other JAR files that might be required bythe constructor code are placed in the directory and is defined in the config.xml file by using thepluginsPath parameter.
© Copyright IBM Corp. 1993, 2018 121

Example of constructors.xml
<?xml version="1.0" encoding="UTF-8"?><constructors> <constructor> <name>FS</name> <!-- Unique constructor name --> <class>com.ibm.constructor.FSConstructor</class> <!-- Full class constructor name including package --> <batchSize>15</ batchSize > <!-- Constructor batchSize defines the maximum document array size that can be populated at a time --> <customConfig> <parameter>a</parameter> <parameter>b</parameter> </ customConfig > <!-- The value of customConfig can be any string or XML fragment. For example, this value can be the location of the file with custom constructor registry information. This information is sent to the constructor one time at run time upon initialization. --> </constructor> <constructor> ... <constructor></constructors>
Client and server workflowsThis topic describes the document constructor client and server workflows.
Client workflow
During an indexing session, the client application invokes theCollection.setConstructorConfiguration method before starting to index. This method definesthe custom data (optionally per collection) that is passed to the constructor.
For each document that must be constructed (as opposed to documents that are indexed directly) theapplication uses the IndexableDocument method which is enhanced by two additional methods:setConstructorName() and setConstructedDocumentData(). The name of the constructor that isused for this document is provided in setConstructorName(). Any additional data that is used by theconstructor, such as a temporary file name from which the content is retrieved, a table name, or a columnname, is provided in the setConstructedDocumentData() method.
The name of the constructor and additional data are not required by the IndexableDocument method.The client application specifies the default constructor name that is associated with a particularcollection. The Collection.createCollection method is used to define a default construction namefor a specific collection.
Server workflow
The constructor is initialized once when it is started with registry information from constructors.xmland can be updated with collection-specific information from setConstructorConfig during run time.
During indexing, the populateDocuments() method is invoked and receives an array of constructeddocuments (IConstructedDocument).
The constructor code can invoke the IConstructedDocument methods to retrieve the ID, theconstructed document data, and the specified content type of the document. The constructor code
122 Content Manager OnDemand for Multiplatforms: Administration Guide

returns the content of the document by setting the input stream (InputStream) and the content type.Possible content types are PLAIN_TEXT, XML, HTML, BINARY, or UNKNOWN.
For example, the constructor can provide an InputStream to a binary document on the file system andset the content type to BINARY. Alternatively, the constructor can create a text string or an XML string,provide an InputSteam pointer to a ByteArrayInputStream, and set the content type to PLAIN_TEXTor XML accordingly. If errors occur, the constructor can provide specific error messages for eachdocument by using the addConstructorMessage(IMessage message) method.
Constructor classes, interfaces, and methodsThis topic describes the document constructor Java API, C++ API, and server APIs.
Client Java APITextSearchServer
createCollection (String collectionId,String physicalPath, String collectionConstructorName,String comment)
Collection
setConstructorConfiguration (String constructorName, byte[] configData);
IndexableDocument
setConstructorName (String constructorName);
setConstructedDocumentData (byte[] docData);
Tip: Calling these two methods is optional. If the collection has a constructor defined and noconstructor is specified for the document, the collection constructor is used for the document.
Client C++ API
namespace and const declarations were removed from the code examples for readability.
Collection class:Collection (constructor)
Create a collection with default constructor. Use this method if you want to use the sameConstructor for most documents in the collection. To use this method, you must add theconstructor name to the colProps parameter. The relevant header isConstants::DOCUMENT_CONSTRUCTOR_NAME.
// Prepare properties with a collection ID and a constructor name:ExtendedProperties props;props.putProperty(Collection::COLLECTION_ID, "collectionId");props.putProperty(Constants::DOCUMENT_CONSTRUCTOR_NAME, "myConstructorName");
// Create the collection:Collection *collection = new Collection(props, *_sessionConfig);
Document constructor 123

setConstructor ConfigurationSets the collection constructor configuration. The constructorName class defines theconstructor name and theconfigData class is a buffer that is passed to the constructor as is.
void setConstructorConfiguration(const String &constructorName, const byte_t *configData, const uint32_t dataLength);
RawDocument class:setConstructor Name
Sets the constructor name for this document. If specified, the constructor is used for thedocument, whether or not a collection constructor is defined.
void setConstructorName(const String& constructorName);
setConstructed DocumentDataSets the document data that will be passed to the constructor, for example, information usedby the constructor to retrieve the document.
void setConstructedDocumentData( const byte_t *constructedDocumentData, const uint32_t dataLength);
Server APIsIConstructor
initialize(String constructorName, String customConstructorRegistryInfo /*from config file*/);setConfiguration (String collectionName, byte[] constructorConfigData/*from setConstructorConfig*/);populateDocuments (IConstructedDocument[] arrayOfConstructedDocuments,IFilterService service); // Array is not more than the batch size defined in the XML configuration file; service is document filtering service.
IConstructedDocumentServes as a public interface for the internal document.
byte[] getDocId(); // returns the document ID which is used by indexerString getCollectionId() returns the collection ID a document is indexedinto byte[] getConstructedDocumentData (); returns byte[] which is passed setInputStream(InputStream inputStream);addMetaData(Metadata metadata) adds meta-data name-value field which areindexed in addition to document contentaddConstructorMessage(IMessage messsage); in case of an error, a messageis added to the array of error messagessetKnownLanguage(String language); known language which will be used for language processingsetDefaultLanguage(String language) default language which will be used forlanguage processing as a fall-back languagesetContentType(ContentType contentType);Note: Content type can be: PLAIN_TEXT, XML,BINARY,UNKNOWNContentType getContentType();
IMessageRepresents an error message.
String getMessageCode() returns message codegetFormattedMessage(String msg,Locale lc)
124 Content Manager OnDemand for Multiplatforms: Administration Guide

Throwable getException()MessageType getType()
Document filteringThe constructor can extract text from binary documents by using the filtering service interface.
The filtering service interface is received as a reference through theConstructor.populateDocuments method.
The IFilterService interface provides the extractText method. The constructor can invoke theextractText method by delivering binary documents as an InputStream parameter and receive thefiltered result as an FilterServiceResult object. The FilterServiceResult object containsaggregated information about the filtering service flow, such as warning and error messages that weregenerated during service invocation. Filtered text is returned in a separate object which consists of aname (if the content has a name) and a reference to the content as InputStream.
Exception and message handlingThe constructor handles exceptions and document messages.
Constructed document messages are added for specific documents during document-related actions.These messages do not affect the overall document construction process. The IConstructedDocumentinterface enables the constructor to handle these messages, adds messages to the document messagelist, and continues to process the next document.
Constructor exceptions are thrown during the execution of constructor methods. Each method can throwa particular exception type that is defined in the IConstructor interface.
The severity level of constructor exceptions can be either error/critical, warning, or info. A criticalexception ends the indexing process. A warning exception allows the indexing process to continuerunning.
In addition to the severity level, a constructor exception contains an IMessage object that provides moredetails about the exception. The message description is localized; the default locale of the system is usedfor the message description.
Document messages are localized according to the locale of the document. The document locale isdetermined by using the IConstructedDocument.getLocale method.
A basic IMessage implementation called FormattedMessage is provided. You can extend theimplementation according to your requirements. A FormattedMessage message contains localizedmessage text, the message type or level which can be one of the predefined values of IMessageType,and the message code.
Basic IMessage implementation of all possible exceptions is provided as follows:
ConstructorInitException extends ConstructorExceptionThis exception is thrown by the Constructor.initialize method when an attempt to initialize aconstructor fails for any reason. The error details are passed in the IMessage member.
ConstructorCongifurationException extends ConstructorExceptionThis exception is thrown by the Constructor.setConfiguration method when an attempt to setruntime constructor configuration fails for any reason. The error details are passed in the IMessagemember.
PopulateDocumentsException extends ConstructorExceptionThis exception is thrown by the Constructor.populateDocuments method when an attempt topopulate a document fails for any reason. The error details are passed in the IMessage member.
Document constructor 125

FilterServiceException extends ConstructorExceptionThis exception is thrown by the IFilterService.extractText method when an attempt to filtertext fails for any reason. The error details are passed in the IMessage member.
126 Content Manager OnDemand for Multiplatforms: Administration Guide

Chapter 19. LDAP (Lightweight Directory AccessProtocol) authentication support
The Lightweight Directory Access Protocol (LDAP) is an open industry standard that has evolved to shareinformation between distributed applications on the same network, organize information in a clear andconsistent manner, and prevent unauthorized modification or disclosure of private information. In recentyears, LDAP has gained wide acceptance as the directory access method of the Internet, and becomesstrategic within corporate intranets.
You can use LDAP to manage basic login authentication directly on the server, in other words, you nolonger need to use the user security exit.
Requirements
The following LDAP servers are supported:
• Novell eDirectory Version 8.8 SP2• Sun Java System Directory Server Enterprise Edition 6.3• IBM Tivoli Directory server (TDS)• Microsoft Active Directory Application Mode (ADAM) server• Microsoft Active Directory (AD)
How Content Manager OnDemand works with LDAP
The following diagram illustrates how Content Manager OnDemand works with LDAP:
Figure 14: How OnDemand works with LDAP
When a Content Manager OnDemand client makes a login request to the Content Manager OnDemandserver, if you enabled LDAP authentication in the server, the Content Manager OnDemand server makesan authentication request to the LDAP through either an anonymous or credentialed bind.
This initial call accesses the LDAP server, searches for the user's credentials and finds the user'sdistinguished name (DN). If the user's DN is found, the Content Manager OnDemand server makesanother call to the LDAP server using that DN to confirm that the password that was given by the user iscorrect. If the password is correct, the LDAP server returns a mapped attribute in LDAP, which is usuallythe Content Manager OnDemand user ID. The Content Manager OnDemand server takes the attribute, andproceeds with its login.
Enabling LDAP authentication
To enable LDAP authentication, in the administrative client, right-click your Content Manager OnDemandserver, and select System Parameters. In the System Parameters window, under LDAP Authentication,select the Enable check box. Under Login Processing, select the Password Case Sensitive check box.
To disable LDAP authentication, clear the Enable check box.
© Copyright IBM Corp. 1993, 2018 127

LDAP authentication processesYou can use LDAP (Lightweight Directory Access Protocol) to authenticate to the Content ManagerOnDemand server.
You can logon to the Content Manager OnDemand server without the LDAP authentication. See the"Logging on a server" link for more information.
Related tasksLogging on a serverRelated informationCollecting data for LDAP authentication problems in Content Manager OnDemand server
OnDemand logon with the LDAP authentication and anonymous bindingSome LDAP servers are set up to allow initial connection to the LDAP server or an anonymous bind.
An LDAP server that is set up to allow anonymous bind is open to the world. Anyone can connect to theLDAP server and search. It is like a building with its front doors unlocked. Anyone can walk in and look fora name from the directory in the lobby. In this example, even though the building is open, the individualoffices might not be open. The individual offices are analogous to the entries in the LDAP server.
After a record is found, you might need to supply a password to access the information in that record(analogous to a key for a locked office). An example of an LDAP server that allows the anonymous bind is acompany's intranet server. With this type of open LDAP server, the only logon information that anemployee of that company would need is a user ID and password.
The anonymous bind LDAP authentication process:
• Connect to the LDAP server (called initial bind) without a user ID or password.• If the initial bind is successful, search for an entry under the bind attribute name that is specified in
ARS_LDAP_BIND_ATTRIBUTE at the location specified by ARS_LDAP_BASE_DN.• If an entry is found, perform a second bind (logon) to it by using the user ID and password that was
entered into the Content Manager OnDemand logon panel. If the second bind is successful, locate thevalue under the mapped attribute name that is specified in ARS_LDAP_MAPPED_ATTRIBUTE.
• If the value is found, return it to Content Manager OnDemand.
Configuring OnDemand with the anonymous bind set to true:
1. The user types the user ID and password in the Logon to a Server panel of the Content ManagerOnDemand client.
2. The user ID and password are sent to the Content Manager OnDemand server to be authenticated.3. The Content Manager OnDemand LDAP authentication component connects to the LDAP server. If the
LDAP server is down or cannot be reached, the flow is based on the setting ofARS_LDAP_OD_AUTHORITY_FALLBACK.
• If ARS_LDAP_OD_AUTHORITY_FALLBACK=FALSE (default) then the logon fails.• If ARS_LDAP_OD_AUTHORITY_FALLBACK=TRUE, then the logon reverts back to the Content
Manager OnDemand logon and continues.4. The Content Manager OnDemand LDAP authentication component searches the LDAP server for the
user ID that is under the attribute name specified in the ARS_LDAP_BIND_ATTRIBUTE configurationparameter.
Remember: The user ID can be an e-mail address. If the attribute name does not exist on the LDAPserver, the logon to the Content Manager OnDemand server fails.
• If the attribute name is correct but the user ID does not exist on the LDAP server, then the flow isbased on the setting of ARS_LDAP_OD_AUTHORITY_FALLBACK.
128 Content Manager OnDemand for Multiplatforms: Administration Guide

• If the user ID exists on the LDAP server and the password is wrong, the logon to the ContentManager OnDemand server fails.
• If the user ID exists on the LDAP server and the password is correct, the LDAP server returns a valueto the Content Manager OnDemand server.
5. You tell the LDAP server what to return by setting the value on the configuration parameterARS_LDAP_MAPPED_ATTRIBUTE to an attribute or field name that is known to the LDAP server. If thisattribute name does not exist on the LDAP server, the logon to the Content Manager OnDemand serverfails.
• If the attribute name is correct, a value is returned. For example, if the ID that is entered on theContent Manager OnDemand logon screen is J12345, ARS_LDAP_MAPPED_ATTRIBUTE is set toodid, and the J12345 attribute odid is jasson1, then jasson1 is returned.
• If the returned value matches a user ID that is stored in the Content Manager OnDemand serverdatabase, the user logs on. Otherwise, the logon fails. The Content Manager OnDemand password isnot checked if the LDAP authentication is successful.
Remember: If the user ID and password case sensitivity is disabled (the default), the user ID andpassword are converted to uppercase before they are sent to the LDAP server. The returned user ID stringfrom the LDAP server is then converted to uppercase and compared with the user IDs that are stored inthe database.
If the Content Manager OnDemand user ID and password sensitivity is enabled, and the IDs that arestored in the Content Manager OnDemand database are in uppercase (for example, as a result of caseinsensitivity in the past), the ID that is returned by LDAP must be in uppercase otherwise the logon fails.
Content Manager OnDemand logon with the LDAP authentication and non-anonymousbinding
Some LDAP servers are set up to allow initial connection to the LDAP server or a non-anonymous bind.
In “OnDemand logon with the LDAP authentication and anonymous binding” on page 128, the term"anonymous bind" was used. An LDAP server can also be set up to disallow the "anonymous bind", or toallow only the "non-anonymous bind." The Microsoft® Windows® Active Directory® (AD) server can only beset up using "non-anonymous bind.". When an LDAP server is set up this way, it is not "open" to the world.It is like a locked building that requires a key or badge to enter. In this example, the individual officesmight or might not be locked. The individual offices are analogous to the entries in the LDAP server.
There are essentially two logons to an LDAP server that disallows the "anonymous bind" during the LDAPauthentication process. The first logon (the initial bind) is required to gain connection to the LDAP server,and the second logon (the bind) is required to gain access to the entry or the record.
To connect to this type of LDAP server, you must supply a valid user ID and password at the initial bindtime. It is like entering a locked building that requires a key or badge to enter. The initial bind ID andpassword are stored in the LDAP configuration under the parameters ARS_LDAP_BIND_DN andARS_LDAP_BIND_DN_PWD, and are not entered by the user at logon time. When you are connected, youcan perform the search. When you find a record, you might need to supply a password to access therecord's information.
Starting with Content Manager OnDemand V9.0, both parameters, ARS_LDAP_BIND_DN andARS_LDAP_BIND_DN_PWD were moved to the instance stash file and were no longer specified inars.cfg on Unix or under the Windows registry on Windows. If ARS_LDAP_ALLOW_ANONYMOUS is setto FALSE, both parameters must exist in the instance stash file or the LDAP authentication fails. OnWindows, use the Content Manager OnDemand Configurator to enter or change those parameter values.On Unix, use the arsstash command to enter the values for ARS_LDAP_BIND_DN andARS_LDAP_BIND_DN_PWD parameters. You can also use the arsstash command on Windows to entervalues for those parameters.
The non-anonymous bind LDAP authentication process:
• Connect to the LDAP server (called initial bind) with a user ID and password that are specified under theparameters ARS_LDAP_BIND_DN and ARS_LDAP_BIND_DN_PW.
LDAP (Lightweight Directory Access Protocol) authentication support 129

• If the initial bind is successful, search for an entry under the bind attribute name that is specified inARS_LDAP_BIND_ATTRIBUTE at the location specified by ARS_LDAP_BASE_DN.
• If an entry is found, perform a second bind (logon) to it using the user ID and password entered into theContent Manager OnDemand logon panel.
• If the second bind is successful, locate the value under the mapped attribute name that is specified inARS_LDAP_MAPPED_ATTRIBUTE.
• If a value is found, return it to Content Manager OnDemand.
Configuring Content Manager OnDemand with the non-anonymous bind set to false:
1. The user types the user ID and password in the Logon to a Server panel of the Content ManagerOnDemand client.
2. The user ID and password are sent to the Content Manager OnDemand server to be authenticated.3. The Content Manager OnDemand LDAP authentication component connects to the LDAP server. If the
LDAP server is down or cannot be reached, the flow is based on the setting ofARS_LDAP_OD_AUTHORITY_FALLBACK.
• If ARS_LDAP_OD_AUTHORITY_FALLBACK=FALSE (default) then the logon fails.• If ARS_LDAP_OD_AUTHORITY_FALLBACK=TRUE, then the logon reverts back to the Content
Manager OnDemand logon and continues.4. If the LDAP server can be reached, the Content Manager OnDemand LDAP authentication component
connects to the LDAP server with the LDAP user ID and password that are specified in theARS_LDAP_BIND_DN and ARS_LDAP_BIND_DN_PWD parameters.
• If the user ID and password are valid, the connection is established. Depending on the LDAP serversetup, this user ID might need to have some administrative authority.
• For the Windows Active Directory server, the default is that any valid user ID that is a member of thedomain can be used in this initial logon to the LDAP server.
• This is the first logon. If this logon fails, the logon to the Content Manager OnDemand server fails.5. After the connection is made, the Content Manager OnDemand LDAP authentication component
searches the LDAP server for the user ID that is under the attribute name specified in theARS_LDAP_BIND_ATTRIBUTE configuration parameter.
Remember: The user ID can be an e-mail address. If the attribute name does not exist on the LDAPserver, the logon to the Content Manager OnDemand server fails.
• If the attribute name that is specified in the ARS_LDAP_BIND_ATTRIBUTE parameter is correct butthe user ID does not exist on the LDAP server, then the flow will be based on the setting ofARS_LDAP_OD_AUTHORITY_FALLBACK. For example, if ARS_LDAP_BIND_ATTRIBUTE=mail and theuser entered [email protected] in the Content Manager OnDemand logon panel, but this e-mailaddress does not exist on the LDAP server.
• If the user ID exists on the LDAP server and the password is wrong, the logon to the ContentManager OnDemand server fails.
• If the user ID exists on the LDAP server and the password is correct, the LDAP server returns a valueto the Content Manager OnDemand server.
• If the attribute name is correct, a value is returned. If the returned value matches a user ID that isstored in the Content Manager OnDemand server database, the user logs on. Otherwise, the logonfails. The Content Manager OnDemand password is not checked if the LDAP authentication issuccessful.
Remember: If the user ID and password case sensitivity is disabled (the default), the user ID andpassword are converted to uppercase before they are sent to the LDAP server. The returned user ID stringfrom the LDAP server is then converted to uppercase and compared with the user IDs that are stored inthe database.
130 Content Manager OnDemand for Multiplatforms: Administration Guide

If the Content Manager OnDemand user ID that is stored is in uppercase, if the user ID case-sensitivity isenabled, and if the returned user ID is in lowercase, then the logon fails.
Bypassing the LDAP server authenticationThe LDAP server authentication can be bypassed. The logon process is reverted back to the normalContent Manager OnDemand logon:
The LDAP server authentication is bypassed if one of the following conditions is true. The logon process isreverted back to the normal OnDemand logon:
• The LDAP server is down or cannot be reached and ARS_LDAP_OD_AUTHORITY_FALLBACK=TRUE• The user ID does not exist on the LDAP server for the bind attribute and
ARS_LDAP_OD_AUTHORITY_FALLBACK=TRUE
The LDAP authentication might fail if one of the following conditions is true:
• The initial bind fails because of the incorrect user ID, password, or both.• The second bind fails because of the incorrect user ID, password, or both.• The attribute name that is specified in the ARS_LDAP_BIND_ATTRIBUTE configuration parameter does
not exist on the LDAP server.• The returned value from the LDAP server does not match any existing Content Manager OnDemand user
ID.• The returned value from the LDAP server matches an existing ID but it is in the wrong case and the
Content Manager OnDemand user ID case sensitivity has been turned on.• When the Content Manager OnDemand user ID sensitivity option is off, the returned value is converted
to the uppercase characters. If the stored Content Manager OnDemand ID is in lower or mixed case, thelogon can fail.
Depending on the LDAP server type and setup, the response you get from the LDAP authentication mightnot always be the same. The best way to diagnose the LDAP authentication problems is to get a detailtrace and examine it. The trace can tell you which step went wrong in the LDAP authentication process.
Sample LDAP configurationsThe Content Manager OnDemand user ID of administrators is not subjected to the LDAP authentication.
You can view LDAP parameters based on your system platform in the "Specifying the ARS.CFG file for theinstance" section of the Content Manager OnDemand for Multiplatforms: Installation and ConfigurationGuide.
Anonymous Bind LDAP Server:
ARS_LDAP_SERVER=ldap1.yourcompany.comARS_LDAP_PORT=ARS_LDAP_USE_SSL=FALSEARS_LDAP_BASE_DN=ou=yourgroup,o=yourcompany.comARS_LDAP_BIND_DN=ARS_LDAP_BIND_DN_PWD=ARS_LDAP_BIND_ATTRIBUTE=mailARS_LDAP_MAPPED_ATTRIBUTE=useridARS_LDAP_ALLOW_ANONYMOUS=TRUEARS_LDAP_BIND_MESSAGES_FILE=
Microsoft Active Directory (AD) server:
ARS_LDAP_SERVER=adserver.yourcompany.comARS_LDAP_PORT=ARS_LDAP_USE_SSL=FALSEARS_LDAP_BASE_DN=dc=ondemand,dc=yourdomain,dc=localARS_LDAP_BIND_DN=CN=userid,OU=users,OU=yourunit,OU=yourcity,DC=dc1,DC=dc2,DC=local
LDAP (Lightweight Directory Access Protocol) authentication support 131

ARS_LDAP_BIND_DN_PWD=passwordARS_LDAP_BIND_ATTRIBUTE=cnARS_LDAP_MAPPED_ATTRIBUTE=sAMAccountNameARS_LDAP_ALLOW_ANONYMOUS=FALSEARS_LDAP_BIND_MESSAGES_FILE=
Microsoft Active Directory Application Mode (ADAM) server:
ARS_LDAP_SERVER=adamserver.yourcompany.comARS_LDAP_PORT=ARS_LDAP_USE_SSL=FALSEARS_LDAP_BASE_DN=ou=yourlocation,o=yourcompanyARS_LDAP_BIND_DN=cn=admin,o=yourcompanyARS_LDAP_BIND_DN_PWD=passwordARS_LDAP_BIND_ATTRIBUTE=mailARS_LDAP_MAPPED_ATTRIBUTE=cnARS_LDAP_ALLOW_ANONYMOUS=FALSEARS_LDAP_BIND_MESSAGES_FILE=
IBM Tivoli Directory server (TDS) with SSL:
ARS_LDAP_SERVER=yourtds.yourcompany.comARS_LDAP_PORT=ARS_LDAP_USE_SSL=TRUEARS_LDAP_KEYRING_FILE=/opt/IBM/ondemand/V10.1/config/ondemand.kdbARS_LDAP_KEYRING_LABEL=LDAP LabelARS_LDAP_BASE_DN=ou=yourlocation,o=yourcompanyARS_LDAP_BIND_DN=cn=rootARS_LDAP_BIND_DN_PWD=passwordARS_LDAP_BIND_ATTRIBUTE=emailARS_LDAP_MAPPED_ATTRIBUTE=snARS_LDAP_ALLOW_ANONYMOUS=FALSEARS_LDAP_BIND_MESSAGES_FILE=
Novel eDirectory server:
ARS_LDAP_SERVER=yournds.yourcompany.comARS_LDAP_PORT=ARS_LDAP_USE_SSL=FALSEARS_LDAP_BASE_DN=ou=yourlocation,o=yourcompanyARS_LDAP_BIND_DN=cn=admin,ou=users,o=yourcompanyARS_LDAP_BIND_DN_PWD=passwordARS_LDAP_BIND_ATTRIBUTE=mailARS_LDAP_MAPPED_ATTRIBUTE=cnARS_LDAP_ALLOW_ANONYMOUS=FALSEARS_LDAP_BIND_MESSAGES_FILE=
Sun Java Directory server (JDS)
ARS_LDAP_SERVER=yourjds.yourcompany.comARS_LDAP_PORT=ARS_LDAP_USE_SSL=FALSEARS_LDAP_BASE_DN=ou=boulder,o=yourcompanyARS_LDAP_BIND_DN=cn=Directory ManagerARS_LDAP_BIND_DN_PWD=passwordARS_LDAP_BIND_ATTRIBUTE=mailARS_LDAP_MAPPED_ATTRIBUTE=cnARS_LDAP_ALLOW_ANONYMOUS=FALSEARS_LDAP_BIND_MESSAGES_FILE=
132 Content Manager OnDemand for Multiplatforms: Administration Guide
Chapter 20. Loading AFP™ and line data
About this task
This section provides an overview of the data loading process.
The process begins with configuring storage on the system and configuring the programs that transmit,index, and load data. You need to decide where to index your reports and define the application groupsand applications for the reports. The next step is to load the data – the process of adding the index data tothe database and loading the report data and resources on storage volumes. When a load processcompletes, you can view the messages that were saved in the system log. To complete the data loadingprocess, backup the Content Manager OnDemand and archive storage manager databases.
OverviewYou can archive the print output of your existing application programs in Content Manager OnDemandwithout changing the print data stream or writing programs to process the data. In OnDemand, the printoutput of an application program is called a report. Content Manager OnDemand provides programs thatcan automatically receive reports from z/OS systems, index the reports, add the index data to thedatabase, divide the input data into indexed groups of pages (documents), compress the documents, andcopy the compressed documents to storage volumes. After you load a report into the system, your userscan query, retrieve, and view or print pages of the report using one of the Content Manager OnDemandclient programs.
The Content Manager OnDemand data indexing and loading programs process input files that reside on aContent Manager OnDemand server. If you generate your reports on an z/OS system, then you wouldtypically transfer the reports to the server and use the data indexing and loading programs to processthem. When you index a report that contains AFP data (or if you plan to convert line data to AFP data), youmust make sure that the data indexing program can access the resources required by the report.Resources include page segments and fonts. You can transfer the resources to the server or you canmount a resource library using the Network File System (NFS). You can also index your reports on thez/OS system and then transmit the report, index, and resource files to the server to load them.
You can create up to 128 index fields for each type of report that you define to Content ManagerOnDemand, providing many ways for users to query information contained in a report. The number ofindex fields that you define depends on the organization of the data in the report. For example, when youindex a report that contains logical items, such as policies and statements, you might define index fieldsfor the date, customer name, customer number, balance due, transaction number, and amount. When youindex a report that contains transaction data, such as a general ledger, you might define index fields forthe date and transaction number. After you determine what index fields you need and define them to thesystem, Content Manager OnDemand extracts the index values from a report during the load process andstores them in records that are added to the database.
Content Manager OnDemand compresses report data into storage objects, using information that youspecify in the application. Depending on how you configure storage management for your applicationgroups, Content Manager OnDemand can automatically copy the report to cache storage and archivestorage. If you use Tivoli Storage Manager to maintain report data in archive storage, you can configurethe system to maintain a backup copy of the reports that are stored in archive storage.
The load process saves messages in the system log each time that you load an input file into the system.You can open the System Log folder and view the messages for information such as the name of the inputfile, the indexing information, and the number of rows that were added to the database.
The load process provides checkpoints so that you can restart a previously interrupted load process. Youcan recover or restart the steps that add the index data to the database and copy the storage objects tostorage volumes.
© Copyright IBM Corp. 1993, 2018 133

Before you begin loading input data
Estimating storage space
About this task
When you initially configure a Content Manager OnDemand system, you calculate the total amount of disk,optical, and tape storage required to hold the Content Manager OnDemand database, database log files,reports, and the Tivoli Storage Manager database and recovery log. You also need to plan for thetemporary space needed by Content Manager OnDemand programs. The amount of storage space thatyou need on your system is usually a factor of how much data that you plan to store in Content ManagerOnDemand, how long you need OnDemand to maintain the data, the compression ratio that you canexpect to achieve on the report data, and the number of copies of reports that you need the system tomaintain. If you plan to index your reports on the Content Manager OnDemand server, then you mustallocate temporary space for the data indexing program. Temporary space is also required for the dataloading program.
After you determine how much storage space that you need, you should organize the physical storagedevices for the various components of the system, such as the database, Download, and cache storage. Ifyou plan to maintain data in archive storage, then you also need to prepare storage devices for use byContent Manager OnDemand. Physically separating program directories, the database, cache storage, andtemporary work spaces can improve performance.
The IBM Content Manager OnDemand for Multiplatforms: Introduction and Planning Guide providesinformation, formulas, and worksheets that can help you calculate your storage requirements. The IBMContent Manager OnDemand for Multiplatforms: Installation and Configuration Guide containsrecommendations for organizing storage devices, describes how to define the database, cache storage,and temporary storage areas, and describes how to configure storage libraries and devices and definethem to Tivoli Storage Manager.
Defining the application group
About this task
When you archive reports in Content Manager OnDemand, the ARSLOAD program adds index data to thedatabase and compresses report data into storage objects and copies the storage objects to storagevolumes. The index data and the storage objects are associated with an application group. As part ofdefining a report to Content Manager OnDemand, you must define or specify the application group thatContent Manager OnDemand uses to maintain the data. The application group specifies the databasefields that hold the index data and the storage management information that determines whereOnDemand maintains the report data and how long it maintains the index data and the report data. Youcan use the Content Manager OnDemand administrative client to define an application group.
If you plan to maintain a copy of your reports in archive storage, then the application group must use astorage set that includes a primary node that identifies a client node in Tivoli Storage Manager. The IBMContent Manager OnDemand for Multiplatforms: Installation and Configuration Guide provides informationabout configuring Tivoli Storage Manager.
Defining the application
About this task
Most customers define an application for each different report (or source of data) that they plan to loadinto the system. When you create an application, you specify information about the report, such as:
• The application group in which you want to store the report• Physical information about the report, including the type of data found in the report and the code page
of the data
134 Content Manager OnDemand for Multiplatforms: Administration Guide

• The indexing parameters, if you plan to index the report on the server• The processing that Content Manager OnDemand should do to the index data before adding it to the
database
You can use the Content Manager OnDemand administrative client to define an application.
Accessing reports, index data, and resources
About this task
Most customers process reports that were created by programs that run on z/OS systems. You can useseveral methods to transfer report data from the z/OS system to the Content Manager OnDemand server.For example:
• You can use Download for z/OS to transmit a print data set from the JES Spool to file systems on theserver. The z/OS component of Download operates as one or more JES writers. You configure thewriters to interpret JCL parameters, such as CLASS and DEST, and route spool files to a ContentManager OnDemand server. You can specify other JCL parameters, such as FORM and DATASET, andinvoke a user-written program to process additional job information that is sent with the data. TheARSJESD program starts the server component of Download and monitors a specific TCP/IP port fordata from a z/OS system. You can start one or more occurrences of the ARSJESD program, eachmonitoring a different port, receiving data sets from different Download writers, and storing data ondifferent file systems. You can configure Download to automatically transmit all of the reports that youneed to archive on the system. See PSF for z/OS: Download for z/OS for information about installing,configuring, and operating Download on the z/OS system. PSF for z/OS: Download for z/OS lists thesupported JCL parameters and provides information about the user exit point at which you can invoke auser-written program. See Chapter 25, “Download exits and processing,” on page 165 for moreinformation about using the ARSJESD program to invoke a user-written program to process adownloaded file, the JCL parameters, and the additional job information. The IBM Content ManagerOnDemand for Multiplatforms: Installation and Configuration Guide shows how to configure the server tostart the ARSJESD program whenever the system is initialized.
• You can provide network access to files that reside on a z/OS system. For example, if you plan to indexreports on the server, you can use NFS to mount the resource library on the server so that the ARSLOADprogram can access the resources required by a report. However, for performance reasons, IBMrecommends against using NFS to access the data sets that contain the actual report or index data.
• You can save a copy of your reports on tape storage volumes. For example, if a system that generates areport is not connected to the same network as the Content Manager OnDemand server, then you mayneed to save a copy of the report on a tape storage volume and have it delivered to a location where itcan be processed.
Configuring the ARSLOAD program
About this task
The ARSLOAD program is the primary Content Manager OnDemand data indexing and loading program.The ARSLOAD program determines if the input data needs to be indexed, and if it does, calls the indexingprogram. The ARSLOAD program then processes the index data, adding it to the database, optionallycompresses the report data into storage objects, and copies the storage objects to storage volumes.
You run the ARSLOAD program each time that you want to load a report or set of reports into the system.You can either run the ARSLOAD program from the command line or configure it to run as a daemon (UNIXservers) or service (Windows servers) to periodically check for input data to process.
Note: The Content Manager OnDemand server program (ARSSOCKD or ARSOBJD in UNIX; LibSrvr orObjSrvr in Windows) must be running, otherwise the ARSLOAD program will fail.
See Chapter 34, “ARSLOAD,” on page 259 for more information about the ARSLOAD program, includingthe parameters that you can specify to process your reports.
Loading AFP™ and line data 135
Specifying input data to process
About this task
The ARSLOAD program can derive the name of the application group to load from the input file name. Todo so, the input file name must conform to the following format:
MVS.JOBNAME.DATASET.FORMS.YYYYDDD.HHMMSST.ARD
Important: The .ARD file name extension is required to initiate a load process.
Unless you specify otherwise, the ARSLOAD program uses the FORM part of the file name to identify theapplication group to load. However, you can use the -G parameter to specify a different part of the filename (MVS, JOBNAME, or DATASET) to identify the application group to load.
If the application group contains more than one application, you must identify the application to load;otherwise the load will fail. You can run the ARSLOAD program with the -A parameter to specify the partof the input file name (MVS, JOBNAME, DATASET, or FORMS) that identifies the application.
Specifying user ID and password
About this task
When you run the ARSLOAD program, you must specify a user ID with administrator authority for theapplication group. By default, the ARSLOAD program obtains the password for the user ID from the stashfile. You can also provide the user ID and password through the following methods; however, using a stashfile provides the additional benefit of encryption, which none of the following methods offer:
• You can specify the -u and -p parameters each time that you run the ARSLOAD program• For Windows servers, the Load Data service uses the user ID and password of the instance owner. If you
run the ARSLOAD program from the command line, then you should use Windows unified logon.
Note: After you save the user ID and password in the the stash file, remember to change the passwordany time that you change the user's password in OnDemand. Otherwise the load will fail. The ARSLOADprogram can accept an expired password. However, the ARSLOAD program will fail if an incorrectpassword is specified.
Running ARSLOAD on UNIX™ servers
About this task
You can use the INIT facility to start the ARSLOAD program as a daemon. The INIT facility makes surethat the ARSLOAD program starts each time that the system is restarted. Each record that you add to theINIT facility defines a process to run and its parameters.
The following shows an example of an INIT record for an AIX server to automatically start the ARSLOADprogram. The ARSLOAD program checks the specified directories for input data to process and storestemporary data in the file system specified with the -c parameter. The ARSLOAD program will process anyinput file that has a file type of ARD or PDF.
Important: OnDemand does not support loading files that have spaces in the file names. The spacecharacter is used as a delimiter for the command line of arsload and the functions it calls.
Unless otherwise specified, the ARSLOAD program uses the FORM part of the input file name todetermine the application group to load. By default, an application group must contain one and only oneapplication. The ARSLOAD program checks for input data to process every thirty minutes. By default, theARSLOAD program logs on to the server and accesses an application group with the userid and passwordfrom the stash file.
ars6:2:once:/opt/IBM/ondemand/V10.1/bin/arsload -d /arsacif/acif2 -d /arsacif/acif3 -d /arsacif/acif4 -c /arsacif/acif1 -t 1800 -v
136 Content Manager OnDemand for Multiplatforms: Administration Guide

See the IBM Content Manager OnDemand for Multiplatforms: Installation and Configuration Guide for moreinformation about configuring the system to automatically load data. See your operating systemdocumentation for information about the INIT facility, automating tasks, and operating systeminitialization.
Running ARSLOAD on Windows™ servers
About this task
You should configure the ARSLOAD service to start automatically when the system is started. To configureARSLOAD service:
Procedure
1. Start the Content Manager OnDemand configurator program.2. Expand the instance that you want to configure.3. Select Services.4. Point to Content Manager OnDemand Load Data and click the right mouse button.5. From the pop-up menu, select Properties.6. On the Service page, verify the Startup Type. See the online help for more information.7. On the Directories page, assign directories to the service. (You add directories to the Available
Directories list from the Directory page of the instance properties dialog box.)8. On the Load Information page, configure the other properties of the service. See the online help for
information on the data that you can enter.9. Click OK.
Note: When you configure one of the Content Manager OnDemand services, you must stop and restartthe Content Manager OnDemand server service and the service that you configured.
Indexing input data
About this task
You must generate index data for a report before you load the report into the system. OnDemand supportsseveral programs to help you generate index data for your reports:
• AFP Conversion and Indexing Facility (ACIF), to index AFP data and line data reports. ACIF can alsocollect AFP resources. If the report contains AFP data (or you are converting line data to AFP data), thenyou need to store the AFP resources in OnDemand. The resources are required to display and reprintpages of a report that contains AFP data.
• IBM Content Manager OnDemand PDF Indexer for Multiplatforms, to index Adobe PDF files• Generic indexer, to index almost any other type of input data
If the report contains AFP data (or you are converting line data to AFP data), then you need to store theAFP resources in OnDemand. The resources are required to display and reprint pages of a report thatcontains AFP data.
Important: Some users find that they are able to pass large files through ACIF successfully, and then thejob fails during the load. This problem is typically related to ulimits. RSS and file size usually have defaultsettings from installation. Increasing these values usually fixes this issue.
For details about indexing data, see IBM Content Manager OnDemand Indexing Reference.
The information in the following sections shows examples of using ACIF to index reports. You can useACIF to index reports and collect resources into a resource group. ACIF processes a report and producesan output file with indexed groups of pages to load on storage volumes, an index file for the databasemanager, and a resource group file that contains the resources required to view and reprint pages of the
Loading AFP™ and line data 137

report. ACIF can run on a Content Manager OnDemand server or a z/OS system. Before you run ACIF on aContent Manager OnDemand server, you must transfer the report to the server and provide access to theresources that may be required to process the report. After you run ACIF on a z/OS system, you musttransfer the output file, index file, and resources created by ACIF to the Content Manager OnDemandserver before you can run the load process.
Indexing reports on Content Manager OnDemand servers
About this task
If you plan to index your reports on the server, then you must first transfer the report to the server. Youmust also provide access to the resources required by the report. Figure 15 on page 138 depicts onemethod that you can use to index reports on the server.
Figure 15: Indexing reports on OnDemand servers
In the example, Download is used to automatically transmit the report to the OnDemand server. After thereport has been successfully transmitted to the server, the ARSLOAD program can process the data. Youcan either invoke the ARSLOAD program from the command line to process a specific file or use facilitiesof the server operating system to run the ARSLOAD program and automatically check for input data toprocess. Since the report must be indexed before it can be loaded into the system, the ARSLOAD programautomatically calls the data indexing program. In the example, the ARSLOAD program calls ACIF to indexthe report. In the example, ACIF uses NFS to access the library that contains the resources.
The IBM Content Manager OnDemand Indexing Reference contains details about indexing reports andshows examples of indexing several types of input data.
138 Content Manager OnDemand for Multiplatforms: Administration Guide

Indexing reports on z/OS® systems
About this task
If you plan to index your reports on z/OS systems, then after you index a report, you must transfer theoutput file, index file, and resource group file generated by ACIF to the Content Manager OnDemandserver where you plan to load the data. Figure 16 on page 139 depicts one method that you can use toindex reports on z/OS systems.
Figure 16: Indexing Reports on z/OS systems
In the example, ACIF processes a line data report, generates index data, converts the input to AFP data,and collects resources from a library on the system. After running ACIF, you must combine the threeoutput files generated by ACIF into one file and then store the combined file in the JES Spool. Downloadcan be used to automatically transmit the combined file to the Content Manager OnDemand server. Afterthe combined file has been successfully transmitted to the server, you must run ACIF on the ContentManager OnDemand server to process the combined file. Using parameters to convert the data and name
Loading AFP™ and line data 139
a default form definition (it is not necessary to specify any trigger, field, or index parameters when you runACIF on the server), ACIF splits the combined file into separate index, resource, and output files that canbe processed by the ARSLOAD program. Contact the IBM support center if you have questions aboutindexing data on z/OS systems and processing the output on a Content Manager OnDemand server.Chapter 25, “Download exits and processing,” on page 165 provides more information about processingfiles transmitted by Download.
The IBM Content Manager OnDemand Indexing Reference contains details about indexing reports andshows examples of indexing several types of input data with ACIF.
Processing the input data
About this task
After a report has been indexed, the ARSLOAD program can process the index file to prepare the indexdata for loading into the database and prepare the report data and resource group files for the storagemanager to load on storage volumes.
Processing index data
About this task
The index file that ACIF creates is processed by the ARSLOAD program before the index data is added tothe database. The ARSLOAD program extracts information from the application group and the applicationand performs the following processing:
• Extracts the database field information from the application group.• Extracts the preprocessing information from the application. This step is required if the field names in
the index file are not the same as the database field names. Then you must map the field names so thatContent Manager OnDemand stores index values in the correct database fields.
• After preprocessing the index file, the ARSLOAD program creates the database rows:
– One row for every group of indexed pages in a report that contains a sorted transaction value– One row for every indexed item in a report that contains logical items, such as policies and
statements• Extracts the postprocessing information from the application. You specify exactly what processing you
want the ARSLOAD program to do when you define the application.• Passes the index rows to the database manager. The rows consist of fields that contain the index values
that the indexing program extracted from the report and other fields generated by Content ManagerOnDemand. An index row contains:
– One column for each field defined in the application group– One or more columns of OnDemand control information
Processing reports and resources
About this task
The ARSLOAD program divides the input data into indexed groups of pages (documents) and compressesthe documents into storage objects. Dividing a report into groups of pages improves the efficiency ofqueries and can improve the time required to retrieve and display the report. Compression improves theefficiency of the storage manager. In this step, the ARSLOAD program:
• Extracts the compression information from the application.• Extracts the storage management information from the application group. The storage management
information determines the storage locations, such as cache storage and archive storage.
140 Content Manager OnDemand for Multiplatforms: Administration Guide

• Compresses the documents into storage objects. Content Manager OnDemand compresses report datainto approximately 100 KB blocks (a default value) and places the blocks into a storage object. ContentManager OnDemand uses a 10 MB storage object (a default value) to improve storage efficiency andperformance. Compressed data does not span storage objects. Content Manager OnDemand assignsunique file names to the storage objects and sequentially numbers them within an application group.
Loading index data
About this task
The ARSLOAD program works with the database manager to add the index data to the database.Depending on the database organization that you specified when you defined the application group,Content Manager OnDemand either creates a new database table each time that you load a report or addsthe index data to an existing database table.
Content Manager OnDemand uses a segment table as a high level index to the index data for anapplication group. Each row in the segment table identifies a specific table of application group indexdata. The fields in the segment table identify the application group and the dates found in a table. Thedates represent the earliest and latest date that can be found in that segment of application group indexdata. Content Manager OnDemand can use the segment table to limit a query to a specific table ofapplication group index data.
The database manager updates the segment table if the beginning date in the report is earlier than a datealready stored in the table.
Content Manager OnDemand limits the size of a table to improve performance and storage management.The number of rows in a table can be specified when you define the application group. The default size ofa table is ten million rows. The database manager automatically closes a table and opens a new tablewhen this threshold is reached. When closing a table, the database manager updates the segment tablewith the latest ending date found in the table.
Loading storage objects
About this task
The ARSLOAD program calls the storage manager to copy storage objects to cache storage and archivestorage. The storage manager extracts information from the application group to determine where andwhen to copy the storage objects.
OnDemand uses an object called a storage set to determine the locations that can hold report data. Astorage set contains one or more storage nodes. A storage node identifies an object server. A storagenode can specify cache storage, archive storage, or both. A storage set can write data to one and only onestorage node at a time (the active storage node).
Cache storageThe primary purpose of cache storage is for short-term, high-speed retrieval of report data. Cache storagecan be located on one or more object servers, depending on how you configure your system and defineyour storage nodes. Reports are always stored in cache storage on the object server identified by theactive storage node.
If you configure your application groups to copy data to cache storage, then the storage manager copiesthe storage object to cache storage. The Cache Data for __ Days setting on the StorageManagement page determines whether Content Manager OnDemand copies documents to cache storage.
Loading AFP™ and line data 141

Archive storageA storage node can identify a client node in storage that is managed by Tivoli Storage Manager.OnDemand works with Tivoli Storage Manager to maintain storage objects in archive storage for long-termstorage and for backup copies of reports.
The storage manager can copy the storage object to archive storage when the report is initially loaded intothe system or at a later time, depending on how you configure your application groups. Most customersconfigure the system to copy report data to cache storage and archive storage at the same time.
Copy storage poolYou can define a copy storage pool in Tivoli Storage Manager to maintain a backup copy of files that arestored in archive storage. Tivoli Storage Manager maintains the backup copy independently of OnDemand.If the primary copy of a file is unavailable or becomes corrupted, then Tivoli Storage Manager canautomatically retrieve the backup copy of the file. See your Tivoli Storage Manager information for helpwith configuring a copy storage pool.
If you define a copy storage pool on your system, you must copy files from the primary storage pool to thecopy storage pool. Tivoli Storage Manager provides a scheduling component that you can use to automatethe copy process. IBM recommends that you schedule the copy process to take place soon after you loadreports into the system.
ResourcesIf caching of data is enabled, OnDemand stores resources in the cache to provide fast retrieval when auser selects an item for viewing. When data is loaded to a particular application, a check is made to see ifthe resource group already exists for the application. If it does not exist, the resource group is saved. Ifthe resource group already exists for the application, then a check is made to see if it is identical to theone that already exists. If it is identical, then no further action is necessary. If it is different, then a secondversion of the resource group is stored.
If the storage node identifies a client node in storage that is managed by Tivoli Storage Manager, then thestorage manager copies the resources to archive storage.
Verifying processing
About this task
When you load an input file into the system, the ARSLOAD program saves a copy of the messagesgenerated during the load process in the system log. (Search for message number 87 in the system log.)After a load process completes, you can open the System Log folder and view the messages. Theinformation in the messages includes the date and time that the load process started and completed, thename of the input file, and the number of rows that were added to the database. For example:
arsload: Processing file >br1010a< arsload: Fri Mar 29 12:37:23 MST 1996 Indexing started, 394419060 bytes to process arsload: Fri Mar 29 12:41:33 MST 1996 Indexing completed arsload: Fri Mar 29 12:41:35 MST 1996 Load Started, 394419060 bytes to load Resource br1010a.res matches the resource 2 Content Manager OnDemand Load ID = >6850-25-0-15FAA-9577-9577< Loaded 130000 rows into the database arsload: Fri Mar 29 13:05:14 MST 1996 Load Completed arsload: Processing successful for file >br1010a<
You can verify the number of rows that Content Manager OnDemand added to the database:
142 Content Manager OnDemand for Multiplatforms: Administration Guide

• For a report that contains transaction data that you have divided into indexed groups of pages, thenumber of pages in the report divided by the number of pages in an indexed group of pages shouldequal the number of rows added to the database. For example, if a report contains 150,010 pages andthere are 100 pages in an indexed group of pages, then Content Manager OnDemand should have added1,501 rows to the database.
• For a report that contains logical items, such as statements and policies, the number of rows added tothe database should equal the number of indexed items in the report. For example, if a report contains1,000 statements, OnDemand should have added 1,000 rows to the database.
The Content Manager OnDemand Load ID represents the data that the ARSLOAD program stored in thesystem during a load process. The Load ID can be used to identify a specific load process. For example,you can run the ARSADMIN program and specify the Load ID to delete the index data and documents thatwere created when the ARSLOAD program processed an input file. For an explanation of the format of theload ID, see the description of the -L parameter in “Parameters” on page 189.
Backing up databases
About this task
After you load reports into the system, IBM recommends that you create a backup copy of the ContentManager OnDemand database and the Tivoli Storage Manager database.
• When you backup the Content Manager OnDemand database, you protect control information and indexdata that Content Manager OnDemand and the database manager need to support the system. Also, ifyou maintain DB2 archived log files on disk, then after the backup completes, the database managercan reclaim the disk space used by the log files.
• When you backup the Tivoli Storage Manager database, you protect control information that TivoliStorage Manager uses to maintain report data in archive storage.
IBM recommends that you backup the databases at least once a week, and more often, if you load reportsevery day. If you are using DB2, then you can use the ARSDB program to backup the database. If you areusing Oracle, then you should use the Oracle procedures to backup the database. If you are using SQLServer, then IBM recommends that you use the Database Maintenance Plan Wizard to configure andschedule your database backups. For Tivoli Storage Manager, you can run or schedule the Tivoli StorageManager database backup using the Tivoli Storage Manager administrative client.
Backup the Content Manager OnDemand database
About this task
For DB2, Content Manager OnDemand provides the ARSDB program so that you can create a backupimage of the Content Manager OnDemand database. When you use the ARSDB program to backup thedatabase and you maintain the archived log files on disk, Content Manager OnDemand automaticallyremoves the log files from the archived log file directory when the backup completes. If you use TivoliStorage Manager to maintain the DB2 archived log files, the Tivoli Storage Manager policy domaindetermines when the archived log files are removed from Tivoli Storage Manager storage.
The ARSDB program supports two types of database backups, an online backup and an offline backup:
• An online backup can be taken when other applications or processes are connected to the database.That is, other applications and processes can continue to read or modify data while the backup is inprogress. You can use facilities of the server operating system to schedule an online backup.
• During an offline backup, only the backup task is connected to the database. Before starting an offlinebackup, IBM recommends that you stop the Content Manager OnDemand server programs and otherrelated processes.
Loading AFP™ and line data 143

If your schedule allows, IBM recommends that you create an offline backup of the database on a regularschedule, perhaps once a week. Taking an offline backup on a regular schedule can reduce the timerequired to rebuild the database if you need to do so.
See Chapter 31, “ARSDB,” on page 205 for information about how to use the ARSDB program to create abackup image of the Content Manager OnDemand database.
Backup the Tivoli Storage Manager database
About this task
After you load reports into the system, IBM recommends that you backup the Tivoli Storage Managerdatabase. A backup image can be used to recover the database, in the event that a hardware failureoccurs or the database becomes corrupted.
The IBM Content Manager OnDemand for Multiplatforms: Installation and Configuration Guide describeshow to define a backup device to Tivoli Storage Manager and create a full backup of the Tivoli StorageManager database. See the Tivoli Storage Manager Administrator's Guide for details about protecting theTivoli Storage Manager database.
Protecting cache storage
About this task
Cache storage is the primary, short-term storage location for reports. If you do not configure the system tocopy reports to archive storage when you load them into the system, then you need to consider how youcan recover the reports in the event that you need to do so (for example, if a cache storage device fails).
Cache storage can be protected by maintaining it on high-availability storage devices. If no high-availability storage is available, IBM recommends that backups of reports in cache storage (the filesystems) be taken on a regular basis.
Loading a previously indexed AFP file
About this task
If AFP files are previously indexed, that is, the *.out, *.ind, *.res files are already in the indexingdirectory, you can use ARSLOAD to load the .out files into the system. When you load the files, specifythe file names without the .out extension. That is, instead of specifying filename.out, just specifyfilename.
Loading documents in large object format
About this task
Large object documents are stored in groups of pages called segments, which can be retrievedindividually to improve performance. You can set the number of pages in a segment in the application. Inorder to load documents in large object format, the loading process must create an index file thatcontains, in addition to the group information, offset and length information for each page in thedocument.
144 Content Manager OnDemand for Multiplatforms: Administration Guide
Chapter 21. Loading image files
About this task
OverviewContent Manager OnDemand provides support for storing and retrieving letters and other types ofcorrespondence. The most straight forward way to store this type of information is to transform a printedcopy of a letter into an image file using a scanner and image capture software. In addition to scanning theletter and saving it as an image file, you must create index data for the letter. You can then use theARSLOAD program to load the index data into the database and store the letter file on the system. Yourusers can then query, retrieve, and view, print or send copies of the letter using one of the ContentManager OnDemand client programs.
Content Manager OnDemand provides the Generic indexer so that you can index input files that containdata other than AFP data, line data, and PDF. You specify the index data for the input files that you want toindex with the Generic indexer in a parameter file. The parameter file contains the index field names andvalues and identifies the input files that you want to process. You can create up to 128 index fields foreach input file that you want to load into the system, providing many ways for users to query and retrievethe letters. The number of index fields that you define usually depends on how your users retrievedocuments from the system. In the example that follows, index fields were specified for the date on theletter, the name of the person that sent the letter, the company name, and the subject of the letter.
This section describes how to use a scanner and image capture software to create the image files. Beforeyou can load the image files into the system, you must define an application group to manage the storageof the letters, an application to specify the physical and logical properties of the letters, and a folder to letusers search for and retrieve the letters.
Defining the application groupWhen you load an input file into the system, Content Manager OnDemand updates the database with theindex data that you provide and stores the indexed groups of pages as documents in cache storage andarchive storage. The application group contains the information that Content Manager OnDemand uses tostore and maintain the index data and the documents on the system. This section provides informationabout some of the key properties of the application group. You can use the Content Manager ContentManager OnDemand administrative client to define an application group.
Database Organization
The Database Organization determines how Content Manager OnDemand organizes the index data that isstored in the application group.
Accept the default Database Organization of Multiple Loads per Database Table and Table Size of 10million rows. Each time that a letter (input file) is loaded into into the system, Content ManagerOnDemand adds one row to a database table. When a table reaches 10 million rows, Content ManagerOnDemand closes the table and creates a new table. Content Manager OnDemand always adds indexrecords to the open table; the closed tables can be queried.
Expiration Type
The Expiration Type determines how Content Manager OnDemand deletes index data and documentsfrom the application group.
© Copyright IBM Corp. 1993, 2018 145

Accept the default Expiration Type of Load. This means that Content Manager OnDemand deletes theindex data and documents from one load process (one or more input files) at a time from the applicationgroup. Depending on the number of input files that are processed during a load process, one or moreletters (input files) may be deleted at a time. For example, if you create a parameter file for the GenericIndexer that contains index data for several input files, then Content Manager OnDemand will delete all ofthe index data and documents from the application group at the same time.
Permissions
Application group permissions determine the users that can access information stored in the applicationgroup and determine the users that can do other types of tasks related to the application group.
Under the *PUBLIC identifier, specify the Access permission so that all of the users defined to the libraryserver can access data stored in the application group.
Field Definition
The Field Definition page is where you define the database fields for the application group. When you loadan input file into the system, Content Manager OnDemand stores the index data that is specified in theparameter file into fields in records that are added to the database. When a user searches for letters,Content Manager OnDemand compares the search criteria entered by the user with index data in theapplication group.
Define the following database fields. The fields allow users to locate letters based on different criteria,such as the date of the letter, the name of the person that sent the letter, and the subject of the letter.ldate
The date on the letter. Defined as a date field.name
The person that sent the letter. Defined as a string field that contains variable length data.company
The person's company. Defined as a string field that contains variable length data.subject
The subject of the letter. Defined as a string field that contains variable length data.
Defining the applicationMost customers define an application for each different source of input data that they plan to load intoContent Manager OnDemand. This section provides information about some of the key properties of theapplication. You can use the Content Manager Content Manager OnDemand administrative client to definean application.
Application Group
You must assign an application to an application group. Assign the application to the application groupthat was created in “Defining the application group” on page 145.
Data Format
The Data Format determines the kind of data that is found in the documents that are stored on thesystem. If the type of the data that is found in the original input file is different than the type of the datathat is found in the documents that are stored on the system, then you should specify the type of the datathat will be stored in Content Manager OnDemand. (In this example, the type of the data is the same – aTIFF image.) Select TIFF as the Data Type. When saving the scanned image of a letter, save the data as aTIFF image.
146 Content Manager OnDemand for Multiplatforms: Administration Guide

Indexer
The Indexer determines the indexing program that Content Manager OnDemand uses to index andconvert input data. Select Generic as the Indexer. To store TIFF images in the system, you must indexthem with the Generic indexer program that is provided with Content Manager OnDemand.
Note: some users may get the following error when trying to load TIFF data to Content ManagerOnDemand:
"arsload: Processing file >D:\SourceDBHK\SOURCE\120040511.txt< arsload: 05/20/04 18:13:06 -- Loading started, --UNKNOWN-- bytes to process Unable to allocate enough memory. File=arslacif.c, Line=402 OnDemand Load Id = >5242-3-0-20040101000000-20040101000000-5243< An error occurred. Contact your system administrator and/or consult the System Log. File=arsadmin.c, Line=1651 Unable to store the object >27FAAA<. Object size 8 Loaded 0 rows into the database".
The failure is because of the 0 byte file. It does not work to try to reallocate a buffer to the 0 byte file.OnDemand issues a generic allocation message "Unable to allocate enough memory. File=arslacif.c,Line=402". The 0 byte file loading is not supported by OnDemand.
Data Compression
The Data Compression determines whether Content Manager OnDemand compresses the input files.
Select Disable, so that Content Manager OnDemand does not attempt to compress the input files. In thisexample, the scanned image files are saved as compressed TIFF images, Therefore, it is not necessary forthe system to compress them.
Defining the folderYou must define a folder so that users can search for and retrieve the input files that you load into ContentManager OnDemand. This section provides information about some of the key properties of the folder.You can use the Content Manager Content Manager OnDemand administrative client to define a folder.
Application Group
A folder can be used to search one or more application groups. Select the application group that wascreated in “Defining the application group” on page 145. When users open the folder, they can search forand retrieve the input files that were loaded into the application group.
Permissions
Folder permissions determine the users that can open the folder and determine the users that can doother types of tasks related to the folder.
Under the *PUBLIC identifier, specify the Access permission so that all users defined to the library servercan open the folder.
Field Definition
The Field Definition page is where you define the search fields for the folder. The search fields contain thesearch criteria entered by the user. For most folders, you probably want to define a search field for eachfield that you defined for the application group.
Define the following fields. The fields allow users to locate letters based on different criteria, such as thedate of the letter, the name of the person that sent the letter, and the subject of the letter.
Loading image files 147

Letter DateThe date on the letter.
FromThe person that sent the letter.
CompanyThe person's company.
SubjectThe subject of the letter.
Field Mapping
The Field Mapping page is where you map, or associate, the folder fields to the application group fields.This is how you specify that the search criteria that a user enters in a particular folder field should be usedto search a specific application group field. Map each of the folder fields to their correspondingapplication group fields. For example, map the folder field named Letter Date to the application groupfield named ldate.
Accessing the input files
About this task
The ARSLOAD program runs on the Content Manager OnDemand server. Therefore, the files that you wantto load into the system must be stored on the server or you must provide network access to files thatreside on some other system.
In the example, the files were copied from a PC to the server as binary files with a file type of TIF.
Store the input files on the server in the location from which you plan to run the ARSLOAD program.Otherwise, specify the full path name of the input files in the Generic index file.
Creating index data
About this task
You must create index data for your input files before you can load them into Content ManagerOnDemand. If the input data is other than AFP, line data, or PDF, then you must use the Generic indexer toload it into the system. You specify index data for the Generic indexer using a parameter file. You shoulduse a standard text editor to create the parameter file. Figure 17 on page 149 shows an example of aparameter file that can be used by the Generic indexer to process image files.
148 Content Manager OnDemand for Multiplatforms: Administration Guide

See the IBM Content Manager OnDemand Indexing Reference for more information about the Genericindexer and the parameter file.
CODEPAGE:819COMMENT: input file number 1GROUP_FIELD_NAME:ldateGROUP_FIELD_VALUE:09/01/95GROUP_FIELD_NAME:nameGROUP_FIELD_VALUE:Mr. Earl HawkinsGROUP_FIELD_NAME:companyGROUP_FIELD_VALUE:Soft ProductsGROUP_FIELD_NAME:subjectGROUP_FIELD_VALUE:optical storage devicesGROUP_OFFSET:0GROUP_LENGTH:0GROUP_FILENAME:letter1.tifCOMMENT: input file number 2GROUP_FIELD_NAME:ldateGROUP_FIELD_VALUE:09/01/95GROUP_FIELD_NAME:nameGROUP_FIELD_VALUE:Hans G. PikerGROUP_FIELD_NAME:companyGROUP_FIELD_VALUE:MBI CompanyGROUP_FIELD_NAME:subjectGROUP_FIELD_VALUE:optical storage devicesGROUP_OFFSET:0GROUP_LENGTH:0GROUP_FILENAME:letter2.tifCOMMENT: input file number 3GROUP_FIELD_NAME:ldateGROUP_FIELD_VALUE:09/16/95GROUP_FIELD_NAME:nameGROUP_FIELD_VALUE:Laurie UnicolasGROUP_FIELD_NAME:companyGROUP_FIELD_VALUE:Dove PropertiesGROUP_FIELD_NAME:subjectGROUP_FIELD_VALUE:account balance dueGROUP_OFFSET:0GROUP_LENGTH:0GROUP_FILENAME:letter3.tifCOMMENT: input file number 4GROUP_FIELD_NAME:ldateGROUP_FIELD_VALUE:10/01/95GROUP_FIELD_NAME:nameGROUP_FIELD_VALUE:George VanLocalGROUP_FIELD_NAME:companyGROUP_FIELD_VALUE:Express AmericanGROUP_FIELD_NAME:subjectGROUP_FIELD_VALUE:airline faresGROUP_OFFSET:0GROUP_LENGTH:0GROUP_FILENAME:letter4.tif
Figure 17: Example of a Generic indexer parameter file
Save the parameter file as LETTERS.IND on the server in the directory from which you plan to run theARSLOAD program.
Loading image files 149

Configuring the ARSLOAD program
About this task
Note: The Content Manager OnDemand server program (ARSSOCKD or ARSOBJD in UNIX; LibSrvr orObjSrvr in Windows) must be running, otherwise the ARSLOAD program will fail.
The ARSLOAD program is the primary Content Manager OnDemand data indexing and loading program.The ARSLOAD program determines if the input data needs to be indexed, and if so, it calls the indexingprogram. The ARSLOAD program then processes the index data, loading it into the database, optionallycompresses the input data into storage objects, and copies the storage objects to storage volumes. SeeChapter 34, “ARSLOAD,” on page 259 for more information about the ARSLOAD program, including theparameters that you can specify to process input files.
You typically run the ARSLOAD program each time that you want to load files into the system. You caneither run the ARSLOAD program from the command line or configure it to run as a daemon (UNIXservers) or service (Windows servers) to periodically check for input data to process. To support a lowvolume scanning operation, most customers choose to run the ARSLOAD program from the commandline. For example:
/opt/IBM/ondemand/V10.1/bin/arsload -h ARCHIVE -u admin -n -g Letters letters
Specify the following parameters to the ARSLOAD program:-h ARCHIVE
The name of the Content Manager OnDemand instance.-u admin
The name of a Content Manager OnDemand user that can add documents to the application group.This is typically a user with administrator authority for the application group.
-nDo not delete the input files.
-g LettersThe name of the application group to load.
lettersThe name of the input file to process.
In the example, the ARSLOAD program locates the input file LETTERS.IND in the directory from whichthe program was started. The input file contains the index information that was created in “Creating indexdata” on page 148 (which is a parameter file for the Generic indexer). Because the full path names of theinput files were not specified in the parameter file, the input files must be in the directory from which theARSLOAD program is started.
Processing the input dataThe ARSLOAD program processes the parameter file, loads the index data into the database, and loadsthe image files on to storage volumes.
Processing index data
The ARSLOAD program processes the parameters that were specified on the command line and theindexing parameter file before loading the index data into the database. The ARSLOAD program extractsinformation from the application group and the application and performs the following processing:
• Extracts the database field information from the application group• Extracts the data type and other information from the application
150 Content Manager OnDemand for Multiplatforms: Administration Guide

• Creates one database row for each group that was specified in the parameter file. Specified one groupfor each image file.
• Passes the index rows to the database manager. The rows contain the index values and other fieldsgenerated by Content Manager OnDemand. An index row contains:
– One column for each field that was defined for the application group– One or more columns of Content Manager OnDemand control information
Processing the image files
The ARSLOAD program processes each image file that was specified in the parameter file. The ARSLOADprogram extracts information from the application group and the application and performs the followingprocessing:
• Extracts the compression information from the application• Extracts the storage management information from the application group. The storage management
information determines the storage locations, such as cache storage and archive storage.• Stores the image files in storage objects. Content Manager OnDemand uses a 10 MB storage object (the
default value) to improve storage efficiency and performance. Content Manager OnDemand assignsunique names to the storage objects and sequentially numbers them within an application group.
Verifying processing
The ARSLOAD program saves a copy of the messages that were generated during a load process in thesystem log. (Search for message number 87 in the system log.) After a load process completes, you canopen the System Log folder and review the messages. The information in the messages includes the dateand time that the load process started and completed, the name of the input file(s), and the number ofrows that were added to the database. For example:
arsload: Processing file >letters< arsload: Mon Dec 18 13:04:37 MST 1995 Indexing started, 116017 bytes to process Content Manager OnDemand Load ID = >6927-1-0-19950101000000-19950101000000-7606< Loaded 4 rows into the database arsload: Mon Dec 18 13:05:14 MST 1995 Loading Completed arsload: Processing successful for file >letters<
You can verify the number of rows that Content Manager OnDemand added to the database. In theexample, the number of rows added to the database should equal the number of groups (and image files)that were specified in the parameter file.
The Content Manager OnDemand Load ID represents the data that the ARSLOAD program stored into thesystem during a load process. The Load ID can be used to identify a specific load process. For example,you can run the ARSADMIN program and specify the Load ID to delete the index data and documents thatwere created when the ARSLOAD program processed a Generic indexer parameter file.
Loading image files 151

152 Content Manager OnDemand for Multiplatforms: Administration Guide

Chapter 22. Loading user-defined data
About this task
OverviewContent Manager OnDemand provides support for storing and retrieving almost any type of data. Forexample, OnDemand provides support for AFP data, line data, PDF files, and image data (GIF, JFIF(JPEG), PCX, and TIFF). However, Content Manager OnDemand is not limited to maintaining these typesof data. Content Manager OnDemand provides the User-Defined data type to support almost any othertype of data that you want to store in the system. For example, you can configure the system to processLotus® WordPro documents, so that when a user retrieves one of the documents from the system, ContentManager OnDemand automatically starts Lotus WordPro to open the document.
To store user-defined data on the system, you must create index data for the input files and you mustregister the file type of the input file with Content Manager OnDemand. The file type determines theprogram that is started on the client PC to open a file when a user retrieves one of the files from thesystem. The file type must also be registered with the client operating system. If your Content ManagerOnDemand system supports client programs that run under different operating systems, then you mustregister the specified file type on all of the client operating systems.
Content Manager OnDemand provides the Generic indexer so that you can index user-defined data. Youspecify the index data for the input files that you want to index with the Generic indexer in a parameterfile. The parameter file contains the index field names and values and identifies the input files that youwant to process. You can create up to 128 index fields for each input file that you want to load into thesystem, providing many ways for users to query and retrieve documents. The number of index fields thatyou define usually depends on how your users retrieve documents from the system. For example, youmight want to define index fields for the date, author, and subject or purpose of the user-defined data.
Before you can load user-defined data into the system, you must define an application group to managethe storage of the data, an application to specify the physical and logical attributes of the input files, and afolder to let users search for and retrieve the documents. This section contains an example that showshow to define Lotus WordPro files to Content Manager OnDemand. It provides an overview of defining theapplication group, application, and folder.
Defining the application groupWhen you load an input file into the system, Content Manager OnDemand updates the database with theindex data that you provide and stores the indexed groups of pages as documents in cache storage andarchive storage. The application group contains the information that Content Manager OnDemand uses tostore and maintain the index data and the documents on the system. This section provides informationabout some of the key properties of the application group. You can use the Content Manager ContentManager OnDemand administrative client to define an application group.
Database organization
The Database Organization determines how Content Manager OnDemand organizes the index data that isstored in the application group.
Accept the default Database Organization of Multiple Loads per Database Table and Table Size of 10million rows. Each time that a Lotus WordPro file is loaded into the system, Content Manager OnDemandadds one row to a database table. When a table reaches 10 million rows, Content Manager OnDemandcloses the table and creates a new table. Content Manager OnDemand always adds index records to theopen table; closed tables can be queried.
© Copyright IBM Corp. 1993, 2018 153

Expiration type
The Expiration Type determines how Content Manager OnDemand deletes index data and documentsfrom the application group.
Accept the default Expiration Type of Load. This means that Content Manager OnDemand deletes theindex data and documents from one load process (one or more input files) at a time from the applicationgroup. Depending on the number of input files processed during a load process, one or more LotusWordPro files may be deleted at a time. For example, if you create a parameter file for the Generic indexerthat contains index data for several input files, then Content Manager OnDemand will delete all of theindex data and documents from the application group at the same time.
Permissions
Application group permissions determine the users that can access information stored in the applicationgroup and determine the users that can do other types of tasks related to the application group.
Under the *PUBLIC identifier, specify the Access permission so that all of the users defined to the libraryserver can access data stored in the application group.
Field definition
The Field Definition page is where you define the database fields for the application group. When you loadan input file into the system, Content Manager OnDemand stores the index data that is specified in theparameter file into fields in records that are added to the database. When a user queries the system,Content Manager OnDemand compares the search criteria entered by the user with index data in theapplication group.
Define the following database fields. The fields allow users to locate files based on different criteria, suchas the date, author, and subject of the file.fdate
The date associated with the input file. For example, the date that the file was created or the date thatthe file was published. Defined as a date field.
authorThe author of the file. Defined as a string field that contains variable length data.
subjectThe subject or purpose of the file. Defined as a string field that contains variable length data.
Defining the applicationMost customers define an application for each different source of input data that they plan to load into thesystem. This section provides information about some of the key properties of the application. You canuse the Content Manager Content Manager OnDemand administrative client to define an application.
Application Group
You must assign the application to an application group. Assign the application to the application groupthat was created in “Defining the application group” on page 153.
Data Format
The Data Format determines the kind of data that is found in the documents that are stored on thesystem. If the type of the data that is found in the original input file is different than the type of the datathat is found in the documents that are stored on the system, then you should specify the type of the datathat will be stored in Content Manager OnDemand.
Because there is not a supplied Data Format for Lotus WordPro files, select User Defined from the DataType list.
154 Content Manager OnDemand for Multiplatforms: Administration Guide

File Extension
When you select User Defined from the Data Type list, you must also enter a value in the File Extension.The File Extension determines the program that is started by the client to open a user-defined documentwhen it is retrieved from the system. For the example, enter the characters LWP, for Lotus WordPro.
The File Extension that you specify must also be registered on the client operating system. See youroperating system information for help with registering file extensions.
Indexer
The Indexer determines the indexing program that Content Manager OnDemand uses to index andconvert input data. Select Generic as the Indexer. To store user-defined files on the system, you mustindex them with the Generic indexer program that is provided with Content Manager OnDemand.
Data Compression
The Data Compression determines whether Content Manager OnDemand compresses the input files.
On the Load Information page, accept the default Data Compression of OD77, to compress the input filesbefore storing them on the server.
Note: Resources are not supported for user-defined input data.
Defining the folderYou must define a folder so that users can search for and retrieve the input files that you load into ContentManager OnDemand. This section provides information about some of the key properties of the folder.You can use the Content Manager Content Manager OnDemand administrative client to define a folder.
Application Group
A folder can be used to search one or more application groups. Select the application group that wascreated in “Defining the application group” on page 153. When users open the folder, they can search forand retrieve the Lotus WordPro files that were loaded into the application group.
Permissions
Folder permissions determine the users that can open the folder and determine the users that can doother types of tasks related to the folder.
Under the *PUBLIC identifier, specify the Access permission so that all users defined to the library servercan open the folder.
Folder fields
The Field Definition page is where you define the search fields for the folder. The search fields contain thesearch criteria entered by the user. For most folders, you probably want to define a search field for eachfield that you defined for the application group.
Define the following folder fields. The fields allow users to locate files based on different criteria, such asthe date, the author, and the subject.File Date
The date associated with the file. For example, the date the file was created or the date that the filewas published.
AuthorThe person that created the file.
SubjectThe subject or purpose of the file.
Loading user-defined data 155

Field Mapping
The Field Mapping page is where you map, or associate, the folder fields to the application group fields.This is how you specify that the search criteria that a user enters in a particular folder field should be usedto search a specific application group field. Map each of the folder fields to their correspondingapplication group fields. For example, map the folder field named File Date to the application groupfield named fdate.
Accessing the input files
About this task
The ARSLOAD program runs on the Content Manager OnDemand server. Therefore, the files that you wantto load into the system must be stored on the server or you must provide network access to files thatreside on some other system.
In the example, the files were copied from a PC to the server as binary files with a file type of LWP.
Store the input files on the server in the location from which you plan to run the ARSLOAD program.Otherwise, specify the full path name of the input files in the Generic index file.
Creating the index data
About this task
You must create index data for your input files before you can load them into the system. If the input datais other than AFP, line, or PDF, then you must use the Generic indexer to load it into the system. You mustspecify index data for the Generic indexer using a parameter file. You should use a standard text editor tocreate the parameter file. Figure 18 on page 157 shows an example of a parameter file that can be usedby the Generic indexer to process the Lotus WordPro files.
156 Content Manager OnDemand for Multiplatforms: Administration Guide

See the IBM Content Manager OnDemand Indexing Reference for more information about the Genericindexer and the parameter file.
CODEPAGE:819COMMENT: input file number 1GROUP_FIELD_NAME:fdateGROUP_FIELD_VALUE:12/18/95GROUP_FIELD_NAME:authorGROUP_FIELD_VALUE:Jessica HawkinsGROUP_FIELD_NAME:subjectGROUP_FIELD_VALUE:optical storage devicesGROUP_OFFSET:0GROUP_LENGTH:0GROUP_FILENAME:letter1.lwpCOMMENT: input file number 2GROUP_FIELD_NAME:fdateGROUP_FIELD_VALUE:12/18/95GROUP_FIELD_NAME:authorGROUP_FIELD_VALUE:Paul GarveysGROUP_FIELD_NAME:subjectGROUP_FIELD_VALUE:optical storage devicesGROUP_OFFSET:0GROUP_LENGTH:0GROUP_FILENAME:letter2.lwpCOMMENT: input file number 3GROUP_FIELD_NAME:fdateGROUP_FIELD_VALUE:12/18/95GROUP_FIELD_NAME:authorGROUP_FIELD_VALUE:Randy PerkinsenGROUP_FIELD_NAME:subjectGROUP_FIELD_VALUE:account balance dueGROUP_OFFSET:0GROUP_LENGTH:0GROUP_FILENAME:letter3.lwpCOMMENT: input file number 4GROUP_FIELD_NAME:fdateGROUP_FIELD_VALUE:12/18/95GROUP_FIELD_NAME:authorGROUP_FIELD_VALUE:Georgia JulyGROUP_FIELD_NAME:subjectGROUP_FIELD_VALUE:airline fairsGROUP_OFFSET:0GROUP_LENGTH:0GROUP_FILENAME:letter4.lwp
Figure 18: Example of a Generic indexer parameter file
Save the parameter file as LWP.IND on the server in the directory from which you plan to run theARSLOAD program.
Configuring the ARSLOAD program
About this task
Note: The Content Manager OnDemand server program (ARSSOCKD or ARSOBJD in UNIX; LibSrvr orObjSrvr in Windows) must be running, otherwise the ARSLOAD program will fail.
The ARSLOAD program is the primary Content Manager OnDemand data indexing and loading program.The ARSLOAD program determines if the input data needs to be indexed, and if so, it calls the indexingprogram. The ARSLOAD program then processes the index data, loading it into the database, optionallycompresses the input data into storage objects, and copies the storage objects to storage volumes. See
Loading user-defined data 157

Chapter 34, “ARSLOAD,” on page 259 for more information about the ARSLOAD program, including theparameters that you can specify to process input data.
You typically run the ARSLOAD program each time that you want to load a file or set of files into thesystem. You can either run the ARSLOAD program from the command line or configure it to run as adaemon (UNIX servers) or service (Windows servers) to periodically check for input data to process. Tostore a few WordPro files at a time, most customers choose to run the ARSLOAD program from thecommand line. For example:
/opt/IBM/ondemand/V10.1/bin/arsload -h ARCHIVE -u admin -n -g "Lotus WordPro Documents" lwp
The following parameters were specified to the ARSLOAD program:-h ARCHIVE
The name of the Content Manager OnDemand instance.-u admin
The name of a Content Manager OnDemand user that can add documents to the application group.This is typically a user with administrator authority for the application group.
-nDo not delete the input files.
-g "Lotus WordPro Documents"The name of the application group to load.
lwpThe name of the input file to process.
In the example, the ARSLOAD program can locate the input file LWP.IND in the directory from which theprogram was started. The input file contains the index information that was created in “Creating the indexdata” on page 156 (which is a parameter file for the Generic indexer). Because the full path names of theinput files were not specified in the Generic index file, the input files must reside in the directory fromwhich you start the ARSLOAD program.
Processing the input dataThe ARSLOAD program processes the parameter file, loads the index data into the database, and loadsthe Lotus WordPro files on to storage volumes.
Processing index data
The ARSLOAD program processes the parameters that were specified on the command line and theindexing parameter file before loading the index data into the database. The ARSLOAD program extractsinformation from the application group and the application and performs the following processing:
• Extracts the database field information from the application group• Extracts the data type and other information from the application• Creates one database row for each group that was specified in the parameter file. One group wasspecified for each Lotus WordPro file.
• Passes the index rows to the database manager. The rows contain the index values and other fieldsgenerated by Content Manager OnDemand. An index row contains:
– One column for each field that was defined for the application group– One or more columns of Content Manager OnDemand control information
Processing the Lotus WordPro files
The ARSLOAD program processes each Lotus WordPro file that was specified in the parameter file. TheARSLOAD program extracts information from the application group and the application and performs thefollowing processing:
158 Content Manager OnDemand for Multiplatforms: Administration Guide

• Extracts the compression information from the application• Extracts the storage management information from the application group. The storage management
information determines the storage locations, such as cache storage and archive storage.• Stores the Lotus WordPro files in storage objects. Content Manager OnDemand uses a 10 MB storage
object (the default value) to improve storage efficiency and performance. Content Manager OnDemandassigns unique names to the storage objects and sequentially numbers them within an applicationgroup.
Verifying processing
The ARSLOAD program saves a copy of the messages that were generated during a load process in thesystem log. (Search for message number 87 in the system log.) After a load process completes, you canopen the System Log folder and review the messages. The information in the messages includes the dateand time that the load process started and completed, the name of the input file, and the number of rowsthat were added to the database. For example:
arsload: Processing file >lwp< arsload: Mon Dec 18 14:14:47 MST 1995 Indexing started, 5116017 bytes to process Content Manager OnDemand Load ID = >6927-0-0-4FAA-0-0< Loaded 4 rows into the database arsload: Mon Dec 18 14:25:11 MST 1995 Loading Completed arsload: Processing successful for file >lwp<
You can verify the number of rows that Content Manager OnDemand added to the database. In theexample, the number of rows added to the database should equal the number of groups (and LotusWordPro files) that were specified in the parameter file.
The Content Manager OnDemand Load ID represents the data that the ARSLOAD program stored into thesystem during a load process. The Load ID can be used to identify a specific load process. For example,you can run the ARSADMIN program and specify the Load ID to delete the index data and documents thatwere created when the ARSLOAD program processed a Generic indexer parameter file.
Loading user-defined data 159

160 Content Manager OnDemand for Multiplatforms: Administration Guide

Chapter 23. Restarting a load process
About this task
The ARSLOAD program will terminate if an unrecoverable error occurs during index, database, or storagemanager processing. Termination processing includes setting a return code and saving error messages inthe system log.
To start problem determination, open the System Log folder and view the messages that the ARSLOADprogram generated during the load process. (Search for message number 87 in the system log.) Themessage log will contain normal processing messages, return codes, and error messages. See IBMContent Manager OnDemand: Messages and Codes for more information about messages.
If the ARSLOAD program failed during indexing, correct the problem and then restart the load processfrom the beginning. Common causes of problems during indexing include invalid input files or indexingparameter files and insufficient temporary space.
If the ARSLOAD program failed during database processing or storage manager processing:
• Determine and correct the problem.• If a Load ID is listed in the message log that the ARSLOAD program saved in the system log, then you
can use the ARSADMIN program to unload the data. See "Deleting a report" for information aboutunloading data from Content Manager OnDemand.
• Restart the load process from the beginning.
© Copyright IBM Corp. 1993, 2018 161

162 Content Manager OnDemand for Multiplatforms: Administration Guide

Chapter 24. Deleting a report
About this task
You can use the UNLOAD function of the ARSADMIN program to delete the index data and documents thatthe ARSLOAD program stored in the system during a load process. To use the UNLOAD function, you mustspecify the Load ID that the ARSLOAD program generated during the load process. The Load IDrepresents the index data that was added to the database and the storage objects that were copied tocache storage and archive storage. The Load ID can be found in the message log that the ARSLOADprogram saved in the system log.
When you use the UNLOAD function, you specify the name of the application group and the Load ID. Youcan obtain the Load ID from the message log that the ARSLOAD program generated during the loadprocess. (Search for message number 87 in the system log.) If there is more than one Load ID listed in themessage log, then you should use the last Load ID listed in the log. Storage locations include cachestorage, the primary storage node, and the secondary storage node. By default, the UNLOAD functiondeletes the storage objects from all locations. The UNLOAD function also deletes the rows of index datathat were added to the database during the original load process.
The following shows how to run the ARSADMIN program on a UNIX server from the command line todelete a load from all of the storage locations:
OnDemand install directory/bin/arsadmin unload -h instance -g Application Group name -L loadID -u user -p password
To UNLOAD a report on a Windows server:
Procedure
1. Start > Programs > IBM OnDemand Server V10.1 > OnDemand Command Window V10.1.2. Run the ARSADMIN program from the prompt.
For example:
arsadmin unload -h instance -g Application Group name -L loadID -u user -p password
Results
When the ARSADMIN program completes, you should open the System Log folder to view the messagesthat were generated during the UNLOAD process. (Search for message number 85 in the system log.) SeeIBM Content Manager OnDemand: Messages and Codes for more information about messages.
The Content Manager OnDemand server program (ARSSOCKD or ARSOBJD in UNIX; LibSrvr or ObjSrvr inWindows) must be running, otherwise the ARSADMIN program will fail.
See Chapter 28, “ARSADMIN,” on page 187 for more information about the ARSADMIN program and theparameters that you can specify to UNLOAD data.
© Copyright IBM Corp. 1993, 2018 163

164 Content Manager OnDemand for Multiplatforms: Administration Guide

Chapter 25. Download exits and processing
Using Download
You can use Download to transmit reports from z/OS systems to Content Manager OnDemand servers. Ifyou use Download to automate the data loading process, then you may need to provide a user-writtenprogram to process the files transmitted by Download before they can be processed by the ARSLOADprogram. You must provide a user-written program if the file name does not contain information that canbe used to identify the application group to load.
For example, suppose that you use a report distribution system to place the output of your applicationprograms on the spool data set. Download selects the output and transmits the data to a ContentManager OnDemand server. However, after the output has been processed by the report distributionsystem, the resulting file name on the spool data set can no longer be associated with the applicationprogram that generated the output. Therefore, the ARSLOAD program cannot use the file name todetermine the application group to load. (And because the file name does not contain information thatcan use used to identify the application group and application to load, you cannot run the ARSLOADprogram with the -A and -G parameters.) You must find some other way to identify the application groupand application to load.
Download provides a user exit (APSUX15) that allows you to provide additional job information to ContentManager OnDemand. Download includes the additional job information in the data stream that istransmitted from the spool data set to the server. The additional job information is installation dependent.See PSF for z/OS: Download for z/OS for details about the APSUX15 user exit and the content, format, andpurpose of the additional job information. The processing done by the user-written program is alsoinstallation dependent. See your Infoprint Manager or PSF information for information about processingthe additional job information with a user-written program.
The ARSJESD program is the component of Download for z/OS that runs on the workstation. The -xparameter of the ARSJESD program may be used to specify the name of a user-written program toprocess additional job information sent by PSF through the APSUX15 user exit. If the ARSJESD programwas invoked with the -x parameter, it calls the specified user-written program. The ARSJESD programpasses the file name and the additional job information to the user-written program.
Invoking the Download user exit
When Download selects output data from the spool data set for transmission to a Content ManagerOnDemand server, it invokes the APSUX15 user exit program. The user exit program concatenates a stringof additional job information to the print parameters that Download transmits to the server. Uponcompletion, the user exit program passes the location of the string and the string length to Download,which transmits the output data set with associated JCL and the additional job information to the server.
The ARSJESD program receives the data sets into file systems on the server. If you start the ARSJESDprogram with the -x parameter, the ARSJESD program invokes the specified user-written program. Theprogram specified with the -x parameter can be any user-written program.
For example, you could provide a user-written program that parses the additional job informationtransmitted by Download and the APSUX15 user exit program. The user-written program could extractthe value of the WRITER parameter to identify the application to load. Using this value, the user-writtenprogram could then query the database to determine the name of the application group to which theapplication belongs. The user-written program could then run the ARSLOAD program with the -aparameter to identify the application to load and the -g parameter to identify the application group toload. (The user-written program could also rename the input file and then run the ARSLOAD program withthe -A parameter to specify the part of the new file name that identifies the application and the -Gparameter to specify the part of the new file name that identifies the application group.)
© Copyright IBM Corp. 1993, 2018 165

By using the Download user exit program, the -x parameter with the ARSJESD program, and a user-written program, you can configure the system so that each file that Download transmits to the server isautomatically processed and loaded into the correct application group and application.
See IBM Content Manager OnDemand for Multiplatforms: Installation and Configuration Guide for moreinformation about using the ARSJESD program and the Download user exit.
166 Content Manager OnDemand for Multiplatforms: Administration Guide

Chapter 26. Importing and exporting administrativeobjects through an XML interface
OverviewYou can use an XML interface to import and export administrative objects from and into a ContentManager OnDemand system. The administrative objects that can be imported and exported include:
• systemParameters• user• group• printer• storageSet• applicationGroup• application• folder• cabinet• hold• odfRecipient• odfRecipientList• odfReportId• odfDistribution with odfReportBundles
This XML interface expands the functionality and enables you to export all administrative objects into asingle XML file, and later import them into the same OnDemand system or another system.
Also, you can create your own XML file through a user application or Web interface according to thedefined specifications, and import it into the system.
If you create your own XML file, ensure that you include objects following this order:
1. systemParameters2. user3. group4. printer5. storageSet6. applicationGroup7. application8. folder9. cabinet
10. hold11. odfRecipient12. odfRecipientList13. odfReportId14. odfDistribution with odfReportBundles
© Copyright IBM Corp. 1993, 2018 167

Installing batch system administrationThis following information describes how to install and set up the prerequisites for Content ManagerOnDemand batch system administration, and guides you through a short installation verification process.
Prerequisites
The following files are included with the Content Manager OnDemand batch system administration:
• /opt/IBM/ondemand/V10.1/bin/arsxml• \Program Files\IBM\ondemand\V10.1\bin\arsxml.exe (Windows)• /opt/IBM/ondemand/V10.1/xml/ondemand.xsd - OnDemand XML Schema file• /opt/IBM/ondemand/V10.1/xml/samples/addgroups.xml• /opt/IBM/ondemand/V10.1/xml/samples/addusers.xml• /opt/IBM/ondemand/V10.1/xml/samples/deletegroups.xml• /opt/IBM/ondemand/V10.1/xml/samples/deleteusers.xml• /opt/IBM/ondemand/V10.1/xml/samples/exportgroups.xml• /opt/IBM/ondemand/V10.1/xml/samples/exportusers.xml• /opt/IBM/ondemand/V10.1/xml/samples/updategroups.xml• /opt/IBM/ondemand/V10.1/xml/samples/updateusers.xml - Sample Content Manager OnDemand XMLfiles
Installation verification
Before you run the batch system administration functions, make sure that the Content ManagerOnDemand environment is properly set up:On Windows systems:
Open a Content Manager OnDemand command prompt by selecting Start > Programs > IBM ContentManager OnDemand Server V10.1 > IBM Content Manager OnDemand Command Window V10.1.
On UNIX systems:Set up the PATH environment variable to include the Content Manager OnDemand bindirectory /opt/IBM/ondemand/V10.1/bin. Use this command:
export PATH=${PATH}:/opt/IBM/ondemand/V10.1/bin
On other systems:Set up the PATH environment variable to include the Content Manager OnDemand bindirectory /opt/IBM/ondemand/V10.1/bin. Use this command:
export PATH=${PATH}:/opt/IBM/ondemand/V10.1/bin
To run the ARSXML command, change directories to the Content Manager OnDemand XML samplesdirectory.
Run this command:
arsxml add -h <hostname> -u <user> -p <password> -i addusers.xml -v
where<hostname>
Hostname for the Content Manager OnDemand system<user>
A Content Manager OnDemand user which has authority to add users and printers
168 Content Manager OnDemand for Multiplatforms: Administration Guide

<password>One of the following options:
• The name of the stash file that contains the password for the Content Manager OnDemand user.• The password for the Content Manager OnDemand user.• Blank. The user is prompted for the password. If the user does not have a password, press enter at
the blank.
The XML file contains user passwords of different lengths. If the Content Manager OnDemand systemwhere these users are created has different password restrictions, you might need to change thesepasswords before you run the command.
After you run the command, you should receive several messages stating that a printer, and five usershave been added successfully.
If the command is properly run, you should be able to use the Content Manager OnDemand systemadministrator GUI to view the newly added users and printer.
To remove the newly added objects, run this command:
arsxml delete -h <hostname> -u <user> -p <password> -i deleteusers.xml -v
There are several other sample XML files that can be used. However, they depend on the users that arecreated by the addusers.xml file.
Common problems during installation
The following information describes some common errors that you might encounter during installationverification.A parsing error occurred in file xxxx/samples/addusers.xml, Line 3, Column 62: cvc-elt.1: Cannotfind the declaration of element onDemand.
This error usually indicates that the Content Manager OnDemand schema file, ondemand.xsd, wasnot found. See “Installation verification” on page 168 and make sure that the ARSXML command is runfrom correct directory.
The sample files require that the Content Manager OnDemand schema file be located in the directory"above" where the ARSXML command is run. If changes are made to the sample files, it might benecessary to update the location of the schema file within the sample files to the full path name of theondemand.xsd file.
Importing an XML file into a Content Manager OnDemand system
About this task
Importing an XML file that contains administrative objects into a Content Manager OnDemand system is atwo-step process:
Procedure
1. Preparing an XML file for the import process2. Importing the XML file by using the ARSXML command
Preparing an XML file for the import process
About this task
Before importing data into a Content Manager OnDemandsystem, you need to have an XML file thatcontains all the data that needs to be imported. The XML file can be either created during a previous XML
Importing and exporting administrative objects through an XML interface 169

export process or written new. If you decide to develop your own XML file, you must follow the format ofthe Content Manager OnDemand XML schema file.
The Content Manager OnDemand XML schema file defines the syntactical format for all Content ManagerOnDemand XML files, and is used during the import process to validate the contents of the import XMLfile. For different objects, the schema file specifies which fields are required and which fields are optional.Also, the schema file can establish a list of valid values for certain fields.
Creating an XML fileOccasionally, you need to create a Content Manager OnDemand XML file, and this section discusses theoverall syntax and layout of the XML file. The XML syntax discussed in this section helps you understandXML to be able to construct the XML objects which are used by Content Manager OnDemand. For moredetailed information on XML and specific XML syntax information, reference XML documentation.
Overall file structure
A Content Manager OnDemand XML file is a basic text file that can be created by the user.
Every Content Manager OnDemand XML file will contain the following:
• An XML identifier tag• A Content Manager OnDemand identifier tag• One or more Content Manager OnDemand objects• A Content Manager OnDemand ending tag
XML identifier tagThe XML identifier tag specifies the version of XML that is used and the encoding that is used. Thestandard XML identifier is:
<?xml version="1.0" encoding="UTF-8"?>
Content Manager OnDemand identifier tagThe Content Manager OnDemand identifier tag specifies what the XML file is used for and whatschema file to use. The standard Content Manager OnDemand identifier is:
<onDemand xmlns:xsi="http://www.w3.org/2001/XMLSchema-instance" xsi:noNamespaceSchemaLocation="ondemand.xsd">
The name of the ondemand.xsd file, shown here as "ondemand.xsd", should be changed toreference the Content Manager OnDemand XML schema file which is located in the Content ManagerOnDemand bin/xml directory.
OnDemand objectsSee “Objects and data model used in the Content Manager OnDemand XML file” on page 359 forobjects and data model used in the XML file.
OnDemand ending tagThe Content Manager OnDemand ending tag indicates the end of the Content Manager OnDemandXML file. The ending tag is:
</onDemand>
Every standard Content Manager OnDemand XML file looks like this:
<?xml version="1.0" encoding="UTF-8"?>
<onDemand xmlns:xsi="http://www.w3.org/2001/XMLSchema-instance" xsi:noNamespaceSchemaLocation="ondemand.xsd"> ... Content Manager OnDemand Objects ...</onDemand>
170 Content Manager OnDemand for Multiplatforms: Administration Guide
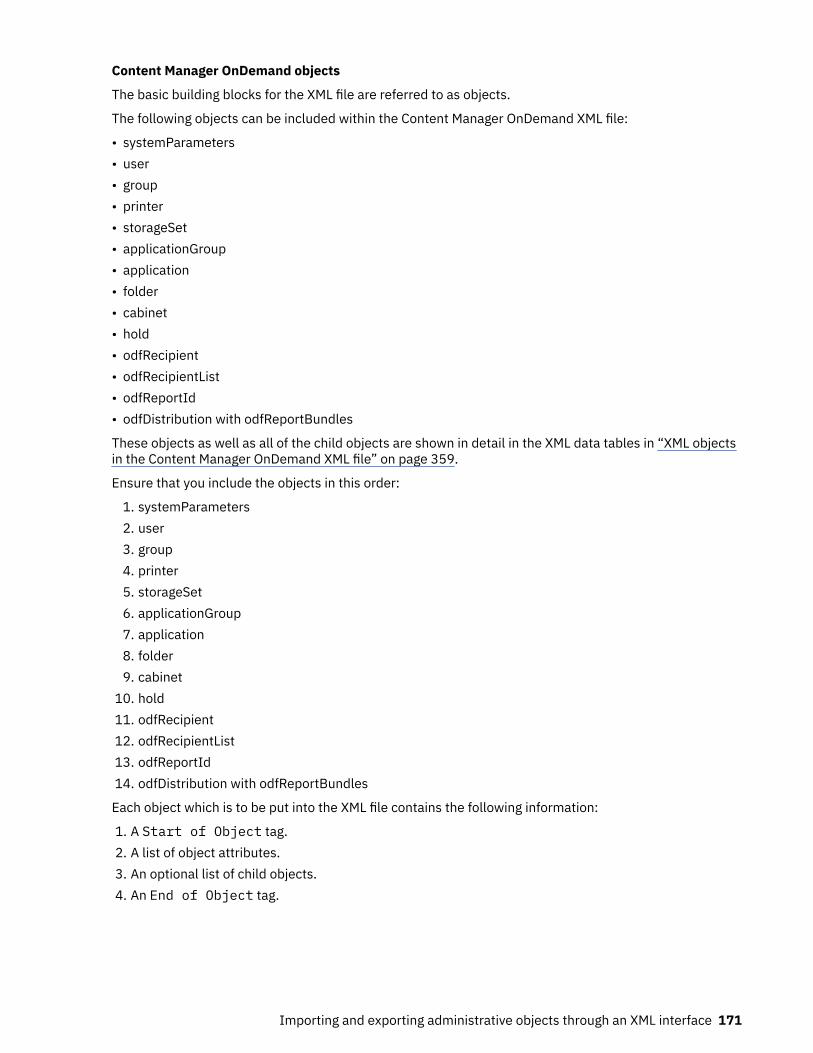
Content Manager OnDemand objects
The basic building blocks for the XML file are referred to as objects.
The following objects can be included within the Content Manager OnDemand XML file:
• systemParameters• user• group• printer• storageSet• applicationGroup• application• folder• cabinet• hold• odfRecipient• odfRecipientList• odfReportId• odfDistribution with odfReportBundles
These objects as well as all of the child objects are shown in detail in the XML data tables in “XML objectsin the Content Manager OnDemand XML file” on page 359.
Ensure that you include the objects in this order:
1. systemParameters2. user3. group4. printer5. storageSet6. applicationGroup7. application8. folder9. cabinet
10. hold11. odfRecipient12. odfRecipientList13. odfReportId14. odfDistribution with odfReportBundles
Each object which is to be put into the XML file contains the following information:
1. A Start of Object tag.2. A list of object attributes.3. An optional list of child objects.4. An End of Object tag.
Importing and exporting administrative objects through an XML interface 171

Start of Object
An object is specified in the XML file by placing the object name after a < symbol. For example,
<user
starts a user object.
Important: The capitalization of the object names is important and should be used exactly as shown inthe data tables in “Objects and data model used in the Content Manager OnDemand XML file” on page359.
Object attributes
All of the information about the object is contained within the object attributes. To add an attribute,specify the attribute name followed by an "=" symbol followed by the value of the attribute in doublequotes. (Note: all attribute values need to be enclosed in a set of double quotes even if the value is anumeric value or a single character.) After all of the attribute values the '>' character is used to indicatethe end of the object tag. For example,
<user name="SAMPLEUSER" phone="(212) 555-1212" timeOut="4" >
Indicates a user with a name of SAMPLEUSER, a phone number of (212) 555-1212, and a timeout valueof 4 minutes. All of the attributes that can be specified for each object as well as the possible valuesand default values are shown in the XML data tables.
Important:
1. The capitalization of the object names is important and should be used exactly as shown in the datatables in “Objects and data model used in the Content Manager OnDemand XML file” on page 359.
2. Unless you set Case Sensitivity as one of the system parameters, when you add a user, ContentManager OnDemand converts lowercase letters in the user ID to uppercase. You can type the user IDin uppercase, lowercase, or mixed case letters. In the above example, whether you enter the user IDas SAMPLEUSER, sampleuser, or SampleUser, Content Manager OnDemand automatically convertsit to SAMPLEUSER.
Child objects
Child objects are constructed the same way as the nine main Content Manager OnDemand objects. Allchild objects must occur after the object to which they are associated with and before the end of theobject tag. In this example, there are two user permission children for the SampleUser user.
<user name="SampleUser" phone="(212) 555-1212" timeOut="4" ><permission user="APP1" adminAuthority="Yes" /><permission user="APP2" adminAuthority="Yes" />
Important: If an object cannot contain any children, such as the permission objects shown above, it mustbe ended with a slash / and the > symbol.
See “XML objects in the Content Manager OnDemand XML file” on page 359 for detailed informationabout the types of child objects that each object can have and, in some cases, the maximum number ofchild objects that can be created.
Some of the child objects themselves can have children. These are defined in the same way as above. Seethe second example in the Examples section below.
172 Content Manager OnDemand for Multiplatforms: Administration Guide

End of object
The last item the user object needs is the end of object tag. This is indicated by placing the name ofthe object between </ and >. For example,
</user>
indicates the end of the user object.
As with any object if the object does not contain child objects, the object can be ended by placing a /> atthe end of the object definition. So the following,
<group name="Sample" gid="1084000"></group>
is equivalent to:
<group name="Sample" gid="1084000"/>
Examples
The following is a complete Content Manager OnDemand XML file that contains two users and a usergroup.
<?xml version="1.0" encoding="UTF-8"?><onDemand xmlns:xsi="http://www.w3.org/2001/XMLSchema-instance" xsi:noNamespaceSchemaLocation="ondemand.xsd">
<user name="SampleUser1" email="[email protected]" printer="Sample" userType="User Admin" createFoldersAuth="Yes"> <permission user="SampleUser2" adminAuthority="Yes" /> <permission user="SampleUser3" adminAuthority="No" /> <permission group="SampleGroup1"/> </user>
<user name="SampleUser2" password="xxxxxxx" timeOut="No Limit" description="This is a description of Sample User Two"> </user>
<group name="SampleGroup1" description="A Sample Group Number One" ownerUser="Admin"> <user name="SampleUser2"/> <user name="SampleUser3"/> </group>
</onDemand>
The following example shows a folder with a field child and the field child has a fieldInfo child.
<?xml version="1.0" encoding="UTF-8"?><onDemand xmlns:xsi="http://www.w3.org/2001/XMLSchema-instance" xsi:noNamespaceSchemaLocation="ondemand.xsd"> <folder name="FolderOne" searchType="Hit List"> <field name="cost" fieldType="Decimal" > <fieldInfo user="SampleUser" sortOrder="2" greaterThan="Default" lessThan="Yes"/> </field>
Importing and exporting administrative objects through an XML interface 173

</folder></onDemand>
Creating Content Manager OnDemand XML files for update
When creating an XML file to be used for updating information, the syntax and layout of the file are thesame as discussed in the previous section. However, there are two major differences.
• Only the fields which are intended to be updated need to be specified.• Child objects might contain an additional attribute, task. The task attribute indicates the task that is
performed by the child object.
Each object that you update must contain the name of the object. Any other attributes that are specifiedare updated to the specified value. If an object that is updated requires a change to another object, thatobject must be included in the XML file before the object that references it. For example, to change theuser SampleUser to timeout after 10 minutes, you need to put the following XML code into an XML file.
<user name="SampleUser" timeOut="10"/>
When you specify some special characters in XML, you need to use the XML specification. For example:
Table 12: XML specification for special characters
XML code Character
& &
' '
" “
< <
> >
Your input file might look like this:
...<user name="DBRYANTDEU" acctInfo="Engraving & Printing"
To rename some objects, you should use the newName attribute. For example, to change the name of aprinter from Boston to New York, use the following XML code during an update:
<printer name="Boston" newName="NewYork"/>
Most objects might contain a set of similar child objects. To update these objects, you should use the taskattribute. The task attribute can have three values:add
Indicates that the child object should be added to the parent object. The default value for the taskattribute is add. However, some child objects do not contain a task attribute. For those objectswithout a task attribute, the action taken for the object is the same action as the parent object.
updateThis indicates that the child object already exists and should be updated with the attributes provided.
deleteThis indicates that the child object already exists and should be removed from the parent object.
The task attribute is only examined during an update process. To add, update or delete a child object, theparent object must be specified, and must contain the child object to be updated. See the examplesbelow.
174 Content Manager OnDemand for Multiplatforms: Administration Guide

The default value for the task attribute is "add". However, some child objects do not contain a taskattribute. For those objects without a task attribute, the action taken for the object will be the same actionas the parent object.
If an object that is updated requires a change to another object, that object must be included in the XMLfile before the object that references it.
Examples
To add a permission for the user SampleUser to the folder FolderOne, the following code could be usedduring an update:
<folder name="FolderOne"><permission user="SampleUser" adminAuthority="Yes" maxHits="No Limit" /></folder>
To remove the admin authority permission from SampleUser on the folder FolderOne, you need toupdate the permission child. The following code is an example:
<folder name="FolderOne"><permission task="update" user="SampleUser" adminAuthority="No" /></folder>
To remove the SampleUser permission from the folder, you need to delete the permission child.
<folder name="FolderOne"><permission task="delete" user="SampleUser"/></folder>
Creating Content Manager OnDemand XML files for delete and export
When creating a Content Manager OnDemand XML file to be used to export or delete objects, the syntaxand layout of the file is the same as discussed above, however there are two major differences:
• The only attribute field which is examined is the name field.• All child objects are ignored.
When you export or delete objects, the only information that is required is the name of the object(s).Other attributes might be present in the XML file, but they are ignored. Child objects cannot be deletedthrough the delete process, they can be deleted only during an update process by using the attributetask="delete".
When you specify an application for delete or export, you must also specify the name of the applicationgroup in which the application is contained.
To export the users, SampleOne, SampleTwo and SampleThree, the following Content ManagerOnDemand XML file can be used during an export:
<?xml version="1.0" encoding="UTF-8"?><onDemand xmlns:xsi="http://www.w3.org/2001/XMLSchema-instance" xsi:noNamespaceSchemaLocation="ondemand.xsd">
<user name="SampleOne"/><user name="SampleTwo"/><user name="SampleThree"/></onDemand>
To delete the printer, OldPrinter, and the folder, MyFolder, use the following XML code:
<printer name="OldPrinter"/><folder name="MyFolder"/>
Importing and exporting administrative objects through an XML interface 175

To delete all defined printers, export all the printers by using the following XML code and command:
<printer name="_ALL"/>
arsxml export -h <host> -u <uid> -p <password> -i input.xml -o allprinters.xml
Then use the output from this command to feed the delete command:
arsxml delete -h <host> -u <uid> -p <password> -i allprinters.xml
When you specify an application for delete or export, the name of the application group in which it iscontained must also be specified.
Application Index Parameter Object
The indexParm child object of the application object has a slightly different syntax than all other objects.Due to the nature of the data associated with the Index Parameters it is not appropriate to use an objectattribute to specify this information. Therefore, for this object (and only this object), the data associatedwith the object is simply the character data which appears between the <indexParm> and the </indexParm> flags.
For example, the following code can be used to set the index parameters associated with the SampleAppapplication:
<application name="SampleApp" .... ><indexParm>*dummy index parametersparm1=value;parm2=value;parm3=value;</indexParm></application>
Importing the XML file by using the ARSXML command
About this task
Use the ARSXML command to import the XML file into the Content Manager OnDemand system. Forsyntax, description, and parameters of this command, see “Purpose” on page 305.
Exporting Content Manager OnDemand administrative objects to an XML file
About this task
You can use the ARSXML command to export objects from Content Manager OnDemand into an XML file inseveral ways:
• Export a single object, such as a single user• All of the defined objects of a particular type, for example, all user groups• Any combination of objects, for example, a user group and all users in that group
This feature can be used to backup part of a Content Manager OnDemand system, copy objects from onesystem to another, or store objects into an XML file so that they can be processed by another application.
Use the ARSXML command to export administrative objects into an XML file. For syntax, description, andparameters of this command, see “Examples” on page 312.
176 Content Manager OnDemand for Multiplatforms: Administration Guide

If you are exporting objects that have dependencies on other objects: Some objects in ContentManager OnDemand might have dependencies on other objects, for example, a group object has adependency on all of the users that are defined within the group. When you export these objects, you canuse the —r parameter with a value of d to include in the XML file all of the dependent objects that theexported objects might have.
See “Examples” on page 312 for more example XML files that are generated in different export scenarios.
Importing and exporting administrative objects through an XML interface 177

178 Content Manager OnDemand for Multiplatforms: Administration Guide

Chapter 27. Command overview
The commands contained in this reference are Content Manager OnDemand programs that you can use toperform server, archive storage manager, and database manager functions. The commands are presentedin alphabetical order. Each command contains a description of its purpose and syntax (includingdescriptions of the parameters that can be used). Examples and general information about using thecommands have also been included.
Examples of commands in this book may appear on one or more lines, for example:
arsdate -z "05/04/12 12:00:00"
05/04/12 12:00:00 -> 1336154400
However, when you enter the command information at the prompt, you must type the entire command,parameters, and values on a single line.
The Content Manager OnDemand server program (ARSSOCKD or ARSOBJD in UNIX; LibSrvr or ObjSrvr inWindows) must be running; otherwise the commands will fail.
Reading a syntax diagram
About this task
A syntax diagram shows you how to specify a command so that the operating system can correctlyinterpret what you type.
Read a syntax diagram from left to right and from top to bottom, following the horizontal line (the mainpath). If the line ends with an arrowhead, the command syntax is continued and the next line starts withan arrowhead. Facing arrowheads mark the end of the command syntax.
When you type a command from the syntax, be sure to include punctuation, such as commas and equalsigns.
Parameters are classified as keywords or variables:
• Keywords represent constants and are shown (in syntax) in uppercase letters; however, at the commandprompt, you can enter keywords in either uppercase or lowercase. An example of a keyword is acommand name. On UNIX servers, command names are case sensitive. On Windows servers, commandnames are not case sensitive.
• Variables represent names or values you supply and are shown (in syntax) in lowercase letters;however, at the command prompt, you can enter variables in either uppercase or lowercase unless thesyntax directions explicitly state the case restrictions. An example of a variable is a file name.
On UNIX servers, file names are case sensitive. On Windows servers, file names are not case sensitive.
A parameter can be a combination of a keyword and a variable.
Required parameters are displayed on the main path.
COMMAND required parameter
Optional parameters are displayed below the main path.
COMMAND
optional parameter
© Copyright IBM Corp. 1993, 2018 179

A stack of parameters, with the first parameter displayed on the main path, shows that you must chooseone of the parameters.
COMMAND required choice 1
required choice 2
A stack of parameters, with the first parameter displayed below the main path, shows that you canchoose one of the parameters.
COMMAND
optional choice 1
optional choice 2
An arrow returning to the left, above the path, shows that items can be repeated following theseconventions:
• If the repeat arrow contains a break, the item can be repeated in a list with the items separated byblank spaces.
COMMAND repeatable parameter
• If the repeat arrow contains a comma, the item can be repeated in a list with the items separated bycommas.
COMMAND
,
repeatable parameter
You can repeat items from parameter stacks following the stack conventions for required and optionalparameters described previously.
Some syntax diagrams contain parameter stacks within other parameter stacks. You can only repeatitems from stacks according to the conventions described previously. That is, if an inner stack does nothave a repeat arrow above it but an outer stack does, you can choose only one parameter from the innerstack and combine it with any parameter from the outer stack, and that combination can be repeated. Forexample, the following diagram shows that you could combine parameter choice2a with parameterchoice2 and then you can repeat that combination again (choice2 plus choice2a).
COMMAND
,
parameter choice1
parameter choice2
parameter choice2a
parameter choice2b
parameter choice2c
parameter choice3
Some commands are preceded by an optional path parameter.
path
COMMAND
180 Content Manager OnDemand for Multiplatforms: Administration Guide

If you do not supply the path parameter, the system searches the current directory for the command. Ifthe command is not in the current directory, the system continues to search for the command using thedirectories defined in the PATH environment variable.
Some commands in this section have several formats that accomplish the same task. These commandsappear (in syntax) similar to the following:
COMMAND FORM1
COMMAND FORM2
The description of the command directs you to the correct format to use.
Using quotes in commands
About this task
When you run a Content Manager OnDemand program from the command line and you specify parametervalues that contain a null (blank) character or some other special character (such as the parenthesis), ifthe command line interpreter of the operating system from which you are running the command requiresthe quoting of special characters, then you must delimit the parameter value with double quotation markcharacters.
For example, when running the ARSDOC GET program from the command line under UNIX and youspecify the -o parameter to specify one or more database field names, then in addition to delimiting eachfield name with parenthesis, you must also delimit the entire parameter value with double quotation markcharacters. For example:
-o "(sdate)(student)"
However, if you were to run the same program under Windows, then you would not need the doublequotation mark characters. For example:
-o (sdate)(student)
See your operating system documentation for more information about quoting and running commands.
Note: There are some exceptions to this rule, where quotes might always be required. See the specificcommands in this reference to identify specific instances where parameters and values may alwaysrequire quoting.
Removing trailing blank characters
About this task
Trailing blank characters are trimmed from the name when adding or updating the following objects:
• application• application group• folder• hold• printer• storage set• cabinet
Command overview 181

As a reminder, for existing objects, the name specified to a command line program must include trailingblank characters that are part of the name.
Using the h and I parameters
About this task
The Content Manager OnDemand programs use the -h and -I parameters to determine the name of theContent Manager OnDemand instance to process. You must specify the parameter and name the instanceif any of the following are true:
• The name of the default instance is archive and you are using a port number other than the defaultport number (1445).
• The name of the default instance is not archive.• You are running more than one instance on the same workstation and you want to process an instance
other than the default instance.• You are running the program from an object server that resides on a different system or node than the
library server.
The Content Manager OnDemand programs locate the specified instance name in the ARS.INI file (UNIXservers; the registry for Windows servers) to determine the TCP/IP address, host name alias, or fully-qualified host name of the system on which the Content Manager OnDemand library server is running andother information about the instance. The ARSADMIN, ARSDOC, and ARSLOAD programs support the -hparameter. The ARSDB, ARSLOAD, ARSMAINT, and ARSTBLSP programs support the -I parameter. Forthe ARSLOAD program, if both the -h and -I parameters are specified, the value of the last parameterspecified is used.
Working with instancesA Content Manager OnDemand instance is a logical server environment made up of a database, a libraryserver, and one or more object servers. An instance is defined in the ARS.INI file by specifying a uniquename for the instance, identifying the userid of the instance owner, and identifying the library server onwhich the database will be maintained.
You can run multiple instances on the same workstation or node, with each instance configureddifferently:
• To have separate test and production environments• To have databases using different code pages
Each instance has different security from other instances on the same machine. You must define usersand groups to each instance and set application group and folder permissions for users of each instance.Each instance has its own system log.
When you work with more than one instance, you must identify the instance name when you run ContentManager OnDemand programs (such as ARSDB, ARSLOAD, and ARSSOCKD) and database commands(such as connecting to the database).
When the Content Manager OnDemand client programs connect to an instance, they must specify theTCP/IP port number over which the instance listens for requests from clients. Each instance that isoperating on the same workstation must use a different TCP/IP port number.
See IBM Content Manager OnDemand for Multiplatforms: Installation and Configuration Guide forinformation about configuring and creating instances, including:
• Adding an instance to the ARS.INI file• Modifying the server configuration in the ARS.CFG file• Defining table space file systems in the ARS.DBFS file
182 Content Manager OnDemand for Multiplatforms: Administration Guide

• Defining cache file systems in the ARS.CACHE file• Automating instance operations
The following topics in this section describe how to work with Content Manager OnDemand instances:
• Manually starting and stopping instances• Connecting to instances• Working with instances
Manually starting and stopping instances
You must start an instance before clients can connect to databases on the instance.
To start an instance:
1. Log on as the root user or instance owner.2. Start the instance:
arssockd test arssockd
Where test is the name of the instance that you want to start. The name test is the value of theSRVR_INSTANCE parameter in the ARS.INI file.
3. Use the PS command to verify that the instance started:
ps -ef ¦ grep ars
root 6014 28991 0 60 13:30:13 - 0:00 arssockd -test: (accepting)
To stop an instance:
1. Log on as the root user or the instance owner.2. Use the ARSSOCKD command to stop the initial ARSSOCKD process. If there is more than one
ARSSOCKD process running, determine the initial ARSSOCKD process. The initial ARSSOCKD processhas a status of accepting:
ps -ef ¦ grep ars
root 6022 28991 0 60 13:43:03 - 0:00 arssockd: db (USERID) root 6018 28991 0 60 13:33:03 - 0:00 arssockd: db (idle) root 6014 28991 0 60 13:30:13 - 0:00 arssockd -arssockd: (accepting)
3. Then stop the accepting process. For example:
arssockd stop 6014
The initial process and all of its children will be stopped.
Note:
1. When you stop the server process, all users who are connected over the network to the ContentManager OnDemand system are disconnected. Therefore, it is a good idea to warn connected usersbefore stopping the server process.
2. The ARSSOCKD STOP command is for UNIX servers only. For Windows servers, the server process runsas a service. The service can be stopped by using the Services administrative tool in Windows or theContent Manager OnDemand Configurator V10.1 client.
3. To stop an instance when you are running more than one instance on the same workstation or node,make sure that you kill the correct accepting ARSSOCKD process. There is no instance nameassociated with the accepting ARSSOCKD process for the default instance (the default instance name
Command overview 183

is archive). The following shows an example of the processes for two instances: the default instanceand an instance named test:
ps -ef ¦ grep ars
root 3326 25955 0 60 10:03:59 - 0:00 arssockd: db (USERID) root 3303 25955 0 60 10:03:31 - 0:00 arssockd: db (idle) root 3299 25955 0 60 10:01:45 - 0:00 arssockd: (accepting) root 6022 28991 0 60 13:43:03 - 0:00 arssockd: db (USERID) root 6018 28991 0 60 13:33:03 - 0:00 arssockd: db (idle) root 6014 28991 0 60 13:30:13 - 0:00 arssockd -TEST: (accepting)
In the example, process 3299 belongs to the default instance and process 6014 belongs to theinstance named test.
Connecting to instancesConnecting from Content Manager OnDemand clients
To connect to a particular instance, the client must log on to the correct library server. Use the UpdateServers dialog box to add library servers to the client. When you add a library server, you identify thehost name of the library server and the port number and communications protocol used tocommunicate with the instance. The port number that you specify in the Update Servers dialog boxmust be the same as the value that you specified for the PORT parameter in the ARS.INI file.
Connecting to a databaseYou can connect to a database using the DB2 command line processor or other tools provided withDB2. To connect to and use a database, log on as root, the instance owner, or some other user thatbelongs to the instance owner's primary group.
You can connect to only one database at a time. If you are currently connected to a database, youmust disconnect from that database before you can connect to a different database.
Working with instances
Content Manager OnDemand provides programs that you can use to work with an instance. For example,Content Manager OnDemand provides programs to create databases, start instances, load data, andmaintain index data. One of the parameters that you can specify to a program is the name of the instance.If you do not specify otherwise, the name of the instance is archive. If you name your first or onlyinstance something other than archive or you work with more than one instance, you should alwaysspecify the name of the instance when you run a program. That way you can make sure you are workingwith the correct instance. Depending on the program that you need to run, there are different ways thatyou can specify the name of the instance.
The ARSADMIN, ARSDB, ARSLOAD, ARSMAINT, and ARSSYSCR programs use the –I instanceparameter. Content Manager OnDemand retrieves the host name of the library server that is associatedwith the instance from the HOST parameter in the ARS.INI file. For example:
arsdb -I test -gcv arssyscr -I test -l arsload -I test -d /arsacif/test/acif1 -c /arsacif/test/acif2
Where test is the name of the instance, and matches the value of a SRVR_INSTANCE parameter in theARS.INI file.
The ARSSOCKD and ARSOBJD programs use the following syntax:
arssockd test arssockd arsobjd test arsobjd arssockd stop test
184 Content Manager OnDemand for Multiplatforms: Administration Guide

Where test is the name of the instance, and matches the value of a SRVR_INSTANCE parameter in theARS.INI file.
Command overview 185

186 Content Manager OnDemand for Multiplatforms: Administration Guide

Chapter 28. ARSADMIN
PurposeThe ARSADMIN program provides functions that can help you manage storage objects, index data, andspecific documents in storage objects.
Description and syntaxThe ARSADMIN program provides the following functions:Unload
The Unload function can be used to delete the storage objects and index data that were loaded intothe system during input processing. To use the Unload function, you must specify a load ID. The LoadID represents the database rows and storage objects that were created when an input file was loadedinto the system.
To get a load ID, in the Windows client, right-click a report and get a partial load ID, then search in thesystem log for an 87 message to find the full load ID.
You would typically use the Unload function to manually remove an input file (report) from the system.You can also use the Unload function to delete data that was created during testing. You must specifythe user ID of a user that is permitted to delete documents from the application group. TheARSADMIN program searches the system log for the specified Load ID. If the Load ID is not found inthe system log, the unload will fail unless you specify the -Q parameter.
arsadmin unload -g applGroup -h instance -L loadID
-p password -Q -u userid
-1 trace_file -2 level
ImportThe Import function can be used to import migrated index data from archive storage to the database.When Content Manager OnDemand determines that a query requires index data that has beenmigrated to archive storage, then a message is sent to stdout (UNIX servers) or the console (Windowsservers) and saved in the system log. An administrator must use the ARSADMIN program to importthe required table or tables into the database. After the index data has been imported, the user cantry the query again.
Note: Importing migrated index data requires additional space in the database, additional log filestorage, and additional temporary space.
arsadmin import -g applGroup -h instance
-p password
-u userid -1 trace_file -2 level
tableName
StoreThe Store function can be used to copy storage objects from one storage location to another. Forexample, you could copy a storage object from cache storage to a primary storage node.
© Copyright IBM Corp. 1993, 2018 187

arsadmin store
-d directory
-g applGroup -h instance
-m
7
1
2
3
4
5
6
-n prinid-secnid
-p password
-u userid -1 trace_file -2 level
filename
RetrieveThe Retrieve function can be used to retrieve a storage object from a specified location. For example,you could retrieve a storage object from cache storage or a primary storage node. After retrieving astorage object, you could use the Decompress function to extract a specific document from thestorage object file.
arsadmin retrieve
-b offset -d directory
-g applGroup -h
instance
-l length
-m
7
1
2
3
4
5
6
-n prinid-secnid
-p password -u userid -1 trace_file -2 level
filename
CompressThe Compress function is used to compress input files in preparation for creating storage objects.
The Compress function can also be used to estimate the amount of storage space required to store aninput file in the system:
• To estimate the amount of storage required to load an input file that contains logical items, such asbills, invoices, or statements, first extract a representative sample of data from an input file. Thencompress the sample with the -l parameter. Divide the size of the compressed output file by thenumber of bytes of input data that you compressed. The result is the compression ratio achieved.
188 Content Manager OnDemand for Multiplatforms: Administration Guide

• To estimate the amount of storage required to store an input file that contains transaction data, firstextract a representative sample of data from an input file. Then compress the sample with the -lparameter. Divide the size of the compressed output file by the size of the input file. The result is thecompression ratio achieved.
To determine the best compression method for a particular type of input data, IBM recommends thatyou compress a sample of the data using each of the four compression methods provided by ContentManager OnDemand (LZW12, LZW16, OD77, OD77Lite, OD77HW, and OD77LiteHW). Compare thecompressed file sizes and the time required to compress the data to determine the best compressionmethod for the input data.
arsadmin compress
-b offset
-c
'O'
'L'
'N'
'D'
-l length
-o outputFile -s sourceFile
-1 trace_file -2 level
DecompressThe Decompress function can be used to extract a specific document from a storage object file. Thedocument can then be sent to a printer or viewed with the appropriate viewing program. You must firstcreate the storage object file with the Retrieve function. Storage objects whose applications aredefined to use Large Object cannot be decompressed by using this command.
arsadmin decompress
-b offset
-c
'O'
'F'
'Z'
'L'
'N'
'D'
-l length
-o outputFile -s sourceFile
-1 trace_file -2 level
ICUThe ICU function converts a document from one code page to another code page. The icu functionwould be used if a document is stored in OnDemand in one code page and then is retrieved anduncompressed on a system that uses a different code page than what the document was stored in; thefile would then need to be converted.
arsadmin icu -s sourceFile -F sourceCodeSet -o outputFile -T
outputCodeSet
-1 trace_file -2 level
Parameters-b offset
ARSADMIN 189

For the RETRIEVE function, the offset (in bytes) into the specified storage object where theARSADMIN program begins a partial storage object retrieval. The default is the first byte inthe storage object.
For the COMPRESS function, the offset (in bytes) from the beginning of the file where theARSADMIN program begins data compression. The default is 0 (zero).
For the DECOMPRESS function, the offset (in bytes) from the beginning of the file where theARSADMIN program begins data decompression. The default is 0 (zero).
-c typeFor the COMPRESS and DECOMPRESS functions, the compression type for source files.Options are 'F' for OD77Lite, 'O' for OD77 compression (the default), 'L' for LZW12compression, 'Z' for LZW16 compression, 'N' for no compression, and 'D' for disablecompression. Storage objects whose applications are defined to use Large Object cannotbe decompressed by using the DECOMPRESS function.
-d directoryFor the STORE function, the name of the directory that contains the storage object file toload. The default is the directory from which the ARSADMIN program was invoked.
For the RETRIEVE function, the directory in which the ARSADMIN program writes the filethat contains the storage object retrieved from Content Manager OnDemand. The default isthe directory from which the ARSADMIN program was invoked.
-FFor the ICU function, specifies the code set for the document specified by the -s parameter.
filenameFor the STORE function, the name of the storage object file (or files) to load. To specifymore than one storage object file, separate the file names with the blank character.
For the RETRIEVE function, the name of the storage object or objects to retrieve. To specifymore than one storage object file, separate the file names with the blank character. Alsodetermines the name of the file that the ARSADMIN program creates in the directoryspecified with the -d parameter.
-g applGroupThe name of the application group from which Content Manager OnDemand extractsprocessing information and stores the data.
-h instanceThe name of the Content Manager OnDemand instance to process. The ARSADMINprogram will attempt to locate the specified instance name in the ARS.INI file (UNIXservers) or the registry (on Windows servers) to obtain the TCP/IP address, host name orhost name alias of the workstation or node on which the instance is running. If theARSADMIN program cannot locate the instance name in the ARS.INI file, the specifiedvalue is treated as a host name.
The -h parameter is required for all functions, except COMPRESS, DECOMPRESS, and ICU.
If you are running multiple instances of Content Manager OnDemand on the sameworkstation, always specify the -h parameter to identify the name of the instance that youwant to process. Verify that the system is configured with the correct information for allinstances of Content Manager OnDemand. See IBM Content Manager OnDemand forMultiplatforms: Installation and Configuration Guide for information about configuringinstances.
-l lengthFor the RETRIEVE function, the number of bytes that the ARSADMIN program retrievesfrom the specified storage object. The -l parameter and the -b parameter provides supportfor partial storage object retrieval.
190 Content Manager OnDemand for Multiplatforms: Administration Guide

For the COMPRESS function, the number of bytes (from the offset) of data to compress.The default is zero bytes, meaning all the remaining bytes in the file.
For the DECOMPRESS function, the number of bytes (from the offset) of data todecompress. The default is zero bytes, meaning all the remaining bytes in the file.
-L loadIDIdentifies the value that Content Manager OnDemand generates to uniquely identify aninput file that was loaded into the system. The Load ID contains the following parts:
agid-pri_nid-sec_nid-docid-start_date-stop_date-aid
The following list describes each part:agidApplication group identifier.docidDocument identifier.pri_nidPrimary storage node.sec_nidSecondary storage node.start_dateFirst date in the report. The format of the date is YYYYMMDDHHMMSS. Loads created withversions of Content Manager OnDemand prior to version 9.0 use an older, internal dateformat for this part.
The value of this part can also be 0.
stop_dateLast date in the report. The format of the date is YYYYMMDDHHMMSS. Loads created withversions of Content Manager OnDemand prior to version 9.0 use an older, internal dateformat for this part.
The value of this part can also be 0.
aidApplication identifier. This part is optional.If you redirected the output of the ARSLOAD program or the Load function to a log file, seethe log file for the Load ID that was created during load processing.
For the UNLOAD function, the Load ID that you want to delete. When recovering from asystem failure or some other problem that occurred during input processing, you shoulddelete the last (or only) Load ID that is listed in the log file.
In the Windows client, you can right-click and get a partial load ID, and then check thesystem log for an '87' message to find the full load ID.
-m locationDetermines the location(s) of the storage objects that are processed by the storagemanager. Possible locations are cache storage, the primary storage node, and thesecondary storage node. The default value is 7, which specifies that the storage managershould process the storage objects for all of the locations that are specified in theapplication group. Specify 1 for cache storage, 2 for the primary storage node, or 4 for thesecondary storage node. The values are additive; that is, if you specify a value of 3, thenthe storage manager processes the storage objects in cache storage and the primarystorage node.
-N
ARSADMIN 191

For the UNLOAD function, allows you to attempt to unload data even if the Load ID is notpresent in the system log.
-n prinid-secnidThe primary and secondary storage node identifiers for the application group. Separate theidentifiers with the - (dash) character.
Content Manager OnDemand stores the primary and secondary storage node identifiers inthe database when you load data into an application group. Content Manager OnDemandincludes the identifiers in the Load ID.
The values specified with the -n and -g parameters enable the ARSADMIN program to storedata on or retrieve data from a specific Content Manager OnDemand object server.
-o outputFile
For the COMPRESS function, the name of the compressed output file.
For the DECOMPRESS function, the name of the file that contains the uncompresseddocument.
For the ICU function, specifies the name of the file that will contain the document after ithas been converted to the code set specified by the -T parameter.
For the Trace function, specifies the name of the output XML file.
-p passwordSpecify one of the following options for password:
• The name of the stash (encrypted password) file that contains the password for the userID specified with the -u parameter.
• The password for the Content Manager OnDemand user ID specified with the -uparameter. If the user ID is not assigned a password, then enter a null password (that is,specify -p ""). If you do not specify the -p parameter while you specify the -uparameter, then the program retrieves the password for the user ID from the stash filespecified in ARS.INI file for that instance. If the user ID is not assigned a password, thenpress the Enter key when prompted.
-QFor the UNLOAD function, allows you to force the ARSADMIN program to unload the LoadID named with the -L parameter, even if the Load ID is not found in the system log. If theARSADMIN program does not find the Load ID in the system log and you do not specify the-Q parameter, then the Unload function will fail.
-s sourceFileFor the COMPRESS function, the name of the uncompressed input file.
For the DECOMPRESS function, the name of the storage object file that contains thedocument or resource to be uncompressed. You cannot decompress Large Object datawith the Decompress function.
For the ICU function, specifies the name of the file that contains the document that is in thecode set specified by the -F parameter.
Important: On the Windows platform, this file cannot be a link to another file.
For the Trace function, specifies the name of the binary file that is generated by anyContent Manager OnDemand command.
-TFor the ICU function, specifies the code set for the document specified by the -oparameter.
-u userid
192 Content Manager OnDemand for Multiplatforms: Administration Guide

A Content Manager OnDemand user ID with administrator authority for the applicationgroup. If you do not specify this parameter, then the ARSADMIN program prompts you toenter the user ID.
For the UNLOAD function, the user ID that you specify must have permission to deletedocuments from the application group.
If you do not specify the -p parameter with the -u parameter, the ARSADMIN programretrieves the password for the user ID from the ARS.INI file for that instance.
tableNameFor the IMPORT function, the name of the migrated index table to import into the database.
-1 trace_fileSpecify a fully qualified trace file name as directed by IBM Software Support.
-2 levelSpecify a numeric value as directed by IBM Software Support.
Examples1. The following example shows how to use the UNLOAD function to delete an input file from the system.
arsadmin unload -g Credit -h instance -L loadID -u user2. The following example shows how to use the COMPRESS function to estimate the amount of storage
required for an input file that contains logical items, such as bills, invoices, or statements. TheARSADMIN program compresses the first 200 KB of data in the input file using the default (OD77)compression method.
arsadmin compress -s report_file -o output_file -l 200000
3. The following example shows how to use the COMPRESS function to estimate the amount of storagerequired for an input file that contains transaction data, such as a general ledger. The input file is aportion of a larger input file.
arsadmin compress -s report_file_segment -o output_file
4. The following example shows how to use the IMPORT function to import a migrated index table fromarchive storage into the database. The name of the application group and the index table to import canbe obtained from the message that OnDemand saves in the system log.
arsadmin import -g Credit SL27 -h instance -u user
5. The following example shows how to use the ICU function to convert the input.utf8 file fromUnicode to EBCDIC and save the output in the output.ibm500 file.
arsadmin icu -s input.utf8 -F UTF-8 -o output.ibm500 -T IBM-500
NotesThe Content Manager OnDemandserver program (ARSSOCKD or ARSOBJD in UNIX; LibSrvr or ObjSrvr inWindows) must be running, otherwise the ARSADMIN program will fail.
Files/opt/IBM/ondemand/V10.1/bin/arsadmin
The AIX or Sun Solaris executable program.
ARSADMIN 193

/opt/ibm/ondemand/V10.1/bin/arsadminThe Linux executable program.
\Program Files\IBM\ondemand\V10.1\bin\arsadminThe Windows executable program.
194 Content Manager OnDemand for Multiplatforms: Administration Guide

Chapter 29. ARSAFPD
PurposeThe ARSAFPD command displays information about input files that are loaded into Content ManagerOnDemand.
The command also displays any Advanced Function Presentation (AFP) readable file. The AFP file can be adocument, index or resource file.
ARSAFPD command interprets a subset of valid structured fields only. Structured fields that are notinterpreted are displayed as
nnn ??? Unknown Structured Field
Syntaxarsafpd -d
-t -w
-i file -s
-1 trace_file -2 level
Remember: The -d option and the -s option cannot be used at the same time.
DescriptionThe ARSAFPD command displays information about the format of an input file, or displays an AdvancedFunction Presentation (AFP) readable file.
Parameters-d
Displays an Advanced Function Presentation (AFP) readable file.-i file
The input file name.-s
Display information about the format of the file.-t
Display information about AFP triplets. This option displays more detail about the AFP file.This parameter can be used with the -d parameter only.
-wDisables warning messages. The arsafpd command issues warning messages if the AFPfile is not in the correct format for loading into Content Manager OnDemand. Thisparameter can be used with the -d parameter only. The arsafpd command displays onlyup to 10 warning messages at one time.
-1 trace_file
© Copyright IBM Corp. 1993, 2018 195

Specify a fully qualified trace file name as directed by IBM Software Support.-2 level
Specify a numeric value as directed by IBM Software Support.
Examples
Display file format information
For example, if you use the arsafpd -s -i \acif\input\loan10k.report command to displayinformation, the output could be:
File is ASCII line data.File contains hex 0D0A delimiters.Carriage control type is ANSI (ASCII).
Display AFP file format information
For example, if you use the arsafpd -s -i \acif\input\test.afp command to display AFP formatinformation, the output could be:
File is AFP.File contains group TLE structured fields.
AFP output
For example, if you use the arsafpd -d -i \acif\input\com.afp command to display AFPinformation, the output could be:
1 BDT Begin Document 0070 D3A8A8 2 BNG Begin Named Page Group 00000001 002A D3A8AD 3 TLE Tag Logical Element 0026 D3A090 4 TLE Tag Logical Element 002B D3A090 5 TLE Tag Logical Element 0029 D3A090 6 TLE Tag Logical Element 0039 D3A090 7 TLE Tag Logical Element 002C D3A090 8 TLE Tag Logical Element 002C D3A090 9 TLE Tag Logical Element 0043 D3A090 10 BPG Begin Page 00000001 0029 D3A8AF 11 BAG Begin Active Environment Group 0008 D3A8C9 12 MCF2 Map Coded Font2 0033 D3AB8A 13 NOP No Operation 0008 D3EEEE 14 PGD Page Descriptor 0016 D3A6AF 15 PTD2 Presentation Text Desc2 0016 D3B19B 16 EAG End Active Environment Group 0008 D3A9C9 17 BCT Begin Composed-Text Block 0008 D3A89B 18 PTX Presentation Text Data 12F7 D3EE9B 19 ECT End Composed-Text Block 0008 D3A99B 20 EPG End Page 0010 D3A9AF 21 ENG End Named Group 0010 D3A9AD
AFP with triplet display output
For example, if you use the arsafpd -d -t -i \acif\input\com.afp command to display AFPinformation with the triplet display, the output could be:
1 BDT Begin Document 0070 D3A8A8 BDT Coded Graphic Character Set Triplet (01) BDT Code Page = 500 (1F4)
196 Content Manager OnDemand for Multiplatforms: Administration Guide

BDT Comment Triplet (65) BDT Fully Qualified Name Triplet (02) BDT 01 Replace First GID Name BDT Name = 'TEST.#331027.ACIF.OUTPUT' BDT Fully Qualified Name Triplet (02) BDT 0A Begin Resource Group Reference BDT Name = 'TEST.#331027.ACIF.RESOBJ' BDT Fully Qualified Name Triplet (02) BDT 98 Begin Document Index Reference BDT Name = 'TEST.#331027.ACIF.INDEX'2 BNG Begin Named Page Group 00000001 002A D3A8AD BNG Fully Qualified Name Triplet (02) BNG 01 Replace First GID Name BNG Name = 'AB 00000001' BNG Fully Qualified Name Triplet (02) BNG 8D Begin Medium Map Reference BNG Name = 'F2F515'3 TLE Tag Logical Element 0026 D3A090 TLE Fully Qualified Name Triplet (02) TLE 0B Attribute Name TLE Name = 'ADMIN CD' TLE Attribute Value Triplet (36) TLE Value = 'AB ' TLE Attribute Qualifier Triplet (80)
ARSAFPD 197

198 Content Manager OnDemand for Multiplatforms: Administration Guide
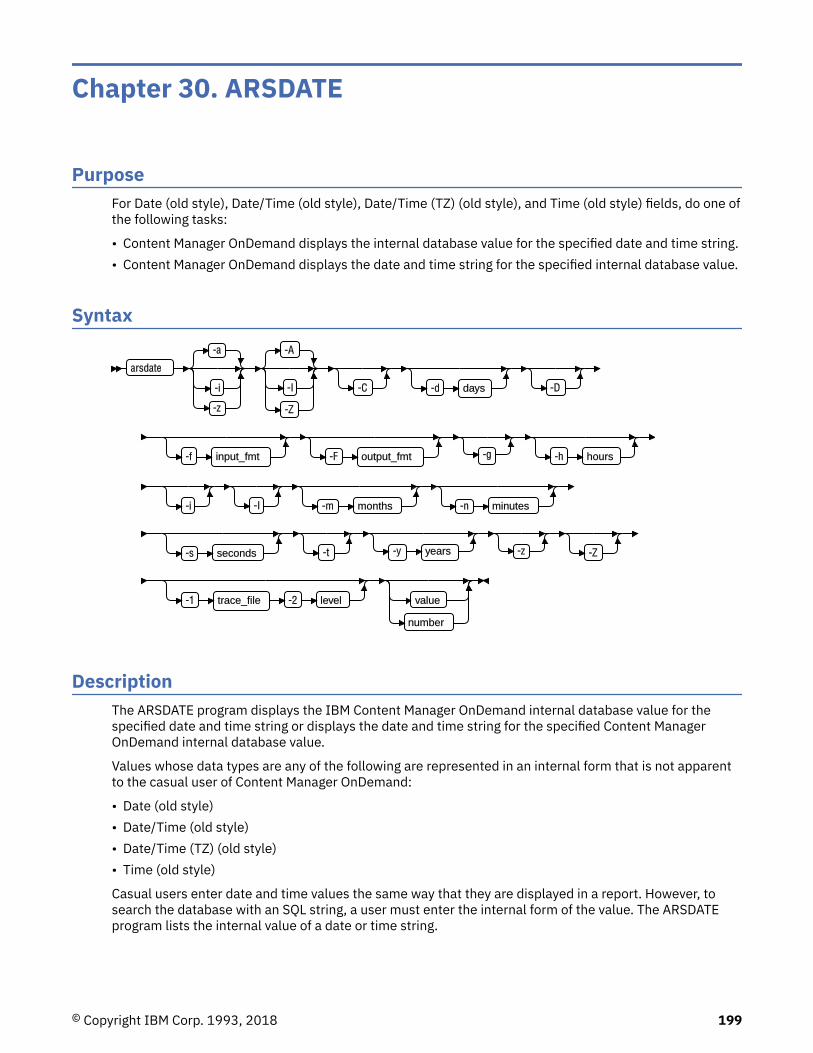
Chapter 30. ARSDATE
PurposeFor Date (old style), Date/Time (old style), Date/Time (TZ) (old style), and Time (old style) fields, do one ofthe following tasks:
• Content Manager OnDemand displays the internal database value for the specified date and time string.• Content Manager OnDemand displays the date and time string for the specified internal database value.
Syntax
arsdate
-a
-i
-z
-A
-I
-Z
-C -d days -D
-f input_fmt -F output_fmt -g -h hours
-i -I -m months -n minutes
-s seconds -t -y years -z -Z
-1 trace_file -2 level value
number
DescriptionThe ARSDATE program displays the IBM Content Manager OnDemand internal database value for thespecified date and time string or displays the date and time string for the specified Content ManagerOnDemand internal database value.
Values whose data types are any of the following are represented in an internal form that is not apparentto the casual user of Content Manager OnDemand:
• Date (old style)• Date/Time (old style)• Date/Time (TZ) (old style)• Time (old style)
Casual users enter date and time values the same way that they are displayed in a report. However, tosearch the database with an SQL string, a user must enter the internal form of the value. The ARSDATEprogram lists the internal value of a date or time string.
© Copyright IBM Corp. 1993, 2018 199

Parameters-a
Use to display database values and date strings for date fields. For example, to display thedatabase value for the date 9/1/99, enter:
arsdate -a 9/1/99
The ARSDATE program returns:
9/1/99 -> 10836
To display the date string for the database value 10836 in the default date format, enter:
arsdate -a 10836
The ARSDATE program returns:
10836 -> 9/1/99
-AOutput date type (defaults to input type)
-iUse to display database values and date and time strings for Date (old style), Date/Time(old style), Date/Time (TZ) (old style), and Time (old style) fields. The time part of the Date/Time (old style) and Date/Time (TZ) (old style) fields is not adjusted for the local time zone.You typically use the -i parameter to find out one of two things:
• Given a date and time printed on a report, what value did Content Manager OnDemandstore in Date (old style), Date/Time (old style), Date/Time (TZ) (old style), or Time (oldstyle) database field? You can use the result to search a date or time field with an SQLstring.
• Given a value stored in a Date (old style), Date/Time (old style), Date/Time (TZ) (oldstyle), or Time (old style) database field, what would be the date and time printed on areport?
-IOutput date/time type (without timezone)
-zUse to display database values and date and time strings for Date/Time (TZ) (old style)fields. The time part of a Date/Time (TZ) (old style) field is adjusted for the local time zone.If you run the ARSDATE program with the -z parameter on systems in different time zonesand you specify the same date and time value, the result will be different. For example,suppose that you need to determine the value stored in a Date/Time (TZ) (old style) fieldfor "09/01/00 04:00:00". The command:
arsdate -z "09/01/00 04:00:00"
When run on a server in the Eastern time zone will return:
09/01/00 04:00:00 -> 936187200
If you run the same command on a server in the Mountain time zone, then result will be:
09/01/00 04:00:00 -> 936180000
200 Content Manager OnDemand for Multiplatforms: Administration Guide

A typical use of the -z parameter is to determine a database value with which to search thesystem log. You can use the result to search the Date/Time (TZ) (old style) field of thesystem log with an SQL string. For example, suppose a user in New York logs on to a serverin Denver. To retrieve the log on messages with an SQL string, you must specify the dateand time part of the query using the local time of the client that is running the query. If theuser logged on to the server at 4 a.m. Eastern time, then a query that is run in Denver mustspecify 2 a.m. to retrieve the message.
-ZOutput date/time type (with timezone)
-CConvert to/from Content Manager OnDemand internal type and database type
-d daysAdd the specified number of days to the specified internal value.
-DDatabase type (default is Content Manager OnDemand internal type)
-f input_fmtDetermines the format of the date and time string that Content Manager OnDemanddisplays.
Table 13 on page 201 lists the standard date and time formats that are supported byContent Manager OnDemand. If the input data contains a date or time format that is notlisted in the table, you can specify the format to Content Manager OnDemand. However,when specifying a format, you can only use values and separators from the standardformats that are listed in the table. Date and time formats may also be specified on theLoad Information page in the application and the Field Information page in the folder.
The format consists of a set of values (for example, %m) and separators (such as the slash,dash, colon, or dot characters). A specification for a date format that uses any of thesethree chars (/ - .) can be used interchangeably; the program allows any of the three,regardless of which one you specified in the date format. A specification for a time formatthat uses either of these two chars (: .) can be used interchangeably; the program allowseither of the two, regardless of which one you specified in the time format.
Table 13: Date and time format specifications
Date Format Specifier Date Format Example
%m/%d/%y mm/dd/yy 01/31/17
%d/%m/%y dd/mm/yy 31/01/17
%f/%e/%y m/d/yy 1/31/17
%e/%f/%y d/m/yy 31/1/17
%y.%m.%d yy.mm.dd 17.01.31
%m.%d.%Y mm.dd.yyyy 01.31.2017
%m-%d-%y mm-dd-yy 01-31-17
%d-%m-%y dd-mm-yy 31-01-17
%m%d%y mmddyy 013117
%m%d%Y mmddyyyy 01312017
%y%m%d yymmdd 170131
%Y%m%d yyyymmdd 20170131
ARSDATE 201

Table 13: Date and time format specifications (continued)
Date Format Specifier Date Format Example
%b %e, %Y Mth d, yyyy Jan 31, 2017
%B %e, %Y Month d, yyyy January 31, 2017
%m/%d/%y %H:%M mm/dd/yy hh:mm 01/31/17 10:50
%H:%M hh:mm 10:50
%T hh:mm:ss 10:50:59
%H.%M hh.mm 10.50
%T hh.mm.ss 10.50.59
-F output_fmtOutput format string
-gDisplay the current system date.
-h hoursAdd the specified number of hours to the specified internal value.
-m monthsAdd the specified number of months to the specified internal value.
-n minutesAdd the specified number of minutes to the specified internal value.
-s secondsAdd the specified number of seconds to the specified internal value.
-tUse to display database values and time strings for Time fields. The time is not adjusted forthe local time zone. For example, to display the database value for the time 04:00:00,enter:
arsdate -t 04:00:00
The ARSDATE program returns:
04:00:00 -> 4800
To display the time string for the database value 4800, enter:
arsdate -t 4800
The ARSDATE program returns:
4800 -> 04:00:00
-y yearsAdd the specified number of years to the specified internal value.
-1 trace_fileSpecify a fully qualified trace file name as directed by IBM Software Support.
-2 levelSpecify a numeric value as directed by IBM Software Support.
202 Content Manager OnDemand for Multiplatforms: Administration Guide

Examples1. The following example shows how to determine the database value for the specified date and time
string. The data type of the database field is Date/Time (old style).
arsdate -i "09/01/99 04:00:00"
09/01/99 04:00:00 -> 936158400
In the example, you could use the database value to search a Date/Time (old style) field in thedatabase with an SQL string. For example:
arsdoc get -i "WHERE somedate=936158400" ...
2. The following example shows how to determine the date and time string for the specified databasevalue. The data type of the database field is Date/Time (old style). The result is shown using thedefault display format.
arsdate -i 936158400
936158400 -> 09/01/99 04:00:00
3. The following example shows how to determine the database value for the specified date and timestring. The data type of the database field is Date/Time (TZ) (old style). The ARSDATE programadjusts the time part of the result for the local time zone.
arsdate -z "09/01/99 04:00:00"
09/01/99 04:00:00 -> 936180000
If you were to run the same command on a server in the Eastern time zone, the result would be:
arsdate -z "09/01/99 04:00:00"
09/01/99 04:00:00 -> 936187200
Notes1. The ARSDATE program works with the following data types to display their internal values in a date or
time format that you can understand:
• Date (old style)• Date/Time (old style)• Date/Time (TZ) (old style)• Time (old style)
The following data types are stored in a date and time format that you can understand; therefore, youdo not need to use the ARSDATE program to interpret the values:
• Date• Date/Time• Date/Time (TZ)
2. When displaying the date string for a given internal value, by default, the ARSDATE program displaysthe date string using the mm/dd/yy format. If you want the ARSDATE program to display the date
ARSDATE 203

string using a different format, then you must specify the date format with the -f parameter. Forexample:
arsdate 10907
10907 -> 11/11/99
arsdate -f "%m/%d/%Y" 10907
10907 -> 11/11/1999
3. When displaying the internal value for a given date string, by default, the ARSDATE program expectsyou to specify the date string using the mm/dd/yy format. If you want to specify the date string using adifferent format, then you must specify the date format with the -f parameter. For example:
arsdate 11/12/99
11/12/99 -> 10908
arsdate 11/12/1999
11/12/1999 -> -1 (Error)
arsdate -f "%m/%d/%Y" 11/12/1999
11/12/1999 -> 10908
Files/opt/IBM/ondemand/V10.1/bin/arsdate
The AIX or Sun Solaris executable program./opt/ibm/ondemand/V10.1/bin/arsdate
The Linux executable program.\Program Files\IBM\ondemand\V10.1\bin\arsdate
The Windows executable program.
204 Content Manager OnDemand for Multiplatforms: Administration Guide

Chapter 31. ARSDB
PurposeProvide an interface to the database manager for specific Content Manager OnDemand databasefunctions, such as creating the database, starting and stopping the database manager, activating thedatabase, and reorganizing the Content Manager OnDemand system tables. The Content ManagerOnDemand database resides on the library server.
Note to Oracle users: See “Using the ARSDB program with Oracle” on page 214.
Syntax
arsdb
-c -d -e -f -g -h
-I instance -i -k -l -m -O
-o file_name -r -s -t -u -v
-X -x -Y device
-y device
-Z device
-z device
-1 trace_file -2 level
tableName
DescriptionThe ARSDB program provides an interface to the database manager for the following database functions:
• Create and initialize the Content Manager OnDemand database.• Start the database manager.• Stop the database manager.• Reorganize and optimize the Content Manager OnDemand system tables.• Import and export tables and databases.
The ARSDB program reads the ARS.CFG file (UNIX servers) or the registry (Windows servers) to obtain thedatabase configuration information. Before creating the database, you should verify the databaseconfiguration information. The IBM Content Manager OnDemand for Multiplatforms: Installation andConfiguration Guide provides details.
© Copyright IBM Corp. 1993, 2018 205

Parameters-c
For DB2 and SQL Server, create the (initial) Content Manager OnDemand databasestructure. (Not supported for Oracle.)
The -c parameter performs the same functions as the -r, -s, and -t parameters.
-dThe arsdb -d command drops all OnDemand system tables from the database. To drop aspecific table, use the -d tableName form of the command, where tableName is thename of the Content Manager OnDemand system table.
-eThe arsdb -e command will drop all the Content Manager OnDemand system indexes forthe specified Content Manager OnDemand System table (using -e tableName). Thedefault, if no tableName is specified, is to drop all the system indexes for all OnDemandSystem tables.
-fIgnore database manager failures.
-gFor DB2 and SQL Server, start the database manager. (Not supported for Oracle.)
-hFor DB2 and SQL Server, stop the database manager. (Not supported for Oracle.)
-iImport data to the Content Manager OnDemand system tables. The default is all ContentManager OnDemand system tables. To import a specific table, use the -i tableNameform of the command, where tableName is the name of the Content Manager OnDemandsystem table and the name of the file that contains the table to be imported. ContentManager OnDemand reads the file from the directory where the ARSDB program wasinvoked.
-I instanceThe name of the Content Manager OnDemand instance to process. The ARSDB programwill attempt to locate the specified instance name in the ARS.INI file (UNIX servers) or theregistry (Windows servers) to obtain the TCP/IP address, host name or host name alias ofthe system on which the instance is running. If the ARSDB program cannot locate theinstance name in the ARS.INI file, then the specified value is treated as a host name.
Note: If you are running multiple instances of Content Manager OnDemand on the sameworkstation, always specify the -h parameter to identify the name of the instance that youwant to process. Verify that the system is configured with the correct information for allinstances of Content Manager OnDemand. See IBM Content Manager OnDemand forMultiplatforms: Installation and Configuration Guide for information about configuringinstances.
-kFor DB2, activate the connection to the Content Manager OnDemand database. (Notsupported for Oracle or SQL Server.)
-lFor DB2, import or export tables in the IXF file format instead of the DEL file format (thedefault). For SQL Server, import or export tables in the native file format. (Not supported forOracle.)
The IXF file format is the PC version of the Integrated Exchange Format. A DEL file is asequential ASCII file with row and column delimiters.
206 Content Manager OnDemand for Multiplatforms: Administration Guide

This flag is valid only with the -i and -x parameters.
-mFor DB2 and SQL Server, run maintenance on the Content Manager OnDemand database,reorganizing the Content Manager OnDemand system tables. (Not supported for Oracle.)This option refreshes the tables and optimizes access to information in the database. Thesystem must be idle when you run the ARSDB program with this option. (Users should notbe using the system and other applications should not be connected to the database.)
-OParameter to identify Content Manager OnDemand Distribution Facility. With the exceptionof the -d parameter, parameters specified with the ARSDB program will only be performedon the Content Manager OnDemand Distribution Facility tables if the -O parameter isspecified.
-o file_nameSpecifies the file name for the log file that captures output from ARSDB commands.
-rCreate indexes for the Content Manager OnDemand system tables. The default is allindexes. To configure a specific index, use the -r tablename form of the command,where tableName is the name of the Content Manager OnDemand system table.
-sRun statistics on the Content Manager OnDemand system tables. This parameter is used tooptimize indexes and tables and make access to information as efficient as possible. Thedefault is all Content Manager OnDemand system tables. To run statistics for a specifictable, use the -s tableName form of the command, where tableName is the name of theContent Manager OnDemand system table.
-tCreate the Content Manager OnDemand system tables. The default is all Content ManagerOnDemand system tables. To configure a specific table, use the -s tableName form ofthe command, where tableName is the name of the Content Manager OnDemand systemtable.
-uUpdates the Content Manager OnDemand system tables with new changes whenever youupgrade Content Manager OnDemand. Use this option only when you are explicitly directedby IBM.
-vEnables verbose mode, to display all messages (informational and error). By default, theARSDB program displays only error messages.
-xExport data from the Content Manager OnDemand system tables. The default is all ContentManager OnDemand system tables. To export a specific table, use the -x tablenameform of the command, where tableName is the name of the Content Manager OnDemandsystem table (and also the name of the file that Content Manager OnDemand creates).Content Manager OnDemand writes the file in the directory from which the ARSDB programwas invoked.
-XExclude the USERSPACE1 table space from the backup image. The USERSPACE1 tablespace is created by DB2 when you initialize the Content Manager OnDemand database. Itcontains system tables and application group tables that have not been migrated to theirown table spaces. This parameter is only valid with the -Y and -Z parameters.
A typical use of this parameter is to test the table space backup process. For example,assume that you migrated a table of application group data to its own table space. All other
ARSDB 207

tables of application group data remains in the USERSPACE1 table space. To create anonline backup image of the migrated application group table, use the arsdb –XZ form ofthe command.
-y deviceFor DB2, create an offline backup image of the Content Manager OnDemand database onthe specified device. For SQL Server, create a complete database backup to the specifieddevice. (Not supported for Oracle.)
Before you start this type of backup, you must make sure that no other users orapplications are connected to the Content Manager OnDemand database. IBMrecommends that you run this type of backup at a time when you are certain that no userswill access the system. Otherwise, you should stop the Content Manager OnDemand serverprograms and other related processes before you start the backup.
If you specify a tape device, you must place a blank tape volume in the device beforestarting the ARSDB program.
If the specified device is ADSM, it means that the backup image file will be stored in storagethat is managed by Tivoli Storage Manager. However, before you use the ARSDB program tostore backup image files in Tivoli Storage Manager storage, you must configure TivoliStorage Manager. See IBM Content Manager OnDemand for Multiplatforms: Installation andConfiguration Guide for help with configuring Tivoli Storage Manager to maintain DB2backup image files. The DB2 Administration Guide also contains information about TivoliStorage Manager support and applicability for your system.
When backing up the database to devices that are managed by the operating system, themaximum number of backup devices that may be specified with the ARSDB program is100. To specify backup devices, use the following format:
arsdb -y device1 [,device2, ... ,device100]
For example, the following shows how to initiate a backup by using three devices:
arsdb -y device1,device2,device3
Where:
• -y is the backup option.• device1,device2,device3 is a comma-separated list of devices to which the
database manager will concurrently write the backup image of the database. Examples:
/dev/rmt0,/dev/rmt1,/dev/rmt2
\\.\Tape0,\\.\Tape1,\\.\Tape2
/arsdb/backup1,/arsdb/backup2,/arsdb/backup3
DB2 provides support for backing up the Content Manager OnDemand database to TivoliStorage Manager storage. The ARSDB program may be used to backup the database byusing multiple connections to Tivoli Storage Manager. Multiple connections to TivoliStorage Manager can improve the performance of the backup task and reduce the time thatit takes to complete the backup. Use the following format of the ARSDB program:
arsdb -y ADSM [,n]
For example, the following shows how to initiate a backup to Tivoli Storage Managerstorage by using three connections to Tivoli Storage Manager:
arsdb -y ADSM,3
208 Content Manager OnDemand for Multiplatforms: Administration Guide

Where:
-y is the backup option.ADSM specifies that the backup image file will be created in Tivoli Storage Managerstorage.3 is the number of connections that DB2 establishes with Tivoli Storage Manager. Thenumber can be from 1 (one) to 10 (ten).
-Y deviceFor DB2, create an incremental, offline backup image of table spaces on the specifieddevice. (Not supported for Oracle or SQL Server.) An incremental backup means thatContent Manager OnDemand backs up only those tables that have changed since the lasttime they were backed up. Content Manager OnDemand keeps track of table spacebackups and can determine which table spaces have changed and need to be backed up.
Before you start an offline backup of the database, you must make sure that no other usersor applications are connected to the Content Manager OnDemand database. IBMrecommends that you run the offline backup at a time when you are certain that no userswill access the system. Otherwise, you should stop the Content Manager OnDemand serverprograms and related processes before you start the offline backup.
If you specify a tape device, you must place a blank tape volume in the device beforestarting the ARSDB program.
If the specified device is ADSM, it means that the backup image file will be stored in storagethat is managed by Tivoli Storage Manager. However, before you use the ARSDB program tostore backup image files in Tivoli Storage Manager storage, you must configure TivoliStorage Manager. See IBM Content Manager OnDemand for Multiplatforms: Installation andConfiguration Guide for help with configuring Tivoli Storage Manager to maintain DB2backup image files. The DB2 Administration Guide also contains information about TivoliStorage Manager support and applicability for your system.
When backing up the database to devices that are managed by the operating system, themaximum number of backup devices that may be specified with the ARSDB program is100. To specify backup devices, use the following format:
arsdb -Y device1 [,device2, ... ,device100]
For example, the following shows how to initiate a backup of the database by using threedevices:
arsdb -Y device1,device2,device3
Where:
• -Y is the backup option.• device1,device2,device3 is a comma-separated list of devices to which the
database manager will concurrently write the backup image of the database. Examples:
/dev/rmt0,/dev/rmt1,/dev/rmt2
\\.\Tape0,\\.\Tape1,\\.\Tape2
/arsdb/backup1,/arsdb/backup2,/arsdb/backup3
DB2 provides support for backing up the Content Manager OnDemand database to TivoliStorage Manager storage. The ARSDB program may be used to backup the database byusing multiple connections to Tivoli Storage Manager. Multiple connections to Tivoli
ARSDB 209

Storage Manager can improve the performance of the backup task and reduce the time thatit takes to complete the backup. Use the following format of the ARSDB program:
arsdb -Y ADSM [,n]
For example, the following shows how to initiate a backup of the database to Tivoli StorageManager storage by using three connections to Tivoli Storage Manager:
arsdb -Y ADSM,3
Where:
-Y is the backup option.ADSM specifies that the backup image file will be created in Tivoli Storage Managerstorage.3 is the number of connections that DB2 establishes with Tivoli Storage Manager. Thenumber can be from 1 (one) to 10 (ten).
-z deviceFor DB2, create an online backup image of the Content Manager OnDemand database onthe specified device. For SQL Server, create a differential database backup to the specifieddevice. (Not supported for Oracle.)
This type of backup may run while other users and applications are connected to thedatabase. That is, other users and applications can read and modify the database while thebackup is in process.
If you specify a tape device, then you must place a blank tape volume in the device beforestarting the ARSDB program.
If the specified device is ADSM, it means that the backup image file will be stored in storagethat is managed by Tivoli Storage Manager. However, before you use the ARSDB program tostore backup image files in Tivoli Storage Manager storage, you must configure TivoliStorage Manager. See the IBM Content Manager OnDemand for Multiplatforms: Installationand Configuration Guide for help with configuring Tivoli Storage Manager to maintain DB2backup image files. The DB2 Administration Guide also contains information about TivoliStorage Manager support and applicability for your system.
When backing up the database to devices that are managed by the operating system, themaximum number of backup devices that may be specified with the ARSDB program is100. To specify backup devices, use the following format:
arsdb -z device1 [,device2, ... ,device100]
For example, the following shows how to initiate an online backup of the database by usingthree devices:
arsdb -z device1,device2,device3
Where:
• -z is the backup option.• device1,device2,device3 is a comma-separated list of devices to which the
database manager will concurrently write the backup image of the database. Examples:
/dev/rmt0,/dev/rmt1,/dev/rmt2
\\.\Tape0,\\.\Tape1,\\.\Tape2
/arsdb/backup1,/arsdb/backup2,/arsdb/backup3
210 Content Manager OnDemand for Multiplatforms: Administration Guide

DB2 provides support for backing up the Content Manager OnDemand database to TivoliStorage Manager storage. The ARSDB program may be used to backup the database byusing multiple connections to Tivoli Storage Manager. Multiple connections to TivoliStorage Manager can improve the performance of the backup task and reduce the time thatit takes to complete the backup. Use the following format of the ARSDB program:
arsdb - z ADSM [,n]
For example, the following shows how to initiate an online backup of the database to TivoliStorage Manager storage by using three connections to Tivoli Storage Manager:
arsdb -z ADSM,3
Where:
-z is the backup option.ADSM specifies that the backup image file will be created in Tivoli Storage Managerstorage.3 is the number of connections that DB2 establishes with Tivoli Storage Manager. Thenumber can be from 1 (one) to 10 (ten).
-Z deviceFor DB2, create an incremental, online backup image of table spaces on the specifieddevice. (Not supported for Oracle or SQL Server.) An incremental backup means thatContent Manager OnDemand backs up only those tables that have changed since the lasttime they were backed up. Content Manager OnDemand keeps track of table spacebackups and can determine which table spaces have changed and need to be backed up.
An online backup of the database can run while other users and applications are connectedto the database. That is, other users and applications can read and modify the databasewhile the backup process is running.
If you specify a tape device, you must place a blank tape volume in the device beforestarting the ARSDB program.
If the specified device is ADSM, it means that the backup image file will be stored in storagethat is managed by Tivoli Storage Manager. However, before you use the ARSDB program tostore backup image files in Tivoli Storage Manager storage, you must configure TivoliStorage Manager. See IBM Content Manager OnDemand for Multiplatforms: Installation andConfiguration Guide for help with configuring Tivoli Storage Manager to maintain DB2backup image files. The DB2 Administration Guide also contains information about TivoliStorage Manager support and applicability for your system.
When backing up the database to devices that are managed by the operating system, themaximum number of backup devices that may be specified with the ARSDB program is100. To specify backup devices, use the following format:
arsdb -Z device1 [,device2, ... ,device100]
For example, the following shows how to initiate a backup of the database by using threedevices:
arsdb -Z device1,device2,device3
Where:
• -Z is the backup option.
ARSDB 211

• device1,device2,device3 is a comma-separated list of devices to which thedatabase manager will concurrently write the backup image of the database. Examples:
/dev/rmt0,/dev/rmt1,/dev/rmt2
\\.\Tape0,\\.\Tape1,\\.\Tape2
/arsdb/backup1,/arsdb/backup2,/arsdb/backup3
DB2 provides support for backing up the Content Manager OnDemand database to TivoliStorage Manager storage. The ARSDB program may be used to backup the database byusing multiple connections to Tivoli Storage Manager. Multiple connections to TivoliStorage Manager can improve the performance of the backup task and reduce the time thatit takes to complete the backup. Use the following format of the ARSDB program:
arsdb -Z ADSM [,n]
For example, the following shows how to initiate an online backup of the database to TivoliStorage Manager storage by using three connections to Tivoli Storage Manager:
arsdb -Z ADSM,3
Where:
-Z is the backup option.ADSM specifies that the backup image file will be created in Tivoli Storage Managerstorage.3 is the number of connections that DB2 establishes with Tivoli Storage Manager. Thenumber can be from 1 (one) to 10 (ten).
Restriction:
If you want to restore a backup database image, and roll it forward to a certain point, donot use the arsdb -z command, because the archive logs, which are needed for theoperation, are removed after the backup is completed. In this situation, a messageSQL4970N is displayed. For example:
SQL4970N Roll-forward recovery on database "TEST2" cannot reach the specified stop point (end-of-log or point-in-time) becauseof missing log file(s) on node(s) "0".
It is recommended that you use the DB2 backup command. When you issue the DB2command line to do backup, DB2 does not delete the archive logs.
tableNameOptionally specify the name of one or more Content Manager OnDemand system tables forthe drop (-d and -e), import (-i), create configuration (-r and -t), run statistics (-s), andexport (-x) parameters. If you do not specify the tableName parameter, then ContentManager OnDemand runs the command for all of the Content Manager OnDemand systemtables.
For the import (-i) parameter, Content Manager OnDemand reads the imported tablesfrom a file in the directory in which the ARSDB program was invoked. For the export (-x)parameter, Content Manager OnDemand writes the exported tables to a file in the directoryin which the ARSDB program was invoked.
-1 trace_fileSpecify a fully qualified trace file name as directed by IBM Software Support.
-2 level
212 Content Manager OnDemand for Multiplatforms: Administration Guide

Specify a numeric value as directed by IBM Software Support.
Examples1. The following shows how to start the database manager:
arsdb -gkv
2. The following shows how to stop the database manager:
arsdb -hv
3. The following shows how to reorganize the Content Manager OnDemand system tables and run thedatabase statistics command, which optimizes access to the tables:
arsdb -msv
4. The following shows how to reorganize a specific Content Manager OnDemand system table. In theexample, the ARSDB program reorganizes the indexes for the Application Group table:
arsdb -mv arsag
5. The following shows how to export a specific Content Manager OnDemand system table to an IXFformat file:
arsdb -xl arsag
6. The following shows how to create an offline backup image of the Content Manager OnDemanddatabase on tape:UNIX servers
arsdb -v -y /dev/rmt0Windows servers
arsdb -v -y \\.\Tape0
Note: You must place a blank, formatted tape in the device before you start the ARSDB program.7. The following shows how to create an online, incremental backup of all table spaces in the Content
Manager OnDemand database. The backup image is written to storage that is managed by TivoliStorage Manager.
arsdb -v -Z ADSM
8. The following shows how to create an offline, incremental backup of all table spaces in the ContentManager OnDemand database. The backup image is written to storage that is managed by TivoliStorage Manager.
arsdb -v -Y ADSM
9. The following shows how to create an online, full backup of the Content Manager OnDemanddatabase. The backup image is written to storage that is managed by Tivoli Storage Manager.
arsdb -v -z ADSM
10. The following shows how to create an offline, full backup of the Content Manager OnDemanddatabase. The backup image is written to storage that is managed by Tivoli Storage Manager.
arsdb -v -y ADSM
ARSDB 213

NotesThe ARSDB program should be run only on the library server.
IBM recommends that you stop the Content Manager OnDemand server programs and related processesbefore you run the ARSDB program with the create (-c), import (-i), reorganize (-m) or offline databasebackup (-y, -Y) parameters.
The Content Manager OnDemand server program (or service) can continue to run even after you stop thedatabase manager. However, Content Manager OnDemand sends an error message to the client and thesystem log when a user attempts to query the database and the database manager has been stopped.
The online database backup command (-z, -Z parameters) can be run while other applications areconnected to the database.
IBM recommends that you do not load data into the system at the same time that you run the ARSDBprogram with the -m or -s parameters.
If you plan to back up the database to a tape device, then you may need to configure the Buffer Size Limitin DB2. If you plan to backup the database to a tape device and specify a variable block size, then youmust configure the DB2 buffer size to a value that is less than or equal to the maximum block size limit forthe backup device. For maximum performance, you should set the buffer size to the maximum block sizefor the backup device. See the DB2 documentation for details. Contact the IBM support center if you havequestions.
Using the ARSDB program with OracleIf you plan to use Oracle with Content Manager OnDemand, then you will need to use the standard Oracleprocedures to start, stop, maintain, and optimize the database, to make backup copies of the database,and so forth. In addition, some of the other options for the ARSDB program do not apply when you useOracle with Content Manager OnDemand. Table 14 on page 214 lists the options of the ARSDB programthat are not valid when you use Oracle with Content Manager OnDemand.
Table 14: ARSDB program and Oracle
Option Purpose Notes
arsdb –g Start the database Use the Oracle proceduresinstead
arsdb –h Stop the database Use the Oracle proceduresinstead
arsdb –k Activate the database Does not apply to Oracle
arsdb –l Import/Export tables Does not apply to Oracle
arsdb –m Reorganize the database Does not apply to Oracle
arsdb –y Backup the database Use the Oracle proceduresinstead
arsdb –Y Backup the database Use the Oracle proceduresinstead
arsdb –z Backup the database Use the Oracle proceduresinstead
arsdb –Z Backup the database Use the Oracle proceduresinstead
214 Content Manager OnDemand for Multiplatforms: Administration Guide

You can use the ARSDB program to collect statistics on the Content Manager OnDemand system tables.The Content Manager OnDemand system tables include the user table, the group table, and theapplication group table. See “System control tables” on page 325 for a complete list of the ContentManager OnDemand system tables. For most customers, the Content Manager OnDemand system tablesrequire very little maintenance. You can probably schedule the ARSDB program to collect statistics once amonth (or less often).
The syntax is:
/opt/IBM/ondemand/V10.1/bin/arsdb <options>
The options are:–e
Drop configuration indexes–r
Create configuration indexes–s
Collect statistics
Files/opt/IBM/ondemand/V10.1/bin/arsdb
The AIX or Sun Solaris executable program./opt/ibm/ondemand/V10.1/bin/arsdb
The Linux executable program.\Program Files\IBM\ondemand\V10.1\bin\arsdb
The Windows executable program.
ARSDB 215

216 Content Manager OnDemand for Multiplatforms: Administration Guide

Chapter 32. ARSDOC
PurposeThe ARSDOC program is a multi-purpose document processing program. You can use the ARSDOCprogram to do the following tasks:
• Query the database and generate a list of items that match a query• Retrieve documents from the system• Add, delete, and update documents• Send documents to a server printer• Add and release holds on documents• Add or remove documents from full text indexing• Federate documents to IBM FileNet P8 through Content Federation Services for Content Manager
OnDemand
Description and syntaxThe ARSDOC program provides the following functions:
• ADD• DELETE• GET• PRINT• QUERY• UPDATE• HOLD_ADD• HOLD_RELEASE• CFSOD_FED• FTI_ADD• FTI_RELEASE
For each function, you can specify all of the required options on the command line or you can specify thename of a parameter file that contains the options. The syntax of each function is listed twice: first, whenyou specify the options on the command line; second, when you specify a parameter file.
GET functionUse to retrieve documents and resources from the system. The GET function can also generate and savegeneric index data for the documents that match the query. You must identify the name of the IBMContent Manager OnDemand library server. You specify the application group or folder that you want tosearch. You can use the following parameters to query the database:
• SQL query (-i)• hold name (-l)• public named query (-n)• text search string (-t or -T)• load ID (-x or -X)
© Copyright IBM Corp. 1993, 2018 217

If you use an SQL query, it must contain clauses, database field names, index values, and operators. Bydefault, the ARSDOC program sends a copy of the documents that match the query to stdout (UNIXservers) or the console (Windows servers). You can also choose to write the output to a file. To retrievedocuments in a sorted order, you must specify the -n parameter.
arsdoc get
-a [ -A value ] -c -d directory
-f folder -g -G applGroup
-h instance
-i sqlQuery
-q namedQuery
-t search_string
-T search_string
-l holdname -L max# -n
-N -o name -p password -P
-Q SQLqueryfile -s seconds
-S startdate,enddate
, format
-u userid
-U user_alias -v -x loadId -X loadId
-1 trace_file -2 level
When you use the parameter file option, you must specify the -F, -h, -p, -u, -U, -v, -1, and -2 parameterson the command line. All other parameters must be specified in the parameter file. The following diagramshows the syntax of the GET function when you use the parameter file option:
arsdoc get -F parm_file -h instance
-p password
-u userid -U user_alias -v
-1 trace_file -2 level
The syntax of the parameter file for the GET function is:
218 Content Manager OnDemand for Multiplatforms: Administration Guide

[ -a ] [ -A value ] [ -c ]
[ -d directory ]
[ -f folder ]
[ -g ]
[ -G applGroup ]
[ -i sqlQuery ]
[ -q namedQuery ]
[ -t search_string ]
[ -T search_string ]
[ -L max# ] [ -n ] [ -N ]
[ -o
name ]
[ -S startdate,enddate
, format
]
[ -x loadId ] [ -X loadID ]
QUERY functionUse to generate a list of items that match a query. You must specify the name of the IBM Content ManagerOnDemand library server. You specify the application group or folder that you want to search. You can usethe following parameters to query the database:
• SQL query (-i)• hold name (-l)• public named query (-n)• text search string (-t or -T)• load ID (-x or -X)
If you use an SQL query, it must contain clauses, database field names, index values, and operators. Thedata that is retrieved from the server is sorted by using the Sort field from the Field Information page forthe folder.
By default, the ARSDOC program sends the list of items that match the SQL query to stdout (UNIXservers) or the console (Windows servers). You typically redirect the output to a printer or anotherprocess. You can also choose to write the output to a file.
ARSDOC 219

arsdoc query
-B orderbystring -d directory -D
-e delimiter -f folder -G applGroup
-h
instance
-H
-i sqlQuery
-q namedQuery
-t search_string
-T search_string
-I
-l holdname -L max# -n
-N " ( dbfield ) "
-o outputFile
-S startdate,enddate
, format
-p password
-u userid -U user_alias -v -x loadId
-X loadId -1 trace_file -2 level
When you use the parameter file option, you must specify the -F, -h, -p, -u, -U, -v, -1, and -2 parameterson the command line. All other parameters must be specified in the parameter file. The following showsthe syntax of the QUERY function when you use the parameter file option:
arsdoc query -F parm_file -h instance
-p password
-u userid -U user_alias -v
-1 trace_file -2 level
The syntax of the parameter file for the QUERY function is:
220 Content Manager OnDemand for Multiplatforms: Administration Guide

[ -d directory ] [ -D ] [ -e delimiter ]
[
-f folder ]
[ -G applGroup ] [ -H ]
[ -i sqlQuery ]
[ -q namedQuery ]
[ -t search_string ]
[ -T search_string ]
[ -I ]
[ -L max# ] [ -n ]
[ -N ( dbfield ) ]
[ -o outputFile ]
[ -S startdate,enddate
, format
]
[ -x loadId ] [ -X loadID ]
ADD functionUse to store data into the system by specifying the folder, application group, application, and databasefields and values. If you specify the -O parameter, then you do not have to specify all of the databasefields; however, you must always specify fields related to date or time fields. When you specify the -Oparameter, the ARSDOC program stores a default value in any database field that you omit. The defaultvalue for string fields is an empty (null) string. The default value for numeric fields is 0 (zero). Numericfields include integer and decimal fields. When adding a document, you can specify the data in one of thefollowing ways:
• A document file• An SQL query that contains clauses, database field names, index values, and operators (-i)• A public named query (-n)• A hold name (-l)• A text search string (-t or -T)
When you specify an SQL query, public named query, hold name, or text search string, you are creating adatabase row that points to an existing document that has been identified by the query.
When you use the ADD function to add a row for an existing document, the row must be added to theapplication group and the application that contain the document. The application must be specified withthe -a parameter. The application group must be specified with the -g parameter and must be one of theapplication groups referenced by the folder named with the -f parameter.
Important: The Database Organization of the application group must be set to Multiple loads perdatabase table to add a document. If a new document is added, the Expiration Type must be set toSegment or Document. If you are adding index data for an existing document, Load can also be specifiedfor Expiration Type if the existing document is identified by an SQL string, public named query, text string,or hold name.
ARSDOC 221

Storage management for the application group needs to be configured to use cache. Cache is required toallow the Content Manager OnDemand server to build a larger storage object and append to the data.Then this storage object can be migrated to TSM. Storing data directly into TSM is not recommended andcan cause TSM performance issues.
arsdoc add -a application
-f folder
-g applGroup
-G applGroup
-h
instance
-i sqlQuery
-l holdname
-o docfilename
-q namedQuery
-t search_string
-T search_string
-n dbfield=value
-O
-p password -S startdate,enddate
, format
-u userid -U user_alias -v
-1 trace_file -2 level
When you use the parameter file option, you must specify the -F, -h, -p, -u, -U, -v, -1, and -2 parameterson the command line. All other parameters must be specified in the parameter file. The following diagramshows the syntax of the ADD function when you use the parameter file option:
arsdoc add -F parmfile -h instance
-p password
-u userid -U user_alias -v
-1 trace_file -2 level
The syntax of the parameter file for the ADD function is:
222 Content Manager OnDemand for Multiplatforms: Administration Guide

[ -a application ] [ -f folder ] [
-g applGroup
-G applGroup
]
[ -i sqlQuery ]
[ -o docfilename ]
[ -q namedQuery ]
[ -t search_string ]
[ -T search_string ]
[ -n dbfield=value ]
[ -O ] [ -S startdate,enddate
, format
]
Important: To use the ADD function, every database field in the application group must be mapped to afolder field. The database field values are validated based on the information that is provided in the folderfield.
UPDATE functionUse to update documents. You must name the application group to update and specify one or moreapplication group fields and their values. To identify the documents that you want to update, you can usethe following parameters to query the database:
• SQL query (-i)• hold name (-l)• public named query (-n)• text search string (-t or -T)• load ID (-x or -X)
If you use an SQL query, it must contain clauses, database field names, index values, and operators. TheUPDATE function updates all of the rows that match the query. It does not change the actual documentdata.
ARSDOC 223

arsdoc update
-f folder
-g applGroup
-G applGroup
-h instance
-i sqlQuery
-l holdname
-q namedQuery
-t search_string
-T search_string
-x loadID
-X loadID
-n dbfield=value
-p password
-S startdate,enddate
, format
-u userid
-U user_alias -v -1 trace_file -2 level
When you use the parameter file option, you must specify the -F, -h, -p, -u, -U, -v, -1, and -2 parameterson the command line. All other parameters must be specified in the parameter file. The following showsthe syntax of the UPDATE function when you use the parameter file option:
arsdoc update -F parm_file -h instance
-p password
-u userid -U user_alias -v
-1 trace_file -2 level
The syntax of the parameter file for the UPDATE function is:[ -f folder ] [
-g applGroup
-G applGroup
]
[ -i sqlQuery ]
[ -l holdname ]
[ -q namedQuery ]
[ -t search_string ]
[ -T search_string ]
[ -x loadID ]
[ -X loadID ]
[ -n dbfield=value ]
[ -S startdate,enddate
, format
]
224 Content Manager OnDemand for Multiplatforms: Administration Guide
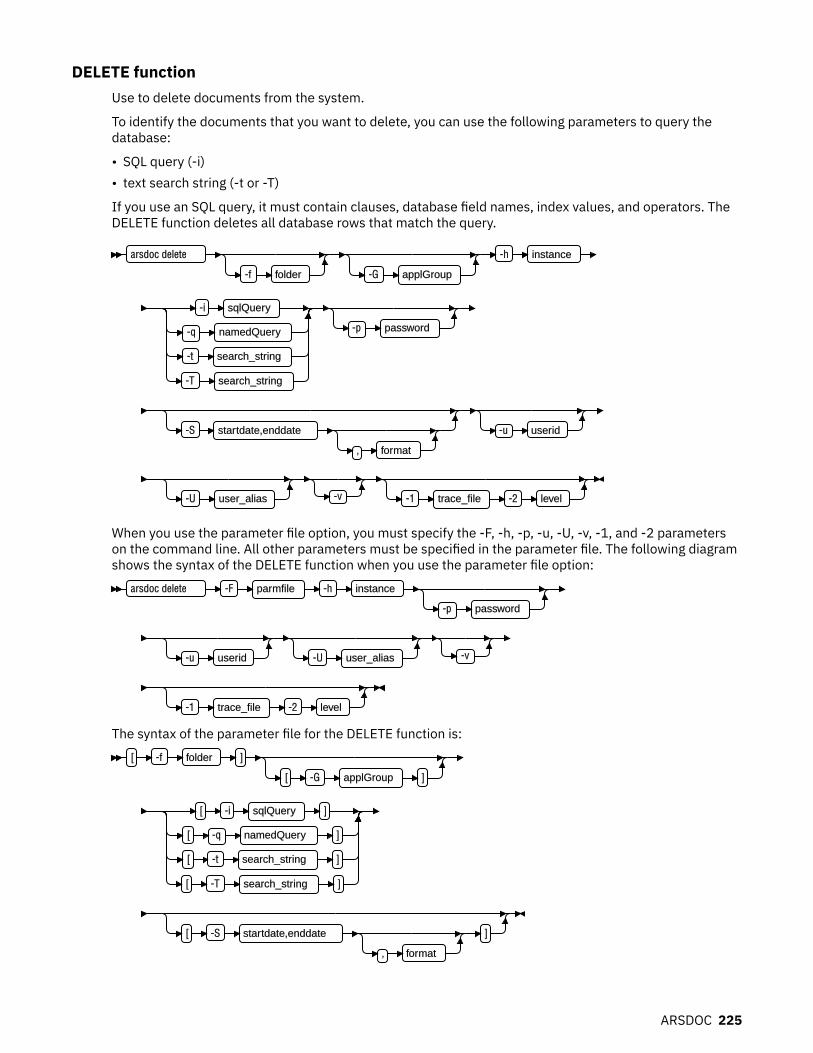
DELETE functionUse to delete documents from the system.
To identify the documents that you want to delete, you can use the following parameters to query thedatabase:
• SQL query (-i)• text search string (-t or -T)
If you use an SQL query, it must contain clauses, database field names, index values, and operators. TheDELETE function deletes all database rows that match the query.
arsdoc delete
-f folder -G applGroup
-h instance
-i sqlQuery
-q namedQuery
-t search_string
-T search_string
-p password
-S startdate,enddate
, format
-u userid
-U user_alias -v -1 trace_file -2 level
When you use the parameter file option, you must specify the -F, -h, -p, -u, -U, -v, -1, and -2 parameterson the command line. All other parameters must be specified in the parameter file. The following diagramshows the syntax of the DELETE function when you use the parameter file option:
arsdoc delete -F parmfile -h instance
-p password
-u userid -U user_alias -v
-1 trace_file -2 level
The syntax of the parameter file for the DELETE function is:[ -f folder ]
[ -G applGroup ]
[ -i sqlQuery ]
[ -q namedQuery ]
[ -t search_string ]
[ -T search_string ]
[ -S startdate,enddate
, format
]
ARSDOC 225

PRINT functionUse to send documents to an IBM Content Manager OnDemand server printer. You must name theContent Manager OnDemand library server. You specify the application group or folder that you want tosearch. The items that match the query are sent to the server printer named with the -P parameter. Theserver printer must be defined to Content Manager OnDemand by using either the OnDemandAdministrator client or ARSXML. You can use the following parameters to query the database:
• SQL query (-i)• hold name (-l)• text search string (-t or -T)• load ID (-X)
If you use an SQL query, it must contain clauses, database field names, index values, and operators. Youcan limit the number of documents sent to the printer by using the -L parameter and specifying themaximum number of documents that should be retrieved, regardless of the number of documents thatmatch the query. The PRINT function does not support server fax.
arsdoc print
-f folder -G applGroup
-h instance
-i sqlQuery
-q namedQuery
-t search_string
-T search_string
-l holdname -L max#
-p password
-P printer
-S startdate,enddate
, format
-u userid
-U user_alias -v [ -X loadID ]
-1 trace_file -2 level
When you use the parameter file option, you must specify the -F, -h, -p, -u, -U, -v, -1, and -2 parameterson the command line. All other parameters must be specified in the parameter file. The following diagramshows the syntax of the PRINT function when you use the parameter file option:
arsdoc print -F parmfile -h instance
-p password
-u userid -U user_alias -v
-1 trace_file -2 level
The syntax of the parameter file for the PRINT function is:
226 Content Manager OnDemand for Multiplatforms: Administration Guide

[ -f folder ]
[ -G applGroup ]
[ -i sqlQuery ]
[ -q namedQuery ]
[ -t search_string ]
[ -T search_string ]
[ -L max# ]
[ -P
printer ]
[ -S startdate,enddate
, format
]
-X loadId
HOLD_ADD functionUse to add documents to a hold. To query the database to determine the documents to add to the hold,you can use the following parameters:
• SQL query (-i)• text search string (-t or -T)• load ID (-X)
Ensure that enhanced retention management is turned on for the application group and you havepermission to add documents to a hold before you attempt this function. Otherwise, a permission errorwill occur.
If a duplicate attempt is made to add the same documents to a hold, no error occurs, and ARSDOCdisplays a successful message. However, the system log might contain messages that indicate that thedocuments were already added.
ARSDOC 227

arsdoc hold_add -h instance -l holdname
-u userid
-p password -f folder -G applGroup
-U user_alias -v -1 trace_file -2 level
-S startdate,enddate
, format
-i sqlQuery
-t search_string -T search_string
-t search_string
-T search_string
-T search_string
-q namedQuery
-X loadId
When you use the parameter file option, you must specify the -F, -h, -p, -u, -U, -v, -1, and -2 parameterson the command line. All other parameters must be specified in the parameter file. The following diagramshows the syntax of the hold_add function when you use the parameter file option:
arsdoc hold_add -F parmfile -h instance
-p password
-u userid -U user_alias -v
-1 trace_file -2 level
The syntax of the parameter file for the hold_add function is:[ -l holdname ] [ -f folder ]
[ -G applGroup ]
[ -S startdate,enddate
, format
]
[ -i sqlQuery ]
[ -t search_string ] [ -T search_string ]
[ -t search_string ]
[ -T search_string ]
[ -T search_string ]
[ -q namedQuery ]
[ -X loadId ]
228 Content Manager OnDemand for Multiplatforms: Administration Guide

HOLD_RELEASE functionUse to remove documents from a hold. To query the database to determine the documents that should beremoved from the hold, you can use the following parameters:
• SQL query (-i)• text search string (-t or -T)• load ID (-X)
If you selected the option in the application group to use implied hold, documents are placed on hold assoon as they are loaded, and there is not a hold name that is associated with the documents that areplaced on hold. To remove documents from an implied hold, specify IMPLIED_HOLD as the hold name.
Ensure that enhanced retention management is turned on for the application group and you havepermission to release documents from a hold before you attempt this function. Otherwise, a permissionerror will occur.
If a duplicate attempt is made to remove the same documents from a hold, no error occurs, and ARSDOCdisplays a successful message. However, the system log might contain messages that indicate that thedocuments were already released.
arsdoc hold_release -h instance -l holdname
-u userid
-p password -f folder -G applGroup
-U user_alias -v -1 trace_file -2 level
-S startdate,enddate
, format
-i sqlQuery
-t search_string -T search_string
-t search_string
-T search_string
-T search_string
-q namedQuery
-X loadId
When you use the parameter file option, you must specify the -F, -h, -p, -u, -U, -v, -1, and -2 parameterson the command line. All other parameters must be specified in the parameter file. The following diagramshows the syntax of the hold_release function when you use the parameter file option:
arsdoc hold_release -F parmfile -h instance
-p password
-u userid -U user_alias -v
-1 trace_file -2 level
The syntax of the parameter file for the hold_release function is:
ARSDOC 229

[ -l holdname ] [ -f folder ]
[ -G applGroup ]
[ -S startdate,enddate
, format
]
[ -i sqlQuery ]
[ -t search_string ] [ -T search_string ]
[ -t search_string ]
[ -T search_string ]
[ -T search_string ]
[ -q namedQuery ]
[ -X loadId ]
CFSOD_FED functionSends documents to CFS-CMOD and makes them available to IBM FileNet P8 features. To query thedatabase to determine the documents to be sent to CFS-CMOD, you can use the following parameters:
• SQL query (-i)• hold name (-l)• text search string (-t or -T)• load ID (-X)
To enable the CFS-CMOD feature, add the following line to the ARS.CFG file:
ARS_SUPPORT_CFSOD=1
Ensure that the CFS-CMOD function is turned on for the application group and you have permission to useCFS-CMOD before you attempt this function. Otherwise, a permission error will occur.
If a duplicate attempt is made to send the same documents to CFS-CMOD, no error occurs, and ARSDOCdisplays a successful message. However, the system log might contain messages that indicate that thedocuments were already sent to CFS-CMOD.
230 Content Manager OnDemand for Multiplatforms: Administration Guide

arsdoc cfsod_fed
-f folder -G applGroup
-h instance
-i sqlQuery
-l holdname
-q namedQuery
-t search_string
-T search_string
-p password
-S startdate,enddate
, format
-u userid
-U user_alias -v -X loadId
-1 trace_file -2 level
When you use the parameter file option, you must specify the -F, -h, -p, -u, -U, -v, -1, and -2 parameterson the command line. All other parameters must be specified in the parameter file. The following diagramshows the syntax of the cfsod_fed function when you use the parameter file option:
arsdoc cfsod_fed -F parmfile -h instance
-p password
-u userid -U user_alias -v
-1 trace_file -2 level
The syntax of the parameter file for the cfsod_fed function is:[ -f folder ]
[ -G applGroup ]
[ -i sqlQuery ]
[ -q namedQuery ]
[ -t search_string ]
[ -T search_string ]
[ -S startdate,enddate
, format
] -X loadId
FTI_ADD functionUse this function to add documents to the full text index. To query the database to determine thedocuments to be indexed, you can use the following parameters:
• SQL query (-i)• hold name (-l)
ARSDOC 231

• text search string (-t)• load ID (-X)
If a duplicate attempt is made to add the same documents to be indexed, no error occurs, and ARSDOCdisplays a successful message. However, the system log might contain messages that indicate that thedocuments were already indexed.
fti_add
-f folder -G applGroup
-h instance
-i sqlQuery
-q namedQuery
-t search_string
-T search_string
-l holdname
-S startdate,enddate
, format
-p passwd
-u userid -U user_alias -v -X loadId
-1 trace_file -2 level
When you use the parameter file option, you must specify the -F, -h, -p, -u, -U, -v, -1, and -2 parameterson the command line. All other parameters must be specified in the parameter file. The following diagramshows the syntax of the fti_add function when you use the parameter file option:
fti_add -F parmfile -h instance
-p passwd -u userid
-U user_alias -v -1 trace_file -2 level
The syntax of the parameter file for the fti_add function is:[ -f folder ]
[ -G applGroup ]
[ -i sqlQuery ]
[ -q namedQuery ]
[ -S startdate,enddate
, format
] -X loadId
FTI_RELEASE functionUse this function to remove documents from the full text index. To query the database to determine thedocuments to be removed from the full text index, you can use the following parameters:
• SQL query (-i)• hold name (-l)• text search string (-t or -T)
232 Content Manager OnDemand for Multiplatforms: Administration Guide

• load ID (-X)
Ensure that Full Text Index is turned on for the application group and that you have permission to removeindex information from the FTS server for the documents before you attempt this function. Otherwise, apermission error occurs.
If a duplicate attempt is made to remove the index infomration from the FTS server, no error occurs, andARSDOC displays a successful message. However, the system log might contain messages that indicatethat the documents were already released.
fti_release
-f folder -G applGroup
-h instance
-i sqlQuery
-q namedQuery
-t search_string
-T search_string
-l holdname
-S startdate,enddate
, format
-p passwd
-u userid -U user_alias -v -X loadId
-1 trace_file -2 level
When you use the parameter file option, you must specify the -F, -h, -p, -u, -U, -v, -1, and -2 parameterson the command line. All other parameters must be specified in the parameter file. The following diagramshows the syntax of the fti_release function when you use the parameter file option:
fti_release -F parmfile -h instance
-p passwd -u userid
-U user_alias -v -1 trace_file -2 level
The syntax of the parameter file for the fti_release function is:[ -f folder ]
[ -G applGroup ]
[ -i sqlQuery ]
[ -q namedQuery ]
[ -S startdate,enddate
, format
] -X loadId
Parameters-a
ARSDOC 233

For the GET function, when retrieving AFP or XML documents, specify this parameter toinclude resources with the documents that are retrieved. If documents from the sameapplication have different resource groups, then the ARSDOC program creates separateoutput files for each resource group.
For the ADD function, you must specify the name of the IBM Content Manager OnDemandapplication. The application must belong to the application group named with the -g (or -G)parameter.
Note that resource groups for XML documents are always written to a separate file, and arenever added to the same file that contains document data even when the -c option isspecified.
-A valueUse this parameter to retrieve annotations. The retrieved annotation files can be used bythe ARSLOAD program if you need to reload the data and annotations in a differentinstance or on a different system. The following are the basic values of this parameter:0
Include public text annotations1
Include private annotations2
Include annotations that cannot be copied to another server4
Include graphic annotations
You can also add up two or more of the basic parameter values to create new values. Forexample:3
Retrieve all public and private text annotations5
Retrieve public and private annotations (text and graphic) that can be copied to anotherserver
6Retrieve all public annotations (text and graphic)
7Retrieve all text and graphic annotations
Table 15: Possible values for the ARSDOC GET function -A parameter
Flag value Public TextCan becopied Private
Cannot becopied Graphic
-A 0 X X X
-A 1 X X X X
-A 2 X X X X
-A 3 X X X X X
-A 4 X X X X
-A 5 X X X X X
-A 6 X X X X X
-A 7 X X X X X X
234 Content Manager OnDemand for Multiplatforms: Administration Guide

When the -A parameter is used and annotations exist, both .ann and .ang files arecreated. Both files will always be created whenever annotations are requested and at leastone text or graphic annotation exists.
See “Examples” on page 246 for examples of using the -A parameter with the ARSDOCGET function.
-B orderbystringFor the QUERY and PRINT functions, used to specify which database field is used to sortthe document list. The -B option cannot be specified if a load ID is specified.
-cFor the GET function, use to concatenate all of the documents that match the query intoone output file. Name the output file with the -o parameter. However, even if you do specifythe -c parameter, the ARSDOC program creates separate output files when any of thefollowing conditions occur:
• If more than one application group is referenced by the folder. The ARSDOC programcreates one output file for each application group that contains items that match thequery.
• If more than one application is contained in an application group. The ARSDOC programcreates one output file for each application that contains items that match the query.
• If documents from the same application have different resource groups, the ARSDOCprogram creates separate output files for each resource group.
For example, if a folder references two application groups, then the following specification:
-o student -c
Can result in file names such as: student.516 or student.517
Where 516 and 517 are application group identifiers. One file is created for eachapplication group. Each file contains all of the items that match the query for that particularapplication group.
If you have difficulty viewing documents that are retrieved in the same file, retrieve thedocuments as individual documents.
-d directoryThe name of the directory where the ARSDOC program writes the output files. Thedirectory must exist before the ARSDOC program attempts to save the output files.
For UNIX servers, directory names are case sensitive; for Windows servers, directorynames are not case sensitive.
-DFor the QUERY function, appends the document handle information to the end of each line.The document handle information consists of the following ten values, in the order listed:
1. Document name2. Offset3. Length4. Compressed object offset5. Compressed object length6. Annotation type7. Compression type8. Resource ID9. Primary node ID
10. Secondary node ID
ARSDOC 235

The values are separated by a delimiter. The default delimiter is the comma character. Youcan specify a different delimiter with the -e parameter.
-e delimiterFor the QUERY function, specifies a one character delimiter to use as a separator betweenvalues. By default, Content Manager OnDemand separates values in the output with acomma.
-f folderThe name of the Content Manager OnDemand folder. The folder name must be specifiedexactly as it appears in Content Manager OnDemand. The case of the folder name issignificant. For example, to query the System Log folder, you must enter:
-f "System Log"
If you are using a parameter file, then you must specify the -f parameter in the parameterfile. If you are not using a parameter file and you do not specify the -f parameter, then theARSDOC program prompts you for the folder name when you run the program.
For the GET and QUERY functions, you can omit the -f parameter and specify the -Gparameter to search a specific application group.
For the UPDATE function, if the folder that is specified with the -f parameter contains onlyone application group, then you can omit the -g or -G parameter (you do not have to specifythe name of the application group).
When you specify the -X parameter, you cannot specify the -f parameter.
Note: The following information applies only when an application group name is notprovided.
A folder can be used to search one or more application groups. Because the ARSDOCprogram generates a single SQL query to search all of the application groups, theproperties of the database fields must be the same for each application group. Theproperties include the field name, type, and length. For example, suppose that you definethe following application groups and fields:
Application Group Field Names
Student Bills name, account, billDate
Student Grades name, account, gradeDate
Student Transcripts name, account, transcriptDate
You cannot query the application groups using the ARSDOC program because the name ofthe date field is not the same for each application group. However, if you were to define theapplication groups and fields as follows:
Application Group Field Names
Student Bills name, account, studentDate
Student Grades name, account, studentDate
Student Transcripts name, account, studentDate
Then you could query the application groups using the ARSDOC program because thenames of the database fields are the same for each application group.
-F parmFileSpecifies the name of the file that contains the actions to run and other parameters, values,and options. You typically specify this option when you want to perform more than oneaction.
236 Content Manager OnDemand for Multiplatforms: Administration Guide

When you specify a parameter file, delimit the options and values with left [ and right ]brackets. The left and right brackets identify each parameter in the file, are required in theparameter file, and the parameter values cannot contain left or right brackets. In thefollowing example, the parameter file for the ARSDOC query function is parmfile.txt:
arsdoc query -u oduser -p odpasswd -h odserver -v -F parmfile.txt
The following lines are examples of parameter values in the parmfile.txt parameter file:
[-f "Credit Card Statements"] [-i "where account = '000-000-000'"][-f "Credit Card Statements"] [-i "where account = '000-000-001'"]
If you want to use the left or right bracket as part of a parameter value, add a line to thebeginning of the file that redefines the left and right delimiters with the keyword DELIMS.The keyword DELIMS is case-sensitive, must be on the first line of the file and it must startat the beginning of the line. For example, if you want to indicate that the left and right curlybraces are the delimiters, add the line DELIMS={}. You can specify any two characters thatare different, are not a space, and are not in any of the parameter values. The followingexample shows left and right curly braces defined as delimiters:
DELIMS={}{-f "Credit Card Statements"} {-i "where account = '000-000-000' and name = 'Republic Bank [North]'"}{-f "Credit Card Statements"} {-i "where account = '000-000-000' and name = 'Republic Bank [South]'"}
An action (one or more input lines) can contain a maximum of 32767 characters (bytes).
You can use the \ (backslash) character to continue the parameters of an action to two ormore lines.
A parameter file can contain blank lines and comment lines. A comment line contains the #character in the first column.
-gFor the GET function, use to generate Generic indexer data for the items that match thequery.
See the IBM Content Manager OnDemand Indexing Reference for details about the Genericindexer.
When you specify the -g parameter, you must specify the -c, -N, and -o parameters.However, you cannot specify database field names with the -o parameter.
The ARSDOC program uses the following convention to name the output files that aregenerated with the -g parameter:
-o.res_id.appl_group.appl.type
Where:
• -o is the value specified with the -o parameter• res_id is the resource group identifier.• appl_group is the name of the application group• appl is the name of the application• type is the file type:
– out identifies a document file– ind identifies a generic index file– res identifies a resource file
ARSDOC 237
In general, the number of files generated is dependent on the number of applicationgroups in a folder, the number of applications in an application group, and the number ofversions of resource groups in an application.
For the ADD and UPDATE functions, specifies the name of the Content Manager OnDemandapplication group. The application group that you specify will be searched from the folderthat is named with the -f parameter. For the UPDATE function, if the folder that is specifiedwith the -f parameter contains only one application group, then you can omit the -gparameter (you do not have to specify the name of the application group).
-G applGroupUse to specify the name of the application group.
For UPDATE: If the folder that is specified with the -f parameter contains only oneapplication group, then you can omit the -G parameter (you do not have to specify thename of the application group).
For ADD: When the database query is run to retrieve the document that contains the datathat is to be used in the add function, the search is limited to the specified applicationgroup, even if the folder named with the -f parameter can be used to search more than oneapplication group. This ensures that only documents in the specified application group canbe used for the add function. You can specify the name of the application group with the -gparameter or the -G parameter.
For DELETE: The -G parameter is an optional parameter. If specified, then the databasequery that is run to determine the document(s) to delete is limited to the specifiedapplication group. The addition of the -G parameter allows you to delete documents from aspecific application group in folders that can search more than one application group. Ifyou do not specify the -G parameter, then the query runs against all of the applicationgroups that can be searched from the folder.
For GET: Specifies the application group to query and retrieve documents from. The -Gparameter lets you retrieve documents from a specific application group from a folder thatcan search more than one application group. If you do not specify the -G parameter, thenthe query runs against all of the application groups that can be searched from the folder.You can omit the -f parameter and specify the -G parameter to search a specific applicationgroup. The -G parameter is required if you specify the -X parameter.
For PRINT: The -G parameter is an optional parameter. If specified, then the databasequery that is run to determine the document(s) to print is limited to the specifiedapplication group. The addition of the -G parameter allows you to print documents from aspecific application group in folders that can search more than one application group. Ifyou do not specify the -G parameter, then the query runs against all of the applicationgroups that can be searched from the folder.
For QUERY: Specifies the application group to search. The -G parameter lets you search aspecific application group from folders that can search more than one application group. Ifyou do not specify the -G parameter, then the query runs against all of the applicationgroups that can be searched from the folder. You can omit the -f parameter and specify the-G parameter to search a specific application group. The -G parameter is required if youspecify the -X parameter.
For UPDATE: When the database query is run to determine the document(s) to update, thesearch is limited to the specified application group, even if the folder named with the -fparameter can search more than one application group. This guarantees that onlydocuments in the specified application group can be updated. You can specify the name ofthe application group with the -g parameter or the -G parameter.
You can use the -G parameter with the -i parameter to query folders that can search morethan one application group. For example, a folder contains three application groups; youwant to query only one of the application groups. Use the -G parameter to specify thename of the application group that you want to query. Use the -i parameter to specify the
238 Content Manager OnDemand for Multiplatforms: Administration Guide

application group's database field names. You can also use the -G and -i parameters whenthe application groups have different database field names. The following example showshow to search a folder and three application groups that have different database fieldnames:
arsdoc get -f "Student Information" -G loans -i "WHERE number LIKE '123456' AND loanDate = 10593"arsdoc get -f "Student Information" -G grades -i "WHERE number LIKE '123456' AND gradeDate = 10593"arsdoc get -f "Student Information" -G transcripts -i "WHERE number LIKE '123456' AND transDate = 10593"
You can use the -G parameter with the -q parameter to query folders that can search morethan one application group. When you specify the -G parameter and you specify a publicnamed query with the -q parameter, the ARSDOC program queries the application groupnamed with the -G parameter instead of the application group specified in the namedquery. (If you do not specify the -G parameter, then the query runs against the applicationgroup specified in the named query. If the named query does not identify an applicationgroup, then the query runs against all of the application groups that can be searched fromthe folder.)
-h instanceThe name of the Content Manager OnDemand instance to process.
The ARSDOC program will attempt to locate the specified instance name in the ARS.INIfile (UNIX servers; the registry on Windows servers) to obtain the TCP/IP address, hostname or host name alias of the workstation or node on which the instance is running. If theARSDOC program cannot locate the instance name in the ARS.INI file, the specified valueis treated as a host name.
This is a required parameter.
Important: If you are running multiple instances of Content Manager OnDemand on thesame workstation, always specify the -h parameter to identify the name of the instancethat you want to process. Verify that the system is configured with the correct informationfor all instances of Content Manager OnDemand.
See IBM Content Manager OnDemand for Multiplatforms: Installation and ConfigurationGuide for information about configuring instances.
-HFor the QUERY function, specify this parameter to generate a header record in the output.The default header record contains the application group field names. This parameter alsogenerates a line that contains the names of the database fields. By default, the field namesare delimited with the comma character. You can specify a delimiter of your choice with the-e parameter.
You can use the -H parameter to generate output that contains only the application groupdatabase field names. To do so, specify the -H parameter without specifying the -i or -qparameters. (You also must not specify the -L, -n or -N parameters.)
The ARSDOC program writes the database field names to the specified output file or tostdout (UNIX servers) or the console (Windows servers), in the format used for theheader record.
-i sqlQueryA valid SQL query, that includes the names of one or more application group databasefields, index values, and operators. Content Manager OnDemand does not validate thestring that you specify. See the SQL reference for your database manager product for anoverview of SQL concepts and details about how to construct a query.
ARSDOC 239

To query the database to identify documents to be processed, the -i parameter can beused alone, or with one or more of the following parameters: -l, -t, -T, or -x.
For the DELETE or UPDATE functions, if more than one document meets the search criteria,then multiple documents will be deleted or updated. For an update, all of the documentswill be updated with the same values.
To construct a query with a database field of type Date (old style), Date/Time (old style),Date/Time (TZ) (old style), Date, Date/Time, or Date/Time (TZ), use the following SQLsyntax rules:
• ODDAT_ must precede the name of the date database field name.• There must be a space between the field name, the operator, and the value.• Date/Time (TZ) or Date/Time (TZ) (old style) fields must be specified in Coordinated
Universal Time (UTC), also known as GMT.• For Date/Time (TZ) or Date/Time (TZ) (old style) fields, the value must be in the following
format: ‘YYYY-MM-DD HH:MM:SS.FFFFFF’ where FFFFFF consists of six fractionaldigits.
-I
Important: When you use this parameter, you must specify the f or p variable, where fcauses a search of the system log for the LoadId and p causes the LoadId to be createdfrom document information. For example:
arsdoc query .. .-I f
For the QUERY function, this parameter appends the Load ID to each line. The Load ID isseparated from the database field values by a delimiter. The default delimiter is the commacharacter. You can specify a different delimiter with the -e parameter.
To use the -I parameter, the user running the query must have permission to access theSystem Log application group and folder.
If the Load ID is not found in the system log, then the string Load ID could not befound is appended to the end of the output record.
The Load ID for a document is determined by searching the system log. Searching thesystem log can be very time consuming, depending on the number of records stored in thesystem log. The system log is searched for each document that matches the query.
-l holdnameThis parameter specifies the hold name.
To query the database to identify documents to be processed, the -l parameter can beused alone, or with one or more of the following parameters: -i, -t, -T, or -x. The -lparameter can also be used with the -q parameter if they are the only two searchparameters specified.
If the hold name is used with the HOLD_ADD or HOLD_RELEASE function, the hold nameidentifies the name of the hold that will be added to or removed from the documents.
For all other functions, specifying the hold name limits the list of returned hits to only thosehits that have been added to the specified hold. For example, an SQL query or a NamedQuery produces ten hits. If two of the ten hits have been added to a hold and the holdname is provided, the result contains only the two hits that are included in the hold.
-L max#For the GET and PRINT functions, determines the maximum number of items retrievedfrom Content Manager OnDemand, regardless of the number of items that match the query.
For the QUERY function, determines the number of items included in the hit list, regardlessof the number of items that match the query.
240 Content Manager OnDemand for Multiplatforms: Administration Guide

-nFor the GET function, use to retrieve items one at a time from the server. By default, theARSDOC GET function uses a bulk retrieval method for high-speed retrieval of items fromthe server.
Important: Specify the -n and -c parameters if a sort order has been defined in the folderand it is a requirement that the documents be retrieved in the order specified by the sortorder. If the -c parameter is not specified, the sort order will not be used when thedocuments are written to individual files. For more information about the sort order, seethe online help on the Field Information page for the folder.
For the QUERY function, use to number the items in the output file. If you specify thisoption, the ARSDOC program sequentially numbers each line in the output file, beginningwith 1 (one).
For the ADD and UPDATE functions, use to specify the application group database fieldnames and their values using the form -n dbfield=value.
• Specify a null (blank) field value by using single quotes within double quotes. Forexample: -n middle="''"
• Specify a string field value that contains a null (blank) or other special character byenclosing the field value in single quotes within double quotes. For example: -nname="'Sally Smith'"
You can specify one or more field names and their values (by specifying the -n parameterone time for each database field name and its value). When adding a document, you mustspecify all of the application group fields unless you specify the -O parameter. Whenupdating a document, you can specify one or more fields and their values. For a date field,you must specify the value using the Display Format from the Field Information pageunder folders.
-N "(dbfield1)(dbfield2)(dbfieldn)"For the QUERY function, specify the order and names of the database fields to include inthe output. For the GET function, when querying a folder that searches more than oneapplication group or a folder that searches an application group that contains more thanone application, specify this parameter to add the resource identifier, application groupname, and application name to the output file name. When you specify the -N parameter,you must specify the -c parameter. If you specify the -g parameter to generate genericindex data, you must specify the -N parameter.
If the folder searches more than one application group or an application group containsmore than one application and you do not specify the -N parameter, then the ARSDOCprogram adds the application group or application identifier to the output file name. Forexample, the following specification:
-o student -c
Can result in output file names such as: student.516 or student.517
Where 516 and 517 are application group identifiers. However, when you specify the -Nparameter, the ARSDOC program uses the resource identifier, application group name, andapplication name to name the output file. For example, the following specification:
-o student -c -N
Can result in output file names such as: student.1.BILLS.1995 orstudent.1.BILLS.1996
Where 1 is the resource identifier, BILLS is the application group name, and 1995 and1996 are application names.
ARSDOC 241

The number of index files created is dependent on the number of application groups in afolder, the number of applications in an application group, and the number of resourcegroups in an application.
For the QUERY function, determines the application group fields that the ARSDOC programwrites to the output file and the field names that appear in the header record. By default,the ARSDOC program writes all fields to the output file. You can specify one or moreapplication group field names using the form -N(dbfield)...(dbfield). Each field name thatyou specify must be delimited with parenthesis. When you run a query from the commandline, you must delimit the entire string in double quote characters. For example, -N"(dbfield)...(dbfield)".
-o nameFor the GET function, use to write documents to one or more files and identify a user-defined string used to generate unique file names. For example, the following specification:
-o student -c
Can result in the following output file name: student
You can concatenate one or more of the database field names that you specify with the -iparameter to generate a unique file name. For example, the following specification:
-o "(sdate)(student)"-i "WHERE sdate='971025' AND student='001200340056'"
Can result in the file name: 971025.001200340056
When you use database field names to generate a unique file name:
• Content Manager OnDemand verifies that the field names that you specify are valid forthe application groups that can be searched by the folder specified with the -f parameter.
• If the field name that you specify is a date field, the output format of the date isdetermined by the Format on the Load Information page under applications.
• The field names must be delimited with parenthesis.• You can specify the fields in any order. The order that you specify determines the file
name that the ARSDOC program generates.• You cannot use a field name to represent a directory name. For example, the following is
not valid:
-o "(field_1)/(field_2)
• You cannot specify the -c parameter to concatenate items in one output file. Each itemthat matches the query is stored in a separate output file.
If more than one item matches a query and you do not generate a unique file name usingdatabase field names, concatenate items in a single file with the -c parameter, or specifythe -g parameter, then the ARSDOC program generates a unique file name for each itemthat matches the query by adding a .n extension to the file name. Where n is the number ofthe item that matched the query. For example, if you specify:
-o statements
And two items match the query, the ARSDOC program creates the following files:statements.1 and statements.2
You must specify the -o parameter when you specify the -c parameter.
For the QUERY function, determines the file name of the output file in which the ARSDOCprogram writes the list of items that match the query.
242 Content Manager OnDemand for Multiplatforms: Administration Guide

For the ADD function, determines the name of the input file that contains the document tobe added. The value that you specify is not checked for valid characters. You can specify afull path name, including the back slash or forward slash characters that are part of adirectory path. When adding a document, you can provide the input data by specifying thename of the input file that contains the data with the -o parameter, an SQL query with the -iparameter, or a public named query with the -q parameter. Only one document may beadded at a time.
-OFor the ADD function, you must specify this parameter if you intend to omit one or moredatabase fields. However, you can never omit the following fields:
• Date• Date (old style)• Date/Time• Date/Time (old style)• Date/Time (TZ)• Date/Time (TZ) (old style)
When you specify the -O parameter, the ARSDOC program stores a default value in anyother database field that you omit. The default value for string fields is an empty (null)string. The default value for numeric fields is 0 (zero). Numeric fields include integer anddecimal fields.The -O option is not required in the case where an index row is being added for an existingdocument. For any index values that are not provided, the values from the existingdocument are used.
-p passwordSpecify one of the following options for password:
• The name of the stash (encrypted password) file that contains the password for the userID specified with the -u parameter.
• The password of the Content Manager OnDemand user that you named with the -uparameter. If there is no password assigned to the user that you specify, use quotationmarks to show a null password. That is, specify -p "". If you do not specify the -pparameter while you specify the -u parameter, then the ARSDOC program retrieves thepassword for the user ID from the stash file specified in ARS.INI file for that instance. Ifthere is no password assigned to the user that you specify, press the Enter key whenprompted.
-P printerFor the PRINT function, identifies the Content Manager OnDemand server printer to whichyou want to send the documents that match the query.
-q namedQueryThe name of a public named query for the folder named with the -f parameter. A namedquery is a set of search criteria previously saved on the library server that can be recalledby name to search a folder. A named query is typically defined to search a folder for aspecific document or set of documents.
To query the database to identify documents to be processed, the -q parameter can beused alone, or with one or more of the following parameters: -l or -x.
-Q SQLqueryfileUse this parameter to specify a file name that contains one or more query strings. Specifyonly one of the parameters, -i, -q, or -Q.
-s seconds
ARSDOC 243

For the GET function, determines the number of seconds that the ARSDOC program waitsbetween query requests when you specify more than one query with the -F parameter. Ifyou do not specify this option, then the ARSDOC program does not wait between queryrequests. That is, the default is 0 (zero) seconds.
-S startdate,enddate,formatProvides a date range that the ARSDOC program uses to limit a search to specific tables.When you specify this parameter, the ARSDOC program searches only tables that contain asegment within the specified date range.
You can optionally specify a date format. See Chapter 30, “ARSDATE,” on page 199 for alist of the standard date formats. An example of a date range with a date format is:
-S "01011990,12311990,%m%d%Y"
If you do not specify a date format, then the date values must be specified by using theDisplay Format that is set on the Field Information page in the folder. An example of a daterange without a date format is:
-S "01011990,12311990"
Important:
• For most queries, you should always specify the -S parameter and specify a date range.Doing so limits the range of a query and can significantly improve the performance of aquery.
• For the ADD function, if you specify the -o parameter, you cannot specify the -Sparameter.
• For the GET and QUERY functions, if you specify the -X parameter, you cannot specify the-S parameter.
• For all functions, if you specify the -q parameter, you cannot specify the -S parameter.
-t search_strSearch for the string search_str using the Content Manager OnDemand search.
To query the database to identify documents to be processed, the -t parameter can beused alone, or with one or more of the following parameters: -i, -l, -T, or -x.
-T search_strSearch for the string search_str using the full text index search.
To query the database to identify documents to be processed, the -T parameter can beused alone, or with one or more of the following parameters: -i, -l, -t, or -x.
-u useridThe Content Manager OnDemand user that is permitted to perform the specified function.The ARSDOC program verifies the following permissions:
• the user ID that you specify is a valid Content Manager OnDemand user for the libraryserver that you name with the -h parameter
• the user ID is permitted to open the folder that you name with the -f parameter• the user ID has permission in application groups to perform the specified function
If you omit the -u parameter, then the ARSDOC program prompts you to enter the user IDwhen you run the program.
If you do not specify the -p parameter while you specify the -u parameter, the ARSDOCprogram retrieves the password for the user ID from the stash file specified in ARS.INI filefor that instance.
-U user_alias
244 Content Manager OnDemand for Multiplatforms: Administration Guide

Identifies the users when multiple users share a common user ID. The maximum length foruser_alias is 128.
-vEnables verbose mode, which displays all messages (informational and error). By default,the ARSDOC program displays error messages.
-x loadId
For the GET, QUERY, and UPDATE functions, use to limit the query to the set of documentsthat were loaded into the system under the specified loadId.
When you specify the -x parameter, use the -f and -G parameters as follows:
• Specify the -f parameter to search all application groups.• Specify the -G parameter to search a specific application group.
To query the database to identify documents to be processed, the -x parameter must beused with at least one or more of the following parameters: -i, -l, -t, or -T.
Alternatively, the -x parameter can be used with the -q parameter as long as the -qparameter is the only additional search parameter provided.
-X loadIdFor the GET function, retrieve documents by using the index file that was generated for thespecified loadId.
For the QUERY function, build a hit list from the index file that was generated for thespecified loadId.
For the UPDATE function, update documents by using the index file that was generated forthe specified loadId. Because a folder is not used when the -X parameter is specified,default date formats are used to validate database fields when updating a document. Thedefault formats are:
Date Type Default Format
Date %Y-%m-%d
Time %X
Date/Time %Y-%m-%d %H:%M:%S
Date/Time (TZ) %Y-%m-%d %H:%M:%S
For the PRINT function, print documents by using the index file that was generated for thespecified loadId.
For the HOLD_ADD function, add documents to a hold by using the index file that wasgenerated for the specified loadId.
For the HOLD_RELEASE function, remove documents from a hold by using the index filethat was generated for the specified loadId.
For the CFSOD_FED function, send documents to CFS-CMOD and make them available toIBM FileNet P8 features by using the index file that was generated for the specified loadId.
For the FTI_ADD function, add documents to the full text index by using the index file thatwas generated for the specified loadId.
For the FTI_RELEASE function, remove documents from the full text index by using theindex file that was generated for the specified loadId.
When you specify the -X parameter, you must specify the -G parameter and name theapplication group.
ARSDOC 245

When you specify the -X parameter, you cannot specify the -x parameter, or the -f, -i, -l, -q,-t, -S, and -T parameters.
Important: The load ID that is provided with the -X parameter is used to identify a set ofdocuments. When the documents are loaded, an index file is created that contains a list ofall of the documents in the load. The index file is then used by ARSDOC to build a list in theorder the documents appear in the index file which is the same order the documentsappear in the original input file.
Important: Any documents with index values that have been updated will not be includedin the document list that is generated from the index file.
-1 trace_fileSpecify a fully qualified trace file name as directed by IBM Software Support.
-2 levelSpecify a numeric value as directed by IBM Software Support.
ExamplesThe following ARSDOC examples include guidance on how to add a user ID to the stash file. For example,to add the user ID "sysadmin" to the stash file, enter the following command:
arsstash -a 1 -s stash_file -u sysadmin
where:
-a 1Adds the user ID to the stash file.
-s stash_fileName of the stash file.
-u sysadminUser ID that is added to the stash file (if -u sysadmin is used on command line, then -p isnot required since the password is obtained from the stash file).
1. The following shows how to use the GET function to retrieve documents and save them in a file in thecurrent directory.
arsdoc get -h ARCHIVE -u sysadmin -f "Student Information" -o student -c -S 1/1/97,12/31/97 -i "WHERE student='001200340056'" -v
The ARSDOC program saves all of the documents that match the query in the following output file:student
2. The following shows how to use the GET function and a parameter file to run more than one query ata time. The parameter file is in the current directory. The output files are saved in the currentdirectory.
arsdoc get -h ARCHIVE -u sysadmin -F parmfile -v
The parameter file contains two queries:
[-f "Student Information"] [-S 1/1/97,12/31/97] [-o (student)(type)] \[-i "WHERE student='123420010056' AND type='B' OR type='G' OR type='T'"]
[-f "Student Information"] [-S 1/1/97,12/31/97] [-o (student)(type)] \[-i "WHERE student='123450011917' AND type='B' OR type='G' OR type='T'"]
246 Content Manager OnDemand for Multiplatforms: Administration Guide

Assuming that documents exist for all of the specified types, the ARSDOC program creates thefollowing output files:
123420010056.Bills123420010056.Grades123420010056.Transcripts123450011917.Bills123450011917.Grades123450011917.Transcripts
3. The following shows how to use the GET function to retrieve documents, write the documents to afile, and generate and save generic index data for the documents that match the query. The exampleshows how to specify the name of a public named query that is valid for the specified folder.
arsdoc get -h ARCHIVE -u sysadmin -f "Student Information" -a -c -g -o student -q "3rd yr students GPA>3.5" -N -v
The number of output files that the ARSDOC program generates is a factor of the number ofapplication groups queried, the applications contained in the application groups, whether the data isAFP and if so, the versions of resource groups in each application. At a minimum, for AFP data withone version of the resource group and one application group, the ARSDOC program generates threeoutput files. For example:
student.1.Student Information.TRANSCRIPTS.indstudent.1.Student Information.TRANSCRIPTS.outstudent.1.Student Information.TRANSCRIPTS.res
For AFP data, if there is more than one version of the resource group per application, then theARSDOC program can generate additional output files. For example:
student.1.Student Information.TRANSCRIPTS.indstudent.1.Student Information.TRANSCRIPTS.outstudent.1.Student Information.TRANSCRIPTS.resstudent.2.Student Information.TRANSCRIPTS.outstudent.2.Student Information.TRANSCRIPTS.indstudent.2.Student Information.TRANSCRIPTS.res
If the application group contains more than one application, then the ARSDOC program can generateadditional output files. For example:
student.1.Student Information.Bills.indstudent.1.Student Information.Bills.outstudent.1.Student Information.Bills.resstudent.2.Student Information.Grades.outstudent.2.Student Information.Grades.indstudent.2.Student Information.Grades.res
4. The following shows how to use the QUERY function to generate a list of items and save the list in afile in the current directory.
arsdoc query -h ARCHIVE -u sysadmin -f "Student Information" -o query1.out -H -S 1/1/97,12/31/97 -i "WHERE student='0012-0034-0056' AND type='B' OR type='G' OR type='T'" -v
5. The following shows how to use the QUERY function and a parameter file to run more than on queryat a time. The parameter file is in the current directory. The output files are saved in the currentdirectory.
arsdoc query -h ARCHIVE -u sysadmin -F parmfile -v
ARSDOC 247

The parameter file contains three queries:
[-f "Student Information"] [-i "WHERE type='B'"] [-o query2.out] \ [-S 1/1/97,12/31/97] [-H] [-N (student)(id)(p_date)]
[-f "Student Information"] [-i "WHERE type='G'"] [-o query3.out] \ [-S 1/1/97,12/31/97] [-H] [-N (student)(id)(p_date)]
[-f "Student Information"] [-i "WHERE type='T'"] [-o query4.out] \ [-S 1/1/97,12/31/97] [-H] [-N (student)(id)(p_date)]
6. The following example shows how to use the QUERY function to search a specific application group:
arsdoc query -h ARCHIVE -u sysadmin -i "where Date_Taken BETWEEN 9863 AND 11531" -G load-scanned-images-jpeg -o jpeg -v
7. The following example shows how to use the ADD function to add a document to the Credit CardStatements folder:
arsdoc add -h ARCHIVE -u sysadmin -o /newdata/crd.dat -n "crd_date=01/21/98" -n "account='000-000-000'" -n balance=123.45 -n "name='John Watpole'" -f "Credit Card Statements" -g CRD -a CRD -v
8. The following example shows how to use the UPDATE function to update a document in the CreditCard Statements folder, changing the balance from 123.45 to 0.00:
arsdoc update -h ARCHIVE -u sysadmin -i "where account='000-000-000' and name='John Watpole'" -n "balance=0.00" -S 1/1/97,12/31/97 -f "Credit Card Statements" -g CRD -v
9. The following example shows how to use the DELETE function to delete a document from the CreditCard Statements folder:
arsdoc delete -h ARCHIVE -u sysadmin -i "where account='000-000-000' and name='John Watpole'" -f "Credit Card Statements" -S 1/1/97,12/31/97 -v
10. The following example shows how to use the PRINT function to send the documents that match aquery to a server printer:
arsdoc print -h ARCHIVE -u sysadmin -P svrprt1 -i "where account='000-000-000' and name='John Watpole'" -f "Credit Card Statements" -S 1/1/97,12/31/97 -v
11. You can use the ARSDOC program to use the ADD function to add an index that points to an existingdocument. For example, assume that you loaded a bank statement for account number000-000-000, date 5/23/97, and account name Joe Smith. You want to add a new index, butpoint to the existing statement. The new index uses the same account number and date, but containsa different account name (for example, Sally Smith). After adding the index, if a query is run withaccount name Joe Smith or Sally Smith, the same bank statement will be retrieved. To add anindex for an existing document:
arsdoc add -h ARCHIVE -u sysadmin -i "where sdate=10005 and account='000-000-000' and name='Joe Smith'" -n "sdate=5/23/97" -n "account=000-000-000" -n "name='Sally Smith'" -f "Credit Card Statements" -S 1/1/97,6/31/97 -v
12. The following example shows how to use the QUERY function to limit a search to the documents thatwere loaded into the system under a specific load ID. For example, assume that the specified folder
248 Content Manager OnDemand for Multiplatforms: Administration Guide

could be used to search several application groups; each application group contains more than oneapplication; there are 500,000 documents in the application groups. By using the -x parameter, thequery will be limited to the set of documents that was loaded into the system under the specifiedload ID. Without the -x parameter, the query is run against all 500,000 documents.
arsdoc query -h ARCHIVE -u sysadmin -x 19867-025-0-3FAA-10136-10136 -f load-scanned-images -q query -o out -v
13. The following example shows how to use the QUERY function to limit a search to the documents thatwere loaded into the system under a specific load ID. In the example, the load ID, application groupname, and query string are provided. The search is limited to the application group and only thosedocuments that were loaded into the system under the specified load ID.
arsdoc query -h ARCHIVE -u sysadmin -x 19867-025-0-3FAA-10136-10136 -i "where Date_Taken BETWEEN 9863 AND 11531" -G load-scanned-images-jpeg -o jpeg -v
14. The following example shows how to use the QUERY function to limit a search to the documents thatwere loaded into the system under a specific load ID. In the example, the load ID, folder name,application group name, and named query are provided. The search is limited to the applicationgroup and only those documents that were loaded into the system under the specified load ID.Because a folder was specified, a named query can be used. (If an application group name isspecified and a folder name is not specified, a named query cannot be used, because a named queryis associated with a folder.)
arsdoc query -h ARCHIVE -u sysadmin -x 19867-025-0-3FAA-10136-10136 -f load_scanned-images -q query -G load-scanned-images-jpeg -o jpeg -v
15. The following example shows how to use the GET function and an index file to retrieve documentsfrom the system. The index file was generated for the set of documents that was loaded into thesystem under the specified load ID. When using the -X parameter, documents are retrieved based onthe information in the index file.
arsdoc get -h ARCHIVE -u sysadmin -X 19867-025-0-3FAA-10136-10136 -G load-scanned-images-jpeg -o jpeg -v
16. -A parameter: The following are two examples of using the ARSDOC GET function with the -Aparameter.
• To retrieve public text annotations:
arsdoc get -u sysadmin -p passwd -h ARCHIVE -f "CRD" -q named_query -o loaddata -a -g -c -N -A 0 -v
• An example of the messages that are generated by the ARSDOC program:03/10/2004 10:32:12: Starting arsdoc. Version: 9.5.0.0
03/10/2004 10:32:14: arsdoc get -h ARCHIVE -u sysadmin -f CRD -q named_query -o loaddata -a -g -c -N -A 0 -v
03/10/2004 10:32:14: Attempting login for userid ’sysadmin’ on server ’ARCHIVE’ ...
03/10/2004 10:32:20: Login successful
03/10/2004 10:32:20: Searching for folder 'CRD' ...
03/10/2004 10:32:27: Search successful
03/10/2004 10:32:27: Searching for documents in 'CRD' ...
03/10/2004 10:32:28: Querying database with SQL string 'where account = '000-000-000''
03/10/2004 10:32:56: Search successful
03/10/2004 10:32:56: 1 document(s) have been queried. Retrieving 1 document(s).
03/10/2004 10:34:05: (1): Retrieving document for userid 'sysadmin' ...
03/10/2004 10:34:05: Document successfully retrieved and stored in file 'loaddata.2.CRD.CRD.out'
03/10/2004 10:34:15: Writing generic indexer file(s).
03/10/2004 10:34:46: '1' annotations were written to file 'loaddata.2.CRD.CRD.ann'
ARSDOC 249

03/10/2004 10:34:46: A total of 1 annotations were written to file 'loaddata.2.CRD.CRD.ann'
03/10/2004 10:34:53: Generic indexer file 'loaddata.2.CRD.CRD.ind' has been successfully created.
03/10/2004 10:34:54: arsdoc completed.
17. The following example is for the -B option. You want the command line to print all of the documentsin the Credit Card Statements folder that have an account number of 000-000-000. The documentsare to be printed in sorted ascending order based on the balance:
arsdoc print -h ARCHIVE -u sysadmin -i "where account = '000-000-000'" -f "Credit Card Statements" -P odprinter -B balance -v
The following is an example of the ARSDOC program command line:
arsdoc get -h ARCHIVE -u sysadmin -f CRD -Q SQL_filename -o loaddata -a -g -c -N -v
The following is an example file:
# 1 document for account number 000-000-000where account ='000-000-000'
#1 document for account number 000-000-001 continued on multiple lines where\ account\ = '000-000-001'
# 1 document for account number 000-000-002where account = '000-000-002'
18. -Q parameter: The following is an example of the messages that are generated by the ARSDOCprogram when multiple SQL queries are used.:03/10/2004 10:32:12: Starting arsdoc. Version: 9.5.0.0
03/10/2004 10:32:14: arsdoc get -h ARCHIVE -u sysadmin -f CRD -Q SQL-filename -o loaddata -a -g -c -N -v
03/10/2004 10:32:14: Attempting login for userid ’sysadmin’ on server ’ARCHIVE’ ...
03/10/2004 10:32:20: Login successful
03/10/2004 10:32:20: Searching for folder 'CRD' ...
03/10/2004 10:32:27: Search successful
03/10/2004 10:32:27: Searching for documents in 'CRD' ...
03/10/2004 10:32:28: Querying database with SQL string 'where account = '000-000-000''
03/10/2004 10:32:28: 1 document(s) matches the search criteria.'03/10/2004 10:32:29: Search successful
03/10/2004 10:32:29: Searching for documents in 'CRD' ...
03/10/2004 10:32:30: Querying database with SQL string 'where account = '000-000-001''
03/10/2004 10:32:32: 1 document(s) matches the search criteria.'
03/10/2004 10:32:33: Search successful
03/10/2004 10:32:33: Searching for documents in 'CRD' ...
03/10/2004 10:32:34: Querying database with SQL string 'where account = '000-000-002''
03/10/2004 10:32:38: 1 document(s) matches the search criteria.'
03/10/2004 10:32:38: Search successful
03/10/2004 10:32:56: 3 document(s) have been queried. Retrieving 3 document(s).
03/10/2004 10:33:05: (1): Retrieving document for userid 'oduser' ...
03/10/2004 10:33:05: Document successfully retrieved and stored in file 'loaddata.2.CRD.CRD.out'
03/10/2004 10:33:07: (2): Retrieving document for userid 'oduser' ...
03/10/2004 10:33:10: Document successfully retrieved and stored in file 'loaddata.2.CRD.CRD.out'
03/10/2004 10:33:12: (3): Retrieving document for userid 'oduser' ...
03/10/2004 10:33:15: Document successfully retrieved and stored in file 'loaddata.2.CRD.CRD.out'
03/10/2004 10:33:24: arsdoc completed.
250 Content Manager OnDemand for Multiplatforms: Administration Guide

19. -U parameter: In this example, if a common user ID sysadmin is shared by three users: John Smith,Mark Jones, and Kathy Brown. A user alias is assigned to identify each of the actual users. In thisexample, the user alias is the real user name.
arsdoc query -h ARCHIVE -u sysadmin -i query_string -f folder-v -U "John Smith"arsdoc query -h ARCHIVE -u sysadmin -i query_string -f folder-v -U "Mark Jones"arsdoc query -h ARCHIVE -u sysadmin -i query_string -f folder-v -U "Kathy Brown"
In the system log, the user ID column then contains:
SYSADMIN-JOHN SMITHSYSADMIN-MARK JONESSYSADMIN-KATHY BROWN
20. HOLD_ADD function:
arsdoc hold_add -h ARCHIVE -u sysadmin -l hold_audit -f "Monthly Status Reports" -i "where code='TX' and ODDAT_sdate='2016-08-10'" -v
21. HOLD_RELEASE function:
arsdoc hold_release -h ARCHIVE -u sysadmin -l hold_audit -f "Monthly Status Reports" -i "where code='TX' and ODDAT_sdate='2016-08-10'" -v
22. CFSOD_FED function:
arsdoc cfsod_fed -h ARCHIVE -u sysadmin -f "Monthly Status Reports" -i "where code='TX' and ODDAT_sdate='2016-08-10'" -v
23. FTI_ADD function:
arsdoc fti_add -h ARCHIVE -u sysadmin -f "Monthly Status Reports" -i "where code='TX' and ODDAT_sdate='2016-08-10'" -v
24. The following example shows how to search the Content Manager OnDemand System Log:
arsdoc query -u oduser -h odserver -f "System Log" -i "where ODDAT_time_stamp > '2015-01-01 12:50:00.000000' and userid like 'ODUSER%'"
25. The following example shows a second method to search the Content Manager OnDemand SystemLog:
arsdoc query -u oduser -h odserver -f "System Log" -i "WHERE ODDAT_time_stamp BETWEEN '2015-01-01 00:00:00.000000' AND '2015-01-06 23:59:59.999999' AND userid LIKE 'ODUSER%'"
26. The following example shows a third method to search the Content Manager OnDemand System Log:
arsdoc query -u oduser -h odserver -f "System Log" -i "WHERE ODDAT_time_stamp BETWEEN '2015-01-01 00:00:00.000000' AND '2015-01-06 23:59:59.999999' AND userid LIKE 'ODUSER%'" -S "2014-01-01 00:00:00.000000,2015-01-06 00:00:00.000000, %Y-%m-%d %H:%M:%S.%F"
ARSDOC 251

27. The following example shows how to use a tokenized query string:
arsdoc query -u oduser -h odserver -f "Credit Card Statements" -i "2;ODDAT_crd_date,account;'2018-03-03','000-000-000';where ODDAT_crd_date = ? and account = ?" -S "2017-01-01,2018-04-30,%Y-%m-%d"
Exit codes used by ARSDOCThe ARSDOC command uses the following exit codes:0
Success1
No hits2
Syntax error. For example, the parameter or value is invalid.3
An error occurred with the specified request. For example: the user ID has an incorrect permissionlevel, the specified folder does not exist, or the specified database field does not exist.
4Unrecoverable error. For example, the operation failed, or the user cannot connect to the server.
NotesThe ADD function will fail unless the Database Organization for the application group named with the -gparameter is Multiple Loads per Database Table and the Expiration Type is Segment or Document.
The ADD function can be run without providing an input document from a file or by retrieving an existingdocument from the system. This means that you can add database field values without adding adocument. To add database field values without adding a document, do not specify the -o, -i, or -qparameters; specify the database field names and their values using one or more -n parameters.
The ARSDOC program can issue an informational message that provides the server version number. Whenyou run the ARSDOC GET function, messages can also be included that provide the number of documentsthat were queried and retrieved, and a status message for each document that is retrieved. To enablethese messages, specify the -v parameter for verbose mode which displays all messages (information anderror). If you do not specify the -v parameter, the ARSDOC program displays only error messages.
For the purpose of retrieving a document from a Content Manager OnDemand server (with the intention ofreloading or loading the data into another Content Manager OnDemand server, ARSDOC GET must beused to retrieve reports, as opposed to the ARSADMIN RETRIEVE and DECOMPRESS.
You can use ARSDOC GET with a load ID by specifying the -X parameter, for example
arsdoc get ...... -X <loadid>.
Use the load ID as it appears in the system log, for example
-X 5547-4-0-2FAA-20170313000000-20170313000000-5548
You can also specify the -g parameter to produce a generic index file. Alternatively, the documentsretrieved can be re-indexed.
252 Content Manager OnDemand for Multiplatforms: Administration Guide

Files/opt/IBM/ondemand/V10.1/bin/arsdoc
The AIX or Sun Solaris executable program./opt/ibm/ondemand/V10.1/bin/arsdoc
The Linux executable program.\Program Files\IBM\ondemand\V10.1\bin\arsdoc
The Windows executable program.
ARSDOC 253

254 Content Manager OnDemand for Multiplatforms: Administration Guide

Chapter 33. ARSJESD
Syntax
arsjesd -p port# -d filesystem
-x command
-1 trace_file -2 level
Description
The ARSJESD program is the server component of Download. A licensed feature of PSF for z/OS,Download can be used to automatically transmit the output data sets of application programs from theJES spool to file systems on Content Manager OnDemand servers. Download also transmits values thatyou specify in JCL parameters and can optionally transmit additional job information. You can use thevalues and job information to specify the name of the application and application group into whichContent Manager OnDemand loads the transmitted data. Download is made up of a pair of cooperatingcomponents, a Download writer that transmits the data set and a program that receives and stores thedata on the server. See PSF for z/OS: Download for z/OS for details about Download, including how toconfigure and operate Download on z/OS systems, a list of the JCL parameters that are transmitted with afile, and information about a user-written program that may be used to provide additional job informationto the ARSJESD program. See Chapter 25, “Download exits and processing,” on page 165 for moreinformation about using the Download user exit with Content Manager OnDemand.
The ARSJESD program monitors a TCP/IP port for activity from a z/OS system. Multiple instances of theARSJESD program may be started, each monitoring a specific port for data transmitted from a differentDownload writer. A Download writer and its corresponding ARSJESD instance must specify the same portnumber. If you start multiple instances of the ARSJESD program, you must specify different file systemsfor use by each instance. Using the same file systems for more than one ARSJESD program can adverselyaffect performance.
The ARSJESD program now receives files larger than 4GB.
The ARSJESD program stores the transmitted data sets into file systems on the server. You can specify upto ten file systems that the ARSJESD program can use to store the transmitted data. The ARSJESDprogram always stores data beginning with the first file system specified. If there is not enough spaceavailable to store the data set being transmitted in the first file system specified, the ARSJESD commandswitches to the second file system specified. If there is not enough space available to store the data setbeing transmitted in the last file system specified, the ARSJESD program switches to the first file systemspecified.
Parameters-p port#
The TCP/IP port number that the ARSJESD program monitors for data from the z/OSsystem. The valid range of port numbers is 5001 through 64000. However, you shouldavoid using port numbers 5001, 8251, and 8253. The Download writer and the ARSJESDprogram must specify the same port number. See PSF for z/OS: Download for z/OS forinformation about configuring Download on z/OS systems.
-d filesystemThe name of the file system into which the ARSJESD program stores the transmitted data.You can specify up to 10 file system parameters, each separated by the blank character.
© Copyright IBM Corp. 1993, 2018 255

-x commandThe name of a user-written program that the ARSJESD program invokes to process thedownloaded file, JCL parameters, and other job information after receiving and storing thefile on the server. You can specify the full path name of the program. If you do not specifythe full path name, the operating system searches the current directory for the program. Ifthe file is not found in the current directory, the operating system continues to search forthe file using the directories defined in the PATH environment variable.
You typically specify this parameter when you need to process the transmitted data beforeit can be loaded into the system. See Chapter 25, “Download exits and processing,” onpage 165 for more information.
-1 trace_fileSpecify a fully qualified trace file name as directed by IBM Software Support.
-2 levelSpecify a numeric value as directed by IBM Software Support.
Examples
1. The following shows how to start the ARSJESD program to monitor TCP/IP port number 6001 andplace transmitted data in the /arsacif/acif1 file system:
arsjesd -p 6001 -d /arsacif/acif1
2. The following shows how to start the ARSJESD program to monitor TCP/IP port number 6002 andplace transmitted data in the /arsacif/acif1 file system. If there is not enough space available inthe /arsacif/acif1 file system to store the data set being transmitted, then the ARSJESD programstores the data set in the /arsacif/acif2 file system.
arsjesd -p 6002 -d /arsacif/acif1 -d /arsacif/acif2
3. The following shows how to start the ARSJESD program to monitor TCP/IP port number 6002 andplace transmitted data in the /arsacif/acif1 file system. After transmitting the file to the server,the ARSJESD program invokes the /opt/IBM/ondemand/V10.1/exits/custusercmd user-writtenprogram. A user-written program may perform any required functions, such as determining the nameof the application group and application to load, renaming or copying input files, and invoking otherprograms.
arsjesd -p 6002 -d /arsacif/acif1 -x /opt/IBM/ondemand/V10.1/exits/custusercmd
Note: You must supply your own user-written program, although IBM provides a sample program inChapter 25, “Download exits and processing,” on page 165.
Notes
A file transmitted by Download uses the following file naming convention:
MVS.JOBNAME.DATASET.FORMS.YYYYDDD.HHMMSST.ARD
Important: The .ARD file name extension is required to initiate a load process.
• By default, the ARSLOAD program uses the FORM part of the file name to identify the application groupto load. When you run the ARSLOAD program, you can use the -G parameter to specify a different partof the file name to identify the application group (MVS, JOBNAME, or DATASET). For example, arsload-G JOBNAME.
• If the application group to load contains more than one application (source of data), you must identifythe application to load. Otherwise, the load will fail. When you run the ARSLOAD program, you can usethe -A parameter to specify the part of the file name that identifies the application (MVS, JOBNAME,
256 Content Manager OnDemand for Multiplatforms: Administration Guide

DATASET, or FORMS). For example, to use the DATASET part of the file name to identify the application,run the ARSLOAD program with the -A DATASET parameter.
Depending on the date format that you specify when you initiate Download on the z/OS system, the datepart of the file name may be YYYYDDD or YYDDD. Apply APAR OW36539 to Download and use theDATE_FORMAT keyword in the routing file to control the format of the date part of the file name. See PSFfor z/OS: Download for z/OS for details.
Files/opt/IBM/ondemand/V10.1/bin/arsjesd
The AIX or Sun Solaris executable program./opt/ibm/ondemand/V10.1/bin/arsjesd
The Linux executable program.\Program Files\IBM\OnDemand Server\V10.1\bin\arsjesd.exe
The Windows executable program.
ARSJESD 257

258 Content Manager OnDemand for Multiplatforms: Administration Guide

Chapter 34. ARSLOAD
PurposeThe ARSLOAD program can be used to process the input files that you want to load into the system. TheARSLOAD program determines if the input data needs to be indexed, and if so, calls the appropriateindexing program. The ARSLOAD program calls the storage manager programs to load report data onstorage volumes and the database manager to update the IBM Content Manager OnDemand databasewith the index information that was extracted from or specified for the input file.
© Copyright IBM Corp. 1993, 2018 259

Syntax
arsload
-a application
-A applID
-b index #, field_name
-B Format
-c indexDir
-d dataDir
-D DELIM
-E -f
-F C T X -g applGroup
-G applGroupID
-h instance
-i -I instance -j parmFile
-J file_name_delimiter -l fieldID -n
-p password -t seconds -u userid -v
-X
A
G
P
X
3
-Z userExit -1 trace_file -2 level
loadFilename
DescriptionThe ARSLOAD program is the main IBM Content Manager OnDemand data indexing and loading program.The ARSLOAD program calls the indexing program if the input data needs to be indexed, creates inputfiles for the storage manager, and updates the Content Manager OnDemand database. The ARSLOADprogram saves processing messages in the system log. You can open the System Log folder and list themessages that were generated when an input file was processed.
You typically configure the ARSLOAD program to run as a daemon (UNIX servers) or service (Windowsservers), to periodically check specified file systems for input files to process.
The ARSLOAD program can use the following sources for input files to process:
260 Content Manager OnDemand for Multiplatforms: Administration Guide

• one or more file systems specified with one or more -d parameters,• one or more load file names.
If you omit the load file name, the ARSLOAD program will run in daemon mode and attempt to load inputdata from the directories that are specified by the -d parameter. If you omit the load file name and do notspecify the daemon mode parameter (-d), the ARSLOAD program will issue a usage note and exit.
Important: When running the ARSLOAD program in daemon mode, the .ARD and .PDF file nameextensions are required to initiate a load process.
When you run the ARSLOAD program, you must provide the user ID of a Content Manager OnDemand userwith administrator authority for the application group into which the input data will be loaded. There areseveral ways that you can provide the user ID:
• Use the -u parameter each time that you run the ARSLOAD program.• On UNIX servers, set a default system administrator userid and password in the ARSLOAD.CFGconfiguration file. The ARSLOAD program uses the values in the ARSLOAD.CFG file unless you specifyotherwise (with the -u parameter).
• On Windows servers, the Load Data service uses the userid and password of the instance owner. If yourun the ARSLOAD program from the command line, you should use Windows unified logon. See the -uparameter for details.
Important: After you upgrade to Content Manager OnDemand Version 10.1, keep in mind that ARSLOADnow automatically excludes duplicate rows during load (thereby lessening the count for the number ofrows loaded by ARSLOAD). Meaning, if duplicate rows are present, then only one is loaded.
Parameters-a application
The name of the application to load. If the application group contains more than oneapplication, then you must identify the application to load. Otherwise, the load will fail. Ifyou plan to automate the loading of files into different application groups and applications,then use the -A parameter to specify the part of the file name that identifies the name ofthe application.
-A applIDDetermines the part of the file name that identifies the application to load. If theapplication group contains more than one application, then you must identify theapplication to load; otherwise, the load will fail.
You typically specify this parameter when you run the ARSLOAD program as a daemon(UNIX servers) or service (Windows servers) to automate the loading of files into differentapplication groups and applications. For example, you can use Download to transmit filesfrom z/OS systems to the server. A file transmitted by Download uses the following filenaming convention:
MVS.JOBNAME.DATASET.FORMS.YYYYDDD.HHMMSST.ARD
• Unless you specify otherwise, the ARSLOAD program uses the FORMS part of the filename to identify the application group to load. You can use the -G parameter to specify adifferent part of the file name that identifies the application group (MVS, JOBNAME, orDATASET). For example, arsload -G JOBNAME.
• If the application group to load contains more than one application (source of data), thenyou must identify the application to load; otherwise, the load will fail. When you run theARSLOAD program, you can use the -A parameter to specify the part of the file name thatidentifies the application (MVS, JOBNAME, DATASET, or FORMS). For example, to use theDATASET part of the file name to identify the application, run the ARSLOAD program withthe -A DATASET parameter.
ARSLOAD 261

-b <index #,field_name>Specify the name of an index field and a number that identifies the part of the input filename that the ARSLOAD programs assigns to that index field. For index_number, you canspecify 1 - 8 and the number must match a part of the input file name identified by the -Bparameter.
In the following example, assume that the input file name is ApplGroup1.App1.ARD:
arsload -b "1,field1" -B "AG.1APP.ARD" -g ApplGroup1 ...
During the load, the ARSLOAD program assigns the value App1 from the input file name tothe index field "field1" of application group "ApplGroup1".
-B "format"Use this parameter to do the following tasks:
• Define the file name formats for MVS™ download files and files processed by theARSLOAD daemon.
• Identify the parts of the file name that the ARSLOAD program assigns to an index fieldspecified by the -b parameter.
Use the following identifiers to define the file name format:1 - 8
A number prefixed to a part of the file name that identifies that part as a value to assignto an index field.
AGApplication group name
APPApplication name
DATAbbreviation for DATASET
EXTExtension
FLDField place holder for indexing
FORAbbreviation for FORMS
HHAbbreviation for HHMMM
IGNIgnore
JOBAbbreviation for JOBNAME
MVSMVS
WRIAbbreviation for WRITER
YYAbbreviation for YYDDD
The following example uses the full word of the JOB, DAT, FOR, YY, and HH identifiers todefine the file name format:
MVS.JOBNAME.DATASET.FORMS.YYDDD.HHMMM.ARD
262 Content Manager OnDemand for Multiplatforms: Administration Guide
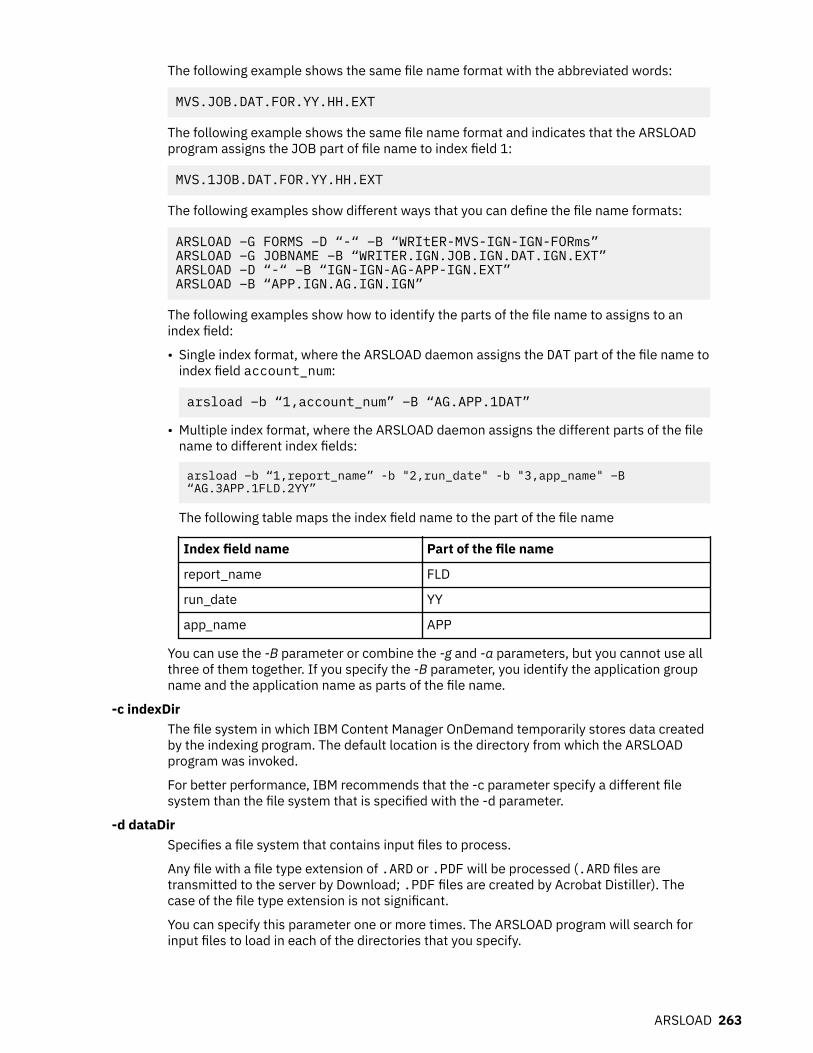
The following example shows the same file name format with the abbreviated words:
MVS.JOB.DAT.FOR.YY.HH.EXT
The following example shows the same file name format and indicates that the ARSLOADprogram assigns the JOB part of file name to index field 1:
MVS.1JOB.DAT.FOR.YY.HH.EXT
The following examples show different ways that you can define the file name formats:
ARSLOAD –G FORMS –D “-“ –B “WRItER-MVS-IGN-IGN-FORms”ARSLOAD –G JOBNAME –B “WRITER.IGN.JOB.IGN.DAT.IGN.EXT”ARSLOAD –D “-“ –B “IGN-IGN-AG-APP-IGN.EXT”ARSLOAD –B “APP.IGN.AG.IGN.IGN”
The following examples show how to identify the parts of the file name to assigns to anindex field:
• Single index format, where the ARSLOAD daemon assigns the DAT part of the file name toindex field account_num:
arsload –b “1,account_num” –B “AG.APP.1DAT”
• Multiple index format, where the ARSLOAD daemon assigns the different parts of the filename to different index fields:
arsload –b “1,report_name” -b "2,run_date" -b "3,app_name" –B “AG.3APP.1FLD.2YY”
The following table maps the index field name to the part of the file name
Index field name Part of the file name
report_name FLD
run_date YY
app_name APP
You can use the -B parameter or combine the -g and -a parameters, but you cannot use allthree of them together. If you specify the -B parameter, you identify the application groupname and the application name as parts of the file name.
-c indexDirThe file system in which IBM Content Manager OnDemand temporarily stores data createdby the indexing program. The default location is the directory from which the ARSLOADprogram was invoked.
For better performance, IBM recommends that the -c parameter specify a different filesystem than the file system that is specified with the -d parameter.
-d dataDirSpecifies a file system that contains input files to process.
Any file with a file type extension of .ARD or .PDF will be processed (.ARD files aretransmitted to the server by Download; .PDF files are created by Acrobat Distiller). Thecase of the file type extension is not significant.
You can specify this parameter one or more times. The ARSLOAD program will search forinput files to load in each of the directories that you specify.
ARSLOAD 263
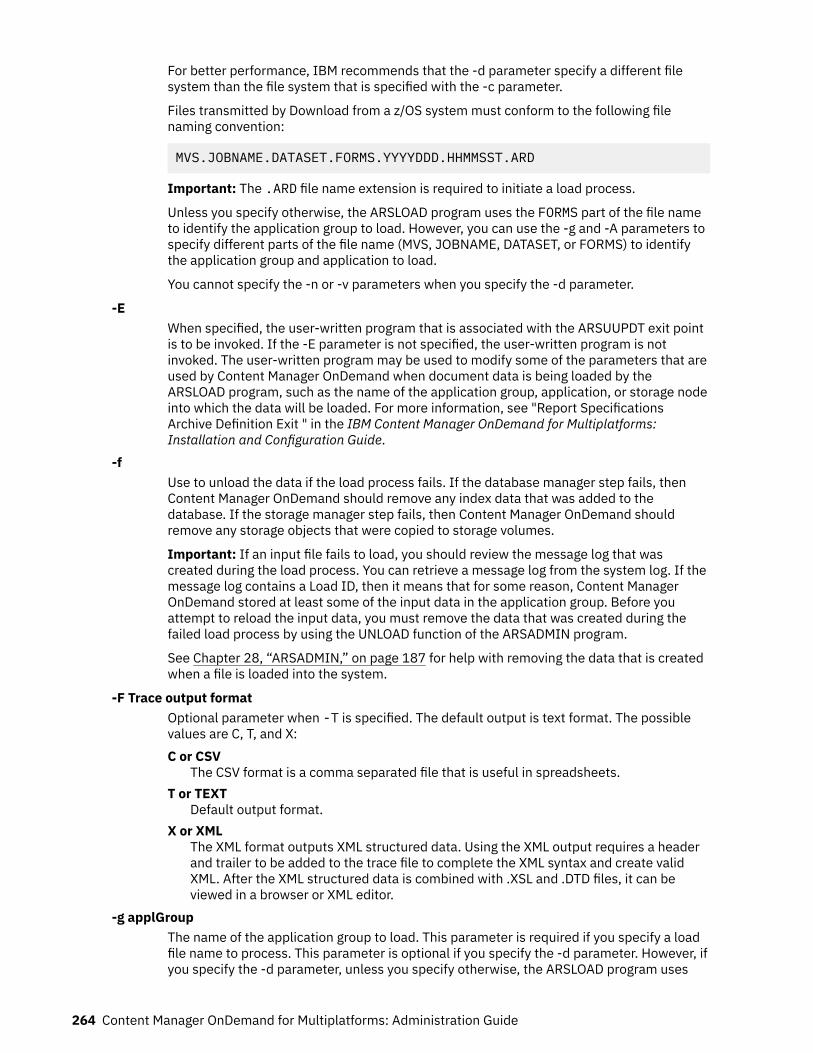
For better performance, IBM recommends that the -d parameter specify a different filesystem than the file system that is specified with the -c parameter.
Files transmitted by Download from a z/OS system must conform to the following filenaming convention:
MVS.JOBNAME.DATASET.FORMS.YYYYDDD.HHMMSST.ARD
Important: The .ARD file name extension is required to initiate a load process.
Unless you specify otherwise, the ARSLOAD program uses the FORMS part of the file nameto identify the application group to load. However, you can use the -g and -A parameters tospecify different parts of the file name (MVS, JOBNAME, DATASET, or FORMS) to identifythe application group and application to load.
You cannot specify the -n or -v parameters when you specify the -d parameter.
-EWhen specified, the user-written program that is associated with the ARSUUPDT exit pointis to be invoked. If the -E parameter is not specified, the user-written program is notinvoked. The user-written program may be used to modify some of the parameters that areused by Content Manager OnDemand when document data is being loaded by theARSLOAD program, such as the name of the application group, application, or storage nodeinto which the data will be loaded. For more information, see "Report SpecificationsArchive Definition Exit " in the IBM Content Manager OnDemand for Multiplatforms:Installation and Configuration Guide.
-fUse to unload the data if the load process fails. If the database manager step fails, thenContent Manager OnDemand should remove any index data that was added to thedatabase. If the storage manager step fails, then Content Manager OnDemand shouldremove any storage objects that were copied to storage volumes.
Important: If an input file fails to load, you should review the message log that wascreated during the load process. You can retrieve a message log from the system log. If themessage log contains a Load ID, then it means that for some reason, Content ManagerOnDemand stored at least some of the input data in the application group. Before youattempt to reload the input data, you must remove the data that was created during thefailed load process by using the UNLOAD function of the ARSADMIN program.
See Chapter 28, “ARSADMIN,” on page 187 for help with removing the data that is createdwhen a file is loaded into the system.
-F Trace output formatOptional parameter when -T is specified. The default output is text format. The possiblevalues are C, T, and X:C or CSV
The CSV format is a comma separated file that is useful in spreadsheets.T or TEXT
Default output format.X or XML
The XML format outputs XML structured data. Using the XML output requires a headerand trailer to be added to the trace file to complete the XML syntax and create validXML. After the XML structured data is combined with .XSL and .DTD files, it can beviewed in a browser or XML editor.
-g applGroupThe name of the application group to load. This parameter is required if you specify a loadfile name to process. This parameter is optional if you specify the -d parameter. However, ifyou specify the -d parameter, unless you specify otherwise, the ARSLOAD program uses
264 Content Manager OnDemand for Multiplatforms: Administration Guide

the FORMS part of the file name to determine the name of the application group to load. Ifyou plan to automate the loading of files into different application groups and applications,then you should use the -g parameter to specify the part of the file name that identifies theapplication group to load.
-G applGroupIDDetermines the part of the file name that the ARSLOAD program uses to identify the nameof the application group to load.
You typically specify this parameter when you run the ARSLOAD program as a daemon(UNIX servers) or service (Windows servers) to automate the loading of files into differentapplication groups and applications. For example, you can use Download to transmit filesfrom z/OS systems to the server. A file transmitted by Download uses the following filenaming convention:
MVS.JOBNAME.DATASET.FORMS.YYYYDDD.HHMMSST.ARD
• Unless you specify otherwise, the ARSLOAD program uses the FORMS part of the filename to identify the application group to load. You can use the -g parameter to specify adifferent part of the file name that identifies the application group (MVS, JOBNAME, orDATASET). For example, arsload -G JOBNAME.
• If the application group to load contains more than one application (source of data), thenyou must identify the application to load; otherwise, the load will fail. When you run theARSLOAD program, you can use the -A parameter to specify the part of the file name thatidentifies the application (MVS, JOBNAME, DATASET, or FORMS). For example, to use theDATASET part of the file name to identify the application, run the ARSLOAD program withthe -A DATASET parameter.
-h instanceThe name of the Content Manager OnDemand instance to process. The ARSLOAD programwill attempt to locate the specified instance name in the ARS.INI file (UNIX servers; theregistry for Windows servers), to obtain the TCP/IP address, host name or host name aliasof the system on which the instance is running. If the ARSLOAD program cannot locate theinstance name in the ARS.INI file, then the specified value is treated as a host name.
Tip: The ARSLOAD program also supports the -I parameter. You can use either parameterto specify the name of the instance to process. If you specify both, the value of the lastparameter specified is used.
You must specify this parameter and name the instance if:
• The name of the default instance is not ARCHIVE.• You are running more than one instance on the same system and you want to process an
instance other than the default instance.• You are running the ARSLOAD program on a system other that the system on which the
instance that you want to process is running.
Important: If you are running multiple instances of Content Manager OnDemand on thesame workstation, always specify the -h parameter to identify the name of the instancethat you want to process. Verify that the system is configured with the correct informationfor all instances of Content Manager OnDemand. See IBM Content Manager OnDemand forMultiplatforms: Installation and Configuration Guide for information about configuringinstances.
Recommendation: Although -h HOST,PORT can be specified, no additional configurationinformation will be read. Use -I INSTANCE_NAME instead to look up the host,port andother configuration values through the ars.ini file.
-i
ARSLOAD 265

Use to run the data indexing program only; do not copy report data to storage volumes oradd the index data to the database.
-I instanceThe name of the Content Manager OnDemand instance to process. The ARSLOAD programwill attempt to locate the specified instance name in the ARS.INI file (UNIX servers; theregistry for Windows servers), to obtain the TCP/IP address, host name or host name aliasof the system on which the instance is running. If the ARSLOAD program cannot locate theinstance name in the ARS.INI file, then the specified value is treated as a host name.
Tip: The ARSLOAD program also supports the -h parameter. You can use either parameterto specify the name of the instance to process. If you specify both, the value of the lastparameter specified is used.
You must specify this parameter and name the instance if:
• The name of the default instance is not ARCHIVE.• You are running more than one instance on the same system and you want to process an
instance other than the default instance.• You are running the ARSLOAD program on a system other that the system on which the
instance that you want to process is running.
Important: If you are running multiple instances of Content Manager OnDemand on thesame workstation, always specify the -h parameter to identify the name of the instancethat you want to process. Verify that the system is configured with the correct informationfor all instances of Content Manager OnDemand. See IBM Content Manager OnDemand forMultiplatforms: Installation and Configuration Guide for information about configuringinstances.
-j parmFileUse to specify the name of a file that contains additional indexing parameters. Each line (orrecord) in the file represents one complete indexing parameter, including keywords anddata values.
Typical usages of this command include:
• Appending a constant to an index value.• Populating an index value with something not seen within the data.• Populating an index value with something that does not change regularly.
When you specify the -j parameter and name a file, the ARSLOAD program adds theindexing parameters from the specified file to the indexing parameters that it extracts fromthe application. (Indexing parameters are typically specified on the Indexing Informationpage in applications.) If an indexing parameter appears in both the application and the filethat you specify, then the ARSLOAD program uses the value from the file.
For example, some of the indexing parameters in the application are as follows:
TRIGGER1=*,1,'REPORT'FIELD1=0,10,20INDEX1='REPORT_NAME',FIELD1
You would like to add the constant "001" to the end of the INDEX1 value. You could addthe following parameters in the -j parameter file:
FIELD2='001'INDEX1='REPORT_NAME',FIELD1,FIELD2
These parameters will add FIELD2 and override the original INDEX1. The FIELD2 value willbe concatenated onto FIELD1.
266 Content Manager OnDemand for Multiplatforms: Administration Guide

To add a constant index value to the above parameters, add the following to the -jparameter file:
FIELD3='WEST COAST'INDEX2='REGION',FIELD3
-J File name delimiterUse this parameter to define file name formats for MVS download files and files that areprocessed by the ARSLOAD daemon. By default, this parameter is "."
-l fieldIDIndicates that the ARSLOAD program will capture and place the entire name of the inputfile into the field identifier specified in the fieldID variable.
-nDetermines whether Content Manager OnDemand deletes the input files when theARSLOAD program terminates.
• If you specify the -n parameter, then Content Manager OnDemand does not delete theinput files when the ARSLOAD program ends.
• If you do not specify the -n parameter, then Content Manager OnDemand deletes theinput files when the ARSLOAD program ends.
In either case, if the ARSLOAD program fails in the load step because of a device or systemproblem, then you can restart the load step after you correct the problem by using theintermediate files that were created by the ARSLOAD program. The ARSLOAD programstores the intermediate files in the directory named with the -c parameter (or the directoryfrom which you started the ARSLOAD program, if you did not specify the -c parameter). Theintermediate files have the same file name as the original input file.
-p passwordThe password for the user that is specified with the -u parameter. If the user is notassigned a password, enter a null password (that is, specify -p ""). If you do not specifythe -p parameter while you specify the -u parameter, then the program retrieves thepassword for the user ID from the stash file specified in ARS.INI file for that instance.
-t secondsDetermines the polling time in seconds. This is the interval of time in which the ARSLOADprogram checks the input directory (specified by the -d parameter) for input files toprocess. The default value is 600 seconds, which means that the ARSLOAD programchecks the input directory every ten minutes.
-u useridThe user ID of a Content Manager OnDemand user with administrator authority for theapplication group. The user must have permission to add documents to the applicationgroup.
There are several ways that you can provide the user ID and password:
• You can specify the -u and -p parameters each time that you run the ARSLOAD program.• For Windows servers, if you run the ARSLOAD program from the command line, use
Windows unified logon to protect your Content Manager OnDemand user ID andpassword. Unified logon attempts to log on to the Content Manager OnDemand serverwith the Windows logon account user name.
• For Windows servers, the Load Data service uses the user ID and password of theinstance owner.
-vEnables verbose mode, which displays all messages (informational and error). By default,the ARSLOAD program displays error messages.
ARSLOAD 267

-X indexer
Allows you to override the indexing program that was specified on the Indexer Informationpage for the application. The possible values are A, G, P, X, and 3:
• Specify -X A to use ACIF.• Specify -X G to use the Content Manager OnDemand Generic indexer.• Specify -X P to use the Content Manager OnDemand PDF indexer.• Specify -X X to use the Content Manager OnDemand XML indexer.• Specify -X 3 to use the Content Manager OnDemand OS/390 indexer.
You must specify an indexing program if the input contains index data in a format otherthan the one supported by the indexing program that was specified for the application. Forexample, assume that you defined an application and specified ACIF as the indexingprogram. Later, you used the ARSDOC program to extract documents from an applicationgroup. The ARSDOC program generates index data that is in the Generic indexer format. Toload the index data into the application, you must specify:
arsload -X G . . .
-Z userExitSpecifies a user-defined string that is passed to the load user exit program (ARSULOAD).The ARSULOAD program is installed in the exits directory.
loadFilenameSpecifies an input file to process.
You may specify the names of one or more input files to process. If you specify more thanone input file, separate the file names with a blank character.
The ARSLOAD program appends the following file type extensions to the file name that youspecify: .ind, .out, .res, .ann, and .ang
• The .ind file contains the index data• The .out file contains the report data• The .res file contains the resource data• The .ann file contains text annotations• The .ang file contains graphic annotations
For example, if you specify arsload -g BILLS po3510, the ARSLOAD program looks forand processes the following files:
• po3510.ind• po3510.out• po3510.res• po3510.ann• po3510.ang
The file extensions on all .ind, .out, .res, .ann, and .ang files must be lowercase. Filenames with extensions .IND, .OUT, .RES, .ANN, and .ANG will not be processed.
If the ARSLOAD program does not find a file with the .ind file type extension, itautomatically calls the indexing program to process the input file.
If you omit an input file name, the ARSLOAD program will run in daemon mode and attemptto load input data from the directories that are specified by the -d parameter. If you omit aninput file name and do not specify the daemon mode parameter (-d), the ARSLOADprogram will issue a usage note and exit.
-1 trace_file
268 Content Manager OnDemand for Multiplatforms: Administration Guide

Specify a fully qualified trace file name as directed by IBM Software Support.-2 level
Specify a numeric value as directed by IBM Software Support.
ExamplesThe following ARSLOAD examples include guidance on how to add a user ID to the stash file. For example,to add the user ID "sysadmload" to the stash file as a default user ID for ARSLOAD, enter the followingcommand:
arsstash -a 3 -s stash_file -u sysadmload
where:
-a 3Adds the user ID for the ARSLOAD command.
-s stash_fileName of the stash file.
-u sysadmloadUser ID that will be used to logon to the server when ARSLOAD is run without specifying auser ID and password (as in, -u userID and -p password are not provided on thecommand line).
To add "bob" to the stash file, enter the following command:
arsstash -a 1 -s stash_file -u bob
where:
-a 1Adds the user ID to the stash file.
-s stash_fileName of the stash file.
-u bobUser ID that is added to the stash file (if -u bob is used on command line, -p is notrequired since the password is obtained from the stash file.
1. The following example shows how to run the ARSLOAD program to check the specified directory forinput files to process. The input files must have a file type extension of .ARD or .PDF. The ARSLOADprogram stores temporary work files in the location specified by the -c parameter. In this example, theARSLOAD program uses the FORM part of the file name to determine the application group to load andthe application group contains only one application; the ARSLOAD program logs on to the system andaccesses the application group with the user ID and password stored in the encrypted password file(stash file).
arsload -h ARCHIVE -c /arsacif/acif1 -d /arsacif/acif2
For example, if "sysadmload" was the user added to the stash file for arsload, arsload would use theuser ID "sysadmload" to logon to the server with the password from the stash file.
2. The following example shows how to run the ARSLOAD program to check the specified directory forinput files to process. The input files must have a file type extension of .ARD or .PDF. The ARSLOADprogram stores temporary work files in the location specified by the -c parameter. In this example, theARSLOAD program uses the JOBNAME part of the file name to determine the application group to loadand the DATASET part of the file name to determine the application to load; the ARSLOAD program
ARSLOAD 269

logs on to the system and accesses the application group with the user ID and password stored in theencrypted password file (stash file).
arsload -h ARCHIVE -c /arsacif/acif1 -d /arsacif/acif2 -A DATASET -G JOBNAME
For example, if "sysadmload" was the user added to the stash file for arsload, arsload would use theuser ID "sysadmload" to logon to the server with the password from the stash file.
3. The following example shows how to run the ARSLOAD program to load the specified file into thespecified application group. The ARSLOAD program logs on to the system and accesses the applicationgroup by using the user ID from the -u parameter and the password for user ID "bob" from the stashfile.
arsload -h ARCHIVE -g BILLS -u bob PO3510
Note that the user ID "bob" would have to have been added to the stash file prior to running theARSLOAD command.
4. The following example shows how to run the ARSLOAD program to load several input files into thespecified application group. The application group name contains an embedded blank character, andmust be quoted. The ARSLOAD program logs on to the system and accesses the application group byusing the user ID and password from the -u and -p parameters.
arsload -h ARCHIVE -g "ABC Credit" -u bob RW7505 RW8505
Note that the user ID "bob" would have to have been added to the stash file prior to running theARSLOAD command.
5. The following shows how to run the ARSLOAD program to load the specified file into the specifiedapplication group. The TCP/IP address of the IBM Content Manager OnDemand library server isspecified. This format of the command can be used to load input files from an object server and storethe index data on the library server. The ARSLOAD program logs on to the system and accesses theapplication group by using the user ID and password from the stash file. Note that the stash file namemust be specified with the -p option because a TCP/IP address is being provided rather than aninstance name:
arsload -h "9.99.111.222" -g BILLS -u bob -p stash_file ARSP0MST
As a result, ARSLOAD will logon to the server using the user ID "bob" (the password for "bob" is fromthe stash file "stash_file").
NotesIBM recommends that you do not run the ARSLOAD program at the same time that you run the ARSMAINTprogram with the -r parameter (or any other program that optimizes or reorganizes the database).
IBM recommends that you do not run the ARSLOAD program at the same time that you run the ARSDBprogram with the -m or -s parameters (or any other program that optimizes or reorganizes the database).
If you do not specify an input file name, the ARSLOAD program checks the directory specified with the -dparameter(s) for input files to process. Any file with a file type extension of .ARD or .PDF will beprocessed (.ARD files are transmitted to the server by Download; .PDF files are created by AcrobatDistiller). The case of the file type extension is not significant.
The IBM Content Manager OnDemand server program (ARSSOCKD or ARSOBJD in UNIX; LibSrvr orObjSrvr in Windows) must be running, otherwise the ARSLOAD program will fail.
270 Content Manager OnDemand for Multiplatforms: Administration Guide

Chapter 35. ARSMAINT
PurposeMaintain application group data in the Content Manager OnDemand database and in cache storage. Youtypically run the ARSMAINT program on a regular schedule to migrate files from cache storage to archivestorage, delete files from cache storage, optionally migrate index data from the database to archivestorage, and delete index data from the database.
Note to Oracle users: See “Using the ARSMAINT program with Oracle” on page 277.
Syntaxarsmaint
-c -D pct -d -e
-f
95
threshold
-g applGroup -i
-I instance -L -m -n minimum -o
-p password -r -s -t internalDate
-u userid -v -x maximum
-1 trace_file -2 level
DescriptionThe ARSMAINT program maintains application group data that is stored in the Content ManagerOnDemand database and in cache storage. The ARSMAINT program maintains the system by using thestorage management values from the application groups that are defined to the system. The ARSMAINTprogram uses the following storage management values:
• Life of Data and Indexes• Length of Time to Cache Data on Magnetic• Length of Time Before Copying Cache to Archive Media• Length of Time Before Migrating Indexes to Archive Media• Length of Time to Maintain Imported Migrated Indexes• Expiration Type. The ARSMAINT program uses the Expiration Type to determine how to delete index
data from an application group. The ARSMAINT program can expire a table of application group data ata time, an input file at a time, or individual documents.
Use the -d, -e, and -i parameters to migrate and expire index data from the database.
© Copyright IBM Corp. 1993, 2018 271

Use the -c and -m parameters to migrate and expire files from cache storage.
Note: Most maintenance processes should run when no other applications are updating the database orneed exclusive access to the database and when you are sure that no one will be retrieving documentsfrom the system. You should not maintain the database at the same time that you load data into thesystem. There may be other processes that conflict; for example, you cannot maintain the database whilean offline backup of the database is in progress.
The time of day and frequency with which you run the maintenance programs and the processing optionsthat you specify will vary, based on your requirements. For example, if you do not load data into thesystem every day or you add few rows to the database when you do load data, you should be able tomaintain the database less often, perhaps once a month. However, if you load a high volume of data everyday, you may need to maintain the database after the load processing completes. If your system hassufficient space available to store index and report data, you may be able to maintain the database lessoften.
The examples in this section illustrate one way to maintain the database and cache storage. You shoulduse the examples as a guideline. The options that you use on your system and the times that you can runthe ARSMAINT program on your system will be different.
ARSMAINT also queries the database for any application groups that are flagged for migration to anexternal storage manager, and creates migration links in the cache against which ARSMAINT is run. Themigration date is the current date so when ARSMAINT normally processes files for migration, it picks upthese newly created links.
Parameters-c
Expires files from cache storage. Most customers should plan to schedule the ARSMAINTprogram to expire files every day.
-dExpires indexes from the Content Manager OnDemand database. Most customers shouldplan to schedule the ARSMAINT program to expire indexes every day.
Important: When the application group has an Expiration Type of Load, the -d parameterexpires the associated objects at the same time.
-D percentageSpecifies a threshold that, if the actual value is lower than this threshold, you wantOnDemand to reload the load. The threshold measures the percentage of documents in aload that have a hold. When OnDemand processes a load, it calculates the percentage ofthe load that has a hold. If the actual value is lower than this threshold, OnDemand reloadsthis load. Specify a number between 0 and 100. The default is 0, which means thatOnDemand does not reload the load.
For example, assume you have a load with 100 document and you specify -D 50. WhenOnDemand processes a load, if the percentage of documents with a hold is lower than50%, OnDemand reloads the load. The following list describes OnDemand behavior as thenumber of documents with holds increases for this example:
• No documents have a hold. Therefore, the actual percentage is 0%. OnDemand does notreload the load.
• One document has a hold. Therefore, the actual percentage is 1%. OnDemand reloadsthe load.
• Forty nine document have a hold. Therefore, the actual percentage is 49%. OnDemandreloads the load.
• Fifty documents have a hold. Therefore, the actual percentage is 50%. OnDemand doesnot reload the load.
272 Content Manager OnDemand for Multiplatforms: Administration Guide

• Fifty one documents have a hold. Therefore, the actual percentage is 51%. OnDemanddoes not reload the load.
-eMigrates index data from the database to archive storage. Customers that plan to usemigration processing should schedule the ARSMAINT program to migrate data every day.
Migration is the process of moving tables of index data from the database to archivestorage. The migration process allows you to maintain index data for a very long time, onindirect access media. You typically migrate index data after users no longer need toaccess the documents to which the indexes point, but for legal or other requirements, youstill need to maintain the index data for some number of months or years.
Important: Before you can migrate index data, the index tables must be closed. To close atable to loading before the Maximum Rows value is reached, use the ARSTBLSP programwith the -a1 parameter. For more information, see the chapter about ARSTBLSP program.
You must configure application groups for migration. Content Manager OnDemand uses theLength of Time Before Migrating Indexes to determine when to migrate index data. If youneed to import index data from archive storage back into the database, then OnDemandwill maintain the index data in the database for the number of days specified in the Lengthof Time to Keep Imported Migrated Indexes. (Content Manager OnDemand maintainsmigrated index data in archive storage until it reaches its Life of Data and Indexes.)
Before you can migrate index data to archive storage, you must configure the SystemMigration application group. See IBM Content Manager OnDemand for Multiplatforms:Installation and Configuration Guide for help with configuring the System Migrationapplication group.
-f thresholdSends an alert message when a cache storage file system is filled to the specifiedpercentage. The default value is 95 (percent). The range is 0 (zero) to 100.
When a cache storage file system exceeds the threshold, it usually means that theARSMAINT program cannot delete enough documents from the file system to fall belowthe threshold. You may need to run migration and expiration processing more often,increase the size of your cache storage file systems, or add new cache storage file systems.
The ARSMAINT program sends the alert message to stdout (UNIX servers), the console(Windows servers), the system log, and the system log user exit point.
-g applGroupThe name of the application group to process. Unless you specify this parameter, theARSMAINT program maintains the database and cache storage for all of the applicationgroups defined on the library server. You can specify this parameter and name anapplication group when you need to maintain the database and cache storage for a specificapplication group. You can specify multiple application groups by specifying the -gparameter multiple times. The -g parameter is valid only with the -c, -d, -e, -i, -m, and -r parameters.
-iExpires imported index data from the database. Customers that need to use migrationprocessing should schedule the ARSMAINT program to expire imported indexes every day.
An administrator must import index data that was previously migrated to archive storageback into the database to satisfy a query. After maintaining the imported index data for thenumber of days specified in the Keep Imported Migrated Indexes field (see the Advancedbutton on the Storage Management page in the application group), the data is eligible to beremoved from the database (and will be removed the next time that the ARSMAINTprogram runs with the -i parameter).
ARSMAINT 273

-I instanceThe name of the Content Manager OnDemand instance to process. The ARSMAINTprogram will attempt to locate the specified instance name in the ARS.INI file (UNIXservers; the registry for Windows servers), to obtain the TCP/IP address, host name or hostname alias of the system on which the instance is running. If the ARSMAINT programcannot locate the instance name in the ARS.INI file, then the specified value is treated as ahost name.
You must specify this parameter and name the instance if:
• The name of the default instance is not ARCHIVE.• You are running more than one instance on the same system and you want to process an
instance other than the default instance.
If you are running multiple instances of Content Manager OnDemand on the sameworkstation, always specify the -I parameter to identify the name of the instance that youwant to process.
Verify that the system is configured with the correct information for all instances of ContentManager OnDemand. See IBM Content Manager OnDemand for Multiplatforms: Installationand Configuration Guide for information about configuring instances.
-LQueries the ARSLOAD table and updates the aid value for all the load IDs that have notbeen previously found. For multiple applications in an application group, queries the datatables to find a corresponding hit for the load in order to determine the aid value.
-mMigrates files from cache storage to archive storage. IBM recommends that you schedulethe ARSMAINT program to migrate files every day.
-n minimumSpecifies the low expiration threshold percentage for cache storage file systems. This valuedetermines when the ARSMAINT program stops expiring files from cache storage filesystems (see the -c and -x parameters). The range is 0 (zero) to 100.
The default value is 80 (percent), which should keep cache storage file systems fairly full,to provide good retrieval hit rates while leaving adequate free space to load new input files.IBM recommends that you periodically check the amount of space available in your cachestorage file systems. Depending on the amount of data that you load into the system andthe length of time that you maintain documents in cache storage, you may need to increasethe size of the cache storage file systems or add new cache storage file systems.
-oExpires Content Manager OnDemand Distribution Facility (ODF) table entries. Expiredentries in the ARSDFPPT, ARSDFDRT, and ARSDFDST tables will be deleted. By default,entries in these tables older than 30 days are considered expired and are automaticallydeleted by the ARSODF program. The number of days can be changed by using theARSODF_EXPIRE_DAYS parameter in the ARS.CFG configuration file. This means thatrunning ARSMAINT -o is optional, because the ARSODF program will automatically deleteexpired entries.
-p passwordSpecify one of the following options for password:
• The name of the stash (encrypted password) file that contains the password for the userID specified with the -u parameter.
• The password for the Content Manager OnDemand user ID specified with the -uparameter. If the user is not assigned a password, enter a null password (that is, specify-p ""). If you do not specify the -p parameter while you specify the -u parameter, thenthe program retrieves the password for the user ID from the stash file specified in
274 Content Manager OnDemand for Multiplatforms: Administration Guide

ARS.INI file for that instance. If the user is not assigned a password, then press the Enterkey when prompted.
-r
Runs database statistics, which causes the database manager to optimize applicationgroup index data and make access to information as efficient as possible. IBMrecommends that you schedule the ARSMAINT program to optimize the database everyday.
-sProduces a report that contains status information about the cache storage file systemswhich is written to the Content Manager OnDemand system log. The report includesinformation such as the name of the file systems and the amount of free space for each filesystem. IBM recommends that you schedule the ARSMAINT program every day to reportthe status.
-t dateSpecifies that you want the ARSMAINT program to process the database and cache storageby using a date other than the current system date (the default value). For example, youcan specify a date in the future to cause the ARSMAINT program to process data and filesbefore their actual expiration and migration period (for example, if you wanted to clearcache storage). The default format for date is YYYY-MM-DD. When you specify this option,you must specify the -u parameter. The ARSMAINT program processes all data and filesbelonging to the application groups for which the user (specified with the -u parameter)has been given permission to delete documents.
Note: Use this option with caution. Contact the IBM support center before you run theARSMAINT program with this option.
-u useridSpecifies a Content Manager OnDemand user that has administrator permission for theapplication groups to be processed. If you specify the -g parameter, the user must havepermission to delete documents from the application groups. If you do not specify thisparameter, the ARSMAINT program prompts you to enter the userid when you run theprogram.
If you do not specify the -p parameter with the -u parameter, the ARSADMIN programretrieves the password for the user ID from the ARS.INI file for that instance.
-x maximumSpecifies the high expiration threshold percentage for cache storage file systems. Thisvalue determines when the ARSMAINT program begins expiring files from cache storagefile systems (see the -c parameter). When a cache storage file system reaches thisthreshold, the ARSMAINT program begins deleting data from the file system by using thedata migration and caching values from the application groups. The ARSMAINT programstops deleting files from a file system when the amount of used space in the file systemdrops below the low expiration threshold (see the -n parameter). The range is 0 (zero) to100.
The default value is 80 (percent), which should keep cache storage file systems fairly full,to provide good retrieval hit rates while leaving adequate free space to load new input files.IBM recommends that you periodically check the amount of space available in your cachestorage file systems. Depending on the amount of data that you load into the system andthe length of time that you maintain data in cache storage, you may need to increase thesize of the cache storage file systems or add new cache storage file systems.
-vValidates cache storage. When you specify this option, the ARSMAINT program inspects allcache storage file systems to make sure that they are correctly linked with the proper filepermissions.
ARSMAINT 275

-1 trace_fileSpecify a fully qualified trace file name as directed by IBM Software Support.
-2 levelSpecify a numeric value as directed by IBM Software Support.
ExamplesThe following ARSMAINT examples include guidance on how to add a user ID to the stash file. Forexample, to add the user ID "sysadmin" to the stash file, enter the following command:
arsstash -a 1 -s stash_file -u sysadmin
where:
-a 1Adds the user ID to the stash file.
-s stash_fileName of the stash file.
-u sysadminUser ID that is added to the stash file (if -u sysadmin is used on command line, then -p isnot required since the password is obtained from the stash file).
1. The following shows how to run the ARSMAINT program with options to migrate and expire files fromcache storage, migrate and expire indexes from the database, optimize database index data, printstatistics, and validate cache storage. These options are typical of those used to maintain a standardlibrary/object server system (with archive storage on the library server).
arsmaint -h ARCHIVE -u sysadmin -cdeimrsv
2. The following shows how to run the ARSMAINT program with options to migrate and expire files fromcache storage, print statistics, and validate cache storage. These options are typical of those used tomaintain cache storage and archive storage on an object server that resides on a different workstationor node than the library server.
arsmaint -h ARCHIVE -u sysadmin -cmsv
NotesSee the online help that is provided with the administrative client for assistance with configuring thestorage management information in your application groups.
The Content Manager OnDemand server programs can remain active while you run the ARSMAINTprogram. However, IBM recommends that you schedule the ARSMAINT program to run at a time whenlittle or no other Content Manager OnDemand activity takes place on the system.
IBM recommends that you do not load data on the system when you run the ARSMAINT program with the-r parameter.
It is recommended that you create a backup image of the Content Manager OnDemand database and theTivoli Storage Manager database before you run the ARSMAINT program.
The Content Manager OnDemand server program (ARSSOCKD or ARSOBJD in UNIX; LibSrvr or ObjSrvr inWindows) must be running, otherwise the ARSMAINT program will fail.
Before you can migrate index data, the index tables must be closed. To close a table to loading before theMaximum Rows value is reached, use the ARSTBLSP program with the -a1 parameter. For moreinformation, see Chapter 40, “ARSTBLSP,” on page 293.
276 Content Manager OnDemand for Multiplatforms: Administration Guide

If the Content Manager OnDemand cache file system becomes unavailable (as during a system failure),automatic retrieval from the archive storage might be possible, depending on the outage cause.
For example, assume that the HBA Adapter fails and causes the file systems to be unmounted. In thisinstance, the system looks in the cache first. If the file system is unmounted, the data will not be there,OnDemand then looks in the archive storage (if the data was stored there). There are several other factorsthat might affect this function:
• The file system is damaged, and commands such asls will not work.• OnDemand does not look in the archive storage if there is an error reading the cache. The permissions of
the unmounted file system are incorrect. AFP data has resources that are put back into the cache if theyare ever removed.
• The unmounted file system might not have enough storage space, so retrievals fail.
For the situations listed above, update the application group and turn off the search cache option. Thesearch cache is located on the Storage Management tab of the application group properties. This causesOnDemand to retrieve directly from the archive storage.
Using the ARSMAINT program with OracleYou can use the ARSMAINT program to maintain the tables that contain user-defined application groupdata. User-defined application groups are the application groups that you define to the system.Customers in a high maintenance operation should run the ARSMAINT program on a regular schedule.
The syntax is:
/opt/IBM/ondemand/V10.1/bin/arsmaint <options>
The options are:–d, –i
Expire index data from the database. The –i parameter expires index data that has been importedfrom archive storage. If you do not migrate index data to archive storage, you do not need to specifythe –i parameter.
–eMigrate index data from the database to archive storage. If you do not migrate index data to archivestorage, you do not need to specify the –e parameter.
–rCollect statistics. Note: The ARSMAINT program collects statistics only on the tables that havechanged since the last time that statistics were collected. Content Manager OnDemand maintainsinformation about the tables, including the last time that a table was modified and the last time thatstatistics were collected on a table.
–g applGroupProcess the tables for the specified application group. If you do not specify this parameter and namean application group, the ARSMAINT program processes all of the user-defined application groups.
Files/opt/IBM/ondemand/V10.1/bin/arsmaint
The AIX or Sun Solaris executable program./opt/ibm/ondemand/V10.1/bin/arsmaint
The Linux executable program.\Program Files\IBM\ondemand\V10.1\bin\arsmaint
The Windows executable program.
ARSMAINT 277

278 Content Manager OnDemand for Multiplatforms: Administration Guide

Chapter 36. ARSRPT
PurposeThe reporting command produces a report for a selectable 24-hour period. The reporting command canproduce the following optional files:
• An XML file with raw data extracted from the Content Manager OnDemand System Log.• A file summarizing the raw data.
The report provides information about the following sets of operations: log ins, loads, and queries withany resulting retrieves. The report shows the following information about each set:
• user or host• operational counts• hourly time periods of when the operations occurred
You can use the summary data to help plan system activities and monitor your system for peak usage andirregularities.
Syntaxarsrpt -h OD_instance -u userid -p password -t date
-d output_directory -f date_format
-o file_name_prefix -r report_selection
-x report_format -1 trace_file -2 level
DescriptionThe command requires a Content Manager OnDemand instance name, user ID, password, and the date toextract data. The command generates two files: arsrpt.date.out and arsrpt.date.xml where date is derivedfrom the input date given with the -t parameter. The remaining parameters are optional. You can use the -t and -x parameters to create reports focused on a particular activity or output format.
Parameters-d output_directory
Specifies the directory where you want the report utility to save the output files.-f date_format
Specifies the format of the date string that you provide with the -t parameter. The ARSRPTcommand assumes that you specify the date in yyyy-mm-dd format. You can specify adifferent format by doing one of the following options:
© Copyright IBM Corp. 1993, 2018 279

• Select a format from the following table and specify the corresponding date formatspecifier.
• Specify a format that is not listed in the table by using the values (for example, %m) andseparators (such as the slash (/), dash (-), colon (:), or dot (.) characters). A specificationfor a date format that uses any of these three chars (slash, dash, or dot) can be usedinterchangeably; the program allows any of the three, regardless of which one youspecified in the date format. A specification for a time format that uses either of thesetwo chars (colon or dot) can be used interchangeably; the program allows either of thetwo, regardless of which one you specified in the time format.
Table 16: Standard date formats supported by Content Manager OnDemand.
Date format specifier Date format Example
%m/%d/%y mm/dd/yy 01/31/17
%d/%m/%y dd/mm/yy 31/01/17
%f/%e/%y m/d/yy 1/31/17
%e/%f/%y d/m/yy 31/1/17
%y.%m.%d yy.mm.dd 17.01.31
%m.%d.%Y mm.dd.yyyy 01.31.2017
%m-%d-%y mm-dd-yy 01-31-17
%d-%m-%y dd-mm-yy 31-01-17
%m%d%y mmddyy 013117
%m%d%Y mmddyyyy 01312017
%y%m%d yymmdd 170131
%Y%m%d yyyymmdd 20170131
%b %e, %Y Mth d, yyyy Jan 31, 2017
%B %e, %Y Month d, yyyy January 31, 2017
-h OD_instanceSpecifies the name of the Content Manager OnDemand instance.
-ISpecifies the name of the Content Manager OnDemand instance.
-o file_name_prefixSpecifies the prefix to add to the output file names.
-p passwordThe password that corresponds to the user ID specified with the -u parameter.
-r report_selectionSpecifies which activities to save in the output files. If you do not specify this parameter,the reporting utility collects information about all activities. The following list describes thevalues you can specify for report_selection:1
Specifies that the report include all login activity.2
Specifies that the report include all load activity.
280 Content Manager OnDemand for Multiplatforms: Administration Guide

3Specifies that the report include all query activity and any corresponding retrieveactivity.
-t dateSpecifies the date for which the reporting utility collects information. The default format isyyyy-m-dd. If you want to specify the date in a different format, specify the -f parameterwith the date format specifier that describes the format.
-u useridSpecifies the Content Manager OnDemand user ID.
-x report_formatSpecifies which output files to create. If you do not specify this parameter, the reportingutility creates both output files. The following list describes the values you can specify forthis parameter:1
Create the summary.2
Create the XML file.-1 trace_file
Specify a fully qualified trace file name as directed by IBM Software Support.-2 level
Specify a numeric value as directed by IBM Software Support.
ExamplesThe following ARSRPT examples include guidance on how to add a user ID to the stash file. For example,to add the user ID "sysadmin" to the stash file, enter the following command:
arsstash -a 1 -s stash_file -u sysadmin
where:
-a 1Adds the user ID to the stash file.
-s stash_fileName of the stash file.
-u sysadminUser ID that is added to the stash file (if -u sysadmin is used on command line, then -p isnot required since the password is obtained from the stash file).
1. If you run the following command:
arsrpt -u sysadmin -h ARCHIVE -o outfile -t 2017-10-31
You will produce these files:
outfile.arsrpt.20171031.out outfile.arsrpt.20171031.xml
2. If you run the following command:
arsrpt -u sysadmin -h ARCHIVE -o outfile -t 10.31.2017 -f %m.%d.%Y
ARSRPT 281

You will produce these files:
outfile.arsrpt.20171031.out outfile.arsrpt.20171031.xml
3. If you run the following command:
arsrpt -u sysadmin -h ARCHIVE -o outfile -t 2017-10-31 -x 1
You will produce this file:
outfile.arsrpt.20171031.out
4. If you run the following command:
arsrpt -u sysadmin -h ARCHIVE -o outfile -t 2017-10-31 -x 2
You will produce this file:
outfile.arsrpt.20171031.xml
5. For a detailed example of how to generate a monthly report showing loads by data type, see http://www.ibm.com/support/docview.wss?rs=129&uid=swg27027027.
NotesFor more information, see http://www.ibm.com/support/docview.wss?rs=129&uid=swg27027027.
Files/opt/IBM/ondemand/V10.1/bin/arsrpt
The AIX and Sun Solaris executable program./opt/ibm/ondemand/V10.1/bin/arsrpt
The Linux executable program.\Program Files\IBM\ondemand\V10.1\bin\arsrpt
The Windows executable program.
282 Content Manager OnDemand for Multiplatforms: Administration Guide

Chapter 37. ARSSLU
PurposeThe ARSSLU command helps you audit your Content Manager OnDemand database for inconsistencies.Run this command only on the library server.
Syntaxarsslu -a -c -d -F format C
T
X
-g Application group name
-I od_inst
-o Output file name
-p
-v
-1 trace_file -2 level
Parameters-a Audit the Content Manager OnDemand database
This option checks the Content Manager OnDemand database for inconsistencies orpotential problems.
-c Create message table and indexCreates a table and index for load data information which is extracted from the ContentManager OnDemand system log. This data is used for auditing purposes.
-d Drop message table and indexDeletes the table and index that are created with the –c parameter and any data contained.Do not combine this parameter with any other parameter except for –v and -I.
-F <format> Trace output informationOptional parameter when -T is specified. The default output is text format. The possiblevalues are C, T, and X:C or CSV
The CSV format is a comma separated file that is useful in spreadsheets.T or TEXT
Default output format.X or XML
The XML format outputs XML structured data. Using the XML output requires a headerand trailer to be added to the trace file to complete the XML syntax and create validXML. After the XML structured data is combined with .XSL and .DTD files, it can beviewed in a browser or XML editor. You can obtain these needed files from: ftp://service.software.ibm.com/software/ondemand/utils/trace
-g <Application group name>
© Copyright IBM Corp. 1993, 2018 283

Specifies an application group name. If the parameter is not specified, the default is allapplication groups. This parameter is used with the -a parameter.
-I <od_inst>Specifies the database instance name.
-o <Output file name>This parameter is optional. Any output is sent to the console if it is not specified. Thisoption provides a file name for any log output that is produced by the utility when you usethe -a parameter. Output to a file is in XML format. Output to the console is in a humanreadable plain text format.
-p Populate message tableExtracts load information from the System Log and populates the table created with the –cparameter. This parameter is used for auditing purposes.
-v VerbosePrints additional status messages to the console.
-1 trace_fileSpecify a fully qualified trace file name as directed by IBM Software Support.
-2 levelSpecify a numeric value as directed by IBM Software Support.
ExamplesHere are several examples of using the ARSSLU command:
arsslu –I ARCHIVE –c –vCreating table odadmin.arssluCreating index odadmin.arsslu.arsapp_idxUpdating runstat statistics for table odadmin.arsslu
arsslu -I ARCHIVE -p -vSystem log data tables: 1Table name: SL2 Messages present: YesProcessing table SL2Total log messages: 333Log messages processed: 330Log messages failed: 0Log messages skipped: 3Reorganizing table odadmin.arssluUpdating runstat statistics for table odadmin.arsslu
arsslu –I ARCHIVE –d –vDropping index odadmin.arsslu.arsapp_idxDropping table odadmin.arsslu
284 Content Manager OnDemand for Multiplatforms: Administration Guide

Chapter 38. ARSSOCKD
PurposeThe ARSSOCKD command starts, stops, and displays Content Manager OnDemand process andconfiguration server information.
Syntaxarssockd -h od_inst -I od_inst
-p -q -r
iterations
-s
seconds
-S -T -v -x
-1 trace_file -2 level
DescriptionIBM provides commands to stop the server process on servers and display server usage and configurationinformation. For example, the syntax to start a server is:
arssockd -I instance -S
Where instance is the name of the Content Manager OnDemand instance to stop. Instance names arelisted in the ARS.INI file. The default instance name is archive.
Parameters-h od_inst
Content Manager OnDemand instance name or host name and is the same as the -Iinstance parameter.
-I od_instContent Manager OnDemand instance name or host name and is the same name as od_instof the -h parameter.
-pDisplays the process usage information for the instance.
-PSend a ping to the Content Manager OnDemand instance.
-qDisplays the configuration and version information for the instance.
-r iterations
© Copyright IBM Corp. 1993, 2018 285

Sets the number of iterations (or times) to run the ARSSOCKD command. The default is 1.If you specify a number other than 1, specify the time interval between each iteration withthe -s parameter.
-s secondsSets the number of seconds between iterations. The default is 1.
-SStarts the Content Manager OnDemand server for the instance.
-TStops the Content Manager OnDemand server for the instance.
-vDisplays the verbose output information.
-xDisplays more information when it is used with the -pparameter.
-1 trace_fileSpecify a fully qualified trace file name as directed by IBM Software Support.
-2 levelSpecify a numeric value as directed by IBM Software Support.
Examples
Start the server
To start the server, the syntax is: arssockd -I instance -S
Stop the server
To stop the server, the syntax is: arssockd -I instance -T
Process usage information
To display process usage information, the syntax is: arssockd -I instance -p
For example:
arssockd -I instance -p
PID TID START TIME CPU MEM STYPE USERID INFO1138878 - 07/04/11 04:09:12 1:25.049844 36724 Program - ARCHIVE1138878 1 07/04/11 04:09:13 0:1.790156 - Main - Accepting1138878 258 07/04/11 04:09:14 0:0.356935 - Activity 01138878 515 07/04/11 04:09:15 0:10.630209 - DB - Idle1138878 772 07/04/11 04:09:15 0:9.086973 - DB - Idle1138878 1029 07/04/11 04:09:15 0:15.093788 - DB - Idle1138878 1286 07/04/11 04:09:15 0:14.202843 - DB - Idle
wherePID
The process ID.TID
The thread ID.START TIME
When the process or thread was created.
286 Content Manager OnDemand for Multiplatforms: Administration Guide

CPUThe amount of CPU in minutes, seconds, and microseconds (MINS:SECS.MICROSECS) used for theprocess or thread.
Important: A CPU memory value might not display for every platform. You might also see a 0 value inthe command line results.
MEMThe amount of memory used by the process or thread.
USERIDThe name of the user currently active on the thread.
INFOAdditional information used to display current activity of the process or thread. For the process, this isthe name of the Content Manager OnDemand instance.
Configuration information of the instance
To display configuration information of the instance, the syntax is: arssockd -I instance -q
For example:
arssockd -I instance -q
Command: ARSSOCKDVersion: Operating System: Operating System Version: Database: Database Version: Storage Manager: Storage Manager Version: Instance: ARCHIVE
[@SRV@_ARCHIVE]PORT=1445SRVR_INSTANCE=ARCHIVESRVR_INSTANCE_OWNER=rootSRVR_OD_CFG=/opt/IBM/ondemand/V10.1/config/ars.cfgSRVR_DB_CFG=/opt/IBM/ondemand/V10.1/config/ars.dbfsSRVR_SM_CFG=/opt/IBM/ondemand/V10.1/config/ars.cacheSSL_PORT=14450SSL_KEYRING_FILE=/opt/IBM/ondemand/V10.1/config/ondemand.kdbSSL_KEYRING_STASH=/opt/IBM/ondemand/V10.1/config/ondemand.sthSSL_KEYRING_LABEL=IBM Content Manager OnDemandSSL_CLNT_USE_SSL=0PROTOCOL=2
[CFG]ARS_LANGUAGE=ENUARS_ORIGINAL_CODEPAGE=923ARS_NUM_DBSRVR=4ARS_TMP=/ondemand/arstmp/logs/db2ARS_PRINT_PATH=/ondemand/arstmp/logs/db2ARS_DB_ENGINE=DB2ARS_DB_IMPORT=0DB2INSTANCE=archiveARS_DB2_DATABASE_PATH=/ondemand/arsdbARS_DB2_PRIMARY_LOGPATH=/ondemand/arsdb_primarylogARS_DB2_LOGFILE_SIZE=1000ARS_DB2_LOG_NUMBER=40ARS_DB2_TSM_CONFIG=/usr/tivoli/tsm/client/api/bin64/dsm.opt.db2ARS_STORAGE_MANAGER=TSMARS_TRACE_SETTINGS=/opt/IBM/ondemand/V10.1/config/archive.trace.settingsDSMI_DIR=/usr/tivoli/tsm/client/api/bin64
ARSSOCKD 287

DSMI_CONFIG=/usr/tivoli/tsm/client/api/bin64/dsm.optDSMI_LOG=/tmp
[DBFS]DBFS1=/ondemand/arsdb/SMS SMSDBFS_NUM=1
[CACHE]SMFS1=/ondemand/arscache/db2SMFS_NUM=1
Notes1. When you stop the server process, all users who are connected over the network to the Content
Manager OnDemand system are disconnected. Therefore, it is a good idea to warn connected usersbefore stopping the server process.
2. The ARSSOCKD STOP command is for UNIX servers only. For Windows servers, the server process runsas a service. The service can be stopped by using the Services administrative tool in Windows or theContent Manager OnDemand configurator program.
3. In the temp directory of your system, there is a file named .instance_name.pid, forexample, .ARCHIVE.pid. This file contains the process ID of the service that needs to be stopped. Ifthis file is deleted, the arssockd stop command will not succeed. The .instance_name.pid ishidden, but sometimes might be deleted by temp directory cleanup tools.
288 Content Manager OnDemand for Multiplatforms: Administration Guide

Chapter 39. ARSSTASH
PurposeThe ARSSTASH command creates and modifies stash files that can be used to store user IDs andpasswords.
Syntaxarsstash
-a action -u userid -c
-s stash_file_name
-1 trace_file -2 level
DescriptionThe ARSSTASH command is used to create and modify the stash file. Storing passwords in a stash file canhelp you improve security because you do not need to specify the password on the command line, wherethe password might be visible to others. You can store the user ID and password for the followingsituations in one stash file:
• Each Content Manager OnDemand instance• Each Content Manager OnDemand program that runs as a daemon or service (for example, ARSLOAD)
You store the stash file in a directory and specify that directory in the SRVR_OD_STASH parameter of theARS.INI file. Content Manager OnDemand and the Content Manager OnDemand programs locate thestash file in that directory. If you need to override the user ID and password stored in the stash file, createa stash file and store it in a directory where you run a Content Manager OnDemand program. For securityreasons, limit access to the file through file permissions or delete it when you no longer need it.
To store the user IDs and passwords into a stash file, complete the following steps:
1. Create a stash file by running the ARSSTASH command. The command prompts you for the password.2. Save the stash file in a directory and limit access to that file through file permissions.
Parameters-a action
Specifies whether to store or delete a user ID and password from the stash file. If you donot specify the -a parameter, the command runs action 1. If you do not specify the -uparameter with actions 3 - 10, then the ARSSTASH command displays the user ID currentlyassigned to that instance, daemon, or service. You can specify one of the following valuesfor the action parameter:1Store the Content Manager OnDemand user ID and password. If you do not specify anaction, this action is the default action.2Delete the Content Manager OnDemand user ID and password.
© Copyright IBM Corp. 1993, 2018 289

3Store the Content Manager OnDemand user ID and password for the ARSLOAD program.4Store the Content Manager OnDemand user ID and password for Content ManagerOnDemand Distribution Facility (ODF).6Store the Content Manager OnDemand user ID and password for Production DataDistribution.7Store the LDAP user ID and password.8Store the DB2 user ID and password.9Store the Oracle user ID and password.10Store the ZooKeeper user ID and password.
-cCreate a stash file.
-s stash_file_nameName of the stash file.
-u useridUser ID for the Content Manager OnDemand instance, daemon, or service specified by theaction variable.
-1 trace_fileSpecify a fully qualified trace file name as directed by IBM Software Support.
-2 levelSpecify a numeric value as directed by IBM Software Support.
Examples1. To store the user ID DEMOUSER and password for use by any Content Manager OnDemand instance,
daemon, or service, in an existing stash file called ars.stash, enter the following command:arsstash -a 1 -s ars.stash -u DEMOUSER
2. To store the Oracle user ID USER1 and password in a stash file called ars.stash and create the stashfile, enter the following command:arsstash -a 9 -c -s ars.stash -u USER1
3. To store the user ID USER2 and password for the LDAP service in an existing stash file calledars.stash, enter the following command: arsstash -a 7 -s ars.stash -u USER2
4. To store the user ID USER3 and password for the ARSLOAD daemon in an existing stash file calledars.stash, enter the following command: arsstash -a 3 -s ars.stash -u USER3
5. To view the user ID currently assigned to ARSLOAD, enter the following command: arsstash -a 3 -s ars.stash
Files/opt/IBM/ondemand/V10.1/bin/arsdoc
The AIX or Sun Solaris executable program.
290 Content Manager OnDemand for Multiplatforms: Administration Guide

/opt/ibm/ondemand/V10.1/bin/arsdocThe Linux executable program.
\Program Files\IBM\ondemand\V10.1\bin\arsdocThe Windows executable program.
ARSSTASH 291

292 Content Manager OnDemand for Multiplatforms: Administration Guide

Chapter 40. ARSTBLSP
PurposeMigrate tables of application group data from the default table space to separate table spaces. TheARSTBLSP program may also be used to change the table that Content Manager OnDemand loads datainto.
Syntaxarstblsp -a action
-d dir
-g applGroup
-I instance
-t table -1 trace_file -2 level
DescriptionThe ARSTBLSP program can be used to migrate existing tables of application group data from the defaulttable space to separate table spaces. IBM recommends that all customers who are upgrading from earlierversions of Content Manager OnDemand use this program to migrate their existing application group datato table spaces.
During normal operation, Content Manager OnDemand loads index rows into a table until the MaximumRows value for the application group has been reached. Such a table is said to be open for loading. Whenthe Maximum Rows value is reached, the table is closed and a new table and table space are created.Under certain circumstances, a customer may want to close a table to loading before the Maximum Rowsvalue is reached. For example, migration processing (by using the ARSMAINT -e function) will not processa table that is open for loading, and the customer may want to migrate the table earlier than initiallyanticipated.
Parameters-a action
The action to perform. The action can be one of the following values:0
Migrate one or more tables of application group data to separate table spaces. Specifythe application group to migrate with the -g parameter. Optionally specify a table tomigrate with the -t parameter. A table must be closed before you can migrate it to atable space.
1Close a table that is still open for loading. This action causes Content ManagerOnDemand to close the table that is currently open for loading in the specifiedapplication group. The next time that data is loaded into the application group, the datais loaded into a table space. Optionally specify a table to close with the -t parameter.
2List the tables of application group data that have not been migrated to separate tablespaces.
© Copyright IBM Corp. 1993, 2018 293

3List the tables of application group data that are open for loading. An open table mustbe closed before you can migrate it to a table space.
4Create a new table if there are no existing open tables. When you use this value, youmust specify the -g parameter.
-d dirForces the ARSTBLSP program to export the existing application group data to disk. If youspecify this parameter, then you must name a directory or file system that containssufficient free space to hold a copy of the existing application group table. Depending onthe size of the table that you are migrating, this can be a significant amount of disk space.For example, a table that contains ten million rows, where each row is one hundred bytes,may require up to 2 GB of disk space to complete the migration.
Note: Unless you specify otherwise, on UNIX servers, Content Manager OnDemand usesnamed pipes to export the existing application data, which provides the best performancewith no file system overhead. IBM recommends that you use the named pipes method. OnWindows servers, the system uses a temporary directory to export data; you can specifythe temporary directory by using the Content Manager OnDemand configurator program.
-g applGroupThe name of the application group to process.
-I instanceThe name of the Content Manager OnDemand instance to process. The ARSTBLSP programwill attempt to locate the specified instance name in the ARS.INI file (UNIX servers; theregistry for Windows servers), to obtain the TCP/IP address, host name or host name aliasof the system on which the instance is running. If the ARSTBLSP program cannot locate theinstance name in the ARS.INI file, then the specified value is treated as a host name.
You must specify this parameter and name the instance if:
• The name of the default instance is not ARCHIVE.• You are running more than one instance on the same system and you want to process an
instance other than the default instance.• You are running the ARSTBLSP program on a system other that the system on which the
instance that you want to process is running.
Note: If running multiple instances of Content Manager OnDemand on the same system,always specify the -I parameter to identify the name of the instance that you want toprocess. Verify that the ARS.INI file is configured with the correct information for allinstances of Content Manager OnDemand. See IBM Content Manager OnDemand forMultiplatforms: Installation and Configuration Guide for information about configuringinstances.
-t tableWhen used with the -a1 parameter, identifies the table to close. When used with the -a0parameter, optionally identifies the table of application group data to migrate. If you do notspecify this parameter when you use the -a0 option, the ARSTBLSP program migrates alltables for the specified application group to separate table spaces.
-1 trace_fileSpecify a fully qualified trace file name as directed by IBM Software Support.
-2 levelSpecify a numeric value as directed by IBM Software Support.
294 Content Manager OnDemand for Multiplatforms: Administration Guide

Examples1. The following shows how to list the tables that have not been migrated for a specific application group:
arstblsp -a 2 -g credit
2. The following shows how to list the tables that are open for loading for a specific application group:
arstblsp -a 3 -g credit
3. The following shows how to close any open tables for a specific application group:
arstblsp -a 1 -g credit
4. The following shows how to close a specified table for a specific application group:
arstblsp -a 1 -g credit -t AAA26
5. The following shows how to migrate all tables for a specific application group. The ARSTBLSP programmigrates each table in the application group to a separate table space:
arstblsp -a 0 -g credit
6. The following shows how to migrate a specific table of application group data:
arstblsp -a 0 -g credit -t AAA26
NotesWhen migrating application group data to table spaces, you should do so at a time when there is little orno other activity on the system.
Do not load data into the system while you are migrating tables with the ARSTBLSP program.
Before you can migrate application group data to table spaces, all of the tables in the application groupmust be closed. You can use the ARSTBLSP program command with the -a1 parameter to close a table.
Before you begin to migrate application group data to table spaces, IBM recommends that you create abackup image of the Content Manager OnDemand database.
If you plan to use Tivoli Storage Manager to maintain DB2 archived log files and backup image files, thenyou must define the Tivoli Storage Manager storage objects before you begin migrating application groupdata to table spaces. See IBM Content Manager OnDemand for Multiplatforms: Installation andConfiguration Guide for assistance with configuring Tivoli Storage Manager.
Files/opt/IBM/ondemand/V10.1/bin/arstblsp
The AIX or Sun Solaris executable program./opt/ibm/ondemand/V10.1/bin/arstblsp
The Linux executable program.\Program Files\IBM\ondemand\V10.1\bin\arstblsp
The Windows executable program.
ARSTBLSP 295

296 Content Manager OnDemand for Multiplatforms: Administration Guide

Chapter 41. ARSXAFP
PurposeThe ARSXAFP program processes an AFP document and creates a line data file suitable for viewing on a3270 display or other line-mode terminal.
Syntaxarsxafp
-c
18
cpi
-f fontDir
-h
11.0
height
-l
12
lpi -o
0
90
180
270
-r resourceFile
-w
8.5
width
-x -y csra -t
-1 trace_file -2 level
inputFile
DescriptionYou can use the Content Manager OnDemand CICS client program to view documents retrieved from thesystem on 3270 displays (line-mode terminals). If the document contains AFP data, Content ManagerOnDemand calls the ARSXAFP program to process the AFP data and create a line data file. ContentManager OnDemand then sends the line data file to the client program. The ARSXAFP program can alsobe used as a general purpose AFP to line data batch conversion utility.
You can invoke the ARSXAFP program from a user-defined program or from the command line.
You can optionally specify a directory that contains user-defined character sets and code page files thatthe ARSXAFP program can use to process the input data. See IBM Content Manager OnDemand: WindowsClient Customization Guide for information about defining character set and code page files for use withContent Manager OnDemand client programs.
The ARSXAFP program ignores any graphics, images, and typographic fonts that may be present in theinput data. All fonts in the input data are mapped to a single point, monospaced font. You can specify thename of the resource group file that contains the form definition and overlay associated with the input file.The ARSXAFP program can process information contained in the form definition, such as the offset, andwrite the overlay text to the output file.
© Copyright IBM Corp. 1993, 2018 297

Parameters-c cpi
Characters per inch in the horizontal direction of the smallest (or only) font in the input file.For example, if the input file contains text at 12 characters per inch and 10 characters perinch, then you would specify -c 12. The default value is 18 characters per inch.
-f fontDirThe name of the directory that contains user-defined character set and code page filesrequired to process the input file. See IBM Content Manager OnDemand: Windows ClientCustomization Guide for information about defining character set and code page files foruse withContent Manager OnDemand client programs.
-h heightThe height of a page in the input file. The -w and -h parameters define the paper size usedto print a page of the input file. The default value is 11.0 inches.
-l lpiLines per inch in the vertical direction of the smallest (or only) font in the input file. Thedefault value is 12 lines per inch.
-o orientationThe orientation of the data on the page in the input file. You can specify that the dataappears rotated 0, 90, 180, or 270 degrees. The default value is 0 degrees.
-r resourceFileThe name of the resource group file that contains the form definition and overlayassociated with the input file. The ARSXAFP program can process information contained inthe form definition, such as the offset, and include text from an overlay in the output file.
-t fileAFP viewer trace file.
-w widthThe width of a page in the input file. The -w and -h parameters define the paper size usedto print a page of the input file. The default value is 8.5 inches.
-xUse to specify that you do not want the output to contain any horizontal or vertical linesthat were present in the AFP document.
-yUse to specify the value that represents the character space reset algorithm with which toplace text in the output.
inputFileThe name of the AFP input file to process
-1 trace_fileSpecify a fully qualified trace file name as directed by IBM Software Support.
-2 levelSpecify a numeric value as directed by IBM Software Support.
298 Content Manager OnDemand for Multiplatforms: Administration Guide

Examples1. The following shows how to process an AFP input file located in the current directory and redirect the
line data output to a file. By default, the input file contains 8.5 x 11 inch pages:
arsxafp -c 12 -l 8 -o 90 37271600.AFP > 37271600.LIN
2. The following shows how to process an input file using the default options for characters per inch, linesper inch, width, height, and orientation. The output is redirected to stdout:
arsxafp 96089900.AFP
Files/opt/IBM/ondemand/V10.1/bin/arsxafp
The AIX or Sun Solaris executable program./opt/ibm/ondemand/V10.1/bin/arsxafp
The Linux executable program.\Program Files\IBM\ondemand\V10.1\bin\arsxafp
The Windows executable program.
ARSXAFP 299

300 Content Manager OnDemand for Multiplatforms: Administration Guide

Chapter 42. ARSXLINE
PurposeThe ARSXLINE program converts line data to UTF-8 or PDF.
Syntaxarsxline
-a cc_type -c cp -d rec_delim
-f rec_fmt -F font_dir -g pdf_image_file
-G pdf_image_file_pos -h page_height -i inp_file
-k overstrike_mode -K pdf_image_mode -l rec_len
-m margin -n font_size -o out_file
-O orientation -p prmode -P parm_file
-q lines_per_page -Q lines_per_print_page
-s line_spacing_factor -t trc -w page_width
-x transform_type -1 trace_file -2 trace_level
DescriptionConverts line data to UTF-8 or PDF.
You specify the format of the input file with the parameters.
Parameters-a cc_type
Specify one of the following values to indicate the type of carriage control used in the inputfile:A
ANSI. This is the default value.
© Copyright IBM Corp. 1993, 2018 301

MMachine
NNone
-c cpSpecify the code page used by the input file. The default value is 500.
-d rec_delimSpecify the value, in hexadecimal, used in the input file to indicate the end of record. Thedefault value is 0A.
-f rec_fmtSpecify one of the following values to indicate the record format used in the input file:F
Fixed. This is the default value.V
Variable.S
Stream. If Stream is specified, the default carriage control is None.-F font_dir
Specify the path or paths of the font files required by the input file.-g pdf_image_file
Specify the path and name of the file containing a PDF image. The file name must endwith .png or .jpg extension.
-G pdf_image_file_posSpecify the location on the page to place the top left corner of the image file. The upper leftcorner of the page is 0,0 which is the default.
-h page_heightSpecify the height of the page in the output file.
-i inp_fileSpecify the name of the input file.
-k overstrike_modeSpecify one of the following values to indicate how the overstrike carriage control isprocessed:M
Merge. This is the default value.S
Separate.F
Full.-K pdf_image_mode
Specify one of the following values to indicate the PDF image mode:A
Place the image on all of the pages. This is the default value.F
Place the image on the first page only.L
Place the image on the last page only.-l rec_len
302 Content Manager OnDemand for Multiplatforms: Administration Guide

If the record format is fixed, specify the length of the record. The default value is 133.-m margin
Specify the size of the margin in the following format:size_of_top_margin,size_of_bottom_margin,size_of_left_margin,size_of_right_margintop,bottom,left,right
-n font_sizeSpecify the size of the font used in the output file. The default value is 12.
-o out_fileSpecify the name of the output file.
-O orientationSpecify one of the following values to indicate the page orientation:P
Portrait.L
Landscape.-p prmode
Specify one of the following values to indicate the presentation mode used by the input file:N
None. This is the default value.1
SOSI12
SOSI23
SOSI3-P parm_file
Specify the name of the parameter file.-q lines_per_page
Specify the number of lines per page. The default value is 0.-Q lines_per_print_page
Specify the number of lines per page when the document is printed. The default value is 0.-s line_spacing_factor
Specify the size of the space between lines. The default value is 1.16.-t trc
Specify one of the following values to indicate if the file contains TRC:0
No. This is the default.1
Yes.-w page_width
Specify the width of the page in the output file.-x transform_type
Specify one of the following values to indicate the target format:U
UTF-8. This is the default.
ARSXLINE 303

PPDF.
-1 trace_fileSpecify a fully qualified trace file name as directed by IBM Software Support.
-2 trace_levelSpecify a numeric value as directed by IBM Software Support.
Note: The -g, -G, -h, -K, -m, -n, -O, -s, and -w parameters are only used when the document is convertedto PDF.
ExamplesTo convert an EBCDIC fixed length (with record length 200) file with ANSI carriage controls to UTF-8,enter the following command: arsxline -l 200 -i input_file -o output_file
304 Content Manager OnDemand for Multiplatforms: Administration Guide

Chapter 43. ARSXML
PurposeThe ARSXML program imports objects within an existing IBM Content Manager OnDemand XML file into aContent Manager OnDemand system, and exports existing Content Manager OnDemand objects into aContent Manager OnDemand XML file.
Syntaxarsxml add
update
delete
-d
directory
-e
error_handling a
c
u
-h hostname -i
input_xml_file
-p
password
-u userid -v
-x -1 trace_file -2 level
Figure 19: Syntax for adding, updating, and deleting administrative objects in a Content ManagerOnDemand system
© Copyright IBM Corp. 1993, 2018 305

arsxml export
-d
directory
-e
error_handling
-h hostname
-i
input_xml_file
-o
output_xml_file
-p
password
-r
range
-u userid -v
-w
encoding
-x -y
directory
-1 trace_file -2 level
Figure 20: Syntax for exporting existing Content Manager OnDemand objects into a Content ManagerOnDemand XML file
arsxml validate
-d
directory
-i input_xml_file
Figure 21: Syntax for validating a Content Manager OnDemand XML file
DescriptionIBM Content Manager OnDemand includes an XML interface that imports and exports administrativeobjects in Content Manager OnDemand. In this model, all administrative objects are exported into an XMLfile, and can be imported into the same system or another system later. You can also create an XML filethrough a user application or Web interface according to the defined specifications, and import a singleobject or multiple objects into the system by importing the XML file.
The data import feature allows you to import a single object, a set of defined objects, or even an entireOnDemand system. This features enables you to complete the following tasks:
• Update a system with newly defined objects• Backup a complete system• Copy a set of objects from one system to another system
The XML import file can be one of the following:
• A file which was previously created during a Content Manager OnDemand export process.• A user created XML file which conforms to the Content Manager OnDemand XML schema.
The following table shows the ARSXML return codes and their meanings.
306 Content Manager OnDemand for Multiplatforms: Administration Guide

Table 17: ARSXML return codes
Return code Meaning
0 success
1 warning
2 syntax error
3 error
4 unrecoverable error
Important:
• The syntax of each Content Manager OnDemand object that is supported by the import process isspecified in the Content Manager OnDemand XML schema file. Each object within the XML file mustconform to the exact syntax as specified in the Content Manager OnDemand XML schema file that isshipped with the product. Objects must appear in the order described in the following document: http://www.ibm.com/support/docview.wss?uid=swg27019614.
• The import XML file references an ondemand.xsd file, which is provided with Content ManagerOnDemand. The ondemand.xsd file must reside in the same directory where the input XML file islocated, otherwise, the reference in the input XML file must contain a full path name for theondemand.xsd file.
• The capitalization of the object names is important and should be used exactly as shown in the datatables in “Objects and data model used in the Content Manager OnDemand XML file” on page 359 .
• The ARSXML validate function validates only the input XML file schema. It is possible that your inputXML file passes the validation but still fails due to object inconsistencies. For example, if you attempt toupdate a user that does not exist, validation can succeed but you will receive an error message in theupdate process.
Parameters for ARSXML add, update, deleteadd
This is the default action. It adds all of the objects in the input XML file into the specifiedIBM Content Manager OnDemand system. For objects that contain child objects, such as alist of users or a set of permissions, each child object that is found in the XML file is addedto the current list of objects.
update
All the fields that are specified in the input XML file are updated for the object. Forexample, if the XML file contains a user with a name of harry and a description of TheNew Description specified, then only the description field of the user harry is updated.All other fields remain unchanged.
Restriction: Not all fields of all objects can be updated.
For objects which contain child objects, such as a list of users or a set of permissions, eachchild object that is found in the XML file are added to the list of objects. A special attributeon each child object can be set to delete for the cases where a member of a list need tobe removed. For example, if you want to add the user newUser to a group, and delete theuser oldUser, the following XML code can be used during an update:
...<group name="MyGroup"><user name="newUser" /><user name="oldUser" task="delete" />
ARSXML 307

</group>...
For more information on the use of the "task" attribute during an update see “Creating anXML file” on page 170.
delete
All of the objects that are specified in the input XML file are deleted from the system. Theonly attribute that is examined in the XML file is the name attribute. While all other fieldsmight be present in the XML file, they are ignored.
-dSpecifies the directory that contains the XML file. If you do not use this parameter, ARSXMLlooks for the input XML file specified by the -i flag in the current working directory wherethe command is run.
-e error_handlingControls how the import process handles any Content Manager OnDemand errors.
Important: The XML file syntax errors and other XML-specific errors are detected by theparsing code, and no objects are processed.
The error_handling parameter can take three values:a
Abort. This is the default value.c
Continue. If an error occurs because of problems in the objects or the Content ManagerOnDemand system (for example, you attempt to add an object but that object alreadyexists, or you attempt to delete an object that does not exist), the object containing theerror is skipped, and the process continues. However, if an XML parsing error occurs,ARSXML stops regardless of whether or not this option is specified.
uUpdate. This value should only be used during an add action.
During an add action:Abort
If an error occurs during an add (for example, an invalid parameter, or the objectalready exists), the error is logged, the entire import process is stopped, and no furtherobjects are added.
ContinueIf an error occurs during an add action, the object containing the error is skipped andan error message is logged. However, the import process continues.
UpdateIf an object already exists, perform an update action instead of an add action.
During a delete action:Abort
If an error occurs during a delete (for example, there is an invalid object or the objectdoes not exist), the error is logged, the entire delete process is stopped, and no furtherobjects are deleted.
ContinueIf an error occurs during an delete action, the object containing the error is skipped andan error message is logged. However, the import process continues.
During an update action:
308 Content Manager OnDemand for Multiplatforms: Administration Guide

AbortIf an error occurs during a update (for example, there is an invalid object or the objectdoes not exist), the error is logged, the entire update process is stopped, and no furtherobjects are updated.
ContinueIf an error occurs during an update action, the object containing the error is skippedand an error message is logged. However, the import process continues.
-h hostnameSpecifies the host name of the Content Manager OnDemand system
-iSpecifies the input XML file.
-p passwordSpecify one of the following options for password:
• The name of the stash (encrypted password) file that contains the password for the userID specified with the -u parameter.
• The password for the Content Manager OnDemand user ID specified with the -uparameter.
If the user ID is not assigned a password, you can do either of the following:
– Press the Enter key when prompted for the password.– Specify a blank password with the following syntax: -p ""
If you do not specify the -p parameter while you specify the -u parameter, then theARSXML program retrieves the password for the user ID from the stash file specified inARS.INI file for that instance. You specify the path and file name of the stash file in theARS.INI file for that instance. For Windows, you manage the SRVR_OD_STASH parameterwith the Configurator. The Configurator stores the value of SRVR_OD_STASH parameter inthe Windows registry for that instance.
If you omit both the -u and the -p parameters, the system attempts a unified logon. If theunified logon fails, you are prompted to enter a user ID and password.
-u useridThe user ID is optional. The following list describes how the ARSXML program retrieves theuser ID and password if you omit or specify this parameter:
• If you omit this parameter, the ARSXML program prompts you for it before running theprogram.
• If you specify the -u parameter and omit the -p parameter, the ARSXML programretrieves the password for the user ID from the stash file defined for that instance. Youspecify the path and file name of the stash file in the ARS.INI file for that instance. ForWindows, you manage the SRVR_OD_STASH parameter with the Configurator. TheConfigurator stores the value of SRVR_OD_STASH parameter in the Windows registry forthat instance.
• If you omit both the -u and the -p parameters, the system attempts a unified logon. If theunified logon fails, you are prompted to enter a user ID and password.
-vEnables verbose mode, which displays all messages (informational and error). By default,the ARSXML program displays error messages.
-xUsed to prevent prompting from occurring. If you do not use this option, during a deleteoperation, you are prompted whether you really want to complete the operation, forexample:
ARSXML 309

The printer object named 'LabPrinter' is about to be deleted.Do you want to delete this object? (Y/N)
You need to respond with a y or Y to confirm the delete operation. Any other responseterminates the operation. If you use this option, you do not get the prompt during anoperation.
-1 trace_fileSpecify a fully qualified trace file name as directed by IBM Software Support.
-2 levelSpecify a numeric value as directed by IBM Software Support.
Important: While importing objects, if an object references another object in its definition but thereferenced object cannot be found, and the import command uses the -e c parameter, an error message isissued, and the default value is used. For example, if a user is defined with a default printer and thedefault printer cannot be found, the user is added with a default printer of *NONE. If the -e c parameter isnot used, the above action will not occur.
Parameters for ARSXML export-d
Use this option to specify the directory for the input XML file. If you do not use thisparameter, the ARSXML command looks for the input XML file that is specified by the -i flagin the current working directory where the command is run.
-e error_handlingSpecifies what to do if an error occurs during the export process. The error_handlingparameter can take two values:a
Abort. This is the default value. The export process stops when an error occurs.c
Continue. If an error occurs due to problems in the objects or the IBM Content ManagerOnDemand system (for example, you attempt to export an object but that objectalready exists), the object that contains the error is skipped, and the process continues.However, if an XML parsing error occurs, ARSXML stops regardless of whether thisoption is specified.
-h hostnameSpecifies the host name of the Content Manager OnDemand system
-iUse to specify the input XML file. All of the objects that are specified in the XML file areexported from the system into the output XML file. In this case, the only attribute in theXML file that is examined is the name attribute. While all other attributes are present in theXML file, they are ignored. If an object is specified with the name _ALL, all of the objects ofthat type defined on the system are exported. If the -i parameter is not present, all of theobjects in the specified system are exported. However, you are prompted to confirmwhether this is what is intended, because the export process could take a long time. Youcan use the -x option to turn off the prompting.
-oUsed to specify the name of the output XML file. If this parameter is not specified, theoutput is directed to stdout.
-p passwordSpecify one of the following options for password:
• The name of the stash (encrypted password) file that contains the password for the userID specified with the -u parameter.
310 Content Manager OnDemand for Multiplatforms: Administration Guide

• The password for the Content Manager OnDemand user ID specified with the -uparameter.
If the user ID is not assigned a password, you can do either of the following:
– Press the Enter key when prompted for the password.– Specify a blank password with the following syntax: -p ""
If you do not specify the -p parameter while you specify the -u parameter, then theARSXML program retrieves the password for the user ID from the stash file specified inARS.INI file for that instance. You specify the path and file name of the stash file in theARS.INI file for that instance. For Windows, you manage the SRVR_OD_STASH parameterwith the Configurator. The Configurator stores the value of SRVR_OD_STASH parameter inthe Windows registry for that instance.
If you omit both the -u and the -p parameters, the system attempts a unified logon. If theunified logon fails, you are prompted to enter a user ID and password.
-r rangeUse this option to specify how much data to export. The range parameter can take fourvalues:a
When an application group is exported, all of the applications that are contained withinthe application group are exported.
dExport the specified objects and all dependent objects. If you use this parameter, eachobject is examined for any dependent objects, and those objects are exported as well.For example, if only user groups are exported and the d option is used for the extent,then any users that the groups refer to are exported as well.
lExport the objects and any logical views that are associated with them.
pExport the objects and a list of permissions for each object.
More than one range option can be specified in the command line, in other words, theoptions may be combined. For example,
-r pl
If you do not specify the -r p option, then Content Manager OnDemand exports only thespecified object or objects and *PUBLIC permission nodes.
-u useridThe user ID is optional. The following list describes how the ARSXML program retrieves theuser ID and password if you omit or specify this parameter:
• If you omit this parameter, the ARSXML program prompts you for it before running theprogram.
• If you specify the -u parameter and omit the -p parameter, the ARSXML programretrieves the password for the user ID from the stash file defined for that instance. Youspecify the path and file name of the stash file in the ARS.INI file for that instance. ForWindows, you manage the SRVR_OD_STASH parameter with the Configurator. TheConfigurator stores the value of SRVR_OD_STASH parameter in the Windows registry forthat instance.
• If you omit both the -u and the -p parameters, the system attempts a unified logon. If theunified logon fails, you are prompted to enter a user ID and password.
-v
ARSXML 311
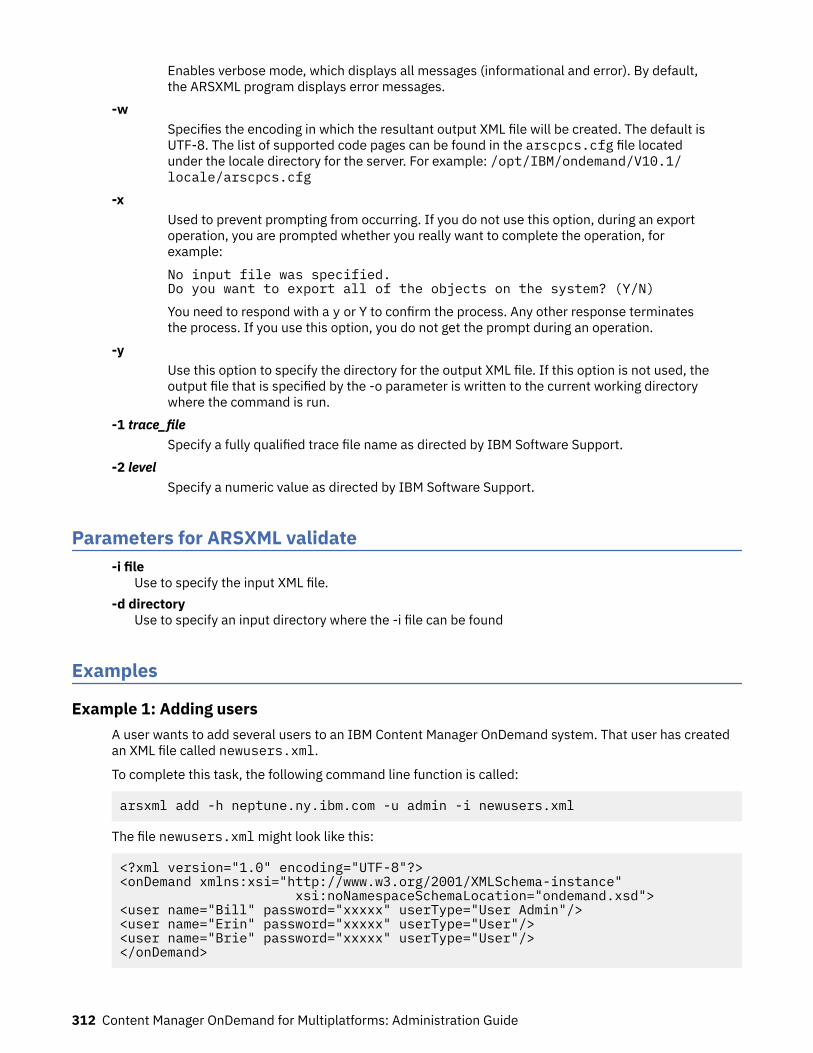
Enables verbose mode, which displays all messages (informational and error). By default,the ARSXML program displays error messages.
-wSpecifies the encoding in which the resultant output XML file will be created. The default isUTF-8. The list of supported code pages can be found in the arscpcs.cfg file locatedunder the locale directory for the server. For example: /opt/IBM/ondemand/V10.1/locale/arscpcs.cfg
-xUsed to prevent prompting from occurring. If you do not use this option, during an exportoperation, you are prompted whether you really want to complete the operation, forexample:
No input file was specified. Do you want to export all of the objects on the system? (Y/N)
You need to respond with a y or Y to confirm the process. Any other response terminatesthe process. If you use this option, you do not get the prompt during an operation.
-yUse this option to specify the directory for the output XML file. If this option is not used, theoutput file that is specified by the -o parameter is written to the current working directorywhere the command is run.
-1 trace_fileSpecify a fully qualified trace file name as directed by IBM Software Support.
-2 levelSpecify a numeric value as directed by IBM Software Support.
Parameters for ARSXML validate-i file
Use to specify the input XML file.-d directory
Use to specify an input directory where the -i file can be found
Examples
Example 1: Adding usersA user wants to add several users to an IBM Content Manager OnDemand system. That user has createdan XML file called newusers.xml.
To complete this task, the following command line function is called:
arsxml add -h neptune.ny.ibm.com -u admin -i newusers.xml
The file newusers.xml might look like this:
<?xml version="1.0" encoding="UTF-8"?><onDemand xmlns:xsi="http://www.w3.org/2001/XMLSchema-instance" xsi:noNamespaceSchemaLocation="ondemand.xsd"><user name="Bill" password="xxxxx" userType="User Admin"/><user name="Erin" password="xxxxx" userType="User"/> <user name="Brie" password="xxxxx" userType="User"/></onDemand>
312 Content Manager OnDemand for Multiplatforms: Administration Guide

Example 2: Updating usersA user wants to update the telephone numbers of the users in the system. This user created an XML filephone.xml, which contains the data for the users and their phone numbers.
To complete this task, the following command line function is called:
arsxml update -h neptune.ny.ibm.com -u admin -i phone.xml
The file phone.xml might look like this:
<?xml version="1.0" encoding="UTF-8"?><onDemand xmlns:xsi="http://www.w3.org/2001/XMLSchema-instance" xsi:noNamespaceSchemaLocation="ondemand.xsd"><user name="Bill" phone="(212) 555-0919"/><user name="Erin" phone="(212) 555-4295"/><user name="Brie" phone="(212) 555-0301"/></onDemand>
Example 3: Deleting usersA user wants to delete another user that no longer needs access to a printer on an IBM Content ManagerOnDemand system. That user has created an XML file called userExpDel.xml.
To complete this task, the following command line function is called:
arsxml delete -h neptune.ny.ibm.com -u admin -p password -v-x-e c i userExpDel.xml
The file userExpDel.xml might look like this:
<?xml version="1.0" encoding="UTF-8"?><onDemand xmlns:xsi="http://www.w3.org/2001/XMLSchema-instance" xsi:noNamespaceSchemaLocation="ondemand.xsd"><user name="Bill" password="xxxxx"/></onDemand>
Example 4: Exporting multiple objectsA user wants to export the printer objects named Prz1 and Prz2. This user also want to export thestorage set named FavoriteSS. An XML file exportlist.xml has been created, and contains theinformation on these objects.
To complete this task, the following command line function is called:
>arsxml export -h jupiter.ibm.com -i exportlist.xml -o output.xml
The file exportlist.xml might look like this:
<?xml version="1.0" encoding="UTF-8"?><onDemand xmlns:xsi="http://www.w3.org/2001/XMLSchema-instance" xsi:noNamespaceSchemaLocation="ondemand.xsd"> <printer name="Prz1"/> <printer name="Prz2"/> <storageSet name="FavoriteSS"/> </onDemand>
After the user runs the command, an output file named output.xml is created, and contains theinformation for the two printers and the storage set.
ARSXML 313

Example 5: Adding groupsA user wants to add a group of users to an IBM Content Manager OnDemand system. That user hascreated an XML file called groupAdd.xml.
To complete this task, the following command line function is called:
arsxml add -h neptune.ny.ibm.com -u admin -i groupAdd.xml
The file groupAdd.xml might look like this:
<?xml version="1.0" encoding="UTF-8"?><onDemand xmlns:xsi="http://www.w3.org/2001/XMLSchema-instance" xsi:noNamespaceSchemaLocation="ondemand.xsd"><group name="BigGroup" password="xxxxx" groupType="Group Admin"/></onDemand>
Example 6: Exporting a groupA user wants to export a group named BigGroup and any users and user groups that are referenced by it.A file named exportbiggroup.xml has been created and looks like this:
<?xml version="1.0" encoding="UTF-8"?><onDemand xmlns:xsi="http://www.w3.org/2001/XMLSchema-instance" xsi:noNamespaceSchemaLocation="ondemand.xsd"> <group name="BigGroup"/> </onDemand>
To complete the task, the following command should be used:
>arsxml export -h jupiter.ibm.com -i exportbiggroup.xml -r d -o output.xml
This command creates an XML file that contains the BigGroup object and all the users and groups thatare referenced by it. Also, any users within the referenced groups are exported.
Example 7: Updating groupsA user wants to update the name of an existing group. This user created an XML file groupUpdate.xml,which contains the data for the users and their user names.
To complete this task, the following command line function is called:
arsxml update -h neptune.ny.ibm.com -u admin -i groupUpdate.xml
The file groupUpdate.xml might look like this:
<?xml version="1.0" encoding="UTF-8"?><onDemand xmlns:xsi="http://www.w3.org/2001/XMLSchema-instance" xsi:noNamespaceSchemaLocation="ondemand.xsd"><group name="BigGroup" name="SmallGroup"/></onDemand>
Example 8: Exporting all of the usersA system administrator wants to export all of the users in an IBM Content Manager OnDemand system. Afile named exportallusers.xml is created, and looks like this:
<?xml version="1.0" encoding="UTF-8"?><onDemand xmlns:xsi="http://www.w3.org/2001/XMLSchema-instance" xsi:noNamespaceSchemaLocation="ondemand.xsd">
314 Content Manager OnDemand for Multiplatforms: Administration Guide

<user name="_ALL"/></onDemand>
To complete the task, the following command should be used:
arsxml export -h jupiter.ibm.com -i exportallusers.xml -o users.xml
This command creates an XML file users.xml that contains the information on all of the users that aredefined on the specified system.
Example 9: Validating input XML file schemaA user created an XML file called newusers.xml.
<?xml version="1.0" encoding="UTF-8"?><onDemand xmlns:xsi="http://www.w3.org/2001/XMLSchema-instance" xsi:noNamespaceSchemaLocation="ondemand.xsd"><user name="Bill" password="xxxxx" userType="User Admin"/><user name="Erin" password="xxxxx" userType="User"/> <user name="Brie" password="xxxxx" userType="User"/></onDemand>
The user then uses this command to validate the newusers.xml:
arsxml validate -i newusers.xml
Example 10: Adding printersA user wants to add new printers to an IBM Content Manager OnDemand system. That user has createdan XML file called printerAdd.xml.
To complete this task, the following command line function is called:
arsxml add -h neptune.ny.ibm.com -u -p password -v -i printerAdd.xml
The file printerAdd.xml might look like this:
<?xml version="1.0" encoding="UTF-8"?><onDemand xmlns:xsi="http://www.w3.org/2001/XMLSchema-instance" xsi:noNamespaceSchemaLocation="ondemand.xsd"><printer name="Printer1"/><printer name="Printer2"/><printer name="Printer3"/></onDemand>
ARSXML 315

316 Content Manager OnDemand for Multiplatforms: Administration Guide

Appendix A. Appendixes to the Administration Guide
Accessibility featuresThis product includes a number of features that make it more accessible for people with disabilities.These features include:
• The ability to operate all features using the keyboard instead of the mouse.• Support for enhanced display properties• Options for audio and visual alert cues• Compatibility with assistive technologies• Compatibility with operating system accessibility features• Accessible documentation formats
Keyboard input and navigationKeyboard input
The Content Manager OnDemand clients can be operated using only the keyboard. Menu items andcontrols provide access keys that allow users to activate a control or select a menu item directly fromthe keyboard. These keys are self-documenting, in that the access keys are underlined on the controlor menu where they appear.
Keyboard focusIn Windows-based systems, the position of the keyboard focus is highlighted, indicating which area ofthe window is active and where the user's keystrokes will have an effect.
Features for accessible display
The clients have a number of features that enhance the user interface and improve accessibility for userswith low vision. These enhancements include support for high-contrast settings and customizable fontproperties.High-contrast mode
The clients support the high-contrast-mode option that is provided by the operating system. Thisfeature assists users who require a higher degree of contrast between background and foregroundcolors.
Font settingsIn Windows-based systems, you can specify display settings that determine the color, size, and fontfor the text in menus and dialog windows. The client allows you to select the font for the documentlist.
Non-dependence on colorYou do not need to distinguish between colors in order to use any function of this product.
Alternative alert cuesIn Windows-based systems, the SoundSentry feature can be used to provide visual feedback forgeneral application and system alerts such as warning beeps.
Compatibility with assistive technologiesThe clients are compatible with screen reader applications such as Narrator and Via Voice. The clientshave properties required for these accessibility applications to make onscreen information availableto visually impaired users.
© Copyright IBM Corp. 1993, 2018 317

Accessible documentation
Documentation for the Content Manager OnDemand product is available in HTML format. This allowsusers to view documentation according to the display preferences set in their browsers. It also allows theuse of screen readers and other assistive technologies.
ARSSUPPORT utilityYou can use ARSSUPPORT, a Java based tool to gather diagnostic information such as log entries. Thistool is especially helpful when you need to report problems to IBM service.
The ARSSUPPORT utility is delivered in the arssupport.jar file. To invoke the utility, use thiscommand:
java -jar arssupport.jar
Prerequisites
• Ensure that you have Java runtime version 1.5 or higher to run this program.• Ensure that you are logged on to the operating system using an ID that has the administrator authority
on Windows or root authority on UNIX.• On Windows systems, run ARSSUPPORT from the Content Manager OnDemand command prompt.• To retrieve system log entries, ensure that the Content Manager OnDemand server is running.• The data are collected from the computer where ARSSUPPORT is run.
Syntaxarssupport
-h ? -I instance name -l
-m minutes -o outputpath -p password
-u userid -v
Parameters-h
Use this parameter to display help and usage information about this tool.-I instance name
Specify the instance name to collect the instance information. If you do not specify this option,ARCHIVE is used as the instance name.
-lSpecify this parameter to retrieve system log entries. If you do not specify this option, the log entriesfor the past 60 minutes are retrieved. Ensure that you use this parameter with the -u parameter.
-m minutesSpecify how many past minutes of the system log entries to retrieve from the server. The maximum is6000 minutes.
-o outputpathSpecify the output directory name. If the output directory is not specified, the output directory is thecurrent directory.
-p passwordPassword that you use to access the server.
318 Content Manager OnDemand for Multiplatforms: Administration Guide

-u useridThe user ID that you use to access the server. If the -l parameter is specified, the -u parameter isrequired.
-vVerbose output while running.
ARSSUPPORT generates information about a Content Manager OnDemand server including informationabout its configuration and system environment. ARSSUPPORT archives all files into one compressed file,arssupport.zip, and places this file in the odsupport subdirectory of the output directory.
Examples
java -jar arssupport.jar -h
java -cp ./arssupport.jar com/ibm/cm/od/arssupport -o c:\pmr11256 -l -u admin
java -cp ./arssupport.jar com/ibm/cm/od/arssupport -o . -I instance -l -m 28 -u admin
Monitoring servers
System logging facility
Content Manager OnDemand provides a logging facility to help administrators track Content ManagerOnDemand activity and monitor the system. When you enable logging for system events, user events, andapplication group events, Content Manager OnDemand stores the messages that are generated by thevarious Content Manager OnDemand programs in the system log. You can use one of the Content ManagerOnDemand client programs to search for and filter messages by time stamp, severity, message number,and user name.
Note: Before you start Content Manager OnDemand for the first time, you must initialize the systemlogging facility. See IBM Content Manager OnDemand for Multiplatforms: Installation and ConfigurationGuide for information about initializing the system logging facility.
Searching for and viewing messages
To search for and view the messages that are stored in the system logging facility, log on to ContentManager OnDemand with a Content Manager OnDemand client program and open the System Log folder.Enter search criteria in one or more of the search fields. When you choose the Search command, ContentManager OnDemand retrieves the messages from the database that match the search criteria that youspecified.
You can specify a date and time value to search for and retrieve messages. You can also specify othersearch criteria, such as:Log Id
Each time that a client logs on to the server, Content Manager OnDemand assigns a transactionnumber to that instance of the client program. All messages that are generated by that instance of theclient program include the same Log Id.
UseridThe Content Manager OnDemand userid
SeverityContent Manager OnDemand assigns a severity to each message: Alert, Error, Warning, Info, andDebug
ViewDepending on the type of message in the system log, you may be able to view other information that isrelated to or associated with the message. For example:
• You can display the message log that was generated during a load process by selecting an ARSLOADmessage and then choosing the View all Selected command.
Appendixes to the Administration Guide 319
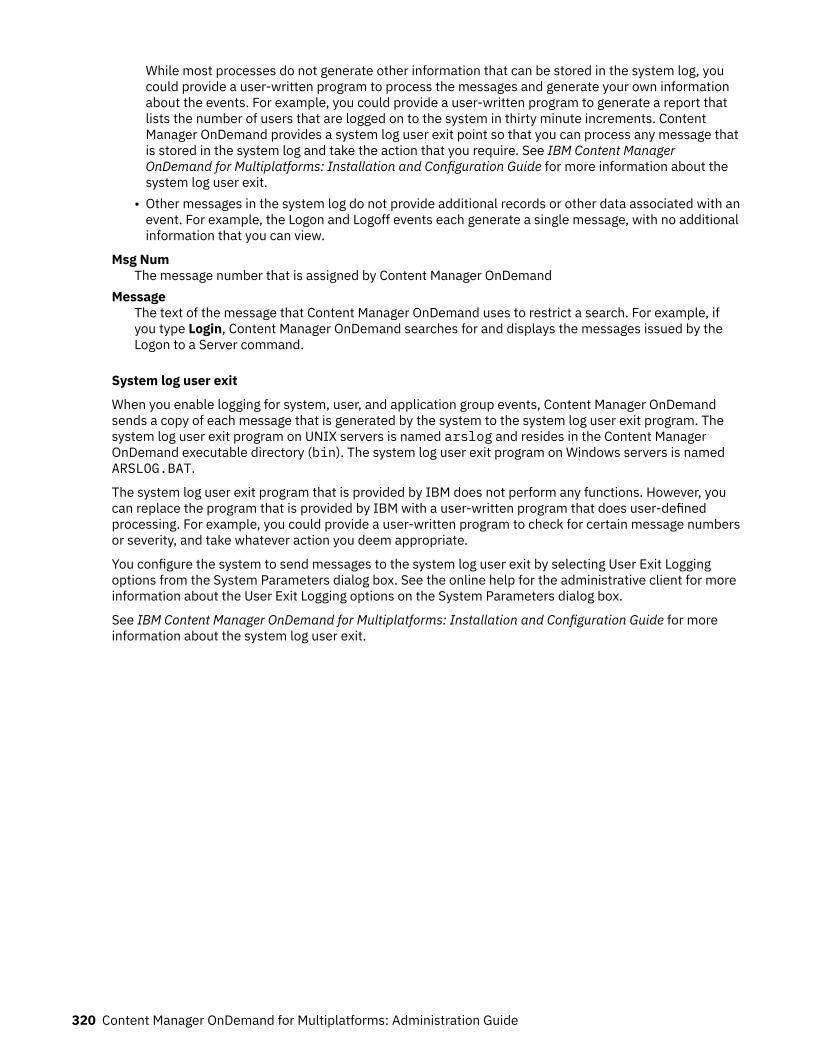
While most processes do not generate other information that can be stored in the system log, youcould provide a user-written program to process the messages and generate your own informationabout the events. For example, you could provide a user-written program to generate a report thatlists the number of users that are logged on to the system in thirty minute increments. ContentManager OnDemand provides a system log user exit point so that you can process any message thatis stored in the system log and take the action that you require. See IBM Content ManagerOnDemand for Multiplatforms: Installation and Configuration Guide for more information about thesystem log user exit.
• Other messages in the system log do not provide additional records or other data associated with anevent. For example, the Logon and Logoff events each generate a single message, with no additionalinformation that you can view.
Msg NumThe message number that is assigned by Content Manager OnDemand
MessageThe text of the message that Content Manager OnDemand uses to restrict a search. For example, ifyou type Login, Content Manager OnDemand searches for and displays the messages issued by theLogon to a Server command.
System log user exit
When you enable logging for system, user, and application group events, Content Manager OnDemandsends a copy of each message that is generated by the system to the system log user exit program. Thesystem log user exit program on UNIX servers is named arslog and resides in the Content ManagerOnDemand executable directory (bin). The system log user exit program on Windows servers is namedARSLOG.BAT.
The system log user exit program that is provided by IBM does not perform any functions. However, youcan replace the program that is provided by IBM with a user-written program that does user-definedprocessing. For example, you could provide a user-written program to check for certain message numbersor severity, and take whatever action you deem appropriate.
You configure the system to send messages to the system log user exit by selecting User Exit Loggingoptions from the System Parameters dialog box. See the online help for the administrative client for moreinformation about the User Exit Logging options on the System Parameters dialog box.
See IBM Content Manager OnDemand for Multiplatforms: Installation and Configuration Guide for moreinformation about the system log user exit.
320 Content Manager OnDemand for Multiplatforms: Administration Guide

Sample ARSLOG user exit script for UNIX
Figure 22 on page 321 shows the sample ARSLOG user exit script for UNIX that is provided by IBM.
# $1 - OnDemand Instance Name# $2 - Time Stamp# $3 - Log Identifier# $4 - Userid# $5 - Account# $6 - Severity# $7 - Message Number# $8 - Message Text# $9 - Document File#
echo "$@" >> ${ARS_TMP}/syslog.log
if [ -n "$9" ];then if [ -f "$9" ];then print "Copy log doc $9\n" >> ${ARS_TMP}/syslog.log cp $9 /tmp/syslogdocs/$(basename $9).doc 2>> ${ARS_TMP}/syslog.log else print "$9 does not exist\n" >> ${ARS_TMP}/syslog.log fifi
exit 0
Figure 22: Sample ARSLOG user exit script for UNIX
Sample ARSLOG user exit batch file for Windows
Figure 23 on page 321 shows the sample ARSLOG user exit batch file for Windows that is provided byIBM.
REM %1 - OnDemand Instance NameREM %2 - Time StampREM %3 - Log IdentifierREM %4 - UseridREM %5 - AccountREM %6 - SeverityREM %7 - Message NumberREM %8 - Message TextREM %9 - Document FileREM
ECHO %1 %2 %3 %4 %5 %6 %7 %8 %9>%ARS_TMP%\System.log
REM make sure the %ARS_TMP%\Syslog directory existsIF EXIST %9 COPY %9 %ARS_TMP%\Syslog
EXIT
Figure 23: Sample ARSLOG user exit batch file for Windows
Monitoring users
The Content Manager OnDemand server generates system log messages to help you track the number ofusers that are logged on to the server:
• Content Manager OnDemand stores message number 201 in the system log every thirty minutes. Thismessage contains the current number of users that are logged on to the server.
Appendixes to the Administration Guide 321

• Content Manager OnDemand stores message number 202 in the system log every time that the numberof concurrent users exceeds the previous maximum number of concurrent users. The number ofconcurrent users is reset each time that you restart the Content Manager OnDemand server processes.
Reviewing a CD-ROM creation manifest
You can open the System Log folder to review a manifest created by the Content Manager OnDemand ad-hoc CD mastering software. A CD creation manifest contains a cover page with control information aboutthe CD and one or more pages that list the items retrieved from the database and written on the CD.
To review a CD creation manifest:
1. Log on to Content Manager OnDemand with a Content Manager OnDemand client program and openthe System Log folder.
2. Type CD in the Message field.
Note: If you know the CD volume number of the manifest that you want to review, enter the number inthe Message field. For example, you can enter %171 in the Message field to locate the manifest forvolume number AOD00000171.
3. Specify a date. For example:
• If you want to display a manifest for a particular date, then select the Equal operator for the TimeStamp search field and enter the date in the Time Stamp field.
• If you want to display the manifests that were created during a range of dates or you do not know theexact date on which a particular manifest was created, select the Between operator for the TimeStamp search field and enter a date range in the Time Stamp fields.
4. Choose Search. Content Manager OnDemand displays the manifests that match the search criteriathat you specified.
5. Review a manifest by selecting an item from the list and choosing the View All Selected command.6. Use the Next Page and Previous Page commands to scroll through the manifest.
System load logging facility
Content Manager OnDemand provides a logging facility to help you track loading activity. After you enablesystem load logging, Content Manager OnDemand stores the messages that are generated by the loadprograms in the system load log. You can use one of the Content Manager OnDemand client programs tosearch for and filter messages by criteria such as load date, application group name, application name,load ID, and input file name.
Before you start Content Manager OnDemand for the first time, make sure that you initialize the systemloading logging facility. See Installation and Configuration Guide for information about initializing thesystem logging facility.
Monitoring performance
You should monitor server resources on a regular schedule. The following resources often have the mostimpact on server performance:
• Memory. The lack of adequate RAM results in excess paging. In general, the more RAM and cache, thebetter your system will perform.
• Processor. The type of processor and the number of processors affects the overall performance of thesystem. Content Manager OnDemand supports symmetric multiprocessing so that if a system hasmultiple applications running concurrently, or applications that are multithreaded, the overall processorpower is shared.
• Disk subsystem. Free space, fragmented files, and high transfer rates affect the performance of thedatabase manager and the storage manager. Lack of adequate RAM, resulting in excess paging, cancause a disk subsystem to become very busy. In addition, the type and number of disk controllersaffects the overall system responsiveness when responding to reads and writes to disk drives.
322 Content Manager OnDemand for Multiplatforms: Administration Guide

• Network subsystem. High transfer rates and otherwise overloaded networks reflect badly on client/server applications. Network I/O is the resource that most affects the performance of TCP/IP.
You can also monitor applications, such as DB2 and Tivoli Storage Manager.
You can choose to monitor snapshots or events. Snapshots allow you to capture point-in-time informationat specified intervals. Events allow you to record information over the duration of an event, such as aconnection to the database.
As part of the initial setup of your system, IBM recommends that you create a measurement baseline ofinformation for use in analyzing system performance. This is important because to determine if a resourceis being overused, under used, or is at maximum capacity and performance, you need to identify what isnormal. You can also use this information to set expectations of system performance for users.
Automating the collection of server data is essential to control the amount of data collected and tofacilitate its analysis. You can use tools provided with the operating system, such as Performance Monitorand Network Monitor on Windows servers, to automatically capture server data during specified periodsand then store the data in a database.
Finally, you should establish and implement a plan for long-term record keeping and long-term trendanalysis. If you store server performance data in a database, you can use tools such as a spreadsheet toanalyze the data and generate charts and create reports.
For Windows servers, Performance Monitor is the tool most often used to monitor server performance.Performance Monitor performs data collection and analysis. Performance Monitor uses objects andcounters to associate statistical information with monitored components. For Content ManagerOnDemand server analysis, IBM recommends that you collect information about the following objects:
• System• Processor• Memory• Logical disk• Physical disk (if using RAID)• Server• Cache• Network adapter• Database (DB2, Oracle, and SQL Server provide Performance Monitor objects and counters)
For more information about Performance Monitor, see your Windows operating system documentation.
Monitoring performance with the system dashboard
You can use the IBM System Dashboard for Enterprise Content Management as a performance monitoringtool for IBM Content Manager OnDemand. The Dashboard displays real-time performance data thatsystem administrators and operators can use to proactively identify and resolve potential performanceproblems before they occur.
The performance data can also be archived for management reporting and trend analysis. For moreinformation, see the IBM FileNet documentation and the IBM System Dashboard for Enterprise ContentManagement documentation for complete information.
Appendixes to the Administration Guide 323

Configuration changes for Content Manager OnDemand client applications inan FDCC environment
This section provides guidance on how to configure the Content Manager OnDemand client applicationson Windows Vista in a Federal Desktop Core Configuration (FDCC) environment.
Federal Desktop Core Configuration (FDCC) on Windows Vista is a mandate issued by United StatesFederal government. The U.S. Executive Office of the President issued policy memorandum M-07-18 andpolicy memorandum M-07-11 requesting that all government agencies set up and Windows Vista with thesecurity settings that are defined in the FDCC. All agencies must comply with the new standard byFebruary 1, 2008. The U.S. government pays high attention to the security and vulnerability of its ITinfrastructure through the enforcement of the FDCC requirement.
Ensure that you have the administrator privileges on the FDCC system before you proceed with theinstructions in this section.
Windows client, Windows administration client
1. Before you use the Windows client or the Windows administration client, add the library server to theFDCC system.
2. If the Windows client and the Windows administration client are installed in the Program Filesdirectory (the default), then you need only read access to the Program Files directory.
3. Unless you specify otherwise, temporary user data is written to the %APPDATA%\IBM\OnDemandClient directory.
AFP Web Viewer, Image Web Viewer
1. In the Group Policy Editor of your system, make the following changes for Local Computer Policy >Computer Configuration > Administrative Templates > Windows Components > Internet Explorer:
• For Security Zones: Do not allow users to change policies, change from Enabled to Disabled.• For Security Zones: Do not allow users to add/delete sites, change from Enabled to Disabled.
On Windows Vista only, make the following change for Local Computer Policy > ComputerConfiguration > Administrative Templates > Internet Explorer:
• For Security Zones: Use only machine settings, change from Enabled to Disabled. To ensure thatusers can add a site to the trusted sites, after this change, ask each user on the operating system toadd all the sites of your Content Manager OnDemand servers into the trusted sites.
Make the following changes for Local Computer Policy > Computer Configuration > AdministrativeTemplates > Windows Components > Internet Explorer > Internet Control Panel > Security Page >Trusted Sites Zone:
• For Run ActiveX controls and plug-ins, change from Disabled to Prompt.• Restart your system for these changes to take effect.• Add the Content Manager OnDemand server URL to the trusted sites of your Internet Explorer
browser.
Make the following changes for Local Computer Policy > Computer Configuration > AdministrativeTemplates > Windows Components > Internet Explorer:
• For Security Zones: Do not allow users to change policies, change from Disabled to Enabled.• For Security Zones: Do not allow users to add/delete sites, change from Disabled to Enabled.
2. If you use Internet Explorer Version 7, then enable the Federal Information Processing Standard 140(FIPS-140) on the WebSphere® Application Server where your Content Manager OnDemand server isdeployed into the server operating system.
324 Content Manager OnDemand for Multiplatforms: Administration Guide

Java Line Data Viewer Version 2 applet
1. Before you access the Java Line Data Viewer in a browser, install the Java Runtime Environment (JRE)plug-in.
2. If you are on Windows Vista, in the Group Policy Editor of your system, make the following change forLocal Computer Policy > Computer Configuration > Administrative Templates > WindowsComponents > Internet Explorer:
• For Security Zones: Use only machine settings, change from Enabled to Disabled. To ensure thatusers can add a site to the trusted sites, after this change, each user on the operating system mustadd all the sites of your Content Manager OnDemand servers into the trusted sites.
Make the following changes for Local Computer Policy > Computer Configuration > AdministrativeTemplates > Windows Components > Internet Explorer > Internet Control Panel > Security Page >Trusted Sites Zone:
• For Java permissions, change from Disabled to High safety.• For Run ActiveX controls and plug-ins, change from Disabled to Prompt.• Restart your system for these changes to take effect.• Add the Content Manager OnDemand server URL to the trusted sites of your Internet Explorer
browser.3. If you use Internet Explorer Version 7, enable the Federal Information Processing Standard 140
(FIPS-140) on the WebSphere Application Server where your Content Manager OnDemand server isdeployed into the server operating system.
After you complete these changes, a limited Windows desktop client user can access all the functionalityof the ODWEK web viewers. One exception is the Java Line Data Viewer Version 2 applet. Currently,Internet Explorer settings does not allow the Java Runtime Environment to load the applet. Otheravailable browsers do not have this restriction and allow the applet to operate correctly.
System control tablesThis section contains a description of each Content Manager OnDemand system table, including columnnames and data types. This section also contains a description of the application group data tables (alsoknown as dynamic tables).
The system tables are created when the Content Manager OnDemand database is created by using theARSDB program. The system tables are updated during normal operation in response to dynamic SQLstatements.
Warning: The Content Manager OnDemand system tables should not be modified or queried directly.Doing so may effect the operation or performance of the system. The system tables are subject to changein future versions of Content Manager OnDemand.
List of tables“Application group table (ARSAG)” on page 326“Application group to folder field mapping table (ARSAG2FOL)” on page 328“Application group field table (ARSAGFLD)” on page 328“Application group field alias table (ARSAGFLDALIAS)” on page 329“Application group composite index table (ARSAGINDEX)” on page 329“Application group permissions table (ARSAGPERMS)” on page 330“Annotation table (ARSANN)” on page 330“Application table (ARSAPP)” on page 331“User logical views table (ARSAPPUSR)” on page 333“Cabinet table (ARSCAB)” on page 333“Cabinet to folder mapping table (ARSCAB2FOL)” on page 334
Appendixes to the Administration Guide 325

“Cabinet permissions table (ARSCABPERMS)” on page 334“CFS-CMOD work table (ARSCFSODWORK)” on page 334“Folder table (ARSFOL)” on page 335“Folder field table (ARSFOLFLD)” on page 336“Folder user fields table (ARSFOLFLDUSR)” on page 336“Folder permissions table (ARSFOLPERMS)” on page 337“FTI work table (ARSFTIWORK)” on page 338“Group table (ARSGROUP)” on page 338“Hold table (ARSHOLD)” on page 339“Hold mapping table (ARSHOLDMAP)” on page 339“Hold permissions table (ARSHOLDPERMS)” on page 340“Hold work table (ARSHOLDWORK)” on page 340“Load table (ARSLOAD)” on page 341“Named query table (ARSNAMEQ)” on page 342“Node table (ARSNODE)” on page 342“Printer table (ARSPRT)” on page 350“Printer options table (ARSPRTOPTS)” on page 351“Printer user table (ARSPRTUSR)” on page 351“Resources table (ARSRES)” on page 352“Segment table (ARSSEG)” on page 352“Storage set table (ARSSET)” on page 354“System parameters table (ARSSYS)” on page 355“User table (ARSUSER)” on page 356“Users in groups table (ARSUSRGRP)” on page 358“User group ID table (ARSUSRGRPID)” on page 358“Application group data table” on page 358
Application group table (ARSAG)This table maintains a catalog of application groups.
Table 18: Application group table (ARSAG)
Column Name Data Type Description
name VARCHAR(60) Application group name
description VARCHAR(120) Application group description
agid INTEGER Application group identifier
agid_name VARCHAR(8) Application group internalidentifier
db_seg CHAR(1) FOR BIT DATA (DB2),BINARY(1) (SQL Server), RAW(1)(Oracle)
Segment type (DatabaseOrganization)
ann_type CHAR(1) FOR BIT DATA (DB2),BINARY(1) (SQL Server), RAW(1)(Oracle)
Annotation update
db_exp_date INTEGER Expire database indexes
db_mgrt_date INTEGER Migrate database indexes
sm_cache_doc INTEGER Storage manager cache definition
resgrp INTEGER Resource group identifier
326 Content Manager OnDemand for Multiplatforms: Administration Guide

Table 18: Application group table (ARSAG) (continued)
Column Name Data Type Description
load_id INTEGER Load Id counter
log INTEGER Log mask
load_id_suffix VARCHAR(8) Load Id suffix
mgrt_cache_date INTEGER Copy cache to archive storage
reimport_exp_date INTEGER Number of days to keep importedtable before re-expiring
sid INTEGER Storage set identifier
expire_type CHAR(1) FOR BIT DATA (DB2),BINARY(1) (SQL Server), RAW(1)(Oracle)
Expiration type
seg_rows INTEGER Rows per segment (MaximumRows)
seg_id INTEGER Segment Id counter
obj_size INTEGER Size of storage object
type INTEGER Type of application group (DataManagement; Create TablespaceType)
upd_userid VARCHAR(128) Last user to update theapplication group
upd_date BIGINT (DB2, SQL Server), INT(Oracle)
Date and time application groupwas last updated
last_doc_date BIGINT (DB2, SQL Server), INT(Oracle)
Migrate last document date
migr_srvr_str VARCHAR(254) Migrate server string
sm_cache_delta INTEGER Delta value of the expiration(number of days) of cached data
database_name VARCHAR(8) Internal database alias name
sm_cache_res INTEGER Storage manager resources cachedefinition
fti_server VARCHAR Full text index server
upd_dt TIMESTAMP (DB2, Oracle),DATETIME2(6) (SQL Server)
Date and time application groupwas last updated
last_doc_dt TIMESTAMP (DB2, Oracle),DATETIME2(6) (SQL Server)
Migrate last document date
last_load_dt TIMESTAMP (DB2, Oracle),DATETIME2(6) (SQL Server)
Date and time application groupwas last loaded
last_query_dt TIMESTAMP (DB2, Oracle),DATETIME2(6) (SQL Server)
Date and time application groupwas last queried
last_retr_dt TIMESTAMP (DB2, Oracle),DATETIME2(6) (SQL Server)
Date and time application groupwas last retrieved
Appendixes to the Administration Guide 327

Table 19: Indexes for application group table (ARSAG)
Index name Columns in index Type of index
arsag_name_idx name Unique index
Application group to folder field mapping table (ARSAG2FOL)This table maintains a catalog of mappings between application group fields and folder fields. This tablealso contains a catalog of applications within application groups that can be queried from a folder.
Table 20: Application group to folder field mapping table (ARSAG2FOL)
Column Name Data Type Description
fid INTEGER Folder identifier
agid INTEGER Application group identifier
aid INTEGER Application within the applicationgroup
folder_field SMALLINT Folder field identifier
appgrp_field1 SMALLINT Application group field identifier
appgrp_field2 SMALLINT Application group field identifier
Table 21: Indexes for application group to folder field mapping table (ARSAG2FOL)
Index name Columns in index Type of index
arsag2fol_idx fid, agid, aid, folder_field Unique cluster index for DB2;Unique index for Oracle and SQLServer
Application group field table (ARSAGFLD)This table maintains a catalog of application group fields.
Table 22: Application group field table (ARSAGFLD)
Column Name Data Type Description
agid INTEGER Application group identifier
field SMALLINT Application group field identifier
name VARCHAR(18) Application group field name
type CHAR(1) FOR BIT DATA (DB2),BINARY(1) (SQL Server), RAW(1)(Oracle)
Application group field type
qual CHAR(1) FOR BIT DATA (DB2),BINARY(1) (SQL Server), RAW(1)(Oracle)
Application group field typequalifier
mask INTEGER Application group field mask
string_type CHAR(1) FOR BIT DATA (DB2),BINARY(1) (SQL Server), RAW(1)(Oracle)
Type of string field
string_len SMALLINT Length of string field
328 Content Manager OnDemand for Multiplatforms: Administration Guide

Table 22: Application group field table (ARSAGFLD) (continued)
Column Name Data Type Description
string_case CHAR(1) FOR BIT DATA (DB2),BINARY(1) (SQL Server), RAW(1)(Oracle)
Case of string field
leading VARCHAR(8) Leading characters to trim fromstring field
strip VARCHAR(8) Any characters to trim from stringfield
trailing VARCHAR(8) Trailing characters to trim fromstring field
map_field SMALLINT Map field
Table 23: Indexes for application group field table (ARSAGFLD)
Index name Columns in index Type of index
arsagfld_idx agid, field Unique cluster index for DB2;Unique index for Oracle and SQLServer
Application group field alias table (ARSAGFLDALIAS)This table maintains a catalog of application group field aliases (Database values and Displayed values).
Table 24: Application group field alias table (ARSAGFLDALIAS)
Column Name Data Type Description
agid INTEGER Application group identifier
field SMALLINT Application group field identifier
internal VARCHAR(254) Internal (Database) value
external VARCHAR(254) External (Displayed) value
Table 25: Indexes for application group field alias table (ARSAGFLDALIAS)
Index name Columns in index Type of index
arsagfldalias_idx agid, field Cluster index for DB2; Index forOracle and SQL Server
Application group composite index table (ARSAGINDEX)This table maintains application group composite indexes on application group fields.
Table 26: Application group composite index table (ARSAGINDEX)
Column Name Data Type Description
agid INTEGER Application group identifier
iid SMALLINT Index identifier
type INTEGER Application group identifier
Appendixes to the Administration Guide 329

Table 26: Application group composite index table (ARSAGINDEX) (continued)
Column Name Data Type Description
sort_order SMALLINT Specifies the order of theapplication group fields
ag_fld SMALLINT Application group field identifier
sort_type CHAR(1) FOR BIT DATA (DB2),BINARY(1) (SQL Server), RAW(1)(Oracle)
Specifies that index entriesshould be kept in ascending ordescending order of the columnvalues
Table 27: Indexes for application group composite index table (ARSAGINDEX)
Index name Columns in index Type of index
arsagindex_idx agid Cluster index for DB2; Index forOracle and SQL Server
Application group permissions table (ARSAGPERMS)This table maintains permissions specifications for application groups. Each row contains two primaryelements: who (id) and what (agid) and specifies the user's authority for the application group, theuser's document and annotation permissions, and a query restriction, if any.
Table 28: Application group permissions table (ARSAGPERMS)
Column Name Data Type Description
id INTEGER User identifier
agid INTEGER Application group identifier
id_perms SMALLINT User authority for the applicationgroup
doc_perms SMALLINT Document permissions
ann_perms SMALLINT Annotation permissions
q_restrict CLOB(32700) (DB2),VARCHAR(MAX) (SQL Server),CLOB (Oracle)
Query restriction; user-definedand validated SQL string
Table 29: Indexes for application group permissions table (ARSAGPERMS)
Index name Columns in index Type of index
arsagperms_idx agid, id Unique cluster index for DB2;Unique index for Oracle and SQLServer
Annotation table (ARSANN)This table maintains a catalog of annotations.
Table 30: Annotation table (ARSANN)
Column Name Data Type Description
id INTEGER User identifier
330 Content Manager OnDemand for Multiplatforms: Administration Guide

Table 30: Annotation table (ARSANN) (continued)
Column Name Data Type Description
userid VARCHAR(128) User name
agid INTEGER Application group identifier
doc_name VARCHAR(11) Document name
doc_off INTEGER Document offset
doc_len INTEGER Document length
comp_off INTEGER Compression offset
comp_len INTEGER Compression length
time_stamp BIGINT (DB2, SQL Server), INT(Oracle)
Time annotation was created
page INTEGER Page (within document) on whichannotation exists
type INTEGER Type of annotation
x_off INTEGER x offset on page
y_off INTEGER y offset on page
reserved VARCHAR(32) FOR BIT DATA (first byte is annotation color)
text_buf CLOB(32700) (DB2),VARCHAR(MAX) (SQL Server),CLOB (Oracle)
The text of the annotation
ann_rowid INTEGER Annotation identifier
image_buf BLOB(1048576) (DB2),VARBINARY(MAX) (SQL Server),BLOB (Oracle)
Any images that are attached tothe annotation
table_name VARCHAR(18) Segment in which annotationexists
doc_exp_date BIGINT (DB2, SQL Server), INT(Oracle)
Expiration date of document
doc_exp_dt TIMESTAMP (DB2, Oracle),DATETIME2(6) (SQL Server)
Expiration date of document
time_stamp_dt TIMESTAMP (DB2, Oracle),DATETIME2(6) (SQL Server)
Date and time annotation tablewas created or last modified
Table 31: Indexes for annotation table (ARSANN)
Index name Columns in index Type of index
arsann_idx agid, id, doc_name, doc_off,doc_len, comp_off, comp_len
Cluster index for DB2; Index forOracle and SQL Server
Application table (ARSAPP)This table maintains a catalog of applications.
Appendixes to the Administration Guide 331

Table 32: Application table (ARSAPP)
Column Name Data Type Description
name VARCHAR(60) Application name
description VARCHAR(120) Application description
agid INTEGER Application group identifier
aid INTEGER Application identifier
doc_type CHAR(1) FOR BIT DATA (DB2),BINARY(1) (SQL Server), RAW(1)(Oracle)
Document type
doc_comp_type CHAR(1) FOR BIT DATA (DB2),BINARY(1) (SQL Server), RAW(1)(Oracle)
Default document compressiontype
res_comp_type CHAR(1) FOR BIT DATA (DB2),BINARY(1) (SQL Server), RAW(1)(Oracle)
Default resource compressiontype
idx_type CHAR(1) FOR BIT DATA (DB2),BINARY(1) (SQL Server), RAW(1)(Oracle)
Indexer
comp_obj_size INTEGER Compressed object size
pid INTEGER Default printer identifier
alias VARCHAR(254) Application identifier withinapplication group
fixed_view CLOB(32700) (DB2),VARCHAR(MAX) (SQL Server),CLOB (Oracle)
Default and fixed logical viewinformation
indexer CLOB(32700) (DB2),VARCHAR(MAX) (SQL Server),CLOB (Oracle)
Indexing parameters
preprocessor CLOB(32700) (DB2),VARCHAR(MAX) (SQL Server),CLOB (Oracle)
Parameters used to preprocessrows before loading
upd_userid VARCHAR(128) Userid of last user to updateapplication
upd_date BIGINT (DB2, SQL Server), INT(Oracle)
Date and time application waslast updated (in old style)
db_exp_date INTEGER Expiration date
appl_type INTEGER Application type
upd_dt TIMESTAMP (DB2, Oracle),DATETIME2(6) (SQL Server)
Date and time application waslast updated
332 Content Manager OnDemand for Multiplatforms: Administration Guide

Table 33: Indexes for application table (ARSAPP)
Index name Columns in index Type of index
arsapp_idx agid, aid, name Unique cluster index for DB2;Unique index for Oracle and SQLServer
User logical views table (ARSAPPUSR)This table maintains a catalog of logical views.
Table 34: User logical views table (ARSAPPUSR)
Column Name Data Type Description
agid INTEGER Application group identifier
aid INTEGER Application identifier
id INTEGER User identifier
user_view CLOB(32700) (DB2),VARCHAR(MAX) (SQL Server),CLOB (Oracle)
Logical view information
Table 35: Indexes for user logical views table (ARSAPPUSR)
Index name Columns in index Type of index
arsappusr_idx agid, aid, id Unique cluster index for DB2;Unique index for Oracle and SQLServer
Cabinet table (ARSCAB)This table maintains a catalog of cabinet definitions.
Table 36: Cabinet table (ARSCAB)
Column Name Data Type Description
name VARCHAR(60) Cabinet name
description VARCHAR(120) Cabinet description
cid INTEGER Cabinet identifier
upd_userid VARCHAR(128) Userid of last user to update thecabinet
upd_date BIGINT (DB2, SQL Server), INT(Oracle)
Date and time cabinet was lastupdated (in old style)
upd_dt TIMESTAMP (DB2, Oracle),DATETIME2(6) (SQL Server)
Date and time cabinet was lastupdated
Table 37: Indexes for cabinet table (ARSCAB)
Index name Columns in index Type of index
arscab_name_idx name Unique index
Appendixes to the Administration Guide 333

Table 37: Indexes for cabinet table (ARSCAB) (continued)
Index name Columns in index Type of index
arscab_cid_idx cid Unique cluster index for DB2;Unique index for Oracle and SQLServer
Cabinet to folder mapping table (ARSCAB2FOL)This table maintains a catalog of mappings between cabinets and folders.
Table 38: Cabinet to folder mapping table (ARSCAB2FOL)
Column Name Data Type Description
cid INTEGER Cabinet identifier
fid INTEGER Folder identifier
Table 39: Indexes for cabinet to folder mapping table (ARSCAB2FOL)
Index name Columns in index Type of index
arscab2fol_idx cid, fid Unique cluster index for DB2;Unique index for Oracle and SQLServer
Cabinet permissions table (ARSCABPERMS)This table maintains permissions specifications for cabinets.
Table 40: Cabinet permissions table (ARSCABPERMS)
Column Name Data Type Description
id INTEGER User identifier
cid INTEGER Cabinet identifier
perms INTEGER User permissions for the cabinet
Table 41: Indexes for cabinet permissions table (ARSCABPERMS)
Index name Columns in index Type of index
arscabperms_idx cid, id Unique cluster index for DB2;Unique index for Oracle and SQLServer
CFS-CMOD work table (ARSCFSODWORK)This table is a catalog of work between Content Manager OnDemand and CFS-CMOD.
Table 42: CFS-CMOD work table
Column Name Data Type Description
agid INTEGER Application group identifier
name VARCHAR(11) Load identifier
type INTEGER Type of work
334 Content Manager OnDemand for Multiplatforms: Administration Guide

Table 42: CFS-CMOD work table (continued)
Column Name Data Type Description
status INTEGER Status of work
time_stamp BIGINT (DB2, SQL Server), INT(Oracle)
Timestamp of work (in old style)
misc_comp_type CHAR(1) FOR BIT DATA (DB2),BINARY(1) (SQL Server), RAW(1)(Oracle)
Compression type of misc
misc_info BLOB(10485760) (DB2),VARBINARY(MAX) (SQL Server),BLOB (Oracle)
Work information
time_stamp_dt TIMESTAMP (DB2, Oracle),DATETIME2(6) (SQL Server)
Timestamp of work
Table 43: Indexes for CFS-CMOD work table
Index name Columns in index Type of index
arscfsodwork_idx agid, name Cluster index for DB2; Index forOracle and SQL Server
Folder table (ARSFOL)This table maintains a catalog of folders.
Table 44: Folder table (ARSFOL)
Column Name Data Type Description
name VARCHAR(60) Folder name
description VARCHAR(120) Folder description
fid INTEGER Folder identifier
ann_search CHAR(1) FOR BIT DATA (DB2),BINARY(1) (SQL Server), RAW(1)(Oracle)
Annotation display
upd_userid VARCHAR(128) Userid of last user to updatefolder
upd_date BIGINT (DB2, SQL Server), INT(Oracle)
Date and time folder was lastupdated (in old style)
upd_dt TIMESTAMP (DB2, Oracle),DATETIME2(6) (SQL Server)
Date and time folder was lastupdated
Table 45: Indexes for folder table (ARSFOL)
Index name Columns in index Type of index
arsfol_name_idx name Unique index
arsfol_fid_idx fid Unique cluster index for DB2;Unique index for Oracle and SQLServer
Appendixes to the Administration Guide 335

Folder field table (ARSFOLFLD)This table maintains a catalog of folder fields.
Table 46: Folder field table (ARSFOLFLD)
Column Name Data Type Description
fid INTEGER Folder identifier
field SMALLINT Folder field identifier
name VARCHAR(60) Folder field name
description VARCHAR(120) Folder field description
type CHAR(1) FOR BIT DATA (DB2),BINARY(1) (SQL Server), RAW(1)(Oracle)
Folder field type
qual CHAR(1) FOR BIT DATA (DB2),BINARY(1) (SQL Server), RAW(1)(Oracle)
Folder field type qualifier
map_type SMALLINT Type of field mapping
Table 47: Indexes for folder field table (ARSFOLFLD)
Index name Columns in index Type of index
arsfolfid_idx fid, field Unique cluster index for DB2;Unique index for Oracle and SQLServer
Folder user fields table (ARSFOLFLDUSR)This table maintains a catalog of folder fields for users that have specific field information for a folder.
Table 48: Folder user fields table (ARSFOLFLDUSR)
Column Name Data Type Description
id INTEGER User identifier
fid INTEGER Folder identifier
field SMALLINT Folder field identifier
query_order SMALLINT Order of fields in search criteria
dspl_order SMALLINT Order of fields in document list
sort_order SMALLINT Default sort order
sort_type CHAR(1) FOR BIT DATA (DB2),BINARY(1) (SQL Server), RAW(1)(Oracle)
Type of sort
usr_mask SMALLINT Field setup
ops SMALLINT Search operators
def_op SMALLINT Default search operator
def_value1 VARCHAR(254) Default search value
336 Content Manager OnDemand for Multiplatforms: Administration Guide

Table 48: Folder user fields table (ARSFOLFLDUSR) (continued)
Column Name Data Type Description
def_value2 VARCHAR(254) Default search value for Between,Not Between
min_int BIGINT (DB2, SQL Server), INT(Oracle)
Smallest integer allowed
max_int BIGINT (DB2, SQL Server), INT(Oracle)
Largest integer allowed
datefmt VARCHAR(60) Format of date strings in searchcriteria
datedef_type CHAR(1) FOR BIT DATA (DB2),BINARY(1) (SQL Server), RAW(1)(Oracle)
Default date units for interval
datedef_arg INTEGER Default date value for interval
min_float FLOAT Smallest decimal allowed
max_float FLOAT Largest decimal allowed
decimal_pt_pos SMALLINT Precision (right of decimal point)
string_wild CHAR(1) FOR BIT DATA (DB2),BINARY(1) (SQL Server), RAW(1)(Oracle)
Wildcard
dspl_datefmt VARCHAR(60) Format of date strings indocument list
min_dt TIMESTAMP (DB2, Oracle),DATETIME2(6) (SQL Server)
Minimum date allowed
max_dt TIMESTAMP (DB2, Oracle),DATETIME2(6) (SQL Server)
Maximum date allowed
min_str VARCHAR(254) Minimum decimal float allowed
max_str VARCHAR(254) Maximum decimal float allowed
Table 49: Indexes for folder user fields table (ARSFOLFLDUSR)
Index name Columns in index Type of index
arsfolfldusr_idx fid, id, field Unique cluster index for DB2;Unique index for Oracle and SQLServer
Folder permissions table (ARSFOLPERMS)This table maintains permissions specifications for folders. Each row contains two primary elements: theuser (id) and the folder (fid) and specifies the user's authority for the folder, fields, and named queries.
Table 50: Folder permissions table (ARSFOLPERMS)
Column Name Data Type Description
id INTEGER User identifier
fid INTEGER Folder identifier
Appendixes to the Administration Guide 337

Table 50: Folder permissions table (ARSFOLPERMS) (continued)
Column Name Data Type Description
perms SMALLINT User permissions for the folder
hits INTEGER Maximum hits returned from aquery
Table 51: Indexes for folder permissions table (ARSFOLPERMS)
Index name Columns in index Type of index
arsfolperms_idx fid, id Unique cluster index for DB2;Unique index for Oracle and SQLServer
FTI work table (ARSFTIWORK)This table maintains a catalog of FTI work.
Table 52: FTI work table (ARSFTIWORK)
Column Name Data Type Description
agid INTEGER Application group identifier
name VARCHAR(11) Load name
type INTEGER Work type
status INTEGER Work status
time_stamp_dt TIMESTAMP (DB2, Oracle),DATETIME2(6) (SQL Server)
Timestamp of work
misc_comp_type CHAR(1) FOR BIT DATA (DB2),BINARY(1) (SQL Server), RAW(1)(Oracle)
Compression type of misc
misc_info BLOB(10485760) (DB2),VARBINARY(MAX) (SQL Server),BLOB (Oracle)
Work information
Table 53: Indexes for FTI work table (ARSFTIWORK)
Index name Columns in index Type of index
arsftiwork_idx agid, name Index
Group table (ARSGROUP)This table maintains a catalog of groups.
Table 54: Group table (ARSGROUP)
Column Name Data Type Description
gid INTEGER Group identifier
id INTEGER Owner of the group; can be a useror a group
name VARCHAR(128) Name of group
338 Content Manager OnDemand for Multiplatforms: Administration Guide

Table 54: Group table (ARSGROUP) (continued)
Column Name Data Type Description
description VARCHAR(120) Group description
upd_userid VARCHAR(128) Userid of last user to updategroup
upd_date BIGINT (DB2, SQL Server), INT(Oracle)
Date and time group was lastupdated (in old style)
upd_dt TIMESTAMP (DB2, Oracle),DATETIME2(6) (SQL Server)
Date and time group was lastupdated
Table 55: Indexes for group table (ARSGROUP)
Index name Columns in index Type of index
arsgroup_gid_idx gid Unique cluster index for DB2;Unique index for Oracle and SQLServer
arsgroup_name_idx name Unique index
Hold table (ARSHOLD)This table is a catalog of holds.
Table 56: ARSHOLD table
Column Name Data Type Description
name VARCHAR(60) Name of hold
description VARCHAR(120) Description of hold
hid INTEGER Hold identifier
upd_userid VARCHAR(128) User ID that created the hold
upd_date BIGINT (DB2, SQL Server), INT(Oracle)
Timestamp when the hold wascreated (in old style)
upd_dt TIMESTAMP (DB2, Oracle),DATETIME2(6) (SQL Server)
Timestamp when the hold wascreated
Table 57: Indexes for ARSHOLD table
Index name Columns in index Type of index
arshold_name_idx name Unique index
arshold_hid_idx hid Unique cluster index for DB2;Unique index for Oracle and SQLServer
Hold mapping table (ARSHOLDMAP)This table maintains a catalog of documents to holds.
Appendixes to the Administration Guide 339

Table 58: Hold mapping table (ARSHOLDMAP)
Column Name Data Type Description
hid INTEGER Hold identifier
agid INTEGER Application group identifier
aid INTEGER Application identifier
hold_type CHAR(1) FOR BIT DATA (DB2),BINARY(1) (SQL Server), RAW(1)(Oracle)
Hold type
name VARCHAR(11) Document object name
doc_off INTEGER Document offset
doc_len INTEGER Document length
comp_off INTEGER Document compression offset
comp_len INTEGER Document compression length
res_id INTEGER Document resource identifier
Table 59: Indexes for hold mapping table (ARSHOLDMAP)
Index name Columns in index Type of index
arsholdmap_idx hid, agid, aid, name, doc_off,doc_len, comp_off, comp_len
Unique cluster index for DB2;Unique index for Oracle and SQLServer
Hold permissions table (ARSHOLDPERMS)This table maintains a catalog of hold permissions.
Table 60: Hold permissions table (ARSHOLDPERMS)
Column Name Data Type Description
id INTEGER User/Group identifier
hid INTEGER Hold identifier
perms INTEGER Permission
Table 61: Indexes for hold permissions table (ARSHOLDPERMS)
Index name Columns in index Type of index
arsholdperms_idx hid, id Unique cluster index for DB2;Unique index for Oracle and SQLServer
Hold work table (ARSHOLDWORK)This table maintains a catalog of hold work.
Table 62: Hold work table (ARSHOLDWORK)
Column Name Data Type Description
agid INTEGER Application group identifier
340 Content Manager OnDemand for Multiplatforms: Administration Guide

Table 62: Hold work table (ARSHOLDWORK) (continued)
Column Name Data Type Description
aid INTEGER Application identifier
name VARCHAR(11) Load name
type INTEGER Work type
status INTEGER Work status
time_stamp BIGINT (DB2, SQL Server), INT(Oracle)
Timestamp of work (in old style)
time_stamp_dt TIMESTAMP (DB2, Oracle),DATETIME2(6) (SQL Server)
Timestamp of work
Table 63: Indexes for hold work table (ARSHOLDWORK)
Index name Columns in index Type of index
arsholdwork_idx agid, aid, name Unique cluster index for DB2;Unique index for Oracle and SQLServer
Load table (ARSLOAD)Use this table to track loads for expiration by load. This table maintains a record of all successful loads toapplication groups with the "expire by load" expiration type.
Table 64: Load table (ARSLOAD)
Column Name Data Type Description
agid INTEGER Application group identifier
pri_nid SMALLINT Primary storage node identifier
sec_nid SMALLINT Secondary storage node identifier
name VARCHAR(11) Name of load
start BIGINT (DB2, SQL Server), INT(Oracle)
Start date in segment
stop BIGINT (DB2, SQL Server), INT(Oracle)
Stop date in segment
exp_date BIGINT (DB2, SQL Server), INT(Oracle)
Expiration date
aid INTEGER Application ID
total_docs INTEGER Number of documents in load
start_dt TIMESTAMP (DB2, Oracle),DATETIME2(6) (SQL Server)
Start date
stop_dt TIMESTAMP (DB2, Oracle),DATETIME2(6) (SQL Server)
Stop date
exp_dt TIMESTAMP (DB2, Oracle),DATETIME2(6) (SQL Server)
Expire date
Appendixes to the Administration Guide 341

Table 65: Indexes for load table (ARSLOAD)
Index name Columns in index Type of index
arsload_idx agid, exp_date Cluster index for DB2; Index forOracle and SQL Server
arsload_name_idx agid, name Index
arsload_dt_idx agid, exp_dt Index
Named query table (ARSNAMEQ)This table maintains a catalog of named queries.
Table 66: Named query table (ARSNAMEQ)
Column Name Data Type Description
fid INTEGER Folder identifier
id INTEGER User identifier
name VARCHAR(60) Name of named query
buf CLOB(32700) (DB2),VARCHAR(MAX) (SQL Server),CLOB (Oracle)
Named query
Table 67: Indexes for named query table (ARSNAMEQ)
Index name Columns in index Type of index
arsnameq_idx fid, id, name Unique cluster index for DB2;Unique index for Oracle and SQLServer
Node table (ARSNODE)This table maintains a catalog of storage nodes.
Table 68: Node table (ARSNODE)
Column Name Data Type Description
sid INTEGER Storage set identifier
nid SMALLINT Storage node identifier
name VARCHAR(60) Name of storage node
description VARCHAR(120) Description of storage node
logon VARCHAR(128) Storage manager logon userid
passwd VARCHAR(128) Storage manager logon password
server VARCHAR(254) Name of OnDemand object server
status SMALLINT Current location of storage set
sec_nid SMALLINT Secondary storage node
upd_userid VARCHAR(128) Userid of last user to updatestorage node
342 Content Manager OnDemand for Multiplatforms: Administration Guide

Table 68: Node table (ARSNODE) (continued)
Column Name Data Type Description
upd_date BIGINT (DB2, SQL Server), INT(Oracle)
Date and time storage node waslast updated (in old style)
upd_dt TIMESTAMP (DB2, Oracle),DATETIME2(6) (SQL Server)
Date and time storage node waslast updated
Table 69: Indexes for node table (ARSNODE)
Index name Columns in index Type of index
arsnode_idx sid, nid Unique cluster index for DB2;Unique index for Oracle and SQLServer
ODF distribution definition table (ARSDFDCT)This table maintains a catalog of distributions.
Table 70: Distribution table (ARSDFDCT)
Column Name Data Type Description
DCT_RECIPIENT VARCHAR(60) Recipient/list name for thisdistribution
DCT_DIST_NAME VARCHAR(60) Distribution name
DCT_DIST_METHOD VARCHAR(8) Distribution method
DCT_STATUS CHAR(1) Status
DCT_JNAME VARCHAR(8) Job name
DCT_FORMDEF VARCHAR(8) Form definition name
DCT_PAGEDEF VARCHAR(8) Page definition name
DCT_DEST VARCHAR(19) Destination
DCT_FORMSID VARCHAR(8) Forms ID name
DCT_CLASS CHAR(1) Class
DCT_WRITER VARCHAR(8) Writer name
DCT_OUTLIM INTEGER Output limit
DCT_FCB VARCHAR(4) FCB
DCT_UCS VARCHAR(4) UCS
DCT_ACCOUNT VARCHAR(60) Account information
DCT_CONT_WAIT CHAR(1) Continue/wait indicator
DCT_CONT_MAXTRIES INTEGER Maximum number of times tocontinue print processing
DCT_MANIFEST CHAR(1) Manifest Indicator
DCT_RPT_BREAK CHAR(1) Report break indicator
DCT_LOCATION CHAR(1) Location
Appendixes to the Administration Guide 343

Table 70: Distribution table (ARSDFDCT) (continued)
Column Name Data Type Description
DCT_CUSTVR VARCHAR(55) Customer variables
DCT_EXITINFO VARCHAR(400) Exit program information
DCT_DATASET VARCHAR(254) GDG dataset base name
DCT_UPD_USERID VARCHAR(128) Last user to update thedistribution
DCT_UPD_DATE BIGINT Date and time distribution waslast updated
Table 71: Indexes for distribution definition table (ARSDFDCT)
Index name Columns in index Type of index
ARSDFDCT_IDX1 DCT_RECIPIENT,DCT_DIST_NAME
Unique cluster index for DB2;Unique index for Oracle and SQLServer
ARSDFDCT_IDX2 DCT_DIST_NAME Unique index
ARSDFDCT_IDX3 DCT_JNAME Index
ODF distribution request table (ARSDFDRT)This table maintains a catalog of distributions that have been scheduled for processing.
Table 72: Distribution request table (ARSDFDRT)
Column Name Data Type Description
DRT_RECIPIENT VARCHAR(60) Recipient name
DRT_DIST_NAME VARCHAR(60) Distribution name
DRT_ORIGINATOR VARCHAR(8) Identifier who scheduled thedistribution
DRT_CREATE_DT TIMESTAMP Timestamp when the distributionrequest was created
DRT_PROCESS_DT TIMESTAMP Timestamp when the distributionrequest was processed
DRT_COMPLETE_DT TIMESTAMP Timestamp when the distributionrequest completed
DRT_STATUS INTEGER(4) Status of distribution request
DRT_CONT_ATTEMPTS INTEGER(4) Number of continuation attemptsmade
DRT_REPRINT INTEGER(4) Reprint indicator
Table 73: Indexes for distribution request table (ARSDFDRT)
Index name Columns in index Type of index
ARSDFDRT_IDX1 DRT_RECIPIENT,DRT_DIST_NAME
Unique cluster index for DB2;Unique index for Oracle and SQLServer
344 Content Manager OnDemand for Multiplatforms: Administration Guide

Table 73: Indexes for distribution request table (ARSDFDRT) (continued)
Index name Columns in index Type of index
ARSDFDRT_IDX2 DRT_DIST_NAME Unique index
ODF document status table (ARSDFDST)This table maintains a catalog of OnDemand documents that are available for distribution.
Table 74: Document status table (ARSDFDST)
Column Name Data Type Description
DST_RECIPIENT VARCHAR(60) Recipient name
DST_DIST_NAME VARCHAR(60) Distribution name
DST_REPORTID VARCHAR(60) Report ID
DST_APPLGRP_NAME VARCHAR(60) Application group name
DST_APPL_NAME VARCHAR(60) Application name
DST_AGID INTEGER(4) Application group ID
DST_AID INTEGER(4) Application ID
DST_LOADID VARCHAR(128) Load ID
DST_LOAD_SIZE BIGINT(8) Number of bytes loaded
DST_RID INTEGER(4) Resource ID
DST_RES_SIZE BIGINT(8) Resource size
DST_CREATE_DT TIMESTAMP Timestamp when the documententry was created
DST_PROCESS_DT TIMESTAMP Timestamp when the documentdistribution was processed
DST_COMPLETE_DT TIMESTAMP Timestamp when the documentdistribution completed
DST_STATUS INTEGER(4) Status
Table 75: Indexes for document status table (ARSDFDST)
Index name Columns in index Type of index
ARSDFDST_IDX1 DST_RECIPIENT,DST_DIST_NAME,DST_REPORTID
Unique cluster index for DB2;Unique index for Oracle and SQLServer
ODF print processor table (ARSDFPPT)This table maintains a catalog of report bundles that are submitted for print processing.
Table 76: Print processor table (ARSDFPPT)
Column Name Data Type Description
PPT_RECIPIENT VARCHAR(60) Recipient name
PPT_DIST_NAME VARCHAR(60) Distribution name
Appendixes to the Administration Guide 345

Table 76: Print processor table (ARSDFPPT) (continued)
Column Name Data Type Description
PPT_SEQUENCE INTEGER(4) Sequence number
PPT_REPORTID VARCHAR(60) Report ID
PPT_LISTID VARCHAR(60) List ID
PPT_APPLGRP_NAME VARCHAR(60) Application group name
PPT_APPL_NAME VARCHAR(60) Application name
PPT_AGID INTEGER(4) Application Group ID
PPT_AID INTEGER(4) Application ID
PPT_LOADID VARCHAR(128) Load ID
PPT_LOAD_SIZE BIGINT(8) Number of Bytes Loaded
PPT_RID INTEGER(4) Resource ID
PPT_RES_SIZE DB2 TIMESTAMP Resource size
PPT_LOCATION CHAR(1) Location
PPT_FILE_DIR VARCHAR(254) File directory
PPT_EMAIL VARCHAR(254) E-mail address
PPT_TRANSFORM INTEGER(4) Transform indicator; 0=None,1=UTF-8, 3=PDF
PPT_CREATE_DT TIMESTAMP Timestamp when the reportbundle request was created
PPT_PROCESS_DT TIMESTAMP Timestamp when the reportbundle was processed
PPT_COMPLETE_DT TIMESTAMP Timestamp when the reportbundle completed
PPT_STATUS INTEGER(4) Status
PPT_LINE_COUNTER BIGINT(8) Line counter
PPT_PAGE_COUNTER INTEGER(4) Page counter
PPT_EXCPT_MSG_NUM INTEGER(4) Exception message number
PPT_REPRINT INTEGER(4) Reprint indicator
PPT_JNAME VARCHAR(8) Job name
PPT_FORMDEF VARCHAR(8) Form definition name
PPT_PAGEDEF VARCHAR(8) Page definition name
PPT_FORMSID VARCHAR(8) Forms ID
PPT_DEST VARCHAR(19) Destination
PPT_CLASS CHAR(1) Class
PPT_WRITER VARCHAR(8) Writer name
PPT_FCB VARCHAR(4) FCB
PPT_UCS VARCHAR(4) UCS
346 Content Manager OnDemand for Multiplatforms: Administration Guide

Table 76: Print processor table (ARSDFPPT) (continued)
Column Name Data Type Description
PPT_ACCOUNT VARCHAR(60) Account
PPT_BURST CHAR(1) Burst
PPT_COPYM VARCHAR(8) COPYM
PPT_FLASH VARCHAR(6) Flash
PPT_CUSTVR VARCHAR(55) Customer variables
PPT_EXITINFO VARCHAR(400) Exit information
PPT_OUTLIM INTEGER(4) Output limit
PPT_NCOPY INTEGER(4) Number of copies
PPT_STARTPAGE BIGINT(8) First page of range of pages toprint
PPT_ENDPAGE BIGINT(8) Last page of range of pages toprint
PPT_SQL CLOB(4) SQL query select statement
Table 77: Indexes for print processor table (ARSDFPPT)
Index name Columns in index Type of index
ARSDFPPT_IDX1 PPT_RECIPIENT,PPT_DIST_NAME,PPT_SEQUENCE
Unique cluster index for DB2;Unique index for Oracle and SQLServer
ODF recipient list table (ARSDFLIS)This table maintains a catalog of recipient lists. The table contains one row per recipient in a particularrecipient list.
Table 78: Recipient list table (ARSDFLIS)
Column Name Data Type Description
LIS_LISTID VARCHAR(60) Recipient list name
LIS_RECIPIENT VARCHAR(60) Recipient name
Table 79: Indexes for recipient list table (ARSDFLIS)
Index name Columns in index Type of index
ARSDFLIS_IDX1 LIS_LISTID, LIS_RECIPIENT Unique cluster index for DB2;Unique index for Oracle and SQLServer
ARSDFLIS_IDX2 LIS_RECIPIENT Unique index
ODF recipient/list table (ARSDFUOT)This table maintains a catalog of recipients and recipient lists.
Appendixes to the Administration Guide 347

Table 80: Recipient/list table (ARSDFUOT)
Column Name Data Type Description
UOT_RECIPIENT VARCHAR(60) Recipient or recipient list name
UOT_IS_LIST INTEGER Name is a recipient list
UOT_HDR1 VARCHAR(60) Header line 1
UOT_HDR2 VARCHAR(60) Header line 2
UOT_HDR3 VARCHAR(60) Header line 3
UOT_HDR4 VARCHAR(60) Header line 4
UOT_HDR5 VARCHAR(60) Header line 5
UOT_HDR6 VARCHAR(60) Header line 6
UOT_HDR7 VARCHAR(60) Header line 7
UOT_HDR8 VARCHAR(60) Header line 8
UOT_BANNER CHAR(1) Banner
UOT_ACCOUNT VARCHAR(60) Account
UOT_ADDRESS1 VARCHAR(60) Address line 1
UOT_ADDRESS2 VARCHAR(60) Address line 2
UOT_ADDRESS3 VARCHAR(60) Address line 3
UOT_ADDRESS4 VARCHAR(60) Address line 4
UOT_BUILDING VARCHAR(60) Building
UOT_DEPT VARCHAR(60) Department
UOT_NAME VARCHAR(60) Name of recipient
UOT_ROOM VARCHAR(60) Room
UOT_TITLE VARCHAR(60) Title of recipient
UOT_EMAIL VARCHAR(254) Email address of recipient
UOT_DESC VARCHAR(120) Description
UOT_UPD_USERID VARCHAR(128) Last user to update the recipientor recipient list
UOT_UPD_DATE BIGINT Date and time recipient orrecipient list was last updated
Table 81: Indexes for recipient/list table (ARSDFUOT)
Index name Columns in index Type of index
ARSDFUOT_IDX1 UOT_RECIPIENT unique index
ODF report bundle definition table (ARSDFBDT)This table maintains a catalog of report bundle definitions.
348 Content Manager OnDemand for Multiplatforms: Administration Guide

Table 82: Report bundle definition table (ARSDFBDT)
Column Name Data Type Description
BDT_RECIPIENT VARCHAR(60) Recipient name
BDT_DIST_NAME VARCHAR(60) Distribution name
BDT_SEQUENCE INTEGER Sequence number
BDT_REPORTID VARCHAR(60) Report ID
BDT_STATUS CHAR(1) Status; A=Active, I= Inactive
BDT_REPORTBUILD CHAR(1) Report build; F=Full Report,Q=Query specified
BDT_JNAME VARCHAR(8) Job name
BDT_FORMDEF VARCHAR(8) Form definition name
BDT_PAGEDEF VARCHAR(8) Page definition name
BDT_DEST VARCHAR(19) Destination
BDT_FORMSID VARCHAR(8) Forms ID
BDT_CLASS CHAR(1) Class
BDT_WRITER VARCHAR(8) Writer name
BDT_OUTLIM INTEGER Output limit
BDT_FCB VARCHAR(4) FCB
BDT_UCS VARCHAR(4) UCS
BDT_WAIT_IGNORE CHAR(1) Wait/ignore indicator
BDT_BURST CHAR(1) Burst
BDT_COPYM VARCHAR(8) COPYM
BDT_FLASH VARCHAR(6) Flash
BDT_NCOPY INTEGER Number of copies
BDT_LOCATION CHAR(1) Location
BDT_CUSTVR VARCHAR(55) Customer variables
BDT_EXITINFO VARCHAR(400) Exit information
BDT_DATASET VARCHAR(254) GDG dataset base name
CLOB VARCHAR(30000) CLOB query select statement
BDT_UPD_USERID VARCHAR(128) Last user to update the reportbundle
BDT_UPD_DATE BIGINT Date and time report bundle waslast updated
Table 83: Indexes for report bundle definition table (ARSDFBDT)
Index name Columns in index Type of index
ARSDFBDT_IDX1 BDT_RECIPIENT,BDT_DIST_NAME,BDT_SEQUENCE
Unique cluster index for DB2;Unique index for Oracle and SQLServer
Appendixes to the Administration Guide 349

Table 83: Indexes for report bundle definition table (ARSDFBDT) (continued)
Index name Columns in index Type of index
ARSDFBDT_IDX2 BDT_DIST_NAME Unique index
ARSDFBDT_IDX3 BDT_REPORTID Unique index
ARSDFBDT_IDX4 BDT_JNAME Unique index
ODF report ID table (ARSDFCRT)This table maintains a catalog of report IDs.
Table 84: Report ID table (ARSDFCRT)
Column Name Data Type Description
CRT_REPORTID VARCHAR(60) Report ID name
CRT_STATUS CHAR(1) Status
CRT_APPLGRP_NAME VARCHAR(60) Application group name
CRT_APPL_NAME VARCHAR(60) Application name
CRT_REFERENCE VARCHAR(254) Reference
CRT_UPD_USERID VARCHAR(128) Last user to update the report ID
CRT_UPD_DATE BIGINT Date and time report ID was lastupdated
Table 85: Indexes for report ID table (ARSDFCRT)
Index name Columns in index Type of index
ARSDFCRT_IDX1 CRT_REPORTID Unique index
ARSDFCRT_IDX2 CRT_APPLGRP_NAME,CRT_APPL_NAME
Unique cluster index for DB2;Unique index for Oracle and SQLServer
Printer table (ARSPRT)This table maintains a catalog of printers.
Table 86: Printer table (ARSPRT)
Column Name Data Type Description
pid INTEGER Printer identifier
name VARCHAR(60) Name of printer
description VARCHAR(120) Description of printer
queue VARCHAR(60) Name of queue that is associatedwith the printer
type CHAR(1) FOR BIT DATA (DB2),BINARY(1) (SQL Server), RAW(1)(Oracle)
Type of printer
upd_userid VARCHAR(128) Userid of last user to updateprinter
350 Content Manager OnDemand for Multiplatforms: Administration Guide

Table 86: Printer table (ARSPRT) (continued)
Column Name Data Type Description
upd_date BIGINT (DB2, SQL Server), INT(Oracle)
Date and time printer was lastupdated (in old style)
upd_dt TIMESTAMP (DB2, Oracle),DATETIME2(6) (SQL Server)
Date and time printer was lastupdated
Table 87: Indexes for printer table (ARSPRT)
Index name Columns in index Type of index
arsprt_name_idx name Unique index
arsprt_pid_idx pid Unique cluster index for DB2;Unique index for Oracle and SQLServer
Printer options table (ARSPRTOPTS)This table maintains a catalog of printing options (parameters) for printers.
Table 88: Printer options table (ARSPRTOPTS)
Column Name Data Type Description
id INTEGER Printer identifier
name VARCHAR(60) Name of printer options
type CHAR(1) FOR BIT DATA (DB2),BINARY(1) (SQL Server), RAW(1)(Oracle)
Type of printer
buf CLOB(32700) (DB2),VARCHAR(MAX) (SQL Server),CLOB (Oracle)
Printing options
Table 89: Indexes for printer options table (ARSPRTOPTS)
Index name Columns in index Type of index
arsprtopts_idx id, name Unique cluster index for DB2;Unique index for Oracle and SQLServer
Printer user table (ARSPRTUSR)This table maintains a catalog of user permissions for printers.
Table 90: Printer user table (ARSPRTUSR)
Column Name Data Type Description
pid INTEGER Printer identifier
id INTEGER User or group identifier
Appendixes to the Administration Guide 351

Table 91: Indexes for printer user table (ARSPRTUSR)
Index name Columns in index Type of index
arsprtusr_idx pid, id Unique cluster index for DB2;Unique index for Oracle and SQLServer
Resources table (ARSRES)This table maintains a catalog of AFP resources.
Table 92: Resources table (ARSRES)
Column Name Data Type Description
rid INTEGER Resource identifier
agid INTEGER Application group identifier
pri_nid SMALLINT Primary storage node identifier
sec_nid SMALLINT Secondary storage node identifier
comp_type CHAR(1) FOR BIT DATA (DB2),BINARY(1) (SQL Server), RAW(1)(Oracle)
Method of compression
add_date BIGINT Date and time (in old style) thatthe resource was loaded into thesystem
comp_size INTEGER Compressed size
decomp_size INTEGER Decompressed size
exp_date BIGINT (DB2, SQL Server), INT(Oracle)
Expiration date (in old style)
hold SMALLINT Whether or not on hold
add_dt TIMESTAMP (DB2, Oracle),DATETIME2(6) (SQL Server)
Date and time that the resourcewas loaded into the system
exp_dt TIMESTAMP (DB2, Oracle),DATETIME2(6) (SQL Server)
Expiration date
Table 93: Indexes for resources table (ARSRES)
Index name Columns in index Type of index
arsres_idx agid, rid Unique cluster index for DB2;Unique index for Oracle and SQLServer
Segment table (ARSSEG)This table maintains a catalog of segments of application group data. There is one row for each segmentof application group data.
The segments of application group data are also known as dynamic tables that are created by OnDemand.
If there is more than one application group in a folder: OnDemand builds a query to the arsseg tablefor each application group that is specified, assuming that you have not limited your query to a specific
352 Content Manager OnDemand for Multiplatforms: Administration Guide
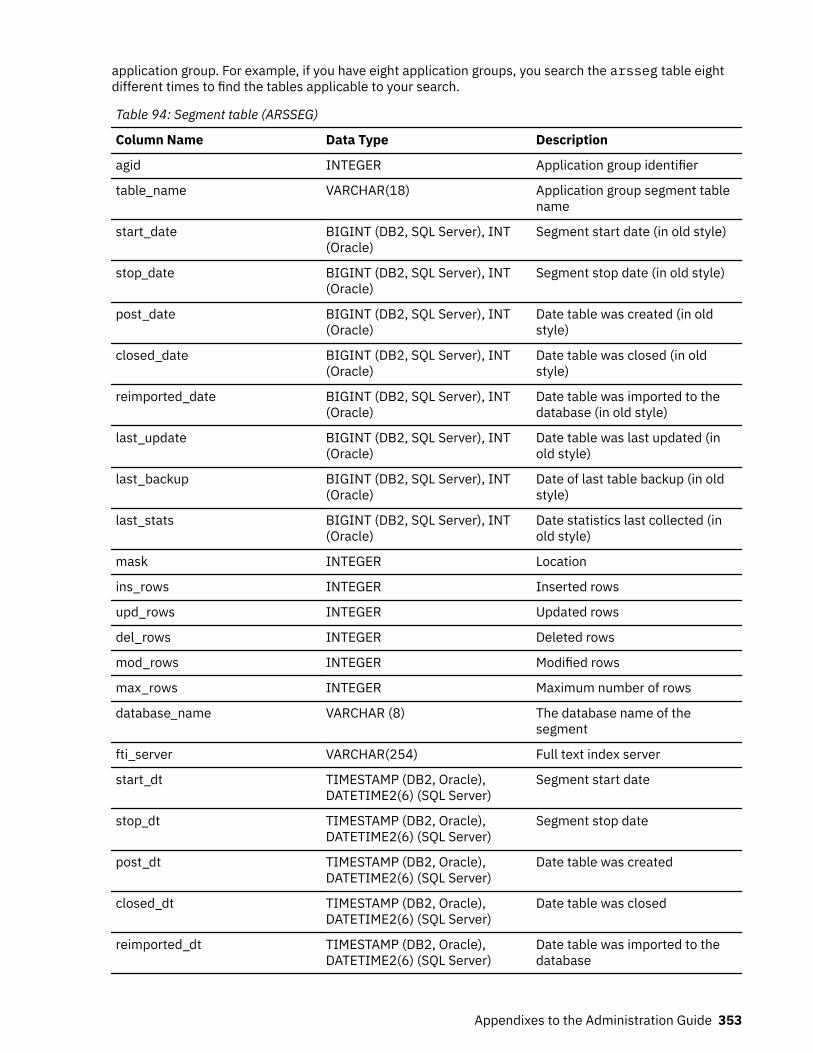
application group. For example, if you have eight application groups, you search the arsseg table eightdifferent times to find the tables applicable to your search.
Table 94: Segment table (ARSSEG)
Column Name Data Type Description
agid INTEGER Application group identifier
table_name VARCHAR(18) Application group segment tablename
start_date BIGINT (DB2, SQL Server), INT(Oracle)
Segment start date (in old style)
stop_date BIGINT (DB2, SQL Server), INT(Oracle)
Segment stop date (in old style)
post_date BIGINT (DB2, SQL Server), INT(Oracle)
Date table was created (in oldstyle)
closed_date BIGINT (DB2, SQL Server), INT(Oracle)
Date table was closed (in oldstyle)
reimported_date BIGINT (DB2, SQL Server), INT(Oracle)
Date table was imported to thedatabase (in old style)
last_update BIGINT (DB2, SQL Server), INT(Oracle)
Date table was last updated (inold style)
last_backup BIGINT (DB2, SQL Server), INT(Oracle)
Date of last table backup (in oldstyle)
last_stats BIGINT (DB2, SQL Server), INT(Oracle)
Date statistics last collected (inold style)
mask INTEGER Location
ins_rows INTEGER Inserted rows
upd_rows INTEGER Updated rows
del_rows INTEGER Deleted rows
mod_rows INTEGER Modified rows
max_rows INTEGER Maximum number of rows
database_name VARCHAR (8) The database name of thesegment
fti_server VARCHAR(254) Full text index server
start_dt TIMESTAMP (DB2, Oracle),DATETIME2(6) (SQL Server)
Segment start date
stop_dt TIMESTAMP (DB2, Oracle),DATETIME2(6) (SQL Server)
Segment stop date
post_dt TIMESTAMP (DB2, Oracle),DATETIME2(6) (SQL Server)
Date table was created
closed_dt TIMESTAMP (DB2, Oracle),DATETIME2(6) (SQL Server)
Date table was closed
reimported_dt TIMESTAMP (DB2, Oracle),DATETIME2(6) (SQL Server)
Date table was imported to thedatabase
Appendixes to the Administration Guide 353

Table 94: Segment table (ARSSEG) (continued)
Column Name Data Type Description
last_update_dt TIMESTAMP (DB2, Oracle),DATETIME2(6) (SQL Server)
Date table was last updated
last_backup_dt TIMESTAMP (DB2, Oracle),DATETIME2(6) (SQL Server)
Date of last table backup
last_stats_dt TIMESTAMP (DB2, Oracle),DATETIME2(6) (SQL Server)
Date statistics last collected
Table 95: Indexes for segment table (ARSSEG)
Index name Columns in index Type of index
arsseg_name_idx agid, table_name Unique cluster index for DB2;Unique index for Oracle and SQLServer
arsseg_idx agid, start_date, stop_date Index
arsseg_cdate_idx agid, closed_date Index
arsseg_ssidx agid, start_dt, stop_dt Index
arsseg_cdt_idx agid, closed_dt Index
Storage set table (ARSSET)This table maintains a catalog of storage sets.
Table 96: Storage set table (ARSSET)
Column Name Data Type Description
sid INTEGER Storage set identifier
name VARCHAR(60) Name of storage set
description VARCHAR(120) Description of storage set
load_type CHAR(1) FOR BIT DATA (DB2),BINARY(1) (SQL Server), RAW(1)(Oracle)
Type of load
upd_userid VARCHAR(128) Userid of last user to updatestorage set
upd_date BIGINT (DB2, SQL Server), INT(Oracle)
Date and time storage set waslast updated (in old style)
upd_dt TIMESTAMP (DB2, Oracle),DATETIME2(6) (SQL Server)
Date and time storage set waslast update
Table 97: Indexes for storage set table (ARSSET)
Index name Columns in index Type of index
arsset_name_idx name Unique index
arsset_sid_idx sid Unique cluster index for DB2;Unique index for Oracle and SQLServer
354 Content Manager OnDemand for Multiplatforms: Administration Guide

System parameters table (ARSSYS)This table contains a single row that specifies the current system parameters.
Table 98: System parameters table (ARSSYS)
Column Name Data Type Description
id INTEGER Identifier counter
name VARCHAR(8) Internal application groupidentifier
cdid INTEGER CD-ROM identifier
passwd_exp INTEGER Password expiration value
time_out BIGINT (DB2, SQL Server), INT(Oracle)
System inactivity timeout value
syslog_mask INTEGER Message logging options
exitlog_mask INTEGER User exit logging options
passwd_min_len SMALLINT Minimum password length
nid SMALLINT Internal storage node identifier
sys_mask INTEGER Case of userids and passwords
buf_resv CLOB(32700) (DB2),VARCHAR(MAX) (SQL Server),CLOB (Oracle)
reserved
upd_userid VARCHAR(128) Userid of last user to updatesystem parameters
upd_date BIGINT (DB2, SQL Server), INT(Oracle)
Date and time system parameterswere last updated (in old style)
sys_mask2 INTEGER Types of annotations
min_gid INTEGER Group ID starting value
upd_dt TIMESTAMP (DB2, Oracle),DATETIME2(6) (SQL Server)
Date and time system parameterswere last updated
failed_logins INTEGER Number of times user canattempt login
user_inactivity INTEGER Disable user that has not loggedin after number of days
prev_passwds INTEGER Number of previous passwords tocheck before user can reuse apassword
life_of_annot INTEGER Number of days OnDemandkeeps an annotation
lockout_mins INTEGER Number of minutes to preventuser from attempting login
notify_pwd_days INTEGER Notify user for a number of daysbefore password expires
Appendixes to the Administration Guide 355
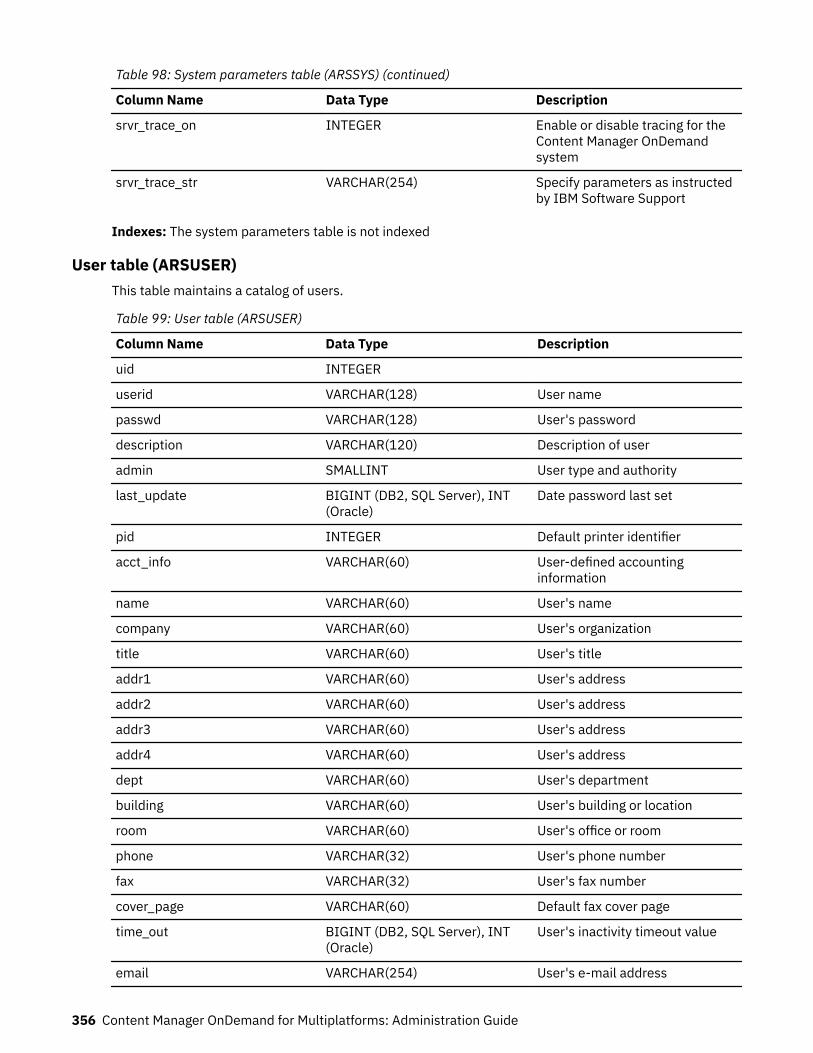
Table 98: System parameters table (ARSSYS) (continued)
Column Name Data Type Description
srvr_trace_on INTEGER Enable or disable tracing for theContent Manager OnDemandsystem
srvr_trace_str VARCHAR(254) Specify parameters as instructedby IBM Software Support
Indexes: The system parameters table is not indexed
User table (ARSUSER)This table maintains a catalog of users.
Table 99: User table (ARSUSER)
Column Name Data Type Description
uid INTEGER
userid VARCHAR(128) User name
passwd VARCHAR(128) User's password
description VARCHAR(120) Description of user
admin SMALLINT User type and authority
last_update BIGINT (DB2, SQL Server), INT(Oracle)
Date password last set
pid INTEGER Default printer identifier
acct_info VARCHAR(60) User-defined accountinginformation
name VARCHAR(60) User's name
company VARCHAR(60) User's organization
title VARCHAR(60) User's title
addr1 VARCHAR(60) User's address
addr2 VARCHAR(60) User's address
addr3 VARCHAR(60) User's address
addr4 VARCHAR(60) User's address
dept VARCHAR(60) User's department
building VARCHAR(60) User's building or location
room VARCHAR(60) User's office or room
phone VARCHAR(32) User's phone number
fax VARCHAR(32) User's fax number
cover_page VARCHAR(60) Default fax cover page
time_out BIGINT (DB2, SQL Server), INT(Oracle)
User's inactivity timeout value
email VARCHAR(254) User's e-mail address
356 Content Manager OnDemand for Multiplatforms: Administration Guide

Table 99: User table (ARSUSER) (continued)
Column Name Data Type Description
upd_userid VARCHAR(128) Userid of last user to update user
upd_date BIGINT (DB2, SQL Server), INT(Oracle)
Date and time user was lastupdated (in old style)
passwd_exp INTEGER Password expiration
uclass VARCHAR(1) Printer class value
banner VARCHAR(1) Printer banner
dest VARCHAR(8) Printer dest value
node VARCHAR(8) The system name
writer VARCHAR(8) Printer writer value
pagedef VARCHAR(8) Printer PageDef
formdef VARCHAR(8) Printer FormDef
forms VARCHAR(8) Printer Forms
routing VARCHAR(24) Printer routing field
misc390 VARCHAR(254) Reserved for future use
upd_dt TIMESTAMP (DB2, Oracle),DATETIME2(6) (SQL Server)
Date and time user was lastupdated
failed_logins INTEGER Number of failed logins
last_login_dt TIMESTAMP (DB2, Oracle),DATETIME2(6) (SQL Server)
Date and time user logged intoContent Manager OnDemand
last_pw_chng_dt TIMESTAMP (DB2, Oracle),DATETIME2(6) (SQL Server)
Date and time user changed thepassword
prev_pwd2 VARCHAR(128) Password previous to currentpassword
prev_pwd3 VARCHAR(128) Password previous to prev_pwd2
prev_pwd4 VARCHAR(128) Password previous to prev_pwd3
prev_pwd5 VARCHAR(128) Password previous to prev_pwd4
prev_pwd6 VARCHAR(128) Password previous to prev_pwd5
prev_pwd7 VARCHAR(128) Password previous to prev_pwd6
prev_pwd8 VARCHAR(128) Password previous to prev_pwd7
prev_pwd9 VARCHAR(128) Password previous to prev_pwd8
prev_pwd10 VARCHAR(128) Password previous to prev_pwd9
lockout_dt TIMESTAMP (DB2, Oracle),DATETIME2(6) (SQL Server)
Date and time user was lockedout of OnDemand
last_action_dt TIMESTAMP (DB2, Oracle),DATETIME2(6) (SQL Server)
Date and time user performedthe most recent action
Appendixes to the Administration Guide 357

Table 100: Indexes for user table (ARSUSER)
Index name Columns in index Type of index
arsuser_id_idx uid Unique cluster index for DB2;Unique index for Oracle and SQLServer
arsuser_name_idx userid Unique index
Users in groups table (ARSUSRGRP)This table maintains the association of groups with individual users.
Table 101: Users in groups table (ARSUSRGRP)
Column Name Data Type Description
gid INTEGER Group identifier
uid INTEGER User identifier
Table 102: Indexes for users in groups table (ARSUSRGRP)
Index name Columns in index Type of index
arsusrgrp_idx gid, uid Unique cluster index for DB2;Unique index for Oracle and SQLServer
User group ID table (ARSUSRGRPID)This table contains the user permissions for a specific user. The information is contained on the UserPermissions page of a user.
Table 103: User group ID table (ARSUSRGRPID)
Column Name Data Type Description
id INTEGER User identifier
owner_id INTEGER Identifier (uid or gid) with thepermissions specified by theperms field
perms INTEGER User authority for the group
Table 104: Indexes for user group ID table (ARSUSRGRPID)
Index name Columns in index Type of index
arsusrgrpid_idx id, owner_id Unique cluster index for DB2;Unique index for Oracle and SQLServer
Application group data tableAn application group data table contains one row for each document that is stored in the applicationgroup. The name of an application group data table is owner.applgrpInternalIdn, where owner isthe value of the SRVR_INSTANCE_OWNER parameter for the instance from the ARS.INI file,applgrpInternalId is the identifier that is assigned to the application group when the applicationgroup is created, and n is an incremental value. For example, arsdbas3.rba1, arsdbas3.rba2, and so
358 Content Manager OnDemand for Multiplatforms: Administration Guide

on. The application group identifier is listed on the Advanced Storage Management page of the applicationgroup.
The application group data tables are also known as dynamic tables that are created by OnDemand.
A row in an application group data table contains from 1 to 128 user-defined fields followed byapproximately 40 bytes of Content Manager OnDemand control information (fields).
Table 105: Application group data table
Column Name Data Type Description
user_field_1 varies First user-defined application group field
user_field_n varies Last user-defined application group field
doc_name VARCHAR(11) Document name
doc_off INTEGER Document offset
doc_len INTEGER Document length
comp_off INTEGER Compression offset
comp_len INTEGER Compression length
annot CHAR(1) FOR BIT DATA (DB2), BINARY(1)(SQL Server), RAW(1) (Oracle)
Annotation flag
comp_type CHAR(1) FOR BIT DATA (DB2), BINARY(1)(SQL Server), RAW(1) (Oracle)
Compression type
resource INTEGER Resource identifier
pri_nid SMALLINT Primary storage node identifier
sec_nid SMALLINT Secondary storage node identifier
Table 106: Indexes for application group data table
Index name Columns in index Types of index
doc_name doc_name Index
usr_index_1...usr_index_n
Note:
1. This table is indexed on one or more of the user-defined fields, as represented by user_field_1 …user_field_n in the table.
2. The index doc_name is used only when the Expiration Type of the application group is set to Load orStorage Manager.
Objects and data model used in the Content Manager OnDemand XML file
XML objects in the Content Manager OnDemand XML fileYou can use an XML interface to import data into a Content Manager OnDemand system. Before importingdata, you need to have an XML file that contains all the data that needs to be imported. The XML file canbe either created during a previous XML export process or written new. This section helps you tounderstand the objects in the XML file.
The following diagram illustrates the overall layout of the Content Manager OnDemand XML file.
Appendixes to the Administration Guide 359

Figure 24: Overall layout of the Content Manager OnDemand XML file
The following tables provide detailed descriptions about the objects in the Content Manager OnDemandXML file. If you create these objects in an input XML file, ensure that you include them in the followingorder:
1. systemParameters2. user3. group4. printer5. storageSet6. applicationGroup7. application8. folder9. cabinet
10. hold
360 Content Manager OnDemand for Multiplatforms: Administration Guide

11. odfRecipient12. odfRecipientList13. odfReportId14. odfDistribution with odfReportBundles
For each object, the following information is provided:Name
The name of the attribute. An attribute name in bold indicates that the attribute is a "key" attribute,which is used to uniquely identify the object. For all top-level objects, this is the Name attribute.
DataTypeThe XML data type of the attribute. Types in italics indicates an XML data type that is defined in theContent Manager OnDemand XML schema file.
RequiredWhether this attribute is required. Dependent means that the attribute may be required based on thesettings of other attributes.
Default ValueThe value that is used internally if the optional attribute is not specified in the XML file.
Possible ValuesLists any limitations on the value for attributes. If there are no limitations, this is blank.
UpdateableWhether this attribute can be updated.
For each child object, the following information is provided:Name
The name of the child object. An attribute name in bold indicates that the attribute is a "key" attributewhich is used to uniquely identify the object.
Min/Max NumberIndicates the minimum and maximum number of children of this type that are allowed.
DeleteableWhether this child object can be deleted.
UpdateableWhether this child object can be updated.
For all XML objects, the data that is associated with an object is only in the form of attribute data and childobjects.
Important: The capitalization of the object names is important and should be used exactly as shown inthe data tables.
System Parameters objectTable 107: Attributes for the systemParameters object
Attributes Description Data Type Required Defaultvalue
Possible values Updateable
allowPrivateUser Allows the user to addprivate annotations toa document.
yesnoString No "" • "No"• "Yes"
Yes
allowPublic Allows the user to addpublic annotations.
yesnoString No "" • "No"• "Yes"
Yes
allowGraphicAnnot Allow the user to addgraphic annotations.
yesnoString No "" • "No"• "Yes"
Yes
Appendixes to the Administration Guide 361

Table 107: Attributes for the systemParameters object (continued)
Attributes Description Data Type Required Defaultvalue
Possible values Updateable
allowTextAnnot Allow the user to addtext annotations.
yesnoString No "" • "No"• "Yes"
Yes
defaultAnnot Specify the defaultviewing scope for allannotations.
String No "" • "Public"• "Private to
User"• "Private to
Group"
disableOrLockUser Specify whether todisable or lock out auser after the userattempts and fails tolog in for the specifiednumber of times.
String No "" • "Never"• "Disable User"• "Lock Out
User"
Yes
enableComments Display the SystemLog Commentswindow when youperform an add,update, or deleteoperation.
yesnoString No "" • "No"• "Yes"
enableLDAP Specify whether youwant to use LDAP(Lightweight DirectoryAccess Protocol)authentication in yourOnDemand server.
yesnoString No "" • "No"• "Yes"
failedLogins Specify the number oftimes a user canattempt to log in.
integer No "" An integerbetween 1 and10
Yes
inactivityTO Specify the number ofminutes betweenserver requests thatmust pass, afterwhich OnDemandnotifies user to log off.
integer No An integerbetween 1 and1440.
lifeOfAnnotations Specify the number ofdays OnDemandkeeps annotations
integer or string No "" • "Never expire"• An integer
between 1 and365
Yes
lockoutMinutes Specify the number ofminutes to prevent auser from attemptingto log in.
integer No "" An integerbetween 1 and1440
Yes
logAGMsgs Specify whetherOnDemand saves amessage in thesystem log when auser queries orretrieves applicationgroup data and othertypes of applicationgroup events.
yesnoString No "" • "No"• "Yes"
362 Content Manager OnDemand for Multiplatforms: Administration Guide

Table 107: Attributes for the systemParameters object (continued)
Attributes Description Data Type Required Defaultvalue
Possible values Updateable
logFailedLogin Specify whetherOnDemand saves amessage in thesystem log whenthere is anunsuccessful log onattempt.
yesnoString No "" • "No"• "Yes"
logLogin Specify whetherOnDemand saves amessage in thesystem log when auser logs on theserver.
yesnoString No "" • "No"• "Yes"
logLogoff Specify whetherOnDemand saves amessage in thesystem log when auser logs off theserver.
yesnoString No "" • "No"• "Yes"
logUEAGMsgs Specify whether theContent ManagerOnDemand user exitsaves a message inthe system log when auser queries orretrieves applicationgroup data and othertypes of applicationgroup events.
yesnoString No "" • "No"• "Yes"
logUEFailedLogin Specify whether theContent ManagerOnDemand user exitsaves a message inthe system log whenthere is anunsuccessful log onattempt.
yesnoString No "" • "No"• "Yes"
logUELogin Specify whether theContent ManagerOnDemand user exitsaves a message inthe system log when auser logs on theserver.
yesnoString No "" • "No"• "Yes"
logUELogoff Specify whether theContent ManagerOnDemand user exitsaves a message inthe system log when auser logs off theserver.
yesnoString No "" • "No"• "Yes"
notifyPasswordDays Notify users that theirpassword will expirewithin the specifiednumber of days.
integer or string No "" • "Never notify"• An integer
from 1 - 30
Yes
Appendixes to the Administration Guide 363

Table 107: Attributes for the systemParameters object (continued)
Attributes Description Data Type Required Defaultvalue
Possible values Updateable
passwordAge Specify the number ofdays after which apassword must bechanged.
integer or string No "" • "NeverExpires"
• "AlwaysExpires"
• An integerfrom 1 - 365
passwordLen Specify whether apassword is required.If a password isrequired, specify theminimum length of apassword.
integer or string No "" • "Permit Blank"• An integer
from 1 - 128
previousPasswords Specify whether userscan reuse a password.
integer or string No "" • "Never check"• An integer
from 1 - 10
Yes
pwdCaseSensitive Specify whether apassword must becase sensitive.
yesnoString No "" • "No"• "Yes"
requireComments Requires you to enterone or morecharacters in theComments field whenyou perform an add,update, or deleteoperation.
yesnoString No "" • "No"• "Yes"
serverTraceOn Enable or disabletracing for the ContentManager OnDemandsystem.
yesnoString No "No" • "No"• "Yes"
Yes
serverTraceString Specify parameters asinstructed by IBMSoftware Support.
String No "" Yes
uidCaseSensitive Specify whether theuser ID must be casesensitive.
yesnoString No "" • "No"• "Yes"
updateDate String No ""
userLoginInactivity Specify whether todisable users that donot login after thespecified number ofdays.
integer or string No "" • "Neverdisable"
• An integerbetween 1 and2147483647
Yes
User objectTable 108: Attributes for the user object
Name Description DataTypeRequired
Default value
Possiblevalues
Updateable
name Name of theuser
nameString Yes • User name• "_ALL"
Yes
364 Content Manager OnDemand for Multiplatforms: Administration Guide
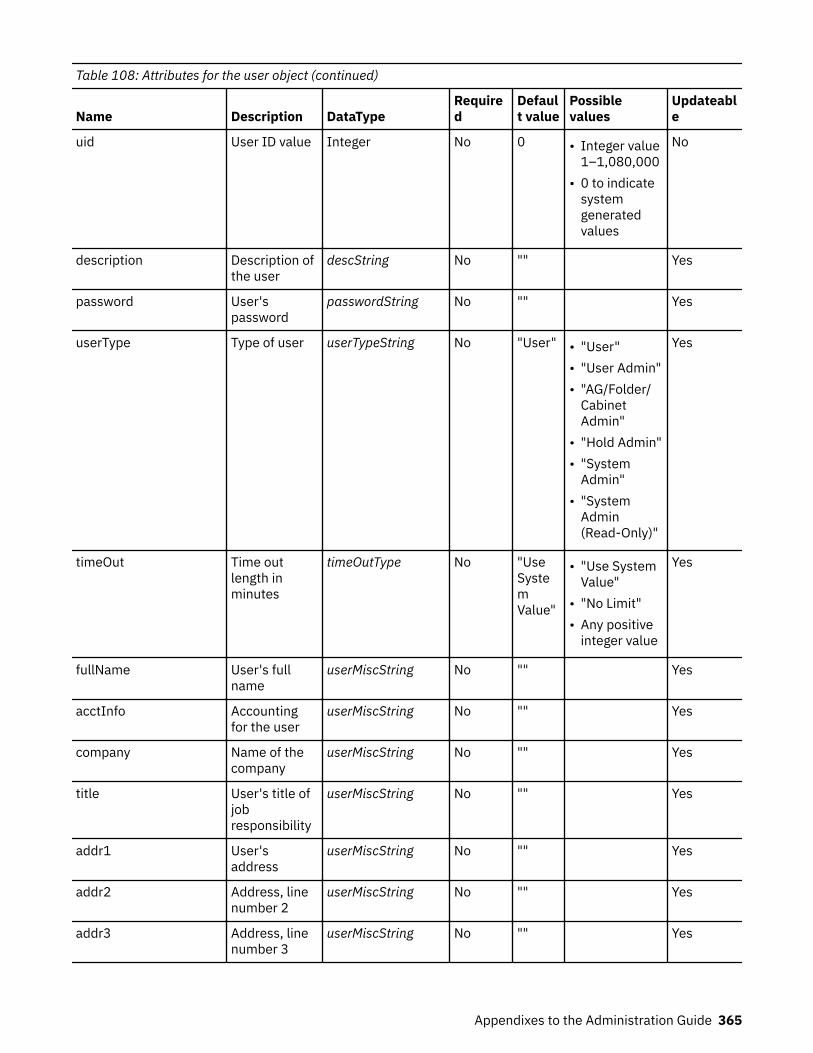
Table 108: Attributes for the user object (continued)
Name Description DataTypeRequired
Default value
Possiblevalues
Updateable
uid User ID value Integer No 0 • Integer value1–1,080,000
• 0 to indicatesystemgeneratedvalues
No
description Description ofthe user
descString No "" Yes
password User'spassword
passwordString No "" Yes
userType Type of user userTypeString No "User" • "User"• "User Admin"• "AG/Folder/
CabinetAdmin"
• "Hold Admin"• "System
Admin"• "System
Admin(Read-Only)"
Yes
timeOut Time outlength inminutes
timeOutType No "UseSystemValue"
• "Use SystemValue"
• "No Limit"• Any positive
integer value
Yes
fullName User's fullname
userMiscString No "" Yes
acctInfo Accountingfor the user
userMiscString No "" Yes
company Name of thecompany
userMiscString No "" Yes
title User's title ofjobresponsibility
userMiscString No "" Yes
addr1 User'saddress
userMiscString No "" Yes
addr2 Address, linenumber 2
userMiscString No "" Yes
addr3 Address, linenumber 3
userMiscString No "" Yes
Appendixes to the Administration Guide 365

Table 108: Attributes for the user object (continued)
Name Description DataTypeRequired
Default value
Possiblevalues
Updateable
addr4 Address, linenumber 4
userMiscString No "" Yes
dept User'sdepartmentname ornumber
userMiscString No "" Yes
building User'sbuilding nameor number
userMiscString No "" Yes
room User's officename ornumber
userMiscString No "" Yes
phone User's phonenumber
phoneString No "" Yes
fax User's faxnumber
phoneString No "" Yes
email User's emailaddress
emailString No "" Yes
coverPage Default Faxcover page forthe user
userMiscString No "" Yes
printer User's defaultprinter
nameString No "NONE"
Yes
createCabinetsAuth Whether thisuser or grouphas authorityto createcabinets
yesnoString No "No" • "Yes"• "No"
Yes
createFoldersAuth Whether thisuser haveauthority tocreate folders
yesnoString No "No" • "Yes"• "No"
Yes
createHoldsAuth Whether thisuser hasauthority tocreate holds
yesnoString No "No" • "Yes"• "No"
Yes
createUsersAuth Whether thisuser hasauthority tocreate users
yesnoString No "No" • "Yes"• "No"
Yes
createGroupsAuth Whether thisuser haveauthority tocreate group
yesnoString No "No" • "Yes"• "No"
Yes
366 Content Manager OnDemand for Multiplatforms: Administration Guide

Table 108: Attributes for the user object (continued)
Name Description DataTypeRequired
Default value
Possiblevalues
Updateable
createAppGroupsAuth Whether thisuser haveauthority tocreateapplicationgroups
yesnoString No "No" • "Yes"• "No"
Yes
disableUser Specifieswhether thisuser shouldbe disabled
yesnoString No "No" • "Yes"• "No"
Yes
passwordExp Specifieswhen theuser'spasswordexpires
pwExpValue No "UseSystemValue"
• "Use SystemValue"
• "NeverExpires"
• An integerbetween 1and 365
Yes
printerClass The printerclass
char No "" Yes
printerBanner Specifieswhether thereshould be aprinter banner
yesnoString No "No" • "Yes"• "No"
Yes
printerDest The printerdestination
valString No "" Yes
printerNode The printernode
valString No "" Yes
printerWriter The printerwriter
valString No "" Yes
printerPagedef The printerpagedef
valString No "" Yes
printerFormdef The printerformdef
valString No "" Yes
printerForms The printerforms
valString No "" Yes
printerRouting The printerrouting
routingString No "" Yes
Table 109: Child object under the user object
Name Minimum number Maximum number Deleteable Updateable
permission 0 Unbounded Yes Yes
Appendixes to the Administration Guide 367

Table 110: Attributes for the permission object under the user object
Attributes Description Datatype Required DefaultValue
Possible Values Updateable
task The task toperform onthis object
taskString No "add" • "add"• "delete"• "update"
N/A
user The name ofa user thatcan view andmaintain thisuser
nameString Yes "" • User name No
group The name ofa group thatcan view andmaintain thisuser
nameString Yes "" • Group name No
adminAuthority Whether thisuser orgroup hasauthority toupdate anddelete theuser
yesnoString No "No" • "Yes"• "No"
Yes
Remember: The "_ALL" value can only be used in an ARSXML export operation.
In the permission child, you must specify either a user or a group object, however, you cannot specifyboth.
Group objectTable 111: Attributes for the group object
Name Description DataType Required Defaultvalue
Possible values Updateable
name Name of thegroup
nameString Yes • Group name• "_ALL"
Yes
gid Group ID value Integer No 0 • Integer valuegreater than orequal to1080001
• 0 to indicate asystem value
No
description Description ofthis group
descString No "" Yes
ownerUser Name of the userthat is the ownerof this group
nameString No "NONE"
Yes
368 Content Manager OnDemand for Multiplatforms: Administration Guide

Table 111: Attributes for the group object (continued)
Name Description DataType Required Defaultvalue
Possible values Updateable
ownerGroup Name of thegroup that is theowner of thisgroup
nameString No "NONE"
Yes
Note: You can specify an ownerUser or an ownerGroup attribute, however, you cannot specify both.
Table 112: Child object under the group object
Name Minimum number Maximum number Deleteable Updateable
user 0 Unbounded Yes No
Table 113: Attributes for the user object under the group object
Attributes Description Datatype Required
DefaultValue
Possible Values Updateable
task The task toperform onthis object
taskString
No "add" • "add"• "delete"
N/A
name The name ofa user that isa member ofthis group
nameString
Yes No
Remember: The "_ALL" value can only be used in an ARSXML export operation.
Printer objectTable 114: Attributes for the printer object
Attributes Description DataType Required Defaultvalue
Possiblevalues
Updateable
name Name of theprinter
nameString Yes • Printername
• "_ALL"
Yes
description A description ofthe printer
descString No "" Yes
queue The printer queue queueString Yes Yes
printerType The type ofprinter
printerTypeString No "Printer" • "Printer"• "Fax"• "Printer
WithInformation"
Yes
Appendixes to the Administration Guide 369

Table 115: Child objects under the printer object
Name Minimum number Maximum number Deleteable Updateable
permission 0 Unbounded Yes No
Table 116: Attributes for the permission object under the printer object
Attributes Description DataType Required Defaultvalue
Possiblevalues
Updateable
task The task to performon this object
taskString No "add" • "add"• "delete"
N/A
user The user to givepermission to
nameString Yes "" • Username
No
group The group to givepermission to
nameString Yes "" • Groupname
• "*PUBLIC"
No
Remember: The "_ALL" value can only be used in an ARSXML export operation.
Storage set objectTable 117: Attributes for the storageSet object
Attributes Description DataType Required
Defaultvalue
Possiblevalues
Updateable
name Name of thestorage set
nameString Yes • Storageset name
• "_ALL"
Yes
description A description ofthe storage set
descString No "" Yes
storageType The load type ofthe storage set
storageTypeString
No "Fixed" • "Fixed"• "Local"
Yes
Table 118: Child objects under the storageSet object
Name Minimum number Maximum number Deleteable Updateable
node 1 Unbounded Yes (unless this isthe only object left)
Yes
Table 119: Attributes for the node object under the storageSet object
Attributes Description DataType Required Default value Possible values Updateable
task The task to performon this object
taskString No "add" • "add"• "delete"• "update"
N/A
name Name of the storageset node
nameString Yes No
370 Content Manager OnDemand for Multiplatforms: Administration Guide
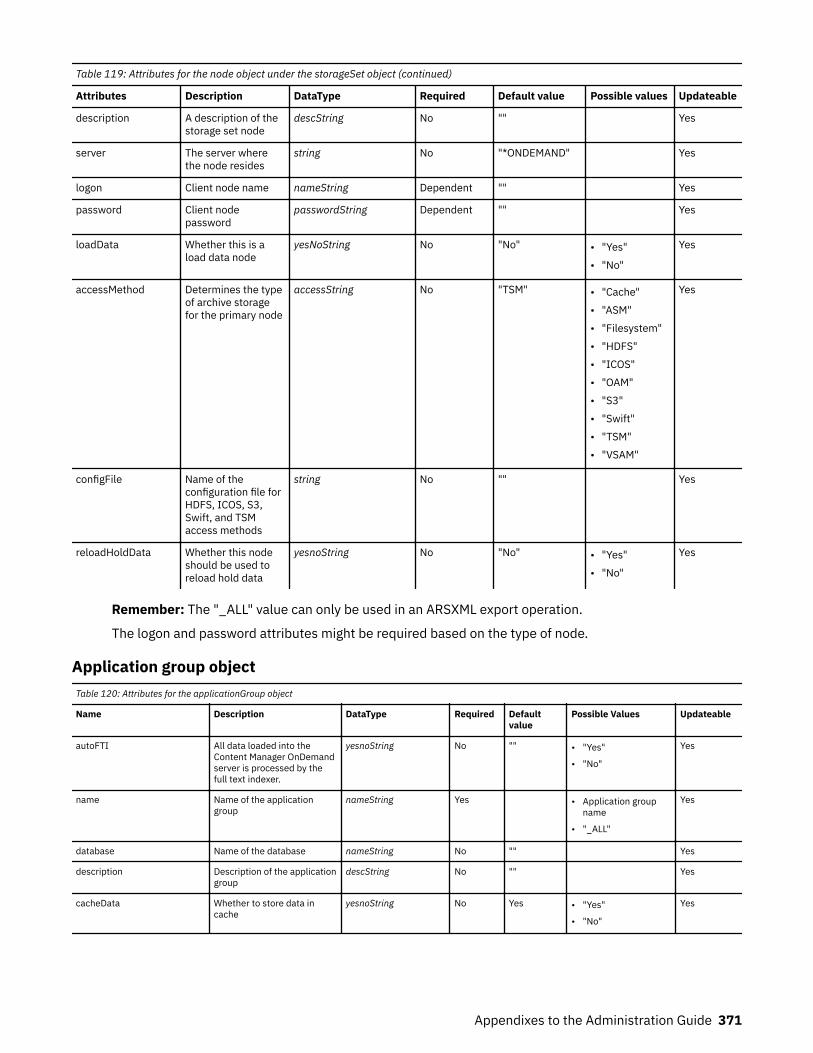
Table 119: Attributes for the node object under the storageSet object (continued)
Attributes Description DataType Required Default value Possible values Updateable
description A description of thestorage set node
descString No "" Yes
server The server wherethe node resides
string No "*ONDEMAND" Yes
logon Client node name nameString Dependent "" Yes
password Client nodepassword
passwordString Dependent "" Yes
loadData Whether this is aload data node
yesNoString No "No" • "Yes"• "No"
Yes
accessMethod Determines the typeof archive storagefor the primary node
accessString No "TSM" • "Cache"• "ASM"• "Filesystem"• "HDFS"• "ICOS"• "OAM"• "S3"• "Swift"• "TSM"• "VSAM"
Yes
configFile Name of theconfiguration file forHDFS, ICOS, S3,Swift, and TSMaccess methods
string No "" Yes
reloadHoldData Whether this nodeshould be used toreload hold data
yesnoString No "No" • "Yes"• "No"
Yes
Remember: The "_ALL" value can only be used in an ARSXML export operation.
The logon and password attributes might be required based on the type of node.
Application group objectTable 120: Attributes for the applicationGroup object
Name Description DataType Required Defaultvalue
Possible Values Updateable
autoFTI All data loaded into theContent Manager OnDemandserver is processed by thefull text indexer.
yesnoString No "" • "Yes"
• "No"
Yes
name Name of the applicationgroup
nameString Yes • Application groupname
• "_ALL"
Yes
database Name of the database nameString No "" Yes
description Description of the applicationgroup
descString No "" Yes
cacheData Whether to store data incache
yesnoString No Yes • "Yes"
• "No"
Yes
Appendixes to the Administration Guide 371

Table 120: Attributes for the applicationGroup object (continued)
Name Description DataType Required Defaultvalue
Possible Values Updateable
docDataLen How many days to cache thedata for
docDataLenValue No 90 • "No Cache"
• "Search Cache"
• A positive integer
Yes
storageSet Name of the storage set touse for this application group
nameString No "" Yes
CFSOD Use CFSOD yesnoString No "No" • "Yes"
• "No"
Yes
declareCFSOD Use to declare CFSOD yesnoString No "No" • "Yes"
• "No"
Yes
expirationType Determines how data isdeleted from the applicationgroup
expTypeString No "Load" • "Load"
• "Segment"
• "Document"
• z/OS only option:"Storage Manager"
No
expirationDate The number of days thatContent Manager OnDemandkeeps documents, resources,and index data in theapplication group
expDateValue No 90 • "Never Expire"
• A positive integer1-99999
Yes
federateCFSOD Federate CFSOD yesnoString No "No" • "Yes"
• "No"
Yes
FTI Whether to enable Full TextIndexing for the applicationgroup
yesnoString No "No" • "Yes"
• "No"
Yes
encryption Whether to enableencryption for theapplication group
yesnoString No "No" • "Yes"
• "No"
No
lastLoadDate The date and time of the lastload
String No "" No
lastQueryDate The date and time of the lastquery
String No "" No
lastRetrieveDate The date and time of the lastretrieve
String No "" No
logRetrieval Whether document retrievalmessages should be logged
yesnoString No "Yes" • "Yes"
• "No"
Yes
logBulkRetrieval Whether document bulkretrieval messages should belogged
yesnoString No "Yes" • "Yes"
• "No"
Yes
logDBQueriesAfter Whether database queries(after the query) should belogged
yesnoString No "No" • "Yes"
• "No"
Yes
logDBQueriesBefore Whether document databasequeries should be logged
yesnoString No "No" • "Yes"
• "No"
Yes
logServerPrinting Whether document serverprinting messages should bedocumented
yesnoString No "Yes" • "Yes"
• "No"
Yes
logIndexAdd Whether document indexadd messages should bedocumented
yesnoString No "Yes" • "Yes"
• "No"
Yes
logIndexUpdate Whether document indexupdate messages should bedocumented
yesnoString No "Yes" • "Yes"
• "No"
Yes
372 Content Manager OnDemand for Multiplatforms: Administration Guide
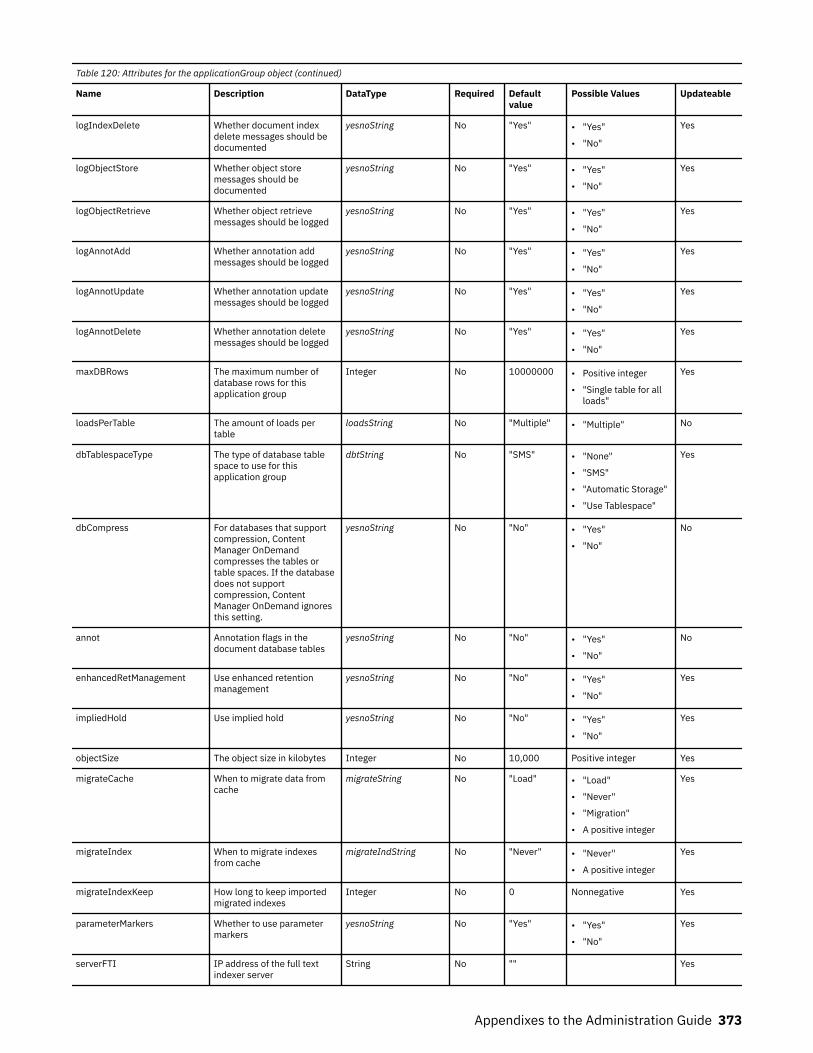
Table 120: Attributes for the applicationGroup object (continued)
Name Description DataType Required Defaultvalue
Possible Values Updateable
logIndexDelete Whether document indexdelete messages should bedocumented
yesnoString No "Yes" • "Yes"
• "No"
Yes
logObjectStore Whether object storemessages should bedocumented
yesnoString No "Yes" • "Yes"
• "No"
Yes
logObjectRetrieve Whether object retrievemessages should be logged
yesnoString No "Yes" • "Yes"
• "No"
Yes
logAnnotAdd Whether annotation addmessages should be logged
yesnoString No "Yes" • "Yes"
• "No"
Yes
logAnnotUpdate Whether annotation updatemessages should be logged
yesnoString No "Yes" • "Yes"
• "No"
Yes
logAnnotDelete Whether annotation deletemessages should be logged
yesnoString No "Yes" • "Yes"
• "No"
Yes
maxDBRows The maximum number ofdatabase rows for thisapplication group
Integer No 10000000 • Positive integer
• "Single table for allloads"
Yes
loadsPerTable The amount of loads pertable
loadsString No "Multiple" • "Multiple" No
dbTablespaceType The type of database tablespace to use for thisapplication group
dbtString No "SMS" • "None"
• "SMS"
• "Automatic Storage"
• "Use Tablespace"
Yes
dbCompress For databases that supportcompression, ContentManager OnDemandcompresses the tables ortable spaces. If the databasedoes not supportcompression, ContentManager OnDemand ignoresthis setting.
yesnoString No "No" • "Yes"
• "No"
No
annot Annotation flags in thedocument database tables
yesnoString No "No" • "Yes"
• "No"
No
enhancedRetManagement Use enhanced retentionmanagement
yesnoString No "No" • "Yes"
• "No"
Yes
impliedHold Use implied hold yesnoString No "No" • "Yes"
• "No"
Yes
objectSize The object size in kilobytes Integer No 10,000 Positive integer Yes
migrateCache When to migrate data fromcache
migrateString No "Load" • "Load"
• "Never"
• "Migration"
• A positive integer
Yes
migrateIndex When to migrate indexesfrom cache
migrateIndString No "Never" • "Never"
• A positive integer
Yes
migrateIndexKeep How long to keep importedmigrated indexes
Integer No 0 Nonnegative Yes
parameterMarkers Whether to use parametermarkers
yesnoString No "Yes" • "Yes"
• "No"
Yes
serverFTI IP address of the full textindexer server
String No "" Yes
Appendixes to the Administration Guide 373

Table 120: Attributes for the applicationGroup object (continued)
Name Description DataType Required Defaultvalue
Possible Values Updateable
useFilegroups Specifies whether thisapplication group uses filegroups
yesnoString No "No" • "Yes"
• "No"
Yes
updateExistingTables Specifies whether tablesshould be updated if anindex changes
yesnoString No "No" • "Yes"
• "No"
Yes
applQueryName Name of the application thathas all the application groupsyou want to export. Whenyou specify applQueryNameduring export, the value forthe name attribute isignored. If you specifyapplQueryName, you cannotspecify folderQueryName.
string No "" No
folderQueryName Name of folder that has theapplication groups you wantto export. When you specifyfolderQueryName duringexport, the values for thename attribute is ignored. Ifyou specifyfolderQueryName, youcannot specifyapplQueryName.
string No "" No
Important:
1. The storageSet value can be updated only if it is currently set to "".2. The default and possible dbTablespaceType values depend on the database that is used.
Remember: The "_ALL" value can only be used in an ARSXML export operation.
Table 121: Child objects for the applicationGroup object
Name Minimum number Maximum number Deleteable Updateable
permission 0 Unbounded Yes Yes
field 1 128 No Yes
index 0 Unbounded Yes No
Table 122: Attributes for the index object under the applicationGroup object
Attributes Description DataType Required Default value Possiblevalues
Updateable
task Task to perform taskString No "add" • "add"• "delete"
N/A
name Name of the index indexName Yes A positiveinteger
No
cluster Only for DB2. Whetherit is a cluster index
yesnoString No "No" • "Yes"• "No"
No
Table 123: Child objects under the index object
Name Minimum number Maximum number Deleteable Updateable
field 2 16 Yes No
374 Content Manager OnDemand for Multiplatforms: Administration Guide

Table 124: Attributes for the field object under the index object
Attributes Description DataType Required
Default Possible values Updateable
name Name of thefield
string Yes No
order The field order orderString No "Ascending" • "Ascending• "Descending"
No
Table 125: Attributes for the permission object under the applicationGroup object
Attributes Description DataType Required Default Possible values Updateable
task The task to perform on thisobject
taskString No "add" • "add"• "delete"• "update"
N/A
user Provide permissions to theapplication group to thisuser
nameString Yes "" • User name• "*PUBLIC"
No
group Provide permissions to theapplication group to thisgroup
nameString Yes "" • Group name• "*PUBLIC"
No
docAddPerm Whether this user or groupshould be allowed to adddocuments to thisapplication group
yesnoString No "No" • "Yes"• "No"
Yes
docDeletePerm Whether this user or groupshould be allowed toremove documents fromthis application group
yesnoString No "No" • "Yes"• "No"
Yes
docUpdatePerm Whether this user or groupshould be allowed toupdate documents in thisapplication group
yesnoString No "No" • "Yes"• "No"
Yes
docPrintPerm Whether this user or groupshould be allowed to printdocuments from thisapplication group
yesnoString No "No" • "Yes"• "No"
Yes
docCopyPerm Whether this user or groupshould be allowed to copydocuments from thisapplication group
yesnoString No "No" • "Yes"• "No"
Yes
docCFSODPerm Whether this user or groupshould be allowed to addCFS-CMOD documents tothis application group
yesnoString No "No" • "Yes"• "No"
Yes
docFTIPerm Whether this user or groupshould be allowed to addfull text indexer documentsto this application group
yesnoString No "No" • "Yes"• "No"
Yes
docHoldPerm Whether this user or groupshould be allowed to addholds to documents for thisapplication group
yesnoString No "No" • "Yes"• "No"
Yes
annotViewPerm Whether this user or groupbe allowed to viewannotation in thisapplication group
yesnoString No "No" • "Yes"• "No"
Yes
Appendixes to the Administration Guide 375

Table 125: Attributes for the permission object under the applicationGroup object (continued)
Attributes Description DataType Required Default Possible values Updateable
annotAddPerm Whether this user or groupbe allowed to addannotation to thisapplication group
yesnoString No "No" • "Yes"• "No"
Yes
annotDeletePerm Whether this user or groupbe allowed to deleteannotation from thisapplication group
yesnoString No "No" • "Yes"• "No"
Yes
annotUpdatePerm Whether this user or groupbe allowed to updateannotation in thisapplication group
yesnoString No "No" • "Yes"• "No"
Yes
annotPrintPerm Whether this user or groupbe allowed to printannotation from thisapplication group
yesnoString No "No" • "Yes"• "No"
Yes
annotCopyPerm Whether this user or groupbe allowed to copyannotation from thisapplication group
yesnoString No "No" • "Yes"• "No"
Yes
authority Specifies the authoritygiven
authagString No "Access" • "Access"• "Administrator
"• "Logical
Views"
Yes
queryRes A query restriction for theuser or group
queryString No "" Yes
Important: Either a user or a group must be specified, but not both.
Table 126: Attributes for the field object under the applicationGroup object
Attributes Description DataType Required Defaultvalue
Possible values Updateable
task The task to performon the object
taskString No Same as thetaskattribute ofthe parent
• "add"• "update"
N/A
name Database fieldname
nameString Yes No
type Index type fieldTypeString No • "Filter"• Index
• "Filter"• "Index"• "Not in Database"
Yes, but only from"Filter" to "Index" orfrom "Index" to "Filter"
CFSOD Whether this field isa CFSOD field
yesnoString No "No" • "Yes"• "No"
Yes
376 Content Manager OnDemand for Multiplatforms: Administration Guide

Table 126: Attributes for the field object under the applicationGroup object (continued)
Attributes Description DataType Required Defaultvalue
Possible values Updateable
dataType The data type ofthe field
dataTypeString No "String" • "Big Int"• "Date"• "Date (native)"• "Date/Time"• "Date/Time
(native)"• "Date/Time (TZ)"• "Date/Time (TZ)
(native)"• "Decimal"• "Integer"• "Small Int"• "String"
No
segment If the expirationtype is segment,value of this field isused by ContentManagerOnDemand todetermine when todelete data fromthe applicationgroup
yesnoString No "No" • "Yes"• "No"
No
expireDate Whether this field isused for theexpiration date
yesnoString No "No" • "Yes"• "No"
No
lockdown Whether this is alockdown field
yesnoString No "No" • "Yes"• "No"
Yes
log Whether to use thesystem log
yesnoString No "No" • "Yes"• "No"
Yes
userExit Whether to senddata to the userexit
yesnoString No "No" • "Yes"• "No"
Yes
partition Used to partitionthe index dataacross the multiplenodes
yesnoString No "No" • "Yes"• "No"
Yes
cluster Only for DB2.Determines theclustering index forthe applicationgroup
yesnoString No "No" • "Yes"• "No"
Yes
reference Only for z/OS.Controls whichreports aredistributed fromContent ManagerOnDemandDistribution Facility.
yesnoString No "No" • "Yes"• "No"
Yes
stringCase The case to use ifthe data type isstring
caseString No "Upper" • "Upper"• "Lower"• "Mixed"
No
Appendixes to the Administration Guide 377

Table 126: Attributes for the field object under the applicationGroup object (continued)
Attributes Description DataType Required Defaultvalue
Possible values Updateable
stringType The type of string stringType No "Fixed" • "Fixed"• "Variable"
No
stringLength The length of thestring
Integer No 0 • For fixed strings:1–254
• For variablelength strings: 1–2000
No
stringEmbedded The embeddedcharacters toremove from thestring
string No "" Yes
stringLeading The leadingcharacters toremove from thestring
string No "" Yes
stringTrailing The trailingcharacters toremove from thestring
string No "" Yes
appIDField Whether this field isthe application IDfield
yesnoString No "No" • "Yes"• "No"
Yes
pageCount Specifies whetherthis is a page countfield
yesnoString No "No" • "Yes"• "No"
Yes
documentSize Specifies whetherthis is a documentsize field
yesnoString No "No" • "Yes"• "No"
Yes
updateable Whether this fieldcan be updated
yesnoString No "Yes" • "Yes"• "No"
Yes
FTI Whether to indexthis field with theFull Text Indexer
yesnoString No "No" • "Yes"• "No"
Yes
uniqueID Whether this is aunique ID field
yesnoString No "No" • "Yes"• "No"
No
hashSHA256 Whether this is aHash SHA-256 field
yesnoString No "No" • "Yes"• "No"
No
encryption Whether this is anencryption field(used internally bythe encryptionprocess)
yesnoString No "No" • "Yes"• "No"
No
The following restrictions apply to the Not in Database value:
• Do not use a field whose type attribute has a definition of Not in Database to hold information suchas a report ID that applies to all documents that are returned in the hit list.
• The Not in Database value allows you to create a segment field that is based off the start/end datesthat are found in the segment table without capturing another date in the application group data table.
• You can query on a value by using a folder field that is mapped to the application group field whosetype attribute has a definition of "Not In Database". The system performs a check to determine
378 Content Manager OnDemand for Multiplatforms: Administration Guide

whether the value matches the segment range. However, the value cannot be displayed because it is notstored anywhere.
• Use the "Not In Database" value for a database field that has been defined as segment field.• You can use the "Not In Database" value to segment a report that is based on a value that you do
not want to capture in the database as an index or filter. In other words, you only needed the field whenyou were indexing the report.
Table 127: Child objects under the field object
Name Minimum number Maximum number Deleteable Updateable
mapping 0 Unbounded Yes Yes
nls 0 26 Yes Yes
Table 128: Attributes for the mapping object under field
Attributes Description DataType Required Default value Possiblevalues
Updateable
task The task to perform onthis object
taskString No "add" • "add"• "update"• "delete"
N/A
dbValue The database value dbString2 Yes No
displayedValue The displayed value dvString Yes Yes
Table 129: Attributes for the nls object under field
Attributes Description DataType Required Default value Possible values Updateable
task The task to perform on thisobject
taskString No "add" • "add"
• "update"
• "delete"
N/A
Appendixes to the Administration Guide 379

Table 129: Attributes for the nls object under field (continued)
Attributes Description DataType Required Default value Possible values Updateable
language The natural language string Yes "" • "English"
• "French"
• "German"
• "Italian"
• "Japanese"
• "Norwegian"
• "Portuguese(Brazil)"
• "Spanish"
• "Chinese(Simplified)"
• "Chinese(Traditional)"
• "Danish"
• "Finnish"
• "Swedish"
• "Korean"
• "Dutch"
• "Arabic"
• "Czech"
• "Greek"
• "Hebrew"
• "Croatian"
• "English"
• "Hungarian"
• "Polish"
• "Russian"
• "Slovakian"
Yes
Table 130: Child objects under the nls object
Name Minimum number Maximum number Deleteable Updateable
mapping 0 Unbounded Yes Yes
Table 131: Attributes for the mapping object under nls
Attributes Description DataType Required Default value Possiblevalues
Updateable
dbValue The database value string Yes No
displayedValue The displayed value string Yes Yes
Application objectTable 132: Attributes for the application object
Name Description DataType Required Default value Possible values Updateable
name Name of theapplication
nameString Yes • Applicationname
• "_ALL"
Yes
description Description of theapplication
descString No "" Yes
380 Content Manager OnDemand for Multiplatforms: Administration Guide

Table 132: Attributes for the application object (continued)
Name Description DataType Required Default value Possible values Updateable
appGroup The applicationgroup that thisapplication belongsto
nameString Yes No
identifier The applicationgroup identifier
dbString2 Yes "" Determined bythe applicationgroup
Yes
dataType The data type ofthis application
appTypeString No • "AFP"• "SCS"
• "AFP"• "Line"• "BMP"• "GIF"• "PCX"• "TIFF"• "PDF"• "JPEG"• "PNG"• "User
Defined"• "OD Defined"• "E-Mail"• "None"• "SCS"• SCS-Extended• Global DJDE• XML
No
indexer The name of theindexer program touse with thisapplication
indexerString No "None" • "None"• "ACIF"• "Generic"• "PDF"• "OS/390"• "OS/400"• "XML"
Yes
expirationDate Use this value tooverride theexpirationDateattribute valuespecified in theapplication group
expDateValueA No "UseAppGroupValue"
• "UseAppGroupValue"
• A positiveinteger1-99999
Yes
dataCompression The compressiontechnique that isused for the data
compressionString No "OD77" • "OD77"• "OD77Lite"• "OD77HW"• "OD77LiteHW
"• "LZW12"• "LZW16"• "Disable"• "None"
Yes
Appendixes to the Administration Guide 381

Table 132: Attributes for the application object (continued)
Name Description DataType Required Default value Possible values Updateable
resCompression The compressiontechnique that isused for theresources
compressionString No "OD77" • "OD77"• "OD77Lite"• "OD77HW"• "OD77LiteHW
"• "LZW12"• "LZW16"• "Disable"• "None"
Yes
resourceComparison The number ofresourcecomparisons
resCompValue No 50 0–9999 Yes
largeObject Whether thisapplication a LargeObject
yesnoString No "No" • "Yes"• "No"
Yes
size The number ofpages or size of theobject in kilobytesthat is based on thesetting of thelargeObjectattribute
Integer No 100 Positive integerrepresentingeither objectsize or numberof pages basedon setting oflargeObject
Yes
pageIdentifiers Whether pageidentifiers shouldbe used
yesnoString No "No" • "Yes"• "No"
Yes
postProcesserString The post processorstring
postProcString No "" Yes
printAmount The default printoption to specifywhich page orpages to print
printAmString No "All Pages" • "All Pages"• "Current
Pages"
Yes
defaultPrinter Default printer nameString No "*NONE" Yes
cicsJCLParms Values that areused by the CICS orESA client programto print documents
string No "None" Yes
printParms Print parametersthat are used by theserver printmanager
string No "" Yes
afpToLine Options thatOnDemand uses toconvert AFP data toline data
string No "" Yes
usePreview Whether to use thepreview user exit
yesnoString No "No" • "Yes"• "No"
Yes
previewParms Whether thepreview parametersshould be used
string No "" Yes
382 Content Manager OnDemand for Multiplatforms: Administration Guide

Table 132: Attributes for the application object (continued)
Name Description DataType Required Default value Possible values Updateable
agQueryName Name of theapplication groupthat has all theapplications youwant to export.When you specifyagQueryNameduring export, thevalues for the nameand appGroupattributes areignored. If youspecifyagQueryName, youcannot specifyfolderQueryName.
string No "" No
folderQueryName Name of folder thathas the applicationsyou want to export.When you specifyfolderQueryNameduring export, thevalues for the nameand appGroupattributes areignored. If youspecifyfolderQueryName,you cannot specifyagQueryName.
string No "" No
Note:
1. If the application group contains more than one field object, identifier is required.2. The identifier object can be updated to an unused field value only.
Table 133: Child objects under the application object
Name Minimum number Maximum number Deleteable Updateable
lineData 0 1 No Yes
SCSData 0 1 No Yes
afpData 0 1 No Yes
pdfData 0 1 No Yes
imageData 0 1 No Yes
udData 0 1 No Yes
indexParm 0 1 Yes Yes
preprocessParm 0 Dependent No Yes
imageOverlay 0 Unbounded Yes No
Important: The udData child is required if the application dataType is User Defined.
Appendixes to the Administration Guide 383

Table 134: Attributes for the SCSData object under the application object
Attributes Description DataType Required Defaultvalue
Possiblevalues
Updateable
codePage The code page touse
Integer No 37 Nonnegativeinteger
Yes
prMode Processing Mode prmodeString No "None" • "None"• "SOSI1"• "SOSI2"• "SOSI3"
Yes
Table 135: Child objects under the SCSData object
Name Minimum number Maximum number Deleteable Updateable
lvHeader 0 1 No Yes
lvField 0 30 Yes Yes
logView 0 20 Yes Yes
See Table 141 on page 387, Table 142 on page 387, and Table 143 on page 388 for descriptions of thelvHeader, lvField, and logView objects.
Table 136: Attributes for the SCSExData object under the application object
Attributes Description DataType Required Defaultvalue
Possiblevalues
Updateable
codePage The code page touse
Integer No 37 Nonnegativeinteger
Yes
orientation The orientation orrotation angle, indegrees, of thedocument
orientString No 0 • 0• 90• 180• 270
Yes
paperSize The output papersize
paperString No "Autosize" See the listthat followsthis table forpossiblevalues forthepaperSizeattribute.
Yes
Possible values for the paperSize attribute are:
• A3• A4 Wide• A4• A5• Autosize• B4 Wide• B4
384 Content Manager OnDemand for Multiplatforms: Administration Guide

• B5• Cut Sheet• Euro Fanfold• Executive 1• Executive 2• Executive 3• Folio• Ledger• Legal Wide• Legal• Letter Wide• Letter• Narrow• Quarto• Short• Statement• Stationery• Tabloid• Wide• 1403W• 1403WS• 3800N• 3800NS• 3800W• 3800WS
Table 137: Child object under the SCSExData object
Name Minimum number Maximum number Deleteable Updateable
logView 0 20 Yes Yes
Table 138: Attributes for the logView object under the SCSExData object
Attributes Description DataType Required Defaultvalue
Possiblevalues
Updateable
task The task toperform on thisobject
taskString No "add" • "add"• "delete"• "update"
N/A
name Name of thislogical view
nameString Yes Yes
user User for thislogical view
nameString Yes • User name• "*PUBLIC"
No
defaultView Whether this isthe default view
yesnoString No "No" • "Yes"• "No"
Yes
Appendixes to the Administration Guide 385

Table 138: Attributes for the logView object under the SCSExData object (continued)
Attributes Description DataType Required Defaultvalue
Possiblevalues
Updateable
zoom Zoom Factor Integer No 100 Positive integer Yes
selAreaColor Selected AreaColor
saColorString No "Yellow" • "White"• "Black"• "Red"• "Blue"• "Green"• "Yellow"• "Grey"• "Custom"
Yes
bgColor Background bgColorString No "White" • "White"• "Black"• "Red"• "Blue"• "Green"• "Yellow"• "Grey"• "Green Bar"• "Custom"
Yes
Table 139: Attributes for the lineData object
Attributes Description DataType Required Defaultvalue
Possiblevalues
Updateable
lineCount The line count Integer No 0 Nonnegativeinteger
Yes
codePage The code page touse
Integer No 500 Positiveinteger
Yes
recFM The record format recfmString No "Variable" • "Fixed"• "Variable"• "Stream"
Yes
LRECL The record length Integer No 133 Positiveinteger
Yes
delimiter The line delimiter(specified in hex)
hexString No "0A" Hexcharacterstring
Yes
prMode Processing mode prmodeString No "None" • "None"• "SOSI1"• "SOSI2"• "SOSI3"
Yes
386 Content Manager OnDemand for Multiplatforms: Administration Guide

Table 139: Attributes for the lineData object (continued)
Attributes Description DataType Required Defaultvalue
Possiblevalues
Updateable
trc Whether the datacontains tablereferencecharacters
yesnoString No "No" • "Yes"• "No"
Yes
CCType The type of thecarriage controlcharacter
yesnoString No "ANSI" • "ANSI"• "Machine"• "None"
Yes
Table 140: Child objects under the lineData object
Name Minimum number Maximum number Deleteable Updateable
lvHeader 0 1 No Yes
lvField 0 30 Yes Yes
logView 0 20 Yes Yes
Table 141: Attributes for the lvHeader object
Attributes Description DataType Required Defaultvalue
Possiblevalues
Updateable
pageHdrRows Number of pageheader rows
Integer No 0 Nonnegative integer
Yes
fieldHdrRows Number of fieldheader rows
Integer No 0 Nonnegative integer
Yes
validationRow The validation row Integer Dependent 0 Nonnegative integer
Yes
validationCol The validationcolumn
Integer Dependent 0 Nonnegative integer
Yes
validationString The validation string String Dependent "" Yes
Table 142: Attributes for the lvField object
Attributes Description DataType Required Defaultvalue
Possiblevalues
Updateable
task The task to performon this object
taskString No "add" • "add"• "delete"• "update"
N/A
name The name of thelogical view field
nameString Yes Yes
dbName The applicationgroup databasename
nameString No "*NONE" databasefield nameor "*NONE"
Yes
Appendixes to the Administration Guide 387

Table 142: Attributes for the lvField object (continued)
Attributes Description DataType Required Defaultvalue
Possiblevalues
Updateable
startCol The start column forthis field definition
Integer Yes 0 An integervaluebetween 1and 999
Yes
endCol The end column forthis field definition
Integer Yes 0 an integervaluebetween 1and 999
Yes
Table 143: Attributes for the logView object
Attributes Description DataType Required Defaultvalue
Possible values Updateable
task The task toperform onthis object
taskString No "add" • "add"• "delete"• "update"
N/A
name Name of thislogical view
nameString Yes Yes
user user for thislogical (orPUBLIC)view
nameString Yes • User name• "*PUBLIC"
No
defaultView Whether thisis the defaultview
yesNoString No "No" • Yes• No
Yes
zoom Zoom factor Integer No 100 Positive integer Yes
selAreaColor Selectedarea color
saColorString No "Yellow" • "White"• "Black"• "Red"• "Blue"• "Green"• "Yellow"• "Grey"• "Custom"
Yes
388 Content Manager OnDemand for Multiplatforms: Administration Guide

Table 143: Attributes for the logView object (continued)
Attributes Description DataType Required Defaultvalue
Possible values Updateable
bgColor Backgroundcolor
bgColorString No "White" • "White"• "Black"• "Red"• "Blue"• "Green"• "Yellow"• "Grey"• "Green Bar"• "Custom"
Yes
headingColor Headingcolor
hdgColorString No "BG Color" • "BG Color"• "White"• "Black"• "Red"• "Blue"• "Green"• "Yellow"• "Grey"• "Custom"
Yes
textFidelity Text fidelity fidelityString No "Line" • "Line"• "Word"• "Char"• "Draft"• "240-pel"
Yes
overstrike Textoverstrikeoption
overstrikeString
No "SeparateLines"
• "Separate Lines"• "Merge Lines"• "Overstrike
Lines"
Yes
fieldOrder A stringshowing theorder inwhich thefields are tobe displayed
String No "" Yes
lockHeader Whether theheader linesshould belocked inplace duringscrolling
yesnoString No "No" • "Yes"• "No"
Yes
Appendixes to the Administration Guide 389

Table 143: Attributes for the logView object (continued)
Attributes Description DataType Required Defaultvalue
Possible values Updateable
lockField Number offields thatyou want tolock in place
Integer No 0 Nonnegativeinteger
Yes
Table 144: Attributes for the afpData object
Attributes Description DataType Required Default value Possiblevalues
Updateable
orientation The orientation or rotationangle, in degrees, of thedocument
orientString No 0 • "0"• "90"• "180"• "270"
Yes
paperSize The output paper size paperString No "Autosize" See the listthat followsthis table forpossiblevalues for thepaperSizeattribute.
Yes
The following are possible values for the paperSize attribute:
• A3• A4 Wide• A4• A5• Autosize• B4 Wide• B4• B5• Cut Sheet• Euro Fanfold• Executive 1• Executive 2• Executive 3• Folio• Ledger• Legal Wide• Legal• Letter Wide• Letter• Narrow• Quarto• Short• Statement
390 Content Manager OnDemand for Multiplatforms: Administration Guide

• Stationery• Tabloid• Wide• 1403W• 1403WS• 3800N• 3800NS• 3800W• 3800WS
Table 145: Child objects under the afpData object
Name Minimum number Maximum number Deleteable Updateable
logView 0 20 Yes Yes
Table 146: Attributes for the logView object under the afpData object
Attributes Description DataType Required Defaultvalue
Possible values Updateable
task The task to perform on thisobject
taskString No "add" • "add"
• delete
• "update"
N/A
name Name of this logical view nameString Yes Yes
user User for this logical view (orPUBLIC)
nameString Yes • User name
• "*PUBLIC"
No
defaultView Whether this is the defaultview
yesnoString No "No" • Yes
• No
Yes
zoom Zoom factor Integer No 100 Positive integer Yes
selAreaColor Selected area color saColorString No "Yellow" • "White"
• "Black"
• "Red"
• "Blue"
• "Green"
• "Yellow"
• "Grey"
• "Custom"
Yes
bgColor Background color bgColorString No "White" • "White"
• "Black"
• "Red"
• "Blue"
• "Green"
• "Yellow"
• "Grey"
• "Green Bar"
• "Custom"
Yes
Appendixes to the Administration Guide 391

Table 146: Attributes for the logView object under the afpData object (continued)
Attributes Description DataType Required Defaultvalue
Possible values Updateable
imageColor Image color imgColorString No "Black" • "Black"
• "Red"
• "Blue"
• "Green"
• "Yellow"
• "Magenta"
• "Cyan"
• "Custom"
Yes
textFidelity Text fidelity fidelityString No "Line" • "Line"
• "Word"
• "Char"
• "Draft"
• "240-pel"
Yes
imageIntensity Image intensity intensityString No "Normal" • "Normal"
• "Light"
• "None"
Yes
copyGroup The copy group for thedocument
Integer No 1 Nonnegative integer Yes
Table 147: Attributes for the pdfData object
Attributes Description DataType Required Defaultvalue
Possiblevalues
Updateable
orientation The orientation orrotation angle, indegrees, of thedocument
orientString No 0 • 0• 90• 180• 270
Yes
Table 148: Child objects under the pdfData object
Name Minimum number Maximum number Deleteable Updateable
logView 0 Unbounded Yes Yes
Table 149: Attributes for the logView object under pdfData
Attributes Description DataType Required Defaultvalue
Possiblevalues
Updateable
task The task to performon this object
taskString No "add" • "add"• delete• "update"
N/A
name Name of this logicalview
nameString Yes Yes
user User for this logicalview (or PUBLIC)
nameString Yes • Username
• "*PUBLIC"
No
392 Content Manager OnDemand for Multiplatforms: Administration Guide

Table 149: Attributes for the logView object under pdfData (continued)
Attributes Description DataType Required Defaultvalue
Possiblevalues
Updateable
defaultView Whether this is thedefault view
yesnoString No "No" • Yes• No
Yes
zoom Zoom factor Integer No 100 Positiveinteger
Yes
selAreaColor Selected area color saColorString
No "Yellow" • "White"• "Black"• "Red"• "Blue"• "Green"• "Yellow"• "Grey"• "Custom"
Yes
Table 150: Attributes for the imageData object
Attributes Description DataType Required Defaultvalue
Possiblevalues
Updateable
orientation The orientation orrotation angle, indegrees, of thedocument
orientString No 0 • 0• 90• 180• 270
Yes
Table 151: Child objects under the imageData object
Name Minimum number Maximum number Deleteable Updateable
logView 0 20 Yes Yes
Table 152: Attributes for the logView object under imageData
Attributes Description DataType Required Default value Possiblevalues
Updateable
task The task to perform onthis object
taskString No "add" • "add"• delete• "update"
N/A
name Name of this logical view nameString Yes Yes
user User for this logical view(or PUBLIC)
nameString Yes • User name• "*PUBLIC"
No
defaultView Whether this is the defaultview
yesnoString No "No" • "Yes"• "No"
Yes
zoom Zoom factor Integer No 100 Integer value10 — 1000
Yes
contrast Image contrast value Integer No 128 Integer value0–255
Yes
Appendixes to the Administration Guide 393

Table 152: Attributes for the logView object under imageData (continued)
Attributes Description DataType Required Default value Possiblevalues
Updateable
brightness Image brightness value Integer No 128 Integer value0–255
Yes
greyScale Whether the image shoulduse grey scales
yesnoString No "No" • "Yes"• "No"
Yes
Table 153: Attributes for the udData object
Attributes Description DataType Required Defaultvalue
Possiblevalues
Updateable
fileExt File extension fileExtString Yes Yes
Table 154: Attributes for the indexParm object
Attributes Description DataType Required Defaultvalue
Possiblevalues
Updateable
task The task to performon this object
taskString No "add" • "add"• "delete"• "update"
n/a
<character data> The character datathat represents theindex parameters forthis application
string Yes Yes
Important: The index parameters are not represented by any attribute data. They are represented by thecharacter data field between the <indexParm> and </indexParm> fields.
Table 155: Attributes for the preprocessParm object
Attributes Description DataType Required Default value Possible values Updateable
dbName Application groupdatabase name
dbString Yes No
loadIDName Load ID name namestring No dbName Yes
defaultValue The default value string No Based on data type Yes
strip The embeddedcharacters toremove
string No Based on data type Yes
leading The leadingcharacters toremove
string No "" Yes
trailing The trailingcharacters toremove
string No "" Yes
divideBy The value to divideby if the field isnumeric
Integer No 1 or 100 based on datatype
Positive integer Yes
format The date or timeformat to use
string No "" Yes
394 Content Manager OnDemand for Multiplatforms: Administration Guide

Table 156: Attributes for the imageOverlay object
Attributes Description DataType Required Default value Possiblevalues
Updateable
task The task to perform onthis object
taskString No "add" • "add"• "delete"
N/A
id The name of the imageoverlay that is added tothe application
string Yes No
fileName The full path name of theDLL file that contains theimage overlay bitmap thatis added to the application
string Yes No
Remember: The "_ALL" value can only be used in an ARSXML export operation.
Folder objectTable 157: Attributes for the folder object
Attributes Description DataType Required Defaultvalue
Possiblevalues
Updateable
name Name of the folder nameString Yes • Folder name• "_ALL"
Yes
description A description of thefolder
descString No "" Yes
searchType The note search type searchTypeString No "Retrieve" • "Retrieve"• "Hit List"• "Note"
Yes
displayDocHold Whether the clientdisplays the hold statusfor each document
yesnoString No "No" • "Yes"• "No"
Yes
displayDocLocation Whether the client shouldshow the storage locationof each document in thedocument list
yesnoString No "No" • "Yes"• "No"
Yes
queryUnmappedFields Whether this user orgroup should be allowedto add CFS-CMODdocuments to thisapplication group
yesnoString No "No" • "Yes"• "No"
Yes
applQueryName Name of the applicationthat has all the foldersyou want to export. Whenyou specifyapplQueryName duringexport, the value for thename attribute is ignored.If you specifyapplQueryName, youcannot specifyagQueryName.
string No "" No
Appendixes to the Administration Guide 395

Table 157: Attributes for the folder object (continued)
Attributes Description DataType Required Defaultvalue
Possiblevalues
Updateable
agQueryName Name of the applicationgroup that has all thefolders you want toexport. When you specifyagQueryName duringexport, the value for theidentifier attributes isignored. If you specifyagQueryName, youcannot specifyapplQueryName.
string No "" No
Table 158: Child objects under the folder object
Name Minimum number Maximum number Deleteable Updateable
permission 0 Unbounded Yes Yes
applicationGroup 1 Unbounded Yes No
field 1 128 No Yes
nls 0 26 Yes Yes
folderNls 0 26 Yes Yes
Table 159: Attributes for the permission object under the folder object
Attributes Description DataType Required Defaultvalue
Possiblevalues
Updateable
task The task to perform onthis object
taskString No "add" • "add"• "delete"• "update"
N/A
user Provide permission to thefolder of this user
nameString Yes "" • User name No
group Provide permission to thefolder of this group
nameString Yes "" • Groupname
• "*PUBLIC"
No
adminAuthority Whether the user orgroup should haveadministrator authority
yesnoString No "No" • "Yes"• "No"
Yes
accessAuthority Whether the user orgroup should have accessauthority
yesnoString No "No" • "Yes"• "No"
Yes
fieldsAuthority Whether the user orgroup should haveauthority to change fields
yesnoString No "No" • "Yes"• "No"
Yes
publicNQAuthority Whether the user orgroup should have publicnamed query authority
yesnoString No "No" • "Yes"• "No"
Yes
privateNQAuthority Whether the user orgroup should have privatenamed query authority
yesnoString No "No" • "Yes"• "No"
Yes
viewNQAuthority Whether the user orgroup should have namedquery view authority
yesnoString No "No" • "Yes"• "No"
Yes
396 Content Manager OnDemand for Multiplatforms: Administration Guide
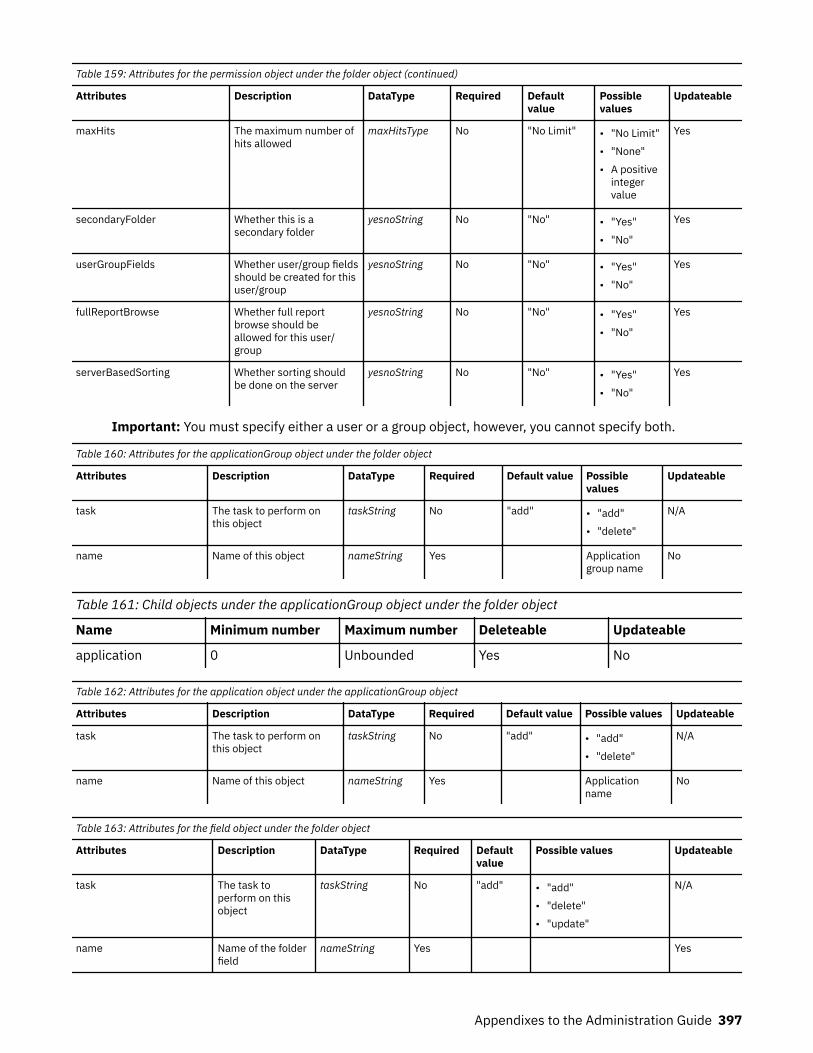
Table 159: Attributes for the permission object under the folder object (continued)
Attributes Description DataType Required Defaultvalue
Possiblevalues
Updateable
maxHits The maximum number ofhits allowed
maxHitsType No "No Limit" • "No Limit"• "None"• A positive
integervalue
Yes
secondaryFolder Whether this is asecondary folder
yesnoString No "No" • "Yes"• "No"
Yes
userGroupFields Whether user/group fieldsshould be created for thisuser/group
yesnoString No "No" • "Yes"• "No"
Yes
fullReportBrowse Whether full reportbrowse should beallowed for this user/group
yesnoString No "No" • "Yes"• "No"
Yes
serverBasedSorting Whether sorting shouldbe done on the server
yesnoString No "No" • "Yes"• "No"
Yes
Important: You must specify either a user or a group object, however, you cannot specify both.
Table 160: Attributes for the applicationGroup object under the folder object
Attributes Description DataType Required Default value Possiblevalues
Updateable
task The task to perform onthis object
taskString No "add" • "add"• "delete"
N/A
name Name of this object nameString Yes Applicationgroup name
No
Table 161: Child objects under the applicationGroup object under the folder object
Name Minimum number Maximum number Deleteable Updateable
application 0 Unbounded Yes No
Table 162: Attributes for the application object under the applicationGroup object
Attributes Description DataType Required Default value Possible values Updateable
task The task to perform onthis object
taskString No "add" • "add"• "delete"
N/A
name Name of this object nameString Yes Applicationname
No
Table 163: Attributes for the field object under the folder object
Attributes Description DataType Required Defaultvalue
Possible values Updateable
task The task toperform on thisobject
taskString No "add" • "add"• "delete"• "update"
N/A
name Name of the folderfield
nameString Yes Yes
Appendixes to the Administration Guide 397

Table 163: Attributes for the field object under the folder object (continued)
Attributes Description DataType Required Defaultvalue
Possible values Updateable
description A description of thefolder field
descString No "" Yes
fieldType Field type of thefolder object
fieldString No "String" • "Ann Color Search"• "Ann Text Search"• "Application Group"• "Big Int"• "Date"• "Date (native)"• "Date/Time"• "Date/Time (native)"• "Date/Time (TZ)"• "Date/Time (TZ)
(native)"• "DecFloat (16)"• "DecFloat (34)"• "Decimal"• "Document Type"• "FTI Highlight"• "FTI Score"• "FTI Search"• "FTI Summary"• "Hold"• "Integer"• "Segment"• "Small Int"• "String"• "Text Search"• "Time"
No
mappingType Mapping type ofthe folder field
mappingString No "Single" • "Single"• "Range"• "Operator Or"
No
applicationGroup The ApplicationGroup to use for asegment field
nameString No "" "" Yes
Table 164: Child objects under the field object under the folder object
Name Minimum number Maximum number Deleteable Updateable
mapping 0 Unbounded Yes No
fieldInfo 1 Unbounded Yes Yes
Table 165: Attributes for the mapping object under the field object
Attributes Description DataType Required Defaultvalue
Possiblevalues
Updateable
task The task to performon this object
taskString No "add" • "add"• "delete"
N/A
398 Content Manager OnDemand for Multiplatforms: Administration Guide

Table 165: Attributes for the mapping object under the field object (continued)
Attributes Description DataType Required Defaultvalue
Possiblevalues
Updateable
dbName The database fieldname
nameString Yes No
appGroup The applicationgroup name
nameString Yes No
Table 166: Attributes for the fieldInfo object under the field object
Attributes Description DataType Required Default value Possible values Updateable
task The task to performon this object
taskString No "add" • "add"• "delete"• "update"
N/A
user The user that isassociated with thisfield definition
nameString Yes User name Yes
group The group that isassociated with thisfield definition
nameString Yes • Group name• "*PUBLIC"
Yes
defaultValue The default value string No Yes
defaultValue2 The second defaultvalue
string No Yes
displayOrder The order of thisfield within the hitlist
Integer No 1 0 — Number of fields Yes
queryOrder The order of thisfield during a query
Integer No 1 0 — Number of fields Yes
sortOrder The sort position ofthis field, if any
Integer No 0 0 — Number of fields Yes
sortType Whether thedocuments shouldbe sorted in anascending ordescending order
sortTypeString No "Ascending" • "Ascending"• "Descending"
Yes
equal Whether the equaloperator should beavailable
compString No "Default" • "Yes"• "No"• "Default"
Yes
notEqual Whether the notequal operatorshould be available
compString No "No" • "Yes"• "No"• "Default"
Yes
lessThan Whether the lessthan operatorshould be available
compString No "No" • "Yes"• "No"• "Default"
Yes
ItOrEqual Whether the lessthan or equaloperator should beavailable
compString No "No" • "Yes"• "No"• "Default"
Yes
Appendixes to the Administration Guide 399

Table 166: Attributes for the fieldInfo object under the field object (continued)
Attributes Description DataType Required Default value Possible values Updateable
greaterThan Whether the greaterthan operatorshould be available
compString No "No" • "Yes"• "No"• "Default"
Yes
gtOrEqual Whether the greaterthan or equaloperator should beavailable
compString No "No" • "Yes"• "No"• "Default"
Yes
in Whether the inoperator should beavailable
compString No "No" • "Yes"• "No"• "Default"
Yes
notIn Whether the not inoperator should beavailable
compString No "No" • "Yes"• "No"• "Default"
Yes
between Whether thebetween operatorshould be available
compString No "No" • "Yes"• "No"• "Default"
Yes
notBetween Whether the notbetween operatorshould be available
compString No "No" • "Yes"• "No"• "Default"
Yes
like Whether the likeoperator should beavailable
compString No "No" • "Yes"• "No"• "Default"
Yes
notLike Whether the notlike operator shouldbe available
compString No "No" • "Yes"• "No"• "Default"
Yes
default Determineswhether the fieldcontains a defaultvalue when the useropens the folder
yesnoString No "No" • "Yes"• "No"
Yes
fixed Determineswhether the valuethat you type in thedefault fields canbe changed by theuser
compString No "No" • "Yes"• "No"
Yes
required Determineswhether the usermust specify asearch value for thefield in order totype a query
yesnoString No "No" • "Yes"• "No"
Yes
400 Content Manager OnDemand for Multiplatforms: Administration Guide

Table 166: Attributes for the fieldInfo object under the field object (continued)
Attributes Description DataType Required Default value Possible values Updateable
viewTitle Determineswhether OnDemandclient programsdisplay the fieldname on the titlebar of the viewingwindow when theuser selects adocument forviewing
yesnoString No "No" • "Yes"• "No"
Yes
internal Determineswhether OnDemandlists the displayedvalues or thedatabase values forthe folder searchfield
yesnoString No "No" • "Yes"• "No"
Yes
wildCard Determineswhether OnDemanduses wildcards withfield search values
wildString No "Append" • "Prepend"• "Append"• "Both"• "None"
Yes
min For integer,DecFloat(16),DecFloat(34),decimal, date, andtime fields,determines theminimum value thatthe user can type inthe search field
Integer No Based on datatype Yes
max For integer,DecFloat(16),DecFloat(34),decimal, date, andtime fields,determines themaximum valuethat the user cantype in the searchfield
Integer No Based on datatype Yes
decimalPrecision Specifies thedecimal precisionfor decimal values
Integer No 2 Nonnegative integer Yes
dateDisplayFormat Determines theformat that is usedto display dates andtimes
string No "" Date or time format Yes
dateDefaultFormat Determines theformat thatOnDemand uses tovalidate date andtime values
string No "" Date or time format Yes
dateInterval For date and timefields, determineswhether theinterval refers tothe next or lastinterval
intervalString No "Last" • "Last"• "Next"
Yes
Appendixes to the Administration Guide 401

Table 166: Attributes for the fieldInfo object under the field object (continued)
Attributes Description DataType Required Default value Possible values Updateable
dateIntLength For date and timefields, determinesthe number of unitsthat OnDemanduses to compute adefault searchrange
integer No 0 Nonnegative integer Yes
dateIntType Units of measurefor dateIntLength
intTypeString No "Days" • "Days"• "Months"• "Years"• "Hours"• "Minutes"• "Seconds"
Yes
Table 167: Attributes for the nls object under the folder object
Attributes Description DataType Required Defaultvalue
Possible values Updateable
task The task to perform onthis object.
taskString No "add" • "add"• "update"
No
language The language employedby this object.
langString Yes • "English"• "French"• "German"• "Italian"• "Japanese"• "Norwegian"• "Portuguese
(Brazil)"• "Spanish"• "Chinese
(Simplified)"• "Chinese
(Traditional)"• "Danish"• "Finnish"• "Swedish"• "Korean"• "Dutch"• "Arabic"• "Czech"• "Greek"• "Hebrew"• "Croatian"• "Hungarian"• "Polish"• "Russian"• "Slovakian"• "Slovenian"• "Turkish"
No
402 Content Manager OnDemand for Multiplatforms: Administration Guide

Table 168: Child objects under the nls object under the folder object
Name Minimum number Maximum number Deleteable Updateable
field 0 128 No Yes
Table 169: Attributes for the field object under the nls object
Attributes Description DataType Required Defaultvalue
Possiblevalues
Updateable
name Name of the folder field. stringLeng1-60 Yes No
langName Name of the folder fieldwritten in the NLSlanguage.
stringLeng1-60 Yes Yes
langDescription Description of the folderfield written in the NLSlanguage.
stringLeng1-120 No Yes
Table 170: Attributes for the folderNls object under the folder object
Attributes Description DataType Required Defaultvalue
Possible values Updateable
task The task to perform on thisobject.
taskString No "add" • "add"• "delete"• "update"
N/A
language The language employed bythis object.
langString Yes • "English"• "French"• "German"• "Italian"• "Japanese"• "Norwegian"• "Portuguese
(Brazil)"• "Spanish"• "Chinese
(Simplified)"• "Chinese
(Traditional)"• "Danish"• "Finnish"• "Swedish"• "Korean"• "Dutch"• "Arabic"• "Czech"• "Greek"• "Hebrew"• "Croatian"• "Hungarian"• "Polish"• "Russian"• "Slovakian"• "Slovenian"• "Turkish"
No
Appendixes to the Administration Guide 403

Table 170: Attributes for the folderNls object under the folder object (continued)
Attributes Description DataType Required Defaultvalue
Possible values Updateable
langName Name of the folder written inthe NLS language.
stringLeng1-60 Yes Yes
langDescription Description of the folderwritten in the NLS language.
stringLeng1-120 No Yes
Note:
1. You must specify either a user or a group, however, you cannot specify both.2. The default values for displayOrder and queryOrder are based on their position within the file.
Remember: The "_ALL" value can only be used in an ARSXML export operation.
Cabinet objectTable 171: Attributes for the cabinet object
Attributes Description DataType Required Defaultvalue
Possiblevalues
Updateable
name Name of thecabinet
nameString Yes • Cabinetname
• "_ALL"
Yes
description A description ofthe cabinet
descString No "" Yes
Table 172: Child objects under the cabinet object
Name Minimum number Maximum number Deleteable Updateable
folder 0 Unbounded Yes No
permission 0 Unbounded Yes Yes
cabinetNls 0 26 Yes Yes
Table 173: Attributes for the folder object under the cabinet object
Attributes Description DataType Required Defaultvalue
Possiblevalues
Updateable
name Name of thefolder
nameString Yes No
task The task toperform on thisobject
taskString No "add" • "add"• "delete"
N/A
Table 174: Attributes for the permission object under the cabinet object
Attributes Description DataType Required Defaultvalue
Possiblevalues
Updateable
user Name of the user nameString No • User name No
404 Content Manager OnDemand for Multiplatforms: Administration Guide

Table 174: Attributes for the permission object under the cabinet object (continued)
Attributes Description DataType Required Defaultvalue
Possiblevalues
Updateable
group Name of thegroup
nameString No • Groupname
• "*PUBLIC"
No
task The task toperform on thisobject
taskString No "add" • "add"• "delete"• "update"
N/A
accessAuthority Whether this useror group hasaccess authority
yesnoString No "No" • "Yes"• "No"
Yes
adminAuthority Whether this useror group hasadministrativeauthority
yesnoString No "No" • "Yes"• "No"
Yes
Table 175: Attributes for the cabinetNls object under the cabinet object
Attributes Description DataType Required Default value
Possible values Updateable
task The task to perform on thisobject.
taskString No "add" • "add"• "delete"• "update"
N/A
Appendixes to the Administration Guide 405

Table 175: Attributes for the cabinetNls object under the cabinet object (continued)
Attributes Description DataType Required Default value
Possible values Updateable
language The language employed bythis object.
langString Yes • "English"• "French"• "German"• "Italian"• "Japanese"• "Norwegian"• "Portuguese
(Brazil)"• "Spanish"• "Chinese
(Simplified)"• "Chinese
(Traditional)"• "Danish"• "Finnish"• "Swedish"• "Korean"• "Dutch"• "Arabic"• "Czech"• "Greek"• "Hebrew"• "Croatian"• "Hungarian"• "Polish"• "Russian"• "Slovakian"• "Slovenian"• "Turkish"
No
langName Name of the cabinet writtenin the NLS language.
stringLeng1-60 Yes Yes
langDescription Description of the cabinetwritten in the NLS language.
stringLeng1-120 No Yes
Remember: The "_ALL" value can only be used in an ARSXML export operation.
Hold objectTable 176: Attributes for the hold object
Attributes Description DataType Required Defaultvalue
Possiblevalues
Updateable
name Name of the hold nameString Yes • Hold name• "_ALL"
Yes
description A description ofthe hold
descString No "" Yes
406 Content Manager OnDemand for Multiplatforms: Administration Guide

Table 177: Child objects under the hold object
Name Minimum number Maximum number Deleteable Updateable
permission 0 Unbounded Yes Yes
holdNls 0 26 Yes Yes
Table 178: Attributes for the permission object under the hold object
Attributes Description DataType Required Defaultvalue
Possiblevalues
Updateable
user Name of a userthat can view andmaintain this hold
nameString Yes "" • User name No
group Name of thegroup that canview andmaintain this hold
nameString Yes "" • Groupname
No
task The task toperform on thisobject
taskString No "add" • "add"• "delete"• "update"
Yes
adminAuthority Whether this useror group hasadministrativeauthority
yesnoString No "No" • "Yes"• "No"
Yes
accessAuthority Whether this useror group hasaccess authority
yesnoString No "No" • "Yes"• "No"
Yes
Table 179: Attributes for the holdNls object under the hold object
Attributes Description DataType Required Defaultvalue
Possible values Updateable
task The task to perform on thisobject.
taskString No "add" • "add"• "delete"• "update"
N/A
Appendixes to the Administration Guide 407

Table 179: Attributes for the holdNls object under the hold object (continued)
Attributes Description DataType Required Defaultvalue
Possible values Updateable
language The language employed bythis object.
langString Yes • "English"• "French"• "German"• "Italian"• "Japanese"• "Norwegian"• "Portuguese
(Brazil)"• "Spanish"• "Chinese
(Simplified)"• "Chinese
(Traditional)"• "Danish"• "Finnish"• "Swedish"• "Korean"• "Dutch"• "Arabic"• "Czech"• "Greek"• "Hebrew"• "Croatian"• "Hungarian"• "Polish"• "Russian"• "Slovakian"• "Slovenian"• "Turkish"
No
langName Name of the hold written inthe NLS language.
stringLeng1-60 Yes Yes
langDescription Description of the holdwritten in the NLS language.
stringLeng1-120 No Yes
Remember: The "_ALL" value can only be used in an ARSXML export operation.
ODF recipient objectTable 180: Attributes for the odfRecipient object
Attributes Description DataType Required Defaultvalue
Possiblevalues
Updateable
name Name of therecipient
stringLen1-60 Yes No, seenewName
newName New value forname of therecipient
stringLen1-60 No Yes
description Description of therecipient
stringLen120 No Yes
408 Content Manager OnDemand for Multiplatforms: Administration Guide

Table 180: Attributes for the odfRecipient object (continued)
Attributes Description DataType Required Defaultvalue
Possiblevalues
Updateable
fullName Full name of therecipient
stringLen60 No Yes
title Title of therecipient
stringLen60 No Yes
email E-mail address ofthe recipient
stringLen254 No Yes
addr1 Address line 1 ofthe recipient
stringLen60 No Yes
addr2 Address line 2 ofthe recipient
stringLen60 No Yes
addr3 Address line 3 ofthe recipient
stringLen60 No Yes
addr4 Address line 4 ofthe recipient
stringLen60 No Yes
dept Department stringLen60 No Yes
building Building stringLen60 No Yes
account Accountinformation
stringLen60 No Yes
room Room stringLen60 No Yes
banner Banner page? boolean No "false" • "true"• "false"
Yes
header1 Header line 1 stringLen60 No Yes
header2 Header line 2 stringLen60 No Yes
header3 Header line 3 stringLen60 No Yes
header4 Header line 4 stringLen60 No Yes
header5 Header line 5 stringLen60 No Yes
header6 Header line 6 stringLen60 No Yes
header7 Header line 7 stringLen60 No Yes
header8 Header line 8 stringLen60 No Yes
ODF recipient list objectTable 181: Attributes for the odfRecipientList object
Attributes Description DataType Required Defaultvalue
Possiblevalues
Updateable
name Name of therecipient list
stringLen1-60 Yes No, seenewName
newName New name of therecipient list
stringLen1-60 No Yes
Appendixes to the Administration Guide 409

Table 181: Attributes for the odfRecipientList object (continued)
Attributes Description DataType Required Defaultvalue
Possiblevalues
Updateable
description A description ofthe recipient list
stringLen120 No Yes
Table 182: Child objects under the odfRecipientList object
Name Minimum number Maximum number Deleteable Updateable
odfRecipient 0 Unbounded Yes No
Table 183: Attributes for the odfRecipient object under the odfRecipientList object
Attributes Description DataType Required Defaultvalue
Possiblevalues
Updateable
task The task to performon this object
taskStringAD
No "add" • "add"• "delete"
N/A
name The name of arecipient that is amember of thisrecipient list
stringLen1-60
Yes No
ODF report ID objectTable 184: Attributes for the odfReportId object
Attributes Description DataType Required Defaultvalue
Possiblevalues
Updateable
name Name of thereport ID
stringLen1-60 Yes No
applicationGroup Application groupassociated withthis report ID
stringLen1-60 No No
application Applicationassociated withthis report ID
stringLen1-60 No No
status Status statusString No "Active" • "Active"• "Inactive"
Yes
reference Reference string stringLen0-254 No Yes
ODF distribution object with report bundle objectTable 185: Attributes for the odfDistribution object
Attributes Description DataType Required Defaultvalue
Possible values Updateable
name Name of thedistribution
stringLen1-60 Yes No
recipient Recipient for thedistribution
stringLen1-60 Yes No
410 Content Manager OnDemand for Multiplatforms: Administration Guide

Table 185: Attributes for the odfDistribution object (continued)
Attributes Description DataType Required Defaultvalue
Possible values Updateable
status Status statusString No "Active" • "Active"• "Inactive"
Yes
location Location locationString No "Print" • "Print"• "File"• "Print Notify"• "E-mail"• "File Notify"• "None"
Yes
transform Transform transformString No "None" • "None"• "UTF8"• "PDF"
Yes
fileNameLocation
Filename location stringLen254 No
exitInfo Exit programinformation
stringLen400 No Yes
custVariables Customer variables stringLen55 No Yes
account Account stringLen60 No Yes
cwIndicator Continue or waitindicator
cwIndString No • "Continue"• "Wait"
Yes
maxTries Maximum number ofattempts to continueprocessing thedistribution
integer0-1440 No Yes
manifest Create manifest manifestString No "Manifest" • "Manifest in JES spoolfile dataset"
• "No Manifest"• "Manifest"
Yes
reportBreak Report break yesnoString No "Yes" • "Yes"• "No"
Yes
distMethod Distribution method distMethod String No "Loaded" • "Loaded"• "External"• "All Ready"• "Time of Print"• "Time of Day"
Yes
time Time associated withdistribution method
stringLen5 No Yes
destination Destination stringLen19 No Yes
writer Writer name stringLen8 No Yes
forms Forms stringLen8 No Yes
formDef Form definition name stringLen8 No Yes
pageDef Page definition name stringLen8 No Yes
job Job name stringLen8 No Yes
class Class stringLen1 No Yes
Appendixes to the Administration Guide 411

Table 185: Attributes for the odfDistribution object (continued)
Attributes Description DataType Required Defaultvalue
Possible values Updateable
FCB FCB stringLen4 No Yes
UCS UCS stringLen4 No Yes
outputLimit Maximum number oflines of output
outputLimitValue No "Unlimited" • "1" to "1677215"• "Unlimited"
Yes
Table 186: Child objects under the odfDistribution object
Name Minimum number Maximum number Deleteable Updateable
odfReportBundle 0 Unbounded Yes Yes
Table 187: Attributes for the odfReportBundle object under the odfDistribution object
Attributes Description DataType Required Defaultvalue
Possible values Updateable
task The task to performon this object
taskString No "add" • "add"• "update"• "delete"
N/A
reportId Report ID stringLen1-60 Yes Yes
sequence The sequence numberof this report bundlewithin the distribution
positiveInteger Yes No, see newsequence
newSequence New value forsequence number
positiveInteger No Yes
reportBuild Report build rptBuildString No "Full" • "Full"• "Query"
Yes
status Status statusString No "Active" • "Active"• "Inactive"
Yes
waitIndicator Wait or ignoreindicator
wiIndString No "Wait" • "Wait"• Do Not Wait"
Yes
location Location locationStringBundle No • "Print"• "File"• "Print Notify"• "E-mail"• "File Notify"• "None"
Yes
transform Transform transformStringBundle No "None" • "None"• "UTF8"• "PDF"
Yes
fileNameLocation FileName location stringLen254 No
exitInfo Exit programinformation
stringLen400 No Yes
custVariables Customer variables stringLen55 No Yes
destination Destination stringLen19 No Yes
writer Writer name stringLen8 No Yes
412 Content Manager OnDemand for Multiplatforms: Administration Guide

Table 187: Attributes for the odfReportBundle object under the odfDistribution object (continued)
Attributes Description DataType Required Defaultvalue
Possible values Updateable
forms Forms stringLen8 No Yes
formDef Form definition name stringLen8 No Yes
pageDef Page definition name stringLen8 No Yes
job Job name stringLen8 No Yes
class Class stringLen1 No Yes
FCB FCB stringLen4 No Yes
UCS UCS stringLen4 No Yes
burst Burst yesnoString No "No" • "Yes"• "No"
Yes
flash Flash stringLen6 No Yes
copies Number of copies integerl-255 No "1" Yes
COPYM COPYM stringLen8 No Yes
outputLimit Maximum number oflines of output
outputLimitValue No "Unlimited" Yes
Table 188: Child objects under the odfReportBundle object
Name Minimum number Maximum number Deleteable Updateable
sql 0 1 Yes Yes
Table 189: Attributes for the sql object under the odfReportBundle object
Attributes Description DataType Required Defaultvalue
Possiblevalues
Updateable
task The task to performon this object
taskString No "add" • "add"• "update"• "delete"
N/A
character data The character datathat represents theSQL string to selectrecords for this reportbundle
stringLen30000 No Yes
Data field limitationsTable 190: Data field limitations
Datatype Minimum length Maximum length
dbString 1 18
dbString2 1 254
defString 0 254
descString 0 120
Appendixes to the Administration Guide 413

Table 190: Data field limitations (continued)
Datatype Minimum length Maximum length
dvString 1 254
emailString 0 254
fileExtString 1 20
formString 1 20
indexParm 0 32,700
nameString 1 60
nameStringUG (Users and Groups) 1 128
passwordString 0 128
phoneString 0 32
postProcString 0 1000
queueString 1 60
routingString 0 24
valString 0 8
userMiscString 0 60
Troubleshooting
LoggingContent Manager OnDemand provides the ability to log many different items, errors, and actions forapplication groups, users, and server events. Every application group has some message logging turnedon by default, and the number of default items that are logged depends on the level of the administrativeclient in use. To reduce the amount of unwanted logging information, for any new application group, verifythat only those items needing to be logged are checked on the Message Logging tab.
The System Log or System Logging Facility is the main message and error logging interface and repository.It is a standard Content Manager OnDemand application group with a folder that can be viewed from aContent Manager OnDemand client like any other data. Therefore, if you try to log the actions of theSystem Log itself, you are essentially logging your logging.
For example, if you log the Index Add command, which generates message #103, you see a vastmultiplication of messages as the initial action is logged, and then the logging of the action is logged, thenthe logging of the logging of the action is logged, and so on, into an infinite loop.
Under normal circumstances, no message logging should be turned on for the System Log applicationgroup. If you need to turn on message logging for the System Log application group for troubleshootingpurposes, you should turn it off again as soon as possible.
Identifying a load ID from a user folder queryTo determine what load a document is from, given a particular hit list, you can use the ARSDOC querycommand.
Use the —D parameter to obtain the document handle information. This gives you some of the followinginformation to query the system log to find the exact load ID:
• Primary node ID
414 Content Manager OnDemand for Multiplatforms: Administration Guide

• Secondary node ID• Part of the doc_name
To get the exact load ID for a specific index, use the ARSDOC query command with the option -I. For theQUERY command function, option -I appends the load ID to the end of each output record. The load ID isseparated from the database field values by a delimiter, that is, the comma character. You can specify adifferent delimiter with the -e parameter. To use the -I parameter, you must have permission to accessthe system log application group and folder. If the load ID is not found in the system log, the string LoadID could not be found is appended to the end of the output record.
Restriction: You cannot specify the -H, -n, or -N parameters when you specify the -I parameter.
Important: Searching the system log can be time-consuming, depending on the number of records storedin the system log. The system log is searched for each document that matches the query.
Troubleshooting scenario 1: Cannot find data when using a mm/dd/yy date format insearch
SymptomsYou defined a new application or application group that contains date fields formatted as %d/%m/%Y,however, I am only able to find the data when I use a date search format of mm/dd/yy.
CausesThe display format of the field in your folder definitions needs to be changed.
Resolving the problemChange the display format to: %d/%m/%Y.
Troubleshooting scenario 2: Error occurred during the CD-ROM mastering process
SymptomsYou received this error message during the CD-ROM mastering process:
Unable to open original file for staging.
CausesIt is possible that the Content Manager OnDemand client was updated on your PC, but the new masterINI file was not transferred.
Resolving the problemCopy the new master INI file over to your PC.
Troubleshooting scenario 3: ARSLOAD daemon cannot load an application group withmultiple applications
SymptomsYou created a Content Manager OnDemand load daemon to automate the load process for an applicationgroup that contains multiple applications. However, the arsload daemon cannot load an application group.
CausesThe Application Name for your Content Manager OnDemand Load Data services is set to None.
Resolving the problemVerify your load information in the Content Manager OnDemand Configurator V10.1 for Windows:
1. Open the Content Manager OnDemand Configurator V10.1.
Appendixes to the Administration Guide 415

2. Click Services.3. Right click OnDemand Load Data (ARCHIVE). Assuming your OnDemand instance is ARCHIVE.4. Open its Properties and select Load Information.5. Deselect the None option in the Application Name field. You must deselect the None option in the
Application Name field to allow the Content Manager OnDemand load daemon to process anapplication group with multiple applications.
Troubleshooting scenario 4: The load process is slowed down by a .lst file
SymptomsThe loading of Adobe Acrobat PDF files are slowed down due to a .lst file. The file name should besimilar to AdobeFnt05.lst.
CausesIt is possible that you have not installed the Adobe fonts on your server. The .lst file that you see is amapping of fonts from the documents. With each load, this file grows and maps the fonts within the newload object. If you install the Adobe fonts on the server, the .lst file maps to those server fonts and doesnot continue to grow. The only exception is when it adds those fonts that it could not map to.
Resolving the problemYou can either delete the .lst font file regularly, or install the Adobe fonts on the server so that they areonly mapped once.
Troubleshooting scenario 5: You received the error that connection cannot be establishedwhile using ARSLOAD
SymptomsWhile running the ARSLOAD command, you received this error:
connection cannot be established
CausesA possible cause is that when you specified the —h parameter for ARSLOAD, you did not set the instancename as ARCHIVE and set the port number to 1445 or 0.
Resolving the problemIf the only parameter that you specify for ARSLOAD is the —h parameter, make sure that you set theinstance name as ARCHIVE and set the port number to 1445 or 0.
Troubleshooting scenario 6: ARSLOAD cannot find the TIFF images when using genericindex
SymptomsWhile running ARSLOAD to automatically load data into Content Manager OnDemand, each load fails.
CausesIt is possible that you did not specify full file names. The generic index file format requires that youspecify absolute file names, that is, full file names.
Resolving the problemMake sure that you specify absolute file names. If you cannot make this happen, try to run separateARSLOAD command daemons for each download directory, and start them up by making sure that theyare invoked from the download directory in which they monitor.
416 Content Manager OnDemand for Multiplatforms: Administration Guide

Troubleshooting scenario 7: Buffer overrun problem while exporting application groups toa local server or another Content Manager OnDemand server
Symptoms
The Content Manager OnDemand administrative client encounters a buffer overrun problem whileexporting application groups to a local server or another Content Manager OnDemand server if theapplication identifier field contains large numbers of Displayed Value/Database Value mappings, forexample, 2619 pairs.
You might receive one or both of the following error messages:
Buffer overrun detected!
or
Unable to add the application group application group name.A return code of 'Exists' was returned from the server.
CausesThe current buffer is not large enough to contain so many internal and external mappings. This is alimitation in the export functionality.
Resolving the problem
You can use one of the following workarounds:
• Limit the number of the application group field mappings.• Use the XML batch administration program ARSXML to export the application groups. For instructions,
see Chapter 26, “Importing and exporting administrative objects through an XML interface,” on page167.
Troubleshooting scenario 8: The ARSLOAD program with a generic indexer does not loadmy AFP documents with inline resources correctly
Symptoms
You used ARSLOAD with a generic indexer to load a data file with more than one AFP document and aresource group, confirmed that the structure of your data file was correct, and received a confirmation onyour console that the documents were successfully loaded into your Content Manager OnDemand server.However, when you retrieve the documents from the Content Manager OnDemand server, you received a1303 error message indicating that some resource was missing.
Causes
The primary cause of this problem is that the resources must be in a separate file when you use ARSLOADwith a generic indexer to load the AFP documents into your DB2 Content Manager OnDemand server.Using ARSLOAD with a generic indexer does not allow resources to be defined inline with the documentsin the data file.
Resolving the problem
Change the extension of your data file to *.out if your data file has another extension, because ARSLOADsearches for a data file with the *.out extension.
Ensure that you have a lowercase extension (for example, *.out, *.ind, *.res) for all the files thatARSLOAD needs to load. Also ensure that the GROUP_FILENAME in *.ind is identical to the name of yourdata file.
Appendixes to the Administration Guide 417

If you use ARSLOAD with a generic indexer, you can load several AFP documents (multiple BDT/EDT pairs)into your OnDemand server with just one data file. To do so, set the length and offset in your *.ind file.However, if the ACIF indexer is used, you cannot do so, because ACIF indexer allows only one data file tocontain one document (one BDT/EDT pair).
Troubleshooting scenario 9: Why Content Manager OnDemand does not support queryresult modifier SQL clauses
Symptoms
Several commands and APIs are available that allow a user to submit raw SQL for querying the ContentManager OnDemand application group data tables. However, because the submitted SQL is not parsed orvalidated, certain query result modifiers are not supported. These query result modifiers include but arenot limited to:
• ORDER BY• READ ONLY• FETCH FIRST• OPTIMIZE FOR• SORT ASC/DESC• GROUP BY
Causes
This happened because of the overall design of the Content Manager OnDemand application group.OnDemand uses database segments, multiple tables, and even multiple queries in order to increase theperformance of queries and lessen the workload of the database. SQL queries against the applicationgroup data tables are first limited to just the tables that meet the database segment constraints. This isaccomplished by using a start and stop date for each data table. That list of tables is used to generate afull-select with UNION ALL SQL statement. This generated SQL string is limited by some restraints, suchas the maximum length of the generated SQL statement and the number of tables that are searched in asingle query. These generated SQL statements create some highly complex queries that are repeated inmultiple select statements while searching over a large range of data. Adding search result modifiers,such as ORDER BY, compounds the workload on the database.
Resolving the problem
In an attempt to reduce the work to the clients, the Content Manager OnDemand folder definitionssupport actions such as sorting, grouping, and limiting the number of rows. This approach frees thedatabase from having to perform complex query modifications that require a large amount of time tooptimize and large amounts of memory to perform.
The following is an example using the arsdoc command, where you submit an SQL query like ACCTNOLIKE ‘1001% and specify a segment date like 12/01/2004 to 12/31/2004 to Content ManagerOnDemand:
arsdoc query –u user –p whatever –f “Credit Card Statements” –i “ACCTNO LIKE ‘1001” –s “12/01/2004,12/31/2004”
The Content Manager OnDemand server uses the database segment values to determine what tablesneed to be searched. This might yield only a single table to search and the generated SQL looks like:
SELECT * FROM root.BAA20 WHERE ACCTNO LIKE ‘1001
In this case, you can append a modifier such as ORDER BY to your submitted SQL. The generated SQL issimply appended to the end of a single SELECT/WHERE statement.
418 Content Manager OnDemand for Multiplatforms: Administration Guide

In another example, extend the database segment date range to 01/01/2004-12/31/2004:
arsdoc query –u user –p whatever –f “Credit Card Statements” –i “ACCTNO LIKE ‘1001” –s “01/01/2003,12/31/2004”
The number of tables being searched increase, possibly by two tables, and the generated SQL looks like:
SELECT * FROM BAA18 WHERE ACCTNO LIKE ‘1001 UNION ALL SELECT root.BAA19.*, ‘BAA19' FROM root.BAA19 WHERE ACCTNO LIKE ‘1001 UNION ALL SELECT root.BAA20.*,'BAA20' FROM root.BAA20 WHERE ACCTNO LIKE ‘1001
This example indicates that using a modifier like ORDER BY cannot be appended directly onto eachWHERE clause. It results in invalid SQL syntax because it is included as part of each WHERE clause. ValidSQL appends it to the end of the entire full-select statement. Because Content Manager OnDemand doesnot parse the query SQL that is submitted, it is not able to append the ORDER BY modifier to the end ofthe full-select statement.
To take this example a step further, change the database segment range to 01/01/1990-12/31/2004:
arsdoc query –u user –p whatever –f “Credit Card Statements” –i “ACCTNO LIKE ‘1001” –s “01/01/1990,12/31/2004”
The number of tables might increase to a hundred or more, and the resulting SQL is too long or span toomany tables. In this case, OnDemand generates multiple full-select queries to accomplish the task, andcannot generate valid SQL across the queries and have it perform an ORDER BY for the entire result set.
In this case, Content Manager OnDemand depends on the client to modify the results. While using APIs orcommands like ARSDOC to submit SQL queries directly to Content Manager OnDemand, use just the fieldsbeing queried and always supply a segment date range. Without a segment date range supplied, all tablesin the application group are searched. After the results are returned, you can modify them accordingly.
Troubleshooting scenario 10: AFP™ file loading failed with invalid user ID or password
Symptoms
I tried to load an AFP file, but the loading failed with the following error:
"Userid or password is invalid Unable to retrieve the object >2< arsload: 11/14/05 14:58:36 Loading failed arsload: Processing failed for file >SYSD.LWMB88FC.FCMNTHYD.FCOCTDEV.2005312.13100688809.ARD<"
Causes
The reason that the loading failed is that this specific user does not have the view permission although theuser has add permission.
Resolving the problem
Grant the view permission to this user ID for loading.
Hints and tips about using an XML interface to import and export administrative objectsThis section includes some hints and tips about using an XML interface to import and exportadministrative objects.
Appendixes to the Administration Guide 419

Tip 1: Child objects must be created under parent objects
In the XML interface, it is only possible to have child objects under parent objects, not the other wayaround. For example, the following XML file example is valid:
<group name="MyGroup"> <user name="tom" /> <user name="chuck" /></group>
However, this example is not valid:
<user name="tom"> <group name="MyGroup"> </group></user>
The same is true for permissions for users and groups. They are child objects under the application groupand folder objects. For example, to add a folder that contains permission for the user Bill, the XML filemight look like this:
<folder name="MyFolder"...> <permission user="Bill" accessAuthority="Yes" viewNQAuthority="Yes" maxHits="No Limit" /> ...</folder>
Tip 2: Parsing error while running ARSXML
If you receive this error message while running ARSXML:
A parsing error occurred in file fileName, Line nnn, Column nnn :cvc-elt.1: Cannot find the declaration of element 'onDemand'.
It usually indicates that the Content Manager OnDemand schema file (ondemand.xsd) cannot be found.The Content Manager OnDemand schema file should be placed in the directory where the ContentManager OnDemand XML file resides, otherwise, the fully qualified path name should be placed in thenoNamespaceSchemaLocation element of the Content Manager OnDemand XML file.
420 Content Manager OnDemand for Multiplatforms: Administration Guide

Notices
This information was developed for products and services that are offered in the US. This material mightbe available from IBM in other languages. However, you may be required to own a copy of the product orproduct version in that language in order to access it.
IBM may not offer the products, services, or features discussed in this document in other countries.Consult your local IBM representative for information on the products and services currently available inyour area. Any reference to an IBM product, program, or service is not intended to state or imply that onlythat IBM product, program, or service may be used. Any functionally equivalent product, program, orservice that does not infringe any IBM intellectual property right may be used instead. However, it is theuser's responsibility to evaluate and verify the operation of any non-IBM product, program, or service.
IBM may have patents or pending patent applications covering subject matter described in this document.The furnishing of this document does not grant you any license to these patents. You can send licenseinquiries, in writing, to:
IBM Director of LicensingIBM CorporationNorth Castle Drive, MD-NC119Armonk, NY 10504-1785US
For license inquiries regarding double-byte character set (DBCS) information, contact the IBM IntellectualProperty Department in your country or send inquiries, in writing, to:
Intellectual Property LicensingLegal and Intellectual Property LawIBM Japan Ltd.19-21, Nihonbashi-Hakozakicho, Chuo-kuTokyo 103-8510, Japan
INTERNATIONAL BUSINESS MACHINES CORPORATION PROVIDES THIS PUBLICATION "AS IS"WITHOUT WARRANTY OF ANY KIND, EITHER EXPRESS OR IMPLIED, INCLUDING, BUT NOT LIMITED TO,THE IMPLIED WARRANTIES OF NON-INFRINGEMENT, MERCHANTABILITY OR FITNESS FOR APARTICULAR PURPOSE. Some jurisdictions do not allow disclaimer of express or implied warranties incertain transactions, therefore, this statement may not apply to you.
This information could include technical inaccuracies or typographical errors. Changes are periodicallymade to the information herein; these changes will be incorporated in new editions of the publication.IBM may make improvements and/or changes in the product(s) and/or the program(s) described in thispublication at any time without notice.
Any references in this information to non-IBM websites are provided for convenience only and do not inany manner serve as an endorsement of those websites. The materials at those websites are not part ofthe materials for this IBM product and use of those websites is at your own risk.
IBM may use or distribute any of the information you provide in any way it believes appropriate withoutincurring any obligation to you.
Licensees of this program who wish to have information about it for the purpose of enabling: (i) theexchange of information between independently created programs and other programs (including thisone) and (ii) the mutual use of the information which has been exchanged, should contact:
IBM Director of LicensingIBM CorporationNorth Castle Drive, MD-NC119Armonk, NY 10504-1785US
© Copyright IBM Corp. 1993, 2018 421

Such information may be available, subject to appropriate terms and conditions, including in some cases,payment of a fee.
The licensed program described in this document and all licensed material available for it are provided byIBM under terms of the IBM Customer Agreement, IBM International Program License Agreement or anyequivalent agreement between us.
The client examples cited are presented for illustrative purposes only. Actual performance results mayvary depending on specific configurations and operating conditions.
Information concerning non-IBM products was obtained from the suppliers of those products, theirpublished announcements or other publicly available sources. IBM has not tested those products andcannot confirm the accuracy of performance, compatibility or any other claims related to non-IBMproducts. Questions on the capabilities of non-IBM products should be addressed to the suppliers ofthose products.
Statements regarding IBM's future direction or intent are subject to change or withdrawal without notice,and represent goals and objectives only.
This information contains examples of data and reports used in daily business operations. To illustratethem as completely as possible, the examples include the names of individuals, companies, brands, andproducts. All of these names are fictitious and any similarity to actual people or business enterprises isentirely coincidental.
COPYRIGHT LICENSE:
This information contains sample application programs in source language, which illustrate programmingtechniques on various operating platforms. You may copy, modify, and distribute these sample programsin any form without payment to IBM, for the purposes of developing, using, marketing or distributingapplication programs conforming to the application programming interface for the operating platform forwhich the sample programs are written. These examples have not been thoroughly tested under allconditions. IBM, therefore, cannot guarantee or imply reliability, serviceability, or function of theseprograms. The sample programs are provided "AS IS", without warranty of any kind. IBM shall not beliable for any damages arising out of your use of the sample programs.
Each copy or any portion of these sample programs or any derivative work must include a copyright noticeas follows:
© (your company name) (year).Portions of this code are derived from IBM Corp. Sample Programs.© Copyright IBM Corp. _enter the year or years_.
TrademarksIBM, the IBM logo, and ibm.com are trademarks or registered trademarks of International BusinessMachines Corp., registered in many jurisdictions worldwide. Other product and service names might betrademarks of IBM or other companies. A current list of IBM trademarks is available on the web at"Copyright and trademark information" at www.ibm.com/legal/copytrade.shtml.
Adobe, the Adobe logo, PostScript, and the PostScript logo are either registered trademarks ortrademarks of Adobe Systems Incorporated in the United States, and/or other countries.
Linux is a registered trademark of Linus Torvalds in the United States, other countries, or both.
Microsoft, Windows, Windows NT, and the Windows logo are trademarks of Microsoft Corporation in theUnited States, other countries, or both.
Java and all Java-based trademarks and logos are trademarks or registered trademarks of Oracle and/orits affiliates.
UNIX is a registered trademark of The Open Group in the United States and other countries.
Other company, product, and service names may be trademarks or service marks of others.
422 Notices

Terms and conditions for product documentationPermissions for the use of these publications are granted subject to the following terms and conditions.
Applicability
These terms and conditions are in addition to any terms of use for the IBM website.
Personal use
You may reproduce these publications for your personal, noncommercial use provided that all proprietarynotices are preserved. You may not distribute, display or make derivative work of these publications, orany portion thereof, without the express consent of IBM.
Commercial use
You may reproduce, distribute and display these publications solely within your enterprise provided thatall proprietary notices are preserved. You may not make derivative works of these publications, orreproduce, distribute or display these publications or any portion thereof outside your enterprise, withoutthe express consent of IBM.
Rights
Except as expressly granted in this permission, no other permissions, licenses or rights are granted, eitherexpress or implied, to the publications or any information, data, software or other intellectual propertycontained therein.
IBM reserves the right to withdraw the permissions granted herein whenever, in its discretion, the use ofthe publications is detrimental to its interest or, as determined by IBM, the above instructions are notbeing properly followed.
You may not download, export or re-export this information except in full compliance with all applicablelaws and regulations, including all United States export laws and regulations.
IBM MAKES NO GUARANTEE ABOUT THE CONTENT OF THESE PUBLICATIONS. THE PUBLICATIONS AREPROVIDED "AS-IS" AND WITHOUT WARRANTY OF ANY KIND, EITHER EXPRESSED OR IMPLIED,INCLUDING BUT NOT LIMITED TO IMPLIED WARRANTIES OF MERCHANTABILITY, NON-INFRINGEMENT,AND FITNESS FOR A PARTICULAR PURPOSE.
IBM Online Privacy StatementIBM Software products, including software as a service solutions, (“Software Offerings”) may use cookiesor other technologies to collect product usage information, to help improve the end user experience, totailor interactions with the end user or for other purposes. In many cases no personally identifiableinformation is collected by the Software Offerings. Some of our Software Offerings can help enable you tocollect personally identifiable information. If this Software Offering uses cookies to collect personallyidentifiable information, specific information about this offering’s use of cookies is set forth below.
This Software Offering does not use cookies or other technologies to collect personally identifiableinformation.
If the configurations deployed for this Software Offering provide you as customer the ability to collectpersonally identifiable information from end users via cookies and other technologies, you should seekyour own legal advice about any laws applicable to such data collection, including any requirements fornotice and consent.
For more information about the use of various technologies, including cookies, for these purposes, seeIBM’s Privacy Policy at www.ibm.com/privacy and IBM’s Online Privacy Statement at www.ibm.com/privacy/details the section entitled “Cookies, Web Beacons and Other Technologies” and the “IBM
Notices 423

Software Products and Software-as-a-Service Privacy Statement” at www.ibm.com/software/info/product-privacy.
Privacy policy considerationsIBM Software products, including software as a service solutions, (“Software Offerings”) may use cookiesor other technologies to collect product usage information, to help improve the end user experience, totailor interactions with the end user or for other purposes. In many cases no personally identifiableinformation is collected by the Software Offerings. Some of our Software Offerings can help enable you tocollect personally identifiable information. If this Software Offering uses cookies to collect personallyidentifiable information, specific information about this offering’s use of cookies is set forth below.
This Software Offering does not use cookies or other technologies to collect personally identifiableinformation.
If the configurations deployed for this Software Offering provide you as customer the ability to collectpersonally identifiable information from end users via cookies and other technologies, you should seekyour own legal advice about any laws applicable to such data collection, including any requirements fornotice and consent.
For more information about the use of various technologies, including cookies, for these purposes, SeeIBM’s Privacy Policy at http://www.ibm.com/privacy and IBM’s Online Privacy Statement at http://www.ibm.com/privacy/details the section entitled “Cookies, Web Beacons and Other Technologies” andthe “IBM Software Products and Software-as-a-Service Privacy Statement” at http://www.ibm.com/software/info/product-privacy.
424 Content Manager OnDemand for Multiplatforms: Administration Guide

Index
Numerics109 Cache Expiration 38110 Cache Migration 36124 Filesystem Statistics 36, 38128 ApplGrp Segment Expire 1414 DB Info Exported 15164 ApplGrp Segment Maintenance 11166 ApplGrp Segment Export 15168 ApplGrp Segment Not Available 17171 CD-ROM Manifest 322196 Cache Migration 38197 Cache Migration 36201 Concurrent Licenses 321202 Concurrent Licenses 32185 ApplGroup Unload 16387 ApplGroup Load 142, 16187 ApplGrp Load (System Migration) 15
Aaccessibility 317accessing reports 91ACIF
fieldsdefining 92
indexesdefining 92
indexing parameters 91, 92processing 138, 139resource information 92triggers 91U limits 138
active log files 4adding
application groups 86applications 86fields 96folders 86groups 79primary storage nodes 84printers 82reports 86server printers 82servers 64storage nodes 84storage sets 84users 78users to a group 80
adding storage volumes 49administrative client
About window 71adding servers 64assistants and wizards 73changing a password 65customizing 71displaying 71
administrative client (continued)excluding from the client installation package 60hardware requirements 59installing 59logging on a server 63passwords 65program properties 69report wizard 73software requirements 59splash screen 71start up parameters 69starting 63updating 61using 63wizards and assistants 73
administrative objectsexporting 167importing 167
administratorsapplication group/folder/cabinet administrator 99system administrator 99user administrator 99
advanced system administrationauthority 112native Lightweight Directory Access Protocol (LDAP)
supportEnabling LDAP authentication 127How Content Manager OnDemand works with LDAP127LDAP server requirements 127
overview 111permissions 114system administration 117user types 111
AFP dataconverting to line data 297indexing information 91processing 138, 139resources 138, 139viewing information 91
annotation group permissions table (ARSANN) 330annotation permission 107annotations 66Application group composite index table (ARSAGINDEX) 329application group data table 358application group field alias table (ARSAGFLDALIAS) 329application group field table (ARSAGFLD) 328application group object 371application group permissions table (ARSAGPERMS) 330application group table (ARSAG) 326application group to folder field mapping table (ARSAG2FOL)328application group/folder administrator 100application group/folder/cabinet administrator 99application groups
access permission 107adding 86, 88
425

application groups (continued)administrator 99administrator permission 107annotation permission 107closing tables 293collecting statistics 11concepts 102defining 86, 88, 134, 145, 153document permission 107documents
maintaining 36, 38expiration processing 14, 18, 38, 271fields
defining 89FORM parameter 256FORMS parameter 261importing migrated index data 18importing migrated indexes 17index data
maintaining 11, 14, 15, 17logical views permission 107maintenance 11, 14, 15, 17, 36, 38messages 11, 14, 15, 17, 36, 38migrating to table spaces 293migration processing 15, 17, 18, 36, 271overview 102permissions 89, 107query restriction 107storage management 88table spaces, migrating to 293tables, closing 293
application object 380application table (ARSAPP) 331applications
adding 86, 90AFP data 91concepts 103DATASET parameter 257, 261defining 86, 90, 134, 146, 154fields
defining 92indexes
defining 92indexing parameters 91, 92load information 93miscellaneous options 93overview 103resource information 92triggers 91
archived log filesDB2 4
ARS_ADSMbackup command 144
ARS_ARCHIVE_LOGPATH parameter 20ARS_DB2_DATABASE_DRIVE parameter 19ARS_LOGFILE_SIZE parameter 5ARS_LOGNUMBER parameter 5ARS_PRIMARY_LOG_PATH parameter 4ARS_PRIMARY_LOGPATH parameter 20ARS_TMP parameter 19ARS.CFG file
active log files 4ARS_ARCHIVE_LOGPATH parameter 20ARS_DB2_DATABASE_DRIVE parameter 19
ARS.CFG file (continued)ARS_LOG_NUMBER parameter 5ARS_LOGFILE_SIZE parameter 5ARS_PRIMARY_LOG_PATH parameter 4ARS_PRIMARY_LOGPATH parameter 20ARS_TMP parameter 19database configuration 205database log files 4DB2 log files 4importing migrated index data 19, 20log files 4primary log files 4
ARSADMINdeleting a report 163importing migrated index data 20migration processing 20reference 187unloading a report 163
ARSAFPDAFP files 195commands 195description 195examples 196parameters 195purpose 195syntax 195
ARSAG (application group table) 326ARSAG2FOL (application group to folder field mapping table)328ARSAGFLD (application group field table) 328ARSAGFLDALIAS (application group field alias table) 329ARSAGINDEX (application group composite index table) 329ARSAGPERMS (application group permissions table) 330ARSANN (annotation table) 330ARSAPP (application table) 331ARSAPPUSR (user logical views table) 333ARSCAB (cabinet table) 333ARSCAB2FOL (cabinet to folder mapping table) 334ARSCABPERMS (cabinet permissions table) 334ARSDATE
reference 199ARSDB
backup command 143Oracle, using 214reference 205using with Oracle 214
ARSDFBDT (report bundle definition table) 348ARSDFCRT (report ID table) 350ARSDFDCT (distribution definition table) 343ARSDFDRT (distribution request table) 344ARSDFDST (Document Status Table) 345ARSDFLIS (recipient list table) 347ARSDFPPT (print processor table) 345ARSDFUOT (recipient/list table) 347ARSDOC
reference 217arsdoc command
parameters 233ARSFOL (folder table) 335ARSFOLFLD (folder field table) 336ARSFOLFLDUSR (folder user fields table) 336ARSFOLPERMS (folder permissions table) 337ARSGROUP (group table) 338ARSJESD
426

ARSJESD (continued)reference 255
ARSLOADDownload for z/OS 256, 261reference 259running 135, 150, 157
ARSLOAD (load table) 341ARSLOAD.CFG file 135ARSMAINT
collecting statistics 11deleting imported migrated indexes 20expiration processing 13, 20messages 11, 13, 14migration processing 14Oracle, using 277reference 271using with Oracle 277
ARSNAMEQ (named query table) 342ARSNODE (node table) 342ARSPRT (printer table) 350ARSPRTOPTS (printer options table) 351ARSPRTUSR (printer user table) 351ARSRES (resources table) 352ARSRPT
parameters 279ARSSEG (segment table) 352ARSSET (storage set table) 354ARSSLU
reference 283ARSSOCKD
description 285examples 286notes 288parameters 285purpose 285stopping 285syntax 285
ARSSTASHreference 289
ARSSTASH commandsexamples 289
ARSSUPPORT utility 318ARSSYS (system parameters table) 355ARSTBLSP
reference 293ARSUSER (user table) 356ARSUSRGRP (users in groups table) 358ARSUSRGRPID (user group ID table) 358ARSUUPDT
exit 261report specification archive definition exit 261user exit 261
ARSXAFPreference 297
ARSXLINEreference 301
ARSXMLreference 305
assistants and wizards 73authority
create application groups 100create cabinets 100create folders 100create groups 100
authority (continued)create holds 100create users 100
Bbackup and recovery
database 5, 29, 143, 205reports and resources 57table spaces 29
backup image filesDB2 29
batch system administrationCommon problems during installation 169installation verification 168installing 168prerequisites 168
buffer pools 4
Ccabinet administrator 99cabinet object 404cabinet permissions table (ARSCABPERMS) 334cabinet table (ARSCAB) 333cabinet to folder mapping table (ARSCAB2FOL) 334cabinets
administrator 99concepts 104overview 104
cache storageexpiration processing 271migration processing 271
CD creation manifestmessages 322reviewing 322
clientdefault server printer 93
clientsconnecting to instances 184
cloudoverview 55storage, managing 55
code page 187collecting statistics 11column delimiter 189commands
adding documents 217AFP data, viewing 297ARSADMIN 187ARSDATE 199ARSDB 205ARSDOC 217ARSJESD 255ARSLOAD 259ARSMAINT 271ARSRPT 279ARSSLU 283ARSSTASH 289ARSTBLSP 293ARSXAFP 297ARSXLINE 301ARSXML 305
427

commands (continued)compress 187creating reports 279data, loading 259decompress 187deleting data 271deleting documents 217documents, adding, deleting, getting, printing, updating217documents, loading 259expiring data 271exporting an XML file 305getting documents 217how to read a syntax diagram 179import 187importing an XML file 305loading data, documents, reports 259printing documents 217reports, loading 259retrieve 187store 187unload 187updating documents 217viewing AFP data 297XML file, exporting 305XML file, importing 305
compressionARSADMIN program 187
concurrent usersmonitoring 321
configuration parameters 4connecting to instances 184constructor, document 121containers 2Content Manager OnDemand
date formats 199internal date format 199
Content Manager OnDemand objectend of object 173object attributes 172Start of Object 172
Content Manager OnDemand objects 171Content Manager OnDemand XML files
creatingfor delete and export 175
conventionsgroup name 101user name 99
copying items 72create application groups authority 100create cabinets authority 100create folders authority 100create groups authority 100create users authority 100creating an XML file 170
Ddata
adding 217deleting 12, 37, 217deleting a report 163, 187Download for z/OS 135, 165, 256, 261estimating storage space for 9, 134
data (continued)expiration processing 12, 37image data 145importing migrated indexes 17loading 133, 145, 153, 259migration processing 14, 17, 35printing 217restarting a load process 161retrieving 187, 217storage space for 9storing 187TIFF image data 145unloading 163, 187updating 217user exit programs 165
databaseactivating 205adding index data 141backup 29, 143, 205collecting statistics 11column delimiter 189concepts 1connecting to instances 184creating 205deleting index data 12, 17estimating size 9expiration processing 12, 17, 271exporting tables 205fields
defining 89importing migrated index data 17, 187importing tables 205logging 30maintenance 11migration processing 14, 17, 187, 271monitoring 23, 25performance 23, 25recovery 30reorganizing 205segment table 141size of 9statistics 11, 205updating 217
database managerconcepts 1
database tables 325DATASET parameter
applications 257, 261ARSLOAD program 257, 261
dateContent Manager OnDemand internal format 199formats of 199internal format 199obtaining Content Manager OnDemand internal format199
DB2ARS_ARCHIVE_LOGPATH parameter 20ARS_DB2_DATABASE_DRIVE parameter 19ARS_LOG_NUMBER parameter 5ARS_LOGFILE_SIZE parameter 5ARS_PRIMARY_LOG_PATH parameter 4ARS_PRIMARY_LOGPATH parameter 20ARS_TMP parameter 19backup 5, 29, 143, 205
428

DB2 (continued)buffer pools 4collecting statistics 11, 205concepts 1configuration parameters 4containers 2database 1exporting tables 205importing migrated index data 19, 20importing tables 205indexes 3, 9instances 1log files 4logging 30maintenance 205monitoring 23parameters 4performance 23recovery 30recovery history file 5SMS table spaces 2, 9starting 205statistics 11stopping 205system catalog tables 3systems 1table space backup 29, 205table spaces 2, 7, 9tables 2
DB2 tablesARSDFBDT (report bundle definition table) 348ARSDFCRT (report ID table) 350ARSDFDCT (distribution definition table) 343ARSDFDRT (distribution request table) 344ARSDFDST (distribution status table) 345ARSDFLIS (recipient list table) 347ARSDFPPT (print processor table) 345ARSDFUOT (recipient/list table) 347distribution definition table (ARSDFDCT) 343distribution request table (ARSDFDRT) 344Document Status Table (ARSDFDST) 345print processor table (ARSDFPPT) 345recipient list table (ARSDFLIS) 347recipient/list table (ARSDFUOT) 347report bundle definition table (ARSDFBDT) 348report ID table (ARSDFCRT) 350
decompressARSADMIN program 187
default directoryadministrative client 72
definingapplication groups 86applications 86fields 96folders 86groups 79primary storage nodes 84printers 82reports 86server printers 82storage nodes 84storage sets 84users 78
deleting a report 163, 187
deleting index data 12, 17diagrams
syntax 179disability 317distribution definition table (ARSDFDCT) 343distribution object 410distribution request table (ARSDFDRT) 344distribution status table (ARSDFDST) 345document constructor
classes, interfaces, and methods 123exception and message handling 125filtering service 125implementation and configuration 121overview 121workflows 122
document permission 107documents in large object format
loading 144Download for z/OS
configuring ARSJESD 255transmitting data 135user exit programs 165, 255, 256
drag and drop operations 73
EEnabling LDAP authentication 127estimating storage space 134examples
ARSRTP 281instance configuration 286process usage 286start the server 286stop the server 286
exception handling 125exits
ARSUUPDT 261report specification archive definition 261
expiration of passwords 68expiration processing 12, 17, 271expired passwords 65expiring reports and TSM 12exporting administrative objects 167exporting items 72exporting tables 205external
overview 55storage, managing 55
FFDCC 324fields
application groupdefining 89
databasedefining 89
defining 89, 94folder
defining 94indexing
defining 92fields permission 106
429

file systemsdatabase 7table space 7
folder administrator 99folder field table (ARSFOLFLD) 336folder object 395folder permissions table (ARSFOLPERMS) 337folder table (ARSFOL) 335folder user fields table (ARSFOLFLDUSR) 336folders
access permission 106adding 86, 93administrator 99administrator permission 106concepts 103defining 86, 93, 147, 155fields
defining 94fields permission 106named queries permission 106overview 103permissions 94, 106, 107
FORM parameterapplication groups 256ARSLOAD program 256
FORMS parameterapplication groups 261ARSLOAD program 261
full-text indexing 3
Ggeneric indexer
parameter file 148, 156group administration 79group object 368group owner 101group table (ARSGROUP) 338groups
adding 79adding users 80assigning users 80concepts 101defining 79naming 101overview 101owner 101permissions 107
Hhints and tips
Tip 1 420Tip 2 420using an XML interface to import and exportadministrative objects 419
hold object 406holds
concepts 104overview 104
how to read a syntax diagram 179
IIBM Spectrum Protect 41ICU
ARSADMIN program 187image data
loading 145image files
index data 148importing administrative objects 167importing migrated index data 17, 187importing tables 205inactivity 69inactivity time out 67index data
about 3ACIF 138, 139adding 217column delimiter 189creating 138, 139, 148, 156deleting 12, 17, 163, 217estimating size 9expiration processing 12, 17fields
defining 92generic indexer 148, 156importing 17, 187indexes
defining 92load information 93loading 133, 145, 153, 259migration processing 14, 17resource information 92restarting a load process 161retrieving 217size of 9system catalog tables 3triggers 91updating 217
indexesdefining 92
indexing 3installing batch system administration 168installing the administrative client 59instances
-h parameter 182-I parameter 182about 182clients, connecting from 184connecting to 184database, connecting to 184programs, specifying 182starting 183stopping 183
internal date format 199
Kkeyboard 317
Llabeling storage volumes 48
430

LDAPauthentication 128, 129, 131configurations 131message examples 131
LDAP authentication 67licenses
monitoring 321line data
converting to AFP 139, 297processing 139
load table (ARSLOAD) 341load user exit 261loading data 133, 145, 153loading image data 145loading index data 133, 145, 153loading PDFs
allowed file names for 136loading reports 133loading TIFF image data 145loading user-defined data 153log files
DB2 4, 30logging 4logging on a server 65logical views permission 107logical views table (ARSAPPUSR) 333login processing 67logon as 65
Mmanifest
reviewing CD contents 322maximum password age 68messages
109 Cache Expiration 38110 Cache Migration 36124 Filesystem Statistics 36, 38128 ApplGrp Segment Expire 1414 DB Info Exported 15164 ApplGrp Segment Maintenance 11166 ApplGrp Segment Export 15168 ApplGrp Segment Not Available 17171 CD-ROM Manifest 322196 Cache Migration 38197 Cache Migration 36201 Concurrent Licenses 321202 Concurrent Licenses 32185 ApplGroup Unload 16387 ApplGroup Load 142, 16187 ApplGrp Load (System Migration) 15application groups 11, 14, 15, 17, 36, 38, 142, 161, 163CD manifests 322collecting statistics 11expiration processing 14, 38licenses 321loading data 142, 161migration processing 15, 17, 36system log 319unloading data 163
migrating data to table spaces 293migration processing 14, 17, 187, 271minimum password length 68monitoring
monitoring (continued)concurrent users 321database 23, 25DB2 23licenses 321Oracle 25performance 23, 25, 322servers 319, 323users 321
Nnamed queries permission 106named query table (ARSNAMEQ) 342naming groups 101naming users 99NLS 187node table (ARSNODE) 342
Oobjects
Content Manager OnDemand 171obtaining Content Manager OnDemand internal date format199OnDemand object
child objects 172OnDemand XML file
data model 359objects 359
OracleARSDB program, using 214ARSMAINT program, using 277managing
table space 26monitoring 25performance 25using the ARSDB program 214using the ARSMAINT program 277
Pparameters
DB2 4password settings 67passwords
ADMIN user password 99age 68built-in administrator password 99case sensitivity 67changing 65expiration 68length 65, 68login processing 67maximum password age 68minimum password length 68security user exit 68setting expiration 68settings 67specifying in ARSLOAD 261
PDFsallowed file names for 136loading 136
431

performancedatabase 23, 25DB2 23monitoring 23, 25, 322Oracle 25
permissionsabout 106application groups 89, 107concepts 106examples 107folders 94, 106overview 106strategies 110
previous indexed AFP fileloading 144
primary log files 4primary storage nodes
adding 84concepts 102defining 84overview 102
print processor table (ARSDFPPT) 345printer object 369printer options table (ARSPRTOPTS) 351printer table (ARSPRT) 350printer user table (ARSPRTUSR) 351printers
adding 82concepts 101defining 82options 93overview 101
printing documents 217private volumes 47program properties 69programs
date formats 199ICU 187instance name 182internal date format 199obtaining Content Manager OnDemand internal format199quote characters 181
Qquery restriction 107
Rrecipient list object 409recipient list table (ARSDFLIS) 347recipient object 408recipient/list table (ARSDFUOT) 347recovery
database 30DB2 recovery history file 5
removing a report 187removing storage volumes 50reorganizing the database 205report bundle definition table (ARSDFBDT) 348report bundle object 410report ID object 410
report ID table (ARSDFCRT) 350report specifications archive definition exit 261report to monitor usage 279report wizard 73report, creating from system log 279reporting utility 279reports
accessing 91adding 86, 217backup and recovery 57defining 86deleting 163, 187, 217Download for z/OS 135, 165, 256, 261estimating storage space for 134example of 91expiring 12indexing 138, 139interaction with TSM 12loading 133, 259printing 217restarting a load process 161retrieving 187, 217storing 187unloading 163, 187updating 217user exit programs 165
requirementshardware 59software 59
resources 92, 138, 139, 142resources table (ARSRES) 352restarting a load process 161retrieve
ARSADMIN program 187reviewing a CD creation manifest 322
Sscratch volumes 47security and user administration 78, 79segment table 141segment table (ARSSEG) 352server printers
adding 82concepts 101defining 82options 93overview 101
serversadding 64adding items 72copying items 72drag and drop operations 73exporting items 72logging on 65monitoring 319, 323system dashboard 323system parameters 66updating 64
SMS table spaces 2, 9start up parameters 69starting instances 183starting the administrative client 63statistics
432

statistics (continued)collecting 11, 205
stoppingARSSOCKD 285server 285
stopping instances 183storage
administration 84for reports 134management 88
storage nodesadding 84concepts 102defining 84loading data 141overview 102
storage objectsloading 141retrieving 187storing 187
storage set object 370storage set table (ARSSET) 354storage set table (ARSSYS) 355storage sets
adding 84application group
assigning to 88assigning to an application group 88concepts 102defining 84loading data 141migration processing 18overview 102System Migration application group 18
storage volumesadding 49labeling 48removing 50
storeARSADMIN program 187
syntax diagramhow to read 179
syntax diagramsreading 179
system administrator 99system catalog tables 3system control tables
annotation table (ARSANN) 330application group data table 358application group field alias table (ARSAGFLDALIAS)329application group field table (ARSAGFLD) 328application group permissions table (ARSAGPERMS)330application group table (ARSAG) 326application group to folder field mapping table(ARSAG2FOL) 328application table (ARSAPP) 331ARSAG (application group table) 326ARSAG2FOL (application group to folder field mappingtable) 328ARSAGFLD (application group field table) 328ARSAGFLDALIAS (application group field alias table)329
system control tables (continued)ARSAGINDEX (application group composite index table)329ARSAGPERMS (application group permissions table)330ARSANN (annotation table) 330ARSAPP (application table) 331ARSAPPUSR (user logical views table) 333ARSCAB (cabinet table) 333ARSCAB2FOL (cabinet to folder mapping table) 334ARSCABPERMS (cabinet permissions table) 334ARSCFSODWORK 334ARSFOL (folder table) 335ARSFOLFLD (folder field table) 336ARSFOLFLDUSR (folder user fields table) 336ARSFOLPERMS (folder permissions table) 337ARSFTIWORK 338ARSGROUP (group table) 338ARSHOLD 339ARSHOLDMAP 339ARSHOLDPERMS 340ARSHOLDWORK 340ARSLOAD (load table) 341ARSNAMEQ (named query table) 342ARSNODE (node table) 342ARSPRT (printer table) 350ARSPRTOPTS (printer options table) 351ARSPRTUSR (printer user table) 351ARSRES (resources table) 352ARSSEG (segment table) 352ARSSET (storage set table) 354ARSSYS (system parameters table) 355ARSUSER (user table) 356ARSUSRGRP (users in groups table) 358ARSUSRGRPID (user group ID table) 358cabinet permissions table (ARSCABPERMS) 334cabinet table (ARSCAB) 333cabinet to folder mapping table (ARSCAB2FOL) 334composite index table (application group compositeindex table) 329folder field table (ARSFOLFLD) 336folder permissions table (ARSFOLPERMS) 337folder table (ARSFOL) 335folder user fields table (ARSFOLFLDUSR) 336group table (ARSGROUP) 338important information 325load table (ARSLOAD) 341logical views table (ARSAPPUSR) 333named query table (ARSNAMEQ) 342node table (ARSNODE) 342overview 325printer options table (ARSPRTOPTS) 351printer table (ARSPRT) 350printer user table (ARSPRTUSR) 351resources table (ARSRES) 352segment table (ARSSEG) 352storage set table (ARSSET) 354system parameters table (ARSSYS) 355user group ID table (ARSUSRGRPID) 358user logical views table (ARSAPPUSR) 333user table (ARSUSER) 356users in groups table (ARSUSRGRP) 358
system log messages109 Cache Expiration 38
433

system log messages (continued)110 Cache Migration 36124 Filesystem Statistics 36, 38128 ApplGrp Segment Expire 1414 DB Info Exported 15164 ApplGrp Segment Maintenance 11166 ApplGrp Segment Export 15168 ApplGrp Segment Not Available 17171 CD-ROM Manifest 322196 Cache Migration 38197 Cache Migration 36201 Concurrent Licenses 321202 Concurrent Licenses 32187 ApplGrp Load (System Migration) 15application groups 11, 14, 15, 17, 36, 38CD manifests 322collecting statistics 11enabling 68expiration processing 14, 38loading data 142, 151, 159, 161migration processing 15, 17, 36monitoring 319unloading data 163user messages 321
system log user exitcache storage file system filled 273migration processing 17
System Migration application group 18system parameters
about 66annotations 66disabling passwords 67inactivity time out 67login processing 67maximum password age 68minimum password length 68password 67password age 68password expiration 68Password Expiration Notification 68password length 68password settings 67passwords 68setting 66system log 68time out 67User Login Inactivity 69userid 67
system tablesexpiration processing 271migration processing 271
systemParameters object 361systems 1
Ttable space file systems 7table spaces
about 2, 7adding space 9backup 29, 205checking space available in 9configuring 7estimating size 9
table spaces (continued)exporting 205importing 205managing 7migrating data to 293size of 9SMS 2, 7, 9space available in 9
tablesclosing 293
TIFF image dataloading 145
time out 67Tivoli Storage Manager
adding storage volumes 49administrative client 46backup and recovery 144database
backup and recovery 144halting 46labeling storage volumes 48migration processing 18overview 41private volumes 47removing storage volumes 50restarting 46scratch volumes 47starting 46stopping 46storage volumes 48–50storage, managing 41
triggersdefining 91
troubleshootinglogging 414
troubleshooting scenariosARSLOAD daemon cannot load an application group withmultiple applications 415error
Unable to open original file for staging 415PDF files do not load 136
Uunified logon 65unloading a report 163, 187update servers dialog box 64updating administrative client software 61user 99, 100user administration 78user administrator 99, 100user exits
ARSUUPDT 261Download for z/OS 165, 255, 256load user exit 261loading data 165, 255, 256migration processing 17report specification archive definition 261system log 17system log user exit 273, 320
user group ID table (ARSUSRGRPID) 358user ID
expired password 68locking out 67
434

user ID (continued)password settings 67
user logical views table (ARSAPPUSR) 333User Login Inactivity 69user object 364user table (ARSUSER) 356user-defined data
index data 156loading 153
useridcase sensitivity 67login processing 67specifying in ARSLOAD 261
usersadding 78adding to a group 80ADMIN user 99administrator 99application group/folder/cabinet administrator 99assigning to a group 80authority 100built-in administrator 99changing a password 65concepts 99defining 78failed logins 67licenses 321monitoring 321naming 99overview 99passwords 65, 67, 68permissions 106, 107system administrator 99types 99user 99user administrator 99
users in groups table (ARSUSRGRP) 358using the administrative client 63
Wwarning messages 125wizards and assistants 73
XXML
exporting 167importing 167
XML filecreating 170exporting 305importing 305
XML objectsapplication 380application group 371cabinet 404distribution 410folder 395group 368hold 406printer 369recipient 408
XML objects (continued)recipient list 409report bundle 410report ID 410storage set 370system parameters 361user 364
XML schema file 169
435

436


IBM®
SC19-3352-02