
Oracle Documaker Desktop Administration Guide 12.6.3
320
Start Oracle® Documaker Desktop Desktop Administration Guide 12.6.3 Part number: F28178-01 March 2020
-
Upload
khangminh22 -
Category
Documents
-
view
4 -
download
0
Transcript of Oracle Documaker Desktop Administration Guide 12.6.3

Start
Oracle® Documaker Desktop
Desktop AdministrationGuide
12.6.3
Part number: F28178-01
March 2020

Copyright© 2009, 2020, Oracle and/or its affiliates. All rights reserved.
The Programs (which include both the software and documentation) contain proprietary information; they are provided under a license agreement containing restrictions on use and disclosure and are also protected by copyright, patent, and other intellectual and industrial property laws. Reverse engineering, disassembly, or decompilation of the Programs, except to the extent required to obtain interoperability with other independently created software or as specified by law, is prohibited.
The information contained in this document is subject to change without notice. If you find any problems in the documentation, please report them to us in writing. This document is not warranted to be error-free. Except as may be expressly permitted in your license agreement for these Programs, no part of these Programs may be reproduced or transmitted in any form or by any means, electronic or mechanical, for any purpose.
If the Programs are delivered to the United States Government or anyone licensing or using the Programs on behalf of the United States Government, the following notice is applicable:
U.S. GOVERNMENT RIGHTS
Programs, software, databases, and related documentation and technical data delivered to U.S. Government customers are "commercial computer software" or "commercial technical data" pursuant to the applicable Federal Acquisition Regulation and agency-specific supplemental regulations. As such, use, duplication, disclosure, modification, and adaptation of the Programs, including documentation and technical data, shall be subject to the licensing restrictions set forth in the applicable Oracle license agreement, and, to the extent applicable, the additional rights set forth in FAR 52.227-19, Commercial Computer Software--Restricted Rights (June 1987). Oracle USA, Inc., 500 Oracle Parkway, Redwood City, CA 94065.
The Programs are not intended for use in any nuclear, aviation, mass transit, medical, or other inherently dangerous applications. It shall be the licensee's responsibility to take all appropriate fail-safe, backup, redundancy and other measures to ensure the safe use of such applications if the Programs are used for such purposes, and we disclaim liability for any damages caused by such use of the Programs.
The Programs may provide links to Web sites and access to content, products, and services from third parties. Oracle is not responsible for the availability of, or any content provided on, third-party Web sites. You bear all risks associated with the use of such content. If you choose to purchase any products or services from a third party, the relationship is directly between you and the third party. Oracle is not responsible for: (a) the quality of third-party products or services; or (b) fulfilling any of the terms of the agreement with the third party, including delivery of products or services and warranty obligations related to purchased products or services. Oracle is not responsible for any loss or damage of any sort that you may incur from dealing with any third party.
Oracle, JD Edwards, and PeopleSoft are registered trademarks of Oracle Corporation and/or its affiliates. Other names may be trademarks of their respective owners.

CONTENTS
Setting Up the System ................................................................................................5System Overview ........................................................................................6System Directory Structure .........................................................................9Printer Support ............................................................................................11Configuring the Operating Environment ......................................................12Setting Up Multiple Users ............................................................................13
Using Resource Libraries ..........................................................................................21Overview .....................................................................................................22Building a Resource Library Directory Structure .........................................26Creating a Resource Library .......................................................................29Selecting a Resource Library ......................................................................33Using the Library Setup Option ...................................................................34Deleting a Resource Library ........................................................................39
Customizing Your System .........................................................................................40Configuring INI Files ....................................................................................41Adding Personal Forms Lists ......................................................................43Assigning Form Sets to Users .....................................................................47Adding Form Description Lines ...................................................................51Attaching Bitmap and PDF Files .................................................................61Automatically Assigning Form Numbers .....................................................65Running Documaker Server ........................................................................71Configuring the Complete Option ................................................................72Restricting Who Can Seed the UNIQUE file ...............................................75Customizing the Form Selection Window ...................................................76Regional Date Processing in Documaker Workstation ...............................85Configuring the Routing Slip Directory ........................................................88Configuring the Routing Slip Directory ........................................................90Setting Up Timed Service Functions ...........................................................91Customizing WIP .........................................................................................105Customizing Archive ...................................................................................139Customizing the Interface ...........................................................................145Using Workstations as Print Servers ...........................................................174Setting Up Email Support ............................................................................176Inserting State Stamps and Signatures .......................................................181
Importing and Exporting Information .......................................................................184Importing and Exporting Files .....................................................................185Using the Field-only Export Option .............................................................199Setting Up Multiple Import Sessions ...........................................................205Batch Importing from a File .........................................................................206Creating a Standard Import File ..................................................................208Creating a Selective Import File ..................................................................214Importing Information Directly into Archive .................................................217Importing Global Data from Archive ............................................................218Importing Data with Forms and Sections ....................................................219
Exporting when Manually Archiving ............................................................220Creating Export Files ...................................................................................222Importing and Exporting WIP, NAFile, and POLFile Information ................226Exporting Files Created by AutoImport, AutoPrint, or AutoArchive .............234Working with XML Files ...............................................................................235Multiple User and Networking Issues ..........................................................247Bypassing Triggers when Importing Forms and Sections ...........................248Adding Form Line and Form Description Line Information ..........................249
Maintaining Your System ...........................................................................................252Handling Unknown Users ............................................................................253Changing the In Use Status ........................................................................254Setting Up Routing Slips .............................................................................255Maintaining Form Sets ................................................................................262Modifying FORM.DAT Files ........................................................................270Maintaining User Information ......................................................................275Splitting Archives .........................................................................................283
Importing and Exporting XML Files in PPS ..............................................................291Modifying INI Files .......................................................................................292Creating an XML Export File .......................................................................293Example Documaker XML File Format .......................................................296Importing a Documaker XML File ................................................................300Transforming XML Files ..............................................................................303

Chapter 1
Setting Up the System
This manual serves as a reference tool for system supervisors. It contains information on how to maintain and customize Documaker Desktop.
This chapter provides an overview of the system and contains information to help get you started configuring your operating environment, installing the software, and creating user IDs.
You will find information on...
• System Overview on page 6
• System Directory Structure on page 9
• Printer Support on page 11
• Configuring the Operating Environment on page 12
• Setting Up Multiple Users on page 13
5

System Overview
SYSTEMOVERVIEW
Documaker Desktop is the workstation-based form set entry and publishing piece of the Documaker system. Documaker is a total form set automation system which enables forms-intensive industries such as insurance, finance, utilities, and government to automate enterprise-wide forms and forms processing.
You collect the information you need for your form sets from various sources including manually entered data, system default data, archived data, and data extracted from external application systems. Documaker Desktop lets you enter that information and print complete, collated form sets on laser printers.
The system’s unique data import and export feature enhances the data entry process. The system lets you import data files that automatically fill or propagate the data onto a form’s fields. Exporting lets you extract data from Documaker Desktop for use in other applications or for import back into the system.
The system’s user interface makes data entry and forms processing easy for non-technical users. You enter basic information and Documaker Desktop displays a list of applicable forms. You then select specific form sets in which to enter data.
This illustration shows the process:
Form set
Forms Library
First, you select the forms from the Forms Library
Next, you enter the data onto the forms
The system merges and propagates the data onto the forms to complete the form set
6

System Overview
The system lets you import data from an internal or an external source and apply the data to specific forms. You can also export system data to use in other application systems or to import back into the system.
TASK FLOW
From the system’s main window, you choose File, New and enter the key field information, such as selecting a company and corresponding lines of business, for a particular form set. The system displays the list of forms applicable for that key field data.
You can then change the number of recipient copies in the forms list. Next, you enter the required variable data into each form. If multiple forms require the same field data, the system automatically propagates the data into subsequent forms.
You can print a form set once you complete data entry, or send a form set to a batch queue for printing later. When you print form sets, the system merges the data with the appropriate form template and prints the form set. The system then archives the data and the form set template separately.
Select the transaction type
Select the key fields(such as Company and Line of Business)
Select the forms
Modify recipient form copies
Enter data onto the forms
Print the forms
7

System Overview
NOTE: For detailed information on using the system’s many features, see the Documaker Desktop User Guide.
8

System Directory Structure
SYSTEMDIRECTORYSTRUCTURE
The example below illustrates the system’s directory and subdirectory structure:
\DEFLIB
\FORMS
\FMRES
\DLL
\MSTRRES
\ARC
\BDFLIB
\DATA
\DEFLIB
\EDLLIB
\FORLIB
\SAMPCO
The FMRES directory contains fonts and font information for the system along with graphic files (.LOG).
These initialization files control many system and user-level options. You can set these options for each resource library.
The MSTRRES directory can contain several resource libraries with the same structure as SAMPCO. The HPINT resource library, not shown, is also included with the system and contains internal HP fonts. You set up additional resource libraries for your company’s form sets.
The DLL directory contains the system programs and related files.
All resource libraries are stored under the MSTRRES (master resource) directory.
\FORMS
\GRPLIB
\HELP
\TABLE
\WIP
FSIUSER.INI
MEN.RES
FSISYS.INI
SAMCO.DXM
SAMCO.DXS
USER.TLX
USERINFO.DBF
USERINFO.MDX
9

System Directory Structure
When you set up your system and build your resource library, you work primarily with the MSTRRES directory structure. You modify the files and subdirectories within each resource library to implement external resources and customize your system.
MSTRRES, the resource library directory, contains various subdirectories and files that define and store system resources. Primary components of the MSTRRES directory include the FSISYS.INI and FSIUSER.INI files, the Form Set Definition file (FORM.DAT) (for legacy MRLS) and form files. You manipulate many of the subdirectories and files within this directory when you create new resource libraries.
\ARC
\BDFLIB
\DATA
\DEFLIB
\EDLLIB
\FONTLIB
DMS1.DXS
FSISYS.INI
\DMS1
\FORLIB
\FORMS
\GRPLIB
\HELP
\INPUT
\PCLINI
DMS1.DXM
In addition to the directories shown for SAMPCO, the DMS1 resource library includes the PCLINI directory. This directory contains two copies of the FSISYS.INI file; one for single step processing (FSISYS.S) and another for multi step processing (FSISYS.M). Both produce PCL output.
\TABLE
\WIP
FSIUSER.INI
MEN.RES
RUN.BAT
RUN.SH
10

Printer Support
PRINTERSUPPORT
The system supports the GDI (Graphical Device Interface) print driver (GDIW32.DLL). When you select the GDI printer type, the driver calls the print drivers installed and set up by a system supervisor. You can then select a specific printer for printing your form sets. With the GDI printer drivers, printers such as the HP5500C, HP1200C, and Xerox 4700 color printers are supported.
The system also supports the following print devices and print languages:
• PCL. Print Control Language (PCL), designed and developed by Hewlett Packard, incorporates commands in compact escape sequence codes embedded in the print data stream. The embedded command approach minimizes data transmission and command decoding overhead. PCL is used by numerous printing devices.
• AFP. Advanced Function Printing (AFP), developed by IBM for its Print Services Facility (PSF), is a print server language that generates data streams of objects. The data streams merge with print controls and system commands to generate IPDS (Intelligent Printer Data Stream). The IPDS is then sent to an IBM PSF printer.
• Metacode. Metacode, developed by Xerox, is the native language of its Centralized Printing Systems. Metacode contains code that defines printing functions to the hardware. Metacode lets you position data via page addressing and specify multiple record fonts and data orientations.
PostScript. PostScript developed by Adobe Systems, is a page description language that describes a document from a computer composition system to a raster output printing system. PostScript describes pages at a high level such as a series of abstract graphic objects.
11

Configuring the Operating Environment
CONFIGURINGTHE OPERATINGENVIRONMENT
Set up considerations differ between LAN and single user workstations. Here are some general considerations that apply to both environments:
• The system stores a resource library’s forms separate from the applicable data.
• The system stores all transaction data, including print-ready data and archived data (stored in compressed format).
CONFIGURING A SINGLE USER WORKSTATION
Independent or single user workstations do not involve communication with external peripherals other than a printer. Consequently, system configuration simply requires setting the system path (c:\dll) in your AUTOEXEC.BAT file. The installation routine completes this procedure automatically.
You can optionally configure Carbon Copy® or PC Anywhere® and your modem so your system will be accessible to external technical support personnel.
CONFIGURING A NETWORKED SYSTEM
When configuring the system for use on a LAN, keep the following considerations in mind:
• Documaker Desktop assumes that the software, the resource libraries, and form set data reside on the same storage device (hard drive).
• If you plan to use large form set libraries, select a server powerful enough to accommodate heavy input/output processing and high speed data transfer.
Perform the following tasks on your network server to configure your network system to run Documaker Desktop:
1 If you use Novell NetWare access the CAPTURE command and add NT (no tab expansion) to the command line. By adding this command you reduce the potential for problems when Documaker Desktop sends binary files to a printer. Refer to your Novell documentation for more specific information.
2 Configure Carbon Copy® or PC Anywhere® and your modem on the network to make your system operations accessible to external technical support personnel.
12

Setting Up Multiple Users
SETTING UPMULTIPLE
USERS
Setting up multiple users includes these tasks:
• Creating user IDs
• Testing the user IDs
• Creating user icons
The system provides you with two default user IDs: DOCUCORP and USER1. DOCUCORP is the system supervisor's ID and password. It lets you access all system options, including system maintenance, user ID set up, INI files, and so on. Do not disclose the DOCUCORP ID to those who are not authorized system supervisors or support technicians. USER1 is the generic user ID and password for data entry users.
NOTE: You can also customize the FSIUSER.INI file so logging on happens automatically. This may be more convenient in some situations, but keep in mind it also circumvents the security features. See Bypassing the Logon Window on page 17 for more information.
USER ID GUIDELINES
The system supervisor sets up, modifies, and deletes user IDs. You can set up user IDs either before or after you install the resource library. Consider these guidelines when you set up user IDs:
• IDs can consist of up to 64 alphanumeric characters. Each ID must be unique.
• The system segregates data by user ID, so users only have access to their own data. You can set up IDs so that supervisory personnel have access to subordinate user data. System supervisors (DOCUCORP ID) have access to all data.
• The system reserves user access level 0 (access rights) for the system supervisor functions, and levels 1 - 9 for user functions (operator access). The base system makes no distinction between access level 1 through 9.
For more information about assigning access rights, see Assigning Access
Rights on page 16.
13

Setting Up Multiple Users
CREATING USER IDS
You create user IDs for all users of the system, and use the Tool, User ID Maintenance option to add, change, or delete user IDs as necessary. Log on using the DOCUCORP ID when you use this option, then follow these steps:
1 Choose Tools, User ID Maintenance. The User ID Maintenance Program window appears.
2 Click Insert to add a new user. The User Maintenance window appears.
3 Type the new user's ID in the ID field then type the new user's full name in the Name field.
4 Type the user's password in the Password field. Asterisks (*) appear when you type the password. Then, type the password again in the Verify Password field. Again, asterisks appear when you type the password.
5 Type a number between 1 and 9 for the user access level in the Level field, and press TAB twice to skip the Security field (future use). Level zero (0) is reserved for the system supervisor.
The system lists the users you have already set up.
14

Setting Up Multiple Users
6 Click the scroll arrow next to the Report To field to display a list of users. Select the user's supervisor from the list.
NOTE: Use only the DOCUCORP ID as the supervisor ID. When performing a batch print function, users can print only their own form sets and the form sets of users reporting to them. Having all users report to DOCUCORP lets the system supervisor print all users' form sets sent to the batch print queue.
7 Click Ok to add the new user information. The system returns you to the User ID Maintenance Program window.
8 Click Save to record the new user ID information. The Save Confirmation message appears.
NOTE: To revert your most recent unsaved settings to their prior status, click Discard in the User ID Maintenance Program window. The Discard button lets you make changes to a user ID, then quickly revert to the prior settings if you change your mind.
9 Click Yes to save the new user ID information.
SETTING UP SUPERUSERS
SuperUsers have all possible access rights plus the ability to...
• Search through the user IDs by name or ID
• Import new users from another database or a text file
• Reset locked user IDs
To designate a SuperUser, make sure the user has his or her access rights set to zero (0) and has the SupportSuperUser option in the UserInfo control group in either the FSIUSER.INI or FSISYS.INI file set to Yes, as shown below:
< UserInfo >
SupportSuperUser = Yes
You should also have the Do_Logon option set as shown here:
< Enviroment >
Do_Logon = Yes
With these settings in place, the system displays an enhanced User ID Maintenance Program window with easy access to the features listed above. This window works like the standard User ID Maintenance window except there is no Save button and there is an Import button.
15
Setting Up Multiple Users
You can import from a...
• Text file. With only one user per line, the text file should have the following format:
UserID,Name,Password,ReportTo,Level
• Database file.
To use the Import button, you must add the following options in your INI file:
< UserImportFunctions >
01=;Text file;USRMAINT->USRImportText;
02=;Another UserInfo database;USRMAINT->USRImportDBF;
The format of these lines is:
XX=;Description;DLLNAME->FunctionName;
where XX is the number, Description defines the type of file to import, DLLNAM E is the name of the DLL that contains the function, which is named in FunctionName.
The import functions shown above do not have to be in the order shown, nor have the same titles, such as Text File.
For instructions on using the features in the SuperUser User ID Maintenance Program window, see Using SuperUser Access on page 278.
Assigning Access Rights
You can assign access rights to different system menus and functions by editing the MEN.RES file in system’s DLL directory. You can edit this file using any ASCII text editor. Before you edit the file, make a backup copy and assign it a name such as MEN.OLD.
Here is a excerpt from the MEN.RES file distributed with the system:
POPUP "Form&set" 170 "Formset"
BEGIN
MENUITEM "&Close" 1069 "Close document" "NULL"
SEPARATOR
.
.
.
POPUP "&Tools" 255 "Utility Programs"
BEGIN
MENUITEM "&User ID Maintenance..." 501 "USRMAINT->UMUserMaint" "User ID Maintenance" 0
SEPARATOR
The first line sets the Formset option on the menu bar. The third line sets the Close option on the Formset menu. There is no access level set for this option so the system will make it available to all users.
The second Popup line sets the Tools option on the menu bar. The first menu option is User ID Maintenance. The zero (0) at the end of this line sets the access level to zero, which typically denotes system supervisors.
16
Setting Up Multiple Users
If you set the access level for the User ID Maintenance option to three (3), users with access levels 3, 2, 1, and 0 (zero) will see this option on the menu. Users with access level 4-9 will not see this option. You can add or change access levels as necessary to meet your company’s needs.
Allowing users to modifyuser information
To allow users who have access rights from 1-9 to change their user information or the information for users who report to them, change this line in those users’ MEN.RES file:
MENUITEM "&User ID Maintenance..." 501 "USRMAINT->UMUserMaint" "User ID Maintenance Program" 0
Change the zero (0) at the end of the line to 9, or whatever level lets the User ID Maintenance option be enabled for them. For example, if managers have an access level of seven and you want managers to have access to the User ID Maintenance option, enter seven. If you leave it at zero (0), only users with that level of access can use the User ID Maintenance option.
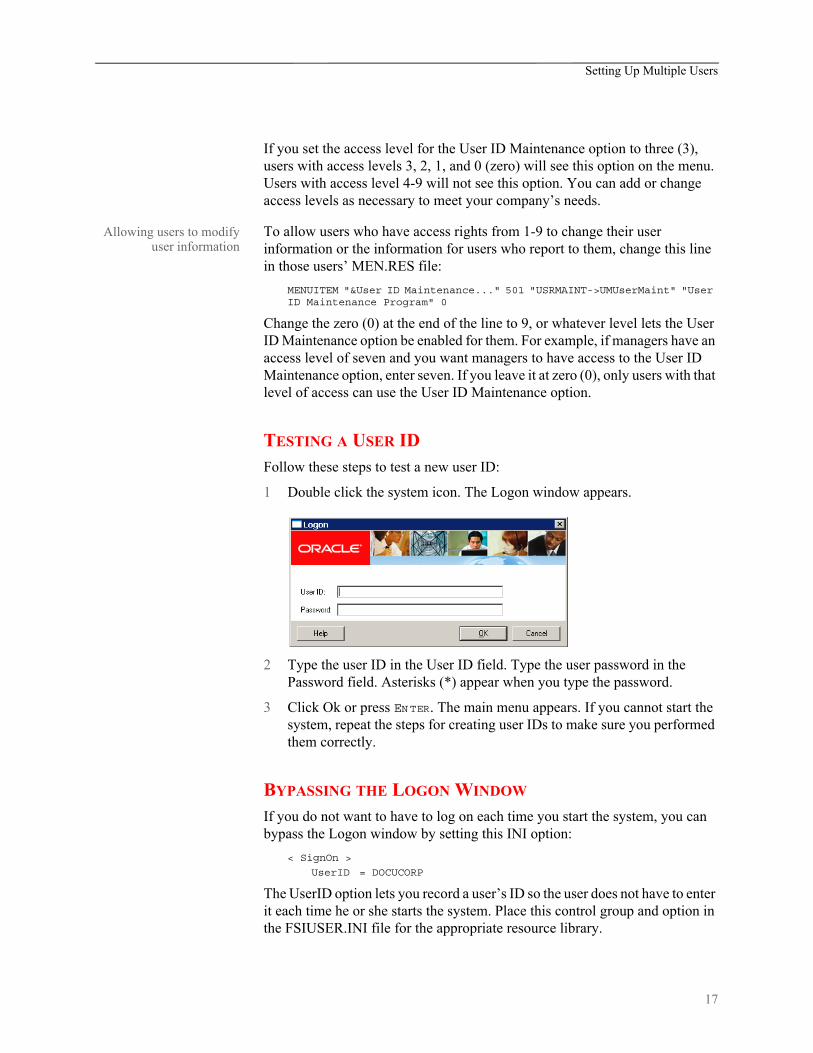
TESTING A USER IDFollow these steps to test a new user ID:
1 Double click the system icon. The Logon window appears.
2 Type the user ID in the User ID field. Type the user password in the Password field. Asterisks (*) appear when you type the password.
3 Click Ok or press ENTER. The main menu appears. If you cannot start the system, repeat the steps for creating user IDs to make sure you performed them correctly.
BYPASSING THE LOGON WINDOW
If you do not want to have to log on each time you start the system, you can bypass the Logon window by setting this INI option:
< SignOn >
UserID = DOCUCORP
The UserID option lets you record a user’s ID so the user does not have to enter it each time he or she starts the system. Place this control group and option in the FSIUSER.INI file for the appropriate resource library.
17

Setting Up Multiple Users
NOTE: Keep in mind that while this option makes it easier to log onto the system, it also circumvents the system’s security features.
USING A WINDOWS USER ID TO LOG ON
If you are using Windows security and you want to use your Windows user ID to automatically log onto the system, do so by adding this function in the FSIUSER.INI file:
< AFEProcedures >
Security = CSTW32->CSTUserFromNT
Microsoft does require you use the security features in Windows NT/2000. Keep in mind...
• Documaker Desktop user IDs can consist of up to 64 characters.
• Use the UserInfo database to assign Report To chains so you are not limited to your own WIP. Otherwise, you might not be able to view the WIP of subordinates.
NOTE: If you have overridden the login hook with custom code, you may be able to provide the Report To chain via some other mechanism. If, however, you want Documaker Desktop to handle it, use the UserInfo database.
SETTING THE STARTUP MODE
You can use command line options to have individual users start up in entry, WIP, or archive/retrieval mode. You can also use this option to set the startup mode:
< Control >
EntryMode = WIP (or RETRIEVE)
The default is Entry. If you use the EntryMode option and omit the command line options, you will not have to reset user icons when you install an upgrade.
NOTE: The command line options (/mode=wip or /mode=retrieve) override this option.
Caching FAP Files
If your users are networked together using shared resources, you can increase workstation performance by adding the following INI option:
< Control >
CacheFAPFiles = 100
18

Setting Up Multiple Users
This example tells the system to cache up to 100 frequently-used FAP files. By caching these files, users can retrieve the forms from memory instead of from across the network. You will see the greatest performance gain in situations where users are re-using the same forms with the same sections. Caching is disabled by default.
NOTE: The number of sections you cache affects available memory. If you set the cache too high, you reduce the amount of memory available for processing. Experiment with different settings to see which setting works best for you.
CREATING USER ICONS
After you create a user ID for each user, you can create a desktop icon for each user. The steps below assume that you installed the system on a network and no icons exist on the end user’s desktop.
If you installed the system on a single user workstation, instead of a network, a Documaker Desktop program group should already exist. In this case, begin with Step 2 below, to create separate icons for each user.
Follow these instructions to create a user icon:
1 Create an icon for the system on the user’s desktop. Refer to your operating system documentation for specific information.
2 Open the properties window for each system icon you create. Use the information in the table below to complete the fields in the Properties window.
Repeat these steps for each user.
STORING USER INFORMATION IN ANOTHER DATABASE
By default, the system stores user information in xBase format. You can, however, store user information in SQL or another database format. For example, to use SQL via an ODBC connection to store user IDs, here is how you would set up your INI file:
< DBHandler:ODBC >
Debug = Yes
InstallFunc = SQInstallHandler
InstallMod = SQW32
CreateIndex = No
CreateTable = Yes
System Program name Target directory
Windows 32-bit
fap\dll\afemnw32.exe fap\mstrres\(resource library name)
19

Setting Up Multiple Users
UserID = sa
Passwd = password
Qualifier = dms1
Server = wipdata
Use these options to specify the database type:
The DBTable:USERINFOSQL control group defines the USERINFOSQL table. This is the custom SQL table the system will create if it does not already exist:
< DBTable:USERINFOSQL >
DBHandler = ODBC
UniqueIDTag = UNIQUEIDTAG
UniqueTag = IDTAG
DefaultTag = UNIQUEIDTAG
Debug = Yes
If you are using ODBC, the File option should specify the name of the table in the database to use. USERINFOSQL is the custom SQL table that will be created if not present.
< UserInfo >
File = USERINFOSQL
SupportSuperUser = Yes
Use these options to import user IDs from a default xBase userinfo.dbf file, a comma-delimited text file, or an SQL table:
< UserImportFunctions >
01 = ;Text file;USRMAINT->USRImportText;
02 = ;Another UserInfo database;USRMAINT->USRImportDBF;
03 = ;Another database using ODBC;USRMAINT->USRImportODBC; \DBTable:UserInfo_1
Note that the 01 option specifies the name of the table you are importing.
Option Description
Qualifier Enter the name of the database that will hold the table.
Server Enter the name of the ODBC connection you made to connect to the database.
20

Chapter 2
Using Resource Libraries
A resource library is a set of customized resources used to create and process form sets. You can use multiple resource libraries and you can create your own resource libraries using an existing library, such as SAMPCO, as a model.
This chapter discusses:
• Overview on page 22
• Building a Resource Library Directory Structure on page 26
• Creating a Resource Library on page 29
• Selecting a Resource Library on page 33
• Using the Library Setup Option on page 34
• Deleting a Resource Library on page 39
21

Overview
OVERVIEW When you set up a master resource library, you tell the system where to look for necessary files and directories. You can also use these instructions to access different resource libraries or resource library components. This is advantageous if your library contains a large amount of resources.
This illustration shows a typical setup where the system accesses several resource libraries. For example, many insurance agents often use one resource library for each company for which they underwrite policies. Resource libraries let you better organize, store, and track resources.
RESOURCE LIBRARY COMPONENTS
The system's directory structure contains directories and files which store and control resources. The basic building blocks of the system are form directories, storage directories, and configuration files.
Form directories store the resources the system uses to produce on-line and printable forms. Form directories include FORMS, DEFLIB, HELP, and TABLE. Storage directories are databases which contain temporary or permanently saved data files. Storage directories include WIP for temporary storage before form completion, and ARC for permanently archived data.
The configuration files, FORM.DAT, FSISYS.INI, and FSIUSER.INI, tell the system how to use resources. Here is an illustration of a resource library's major components:
Resource
Company
Resource
Resource
Company
Company
Documaker Desktop
22

Overview
FORM DIRECTORIES The main component of any resource library is forms. Forms contain viewable and printable sections and graphics. Forms and their components are contained in these directories: DEFLIB, FORMS, HELP, and TABLE.
• DEFLIB - contains the form set definition (FORM.DAT), and all the font files used during forms creation, form set production, and form set printing.
• FORMS - stores FAP and LOG files. FAP (section) files define page layout, static fields, and variable fields. LOG files contain graphics used on forms. You create FAP files using Documaker Studio or Image Editor, or get them from an approved forms provider.
• HELP and TABLE - contain databases of help and table information. When creating forms, the forms developer attaches help and table information to specific variable fields to assist the user during form set production.
When you receive the section and related files, copy them into the appropriate resource library directory so they become part of the resource library. See Implementing Sections on page 31 for more information.
Resource Library
Form Directories
Storage Directories
Configuration Files
\DEFLIB
\HELP
\TABLE
\ARC
\WIP
FORM.DAT
FSISYS.INI
FSIUSER.INI
\FORMS
23

Overview
STORAGE DIRECTORIES After users enter form data into form sets, the system provides these storage directories for the data: WIP (work-in-process) and ARC (archive).
• WIP - contains temporary form data. There are times when a user is not able to complete a form in one sitting. In these instances, the user can save form data to the WIP directory, then reopen and complete the form at a later time.
• ARC - stores data from completed and printed form sets. Users can retrieve and view archived form data, but they cannot edit it.
CONFIGURATION FILES You can easily configure the system to meet your company’s needs using these configuration files:
• FORM.DAT (form set definition table) - defines the sections that comprise the forms and the forms that comprise the form sets. The FORM.DAT file identifies the library to which sections belong, the section groupings within a form, and the form and section options (types). The forms designer usually creates the FORM.DAT file.
• FSISYS.INI and FSIUSER.INI - lets you customize the system for your company or individual users. You can configure the INI files in each resource library to use different system options with different libraries. For example, you may want to use the data importing and exporting functions with one library, but not with others.
RECEIVING LIBRARIES FROM OTHER SOURCES
If your company gets forms and libraries from outside sources, you may include their representatives in your implementation team. The implementation team shares the responsibility for providing resource files and preparing the operating environment. Usually forms providers and software vendors build the library information files necessary for the system. Users perform setup activities to prepare their environment for the libraries provided.
24

Overview
Users
Software Vendors Forms Providers
Documaker Desktop
25

Building a Resource Library Directory Structure
BUILDING ARESOURCE
LIBRARYDIRECTORYSTRUCTURE
This example illustrates the structure of the MSTRRES directory, the master resource library directory. Understanding the resource library directory structure in relation to the system should make building a resource library easier to follow.
MSTRRES DIRECTORY
MSTRRES, the master resource library directory, contains your custom resource libraries. You perform most of the library implementation activities in the MSTRRES directory. Your MSTRRES directory may also contain other predefined resource libraries created specifically for your company.
\DLL
\MSTRRES
These initialization files control many system and user-level options. You can set these options for each resource library.
The MSTRRES directory can contain several resource libraries with the same structure as SAMPCO.You set up additional resource libraries for your company’s form sets.
The DLL directory contains the system programs and related files.
All resource libraries are stored under the MSTRRES (master resource) directory.
\ARC
\BDFLIB
\DATA
\DEFLIB
\EDLLIB
\FORLIB
\SAMPCO
\FORMS
\GRPLIB
\HELP
\TABLE
\WIP
FSIUSER.INI
MEN.RES
FSISYS.INI
SAMCO.DXM
SAMCO.DXS
USER.TLX
USERINFO.DBF
USERINFO.MDX
26

Building a Resource Library Directory Structure
SAMPCO Directory
The SAMPCO directory is a sample resource library. You can use the files and subdirectories in SAMPCO as a model for additional form or resource libraries. A description of selected SAMPCO subdirectories and files follows:
• ARC - This directory contains an empty archive database definition file the system uses to correctly archive information users enter into the system. The directory contains the files APPIDX.DFD, CATALOG.DAT, CATALOG.MDX, and ARCHIVE.CAR. These files define all data fields in the archive database. Do not change these files.
• DEFLIB - This directory may contain actual font files used during the forms creation process and form production. DEFLIB contains font cross reference files (*.FXR), and a downloadable font spool file that the system sends to the printer. The system uses the font files to ensure that forms and form sets appear correctly on-line and when printed.
The DEFLIB directory may contain the FORM.DAT, which specifies how individual forms are grouped into form sets in legacy MRL.
• FORMS - This directory contains a sample forms library. Each file located in this directory stores information about a form used by the system. The FORMS directory stores the actual form and graphics that appear on screen during form production and form set printing. Forms can be created using Documaker Studio or legacy Image Editor, or can be produced by an approved forms provider.
• HELP - This directory contains help files specific to the forms you create and store in your resource library. Help directory files consist of help database files (DBF) and help index files (MDX). These files store and track the help information attached to specific form fields during forms creation.
• TABLE - This directory contains table files specific to the forms you create and store in your resource library. Table directory files consist of table database files (DBF) and table index files (MDX). These files store and track the table information attached to specific form fields during forms creation.
• WIP - This directory stores form data a user designates as WIP. When users save forms to WIP for the first time, the system generates two database files, WIP.DBF and WIP.MDX. The system uses these files to store and track form sets saved to WIP.
Here is a description of some of the important files in a master resource directory
27

Building a Resource Library Directory Structure
• FORM.DAT - This is the form set definition file used in legacy MRLS. FORM.DAT defines the organization of sections within forms, and the organization of forms within form sets. The FORM.DAT file identifies the library, to which sections belong, the section groupings within a form, and the form and section options. The FORM.DAT file also specifies the recipients of each section, and the number of recipient copies. This file resides in the DEFLIB directory.
• FSISYS.INI - This file is the system configuration file for each resource library. You modify this file to enable or disable import and export functions. See Customizing Your System on page 40, for more information.
• FSIUSER.INI - This file is the company library configuration file for each resource library. You modify this file to specify how users perform certain operations such as archiving or printing within a company resource library.
28

Creating a Resource Library
CREATING ARESOURCE
LIBRARY
As the system supervisor, you may be responsible for implementing resource libraries for your organization. In most cases, you use a separate resource library for each logical grouping of form sets. For instance, in the insurance market, you would probably create a resource library for each company for which you underwrite policies.
As defined previously, SAMPCO is a sample resource library, which you can use as a model for the additional resource libraries you create. SAMPCO is available for download from Oracles Technology Network
http://www.oracle.com/technetwork/documentation/insurance-097481.html
To create a new MRL, you can simply create the appropriate directory structure for the new library and place the various forms and other files into the appropriate directories. You can do this using operating system commands, such as md, or a file utility program, such as Windows Explorer. New workspaces can be created using Oracle Documaker Studio. Please see the Oracle Documaker Studio User guide for details on workspace creation.
NOTE: The examples below assume that you are familiar with basic operating system commands for creating directories and copying files. If you need additional instruction, please refer to your operating system manual.
Follow these instructions to create a new resource library:
1 From the command line, go to the MSTRRES directory. For example, you could enter:
cd\mstrres
2 From the MSTRRES directory, create a new directory for your new resource library. For example, you could enter md newlib to create a new resource library called newlib.
3 Go to your new directory and create the same subdirectories you see under the SAMPCO directory. For example, if you named your new resource library newlib, your new directory structure would look like this:
29

Creating a Resource Library
4 Copy the APPIDX.DFD file from the ARC subdirectory of SAMPCO to the ARC subdirectory in your new resource library. For example, you could enter:
copy c:\mstrres\sampco\arc\ appidx.dfd c:\mstrres\newlib\arc
5 If you received your form library from a forms provider, make sure you also received the FSISYS.INI and FSIUSER.INI files. If you did not receive the files, copy the FSISYS.INI and FSIUSER.INI files from the SAMPCO directory into your new resource library. For example, you could enter these commands:
copy c:\mstrres\sampco\fsisys.ini c:\mstrres\newlibcopy c:\mstrres\sampco\fsiuser.ini c:\mstrres\newlib
Renaming INI File Library References
If you copied the FSIUSER.INI file from the SAMPCO resource library, all references in the file point to the SAMPCO subdirectory. You must change these references so the system will know where to get the information it needs.
You can make these changes several ways:
• Using the Library Setup option
• Manually changing the references in a text editor
\ARC
\BDFLIB
\DATA
\DEFLIB
\FORLIB
\FORMS
\NEWLIB
\MSTRRES
Create these directories under the new resource library directory you created.
All resource libraries are stored under the MSTRRES (master resource) directory.
\GRPLIB
\HELP
\TABLE
\WIP
30

Creating a Resource Library
For information on using the Library Setup option, see Adding or Changing
Libraries on page 34.
To manually change the references, use the search and replace option available in most text editors to rename the subdirectory references. You must modify all FSIUSER.INI files of each resource library you create so the system correctly accesses the resources within your resource library.
Follow these steps to manually rename INI file library references:
1 Open the FSIUSER.INI file in your new resource library using a text editor.
2 Use the search and replace feature of your text editor to change all SAMPCO references to your resource library name. For example, if you named the new resource library newlib, you would search for SAMPCO and replace with newlib.
IMPLEMENTING SECTIONS
The next step in creating your resource library is to copy your resource files (sections, graphics, fonts, tables, help files) to the appropriate directory. Make sure you place each resource in the appropriate directory so that the system can find them. If you are unsure where to place certain files, contact your forms provider. This table lists the resource library directories, their component file types, and a description.
This… Changes to…
[MasterResource] [MasterResource]
FormDef = [CONFIG:SAMPCO] FormDef =
FormDef = [CONFIG:newlib] FormDef =
Directory File Types Description
FORMS .FAP files.LOG files
Files which comprise the sections and graphics which appear on screen during data entry.
DEFLIB FORM.DAT
Font files
.FXR files
Defines the organization of sections within forms, and the organization of forms within form sets.
Font files used during section creation and printing. These can be single fonts (FNT files) or a downloadable spool file used when printing.
Font cross-reference files.
HELP .DBF files.MDX files
Help database files associated with specific forms.Index file used for tracking and using help files.
TABLES .DBF files.MDX files
Table database files associated with specific forms.Index file used for tracking and using table files.
31

Creating a Resource Library
SETTING UP USER ICONS
The final step in creating your resource library is to set up icons for each user. You must create a separate icon for each resource library created. See Creating
User Icons on page 19, for more information.
UPDATING A MASTER RESOURCE LIBRARY
When updating a master resource library (MRL), first make all users who are using the older version of the MRL exit the system.
32
Selecting a Resource Library
SELECTING ARESOURCE
LIBRARY
Selecting a master resource library lets you choose the resources you want to use. When you select a resource library, you configure your system setting to use the resources within the library. The SAMPCO workspace is available for download from Oracle Technology Network.
NOTE: Access to this menu option depends on your user security level as specified during user ID setup.
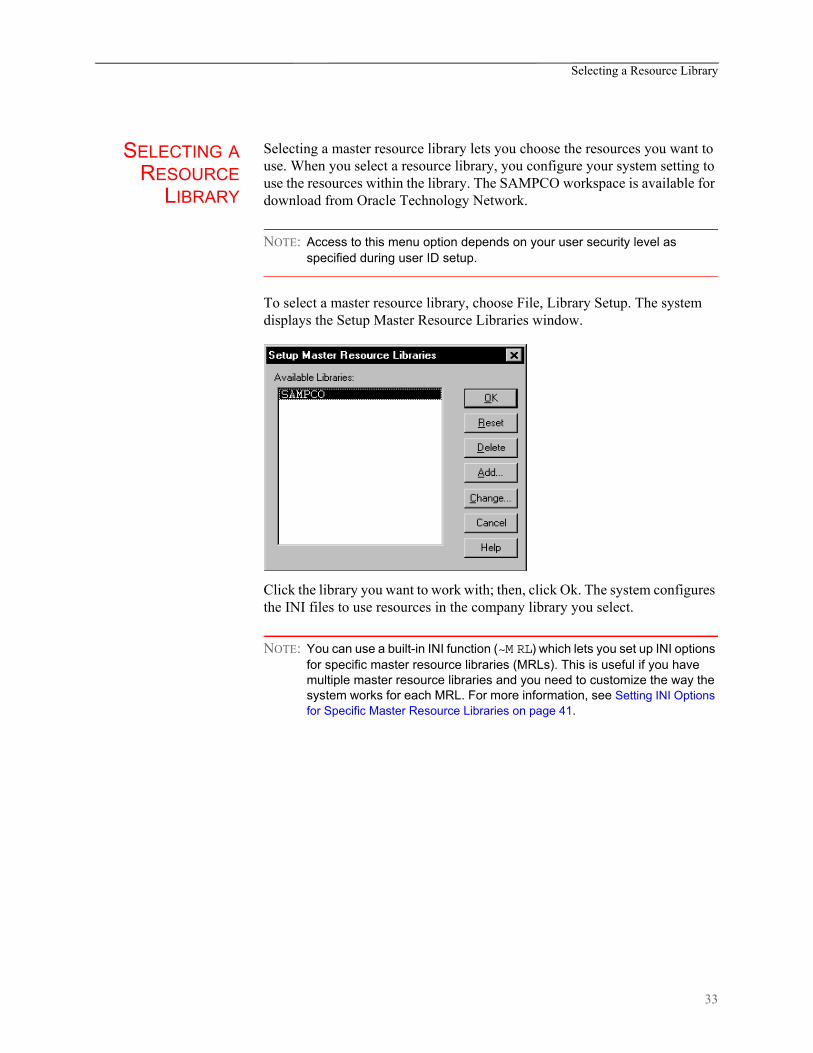
To select a master resource library, choose File, Library Setup. The system displays the Setup Master Resource Libraries window.
Click the library you want to work with; then, click Ok. The system configures the INI files to use resources in the company library you select.
NOTE: You can use a built-in INI function (~M RL) which lets you set up INI options for specific master resource libraries (MRLs). This is useful if you have multiple master resource libraries and you need to customize the way the system works for each MRL. For more information, see Setting INI Options for Specific Master Resource Libraries on page 41.
33

Using the Library Setup Option
USING THELIBRARY SETUP
OPTION
If you modified the FSIUSER.INI file when you built your resource library, you do not need to use the File, Library Setup option at this time. However, you can use this option if you later choose to change directory paths or file names.
By using the File, Library Setup option, you can tell the system how to locate and use the resources contained in your resource library. This option lets you modify the FSIUSER.INI file.
With the Library Setup option, you can add or remove a library, or change the directory paths and file settings for a library. Access to this option depends on the security level assigned to individual users during user ID setup.
NOTE: The Library Setup option is available only when all sections and forms are closed.
ADDING OR CHANGING LIBRARIES
Using the library setup options you can add a customized resource library or change the existing library path and file settings.
To add or change a library, follow these steps:
1 Choose File, Library Setup. The Setup Master Resource Libraries window appears.
2 Click the library you want to work with; then, do one of the following:
To Do This
Create a library Click Add.
Change a library Click the library you want to change; then click Change.
34
Using the Library Setup Option
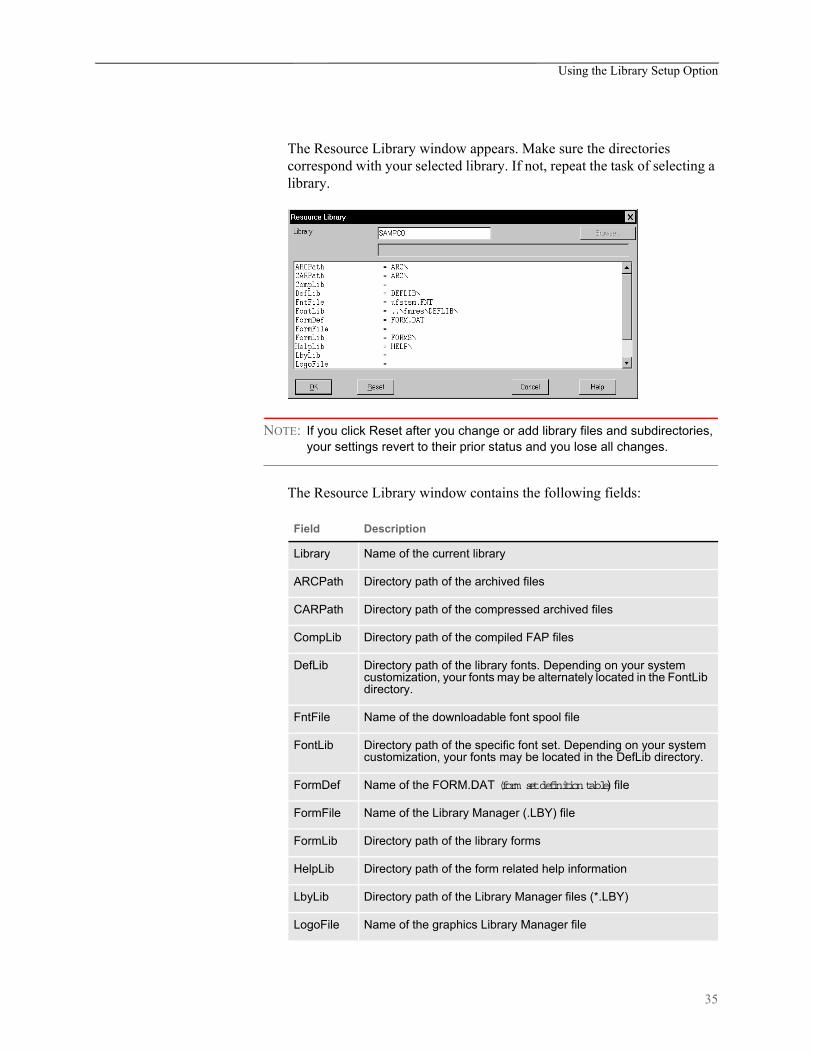
The Resource Library window appears. Make sure the directories correspond with your selected library. If not, repeat the task of selecting a library.
NOTE: If you click Reset after you change or add library files and subdirectories, your settings revert to their prior status and you lose all changes.
The Resource Library window contains the following fields:
Field Description
Library Name of the current library
ARCPath Directory path of the archived files
CARPath Directory path of the compressed archived files
CompLib Directory path of the compiled FAP files
DefLib Directory path of the library fonts. Depending on your system customization, your fonts may be alternately located in the FontLib directory.
FntFile Name of the downloadable font spool file
FontLib Directory path of the specific font set. Depending on your system customization, your fonts may be located in the DefLib directory.
FormDef Name of the FORM.DAT (form set definition table) file
FormFile Name of the Library Manager (.LBY) file
FormLib Directory path of the library forms
HelpLib Directory path of the form related help information
LbyLib Directory path of the Library Manager files (*.LBY)
LogoFile Name of the graphics Library Manager file
35

Using the Library Setup Option
3 Type the name of your new library, or change the library name in the Library field.
NOTE: If you know the various directories and file names you want to change, you can click the applicable field and type the new path or file name in the entry field. If you rename files or directories within the window, you must also rename the files or directories in your operating system.
4 Click the library path or file you want to add or change; then, click the Browse button. The Select Location window or the Select File window appears, depending on your field selection.
To add or change directory information, follow the instructions below. If adding or changing file information, see Adding or Changing File Information on
page 37.
Adding or Changing Directory Information
Follow these steps to add or change directory information:
1 Select the drive where the system stores the files you want to use or change.
2 Double click the dots in the window to display the previous subdirectory within the current directory path. Each double click moves you one step back in the directory hierarchy.
TableLib Directory path of the form related table information
WIPPath Directory path of the Work-in-Process files
XrfFile Name of the font cross-reference file
Field Description
Double click these dots to display the previous subdirectory in this path.
36
Using the Library Setup Option
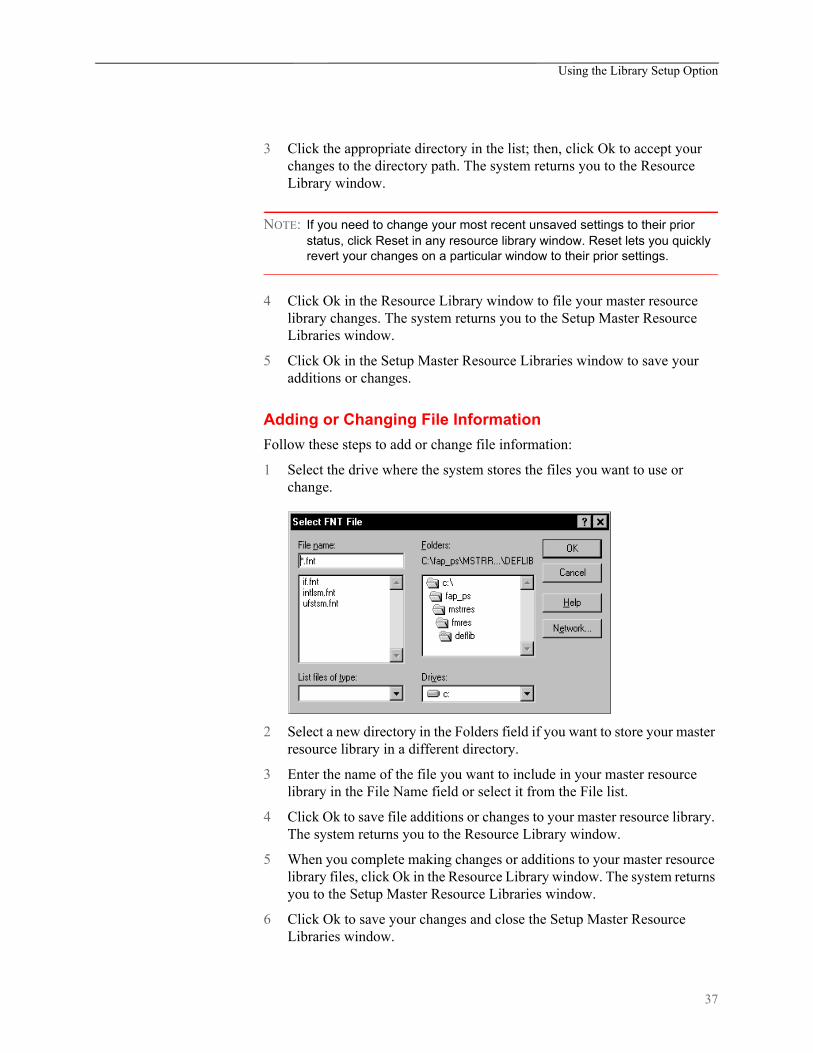
3 Click the appropriate directory in the list; then, click Ok to accept your changes to the directory path. The system returns you to the Resource Library window.
NOTE: If you need to change your most recent unsaved settings to their prior status, click Reset in any resource library window. Reset lets you quickly revert your changes on a particular window to their prior settings.
4 Click Ok in the Resource Library window to file your master resource library changes. The system returns you to the Setup Master Resource Libraries window.
5 Click Ok in the Setup Master Resource Libraries window to save your additions or changes.
Adding or Changing File Information
Follow these steps to add or change file information:
1 Select the drive where the system stores the files you want to use or change.
2 Select a new directory in the Folders field if you want to store your master resource library in a different directory.
3 Enter the name of the file you want to include in your master resource library in the File Name field or select it from the File list.
4 Click Ok to save file additions or changes to your master resource library. The system returns you to the Resource Library window.
5 When you complete making changes or additions to your master resource library files, click Ok in the Resource Library window. The system returns you to the Setup Master Resource Libraries window.
6 Click Ok to save your changes and close the Setup Master Resource Libraries window.
37

Using the Library Setup Option
CONTROL PATH ERROR CHECKING
This option tells the system to recognize new paths when you set up resource libraries and alert you when you have defined a non-existent path. The system displays an error message with an option to turn off the error message display.
Click Ok to continue displaying the error message when you add an undefined path to your master resource library. Click the field; then, click Ok to disable the message and close the window. The system lets you define new paths during library setup without displaying the message.
You can make the directories for the new paths after you have set up the master resource library.
NOTE: The error window becomes active again after you exit the Resource Library window.
38
Deleting a Resource Library
DELETING ARESOURCE
LIBRARY
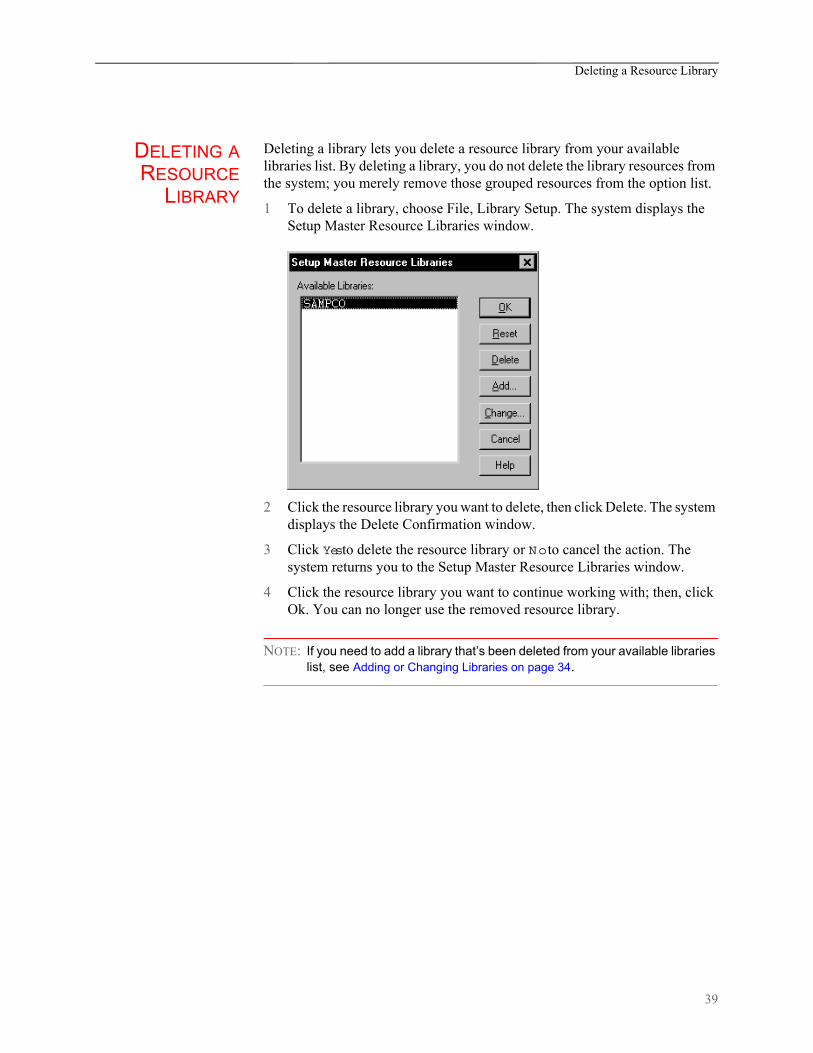
Deleting a library lets you delete a resource library from your available libraries list. By deleting a library, you do not delete the library resources from the system; you merely remove those grouped resources from the option list.
1 To delete a library, choose File, Library Setup. The system displays the Setup Master Resource Libraries window.
2 Click the resource library you want to delete, then click Delete. The system displays the Delete Confirmation window.
3 Click Yes to delete the resource library or No to cancel the action. The system returns you to the Setup Master Resource Libraries window.
4 Click the resource library you want to continue working with; then, click Ok. You can no longer use the removed resource library.
NOTE: If you need to add a library that’s been deleted from your available libraries list, see Adding or Changing Libraries on page 34.
39

Chapter 3
Customizing Your System
The system includes many features you can add to meet specific needs. The most commonly-used features are discussed in this chapter, including…
• Configuring INI Files on page 41
• Adding Personal Forms Lists on page 43
• Assigning Form Sets to Users on page 47
• Adding Form Description Lines on page 51
• Attaching Bitmap and PDF Files on page 61
• Automatically Assigning Form Numbers on page 65
• Running Documaker Server on page 71
• Configuring the Complete Option on page 72
• Restricting Who Can Seed the UNIQUE file on page 75
• Customizing the Form Selection Window on page 76
• Configuring the Routing Slip Directory on page 90
• Setting Up Timed Service Functions on page 91
• Customizing WIP on page 105
• Customizing Archive on page 139
• Customizing the Interface on page 145
• Using Workstations as Print Servers on page 174
• Setting Up Email Support on page 176
• Inserting State Stamps and Signatures on page 181
40
Configuring INI Files
CONFIGURINGINI FILES
The system is very flexible. Virtually all functions can be configured to meet your company's specific needs through the use of two INI, or initialization files. INI files are used to specify default values, and other user-defined parameters.
An INI file is simply a text file consisting of control groups and options. A control group defines the file setting and is denoted by braces ( < > ). Control group options appear below each control group. Option lines define control option parameters which appear after the equals sign (=).
The INI file control group syntax appears below:
< Control_Group >
Option1 = Parameters
Option2 = Parameters
...
OptionN = Parameters
NOTE: For all binary INI options which require a Yes/No or True/False value, the system looks for Y, y, T, or t. Any of these values is interpreted as Yes or True. If the value entered begins with the letter “t,” the system interprets the value as True. Any other value, including blank, is interpreted as No or False.
Configuring the INI files lets you specify how you want the system to function, and how it should use your library resources. Each resource library has its own INI files and INI file settings control options related to specific resource libraries.
Each resource library uses two INI files: FSISYS.INI and FSIUSER.INI.
• FSISYS.INI - controls information related to the entire system, such as system settings and program function calls.
• FSIUSER.INI - controls settings which can vary between resource libraries, such as sorting options, archival mode, and import/export ability, as well as individual user options.
Many of the options are discussed on the following pages, as they relate to specific aspects of the system you can customize.
SETTING INI OPTIONS FOR SPECIFIC MASTER RESOURCE LIBRARIES
You can use a built-in INI function (~M RL) which lets you set up INI options for specific master resource libraries (MRLs). This is useful if you have multiple master resource libraries and you need to customize the way the system works for each resource library.
For example, assume you have these master resource libraries:
• SAMPCO
• DMS1
• DMS2
41

Configuring INI Files
You can set up options such as these:
< Control >
FixedPosFields = [~MRL]FixedPosFields=
< SAMPCO >
FixedPosFields = Yes
< DMS1 >
FixedPosFields = No
If you are using the SAMPCO library while editing a form set, the Fixed Edit option will be set to Yes. If you switch to the DMS1 library, the edits will float because the option is set to No. If you switch to DMS2, the option defaults to whatever value the system normally defaults to, which would be No in this case.
With the ~M RL built-in INI function, you can create different setups using a single set of INI files.
Recording the INIoptions used by
Documaker Desktop
You can use the LogINI parameter to have the system create a log of the INI options Documaker Desktop is using.
Here is an example:
E:\FAP\dll\AFEMNW32.EXE /LogINI=INIOptions.log
Parameter Description
/LogINI Enter the name of the file you want created to contains the INI records. If you include the parameter but omit the file name, the system uses the current trace file.
42

Adding Personal Forms Lists
ADDINGPERSONAL
FORMS LISTS
If your company has a large number of forms, you may want to use the Personal Forms List feature to help data entry users quickly find the forms they need. This feature lets you define a subset of all the forms for each user. Typically, you would use this feature to create personal forms lists for each data entry user which contain the forms those users work with most often. Data entry users can still select from any available form, they are not limited to those forms listed on their personal forms list.
SETTING UP PERSONAL FORMS LISTS
The Personal Forms List feature is available as soon as you or a data entry user assigns one or more forms to the list. You assign forms to or remove forms from a personal list using the Personal Formset Selection window.
To add the Personal Formset Selection window to your system, you must first add the following line to the MEN.RES file, which defines the system menus:
MENUITEM "&Personal..." 262 "AFEW32->AFEPersonal" "Personal Forms List" 9
You can add this line, or a line similar to it, under any menu group you like. You can also change the text of the option.
NOTE: The ampersand (&) indicates that the next character is the accelerator for this menu option. You can omit the ampersand if you like.
Also, make sure the menu ID (262) is not already in use by another menu option—if it is, choose another ID which is unique to the menu. The 9 at the end of the menu item represents the lowest user security level which should have access to this option. Security level values range between 0 (supervisor) and 9 (anybody).
ADDING BUTTONS TO THE FORMS SELECTION WINDOW
You can also add a button to the Forms Selection window which the data entry user can use to display the Personal Formset Selection window. Since the Personal Forms List is related to form set selection, this is a logical place to provide access.
The system includes three buttons you can use for custom (and internal) functionality. To enable a button to display the Personal Formset Selection window, add this option:
< AFEProcedures >
Button1 = AFEW32->AFEPersonalEdit
43

Adding Personal Forms Lists
If Button1 is already in use, substitute Button2 or Button3. After you set this up, the button appears on the Forms Selection window, just above the forms list. By default, the text on the button reads, Personal. You can change the text using this option:
< DLGTitles >
Personal = ~text
You can enter anything, but the size of the button is set so long descriptions may not fit.
NOTE: Use the tilde character (~) to indicate that the next character is the accelerator for the button.
USING THE PERSONAL FORMSET SELECTION WINDOW
Customers who use this feature typically have a large number of available forms. To make it easier to select from a large number of forms, the Personal Formset Selection window contains fields for the Key1 and Key2 field combinations. You use these fields to filter the list of available forms.
After the data entry user chooses Key1 and Key2 categories, a list of forms which meet that criteria appears in the Available Forms column. Any forms in this column which are already in your personal list appear in the Selected Forms column.
To move forms into the Selected Forms column, highlight the forms in the Available Forms column and click Add. To remove forms from the Selected Forms column, highlight the forms you want to remove and click Remove.
Use the Up and Down buttons to change the order of the forms in the Selected Forms column.
44
Adding Personal Forms Lists
You can change you entries in the Key1 and Key2 fields to display additional forms. Once you have all of the forms you want on your personal list displaying in the Selected Forms column, click OK to save that list.
You can customize the fields and column headings which appear on the Personal Formset Selection window using the following INI options. These options are shown below with their default values.
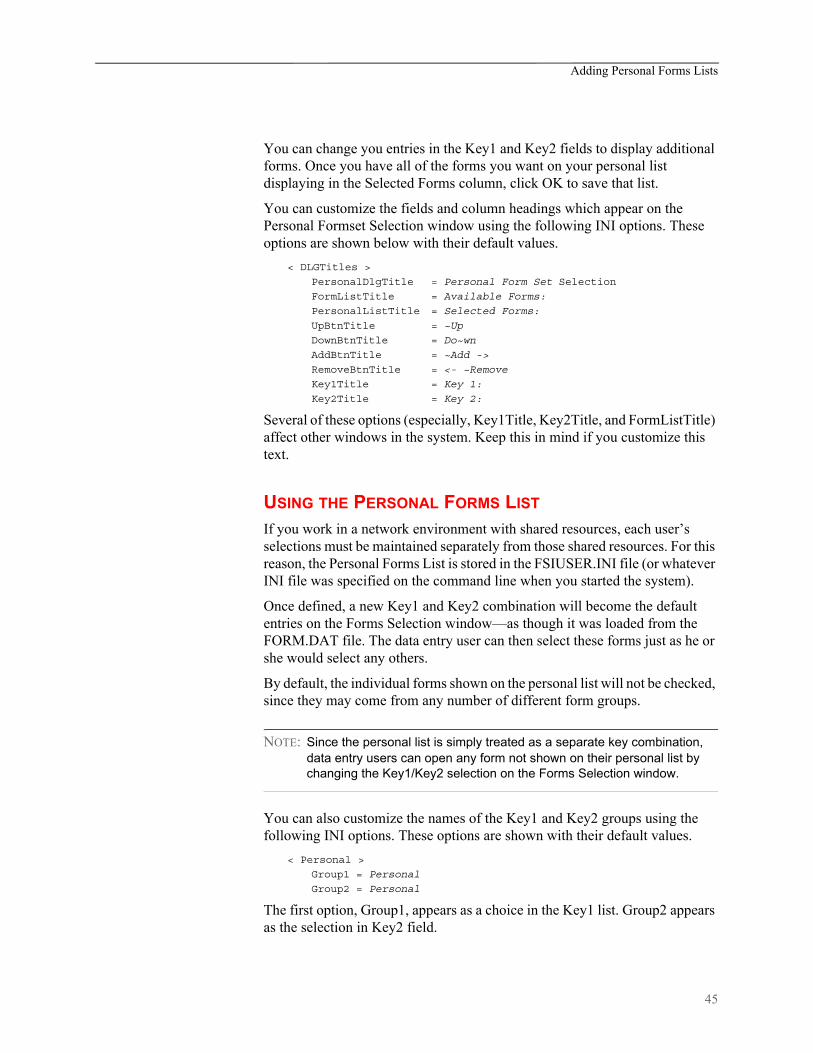
< DLGTitles >
PersonalDlgTitle = Personal Form Set Selection
FormListTitle = Available Forms:
PersonalListTitle = Selected Forms:
UpBtnTitle = ~Up
DownBtnTitle = Do~wn
AddBtnTitle = ~Add ->
RemoveBtnTitle = <- ~Remove
Key1Title = Key 1:
Key2Title = Key 2:
Several of these options (especially, Key1Title, Key2Title, and FormListTitle) affect other windows in the system. Keep this in mind if you customize this text.
USING THE PERSONAL FORMS LIST
If you work in a network environment with shared resources, each user’s selections must be maintained separately from those shared resources. For this reason, the Personal Forms List is stored in the FSIUSER.INI file (or whatever INI file was specified on the command line when you started the system).
Once defined, a new Key1 and Key2 combination will become the default entries on the Forms Selection window—as though it was loaded from the FORM.DAT file. The data entry user can then select these forms just as he or she would select any others.
By default, the individual forms shown on the personal list will not be checked, since they may come from any number of different form groups.
NOTE: Since the personal list is simply treated as a separate key combination, data entry users can open any form not shown on their personal list by changing the Key1/Key2 selection on the Forms Selection window.
You can also customize the names of the Key1 and Key2 groups using the following INI options. These options are shown with their default values.
< Personal >
Group1 = Personal
Group2 = Personal
The first option, Group1, appears as a choice in the Key1 list. Group2 appears as the selection in Key2 field.
45

Adding Personal Forms Lists
Viewing all Lines of Business (Key2)
The Personal Forms List shows your forms for each Key2 field option. For example, in insurance implementations, the Key2 field typically indicates the line of business. By adding the following option, the system will show you all of your forms for all lines of business:
< AFEProcedures >
Button1 = AFEW32->AFENewPersonalDlg
For example, if you have
The Button1 option lets you select forms from the General Liability, Property, and Inland Marine lines of business instead of only seeing one line of business at a time.
Field Entries
Company (Key1) Formmaker Package
LOB (Key2) General Liability, Property, and Inland Marine
46
Assigning Form Sets to Users
ASSIGNINGFORM SETS TO
USERS
The system provides several ways to customize how form sets are assigned to users. For instance, you can have the system automatically assign a form set to a user, add a menu option which makes the assignment, or customize the list of possible users.
All of these options are turned on by adding INI options. For more information, see the following topics.
ASSIGNING FORM SETS USING A MENU OPTION
You can add a menu option to automatically save and assign a form set to another user. This option lets you select from a list or automatically assign a form set to a specific user. The choices that appear are based on your user ID.
The Assign for Edit works similar to any assignment except a MEN.RES option is available that lets the user do the assignment while the form set is open.
AUTOMATICALLY ASSIGNING FORM SETS TO USERS
You can map users to other users so form sets can be automatically assigned by the system. All the user has to do is select the Assign option while the form set is open and the system takes care of making the assignment. To set up this feature, you use these INI options in the AutoAssign control group:
< AutoAssign >
User1 = User2
User2 = User3
This example tells the system that form sets from User1 are always assigned to User2. Form sets from User2 are always assigned to User3. The From user is listed on the left and the To user is listed on the right.
When you use this feature, the system does not display the Choose a User ID window during the assignment.
CREATING AN ASSIGN-TO LIST
You can set up the system to present only a subset of all users for selection during assignment.
The base system shows you all users when you assign a form set. By turning on this feature, you can define the users you want to appear on the Choose a User ID window, limiting the choices to only the appropriate ones.
To use this feature, you set up the AssignUserList control group similar to that shown here:
< AssignUserList >
UserID = ;TOM;Thomas;
UserID = ;ROB;Robert;
47
Assigning Form Sets to Users
UserID = ;JOHN;Jonathan;
UserID = ;SMITH;Samuel;
UserID = ;DOCUCORP;DOCUCORP;
Start each entry with UserID =. The system lists the users based on the order in which they appear in the INI file, so place the most likely choices first.
To the right of the equals sign, specify a user you want to appear on the list. The syntax for specifying the users is shown here:
;UserID;Name;Password;Rights;InUse;ReportsTo;Security;Message;
You do not have to include all of the parameters. Use semicolons at the beginning and end of the statement. Semicolons also separate parameters, so be sure to include them if you skip a parameter, as shown in this example:
;USER1;John Doe;;;;DOCUCORP;
This example defines the UserID, Name, and ReportsTo parameters, but leaves the Password, Rights, and InUse parameters blank.
Also, the Security and Message parameters were omitted after the ReportsTo field. Because these parameters were omitted, rather than skipped, you can also omit the semicolons that separate them.
ASSIGNING FORM SETS USING A DAL SCRIPT
You can use a MEN.RES function to automatically scan WIP and invoke a DAL script for each WIP record for that user. This lets you automatically save and then assign form sets assigned to one user to another user.
For instance, assume you set up the GenWip program to assign certain form sets to a specific user. Using this feature and a DAL script, you can then have the system automatically evaluate the form set data and then...
• Complete the form set
• Delete the form set
• Archive the form set
• Assign the form set to another user
See the DAL Reference for more information about DAL functions and DAL scripts.
ENABLING THE DAL DEBUGGER
You can enable the DAL Debugger by editing the MEN.RES file used by the master resource library. You can edit this file using any ASCII text editor. Before you edit the file, make a backup copy of the MEN.RES file. Here is an example of what you need to add to the MEN.RES file:
POPUP "&Tools" 255 "Utility Programs"
BEGIN
MENUITEM "Enab&le Debugger..." 502 "DBGW32->DBGEnableDebugger" "Enable DAL debugger." 0
48

Assigning Form Sets to Users
SEPARATOR
49

Assigning Form Sets to Users
REQUIRING FORMS
Use the R_Option INI option to require that any form marked as required in the FORM.DAT file be accepted by the user. Only the transaction type can override this option. Here is an example of how to set up this option:
< Control >
R_Option = Required
There is no default for this option, so you have to define the option if you want to require the user to accept these forms.
50

Adding Form Description Lines
ADDING FORMDESCRIPTION
LINES
You can include a form (or several forms) which contain descriptions of the other forms included in the form set. The Form Description Line feature uses a method similar to Form Line fields on DEC pages with a few distinct differences.
• Form Description Line variable fields must have names that begin with FORM DESC LINE. You can include multiple lines of these fields on a form simply by varying the field’s name, such as FORM DESC LINE #002, FORM DESC LINE #003, and so on.
• For each form in a form set (and, optionally, for each Key2 grouping), a Form Description Line field will be assigned a text description of that form. Unlike FORM LINEs which append all the form names together, only one text description is assigned to each Form Description Line field. If you do not include enough Form Description Line fields to accommodate the maximum number of selected forms, the page may duplicate (overflow) to add more lines.
• In addition, unlike Form Line fields, Form Description Lines do not wrap the text description to succeeding lines. If a text description is longer than the field’s representation, the text can extend beyond the page boundaries or into undesirable areas. Make sure the Form Description Line fields are long enough to contain the longest description. Choosing a small font will allow the most characters on a given line.
An example of description lines generated from a sample package policy might look like this:
DEC PAGE Common Policy Declarations
FIL 1010 04 92 Supplemental Declarations
CG DEC General Liability Declarations
These default descriptions contain the form name and the description assigned in the forms list. Notice that this is the same information you see on the Form Selection window. If you want the information to line up appropriately, you should use a fixed pitch or non-proportional font, like Courier, to these fields.
Turning on formdescription lines
This feature is enabled (or disabled) by the following INI option:
< Control >
DoFormDescLines = Yes
This option is set to Yes by default, so you do not have to modify the INI files to enable the option. The only reason to disable this option is if you intend to have fields with names which begin with FORM DESC LINE but you do not want those fields treated as form description lines. If you need to disable this option, set it to No. You must define this option under the Control INI control group.
51

Adding Form Description Lines
SETTING UP FORM DESCRIPTION LINES
Unlike the Form Line fields, this feature is not limited to DEC pages. Any form can contain the Form Description Line fields. You can have the Form Description Lines on a separate form. This is often referred to as a Forms Schedule or Schedule of Forms. The section defining these description fields can contain other content, such as text, lines, boxes, and fields, and is not limited to just Form Desc Line fields.
The placement of the form on the forms list is important. By default, the forms placed after the first form which contains a FORM DESC LINE field are included in the listed forms. For example, assume a form set contains these forms:
Form Description Form (includes the FORM DESC LINE fields listing these forms
• User Letter
• Declaration Page
• Endorsement Page
• Supplementary Forms
The Form Description Form contains the form description lines which tell the system to include the descriptions of all listed forms which follow that form. If you place the Form Description Form first, the system includes the following four forms. If you place the Form Description Form after the User Letter, only the Declaration Page, Endorsement Page, and Supplementary Forms will be included.
NOTE: You can tell the system to include all forms on the form list, including the form description lines form by adding the StartFromFirstForm option:
< FormDescTable >
StartFromFirstForm =
The default (No) is to start with the form that follows the one with the form description lines.
To start at the first form in the form set, set this option to Yes. If you do not set the StartFromFirstForm option to Yes, placing the Form Description Form at the end of a form set has no effect.
52

Adding Form Description Lines
CUSTOMIZING FORM DESCRIPTION LINES
Use the following options to customize form description lines:
Creating a columnarformat
Form description lines are formatted in a columnar format with the form name on left padded to the largest form name length used. To create a columnar look, you must use a fixed-pitch (non-proportional) font, like Courier. Here is an example of this option:
< FormDescTable >
ColumnFormat = No
Here is an example with the ColumnFormat option set to Yes (the default):
DEC PAGE Common Policy Declarations
FIL 1010 04 92 Supplemental Declarations
CG DEC General Liability Declarations
Here is the same example with the ColumnFormat option set to No:
DEC PAGE Common Policy Declarations
FIL 1010 04 92 Supplemental Declarations
CG DEC General Liability Declarations
Excluding the formname or description
By default, the form description line includes both the form's name and its description in the forms list. To tell the system to exclude the form names and only show the descriptions, use the IncludeFormName option.
< FormDescTable >
IncludeFormName = No
You can also tell the system to omit the description using the IncludeFormDesc option.
< FormDescTable >
IncludeFormDesc = No
Option Description
ColumnFormat Set this option to No to have the system append the form description to the end of the form name, separated by two spaces. The default is Yes, which formats the form lines in a columnar fashion.
Option Description
IncludeFormName Enter No to exclude the form’s name from the form description line. The default is Yes, which includes the form’s name.
Option Description
IncludeFormDesc Enter No to exclude the form’s description from the form description line. The default is Yes, which includes the form’s description.
53

Adding Form Description Lines
NOTE: Since you would typically want at least the name or description to appear, make sure at least one of these options is set to Yes.
Including duplicateforms
Use this option to tell the system what to do with duplicate forms. By default, only the first form in a set of duplicates is included in the Form Description lines.
< FormDescTable >
IncludeDuplicateForms = No
Excluding forms You can exclude specific forms from the form description lines without having to change their sequence of occurrence in the form set. Include an ExcludedForm option for each form you want to exclude.
< FormDescTable >
ExcludedForm = FORMDESC
ExcludedForm = CDEC
NOTE: This does not affect the printing of the form.
Suppressing duplicateform descriptions
You can suppress duplicate form descriptions. For instance, suppose you have several versions of what is basically the same form, but each instance of the form has a different name. For your purposes they are the same form and have the same description, even if the names are not identical.
When building the form table using Form Description Lines, if you want to suppress the duplicate form descriptions, include the ExcludeDuplicateDescriptions option:
< FormDescTable >
ExcludeDuplicateDescriptions = No
Option Description
IncludeDuplicateForms
When you use the Formset, Duplicate Form option to duplicate a form, the system excludes the duplicate forms from the form description lines. If you want the system to include the duplicate forms, change this option to Yes.
Option Description
ExcludedForm Enter the name of the form you want to exclude.
Option Description
ExcludeDuplicateDescriptions
Enter Yes if you want the system to look for and exclude duplicate form descriptions. The default is No.
54

Adding Form Description Lines
NOTE: By default, the Form Description Line feature will eliminate duplicate form names.
Controlling overflow By default, if there are not enough Form Desc Line fields found to accommodate the number of forms in the form set, the form automatically overflows to a new page. This is accomplished by duplicating the section that contains the Form Desc Line fields to a new page along with any header or footer sections that are designated as Copy on overflow.
To change this behavior, use the AutoOverflow option.
< FormDescTable >
AutoOverflow = No
As an alternative to the normal overflow method, you can specify a section you want the system to insert instead of copying the section at which the page ended. This lets you create a specialized section that contains more form description fields or a different arrangement of the form description fields you already have.
Use this option to specify the section you want the system to use:
< FormDescTable >
OverflowSectionName =
NOTE: If the AutoOverflow option is set to No, the OverflowSectionName option is ignored.
Using DAL to createform lines
By default, the form description line is created from the form name or form description or both, depending upon the options you chose. You can also have the system execute a DAL script each form to provide a custom description line. You specify the DAL script with this option:
< FormDescTable >
Script =
Option Description
AutoOverflow Enter No to disable the automatic overflow and limit the form descriptions to the number of fields you provide. The default is Yes, which allows form description overflow.
Option Description
OverflowSectionName
Enter the name of the section you want the system to use during overflow.The system inserts this section instead of copying the section where the last Form Desc Line field was encountered.When you include this option, the system still copies the header and footer sections that are designated as Copy on overflow.
55

Adding Form Description Lines
The DAL script should return the text you want to see on the form. In the script, use the HAVEFORM and FO RMDESC functions to get the name and description of the current form, if that is required. If no text is returned from the script, the system omits that form line from the list.
For more information on DAL functions, see the DAL Reference.
Alternative groupdescriptions
When you choose to include the group (KEY2) names within the form lines, you can provide an alternative description supplied from an external file. All you have to do is create the external file and tell the system its name using the File option:
< Key2File >
File =
The file you specify should be a plain text file. Each line in the file should consist of a KEY2 name followed by an equal sign (=) and the description you want to substitute. Here is an example:
;This is the alternate group description file
CPP=Commercial Package Policy
GL=General Liability
CRIME=General Crime Policy
*=Not Applicable
You can define as many group descriptions as you need. The final line shows how to use an asterisk (*) as a wildcard. You can only include one wildcard per file. The asterisk tells the system to use this description for any group names that do not match one of the lines you defined.
If you omit the asterisk (wildcard) and the group name is not found within the file, the system uses the original group name.
NOTE: Lines beginning with a semicolon are comment lines.
Option Description
Script Enter the name of the DAL script you want the system to execute to create a custom form description line. Omit the extension.
Option Description
File Enter the name of the file you want the system to open to get the alternative group descriptions.
56

Adding Form Description Lines
INCLUDING FORM GROUP DESCRIPTIONS
By default, the form description lines only contain descriptions of the forms. Optionally, you can include descriptions for form groups, such as lines of business. These form groups are called Key2s.
These options tell the system how to represent form group lines on form description lines.
< FormDescTable >
IncludeKey2 = No
BoldKey2 = No
Key2Prefix =
Key2PreInc = 0
Key2PostInc = 0
ExcludedGroup = PROPERTY FORMS
Option Description
IncludeKey2 Use this option to enable or disable Key2 descriptions. To enable Key2 descriptions, set this option to Yes. The default is No.If this option is set to No, all the other Key2 related options are ignored.Note: The ExcludedGroup option is honored even if you set this option to No.
BoldKey2 Use this option to present Key2 descriptions in a bold font. The system determines which font to use by querying the font defined on the field and selecting its bold equivalent. The fonts of normal Form Description Lines fields (not assigned a Key2 name) will be changed to their non-bold counterparts.If you enable this feature, the system will query the font associated with each Form Description Line field and request either the bold or non-bold equivalent from the same font family and size. If the requested font is not available, the system does not change the field’s font.To choose the bold and non-bold equivalent of a font, the system uses your FXR file, which must be defined properly. Each font listed in the FXR file has a stroke weight assigned to it. The stroke weight indicates the boldness of the font.
57

Adding Form Description Lines
USING TABLE DESCRIPTIONS
One customized Form Description Line function is included in the base product. This function tells the system to look up each form name in a specified table and return the form name and description found in that table. When you use this table description method, the text items printed come from the matching table entries. Use these INI options to set up this feature.
< AFEProcedures >
FormDescProc = TRNW32->TRNFormDescTable
< FormDescTable >
File = tablefilename
Table = tablename
UseDefaultIfMissing = Yes
The AFEProcedures control group is defined in the following topic. See Customizing the Descriptions on page 60 for more information. Here is a discussion of the options in the FormDescTable control group:
Key2Prefix Use this option to specify a text string which will appear before each Key2 description line. The system automatically appends a single space after the text string. By default, this option is blank and does not affect the description lines. Here is an example of how you can use this option:
Key2Prefix = Forms Applicable -
By setting the option as shown above, the system prefixes all Key2 descriptions with the specified text. For instance, the output might look like this:
Forms Applicable - General Liability Coverage
Key2PreIncKey2PostInc
Use these options to add blank lines between the Key2 descriptions and the form descriptions. If you set both of these options to one (1), your output might look like this:
Forms Applicable - COMMON POLICY
DEC PAGE Common Policy DeclarationsFIL 1010 04 92 Supplemental Declarations
Forms Applicable GENERAL LIABILITY
CG DEC General Liability Declarations
If you include Key2 descriptions, the first text will always represent the first form grouping. This first Key2 description will not use the Key2PreInc option to include blank lines before the text. Subsequent groups, however, will have the specified number of blank lines before their text descriptions.
ExcludedGroup Enter the name of the group you want to exclude. Omit this option or leave it blank if you do not want to exclude any groups.Excluding a group in this way means that neither the group description nor the forms listed as members of that group appear in the Form Description Lines. The entire group of forms are skipped when the system builds the Form Description Line fields.Include an ExcludedGroups option for each group you want to exclude.
Option Description
58

Adding Form Description Lines
CREATING THE TABLE
Creating and maintaining this table must be handled by you or by the Professional Services Group. Since the table is not attached to the Form Description Line fields, use the Table Editor to maintain the description table. There are a few other rules you must follow to create and maintain a table used to store form and group names and descriptions.
Form names can consist of up to 40 characters. Therefore, the key length you assign for the table should be 40 (this is the value defaulted by the Table Editor).
Table keys are case sensitive. This means that the form and group names should be taken from the forms list exactly as they appear. If the case of the form name in the forms list does not match the key value of the corresponding entry in the table, the system will not return any text. This has the same effect as misspelling the name.
Option Description
File Defines the name of a system table file (located in the MasterResource TableLib directory). If you omit the file name or enter an invalid name, the function fails.
Table This option defines the name of a specific table in the file defined by the previous option. If you omit the table name or enter an invalid table name, the function will fail.Keep in mind you do not have to attach the table to the Form Description Line fields. The INI options that enable this feature provide all the information the system requires. Therefore, you do not have to make any FAP file changes to begin using a table with existing Form Description Line fields.
UseDefaultIfMissing
Enter Yes to tell the system to use the form description from the forms list, if the entry is not found in the table.The default is No, meaning that the form name must be in the table for a description to appear.
59
Adding Form Description Lines
CUSTOMIZING THE DESCRIPTIONS
You can customize the descriptions placed in the Form Description Line fields if you do not want to use the default name and description identified in the FORM.DAT file. The Table Description method, described earlier, uses this hook to enable that feature.
The following INI setting shows you the information the system needs to identify a customization method:
< AFEProcedures >
FormDescProc = module->funcname
Where module equates to a DLL name, such as TRNW32, and funcname is the name of the exported function in that DLL. If you enter an incorrect DLL or function name, the system displays an error message and uses the information provided in the FORM.DAT file, which is the default method.
The function called must conform to the FAPUSERPROC prototype defined in the FAPUSER.H header file. An example of this prototype is shown here:
FAPDW _VMMAPI TRNFormDescTable(FAPDW dwMessage,
FAPDW dwFAPHab,
FAPDW dwFAPHwnd,
FAPDW dwObjectIdentifier,
FAPDW dwObjectType,
FAPDW dwInputFlag1,
FAPDW dwInputFlag2,
FAPDW dwInputFlag3,
char FAR * lpszObjectName,
char FAR * lpszFormatType,
char FAR * lpszFormat,
char FAR * lpszEditData,
char FAR * lpszInputBuffer,
char FAR * lpszOutputBuffer,
FAPDW dwOutputBufferMaxSize,
FAPDW FAR * lpdwOutputFlag1,
FAPDW FAR * lpdwOutputFlag2,
FAPDW FAR * lpdwOutputFlag3)
• dwObjectIdentifier will be a VMMHANDLE of the requested form or Key2 group.
• dwObjectType will be the appropriate FAP object type indicated for the item passed -- either FAP_OBJGROUP or FAP_OBJFORM.
• lpszObjectName will be a pointer to the name of the item passed -- either the form name or the name associated with the Key2 group.
• lpszOutputBuffer is a pointer to an area which will receive the output from this function.
• dwOutputBufferMaxSize is the maximum size of the output buffer.
All other parameters should be ignored and will be NULL.
60

Attaching Bitmap and PDF Files
ATTACHINGBITMAP ANDPDF FILES
The system lets you attach or overlay a PDF or TIFF file onto a form. The form can contain content or be blank. You can use this capability, for instance, to overlay a signature onto a form or to overlay content in a PDF file onto a blank form.
If the PDF or TIFF file covers more pages than the form, then overlay will begin on the first section on the first page of the form and continue from there. For instance, if you have a one-page form and you are overlaying the form with a three-page PDF file, the PDF would begin overlaying the first section on the form. Then the last two pages of the PDF would print.
Adding a button Use the Button1 or Button2 INI option to assign the AFEAttachForm function to a button, as shown here:
< AFEProcedures >
Button1 = AFEW32->AFEAttachForm
Here is an example of how the button will appear on the Form Selection window:
Form PDFPage 1
PDFPage 3
PDFPage 2
Form
PDFPage 1
=+
Option Description
Button1 or Button2
To provide the ability to attach a PDF or TIFF file to a form set, enter this function:
AFEW 32->AFEAttachForm
61

Attaching Bitmap and PDF Files
Customizing the button The size and location of the button is fixed, but you can use the Attachment option to change the text that appears on the button:
< DLGTitles >
Attachment = Attach Scan
Here is an example:
Specifying the form Use the FormName option to specify the form to which PDF or TIFF file will be attached. To create multiple attachments, you must set the Multicopy option to Yes when defining the form options in Documaker Studio.
< Attachments >
FormName =
When you click the button, the system uses the FormName option to make sure the form is eligible to receive an attachment. If not, an error message appears.
Here is the Attachment button.
Option Description
FormName
Enter the name of the form.
62

Attaching Bitmap and PDF Files
If the form you specified is not defined in the forms list, the system adds that form to the end of the first forms list it finds in the transaction. So, you do not have to define the form in the forms list unless you need to control where the form occurs in the list.
NOTE: If the Multicopy option is not set on the form, the system will ask you if you want to replace the existing attachment..
Forms which will receive attachments typically contain one blank section. If this section includes content, then the attachment will overlay that content and may not look appropriate. One way to do this is to define a single section on the form that enables the Embedded option. This option is available in Studio’s Forms and Template managers. Using the Embedded option, you do not have to create a blank section to store as a resource in the library for this form.
Note that the top-left corner of the attachment is placed at the margin defined for the first section on the destination form. The system scales the pages of the attachment to fit within the margins of the section. For instance, if the attachment consist of documents scanned at a full-page size and you want to see them at that size, set the margins on the destination section to zero. The system will create new pages for additional attachment pages that have the same margins.
If the Multicopy option is set to Yes for the form, the system adds a new form each time you click the button and select a new file to attach. If the Multicopy option is set to No, only one attachment is in allowed in the transaction. If this happens, clicking the button again will trigger this message:
The attachment form does not allow for multiple copies and contains an attachment already. Do you wish to overwrite existing attachment?
NOTE: The Multicopy option is set when you create the form in Studio.
Removing anattachment
Once an attachment is a part of a transaction, you can remove the form that contains the attachment by removing the check mark beside the form on the Form Selection window.
Troubleshooting Here is a discussion of some common errors:
• If you add the button, but do not use the FormName option to define the attachment, this error appears when you click the button.
Error: No attachment form name defined in the INI.
To correct, use the FormName option in Studio to specify the form in the library that should receive the attachment, then update your forms in Documaker Desktop:
< Attachments >
FormName = (form name)
63
Attaching Bitmap and PDF Files
• When the FormName option defines the attachment, but that form is not in the library, this error occurs:
Platform error: The FOR file named <Application> cannot be found in the library <master>.
To correct this, add the form to the library or specify another form that is in the library.
• When the FormName option specifies a form that has a future effective date, this error occurs:
Platform error: The FOR file named <Application> was found in Library <master> but no version exists that is Effective for <YYYYMMDD>.
Where YYYYM M DD reflects the current transaction date. To correct this situation, modify the effective date for the form or specify a different form.
• When the FormName option specifies a form that has expired based upon the current transaction date, this message appears:
Platform error: The FOR file named <Application> was found in Library <master> but is expired for Effective date <YYYYMMDD>.
Where YYYYM M DD reflects the current transaction date. To correct this situation, remove the expiration from the form or specify a different form.
• If the form specified to receive an attachment does not contain any sections, this message appears:
Error: The specified form <Application> does not contain any sections to receive the attachment.
To correct this, add a section to the form in Studio and then check the form back into the library. One way to do this is to add a blank section that uses the Embedded option. This tells the system there is no need to look for a library resource to load for that section.
• If you select an attachment that is not a PDF or TIFF file, this message appears:
Error: You must select a PDF or TIFF to attach.
Convert the attachment into a PDF or TIFF file or specify a different file.
64
Automatically Assigning Form Numbers
AUTOMATICALLY ASSIGNING
FORMNUMBERS
You can have the system automatically fill the KeyID field which is typically used to contain the form set or form number on the Form Selection window. For instance, if the KeyID contains the policy or account number, you can have the system assign these for you.
You define the set of numbers the system uses. You can also define multiple sets of numbers. This feature can be turned on or off and customized via INI file options.
Here is a summary of the available features:
• Each KeyID you define can only be used once.
• The system retrieves KeyIDs in alphanumeric order.
• You can add KeyIDs at any time.
• The system displays warnings if the number of available KeyIDs falls below an INI defined value. The warnings can be bypassed if you set this option to -1.
• KeyIDs can be up to 20 characters in length.
• Optionally, you can enable a feature which will ignore a KeyID you do not want the system to use and find the next available key.
You can use the number generation window to define the KeyIDs (such as policy numbers) you want the system to use. To display this window, you must first add an entry to the MEN.RES file, which defines system menus.
The system stores the series of KeyIDs in a database table. You can add additional series of KeyIDs to the table at any time. The system pulls KeyIDs from the table in alphanumeric order, not in the order in which they were created.
The system stores all defined KeyIDs in a database table named POLNUMBR. This table is stored in the directory specified by the TableLib option in the MasterResource control group. The system creates a record for each form set KeyID with these initial values:
Entry_name=policy number
Descrip=blank
When a data entry user assigns a system-generated KeyID (policy number) to a form, the system changes the description to show the USERID to which it gave the KeyID. Once the system changes the description to document which user used the KeyID, only two things can occur:
• If the form is archived, the system deletes the entry from the database table to prevent that KeyID from being assigned to another form.
• If the form is canceled before it is saved, or if the WIP is deleted before it is completed, the system releases the KeyID back to the table where it can be used again, on another form.
To the data entry user, the only change is that the system defaults a KeyID into the field, which is typically called the Policy Number field in the base system. Data entry users can override the system-generated KeyID by simply typing in a different one. If the data entry user does this, the system returns the unused KeyID it generated to the database for future use.
65

Automatically Assigning Form Numbers
SETTING UP THE INI FILE
To use this feature, you must add information in the INI file. The following topics explain what you must do in these control groups:
• Control
• Window titles
• Entry procedures
Control control group < Control >
CaseSensitiveKeys = NO
The number generation window accepts both upper- and lowercase characters. You should, however, define the beginning and ending KeyID masks using uppercase characters. This way, the CaseSensitiveKeys option can be set either way without affecting this feature.
If you set the CaseSensitiveKeys option to No and you use lowercase letters in the form set mask, the system cannot track the numbers correctly. If you set this option to Yes, the system can use both upper- and lowercase as it generates the numbers.
< Control >
AutoKeyIDWarnCount = #
Use the AutoKeyIDWarnCount option to set a value at which the system will display a message which tells the user the available KeyIDs, such as form set numbers, are running low. The system counts the remaining numbers in the database table each time it assigns a number.
If you omit this option, the system warns the user when he or she assigns the last number in the database table. If you do not generate a new set of KeyIDs, the system ignores any subsequent attempt to retrieve a KeyID from the database table. The user will not see another message.
If you do not want to receive any warning messages about the lack of KeyIDs, set this option to -1.
DLGTitles control group < DLGTitles >
AutoKeyIDBeginTitle = Begin
AutoKeyIDEndTitle = End
Use these two options to define the text which appears on the Policy Number Generation window. The default values are Begin and End.
66

Automatically Assigning Form Numbers
AFEProcedures controlgroup
< AFEProcedures >
AutoKeyID = TRNW32->TRNAutoKeyIDUsrFunc
TRNAutoKeyIDUsrFunc is an installable procedure which handles the operations required for the automatic policy number feature. You can install a custom procedure by defining the custom DLL and exported function you want the system to call, in the same manner shown above.
NOTE: You can use multiple AutoKeyIDs. To set this up, modify your INI files as shown here:
< AFEProcedures >
AutoKeyID = TRNW32->TRNMultipleAutoKeyID [MultiAutoKeyID]
AutoKeyID = TRNW32->TRNAutoKeyIDUsrFunc
AutoKeyID = TRNW32->TRNVerifyKeyID
SETTING UP THE MEN.RES FILE
To add the number generation window to the system, you must add the following line in the MEN.RES (menu resource) file. You can modify the name of the window, as necessary. This example uses Policy Number Generation.
SEPARATOR
MENUITEM "Policy Number &Generation..." 287 "TRNW32->TRNKeyIDMaster" "Policy Number Generation" 0
The example shown above should appear on two lines: one for SEPARATOR and one for MENUITEM and the rest of the text.
You can place the Policy Number Generation option on any menu and you can call the option anything you like. Make sure the menu ID (287) is not already in use by another menu option—if it is, choose another ID which is unique to the menu. Also, the zero (0) at the end of the menu item represents the lowest user security level which should have access to this option. Security level values range between 0 (supervisor) and 9 (typical user).
NOTE: To explain how to set up form set numbering, this manual will refer to the window as the Policy Number Generation window. If you chose another name, substitute that name as you read this topic.
GENERATING KEYIDS
If you have made the changes to the MEN.RES file as described earlier in this section, you can display the Policy Number Generation window by selecting the Policy Number Generation option from the appropriate menu.
Use the following window to create one or more series of KeyIDs.
67
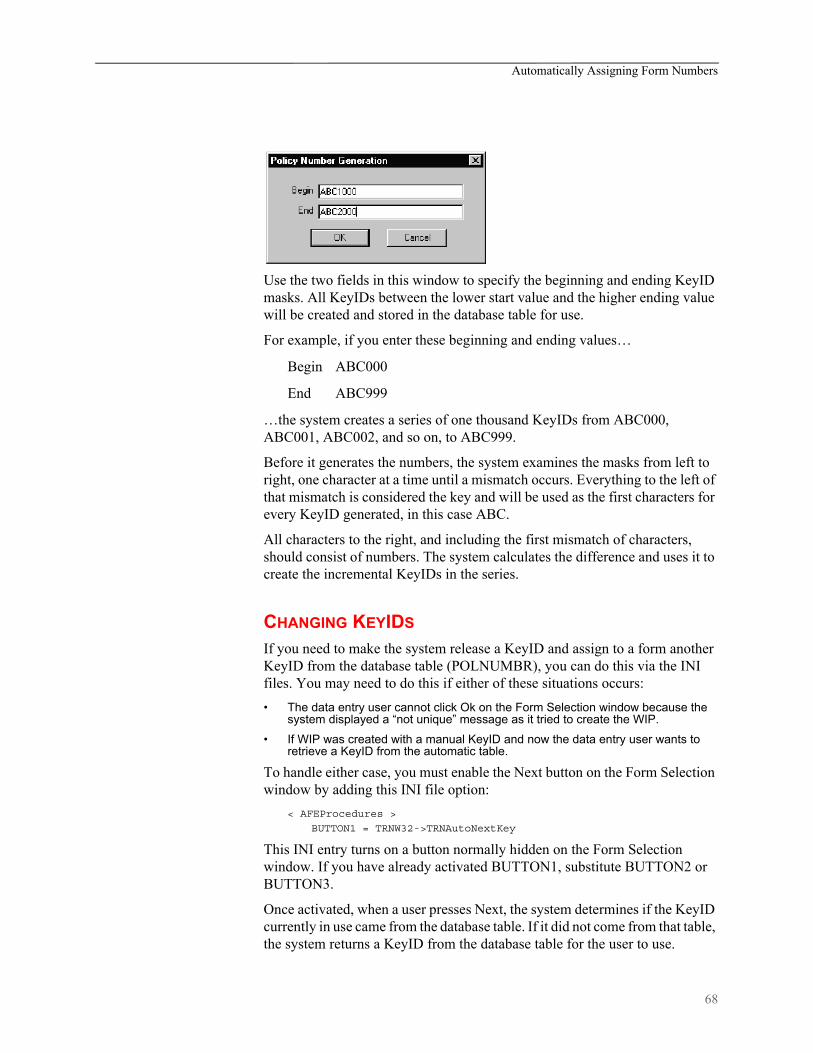
Automatically Assigning Form Numbers
Use the two fields in this window to specify the beginning and ending KeyID masks. All KeyIDs between the lower start value and the higher ending value will be created and stored in the database table for use.
For example, if you enter these beginning and ending values…
Begin ABC000
End ABC999
…the system creates a series of one thousand KeyIDs from ABC000, ABC001, ABC002, and so on, to ABC999.
Before it generates the numbers, the system examines the masks from left to right, one character at a time until a mismatch occurs. Everything to the left of that mismatch is considered the key and will be used as the first characters for every KeyID generated, in this case ABC.
All characters to the right, and including the first mismatch of characters, should consist of numbers. The system calculates the difference and uses it to create the incremental KeyIDs in the series.
CHANGING KEYIDS
If you need to make the system release a KeyID and assign to a form another KeyID from the database table (POLNUMBR), you can do this via the INI files. You may need to do this if either of these situations occurs:
• The data entry user cannot click Ok on the Form Selection window because the system displayed a “not unique” message as it tried to create the WIP.
• If WIP was created with a manual KeyID and now the data entry user wants to retrieve a KeyID from the automatic table.
To handle either case, you must enable the Next button on the Form Selection window by adding this INI file option:
< AFEProcedures >
BUTTON1 = TRNW32->TRNAutoNextKey
This INI entry turns on a button normally hidden on the Form Selection window. If you have already activated BUTTON1, substitute BUTTON2 or BUTTON3.
Once activated, when a user presses Next, the system determines if the KeyID currently in use came from the database table. If it did not come from that table, the system returns a KeyID from the database table for the user to use.
68

Automatically Assigning Form Numbers
If the current KeyID was assigned to the data entry user from the database table, the system displays a message which asks if it should remove the KeyID from the database table. If the user clicks Yes, the system deletes the current KeyID and retrieves a new KeyID from the database table. If the user clicks No, the system leaves the current KeyID in the field.
MAINTAINING THE POLNUMBR TABLE
Normally, the data entry user does not have to maintain the POLNUMBR table. If installed properly, the system handles the creation of this database table and the assignment and release of table entries.
On occasion, you may need to maintain the POLNUMBR table. To help you perform these tasks, Docucreate includes a table editor which you can also add to the system menu.
To add the Table Editor to your system menu, add these lines to your MEN.RES file:
SEPARATOR
MENUITEM "Table Maintenance..." 288 "TBSW32->TBSEdit" "Table Maintenance" 0
You can place the Table Maintenance option on any menu you like. Make sure the menu ID (288) is not already in use by any another menu option—if it is, choose another ID which is unique to the menu.
Also, the zero (0) at the end of the menu item represents the lowest user security level which should have access to this option. Security level values range between zero (0) (supervisor) and 9 (typical user).
Follow these steps to maintain the tables:
NOTE: Make sure no other users are performing tasks which use the POLNUMBR table you are maintaining.
1 Select the Table Maintenance option. The system shows you a list of the files it found in the Master Resource table directory.
2 Select the file named POLNUMBR.DBF. There is only one table defined in this file and it too is named POLNUMBR. Choose this table and click the Edit Entries button.
3 The system displays a window which lists all entries found in this table. The first column shows you the KeyIDs which the system automatically generated. The second column shows any user IDs to which a KeyID has been assigned.
4 Add, change, or delete entries as necessary using the buttons on the window.
69

Automatically Assigning Form Numbers
When you finish, be sure to close all Table Editor windows before you use the POLNUMBR table again.
70

Running Documaker Server
RUNNINGDOCUMAKER
SERVER
You can set up Documaker Desktop to run the Documaker Server programs (GenTrn, GenData, GenPrint, GenWIP, and GenArc) of Documaker in single-step mode.
All you have to do is add the following line to the MEN.RES file:
MENUITEM "&Run Rules.." 10200 "CSTW32-
>CSTRunRulesProcessor" "Run Rules Processor" 0
And, in the Documaker’s AFGJOB.JDT file, replace
;JobInit1;1;;
with
;AFEJobInit;1;;
Keep in mind...
• Multi- and two-step mode are not supported.
• You cannot include run-time parameters.
• Documaker Desktop must be set to use the same master resources Documaker Server will use.
For more information, see the Documaker Administration Guide.
71

Configuring the Complete Option
CONFIGURINGTHE COMPLETE
OPTION
When you complete a form set, the system optionally lets you perform several tasks automatically. These tasks include:
• Printing the form set (immediate, batch, or not at all)
• Exporting the form set
• Archiving the form set
• Deleting the form set
Documaker Desktop lets you specify what happens when a form set is completed by using INI options. These options are turned on or off in the FSISYS.INI or FSIUSER.INI files. If you want to hide or disable an option, include the comma before the appropriate option.
Printing the Form Set< Complete >
Print = Yes
This option defaults to Yes. If you set it to No, all print controls on the Complete window are hidden. In addition, you can configure the print options (Immediate or Batch), hiding or protecting these options so entry users cannot change them.
< Control >
PrintOnComplete = Yes[No], Hidden, Disabled
BatchOnComplete = No[Yes], Hidden, Disabled
ImmediateOnComplete = Yes[No], Hidden, Disabled
The PrintOnComplete option determines whether the Print field is initially checked. If Yes, the available options are enabled. If No, the options are disabled.
NOTE: If you set this option to No and you also hide it, the result is the same as turning off the printing option using the Print option in the Complete control group.
The BatchOnComplete option affects the batch printing option. It can be hidden or disabled from change and can be initially checked or left blank. The system determines the default setting for this option by examining the DefaultPrint option in the CONTROL control group. If this option is set to BATCH, the batch printing option is enabled by default. The BatchOnComplete option overrides the DefaultPrint option.
The ImmediateOnComplete option affects the Immediate print option. It, too, can be hidden or disabled from change and can be initially checked or not checked. Like the BatchOnComplete option, the system determines the default for this setting based on The DefaultPrint option in the Control INI control group. The ImmediateOnComplete option overrides the DefaultPrint option.
72

Configuring the Complete Option
If both the BatchOnComplete and ImmediateOnComplete options are checked on or off, the ImmediateOnComplete option serves as the default. If, however, one option is turned off and the other is turned on, the enabled option becomes the default, regardless of the INI setting.
NOTE: When you select batch print, the WIP transaction is not archived or deleted until that process occurs.
Exporting the Form Set< Complete >
Export = Yes
This option defaults to Yes. When set to No, the Export field and export list are hidden. Use this option to specify whether the Export field is initially checked, disabled, or hidden.
< Complete >
ExportOnComplete = No[Yes], Hidden, Disabled
If the Export field is not checked but is turned off or hidden, the export list will also be hidden since it is not possible for a user to make such a selection.
Specifying recovery timefrom corruptedUNIQUE.* files
You may want to specify a recovery time for corrupted UNIQUE.* files if the complete process uses the form set ID from the Unique database to generate unique export file names. The LockAttempts option:
< DBHandler:CB5 >
LockAttempts =
lets you specify the length of time the system will try to recover from corrupted UNIQUE.* files. The default is 600 attempts. Since the system retries every second, the default is equivalent to five minutes of wait time.
If an open call fails, the system removes the UNIQUE.DBF and UNIQUE.MDX files and recreates them. The open call can fail because of a file lock error which forces the removal of the UNIQUE.* files.
NOTE: This INI option is not specifically limited to the UNIQUE.DBF file and would apply to any dBase IV type file you might attempt to lock. Careful consideration should be given before overriding the default setting in the INI file.
Archiving the Form Set< Complete >
Archive = Yes[No]
This option is on by default. When turned off, the Archive field is hidden. In addition, if turned off and the WIP is not in route, the Mode indicator is blank.
73

Configuring the Complete Option
NOTE: This control has never been accessible by the user, and no INI option is provided to hide the option, other than to turn off Archive entirely.
Retaining WIP Files When Archiving< Complete >
Delete = No
The Delete option is turned on (Yes) by default. When you archive a form set using the Archive module, the WIP record and the associated files in the WIP directory, NAFILE.DAT and POLFILE.DAT, are deleted once the form set is archived. If the Archive module is disabled, the WIP record and the associated files are deleted when the form set is completed. Set the Delete option to No to retain the WIP files in the WIP directory. If you set this option to No, you must periodically purge the WIP either manually or through a timed or automatic process.
NOTE: This option only applies if you are not using the Archive module. There are no windows affected by this option.
When you use the following options in the Complete control group:
< Complete >
Delete = No
Archive = No
the WIP records are updated with the status code specified in the Complete option of the Status_CD control group:
< Status_CD >
Complete = CP
There is no default for this status code because normally a record is deleted when WIP is completed. The status code CP is shown as an example. You can define any one or two-character status code not in use by one of the other modes defined in the same INI control group.
74

Restricting Who Can Seed the UNIQUE file
RESTRICTINGWHO CAN SEED
THE UNIQUEFILE
The UNIQUE.* files contain the last number for the WIP file that was created. Whenever a WIP file is created, a number is generated to uniquely identify it to make sure no WIP file is overwritten. The GenWIP and GenArc programs use this information to create separate data and form information files for the incomplete transactions received from the GenData program and for the individual forms stored in archive.
If these files are corrupted, the next user to work with WIP is automatically given an opportunity to re-seed these files. The UniqueSeed function lets you specify who has rights to do this. To use this function, add the following line to your INI files:
< AFEProcedures >
UniqueSeed = AFEW32->AFERestrictedUniqueSeed
The system will create a UNIQUE.DAT file if the UNIQUE.DBF and UNIQUE.MDX files are missing. If you want to always use the UNIQUE.DBF file, change the INI option which names the file to include the DBF extension, as shown here:
< WIPData >
UNIQUE = UNIQUE.DBF
Normally this option is not present in the INI file. The name UNIQUE, without an extension, is used when the option is omitted.
If you omit the UniqueSeed function, the standard method of examining the AFELOG file is used and the file is seeded with the largest FORMSETID found in the log. If the AFELOG file is not present, the file is seeded with one (1) as the first form set.
The AFERestrictedUniqueSeed function prevents users from automatically seeding the file unless they meet specified criteria. The system displays a window stating that seeding of the UNIQUE file failed and that the user does not have authorization to perform this operation.
Adding a menu optionfor re-seeding the file
You can add the following MEN.RES line to set up a menu option for re-seeding the file:
MENUITEM “&Manual WIP Seed” 207 “AFEW32->AFEManualUniqueSeed” “ReSeed the Unique file” 0
Make sure the ID of the menu option (207) does not conflict with other options. The security level you attach is up to you. Zero (0) indicates a supervisor.
With these settings, if the file is already seeded correctly and someone tries to re-seed it, the system informs the user that the UNIQUE data file is already seeded correctly.
If the file needs to be seeded, a window asks the user to enter the seed value. Enter an integer, not a hexidecimal value. The system converts the number to the proper format, if it is accepted, and displays a message stating that the operation was successful.
75

Customizing the Form Selection Window
CUSTOMIZINGTHE FORM
SELECTIONWINDOW
You can customize the Form Selection window using INI options. These options let you control whether or not fields, columns, prompts, buttons, and titles appear and, in some cases, accept entry. Keep in mind that although you can hide these items, the data is still applied and active — the end user just can’t see or manipulate it. Removing these items from view merely prevents users from changing the fields, it does not change the fields default values.
You use options in these control groups to customize the Form Selection window:
• FormSelection
• DlgTitles
• Control
• AFEProcedures
• AllowTransEdits
FormSelection options Here is a list of the FormSelection control group options you can use to customize this window. Place this control group in either your FSISYS.INI or FSIUSER.INI file.
Option Description
CreateStartField Use this option to select the field you want the system to assign focus when the window appears in create WIP mode. You can choose from: Transaction, Key1, Key2, KeyID, or Description.
DescriptionRequired Set this option to Yes if you want to require users to enter data in the Description field.
FullRecipWidth Use this option to size the recipient columns so you can read the entire recipient name on the column header. Variable space fonts may prevent you from seeing certain recipient names in their entirety, even if you turn on this option.By default, the system allocates minimal space to the recipient columns. This lets you see as many as possible and lessens the need to scroll to see additional recipients.
HideCheckBox Controls whether or not the column for selecting and deselecting forms in the available list appears. If you set this option to Yes, the user cannot change the forms selected.
HideDescription Controls whether or not the Description field and prompt appear. When creating a form set, you must use a hook or some other method to assign a description if you want this field hidden from the user.WIP form sets use the description read from the WIP record.
HideDuplicate Removes the Duplicate button.
HideImport Removes the Import button.
76

Customizing the Form Selection Window
HideFormDescription Controls whether or not the Form Description column appears.
HideFormName Controls whether or not the Form Name column appears.
HideKey1 Controls whether or not the Key1 field and prompt appear. The first item in the Key1 list will be selected.
HideKey2 Controls whether or not the Key2 field and prompt appear. The first item in the Key2 list will be selected. When Master Dec groups are used, the Key2 group that contains the Master Dec appears as the title and is automatically selected.
HideKeyID Controls whether or not the KeyID field and prompt appear. Unless you limit users to editing existing WIP or use some type of automatic KeyID generation, you cannot leave this field blank, even when it is not visible.
HideMode Controls whether or not the Mode column that identifies the entry and pull form setting appears.
HideRecip Use these options to hide specific recipient columns. To use, append the name of the recipient to the option, as shown here:
HideRecipInsured=Yes
HideRecipAgent=Yes
HideRecipHome Office=Yes
Note there is no space between HideRecip and the first character of the recipient name. If, however, the recipient name includes spaces, as in Home Office, include the spaces in the name.
HideRetrieve Removes the Retrieval button.
HideTransaction Controls whether or not the Transaction field and prompt appear. Regardless of what you choose, the default selection for the Transaction list is still active.
HideTrnName Provides an option to hide the Name (i.e. transaction name) field on the Form Selection window, for those applications that do not wish to see this field. The description field on the Forms Selection dialog is typically used to hold the customer name. The Name field can optionally be used to associate a name with the WIP transaction. The default setting is No.
Option Description
77

Customizing the Form Selection Window
OnlyEditZeroRecip This option only lets users change the recipient copy count if the copy count was set to zero (0) in the FORM.DAT file.If you are working with WIP and the form specifies a recipient not included in the FORM.DAT, or the form is not included in the FORM.DAT file, the system will let you change those recipient copy counts.When you set this option to Yes, only the editable copy counts appear, the rest are hidden.
ProtectRecip Use these options to identify recipient columns that should appear, but not accept entry (display-only). This prevents users from changing copy counts for that recipient. To use this feature, append the name of the recipient to the option, as shown here
ProtectRecipInsured=Yes
ProtectRecipAgent=Yes
ProtectRecipHome Office=Yes
Note there is no space between ProtectRecip and the first character of the recipient name. If, however, the recipient name includes spaces, as in Home Office, include the spaces in the name.
SelectByRowClick Set this option to Yes if you want to be able to select a form on the Form Selection window by simply clicking on the form line.
SelRequiredFormOnUpdate Use this option if you would like the required forms on the Forms Selection window, pre-selected when you are editing a policy from WIP.During the normal form selection process, picking a new group (LOB) does not automatically select required forms. Use this option if you would like the required forms to be selected for new group (LOB) selections. If you first deselect a group (LOB) and then reselect it, this tells the system to mark as selected all the required forms in that group when using this feature.This option affects selecting forms in Documaker Desktop and via the WIP Edit plug-in.
ShowEffectiveDate Controls the Effective Date field on the Forms Selection window. If left blank or set to Yes, this option shows the Effective Date field and lets users create postdated form sets.If you set this option to No, the system hides the Effective Date field and uses the current date as the effective date when it creates a new form set.
SuppressDialog Use this option to prevent the Form Selection window from appearing when editing existing WIP.
UpdateStartField Use this option to select the field you want the system to assign focus when the window appears in update WIP mode. You can choose from: Transaction, Key1, Key2, KeyID, or Description.
Option Description
78

Customizing the Form Selection Window
DlgTitles options In the DlgTitles control group, you can use these options:
Option Description
CheckArchiveTitle Changes the name of the Retrieve button on the Form Selection window.
CheckImportTitle Changes the name of the Import button on the Form Selection window.
DuplicateTitle Changes the name of the Duplicate button on the Form Selection window.
FormDlgTitle Changes the name of the Form Selection window.
FormListTitle Changes the Available Forms prompt on the Form Selection window.
InfoTitle Changes the prompt of a Description field on the Form Selection window.
Key1Title Changes the default prompt of a Key1 field on all windows.
Key2Title Changes the default prompt of a Key2 field on all windows.
KeyIDTitle Changes the default prompt of a KeyID field on all windows.
Key1TitleFS Changes the prompt of a Key1 field on the Form Selection window.
Key2TitleFS Changes the prompt of a Key2 field on the Form Selection window.
KeyIDTitleFS Changes the prompt of a KeyID field on the Form Selection window.
TransTitle Changes the prompt of the Transaction field on the Form Selection window.
79
Customizing the Form Selection Window
CONTROL options In this control group, you can use these options:
NOTE: To hide an existing company or line of business, you must mark every line which has the company name or line of business with the prefix specified in the HiddenGroupPrefix option. You cannot simply mark the first line in the FORM.DAT file. The system does not extend the hidden flag to subsequent lines.
You can view sections included in a company or line of business that have the hidden flag using the AddImage DAL function. Unless you use this function, those sections will not display or print. For more information, see the DAL Reference.
AFEProcedures options In the AFEProcedures control group, you can use these options:
The DupForm and CheckDupForm options provide hooks which you can use to register functions for the Duplicate button.
Option Description
DoFormSelection Use this option to allow the Form Selection window to appear when using Mode=WIP. The default behavior is not to show the Form Selection window when using Mode=WIP.
HiddenGroupPrefix Lets you hide certain form groups. For example, some worksheet-style form set implementations are set up to block from view certain forms that must be in the FORM.DAT fileTo specify, enter the prefix to use for a hidden group. Leaving the option blank overrides the default prefix of “.H.” and makes all forms visible.Any group (Key1 = Company, or Key2 = LOB) in the FORM.DAT file that begins with a special prefix (by default “.H.”) will not appear as a selection in the Key1 (Company) or Key2 (LOB) fields on the Form Selection window.
NoKey2Changes Use this option to prevent the user from change Key2 selections when Retrieve or Import is used to create the form set, and when editing WIP.
Option Description
Button1 Custom button hook
Button2 Custom button hook
Button3 Custom button hook
DupForm This function handles the form duplication process. This function displays messages which indicate the success or failure of the duplication operation.
CheckDupForm The CheckDupForm hook returns True or False to indicate if you can duplicate the form.
80

Customizing the Form Selection Window
The Form Selection window calls AFECallCheckDupFormHook at the appropriate places to determine whether the button should be active. It also calls AFECallDupFormHook to do the actual duplication.
AllowTransEdits options In the AllowTransEdits control group, you can use these options:
Specifying the numberof copies
When selecting forms, any form with the Multicopy option turned on activates the Duplicate button. You can use this button to copy the form. So if you want 10 copies, you have to click the Duplicate button 10 times.
Instead of clicking the Duplicate button, you can use the FormDuplicateCount option to tell the system to display a window that lets you enter the number of copies you want it to create. To display this window, add the FormDuplicateCount option, as shown here:
< FormSelection >
FormDuplicateCount = Yes
VALIDATING KEYID ENTRIES
In addition to the following restrictions on KeyID values, you can make sure that data entered conforms to a specific alpha and numeric format. For instance, KeyIDs can be:
• limited by the use of the AutoKeyID table (only accepts KeyIDs listed in the table)
• limited as to whether there can be duplicates in WIP and/or Archive
• converted to uppercase (if the CaseSensitiveKeys option is set to No)
• limited to the length defined in the database. (A standard WIP file allows 20 characters for the KeyID.)
NOTE: KeyIDs are typically used as the policy, document, or form set number.
Option Description
KeyID Normally during WIP Edit, the KeyID field cannot be edited. Use this option to identify which Transaction types can allow the field to be edited. Each type must specify the transaction code from the INI file. Separate additional codes with semicolons.
Key2 Normally during WIP Edit, the Key2 field can be edited. This can be disabled by setting the NoKey2Changes option in the Control control group to Yes.Use this option to identify which Transaction types can allow the field to be edited. Each type must specify the transaction code from the INI file. Separate additional codes with semicolons.
Transaction Normally during WIP Edit, the Transaction field cannot be edited. Use this option to identify which Transaction types can allow the field to be edited. The setting must specify the transaction code from the INI file. Separate additional codes with semicolons.
81

Customizing the Form Selection Window
You can use the VerifyKeyID hook to call a DAL script. Within the DAL script, the verification can be constant, or provide exceptions based on the Key1 (Company), Key2 (Line of Business), or the transaction code currently selected.
All the relevant WIP record information taken from the Form Selection window is available to the DAL script for examination. Simply use the available DAL functions like WIPKeyID, WIPKey1, or WIPFld.
NOTE: The script can retrieve WIP values, but not change them.
You must handle any error messages using the MSG function.
To install the KeyID validation hook, include these INI options.
< AFEProcedures >
AutoKeyID = TRNW32->TRNVerifyKeyID
< VerifyKeyID >
Script = KeyID.DAL
OnCreate = Yes
OnUpdate = No
The script can do whatever evaluation is necessary for validation purposes. Here is an example DAL script that validates a KeyID using a format token string.
-------------------------------------------------------------------
* Define the format requirement in the fmt variable below.
* 9 - means numeric
* A - means alphabetic
Option Description
AFEProcedures control group
AutoKeyID Enter TRNW 32->TRNVerifyKeyID as shown above to install the KeyID validation hook.
VerifyKeyID control group
Script Enter the name of the script you want the system to use. Store this script in the DefLib directory specified for your master resource library (MRL).If you omit this option, a message appears on the Form Selection window. You will have to exit and correct the INI file by either defining the script or removing the hook declaration.
OnCreate This option defaults to Yes to indicate you want to call the script when creating a new form set via the Form Selection window.To exclude newly-created form sets, set this option to No.
OnUpdate This option defaults to No to indicate you do not want to call the script to verify the KeyID on transactions that have already been saved to WIP. To verify WIP transactions as well, set this option to Yes.
82

Customizing the Form Selection Window
* X - means alphanumeric
* * - means any character - not limited to alphabetic or numeric
* For example, if you need 4 numeric, followed by 2 alpha, followed
* by 2 numeric, followed by 2 alphanum, you would define:
* fmt = "9999AA99XA"
* The length of the overall format string is assumed to also define
* the required length of the key value.
* Note DAL does not support case sensitive string comparisons.
* Therefore, it assumes either case is sufficient and that if the
* key is required to be in uppercase, you have set the
* CaseSensitiveKeys option to No.
fmt="9999AA99XA"
* This next statement is used to get the KeyID prompt
name = GETINISTRING(,"DlgTitles", "KeyIDTitle", "Policy #");
val = WIPKeyID();
if (val = "")
* This is returned successfully because a blank key is going to
* be handled by the Form Selection window anyway.
return("Yes");
End
#l = len(fmt);
if (#l != len(val))
msg(name, "Length must be " & #l & '.');
return("No");
End
* Now example each character from right to left because we
* already have the length from the earlier check.
top:
if (#l = 0)
goto done:
endf = sub(fmt,#l,1);
g = sub(val,#l,1);
if (f = '9')
if (NUMERIC(g) = 0)
msg(name, "Position "& #l & " must be numeric.");
return("No");
end
elseif (f = 'A')
if (g < 'A' OR g > 'Z')
msg(name, "Position "& #l & " must be alphabetic.");
return("No");
end
elseif (f = 'X')
if (NUMERIC(g) = 0)
if (g < 'A' OR g > 'Z')
msg(name, "Position "& #l & " must be alphanumeric.");
return("No");
end
end
elseif (f != '*')
msg("Invalid format found at position " & #l & ".");
return("No");
83
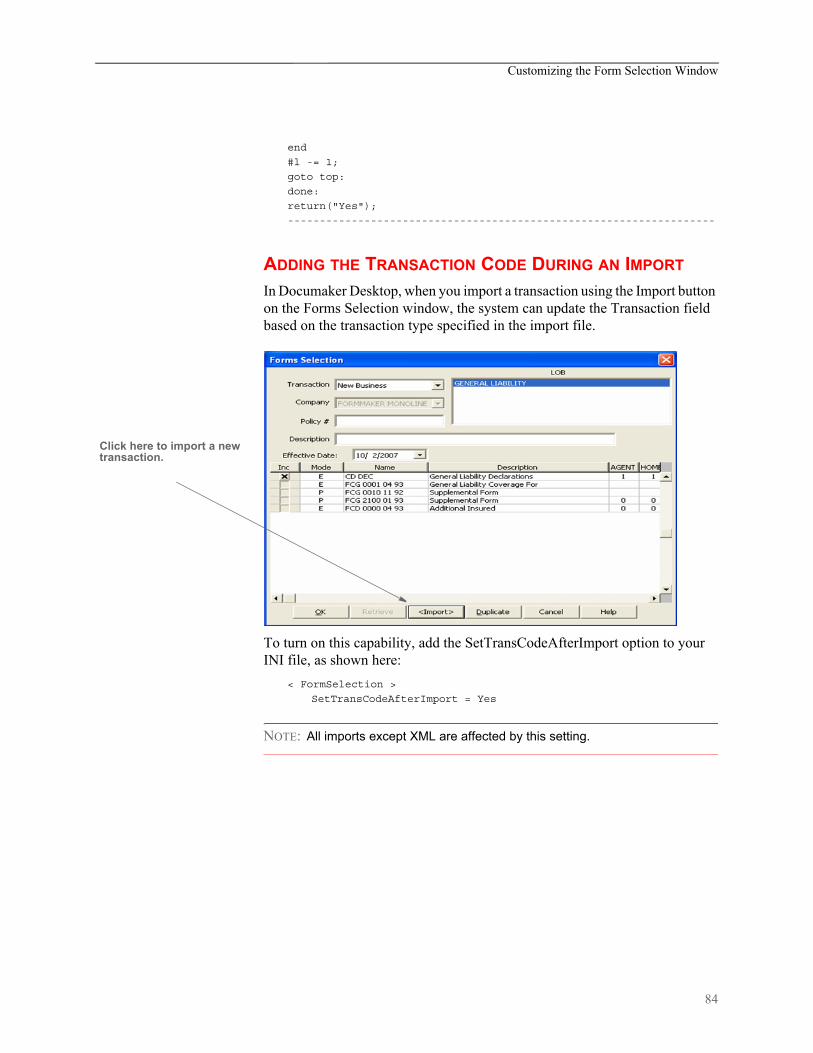
Customizing the Form Selection Window
end
#l -= 1;
goto top:
done:
return("Yes");
-------------------------------------------------------------------
ADDING THE TRANSACTION CODE DURING AN IMPORT
In Documaker Desktop, when you import a transaction using the Import button on the Forms Selection window, the system can update the Transaction field based on the transaction type specified in the import file.
To turn on this capability, add the SetTransCodeAfterImport option to your INI file, as shown here:
< FormSelection >
SetTransCodeAfterImport = Yes
NOTE: All imports except XML are affected by this setting.
Click here to import a new transaction.
84

Regional Date Processing in Documaker Workstation
REGIONALDATE
PROCESSING INDOCUMAKER
WORKSTATION
You can setup Documaker Desktop to use the Policy Effective Date and State to filter the list of forms that can be applied to the policy. Details can be found in the Documaker Studio User Guide under the topic “Using Regional Date Processing”.
If you have defined regional date processing tokens in the BDF and rules in a Form List, the Form Selection window in Documaker Workstation includes the fields Production, Location and SubLocation:
The Jurisdiction, Location and Sub Location fields are populated from your INI files. The syntax for these options is as follows
< RDP > Regions = entries separated by commas Location = entries separated by commas Location:SubLoc = entries separated by commas
Here is an example:
< RDP > Regions = AL, GA, TX Location = DEF, ABC Location:ABC = Agent1, Agent2 Location:DEF = Agent3, Agent4
Regions maps to the Jurisdiction field on the Form Selection window. The Location you select will filter the Sub Location entries to the proper list.
85
Regional Date Processing in Documaker Workstation
The first entry in each INI option list becomes the default when you open the Form Selection window. So in the above example, Jurisdiction is set to AL, Location to DEF, and Sub Location to Agent3. The entries are sorted in alphabetical order.
You can also use RDP shortcuts defined in the BDF (Application Definition File) file in INI options. For example, if you defined West as CA, OR, WA, you could put it in the INI option as shown here:
< RDP > Regions = AL, *West, GA
NOTE: The asterisk (*) denotes a shortcut. Without it, the system inserts West as a region.
If a shortcut is the first item in the INI list, no default is selected for that item.
The system executes RDP rules with the Form Selection window first begins to populate the forms list. It executes them again when you change the Key1, Key2, Jurisdiction, Location, Sub Location or Effective Date Fields.
Other INI Options
The TrnName field only appears on the Form Selection window if it is defined in the WIP database/table. Older WIP databases do not have this field
< DlgTitles > JurisdictnTitle = Jurisdiction LocIDTitle = Location SubLocIDTitle = Sub Location TrnNameTitle = Name
< FormSelection > HideTrnName = No TrnNameRequired = No
The Jurisdiction, Location and Sub Location fields are populated from your INI files. The syntax for these options is shown here:
< RDP >Regions = entries separated by commasLocation = entries separated by commasLocation: SubLoc = entries separated by commas
Here is an example:
< RDP >Regions = AL, GA, TXLocation = DEF, ABCLocation: ABC = Agent1, Agent2Location: DEF = Agent3, Agent4
86

Regional Date Processing in Documaker Workstation
Regions maps to the Jurisdiction field on the Form Selection window. The Location you select will filter the Sub Location entries to the proper list.
The first entry in each INI option list becomes the default when you open the Form Selection window. So in the above example, Jurisdiction is set to AL, Location to DEF, and Sub Location to Agent3. The entries are sorted in alphabetical order.
You can also use RDP shortcuts defined in the BDF file in INI options. For example, if you defined West as CA, OR, WA, you could put it in the INI option as shown here:
< RDP >Regions = AL, *West, GA
NOTE: The asterisk (*) denotes a shortcut. Without it, the system inserts West as a region).
If a shortcut is the first item in the INI list, no default is selected for that item.
The system executes RDP rules when the Form Selection window first begins to populate the forms list. It executes them again when you change the Key1, Key2, Jurisdiction, Location, Sub Location, or Effective Date fields.
Other INI options The TrnName field can only appear on the Form Selection window if it is defined in the WIP database/table. Older WIP databases do not have this field.
< DlgTitles >JurisdictnTitle = JurisdictionLocIDTitle = LocationSubLocIDTitle = Sub LocationTrnNameTitle = Name
< FormSelection >HideTrnName = NoTrnNameRequired = No
87

Configuring the Routing Slip Directory
CONFIGURINGTHE ROUTING
SLIPDIRECTORY
You can setup Documaker Desktop to use the Policy Effective Date and State to filter the list of forms that can be applied to the policy. Details can be found in the Documaker Studio User Guide under the topic "Using Regional Date Processing".
If you have defined regional date processing tokens in the BDF and rules in a Form List, the Form Selection window in Documaker Workstation includes the fields Production, Location and SubLocation:
The Jurisdiction, Location and Sub Location fields are populated from your INI files. The syntax for these options is as follows
< RDP >
Regions = entries separated by commas
Location = entries separated by commas
Location:SubLoc = entries separated by commas
Here is an example:
< RDP >
Regions = AL, GA, TX
Location = DEF, ABC
Location:ABC = Agent1, Agent2
Location:DEF = Agent3, Agent4
88
Configuring the Routing Slip Directory
Regions maps to the Jurisdiction field on the Form Selection window. The Location you select will filter the Sub Location entries to the proper list.
The first entry in each INI option list becomes the default when you open the Form Selection window. So in the above example, Jurisdiction is set to AL, Location to DEF, and Sub Location to Agent3. The entries are sorted in alphabetical order.
You can also use RDP shortcuts defined in the BDF (Application Definition File) file in INI options. For example, if you defined West as CA, OR, WA, you could put it in the INI option as shown here:
< RDP > Regions = AL, *West, GA
NOTE: The asterisk (*) denotes a shortcut. Without it, the system inserts West as a region.
If a shortcut is the first item int eh INI list, no default is selected for that item.
The system executes RDP rules with the Form Selection window first begins to populate the forms list. It executes them again when you change the Key1, Key2, Jurisdiction, Location, Sub Location or Effective Date Fields.
Other INI Options
The TrnName field only appears on the Form Selection window if it is defined in the WIP database/table. Older WIP databases do not have this field
< DlgTitles >
JurisdictnTitle = Jurisdiction
LocIDTitle = Location
SubLocIDTitle = Sub Location
TrnNameTitle = Name
< FormSelection >
HideTrnName = No
TrnNameRequired = No
89

Configuring the Routing Slip Directory
CONFIGURINGTHE ROUTING
SLIPDIRECTORY
Routing slips let you use an on-line email directory for sending documents. You can group recipients by department, or organize them in any way. When you send documents using routing slips, the system sends a document to each individual in the order they appear on the routing slip. The system then routes the document back to you.
You can use the following INI option to specify the location of routing slips:
< Mail >
SlipTable = (path\table name)
You can use this option to specify:
• An alternate path for the routing slip table. In this scenario, the system uses the default slip table name (RTESLIPS), but accesses the table via another path. If you specify only the path, be sure to include a backslash at the end of the path.
Here is an example:
SlipTable = ..\MyPath
• An alternate file name for the routing slip table. In this scenario, the system uses the default table directory to locate the routing slip table you specify. The default table directory is specified in your master resource setup.
In this scenario, you omit the path and enter only the table name. The extension is optional, but you may want to include it for purposes of clarity.
Here is an example:
SlipTable = MyTable.dbf
• Both a new path and table name for the routing slip table. The extension is optional, but you may want to include it for purposes of clarity.
Here is an example:
SlipTable = ..\MyPath\MyTable.dbf
90

Setting Up Timed Service Functions
SETTING UPTIMED SERVICE
FUNCTIONS
You can use TMRLIB features to set up timed service functions. The system executes these functions based on criteria you specify. For instance, you can use these functions for a variety of purposes, some of which are listed below:
• Automatically Saving Form Sets on page 94
• Sending Imported Information to Archive on page 94
• Starting the Entry System Automatically on page 96
• Counting the WIP Records in the User’s Queue on page 96
• Using Automatic WIP Import on page 106
You must set up timed service functions in your INI files as shown below:
< TimerFuncs >
REF = ;STATE;URGENCY;SECONDS;DLLNAME->FuncName;\DATA
The semicolons (;) are required. The DATA option is optional. If you include it, be sure to precede it with a backslash (\).
REF is simply a placeholder to distinguish each entry in the TimerFuncs control group. Each listed function should have a different REF value. The actual value is not used by TMRLIB, so in most cases you can use simple ASCII numbering such as 01=, 02=, 03=, and so on, to distinguish each timer service function line.
NOTE: Although the REF value is not used by TMRLIB, keep in mind that INI files are sorted when loaded. If the sequence of the service functions is important, set up the REF values so the sorting does not change the sequence.
STATE flag The first flag, STATE, is a mode or program status flag. The STATE, combined with URGENCY, tells the system at what point it can call the service function. This indicator only applies to service function calls which are triggered by the timer. Initialization and termination affects all service functions, regardless of the setting you enter on the registration line. This values for this flag are:
NOTE: The desktop is considered opened when any form contained in the current form set (retrieved by FAPFormset) has a FAPWINDOW associated with it.
Means…
0 The desktop is closed, no form set is currently loaded or in view.
1 The desktop is open, a form set is currently loaded or in view.
2 You can call the service function any time (use with caution).
91

Setting Up Timed Service Functions
If you want the system to call a service function when the desktop is closed, enter zero (0) as the STATE. Note, that even if the desktop is closed, the system will not call a service function registered at STATE 0 (zero) if the URGENCY requirement is not also satisfied. You can set STATE to zero (0) to implement features like automatic import, or automatic WIP edit.
Enter 1 if you want the system to call a service function while the desktop is opened. Note, however, this means that a FAPWINDOW is associated with a form in the current form set. The system will not call a service function registered at STATE 1 if the URGENCY requirement is not satisfied. You can use STATE 1 to implement a feature like automatic save to WIP.
Only enter 2 with caution. The system will call any timed service function with STATE set to two (2) regardless of whether the desktop is opened or closed as long as the URGENCY requirement is satisfied. Service functions with STATE 2 should not attempt to alter current forms or change the form set management because this may cause the system to stop functioning. You should only use STATE 2 to implement features which do not hinder the data entry user and which do not affect form set management.
URGENCY flag Once the system evaluates the STATE flag, it then evaluates the URGENCY flag. URGENCY tells the system how important it is to enforce the call to the service function. Depending on your entry, this setting tells the system to skip or delay the call if the data entry user is working with an open window or menu.
This indicator only applies to service function calls triggered by the timer. The initialization and termination processes call all registered service functions regardless of this setting. The values for this flag are:
NOTE: TMRLIB subclasses the main window of the application and looks for messages that indicate the menu is active. In addition, all child windows associated with the application window are scanned to determine if any are windows.
These tasks determine when the system should enforce the URGENCY flag.
Enter 0 to tell the system to skip the call to the service function if a system window or menu is open. The system will not call the service function again until the next time interval occurs.
Means…
0 not urgent (okay to bypass if a window or menu is open)
1 rush (call as soon as possible after a window or menu is not open)
2 urgent (call even if a window or menu is open— use with caution)
92
Setting Up Timed Service Functions
Enter 1 to tell the system to call the service function if no system window or menu is active. This setting delays the call, instead of skipping it, if a window or menu is open.
The system evaluates delayed service functions approximately every second (based upon the system timer) to determine when it can safely make the call. Delaying the call lets the system make the call at the next available point in time, instead of making it wait for the next standard interval registered with the function.
NOTE: The system does not accumulate time intervals. If the delay causes the function to miss two or three time intervals, those intervals are ignored. The system will only call the function once when the URGENCY flag is satisfied.
Enter 2 with caution. With this setting, the system calls the service function regardless of whether a window or menu is active. Timed service functions with this setting should not attempt to alter current forms or change management of the form set. Doing so may cause the system to stop functioning.
Since the data entry user may be working with a window, this setting should only be used to implement features which do not affect data entry user operations. Also, avoid using these functions to open windows. This avoids a situation where as data entry user works on one task, the system suddenly switches to another task or window.
SECONDS flag The SECONDS flag tells the system how often, in seconds, it should call the service function. You can set this time-out value to any value from 1 to 32767 (32767 seconds exceeds nine hours). If you enter zero (0), the system skips the line.
NOTE: Although you enter the time-out value in seconds, the actual time is approximated. Internally, the system maintains two time values. One value is used to test when STATE 2 functions should be called. STATE 2 functions are called whether the desktop is opened or closed. STATEs 0 and 1 use a second time value maintained by TMRLIB.
Only those functions satisfied by the current STATE flag (desktop opened or closed) will be called when the proper time interval has elapsed. When the desktop is opened or closed, the second time value is reset to zero. This guarantees the time interval associated with a function must elapse before being called when the desktop state changes. Calling a timed service function too frequently can slow the system.
DLLNAME->FuncNameflag
The DLLNAME->FuncName flag lets you identify a DLL to load and an exported function to call. The DLLNAME must be a valid DLL name and FuncName much match a name which can be queried from that DLL.
93

Setting Up Timed Service Functions
Only functions named in a DLL’s export list can be referenced by TMRLIB. The function you choose must conform to the FAPHANDLER function prototype.
\DATA flag This flag is optional. Only use this flag if the timed service function requires it. There are no format requirements except it must begin with a backslash (\).
The system attaches function-specific data, as a string of ASCII characters, to the FSITIMERREC structure associated with the registration line. It is the service functions responsibility to verify the existence or validity of the line.
NOTE: The leading backslash does not appear in the data member of the structure.
AUTOMATICALLY SAVING FORM SETS
This timed service function lets you automatically save the current form set. To use this function, add an INI option similar to the one shown here:
< TimerFuncs >
01 = ;1;1;60;AFEW32->AFEAutoSave;
Where the values (;1;1;60;AFEW 32->AFEAutoSave;) represent:
;State;Urgency;Seconds/Time-of-day;Function
SENDING IMPORTED INFORMATION TO ARCHIVE
The system also includes a timed service function which lets you automatically send imported information which meets certain criteria to manual archive. For more information on this feature, see Importing Information Directly into Archive on page 217.
Value Description
State Always set to one (1)
Urgency Always set to one (1). Zero (0) means the call can be skipped if the user is engaged in an operation, while 1 means to call the feature as soon as the user has finished the current operation.
Seconds orTime-of-day
Enter the number of seconds to call the function at a specific interval. The default is 60 which means the system will automatically save the form set every 60 seconds while the desktop is open and the user is not selecting a window or menu option.Or, enter the specific time of the day at which you want the system to call this function. The system uses a 24-hour clock, so enter 13:00 to indicate 1 pm.
Function AFEW32->AFEAutoSave indicates the timed service function. Enter this value exactly as shown. Without this value, this feature will not work.Case is important when entering the timed service function name.
94

Setting Up Timed Service Functions
95
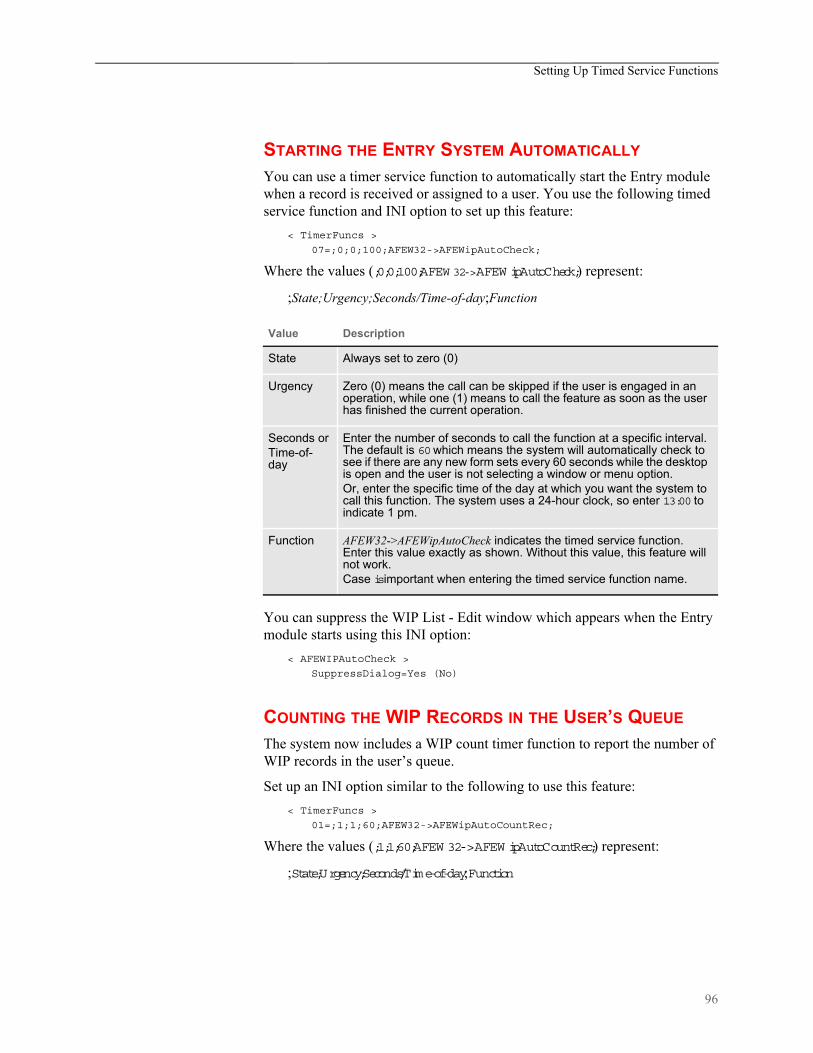
Setting Up Timed Service Functions
STARTING THE ENTRY SYSTEM AUTOMATICALLY
You can use a timer service function to automatically start the Entry module when a record is received or assigned to a user. You use the following timed service function and INI option to set up this feature:
< TimerFuncs >
07=;0;0;100;AFEW32->AFEWipAutoCheck;
Where the values (;0;0;100;AFEW 32->AFEW ipAutoCheck;) represent:
;State;Urgency;Seconds/Time-of-day;Function
You can suppress the WIP List - Edit window which appears when the Entry module starts using this INI option:
< AFEWIPAutoCheck >
SuppressDialog=Yes (No)
COUNTING THE WIP RECORDS IN THE USER’S QUEUE
The system now includes a WIP count timer function to report the number of WIP records in the user’s queue.
Set up an INI option similar to the following to use this feature:
< TimerFuncs >
01=;1;1;60;AFEW32->AFEWipAutoCountRec;
Where the values (;1;1;60;AFEW 32->AFEW ipAutoCountRec;) represent:
;State;Urgency;Seconds/Time-of-day;Function
Value Description
State Always set to zero (0)
Urgency Zero (0) means the call can be skipped if the user is engaged in an operation, while one (1) means to call the feature as soon as the user has finished the current operation.
Seconds orTime-of-day
Enter the number of seconds to call the function at a specific interval. The default is 60 which means the system will automatically check to see if there are any new form sets every 60 seconds while the desktop is open and the user is not selecting a window or menu option.Or, enter the specific time of the day at which you want the system to call this function. The system uses a 24-hour clock, so enter 13:00 to indicate 1 pm.
Function AFEW32->AFEWipAutoCheck indicates the timed service function. Enter this value exactly as shown. Without this value, this feature will not work.Case is important when entering the timed service function name.
96

Setting Up Timed Service Functions
These parameters show the default for this function in the TimerFuncs control group. Using these settings, the system calls the AFEWipAutoCountRec function approximately every 60 seconds while the desktop is open and user is not engaged in a window or menu selection. If a window or menu is open, the function waits until the window or menu closes.
TROUBLESHOOTING
If you have problems using the automatic WIP import feature, check your INI settings. The system loads the FSIUSER.INI file from the current working directory—unless you specified a different INI file on the command line when you started the system. If you are starting the system by clicking an icon, check the properties for that icon to determine which INI file is being used.
Once you have determined which FSIUSER.INI file is being used, open that file in a text editor and find this control group and option:
< Environment >
FSISYSINI = ..\FSISYS.INI
Your settings may vary, but this option always tells the system where to find the FSISYS.INI file. This example indicates that the file is loaded from the current working directory. If your setting has a relative path like the one shown above, you’ll need to determine where the FSISYS.INI file is being read based upon your current working directory.
Value Description
State always set to one (1)
Urgency Zero (0) means the call can be skipped if the user is engaged in an operation, while one (1) means to call the feature as soon as the user has finished the current operation.
Seconds orTime-of-day
Enter the number of seconds to call the function at a specific interval. The default is 60 which means the system will automatically count the number of WIP records in the user’s queue every 60 seconds while the desktop is open and the user is not selecting a window or menu option.Or, enter the specific time of the day at which you want the system to call this function. The system uses a 24-hour clock, so enter 13:00 to indicate 1 pm.
Function AFEW 32->AFEW ipAutoCountRec indicates the timer function. Enter this value exactly as shown. Without this value, this feature will not work.
97
Setting Up Timed Service Functions
Determine the Location of the Option
FSIUSER.INI options take precedence over duplicate options defined in the FSISYS.INI file. For instance, suppose you have the following settings defined in your INI files.
In the FSIUSER.INI file < MyGroup >
Value = Yes
In the FSISYS.INI file < MyGroup >
Value = No
File = x.tmp
If the system attempts to locate the current value for Value under M yGroup, the response will be Yes. If, however, the system attempts to locate the File option, the one defined in FSISYS.INI will be returned (x.tmp).
This means you need to examine the FSIUSER.INI file first and then the FSISYS.INI file to check which options are being used by the system. Always examine both files. This step shows the relationship between the FSIUSER.INI and FSISYS.INI files. At a higher level, the distinction between these two files is represented by their names—user options vs. system options.
System options are usually placed in the FSISYS.INI file. The type of options include any that must or should be the same for all users. By placing common options in the same file, you can usually be assured that everyone’s system operates similarly.
The FSIUSER.INI file is where the user specific options are defined. User specific options are those which may vary between individuals. Usually this file contains the master resource directives which are used to locate the files and data required by the system. If users do not share printers, email, and other similar options, then these too may be defined in the FSIUSER.INI file.
When attempting to determine in which file to place options, ask if this applies to everyone or just certain individuals.
Check the Timer Setup< TimerFuncs >
01=;0;0;300;TRNW32->TRNAutoImport;
The definition above (or a variation of it) is required to activate the auto import feature. Descriptively, the line reads like this:
Every five minutes (300 seconds), if no window or menu item is active, and a form set is not currently being edited, run the TRNAutoImport function located in the TRN??? DLL. If one of these assumptions fail, skip this call and check again at the next interval.
Valid values for the first variable after the equal sign are 0, 1, or 2. Where zero (0) means a form set is not loaded; 1 means only when a form set is loaded; and 2 means it does not matter.
98

Setting Up Timed Service Functions
For the automatic WIP import feature, this option would be zero (0) if you use the Edit=Yes feature. If the import information is complete (in and of itself), this field may be zero (0) or 1. Neither of these options allow the action to occur if a window or menu option is active when the time interval occurs. Entering the 2 is not appropriate for this feature.
The second field may also be 0, 1, or 2. Again, 2 is not a good choice. A zero (0) tells the system to skip the action if the form set is in the incorrect state or a window or menu option is active. A 1 tells the system to delay the call until the proper state is achieved.
For instance, in the example shown above, if you were to open a window at four minutes 59 seconds, the service function will be skipped and not checked again for five minutes. If you change the option to 1, the system checks the state each second after the initial attempt to see if the action can be taken. When all values are satisfactory, the system starts the automatic WIP import feature.
Check the Timer Service Functions
If you have not received any messages from the system to indicate where a problem may be, and it appears that nothing happens to your import files (like being renamed to *.BAD), test your timers.
To do this change the TimerFunc (or simply add another timerfunc) to do the following.
< TimerFuncs >
01=;0;0;5;TMRW32->TMRTimerTest1;
The function referenced by this call will display a window each time the function is called. You should receive a window indicating the system is initializing when it first starts.
In this example, every five seconds—if a form set is not open and no window or menu option is active—another window should appear. When you exit the system, you should get a termination notice from the function.
If this test works, your timers are operational. Change the settings back to those appropriate for the Automatic WIP Import option.
Check Your AutoImport Options
There must be an AutoImport control group defined in the INI file or the feature cannot operate. The options supported by this feature are shown below:
< AutoImport >
Path = c:\data\
File =
Match = *
Ext = .DAT
DeleteOnSuccess = Yes
DeleteOnFail = No
99

Setting Up Timed Service Functions
TransactionCode = NB
Description = Imported
StatusCode = WIP
RecordType = NEW
Edit = No
You must define a value for Path or File or the initialization will fail. You can omit all other options if you want to use the defaults shown above. If you specify a File setting, it must be a valid 8.3 file name. The other values allowed for these options are defined earlier in the Automatic WIP Import section.
If the File Imports But Some of the Data is Missing
This is generally a result of improper field scope. Field scopes are set in the field’s properties. All fields defined in the import file after the Header Lines but before the first Form/Section Line should be defined with a global field scope.
All fields defined after a Form/Section line but before the next Form/Section line should have their scope set to either form or section (image). The deciding factor is whether a section was named by the “NA=” portion of the definition. If a section is named, the field must have a section scope. If a section was not named, which means only a form was specified, then any fields must have a form scope.
Another possibility is that the field name is not defined on the form and/or section specified. Remember importing does not create fields, it merely assigns data to existing fields which were defined with the proper scope.
If the System Does Not Import the File and does not Rename It
First, check to see if the FILE option is being used and if the file has the proper extension defined or defaulted by the AutoImport control group.
Also, check the user’s rights to the directory where the file is located. Due to potential multi-user clashes over the same file, each workstation attempts to rename the file as soon as it locates it. If the rename operation fails, the system does not attempt to import the file. Failure of the rename operation can occur if the import file has the read-only attribute or, on some networks, if the user does not have the right to rename files.
If the System Renames the Import File to *.BAD
Typically, in this situation the system displays a message to indicate what failed during the import process—unless you have the Edit option set to Yes. If the Edit option is set to Yes, the system renames the import file to *.BAD if the Form Selection window is canceled. This means the system did not accept the import.
100

Setting Up Timed Service Functions
Error messages and their meanings are discussed next. If you do not receive an error message, check the import file format. Check to make sure the header information is set up as required. Also, the header should define a valid Key1/Key2 (Company/Line of Business) which is listed in the FORM.DAT file currently in use. Likewise, any form definition lines which appear in the import file must identify the proper Key1/Key2 and form name found in the FORM.DAT file.
This error can also occur if insufficient memory is available during the WIP save operations.
101
Setting Up Timed Service Functions
AUTOMATIC WIP IMPORT ERROR MESSAGES
Here is a list of the common error messages you may receive when using the automatic WIP import feature.
Cannot load moduleTRNW32
This means that the DLLs associated with the function cannot be located. The actual name of the DLL being loaded will depend upon your operating system, but it will start with TRN .
Cannot query addressof: func
Here, func will be the name of the function read from the INI file. Normally this error indicates you are using a version of the system which does not include the function you want to query; or the name does not match the proper case or letters required. For AutoImport, the function must be declared exactly as TRNAutoImport.
Error in [TimerFuncs]value in INI file Line
This message means a service function registration line under the TimerFuncs control group is not in the proper syntax. The line in question should appear as part of the error message.
Memory error in loading[TimerFuncs] values
There is not enough memory to load the service function list.
Timer function xxx failedto initialize
The named function (represented here by xxx) failed to initialize properly. Usually this means that one or more required options are set improperly.
Cannot register timer This message indicates the system cannot get a timer from the operating system. Usually this indicates there are too many timers in use by other applications. Try closing other applications and starting this process again.
Function [xxx] hasalready been installed
Normally xxx will be AutoImport, but it may differ in some situations. This message tells you the system attempted to initialize an AutoImport control group twice. Remove the duplicate option or check the documentation on how to set up multiple imports properly. See Setting Up Multiple Import Sessions on
page 205 for more information.
Invalid file name [xxx]FILE = file name
Normally xxx will be AutoImport, but it may differ in some situations. File name will be the file name as defined by the PATH and/or FILE options.
INI option [xxx] Path= orINI option [xxx] File=
must be defined
Normally xxx will be AutoImport, but it may differ in some situations. This message tells you to specify a valid path or file name in the PATH or FILE options in the proper AutoImport control group.
Unable to create importlist
Generally, this means the system is out of memory, or an internal error has occurred.
Unable to add to importlist
Generally, this means the system is out of memory, or an internal error has occurred.
102

Setting Up Timed Service Functions
Function [xxx] has beenrequested but has not
been initialized
Normally xxx will be AutoImport, but it may differ in certain situations. This message should seldom occur. Receiving this message means the service function is being asked to run before it is initialized.
Cannot allocate importstructure
This message is associated with the Edit=Yes option. It indicates you do not have enough memory to perform the task or that an internal error occurred.
[xxx] StatusCode=code,WIP status code is not
coded in INI
Normally xxx will be AutoImport, but it may differ in some situations. This message tells you an attempt was made to use an invalid status code. This attempt may be associated with the StatusCode option, or the improper code may exist in the import header record. Valid status codes are defined under the StatusCode control group.
[xxx] RecordType=type,WIP record type is not
coded in INI
Normally xxx will be AutoImport, but it may differ in some situations. This message tells you an attempt was made to use an invalid WIP record type. This attempt may be associated with the RecordType option, or the invalid record type may exist in the import header record. Valid WIP record types are defined under the Record_Type control group.
AFEDATA WIP recordnot defined
This message indicates the form set failed to create a WIP record during import. If this message was preceded by another message, refer to its description of the problem. Otherwise, this may mean you do not have enough memory to perform the import. This message can also indicate an internal error occurred.
Transaction Code ismissing in WIP
This message indicates that no valid transaction code was specified in either the INI file or in the import header record.
Field is missing in WIPrecord
This message indicates that a variable the system expected was not provided. This message may appear for the fields Key1 (Company), Key2 (Line of Business), or KeyID (Policy Number). These must be declared in the header records of the import file.
KeyID is not unique This indicates that a form set with the same Key1+Key2+KeyID already exists and the transaction code requires unique keys (usually New Business). If the CheckInArc option is defined as Yes, the clashing record may have been located in the archive file.
Error loading archive filename
The archive file could not be located or opened. Check your master resource setup to determine where these files should be located and that a proper APPIDX.DFD file is available.
Error loading archiveDFD file APPIDX.DFD
The archive DFD file could not be located or opened. Check your master resource setup to determine where this file should be located and that a proper APPIDX.DFD file is available.
WIPAppend failed This is a general message which tells you the system could not successfully create or save the WIP record. This message does not indicate a specific error situation.
103

Setting Up Timed Service Functions
If you get this error, check the master resource setup to make sure you specified a WIP directory. Also, make sure that you have sufficient disk space and access rights to open and add records to this file.
104

Customizing WIP
CUSTOMIZINGWIP
There are several ways you can customize the work-in-progress features of the system. These include:
• Using Automatic WIP Import on page 106
• Accessing WIP Fields on page 111
• Customizing WIP Windows and Options on page 115
• Limiting WIP and Batch Print to Specific Recipients on page 122
• Customizing WIP Transaction Codes on page 124
• Using ODBC WIP Indexes on page 127
• Using Compressed WIP on page 127
• Storing WIP on an SQL Server on page 128
• Deleting WIP on page 129
• Using GenData WIP Transaction Processing on page 131
• Using the WIPField Built-in function on page 132
• Exporting When Batch Printing WIP on page 132
• Hiding DLL Load Errors on page 134
• Adding a Print Option on page 135
• Updating WIP Records Using INI Files on page 136
105
Customizing WIP
USING AUTOMATIC WIP IMPORT
This feature lets you automatically identify and import data for user form selection and automatically import data files directly into the WIP database. This feature is designed as a timed service function which means you can tell the system to look for files to import at specified times during the day. If the system finds a file to import, it will then automatically import the file for you. You must set up this feature via an INI option and call it through TMRLIB.
NOTE: If you need additional customization of this feature to meet your business needs, call the Professional Services Group.
After you add the required INI file settings, the system scans the directory you specify to locate import data files. Additionally, you can tell the system to look for a specific file name. The system performs this scan on a timed interval, which you also specify in the INI file.
Once it locates an import file, the system renames the file so other workstations, also using this feature, do not attempt to import the file. After it renames the file, the system imports the renamed file using the standard import function included in the base system. This process usually takes only a few seconds.
In the (default) automated mode, this feature does not use the Forms Selection window. The imported form set is, however, created using logic which is similar to how the Form Selection window works. In automated mode, the user does not have to do anything — which is typically desired.
If the system cannot find the selected forms identified in the import file, it uses the default required forms specified by the FORM.DAT. The data entry user can remove any unused forms or add other forms once he or she retrieves the form set from WIP.
You can also set up this feature in non-automated mode, so that once the system reads the import file, it displays the Form Selection window. The data entry user then has control over which forms are included into the form set, as well as the other information provided on that window.
You can use other INI options to set up default WIP information not provided by the imported file. The system uses the current user’s ID as the creator of the work-in-process and, in the automated mode, the system places the information into the WIP database specified by the user’s current MasterResource control group options when the user chooses the WIP, Save option.
If the system cannot save the file, it renames the data file with the extension BAD . This will normally prevent any attempts to load this file again. You must periodically check these files to determine why the import failed and correct or delete the files with this extension. The system will alert you if this occurs.
106

Customizing WIP
NOTE: There is an optional INI setting you can use to automatically delete files the system cannot successfully import.
Setting Up the INI File
You must set up the Automatic WIP Import feature in your INI files before you can use it. Here is an example of how the settings look in an INI file.
< TimerFuncs >
01=;0;0;300;TRNW32->TRNAutoImport;
Where the values (;0;0;300;) represent:
;State;Urgency;Seconds/Time-of-day;Function
There may be occasions when users need to import data from more than one directory. For example, you may have one directory set up for form sets with a status code of W IP and another directory for form sets with a status code of Batch Print.
For information on handling this requirement, see Setting Up Multiple Import
Sessions on page 205. See also Setting Up Timed Service Functions on page 91 for more information.
Alternate registrations are possible if more than one type of auto-import will be active at once. See the following topic for more information.
Value Description
State Always set to zero (0)
Urgency Zero (0) means the call can be skipped if the user is engaged in an operation, while one (1) means to call the feature as soon as the user has finished the current operation.
Seconds orTime-of-day
Enter the number of seconds to call the function at a specific interval. The default is 300 which means the system will automatically save the form set every five minutes while the desktop is open and the user is not selecting a window or menu option.Or, enter the specific time of the day at which you want the system to call this function. The system uses a 24-hour clock, so enter 13:00 to indicate 1 pm.
Function TRNW 32->TRNAutoImport indicates the timed service function. Enter this value exactly as shown. Without this value, this feature will not work.Case is important when entering the timed service function name.
107

Customizing WIP
AutoImport Options
By default, the automatic import function (TRNAutoImport) expects to locate the AutoImport control group. In some situations, the control group can have a different name, however, the options under the control group remain the same.
This list defines the options you can specify, along with the default values, if any. You must define the Path or File options or the system will not initialize this function.
< AutoImport >
Path = c:\data\
File =
Match = *
Ext = .DAT
DeleteOnSuccess = Yes
DeleteOnFail = No
TransactionCode = NB
Description = Imported
StatusCode = WIP
RecordType = NEW
Edit = No
Here is an explanation of the options:
Path option Use the Path option to tell the system the directory path it should use to check for import data files. The directory path you enter must be valid and the data entry user must have access to it. For example:
PATH = c:\data\
If you do not specify a file, the system scans the specified directory at the timed interval for a file which matches the query you defined in the Match and Ext options. The default Ext (extension) is DAT. If you specify a file without a path, the system uses the Path option to identify the path for the file you specified.
NOTE: The system imports only one file at a time. If there are additional import files in the directory, the system will import the first one, and then import the next file at the next timed interval.
File option Use the File option to tell the system to import a specific file. Enter the name of the file beside the option. If you omit this option, the system will import files which match the criteria created by the Match and Ext options.
If you enter a file name without a path, the system uses your entry for the Path option to locate the file. If you omit the extension, the system uses the extension you entered in the Ext option. If you do not enter an extension in the Ext option, the systems uses the default extension, which is DAT.
108

Customizing WIP
Match option The system uses the Match option, combined with the Ext option, as search criteria for locating import files when the File option is not specified. The system performs the search in the directory you specify using the Path option.
This option defaults to the DOS wildcard asterisk (*), which means that any file name with the appropriate extension is a match. You can enter any valid DOS file name search value.
Ext option Use this option to specify the file extension the import files will use. If you do not use the File option, or if the File value does not include an extension, the system looks to this option for the import file extension.
This option defaults to DAT. It is not recommended that you use the extension BAD because this can conflict with import files that fail to import properly. (Because non-successful import files are renamed to BAD .) Likewise, an extension consisting of a single period (dot) should not be used because this can conflict with the multi-user capability in a networked environment.
DeleteOnSuccessoption
Before actually importing a file, the system renames the file to match the WIP NA and POL file it created for the form set. This option tells the system to delete files which are successfully imported. The option defaults to Yes.
If you want to keep the import files, enter No. The system does not rename the import file back to its original name — this prevents it from importing the files a second time. If you set this option to No, it is up to you to periodically move or delete the imported files.
DeleteOnFail option Files the system cannot successfully import are renamed with the extension BAD unless you enter Yes for this option. If you enter Yes, the system deletes any files it cannot import. The default for this option is No.
NOTE: If you delete bad import files, there is no physical evidence an import was attempted other than any error message which may have appeared.
TransactionCode option If the imported file does not contain a WIP transaction code, the system sets it to the value you specify here. The system checks the transaction code with those listed in the INI file. The default transaction code is NB (New Business).
Description option If the imported file does not contain a WIP description, the system will set it to the value you specify with this option. The default WIP description is Imported.
StatusCode option If the imported file does not contain a WIP StatusCode, the system will set it to the value you specify with this option. The system checks the status code with those listed in the INI file. The default status code is WIP.
By setting the WIP status code, the data entry user can control whether the form set is identified as work-in-process — which must be completed — or is marked with some other status, such as Batch Print.
109

Customizing WIP
RecordType option If the imported file does not contain a WIP RecordType, the system sets it to the value you specify with this option. The system checks the record type with those listed in the INI file. The default value for this option is NEW.
Edit option By default this option is set to No. This means the system saves import files directly to WIP without any data entry user interaction. If you enter Yes, the data entry user must complete the Forms Selection window before the import is considered successful.
When set to Yes, the system only recognizes this option when no form set is currently loaded (the desktop is closed) and the data entry user is not working with a menu or window. See the following discussion of TMRLIB’s STATE and URGENCY flags for more information.
The data entry user can override much of the imported information on the Forms Selection window. If however, the data entry user changes the Key1 value on this window, the imported data will be lost.
When the user accepts the window (after any changes), the system will assume the import was successful. Aborting the Forms Selection window will cause the import to fail. The system will rename the import file by adding the extension BAD (or deleted if the DeleteOnFail option is activated).
NOTE: If the system is minimized when the system locates an import file and the Edit option is active, the system will be restored automatically before the Forms Selection window appears.
110

Customizing WIP
ACCESSING WIP FIELDS
You can access most standard WIP fields using the following built-in INI functions. For instance, if you want to create an export file and a PDF file and have the names for these files be identical except for the extension, you could use these functions to create a unique name for a file that does not depend on the current time, but rather on a time that does not change, such as the create or modify time.
NOTE: You can access all of the WIP fields via DAL using the WIPFld function. And, since DAL can be accessed via the ~DALRUN function, you have another method you can use to get those fields.
The system retrieves the Modify Time and Create Time from the WIP record. You can use the ~DATE function to get the current date value. You can also include a parameter to tell the system to format the date.
Keep in mind that if you are trying to use the value as part of a file name, you should only include characters that are valid in file names.
Here is an example of how to specify a date format:
~MODIFYTIME ;%m-%d-%Y;
Function Returns the
~Key1 WIP Key1 field
~Key2 WIP Key2 field
~KeyID WIP KeyID field
~ORIGUSER Original WIP User ID field (the ID used to create the WIP)
~CREATETIME WIP Create Time field. You can format this option.
~MODIFYTIME WIP Modify Time field. You can format this option.
~ORIGFSID Original WIP form set ID. Keep in mind when routing messages, the original form set ID is not necessarily the same as the current form set ID.
~TRANCODE WIP Transaction Code field.
~DESC WIP Description field.
~DATE The current date value.
~USERID Currently logged in user ID.
~FIELD A field value from the form set.
111

Customizing WIP
Semicolons (:) begin and end the string that defines the date format. If you omit a semicolon, you get the hexadecimal value of the date for ~MODIFYTIME and ~CREATETIME. For the ~DATE function, you get the format specified by the DateFormat option in the Formats control group. This option defaults to:
%m/%d/%y
If you include the semicolon, but omit the format information after the semicolon, for ~MODIFYTIME and ~CREATETIME you get the format specified by the DateFormat option in the Formats control group. This option defaults to:
%m/%d/%y.
Formatting arguments Format arguments consist of one or more codes. Begin each code with a percent sign (%). Characters that do not begin with a percent sign are copied unchanged to the output buffer.
Any character following a percent sign that is not recognized as a format code is copied to the destination—so you can enter % % to include a percent sign in the resulting output string.
You can choose from these format codes:
Code Description
%d Day of month as decimal number (01 - 31)
%H Hour in 24-hour format (00 - 23)
%I Hour in 12-hour format (01 - 12)
%m Month as decimal number (01 - 12)
%M Minute as decimal number (00 - 59)
%p Current locale's AM/PM indicator for 12-hour clock
%S Second as decimal number (00 - 59)
%y Year without century, as decimal number (00 - 99)
%Y Year with century, as decimal number
%A Weekday name, such as Tuesday
%b Abbreviated month name, such as Mar
%B Full month name, such as March
112

Customizing WIP
Here are some examples:
Here are some additional format attributes for certain codes:
Specifying locales When you use % @xxx in the format string, the xxx represents a 3-letter code that identifies one of the supported language locales.
%j Day of year as decimal number (001 - 366)
%w Weekday as decimal number (0-6, with Sunday as 0)
%@xxx Specify language locale (where xxx is a 3-letter code that identifies one of the supported languages. For example. A format of % @CAD% A might produce mardi, the French word for Tuesday.
This format Will result in
%m-%d-%Y 01-01-2012
The year is %Y. The year is 2012.
Born %m/%d/%y at %I:%M %p
Born 01/01/12 at 11:57 PM
Code Description
# Tells the system to suppress leading zeros for the following format codes. This flag only affects these format codes:
%#d, %#H, %#I, %#j, %#m, %#M, %#S, %#w
For example, if % d outputs 01, using % #d will produce 1. Subsequent codes are not affected unless they also have this flag.
> Tells the system to uppercase the resulting text. This flag only affects these format codes:
%>p, %>A, %>b, %>B
For example, if % A results in Tuesday, using % >A will produce TUESDAY. Subsequent codes are not affected unless they also have this flag.
< Tells the system to lowercase the resulting text. This flag affects only these codes:
%<p, %<A, %<b, %<B
For example, if % b results in M ar, using % <b will produce mar. Subsequent codes are not affected unless they also have this flag.
<> Tells the system to capitalize the first letter of the resulting text. This flag affects only these codes:
%<>p, %<>A, %<>b, %<>B
For example, if % p results in AM , using % <>p will produce Am . Subsequent codes are not affected unless they also have this flag.
Code Description
113

Customizing WIP
Until a locale format code is encountered in the format string, the default locale (typically USD which is US English) is used. Once a locale format code is found, the locale specified remains in effect until another locale code is encountered.
For example, suppose the input date is 03-01-1999. This table shows the output from various formats:
Using the ~Fieldfunction
The ~Field function lets you use a quoted parameter string to name the specific field to locate within the form set. The definition of the field can name a specific section, form, and group (Key2 or Line of Business), separated by semicolons, that contains the field requested. This lets you make sure you are retrieving a specific field occurrence within the document.
Because object names, like fields, sections, forms, and groups, can sometimes contain spaces or other special characters, you should enclose the entire definition in quotation marks (“). You cannot quote individual elements of the search.
Here are some examples:
This is a valid definition for the ~Field function:
option = ~FIELD "Field;Section;Form;Group"
This is not a valid definition for the ~Field function:
option = ~FIELD "Field";"Section";"Form";"Group"
This format Will result in
“ %A, %B %d” “Monday, March 01”.
“%@CAD%A %@CAD%A, %B %d”
“lundi, mars 01”
“%A, %@CAD%B %d” “Monday, mars 01”
“%@CAD%A, %@USD%B %d” “lundi, March 01”
114

Customizing WIP
CUSTOMIZING WIP WINDOWS AND OPTIONS
The WIP List option on the WIP menu provides one window from which you can select various WIP tasks. Earlier versions of the system did not include this option. Instead, menu options for each WIP task appeared on the WIP menu.
The WIP List option lets you switch back and forth between different WIP functions without having to close one window to open another. When you choose the WIP List option, the Edit window appears, as shown here:
The WIP List option does not affect the functionality of the old windows. In fact, you can use the older WIP windows and the WIP List option if you like, but we recommend using one or the other.
If you prefer to use the WIP menu option approach, see Using the WIP Menu
Options on page 116 for more information.
If you are using the WIP List and the Automatic Return feature, see the following topic for more information.
NOTE: A range of MEN.RES menu IDs (400-499) are active only when in retrieval mode, such as when you view a form set. You can use these IDs to customize the system and set up options only available during retrieval.
Setting Column Widths on the WIP List Window
You can set the column widths on the WIP List window to a specific size using INI settings. Every field in this INI control group could have the optional setting:
< AFEWIPDisplay >
Field = KeyID,%-20.20s,KeyID;55
Field = CreateTime,DX%m/%d/%Y,Create Time;35
Field = StatusCode,%-1.2s;ST
Field = EffDate,%-10.10s,Eff Date;50
115
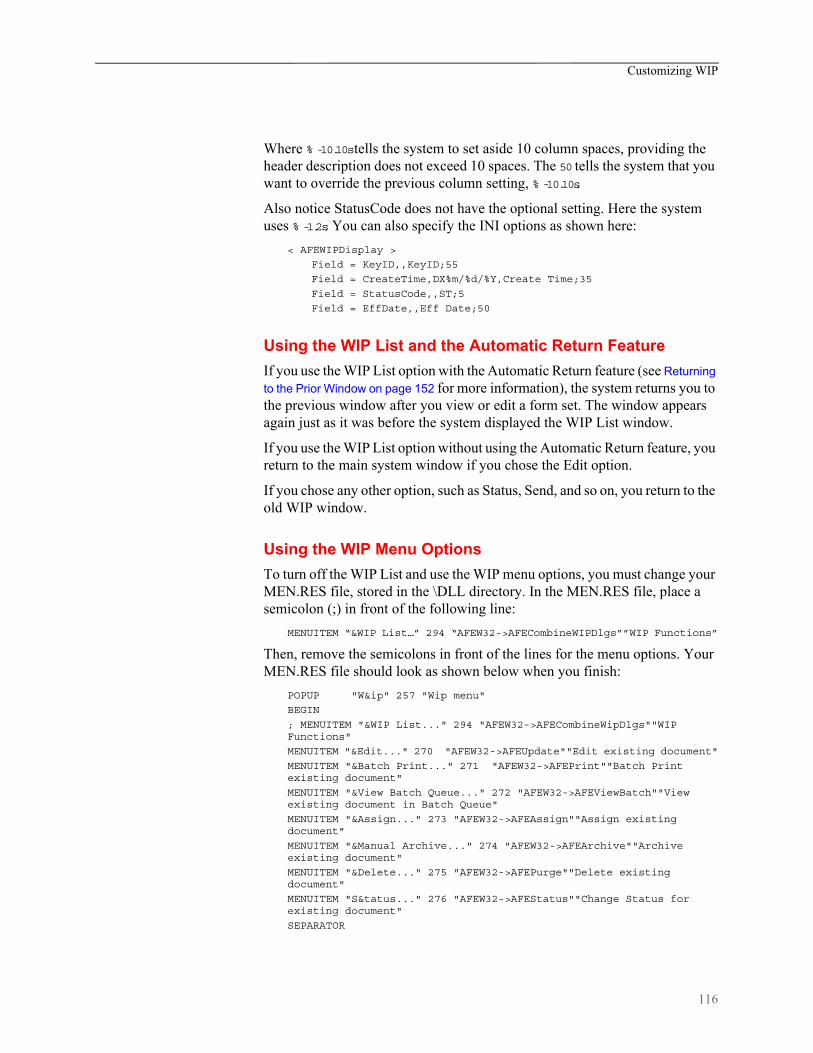
Customizing WIP
Where % -10.10s tells the system to set aside 10 column spaces, providing the header description does not exceed 10 spaces. The 50 tells the system that you want to override the previous column setting, % -10.10s.
Also notice StatusCode does not have the optional setting. Here the system uses % -1.2s. You can also specify the INI options as shown here:
< AFEWIPDisplay >
Field = KeyID,,KeyID;55
Field = CreateTime,DX%m/%d/%Y,Create Time;35
Field = StatusCode,,ST;5
Field = EffDate,,Eff Date;50
Using the WIP List and the Automatic Return Feature
If you use the WIP List option with the Automatic Return feature (see Returning
to the Prior Window on page 152 for more information), the system returns you to the previous window after you view or edit a form set. The window appears again just as it was before the system displayed the WIP List window.
If you use the WIP List option without using the Automatic Return feature, you return to the main system window if you chose the Edit option.
If you chose any other option, such as Status, Send, and so on, you return to the old WIP window.
Using the WIP Menu Options
To turn off the WIP List and use the WIP menu options, you must change your MEN.RES file, stored in the \DLL directory. In the MEN.RES file, place a semicolon (;) in front of the following line:
MENUITEM “&WIP List…” 294 “AFEW32->AFECombineWIPDlgs””WIP Functions”
Then, remove the semicolons in front of the lines for the menu options. Your MEN.RES file should look as shown below when you finish:
POPUP "W&ip" 257 "Wip menu"
BEGIN
; MENUITEM "&WIP List..." 294 "AFEW32->AFECombineWipDlgs""WIP Functions"
MENUITEM "&Edit..." 270 "AFEW32->AFEUpdate""Edit existing document"
MENUITEM "&Batch Print..." 271 "AFEW32->AFEPrint""Batch Print existing document"
MENUITEM "&View Batch Queue..." 272 "AFEW32->AFEViewBatch""View existing document in Batch Queue"
MENUITEM "&Assign..." 273 "AFEW32->AFEAssign""Assign existing document"
MENUITEM "&Manual Archive..." 274 "AFEW32->AFEArchive""Archive existing document"
MENUITEM "&Delete..." 275 "AFEW32->AFEPurge""Delete existing document"
MENUITEM "S&tatus..." 276 "AFEW32->AFEStatus""Change Status for existing document"
SEPARATOR
116

Customizing WIP
MENUITEM "&Save" 103 "AFEW32->AFESaveClose"“Save document to wip and close desktop"
SEPARATOR
MENUITEM "Se&nd..." 281 "AFEW32->AFEPackage"“Route documents via mail"
MENUITEM "&Receive..." 282 "AFEW32->AFEReceive""Receive documents via mail"
SEPARATOR
MENUITEM "Change In &Use..." 201 "AFEW32->AFEInUse""Edit In Use" 0
END
If you want to use both the older style WIP menu options and the WIP List option, include all of the lines shown above in the MEN.RES file, with no semicolons to comment out any of the lines.
Here are examples of how the WIP menu options can appear:
Using the Sort button If you turn off the WIP List and instead use the WIP menu options, your system screens will include a Sort button which lets you sort the form sets in WIP. The following instructions explain how you can use the Sort button.
NOTE: If you have a large number of WIP records, you may want to use enhanced WIP selection to improve the speed with which the system displays WIP information. This is especially helpful if your users log in with the same ID. See Using WIP menu options and enhanced WIP selection on page 119 for more information.
This is the default menu. You choose the WIP List option and then choose from the various tasks listed in the
This menu lets you choose the various WIP tasks directly from the
This menu lets you use the WIP List or choose the various WIP tasks directly from the menu.
117

Customizing WIP
Sorting the WIP list lets you display the stored files in any order, according to selected criteria. Common sort criteria include Current User, Modify Time, Transaction Code, and Status Code. The sort criteria is defined in the FSIUSER.INI file, which you can customize to meet your needs.
Follow these steps to sort the form sets:
1 Choose WIP, Edit or File, Edit. An edit window appears.
2 Click Sort to display the Sorting window.
3 Select a sort option and click Ok. The system displays the form sets in the new order.
Depending on your INI configuration, you may have a variety of WIP sorting options. The table below outlines available sort criteria.
Sort Criteria Description Examples
Company Name of the company that uses the form set.
Insurance Underwriters, Mortgage Companies
LOB Line of business associated with the form set.
Automobile Insurance, Homeowner's Insurance
Policy Number
Alphanumeric characters identifying the form set.
ABC12345
Record Type Any type of company-specific code or number which further defines the form set.
N = New PolicyR = Renewal01 = Partial Policy
Create Time The time of day the form set was created.
The create time is the time when the user saves entered form set data.
Original User The user who originally processed the form set, if the set was reassigned to another user. You can configure form set assigning and routing options in the INI file.
The original Insurance Agent who administers the form set. Also can identify a supervisor responsible for managing the form set.
118

Customizing WIP
Using WIP menu optionsand enhanced WIP
selection
If you turn off the WIP List and instead use the WIP menu options, your system screens will include a Sort button which lets you sort the form sets in WIP. If you have a large number of WIP records, you may want to make the following changes to improve the speed with which the system displays WIP information. This is especially helpful if your users log in with the same ID.
Current User The user who currently administers the form set.
Insurance Agents, Loan Officers
Modify Time The time of day the form set data was modified.
Displays 24-hour time: 14:09 = 2:09 PM
Form Set ID The system’s name for the form set, based on the date and time.
Any combination of 8 alphabetic characters.
Transaction Code
A one or two character code associated with the form set type. You can configure these codes in the INI file.
NB = New BusinessRN = Renewal PolicyEN = Endorsement
Status Code A one or two character code associated with the current status of the form set. You can configure these codes in the INI file.
W = Work in Process (WIP)A = Assign (to another user)Q = QuoteU = UnderwrittenT = Transmit (via network)B = Batch print (group of form sets waiting for print processing)AR = ArchivedP = PrintedCO = Combine (split or routed and assigned forms)DU = Duplicate* = User Defined
From User The last user assigned to the form set.
Insurance Agent's supervisor
From Time/To Time
The time of day the form set was reassigned from/to a user (when the new user received it)
Displays 24-hour time.
To User The user to whom the form set was assigned.
Insurance Agent
Description The description of the form set.
Insured - John E. Doe
In Use The form sets that are currently in use.
Sorts in alphabetical order.
Record Number
Unsorted archive list. Sorts in order of policy creation.
Sort Criteria Description Examples
119
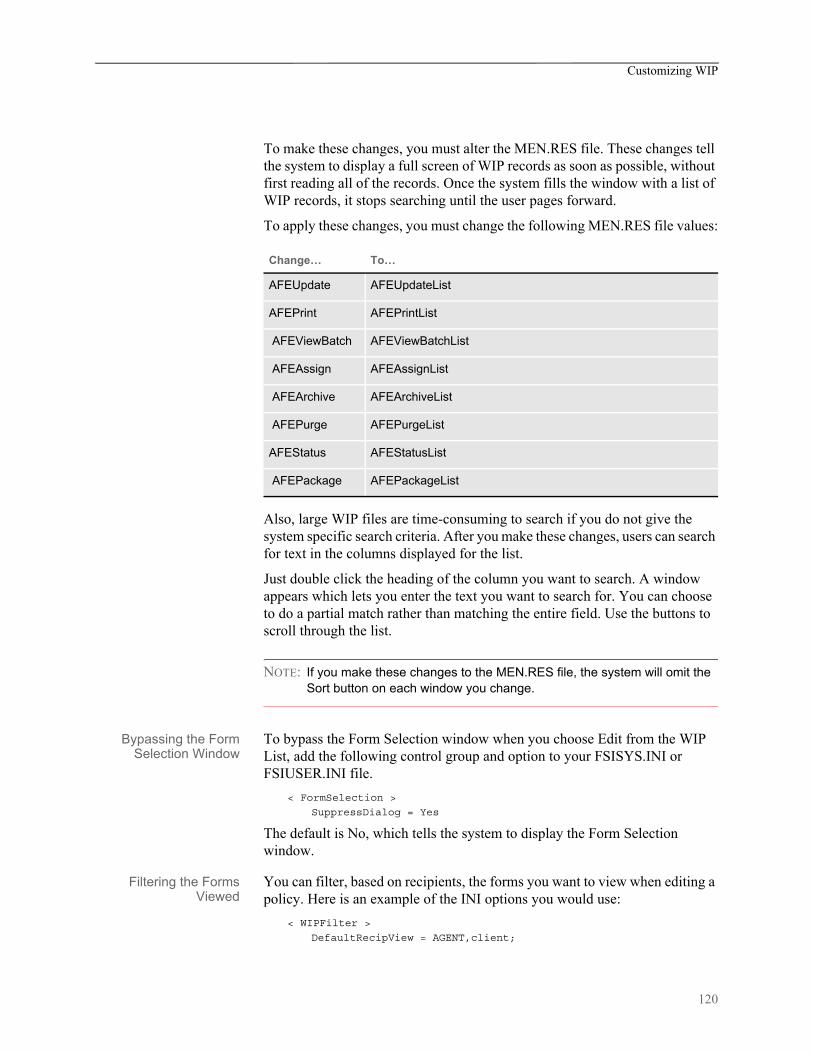
Customizing WIP
To make these changes, you must alter the MEN.RES file. These changes tell the system to display a full screen of WIP records as soon as possible, without first reading all of the records. Once the system fills the window with a list of WIP records, it stops searching until the user pages forward.
To apply these changes, you must change the following MEN.RES file values:
Also, large WIP files are time-consuming to search if you do not give the system specific search criteria. After you make these changes, users can search for text in the columns displayed for the list.
Just double click the heading of the column you want to search. A window appears which lets you enter the text you want to search for. You can choose to do a partial match rather than matching the entire field. Use the buttons to scroll through the list.
NOTE: If you make these changes to the MEN.RES file, the system will omit the Sort button on each window you change.
Bypassing the FormSelection Window
To bypass the Form Selection window when you choose Edit from the WIP List, add the following control group and option to your FSISYS.INI or FSIUSER.INI file.
< FormSelection >
SuppressDialog = Yes
The default is No, which tells the system to display the Form Selection window.
Filtering the FormsViewed
You can filter, based on recipients, the forms you want to view when editing a policy. Here is an example of the INI options you would use:
< WIPFilter >
DefaultRecipView = AGENT,client;
Change… To…
AFEUpdate AFEUpdateList
AFEPrint AFEPrintList
AFEViewBatch AFEViewBatchList
AFEAssign AFEAssignList
AFEArchive AFEArchiveList
AFEPurge AFEPurgeList
AFEStatus AFEStatusList
AFEPackage AFEPackageList
120

Customizing WIP
DisplayRecipDialog = Yes
The DefaultRecipView option lets you specify the recipient forms you want to see.
The DisplayRecipDialog option tells the system whether or not it should display a window which shows all recipient names. The default is No.
If you include the DefaultRecipView option, the system ignores the DisplayRecipDialog option.
Automatically savingWIP
Each time you close a form set in WIP, the system asks if you want to save the data you entered. If you want the system to automatically save the information without asking, add the following control group and option to your FSISYS.INI or FSIUSER.INI file.
< EntryOptions >
SaveWIPResponse = Yes
For example, if you set this option to Yes, as shown above, the system automatically saves the form set before it closes the form set. If you set this option to No, the system does not save the form set before it closes it.
There is no default for this option. If you omit the option or do not specify Yes or No, the system displays the confirmation prompt.
Sorting Form Sets using INI Options
Use the Sort and Sort_Menu control groups in the FSIUSER.INI file to define the default way to sort form sets and what appears on the sort menu. The Sort_Menu control group is where you define the possible sorting options for the sort menu. The Sort control group lets you specify the default sorting options you want to use. Here is an example:
< Sort >
Default = 08,07
< Sort_Menu >
01 = ;Key1;Company;N;A;
02 = ;Key2;LOB;N;A;
03 = ;KeyID;Policy Number;Y;A;
04 = ;RecType;Record Type;N;A;
05 = ;CreateTime;Create Time;N;A;
06 = ;OrigUser;Original User;N;A;
07 = ;CurrUser;Current User;Y;A;
08 = ;ModifyTime;Modify Time;Y;D;
09 = ;FormsetID;Formset ID;N;A;
You define the default sort order using the Default option:
< Sort >
Default =
121

Customizing WIP
Use the option parameters for the Sort_Menu control group to determine the following:
• The text that appears on the sort menu
• Whether a sort option is enabled or disabled
• Whether information is sorted in ascending or descending order
< Sort_Menu >
NumericID = ;FIELD NAME;FIELD DESCRIPTION;DISPLAY FLAG;SORT ORDER
LIMITING WIP AND BATCH PRINT TO SPECIFIC RECIPIENTS
You can limit WIP and batch print to include specific recipients. If, for instance, you need to print specific recipients and those recipients are present, you can print that recipient’s copy of the document. Regardless of whether anything actually prints, the document is then treated as though it did print and you continue to the next step of the completion process. The next step is usually automatic archiving or staged for manual archival, depending on your system’s configuration.
To do this, add this INI option to the BatchPrint control group:
< BatchPrint >
Select_Recipient = value1,value2,value3, ...
Parameter Description
Default The values you enter here correspond to your entries in the Sort_Menu control group.Based on the example, to list form sets by the date modified and current user, you would enter 08, 07. These number correspond to the entries in the Sort_Menu control group.
Parameter Description
Numeric ID The number of the field. This is used to specify the default sort order via the Sort control group.
Field Name The name of the field in WIP file. Do not change.
Field Description The description of the field that appears on the sort menu.
Display Flag This flag controls the appearance of the field in the sort menu. Choose from these options:Y = The field is enabledN = The field is not enabled
Sort Order Specify one of these options to define the order of the sort:A = Sort in ascending orderD = Sort in descending order
122

Customizing WIP
You can specify any number of recipients. Just separate the recipients using commas or semicolons. Space characters are not a valid separators because recipient names can contain spaces. The system removes leading and trailing spaces from recipient names.
During the batch print process, the system loads each selected transaction to see if it includes any of the specified recipients. If so, those recipients will print. If the document does not include any of the requested recipients, the system skips the print process for that transaction and continues through the workflow as though it had printed.
The Print Selection window shows the list of recipients you specified in the Select_Recipient option. Check the All Recipients option to indicate you want to have the recipients in the INI file printed. Keep in mind the All Recipients option does not mean the system will print all of the legitimate recipients in the documents.
You can turn off the All Recipients option on the Print Selection window and further limit the recipients.
AutoPrint
In case you are using the AutoPrint feature, the system includes a way to override the Select_Recipient option. This lets you set up the automatic print process to select one set of recipients, while having the normal batch print process select a different set of recipients.
To override the Select_Recipient option in the BatchPrint control group, you add another Select_Recipient option in the AutoPrint control group, as shown here:
< TimerFunc >
0;0;10:10;AFEW32->AFEAutoPrint;
< BatchPrint >
Select_Recipient = INSURED, AGENT
< AutoPrint >
Select_Recipient = HOME OFFICE
Based on this example, BatchPrint will print one set of recipients while AutoPrint only prints a single recipient.
To have AutoPrint print all recipients, include the Select_Recipient option in the AutoPrint control group, but leave it blank. You would do this, for instance, if you want AutoPrint to print all recipients, while BatchPrint is limited to certain recipients. Here is an example:
< AutoPrint >
Select_Recipient =
If you omit the Select_Recipient option from the AutoPrint control group, AutoPrint uses the setting provided by the BatchPrint control group — so you do not have to define the same option values in both control groups.
123
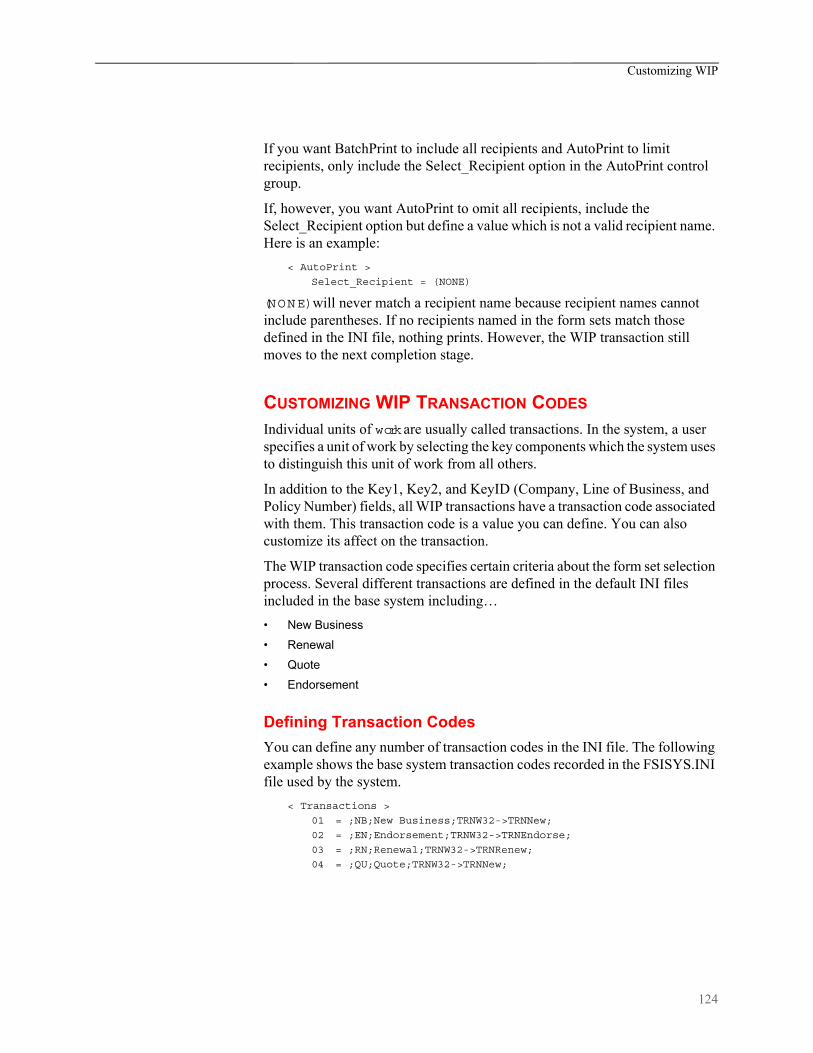
Customizing WIP
If you want BatchPrint to include all recipients and AutoPrint to limit recipients, only include the Select_Recipient option in the AutoPrint control group.
If, however, you want AutoPrint to omit all recipients, include the Select_Recipient option but define a value which is not a valid recipient name. Here is an example:
< AutoPrint >
Select_Recipient = (NONE)
(NONE) will never match a recipient name because recipient names cannot include parentheses. If no recipients named in the form sets match those defined in the INI file, nothing prints. However, the WIP transaction still moves to the next completion stage.
CUSTOMIZING WIP TRANSACTION CODES
Individual units of work are usually called transactions. In the system, a user specifies a unit of work by selecting the key components which the system uses to distinguish this unit of work from all others.
In addition to the Key1, Key2, and KeyID (Company, Line of Business, and Policy Number) fields, all WIP transactions have a transaction code associated with them. This transaction code is a value you can define. You can also customize its affect on the transaction.
The WIP transaction code specifies certain criteria about the form set selection process. Several different transactions are defined in the default INI files included in the base system including…
• New Business
• Renewal
• Quote
• Endorsement
Defining Transaction Codes
You can define any number of transaction codes in the INI file. The following example shows the base system transaction codes recorded in the FSISYS.INI file used by the system.
< Transactions >
01 = ;NB;New Business;TRNW32->TRNNew;
02 = ;EN;Endorsement;TRNW32->TRNEndorse;
03 = ;RN;Renewal;TRNW32->TRNRenew;
04 = ;QU;Quote;TRNW32->TRNNew;
124

Customizing WIP
The numbers to the left distinguish each item and also specify the order the codes appear on the list the system presents to the data entry user. When the system loads the INI options, it sorts the list alphanumerically. In this example, New Business (NB) will be the default transaction presented to the user since it will sort as the first item in the list.
To the right of the equals sign (=) is the transaction code, its description, the DLL file name, and the function associated with the code. Notice that semicolons separate each of the components.
The first value is a two-character transaction code abbreviation. This is the value the system assigns to the WIP transaction record. The next value is the transaction description. The system displays this value to the user in the selection list for transaction type. The description should not exceed 19 characters.
The last value is the standard definition for DLL to load and an exported function name to call. Functions are associated with transactions to help data entry users select form sets or to affect how the system handles the transaction.
Each two-character transaction code should be unique. If it is not unique, it may not be possible for the system to match the transaction code to the description the data entry user selects when he or she creates the form set.
On the other hand, there may be times when you want to define a code more than once. For instance, suppose you want an endorsement based upon an archived form set to behave slightly different than one created by imported data. In each of these cases, you may want to assign the EN transaction code. To accomplish this during form selection, you would need different custom functions associated with separate transaction lines, as shown here:
02 = ;EN;Endorsement;TRNW32->TRNEndorse;
05 = ;EN;Arc Endorsement;TRNW32->TRNNew;
This example shows how one transaction code can be defined with two behaviors. If the user selects either of these transactions, the WIP record is still assigned EN as the transaction code. However, notice that each transaction invokes a different function and this affects how the user completes the form selection process.
This example works because the creation of the form set is usually the only time that a data entry user can specify the transaction code to use. Once WIP is created, the transaction code usually does not change.
New business = NB Associating NB with a WIP transaction tells the system this is a first time entry or that the transaction stands on its own. The function invoked when selecting this transaction is usually TRNNew. The Form Selection window displays the available forms with the required forms already selected (checked). Also, if the INI settings require unique WIP keys, the default functionality enables this check on this transaction type.
125
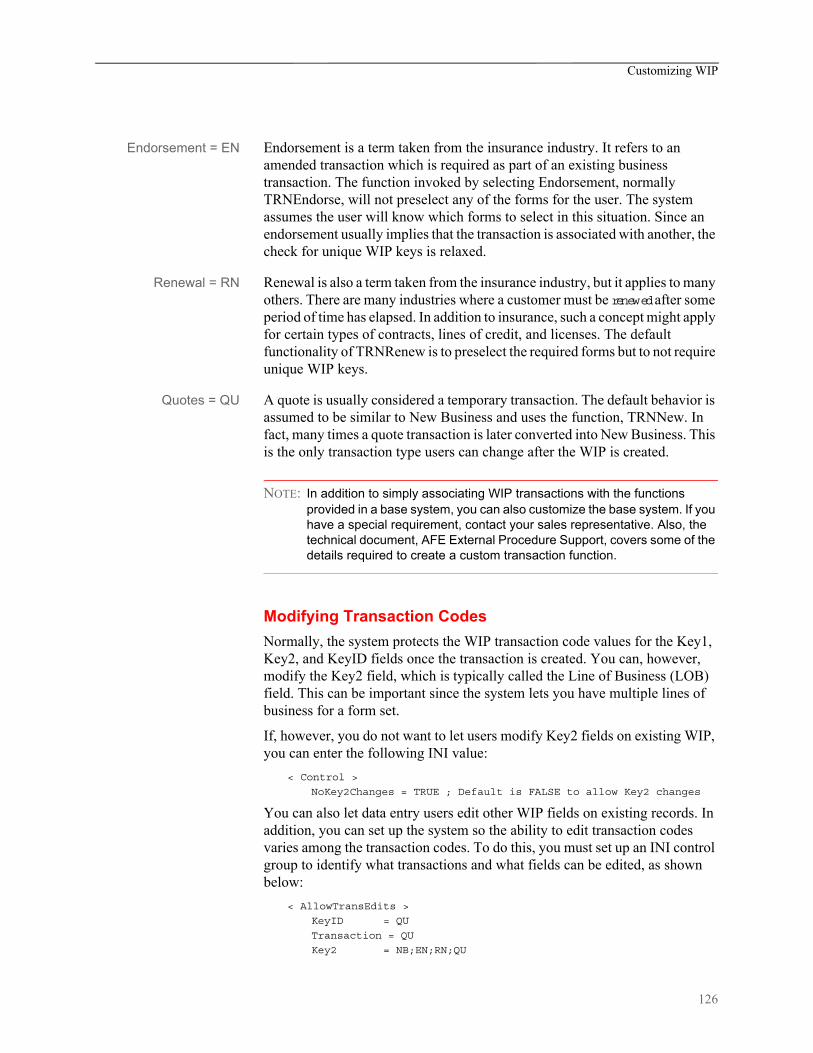
Customizing WIP
Endorsement = EN Endorsement is a term taken from the insurance industry. It refers to an amended transaction which is required as part of an existing business transaction. The function invoked by selecting Endorsement, normally TRNEndorse, will not preselect any of the forms for the user. The system assumes the user will know which forms to select in this situation. Since an endorsement usually implies that the transaction is associated with another, the check for unique WIP keys is relaxed.
Renewal = RN Renewal is also a term taken from the insurance industry, but it applies to many others. There are many industries where a customer must be renewed after some period of time has elapsed. In addition to insurance, such a concept might apply for certain types of contracts, lines of credit, and licenses. The default functionality of TRNRenew is to preselect the required forms but to not require unique WIP keys.
Quotes = QU A quote is usually considered a temporary transaction. The default behavior is assumed to be similar to New Business and uses the function, TRNNew. In fact, many times a quote transaction is later converted into New Business. This is the only transaction type users can change after the WIP is created.
NOTE: In addition to simply associating WIP transactions with the functions provided in a base system, you can also customize the base system. If you have a special requirement, contact your sales representative. Also, the technical document, AFE External Procedure Support, covers some of the details required to create a custom transaction function.
Modifying Transaction Codes
Normally, the system protects the WIP transaction code values for the Key1, Key2, and KeyID fields once the transaction is created. You can, however, modify the Key2 field, which is typically called the Line of Business (LOB) field. This can be important since the system lets you have multiple lines of business for a form set.
If, however, you do not want to let users modify Key2 fields on existing WIP, you can enter the following INI value:
< Control >
NoKey2Changes = TRUE ; Default is FALSE to allow Key2 changes
You can also let data entry users edit other WIP fields on existing records. In addition, you can set up the system so the ability to edit transaction codes varies among the transaction codes. To do this, you must set up an INI control group to identify what transactions and what fields can be edited, as shown below:
< AllowTransEdits >
KeyID = QU
Transaction = QU
Key2 = NB;EN;RN;QU
126

Customizing WIP
As shown in this example, there are three fields you can edit as you work with WIP records, as long as those record have the specified transaction codes.
To the left of the equals sign (=) you see the name of these fields: KeyID (Policy number), Transaction (TransCode), and Key2 (LOB). To the right of the equals sign you see the transaction codes data entry users can edit.
This means, for instance, that while working with WIP transactions, you can change the transaction code if the code is QU (quote). A typical use of this feature is to let data entry users change a quote (QU) to new business (NB) and then assign a new KeyID. Notice too, that the Key2 example shows that multiple transaction codes are separated by semicolons.
NOTE: In the base system, there is no need to include the example Key2 line in any INI file since this definition represents the default behavior of the Key2 field. The behavior of the Key2 field is only changed if the NoKey2Changes option, mentioned earlier, is set to True.
USING ODBC WIP INDEXES
WIP search windows can support ODBC WIP indexes. To use ODBC indexes, you must set up your INI files to set the database handler as shown in Chapter 8, Archiving and Retrieving Information in the Rules Processor System Guide.
Here are your options:
< DBHandler:ODBC >
CreateIndex = No
CreateTable = Yes
Debug = No
Install = SQW32->SQInstallHandler
Qualifier = e:\doculab\doculabs.mdb
Server = MS Access Database
Where Server is the name of the data source from your ODBC control panel setup and Qualifier is the name of the database (for MS Access).
Each database table you want to be an ODBC table will need entries in the INI file defining it as ODBC. For example, to define the WIP table, add these INI options:
< DBTable:WIP >
DBHandler = ODBC
USING COMPRESSED WIPThe system provides two ways to store WIP: standard mode and compressed mode. Storing WIP in compressed mode saves disk space.
127

Customizing WIP
Using compressed mode, you can work with compressed and non-compressed form sets. In standard mode, you can only work with non-compressed form sets.
Compressed mode uses the same storage format as the email attachment. It saves each WIP form set as a single compressed file rather than the two or more current WIP files, such as *.dat; *.pol, *.pkg.
To use WIP compression, you must add these INI options:
< WIPData >
CompressWIP = Yes
< CompressWIPFiles >
Extension = CWP
Since the default extension is CW P, the extension is not required in the example above. You must add the extension if you want to use an extension other than CWP.
NOTE: The CompressWIP option was added in version 11.1, patch 25. For earlier versions, you must specify the function as shown here:
< AFEProcedures >
AFECompressWipFunc = AFEW32->AFEPackWipFilesFunc
You should use the latest version, including all applicable patches.
The benefit is that only one smaller file per form set will be kept in the network WIP directory, which conserves disk space.
NOTE: Changing to the WIP compressed mode does not delete existing WIP files from the WIP directory.
STORING WIP ON AN SQL SERVER
Follow these steps to set up your INI files so you can store WIP information on an SQL server.
1 Add these INI options:
< DBTable:WIP >
DBHandler = ODBC
UniqueTag = DOCTAG
Option Description
DBHandler Enter ODBC to tell the system that WIP is a table in a ODBC-compliant database.
UniqueTag Specify a unique key defined in the WIP.DFD file. For instance, if you are using the default WIP.DFD file, DOCTAG is a good choice since it is a unique key.
128

Customizing WIP
Here is a WIP.DFD example which uses DOCTAG:
< Key:DOCTAG >
Expression = KEY1+KEY2+KEYID+RECTYPE
FieldList = KEY1,KEY2,KEYID,RECTYPE
2 Add the DBHandler:ODBC control group and these options:
< DBHandler:ODBC >
CreateTable= Yes
CreateIndex= No
Server = MS SQL Server
Qualifier = master
UserID = sa
Passwd =
Use the Server option to define a data source name. Use the Qualifier option to define the database name if it differs from the default database name in the ODBC configuration.
3 Since Desc is a reserved word for SQL Server, convert it to a different name. Here is an example:
< ODBC_FieldConvert >
Desc = DESC2
4 Use the ODBC_FileConvert control group to convert a short WIP file name into a long table name. Here is an example:
< ODBC_FileConvert >
WIP = dms1sqlwip
DELETING WIPThe system lets you delete WIP records by date, user ID, status code, or key ID. A counter indicates progress as the system deletes the records.
To do this, you must add the Delete WIP Records option to your Tools menu. Make the following changes to the MEN.RES file:
1 Search for the line that reads Popup “&Tools” 255 “Utility Programs”
2 On the line below the word Begin, remove the semicolon from this line:
; MENUITEM "&Delete WIP Records…" 2831 "AFEW32->AFEDeleteWIPRec" "Delete WIP DBF records by …" 0
3 Add these options to your INI file:
< AFEWIPDBFFunc >
01=;HT;Delete WIP records by Date;AFEW32->AFEDelWipDBFByDate"
02=;UI;Delete WIP records by UserID;AFEW32->AFEDelWipDBFByUserID"
03=;SC;Delete WIP records by StatusCode;AFEW32>AFEDelWipDBFBySt"
04=;KI;Delete WIP records by KeyID;AFEW32->AFEDelWipDBFByKeyID"
Once the option is added, you can use it to delete WIP records by:
• Date
129

Customizing WIP
• User ID
• Status code
• Key ID
When you choose the Tools, Database Maintenance, Delete WIP Records option, the Delete Specific WIP Records window appears.
NOTE: You should always make a complete backup before you use this feature.
Choose the criteria you want to use to delete WIP records and click Select. Depending on the criteria you choose, the system displays a window to let you select a range of dates, a specific user ID, choose a status code, or enter a Key ID.
Removing the All field from the WIP List
When you select the WIP List option from the WIP menu and then select Delete in the Task field, the following window appears:
To remove the All field, change the AllSelect option from Yes to No, as shown here:
You can remove this field to prevent users from inadvertently deleting all work-in-process.
130

Customizing WIP
< AFEWIPDisplay >
AllSelect = No
Keep in mind that if you change the AllSelect option to No, the All field will not appear on other WIP List windows, including the following:
• WIP List - Batch Print
• WIP List - Assign
• WIP List - View Batch Queue
• WIP List - Manual Archive
• WIP List - Status
• WIP List - Change in Use
• WIP List - Send
USING GENDATA WIP TRANSACTION PROCESSING
GenData WIP Transaction Processing lets you process WIP transactions based on their status code. The transactions are created by one of these processes:
NOTE: You must have a license to both Documaker and Documaker Desktop to use GenData WIP Transaction Processing.
• Executing the GenWIP program after the GenData program to process the transactions in the manual batch. Then using Documaker Desktop to:
• Manually view a transaction and update any required data. Then use the WIP, Save option to save the transaction with a status code such as: Approved or Accepted.
• Manually view a transaction and then use the WIP, Save option to save the transaction with a status code of Rejected.
• Manually view a transaction, update any required data, and save the transaction using the File, Complete, Batch Print option. This assigns a Batch Print status code to the transaction.
• Creating a new transaction using Documaker Desktop and then using the WIP, Save or File, Complete, Batch Print option to save it with a status code such as Approved, Accepted, or Rejected.
You can then process these transactions as:
• New transactions
• Transactions appended to an existing MRL recipient batch, NewTrn, NA, and POL files created by a prior run of the GenData program.
GenData WIP Transaction Processing creates new recipient batch, NewTrn, NA, and POL files which you can print, archive, or both using the GenPrint and/or GenArc programs.
To process the transactions in Documaker Desktop, you need to use two MEN.RES functions. One lets you change the status of the transaction being edited and close the form set. The other deletes the transaction being edited.
131

Customizing WIP
You can define the change status functionality multiple times in the MEN.RES file, once for each status code you have. Typically, users only set up two status codes—Approved and Rejected—but you can define as many as you want.
Use the delete function when you do not want to batch process transactions that have been rejected and instead want to delete those transactions immediately.
The MEN.RES functions are:
• AFESetStatus. This function sets the status of a WIP transaction and closes it. You can use this function if you have to set the status of WIP transactions over and over again. Set up the codes you want to use in the Status_CD control group and then include those codes in the MEN.RES file.
This example sets up two status codes, Approved and Rejected, in the INI file, two Documaker Desktop menu functions to set the status of the WIP transaction to either Approved or Rejected, and two buttons on the toolbar to make it easier to approve or reject transactions.
Here is a example of the Status_CD control group:
< Status_CD >
APPROVED = AP
REJECTED = RJ
Here is an excerpt from a MEN.RES file:
MENUITEM "&Approve Form" 150 "AFEW32->AFESetStatus" "Approved"
MENUITEM "&Reject Form" 151 "AFEW32->AFESetStatus" "Rejected"
:
:
TOOL 71 150 DISABLED BUTTON
TOOL 70 151 DISABLED BUTTON
• AFECloseAndDelete. This function deletes a transaction from the WIP list and then closes the form set. Here is an excerpt from the MEN.RES file:
MENUITEM "&Close and Delete" 152 "AFEW32->AFECloseAndDelete" "Close and delete the current form set"
USING THE WIPFIELD BUILT-IN FUNCTION
You can use the WIPField built-in INI function to tell the system to substitute a value in the INI file with a value from the WIP record. This works with either Documaker Desktop (AFEMAIN) or the WIP Edit plug-in.
For example, if you want the UserDict value to equal the value for ORIGUSER in the current WIP record, you would set up the following option:
< Spell >
UserDict = ~WIPFIELD ORIGUSER
EXPORTING WHEN BATCH PRINTING WIPYou can have the system export a form set when it batch prints documents in WIP. Through the use of INI options, the system makes sure the export of the form set is delayed to make sure it is not modified before being printed.
132

Customizing WIP
The system checks the BatchExport option to determine which export routine you want to use. It then loads the form set into memory. This is necessary for the export function, but not for printing.
The export function is called before the printing functions are called. This way, if an error occurs during the export, the printing process stops and returns the error. Since the form set is still in WIP, you can correct the error.
To use this feature, include the BatchExport option in the BatchPrint control group, as shown in this example:
< BatchPrint >
BatchExport = DLL->FunctionName;SourceINI;DestINI;
NOTE: You only need to specify the DLL->FunctionName to run an export. The SourceINI and DestINI parameters are optional.
The BatchExport option identifies the DLL and name of the export function you want to use. The export function does not have to be defined in the ExportFormats control group. Define the export function name the same way you define other entry hooks — a DLL name followed by the name of the function to dynamically call to do the export. Here is an example:
< BatchPrint >
BatchExport = TRNW32->TRNExportV2;Export2;ExpFile_CD;
Handling different exportoptions
To handle different export options used when called in this manner, you can include two optional parameters after the export function name. Separate the parameters with semicolons. Each parameter names an INI control group that contains various options.
The first or source control group (Export2 in the example) specifies the INI control group which contains alternative INI options you want to apply to the second INI control group (ExpFile_CD in the example). The second or destination control group should be the control group normally associated with the export function you want to use.
In the example above, the system copies the INI settings found under the Export2 control group to the ExpFile_CD control group. The standard V2 export function then uses the ExpFile_CD control group to find its options.
For instance, you might define the following:
< Export2 >
Overwrite = Yes
SuppressDlg= Yes
File = ~HEXTIME .EXP
< ExpFile_CD]
Overwrite = No
File = Output.EXP
Path = .\data\
133
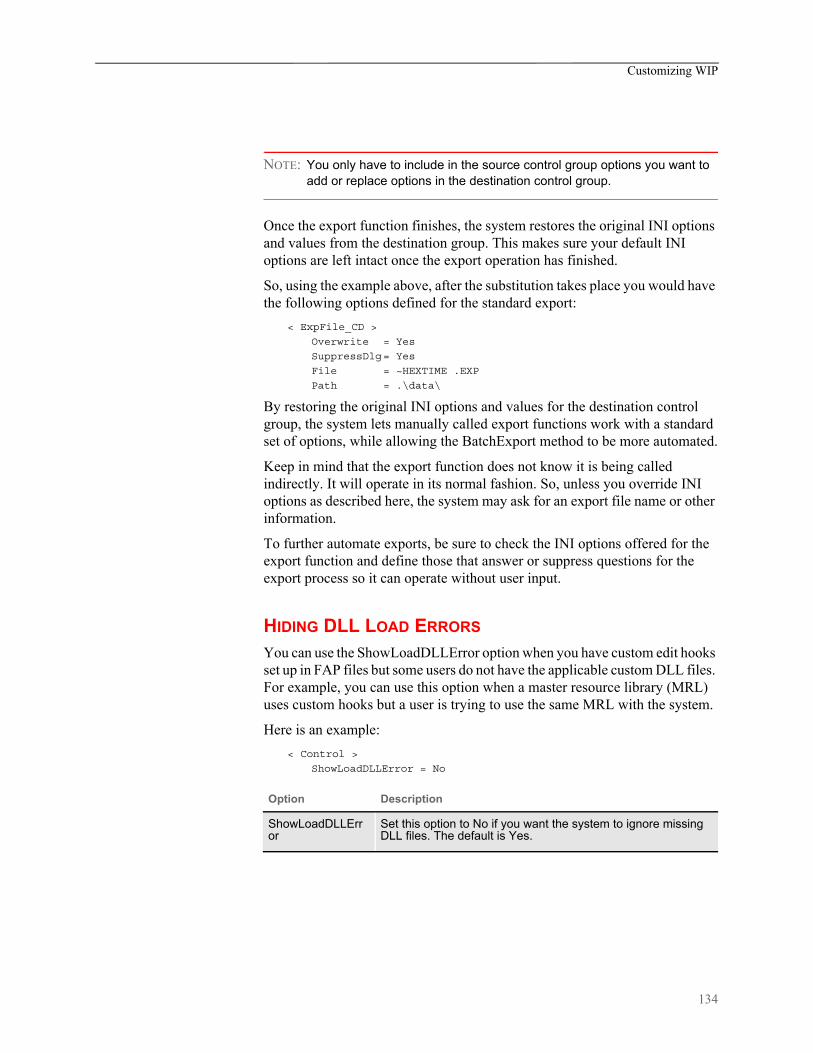
Customizing WIP
NOTE: You only have to include in the source control group options you want to add or replace options in the destination control group.
Once the export function finishes, the system restores the original INI options and values from the destination group. This makes sure your default INI options are left intact once the export operation has finished.
So, using the example above, after the substitution takes place you would have the following options defined for the standard export:
< ExpFile_CD >
Overwrite = Yes
SuppressDlg= Yes
File = ~HEXTIME .EXP
Path = .\data\
By restoring the original INI options and values for the destination control group, the system lets manually called export functions work with a standard set of options, while allowing the BatchExport method to be more automated.
Keep in mind that the export function does not know it is being called indirectly. It will operate in its normal fashion. So, unless you override INI options as described here, the system may ask for an export file name or other information.
To further automate exports, be sure to check the INI options offered for the export function and define those that answer or suppress questions for the export process so it can operate without user input.
HIDING DLL LOAD ERRORS
You can use the ShowLoadDLLError option when you have custom edit hooks set up in FAP files but some users do not have the applicable custom DLL files. For example, you can use this option when a master resource library (MRL) uses custom hooks but a user is trying to use the same MRL with the system.
Here is an example:
< Control >
ShowLoadDLLError = No
Option Description
ShowLoadDLLError
Set this option to No if you want the system to ignore missing DLL files. The default is Yes.
134

Customizing WIP
ADDING A PRINT OPTION
You can customize the system to let users print a form set from the WIP List window. Adding this option does not affect the form set’s status nor does it archive or delete the for set — unlike the Batch Print option which moves things along in the workflow.
You can choose this option from the WIP List window. From the window that appears, you can select multiple form sets to print.
For new installations, this feature is automatically enabled. You can activate this feature in existing installations by removing the semicolon from the WIP Print line in the MEN.RES file, as shown here:
POPUP "W&ip" 257 "Wip menu"
BEGIN
MENUITEM "&Wip List..." 297 "AFEW32->AFECombineWipDlgs""Wip Functions"
; MENUITEM "&Edit..." 270 "AFEW32->AFEUpdate" "Edit existing document"
; MENUITEM "&Batch Print..." 271 "AFEW32->AFEPrint" "Batch Print existing document"
; MENUITEM "&View Batch Queue..." 272 "AFEW32->AFEViewBatch" "View existing document in Batch Queue"
; MENUITEM "&Assign..." 273 "AFEW32->AFEAssign" "Assign existing document"
; MENUITEM "&Manual Archive..." 274 "AFEW32->AFEArchive" "Archive existing document"
; MENUITEM "&Delete..." 275 "AFEW32->AFEPurge" "Delete existing document"
; MENUITEM "S&tatus..." 276 "AFEW32->AFEStatus" "Change Status for existing document"
; MENUITEM "&Wip Print..." 298 "AFEW32->AFEWIPPrint" "Wip Print"
SEPARATOR
MENUITEM "&Save" 103 "AFEW32->AFESaveClose" "Save document to wip and close desktop"
SEPARATOR
...
0
END
Remove this semicolon to turn on this feature
135

Customizing WIP
UPDATING WIP RECORDS USING INI FILES
You can update certain WIP columns with information not automatically assigned during normal WIP processing. For instance, you can define specific WIP columns in your INI file using scripts that are automatically processed when you save WIP.
Use the AFEFormSet2WIPRecord control group to map transaction field or constant data into the WIP record any time the workstation saves WIP. Here is an example:
< AFEFormSet2WIPRecord >
WIPField = FormSetField; DFDField; DateFormat; TextOrFormat
The WIPField option uses this syntax:
NOTE: The AFEFormSet2WIPRecord control group is used by Documaker Desktop and the WIP Edit plug-in. Documaker Server uses the Trigger2WIP control group when mapping WIP columns.
Parameter Description
FormSetField (Optional) Enter the name of a field in your document. The field must be defined as having Formset global scope.
DFDField This parameter is required and must be preceded by a semicolon. Enter the name of a WIP index column.
DateFormat (Optional) If the value you want to map to a WIP column is a date value and you need to change the date format, you indicate this using this parameter and the TextOrFormat parameter. To indicate a date conversion, enter the letter D followed by the original date format string. For instance, if the date value from the form set field is using Month D, Year format and you would like the resulting WIP field to be in YYYY-MM-DD format, you would enter:
WIPField = EFFDATE; DESC;D4;7-4
This example would map the date value from the global formset field EFFDATE to the WIP column named DESC. The D4 indicates you want a date conversion and the original value is using date format type 4, which is Month D, YY format.The next semicolon identifies the desired date format when using the date conversion parameter. In this example, date format 7-4 gives you a YYYY-MM-DD formatted value.
TextOrFormat
(Optional) If you included the DateFormat parameter, use this parameter to indicate the date format to which you would like the value converted. If you omitted both the FormSetField and DateFormat parameters, you can use this parameter to provide a text value to assign to a WIP column not specifically tied to a field in the form set. For instance, the value you enter could simply be constant text or could use almost any of the INI built-in functions (like ~DALRUN) to provide the value you want to map.
136

Customizing WIP
Your entry for the WIPField option consists of up to four parameters separated by semicolons. Most of the time, however, you will only use the first two items. Here are some examples:
WIPField = BUSINESS DESCRP; DESC
WIPField = STATE; JURISDICTN
WIPField = ;TRNNAME; ;Constant1
If you are simply mapping a form set field to a WIP column, you only need to specify the first two parameters and you can omit the final two semicolons, as shown here:
WIPFIELD = BUSINESS DESCRP; DESC
This example finds the global formset field BUSINESS DESCRP and maps the content into the WIP column DESC.
Only fields defined as Formset Global can be mapped to WIP index columns. Form or section (image) scope fields are not located. Remember, however, that the TextOrFormat parameter can use any INI built-in function, like ~DALRUN. So you can use DAL to locate any field in the document or even query the value from external sources. Here is an example:
WIPFIELD = ;DESC ; ;~DALRUN MyScript.DAL
This example specifies that the WIP column DESC will be mapped with the result of the DAL execution of MyScript.DAL. For example, assume this script:
X = "***" & USERID() & "***";
RETURN( X );
The result would be to assign the AFE User ID into the DESC column with asterisks around it. Assuming you had this definition and created a WIP entry, here is how the column would appear on the WIP List window.
NOTE: The examples shown in this document are for illustration purposes and may not represent useful overrides.
Only define those WIP columns you want to override with form set data. WIP columns omitted from the AFEFormSet2WIPRecord control group are not modified.
Also note that the values are not assigned into the WIP columns unless the document is open and an explicit action causes the WIP transaction to be saved. Pre-existing WIP remains unaffected until loaded and saved again. These actions trigger the execution of this feature:
• Pressing the Save button or choosing the Save menu option
• Closing and choosing to save the document
137

Customizing WIP
Choosing an action that causes the Complete step to execute
138
Customizing Archive
CUSTOMIZINGARCHIVE
There are several options you can use to customize how information is transferred to and from archive. These options are explained below.
Transferring Key Information to Archive
The File, New and File, Retrieve options transfer key field (Key1, Key2, and KeyID) information from the Form Selection window to preselect records on the Retrieve window.
If you have customized your implementation and your settings differ from the base system’s default settings, this transfer of information may result in a message stating that no records were found. Users must respond to this message before they can continue the retrieval process.
You can use the following INI options to specify whether the system should continue to transfer this key field information:
< ArcRet >
TransferKey1 = Yes/No
TransferKey2 = Yes/No
TransferKeyID = Yes/No
Set the options to Yes to transfer the information. Set the options to No if your system has been customized and you are receiving messages indicating that no records were found.
Mapping Form Set Field Values
You can assign form set field values to the archive index record. This is controlled by INI options in the AFEFormset2ArchiveRecord control group.
In the base system, the standard archive process uses the AFEWIP2ArchiveRecord control group to map fields from the WIP record to the archive index record. Once this takes place, you can use the AFEFormset2ArchiveRecord control group to match certain form set fields with archive index field destinations, as shown here:
< AFEFormset2ArchiveRecord >
NAME = INSURED NAME
CITY = CITY
The name on the left is a DFD field name defined in the archive index record. The name on the right is the name of the field located in the form set.
In this example, two fields from the form set are being mapped into the index record. The form set field, INSURED NAM E, is mapped to the DFD field, NAM E. In the second line, the DFD field name and form set field names are both named CITY.
When you use this feature, keep these items in mind:
• During archival, if the form set is not currently loaded (as is often the case when you are doing a manual archive), the form set is temporarily loaded while the mapping occurs.
139

Customizing Archive
• If a named form set field occurs multiple times within the form set, the value transferred will be taken from first occurrence the system locates. The scope of the field defined is not considered.
• If a form set field is named but cannot be found within the form set the archive process continues and no error message appears.
• If a DFD field is named but does not exist, an error appears and the process continues—which is consistent with the standard WIP to Archive transfer.
• If the DFD field length is defined shorter than the field data from the form set, it will be truncated to the DFD field length. No additional formatting occurs. No error message appears.
Preserving the CreateTime Value
Use the KeepCreateTime option to tell the system you want to preserve the CreateTime field value when it creates a new form set based on a document retrieved from archive.
Typically, when you create a new WIP Entry it has a create time that reflects when the form set was actually created. If, however, the form set was created from an archived document and you want to preserve the CreateTime from the archived document, add this option:
< ArcRet >
KeepCreateTime = Yes
The default is No which tells the system to give the new form set a new create time. Enter Yes to tell the system to instead use the entry in the CreateTime field from the archive record.
Converting Archive Index Fields into WIP
You can convert all archive index fields into WIP index fields, not just the key fields.
You use the AFEWIP2ArchiveRecord control group to map back and forth between these two windows, instead of forcing the Key1 (Company), Key2 (LOB), and KeyID (Policy Number) fields to match on both windows.
< AFEWIP2ArchiveRecord >
NAME = INSURED NAME
CITY = CITY
The name identified on the left is a DFD field name defined in the archive index record. The name on the right is the name of the field in the form set in WIP.
If you do a retrieval from the Form Selection window the Retrieval window is populated with the fields from the Form Selection window, and when you pick a form set to retrieve that information is populated back onto the Form Selection window.
140

Customizing Archive
In other words, the default behavior should appear the same even though the underlying code has changed. However, this makes it possible for the two windows to have different fields and still transfer data from archive back to the Form Selection window.
Clearing Version Information
You can use the RetrieveVersionInfo option to clear the library version and revision information stored in an archived form set:
< FormSelection >
RetrieveVersionInfo = No
For instance, you would use this option if you want to use newer versions of the forms than those in the retrieved form set. Set this option to No to clear that information when you are using an archived form set to create a new form set.
Specifying the Sort Order
You can specify the order, ascending or descending, during an archive search. To do this, you must make the following changes in your APPIDX.DFD file and FSIUSER.INI files.
NOTE: You can only use one column to change the order. The ODBC, Oracle, and DB2 drivers are supported.
Assuming this is in your APPIDX.DFD and you want to sort on Company in descending order, here is an example of the changes you must make (some fields were omitted for clarity):
< Fields >
FieldName = Company
< Field:Company >
INT_Type = CHAR_ARRAY
INT_Length = 6
EXT_Type = CHAR_ARRAY
EXT_Length = 6
You will also need to add these options:
< Keys >
KeyName = Company
< Key:YourTagName >
Expression = Company
FieldList = Company
Descending = 1
Your FSIUSER.INI file should include information similar to this:
< DBTable:APPIDX >
DBHandler = ODBC
DefaultTag = YourTagName
141

Customizing Archive
The string YourTagName can be anything, including the word Company. The SQL statement logged in the trace file should include order by Company desc at the end.
142

Customizing Archive
Specifying the File Size when Splitting Archive Files
You can limit the size of the CAR files created when you split an archive file to size no less than 100KB and no more than 1.4GB. The system does not accept values outside that range.
NOTE: You can also limit the size of CAR files created when you split an archive using the ARCSPLIT utility. See the Utilities Reference for more information on the ARCSPLIT utility.
You enter the file size limit on the ArcSplit window. Use these options to enable this feature for Documaker Desktop:
< ArcSplitConfig:Example >
CARFileSize = 1
EnableCARFileSize = No
Mapping Old Archive Keys to Current Document Keys
You can map old keys to new keys using the Key1Table and Key2Table control groups. For instance, if you have changed the Key1 or Key2 fields in your FORM.DAT file, but would like to retrieve data from archive or import data through the Form Selection window using the old Key1 and Key2 values, now you can.
To do this, you use the following control groups for Key1 and Key2 fields.
< Key1Table >
OldCompany = NewCompany
< Key2Table >
OldLOB = NewLOB
You do not have to add both groups if only one key was affected. Just add the appropriate control group and the key to which you would like the mapping done. In this example, the NewCompany and NewLOB options represent the new names of the keys. The values OldCompany and OldLOB represent the old names of the keys.
Option Description
CARFileSize Enter a number between one (1) to 14,000 to define the size for the CARFile. If you enter one (1), the system interprets that as 100,000 bytes (100 KB). If you enter 14,000, the system interprets that as 1,400,000,000 bytes (1,4000,000 KB).
EnableCARFileSize
This option turns on and off the related radio button field on the ArcSplit window in Documaker Desktop and also tells both Documaker Desktop and the ARCSPLIT utility whether to use the CARFileSize option. The default is No.
143
Customizing Archive
If you are using Documaker Studio, you can handle the alias mapping at a global level by adding them to the BDF file. By using the BDF file, any workstation or program using the library automatically inherits the necessary information.
If you are not using Documaker Studio, add the alias mappings to the INI file using Key1Table and Key2Table control group, as shown in the example above. If the users share a common INI file, such as the FSISYS.INI file, you can make this change in a global fashion. If your users do not share INI settings, you will have to make these changes in each user’s FSIUSER.INI file.
144

Customizing the Interface
CUSTOMIZINGTHE INTERFACE
The system provides numerous options you can use to customize the interface the end user sees. These options are discussed below.
Highlighting the Active Field
Use this INI option to control whether or not fields are highlighted on forms when using the View, Fixed Edits option.
< Control >
ActiveFieldHighlight = Yes/No
The default is Yes.
Remembering the Size of the Window
To have the system remember the size of your window, set the Maximized and SaveWindowSize options as shown here:
< Control >
Maximized = No
SaveWindowSize = Yes
Making Sure Required Fields have Data
You can now include the RACCheckRequiredFields function in your MEN.RES or WIPEDIT.RES file to have the system make sure required fields have data.
This table describes what the RACCheckRequiredFields function does:
Option Description
Maximized Enter Yes to have the system always maximize your Documaker Desktop window when you start the system. Enter No if you do not want your Documaker Desktop window maximized.
SaveWindowSize
Enter Yes to have the system store the dimensions of the Documaker Desktop window when you exit so Documaker Desktop will open to the same window dimensions the next time you start the system. Enter No if you do not want your Documaker Desktop window dimensions stored.
If... The function displays
The required fields have data All required fields have data.
One or more of the required fields is missing data
Data required for [name of field]. The system makes the first required field with missing data the current field.
145

Customizing the Interface
Setting up a requiredfields check with the
WIP Edit plug-in
There is a RACLIB function that should be placed in the WIPEDIT.RES file. This function may send a response back to WIPCTL or it may display a message, depending on whether it is executed from the WIP Edit plug-in or AFEMAIN (Documaker Desktop). It is set up like any MEN.RES function and must be identified by a command number not used by any other function in the WIPEDIT.RES file. The setup in the WIPEDIT.RES file must be included regardless of the way you start the required field check.
Here is an example line from the WIPEDIT.RES file:
MENUITEM "&CheckRequiredFields" 263 "RACOS2->RACCheckRequiredFields" "Check Required"
You do not need to make changes to IDS.
There are two ways to start the required field check:
• From a menu
• From an ASP or JSP page
Starting from a menu To let users start a required field check from the menu add the following line to the WIPEDIT.RES file. The number 263 may vary but it should not be used for another function in the WIPEDIT.RES file. This line tells the system to include a Check Required Fields option on the menu that appears when you right click the mouse.
MENUITEM "&Check Required Fields" 263 "RACOS2->RACCheckRequiredFields" "Check Required"
Starting from an ASPpage
Follow these steps to start a required field check from an ASP page.
1 Register the WIPCTL.DLL file.
2 Set up the WIPEDIT.RES file to execute the required field check from the menu.
3 The web page must contain a script like the following. When this script executes, the required field check will occur. The variable rspmsg will contain either “All required fields have data” or an error indicating the field that needs data. The RACCheckRequiredFields function will be executed in this case as well but its response is returned to the script, not displayed in a message box.
< Script Language="VBScript" >
Function SendToWipedit
Dim rspmsg
set aspobj = CreateObject("Wipctl.WipEd.1")
aspobj.cmdWithMessage 263,rspmsg
set aspobj = Nothing
MsgBox(rspmsg)
End Function
</Script>
Showing and Hiding Field Placeholders
You can control the display of field placeholders using this INI option:
146
Customizing the Interface
< Control >
ShowPlaceHolders=Yes/No
The default is Yes.
Display Notes as Form Help
Sticky notes can provide information about a field on a form if added when the form is created. In Entry, when you position your cursor over the sticky note icon, the system then displays the contents of the note in a tooltip-style window. When you move the cursor again, the note disappears.
To enable this option in the Entry module, add the ShowNotes INI option to your FSISYS.INI file:
< Control >
ShowNotes = Yes
The default is No.
You can also add a menu option to turn on or off the display of notes. To add this option to your menu, add the Show Notes line to your MEN.RES file:
...
MENUITEM “Show &Notes” 1086 “NULL” “NULL”
...
1086 is the reserved menu ID for the Show Notes option.
NOTE: You cannot embed note objects within text area objects for use with paragraph assembly. TERSUB only imports information stored in the first text area in the section. Objects defined outside the text area are ignored.
Enabling Indexes and Tables of Contents
A section’s creator can add tables of contents, lists of figures, or indexes to form sets to make it easier for users to navigate through the various forms. To use this feature, all sections must be loaded before the print operation executes. Otherwise, the system will not have all the content available and will not be able to create a complete table of contents, list of figures, or index.
Since some print drivers do not force the loading of all sections until necessary, you need to include this INI option:
< Control >
LoadPrintOnly = Yes
Fixed Prompt Placement
Use the FixedPrompt option to control the placement of the fixed prompt line used to enter data onto forms.
FixedPrompt=Yes/No
147

Customizing the Interface
The default is No.
This option works with the Fixed Edits option. Once you select Fixed Edits, the system activates the Fixed Prompt option and puts a check mark beside both on the menu.
The following line in the MEN.RES file lets users toggle Fixed Prompt mode on and off:
MENUITEM “Fixed &Promp ”1084 “NULL” “NULL”
The code number 1084 is automatically keyed to fixed prompts so “NULL”, “NULL” is all that is required to activate this option.
Customizing the Titles of Windows
To change the title of the Complete window, use the following INI option. If you do not want the window to have a title, leave the right side (TitleToDisplay) blank.
< DLGTitles >
CompleteDlgTitle = TitleToDisplay
The system defaults to the default title included in the MEN.RES file.
To change the title of the Retrieve window, use the following INI option. If you do not want the window to have a title, leave the right side (TitleToDisplay) blank.
< DLGTitles >
RetrieveDlgTitle = TitleToDisplay
The system defaults to the default title included in the MEN.RES file.
Customizing the Text Editor Menus and Toolbar
To customize the Text Editor’s menus and toolbar, you must add this INI option in the Menu control group:
< Menu >
TXMMENU=TXM.RES
This option tells the system to find the definition of the Text Editor’s menus and toolbar in the file named TXM .RES.
NOTE: Documaker Desktop uses a resource file named MEN.RES to define its menus. The TXMMENU option lets you do a similar thing with the Text Editor. Keep in mind, however, that the MEN.RES file can call custom functions and DLLs while the file specified with the TXMMENU option cannot.
Here is a sample resource file for defining the Text Editor menus and toolbars. This file specifies the default Text Editor menus and toolbar.
148

Customizing the Interface
Sample resource file forthe Text Editor
MENU "Edit"
BEGIN
POPUP "&File" 5850 "System menu"
BEGIN
MENUITEM "&Save\tCtrl+S" 5851 "NULL" "Description"
MENUITEM "&Properties..." 5852 "NULL" "Description"
MENUITEM "E&xit\tF3" 5853 "NULL" "Description"
END
POPUP "&Edit" 5854
BEGIN
MENUITEM "&Undo\tCtrl+Z" 5856 "NULL" "Description"
SEPARATOR
MENUITEM "&Copy\tCtrl+C" 5857 "NULL" "Description"
MENUITEM "Cu&t\tCtrl+X" 5858 "NULL" "Description"
POPUP "&Paste"
BEGIN
MENUITEM "Formatted text\tCtrl+V" 5859 "NULL" "Description"
MENUITEM "Unformatted text\tCtrl+Alt+V" 5838 "NULL" "Description"
END
MENUITEM "&Delete\tDel" 5844 "NULL" "Description"
SEPARATOR
POPUP "Se&lect"
BEGIN
MENUITEM "&Character" 5874 "NULL" "Description"
MENUITEM "&Word\tCtrl+Sp" 5875 "NULL" "Description"
MENUITEM "&Line" 5876 "NULL" "Description"
MENUITEM "&Paragraph" 5877 "NULL" "Description"
MENUITEM "C&olumn" 5846 "NULL" "Description"
MENUITEM "&All\tCtrl+/" 5879 "NULL" "Description"
MENUITEM "&Deselect\tCtrl+\\" 5880 "NULL" "Description"
END
SEPARATOR
MENUITEM "&Bold\tCtrl+B" 5860 "NULL" "Description"
MENUITEM "&Italic\tCtrl+I" 5861 "NULL" "Description"
MENUITEM "U&nderline\tCtrl+U" 5862 "NULL" "Description"
MENUITEM "&Strike-out" 5863 "NULL" "Description"
MENUITEM "Do not &hyphen" 5885 "NULL" "Description"
MENUITEM "&Do not break" 5895 "NULL" "Description"
MENUITEM "C&olor..." 5864 "NULL" "Description"
POPUP "C&hange Case..."
BEGIN
MENUITEM "&Upper Case\tAlt+U" 5803 "NULL" "Description"
MENUITEM "&Lower Case\tAlt+L" 5804 "NULL" "Description"
MENUITEM "&Sentence Case\tAlt+S" 5805 "NULL" "Description"
MENUITEM "&Title Case\tAlt+T" 5806 "NULL" "Description"
END
END POPUP "&View" 5865
BEGIN
MENUITEM "&Zoom..." 5866 "NULL" "Description"
SEPARATOR
MENUITEM "&Status Line" 5869 "NULL" "Description"
MENUITEM "&Nonprinting Tokens" 5870 "NULL" "Description"
MENUITEM "R&ulers" 5830 "NULL" "Description"
149

Customizing the Interface
MENUITEM "&Title bar" 5831 "NULL" "Description"
MENUITEM "Tool&bar" 5832 "NULL" "Description"
SEPARATOR
MENUITEM "&Refresh\tF5" 1009 "NULL" "Description"
MENUITEM "Re&format\tF6" 5872 "NULL" "Description"
MENUITEM "&Level Columns" 5898 "NULL" "Description"
END
POPUP "&Insert" 5881
BEGIN
MENUITEM "&Break..." 5882 "NULL" "Description"
MENUITEM "&File..." 5883 "NULL" "Description"
MENUITEM "&Logo..." 5884 "NULL" "Description"
MENUITEM "Fiel&d..." 5878 "NULL" "Description"
MENUITEM "B&ox..." 5847 "NULL" "Description"
END
POPUP "F&ormat" 5885
BEGIN
MENUITEM "&Font...\tCtrl+F" 5886 "NULL" "Description"
MENUITEM "&Paragraph...\tCtrl+P" 5887 "NULL" "Description"
MENUITEM "&Tab Stops...\tCtrl+T" 5888 "NULL" "Description"
MENUITEM "&Border..." 5889 "NULL" "Description"
MENUITEM "&Shade..." 5890 "NULL" "Description"
MENUITEM "&Columns..." 5891 "NULL" "Description"
END
POPUP "&Tools" 5892
BEGIN
MENUITEM "&Spell Check...\tF7" 5893 "NULL" "Description"
MENUITEM "Spelling &Options..." 5816 "NULL" "Description"
MENUITEM "&Find/Replace..." 5894 "NULL" "Description"
END
POPUP "&Help" 5895
BEGIN
MENUITEM "&Contents\tF11" 9904 "NULL" "Description"
MENUITEM "&How to...\tCtrl+F2" 9902 "NULL" "Description"
MENUITEM "&Shortcuts\tShift+F2" 9903 "NULL" "Description"
MENUITEM "&Glossary...\tCtrl+F11" 9907 "NULL" "Description"
MENUITEM "&Using Help\tShift+F11" 9901 "NULL" "Description"
SEPARATOR
MENUITEM "&Product Information..." 9906 "NULL" "Description"
END
END
TOOL 2 5851 ENABLED BUTTON
TOOL 0 0 NULL SEPARATOR
TOOL 21 5858 ENABLED BUTTON
TOOL 22 5857 ENABLED BUTTON
TOOL 23 5859 ENABLED BUTTON
TOOL 0 0 NULL SEPARATOR
TOOL 52 5860 ENABLED BUTTON
TOOL 53 5861 ENABLED BUTTON
TOOL 54 5862 ENABLED BUTTON
TOOL 68 5885 ENABLED BUTTON
TOOL 0 0 NULL SEPARATOR
150

Customizing the Interface
TOOL 60 5870 ENABLED BUTTON
TOOL 0 0 NULL SEPARATOR
TOOL 29 5884 ENABLED BUTTON
TOOL 34 5878 ENABLED BUTTON
TOOL 30 5847 ENABLED BUTTON
TOOL 0 0 NULL SEPARATOR
TOOL 63 5891 ENABLED BUTTON
TOOL 64 5889 ENABLED BUTTON
TOOL 31 5890 ENABLED BUTTON
TOOL 0 0 NULL SEPARATOR
TOOL 41 5856 ENABLED BUTTON
TOOL 62 5893 ENABLED BUTTON
TOOL 55 5886 ENABLED BUTTON
TOOL 8 5866 ENABLED BUTTON
TOOL 0 0 NULL SEPARATOR
TOOL 13 5899 ENABLED BUTTON
TOOL 0 0 NULL SEPARATOR
Adding Information to the Assign Window
The Assign window shows a list of users after you select the WIP, Assign option. The system also includes columns for the user ID and name.
By changing INI options, you can display more user information and control the placement of the information. These options are stored in the AFEAssignDisplay control group. Here is an example of how you can customize this window:
< AFEAssignDisplay >
; These are the defaults if you have no options defined
FIELD = ID,%-9.8s,User ID
FIELD = NAME,%-26.25s,User Name
; These are additional fields you can display
FIELD = RIGHTS,%-2.1s,RT
FIELD = INUSE,%-2.1s,US
FIELD = REPORTTO,%-9.8s,Report
FIELD = SECURITY,%-65.64s,Security
FIELD = MESSAGE,%-129.128s,Message
NOTE: The system will not display the password even if you add it to the INI file.
Start each option with FIELD=. The order in which you define the list determines the order of the columns—the first column appears to the left of the window.
The right side defines the DFD field name, followed by the format and the column heading description. You can use these formats:
• Percent signs (%) indicate the opening of the format string.
• A dash (-) indicates you want the text left justified. Omit the dash for right justification.
151
Customizing the Interface
The formats are followed by a precision.length indicator. This indicator makes sure all data is displayed at a consistent length within that column.
The s at the end of each format tells the system it is a text string. This is the only option you can use for these fields.
NOTE: The size of the window does not vary, if you display more information than will fit, use the scroll bar to see the additional columns.
Centering Form Titles
To center form titles set the following INI option.
< Control >
CenterFormTitles = Yes/No
The default, No, left justifies form titles.
Customizing the Send and CC Confirmation Messages
Use the KeyIDTitles option to customize the text that appears on the Send and CC confirmation messages. For example, if you want the system to display a message similar to this one:
Package CC'd to Tyler, Susan.
Customer ID is 33333
You would set the option as shown here:
< DLGTitles >
KeyIDTitle = Customer ID
The default is KeyID .
Turning Off the Page Break Option
Use the LimitPageBreak option to turn off the option to insert a page break (Insert, Break, Page Break) when a text area field does not have the proper options set:
< Control >
LimitPageBreak = Yes
This INI option also disables the CTRL+ENTER shortcut.
Returning to the Prior Window
Use the Automatic Return feature to have the system redisplay the window as it was before the user made his or her last selection. You turn this feature on or off using an INI option. By default this option is set to No. To set feature, use these INI options:
< AutoReturn >
152

Customizing the Interface
FormSelection = Yes
FormsetRetrieve= Yes
WIPEdit = Yes
When you use the Automatic Return feature with the WIP List window, (see Using the WIP List and the Automatic Return Feature on page 116 for more information) you return to the WIP window instead of the Form Selection window, Edit window, Retrieve window, or View Batch Queue window.
The FormSelection option returns you to the Form Selection window if the you selected the File, New option. The WIP List option returns you to the WIP List - Edit window if you selected the WIP, WIP List or File, Edit option to open a form set.
Displaying the Form Description on the Print Notification Window
Use this option to show the form description instead of the form name on the Print Notification window:
< Control >
PrintNotifyText = Description/Name
The default is Name. The system looks in the FORM.DAT file for the form description data instead of the form name and displays the form description name when you are printing form sets, if you set this option to Description.
Preventing Users from Retrieving Forms During Form Selection
Use the following INI option to hide the Retrieve button on the Form Selection window.
< FormSelection >
HideRetrieve = Yes
If you omit this option, the Retrieve button appears on the Form Selection window.
Displaying Grid Lines
If you want to add an option for displaying grid lines, add this line to your MEN.RES file:
POPUP "&Options" 1056 "Options"
BEGIN
MENUITEM "&Field Template" 1057 "NULL" "NULL"
MENUITEM "&Auto Focus" 1059 "NULL" "NULL"
MENUITEM "&Information" 1062 "NULL" "NULL"
MENUITEM "Fixed &Edits" 1077 "NULL" "NULL"
MENUITEM "Fixed &Prompt" 1084 "NULL" "NULL"
MENUITEM "&Grid" 1015 "NULL" "NULL"
Add this line
153

Customizing the Interface
This adds the Grid option to the Options menu.
Handling Banner Pages
You can use the following options to control how the system handles banner pages:
< Banner >
Enabled = No
Banner = filename.fap
FilterRecips = recip;recip;recip;
Showing the Prior PolicyNumber on Renewals
When users renew a policy they retrieve the original policy from archive and then assign it a new policy number on the Forms Selection window. To add a field to the banner page that automatically displays the previous policy number, create a field on the banner page called PRVPOL.
In your INI file, include the new field in the Banner control group, as shown here:
< Banner >
Field = PRVPOL
Field = POLICY NBR
Field = INSURED NAME
Name = PFORM
Size =
In the BannerProc field be sure to include the following:
< AFEProcedures >
BannerProc = TRNw32->TRNSetBannerFormInfo
Also you must enter the following line in the FormSelection group of the INI file:
< FormSelection >
OriginalPolicyNumber = PRVPOL
NOTE: The name PRVPOL is user defined. It does not have to be PRVPOL.
Option Description
Enabled Enter Yes so you do not have to define the Name option. This tells the system to instead use the Banner option. The default is No.
Banner Setting this option to banner provides support for legacy systems. You can, however, enter the name of a FAP file.
FilterRecips
Use this option to specify recipients who should receive banner pages. If not defined, all recipients receive a banner page. If you enter more than one recipient, separate the recipient names with semicolons.
154

Customizing the Interface
Customizing Recipient Selection on the Print Window
You can use the following INI options to customize how users select recipients:
< PrtType:XXX >
SelectRecipients = Yes
AllRecipients = No
Specifying Recipient Print Order
Use the RecipientPrintOrder option to choose the recipient print order when printing from archive:
< Printer >
RecipientPrintOrder = Company,INSURED,PRODUCER
This example specifies the order in which forms or the form set should print. If you append Yes to the entry, a window appears which lets users rearrange the order. Here is an example:
< Printer >
RecipientPrintOrder = Company,INSURED,PRODUCER;YES
Customizing the Select Recipients Option
The select recipients functions (AFEViewRecipients, AFEViewNextRecipient, and DefaultRecipView) let you choose which recipient forms view. These functions, located in the MEN.RES file, are called from the Formset, Select Recipients options. These functions determine the options which appear in the Select Recipients window. If you want to see a certain recipient repeatedly, such as the INSURED recipient, you can add a customized MEN.RES function to view that recipient's forms.
AFEViewRecipients AFEViewRecipients is the MEN.RES function that specifies one or more recipients for display in the Select Recipients window. The following is an example of how to set this option in the MEN.RES file:
MENUITEM "Select Insured" 187 "AFEW32->AFEViewRecipients" "INSURED"
MENUITEM "Select Others" 188 "AFEW32->AFEViewRecipients" "AGENT, HOME OFFICE"
Option Description
SelectRecipients
Enter Yes to have the system pre-select this option when the Print window appears.
AllRecipients Enter Yes if you want the All Recipients field pre-selected so the system will print copies for all recipients. Enter No if you want to make the user choose the individual recipients for which you want to print copies.If you enter Yes for the SelectRecipients option and omit this option, the system defaults to pre-selecting the All Recipients field.
155
Customizing the Interface
In the second line, there are two recipients. If you need to see two or more recipients, enter those recipients on the same line and separate them with commas or semicolons. You can change the control ID, but it must remain in the 151-200 range because a form set has to be open to use these functions.
AFEViewNextRecipient The AFEViewNextRecipient function displays the next recipient's form. Here is an example of how to set up this option in the MEN.RES file:
MENUITEM "Select Next" 190 "AFEW32->AFEViewNextRecipient" "View the next recipient"
The control ID must be within the range of 151-200.
DefaultRecipView The DefaultRecipView function works in Archive Retrieval. If you want to display a form set from Archive Retrieval in a particular recipient's view, enter the following INI option in the ArcRet group:
< ArcRet >
DefaultRecipView =
Set the values for this option to the recipients you want to see. If there is more than one recipient, separate them by commas. For example, to display the retrieved forms for the Insured and the Agent, enter the following:
< ArcRet >
DefaultRecipView = INSURED, AGENT
Forcing Users to Select from Tables
Some form fields let data entry users select entries from drop-down tables. By default, the system also lets users type in entries. You can add the following option to your FSISYS.INI or FSIUSER.INI file to force data entry users to select from the options listed in the table. When set to Yes, this option removes the ability to type in an entry.
< Control >
ForceTableOnlySelection = Yes
When set to Yes, this option removes the ability to type in an entry. If you omit this option or set it to No, users can select an entry from the table or type in an entry.
Optimizing the Use of Tables
For performance purposes, you can include one of these INI options to specify that entry table files will use the old or new format, which was introduced in version 10.1. (Do not include both options.)
< Tables >
OldFormatOnly = Yes
NewFormatOnly = Yes
156

Customizing the Interface
For instance, if you are doing a lot of entry table lookups, your tables are located on a network drive, and the tables are a mix of both old and new format tables, performance can be affected because the system has to check the format of each table.
If, however, you can use one of these new options to tell the system that all tables are in the same format, it can omit that query and performance improves. Specify only the option that applies. If you omit both options, the system first checks to see if the table is in the new format. If not, then it checks to see if the table is in the old format.
Keep in mind that if you include one of these options, all of your tables must be in that format. For instance if you set the OldFormatOnly option to Yes, all of your tables must be in the old format. If you later decide to convert your tables to the new format, you must remove this option and, to get the same performance gain, include the NewFormatOnly option.
Printing “Draft” or “Reprinted” on Form Sets
To have the system automatically print Draft on form sets which have not been completed or Reprinted on form sets printed from Archive, add the following options in your FSISYS.INI file:
< AfeProcedures >
INIT=CSTW32->CSTInitImageHandler
< Control >
PrintDraft=Yes
< ArcRet >
PrintReprinted=Yes
The INIT option specifies the code module to use. The PrintDraft option tells the system to add Draft to the SendCopyTo field instead of the recipient name during normal WIP printing.
NOTE: If you print the form set from the Complete window, the system will name the recipients as usual.
The PrintReprinted option tells the system to include Reprinted in the SendCopyTo field when it prints an archived form set.
Printing Through Menu and Toolbar Options
Using the MEN.RES file, you can add a menu or toolbar option that lets you print immediately without having to choose the print destination and which lets you select printer definitions that are not available on the Print window.
For each menu option, you specify the printer type in the MEN.RES file that you want to use and, optionally, whether you want the Print window to appear.
Here are some example MEN.RES file changes:
157

Customizing the Interface
MENUITEM "PCL" 191 "AFEW32->AFEDirectPrint" "PCL"
MENUITEM "GDI" 192 "AFEW32->AFEDirectPrint" "GDI,N"
MENUITEM "Other" 193 "AFEW32->AFEDirectPrint" "OTHER,T,F"
These three menu items all use the same AFE function. An associated toolbar icon would need to specify the appropriate value (191, 192, or 193) to invoke one of these items.
The syntax of the last part of the menu line is the key. The first section up to the comma (if included) specifies the PrtType control group to use from the INI file. This does not have to be one of the printer types you specify in your Printers control group. This feature lets you have print groups that do not appear on the printer selection list of the Print window.
So, using the example above, these three menu items refer to the following printer groups: PrtType:PCL, PrtType:GDI, and PrtType:Other. The two remaining options are optional. Each is separated from the PrtType name and each other by a comma. Each option is a Yes or No (True or False) answer to the SuppressWindow and SuppressDlg options. By default the answer to both questions is True— which tells the system to suppress the windows.
NOTE: You can spell out the entries, such as GDI,No, to override the option, or you can simply enter a single character, such as Y, N , or T, F.
If you disable the Suppress option, one or both of the Print windows may appear. In the example above, the PCL print would display a window. GDI print would display a print window but would attempt to suppress the Windows GDI print window. Because the second option was omitted it defaults to True. The Other option suppresses the GUI window, or the T, but allows the Windows GDI print window to appear because of the F in the second position.
Remember if you are printing to the GDI device and have not specified enough information in the INI file, or incorrect information in the INI, the Windows’ Print window may still appear.
Showing Blank Fields as NULL Fields
Normally, only those fields that have never been assigned a value show the place holder. Fields with values — even an empty string — show the text assigned. You can, however, use the ShowEmptyFieldAsNull option to override the behavior of fields that have been assigned an empty string as a value.
< Control >
ShowEmptyFieldAsNull = Yes
158

Customizing the Interface
Directing Print Streams
You can specify the folder you would like to send a print stream to while on the Print window. You use this INI control group to specify choices:
< Print_To_Folder >
Test_Folder = D:\DAP\Test_Folder
Example_Folder = D:\DAP\Example_Folder
Sample_Folder = D:\DAP\Sample_Folder
The names of the folders you specify, such as Test_Folder, appear as options the user can choose from on the Print window. You can select one folder per print. You can also print to the same folder as many times as necessary. The system creates a unique file name for each print stream which cannot be overwritten. The names of these print streams are a combination of the user name, the date (using format E—Mar062003), and the time (192459 is 07:24:59).
Generating Print Stream Names Automatically
You can use the GenerateFileName option to tell the system to automatically generate names for print streams. The file name is comprised of the user ID, the date (such as Mar062003), and the time (such as 192459, which is 07:24:59 pm).
< Printer >
GenerateFileName = Yes
When you set the option to Yes, the device on the Printer window is grayed out and the system generates a print file in the current directory.
Controlling Pagination when Editing a Form Set
You can use the AutoPagination option to control pagination when you edit a form set in Documaker Desktop or iDocumaker.
< EntryOptions >
AutoPagination = No
Option Description
ShowEmptyFieldAsNull
Enter Yes to have the system show a field with an empty string as it would a field which has never had data entered into it. This means the place holder rectangle normally reserved for fields with null data will appear for fields containing an empty string.The default is No.
Option Description
AutoPagination Enter No to turn off automatic re-pagination when editing a form set. The default is Yes.
159

Customizing the Interface
NOTE: Keep in mind you can also use the AutoPagination option in the Control control group to prevent the system from re-paginating the form set when a section grows because of expanding text in a text area. Here is an example:
< Control >
AutoPagination = No
This tells the system not to re-paginate the form.
Using Tab to Page through a Form Set
If you want to use the TAB key to move to the next page while in Archive View mode, set the following INI option. The default is Yes.
< ArcRet >
TabNextPage = Yes
Viewing Print-only Forms
By default, the system skips forms on which no entry is required. These forms are called print-only forms. If you want to view these forms, set this INI option to No:
< Control >
ActivateFirstField=Yes
The default (Yes) tells the system to display the first form with an active entry field. If set to No, the system activates the first viewable page of a form. Viewable pages are set by the DisplayPrintOnly or the DisplayAllEntryFormPages options.
To avoid viewing all forms (the DisplayPrintOnly option is set to Yes), use this option:
< Control > or < ArcRet >
DisplayAllEntryFormPages = No
The default is No. Set this option to Yes if you want all pages with sections marked for Entry or Entry and Print to appear. Assigning this option under the Control group affects Entry modes. Assigning it under the ArcRet control group affects Archive/Retrieval.
NOTE: If the DisplayPrintOnly option is set to Yes the appropriate group, the system ignores the ActivateFirstField option.
160

Customizing the Interface
Customizing Units of Measure
By default, the system uses inches as the unit of measure. This means your rulers and grid lines are marked in increments based on inches. You can select a different unit of measure by modifying your FSIUSER.INI or FSISYS.INI files. This example shows how to set the rulers and grid to centimeters:
< HorizontalRuler >
Type = 4
< VerticalRuler >
Type = 4
Your other options are explained in this table:
NOTE: You have the same unit of measurement options in the Image Editor. When you create a section, the system stores all measurement information in FAP units. Based on the user’s INI settings, the system switches to the user’s unit of measure for entry and display purposes. For example, if you create a section using inches, a data entry user in Documaker Desktop sees centimeters as the unit of measure if his or her INI files are set for centimeters.
Enabling Spell Checking
The Spell Check option is automatically included in the MEN.RES file so this option appears in the application unless you specifically remove it. Here is an example of the line in the MEN.RES file that adds the Spell Check option:
MENUITEM "&Spell Check Fields..." 1087 "NULL" "NULL"
You can remove this option from the menu by commenting it out.
Users will be able to spell check data just entered into a field as well as imported data or data assigned in other ways (such as with a DAL script).
To choose… Set Type equal to…
none 0
FAP units (1/2400 of an inch) 1
Points 2
Inches 3
Metric (centimeters) 4
Picas 5
1/8 inch increments 6
1/6 inch increments 7
161

Customizing the Interface
Setting Spell Check Options
You can use the SuggestDepth option in the Spell control group to control how the spell checker works. These options control how quickly and how completely the spell checker searches for errors.
< Spell >
SuggestDepth = 0
The default is zero (0). If your users notice the spell checker is not finding errors in commonly used words, try setting the spell checker at a different setting.
Anchoring the Check Spelling Window
You can anchor the Check Spelling window and not have it float, depending on the location of the text it highlights. To anchor the window, add this option to your FSIUSER.INI or FSISYS.INI file:
< Spell >
FixedDialogPos = Yes
The default is No.
Setting the Default Language
The base system uses US English as the default language for the spell checker. The spell checker supports these languages: Afrikaans, Canadian English, Czech, Danish, Dutch, Finnish, French, German, Greek, Italian, Norwegian, Polish, Portuguese, Brazilian Portuguese, Russian, Slovak, Spanish, Swedish, US English, UK English, and Welsh. It also supports hyphenation in these languages.
NOTE: The system also provides hyphenation support for Hungarian and Turkish.
To have the spell checker default to a different language add the MainDicts option to your FSISYS.INI or FSIUSER.INI file, as shown here:
< Spell >
MainDicts = ssceXX.tlx, ssceXX2.clx
You can choose from these languages:
To have the spell checker work Enter
more quickly, but find fewer items 0 (zero)
fairly quickly and fairly accurately 50
slowly, but very accurately 100
162
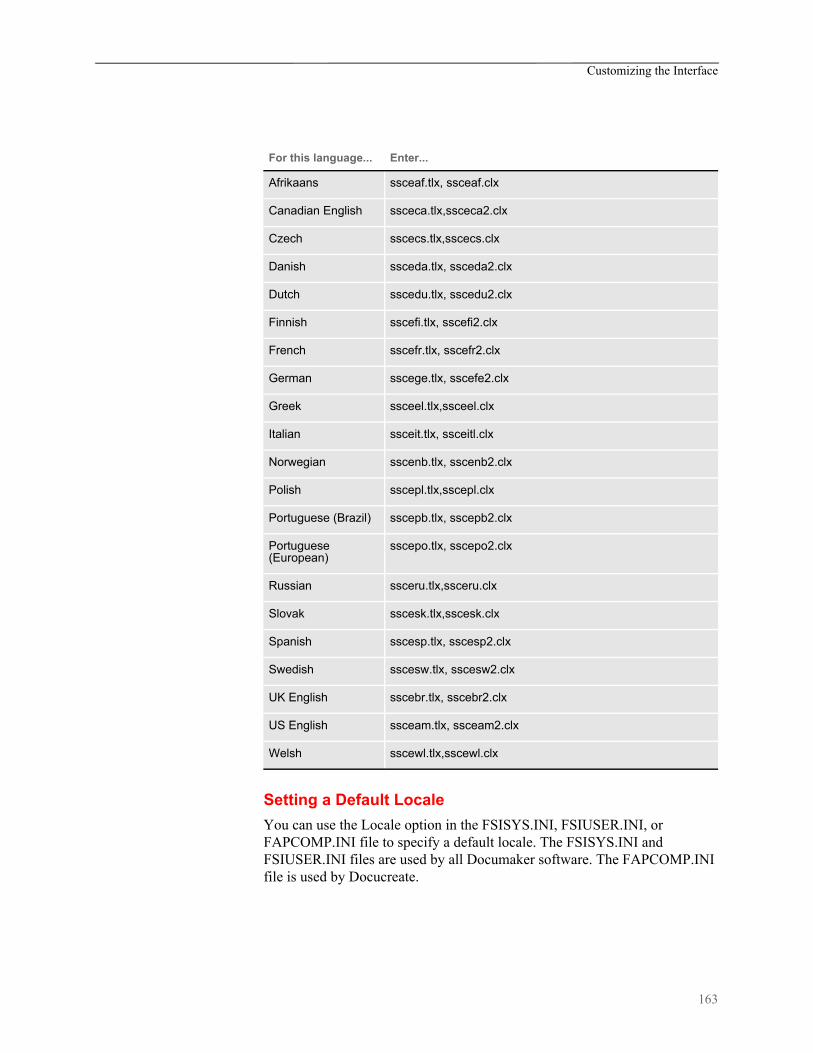
Customizing the Interface
Setting a Default Locale
You can use the Locale option in the FSISYS.INI, FSIUSER.INI, or FAPCOMP.INI file to specify a default locale. The FSISYS.INI and FSIUSER.INI files are used by all Documaker software. The FAPCOMP.INI file is used by Docucreate.
For this language... Enter...
Afrikaans ssceaf.tlx, ssceaf.clx
Canadian English ssceca.tlx,ssceca2.clx
Czech sscecs.tlx,sscecs.clx
Danish ssceda.tlx, ssceda2.clx
Dutch sscedu.tlx, sscedu2.clx
Finnish sscefi.tlx, sscefi2.clx
French sscefr.tlx, sscefr2.clx
German sscege.tlx, sscefe2.clx
Greek ssceel.tlx,ssceel.clx
Italian ssceit.tlx, ssceitl.clx
Norwegian sscenb.tlx, sscenb2.clx
Polish sscepl.tlx,sscepl.clx
Portuguese (Brazil) sscepb.tlx, sscepb2.clx
Portuguese (European)
sscepo.tlx, sscepo2.clx
Russian ssceru.tlx,ssceru.clx
Slovak sscesk.tlx,sscesk.clx
Spanish sscesp.tlx, sscesp2.clx
Swedish sscesw.tlx, sscesw2.clx
UK English sscebr.tlx, sscebr2.clx
US English ssceam.tlx, ssceam2.clx
Welsh sscewl.tlx,sscewl.clx
163
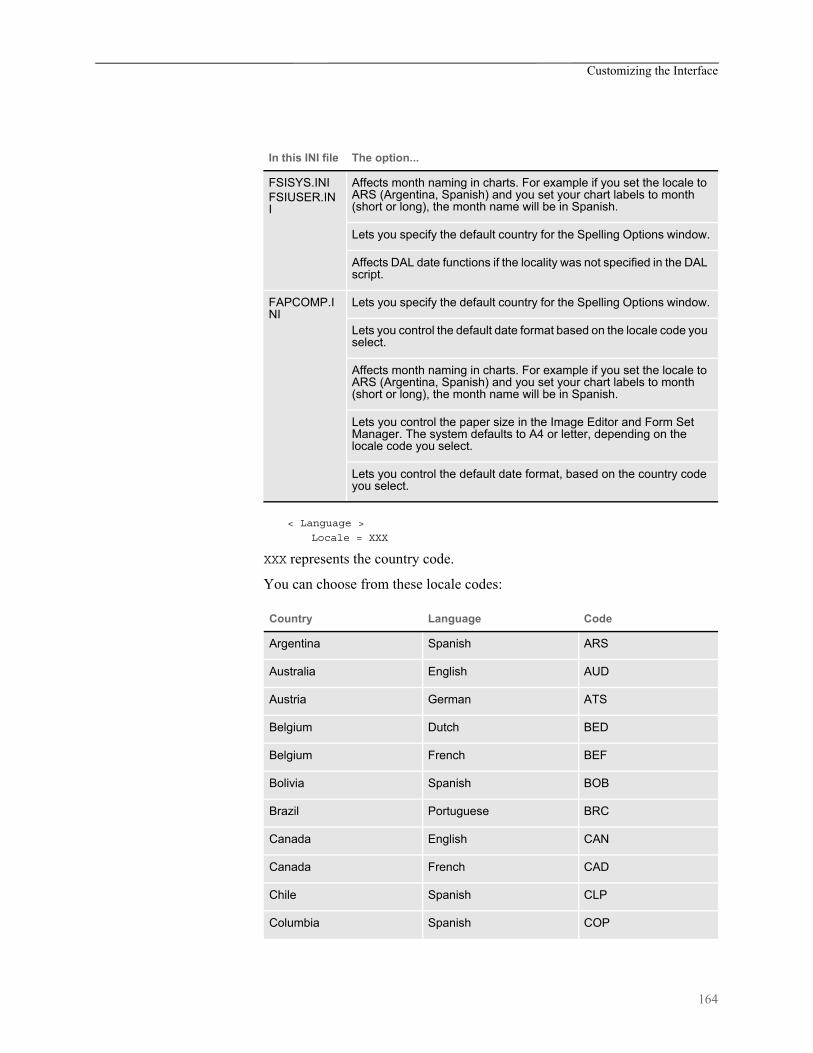
Customizing the Interface
< Language >
Locale = XXX
XXX represents the country code.
You can choose from these locale codes:
In this INI file The option...
FSISYS.INIFSIUSER.INI
Affects month naming in charts. For example if you set the locale to ARS (Argentina, Spanish) and you set your chart labels to month (short or long), the month name will be in Spanish.
Lets you specify the default country for the Spelling Options window.
Affects DAL date functions if the locality was not specified in the DAL script.
FAPCOMP.INI
Lets you specify the default country for the Spelling Options window.
Lets you control the default date format based on the locale code you select.
Affects month naming in charts. For example if you set the locale to ARS (Argentina, Spanish) and you set your chart labels to month (short or long), the month name will be in Spanish.
Lets you control the paper size in the Image Editor and Form Set Manager. The system defaults to A4 or letter, depending on the locale code you select.
Lets you control the default date format, based on the country code you select.
Country Language Code
Argentina Spanish ARS
Australia English AUD
Austria German ATS
Belgium Dutch BED
Belgium French BEF
Bolivia Spanish BOB
Brazil Portuguese BRC
Canada English CAN
Canada French CAD
Chile Spanish CLP
Columbia Spanish COP
164

Customizing the Interface
Costa Rica Spanish CRC
Denmark Danish DKK
Ecuador Spanish ECS
France French FLX
Finland Swedish FMK
Germany German DEM
Guatemala Spanish GTQ
Iceland Icelandic ISK
Indonesia Indonesian IDR
Italy Italian TL
Ireland English IEP
Liechtenstein German CHL
Luxembourg German LUX
Luxembourg French FRF
Mexico Spanish MXN
The Netherlands Dutch NLG
New Zealand English NZD
Norway Norwegian NOK
Panama Spanish PAB
Paraguay Spanish PYG
Peru Spanish PES
Portugal Portuguese PTE
South Africa Affrikaans ZAA
South Africa English ZAR
Spain Basque ESB
Spain Catalan ESC
Spain Spanish ESP
Sweden Swedish SEK
Country Language Code
165

Customizing the Interface
Removing Fields from the Retrieve Document Window
You can add the following options in the ArcRet control group to remove key fields from the Retrieve Document window. You can also turn off the display of the Run Date field.
< ARCRET >
; HideKey1 = Yes
HideKey2 = Yes
; HideKeyID = Yes
HideRunDate= Yes
In the example shown above, the Key2 field and the Run Date field are hidden. The semi-colons comment out the other options. If you omit these options, comment them out, or set them to No, the system displays the field. Here is an example of the result:
MAKING SURE REQUIRED FIELDS HAVE DATA
You can include the RACCheckRequiredFields function in your MEN.RES or WIPEDIT.RES file to have the system make sure required fields have data.
Switzerland German CHF
Switzerland French CHH
Switzerland Italian CHI
United Kingdom English GBP
United States English USD
Uruguay Spanish UYU
Venezuela Spanish VEB
Country Language Code
The options above tell the system to hide the Key2 (Line of Business) and Run Date fields, as shown here.
166

Customizing the Interface
This table describes what the RACCheckRequiredFields function does:
Setting up a requiredfields check with WIP
Edit
There is a RACLIB function that should be placed in the WIPEDIT.RES file. This function may send a response back to WIPCTL or it may display a message box, depending on whether it is executed from WIP Edit or AFEMAIN. It is set up like any MEN.RES function and must be identified by a command number not used by any other function in the WIPEDIT.RES file. The setup in the WIPEDIT.RES file must occur regardless of the way you start the required field check.
Here is an example line from the WIPEDIT.RES file:
MENUITEM "&CheckRequiredFields" 263 "RACW32->RACCheckRequiredFields" "Check Required"
You do not need to make changes to IDS.
There are two ways to start the required field check:
• From a menu
• From an ASP or JSP page
Starting from a menu To let users start a required field check from the menu add the following line to the WIPEDIT.RES file. The number 263 may vary but it should not be used for another function in the WIPEDIT.RES file. This line tells the system to include a Check Required Fields option on the menu that appears when you right click the mouse.
MENUITEM "&Check Required Fields" 263 "RACW32->RACCheckRequiredFields" "Check Required"
Starting from an ASPpage
Follow these steps to start a required field check from an ASP page.
1 Register the WIPCTL.DLL file.
NOTE: The WIPCTL program (WIPCTL.DLL) contains the WIP Edit plug-in which lets custom web applications send messages to WIP Edit to do things like zoom in, zoom out, advance to the next page or form, and so on. This component must be registered with regsvr32. See Using Web-Enabled Solutions for more information on the WIPCTL feature.
2 Set up the WIPEDIT.RES file to execute the required field check from the menu.
If... The function displays
The required fields have data All required fields have data.
One or more of the required fields is missing data
Data required for [name of field]. The system makes the first required field with missing data the current field.
167

Customizing the Interface
3 The web page must contain a script like the following. When this script executes, the required field check will occur. The variable rspmsg will contain either “All required fields have data” or an error indicating the field that needs data. The RACCheckRequiredFields function will be executed in this case as well but its response is returned to the script, not displayed in a message box.
< Script Language="VBScript" >
Function SendToWipedit
Dim rspmsg
set aspobj = CreateObject("Wipctl.WipEd.1")
aspobj.cmdWithMessage 263,rspmsg
set aspobj = Nothing
MsgBox(rspmsg)
End Function
</Script>
Automatically Re-Paginating Sections
Beginning with version 11.2, when a section changes size, Documaker Desktop automatically re-paginates pages that consist of multiple floating sections.
NOTE: This applies to both Documaker Desktop and the WIP Edit plug-in. Documaker Server waits until the end of its processing to handle pagination. Earlier versions of Documaker Desktop did not re-paginate a form when a page consisted of multiple sections and one of those sections changed size.
If a text area causes a section to grow or shrink — due to embedded fields changing or because it was a multi-line text field — the form that contains the section automatically re-paginates.
If you designed the form using Documaker Studio, the positioning information you established is reapplied to the form each time changes in a text area cause the dimensions of a section to change. You can, however, use the AutoPagination option to disable automatic re-pagination:
< Control >
AutoPagination = Yes
Keep in mind...
• The system honors positioning information designed into the form via Documaker Studio. Positioning information is stored via SetOrigin rules.
Option Description
AutoPagination Enter No if you do not want the system to automatically re-paginate when section dimensions change. The default is Yes.
168

Customizing the Interface
• If a form consists of multiple sections on a page, but those sections comprise more space than defined for the page size, the system automatically paginates that page and moves the sections that did not fit to a new page.
• If a section grows to push another section such that its positioning rule causes it to encroach on a defined footer or the bottom of the page, that section is moved to the next page and the entire form will be have the SetOrigin rules reapplied.
• When designing a form, avoid having a footer section that uses a relative position. This ultimately means there can only be one section on the page that is not a header or footer. Footers, typically should be placed using a rule that makes sure it has a relationship to the bottom of the page.
• When sections shrink (due to text area shrinking) a section from the next page may be brought back to the current page. In other words, sections can not only flow to the next page, but they can come back when space allows.
• Remember that the positioning (SetOrigin) defined in the form is applied. So although there may appear to be a space large enough to hold a section, you also have to account for any additional adjustments applied by the SetOrigin rules.
For example, suppose you have a section that is 2 inches in height, but the SetOrigin rule for that section specifies a relative placement 1/2 inch from the previous section. In this case, 2 1/2 inches of space is required for that section to fit on the page. If there is less than 2 1/2 inches remaining before encountering a footer section or the bottom of the page layout, then that section will move to the next page.
• Sections can only flow to and from pages that were created during pagination. If a page was specifically designed into the form via Documaker Studio, then no sections will move onto that page from a prior page. Sections can only move to or from pages that were created by overflowing their defined page.
Using the Complete and Exit Option
You can add an option to your MEN.RES file which lets you complete the current form set and then exit the system. This option combines the Complete and Exit menu options.
If there is an error on the form set, the system will not complete the form set and exit the system until you correct the error.
NOTE: This option is typically used with iDocumaker or iPPS implementations but it can also be used if you have created specialized applications that launch entry via the RACLIB interface. Documaker Desktop and PPS users can also use this option if users typically exit the application after completing a form set.
To add the Complete and Exit option to your system, you must first add the following line to the MEN.RES file:
MENUITEM "Complete and &Exit" 106 "AFEW32->AFEComplShutDown" "Complete the form set and exit the system"
You can add this line, or a line similar to it, under any menu group you like. You can also change the text of the option.
169

Customizing the Interface
NOTE: In this example, 106 is used as the ID for the menu function. You can assign any ID between 100 and 200, as long as it is not used by another menu function.
The ampersand (&) indicates that the next character is the accelerator for this menu option. You can omit the ampersand if you like.
For instance, you could place this option on the Formset menu, as shown here:
POPUP "Form&set" 170 "Formset"
BEGIN
MENUITEM "&Close" 1069 "Close document" "NULL"
MENUITEM "Complete and &Exit" 106 "AFEW32->AFEComplShutDown" "Complete the form set and exit the system"
SEPARATOR
MENUITEM "Select &Recipients..." 187 "AFEW32->AFESelectRecipients" "View forms by recipient"
SEPARATOR
MENUITEM "&Assign Document" 150 "AFEW32->AFEAssignDocument" "Assign Document"
SEPARATOR
MENUITEM "&Duplicate Form" 104 "AFEW32->AFEDuplicateForm" "Duplicate current form"
END
To see this menu:
ROTATING GRAPHICS
When dynamically adding graphics, like multi-page TIFF files of scanned sections, occasionally you may incorrectly insert a section and that page appears upside down. You can add a menu option which lets the user rotate the graphic to the correct position from Documaker Desktop or the WIP Edit plug-in.
To rotate dynamically-added graphics, there are two menu functions (with optional toolbar buttons) you can activate. One is a Rotate (90 degrees) and the other is Flip (180 degrees). Here is an example from the MEN.RES file:
MENUITEM "Rotate dynamic graphic" 1090 "NULL" "NULL"
MENUITEM "Flip dynamic graphic" 1091 "NULL" "NULL"
TOOL 61 1090 DISABLED BUTTON
TOOL 46 1091 DISABLED BUTTON
170

Customizing the Interface
You cannot change the menu and tool IDs. 1090 is the ID for 90 degree rotation and 1091 is the ID for flipping the graphic 180 degrees (upside down). You can include one or both options if you like. The toolbar options are optional.
Each time you click or choose Rotate, the graphic is rotated 90 degrees. So clicking Rotate twice produces the same result as clicking Flip once. The system rotates the graphic counter-clockwise.
Since these are defined via the MEN.RES file, you control where you want the options to appear on the menu and what text appears. The tool tip information is, however, built into the system and cannot be customized via the MEN.RES file.
This only applies to dynamically added graphics that are also embedded into the transaction. This means that normal graphics (LOG files) in your FAP files are not rotated when you use these new options.
If you choose one of these option on a page where no dynamic graphics occur, you will see the following message:
No dynamic bitmap was found on this page.
Keep in mind these limitations:
• Because of the way that page orientations are determined, the ability to change the page to landscape on rotation only works if this is the first section on the page. In cases where you might have other sections, including dummy sections, inserted before the one that contains the graphic, the page may not rotate with the graphic.
• When the first page defines other FAP files before the section that contains the graphic, rotating this one section will not cause the entire page to be changed to landscape.
This is really only an issue if you plan to do a 90 degree rotation and expect the orientation of the page to change as well. The Flip option (180 degrees) does not require any page changes.
• You can overlay full size sections on top of one another using SetOrigin. Any section can contain text or other objects that you might not want to print in a landscape fashion, even if the graphic does rotate.
• Not all the FAP files on a given page have to print for each recipient. The first printable section on the page, for a given recipient, determines the orientation of the page and its size. This means the view of the page may differ per recipient — not only in portrait or legal orientation, but also the page sizes can change for the same page with different recipients. For instance, the same page when printed for one recipient might be Letter+Portrait, but print as Legal+Landscape for a different recipient.
NOTE: It is not possible for the system to know whether the page will display or print successfully. The best plan would be to make sure you create your form containing the graphic on a single FAP per page.
171
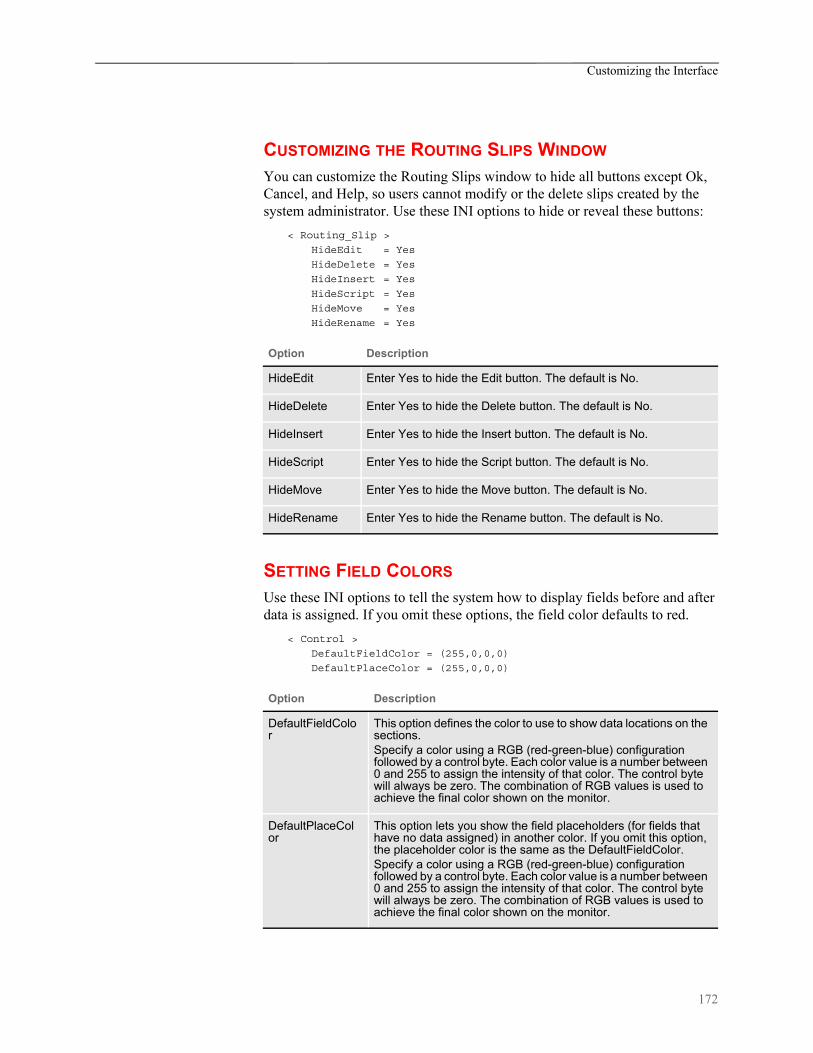
Customizing the Interface
CUSTOMIZING THE ROUTING SLIPS WINDOW
You can customize the Routing Slips window to hide all buttons except Ok, Cancel, and Help, so users cannot modify or the delete slips created by the system administrator. Use these INI options to hide or reveal these buttons:
< Routing_Slip >
HideEdit = Yes
HideDelete = Yes
HideInsert = Yes
HideScript = Yes
HideMove = Yes
HideRename = Yes
SETTING FIELD COLORS
Use these INI options to tell the system how to display fields before and after data is assigned. If you omit these options, the field color defaults to red.
< Control >
DefaultFieldColor = (255,0,0,0)
DefaultPlaceColor = (255,0,0,0)
Option Description
HideEdit Enter Yes to hide the Edit button. The default is No.
HideDelete Enter Yes to hide the Delete button. The default is No.
HideInsert Enter Yes to hide the Insert button. The default is No.
HideScript Enter Yes to hide the Script button. The default is No.
HideMove Enter Yes to hide the Move button. The default is No.
HideRename Enter Yes to hide the Rename button. The default is No.
Option Description
DefaultFieldColor
This option defines the color to use to show data locations on the sections. Specify a color using a RGB (red-green-blue) configuration followed by a control byte. Each color value is a number between 0 and 255 to assign the intensity of that color. The control byte will always be zero. The combination of RGB values is used to achieve the final color shown on the monitor.
DefaultPlaceColor
This option lets you show the field placeholders (for fields that have no data assigned) in another color. If you omit this option, the placeholder color is the same as the DefaultFieldColor. Specify a color using a RGB (red-green-blue) configuration followed by a control byte. Each color value is a number between 0 and 255 to assign the intensity of that color. The control byte will always be zero. The combination of RGB values is used to achieve the final color shown on the monitor.
172

Customizing the Interface
NOTE: If you do not enter the defined RGB structure and instead enter a long numeric value, the system assumes your entry represents a single (resolved) color value. For instance DefaultFieldColor = 16711680 is the resolved value for red.
Also note that these INI options only affect those fields using the default field color. If the color is overridden at the field or section level (for all fields on the section), these values will not apply.
173

Using Workstations as Print Servers
USINGWORKSTATIONS
AS PRINTSERVERS
You can configure a workstation to function as a print server. When you do this, the user can continue entering data while the system prints forms. The print server controls the flow of printer data and monitors the available drive space for the spool file. Based on a value you set, the print server will not send additional print data if it begins to run out of space. The print server performs a similar function for archive operations — monitoring available drive space based on a value you set.
The print server can run on one workstation for all users or on each workstation. The only limitation for having one print server for several workstations is that all workstations must have the same network drive mappings or all resource libraries must be located on the same drive. The print server must have access to the same WIP data and resource libraries as do the workstations.
SETTING UP INI OPTIONS
To set up a print server, you must add the following control group and options (sample 32-bit WIndows values are shown):
< BatchPrint >
Program = PRSRVW32.EXE
Path = K:\FAPDEMO\BATCH\
AutoStart = No
SpoolDrive = P:
SpaceNeeded = 10000000
ArchiveDrive = R: or
ArchiveSpaceNeeded = 5000000
Option Description
Program The name of the print server program. Enter PRSRVW32.EXE for 32-bit Windows environments.
Path The full path to the batch print queue. All workstations using the print server must point to the same directory.
AutoStart Tells 32-bit Windows environments whether or not to start the print server in the background.
SpoolDrive The drive where the network spooler is located.
SpaceNeeded Defines how much space (in bytes) must be free on the network drive on which the spooler is located. You define the drive using the SpoolDrive option.
ArchiveDrive The drive where the archive files are located.
ArchiveSpaceNeeded
Defines how much space (in bytes) must be free on the network drive on which the archive files are located. You define the drive using the ArchiveDrive option.
174
Using Workstations as Print Servers
Setting Up INI Options for Multiple Environments
If you have multiple environments, such as Windows XP and Windows 2000, you can set up substitutions for the Program option. This option defines the print server program.
NOTE: You must make sure the appropriate print server program is located on each workstation.
Instead of having a separate Program option setting for each platform, you can enter PRSRVW 32.EXE as the setting for the Program option in the BatchPrint control group and include the following control group and option to the same INI file:
< Windows32Subs >
PRSRVW32.EXE = PRSRVW32.EXE
175

Setting Up Email Support
SETTING UPEMAIL SUPPORT
Documaker Desktop includes an application independent interface to electronic-mail systems. Currently, Documaker Desktop supports Microsoft MAPI (MSMail, WFW Mail, MS Exchange) through DLLs you can install.
Only core level functions are addressed in each supported email system. This lets Documaker Desktop support a large number of email products without requiring you to have a specific implementation or version of the email software. Documaker Desktop uses an email system’s transport abilities, it does not attempt to be an alternate email application interface.
Most installed email products require no changes to enable email services in Documaker Desktop. This means you can install Documaker Desktop in environments where a supported email product has already been established.
As implemented, Documaker Desktop does not maintain a continuous open session with the email system. Instead, specific user-initiated events occur which tell Documaker Desktop to open an email session, perform a task, and then close the session.
USING MICROSOFT MAPIThe Microsoft Messaging Application Interface (MAPI) is only available for Microsoft Windows environments. This interface supports Microsoft Mail, Windows for Workgroups Mail, Outlook, and Microsoft Exchange.
Documaker Desktop expects to load the MAPI.DLL (or MAPI32.DLL under Windows) and only requires a subset of the MAPI API specification called Simple MAPI.
Documaker Desktop automatically substitutes the correct module name of a DLL if you use a basic name. For MAPI support, set the Module option as shown here to support all environments:
Module=MSMW32
MSMWIN.DLL is the module name of the DLL for 16-bit email systems. MSMW32.DLL is the module name of the DLL for 32-bit email systems (MS Exchange).
MSMMail is the MailFunc function that serves as the entry point to this DLL.
Debugging You can use the following INI options for debugging. These options turn on debug log tracing for Microsoft Mail (MSM_Debug = Yes) and the Email Print Driver (EPT_Debug = Yes):
< Debug_Switches >
MSM_Debug = Yes
EPT_Debug = Yes
Use the EPT_Debug option to generate addition trace information about errors within that driver. This includes outputting the names of the printer and email drivers that are referenced.
176

Setting Up Email Support
If you need error trace information from the referenced email driver, activate the MSM_Debug option for the Microsoft Mail (Outlook or MAPI) interface driver.
SETTING UP DOCUMAKER DESKTOP
Enabling email support within Documaker Desktop is easy. All you have to do is set up two control groups and options in the FSISYS.INI or FSIUSER.INI files that specify which email system is installed and a few other access parameters.
The Mail control group identifies the specific control group in the INI file which contains the email system requirements. This control group should appear as shown here:
< Mail >
MailType = xxx
SendForms =
ReceiveForms =
The MailType:xxx control group contains the system requirements necessary to load and use the email system. In addition, you can specify default user login information in this control group. This control group appears as shown below:
< MailType:xxx >
Module =
MailFunc =
Name =
UserID =
Password =
From =
AltFrom =
DataPath =
ShowDataPath =
HiddenMsgSupport=
Option Description
MailType xxx identifies a specific INI control group appended with the MailType option, such as MailType:SMTP for SMTP.
SendForms Enter Yes if you want to send FAP files along with the WIP policies. The default is No which means that you will receive the forms into WIP but no FAP files.
ReceiveForms
Enter Yes if you want the recipient to receive the FAP files into the forms directory of the MRL.
177
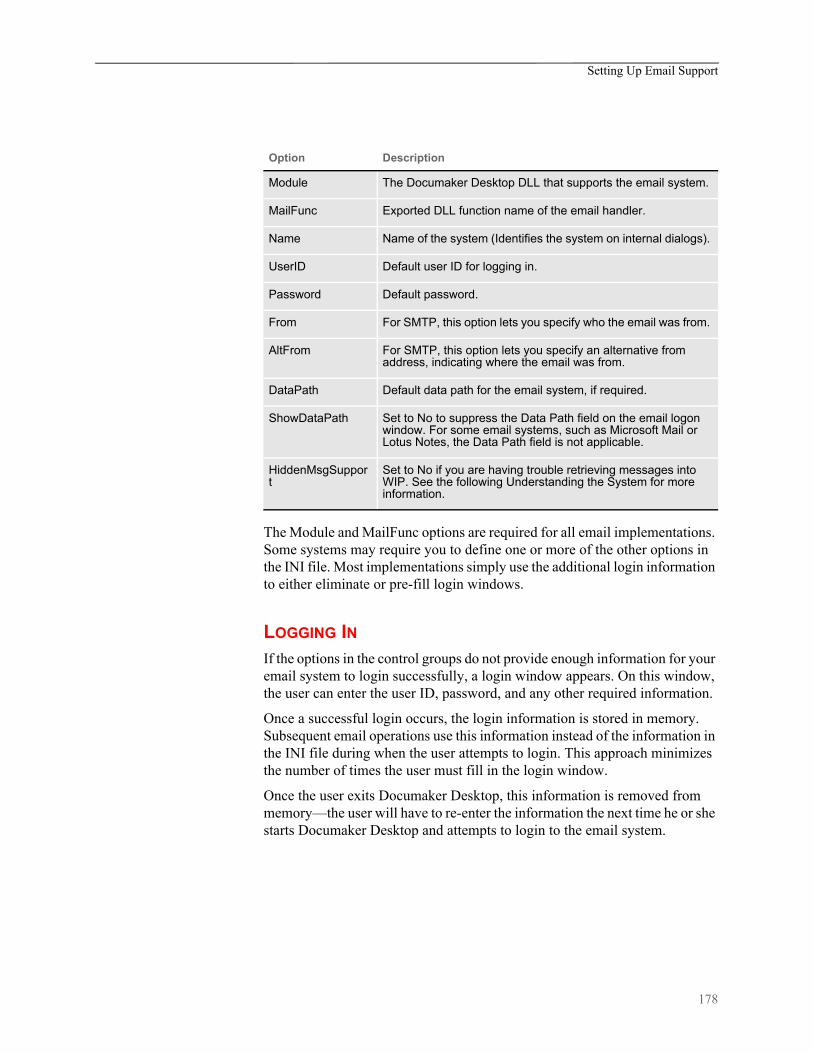
Setting Up Email Support
The Module and MailFunc options are required for all email implementations. Some systems may require you to define one or more of the other options in the INI file. Most implementations simply use the additional login information to either eliminate or pre-fill login windows.
LOGGING INIf the options in the control groups do not provide enough information for your email system to login successfully, a login window appears. On this window, the user can enter the user ID, password, and any other required information.
Once a successful login occurs, the login information is stored in memory. Subsequent email operations use this information instead of the information in the INI file during when the user attempts to login. This approach minimizes the number of times the user must fill in the login window.
Once the user exits Documaker Desktop, this information is removed from memory—the user will have to re-enter the information the next time he or she starts Documaker Desktop and attempts to login to the email system.
Option Description
Module The Documaker Desktop DLL that supports the email system.
MailFunc Exported DLL function name of the email handler.
Name Name of the system (Identifies the system on internal dialogs).
UserID Default user ID for logging in.
Password Default password.
From For SMTP, this option lets you specify who the email was from.
AltFrom For SMTP, this option lets you specify an alternative from address, indicating where the email was from.
DataPath Default data path for the email system, if required.
ShowDataPath Set to No to suppress the Data Path field on the email logon window. For some email systems, such as Microsoft Mail or Lotus Notes, the Data Path field is not applicable.
HiddenMsgSupport
Set to No if you are having trouble retrieving messages into WIP. See the following Understanding the System for more information.
178
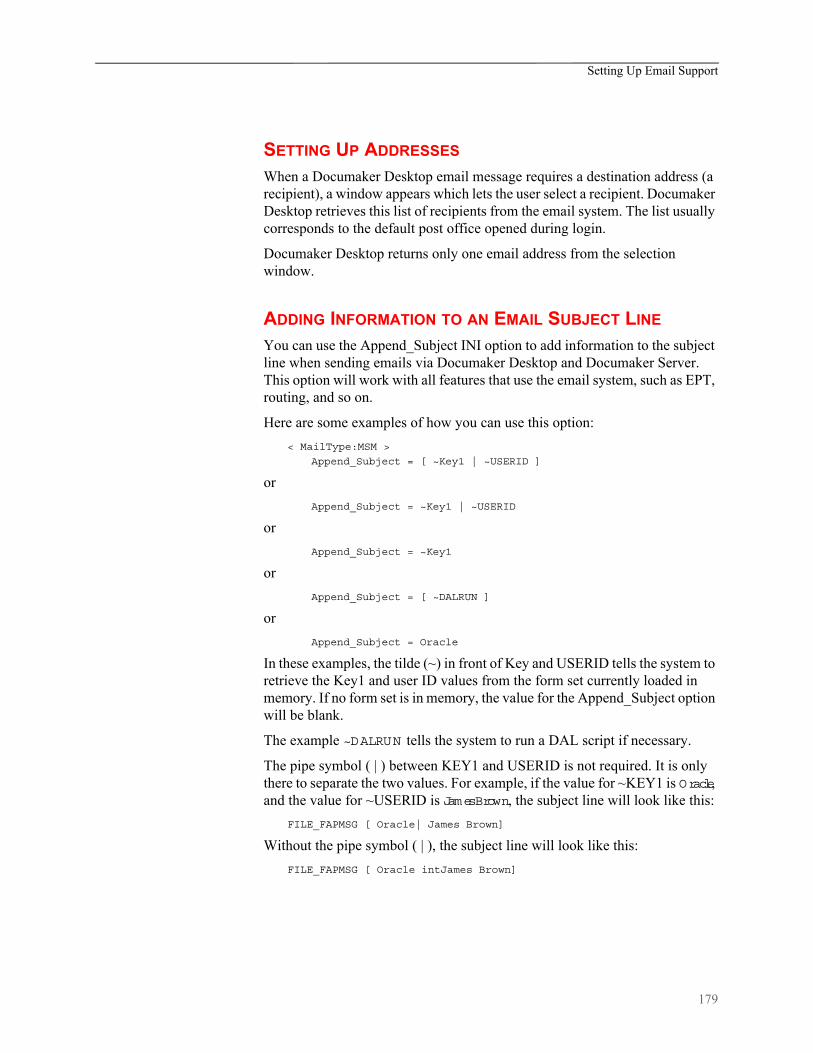
Setting Up Email Support
SETTING UP ADDRESSES
When a Documaker Desktop email message requires a destination address (a recipient), a window appears which lets the user select a recipient. Documaker Desktop retrieves this list of recipients from the email system. The list usually corresponds to the default post office opened during login.
Documaker Desktop returns only one email address from the selection window.
ADDING INFORMATION TO AN EMAIL SUBJECT LINE
You can use the Append_Subject INI option to add information to the subject line when sending emails via Documaker Desktop and Documaker Server. This option will work with all features that use the email system, such as EPT, routing, and so on.
Here are some examples of how you can use this option:
< MailType:MSM >
Append_Subject = [ ~Key1 | ~USERID ]
or
Append_Subject = ~Key1 | ~USERID
or
Append_Subject = ~Key1
or
Append_Subject = [ ~DALRUN ]
or
Append_Subject = Oracle
In these examples, the tilde (~) in front of Key and USERID tells the system to retrieve the Key1 and user ID values from the form set currently loaded in memory. If no form set is in memory, the value for the Append_Subject option will be blank.
The example ~DALRUN tells the system to run a DAL script if necessary.
The pipe symbol ( | ) between KEY1 and USERID is not required. It is only there to separate the two values. For example, if the value for ~KEY1 is Oracle, and the value for ~USERID is James Brown, the subject line will look like this:
FILE_FAPMSG [ Oracle| James Brown]
Without the pipe symbol ( | ), the subject line will look like this:
FILE_FAPMSG [ Oracle intJames Brown]
179

Setting Up Email Support
CUSTOMIZING THE CONFIRMATION MESSAGE
When using Documaker Desktop to send a WIP document from one system user to another, you can specify what should appear in the confirmation message.
For example, to specify Account Number:
Package CC'd to Tyler, Susan.
Account Number is 33333
Set the KeyIDTitle option in the DlgTitles control group:
< DlgTitles >
KeyIDTitle = Account Number
The default is KeyID.
180
Inserting State Stamps and Signatures
INSERTINGSTATE STAMPS
ANDSIGNATURES
Documaker software lets you automatically insert state stamps and signature sections via Documaker Desktop and PPS.
For instance, there is an insurance industry requirement to apply a state stamp on certain forms. The stamp typically declares the document is valid in the state that has jurisdiction over the policy. Each state has its own stamp.
And, depending upon which agency issued the policy, different signatures may be required to make the policy valid within that insurance organization or state of issuance.
Configuring your system To handle the automatic insertion of a state stamp or a signature, create sections (FAP files) that contain the state stamp or signature or other information you want inserted and then add the following option in your INI file:
< AFEProcedures >
AutoInsert = LSSW32->LSSAutoInserts
NOTE: You must make sure the dimensions of the FAP file that contain the information you want to insert fit appropriately within the target section.
In the target section — such as a DEC page — define a field that indicates where you want the system to place the inserted section. This field must have one of these root names:
LSS_LOGO
LSS_STAMP
LSS_SIGNATURE
NOTE: A root name means that the field name must start with these letters. The actual field name might be something like:
LSS_LOGO_LOGONAMELSS_STAMP_TEXASLSS_SIGNATURE_JOHNDOE
Like page numbering fields, the system only requires that the field name starts with the required root name to determine it will be used. The remainder of the name is for your identification purposes.
How it works The system makes no assumptions on what the sections contain. When it locates a field with one of the pre-defined root names, it builds a corresponding FAP name from WIP index values defined for this document, as shown in this table:
181

Inserting State Stamps and Signatures
In each of the definitions, the curly brace enclosures ( {} ) identify the WIP column that will substitute into the name. Column names preceded by a percent sign (%) indicate the column is optional.
If a WIP column is required and the data in that column is missing or spaces, the system removes the spaces. In this case, the character preceding the insertion point is examined and if found to be a space, period, hyphen, or underscore, it is also removed from the name. You cannot, therefore, assume that just because a column is required empty data will not be accepted.
For instance, suppose the definition is LSS_STAMP_{JURISDICTN}. The column JURISDICTN is not declared as optional, therefore data from the matching WIP column is inserted into the resulting name. If that column is blank, the resulting name generated will be LSS_STAMP because the preceding underscore character will be removed when the data is blank.
When there are optional columns, the system first tries the entire line, then removes one optional column at a time starting from the right-hand side. It will continue to try the name until all optional columns are removed. Here is an example:
LOCID = ABC
SUBLOCID = XYZ
JURISDICTN = GA
KEY1 = ANYSTATE
For LSS_STAMP, the only name the system would generate is:
LSS_STAMP_GA
If there was no FAP file with that name, nothing would be inserted.
For LSS_LOGO, the system would try the following names in sequence and select the first match:
LSS_LOGO_ABC_ANYSTATE_GA_XYZ
LSS_LOGO_ABC_ANYSTATE_GA
LSS_LOGO_ABC_ANYSTATE
If there was no FAP file with that name, nothing would be inserted.
For LSS_SIGNATURE, the system would try the following names in sequence and select the first match:
LSS_SIGNATURE_ANYSTATE_ABC_GA_XYZ
LSS_SIGNATURE_ANYSTATE_ABC_GA
LSS_SIGNATURE_ANYSTATE_ABC
This field Builds a FAP name comprised of this information
LSS_STAMP LSS_STAMP_{JURISDICTN}
LSS_LOGO LSS_LOGO_{LOCID}_{%KEY1}_{%JURISDICTN}_{%SUBLOCID}
LSS_SIGNATURE LSS_SIGNATURE_{KEY1}_{%LOCID}_{%JURISDICTN}_{%SUBLOCID}
182

Inserting State Stamps and Signatures
If there was no FAP file with that name, nothing would be inserted.
NOTE: The system removes spaces, periods, underscores, or hyphens that precede an optional item.
You can override the way the system substitutes for the these fields using these INI options:
< LSS_INSERTS >
LSS_STAMP = LSS_STAMP_{JURISDICTN}.FAP
LSS_LOGO = LSS_LOGO_{LOCID}_{%KEY1}_{%JURISDICTN}_{%SUBLOCID}.FAP
LSS_SIGNATURE = LSS_SIGNATURE_{KEY1}_{%LOCID}_{%JURISDICTN}_{%SUBLOCID}.FAP
You can include any valid WIP index column name within curly braces and you can include as many fields as necessary.
183

Chapter 4
Importing and Exporting Information
The system's data import and export features make data entry quicker, more efficient, and more accurate. During an import, the system automatically fills specific variable fields with data from another application.
These features reduce the need to enter data multiple times and help avoid data entry mistakes. Likewise, you can export data from the system to other applications. The export process provides the same benefits as the import process. This chapter includes information on…
• Importing and Exporting Files on page 185
• Using the Field-only Export Option on page 199
• Setting Up Multiple Import Sessions on page 205
• Batch Importing from a File on page 206
• Creating a Standard Import File on page 208
• Creating a Selective Import File on page 214
• Importing Information Directly into Archive on page 217
• Importing Global Data from Archive on page 218
• Exporting when Manually Archiving on page 220
• Importing Data with Forms and Sections on page 219
• Exporting when Manually Archiving on page 220
• Creating Export Files on page 222
• Importing and Exporting WIP, NAFile, and POLFile Information on page 226
• Exporting Files Created by AutoImport, AutoPrint, or AutoArchive on page 234
• Working with XML Files on page 235
• Multiple User and Networking Issues on page 247
• Bypassing Triggers when Importing Forms and Sections on page 248
• Adding Form Line and Form Description Line Information on page 249
184

Importing and Exporting Files
IMPORTING ANDEXPORTING
FILES
When users export data, they send a file to a specified directory so other applications can use that same data. The system’s import and export functions work with the manual data entry features. You can import and apply common data, such as a name and address, then manually add the information specific to the form set. By importing common data and manually entering the remaining data, you can save time and reduce data entry errors.
The export function lets you extract data from the system, and then use the data in another application.
The system includes two import functions. You can use the Standard Import to import files which contain data for specific form sets. And, you can use a Selective Import to select import files that are specific to form set transaction types and user access levels.
NOTE: When you import multi-page sections, the system includes after the field name a pipe symbol ( | ) with an M and the page number. Here is an example:
\NA=qvrfld|M2\
Standard import A standard import file contains data for a specific form set. The import file contains a header record which the system uses to match the data with the appropriate form set. When you select a Standard Import function, the system displays a window which contains a list of import files. You must know what data the import files contain, and what type of form set transaction the data relates to, to choose the proper import file.
Other
Documaker
importexport
Data
185

Importing and Exporting Files
Selective import A selective import function contains a driver file and import files. The driver file filters the import files based on the user's form set selections. The driver file recognizes the current user and the selected transaction type, and displays only the import files which correspond to that user ID and form set transaction. The driver file can include a brief description of each import file, which helps the user select the appropriate file.
Export file An export file contains data from the system. You can apply a generic format to this data so other applications can read the exported data.
SETTING UP THE INI FILES
You must perform these tasks to enable and configure the import and export functions.
• Modify the FSISYS.INI file
• Modify the FSIUSER.INI file
This chapter focuses on setting up your system so you can import and export information and outlines the settings your INI files must contain. For more information about modifying INI file settings, see Configuring INI Files on page
41.
Each resource library contains two INI files which you must configure to use the import and export features. You enable or disable import and export options and select the import and export file formats in the FSISYS.INI file. In the FSIUSER.INI file, you specify the directory where the system stores the files.
NOTE: You must configure the INI files for (and in) each resource library for which you create import and export files.
Setting Up the FSISYS.INI File
When you set up your resource libraries, you may have several import files. If this is the case, your users can select from a list of files to import.
You enable or disable import and export functionality, and define the format of import and export files in the ImportFormats and ExportFormats control groups in the FSISYS.INI file. These control groups contain options which define import and export formats and function calls. The control groups contain option lines for specific import and export formats. Each option line includes these semicolon delimited parameters. Here is an example:
01=;TD;Standard Import;TRNW32->TRNImport;
02=;TD;Selective Import;TRNW32->TRNSelImport;
Syntax ;_NOT_USED;_DESCRIPTION;_DLL NAME->FUNCTION;
186
Importing and Exporting Files
If either the ImportFormats or the ExportFormats control group is missing from the FSISYS.INI file, or if a group contains no options, the import or export feature is disabled.
NOTE: For more information about INI files, see Configuring INI Files on page 41.
CONFIGURING IMPORT FORMAT OPTIONS
Configuring import format options lets you enable and modify specific import formats. The SAMPCO workspace which is available for download from Oracle Technology Network includes a default import file format. You can modify the default formats to customize the import format selections displayed for the users. You can also modify the numeric value to display a format in a different order.
Setting Up Import Formats
Follow these steps to set up an import format:
1 Open the FSISYS.INI file in the resource library for which you want to use import files. You can use any text editor to open this file.
2 Locate the ImportFormats control group. Most text editors have a find or search function you can use to quickly find this group heading.
3 Add or delete the following lines, depending on the import format you want to use:
Parameter Description
01 Any two-character numeric value for sorting purposes
NOT USED This field is not used by the system. You can use this field for a code for the file format. If not used, place a semicolon to mark the field.
DESCRIPTION The import format description which appears in the import window.
DLL-> FUNCTION
The Dynamic Link Library (DLL) and function to call when a user selects an import file. Do not modify this parameter.
For this import format Enter...
Standard 01=;TD;Standard Im port;TRNW 32->TRNIm port;
Selective 02=;SI;Selective Im port;TRNW 32->TRNSelIm port;
187
Importing and Exporting Files
Modifying Import Format Settings
Follow these steps to change import format settings:
1 Open the FSISYS.INI file in the resource library for which you want to use import files. You can use any text editor to open this file.
2 Locate the ImportFormats control group. Most text editors have a find or search function you can use to quickly find this group heading.
3 Select the format option you want to modify.
4 Change only the numeric and the description parameters as desired, using the table in the previous topic as a guideline. The format description appears in the Import window when you select the import option.
CONFIGURING EXPORT FORMAT OPTIONS
Configuring export format options lets you enable and modify specific export formats. You can create export files that are compatible with the import feature or using an older method with or without headers.
The standard export format is compatible with the import format. This format contains all of the key information used to create the form set, as well as, field data grouped by the form and section on which they occurred.
The older export methods are supported for legacy systems. If headers are included, the headers indicate the specific form set where the exported data originated. This format does not include any form information and omits much of the form set definition information. If you enable export files with or without headers, you should indicate this fact in the format description.
Setting Up Export Formats
Follow these steps to set up export formats:
1 Open the FSISYS.INI file in the resource library for which you want to use export files. You can use any text editor to open this file.
2 Locate the ExportFormats control group. Most text editors have a find or search function you can use to quickly find this group heading. Then add or delete the following lines to indicate the export formats you want to use:
For this export format Enter...
Standard export format 01=;V2;Export Version 2;TRNW 32->TRNExportV2;
Old method, without headers
02=;NH ;Export no H eader;TRNW 32->TRNExportNoNA;
Old method, with headers
03=;TD ;Standard Export;TRNW 32->TRNExport;
188

Importing and Exporting Files
Modifying Export Format Settings
Follow these steps to change export format settings:
1 Open the FSISYS.INI file in the resource library for which you want to use export files. You can use any text editor to open this file.
2 Locate the ExportFormats control group. Most text editors have a find or search function you can use to quickly find this group heading.
3 Select the format option you want to modify.
4 Change only the numeric value and the description, using the following table as a guide. The format description appears in the Export window when you select the export option.
SETTING UP THE FSIUSER.INI FILE
Since both standard and selective imports use the same import files, you can store these files in the same directory. You specify the directory paths in the FSIUSER.INI file.
Configuring Import Options
There are several options you can use to configure the import feature so it works the way you need it to work. Simply omit any option you do not want to use. Here’s how to find the section of the INI file which contains import options:
1 Open the FSIUSER.INI file in the resource library for which you want to use import files. You can use any text editor to open this file.
2 Locate the ImpFile_cd control group. Most text editors have a find or search function you can use to quickly find this group heading.
If not found, you will need to add this group to your INI file. Simply type in the text, exactly as shown above, and be sure to include brackets (< ImpFile_cd >).
The import options follow the group heading. Usually, the order in which the options appear does not matter. In some cases, however, INI options are dependent on other INI options. These dependencies are discussed in the description of each option.
Parameter Description
01 Any two-character numeric value for sorting purposes
DESCRIPTION The description of the import format which appears in the import window.
189
Importing and Exporting Files
Setting Up the Default Import File Name< ImpFile_cd >
File = file name
Substitute a valid file name where indicated. There is no default for this option.
The system uses the file name you enter as the default in the File window the user sees when selecting the import file.
Setting Up the Default Import Directory< ImpFile_cd >
Path = MSTRRES\(resource library name)
Substitute a valid drive and directory path where indicated. There is no default for this option.
Specifying the import directory lets you map where your import files are located. If you omit this option, the system looks for your import files in the working directory specified during installation.
The system uses the path you enter here to determine the default directory displayed in the File window. If you use the File option and the file name specified there also includes a path, that path overrides one entered here.
Setting Up the Default Import File Extension< ImpFile_cd >
Ext = .DAT
Substitute a valid file extension where indicated. Be sure to include the period. The default is .DAT.
On the File window, the system will use this default extension to fill the selection list with available files.
If you use the File option and the file name you entered there includes an extension, that extension overrides one entered here.
Setting Up the Driver File for Selective Import< ImpFile_CD >
SelectionFile = driver file name
Substitute a file name where indicated. This file name indicates the driver file you want to use for selective imports. There is no default for this option.
If you enter a valid driver file name here, the system will not display the File window. If you omit this option or if the file name you enter is invalid, the system will display the File window so the user can select a driver file to import.
190
Importing and Exporting Files
Preventing Users from Changing Imported Data< ImpFile_CD >
ProtectFlds = Yes/No
Substitute Yes or No where indicated. The default is Yes, which means the contents of imported fields cannot be changed from within the system.
This option defaults to Yes because import data typically comes from another application. If the data is incorrect, most users prefer to correct the data in the original application and re-import the data into the system.
If you are using the import file to provide default data, and you do not mind if users change the imported data, set this option to No.
NOTE: Keep in mind that normally the system only lets users change a global field the first time the field is accessed. Your system may function differently if it has been customized.
Ignoring Invalid Groups in Import Headers< ImpFile_CD >
IgnoreInvalidGroup = Yes/No
Substitute Yes or No where indicated. The default is No. All Key1 and Key2 group names must correspond to those specified in the FORM.DAT file.
If you turn this option on, which it is not recommended, the system attempts to import the data into the current form set. Since the system does not check the form group information, there is no way to make sure the data in the import file is valid for the current form set. Any information in the import file which does not correspond with fields in the form set simply disappears.
Importing and Exporting a Form Set that has Sections added using a DAL Function
You can use the DAL functions AddImage and AddForm to add sections or forms to a form set and then export the information. To use this capability, you must use the Standard Export Version 2 export option and add the IgnoreInvalidImage option.
For example, first make sure your ExportFormats control group looks like the one shown here:
< ExportFormats >
01 = ;V2;New Std Export w Header ;TRNW32->TRNExportV2;
02 = ;TD;Old Std Export w Header ;TRNW32->TRNExport;
03 = ;NH;Old Std Export w/o Header;TRNW32->TRNExportNoNA;
Then, add the IgnoreInvalidImage option to tell the import function to include any sections added to the form set by the AddImage or AddForm DAL functions.
191

Importing and Exporting Files
< ImpFile_CD >
IgnoreInvalidImages = Yes
Be sure to set this option to Yes to avoid an error message. The default is No.
CONFIGURING EXPORT OPTIONS
As with import, there are several options you can use to configure the export feature so it works the way you need it to work. Simply omit any option you do not want to use. Here’s how to find the section of the INI file which contains export options:
1 Open the FSIUSER.INI file in the resource library for which you want to use export files. You can use any text editor to open this file.
2 Locate the ExpFile_CD control group. Most text editors have a find or search function you can use to quickly find this group heading.
If not found, you will need to add this control group to your INI file. Simply type in the text, exactly as shown above, and be sure to include braces ([ExpFile_CD]).
The export options follow the group heading. Usually, the order in which the options appear does not matter. In some cases, however, INI options are dependent on other INI options. These dependencies are discussed in the description of each option.
Setting Up the Default Export File Name< ExpFile_CD >
File = file name
Substitute a valid file name where indicated. There is no default for this option.
The system uses the file name you enter as the default in the File window the user sees when selecting the export file.
Setting Up the Default Export Directory< ExpFile_CD >
Path = MSTRRES\(resource library name)
Substitute a drive and directory path where indicated. There is no default.
Specifying the export directory lets you map where your export files are located. If you omit this option, the system looks for your export files in the working directory specified during system setup.
The system uses the path you enter here to determine the default directory displayed in the File window. If you use the File option and the file name specified there also includes a path, that path overrides one entered here.
192

Importing and Exporting Files
Setting Up the Default Export File Extension< ExpFile_CD >
Ext = .OUT
Substitute a valid file extension where indicated. Be sure to include the period. The default is .OUT.
On the File window, the user can use the List of Files field to display only those files with the export file extension.
If you use the File option and the file name you entered there includes an extension, that extension overrides one entered here.
Appending to an Existing Export File< ExpFile_CD >
AppendedExport = Yes/No
Substitute Yes or No where indicated. The default is No.
If you set this option to Yes and the export file exists, the system does not display the Confirm Overwrite message to the user. The system simply appends the current form set data to the existing file.
If the file name you specified does not exist, the system creates a new file using that name.
193

Importing and Exporting Files
Suppressing the Confirm Overwrite Message< ExpFile_CD >
Overwrite = Yes/No
Substitute Yes or No where indicated. The default is No.
Enter Yes to turn off the Confirm Overwrite message if a user chooses an existing file as the export file.
The system ignores this option if the AppendedExport option is set to Yes. Appending to an export file implicitly means the export file will not be overwritten.
Suppressing the Export File Selection Window< ExpFile_CD >
SuppressDlg = Yes/No
Substitute Yes or No where indicated. The default is No.
If the File option was not defined, or if it was defined improperly, the window appears regardless of what you enter here.
The File Selection window is also affected by the AppendedExport option and the Overwrite option. If you set either of these options to Yes, setting the SuppressDlg option to Yes tells the system not to display the File Selection window.
If you set those options to No, the File Selection window appears unless the export file does not exist. This prevents the user from accidentally overwriting a valid export file without confirmation.
Controlling the Default Export Button on the Complete Window
Please note that this option does not appear under the ExpFile_cd control group. Instead, it appears in the Complete control group, which is usually located in the FSISYS.INI file.
< Complete >
ExportOnComplete = Yes/No
By default, the check box is enabled and visible on the Complete window. The default is no (unchecked). If you set this option to Yes, the system checks the Export option on the Complete window.
Optionally, you can hide or disable the control so the user cannot change the setting. Hide the option by including ,hidden after the answer, as shown below:
ExportOnComplete = Yes,hidden
To let the user see the option, but not change it, include ,disabled after the answer:
ExportOnComplete = Yes,disabled
194
Importing and Exporting Files
Exporting Recipient Information
Use this option to determine whether recipient information is exported. The default is No.
< ExpFile_CD >
AFEExportRecips = Yes/No
If you set this option to Yes, recipients are written for each form listed inside angle brackets. Recipients are separated by commas and each recipient’s copy count is shown in parentheses. This option lets you import recipient information that has been changed in a form set. For example:
\NA=\;SAMPCO;LB1;DEC PAGE;<AGENT(1),COMPANY(2),INSURED(1)>
If a section on a form has a recipient with a different copy count from the form, that section’s differing recipients are written. Here is an example:
\NA=qmdc3\<COMPANY(1)>
There is no option for importing recipient information from the import file, since the information is either in the file or not.
LISTING THE EXPORT FUNCTIONS YOU WANT TO USE
The system lets you specify a list of export functions you want the system to execute. You can use this capability for a variety of purposes. For instance, you can create a backup copy of an exported file in a second directory or you can run multiple exports using different export methods.
To install this feature, add the following INI option:
< ExportFormats >
99 =;ME;Multi-Export;TRNW32->TRNMultiExport;
If you have other export functions listed under this control group and you want to remove those functions, insert a semicolon as the first character on the line to comment out that line. You can also delete the line from the INI file.
Keep in mind:
• The INI file is sorted when loaded. This lets you control which option appears first, second, third, and so on. For instance, you can use numbers as the option indicator left of the equal sign (01 =, 02 =, and so on) to set the order of the options.
The semicolons identify and separate each portion of the definition.
M E is a token that represents this export method. You can change the text, but make sure it is unique.
• The text Multi-Export appears in the Export area on the Complete Form Set window. You can enter any description you want, but space is limited in the export list display area. Make sure the text you enter fits.
• The final portion of the definition
195

Importing and Exporting Files
TRNW32->TRNMultiExport
must be copied exactly as shown. This identifies the DLL to load and the function that performs this feature. This information is case sensitive.
Calling Export Operations
This export feature does not export data. Instead, it lets you call multiple export operations during a single event. For instance, you can use this feature to call the standard V2 export multiple times or in combination with other export routines.
Use the MultiExportList control group to list the export operations you want to call:
< MultiExportList >
01 = TRNW32->TRNExportV2
02 = TRNW32->TRNExportV2;EXPORT2;EXPFILE_CD;
03 = TRNW32->TRNExportDS
The options in this control group are sorted by the value to the left of the equal sign.
Each option must list the export DLL and function name you want to execute. The export functions you list here do not have to be defined in the ExportFormats control group shown earlier. The method of defining this information is:
DLL->FunctionName
Notice the example above actually names the export function, TRNExportV2, twice in the list. Depending upon how you have configured your INI options for each export function, this may or may not result in a separate export file.
If you want to temporarily change the export options used by the called function, you can include two optional parameters, separated by semicolons, after the export function name. You can see an example of this in this option line:
02 = TRNW32->TRNExportV2;EXPORT2;EXPFILE_CD;
Each parameter names a control group that contains the options you want to temporarily use.
The first parameter names a source control group that contains alternate INI options you want to apply to the destination control group in the second parameter. The destination control group is the control group normally associated with the export operation you want to call.
The above example tells the system to copy the INI options found in the Export2 control group to the ExpFile_CD control group. The standard V2 export function, TRNExportV2, uses the ExpFile_CD control group to define its options.
196
Importing and Exporting Files
During the first export, the options remain as is. During the second export operation, the system first copies the alternate options from the source control group into the destination control group used by the export function.
This option switching process replaces any INI options which have the same name and adds missing INI options to the destination group. Once the export function completes, the original INI values from the destination group are restored. This makes sure your default INI options are always left intact once the export operations are completed.
NOTE: Any INI options that exist in the destination group and are not replaced by an option in the source group are left unchanged. This means that you only have to include in the source control group those options you want to alter for the subsequent export operation.
Keep in mind...
• The individual export functions listed under the MultiExportList control group do not know they are being called indirectly or in series. Each operates normally unless you override their INI options by substituting INI options as discussed previously. Normal operation can include displaying a window to ask for an export file name or for permission to overwrite an existing file.
So, if you want your exports to work without user intervention, check the INI options for each export and use those that answer or suppress questions which have to be answered for the export to operate.
• Each export operation can generate error messages. The MultiExport feature calls all export functions in the list regardless of any errors which occur inside the subordinate export functions. If one of the export operations fails, this does not necessarily prevent the other operations from being called.
• If an export function named in an option in the MultiExportList control group cannot be located, an error message appears and that function is skipped.
• If you define a source control group without naming a destination control group, that will cause an error and the export function will be skipped.
• Do not include the multi-export function in the list declared in the MultiExportList control group.
• Do not name the MultiExportList control group as a destination control group on any of the listed export functions.
• If the source and destination control group are the same, the export is called without doing any substitutions.
197

Importing and Exporting Files
• If you specify a destination control group without specifying a source control group, the export function is called and any substitutions are omitted.
Export Functions and INI Control Groups
This table lists the various export functions and the corresponding control groups which contain the options that apply to these functions.
Function Control group Description
TRNW32->TRNExportV2 ExpFile_CD The standard V2 (version 2) export.
TRNW32->TRNExportDS ImpExpCombined
The full-document export or combined-WIP export.
TRNW32->TRNExportFields ExportFields The field data export used to limit exporting to certain fields and WIP record information.
WXMW32->WXMExportXML XML_Imp_Exp The XML document export function. This export is included with Documaker licenses, but sold separately with other products, such as PPS.
198

Using the Field-only Export Option
USING THEFIELD-ONLY
EXPORT OPTION
The standard export feature outputs all form and field information contained in a form set. In some cases, you may want to extract only certain field information (like accounting data) from the form set without having to deal with all of the field and header information included in the standard export. You can use the Field-only export option to limit the exported output to the fields you choose.
By installing and using the Field-only export option, you can create an export file which contains only the information you want. After you install this export method, the Field-only export option appears on the Complete Formset window, along with the other export options.
This export method lets you specify which fields should be written to the export file. Each field is located by name, regardless of which section contains the information. Rather than output the same field and data numerous times, this export option only writes the first occurrence of any specified field in the form set.
In addition, if you later plan to import this information using another program, you can define an alias name which can be written to the export file. This means that you are not limited to using the field names chosen by the form designers.
The field-only export option uses many of the same INI options specified for a standard export method. Detail information about all options are included in this topic.
INSTALLING THE FIELD-ONLY EXPORT OPTION
To turn on this feature, first locate the ExportFormats control group. This control group defines the export methods available to the user on the Complete Formset window. It should look something like this:
< ExportFormats >
01 = ;TD;Standard Export;TRNW32->TRNExportV2;
Then follow these steps:
1 To add this new export option, edit the file and include the following line under the ExportFormats control group:
02 = ;FX;Field-only Export;TRNW32->TRNExportFields;
There are several important things to note about this new line.
The INI file is sorted when loaded. Therefore, you can control which option appears first, second, third, and so on. This is accomplished in this example by using numbers as the option indicator -- 01 comes before 02. If you wish the new option to be first, you can simply change the numbers used for each option.
The semicolons are necessary to identify and separate each portion of the definition.
199

Using the Field-only Export Option
The first bit of information, FX, is a token that represents this export method.
The option text that appears in the Export area on the Complete Formset window occurs next. This text can be any text description. Please note, there is limited space in the export list to display the text description, so test to make sure the entire description can be seen on the window.
The final portion of the definition must be copied exactly as shown. This identifies the DLL to load and the function that performs this specific feature. This information is case sensitive, so you should spell it exactly as defined here—otherwise the option will fail to load when chosen.
2 Next, one of the INI files will need to be changed. The FSIUSER.INI file typically contains individual user options, while the FSISYS.INI file contains the universal options shared by all users. The file you elect to change should be based upon whether you intend for all users or a select few to use the field-only export option.
NOTE: Control group options in the FSIUSER.INI file work with options in the FSISYS.INI file and in some cases, override those settings. This means that if you define the same control group in both INI files, they combine to form one control group when loaded.
3 In the INI file you chose, add the ExportFields control group. For the settings that can be specified under this control group, see Setting Up the
Field-only Export Option on page 200.
SETTING UP THE FIELD-ONLY EXPORT OPTION
This export feature supports many of the same INI options that can be specified for the standard export option. The main difference is that the control group name for this feature is ExportFields instead of ExpFile_CD, which is used for the standard export feature.
Specifying a default filename
< ExportFields >
File = file name
There is no default for this option. If you omit this option, the user must specify a file name for export. If you enter a valid file name for this option, the File window used for selecting the export file name defaults to this value. Optionally, you can suppress the File window if a valid file name is specified.
Specifying a default path < ExportFields >
Path = path name
200
Using the Field-only Export Option
There is no default for this option and without it, the current working directory is assumed. Setting the Path option tells the system to automatically write the export files to this directory, or the initial directory presented in the File window.
NOTE: If you enter a file name and full path for the File option, that path overrides your entry for this option.
Specifying a default fileextension
< ExportFields >
Ext = .exp
The default for this option is .EXP. To use another extension, simply specify it using this option.
NOTE: If you enter a file name and an extension for the File option, that extension overrides your entry for this option.
Appending to an existingexport file
< ExportFields >
AppendedExport = Yes
The default setting is No. If you turn this option on and an existing file is selected (or specified by an INI option), no overwrite confirmation message is shown to the user. The current form set data is appended to the existing file.
Suppressing the overwritefile confirmation message
< ExportFields >
Overwrite = Yes
The default is No. Enabling this option prevents the overwrite confirmation message from appearing if the user chooses an existing file as the export file.
This option is ignored if you activate the AppendedExport option. Appending to an export file implicitly means it will not be overwritten.
Suppress the Export Filewindow
< ExportFields >
SuppressDlg = Yes
The default is No, which means the window will appear. If an INI option has not been defined, or defined improperly for the default export file name, the window appears despite the setting of this option.
The File Selection window is also affected by the AppendedExport and Overwrite options. If either options is enabled (Yes) the SuppressDlg option prevents the File Selection window from appearing. If neither of these options are enabled, the window is only suppressed if the specified export file does not exist. This prevents users from accidentally destroying a potentially valid export file without confirmation.
Identifying the fields toexport
< ExportFields >
FIELD = field name ; alias
FIELD = field name2 ; alias2
201
Using the Field-only Export Option
...
For each field that should be exported from the form set you must include a FIELD= line in the INI file. You may export as many fields as necessary, but each line must begin with the FIELD= statement.
The field name reference in the example should be replaced with an actual variable field name contained on a section within the form set. To determine the field names, it may be necessary to load the section in Documaker Studio or Image Editor and check the properties of the given fields.
The alias reference is optional and should be separated by a semicolon from the section field name, if used. This identifies a different name to write in the export file, rather than the name of the actual field from the section. Use the alias feature when you are exporting information which will be imported into another application that uses different names for its fields.
For instance, assume the line reads as follows:
FIELD = Acct#;Account Number
This line would locate the Acct# field in the form set. If found, the data would be written to the export file using the name Account Number.
Other important notes about these settings:
• The order of the fields in the export file matches the order they are defined within the INI control group.
• If an alias is not provided, the exported field name will be the same as the section field name.
• Including a semicolon after the section field name, but not providing any text for the alias suppresses the output of a field name in the export file. The backslash, (\), will still precede the data for the field, even when the field name is suppressed.
• Any field that is not located within the form set is omitted in the export file.
• The field data written to the export file appears just as it does in the form set. Fields without data are written to the export file with no data following the backslash.
• When specifying an alias, spaces before and after the semicolon divider are ignored. This means that IM GFLD;EXPFLD is the same as IM GFLD ; EXPFLD .
• Section field names are not case sensitive. SECFLD is equivalent to secfld and will locate the same field within the form set. However, the case of the field name or alias in the INI file is preserved in the output file.
Defining header and trailerinformation
< ExportFields >
START = text
END = text
202

Using the Field-only Export Option
These settings are optional and independent of each other. You can specify a START without an END or vice versa. No default is provided for the START and END options.
Since this export method does not include header information from the referenced form set, it may be necessary to identify the starting and ending locations of export information. This is probably most important when you are using the AppendedExport option, which means that more than one form set’s information will be written to the same file.
The text specified on these options can be any ASCII string. The text is written exactly as it is specified in the INI file. START is written before the first field’s data from the form set is written. END is written after all field data has been written.
The START and END text is written to the export file whether any field data is written from the given form set.
Exporting to a single line < ExportFields >
SingleLine = Yes (or No)
This options defaults to No and is not enabled unless you change it in the INI file.
Normally, each field’s name and data is written to a different text line within the export file. By enabling the SingleLine option, this will condense the exported field information into a single line of output. This option is provided for those environments where this method of export is more desirable.
By default, when the SingleLine option is in use, each field name and data set is separated by a semicolon. You can change this field separator using the Separator option.
< ExportFields >
Separator = text
This additional option is only recognized when you specify the SingleLine option. The text assigned to the statement is used to separate each field name and data set written to the export file.
The text can be any ASCII string value you want to specify. For example...
Separator = **!**
tells the system to write the text
**!**
between each field. Here’s another example...
Separator = NEXT FIELD=
tells the system to write the text
NEXT FIELD=
between each field.
203

Using the Field-only Export Option
Other important notes about these options:
• The separator text is only written when the SingleLine option is set to Yes.
• The separator text is only written between the field information sets. If you use a START option, the system omits the separator between the START text and the first field. Likewise, if you specify an END option, the system omits the separator between the last field output and the trailing text.
• The SingleLine option is probably of most value when using the AppendedExport option and writing more than one form set to the same export file.
USING THE FIELD-ONLY EXPORT OPTION
Once installed, the option appears as a choice in the Export list, as shown below.
Choosing this option tells the system to write to the export file those fields specified in the ExportFields control group.
By default, the field information is written to the export file in the format shown below:
FIELD NAME\FIELD DATA
The field’s name is separated from its associated data via the backslash (\) character. Using some of the other options provided with this feature, it is possible to change the output in several ways. For information about additional format options, see Setting Up the Field-only Export Option on page 200.
204

Setting Up Multiple Import Sessions
SETTING UPMULTIPLE
IMPORTSESSIONS
There may be occasions when users need to import data from more than one directory. For example, you may have one directory set up for form sets with a status code of W IP and another directory for form sets with a status code of BatchPrint.
To handle this requirement, you can define more than one set of options for auto-import in the INI file. The following examples show how to change the default AUTOIMPORT settings to accommodate this:
< TimerFuncs >
01=;0;0;300;TRNW32->TRNAutoImport;
02=;0;0;300;TRNW32->TRNAutoImport; \AUTOBATCH
In this example, definition 01= assumes AutoImport is the control group that identifies the behavior for this auto-import registration. The second definition, 02, names an alternate control group, called AutoBatch, which contains the definitions for that registration.
Each auto-import control group, such as AUTOIMPORT and AUTOBATCH in this example, can contain different auto-import options.
Notice that the same auto-import function is used for all definitions. You can set the TMRLIB flags (STATE, URGENCY, and SECONDS) as needed for each control group.
Once the system activates TRNAutoImport, it identifies the specific auto-import control group and options before it searches for import files.
For more information about timed service functions, see Setting Up Timed
Service Functions on page 91.
205

Batch Importing from a File
BATCHIMPORTING
FROM A FILE
Batch importing from a file lets you import multiple form sets from a single file and place the individual form sets in the WIP list. When you batch import from a file, the system imports both the forms and the data. Users can then open the form sets from the WIP list and complete data entry. See Importing and
Exporting Files on page 185 for more information on setting up import and export files.
Follow these steps to perform a batch import:
1 Choose Tools, Batch Import from File. The Select Batch Import File window appears.
2 Enter or select the batch import file. You can change the drive and directory if necessary. Click Ok.
NOTE: The system defaults to the working directory. You can change the drive and directory to locate a batch import file, but if you try to import form sets with key fields that do not match the current resource directory, the import will not be successful.
3 The system displays a message confirming the number of successful form set imports. Click Ok to close the message.
4 If there are data or key field discrepancies in any of the form sets, the system displays a warning message either telling you the form set number is not unique or stating there were no successful imports. If the problem is in a single form set, the system displays this message:
5 Click Yes to continue importing the form sets, or No to cancel the import. If you choose Yes, the system will place the form sets in the WIP list and display a message confirming the number of successful imports.
206

Batch Importing from a File
6 You can choose WIP, WIP List to view the form sets in the WIP list:
207

Creating a Standard Import File
CREATING ASTANDARD
IMPORT FILE
Creating import and export files lets you automatically import data from an external application or data created during entry, into specific form sets in the system. You can also export data from the system to use in other applications or to import back into the system. When you create an import file, you must format the import data and set up the file so that the system knows which form set to apply the data to.
In addition to standard import files, you can also create a selective import driver file which displays applicable import files for user selection, based on the company, transaction, and user ID.
After you and the users have selected the forms for data import, your next task is to extract the applicable data from the host application system.
For a standard import file, you extract data to apply to a single form set. The type of data you import normally includes common data that does not vary. Common data can include company, line of business, policy, recipient, agent, lien holder, policy dates, and other general information. In addition, is it possible for the import file to designate which forms should be included in the form set. When importing data from a standard import file, the user must know what the import file contains to import it to the appropriate form set.
After you extract the host data, you must format it so the system can recognize and import the data to the correct forms, and to the correct fields on the forms.
Documaker Desktop
Other Application
Form set
import data
208

Creating a Standard Import File
You can format the text using any text editor. You may find it helpful to first map the data on paper, using an actual form as a guide, then enter the formats into the text editor.
NOTE: When creating files for batch import, follow the instructions for creating standard import and export files (with a header). For more information on configuring the system to append form set data to an existing export file, see Importing and Exporting Files on page 185.
For information on batch importing, see Batch Importing from a File on page 206. For information on exporting recipient information, see Exporting Recipient Information on page 195.
Sample Standard Import File
An import file is an ASCII text file which contains form set information. The file is formatted into lines with each line terminated by a carriage return/line feed (\r\n) combination. Each line is interpreted as one of these basic components:
• Header Record lines
• Form/section lines
• Field Definition lines
Some import files will only contain header record lines and field definition lines. Files may contain form/section lines if specific form information is to be included.
One header record is normally required, but any number of header records may be included. If more than one header record is included, they should all include the same KEY1 definition. Group all header records at the top of the file, because the system will not recognize additional headers once it encounters field or form information.
Header records consist of elements separated by semicolons (:). In addition, the line must start with a semicolon. The components of a header record are shown here:
;KEY1;KEY2;KEYID;TRANSCODE;STATUSCODE;DESCRIPTION
The first three components are required while the last three are optional. Note that all components are positional. This means that should a component be omitted, include the semicolon following the component. For instance, all of the following are valid header representations.
;KEY1;KEY2;KEYID;
;KEY1;KEY2;KEYID;TRANSCODE;
;KEY1;KEY2;KEYID;TRANSCODE;STATUSCODE;
;KEY1;KEY2;KEYID;;;DESCRIPTION
209

Creating a Standard Import File
Form/section lines define which forms and sections on those forms to preselect for the user. Field information which is read after reading a form line is assumed to refer to fields on that form/section. Form lines have the following syntax:
\NA=name\;KEY1;KEY2;FORMNAME;
The first backslash (\) indicates this is a form/section line and must be followed by NA=.
KEY1 and KEY2 represent similar values to that shown for header records. Along with the FORMNAME (form’s name), the system uses KEY1 and KEY2 to locate the specific FORM.DAT line that represents that form.
If name is included, it defines the section to locate on the current form. This component may be omitted to represent the form named for selection.
\NA=\;KEY1;KEY2;FORMNAME;
In addition, if the following line is included, this simply defines the next section on the previous form to locate.
\NA=name\
Field Definition lines refer to any line that does not begin with a semicolon or backslash. They take the following form:
FIELDNAME\FIELDDATA
Where FIELDNAME represents a field that is defined globally (if no current section or form has been named), or belongs to the last form/section that was named. The backslash (\ ) separates the field’s name from the field’s data.
FIELDDATA is any valid field (already formatted) for use by the named field.
POLICY CNT\31
POLICY EFFECT\04/25/06
POLICY EXPIR\04/25/07
In the sample data records above, each line is a field name, followed by field data:
Component Description
KEY1 a valid Key1 (Company) defined in the FORM.DAT file.
KEY2 a valid Key2 (Line of Business) defined in the FORM.DAT for that KEY1 (Company).
KEYID the WIP KeyID (such as a policy number) provided on the Form Selection window.
TRANSCODE corresponds to a valid transaction type defined by the user in INI files.
STATUSCODE a valid WIP status identifier which is also defined in the INI files.
DESCRIPTION text to be assigned as the WIP description.
210

Creating a Standard Import File
• Policy Count = 31
• Policy Effective Date = 4/25/06
• Policy Expiration Date = 4/25/07
NOTE: If multiple fields with the same name are defined, the data in the last field with that name will import to all the similarly named fields in your form/section.
This example shows a formatted import file:
Field Length Description
Variable Field Name
32 Field name as it appears on the applicable form. Field names cannot contain a backslash (\).
Variable Field Data
255 Data corresponding to the field name. Field data cannot contain a backslash (\). Make field data lengths equal to or less than field lengths on the form. If data is greater than the form field lengths, the system truncates the data.
Header record line 1
;GENERAL AGTS INS;COMML PACKAGE;CPP_94;NB;WIP;Sample;
Header record line 2
;GENERAL AGTS INS;GENERAL;GEN_94;INSURED NAME\Bob BradshawPOLICY NBR\332-224521-NR
Form/section line 1 \NA=IMG1\;GENERAL AGTS INS;COMML PACKAGE;FORM1;
Field data lines POLICY CNT\31EFFECT DATE\04/25/06EXPIR DATE\04/25/07
Form/section line 2 \NA=IMG2\;GENERAL AGTS INS;COMML PACKAGE;FORM2;POLICY CAN DATE\9/11/03POLICY END DATE\9/11/04POLICY AUD DATE\9/11/06
Form/section line 3 \NA=IMG2B\
Form/section line 4 \NA=IMG2B\LOB1\AUTOMOBILEPREMIUM 1\1111.1POLICY FEE\44.4
Form/section line 5 \NA=IMG3\;GENERAL AGTS INS;GENERAL;FORM3;AGENT NUM\77AGENT NAME\JOE SMITHAGENT ADDRS1\1234 CANTERBURY LANE
211
Creating a Standard Import File
In this example, the form set contains two KEY2 groups (COMML PACKAGE and GENERAL) for the same KEY1. This normally indicates a packaged policy situation.
Field data defined before any form/section lines represents globally defined fields. Any form in the form set which has one of these globally defined fields will be prefilled with the imported data.
FORM1 and FORM2, are selected from the COMML PACKAGE group. Two copies of FORM3 are selected from the GENERAL group.
FORM2 identifies three sections, SEC2, SEC2B, and SEC2B. The last two sections are named the same, but no data is imported for the first occurrence of this section.
Rules for import files Here are the rules for the import files:
• If no current form/section line has been identified, assume the fields are form set global.
• If a form is named and a section is not, assume fields have a form scope and will propagate to any identically named fields on that form.
• The first form/section line found must have the additional KEY1, KEY2, and FORMNAME fields. The program takes this information and searches the FORM.DAT for the appropriate form. Until another form is named, the system assumes the data following this line belongs to the named form/section.
• All forms identified by the import file are automatically selected for the user. This causes the form to appear with a check mark on the Form Selection window.
• Forms can be identified without additional section or field data.
Listing the global fields You can use the OutputFieldScope option to list the global scope fields near the beginning of the FAP file:
< ExpFile_CD >
OutputFieldScope = Yes
Here is an example:
Form/section line 6 \NA=IMG3\;GENERAL AGTS INS;GENERAL;FORM3;AGENT CITY/ST\ANYWHERE/USAAGENT PHONE\5551234LOSS PAYEE\THE BANK, INC.
212
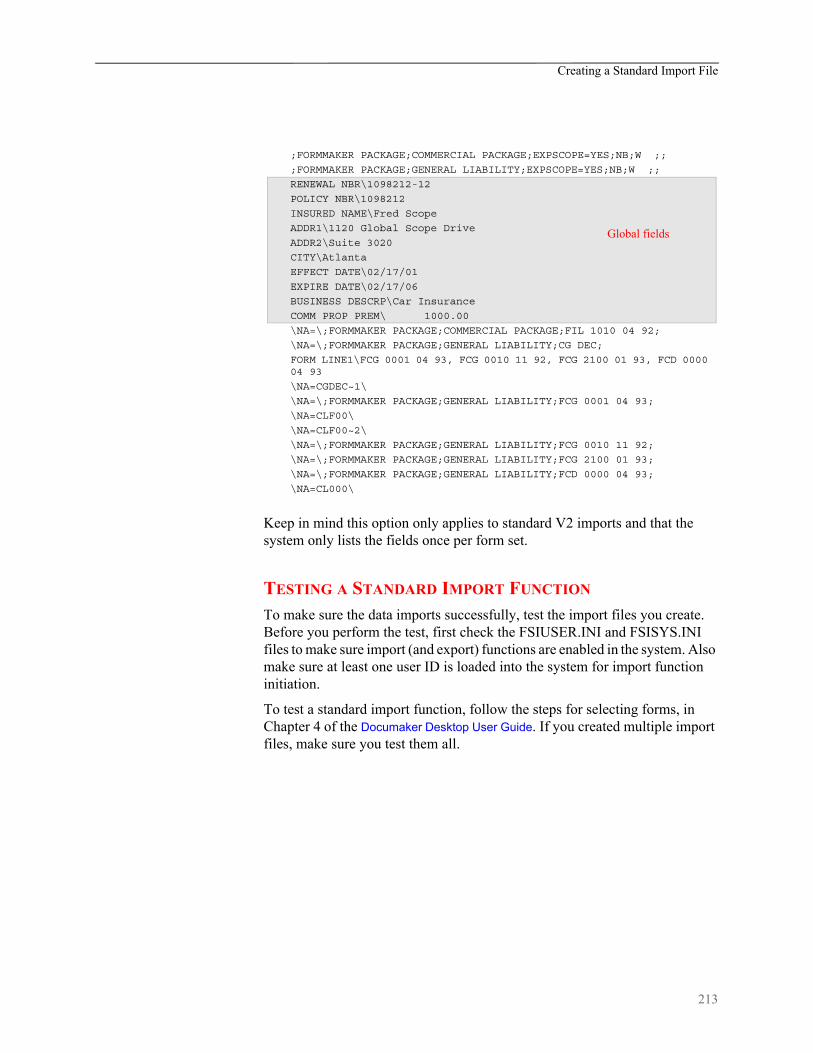
Creating a Standard Import File
Keep in mind this option only applies to standard V2 imports and that the system only lists the fields once per form set.
TESTING A STANDARD IMPORT FUNCTION
To make sure the data imports successfully, test the import files you create. Before you perform the test, first check the FSIUSER.INI and FSISYS.INI files to make sure import (and export) functions are enabled in the system. Also make sure at least one user ID is loaded into the system for import function initiation.
To test a standard import function, follow the steps for selecting forms, in Chapter 4 of the Documaker Desktop User Guide. If you created multiple import files, make sure you test them all.
;FORMMAKER PACKAGE;COMMERCIAL PACKAGE;EXPSCOPE=YES;NB;W ;;
;FORMMAKER PACKAGE;GENERAL LIABILITY;EXPSCOPE=YES;NB;W ;;
RENEWAL NBR\1098212-12
POLICY NBR\1098212
INSURED NAME\Fred Scope
ADDR1\1120 Global Scope Drive
ADDR2\Suite 3020
CITY\Atlanta
EFFECT DATE\02/17/01
EXPIRE DATE\02/17/06
BUSINESS DESCRP\Car Insurance
COMM PROP PREM\ 1000.00
\NA=\;FORMMAKER PACKAGE;COMMERCIAL PACKAGE;FIL 1010 04 92;
\NA=\;FORMMAKER PACKAGE;GENERAL LIABILITY;CG DEC;
FORM LINE1\FCG 0001 04 93, FCG 0010 11 92, FCG 2100 01 93, FCD 0000 04 93
\NA=CGDEC~1\
\NA=\;FORMMAKER PACKAGE;GENERAL LIABILITY;FCG 0001 04 93;
\NA=CLF00\
\NA=CLF00~2\
\NA=\;FORMMAKER PACKAGE;GENERAL LIABILITY;FCG 0010 11 92;
\NA=\;FORMMAKER PACKAGE;GENERAL LIABILITY;FCG 2100 01 93;
\NA=\;FORMMAKER PACKAGE;GENERAL LIABILITY;FCD 0000 04 93;
\NA=CL000\
Global fields
213

Creating a Selective Import File
CREATING ASELECTIVE
IMPORT FILE
A selective import function uses a driver file that filters import data. When performing a selective import function, the user selects the driver file from the list of import files. The driver file recognizes the selected transaction type, the company name, and the user's access level, and displays only the import files that apply to that combination of variables.
If your company uses numerous import files, the user can narrow the file choices, to display only one or two that are appropriate for the selected form set type. Choosing a selective import function takes the guesswork out of identifying the correct file to import. The selective import function supports multiple users who access the driver file simultaneously.
Documaker
2
3
2
1
Driver File
Import files
1
3
214

Creating a Selective Import File
SAMPLE SELECTIVE DRIVER FILE The file format for selective import data is exactly the same as for standard import data. The import driver file format (fields) differs slightly. Like the standard import file, a driver file contains ASCII characters with semicolon delimited fields, and carriage return/line feed (\r\n) record delimiters.
Each record line in the driver file normally contains five fields: Resource Library (Company) Name, Policy Transaction Name, Import File Name (including the path), User ID, and File Description. The company library name entered should match the name of the resource library where you store the file.
These five fields indicate the form set that receives the import data. The file description indicates the form set that receives the import data, to ensure importing into the correct form set. Each two-line record indicates the particular form set to which you import related data. You cannot import form sets to different resource libraries. Here is a sample driver file.
;SAMPCO;NEWFMSET;\MSTRRES\SAMPCO\
IMPORT3.DAT;DOCUCORP;General Information
;SAMPCO;ENDORSE;\MSTRRES\SAMPCO\
IMPORT4.DAT;USER1;Health endorsement
NOTE: In the actual driver file, each record appears on a single line.
Formatting the Driver Import File
The table below contains syntax and format guidelines for the import driver file. Refer to this table as you create the driver records. You can assign any name to the driver file, as long as the users know the file name. Create the driver file as you would create a standard import file, using a text editor.
Field Length Description
Company 8 Company library name of the DOS batch file (no extension). This batch file calls a specific resource library directory (\dll).
Transaction 8 Transaction type, enter:NEWFMSET - New form setENDORSE - EndorsementRENEWAL - Renewal
Import File 127 Import file name, include the path and subdirectories
User ID 64 User ID for individual who completes the transaction
Description 35 Description of the import file Driver file parameters, appears in the Import Selection window
215

Creating a Selective Import File
TESTING A SELECTIVE IMPORT
The requirements for testing a selective import function are the same as for a standard import function. Confirm that the import function is enabled in the FSIUSER.INI file for each company library you designated in the import driver file.
To test a selective import function, follow the steps for selecting forms, in Chapter 3 of the Documaker Desktop User Guide.
When a user selects the driver file from the Import File window, the driver file checks for the selected transaction type and user ID. The driver file then checks the transaction types you defined in each driver record for a match with the user selected transaction. By process of elimination, the driver file then displays only the import files applicable to the user's selected transaction type, and to the user's ID level.
216

Importing Information Directly into Archive
IMPORTINGINFORMATION
DIRECTLY INTOARCHIVE
The system lets you import data directly into archive using a timed service function that automatically archives all records waiting in the Manual Archive queue.
This function performs the manual steps of choosing the WIP, Manual Archive option, selecting all records on the window, and then clicking Ok.
Use an INI setting similar to the following to set up this feature:
< TimerFuncs >
08 =;0;0;100;AFEW32->AFEAutoArchive;
Where the first three values (;0;0;100;) represent:
;State;Urgency;Seconds/Time-of-day;Function
If you use this feature with the Automatic Import (to import records with a Manual Archive status), you can have the system archive imported files without requiring user intervention.
For more information on other timed service functions, see Setting Up Timed
Service Functions on page 91.
Value Description
State always set to zero (0)
Urgency zero (0) or 1, where zero means the call can be skipped if the user is engaged in an operation and 1 means to call the feature as soon as the user has finished the current operation.
Seconds orTime-of-day
Enter the number of seconds to call the function at a specific interval, such as 300 for every five minutes.Or, enter the specific time of the day at which you want the system to call this function. The system uses a 24-hour clock, so enter 13:00 to indicate 1 pm.
Function AFEW 32->AFEAutoArchive indicates the timed service function. Enter this value exactly as shown. Without this value the automatic archive feature will never work. An error message will be displayed if this value is incorrect.
217
Importing Global Data from Archive
IMPORTINGGLOBAL DATA
FROM ARCHIVE
This feature lets you select a form set from the Archive window and, instead of retrieving the entire original form set as it is done with Archive Retrieval, only import the global data from that form set. This data (without the forms) is then available for new form sets.
Using this feature, you do not have to keep the forms stored in the archive form set to make sure the data propagates onto the newer forms.
You set up the Import from Archive feature using INI files. The description of the Retrieve from Archive option in the Import list is based on your entries in the INI options.
To install the Import from Archive feature, add these INI options:
< ImportFormats >
02 =;IA;Import From Archive;TRNW32->TRNImpDatFromArchive;
You can change the text that appears in the Select Import window as necessary.
NOTE: This feature does not select forms for you; it simply imports the data designated as global. You use the Scope field in the field’s Properties window in Documaker Studio to designate a field as global.
218

Importing Data with Forms and Sections
IMPORTINGDATA WITHFORMS AND
SECTIONS
If the form and section names match, the system can transfer data to the Entry system when importing forms and sections from archive.
For instance, if the archived form set consists of FORM _A and FORM _B and you currently have FORM _A and FORM _B_v2 selected, the system transfers the form data from FORM _A, plus any global fields set up for the entire form set. Since FORM _B does not match FORM _B_v2, no form or section level information is transferred between the form sets. Similar name matching is required at the section levels.
To use this feature, you must include these INI options:
< ImportFromArchive >
SelectForms = Yes
TransferRecord = Yes
The default for both options is No, to be compatible with the original release of the ImportFromArchive feature discussed in the previous section (Importing
Global Data from Archive on page 218).
If you set the SelectForms option to Yes, the import operation reselects the forms based upon those found in the archive. Any prior form select made by the user is removed.
If you set the TransferRecord option to Yes, the archive index record information is transferred to the WIP record information and the system updates the Form Selection window to show any changed values. For instance, you would set this option to Yes if you want the Key1, Key2, KeyID, and Description fields from the archived record used on your current form selection.
NOTE: Multi-line text fields will retain paragraph markers but will not retain any text formatting.
219

Exporting when Manually Archiving
EXPORTINGWHEN
MANUALLYARCHIVING
You can have the system export a form set when it manually archives the form set. Using INI options, you can make the system wait until archive is about to occur before it exports the form set. This makes sure the exported data accurately represents the archived document.
The system checks the ArchiveExport option to determine which export routine you want to use. It then loads the form set into memory. This is necessary for the export function, but not for archival.
NOTE: Using the ArchiveExport method does not affect the export feature on the Complete window. This is a separate export from the one started there.
The export function is called before the archival functions are called. This way, if an error occurs during the export, the archival process stops and returns the error. The form set is still in WIP, so you can correct the error.
To use this feature, include the ArchiveExport option in the Complete control group, as shown in this example:
< Complete >
ArchiveExport = DLL->FunctionName;SourceINI;DestINI;
The ArchiveExport option identifies the DLL and name of the export function you want to use. The export function does not have to be defined in the ExportFormats control group. Define the export function name the same way you define other entry hooks — a DLL name followed by the name of the name of a function to dynamically call to do the export. Here is an example:
< Complete >
ArchiveExport = TRNW32->TRNExportV2;Export2;ExpFile_CD;
To handle different export options used when called in this manner, you can include two optional parameters after the export function name. Separate the parameters with semicolons. Each parameter names an INI control group that contain various options.
The first or source control group (Export2 in the example) specifies the INI control group which contains alternative INI options you want to apply to the second INI control group (ExpFile_CD in the example). The second or destination control group should be the control group normally associated with the export function you want to use.
In the example above, the system copies the INI settings found under the Export2 control group to the ExpFile_CD control group. The standard V2 export function then uses the ExpFile_CD control group to find its options.
For instance, you might define the following:
< Export2 >
Overwrite = Yes
SuppressDlg = Yes
File = ~HEXTIME .EXP
< ExpFile_CD]
220

Exporting when Manually Archiving
Overwrite = No
File = Output.EXP
Path = .\data\
NOTE: You only have to include in the source control group options you want to add or replace options in the destination control group.
Once the export function completes, the system restores the original INI options and values from the destination group. This makes sure your default INI options are left intact once the export operation has finished.
So, using the example above, after the substitution takes place you would have the following options defined for the standard export:
< ExpFile_CD >
Overwrite = Yes
SuppressDlg= Yes
File = ~HEXTIME .EXP
Path = .\data\
By restoring the original INI options and values for the destination control group, the system lets manually called export functions work with a standard set of options, while allowing the ArchiveExport method to be more automated.
Keep in mind that the export function does not know it is being called indirectly. It will operate in its normal fashion. So, unless you override INI options as described here, the system may ask for an export file name or other information.
To further automate exports, check the INI options available for the export function and define those that answer or suppress questions for the export process so it can operate without user input.
221

Creating Export Files
CREATINGEXPORT FILES
Creating an export file lets you extract form set data from the system and use the data in other applications or import the data back into the system. The export file contains the generically formatted system data that other applications read.
You can create two different kinds of export files: with headers or without headers. Depending on your system configuration, your export options may include Export Version 2. This export file is the same as the Standard Export (with a header). An export file with a header lets you indicate the form (or form set) where the data originated. An export file without a header does not include the form information. An export file without a header lets you export only the form data.
To create an export file, you can extract data that users have manually entered into the system, or data that was imported from another application.
The following illustration shows the flow of data when you create an export file without a header.
Other application
\NA=GENFORM Export Data
Documaker
222

Creating Export Files
* The Application Data Interface is a program written by the application to read system export file data.
Creating an export file without a header lets you extract raw data from the system, without indicating the section where the data originated. With this option, users can use the exported data in various other applications.
Sample Export File Format (with Headers)
This example shows part of a sample export file with a header. The export file uses the exact format as a standard import file. Each record line contains the variable field name and the variable field data, separated by a backslash (\). The export file also contains the header as record line 1. If a form appears multiple times in a form set, the export file contains recurring variable field data for the duplicate forms.
Documaker
Application A
Application A’sData Interface
Application B
Application B’sData Interface
Application C
Application C’sData Interface
Application A
Application A’sData Interface
Header record line 1 \NA=GENFORM\INSURED NAME\John SmithPOLICY NBR\06871
Variable field data lines PERSONAL LIMIT\300EACH OCCR LIMIT\400FIRE DAMG LIMIT\500MED EXPEN LIMIT\600
Header record line 2 \NA=TESTFORM\INSURED NAME\Richard SmithPOLICY NBR\28754
223

Creating Export Files
A form set may contain multiple forms. You can create an export file containing data corresponding to each form. The header records separate the data by section.
Below are two general guidelines to consider when creating export files, both with or without a header:
• If you create an export file corresponding to an import file, you can use the same name for both files, but use different extensions, or possibly use separate directories. For example…
(Library Name).IMP = Import Extension
(Library Name).OUT = Export Extension
• If you do not use an import file, the system prompts you to enter an export file name. If you use an import file, the system uses the file name of the import file also as the export file name.
Formatting the Export File
The following tables contain a section of the sample export file from the previous page, and the file format. Refer to these tables as you create the export data file. The headers separate the form data.
\NA=GENFORM\
INSURED NAME\John Smith
POLICY NBR\06871
PERSONAL LIMIT\300
\NA=TESTFORM\
INSURED NAME\Richard Smith
POLICY NBR\28754
PERSONAL LIMIT\1000
Variable field data lines PERSONAL LIMIT\1000EACH OCCR LIMIT\500FIRE DAMG LIMIT\500MED EXPEN LIMIT\2000
Field Length Description
Header 20 The name of the section in a form or form set where the export data originated. Header name is always in standard format: \NA= followed by the section name.
Variable Field Name
15 Field name as it appears on the applicable form. Same format as Standard Import file.
Variable Field Data
150 Data corresponding to the field name. Same format as Standard Import file.
224

Creating Export Files
Sample Export File Format (without Headers)
The format for an export file without a header is identical to an export file with a header, except the file does not include \NA records as headers. Each record line contains the variable field name, followed by the variable field data, separated by a backslash.
INSURED NAME\John Smith
POLICY NBR\06871
PERSONAL LIMIT\300
EACH OCCR LIMIT\400
FIRE DAMG LIMIT\500
MED EXP LIMIT\600
TESTING AN EXPORT FUNCTION
Always perform a test export to make sure the export file you create contains the data you intended and the data is in the correct format. Test your application data interface to make sure your application system correctly imports the system data you exported. See the Documaker Desktop User Guide for instructions on importing and exporting.
Field Length Description
Variable Field Name
15 Field name as it appears on the applicable form. Same format as export with Header file.
Variable Field Data
150 Data corresponding to the field name. Same format as export with Header file.
225

Importing and Exporting WIP, NAFile, and POLFile Information
IMPORTING ANDEXPORTING
WIP, NAFILE,AND POLFILEINFORMATION
The Entry system includes an import/export format that combines WIP, NAFILE, and POLFILE information. This format exports information from the Entry system which will then be imported into Documaker Server.
This feature uses many of the same INI options as standard import and shares the same options with a standard export file (export with headers). The import function conforms to standard Documaker Desktop import requirements. The input to this function is a single file which contains WIP record information appended with standard NA and POL form set data. For more information on formatting import/export files, see Setting Up Import Formats on page 187 and Setting Up Export Formats on page 188.
To use this format type, you must add the following options to your INI file:
< ImportFormats >
02 = ;DS;Full Document Import;TRNW32->TRNImportDS;
< ExportFormats >
04 = ;DSFull Document Export;TRNW32->TRNExportDS;
You can also add these options in the ImpExpCombined control group:
< ImpExpCombined >
File =
Path =
Ext =
SuppressDlg=
WIPHeader =
Separator =
Field =
Option Description
File (Optional) Enter the name of the import or export file.
Path (Optional) Enter the path for the import or export file if not included in the File option.
Ext (Optional) Enter the default extension of the file. Defaults to DS.
SuppressDlg
(Optional) Set to Yes to prevent the File Selection window from appearing if enough information is specified in the INI file. The default is No.
226

Importing and Exporting WIP, NAFile, and POLFile Information
For each field that should be exported to the WIP record line, you must include a line in the INI file. You may export as many fields as necessary. Begin each line with FIELD= and use this syntax:
FIELD=WIP field name;formatstring
Here are some examples:
FIELD=KEY1;%-3.3s
FIELD= ;,
FIELD=KEYID;%-10.10s
NOTE: See also Exporting When Batch Printing WIP on page 132.
MAPPING ALTERNATE WIP INDEX COLUMNS FROM IMPORTED WIP DATA
You can add INI options to the INI control group associated with the import method you are using to identify globally-defined fields from which you want data transferred to the WIP index record.
Here is an example of how you would define one of these INI options:
WIPField = FAPField;DFDField
By default, the system looks for the Key1, Key2, and KeyID fields using their standard WIP names. After that, any additional WIPField definitions are located and mapped accordingly.
WIPHeader (Optional) Enter a text string to indicate where WIP record transactions begin. The default is W IP.
Separator (Optional) Enter a text string to indicate an alternative separator for WIP fields. The default separator is a quotation mark (“).You could use another character as the separator, such as a semicolon (;).
Field For each field that should be imported/exported to the WIP record line, you must include a line in the INI file. You can import as many fields as necessary. Begin each line with FIELD= and use this syntax:
Field = The WIP field name;stringformat
The string format is the standard C sprintf function format. Here are some examples:
Field =KEY1;%-3.3s
Field =KEYID;%-10.10s
Option Description
WIPField FAPField is the name of a field stored in the global form set dictionary. The FAPField definition must name a field that is defined as Formset Global (globally) in the import fileDFDField is the name of a WIP DFD field.
Option Description
227

Importing and Exporting WIP, NAFile, and POLFile Information
Here is an example:
< ImpFile_CD>
WIPField = INSURED NAME;DESC
This definition looks for the globally-defined document field INSURED NAME and maps it into the WIP record DESC column. Since the DESC column is normally one of the WIP columns that would be automatically mapped in the V2 header, this definition overrides that and stores the value of the global field INSURED NAME in its place.
228

Importing and Exporting WIP, NAFile, and POLFile Information
USING WIP FIELDS IN V2 AND XML IMPORT FILES
You can output the following WIP fields in V2 and XML format when exported or printed from PPS or Docupresentment:
• Key1
• Key2
• KeyID
• TranCode
• StatusCode
• Desc
• GuidKey
• TrnName
• LocID
• SubLocID
• Jurisdictn
• QueueID
NOTE: These fields are included in the standard WIPDFD file, however, you must define them in a custom WIPDFD file if you want to use them.
For V2 When Docupresentment exports or prints transaction data to V2 format, the system checks input attachment variables for field data. If these variables are not located, the system gets the field data from WIP.
If the new fields (GuidKey, TrnName, LocID, SubLocID, Jurisdictn, and QueueID) are not defined or the field data are not found in WIP, the system looks in the WIPData control group to get a list of mapped fields and tries again to get field data from WIP.
If one or more new fields are present, the header line in the V2 file should have a record format as shown here:
;Key1;Key2;KeyID;TranCode;StatusCode;Desc;GuidKey;TrnName;LocID;
SubLocID;Jurisdictn;QueueID;
NOTE: If no values are found, the system omits all of the new fields from the header line.
229

Importing and Exporting WIP, NAFile, and POLFile Information
For XML When Docupresentment exports or prints transaction data into XML format, the system inserts these fields into the XML tree under the DOCSET tag. Those XML elements are output as children of DOCSET. Each element has an attribute NAME. Its attribute value is the mapped key name if it is defined in the WIPData control group, otherwise, its value is itself.
For WIP data, the system exports the WIPKEYS element with its children based on the WIP field definition. For archived data, it exports the ARCHIVEKEYS element with its children based on the archive field definition. As mentioned previously, each child element has an attribute NAME and the attribute value is from the key mapping.
If some fields are not defined in the standard WIPDFD or APPIDXDFD files, those fields are output to CUSTOMKEYS.
Here is an example of a typical XML format of output WIP fields:
<?xml version="1.0" encoding="UTF-8" ?>
<DOCUMENT TYPE="RPWIP" VERSION="11.3">
<DOCSET NAME="">
<LIBRARY NAME="" CONFIG="SAMPCO">SAMPCO</LIBRARY>
<ARCEFFECTIVEDATE NAME="RUNDATE">20050831
</ARCEFFECTIVEDATE>
<KEY1 NAME="COMPANY">SAMPCO</KEY1>
<KEY2 NAME="LOB">MULTI-PRL</KEY2>
<KEYID NAME="POLICYNUM">205776255</KEYID>
<TRANCODE NAME="TRANCODE">NB</TRANCODE>
<STATUSCODE NAME="STATUSCODE">W</STATUSCODE>
<DESC NAME="DESC">XML FIELDS EXPORT EXAMPLE</DESC>
<LOCID NAME="" />
<SUBLOCID NAME="" />
<JURISDICTN NAME="" />
<TRNNAME NAME="" />
<QUEUEID NAME="" />
<GUIDKEY NAME="GUIDKEY">85F0B38055624FABBB0870699BF919C7
</GUIDKEY>
<WIPKEYS>
<KEY1 NAME="COMPANY">SAMPCO</KEY1>
<KEY2 NAME="LOB">MULTI-PRL</KEY2>
<KEYID NAME="POLICYNUM">205776255</KEYID>
<RECTYPE NAME="RECTYPE">00</RECTYPE>
<CREATETIME NAME="CREATETIME">20050831</CREATETIME>
<ORIGUSER NAME="ORIGUSER">DEMO1</ORIGUSER>
<CURRUSER NAME="CURRUSER">DEMO1</CURRUSER>
<MODIFYTIME NAME="MODIFYTIME">20050831</MODIFYTIME>
<FORMSETID NAME="FORMSETID">00000008</FORMSETID>
<TRANCODE NAME="TRANCODE"">NB</TRANCODE>
<STATUSCODE NAME="STATUSCODE">W</STATUSCODE>
<FROMUSER NAME="FROMUSER">DEMO1</FROMUSER>
<FROMTIME NAME="FROMTIME" />
<TOUSER NAME="TOUSER" />
<TOTIME NAME="TOTIME" />
<DESC NAME="DESC">XML FIELDS EXPORT EXAMPLE</DESC>
<INUSE NAME="" />
<ARCKEY NAME="ARCKEY" />
230

Importing and Exporting WIP, NAFile, and POLFile Information
<APPDATA NAME="APPDATA" />
<RECNUM NAME="RECNUM">3</RECNUM>
<LOCID NAME="" />
<SUBLOCID NAME="" />
<JURISDICTN NAME="" />
<TRNNAME NAME="" />
<QUEUEID NAME="" />
<GUIDKEY NAME="" />
<CUSTOMKEYS>
<KEY NAME="RECINUSE" />
<KEY NAME="RUNDATE">20050831</KEY>
</CUSTOMKEYS>
</WIPKEYS>
...
</DOCSET>
</DOCUMENT>
This WIPData control group is set:
< WIPData >
(Standard WIP key) =
(Standard WIP key or custom WIP field) =
DefaultKeys2XML =
WIPKeys2XML =
NOTE: Keep in mind that for archived data, the control group is ArcRet and name of the fourth INI option is ARCKeys2XML instead of WIPKeys2XML. Other options are the same as those shown in this table.
Here is an example of the INI options you could use:
< ArcRet >
APPIDX = d:\docserv\mstrres\Sampco\arc\appidx
ARCPath = d:\docserv\mstrres\Sampco\arc\
CARFile = d:\docserv\mstrres\Sampco\arc\archive
Catalog = d:\docserv\mstrres\Sampco\arc\catalog
CARPath = d:\docserv\mstrres\Sampco\arc
APPIDXDFD = d:\docserv\mstrres\Sampco\arc\AppIdx.Dfd
Option Description
(Standard WIP key) Use this option to map a corresponding custom WIP field so that when a XML tree is exported, the standard WIP key becomes the XML element tag name and the mapped custom WIP field becomes the value of its attribute NAME.
(Standard W IP key or custom W IP field)
Use this option to exclude a standard WIP key or a custom WIP field from the exported XML tree.
DefaultKeys2XML Enter No to prevent the system from exporting all of the new WIP fields (LocID, SubLocID, Jurisdictn, TrnName, QueueID, and GuidKey). The default is Yes.
WIPKeys2XML Enter No to prevent the system from exporting <WIPKEYS> and its children. The default is Yes.
231
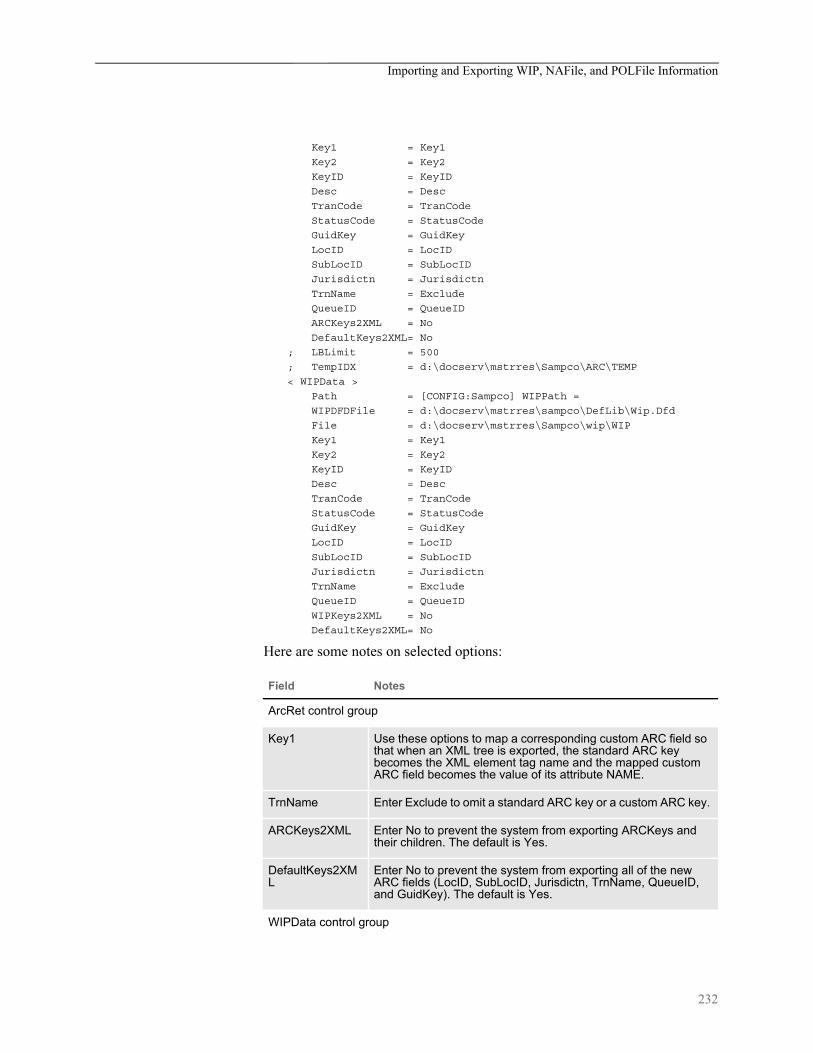
Importing and Exporting WIP, NAFile, and POLFile Information
Key1 = Key1
Key2 = Key2
KeyID = KeyID
Desc = Desc
TranCode = TranCode
StatusCode = StatusCode
GuidKey = GuidKey
LocID = LocID
SubLocID = SubLocID
Jurisdictn = Jurisdictn
TrnName = Exclude
QueueID = QueueID
ARCKeys2XML = No
DefaultKeys2XML= No
; LBLimit = 500
; TempIDX = d:\docserv\mstrres\Sampco\ARC\TEMP
< WIPData >
Path = [CONFIG:Sampco] WIPPath =
WIPDFDFile = d:\docserv\mstrres\sampco\DefLib\Wip.Dfd
File = d:\docserv\mstrres\Sampco\wip\WIP
Key1 = Key1
Key2 = Key2
KeyID = KeyID
Desc = Desc
TranCode = TranCode
StatusCode = StatusCode
GuidKey = GuidKey
LocID = LocID
SubLocID = SubLocID
Jurisdictn = Jurisdictn
TrnName = Exclude
QueueID = QueueID
WIPKeys2XML = No
DefaultKeys2XML= No
Here are some notes on selected options:
Field Notes
ArcRet control group
Key1 Use these options to map a corresponding custom ARC field so that when an XML tree is exported, the standard ARC key becomes the XML element tag name and the mapped custom ARC field becomes the value of its attribute NAME.
TrnName Enter Exclude to omit a standard ARC key or a custom ARC key.
ARCKeys2XML Enter No to prevent the system from exporting ARCKeys and their children. The default is Yes.
DefaultKeys2XML
Enter No to prevent the system from exporting all of the new ARC fields (LocID, SubLocID, Jurisdictn, TrnName, QueueID, and GuidKey). The default is Yes.
WIPData control group
232

Importing and Exporting WIP, NAFile, and POLFile Information
NOTE: You must map the custom fields to the standard WIP keys. Otherwise, the system exports them under CUSTOMKEYS as shown in the example XML tree format.
Keep in mind that Key fields are always exported according to the standard WIP keys. If a standard WIP key does not map to a custom WIP field, it exported as an empty tag and its attribute NAME does not have a value, such as INUSE, LOCID, and so on. Custom WIP fields that are not mapped to standard WIP keys are grouped into CUSTOMKEYS.
Key1 Use these options to map a corresponding custom WIP field so that when a XML tree is exported, the standard WIP key becomes the XML element tag name and the mapped custom WIP field becomes the value of its attribute NAME.
WIPDFDFile This option defines a custom WIPDFD. Key1, Key2, and KeyID are standard WIP keys used to map these custom WIP fields: COMPANY, LOB, and POLICYNUM.
TrnName Enter Exclude to omit a standard WIP key or a custom WIP key.
WIPKeys2XML Enter No to prevent the system from exporting WIPKeys and their children. The default is Yes.
DefaultKeys2XML
Enter No to prevent the system from exporting all of the new WIP fields (LocID, SubLocID, Jurisdictn, TrnName, QueueID, and GuidKey). The default is Yes.
Field Notes
233
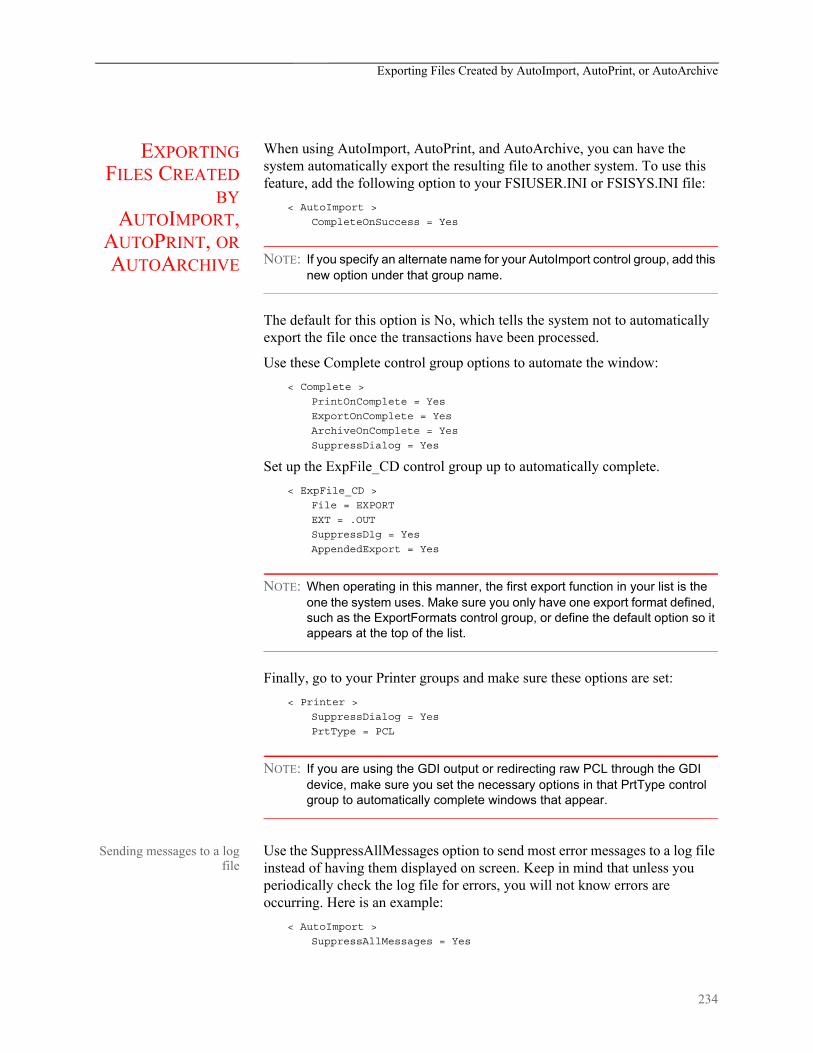
Exporting Files Created by AutoImport, AutoPrint, or AutoArchive
EXPORTINGFILES CREATED
BYAUTOIMPORT,
AUTOPRINT, ORAUTOARCHIVE
When using AutoImport, AutoPrint, and AutoArchive, you can have the system automatically export the resulting file to another system. To use this feature, add the following option to your FSIUSER.INI or FSISYS.INI file:
< AutoImport >
CompleteOnSuccess = Yes
NOTE: If you specify an alternate name for your AutoImport control group, add this new option under that group name.
The default for this option is No, which tells the system not to automatically export the file once the transactions have been processed.
Use these Complete control group options to automate the window:
< Complete >
PrintOnComplete = Yes
ExportOnComplete = Yes
ArchiveOnComplete = Yes
SuppressDialog = Yes
Set up the ExpFile_CD control group up to automatically complete.
< ExpFile_CD >
File = EXPORT
EXT = .OUT
SuppressDlg = Yes
AppendedExport = Yes
NOTE: When operating in this manner, the first export function in your list is the one the system uses. Make sure you only have one export format defined, such as the ExportFormats control group, or define the default option so it appears at the top of the list.
Finally, go to your Printer groups and make sure these options are set:
< Printer >
SuppressDialog = Yes
PrtType = PCL
NOTE: If you are using the GDI output or redirecting raw PCL through the GDI device, make sure you set the necessary options in that PrtType control group to automatically complete windows that appear.
Sending messages to a logfile
Use the SuppressAllMessages option to send most error messages to a log file instead of having them displayed on screen. Keep in mind that unless you periodically check the log file for errors, you will not know errors are occurring. Here is an example:
< AutoImport >
SuppressAllMessages = Yes
234
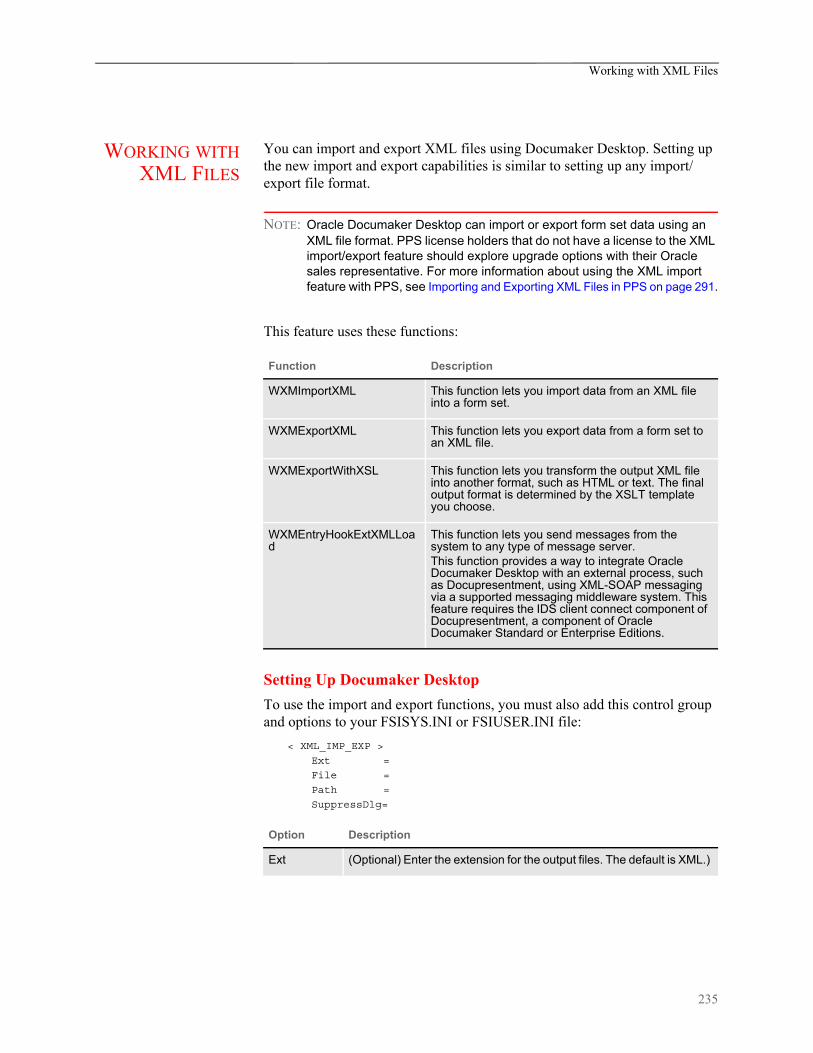
Working with XML Files
WORKING WITHXML FILES
You can import and export XML files using Documaker Desktop. Setting up the new import and export capabilities is similar to setting up any import/export file format.
NOTE: Oracle Documaker Desktop can import or export form set data using an XML file format. PPS license holders that do not have a license to the XML import/export feature should explore upgrade options with their Oracle sales representative. For more information about using the XML import feature with PPS, see Importing and Exporting XML Files in PPS on page 291.
This feature uses these functions:
Setting Up Documaker Desktop
To use the import and export functions, you must also add this control group and options to your FSISYS.INI or FSIUSER.INI file:
< XML_IMP_EXP >
Ext =
File =
Path =
SuppressDlg=
Function Description
WXMImportXML This function lets you import data from an XML file into a form set.
WXMExportXML This function lets you export data from a form set to an XML file.
WXMExportWithXSL This function lets you transform the output XML file into another format, such as HTML or text. The final output format is determined by the XSLT template you choose.
WXMEntryHookExtXMLLoad
This function lets you send messages from the system to any type of message server.This function provides a way to integrate Oracle Documaker Desktop with an external process, such as Docupresentment, using XML-SOAP messaging via a supported messaging middleware system. This feature requires the IDS client connect component of Docupresentment, a component of Oracle Documaker Standard or Enterprise Editions.
Option Description
Ext (Optional) Enter the extension for the output files. The default is XML.)
235

Working with XML Files
File (Optional) Enter a file name, such as XMLEXP. If you omit this option the system prompts the user to enter the file name.
Path (Optional) Enter the path, such as \xmlfile. If you omit this option, the system defaults to the current directory.
SuppressDlg
(Optional) Enter Yes to suppress the File Selection window. The default is No.
Option Description
236

Working with XML Files
Follow the instructions below to complete the import, export, and messaging setup.
Setting up the XML exportformat
Follow these steps to set up the XML export format:
1 Open the FSISYS.INI file in the resource library for which you want to use export files. You can use any text editor to open this file.
2 Locate the ExportFormats control group. Most text editors have a find or search function you can use to quickly find this group heading. Then add the following line:
This assumes 09 is not already being used. Here is an example:
< ExportFormats >
09=;XM;XML Export;WXMW32->WXMExportXML
Setting up the XML importformat
Follow these steps to set up the XML import format:
1 Open the FSISYS.INI file in the resource library for which you want to use export files. You can use a text editor to open this file.
2 Locate the ImportFormats control group. Most text editors have a find or search function you can use to quickly find this control group. Then add the following line:
This assumes 09 is not already being used. Here is an example:
< ImportFormats >
09=;XM;XML Import;WXMW32->WXMImportXML
Setting up the XMLmessage format
To send a message from Documaker Desktop to an external system such as IDS (Docupresentment) via messaging middleware such IBM WebSphere MQ, you must add the EntryFormSet INI option. Follow these steps:
1 Open the FSISYS.INI file in the resource library for which you want to use export files. You can use any text editor to open this file.
2 Locate the AFEProcedures control group. Most text editors have a find or search function you can use to quickly find this group heading. Then add the following option:
For this export format Enter...
XML 09=;XM ;XM L Export;W XM W 32->W XM ExportXM L
For this import format Enter...
XML 09=;XM ;XM L Im port;W XM W 32->W XM Im portXM L
For this option Enter...
EntryFormSet W XM W 32->W XM EntryH ookExtXM LLoad
237

Working with XML Files
Here is an example:
< AFEProcedures >
EntryFormset = WXMW32->WXMEntryHookExtXMLLoad
Setting Up IDS
If you are using IDS as the message server, you must also add the INI options shown below to let Documaker Desktop retrieve an archived record from IDS and load data into a form set before any data is entered by a user.
The archived record is retrieved using the Key1, Key2, and KeyID entered on the New Form Set window. For this to happen, you must set up the following request type in the DOCSERV.INI file for IDS:
< ReqType:GetXML>
function = atcw32->ATCLogTransaction
function = atcw32->ATCLoadAttachment
function = atcw32->ATCUnloadAttachment
function = dprw32->DPRSetConfig
function = dprw32->DPRLocateOneRecord,Key1,Key2,KeyID
function = dprw32->DPRRetrieveFormset
function = dprw32->DPRPrint
function = dprw32->DPRProcessTemplates
function = atcw32->ATCSendFile, DOCC_XML, SENDBACKPAGE, TEXT
You can use any name for the archive library, as long as the same MRL name is used in Documaker Desktop.
You can set up the new function as an entry hook:
< AFEProcedures >
EntryFormset = WXMW32->WXMEntryHookExtXMLLoad
If you set it up as an entry hook, you must also set up these INI options:
< XML_IMP_EXP >
DSIUseNTUserID =
DSIVARS =
DSIIgnoreTimeoutError =
DSIAttachedVarFile =
DSIImportLevel =
DSITimeout =
DSIReqType =
DSIRecordDFD =
238

Working with XML Files
If the request for an XML file comes back with an error, as opposed to a time-out, IDS displays an error message.
Option Description
DSIUseNTUserID (Optional) Set this option to Yes to use the NT user ID. The default is No. This gives you a way to pass the NT user ID in the queue instead of the normal DMWS ID.
DSIVARS (Optional) Enter variable;value, where variable is the variable name and value is its value. This lets you identify a constant list of variables to be sent in the queue.
DSIIgnoreTimeoutError
(Optional) Enter Yes to continue processing if a timeout interval occurs. The default is No. This gives you a way to ignore a timeout interval when waiting on a return queue.
DSIAttachedVarFile (Optional) The default is DOCC_XML. Set this option to the attachment name if it differs from DOCC_XML. This gives you a way to specify the variable name the XML file is attached to.
DSIImportLevel (Optional) This option is typically used by programmers. Enter 2 if you want the hook to operate on the FAP_MSGOPEN level. Enter 3 if you want it to operate on the FAP_MSGRUN level. The default is two (2).
DSITimeout (Optional) Enter the number of milliseconds you want for the timeout interval. The default is 60000 milliseconds or 60 seconds.
DSIReqType (Optional) Enter the name of the request type of the message placed in the queue. The default is GETXML.
DSIRecordDFD (Optional) Enter the name of a DFD file. The system tries to match variable fields sent in the request to field values in this DFD file. It then attaches the DFD record to the end of the message.
239

Working with XML Files
XML FILE FORMAT
Here is an example of the format of the XML file the system creates:
Form set global data
Group
Form
Multi-page section
Multi-line field
Form global fields
Recipient information
Page
Multi-page form
Section local fields
<?xml version="1.0" encoding="UTF-8"?><DOCUMENT TYPE="RPWIP" VERSION="10.2">
<DOCSET NAME=""><FIELD NAME="POLICY NBR">P1234-1</FIELD><FIELD NAME="RENEWAL NBR">1234-2</FIELD><FIELD NAME="AGENT'S NBR">6789</FIELD><FIELD NAME="EFFECT DATE">10/1/02</FIELD><FIELD NAME="EXPIRE DATE">10/1/03</FIELD><FIELD NAME="INSURED NAME">John A. Doe</FIELD><FIELD NAME="ADDR1">2345 Anystreet</FIELD><FIELD NAME="CITY">Anytown</FIELD><FIELD NAME="STATE">GA</FIELD><FIELD NAME="ZIP CODE">30339</FIELD><FIELD NAME="BUSINESS DESC1">Business</FIELD><FIELD NAME="BUSINESS DESC2">Personal</FIELD><FIELD NAME="BUSINESS DESC3">Property</FIELD><FIELD NAME="DATE">09/27/02</FIELD><GROUP NAME="" NAME1="DOCUCORP PACKAGE"NAME2="PROFESSIONAL INSURANCE"><FORM NAME="Professional Dec"><DESCRIPTION>Professional Declarations</DESCRIPTION>
<FIELD NAME="FORM LINE1">Form Letter</FIELD><RECIPIENT NAME="AGENT" COPYCOUNT="1"/><RECIPIENT NAME="HOME OFFICE" COPYCOUNT="1"/><RECIPIENT NAME="INSURED" COPYCOUNT="1"/><SHEET><PAGE><SECTION NAME="profdec"/>
</PAGE></SHEET>
</FORM><FORM NAME="Form Letter"><DESCRIPTION>Form Letter</DESCRIPTION><RECIPIENT NAME="AGENT" COPYCOUNT="1"/><RECIPIENT NAME="HOME OFFICE" COPYCOUNT="1"/><RECIPIENT NAME="INSURED" COPYCOUNT="1"/><SHEET><PAGE><SECTION NAME="let~tbl"><FIELD NAME="Coverage">Automobile</FIELD><FIELD NAME="Extra"><P><FONT SIZE="12"FACE="Univers ATT" COLOR="#FF0000">Text inmultiline variable field.</FONT></P>
</FIELD></SECTION>
</PAGE><PAGE><SECTION NAME="let~tbl"><DAPINSTANCE VALUE="2"/><DAPOPTIONS VALUE="M"/>
</SECTION></PAGE>
</SHEET></FORM>
</GROUP></DOCSET>
</DOCUMENT>
Indicates a second page
240

Working with XML Files
Keep in mind...
• DAPOPTIONS should have a value of M for multi-page sections (FAP files). There are other section options, but only M is applicable in XML.
Use DAPINSTANCE to provide a page number for multi-page sections. If the section does not span multiple pages, omit the DAPINSTANCE value.
• When you have multiple XML transactions within a single file, separate each transaction with a line feed. This is a requirement of Documaker software, not the XML parser.
• Although you do not have to include line feeds inside the XML for a transaction, we suggest you add a line feed after each element tag. This makes it easier to read the file and helps in debugging your XML. A message like
Line 255, column 8, syntax is incorrect
is easier to diagnose than
Line 1, column 156780, syntax is incorrect.
241
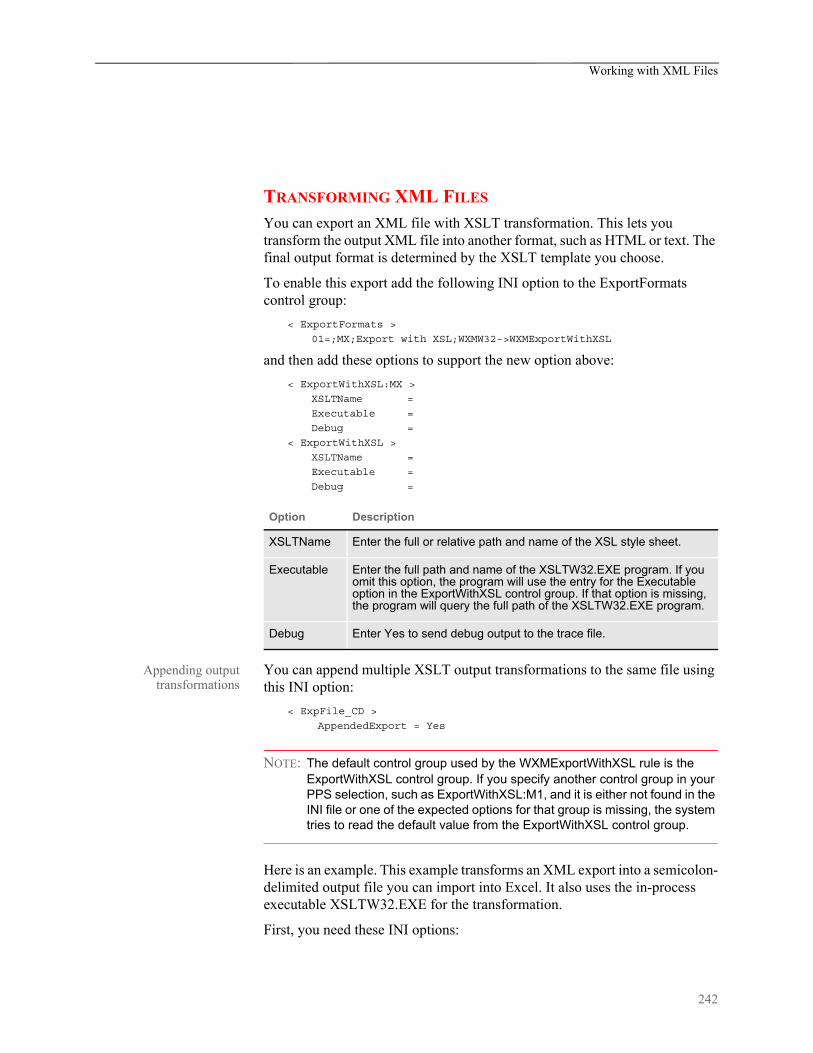
Working with XML Files
TRANSFORMING XML FILES
You can export an XML file with XSLT transformation. This lets you transform the output XML file into another format, such as HTML or text. The final output format is determined by the XSLT template you choose.
To enable this export add the following INI option to the ExportFormats control group:
< ExportFormats >
01=;MX;Export with XSL;WXMW32->WXMExportWithXSL
and then add these options to support the new option above:
< ExportWithXSL:MX >
XSLTName =
Executable =
Debug =
< ExportWithXSL >
XSLTName =
Executable =
Debug =
Appending outputtransformations
You can append multiple XSLT output transformations to the same file using this INI option:
< ExpFile_CD >
AppendedExport = Yes
NOTE: The default control group used by the WXMExportWithXSL rule is the ExportWithXSL control group. If you specify another control group in your PPS selection, such as ExportWithXSL:M1, and it is either not found in the INI file or one of the expected options for that group is missing, the system tries to read the default value from the ExportWithXSL control group.
Here is an example. This example transforms an XML export into a semicolon-delimited output file you can import into Excel. It also uses the in-process executable XSLTW32.EXE for the transformation.
First, you need these INI options:
Option Description
XSLTName Enter the full or relative path and name of the XSL style sheet.
Executable Enter the full path and name of the XSLTW32.EXE program. If you omit this option, the program will use the entry for the Executable option in the ExportWithXSL control group. If that option is missing, the program will query the full path of the XSLTW32.EXE program.
Debug Enter Yes to send debug output to the trace file.
242

Working with XML Files
< ExportWithXSL:M1 >
XSLTName = x:\rp\mstrres\aeic\xsl\output1.xsl
Debug = no
And this XSL style sheet:
<?xml version="1.0" encoding="UTF-8"?>
<xsl:stylesheet
xmlns:xsl="http://www.w3.org/1999/XSL/Transform" version="1.0">
<xsl:output method="text" encoding="ISO-8859-1" />
<!-- global variables -->
<xsl:template match="/">
<xsl:call-template name="process"/>
</xsl:template>
<xsl:template name="process">
<xsl:variable name="semicolon" select="';'"/>
<xsl:variable name="root" select="DOCUMENT/DOCSET"/>
<xsl:variable name="policy" select="$root/FIELD[@NAME='POLICY']"/>
<xsl:variable name="insnam" select="$root/FIELD[@NAME='INSNAM']"/>
<xsl:variable name="insnam2" select="$root/FIELD[@NAME='INSNAM2']"/>
<xsl:variable name="insad1" select="$root/FIELD[@NAME='INSAD1']"/>
<xsl:variable name="insad2" select="$root/FIELD[@NAME='INSAD2']"/>
<xsl:variable name="inszip" select="$root/FIELD[@NAME='INSZIP']"/>
<xsl:variable name="agent" select="$root/FIELD[@NAME='AGENT']"/>
<xsl:variable name="effdte" select="$root/FIELD[@NAME='EFFDTE']"/>
<xsl:variable name="expdte" select="$root/FIELD[@NAME='EXPDTE']"/>
<xsl:variable name="cddesc" select="$root/FIELD[@NAME='CDDESC_BUSDSC']"/>
<xsl:variable name="premo_prop" select="$root/FIELD[@NAME='PREMO_PROP']"/>
<xsl:variable name="advprem" select="$root/FIELD[@NAME='ADVPREM']"/>
<xsl:variable name="totpre" select="$root/FIELD[@NAME='TOTPRE']"/>
<xsl:variable name="galmt" select="$root/FIELD[@NAME='GALMT']"/>
<xsl:variable name="prcolmt" select="$root/FIELD[@NAME='PRCOLMT']"/>
<xsl:variable name="pailmt" select="$root/FIELD[@NAME='PAILMT']"/>
243

Working with XML Files
<xsl:variable name="perocc" select="$root/FIELD[@NAME='PEROCC']"/>
<xsl:variable name="fdlmt" select="$root/FIELD[@NAME='FDLMT']"/>
<xsl:variable name="medlmt" select="$root/FIELD[@NAME='MEDLMT']"/>
<xsl:value-of select="concat($policy, $semicolon)"/>
<xsl:value-of select="concat($insnam, $semicolon)"/>
<xsl:value-of select="concat($insnam2, $semicolon)"/>
<xsl:value-of select="concat($insad1, $semicolon)"/>
<xsl:value-of select="concat($insad2, $semicolon)"/>
<xsl:value-of select="concat($inszip, $semicolon)"/>
<xsl:value-of select="concat($agent, $semicolon)"/>
<xsl:value-of select="concat($effdte, $semicolon)"/>
<xsl:value-of select="concat($expdte, $semicolon)"/>
<xsl:value-of select="concat($cddesc, $semicolon)"/>
<xsl:value-of select="concat($premo_prop, $semicolon)"/>
<xsl:value-of select="concat($advprem, $semicolon)"/>
<xsl:value-of select="concat($totpre, $semicolon)"/>
<xsl:value-of select="concat($galmt, $semicolon)"/>
<xsl:value-of select="concat($prcolmt, $semicolon)"/>
<xsl:value-of select="concat($pailmt, $semicolon)"/>
<xsl:value-of select="concat($perocc, $semicolon)"/>
<xsl:value-of select="concat($fdlmt, $semicolon)"/>
<xsl:value-of select="concat($medlmt, $semicolon)"/>
<xsl:text>
</xsl:text>
</xsl:template>
</xsl:stylesheet>
And this XML export file:
<?xml version="1.0" encoding="UTF-8" ?>
- <DOCUMENT TYPE="RPWIP" VERSION="10.2">
- <DOCSET NAME="">
<FIELD NAME="POLICY">A108</FIELD>
<FIELD NAME="INSNAM">SAM MALONE</FIELD>
<FIELD NAME="INSNAM2">CHEERS, INC.</FIELD>
<FIELD NAME="NEW">X</FIELD>
<FIELD NAME="INSAD1">123 MAIN ST</FIELD>
<FIELD NAME="INSAD2">SUITE 100</FIELD>
<FIELD NAME="INSCTY">ATLANTA</FIELD>
<FIELD NAME="INSST">GA</FIELD>
<FIELD NAME="INSZIP">23033</FIELD>
<FIELD NAME="AGENT">12345</FIELD>
<FIELD NAME="AGYNAM">Docucorp Insurance Agency</FIELD>
<FIELD NAME="AGYAD1">2727 Paces Ferry Road S.E.</FIELD>
<FIELD NAME="AGYAD2">Suite II-900</FIELD>
244
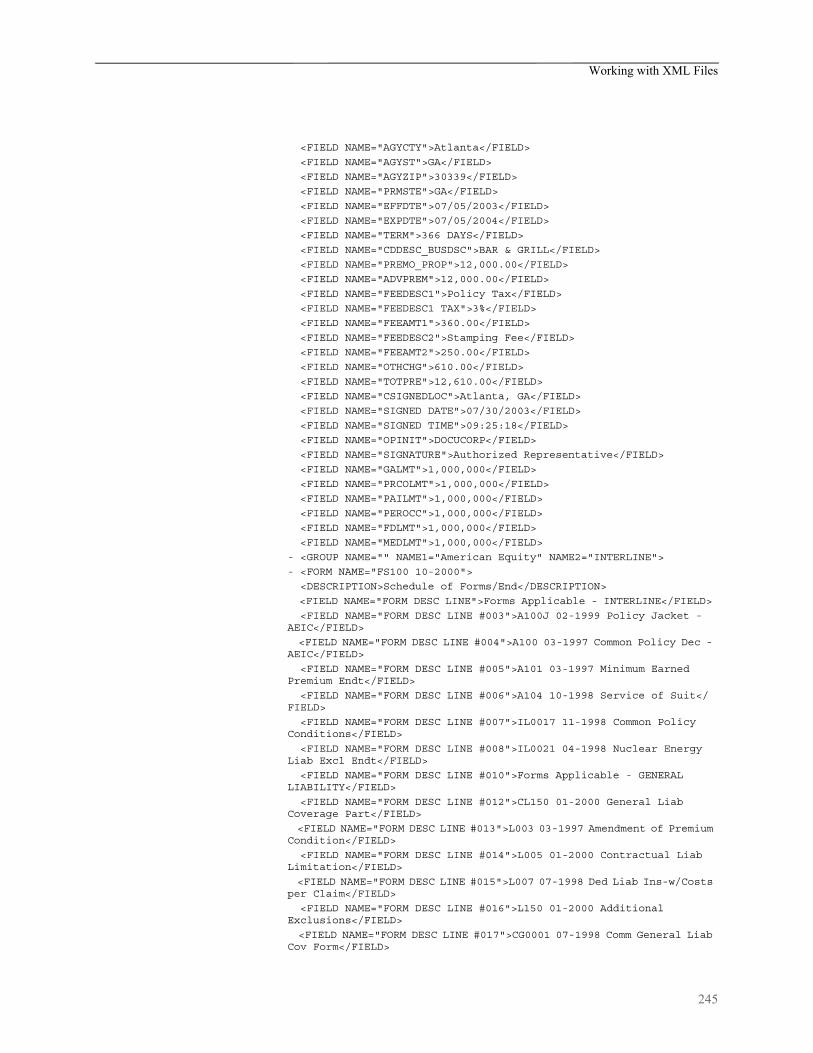
Working with XML Files
<FIELD NAME="AGYCTY">Atlanta</FIELD>
<FIELD NAME="AGYST">GA</FIELD>
<FIELD NAME="AGYZIP">30339</FIELD>
<FIELD NAME="PRMSTE">GA</FIELD>
<FIELD NAME="EFFDTE">07/05/2003</FIELD>
<FIELD NAME="EXPDTE">07/05/2004</FIELD>
<FIELD NAME="TERM">366 DAYS</FIELD>
<FIELD NAME="CDDESC_BUSDSC">BAR & GRILL</FIELD>
<FIELD NAME="PREMO_PROP">12,000.00</FIELD>
<FIELD NAME="ADVPREM">12,000.00</FIELD>
<FIELD NAME="FEEDESC1">Policy Tax</FIELD>
<FIELD NAME="FEEDESC1 TAX">3%</FIELD>
<FIELD NAME="FEEAMT1">360.00</FIELD>
<FIELD NAME="FEEDESC2">Stamping Fee</FIELD>
<FIELD NAME="FEEAMT2">250.00</FIELD>
<FIELD NAME="OTHCHG">610.00</FIELD>
<FIELD NAME="TOTPRE">12,610.00</FIELD>
<FIELD NAME="CSIGNEDLOC">Atlanta, GA</FIELD>
<FIELD NAME="SIGNED DATE">07/30/2003</FIELD>
<FIELD NAME="SIGNED TIME">09:25:18</FIELD>
<FIELD NAME="OPINIT">DOCUCORP</FIELD>
<FIELD NAME="SIGNATURE">Authorized Representative</FIELD>
<FIELD NAME="GALMT">1,000,000</FIELD>
<FIELD NAME="PRCOLMT">1,000,000</FIELD>
<FIELD NAME="PAILMT">1,000,000</FIELD>
<FIELD NAME="PEROCC">1,000,000</FIELD>
<FIELD NAME="FDLMT">1,000,000</FIELD>
<FIELD NAME="MEDLMT">1,000,000</FIELD>
- <GROUP NAME="" NAME1="American Equity" NAME2="INTERLINE">
- <FORM NAME="FS100 10-2000">
<DESCRIPTION>Schedule of Forms/End</DESCRIPTION>
<FIELD NAME="FORM DESC LINE">Forms Applicable - INTERLINE</FIELD>
<FIELD NAME="FORM DESC LINE #003">A100J 02-1999 Policy Jacket - AEIC</FIELD>
<FIELD NAME="FORM DESC LINE #004">A100 03-1997 Common Policy Dec - AEIC</FIELD>
<FIELD NAME="FORM DESC LINE #005">A101 03-1997 Minimum Earned Premium Endt</FIELD>
<FIELD NAME="FORM DESC LINE #006">A104 10-1998 Service of Suit</FIELD>
<FIELD NAME="FORM DESC LINE #007">IL0017 11-1998 Common Policy Conditions</FIELD>
<FIELD NAME="FORM DESC LINE #008">IL0021 04-1998 Nuclear Energy Liab Excl Endt</FIELD>
<FIELD NAME="FORM DESC LINE #010">Forms Applicable - GENERAL LIABILITY</FIELD>
<FIELD NAME="FORM DESC LINE #012">CL150 01-2000 General Liab Coverage Part</FIELD>
<FIELD NAME="FORM DESC LINE #013">L003 03-1997 Amendment of Premium Condition</FIELD>
<FIELD NAME="FORM DESC LINE #014">L005 01-2000 Contractual Liab Limitation</FIELD>
<FIELD NAME="FORM DESC LINE #015">L007 07-1998 Ded Liab Ins-w/Costs per Claim</FIELD>
<FIELD NAME="FORM DESC LINE #016">L150 01-2000 Additional Exclusions</FIELD>
<FIELD NAME="FORM DESC LINE #017">CG0001 07-1998 Comm General Liab Cov Form</FIELD>
245

Working with XML Files
<FIELD NAME="FORM DESC LINE #018">CG2160 09-1998 Excl - Year 2000 Computer Prob</FIELD>
<RECIPIENT NAME="EXTRA COPY" COPYCOUNT="1" />
<RECIPIENT NAME="GENERAL AGENT" COPYCOUNT="1" />
<RECIPIENT NAME="HOME OFFICE" COPYCOUNT="1" />
<RECIPIENT NAME="ORIGINAL" COPYCOUNT="1" />
<RECIPIENT NAME="RETAIL AGENT" COPYCOUNT="1" />
- <SHEET>
- <PAGE>
<SECTION NAME="FORMSCHA" />
</PAGE>
</SHEET>
</FORM
</DOCSET>
</DOCUMENT>
The output file looks like this:
A108;SAM MALONE;CHEERS, INC.;123 MAIN ST;SUITE 100;23033;12345;07/05/2003;07/05/2004;; 12,000.00; 12,000.00;;1,000,000;1,000,000;1,000,000;1,000,000;1,000,000;1,000,000;
You can import this file into an Excel spreadsheet.
246

Multiple User and Networking Issues
MULTIPLE USERAND
NETWORKINGISSUES
In a networked, multi-user environment you must carefully handle files to avoid conflicts. Two users trying to write to the same file at the same time is an obvious problem. In addition, problems can arise if one user tries to read a file, while another is writing to it. The import and export features of the system avoid these types of file conflicts.
When a user imports a file, the system opens the file and prevents or delays other users from writing to that file. Likewise, while a user is writing and exporting a file, other users are prevented or delayed from reading or writing to that same file. Multiple users can, however, read from the same import file at the same time.
When a conflict occurs, the workstation attempts to secure the file (in the proper mode) for up to 15 seconds. If the file becomes available within that time, the requested operation continues as expected. If, however, the file does not become available, the operation fails and the system displays a message. If the user is exporting a file, the message tells the user the export failed and asks if the user wants to try again. If the user is importing a file, the message simply states that the import file is invalid.
To change the delay or wait time, set the FSIWAIT environment variable to the number of seconds you want the system to wait. Place this setting in your AUTOEXEC.BAT file. For example, enter…
SET FSIWAIT=number of seconds
If you set FSIWAIT too low, operations may fail more frequently on a heavily used network. If you set it too high, the user may become concerned the program is no longer functioning.
NOTE: If you set FSIWAIT to zero, the system uses the default of 15 seconds instead. The least amount of wait time you can specify is one second.
Most of the time, users will be unaware of any delay because the import and export processes typically take only a second or two. The file is then released to other users.
Problems may still arise in environments where users open the import or export file in a file editor or some other program that keeps the file opened.
247

Bypassing Triggers when Importing Forms and Sections
BYPASSINGTRIGGERS WHEN
IMPORTINGFORMS AND
SECTIONS
In some situations, you may want to create a document set using an import method, but still want triggers applied to get additional forms. In such a situation, you would not want the system to actually evaluate the trigger to determine whether the form should be a part of the imported document set, you just want the system to assume the triggering condition has been met.
To handle this situation, you can use the XML and standard (V2) import methods to now flag imported forms, sections, and recipients. You tell the system to use these flags to perform or skip all or part of a trigger when building the form set.
The normal RunSetRcpTbl rule triggering automatically detects when you have imported a form set by looking for the internal flag mentioned above. This means you do not have to change any of your existing form or section triggers to make this work.
This pre-scan check only minimally impacts implementations that are doing imports because the scan stops at the point where the first import flag is discovered. When you are running without doing an import, there are no forms in memory when triggering begins so the pre-scan has no effect.
Here is a summary of how the triggering process occurs when an imported form set precedes the triggering process:
1 When a form trigger is recognized, the system determines whether the form is part of the document set. If so, the system skips the evaluation of the form trigger. If the form was not defined during the import, the form trigger is evaluated normally.
2 If the evaluation portion of a form trigger was skipped because the form was already included via the import, the system next determines if the imported form specified recipients. If it did, the recipient counts assigned by the trigger are skipped. If recipients were not provided via import for this form, the recipient values are applied to the form.
3 If the form was imported, the section triggers that comprise that form also determine if the section was part of the original import. If they were, the trigger evaluation is considered met and is skipped.
4 If the imported form included the definition of sections, no new sections are added via triggers. The system assumes that if the import file specifies sections, it will include all necessary sections to compose the form.
You can use the SkipImportCheck option to bypass this check. Typically, you would only set this option to Yes if you expect all your triggers to evaluate normally without considering whether a form was imported.
< Control >
SkipImportCheck = Yes
248

Adding Form Line and Form Description Line Information
ADDING FORMLINE AND FORM
DESCRIPTIONLINE
INFORMATION
You can use the DSAddFormLines function with Documaker Bridge import rules to add field Form Line and Form Desc Line information. This affects Documaker Desktop and the following rules:
• DPRUpdateFormsetFromXML rule (see Using the Documaker Bridge for more information)
• DPRLoadImportFile rule (see Using the Documaker Bridge for more information)
• ImportXMLExtract rule (see the Rules Reference for more information)
• ImportXMLFile rule (see the Rules Reference for more information)
Use these INI options to enable this feature:
< Control>
DoFormLines = Yes
DoFormDescLines= Yes
Use these INI options to control how the information is presented:
< FormDescTable >
BoldKey2 =
ColumnFormat =
IncludeKey2 =
IncludeKey2Name =
Key2Prefix =
Key2PreInc =
Key2PostInc =
IncludeFormName =
IncludeDuplicateForms=
ExcludedGroup =
ExcludedForm =
Option Description
DoFormLines Enter No to exclude form lines. The default is Yes.
DoFormDescLines
Enter No to exclude form description lines. The default is Yes.
249
Adding Form Line and Form Description Line Information
Option Description
BoldKey2 Use this option to present Key2 descriptions in a bold font. The system determines which font to use by querying the font defined on the field and selecting its bold equivalent. The fonts of normal Form Description Lines fields (not assigned a Key2 name) will be changed to their non-bold counterparts.If you enable this feature, the system will query the font associated with each Form Description Line field and request either the bold or non-bold equivalent from the same font family and size. If the requested font is not available, the system does not change the field’s font.To choose the bold and non-bold equivalent of a font, the system uses your FXR file, which must be defined properly. Each font listed in the FXR file has a stroke weight assigned to it. The stroke weight indicates the boldness of the font.
ColumnFormat Set this option to No to have the system append the form description to the end of the form name, separated by two spaces. The default is Yes, which formats the form lines in a columnar fashion.
IncludeKey2 Use this option to enable or disable Key2 descriptions. To enable Key2 descriptions, set this option to Yes. The default is No.
IncludeKey2Name Like the previous option, you can use this option to tell the system whether or not to include the Key2 group name obtained from the table in the returned description. The default is No.When you use the table feature, the system ignores the Key2Prefix option mentioned previously. The text for Key2 must appear in the table as you want it to appear on the form.If you include the Key2 name in the description text, the system pads the name with spaces up to the maximum length of a form name. This helps make sure the Form Description Lines appear as columns of data if you use a fixed pitch or non-proportional font (like Courier) to define the fields.If you do not want Key2 names included on the description line, set this option to Yes.
Key2Prefix Use this option to specify a text string which will appear before each Key2 description line. The system automatically appends a single space after the text string. By default, this option is blank and does not affect the description lines. Here is an example of how you can use this option:
Key2Prefix = Forms Applicable -
By setting the option as shown above, the system prefixes all Key2 descriptions with the specified text. For instance, the output might look like this:
Forms Applicable - General Liability Coverage
250

Adding Form Line and Form Description Line Information
Key2PreIncKey2PostInc
Use these options to add blank lines between the Key2 descriptions and the form descriptions. If you set both of these options to one (1), your output might look like this:
Forms Applicable - COMMON POLICY
DEC PAGE Common Policy DeclarationsFIL 1010 04 92 Supplemental Declarations
Forms Applicable GENERAL LIABILITY
CG DEC General Liability Declarations
If you include Key2 descriptions, the first text will always represent the first form grouping. This first Key2 description will not use the Key2PreInc option to include blank lines before the text. Subsequent groups, however, will have the specified number of blank lines before their text descriptions.
IncludeFormName When you include form description lines on a form, the system typically returns both the form name and description. The IncludeFormName option lets you omit the form name and only print the description for each form.The default is Yes. This tells the system to include the form name and description, as shown in this example:
DEC PAGE Policy declarations for all coverage
The form’s name (DEC PAGE) is included in the first portion of the string. The system pads the name with extra spaces equivalent to the maximum length of the form name to make sure the form description lines appear as columns of data if you use fixed pitch or non-proportional font (like Courier) to define the fields. To omit form names on the description line, set this option to No.Although this option is in the FormDescTable control group, you can use this option even when you do not use an associated table file to provide longer descriptions than those provided in the FORM.DAT.
IncludeDuplicateForms
When you use the Formset, Duplicate Form option to duplicate a form, the system excludes the duplicate forms from the form description lines. If you want the system to include the duplicate forms, change this option to Yes.
ExcludedGroup Enter the name of the groups (as defined in the Key2 field) you want to exclude.
ExcludedForm Enter the name of the forms you want to exclude.
Option Description
251

Chapter 5
Maintaining Your System
System maintenance ensures the integrity and smooth functionality of Documaker Desktop. System supervisors have access to maintenance functions unavailable to general system operators primarily through the Tools menu.
Maintenance functions include activities such as compressing the database, deleting form sets to maximize the system's processing efficiency, maintaining user IDs, and troubleshooting potential user ID problems. To make sure the system is fully operational at all times, you should schedule maintenance activities on a regular basis.
In addition to maintenance activities, the Tools menu lets system supervisors increase forms processing efficiency by importing multiple form sets to the WIP menu for data entry and by letting supervisors set up routing slips to direct the work flow.
This chapter discusses...
• Handling Unknown Users on page 253
• Setting Up Routing Slips on page 255
• Maintaining Form Sets on page 262
• Modifying FORM.DAT Files on page 270
• Maintaining User Information on page 275
• Splitting Archives on page 283
All activities focus on using the system on single user workstations. If you use the system on a networked system, your maintenance activities may differ slightly. Consult your network documentation for additional information.
252

Handling Unknown Users
HANDLINGUNKNOWN
USERS
You can use the AFEW32->AFEVerifyWIPUserID function to display a window which shows WIP assigned to users unknown to the system. An unknown user is a user not defined in the UserInfo database.
To use this function, add the following to your MEN.RES file. You can place this function anywhere you like, such as on the Tools menu.
MENUITEM “List WIP of Unknown Users” 283 “AFEW32->AFEVerifyWIPUserID”
“List WIP of Unknown Users” 0
You can name the menu option and window any way you like. In the example shown above, it is set to List W IP of Unknown Users. You can also enter any unused menu ID in the range of 201-300. This range of menu IDs are inactive when a form set is open and active when no form sets are open.
The zero (0) indicates the security level of the user who can use this function. Level 0 is typically used for supervisor-type functions such as this.
When you set up the function and then choose the List WIP of Unknown Users option, the WIP window that appears is a variation of the Assignment window which includes a new column listing users unknown to the system.
You can select multiple WIP records assign those records to the appropriate users. This window works like the normal Assignment window except it does not let you assign the WIP to a remote user via email.
NOTE: The CurrUser field from the WIP records tells the system which users are unknown. The system uses the CurrUser field as a key to find the user's ID in the UserInfo database.
This column lists users unknown to the system.
253

Changing the In Use Status
CHANGING THEIN USE STATUS
Changing a form set’s In Use status lets you unlock a document and make it available for editing in the WIP list. You must have a system supervisor access level to perform this task.
To change a document’s In Use status, choose the WIP, WIP List option. Then select the Change In Use option from the Task field. The Change In Use window appears.
1 Click the document whose In Use status you want to change; then, click Ok. The WIP Use Settings window appears.
2 Click the In Use status you want for the document; then, click Ok. The system returns to the Change In Use window with the new In Use status displayed.
NOTE: A blank space in the In Use column indicates a document is not in use; therefore, choosing Not in Use will leave the column blank.
3 Click the upper right corner of the Edit In Use window, or click Cancel, to close the window.
After changing a document’s In Use status you may need to change the form set’s status to place it back in the WIP list for editing. See the Documaker Desktop User Guide for information on this task.
254

Setting Up Routing Slips
SETTING UPROUTING SLIPS
Setting up routing slips lets you set up an email directory for sending documents. You can group recipients by department, or organize them in any way. When you send documents using routing slips, the system sequentially sends a document to each individual in the order they appear on your list. The system then routes the document back to you.
NOTE: All documents must be closed before you set up a routing slip.
Follow these steps to set up a routing slip:
1 Choose Tools, Routing Slips. The Routing Slips window appears.
2 Click Insert. The Insert Routing Slip window appears.
3 Type the title of the routing slip in the Routing Slip Name field; then, click Ok. The name appears in the routing slip list.
NOTE: The system limits the number of characters that display in the routing slip list to only eight, including spaces.
255
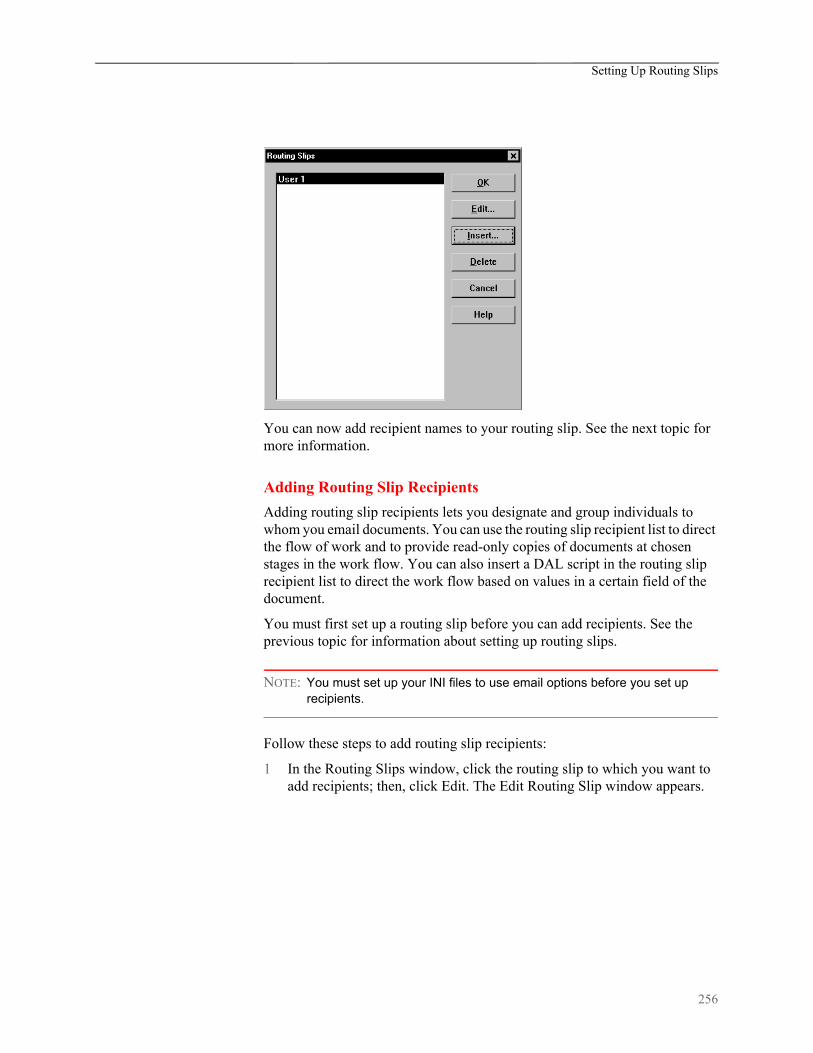
Setting Up Routing Slips
You can now add recipient names to your routing slip. See the next topic for more information.
Adding Routing Slip Recipients
Adding routing slip recipients lets you designate and group individuals to whom you email documents. You can use the routing slip recipient list to direct the flow of work and to provide read-only copies of documents at chosen stages in the work flow. You can also insert a DAL script in the routing slip recipient list to direct the work flow based on values in a certain field of the document.
You must first set up a routing slip before you can add recipients. See the previous topic for information about setting up routing slips.
NOTE: You must set up your INI files to use email options before you set up recipients.
Follow these steps to add routing slip recipients:
1 In the Routing Slips window, click the routing slip to which you want to add recipients; then, click Edit. The Edit Routing Slip window appears.
256
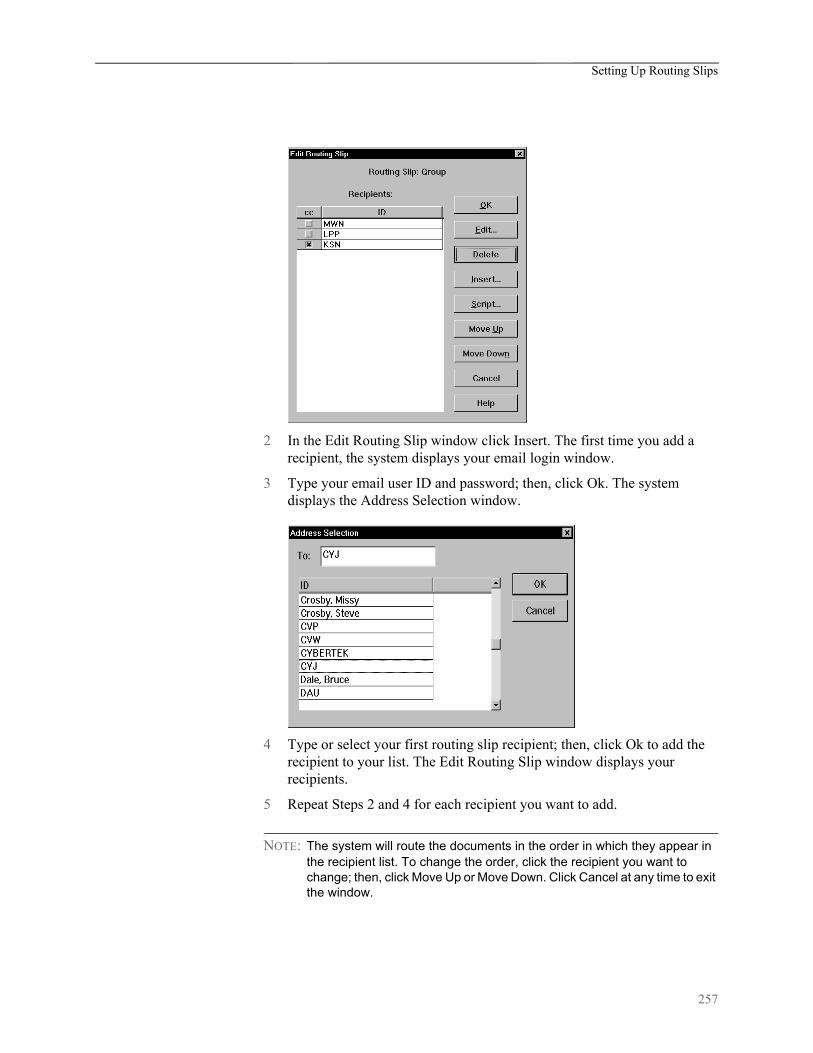
Setting Up Routing Slips
2 In the Edit Routing Slip window click Insert. The first time you add a recipient, the system displays your email login window.
3 Type your email user ID and password; then, click Ok. The system displays the Address Selection window.
4 Type or select your first routing slip recipient; then, click Ok to add the recipient to your list. The Edit Routing Slip window displays your recipients.
5 Repeat Steps 2 and 4 for each recipient you want to add.
NOTE: The system will route the documents in the order in which they appear in the recipient list. To change the order, click the recipient you want to change; then, click Move Up or Move Down. Click Cancel at any time to exit the window.
257

Setting Up Routing Slips
6 To provide a read-only copy of the form set to a recipient, click the CC column next to the recipient’s name. Read-only copies cannot have data added or modified; the recipient can only view and/or print the document. Recipients with the CC column checked receive a copy of the document the recipient above received. When the first recipient completes work on the document, it is routed to the next recipient in the list.
This table shows how routing occurs:
NOTE: You can set up routing slips in which all recipients receive read-only copies of the form set. Simply click the CC column next to each recipient’s name and the system broadcasts a read-only copy to everyone in the routing slip.
cc ID Receives…
First Person the document and completes his work. The document is then routed to Second Person.
Second Person
First Person’s completed document and enters data in his portion of the document. The package is then routed to Third Person.
X John Doe a read-only copy of the same document Second Person received.
X Jane Doe a read-only copy of the same document Second Person received.
Third Person Second Person’s completed work and enters data in his portion of the document. The package is then routed back to the originator of the package.
258
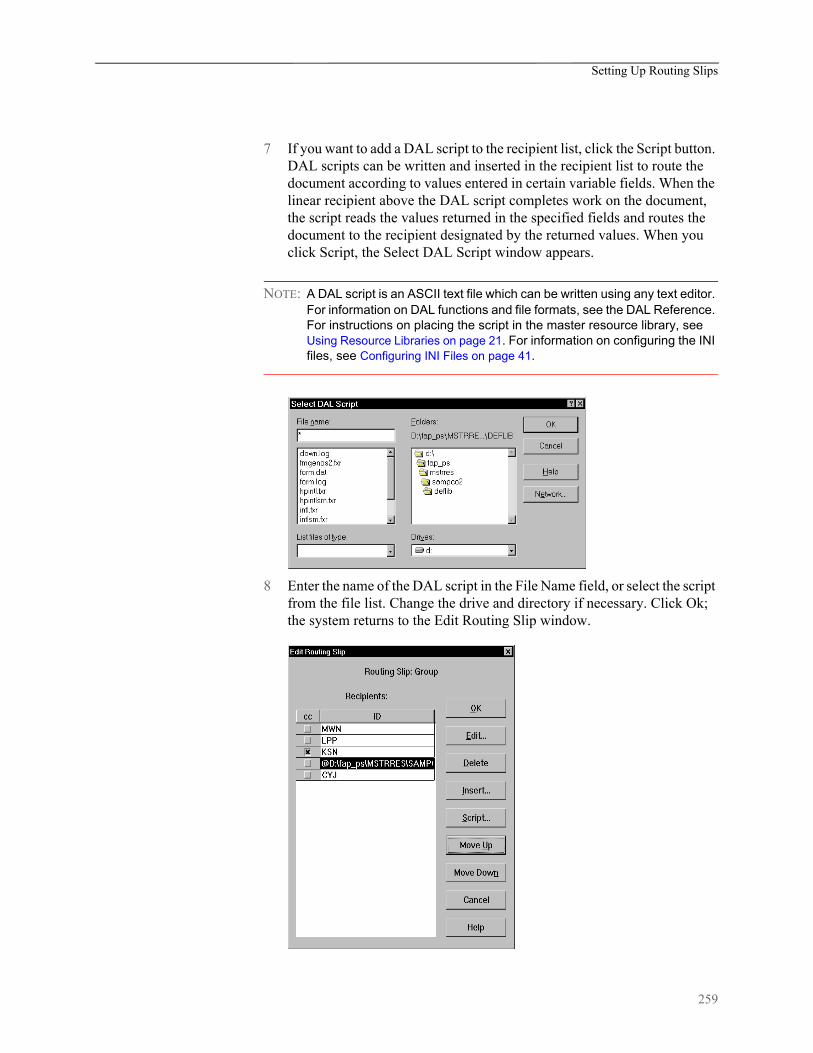
Setting Up Routing Slips
7 If you want to add a DAL script to the recipient list, click the Script button. DAL scripts can be written and inserted in the recipient list to route the document according to values entered in certain variable fields. When the linear recipient above the DAL script completes work on the document, the script reads the values returned in the specified fields and routes the document to the recipient designated by the returned values. When you click Script, the Select DAL Script window appears.
NOTE: A DAL script is an ASCII text file which can be written using any text editor. For information on DAL functions and file formats, see the DAL Reference. For instructions on placing the script in the master resource library, see Using Resource Libraries on page 21. For information on configuring the INI files, see Configuring INI Files on page 41.
8 Enter the name of the DAL script in the File Name field, or select the script from the file list. Change the drive and directory if necessary. Click Ok; the system returns to the Edit Routing Slip window.
259
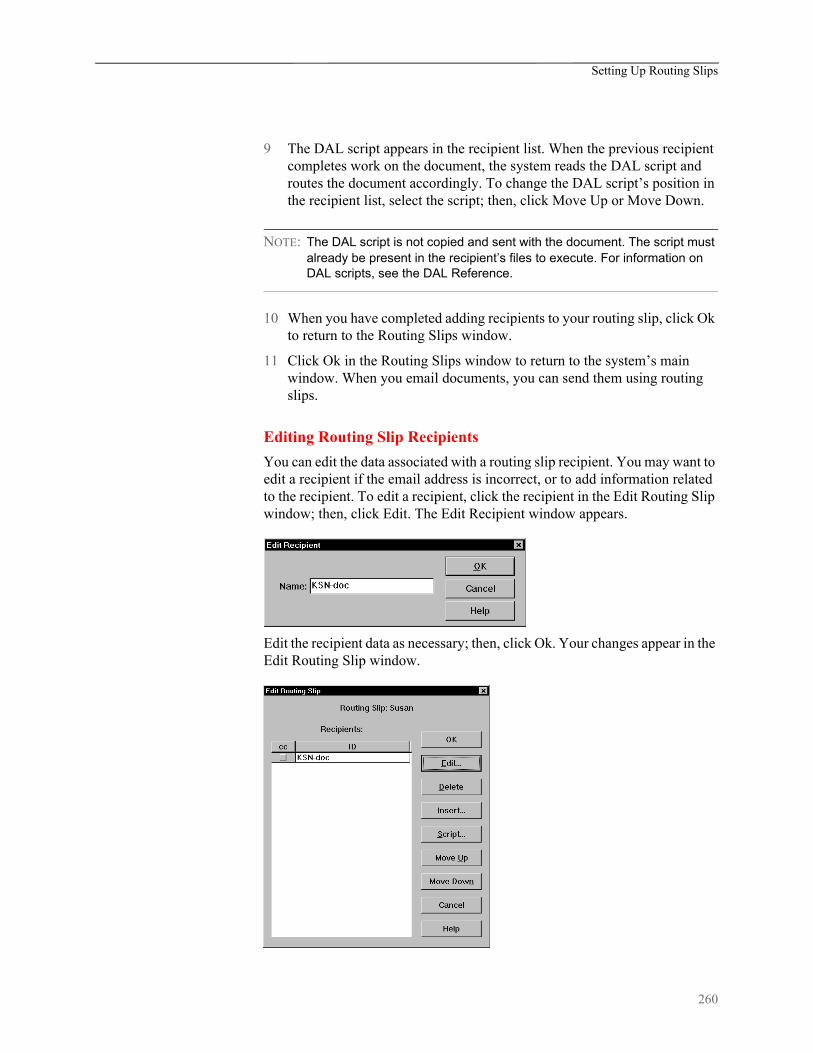
Setting Up Routing Slips
9 The DAL script appears in the recipient list. When the previous recipient completes work on the document, the system reads the DAL script and routes the document accordingly. To change the DAL script’s position in the recipient list, select the script; then, click Move Up or Move Down.
NOTE: The DAL script is not copied and sent with the document. The script must already be present in the recipient’s files to execute. For information on DAL scripts, see the DAL Reference.
10 When you have completed adding recipients to your routing slip, click Ok to return to the Routing Slips window.
11 Click Ok in the Routing Slips window to return to the system’s main window. When you email documents, you can send them using routing slips.
Editing Routing Slip Recipients
You can edit the data associated with a routing slip recipient. You may want to edit a recipient if the email address is incorrect, or to add information related to the recipient. To edit a recipient, click the recipient in the Edit Routing Slip window; then, click Edit. The Edit Recipient window appears.
Edit the recipient data as necessary; then, click Ok. Your changes appear in the Edit Routing Slip window.
260

Setting Up Routing Slips
Deleting Routing Slip Recipients
You can delete routing slip recipients to allow for personnel changes and transfers.
To delete a routing slip recipient, open the Routing Slip window and click the routing slip which contains the recipients you want to delete. Click Edit to display the Edit Routing Slip window.
Click the recipient you want to delete; then, click Delete. The system removes the recipient from the routing slip.
Deleting Routing Slips
Deleting routing slips lets you remove an entire routing slip from your list. When you delete a routing slip, you delete all recipients’ names within the name of your routing slip.
To delete a routing slip, choose Tools, Routing Slips. The system displays the Routing Slips window.
Click the routing slip you want to delete; then, click Delete. The system removes the routing slip from the Routing Slips window and you can no longer use it.
261

Maintaining Form Sets
MAINTAININGFORM SETS
Maintaining form sets in Documaker Desktop lets you monitor storage and track transactions. By monitoring and managing storage, you enhance your system performance and efficiency. Tracking transactions lets you view and print status reports of user and form set transactions to assist you with maintenance.
Deleting Form Sets
Deleting form sets lets you delete any unused, incorrect, or outdated form sets from the system. Remember that when you delete the form sets, you delete the data from the library you opened when logging onto the system.
If you want to delete form sets from several libraries, you must delete them within each selected library. Archived form sets cannot be deleted. Although users can no longer access deleted form sets, the form set record remains in the system.
See Packing the WIP Database on page 264, for information on removing all deleted form set references from the system.
Form Set Status
Before deleting a form set, you should understand the status codes associated with form sets:
• W (W ork-in-Process) - The system lets users save form sets to Work-in-Process prior to printing and archiving. The user can later edit and print the form set. After the user prints a completed form set, the system changes the form set status from W to AR (Archived) as defined in the FSIUSER.INI file (refer to Configuring INI Files on page 41, for more information on FSIUSER.INI options).
Deleting the Transaction Log
Printing the Transaction Log
Packing the Database
Deleting Form Sets
Documaker Desktop
262

Maintaining Form Sets
• P (Printed) - The system lets users print completed WIP form sets without archiving them if the FSIUSER.INI file is configured as Archival M ode = M ANUAL.
• B (Batch Print Q ueue) - The system lets users send form sets to a batch print queue for printing at a later time. The user cannot edit form sets with status B. The user can, however, change status B to W (Work-in-Process) and then edit the form set. The system archives status B form sets after printing them.
• AR (Archived) - The system archives form sets for permanent storage after printing via the Complete window. Users cannot edit the form set, but they can view or print the form set. Users cannot delete archived form sets.
• User D efined Codes - The system lets you define status codes in the FSIUSER.INI file. These codes appear in the WIP status list. See Configuring INI Files on page 41, for more information.
Deleting Form Sets in WIP
Deleting form sets in WIP lets you delete form sets from the combined Work-in-Process list. The combined Work-in-Process list includes form sets saved to WIP and form sets sent to the batch print queue. Deleting form sets removes the form sets from the WIP list, but does not delete the form set records from the system.
NOTE: Packing the WIP database lets you permanently delete the form set records from your system. See Packing the WIP Database on page 264 for more information.
You should check with users to determine if their WIP data needs to be saved before you delete it. If your system is set for manual archive, completed and printed form sets appear in the WIP list with a P (Printed) status code, but have not been archived. If data needs to be saved, you should manually archive or backup that form set data in WIP before you delete other form sets.
Follow these steps to delete form sets in WIP:
1 Start the system using the resource library icon from which you want to delete form sets in WIP.
2 Choose the WIP, WIP List option. Then choose the Delete option from the Task field. The Delete window appears, containing the combined WIP list of all users' form sets.
263

Maintaining Form Sets
3 Select the form sets you want to delete by clicking the Sel column in the WIP list. You can also select and deselect form sets by using the directional arrows to move to the form set line. Then press the SPACEBAR to select or deselect.
4 Click Ok after you have selected all the form sets you want to delete. The Delete Confirmation window appears.
5 Click Yes to delete your selected form sets, or No to retain the form sets in WIP.
PACKING THE WIP DATABASE
Packing the WIP database lets you remove all deleted form set references from the system. Your system's processing efficiency corresponds to your database size. When you delete form sets, users cannot access the form sets. The record of the form set, however, still resides in the system, using hard disk space. Packing the WIP database removes the form set record from your system. Pack the WIP database after deleting form sets, or at any time your system seems sluggish.
NOTE: You should pack the database only when all users are logged off the system. Additionally, you should note that packing the WIP database can take an extended period of time, depending on the number of deleted form sets, so you may want to schedule this activity for after business hours.
Follow these steps to pack the WIP database:
1 Start the system using the company resource library icon for which you want to pack the WIP database.
2 Choose the Tools, Database Maintenance option. Then choose the Pack Database option. A confirmation window appears. Click Yes to pack the database, or No to cancel. The system displays a message to tell you if the operation was successful.
264
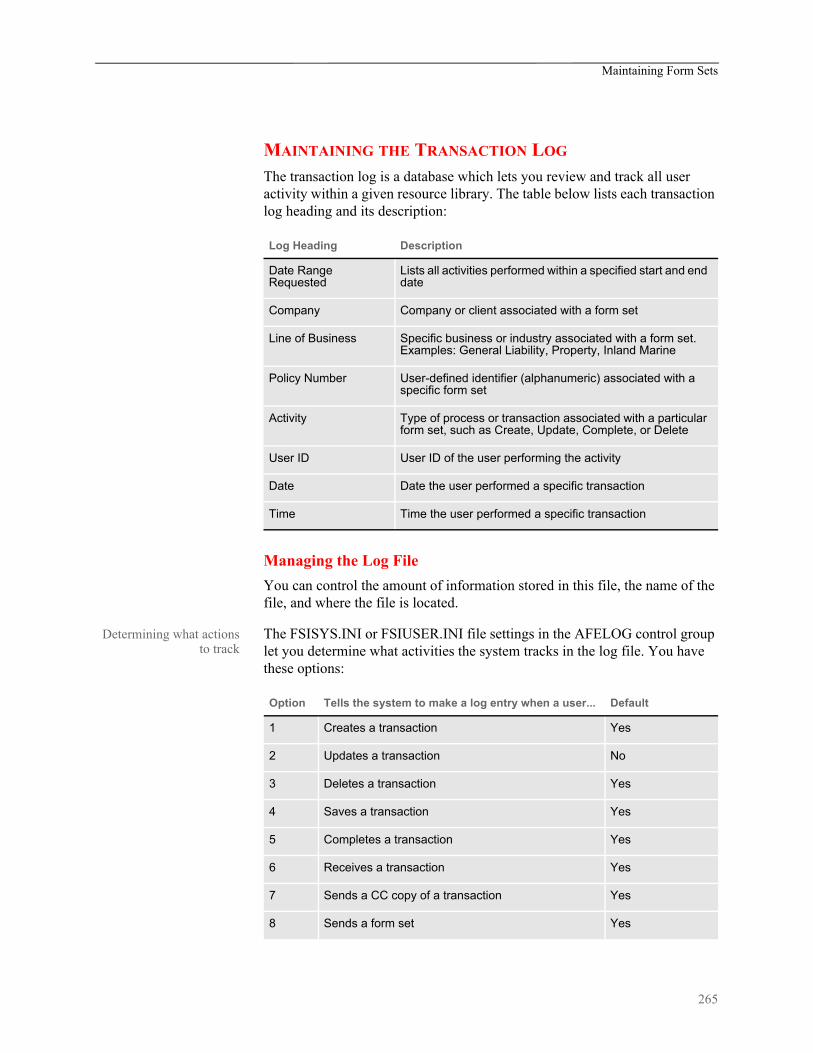
Maintaining Form Sets
MAINTAINING THE TRANSACTION LOG
The transaction log is a database which lets you review and track all user activity within a given resource library. The table below lists each transaction log heading and its description:
Managing the Log File
You can control the amount of information stored in this file, the name of the file, and where the file is located.
Determining what actionsto track
The FSISYS.INI or FSIUSER.INI file settings in the AFELOG control group let you determine what activities the system tracks in the log file. You have these options:
Log Heading Description
Date Range Requested
Lists all activities performed within a specified start and end date
Company Company or client associated with a form set
Line of Business Specific business or industry associated with a form set. Examples: General Liability, Property, Inland Marine
Policy Number User-defined identifier (alphanumeric) associated with a specific form set
Activity Type of process or transaction associated with a particular form set, such as Create, Update, Complete, or Delete
User ID User ID of the user performing the activity
Date Date the user performed a specific transaction
Time Time the user performed a specific transaction
Option Tells the system to make a log entry when a user... Default
1 Creates a transaction Yes
2 Updates a transaction No
3 Deletes a transaction Yes
4 Saves a transaction Yes
5 Completes a transaction Yes
6 Receives a transaction Yes
7 Sends a CC copy of a transaction Yes
8 Sends a form set Yes
265

Maintaining Form Sets
You only need to include changes to the defaults in the INI file—you do not have to include default settings.
To turn on any option that is off (No) by default, enter the number shown above followed by Yes. To turn off any option that is on (Yes) by default, enter the number shown above followed by No.
For example, to have the system log all updates to transactions and to accept all other defaults, you would enter:
< AFELog >
2 = Yes
Typically, you would leave this option set to No (off) because it results in very large log files.
Specifying where the logfile is stored
The default log file is named AFELOG . The AFELOG file is, by default, stored in the WIP directory. You can, however, use the following INI options to specify another file name or location for the log file.
< AFELog >
File = file name
Path = directory path
If you enter a path for the FILE option, your entry overrides any path you specify in the PATH option. If your entry for the FILE option does not include a path, the system uses the path you enter for the PATH option, if any.
NOTE: See Configuring INI Files on page 41, for more information on customizing the transaction log.
Printing the Transaction Log
Printing the transaction log lets you view all user activity within a form library, for a specific date range. Since you cannot display this information, you must print the transaction log to track user activity.
9 Assigns a form set Yes
10 Archives a form set Yes
11 Prints a form set Yes
12 Changes the status of a form set Yes
13 Exits a form set without saving it No
14 Retrieves a form set No
15 Aborts the system Yes
Option Tells the system to make a log entry when a user... Default
266

Maintaining Form Sets
The system uses a Documaker section named AFELOG.FAP to define the layout of the printed transaction log. When you install the system, the installation places the AFELOG.FAP file in these locations:
• In the Forms directory of the SAMPCO sample resources
• In the MSTRRES\FMRES\FORMS directory
The AFELOG.FAP defines the log's title, column headings, and the overall layout of the transaction log form. As with any other Documaker section, the text elements and fields in this section reference specific font IDs. These font IDs must be present in the font cross reference (FXR) file used for this library. If the FXR does not contain the font IDs referenced in the AFELOG.FAP, you can remedy the problem in one of two ways:
• Use Documaker Studio or the FXR Editor to import these font IDs from the base FXR (such as rel112.fxr, rel113.fxr, or rel121.fxr) into your FXR file
• Use Documaker Studio to edit the AFELOG.FAP and change the font IDs referenced in the section to font IDs that are present in your FXR
If your Documaker Desktop system uses Library Manager, you must check the AFELOG.FAP file into the library you are using. If you are not using Library Manager, make sure the AFELOG.FAP is in the Forms directory.
To print the transaction log, follow these steps:
1 Start the system using the Company Resource Library icon from which you want to print the transaction log.
2 Choose Tools, Print Log File. The system displays the Print Log File window.
3 In the From field, type the beginning date for the range of user transactions that you want to print.
4 In the To field, type the ending date for the range of user transactions you want to print, and click Ok. The Print window appears.
To print the entire transaction log since the last transaction log deletion, click the All button.
267
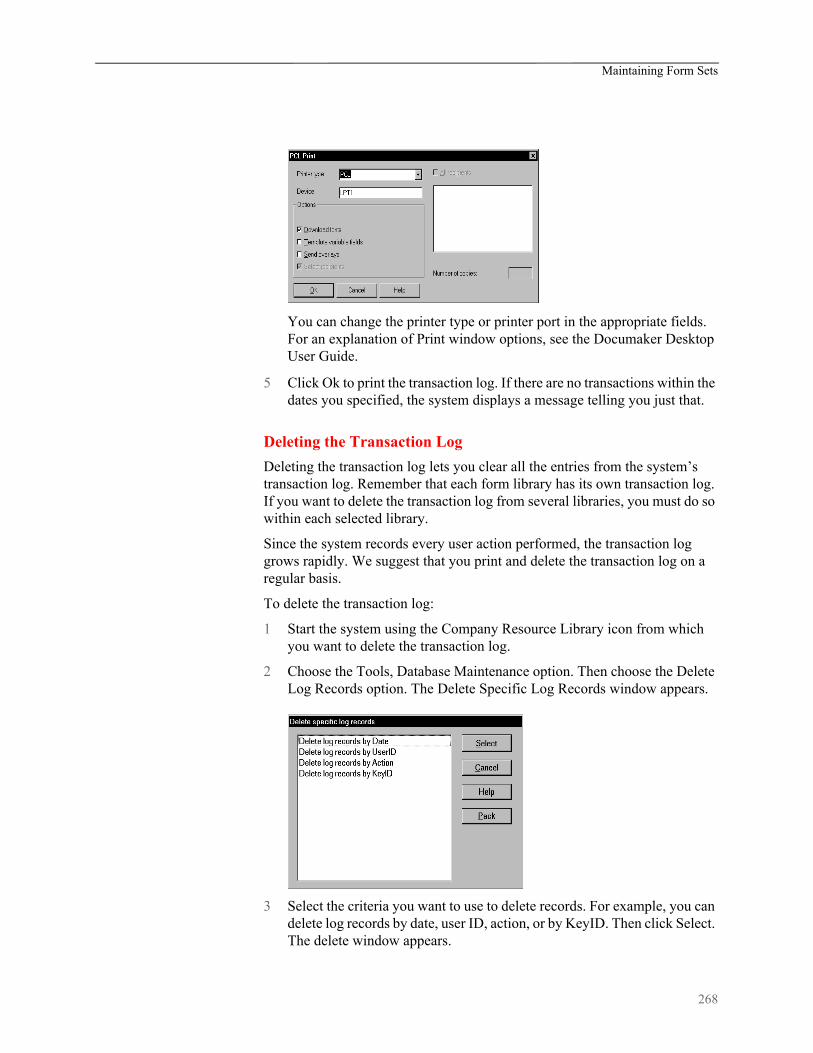
Maintaining Form Sets
You can change the printer type or printer port in the appropriate fields. For an explanation of Print window options, see the Documaker Desktop User Guide.
5 Click Ok to print the transaction log. If there are no transactions within the dates you specified, the system displays a message telling you just that.
Deleting the Transaction Log
Deleting the transaction log lets you clear all the entries from the system’s transaction log. Remember that each form library has its own transaction log. If you want to delete the transaction log from several libraries, you must do so within each selected library.
Since the system records every user action performed, the transaction log grows rapidly. We suggest that you print and delete the transaction log on a regular basis.
To delete the transaction log:
1 Start the system using the Company Resource Library icon from which you want to delete the transaction log.
2 Choose the Tools, Database Maintenance option. Then choose the Delete Log Records option. The Delete Specific Log Records window appears.
3 Select the criteria you want to use to delete records. For example, you can delete log records by date, user ID, action, or by KeyID. Then click Select. The delete window appears.
268

Maintaining Form Sets
NOTE: Click Pack to remove from the system all previously deleted log records.
4 Select the records you want to delete and then click Ok. The system shows you the number of records deleted and returns you to the delete window. Click Cancel to exit.
269
Modifying FORM.DAT Files
MODIFYINGFORM.DAT
FILES
The FORM.DAT file (form set definition table) defines how sections are organized within forms, and how those forms are grouped into form sets. In addition, the FORM.DAT file defines the recipients for your form sets. You use the legacy tool, Docucreate, to create and modify FORM.DAT files.
You modify the FORM.DAT file whenever you add new forms. If you receive forms from an external forms provider, normally you will receive the complete FORM.DAT file with those forms. You should not modify a FORM.DAT file you have received from an external source, unless you are creating forms to add to that resource library.
Each resource library contains a FORM.DAT file which defines each form available in that library. The FORM.DAT file is located in the DEFLIB directory of your resource library.
USING A TEXT EDITOR TO MODIFY THE FORM.DAT FILE
The FORM.DAT file is a semicolon-delimited file which can be edited using a text editor, but this is not recommended. Furthermore, Support will not be able to help you if problems arise.
If you modify the FORM.DAT file using a text editor, you must change each field and replace the information with your new library name, new forms, sections, and designated recipient copies.
In addition, you make sure any information you add to the FORM.DAT file is placed in the appropriate location. For example, if you are adding a form to a form set, you must locate the form set information in the FORM.DAT file and add the new form in the appropriate spot within the form set.
It is imperative that you create the file in the exact format shown on the following pages. A single misplaced semicolon corrupts the FORM.DAT file, so you must modify it carefully. Consider these guidelines and recommendations when creating or modifying a FORM.DAT file:
• Always create a backup copy of the FORM.DAT file before you modify it.
• Use a text editor that saves files as straight ASCII text.
• Insert semicolons (;) between each element on a record line, and braces ([ ]) between each section recipient list.
• Do not use tabs or any text formatting when you create a FORM.DAT file.
Follow these steps to create or modify the FORM.DAT file:
1 Open the FORM.DAT file in the DEFLIB directory of your new master resource library directory.
2 Using the format guidelines that follow, modify the existing FORM.DAT file, or create a new FORM.DAT file using the sample FORM.DAT file as a template.
270

Modifying FORM.DAT Files
Sample FORM.DAT File
The following example shows the first two lines of a sample FORM.DAT file. A FORM.DAT file contains one record line corresponding to each form in the library.
Line 1 ;DOCUCORP PACKAGE;COMMERCIAL PACKAGE;DEC PAGE;DEC PAGE;RX;;CPDEC~1|D[INSURED(1),HOME OFFICE(1),AGENT(1)];
Each semicolon delimited field represents a particular piece of information on a form. Each FORM.DAT record line contains two distinct sections of information:
• The form section associates the form with a company and line of business (all semicolon ( ; ) delimited fields) and includes the name and description of the form.
• The section part details each section, section recipients, and number of recipient section copies.
A pipe ( | ) separates the section name from its related information.
Recipient information appears within braces ( [ ] ).
Recipient section copies appear within parentheses ( ( ) ).
A comma ( , ) separates recipient section copies from the next recipient name.
A backslash (\) at the end of a line indicates that the definition continues on the next line.
This example shows a FORM.DAT record format:
Form section ;COMPANY;LOB;EXTERNAL NAME;DESCRIPTION;
FORM OPTIONS;COPY COUNT
Section part ;SECTION1|IMAGEOPTIONS[RECIPIENT1(COPIES),...RECIPIENTn
(COPIES)]/SECTION2|OPTIONS[RECIPIENT1(COPIES),...
RECIPIENTn(COPIES)]/...SECTIONn|OPTIONS[RECIPIENT2
(COPIES)];
Formatting the FORM.DAT File
The following tables contain FORM.DAT file layouts and guidelines for the form part and the section part. Refer to these tables as you create the FORM.DAT file.
;COMPANY;LOB;EXTERNAL NAME;DESCRIPTION;
FORM OPTIONS;COPY COUNT
271

Modifying FORM.DAT Files
NOTE: Do not use the following form option combinations in the FORM.DAT file: DM, XM, SM, DX, DS, SX
;SECTION|IMAGEOPTIONS[RECIPIENT1(COPIES),...RECIPIENTn
(COPIES)]/SECTION2|OPTIONS[RECIPIENT1(COPIES),...
RECIPIENTn(COPIES)]/...SECTIONn|OPTIONS[RECIPIENT2
(COPIES)];
The FORM.DAT file considers the section (all section names, recipients, and section copies) as one field. Form definitions that exceed 1,024 characters must be broken into several lines using the continuation character (\).
Field Length Description
Company 20 Company name
LOB 20 Line of business
External Name
20 Common form name associated with form
Description 30 Form description, external name is often used for form description
Form Options: Select up to five options per form
R 1 Required form, includes pull and electronic forms
P 1 Pull form, includes forms unavailable in electronic form
M 1 Repeatable form, form can appear multiple times within a form set.
X 1 Master Dec Page, include in a package policy
S 1 Sub Dec Page, include one per form set within a package.
D 1 Monoline Dec Page, first page of a single form set
Copy Count N/A Not applicable, add a semicolon to mark the field
272
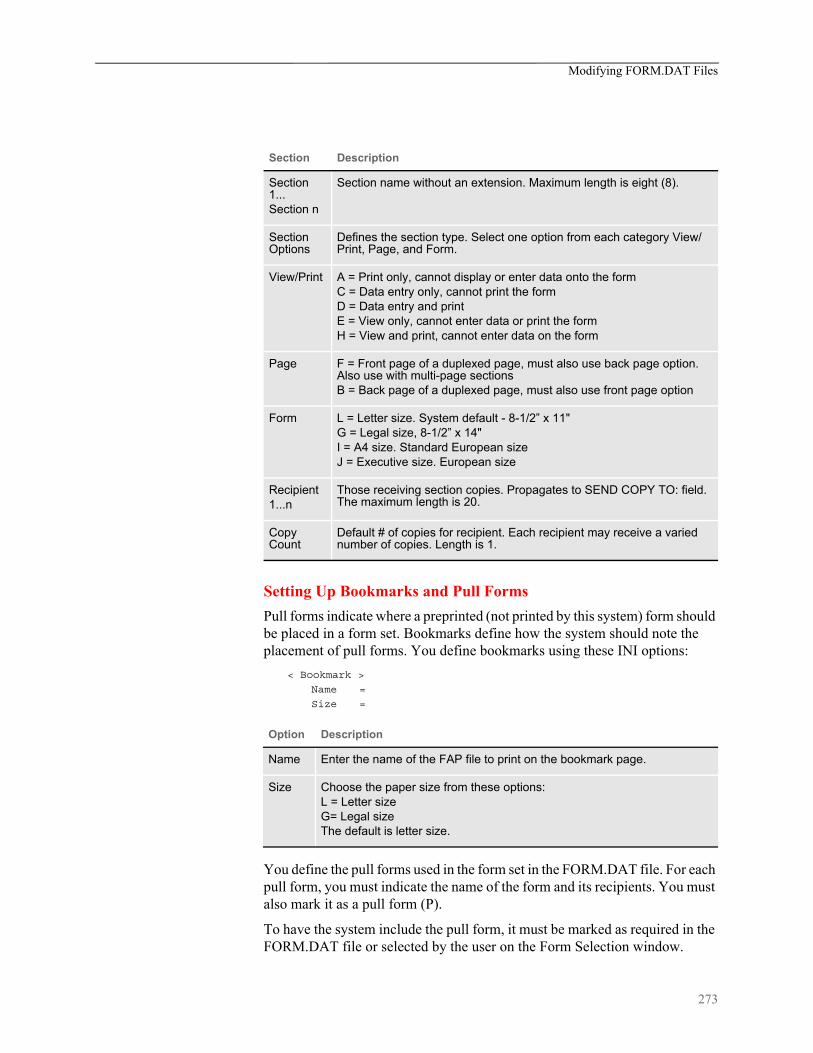
Modifying FORM.DAT Files
Setting Up Bookmarks and Pull Forms
Pull forms indicate where a preprinted (not printed by this system) form should be placed in a form set. Bookmarks define how the system should note the placement of pull forms. You define bookmarks using these INI options:
< Bookmark >
Name =
Size =
You define the pull forms used in the form set in the FORM.DAT file. For each pull form, you must indicate the name of the form and its recipients. You must also mark it as a pull form (P).
To have the system include the pull form, it must be marked as required in the FORM.DAT file or selected by the user on the Form Selection window.
Section Description
Section 1...Section n
Section name without an extension. Maximum length is eight (8).
Section Options
Defines the section type. Select one option from each category View/Print, Page, and Form.
View/Print A = Print only, cannot display or enter data onto the formC = Data entry only, cannot print the formD = Data entry and printE = View only, cannot enter data or print the formH = View and print, cannot enter data on the form
Page F = Front page of a duplexed page, must also use back page option. Also use with multi-page sectionsB = Back page of a duplexed page, must also use front page option
Form L = Letter size. System default - 8-1/2” x 11"G = Legal size, 8-1/2” x 14"I = A4 size. Standard European sizeJ = Executive size. European size
Recipient1...n
Those receiving section copies. Propagates to SEND COPY TO: field. The maximum length is 20.
Copy Count
Default # of copies for recipient. Each recipient may receive a varied number of copies. Length is 1.
Option Description
Name Enter the name of the FAP file to print on the bookmark page.
Size Choose the paper size from these options: L = Letter sizeG= Legal sizeThe default is letter size.
273

Modifying FORM.DAT Files
274

Maintaining User Information
MAINTAININGUSER
INFORMATION
Maintaining user information is an important facet of system maintenance. As a system supervisor, you are responsible for making sure user information is correctly set up and properly maintained in the system. Maintenance includes editing and deleting user IDs and resetting locked user IDs as needed.
MAINTAINING USER ID INFORMATION
Maintaining user ID information lets you update the user IDs and related information within your system. User ID maintenance includes editing user ID information and deleting specific user IDs. For information on adding a new user, see Setting Up Multiple Users on page 13.
Editing User ID Information
Editing user ID information lets you change the user information associated with a particular ID. You can change a user's name, password, access level rights, security level, and the person to whom the user reports. When editing user ID information, do not change the ID itself. Changing an ID results in the inability to open form sets stored under the particular user ID. If you must change a user ID, delete the ID, then create a new one.
To edit user ID information:
1 Choose Tools, User ID Maintenance, to display the User ID Maintenance Program window.
Edit user ID information
Delete user IDs
Documaker
Reset locked user
275

Maintaining User Information
2 Click the user for which you want to edit information, and click Change to display the User Maintenance window.
3 In the Name field, type the user's name with any changes or corrections.
NOTE: Use this step to alter a current user's name, not to add a new user to the system. See Setting Up Multiple Users on page 13, for information about adding a new user.
4 Type the user's new password in the Password field. If you don't type a new password, the user's password remains the same.
5 Type a number between 1 and 9 to assign a new user access level in the Level field, and press TAB twice to skip the Security field (future use). Zero (0) is reserved for supervisor access level.
NOTE: You can enable or disable main menu options depending on a user's access level.
6 Click the scroll arrow next to the Report To field to display a list of users. Select the user's new supervisor from the list.
7 Click Ok to update the user information. The system returns you to the User ID Maintenance Program window.
276

Maintaining User Information
8 Click Save to record the updated user ID information. The system displays the Save Confirmation window.
9 Click Yes to save the updated user ID information. Click No to cancel the changes.
NOTE: To revert your most recent unsaved settings to their prior status, click Discard in the User ID Maintenance Program window. Discard lets you make changes to a user ID, then quickly revert to the prior settings if you change your mind.
Deleting a User ID
Deleting a user ID lets you delete a specific user ID from the system. When you delete a user ID, the user cannot start the system.
For instructions on deleting user IDs using SuperUser access, see Deleting Users
on page 279. Follow these steps to delete a user ID:
1 Choose Tools, User ID Maintenance to display the User ID Maintenance Program window.
2 Click the user you want to delete, then click Delete. An asterisk (*) appears next to the selected ID.
NOTE: The Delete button is a toggle. The system deselects the user ID you marked for deletion if you click Delete again.
3 Click Save to remove the user ID from the User ID Maintenance Program list, and to display the Save Confirmation window.
4 Click Yes to save the updated user ID information, or No to cancel your changes.
NOTE: To revert your most recent unsaved settings to their prior status, click Discard in the User ID Maintenance Program window.
277

Maintaining User Information
USING SUPERUSER ACCESS
With SuperUser access, the system displays an enhanced version of the User ID Maintenance Program window. SuperUsers must have a security level of zero (0) and the SupportSuperUser option must be configured in the INI file. See Setting Up SuperUsers on page 15.
The SuperUser window lets you...
• Search for a user by name or user ID by double-clicking on the appropriate column heading. You can enter a partial text string or an exact match.
• Import user information from a database or text file.
• Reset locked user IDs.
There is no Save button in this window because the system saves your information as you enter it.
To change the security level so users with a security level between 1 and 9 can use these features, see Assigning Access Rights on page 16.
Searching for a User
You can double click on any of the column headings in the User ID Maintenance window to do a full or partial text search in that field.
Enter the text you want to search for, indicate whether or not the system should look for partial matches, and click Find First.
Changing User Information
Once you have selected the user you want to change...
278

Maintaining User Information
• Highlight the user and click the Change button or
• Double-click on the user you want to change
This brings up the User Maintenance window where you can change the user's data.
Deleting Users
To delete a user, select the user in the User ID Maintenance window and click delete. The system asks you to confirm the deletion. You can set the following option to suppress the confirmation window.
< UserInfo >
SuppressDeleteDialog = Yes
The system warns you if you try to delete yourself.
If other users are reporting to the deleted user, the system asks you who to reassign as the users’ report to person and displays a list of all users.
Replacing a User in aReport To List
For example, suppose the CSN user ID has three users that report to it. If you have SuperUser rights and you delete CSN from the User ID Maintenance window, the following window appears (assuming CSN is not currently logged in):
Select the appropriate report-to person to replace CSN and click OK. The users that once reported to CSN now report to the new user.
279

Maintaining User Information
If you want to suppress the User Replace List window, add this INI option:
< UserInfo >
SuppressReportToDlg = Yes
If you set the SuppressReportToDlg option to Yes, the system sets the current user as the new report to person for each person in the deleted user’s report to list.
Importing User Information
To use the Import button, the UserImport functions must be configured in the INI file. See Setting Up SuperUsers on page 15.
With SuperUser access, you can import user information into the system user database from a...
• Text file. The text file should have the following format.
UserID,Name,Password,ReportTo,Level
You can leave a parameter blank as long as you include the comma separators. You can only have one user per line in the text file.
• Database file.
Follow these steps to import user information:
1 In the User ID Maintenance window, click Import. The Import Formats window appears.
2 Select an import format and click Ok. The Select Import File window appears.
3 Choose the file to import and click Ok. If the system notes an existing user ID among those being imported, it asks you to choose one of the following options:
Choose To
Skip Skip the current record being imported.
Skip All Skip all records that conflict with an existing user ID
280

Maintaining User Information
After you are finished importing new IDs, you return to the User ID Maintenance window.
NOTE: If you are importing a file which contains a record with a report to person who is not in the database, the system produces a warning and skips that record. You can use the following option to suppress this feature so the record is imported even if the report to person does not exist.
< UserInfo >
ImportBadReportTo = Yes
The default (No) is to show the warning and not import the record.
Resetting Locked User IDs
If the system is shut down inadvertently, such as when there is a loss of power, user IDs can become locked. Once locked, you cannot use the ID to start the system. Instead, when the user attempts to restart the system, it displays a message stating the user ID is already in use. This occurs because the system assumes the user is still logged on. Resetting a locked user ID lets you unlock the ID so it can be used again.Resetting a Locked User ID
With SuperUser access, you can select a user in the User ID Maintenance window and click the Release button to reset the user ID. The system displays a message confirming the user ID has been reset.
To reset a locked user ID using the OpenUser program, click the OpenUser icon:
or run the openuw32.exe program from the working directory used by your Documaker Desktop icon.
The Open User window appears:
Replace Update the existing record with the record being imported.
Replace All
Update all existing records with new records which have the same ID.
Cancel Stop the import process. Records imported before you clicked cancel remain in the database.
Choose To
281
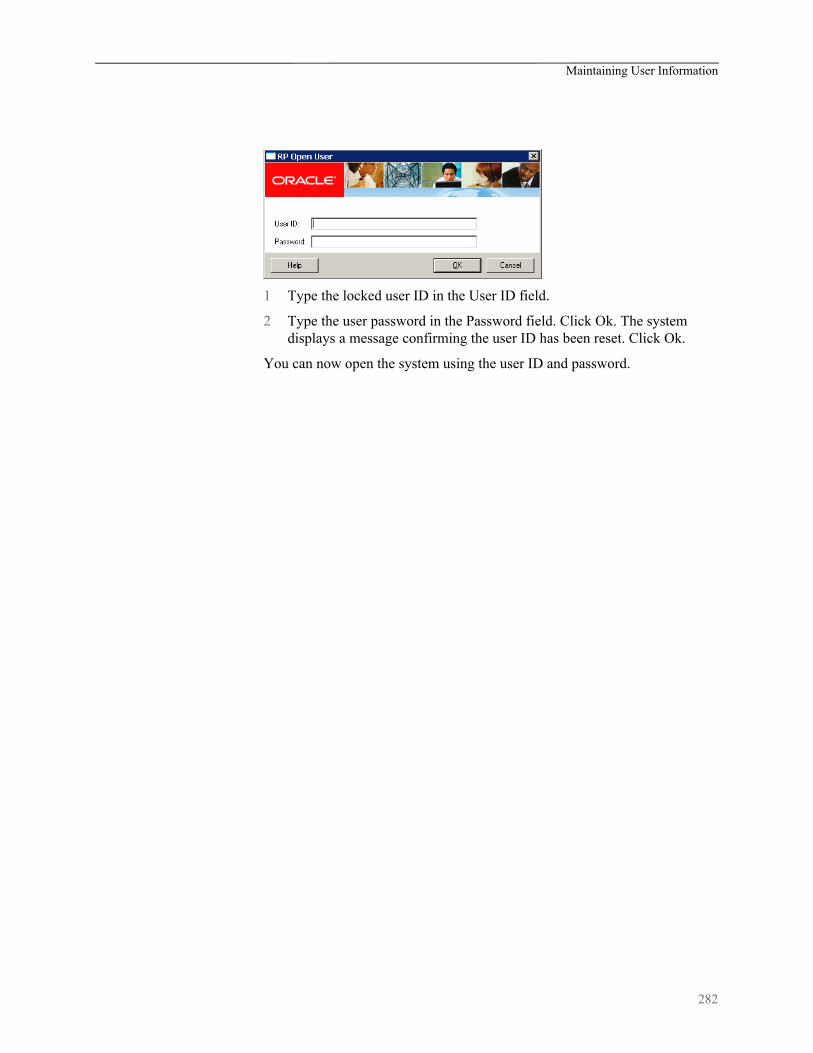
Maintaining User Information
1 Type the locked user ID in the User ID field.
2 Type the user password in the Password field. Click Ok. The system displays a message confirming the user ID has been reset. Click Ok.
You can now open the system using the user ID and password.
282

Splitting Archives
SPLITTINGARCHIVES
The Archive Maintenance option on the Tools menu lets you split an archive into two files based on criteria you specify.
You can use this option for a variety of purposes, such as...
• If you need to free space or speed retrieval, you can extract older form sets and store them separately on CD or other media
• If your company is closing one location, you can split that location’s archives for distribution to the remaining locations.
You specify the criteria the system will use to split the archive by selecting a cut-off date or by using a DAL script. Using a DAL script lets you split an archive based on any field in the form sets in the archive. This illustration shows what happens:
Original Archive
Transaction # Date
2170001 02172010
2170002 02172010
2170003 02182010
2170004 03012010
If you simply split this archive using a cut-off date of 03012005, the result is...
Original Archive
Transaction # Date
2170001 02172010
2170002 02172010
2170003 02182010
2170004 03012010
Newly-created Archive
Transaction # Date
2170004 03012010
Original Archive
Transaction # Date
2170001 02172010
2170002 02172010
2170003 02182010
Newly-created Archive
Transaction # Date
2170004 03012010
Note that the system marks as deleted the records it split from the original archive. Though marked as deleted, those records still exist in the original archive and can be accessed. If you also elected to purge the original archive, the result is shown below:
Before splitting an archive, always back up the archive file.Failure to back up an archive before performing a split could result in the loss of information crucial to your company.
As shown above, purging an archive file after performing a split deletes archive information and index entries from your original archive. The blank lines in the archives are there for illustrative purposes only. The system does not allow blank records to exist in an archive file.
283

Splitting Archives
Making a backup of the archive file, CAR files, and the archive index before you begin this operation protects you in case of a power outage or some other event which would result in the loss of information crucial to your company.
NOTE: You can also use the ARCSPLIT command-line utility to split an archive. The Archive Maintenance option simply provides a more user-friendly way of using the ARCSPLIT utility. The ARCMERGE utility lets you combine two archives. There is no graphical user interface for the ARCMERGE utility. For more information, see the Utilities Reference.
SPLITTING AN ARCHIVE
The system includes a convenient way for you to split archive files. To add this feature onto your system menu, include the following line in your MEN.RES file:
MENUITEM “&Split Archive...” 9299 “AGIW32->AGISplitArchive” “Archive split utilities” 0
Here is an example:
POPUP “&Tools” 255 “Utility Programs”
BEGIN
MENUITEM “&Split Archive...” 9299 “AGIW32->AGISplitArchive” “Archive split utilities” 0
SEPARATOR
...
NOTE: This option performs the same task as the ARCSPLIT utility. For information on the new parameters for this utility, see the Utilities Reference.
When you choose the Split Archive option from the Tools menu, as shown in the example, the system prompts you to enter a name for your split archive settings:
Once you enter a name for the settings, the Split Archive window appears:
284
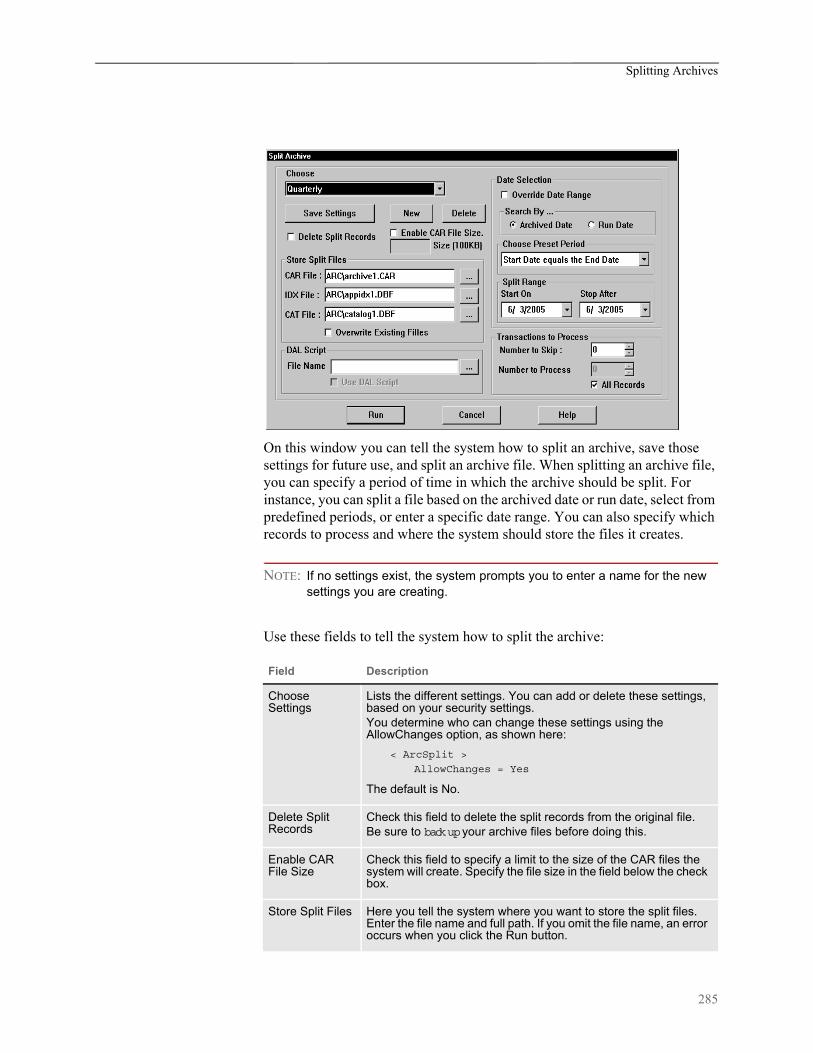
Splitting Archives
On this window you can tell the system how to split an archive, save those settings for future use, and split an archive file. When splitting an archive file, you can specify a period of time in which the archive should be split. For instance, you can split a file based on the archived date or run date, select from predefined periods, or enter a specific date range. You can also specify which records to process and where the system should store the files it creates.
NOTE: If no settings exist, the system prompts you to enter a name for the new settings you are creating.
Use these fields to tell the system how to split the archive:
Field Description
Choose Settings
Lists the different settings. You can add or delete these settings, based on your security settings. You determine who can change these settings using the AllowChanges option, as shown here:
< ArcSplit >
AllowChanges = Yes
The default is No.
Delete Split Records
Check this field to delete the split records from the original file. Be sure to back up your archive files before doing this.
Enable CAR File Size
Check this field to specify a limit to the size of the CAR files the system will create. Specify the file size in the field below the check box.
Store Split Files Here you tell the system where you want to store the split files. Enter the file name and full path. If you omit the file name, an error occurs when you click the Run button.
285

Splitting Archives
NOTE: The settings are stored in the INI file. See INI options on page 287 for more information.
You can also use these buttons:
Use DAL Script Select the DAL script you want the system to run and check the Use DAL Script field. The system compiles the DAL script to enhance optimization.
Override Date Range
Check this field if you want to override the date range specified in the Split Range fields.
Search By Select which date to base the search on. You can choose between the archive date or the run date.The archive date reflects when the record was archived.The run date tells you when the record was last modified.
Choose Preset Period
Select from predefined ranges such as less than or equal to 90 days, greater than or equal to 60 days, and so on. Your choice is based on the date you enter as the starting date in the Split Range field.
Split Range Enter the date on which to start and the date on which to stop. For instance, 01/01/06 to 12/31/06 covers an entire year.
Transactions to Process
Specify the record with which the system should start and the number of records you want to process. For instance, if you have a huge archive, you can limit processing time by limiting the number of records to process at one time. If you omit the starting record, the system starts with the first record that matches the criteria you set on the other fields.
Button Description
Save Settings
If you click this button, the current settings are saved to the INI file.
New Click New to add a setting. The system prompts you for the name of the new setting and adds the name in the list of settings. Once you enter the name, you can begin with the current settings or start with no options selected.
Delete Click Delete to remove the current settings and select the next setting on the list. If the list is empty, the system prompts you to create a new setting.
Run Click Run to split an archive based on the setting you selected.
Cancel Click Cancel to close the window without splitting an archive.
Field Description
286

Splitting Archives
INI options In addition to parameters, you can also set up INI options to specify criteria. The system looks in the FSIUSER.INI file for these options. The following INI options are required. These options tell the system where to find the source archive files you want to split.
< ArcRet >
AppIdx = arc\appidx.dbf
ArcPath = arc\
CARFile = archive
CARPath = arc\
Catalog = arc\catalog
The system also looks for options that specify the names of the split archive files and provide other information. These options are located in the ArcSplit and ArcSplitConfig control groups:
< ArcSplit >
ArcSplitConfig =
DefConfig =
< ArcSplitConfig:TEST1 >
SplitDays =
RunDALScript =
DALScript =
RecordsToProcess =
RecordsToSkip =
SearchDateBy =
SplitAppIdx =
SplitCARFile =
SplitCatalog =
SplitFromDate =
SplitToDate =
PurgeRecords =
CARFileSize =
EnableCARFileSize =
AllowChanges =
LogFile =
Option Description
ArcSplit
ArcSplitConfig Lets you assign a name to your archive split settings. You can create as many ArcSplitConfig options as you need. Each group of settings represents a control group with individual options. Below is an example of a setting named TEST1.
DefConfig If you set up multiple ArcSplitConfig options for Documaker Desktop, you can use this option to designate a default.
ArcSplitConfig:TEST1
SplitDays (Optional) Enter the number of days you want the utility to add to the start date to determine the end date. The utility then splits the archive between the start and end dates.
RunDALScript (Optional) Enter Yes if you want the utility to run the DAL script you specified with the DALScript option.
287
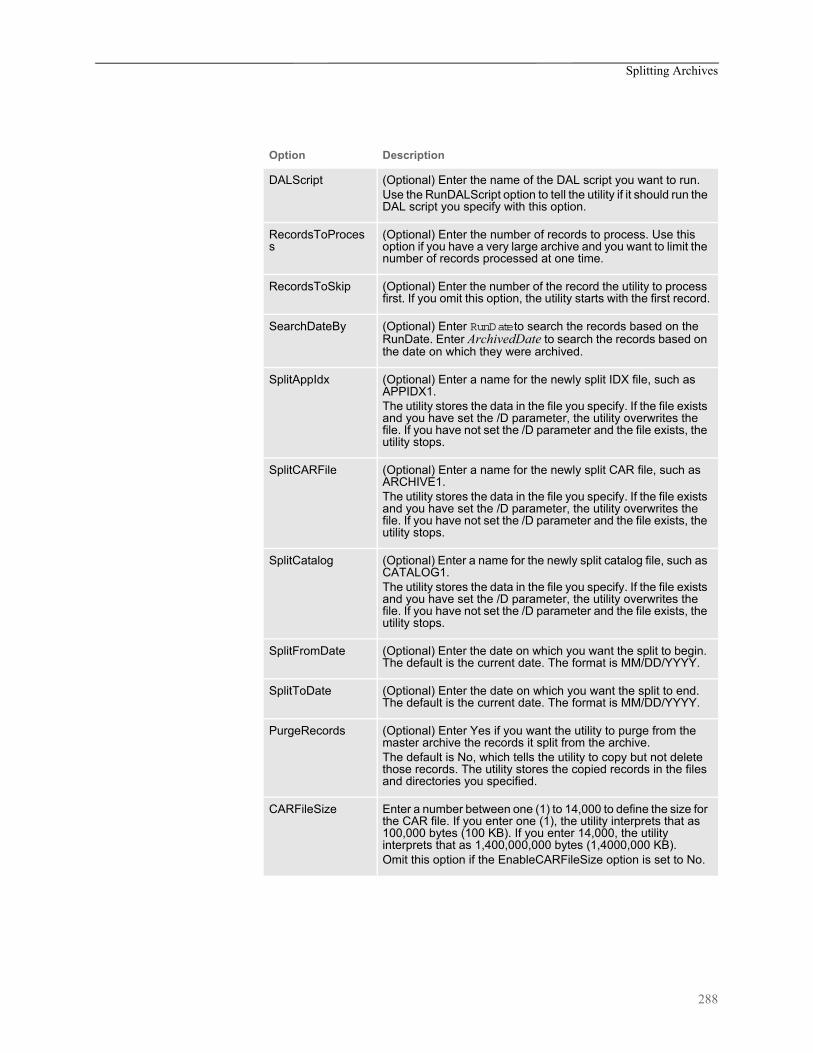
Splitting Archives
DALScript (Optional) Enter the name of the DAL script you want to run.Use the RunDALScript option to tell the utility if it should run the DAL script you specify with this option.
RecordsToProcess
(Optional) Enter the number of records to process. Use this option if you have a very large archive and you want to limit the number of records processed at one time.
RecordsToSkip (Optional) Enter the number of the record the utility to process first. If you omit this option, the utility starts with the first record.
SearchDateBy (Optional) Enter RunDate to search the records based on the RunDate. Enter ArchivedDate to search the records based on the date on which they were archived.
SplitAppIdx (Optional) Enter a name for the newly split IDX file, such as APPIDX1.The utility stores the data in the file you specify. If the file exists and you have set the /D parameter, the utility overwrites the file. If you have not set the /D parameter and the file exists, the utility stops.
SplitCARFile (Optional) Enter a name for the newly split CAR file, such as ARCHIVE1.The utility stores the data in the file you specify. If the file exists and you have set the /D parameter, the utility overwrites the file. If you have not set the /D parameter and the file exists, the utility stops.
SplitCatalog (Optional) Enter a name for the newly split catalog file, such as CATALOG1.The utility stores the data in the file you specify. If the file exists and you have set the /D parameter, the utility overwrites the file. If you have not set the /D parameter and the file exists, the utility stops.
SplitFromDate (Optional) Enter the date on which you want the split to begin. The default is the current date. The format is MM/DD/YYYY.
SplitToDate (Optional) Enter the date on which you want the split to end. The default is the current date. The format is MM/DD/YYYY.
PurgeRecords (Optional) Enter Yes if you want the utility to purge from the master archive the records it split from the archive.The default is No, which tells the utility to copy but not delete those records. The utility stores the copied records in the files and directories you specified.
CARFileSize Enter a number between one (1) to 14,000 to define the size for the CAR file. If you enter one (1), the utility interprets that as 100,000 bytes (100 KB). If you enter 14,000, the utility interprets that as 1,400,000,000 bytes (1,4000,000 KB).Omit this option if the EnableCARFileSize option is set to No.
Option Description
288

Splitting Archives
Using DAL scripts You can use DAL scripts to when you split or back up an archive. The system makes available to the DAL script all of the APPIDX column values you specify. This script can only return Yes or No. If anything else is returned, the system defaults to No.
All field names specified in the script file must include the word ARCSPLIT, such as ARCSPLIT.KEY1. This is required in case multiple index files are in use.
NOTE: Refer to the DAL Reference for information on the DAL functions you can use to create the scripts.
Assume the following form sets are stored in the archive, the INI options are set as shown below, and the DAL scripts COMPANY.DAL and COMBINED.DAL exist in the DefLib directory.
Also assume these INI options are set:
< ArcRet >
SplitAppIdx = arc1\AppIdx1.dbf
SplitCARFile = arc1\Archive1.car
SplitCatalog = arc1\Catalog1.
The COMPANY.DAL script looks like this:
If ARCSPLIT.Key1 = “FSI” then Return (“Yes”);
Else Return (“No”);
End
EnableCARFileSize
(Optional) This option turns on and off the related radio button field on the Split Archive window and also tells the system whether to use the CARFileSize option. The default is No.
AllowChanges (Optional) Lets you change settings from a window. The default is No.
LogFile (Optional) Enter the name of the file into which the utility should write any error messages. Here is an example:
LogFile = c:\errlog.txt
Option Description
KeyID Key1 Key2 Date archived
AA Sampco LB1 03/01/1999
BB Sampco LB2 03/01/1999
CC FSI GL 03/02/1999
DD FSI GF 03/02/1999
EE MyCompany GO 03/03/1999
289

Splitting Archives
The COMBINED.DAL script looks like this:
if (ARCSPLIT.KEY1 = “FSI “ AND ARCSPLIT.KEY2 = “GL “) then
Return (“YES”);
Else
Return(“NO”);
End
NOTE: Make sure the value you specify matches the field length defined in the DFD (Database Field Definition) file. In this example, the field length of KEY1 is four characters and the search value should be “FSI “ (with a space between I and the ending quotation mark) instead of “FSI”.
Based on these assumptions, this table shows the results if you enter the following commands to run the ARCSPLIT utility:
If you enter… The result is…
ARCSPLIT /sd=19990301 /ed=19990301 /ini=fsiuser.ini
Records AA and BB are written to the archive files (ARCHIVE.CAR, APPIDX1.DBF, CATALOG1.DBF, APPIDX1.MDX, and CATALOG1.MDX) in the arc1 directory. The records in the master archive are not changed.
ARCSPLIT /sd=19990301 /ed=19990301 /ini=fsiuser.ini
Records AA and BB are written to the archive files in the arc1 directory. The records in the master archive are not changed. The APPIDX1 and CATALOG1 files will be flat files.
ARCSPLIT /sd=19990301 /ed=19990301 /ini=fsiuser.ini /p
Records AA and BB are written to the archive files in the arc1 directory. These records are also deleted from the master archive.
ARCSPLIT /dal=deflib\company.dal ini=fsiuser.ini
Records CC and DD are written to the archive files in the arc1 directory. The records in the master archive are not changed.
ARCSPLIT /dal=deflib\combined.dal ini=fsiuser.ini
Record CC is written to the archive files in the arc1 directory. The records in the master archive are not changed.
290

Appendix A
Importing and Exporting XML Files in PPS
This appendix discusses importing and exporting XML files while using PPS. It tells you how to install the XML Import feature and configure your INI files.
NOTE: Oracle Documaker Desktop can import or export form set data using an XML file format. PPS license holders that do not have a license to the XML import/export capability should explore upgrade options with their Oracle sales representative.
These topics are discussed:
• Modifying INI Files on page 292
• Creating an XML Export File on page 293
• Example Documaker XML File Format on page 296
• Importing a Documaker XML File on page 300
• Transforming XML Files on page 303
291
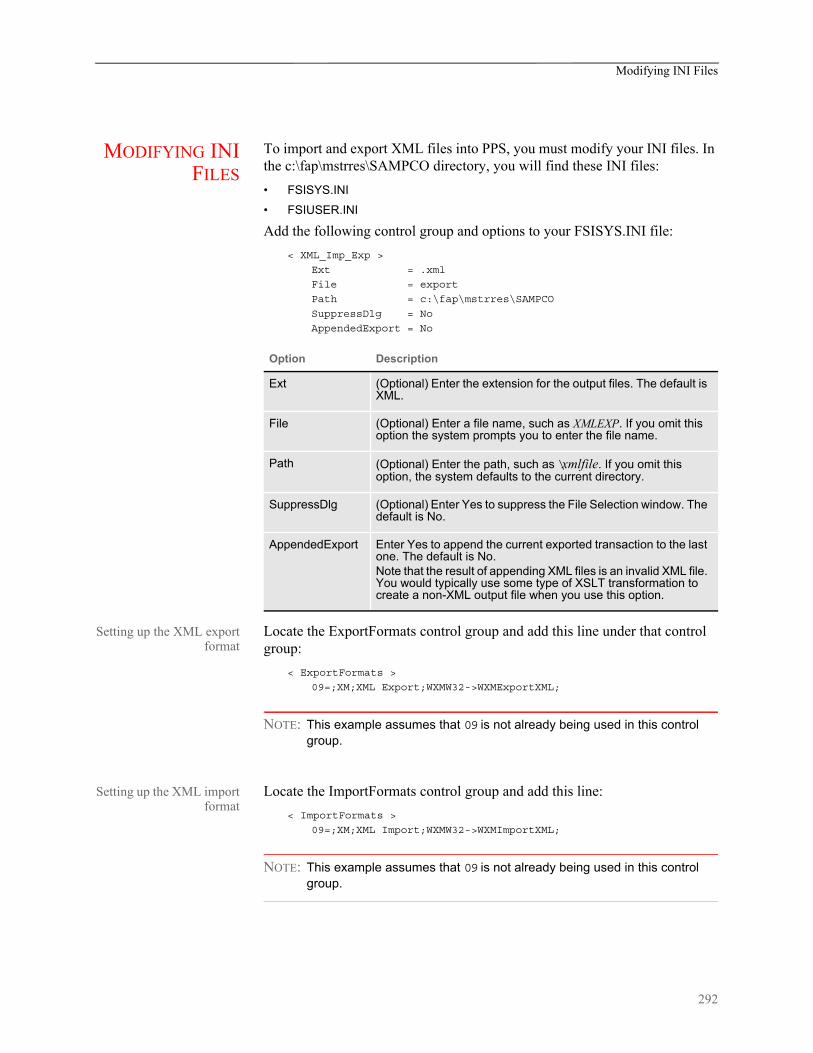
Modifying INI Files
MODIFYING INIFILES
To import and export XML files into PPS, you must modify your INI files. In the c:\fap\mstrres\SAMPCO directory, you will find these INI files:
• FSISYS.INI
• FSIUSER.INI
Add the following control group and options to your FSISYS.INI file:
< XML_Imp_Exp >
Ext = .xml
File = export
Path = c:\fap\mstrres\SAMPCO
SuppressDlg = No
AppendedExport = No
Setting up the XML exportformat
Locate the ExportFormats control group and add this line under that control group:
< ExportFormats >
09=;XM;XML Export;WXMW32->WXMExportXML;
NOTE: This example assumes that 09 is not already being used in this control group.
Setting up the XML importformat
Locate the ImportFormats control group and add this line:
< ImportFormats >
09=;XM;XML Import;WXMW32->WXMImportXML;
NOTE: This example assumes that 09 is not already being used in this control group.
Option Description
Ext (Optional) Enter the extension for the output files. The default is XML.
File (Optional) Enter a file name, such as XMLEXP. If you omit this option the system prompts you to enter the file name.
Path (Optional) Enter the path, such as \xmlfile. If you omit this option, the system defaults to the current directory.
SuppressDlg (Optional) Enter Yes to suppress the File Selection window. The default is No.
AppendedExport Enter Yes to append the current exported transaction to the last one. The default is No.Note that the result of appending XML files is an invalid XML file. You would typically use some type of XSLT transformation to create a non-XML output file when you use this option.
292

Creating an XML Export File
CREATING ANXML EXPORT
FILENOTE: These example screen shots only apply to the Workstation environment.
IDS/iPPS users do not see the Forms Selection window.
To create an XML export file, follow these steps:
1 Start PPS. From the main menu select the File, New option.
2 Complete the Form Selection window and press Ok.
3 Enter data on the forms and complete the form set using the File, Complete option.
293

Creating an XML Export File
4 Next, check the Print and Export Data fields. Then click XML Export and Ok.
5 Print the form set.
294

Creating an XML Export File
6 Export the data to an XML file.
If the SuppressDlg option is set to No under the XML_Imp_Exp control group, the system displays this window:
The name that appears in the File Name field is the one you specified in the File option in the XML_Imp_Exp control group. If you left that option blank, enter a file name here.
295
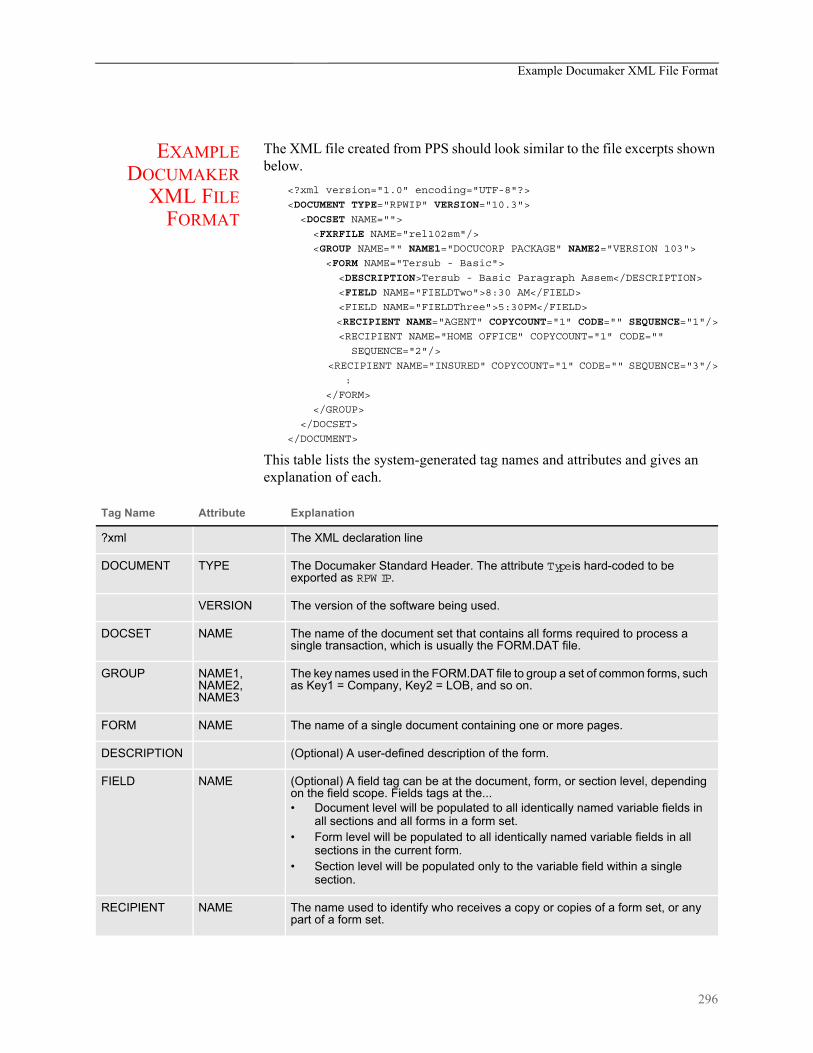
Example Documaker XML File Format
EXAMPLEDOCUMAKER
XML FILEFORMAT
The XML file created from PPS should look similar to the file excerpts shown below.
<?xml version="1.0" encoding="UTF-8"?>
<DOCUMENT TYPE="RPWIP" VERSION="10.3">
<DOCSET NAME="">
<FXRFILE NAME="rel102sm"/>
<GROUP NAME="" NAME1="DOCUCORP PACKAGE" NAME2="VERSION 103">
<FORM NAME="Tersub - Basic">
<DESCRIPTION>Tersub - Basic Paragraph Assem</DESCRIPTION>
<FIELD NAME="FIELDTwo">8:30 AM</FIELD>
<FIELD NAME="FIELDThree">5:30PM</FIELD>
<RECIPIENT NAME="AGENT" COPYCOUNT="1" CODE="" SEQUENCE="1"/>
<RECIPIENT NAME="HOME OFFICE" COPYCOUNT="1" CODE=""
SEQUENCE="2"/>
<RECIPIENT NAME="INSURED" COPYCOUNT="1" CODE="" SEQUENCE="3"/>
:
</FORM>
</GROUP>
</DOCSET>
</DOCUMENT>
This table lists the system-generated tag names and attributes and gives an explanation of each.
Tag Name Attribute Explanation
?xml The XML declaration line
DOCUMENT TYPE The Documaker Standard Header. The attribute Type is hard-coded to be exported as RPW IP.
VERSION The version of the software being used.
DOCSET NAME The name of the document set that contains all forms required to process a single transaction, which is usually the FORM.DAT file.
GROUP NAME1, NAME2, NAME3
The key names used in the FORM.DAT file to group a set of common forms, such as Key1 = Company, Key2 = LOB, and so on.
FORM NAME The name of a single document containing one or more pages.
DESCRIPTION (Optional) A user-defined description of the form.
FIELD NAME (Optional) A field tag can be at the document, form, or section level, depending on the field scope. Fields tags at the...• Document level will be populated to all identically named variable fields in
all sections and all forms in a form set.• Form level will be populated to all identically named variable fields in all
sections in the current form.• Section level will be populated only to the variable field within a single
section.
RECIPIENT NAME The name used to identify who receives a copy or copies of a form set, or any part of a form set.
296

Example Documaker XML File Format
<SHEET>
<PAGE>
<SECTION NAME="parasem">
<FIELD NAME="FIELD">
<P ALIGN="CENTER">
<FONT STYLE="FONT-SIZE: 10pt" FACE="Univers ATT">
<B>Sample Text</B>
</FONT>
</P>
<P STYLE="margin-left: 2.00in">
<FONT STYLE="FONT-SIZE: 10pt" FACE="Univers ATT">
Sample text left margin is 2 inches sample text
</FONT>
</P>
<BR>
:
</PAGE>
</SHEET>
COPYCOUNT The number of copies for a particular recipient
CODE Not required.
SEQUENCE (Optional) The order in which the recipient copies print.
Tag Name Attribute Explanation
Tag Name Attribute Explanation
SHEET Used to identify if the form pages are simplex or duplex.
PAGE Indicates a single sheet of paper.
SECTION
NAME Indicates a segment of a page or an entire page. (Section Name)
FIELD NAME (Optional) The field tag at the section level is data that will be populated only to the variable field within a single section.
P (Optional) Indicates a paragraph in a text area or multi-line field. P is used when paragraph attributes are needed.
BR (Optional) Indicates a paragraph break. BR is used when there are no attributes for a paragraph.
ALIGN (Optional) Indicates the justification, such as Left, Center, Right, or Left & Right.
STYLE (Optional) Indicates the indentation, such as a 2-inch left margin or a 1-inch hanging indent margin. You can Indent paragraphs three ways: normal, hanging, and first line. The default is normal.
FONT STYLE (Optional) Indicates the point size of the font used.
FACE (Optional) Indicates the font family name.
297
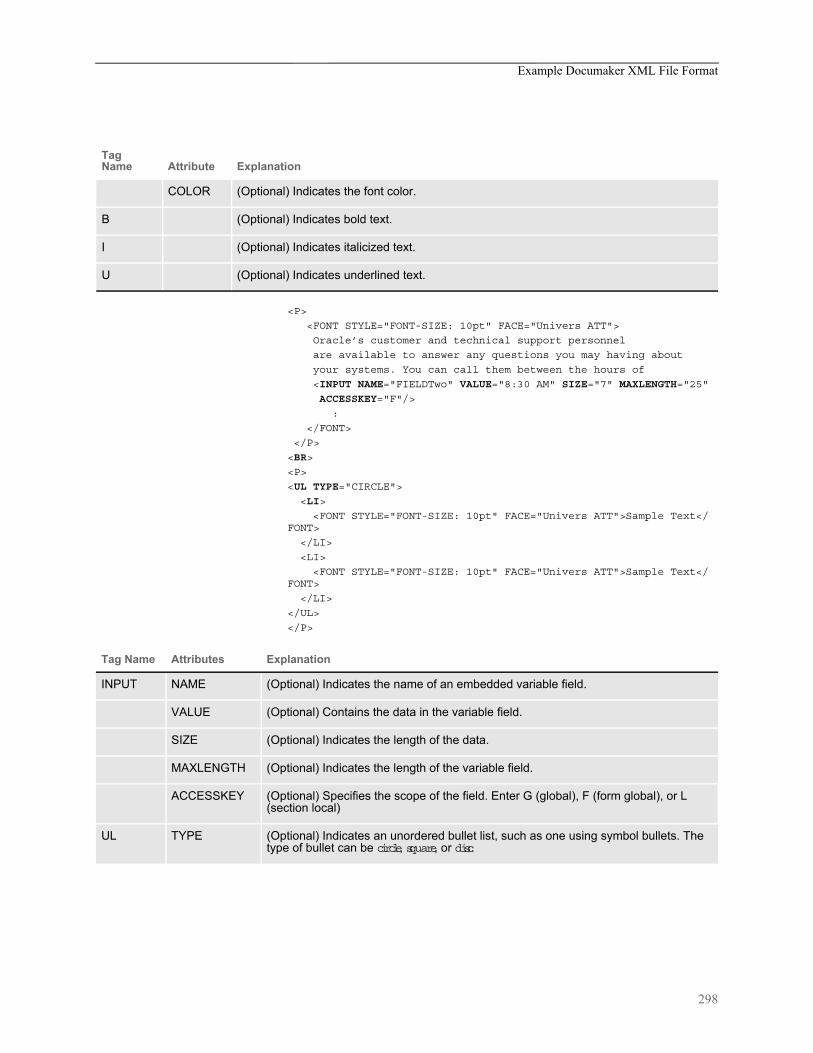
Example Documaker XML File Format
<P>
<FONT STYLE="FONT-SIZE: 10pt" FACE="Univers ATT">
Oracle’s customer and technical support personnel
are available to answer any questions you may having about
your systems. You can call them between the hours of
<INPUT NAME="FIELDTwo" VALUE="8:30 AM" SIZE="7" MAXLENGTH="25"
ACCESSKEY="F"/>
:
</FONT>
</P>
<BR>
<P>
<UL TYPE="CIRCLE">
<LI>
<FONT STYLE="FONT-SIZE: 10pt" FACE="Univers ATT">Sample Text</FONT>
</LI>
<LI>
<FONT STYLE="FONT-SIZE: 10pt" FACE="Univers ATT">Sample Text</FONT>
</LI>
</UL>
</P>
COLOR (Optional) Indicates the font color.
B (Optional) Indicates bold text.
I (Optional) Indicates italicized text.
U (Optional) Indicates underlined text.
Tag Name Attribute Explanation
Tag Name Attributes Explanation
INPUT NAME (Optional) Indicates the name of an embedded variable field.
VALUE (Optional) Contains the data in the variable field.
SIZE (Optional) Indicates the length of the data.
MAXLENGTH (Optional) Indicates the length of the variable field.
ACCESSKEY (Optional) Specifies the scope of the field. Enter G (global), F (form global), or L (section local)
UL TYPE (Optional) Indicates an unordered bullet list, such as one using symbol bullets. The type of bullet can be circle, square, or disc.
298
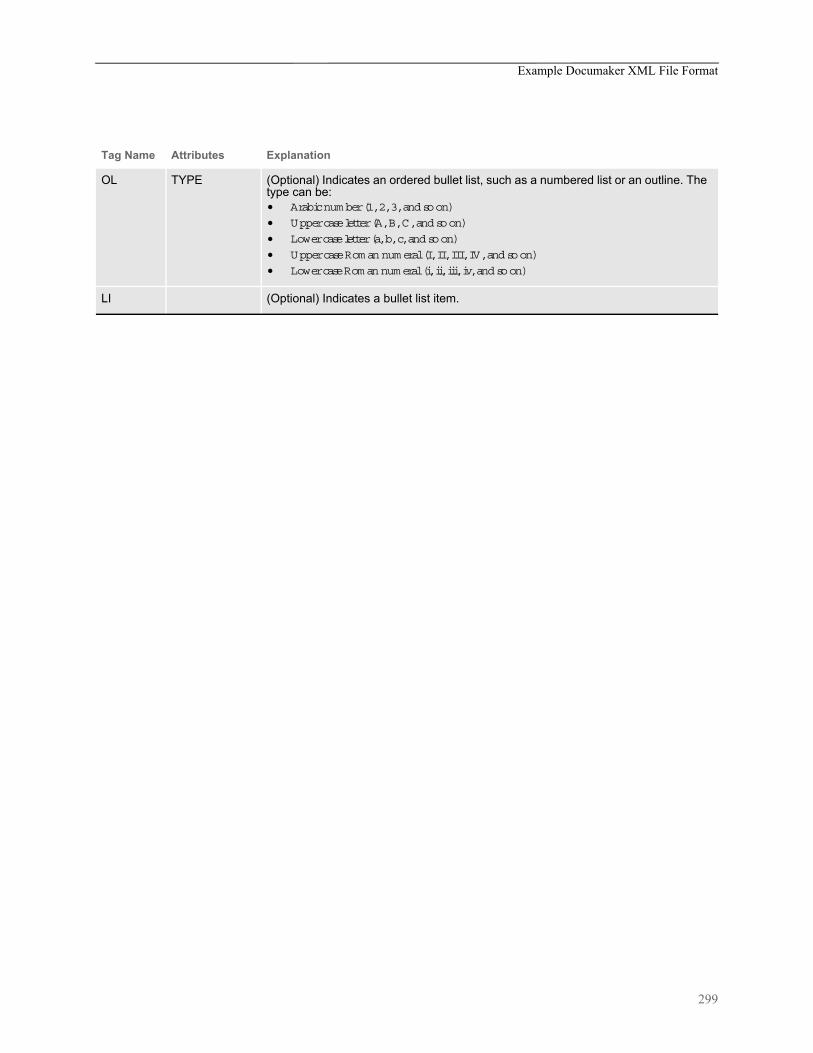
Example Documaker XML File Format
OL TYPE (Optional) Indicates an ordered bullet list, such as a numbered list or an outline. The type can be:• Arabic num ber (1, 2, 3, and so on)
• Upper case letter (A, B, C, and so on)
• Lower case letter (a, b, c, and so on)
• Upper case Rom an num eral (I, II, III, IV, and so on)
• Lower case Rom an num eral (i, ii, iii, iv, and so on)
LI (Optional) Indicates a bullet list item.
Tag Name Attributes Explanation
299

Importing a Documaker XML File
IMPORTING ADOCUMAKER
XML FILE
Follow these steps to import a Documaker XML file:
1 Start PPS. From the main menu select the File, New option. Then, from the Form Selection window, click Import.
2 Click XML Import as the format.
3 Select the XML file you want to import.
4 Complete the Forms Selection window and click Ok.
Your form set should be populated with data from your XML import file.
300

Importing a Documaker XML File
CONFIGURING A 3RD PARTY INTEGRATION APPLICATION
Documaker Desktop can launch a 3rd party application to initiate the creation of a new document via the XML import function. You can use the 3rd party application to capture data and generate an XML import file. Documaker Desktop can then import the XML file as a new transaction.
Target 3rd party applications are those which capture or get policy data based on elements input into the application and which return a results code and an XML file in an import format Documaker Desktop can process.
Here are examples of the INI options you use to configure a 3rd-party integration application:
< ImportFormats >
05 = ;XE;XML Import from EXE;wxmw32->WXMImportXMLFromExe
WXMImportXMLFromExe is the import function that launches 3rd-party options. You must also set up the following information about the 3rd-party application in the FSIUSER.INI or FSISYS.INI file. This control group is specific to the WXMImportXMLFromExe function.
< ImportXMLFromExe >
Executable = \\(full path)\3rdParty.exe
CurrentDirectory = \\(full path)
Executable option is used to configure the full path and file name for the 3rd-party executable. The CurrentDirectory option allows to configure the working directory for the 3rd party executable. The 3rd party application should output to the standard Output stream (stdout) the following information:
(return code) | (path to import file)
This <ImportFormats> option can also be used to allow the user to select a transaction from the standard (smart) archive and imports the data into a new transaction. This imports the data from an archived transaction and only optionally selects the forms if they are still defined in the current system. You may have newer forms that inherit the data. The format as follows
05 = ;IA;Import From Archive;TRNW32->TRNImpDatFromArchive;
Example
Parameter Description
Return code The 3rd-party application should return one of these codes:0 - Success1 - Fail2 - User cancel
Path to import file The full path to the import file
301

Importing a Documaker XML File
< ImportFormats >
05 = ;XE;XML Import from Archive;wxmw32->WXMImportXMLFromArchive
302
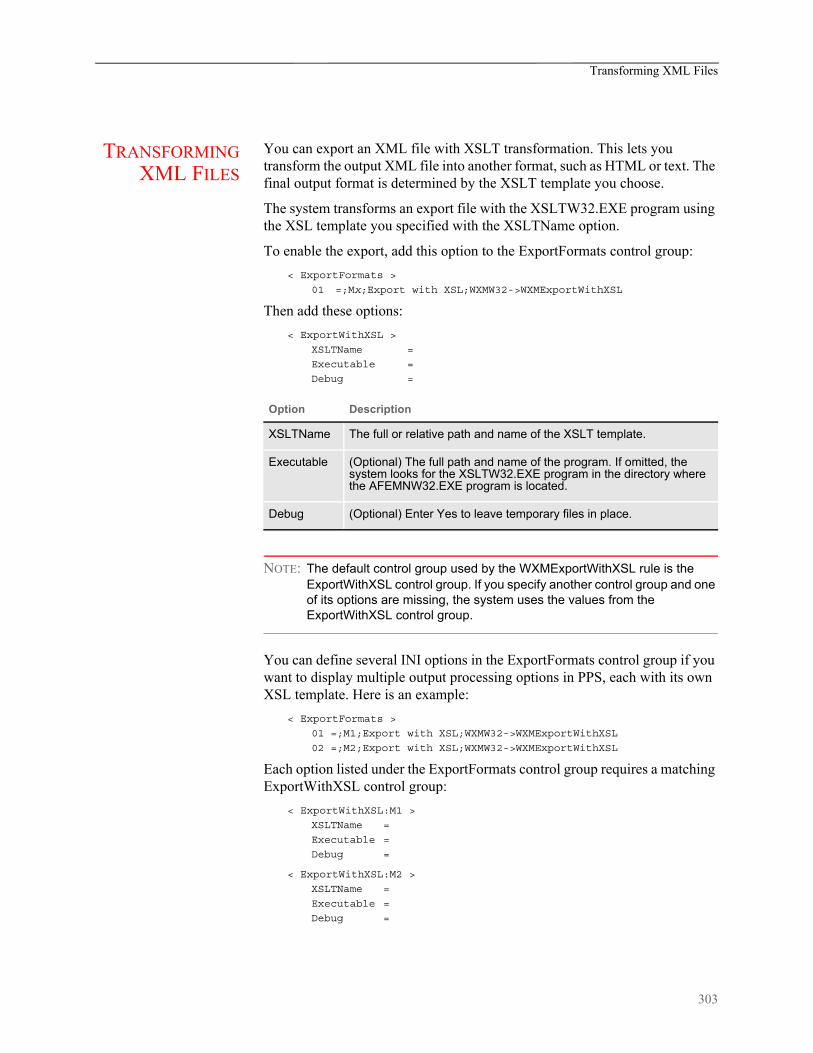
Transforming XML Files
TRANSFORMINGXML FILES
You can export an XML file with XSLT transformation. This lets you transform the output XML file into another format, such as HTML or text. The final output format is determined by the XSLT template you choose.
The system transforms an export file with the XSLTW32.EXE program using the XSL template you specified with the XSLTName option.
To enable the export, add this option to the ExportFormats control group:
< ExportFormats >
01 =;Mx;Export with XSL;WXMW32->WXMExportWithXSL
Then add these options:
< ExportWithXSL >
XSLTName =
Executable =
Debug =
NOTE: The default control group used by the WXMExportWithXSL rule is the ExportWithXSL control group. If you specify another control group and one of its options are missing, the system uses the values from the ExportWithXSL control group.
You can define several INI options in the ExportFormats control group if you want to display multiple output processing options in PPS, each with its own XSL template. Here is an example:
< ExportFormats >
01 =;M1;Export with XSL;WXMW32->WXMExportWithXSL
02 =;M2;Export with XSL;WXMW32->WXMExportWithXSL
Each option listed under the ExportFormats control group requires a matching ExportWithXSL control group:
< ExportWithXSL:M1 >
XSLTName =
Executable =
Debug =
< ExportWithXSL:M2 >
XSLTName =
Executable =
Debug =
Option Description
XSLTName The full or relative path and name of the XSLT template.
Executable (Optional) The full path and name of the program. If omitted, the system looks for the XSLTW32.EXE program in the directory where the AFEMNW32.EXE program is located.
Debug (Optional) Enter Yes to leave temporary files in place.
303

Transforming XML Files
Appending outputtransformations
You can append multiple XSLT output transformations to the same file using this INI option:
< ExpFile_CD >
AppendedExport = Yes
This example transforms an XML export into a semicolon-delimited output file you can import into Excel. It also uses the XSLTW32.EXE program for the transformation.
First, you need these INI options:
< ExportFormats >
01 =;M1;Export with XSL;WXMW32->WXMExportWithXSL
< ExportWithXSL:M1 >
XSLTName = x:\rp\mstrres\aeic\xsl\output1.xsl
Executable =
Debug = No
And this XSL style sheet:
<?xml version="1.0" encoding="UTF-8"?>
<xsl:stylesheet
xmlns:xsl="http://www.w3.org/1999/XSL/Transform"
version="1.0">
<xsl:output method="text" encoding="ISO-8859-1" />
<!-- global variables -->
<xsl:template match="/">
<xsl:call-template name="process"/>
</xsl:template>
<xsl:template name="process">
<xsl:variable name="semicolon" select="';'"/>
<xsl:variable name="root" select="DOCUMENT/DOCSET"/>
<xsl:variable name="policy" select="$root/
FIELD[@NAME='POLICY']"/>
<xsl:variable name="insnam" select="$root/
FIELD[@NAME='INSNAM']"/>
<xsl:variable name="insnam2" select="$root/
FIELD[@NAME='INSNAM2']"/>
<xsl:variable name="insad1" select="$root/
FIELD[@NAME='INSAD1']"/>
<xsl:variable name="insad2" select="$root/
FIELD[@NAME='INSAD2']"/>
<xsl:variable name="inszip" select="$root/
FIELD[@NAME='INSZIP']"/>
<xsl:variable name="agent" select="$root/
FIELD[@NAME='AGENT']"/>
<xsl:variable name="effdte" select="$root/
FIELD[@NAME='EFFDTE']"/>
<xsl:variable name="expdte" select="$root/
FIELD[@NAME='EXPDTE']"/>
<xsl:variable name="cddesc" select="$root/
FIELD[@NAME='CDDESC_BUSDSC']"/>
<xsl:variable name="premo_prop" select="$root/
FIELD[@NAME='PREMO_PROP']"/>
<xsl:variable name="advprem" select="$root/
FIELD[@NAME='ADVPREM']"/>
304
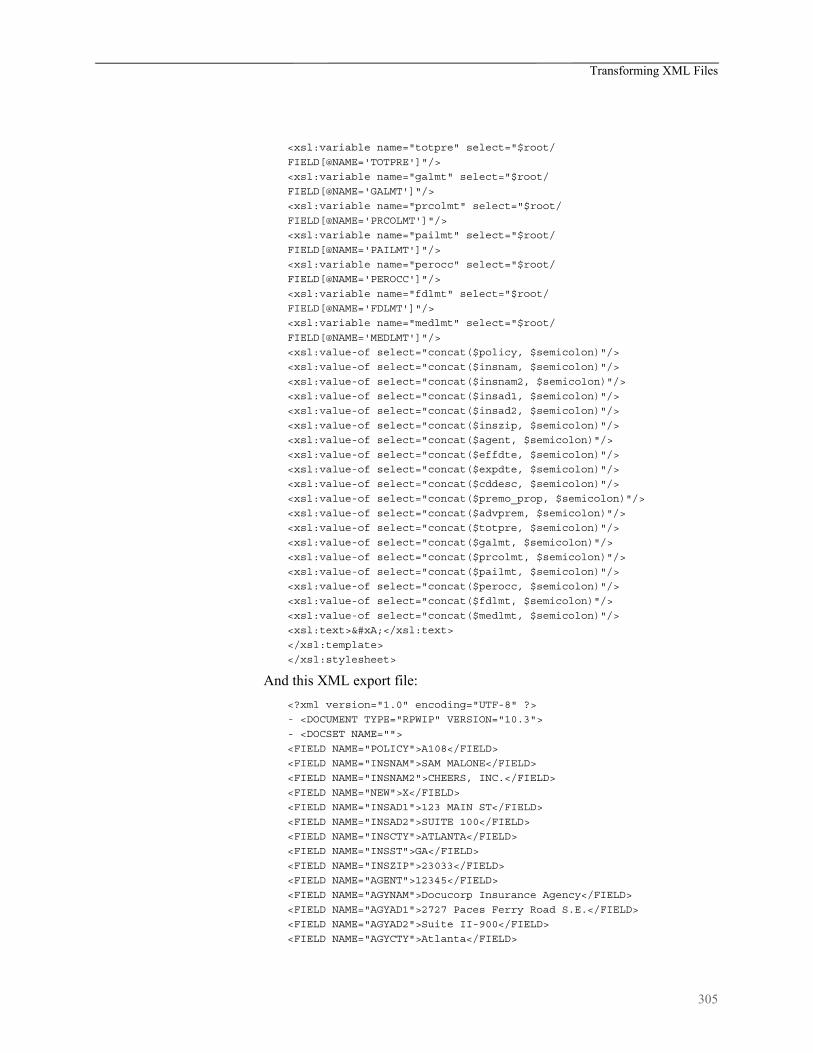
Transforming XML Files
<xsl:variable name="totpre" select="$root/
FIELD[@NAME='TOTPRE']"/>
<xsl:variable name="galmt" select="$root/
FIELD[@NAME='GALMT']"/>
<xsl:variable name="prcolmt" select="$root/
FIELD[@NAME='PRCOLMT']"/>
<xsl:variable name="pailmt" select="$root/
FIELD[@NAME='PAILMT']"/>
<xsl:variable name="perocc" select="$root/
FIELD[@NAME='PEROCC']"/>
<xsl:variable name="fdlmt" select="$root/
FIELD[@NAME='FDLMT']"/>
<xsl:variable name="medlmt" select="$root/
FIELD[@NAME='MEDLMT']"/>
<xsl:value-of select="concat($policy, $semicolon)"/>
<xsl:value-of select="concat($insnam, $semicolon)"/>
<xsl:value-of select="concat($insnam2, $semicolon)"/>
<xsl:value-of select="concat($insad1, $semicolon)"/>
<xsl:value-of select="concat($insad2, $semicolon)"/>
<xsl:value-of select="concat($inszip, $semicolon)"/>
<xsl:value-of select="concat($agent, $semicolon)"/>
<xsl:value-of select="concat($effdte, $semicolon)"/>
<xsl:value-of select="concat($expdte, $semicolon)"/>
<xsl:value-of select="concat($cddesc, $semicolon)"/>
<xsl:value-of select="concat($premo_prop, $semicolon)"/>
<xsl:value-of select="concat($advprem, $semicolon)"/>
<xsl:value-of select="concat($totpre, $semicolon)"/>
<xsl:value-of select="concat($galmt, $semicolon)"/>
<xsl:value-of select="concat($prcolmt, $semicolon)"/>
<xsl:value-of select="concat($pailmt, $semicolon)"/>
<xsl:value-of select="concat($perocc, $semicolon)"/>
<xsl:value-of select="concat($fdlmt, $semicolon)"/>
<xsl:value-of select="concat($medlmt, $semicolon)"/>
<xsl:text>
</xsl:text>
</xsl:template>
</xsl:stylesheet>
And this XML export file:
<?xml version="1.0" encoding="UTF-8" ?>
- <DOCUMENT TYPE="RPWIP" VERSION="10.3">
- <DOCSET NAME="">
<FIELD NAME="POLICY">A108</FIELD>
<FIELD NAME="INSNAM">SAM MALONE</FIELD>
<FIELD NAME="INSNAM2">CHEERS, INC.</FIELD>
<FIELD NAME="NEW">X</FIELD>
<FIELD NAME="INSAD1">123 MAIN ST</FIELD>
<FIELD NAME="INSAD2">SUITE 100</FIELD>
<FIELD NAME="INSCTY">ATLANTA</FIELD>
<FIELD NAME="INSST">GA</FIELD>
<FIELD NAME="INSZIP">23033</FIELD>
<FIELD NAME="AGENT">12345</FIELD>
<FIELD NAME="AGYNAM">Docucorp Insurance Agency</FIELD>
<FIELD NAME="AGYAD1">2727 Paces Ferry Road S.E.</FIELD>
<FIELD NAME="AGYAD2">Suite II-900</FIELD>
<FIELD NAME="AGYCTY">Atlanta</FIELD>
305

Transforming XML Files
<FIELD NAME="AGYST">GA</FIELD>
<FIELD NAME="AGYZIP">30339</FIELD>
<FIELD NAME="PRMSTE">GA</FIELD>
<FIELD NAME="EFFDTE">07/05/2003</FIELD>
<FIELD NAME="EXPDTE">07/05/2004</FIELD>
<FIELD NAME="TERM">366 DAYS</FIELD>
<FIELD NAME="CDDESC_BUSDSC">BAR & GRILL</FIELD>
<FIELD NAME="PREMO_PROP">12,000.00</FIELD>
<FIELD NAME="ADVPREM">12,000.00</FIELD>
<FIELD NAME="FEEDESC1">Policy Tax</FIELD>
<FIELD NAME="FEEDESC1 TAX">3%</FIELD>
<FIELD NAME="FEEAMT1">360.00</FIELD>
<FIELD NAME="FEEDESC2">Stamping Fee</FIELD>
<FIELD NAME="FEEAMT2">250.00</FIELD>
<FIELD NAME="OTHCHG">610.00</FIELD>
<FIELD NAME="TOTPRE">12,610.00</FIELD>
<FIELD NAME="CSIGNEDLOC">Atlanta, GA</FIELD>
<FIELD NAME="SIGNED DATE">07/30/2003</FIELD>
<FIELD NAME="SIGNED TIME">09:25:18</FIELD>
<FIELD NAME="OPINIT">DOCUCORP</FIELD>
<FIELD NAME="SIGNATURE">Authorized Representative</FIELD>
<FIELD NAME="GALMT">1,000,000</FIELD>
<FIELD NAME="PRCOLMT">1,000,000</FIELD>
<FIELD NAME="PAILMT">1,000,000</FIELD>
<FIELD NAME="PEROCC">1,000,000</FIELD>
<FIELD NAME="FDLMT">1,000,000</FIELD>
<FIELD NAME="MEDLMT">1,000,000</FIELD>
- <GROUP NAME="" NAME1="American Equity" NAME2="INTERLINE">
- <FORM NAME="FS100 10-2000">
<DESCRIPTION>Schedule of Forms/End</DESCRIPTION>
<FIELD NAME="FORM DESC LINE">Forms Applicable - INTERLINE</FIELD>
<FIELD NAME="FORM DESC LINE #003">A100J 02-1999 Policy Jacket -
AEIC</FIELD>
<FIELD NAME="FORM DESC LINE #004">A100 03-1997 Common Policy Dec -
AEIC</FIELD>
<FIELD NAME="FORM DESC LINE #005">A101 03-1997 Minimum Earned
Premium Endt</FIELD>
<FIELD NAME="FORM DESC LINE #006">A104 10-1998 Service of Suit</
FIELD>
<FIELD NAME="FORM DESC LINE #007">IL0017 11-1998 Common Policy
Conditions</FIELD>
<FIELD NAME="FORM DESC LINE #008">IL0021 04-1998 Nuclear Energy
Liab Excl Endt</FIELD>
<FIELD NAME="FORM DESC LINE #010">Forms Applicable - GENERAL
LIABILITY</FIELD>
<FIELD NAME="FORM DESC LINE #012">CL150 01-2000 General Liab
Coverage Part</FIELD>
<FIELD NAME="FORM DESC LINE #013">L003 03-1997 Amendment of Premium
Condition</FIELD>
<FIELD NAME="FORM DESC LINE #014">L005 01-2000 Contractual Liab
Limitation</FIELD>
<FIELD NAME="FORM DESC LINE #015">L007 07-1998 Ded Liab Ins-w/Costs
per Claim</FIELD>
<FIELD NAME="FORM DESC LINE #016">L150 01-2000 Additional
Exclusions</FIELD>
306

Transforming XML Files
<FIELD NAME="FORM DESC LINE #017">CG0001 07-1998 Comm General Liab
Cov Form</FIELD>
<FIELD NAME="FORM DESC LINE #018">CG2160 09-1998 Excl - Year 2000
Computer Prob</FIELD>
<RECIPIENT NAME="EXTRA COPY" COPYCOUNT="1" />
<RECIPIENT NAME="GENERAL AGENT" COPYCOUNT="1" />
<RECIPIENT NAME="HOME OFFICE" COPYCOUNT="1" />
<RECIPIENT NAME="ORIGINAL" COPYCOUNT="1" />
<RECIPIENT NAME="RETAIL AGENT" COPYCOUNT="1" />
- <SHEET>
- <PAGE>
<SECTION NAME="FORMSCHA" />
</PAGE>
</SHEET>
</FORM
</DOCSET>
</DOCUMENT>
The output file looks like this:
A108;SAM MALONE;CHEERS, INC.;123 MAIN ST;SUITE 100;23033;12345;07/
05/2003;07/05/2004;; 12,000.00;
12,000.00;;1,000,000;1,000,000;1,000,000;1,000,000;1,000,000;1,000,000;
You can import this file into an Excel spreadsheet.
307

Appendix B
Legal Notices
THIRD PARTY SOFTWARE NOTICES
This product includes software developed by Apache Software Foundation (http://www.apache.org/).
THIS SOFTWARE IS PROVIDED "AS IS" AND ANY EXPRESS OR IMPLIED WARRANTIES, INCLUDING, BUT NOT LIMITED TO, THE IMPLIED WARRANTIES OF MERCHANTABILITY AND FITNESS FOR A PARTICULAR PURPOSE ARE DISCLAIMED. IN NO EVENT SHALL THE AUTHOR OR CONTRIBUTORS BE LIABLE FOR ANY DIRECT, INDIRECT, INCIDENTAL, SPECIAL, EXEMPLARY, OR CONSEQUENTIAL DAMAGES (INCLUDING, BUT NOT LIMITED TO, PROCUREMENT OF SUBSTITUTE GOODS OR SERVICES; LOSS OF USE, DATA, OR PROFITS; OR BUSINESS INTERRUPTION) HOWEVER CAUSED AND ON ANY THEORY OF LIABILITY, WHETHER IN CONTRACT, STRICT LIABILITY, OR TORT (INCLUDING NEGLIGENCE OR OTHERWISE) ARISING IN ANY WAY OUT OF THE USE OF THIS SOFTWARE, EVEN IF ADVISED OF THE POSSIBILITY OF SUCH DAMAGE.
Copyright © 2000-2009 The Apache Software Foundation. All rights reserved.
Apache Commons Math Copyright 2001-2008 The Apache Software Foundation
This product includes software translated from the odex Fortran routine developed by E. Hairer and G. Wanner and distributed under the following license:
Copyright (c) 2004, Ernst Hairer
Apache License Version 2.0, January 2004 (http://www.apache.org/licenses/LICENSE-2.0)
THIS SOFTWARE IS PROVIDED "AS IS'' AND ANY EXPRESSED OR IMPLIED WARRANTIES, INCLUDING, BUT NOT LIMITED TO, THE IMPLIED WARRANTIES OF MERCHANTABILITY AND FITNESS FOR A PARTICULAR PURPOSE ARE DISCLAIMED. IN NO EVENT SHALL THE VISIGOTH SOFTWARE SOCIETY OR ITS CONTRIBUTORS BE LIABLE FOR ANY DIRECT, INDIRECT, INCIDENTAL, SPECIAL, EXEMPLARY, OR CONSEQUENTIAL DAMAGES (INCLUDING, BUT NOT LIMITED TO, PROCUREMENT OF SUBSTITUTE GOODS OR SERVICES; LOSS OF USE, DATA, OR PROFITS; OR BUSINESS INTERRUPTION) HOWEVER CAUSED AND ON ANY THEORY OF LIABILITY, WHETHER IN CONTRACT, STRICT LIABILITY, OR TORT (INCLUDING NEGLIGENCE OR OTHERWISE) ARISING IN ANY WAY OUT OF THE USE OF THIS SOFTWARE, EVEN IF ADVISED OF THE POSSIBILITY OF SUCH DAMAGE.
Apache Commons Codec Copyright 2002-2009 The Apache Software Foundation Copyright (C) 2002 Kevin Atkinson ([email protected])
Apache Commons Pool Copyright 2001-2011 The Apache Software Foundation
Apache Jakarta Commons LangCopyright 2001-2007 The Apache Software Foundation
Apache Jakarta Commons FileUpload

Copyright 2002-2006 The Apache Software Foundation
Apache Commons CLICopyright 2001-2009 The Apache Software Foundation
Apache Commons CollectionsCopyright 2001-2008 The Apache Software Foundation
Apache Commons LoggingCopyright 2003-2013 The Apache Software Foundation
Barcode4JCopyright 2002-2010 Jeremias MärkiCopyright 2005-2006 Dietmar BürklePortions of this software were contributed under section 5 of theApache License. Contributors are listed under: (http://barcode4j.sourceforge.net/contributors.html) Copyright 2002-2010 The Apache Software Foundation
This product includes software distributed via the Berkeley Software Distribution (BSD) and licensed for binary distribution under the Generic BSD license.
THIS SOFTWARE IS PROVIDED BY THE COPYRIGHT HOLDERS AND CONTRIBUTORS "AS IS'' AND ANY EXPRESS OR IMPLIED WARRANTIES, INCLUDING, BUT NOT LIMITED TO, THE IMPLIED WARRANTIES OF MERCHANTABILITY AND FITNESS FOR A PARTICULAR PURPOSE ARE DISCLAIMED. IN NO EVENT SHALL THE COPYRIGHT OWNER OR CONTRIBUTORS BE LIABLE FOR ANY DIRECT, INDIRECT, INCIDENTAL, SPECIAL, EXEMPLARY, OR CONSEQUENTIAL DAMAGES (INCLUDING, BUT NOT LIMITED TO, PROCUREMENT OF SUBSTITUTE GOODS OR SERVICES; LOSS OF USE, DATA, OR PROFITS; OR BUSINESS INTERRUPTION) HOWEVER CAUSED AND ON ANY THEORY OF LIABILITY, WHETHER IN CONTRACT, STRICT LIABILITY, OR TORT (INCLUDING NEGLIGENCE OR OTHERWISE) ARISING IN ANY WAY OUT OF THE USE OF THIS SOFTWARE, EVEN IF ADVISED OF THE POSSIBILITY OF SUCH DAMAGE.
Copyright © 2009, Berkeley Software Distribution (BSD)
This product includes software developed by the JDOM Project (http://www.jdom.org/).
THIS SOFTWARE IS PROVIDED "AS IS'' AND ANY EXPRESSED OR IMPLIED WARRANTIES, INCLUDING, BUT NOT LIMITED TO, THE IMPLIED WARRANTIES OF MERCHANTABILITY AND FITNESS FOR A PARTICULAR PURPOSE ARE DISCLAIMED. IN NO EVENT SHALL THE JDOM AUTHORS OR THE PROJECT CONTRIBUTORS BE LIABLE FOR ANY DIRECT, INDIRECT, INCIDENTAL, SPECIAL, EXEMPLARY, OR CONSEQUENTIAL DAMAGES (INCLUDING, BUT NOT LIMITED TO, PROCUREMENT OF SUBSTITUTE GOODS OR SERVICES; LOSS OF USE, DATA, OR PROFITS; OR BUSINESS INTERRUPTION) HOWEVER CAUSED AND ON ANY THEORY OF LIABILITY, WHETHER IN CONTRACT, STRICT LIABILITY, OR TORT (INCLUDING NEGLIGENCE OR OTHERWISE) ARISING IN ANY WAY OUT OF THE USE OF THIS SOFTWARE, EVEN IF ADVISED OF THE POSSIBILITY OF SUCH DAMAGE.
Copyright (C) 2000-2004 Jason Hunter & Brett McLaughlin. All rights reserved.
This product includes software developed by the Massachusetts Institute of Technology (MIT).

THE SOFTWARE IS PROVIDED "AS IS", WITHOUT WARRANTY OF ANY KIND, EXPRESS OR IMPLIED, INCLUDING BUT NOT LIMITED TO THE WARRANTIES OF MERCHANTABILITY, FITNESS FOR A PARTICULAR PURPOSE AND NONINFRINGEMENT. IN NO EVENT SHALL THE AUTHORS OR COPYRIGHT HOLDERS BE LIABLE FOR ANY CLAIM, DAMAGES OR OTHER LIABILITY, WHETHER IN AN ACTION OF CONTRACT, TORT OR OTHERWISE, ARISING FROM, OUT OF OR IN CONNECTION WITH THE SOFTWARE OR THE USE OR OTHER DEALINGS IN THE SOFTWARE.
Copyright © 2009 MIT
This product includes software developed by Jean-loup Gailly and Mark Adler. This software is provided 'as-is', without any express or implied warranty. In no event will the authors be held liable for any damages arising from the use of this software.
Copyright (c) 1995-2005 Jean-loup Gailly and Mark Adler
This software is based in part on the work of the Independent JPEG Group (http://www.ijg.org/).
This product includes software developed by the Dojo Foundation (http://dojotoolkit.org).
THIS SOFTWARE IS PROVIDED BY THE COPYRIGHT HOLDERS AND CONTRIBUTORS "AS IS" AND ANY EXPRESS OR IMPLIED WARRANTIES, INCLUDING, BUT NOT LIMITED TO, THE IMPLIED WARRANTIES OF MERCHANTABILITY AND FITNESS FOR A PARTICULAR PURPOSE ARE DISCLAIMED. IN NO EVENT SHALL THE COPYRIGHT OWNER OR CONTRIBUTORS BE LIABLE FOR ANY DIRECT, INDIRECT, INCIDENTAL, SPECIAL, EXEMPLARY, OR CONSEQUENTIAL DAMAGES (INCLUDING, BUT NOT LIMITED TO, PROCUREMENT OF SUBSTITUTE GOODS OR SERVICES; LOSS OF USE, DATA, OR PROFITS; OR BUSINESS INTERRUPTION) HOWEVER CAUSED AND ON ANY THEORY OF LIABILITY, WHETHER IN CONTRACT, STRICT LIABILITY, OR TORT (INCLUDING NEGLIGENCE OR OTHERWISE) ARISING IN ANY WAY OUT OF THE USE OF THIS SOFTWARE, EVEN IF ADVISED OF THE POSSIBILITY OF SUCH DAMAGE.
Copyright (c) 2005-2009, The Dojo Foundation. All rights reserved.
This product includes software developed by W3C.
Copyright © 2009 World Wide Web Consortium, (Massachusetts Institute of Technology, Institut National de Recherche en Informatique et en Automatique, Keio University). All Rights Reserved. (http://www.w3.org/Consortium/Legal/)
This product includes software developed by Mathew R. Miller (http://www.bluecreststudios.com).
Copyright (c) 1999-2002 ComputerSmarts. All rights reserved.
This product includes software developed by Shaun Wilde and distributed via Code Project Open License (http://www.codeproject.com).
THIS WORK IS PROVIDED "AS IS", "WHERE IS" AND "AS AVAILABLE", WITHOUT ANY EXPRESS OR IMPLIED WARRANTIES OR CONDITIONS OR GUARANTEES. YOU, THE USER, ASSUME ALL RISK IN ITS USE, INCLUDING COPYRIGHT INFRINGEMENT, PATENT INFRINGEMENT, SUITABILITY, ETC. AUTHOR

EXPRESSLY DISCLAIMS ALL EXPRESS, IMPLIED OR STATUTORY WARRANTIES OR CONDITIONS, INCLUDING WITHOUT LIMITATION, WARRANTIES OR CONDITIONS OF MERCHANTABILITY, MERCHANTABLE QUALITY OR FITNESS FOR A PARTICULAR PURPOSE, OR ANY WARRANTY OF TITLE OR NON-INFRINGEMENT, OR THAT THE WORK (OR ANY PORTION THEREOF) IS CORRECT, USEFUL, BUG-FREE OR FREE OF VIRUSES. YOU MUST PASS THIS DISCLAIMER ON WHENEVER YOU DISTRIBUTE THE WORK OR DERIVATIVE WORKS.
This product includes software developed by Chris Maunder and distributed via Code Project Open License (http://www.codeproject.com).
THIS WORK IS PROVIDED "AS IS", "WHERE IS" AND "AS AVAILABLE", WITHOUT ANY EXPRESS OR IMPLIED WARRANTIES OR CONDITIONS OR GUARANTEES. YOU, THE USER, ASSUME ALL RISK IN ITS USE, INCLUDING COPYRIGHT INFRINGEMENT, PATENT INFRINGEMENT, SUITABILITY, ETC. AUTHOR EXPRESSLY DISCLAIMS ALL EXPRESS, IMPLIED OR STATUTORY WARRANTIES OR CONDITIONS, INCLUDING WITHOUT LIMITATION, WARRANTIES OR CONDITIONS OF MERCHANTABILITY, MERCHANTABLE QUALITY OR FITNESS FOR A PARTICULAR PURPOSE, OR ANY WARRANTY OF TITLE OR NON-INFRINGEMENT, OR THAT THE WORK (OR ANY PORTION THEREOF) IS CORRECT, USEFUL, BUG-FREE OR FREE OF VIRUSES. YOU MUST PASS THIS DISCLAIMER ON WHENEVER YOU DISTRIBUTE THE WORK OR DERIVATIVE WORKS.
This product includes software developed by PJ Arends and distributed via Code Project Open License (http://www.codeproject.com).
THIS WORK IS PROVIDED "AS IS", "WHERE IS" AND "AS AVAILABLE", WITHOUT ANY EXPRESS OR IMPLIED WARRANTIES OR CONDITIONS OR GUARANTEES. YOU, THE USER, ASSUME ALL RISK IN ITS USE, INCLUDING COPYRIGHT INFRINGEMENT, PATENT INFRINGEMENT, SUITABILITY, ETC. AUTHOR EXPRESSLY DISCLAIMS ALL EXPRESS, IMPLIED OR STATUTORY WARRANTIES OR CONDITIONS, INCLUDING WITHOUT LIMITATION, WARRANTIES OR CONDITIONS OF MERCHANTABILITY, MERCHANTABLE QUALITY OR FITNESS FOR A PARTICULAR PURPOSE, OR ANY WARRANTY OF TITLE OR NON-INFRINGEMENT, OR THAT THE WORK (OR ANY PORTION THEREOF) IS CORRECT, USEFUL, BUG-FREE OR FREE OF VIRUSES. YOU MUST PASS THIS DISCLAIMER ON WHENEVER YOU DISTRIBUTE THE WORK OR DERIVATIVE WORKS.
This product includes software developed by Erwin Tratar. This source code and all accompanying material is copyright (c) 1998-1999 Erwin Tratar. All rights reserved.
THIS SOFTWARE IS PROVIDED "AS IS" WITHOUT EXPRESS OR IMPLIED WARRANTY. USE IT AT YOUR OWN RISK! THE AUTHOR ACCEPTS NO LIABILITY FOR ANY DAMAGE/LOSS OF BUSINESS THAT THIS PRODUCT MAY CAUSE.
This product includes software developed by Sam Leffler of Silicon Graphics.
THE SOFTWARE IS PROVIDED "AS IS" AND WITHOUT WARRANTY OF ANY KIND, EXPRESS, IMPLIED OR OTHERWISE, INCLUDING WITHOUT LIMITATION, ANY WARRANTY OF MERCHANTABILITY OR FITNESS FOR A PARTICULAR PURPOSE.
IN NO EVENT SHALL SAM LEFFLER OR SILICON GRAPHICS BE LIABLE FOR ANY SPECIAL, INCIDENTAL, INDIRECT OR CONSEQUENTIAL DAMAGES OF ANY KIND, OR ANY DAMAGES WHATSOEVER RESULTING FROM LOSS OF USE, DATA OR PROFITS, WHETHER OR NOT ADVISED OF THE POSSIBILITY OF DAMAGE, AND ON ANY THEORY OF LIABILITY, ARISING OUT OF OR IN CONNECTION WITH THE

USE OR PERFORMANCE OF THIS SOFTWARE
Copyright (c) 1988-1997 Sam LefflerCopyright (c) 1991-1997 Silicon Graphics, Inc.
This product includes software developed by Guy Eric Schalnat, Andreas Dilger, Glenn Randers-Pehrson (current maintainer), and others. (http://www.libpng.org)
The PNG Reference Library is supplied "AS IS". The Contributing Authors and Group 42, Inc. disclaim all warranties, expressed or implied, including, without limitation, the warranties of merchantability and of fitness for any purpose. The Contributing Authors and Group 42, Inc. assume no liability for direct, indirect, incidental, special, exemplary, or consequential damages, which may result from the use of the PNG Reference Library, even if advised of the possibility of such damage.
This product includes software components distributed by the Cryptix Foundation.
THIS SOFTWARE IS PROVIDED BY THE CRYPTIX FOUNDATION LIMITED AND CONTRIBUTORS "AS IS" AND ANY EXPRESS OR IMPLIED WARRANTIES, INCLUDING, BUT NOT LIMITED TO, THE IMPLIED WARRANTIES OF MERCHANTABILITY AND FITNESS FOR A PARTICULAR PURPOSE ARE DISCLAIMED. IN NO EVENT SHALL THE CRYPTIX FOUNDATION LIMITED OR CONTRIBUTORS BE LIABLE FOR ANY DIRECT, INDIRECT, INCIDENTAL, SPECIAL, EXEMPLARY, OR CONSEQUENTIAL DAMAGES (INCLUDING, BUT NOT LIMITED TO, PROCUREMENT OF SUBSTITUTE GOODS OR SERVICES; LOSS OF USE, DATA, OR PROFITS; OR BUSINESS INTERRUPTION) HOWEVER CAUSED AND ON ANY THEORY OF LIABILITY, WHETHER IN CONTRACT, STRICT LIABILITY, OR TORT (INCLUDING NEGLIGENCE OR OTHERWISE) ARISING IN ANY WAY OUT OF THE USE OF THIS SOFTWARE, EVEN IF ADVISED OF THE POSSIBILITY OF SUCH DAMAGE
Copyright © 1995-2005 The Cryptix Foundation Limited. All rights reserved.
This product includes software components distributed by Sun Microsystems.
This software is provided "AS IS," without a warranty of any kind. ALL EXPRESS OR IMPLIED CONDITIONS, REPRESENTATIONS AND WARRANTIES, INCLUDING ANYIMPLIED WARRANTY OF MERCHANTABILITY, FITNESS FOR A PARTICULAR PURPOSE OR NON-INFRINGEMENT, ARE HEREBY EXCLUDED. SUN AND ITS LICENSORS SHALL NOT BE LIABLE FOR ANY DAMAGES SUFFERED BY LICENSEE AS A RESULT OF USING, MODIFYING OR DISTRIBUTING THE SOFTWARE OR ITS DERIVATIVES. IN NO EVENT WILL SUN OR ITS LICENSORS BE LIABLE FOR ANY LOST REVENUE, PROFIT OR DATA, OR FOR DIRECT, INDIRECT, SPECIAL, CONSEQUENTIAL, INCIDENTAL OR PUNITIVE DAMAGES, HOWEVER CAUSED AND REGARDLESS OF THE THEORY OF LIABILITY, ARISING OUT OF THE USE OF OR INABILITY TO USE SOFTWARE, EVEN IF SUN HAS BEEN ADVISED OF THE POSSIBILITY OF SUCH DAMAGES.
Copyright (c) 1998 Sun Microsystems, Inc. All Rights Reserved.
This product includes software components distributed by Dennis M. Sosnoski.
THIS SOFTWARE IS PROVIDED BY THE COPYRIGHT HOLDERS AND CONTRIBUTORS "AS IS'" AND ANY EXPRESS OR IMPLIED WARRANTIES, INCLUDING, BUT NOT LIMITED TO, THE IMPLIED WARRANTIES OF MERCHANTABILITY AND FITNESS FOR A PARTICULAR PURPOSE ARE DISCLAIMED. IN NO EVENT SHALL THE COPYRIGHT OWNER OR CONTRIBUTORS BE LIABLE FOR ANY DIRECT, INDIRECT, INCIDENTAL, SPECIAL, EXEMPLARY, OR

CONSEQUENTIAL DAMAGES (INCLUDING, BUT NOT LIMITED TO, PROCUREMENT OF SUBSTITUTE GOODS OR SERVICES; LOSS OF USE, DATA, OR PROFITS; OR BUSINESS INTERRUPTION) HOWEVER CAUSED AND ON ANY THEORY OF LIABILITY, WHETHER IN CONTRACT, STRICT LIABILITY, OR TORT (INCLUDING NEGLIGENCE OR OTHERWISE) ARISING IN ANY WAY OUT OF THE USE OF THIS SOFTWARE, EVEN IF ADVISED OF THE POSSIBILITY OF SUCH DAMAGE.
Copyright © 2003-2007 Dennis M. Sosnoski. All Rights Reserved
It also includes materials licensed under Apache 1.1 and the following XPP3 license
THIS SOFTWARE IS PROVIDED "AS IS'" AND ANY EXPRESSED OR IMPLIED WARRANTIES, INCLUDING, BUT NOT LIMITED TO, THE IMPLIED WARRANTIES OF MERCHANTABILITY AND FITNESS FOR A PARTICULAR PURPOSE ARE DISCLAIMED. IN NO EVENT SHALL THE COPYRIGHT OWNER OR CONTRIBUTORS BE LIABLE FOR ANY DIRECT, INDIRECT, INCIDENTAL, SPECIAL, EXEMPLARY, OR CONSEQUENTIAL DAMAGES (INCLUDING, BUT NOT LIMITED TO, PROCUREMENT OF SUBSTITUTE GOODS OR SERVICES; LOSS OF USE, DATA, OR PROFITS; OR BUSINESS INTERRUPTION) HOWEVER CAUSED AND ON ANY THEORY OF LIABILITY, WHETHER IN CONTRACT, STRICT LIABILITY, OR TORT (INCLUDING NEGLIGENCE OR OTHERWISE) ARISING IN ANY WAY OUT OF THE USE OF THIS SOFTWARE, EVEN IF ADVISED OF THE POSSIBILITY OF SUCH DAMAGE.
Copyright © 2002 Extreme! Lab, Indiana University. All Rights Reserved
This product includes software components distributed by CodeProject. This software contains material that is © 1994-2005 The Ultimate Toolbox, all rights reserved.
This product includes software components distributed by Geir Landro.
Copyright © 2001-2003 Geir Landro ([email protected]) JavaScript Tree - www.destroydrop.com/hjavascripts/tree/version 0.96
This product includes software components distributed by the Hypersonic SQL Group.
THIS SOFTWARE IS PROVIDED BY THE COPYRIGHT HOLDERS AND CONTRIBUTORS "AS IS'" AND ANY EXPRESS OR IMPLIED WARRANTIES, INCLUDING, BUT NOT LIMITED TO, THE IMPLIED WARRANTIES OF MERCHANTABILITY AND FITNESS FOR A PARTICULAR PURPOSE ARE DISCLAIMED. IN NO EVENT SHALL THE COPYRIGHT OWNER OR CONTRIBUTORS BE LIABLE FOR ANY DIRECT, INDIRECT, INCIDENTAL, SPECIAL, EXEMPLARY, OR CONSEQUENTIAL DAMAGES (INCLUDING, BUT NOT LIMITED TO, PROCUREMENT OF SUBSTITUTE GOODS OR SERVICES; LOSS OF USE, DATA, OR PROFITS; OR BUSINESS INTERRUPTION) HOWEVER CAUSED AND ON ANY THEORY OF LIABILITY, WHETHER IN CONTRACT, STRICT LIABILITY, OR TORT (INCLUDING NEGLIGENCE OR OTHERWISE) ARISING IN ANY WAY OUT OF THE USE OF THIS SOFTWARE, EVEN IF ADVISED OF THE POSSIBILITY OF SUCH DAMAGE
Copyright © 1995-2000 by the Hypersonic SQL Group. All Rights Reserved
This product includes software components distributed by the International Business Machines Corporation and others.
THE SOFTWARE IS PROVIDED "AS IS", WITHOUT WARRANTY OF ANY KIND, EXPRESS OR IMPLIED, INCLUDING BUT NOT LIMITED TO THE WARRANTIES OF

MERCHANTABILITY, FITNESS FOR A PARTICULAR PURPOSE AND NONINFRINGEMENT. IN NO EVENT SHALL THE AUTHORS OR COPYRIGHT HOLDERS BE LIABLE FOR ANY CLAIM, DAMAGES OR OTHER LIABILITY, WHETHER IN AN ACTION OF CONTRACT, TORT OR OTHERWISE, ARISING FROM, OUT OF OR IN CONNECTION WITH THE SOFTWARE OR THE USE OR OTHER DEALINGS IN THE SOFTWARE.
Copyright (c) 1995-2009 International Business Machines Corporation and others. All rights reserved.
This product includes software components distributed by the University of Coimbra.
University of Coimbra distributes this software in the hope that it will be useful but DISCLAIMS ALL WARRANTIES WITH REGARD TO IT, including all implied warranties of MERCHANTABILITY or FITNESS FOR A PARTICULAR PURPOSE. In no event shall University of Coimbra be liable for any special, indirect or consequential damages (or any damages whatsoever) resulting from loss of use, data or profits, whether in an action of contract, negligence or other tortious action, arising out of or in connection with the use or performance of this software.
Copyright (c) 2000 University of Coimbra, Portugal. All Rights Reserved.
This product includes software components distributed by Steve Souza.
THIS SOFTWARE IS PROVIDED BY THE AUTHOR AND CONTRIBUTORS "AS IS'" AND ANY EXPRESS OR IMPLIED WARRANTIES, INCLUDING, BUT NOT LIMITED TO, THE IMPLIED WARRANTIES OF MERCHANTABILITY AND FITNESS FOR A PARTICULAR PURPOSE ARE DISCLAIMED. IN NO EVENT SHALL THE COPYRIGHT OWNER OR CONTRIBUTORS BE LIABLE FOR ANY DIRECT, INDIRECT, INCIDENTAL, SPECIAL, EXEMPLARY, OR CONSEQUENTIAL DAMAGES (INCLUDING, BUT NOT LIMITED TO, PROCUREMENT OF SUBSTITUTE GOODS OR SERVICES; LOSS OF USE, DATA, OR PROFITS; OR BUSINESS INTERRUPTION) HOWEVER CAUSED AND ON ANY THEORY OF LIABILITY, WHETHER IN CONTRACT, STRICT LIABILITY, OR TORT (INCLUDING NEGLIGENCE OR OTHERWISE) ARISING IN ANY WAY OUT OF THE USE OF THIS SOFTWARE, EVEN IF ADVISED OF THE POSSIBILITY OF SUCH DAMAGE.
Copyright © 2002, Steve Souza ([email protected]). All Rights Reserved.
This product includes software developed by the OpenSymphony Group (http://www.opensymphony.com/.)"
Copyright © 2001-2004 The OpenSymphony Group. All Rights Reserved.
PANTONE (R) Colors displayed in the software application or in the user documentation may not match PANTONE-identified standards. Consult current PANTONE Color Publications for accurate color. PANTONE(R) and other Pantone LLC trademarks are the property of Pantone LLC. (C) Pantone LLC, 2011.
Pantone LLC is the copyright owner of color data and/or software which are licensed to Oracle to distribute for use only in combination with Oracle Documaker. PANTONE Color Data and/or Software shall not be copied onto another disk or into memory unless part of the execution of Oracle Documaker.
This product includes software developed by Dave Gamble and distributed via

SourceForge.net (http://sourceforge.net/projects/cjson/)
THE SOFTWARE IS PROVIDED "AS IS", WITHOUT WARRANTY OF ANY KIND, EXPRESS OR IMPLIED, INCLUDING BUT NOT LIMITED TO THE WARRANTIES OF MERCHANTABILITY, FITNESS FOR A PARTICULAR PURPOSE AND NONINFRINGEMENT. IN NO EVENT SHALL THEAUTHORS OR COPYRIGHT HOLDERS BE LIABLE FOR ANY CLAIM, DAMAGES OR OTHER LIABILITY, WHETHER IN AN ACTION OF CONTRACT, TORT OR OTHERWISE, ARISING FROM, OUT OF OR IN CONNECTION WITH THE SOFTWARE OR THE USE OR OTHER DEALINGS IN THE SOFTWARE.
Copyright (c) 2009 Dave Gamble
This product includes software developed by the Zxing Project.
THE SOFTWARE IS PROVIDED "AS IS", WITHOUT WARRANTY OF ANY KIND, EXPRESS OR IMPLIED, INCLUDING BUT NOT LIMITED TO THE WARRANTIES OF MERCHANTABILITY, FITNESS FOR A PARTICULAR PURPOSE AND NONINFRINGEMENT. IN NO EVENT SHALL THE AUTHORS OR COPYRIGHT HOLDERS BE LIABLE FOR ANY CLAIM, DAMAGES OR OTHER LIABILITY, WHETHER IN AN ACTION OF CONTRACT, TORT OR OTHERWISE, ARISING FROM, OUT OF OR IN CONNECTION WITH THE SOFTWARE OR THE USE OR OTHER DEALINGS IN THE SOFTWARE.
Copyright (c) 2013 Zxing Project (https://github.com/zxing/zxing)
This product includes software developed by the Wintertree software.
THE SOFTWARE IS PROVIDED "AS IS", WITHOUT WARRANTY OF ANY KIND, EXPRESS OR IMPLIED, INCLUDING BUT NOT LIMITED TO THE WARRANTIES OF MERCHANTABILITY, FITNESS FOR A PARTICULAR PURPOSE AND NONINFRINGEMENT. IN NO EVENT SHALL THE AUTHORS OR COPYRIGHT HOLDERS BE LIABLE FOR ANY CLAIM, DAMAGES OR OTHER LIABILITY, WHETHER IN AN ACTION OF CONTRACT, TORT OR OTHERWISE, ARISING FROM, OUT OF OR IN CONNECTION WITH THE SOFTWARE OR THE USE OR OTHER DEALINGS IN THE SOFTWARE.
The Sentry Spelling-Checker Engine Copyright (c) 1993 Wintertree (https://wintertree-software.com/dev/ssce/windows/index.html )
Freemarker Copyright (c) 2003 The Visigoth Software Society. All rights reserved.
THIS SOFTWARE IS PROVIDED "AS IS'' AND ANY EXPRESSED OR IMPLIED WARRANTIES, INCLUDING, BUT NOT LIMITED TO, THE IMPLIED WARRANTIES OF MERCHANTABILITY AND FITNESS FOR A PARTICULAR PURPOSE ARE DISCLAIMED. IN NO EVENT SHALL THE VISIGOTH SOFTWARE SOCIETY OR ITS CONTRIBUTORS BE LIABLE FOR ANY DIRECT, INDIRECT, INCIDENTAL, SPECIAL, EXEMPLARY, OR CONSEQUENTIAL DAMAGES (INCLUDING, BUT NOT LIMITED TO,PROCUREMENT OF SUBSTITUTE GOODS OR SERVICES; LOSS OF USE,DATA, OR PROFITS; OR BUSINESS INTERRUPTION) HOWEVER CAUSED AND ON ANY THEORY OF LIABILITY, WHETHER IN CONTRACT, STRICT LIABILITY, OR TORT (INCLUDING NEGLIGENCE OR OTHERWISE) ARISING IN ANY WAY OUT OF THE USE OF THIS SOFTWARE, EVEN IF ADVISED OF THE POSSIBILITY OF SUCH DAMAGE.
This software consists of voluntary contributions made by many individuals on behalf of the

Visigoth Software Society. For more information on the Visigoth Software Society, please see http://www.visigoths.org/
Copyright (c) 2000,2002,2003 INRIA, France Telecom ( http://asm.ow2.org/) All rights reserved.
THIS SOFTWARE IS PROVIDED BY THE COPYRIGHT HOLDERS AND CONTRIBUTORS "AS IS" AND ANY EXPRESS OR IMPLIED WARRANTIES, INCLUDING, BUT NOT LIMITED TO, THE IMPLIED WARRANTIES OF MERCHANTABILITY AND FITNESS FOR A PARTICULAR PURPOSE ARE DISCLAIMED. IN NO EVENT SHALL THE COPYRIGHT OWNER OR CONTRIBUTORS BE LIABLE FOR ANY DIRECT, INDIRECT, INCIDENTAL, SPECIAL, EXEMPLARY, OR CONSEQUENTIAL DAMAGES (INCLUDING, BUT NOT LIMITED TO, PROCUREMENT OF SUBSTITUTE GOODS OR SERVICES; LOSS OF USE, DATA, OR PROFITS; OR BUSINESS INTERRUPTION) HOWEVER CAUSED AND ON ANY THEORY OF LIABILITY, WHETHER IN CONTRACT, STRICT LIABILITY, OR TORT (INCLUDING NEGLIGENCE OR OTHERWISE) ARISING IN ANY WAY OUT OF THE USE OF THIS SOFTWARE, EVEN IF ADVISED OF THE POSSIBILITY OF SUCH DAMAGE.
Copyright© 2001-2016 ej-technologies GmbH (https://www.ej-technologies.com/products/install4j/overview.html) All rights reserved.
THIS SOFTWARE IS PROVIDED BY THE COPYRIGHT HOLDERS AND CONTRIBUTORS "AS IS" AND ANY EXPRESS OR IMPLIED WARRANTIES, INCLUDING, BUT NOT LIMITED TO, THE IMPLIED WARRANTIES OF MERCHANTABILITY AND FITNESS FOR A PARTICULAR PURPOSE ARE DISCLAIMED. IN NO EVENT SHALL THE COPYRIGHT OWNER OR CONTRIBUTORS BE LIABLE FOR ANY DIRECT, INDIRECT, INCIDENTAL, SPECIAL, EXEMPLARY, OR CONSEQUENTIAL DAMAGES (INCLUDING, BUT NOT LIMITED TO, PROCUREMENT OF SUBSTITUTE GOODS OR SERVICES; LOSS OF USE, DATA, OR PROFITS; OR BUSINESS INTERRUPTION) HOWEVER CAUSED AND ON ANY THEORY OF LIABILITY, WHETHER IN CONTRACT, STRICT LIABILITY, OR TORT (INCLUDING NEGLIGENCE OR OTHERWISE) ARISING IN ANY WAY OUT OF THE USE OF THIS SOFTWARE, EVEN IF ADVISED OF THE POSSIBILITY OF SUCH DAMAGE.
This component is distributed with the following third party components: (1) Third party components licensed under EPL v1.0; (2) JARGS (Stephen Purcell); JDOM (Brett McLaughlin & Jason Hunter); and (3) ORO (Apache Software Foundation). Please see EPL v1.0 and applicable components (#2072, 2686, 2074) for restrictions/requirements.
Copyright 2001-2005 (C) MetaStuff, Ltd.(http://www.dom4j.org ) All Rights Reserved.
THIS SOFTWARE IS PROVIDED BY METASTUFF, LTD. AND CONTRIBUTORS "AS IS'' AND ANY EXPRESSED OR IMPLIED WARRANTIES, INCLUDING, BUT NOT LIMITED TO, THE IMPLIED WARRANTIES OF MERCHANTABILITY AND FITNESS FOR A PARTICULAR PURPOSE ARE DISCLAIMED. IN NO EVENT SHALL METASTUFF, LTD. OR ITS CONTRIBUTORS BE LIABLE FOR ANY DIRECT, INDIRECT, INCIDENTAL, SPECIAL, EXEMPLARY, OR CONSEQUENTIAL DAMAGES (INCLUDING, BUT NOT LIMITED TO, PROCUREMENT OF SUBSTITUTE GOODS OR SERVICES; LOSS OF USE, DATA, OR PROFITS; OR BUSINESS INTERRUPTION) HOWEVER CAUSED AND ON ANY THEORY OF LIABILITY, WHETHER IN

CONTRACT, STRICT LIABILITY, OR TORT (INCLUDING NEGLIGENCE OR OTHERWISE)ARISING IN ANY WAY OUT OF THE USE OF THIS SOFTWARE, EVEN IF ADVISED OF THE POSSIBILITY OF SUCH DAMAGE.
Little CMS Copyright (c) 1998-2011 (http://www.littlecms.com/) All Rights Reserved.
THE SOFTWARE IS PROVIDED "AS IS", WITHOUT WARRANTY OF ANY KIND, EXPRESS OR IMPLIED, INCLUDING BUT NOT LIMITED TO THE WARRANTIES OF MERCHANTABILITY, FITNESS FOR A PARTICULAR PURPOSE AND NONINFRINGEMENT. IN NO EVENT SHALL THE AUTHORS OR COPYRIGHT HOLDERS BE LIABLE FOR ANY CLAIM, DAMAGES OR OTHER LIABILITY, WHETHER IN AN ACTION OF CONTRACT, TORT OR OTHERWISE, ARISING FROM, OUT OF OR IN CONNECTION WITH THE SOFTWARE OR THE USE OR OTHER DEALINGS IN THE SOFTWARE.
Marti Maria Saguer Permission is hereby granted, free of charge, to any person obtaining a copy of this software and associated documentation files (the "Software"), to deal in the Software without restriction, including without limitation the rights to use, copy, modify, merge, publish, distribute, sublicense, and/or sell copies of the Software, and to permit persons to whom the Software is furnished to do so, subject to the following conditions: The above copyright notice and this permission notice shall be included in all copies or substantial portions of the Software.
Copyright (c) 2002-2007, Communications and Remote Sensing Laboratory, Universite catholique de Louvain (UCL), Belgium
Copyright (c) 2002-2007, Professor Benoit Macq
Copyright (c) 2001-2003, David Janssens
Copyright (c) 2002-2003, Yannick Verschueren
Copyright (c) 2003-2007, Francois-Olivier Devaux and Antonin Descampe
Copyright (c) 2005, Herve Drolon, FreeImage Team
All rights reserved.
THIS SOFTWARE IS PROVIDED BY THE COPYRIGHT HOLDERS AND CONTRIBUTORS "AS IS" AND ANY EXPRESS OR IMPLIED WARRANTIES, INCLUDING, BUT NOT LIMITED TO, THEIMPLIED WARRANTIES OF MERCHANTABILITY AND FITNESS FOR A PARTICULAR PURPOSE ARE DISCLAIMED. IN NO EVENT SHALL THE COPYRIGHT OWNER OR CONTRIBUTORS BE LIABLE FOR ANY DIRECT, INDIRECT, INCIDENTAL, SPECIAL, EXEMPLARY, OR CONSEQUENTIAL DAMAGES (INCLUDING, BUT NOT LIMITED TO, PROCUREMENT OF SUBSTITUTE GOODS OR SERVICES; LOSS OF USE, DATA, OR PROFITS; OR BUSINESS INTERRUPTION) HOWEVER CAUSED AND ON ANY THEORY OF LIABILITY, WHETHER IN CONTRACT, STRICT LIABILITY, OR TORT (INCLUDING NEGLIGENCE OR OTHERWISE) ARISING IN ANY WAY OUT OF THE USE OF THIS SOFTWARE, EVEN IF ADVISED OF THE POSSIBILITY OF SUCH DAMAGE.
Copyright (c) 2004-2013 QOS.ch (http://www.qos.ch/shop/index) All rights reserved.

THE SOFTWARE IS PROVIDED "AS IS", WITHOUT WARRANTY OF ANY KIND, EXPRESS OR IMPLIED, INCLUDING BUT NOT LIMITED TO THE WARRANTIES OF MERCHANTABILITY, FITNESS FOR A PARTICULAR PURPOSE AND NONINFRINGEMENT. IN NO EVENT SHALL THE AUTHORS OR COPYRIGHT HOLDERS BE LIABLE FOR ANY CLAIM, DAMAGES OR OTHER LIABILITY, WHETHER IN AN ACTION OF CONTRACT, TORT OR OTHERWISE, ARISING FROM, OUT OF OR IN CONNECTION WITH THE SOFTWARE OR THE USE OR OTHER DEALINGS IN THE SOFTWARE.
Permission is hereby granted, free of charge, to any person obtaining a copy of this software and associated documentation files (the "Software"), to deal in the Software without restriction, including without limitation the rights to use, copy, modify, merge, publish, distribute, sublicense, and/or sell copies of the Software, and to permit persons to whom the Software is furnished to do so, subject to the following conditions: The above copyright notice and this permission notice shall be included in all copies or substantial portions of the Software.
The Code Project Open License (CPOL) 1.02
Copyright © CodeProject, 1999-2016 (http://www.codeproject.com/info/cpol10.aspx) All Rights Reserved.
THE SOFTWARE IS PROVIDED "AS IS", WITHOUT WARRANTY OF ANY KIND, EXPRESS OR IMPLIED, INCLUDING BUT NOT LIMITED TO THE WARRANTIES OF MERCHANTABILITY, FITNESS FOR A PARTICULAR PURPOSE AND NONINFRINGEMENT. IN NO EVENT SHALL THE AUTHORS OR COPYRIGHT HOLDERS BE LIABLE FOR ANY CLAIM, DAMAGES OR OTHER LIABILITY, WHETHER IN AN ACTION OF CONTRACT, TORT OR OTHERWISE, ARISING FROM, OUT OF OR IN CONNECTION WITH THE SOFTWARE OR THE USE OR OTHER DEALINGS IN THE SOFTWARE.
Copyright (c) 1998, 1999, 2000 Thai Open Source Software Center Ltd and Clark Cooper
Copyright (c) 2001, 2002, 2003, 2004, 2005, 2006 Expat maintainers (http://expat.sourceforge.net/)
All Rights Reserved.
THE SOFTWARE IS PROVIDED "AS IS", WITHOUT WARRANTY OF ANY KIND, EXPRESS OR IMPLIED, INCLUDING BUT NOT LIMITED TO THE WARRANTIES OF MERCHANTABILITY, FITNESS FOR A PARTICULAR PURPOSE AND NONINFRINGEMENT. IN NO EVENT SHALL THE AUTHORS OR COPYRIGHT HOLDERS BE LIABLE FOR ANY CLAIM, DAMAGES OR OTHER LIABILITY, WHETHER IN AN ACTION OF CONTRACT, TORT OR OTHERWISE, ARISING FROM, OUT OF OR IN CONNECTION WITH THE SOFTWARE OR THE USE OR OTHER DEALINGS IN THE SOFTWARE.
Copyright (c) 2002-2010 Atsuhiko Yamanaka, JCraft,Inc(http://www.jcraft.com/jsch/ ) All rights reserved.
THIS SOFTWARE IS PROVIDED "AS IS'' AND ANY EXPRESSED OR IMPLIED WARRANTIES, INCLUDING, BUT NOT LIMITED TO, THE IMPLIED WARRANTIES OF MERCHANTABILITY AND FITNESS FOR A PARTICULAR PURPOSE ARE DISCLAIMED. IN NO EVENT SHALL JCRAFT,INC. OR ANY CONTRIBUTORS TO

THIS SOFTWARE BE LIABLE FOR ANY DIRECT, INDIRECT, INCIDENTAL, SPECIAL, EXEMPLARY, OR CONSEQUENTIAL DAMAGES (INCLUDING, BUT NOT LIMITED TO, PROCUREMENT OF SUBSTITUTE GOODS OR SERVICES; LOSS OF USE, DATA, OR PROFITS; OR BUSINESS INTERRUPTION) HOWEVER CAUSED AND ON ANY THEORY OFLIABILITY, WHETHER IN CONTRACT, STRICT LIABILITY, OR TORT (INCLUDING NEGLIGENCE OR OTHERWISE) ARISING IN ANY WAY OUT OF THE USE OF THIS SOFTWARE, EVEN IF ADVISED OF THE POSSIBILITY OF SUCH DAMAGE.
This product includes software developed by Christian Bach and distributed via (http://tablesorter.com/docs/)
All rights reserved.
THE SOFTWARE IS PROVIDED "AS IS", WITHOUT WARRANTY OF ANY KIND, EXPRESS OR IMPLIED, INCLUDING BUT NOT LIMITED TO THE WARRANTIES OF MERCHANTABILITY, FITNESS FOR A PARTICULAR PURPOSE AND NONINFRINGEMENT. IN NO EVENT SHALL THE AUTHORS OR COPYRIGHT HOLDERS BE LIABLE FOR ANY CLAIM, DAMAGES OR OTHER LIABILITY, WHETHER IN AN ACTION OF CONTRACT, TORT OR OTHERWISE, ARISING FROM, OUT OF OR IN CONNECTION WITH THE SOFTWARE OR THE USE OR OTHER DEALINGS IN THE SOFTWARE.
Copyright (c) 2007 Christian Bach
This product includes software developed by Dmitry Baranovskiy and distributed via (https://github.com/DmitryBaranovskiy)
All rights reserved.
THE SOFTWARE IS PROVIDED “AS IS”, WITHOUT WARRANTY OF ANY KIND, EXPRESS OR IMPLIED, INCLUDING BUT NOT LIMITED TO THE WARRANTIES OF MERCHANTABILITY, FITNESS FOR A PARTICULAR PURPOSE AND NONINFRINGEMENT. IN NO EVENT SHALL THE AUTHORS OR COPYRIGHT HOLDERS BE LIABLE FOR ANY CLAIM, DAMAGES OR OTHER LIABILITY, WHETHER IN AN ACTION OF CONTRACT, TORT OR OTHERWISE, ARISING FROM, OUT OF OR IN CONNECTION WITH THE SOFTWARE OR THE USE OR OTHER DEALINGS IN THE SOFTWARE.
Copyright © 2008 Dmitry Baranovskiy.
This product includes software developed by John Resig and distributed via (http://jquery.com/) All rights reserved.
THE SOFTWARE IS PROVIDED "AS IS", WITHOUT WARRANTY OF ANY KIND,EXPRESS OR IMPLIED, INCLUDING BUT NOT LIMITED TO THE WARRANTIES OF MERCHANTABILITY, FITNESS FOR A PARTICULAR PURPOSE AND NONINFRINGEMENT. IN NO EVENT SHALL THE AUTHORS OR COPYRIGHT HOLDERS BE LIABLE FOR ANY CLAIM, DAMAGES OR OTHER LIABILITY, WHETHER IN AN ACTION OF CONTRACT, TORT OR OTHERWISE, ARISING FROM, OUT OF OR IN CONNECTION WITH THE SOFTWARE OR THE USE OR OTHER DEALINGS IN THE SOFTWARE.
Copyright (c) 2011 John Resig

Copyright (c) Monotype Imaging, Inc (http://www.monotype.com/) All rights reserved.
Monotype®, Albany®, Andale®, Cumberland®, Thorndale®, MT®, WorldType® is a trademark of Monotype Imaging, Inc., registered in U.S. Patent and Trademark Office and certain other jurisdictions.
THE SOFTWARE IS PROVIDED "AS IS", WITHOUT WARRANTY OF ANY KIND, EXPRESS OR IMPLIED, INCLUDING BUT NOT LIMITED TO THE WARRANTIES OF MERCHANTABILITY, FITNESS FOR A PARTICULAR PURPOSE AND NONINFRINGEMENT. IN NO EVENT SHALL THE AUTHORS OR COPYRIGHT HOLDERS BE LIABLE FOR ANY CLAIM, DAMAGES OR OTHER LIABILITY, WHETHER IN AN ACTION OF CONTRACT, TORT OR OTHERWISE, ARISING FROM, OUT OF OR IN CONNECTION WITH THE SOFTWARE OR THE USE OR OTHER DEALINGS IN THE SOFTWARE.