
Workspace Desktop Edition Deployment Guide
547
This PDF is generated from authoritative online content, and is provided for convenience only. This PDF cannot be used for legal purposes. For authoritative understanding of what is and is not supported, always use the online content. To copy code samples, always use the online content. Workspace Desktop Edition 8.5.1 Workspace Desktop Edition Deployment Guide 12/29/2021
-
Upload
khangminh22 -
Category
Documents
-
view
4 -
download
0
Transcript of Workspace Desktop Edition Deployment Guide

This PDF is generated from authoritative online content, andis provided for convenience only. This PDF cannot be usedfor legal purposes. For authoritative understanding of whatis and is not supported, always use the online content. Tocopy code samples, always use the online content.
Workspace Desktop Edition 8.5.1
Workspace Desktop EditionDeployment Guide
12/29/2021
www.princexml.com
Prince - Non-commercial License
This document was created with Prince, a great way of getting web content onto paper.

Table of ContentsWorkspace Desktop Edition 8.5 Deployment Guide 7
What's new in Workspace? 9Concepts And Features 35Workspace Plug-ins 38Workspace And Genesys 8 39Role-based approach of Genesys 8 55Configuration and administration by using options and annexes 58Configuring the appearance and content of the user interface 63Customization and Rebranding 65
Preparing to deploy Workspace 66Migrating from Workspace 8.1 to 8.5 67Planning Your Deployment 68Deployment overview 75Deployment prerequisites 88Workspace SIP Endpoint in Virtual Desktop Infrastructure 91Configuring system-access permissions 98Genesys Engage/Genesys Cloud Hybrid Integrations 100
Deployment procedures 101Configuring the Workspace application object 102Choose your deployment 109Adding and removing Language Packs 143Installing the Workspace SIP Endpoint 148Installing plug-ins for workspace 157Installing the Screen Capture application 160
Provisioning functionality 161Setting up agents on the system 163Overriding Workspace options 182Accessibility and navigation 184Agent login, authentication, and logout 189Managing agent status 200Managing agent inactivity 202Configuring the behavior of incoming interactions 204Channels and interaction handling 206
Case Data 208Interaction Bar 224

Workbin and Interaction Queue management 225Standard Responses Library 231Setting up Spelling Check 233
Enabling internal and external communications 235Communicating inside your business 237Voice 240Enabling Team Communicator calling features 246Voicemail 254Workspace SIP Endpoint 255Monitoring SIP, Cisco UCM, or Skype for Business voice interactions 265Outbound campaigns 267Email 282Email Quality Assurance 294Chat 298Chat monitoring 308Video 309SMS and MMS 312Web Callback 316Callback 318Workitems 321Setting up agents to use workbins 324Instant Messaging 327Disposition codes 329Contact History 334Case Information editing 336Standard Responses 337Broadcast Messages 339Team Leads and Supervisors 343
Call recording and screen recording 346Exposing Contacts to Agents 350Exposing History to agents 356Triggering contact look-up and populating History 367KPIs and Contact Center Statistics 371Reporting 377Hiding selected data in logs 379Client-side port security 380Business Continuity for SIP Server, Configuration Server, and Statistic Server 381

eServices Business Continuity with UCS 9.1 387eServices Business Continuity with UCS 8.5 396Load Balancing using clusters 406Customizing display names 413
Supported systems and switches 419Configuration Options Reference 423
Introduction to configuration options 425Section interaction-workspace 426
<media-type> options 429Accessibility options 430Active Recording options 431Agent Status options 432Alert options 433Application options 434Broadcast options 435Business Continuity options 437Callback options 438Case Data options 439Channel Information options 440Chat options 441Chat Server options 443Contact options 444Display Format options 446Email options 447Editor options 449eServices Options 450Expression options 451Statistics Gadget options 452General options 453GUI options 454IM options 455Interaction options 456Interaction Bar options 458Interaction Management Options 459Intercommunication options 460Keyboard options 462KPI options 465
License options 466Log options 467Login options 468Logout options 470Main Window options 471Open Media options 472Options options 473Outbound options 474Presence options 475Printing options 476Reporting options 477Screen Recording options 478Security options 479Workspace SIP Endpoint options 480SMS options 483Sounds options 485Spellchecker options 486Standard Responses options 487Statistics options 488System Tray options 489Team Communicator options 490Team Lead options 491Toast options 492View options 493Voice options 494Voicemail options 496Warm-Standby options 497Web Callback options 498Webproxy options 499Workbin options 500Workitem options 501Miscellaneous options 502
Section interaction-queue-presence 503Section queue-presence 504Section routing-point-presence 505Section KPI Name 506Section Object Statistic Name 509

Not Ready Reason codes 514Role privileges 516
Broadcast Message privileges 518Callback privileges 519Case Information privileges 520Chat privileges 521Contact Management privileges 523E-Mail Privileges 525IM privileges 527Interaction Management privileges 528Main Window privileges 529Outbound Campaign privileges 530Recording privileges 532Security privileges 534SMS privileges 535Standard Response privileges 536Statistics privileges 537Team Communicator privileges 538Team Lead privileges 539Voice privileges 541Voicemail privileges 543Web Callback privileges 544Workbins privileges 545Workitem privileges 546Workspace SIP Endpoint privileges 547
Workspace Desktop Edition 8.5Deployment GuideDeployment and Configuration information for Genesys Workspace Desktop Edition (Workspace)
These pages introduce you to Workspace Desktop Edition, the Genesys agent desktop interface.Privilege- and role-driven capabilities, as well as features that focus on the needs of the user, makeWorkspace a total agent solution. The Workspace agent interface enables users to invoke interactionsthat are related to existing interactions -- thus ensuring a consistent customer experience. Workspaceis a modular application that permits expansion and customization.
See the following resources for information about how to customize and extend Workspace:
• Workspace Developer's Guide and .NET API Reference• Workspace Extension Examples
See the following topic for information about the Genesys Plug-ins that are available forWorkspace:
• Workspace Plug-ins
Hybrid IntegrationsSome Genesys Cloud services are available for Workspace. You must prepare your environment byprovisioning a Genesys Engage Hybrid Integration and Integrating Genesys Predictive Engagementinto Genesys Engage on-premises.
Installation and deploymentintroductionFind information about concepts,features, functionality and environment.
Concepts and FeaturesWorkspace Functionality OverviewSupported Systems and Switches
Deploying WorkspaceFind detailed information about planningyour Workspace deployment.
Deploying WorkspaceEffects of Configuration Options andPrivileges on Performance
Workspace Desktop Edition 8.5 Deployment Guide
Workspace Desktop Edition Deployment Guide 7

Deployment ProceduresFind all of the procedures that you needto install and deploy Workspace.
Deployment Procedures for WorkspaceInstalling plug-ins for Workspace
Provisioning WorkspaceFind all of the procedures that you needto enable the features of Workspace.
Provisioning Workspace
Configuration options and privilegesFind detailed descriptions for all of theconfiguration options and role privilegesthat are available in Workspace.
Workspace Configuration OptionsReference
Document change historyA list of topics that are new or that havechanged since the previous release.
New in Deployment Guide 8.5.1
Workspace Desktop Edition 8.5 Deployment Guide
Workspace Desktop Edition Deployment Guide 8
What's new in Workspace?The following pages contain a list of topics that are new or have changed significantly in the specifiedrelease of Workspace:
Workspace 8.5.150.06
The following content has been added to the Workspace 8.5.1 Deployment Guide for WorkspaceDesktop Edition 8.5.150.06:
• Agents can paste formatted text as plain text in HTML emails using Paste Text Only format.• You can specify the time, in seconds, after which an engaging call of Outbound Assured Connection can
be released. The following configuration option has been added to support this feature:• outbound.assured-connection.allow-release-engaging-call-timeout
• You can specify the width, in pixels, of Rich Media in a chat interaction. The value of this option affectsthe minimum width of the Chat transcript view. The following configuration option has been added tosupport this feature:• chat.rich-media-widget-width
• You can specify whether the agent must complete the mandatory case data before applying a 'Transfer'and/or 'Conference' action for any Digital Channel interaction other than email. The followingconfiguration option has been added to support this feature:• interaction.case-data.<media-type>.mandatory-actions
• You can specify whether the agent must complete the mandatory case data before applying a 'Transfer'or 'Forward as an attachment’ action on an email interaction. The following configuration option hasbeen added to support this feature:• interaction.case-data.email.mandatory-actions
• You can specify whether the mandatory disposition code must be completed by the agent beforeapplying a 'Transfer’ and/or 'Conference' action for interactions of any given media type that is differentfrom email. The following configuration option has been added to support this feature:• interaction.disposition.<media-type>.mandatory-actions
Workspace 8.5.149.03
The following content has been added to the Workspace 8.5.1 Deployment Guide for WorkspaceDesktop Edition 8.5.149.03:
• In addition to the existing Screen and Classify service support, Workspace now supports the Analyze
Workspace Desktop Edition 8.5 Deployment Guide What's new in Workspace?
Workspace Desktop Edition Deployment Guide 9

service of Classification Server to detect suggested responses.
Workspace 8.5.148.04
• Workspace now supports Mutual TLS connection with the Genesys backend servers. The followingoptions have been added to support this feature:• security.client-authentication-certificate-search-value• chatserver.tls-mutual
Workspace 8.5.147.05
The following content has been added to the Workspace 8.5.1 Deployment Guide for WorkspaceDesktop Edition 8.5.147.05:
• Workspace Desktop Edition now embeds a WebView2 SDK, which allows Chromium-based webrendering customizations with WebView2 control supported by Microsoft Edge WebView2.
Workspace 8.5.145.06
The following content has been added to the Workspace 8.5.1 Deployment Guide for WorkspaceDesktop Edition 8.5.145.06:
• You can now use the Assured Connection feature in Progressive and Predictive Outbound Campaigns.• You can now specify the display format of the Chat contact party name by using a string that can
contain regular characters and field codes. The following option has been added to support this feature:• display-format.chat-customer-name
Workspace 8.5.144.05
The following content has been added to the Workspace 8.5.1 Deployment Guide for WorkspaceDesktop Edition 8.5.144.05:
• You can now mask the contact phone number for contact information stored in Universal Contact Server(UCS). The following options have been added to support this feature:• contact.history.voice-detail-attributes• contact.multi-value-attribute-display.<contact-attribute>
• The standard-response.categories option has been modified for this release.
Workspace Desktop Edition 8.5 Deployment Guide What's new in Workspace?
Workspace Desktop Edition Deployment Guide 10

Workspace 8.5.143.08
The following content has been added to the Workspace 8.5.1 Deployment Guide for WorkspaceDesktop Edition 8.5.143.08:
• Workspace Desktop Edition Role-based access (RBAC) now supports both the Genesys AdministratorRole data storage model, introduced by Management Framework 8, and the Genesys AdministratorExtension Role data storage model (as implemented in Genesys Engage cloud). RBAC requiresConfiguration Server 8.0.2 or higher and either Genesys Administrator 8.0.2 or higher, or GenesysAdministrator Extension (9.0.100.56 or higher is recommended).
• You can now specify whether a Business Attribute is used to specify the default 'From' email address ofa reply email interaction. The following option has been added to support this feature:• email.from-addresses.force-default-on-reply
• The <media-type>.contact-history.enable-combine-interaction-with-current option is replaced by<media-type>.contact-history.enable-combine-ixn-with-current. This change resolves an issue wherethe length of the name of the media type could cause the length of the option name to exceed themaximum number of allowable characters.
• You can now specify how an Outbound Record from a Record Chain is displayed when presented to anagent. The following option has been added to support this feature:• display-format.outbound-record-name
The following option has been modified to support this feature:
• display-format.caller-name
See Masking a contact's phone number on inbound and outbound interaction views for a use caseon using the display-format.* options to mask caller data in the Workspace agent UI.
• Workspace Desktop Edition now provides a Voluntary Product Accessibility Template (VPAT) report aspart of the accessibility and navigation features and accessiblity configuration documentation: GenesysWorkspace Desktop Edition Accessibility Conformance Report
• Use the screen-recording.client.address option to specify the IP address or host of the Screen RecordingService. You can use this option to support screen recording in a Genesys Softphone VDI environment.
Workspace 8.5.142.05
The following content has been added to the Workspace 8.5.1 Deployment Guide for WorkspaceDesktop Edition 8.5.142.05:
• Workspace can now display Rich Media elements contained in Chatbot messages sent to a contact whois connected to the Genesys WebChat Widget. This applies to live Chat interactions and the Historyview.
• You can now specify whether interactions opened from the Contact History tab are opened in thesame view as the currently active interaction or in a separate case view. The following option has beenadded to support this feature:• <media-type>.contact-history.enable-combine-interaction-with-current
Workspace Desktop Edition 8.5 Deployment Guide What's new in Workspace?
Workspace Desktop Edition Deployment Guide 11

(Note: this option is renamed to <media-type>.contact-history.enable-combine-ixn-with-current in8.5.143.08; however, both options are supported).
Workspace 8.5.141.04
The following content has been added to the Workspace 8.5.1 Deployment Guide for WorkspaceDesktop Edition 8.5.141.04:
• You can specify how the DN-less phone number specified by an agent during login is propagated to theGenesys back-end. Passing as an extension to SIP Server limits the impact of multiple simultaneouslogin or logout events in the case of a Disaster Recovery/Business Continuity event. SIP Server8.1.102.93 or higher is required for this feature. Refer to Remote Agents with Non-provisioned DNs formore information. The following option has been added to support this feature:• login.voice.use-dn-less-login-extension
• You can have editable case data copied back to the original inbound email from an outgoing reply emailinteraction when it is sent. The following option has been added to support this feature:• email.outbound.copy-editable-case-data-in-inbound
• You can specify a prefix to be used when an agent resends an outgoing or reply email from History (MyHistory, Contact History, and Interaction Search). The following option has been added to supportthis feature:• email.resend-prefix.
• You can specify whether the default Business Attribute value of a drop-down list is automaticallypopulated in the associated contact attribute field of the Contact Information tab. The following optionhas been added to support this feature:• contact.multiple-value-attributes-enable-default-description
• You can pre-load folders of Business Attribute objects containing folders for folder/tree structure displayfor Disposition Codes and Case Data when an agent logs in to avoid a delay in loading this contentwhen an interaction is first received. The following option has been added to support this feature:• general.configuration-business-attribute-folder-cache-preload
Workspace 8.5.140.08
The following content has been added to the Workspace 8.5.1 Deployment Guide for WorkspaceDesktop Edition 8.5.140.08:
• You can specify whether the chat transcript displays interactions as left-to-right or right-to-left readingto support interactions written in a right-to-left reading language. By default, Workspace displaysinteractions as left-to-right reading. The following option has been added to support this feature:• chat.transcript-message-text-direction
• In SIP Server environments, you can specify whether the DN-less phone number stored in the agent'sDN is restored to its original value when the agent logs out of this DN. The following option has beenadded to support this feature:
Workspace Desktop Edition 8.5 Deployment Guide What's new in Workspace?
Workspace Desktop Edition Deployment Guide 12

• login.voice.restore-dn-less-phone-number-on-logout
• In a Virtual Desktop Infrastructure (VDI) environment, you can specify whether Workspace relies on aDNS resolution to identify the IP Address used to connect to Workspace SIP Endpoint. The followingoption has been added to support this feature:• sipendpoint.standalone.vdi-detection-use-dns
• The login.kerberos.agent-identification option has been updated in this release. The followingvalues have been added or modified:• implicitupn: Workspace 8.5.140.08 and higher uses the Implicit User Principal Name (iUPN), which
is a combination of the samAccountName and the user's Domain name. [Added: 8.5.140.08]• upn: Workspace 8.5.132.05 to 8.5.139.07 uses the User Principal Name (UPN) specified by Windows
Administrator in the Windows Active Directory when provisioning the account of an agent. Thismode is deprecated and should be substituted by implicitupn, but is maintained for compatibilitypurposes.
Workspace 8.5.139.06
The following content has been added to the Workspace 8.5.1 Deployment Guide for WorkspaceDesktop Edition 8.5.139.06:
• You can configure Workspace to automatically set agent status to Not Ready or Not Ready with a NotReady Reason when their workstation is locked. The following options have been added to support thisfeature:• security.session-lock-set-agent-not-ready• security.session-lock-force-not-ready-state• security.session-lock-not-ready-reason
• You can configure Workspace to automatically force the agent state to Not Ready when inactivitytimeout occurs. The following option has been added to support this feature:• security.inactivity-force-not-ready-state
Workspace 8.5.138.04
The following content has been added to the Workspace 8.5.1 Deployment Guide for WorkspaceDesktop Edition 8.5.138.04:
• You can now enable agents to enter different Places associated with different types of SIP DNs whenthey log in so that they can login from a Workspace SIP Endpoint/Genesys Softphone workstation oneday and from their mobile or home phone through SIP Server, or a 3rd party SIP Endpoint on a differentday. The following option has been added to support this feature:• voice.device-type
Workspace Desktop Edition 8.5 Deployment Guide What's new in Workspace?
Workspace Desktop Edition Deployment Guide 13

Workspace 8.5.137.06
The following content has been added to the Workspace 8.5.1 Deployment Guide for WorkspaceDesktop Edition 8.5.137.06:
• You can now specify whether Workspace preserves the availability interval of the parent Outboundrecord when rescheduling an Outbound record with a new phone number. The following option hasbeen added to support this feature:• outbound.reschedule-inherit-parent-availability-interval
• In environments where the main toolbar is configured in auto-hide mode, you can now configure thedelay between the moment when the mouse cursor reaches the top of the screen and the moment theWorkspace toolbar is displayed. The following option has been added to support this feature:• main-window.auto-hide-display-delay
Workspace 8.5.136.07
The following content has been added to the Workspace 8.5.1 Deployment Guide for WorkspaceDesktop Edition 8.5.136.07:
• Contact History search has been improved for UCS 9.1 users. The following option has been added tosupport this feature:• contact.history-custom-attributes-search-types
• It is now possible to adjust the timing of the auto-hide/display property of the Main window. Thefollowing option has been added to support this feature:• main-window.auto-hide-display-delay
Workspace 8.5.132.05
The following content has been added to the Workspace 8.5.1 Deployment Guide for WorkspaceDesktop Edition 8.5.132.05:
• To prevent changes to the case data after a voice or chat interaction has ended, the interaction.case-data.is-read-only-on-idle option has been added.
• To specify whether the Category ID of the reply outbound email is copied to the parent inbound email,the email.reply-copy-category-id option has been added.
• For Chat interactions, to specify that the value specified for the contact.history.filters-<attribute> optionis used to filter the history-based part of the chat transcript, the chat.transcript-enable-history-filtersoption has been added. Keys and values of the option are constructed like those of thecontact.history.filters-<attribute> option. You can add these options to a routing strategy.
• For SMS interactions, to specify that the value specified for the contact.history.filters-<attribute> optionis used to filter the history-based part of the SMS transcript, the sms.transcript-enable-history-filtersoption has been added. Keys and values of the option are constructed like those of the
Workspace Desktop Edition 8.5 Deployment Guide What's new in Workspace?
Workspace Desktop Edition Deployment Guide 14

contact.history.filters-<attribute> option. You can add these options to a routing strategy.• To support Kerberos in a multi-tenant environment, the login.kerberos.agent-identification option
in the interactionworkspace.exe.config configuration file has been modified. The upn value hasbeen added to enable Workspace to use the User Principal Name (UPN) specified by WindowsAdministrator in Windows Active Directory when provisioning the account of an agent.
• To specify whether the 'Complete Conference' function requires a consultation call to the Agent to beestablished first or not, the voice.complete-conference-requires-connected-consultation-call option hasbeen added.
Workspace 8.5.128.07
The following content has been added to the Workspace 8.5.1 Deployment Guide for WorkspaceDesktop Edition 8.5.128.07:
• When contacts disconnect from chat interactions, you can specify that chat interactions are automarked done immediately or are auto marked done after a configurable time interval. The followingconfiguration options have been added to support this feature:• chat.auto-mark-done-owner-agent• chat.auto-mark-done-owner-agent.timer• chat.auto-mark-done-non-owner-agent• chat.auto-mark-done-non-owner-agent.timer
• You can keep chats open after the last agent leaves the session, enabling an agent to rejoin the sessionuntil the session is marked Done using the Asynchronous chat function. The following Chat privilegeswere added to support this feature:• Chat - Can Place On Hold• Chat - Can Release Async• Chat - Can Release
The following configuration options have been added to support this feature:
• chat.on-hold-queue• keyboard.shortcut.interaction.chat.hold
Workspace 8.5.127.06
The following content has been added to the Workspace 8.5.1 Deployment Guide for WorkspaceDesktop Edition 8.5.127.06:
• Agents can combine left-to-right (LTR) text or right-to-left (RTL) text in the same email message byusing the Right-to-left Text Direction and Left-to-right Text Direction buttons. The followingconfiguration option has been added to support this feature:• email.can-change-text-direction
Workspace Desktop Edition 8.5 Deployment Guide What's new in Workspace?
Workspace Desktop Edition Deployment Guide 15

Workspace 8.5.126.07
The following content has been added to the Workspace 8.5.1 Deployment Guide for WorkspaceDesktop Edition 8.5.126.07:
• Supervisors/Team Leads can manually change the state of agents to Ready, Not Ready, and Logoff byusing Team Communicator. The following privilege has been added to support this feature:• Team Lead - Can Change Agent State
The following configuration option has been added to specify which state changes a team lead isallowed to make:
• teamlead.agent-status.enabled-remote-actions
• Support for UCS 9.1.• You can specify the list of attributes to be displayed in tree view in the Interaction Search view. The
following configuration option has been added to support this feature:• contact.all-interactions-displayed-columns-treeview
• You can specify the date display format for custom attributes that you want to display as dates in theHistory view.
• Support for Receiving-side Automatic Gain Control (Rx-AGC) for Workspace SIP Endpoint has beenadded to address the problem with some calls having too low a volume for agent to hear the customerclearly. The following configuration option has been added to support this feature:• sipendpoint.policy.session.rx_agc_mode
• Support for specifying the Local IP address or Fully Qualified Domain Name (FQDN) of the machine onwhich SIP Endpoint is running. This setting can be an explicit setting or a special value that the SIPEndpoint uses to automatically obtain the public address. The following configuration option has beenadded to support this feature:• sipendpoint.policy.endpoint.public_address
• The valid values of the sipendpoint.system.security.use_srtp option have been expanded.
Workspace 8.5.125.04
The following content has been added to the Workspace 8.5.1 Deployment Guide for WorkspaceDesktop Edition 8.5.125.04:
• The date.time-display-format option has been added to Case Information to enable you to specifyhow the DateTime variable in attached data are displayed in Workspace views, such as Outboundattached data. You can specify both date and time, just the date, just the time, and so on.
Workspace 8.5.124.08
The following content has been added to the Workspace 8.5.1 Deployment Guide for Workspace
Workspace Desktop Edition 8.5 Deployment Guide What's new in Workspace?
Workspace Desktop Edition Deployment Guide 16

Desktop Edition 8.5.124.08:
• For Alcatel 4400/OXE switch environments only, you can specify whether or not the queue that is usedon login should be used for the queue on logout. The following configuration option controls thisfeature:• logout.voice.use-login-queue-on-logout
• You can control whether agents are able to extend their After Call Work (ACW) status beyond the wrap-up time that you specified. The following configuration option enables this feature:• voice.after-call-work-extension
• In Accessibility mode, you can prevent hyperlinks from being active in email, chat, and SMSinteractions. Some screen readers cause Workspace to become unresponsive when processing activehyperlinks. The following option has been added to enable this feature:• accessibility.disable-hyperlinks
Workspace 8.5.122.08
The following content has been added to the Workspace 8.5.1 Deployment Guide for WorkspaceDesktop Edition 8.5.122.08:
• You can choose between the original simple text display and the new block style display introduced inthis release for the Chat, SMS, and IM transcript views. The following options have been added tosupport this feature:• chat.simple-transcript• im.simple-transcript• sms.simple-transcript
• You can add an unread message icon to the chat transcript so that your agents know when the chatmessage they sent has been read. The icon disappears when the message is read. The following optionhas been added to support this feature:• chat.show-unread-notification
• You can specify whether agents can see previous chat sessions with a contact in the current chatsession. This reduces the need for agents to open the contact history to find previous chat interactions.Many chat sessions are conducted on mobile devices, meaning that the likelihood of timeout is veryhigh. If a chat is resumed after a timeout, the agent sees the content of the previous sessions. Thefollowing option has been added to support this feature:• chat.historical.maximum-age
• The default color values have been updated for the following Chat, SMS, and IM options:• chat.agent.prompt-color = #FF2E6599• chat.agent.text-color = #FF3D464D• chat.other-agent.prompt-color = #FF295B00• chat.other-agent.text-color = #FF3D464D• chat.client.prompt-color = #FFAF4F0B
Workspace Desktop Edition 8.5 Deployment Guide What's new in Workspace?
Workspace Desktop Edition Deployment Guide 17

• chat.client.text-color = #FF3D464D• im.agent.prompt-color = #FF2E6599• im.agent.text-color = #FF3D464D• im.other-agent.text-color = #FF3D464D• im.other-agent.prompt-color = #FF295B00• sms.agent.prompt-color = #FF2E6599• sms.agent.text-color = #FF3D464D• sms.other-agent.prompt-color = #FF295B00• sms.other-agent.text-color = #FF3D464D• sms.client.prompt-color = #FFAF4F0B• sms.client.text-color = #FF3D464D
• You can specify an alert bell when there is a pending chat message to be answered. The followingoption has been added to support this feature:• chat.pending-response-to-customer-bell
• You can configure Workspace to notify agents when there is a change to an interaction property inside aspecified workbin. The following option has been added to support this feature:• workbin.<media-type>.<nick-name>.notify-property-changed
Workspace 8.5.120.05, WSEP 8.5.114.05
The following content has been added to the Workspace 8.5.1 Deployment Guide for WorkspaceDesktop Edition 8.5.120.05, WSEP 8.5.114.05:
• You can specify the format of the folder structure that is displayed to agents in the Disposition Codeview and Case Data view. The following option has been added to support this feature:• display-format.folder.name
Workspace 8.5.119.05
The following content has been added to the Workspace 8.5.1 Deployment Guide for WorkspaceDesktop Edition 8.5.119.05:
• You can configure Workspace to specify whether an outgoing email interaction must have a subjectbefore the email can be sent. The following option has been added to support this feature:• email.mandatory-subject
Workspace Desktop Edition 8.5 Deployment Guide What's new in Workspace?
Workspace Desktop Edition Deployment Guide 18

WSEP 8.5.113.02
The following content has been added to the Workspace 8.5.1 Deployment Guide for WorkspaceDesktop Edition WSEP 8.5.113.02:
• Workspace SIP Endpoint now supports DNS SRV resolution to connect to Genesys SIP Proxies. Thefollowing options have been updated to support this feature:• sipendpoint.sbc-register-address• sipendpoint.sbc-register-port• sipendpoint.sbc-register-address.peer• sipendpoint.sbc-register-port.peer
Workspace 8.5.118.10
The following content has been added to the Workspace 8.5.1 Deployment Guide for WorkspaceDesktop Edition 8.5.118.10:
• Agents can call and transfer calls to the voice mail of other agents and agent groups. The followingconfiguration options have been added to support this feature:• intercommunication.voicemail.enabled-target-types• intercommunication.voicemail.routing-points
The following privileges have been added to support this feature:• Voice Mail - Can Deposit Message• Voice Mail - Can Transfer Message
• Agents can create, manage, and delete hyperlinks in chat and email interactions using hyperlinkmanagement tools. Refer to the Help and User's Guide for more information about this feature.
• You can set up short cut keywords that let agents enter responses into text based interactions by typinga prefix key followed by the keyword. The following configuration options have been added to supportthis feature:• editor.shortcuts.prefix• standard-response.shortcuts.<keyword>
• Agents can update case information by searching and selecting categories from a directory tree.• You can specify attachment types to edit only certain file types preserves the data integrity of files that
you do not want agents to modify. For example, you might allow agents to modify .jpg and .png files sothat the orientation can be changed, but restrict the modification of .docx, .xlsx, and other file types.Or, you might want to ensure that only .xlsx files can be updated by agents. The following configurationoption has been added to support this feature:• general.writable-downloaded-attachment-file-types
• You can manage how agents can force close stuck interactions. The following configuration option has
Workspace Desktop Edition 8.5 Deployment Guide What's new in Workspace?
Workspace Desktop Edition Deployment Guide 19

been added to support this feature:• interaction.unconditional-force-close
Workspace 8.5.117.18
The following content has been added to the Workspace 8.5.1 Deployment Guide for WorkspaceDesktop Edition 8.5.117.18:
• Hybrid voice agent configuration is now supported to let an agent log in on two distinct voice devicesand answer or make calls (according to priority rules) from each of them. Skype for Business andWorkspace SIP Endpoint hybrid mode support has been added. Contact centers are no longer requiredto choose between Skype for Business or Workspace SIP Endpoint as their communication media ofchoice. With hybrid mode, both can be used by the same agent for handling customer interactions andinternal communication. This feature significantly expands Skype enabled enterprise/back office usersas available resources for assistance to improve first contact resolution. The following configurationoptions support this feature:• expression.callable-phone-number• voice.hybrid-switch-preference• spl.switch-policy-label
• display-name or display-name.<language-code>-<country-code>
• You can control automatic contact assignment by enabling agents to choose from a list of possiblematching if there is more than one contact in the contact database to which a new inbound interactioncan be assigned. The following configuration options support this feature:• contact.lookup.auto-assign-mode• contact.lookup.<media-type>.auto-assign-mode
• You can force an Outbound enabled agent to complete the processing of an outbound record prior totransferring or conferencing the call to another agent, and retain the call result in the OCS database.The following configuration options support this feature:• outbound.complete-record-before-transfer• outbound.call-result-is-mandatory
• You can specify whether the current interaction is highlighted in the Contact History view of the currentinteraction. If the current interaction is not on the first page of the view, the view is scrolled to theposition of the current interaction. The following configuration option has been added to support thisfeature:• contact.history.highlight-current-interaction
• You can specify that it is mandatory for agents to edit case data fields before they can mark aninteraction as Done. If the agent tries to close the interaction without editing the case data field, anerror message is displayed. Mandatory fields are marked with a red asterisk. This feature is supportedby the interaction-workspace/mandatory option.
Workspace Desktop Edition 8.5 Deployment Guide What's new in Workspace?
Workspace Desktop Edition Deployment Guide 20

Workspace 8.5.116.10
The following content has been added to the Workspace 8.5.1 Deployment Guide for WorkspaceDesktop Edition 8.5.116.10:
• You can specify how new interaction windows behave after an agent who is working on one or moreinteractions accepts a new inbound interaction. You can choose to have the new interaction windowreceive the focus (default behavior), or you can choose to keep the focus on the currently activeinteraction window. You can also configure this behavior by media channel. The following configurationoptions have been added to support this feature:• interaction.auto-focus• interaction.auto-focus.<media-type>
• Screen recording through Genesys Interaction Recording (GIR) has been ehanced to support hot seating(hot desking) environments. The following option has been modified to support this feature:• screen-recording.htcc.uri
• The behavior of the email.reply-prefix option has been modified to better handle multiple reply emailinteraction threads. This option can also be overridden by a routing strategy to handle situations wherethe locale of the recipient might be different from the locale of the agent.
• Cisco Call Manager environments now support two DNs, one for ACD calling and one extension.
Workspace 8.5.115.17
The following content has been added to the Workspace 8.5.1 Deployment Guide for WorkspaceDesktop Edition 8.5.115.17:
• Agents can save files that they receive through chat interactions and can transfer files either from theirworkstation or from Standard Responses to contacts in a chat interaction. The following configurationoptions have been added to support this feature:• chat.attachment-download-timeout• chat.max-attachments-files• chat.max-attachments-size• chat.max-file-size• chat.restricted-attachment-file-types• chat.show-attachment-image-thumbnail
The following privileges have been added to support this feature:• Chat - Can Save Attached files• Chat - Can Transfer File From File System• Chat - Can Transfer File From Standard Response
• You can enable your agents to send emojis as part of chat interactions. The handling of received emojis
Workspace Desktop Edition 8.5 Deployment Guide What's new in Workspace?
Workspace Desktop Edition Deployment Guide 21

has been improved. In Workspace, sent and received emojis are displayed as Unicode charactersaccording to the default Workspace and Windows system fonts, which Workspace uses in the ChatInteraction view. You define which emojis your agents can use by configuring a Business Attribute thatpopulates the emoji item in the chat composition tool bar. The following configuration option has beenadded to support this feature:• chat.emojis-business-attribute• gui.emoji-font-name
The following privilege has been added to support this feature:• Chat - Can Use Emojis
• You can control which Chat Server messages are recorded in chat transcripts and SMS Sessiontranscripts in the Contact History.
• For Outbound campaigns, you can specify whether rescheduled calls/callbacks are personal, campaign,or both. The following configuration option has been added to support this feature:• outbound.callback-types
• Agents can change the phone number to be dialed in Outbound Campaign calls. This covers both thescenario where a different number than the one in the record must be dialed and the scenario wherethere is no number in the record. The following privilege has been added to enable this feature:• Outbound - Can Dial On New Number
The following configuration option has been added to support this feature:• expression.outbound-campaign-phone-number
• You can include Interaction Server and T-Server system properties keys in Case Data (Attached Data).• You can configure the keyboard.shortcut.hamburger.open option to enable agents to open the Main
Menu (Hamburger Menu) to access views such as 'My Workspace' and 'My History'.
Workspace 8.5.114.08
The following content has been added to the Workspace 8.5.1 Deployment Guide for WorkspaceDesktop Edition 8.5.114.08:
• Automatic Place selection using Place Groups is now supported to improve the management of Placesby no longer tying a single Place to a single agent. This feature enables you to create a pool of Placesthat agents can select from whether they are connecting from a workstation, from home, or from amobile. The Place Group selection feature works only with SIP Server. It is not supported by WorkspaceSIP Endpoint. The following configuration options have been added to support this feature:• login.available-place-groups• login.place-selection-type
The following configuration options have been modified to support thisfeature:
• login.default-place
Workspace Desktop Edition 8.5 Deployment Guide What's new in Workspace?
Workspace Desktop Edition Deployment Guide 22
• login.enable-place-completion• login.enable-same-agent-place• login.prompt-place• login.store-recent-place
• You can restrict outgoing email interactions by preventing agents from added or editing the To, Cc, andBcc fields. The following configuration options have been added to support this feature:• email.outbound.editable-to-addresses• email.outbound.editable-cc-addresses• email.outbound.editable-bcc-addresses
Workspace 8.5.113.11
The following content has been added to the Workspace 8.5.1 Deployment Guide for WorkspaceDesktop Edition 8.5.113.11:
• Embedded images in outgoing email interactions. Agents can paste copied images at the insertion pointin the outgoing email interaction view. The following privilege supports this feature:• E-Mail - Can Add Embedded Image In Outbound E-Mail
• Agents can forward emails to external resources as a new, in-line, quoted email. The previous Forwardto External Resource feature has been renamed Forward as an Attachment.
• Enable or disable inserting TAB characters into outgoing email interactions by using theaccessibility.visual-impairment-profile option. The following configuration option supports this feature:• email.inline-forward-prefix• email.inline-forward-queue• keyboard.shortcut.interaction.email.inline-forward
The following privilege supports this feature:• E-Mail - Can In-line Forward To External Resource
• Agents are now notified if either party in a chat has timed out due to inactivity.
Workspace 8.5.112.08
The following content has been added to the Workspace 8.5.1 Deployment Guide for WorkspaceDesktop Edition 8.5.112.08:
• You can create custom field codes for Standard Response objects. The following configuration optionsupports this new feature:• standard-response.field.<CustomFieldCode>
Workspace Desktop Edition 8.5 Deployment Guide What's new in Workspace?
Workspace Desktop Edition Deployment Guide 23
• You can store agent profile information on a shared directory instead of in the Configuration layer. Thefollowing configuration options support this feature:• options.clean-up-former-record-location• options.record-location
• You can optimize the way that the most recently used Place is tracked. This feature is beneficial inenvironments where agents move from workstation to workstation or phone set to phone set. Thefollowing configuration option supports this new feature:• login.place-location-source
• You can configure how interaction duration information is collected and reported to the Genesys back-end by using the Duration in Focus feature. The following configuration option supports this feature:• reporting.case.report-case-in-focus-duration
Workspace 8.5.111.21
The following content has been added to the Workspace 8.5.1 Deployment Guide for WorkspaceDesktop Edition 8.5.111.21:
• For the Voice channel, you can configure Workspace to display the current hold time instead of the totalcall time when an agent puts a contact on hold; and, you can configure Workspace to display a holdtime progress bar as part of the Hold icon. You can also configure Workspace to display the currentafter call work time instead of the total call time after the agent disconnects a call. The followingconfiguration options support these new behaviors:• voice.hold-indicator-timer• voice.show-hold-duration• voice.show-post-call-duration
• Workspace now supports Genesys Mobile Server (GMS) Callback interactions. The Web Callback featureis being phased out.• Use the Callback privileges to enable this feature.• Use the Callback options to configure this feature.
• Workspace now supports Load Balancing Using Clusters.
Workspace 8.5.110.13
The following content has been added to the Workspace 8.5.1 Deployment Guide for WorkspaceDesktop Edition 8.5.110.13:
• You can configure agent accounts to enable agents to search/filter Workbins and Interaction Queues.This feature is supported by the following privileges:• Workbins - Can Search in Workbins• Interaction Management - Can Search In Interaction Queues
Workspace Desktop Edition 8.5 Deployment Guide What's new in Workspace?
Workspace Desktop Edition Deployment Guide 24
This feature is supported by the following configuration options:• workbin.<media-type>.<workbin-nickname>.auto-update• workbin.<media-type>.<workbin-nickname>.quick-search-attributes• workbin.<media-type>.<workbin-nickname>.max-results
• Workspace now supports Multimedia Message Service (MMS) messages that contain images sent in thefollowing formats:• Bitmap (image/bmp)• GIF (image/gif)• JPEG (image/jpeg)• Portable Network Graphics (image/png)• TIFF (image/tiff)• ICO (image/vnd.microsoft.icon)
This feature is available through the SMS channel. You configure this featureby using the following configuration option:
• openmedia.bundle.sms
This feature is supported by the following privilege:• SMS - Can Save Attached File
• Agents can mark interactions as Done from the Contact History, My History, and Interaction Searchviews.
• Agents can delete interactions from the Contact History, My History, and Interaction Search views.• You can display agent names in the interactive notification for cross site internal calls by using the
following option:• interaction.evaluate-real-party-for-agent.expression
• Team Communicator can be configured to display different metrics for the availability of Routing Points,Queues, and Interaction Queues. If the corresponding metric from Stat Server is a time, you can usethe new statistic-text option to specify the format of the time information. You can specify a {0}field code anywhere in this string, and to add time formatting value to this field code, like{0:HH:mm:ss}, following Microsoft reference: https://msdn.microsoft.com/en-us/library/8kb3ddd4(v=vs.110).aspx. Previously, time information in Team Communicator was always displayed in seconds;however, this was inconvenient if the number of seconds was large. This feature is supported by thestatistic-text configuration option in the following sections:• routing-point-presence
• queue-presence
• interaction-queue-presence
• Changes to the following configuration options now take effect immediately instead of when theapplication is started or restarted:• kpi.displayed-kpis
Workspace Desktop Edition 8.5 Deployment Guide What's new in Workspace?
Workspace Desktop Edition Deployment Guide 25

• statistics.displayed-statistics• statistics.queues• statistics.routing-points
Workspace 8.5.109.16
The following content has been added to the Workspace 8.5.1 Deployment Guide for WorkspaceDesktop Edition 8.5.109.16:
• Stand-alone version of Workspace SIP Endpoint for Virtual Desktop Infrastructure environments. Thisfeature is supported by the following configuration options:• sipendpoint.standalone.protocol• sipendpoint.standalone.port• sipendpoint.standalone.vdi-detection-model• sipendpoint.standalone.security-level• sipendpoint.standalone.certificate-search-value• sipendpoint.standalone.subject-criteria• sipendpoint.standalone.subject-matching-properties
Enable the Standalone Workspace SIP Endpoint by removing the SIP Endpoint - Can Use EmbeddedSIP Endpoint privilege.
Install the Standalone Workspace SIP Endpoint by using the Installing the Workspace SIP EndpointStandalone Application procedure.
• You can add a display name for certain configuration layer objects. This feature enables you to nameobjects without relying on a local dictionary file. This feature makes localization and centralization moreefficient. The following configuration options support the new $<object-type>.AnnexValue$ key:• display-format.acd-queue.name• display-format.action-code.name• display-format.agent-group.name• display-format.business-attribute.name• display-format.interaction-queue.name• display-format.routing-point.name• display-format.skill.name• display-format.virtual-queue.name• display-format.workbin.name
• You can specify how agents who are part of Push Preview, Pull Preview, and Reschedule Previewoutbound campaigns dial campaign calls: manually, immediately, or after a specified time. This featureis enabled by the following configuration option:• outbound.timed-preview-auto-dial
Workspace Desktop Edition 8.5 Deployment Guide What's new in Workspace?
Workspace Desktop Edition Deployment Guide 26

• You can enable agents to set the zoom of text editing fields, such as email, chat, and SMS, andtranscript areas. This feature applies to the following views:• IM (text entry, transcript, and interaction data tooltip)• Chat (text entry, transcript, and interaction data tooltip)• Email (text entry and inbound email view)• SMS (text entry, transcript, and interaction data tooltip)• Interaction history (IM, Chat, Email, SMS)• Standard responses• Social media (text entry only)
The following topics have been updated to include this feature:
• Overriding Default Font and Icon Sizes• Enabling Accessibility Features
The following configuration option was added to support this feature:
• gui.editor-zoom-range
• The Prevent/Allow Listening feature has been modified slightly in the agent interface. The interface nowinforms agents when a party is suspended from a conference or reinstated to a conference. Conferenceparty Action menu items have been renamed accordingly. This feature is controlled by the Voice - CanSuspend or Reinstate A Conference Party privilege.
• You can control which media Workspace tries to reconnect for active interactions after connection toInteraction Server is reestablished. The following configuration options have been added to support thisfeature:• eservices.session-restore-mediatype• eservices.session-restore-timeout
• Changes to the following two options are now taken into effect immediately instead of when theapplication is started or restarted:• gadget-statistics.displayed-call-center-statistics• gadget-statistics.displayed-kpis
Workspace 8.5.108.11
The following content has been added to the Workspace 8.5.1 Deployment Guide for WorkspaceDesktop Edition 8.5.108.11:
• The Chat typing feature has been enhanced to enable agents to see what a contact is typing on a website chat form before the contact clicks Send. This feature is enabled by the following privilege:• Chat - Can Preview Customer Typing
• You can configure the Disposition tab in the interaction views to display dispositions as a hierarchicaltree of folders and dispositions instead of a radio button list. Use the following option to retain theformer radio button interface:
Workspace Desktop Edition 8.5 Deployment Guide What's new in Workspace?
Workspace Desktop Edition Deployment Guide 27

• interaction.disposition.display-mode
• You can optimize the use of eServices licensing by using the following configuration option:• eservices.disconnect-on-logoff
• Business Continuity (Disaster Recovery) support has been extended to include StatServer.
Workspace 8.5.106.19
The following content has been added to the Workspace 8.5.1 Deployment Guide for WorkspaceDesktop Edition 8.5.106.19:
• You can configure Workspace for eServices Business Continuity. The following configuration optionshave been added to support this feature:• disaster-recovery.eservices-random-delay-range• disaster-recovery.eservices-site• warm-standby.retry-delay• warm-standby.reconnection-random-delay-range
As well, some other Business Continuity (Disaster Recovery) options have been modified to supportthis feature.
• IPv6 Support• You can use the interaction-bar.quick-access-auto-open.<media-type> configuration options to specify
that when an agent accepts an interaction, it is displayed as collapsed to the Interaction Bar. Thisenables agents to view other content, such as custom or 3rd-party content in the Main View, withoutthe pinned or floating interaction views opening in front of the content.
• The string.expression and string.expression-instructions options have been added to the stringtype for editable Case Data. It is used to validate the format for the string data type Key-Value Pairs.
• Screen Recording Client Authentication is added for users of Genesys Interaction Recording (GIR). Youmust have a login provided by Genesys to access the Genesys Interaction Recording documentation.This feature is supported by the following privilege:• Can Use Active Recording
The following options have been added to configure the behavior of Screen Recording:
• screen-recording.client.port: Specifies the port on which Screen Recording Client listens forcredentials.
• screen-recording.client.ping-interval: Specifies, in milliseconds, the interval between ping requeststo Screen Recording Client.
• screen-recording.client.max-attempts: : Specifies the maximum number of attempts made toestablish communication with Screen Recording Client.
• screen-recording.client.secure-connection: Specifies whether a secure connection is to be used forcommunication with Screen Recording Client.
• screen-recording.htcc.uri: Specifies the URI of HTCC server. This URI is used as as the Origin headerfield for HTTP requests to SRC REST services.
Workspace Desktop Edition 8.5 Deployment Guide What's new in Workspace?
Workspace Desktop Edition Deployment Guide 28

• Several options in the Interaction Options section have been slightly modified.• Several options in the Display Formats Options section have been slightly modified.
Workspace 8.5.105.12
The following content has been added to the Workspace 8.5.1 Deployment Guide for WorkspaceDesktop Edition 8.5.105.12:
• The mandatory ring before auto-answer feature enables you to configure the auto-answer functionalityto display a timer that enables an agent to view case information before the interaction is automaticallyanswered. This feature is configured by media type using the following new options:• chat.auto-answer.enable-reject• chat.auto-answer.timer• email.auto-answer.enable-reject• email.auto-answer.timer• outbound.push-preview.auto-answer.enable-reject• outbound.push-preview.auto-answer.timer• sms.auto-answer.enable-reject• sms.auto-answer.timer• voice.auto-answer.enable-reject• voice.auto-answer.timer• webcallback.auto-answer.enable-reject• webcallback.auto-answer.timer• <media-type>.auto-answer.enable-reject• <media-type>.auto-answer.timer
• You can specify by media type whether you want agents to be prompted when they send an emailmessage, SMS, or Chat if there are misspelled words in the message by using the spellchecker.<media-type>.prompt-on-send configuration option.
• Agents can double-click to insert a standard response into an email message, SMS, Chat, and other text-based interactions.
• The contact.directory-enabled-modes option is added to enable you to specify which Contact Directoryviews can be displayed by the agent. Specifies which view(s) of the Contact Directory can be selectedby an agent. Genesys recommends that the value is set to ListView in environments with a largenumber of contacts and, in particular, where contact segmentation is used.
• VMWare Horizon (View) 6 is now supported.
Workspace Desktop Edition 8.5 Deployment Guide What's new in Workspace?
Workspace Desktop Edition Deployment Guide 29

Workspace 8.5.104.15
The following content has been added to the Workspace 8.5.1 Deployment Guide for WorkspaceDesktop Edition 8.5.104.15:
• The Forward E-Mail feature has been modified to enable agents to forward email interactions to multipletargets, including CC (carbon copy) targets. Agents can also include information or instructions in adedicated case data field of the Forward view. The following configuration options have been added tosupport this feature:• email.forward.enable-multiple-to-addresses• email.forward.enable-cc-addresses• email.forward.enable-instructions
• The Interaction Search feature expands on the Contact History/My History search capabilities to enableyou to search for email and chat interactions without knowing which agent worked on them, when theywere handled, or who the contact is. You must define the search attributes by using thecontact.history options. The following configuration options have been modified or added to supportthis feature:• contact.all-interactions-default-time-filter-main• contact.all-interactions-displayed-columns• contact.all-interactions-quick-search-attributes• contact.date-search-types• contact.directory-permissions.<ContactAttributeName>• contact.history-advanced-default• contact.history-custom-attribute-values.<attribute-name>• contact.history-search-attribute-group.<group-name>• contact.history-search-attributes• contact.history-quick-search-attributes• contact.history.media-filters• contact.myhistory-displayed-columns• contact.myhistory-quick-search-attributes
The following privilege is added to enable this feature:
• Contact - Can Use Interaction Search
• The following configuration options have been added to support Chat Server ADDP:• chatserver.addp.local-timeout• chatserver.addp.remote-timeout• chatserver.addp.trace-mode
• The Active Recording Privileges have been renamed to the following:• Recording - Can Use MSML-based Recording
Workspace Desktop Edition 8.5 Deployment Guide What's new in Workspace?
Workspace Desktop Edition Deployment Guide 30
• Recording - Can Monitor Call Recording• Recording - Can Control Call Recording
Workspace 8.5.103.10
The following content has been added to the Workspace 8.5.1 Deployment Guide for WorkspaceDesktop Edition 8.5.103.10:
• In SIP Server environments, you can control whether contacts are automatically taken off hold when anagent ends a consultation call, or whether agents must end the hold manually by using the voice.end-consultation-method option.
• You can specify whether it is mandatory for agents to assign a disposition code when they transfer orforward email interactions by using the interaction.disposition.email.mandatory-actions configurationoption.
• You can specify that the After Call Work state is automatically changed to Ready when an agent clicksDone by using the voice.cancel-after-call-work-on-done option.
• You can specify whether the most recently used Username is stored locally in the user profile and isused to automatically populate the username field in the login view by using the login.store-username.
Workspace 8.5.102.06
The following content has been added to the Workspace 8.5.1 Deployment Guide for WorkspaceDesktop Edition 8.5.102.06:
• Management Framework 8.5 is now fully supported.• eServices 8.5 is now fully supported.• Kerberos User Authentication support.
• ClickOnce and console deployment• Non-ClickOnce deployment
• You can define several formats for displaying queue, routing point and interaction queue presence in theTeam Communicator. The following configuration options have been added to support this feature:• teamcommunicator.interaction-queue-presence-metrics• teamcommunicator.queue-presence-metrics• teamcommunicator.routing-point-presence-metrics
The following options have also been added to the "presence" sections to allow to use a statisticmetric of an hidden technical object like a Virtual Queue on behalf of a queue/routingpoint/interactionqueue actually presented in Team Communicator: object-ids, associated-statistic-type,and associated-object-ids. These are supported by the following sections:
• interaction-queue-presence• queue-presence
Workspace Desktop Edition 8.5 Deployment Guide What's new in Workspace?
Workspace Desktop Edition Deployment Guide 31

• routing-point-presence
• You can control the display size of fonts and icons in the Workspace views by using thegui.magnification-factor configuration option.
• To enable the standardization across all workstations of the Dates that are displayed in CaseInformation, the following new formats for the Date attribute type have been added: date.time-format and date.utc-time-zone. Refer to the Editing Case Information table in the Displayingand Editing Case Information section.
Workspace 8.5.101.14
The following content has been added to the Workspace 8.5.1 Deployment Guide for WorkspaceDesktop Edition 8.5.101.14:
• Workspace SIP Endpoint 8.5.0 now supports the G729 and H.264 video codecs. The followingconfiguration options have been added to support this feature:• sipendpoint.codecs.g729/8000.fmtp• sipendpoint.codecs.h264.fmtp
• The following new options have been added to enable you to optimize bandwidth and ConfigurationServer load when Team Communicator is initialized:• general.configuration-agent-collection-loading-method• general.configuration-object-collection-cache-timeout
• E-mail printing capability has been extended to the following views:• My History• Contact History• Draft workbin• Search results
• Workspace now supports the customizing of display names for configuration objects. The followingconfiguration options have been added to support this feature:• display-format.action-code.name• display-format.agent-group.name• display-format.business-attribute.name• display-format.skill.name• display-format.workbin.name
The following configuration options have been modified to support this feature:
• display-format.acd-queue.name• display-format.interaction-queue.name• display-format.routing-point.name
Workspace Desktop Edition 8.5 Deployment Guide What's new in Workspace?
Workspace Desktop Edition Deployment Guide 32

• display-format.virtual-queue.name
• You can specify which contact attributes can be edited by agents. The following configuration option hasbeen added to support this feature:• contact.editable-attributes
• You can specify whether agents can reject ClickOnce upgrades when they are presented at login time.Use the Force the end-user to upgrade to the latest available version option in the ClientConfiguration dialog box of the Workspace Desktop Edition Deployment Manager to control thisfeature — refer to 1a. Wizard: Deploy the Workspace downloadable ClickOnce package on your webserver procedure.
• Accessibility has been enhanced. You can control whether Interaction Notification views receive thefocus in environments that use screen reader applications. The following configuration options havebeen added to support this feature:• accessibility.focus-on-interaction-toast• accessibility.<media-type>.focus-on-interaction-toast
• The following configuration options have also been added or modified in this release:• sipendpoint.policy.endpoint.video_max_bitrate• sipendpoint.policy.device.audio_in_device• sipendpoint.policy.device.audio_out_device• sipendpoint.policy.device.capture_device
Workspace 8.5.100.05
The following content has been added to the Workspace 8.5.1 Deployment Guide for WorkspaceDesktop Edition 8.5.100.05:
• Support for SIP Voicemail• Overview• Privileges• Configuration options:
• voicemail.access-number• voicemail.notification-types
• Support for High Contrast Theme• High Contrast Workspace• Supporting configuration option:
• gui.themes
• Configuration of the High Contrast Theme: Enabling Accessibility Features
The following configuration options were also added or modified in this release:
Workspace Desktop Edition 8.5 Deployment Guide What's new in Workspace?
Workspace Desktop Edition Deployment Guide 33

• application.wiki-help-locale• display-format.contact-name• email.include-original-text-in-reply• log.PSDK.SwitchPolicy• outbound.call-result-is-mandatory
Workspace Desktop Edition 8.5 Deployment Guide What's new in Workspace?
Workspace Desktop Edition Deployment Guide 34

Concepts And FeaturesWorkspace features a unified user interface (UI) that empowers contact center employees to maketheir contact center truly dynamic by enabling them to respond in real time to real-time informationfrom a wide variety of touch points and channels.
BenefitsWorkspace enhances internal communications, user performance, and quality. Workspace features aprivilege-driven flow of information based on roles that you assign to your agents.
ImportantThe functionality that is assigned to agents through their defined role determines thefootprint of the Interaction Workspace application that is downloaded to theirworkstation. Agents who have simple roles assigned to them do not require as muchspace for the application as agents whose roles contain many privileges.
Main featuresThe following is a list of some of the main features of Workspace:
• Role-based application• Open Framework for integration and extendability• Support of plug-ins from many Genesys solutions.• Advanced Multi-Channel Interaction interface• Accessibility• Active Call Recording• Active Screen Recording• Multiple Channels
• Inbound Voice for both SIP and TDM• Outbound Campaigns• Callback/Web Callback• Email
• Print preview• QA review
• eServices
Workspace Desktop Edition 8.5 Deployment Guide Concepts And Features
Workspace Desktop Edition Deployment Guide 35

• Inbound Video• Video Chat• Chat (including support for Chat High Availability (HA) and nicknames)• SMS and MMS• Web Callback• Facebook (by an eServices plug-in)• Twitter (by an eServices plug-in)• RSS (by an eServices plug-in)
• Voicemail• Workbin• Workitem
• Team Communicator• Favorites and Corporate Favorites• Internal Instant Messaging• Standard Response Library and suggested responses (including filtering by language or other category)• Agent and Contact-Center performance tracking• Contact History Management• Last-agent routing• Broadcast Message viewing• Disposition codes• Customer context notifications• Silent Monitoring, coaching, and barge-in (SIP and Chat only; for Team Lead agents or from a 3rd party
Supervisor, including monitoring the current interaction)• Multi-site support
• Spelling check (including corporate dictionary support)• Business Continuity (Disaster Recovery)• Implementation of Language Packs to facilitate the customization of the User Interface in any non-right-
reading language.• Business Data Management and Case Data Management
High-level architectureWorkspace incorporates Genesys interactions into a multi-modal paradigm that enables agents toinvoke interactions within interactions to ensure a consistent customer experience.
Workspace is integrated with Genesys 8 components and applications, including Enterprise Services,Platform SDK, Management Framework, T-Servers, Universal Contact Server, Interaction Server,
Workspace Desktop Edition 8.5 Deployment Guide Concepts And Features
Workspace Desktop Edition Deployment Guide 36

Configuration Server Data Base, Statistics Server for Reporting, SIP Server, and various specializedplug-in IPs. Workspace is dependent upon Genesys Administrator Extension. See Architecture for amore detailed description of the Workspace architecture.
Time zonesWorkspace displays all dates based on the time zone and the locale of the workstation where theuser is logged in.
Workspace Desktop Edition 8.5 Deployment Guide Concepts And Features
Workspace Desktop Edition Deployment Guide 37
Workspace Plug-insThe following Workspace compatible plug-ins are available from Genesys:
• Genesys Predictive Engagement for Workspace: Genesys Predictive Engagement (formerly Altocloud) isa customer journey analytics platform that analyzes all kinds of customer journey behavior and data. Itcan be used to observe and analyze visitors on your digital properties, such as websites. GenesysPredictive Engagement can predict what it will take for visitors to achieve a desirable businessoutcome, and then acts to offer the most appropriate and effective channel to assist them incompleting their journey.
ImportantGenesys Predictive Engagement requires you to provision a Genesys Engage/Genesys Cloud HybridIntegration to use this service. Refer to: Provisioning Genesys Engage Hybrid Integrations and IntegratingGenesys Predictive Engagement into Genesys Engage on-premises.
• Workspace Plug-ins for LYNC / Skype: Genesys provides a plugin that adds functionality to WorkspaceDesktop Edition to tightly integrate it with the Skype for Business client on the agent desktop. Throughthe plugin, agents can handle voice, video, and instant messaging interactions handled by Skype forBusiness, in addition to accessing their Skype for Business contacts and seeing their presence status.
• Workspace Plug-ins for Social Media: Genesys provides a plugin that adds functionality to WorkspaceDesktop Edition, enabling agents to handle social media interactions.
• Workspace Plug-in Genesys Agent Scripting: Genesys Agent Scripting provides customized solutions tothe agent desktop to guide an agent through each interaction by structuring, enriching, and optimizingagent conversation and workflow.
• Genesys Web Engagement Plug-in for Workspace: Genesys Web Engagement provides the ability tomonitor, identify, and proactively engage web visitors in conversations that match business objectives.
• Genesys Co-browse Plug-in for Workspace: Genesys Co-browse provides the ability for an agent and theend customer to browse and navigate the same web page at the same time. In a Genesys Co-browsesession, both the agent and the customer share the same instance of the screen, as opposed to aconventional screen sharing application, where one of the parties sees an image of the other party'sbrowser instance.
Refer to Installing plug-ins for Workspace for information about installing Workspace compatible plug-ins.
Workspace Desktop Edition 8.5 Deployment Guide Workspace Plug-ins
Workspace Desktop Edition Deployment Guide 38

Workspace And Genesys 8[Modified: 8.5.148.04]
Workspace is the key agent interface for Genesys 8. Workspace is built on top of the primary Genesys8 SDKs. See the Table - Interoperability between Workspace Desktop Edition 8.5 and otherGenesys Products for a list and description of the components of Workspace and the Table -Miscellaneous Deliverables of Workspace for a list of miscellaneous deliverables that ship withWorkspace.
Miscellaneous Deliverables of WorkspaceComponent Description
Workspace Desktop Edition Deployment Manager Wizard that is used during deployment to preparethe ClickOnce packages
Workspace Extension Samples Set of examples that illustrate how to implementextensions for Workspace
Topology
You can deploy Workspace in two different deployment configurations, depending upon thearrangement of your network; they are:
• Oversimplified deployment with a Client-server in a local setup.• Client-server with centralized deployment based on ClickOnce
This section shows the key components of the Workspace network topology and indicates howWorkspace is related to other Genesys components.
The Figure - Simple client-server deployment of Workspace shows aminimal deployment that consists of agent workstations that are connecteddirectly to the Genesys back-end servers. For the procedure on deployingWorkspace in this configuration, see the Procedure: Installing WorkspaceDeployment Package on the Windows operating system.
Simple client-server deployment of Workspace
The Figure - Standard deployment of Workspace with a ClickOnce servershows the standard deployment of Workspace in an environment in which thedeployment is controlled from a centralized place and in which remote agentscan be connected to Genesys back-end through a Virtual Private Network.
Workspace Desktop Edition 8.5 Deployment Guide Workspace And Genesys 8
Workspace Desktop Edition Deployment Guide 39
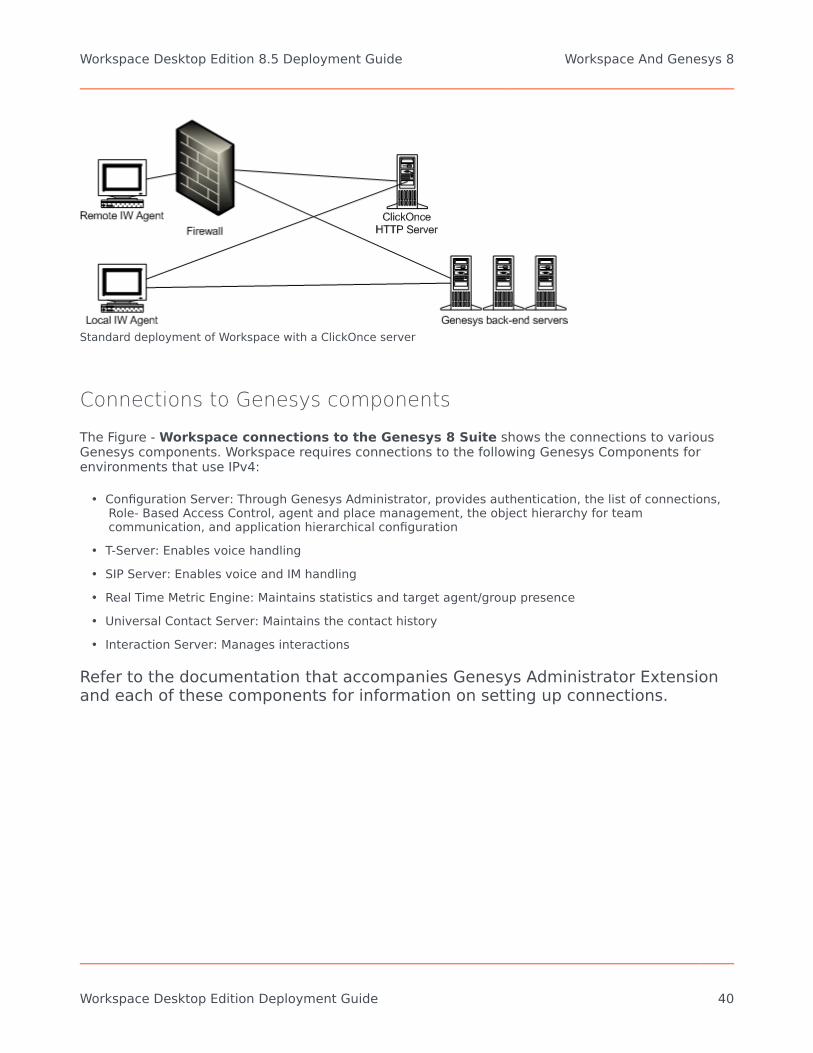
Standard deployment of Workspace with a ClickOnce server
Connections to Genesys components
The Figure - Workspace connections to the Genesys 8 Suite shows the connections to variousGenesys components. Workspace requires connections to the following Genesys Components forenvironments that use IPv4:
• Configuration Server: Through Genesys Administrator, provides authentication, the list of connections,Role- Based Access Control, agent and place management, the object hierarchy for teamcommunication, and application hierarchical configuration
• T-Server: Enables voice handling• SIP Server: Enables voice and IM handling• Real Time Metric Engine: Maintains statistics and target agent/group presence• Universal Contact Server: Maintains the contact history• Interaction Server: Manages interactions
Refer to the documentation that accompanies Genesys Administrator Extensionand each of these components for information on setting up connections.
Workspace Desktop Edition 8.5 Deployment Guide Workspace And Genesys 8
Workspace Desktop Edition Deployment Guide 40

Interaction Workspace connections to the Genesys 8Suite
IPv6 environments[Added: 8.5.106.19]
Workpace supports IPv6 connections with all Genesys components if your system hardware supportsIPv6 and it is implemented in your Framework Layer.
Review the IPv6 provisioning in the Genesys Framework documentation before proceeding:
• Internet Protocol version 6 (IPv6)• IPv6 vs. IPv4 Overview
Enabling IPv6 in WorkspaceYou can enable IPv6 at various levels and with various scope.
You can enable IPv6 at the Environment level, which is shared with other Genesys components byconfiguring the following Environment Variables:
• GCTI_CONN_IPV6_ON=1
• GCTI_CONN_IP_VERSION=6,4
At the Environment level, the IPv6 settings apply to all connections that Workspace opens, such asConfiguration Server, TServer or SIP Server, Stat Server, Universal Contact Server, Interaction Server,and Chat Server, and to SIP or RTP from/to the SIP Endpoint.
The setting of these Environment variables can be overridden by setting the following option in theinteractionworkspace.exe.config file:
• enable-ipv6=true
Workspace Desktop Edition 8.5 Deployment Guide Workspace And Genesys 8
Workspace Desktop Edition Deployment Guide 41

• ip-version=6,4
When IPv6 is set at the Workspace level, the IPv6 settings apply to all connections that Workspaceopens, such as Configuration Server, TServer or SIP Server, Stat Server, Universal Contact Server,Interaction Server, and Chat Server, but not for the SIP or RTP from/to the SIP Endpoint.
If Workspace is running in an environment where the IPv6 must be selectively enabled depending onthe server to be contacted, you can use the following options to override the IP version that isspecified by an Environment Variable or in the interationworkspace.exe.config file:
Options to Override the IP Version of Workspace Connections
Connection Options to make an IPv6 settings specific forthis connection
Configuration Server N/A
Chat ServerWorkspace option:
• interaction-workspace\chatserver.ip-version=6,4
T-Server, SIP Server, Stat Server, InteractionServer, Universal Contact Server
In the connection object that links Workspace tothis server (Connection Info, Advanced tab,Transport Parameters)
• ip_version=6,4
SIP/RTP (for Workspace SIP Endpoint 8.5.1)• interaction-workspace\
sipendpoint.enable_ipv6=true• interaction-workspace\sipendpoint.ip_version=
6,4
IPv6 provisioning reference
[+] Show Workstation Environment Variables
GCTI_CONN_IPV6_ON
• Default Value: 0• Valid Values: 0 and any non-zero integer value• Changes take effect: When the application is started or restarted.• Description: This environment variable enables IPv6. When set to 0 (false), IPv6 is not enabled. When
set to any non-zero integer value (true), IPv6 is enabled.
GCTI_CONN_IP_VERSION
• Default Value: 4,6
Workspace Desktop Edition 8.5 Deployment Guide Workspace And Genesys 8
Workspace Desktop Edition Deployment Guide 42
• Valid Values: 4,6, 6,4• Changes take effect: When the application is started or restarted.• Description: This environment variable specifies whether IPv4 (4,6) or IPV6 (6,4) is the preferred
connection protocol.
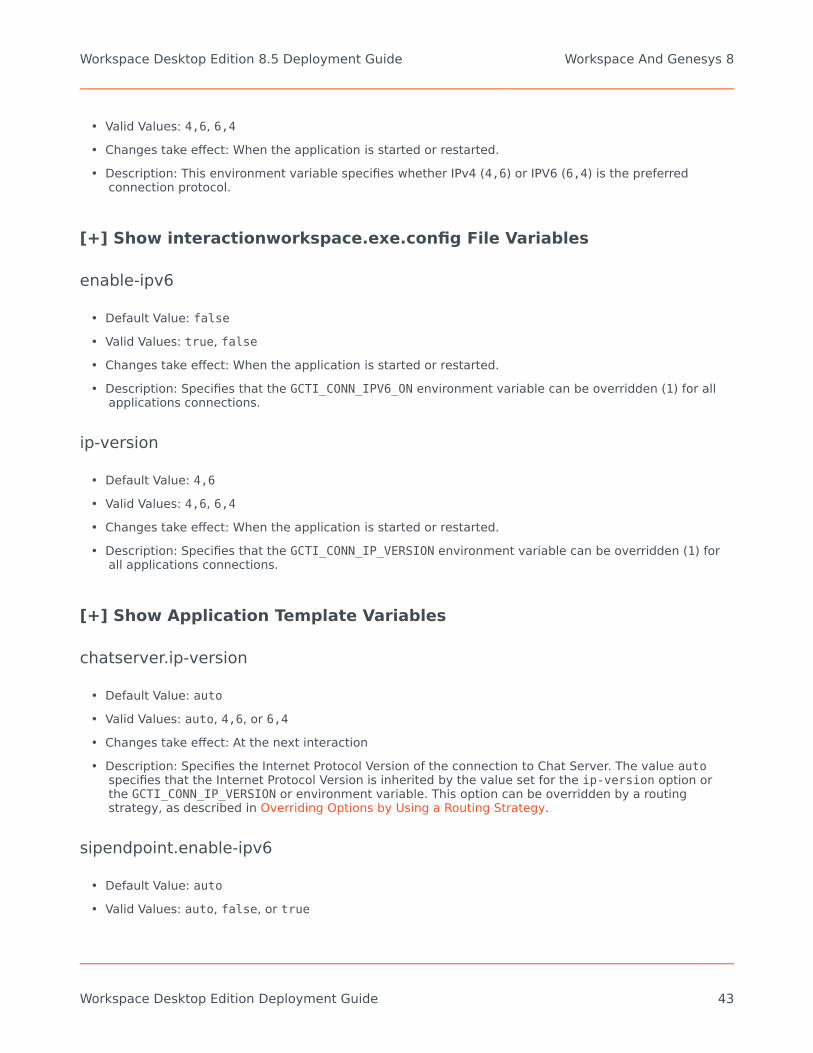
[+] Show interactionworkspace.exe.config File Variables
enable-ipv6
• Default Value: false• Valid Values: true, false• Changes take effect: When the application is started or restarted.• Description: Specifies that the GCTI_CONN_IPV6_ON environment variable can be overridden (1) for all
applications connections.
ip-version
• Default Value: 4,6• Valid Values: 4,6, 6,4• Changes take effect: When the application is started or restarted.• Description: Specifies that the GCTI_CONN_IP_VERSION environment variable can be overridden (1) for
all applications connections.
[+] Show Application Template Variables
chatserver.ip-version
• Default Value: auto• Valid Values: auto, 4,6, or 6,4• Changes take effect: At the next interaction• Description: Specifies the Internet Protocol Version of the connection to Chat Server. The value auto
specifies that the Internet Protocol Version is inherited by the value set for the ip-version option orthe GCTI_CONN_IP_VERSION or environment variable. This option can be overridden by a routingstrategy, as described in Overriding Options by Using a Routing Strategy.
sipendpoint.enable-ipv6
• Default Value: auto• Valid Values: auto, false, or true
Workspace Desktop Edition 8.5 Deployment Guide Workspace And Genesys 8
Workspace Desktop Edition Deployment Guide 43

• Changes take effect: When the application is started or restarted.• Description: Specifies that the GCTI_CONN_IPV6_ON environment variable can be overridden (1) for
connections to SIP Server and RTP. If the value auto and the GCTI_CONN_IPV6_ON variable do not exist,then the value of ip-version is set to 4,6.
sipendpoint.ip-version
• Default Value: auto• Valid Values: auto, 4,6, or 6,4• Changes take effect: When the application is started or restarted.• Description: Specifies the Internet Protocol Version of connections to SIP Server and RTP. The value auto
specifies that the Internet Protocol Version is inherited by the value set for the ip-version option orthe GCTI_CONN_IP_VERSION environment variable. If the GCTI_CONN_IP_VERSION environment variabledoes not exist, the value of the ip-version option is set to 4,6.
[+] Show Connection Object VariablesIn the Transport Protocol Parameters (Tab Advanced) set the following variable:
ip-version
• Default Value: 4,6• Valid Values: 4,6, or 6,4• Changes take effect: When the application is started or restarted.• Description: Specifies that the GCTI_CONN_IP_VERSION environment variable and the values configured
for applications can be overridden for all connection objects.
Architecture
Workspace is integrated with the following Genesys 8 applications:
• Embedded components:• Enterprise Services• Platform SDK
• Direct connections:• T-Server• Universal Contact Server
Workspace Desktop Edition 8.5 Deployment Guide Workspace And Genesys 8
Workspace Desktop Edition Deployment Guide 44

• Interaction Server• Configuration Server• Statistics Server for Reporting• SIP Server
• Dependencies:• Genesys Administrator/Genesys Administrator Extension
• Optional installation:• Workspace SIP Endpoint• Workspace Compatible Plug-ins
Workspace features a modular design that divides the application into several components that areserved out to agents based on their roles. All agents receive common modules such as the Login andGo Ready module and the Main Window module, while other modules, such as the ContactManagement module and the Team Communicator module are distributed only to agents whose rolesinclude those modules.
Workspace relies on both Enterprise Services and Platform SDK (refer to theFigure - Workspace architecture). This architecture enables developers tobuild customization for Workspace at any level.
Workspace architecture
Customization supportThis architecture supports the following customization:
• Workspace -- User-interface customization• Enterprise Services -- Business logic customization using a high-level API• Platform SDK -- Business logic customization using a low-level API
Refer to the Workspace Developer's Guide and .NET API Reference and the Workspace ExtensionExamples for information on how to customize Workspace. Refer to the Platform SDK 8.0 .NET APIReference and Developer's Guide for information on lower-level customization capabilities.
Workspace Desktop Edition 8.5 Deployment Guide Workspace And Genesys 8
Workspace Desktop Edition Deployment Guide 45
Common system aspects
The goal of Genesys 8 and Workspace is to provide a consistent, simplified, and comprehensiveapplication that enables each user at every level to be efficient and productive. Genesys 8 andWorkspace focus on a set of criteria that deliver a higher level of productivity. Workspace is designed"from the ground up" to have a high degree of usability, with the goal of enhancing agentproductivity.
InternationalizationWorkspace uses the existing internationalization capabilities of Genesys back-end components, suchas Universal Contact Server, that employ Unicode to support multiple languages. Workspace uses theGenesys Platform SDK ESP protocol to communicate with Genesys back-end servers that alsosupport the same Unicode protocol.
Any set of Unicode characters is supported; therefore, any language that is supported by Unicode issupported by Workspace; however, to support more than one Unicode language in your environment,you must configure the specific Unicode support for each connection (this is configured in the sameway as TLS requires custom encoding).
Workspace is aligned with the existing internationalization capabilities of Genesys back-endcomponents:
• Universal Contact Server uses Unicode to support multiple languages. Therefore, for this connection anycombination of locale that is specified in the client configuration, server configuration, and interactioncontent is supported. This applies to the content of the Notepad, the body of an email and so on.
• Other Genesys back-end servers do not implement Unicode. Therefore, internationalization requires youto configure consistently the locale of the system servers, the client "locale for non Unicodeapplication", and the content of interactions. Each of these items must rely on the same Code Page(several languages can be supported by a single code page). This configuration applies to the userdata, configuration data, and so on of each interaction.
• You can configure Workspace to enforce which encoding is used when it communicates with non-Unicode back-end servers. To do this, configure the following options:
general.non-unicode-connection-encoding--The value corresponds to the .Net Name of Code PageIdentifier. Refer to the following article: http://msdn.microsoft.com/en-us/library/windows/desktop/dd317756(v=vs.85).aspx
For the Configuration Server connection, the code page identifier must be set in the general.non-unicode-connection-encoding key in the Workspace.exe.config file.
Accessibility and navigation
Section 508 accessibilityYou can use a screen-reader application or the keyboard to navigate the agent desktop interface.
Workspace Desktop Edition 8.5 Deployment Guide Workspace And Genesys 8
Workspace Desktop Edition Deployment Guide 46

Screen readersWorkspace is designed to maximize content readability for screen-reader applications. Workspacecan be configured to be compatible with screen readers that support Microsoft UI Automation API,such as the Freedom Scientific application: Job Access With Speech (JAWS) version 11. Screen readersenable visually impaired (blind and low-vision) agents to use the desktop interface through text-to-speech or text-to-Braille systems. Workspace must be configured in the Configuration Layer to enablethis compatibility (see Accessibility). These options can be set in the Configuration Layer as defaultvalues that can be overridden in the Agent Annex following the standard hierarchy configuration.
Keyboard navigation of the interfaceYou can navigate the Workspace interface by using a keyboard or other accessibility device that isenabled by keyboard navigation. This feature improves the accessibility of the interface by notforcing the user to navigate by using the mouse. Navigation works panel to panel and, within a panel,component to component.
In general, you can use the TAB key to set the focus on the next component; use the SHIFT-TAB keycombination to set the focus on the previous component. You can use this method to navigate theMenu bar, the interaction interface, the tabs, and so on.
Access keys and keyboard shortcutsWorkspace follows the Microsoft Windows convention of enabling interface navigation by usingaccess keys. Access keys are alphanumeric keys that are employed in combination with the ALT keyto replicate a menu command or button click the interface.
Workspace also provides shortcut keys. Shortcut keys, which are intended mostly for advanced users,enable quick access to frequently performed actions. Shortcut keys can be reconfigured by Tenant,Group, and/or User by using Genesys Administrator Extension. These key combinations aredocumented in the Workspace 8.5 User's Guide.
Security
RADIUSWorkspace implements the Remote Authentication Dial-In User Service (RADIUS) security protocol toprevent illegal system access, track system use, and limit the access of authenticated users. Toaccess the system, users must provide their credentials and connection parameters forauthentication before they can be granted limited system access.
The user must provide both a user name and a password to gain access to the Configuration Layer,which is used to obtain a list of existing places, privileges that are specified for the user, andconfiguration of the agent application. A place is mandatory for all Interaction Workspace agentscenarios. A role or roles are assigned to agents upon login. Agents do not have access to systemaspects outside of those that are defined by their assigned roles.
Workspace Desktop Edition 8.5 Deployment Guide Workspace And Genesys 8
Workspace Desktop Edition Deployment Guide 47
Transport Layer Security (TLS)Workspace supports Transport Layer Security (TLS), which is a cryptographic protocol that providessecurity and data integrity for communications over networks such as the Internet. TLS encrypts thesegments of network connections at the transport layer from end to end. For more information aboutTLS, refer to the Genesys TLS Configuration chapter of the Genesys 8.1 Security Deployment Guide.
FIPS
As of release 8.1.401, Workspace supports Federal Information Processing Standard (FIPS). Forinformation about configuring and using FIPS, refer to Genesys 8.1 Security Deployment Guide.
Controlling TLS version
Prior to Interaction Workspace 8.1.4, encrypted communication was used to secure thecommunication protocol between Workspace and the other Genesys Servers. This method meant thatcontrol on certificate expiration and authority was not enforced. Workspace 8.1.4 (and higher)implements full TLS control. If you have migrated from Interaction Workspace 8.1.3 (or lower) to8.5.0, you might receive warning messages from the system informing you that the securitycertificate on a particular channel has expired. This renders the channel Out of Service until thecertificate is updated. Workspace supports a TLS connection to Universal Contact Server (UCS)starting from version 8.1.3 of UCS. For support details for other Genesys servers please refer to therespective product documentation.
Up to version 8.5.118.10, you can use the ssl-version option in theinteractionworkspace.exe.config configuration file to specify the maximum TLS version to beused by Workspace during the handshake of the initialization of a secured connection to one of theGenesys back-end servers such as SIP Server:
• Name: ssl-version• Valid values: One label from the following list: TLS1.0, TLS1.1, TLS1.2• Default value: TLS1.0
Starting with version 8.5.119.05, the mentioned ssl-version option is deprecated and the maximumTLS version that Workspace requires is 1.2.
Configuring Mutual TLS with backend servers
[Added: 8.5.148.04]
Configuring Mutual TLS between Workspace and the backend servers for which you have set upconnections, such as TServer, Interaction Server, Universal Contact Server, Statistics Server, andConfiguration Server ensures security of data exchange. Each time Workspace and server initiate aconnection, Mutual TLS negotiation occurs, and it is valid until the connection ends. Workspacenotifies the agent if a TLS certificate error occurs for the corresponding media or service and aresponse is available from the server. Servers may behave differently on TLS connection issues.Therefore, check the server logs to troubleshoot the Mutual TLS connection issues.
Workspace Desktop Edition 8.5 Deployment Guide Workspace And Genesys 8
Workspace Desktop Edition Deployment Guide 48
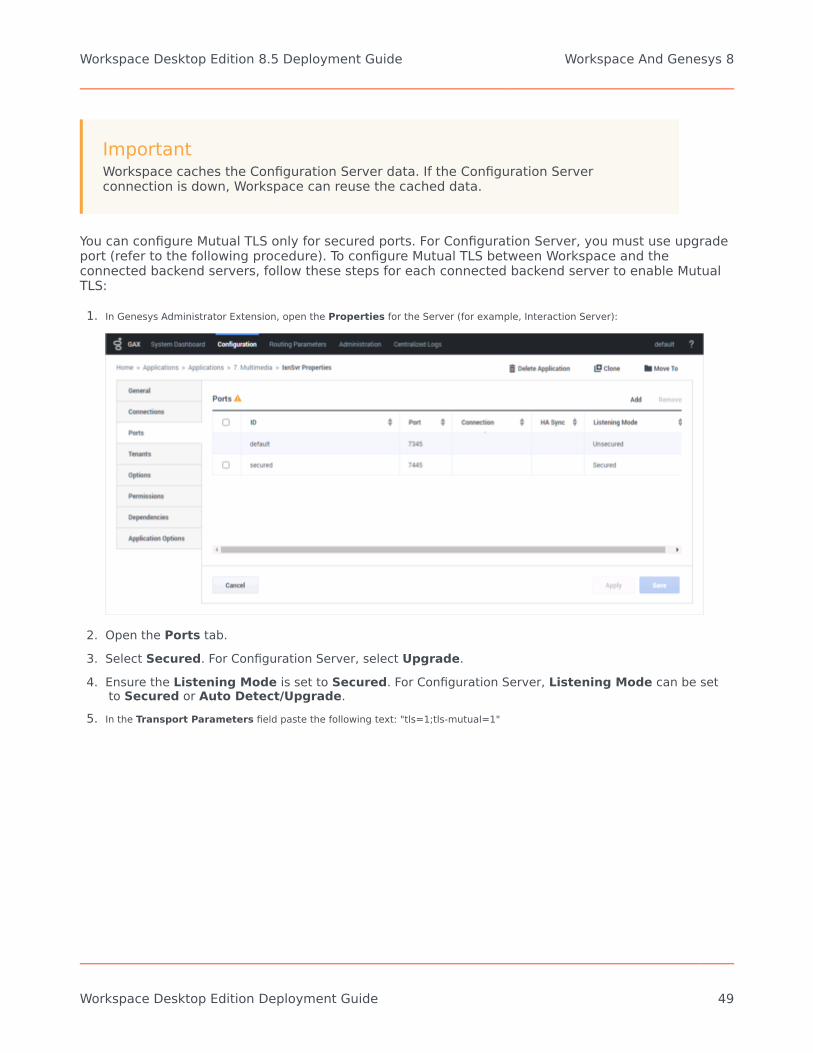
ImportantWorkspace caches the Configuration Server data. If the Configuration Serverconnection is down, Workspace can reuse the cached data.
You can configure Mutual TLS only for secured ports. For Configuration Server, you must use upgradeport (refer to the following procedure). To configure Mutual TLS between Workspace and theconnected backend servers, follow these steps for each connected backend server to enable MutualTLS:
1. In Genesys Administrator Extension, open the Properties for the Server (for example, Interaction Server):
2. Open the Ports tab.3. Select Secured. For Configuration Server, select Upgrade.4. Ensure the Listening Mode is set to Secured. For Configuration Server, Listening Mode can be set
to Secured or Auto Detect/Upgrade.5. In the Transport Parameters field paste the following text: "tls=1;tls-mutual=1"
Workspace Desktop Edition 8.5 Deployment Guide Workspace And Genesys 8
Workspace Desktop Edition Deployment Guide 49
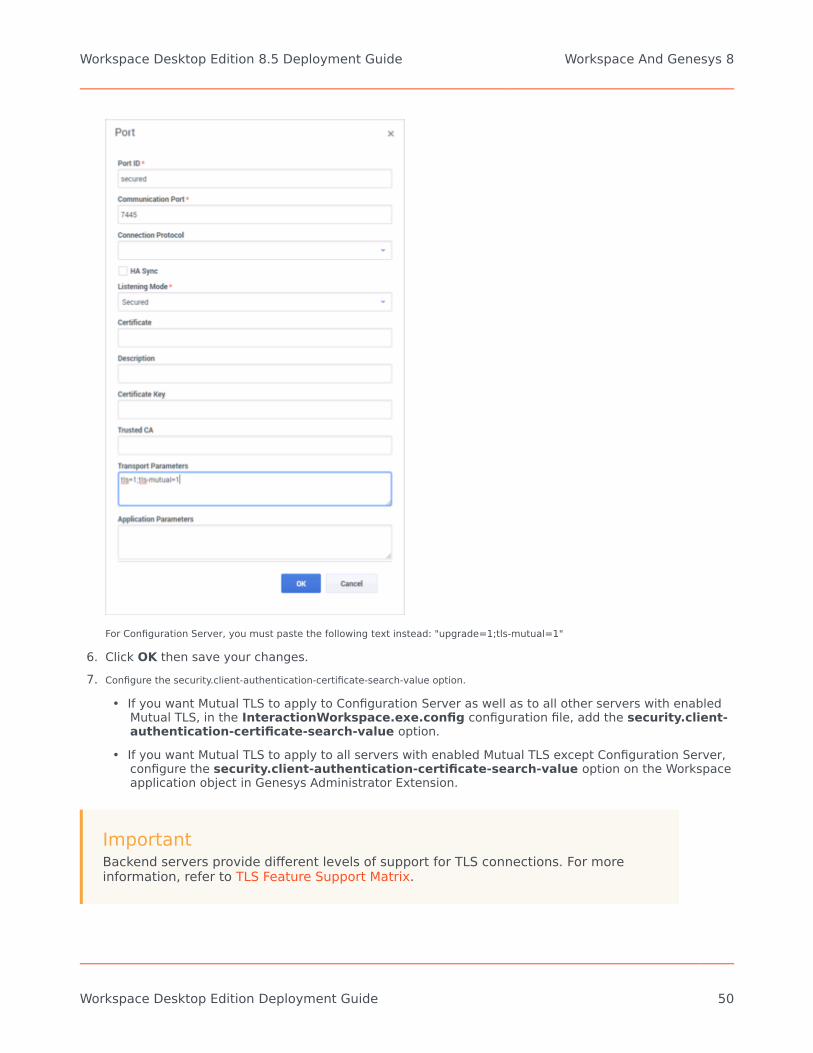
For Configuration Server, you must paste the following text instead: "upgrade=1;tls-mutual=1"
6. Click OK then save your changes.7. Configure the security.client-authentication-certificate-search-value option.
• If you want Mutual TLS to apply to Configuration Server as well as to all other servers with enabledMutual TLS, in the InteractionWorkspace.exe.config configuration file, add the security.client-authentication-certificate-search-value option.
• If you want Mutual TLS to apply to all servers with enabled Mutual TLS except Configuration Server,configure the security.client-authentication-certificate-search-value option on the Workspaceapplication object in Genesys Administrator Extension.
ImportantBackend servers provide different levels of support for TLS connections. For moreinformation, refer to TLS Feature Support Matrix.
Workspace Desktop Edition 8.5 Deployment Guide Workspace And Genesys 8
Workspace Desktop Edition Deployment Guide 50

Configuring Mutual TLS with Chat Server
ImportantTo enable successful Mutual TLS connection between Workspace and Chat Server,besides configuring the security.client-authentication-certificate-search-value option,you must also set the value of the chatserver.tls-mutual option to true. This optionindicates to Workspace to provide a certificate key in environments where Chat Serverworks in Mutual TLS mode.
If the agent handles an interaction that is specific to Chat Server, Workspace connects to Chat Server.To configure Mutual TLS between Workspace and Chat Server, follow these steps:
1. In Genesys Administrator Extension, open the Properties for Chat Server.
2. Open the Ports tab.3. Select default.4. Ensure the Listening Mode is set to Secured.5. In the Transport Parameters field paste the following text: "tls=1;tls-mutual=1"
Workspace Desktop Edition 8.5 Deployment Guide Workspace And Genesys 8
Workspace Desktop Edition Deployment Guide 51

6. Select ESP.7. Repeat from Step 2 to Step 5 to define values in the Transport Parameters field.8. Click OK then save your changes.9. Configure the chatserver.tls-mutualoption.
Workspace SIP Endpoint
Pre-requisites: Workspace 8.5.001 and higher, and Workspace SIP Endpoint 8.5.000 and higher.
The sipendpoint.transport-protocol option enables configuration of the SIP Transport Protocol. Forencrypted transport, set the value of this option to TLS.
The No results option enables you to configure the RTP Protocol. For encrypted transport, set thevalue of this option to 1. If Workspace is deployed in a SIP Business Continuity environment, set alsothe value of the No results option to 1 to encrypt the peer SIP connection. For more information aboutSRTP, refer to Genesys 8.1 Security Deployment Guide and SIP Server 8.1 Deployment Guide.
If Workspace SIP Endpoint must connect to an SBC or a SIP Proxy instead of an actual SIP Server, then
Workspace Desktop Edition 8.5 Deployment Guide Workspace And Genesys 8
Workspace Desktop Edition Deployment Guide 52

you must configure the sipendpoint.sbc-register-port configuration option (and sipendpoint.sbc-register-port.peer if you are running Workspace in SIP Business Continuity scenarios) by specifyingthe UDP/TCP or TLS ports.
Inactivity time-outWorkspace can be configured to become locked after a specific period of time during which neitherthe agent's mouse nor keyboard are used. This feature protects your system from unwanted systemaccess, should the agent walk away from a workstation without locking it.
When the specified time period of inactivity is reached, all of the open Workspace windows on theagent's desktop are minimized, and the Reauthenticate view is displayed. Interaction notificationssuch as notification of inbound interaction delivery are still displayed, but business information aboutthem is not, and the Accept and Reject buttons are disabled.
To unlock Workspace, the agent must enter in the Reauthenticate view the password that was used tolog in the locked application, then click Authenticate.
Refer to the Workspace 8.5.x Help for details about using the reauthentication feature.
Business Continuity
The Framework 8.1 SIP Server Deployment Guide provides detailed information about BusinessContinuity architecture and configuration. A disaster is defined as the loss of all Genesys componentsthat are running on one or more physical sites. Business Continuity is a set of automated proceduresthat enable agents that are connected to the site that is experiencing a disaster to connect to analternate site to continue working normally with minimal data lost. This is known as Geo-redundancy.
In the event of a disaster, Workspace can be configured to maintain a dual connection to a pair of SIPServers, a pair of Stat Servers, and a pair of Configuration Servers at two different sites.
Two or more switches must be configured in Genesys Administrator Extension to have identical agentextensions and logins. Agents must be able to log in to any synchronized switch at any time. In atypical Business Continuity set up, two pairs of High Availability (HA) SIP Servers are implemented.Each pair of SIP Servers, the Preferred server and the Peer server, use synchronized (not replicated)configuration layer objects. Agents are logged in to the Current Primary server in their Preferred siteHA Pair. Each agent has two SIP Channels and two SIP Endpoints registered on each server.
Workspace always tries to connect to the Preferred server. If it is not available it connects to thealternate (Peer) server until the Preferred server becomes available again. The agent state is set toNot Ready until a connect with one or the other server is established.
WarningThe current interaction might be lost.
Refer to the Procedure: Configuring Workspace for Business Continuity to enable Business Continuityfor your agents and eServices Business Continuity.
Workspace Desktop Edition 8.5 Deployment Guide Workspace And Genesys 8
Workspace Desktop Edition Deployment Guide 53
Licensing
There are no technical licensing requirements for Workspace.
Framework and solutions compatibility
Workspace is part of the Genesys 8 suite of products. See Table - Interoperability betweenWorkspace Desktop Edition 8.5 and other Genesys Products for a list of key compatibilities.Also see the following system guides for details on compatibility and system requirements:
• Genesys Hardware Sizing Guide''
• Genesys Interoperability Guide
• Genesys Licensing Guide
• Genesys Supported Media Interfaces Reference Manual
• Genesys Supported Operating Environment Reference Guide
Workspace Desktop Edition 8.5 Deployment Guide Workspace And Genesys 8
Workspace Desktop Edition Deployment Guide 54

Role-based approach of Genesys 8[Modified: 8.5.143.08]
TipYou no longer have to use Genesys Administrator to create agent Roles for WorkspaceDesktop Edition. Workspace also supports the Role storage model of GenesysAdministrator Extension 9.0.100.56 or higher. [Added: 8.5.143.08]
Genesys Administrator Extension is used to create Roles that contain a list of privileges. Roles aredefined as the set of privileges that are either Allowed or Not Assigned. Each agent receives onlywhat is needed to complete the privileges that relate to the Role of that agent; everything else isinaccessible. Genesys Administrator Extension enables the assignment of a Role to an Access Groupor a Person.
TipUsers have no default assigned Role. Roles have no default granted privileges.
Depending on the privileges that are granted to an agent, Workspace enables the following:
• Module activation — Triggering of module download from the ClickOnce server; this modifies thefootprint of the agent desktop application.
• User Interface rendering — Includes the display of menu items, toolbar buttons, and views.
Refer to the Procedure: Creating a Role, allowing a Workspace privilege, and assigning a Role to anagent or agent group to create or modify a role and assign privileges to an agent or Agent Group.
Role- and Privilege-Based Models
Workspace implements Role-Based Access Control (RBAC). RBAC enables administrators to limitagents to specific channels, interactions, and so on, based on their permissions.
ImportantRBAC requires Configuration Server 8.0.2 or higher. RBAC requires GenesysAdministrator 8.0.2 or higher, or Genesys Administrator Extension 9.0.100.56 orhigher.
Workspace Desktop Edition 8.5 Deployment Guide Role-based approach of Genesys 8
Workspace Desktop Edition Deployment Guide 55

Workspace supports both the Genesys Administrator Role data storage model, introduced byManagement Framework 8, and the Genesys Administrator Extension Role data storage model (asimplemented in Genesys Engage cloud). The following are the general rules for Roles defined forWorkspace:
• In one environment, you can define both Genesys Administrator and Genesys Administrator ExtensionRoles.
• Each Role is defined and stored either in a Genesys Administrator storage model or a GenesysAdministrator Extension storage model.
• The Person (agent) object can be assigned to Roles defined by both Genesys Administrator and GenesysAdministrator Extension.
The system administrator defines a Role for each agent. The Role has a series of privileges that areassociated with it; in this way, agents do not have access to privileges or functionality that areoutside their assigned Roles.
RBAC enhances system security by limiting agent access to the system. This is critical for protectingthe system against accidental or intentional damage. Accidental damage can occur if an agent isaccessing a part of the system that is outside of the area of responsibility of that agent.
RBAC enables you to update your system easily. If agents change responsibilities or new agents areadded, you do not have to assign permissions to those agents based on their username. When youcreate or modify an agent, all that you have to do is set the Role of that agent; system access isdetermined automatically. As soon as the agent logs into the system, the identity of that agentdetermines access. Individual permissions do not have to be set for new or modified users.
To facilitate RBAC, Workspace is constructed as a collection of modules that encompass privileges orrelated privileges. RBAC selects only those modules that pertain to the Role of the agent and arenecessary for the context of the functions that are accessible to the agent.
The security.disable-rbac configuration option in the interaction-workspace section determineswhether agents have all privileges granted or whether the Role Based Access Control (RBAC) controlsystem is used. You can set this option to true when you deploy the application in your testing lab toevaluate and test the application. Refer to Role Privileges for a list of all the privileges.
Views (Modules and Groups of Privileges)
Modules are assembled into views. Each module, set of modules, or view is related to a privilege orset of privileges. Privileges are implemented by modules. In a ClickOnce environment; when an agentlogs in to Workspace, modules are transferred to the client desktop. The modules that are transferredare dependent upon the Role that is assigned to the user with that login.
Privileges implemented by WorkspaceThis section introduces the privileges that are implemented by Workspace. The privileges aregrouped logically by action and access type:
• Voice actions• Instant Messaging actions• Statistics access
Workspace Desktop Edition 8.5 Deployment Guide Role-based approach of Genesys 8
Workspace Desktop Edition Deployment Guide 56

• Contact actions• Team Communicator actions• eServices actions• Standard Response Favorites actions
Voice actions
Voice action privileges enable a variety of capabilities, including the use of the Voice media, transfer,conference, disposition, answering, rejecting, and making calls.
Instant Messaging actions
Instant Messaging (IM) actions enable agents to use the IM media for internal communication, and tomake and release IM sessions.
Statistics access
Statistics access privileges enable the viewing of Key Performance Indicators (KPIs) and contactcenter statistics by agents.
Contact actions
Contact action privileges can be used to enable a wide variety of contact related privileges includingmarking done interactions, merging contacts and interactions, creating contacts, deleting contacts,and saving changes to contacts. Contact action privileges also enable access to InteractionWorkspace features such as Contact history, information, directory, details, notepad, and case data.
Team Communicator actions
Team Communicator privileges enable contacts to use the Team Communicator feature to contactinternal targets, create and use favorites, and view recent contacts.
eServices actions
eServices privileges for E-Mail, Chat, Video, Web Callback, Workitems, and Workbins. For moreinformation on the privileges implemented by Workspace, refer to Workspace Functionality Overview.
Standard Response Favorites actions
Standard Response Favorites privileges enable the agents to save a list of favorite responses from theSRL.
Workspace Desktop Edition 8.5 Deployment Guide Role-based approach of Genesys 8
Workspace Desktop Edition Deployment Guide 57

Configuration and administration by usingoptions and annexes
TipFor the most up to date Workspace Desktop Edition configuration options, see theGenesys Configuration Option Database.
Workspace privileges are assigned to users based on the role that is configured for them in theConfiguration Layer. Workspace privileges are associated with modules. Under the terms of RBAC,agents must be configured to have access to Workspace modules. Later, agents may be granted theability to set preferences that personalize the modules. As with the other Genesys 8 applications,Workspace is first set up and configured through the Genesys Administrator Extension interface. Afterthe initial configuration, the settings of each Workspace module can be assigned hierarchically to:
1. An Application.2. A Tenant.3. An Agent Group.4. A Person.
The option settings are applied to an agent upon login to Workspace in the following override order:
1. Default settings that are defined in the application code, which are overridden by:2. Settings that are specified in the Application, which are overridden by:3. Settings that are specified in the Tenant of the agent, which are overridden by:4. Settings that are specified in the Agent Group(s) to which an agent belongs (Note: only Virtual Agent
Groups defined with rules that are based on Skills are supported) — in cases in which an agent is amember of more than one group, Workspace considers the union of options that are set in each group;if an option is declared in two different groups, each of which has a different value, Workspace usesbuilt-in rules to resolve the conflict (see Conflict Resolution for Configuration Options for information onhow such conflicts are resolved), which are overridden by:
5. Settings that are specified in the Person object that corresponds to the agent.
You can override options only in the interaction-workspace section. Therefore, you must replicatethe interaction-workspace section to the annex of the object level at which you want the overrideto occur (Tenant, Group, User, or Transaction).
Other applicable object hierarchies
Some specific Workspace options can be defined in other objects and object hierarchies, such as:
Workspace Desktop Edition 8.5 DeploymentGuide
Configuration and administration by using options andannexes
Workspace Desktop Edition Deployment Guide 58

Action Codes -- For example: Not Ready reason codes.
Overriding options by using a Routing Strategy
A Routing Strategy can be used to override configuration options that you have defined by using thehierarchies that are described in Configuration And Administration By Using Options And Annexes.
Workspace uses Transaction Objects of type object list. You can attach a transaction name or listof transaction names to your strategy. The transaction names in the list should be separated bycommas. Workspace reads the transaction objects at rendering time to override the static options.
Overriding options enables you to change the appearance of interactions based on a key-value pairthat is defined in the annex of each listed transaction object. The attached data contains the name ofthe transaction object to be used for the interaction. Transaction objects are configured in GenesysAdministrator Extension or Composer, by using the standard approach that is used for other objecttypes in the hierarchy.
Use the interaction.override-option-key option to define the key in which the Transaction object(s) areto be listed in attached data. If you set an override value, Workspace will look for the transactionobject that corresponds to the key-value pair.
Not all the options in the interaction-workspace section can be overridden by transaction objects.Refer to Section: interaction-workspace to determine which options support overriding by transactionobjects. To apply this approach, you must replicate in the annex of the transaction object thestructure that is used in the interaction-workspace section of the Workspace Application object.The option name must be the same key as in the Workspace Application object template.
Conflict resolution for configuration options
In the hierarchy that is described in the previous sections, conflicts might occur during the resolutionof option inheritance. Typically, an agent can be a member of more than one Agent Group. If groupoptions conflict with one another, Workspace considers the conflict to be an administration error. Anarbitrary resolution is applied.
Single value option types
The arbitrary conflict resolution for single-value options proceeds as follows:
1. Agent Groups are sorted into ascending order by the name of the Agent Group.2. The values of the options for each section are compared.3. If there is a conflict, the value that is set for the agent corresponds to the value that is set for the group
name that comes first in the sort order. For example, values that are set for options in the "Pre-Sales"group take precedence over values that are set for options in the "Support" group.
Transaction object conflicts
If there is a conflict between transaction objects as specified by the list of override options, the firstvalue that is set in a transaction, starting from the beginning of the list, is taken into account. All thesubsequent values that are specified for the same option are ignored.
Workspace Desktop Edition 8.5 DeploymentGuide
Configuration and administration by using options andannexes
Workspace Desktop Edition Deployment Guide 59

Using options in Genesys 8 and Workspace
Each object in Genesys Framework, including agents and the Workspace application, can beconfigured using Genesys Administrator Extension. Refer to Genesys Administrator Extension Helpand Genesys Administrator Extension Deployment Guide for detailed information on how to useGenesys Administrator Extension and Management Framework to set up your contact center andconfigure objects such as agents, groups, privileges, and applications.
All configuration options in Genesys 8 are divided first into sections. Sections are groups of relatedconfiguration options. Within a section, each option is named by its functional area, and then by itsname or specific function. The Figure - Examples of Workspace sections and configurationoptions, derived from metadata, displayed in the Genesys Administrator Extensioninterface shows examples of Workspace options in the KPIs and interaction-workspace sections,such as agent-status.not-ready-reasons. The functional area is agent-status, and the optionname is not-ready-reasons.
Workspace Desktop Edition 8.5 DeploymentGuide
Configuration and administration by using options andannexes
Workspace Desktop Edition Deployment Guide 60

Examples of Workspace sections and configuration options, derived from metadata, displayed in the Genesys Administrator Extension interface
Option-value yypesOption values are of the following types:
Workspace Desktop Edition 8.5 DeploymentGuide
Configuration and administration by using options andannexes
Workspace Desktop Edition Deployment Guide 61

• String -- Open content or a comma-separated list of valid string or numeric values; some lists may havean open number of members to be determined by the user.
• Numeric -- Specific values or ranges of values.• Boolean -- Either true or false.
Workspace Configuration Options Reference contains a list of all the Workspace options. It includesdescriptions of their type and use. Refer also to Deploying Workspace, when you are planning yourimplementation of Workspace.
Effect of privileges and hierarchical options on the behavior ofWorkspace
The behavior of Workspace is controlled by a compilation of settings in various systems andcomponents of the Genesys 8 suite. The behavior is controlled by the following components:
• Privileges are assigned to logged-in agents through the Genesys RBAC security system (refer to Role-and Privilege-Based Models).
• Option and Annex settings that are defined in the applicable objects of the configuration layer.
Privileges are part of the security of the Genesys 8 suite; therefore, they have a higher priority thanapplication and user settings. It is important to note that the options that are defined in theconfiguration layer and the routing strategy will never override any privilege management.
Under this hierarchy of control, options act only on the feature set that is permitted by the privilegethat is specified for a given role. For example, a graphical module is configured to be visible by theapplication settings; however, none of the privileges that are implemented by this module aregranted to the agent; therefore the module is not visible for this agent.
Effects of configuration options and privileges on performance
This content had been moved here.
Workspace Desktop Edition 8.5 DeploymentGuide
Configuration and administration by using options andannexes
Workspace Desktop Edition Deployment Guide 62

Configuring the appearance and content ofthe user interfaceMany of the Workspace views can be configured to display certain elements depending on thecontext—for example:
• Case data key-value pairs• The values that are displayed for a Case History• The title of the Main Toolbar• The party identifier in Voice Media view• The information that is displayed in the Preview window
There are three ways to specify the appearance and functionality of Workspace: Administration,Personalization, and Customization.
Administration
Administration is configuration that is performed by system administrators. It managed throughGenesys Administrator Extension by setting configuration options on the Workspace Applicationobject. Administration settings are stored in the Genesys Configuration Layer.
Views
The View options enable you to configure the sorting order and the default tab selection of tabbedviews within each window.
The sort order can be customized by using the views.<RegionName>.order options.
The default tab selection can be configured by using the views.<RegionName>.activate-orderoptions. The first in the list, if present, is selected by default. If the first in the list is absent, thesecond in the list is presented by default, and so on. Both options support out-of-the-box view namesand names of custom views added to tab areas.
For custom views, use the ViewName string in the option; this is the string that is passed as theViewName in the view activator. For the details about how to do this, refer to the WorkspaceDeveloper's Guide.
Workspace Desktop Edition 8.5 DeploymentGuide
Configuring the appearance and content of the userinterface
Workspace Desktop Edition Deployment Guide 63
Personalization
[Modified: 8.5.112.08]
Workspace is personalized at the user level by the setting of Personal Preferences. Personalizationdata are stored in the agent annex, in the personal-data directory on the local workstation (asspecified by the options.record-option-locally-only option), or on a common working directory (asspecified by the options.record-location option).
For more information on setting preferences, see Workspace User's Guide and Workspace Context-Sensitive Help (which is available by clicking the Help icon in the Workspace Main Window, or, withthe Workspace Main Window open, by pressing F1 on your keyboard).
Agents have control over the display location of various Workspace Windows, as well as thearrangement and appearance of text and fields within the display.
Keyboard shortcutsYou can configure keyboard shortcuts that control many different features of Workspace. Refer to thekeyboard shortcut configuration option reference for a complete list of all configurable keyboardshortcuts.
ImportantWhenever the rich text editor is used, for example to edit an outbound email interaction, it is possible thatthere will be a conflict between shortcuts that you have configured by using the Workspace configurationoptions and the shortcuts of the Rich Text Editor interface. A list of the default shortcuts of the Rich TextEditor are available on this Microsoft Web Page. Scroll down to the table in the Remarks section. Genesysrecommends that you do not use any of the keyboard shortcuts that are already in use by the Rich TextEditor.
Workspace also supports accessibility through keyboard navigation.
Customization
Customization is accomplished through development. Workspace features an open framework thatenables developers to add value and extend the capabilities of the application. Workspace employs amodular design that enables you to expand and integrate your application by using multiple datasources and systems. Workspace enables you to customize views and create or customizeextensions. For more information on extending Workspace, see the Workspace Developer's Guide and.NET API Reference and the Workspace 8.5 Extension Examples.
Workspace Desktop Edition 8.5 DeploymentGuide
Configuring the appearance and content of the userinterface
Workspace Desktop Edition Deployment Guide 64
Customization and RebrandingWorkspace can be customized through development. Refer to the Workspace Developer's Guide and.NET API Reference and the Workspace 8.5 Extension Examples for more information.
To customize the Workspace, you must install the Workspace Developer's Kit. For more, informationsee the Procedure: Installing Workspace Customization on the Windows operating system.
ImportantUsage of Enterprise Services that is provided with this release of Workspace issupported only for the purpose of Workspace customization.
Workspace 8.5.0 and higher enables you to completely customize the color (theme), logo (branding),images, and icons of the user interface. Refer to Best Practices for Views for information about thisfeature.
Workspace Desktop Edition 8.5 Deployment Guide Customization and Rebranding
Workspace Desktop Edition Deployment Guide 65

Preparing to deploy WorkspaceThis topic provides an overview of the deployment procedures for Workspace and discusses theprerequisites and other items that should be considered prior to deployment.
This topic contains the following sections:
• Migrating from Interaction Workspace 8.1 to Workspace 8.5• Planning Your Deployment• Deployment Overview• ClickOnce Deployment• Non-ClickOnce Deployment• Configuring System-Access Permissions
Preparing to deploy Workspace Customization and Rebranding
Workspace Desktop Edition Deployment Guide 66

Migrating from Workspace 8.1 to 8.5Migrating from Interaction Workspace 8.1 to Workspace Desktop Edition 8.5 is a simple andstraightforward task. It is as simple as when you initially deployed and intalled Workspace.
Refer to the Genesys Migration Guide for the complete procedure.
Preparing to deploy Workspace Migrating from Workspace 8.1 to 8.5
Workspace Desktop Edition Deployment Guide 67

Planning Your Deployment[Modified: 8.5.102.06, 8.5.141.04]
Before you deploy Workspace, you should take time to define your needs in terms of load, bandwidth,scale, the type of network that you have or want to develop, the number of resources you plan tomanage, and the type of deployment that you want:
• ClickOnce• Non-ClickOnce
Defining your needs
This section provides items that you should consider when you are planning your deployment.
Load, IIS vs. ApacheWorkspace is designed to be equally compatible with Microsoft Internet Information Services (IIS) orApache web servers. Your choice depends on the server-side operating system and HTTP server thatyou are running. Refer to the following system guides for details on compatibility and systemrequirements:
• Hardware Sizing
• Genesys Interoperability Guide
• Genesys Supported Operating Environment Reference Manual
Type of networkRefer to the following system guides for details on compatibility and system requirements:
• Hardware Sizing
• Genesys Interoperability Guide
• Genesys Supported Operating Environment Reference Manual
Single Sign-On (SSO)[Added: 8.5.102.06]
Workspace supports Single Sign-On authentication by using Kerberos User Authentication. Thisfeature must be configured prior to deployment.
Preparing to deploy Workspace Planning Your Deployment
Workspace Desktop Edition Deployment Guide 68

Choosing between a ClickOnce deployment and a Non-ClickOnce deploymentClickOnce A ClickOnce deployment of Workspace automatically handles software updates as youmake them available in your environment. If you do not have the ability to push applications,updates, and configurations to your agents, you might want to take advantage of a managedservices deployment approach in your environment by using ClickOnce.
Non-ClickOnce In a Standard Deployment, you must install the Workspace application on each clientworkstation. In this scenario, you must push software updates to each workstation in yourenvironment. Refer to the following sections for information about different deployment scenarios:
• Deployment Overview• ClickOnce Deployment• Non-ClickOnce Deployment
Memory usageThis Table represents the Memory Usage range of Interaction Workspace. Minimum value is the out ofthe box version using voice only interactions Maximum value is the out of the box version usingmultimedia interactions
OS Type Memory usedx86 (32-bits) 180 - 280 MBx64 (64-bits) 200 - 300 MB
Interaction Workspace can use more memory if deployed with click-once on compatibility mode with8.1.2. This mode runs Interaction Workspace in 64-bits native mode and can use up to 450 MB.
If you are using Workspace SIP Endpoint, an additional 60 MB are used.
Monitor resolutionThe minimum supported resolution is 1024 x 768 at 100% appearance display factor.
Effects of configuration options and privileges on performance
These table list the effects that some configuration options and privileges might have on networkbandwidth and also the performance of Configuration Server and Configuration Server proxies.
Summary of the effects of Workspace options and privileges on network bandwidth
Option/Privilege Default ValueValues that might
affect systemnetwork bandwidth
Functional impact ofusing different values
Workbins - Can Use MyTeam Workbins Unassigned
AssignedDuring supervisor/Team Lead
No Team WorkbinSupervision
Preparing to deploy Workspace Planning Your Deployment
Workspace Desktop Edition Deployment Guide 69

Option/Privilege Default ValueValues that might
affect systemnetwork bandwidth
Functional impact ofusing different values
login, the Workbin moduleloads the current state of eachof the workbins of the agentson the supervisor's team toprovide the supervisor with anoverview of the content ofeach workbin.
This action generates a set ofrequests to Interation Server.The bandwidth that isconsumed by those requestsis proportional to the followingvariables:
• the number ofmonitored agents
• the number ofworkbins assignedthe supervisor
• the number ofinteractions in eachworkbin
• the size of theinteractionproperties in eachinteraction (dependson the BusinessProcess design
teamcommunicator.list-filter-showing Agent
AgentAffected instance:Configuration Server (Proxy)
Target types are notdisplayed to agents
login.enable-place-completion true
true: Workspace loadsall the Places that arevisible to the logged-inagent immediately toenable the process ofPlace. This might be alarge number of Placesin a large scaleenvironment.Affected instance:Configuration Server (Proxy)
false: agents must entertheir Place namemanually and theverification is performedafter the Place issubmitted. If a defaultplace is assigned toagents, this issue ismitigated.
teamcommunicator.load-at-startup true
true: all configuredobject lists for teamcommunicator areloaded during agentlogin and added to theindex.
false: all configuredobject lists for teamcommunicator areloaded at the first timethat the TeamCommunicator is used.
Preparing to deploy Workspace Planning Your Deployment
Workspace Desktop Edition Deployment Guide 70

Option/Privilege Default ValueValues that might
affect systemnetwork bandwidth
Functional impact ofusing different values
Affected instance:Configuration Server (Proxy)
general.configuration-object-collection-cache-timeout
0
0: No local cache of thelist of objects ismaintained; therefore,every time that theTeam Communicator isinitialized, the list ofobjects is requestedfrom ConfigurationServer.
Any positive integer:Specifies the number ofhours between requestsfor objects fromConfiguration Server,reducing the number ofrequests made toConfiguration Server.
general.configuration-agent-collection-loading-method
read-objects
read-objects: This is thelegacy agent-retrievalmethod. This methodreturns the list of agentsaccording to the "read"permission of thecurrent agent. For eachretrieved agent thismethod returns the fullagent data fromConfiguration Server,including annexstructure, in anuncompressed format.The bandwidthconsumed can be muchlarger than the otherretrieval methods.When an agent logs in toWorkspace, several collectionsof configuration objects areloaded from ConfigurationServer or Configuration ServerProxy to build a Lucene indexwhich enables instant quicksearch in Team Communicator.Depending on the user profile,this mechanism triggers thedownload of different types ofobjects, such as: agents, DNs(Routing Point, Queues),Scripts (Interaction Queue,Workbins), Agent Groups, and/or Skills.
In large scale environmentswhere Workspace isconfigured to enablesearching of agents in TeamCommunicator, Workspacemight cause a large load onConfiguration Server/Configuration Server Proxy,and on the network. This isparticularly true of massive
brief-info: For eachretrieved agent, thismethod returns only asubset of the agentdata. This can result insignificant networkbandwidth optimization,as well as a decrease ofthe load onConfiguration Server.The larger the contact center,the larger the size of thePerson collection. Each personobject returned byConfiguration Server Proxycan be a large data set thatcontains annex KVCollectionwhere Workspace can storethe agent profile and whereother custom businessapplications can also storedata. This can result in severalmegabytes of download foreach agent login.
Preparing to deploy Workspace Planning Your Deployment
Workspace Desktop Edition Deployment Guide 71

Option/Privilege Default ValueValues that might
affect systemnetwork bandwidth
Functional impact ofusing different values
concurrent logins, such as atthe beginning of a shift orafter an infrastructureincident.
Summary of Interaction Workspace options and privileges that can affect Configuration Server(or CS Proxies)
Option/Privilege Default ValueValues that can affectConfiguration Server
(or CS Proxies)Functional impact of
using different values
options.record-option-locally-only false
false and theoptions.record-locationoption is absent or leftempty: the agent profileis stored in the annex ofthe correspondingPerson object when anagent logs out of theapplication. Writerequests aretransmitted byConfiguration ServerProxies back to thecentral ConfigurationServer and then theCentral ConfigurationServer notifies all proxyinstances about theupdate.Affected instance: centralConfiguration Server andConfiguration Server Proxies.
false andoptions.record-locationset to a valid shareddirectory: there is nofunctional impact. Referto Storing the agentprofile on a controlledshared host.true: Unless you are using theWindows Roaming Profileapproach as part of your ITpolicy, the personal settingsdo not follow an agent who isroaming or hot seating.
general.configuration-update-notification All
All or <empty>:Workspace subscribesfor notifications aboutall object types that areread.The Agent option might alsogenerate a lot of notifications,depending on ConfigurationServer operations.
Affected instance:Configuration Server (Proxy)
None: no notification atall. Any config update istaken into account atnext login.ThisApplication, ThisAgent:Workspace is informed aboutmodifications to theconfiguration of the currentagent or current Application.Any other changes are takeninto account at the next login.
teamcommunicator.list-filter-showing Agent
AgentAffected instance:
Target types are notpresented to agent
Preparing to deploy Workspace Planning Your Deployment
Workspace Desktop Edition Deployment Guide 72

Option/Privilege Default ValueValues that can affectConfiguration Server
(or CS Proxies)Functional impact of
using different values
Configuration Server (Proxy)
login.enable-place-completion true
true: Workspace loadsall the Places that arevisible to the logged-inagent immediately toenable the process ofPlace. This might be alarge number of Placesin a large scaleenvironment.Affected instance:Configuration Server (Proxy)
false: agents must entertheir Place namemanually and theverification is performedafter the Place issubmitted. If a defaultplace is assigned toagents, this issue ismitigated.
• interaction.evaluate-real-party-for-agent
• display-format.agent-name
true
true: Workspaceaccesses ConfigurationServer and Stat Serverbefore an interactivenotification is displayed,to retrieve the displayname of internal agentsor supervisors who areengaged. The generatedload on Config ServerProxy is not large, but itis proportional to theflow of interactions. Usetheinteraction.evaluate-real-party-for-agent.expression optionto use a regularexpression to display anagent's name instead ofthe agent's DN.Affected instance: Workspaceclient
false: the internal voiceinteraction parties aredisplayed as phonenumbers instead of adisplay name.
teamcommunicator.load-at-startup true
true: all lists ofconfigured objects forTeam Communicator areloaded at login time andadded to the index,which can affect thesystem in a scenariowhere there ismassively concurrentagent login operations.Affected instance:Configuration Server (Proxy)
false: all lists ofconfigured objects forTeam Communicator areloaded the first timethat TeamCommunicator is used,which might make thefirst activation of TeamCommunicator slower.
Preparing to deploy Workspace Planning Your Deployment
Workspace Desktop Edition Deployment Guide 73
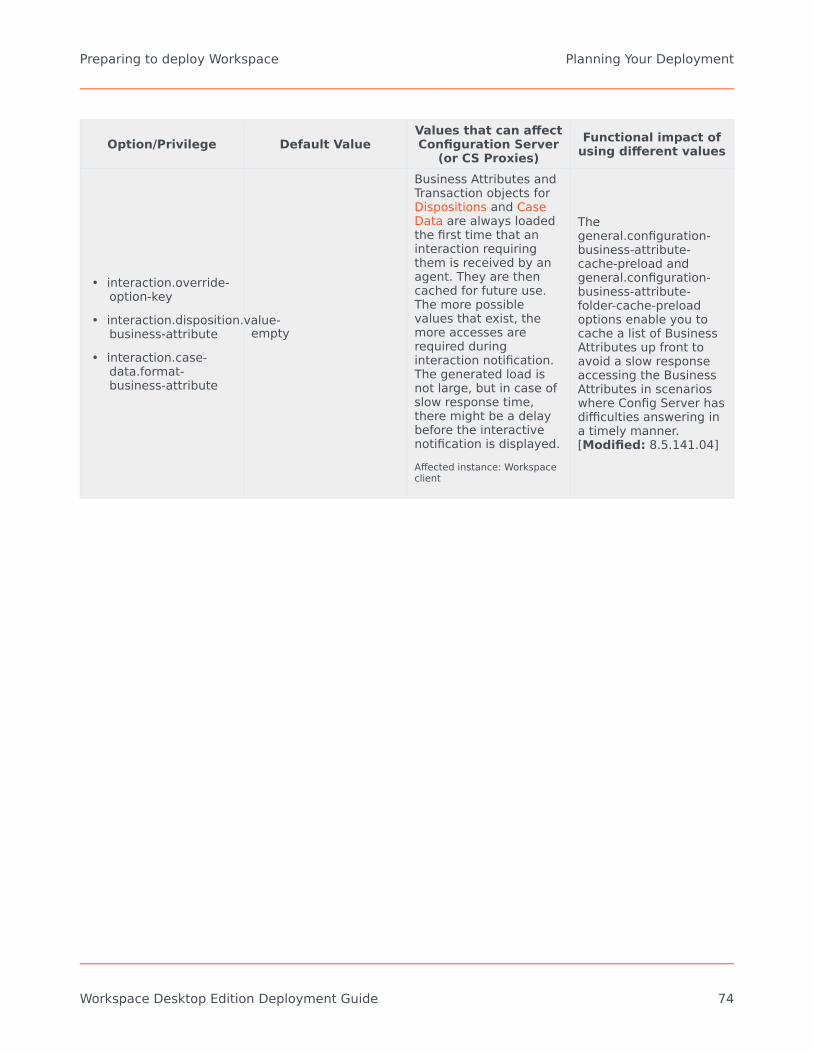
Option/Privilege Default ValueValues that can affectConfiguration Server
(or CS Proxies)Functional impact of
using different values
• interaction.override-option-key
• interaction.disposition.value-business-attribute
• interaction.case-data.format-business-attribute
empty
Business Attributes andTransaction objects forDispositions and CaseData are always loadedthe first time that aninteraction requiringthem is received by anagent. They are thencached for future use.The more possiblevalues that exist, themore accesses arerequired duringinteraction notification.The generated load isnot large, but in case ofslow response time,there might be a delaybefore the interactivenotification is displayed.Affected instance: Workspaceclient
Thegeneral.configuration-business-attribute-cache-preload andgeneral.configuration-business-attribute-folder-cache-preloadoptions enable you tocache a list of BusinessAttributes up front toavoid a slow responseaccessing the BusinessAttributes in scenarioswhere Config Server hasdifficulties answering ina timely manner.[Modified: 8.5.141.04]
Preparing to deploy Workspace Planning Your Deployment
Workspace Desktop Edition Deployment Guide 74
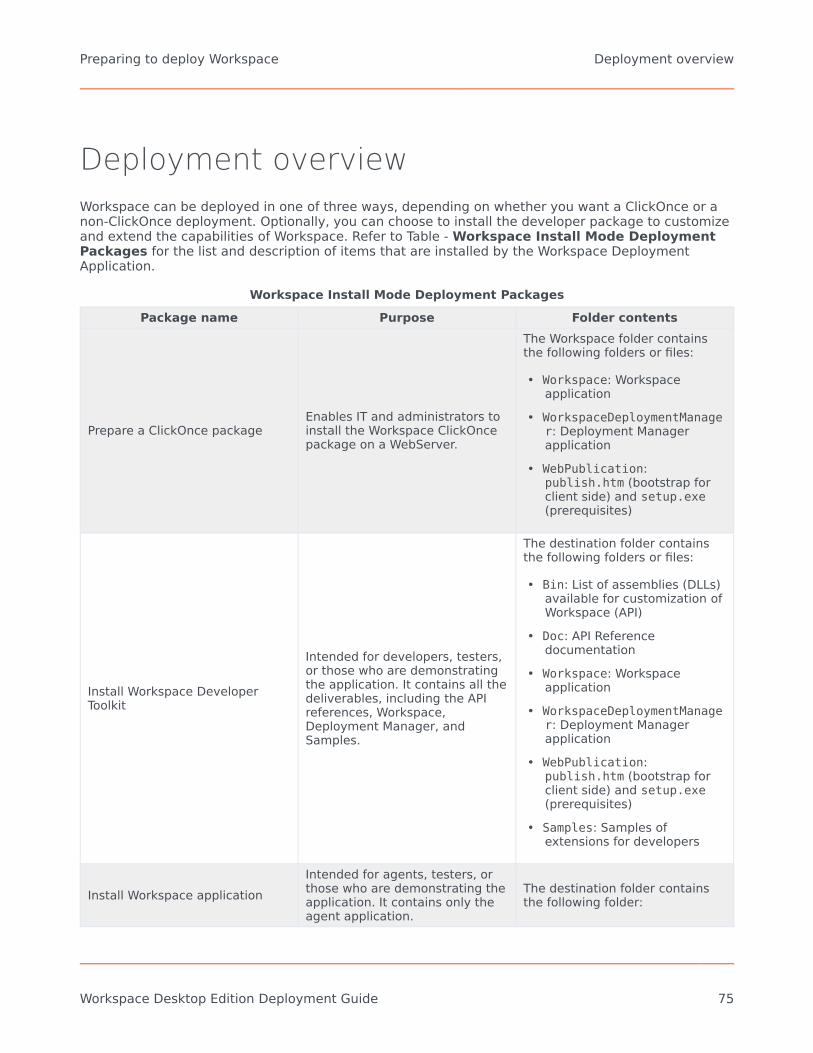
Deployment overviewWorkspace can be deployed in one of three ways, depending on whether you want a ClickOnce or anon-ClickOnce deployment. Optionally, you can choose to install the developer package to customizeand extend the capabilities of Workspace. Refer to Table - Workspace Install Mode DeploymentPackages for the list and description of items that are installed by the Workspace DeploymentApplication.
Workspace Install Mode Deployment PackagesPackage name Purpose Folder contents
Prepare a ClickOnce packageEnables IT and administrators toinstall the Workspace ClickOncepackage on a WebServer.
The Workspace folder containsthe following folders or files:
• Workspace: Workspaceapplication
• WorkspaceDeploymentManager: Deployment Managerapplication
• WebPublication:publish.htm (bootstrap forclient side) and setup.exe(prerequisites)
Install Workspace DeveloperToolkit
Intended for developers, testers,or those who are demonstratingthe application. It contains all thedeliverables, including the APIreferences, Workspace,Deployment Manager, andSamples.
The destination folder containsthe following folders or files:
• Bin: List of assemblies (DLLs)available for customization ofWorkspace (API)
• Doc: API Referencedocumentation
• Workspace: Workspaceapplication
• WorkspaceDeploymentManager: Deployment Managerapplication
• WebPublication:publish.htm (bootstrap forclient side) and setup.exe(prerequisites)
• Samples: Samples ofextensions for developers
Install Workspace applicationIntended for agents, testers, orthose who are demonstrating theapplication. It contains only theagent application.
The destination folder containsthe following folder:
Preparing to deploy Workspace Deployment overview
Workspace Desktop Edition Deployment Guide 75
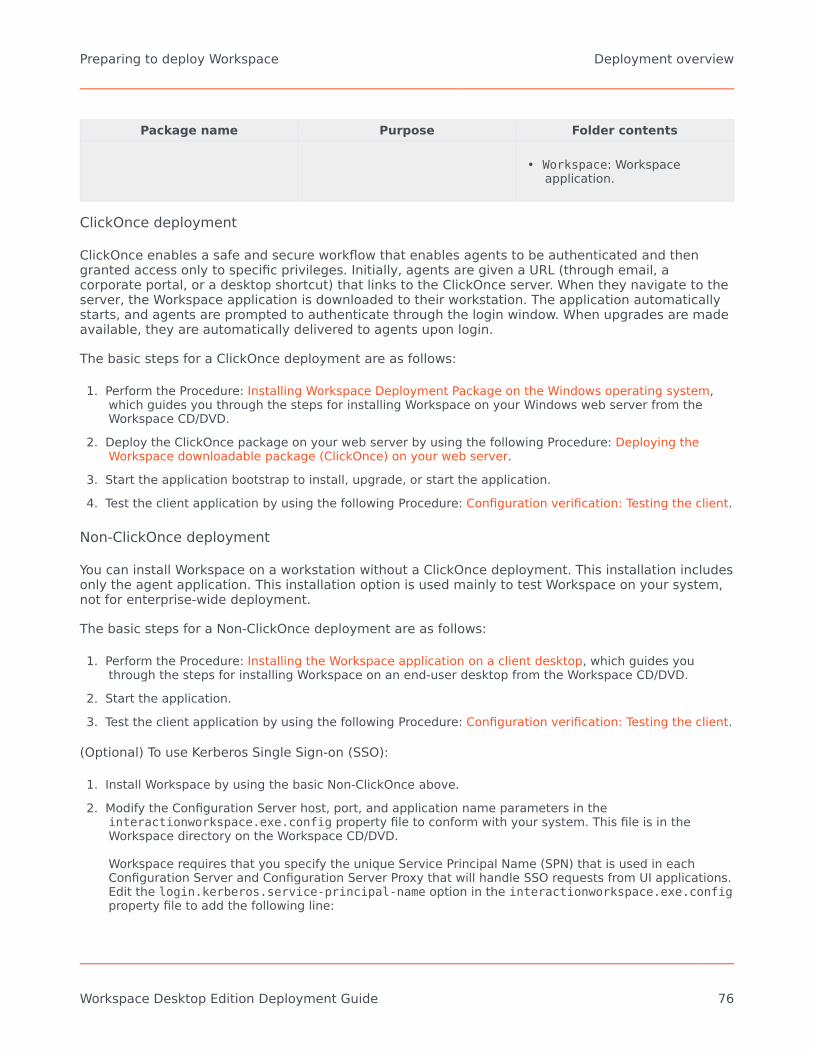
Package name Purpose Folder contents
• Workspace: Workspaceapplication.
ClickOnce deployment
ClickOnce enables a safe and secure workflow that enables agents to be authenticated and thengranted access only to specific privileges. Initially, agents are given a URL (through email, acorporate portal, or a desktop shortcut) that links to the ClickOnce server. When they navigate to theserver, the Workspace application is downloaded to their workstation. The application automaticallystarts, and agents are prompted to authenticate through the login window. When upgrades are madeavailable, they are automatically delivered to agents upon login.
The basic steps for a ClickOnce deployment are as follows:
1. Perform the Procedure: Installing Workspace Deployment Package on the Windows operating system,which guides you through the steps for installing Workspace on your Windows web server from theWorkspace CD/DVD.
2. Deploy the ClickOnce package on your web server by using the following Procedure: Deploying theWorkspace downloadable package (ClickOnce) on your web server.
3. Start the application bootstrap to install, upgrade, or start the application.4. Test the client application by using the following Procedure: Configuration verification: Testing the client.
Non-ClickOnce deployment
You can install Workspace on a workstation without a ClickOnce deployment. This installation includesonly the agent application. This installation option is used mainly to test Workspace on your system,not for enterprise-wide deployment.
The basic steps for a Non-ClickOnce deployment are as follows:
1. Perform the Procedure: Installing the Workspace application on a client desktop, which guides youthrough the steps for installing Workspace on an end-user desktop from the Workspace CD/DVD.
2. Start the application.3. Test the client application by using the following Procedure: Configuration verification: Testing the client.
(Optional) To use Kerberos Single Sign-on (SSO):
1. Install Workspace by using the basic Non-ClickOnce above.2. Modify the Configuration Server host, port, and application name parameters in the
interactionworkspace.exe.config property file to conform with your system. This file is in theWorkspace directory on the Workspace CD/DVD.
Workspace requires that you specify the unique Service Principal Name (SPN) that is used in eachConfiguration Server and Configuration Server Proxy that will handle SSO requests from UI applications.Edit the login.kerberos.service-principal-name option in the interactionworkspace.exe.configproperty file to add the following line:
Preparing to deploy Workspace Deployment overview
Workspace Desktop Edition Deployment Guide 76

<appSettings>...<add key="login.kerberos.service-principal-name" value="<SPN Name>"/><add key="login.url" value="tcp://<host><port>/AppName" /><add key="login.connections.parameters.isenable" value="false" />...
</appSettings>
3. Add the customization resources that are required for your final installation.4. Prepare your final package by using the updated file set.5. Push the package to the agent workstations by using your desktop technology.
Customization package deployment
You can install the Workspace application, API references, Deployment Manager, and Samples on adevelopment workstation as follows: Perform the Procedure: Installing Workspace Customization onthe Windows operating system, which guides you through the steps for installing WorkspaceCustomization on a development workstation from the Workspace CD/DVD.
ClickOnce deployment principles
ClickOnce provides a smooth experience for both the user and the network administrator. The userlaunches the application by using either a URL or a desktop icon. The URL can be provided to agentsby email, a corporate portal, a desktop shortcut, or other means. This simple method enables you toinstall the Workspace application on every workstation easily.
When an agent accesses the URL the Interaction Workspace application is downloaded to the agent'sworkstation; it automatically starts and the login window is displayed.
For subsequent application starts, the agent can reuse the initial URL or execute the applicationthrough a desktop icon or through the Start menu.
If a hot fix or update is required or made available on the server, Workspace automatically upgradesthe next time that the agent starts the application without you having to push-out a fix or update toevery user.
ImportantDuring deployment, you can specify whether agents can reject the Workspaceupgrade.
ClickOnce enables you to deploy a security-enabled centralized WebService. Microsoft ClickOncedeployment technology that simplifies the privilege of publishing Windows-based applications to aweb server or other network file share.
ClickOnce eliminates the need to reinstall the entire application whenever updates occur. Updates areprovided automatically when an agent logs in. Only those portions of the application that havechanged are downloaded to the client.
Preparing to deploy Workspace Deployment overview
Workspace Desktop Edition Deployment Guide 77

ClickOnce applications are entirely self-contained, they do not rely on shared resources. This meansthat you can update other resources without any impact on Interaction Workspace, or you can updateWorkspace without breaking other applications.
Another advantage of ClickOnce is that administrative permissions are not required for the update tobe installed. The update is installed automatically from the server when an authorized client logs in.
Scenarios: ClickOnce principlesThe following three scenarios demonstrate the utility of the ClickOnce approach to application andsystem security management:
• Initial installation• Application patch• Update of agent privilege permissions
The application patch and permission-update scenarios can occur simultaneously.
Initial installation
For the initial installation onto the client workstation, the following prerequisites must be met:
• The Workspace application must be installed as a ClickOnce package on the HTTP Server that enablesClickOnce.
• Microsoft .NET Framework 4.5 must be installed on the client workstation.
The Figure - Initial ClickOnce installation of the Workspace (IW) application shows the stepsin a typical first installation of Workspace in a ClickOnce environment:
1. The administrator manages the roles and privileges of the contact center agent by using GenesysAdministrator Extension and stores the configurations in the Configuration Layer. Through email, thecorporate portal, or other notification, agents are provided with the application URL.
2. Agents use the URL to go to the ClickOnce HTTP Server and initiate the download.3. The Workspace Application Bootstrap is delivered to the agent workstation; then the Workspace
application launches and agents are prompted for authentication information. Note: Agents providetheir credentials and are authenticated on the network.
4. The Workspace application starts and requests agent authentication.5. The Workspace application loads the list of privileges that are granted to each agent, based on agent
authentication.6. The Workspace application then downloads the libraries that are required to execute the granted
privileges.7. Workspace is fully initialized and ready to be used.
Preparing to deploy Workspace Deployment overview
Workspace Desktop Edition Deployment Guide 78

Initial ClickOnce installation of the Workspace application
Applying a patch
To apply a patch to the installation on the client workstation, the following prerequisites must be met:
• The agent has run Workspace and has been successfully authenticated at least once on the currentworkstation.
• Privileges that are granted to the agent have not been changed since their previous authentication.
The Figure - Patching of the Workspace application through ClickOnce shows the steps in atypical patch installation of Workspace in a ClickOnce environment:
1. The administrator installs a new version of the Workspace Bootstrap and upgrades one or morelibraries.
2. Agents launch the Workspace application on their desktop by using the URL or by double-clicking thedesktop icon. The agent is authenticated.
3. The Workspace application checks the ClickOnce HTTP Server to determine if the bootstrap binaries areup to date.
4. The updated bootstrap libraries are delivered to the agent workstation.5. The Workspace application loads the list of privileges that are granted to each agent, based on agent
authentication.6. The Workspace application checks the ClickOnce HTTP Server to determine if the optional binaries are
up to date.7. Updated binaries, if any, are delivered to the agent workstation.
Preparing to deploy Workspace Deployment overview
Workspace Desktop Edition Deployment Guide 79

8. The Workspace application is fully initialized and ready for agent use.
Patching of the Workspace application through ClickOnce
Limitation of patching with ClickOnce
Because of the architecture of Workspace and the underlying Platform SDK and Enterprise Serviceson which it is built, patches are applied to groups of assemblies, not just to a single assembly.Therefore if one assembly in a group is updated, the whole group must be patched.
Update agent privilege permissions
To update the Workspace installation on the client workstation with updated privilege permissions,the following prerequisites must be met:
• The agent has run Workspace and has been successfully authenticated at least once on the currentworkstation.
• The Workspace application has not been upgraded on the ClickOnce server since the previous login.
Privilege updates while the agent is not logged in
The Figure - Update of the agent's role through ClickOnce shows the steps in a typical privilege-permission upgrade of Workspace in a ClickOnce environment if the agent is not already logged in:
1. The administrator modifies the roles and privileges of the contact center agent by using GenesysAdministrator Extension and stores the modified configurations in the Configuration Layer.
2. Agents launch the Workspace application on their desktop by using the URL or by double-clicking thedesktop icon. The agents are authenticated.
3. The Workspace application loads the list of privileges that are granted to each agent, based on agent
Preparing to deploy Workspace Deployment overview
Workspace Desktop Edition Deployment Guide 80

authentication.4. The Workspace application then downloads the missing libraries that are required to execute the new
granted privileges.5. Workspace is fully initialized and ready for agent use.
Update of the agent's role through ClickOnce (IW = Workspace)
Privilege updates while the agent is logged in
If new privileges are granted to the agent while the agent is logged in, the additional libraries will notbe downloaded to the agent's workstation; however, if privileges are removed, this change is takeninto account immediately to ensure security.
ClickOnce updates for shared workstations
If multiple users share the same workstation, the download behavior depends on whether each agenthas a unique account or whether all agents share the same account.
If each agent has a unique account, then updates are downloaded by account. Therefore, each userwill have to download updates. The advantage of this scenario is that multiple agents with differentroles can share the same workstation without compromising security.
If all users share a generic account, then only a single instance of the application is downloaded. Thismeans that each user will have the same role as that assigned to the first user to download theapplication.
Preparing to deploy Workspace Deployment overview
Workspace Desktop Edition Deployment Guide 81

Security constraints
To deploy Workspace, three deliverable subsets are installed on the agent workstation:
• Prerequisites: Microsoft .NET Framework 4.5.• Mandatory executable: Workspace Application Bootstrap (.exe file and mandatory DLL assemblies).• Optional assemblies: The list of optional assemblies depends on the privileges that are granted to the
agent who logs in to the application.
The .NET Framework and service pack are not installed through the ClickOnce system; they areinstalled by the ClickOnce Bootstrap application (see the Figure - Initial ClickOnce installation ofthe Workspace application and Figure Patching of the Workspace application throughClickOnce). Therefore, more rights are required on the target computer to install the prerequisitethan to install Workspace.
The Workspace Application Bootstrap and the optional assemblies are pure ClickOnce deliverables;therefore, the full ClickOnce security model applies to these installables. However, the .NETFramework does not have the same security constraints. Therefore, Genesys recommends that youdeploy the agent application in two phases:
1. Installation of .NET Framework by the administrator by using the ClickOnce Bootstrapper, or byusing the standard network distribution.
2. Installation of Workspace by the agents at the initial login.
You can find more information about ClickOnce security at this URL: http://msdn.microsoft.com/en-us/library/76e4d2xw(VS.80).aspx
Code Access Security
Code Access Security (CAS) is a mechanism that limits system access to the permissions that aregranted to each code. CAS protects resources and operations and enables you to grant permissionsto assemblies — giving a high degree of control over what resources the assemblies can access. Forexample, restrictions can be applied to file-system locations, the registry, and specific name spaces.
Setting Code Access Security permissions
You must set CAS permissions for both the Workspace ClickOnce application and the zone from whichthe application will be installed (for example, your local intranet, the Internet, and so on).
Workspace must be defined as a Full Trust application. A Full Trust application is granted all access toany resource. Granting this level of permission is necessary because some of the embedded DLLsrequire Full Trust permissions. If Workspace is not defined as a Full Trust application, executionfailures will occur when the application tries to access a restricted resource.
Machine Access Security
The Workspace application, which is deployed by ClickOnce, uses CAS permissions. This means thatWorkspace might require more permissions than are allowed by your security policy. In this case,ClickOnce will allow an automatic elevation of privileges. However, if the publisher is not trusted, aMachine Access security warning is prompted, but no security warning is prompted if the publisher of
Preparing to deploy Workspace Deployment overview
Workspace Desktop Edition Deployment Guide 82

Interaction Workspace is trusted.
TipClickOnce supports Windows Vista User Account Control (UAC); therefore no additionalmessages are displayed.
ClickOnce and installation security
The minimum class privilege for running a ClickOnce application is User. A Guest account cannotdeploy a ClickOnce application through the network. If an agent is logged in with a User account,ClickOnce will automatically elevate the privileges for installing the application on the agent'sworkstation. If the publisher of ClickOnce deployment is Trusted, the installation will run without anyprompting; however, if the publisher is not Trusted, the agent will be prompted to Trust the publisherof the deployment.
ClickOnce and location security
To deploy an application via ClickOnce, the ClickOnce HTTP server must be in a Trusted Zone, such asyour local intranet, or be listed in Trusted Sites.
ClickOnce and publisher security
You must consider two publishers when you are deploying a ClickOnce application: the publisher ofthe application and the publisher of the deployment.
The Workspace Deployment Wizard updates some application files; therefore, the applicationmanifest must be signed after these updates. The Workspace Deployment Wizard must be enabled tosign both the application and deployment manifests.
To sign the manifests, the Workspace Deployment Wizard requires a security certificate. The samesecurity certificate can be used to sign both manifests.
Certificate deployment overview
You must provide a permanent certificate that is used to sign the Workspace installer manifest. Thiscertificate is pointed to during installation. You can obtain your own certificate by one of the followingmethods:
• Generate a self-signed certificate by using the Makecert.exe file.• Purchase a third-party verified certificate• Generate a certificate by using Windows Certificate Server
TipThe certificate can be stored on the client side and the server side in the Windows
Preparing to deploy Workspace Deployment overview
Workspace Desktop Edition Deployment Guide 83

domain. The certificate must be on the target workstation. The certificate can bedeclared at the Network level.
Refer to the Genesys 8 Security Deployment Guide to review a detailed procedure about how tocreate a certificate.
Deploying certificates on a workstation
The Workspace Deployment Wizard requires you to do one of the following:
• Provide a security certificate.• Generate a self-signed security certificate in the Workspace Deployment Wizard.
You must retain the Certificate file for all upcoming updates. If the updated version is signed by adifferent certificate, ClickOnce will consider it as a new installation, which means that you will have touninstall the previous version by using Add/Remove Programs command on each client workstation.
Application and deployment signing cases
The Table - Summary of the Cases for Signing the Application and the Deployment for theIntegrator and the User provides a summary of the cases for signing the application and thedeployment for the Integrator and the User, along with the impact for the user.
Summary of the Cases for Signing the Application and the Deployment for the Integrator andthe User
Integration User administration User impact
Application VerisignCertificate
Non-modifiableapplication
A prompt to trust theknown publisher isdisplayed.
Add the certificate inTrusted Publishers store(see Figure - Importinga Trusted Publisher).
No warning is displayed.
Application Self-Certification
Non-modifiableapplication
A prompt to trust theunknown publisher isdisplayed.
Add the certificate inthe Trusted RootCertification Authoritiesstore (see Figure -Importing a TrustedRoot CertificationAuthority) and in theTrusted Publishers store(see Figure - Importinga Trusted Publisher).
No warning is displayed.
Deployment VerisignCertificate N/A Sign the Deployment. A prompt to trust the
known publisher is
Preparing to deploy Workspace Deployment overview
Workspace Desktop Edition Deployment Guide 84

Integration User administration User impactdisplayed.
Sign the Deploymentand Add the certificatein the Trusted Publishersstore (see Figure -Importing a TrustedPublisher).
No warning is displayed.
Deployment Self-Certification N/A
Sign the Deployment.A prompt to trust theunknown publisher isdisplayed.
Sign the Deploymentand Add certificate inthe Trusted RootCertification Authoritiesstore (see Figure -Importing a TrustedRoot CertificationAuthority) and in theTrusted Publishers store(see Figure - Importinga Trusted Publisher).
No warning is displayed.
Importing a Trusted Publisher
Preparing to deploy Workspace Deployment overview
Workspace Desktop Edition Deployment Guide 85

Importing a Trusted Root Certification Authority
Trusted publishers
For a publishers to be consider a Trusted Publisher, the following criteria must be met:
• The publisher certificate must be installed in the Trusted Publishers certificate store on the user'scomputer.
• The issuing authority of the publisher certificate must have its own certificate installed in the TrustedRoot Certification Authorities certificate store (This is already included in Verisign).
If the issuer of the certificate is not in the Trusted Root Certification Authorities certificate store, or ifthe publisher is not in the Trusted Publishers certificate store, the user will be prompted with a dialogbox that asks for confirmation. For more information on Trusted Publisher certificates, refer to thefollowing article: http://msdn.microsoft.com/en-us/library/ms996418.aspx
Deploying certificates on the networkThere are two methods for deploying certificates over a network to a large number of clientworkstations:
1. Active Directory domain2. certmgr.exe tool
Active Directory domain
If you run in an Active Directory (AD) domain, use the AD Group Policy Objects (GPO) to distributecertificates centrally. For the root Certificate Authorities (CA) certificate, add a GPO to AD, and thenlink to the appropriate level (usually the domain level).
Preparing to deploy Workspace Deployment overview
Workspace Desktop Edition Deployment Guide 86
1. Go to: Computer Settings>Windows Settings>Security>Public Key Policies.2. Add the root CA certificate under Trusted Root Certification Authorities.
Next you must distribute the trusted publisher. Add a GPO to AD and link at the appropriate level(usually for the organizational unit that should trust the application).
1. Go to User Settings>Windows Settings>Internet Explorer Maintenance>Security>AuthenticodeSettings.
2. Click Import.3. Click Modify.4. Enable the Lock down Trusted Publishers feature to prevent users from modifying their Trusted
Publisher certificate store.
After the standard GPO-replication-to-clients occurs, every client trusts your CA and the TrustedPublisher certificate. Users will not receive Trust challenges for applications that are signed withcorporate certificates. For more information on this topic, refer to the following technical article:http://msdn.microsoft.com/en-us/library/aa719097.aspx#clickonce_topic6
certmgr.exe tool
You can use the certmgr.exe tool to install the certificate on each client workstation. See thefollowing technical article for more information: http://msdn.microsoft.com/en-us/library/ms996418.aspx#clickoncetrustpub_topic5
Modifying agent workstationsInstallation of Workspace results in the following modifications to your agent workstations:
• Workspace is added to the Start menu.• Workspace is added to the Add/Remove Programs group in the Control Panel.• The Workspace icon is added to the desktop.• ClickOnce stores the application binaries and associated data files in directories that it creates and
manages in the user-profile Local Settings folder or other location.
To determine the folder locations at which ClickOnce has stored the application binaries, launchWorkspace, and open the About dialog box from the Help menu. Press Ctrl-Click on the Genesysicon to display hidden buttons that enable you to access the exe, data, log, and GC folders.
Nothing is added to the Program Files folder or the registry. No administrative rights are requiredfor the agent to install the application.
Preparing to deploy Workspace Deployment overview
Workspace Desktop Edition Deployment Guide 87

Deployment prerequisites
ClickOnce deployment prerequisites
ClickOnce provides a centralized deployment environment that enables you to distribute softwareand updates from a single server to all agent workstations.
A ClickOnce deployment requires certain conditions to be met both on the client-side and on theserver side. This section summarizes the prerequisites for deployment on different web severs and onthe client workstation. Refer to the Genesys Supported Operating Environment Reference Guide topicfor information about the specific environment, system, and operating system versions that aresupported by Interaction Workspace.
Licensing and certificate managementFor details on deploying security certificates, refer to Security Constraints.
Deployment on an Apache serverYou must have a Windows server, Linux server, or Solaris server, and Apache Server (refer toGenesys Supported Operating Environment Reference Guide). You must also configure Apache byusing the following Procedure: Configuring Apache to enable the ClickOnce package.
Deployment on an IIS serverYour environment must have Windows Server and Microsoft IIS (Refer to the Genesys SupportedOperating Environment Reference Guide).
The Workspace Deployment Manager is installed on the server along with the application material. Todeploy Workspace, launch the Workspace Deployment Manager wizard. The wizard prompts for therequired information. You must sign the ClickOnce deployment using a corporate certificate or a testcertificate.
TipTo avoid an error with Interaction Workspace Deployment Manager, you must log in asAdministrator.
Deployment on the clientWorkspace runs on the Window client-side operating system. The workstation must have the .NETFramework installed. The following browsers are supported: Microsoft Internet Explorer, MozillaFirefox, and Google Chrome. Refer to the Genesys Supported Operating Environment Reference
Preparing to deploy Workspace Deployment prerequisites
Workspace Desktop Edition Deployment Guide 88
Guide for the specific versions that are supported.
Important• To use Mozilla Firefox, you must install the following add-on : "Microsoft .NET
Framework Assistant". This add-on enables you to start the application directly andhave Framework .NET detection. This add-on is found here: Microsoft .NET FrameworkAssistant
• If you have Microsoft .NET Framework Assistant 1.3.0 or higher installed, then thepublish.htm page might not detect the installed prerequisites and might display awarning. In this case, click the launch link.
• To use Google Chrome, you must install the following add-on "ClickOnce for GoogleChrome" from Chrome Web Store : ClickOnce for Google Chrome
• Other browsers, such as Safari and Opera are not officially supported and might notfunction correctly.
• To properly deploy the Workspace ClickOnce package on agent workstations, the endusers must have write access to the StartMenu folder of their Windows Users Profile.
Mass Deployment of .NET FrameworkIf you do not have the .NET Framework installed on all of your client workstation, you can use theprocedures that are found on the Microsoft Developer Network to perform a mass deployment.http://msdn.microsoft.com/en-us/library/ee390831(v=vs.110).aspx
Non-ClickOnce deployment prerequisites
A non-ClickOnce deployment does not give you the advantages of managing updates to privileges,permissions, or software upgrades. A non-ClickOnce deployment is done typically for testing ordevelopment purposes where the agent workstation is not in a production environment. Only theWorkspace application is installed on the client workstation.
Refer to the Genesys Supported Operating Environment Reference Guide for information about client-side operating system and browsers support in a non-ClickOnce deployment.
ImportantOther browsers, such as Safari and Opera are not officially supported and might notfunction correctly.
Preparing to deploy Workspace Deployment prerequisites
Workspace Desktop Edition Deployment Guide 89

Mass Deployment of .NET FrameworkIf you do not have the .NET Framework installed on all of your client workstation, you can use theprocedures found on the Microsoft Developer Network to perform a mass deployment.http://msdn.microsoft.com/en-us/library/ee390831(v=vs.110).aspx
Preparing to deploy Workspace Deployment prerequisites
Workspace Desktop Edition Deployment Guide 90

Workspace SIP Endpoint in Virtual DesktopInfrastructure[Added: 8.5.109.16] [Modified: 8.5.140.08]
ImportantA direct network connection between the VDI infrastructure (VM or Citrix Server) and Workspace SIPEndpoint host is required. Network Address Translation and home office behind a router without VPN are notsupported.
TipWorkspace also supports the Genesys Softphone in place of Workspace SIP Endpoint.To learn about how Genesys Softphone can be deployed in a VDI environment, seeGenesys Softphone Deployment Guide.
The standalone version of Workspace SIP Endpoint 8.5.1 enables Workspace and Workspace SIPEndpoint to run in separate user sessions. Workspace manages the UI and interaction controlbusiness logic in a virtual desktop infrastructure (VDI, for example: RDP, VMWare, XenApp,XenDesktop) environment and Workspace SIP Endpoint manages voice and video media on the localworkstation. This architecture enables you to offload media processing to the agent workstation andreduce the load on your server, leading to better scalability. For information about Virtual DesktopInfrastucture, refer to the Genesys Virtualization Platform Support topics in the Genesys SupportedOperating Environment Reference Guide.
Workspace SIP Endpoint 8.5.1 can be deployed as a standalone application on agent workstations,either as part of a ClickOnce package or directly installed.
The following figures detail how Workspace and Workspace SIP Endpoint 8.5.1 use HTTPS REST tocommunicate in a VDI environment. The communication between Workspace and Workspace SIPEndpoint relies on as HTTPS REST connection, independent from the VDI technology.
Network view:
Preparing to deploy Workspace Workspace SIP Endpoint in Virtual Desktop Infrastructure
Workspace Desktop Edition Deployment Guide 91
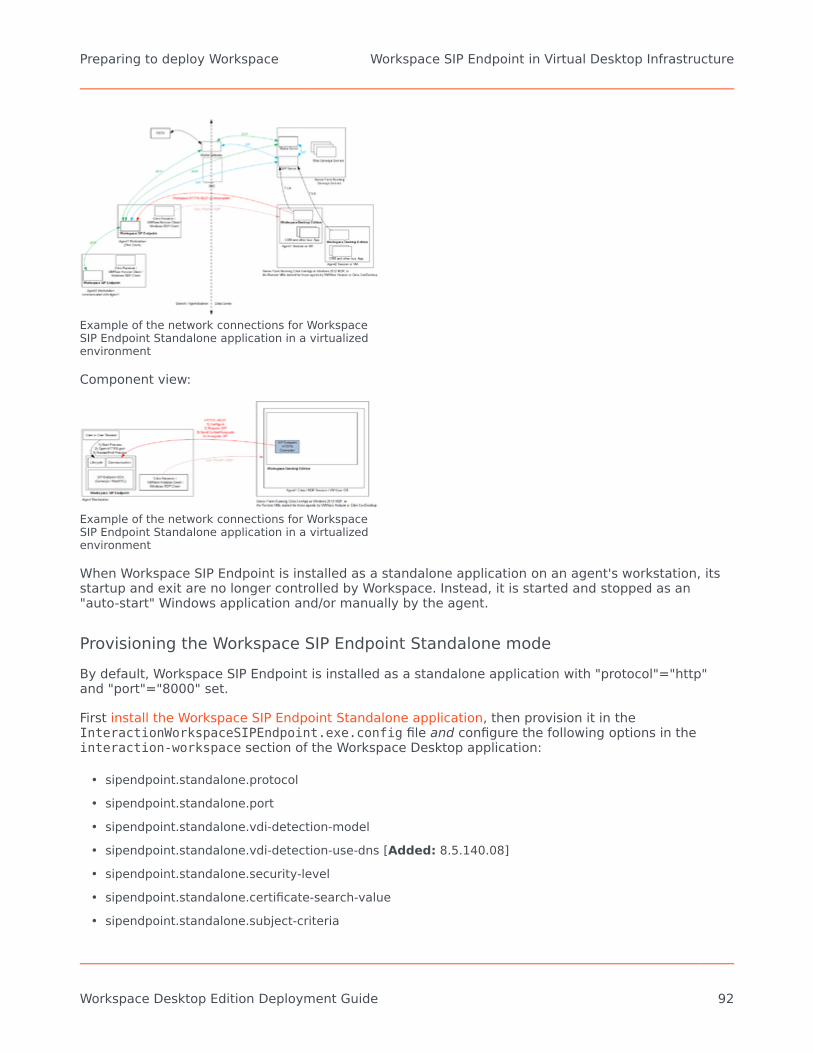
Example of the network connections for WorkspaceSIP Endpoint Standalone application in a virtualizedenvironment
Component view:
Example of the network connections for WorkspaceSIP Endpoint Standalone application in a virtualizedenvironment
When Workspace SIP Endpoint is installed as a standalone application on an agent's workstation, itsstartup and exit are no longer controlled by Workspace. Instead, it is started and stopped as an"auto-start" Windows application and/or manually by the agent.
Provisioning the Workspace SIP Endpoint Standalone modeBy default, Workspace SIP Endpoint is installed as a standalone application with "protocol"="http"and "port"="8000" set.
First install the Workspace SIP Endpoint Standalone application, then provision it in theInteractionWorkspaceSIPEndpoint.exe.config file and configure the following options in theinteraction-workspace section of the Workspace Desktop application:
• sipendpoint.standalone.protocol• sipendpoint.standalone.port• sipendpoint.standalone.vdi-detection-model• sipendpoint.standalone.vdi-detection-use-dns [Added: 8.5.140.08]• sipendpoint.standalone.security-level• sipendpoint.standalone.certificate-search-value• sipendpoint.standalone.subject-criteria
Preparing to deploy Workspace Workspace SIP Endpoint in Virtual Desktop Infrastructure
Workspace Desktop Edition Deployment Guide 92
• sipendpoint.standalone.subject-matching-properties
To adjust these default settings and make Workspace SIP Endpoint 8.5.1 run in standalone mode as asecured application, you must make the following modifications to the SIP Endpoint settings in theappSettings section of the InteractionWorkspaceSIPEndpoint.exe.config file:
<appSettings><!-- This option activates HTTP or HTTPS communication - requires that a port is defined inport option. --><add key="protocol" value="https"/><!-- This option gives the level of security if 'protocol' option is set to HTTPS. --><!-- 0: check Address IP range, no client certificate required (no check on clientcertificate) --><!-- 1: check Address IP range, check client certificate --><!-- 2: check Address IP range, check client certificate, check client certificate subject --><add key="security_level" value="1"/><!-- This option gives a string value Workspace uses to select a certificate if 'protocol'option is set to HTTPS. --><!-- Search is done first by thumbprint, then by issuer, then by subject. --><add key="certificate_search_value" value="Communications Server"/><!-- This option specifies the port to be used when communicating in HTTP or HTTPS --><add key="port" value="8000"/><!-- This option is only needed if 'security_level' option is 2 for validation of clientcertificate subject. --><!-- It gives a list of subject fields to validate in the client certificate. --><add key="subject_criteria" value="E,CN,OU,OU,OU,DC,DC,DC,DC"/><!-- This option is only needed if 'security_level' option is 2 for validation of clientcertificate subject. --><!-- It gives a list of current user property values to match with the list of criteriadefined by 'subject_criteria' option. --><!-- The certificate subject validation process compare the subject criteria values withcurrent user property values find in its active directory. --><add key="subject_matching_properties"value="mail,cn,distinguishedName.OU,distinguishedName.OU,distinguishedName.OU,distinguishedName.DC,distinguishedName.DC,distinguishedName.DC,distinguishedName.DC"/><!-- This option activates the CORS mechanism for the HTTP REST port with the required policy--><!--<add key="cors" value="*"/>--><!-- This option specifies if SIP Endpoint can be activated only by an application on thesame local host --><!--<add key="localhost" value="true"/>--><!-- These options specify a ranges of IP addresses allowed for connection to SIP Endpointhttp services in CIDR format.--><!-- Several range can be applied separted with commas "10.20.35.0/24,10.20.39.0/24"--><!--<add key="ipv4_address_range" value=""/>--><!--<add key="ipv6_address_range" value=""/>--><!-- SIP Endpoint dictionary --><add key="title" value="Workspace SIP Endpoint"/><add key="exit" value="Exit..."/></appSettings>
Workspace Standalone SIP Endpoint deployment modes
Workspace Standalone SIP Endpoint can be deployed using one of two modes:
• Standalone Application• ClickOnce Standalone Package
Preparing to deploy Workspace Workspace SIP Endpoint in Virtual Desktop Infrastructure
Workspace Desktop Edition Deployment Guide 93

Standalone modeIn this mode, executing the setup.exe file installs Worksapce SIP Endpoint on the target workstationwith no pre-requisites other than .NET Framework version 4.5.
It can be executed in silent mode.
You can repackage the out-of-the-box Workspace SIP Endpoint Standalone setup to meet thespecifications of "Microsoft System Center Configuration Manager" and allow it to push this softwareto workstations in a standard way. The auto-start registry keys instructions can be reused for thispurpose.
SIP Endpoint auto-start
Workspace SIP Endpoint application is deployed as an auto-start application. This enables theWorkspace SIP Endpoint to be started automatically as a standalone application each time the agentlogs in on the workstation, and stops when he or she logs off. To enable this feature, the followingregistry key is set when Workspace SIP Endpoint is installed:
\HKEY_LOCAL_MACHINE\SOFTWARE\Wow6432Node\Microsoft\Windows\CurrentVersion\Run\InteractionWorkspaceSIPEndpoint
The full path to the Workspace SIP Endpoint application is assigned as the value of the this key, forexample:
C:\Program Files (x86)\InteractionWorkspaceSIPEndpoint\InteractionWorkspaceSIPEndpoint.exe
When the Workspace SIP Endpoint application is running in this mode, the application waits for aWorkspace application to connect to the HTTP port and start a SIP session.
Each time that Workspace exits, it informs the connected standalone SIP Endpoint application tofinalize its endpoint activity. Once there are no more active calls, Workspace SIP Endpoint closes itselfand then restarts so that it is ready to receive a new connection from a new Workspace instance.
Click-Once modeRefer to ClickOnce Deployment and Installation.
Once Workspace SIP Endpoint is deployed on the HTTP Server, the .NET Framework that is installedas a pre-requisite on Agent Workstation allows a seamless installation as well as execution of the SIPEndpoint process, using only the Microsoft Windows USER security model.
The following is a summary of the deployment and upgrade cycle of the Workspace Standalone SIPEndpoint in a ClickOnce deployment:
1. First time execution for User X on workstation Y:
Preparing to deploy Workspace Workspace SIP Endpoint in Virtual Desktop Infrastructure
Workspace Desktop Edition Deployment Guide 94

2. Second time execution for User X on workstation Y, with the server version of the software unchanged:
3. Third time execution for User X on workstation Y, after the server version of the software has beenupgraded:
Auto-upgrade on ClickOnce in Standalone mode
At Workspace SIP Endpoint application restart, the application checks to determine if a new version isavailable in the ClickOnce repository, and it is downloaded if necessary. The application is thenrestarted with the new version.
Auto-start on ClickOnce in Standalone mode
When Workspace SIP Endpoint is installed with ClickOnce as a standalone application, it is thenautomatically restarted at the beginning of each new Windows session started by the same user onthe same workstation.
Workspace Standalone SIP Endpoint security risks
The following table summarizes the various levels of security versus functionality that can beachieved by different option configuration scenarios. Because a dedicated listening port is opened onagent workstations by Workspace Standalone SIP Endpoint, the workstation is vulnerable to certainsecurity risks. This dedicated port is in addition to listening ports that are opened for SIP and RTP/RTCP.
Preparing to deploy Workspace Workspace SIP Endpoint in Virtual Desktop Infrastructure
Workspace Desktop Edition Deployment Guide 95

Workspace/SIP Endpoint Security Matrix
Security Level SIP Endpoint optionvalues
Workspace optionvalues IT operational effort
Encryption withValidation level 1:no certificate validation (Labonly)
<addkey="ipv4_address_range"value=""/> and/or <addkey="ipv6_address_range"value=""/>
<add key="protocol"value="https"/>
<add key="security_level"value="0"/>
<addkey="certificate_search_value"value="certificatethumbprint"/>
sipendpoint.standalone.security-level=0
Low:Make any certificate (valid ornot) availalble on the PersonalStore of the workstations thatrun Workspace SIP Endpoint
Encryption withValidation level 2:Simple certificate validation
<addkey="ipv4_address_range"value=""/> and/or <addkey="ipv6_address_range"value=""/>
<add key="protocol"value="https"/>
<add key="security_level"value="0"/>
<addkey="certificate_search_value"value="certificatethumbprint"/>
sipendpoint.standalone.security-level=1
Low:Make any valid certificateavailable on the PersonalStore of the workstations thatrun Workspace SIP Endpoint
Encryption withValidation level 3:Mutual certificate validation
<addkey="ipv4_address_range"value=""/> and/or <addkey="ipv6_address_range"value=""/>
<add key="protocol"value="https"/>
<add key="security_level"value="1"/>
<addkey="certificate_search_value"value="certificatethumbprint"/>
sipendpoint.standalone.security-level=2sipendpoint.standalone.certificate-search-value=certificatethumbprint
Medium:Make any valid certificateavailable on the PersonalStore of the workstations thatrun Workspace SIP Endpointand on the Personal Store ofthe virtual system that runsWorkspace Desktop Edition
Mutual HTTPS withPersonal Identity check
<addkey="ipv4_address_range"value=""/> and/or <addkey="ipv6_address_range"value=""/>
<add key="protocol"value="https"/>
sipendpoint.standalone.security-level=3sipendpoint.standalone.certificate-search-value=certificateissuer or subject common part
sipendpoint.standalone.subject-criteria=certificate subjectattribute for validation,
High:Make valid personalcertificates available on thePersonal store of theworkstations that runWorkspace SIP Endpoint andon the Personal Store of thevirtual system that runsWorkspace Desktop Edition.
Preparing to deploy Workspace Workspace SIP Endpoint in Virtual Desktop Infrastructure
Workspace Desktop Edition Deployment Guide 96
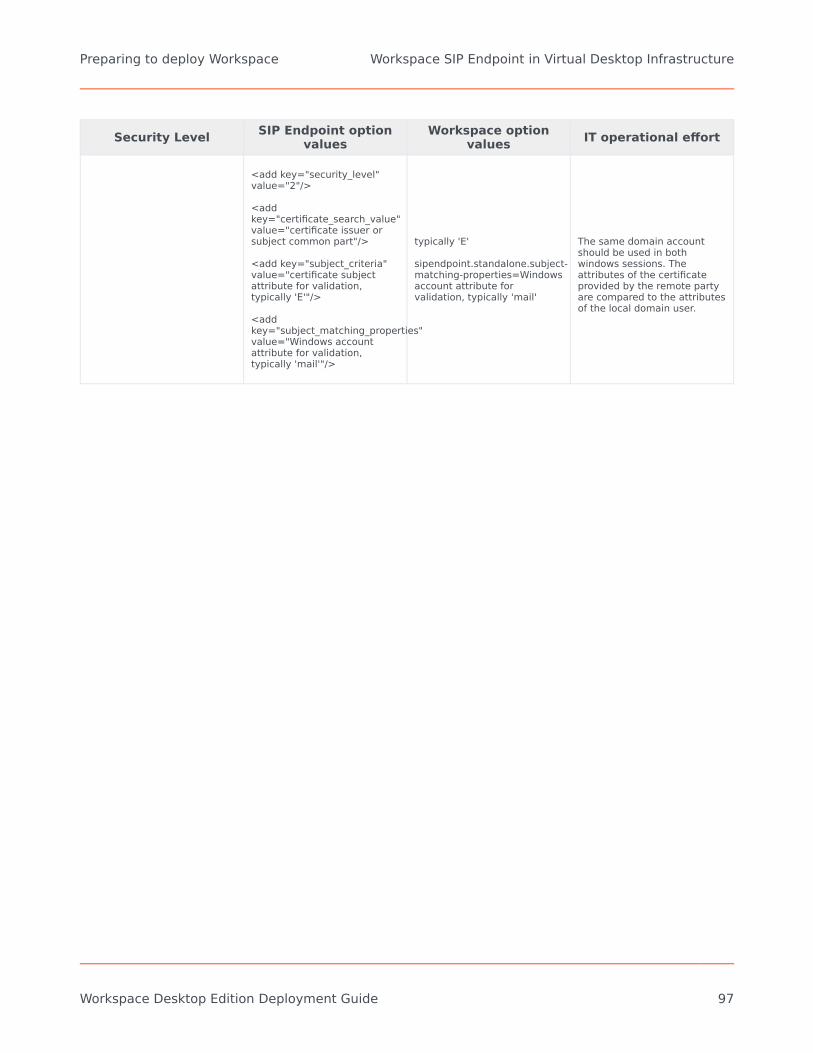
Security Level SIP Endpoint optionvalues
Workspace optionvalues IT operational effort
<add key="security_level"value="2"/>
<addkey="certificate_search_value"value="certificate issuer orsubject common part"/>
<add key="subject_criteria"value="certificate subjectattribute for validation,typically 'E'"/>
<addkey="subject_matching_properties"value="Windows accountattribute for validation,typically 'mail'"/>
typically 'E'
sipendpoint.standalone.subject-matching-properties=Windowsaccount attribute forvalidation, typically 'mail'
The same domain accountshould be used in bothwindows sessions. Theattributes of the certificateprovided by the remote partyare compared to the attributesof the local domain user.
Preparing to deploy Workspace Workspace SIP Endpoint in Virtual Desktop Infrastructure
Workspace Desktop Edition Deployment Guide 97

Configuring system-access permissionsFor Workspace to run correctly, the agent application must be granted permission to access specificsystem objects. When Workspace is launched, it connects to Configuration Server using thecredentials of the agent who is logging in. Therefore, the required permissions to access systemobjects are typically much higher than those granted to an agent who uses Workspace.
To mitigate this situation you must assign three different kinds of permissions to the agent login:
• Execute permissions• Read permissions• Write permissions
The following subsections describe how to configure these permissions in the Permissions tab of thespecified object. You can choose to configure agents individually by the Person object, or as a groupby Access Group.
Refer to Genesys Administrator Extension Help and Genesys Security Guide for detailed informationon how to use Genesys Administrator Extension and Management Framework to configure accesspermissions.
Configuring execute permissionsYou must grant execute permissions for the Workspace application to each agent or groups of agentsso that Workspace can connect to Configuration Server to start the application.
Configuring read permissionsAgents might require permissions to read from the Application objects that are referenced in theConnection list of the Workspace application object. They might be required to connect to one ofthese servers to activate its associated features. The following is a list of items to which an agentmight require read access:
• The host of any application objects that are referenced in the Connection list of the Workspaceapplication object.
• The Person object that corresponds to the agent.• The Place object that corresponds to the voice channel to which the agent is assigned.• The DN object that determines the capacity of the channel (Voice, IM). This information is stored in
annex of the DN.• The Switch and the T-Server object to determine the possible channel.• The Tenant object.• The Person objects of the Tenant to enable Team Communicator to access the firstname, lastname, and
username of internal targets.• The Skills objects of the Tenant to enable Team Communicator to access the names of Skills.
Preparing to deploy Workspace Configuring system-access permissions
Workspace Desktop Edition Deployment Guide 98

• The Agent Group objects of the Tenant to enable Team Communicator to access the names of AgentGroups.
• The Routing Point objects of the Tenant to enable Team Communicator to access the number, name, andswitch.name of Routing Points.
• The ACD Queue objects of the Tenant to enable Team Communicator to access the number, name, andswitch.name of ACD Queues.
• The User Properties of the agent's Tenant, logged in application, and agent's Agent Groups, to readcorporate favorites for display in Team Communicator.
• The Business Attributes of the Tenant to enable the Contact module to use Business Attributes.• The transaction object of the Tenant that can be used for overriding options of the strategy.• The applications used as Backup servers and configuration Server application to have HA.• Script objects of the tenant Interaction queue and workbins.• The Calling List, Table Access, DB Access Point Application of Table Access, Format, Field objects
reflecting the data structure of the campaigns where the agent will be engaged.
Configuring write permissionsIf you have configured the agent to store preferences in their Person annex instead of on their localdesktop or in a shared directory, you must grant that agent write permissions on their Person object.
If you plan to store agent preferences and personal information on a shared directory, refer to Storingthe agent profile on a controlled shared host.
If you have configured your system to prompt for a the agent's phone number at login time (thisrequires SIP Server), you must grant write access to the agent on the SIP DN in which the agent logsin, to set the request-uri.
Preparing to deploy Workspace Configuring system-access permissions
Workspace Desktop Edition Deployment Guide 99

Genesys Engage/Genesys Cloud HybridIntegrationsTo use the following Genesys Cloud services in Workspace you must first provision a Genesys Engage/Genesys Cloud hybrid integration.
The following Genesys Cloud services are available as Hybrid Integrations:
• Genesys Predictive Engagement (Altocloud). Click here to get started.
Preparing to deploy Workspace Genesys Engage/Genesys Cloud Hybrid Integrations
Workspace Desktop Edition Deployment Guide 100

Deployment proceduresThis chapter provides the procedures that are required to install and deploy Workspace in a Genesys8 environment.
The following task table provides an overview of how to set up your Genesys 8 Configuration Layerfor Workspace, install and deploy Workspace, and perform additional (optional) installations.
Refer to Genesys Administrator Extension Help and Genesys Security Guide for detailed informationon how to use Genesys Administrator Extension and Management Framework to configure accesspermissions.
Preparing the Configuration Layer and Installing WorkspaceObjective Related procedures and actions
1. Configuring the Workspace Application Object
• Installing Workspace Deployment Package onthe Windows operating system
• Using Genesys Administrator Extension to setup the Workspace application
• (Optional) Enabling client-side port definition
2. (Optional) Deploying The ClickOnce ApplicationOn Your Web Server. Choose this option if you wantto deploy Workspace as a ClickOnce application.
1. Deploying the Workspace downloadablepackage (ClickOnce) on your web server
2. Configuring Apache to enable the ClickOncepackage
3. Configuration verification--Testing the client4. (Optional) Installing the Workspace SIP Endpoint5. (Optional) Install Language Packs for Workspace
3. (Optional) Installing The Workspace DeveloperToolkit. Choose this option if you want to deploy theWorkspace developer package.
1. Installing Workspace Customization on theWindows operating system
2. (Optional) Installing the Workspace SIP Endpoint3. (Optional) Install Language Packs for Workspace
4. (Optional) Installing The Workspace Application.Choose this option if you want to deploy a non-ClickOnce version of Workspace.
1. Installing the Workspace application on a clientdesktop
2. (Optional) Installing the Workspace SIP Endpoint3. (Optional) Installing Plug-ins for Workspace4. (Optional) Install Language Packs for Workspace
Deployment procedures Genesys Engage/Genesys Cloud Hybrid Integrations
Workspace Desktop Edition Deployment Guide 101

Configuring the Workspace applicationobject[Modified: 8.5.111.21]
Workspace is designed to be used with the Genesys 8 Suite. Before you install Workspace, you mustdeploy the Genesys 8 Management Framework. You must also be familiar with Genesys AdministratorExtension (or Genesys Administrator 8.0.2 or higher). For more information on these products, pleaseconsult the following documents:
• Genesys Framework documentation set• Genesys Administrator Extension Deployment Guide• Genesys Administrator Extension Help
1. Using Genesys Administrator Extension to create andprovision the Workspace application
Purpose:
To create and configure a Workspace Desktop Edition Application object in Genesys AdministratorExtension to enable you to deploy and provision Workspace.
The Workspace Desktop Edition Application Template and the configuration metadata are included inthe standard application-template set that comes with Genesys Suite 8.
Beginning with Workspace 8.5, three templates and their associated XML metadata files aredistributed with the application. You can choose to deploy different combinations of templates/XMLmetadata files to meet the needs of your call center:
• The Core Workspace template with core Workspace options, which does not contain any SIP Endpointoptions: Workspace_Desktop_Edition_850.apd/xml. Use this option if you already are not planning touse any Genesys SIP Endpoint.
• The core Workspace template with core Workspace options and the Interaction Workspace SIP Endpoint8.0.2 options: Workspace_Desktop_Edition_SEP802_850.apd/xml. Use this option if you are planningto deploy Interaction Workspace SIP Endpoint 8.0.2 (no video channel).
• The core Workspace template with core Workspace options and the Workspace SIP Endpoint 8.5.0options: Workspace_Desktop_Edition_SEP850_850.apd/xml. Use this option if you are planning to useWorkspace SIP Endpoint 8.5.0, which implements video channel.
Use the Options tab of the Workspace Desktop Edition Application object to provision Workspaceby setting configuration options. Refer to Provisioning Functionality for more details.Prerequisites
Deployment procedures Configuring the Workspace application object
Workspace Desktop Edition Deployment Guide 102
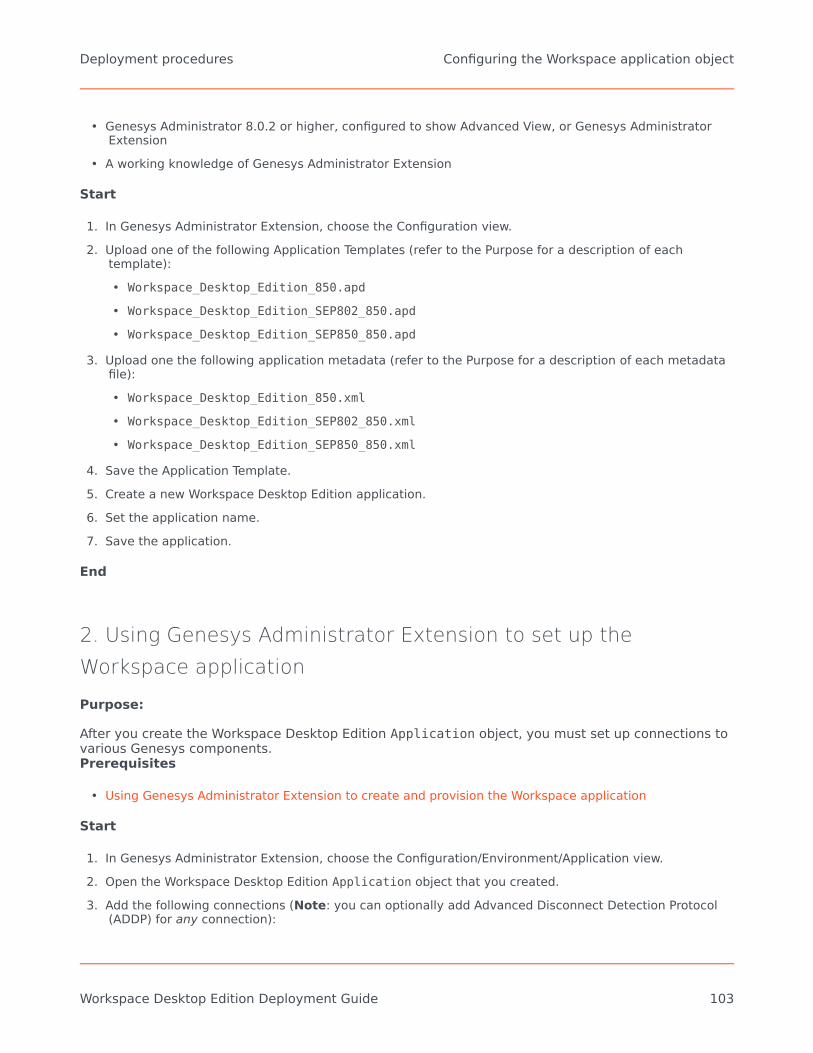
• Genesys Administrator 8.0.2 or higher, configured to show Advanced View, or Genesys AdministratorExtension
• A working knowledge of Genesys Administrator Extension
Start
1. In Genesys Administrator Extension, choose the Configuration view.2. Upload one of the following Application Templates (refer to the Purpose for a description of each
template):• Workspace_Desktop_Edition_850.apd
• Workspace_Desktop_Edition_SEP802_850.apd
• Workspace_Desktop_Edition_SEP850_850.apd
3. Upload one the following application metadata (refer to the Purpose for a description of each metadatafile):• Workspace_Desktop_Edition_850.xml
• Workspace_Desktop_Edition_SEP802_850.xml
• Workspace_Desktop_Edition_SEP850_850.xml
4. Save the Application Template.5. Create a new Workspace Desktop Edition application.6. Set the application name.7. Save the application.
End
2. Using Genesys Administrator Extension to set up theWorkspace application
Purpose:
After you create the Workspace Desktop Edition Application object, you must set up connections tovarious Genesys components.Prerequisites
• Using Genesys Administrator Extension to create and provision the Workspace application
Start
1. In Genesys Administrator Extension, choose the Configuration/Environment/Application view.2. Open the Workspace Desktop Edition Application object that you created.3. Add the following connections (Note: you can optionally add Advanced Disconnect Detection Protocol
(ADDP) for any connection):
Deployment procedures Configuring the Workspace application object
Workspace Desktop Edition Deployment Guide 103

• T-Server or SIP Server (for Voice and IM features)• Statistics Server (for Statistics feature and Presence)• Universal Contact Server (for Contact Management)• Interaction Server (for eServices)• Configuration Server/Configuration Server Proxy (if you plan to use Configuration Server Proxy).
Note: Before setting ADDP with Configuration Server or Configuration Server Proxy, first create aconnection to this server in the Workspace Desktop Edition application object.
4. Grant execution rights to the agents that will log on to this application.5. Grant read rights to the agents that will log on to this application for the objects listed in Steps 3.6. (Optional) To use HA functionality, grant Read rights to backup applications of the object that are listed
in Step 3 and Configuration Server application, and the associated Host objects.7. In T-Server environments, you can specify the the time, in seconds, between the two attempts to
reconnect to the back-up T-Server by setting the value of the voice.hot-standby.backup-retry-delayoption. Genesys recommends that you keep the value of this option above 30 seconds for optimalperformance.
End
Next Steps
• (Optional) Procedure: Enabling client-side port definition• Installing The Deployment Package and Deploying Workspace
3. Enabling client-side port definition
Purpose:
To enhance security by defining a client-side port.
Defining the access ports for each application to which Workspace connects ensures the security ofthe system. This feature is configured partially on Framework Configuration Server and partially onthe Workspace Desktop Edition application in Genesys Administrator Extension.
Start
1. Open the InteractionWorkspace.exe.config file. This file is in the Workspace Desktop Editiondirectory on the Workspace Desktop Edition CD/DVD.
2. In the appSettings section, modify the value of the transport-port and transport-address keys asfollows:• For the transport-address key, specify the IP address or the host name that Workspace will use to
make a TCP/IP connection to Configuration Server. If the value is empty, this parameter is not used.• For the transport-port key, specify the port number that Workspace will use to make a TCP/IP
connection to Configuration Server. If the value is empty, this parameter is not used.<appSettings>
Deployment procedures Configuring the Workspace application object
Workspace Desktop Edition Deployment Guide 104
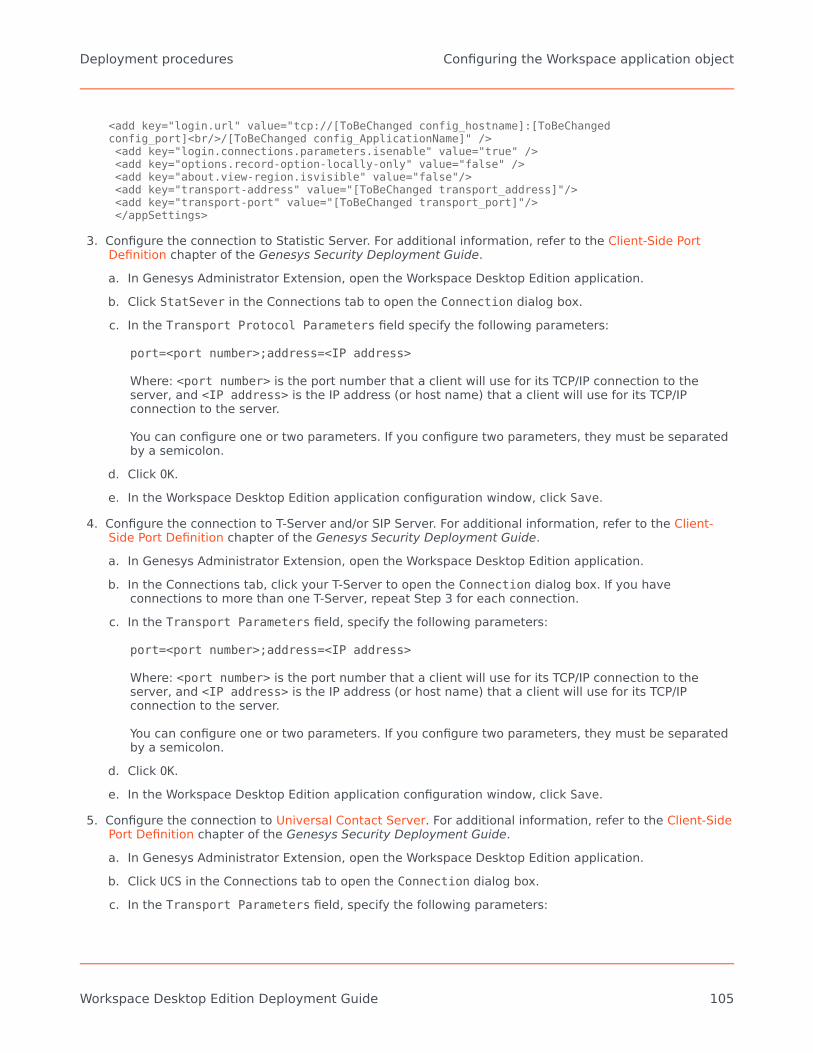
<add key="login.url" value="tcp://[ToBeChanged config_hostname]:[ToBeChangedconfig_port]<br/>/[ToBeChanged config_ApplicationName]" /><add key="login.connections.parameters.isenable" value="true" /><add key="options.record-option-locally-only" value="false" /><add key="about.view-region.isvisible" value="false"/><add key="transport-address" value="[ToBeChanged transport_address]"/><add key="transport-port" value="[ToBeChanged transport_port]"/></appSettings>
3. Configure the connection to Statistic Server. For additional information, refer to the Client-Side PortDefinition chapter of the Genesys Security Deployment Guide.a. In Genesys Administrator Extension, open the Workspace Desktop Edition application.b. Click StatSever in the Connections tab to open the Connection dialog box.c. In the Transport Protocol Parameters field specify the following parameters:
port=<port number>;address=<IP address>
Where: <port number> is the port number that a client will use for its TCP/IP connection to theserver, and <IP address> is the IP address (or host name) that a client will use for its TCP/IPconnection to the server.
You can configure one or two parameters. If you configure two parameters, they must be separatedby a semicolon.
d. Click OK.e. In the Workspace Desktop Edition application configuration window, click Save.
4. Configure the connection to T-Server and/or SIP Server. For additional information, refer to the Client-Side Port Definition chapter of the Genesys Security Deployment Guide.a. In Genesys Administrator Extension, open the Workspace Desktop Edition application.b. In the Connections tab, click your T-Server to open the Connection dialog box. If you have
connections to more than one T-Server, repeat Step 3 for each connection.c. In the Transport Parameters field, specify the following parameters:
port=<port number>;address=<IP address>
Where: <port number> is the port number that a client will use for its TCP/IP connection to theserver, and <IP address> is the IP address (or host name) that a client will use for its TCP/IPconnection to the server.
You can configure one or two parameters. If you configure two parameters, they must be separatedby a semicolon.
d. Click OK.e. In the Workspace Desktop Edition application configuration window, click Save.
5. Configure the connection to Universal Contact Server. For additional information, refer to the Client-SidePort Definition chapter of the Genesys Security Deployment Guide.a. In Genesys Administrator Extension, open the Workspace Desktop Edition application.b. Click UCS in the Connections tab to open the Connection dialog box.c. In the Transport Parameters field, specify the following parameters:
Deployment procedures Configuring the Workspace application object
Workspace Desktop Edition Deployment Guide 105

port=<port number>;address=<IP address>
Where: <port number> is the port number that a client will use for its TCP/IP connection to theserver, and <IP address> is the IP address (or host name) that a client will use for its TCP/IPconnection to the server.
You can configure one or two parameters. If you configure two parameters, they must be separatedby a semicolon.
d. Click OK.e. In the Workspace Desktop Edition application configuration window, click Save.
End
Next Steps
• Installing The Deployment Package
4. Pre-Defining HA for Configuration Server
[Added: 8.5.111.21]
Purpose: To enable simple primary/backup HA on the client-side when an agent logs in for the firsttime.
If you want to setup:
• Business Continuity for Configuration Server go to this page: Business Continuity• High Availability and Load balancing using a Cluster of Configuration Server Proxies, go to that page:
Load Balancing Using Clusters
Prerequisites
• Using Genesys Administrator Extension to set up the Workspace application.
Start
1. Open the InteractionWorkspace.exe.config file. This file is in the Workspace Desktop Editioninstallation directory.
2. To support Primary/backup High Availability configuration for Config Server, you can provide informationabout the connection to Config Server, both primary and backup, from theinteractionWorkpace.exe.config configuration file:<appSettings>...<add key="login.url" value="tcp://MyConfigurationEnvironment/ApplicationName" /><add key="login.nodes.MyConfigurationEnvironment"
value="[PrimaryConfigurationServerHost:PrimaryConfigurationServerPort][BackupConfigurationServerHost:BackupConfigurationServerPort],Timeout=10"/>...
</appSettings>
Deployment procedures Configuring the Workspace application object
Workspace Desktop Edition Deployment Guide 106
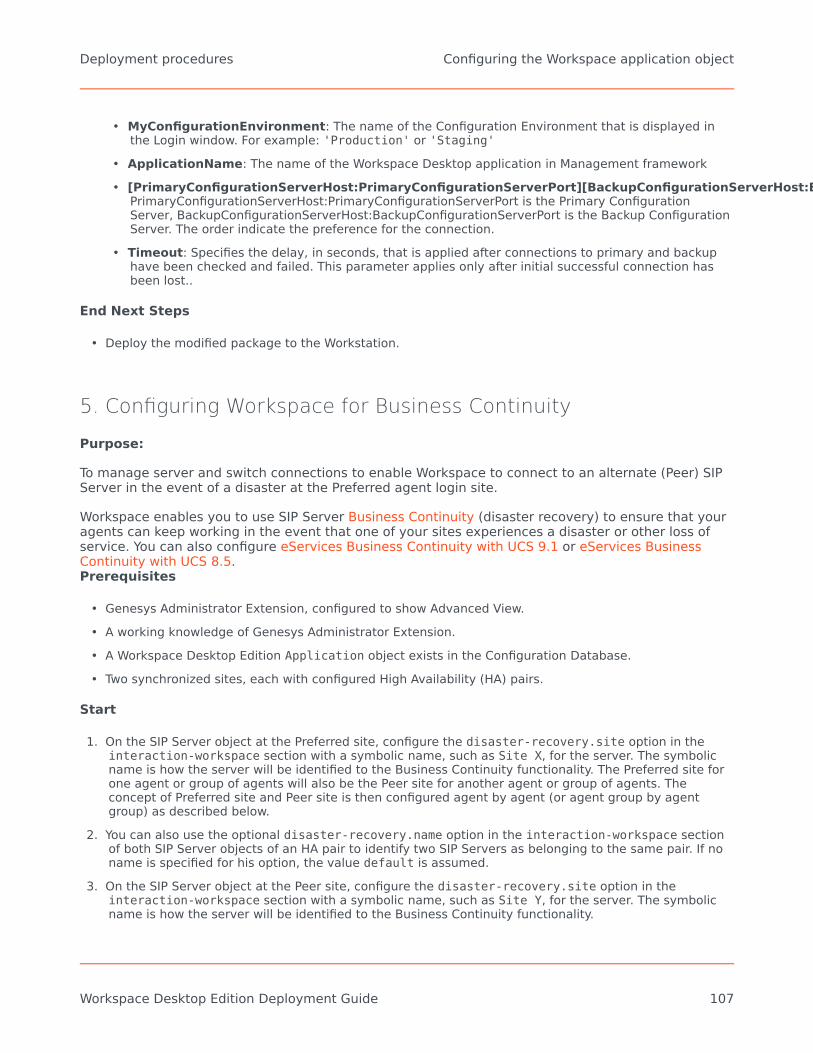
• MyConfigurationEnvironment: The name of the Configuration Environment that is displayed inthe Login window. For example: 'Production' or 'Staging'
• ApplicationName: The name of the Workspace Desktop application in Management framework• [PrimaryConfigurationServerHost:PrimaryConfigurationServerPort][BackupConfigurationServerHost:BackupConfigurationServerPort]
PrimaryConfigurationServerHost:PrimaryConfigurationServerPort is the Primary ConfigurationServer, BackupConfigurationServerHost:BackupConfigurationServerPort is the Backup ConfigurationServer. The order indicate the preference for the connection.
• Timeout: Specifies the delay, in seconds, that is applied after connections to primary and backuphave been checked and failed. This parameter applies only after initial successful connection hasbeen lost..
End Next Steps
• Deploy the modified package to the Workstation.
5. Configuring Workspace for Business Continuity
Purpose:
To manage server and switch connections to enable Workspace to connect to an alternate (Peer) SIPServer in the event of a disaster at the Preferred agent login site.
Workspace enables you to use SIP Server Business Continuity (disaster recovery) to ensure that youragents can keep working in the event that one of your sites experiences a disaster or other loss ofservice. You can also configure eServices Business Continuity with UCS 9.1 or eServices BusinessContinuity with UCS 8.5.Prerequisites
• Genesys Administrator Extension, configured to show Advanced View.• A working knowledge of Genesys Administrator Extension.• A Workspace Desktop Edition Application object exists in the Configuration Database.• Two synchronized sites, each with configured High Availability (HA) pairs.
Start
1. On the SIP Server object at the Preferred site, configure the disaster-recovery.site option in theinteraction-workspace section with a symbolic name, such as Site X, for the server. The symbolicname is how the server will be identified to the Business Continuity functionality. The Preferred site forone agent or group of agents will also be the Peer site for another agent or group of agents. Theconcept of Preferred site and Peer site is then configured agent by agent (or agent group by agentgroup) as described below.
2. You can also use the optional disaster-recovery.name option in the interaction-workspace sectionof both SIP Server objects of an HA pair to identify two SIP Servers as belonging to the same pair. If noname is specified for his option, the value default is assumed.
3. On the SIP Server object at the Peer site, configure the disaster-recovery.site option in theinteraction-workspace section with a symbolic name, such as Site Y, for the server. The symbolicname is how the server will be identified to the Business Continuity functionality.
Deployment procedures Configuring the Workspace application object
Workspace Desktop Edition Deployment Guide 107

4. For each agent, agent group, or tenant, configure the disaster-recovery.preferred-site option inthe interaction-workspace section by specifying the symbolic site name of the SIP Server that youspecified with the disaster-recovery.site option.
5. For each agent, agent group, or tenant, configure the disaster-recovery.peer-site option in theinteraction-workspace section with the symbolic site name of the SIP Server that you specified withthe disaster-recovery.site option.
6. Enable Business Continuity for each agent, agent group, or tenant and specify the Business Continuitybehavior by configuring the other Business Continuity options that are listed in the Business ContinuityConfiguration Options reference.
End
Deployment procedures Configuring the Workspace application object
Workspace Desktop Edition Deployment Guide 108

Choose your deploymentChoose one of the deployment options in the following tabs.
Important• Some releases of Workspace include Workspace language packs (localized User
Interface and Help). These procedures include information about how to install languagepacks either as part of the Workspace deployment or after you have deployedWorkspace.
• Genesys recommends that you always install the release of Workspace for which thelanguage pack was developed rather than installing a language pack on a previouslydeployed release of Workspace. For example, you should not install an 8.5.1 languagepack on top of an 8.5.0 release of Workspace; doing so might result in some UI textbeing displayed in English or some UI elements being incorrectly labelled.
• If you are not deploying from the Workspace International CD/DVD, you must manuallyadd Language Packs to your deployment package.
Watch video: How to Deploy Languages in Workspace Desktop Edition (International) 8.5.1: Link tovideo
Deploying the ClickOnce Application on your web server
Procedures1. Install the deployment package
Perform the Procedure: Installing Workspace Deployment Package on the Windows operating system,which guides you through the steps for installing Workspace on your Windows web server from theWorkspace CD/DVD.
[+] Procedure: Installing Workspace Deployment Package on theWindows operating systemPurpose: To install the deployment files for Workspace on the Windows web server.
TipAfter running one of the Windows installers, inspect the directory tree of your system
Deployment procedures Choose your deployment
Workspace Desktop Edition Deployment Guide 109

to make sure that the files have been installed in the location that you intended.
Prerequisites
• Have Administrative rights to the web server• Framework .NET 4.5 installed
Start
1. On your desktop, open the Workspace Desktop Edition CD/DVD or the Workspace Desktop Edition IP anddouble-click the Setup.exe file.
You might be asked to reboot your system to delete or rename certain system files before the Installation Wizard runs.
The Genesys Installation Wizard launches and the Welcome panel is displayed.
2. On the Welcome panel, do one of the following:• Click Next to begin the installation procedure.• Click Cancel to exit the Genesys Installation Wizard.• Click About to open the Workspace Desktop Edition ReadMe file in your default browser.
If you clicked Next, the Genesys License Agreement panel is displayed.3. On the Genesys License Agreement panel, read the DEVELOPER SOFTWARE LICENSE AGREEMENT.
If you accept the DEVELOPER SOFTWARE LICENSE AGREEMENT, check I accept Genesys License Agreement; if you do not acceptthe DEVELOPER SOFTWARE LICENSE AGREEMENT, click Cancel.
If you accepted the DEVELOPER SOFTWARE LICENSE AGREEMENT, do one of the following:
• Click Next to continue the installation procedure.• Click Back to return to the Welcome panel.• Click Cancel to exit the Genesys Installation Wizard.
If you clicked Next, the Select Options panel is displayed.4. On the Select Options panel, do one of the following:
• Choose Prepare a ClickOnce package, and click Next.• Click Back to return to the Welcome panel.• Click Cancel to exit the Genesys Installation Wizard.
For more information about installation options, see the Table - Workspace Install Mode Deployment Packages.
If you clicked Next, the Choose Destination Location panel is displayed (see Figure - Choose Destination Location panel ofthe Genesys Installation Wizard) unless you are installing from the International DVD.
5. (Optional) If you are installing from the International DVD, the Language Pack Selection panel isdisplayed.
Deployment procedures Choose your deployment
Workspace Desktop Edition Deployment Guide 110

Language Pack Selection panel of the Genesys Installation Wizard
Select Select Language Pack to display the list of available language packs.
Adding and Removing languages by using the Language Pack Selectionpanel of the Genesys Installation Wizard
To select a language for installation, select it in the left hand box then click Add. The language is moved to the right hand box. Tode-select a language for installation, select it and click Remove. The language is moved back to the left hand box and will not beinstalled. After you have added to the right hand box the languages that you want to install, do one of the following:
• Click Next to continue the installation procedure.• Click Back to return to the Select Options panel.• Click Cancel to exit the Genesys Installation Wizard.
6. On the Choose Destination Location panel, specify the location on your web server in whichWorkspace is to be installed by doing one of the following:• Type a location in the Destination Folder text box.• Click Default to reset the location to the default location.• Click Browse to navigate to a destination folder.
Deployment procedures Choose your deployment
Workspace Desktop Edition Deployment Guide 111
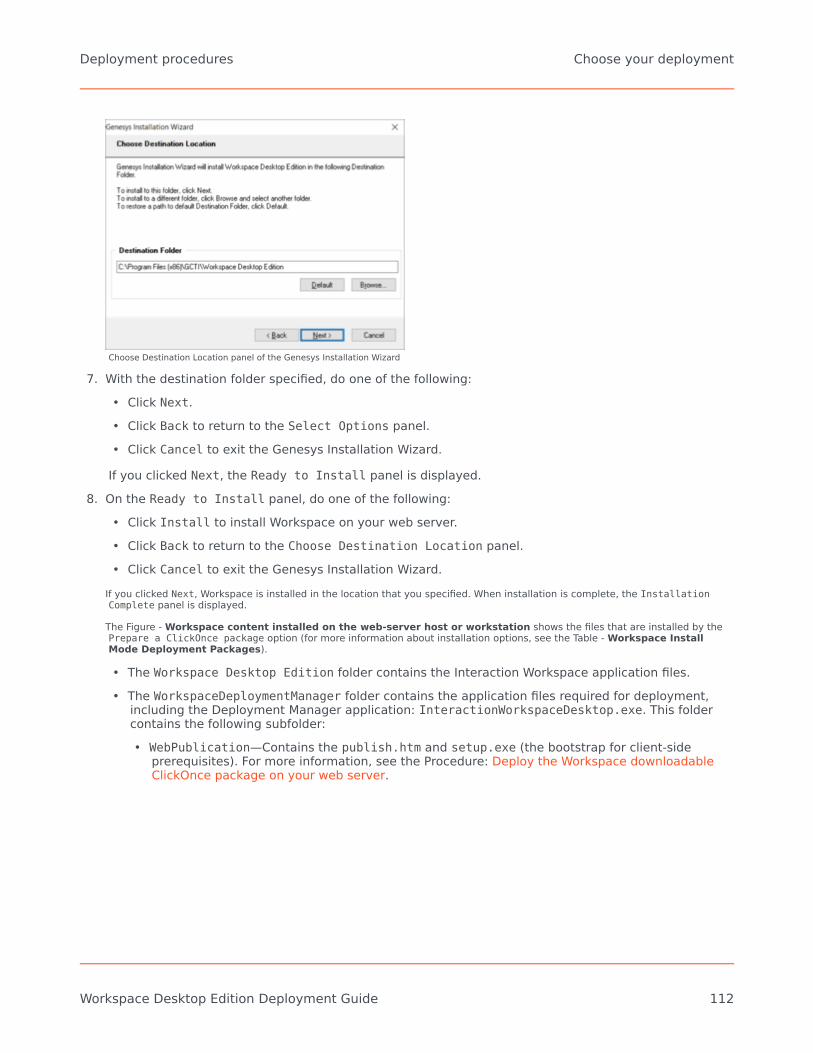
Choose Destination Location panel of the Genesys Installation Wizard
7. With the destination folder specified, do one of the following:• Click Next.• Click Back to return to the Select Options panel.• Click Cancel to exit the Genesys Installation Wizard.
If you clicked Next, the Ready to Install panel is displayed.8. On the Ready to Install panel, do one of the following:
• Click Install to install Workspace on your web server.• Click Back to return to the Choose Destination Location panel.• Click Cancel to exit the Genesys Installation Wizard.
If you clicked Next, Workspace is installed in the location that you specified. When installation is complete, the InstallationComplete panel is displayed.
The Figure - Workspace content installed on the web-server host or workstation shows the files that are installed by thePrepare a ClickOnce package option (for more information about installation options, see the Table - Workspace InstallMode Deployment Packages).
• The Workspace Desktop Edition folder contains the Interaction Workspace application files.• The WorkspaceDeploymentManager folder contains the application files required for deployment,
including the Deployment Manager application: InteractionWorkspaceDesktop.exe. This foldercontains the following subfolder:• WebPublication—Contains the publish.htm and setup.exe (the bootstrap for client-side
prerequisites). For more information, see the Procedure: Deploy the Workspace downloadableClickOnce package on your web server.
Deployment procedures Choose your deployment
Workspace Desktop Edition Deployment Guide 112

Workspace content installed on the web-server host or workstation
9. Click Finish to exit the Genesys Installation Wizard.
2. Install the optional SIP endpoint and plugins
[+] (optional) Procedure: Installing the Workspace SIP Endpoint[Modified: 8.5.109.16, 8.5.114.08]
The Workspace SIP Endpoint is an optional plug-in or standalone application for Workspace. It isavailable as a separate IP that you install from a separate CD/DVD. You can install it in one of twomodes, as a plugin that runs with Workspace Desktop Edition on the agent workstation, or as astandalone application that connects to Workspace running in a virtualized environment.
TipWorkspace also supports the Genesys Softphone in place of Workspace SIP Endpoint.To learn about the installation of Genesys Softphone, see Deploying GenesysSoftphone in the Genesys Softphone Deployment Guide.
If you intend to create a ClickOnce package to install Workspace SIP Endpoint, install the WorkspaceSIP Endpoint after you install the Workspace application on your server, but before you run theWorkspace Deployment Manager.
If you deploy Workspace SIP Endpoint as part of a ClickOnce deployment, the behavior of theClickOnce download depends on the privileges that are assigned to the agent who is logging in. If theagent is granted the privilege to execute a local Workspace SIP Endpoint, the following files aredownloaded to the agent workstation:
• The SIP Endpoint Communication plug-in (part of Workspace runtime)• The Workspace SIP Endpoint executable and associated assemblies.
Deployment procedures Choose your deployment
Workspace Desktop Edition Deployment Guide 113

Installing Workspace SIP Endpoint as a Workspace DesktopEdition plugin
Use the following procedure to install Workspace SIP Endpoint in environments where the Workspaceapplication and Workspace SIP Endpoint run on the same workstation. Use the Installing theStandalone Workspace SIP Endpoint when you are running Workspace in a virtualized environment.
ProcedureInstalling the Workspace SIP Endpoint as a Workspace Desktop Edition plugin
Purpose: To install the Workspace SIP Endpoint on your web server, an agent workstation, or adevelopment workstation as a plugin.
Prerequisites
• .NET Framework 4.5• The following Microsoft redistributable package(s) is/are required to be installed on the workstation
where Workspace SIP Endpoint will execute. They are installed by the Installation Package if they arenot already present on the target workstation, but if you are deploying Workspace and Workspace SIPEndpoint by using ClickOnce, you must plan the installation of the following packages on thoseworkstations prior to enabling the ClickOnce deployment:• For 8.5.114.xx and higher
• Visual C++ Redistributable for Visual Studio 2013: http://download.microsoft.com/download/2/E/6/2E61CFA4-993B-4DD4-91DA-3737CD5CD6E3/vcredist_x86.exe
• For 8.5.104.xx to 8.5.113.xx:• Microsoft Visual C++ 2005 Service Pack 1 Redistributable Package MFC Security Update:
http://download.microsoft.com/download/8/B/4/8B42259F-5D70-43F4-AC2E-4B208FD8D66A/vcredist_x86.EXE
• Visual C++ Redistributable for Visual Studio 2013: http://download.microsoft.com/download/2/E/6/2E61CFA4-993B-4DD4-91DA-3737CD5CD6E3/vcredist_x86.exe
• 8.5.103.xx and lower:• Microsoft Visual C++ 2005 Service Pack 1 Redistributable Package MFC Security Update:
http://download.microsoft.com/download/8/B/4/8B42259F-5D70-43F4-AC2E-4B208FD8D66A/vcredist_x86.EXE
• Visual C++ Redistributable for Visual Studio 2012 Update 4, 32-bits package only:http://www.microsoft.com/en-us/download/details.aspx?id=30679
• Install the Workspace application by using one of the following procedures:• Deploying The ClickOnce Application On Your Web Server. Choose this option if you want to deploy
Workspace as a ClickOnce application.• Installing The Workspace Developer Toolkit. Choose this option if you want to deploy the Workspace
developer package.• Installing The Workspace Application. Choose this option if you want to deploy a non-ClickOnce
version of Workspace.
Deployment procedures Choose your deployment
Workspace Desktop Edition Deployment Guide 114

Start
1. On your desktop, open the Workspace SIP Endpoint disc or the Workspace SIP Endpoint IP and double-click the Setup.exe file.
You might be asked to reboot your system to delete or rename certain system files before the Installation Wizard runs.
The Genesys Installation Wizard launches and the Welcome panel is displayed.
2. On the Welcome panel, do one of the following:• Click Next to begin the installation procedure.• Click Cancel to exit the Genesys Installation Wizard.• Click About to open the Workspace SIP Endpoint ReadMe in your default browser.
If you clicked Next, the Select Installed Application panel is displayed (see the Figure - Select Installed ApplicationPanel of the Genesys Installation Wizard).
Select Installed Application Panel of the Genesys Installation Wizard
3. The Select Installed Application panel enables you to select the Workspace application instanceto which you want to add Workspace SIP Endpoint as a plug-in.
The Genesys Installation Wizard searches the target computer for an installed version of Workspace. Select the version ofWorkspace in the location in which you want Workspace SIP Endpoint to be installed.
The Application Properties pane displays the name, version, and location of the selected Workspace application (see theFigure - Select Installed Application Panel of the Genesys Installation Wizard).
4. After you have selected the version of Workspace that you want to use with Workspace SIP Endpoint, doone of the following:• Click Next to proceed to the next panel.• Click Cancel to exit the Genesys Installation Wizard.• Click Back to return to the previous panel.
If you clicked Next, the Ready to Install panel is displayed.
5. On the Ready to Install panel do one of the following:• Click Install to install Workspace SIP Endpoint on your web server, development workstation, or
agent workstation.• Click Back to return to the Select Installed Application panel.
Deployment procedures Choose your deployment
Workspace Desktop Edition Deployment Guide 115

• Click Cancel to exit the Genesys Installation Wizard.
If you clicked Next, Workspace SIP Endpoint is installed in the location that you specified. Wheninstallation is complete, the Installation Complete panel is displayed.
6. Click Finish to exit the Genesys Installation Wizard.A folder that is named InteractionWorkspaceSIPEndpoint is created in the Workspace folder. TheInteractionWorkspaceSIPEndpoint folder contains the Workspace SIP Endpoint application and associated files.
After the Workspace SIP Endpoint application is installed on the agent or developer workstation, or after it is downloaded by theClickOnce application (see Deploying The ClickOnce Application On Your Web Server), and after the agent is granted permissionto use the application, agents must login Workspace on a Place that is associated with a SIP DN to start the Workspace SIPEndpoint. The Workspace SIP Endpoint process is started automatically when Workspace application is being initialized.
7. To ensure that the supporting programs were installed correctly, check if the following programs areavailable in the "uninstall programs" view of the Control Panel on your Windows workstation:• Genesys Workspace SIP Endpoint <version>• Microsoft Visual C++ 2005 Redistributable (8.5.113.xx and lower)• Microsoft Visual C++ 2012 Redistributable (x86) - 11.0.60.610
[+] (optional) Procedure: Installing plugins for WorkspaceWorkspace enables you to install optional plug-ins for Workspace. Plug-ins, such as eServices SocialMedia interaction handling, are available as separate IPs that you install from a separate CD/DVD.
If you deploy a plug-in as part of a ClickOnce deployment, the behavior of the ClickOnce downloaddepends on the privileges that are assigned to the agent who is logging in. If the agent is granted theprivilege to execute a plug-in, the plug-in is downloaded as part of the deployment.
The Procedure: Installing plug-ins for Workspace is a general procedure that describes how to installplug-ins for Workspace. The documentation for your plug-in provides specific information about howto install and deploy your plug-in.
Consult the documentation that comes with your plug-in for specific information abouthow to install and provision your plug-in.
Before you install your plug-in, you must provision it in Genesys Administrator Extension (refer to theGenesys Administrator Extension documentation for more information) in the same way that youprovision Workspace.
Workspace plug-ins come with <Plug-In Name>.apd and <Plug-In Name>.xml (privileges) files, bothof type Workspace. Upload the <Plug-In Name>.apd file and attach the <Plug-In Name>.xml file tocreate the <Plug-In Name> Template.
The Workspace application object is created based on the Workspace Template.
When you provision the Privileges that are assigned to a Role, the list of Privileges that are availablefor the Workspace application type combine the privileges that are specified in the Workspace.xmland <Plug-In Name>.xml files.
Deployment procedures Choose your deployment
Workspace Desktop Edition Deployment Guide 116
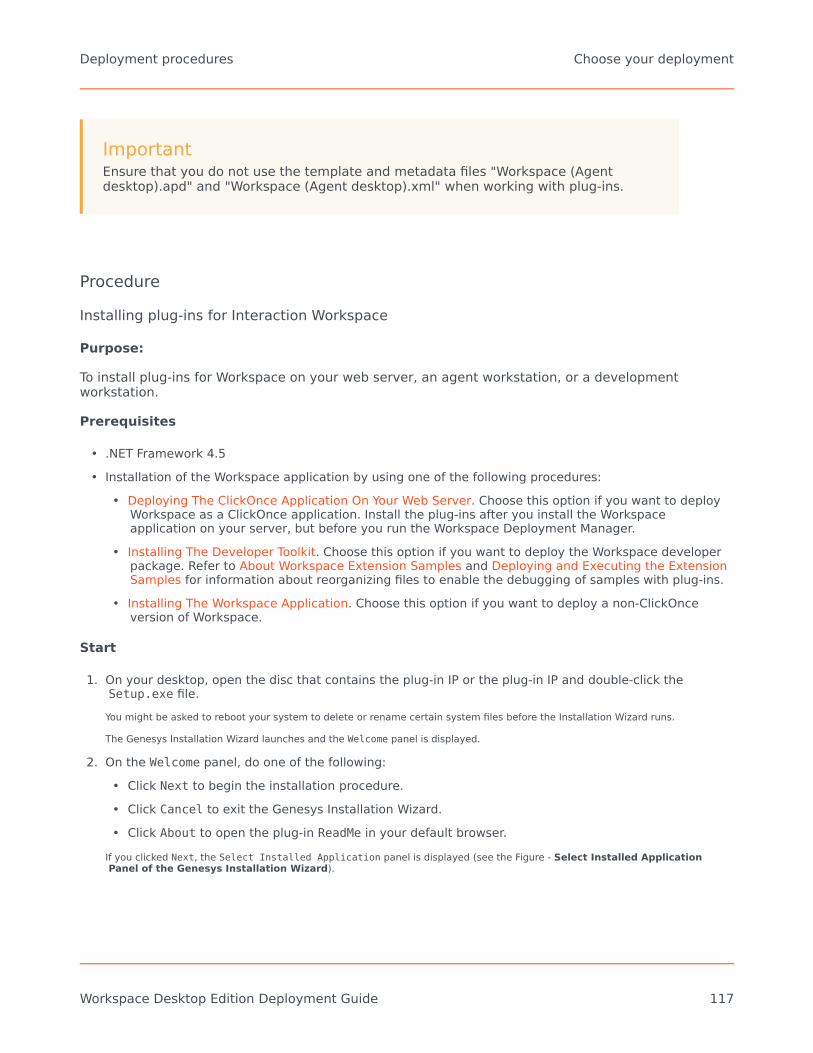
ImportantEnsure that you do not use the template and metadata files "Workspace (Agentdesktop).apd" and "Workspace (Agent desktop).xml" when working with plug-ins.
ProcedureInstalling plug-ins for Interaction Workspace
Purpose:
To install plug-ins for Workspace on your web server, an agent workstation, or a developmentworkstation.
Prerequisites
• .NET Framework 4.5• Installation of the Workspace application by using one of the following procedures:
• Deploying The ClickOnce Application On Your Web Server. Choose this option if you want to deployWorkspace as a ClickOnce application. Install the plug-ins after you install the Workspaceapplication on your server, but before you run the Workspace Deployment Manager.
• Installing The Developer Toolkit. Choose this option if you want to deploy the Workspace developerpackage. Refer to About Workspace Extension Samples and Deploying and Executing the ExtensionSamples for information about reorganizing files to enable the debugging of samples with plug-ins.
• Installing The Workspace Application. Choose this option if you want to deploy a non-ClickOnceversion of Workspace.
Start
1. On your desktop, open the disc that contains the plug-in IP or the plug-in IP and double-click theSetup.exe file.
You might be asked to reboot your system to delete or rename certain system files before the Installation Wizard runs.
The Genesys Installation Wizard launches and the Welcome panel is displayed.
2. On the Welcome panel, do one of the following:• Click Next to begin the installation procedure.• Click Cancel to exit the Genesys Installation Wizard.• Click About to open the plug-in ReadMe in your default browser.
If you clicked Next, the Select Installed Application panel is displayed (see the Figure - Select Installed ApplicationPanel of the Genesys Installation Wizard).
Deployment procedures Choose your deployment
Workspace Desktop Edition Deployment Guide 117
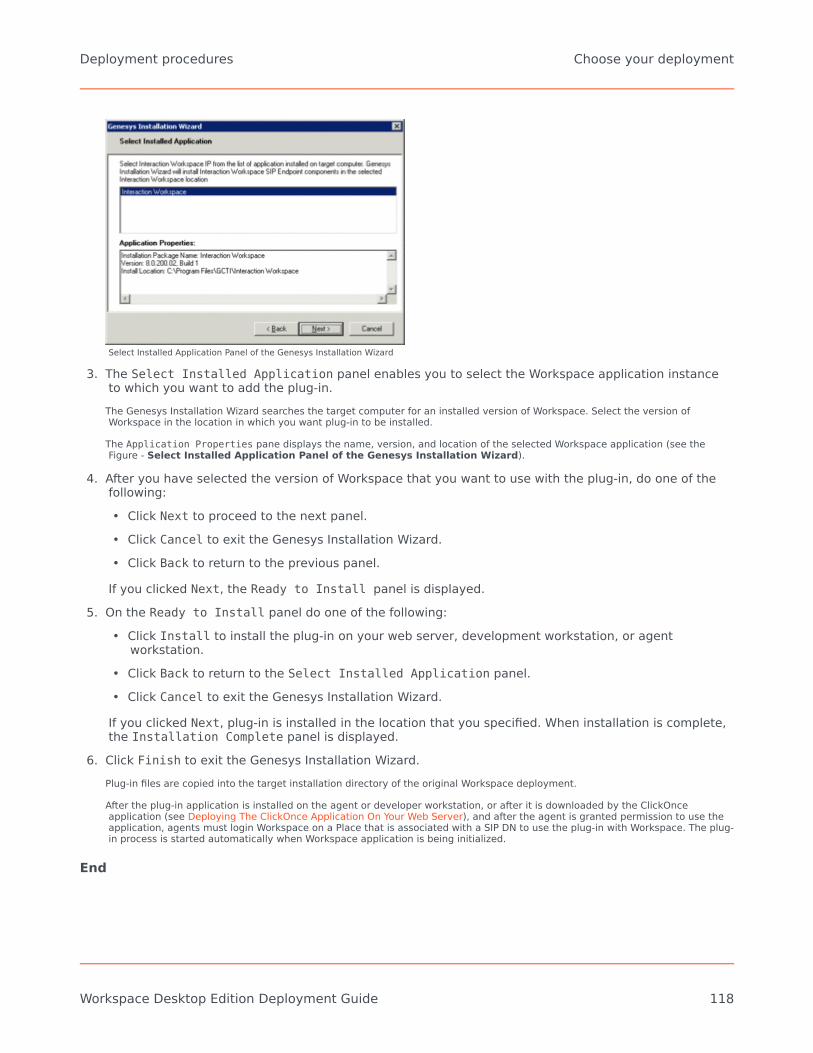
Select Installed Application Panel of the Genesys Installation Wizard
3. The Select Installed Application panel enables you to select the Workspace application instanceto which you want to add the plug-in.
The Genesys Installation Wizard searches the target computer for an installed version of Workspace. Select the version ofWorkspace in the location in which you want plug-in to be installed.
The Application Properties pane displays the name, version, and location of the selected Workspace application (see theFigure - Select Installed Application Panel of the Genesys Installation Wizard).
4. After you have selected the version of Workspace that you want to use with the plug-in, do one of thefollowing:• Click Next to proceed to the next panel.• Click Cancel to exit the Genesys Installation Wizard.• Click Back to return to the previous panel.
If you clicked Next, the Ready to Install panel is displayed.5. On the Ready to Install panel do one of the following:
• Click Install to install the plug-in on your web server, development workstation, or agentworkstation.
• Click Back to return to the Select Installed Application panel.• Click Cancel to exit the Genesys Installation Wizard.
If you clicked Next, plug-in is installed in the location that you specified. When installation is complete,the Installation Complete panel is displayed.
6. Click Finish to exit the Genesys Installation Wizard.Plug-in files are copied into the target installation directory of the original Workspace deployment.
After the plug-in application is installed on the agent or developer workstation, or after it is downloaded by the ClickOnceapplication (see Deploying The ClickOnce Application On Your Web Server), and after the agent is granted permission to use theapplication, agents must login Workspace on a Place that is associated with a SIP DN to use the plug-in with Workspace. The plug-in process is started automatically when Workspace application is being initialized.
End
Deployment procedures Choose your deployment
Workspace Desktop Edition Deployment Guide 118

TipIf you did not add Language Packs in the previous step, you can perform a manualinstallation at this point by using the manual procedure.
3. Deploy the ClickOnce application on your web server
Use the Workspace Deployment Manager wizard or console to generate the file hierarchy that isrequired by the ClickOnce application on your web server.
During the deployment of the ClickOnce application, you are required to enter the followinginformation in the Deployment Manager wizard (this information also has to be added to thesilent.xml file to be used by the console):
• The deployment URL• The deployment version• The deployment certificate:
• If you do have a deployment certificate, select the Sign with a provided certificate option,and then browse to select the certificate. You must also input the password in the dedicated textbox.
• If you do not have a deployment certificate, do not select the Sign with a provided certificateoption. Without a signed package, a security warning is displayed whenever the client downloadsthe package.
Be sure to have this information ready before you begin.
The first two procedures: Wizard: Deploy the Workspace downloadable ClickOnce package on yourweb server or Console: Deploy the Workspace downloadable ClickOnce package on your web servercontain the deployment steps for deploying Workspace on your web server. Choose which procedureyou want to use.
TipYou can put the Workspace downloadable package in a shared directory instead of onyour web server, and then install Workspace from a shared directory.
Choose one of the following two ways to deploy the ClickOnce application on your Web Server:
[+] 3a. Wizard: Deploy the Workspace downloadable ClickOnce packageon your web server[Modified: 8.5.102.06]
Purpose: Deploy the Workspace downloadable package on your web server by using the WorkspaceDeployment Manager Wizard
Deployment procedures Choose your deployment
Workspace Desktop Edition Deployment Guide 119

ImportantThe following procedure employs a Windows-based Deployment Wizard. If your HTTPserver is running on a Solaris or Linux server, you must first build the deploymentpackage on a computer that is running the Windows Operating System, and then copythe package to a compatible location on your Solaris or Linux HTTP server.
Prerequisites
• Install the Deployment Manager and associated files from the Genesys Workspace disc or downloadimage. See the Procedure: Installing Workspace Deployment Package on the Windows operatingsystem.
• Create an Application object of type Workspace from the Workspace Application template.• Microsoft .NET Framework 4.5 installed on the computer on which you run the wizard. This can be the
computer on which you run your web server.
Start
1. Open the InteractionWorkspaceDeploymentManager folder. This folder contains the application filesrequired for deployment, including: InteractionWorkspaceDeploymentManager.exe.
2. Launch the InteractionWorkspaceDeploymentManager.exe application by double-clicking the file orselecting it from the Start menu. The Deployment Manager installs the ClickOnce files on your webserver. The Welcome pane of the Deployment Manager is displayed (refer to Figure - The WorkspaceDeployment Manager splash page).
The Workspace Deployment Manager splash page
3. Click Next to proceed with the installation. Click Cancel to cancel the deployment.4. If you clicked Next, the Deployment Folder pane is displayed (refer to Figure - Workspace Deployment
Manager Deployment Folder pane). Specify the location on your server in which you want theClickOnce files to be deployed. If you are deploying to a Solaris server or a Linux server,specify a local folder on the Windows-based computer on which you are running the
Deployment procedures Choose your deployment
Workspace Desktop Edition Deployment Guide 120
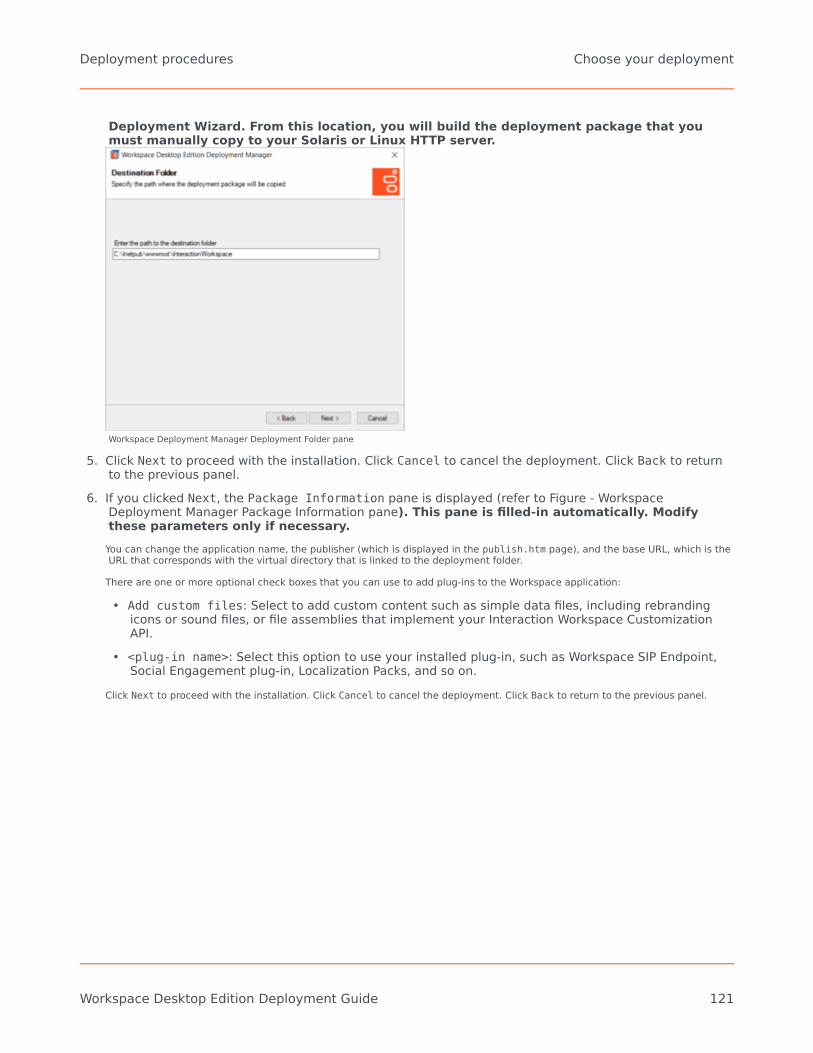
Deployment Wizard. From this location, you will build the deployment package that youmust manually copy to your Solaris or Linux HTTP server.
Workspace Deployment Manager Deployment Folder pane
5. Click Next to proceed with the installation. Click Cancel to cancel the deployment. Click Back to returnto the previous panel.
6. If you clicked Next, the Package Information pane is displayed (refer to Figure - WorkspaceDeployment Manager Package Information pane). This pane is filled-in automatically. Modifythese parameters only if necessary.
You can change the application name, the publisher (which is displayed in the publish.htm page), and the base URL, which is theURL that corresponds with the virtual directory that is linked to the deployment folder.
There are one or more optional check boxes that you can use to add plug-ins to the Workspace application:
• Add custom files: Select to add custom content such as simple data files, including rebrandingicons or sound files, or file assemblies that implement your Interaction Workspace CustomizationAPI.
• <plug-in name>: Select this option to use your installed plug-in, such as Workspace SIP Endpoint,Social Engagement plug-in, Localization Packs, and so on.
Click Next to proceed with the installation. Click Cancel to cancel the deployment. Click Back to return to the previous panel.
Deployment procedures Choose your deployment
Workspace Desktop Edition Deployment Guide 121

Workspace Deployment Manager Package Information pane
7. If you clicked Next, and if you selected Add Custom Files in the previous view, the Custom Filespanel is displayed (refer to Figure - Interaction Workspace Deployment Manager Custom Filespane). This window enables you to add custom content to the out-of-the-box Interaction Workspace.
Interaction Workspace Deployment Manager Custom Files pane
• Relative Path: The path where the file will be copied relative to the core Workspace installationdirectory.
• Data File: Not used — This should be left unchecked.• Optional: Must be checked if the file is part of an optional module that is loaded according to user
privileges. A module is considered as optional if the value of the startupLoaded attribute is set tofalse in the .module.config file, and the same module is associated to a task in the same file.
ImportantThe .module-config file that core Workspace uses for module declaration, as well as any language dictionary file required by themodule, must be specified as NOT optional so that they are loaded unconditionally at Workspace start-up.
Deployment procedures Choose your deployment
Workspace Desktop Edition Deployment Guide 122

• Group Name: For mandatory files (files that have Optional unchecked), always specify Core. Foroptional files, specify the group name that is assigned to the module description in the .module-config file by the clickOnceGroupsToDownload attribute. For example:<task name="InteractionWorkspace.Custom.ThePrivilege"clickOnceGroupsToDownload="TheGroup"modulesToLoad="TheModule" />
The following table provides examples of settings for a typical optional module comprising a DLL, a dictionary file, and a .module-config file:
File Name Relative Path Data File Optional Group Name.module-config file <empty> unchecked unchecked Core.dll file <empty> unchecked checked <custom group>language file(.language-code.country-code.xml)
languages unchecked unchecked Core
8. Click Next to proceed with the installation. Click Cancel to cancel the deployment. Click Back to returnto the previous panel.
9. If you clicked Next, the Client Configuration pane is displayed (refer to Figure - WorkspaceDeployment Manager Client Configuration pane). In this pane, provide the following information:• The address and port number of your local Genesys Configuration Server• The name of the Interaction Workspace (client) application that you created in the Configuration
Layer by using Genesys Administrator Extension• (optional) To use Kerberos Single Sign-on (SSO), specify the Service Principal Name (SPN) Enabling
Client-side Port Definition: To define the client-side port functionality, check Use Client-sidePort by specifying the port number and/or the IP address. Checking this option enablesthe following two text fields: [Modified: 8.5.101.14]
• Port Number: The port number that a client will use to make a TCP/IP connection to ConfigurationServer. If the value is empty, this parameter is not used.
• IP Address: The IP address or the host name that a client will use to make a TCP/IP connection toConfiguration Server. If the value is empty, this parameter is not used.
If you specify one or both values, they will be set in the InteractionWorkspace.exe.config file.
There are three additional options in this dialog box:
• Allow the end-user to change connection parameters on the login prompt: Enables agentsto change their connection parameters when they log in.
• Allow the end-user to install the .NET Framework if it is not already installed:Enables an agent to download and install .NET Framework to their workstation if you have notalready installed it on the workstation.
• Force the end-user to upgrade to the latest available version: Disables the ability foragents to reject application updates that are pushed to agents.
Deployment procedures Choose your deployment
Workspace Desktop Edition Deployment Guide 123
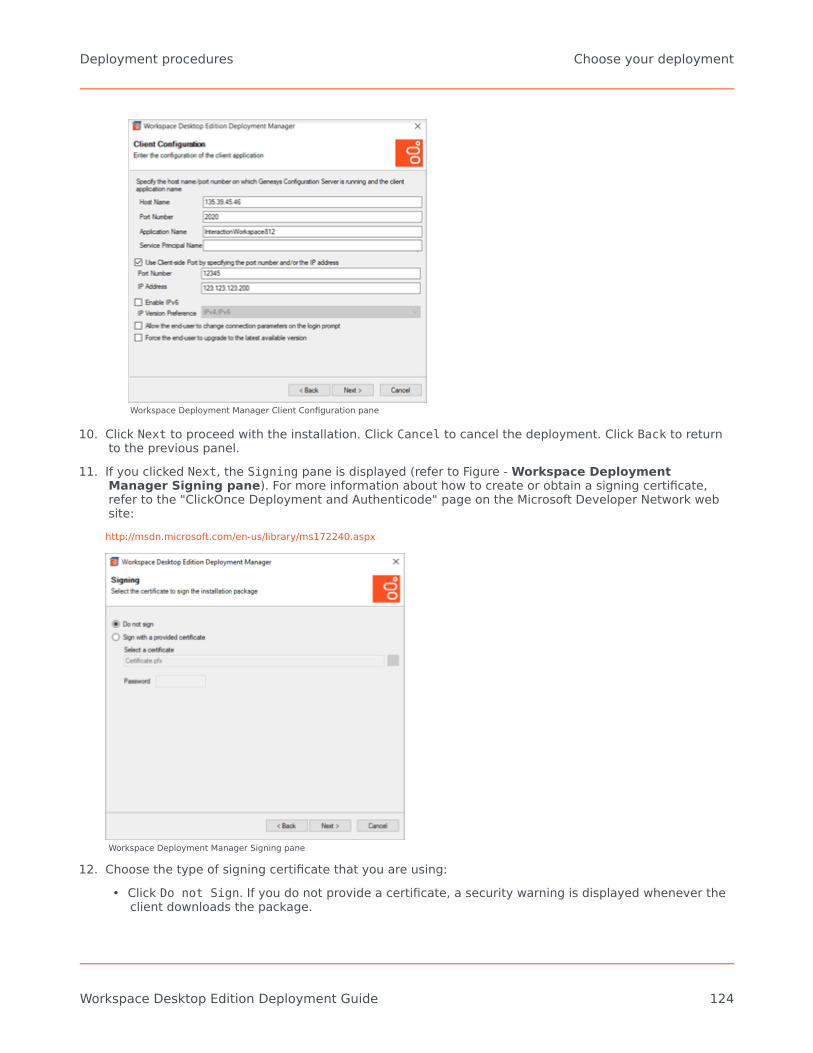
Workspace Deployment Manager Client Configuration pane
10. Click Next to proceed with the installation. Click Cancel to cancel the deployment. Click Back to returnto the previous panel.
11. If you clicked Next, the Signing pane is displayed (refer to Figure - Workspace DeploymentManager Signing pane). For more information about how to create or obtain a signing certificate,refer to the "ClickOnce Deployment and Authenticode" page on the Microsoft Developer Network website:
http://msdn.microsoft.com/en-us/library/ms172240.aspx
Workspace Deployment Manager Signing pane
12. Choose the type of signing certificate that you are using:• Click Do not Sign. If you do not provide a certificate, a security warning is displayed whenever the
client downloads the package.
Deployment procedures Choose your deployment
Workspace Desktop Edition Deployment Guide 124

• Click Sign with a provided certificate to enable the Selects a certificate field.
13. Click the browse button to navigate to the certificate.14. Enter the password for the certificate in the Password field.15. Click Next to proceed with the installation. Click Cancel to cancel the deployment. Click Back to return
to the previous panel.16. If you clicked Next, the Ready to Build pane is displayed (refer to Figure - Workspace Deployment
Manager Ready to Build pane). This pane contains a summary of the files that will be deployed onyour web server and a confirmation of the deployment URL.
Interaction Workspace Deployment Manager Ready to Build pane
17. Click Next to complete the deployment. Click Cancel to cancel the deployment. Click Back to modifyany of the previous panes.
18. If you clicked Next, the Deployment Manager deploys the Workspace ClickOnce application in the paththat you specified at the beginning of the wizard execution. This can be the appropriate place on yourweb server.
When the deployment is complete, the Deployment Finished pane is displayed (refer to Figure - Workspace DeploymentManager Deployment Finished pane). This pane contains messages that relate to the success of the deployment.
Interaction Workspace Deployment Manager Deployment Finishedpane
Deployment procedures Choose your deployment
Workspace Desktop Edition Deployment Guide 125
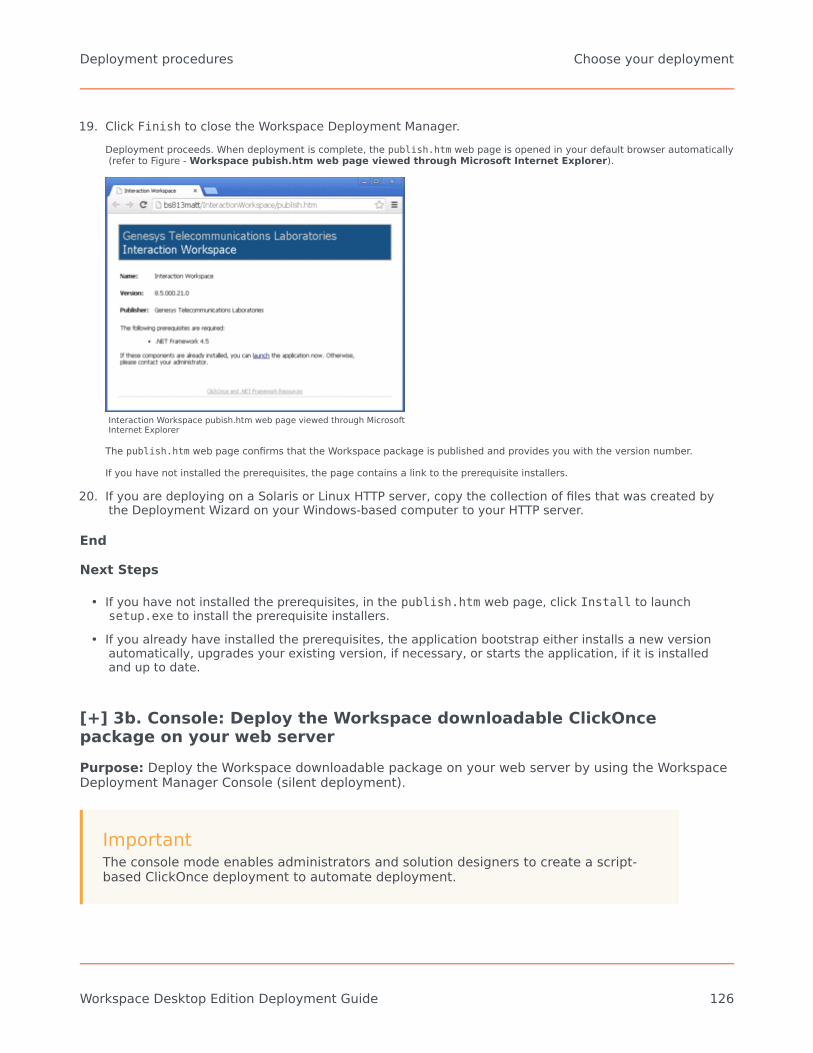
19. Click Finish to close the Workspace Deployment Manager.Deployment proceeds. When deployment is complete, the publish.htm web page is opened in your default browser automatically(refer to Figure - Workspace pubish.htm web page viewed through Microsoft Internet Explorer).
Interaction Workspace pubish.htm web page viewed through MicrosoftInternet Explorer
The publish.htm web page confirms that the Workspace package is published and provides you with the version number.
If you have not installed the prerequisites, the page contains a link to the prerequisite installers.
20. If you are deploying on a Solaris or Linux HTTP server, copy the collection of files that was created bythe Deployment Wizard on your Windows-based computer to your HTTP server.
End
Next Steps
• If you have not installed the prerequisites, in the publish.htm web page, click Install to launchsetup.exe to install the prerequisite installers.
• If you already have installed the prerequisites, the application bootstrap either installs a new versionautomatically, upgrades your existing version, if necessary, or starts the application, if it is installedand up to date.
[+] 3b. Console: Deploy the Workspace downloadable ClickOncepackage on your web serverPurpose: Deploy the Workspace downloadable package on your web server by using the WorkspaceDeployment Manager Console (silent deployment).
ImportantThe console mode enables administrators and solution designers to create a script-based ClickOnce deployment to automate deployment.
Deployment procedures Choose your deployment
Workspace Desktop Edition Deployment Guide 126
Prerequisites
• Install the Deployment Manager and associated files from the Genesys Workspace disc or downloadimage. See the Procedure: Installing Workspace Deployment Package on the Windows operatingsystem.
• Create an Application object of type Workspace from the Workspace Application template.• Microsoft .NET Framework 4.5 installed on the computer on which you run the wizard. This can be the
computer on which you run your web server.
Start
1. Open the WorkspaceDeploymentManager folder. This folder contains the application files required fordeployment.
2. Edit the silent.xml file (refer to an example below) to include the deployment parameters that yourequire. The Table - The deployment attributes that are contained in silent.xml file describesthe parameters that you can specify.
3. Launch the InteractionWorkspaceDeploymentManager.exe application by using a command line likethe following:start /wait interactionworkspacedeploymentmanager.exe -s silent.xml
The following Command Line Arguments are supported:
• -s <silent_file_name>: (mandatory for console execution) This attribute specifies that thedeployment manager will execute in console mode, and specifies the configuration file used forexecution.
• -f <log_file>: (optional) This attribute specifies the path and the name of the log file printedduring the deployment manager execution.
Use the command start /wait if you want the script to wait for end of process execution.4. If you are deploying on a Solaris or Linux HTTP server, copy the collection of files that was created by
the Deployment Wizard on your Windows-based computer to your HTTP server.
End
Next Steps
• If you have not installed the prerequisites, in the publish.htm web page, click Install to launchsetup.exe to install the prerequisite installers.
• If you already have installed the prerequisites, the application bootstrap either installs a new versionautomatically, upgrades your existing version, if necessary, or starts the application, if it is installedand up to date.
The deployment attributes that are contained in silent.xml fileXML Key Name: ApplicationToDeployDescription: The application that Workspace Desktop Edition Deployment Manager will deploy.If the value is empty or WorkspaceDesktopEdition, deployment of Workspace Desktop Edition withor without plug-ins (Workspace SIP Endpoint can be a plug-in in this mode)If the value is WorkspaceSIPEndpoint, deployment of Workspace SIP Endpoint in standalone modeDefault Value:
Deployment procedures Choose your deployment
Workspace Desktop Edition Deployment Guide 127

Example: WorkspaceSIPEndpoint
XML Key Name: DeploymentDestinationFolderDescription: The path where the Deployment Manager console will copy the built ClickOnce package.This path can be the Production Web Site path or an interim storage from where another utility willhave to push the package to the Production Web Site.Default Value:Example: c:\temp\depmgr
XML Key Name: EndUserConfigureClientSidePortDescription: When set to true, the Deployment Manager Console populates the client-side port/address in the property file that is deployed with Workspace on the destination workstation.Default Value: falseExample:
XML Key Name: EndUserClientSideTransportAddressDescription: The Client-Side Address that the deployed Workspace application will use to connect toConfiguration Server.Default Value:Example: 123.123.123.200
XML Key Name: EndUserClientSideTransportPortDescription: The Client-Side Port that the deployed Workspace application will use to connect toConfiguration Server.Default Value:Example: 12345
XML Key Name: EndUserConfigAllowFrameworkInstallDescription: When set to true, the publish.htm page might allow the end user to execute the .NETFramework 4.5 installation if it is detected as missing. Genesys recommends that you keep the valueset to false and manage the .NET Framework as a pre-requisite.Default Value: falseExample:
XML Key Name: EndUserConfigAllowUserToChangeConnectionParametersDescription: When set to true, the Configuration Server Host, Port, and Application Name can beedited in the login window of the deployed Workspace application (if the user clicks More).When set to false, the application will always use the parameters that are configured in this file.Default Value: falseExample:
XML Key Name: EndUserConfigApplicationNameDescription: The Application Name that the deployed Workspace application will use to connect toConfiguration Server.Default Value:Example: InteractionWorkspace850
XML Key Name: EndUserConfigHostDescription: The Host Name that the deployed Workspace application will use to connect toConfiguration Server.Default Value:Example: <your host name>
XML Key Name: EndUserConfigPortDescription: The Port that the deployed Workspace application will use to connect to Configuration
Deployment procedures Choose your deployment
Workspace Desktop Edition Deployment Guide 128

Server.Default Value:Example: 2021
XML Key Name: InformationApplicationNameDescription: Name of the ClickOnce package.The name of the .application file to be downloaded on the target workstation.The icon on the target workstation desktop will have this name.Default Value: WorkspaceExample:
XML Key Name: InformationPublisherDescription: The name of the company that delivers the ClickOnce package.Default Value:Example: Genesys Telecommunications Laboratories, Inc
XML Key Name: InformationURLDescription: The URL Root from which the final ClickOnce package will be downloaded by end users.Default Value:Example: http://<your host name>/InteractionWorkspace
XML Key Name: OptionsAllowsMultiDeploymentDescription: When set to true, the ClickOnce package is built to allow distinct ClickOnce packagesinstances to be installed on the same target destination.Default Value: falseExample:
XML Key Name: OptionsAllowUpgradeFrom812VersionsEndEarlierDescription: When set to false, the ClickOnce package includes a 32-bit version of the Workspaceexecutable. This is the default mode when using a regular IP, and this is the recommended mode tooptimize the memory footprint on an agent workstation.The value true is required only if you deployed the ClickOnce packages with 8.1.2 versions or earlierand want to ensure a smooth upgrade without first uninstalling old versions. This deploys a 64-bitenabled .NET executable, which can run on a 32-bit OS, and which consumes a significantly highermemory footprint than a 32-bit-only executable when running on a 64 bits OS.Default Value: falseExample:
XML Key Name: PackagesToDeployDescription: The list of optional file packages ("plug-ins") to be included in the ClickOnce package.Default Value:Example: Sip Endpoint;Language Pack for French (France)
XML Key Name: SigningCertificateFileNameDescription: The path to the certificate to be used to sign the package.Default Value:Example: c:\inetpub\InteractionWorkspace
XML Key Name: SigningPasswordDescription: The password that is required to sign the ClickOnce package with the selectedcertificate.Default Value:Example: abcd
XML Key Name: SigningSignsWithProvidedCertificate
Deployment procedures Choose your deployment
Workspace Desktop Edition Deployment Guide 129

Description: When set to true, the Deployment Manager Console attempts to sign the ClickOncepackage with the provided signing data.Default Value: falseExample:
[Added: 8.5.102.06]
XML Key Name: EndUserConfigServicePrincipalNameDescription: Specifies the Service Principal Name to support Kerberos Single Sign On.Default Value: ""Example:
[Added: 8.5.101.14]
XML Key Name: EndUserConfigForceUpgradeDescription: Specify whether agents can reject ClickOnce upgrades when they are presented at logintime. When set to true, agents are forced to upgrade to this new version of the application at nextapplication start. When set to false, agents are prompted with the choice to upgrade immediately orlater.Default Value:falseExample:
The following is an example of a silent.xml file (refer to procedure 1b):
<?xml version="1.0" encoding="windows-1250"?>
<configuration>
<InformationApplicationName>Interaction Workspace</InformationApplicationName>
<InformationURL>http://BLSHGS1/InteractionWorkspace</InformationURL>
<InformationPublisher>Genesys Telecommunications Laboratories</InformationPublisher>
<DeploymentDestinationFolder>c:\temp\depmgr</DeploymentDestinationFolder>
<SigningSignsWithProvidedCertificate>false</SigningSignsWithProvidedCertificate>
<SigningCertificateFileName></SigningCertificateFileName>
<SigningPassword></SigningPassword>
<EndUserConfigHost>bsgenbruno811</EndUserConfigHost>
<EndUserConfigPort>2021</EndUserConfigPort>
<EndUserConfigApplicationName>InteractionWorkspace850</EndUserConfigApplicationName>
<EndUserConfigureClientSidePort>true</EndUserConfigureClientSidePort>
<EndUserClientSideTransportAddress>123.123.123.200</EndUserClientSideTransportAddress>
<EndUserClientSideTransportPort>12345</EndUserClientSideTransportPort>
<EndUserConfigAllowUserToChangeConnectionParameters>false</EndUserConfigAllowUserToChangeConnectionParameters>
<EndUserConfigAllowFrameworkInstall>false</EndUserConfigAllowFrameworkInstall>
<EndUserConfigServicePrincipalName>confserv/host:port</EndUserConfigServicePrincipalName>
Deployment procedures Choose your deployment
Workspace Desktop Edition Deployment Guide 130

<PackagesToDeploy>Sip Endpoint;Language Pack for French (France)</PackagesToDeploy>
<OptionsAllowsMultiDeployment>false</OptionsAllowsMultiDeployment>
<OptionsAllowUpgradeFrom812VersionsEndEarlier>false</OptionsAllowUpgradeFrom812VersionsEndEarlier>
<EndUserConfigForceUpgrade>false</EndUserConfigForceUpgrade>
</configuration>
4. Enable the ClickOnce Ppackage on your web server
Choose one of the following procedures depending on the web server in your environment:
[+] 4a. (For Apache deployments) Configuring Apache to enable theClickOnce packagePurpose:
By default, the Apache web server does not permit the download of documents of specific MIMEtypes. Apache must be configured to enable the ClickOnce package.
Prerequisites
• Apache Server 2.x on any Operating System it supports.
Start
1. In the conf/mime.types file (in the Apache install folder), add the following lines:application/x-ms-application application
application/x-ms-application manifest
application/octet-stream deploy
2. Save the file.
End
[+] 4b. (For IIS Deployments) Configuring Microsoft IIS6 to enable theClickOnce packagePurpose: Microsoft IIS must be configured to enable the ClickOnce package.
Prerequisites
• Microsoft IIS on any Operating System it supports
Start
Deployment procedures Choose your deployment
Workspace Desktop Edition Deployment Guide 131
1. From Administrative Tools, start Internet Information Services Manager.2. Right click the tree leaf that represents your server.3. Select Properties from the contextual menu.4. In the Properties dialog box, click Mime Types.5. Click New to add each of the following configuration pairs:
.application => application/x-ms-application
.manifest => application/x-ms-application
.deploy => application/octet-stream
6. Click OK.7. Click OK to validate the new MIME types list.
End
5. Verify your configuration
Verify that Workspace was correctly deployed on your web server and client workstation.
[+] Procedure: Configuration verification (Testing the client)Purpose:
To ensure that the Workspace application was correctly deployed on your web server and clientworkstation.
Start
1. On a client workstation, open a new Internet browser window.2. In the Address field, enter the URL of the Workspace web application:
http://<host>/<application name>/publish.htm
For example:
http://SUITE80/Workspace/publish.htm
3. Press Enter on your keyboard. The Workspace ClickOnce publish window opens (see the Figure -Workspace publish window).
Deployment procedures Choose your deployment
Workspace Desktop Edition Deployment Guide 132

Workspace publish window
This window lists all of the prerequisites that should be installed before you launch Workspace for the first time.
4. If all prerequisites are installed, click launch to launch the Workspace installer application.5. If a security-warning dialog box appears, click Install.
When installation is complete, a shortcut is placed on the desktop, after which the application launches. The Workspace agent-login window is displayed.
6. Enter the following information into the agent-login panel and the connection-parameters panel:• User Name: A valid user name that is configured in the Configuration Layer• Password: The valid password for the specified user name
7. Click Login to continue logging in to Workspace; click Cancel to close the agent-login window withoutlogging in.
Refer to Workspace User's Guide for more information about how to log in to Workspace and use the application.
End
Next Steps
Installation is complete. You can provision Interaction Workspace functionality:
• Workspace Functionality Overview• Provisioning Functionality
Rollback to a previous release of Workspace[+] Rollback to a previous release of Workspace by using ClickOncePurpose:
Deployment procedures Choose your deployment
Workspace Desktop Edition Deployment Guide 133

Rollback the software version installed on the end user (agent) workstation to the previouslydeployed release of your Workspace package after you have deployed a new version of yourWorkspace package by using ClickOnce. Here, 'Workspace package' defines the combination of thecore Workspace product and the associated customization files.
Pre-requisites:
• Identify the out-of-the-box Workspace version that will host the downgrade package (refer to Restrictionbelow).
• Identify the list of custom files (.dll, .module-config, .properties, .xml and so on) that comprise thedowngrade package.
Restriction:
When you activate the Force upgrade option of the Deployment Manager, any package version thatis downloaded to an end user (agent) workstation requires that the new package version has aversion greater than the currently installed one. This means that the procedure above does not allowyou to rollback installation on workstations to a version of the out-of-the-box Workspace product thatis lower than the currently installed version (as the core Workspace version is used to build theClickOnce package version). It only allows you to rollback to a previous version of the custom filesassociated to same of more recent version of out-of-the-box Workspace. To downgrade to an olderversion of out-of-the-box Workspace, when the Force upgrade option has been enabled, an explicituninstall of the former package on the workstation is required before downloading the older version.
Start
1. Navigate to the location where the target out-of-the-box version comprising the downgrade package isavailable.
2. Execute the Workspace Deployment Manager (console or UI) of the Workspace version that must bepart of this rollback.
3. Specify in the wizard execution or in the console configuration file, the list of custom files that mustcompose the rollback package.
4. Run the Deployment Manager to increment the package build number.5. After the rollback package is created, push it to the web server.6. Restart the agent application or, from the Main Menu select Check and Update. The agent is
prompted to update to the new version.
End
Deploying the Developer Toolkit on your developmentworkstation
Use the Procedure: Installing Workspace Customization on the Windows operating system to install
Deployment procedures Choose your deployment
Workspace Desktop Edition Deployment Guide 134

the Workspace application and Developer's Kit on your development workstation. This procedureinstalls everything that is required to build and test a Workspace extension. For information abouthow to build a custom extension or customize Workspace, see the Workspace 8.5 .NET Developer'sGuide & API Reference.
ProcedureInstalling Workspace Customization on the Windows operating system
Purpose: To install the deployment files for Workspace Customization on your developmentworkstation.
Prerequisites
• Preparing The Configuration Layer• Microsoft Visual Studio 2012, or higher, Express/Community Edition, or above• .NET Framework 4.5
Start
1. On your desktop, open the Workspace disc or the Workspace IP and double-click the Setup.exe file.You might be asked to reboot your system to delete or rename certain system files before the Installation Wizard runs.
The Genesys Installation Wizard launches and the Welcome panel is displayed.
2. On the Welcome panel, do one of the following:• Click Next to begin the installation procedure.• Click Cancel to exit the Genesys Installation Wizard.• Click About to open the Workspace ReadMe file in your default browser.
If you clicked Next, the Select Options panel is displayed.3. On the Select Options panel, do one of the following:
• Choose Install Interaction Workspace Developer Toolkit, and click Next.• Click Back to return to the Welcome panel.• Click Cancel to exit the Genesys Installation Wizard.
For more information on installation options, see the Table - Workspace Install Mode Deployment Packages.
If you clicked Next, the Choose Destination Location panel is displayed (see the Figure - Choose Destination Locationpanel of the Genesys Installation Wizard).
Deployment procedures Choose your deployment
Workspace Desktop Edition Deployment Guide 135

Choose Destination Location panel of the Genesys Installation Wizard
4. (Optional) If you are installing from the International DVD, the Language Pack Selection panel isdisplayed.
Language Pack Selection panel of the Genesys Installation Wizard
Select Select Language Pack to display the list of available language packs.
Adding and Removing languages by using the Language Pack Selectionpanel of the Genesys Installation Wizard
Deployment procedures Choose your deployment
Workspace Desktop Edition Deployment Guide 136

To select a language for installation, select it in the left hand box then click Add. The language is moved to the right hand box. Tode-select a language for installation, select it and click Remove. The language is moved back to the left hand box and will not beinstalled. After you have added to the right hand box the languages that you want to install, do one of the following:
• Click Next to continue the installation procedure.• Click Back to return to the Select Options panel.• Click Cancel to exit the Genesys Installation Wizard.
5. On the Choose Destination Location panel, specify the location on your development workstation inwhich the Workspace customization files are to be installed by doing one of the following:• Type a location in the Destination Folder text box.• Click Default to reset the location to the default location.• Click Browse to navigate to a destination folder.
6. With the destination folder specified, do one of the following:• Click Next.• Click Back to return to the Select Options panel.• Click Cancel to exit the Genesys Installation Wizard.
If you clicked Next, the Ready to Install panel is displayed.7. On the Ready to Install panel do one of the following:
• Click Install to install the Interaction Workspace customization files.• Click Back to return to the Choose Destination Location panel.• Click Cancel to exit the Genesys Installation Wizard.
If you clicked Install, the Workspace customization files are installed in the location that you specified (see the Figure -Contents of the Workspace install disc or image copied onto the web-server host).
Contents of the Workspace install disc or image copied onto the web-server host
The Workspace folder contains the following:
• The Bin folder, which contains the Workspace API• The Doc directory, which contains the Workspace 8.5 .NET Developer's Guide & API Reference
(WorkspaceSDKNet.chm)• The Workspace folder, which contains Workspace application files• The WorkspaceDeploymentManager folder, which contains the application files that are required to
deploy customized code, including the Deployment Manager application
Deployment procedures Choose your deployment
Workspace Desktop Edition Deployment Guide 137
(InteractionWorkspaceDeploymentManager.exe), and the following subfolder:• WebPublication"Contains publish.htm and setup.exe files (the bootstrap files for client-side
prerequisites)
• The Samples directory, which contains code samples that demonstrate Genesys best-practicesrecommendations for developers
8. When installation is complete, the Installation Complete panel is displayed.• Click Finish to exit the Genesys Installation Wizard.
End
Next Steps
• (optional) The Procedure: Installing the Workspace SIP Endpoint.• Refer to the Workspace 8.5 .NET Developer's Guide & API Reference for information about how to use
the toolkit and samples to customize Workspace.
Non-ClickOnce deployment
Installing the Workspace applicationInstall the out-of-the-box Workspace application on an end-user desktop. The installation containsonly the agent application. Use this procedure if you are not going to use the ClickOnce centralizeddeployment.
ProcedureInstalling the Workspace application on a client desktop
Purpose: To install the Workspace client application on your local agent workstation or virtualmachine to test the Workspace application.
Prerequisites
• .NET Framework 4.5
Start
1. On your desktop, open the Workspace disc or the Workspace IP and double-click the Setup.exe file.You might be asked to reboot your system to delete or rename certain system files before the Installation Wizard runs.
The Genesys Installation Wizard launches, and the Welcome panel is displayed.
2. On the Welcome panel, do one of the following:• Click Next to begin the installation procedure.• Click Cancel to exit the Genesys Installation Wizard.
Deployment procedures Choose your deployment
Workspace Desktop Edition Deployment Guide 138

• Click About to open the Workspace ReadMe in your default browser.
If you clicked Next, the Select Options panel is displayed.3. On the Select Options panel, do one of the following:
• Choose Install Workspace application, and click Next.• Click Back to return to the Welcome panel.• Click Cancel to exit the Genesys Installation Wizard.
If you clicked Next, the Choose Destination Location panel is displayed (see the Figure - Choose Destination Locationpanel of the Genesys Installation Wizard).
Choose Destination Location panel of the Genesys Installation Wizard
4. (Optional) If you are installing from the International DVD, the Language Pack Selection panel isdisplayed.
Language Pack Selection panel of the Genesys Installation Wizard
Select Select Language Pack to display the list of available language packs.
Deployment procedures Choose your deployment
Workspace Desktop Edition Deployment Guide 139

Adding and Removing languages by using the Language Pack Selectionpanel of the Genesys Installation Wizard
To select a language for installation, select it in the left hand box then click Add. The language is moved to the right hand box. Tode-select a language for installation, select it and click Remove. The language is moved back to the left hand box and will not beinstalled. After you have added to the right hand box the languages that you want to install, do one of the following:
• Click Next to continue the installation procedure.• Click Back to return to the Select Options panel.• Click Cancel to exit the Genesys Installation Wizard.
5. On the Choose Destination Location panel, specify the location on your agent workstation in whichWorkspace is to be installed by doing one of the following:• Enter a location in the Destination Folder text box.• Click Default to reset the location to the default location.• Click Browse to navigate to a destination folder.
6. With the destination folder specified, do one of the following:• Click Next.• Click Back to return to the Select Options panel.• Click Cancel to exit the Genesys Installation Wizard.
If you clicked Next, the Ready to Install panel is displayed.7. On the Ready to Install panel, do one of the following:
• Click Install to install Workspace on the client desktop.• Click Back to return to the Choose Destination Location panel.• Click Cancel to exit the Genesys Installation Wizard.
If you clicked Next, the Workspace client application is installed in the location that you specified. When installation is complete,the Installation Complete panel is displayed.
The Workspace agent application is installed by the Install Workspace application option into the folder that you specified(for more information about installation options, see the Table - Workspace Install Mode Deployment Packages).
8. Click Finish to exit the Genesys Installation Wizard.9. (optional) Procedure: Installing the Workspace SIP Endpoint.
Deployment procedures Choose your deployment
Workspace Desktop Edition Deployment Guide 140

10. (optional) To use Kerberos Single Sign-on (SSO), edit the login.kerberos.service-principal-nameoption in the interactionworkspace.exe.config property file to add the following line:<appSettings>...<add key="login.kerberos.service-principal-name" value="<SPN Name"/><add key="login.url" value="tcp://<host><port>/AppName" /><add key="login.connections.parameters.isenable" value="false" />...
</appSettings>
11. (optional) To include custom packages, add the customization resources that are required for your finalinstallation.
12. If you executed at least one of the steps 9 to 11:a. Prepare your final package by using the updated file set.b. Push your custom package to the agent workstations.
13. To launch the Workspace client application on the client desktop, select it from the Start menu ornavigate to the installation folder that you specified and double-click the InteractionWorkspace.exefile .
The Workspace login window is displayed on the client desktop (see the Figure - Workspace agent Login window with noconnection parameters). The connection panel of the login window indicates that no connection has been specified. Before theagent can log in, you must connect to the Workspace application in your Genesys Framework.
Workspace agent Login window with no connection parameters
14. Click the More Options drop-down list to open the connection options panel (see the Figure -Workspace agent Login window with the connection-parameters panel displayed).
Deployment procedures Choose your deployment
Workspace Desktop Edition Deployment Guide 141

Workspace agent Login window with the connection-parameters paneldisplayed
15. Enter the following information into the agent-login panel and the connection-parameters panel:• User Name: A valid user name that is configured in the Configuration Layer• Password: The valid password for the specified user name• Application Name: The name that is specified for the Workspace application object to which you
want to connect• Host Name: The name of the web server.• Port: The port that is configured for your web-server application
See the Figure - Workspace agent Login window with the connection-parameters paneldisplayed for an example of how to populate the fields in the Workspace login window.
16. Click Login to continue logging in to Workspace; click Cancel to close the agent-login window withoutlogging in.
Refer to Workspace User's Guide for more information about how to log in to Workspace and use the application.
End
Next Steps
• Workspace Functionality Overview and Provisioning Workspace
Deployment procedures Choose your deployment
Workspace Desktop Edition Deployment Guide 142

Adding and removing Language PacksUse the following procedures to manually add and remove Workspace Language Packs after you havedeployed Workspace.
ImportantNotes about upgrading Language Packs when you upgrade Workspace:
Upgrade from DVD
• When you upgrade Workspace from DVD, only the application is upgraded• All language packs that were install using an older version will not be upgraded—You
must manually upgrade each language pack by using the same procedure that wasused to install the original language packs; during install, the wizard will detect theolder language packs and enable you to choose which ones to upgrade
Upgrade from Language Pack IP
• Open the folder containing the language pack• Follow the standard procedure to add a language pack to workspace
Adding a Language Pack to Workspace after deployment
Language packs (localized content for Workspace) are not always released at the same time as theEnglish version of Workspace, and new language packs are added as demanded by Genesys'customers.
Language packs are available as part of the Genesys International DVD/IP. If you are installing a newrelease of Workspace from an International DVD/IP, use the standard ClickOnce, Developer, and Non-ClickOnce procedures in the other tabs of this topic.
Watch video: How to add a language pack to an already deployed Workspace Desktop Edition 8.5.1:Link to video
Use the following procedure to add a language pack to your existing Workspace deployment.
ProcedureInstalling a Workspace Language Pack on an existing Workspace deployment or ClickOncepackage
Purpose: To install a Workspace language pack on your existing Workspace deployment on a client
Deployment procedures Adding and removing Language Packs
Workspace Desktop Edition Deployment Guide 143

desktop or on an existing ClickOnce package.
Prerequisites
Workspace must already be installed using one of the following deployment types:
• ClickOnce Deployment• Developer Deployment• Non-ClickOnce Deployment
Start
1. If you are deploying from the Workspace Desktop Edition DVD, open the Lang folder (refer to the Lang(Language) folder in the Workspace Install Package figure).
Lang (Language) folder in the Workspace Install Package
If you are installing from a language specific IP, go to Step 3.2. The Lang folder contains folders named with three-letter language codes. These folders contain the
language specific language pack installers (refer to the Three letter language-code folders in theLang folder figure). Open the folder that contains the language installer that you want to use.
Three letter language-code folders in the Lang folder
3. Double-click the setup.exe file to launch the language pack installer.
Deployment procedures Adding and removing Language Packs
Workspace Desktop Edition Deployment Guide 144

Language pack specific installer setup.exe
The Genesys Installation Wizard launches and the Welcome panel is displayed.
Genesys Installation Wizard language pack splash screen panel
4. On the Welcome panel, do one of the following:• Click Next to begin the installation procedure.• Click Cancel to exit the Genesys Installation Wizard.• Click About to open the Workspace Desktop Edition ReadMe file in your default browser.
If you clicked Next, the installer searches for instances of the Workspace application installed on your computer and displays a listof installations in the Select Installed Application panel from which you can choose.
Deployment procedures Adding and removing Language Packs
Workspace Desktop Edition Deployment Guide 145
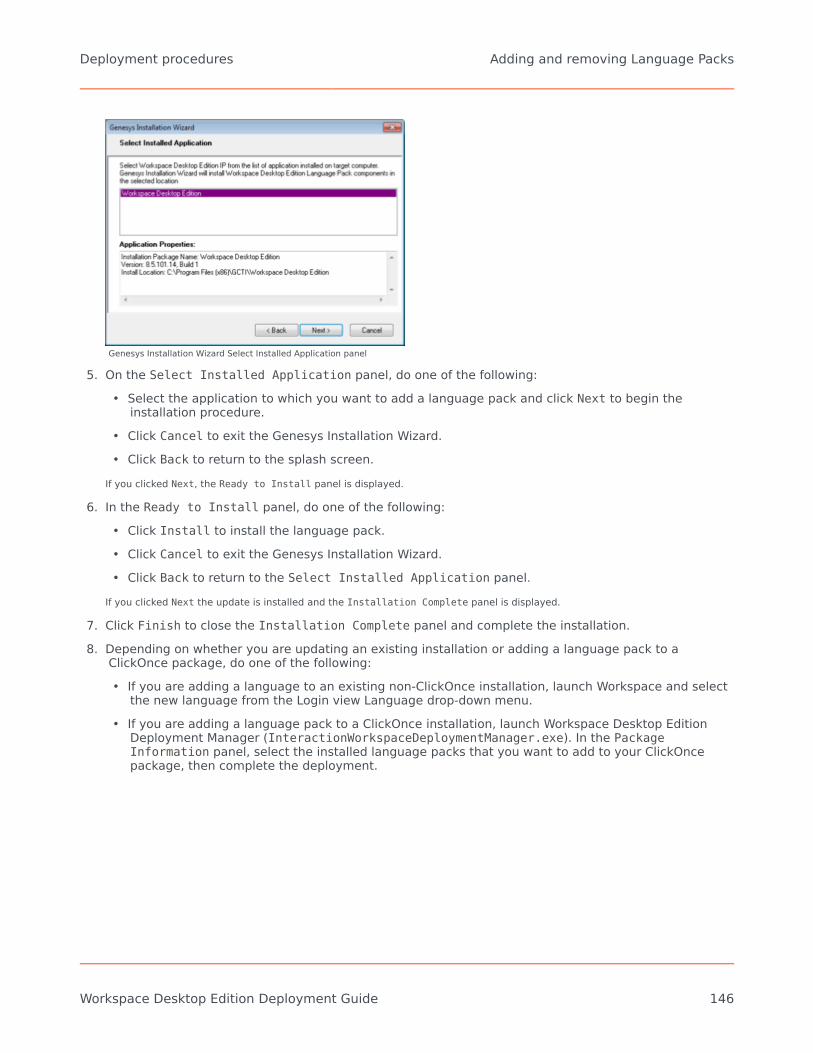
Genesys Installation Wizard Select Installed Application panel
5. On the Select Installed Application panel, do one of the following:• Select the application to which you want to add a language pack and click Next to begin the
installation procedure.• Click Cancel to exit the Genesys Installation Wizard.• Click Back to return to the splash screen.
If you clicked Next, the Ready to Install panel is displayed.
6. In the Ready to Install panel, do one of the following:• Click Install to install the language pack.• Click Cancel to exit the Genesys Installation Wizard.• Click Back to return to the Select Installed Application panel.
If you clicked Next the update is installed and the Installation Complete panel is displayed.
7. Click Finish to close the Installation Complete panel and complete the installation.8. Depending on whether you are updating an existing installation or adding a language pack to a
ClickOnce package, do one of the following:• If you are adding a language to an existing non-ClickOnce installation, launch Workspace and select
the new language from the Login view Language drop-down menu.• If you are adding a language pack to a ClickOnce installation, launch Workspace Desktop Edition
Deployment Manager (InteractionWorkspaceDeploymentManager.exe). In the PackageInformation panel, select the installed language packs that you want to add to your ClickOncepackage, then complete the deployment.
Deployment procedures Adding and removing Language Packs
Workspace Desktop Edition Deployment Guide 146

Genesys Installation Wizard Package Information panel
End
Removing a Language Pack From Workspace after Deployment
For non-ClickOnce deployments, use Add/Remove Programs to select which Language Packs youwant to remove from your workstation.
For ClickOnce deployments, run Workspace Deployment Manager and de-select language packsin the Package Information panel and push new ClickOnce package to your web server.
Deployment procedures Adding and removing Language Packs
Workspace Desktop Edition Deployment Guide 147

Installing the Workspace SIP Endpoint[Modified: 8.5.109.16, 8.5.114.08]
The Workspace SIP Endpoint is an optional plug-in or standalone application for Workspace. It isavailable as a separate IP that you install from a separate CD/DVD. You can install it in one of twomodes, as a plugin that runs with Workspace Desktop Edition on the agent workstation, or as astandalone application that connects to Workspace running in a virtualized environment.
TipWorkspace also supports the Genesys Softphone in place of Workspace SIP Endpoint.To learn about the installation of Genesys Softphone, see Deploying GenesysSoftphone in the Genesys Softphone Deployment Guide.
If you intend to create a ClickOnce package to install Workspace SIP Endpoint, install the WorkspaceSIP Endpoint after you install the Workspace application on your server, but before you run theWorkspace Deployment Manager.
If you deploy Workspace SIP Endpoint as part of a ClickOnce deployment, the behavior of theClickOnce download depends on the privileges that are assigned to the agent who is logging in. If theagent is granted the privilege to execute a local Workspace SIP Endpoint, the following files aredownloaded to the agent workstation:
• The SIP Endpoint Communication plug-in (part of Workspace runtime)• The Workspace SIP Endpoint executable and associated assemblies.
Installing Workspace SIP Endpoint as a Workspace DesktopEdition plugin
Use the following procedure to install Workspace SIP Endpoint in environments where the Workspaceapplication and Workspace SIP Endpoint run on the same workstation. Use the Installing theStandalone Workspace SIP Endpoint when you are running Workspace in a virtualized environment.
ProcedureInstalling the Workspace SIP Endpoint as a Workspace Desktop Edition plugin
Purpose: To install the Workspace SIP Endpoint on your web server, an agent workstation, or adevelopment workstation as a plugin.
Prerequisites
Deployment procedures Installing the Workspace SIP Endpoint
Workspace Desktop Edition Deployment Guide 148

• .NET Framework 4.5• The following Microsoft redistributable package(s) is/are required to be installed on the workstation
where Workspace SIP Endpoint will execute. They are installed by the Installation Package if they arenot already present on the target workstation, but if you are deploying Workspace and Workspace SIPEndpoint by using ClickOnce, you must plan the installation of the following packages on thoseworkstations prior to enabling the ClickOnce deployment:• For 8.5.114.xx and higher
• Visual C++ Redistributable for Visual Studio 2013: http://download.microsoft.com/download/2/E/6/2E61CFA4-993B-4DD4-91DA-3737CD5CD6E3/vcredist_x86.exe
• For 8.5.104.xx to 8.5.113.xx:• Microsoft Visual C++ 2005 Service Pack 1 Redistributable Package MFC Security Update:
http://download.microsoft.com/download/8/B/4/8B42259F-5D70-43F4-AC2E-4B208FD8D66A/vcredist_x86.EXE
• Visual C++ Redistributable for Visual Studio 2013: http://download.microsoft.com/download/2/E/6/2E61CFA4-993B-4DD4-91DA-3737CD5CD6E3/vcredist_x86.exe
• 8.5.103.xx and lower:• Microsoft Visual C++ 2005 Service Pack 1 Redistributable Package MFC Security Update:
http://download.microsoft.com/download/8/B/4/8B42259F-5D70-43F4-AC2E-4B208FD8D66A/vcredist_x86.EXE
• Visual C++ Redistributable for Visual Studio 2012 Update 4, 32-bits package only:http://www.microsoft.com/en-us/download/details.aspx?id=30679
• Install the Workspace application by using one of the following procedures:• Deploying The ClickOnce Application On Your Web Server. Choose this option if you want to deploy
Workspace as a ClickOnce application.• Installing The Workspace Developer Toolkit. Choose this option if you want to deploy the Workspace
developer package.• Installing The Workspace Application. Choose this option if you want to deploy a non-ClickOnce
version of Workspace.
Start
1. On your desktop, open the Workspace SIP Endpoint disc or the Workspace SIP Endpoint IP and double-click the Setup.exe file.
You might be asked to reboot your system to delete or rename certain system files before the Installation Wizard runs.
The Genesys Installation Wizard launches and the Welcome panel is displayed.
2. On the Welcome panel, do one of the following:• Click Next to begin the installation procedure.• Click Cancel to exit the Genesys Installation Wizard.• Click About to open the Workspace SIP Endpoint ReadMe in your default browser.
If you clicked Next, the Select Installed Application panel is displayed (see the Figure - Select Installed ApplicationPanel of the Genesys Installation Wizard).
Deployment procedures Installing the Workspace SIP Endpoint
Workspace Desktop Edition Deployment Guide 149

Select Installed Application Panel of the Genesys Installation Wizard
3. The Select Installed Application panel enables you to select the Workspace application instanceto which you want to add Workspace SIP Endpoint as a plug-in.
The Genesys Installation Wizard searches the target computer for an installed version of Workspace. Select the version ofWorkspace in the location in which you want Workspace SIP Endpoint to be installed.
The Application Properties pane displays the name, version, and location of the selected Workspace application (see theFigure - Select Installed Application Panel of the Genesys Installation Wizard).
4. After you have selected the version of Workspace that you want to use with Workspace SIP Endpoint, doone of the following:• Click Next to proceed to the next panel.• Click Cancel to exit the Genesys Installation Wizard.• Click Back to return to the previous panel.
If you clicked Next, the Ready to Install panel is displayed.
5. On the Ready to Install panel do one of the following:• Click Install to install Workspace SIP Endpoint on your web server, development workstation, or
agent workstation.• Click Back to return to the Select Installed Application panel.• Click Cancel to exit the Genesys Installation Wizard.
If you clicked Next, Workspace SIP Endpoint is installed in the location that you specified. Wheninstallation is complete, the Installation Complete panel is displayed.
6. Click Finish to exit the Genesys Installation Wizard.A folder that is named InteractionWorkspaceSIPEndpoint is created in the Workspace folder. TheInteractionWorkspaceSIPEndpoint folder contains the Workspace SIP Endpoint application and associated files.
After the Workspace SIP Endpoint application is installed on the agent or developer workstation, or after it is downloaded by theClickOnce application (see Deploying The ClickOnce Application On Your Web Server), and after the agent is granted permissionto use the application, agents must login Workspace on a Place that is associated with a SIP DN to start the Workspace SIPEndpoint. The Workspace SIP Endpoint process is started automatically when Workspace application is being initialized.
7. To ensure that the supporting programs were installed correctly, check if the following programs areavailable in the "uninstall programs" view of the Control Panel on your Windows workstation:• Genesys Workspace SIP Endpoint <version>
Deployment procedures Installing the Workspace SIP Endpoint
Workspace Desktop Edition Deployment Guide 150

• Microsoft Visual C++ 2005 Redistributable (8.5.113.xx and lower)• Microsoft Visual C++ 2012 Redistributable (x86) - 11.0.60.610
End
Next Steps
• (Optional) If you are deploying Workspace as a ClickOnce application on your web server, go toDeploying The ClickOnce Application On Your Web Server.
• Installation is complete. You can provision Workspace SIP Endpoint functionality. Refer to:• Provisioning Functionality.
Installing the standalone Workspace SIP Endpoint
[Added: 8.5.109.16]
Use the following procedure to install Workspace SIP Endpoint in environments where the Workspaceapplication is running in a virtualized environment and Workspace SIP Endpoint runs as a standaloneapplication on the agent workstation.
ProcedureInstalling the standalone Workspace SIP Endpoint as a ClickOnce package
Purpose: To install the Workspace SIP Endpoint on your web server so that it can be deployed on anagent workstation or a development workstation.
Prerequisites
• .NET Framework 4.5• Workspace Desktop Edition is installed on the host machine as a ClickOnce package.• The following Microsoft redistributable package(s) is/are required to be installed on the workstation
where Workspace SIP Endpoint will execute. They are installed by the Installation Package if they arenot already present on the target workstation, but if you are deploying Workspace and Workspace SIPEndpoint by using ClickOnce, you must plan the installation of the following packages on thoseworkstations prior to enabling the ClickOnce deployment:• Microsoft Visual C++ 2005 Service Pack 1 Redistributable Package MFC Security Update:
http://download.microsoft.com/download/8/B/4/8B42259F-5D70-43F4-AC2E-4B208FD8D66A/vcredist_x86.EXE
• Visual C++ Redistributable for Visual Studio 2013: http://download.microsoft.com/download/2/E/6/2E61CFA4-993B-4DD4-91DA-3737CD5CD6E3/vcredist_x86.exe
• Install the Workspace application in a virtualized environment by using one of the following procedures:• Deploying The ClickOnce Application On Your Web Server. Choose this option if you want to deploy
Workspace as a ClickOnce application.• Installing The Workspace Developer Toolkit. Choose this option if you want to deploy the Workspace
Deployment procedures Installing the Workspace SIP Endpoint
Workspace Desktop Edition Deployment Guide 151

developer package.• Installing The Workspace Application. Choose this option if you want to deploy a non-ClickOnce
version of Workspace.
Start
1. Open the Workspace SIP Endpoint disc or the Workspace SIP Endpoint IP and double-click the Setup.exefile. You might be asked to reboot your system to delete or rename certain system files before theInstallation Wizard runs. The Genesys Installation Wizard launches and the Welcome panel is displayed.
2. On the Welcome panel, do one of the following:• Click Next to begin the installation procedure.• Click Cancel to exit the Genesys Installation Wizard.
If you clicked Next, the Select Installed Application panel is displayed (see the Figure - Select Installed ApplicationPanel of the Genesys Installation Wizard).
Select Installed Application Panel of the Genesys Installation Wizard
3. Ensure that Workspace Desktop Edition is selected, then click Next to proceed to the Ready toInstall panel.
4. On the Ready to Install panel, click Install to install Workspace SIP Endpoint on your web server.Workspace SIP Endpoint is installed in the location that you specified. When installation is complete, the Installation Completepanel is displayed.
5. Click Finish to exit the Genesys Installation Wizard.A folder that is named InteractionWorkspaceSIPEndpoint is created in the Workspace Desktop Edition folder. TheInteractionWorkspaceSIPEndpoint folder contains the Workspace SIP Endpoint application and associated files.
6. From the Start menu of your web server host, use the application shortcut to launch the WorkspaceDesktop Edition Deployment Manager. The Deployment Manager can also be launched from thelocation where you installed it. The Welcome panel is displayed on the desktop of your web server.
7. On the Welcome panel, click Next to begin the installation procedure. The Select Package panel isdisplayed.
Deployment procedures Installing the Workspace SIP Endpoint
Workspace Desktop Edition Deployment Guide 152

Select Package Panel of the Workspace Desktop Edition DeploymentManager
8. Click the Workspace Desktop Sip Endpoint standalone option, then click Next. The DestinationFolder panel is displayed.
9. Specify the path to the destination folder for the ClickOnce package, then click Next. The PackageInformation panel is displayed.
10. Specify the following information:• Application Name—The default name is Workspace Desktop SIP Endpoint• Publisher—The default name is Genesys Telecommunications Laboratories• Base URL—Specify the host URL that will be provided to agents to download the ClickOnce package
Click Next. The Signing panel is displayed. For more information about how to create or obtain a signing certificate, refer to the"ClickOnce Deployment and Authenticode" page on the Microsoft Developer Network web site:
http://msdn.microsoft.com/en-us/library/ms172240.aspx11. Choose the type of signing certificate that you are using:
• Click Do not Sign if you do not provide a certificate, a security warning is displayed whenever theclient downloads the package.
• Click Sign with a provided certificate to enable the Selects a certificate field.1. Click the browse button to navigate to the certificate.2. Enter the password for the certificate in the Password field.
12. Click Next to proceed with the installation. The Ready to Build pane is displayed. This pane contains asummary of the files that will be deployed on your web server and a confirmation of the deploymentURL.
13. Click Next to complete the deployment. The Deployment Manager deploys the Workspace StandaloneSIP Endpoint ClickOnce application in the path that you specified at the beginning of the wizardexecution. When the deployment is complete, the Deployment Finished pane is displayed. This panecontains messages that relate to the success of the deployment.
14. Click Finish to close the Workspace Deployment Manager.Deployment proceeds. When deployment is complete, the publish.htm web page is opened in your default browser automatically
Deployment procedures Installing the Workspace SIP Endpoint
Workspace Desktop Edition Deployment Guide 153

for testing purposes.
The Workspace Standalone SIP Endpoint publish.htm page
15. Provide the URL for the publish.htm page to your agents to enable them to install the WorkspaceStandalone SIP Endpoint on their workstations and receive automatic updates when the application isupdated on the web server.
16. When an agent navigates to the publish.htm page, the ClickOnce package deployment automaticallystarts, or she or he should click the Launch hyperlink to start the deployment on his or herworkstation.
17. Instruct your agent to click Install. When the installation is complete, the Workspace Standalone SIPEndpoint launches automatically. The application icon is displayed in the system tray ( ). The icon isgrey when the SIP Endpoint is not connected to a Workspace application running in a virtualizedenvironment, and red when it has an active connection.
Agents can exit the SIP Endpoint by right clicking on the icon and selecting Exit. If Agents have to relaunch the application, theycan do so by using the shortcut in the Start menu.
Note: When Workspace SIP Endpoint is started for the first time on a workstation with an active Windows Firewall, the WindowsOperating System displays a security message requesting the user to approve the selection of a private or enterprise network.
Agents running Workspace SIP Endpoint on Workstations usingWindows Firewall might have to grant access to run the application forthe first time
End
Next Steps
Deployment procedures Installing the Workspace SIP Endpoint
Workspace Desktop Edition Deployment Guide 154

• Installation is complete. You can provision Workspace SIP Endpoint functionality. Refer to:• Provisioning Functionality.
ProcedureInstalling the Standalone Workspace SIP Endpoint on a workstation
Purpose: To install the Workspace SIP Endpoint on an agent workstation or a developmentworkstation.
Prerequisites
• Ensure that Workspace Desktop Edition was not installed on this workstation by an Installation Packagefrom Genesys.
• .NET Framework 4.5• The following Microsoft redistributable package(s) is/are required to be installed on the workstation
where Workspace SIP Endpoint will execute. They are installed by the Installation Package if they arenot already present on the target workstation, but if you are deploying Workspace and Workspace SIPEndpoint by using ClickOnce, you must plan the installation of the following packages on thoseworkstations prior to enabling the ClickOnce deployment:• Microsoft Visual C++ 2005 Service Pack 1 Redistributable Package MFC Security Update:
http://download.microsoft.com/download/8/B/4/8B42259F-5D70-43F4-AC2E-4B208FD8D66A/vcredist_x86.EXE
• Visual C++ Redistributable for Visual Studio 2013: http://download.microsoft.com/download/2/E/6/2E61CFA4-993B-4DD4-91DA-3737CD5CD6E3/vcredist_x86.exe
• Install the Workspace application in a virtualized environment by using one of the following procedures:• Deploying The ClickOnce Application On Your Web Server. Choose this option if you want to deploy
Workspace as a ClickOnce application.• Installing The Workspace Developer Toolkit. Choose this option if you want to deploy the Workspace
developer package.• Installing The Workspace Application. Choose this option if you want to deploy a non-ClickOnce
version of Workspace.
Start
1. On your workstation, open the Workspace SIP Endpoint disc or the Workspace SIP Endpoint IP anddouble-click the Setup.exe file. You might be asked to reboot your system to delete or rename certainsystem files before the Installation Wizard runs. The Genesys Installation Wizard launches and theWelcome panel is displayed.
2. On the Welcome panel, do one of the following:• Click Next to begin the installation procedure.• Click Cancel to exit the Genesys Installation Wizard.
If you clicked Next, the Choose Destination Location panel is displayed.3. Specify the Destination Folder for the Workspace SIP Endpoint application, then click Next to proceed
to the Ready to Install panel.
Deployment procedures Installing the Workspace SIP Endpoint
Workspace Desktop Edition Deployment Guide 155

4. On the Ready to Install panel, click Install to install Workspace SIP Endpoint on your workstation.Workspace SIP Endpoint is installed in the location that you specified. When installation is complete, the Installation Completepanel is displayed.
5. Click Finish to exit the Genesys Installation Wizard.6. When the installation is complete, the Workspace Standalone SIP Endpoint can be launched for the first
time by using the shortcut in the Start menu (or it will start automatically when any Windows usersession is started). The application icon is displayed in the system tray ( ).
The icon is grey when the SIP Endpoint is not connected to a Workspace application running in a virtualized environment, and redwhen it has an active connection.
Agents can exit the SIP Endpoint by right clicking on the icon and selecting Exit. If Agents have to relaunch the application, theycan do so by using the shortcut in the Start menu.
End
Next Steps
• Installation is complete. You can provision Workspace SIP Endpoint functionality. Refer to:• Provisioning Functionality.
Deployment Manager in Console modeYou can build a Workspace Standalone SIP Endpoint ClickOnce package using Workspace DesktopEdition Deployment Manager in Console mode. This can be done by setting theApplicationToDeploy attribute in the silent.xml file:
<ApplicationToDeploy>WorkspaceSipEndpoint</ApplicationToDeploy>
For more information, refer to 3b. Console: Deploy the Workspace downloadable ClickOnce packageon your web server.
The following is an example of a silent.xml file with supported options for Workspace SIP Endpoint:
<?xml version="1.0" encoding="windows-1250"?><configuration><ApplicationToDeploy>WorkspaceSipEndpoint</ApplicationToDeploy><InformationApplicationName>Workspace SIP Endpoint</InformationApplicationName><InformationURL>http://WebServerHost/WorkspaceSipEndpoint</InformationURL><InformationPublisher>Genesys Telecommunications Laboratories</InformationPublisher><DeploymentDestinationFolder>c:\inetpub\wwwroot\WorkspaceSipEndpoint</DeploymentDestinationFolder><SigningSignsWithProvidedCertificate>false</SigningSignsWithProvidedCertificate><SigningCertificateFileName></SigningCertificateFileName><SigningPassword></SigningPassword></configuration>
Deployment procedures Installing the Workspace SIP Endpoint
Workspace Desktop Edition Deployment Guide 156

Installing plug-ins for workspaceWorkspace enables you to install optional plug-ins for Workspace. Plug-ins, such as eServices SocialMedia interaction handling, are available as separate IPs that you install from a separate CD/DVD.
If you deploy a plug-in as part of a ClickOnce deployment, the behavior of the ClickOnce downloaddepends on the privileges that are assigned to the agent who is logging in. If the agent is granted theprivilege to execute a plug-in, the plug-in is downloaded as part of the deployment.
The Procedure: Installing plug-ins for Workspace is a general procedure that describes how to installplug-ins for Workspace. The documentation for your plug-in provides specific information about howto install and deploy your plug-in.
Consult the documentation that comes with your plug-in for specific information abouthow to install and provision your plug-in.
Before you install your plug-in, you must provision it in Genesys Administrator Extension (refer to theGenesys Administrator Extension documentation for more information) in the same way that youprovision Workspace.
Workspace plug-ins come with <Plug-In Name>.apd and <Plug-In Name>.xml (privileges) files, bothof type Workspace. Upload the <Plug-In Name>.apd file and attach the <Plug-In Name>.xml file tocreate the <Plug-In Name> Template.
The Workspace application object is created based on the Workspace Template.
When you provision the Privileges that are assigned to a Role, the list of Privileges that are availablefor the Workspace application type combine the privileges that are specified in the Workspace.xmland <Plug-In Name>.xml files.
ImportantEnsure that you do not use the template and metadata files "Workspace (Agentdesktop).apd" and "Workspace (Agent desktop).xml" when working with plug-ins.
ProcedureInstalling plug-ins for Interaction Workspace
Purpose:
To install plug-ins for Workspace on your web server, an agent workstation, or a developmentworkstation.
Prerequisites
Deployment procedures Installing plug-ins for workspace
Workspace Desktop Edition Deployment Guide 157

• .NET Framework 4.5• Installation of the Workspace application by using one of the following procedures:
• Deploying The ClickOnce Application On Your Web Server. Choose this option if you want to deployWorkspace as a ClickOnce application. Install the plug-ins after you install the Workspaceapplication on your server, but before you run the Workspace Deployment Manager.
• Installing The Developer Toolkit. Choose this option if you want to deploy the Workspace developerpackage. Refer to About Workspace Extension Samples and Deploying and Executing the ExtensionSamples for information about reorganizing files to enable the debugging of samples with plug-ins.
• Installing The Workspace Application. Choose this option if you want to deploy a non-ClickOnceversion of Workspace.
Start
1. On your desktop, open the disc that contains the plug-in IP or the plug-in IP and double-click theSetup.exe file.
You might be asked to reboot your system to delete or rename certain system files before the Installation Wizard runs.
The Genesys Installation Wizard launches and the Welcome panel is displayed.
2. On the Welcome panel, do one of the following:• Click Next to begin the installation procedure.• Click Cancel to exit the Genesys Installation Wizard.• Click About to open the plug-in ReadMe in your default browser.
If you clicked Next, the Select Installed Application panel is displayed (see the Figure - Select Installed ApplicationPanel of the Genesys Installation Wizard).
Select Installed Application Panel of the Genesys Installation Wizard
3. The Select Installed Application panel enables you to select the Workspace application instanceto which you want to add the plug-in.
The Genesys Installation Wizard searches the target computer for an installed version of Workspace. Select the version ofWorkspace in the location in which you want plug-in to be installed.
The Application Properties pane displays the name, version, and location of the selected Workspace application (see theFigure - Select Installed Application Panel of the Genesys Installation Wizard).
4. After you have selected the version of Workspace that you want to use with the plug-in, do one of the
Deployment procedures Installing plug-ins for workspace
Workspace Desktop Edition Deployment Guide 158
following:• Click Next to proceed to the next panel.• Click Cancel to exit the Genesys Installation Wizard.• Click Back to return to the previous panel.
If you clicked Next, the Ready to Install panel is displayed.5. On the Ready to Install panel do one of the following:
• Click Install to install the plug-in on your web server, development workstation, or agentworkstation.
• Click Back to return to the Select Installed Application panel.• Click Cancel to exit the Genesys Installation Wizard.
If you clicked Next, plug-in is installed in the location that you specified. When installation is complete,the Installation Complete panel is displayed.
6. Click Finish to exit the Genesys Installation Wizard.Plug-in files are copied into the target installation directory of the original Workspace deployment.
After the plug-in application is installed on the agent or developer workstation, or after it is downloaded by the ClickOnceapplication (see Deploying The ClickOnce Application On Your Web Server), and after the agent is granted permission to use theapplication, agents must login Workspace on a Place that is associated with a SIP DN to use the plug-in with Workspace. The plug-in process is started automatically when Workspace application is being initialized.
End
Next Steps
• (Optional) If you are deploying Workspace as a ClickOnce application on your web server, go to theProcedure: Deploying The ClickOnce Application On Your Web Server. When the WorkspaceDeployment Manager Package Information pane is displayed, you can specify that your plug-in isinstalled with the ClickOnce package.
• (Optional) If you are deploying Workspace for development purposes, go to About Workspace ExtensionSamples.
• Installation is complete. You can provision the plug-in functionality. Refer to the documentation thataccompanies your plug-in IP.
Deployment procedures Installing plug-ins for workspace
Workspace Desktop Edition Deployment Guide 159

Installing the Screen Capture applicationScreen Capture is not currently available for Workspace.
Deployment procedures Installing the Screen Capture application
Workspace Desktop Edition Deployment Guide 160
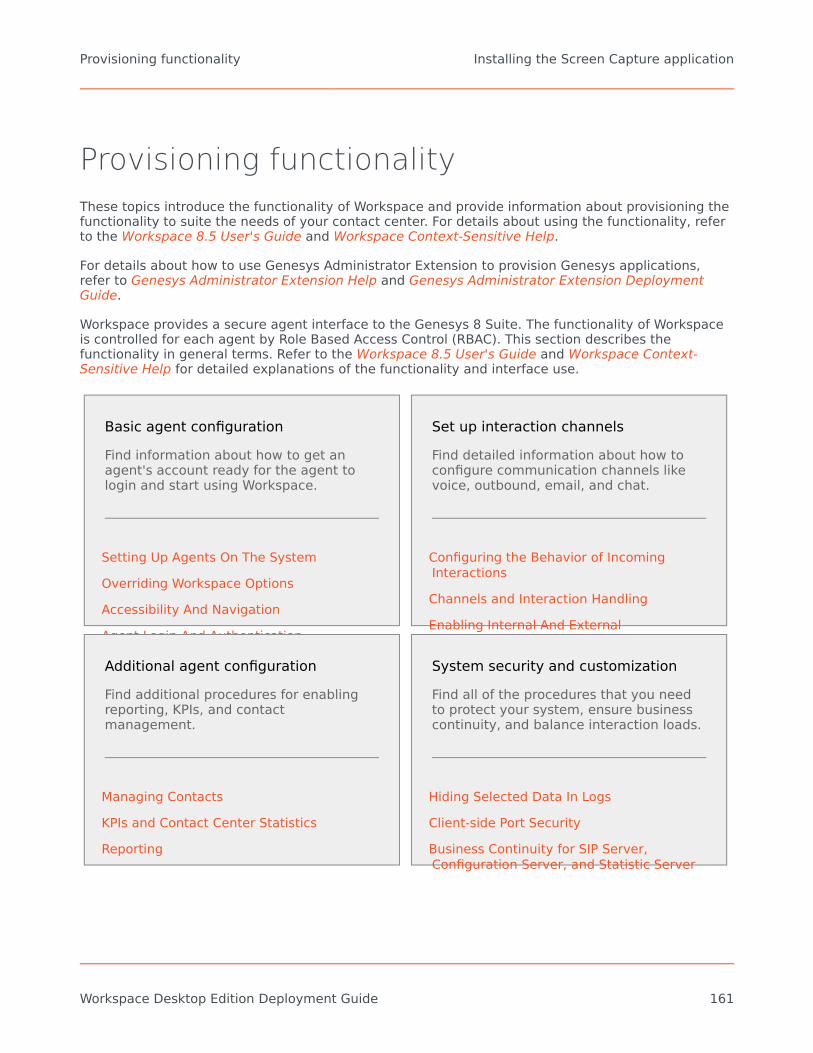
Provisioning functionalityThese topics introduce the functionality of Workspace and provide information about provisioning thefunctionality to suite the needs of your contact center. For details about using the functionality, referto the Workspace 8.5 User's Guide and Workspace Context-Sensitive Help.
For details about how to use Genesys Administrator Extension to provision Genesys applications,refer to Genesys Administrator Extension Help and Genesys Administrator Extension DeploymentGuide.
Workspace provides a secure agent interface to the Genesys 8 Suite. The functionality of Workspaceis controlled for each agent by Role Based Access Control (RBAC). This section describes thefunctionality in general terms. Refer to the Workspace 8.5 User's Guide and Workspace Context-Sensitive Help for detailed explanations of the functionality and interface use.
Basic agent configurationFind information about how to get anagent's account ready for the agent tologin and start using Workspace.
Setting Up Agents On The SystemOverriding Workspace OptionsAccessibility And NavigationAgent Login And AuthenticationManaging Agent StatusManaging Agent Inactivity
Set up interaction channelsFind detailed information about how toconfigure communication channels likevoice, outbound, email, and chat.
Configuring the Behavior of IncomingInteractionsChannels and Interaction HandlingEnabling Internal And ExternalCommunicationsCall Recording And Screen RecordingAdditional agent configuration
Find additional procedures for enablingreporting, KPIs, and contactmanagement.
Managing ContactsKPIs and Contact Center StatisticsReporting
System security and customizationFind all of the procedures that you needto protect your system, ensure businesscontinuity, and balance interaction loads.
Hiding Selected Data In LogsClient-side Port SecurityBusiness Continuity for SIP Server,Configuration Server, and Statistic Server
Provisioning functionality Installing the Screen Capture application
Workspace Desktop Edition Deployment Guide 161

eServices Load Balancing BusinessContinuityLoad Balancing Using ClustersCustomizing Display Names forConfiguration Objects
Provisioning functionality Installing the Screen Capture application
Workspace Desktop Edition Deployment Guide 162

Setting up agents on the system[Modified: 8.5.112.08, 8.5.117.18, 8.5.143.08]
Refer to Genesys Administrator Extension Help and Genesys Administrator Extension DeploymentGuide for detailed information on how to use Genesys Administrator Extension and ManagementFramework to configure access permissions.
1. Creating a Role and allowing a Workspace privilege andassigning a Role to an agent or agent group
Purpose:
To restrict the privileges that are assigned to an agent or agent group.
The security.disable-rbac configuration option in the interaction-workspace section determineswhether agents have all privileges granted or whether the Role-Based Access Control (RBAC) controlsystem is used.
ImportantRBAC requires Configuration Server 8.0.2 or higher. RBAC requires GenesysAdministrator 8.0.2 or higher, or Genesys Administrator Extension (9.0.100.56 orhigher is recommended).
If security.disable-rbac is set to true, RBAC is disabled and all privileges are assigned to all agentsand Agent Groups. If security.disable-rbac is set to false, RBAC is enabled and you must assign rolesto agents and Access Groups.
ImportantBeginning with Workspace 8.5.143.08, Workspace supports both the GenesysAdministrator Role storage model and the Genesys Administrator Extension Rolestorage model. Before you create a Role, refer to Role-Based Approach of Genesys 8for more information about using these different storage models.
Prerequisites
• Genesys Administrator 8.0.200.29 or higher or Genesys Administrator Extension (9.0.100.56 or higher isrecommended), configured to show Advanced View.
Provisioning functionality Setting up agents on the system
Workspace Desktop Edition Deployment Guide 163

• Configuration Server 8.0.2 or higher.• A working knowledge of Genesys Administrator Extension.• Workspace Application Template in the Configuration Layer.
Start
1. Create the Workspace Application object from the Workspace Application Template.2. From the Tenant drop-down list, select the Tenant for which you want to create the role.3. In the Genesys Administrator Extension Provisioning view, select Accounts in the Navigation
column.4. Select the Roles view.5. In the Roles view, click New.6. In the Configuration tab, specify the following General parameters:
• A name for the role.• A description of the role (optional).• Whether or not the role is enabled.
7. In the Configuration tab, specify a list of users or access groups in the Members view.8. In the Role Privileges tab, click Workspace privileges.9. Initially, all privileges are unassigned. To assign a privilege, click the drop-down list in the Value column
that is associated with the privilege and select Allowed. Refer to Role Privileges for a list of all theprivileges.
10. To save the new role, click Save and Close. The new role is now applied to the specified agents andAgent Groups. For information on privilege conflicts, refer to Conflict Resolution for ConfigurationOptions.
To discard the new role without saving your changes, click Cancel.
End
2. Optimizing the Login window
[Modified: 8.5.114.08]
ImportantRefer to Agent login, authentication, and logout for detailed information aboutconfiguring agent accounts and Places for login and authentication.
Purpose:
To control the behavior of the Workspace Agent Login Window.
Provisioning functionality Setting up agents on the system
Workspace Desktop Edition Deployment Guide 164

Tip• Agent login can be configured as either a one-step or a two-step process depending on
whether you want to prompt the agent for connection parameters in the secondarylogin window or specify the parameters for the agent.
• For a list of configuration options that are related to login, refer to Login.
• You can specify whether agents login to a Place or Place Group.
Prerequisites
• Genesys Administrator 8.0.2 or higher, configured to show Advanced View, or Genesys AdministratorExtension.
• A working knowledge of Genesys Administrator Extension.• An Workspace Application object exists in the Configuration Database.
Start
1. Configure the agent for two-step login by setting the options that control Password, Queue, Switch, andPlace.a. If the agent must enter a phone-set Password, set the login.voice.prompt-dn-password option to
true. The second login window is displayed after the agent is authenticated. A phone-set Passwordprompt will be displayed in the secondary login window.
b. If the agent must enter a Queue at login, set the login.voice.prompt-queue option to true. A Queueprompt will be displayed in the secondary login window.
If the switch has multiple logins for the agent, the agent will be prompted to enter the particular login that they want to use.
c. For details about setting up Places or Place Groups, refer to Place Selection. Several options controlPlace login:i. If the agent must enter a Place at each login, set the login.prompt-place option to true.ii. If the agent always logs in to a default Place at each login, do the following:
• Assign a default Place in the Agent Advanced tab.• Set the login.prompt-place option to false.• Set the login.default-place option to true.
iii. If the agent must specify a Place only the first time that the agent logs in (Note: The Place isstored in the local settings of the agent):• Set the login.default-place option to false.• Set the login.prompt-place option to false.
4. Configure the agent for one-step login by using the following configuration-option settings:
Provisioning functionality Setting up agents on the system
Workspace Desktop Edition Deployment Guide 165

• Set the login.voice.prompt-dn-password option to false.• Set the login.voice.prompt-queue option to false.• Set the login.prompt-place option to false.
Note: If the default Place in the Agent Advanced tab is blank, the agent will have to perform a two-steplogin the first time that the agent logs in to a particular workstation.
End
3. Provisioning Workspace for the Voice channel
Purpose:
To enable an agent to log in to the Voice channel.
Prerequisites
• Genesys Administrator 8.0.2 or higher, configured to show Advanced View, or Genesys AdministratorExtension.
• A working knowledge of Genesys Administrator Extension.• An Workspace Application object exists in the Configuration Database.• T-Server with associated switch and switching office.• A Switch that is configured with DNs that correspond to agent devices in the switch.• Agent logins that are configured in the Switch that can be referred by agents.• A Place that contains one or more DNs from the Switch.
Start
For each agent that you want to configure to use the Voice channel, do thefollowing:
1. Reference at least one AgentLogin from the Switch.2. Check the isAgent flag.3. Set a default Place. (Optional)4. Allow the voice media privilege (see Voice Privileges) for the role to which the agent is assigned (refer to
the Procedure: Creating a Role, allowing an Interaction Workspace privilege, and assigning a Role to anagent or agent group).
5. Allow the voice media privileges that you want the agent to use (see Voice Privileges).6. Configure the voice options in the interaction-workspace section of the Workspace Application
object (refer to the Voice configuration option reference for a list of Voice options and a description ofhow to configure them).
End
Provisioning functionality Setting up agents on the system
Workspace Desktop Edition Deployment Guide 166

TipAgents sometimes click Hang up by accident while handling a call. Use the voice.prompt-for-end option toensure that a confirmation dialog box is displayed so that the call is not ended accidentally.
4. Provisioning a hybrid voice agent
Example: Provisioning a hybrid Skype for Business and Workspace SIP Endpointagent[Added: 8.5.117.18]
In the past, Workspace has supported a single Voice channel represented by a softphone (WorkspaceSIP Endpoint, Skype for Business, and so on) or a hard phone during an agent session. Beginning with8.5.117.18, you can set up agents to have multiple voice devices on the same Place so that they canbe hybrid agents with typically at least one voice device, being a softphone, and the second one ahard phone or another softphone. Typical device combinations include:
• Skype for Business DN + SIP Server Voice DN (embedded SIP Endpoint or hard/soft SIP Phone)• Skype for Business DN + Voice DN of a non-SIP Server system• Voice DNs from any two voice systems (such as a third party vendor and SIP Server)
ImportantIn hybrid mode, two voice channels are supported, but only one IM channel can be supported. If hybridmode agents are set up to use IM, all IM interactions should be handled by the same T-Server (SIP Server orT-Server for Skype for Business) to avoid functional issues. Furthermore, it is not possible to send IMsbetween SIP Server and Skype for Business Server.
With this configuration, agents can make calls and Workspace selects the best device to useaccording to configuration and internal rules to select the best way.
During login, the agent chooses a Place that is set up to support multiple devices.
While logged in, the agent can independently control and view the status of the two devices in theMy Channels tab.
Supervisors can monitor any device for silent monitoring, coaching, and barge-in of hybrid agents assoon as Workspace supports the supervision capability of the corresponding voice channel.
Provisioning functionality Setting up agents on the system
Workspace Desktop Edition Deployment Guide 167

Important• If both voice channels are software devices running on an agent workstation, this
solution supports a single headset for both devices.• The two devices cannot be used simultaneously. One call must be on hold while the
other is active. If an agent accepts a call on another device, the first device isautomatically put on hold.
Purpose:
To enable an agent to log in to two separate Voice channels, one for Skype for Business and one forWorkspace SIP Endpoint.
Prerequisites
• Genesys Administrator 8.0.2 or higher, configured to show Advanced View, or Genesys AdministratorExtension.
• A working knowledge of Genesys Administrator Extension.• A Workspace Application object exists in the Configuration Database.• T-Server with associated switch and switching office.• A Switch that is configured with DNs that correspond to agent devices on the switch.• Agent logins that are configured on the Switch that can be referred by agents.• An environment that contains one T-Server for Skype for Business and one SIP Server and associated
Switches.• (optional) ISCC connection between SIP Server and T-Server for Skype for Business, using cast-type=
route.• A Trunk between SIP Server and Skype for Business Server.• A Place that contains one voice DN from SIP Server and one DN from the Skype for Business Switch.
Start For each agent that you want to configure to be a hybrid Voice agent, do the following:
1. Reference at least one AgentLogin from the Switch.2. Check the isAgent flag.3. Set a default Place. (Optional)4. Allow the voice media privilege (see Voice Privileges) for the role to which the agent is assigned (refer to
the Procedure: Creating a Role, allowing an Interaction Workspace privilege, and assigning a Role to anagent or agent group).
5. Allow the voice media privileges that you want the agent to use (see Voice Privileges).6. Configure the voice options in the interaction-workspace section of the Workspace Application
object (refer to the Voice configuration option reference for a list of Voice options and a description ofhow to configure them).
Provisioning functionality Setting up agents on the system
Workspace Desktop Edition Deployment Guide 168

7. In the interaction-workspace section, set the value of the spl.switch-policy-label on the Skypefor Business Switch annex to SIPSwitch::Lync.
8. In the interaction-workspace section, set the value of the display-name or display-name.<language-code>-<country-code> option on the Switch annex to the display name of the switchobject as you want it to appear in Team Communicator and the My Channels tab. The value of thisoption overrides the name property of the switch.
9. In the interaction-workspace section, set the value of the expression.callable-phone-number on theSwitch or DN annex to the pattern of phone numbers that can be dialed from this switch or DN. You canuse this option to limit the numbers that can be called from each switch or DN in a hybrid environment.
Examples:
a. You could configure the SIP Server to dial only outgoing calls and Skype for Business only for internalcalls.
b. If you have Skype for Business urls like these:• sip:[email protected]
• sip:[email protected]
You could set the regular expression value of the expression.callable-phone-number option to sip:\w+-?\w+@\w+\.\w+.
10. Set the value of the voice.hybrid-switch-preference option to a comma-separated list of switch names inyour hybrid environment. The order of the names specifies the preferred switch when the call policydoes not favor either switch.
End
5. Enabling Workspace to play ring tones
Purpose: To enable Workspace to play ring tones for inbound interactions on one or more devices.
In Interaction Workspace 8.0 and 8.1, tones were played through the embedded Windows MediaPlayer application on a single audio device that was configured as the default console sound device inthe Windows Sound configuration panel. Starting from 8.5.0, the sounds are played through theDirect Sound API, which enables more flexibility on the device(s) that are used to play the sound.
The following procedure enables you to specify whether tones are played on the default audio device,a secondary audio device, or both.
A secondary audio device can be defined as either a specific audio device or all of the non-defaultaudio devices. You can individually each configure sound (ringing bells, state changes, and so on).
All file formats that are playable by Windows DirectShow are usable (*.wav; *.mpa; *.mp2; *.mp3;*.au; *.aif; *.aiff; *.snd).
Prerequisites
Provisioning functionality Setting up agents on the system
Workspace Desktop Edition Deployment Guide 169
• Genesys Administrator 8.0.2 or higher, configured to show Advanced View, or Genesys AdministratorExtension.
• A working knowledge of Genesys Administrator Extension.• An Workspace Application object exists in the Configuration Database.
Start
1. Enable the secondary audio device(s) by specifying the value of the new application.secondary-audio-out-device configuration option to the name of the secondary audio device or by specifying the value$AllNonDefault$ to enable all non-default audio divices.
2. The following existing configuration options have been modified in Workspace 8.5, and higher, to enablea tone to be played on the default audio device, a secondary audio device, or both.• webcallback.ringing-bell• chat.ringing-bell• chat.new-message-bell• email.ringing-bell• im.new-message-bell• im.ringing-bell• outbound-callback.ringing-bell• outbound.sound.campaign-updated• sms.ringing-bell• voice.ringing-bell• <media-type>.ringing-bell• accessibility.agent-state-change-bell• accessibility.interaction-state-change-bell• accessibility.warning-message-bell• broadcast.sound.minimal-priority• broadcast.sound.low-priority• broadcast.sound.normal-priority• broadcast.sound.high-priority• broadcast.sound.important-priority
For each of these options, you can add an additional parameter to the end of the ringing sound configuration string:
• |primary—Play the sound on the default audio output device• |secondary—Play the sound on the secondary audio device, as defined by the
application.secondary-audio-out-device configuration option• |both—Play the sound on the default and secondary (application.secondary-audio-out-device
configuration option) audio devices
3. You can restrict which sound files are pre-loaded when an agent logs in by using the sounds.preloadfilesoption. Pre-loading only selected sound files at login can improve bandwidth performance at the start of
Provisioning functionality Setting up agents on the system
Workspace Desktop Edition Deployment Guide 170
a shift when many agents log in simultaneously.
End
6. Declaring and using new Not-Ready Reason codes
Purpose:
To enable an agent to use custom Not-Ready Reason codes and to support the aux work mode.
The only Not-Ready Reasons that Workspace supports by default are Unknown and After Call Work.Custom Not-Ready Reason codes are defined in the Action Codes folder of the Desktop folder in theProvisioning view of Genesys Administrator Extension.
Prerequisites
• Genesys Administrator 8.0.2 or higher, configured to show Advanced View, or Genesys AdministratorExtension.
• A working knowledge of Genesys Administrator Extension.• An Workspace Application object exists in the Configuration Database.
Start
1. Create a new Action Code in the following Genesys Administrator Extension view: Provisioning >Desktop > Action Code.
2. Enable the new Action Code so that it can be used in the Configuration Layer.3. To enable the Action Code to display in the Agent Interface, configure the agent-status.enabled-actions-
global option in the interaction-workspace section of the Workspace Application object (refer tothe Agent status configuration option reference for a list of agent status options and a description ofhow to configure them).
4. Configure the Workspace agent-status.not-ready-reasons option to include the value that is specified inthe Action Code (refer to the Agent status configuration option reference). Not-Ready Reasons aredisplayed in the order that is defined by the value of the agent-status.not-ready-reasons option. If novalue is specified for the agent-status.not-ready-reasons option, the default behavior is to display allNot-Ready Reasons that are defined and enabled in the Action Code folder.
End
7. Storing the agent profile on a controlled shared host
[Added: 8.5.112.08]
Purpose:
Provisioning functionality Setting up agents on the system
Workspace Desktop Edition Deployment Guide 171

To enable agents to store preferences and configuration information on a common directory insteadof in the Configuration Database or their local workstation.
Genesys recommends using this feature in contact centers that have a large number of agents. Thegoal of this feature is to reduce the amount of information being sent back and forth betweenWorkspace and Configuration Server. Workspace stores many agents specific preferences and otherinformation both locally (on the agent's workstation) and in the Configuration Database. In someenvironments, this means that a large amount of configuration data is sent from Configuration Serverto Configuration Server Proxy (CSP) and then from CSP to Workspace.
This feature also supports contact center where agents are not required to log in to Workspace fromthe same workstation each time. This feature supports agent roaming to different workstations. Inenvironments where agents do not always use the same workstation, locally stored configurationdata and personalized information is available only on the workstation where the agent first loggedin. Use the following procedure to set up your environment to enable agents to roam by storing agentconfiguration, preferences, and personalized information in a common shared directory.
To set up your environment to support this feature, administrators should work with IT to set up ahost where agent information is stored so that it does not have to be stored on Configuration Serveror locally on the agent workstation.
Genesys recommends the following best practices that you can discuss with IT.
SecurityWhen you create a directory on the host, the agent windows user must have write access. Workspacewill write encrypted files that only Workspace running on the agent account can read. You do nothave to create explicit permissions for the files. The files should inherit their permissions from theuser's folder on the host. You can choose to set up a personal or a global shared directory.
When you implement the procedure below, agent information on Config Server will be merged withthe new file location. Once that is complete, it will no longer be necessary for agents to have writeaccess to the agent annex in the Configuration Layer; however, if you remove write access, you mustgrant it each time that that you need to change record location.
Recommendations about external storage selectionWhen you create the user profile storage on a network share, follow the Microsoft Windows GroupPolicy Object Management practices for the redirection of User Profile Folder, following the principlesof the definition of the Network Share.
Genesys recommends one of two approaches; however, your IT might have other approaches thatthey might want to employ.
1. Personal Network SpaceConfigure the agent workstations with a login script that assigns a Drive letter to a personal network space for the agent. In thisscenario, the profile configuration can explicitly refer to this area. Security is ensured by the design of the Personal networkshare.
For example: G:\WDE\Profile
2. Dedicated User Profile storageMicrosoft recommends this approach to administrate the sharing of Roaming Profiles.
Provisioning functionality Setting up agents on the system
Workspace Desktop Edition Deployment Guide 172
In this scenario, the IT administrator must define the first level of security when the share is configured. For example, refer to Howto enable Roaming Profiles on Windows Server 2012 R2
A second level of security is implemented at run time by the capability for Workspace to restrict access permissions to the createdfolder and files. In Microsoft Windows, use the following optional setting for Folder Redirection configuration: Grant the userexclusive rights. This setting is enabled by default. This setting specifies that the administrator and other users do not havepermissions to access this folder.
Share sizing suggestions
Use the following guidelines for minimum sizing requirements for each agent when setting up thestorage folders.
• externalUserSettings.conf: Contains about 100 options and requires at least 10 KB• Peronsal Favorites: 10 favorites is about 7 KB; 100 favorites is about 70 KB• List of pushed-url: 10 items is about 3 KB; 100 items is about 30 KB• List of Recents (recent contacts): 10 contacts is about 8 KB; 100 contacts is about 80 KB
Migration considerationsWhen Workspace starts, it checks to determine whether a value is specified for the options.record-location option. If no value is specified, Workspace does nothing. If a directory is specified, Workspacechecks to determine if the directory exists a the location. If it does not exist, Workspace tries tocreate it; therefore, Workspace must have permission (*read/write access) to create directories andfile on the specified location.
Workspace then compares the location specified by the options.record-location option with thelast location where personal information was stored. If these locations are different, Workspaceattempts to migrate the data from the previous location to the specified location.
If the migration fails, Workspace will attempt to complete the migration again the next time that theapplication is started; and, if the value of the options.clean-up-former-record-location option is set totrue, Workspace will not remove data from the former location.
If the migration is successful and the value of the options.clean-up-former-record-locationoption is set to true, Workspace will remove data from the former location.
Migration use case 1
The User Profile was previously configured to be stored in Person's annex and is then configured to bestored in a shared directory. The content of the annex in the configuration layer is copied to theshared directory. Workspace will no longer access the Configuration Layer to store personalinformation.
Migration use case 2
The User Profile was previously configured to be stored in a shared directory and is then configured tobe stored in Person's annex in the Configuration Layer. The content of the shared directory is copiedto the Person's annex in the configuration layer. Workspace will no longer access the personaldirectory to store personal information.
Provisioning functionality Setting up agents on the system
Workspace Desktop Edition Deployment Guide 173

Migration use case 3
The User Profile storage location is modified from one shared directory to another shared directory.The content of the first shared directory is copied to the second shared directory. Workspace will nolonger access the first shared directory to store personal information.
WarningProfile data that is stored on a workstation cannot be migrated.
Prerequisites
• Genesys Administrator 8.0.2 or higher, configured to show Advanced View, or Genesys AdministratorExtension.
• A working knowledge of Genesys Administrator Extension.• An Workspace Application object exists in the Configuration Database.• Agent objects created in the Configuration Database.
Start
1. Create a shared directory on a host for your agents.2. If you you have previously configured the value of the options.record-option-locally-only option to true
to store the agent profile information locally instead of in the Configuration Database, set the value tofalse.
3. Use the options.record-location option to specify the path to the shared directory on the host that youcreated. The full path can also contain the following field codes: $Agent.UserName$,$Agent.LastName$,$Agent.FirstName$,$Agent.EmployeeId$,$Env.X$ (where X is the name of theenvironment variable). Genesys recommends that you append the agent's Username to the specifiedpath as shown above.
End
8. Enabling accessibility features
[Modified: 8.5.102.06, 8.5.109.16, 8.5.143.08]
Purpose:
To enable agents to use the accessibility and navigation features of Workspace.
Prerequisites
• Genesys Administrator 8.0.2 or higher, configured to show Advanced View, or Genesys Administrator
Provisioning functionality Setting up agents on the system
Workspace Desktop Edition Deployment Guide 174

Extension.• A working knowledge of Genesys Administrator Extension.• A Workspace Application object exists in the Configuration Database.
Start
1. In Genesys Administrator Extension, open the Workspace Application.2. Select the Options tab.3. In the interaction-workspace section, configure the following option value:
• accessibility.visual-impairment-profile: Specify true to optimize Workspace for keyboard navigationand screen reader applications.
• In the interaction-workspace section, configure the following option values to specify whether ornot the Interaction Preview should receive the focus when it is displayed on the desktop:• accessibility.focus-on-interaction-toast: Specifies whether all Interaction Notification views
receive the focus when they are displayed. This option does not rely on accessibility.visual-impairment-profile; therefore, it applies to all configured agents, not just visually impairedagents. By default, the Interaction Notification views do not receive then focus automatically;agents must click the view to make it active.
• accessibility.<media-type>.focus-on-interaction-toast: Specifies that all Interaction Notificationviews for the <media-type> receives the focus when they are displayed. When specified, thisoption overrides the value specified for accessibility.focus-on-interaction-toast. Thisoption does not rely on accessibility.visual-impairment-profile; therefore, it applies to allconfigured agents, not just visually impaired agents.
4. In the interaction-workspace section, configure the following option values to add sounds to specificinterface events:• accessibility.agent-state-change-bell: Specify the name of the sound file that you want to play to the
agent when the agent changes state.• accessibility.interaction-state-change-bell: Specify the name of the sound file that you want to play
when an interaction changes state.• accessibility.warning-message-bell: Specify the name of the sound file that you want to play when a
warning message is displayed to the agent.• <media-type>.ringing-bell: Specify the name of the sound file that you want to play to the agent
when an interaction of <media-type> is received.• chat.new-message-bell: Specify the name of the sound file that you want to play to the agent when
a new chat message is received.• im.new-message-bell: Specify the name of the sound file that you want to play to the agent when a
new IM message is received.
5. To enable the high contrast theme for visually impaired agents, in the interaction-workspace section,configure the following option value:• gui.themes : Specify only the value HighContrast.
6. To change the default display size of interface elements in Workspace views, use the gui.magnification-factor.
Provisioning functionality Setting up agents on the system
Workspace Desktop Edition Deployment Guide 175

ImportantThis feature functions only with the default Workspace 8.5 GUI themes, and to custom themes that aredeveloped according to the documentation and samples of the Workspace Developer's Guide. If the blue,royale, and fancy legacy themes are used, the magnification is forced to normal.
7. To enable agents to set the zoom of text editing fields, such as email, chat, and SMS, and transcriptareas, use the gui.editor-zoom-range option to specify minimum and maximum text zoom. This featureapplies to the following views:• IM (text entry, transcript, and interaction data tooltip)• Chat (text entry, transcript, and interaction data tooltip)• Email (text entry and inbound email view)• SMS (text entry, transcript, and interaction data tooltip)• Interaction history
• IM• Chat• Email• SMS
• Standard responses• Social media (text entry only)
8. To specify how long contextual warning messages are displayed to agents, set the number of secondsby using the alert.timeout option. You can specify that message notifications must be manually closedby setting the value to 0.
End
9. Enabling security features
Purpose:
To enable the security features of Workspace.
Prerequisites
• Genesys Administrator 8.0.2 or higher, configured to show Advanced View, or Genesys AdministratorExtension.
• A working knowledge of Genesys Administrator Extension.• An Workspace Application object exists in the Configuration Database.
Start
Provisioning functionality Setting up agents on the system
Workspace Desktop Edition Deployment Guide 176

1. In Genesys Administrator Extension, open the Workspace Application.2. Select the Options tab.3. Configure any of the following options in the Security section:
• security.disable-rbac: Specify whether Role Based Access is applied to agents to control access toWorkspace features and functionality.
• security.inactivity-timeout: Specify whether the agent workstation locks after a certain period ofinactivity.
• security.inactivity-set-agent-not-ready: Specify whether the agent is automatically set to Not Readywhen agent inactivity is detected.
• security.inactivity-not-ready-reason: Specify the default Not Ready Reason if the agent's workstationtimes out.
4. Configure any of the following options to control appearance of sensitive data in logs:• log.default-filter-type: Specify the default filter type for logging.• log.filter-data.<keyName>: Specify the treatment of log data. Enables you to filter for specific
attached data keys, by specifying the key name in the option name.• sipendpoint.system.diagnostics.log_filter: Specifies the list of keys of SIP Messages for which the
value should be hidden in the log files.
End
10. Creating Corporate Favorites
Purpose:
To enable the use of corporate favorites in the Team Communicator.
Prerequisites
• Genesys Administrator 8.0.2 or higher, configured to show Advanced View, or Genesys AdministratorExtension.
• A working knowledge of Genesys Administrator Extension.• An Workspace Application object exists in the Configuration Database.
Start
1. In Genesys Administrator Extension, open the Workspace Application.2. Select the Options tab.3. Create a new section and name it with the name of the Corporate Favorite that you want to create.4. Configure the new Corporate Favorite section to be one of the following types:
• Agent
• Agent Group
Provisioning functionality Setting up agents on the system
Workspace Desktop Edition Deployment Guide 177

• Skill
• Queue
• Interaction Queue
• Routing Point
• Custom Contact
The Table Corporate Favorite Options by Type defines the Corporate Favorite types and themandatory options.
Corporate Favorite Options by TypeType Options Mandatory Valid values Example
Agent
type Yes Agent Agent
id Yes <user name of theagent> User123
category Yes<a semicolon-separated list ofcategory names>
CorporateCategory1;FavoriteAgents
Agent Group
type Yes AgentGroup AgentGroup
id Yes <name of theagent group>
Agent GroupMeridian
category Yes<a semicolon-separated list ofcategory names>
CorporateCategory1;FavoriteAgents
Skill
type Yes Skill Skill
id Yes <name of theskill> French
category Yes<a semicolon-separated list ofcategory names>
French SpeakingAgents; MandarinSpeaking Agents
Queue
type Yes Queue Queue
id YesDN number in thefollowing format<DN>@<SwitchName>
123@MySwitch
category Yes<a semicolon-separated list ofcategory names>
CorporateCategory1;FavoriteAgents
Interaction Queue
type Yes InteractionQueue InteractionQueue
id Yes<script name ofthe interactionqueue>
queue_email_inbound
category Yes<a semicolon-separated list ofcategory names>
CorporateCategory1;FavoriteAgents
Routing Pointtype Yes RoutingPoint RoutingPoint
id Yes DN number in thefollowing format 123@MySwitch
Provisioning functionality Setting up agents on the system
Workspace Desktop Edition Deployment Guide 178

Type Options Mandatory Valid values Example<DN>@<SwitchName>
category Yes<a semicolon-separated list ofcategory names>
CorpRoutingPoint
Custom Contact
type Yes CustomContact CustomContact
category Yes<a semicolon-separated list ofcategory names>
ExternalResources
firstname No <any string> Firstlastname No <any string> External
phonenumberYes (one or both)
<a semicolon-separated list ofphone numbers>
+1555234567890;+555123454321
emailaddress<a semicolon-separated list ofemail addresses>
[email protected];[email protected]
5. The list of corporate favorites can be defined by the teamcommunicator.corporate-favorites options or by using theteamcommunicator.corporate-favorites field in an XML file.
Configure one or both of the following options in the interaction-workspace section of agent, agent group, tenant, and/orapplication annexes:
• teamcommunicator.corporate-favorites: The list of corporate favorites (quick dial favorites) that areconfigured in the Configuration Layer in GAX or in a XML file containing corporate favorites for anAgent, Agent Group, Skill, Routing Point, Queue, Interaction Queue, or Custom Contact in the sametenant as the agent. Favorites that are configured at the agent level take precedence over thosethat are configured at the agent group level, which take precedence over the tenant level, whichtakes precedence over the application level.
• teamcommunicator.corporate-favorites-file: The name and the path to an XML file that contains alist and definition of each corporate favorite. The path can be relative to the Workspace workingdirectory (for example: Favorites\CorporateFavorites.xml) or an absolute path (for example:C:\PathToFavorites\CorporateFavorites.xml).
The corporate favorites functionality works in one of three ways, depending on how you choose to configure the two options andwhether corporate favorites are specified in the Configuration Layer or in an XML file:
• If teamcommunicator.corporate-favorites-file is not configured and corporate favorites are specifiedin the Configuration Layer.• Workspace selects corporate favorites only from the list of favorites specified by the
teamcommunicator.corporate-favorites option for the Main Window Team Communicator and theInteraction Window Team Communicator.
• Corporate Favorites in the Interaction Window Team Communicator, for operations such astransfer and conference, can be overridden by favorites specified by a transaction objectoverride.
• If teamcommunicator.corporate-favorites-file is configured, an XML file is present, the XML file doesnot include the <teamcommunicator.corporate-favorites> parameter, and theteamcommunicator.corporate-favorites option is configured in the Configuration Layer.• Workspace searches for corporate favorites from the list of favorites in the XML file that are
specified by the teamcommunicator.corporate-favorites option.
Provisioning functionality Setting up agents on the system
Workspace Desktop Edition Deployment Guide 179

• Corporate Favorites in the Interaction Window Team Communicator, for operations such astransfer and conference, can be overridden by favorites specified by a transaction objectoverride only if those favorites are included in the XML file.
• If teamcommunicator.corporate-favorites-file is configured, an XML file is present, and the XML fileincludes the <teamcommunicator.corporate-favorites> parameter, for example:<interaction-workspace><teamcommunicator.corporate-favorites>fav2;fav3</teamcommunicator.corporate-
favorites></interaction-workspace>
• Workspace selects only corporate favorites from the XML file specified by the<teamcommunicator.corporate-favorites> parameter for the Main Window TeamCommunicator and the Interaction Window Team Communicator.
• Workspace ignores the teamcommunicator.corporate-favorites option in the Configuration Layer.• For operations such as transfer and conference, corporate favorites cannot be overridden by a
transaction object.
6. To enable each interaction to have an independent list of corporate favorites that are dynamicallyloaded into the corporate favorites in the team communicator view of the current interaction, configurethe following options:a. Configure a Transaction object of type list. For example, you could configure a Transaction object
that is named: IW_CorporateFavoritesOverrideOptions.b. In the interaction-workspace section configure the teamcommunicator.corporate-favorites
option to a value such as fav1 as described in the previous steps.c. To the interaction.override-option-key option in the interaction-workspace section, set a
valid key name, for example IW_OverrideOptions.d. Add the Transaction object name to the AttachedData in your strategy. In this example, set the
value of IW_OverrideOptions to IW_CorporateFavoritesOverrideOptions.
Refer to the Modifying a Routing Strategy to Override Workspace Options, Based on Attached Datasection for a general description of this mechanism.
End
Corporate Favorites sample XML
The following is an example of an XML file that is used to define corporate favorites:
<?xml version="1.0" encoding="utf-8"?><options><interaction-workspace><teamcommunicator.corporate-favorites>fav2;fav3</teamcommunicator.corporate-favorites></interaction-workspace><fav3><category>Partners</category><type>Agent</type><id>Jim</id></fav3><fav2><category>CorporatePartners;Partners2</category><type>Agent</type><id>John</id>
Provisioning functionality Setting up agents on the system
Workspace Desktop Edition Deployment Guide 180

</fav2><fav4CustomContact><category>CorporatePartners</category><type>CustomContact</type><firstname>Bob</firstname><lastname>Davis</lastname><phonenumber>+12121231234;+18001231234</phonenumber><emailaddress>[email protected];[email protected]</emailaddress></fav4CustomContact><fav5RoutingPt><type>RoutingPoint</type><category>RoutingPoint</category><id>122@LucentG3</id></fav5RoutingPt><fav6AgentGroup><category>CorpAgentGroup</category><type>AgentGroup</type><id>Agent Group Meridian</id></fav6AgentGroup><fav7Skill><category>CorpSkill</category><type>Skill</type><id>Email-QualityConfidencePercentageSkill</id></fav7Skill><fav8ACDQueue><category>CorpACDQueue</category><type>Queue</type><id>8000@1LucentG3</id></fav8ACDQueue><fav9IxnQueue><category>CorpIxnQueues</category><type>InteractionQueue</type><id>route-to-agent-group-8002</id></fav9IxnQueue></options>
Provisioning functionality Setting up agents on the system
Workspace Desktop Edition Deployment Guide 181

Overriding Workspace options
Modifying A Routing Strategy to override Workspace optionsbased on attached data
Refer to Genesys Administrator Extension Help and Genesys Administrator Extension DeploymentGuide for detailed information about how to use Genesys Administrator Extension and ManagementFramework to configure access permissions.
ProcedureModifying a Routing Strategy to override a Workspace option based on attached data
Purpose: To override previously defined configuration options by using a Routing Strategy.A Routing Strategy can be used to override configuration options that you have defined by using thehierarchies described in Configuration And Administration By Using Options And Annexes.Workspace uses Transaction Objects of type object list. Attach a transaction name or list oftransaction names to the interaction in your strategy. The transaction names in the list should beseparated by commas. Workspace reads the transaction objects at rendering time to override thestatic options.Overriding options enables you to change the appearance of interactions per line of business basedon a key-value pair that is defined in the annex of Transaction objects. The attached data containsthe name of the transaction object(s) to be used for the interaction.Prerequisites
• Deploying Workspace• Strategy that routes to your Workspace agent workstations.
Start
1. Configure one or more Transaction objects, of type list, in Genesys Administrator Extension orComposer, by using the standard approach that is used for other object types in the hierarchy (theserely on the option reference to determine if a particular option can be overridden in a Transaction).You can only override options in the interaction-workspace section. Therefore, you must replicate theinteraction-workspace section to the annex of the object level where you want the override to occur(Tenant, Group, User, or Transaction).
2. Configure the option interaction.override-option-key to define the key where the Transaction object(s)are to be listed in attached data (refer to the Interaction configuration option reference for a list ofInteraction options and a description of how to configure them).
3. Using either IRD or Composer, edit your routing strategy by adding an "Attach" or "Multi-attach" blockthat attaches the key value pair that is defined below:• key: The name of the key that you defined in the option set in Step 2.• value: One or several comma-separated Transaction objects, as defined in Step 1.
Provisioning functionality Overriding Workspace options
Workspace Desktop Edition Deployment Guide 182
End
Provisioning functionality Overriding Workspace options
Workspace Desktop Edition Deployment Guide 183

Accessibility and navigation[Modified: 8.5.113.11, 8.5.124.08, 8.5.143.08]
Workspace enables you to navigate the user interface by using the keyboard and keyboard shortcutsinstead of the mouse to enhance your productivity. Navigation works panel to panel, and within apanel, component to component. Keyboard navigability enables users who are using a device foraccessibility that relies on keyboard navigation to manipulate the desktop components.
Accessibility overview
[Added: 8.5.143.08]
Genesys provides a Voluntary Product Accessibility Template® - VPAT® report from ITI, to documentconformance of Genesys Workspace Desktop Edition to WCAG 2.1 Level A specification. The VPAT®report is a standardized template for documenting conformance to various accessibilityspecifications. VPAT® report provided by Genesys follows the W3C/WAI’s WCAG 2.1 specification, asthis is an international standard adopted and recognized by our customers worldwide. The GenesysVPAT® can be downloaded here: Genesys Workspace Desktop Edition Accessibility ConformanceReport.
What is WCAG?
Web Content Accessibility Guidelines (WCAG) 2.1 covers a wide range of recommendations formaking Web content more accessible. Following these guidelines will make content more accessibleto a wider range of people with disabilities, including accommodations for blindness and low vision,deafness and hearing loss, limited movement, speech disabilities, photosensitivity, and combinationsof these, and some accommodation for learning disabilities and cognitive limitations; but will notaddress every user need for people with these disabilities. These guidelines address accessibility ofweb content on desktops, laptops, tablets, and mobile devices. Following these guidelines will alsooften make Web content more usable to users in general.
Screen reader compatibility
Workspace employs a visual impairment profile feature. This feature enables more elements in theMain Window and the Interaction window to have the focus, enhancing step-wise navigation forscreen-reading applications such as Job Access With Speech (JAWS) screen reader from FreedomScientific. Screen readers enable visually impaired (blind and low vision) agents to use the desktopinterface through text-to-speech or text-to-braille. Workspace must be configured in the ConfigurationLayer to enable this compatibility. These options can be set in the Configuration Layer as defaultvalues that can be overwritten in the Agent Annex. The Workspace windows are designed tomaximize content readability for screen-reader applications.
Provisioning functionality Accessibility and navigation
Workspace Desktop Edition Deployment Guide 184
JAWS compatibility[Added: 8.5.124.08]
Use the following two options to ensure compatibility with the JAWS screen reader:
• accessibility.visual-impairment-profile: Specifies whether the profile for visually impaired users is active.This option enables more interface elements to be focusable (accessible from keyboard navigation andmouse-over) so that they can be navigated from Screen Reader applications. [Added: 8.5.113.11]
• accessibility.disable-hyperlinks: Specifies whether processing and presenting hyperlinks in email, chat,and SMS as active elements are disabled or enabled. [Added: 8.5.124.08]
Controlling interaction notifications[Added: 8.5.101.14]
By default, the Interaction Notification views do not receive then focus automatically; agents mustclick the view to make it active. To ensure that screen reader applications can read the content of theInteraction Notification views, you must specify whether or not the text content of InteractionNotification views will receive the focus. In screen reader environments, any window that has thefocus is read by the screen reader to the agent. Use the following two configuration options toautomatically assign the focus to the Interaction Notification view when it is displayed:
• accessibility.focus-on-interaction-toast—Specifies whether all Interaction Notification views receive thefocus when they are displayed. This option does not rely on the accessibility.visual-impairment-profileoption; therefore, it applies to all configured agents, not just visually impaired agents.
• accessibility.<media-type>.focus-on-interaction-toast—Specifies that all Interaction Notification viewsfor the <media-type> receives the focus when they are displayed. When specified, this optionoverrides the value specified for accessibility.focus-on-interaction-toast. This option does notrely on accessibility.visual-impairment-profile; therefore, it applies to all configured agents, not justvisually impaired agents.
ImportantIf these options are not specified, then the user must use ALT+TAB to navigate to theInteraction Notification view when it is displayed.
High contrast Workspace
[Added: 8.5.100.05]
Workspace enables visually impaired agents to use a high contrast theme to compliment theWindows high contrast themes that are available from the Windows Personalization control panel. TheWorkspace high contrast theme follows Web Content Accessibility Guidelines (WCAG) 2.0, with somelimitations. The Workspace high contrast theme was tested against red/green and blue/yellow colordeficit vision.
Provisioning functionality Accessibility and navigation
Workspace Desktop Edition Deployment Guide 185

TipThe Workspace high contrast theme functions whether or not one of the Windows highcontrast themes are in use.
Enable the Workspace high contrast theme by setting the value of the gui.themes configurationoption. To direct the user to the High Contrast theme by default, specify only the valueHighContrast, removing the other values (Default,Blue,Royale,Fancy).
The gui.themes option can be configured at the application, skill, group, and agent levels. You canconfigure gui.themes so that specific agents or agent groups have only the high contrast themeavailable. This ensures that the high contrast theme is the default theme when those agents login.
To make the login window displayed in high contrast, you must make the following edit to theinteractionworkspace.exe.properties file, which is part of the Workspace package that is pushedto the workstation of the agent who requires the high contrast theme:
1. In the section <appsettings> uncomment the line that contains gui.theme.2. Set the following value: <add key="gui.theme" value="HighContrast" />
Overriding default font and icon sizes
[Added: 8.5.102.06] [Modified: 8.5.109.16]
Workspace specifies the size at which interface elements are displayed so that no matter whatmagnification or reduction a user specifies for their browser or operating system, these items aredisplayed consistently. However, some agents might change the browser or operating systemsettings to increase font size and improve readability. To enable agents to change the size at whichinterface elements, including fonts and icons, are displayed, use the gui.magnification-factorconfiguration option to specify the ratio that is applied to the Workspace interface.
ImportantThis feature functions only with the default Workspace 8.5 GUI themes, and to customthemes that are developed according to the documentation and samples of theWorkspace Developer's Guide. If the blue, royale, and fancy legacy themes are used,the magnification is forced to normal.
Use the gui.editor-zoom-range option to enable agents to set the zoom of text editing fields, such asemail, chat, and SMS, and transcript areas. The gui.editor-zoom-range option is used to specify theminimum and maximum text zoom. This feature applies to the following views:
• IM (text entry, transcript, and interaction data tooltip)• Chat (text entry, transcript, and interaction data tooltip)
Provisioning functionality Accessibility and navigation
Workspace Desktop Edition Deployment Guide 186

• Email (text entry and inbound email view)• SMS (text entry, transcript, and interaction data tooltip)• Interaction history
• IM• Chat• Email• SMS
• Standard responses• Social media (text entry only)
To ensure that the login dialog box is also displayed at the same ratio, configure thegui.magnification-factor option in the ..\Interaction Workspace\InteractionWorkspace.exe.config file after you install Workspace on the workstation of an agentwho requires a different display size.
Configuring accessibility features
[Modified: 8.5.100.05, 8.5.113.11]
Use the Procedure: Enabling Accessibility Features to enable the Accessibility features for youragents.
Use the following options in the interaction-workspace section to configure Accessibility:
• accessibility.agent-state-change-bell: Specifies the agent state change sound configuration string.• accessibility.interaction-state-change-bell: Specifies the interaction state change sound configuration
string.• accessibility.warning-message-bell: Specifies the warning message sound configuration string.• accessibility.visual-impairment-profile: Specifies whether the profile for visually impaired users is active.
This option enables more interface elements to be focusable (accessible from keyboard navigation andmouse-over). Beginning with version 8.5.113.11, Workspace enables agents to enter TABs in the emailcomposition area of outgoing email interactions by pressing the TAB key if the value of this option isset to false; to use the TAB key to step to the next control or field, agents must first press Ctrl-TAB tostep out of the text composition area. To disable this feature, set the value of this option to true;agents will not be able to enter TABS in the email composition area, but they can use the TAB key tomove to the next control in the tab order.
• chat.new-message-bell: Specifies the path to the alert sound file for new chat messages.• email.ringing-bell: Specifies the path to the alert sound file for new email interactions.• im.new-message-bell: Specifies the path to the alert sound file for new SMS messages.• chat.new-message-bell: Specifies the path to the alert sound file for new chat messages. [Added:
8.5.124.08]• sms.ringing-bell: Specifies the path to the alert sound file for new SMS Session messages.
Provisioning functionality Accessibility and navigation
Workspace Desktop Edition Deployment Guide 187

• voice.ringing-bell: Specifies the path to the alert sound file for new voice interactions.• <media-type>.ringing-bell: Specifies the path to the alert sound file for new workitems.• gui.themes: Specifies that the high contrast theme is avalaible to agents.• gui.magnification-factor: Specifies the default display size of fonts and icons in the Workspace views.
Provisioning functionality Accessibility and navigation
Workspace Desktop Edition Deployment Guide 188

Agent login, authentication, and logout[Modified: 8.5.112.08, 8.5.124.08, 8.5.138.04, 8.5.140.08, 8.5.141.04]
Agent login is a two-step process:
1. User authentication and selection of Place in the primary login dialog box2. Selection of advanced parameters in the secondary login dialog box. Workspace enhances the security
of your system by limiting agent login to basic authentication. Workspace further enhances security byenabling you to limit the choices that are presented to an agent at login.
ImportantWhen an agent logs in to Workspace, the application creates a list of headsets that are plugged in to theworkstation. If an agent wants to use a different headset, he or she should exit Workspace, plug in the newheadset, then relaunch Workspace.
User authentication
When Workspace is launched by an agent, the agent must provide a user name and password asauthentication. After authentication the Configuration Layer is accessed by Workspace to obtain thelist of existing places and privileges that are granted to the agent, as well as the configuration of theWorkspace application for that agent.
You can specify whether the username is stored locally in the user profile so that the next time theagent logs in the username is populated automatically. [Added: 8.5.103.10]
ImportantIf Workspace is started from the silent command line, the username is never stored.
Changing passwordsYou can require agents to automatically change their password the first time that they log in to thesystem. You can assign temporary passwords to new agent objects when you create them, and thenspecify that the password must be changed before the new agent is able to log in to Workspace forthe first time.
You can also enable agents to change their passwords by selecting the Change Password action fromthe Interaction Workspace Main Menu.
Provisioning functionality Agent login, authentication, and logout
Workspace Desktop Edition Deployment Guide 189

Use the following Security privilege to enable the password change feature:
• Can Change Password
Refer to the Genesys Security Guide for a complete description of password policies and how toconfigure them.
Kerberos user authentication[Added: 8.5.102.06] [Modified: 8.5.132.05, 8.5.135.05]
Workspace supports Kerberos single sign-on (SSO) authentication. This means that agents only haveto authenticate once on their workstations to start using Workspace. If Kerberos authentication is notused, agents must still login to Workspace after authenticating on their workstations.
You must configure your Genesys Management Framework to support Kerberos (refer to Chapter 4:Kerberos External Authentication of the Framework External Authentication Reference Manual andthe Genesys Security Guide).
Workspace requires that you specify the unique Service Principal Name (SPN) that is used in eachConfiguration Server and Configuration Server Proxy that handles SSO requests from UI applications.
To specify the Service Principal Name in the software package:
• ClickOnce deployment: You can specify the Service Principal Name parameter in the DeploymentManager Wizard if you are installing Workspace as a ClickOnce application or by using Console Mode.
• Non-ClickOnce deployment: Edit the login.kerberos.service-principal-name option in theinteractionworkspace.exe.config property file, which is located in the Workspace InstallationPackage (IP), and add the following line:<appSettings>...<add key="login.kerberos.service-principal-name" value="<SPN Name>"/><add key="login.url" value="tcp://<host><port>/AppName" /><add key="login.connections.parameters.isenable" value="false" />...
</appSettings>
• To specify how Workspace retrieves agent identity using the Windows API set thelogin.kerberos.agent-identification option in the interactionworkspace.exe.configconfiguration file. The value should also match the way agent usernames are synchronized in theGenesys Configuration Layer. See the description of the authentication/enable-upn option in the theConfiguration Option section of the Framework External Authentication Reference Manual. The validvalues are:• implicitupn: Workspace uses the Implicit User Principal Name (iUPN), which is a combination of the
samAccountName and the user's Domain. [Added: 8.5.140.08]• samaccountname: (default value) Workspace uses the SAM Account Name attribute specified by
Windows Administrator in Windows Active Directory when provisioning the account of an agent(8.5.110.13 and higher).
• upn: Workspace uses the User Principal Name (UPN) specified by Windows Administrator in WindowsActive Directory when provisioning the account of an agent (8.5.132.05 and higher). This mode isdeprecated and should be substituted by implicitupn, but is maintained for compatibility
Provisioning functionality Agent login, authentication, and logout
Workspace Desktop Edition Deployment Guide 190
purposes.• windowsidentity: Workspace uses the information entered by the agent when opening the
Windows session. Depending on the Windows authentication mechanism, this method can returnthe exact case typed by the agent in the login dialog, which might not match the user nameconfigured in Genesys Configuration Layer. This is the API used in Workspace versions up to8.5.109.25.
• For environments using Kerberos authentication, set the value of the login.kerberos.enable-case-insensitive-agent-identification option to true to specify that the matching of the usernamestored in the Genesys Configuration layer and the username specified by the login.kerberos.agent-identification option is not case-sensitive (the case of the letters is ignored). [Added: 8.5.135.05]
If Kerberos is configured, the agent login process works as follows:
If the Workspace property file is defined to enable Kerberos authentication, Workspace tries toacquire a Kerberos ticket. If the Kerberos ticket is found, Workspace tries to open a connection toConfiguration Server using this ticket.
• If the connection attempt is successful, Workspace bypasses the first Workspace Login view anddisplays the second Login view or immediately displays the Main Toolbar. For more information aboutlaunching and logging in to Workspace, refer to the Workspace Desktop Edition 8.5.1 Help.
• If connection is not successful because of an invalid Kerberos ticket, a warning message is displayed tothe agent, and the application start-up is interrupted.
You can override the error message that is displayed to agents if Workspace is unable to obtain aKerberos ticket by using the methodology to customize a dictionary to specify an alternative messagestring for the Windows.login.Kerberos.Retry key.
Place selection
[Modified: 8.5.114.08, 8.5.112.08, 8.5.138.04]
Genesys 8 requires that each agent connect to a unique Place. Depending on your environmentalconstraints, you can adjust the Place selection process to make it completely invisible to the agentsor to minimize the effort required to select the correct Place where the agent logs in.
Fine-tuning Place selectionYou can control or improve the way that agent Place selection is handled. This section describesoptional Place selection fine-tunings that are available.
Static Place
To assign a static Place to an agent and make Place selection invisible during login, in GenesysAdministrator Extension you must assign a Default Place to the Agent in the Advanced tab of theAgent object Properties section and set the value of the login.default-place option to$Agent.DefaultPlace$, and set the value of the login.prompt-place option to false.
Provisioning functionality Agent login, authentication, and logout
Workspace Desktop Edition Deployment Guide 191

Auto-complete
You can configure the agent account using the login.prompt-place option so that duringauthentication the agent must specify a Place in the Place field of the secondary login dialog box. Ifthe value of the login.enable-place-completion is true, a list of Places is displayed to agentsaccording to the text entered in the Place field; this feature enables agents to choose theappropriate Place without typing the entire Place name.
Last used Place
To optimize the Place selection process, you can configure Workspace to store the last used Place inthe Windows User Profile by setting the value of the login.store-recent-place option to true. If thisinformation is available in the Windows User Profile the next time the agent logs in, this recent Placeis proposed to the agent for confirmation during login. If the agent confirms that the recent Place isthe correct one, the agent will be able to proceed with the connection to this Place without having toselect it in the second login screen.
Hot seating
The Windows User Profile can be fully or partially set up for roaming/hot seating depending on howyour environment is set up and the available infrastructure.
This means that in environments where the Windows User Profile of the agent stored fromWorkstation A, corresponding to Place 1 where the agent sits on Day 1, can be available onWorkstation B, corresponding to Place 2 where agent sits on Day 2. However, in this scenario, thePlace restored from the Windows User Profile and proposed as the recent Place might be incorrect.
Beginning with Workspace 8.5.112.08, you can configure the environment so that the stored Place isassociated with information that corresponds to the workstation where the agent sits when an agentselects the Place. This Place is then presented to the agent as the recent Place during login only if itwas previously stored with the current workstation as an associated identifier.
Use the login.place-location-source option to specify how Workspace stores the last selected loginPlace in the Windows User Profile when the value of the login.store-recent-place option is set to true.The following values (modes) are supported:
• standard: The most recently used Place is stored in the Windows User Profile without any informationabout the workstation. This is the legacy recent place storage mode.
• machine-name: The most recently used Place is stored in the Windows User Profile, along with the nameof the machine where the Workspace application is running. Use this value when Workspace is installedon the physical workstation where the agent logs in.
• vdi: The most recently used Place is stored in the Windows User Profile, along with the name of thephysical workstation from which the agent executes a virtual session (for example, in Citrix XenApp/XenDesktop, VMWare Horizon, and Windows Terminal Server environments). Use this value whenWorkspace is installed in a Virtual Desktop Environment. If the machine name of the VDI client is notfound, for example because agents are running Workspace on a physical workstation, the machine-name mode is used instead. This setting is appropriate for hybrid environments where agents arerunning Workspace alternatively in physical workstations and in virtual sessions. [Added: 8.5.112.08]
Provisioning functionality Agent login, authentication, and logout
Workspace Desktop Edition Deployment Guide 192

SIP DN type selection[Added: 8.5.138.04]
You can create multiple Places associated with different types of SIP DNs for each agent to enablethem to login from different devices, such as Workspace SIP Endpoint and Genesys Softphone whenthey are in the office, and their mobile through SIP Server or a 3rd party SIP Endpoint when they areworking at home or outside the office. Alternately, you might want a hard phone back up for your softphone in case there are issues with an agent's endpoint.
Use the voice.device-type option in the interaction-workspace section of the Annex of the DNobject to specify whether the DN associated with a Place is Workspace SIP Endpoint or GenesysSoftphone (auto), or whether it is a hard phone or 3rd party SIP Endpoint (separate).
Genesys recommends that you name your Places in a way that it will make it easy for agents tofigure out which one to choose. For example, in the office you might have a desk associated with asoft phone labeled with "SIP-abc123". When the agent sits at the desk associated with the "SIP-abc123" Place, the agent specifies "SIP-abc123" in the Place field of the login screen. For an agentcalling in from their mobile or home phone, you might name the Place that the agent should enterwhen they log in as "Agent XYZ Mobile". It is up to you to train your agents on which Place to enterwhen they log in.
Automatic Place selection using Place Groups[Added: 8.5.114.08]
In traditional voice contact centers, a Place contains a DN that represents a hard or a soft phone andagents select it (manually or automatically) according to the location where they work. As contactcenters evolve, some individuals that handle calls might be back office workers who loginintermittently, while others are workers answering from home or on a mobile device. In each of thesesituations, the phone that is used is not directly monitored by the Contact Center infrastructure.Creating a static Place/DN pair for each one of these worker/phone combinations is a managementissue because of the large number of Places that might be unused at any given time.
To solve this issue, you can enable agents to automatically select a Place using Place Groups. A PlaceGroup makes a small number of Places available to any agent that selects the Place Group when theylog in.
Depending on which approach you choose, during login, either your agents either select a Place or aPlace Group, or you can assign them a specific default Place Group.
WarningThe Automatic place selection using Place Groups feature currently works only with SIP Server for DNs thatare provisioned to support the remote login capability, which is enabled by the login.voice.prompt-dn-less-phone-number option.
The feature is not supported for:
• DNs that are used with Workspace SIP Endpoint
Provisioning functionality Agent login, authentication, and logout
Workspace Desktop Edition Deployment Guide 193

• Places that also support eServices channels
A Place Group is a preconfigured collection of Places, each containing a preconfigured Extension DN.When an agent logs in, Workspace selects a free Place from the group based on information providedby Statistic Server and assigns it to the agent.
The physical phone number typed by the agent, according to the capability enabled by thelogin.voice.prompt-dn-less-phone-number option in the PlaceGroup option, is stored in the settings ofthe DN contained in the selected Place.
To use this capability, complete the following steps:
1. Create one or more Place Group objects and add to it all the Places that you want to include in thegroup.
2. At the Agent, Agent Group, Application, or Tenant level, use the login.place-selection-type option tospecify whether agents can select within a list of Places and/or a Place Groups when they log in.
3. At the Agent, Agent Group, Application, or Tenant level, use the login.available-place-groups option tospecify the list of Place Groups that is presented to the agent. You can specify a list of Place Groupnames, or use the $All$ keyword to enable agents to select from all the Place Groups to which theyhave read access.
4. Check that the login.voice.prompt-dn-less-phone-number option is enabled, to ensure that the Login onPlace Group capability has access to the agent's phone number. You can either specify the option in thetraditional Application, Tenant, AgentGroup, Agent hierarchy, or specify it in the PlaceGroup object sothat it is taken into account only when this Place Group is selected.
You can also use the login.default-place option at the Agent, Agent Group, Application, or Tenant levelto specify a default Place Group for an Agent or a group of Agents.
ImportantThe following options treat Place Groups as Places:
• login.enable-place-completion• login.prompt-place• login.store-recent-place
Optimizing the use of eServices Interaction Server licenses
[Added: 8.5.108.11]
Provisioning functionality Agent login, authentication, and logout
Workspace Desktop Edition Deployment Guide 194
To enable the operational engagement of Agents in an eServices workflow, the eServices systemrelies on the following technical license scheme:
• Seat licenses: Agents or supervisors require one seat license to:• handle interactions of one or more eServices media type• access the content of workins or interaction queues.
• Media Channel licenses: One media license of the corresponding type is required for each media typethat is enabled for an agent to handle interactions.
Refer to Genesys Licensing Guide for details about the different types of eServices licenses.
Workspace does not directly manage eServices licenses; however, the way that it interacts withInteraction Server or Interaction Server Proxy has a direct influence on the way that licenses arechecked out or checked in by Interaction Server.
Workspace enables you to manage (optimize) the checkout of eServices licenses by your agents andsupervisors by using the eservices.disconnect-on-logoff. You can choose either the legacy behavior(pre-8.5.108.11) or the optimized behavior (8.5.108.11 and higher).
Legacy seat license and media checkoutThe legacy behavior of license checkout when the value of the eservices.disconnect-on-logoff optionis set to false is as follows:
1. A seat license is checked out when:• an agent logs in Workspace and this agent is granted the privilege to use at least one eServices
channel (email, chat, social, and so on), or,• an agent logs in Workspace and this agent is granted the privilege to use Team Workbin or
Interaction Management privilege, or,• an agent is notified that he or she is part of a push preview campaign and this agent is granted the
privilege to use Outbound.
In all these cases, the seat license is checked-in when the agent exits the application. Agents canaccess the content of their Personal or Shared Workbins at any time during the session,independently from media channel status.
2. One media license of a specific type (email, chat, custom, and so on) is checked-out as soon as theagent logs on the corresponding media channel. This can be done automatically at application start-upby implicit or explicit selection of media, or manually during an application session by global orselective media Log On. The media license is checked-in when the corresponding media is logged offmanually, or when the agent exists the application.
The custom media license that corresponds with the ‘outboundpreview’ media login is checked outthe first time the agent is notified that he or she is assigned to a push preview campaign, and ischecked in when the agent logs off voice channel or exists the application.
Optimized seat and media license checkoutThe optimized seat and media license checkout feature is particularly applicable to environmentswhere the license distribution between Voice and eServices seats is asymmetric, for example insystems where the number of Chat seats represent 20% of the total number of Voice seats, and all
Provisioning functionality Agent login, authentication, and logout
Workspace Desktop Edition Deployment Guide 195

the agents are granted the privilege to handle voice and chat interactions.
To configure the optimized license and media checkout behavior, set the value of theeservices.disconnect-on-logoff option to true. The license checkout behavior is as follows:
1. A seat license is checked out when:• an agent logs on at least one eServices channel in Workspace, either at login time by implicit or
explicit selection of media, or manually during an application session by global or selective mediaLog On. The seat license is checked-in when the last eServices media is logged off manually, orwhen the agent exists the application (Warning: The Agent cannot access the content of his or herPersonal or Shared Workbins when no eServices media is logged on), or,
• when an agent logs in Workspace while this agent is granted the privilege to use Team Workbin orInteraction Management. In this case the seat license is checked in when the agent exitsWorkspace, or,
• when an agent is notified that he or she is part of a push preview campaign and this agent isgranted the privilege to use Outbound. In this case the seat license is checked in when the agentlogs off the voice channel (it will be checked out again when voice channel is logged on again) orwhen he or she exits Workspace.
2. The media license checkout/checkin life cycle in the optimized license model is the same as in legacylicense model.
ImportantFor both the legacy and optimized licensing model, the opening of the connection toInteraction Server or Interaction Server Proxy is synchronous with the seat licensecheck-out and its closing is synchronous with the seat license is check-in.
Specification of advanced login parameters
Advanced login parameters are defined by the privileges, such as channel privileges, that areassigned to a particular agent. The privileges assigned to a particular agent, therefore, determinewhich advanced parameters, if any, are displayed in the secondary login dialog box.
The Place that is specified by an agent also determines the advanced login parameters that isavailable to be specified by the agent. For example, if the Place is associated with a voice channel,the agent must also provide login and queue information for each assigned DN. Other advancedparameters that might be required include SIP phone numbers.
Advanced parameters can be preset for agents—making it unnecessary for the agent to specifyadvanced parameters.
Application options that control loginThe following are the most commonly used application options in the interaction-workspacesection to control agent login (more options can be found here):
Provisioning functionality Agent login, authentication, and logout
Workspace Desktop Edition Deployment Guide 196

• login.default-place—Specifies the default Place that is proposed to the authenticated agent at login.• login.enable-place-completion—Enables the name of the Place to be completed as the agent types.• login.im.can-unactivate-channel—Specifies whether the agent can select and deselect (activate and
deactivate) IM channels.• login.im.prompt-agent-login-id—Specifies whether the agent can select a login id from the configured
ones for the IM channel in the login window.• login.im.prompt-dn-password—If applicable, prompts for the IM channel password in the secondary login
dialog box.• login.im.prompt-queue—If applicable, prompts for the ACD Queue in the secondary login dialog box.• login.place-location-source—Specifies how Workspace stores the last selected login Place in the
Windows User Profile when the value of the login.store-recent-place option is set to true. [Added:8.5.112.08]
• login.prompt-place—Specifies whether the agent must enter a place in the login window.• login.store-recent-place—Specifies whether the most recently used Place on the workstation is stored
and displayed for the agent at the next login.• login.store-username—Specifies whether the most recently used Username is stored locally in the user
profile. If the value is false, the previous value is cleared. [Added: 8.5.103.10]• login.voice.can-unactivate-channel—Specifies whether the agent can select and deselect (activate and
deactivate) voice channels.• login.voice.prompt-agent-login-id—Specifies whether the agent can select a login id from those
configured for the voice channel in the login window.• login.voice.prompt-dn-password—If applicable, prompts for the DN password in the secondary login
dialog box.• login.voice.prompt-queue—If applicable, prompts for the ACD Queue in the secondary login dialog box.• login.workmode—Specifies the work mode that is applied when the user of the voice DN logs in. If set to
auto-in, the agent is automatically in Ready state. If set to manual-in, the agent must manuallyactivate the Ready state. To determine whether your switch supports the work mode, refer to theDeployment Guide of the relevant T-Server.
• login.<media-type>.can-unactivate-channel—Specifies whether the agent can select and deselect(activate and deactivate) particular channels.
• login.<media-type>.is-auto-ready—Specifies whether the indicated workitem channel is automaticallyset to the Ready state at login.
DN-less login configuration options
• login.voice.prompt-dn-less-phone-number—Specifies whether a DN-less phone number is prompted forin the login window. This option is specific to the SIP Server environment.
• login.voice.use-dn-less-login-extension—Specifies how the DN-less phone number specified by an agentduring login is propagated to the Genesys back-end. Passing as an extension to SIP Server limits theimpact of multiple simultaneous login or logout events in the case of a Disaster Recovery/BusinessContinuity event. SIP Server 8.1.102.93 or higher is required for this feature. Refer to Remote Agentswith Non-provisioned DNs for more information. [Added: 8.5.141.04]
Provisioning functionality Agent login, authentication, and logout
Workspace Desktop Edition Deployment Guide 197

Using the command line to start Workspace
You can pass certain Workspace login information through the command line when you start theWorkspace application:
interactionworkspace.exe -url tcp://<host>:<port>/<appli> -u <user> -p <password> -place<place>where:<host>: host name or IP Address of Configuration Server<port>: port of Configuration Server<appli>: Interaction Worksapce application name in Management Framework<user> Username of the agent<password> Password of the agent (optional)<place> Place where the agent log to (optional)
ImportantYou must pass all of the parameters on the command line. For example, you cannotpass only the host, port, appli and place, and then prompt for the username andpassword, for example.
If parameters are typed manually in the first login window, they are stored in the localuser profile and restored to the login window at the next login session. If theparameters of the first login window are passed by the command line, therebybypassing the first login window, then the parameters are not saved in the local userprofile.
WarningWhen the command-line is used to run Workspace Desktop Edition there is no way to prompt any loginparameter, neither in the first nor in the second login screen. The purpose of running from the command-line is to by-pass the login screens and to immediately display the Workspace toolbar. As a consequence thefollowing login.* options are by-passed by the command-line start:
• login.<media-type>.can-unactivate-channel = false• login.<media-type>.available-queues = ACDQueue
• login.<media-type>.prompt-queue = true
• login.<media-type>.prompt-agent-login-id = false
• login.<media-type>.prompt-dn-password = false
• login.voice.prompt-dn-less-phone-number = false
• login.voice.use-dn-less-login-extension = false
• login.store-username = true
• login.place-location-source = standard
Provisioning functionality Agent login, authentication, and logout
Workspace Desktop Edition Deployment Guide 198

• login.store-recent-place = true
• login.default-place = <any value>• login.prompt-place = false
• login.enable-place-completion = true
Kerberos Single Sign-on(Optional) To use Kerberos Single Sign-on (SSO) you must omit the user name and password. The URLis mandatory. Place is optional when the agent is configured with a “default place” in ManagementFramework:
interactionworkspace.exe -url tcp://<host>:<port>/<appli> -place <place>where:<host>: host name or IP Address of Configuration Server<port>: port of Configuration Server<appli>: Interaction Workspace application name in Management Framework<place> Place where the agent log to (optional)
Logout
[Added: 8.5.124.08]
Agents log out by selecting Exit from the Main Menu in the Workspace Window. Agents cannot logout if they have active interactions on their desktop.
You can modify logout behavior by using the following two options:
• logout.enable-exit-on-logoff-error• login.voice.restore-dn-less-phone-number-on-logout [Added: 8.5.140.08]• logout.voice.use-login-queue-on-logout
Provisioning functionality Agent login, authentication, and logout
Workspace Desktop Edition Deployment Guide 199
Managing agent status[Modified: 8.5.124.08]
Workspace provides options that enable agents to control their status. Use these options to populatethe Workspace status menu with one or more of the following privileges:
• Global Ready• Global Not Ready (with reason code)• Global DND (Do Not Disturb)• Global After Call Work• Global Log Off• Global Login
The options enable the following agent states:
• Logged off• DND (Do Not Disturb)• After Call Work• Not Ready - Full (Multiple Reasons)• Not Ready - Full (Single Reason)• Ready - Partial (for example, ready on one channel)• Ready - Full
Workspace also enables detailed agent and place status management through options. Agents canset individual channels to the following states:
• Ready• Not Ready• Do Not Disturb• After Call Work• Logged off• Call Forwarded (for voice)
Other configurable agent privileges include the following:
• Refine advanced login parameters, when applicable (for example, Place, and Queue)
You can use the following options in the interaction-workspace section to control the contents ofthe command menu in the Workspace Main Window.
Provisioning functionality Managing agent status
Workspace Desktop Edition Deployment Guide 200
• agent-status.enabled-actions-by-channel: Defines the available agent state actions in the My Channelscontextual menu. The actions are displayed in the order in which they appear in the list.
• agent-status.enabled-actions-global: Defines the available agent states in the global Status menu. Theagent state commands are displayed in the order in which they appear in the list.
You can set automatic not-ready reasons for individual channels by media-type at login time.
• login.<media-type>.auto-not-ready-reason: Specifies the Not Ready Reason code that is displayed forthe specified channel. If the login.<media-type>.is-auto-ready option is set to true, the login.<media-type>.auto-not-ready-reason is ignored.
Voice Channel status
[Modified: 8.5.124.08]
You can configure Workspace to automatically set the agent status to the former status when anagent clicks Done. This enables an agent to return to their former status as soon as he or she hascompleted after call work, instead of having to manually change their status. [Added: 8.5.103.10]
• voice.cancel-after-call-work-on-done: Specifies that the After Call Work state is changed to the formerstatus when an agent clicks Done.
For SIP Server environments, you can control whether agents can request an extension to After CallWork by using the following option: [Added: 8.5.124.08]
• voice.after-call-work-extension: Specifies that the After Call Work state is unrestricted, can be extended,or is restricted to the interval specified in the SIP Server Emulated Agents configuration, pps. 251-252;Wrap-up time configuration is also explained on p. 546.
ImportantIf an agent manually changes status while still engaged in a voice interaction, theirstatus will display the change, but the time in status is suspended until the call isended.
Provisioning functionality Managing agent status
Workspace Desktop Edition Deployment Guide 201

Managing agent inactivity[Modified: 8.5.139.06]
For security purposes, Workspace can be configured to lock the application, if an agent has not usedthe keyboard or mouse for a period that you specify. All user input is blocked until the agent provideslogin information to unlock the application.
When Workspace is locked, the following conditions occur:
• The following windows are minimized or hidden when the application is locked:• Main window• Statistics Gadget• Interaction window• My Channels• My History• My Statistics• My Contact Center Statistics• My Messages
• The following windows/controls remain visible, but are disabled:• Interaction notifications (case information is not displayed)• System tray icon
• An authentication dialog window is displayed.• A notification that the agent should authenticate to unlock Workspace is displayed.• System notices are not locked.
Inactivity timeout
[Modified: 8.5.139.06]
You can use the following option in the interaction-workspace section to control the inactivitytimeout.
• security.inactivity-timeout: Specifies the amount of time in minutes of agent inactivity (no mouse orkeyboard usage) that triggers application locking. If the agent has been inactive longer than thenumber of minutes that are specified by the inactivity timeout, the agent must reauthenticate to beable to use the Interaction Workspace application. A value of 0 disables this functionality.
• security.inactivity-set-agent-not-ready: Specifies whether the agent is automatically set to Not Ready
Provisioning functionality Managing agent inactivity
Workspace Desktop Edition Deployment Guide 202

when agent inactivity is detected.• security.inactivity-not-ready-reason: Specifies the Not Ready Reason if the security.inactivity-set-agent-
not-ready option is set to true.• security.inactivity-force-not-ready-state: Specifies whether channels that are already in Not Ready status
(with or without a Not Ready Reason) are switched to the Not Ready Reason specified by thesecurity.inactivity-not-ready-reason option when the agent is set to Not Ready when their workstation islocked. Depends on security.inactivity-set-agent-not-ready. If the value of this option is set to false,only the status of channels in the Ready and After Call Work statuses are updated. [Added: 8.5.140.08]
Managing workstation screen lock
[Added: 8.5.139.06]
Sometimes agents lock their workstation without first setting their status to Not Ready. If thishappens, the agent will still be the target of Voice and Digital Channels interactions. You canconfigure Workspace to automatically set agent status to Not Ready or Not Ready with a Reasonwhen their workstation is locked by using the following configuration options:
• security.session-lock-set-agent-not-ready: Specifies whether the agent channels status is switched toNot Ready automatically when the Windows session is locked while the agent state is Ready, After CallWork, and optionally Not Ready.
• security.session-lock-not-ready-reason: Specifies the Not Ready Reason to be used when the agentstatus is forced to the Not Ready with a Reason status. Depends on security.session-lock-set-agent-not-ready.
• security.session-lock-force-not-ready-state: Specifies whether channels that are already in a Not Readystatus (with or without a Not Ready Reason) are switched to the Not Ready Reason specified by thesecurity.session-lock-not-ready-reason option when the agent is set to Not Ready when theirworkstation is locked. Depends on security.session-lock-set-agent-not-ready. If the value of this optionis set to false, only the status of channels in the Ready and After Call Work statuses are updated.
Provisioning functionality Managing agent inactivity
Workspace Desktop Edition Deployment Guide 203

Configuring the behavior of incominginteractions[Modified: 8.5.116.10]
(Formerly: Previewing Incoming Interactions)
For information about automatic contact assignment for incoming interactions, see ContactManagement.
Configuring the Interaction Preview window
Interaction Preview is rendered through an Interactive Notification pop-up from the System Tray fromthe Workspace icon. The Interactive Notification pop-up preview handles inbound notification forringing voice interactions (SIP or TDM) or SIP interaction preview or incoming eServices interactions(email, chat, or workitem). The preview contains sufficient information to enable agents to determinewhether to accept or reject an interaction. The following privileges enable these actions:
• Accept Interaction or Accept Preview• Reject Interaction or Decline Preview
In a Voice environment, if the Reject privilege is granted to an agent, the Reject function is availableonly for an incoming voice call if T-Server provides information about the queue or Routing Point thatis used to deliver the call to the agent.
TipYou can control the behavior of the Voice Reject function by using theinteraction.reject-route configuration option.
You can use the following options in the interaction-workspace section to configure the Interactionpreview:
• interaction.case-data.format-business-attribute: Specifies the case-data format.• interaction.case-data.frame-color: Specifies the color of the border of the Case Data view frame.
Examples: #FFFFBA00 for a Gold color, #FF6F7074 for a Silver color, and #FFB8400B for a Bronzecolor. This option can be overridden by a routing strategy.
• voice.ringing-bell: Specifies the voice channel ringing sound configuration string.• interaction.override-option-key.
To configure an agent for SIP Preview, see the Procedure: Enabling an agent to use the SIP Preview
Provisioning functionality Configuring the behavior of incoming interactions
Workspace Desktop Edition Deployment Guide 204
feature.
Configuring the behavior of new interactions
[Added: 8.5.116.10]
You can specify how new interaction windows behave after an agent who is working on one or moreinteractions accepts a new inbound interaction. You can choose to have the new interaction windowreceive the focus (default behavior), or you can choose to keep the focus on the currently activeinteraction window. You can also configure this behavior by media channel. For example, you mightchoose to have newly accepted email interactions appear in the background and newly acceptedvoice interactions to receive the focus.
Use the following new configuration options to control the behavior of new interaction windows:
• interaction.auto-focus: Specifies whether a new inbound interaction should be in focus automaticallywhen it is accepted.
• interaction.auto-focus.<media-type>: Specifies whether a new inbound interaction of the specifiedmedia type should be in focus automatically when is accepted. When this option is defined it overridesthe interaction.auto-focus option.
Outbound/outgoing interactionsNewly created outbound/outgoing interactions always receive the focus. These options do not affectthem.
Inbound interactionsIf there are no other active interactions, newly accepted (or auto-accepted) inbound interactionsalways receives focus.
If active interaction(s) exist in Workspace, and option is set for the media type of newly acceptedinbound interaction to not automatically receive focus, the new interaction will not be in focus whenit is accepted or auto-accepted.
Focus Time calculationsWhen interactions are accepted, but are displayed in the background, focus time calculations do notbegin until the agent selects the interactions window and gives it the focus.
Provisioning functionality Configuring the behavior of incoming interactions
Workspace Desktop Edition Deployment Guide 205

Channels and interaction handling[Modified: 8.5.110.13, 8.5.111.21, 8.5.115.17, 8.5.117.18, 8.5.118.10]
The following media types are supported by Workspace:
• Voice and SIP Voice• Voicemail• Outbound Campaigns• E-Mail• Chat• Video• SMS and MMS• Callback [Added: 8.5.111.21]• Web Callback• Workitems• Social Media:
• Facebook (by using an eServices plug-in)• Twitter (by using an eServices plug-in)• RSS (by using an eServices plug-in)
Force close stuck interactions[Modified: 8.5.118.10]
Since 8.0, Workspace has enabled agents to force-close stuck interactions (at the case level) by usingthe Force Close This Case feature. Prior to 8.5.118.10, this capability was unconditional and couldresult in a real active interaction becoming uncontrollable by agents.
Beginning with 8.5.118.10, you can use the interaction.unconditional-force-close option to control thebehavior of this feature. When this option is set to false (the new default value), Workspace disablesthe Force Close feature, but enables it only when the following conditions are detected:
• T-Server reports that the voice or IM call on which an operation is requested is no longer under agentcontrol
• Interaction Server reports that the eServices interaction on which an operation is requested is no longerunder agent control
Provisioning functionality Channels and interaction handling
Workspace Desktop Edition Deployment Guide 206
Common interaction functionality
[Modified: 8.5.110.13, 8.5.115.17, 8.5.117.18, 8.5.118.10]
Workspace also supports the following functionality for various interaction types:
• Case Data (also called: Customer Case or Case Information)• Interaction Bar• Workbins• Standard Response Library• Spelling Check
Provisioning functionality Channels and interaction handling
Workspace Desktop Edition Deployment Guide 207
Case Data[Modified: 8.5.115.17, 8.5.117.18, 8.5.118.10, 8.5.125.04, 8.5.141.04]
This topic is part of a set of topics related to setting up channels and interaction handling.
Customer Case Data, also called Case Information, is the grouping in one location of all theinformation (Attached Data) about active interactions of all types for a single customer. The CustomerCase facilities enable agents to store all information about the following actions in one location, aswell as:
• Handle two voice calls simultaneously.• Toggle between two calls.• Transfer/conference one or all interaction(s).
Evolution and behavior of Attached Data or Case Data
Attached data, or Customer Case information, that is relevant to a call evolves and changes as a callprogresses through the system in a contact center. For example, during a Transfer or Conference,information about who transferred a call and when, is attached to the Customer Case as case data.Not all agents in the chain will see the same case data. This information can be retrieved through thecontact database by agents who have the following privileges assigned:
• Contact - Can Use Contact History Case Data• Contact - Can Use Contact My History
Displaying and editing Case Information
ImportantThe following section assumes that you are familiar with the use of Genesys Administrator Extention,Genesys Administrator, and/or Genesys Configuration Manager, and that you are familiar with the creationof Business Attribute objects and Business Attribute Values.
Refer to:
• Business Attribute Values• Universal Routing 8.1 Business Process User's Guide• Universal Routing 8.1 Reference Manual
Provisioning functionality Channels and interaction handling
Workspace Desktop Edition Deployment Guide 208
1. Basic attached data display[Modified: 8.5.141.04]
To display attached data key-values in Workspace, you must first define a Business Attribute thatcontains a list of Business Attribute Values.
• The Names of Business Attribute Values correspond to the names of the attached data keys that youwant to display.
• The Display Names of the Business Attribute Values display the key in the User Interface.
You must then assign the name of this Business Attribute to the interaction.case-data.format-business-attribute option.
To pre-load case data Business Attribute objects when an agent logs in, configure the value of thegeneral.configuration-business-attribute-cache-preload option with a list of Business Attributes to pre-load. Business Attributes and Transaction objects are otherwise loaded the first time that aninteraction requiring them is received by an agent. They are then cached for future use. If there is alarge number of possible attribute values, such as a large list of case data, there could be a delay inthe display of the Interaction Notification while the case data loads. Pre-loading Business Attributesrelated to disposition and case data when an agent logs in ensures that there is no delay indisplaying Interaction Notifications.
2. Translated attached data valuesTo display a value of attached data by using a display name instead of raw data, in addition to what isdescribed in step #1, you must define an additional Business Attribute in which each BusinessAttribute Value represents a way to display this value in the User Interface:
• The name of the Business Attribute Value is the raw attached value that is contained in the interaction.• The Display Name of the Business Attribute Value is the label that is used for rendering in the User
Interface.
Next, you must define the annex of the Business Attribute Value that was defined in step #1 torepresent this attached data, such as the following:
• interaction-workspace/enum.business-attribute = the name of the Business Attribute that isdefined to translated attached data value
• interaction-workspace/read-only = true
• interaction-workspace/display-type = enum
Example:
To display a key-value pair in the Case Information area of an interaction in Workspace, such as"CallQuality = "0" (which is stored in attached data), perform the following steps:
In Genesys Administrator Extension/Genesys Administrator:
1. Create a Business Attribute that is named "CaseData".
Provisioning functionality Channels and interaction handling
Workspace Desktop Edition Deployment Guide 209

2. In this Business Attribute, create a Business Attribute Value that has thename Name="CallQuality" and Display Name = "Call Quality".
3. In the Workspace application object, set the value of the interaction-workspace/interaction.case-data.format-business-attribute to "CaseData"
Workspace can display the attached data, but the value "0" will be displayed.
4. In Genesys Administrator Extension/Genesys Administrator:a) Create a Business Attribute that is named enumCallQuality
b) In this Business Attribute, create the following Business AttributeValues:
Name = '0' and display name = '0 - Good'
Name = '1' and display name '1 - Poor'
Name = '2' and display name '2 - No audio'
5. In the "CallQuality" Business Attribute Value of the "CaseData"Business Attribute, set the following annex:
• interaction-workspace/enum.business-attribute = enumCallQuality
• interaction-workspace/read-only = true
• interaction-workspace/display-type = enum
Enabling attached data editing[Modified: 8.5.117.18, 8.5.118.10]
You can configure Workspace to give agents the ability to edit the case and interaction informationthat is attached to an interaction. You can also make it mandatory that an agent edits the attacheddata prior to marking the interaction as Done. You can make editable case data display as a field, acalendar, a list or a folder tree in a drop-down list, or a checkbox.
To make case data editable, you specify which key-value pairs are editable by an agent by adding anew section called interaction-workspace to the attribute in Genesys Administrator Extension/Genesys Administrator, and then defining its properties.
When you define the properties of an attribute in a Business Attribute, you can also specify whether ithas the property read-only or not. Attributes that are not read-only can be edited by agents whohave the Contact - Can Use Contact History Case Data privilege allowed.
When you set the key-value pair to be editable (read-write enabled), agents can perform thefollowing actions:
• edit plain strings (with format and length control)
Provisioning functionality Channels and interaction handling
Workspace Desktop Edition Deployment Guide 210
• edit integer values (within a valid interval)• edit float values (within a valid interval)• edit date/time (by using a calendar control)• edit enum (by using a drop-down control)• edit enum-tree (by using a drop-down control containing a folder tree) [Added: 8.5.118.10]• edit boolean (by using a check box control)
TipAn agent can only edit case information key-value pairs of those attributes that are displayed to the agent.
To make it mandatory that an agent edit an attribute before marking the interaction as Done, in theBusiness Attribute Value, create the interaction-workspace/mandatory option and set the value totrue. [Added: 8.5.117.18]
WarningGenesys recommends that you set the value of the interaction.case-data.is-read-only-on-idle option tofalse to ensure that mandatory case data fields do not become read-only by default after the agent ends acall or a chat.
Some interaction actions such as 'Transfer', 'Forward as an attachment', and 'Transfer' and/or'Conference', have an uncertain final status. By configuring the following options, you can specifywhether the agent must complete the mandatory case data:
• interaction.case-data.email.mandatory-actions - Specifies whether the agent must complete themandatory case data before applying a 'Transfer' or 'Forward as an attachment’ action on an emailinteraction. If you specify Transfer and/or Forward for this option, agents must complete themandatory case data before completing one of these actions. [Added: 8.5.150.06]
• interaction.case-data.<media-type>.mandatory-actions - Specifies whether the agent must completethe mandatory case data before applying a ‘Transfer’ and/or ‘Conference’ action for any Digital Channelinteraction other than email. If you specify Transfer and/or Conference for this option, agents mustcomplete the mandatory case data before completing one of these actions. Agents can apply theConference action only for the media types that support the functionality. [Added: 8.5.150.06]
These options can be overridden by a routing strategy as described in Overriding Options by Using aRouting Strategy.
The Editing Case Information table lists the case information Business Attribute keys that can beconfigured to be editable. For each attribute, add a new section named interaction-workspace,then define the options according to the type (boolean, string, integer, list, enum, enum-tree, float,and date) of the attribute.
Provisioning functionality Channels and interaction handling
Workspace Desktop Edition Deployment Guide 211
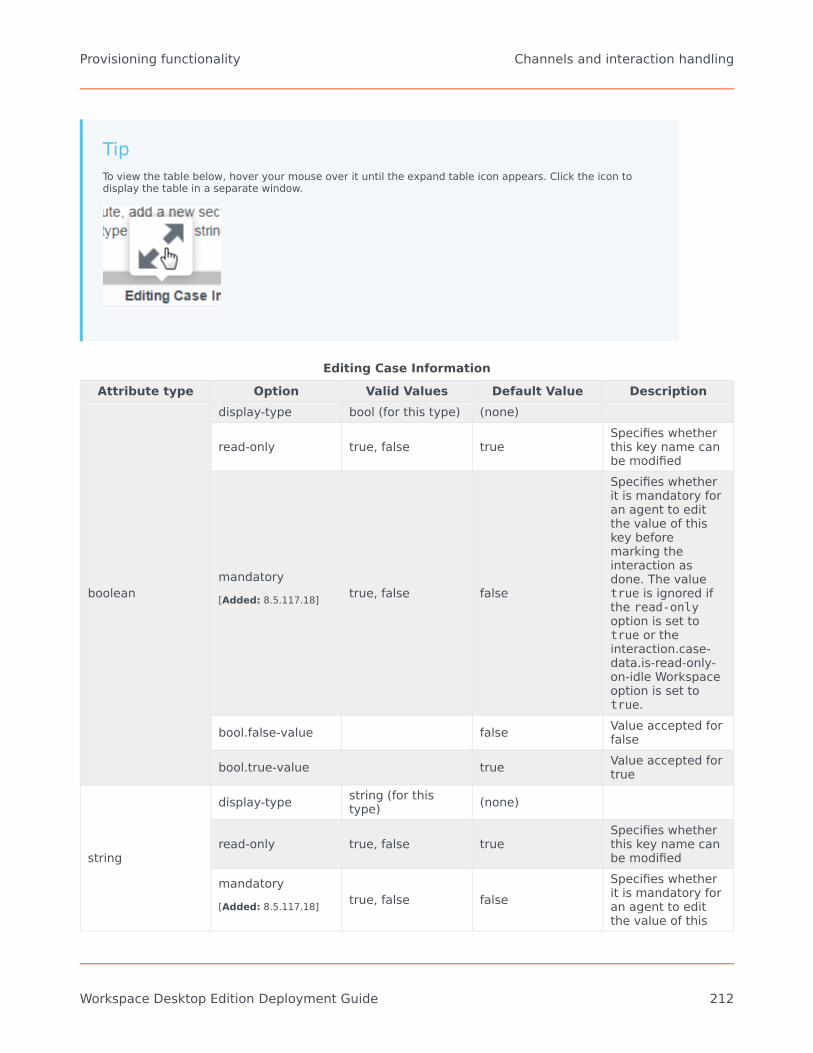
TipTo view the table below, hover your mouse over it until the expand table icon appears. Click the icon todisplay the table in a separate window.
Editing Case InformationAttribute type Option Valid Values Default Value Description
boolean
display-type bool (for this type) (none)
read-only true, false trueSpecifies whetherthis key name canbe modified
mandatory[Added: 8.5.117.18] true, false false
Specifies whetherit is mandatory foran agent to editthe value of thiskey beforemarking theinteraction asdone. The valuetrue is ignored ifthe read-onlyoption is set totrue or theinteraction.case-data.is-read-only-on-idle Workspaceoption is set totrue.
bool.false-value false Value accepted forfalse
bool.true-value true Value accepted fortrue
string
display-type string (for thistype) (none)
read-only true, false trueSpecifies whetherthis key name canbe modified
mandatory[Added: 8.5.117.18] true, false false
Specifies whetherit is mandatory foran agent to editthe value of this
Provisioning functionality Channels and interaction handling
Workspace Desktop Edition Deployment Guide 212
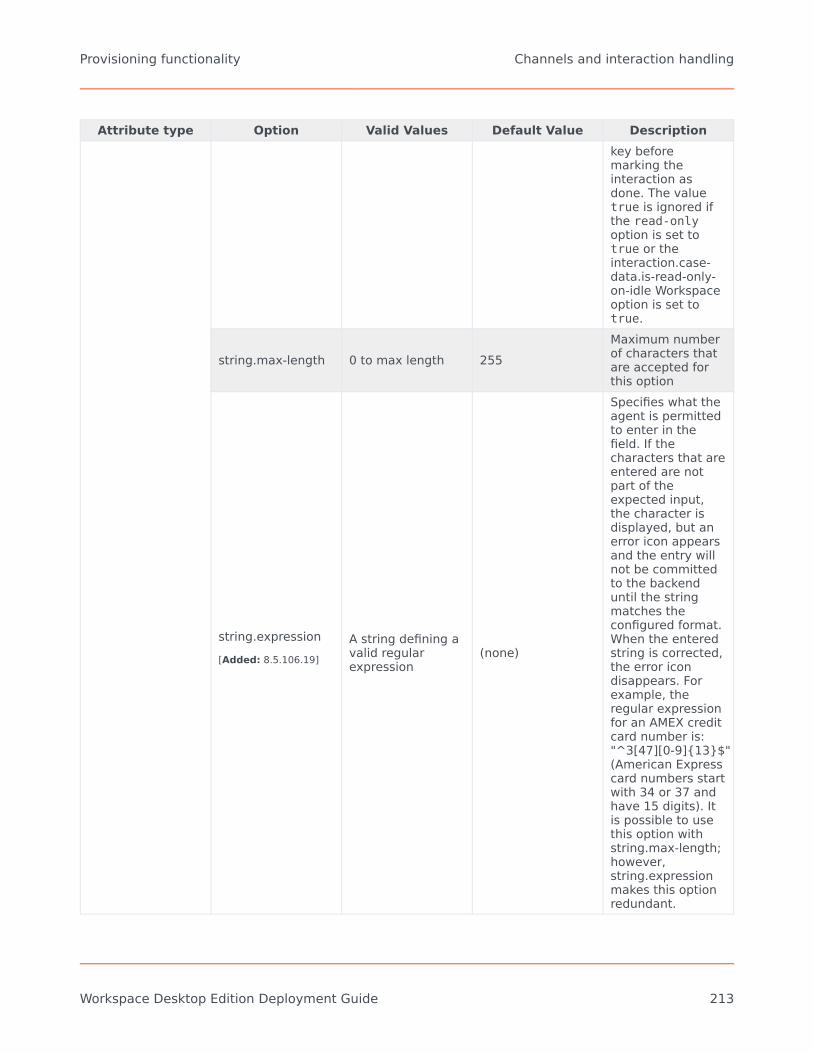
Attribute type Option Valid Values Default Value Descriptionkey beforemarking theinteraction asdone. The valuetrue is ignored ifthe read-onlyoption is set totrue or theinteraction.case-data.is-read-only-on-idle Workspaceoption is set totrue.
string.max-length 0 to max length 255Maximum numberof characters thatare accepted forthis option
string.expression[Added: 8.5.106.19]
A string defining avalid regularexpression
(none)
Specifies what theagent is permittedto enter in thefield. If thecharacters that areentered are notpart of theexpected input,the character isdisplayed, but anerror icon appearsand the entry willnot be committedto the backenduntil the stringmatches theconfigured format.When the enteredstring is corrected,the error icondisappears. Forexample, theregular expressionfor an AMEX creditcard number is:"^3[47][0-9]{13}$"(American Expresscard numbers startwith 34 or 37 andhave 15 digits). Itis possible to usethis option withstring.max-length;however,string.expressionmakes this optionredundant.
Provisioning functionality Channels and interaction handling
Workspace Desktop Edition Deployment Guide 213

Attribute type Option Valid Values Default Value Description
string.expression-instructions[Added: 8.5.106.19]
Any string (none)
Specifies theinstructions and/orexamples thatrepresent how thevalue configuredby the'string.expression'are populated. Thisstring is displayedas a tooltip on topof the icon thatinforms the agentabout incorrectformatting.
integer
display-type int (for this type) (none)
read-only true, false trueSpecifies whetherthis key name canbe modified
mandatory[Added: 8.5.117.18] true, false false
Specifies whetherit is mandatory foran agent to editthe value of thiskey beforemarking theinteraction asdone. The valuetrue is ignored ifthe read-onlyoption is set totrue or theinteraction.case-data.is-read-only-on-idle Workspaceoption is set totrue.
int.min-value integer 0
Minimum valueaccepted. If thevalue that isentered is not partof the expectedinput, the value isdisplayed, but anerror icon appearsand the entry willnot be committedto the backenduntil the valuematches theconfigured format.When the enteredstring is corrected,the error icondisappears.
Provisioning functionality Channels and interaction handling
Workspace Desktop Edition Deployment Guide 214

Attribute type Option Valid Values Default Value Description
int.max-value integer 9223372036854775807
Maximum valueaccepted. If thevalue that isentered is not partof the expectedinput, the value isdisplayed, but anerror icon appearsand the entry willnot be committedto the backenduntil the valuematches theconfigured format.When the enteredstring is corrected,the error icondisappears.
int.storage-type int or string string Type storage of thevalue
enum
display-type enum (for thistype) (none)
read-only true, false trueSpecifies whetherthis key name canbe modified
mandatory[Added: 8.5.117.18] true, false false
Specifies whetherit is mandatory foran agent to editthe value of thiskey beforemarking theinteraction asdone. The valuetrue is ignored ifthe read-onlyoption is set totrue or theinteraction.case-data.is-read-only-on-idle Workspaceoption is set totrue.
enum.business-attribute
(link to businessattributes) (none)
Link to businessattributes thatdefine the enumvalue. By defaultthe items in thislist are sortedalphabetically. Tomove some or allof the fields to thetop of the list, usethe order option.
Provisioning functionality Channels and interaction handling
Workspace Desktop Edition Deployment Guide 215

Attribute type Option Valid Values Default Value DescriptionThis option mustbe created in theannex of theBusiness Attributeobject thatcontains the list ofvalues:
• Section:interaction-workspace
• Option: Order• Default value:
""
• Valid values: Acomma-separated listof BusinessAttribute Valuenames.
enum-tree[Added: 8.5.118.10]
display-type enum-tree (for thistype) (none)
read-only true, false trueSpecifies whetherthis key name canbe modified
mandatory true, false false
Specifies whetherit is mandatory foran agent to editthe value of thiskey beforemarking theinteraction asdone. The valuetrue is ignored ifthe read-onlyoption is set totrue or theinteraction.case-data.is-read-only-on-idle Workspaceoption is set totrue.
enum.business-attribute
(link to businessattributes) (none)
Name of theBusiness Attributeobject that definesthe tree structureand enum valuespresented in thetree view. Agentscan fold or unfoldthe treeview.
Provisioning functionality Channels and interaction handling
Workspace Desktop Edition Deployment Guide 216

Attribute type Option Valid Values Default Value DescriptionAgents can searchfor values insidethe tree structure.
float
display-type float (for this type) (none)
read-only true, false trueSpecifies whetherthis key name canbe modified
mandatory[Added: 8.5.117.18] true, false false
Specifies whetherit is mandatory foran agent to editthe value of thiskey beforemarking theinteraction asdone. The valuetrue is ignored ifthe read-onlyoption is set totrue or theinteraction.case-data.is-read-only-on-idle Workspaceoption is set totrue.
float.min-value float 0
Minimum valueaccepted. If thevalue that isentered is not partof the expectedinput, the value isdisplayed, but anerror icon appearsand the entry willnot be committedto the backenduntil the valuematches theconfigured format.When the enteredstring is corrected,the error icondisappears.
float.max-value float 3.40282347E+38
Maximum valueaccepted. If thevalue that isentered is not partof the expectedinput, the value isdisplayed, but anerror icon appearsand the entry willnot be committedto the backend
Provisioning functionality Channels and interaction handling
Workspace Desktop Edition Deployment Guide 217
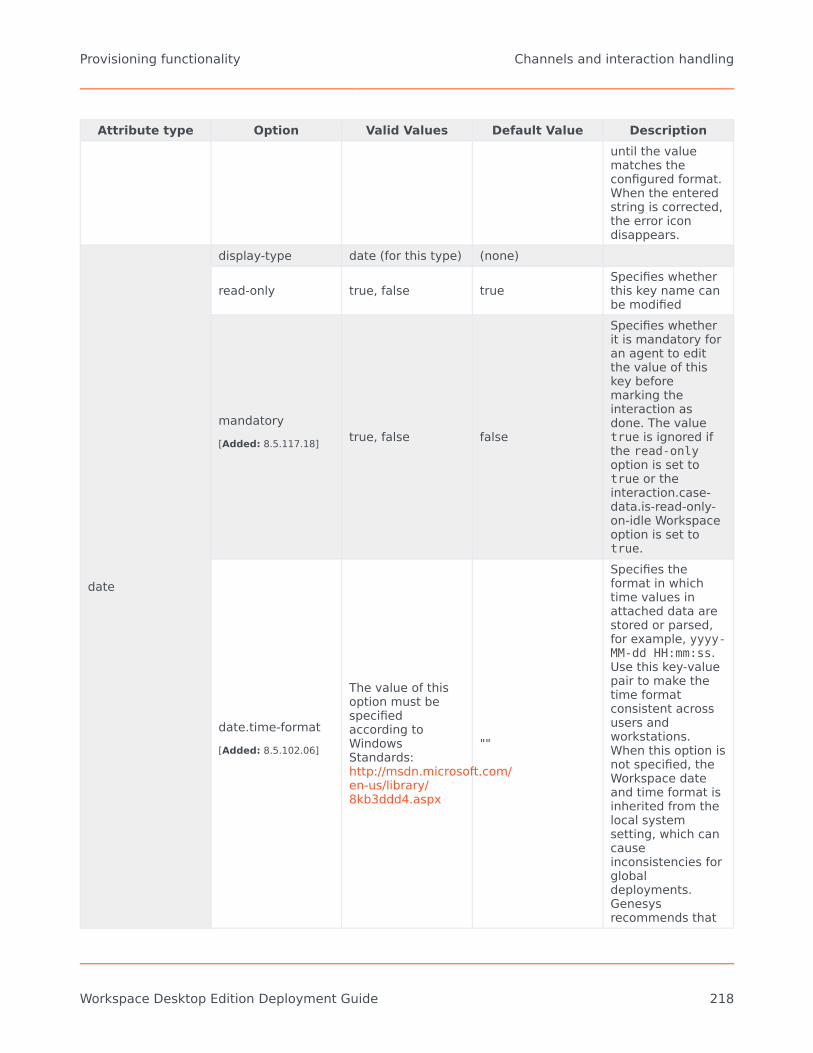
Attribute type Option Valid Values Default Value Descriptionuntil the valuematches theconfigured format.When the enteredstring is corrected,the error icondisappears.
date
display-type date (for this type) (none)
read-only true, false trueSpecifies whetherthis key name canbe modified
mandatory[Added: 8.5.117.18] true, false false
Specifies whetherit is mandatory foran agent to editthe value of thiskey beforemarking theinteraction asdone. The valuetrue is ignored ifthe read-onlyoption is set totrue or theinteraction.case-data.is-read-only-on-idle Workspaceoption is set totrue.
date.time-format[Added: 8.5.102.06]
The value of thisoption must bespecifiedaccording toWindowsStandards:http://msdn.microsoft.com/en-us/library/8kb3ddd4.aspx
""
Specifies theformat in whichtime values inattached data arestored or parsed,for example, yyyy-MM-dd HH:mm:ss.Use this key-valuepair to make thetime formatconsistent acrossusers andworkstations.When this option isnot specified, theWorkspace dateand time format isinherited from thelocal systemsetting, which cancauseinconsistencies forglobaldeployments.Genesysrecommends that
Provisioning functionality Channels and interaction handling
Workspace Desktop Edition Deployment Guide 218

Attribute type Option Valid Values Default Value Descriptionyou configure adate/time formatthat contains bothdate and time-of-day information.
date.time-display-format[Added: 8.5.125.04]
The value of thisoption must bespecifiedaccording toWindowsStandards:http://msdn.microsoft.com/en-us/library/8kb3ddd4.aspx
""
Specifies theformat in whichtime values for theDateTime variablein attached dataare displayed inWorkspace views.You can specifydate and time, justdate, or just time.
date.utc-time-zone[Added: 8.5.102.06] true, false false
Specifies whetherthe local time zoneor UTC time zoneis used to storedata and timeinformation forcase information.If the value falseis specified, thetime is saved aslocal time. If thevalue true isspecified, the timeis saved as UTCtime and thefollowing timezone information isadded to theformatted time incase no time zoneinformation isspecified as part ofthe value of thedate.time-formatoption: "+00:00".
Using enum-tree to display folders in Case Data[Added: 8.5.118.10][Modified: 8.5.141.04]
The enum-tree option is intended to enable you to create a complex tree structure of categories in adrop-down list that presents all potential outcomes (dispositions) for an interaction. This is asupplement to the Disposition feature in each interaction. Agents can both browse and search thecategory tree.
The enum-tree value selected by an agent while handling an interaction can be used to improverouting or suggested responses for the interaction.
Provisioning functionality Channels and interaction handling
Workspace Desktop Edition Deployment Guide 219

You can specify more than one enum-tree for each interaction.
You can specify that the agent must edit the case data (select a category) before marking theiteraction Done.
To support this feature, you must create multiple categories in a folder structure.
1. Using Genesys Administrator Extension, create a Business Attribute (for example CategoryStructure>).
2. In the Attribute Values folder, add a series of folders that represent the categories that you want touse for your business outcomes or dispositions.
3. In each category folder, create one or more new Attribute Values.
For case data that employ the folder/tree structure, you can choose to pre-load the folder structurewhen a agent logs in by using the general.configuration-business-attribute-folder-cache-preloadoption to specify the list of Business Attributes containing the folders that you want to pre-load.
ImportantYou must specify the Business Attributes containing folders in both the general.configuration-business-attribute-folder-cache-preload and general.configuration-business-attribute-cache-preload options for theBusiness Attributes containing folders to be pre-loaded.
Interaction Server and T-Server system properties keys[Added: 8.5.115.17]
You can access Interaction Server system properties keys and T-Server system properties keys to beused in case information.
When you use the system properties keys that are listed in the Supported Interaction Server SystemProperties' and Supported T-Server System Properties tables. Only the ScheduledAt property can bemodified to be read-only or read-write, the other properties are read-only.
When you use system properties keys to display a system property in the Attached Data, create aCase Data object that uses the system property name. Since system properties keys have a
Provisioning functionality Channels and interaction handling
Workspace Desktop Edition Deployment Guide 220
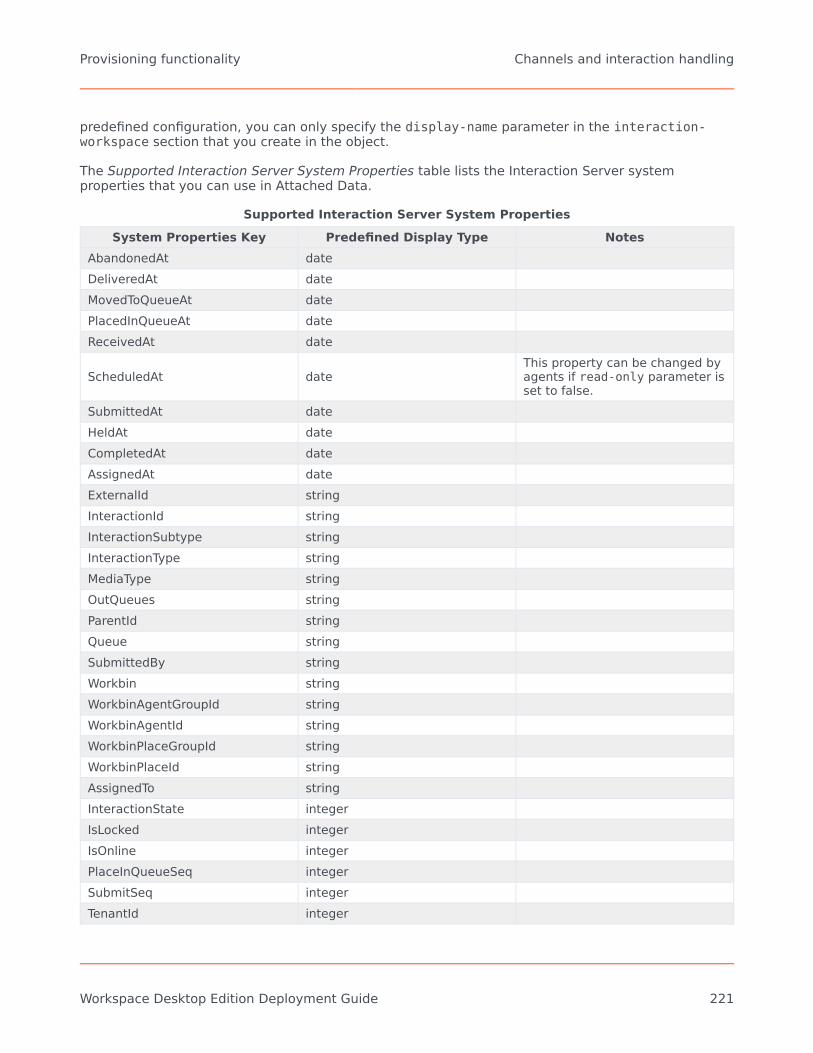
predefined configuration, you can only specify the display-name parameter in the interaction-workspace section that you create in the object.
The Supported Interaction Server System Properties table lists the Interaction Server systemproperties that you can use in Attached Data.
Supported Interaction Server System PropertiesSystem Properties Key Predefined Display Type Notes
AbandonedAt dateDeliveredAt dateMovedToQueueAt datePlacedInQueueAt dateReceivedAt date
ScheduledAt dateThis property can be changed byagents if read-only parameter isset to false.
SubmittedAt dateHeldAt dateCompletedAt dateAssignedAt dateExternalId stringInteractionId stringInteractionSubtype stringInteractionType stringMediaType stringOutQueues stringParentId stringQueue stringSubmittedBy stringWorkbin stringWorkbinAgentGroupId stringWorkbinAgentId stringWorkbinPlaceGroupId stringWorkbinPlaceId stringAssignedTo stringInteractionState integerIsLocked integerIsOnline integerPlaceInQueueSeq integerSubmitSeq integerTenantId integer
Provisioning functionality Channels and interaction handling
Workspace Desktop Edition Deployment Guide 221

The Supported T-Server System Properties table lists the T-Server system properties that you can usein Attached Data. All properties are read-only.
Supported T-Server System PropertiesSystem Properties Key Predefined Display Type
ANI stringCallID integerConnID stringCustomerID stringDNIS stringNetworkCallID stringNetworkNodeID integerPreviousConnID stringServer stringThisDN string
Important• All system attributes can be displayed in the following views: Case Information,
Workbins Case Data tab, and Interaction Queues Case Data tab.• Some system attributes are not available in the History and Interaction Search views
depending on the media type of interaction.• There might be some display issues between Interaction Server System Properties and
T-Server System Properties in Case Information during the following times:• after the preview phase of a Push Preview interaction• after the preview phase and after call work phase of a Web Callback interaction• after adding a multimedia channel to a voice interaction and vice versa
Displaying active URLs in Case Information
You can configure Workspace to render some key-values as clickable hyperlinks in the CaseInformation area and also enable previewing of web pages by tooltip on the clickable hyperlinks.
Use the following configuration options to control the way that hyperlinks are displayed, whether theyare active or not, and to enable the display of a tooltip that displays a preview of the web page.
• expression.url—The option is configured by default to display most valid URLs as clickable hyperlinks.• interaction.case-data.enable-url-preview—If this option is set to true, the tooltip-preview of linked web
pages is enabled.
Provisioning functionality Channels and interaction handling
Workspace Desktop Edition Deployment Guide 222
To control the display of hyperlinks in the Case Information area, format the attached data:
• If the attached data contains a raw URL, the hyperlink will be displayed as a raw URL (for example,http://<your web site>).
• If the attached data is formatted in the following way, the TITLE is displayed as a clickable hyperlink,and the target is the URL:• <a href="URL" title="TITLE" />• <a href="URL">TITLE<a/>
The Business Attribute Value of the key that contains the URL must contain the following key value:[interaction-workspace]/display-type=string
Add key-value pair to the Case Information
You can enable the ability to edit the case information to add Key-Values that are missing from thecase information. For example, the country or region contact information might be missing. If theagent obtains this information, the agent can edit the Case Information view to add the data value.
Pre-requisites:
• Enable the following privilege to allow editing of case information: Case Information - Can Add• To enable a key to be added, the key must be configured as editable (refer to Enabling Attached Data
Editing).
Sharing case information between conversation participant andmaking it persistent in UCS
Case information structure is dependent on the context. For example, it will vary according to theagent configuration and any interaction overrides. Workspace attaches dedicated data to theinteraction, in the form of key-value pairs, that is shared by anyone accessing the interaction,whether it is during live handling, from a workbin, or from the history. Workspace maintains thesekey-value pairs in a sub-list stored in the IWAttachedDataInformation key in the interaction.
Provisioning functionality Channels and interaction handling
Workspace Desktop Edition Deployment Guide 223

Interaction BarThis topic is part of a set of topics related to setting up channels and interaction handling.
Workspace supports multiple simultaneous contact interactions. This means that agents can havemore than one interaction open and active on their desktop simultaneously. The Interaction Bar is afeature of the Main Window that enables agents to track and access all their current interactions.Each interaction is represented by a block in the Interaction Bar view. The block contains contactinformation and interaction types to enable an agent to distinguish one interaction from another.
When an agent has one or more active interactions, each one can be displayed in one of three ways:
• As a toolbar in the Interaction Bar• As a floating interaction window that is attached to the Interaction Bar• As an interaction window that is pinned to the Interaction Bar
For more information about the Interaction Bar, refer to the Workspace 8.5 Help and the Workspace8.5 User's Guide.
To use the Interaction Bar, allow the Interaction Bar Privileges and set the Interaction Bar options.
You can use the interaction-bar.quick-access-auto-open and interaction-bar.quick-access-auto-open.<media-type> configuration options to specify that when an agent creates or accepts aninteraction, it is displayed as collapsed to the Interaction Bar. This enables agents to view othercontent, such as custom or 3rd-party content in the Main View, without the pinned or floatinginteraction views opening in front of the content. [Added: 8.5.106.19]
Provisioning functionality Channels and interaction handling
Workspace Desktop Edition Deployment Guide 224

Workbin and Interaction Queuemanagement[Modified: 8.5.110.13]
This topic is part of a set of topics related to setting up channels and interaction handling.
A workbin is like a shared queue for Agents, Places, Agent Groups, and Place Groups, in which anagent, supervisor, or manager can store email and other multimedia interactions that are to behandled later. However, unlike with a queue, interactions that are stored in a workbin can beaccessed in any order; and can be assigned to Agents, Places, Agent Groups, or Place Groups. Itemsthat are stored in a workbin are owned by the owner of the workbin.
Open interactions can be added to a workbin and saved for future processing or collaborativeprocessing by the agent, place, agent group, or place group. Interactions can also be distributed toworkbins by Universal Routing Server.
For information about configuring Workbins, refer to Universal Routing 8.1 Interaction RoutingDesigner Help.
The desktop-draft-workbin workbin object is normally configured by the Multimedia ConfigurationWizard. However, you might have to create your workbins. Refer to Genesys Administrator ExtensionHelp and the eServices User's Guide for information about defining Scripts in Configuration Server.
Workspace employs the following privileges for all workbin interactions:
• Can Use Workbins
You can use configuration options in each section that defines a workbin to configure the behavior ofeach workbin in Workspace (refer to Section: interaction-workspace).
Workbin and Queue management
You can configure an agent who is specified as a Supervisor (Team Lead) for an Agent Group to readand manage the contents of the workbins of the other Agent Group members. A Supervisor can alsomanage the contents of queues. This functionality is enabled by granting the following privilegesaccording to the functionality that you want to enable:
• Can Use My Team Workbins (InteractionWorkspace.Workbins.canUseMyTeamWorkbins)—Enables theTeam Lead to see the workbins of the agents who are members of the Agent Group for which the TeamLead is specified as a Supervisor.
• Can Use Interaction Management (InteractionWorkspace.InteractionManagement.canUse)—Enablesthe Team Lead to see interactions that are filtered by predefined criteria.
• Can Use Interaction Management Move to Queue(InteractionWorkspace.InteractionManagement.canMoveToQueue)—Enables the Team Lead who can
Provisioning functionality Channels and interaction handling
Workspace Desktop Edition Deployment Guide 225

use Interaction Management to move items from displayed workbins or from an Interaction Filter to anavailable Queue.
• Can Use Interaction Management Move to Workbin(InteractionWorkspace.InteractionManagement.canMoveToWorkbin)—Enables the Team Lead whocan use Interaction Management to move items from displayed workbins or from an Interaction Filter toanother workbin.
• Interaction Management - Can Search in Interaction Queues(InteractionWorkspace.InteractionManagement.canSearchInInteractionQueues)—Enables theTeam Lead to further refine an assigned Interaction Queue Filter. [Added: 8.5.110.13]
Team Leads who are provisioned for Interaction Management can select single or multipleinteractions in a workbin or a Queue and reassign them by moving them to other workbins or queuesor mark them as Done.
Creating interaction filters for Team Leads
[Modified: 8.5.110.13, 8.5.117.18]
Agents who are granted the InteractionWorkspace.InteractionManagement.canUse privilege canview "snapshots" from the Interaction Server database of all the interactions that belong to specifiedqueues. System administrators use Genesys Administrator Extension to build interaction filters, andthen use the interaction-management.filters option to assign the filters to Team Lead (Supervisor)agents.
An interaction filter is a database request that is sent to the Interaction Server database. Thefollowing are examples of criteria that can be used to create a filter:
• mediaType—The media type, for example email, of the interactions to be extracted.• age—The age of the interactions to be extracted. You can use this criteria to find interactions received in
the last 4 hours, or the interactions that are older than 1 day, and so on.• Priority—The priority of the interactions to be extracted.• Queue—The name of the queue or a comma-separated list of queues in which the interactions to be
extracted are stored.• Time in Queue—The duration that the interactions to be extracted have been in the queue.• Received At—The date and time at which the interaction was received. The query can specify that the
filter returns either all the interactions created on, before, or after this date, or in a range of two dates.
To create and use a filter in Workspace and make it searchable in workbins and interaction queues,do the following:
1. Create a new Section for the Workspace application object that is the name of the filter (for example:FilterEmailAge).
Provisioning functionality Channels and interaction handling
Workspace Desktop Edition Deployment Guide 226

Sample Workspace Interaction Queue configurationin Genesys Administrator Extension.
[Added: 8.5.110.13]
2. Allow the Interaction Management - Can Search In Interaction Queues privilege on the Role, AgentGroup, Group or other user objects.
Interaction Queue Search Privilege.
3. Configure options for the filter by using the names of fields in the Interaction Server database. Theoptions correspond to the criteria for the interactions to be extracted from the database. The filtersection must contain the following options:• category: The name of the category that contains the filter—for example: Email• condition: The complete filter—for example: (priority >= 2) AND (MediaType='email') AND
(_age() > 172800). Refer to Specifying Filter Conditions for information about how to define theconditions of a filter.
• display-name: The display name of the filter—for example: Older Than Two Days• displayed-columns: (Optional) The list of columns that are displayed for this interaction filter—for
example: From,To,Subject,Received. If this option is not set, the displayed columns are takenfrom the interaction-management.interactions-filter.displayed-columns option.
• queues: (Optional) The list of queues to which this filter applies—for example: email-routing-queue-inbound,email-default-queue.
• case-data.business-attribute: Specifies the name of the Business Attribute that contains theBusiness Attribute Values that are used to filter and render attached data for an interactiondisplayed in this filter. Use the case-data.business-attribute option to enable agents who areconfigured to be supervisors to view different interaction content than the agents whom theysupervise. This option is not mandatory; however, when it is used, it is impacted by the mandatoryoption of a Business Attribute Value ([Added: 8.5.117.18]). If it is not specified, Workspace displaysthe case data that is specified by the interaction.case-data.format-business-attribute option.
• quick-search-attributes: This key specifies the list of interaction attributes that are used whenapplying a quick search in this Interaction Queue Filter. The quick search criteria is applied like anAND logical operation combination, with the default criteria defined for this Filter (keys 'condition'
Provisioning functionality Channels and interaction handling
Workspace Desktop Edition Deployment Guide 227
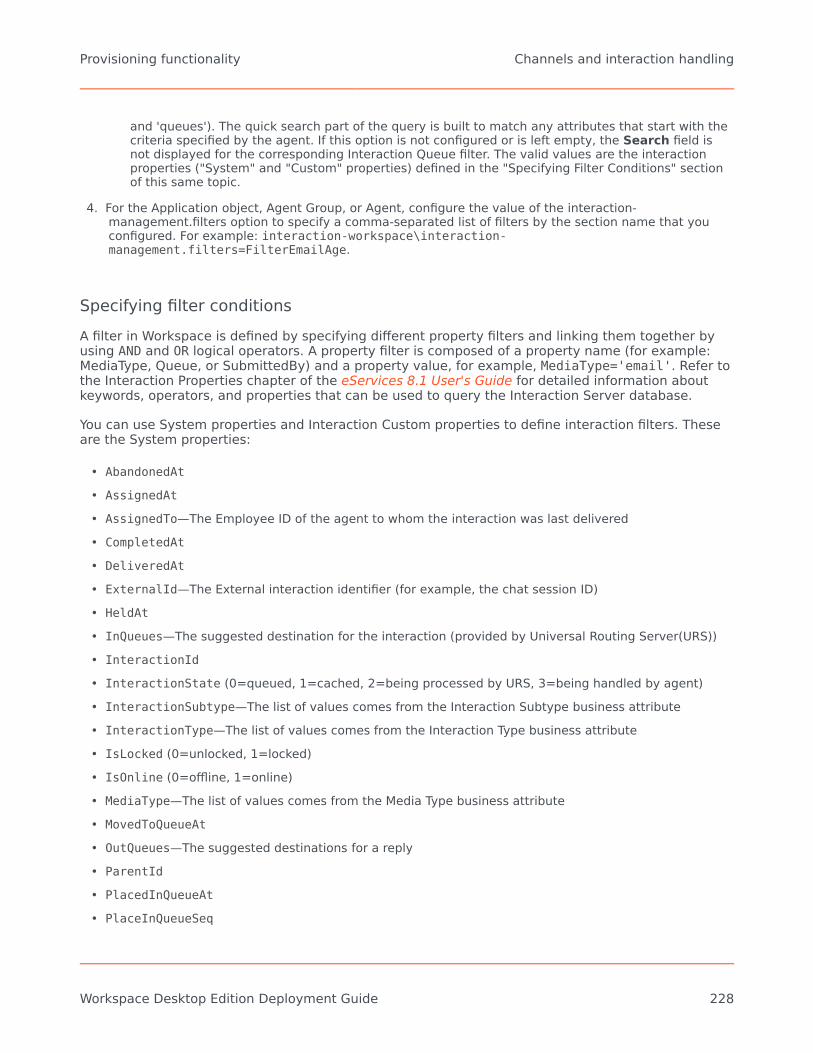
and 'queues'). The quick search part of the query is built to match any attributes that start with thecriteria specified by the agent. If this option is not configured or is left empty, the Search field isnot displayed for the corresponding Interaction Queue filter. The valid values are the interactionproperties ("System" and "Custom" properties) defined in the "Specifying Filter Conditions" sectionof this same topic.
4. For the Application object, Agent Group, or Agent, configure the value of the interaction-management.filters option to specify a comma-separated list of filters by the section name that youconfigured. For example: interaction-workspace\interaction-management.filters=FilterEmailAge.
Specifying filter conditionsA filter in Workspace is defined by specifying different property filters and linking them together byusing AND and OR logical operators. A property filter is composed of a property name (for example:MediaType, Queue, or SubmittedBy) and a property value, for example, MediaType='email'. Refer tothe Interaction Properties chapter of the eServices 8.1 User's Guide for detailed information aboutkeywords, operators, and properties that can be used to query the Interaction Server database.
You can use System properties and Interaction Custom properties to define interaction filters. Theseare the System properties:
• AbandonedAt
• AssignedAt
• AssignedTo—The Employee ID of the agent to whom the interaction was last delivered• CompletedAt
• DeliveredAt
• ExternalId—The External interaction identifier (for example, the chat session ID)• HeldAt
• InQueues—The suggested destination for the interaction (provided by Universal Routing Server(URS))• InteractionId
• InteractionState (0=queued, 1=cached, 2=being processed by URS, 3=being handled by agent)• InteractionSubtype—The list of values comes from the Interaction Subtype business attribute• InteractionType—The list of values comes from the Interaction Type business attribute• IsLocked (0=unlocked, 1=locked)• IsOnline (0=offline, 1=online)• MediaType—The list of values comes from the Media Type business attribute• MovedToQueueAt
• OutQueues—The suggested destinations for a reply• ParentId
• PlacedInQueueAt
• PlaceInQueueSeq
Provisioning functionality Channels and interaction handling
Workspace Desktop Edition Deployment Guide 228

• Queue
• ReceivedAt
• ScheduledAt
• SubmittedAt
• SubmittedBy—The name of the client application that submitted the interaction• SubmitSeq
• TenantId
• Workbin
• WorkbinAgentGroupId
• WorkbinAgentId
• WorkbinPlaceGroupId
• WorkbinPlacedId
Custom properties are defined in the Configuration Layer in the Interaction Custom PropertiesBusiness Attribute. Each Custom Property annex must have a section that is named translation.The translation section contains the translate-to option that has a value corresponding to thename of a column in the interactions table of the Interaction Server database. The followingproperty types for System and Custom are supported: Integer, String and Timestamp.
The name of the custom property (name of the Business Attribute value) can be used to define theinteraction filter.
Property values have different types:
• string—Strings are enclosed by single quote characters, for example: 'email'• date—Use the _timestamp keyword from Interaction Server for the value, for example:
_timestamp('2013-11-21 14:12:00')
• integer
Filter conditions use comparators and logical operators to test the value of a property against thevalue that is stored in the database field. The following operators are supported:
• > (greater than)• < (less than)• >= (greater than or equal)• <= (less than or equal)• = (equal)• != OR <> (different from/not equal)• LIKE (contains the string)—for example, MediaType LIKE '%a%' finds all of the media types that
contain the letter a. The % character acts as a wildcard. If MediaType LIKE 'ema%' is used, then mediatypes that begin with ema are found. If MediaType LIKE '%at' is used, then media types that end withat are found.
• NOT LIKE (does not contain the string)
Provisioning functionality Channels and interaction handling
Workspace Desktop Edition Deployment Guide 229

For interaction properties that have the String type, use the _empty and _not_empty keywords toavoid the problem of database formatting differences for empty strings. For example, to filter all theinteractions that have a ExternalId property that is non-null, use: _not_empty(ExternalId)
For Interaction properties that have the Timestamp type, use the keywords that are described in theTranslations section of the eServices 8.1 User's Guide. Use the following Timestamp properties forfiltering based on the Timestamps of interactions:
• _age()—For example, _age() >= 86400 returns all interactions that are older than 1 day (86400seconds)
• _time_in_queue()
• _current_time()
• _timestamp()
• _timestampdiff()
• _timestampadd()
• _time_in_same_queue()
To find all interactions that were received between November 24 and November 29, 2013, use thefollowing conditions: ReceivedAt >=_timestamp('2013-11-23 00:00:00') AND ReceivedAt <=_timestamp('2012-11-29 00:00:00')
ImportantTo make the columns of the Interactions Table sortable, in the Interaction CustomProperties Business Attribute, you must explicitly declare the attribute as a columnof the 'interactions' table of Interation Server Database.
TipYou can perform a bulk disposition code application followed by a bulk "Mark Done"operation on email interactions by performing a bulk "place in queue" operation to anInteraction Queue that is configured with a strategy that edits the Disposition KVPand then Terminates the email.
Provisioning functionality Channels and interaction handling
Workspace Desktop Edition Deployment Guide 230

Standard Responses LibraryThis topic is part of a set of topics related to setting up channels and interaction handling.
The Standard Responses Library (SRL) enables you to access a database of pre-written standardresponses for interactions. Agents can insert these responses as replies into any email, chatmessage, or instant message, or they can read them to the contact during a voice interaction.
Agents can modify the contents of a standard response after inserting it into an email, chat message,or instant message.
The following information about the usage of standard responses is provided automatically to theUniversal Contact Server by Workspace:
• 0—The agent received suggested responses on the desktop but chose to ignore them and choseanother response from the SRL.
• 2—The agent received suggested responses on the desktop, chose one of them, and replied.• 3—The agent did not receive a suggested response from the content analyzer and chose a standard
response from the SRL.
Interaction Workspace employs the following privilege for the Standard Responses Library (SRL):
• Can Use Standard Response Library
You use the following options in the interaction-workspace section to configure the SRL:
• standard-response.default-search-type: Specifies the default search type that is used to search for textin Standard Response Library. If empty, the default search type AllKeywords is used.
• standard-response.suggested-responses-min-relevancy: Specifies the minimum level of relevancy abovewhich Suggested Responses will be shown from the Standard Response Library.
• standard-response.categories—Specifies the Standard Response category names to which the agent isrestricted. Only standard responses and sub-category trees of the specified categories are displayed tothe agent.
• standard-response.languages—Specifies the Standard Response languages to which the agent isrestricted. Only standard responses of the specified languages are displayed to the agent. Languagesare defined as Business Attributes in the Configuration Layer.
The standard-response.categories and standard-response.languages options can be overriddenby a routing strategy. For example:
1. Configure a Transaction object of type list. For example, the object could be named:IW_StandardResponseOverrideOptions.
2. In the interaction-workspace section of the Agent configure the following options:• standard-response.languages = French
• standard-response.categories = Financial Service,HTML,English/Email/Loan
Provisioning functionality Channels and interaction handling
Workspace Desktop Edition Deployment Guide 231

3. To the override options add the name of the key to be used in the Routing Strategy to the interaction-workspace section: interaction.override-option-key = IW_OverrideOptions (default).
4. To the AttachedData in the strategy, add the following object name: IW_OverrideOptions =IW_StandardResponseOverrideOptions
For more information, refer to Modifying a Routing Strategy to Override Workspace Options, Based onAttached Data.
Provisioning functionality Channels and interaction handling
Workspace Desktop Edition Deployment Guide 232

Setting up Spelling CheckThis topic is part of a set of topics related to setting up channels and interaction handling.
The spelling-check feature enables agents to verify the spelling of text that they have entered in anemail, chat, or SMS interaction. The spelling of the contents of an outgoing email or chat interactionis verified against the default language dictionary.
The spelling-check feature steps through the text of replies, and underlines in red potentiallymisspelled words one by one. Agents can replace the underlined word with another word from a listof suggestions, add it to a custom dictionary, or ignore it.
The following languages are supported by default: English (US), English (UK), French, German,Spanish, Czech, Russian, Portuguese, and Italian.
Use the spellchecker.<media-type>.prompt-on-send configuration option to specify by media typewhether you want agents to be prompted when they click Send if there are misspelled words in anemail, chat, or SMS message. [Added: 8.5.105.12]
Corporate Dictionary
There are two ways to add a corporate dictionary to the spelling-check feature. You can choose tocombine these methods in the following execution order:
1. Configure the spellchecker.corporate-dictionary option with a list of comma-separated corporatedictionary words. Words in this list are limited to 7-bit ASCII characters. For words that require adifferent character set, us the spellchecker.corporate-dictionary-file option. The file can handle any typeof encoded characters.
2. Configure the spellchecker.corporate-dictionary-file option with the absolute or relative path to yourcorporate dictionary text file. Each entry in the file should be on a separate line.
Procedure
Adding a new language dictionary to WorkspacePurpose:
To add a new spelling check language dictionary to Workspace.
Start
1. Find the appropriate dictionary from the Open Office web site:http://extensions.services.openoffice.org/en/dictionaries
2. Download the .oxt file and save it.
Provisioning functionality Channels and interaction handling
Workspace Desktop Edition Deployment Guide 233

3. Rename the .oxt file by using the following naming convention, which follows the ISO 639-1 and ISO3166 standard codes:<language-code>-<country-code>.oxt
4. Copy this file to [IW install location]/Dictionaries.5. Restart Interaction Workspace.6. The new language is then available in the dictionary language selection available in rich edit toolbar or
by right-clicking in text areas.The following languages are supported by default: English (US), English (UK), French, German, Spanish,Czech, Russian, Portuguese, and Italian.
End
The Spelling Check Interaction Workspace User's Guide lesson demonstrates how to select alanguage in the E-Mail Interaction interface (it applies to the interfaces of other interaction types aswell.
The above procedure implements two "spellchecker" configuration options. You can use theseoptions to configure the behavior of the Spelling Check feature. Use the spellchecker.corporate-dictionary-file option to point to a text file that contains a list of spelling words.
You can also customize the language pack for Workspace.
Provisioning functionality Channels and interaction handling
Workspace Desktop Edition Deployment Guide 234

Enabling internal and externalcommunicationsRefer to Genesys Administrator Extension Help and Genesys Administrator Extension DeploymentGuide for detailed information on how to use Genesys Administrator Extension and ManagementFramework to configure access permissions.
Setting up Voice and OutboundFind information about setting up youragents' voice channel, universal look uptool (Team Communicator), voice mail,and voice call monitoring.
Communicating Inside Your BusinessVoiceEnabling Team Communicator CallingFeaturesVoice MailWorkspace SIP EndpointMonitoring SIP, Cisco UCM, or Skype forBusiness Voice InteractionsOutbound Campaigns
Setting up eServices channelsFind information about setting up youragents' email, chat, video, and SMS/MMSchannels.
EmailEmail Quality AssuranceChatChat MonitoringVideoSMS and MMS
Setting up CallbackFind information about setting up youragents for Web Callback and Callback.
Web CallbackCallback
Miscellaneous set upFind information about enabling youragents to handle workitems, manageinteractions in workbins, exchange IM'swith coworkers. Agents can also be set upto specify call outcomes (disposition),access contact history, edit caseinformation, use standard responses,read broadcast messages, and be teamleads/supervisors.
WorkitemsWorkbinsInstant Messaging
Provisioning functionality Enabling internal and external communications
Workspace Desktop Edition Deployment Guide 235

Disposition CodesContact HistoryCase Information EditingStandard ResponsesBroadcast MessagesTeam Leads and Supervisors
Provisioning functionality Enabling internal and external communications
Workspace Desktop Edition Deployment Guide 236

Communicating inside your businessWorkspace supports internal communication through Voice, Instant Messaging, and eServices Chat.The various interaction interfaces, such as Interactive Notifications, Interaction Window title bars, andlists of parties involved in an interaction, support the display of internal parties.
Employing internal communication for Coaching and Barge-inWorkspace is an agent-only application that supports supervision in many different ways, includingseparate interactions integrated into one interaction window. Supervisors can silently monitor agents,and agents can be aware when they are being silently monitored.
Agents can consult with internal targets (supervisors and others) about their voice, chat, and emailinteractions, by starting a consultation interaction in the same window as their contact interaction.Agents can also communicate with a supervisor who has initiated coaching with the agent, or barge-in with the agent and the contact.
Voice communicationWorkspace provides many facilities for voice communication between agents, between agents andsupervisors, and between agents and internal experts. The following functionality is available:
• Starting a consultation call• One-step transfer• Two-step transfer• One-step conference• Two-step conference• Sending DTMF from a consultation call• Holding a call• Retrieving a call• Alternating (toggling) between calls — holding and retrieving a call while on a consultation call• Ending a consultation call
Voice call functionality is enabled for agent by using the Voice privileges.
You can use the following options in the interaction-workspace section to configure internal voicecommunications:
• voice.one-step-trsf-mode: Specifies the type of one-step transfer. If you specify default, the default onestep transfer type for your switch is applied. For a Lucent G3 switch, the default type is mute-transfer;for a SIP switch, the default type is single-step-transfer; for an Alcatel A4400 switch, the defaulttype is single-step-transfer.
Use the Enabling an agent to use Team Communicator to call/transfer to an agent group, skill, or
Provisioning functionality Enabling internal and external communications
Workspace Desktop Edition Deployment Guide 237
Voicemail procedure to enable agents to call or transfer a call to the voicemail box of another agentor agent group.
Voice Conference functionsWorkspace supports four-way conferencing. Agents can mute and parties can drop out without endingthe call. The following functionality is available:
• Prevent a party from listening to the conversation• Re-allow a party to listen to the conversation• Remove a party from the conference
Use the following privileges to enable these voice conferencing functions:
• Can Delete From Conference• Can Prevent a Conferenced Party From Listening• Can ReAllow Conferenced Party To Listen
Instant Messaging communicationWorkspace provides many facilities for instant-messaging communication between agents, betweenagents and supervisors, and between agents and internal experts. The following functionality isavailable:
• Invite an internal target to join an Instant Messaging session• Accept or Reject an invitation to join an Instant Messaging session• Time-out if the internal target does not respond to an invitation
Use the following option in the interaction-workspace section to configure internal instant-messaging conferences:
• im.toast-timeout: Defines the duration, in seconds, of Interactive Notification for interaction instantmessaging in the Information area of the Main Window. The value 0 means the Interactive Notificationis not displayed.
eServices Chat consultationWorkspace supports integrated chat consultation in the Chat Interaction window. A chat consultationenables an internal target to view the chat transcript between an agent and contact, and to chat withthe agent privately in a second chat session in the same Chat Interaction window.
The internal target can see the messages that are exchanged with the contact, but the contact doesnot see the messages that are exchanged with the internal target.
eServices Chat conferenceThe Workspace Chat Interaction window enables agents to instant-conference the current chat
Provisioning functionality Enabling internal and external communications
Workspace Desktop Edition Deployment Guide 238

interaction with an internal target. In an instant conference, the conference starts as soon as theother party accepts the interaction. All parties in a chat conference can read all messages that aresent by each party.
Transitioning to a different channelDuring a collaboration with an agent or a knowledge worker, agents can perform the following tasks:
• Change from an Instant Message consultation to a Voice consultation• Change from a Voice consultation to an Instant Message consultation• Change from an Chat consultation to a Voice consultation• Change from an Chat consultation to an Instant Message consultation
TipWhen an IM is transferred or conferenced to a different agent, or if an internal IMconsultation is transitioned to a Voice consultation, or vice versa, all the informationabout the transferring agent is included with the interaction.
Provisioning functionality Enabling internal and external communications
Workspace Desktop Edition Deployment Guide 239

Voice[Modified: 8.5.144.05]
Workspace employs the following privileges for all voice interactions:
• Answer Call• Delete from conference• End Consultation Call• Forward Call• Hold/Retrieve Call• Make Call• One Step Conference• Two Step Conference• One Step Transfer• Two Step Transfer• Reject Call• Release Call• Set Interaction Disposition• Send DTMF• Suspend or Reinstate a Conference Party• Show Silent Monitoring• Use Voice Channel
Use the Voice and Interaction options in the interaction-workspace section to configure thehandling of voice interactions. The following options are critical for configuring the behavior of theVoice channel:
• voice.mark-done-on-release: Specifies whether the Mark Done function is required to complete therelease of the call.
• voice.auto-answer: Specifies whether a voice interaction is automatically answered when a TServerRinging event is received. This feature is disabled if the voice media that handles the interaction is inLogged Off state (Modified: 8.5.117.18). This option can be overridden by a routing strategy. You canalso configure auto-answer to display a timer that enables an agent to view case information before theinteraction is automatically answered by using the voice.auto-answer.timer and voice.auto-answer.enable-reject options (Added: 8.5.105.12).
• interaction.disposition.is-mandatory: Specifies whether it is mandatory for the agent to set a dispositioncode before Marking Done an interaction. This option can be overridden by a routing strategy.
• interaction.disposition.is-read-only-on-idle: Prevents changes to the disposition code after theinteraction has been released. This option can be overridden by a routing strategy.
Provisioning functionality Enabling internal and external communications
Workspace Desktop Edition Deployment Guide 240

• interaction.disposition.key-name: The key that is used to populate attached data or a user event when adisposition code is submitted to the back-end system, such as T-Server, Interaction Server, and ContactServer. This option can be overridden by a routing strategy.
• interaction.disposition.use-attached-data: Enables the adding of attached data from the interaction inUserEvent. This option can be overridden by a routing strategy.
• interaction.disposition.use-connection-id: Specifies whether the connection id is sent as part of the userevent that is sent for disposition code. This option can be overridden by a routing strategy.
• interaction.disposition.value-business-attribute: A character string that specifies the name of theBusiness Attribute that contains the Attribute Values that are used as an enumerated value for adisposition code. This option can be overridden by a routing strategy.
SIP Calls
In environments that use SIP Server, in the SIP Server application object, use the sip-enable-call-info option to control the user experience.
• Set the value to true to improve the display of call parties and enable blended interactions such ascreating an email to the contact of voice interaction. This setting also ensures that caller informationremains consistent when calls are transferred, conferenced, or routed between switches, for example inmulti-site environments and business continuity environments.
• Set the value to false to maintain the default behavior; however, caller identification might not bedisplayed consistently in the interaction notification and the interaction view.
Controlling Hold behavior
[Modified: 8.5.111.21]
During Consultation calls[Added: 8.5.103.10]
Workspace supports two different call hold behaviors during consultation calls in SIP Serverenvironments. During consultation call, the contact is put on hold automatically when an agentinitiates the consultation. You can control whether after the consultation call is ended the hold endsautomatically or whether agents must end the hold manually by using the voice.end-consultation-method option.
Forcing agents to end the hold manually enables them to make other consultation calls or performother actions prior to reconnecting with the contact, rather than reconnecting and then immediatelyputting the contact back on hold.
Hold Indicator thresholds[Added: 8.5.111.21]
Provisioning functionality Enabling internal and external communications
Workspace Desktop Edition Deployment Guide 241
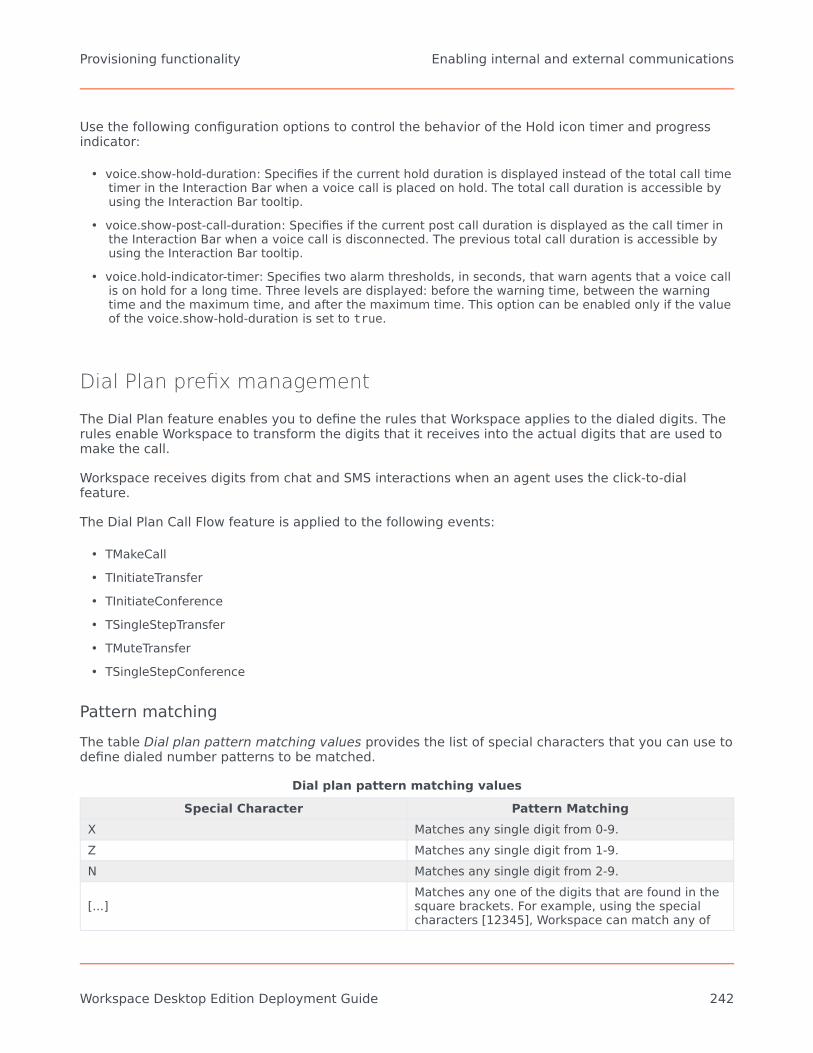
Use the following configuration options to control the behavior of the Hold icon timer and progressindicator:
• voice.show-hold-duration: Specifies if the current hold duration is displayed instead of the total call timetimer in the Interaction Bar when a voice call is placed on hold. The total call duration is accessible byusing the Interaction Bar tooltip.
• voice.show-post-call-duration: Specifies if the current post call duration is displayed as the call timer inthe Interaction Bar when a voice call is disconnected. The previous total call duration is accessible byusing the Interaction Bar tooltip.
• voice.hold-indicator-timer: Specifies two alarm thresholds, in seconds, that warn agents that a voice callis on hold for a long time. Three levels are displayed: before the warning time, between the warningtime and the maximum time, and after the maximum time. This option can be enabled only if the valueof the voice.show-hold-duration is set to true.
Dial Plan prefix management
The Dial Plan feature enables you to define the rules that Workspace applies to the dialed digits. Therules enable Workspace to transform the digits that it receives into the actual digits that are used tomake the call.
Workspace receives digits from chat and SMS interactions when an agent uses the click-to-dialfeature.
The Dial Plan Call Flow feature is applied to the following events:
• TMakeCall• TInitiateTransfer• TInitiateConference• TSingleStepTransfer• TMuteTransfer• TSingleStepConference
Pattern matchingThe table Dial plan pattern matching values provides the list of special characters that you can use todefine dialed number patterns to be matched.
Dial plan pattern matching valuesSpecial Character Pattern Matching
X Matches any single digit from 0-9.Z Matches any single digit from 1-9.N Matches any single digit from 2-9.
[...]Matches any one of the digits that are found in thesquare brackets. For example, using the specialcharacters [12345], Workspace can match any of
Provisioning functionality Enabling internal and external communications
Workspace Desktop Edition Deployment Guide 242

Special Character Pattern Matchingthe digits: 1, 2, 3, 4, or 5.
[a-b]The hyphen inside square brackets acts as a rangeindicator. Matches any one digit that falls in arange of digits. For example, [125-8] matches anyof the digits 1, 2, 5, 6, 7, 8.
The following are some examples of the use of special characters to match the patterns for dialednumber Pattern Matching:
• 9NXXXXXXXXX: Matches any 11-digit number that begins with 9, where the second digit is between 2 and9.
• 9[54]10XXXXXX: Matches any 11-digit number that begins with either 9510 or 9410.• [45]XXX: Matches any 4-digit number that begins with either 4 or 5.
Digit translationAfter the number to be dialed is matched to the pattern that is defined in the dial-plan rule,Workspace uses the digits parameter to determine which number to use to make the call. Thesedigits can be any alphanumeric string. The string must be terminated with a semicolon. Thisparameter can also use the {DIGITS} variable, which provides flexibility in defining the digits to bedialed. {DIGITS} Variable: The digits variable in the dial-plan rule must take one of the followingformats:
• ${DIGITS}
• ${DIGITS:x}
• ${DIGITS:x:y}
Where:
• DIGITS defines the actual digits dialed from the endpoint.• X defines the starting position of the variable, identified by the character position in the digit string. The
value 0 represents the first character in the string (starting from the left). This value can be negative,which indicates a character position that starts from the right instead of left. For example, -1 indicatesthe right-most character. The default value is 0.
• Y specifies the number of characters to be included, starting from the position that is defined by X. Bydefault, all characters in the string are included.
For example, if the number 96501235678 is dialed, here are some examples of how the {DIGITS}translate:
• ${DIGITS} translates to 96501235678.• ${DIGITS:1} translates to 6501235678.• ${DIGITS:-4:4} translates to 5678.• ${DIGITS:0:4} translates to 9650.
You must configure a Dial-Plan Rule in the dial-plan-rule-<name> option that uses the following
Provisioning functionality Enabling internal and external communications
Workspace Desktop Edition Deployment Guide 243

format: pattern => digit translation \# comment For example:
• 5XXX=>4351707${DIGITS} # This rule matches any 4-digit number starting with 5 and translates it tothe number 43517075XXX
• 5002=>43517075002 # This rule matches the dialed number 5002 and translates it to the number43517075002
Formatting and masking the contact phone number
[Added: 8.5.144.05]
Workspace enables you to control how contact information is displayed to agents in the followinguser interface elements. Controlling the display of contact information can be helpful if yourorganization has policies regarding the masking of specific contact information, such as a phonenumber, from agents. You can mask contact information in the following interface elements by usingthe options described in this section:
• Call details in the Contact History.• Interaction creation menu options in the Interaction Party view Party Action menu.• Team Communicator tooltip.• Call Party List tooltip.• Callback reschedule Phone Number menu.• Interaction Action menu items in the Contact Directory.
The following options enable you to specify how the contact information is displayed:
• display-format.caller-name• display-format.case-name-format• display-format.customer-name-format• display-format.interaction-callback-name• display-format.interaction-voice-name• display-format.party-name-format• interaction.window-title• contact.history.voice-detail-attributes• contact.multi-value-attribute-display.<contact-attribute>
The display-format.* option method enables you to hide information in specific interface elements.To mask contact information, such as the contact's phone number, using these options, you caninclude a text string in the option value instead of specifying a field code. In the following example,the default value will show the contact full name and will fallback to only the contact phone number ifthere is no first name, last name for this contact; the alternative option value will change the fallbackto the configured string "Hidden Phone Number" when there is no first name, and last name.
Provisioning functionality Enabling internal and external communications
Workspace Desktop Edition Deployment Guide 244

Default value$Contact.FirstName$ $Contact.LastName$|$Interaction.MainParty$
Masking value$Contact.FirstName$ $Contact.LastName$|Hidden Phone Number
Use the contact.history.voice-detail-attributes option to specify which of the following contactattributes are displayed in the History views: Date, Contact, PhoneNumber, Duration.
Use the contact.multi-value-attribute-display.<contact-attribute> option to specify how a contactattribute, which might have multiple values is displayed. To use this option, substitute <contact-attribute> with the name of a contact attribute, such as PhoneNumber (contact.multi-value-attribute-display.PhoneNumber is the only supported option at this time). Specify Descriptionand/or value (see the tables below for information on reformatting the phone number display).
Attributes that support multiple values often have a Description property to distinguish among themultiple values. Here are some examples of PhoneNumber attributes that might have multiplevalues.
Attribute format Attribute description and value
Description (Value)Home (+15555555555)Office (+15666666666)(+15555555555)
Description OfficePrimary
Value +15555555555
Provisioning functionality Enabling internal and external communications
Workspace Desktop Edition Deployment Guide 245

Enabling Team Communicator callingfeatures[Modified: 8.5.102.06, 8.5.118.10]
The following procedures enable calling and presence features in Team Communicator.
Enabling an agent to use Team Communicator to call/transfer to an agent group,skill, or Voicemail[Modified: 8.5.118.10]
Purpose:
To enable an agent to use Team Communicator to call or transfer a voice call to an agent group or askill.
Prerequisites
• Genesys Administrator 8.0.2 or higher, configured to show Advanced View, or Genesys AdministratorExtension.
• A working knowledge of Genesys Administrator Extension.• A Workspace Application object exists in the Configuration Database.
Start
1. In the Configuration tab of the Workspace application, add a connection to Statistics Server.2. In the connection, add a reference to the T-Server in which the agent logs in.3. Allow any applicable privileges from the following list of Voice privileges for the role to which the agent
is assigned:• Voice - Can Use• Voice - Can Make Call• Voice - Can One Step Transfer• Voice - Can Two Step Transfer
4. Allow the Team Communicator privileges (see Team Communicator Privileges) for the role to which theagent is assigned (refer to the Procedure: Creating a Role and allowing a Workspace privilege andassigning a Role to an agent or agent group).
5. Configure the Team Communicator options in the interaction-workspace section of the WorkspaceApplication object (refer to the Team Communicator configuration option reference for a list of TeamCommunicator options and a description of how to configure them). The value of theteamcommunicator.list-filter-showing option must at least contain AgentGroup and Skill.
Provisioning functionality Enabling internal and external communications
Workspace Desktop Edition Deployment Guide 246
6. Configure the values of the intercommunication options as follows:• intercommunication.voice.routing-points: a valid routing point name that will be used to load the
strategy to be used for call and transfer• intercommunication.voice.routing-based-actions: at least one of the following values: MakeCall,
OneStepTransfer,InitTransfer
7. In your routing configuration, configure a routing strategy that uses the routing targets that areconnected to Workspace (see intercommunication.voice.routing-points, which describes the list of keysthan can be used in the routing strategy).
8. Load the routing strategy on the Routing Point that is defined by the intercommunication.voice.routing-points option.
9. You can enable agents to call or transfer calls to the voicemail of another agent by using the TeamCommunicator. [Added: 8.5.118.10]a. Set up voicemail for the target agent and/or agent group.b. Configure the values of the intercommunication options as follows:
• intercommunication.voicemail.routing-points: a valid routing point name that will be used to loadthe strategy to be used for call and transfer.
• intercommunication.voicemail.enabled-target-types: the list of targets, Agent and/or AgentGroup, that are contacted through the routing based strategy mechanism for requests.
c. Allow the following privileges from the following list of Voicemail privileges for the role to which theagent is assigned:• Voicemail - Can Deposit Message• Voicemail - Can Transfer Message
End
Enabling an agent to use Team Communicator to call a contactPurpose:
To enable an agent to use Team Communicator to call a contact that is stored in the UniversalContact Server (UCS).
Prerequisites
• Genesys Administrator 8.0.2 or higher, configured to show Advanced View, or Genesys AdministratorExtension.
• A working knowledge of Genesys Administrator Extension.• A Workspace Application object exists in the Configuration Database.• Workspace has a connection to Universal Contact Server.• Procedure: Enabling agents to manage contacts.• The Procedure: Provisioning Workspace for the Voice channel.
Start
Provisioning functionality Enabling internal and external communications
Workspace Desktop Edition Deployment Guide 247

1. Allow the Team Communicator privileges (see Team Communicator Privileges) for the role to which theagent is assigned (refer to the Team Creating a Role and allowing a Workspace privilege and assigninga Role to an agent or agent group).
2. Configure the Team Communicator options in the interaction-workspace section of the WorkspaceApplication object (refer to the Team Communicator configuration option reference for a list of TeamCommunicator options and a description of how to configure them).
3. Ensure that the UCS application to which Workspace is connected is configured to support indexsearches on Contact database:• Set the index\enabled option to true.• Set the index.contact\enabled option to true.
For more details about these settings, refer to the eServices (Multimedia) 8.0 Reference Manual.4. Allow the following Voice privileges for the role to which the agent is assigned:
• Can Hold/Retrieve Call• Can Make Call• Can Release Call
5. Allow the following contact management privileges for the role to which the agent is assigned:• Can Use Contact Directory• Can Use Contact Information• Contact Module
End
Enabling an agent to view queue, interaction queue, and routing point presenceinformation in Team Communicator[Added: 8.5.102.06]
This section describes how you can configure Workspace to display presence information, includingwarning and error levels, in the Team Communicator for Interaction Queue, Queue, or Routing PointObjects.
Each object or group of objects for which you want to define presence must have its own sectiondefined in the Workspace Application object in the Configuration Database.
Provisioning functionality Enabling internal and external communications
Workspace Desktop Edition Deployment Guide 248

Defining a Presence Object section
Use Genesys Administrator Extension to define a new section in the options of Workspace Applicationobject. Use any string representing the type of object (Interaction Queue, Queue, or Routing Point)concatenated with any logical identifier as the name of the section. Define the values that are to bedisplayed for the Interaction Queue, Queue, or Routing Point as the Options and Values of the section.The following options are used in the "presence" sections to enable you to display interaction queue,queue and routing point presence in the Team Communicator: object-ids, associated-statistic-type,associated-object-ids... Refer to the Table - Mandatory and Optional Options for PresenceSections for a complete list of the mandatory and optional options that you can define for eachpresence Object.
Workspace application template includes three default sections that can be used as the defaultgeneric presence metric definition respectively for Interaction Queues, Queues, and Routing Points:
• Section: interaction-queue-presence• Section: queue-presence• Section: routing-point-presence
Mandatory and Optional Options for Presence SectionsKey Default Value Valid Values Description Mandatory
Key: statistic-name ""A valid statisticname according towhat is configuredin Stat Server
Name of the StatServer metric usedto compute thepresence status
Yes
Key: statistic-text "" A String
Display name ofthe presenceinformationpresented in TeamCommunicatorbelow the name ofthe object
Yes
Key: warning-level 0.0A decimal valuegreater than orequal to 0
First availabilitythresholdaccording to theUnit of the StatServer metric
No
Provisioning functionality Enabling internal and external communications
Workspace Desktop Edition Deployment Guide 249

Key Default Value Valid Values Description Mandatory
Key: error-level 0.0A decimal valuegreater than orequal to 0
Second availabilitythresholdaccording to theUnit of the StatServer metric
No
Key: object-ids ""A commaseparated list ofobject ids of thesame type
A commaseparated list ofobject identifiersthat represent theobjects displayedin TeamCommunicator forwhich thispresence metric isapplicable. Thiskey is optional. If itis absent from thesection, thepresence metricapplies to allobjects of the typefor which thissection is definedthat do not havean explicitpresence metricassignment. TheObject identifierformat is:
• For Queues andRouting Points:<DNNumber>@<Switch_Name>
• For InteractionQueues:<Script_Name>
No
Key: associated-statistic-type "" A valid statistic
type
The statistic type,as referenced inStat Server, that isrequested to showthe presencemetric when thismetric is notcalculated directlyon the object thatis displayed inTeamCommunicator,but instead on theobjects that arereferenced in theassociated-
No
Provisioning functionality Enabling internal and external communications
Workspace Desktop Edition Deployment Guide 250

Key Default Value Valid Values Description Mandatoryobject-idsoption. This optionis applicable only ifthe associated-object-ids optionis also set. Forexample 'Queue'or 'RoutingPoint'.
Key: associated-object-ids ""
A commaseparated list ofobject ids of thesame type
A commaseparated list ofobject identifiersthat represent theobjects that holdthe statisticrequested fromStat Server that isdisplayed in TeamCommunicator asthe "presencemetric" of theobject. The type ofthose objects mustmatch the typespecified by theassociated-statistic-typeoption. If multiplevalues are definedby the object-idsoption, this optionmust contain thesame number ofobjects in theorder specified byobject-ids. Thisoption isapplicable only ifthe associated-statistic-typeoption is also set.The Objectidentifier format is:
• For Queues andRouting Points:<DNNumber>@<Switch_Name>
• For InteractionQueues:<Script_Name>
No
Provisioning functionality Enabling internal and external communications
Workspace Desktop Edition Deployment Guide 251

Displaying object statistics
Workspace enables you to assign the Object presence statistics that you have defined on theApplication object at one or more of the following levels:
• Application level -- Display Object Statistic to all agents• Tenant level -- Display Object Statistic to all the agents of the Tenant• Agent Group level -- Display Object Statistic to all the agents of the Agent Group• Agent level -- Display Object Statistic to the agent
To assign an Object presence statistic to a specific configuration hierarchy level, define and configurethe option corresponding to the object type in the interaction-workspace section of the level. Thevalue of this option is a comma-separated list of Presence Object sections that are to be interpreted.
Use the following Team Communicator options to assign interaction queue, queue and routing pointobject presence to Team Communicator:
• teamcommunicator.interaction-queue-presence-metrics• teamcommunicator.queue-presence-metrics• teamcommunicator.routing-point-presence-metrics
Display precedence rules:
• When there is a presence section that does not have a specified object-ids key and a presencesection which applies to object "queue 1", the second section will apply to "queue 1"; the presence ofall other objects is defined by the first section.
• When there are multiple presence sections that do not have object-ids, only the first presence sectionin the list is taken into account.
• When an object is listed in multiple presence sections, only the first one in the list is taken into account.• When all presence sections have explicit object-ids keys, the objects that are not explicitly listed in
any presence section are displayed without presence information.
Example
The following is an example of a contact center that displays routing points in Team Communicatorand also uses virtual queues to calculate statistics for presence on routing points.
• Routing Points RP1, RP2, RP3 are available in Team Communicator as target for voice call transfers.• Virtual Queues VQ1, VQ2 are not available in Team Communicator, but are technical objects that are
available for background operations.• The availability of RP1 is based on the "Number of Waiting Calls" on RP1.• The availability of RP2 is based on the "Estimated Waiting Time" of VQ1.• The availability of RP3 is based on the "Estimated Waiting Time" of VQ2.
Use the following configuration to get the expected presence metric of the routing points describedabove:
Provisioning functionality Enabling internal and external communications
Workspace Desktop Edition Deployment Guide 252
• Section: routing-point-presence1• statistic-name=CurrNumberWaitingCalls
• statistic-text=interaction(s) waiting.
• warning-level=5
• error-level=10
• object-ids=RP1@Switch1
• Section: routing-point-presence2• statistic-name=ExpectedWaitTime
• statistic-text=second(s) to wait
• warning-level=30
• error-level=60
• object-ids=RP2@Switch1,RP3@Switch1
• associated-statistic-type=Queue
• associated-object-ids=VQ1@Switch1,VQ2@Switch1
• Section: interaction-workspace• teamcommunicator.routing-point-presence-metrics=routing-point-presence1,routing-
point-presence2
In this configuration, any routing point apart from RP1, RP2, and RP3 will not display presence inTeam Communicator.
Provisioning functionality Enabling internal and external communications
Workspace Desktop Edition Deployment Guide 253

Voicemail[Added: 8.5.100.05]
Workspace enables SIP agents to access their voicemail boxes through the agent interface by usingtheir hard-phone or soft-phone to dial their voicemail box. When this feature is enabled, a MessageWaiting Indicator, a red circle that displays the total number of unread messages, including systemmessages, in all voicemail boxes that are configured to be connected to Workspace.
Refer to the following Genesys documentation for information about setting up voicemail boxes inyour Genesys system:
• Genesys SIP Voicemail (Voicemail deployment, administration, and use)• Feature Server Deployment Guide (mailbox configuration)
Workspace employs the following privilege for voicemail support:
• Voice Mail - Can Use
You use the following option in the interaction-workspace section to configure the number to dialto access the voicemail system:
• voicemail.access-number: Specifies the number to call to access your voicemail system.• voicemail.notification-types: Specifies the types of voicemail boxes, personal and/or group (public) to be
included in the count of unread voicemail messages in the Main Window.• broadcast.system-messages-auto-mark-read: Specifies whether system messages are automatically
marked as read so that they are not included in the total messages displayed in the Message WaitingIndicator.
Use the Enabling an agent to use Team Communicator to call/transfer to an agent group, skill, orVoicemail procedure to enable agents to call or transfer a call to the voicemail box of another agentor agent group.
Related Resources
The following pages provide more information about managing voicemail boxes:
• Accessing voicemail from the web• Provisioning mailboxes
Provisioning functionality Enabling internal and external communications
Workspace Desktop Edition Deployment Guide 254
Workspace SIP Endpoint[Modified: WSEP 8.5.113.02]
Workspace Desktop Edition supports two different SIP Endpoints: Interaction Workspace SIP Endpoint8.0.2 and Workspace SIP Endpoint 8.5.0. If you want to continue to use SIP Endpoint 8.0.2, use theconfiguration options that are described in the Interaction Workspace 8.1.4 Deployment Guide.
TipWorkspace also supports the Genesys Softphone in place of Workspace SIP Endpoint.To learn about Genesys Softphone, see Configuring Workspace Desktop Edition to useGenesys Softphone in the Genesys Softphone Deployment Guide.
Workspace provides three templates from which you can choose when you deploy, one for theapplication, and two optional ones for the Workspace SIP Endpoint. This means that there are threepossible deployment configuration scenarios, depending on your environment, and whether you wantto use the new Workspace SIP Endpoint video features.
1. Workspace_Desktop_Edition_850.apd: Deploy only this template if you want to use a different SIPEndpoint.
2. Workspace_Desktop_Edition_SEP802_850.apd: Deploy this template to use Workspace and theWorkspace SIP Endpoint 8.0.2.
3. Workspace_Desktop_Edition_SEP850_850.apd: Deploy this template to use Workspace and theWorkspace SIP Endpoint 8.5.0.
You can install an optional SIP Endpoint that can be added as a privilege to enable the agentworkstation to handle SIP Voice-over-IP calls. The Workspace SIP Endpoint does not have an interface;instead, it adds interface elements to the Voice Interaction window, including muting and volumecontrol for both the microphone channel and the speaker channel of the selected audio device(s) onthe agent workstation.
TipAny USB headset that is supported by the Windows Operating System should worknormally with Workspace SIP Endpoint.
Other SIP Voice features include: automatic gain control, beep tone, auto-answer, unavailableheadset detection, log-level support, Real-time Transport Protocol (RTP) support, and speakingdetection.
Workspace SIP Endpoint is started and stopped by Workspace. Both applications employ a keep-alivemechanism that allows each to detect when the other is no longer running. If the SIP Endpointdetects that Workspace is no longer running, it waits for any active calls to end, and then exits. If
Provisioning functionality Enabling internal and external communications
Workspace Desktop Edition Deployment Guide 255

Workspace detects that the SIP Endpoint is no longer running, it starts a new instance of WorkspaceSIP Endpoint.
The Workspace SIP Endpoint can be configured at any level of the configuration-layer hierarchy, fromTenant to agent. Workspace employs the following privilege for activating the Interaction WorkspaceSIP Endpoint:
• Can Use Embedded SIP Endpoint
Refer to the SIP Endpoint SDK for .NET Developer's Guide for a list of supported codecs for theWorkspace SIP Endpoint.
ImportantQoS policies are managed by the operating system. To configure a QoS policy inWindows, refer to Quality of Service (QoS) Policy in the Microsoft documentation.
USB headset configuration
You can use the following options to configure Workspace to use a headset:
• sipendpoint.policy.device.use_headset: Specifies whether a USB head set is used for voice calls.• sipendpoint.policy.device.headset_name: Specifies what type of USB headsets are supported in your
environment. Use the "|" character to separate the names of different headsets if more than one type issupported. For example: 'Plantro|Jabra'.
If these options are set, and the corresponding USB headset is connected to the agent workstation atstart-up time, the headset is selected automatically.
If the configured USB headset is not connected to the agent workstation, then the behavior dependson the following configuration option in the interaction-workspace section of the WorkspaceApplication object:
• sipendpoint.headset-enforce-configured-usage
This option specifies whether the agent must plug in the specified USB headset to complete loggingin. By default, when it is set to false, and if the headset is not plugged in at start-up time, thedefault audio devices that are available on the workstation, if any, are selected. When it is set totrue, and if the headset is not plugged in when the agent logs in, Workspace waits for the headset tobe plugged in before finalizing the login of the voice channel. The behavior of other medias, such asemail and chat, are not affected by this option.
Workspace SIP Endpoint enables agents to switch to a pre-configured Not Ready state if the USBheadset becomes unplugged after the agent has logged in to the SIP Voice Media. The agent willremain logged in to other eServices media such as email and chat.
Use the following configuration options in the interaction-workspace section of the WorkspaceApplication object to control the behavior of this feature:
Provisioning functionality Enabling internal and external communications
Workspace Desktop Edition Deployment Guide 256

• sipendpoint.headset-unplugged.not-ready-reason—Specifies the Not Ready reason to be set to the SIPDN if the USB headset that is used by the agent becomes unplugged.
• sipendpoint.headset-unplugged-set-not-ready—Specifies whether the SIP DN of the agent is setautomatically to Not Ready if the USB Headset that is used by the agent becomes unplugged.
• sipendpoint.headset-replugged-set-ready—Specifies whether the SIP DN of the agent is setautomatically to Ready if the USB Headset that is used by the agent is plugged back in.
Workspace SIP Endpoint can be configured to retain volume setting of the USB headset betweenagent sessions.
Use the following configuration options in the interaction-workspace section of the WorkspaceApplication object to control the behavior of this feature:
• sipendpoint.retain-volume-settings-between-sessions—Specifies whether the volume settings are savedfor both microphone and speaker, when the agent logs out.
ImportantWhen an agent logs in to Workspace, the application creates a list of headsets that are plugged in to theworkstation. If an agent wants to use a different headset, he or she should exit Workspace, plug in the newheadset, then relaunch Workspace.
Session Border Controller
Interaction Workspace SIP Endpoint supports connecting to SIP Server through a Session BorderController (SBC) (refer to Server 8.1 Deployment Guide). You must configure Interaction Workspace toconnect to SIP Server through an SBC instead of directly to SIP Server.
If you do not configure Interaction Workspace to connect to SIP Server by using an SBC, InteractionWorkspace SIP Endpoint connects directly to SIP Sever to register the agent SIP Endpoint by using theTServer/sip-address and TServer/sip-port options of the corresponding SIP Server application.When you configure Interaction Workspace to connect by using an SBC you decouple the address andport information that is sent to the SIP REGISTER from SIP Server and Interaction Workspace obtainsthe host address and port from the configuration.
Configure the following two options in the interaction-workspace section of the Application,Tenant, Agent Group, or User object.
• sipendpoint.sbc-register-address—Specifies the address of your SBC to which Interaction Workspace SIPEndpoint connects.
• sipendpoint.sbc-register-port—Specifies the port on your SBC to which Interaction Workspace SIPEndpoint connects.
To set the Domain/Realm of your contact center instead of an IP when Workspace SIP Endpoint triesto register through a session border controller (SBC) device, set the value of the following two optionsto represent valid SIP domain names to specify a 'request-uri' in the SIP REGISTER request that isdecoupled from the SIP Proxy address that is contacted:
Provisioning functionality Enabling internal and external communications
Workspace Desktop Edition Deployment Guide 257

• sipendpoint.proxies.proxy0.domain• sipendpoint.proxies.proxy1.domain
Genesys SIP Proxy configuration
[Modified: WSEP 8.5.113.02]
Workspace Desktop Edition supports Genesys SIP Proxy. This feature enables SIP high availability (HA)without requiring a virtual IP address. Refer to the SIP Proxy 8.1 Deployment Guide for informationabout deploying and using SIP Proxy.
DNS SRV[Added: WSEP 8.5.113.02]
You can configure the Workspace SIP Endpoint with either:
• a standard DNS A-Records. Final URI form is: sip:user@<host_fqdn>:<port> where <host_fqdn> canbe virtual and can represent multiple physical addresses behind the scenes, but the :<port> ismandatory, or
• a DNS SRV (Service record) as specified in the Genesys SIP Proxy Architecture. Final URI form is:sip:user@<host_fqdn>
Limitations
• Genesys SIP Proxy currently does not support scenarios with switchover mid-transaction; therefore, callANSWER and CANCEL probably will not work, but BYE is fully supported.
ProvisioningThe connection to the SIP Proxy is configured by using the following Workspace configuration options:
• sipendpoint.sbc-register-address—Specifies the IP Address, Host Name of the SIP Proxy or the FQDN ofthe SIP Proxy farm.
• sipendpoint.sbc-register-port—Specifies the port of the SIP Proxy. In case of a SIP Proxy farm, all SIPProxy instances must have the same SIP Port. In case of DNS SRV, set this option to '0'.
• sipendpoint.sbc-register-address.peer— Specifies the IP Address, Host Name of the DR peer SIP Proxy orthe FQDN of the DR peer SIP Proxy farm.
• sipendpoint.sbc-register-port.peer—Specifies the port of the DR peer SIP Proxy. In case of DNS SRV, setthis option to '0'.
Tip
Provisioning functionality Enabling internal and external communications
Workspace Desktop Edition Deployment Guide 258

• These options were introduced in Interaction Workspace 8.1 to support Session BorderController; therefore, they are not specific to SIP Proxy.
• Genesys recommends that you set the value of thesipendpoint.policy.endpoint.rtp_inactivity_timeout option to the default value of 30.
Video configuration
Use the procedure: Enable an agent to use the SIP video interactions to set up agents to receiveinbound video interactions. The following configuration options support this feature:
• sipendpoint.policy.session.auto_accept_video• sipendpoint.video.auto-activate• sipendpoint.video.always-on-top• sipendpoint.video.thumbnail-ratio• sipendpoint.video.camera-frame-rate• sipendpoint.video.camera-frame-size• sipendpoint.video.camera-render-format
Changes to Workspace SIP Endpoint configuration options inWorkspace 8.5.x
The Workspace SIP Endpoint 8.0.2 versus Interaction Workspace SIP Endpoint 8.5.xoptions table lists the changes that have been made to the Workspace SIP Endpoint configurationoptions with the introduction of Workspace SIP Endpoint 8.5.x. If you want to continue to useInteraction Workspace SIP Endpoint 8.0.2, use the configuration options that are described in theInteraction Workspace 8.1.4 Deployment Guide.
Interaction Workspace SIP Endpoint 8.0.2 versus Workspace SIP Endpoint 8.5.x optionsInteraction Workspace SIP Endpoint 8.0.2
Option Name Workspace SIP Endpoint 8.5.x Option Name
sipendpoint.audio.headset.audio_in_agc_enabled sipendpoint.policy.session.agc_modesipendpoint.audio.incoming.use_agc N/Asipendpoint.genesys.beeptone.beeptone_timeout N/Asipendpoint.genesys.beeptone.enable_beeptone N/Asipendpoint.genesys.beeptone.play_locally N/Asipendpoint.genesys.control.auto_answer sipendpoint.policy.session.auto_answer
Provisioning functionality Enabling internal and external communications
Workspace Desktop Edition Deployment Guide 259

Interaction Workspace SIP Endpoint 8.0.2Option Name Workspace SIP Endpoint 8.5.x Option Name
sipendpoint.genesys.device.audio_in_device sipendpoint.policy.device.audio_in_devicesipendpoint.genesys.device.audio_out_device sipendpoint.policy.device.audio_out_devicesipendpoint.genesys.device.error_code_when_headset_nasipendpoint.policy.session.sip_code_when_headset_nasipendpoint.genesys.device.headset_name sipendpoint.policy.device.headset_namesipendpoint.genesys.device.manual_audio_devices_configureNAsipendpoint.genesys.device.reject_call_when_headset_nasipendpoint.policy.session.reject_session_when_headset_nasipendpoint.genesys.device.use_headset sipendpoint.policy.device.use_headsetsipendpoint.genesys.dtmf.pause_start_stop_dtmf N/Asipendpoint.genesys.dtmf.play_locally N/Asipendpoint.genesys.system.log_level_AbstractPhone N/Asipendpoint.genesys.system.log_level_Audio N/Asipendpoint.genesys.system.log_level_AutoConfiguration N/A
sipendpoint.genesys.system.log_level_CCM N/Asipendpoint.genesys.system.log_level_Conferencing N/Asipendpoint.genesys.system.log_level_Contacts N/Asipendpoint.genesys.system.log_level_DNS N/Asipendpoint.genesys.system.log_level_Endpoint N/Asipendpoint.genesys.system.log_level_Jitter N/Asipendpoint.genesys.system.log_level_Licensing N/Asipendpoint.genesys.system.log_level_Media N/Asipendpoint.genesys.system.log_level_Privacy N/Asipendpoint.genesys.system.log_level_RTP N/Asipendpoint.genesys.system.log_level_Security N/Asipendpoint.genesys.system.log_level_Storage N/Asipendpoint.genesys.system.log_level_STUN N/Asipendpoint.genesys.system.log_level_Transport N/Asipendpoint.genesys.system.log_level_USB Devices N/Asipendpoint.genesys.system.log_level_Utilities N/Asipendpoint.genesys.system.log_level_Voice Quality N/Asipendpoint.genesys.system.log_level_XMPP N/Asipendpoint.proxies.proxy0.reregister_in_seconds sipendpoint.proxies.proxy0.reg_timeoutsipendpoint.rtp.2833.enabled sipendpoint.policy.session.dtmf_methodsipendpoint.rtp.2833.hold_over_time_in_ms N/Asipendpoint.rtp.2833.packet_time_in_ms N/Asipendpoint.rtp.2833.payload_number N/Asipendpoint.rtp.inactivity.timer_enabled sipendpoint.policy.endpoint.rtp_inactivity_timeout
Provisioning functionality Enabling internal and external communications
Workspace Desktop Edition Deployment Guide 260

Interaction Workspace SIP Endpoint 8.0.2Option Name Workspace SIP Endpoint 8.5.x Option Name
sipendpoint.system.diagnostics.enable_logging sipendpoint.system.diagnostics.enable_logging(Unchanged)
sipendpoint.system.diagnostics.log_levelsipendpoint.system.diagnostics.log_level (keyunchanged; Warning: value format has beenchanged)
sipendpoint.system.dtmf.force_send_in_band sipendpoint.policy.session.dtmf_methodsipendpoint.system.dtmf.minimum_rfc2833_play_timeN/Asipendpoint.system.indialog_notify.enable_indialognotifyN/Asipendpoint.system.network.dtx_enabled sipendpoint.policy.session.dtx_modesipendpoint.system.qos.audio N/Asipendpoint.tuning.mixer.allow_master_volume_changeN/A
Provisioning procedures
1. Enabling an agent to use the Workspace SIP EndpointPurpose: To enable an agent to use the Workspace SIP Endpoint to send and receive SIP-basedinteractions.Prerequisites
• Genesys Administrator 8.0.2 or higher, configured to show Advanced View, or Genesys AdministratorExtension.
• A working knowledge of Genesys Administrator Extension.• A Workspace Application object exists in the Configuration Database.
Start
1. Allow the SIP Endpoint privileges (see SIP Endpoint Privileges) for the role to which the agent is assigned(refer to the Procedure: Creating a Role and allowing a Workspace privilege and assigning a Role to anagent or agent group).
2. If required, configure the SIP Endpoint options in the interaction-workspace section of the WorkspaceApplication object (refer to the SIP Endpoint configuration option reference for a list of SIP Endpointoptions and a description of how to configure them).
3. If required, configure SIP Endpoint for SIP Proxy support.4. Set the following TServer section options for the DNs of the Place to which the agent is logging in:
• sip-cti-control = talk,hold
• voice = true
5. Install Workspace SIP Endpoint (refer to Procedure: Installing the Workspace SIP Endpoint).
End
Provisioning functionality Enabling internal and external communications
Workspace Desktop Edition Deployment Guide 261

2. Enabling an agent to use the SIP Preview featurePurpose:
To enable an agent to view a display that contains a preview of an inbound SIP interaction.Prerequisites
• Target agents are using an internal or external SIP endpoint.• Genesys Administrator 8.0.2 or higher, configured to show Advanced View, or Genesys Administrator
Extension.• A working knowledge of Genesys Administrator Extension.• A Workspace Application object exists in the Configuration Database.
Start
1. Configure a SIP DN for an agent with the preview feature by setting the value of the preview-interaction option to true in the TServer section of the annex of the DN.
2. To test the configuration, log the agent in to Workspace on the place that contains the DN that youconfigured in Step 1.
3. Use a SipEndpoint sample application to connect to a different SIP DN.4. Make a call to a queue (Call to sip:<QueueNumber>@<SIPServerHost>) that routes interactions to the
agent's Place Group that contains the agent.5. The SIP Preview Interactive Notification is displayed on the agent's desktop.
End
3. Enabling an agent to use the SIP Video interactionsPurpose:
To enable an agent to receive inbound SIP video interactions.Prerequisites
• Target agents are using Workspace SIP Endpoint 8.5.0.• Genesys Administrator 8.0.2 or higher, configured to show Advanced View, or Genesys Administrator
Extension.• A working knowledge of Genesys Administrator Extension.• A Workspace Application object exists in the Configuration Database.• A webcam connected to the agent workstation.
Important
Provisioning functionality Enabling internal and external communications
Workspace Desktop Edition Deployment Guide 262

Workspace SIP Endpoint 8.5.0 supports only the VP8 and H.264 video codecs.
Start
1. Configure the values of the following SIP Server options:• TServer\default-music: Specify the path to an audio or video file to be played when the video call
is on hold. The path is relative to the MCP root directory (for example: video/on_hold.avi). Videofiles must be .AVI file format with VP8 encoding. The frame rate must be 8000/16000 Hz for audio.30 fps is recommended for video.
• TServer\info-pass-through Specify the value true.
2. Configure the values of the Media Control Platform (MCP) 8.1.7+ options:• mcp\codec: Specify the list of codecs known by MCP and presented to SIP Endpoints. This list must
include the vp8 codec to enable video hold, transfer, and conference.• mcp\transcoders: Specify the list of transcoders used by MCP. This list must include the vp8 codec
to enable video hold, transfer, and conference.• conference\video_output_type: Specify the type of video output for conferences to be single
(mixed mode is not supported).
3. Allow the following SIP Endpoint privilege (see SIP Endpoint Privileges) for the role to which the agent isassigned (refer to the Procedure: Creating a Role and allowing a Workspace privilege and assigning aRole to an agent or agent group).
4. Activate the Workspace video capability by specifying 1 for thesipendpoint.policy.session.auto_accept_video configuration option.
5. For the sipendpoint.video.auto-activate configuration option, specify true to automatically connect tothe video stream or false to require agents to manually connect to the video stream.
6. To control the size of the thumbnail of the local video stream specify a value for thesipendpoint.video.thumbnail-ratio configuration option.
7. For the sipendpoint.video.always-on-top configuration option, specify true to display the Video windowalways on top of all the other windows of the agent workstation or false to allow other windows to beon top of the Video window when they are made the active window.
8. If you are using H.264 codec, use the following configuration option to specify additional advancedparameters: sipendpoint.codecs.h264.fmtp
End
High definition video requirements
ImportantIf you plan on supporting High Definition (HD) video, please take the followingrequirements into account.
Provisioning functionality Enabling internal and external communications
Workspace Desktop Edition Deployment Guide 263

Due to the complex processing required for High Definition video, all of the endpoints that areinvolved in a video conversation must run on computers that meet a certain minimum hardwareperformance level. As the actual CPU performance can no longer be accurately measured in MHz andsince video processing performance depends on a wide variety of factors, Genesys recommends thatyou use the free benchmarking tool NovaBench to assess whether your hardware meets therequirements for successful HD video processing.
For 720p HD video, the minimum requirements are (in addition to what the camera manufacturerrequires):
• A total NovaBench score of at least 500 (with a Graphic Test sub-score of at least 12), withrecommended scores of at least 800 and 20, respectively
• 2 GB RAM• 1 Mbps upload and download speed (for a total bandwidth of 2 Mpbs)
Workspace SIP Endpoint does not currently support video resolutions higher than 720p.
Provisioning functionality Enabling internal and external communications
Workspace Desktop Edition Deployment Guide 264
Monitoring SIP, Cisco UCM, or Skype forBusiness voice interactionsWorkspace supports two approaches to monitoring, built-in Team Lead capabilities and support for3rd-party Supervisor applications.
ImportantDepending on the technical environment of your voice channel, some voice specific supervisor switch-modes might not be available:
• Switching from coaching to barge-in is not possible for agents or supervisors who arelogged in to an environment that uses SIP Server or Multimedia Connector for Skype forBusiness.
• Switching from coaching to barge-in is not possible for agents or supervisors who arelogged in to an environment that uses T-Server for Cisco UCM.
• Switching from monitoring to barge-in is not possible for agents or supervisors who arelogged in to an environment that uses T-Server for Cisco UCM.
• Only Interaction Workspace 8.1.3 and higher and Workspace Desktop Edition 8.5.0 andhigher are compatible with T-Server for Cisco UCM.
• To use Skype for Business with Workspace, you must install the Workspace Plugin forSkype for Business.
Team Lead functionality
You can configure an agent role to have the Team Lead capability. Team Leads have capabilities thatextend beyond the coaching and barge-in abilities that are enabled by internal communications.Interaction Workspace supports auto-monitoring of agents in an agent group by a team lead that isconfigured as the Supervisor of this Agent Group.
A Team Lead can perform the following functions:
• Monitor the next interaction or the currently active interaction.• Select an agent and monitor all the voice interactions of this agent in one of two modes:
• silent—neither the agent nor the contact is aware of the monitoring• coaching—only the agent can hear the Team Lead
• Silently monitor voice interactions• Start a coaching monitoring session from a silent session
Provisioning functionality Enabling internal and external communications
Workspace Desktop Edition Deployment Guide 265

• Start a barge-in (all parties on the call can hear the Team Lead) monitoring session from silent orcoaching session
• Start a silent monitoring session from coaching or barge-in session
Enable Team Lead functionality by allowing the Team Lead Privileges.
To support the monitoring of currently active voice interactions, you must also configure the SIPServer or T-Server for Cisco UCM application object by setting the intrusion-enabled option in theTServer section to the value true.
ImportantThere are no options in the interaction-workspace section to control the Team Leadfunctionality; however, Genesys strongly recommends that you use different DNs forthe voice and multimedia channels to ensure that voice and IM channels can bemonitored independently.
Third-party supervision
You can enable agents to be monitored by a supervisor that is using a Supervisor application, such asGenesys 7.6 Supervisor Desktop, if you are running a Genesys Suite that include Genesys SIP Serveror T-Server for Cisco UCM and Genesys Media Server. The monitoring feature is implemented as ahidden conference with the SIP DN or Cisco UCM DN of a supervisor.
If configured, the agent is notified through the Workspace interface during supervisor monitoring. Allmonitoring is conducted through the supervisor application. If the supervisor is using whispercoaching or barge-in, an "eye" icon is displayed within the voice interaction window to indicate thatthe call is monitored. When the supervisor leaves the call, the icon disappears.
Provisioning functionality Enabling internal and external communications
Workspace Desktop Edition Deployment Guide 266

Outbound campaigns[Modified: 8.5.115.17, 8.5.109.16, 8.5.106.19, 8.5.105.12, 8.5.102.06, 8.5.117.18, 8.5.125.04,8.5.137.06, 8.5.145.06]
Workspace supports the following campaign types:
• Preview: Contacts are retrieved manually by the agent and dialed manually by the agent. These arelow volume/high value campaigns, in which campaign calls are made by using a preset calling list for aspecific campaign.
• Push Preview: Contacts are retrieved automatically by the campaign, but the agent dials the callmanually. These are low volume/high value value campaigns, in which campaign calls are made byusing a preset calling list. Agents are provided with a preview of the call, and then can either have theopportunity to accept it, or to reject it and return it to the top of the queue or discard the record.
• Progressive: Contacts are retrieved and dialed automatically by the campaign. These are low volume/high value campaigns, in which outbound calls are directed to the agent desktop.
• Predictive: Contacts are retrieved and dialed automatically by the campaign. These are high volume/low value campaigns, in which outbound calls are directed to the agent desktop.
• Assured Connection: This is a dialing mode for certain records in Progressive and Predictivecampaigns. In this mode, an agent is engaged (connected) to the call prior to dialing the contact. Forinformation about using Assured Connection in your campaigns, refer to the Outbound Contact 8.1Deployment Guide. This mode is supported for SIP Campaigns only. [Added: 8.5.145.06]
• Active Switching Matrix (ASM): Contacts are retrieved and dialed automatically by the campaign,like Progressive and Predictive, but the agent is connected immediately to the contact.
WarningIf you grant an agent voice capabilities and Instant Messaging (IM) capabilities on two different DNs, theagent does not get Outbound Campaign notifications and experiences other issue when handling OutboundCampaign interactions.
Workaround: Configure the Log On As Person feature of the Outbound Contact Server so that it does not"see" the IM DNs that are configured in the Places of the agent.
Provisioning Outbound Campaigns
Workspace employs the following Outbound privileges for all outbound campaign voice interactions:
• Can Use: Enables access to the Outbound Campaign functions• Can Cancel Record: Enables agents to decline a preview record so that it is not processed during the
current campaign.
Provisioning functionality Enabling internal and external communications
Workspace Desktop Edition Deployment Guide 267

• Can Dial Alternative Chained Record: Enables agents to dial a number from the preview record chainthat is different from the number selected by the system.
• Can Edit Record Data: Enables agents to edit the outbound record fields that are configured as editable.• Can Get Next Preview Record: Enables agents to request a new preview record while terminating the
processing of the previous record.• Can Mark Do Not Call: Enables agents to mark a contact as Do Not Call.• Can Reject Record: Enables agents to decline a preview record and redirect it back to the queue to be
processed by another agent in the campaign.• Can Reschedule: Enables agents to reschedule an outbound record of an active call for callback at a
different date and/or time.• Can Reschedule Before Call: Enables agents to reschedule an outbound record of an Outbound Preview
for callback at a different date and/or time. The Can Reschedule privilege must be enabled for thisprivilege to be active.
• Can Reschedule On New Number: Enables agents to reschedule an outbound record using a newnumber. This action results in a new record being added to the chain.
• Can Set Call Result: Enables agents to set a call result for the outbound record.• Can Set Interaction Disposition: Enables agent to set a disposition code for Outbound interactions.
Interaction Workspace also enables privileges for Outbound Push Preview campaigns interactions:
• Can Use Push Preview: Enables agents to actively participate in Outbound Push Preview campaigns.
To ensure that this feature behaves correctly in Workspace, you must configure the send_attributekey-value pair as specified in the Outbound Reference Guide. For example, where the OutboundReference Guide recommends that you set the field name to GSW_UNTIL or GSW_FROM, considersetting those values to GSW_UNTIL or GSW_FROM only. To set an alternative display name in the agentfacing interface, you can use the display-name key-value as described in the table below.
There are two ways to specify the attribute type of outbound field:
• To create an attribute of the string, integer, float, or date type, specify this type in the data type ofthe outbound field.
• To create an attribute of the boolean or enum type, follow these two steps:1. Specify the type char or varchar for the data type of the outbound field.2. Set the value of display-type to bool for Boolean, or enum for enum.
Configuration of the interaction-workspace section in the objects of type ‘Field’ inGenesys Administrator Extension
Configuration of the interaction-workspace section in the objects of type ‘Field’ in GenesysAdministrator Extension
Attribute type Option Valid Values Default Value Description
boolean display-type bool (none)Specifies the typeof the outboundfield to be
Provisioning functionality Enabling internal and external communications
Workspace Desktop Edition Deployment Guide 268

Attribute type Option Valid Values Default Value Descriptiondisplayed on theWorkspace side.The outbound fieldvalue is displayedas a checkbox.bool display typeis taken intoaccount only if theoutbound fielddata type is charor varchar
display true, false true
Specifies if theoutbound field isdisplayed or not onthe Workspaceside. This option isused in addition tothe creation of thesend_attribute.If thesend_attribute isdefined, use thisoption to hide theoutbound field.
display-name any string (none)
Specifies the namethat is displayedfor this outboundfield on theWorkspace side. Ifthis option is notset, the outboundfield is displayedby using thesend_attributevalue.
read-only true, false
true (for systemfields),false (for user-definedfields)
Specifies whetherthis outbound fieldcan be modified
bool.false-value any string falseDefines the stringthat correspondsto 'false'.
bool.true-value any string trueDefines the stringthat correspondsto 'true'.
string display true, false true
Specifies if theoutbound field isdisplayed or not onthe Workspaceside. This option isused in addition tothe creation of the
Provisioning functionality Enabling internal and external communications
Workspace Desktop Edition Deployment Guide 269

Attribute type Option Valid Values Default Value Descriptionsend_attribute.If thesend_attribute isdefined, use thisoption to hide theoutbound field.
display-name any string (none)
Specifies the namethat is displayedfor this outboundfield on theWorkspace side. Ifthis option is notset, the outboundfield is displayedby using thesend_attributevalue.
read-only true, falsetrue (for systemfields), false (foruser-defined fields)
Specifies whetherthis outbound fieldcan be modified
string.expression[Added: 8.5.106.19]
A string defining avalid regularexpression
(none)
Specifies what theagent is permittedto enter in thefield. If thecharacters that areentered are notpart of theexpected input,the character isdisplayed, but anerror icon appearsand the entry willnot be committedto the backenduntil the stringmatches theconfigured format.When the enteredstring is corrected,the error icondisappears. Forexample, theregular expressionfor an AMEX creditcard number is:"^3[47][0-9]{13}$"(American Expresscard numbers startwith 34 or 37 andhave 15 digits).
string.expression-instructions Any string (none)
Specifies theinstructions and/orexamples thatrepresent how the
Provisioning functionality Enabling internal and external communications
Workspace Desktop Edition Deployment Guide 270

Attribute type Option Valid Values Default Value Description
[Added: 8.5.106.19]
value configuredby the'string.expression'are populated. Thisstring is displayedas a tooltip on topof the icon thatinforms the agentabout incorrectformatting.
enum
display-type enum (none)
Specifies the typeof the outboundfield to bedisplayed on theWorkspace side.The outbound fieldpossible values aredisplayed in acombo box. In thiscase, the list ofpossible values isdefined in theenum.business-attribute option.enum display typeis taken intoaccount only if theoutbound fielddata type is charor varchar
display true, false true
Specifies if theoutbound field isdisplayed or not onthe Workspaceside. This option isused in addition tothe creation of thesend_attribute.If thesend_attribute isdefined, use thisoption to hide theoutbound field.
display-name any string (none)
Specifies the namethat is displayedfor this outboundfield on theWorkspace side. Ifthis option is notset, the outboundfield is displayedby using thesend_attributevalue.
Provisioning functionality Enabling internal and external communications
Workspace Desktop Edition Deployment Guide 271
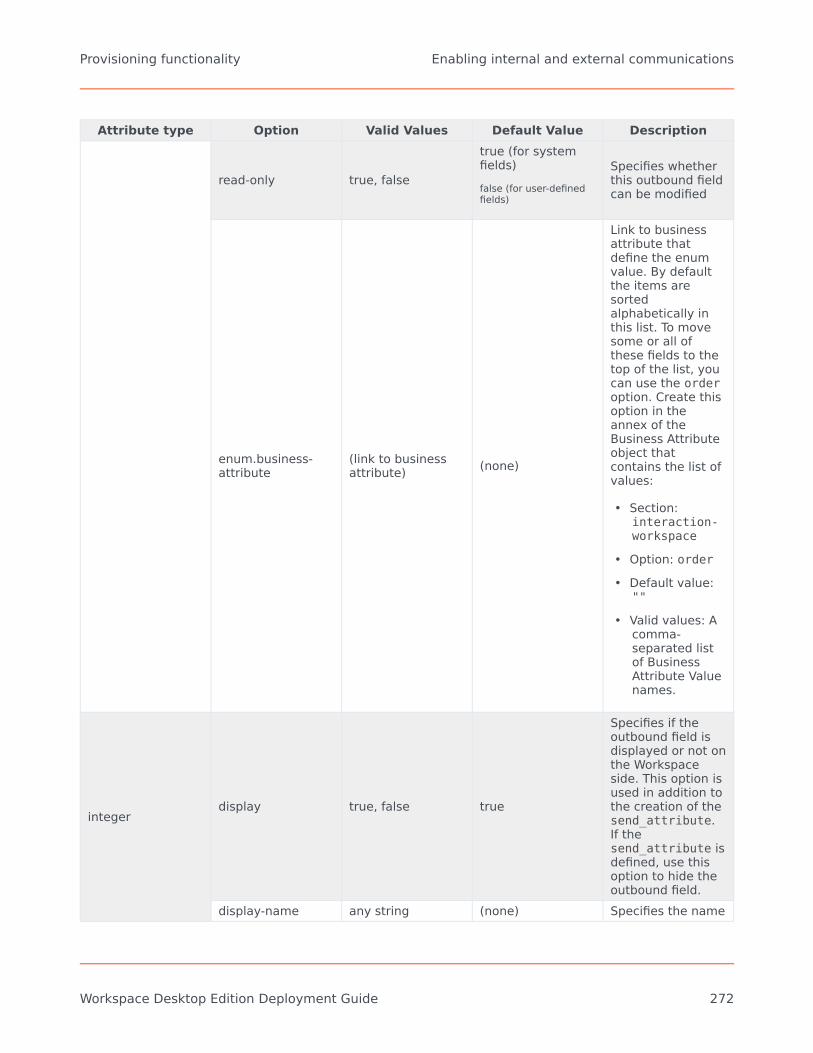
Attribute type Option Valid Values Default Value Description
read-only true, false
true (for systemfields)false (for user-definedfields)
Specifies whetherthis outbound fieldcan be modified
enum.business-attribute
(link to businessattribute) (none)
Link to businessattribute thatdefine the enumvalue. By defaultthe items aresortedalphabetically inthis list. To movesome or all ofthese fields to thetop of the list, youcan use the orderoption. Create thisoption in theannex of theBusiness Attributeobject thatcontains the list ofvalues:
• Section:interaction-workspace
• Option: order• Default value:
""
• Valid values: Acomma-separated listof BusinessAttribute Valuenames.
integerdisplay true, false true
Specifies if theoutbound field isdisplayed or not onthe Workspaceside. This option isused in addition tothe creation of thesend_attribute.If thesend_attribute isdefined, use thisoption to hide theoutbound field.
display-name any string (none) Specifies the name
Provisioning functionality Enabling internal and external communications
Workspace Desktop Edition Deployment Guide 272

Attribute type Option Valid Values Default Value Descriptionthat is displayedfor this outboundfield on theWorkspace side. Ifthis option is notset, the outboundfield is displayedby using thesend_attributevalue.
read-only true, false
true (for systemfields),false (for user-definedfields)
Specifies whetherthis outbound fieldcan be modified
int.max-value integer 9223372036854775807Maximum valueaccepted.
int.min-value integer 0 Minimum valueaccepted.
float
display true, false true
Specifies if theoutbound field isdisplayed or not onthe Workspaceside. This option isused in addition tothe creation of thesend_attribute.If thesend_attribute isdefined, use thisoption to hide theoutbound field.
display-name any string (none)
Specifies the namethat is displayedfor this outboundfield on theWorkspace side. Ifthis option is notset, the outboundfield is displayedby using thesend_attributevalue.
read-only true, falsetrue (for systemfields), false (foruser-defined fields)
Specifies whetherthis outbound fieldcan be modified
float.max-value float 3.40282347E+38 Maximum valueaccepted.
float.min-value float 0 Minimum valueaccepted.
date display true, false true Specifies if the
Provisioning functionality Enabling internal and external communications
Workspace Desktop Edition Deployment Guide 273

Attribute type Option Valid Values Default Value Descriptionoutbound field isdisplayed or not onthe Workspaceside. This option isused in addition tothe creation of thesend_attribute.If thesend_attribute isdefined, use thisoption to hide theoutbound field.
display-name any string (none)
Specifies the namethat is displayedfor this outboundfield on theWorkspace side. Ifthis option is notset, the outboundfield is displayedby using thesend_attributevalue.
display-type date date
Specifies that thedisplay type of thedate.utc-time-zone and/or thedate.time-formatoptions in thecorrespondingdate formatoutbound field isdate. Note: forWorkspace8.5.105.xx andearlier, if thisoption is notspecified, thedate.utc-time-zone anddate.time-formatoptions are nottaken into account.
read-only true, false
true (for systemfields),false (for user-definedfields)
Specifies whetherthis outbound fieldcan be modified
date.time-format[Added: 8.5.102.06]
The value of thisoption must bespecifiedaccording toWindowsStandards:
""
Specifies theformat in whichtime values inattached data arestored or parsed,for example, yyyy-
Provisioning functionality Enabling internal and external communications
Workspace Desktop Edition Deployment Guide 274
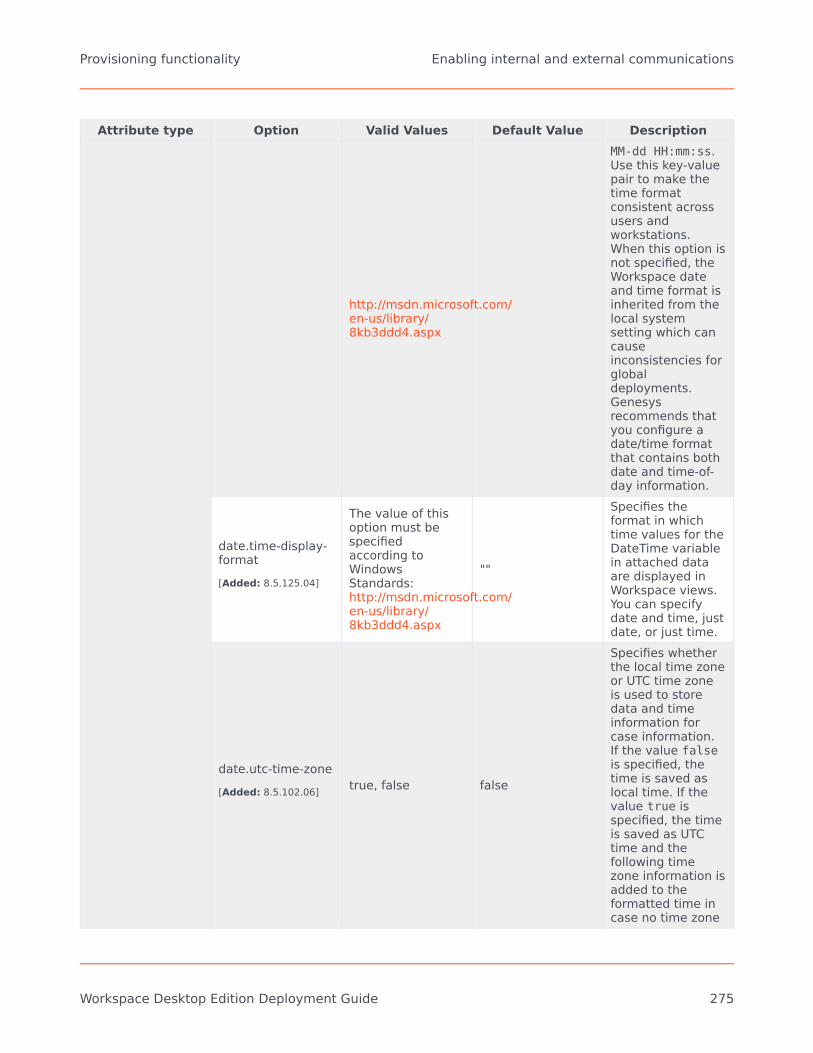
Attribute type Option Valid Values Default Value Description
http://msdn.microsoft.com/en-us/library/8kb3ddd4.aspx
MM-dd HH:mm:ss.Use this key-valuepair to make thetime formatconsistent acrossusers andworkstations.When this option isnot specified, theWorkspace dateand time format isinherited from thelocal systemsetting which cancauseinconsistencies forglobaldeployments.Genesysrecommends thatyou configure adate/time formatthat contains bothdate and time-of-day information.
date.time-display-format[Added: 8.5.125.04]
The value of thisoption must bespecifiedaccording toWindowsStandards:http://msdn.microsoft.com/en-us/library/8kb3ddd4.aspx
""
Specifies theformat in whichtime values for theDateTime variablein attached dataare displayed inWorkspace views.You can specifydate and time, justdate, or just time.
date.utc-time-zone[Added: 8.5.102.06] true, false false
Specifies whetherthe local time zoneor UTC time zoneis used to storedata and timeinformation forcase information.If the value falseis specified, thetime is saved aslocal time. If thevalue true isspecified, the timeis saved as UTCtime and thefollowing timezone information isadded to theformatted time incase no time zone
Provisioning functionality Enabling internal and external communications
Workspace Desktop Edition Deployment Guide 275
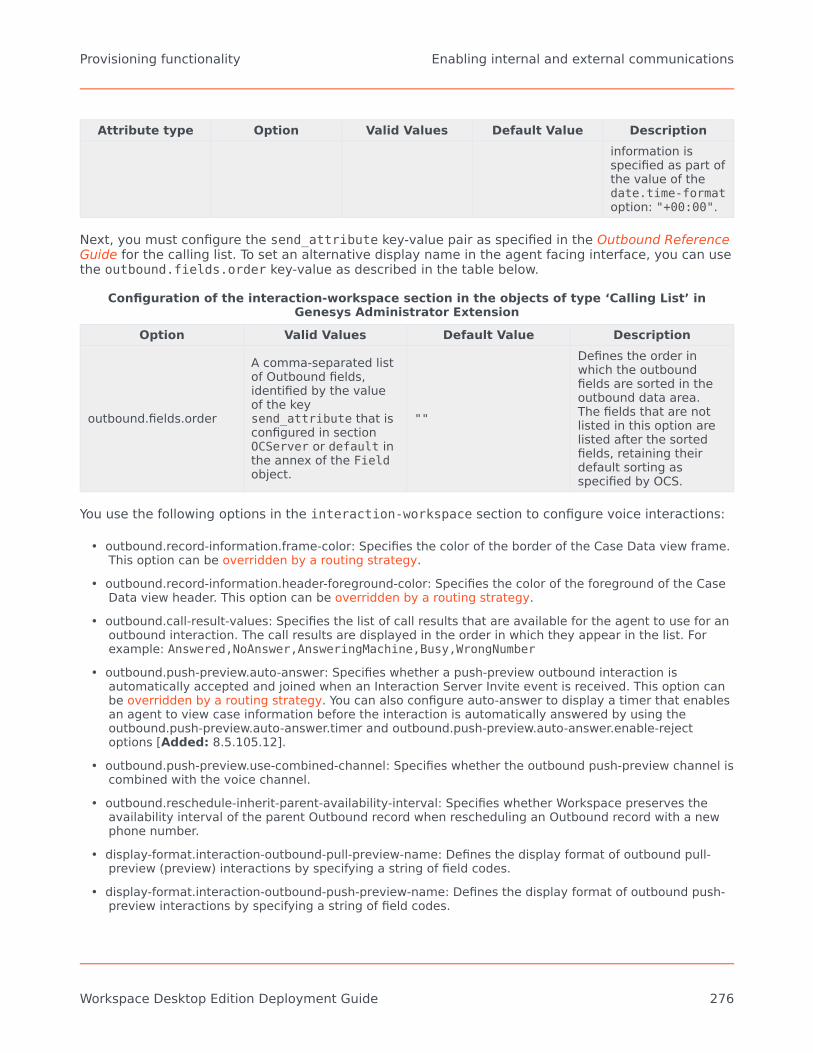
Attribute type Option Valid Values Default Value Descriptioninformation isspecified as part ofthe value of thedate.time-formatoption: "+00:00".
Next, you must configure the send_attribute key-value pair as specified in the Outbound ReferenceGuide for the calling list. To set an alternative display name in the agent facing interface, you can usethe outbound.fields.order key-value as described in the table below.
Configuration of the interaction-workspace section in the objects of type ‘Calling List’ inGenesys Administrator Extension
Option Valid Values Default Value Description
outbound.fields.order
A comma-separated listof Outbound fields,identified by the valueof the keysend_attribute that isconfigured in sectionOCServer or default inthe annex of the Fieldobject.
""
Defines the order inwhich the outboundfields are sorted in theoutbound data area.The fields that are notlisted in this option arelisted after the sortedfields, retaining theirdefault sorting asspecified by OCS.
You use the following options in the interaction-workspace section to configure voice interactions:
• outbound.record-information.frame-color: Specifies the color of the border of the Case Data view frame.This option can be overridden by a routing strategy.
• outbound.record-information.header-foreground-color: Specifies the color of the foreground of the CaseData view header. This option can be overridden by a routing strategy.
• outbound.call-result-values: Specifies the list of call results that are available for the agent to use for anoutbound interaction. The call results are displayed in the order in which they appear in the list. Forexample: Answered,NoAnswer,AnsweringMachine,Busy,WrongNumber
• outbound.push-preview.auto-answer: Specifies whether a push-preview outbound interaction isautomatically accepted and joined when an Interaction Server Invite event is received. This option canbe overridden by a routing strategy. You can also configure auto-answer to display a timer that enablesan agent to view case information before the interaction is automatically answered by using theoutbound.push-preview.auto-answer.timer and outbound.push-preview.auto-answer.enable-rejectoptions [Added: 8.5.105.12].
• outbound.push-preview.use-combined-channel: Specifies whether the outbound push-preview channel iscombined with the voice channel.
• outbound.reschedule-inherit-parent-availability-interval: Specifies whether Workspace preserves theavailability interval of the parent Outbound record when rescheduling an Outbound record with a newphone number.
• display-format.interaction-outbound-pull-preview-name: Defines the display format of outbound pull-preview (preview) interactions by specifying a string of field codes.
• display-format.interaction-outbound-push-preview-name: Defines the display format of outbound push-preview interactions by specifying a string of field codes.
Provisioning functionality Enabling internal and external communications
Workspace Desktop Edition Deployment Guide 276

• outboundpreview.ringing-bell: Specifies the Outbound preview ringing sound configuration string of anOutbound preview interaction pushed to the agent as a preview.
ProcedureEnabling an agent to use Outbound Campaign functionality call to a contact
Purpose:
To enable an agent to join an Outbound Campaign call to a contact that is stored in Outbound ContactServer (OCS).Prerequisites
• Genesys Administrator 8.0.2 or higher, configured to show Advanced View, or Genesys AdministratorExtension.
• A working knowledge of Genesys Administrator Extension.• Workspace Application object exists in the Configuration Database.
Start
1. Allow the Outbound privileges (see Outbound Campaign Privileges) for the role to which the agent isassigned (refer to the Procedure: Creating a Role and allowing a Workspace privilege and assigning aRole to an agent or agent group).• Can Use• Can Reject Record• Can Cancel Record• Can Dial Alternative Chained Record• Can Get Next Preview Record• Can Use Push Preview• Can Mark Do Not Call• Can Set Call Result• Can Reschedule• Can Reschedule On New Number• Can Edit Record Data
2. Configure the Outbound options in the interaction-workspace section of the Workspace Applicationobject (refer to the Outbound configuration option reference for a list of Outbound options and adescription of how to configure them).
End
Important
Provisioning functionality Enabling internal and external communications
Workspace Desktop Edition Deployment Guide 277

Workspace does not support OCS Recall Record. To allow for Recall, Genesys recommends that you createan OCS treatment capacity based on the the Call Result specified by the agent after the first call attempt.
Dialing an alternate number in Outbound Preview Mode
You can configure an alternate dialing number for an Outbound call that has a NoAnswer or Busyresult, or some other result than Answered.
To enable this functionality, you must create a new Treatment object in the Outbound Contact Server(OCS) application in the Genesys Configuration layer. The Treatment object specifies that the nextnumber in the dialing chain for the contact is dialed. The Treatment ensures that each number in thedialing chain is tried until the agent applies a different disposition to the call.
1. In Genesys Administrator Extension, open PROVISIONING > Outbound Contact > Treatments.2. Click New.3. In the New Treatment view, set the following field values:
• Name: ReDial_NoAnswer• Call Result: No Answer• Apply to Record: Next in chain• Number in Sequence: 1• State: Enabled• Cycle Attempt: 10• Interval, minutes: 1
4. Assign the new Treatment to the calling list. Open one or more of your Calling List objects in GenesysAdministrator Extension and select the Treatments tab.
5. Click Add.6. In the Browse dialog box, select the treatment that you just created.7. Click OK.8. Click Save & Close.9. In Genesys Administrator Extension, open the Workspace Application object and configure it to use the
Treatment.10. In the interaction-workspace section assign the value personal to the outbound.treatment-mode
option. Setting this option to personal adds the GSW_TREATMENT = RecordTreatPersonal attacheddata to the EventUserEvent that is generated when the record is marked as processed. This attacheddata informs OCS that a treatment should be applied to the outbound record if the call result matchesthe result that is set for the record. This ensures that the callback is assigned to the agent who set theNo Answer disposition for the call and not to the next available agent who is working on the samecampaign. Refer to the scenario that is described below.
Provisioning functionality Enabling internal and external communications
Workspace Desktop Edition Deployment Guide 278
Scenario
1. Your Outbound campaign is started in Preview mode.2. An agent logs in to Interaction Workspace.3. The agent clicks Get Record to retrieve an Outbound Record from the Outbound Campaign on which
they are working.4. The agent receives an Outbound Record and selects the number to be dialed from the list of available
phone numbers in the Outbound Chain.5. The agent calls the selected number.6. When the call is over, the agent sets the Call Result to No Answer and then clicks Done, closing the
interaction.7. OCS applies the ReDial_NoAnswer call treatment that you created to handle the No Answer call result.8. An immediate callback for the Outbound Record is triggered (refer to the "Call Handling/Treatments"
section in the Outbound Contact 8.1 Deployment Guide).9. The agent immediately receives a personal callback for this outbound record because the value of the
outbound.treatment-mode option is set to personal.10. The agent accepts the personal callback.11. The preview record is displayed and the agent is able to dial one of the available numbers from the
outbound chain.
Timed Auto-dial in Outbound Preview campaigns
[Added: 8.5.109.16]
You can specify how agents who are part of Push Preview, Pull Preview, and Reschedule Previewoutbound campaigns dial campaign calls. Use the outbound.timed-preview-auto-dial option to specifyone of the following dial scenarios:
• Manual dialing (-1, default value)—Agents manually dial calls after viewing the call preview.• Auto-dial (0)—The call is automatically dialed when agents get or accept a new record.• Timed auto-dial (any value greater than 0)—Calls are automatically dialed the specified number of
seconds after agents get or accept a new record. A countdown is displayed on the record preview toinform agents of how long they have before the call is dialed.
Push Preview campaign pre-requisites
[Added: 8.5.109.16]
To ensure that Workspace properly handles scenarios where a call that is generated from a PushPreview Campaign record is transferred to another agent who is also engaged in the same PushPreview Campaign, use the following configuration:
Provisioning functionality Enabling internal and external communications
Workspace Desktop Edition Deployment Guide 279

Configure a Routing Point or ACD Queue belonging to the TServer/SIPServer to the Voice TransferDestination of the Campaign Group object that assigns agents as transfer targets.
Personal versus campaign callbacks
[Added: 8.5.115.17]
To specify whether rescheduled calls/callback are personal (the agent who created the callback),campaign (any agent active in the campaign), or both, use the outbound.callback-types
Forcing agents to complete Outbound Record processing beforetransferring a call
[Added: 8.5.117.18]
By default, if an outbound campaign call is transferred from an Outbound enabled agent to an agentwho is not enabled to handle outbound campaign calls, the call result set by the Outbound agent islost because the ownership of the record is transferred from an Outbound agent to another agent.
Use the outbound.complete-record-before-transfer option to control whether or not the call result isretained. Setting the value of this option to true forces Workspace to complete the processing of theOutbound record before the call is transferred or conferenced to another agent, and makes theOutbound record read-only.
Use the outbound.call-result-is-mandatory option to ensure that the transferring agent is forced to seta call result prior to transferring an Outbound record.
Setting up manual dialing of alternate numbers
[Added: 8.5.115.17]
There are many scenarios where an agent has to reject an Outbound Record because the providedphone number or phone numbers are incorrect or empty. For example, the phone number might havebeen entered incorrectly into the record and is missing a digit. A blank record might be intentional.Perhaps the requirements of the state are that all campaign calls must be manually dialed. In both ofthese scenarios, the agent needs a way to enter a phone number for the chain.
Make the following configurations to enable agents to enter a new phone number from the activeOutbound Interaction toolbar:
1. Grant the Outbound - Can Dial On New Number privilege.2. Set the value of the expression.outbound-campaign-phone-number option to a valid regular expression
that confirms to the dialing requirements of the campaign. This option validates the number that an
Provisioning functionality Enabling internal and external communications
Workspace Desktop Edition Deployment Guide 280
agent enters into the New Phone Number dialog box.
Provisioning functionality Enabling internal and external communications
Workspace Desktop Edition Deployment Guide 281

Email[Modified: 8.5.116.10, 8.5.113.11, 8.5.118.10, 8.5.127.06, 8.5.141.04, 8.5.143.08]
Features
Workspace enables agents to handle email interactions, including the following functionality:
• Reply to inbound emails (with or without the original text).• Create new outbound emails• Validate the format of email addresses enter by agents into the To, Cc, and Bcc fields and provide
feedback to agents prior to sending an email with an improperly formatted address [Modified:8.5.114.08]
• Check the spelling of an outbound email• Insert, edit, or delete hyperlinks dynamically, by context menu, or by a toolbar button into outgoing
email interactions [Added: 8.5.118.10]• Apply a signature to an outbound email• Store emails in a workbin• Transfer an email to an internal target such as another agent or an interaction queue• Forward or forward as an attachment an email to someone outside of the Genesys system• Set a disposition code• Mark the interaction as Done• Quality Assurance (QA) review of emails• View and copy links to non-embedded images in inbound and outbound email interactions• View and insert Standard Responses• Paste content from browsers and other applications that display HTML• Paste formatted text as plain text in HTML emails using Paste Text Only format. [Added: 8.5.150.06]• Paste images from browsers and other applications that display HTML• Print emails
TipIf you are using Interaction Routing Designer to create a Business Process to routeyour email interactions, refer to "Multimedia Objects" in the Universal Routing 8.1Reference Manual.
Provisioning functionality Enabling internal and external communications
Workspace Desktop Edition Deployment Guide 282

Enabling Email
This section describes the privileges and configuration options that you use to enable Workspaceemail.
PrivilegesWorkspace employs the following privileges for all E-mail interactions:
• Can Use E-mail media• Can Decline• Can Move to Workbin• Can Reply• Can Reply All• Can Add Attachments• Can Send• Can Save• Can Delete• Can Transfer• Can Forward• Can Forward As An Attachment• Can Set Interaction Disposition• Can Interim Send• Can Print E-mail• Can Change Format In New E-mail• Can Change Format In Reply E-mail• Can Mark Done
Basic ConfigurationYou can find all of the email configuration options here. Use the following configuration options forcorrect email interaction handling:
• email.default-queue: Specifies the default queue for email interactions.• email.outbound-queue: Specifies the default queue for email interactions.• workbin.email.draft: Specifies the name of the Workbin to be used to store draft email interactionss• workbin.email.in-progress: Specifies the workbin to be used to store email interactions which are in the
In Progress state.• email.auto-answer: Specifies whether an email interaction is automatically answered when it is routed
Provisioning functionality Enabling internal and external communications
Workspace Desktop Edition Deployment Guide 283
to an agent. This option can be overridden by a routing strategy. You can also configure auto-answer todisplay a timer that enables an agent to view case information before the interaction is automaticallyanswered by using the email.auto-answer.timer and email.auto-answer.enable-reject options [Added:8.5.105.12].
• Reply to inbound emails (with or without the original text). The behavior of the email.reply-prefix optioncan be overridden by a routing strategy to conform to locale requirements [Added: 8.5.116.10].
• email.resend-prefix: Specifies a prefix to be used for resending an email. Agents who are granted the"Email - Can Reply" privilege to reply to emails can use the Resend feature in the History (My History,Contact History, and Interaction Search) to resend an outgoing or reply email. [Added:8.5.141.04].
• accessibility.visual-impairment-profile: Beginning with version 8.5.113.11, Workspace enables agents toenter TABs in the email composition area of outgoing email interactions by pressing the TAB key if thevalue of this option is set to false; to use the TAB key to step to the next control or field, agents mustfirst press Ctrl-TAB to step out of the text composition area. To disable this feature, set the value ofthis option to true; agents will not be able to enter TABS in the email composition area, but they canuse the TAB key to move to the next control in the tab order.
• expression.url: Specify a regular expression that defines a valid URL.• email.can-change-text-direction: Specifies whether the Right-to-left Text Direction and Left-to-right Text
Direction buttons are enabled in the outbound email editor. Agents can use these buttons to changethe text field to left-to-right (LTR) script or right-to-left (RTL) script. This means that an email can have amix of both LTR and RTL scripts. Enabling the option is not mandatory if agents are working exclusivelyin LTR or RTL scripts.
Controlling attachment read-only behavior[Added: 8.5.118.10]
By default, all attachments opened by agents in an external program are read-only. This means thatagents cannot update them and save the changes to their hard drive.
Use the general.writable-downloaded-attachment-file-types option to override this behavior forspecific file types. Allowing agents to edit only certain file types preserves the data integrity of filesthat you do not want agents to modify. For example, you might allow agents to modify .jpg and .pngfiles so that the orientation can be changed, but restrict the modification of .docx, .xlsx, and otherfile types. Or, you might want to ensure that only .xlsx files can be updated by agents.
Linked imagesWorkspace handles linked images in the HTML content of inbound and outbound email interactions.Images are loaded from their respective web servers in the background so that display of the emailinteraction does not block the application. For environments where Internet proxies require userauthentication, the following options have been added to the template:
• webproxy.address—Specifies the the web proxy address.• webproxy.username—Specifies the the web proxy username.• webproxy.password—Specifies the the web proxy password.
Provisioning functionality Enabling internal and external communications
Workspace Desktop Edition Deployment Guide 284

Provisioning the Email channel
[Modified: 8.5.115.17]
1. Enabling an agent to use Email to correspond with a contactPurpose:
To enable an agent to use Email to correspond with a contact that is stored in Universal ContactServer (UCS).Prerequisites
• Genesys Administrator 8.0.2 or higher, configured to show Advanced View, or Genesys AdministratorExtension.
• A working knowledge of Genesys Administrator Extension.• Workspace Application object exists in the Configuration Database.• Workspace has a connection to Universal Contact Server and Interaction Server.• The Procedure: Enabling agents to manage contacts.
Start
1. Allow the Email privileges (see Email Privileges) for the role to which the agent is assigned (refer to theProcedure: Creating a Role and allowing a Workspace privilege and assigning a Role to an agent oragent group).• Can Use E-mail media• Can Decline E-mail• Can Release E-mail• Can Reply• Can Send• Can One Step Transfer• Can Set Interaction Disposition
2. Configure the Email options in the interaction-workspace section of the Workspace Applicationobject (refer to the Email configuration option reference for a list of Email options and a description ofhow to configure them).
3. Configure the email queue options in the email section that are mandatory for basic email processing:email.default-queue and email.outbound-queue.
4. (Optional for transfer or email to queues) Configure the queue options in the interaction-queue-presence, queue-presence, routing-point-presence sections of the Workspace Application object(refer to Section: interaction-queue-presence, Section: queue-presence, Section: routing-point-presencein the configuration option reference for a list of queue options and a description of how to configurethem).
5. Configure the workbins options in the interaction-workspace section of the Workspace Applicationobject (refer to the Workbin configuration option reference for a list of workbin options and adescription of how to configure them), in particular: workbin.email.in-progress and workbin.email.draft.
Provisioning functionality Enabling internal and external communications
Workspace Desktop Edition Deployment Guide 285

6. To add an email signature, configure the email.signature template option in the interaction-workspace section to enable automatic insertion of a signature in all new and reply outbound emails.
7. To limit the 'From' addresses that are available to agents to select in the outbound Email Interaction view to an address oraddresses that are based on the inbound service used, or to specify a default address for each service rather than a fixed list,configure the email.from-addresses option. [Added: 8.5.115.17]
If you use a Business Attribute with a value containing the 'From' address that you want agents to use by default, you can use theemail.from-addresses.force-default-on-reply option to specify whether the 'From' address of a reply email interaction is the valueconfigured in the Business Attribute (true) or the target inbound mailbox of the parent inbound email interaction (false).[Added: 8.5.143.08]
8. To have editable case data copied back to the original inbound email from an outgoing reply emailinteraction when it is sent, set the value of the email.outbound.copy-editable-case-data-in-inboundoption to true.
TipFor information about configuring Load Balancing and Business Continuity, refer to Runtime ConnectionLogic in the eServices Load Balancing Business Continuity section of the Business Continuity andDisaster Recovery topic. Added: 8.5.109.16
End
2. Configuring filtered email From Address functionalityPurpose:
To enable an agent to access a configured list of Contact Center "From" email addresses.Prerequisites
• Genesys Administrator 8.0.2 or higher, configured to show Advanced View, or Genesys AdministratorExtension.
• A working knowledge of Genesys Administrator Extension.• A Workspace Application object exists in the Configuration Database.• Workspace can handle email interactions.
Start
The list of "From" email addresses that can be used in outbound emails can be populated from twomutually exclusive sources, based on options that you configure:
• Email Server POP addresses. Configure the email.from-addresses option with the value$EMAILSERVER$.
• An option that references a Business Attribute. Each Business Attribute Value corresponds to a "From"Address, where Name is the actual address, Display name is the human-readable name displayed to theagent, and Default tag is used to display a default value in the combo box that is used by the agentto select an address.
End
Provisioning functionality Enabling internal and external communications
Workspace Desktop Edition Deployment Guide 286

Displaying Suggested Responses
Suggested responses are relevant standard responses to an email interaction that the agents canuse. These responses are associated with an email interaction as part of the routing process beforethe email is displayed to the agent. Workspace supports the following Classification Server servicesto detect suggested responses:
• Analyze (starting with 8.5.149.03) - Refer to the Analyze Block documentation based on the routingapplication you use, for more information on screening rules.
• Screen and Classify - Refer to the topic Screening Rules in eServices Digital Administration for moreinformation on these services.
Workspace automatically detects the type of suggested response delivered to it.
ImportantIf you are designing a business process that leverages the Analyze service, ensurethat the nested KVPair structure that is returned by the Analyze service is preservedonce it is attached to the user data of the email interaction.
Restricting the editing of addresses in outgoing email
You can prevent your agents from adding or editing the To, Cc, and Bcc fields of outgoing emailinteractions. This feature enhances email security and other business strategies. Use the followingconfiguration options to implement this email control feature:
• email.outbound.editable-to-addresses• email.outbound.editable-cc-addresses• email.outbound.editable-bcc-addresses
By default, these options are set to true, meaning that, by default, there are no email addressediting restrictions applied. The behavior of these options can be overridden by a routing strategy, asdescribed in Overriding Options by Using a Routing Strategy.
Signatures
Workspace enables you to assign default signature templates to outbound email interactions. E-mailsignatures allow the insertion of tagged-data fields with data that is related to the agent, such asname, job title, department, phone number, email address, and so on. Refer to "Using UCS Data in
Provisioning functionality Enabling internal and external communications
Workspace Desktop Edition Deployment Guide 287
Standard Responses: System Variables" in the "Genesys Knowledge Management: Basics" chapter ofthe eServices User's Guide for more information about the tagged data field. Signatures also supportlinked image(s) and hyperlinks.
Use the email.signature configuration option in the interaction-workspace section to specify thepath and name of the signature file or the location of the Response in the Standard Response Librarythat is to be used as the default signature.
TipThis option can be overridden by a routing strategy based on the attached data of theinteraction.
Attaching files to outgoing emails
You can enable agents to attach files to outgoing email interactions by allowing the Can AddAttachments privilege. Control the behavior of this feature by using the following configurationoptions:
• email.attachment-download-timeout• email.max-attachments-size• email.restricted-attachment-file-types
Inserting images into outgoing emails
[Added: 8.5.113.11]
Beginning with Workspace 8.5.113.11, embedded in-line images are supported for both inbound andoutgoing email interactions. If a contact inserts an image in an HTML formatted email interactions,agents see the image displayed where the contact inserted it.
You can enable agents to paste copied images at the insertion point in an outgoing email interactionor to click the Insert Image button and browse to find an image to insert by granting the Can AddEmbedded Image In Outbound Email privilege. If this privilege is not granted, agents can onlyinclude images as attachments.
In Workspace 8.5.112.12 and lower, inserted images were handled as attachments; this did not allowimages to be inserted next to the text that provided context for the image.
Important
Provisioning functionality Enabling internal and external communications
Workspace Desktop Edition Deployment Guide 288

Embedded in-line images are only supported by Genesys Email Server Java version 8.5.102.02 or Higher
Inbound email forwarding
[Modified: 8.5.113.11, 8.5.104.15]
Workspace supports two different email forwarding modes:
1. Forward [Added: 8.5.113.11]2. Forward as an Attachment (Formerly: Inbound Email Forward to External Resource)
Forward
[Added: 8.5.113.11]
Agents can send a commented copy of an email interaction to an external resource (someone in yourcompany directory that is outside of the control of the Genesys environment — for example, yourback office). This is sometimes referred to as in-line forwarding. A forwarded inbound emailinteraction is copied into a new email interaction with a note indicating the date and contact name ofthe inbound email interaction, and the contents of the original email at the bottom of the email body.Agents remain responsible for responding to the original inbound email interaction. Agents may ormay not wait for an answer to this forward, depending upon your corporate policies and processes.
When an agent selects Forward, a new outbound email is created as a child of the original email.The email subject is initialized to the subject of the parent email, and, if configured, a forward prefix(email.inline-forward-prefix). The body contains the agent's signature, if configured, and a quoteheader followed by the content of the parent email content . Attachments and attached data of theparent email, if any, are copied to the new email. The interaction is assigned to the same contact, ifany, as the parent email. Agents can edit the body before completing the forward. The new outboundemail is then placed in the email.inline-forward-queue. The agent EmployeeId is attached to thatnew outbound email to enable business procesess to distribute the possible reply back to the sameagent. The original inbound email is placed in the in-progress workbin of the agent while it is beingforwarded, and then removed from the in-progress workbin when the forward is completed.
The typical use case is that agents use the answer received from the person to whom they forwardemail interactions to elaborate their responses.
Agents can use Forward to forward emails from the following locations:
• Active inbound email interaction• Inbound and outbound email interactions in the Contact History• Inbound and outbound email interactions in My History
Provisioning functionality Enabling internal and external communications
Workspace Desktop Edition Deployment Guide 289

• Inbound and outbound email interactions in the Interaction Search
Use the following privilege to enable Forwarding:
• E-Mail - Can Forward
If only this privilege is granted, then the Forward ( ) button has no drop-down menu. Clicking itlaunches the forward process described above. If the E-Mail - Can Forward As An Attachmentprivilege is also granted, then the button activiates a drop-down menu that enables agents to choosebetween forwarding (in-line) or forwarding as an attachment.
Use the following configuration options to control the behavior of the Forward feature:
• email.inline-forward-prefix—Specifies the prefix that is added at the beginning of the subject of theoriginal email when it is forwarded to an external resource.
• email.inline-forward-queue—Specifies the Interaction Queue in which outbound emails created for in-line forwarding are placed when agents click 'Complete Forward'.
• keyboard.shortcut.interaction.email.inline-forward—Specifies the combination of keys that can be usedas a keyboard shortcut to forward an active inbound email to an external resource.
Forward as an attachment[Modified: 8.5.113.11]
(Formerly: Inbound Email Forward to External Resource)
Workspace enables agents to forward active inbound email interactions to an external resource(someone in your company directory that is outside of the control of the Genesys environment — forexample, your back office) by selecting a valid email address in Team Communicator, either bymanually entering the address or by selecting it from a searched Contact or a Corporate or PersonalFavorite. Forward as an Attachment supports both To and CC (carbon copy) addressing and multiplerecipient targets. You can configure agents to be able to add additional information about theforwarded interaction in a dedicated text box.
The typical use case is that agents delegate the writing of an answer to the external resource.
A set of key-value pairs that include the destination email address and other information is added tothe inbound email before it is placed in the Forward queue so that they can be used in a BusinessProcess:
• GD_ExternalAgentAddress—The same content as IW_ExternalAgentAddress. This is added only if thegeneral.gad.attached-data option is set to true.
• GD_OriginalAgentEmployeeId—The same content as IW_OriginalAgentEmployeeId. This is addedonly if the general.gad.attached-data option is set to true.
• GD_TransferrerUserName—The same content as IW_TransferrerUserName. This is added only if thegeneral.gad.attached-data option is set to true.
• IW_OriginalAgentEmployeeId—The Empoyee Id of the agent.• IW_TransferrerUserName—The UserName of the agent.
Provisioning functionality Enabling internal and external communications
Workspace Desktop Edition Deployment Guide 290

• IW_EmailNotepad—The current notepad text of the email view.• IW_ExternalAgentAddress—The To email address destination. If the value of the email.forward.enable-
multiple-to-addresses option is set to true, the value of IW_ExternalAgentAddress is a commaseparated list of To addresses. This list has to be parsed in the Business Process. For each extractedaddress, the Business Process has to do the following:1. Assign the extracted address to a variable.2. Use this variable in the Forward Email block.
• IW_ExternalAgentCcAddress—The CC email address destination. This is added only if the value of theemail.forward.enable-cc-addresses option is set to true (Enable the CC address field where agents canspecify one or several CC addresses). The value is a comma separated list of CC addresses. With thislist, the Business Process has to do the following:1. Assign the list to a variable.2. Use this variable in the Forward Email block.
• IW_ExternalAgentInstructions—The text provided by the agent who is forwarding the emailinteraction. This is added only if the value of the email.forward.enable-instructions option is set to true(Enable the forward instructions field). This value can be used as a Field Code in the Standard Responsethat is contained in the Forward Email block to give forward instructions to an external resource.
Refer to EServices email workflow samples for more information about forwarding email interactionsto external resources.
The following privilege controls the use of the forwarding feature:
• E-Mail - Can Forward to External Resource
Use the following configuration options in the interaction-workspace section to configure thisfeature:
• email.forward-queue: Specifies the Interaction Queue in which the inbound email is placed when anagent forwards it to an external resource.
• email.forward.enable-multiple-to-addresses: Enable agents to specify more than one target in the Toaddress field.
• email.forward.enable-cc-addresses: Enable agents to specify one or more target in the CC address field.• email.forward.enable-instructions: Enable the forward instructions field.• keyboard.shortcut.interaction.email.forward: Specifies the shortcut that forwards an active inbound
email.
Email Can Mark Done privilege
The Can Mark Done privilege controls how emails are marked as done.
When this privilege is allowed, the Done button is displayed in the toolbar when an inbound email ispresented. If an agent clicks Done, the inbound email is terminated (removed from the BusinessProcess). It will then not be possible to submit any corresponding outbound reply from the interactionview. It can only be reopened from the Contact History.
Provisioning functionality Enabling internal and external communications
Workspace Desktop Edition Deployment Guide 291

When this privilege is not allowed, the Done button is not displayed in the toolbar when an inboundemail is displayed. The agent must handle the email by replying to it, transferring it, or placing it in aworkbin.
Email interaction history
An agent can take ownership of email interactions that are in-progress if you grant the permissionsthat are listed in the table Agent Privileges that Control Email Interaction HistoryFunctionality lists the privileges that can be used to enable the Interaction History for agents. TheE-mail Interaction History feature displays the status of the interaction to agents by using thedetailed status information that is provided by Interaction Server. The in-progress status of an emailenables agents to find and process inbound email interactions that are in a queue but are notassigned, or are in the process of being routed. The in-progress status can also be used to restrictwhich agents can handle an in-progress interaction.
Agent Privileges that Control Email Interaction History FunctionalityPrivilege Agent Functionality
Workbin - Can UseAgents can open any email that is present in theagent's personal workbins or in shared workbins towhich the agent has access from the Workbin view.
Contact - Can Pull From Other Personal Workbins Agents can select an email that is currently in theworkbin of another agent.
Contact - Can Pull From unasigned shared workbinAgents can select an email from a shared workbinto which the agent is not assigned or is in thescope of a group to which the agent is not amember.
Contact - Can Pull Queued Emails Agents can select an email that is in a queue orthat is currently being delivered.
Printing
[Modified: 8.5.101.14]
From the following views, agents can display and use the Print Preview window:
• Email Interaction window• My History• Contact History• Draft workbin
The Print Preview window provides the following functionality:
• Print preview• Printer selection
Provisioning functionality Enabling internal and external communications
Workspace Desktop Edition Deployment Guide 292
• Page range• Page layout• Configurable page margins• Page numbers
Enable the following privilege to allow agents to print email interactions:
• Can Print Email
Configure the following option to specify whether the Print Preview window is displayed to the agent:
• printing.use-print-preview
Provisioning functionality Enabling internal and external communications
Workspace Desktop Edition Deployment Guide 293

Email Quality AssuranceWorkspace supports Quality Assurance (QA) review of outbound email interactions. Team Leads(supervisors) or other individuals can approve or reject email interactions or email interactions inworkbins. You can design your routing strategy to send all email interactions from and agent or agentgroup to a reviewer; you can design your routing strategy to enable an agent to request a review;you can direct email interactions for review to a reviewer or a group or to a workbin. You can designyour routing strategy to send rejected email interaction back to the originating agent or to a workbin.
Designing a Routing Strategy for an email quality assurancereview
The email QA Review process is managed by a Routing Strategy and Business Process design. Youmust configure specific keys that are set in the interaction by Workspace; these keys are used by theRouting Strategy to route the interaction based on its review state, as defined by the keys. In thefollowing example, the keys prefixed by "BP_" are exclusively under the responsibility of the RoutingStrategy or Business Process. The keys that do not have this prefix are keys that are defined byWorkspace. The values of the keys are interpreted and/or updated by the core productimplementation and can also be interpreted/edited by the Routing Strategy or Business Process.
Prerequisites to enable the "QA Review Disposition" feature:
• Create a Business Attribute in Genesys Administrator Extension that defines all possible QA reviewdispositions. The following example uses the Rejected and Accepted dispositions as samples. Youshould use values that suit your business purposes.
• Assign the name of this Business Attribute as the value of the email.qa-review-dispositions-business-attribute option.
• The QA Review disposition that is selected by a Team Lead (supervisor) is assigned to the attached dataIxn.UserData.QAReviewDisposition, described in the following section. Your Business Process mustapply rules that are based on this disposition— for example, redistributing to the writer.
The following is an example of a Strategy workflow:
1. An inbound email is received by the Business Process2. The inbound email is distributed to an agent3. The agent writes a reply email and clicks Send
4. Workspace makes the following updates to the attached data of the reply email• In the UCS interaction record, OwnerID is set to the DBID of the agent.• In the UserData of the Interaction Server interaction record, OriginalAgentEmployeeID is set to the
EmployeeID of the agent.• In the UserData of the Interaction Server interaction record, OriginalAgentUserName is set to the
username of the agent.
Provisioning functionality Enabling internal and external communications
Workspace Desktop Edition Deployment Guide 294

5. The email is then directed to the Business Process, and the Business Process should make the followingupdates to the reply email and distribute it to the reviewer target:• In the UserData of the Interaction Server interaction record, QAReviewFlag is set to 1
• In the UserData of the Interaction Server interaction record, QAReviewDisposition is set to Unknown
• In the UserData of the Interaction Server interaction record, BP_QAReview_Status is set to Review
• In the UserData of the Interaction Server interaction record, BP_QAReview_Cycle# is set to 1
6. The reviewer reviews the email and edits it or provides feedback. If the reviewer sets the disposition toRejected, it is sent back to the originating agent.
7. Workspace makes the following updates to the attached data of the rejected reply email:• In the UCS interaction record, ReviewerID is set to the DBID of the reviewer.• In the UserData of the Interaction Server interaction record, QAReviewerEmployeeId is set to the
employee ID of the reviewer.• In the UserData of the Interaction Server interaction record, QAReviewerUserName is set to the
username of the reviewer.• In the UserData of the Interaction Server interaction record, QAReviewDisposition is set to
Rejected
8. The email is then directed to the Business Process, and the Business Process should make the followingupdates to the reply email and distribute it to the original agent:• In the UserData of the Interaction Server interaction record, QAReviewFlag is set to 0
9. The agent makes the required changes and then clicks Send.10. Workspace makes the following updates to the attached data of the reply email and directs it the the
Business Process:• In the UCS interaction record, OwnerID is set to the DBID of the agent.• In the UserData of the Interaction Server interaction record, OriginalAgentEmployeeID is set to the
employee ID of the agent.• In the UserData of the Interaction Server interaction record, OriginalAgentUserName is set to the
username of the agent.
11. The Business Process should make the following updates to the reply email and distribute it to theReviewer Target:• In the UserData of the Interaction Server interaction record, QAReviewFlag is set to 1
• In the UserData of the Interaction Server interaction record, QAReviewDisposition is set to Unknown
• In the UserData of the Interaction Server interaction record, BP_QAReview_Status is set to Review
• In the UserData of the Interaction Server interaction record, BP_QAReview_Cycle# is set to 2
12. The reviewer reviews the email reply again and sets the disposition to Accepted and clicks Send
13. Workspace makes the following updates to the attached data of the accepted reply email and directs itto the Business Process:• In the UCS interaction record, ReviewerID is set to the DBID of the reviewer.• In the UserData of the Interaction Server interaction record, QAReviewerEmployeeId is set to the
employee ID of the reviewer.
Provisioning functionality Enabling internal and external communications
Workspace Desktop Edition Deployment Guide 295

• In the UserData of the Interaction Server interaction record, QAReviewerUserName is set to theusername of the reviewer.
• In the UserData of the Interaction Server interaction record, QAReviewDisposition is set toAccepted
14. The Business Process should make the following updates to the reply email and then distribute it to theFinal 'Send Email' Business Process:• In the UserData of the Interaction Server interaction record, clear key: QAReviewFlag• In the UserData of the Interaction Server interaction record, clear key: BP_QAReview_Status
15. The email reply is sent to the contact.
Outbound email quality assurance review
The Workspace outbound email review feature enables you to redirect outbound email interactions toan internal target for review. The Quality Assurance Review function has the following features:
• Outbound email interactions can be redirected to a reviewer or workbin• Reviewers can accept and send the outbound email to the recipient• Reviewers can reject the outbound email interaction and send it back to the author to be reworked• Review of outbound email interactions can be configured to be handled through a workbin folder• Rejected outbound email interactions can be configured to be handled through a workbin folder
The following is a sample of the outbound email review process workflow:
1. E-mail interaction is received from a contact and is routed to an agent who, by a business process isidentified as an agent whose outbound email interactions are to be sent for review before the email issent to the contact.
2. The agent creates a reply to the inbound email interaction, or the agent creates a new outbound emailinteraction, and clicks Send.
3. Workspace tags the email interaction with the EmployeeID and UserName of the agent, and stores theOwnerID of the author in the email interaction history in Universal Contact Server.
4. The outbound business process for the agent is activated and the email interaction is flagged for review.The review flag is a count of the number of review iterations which the interaction has undergone. Thebusiness process might also be configured to attach other key/value pairs to the interaction.
5. The email interaction is redirected to the agent, agent group, role, or workbin who/that is defined by thebusiness process as the reviewer. The reviewer either receives the email interaction directly orretrieves it from a workbin.
6. The email interaction reviewer can modify the interaction, add information to the Notepad, and thenaccept or reject the email interaction.• If the reviewer accepts the interaction, the email interaction is sent to the contact.• If the reviewer rejects the interaction, the email interaction is sent back to the agent who created
the email.
7. If the email interaction is returned to the agent, the agent can change the email according to the
Provisioning functionality Enabling internal and external communications
Workspace Desktop Edition Deployment Guide 296

comments that are provided by the reviewer or view the changes that were made by the reviewer.8. The agent finishes updating the email interaction and then clicks Send.9. The outbound business process for the agent is activated and the email interaction is flagged for second
review.10. The email interaction is redirected to the agent or agent group or roles who is defined by the business
process as the reviewer.11. The email interaction reviewer can modify the interaction, add information to the Notepad, and then
accept or reject the email interaction, or apply some other disposition that is specific to the design ofyour business process or routing strategy. Workspace tags the email interaction with the EmployeeIDand UserName of the reviewer, and stores the ReviewerID of the author in the email interaction historyin Universal Contact Server.• If the reviewer accepts the interaction, the email interaction is sent to the contact.• If the reviewer rejects the interaction, the email interaction is sent back to the agent who created
the email, either directly, or placed in a special workbin for rejected email interactions, and theprocess begins again. The review count is incremented by one.
Creating a For-Review workbinIf you want to direct to a workbin outbound emails that require review, you must create the workbinin the eServices Business Process (script name="review_outbound_emails").
Configure a group or user and make it available only to agents, agent groups, tenants, or roles whomyou want to be email interaction reviewers by specifying the value review_outbound_emails for theworkbin.<media-type>.<workbin-nickname> (workbin.email.review) option in the interaction-workspace section.
Displaying review information in the Case Information areaYou can create Business Attributes to populate the interaction Case Information area with informationabout the review process that informs the reviewer and the author of the email about the status ofthe review. For example, you could create keys for Review Status and Review Cycle Count.
You can create an editable Case Information attribute that is displayed as a drop-down list ofdisposition types. Refer to the interaction.case-data.format-business-attribute option for informationabout creating new attributes for case data.
Creating a Rejected Outbound Email workbinIf you want to direct to a workbin outbound emails that were rejected by a reviewer, you must createthe workbin in the eServices Business Process (script name="rejected_outbound_emails").
Configure a group or user and make it available only to agents, agent groups, tenants, or roles whomyou want to be email interaction reviewers by specifying the value rejected_outbound_emails forthe workbin.<media-type>.<workbin-nickname> (workbin.email.rejected) option in theinteraction-workspace section.
Provisioning functionality Enabling internal and external communications
Workspace Desktop Edition Deployment Guide 297
Chat[Modified: 8.5.108.11, 8.5.113.11, 8.5.115.17, 8.5.118.10, 8.5.122.08, 8.5.128.07, 8.5.132.05,8.5.140.08, 8.5.142.05, 8.5.145.06]
Workspace employs the following Chat privileges for all Chat interactions:
• Can Use Chat Media• Can Decline Chat• Can Release• Can One Step Transfer• Can One Step Conference• Can Push Url• Can Set Interaction Disposition• Show Silent Monitoring• Can Preview Customer Typing [Added: 8.5.108.11]• Chat - Can Transfer File From File System [Added: 8.5.115.17]• Chat - Can Transfer File From Standard Response [Added: 8.5.115.17]• Chat - Can Save Attached files [Added: 8.5.115.17]
WarningIf the Chat - Can Preview Customer Typing privilege is also granted, and you have configured eServices tohide sensitive personal information that is entered by the contact during the chat, agents will be able to seethe information as it is entered, but not after the contact sends it.[Added: 8.5.108.11]
Workspace displays a "Contact is typing a message" notice when the contact begins to type a replymessage in your web site chat interface. The Chat - Can Preview Customer Typing privilege enablesagents to see what the contact is typing before the contact clicks Send. This feature enables agentsto anticipate their reply and therefore respond more quickly. However, Genesys recommends that youtrain your agents to wait until the contact has sent their message before responding to it. The textthat is being typed by the contact is updated according to the updates that the web site sends to theWeb API and Chat Server; therefore, your web site designer is responsible of the refresh rate of thecontent.
Chat server can be configured to disconnect a chat upon inactivity of engaged parties. Workspacewarns the agents when a chat is about to expire due to inactivity and notifies when the session isautomatically closed because of inactivity. [Added: 8.5.109.25]
Workspace notifies the agent through an audio alert or a visual alert when
Provisioning functionality Enabling internal and external communications
Workspace Desktop Edition Deployment Guide 298

another party is leaving (automatically, due to inactivity, or manually) or joiningthe chat session while the focus is not on the Workspace application or is onanother area of Workspace.Visual notification added: 8.5.113.11The Chat feature supports spelling check. Refer to Spelling tab for information about configuringSpelling Check.
For Genesys Widget customers, Workspace supports Rich Messaging. [Added: 8.5.142.05]
You use the following options in the interaction-workspace section to configure Chat interactions:
• chat.simple-transcript: Specifies whether the chat transcript is displayed as simple lines of text or ascolored blocks of text. [Added: 8.5.122.08]
• options.record-option-locally-only: Specifies whether the display settings for the agent are stored locallyor in the agent annex.
• chat.pending-response-to-customer: Defines two alarm thresholds, in seconds, that warn agents thatthey have a pending response to a chat. Three levels are displayed: below the warning time, betweenthe warning time and the maximum time, and above the maximum time. Agents are warned by theflashing of various elements in the user interface, including the taskbar, collapse/expand button, theinteraction bar, and the pending response timer. If the agent places his or her mouse pointer on any ofthese flashing elements, a preview of the last received message from the contact is displayed.
• chat.show-unread-notification: Specifies whether the unread message notification is displayed in thechat transcript. When the message is read, the notification icon disappears. [Added: 8.5.122.08]
• chat.toast-information-key: Specifies whether the Information area is displayed in the Chat interactionnotification. The option specifies the name of the attached data key that contains the information.
• chat.typing-isenabled: Specifies whether typing notification is enabled. It should be disabled for ChatServer lower than 8.0.1.
• chat.typing-timeout: Specifies the duration, in seconds, that the typing notification is displayed after thelast keystroke and before the agent or contact sends their message.
• chat.new-message-bell: Specifies the new Chat sound configuration string.• chat.reconnect-attempts—Defines the number of attempts to reconnect to the chat session. This applies
to environments that implement Chat High Availability (HA) but also to simple environments if networkdisconnection occurs during a chat session.
• chat.reconnect-timeout—Defines the interval between each attempt to reconnect to the chat session.This applies to environments that implement Chat High Availability (HA) but also to simpleenvironments if network disconnection occurs during a chat session.
• chat.nickname—Specifies that a nickname (pseudonym) is used in chat sessions instead of the agent'suser name, and defines the nickname.
• display-format.chat-agent-name—Specifies the display format of agent identifiers in agent and teamsupervisor views.
• display-format.chat-customer-name—Specifies the display format of contact identifiers in agent andteam supervisor views. [Added: 8.5.145.06]
• chat.auto-answer: Specifies whether a chat interaction is automatically answered when it is routed to anagent. This option can be overridden by a routing strategy. You can also configure auto-answer todisplay a timer that enables an agent to view case information before the interaction is automaticallyanswered by using the chat.auto-answer.timer and chat.auto-answer.enable-reject options [Added:
Provisioning functionality Enabling internal and external communications
Workspace Desktop Edition Deployment Guide 299

8.5.105.12].• chat.historical.maximum-age: Specifies the number of days of previous chat sessions with the current
contact are to be displayed in the Chat interaction view before the current chat session. This reducesthe need for agents to open the contact history to find previous chat interactions. Many chat sessionsare conducted on mobile devices, meaning that the likelihood of timeout is very high. If a chat isresumed after a timeout, the agent sees the content of the previous sessions. [Added: 8.5.122.08]
• chat.rich-media-widget-width: Specifies the width, in pixels, of Rich Media in a chat interaction. Thevalue of this option affects the minimum width of the Chat transcript view [Added: 8.5.150.06].
• chat.transcript-enable-history-filters: Specifies that the value specified for the contact.history.filters-<attribute> option is used to filter the history-based part of the chat transcript. Keys and values of theoption are constructed like those of the contact.history.filters-<attribute> option. You can addthese options to a routing strategy [Added: 8.5.132.05].
• chat.transcript-message-text-direction: Specifies whether messages in the chat transcript are displayedwith a left-to-right (default) or a right-to-left reading layout. Use this option for chat interactions wherecontacts are using a right-to-left reading language [Added: 8.5.140.08].
Provisioning the Chat channel
[Modified: 8.5.115.17, 8.5.128.07]
1. Enabling an agent to chat with a contactPurpose:
To enable an agent to use the Chat channel to chat with a contact whose information is stored inUniversal Contact Server (UCS).Prerequisites
• Genesys Administrator 8.0.2 or higher, configured to show Advanced View.• A working knowledge of Genesys Administrator 8.• A Workspace Application object exists in the Configuration Database.• Workspace has a connection to Universal Contact Server, Chat Server, and Interaction Server.• The Procedure: Enabling agents to manage contacts.
Start
1. Allow the Chat privileges (see Chat Access Privileges) for the role to which the agent is assigned (referto the Procedure: Creating a Role and allowing a Workspace privilege and assigning a Role to an agentor agent group):• Can Use Chat Media• Can Decline Chat• Can Release• Can One Step Transfer
Provisioning functionality Enabling internal and external communications
Workspace Desktop Edition Deployment Guide 300

• Can Two Step Transfer• Can One Step Conference• Can Two Step Conference• Can Set Interaction Disposition• Can Preview Customer Typing [Added: 8.5.108.11]
2. Configure the Chat options in the interaction-workspace section of the Workspace Applicationobject (refer to the Chat configuration option reference for a list of Chat options and a description ofhow to configure them).
3. [Added: 8.5.128.07] Configure the Chat options that control how Chat interactions are marked as done. When an agent manuallymarks a Chat interaction as done, a new Chat interaction can be directed to the agent. Sometimes agents do not markinteractions done to avoid getting new interactions, which affects the focus time. To have Workspace automatically mark a Chatas done, use the following configuration options:
• chat.auto-mark-done-owner-agent: When set to true, the Chat interaction is automatically closedand marked as done as soon as the last agent (the owner) ends the Chat session or the contactdisconnects. To prevent the Chat interaction from closing immediately — for example to allow forafter-call work — you can specify how long the interaction window stays open by using thechat.auto-mark-done-owner-agent.timer option.
• chat.auto-mark-done-non-owner-agent: When set to true, the Chat interaction on the non-owner'sdesktop is automatically closed and marked as done as soon as the non-owner leaves the Chatsession or the contact disconnects. To prevent the Chat interaction from closing immediately, forexample to allow for after-call work, specify how long the interaction window stays open by usingthe chat.auto-mark-done-non-owner-agent.timer option.
If the value of the interaction.disposition.is-mandatory option is true, then an agent must specify an outcome for the interactionbefore it can be closed. In this case, the auto-close options are overridden and the agent must click Done to close theinteraction.
If the value of the interaction-workspace/mandatory option is set to true, then an agent must edit the case data for theinteraction before it can be closed. In this case, the auto-close options are overridden and the agent must click Done to close theinteraction.
4. To keep chats open after the last agent leaves the session, which enables an agent to rejoin the sessionuntil the session is marked as done, set up Asynchronous chat [Added: 8.5.128.07]. Allow the followingChat privileges:• Chat - Can Place On Hold• Chat - Can Release Async• Chat - Can Release
Configure the following options according to your environment:
• chat.on-hold-queue• keyboard.shortcut.interaction.chat.hold
5. You can specify which Chat Server messages are included as part of the chat transcript in theinteraction history. To include notices about inactivity timeout:• Set up the Chat Server inactivity control configuration options.• Set the value of the transcript-save-notices Chat Server option to selective2. [Added: 8.5.115.17]
End
Provisioning functionality Enabling internal and external communications
Workspace Desktop Edition Deployment Guide 301

2. Enabling Chat HAPurpose:
To enable Chat for High Availability (HA).Prerequisites
• Genesys Administrator 8.0.2 or higher, configured to show Advanced View.• A working knowledge of Genesys Administrator 8.• A Workspace Application object exists in the Configuration Database.• Workspace has a connection to Universal Contact Server and Interaction Server.• Chat Server 8.1.0 or higher.• The Procedure: Enabling agents to manage contacts.
ImportantChat Server 8.1.0 Limitation: Do not use the application cluster to connect the WebAPI Server Application to Chat Server.
Start
1. Configure Chat Server for Warm Stand-by. Set the following values for the following Chat Server optionsfor both the primary and backup Chat Servers:• session-restoration-mode = simple
• transcript-auto-save = 2
• transcript-resend-attempts = 10
• transcript-resend-delay = 15
• transcript-save-on-error = continue
Refer to the EServices documentation for more information on setting up Chat Server.2. For the Web API Server application, add a connection to the primary Chat Server.3. Configure the following options in the interaction-workspace section of the Workspace Application
object:• chat.reconnect-attempts--Defines the number of attempts to reconnect to the chat session.• chat.reconnect-timeout--Defines the interval between each attempt to reconnect to the chat
session.
Refer to the Chat configuration option reference for information about how to configure these options.
Provisioning functionality Enabling internal and external communications
Workspace Desktop Edition Deployment Guide 302

TipFor information about configuring Load Balancing and Business Continuity, refer to Runtime ConnectionLogic in the eServices Load Balancing Business Continuity section of the Business Continuity andDisaster Recovery topic. [Added: 8.5.109.16]
End
Configuring Chat Conference and Consultation with a Skill,Group, or Interaction Queue
Agents can use the Team Communicator to find an "Instant Chat Conference" and "Start ChatConsultation" target based on a skill, group, or interaction queue instead of searching for a specificindividual or DN. The system router finds the next available target from a list of targets based on theskill, group, or interaction queue that is selected by the agent. A Business Process tries to route thecall based on attached data. You can configure the contact attempt interval and the number ofattempts to find an available target with the specified skill or in the specified agent group orinteraction queue before the request times out. The requesting agent is informed if the request hastimed out.
The following attached data keys are populated by Workspace:
• InternalConferenceInviteOwnerId—The employeeId of the agent who is requesting the conference orconsultation.
• InternalConferenceInviteOwnerInteractionId—The Interaction Id of parent Interaction.
To enable this feature, allow the following privilege:
• Can One Step Conference
To configure the features of the Chat conference or consultation with a skill, an agent group, or aninteraction queue, set the following configuration options:
• Set the value of the intercommunication.chat.conference.invite-timeout to specify the length of theinterval before the conference invitation times out.
• Set the value of the intercommunication.chat.queue to the name of the interaction queue that is usedby the routing based feature for chat.
Receiving Files from Contacts
[Added: 8.5.115.17]
Workspace lets your agents handled files that have been sent by contacts in chat interactions. By
Provisioning functionality Enabling internal and external communications
Workspace Desktop Edition Deployment Guide 303
default, agents enabled for chat can receive files, open them in an appropriate application, and printthem (if applicable). You can configure Workspace to enable agents to save files on their localworkstation that have been sent through chat by a contact. To enable this feature, allow the followingprivilege:
• Chat - Can Save Attached files
Configure the chat.show-attachment-image-thumbnail option to specify whether to display the icon ofan attached image file in chat transcript as image thumbnail or as generic file) in the online session,the interaction history, or both.
Files are stored in the Contact History, so attached files can also be opened or saved from theContact History view.
WarningWorkspace does not provide virus checking of files sent to your agents. You shouldhave anti-virus software running on agent workstations to prevent infection fromopening or saving infected files.
Controlling attachment read-only behavior[Added: 8.5.118.10]
By default, all attachments opened by agents in an external program are read-only. This means thatagents cannot update them and save the changes to their hard drive.
Use the general.writable-downloaded-attachment-file-types option to override this behavior forspecific file types. Allowing agents to edit only certain file types preserves the data integrity of filesthat you do not want agents to modify. For example, you might allow agents to modify .jpg and .pngfiles so that the orientation can be changed, but restrict the modification of .docx, .xlsx, and otherfile types. Or, you might want to ensure that only .xlsx files can be updated by agents.
Transferring files to contacts
[Added: 8.5.115.17]
You can enable your agents to transfer files to contacts in a chat interaction. You can specify whetheragents can transfer files from their local workstation, from the Standard Response Library, or both. Toenable this feature, allow one or more of the following privileges:
• Chat - Can Transfer File From File System• Chat - Can Transfer File From Standard Response
A toolbar in the chat composition field enables agents to choose files from their local workstation.
Files that are transferred to a contact are also stored in the Contact History, so attached files can also
Provisioning functionality Enabling internal and external communications
Workspace Desktop Edition Deployment Guide 304

be opened or saved from the Contact History view.
Use the following configuration options to control the behavior of this feature:
• chat.max-file-size: Specifies the maximum size of the file, in kilobytes, that an agent can attach to achat interaction.
• chat.max-attachments-size: Specifies the total number of megabytes of files that an agent can attach toa chat interaction.
• chat.max-attachments-files: Specifies the maximum number of files that an agent can attach to a chatinteraction.
• chat.restricted-attachment-file-types: Specifies the list of file types (for example: exe, bat, and so on)that agents cannot attach to a chat interaction.
• chat.attachment-download-timeout: Specifies the time to wait for Universal Contact Server to downloada chat attachment.
• chat.show-attachment-image-thumbnail: Specifies whether to display the icon of an attached image filein chat transcript (as image thumbnail or as generic file) in the online session, the interaction history,or both.
Enabling emojis
[Added: 8.5.115.17]
Prerequisites:
• Chat Server deployed in UTF-8 mode• Interaction Server to handle attached data• Universal Contact Server deployed in UTF-8 mode
If you want your agents to be able to send and receive emojis during chat interactions you mustperform the following actions:
1. Allow the Chat - Can Use Emojis privilege.2. Set the value of the chat.emojis-business-attribute option to the name of a Business Attribute that
defines the emojis that you want to support.3. Set the value of the gui.emoji-font-name option to specify which font should be used to display received
emojis.
In chat interactions, emojis are handled as Unicode characters, which systems recognize andtranslate into an image. On computers, the image that is displayed is dependent on the font beingused. Not all fonts support emojis and not all fonts support all emojis. On mobile devices, the imagethat is displayed is depending on the image set of the platform. Each mobile device substitutes theUnicode character with an image.
The list of emojis can be found at http://unicode-table.com/en/blocks/emoticons/. Click a Unicodecharacter in the table to view how it looks on different platforms. For example: 1F601. Another
Provisioning functionality Enabling internal and external communications
Workspace Desktop Edition Deployment Guide 305

resource for emojis can be found at http://unicode.org/emoji/charts/full-emoji-list.html.
If an emoji is not supported by the font that you are using in your environment, it will be replaced bya rectangle in the chat transcript.
TipFor more information about emojis in Genesys solutions, see this article.
Creating the Business AttributeUse the following steps to create a Business Attribute that defines the emojis that your agent cansend:
1. Create a new Business Attribute of type Custom with a name such as Emojis. This is the BusinessAttribute that you set as the value of the chat.emojis-business-attribute option.
2. In the Attribute Value tab of the Business Attribute, create one value for each emoji Unicode characterthat you want to support.
3. Name each value with a unique name, such as the code value of the Unicode character that you want tosupport. The Display Name that you define is displayed in a tooltip when an agent hovers their mousepointer over an emoji before selecting it from the chat text field tools.
Provisioning functionality Enabling internal and external communications
Workspace Desktop Edition Deployment Guide 306

4. For each attribute value, configure the interaction-workspace\code option and assign to it the valueof the emoji Unicode character. The value of the Unicode emoji format is 1F6nn where nn are digits inhex format; for example: 1F607
Provisioning functionality Enabling internal and external communications
Workspace Desktop Edition Deployment Guide 307
Chat monitoringWorkspace supports two approaches to monitoring, built-in Team Lead capabilities and support for3rd-party Supervisor applications, such as Genesys 7.6 Supervisor Desktop.
Team Lead functionality
You can configure an agent role to have the Team Lead capability. Team Leads (supervisors) havecapabilities that extend beyond the coaching and barge-in abilities that are enabled by internalcommunications. Workspace supports auto-monitoring of agents in an agent group by a team leadthat is configured as the Supervisor of this Agent Group.
A Team Lead can perform the following functions:
• Monitor the next interaction or the currently active interaction.• Select an agent and monitor all the chat interactions of this agent in one of two modes:
• silent—neither the agent nor the contact is aware of the monitoring• coaching—only the agent can see the messages from the Team Lead
• Silently monitor chat interactions• Start a coaching monitoring session from a silent session• Start a barge-in (all parties on the chat can see the Team Lead) monitoring session from silent or
coaching session• Start a silent monitoring session from coaching or barge-in session
Enable Team Lead functionality by allowing the Team Lead Privileges.
Third-party supervision
You can enable agents that are assigned the chat task to be monitored by a supervisor who is using aSupervisor application, such as Genesys Supervisor Desktop 7.6.
If the agent is configured for notification, the agent is notified through the Workspace interface duringsupervisor monitoring. All monitoring is conducted through the supervisor application. An "eye" iconis displayed in the chat interaction window to indicate that the chat interaction is monitored. Whenthe supervisor leaves the call, the icon disappears.
Workspace employs the following privilege for activating the Workspace supervisor monitoring:
• Chat - Show Silent Monitoring
Provisioning functionality Enabling internal and external communications
Workspace Desktop Edition Deployment Guide 308
VideoWorkspace enables agents to handle video interactions, including the following functionality:
• Accept, Reject, or Ignore an inbound Video Call by using the interactive Interaction Notification view.• Auto-accept an inbound Video Call• End Call• Instant Transfer• Instant Conference• Add video to a SIP Voice call• Hold the Video Call and display a splash screen• Toggle the agent's camera on and off• Store and view Video interactions in the Interaction History• Control the size of the video display of each party during a Video Call• Set an interaction disposition
The following limitations apply to video transfer and conference:
• For video conferences, the video stream is limited to single mode. Mixed mode is not supported.• Two-Step conference of a video call results in a pure voice conference engaging the video call initiator,
the agent making the conference, and the new party of the conference.• Two-Step transfer of a video call results in a pure voice call between the video call initiator and the
target of the transfer.• Consultation video calls are not supported. If a consultation is started in the context of a video call, this
will be a pure voice consultation.
Refer to the following resources for details about video conference settings:
• SIP Server Deployment Guide• Chapter 3 in the GVP 8.1 User's Guide has numerous references to MCP, including: Configuring MCP,
MRCPv2, CCP, CTIC, and RM for Secure SIP Transport• VP Solution 8.1 Integration Guide• GVP 8.5 Deployment Guide• Media Server 8.5 Deployment Guide
Workspace employs the following privileges for all video interactions:
SIP Endpoint - Can Use Embedded SIP Endpoint
Provisioning functionality Enabling internal and external communications
Workspace Desktop Edition Deployment Guide 309

ImportantWorkspace SIP Endpoint 8.5.0 is required to support video functionality. Only the VP8and H.264 video codecs are supported.
You use the following options in the interaction-workspace section to configure video interactions:
• sipendpoint.policy.session.auto_accept_video—Specifies whether video calls are accepted automaticallyor manually.
• sipendpoint.video.auto-activate—Specifies whether a video stream is automatically or manually addedto a voice call.
• sipendpoint.video.always-on-top—Specifies the video capture rate, in frame per second, of the localvideo camera.
• sipendpoint.video.thumbnail-ratio—Specifies the size of the video thumbnail that displays on the agentdesktop the video stream that the agent is sending to the contact.
• sipendpoint.video.camera-frame-rate—Specifies the video capture rate, in frame per second, of thelocal video camera.
• sipendpoint.video.camera-frame-size—Specifies the frame size capture of the local video camera.• sipendpoint.video.camera-render-format—Specifies the size ratio of the thumbnail to the video in the
SIP video window when both local and remote video are displayed.• sipendpoint.codecs.h264.fmtp—Specifies the profile of the H.264 codec. This option is applicable only if
the value of the sipendpoint.policy.session.auto_accept_video option is set to 1.
Refer to the Procedure: Enabling an agent to use SIP Video interactions for information on enablingthe video feature.
The following are examples of two scenarios that you might choose to use:
1. Inbound with auto-accept
To configure the video channel to automatically accept inbound interactions, set the values of thefollowing two options like this:
• sipendpoint.policy.session.auto_accept_video = 1
• sipendpoint.video.auto-activate = true
With this configuration, inbound video calls are distributed to the agent from an endpoint thatenables video by using the VP8 or H.264 codec. When an agent accepts the incoming call, the videowindow is also displayed. The contact is displayed in the main video window and the local video isdisplayed in the main video window as a thumbnail.
Provisioning functionality Enabling internal and external communications
Workspace Desktop Edition Deployment Guide 310

2. Inbound without auto-accept
To configure the video channel to automatically accept inbound interactions, set the values of thefollowing two options like this:
• sipendpoint.policy.session.auto_accept_video = 1
• sipendpoint.video.auto-activate = false
With this configuration, inbound video calls are distributed to the agent from an endpoint thatenables video by using the VP8 or H.264 codec. When the agent accepts the incoming call, it ishandled by agents as voice-only calls.
Agents can use the Start Video control of the interaction bar to activate the video component of thecall and display the video window. The contact is displayed in the main video window and the localvideo is displayed in the main video window as a thumbnail (reduced size image).
Provisioning functionality Enabling internal and external communications
Workspace Desktop Edition Deployment Guide 311

SMS and MMS[Modified: 8.5.110.13, 8.5.115.17, 8.5.122.08, 8.5.132.05]
There are three media types that you can configure in the Configuration Server Manager Media Typebusiness attribute. You can set the following media types:
• sms: Use this media type to enable page mode (single message inbound and reply).• smssession: Use this media type to enable session mode (multiple message "chat"-like session).• mms: Use this media type to enable the attachment of images as Multimedia Message Service (MMS) to
an SMS interaction. MMS is a separate media channel that appears as part of the SMS channel in theagent interface. [Added: 8.5.110.13]
In page mode, messages are handled individually. A contact sends a message, the agent handles themessage (replies or forwards it), and the SMS interaction view is closed.
In session mode, a keyword is sent by the contact that indicates that the SMS is to be part of a chat-like session. Multiple SMS messages are exchanged between an agent and a contact in a singleinterface. In addition to the keyword, session mode also functions when the SMS is sent to a specific,pre-configured inbound phone number.
In MMS mode [Added: 8.5.110.13], an image is sent by a contact as an inbound MMS in page mode.Images are displayed in the transcript as thumbnails. To view the images full size, an agent must clickthe thumbnail. The image opens in the application that is configured as the Windows default for thatmedia type. The following MIME-types are supported for MMS:
• Bitmap (image/bmp)• GIF (image/gif)• JPEG (image/jpeg)• Portable Network Graphics (image/png)• TIFF (image/tiff)• ICO (image/vnd.microsoft.icon)
WarningWhen MMS interactions are selected in the Contact History view of an interaction window, the full-sizedMMS image is loaded when the MMS message is selected.
Workspace employs the following privileges for all SMS and MMS interactions:
• SMS - Can Use SMS: Enables access to the SMS channel.• SMS - Can Decline SMS: Enables the agent to decline an SMS interaction.
Provisioning functionality Enabling internal and external communications
Workspace Desktop Edition Deployment Guide 312
• SMS - Can One Step Transfer: Enables the agent to transfer an SMS interaction.• SMS - Can Set Interaction Disposition: Enables the agent to set a disposition for an SMS interaction.• SMS - Can Create SMS: Enbles the agent to create a new SMS interaction.• SMS - Can Save Attached File: Enbles the agent to save an MMS [Added: 8.5.110.13]
Refer to Spelling tab for information about configuring spelling check.
You use the following options in the interaction-workspace section to configure the channel tohandle SMS interactions:
• sms.simple-transcript: Specifies whether the SMS transcript is displayed as simple lines of text or ascolored blocks of text. [Added: 8.5.122.08]
• openmedia.bundle.sms: Specifies the list of media-types (SMS page mode, SMS Session mode, andMMS) that are used to implement the SMS channel. [Modified: 8.5.110.13]
• login.sms.can-unactivate-channel: Specifies whether the agent can select and unselect (activate anddeactivate) the SMS channel.
• login.sms.is-auto-ready: Specifies whether the SMS channel is automatically in the ready state at login.• sms.ringing-bell: Specifies the path to the sound file that is played when an sms message is received.
You can use the following intercommunication options in the interaction-workspace section toconfigure the routing of SMS interactions:
• intercommunication.sms.routing-based-targets: Specifies the list of targets that are contacted throughthe Routing Base feature mechanism for the requests that are defined in the optionintercommunication.sms.routing-based-actions.
• intercommunication.sms.routing-based-actions: Specifies the list of routing-based actions that an agentmay perform.
• intercommunication.sms.queue: Specifies the name of the queue that is used by the Routing Basefeature.
• sms.transcript-enable-history-filters: Specifies that the value specified for the contact.history.filters-<attribute> option is used to filter the history-based part of the SMS transcript. Keys and values of theoption are constructed like those of the contact.history.filters-<attribute> option. You can addthese options to a routing strategy. [Added: 8.5.132.05]
You can use the following options in the interaction-workspace section to configure SMSinteractions:
• sms.max-message-number: Specifies the maximum number of SMS that are considered to be part of asingle message.
• sms.agent.text-color: Specifies the color of the text of the messages that are entered by an agent in theSMS interaction view.
• sms.agent.prompt-color: Specifies the color of the prompt for the messages that are entered by anagent in the SMS interaction view.
• sms.other-agent.text-color: Specifies the color of the text entered by another agent in the SMSinteraction view.
• sms.other-agent.prompt-color: Specifies the color of the prompt for the messages that are entered bythe target agent in the SMS interaction view.
Provisioning functionality Enabling internal and external communications
Workspace Desktop Edition Deployment Guide 313

• sms.client.text-color: Specifies the color of the text received by a contact in the SMS interaction view.• sms.client.prompt-color: Specifies the color of the prompt for the messages entered by a contact in the
SMS interaction view.• sms.time-stamp: Specifies whether the time stamp is displayed in the SMS transcript area.• sms.auto-answer: Specifies whether an SMS interaction is accepted automatically when an Interaction
Server Invite event is received. This option can be overridden by a routing strategy. You can alsoconfigure auto-answer to display a timer that enables an agent to view case information before theinteraction is automatically answered by using the sms.auto-answer.timer and sms.auto-answer.enable-reject options (Added: 8.5.105.12).
• sms.default-queue: Specifies the Interaction Queue to which a new or reply outbound SMS is submitted.• sms.outbound-queue: Specifies the Interaction Queue to which outbound SMS are moved when an
agent clicks Send. This option is used only when the Interaction Workflow does not specify the Queuefor New Interactions when Inbound SMS are being routed to an agent.
• sms.from-numbers-business-attribute: Specifies the business attributes that contain the attribute valuesthat are used as an enumerated value for the From number of an SMS interaction.
• sms.transcript-time-frame: Specifies the range of time in which to search for previous interactions bythe same contact.
• sms.subject-max-chars: Specifies the maximum number of characters from an SMS message that areused to create the message subject if the SMS does not contain a subject.
Provisioning the SMS Channel
[Modified: 8.5.110.13, 8.5.115.17]
ProcedureEnabling an agent to use SMS to exchange SMS with a contact
Purpose:
To enable an agent to use the SMS channel to exchange SMS with a contact that is stored in UniversalContact Server (UCS) and to receive MMS.Prerequisites
• Genesys Administrator 8.0.2 or higher, configured to show Advanced View, or Genesys AdministratorExtension.
• A working knowledge of Genesys Administrator Extension.• A Workspace Application object exists in the Configuration Database.• Workspace has a connection to Universal Contact Server and Interaction Server.• The Procedure: Enabling agents to manage contacts.
Start
Provisioning functionality Enabling internal and external communications
Workspace Desktop Edition Deployment Guide 314
1. Allow the SMS privileges (see SMS Access Privileges) for the role to which the agent is assigned (refer tothe Procedure: Creating a Role and allowing a Workspace privilege and assigning a Role to an agent oragent group).• SMS - Can Use SMS: Enables access to the SMS channel.• SMS - Can Decline Chat: Enables the agent to decline an SMS interaction.• SMS - Can One Step Transfer: Enables the agent to transfer an SMS interaction.• SMS - Can Set Interaction Disposition: Enables the agent to set a disposition for an SMS interaction.• SMS - Can Create SMS: Enbles the agent to create a new SMS interaction.• SMS - Can Save Attached File: Enbles the agent to save an MMS [Added: 8.5.110.13]
2. Configure the openmedia.bundle.sms option to specifies the list of media-types (SMS page mode, SMSSession mode, and MMS) that are used to implement the SMS channel. [Modified: 8.5.110.13]
3. Configure the SMS options in the interaction-workspace section of the Workspace Applicationobject (refer to the SMS configuration option reference for a list of SMS options and a description of howto configure them, and to SMS and MMS Interactions for a list of other configuration options).
TipFor information about configuring Load Balancing and Business Continuity, refer to Runtime Connection Logic in the eServices LoadBalancing Business Continuity section of the Business Continuity and Disaster Recovery topic. Added: 8.5.109.16
4. You can specify which Chat Server messages are included as part of the SMS Session transcript in theinteraction history. To include notices about inactivity timeout:• Set up the Chat Server inactivity control configuration options.• Set the value of the transcript-save-notices
Chat Server option to selective2. [Added: 8.5.115.17]
End
Provisioning functionality Enabling internal and external communications
Workspace Desktop Edition Deployment Guide 315

Web CallbackWorkspace supports agent processing of Web Callbacks. Contacts can schedule a callback throughyour website. Workspace employs the following privileges for all Web Callback interactions:
• Can Use Web Callback Channel: Enables access to the Web Callback channel. All other Web Callbackprivileges are dependent on this one.
• Can Decline: Enables agents to decline incoming Web Callback interactions.• Can Set Interaction Disposition: Enables agents to set disposition codes for Web Callback interactions.• Can Reschedule: Enables agents to reschedule a Web Callback interaction.• Can Reschedule Before Call: Enables agents to reschedule a Web Callback Preview at a different date
and/or time. The Can Reschedule privilege must be enabled for this privilege to be active. If CanReschedule is enabled but Can Reschedule Before Call is disabled, agents can still reschedule the WebCallback Preview after they have connected and disconnected the call.
• Can Reschedule On New Number: Enables agents to reschedule a Web Callback interaction by using anew phone number.
• Can Mark Done: Enables agents to mark inbound Web Callback interactions as Done without processingthem further.
You must also allow the voice privileges since the Workspace Voice channel is used to complete WebCallback interactions. To function correctly, the Web Callback feature requires Interaction Server to beavailable in the environment (refer to the eServices documentation), as well as either a Voice TServeror SIP Server. To support the transfer of corresponding Voice calls, configure the webcallback.park-queue option. To automatically dial the call when the web Callback interaction is accepted, configurethe webcallback.auto-dial. You use the following options in the interaction-workspace section toconfigure the channel to handle Web Callback interactions:
• login.webcallback.auto-not-ready-reason: Specifies whether the channel is set to Not Ready Reasonautomatically when the agent logs in.
• login.webcallback.can-unactivate-channel: Specifies whether the agent can unactivate the Web CallbackChannel.
• login.webcallback.is-auto-ready: Specifies whether the channel is set to Ready automatically when theagent logs in.
• webcallback.auto-answer: Specifies whether a Web Callback interaction is automatically accepted whenan Interaction Server Invite event is received. This option can be overridden by a routing strategy, asdescribed in Overriding Options by Using a Routing Strategy. You can also configure auto-answer todisplay a timer that enables an agent to view case information before the interaction is automaticallyanswered by using the webcallback.auto-answer.timer and webcallback.auto-answer.enable-rejectoptions (Added: 8.5.105.12).
• webcallback.auto-dial: Specifies whether Callback Phone Number is automatically dialed when anInteraction Web Callback is accepted.
• webcallback.callback-information.content: Specifies the callback data that is displayed in the CallbackInformation Area. The callback data entries are displayed in the order in which they appear in the list.
• webcallback.complete-queue: Specifies the Interaction Queue in which Web Callback interactions areplaced when an agent marks it as Processed.
Provisioning functionality Enabling internal and external communications
Workspace Desktop Edition Deployment Guide 316

• webcallback.park-queue: Specifies the Interaction Queue in which the parent Web Callback interactionis placed when an agent transfers a voice call that is created from a Web Callback interaction.
• webcallback.ringing-bell: Specify the web callback ringing sound configuration string of a web callbackis delivered to the agent.
• webcallback.callback-information.frame-color: Specifies the color of the border of the Web CallbackInformation view frame of Web Callback interactions. This option can be overridden by a routingstrategy, as described in Overriding Options by Using a Routing Strategy.
• webcallback.callback-information.header-foreground-color: Specifies the color of the foreground of theWeb Callback Information view frame of Web Callback interactions. This option can be overridden by arouting strategy, as described in Overriding Options by Using a Routing Strategy.
• webcallback.reschedule-queue: Specifies the Interaction Queue in which Web Callback interactions areplaced when an agent reschedules it.
Provisioning functionality Enabling internal and external communications
Workspace Desktop Edition Deployment Guide 317
Callback[Added: 8.5.111.21]
Workspace supports agent processing of Voice Callback interactions through Genesys Callback isprovided as an integrated service through Genesys Mobile Services (GMS) component. Contacts canrequest a callback through your website and these are routed to available agents according to yourrouting strategy. For information about setting up Genesys Callback, refer to the Genesys CallbackOnline Documentation and the Genesys Callback User's Guide.
The following user callback request scenarios are supported:
• Immediate: The contact requests an immediate callback, to be routed to the agent as soon as theagent is available. The contact is called and a treatment is played until the agent is available.
• Delayed: The contact requests a delayed callback, to be called back when the request reaches the topof the queue.
• Delayed (Agent Preview): The contact requests a delayed callback based on available times. At thedesignated time, when the agent is available, a callback preview is directed to the agent and the agentconnects the call to the contact. Configure five different key-value pairs or whole list.
• Scheduled: The contact requests a callback to be scheduled for a desired time based on available timeslots.
Workspace employs the following privileges for all Callback interactions:
• Can Use Callback: The agent is permitted to use the Callback media.• Can Reject Invitation: The agent is permitted to decline a Callback so that it can be processed by a
different agent. Depends on 'Callback - Can Use Callback Channel'.• Can Reschedule Current Callback: The agent is permitted to reschedule the current Callback interaction.
Depends on 'Callback - Can Use Callback Channel'.• Can Reschedule Or Submit On New Number: The agent is permitted to reschedule a Callback interaction
or submit a new Callback by using a new phone number. Depends on 'Callback - Can Use Callback' and'Callback - Can Reschedule Current Callback' or 'Callback - Can Submit New Callback'.
• Can Submit New Callback: The agent is permitted to create a new Callback interaction from anotherinteraction or by using the Team Communicator. Depends on 'Callback - Can Use Callback Channel'.
You must also allow the voice privileges since the Workspace Voice channel is used to completeCallback interactions.
Use the Callback options in the interaction-workspace section to configure the channel to handleCallback interactions and to configure the appearance and content of the Callback information view.You must specify the URL of the Genesys Mobile Server (GMS) that is used for Callback requests byusing the callback.gms-url option.
Provisioning functionality Enabling internal and external communications
Workspace Desktop Edition Deployment Guide 318

Configuring a callback type for the Schedule Callback windowYou use a Business Attribute of type Interaction Operational Attribute to define the callbacktypes that are specified by the callback.callback-types-business-attribute option in the interaction-workspace section. A callback type is a combination of the following:
• A Callback Service defined in Genesys Mobile Services (GMS)• A time slot duration• A set of Key-Value Pairs.
The callback types that are available to an Agent or a Group of Agents are defined by using BusinessAttribute Values. Specify the Business Attribute name as the value of the callback.callback-types-business-attribute option.
WarningConfigure the Callback type data in the annex of the Business Attribute Value objects, not in the annex ofthe Business Attribute object that contains it.
This is the recommended workflow for specifying Callback types:
1. Create a Business Attribute and give it a name.2. In the Business Attribute, create as many Business Attribute Values as there are Callback Types to
be exposed to Agents.3. In the annex of each Business Attribute Value, specify the keys described below under Business
Attribute Value Annex.4. Set the value of the callback.callback-types-business-attribute Workspace option to the name of the
Business Attribute that you created in step 1.
Business Attribute Values should be configured as follows:
• Business Attribute Value Name: (Mandatory) The unique technical name for this callback type• Business Attribute Value Display Name: The name that is shown in the Callback Type drop-down list of
the Schedule Callback window. To specify that a particular Business Attribute value is default, setDefault to True when you create the attribute value.The default callback type is selected by default inthe Reschedule Callback and New Callback dialog boxes. If no default is specified, the callback typesare displayed alphabetically and the first callback type is selected by default.
• Business Attribute Value Annex:• interaction-workspace/callback.service-name: The Callback Service name defined in GMS to
be associated with this callback type• interaction-workspace/callback.time-slot-duration: Specifies the duration, in minutes, of the
time slots to be displayed in the time picker of the Reschedule Callback and New Callbackdialog boxes. It must be a multiple of the "bucket" duration that is specified in the correspondingCallback Service ('_request_time_bucket') option defined in GMS. Valid values are 15, 20, 30, 60.Default value is 15.
Provisioning functionality Enabling internal and external communications
Workspace Desktop Edition Deployment Guide 319

• interaction-workspace/callback.keys.<business-key>=<business-value>: The Key-Valuepairs to be attached to the (re-)schedule request as the business context of this callback type.
Personalizing the content of the Callback Preview notificationThe business data that is distributed as part of the Callback Preview notification has a static keystructure:
1=Value12=Value23=Value3etc...
To display agent-facing labels instead of the keys "1", "2",and so on, use Business Attributes,specified by the toast.case-data.format-business-attribute.
As this option can be overwritten by a routing strategy, if the Callback business process is able toassign to the notification UserEvent a Key-Value Pair that points at a Transaction object name, thiscan provide even more flexibility.
The localization model of Configuration Objects can also be used to transform the display name ofthe configured Business Attribute Values into labels in the language of the logged in agent.
To make callback Key-Value pairs ready to be displayed in the case data of the interaction notificationand the interaction view, you should configure the corresponding GMS Service by setting the value ofthe _attach_udata option to separate_keys. Next, you can configure Case Data to show these asany regular interaction key-value pair.
Configuring callback availability
• Opening hours configured in solution.• Not available: slot capacity full
Provisioning functionality Enabling internal and external communications
Workspace Desktop Edition Deployment Guide 320

WorkitemsWorkitems are custom media types or tasks that are processed by the intelligent WorkloadDistribution (iWD) solution. iWD is an application that works with the Genesys Customer InteractionManagement (CIM) Platform to distribute tasks to the resources that are best suited to handle them.It is a collection of software components for:
• Capturing tasks from various enterprise work sources.• Applying business rules to classify, prioritize, and reprioritize the tasks.• Routing the tasks to agents or knowledge workers in the enterprise.• Monitoring and reporting on the intraday and historical status of the tasks and the task handling.
Refer to the intelligent Workload Distribution Deployment Guide for more information.
You must define workitems in Configuration Server (refer to Genesys Administrator Extension Helpand the eServices (Multimedia) documentation for information about defining Business Attributes(Media Type) in Configuration Server).
Workspace employs the following privileges for all Workitem interactions:
• Can Use WorkItem Channel• Can One Step Transfer• Can Set Interaction Disposition
You use the following options in the interaction-workspace section to configure Workiteminteractions:
• intercommunication.<media-type>.queue: Specifies the name of the queue to be used by the RoutingBase feature. The following attached data are added by Workspace:
IW_RoutingBasedOriginalEmployeeId, IW_RoutingBasedTargetId,IW_RoutingBasedTargetType, IW_RoutingBasedActionType.
• intercommunication.<media-type>.routing-based-targets: Specifies the list of targets (Agent and/orQueue) that are contacted through the routing-based mechanism, for the requests that are defined inthe intercommunication.<media-type>.routing-based-actions option. The AgentGroup and Skilltargets are always addressed by routing; therefore, they are not affected by this option.
• login.<media-type>.can-unactivate-channel: Specifies whether an agent is allowed to select andunselect (activate and deactivate) a workitem channel during login, for example:login.myworkitem.can-unactivate-channel=true
• login.<media-type>.is-auto-ready: Specifies whether the Workitem channel is in the auto-ready stateat agent login.
• openmedia.workitem-channels: Specifies a list of Workitem channels that an agent can be enabled touse, for example: openmedia.workitem-channels=myworkitem
• <media-type>.auto-answer: Specifies whether a Workitem interaction is accepted automatically whenan Invite event is received from Interaction Server. This option can be overridden by a routing
Provisioning functionality Enabling internal and external communications
Workspace Desktop Edition Deployment Guide 321

strategy. You can also configure auto-answer to display a timer that enables an agent to view caseinformation before the interaction is automatically answered by using the <media-type>.auto-answer.timer and <media-type>.auto-answer.enable-reject options (Added: 8.5.105.12).
Provisioning the Workitems feature
ProcedureEnabling an agent to use Workitems to handle custom media types
Purpose:
To enable an agent to use custom media types as Workitem interactions.Prerequisites
• Genesys Administrator 8.0.2 or higher, configured to show Advanced View, or Genesys AdministratorExtension.
• A working knowledge of Genesys Administrator Extension.• A Workspace Application object exists in the Configuration Database.• Workspace has a connection to Universal Contact Server (optional, depending on the workitem type).• Workspace has a connection to Interaction Server.• The Procedure: Enabling agents to manage contacts.
Start
1. In Genesys Administrator Extension, add the Workitem media in the Media Type Business Attribute.(refer to Genesys Administrator Extension Help and Genesys Administrator Extension DeploymentGuide for information about defining Business Attributes in Configuration Server ).
2. Update the capacity rules for the Workitem (refer to Genesys 8 Resource Capacity Planning Guide).3. Allow the Workitem privileges (see Workitem Privileges) for the role to which the agent is assigned
(refer to the Procedure: Creating a Role and allowing a Workspace privilege and assigning a Role to anagent or agent group).• Can Use Workbins• Can One Step Transfer
4. Configure the Workitem options in the interaction-workspace section of the Workspace Applicationobject (refer to the Workitem configuration option reference for a list of Workitem options and adescription of how to configure them).
TipFor information about configuring Load Balancing and Business Continuity, refer to Runtime Connection Logic in the eServices LoadBalancing Business Continuity section of the Business Continuity and Disaster Recovery topic. Added: 8.5.109.16
Provisioning functionality Enabling internal and external communications
Workspace Desktop Edition Deployment Guide 322

5. Configure the options that support Workitems (refer to Workitems).
End
Workitem Can Mark Done privilege
The Can Mark Done privilege controls how workitems are marked as done.
When this privilege is allowed, the Done button is displayed in the toolbar when an inbound workitemis presented. If an agent clicks Done, the inbound workitem is terminated (removed from the BusinessProcess). It will then not be possible to submit any corresponding outbound reply from the interactionview. It can only be reopened from the Contact History.
When this privilege is not allowed, the Done button is not displayed when an inbound workitem isdisplayed. The agent must handle the workitem by replying to it, transferring it, or placing it in aworkbin.
Open In-progress Workitems from History
You can enable agents to open a workitem of a specified media type that is in progress and in aworkbin or a queue and is not assigned to any agent that is listed in the contact history for thatinteraction. This feature enables an agent to immediately work on the workitem before it is assigned.This feature is useful for an agent who is interacting with a contact on another media channel.
To enable this feature, for the agent, agent group, or application object, allow the following privilegesand set the value of the <media-type>.pull-from-history-isenabled option to true:
• Contact - Can Pull From Queue• Contact - Can Pull Interactions In Shared Workbins• Contact - Can Pull Interactions In Workbins Not Owned By The User
Provisioning functionality Enabling internal and external communications
Workspace Desktop Edition Deployment Guide 323

Setting up agents to use workbins[Modified: 8.5.110.13, 8.5.122.08, 8.5.126.07]
ProcedureEnabling an agent to use and search agent, place, agent group, or place group workbins
Purpose:
To enable an agent to use agent, place, agent group, or place group workbins to receive and/or storecontact interactions for future processing.Prerequisites
• Genesys Administrator 8.0.2 or higher, configured to show Advanced View, or Genesys AdministratorExtension.
• A working knowledge of Genesys Administrator Extension.• A Workspace Application object exists in the Configuration Database.• Workspace has a connection to Universal Contact Server and Interaction Server.• The Procedure: Enabling agents to manage contacts.
Start
1. Use Genesys Interaction Routing Designer (IRD) or Genesys Composer to create a workbin.2. In Genesys Administrator Extension, create a reference to the workbin in the Workspace Application
object, following the generic rule: workbin.<media-type>.<workbin-nick-name>=<workbin-script-name>Refer to the Section: interaction-workspace and workbin configuration option reference for a list ofWorkbin options and a description of how to configure them.
3. Allow the workbin privileges (see Workbin Access Privileges) for the role to which the agent is assigned(refer to the Procedure: Creating a Role and allowing a Workspace privilege and assigning a Role to anagent or agent group).• Workbin - Can Use Workbins
4. To enable agents to use Interaction Search in workbins, allow the following privilege on the agent, role,agent group, or other User object: [Added: 8.5.110.13]• Workbin - Can search in Workbins
Provisioning functionality Enabling internal and external communications
Workspace Desktop Edition Deployment Guide 324
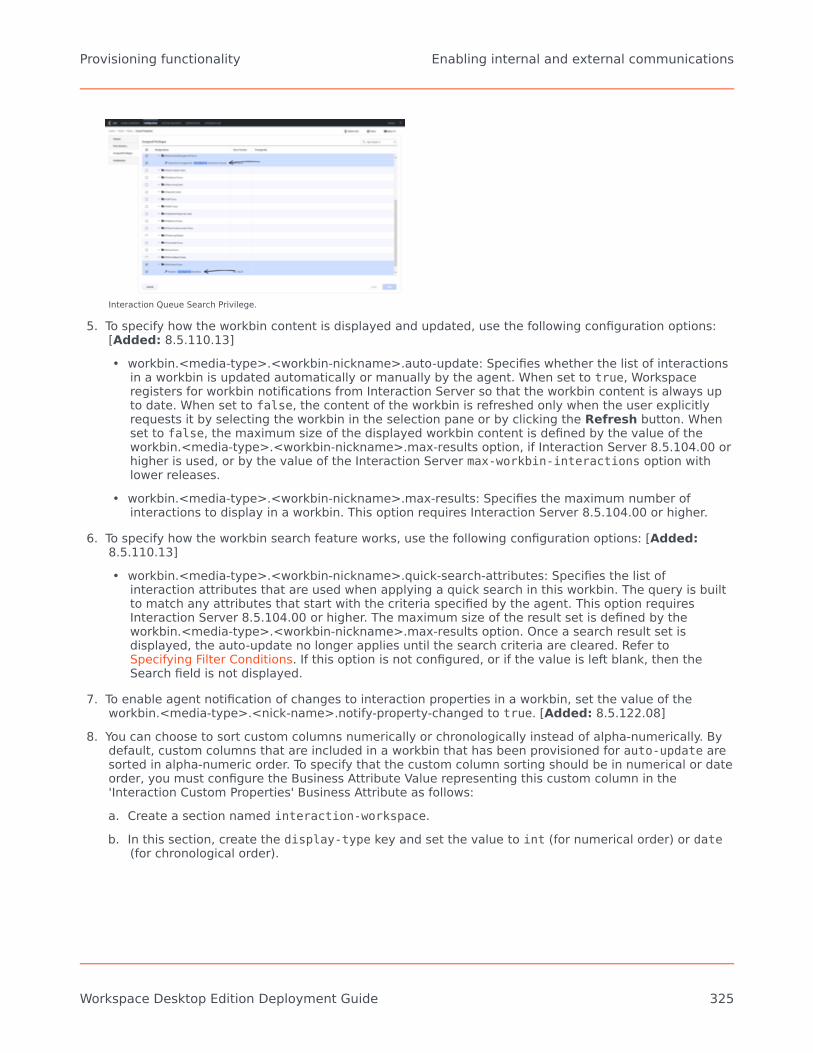
Interaction Queue Search Privilege.
5. To specify how the workbin content is displayed and updated, use the following configuration options:[Added: 8.5.110.13]• workbin.<media-type>.<workbin-nickname>.auto-update: Specifies whether the list of interactions
in a workbin is updated automatically or manually by the agent. When set to true, Workspaceregisters for workbin notifications from Interaction Server so that the workbin content is always upto date. When set to false, the content of the workbin is refreshed only when the user explicitlyrequests it by selecting the workbin in the selection pane or by clicking the Refresh button. Whenset to false, the maximum size of the displayed workbin content is defined by the value of theworkbin.<media-type>.<workbin-nickname>.max-results option, if Interaction Server 8.5.104.00 orhigher is used, or by the value of the Interaction Server max-workbin-interactions option withlower releases.
• workbin.<media-type>.<workbin-nickname>.max-results: Specifies the maximum number ofinteractions to display in a workbin. This option requires Interaction Server 8.5.104.00 or higher.
6. To specify how the workbin search feature works, use the following configuration options: [Added:8.5.110.13]• workbin.<media-type>.<workbin-nickname>.quick-search-attributes: Specifies the list of
interaction attributes that are used when applying a quick search in this workbin. The query is builtto match any attributes that start with the criteria specified by the agent. This option requiresInteraction Server 8.5.104.00 or higher. The maximum size of the result set is defined by theworkbin.<media-type>.<workbin-nickname>.max-results option. Once a search result set isdisplayed, the auto-update no longer applies until the search criteria are cleared. Refer toSpecifying Filter Conditions. If this option is not configured, or if the value is left blank, then theSearch field is not displayed.
7. To enable agent notification of changes to interaction properties in a workbin, set the value of theworkbin.<media-type>.<nick-name>.notify-property-changed to true. [Added: 8.5.122.08]
8. You can choose to sort custom columns numerically or chronologically instead of alpha-numerically. Bydefault, custom columns that are included in a workbin that has been provisioned for auto-update aresorted in alpha-numeric order. To specify that the custom column sorting should be in numerical or dateorder, you must configure the Business Attribute Value representing this custom column in the'Interaction Custom Properties' Business Attribute as follows:a. Create a section named interaction-workspace.b. In this section, create the display-type key and set the value to int (for numerical order) or date
(for chronological order).
Provisioning functionality Enabling internal and external communications
Workspace Desktop Edition Deployment Guide 325

TipWhen a workbin is not provisioned as 'auto-update', sorting is handled by the Interaction Server database,and so relies on the type assigned in the database table schema.
[Added: 8.5.126.07]
End
Provisioning functionality Enabling internal and external communications
Workspace Desktop Edition Deployment Guide 326
Instant Messaging[Modified: 8.5.122.08]
You use the following options in the interaction-workspace section to configure the channel tohandle IM interactions:
• im.simple-transcript: Specifies whether the IM transcript is displayed as simple lines of text or ascolored blocks of text. [Added: 8.5.122.08]
WarningIf you grant an agent voice capabilities and Instant Messaging (IM) capabilities on two different DNs, theagent does not get Outbound Campaign notifications and experiences other issue when handling OutboundCampaign interactions.
Workaround: Configure the Log On As Person feature of the Outbound Contact Server so that it does not"see" the IM DNs that are configured in the Places of the agent.
ProcedureEnabling agents to use Instant Messaging
Purpose:
To enable an agent to use Instant Messaging (IM) to send and receive text messages with an internaltarget.Prerequisites
• Genesys Administrator 8.0.2 or higher, configured to show Advanced View, or Genesys AdministratorExtension.
• A working knowledge of Genesys Administrator Extension.• A Workspace Application object exists in the Configuration Database.• Workspace has a connection to SIP Server.
Start
1. Allow the Team Communicator privileges (see Team Communicator Privileges) for the role to which theagent is assigned (refer to the Procedure: Creating a Role and allowing a Workspace privilege andassigning a Role to an agent or agent group).
2. Configure the Team Communicator options in the interaction-workspace section of the WorkspaceApplication object (refer to the Team Communicator configuration option reference for a list of TeamCommunicator options and a description of how to configure them).
3. Allow the following IM privileges for the role to which the agent is assigned:
Provisioning functionality Enabling internal and external communications
Workspace Desktop Edition Deployment Guide 327

• Can Release IM• Can Make IM• Can Use IM
4. Configure the IM options in the interaction-workspace section of the Workspace Application object(refer to the IM configuration option reference for a list of IM options and a description of how toconfigure them).
5. Ensure that the SIP DN of the Place used for Instant Messaging has the following options defined in theTServer section:• sip-signaling-chat = none
• multimedia = true
• voice =• false: The DN will handle only IM• true: The DN will handle IM and voice• "": Option not set (Default = true; therefore, the DN will handle IM and voice)
Important• The DN that holds the IM channel does not support the ACDPosition type. It must be
of type Extension.• If the voice key is not included in the Tserver Section, the DN handles both IM and
voice.
End
Provisioning functionality Enabling internal and external communications
Workspace Desktop Edition Deployment Guide 328

Disposition codes[Modified: 8.5.108.11, 8.5.141.04]
The Disposition Code feature enables agents to specify outcomes for interactions that they arehandling. Disposition Codes are handled as Business Attributes in Genesys Framework. Theinteraction disposition is part of the attached data for the interaction.
Workspace supports two different views of the disposition codes that you specify as BusinessAttributes, as a hierarchical folder tree with a search control or as a radio button list.
The folder tree hierarchy and the radio button list
Agents select an item from the tree or click a radio button to specify the disposition of an interaction.This disposition become part of the attached data of the interaction.
ProcedureEnabling an agent to use disposition codes
TipIf you are creating disposition codes to report on a business result, for example to provide data for GenesysInfo Mart (GIM) and Genesys Interactive Insights, configure the Disposition Code Business Attribute as a"Business Result". To use this feature, specify the name of the "Business Result" Business Attribute as thevalue of the interaction.disposition.key-name option.GIM supports reporting on Business Result out-of-box, provided that ICON has been configured to send theBusiness Result KVP. The GIM IP includes a customized ICON attached-data specification file that providesthis configuration (refer to Sample ICON Attached Data Specification).
Provisioning functionality Enabling internal and external communications
Workspace Desktop Edition Deployment Guide 329

For more information about how Genesys Info Mart handles user data (such as Business Result) that isattached to interactions, refer to the User Data Mapping topic in the Genesys Info Mart Deployment Guide.This topic has links to additional information in the GIM Deployment Guide and PDMs.The Mapping User Data Worksheet topic might also help you when setting up your business results. Searchfor "business result" on this page.
Purpose:
To enable an agent to specify the outcome (disposition) of an interaction.Prerequisites
• Genesys Administrator 8.0.2 or higher, configured to show Advanced View, or Genesys AdministratorExtension.
• A working knowledge of Genesys Administrator Extension.• A Workspace Application object exists in the Configuration Database.• The Procedure: Creating a Role and allowing a Workspace privilege and assigning a Role to an agent or
agent group• The Procedure: Provisioning Workspace for the Voice channel
Start
1. Start Genesys Administrator Extension2. Select your tenant.3. Open Routing/eServices in the Navigation area.4. Select Business Attributes.5. Create or update the Disposition Code Business Attribute. Alternately, you can create a different
Business Attribute and specify it by using the interaction.disposition.value-business-attributeconfiguration option.
Create or modify the Disposition Code object in the Business Attributesarea
• The Type of the Business Attribute is Interaction Operation Attributes.• The Display Name of the Business Attribute is used as the name of the section in the Agent
interface.
Provisioning functionality Enabling internal and external communications
Workspace Desktop Edition Deployment Guide 330
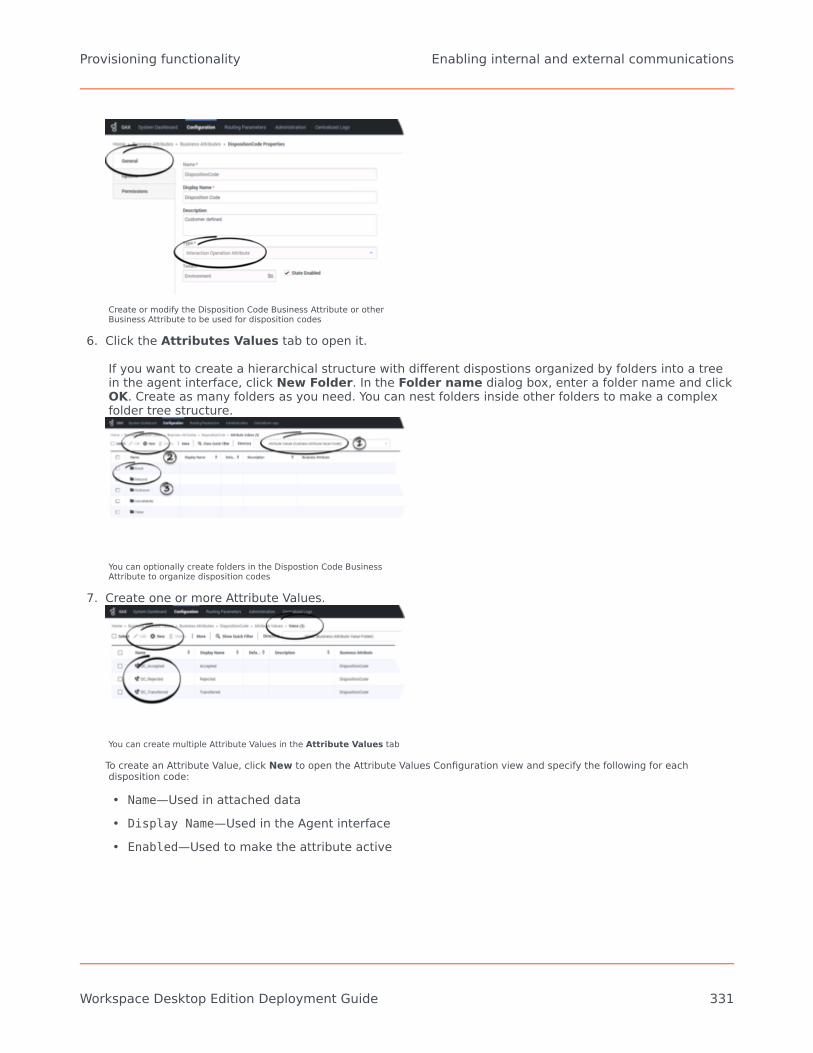
Create or modify the Disposition Code Business Attribute or otherBusiness Attribute to be used for disposition codes
6. Click the Attributes Values tab to open it.
If you want to create a hierarchical structure with different dispostions organized by folders into a treein the agent interface, click New Folder. In the Folder name dialog box, enter a folder name and clickOK. Create as many folders as you need. You can nest folders inside other folders to make a complexfolder tree structure.
You can optionally create folders in the Dispostion Code BusinessAttribute to organize disposition codes
7. Create one or more Attribute Values.
You can create multiple Attribute Values in the Attribute Values tab
To create an Attribute Value, click New to open the Attribute Values Configuration view and specify the following for eachdisposition code:
• Name—Used in attached data• Display Name—Used in the Agent interface• Enabled—Used to make the attribute active
Provisioning functionality Enabling internal and external communications
Workspace Desktop Edition Deployment Guide 331

Specify a name and display name for each disposition code that youcreate
8. For the object to which the set of disposition codes apply, in the interaction-workspace section, setthe value of the interaction.disposition.value-business-attribute option to the name of the businessattribute that you configured.
9. Allow the Can Set Interaction Disposition privilege (see Role Privileges) for the role to which theagent is assigned (refer to the Procedure: Creating a Role and allowing a Workspace privilege andassigning a Role to an agent or agent group):• Chat Privileges• Email Privileges• SMS Privileges• Voice Privileges• Web Callback Privileges• Workitem Privileges
10. For the object to which the set of disposition codes apply, configure the following Interaction options inthe interaction-workspace section (refer to the Interaction configuration option reference for a list ofInteraction options and a description of how to configure them):• interaction.disposition.is-mandatory• interaction.disposition.email.mandatory-actions [Added: 8.5.103.10]• interaction.disposition.<media-type>.mandatory-actions [Added: 8.5.150.06]• interaction.disposition.is-read-only-on-idle• interaction.disposition.key-name• interaction.disposition.use-attached-data• interaction.disposition.use-connection-id• interaction.disposition.value-business-attribute
Optionally, if you want to display disposition codes in the legacy radio button interface, set the value ofthe interaction.disposition.display-mode option to radio-buttons.
11. To pre-load Business Attribute objects, such as Disposition Codes, when an agent logs in, configure the value of thegeneral.configuration-business-attribute-cache-preload option with a list of Business Attributes to pre-load. Business Attributesand Transaction objects are otherwise loaded the first time that an interaction requiring them is received by an agent. They arethen cached for future use. If there are a large number of possible attribute values, such as a large list of dispositions, there couldbe a delay in the display of the Interaction Notification while the dispositions load. Pre-loading Buiness Attributes related todisposition and case data when an agent logs in ensures that there is no delay in displaying Interaction Notifications.
Provisioning functionality Enabling internal and external communications
Workspace Desktop Edition Deployment Guide 332

For dispositions that employ the folder/tree structure, you can choose to pre-load the folder structure when a agent logs in byusing the general.configuration-business-attribute-folder-cache-preload option to specify the list of Business Attributes containingthe folders that you want to pre-load.
ImportantYou must specify the Business Attributes containing folders in both the general.configuration-business-attribute-folder-cache-preload andgeneral.configuration-business-attribute-cache-preload options for the Business Attributes containing folders to be pre-loaded.
[Added: 8.5.141.04]
End
Provisioning functionality Enabling internal and external communications
Workspace Desktop Edition Deployment Guide 333
Contact History[Modified: 8.5.104.15]
For information about Contact Management and search, refer to the Managing Contacts topic.
ProcedureEnabling agents to manage and search contact and interaction history
Purpose:
To enable an agent to view, search, and update the history of a contact.Prerequisites
• Genesys Administrator 8.0.2 or higher, configured to show Advanced View, or Genesys AdministratorExtension.
• A working knowledge of Genesys Administrator Extension.• A Workspace Application object exists in the Configuration Database.• Workspace has a connection to Universal Contact Server.• The Procedure: Creating a Role and allowing a Workspace privilege and assigning a Role to an agent or
agent group.• Enable one or more channels:
• Provisioning Workspace for the Voice channel.• E-Mail, Chat, and/or SMS
Start
1. Allow the following Contact Actions privileges (see Contact Management Privileges) for the role to whichthe agent is assigned (refer to the Procedure: Creating a Role and allowing a Workspace privilege andassigning a Role to an agent or agent group):• Can Use Contact Directory• Can Use Contact History• Can Use Interaction Search[Added: 8.5.104.15]• Can Use Contact History CaseData• Can Use Contact History Detail• Can Use Contact History Notepad• Can Use Contact Information• Can Use Contact my History• Can Use Save Contact
Provisioning functionality Enabling internal and external communications
Workspace Desktop Edition Deployment Guide 334

• Contact Module
2. Configure the Contact options in the interaction-workspace section of the Workspace Applicationobject (refer to the Contact configuration option reference for a list of Contact options and a descriptionof how to configure them).
3. Enable UCS contact index to permit contact search in list views and Team Communicator, and enableUCS interaction index to permit searches on contact interactions in Contact History, My History, andGlobal Interaction Search views. For more information about enabling UCS index refer to the eServices(Multimedia) 8.0 User's Guide.
4. (Optional) Configure Global Interaction Search.
End
Provisioning functionality Enabling internal and external communications
Workspace Desktop Edition Deployment Guide 335

Case Information editingFor a discussion of Case Information refer to the Case tab of the Handling Interactions topic. Caserelated configuration options are listed here. Case data privileges are discussed here.
ProcedureConfiguring the Workspace application to enable an agent to edit case information
Purpose:
To enable an agent to edit the contents of case information.Prerequisites
• Genesys Administrator 8.0.2 or higher, configured to show Advanced View, or Genesys AdministratorExtension.
• A working knowledge of Genesys Administrator Extension.• A Workspace Application object exists in the Configuration Database.• One or more custom Case Information Business Attributes in the Configuration Layer.
Start
1. In Genesys Administrator Extension, open a Case Information Business Attribute.2. In the Attributes Values tab, open an attribute value.3. Select the Options tab.4. Add a new section named interaction-workspace.5. Configure the option according to the values in the table Editing Case Information in the Case tab of
the Handling Interactions topic.6. Save your updates.
End
Provisioning functionality Enabling internal and external communications
Workspace Desktop Edition Deployment Guide 336
Standard Responses[Modified: 8.5.112.08, 8.5.118.10]
ProcedureEnabling agents to use the Standard Responses Library (SRL)
Purpose:
To enable an agent to access the Universal Contact Server database of prewritten standard responsesfor interactions.
Agents can insert these responses as replies into any email, instant messaging, or chat message, orthey can read them to the contact during a voice interaction.
Prerequisites
• Genesys Administrator 8.0.2 or higher, configured to show Advanced View, or Genesys AdministratorExtension.
• A working knowledge of Genesys Administrator Extension.• A Workspace Application object exists in the Configuration Database.• Workspace has a connection to Universal Contact Server.• The Procedure: Creating a Role and allowing an Workspace privilege and assigning a Role to an agent or
agent group.• (Optional) The Procedure: Provisioning Workspace for the Voice channel.• (Optional) The Procedure: Enabling an agent to use E-Mail to correspond with a contact.• (Optional) The Procedure: Enabling an agent to use Chat to chat with a contact.
Start
1. For information about creating and managing Standard Responses and standard response field codes,refer to Knowledge Manager.
2. Allow the following SRL privileges (see Standard Response Privileges) for the role to which the agent isassigned (refer to the Creating a Role and allowing an Workspace privilege and assigning a Role to anagent or agent group):• Can Use SRL
3. Enable an index search on SRL in the Universal Contact Server configuration.• Set the index\enabled option to true.• Set the index.srl\enabled option to true.
For more details about these settings, refer to the eServices (Multimedia) 8.0 User's Guide.
Provisioning functionality Enabling internal and external communications
Workspace Desktop Edition Deployment Guide 337

4. Configure the relevancy level for Suggested Responses:• Set the standard-response.suggested-responses-min-relevancy option to display responses in order
according to their relevancy to the inbound interaction.
5. Configure the other Standard Response options to meet the requirements of your environment.6. (Optional) Create custom field codes for agents, agent groups, tenants, or at the application level that
can be used by Standard Response objects. Use the standard-response.field.<CustomFieldCode>option to specify a custom field code and value, such as an agent nickname, role, department, or otherqualification, and then insert the field code into a Standard Response object.
For example, you could create a set of field codes for a Standard Response for an agent signature such as the following:
Name: "Signature"Text: "<$ Agent.Title $> <$ Agent.FullName $> (< $Agent.NickName$ >) - <$ Agent.Position$><$ Department $>"
In the Agent annex configure standard-response.field.<[Agent.]CustomFieldCode>:
• 'interaction-workspace'/'standard-response.field.Agent.Title' = "Ms"
• 'interaction-workspace'/'standard-response.field.Agent.NickName' = "Beth"
• 'interaction-workspace'/'standard-response.field.Agent.Position' = "TechnicalSupport Analyst"
In the Agent Group annex (in Configuration Server):
• 'interaction-workspace'/'standard-response.field.Department' = "Customer Care"
7. (Optional) Create shortcut keywords that agents can enter into the email, chat, SMS, and MMScomposition areas to automatically add common Standard Responses. [Added: 8.5.118.10]a. Specify the prefix character that agents must type before entering the keyword by configuring the
editor.shortcuts.prefix option. Workspace detects the prefix/keyword combination as a shortcut ifthe agent immediately types Ctrl+Space after typing the prefix character followed by the keyword.For example, if you have a standard response about a new sale and you create a keyword calledsale and you specify # as the prefix, the agent would type #sale followed by Ctrl+Space toautomatically populate the email interaction with the content of the sale Standard Response.
b. For each shortcut that you want to create, add the standard-response.shortcuts.<keyword> option to the interaction-workspace of the configuration object for which you want to enable the shortcut. In the name of the configuration option,replace <keyword> with the name of the shortcut keyword. For example, if the keyword that you want your agent to type is#sale, add the following option:
standard-response.shortcuts.sale
Then, set the value of the option to the path to the response. For example: Agent Responses\Latest Promotions.
End
Provisioning functionality Enabling internal and external communications
Workspace Desktop Edition Deployment Guide 338
Broadcast MessagesWorkspace enables agents to receive messages that are sent simultaneously (broadcast) to multiplecontact center parties. You must use an application that can publish messages, associated by topic,to a common communication DN. Workspace employs a simple protocol based on communication DNand provisioning to enable this functionality.
Agents can be provisioned to receive messages that are addressed, by topic, to a property of theagent or a property of an agent group (see the Procedure: Enabling agents to view BroadcastMessages).
Messages are displayed to agents by an Interactive Notification that is similar to the new interactionInteractive Notification. An audio alert can be configured to alert agents when a new broadcastmessage arrives. Messages are also displayed in the Workspace Main Window as a summary table inthe Messages drop-down area. If the agent opens the message, a detailed view is displayed. If theagent uses the Gadget view, messages are displayed in a message gadget.
AttributesA broadcast protocol message is defined by the following attributes:
• Message: The content of the message.• Sender: The identity of the sender.• Message Type: The type of message, such as Error, Information, Notification, and so on.• Subject: The subject of the message (optional).• Priority: The relative importance of the broadcast message. The following subcategories are
predefined; however, you can also configure your own values:• Minimal
• Low
• Normal
• High
• Important
• Date: The date sent, in local time of the agent.• Topic: To which topic the message was sent.• Custom Data: Any custom data included with the message.
ProtocolUse the following protocol on your supervisor client configuration:
IWS_MessageIWS_SenderIWS_MessageType
Provisioning functionality Enabling internal and external communications
Workspace Desktop Edition Deployment Guide 339

IWS_SubjectIWS_PriorityIWS_Date (RFC1123 pattern.)IWS_TopicIWS_CustomData
The following is an example of a UserEvent configuration:
Event:EventUserEventServer:65200ReferenceID:7CustomerID:ResourcesThisDN:BroadcastDNUserData:(Str) IWS_Subject Coffee Break(Int) IWS_Priority 3(Str) IWS_Message Please take your coffee break NOW !!!(Str) IWS_Date Thu, 11 Feb 2010 16:15:16 GMT(Str) IWS_Topic Agent4(Str) IWS_Sender Ministrator(Str) IWS_MessageType ErrorSeconds:1265904964USeconds:234000Server Time:11/02/2010@17:16:04.234
Configuration optionsYou can use the following options in the interaction-workspace section to configure BroadcastMessaging:
• broadcast.color.xxx-priority: Specifies the Hexidecimal-color code of the border of the Messageview frames for messages that have the xxx priority. The following priorities are supported:• broadcast.color.high-priority• broadcast.color.important-priority• broadcast.color.low-priority• broadcast.color.minimal-priority• broadcast.color.normal-priority
• broadcast.displayed-columns: Specifies the attribute columns that are displayed in the BroadcastMessage window and the item tooltip in the My Messages tab/window.
• broadcast.dn: The name of the DN and switch that is used for broadcasting. Use the following valueformat: DN@switch
• broadcast.mark-read-timeout: Specifies the duration after which a message, as a tooltip, isconsidered to be read.
• broadcast.message-content: Specifies the attributes that are displayed in the Broadcast Messagewindow and the item tooltip in the My Messages tab/window.
• broadcast.preview-timeout: Specifies the duration after which a message preview is closed.• broadcast.sound.xxx-priority: Specifies the sound configuration string for messages that have
priority xxx. The following priorities are supported:• broadcast.sound.high-priority
Provisioning functionality Enabling internal and external communications
Workspace Desktop Edition Deployment Guide 340

• broadcast.sound.important-priority• broadcast.sound.low-priority• broadcast.sound.minimal-priority• broadcast.sound.normal-priority
• broadcast.subscribed.topics: Specifies the list of subscription topics.• broadcast.toast-summary: Specifies the attributes that are displayed in the Interactive Notification.• broadcast.value-business-attribute: Specifies the name of the Business Attribute that contains the
Attribute Values that are used as an enumerated value for a custom attribute of message.
Message types can be customized by adding the following lines to theGenesyslab.Desktop.Modules.Windows.en-US.xml dictionary file:
<Value Id="Broadcast.MessageType.System" String="System"/><Value Id="Broadcast.MessageType.Error" String="Error"/><Value Id="Broadcast.MessageType.Information" String="Information"/><Value Id="Broadcast.MessageType.Internal Note" String="Internal Note"/>
The value that is set in the String property is displayed as the message type.
Provisioning Broadcast Messages
ProcedureEnabling agents to view Broadcast Messages
Purpose:
To enable an agent to receive and view messages that are sent simultaneously (broadcast) tomultiple contact center parties.Prerequisites
• Genesys Administrator 8.0.2 or higher, configured to show Advanced View, or Genesys AdministratorExtension.
• A working knowledge of Genesys Administrator Extension.• A Workspace Application object exists in the Configuration Database.• The Procedure: Creating a Role and allowing a Workspace privilege and assigning a Role to an agent or
agent group.
Start
1. Allow the following Broadcast Message privilege (see Broadcast Privileges) for the role to which theagent is assigned (refer to the Creating a Role and allowing a Workspace privilege and assigning a Roleto an agent or agent group):• Can Use Broadcast Message
Provisioning functionality Enabling internal and external communications
Workspace Desktop Edition Deployment Guide 341

2. Create a communication DN and configure it in broadcast.dn.3. Configure the broadcast message topics to which an agent can be subscribed by using
broadcast.subscribed.topics.Topics can be associated with different configuration objects such as agents ($Agent$) and agentgroups ($AgentGroup$); or they can be the names of custom topics such as team (for example,billing) or site (for example main_campus).
4. Ensure that you have a Sender application that implements the protocol described in Protocol, above,that sends messages to topics that match what is configured in your system.
End
Provisioning functionality Enabling internal and external communications
Workspace Desktop Edition Deployment Guide 342
Team Leads and Supervisors[Modified: 8.5.126.07]
For details on the capabilities of Team Leads and Supervisors in Workspace, refer to these topics:
• Team Lead Help• Team Lead Functionality
Enabling agents to be Team Leads and Supervisors
ProcedureEnabling agents to be Team Leads and Supervisors
Purpose:
To enable an agent who is configured to be a supervisor (Team Lead) to automatically monitor the SIPVoice and Chat interactions that are handled by other agents.Prerequisites
• Genesys Administrator 8.0.2 or higher, configured to show Advanced View, or Genesys AdministratorExtension.
• A working knowledge of Genesys Administrator Extension.• A Workspace Application object exists in the Configuration Database.• The Procedure: Creating a Role and allowing a Workspace privilege and assigning a Role to an agent or
agent group.
Start
1. Allow the following Team Lead privilege (see Team Lead Privileges) for one of the roles to which theusers who will be Team Leads are members:• Can Use Team Lead
2. Allow the following optional Team Lead privileges (see Team Lead Privileges) for the role to which theagents who will be Team Leads are members:• Can Auto-Monitor (Voice or Chat)• Can Switch to Barge-in (Voice or Chat)• Can Switch to Coaching (Voice or Chat)• Can Switch to Silent Monitoring (Voice or Chat)• Can End Monitoring (Voice or Chat)
Provisioning functionality Enabling internal and external communications
Workspace Desktop Edition Deployment Guide 343

3. Configure the Team Lead options.4. Create or select an agent group to be used to specify the list of Agents that a Team Lead will monitor.5. Add the agents to be monitored by that team lead to that agent group.6. In Genesys Administrator Extension Configuration tab for the agent group, open the Advanced view.7. In the Supervisor field, add the name of the user that will be acting as Team Lead for that agent group.8. Save the changes to the Agent Group object.
End
Enabling Team Leads and Supervisors to log off or change agentstate
[Added: 8.5.126.07]
You can enable your supervisors/team leads to manually change an agent's state or log off an agentby using the Team Communicator. If a supervisor discovers that an agent is in the wrong state, he orshe can use Team Communicator to select the agent, and then use the Action menu to set an agentto Ready or Not Ready (Not Ready Reasons options are not supported) on all channels or on specificchannels. If a supervisor discovers that an agent has left their account logged on after their shift, heor she can use Team Communicator to select the agent, and then use the Action menu to log off theagent on all channels; this ability benefits the company in two ways: it ensures that seat licenses arenot unnecessarily consumed, and interactions are prevented from being routed to an agent who isnot present but is configured for auto-answer!
To enable the agent state control feature, grant the 'Team Lead - Agent Status Enabled RemoteActions' privilege, then configure the following Application option in the interaction-workspacesection of a Tenant, Group, or User object:
• teamlead.agent-status.enabled-remote-actions
ImportantWhen you are setting up supervisors/team leads with the remote actions, the following behaviors occur withthis feature:
• If an agent has set their status to After Call Work, Not Ready <with the reason>, orDo Not Disturb, these are displayed in Team Communicator as Not Ready.
• Since Team Communicator does not support these statuses, you cannot set an agentstatus from Ready to After Call Work, Not Ready <with the reason>, or Do NotDisturb; you can only set the status to Not Ready from Ready.
Provisioning functionality Enabling internal and external communications
Workspace Desktop Edition Deployment Guide 344
WarningTeam leads might experience unexpected behavior if they change the state of a particular eService channelfrom Do Not Disturb, to Ready for an agent who is assigned two or more eServices channels. SettingReady on one eServices channel restores all other eServices channels to the status prior to Do NotDisturb.
Provisioning functionality Enabling internal and external communications
Workspace Desktop Edition Deployment Guide 345

Call recording and screen recording[Modified: 8.5.104.15, 8.5.106.19, 8.5.116.10, 8.5.118.10, 8.5.143.08]
Workspace supports call recording and screen capture. Conversations and screen image files arestored as a set of files in a centralized storage location. Agents can control and monitor this feature.
Call recording
SIP Server supports call recording using two different methods: NETANN-based call recording,provided by Stream Manager or Genesys Media Server; and Media Server Markup Language (MSML)-based call recording, provided by Genesys Voice Platform (GVP) Genesys Media Server only.
MSML-based call recordingRefer to the Genesys Quality Management 8.1 documentation.
MSML-based Call Recording enables agents to do the following:
• Control Active Call Recording (start, stop, pause, and resume)• Display the status of Call Recording
MSML-based Call Recording functionality is enabled by the following privileges:
• Voice - Can Use• Recording - MSML-based Recording - Can Use• Recording - Can Control Voice Recording (optional)• Recording - Can Monitor Voice Recording (optional)
Set the active-recording.voice.recording-type option in the interaction-workspace section to MSML.
Legacy NETANN-based call recordingNETANN-based Call Recording enables agents to do the following:
• Control Call Recording (start and stop)
NETANN-based Call Recording functionality is enabled by the following privileges:
• Voice - Can Use• Recording - Can Control Voice Recording (optional)
Set the active-recording.voice.recording-type option in the interaction-workspace section to
Provisioning functionality Call recording and screen recording
Workspace Desktop Edition Deployment Guide 346
NETANN (the default value).
Display of Call Recording status is not possible with NETANN-based Call Recording.
Screen recording
[Added: 8.5.106.19] [Modified: 8.5.116.10, 8.5.118.10, 8.5.143.08]
This functionality is supported for Genesys Interaction Recording (GIR) customers. You must have alogin provided by Genesys to access the Genesys Interaction Recording documentation.
Screen Recording allows the recording of the full workstation screen of the agent during a voice callor an eServices login session. The video stream is recorded on a server by the GIR Screen RecordingService.
Screen Recording functionality is enabled by the following Privileges:
• Recording - Can Use MSML-based and Screen Recording• Recording - Can Use Screen Recording
Use the following options to configure the behavior of Screen Recording:
• screen-recording.client.address: Specifies the IP address or host of the Screen Recording Service. If leftblank, the connection to the Screen Recording Service is established on the localhost, according the IPversion specified at the system level. [Added: 8.5.143.08]
• screen-recording.client.port: Specifies the port on which Screen Recording Service listens forcredentials. The value of this option should be set to 443.
• screen-recording.client.ping-interval: Specifies the interval in milliseconds between two keep-aliverequests to Screen Recording Service.
• screen-recording.client.max-attempts: Specifies the maximum number of attempts to establishcommunication with Screen Recording Service when Workspace is initialized before the ScreenRecording Service is considered inactive.
• screen-recording.client.secure-connection: Specifies whether secure connection should be used for thecommunication between Workspace and Screen Recording Service. The value of this option should beset to True.
• screen-recording.htcc.uri: Specifies the URI representing the HTTP/HTTPS access to Genesys InteractionRecording Web Services (or Genesys Web Services for older versions of the Genesys InteractionRecording solutions). For example: http://server.domain:443.
TipWhen you are setting up GIR in a SIP Server environment, Genesys recommends that you set the value ofthe enable-agentlogin-presence option to false. For more information, see the Deploying SIP Serverfor GIR topic in the Genesys Interaction Recording Solution Guide.
Provisioning functionality Call recording and screen recording
Workspace Desktop Edition Deployment Guide 347
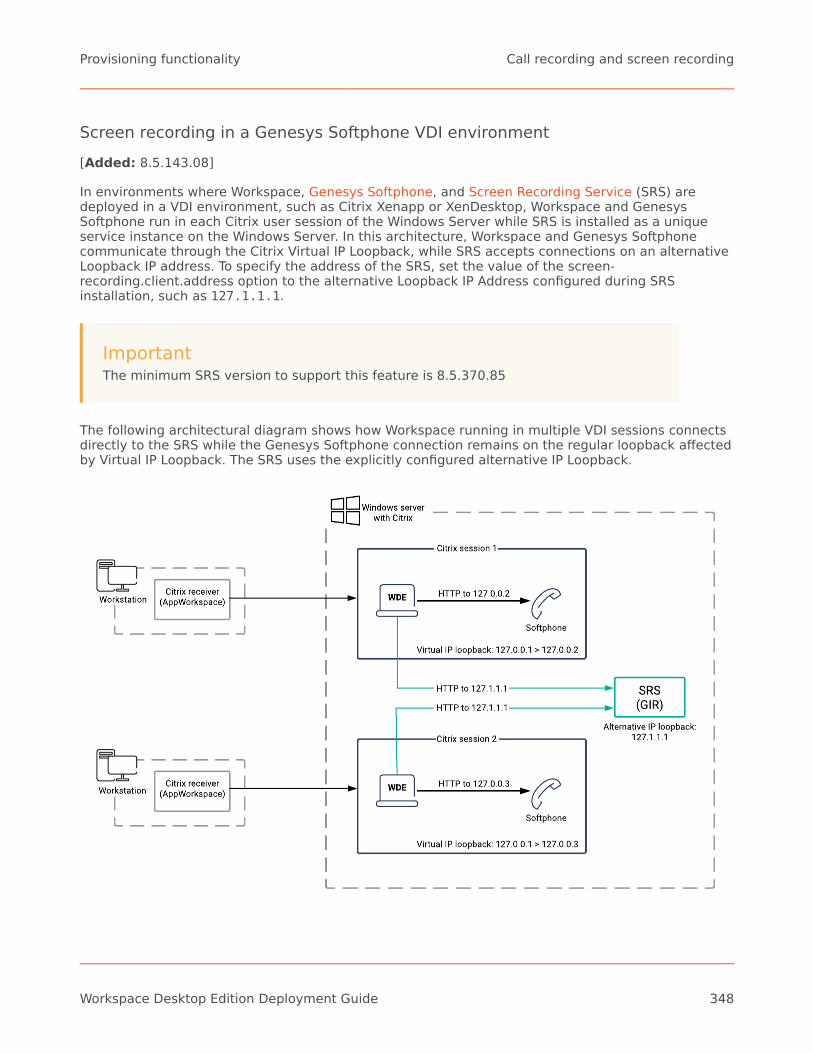
Screen recording in a Genesys Softphone VDI environment[Added: 8.5.143.08]
In environments where Workspace, Genesys Softphone, and Screen Recording Service (SRS) aredeployed in a VDI environment, such as Citrix Xenapp or XenDesktop, Workspace and GenesysSoftphone run in each Citrix user session of the Windows Server while SRS is installed as a uniqueservice instance on the Windows Server. In this architecture, Workspace and Genesys Softphonecommunicate through the Citrix Virtual IP Loopback, while SRS accepts connections on an alternativeLoopback IP address. To specify the address of the SRS, set the value of the screen-recording.client.address option to the alternative Loopback IP Address configured during SRSinstallation, such as 127.1.1.1.
ImportantThe minimum SRS version to support this feature is 8.5.370.85
The following architectural diagram shows how Workspace running in multiple VDI sessions connectsdirectly to the SRS while the Genesys Softphone connection remains on the regular loopback affectedby Virtual IP Loopback. The SRS uses the explicitly configured alternative IP Loopback.
Provisioning functionality Call recording and screen recording
Workspace Desktop Edition Deployment Guide 348
Screen recording Disaster Recovery[Added: 8.5.118.10]
Disaster Recovery is supported for Screen Recording. To enable this feature, you must have twoclusters of Interaction Recording Web Services servers. You must configure both the screen-recording.htcc.uri and screen-recording.htcc.peer_uri options to point at those 2 clusters.
• screen-recording.htcc.uri: Specifies the URI representing the HTTP/HTTPS access to Genesys InteractionRecording Web Services (or Genesys Web Services for older versions of the Genesys InteractionRecording solutions). For example: http://server.domain:443.
• screen-recording.htcc.peer_uri: Specifies the URI representing the HTTP/HTTPS access to the GenesysInteraction Recording Web Services (or Genesys Web Services for older versions of the GenesysInteraction Recording solutions) of the peer site in a Disaster Recovery deployment. For example:http://server.domain:443.
This functionality is supported for Genesys Interaction Recording (GIR) customers. You must have alogin provided by Genesys to access the Genesys Interaction Recording documentation.
Screen recording in a Hot Seating environment[Added: 8.5.116.10]
Workspace supports Genesys Interaction Recording (GIR) in hot seating (hot desking) environments inthe following scenarios:
1. Agents log in to a Place.2. Agents change Place during their session after logging in a Place.3. Agents log in to a device in a Place where they have not previously logged in.
To support this feature, you must use the following versions of the GIR components:
• Screen Recording Service (SRS): 8.5.330.64 or higher• Interaction Recording Web Services (RWS): 8.5.201.75 or higher
Provisioning functionality Call recording and screen recording
Workspace Desktop Edition Deployment Guide 349

Exposing Contacts to Agents[Modified: 8.5.101.14, 8.5.104.15, 8.5.105.12, 8.5.117.18, 8.5.141.04]
ImportantThis topic includes the Contact Management portion of the former Managing Contact topic. The ContactHistory content has been moved to Exposing History to Agents and the Contact Lookup and Contact HistoryGeneration content has been moved to Triggering Contact Look-up and Populating History.
Configuring contact management
[Modified: 8.5.104.15, 8.5.117.18]
Use the Procedure Enabling agents to manage and search contact and interaction history to enablethe Contact History feature and Enabling Agents to Manage Contacts to set up agents, Workspace,and Universal Contact Server.
privilegesWorkspace enables agents to manage contacts. The privileges that can be enabled for an agent arethe following:
• Can Use Contacts• View Contact Record• Edit Contact Record• Delete Contact• Create Contact• Merge Contact• Undo Merge Contact
Use the options in the contact section to configure the way in which agents can manage contacts.
Configuring the Contact Profile
• contact.displayed-attributes: The list of Contact fields that are displayed when a Contact record isrendered.
• contact.multiple-value-attributes: A list of contact attributes that allow multiple values when theContact record is displayed.
Provisioning functionality Exposing Contacts to Agents
Workspace Desktop Edition Deployment Guide 350

• contact.editable-attributes: The list of Contact fields that can be edited in the contact record.• contact.mandatory-attributes: The list of contact fields that cannot be left blank when creating or
editing a contact record.
Configuring the Contact Directory
• contact.directory-displayed-columns: The list of contact fields displayed when the results of a contactsearch is rendered.
• contact.directory-permissions.<ContactAttributeName>: Specifies a custom contact attribute that isdefined in Universal Contact Server that can be used to automatically filter the set of contact presentedto the agent after a search. For UCS 8.5 environments, using this capability when using the grid viewdisplay mode might impact performance.
• contact.directory-default-mode: Specifies the type of display used by default to present the list ofcontacts. Applicable only in UCS 8.5 environments.
• contact.default-directory-page-size: The default value for the number of rows per page in the contactdirectory search result view. A value must be defined in the contact.available-page-size option.
• contact.available-directory-page-sizes: The number of rows per page in the contact directory searchresult view.
• contact.directory-advanced-default: The list of Contact fields that are displayed as default searchparameters in advanced search.
• contact.directory-search-types: The list of search types that are available for the agent to use to searchthe contact database in advanced mode. Specifying the value contains might impact performance.
• contact.directory-search-attributes: The list of Contact fields that are used as search parameters inquick search and that can be selected in advanced search.
To mask contact information in the Workspace interface from agents, refer to Masking a contactphone number. [Added: 8.5.144.05]
Enabling agents to manage contactsRefer to Genesys Administrator Extension Help and Genesys Administrator Extension DeploymentGuide for detailed information about how to use Genesys Administrator Extension and ManagementFramework to configure access permissions.
Purpose:
To enable an agent to view and manage contact information.Prerequisites
• Genesys Administrator 8.0.2 or higher, configured to show Advanced View, or Genesys AdministratorExtension.
• A working knowledge of Genesys Administrator Extension.• A Workspace Application object exists in the Configuration Database.• Workspace has a connection to Universal Contact Server.• The Procedure: Creating a Role and allowing a Workspace privilege and assigning a Role to an agent or
agent group
Provisioning functionality Exposing Contacts to Agents
Workspace Desktop Edition Deployment Guide 351

• The Procedure: Provisioning Workspace for the Voice channel
Start
1. Allow the applicable Contact Actions privileges (see Contact Management Privileges) for the role towhich the agent is assigned (refer to the Procedure: Creating a Role and allowing a Workspace privilegeand assigning a Role to an agent or agent group).
2. Configure the Contact options in the interaction-workspace section of the Workspace Applicationobject (refer to the Contact configuration option reference for a list of Contact options and a descriptionof how to configure them).
End
Configuring the Workspace application and Universal ContactServer to enable custom contact attributes
[Modified: 8.5.101.14]
Refer to Genesys Administrator Extension Help and Genesys Administrator Extension DeploymentGuide for detailed information about how to use Genesys Administrator Extension and ManagementFramework to configure access permissions.
Purpose:
To enable an agent to search for and manage contacts based on custom Business Attributes.Business Attributes must be configured to be searchable and sortable.In the Universal Contact Server (UCS), each contact is defined by a set of attributes that are knownas Business Attributes. Business Attributes are metadata for the contact fields in the contactdatabase. Each Business Attribute value contains a description of one of the contact fields in thecontact database.Prerequisites
• Genesys Administrator 8.0.2 or higher, configured to show Advanced View, or Genesys AdministratorExtension.
• A working knowledge of Genesys Administrator Extension.• A Workspace Application object exists in the Configuration Database.• Workspace has a connection to UCS.• The Procedure: Enabling agents to manage contacts
Start
1. In Genesys Administrator Extension, create a new Business Attribute by using the name and displayname of the Custom Contact Attribute.
2. In UCS 8.5 environments, configure the new Business Attribute as follows (Business Attributes areautomatically searchable and sortable in UCS 9.1 environments):• Set the is-searchable to true option to make the Business Attribute available for contact
Provisioning functionality Exposing Contacts to Agents
Workspace Desktop Edition Deployment Guide 352

searches.• Set the is-sortable to true option to make the Business Attribute available in the directory view.
3. Add the Business Attribute to the list of searchable attributes in the Workspace contact.directory-search-attributes option.
4. Configure the Workspace contact.directory-displayed-columns option by using the display name of theBusiness Attribute to enable the Business Attribute to appear as a column heading in search results(refer to the Contact configuration option reference for a list of Contact options and a description ofhow to configure them).
5. To enable the Business Attribute to display in the record details for the contact, configure the Workspacecontact.displayed-attributes option that is displayed (refer to the Contact configuration optionreference for a list of Contact options and a description of how to configure them).
6. To specify/restrict the list of contact attributes that can be edited, use the contact.editable-attributesoption. By default, the value $ALl$ enables editing of all the displayed contact attributes.
End
Restricting Contact Management access
You can configure Workspace to restrict the access of agents to the Contact Directory. Access to thecontents of this view is restricted by using a custom filter based on the role of the Application,Tenant, Agent Group, or Agent. For example, you can create a contact search filter that is applied tothe Team Communicator or the Contact Search for attributes such as department or customer.
Restricting Contact Search by permissionsWorkspace automatically restricts the results that are displayed on the contact list in the followinginterface view:
• Team Communicator• Contact Directory• Merge-Contact dialog• Assign Contact• Email address selection dialog
To provision restricted access to the Contact Directory, for each contact attribute that is used to grantpermission to access contact records, use the following example as a guide:
In the interaction-workspace section of the Application, Tenant, Agent Group, or Agent for whomyou want to configure permissions, create one or more options like the following option examples:
• contact.directory-permissions.<ContactAttributeName> whereContactAttributeName1=AttributeValue1,AttributeValue2
• contact.directory-permissions.<ContactAttributeName> where <ContactAttributeName2>=AttributeValue3,AttributeValue4
Provisioning functionality Exposing Contacts to Agents
Workspace Desktop Edition Deployment Guide 353
• contact.directory-enabled-modes: Specifies which view(s) of the Contact Directory can be selected byan agent in [[Documentation:ES:Admin:UCS:8.5.1|UCS 8.5 environments. Warning: Genesysrecommends that the value is set to ListView in environments where contact segmentation is used, asGridView is known to cause performance issues with Universal Contact Server DB. [Added:8.5.105.12]
The contact.directory-permissions.<ContactAttributeName> option modifies the search logicwhenever the Agent makes a contact search request. For the example above, the following logicalfiltering criteria are added to the search criteria that are specified by the agent in the following way:
AND ((ContactAttributeName1=AttributeValue1) or(ContactAttributeName1=AttributeValue2)) AND ((ContactAttributeName2=AttributeValue3)or (ContactAttributeName2=AttributeValue4)) AND
The logic of the filtering might be slightly different than this depending on which search algorithm isbeing used.
The attributes used in contact permission configuration must be defined as Custom ContactAttributes in Universal Contact Server (UCS). For UCS 8.5 environments, in the Annex of the BusinessAttribute Value representing the custom contact attribute, the is-searchable option in the settingssection must be set to true.
ExampleYou have defined the following attributes in UCS: IsVIP and DepartmentID You want to restrictmembers of the Agent Group ABC so that they cannot access to the "VIP" contacts, and you want torestrict them to the following departments: Sales and Pre-Sales.
Configure the following interaction-workspace section options in the Annex of the ABC AgentGroup:
• contact.directory-permissions.IsVip=FALSE
• contact.directory-permissions.DepartmentID=Sales,PreSales
Add predefined descriptions for a custom contact attributes withmultiple values
You can add a custom attribute to the Contact Information that can be populated with multiplevalues. It is possible to assign a description to those values, either by allowing the user to add plaintext (the default mode) or through a selection of a pre-defined descriptions through a drop-down list(the mechanism described here). For example, you might want to create a new contact attributecalled "Company" and, for each value assigned to this contact attribute, associate a Company Typefrom a predefined list.
Provisioning functionality Exposing Contacts to Agents
Workspace Desktop Edition Deployment Guide 354

Use the following steps to create the attribute and add it to the Contact Information view:
1. Create a new Business Attribute where the Business Attribute Values represent the list of validdescriptions that are displayed in the drop-down control; for example, CompanyTypes.
2. Create a new Business Attribute Value in the Business Attribute ContactAttributes; for example,Company.
3. In the annex of the new Business Attribute Value of the Business Attribute ContactAttributes, create asection called settings.
4. In the settings section, create a Key-Value Pair (KVP) where the key is MultipleValues-Descriptionsand the value is the name of the Business Attribute created in step 1 to store valid descriptions; forexample, MultipleValues-Descriptions = CompanyTypes.
5. Make the new Contact Attribute part of the contact profile by adding the value, Company in thisexample, to the contact.displayed-attributes application option.
6. Make the new Contact Attribute of type multiple by adding its name to the contact.multiple-value-attributes application option. For example, contact.multiple-value-attributes='FirstName,LastName,Company'
7. For multiple contact attributes, specify whether the default Business Attribute value of a drop-down listis automatically populated in the associated contact attribute field of the Contact Information tab byusing the contact.multiple-value-attributes-enable-default-description option. [Added: 8.5.141.04]
8. Restart Workspace.
Provisioning functionality Exposing Contacts to Agents
Workspace Desktop Edition Deployment Guide 355

Exposing History to agents[Modified: 8.5.117.18, 8.5.126.07, 8.5.136.07, 8.5.142.05, 8.5.143.08, 8.5.144.05]
ImportantThis topic includes the History Management portion of the former Managing Contact topic. The ContactManagement content has been moved to Exposing Contacts to Agents and the Contact Lookup and ContactHistory Generation content has been moved to Triggering Contact Look-up and Populating History.
Configuring History management
[Modified: 8.5.104.15, 8.5.117.18]
Use the Procedure Enabling agents to manage and search contact and interaction history to enablethe Contact History feature and Enabling Agents to Manage Contacts to set up agents, Workspace,and Universal Contact Server.
privilegesWorkspace enables agents to manage contacts. The privileges that can be enabled for an agent arethe following:
• Can Use Contact History• Manually assign an interaction to a Contact• Interaction Threads• Interaction Ownership• Populating the Contact History with eServices Interactions• Resend email interactions from the Contact History
Use the options in the contact section to configure the way in which agents can manage interactionsin the History.
Accessing HistoryWorkspace can search for and display a list of Historical Interactions in three different scopes:
• The Contact History search feature returns lists of interactions restricted by the ContactID. You canfilter the result list by timeframe and by configured filters, and then search within this list in eitherquick search or advanced search mode.
Provisioning functionality Exposing History to agents
Workspace Desktop Edition Deployment Guide 356

• The My History Search feature returns lists of interactions restricted by the ownerID. You can filter theresult by timeframe and configured filters, and then search within this list in either quick search oradvanced search mode.
• The Interaction Search feature enables an agent to search the historical interactions without knowingthe contact name or being restricted to interactions processed by that agent. This view does not returnany interaction by default. It allows an agent to search for interactions by using quick search oradvanced search mode. You can filter the result by timeframe and configured filters.
For UCS 8.5 environments, in any of these scopes, the search operation searches interactions thatare stored in the UCS Lucene index and that correspond to the content of the "Main" UCS database.The interactions that have been pruned from the Main to the Archive UCS database are not availablefor searching.
Configuring History display[Modified: 8.5.126.07, 8.5.142.05, 8.5.143.08]
Use the following configuration options to specify how the contact history is displayed in InteractionSearch, My History, and Contact History views:
• contact.history-displayed-columns: Specifies the list of Interaction Attributes that are used to displayhistorical interactions in Contact History Flat View.
• contact.history-displayed-columns-treeview: Specifies the list of Interaction Attributes that are used todisplay historical interactions in Contact History Tree View.
• contact.myhistory-displayed-columns: Specifies the list of Interaction Attributes that are used to displayhistorical interactions in My History Flat View.
• contact.myhistory-displayed-columns-treeview: Specifies the list of Interaction Attributes that are usedto display historical interactions in My History Tree View.
• contact.all-interactions-displayed-columns: Specifies the list of Interaction Attributes that are used todisplay historical interactions in Interaction Search.
• contact.history.media-filters: Specifies the list of media types that can be used to filter the list ofinteractions.
• contact.history.filters-<attribute>: Specifies a custom interaction attribute that is defined in UniversalContact Server that can be used to automatically filter the set of interactions presented to the agent.
• contact.history-default-time-filter-main: Specifies the default position of the time filter slider in ContactHistory.
• contact.myhistory-default-time-filter-main: Specifies the default position of the time filter slider in MyHistory.
• contact.all-interactions-default-time-filter-main: Specifies the default position of the time filter slider ininteraction search list.
• <media-type>.contact-history.enable-combine-ixn-with-current: Specifies how an interaction isdisplayed when opened from the Interaction view Contact History tab. [Added: 8.5.143.08]
To mask contact information in the Workspace interface from agents, refer to Masking a contactphone number. [Added: 8.5.144.05]
Provisioning functionality Exposing History to agents
Workspace Desktop Edition Deployment Guide 357

Formatting a custom history attribute as a date
When a custom attribute is designed to store dates, you can specify how it should be formatted in theHistory views.
First, create a Business Attribute Value in the Business Attribute Interaction Attributes to representyour custom attribute. Then, in the annex of this Business Attribute Value create an interaction-workspace section and add the following options:
• display-type=date
• date.time-format=<date and time format>Refer to date.time-format for supported formats.
Configuring History Quick Search
• contact.history-quick-search-attributes: Specifies which interaction attributes are used to Quick Searchinteractions within the History of a Contact. Refer to list of interaction attributes available for search.
• contact.myhistory-quick-search-attributes: Specifies which interaction attributes are used to QuickSearch interactions within My History. Refer to list of interaction attributes available for search.
• contact.all-interactions-quick-search-attributes: Specifies which interaction attributes are used to QuickSearch interactions within the Interaction Search view. Refer to list of interaction attributes available forsearch.
Configuring History Advanced SearchThe Advanced Search enables agents to specify multiple search criteria by selecting predefinedsearch attributes from drop-down buttons in Interaction Search, Contact History and My Historyviews. The Advanced Search can by constrained by Match All and Match Any filter. Depending on theselected search criteria, various search types are allowed, such as Matches and Equals.
• contact.history-search-attributes: Specifies the list of interaction attributes that are available inadvanced search (refer to list of interaction attributes available for search).
• contact.history-advanced-default: Specifies the list of interaction attributes that are presented asdefault search parameters in advanced search.
• contact.date-search-types: The list of search types that are available for the agent to search forhistorical interactions by date.
• Use the contact.history-custom-attribute-values.<attribute-name> options to specify the commaseparated list of possible values for each custom search attribute that you want to enable. Optionally,in the dictionary, specify the display name of agent groups by adding the following parameter:
<Value Id="Contacts.ContactDirectoryView.CustomAttribute.<custom-attribute-name>.<attribute-value-name>" String=" Display Name"/>
• Configuring Groups: To group the search attributes that can be used in advanced search, specify acomma separated list of search attributes as the value for the contact.history-search-attribute-group.<group-name> option.
Optionally, in the dictionary, specify the display name of the attribute groups by adding the followingkey:
Provisioning functionality Exposing History to agents
Workspace Desktop Edition Deployment Guide 358
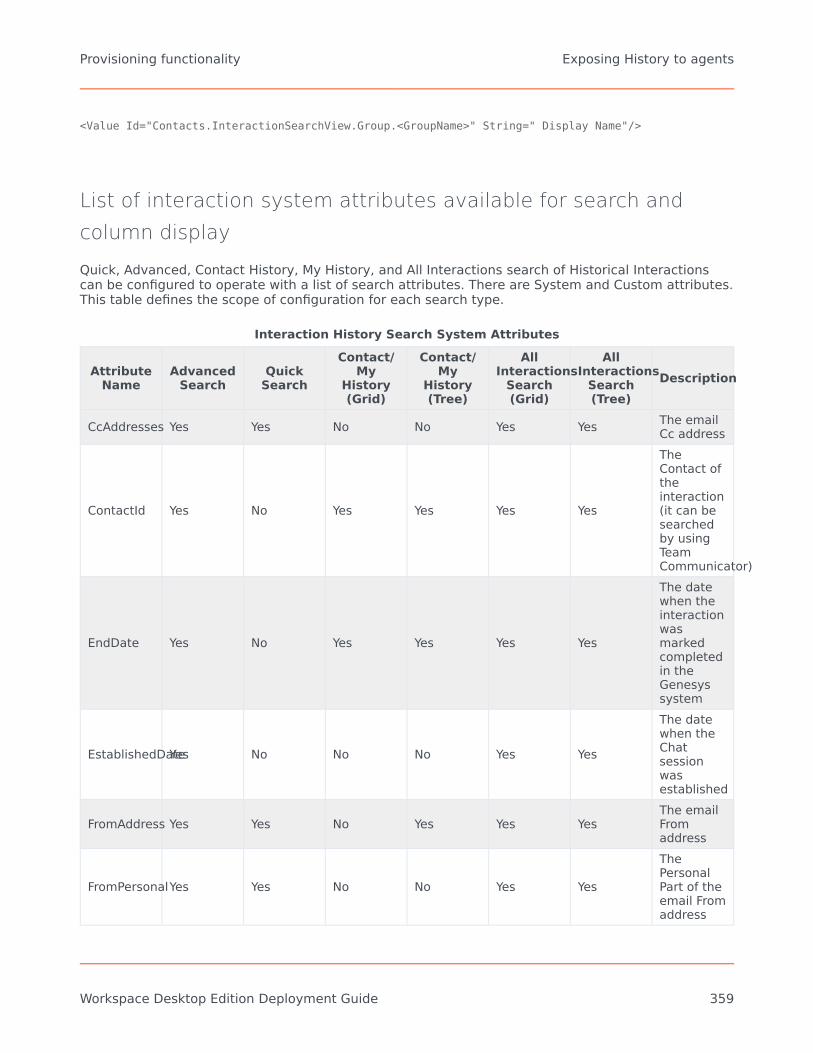
<Value Id="Contacts.InteractionSearchView.Group.<GroupName>" String=" Display Name"/>
List of interaction system attributes available for search andcolumn display
Quick, Advanced, Contact History, My History, and All Interactions search of Historical Interactionscan be configured to operate with a list of search attributes. There are System and Custom attributes.This table defines the scope of configuration for each search type.
Interaction History Search System Attributes
AttributeName
AdvancedSearch
QuickSearch
Contact/My
History(Grid)
Contact/My
History(Tree)
AllInteractions
Search(Grid)
AllInteractions
Search(Tree)
Description
CcAddresses Yes Yes No No Yes Yes The emailCc address
ContactId Yes No Yes Yes Yes Yes
TheContact oftheinteraction(it can besearchedby usingTeamCommunicator)
EndDate Yes No Yes Yes Yes Yes
The datewhen theinteractionwasmarkedcompletedin theGenesyssystem
EstablishedDateYes No No No Yes Yes
The datewhen theChatsessionwasestablished
FromAddress Yes Yes No Yes Yes YesThe emailFromaddress
FromPersonalYes Yes No No Yes Yes
ThePersonalPart of theemail Fromaddress
Provisioning functionality Exposing History to agents
Workspace Desktop Edition Deployment Guide 359

AttributeName
AdvancedSearch
QuickSearch
Contact/My
History(Grid)
Contact/My
History(Tree)
AllInteractions
Search(Grid)
AllInteractions
Search(Tree)
Description
Id Yes Yes No Yes No YesTheunique IDof theInteraction
Mailbox Yes Yes No No Yes Yes
TheMailboxfrom whichthe emailwasreceived
OwnerId Yes No Yes Yes Yes Yes
Thepersonwhoprocessedtheinteraction(it can besearchedby usingTeamCommunicator)
PhoneNumberYes Yes No No No Yes
The PhoneNumberfrom whichthecontactcalled orwas usedto call thecontact
ReleasedDateYes No No No Yes Yes
The datewhen theChatsessionwas ended
ReplyToAddressYes Yes No No Yes YesThe emailReply-Toaddress
ReviewerId Yes No No No Yes Yes
Thepersonwhoreviewedtheinteraction(typicallyan email— it canbesearchedby using
Provisioning functionality Exposing History to agents
Workspace Desktop Edition Deployment Guide 360

AttributeName
AdvancedSearch
QuickSearch
Contact/My
History(Grid)
Contact/My
History(Tree)
AllInteractions
Search(Grid)
AllInteractions
Search(Tree)
Description
TeamCommunicator)
SentDate Yes No No No Yes Yes
The datewhen theoutboundemail wassent to thedestination
StartDate Yes No Yes Yes Yes Yes
The datewhen theinteractionwascreated intheGenesyssystem
Status Yes No Yes Yes Yes Yes
The Statusof theinteractionin UCS (InProgress,Done)
StructuredTextYes Yes No No Yes Yes
TheTranscriptof theChat, SMSSession, orFacebookPrivateMessagesession, orthe E-MailRich TextContent
Subject Yes Yes Yes Yes Yes YesTheSubject oftheinteraction
SubtypeId Yes No No Yes No Yes
The Sub-Type of theeServicesinteraction(forexample:InboundNew,OutboundReply)
Text Yes Yes No No Yes Yes
The textreceivedfrom orsent to thecontact,
Provisioning functionality Exposing History to agents
Workspace Desktop Edition Deployment Guide 361

AttributeName
AdvancedSearch
QuickSearch
Contact/My
History(Grid)
Contact/My
History(Tree)
AllInteractions
Search(Grid)
AllInteractions
Search(Tree)
Description
typicallythe emailplain textcontent
TheCommentYes Yes No No Yes Yes
The Notesattachedto theinteractionby thepersonwhohandled it
ToAddresses Yes Yes No No Yes YesThe emailToaddress.
TypeId Yes No No Yes No Yes
The Typeof theeServicesinteraction(forexample:Inbound,Outbound)
• System date attributes: "On", "OnOrAfter", "Before", and "Between" search types. This is configured byusing the contact.date-search-types option.
• System text attributes: can be searched by using the Matches search type which, for each word typedinto the query, returns at least one word that starts with this word. Text search does not support querycontaining double quotes. Interaction Search enables agents to search for the content of email andchat interactions. Content for these interactions is stored in "Text" and/or "StructuredText" attributes.Text includes the content of the plain-text email interactions. StructuredText includes the content ofHTML-formatted email interactions and chat transcripts, as well as SMS interactions handled in "sessionmode" and Facebook Private Message sessions.
Custom History Search Attributes: A custom interaction search attribute is an interactionattribute that is not part of the default Genesys UCS data design. A custom interaction searchattribute is typically defined during the Business Process design and is implemented by the additionof key-value pair to the attached data of the interactions that are then stored in UCS.
You can configure Workspace to use custom interaction search attributes as search criteria that areused in quick search or displayed in the advanced search mode of Interaction Search, ContactHistory, and My History views, by using the contact.history-quick-search-attributes,contact.myhistory-quick-search-attributes, contact.all-interactions-quick-search-attributes,contact.history-search-attributes configuration options.
Limitation: JOINT searches of the interaction list with the contact list are not possible unless youcreate a business process that copies attributes from the contact records into the correspondinginteraction records.
Provisioning functionality Exposing History to agents
Workspace Desktop Edition Deployment Guide 362

Custom interaction properties[Modified: 8.5.136.07]
You can create custom attributes and make them searchable. In UCS 9.1 environments, theinteraction properties are searchable when you add them to a custom attribute. In UCS 8.5environments, you must configure the attribute first to make it searchable— for more information,refer to Making an Attribute Searchable from the Desktop' in the eServices documentation.
In UCS 9.1 environments, use the contact.history-custom-attributes-search-types option to specifywhether the custom attribute is can be found as an exact match (is) or by a "starts-with" (begins-with) search. In UCS 8.5 environments, the only supported value is is; it is not necessary toconfigure this option in UCS 8.5 environments.
WarningThe following limitations must be taken into account before enabling an interaction custom attribute as anadvanced search criteria:
• For UCS 8.5 environments, custom interaction search attribute support only an exactmatch search; for UCS 9.1 environments, begins-with searches are also supported.Genesys strongly recommends that you use the contact.history-custom-attribute-values.<attribute-name> option to configure a list of predefined values that enable theagent to select the search value from a list. You can control the search behavior byusing the contact.history-custom-attributes-search-types option. The custom attributesused in the interaction history search must be defined as a Business Attribute Value ofthe Interaction Attributes Business Attribute in the Configuration Layer. In the Annexof the Business Attribute Value, the is-searchable option in the settings section mustbe set to true.
• For UCS 8.5 environments, when you assign custom interaction search attribute keynames, you must avoid key names that are sub-strings of other key names that are alsostored as business attached data of the same or other interactions. Failure to heed thiswarning will result in misleading search results.
For example, if the term Priority is defined as a custom interaction searchattribute and the following attributes might also be part of the interactions thatstored in UCS: Priority, GEMX-Priority, _Priority, and GEMX-MSMail-Priority. If these alternate *Priority attributes can be assigned with a valueset that is partially shared with the Priority attribute, the wrong matching logicand extended result set might be returned.
Contact Management: Summary of activity that is related to thecurrent contact
In the interaction windows, Workspace displays visual indicators that inform the agent who ishandling the interaction about the activities that are related to the current contact. To enable thesefeatures, allow the following privilege:
Provisioning functionality Exposing History to agents
Workspace Desktop Edition Deployment Guide 363

• Can Use Contacts
For Interaction Workspace 8.1.2 and later and Workspace Desktop Edition 8.5.0 and later, this featuredisplays the number of in-progress interactions for a contact in an icon. This indicator measures thenumber of eServices interactions that are currently in-progress somewhere in the workflow, excludingthe current one. You can activate this feature by configuring the contact.metrics.enable-interactions-in-progress option in the Contact section. If the agent clicks the icon, the interactions areimmediately displayed in the History view.
For Interaction Workspace 8.1.3 and later and Workspace Desktop Edition 8.5.0 and later, the RecentInteraction Notification is also displayed. This indicator provides the number of interactions that havebeen exchanged with this contact in the past specified number of days, excluding current interaction.This feature is useful for predicting the level of contact frustration. Configure thecontact.metrics.time-frame-customer-notification option in the Contact section to specify the timeinterval.
If the following privilege is granted, Workspace displays the list of recent interactions with thiscontact as a tooltip for the icon:
• Can Use Contact History
Restricting Contact History access
You can configure Workspace to restrict the access of agents to the Contact History. Access to thecontents of these views is restricted by using a custom filter based on the role of the Application,Tenant, Agent Group, or Agent. For example, you can create a contact search filter that is applied tothe Team Communicator or the Contact Search for attributes such as department or customer.
Restricting Interaction History views and Search by permissionsWorkspace automatically restricts the results that are displayed in the interaction list in the followinginterface views:
• Contact History• My History• Global Interaction Search
The contact.history.filters-<attribute> option modifies the search logic and presentation wheneverthe Agent accesses or searches an interaction list.
To provision restricted access to the interaction lists, in the interaction-workspace section of theApplication, Tenant, Agent Group, or Agent for whom you want to configure permissions, create oneor more options like the following option examples:
• contact.history.filters-<attribute> where <InteractionAttributeName1>=AttributeValue1,AttributeValue2
The custom attributes used in the interaction history search must be defined as a Business AttributeValue of the Interaction Attributes Business Attribute in the Configuration Layer. In the Annex of
Provisioning functionality Exposing History to agents
Workspace Desktop Edition Deployment Guide 364

the Business Attribute Value, the is-searchable option in the settings section must be set to trueand the value of the is-sortable option should also be set to true when you enable this feature.
ExampleThe following interaction custom attribute is attached to interactions stored in UCS: DepartmentID
You want to restrict members of the Agent Group ABC so that they can see the Contact History onlythrough filters that give them access to interactions related to the Sales or Support departments.
Configure the following interaction-workspace section options in the Annex of the ABC AgentGroup:
• contact.history.filters-DepartmentID=Sales,Support
The Sales attribute is displayed as an option in the Filter menu and as an attribute in theContactHistory view list or grid. Agents can alternatively access the Sales or the Support interactions,but cannot see any other interactions.
Note: If you define only one possible value, for example, contact.history.filters-DepartmentID=Sales, the related filter will not show up in the Contact History form, but this filter isapplied automatically to all agent requests to access the history.
Enabling History filtering
Media filteringThe Filter menu of the Contact History view and My History view can be configured to displayspecific media types in a specific order by using the contact.history.media-filters option in theinteraction-workspace section of the Interaction Workspace application object. You can use thisoption to add the media types of the workitems that are supported by 3rd party plug-ins.
Custom filteringYou can create custom business attributes in Universal Contact Server for contacts. For example, youmight want to create a set of service areas from your business and use these as custom contactattributes, or you might want to create a set of contact levels, such as silver, gold, and platinum, anduse these as custom attributes. When you define your custom business attribute, you must definethe valid values. Use the following configuration option to enable filtering on your custom businessattribute values:
• contact.history.filters-<attribute>
Managing interaction ownership
Workspace enables you to display the interaction owner that is defined in the UCS data base to the
Provisioning functionality Exposing History to agents
Workspace Desktop Edition Deployment Guide 365

agents that can view the Contact History.
Display of interaction ownership is controlled by the following options:
• display-format.agent-name: Specifies the format of the agent name in the Contact History view.Workspace uses this information to convert the owner ID from UCS to a label that is displayed in theContact History view. If there is no owner ID associated with an interaction, then this field is blank.
• contact.history-displayed-columns: Specifies which interaction attributes are displayed in the ContactHistory view. Add the value OwnerId to display the Interaction "Processed by" column.
Provisioning functionality Exposing History to agents
Workspace Desktop Edition Deployment Guide 366

Triggering contact look-up and populatingHistory[Modified: 8.5.117.18]
ImportantThis topic includes the Contact Look-up portion of the former Managing Contact topic. The ContactManagement content has been moved to Exposing Contacts to Agents and the Contact History content hasbeen moved to Exposing History to Agents.
Interactions can be assigned to a contact in the contact database automatically or manually.Automatic assignment is handled by contact look-up when an inbound interaction is received.
Use the following configurations to specify how automatic contact assignment and creation ishandled.
Automatic contact look-up and interaction storage
[Modified: 8.5.117.18]
Workspace can be configured to automatically assign a new inbound interaction to an existingcontact in the contact database, or to create a new contact if the contact is not found. This behaviorcan be specified for all channels or for individual channels. To enable this capability, you mustconfigure the following options:
• contact.lookup.enable: Specifies that the Universal Contact Server (UCS) identify service is to be usedfor contact lookup.
• contact.lookup.enable-create-contact: Specifies that the Universal Contact Server (UCS) creates acontact service to be used if the identify service fails to find the contact.
• contact.lookup.auto-assign-mode: When there are multiple contact matches, specify whether the firstfound contact is assigned automatically (default behavior) or the agent is presented with a list ofmatches that he or she can manually choose the contact.
• contact.lookup.<media-type>.enable: Activates the Workspace features that rely on the UniversalContact Server (UCS) IdentifyService for contact lookup when an interaction is presented to the Agent.
• contact.lookup.<media-type>.auto-assign-mode: For the specified media type, when there are multiplecontact matches, specify whether the first found contact is assigned automatically (default behavior) orthe agent is presented with a list of matches that he or she can manually choose the contact.
• contact.lookup.<media-type>.enable-create-contact: Activates the Workspace features that rely onUniversal Contact Server (UCS) for contact lookup when an interaction of the given media type is
Provisioning functionality Triggering contact look-up and populating History
Workspace Desktop Edition Deployment Guide 367

presented to the agent.• contact.ucs-interaction.<media-type>.enable-create: Activates the Workspace feature that generates
the interaction history in Universal Contact Server (UCS) based on the inbound and outboundinteractions of type <media-type> that are handled by Workspace. Enable agents to createinteractions of type <media-type>.
• contact.ucs-interaction.<media-type>.enable-lookup: Activates the Workspace feature that looks up thehistory of existing interactions of the given <media-type> in Universal Contact Server (UCS) to updatetheir content and status according to live interaction lifecycle.
• contact.ucs-interaction.<media-type>.use-server-date: For the specified <media-type>, it specifieswhether Workspace sets the start and end dates of interactions by using the time of the local agentworkstation, or uses the date and time specified by Universal Contact Server (UCS) when it creates orupdates an interaction record in UCS. Use this option as a template and modify its name by replacingthe <media-type> by an actual media type that is defined in Management Framework.
• contact.threading-ucs-interaction.enable: Activates the Workspace feature that associates interactionsthat are submitted during multi-channel contact communication, such as smssession, in threads inUniversal Contact Server history.
Directly dialed callsIf you want to record calls directly dialed by agents in your Contact Database so that it can betracked in their history, ensure that the following two options are set to true:
• contact.lookup.<media-type>.enable-create-contact• contact.ucs-interaction.<media-type>.enable-create
To enable agents to manually create a contact when they have an active interaction, set the value ofthe contact.lookup.enable-create-contact option to true
Improving automatic contact assignment
[Added: 8.5.117.18]
If you implement the default contact look-up configuration, Workspace selects the first contact fromthe list of matching contacts returned by UCS based on interaction attributes. If more than onecontact matches the information available for a new inbound interaction, subsequent matches arenot considered. To improve automatic contact assignment when multiple matches are found, use thefollowing configuration options to enable agents to choose a contact from the list of matchesreturned by UCS:
• contact.lookup.auto-assign-mode: When there are multiple contact matches, specify whether the firstfound contact is assigned automatically (default behavior) or the agent is presented with a list ofmatches that he or she can manually choose the contact.
• contact.lookup.<media-type>.auto-assign-mode: For the specified media type, when there are multiplecontact matches, specify whether the first found contact is assigned automatically (default behavior) orthe agent is presented with a list of matches that he or she can manually choose the contact.
Example: Preventing automatic contact creation in case of no UCS match and automatic
Provisioning functionality Triggering contact look-up and populating History
Workspace Desktop Edition Deployment Guide 368

contact assignment in case of multiple UCS matches
This example is for the voice channel, but it can be applied to all channels or to other specificchannels. Normally, if there is a single contact in the Universal Contact Server (UCS) database,Workspace automatically assigns the contact. In these scenarios:
• If you want to enable your agents to assign a contact to an interaction based on a look-up in the UCSdatabase in scenarios where no match is found for the inbound interaction, but you do not want a newcontact to be created automatically without your agent searching the contact database first,
• If you want to enable an agent to review the possible contact matches and choose the appropriate onein scenarios where there are multiple contacts that match an incoming interaction,
Use the following configuration:• Contact - Can Assign is allowed• contact.lookup.voice.enable = true
• contact.lookup.voice.enable-create-contact = false
• contact.lookup.voice.auto-assign-mode = false
Contact Management: Last Routed Agent
The Last Routed Agent Feature enables you to save in the Contact Profile, information about the lastagent who handled interactions from that contact. The agent handling information can then be usedduring the routing of subsequent interactions from this contact. When an agent actively handles aninteraction of a given media type from a contact, the following keys are set in the Contact Profile:
• LastCalledAgent_EmployeeID
• LastCalledAgent_TimeStamp
• LCA_EmplID_<MediaType>
• LCA_TimeStamp_<MediaType>
Where <MediaType> corresponds to the media of the interaction.
Refer to the eServices and Routing documentation for more information about this feature.
You can activate this option globally by setting to true the contact.last-called-agent.enable option inthe Contact section. Or you can activate it by media type by setting to true the contact.last-called-agent.<media-type>.enable option in the Contact section.
Interaction threads
Workspace enables you to manage interaction threading in the Universal Contact Server (UCS)database. E-mail threading is set according to reply actions that are made by agents, automaticresponse, and contacts. Voice threading is set according to the transfer record of a call; each agent
Provisioning functionality Triggering contact look-up and populating History
Workspace Desktop Edition Deployment Guide 369
that handles the interaction generates an interaction in the UCS database. The contact.threading-ucs-interaction.enable option controls how multi-channel threading that results from the outboundinteractions that are created during the handling of an original inbound or outbound contactinteraction. For example, an inbound email might result in an outbound email, or or more outboundvoice calls, and an SMS session. All of these related interactions can be associated as a single thread.
In the Workspace Contact Directory and My History views, agents can view the interaction history asthreads. Threads are sorted in reverse chronological order, with the most recent first, but withinthreads, interactions are sorted chronologically, from first to most recent.
To use interaction threading, enable the following privilege:
• Can Use Contacts
Then, configure the following configuration option to true:
• contact.threading-ucs-interaction.enable: Enables the Workspace feature that associates interactionsthat are submitted during multi-channel contact communication, such as smssession, in threads inUniversal Contact Server history.
Populating the Contact History with eServices Interactions
eServices interactions differ by type in the way that they are submitted to the Contact History:
• email: E-mail interactions are automatically submitted to the Contact History by Email Server andInteraction Workspace. They are completed by Interaction Workspace or by a Business Workflow.
• chat: Chat interactions are automatically submitted to the Contact History by Chat Server. They arecompleted by Interaction Workspace or by a Business Workflow.
• SMS Session: SMS Session interactions are automatically submitted to the Contact History by ChatServer. They are completed by Interaction Workspace or by a Business Workflow.
• SMS Page: SMS Page interactions are submitted to the Contact History by a Business Workflow only. Thisis applicable to both inbound and outbound workflows.
• workitem: Custom workitem interactions are submitted to the Contact History by a Business Workflowonly. This is applicable to both inbound and outbound workflows.
ImportantNotes:
• If the Contact History is created by a Business Workflow, the integrator is responsible forusing the appropriate building blocks in the ad-hoc strategy.
• Interaction Workspace can submit interactions to the contact history if the contact.ucs-interaction.<media-type>.enable-create option is set to true for any media.
• Interaction Workspace can look for a matching contact for any media-type if thecontact.ucs-interaction.<media-type>.enable-lookup option is set to true.
Provisioning functionality Triggering contact look-up and populating History
Workspace Desktop Edition Deployment Guide 370

KPIs and Contact Center StatisticsRefer to Framework 8.5 Genesys Administrator Extension Help and Genesys Administrator ExtensionDeployment Guide for detailed information on how to use Genesys Administrator Extension andManagement Framework to configure access permissions.
Viewing user and group metrics
Workspace enables agents to view real-time metrics of their performance and the performance of thecontact center in a table view or in a dedicated gadget component. Statistical information isdisplayed in the form of industry standard- and contact center-defined Key Performance Indicators(KPIs). KPIs enable agents to focus on their efficiency and to compare their performance against thatof their colleagues.
Workspace enables you to configure which KPIs are displayed to your agents, with what frequency,and with what alarm conditions.
Examples of statistics that can be displayed in Workspace:
Login-time statistics:
• Login duration• Ready duration• Wrap duration• Talk duration• Hold duration• Number of interaction transferred• Number of internal calls• Number of refused interactions• Total number of interactions• Average handling time• Number of voice interactions• Average handling time voice interactions• Number of email interactions• Average handling time email interactions• Number of chat• Average handling time chat
Provisioning functionality KPIs and Contact Center Statistics
Workspace Desktop Edition Deployment Guide 371

You can use the following options in the interaction-workspace section to configure the behaviorof KPIs in Workspace:
• kpi.displayed-kpis: Defines the KPIs that are displayed to the agent. The KPI names refer to namesof the sections that are defined by the Application KPI options.
• kpi.show-agent-groups: Defines whether KPIs are also calculated for the Agent Groups that containthe agent.
• kpi.refresh-time: Defines the frequency of notification (in seconds) for statistics.
You can use configuration options in each section that defines a KPI to configure the behavior of KPIsin Workspace (refer to Section KPI Name). Statistics are displayed in both the Main Window and theStatistics Gadget.
Viewing Contact-Center Metrics
Workspace enables agents to view real-time metrics of the performance of the contact center.Statistical information is displayed in the form of industry standard- and contact center-definedmetrics. Metrics enable agents to focus on their efficiency and to compare their performance againstthat of their colleagues. Statistics are displayed only for the Tenant to which the agent is logged.
Workspace enables you to configure which metrics are displayed to your agents, with whatfrequency, and with what alarm conditions.
Queue statistics
• Number of interactions in queue (In the Login Queue)• Average waiting time (In the Login Queue)• Number of distributed calls (In the Login Queue)• Number of abandoned calls (In the Login Queue)• Number of agents logged in to the ACD Queue
The Workspace default statistics are controlled by the following privileges set in the interaction-workspace section, except where noted otherwise:
• statistics.refresh-time: Defines the frequency of notification (in seconds) for statistics.• statistics.queues: Specifies the list of queues for which queue statistics are calculated. A comma-
separated list of queues are defined as follows: <QueueName>@<SwitchName>. This option is part of theregular option hierarchy; therefore, you can define the list of applicable objects per Tenant, Group, orUser; however, if the list is defined in the statistic section, the list is global.
• statistics.routing-points: Specifies the list of Routing Points for which routing point statistics arecalculated. A comma-separated list of queues are defined as follows: <RoutingPoint>@<SwitchName>.This option is part of the regular option hierarchy; therefore, you can define the list of applicableobjects per Tenant, Group, or User; however, if the list is defined in the statistic section, the list isglobal.
Statistics are calculated in the following way, the statistic is calculated for the list of objects specified
Provisioning functionality KPIs and Contact Center Statistics
Workspace Desktop Edition Deployment Guide 372
by the statistics.queues option, which can be populated with the following tags; however, if thesection contains an option named "object-id", the statistic is calculated only for that specific object:
• $Agent.LoginQueue$: Returns the list of queue identifiers on which the agent logs in. Set this valueeither in the object-id option in the contact center statistics section, or in the statistics.queuesoption.
• $AgentGroup.OriginationDns$: Returns the list of origination DNs for the list of agent groups to whichthe agent currently logged in. This value IS set by the object-id option in the contact center statisticssection.
Contact Center Metrics are displayed in both the Main Window and the Statistics Gadget.
Provisioning KPIs and Contact Center Statistics
1. Enabling an agent to view My Statistics (KPIs)
Purpose:
To enable an agent to view their Key Performance Indictors (KPIs).Prerequisites
• Genesys Administrator 8.0.2 or higher, configured to show Advanced View, or Genesys AdministratorExtension.
• A working knowledge of Genesys Administrator Extension.• A Workspace Application object exists in the Configuration Database.• Workspace has a connection to Stat Server.
Start
1. Configure Stat Server as described in Framework Stat Server 8.1 Deployment Guide. to produce themetrics that you want to employ to measure the KPIs in your contact center.
2. In the Workspace Application, configure the Workspace KPIs section following the option reference inSection KPI Name.
3. Allow the following Statistics Access privileges (see Statistics Access Privileges) for the role to which theagent is assigned (refer to the Procedure: Creating a Role, allowing a Workspace privilege, andassigning a Role to an agent or agent group):• KPI module
4. Configure the KPI options in the interaction-workspace section of the Workspace Application object(refer to the KPI configuration option reference for a list of KPI options and a description of how toconfigure them).
Example
Provisioning functionality KPIs and Contact Center Statistics
Workspace Desktop Edition Deployment Guide 373

End
2. Enabling an agent to view Contact Center Statistics (Object Metrics)
Purpose:
To enable an agent to view the overall performance of the contact center by viewing statisticsregarding Queues, Routing Points, and so on.An agent can log in to a queue or a routing point if the estimated wait times are particularly high or ifthe object is displaying a warning or error. Agents should log in to those queues that are experiencinghigh levels of abandoned calls.For each Contact Center Statistic (Object Metric) that you want to define and use, you must define asection in the Workspace Application object in the Configuration Database.Prerequisites
• Genesys Administrator 8.0.2 or higher, configured to show Advanced View, or Genesys AdministratorExtension.
• A working knowledge of Genesys Administrator Extension.• A Workspace Application object exists in the Configuration Database.• Workspace has a connection to Statistics Server.
Start
1. In Genesys Administrator Extension, create a new section named after the Object Statistic that you
Provisioning functionality KPIs and Contact Center Statistics
Workspace Desktop Edition Deployment Guide 374

want to use.2. Define the mandatory and optional options and values for the statistic (refer to Section Object Statistic
Name).3. Allow the following Statistics Access privileges (see Statistics Access Privileges) for the role to which the
agent is assigned (refer to the Procedure: Creating a Role, allowing a Workspace privilege, andassigning a Role to an agent or agent group):• Object Statistics module
4. Configure the Statistics options in the interaction-workspace section of the Workspace Applicationobject (refer to the Statistics configuration option reference for a list of Statistics options and adescription of how to configure them).
Example
End
3. Enabling an agent to view My Statistics and Contact Center Statistics in theStatistics GadgetPurpose:
To enable an agent to view Statistics and Contact Center Metrics in the Statistics Gadget.The Statistics Gadget provides a small, convenient viewer for Statistics and Contact Center Metricsthat does not require agents to keep opening the My Statistics tab and the Contact CenterStatistics tab in the Workspace. The Statistics Gadget provides continuous updates and warnings.
Provisioning functionality KPIs and Contact Center Statistics
Workspace Desktop Edition Deployment Guide 375
Prerequisites
• Genesys Administrator 8.0.2 or higher, configured to show Advanced View, or Genesys AdministratorExtension.
• A working knowledge of Genesys Administrator Extension.• A Workspace Application object exists in the Configuration Database.• Workspace has a connection to Statistics Server.• Complete one or both of the following:
• The Procedure: Enabling an agent to view My Statistics (KPIs) (Refer to Procedure 1 on this topicpage)
• The Procedure: Enabling an agent to view Contact Center Statistics (Object Metrics) (Refer toProcedure 2 on this topic page)
Start
1. Allow the following Statistics Access privilege (see Statistics Access Privileges) for the role to which theagent is assigned (refer to the Procedure: Creating a Role, allowing a Workspace privilege, andassigning a Role to an agent or agent group):• Gadget Statistics module
2. Configure the Statistics Gadget options in the interaction-workspace section of the WorkspaceApplication object (refer to the Gadget and Statistics Gadget configuration option reference for a listof Statistics options and a description of how to configure them).
End
Provisioning functionality KPIs and Contact Center Statistics
Workspace Desktop Edition Deployment Guide 376

Reporting[Added: 8.5.112.08] [Modified: 8.5.116.10]
This topic summarizes the Workspace features that contribute to statistics computation by theGenesys back-end.
Focus duration
Workspace is an omni-channel application which means that agents might be handling multipleinteractions on different channels for the same contact, or for multiple contacts. For example, anagent might be talking on the phone with a contact, sending the contact text information by the SMSchannel, and composing an email to the contact while exchanging Instant Messages with someone inyour back office; or, an agent might be handling multiple chats for multiple contacts while handlingemail interactions or workitems. In both of these example scenarios, the agent spends a little bit oftime focused on each individual interaction; however, from a reporting perspective, the duration ofhandling is the total time from when each interaction was initiated until it was marked Done. Thisgives a false representation of the actual amount of time that an agent was actually handling eachindividual interaction.
When the value of the reporting.case.report-case-in-focus-duration option is set to true, Workspacereports to the Genesys back-end the time, in seconds, that an individual interaction had the focus,that is, the time that the agent actually spent working directly or indirectly on this interaction. Theduration of each interaction is reported as the sum of the times that the interaction had the focus ofthe agent. The assignment of focus-time to an interaction is based on the following rules:
1. At any given time, only one Case can be considered as in focus.Therefore, the sum of the focus-times of the agent cannot exceed the total focus-time.
2. When a Case is considered to be in focus, the time in focus is assigned to the Main interaction of thecase; that is, the interaction that initiated the case (for example an inbound chat or an outbound call).
3. The Case that contains the current Active Voice Call (Established) is considered as in focus, whetherthe voice call in the Case is the main interaction, a secondary interaction, or a consultation.
There cannot be more that one Active Voice Call at a given time.
4. When there is no Active Voice Call, the Case that has the visual focus, corresponding to the selectedview, is considered as in focus. This can be a Case that contains a non-Active Voice Call (for example,Dialing, On Hold, or Released).
5. If Workspace loses the application focus, the Case that had visual focus at the time Workspace lost thefocus continues to be considered as in focus.
TipSetting the values of the interaction.auto-focus and interaction.auto-focus.<media-type> options affects
Provisioning functionality Reporting
Workspace Desktop Edition Deployment Guide 377

the focus time calculations for accepted interactions. [Added: 8.5.116.10]
Provisioning functionality Reporting
Workspace Desktop Edition Deployment Guide 378

Hiding selected data in logsWorkspace enables you to specify and filter the contents of the application logs. You can choose tohide content by using asterisks or to skip specific key-value pairs.
Use the options in the log section to configure the way in which logs are filtered.
• log.default-filter-type: Specifies the default filter type for logging.• log.filter-data.<keyName>: Specifies the treatment of log data. This option enables you to filter for
specific attached data keys, by specifying the key name in the option name. This option overrides anyvalues specified by the log.default-filter-type option.
Provisioning functionality Hiding selected data in logs
Workspace Desktop Edition Deployment Guide 379
Client-side port securityUse the Procedure: Enabling client-side port definition to define the access ports for each applicationto which Workspace connects to ensure the security of the system. This feature is configured partiallyon Framework Configuration Server and partially on the Workspace application in GenesysAdministrator Extension. The Client-Side Port Definition chapter of the Genesys Security DeploymentGuide. provides detailed information on client-side port definition.
ImportantWhen you set the client-side port for the connection to Configuration Server, ensure that you use theInteraction_Workspace_850.apd template; do not use theInteraction_Workspace_AgentDesktop_850.apd template.
If a connection to at least one back-end server is configured with an explicit client-side port, after exiting,the agent must wait for a system timeout before they are able to initialize Workspace application again. Thetimeout is positioned at the Windows OS level through the following registry key: TcpTimedWaitDelay. Thisis a system level limitation.
Provisioning functionality Client-side port security
Workspace Desktop Edition Deployment Guide 380

Business Continuity for SIP Server,Configuration Server, and Statistic Server[Modified: 8.5.106.19, 8.5.108.11, 8.5.109.16, 8.5.111.21]
Business Continuity Using High Availability Paired Servers (SIPServer, Statistic Server, Configuration Server Proxy)
Business Continuity relies on pairs of servers. A pair is composed of regular linked Primary and Back-up Servers. Two Server pairs are considered peers when they support each other in a BusinessContinuity model.
You can specify the name of the preferred connection site and the Business Continuity connectionsite, and the time-out interval for switch-over to the Business Continuity site.
TipAll Workspace Business Continuity-related (disaster recovery) options can beconfigured for any object in the configuration hierarchy (Application, Tenant, AgentGroup, and Person).
Use the Procedure: Configuring Workspace for Business Continuity to enable Business Continuity foryour agents. By using that procedure, you specify the site name in the options of the correspondingserver application (SIP Servers, Stat Servers and Configuration Servers) in the interaction-workspace section.
Procedure: Configuring Workspace for Business ContinuityPurpose:
To manage server and switch connections to enable Workspace to connect to an alternate (Peer)Server in the event of a disaster at the Preferred agent login site. This Configuration applies to SIPServers, Stat Servers and Configuration Server (Proxies)
Prerequisites
• Genesys Administrator 8.0.2 or higher, configured to show Advanced View, or Genesys AdministratorExtension.
• A working knowledge of Genesys Administrator Extension.
Provisioning functionalityBusiness Continuity for SIP Server, Configuration Server, and Statistic Server
Workspace Desktop Edition Deployment Guide 381

• A Workspace Desktop Edition Application object exists in the Configuration Database.• Two synchronized sites, each with configured High Availability (HA) pairs.
Start
1. On the Server object at the Preferred site, configure the disaster-recovery.site option in theinteraction-workspace section with a symbolic name, such as Site X, for the server. The symbolicname is how the server will be identified to the Business Continuity functionality. The Preferred site forone agent or group of agents will also be the Peer site for another agent or group of agents. Theconcept of Preferred site and Peer site is then configured agent by agent (or agent group by agentgroup) as described below.
2. You can also use the optional disaster-recovery.name option in the interaction-workspace sectionof both SIP Server objects of an HA pair to identify two SIP Servers as belonging to the same pair. If noname is specified for his option, the value default is assumed.
3. On the Server object at the Peer site, configure the disaster-recovery.site option in theinteraction-workspace section with a symbolic name, such as Site Y, for the server. The symbolicname is how the server will be identified to the Business Continuity functionality.
4. For each agent, agent group, or tenant, configure the disaster-recovery.preferred-site option inthe interaction-workspace section by specifying the symbolic site name of the Server that youspecified with the disaster-recovery.site option.
5. For each agent, agent group, or tenant, configure the disaster-recovery.peer-site option in theinteraction-workspace section with the symbolic site name of the Server that you specified with thedisaster-recovery.site option.
6. Enable Business Continuity for each agent, agent group, or tenant and specify the Business Continuitybehavior by configuring the other Business Continuity options that are listed in the Business ContinuityConfiguration Options reference.
End
Then, use the following options in the interaction-workspace section of the Interaction WorkspaceApplication object to configure Business Continuity:
• disaster-recovery.enabled: Specifies whether Business Continuity is enabled.• disaster-recovery.preferred-site: Specifies the name of the preferred connection site for the
application, tenant, agent Group, or agent. It must correspond to the value of the disaster-recovery.site option on the server object at the preferred site.
• disaster-recovery.peer-site: Specifies the name of the site that is to be the Business Continuity-peer. It must correspond to the value of the disaster-recovery.site option on the server object atthe peer site.
• disaster-recovery.timeout: Specifies the timeout interval in seconds after loss of connection to theHigh Availability (HA) Pair of servers and before Business Continuity switchover is initiated.
SIP Server specific optionsFor more information about SIP Server High-Availability, refer to Framework SIP Server High-Availability Deployment Guide.
To ensure that the switchover from the peer to the preferred site occurs correctly when the preferredsite is restored, use the following options in the interaction-workspace section of the Interaction
Provisioning functionalityBusiness Continuity for SIP Server, Configuration Server, and Statistic Server
Workspace Desktop Edition Deployment Guide 382

Workspace Application object to configure SIP Server Business Continuity:
• disaster-recovery.wait-for-sipphone-timeout: Specifies the time interval in seconds to wait forSipPhone (SIPEndpoint) registration before initiating the Business Continuity switchover if the currentSipPhone(SIPEndpoint) connection was lost or registration was expired.
• disaster-recovery.auto-restore (for T-Server only): Specifies whether or not switching back to thePreferred site should occur if it becomes available.
The default values for the following configuration options can cause the switchover to the preferredsite to be delayed in some environments:
• sipendpoint.proxies.proxy0.reg_timeout=3600• sipendpoint.proxies.proxy1.reg_timeout=3600
ImportantThese options are used by Workspace to configure Workspace SIP Endpoint orGenesys Softphone (since the end of 2018). It is not applicable to any other SIPEndpoint, hard or soft.
The default values of 3600 seconds means that the first SIP Endpoint re-registration attempt willoccur after one hour. In scenarios where the preferred site is returned to service in a few minutes,there is a significant delay between the preferred site being available and the SIP Endpointattempting to re-register with the preferred site.
You can choose much shorter re-registration attempt intervals by setting the values of these optionsto a value between 30 and 60 seconds.
If the agent is configured to restore the last seen state after switchover (the value of disaster-recovery.restore-agent-state is set to true), Workspace postpones automatic restoration of thelast seen agent state until the agent closes all stacked interaction windows. In earlier releases ofWorkspace, the application restored the last seen state immediately after login on paired DR sites,but this made it possible to accept new calls while the last call was still in progress.[Modified:8.5.105.12]
Important• For SIP Server Business Continuity, the preferred Extension DN and the peer Extension
DN must be assigned to the same Place. This equally applies to environments withVoice/IM only medias and to environments with "blended agents" (agents who have aSIP Business Continuity Voice/IM DN and at least one eServices media).
• Stat Server 8.1.2 or above must be used to properly support SIP Business Continuityenvironment.
Provisioning functionalityBusiness Continuity for SIP Server, Configuration Server, and Statistic Server
Workspace Desktop Edition Deployment Guide 383

Provision Workspace Client with Configuration Server HA settings[Added: 8.5.111.21]
Genesys recommends that you edit the InteractionWorkspace.exe.config file that you deliver toagents to provide Configuration HA/Pair information to the client for the first time that Workspace islaunched in a Configuration Server HA/Pair environment. This file is in the Workspace installationdirectory. Those settings are updated based on central configuration once Workspace is connected toa Configuration Server Proxy.
Edit or add the following keys:
<appSettings>...<add key="login.url" value="tcp://MyConfigEnvironment/ApplicationName" /><add key="login.nodes.preferred-site.MyConfigEnvironment"value="[CSP1Host:CSP1Port][CSP2Host:CSP2Port],Timeout=10" /><add key="login.nodes.peer-site.MyConfigEnvironment"value="[CSP3Host:CSP3Port][CSP4Host:CSP4Port],Timeout=10" />...</appSettings>
• MyConfigEnvironment: The name of the Configuration Environment that is displayed in the Loginwindow.
• ApplicationName: The name of the Workspace Desktop application in Management framework• CSP1Host:CSP1Port,...,CSP4Host:CSP4Port: CSP1 is the Primary Preferred, CSP2 the backup
Preferred, CSP3 the Primary Peer, CSP4 the backup Peer of your configuration HA/Pair. The orderindicates the preference (Primary first).
• Timeout: Specifies the delay, in seconds, that is applied after connections to primary and backup havebeen checked and failed. This parameter applies only after initial successful connection has been lost.
Business Continuity using clustered servers (Statistic Server andConfiguration Server Proxy)
Instead of using Primary/backup pairs on each site, Workspace Desktop can be configured to connectto a cluster on each site to provide less down time and load balancing.
To properly set up clusters for Business Continuity, you must provision one cluster of ConfigurationServer Proxies and one cluster of Statistic Servers on the preferred site and similar clusters on thepeer site. Use the procedures in the Load Balancing Using Clusters topic to create load balancingclusters.
Use the Procedure: Configuring Workspace for Business Continuity based on Clusters to enableBusiness Continuity for your agents.
Procedure: Configuring Workspace for Business Continuity based on clustersPurpose:
Provisioning functionalityBusiness Continuity for SIP Server, Configuration Server, and Statistic Server
Workspace Desktop Edition Deployment Guide 384

To manage server to enable Workspace to connect to an alternate (Peer) cluster in the event of adisaster has affected the Preferred cluster.
This Configuration applies to Statistic Servers and Configuration Server Proxies.Prerequisites
• Genesys Administrator 8.0.2 or higher, configured to show Advanced View, or Genesys AdministratorExtension.
• A working knowledge of Genesys Administrator Extension.• A Workspace Desktop Edition Application object exists in the Configuration Database.• A cluster of Configuration Server Proxies or Statistic Servers has been defined for each Business
Continuity site.
Start
1. On the object representing the cluster at the Preferred site, configure the disaster-recovery.siteoption in the interaction-workspace section with a symbolic name, such as Site X, for the server.The symbolic name is how the server will be identified to the Business Continuity functionality.
2. On the object representing the cluster at the Peer site, configure the disaster-recovery.site optionin the interaction-workspace section with a symbolic name, such as Site Y, for the server. Thesymbolic name is how the server will be identified to the Business Continuity functionality.
3. For each agent or agent group, configure the disaster-recovery.preferred-site option in theinteraction-workspace section by specifying the symbolic site name of the Server that you specifiedwith the disaster-recovery.site option.
4. For each agent or agent group, configure the disaster-recovery.peer-site option in theinteraction-workspace section with the symbolic site name of the Server that you specified with thedisaster-recovery.site option.
5. The Preferred site for one agent or group of agents can also be the Peer site for another agent or groupof agents.
6. Use option disaster-recovery.enabled to enable Business Continuity for each agent or agent groupand use option disaster-recovery.timeout to specify the Business Continuity switch over behavior.
End
Provision bootstrap configuration cluster settings in Workspace configuration fileGenesys recommends that you edit the InteractionWorkspace.exe.config file that you deliver toagents to provide Configuration cluster information to the client for the first time that Workspace islaunched in a Configuration Server Cluster environment. This file is located in the Workspaceinstallation directory. Those settings are updated based on central configuration once Workspace isconnected to a Configuration Server Proxy.
Edit or add the following keys:
<appSettings>...<add key="login.url" value="tcp://MyConfigEnvironment/ApplicationName" /><add key="login.cluster.nodes.preferred-site.MyConfigEnvironment"
value="[CSP1Host:CSP1Port][CSP2Host:CSP2Port][CSP3Host:CSP3Port],Timeout=10" /><add key="login.cluster.nodes.peer-site.MyConfigEnvironment"
Provisioning functionalityBusiness Continuity for SIP Server, Configuration Server, and Statistic Server
Workspace Desktop Edition Deployment Guide 385
value="[CSP4Host:CSP4Port][CSP5Host:CSP5Port][CSP6Host:CSP6Port],Timeout=10" />...
</appSettings>
• MyConfigEnvironment: The name of the Configuration Environment that is displayed in the Loginwindow.
• ApplicationName: The name of the Workspace Desktop application in Management framework• CS1PHost:CSP1Port...CS6PHost:CSP6Port: The host:port pairs of your configuration cluster.• Timeout: Sets the value in seconds of the warm-standby.retry-delay option.
Provisioning functionalityBusiness Continuity for SIP Server, Configuration Server, and Statistic Server
Workspace Desktop Edition Deployment Guide 386

eServices Business Continuity with UCS 9.1[Added: 8.5.126.07]
ImportantThis topic covers deployments that use UCS 9.1. For deployments that use UCS 8.5, refer to eServicesBusiness Continuity with UCS 8.5.
Workspace enables you to configure and provision a Business Continuity model by defining LoadBalancing rules in a single Workspace Application object in the Configuration Layer so that a singlesoftware package can be distributed to all agents, and to define a Disaster Recovery model thatswitches to a peer data center without requiring agents to re-start their application.
Setting up your system
This section describes how to set up your environment to implement disaster recovery and loadbalancing for Interaction Server and UCS 9.1 in a high availability (HA) environment.
Physical connectionsYou must create an eServices server environment that is divided between two data centers that areset up to support disaster recovery.
In a standard operational situation, the load is equally distributed between the two data centers,based on static distribution rules: Each agent is provisioned to connect preferably to one data centerbut can also connect to the other one if the preferred data center is no longer available. Therefore,each data center must be able to support the full agent load.
Set up your data centers following this model:
• A Proxy Tier• A pool of Interaction Server Proxies running in a N+1 failover schema (there is no primary-backup
definition)
• A Core Application Tier• Contains a primary-backup Interaction Server pair• Contains UCS 9.1 Nodes
• A Database Tier• Contains the database nodes which includes Interaction Server data running in primary or replica mode
Provisioning functionality eServices Business Continuity with UCS 9.1
Workspace Desktop Edition Deployment Guide 387
• Contains the cassandra nodes for UCS 9.1 data running in a Multiple-Data-Center configuration
Interaction Server runs in an active/passive mode with respect to the eServices components:
• Active• The Interaction Server database is in Primary mode• The Interaction Server pair are running and connected to the primary database• The Interaction Server Proxies are running and connected to the core Interaction Server, and each is
listening on its configured connection port
• Passive• The Interaction Server database is in Replica mode• The Interaction Server pair are stopped• The Interaction Server Proxies are running or not, connected or not, to the core Interaction Server,
and each is not listening on its configured connection port. This means that it is not possible toopen any network connection to them
ImportantUCS 9.1 supports geo-replication by using the Datacenter Replication feature in Cassandra.
Provisioning Interaction Server for Disaster Recovery
The Database Tier is critical for eServices components. The Disaster Recovery site model that is usedfor SIP Server, Stat Server, and Configuration Server Proxy (refer to eServices Business Continuitywith UCS 8.5 or eServices Business Continuity with UCS 9.1) cannot be applied to eServicescomponents. The advanced proxy architecture that enables the N+1 model of High Availability andload balancing also does not apply to the Primary/Backup model.
eServices and UCS 9.1 Disaster Recovery takes advantage of the Application Cluster (a pool ofservers of different types; for example, UCS 9.1 Nodes and Interaction Server Proxies) in GenesysManagement Framework. This model provisions server pools for the Interaction Server Proxy/UCS 9.1Nodes connections types. The Application Cluster model also enables the support of various scalefactors that depend on the application type (for example, three Interaction Server Proxy nodes for theeServices agents and six UCS 9.1 nodes for the eServices agents and the Voice agents).
ImportantThe cluster of Interaction Server Proxy objects discussed in this section should not be confused with theconcept of the Interaction Server Cluster described in the eServices Documentation.
Provisioning functionality eServices Business Continuity with UCS 9.1
Workspace Desktop Edition Deployment Guide 388

An Application Cluster can contain a set of optional Workspace specific key-value pairs which aredefined in the interaction-workspace section. The disaster-recovery.site option defines thedata center where the Cluster is located. The disaster-recovery.site option is a Key that you addin the options of another application to which Workspace connects (for example: SIP Server, StatServer, and Config Server) to recognize it as a "peer" or a "preferred" site. See the examples below tosee how this option is used.
The disaster-recovery.eservices-site Workspace option, which can be defined in the Applicationoptions or in the Tenant, Group, or User annex, is used to define the cluster assignment. This optiondefines the data center where a user must connect to enable eServices / UCS 9.1 links (it is optionaland taken into account dynamically).
The list of connections is taken into account when the application is restarted.
• If the Workspace disaster-recovery.eservices-site option is not defined, or is left empty, Workspaceselects the first cluster in the list that is available independent of the value specified for the disaster-recovery.site option, and uses the pool of servers that it contains.
• If Workspace option disaster-recovery.eservices-site is assigned a site name, Workspace selects the firstcluster in the list that has an equivalent value specified in the disaster-recovery.site, and uses thepool of servers that it contains.
This approach enables you to define different kinds of deployment models that enable LoadBalancing and Disaster Recovery.
Provisioning examplesThe following tables provide administrators with an example of how an eServices Business Continuity/Disaster Recovery environment might be set up for each type of data center.
Example 1: Load Balancing in one data centerCluster Applications
Connections Options
Cluster eService Site_AIxnProxy_A_1, IxnProxy_A_2, IxnProxy_A_3UCS_Node_A_1, UCS_Node_A_2,UCS_Node_A_3
interaction-workspace/disaster-recovery.site=<not defined>
Notes:
• UCS_Node_x_y stands for UCS Node number y on site x.• IxnProxy_x_y stands for Interaction Server Proxy number y on site x.• For example, IxnProxy_A_2 is the Interaction Server Proxy #2 on Site A
Workspace ApplicationConnections Options
Workspace Cluster eService Site_Ainteraction-workspace/disaster-recovery.eservices-site=<not defined>
Provisioning functionality eServices Business Continuity with UCS 9.1
Workspace Desktop Edition Deployment Guide 389
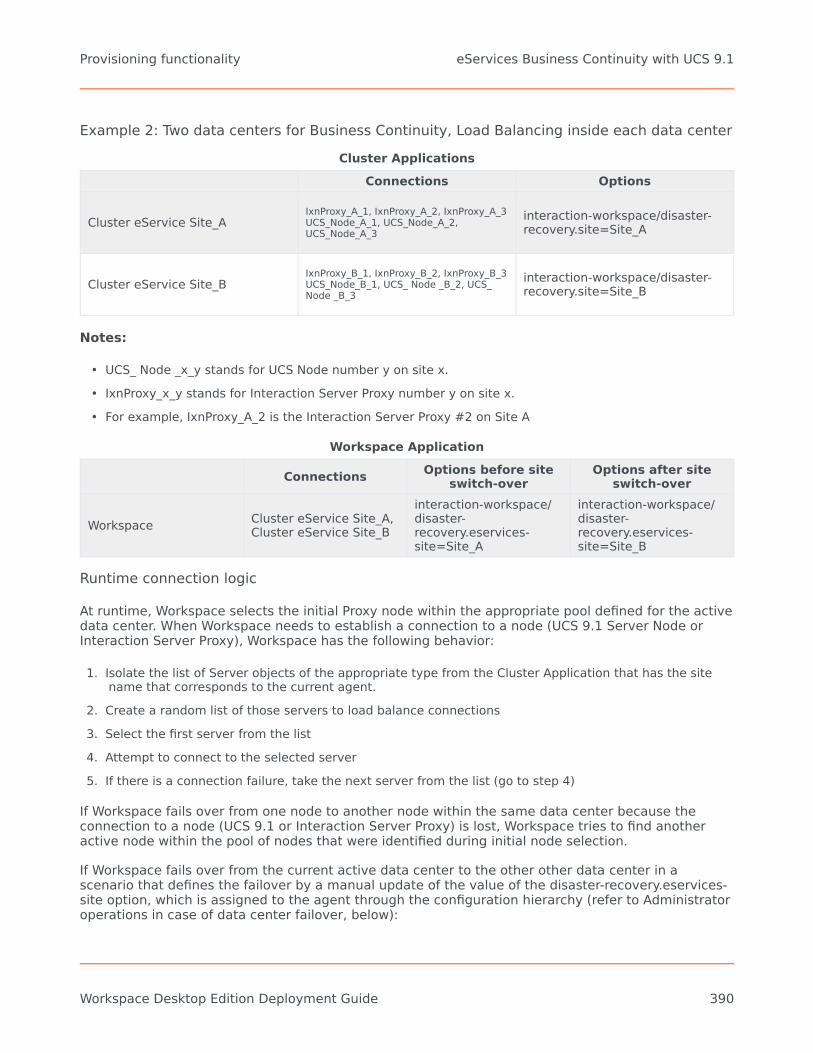
Example 2: Two data centers for Business Continuity, Load Balancing inside each data centerCluster Applications
Connections Options
Cluster eService Site_AIxnProxy_A_1, IxnProxy_A_2, IxnProxy_A_3UCS_Node_A_1, UCS_Node_A_2,UCS_Node_A_3
interaction-workspace/disaster-recovery.site=Site_A
Cluster eService Site_BIxnProxy_B_1, IxnProxy_B_2, IxnProxy_B_3UCS_Node_B_1, UCS_ Node _B_2, UCS_Node _B_3
interaction-workspace/disaster-recovery.site=Site_B
Notes:
• UCS_ Node _x_y stands for UCS Node number y on site x.• IxnProxy_x_y stands for Interaction Server Proxy number y on site x.• For example, IxnProxy_A_2 is the Interaction Server Proxy #2 on Site A
Workspace Application
Connections Options before siteswitch-over
Options after siteswitch-over
Workspace Cluster eService Site_A,Cluster eService Site_B
interaction-workspace/disaster-recovery.eservices-site=Site_A
interaction-workspace/disaster-recovery.eservices-site=Site_B
Runtime connection logic
At runtime, Workspace selects the initial Proxy node within the appropriate pool defined for the activedata center. When Workspace needs to establish a connection to a node (UCS 9.1 Server Node orInteraction Server Proxy), Workspace has the following behavior:
1. Isolate the list of Server objects of the appropriate type from the Cluster Application that has the sitename that corresponds to the current agent.
2. Create a random list of those servers to load balance connections3. Select the first server from the list4. Attempt to connect to the selected server5. If there is a connection failure, take the next server from the list (go to step 4)
If Workspace fails over from one node to another node within the same data center because theconnection to a node (UCS 9.1 or Interaction Server Proxy) is lost, Workspace tries to find anotheractive node within the pool of nodes that were identified during initial node selection.
If Workspace fails over from the current active data center to the other other data center in ascenario that defines the failover by a manual update of the value of the disaster-recovery.eservices-site option, which is assigned to the agent through the configuration hierarchy (refer to Administratoroperations in case of data center failover, below):
Provisioning functionality eServices Business Continuity with UCS 9.1
Workspace Desktop Edition Deployment Guide 390
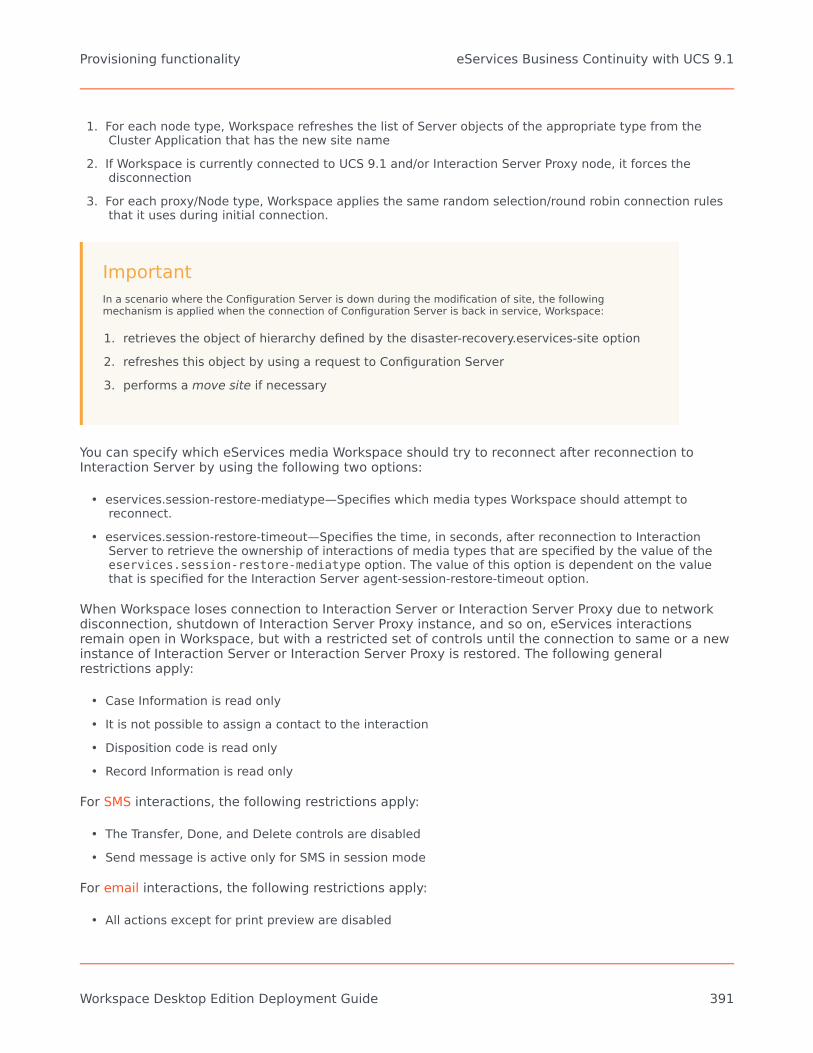
1. For each node type, Workspace refreshes the list of Server objects of the appropriate type from theCluster Application that has the new site name
2. If Workspace is currently connected to UCS 9.1 and/or Interaction Server Proxy node, it forces thedisconnection
3. For each proxy/Node type, Workspace applies the same random selection/round robin connection rulesthat it uses during initial connection.
ImportantIn a scenario where the Configuration Server is down during the modification of site, the followingmechanism is applied when the connection of Configuration Server is back in service, Workspace:
1. retrieves the object of hierarchy defined by the disaster-recovery.eservices-site option2. refreshes this object by using a request to Configuration Server3. performs a move site if necessary
You can specify which eServices media Workspace should try to reconnect after reconnection toInteraction Server by using the following two options:
• eservices.session-restore-mediatype—Specifies which media types Workspace should attempt toreconnect.
• eservices.session-restore-timeout—Specifies the time, in seconds, after reconnection to InteractionServer to retrieve the ownership of interactions of media types that are specified by the value of theeservices.session-restore-mediatype option. The value of this option is dependent on the valuethat is specified for the Interaction Server agent-session-restore-timeout option.
When Workspace loses connection to Interaction Server or Interaction Server Proxy due to networkdisconnection, shutdown of Interaction Server Proxy instance, and so on, eServices interactionsremain open in Workspace, but with a restricted set of controls until the connection to same or a newinstance of Interaction Server or Interaction Server Proxy is restored. The following generalrestrictions apply:
• Case Information is read only• It is not possible to assign a contact to the interaction• Disposition code is read only• Record Information is read only
For SMS interactions, the following restrictions apply:
• The Transfer, Done, and Delete controls are disabled• Send message is active only for SMS in session mode
For email interactions, the following restrictions apply:
• All actions except for print preview are disabled
Provisioning functionality eServices Business Continuity with UCS 9.1
Workspace Desktop Edition Deployment Guide 391

• Agent can edit To, From, Cc, Bcc, subject, and email body in outbound email only are active
For chat interactions, the following restrictions apply:
• The End, Transfer, Conference, and Done (if the chat session is already ended) controls are disabled• The Send message control is active if the chat session is still active and the Chat Server connection is
still up
Administrator operations in case of data center failover
The key operation in a data center failover scenario is the transfer of mastership of the databasefrom Site_A to Site_B.
ImportantYou should note that this is an intensive operation that can take a significant amount of time. It involvesworking with the Database Administrator who must initiate the procedure. Since a failover scenario canhappen at any time, the Database Administrator might not be available immediately.
The following is a typical failover operation scenario:
1. A disaster is detected2. The decision to switch over to data center 2 (Site_B) is taken3. Stop all the active servers (core and proxies) that might still be running on Site_A4. eServices agent activity is suspended5. The database administrator must make the DB of Site_B the primary
6. Start the core Interaction Server pair of Site_B, UCS 9.1 nodes on Site_B should be already running7. Start the Interaction Server Proxy instances of Site_B8. Change the value of the disaster-recovery.eservices-site option of the agent at the appropriate hierarchy
level (this can be at the Application level if everyone shares the same data center at the same time) sothat it points to Site_B
9. Workspace instances automatically reconnect to UCS 9.1 nodes and Interaction Server Proxies of Site_Band agents can resume their eServices activity
ImportantThe transition from passive to active of the peer eServices data-center takes a significant amount of time,during which the eServices capabilities are not usable by agents.
Provisioning functionality eServices Business Continuity with UCS 9.1
Workspace Desktop Edition Deployment Guide 392

For blended agents (voice + at least one eServices channel)
The data center failover logic between data centers is not the same for SIP Voice/IM channels andeServices channels, nor is the login model the same. However, Workspace and Stat Server maintain acomposite connection between these two solutions known as "blended agents". In particular, the StatServer composite representation requires a single agent-place virtual runtime link.
In SIP Business Continuity:
• The configuration model is based on a pair of DNs (one for each data center)• In typical deployment model, each DN belongs to its dedicated Place (preferred DN in Place 1, peer DN
in Place 1_DR). To have the two DNs configured in one place, they must be of type ACD Position.• Agents logon one DN at a time, according to the site currently defined as the active preferred,
according to the agent configuration; this can change dynamically at runtime according to site failuredetection.
• At runtime, Stat Server detects that an agent dynamically moves from the default Place to peer Place.
In Interaction Server:
• An agent logs in to a Place at the beginning of a session. This place remains the same during thesession, even if Workspace has to connect to another Interaction Server Proxy, from the local datacenter or the remote data center.
Therefore, there are situations when an agent might be virtually logged in to two distinct Places, onefor voice and one for eServices, which is a not a supported situation for Stat Server.
One possible approach to resolve this situation is to use the Single Place configuration model for theVoice DNs.
Provisioning
You can configure eService Cluster and eServices Business Continuity together or independently,depending on the design of your eServices architecture. Use the following options to enableWorkspace to connect correctly to your environment.
Cluster provisioningThe following options enable you to specify how the connection to any node of your cluster should beset-up and how the transition between nodes should behave.
Warm standby
These two options enable you to specify the time interval for reconnection. Refer to the configurationoption reference for details about how to configure these options:
• warm-standby.reconnection-random-delay-range• warm-standby.retry-delay
Provisioning functionality eServices Business Continuity with UCS 9.1
Workspace Desktop Edition Deployment Guide 393

Addp
You can define the addp parameters for all applications of the cluster from the Workspace applicationconnections table. These parameters can be overridden in each server application.
Example of Workspace in a cluster configuration forDisaster Recovery
ip-version
You can define the ip-version option for all applications of the cluster from the Workspaceapplication connections table. ip-version can be overridden in each server application options. Inthis example, the ip-version of all applications of the cluster is 4,6:
Setting ip-version preferences for Workspaceconnections for Disaster Recovery
Provisioning functionality eServices Business Continuity with UCS 9.1
Workspace Desktop Edition Deployment Guide 394

eServices Disaster Recovery provisioningThese two options enable you to configure the data center infrastructure that is applicable toeServices components:
• disaster-recovery.eservices-site
• disaster-recovery.eservices-random-delay-range
Provisioning functionality eServices Business Continuity with UCS 9.1
Workspace Desktop Edition Deployment Guide 395
eServices Business Continuity with UCS 8.5[Added: 8.5.106.19] [Modified: 8.5.109.16]
ImportantThis topic covers deployments that use UCS 8.5. For deployments that use UCS 9.1, refer to eServicesBusiness Continuity with UCS 9.1.
Workspace enables you to configure and provision a Business Continuity model by defining LoadBalancing rules in a single Workspace Application object in the Configuration Layer so that a singlesoftware package can be distributed to all agents, and to define a Disaster Recovery model thatswitches to a peer data center without requiring agents to re-start their application.
Setting up your system
This section describes how to set up your environment to implement disaster recovery and loadbalancing for eServices in a high availability (HA) environment.
Physical connectionsYou must create an eServices server environment that is divided between two data centers that areset up to support disaster recovery.
In a standard operational situation, the load is equally distributed between the two data centers,based on static distribution rules: Each agent is provisioned to connect preferably to one data centerbut can also connect to the other one if the preferred data center is no longer available. Therefore,each data center must be able to support the full agent load.
Set up your data centers following this model:
• A Proxy Tier• An Application Cluster containing a pool of Interaction Server Proxies and UCS Proxies running in a
N+1 failover schema (there is no primary-backup definition)
• A Core Application Tier• Contains a primary-backup Interaction Server pair• Contains a primary-backup UCS pair
• A Database Tier• Contains the database node which includes UCS and Interaction Server data running in primary or
Provisioning functionality eServices Business Continuity with UCS 8.5
Workspace Desktop Edition Deployment Guide 396

replica mode
Data centers run in an active/passive mode with respect to the eServices components:
• Active• The database is in Primary mode• The Interaction Server pair and the UCS pair are running and connected to the primary database• The Interaction Server Proxies and UCS Proxies are running and connected to the core Interaction
Server and core UCS, and each is listening on its configured connection port
• Passive• The database is in Replica mode• The Interaction Server pair and the UCS pair are stopped• The Interaction Server Proxies and UCS Proxies are running or not, connected or not, to the core
Interaction Server and core UCS, and each is not listening on its configured connection port. Thismeans that it is not possible to open any network connection to them
The following is an example of the physical network connections when the environment is running inregular operation, and data centers #1 and #2 are up and running:
Example of the physical network connections inregular operation when data centers #1 and #2 areup and running
The following is an example of the physical network connections when the environment is running inregular operation, and data center #1 is down:
Provisioning functionality eServices Business Continuity with UCS 8.5
Workspace Desktop Edition Deployment Guide 397

Example of the physical network connections inregular operation when data center #1 is down
Provisioning eServices Disaster Recovery
The Database Tier is critical for eServices components. The disaster recovery site model that is usedfor SIP Server, Stat Server, and Configuration Server Proxy (refer to Configuration of Voice andStatistic Business Continuity) cannot be applied to eServices components. The advanced proxyarchitecture that enables the N+1 model of High Availability and load balancing also does not applyto the Primary/Backup model.
eServices Disaster recovery takes advantage of the Application Cluster (a pool of Proxy servers ofdifferent types; for example, UCS Proxies and Interaction Server Proxies) in Genesys ManagementFramework. This model provisions server pools for the Interaction Server Proxy/UCS Proxyconnections types. The Application Cluster model also enables the support of various scale factorsthat depend on the application type (for example, three Interaction Server Proxy nodes for theeServices agents and six UCS Proxy nodes for the eServices agents and the Voice agents). Thefollowing is an example of how an application cluster might be configured in Genesys AdministratorExtension:
Application Cluster configuration in GenesysAdministrator Extension
An Application Cluster can contain a set of optional Workspace specific key-value pairs which aredefined in the interaction-workspace section. The disaster-recovery.site option defines thedata center where the Cluster is located. The disaster-recovery.site option is a Key that you addin the options of another application to which Workspace connects (for example: SIP Server, StatServer, and Config Server) to recognize it as a "peer" or a "preferred" site. See the examples below tosee how this option is used.
Provisioning functionality eServices Business Continuity with UCS 8.5
Workspace Desktop Edition Deployment Guide 398

The disaster-recovery.eservices-site Workspace option, which can be defined in the Applicationoptions or in the Tenant, Group, or User annex, is used to define the cluster assignment. This optiondefines the data center where a user must connect to enable eServices links (it is optional and takeninto account dynamically).
In the example above, the Workspace Application has connections to one or several clusters. Thelist of connections is taken into account when the Application is restarted.
• If the Workspace disaster-recovery.eservices-site option is not defined, or is left empty, Workspaceselects the first Cluster in the list that is available independent of the value specified for the disaster-recovery.site option, and uses the pool of proxies that it contains.
• If Workspace option disaster-recovery.eservices-site is assigned a site name, Workspace selects the firstCluster in the list that has an equivalent value specified in the disaster-recovery.site, and uses thepool of proxies that it contains.
This approach enables you to define different kinds of deployment models that enable LoadBalancing and Disaster Recovery.
Provisioning ExamplesThe following tables provide administrators with an example of how an eServices Business Continuity/Disaster Recovery environment might be set up.
Example 1: Load Balancing in one data centerCluster Applications
Connections Options
Cluster eService Site_AIxnProxy_A_1, IxnProxy_A_2, IxnProxy_A_3UCS_Proxy_A_1, UCS_Proxy_A_2,UCS_Proxy_A_3
interaction-workspace/disaster-recovery.site=<not defined>
Notes:
• UCS_Proxy_x_y stands for UCS Proxy number y on site x.• IxnProxy_x_y stands for Interaction Server Proxy number y on site x.• For example, IxnProxy_A_2 is the Interaction Server Proxy #2 on Site A
Workspace ApplicationConnections Options
Workspace Cluster eService Site_Ainteraction-workspace/disaster-recovery.eservices-site=<not defined>
Provisioning functionality eServices Business Continuity with UCS 8.5
Workspace Desktop Edition Deployment Guide 399

Example 2: Two data centers for Business Continuity, Load Balancing inside each data centerCluster Applications
Connections Options
Cluster eService Site_AIxnProxy_A_1, IxnProxy_A_2, IxnProxy_A_3UCS_Proxy_A_1, UCS_Proxy_A_2,UCS_Proxy_A_3
interaction-workspace/disaster-recovery.site=Site_A
Cluster eService Site_BIxnProxy_B_1, IxnProxy_B_2, IxnProxy_B_3UCS_Proxy_B_1, UCS_Proxy_B_2,UCS_Proxy_B_3
interaction-workspace/disaster-recovery.site=Site_B
Notes:
• UCS_Proxy_x_y stands for UCS Proxy number y on site x.• IxnProxy_x_y stands for Interaction Server Proxy number y on site x.• For example, IxnProxy_A_2 is the Interaction Server Proxy #2 on Site A
Workspace Application
Connections Options before siteswitch-over
Options after siteswitch-over
Workspace Cluster eService Site_A,Cluster eService Site_B
interaction-workspace/disaster-recovery.eservices-site=Site_A
interaction-workspace/disaster-recovery.eservices-site=Site_B
Runtime connection logic
[Modified: 8.5.109.16]
At runtime, Workspace selects the initial Proxy node within the appropriate pool defined for the activedata center.
When Workspace needs to establish a connection to a node (UCS Proxy or Interaction Server Proxy),Workspace has the following behavior:
1. Isolate the list of Server objects of the appropriate type from the Cluster Application that has the sitename that corresponds to the current agent.
2. Create a random list of those servers to load balance connections3. Select the first server from the list4. Attempt to connect to the selected server5. If there is a connection failure, take the next server from the list (go to step 4)
If Workspace fails over from one proxy node to another proxy node within the same data centerbecause the connection to a node (UCS Proxy or Interaction Server Proxy) is lost, Workspace tries tofind another active node within the pool of nodes that were identified during initial node selection.
Provisioning functionality eServices Business Continuity with UCS 8.5
Workspace Desktop Edition Deployment Guide 400

If Workspace fails over from the current active data center to the other other data center in ascenario that defines the failover by a manual update of the value of the disaster-recovery.eservices-site option, which is assigned to the agent through the configuration hierarchy (refer to Administratoroperations in case of data center failover, below):
1. For each proxy type, Workspace refreshes the list of Server objects of the appropriate type from theCluster Application that has the new site name
2. If Workspace is currently connected to UCS Proxy and/or Interaction Server Proxy node, it forces thedisconnection
3. For each proxy type, Workspace applies the same random selection/round robin connection rules that ituses during initial connection.
ImportantIn a scenario where the Configuration Server is down during the modification of site, the followingmechanism is applied when the connection of Configuration Server is back in service, Workspace:
1. retrieves the object of hierarchy defined by the disaster-recovery.eservices-site option2. refreshes this object by using a request to Configuration Server3. performs a move site if necessary
You can specify which eServices media Workspace should try to reconnect after reconnection toInteraction Server by using the following two options:
• eservices.session-restore-mediatype—Specifies which media types Workspace should attempt toreconnect.
• eservices.session-restore-timeout—Specifies the time, in seconds, after reconnection to InteractionServer to retrieve the ownership of interactions of media types that are specified by the value of theeservices.session-restore-mediatype option. The value of this option is dependent on the value that isspecified for the Interaction Server agent-session-restore-timeout option.
When Workspace loses connection to Interaction Server or Interaction Server Proxy due to networkdisconnection, shutdown of Interaction Server Proxy instance, and so on, eServices interactionsremain open in Workspace, but with a restricted set of controls until the connection to same or a newinstance of Interaction Server or Interaction Server Proxy is restored.
The following general restrictions apply:
• Case Information is read only• It is not possible to assign a contact to the interaction• Disposition code is read only• Record Information is read only
For SMS interactions, the following restrictions apply:
• The Transfer, Done, and Delete controls are disabled
Provisioning functionality eServices Business Continuity with UCS 8.5
Workspace Desktop Edition Deployment Guide 401
• Send message is active only for SMS in session mode
For email interactions, the following restrictions apply:
• All actions except for print preview are disabled• Agent can edit To, From, Cc, Bcc, subject, and email body in outbound email only are active
For chat interactions, the following restrictions apply:
• The End, Transfer, Conference, and Done (if the chat session is already ended) controls are disabled• The Send message control is active if the chat session is still active and the Chat Server connection is
still up
Administrator operations in case of data center failover
The key operation in a data center failover scenario is the transfer of mastership of the databasefrom Site_A to Site_B.
ImportantYou should note that this is an intensive operation that can take a significant amount of time. It involvesworking with the Database Administrator who must initiate the procedure. Since a failover scenario canhappen at any time, the Database Administrator might not be available immediately.
The following is a typical failover operation scenario:
1. A disaster is detected2. The decision to switch over to data center 2 (Site_B) is taken3. Stop all the active servers (core and proxies) that might still be running on Site_A4. eServices agent activity is suspended5. The database administrator must make the DB of Site_B the primary
6. Start the core UCS pair and Interaction Server pair of Site_B7. Start the Interaction Server Proxy and UCS Proxy instances of Site_B8. Change the value of the disaster-recovery.eservices-site option of the agent at the appropriate hierarchy
level (this can be at the Application level if everyone shares the same data center at the same time) sothat it points to Site_B
9. Workspace instances automatically reconnect to UCS Proxies and Interaction Server Proxies of Site_Band agents can resume their eServices activity
Important
Provisioning functionality eServices Business Continuity with UCS 8.5
Workspace Desktop Edition Deployment Guide 402
The transition from passive to active of the peer eServices data-center takes a significant amount of time,during which the eServices capabilities are not usable by agents.
For blended agents (voice + at least one eServices channel)
The data center failover logic between data centers is not the same for SIP Voice/IM channels andeServices channels, nor is the login model the same. However, Workspace and Stat Server maintain acomposite connection between these two solutions known as "blended agents". In particular, the StatServer composite representation requires a single agent-place virtual runtime link.
In SIP Business Continuity:
• The configuration model is based on a pair of DNs (one for each data center)• In typical deployment model, each DN belongs to its dedicated Place (preferred DN in Place 1, peer DN
in Place 1_DR). To have the two DNs configured in one place, they must be of type ACD Position.• Agents logon one DN at a time, according to the site currently defined as the active preferred,
according to the agent configuration; this can change dynamically at runtime according to site failuredetection.
• At runtime, Stat Server detects that an agent dynamically moves from the default Place to peer Place.
In Interaction Server:
• An agent logs in to a Place at the beginning of a session. This place remains the same during thesession, even if Workspace has to connect to another Interaction Server Proxy, from the local datacenter or the remote data center.
Therefore, there are situations when an agent might be virtually logged in to two distinct Places, onefor voice and one for eServices, which is a not a supported situation for Stat Server.
One possible approach to resolve this situation is to use the Single Place configuration model for theVoice DNs.
Provisioning
You can configure eService Cluster and eServices Business Continuity together or independently,depending on the design of your eServices architecture. Use the following options to enableWorkspace to connect correctly to your environment.
Cluster provisioningThe following options enable you to specify how the connection to any node of your cluster should beset-up and how the transition between nodes should behave.
Provisioning functionality eServices Business Continuity with UCS 8.5
Workspace Desktop Edition Deployment Guide 403
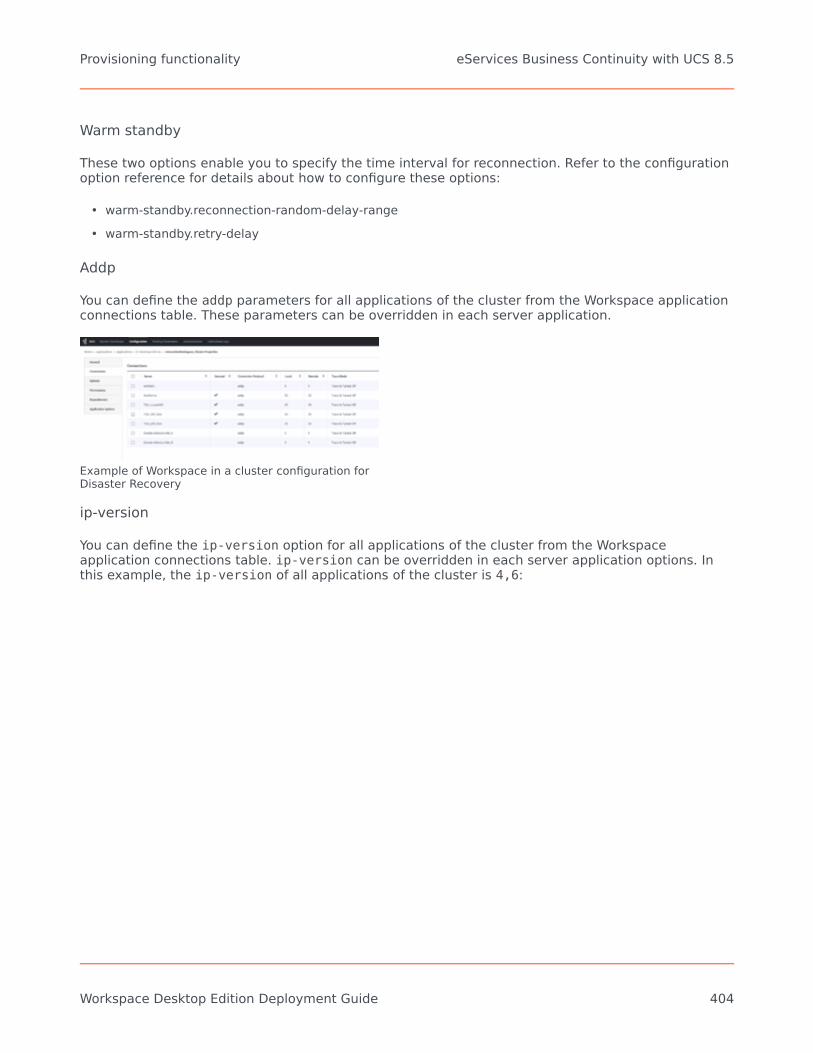
Warm standby
These two options enable you to specify the time interval for reconnection. Refer to the configurationoption reference for details about how to configure these options:
• warm-standby.reconnection-random-delay-range• warm-standby.retry-delay
Addp
You can define the addp parameters for all applications of the cluster from the Workspace applicationconnections table. These parameters can be overridden in each server application.
Example of Workspace in a cluster configuration forDisaster Recovery
ip-version
You can define the ip-version option for all applications of the cluster from the Workspaceapplication connections table. ip-version can be overridden in each server application options. Inthis example, the ip-version of all applications of the cluster is 4,6:
Provisioning functionality eServices Business Continuity with UCS 8.5
Workspace Desktop Edition Deployment Guide 404
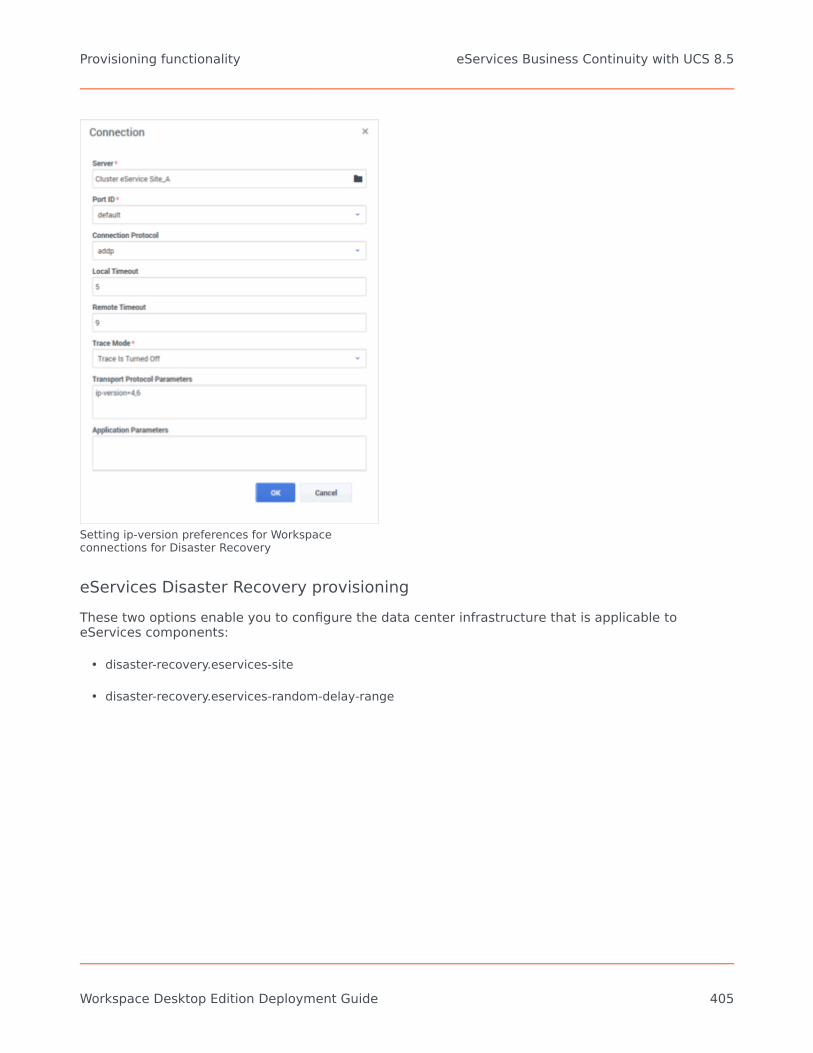
Setting ip-version preferences for Workspaceconnections for Disaster Recovery
eServices Disaster Recovery provisioningThese two options enable you to configure the data center infrastructure that is applicable toeServices components:
• disaster-recovery.eservices-site
• disaster-recovery.eservices-random-delay-range
Provisioning functionality eServices Business Continuity with UCS 8.5
Workspace Desktop Edition Deployment Guide 405
Load Balancing using clusters[Added: 8.5.108.11] [Modified: 8.5.111.21, 8.5.126.07]
A Cluster is pool of Genesys Servers of the same type to which Workspace connects. Workspaceconnects to a single node of a cluster at a time. The node is selected by a client-side or server-sidelogic, depending on the clustering model. The Genesys servers that Workspace supports through theclustering model are: Statistic Server, Configuration Server Proxy, Universal Contact Server Proxy(8.5), Universal Contact Server Node (9.1), and Interaction Server Proxy.
There are two Configuration models to defined clusters for Workspace:
1. Stat Server, Interaction Server Proxy, and UCS Proxy (8.5) or UCS Node (9.1) clusters2. Configuration Server Proxies
ImportantFor information about UCS 9.1 Nodes architecture, refer to the 9.1 Architecture topic in the UniversalContact Server Deployment Guide. [Added: 8.5.126.07]
Please refer to the Business Continuity page for details about how to provision as many clusters asbusiness continuity sites.
Provisioning clusters for Stat Servers, Interaction Server Proxies,and UCS proxies or nodes
Using clusters, Workspace can enable Load Balancing between each server of same type.
To enable Load Balancing through clusters, Workspace takes advantage of the Application Cluster inGenesys Management Framework (a pool of servers that can be of different types; for example, UCSProxies (8.5) or UCS Nodes (9.1), Interaction Server Proxies and Statistic Servers). This modelprovisions server pools for the Interaction Server Proxy, UCS Proxy (8.5) or UCS Node (9.1), StatServers connections types. The Application Cluster model also enables the support of various scalefactors that depend on the application type (for example, three Interaction Server Proxy nodes foreServices agents and six UCS Proxy (8.5) or UCS Node (9.1) clusters for eServices agents and Voiceagents). The following figure shows an example of how an application cluster might be configured inGenesys Administrator Extension:
Provisioning functionality Load Balancing using clusters
Workspace Desktop Edition Deployment Guide 406

ImportantWorkspace employs a Cryptographically secure pseudo-random number generator(CSPRNG) to select the next node to ensure the best load balancing between allWorkspace instances.
ProcedureCreating a cluster for Workspace
Purpose:
To enable Business Continuity for Statistic Server, Interaction Server Proxy, or Universal ContactServer Proxy (8.5), or Universal Contact Server Node (9.1) clusters in Workspace.
Start
1. Be sure to have ApplicationCluster template in Genesys Administrator Extension. if you don't have suchapplication template, either import it from eService Interaction Management CD or create an emptytemplate from scratch using "Application template" type.
2. Create a new application based on application cluster template3. In connections, add all Stat Servers, Interaction Server Proxies, and UCS Proxies (or UCS Nodes) you
want to load balance4. In Server Info tab, select the tenant (ignored by Workspace) and a fake host and port (this information
will not be used by Workspace), also working directory and command line can be filled with some fakechars
5. Save Application Cluster6. Add this Application Cluster to the Connections of your Workspace Desktop Edition application.
End
ADDP
In Genesys Administrator Extension, you can define the cluster addp parameter for all applications inthe cluster application from the Workspace application connections table. These parameters can beoverridden in each server application.
Provisioning functionality Load Balancing using clusters
Workspace Desktop Edition Deployment Guide 407

IP Version
You can define the ip-version option for all applications of the cluster from the Workspaceapplication connections table. The ip-version option can be overridden in each server applicationobject. For example, you could set the value of the ip-version options for each application of thecluster to 4,6.
Time interval for reconnection
Use the following two options (in Workspace application to make it global to all clusters or inApplication Cluster annex, in section 'interaction-workspace') to specify the time interval forreconnection:
• warm-standby.reconnection-random-delay-range
• warm-standby.retry-delay
Provisioning cluster for Configuration Server proxies
There are two approaches to provisioning Cluster for Configuration server, Cluster based on NetworkLoad Balancer F5 BIGIP and Cluster based on Client Side Load Balancing.
Cluster based on Network Load Balancer F5 BIGIPThis approach involves a hardware network load balancer that achieves a server-side load balancingand fault detection to equally distribute the connection load between up and running ConfigurationServer Proxies configured in a pool. In this approach Workspace applications physically connect to theNetwork Load Balancer, which is connected to all the Configuration Server Proxies of the pool.
Refer to Load-Balanced Configuration Server Proxies for Agent-Facing Applications in the GenesysManagement Framework documentation. In an F5 BIGIP environment, Workspace is configured toconnect to one or several External Configuration Server Proxy applications; these ExternalConfiguration Server Proxies are not connected to an actual Configuration Server, but instead point tothe hardware network load balancers.
Important• This approach requires Config Server 8.5.1• The CSProxy/proxy-cluster-name option should be set with the name of the External
CS Proxy in each of the CS Proxy application that simulate a real CS Proxy executable• In this approach, the selection of the node of the cluster is done by the Network Load
Balancer.
Provisioning functionality Load Balancing using clusters
Workspace Desktop Edition Deployment Guide 408

Cluster based on Client-Side Load BalancingUnlike network load balancing, the client-side random balancing approach relies on the statistical Lawof Large Numbers to achieve equal distribution of Workspace instances between the ConfigurationServer Proxies. In this approach, Workspace instances are directly connected to the ConfigurationServer Proxy instance selected by the random algorithm.
Procedure
Creating a CS Proxy Cluster for Workspace
Purpose:
To enable Business Continuity for CS Proxy in Workspace.
Prerequisites
• The Configuration Server Proxies are created as individual Application objects of typeConfigurationServer Provisioning Configuration Server proxies. They do not have any backup instance,to ensure that all instances are independent from each other.
Start
1. Create a Fake Host object and set its LCA port to 0 (zero). It will not be used at runtime.2. Configure another Application object of type ConfigurationServer, to create a Virtual Configuration
Server Proxy that represents the Configuration Server Proxy cluster. Set its host using the fake host andassign it a fake port. Host and Port are not used at run-time. The Virtual Configuration Server Proxyobject, representing the Configuration Server Proxy cluster, is not monitored by SCS.
3. In the options of the virtual Configuration Server Proxy application, create in the Section interaction-workspace:• A key-value pair for each Configuration Server Proxy that composes the cluster where:
• Key is cluster.nodes.<CS Proxy name>, where <CS Proxy name> refers to a static name, usedinternally for reference to that node.
• Value is host:port that represents the Configuration Server Proxy host and port.
• The cluster.environment-name option with a name that represent the configuration environmentname.
4. Add a connection in the Workspace application to this Virtual Configuration Server Proxy.5. If you are using Configuration Server Proxy version 8.5 or higher, in the [csproxy] section of each
Configuration Server Proxy in the proxy cluster, set the value of proxy-cluster-name to the name ofthe Virtual Configuration Server Proxy object. For more information about this option, refer to theFramework Configuration Options Reference Manual.
TLS
To enable TLS, if available, specify autodetect Configuration Server Proxy ports in the definition ofthe cluster nodes through options cluster.nodes.*.
Provisioning functionality Load Balancing using clusters
Workspace Desktop Edition Deployment Guide 409

Kerberos
To enable authentication of Workspace users through Kerberos, all Configuration Server Proxies mustbe configured with the same SPN and the same .keytab file.
ImportantTo run multiple Configuration Server Proxies configured with the same SPN on the same host, refer toManagement Framework External Authentication Guide for details about how to set up redundant/clusteredapplications. This is not a restriction specific to the cluster model, but is applicable to any ConfigurationServer connection model from Workspace.
ADDP
In Workspace Application table connection, you can define the connection protocol ADDP byspecifying the addp parameter for the Virtual Configuration Server Proxy application.
Time interval for reconnection
Use the following two options in Workspace Desktop Application to specify the time interval forreconnection:
• warm-standby.reconnection-random-delay-range
• warm-standby.retry-delay
warm-standby.retry-delay can be overriden in the Virtual Configuration Server Proxy
Provision Bootstrap Configuration Cluster Settings in Workspace Configuration File
Genesys recommends that you edit the InteractionWorkspace.exe.config file that you deliver toagents to provide Configuration cluster information to the client for the first time that Workspace islaunched in a Configuration Server Cluster environment. This static provisioning is making the firstconnection of a user from a new workstation more safe. This file is in the Workspace installationdirectory.
Edit or add the following keys:
• For Stand-alone deployment:<appSettings>...<add key="login.url" value="tcp://MyConfigurationEnvironment/ApplicationName" /><add key="login.cluster.nodes.MyConfigurationEnvironment"
value="[CSP1Host:CSP1Port][CSP2Host:CSP2Port][CSP3Host:CSP3Port],Timeout=10" />...
</appSettings>
• For Business Continuity deployment:<appSettings>
Provisioning functionality Load Balancing using clusters
Workspace Desktop Edition Deployment Guide 410

...<add key="login.url" value="tcp://MyConfigurationEnvironment/ApplicationName" /><add key="login.cluster.preferred-site.nodes.MyConfigurationEnvironment"
value="[CSP1Host:CSP1Port][CSP2Host:CSP2Port][CSP3Host:CSP3Port],Timeout=10" /><add key="login.cluster.peer-site.nodes.MyConfigurationEnvironment"
value="[CSP4Host:CSP4Port][CSP5Host:CSP5Port][CSP6Host:CSP6Port],Timeout=10" />...
</appSettings>
Where:
• MyConfigurationEnvironment: The name of the Configuration Environment that is displayed inthe Login window. For example: 'Production' or 'Staging'. This must be consistent with thecluster.environment-name configured in the Virtual Configuration Server Proxy application(s).
• ApplicationName: The name of the Workspace Desktop application in Management framework• CSP1Host:CSP1Port...: The host:port pairs of your configuration server proxies defining the
cluster.• Timeout: Specifies the delay, in seconds, that is applied after connections to primary and backup
have been checked and failed. This parameter applies only after initial successful connection hasbeen lost.
Summary of connection flow
A combination of three sources is used to define the connection logic to the Configuration ServerProxy nodes.
When an agent logs in to a workstation for the first time:
1. A pre-defined configuration is read from the Interactionworkspace.exe.config file.2. Workspace tries to connect to one of the nodes of Configuration Server Proxy according to one of the
following logic: Primary/Backup with Disaster Recovery, Cluster with Disaster Recovery, Primary/Backupwithout Disaster Recovery, Cluster without Disaster Recovery.
3. Once Workspace is connected, it reads the virtual Configuration Server Proxy connection(s) information.4. Store the current configuration in the localUserSettings.conf file for the next login from this
Workstation.
When an agent logs in to a workstation for the second and subsequent times:
1. Workspace reads the configuration information stored in the localUserSettings.conf file. Storedsettings have a configuration environment name.
2. Workspace reads the predefined configuration stored in the Interactionworkspace.exe.config file,which has a configuration environment name.
3. Workspace compares the configuration environment name, if they match, then Workspace uses thestored settings from the localUserSettings.conf file. If they do not match, Workspace uses theInteractionworkspace.exe.config file as if this is a first login situation.
Important
Provisioning functionality Load Balancing using clusters
Workspace Desktop Edition Deployment Guide 411

• Workspace employs a Cryptographically secure pseudo-random number generator(CSPRNG) to select the next node to ensure the best load balancing between allWorkspace instances.
• In all cases, Workspace does not try to close the current Configuration Server Proxy nodeconnection if it does not match the configuration.
Provisioning functionality Load Balancing using clusters
Workspace Desktop Edition Deployment Guide 412

Customizing display names[Modified: 8.5.109.16, 8.5.120.05, 8.5.143.08, WSEP 8.5.114.05]
[Added: 8.5.101.14]
Workspace uses the display-format.* configuration options to enable you to customize howdifferent interface elements are displayed to agents. They are also used to customize the displaynames of Framework objects, such as Routing Points and Queues, in the agent interface.
TipThis article is a work in progress. Additional use cases and examples will be added inthe future.
Customizing display names for configuration objects
The display-format.* configuration options enable you to specify the data source for the displaynames of different objects. For example:
1. System attributes of configuration objects (for example, Routing Point Number or Agent Group Name)2. Custom Display names defined in custom dictionary files3. Custom Display names defined in the object Annex4. If none of the defined sources contain an actual string to display, Workspace displays the mandatory
attribute value that is identified as the default for a particular object (for example, 'Number' for a DN).
You can use the display-format.* options to define multiple sources, separated by the ‘|’character, which specifies the precedence order of the sources. Precedence order if from left to right.If nothing is defined for the first source, the next one is checked, and so on.
Configuring object display names using custom dictionary files[Added: 8.5.101.14]
Starting with Workspace 8.5.100x.xx, the list of field codes for these options is extended to take localdictionary entries into account. For example, for the display-format.routing-point.name option,the following key is supported: $RoutingPoint.DictionaryValue$. This key selects the name for therouting point based on the value specified for it in the language dictionary file.
For the display-format.action-code.name option, if the $ActionCode.DictionaryValue$ key isspecified, then the value for the action code will be selected from the dictionary that corresponds tothe language that the agent specified at login.
Provisioning functionality Customizing display names
Workspace Desktop Edition Deployment Guide 413

For example, in custom.en-US.xml, the action code might be specified as:
{code}<Value Id="ActionCode.Break" Text="Break"/>{code}
And, in custom.fr-FR.xml, the same action code might be specified as:
{code}<Value Id="ActionCode.Break" Text="Pause"/>{code}
The following is an example of a custom dictionary that specifies alternate text for configurationobjects:
<?xml version="1.0" encoding="utf-8" ?><Dictionary EnglishName="English" CultureName="English" Culture="en-US"><!-- [<Tenant>].<object-type>.[<switch>].<object-identifier> (where [<Tenant>] and
[<switch>] are optional) -->
<Value Id="defaultTenant.RoutingPoint.LucentG3.122" Text="Routing Point 122" /><Value Id="defaultTenant.ACDQueue.LucentG3.80001" Text="ACD Queue 80001" /><Value Id="defaultTenant.InteractionQueue.any-queue-to-agent-group-8002" Text="Interaction
Queue for Agent Group 8002" /><Value Id="defaultTenant.InteractionQueue.email-routing-queue-inbound" Text="Interaction
Queue for inbound emails" /><Value Id="defaultTenant.ActionCode.Break" Text="Coffee Break" /><Value Id="defaultTenant.Workbin.email-draft-wb" Text="Rough copy Emails" /><Value Id="defaultTenant.BusinessAttribute.DispositionCode" Text="Disposal Code" /><Value Id="defaultTenant.BusinessAttribute.DispositionCode.DC_Accepted" Text="Taken" /><Value Id="defaultTenant.Skill.Email-QualityConfidencePercentageSkill" Text="Email skill" /><Value Id="defaultTenant.AgentGroup.Agent Group 80001" Text="Lucent Agent Group 80001" />
</Dictionary>
Configuring display names in the Object Annex[Added: 8.5.109.16] [Modified: 8.5.120.05, WSEP 8.5.114.05]
You can add a display name for certain configuration layer objects. This feature enables you to nameobjects without relying on a local dictionary file. This feature makes localization and centralizationmore efficient.
This method provides a way to configure the display name centrally instead of locally in a dictionaryfile by enabling you to specify key-value pairs in object Annex. Key-value pairs can be defined for adefault language and for localization in alternative languages.
ImportantTo store a display name in an object Annex as a string value that does not use the character set that is usedby Configuration Server, Configuration Server 8.1.3 or higher must be installed and its multi-languagecapability must be enabled. For example, using French accented characters in a U.S. English deployment orusing Korean characters in a Japanese deployment. Refer to Deploying Genesys for Key Mixed LanguageScenarios for information about supporting multi-language deployment.
Provisioning functionality Customizing display names
Workspace Desktop Edition Deployment Guide 414

For each object, the default display name is defined by using the interaction-workspace/display-name = <value> key-value pair.
For each object, additional language display names are defined by using the interaction-workspace/display-name.<ISO_language_code>-<ISO_country_code> = <value> key-value pair(for example, display-name.fr-CA for French Canadian.
The following precedence rules are followed for display names:
• If a particular object type is configured to be displayed through the configuration Annex, Workspacetries at runtime to find a key-value pair that matches the locale that selected by the agent at logintime.
• If no match is found, Workspace uses the default display-name=value key-value pair.• If no default key-value pair is found, Workspace the value that is defined by the display-format.*
options.
The following is an example of a display name in two different languages, the default, and French(France), that could be defined in the object Annex of a Routing Point:
• interaction-workspace/display-name = 'Technical Support Queue': Used if there is no matchinglanguage specific entry for the locale selected by the agent in the login window.
• interaction-workspace/display-name.fr-FR = 'File d'Attente du Support Technique': Used ifthe locale selected by the agent in login window is French (France) (fr-FR)
Use the display-format.folder.name option to specify the display format of folders that are displayedin the Disposition Code and Case Data views. You can localize the folder name using the$Folder.Name$ parameter. [Added: 8.5.120.05, WSEP 8.5.114.05]
Summary of Display Format options[Modified: 8.5.109.16]
The table Summary of Display Format Options contains descriptions of all of the new andupdated display-format configuration options that use the Dictionary Value keys to support thisfeature.
Summary of Display Format Options
Object Type Option Name
Field codes tobe used in
display-format.*options
Dictionary KeyFormat to be
spcified in theXML dictionary
if the$DictionaryValue$is specified in
display-format.*options
Views affectedby this option
DN - ACD Queue display-format.acd-queue.name
$ACDQueue.DictionaryValue$,$ACDQueue.AnnexValue$
[<Tenant>].ACDQueue.<switch>.<dn-number>
TeamCommunicatorLogin views
Provisioning functionality Customizing display names
Workspace Desktop Edition Deployment Guide 415
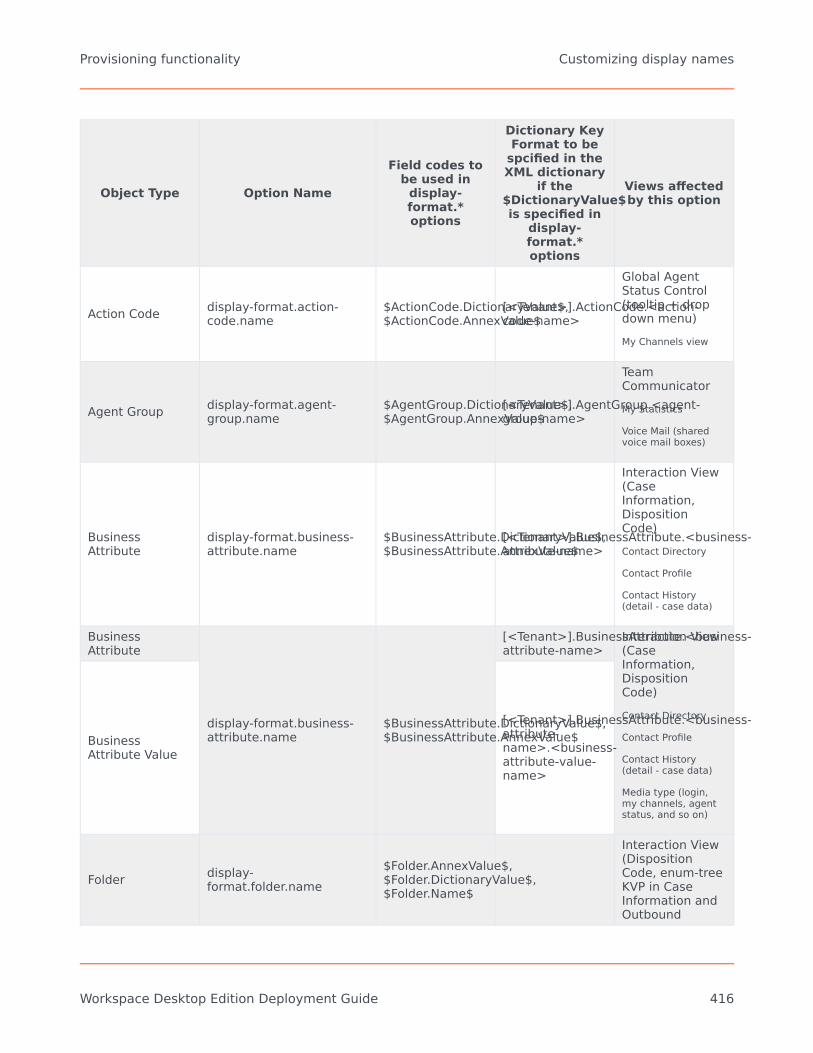
Object Type Option Name
Field codes tobe used in
display-format.*options
Dictionary KeyFormat to be
spcified in theXML dictionary
if the$DictionaryValue$is specified in
display-format.*options
Views affectedby this option
Action Code display-format.action-code.name
$ActionCode.DictionaryValue$,$ActionCode.AnnexValue$
[<Tenant>].ActionCode.<action-code-name>
Global AgentStatus Control(tooltip + dropdown menu)My Channels view
Agent Group display-format.agent-group.name
$AgentGroup.DictionaryValue$,$AgentGroup.AnnexValue$
[<Tenant>].AgentGroup.<agent-group-name>
TeamCommunicatorMy Statistics
Voice Mail (sharedvoice mail boxes)
BusinessAttribute
display-format.business-attribute.name
$BusinessAttribute.DictionaryValue$,$BusinessAttribute.AnnexValue$
[<Tenant>].BusinessAttribute.<business-attribute-name>
Interaction View(CaseInformation,DispositionCode)Contact Directory
Contact Profile
Contact History(detail - case data)
BusinessAttribute
display-format.business-attribute.name
$BusinessAttribute.DictionaryValue$,$BusinessAttribute.AnnexValue$
[<Tenant>].BusinessAttribute.<business-attribute-name>
Interaction View(CaseInformation,DispositionCode)Contact Directory
Contact Profile
Contact History(detail - case data)
Media type (login,my channels, agentstatus, and so on)
BusinessAttribute Value
[<Tenant>].BusinessAttribute.<business-attribute-name>.<business-attribute-value-name>
Folder display-format.folder.name
$Folder.AnnexValue$,$Folder.DictionaryValue$,$Folder.Name$
Interaction View(DispositionCode, enum-treeKVP in CaseInformation andOutbound
Provisioning functionality Customizing display names
Workspace Desktop Edition Deployment Guide 416

Object Type Option Name
Field codes tobe used in
display-format.*options
Dictionary KeyFormat to be
spcified in theXML dictionary
if the$DictionaryValue$is specified in
display-format.*options
Views affectedby this option
Record)
Script -InteractionQueue
display-format.interaction-queue.name
$InteractionQueue.DictionaryValue$,$InteractionQueue.AnnexValue$
[<Tenant>].InteractionQueue.<script-name>
TeamCommunicatorWorkbins view (MyInteraction Queues)
DN - RoutingPoint
display-format.routing-point.name
$RoutingPoint.DictionaryValue$,$RoutingPoint.AnnexValue$
[<Tenant>].RoutingPoint.<switch>.<dn-number>
TeamCommunicatorLogin views
Skill display-format.skill.name $Skill.DictionaryValue$,$Skill.AnnexValue$
[<Tenant>].Skill.<skill-name>
TeamCommunicator
DN - VirtualQueues
display-format.virtual-queue.name
$VirtualQueue.DictionaryValue$,$VirtualQueue.AnnexValue$
[<Tenant>].VirtualQueue.<switch>.<dn-number> Login Views
Script -InteractionWorkbin
display-format.workbin.name
$Workbin.DictionaryValue$,$Workbin.AnnexValue$
[<Tenant>].Workbin.<script-name>
Workbins view(My Workbin, MyTeam Workbins)
Masking a contact's phone number on inbound and outboundinteraction views
[Added: 8.5.143.08]
Protecting the security and privacy of contacts is an important consideration, especially if you haveagents who are working from home. You can use the configuration options in this section to hide thecontact's phone number in the Interaction window. You can modify the default values of theconfiguration options that control the contact information that is displayed in inbound and outboundinteractions. Workspace also supports plain text instead of field codes in the values of the followingoptions:
• display-format.caller-name• display-format.case-name-format• display-format.customer-name-format• display-format.interaction-callback-name• display-format.interaction-outbound-pull-preview-name
Provisioning functionality Customizing display names
Workspace Desktop Edition Deployment Guide 417

• display-format.interaction-voice-name• display-format.party-name-format• interaction.window-title
For example, you can modify the default value of display-format.caller-name to replace$Interaction.MainParty$ with plain text such as XXXXXXXXXXX or Hidden Phone Number.
For Outbound interactions, use the following configuration options and replace the$OutboundRecord.PhoneNumber$ value with plain text to modify what your agents see in theOutbound interaction view:
• display-format.outbound-record-name: Specifies how an Outbound Record from a Record Chain isdisplayed when presented to an agent. The content is populated based on record attributes by a stringthat contains the following field codes: $OutboundRecord.PhoneType$,$OutboundRecord.PhoneNumber$,$OutboundRecordField.X$, where X is the name of the customoutbound field. [Added: 8.5.143.08]
• display-format.caller-name: Specifies the content of the 'Origin' field of the Case Information area. Thisoption is enabled when the value of the interaction.case-data.content option contains the History key.This content is typically used when placing an outbound call where the origin contains a string such as"outbound call to xxx". The content is populated based on attached data keys or contact attributes (ifthere is a contact) or outbound record fields (if there is an outbound record) that are defined by a stringthat contains the following field codes: $Interaction.CaseId$,$Interaction.MainParty$,$Contact.X$,$AttachedData.Y$,$OutboundRecord.PhoneType$,$OutboundRecord.PhoneNumber$,$OutboundRecordField.Z$, where X is the name of contact attribute, Y is the attached data key name,and Z is the name of custom outbound field. If the values of the default field codes are empty, thefollowing field code is used: $Interaction.MainParty$.
[Modified: 8.5.143.08]
Provisioning functionality Customizing display names
Workspace Desktop Edition Deployment Guide 418

Supported systems and switches[Modified: 8.5.116.10]
Supported systems
Refer to the Workspace Desktop Edition topics and the Workspace SIP Endpoint topics in the GenesysSupported Operating Environment Reference Guide.
For information about Virtual Desktop Infrastucture (for example: RDP, VMWare, XenApp,XenDesktop), refer to the Genesys Virtualization Platform Support topics in the Genesys SupportedOperating Environment Reference Guide.
Supported switches
The following switches are supported:
• Avaya Communication Server• Alcatel OmniPCX Enterprise (OXE)/A4400• Cisco CallManager (CM) IP PBX• EADS Telecom Intecom E Series• EADS Telecom Intecom M6880 PointSpan• Ericsson MD110• Ericsson MX-ONE• NEC Small TDM• NEC Large TDM• NEC Small Hybrid• NEC Large Hybrid• NEC SV7000• Nortel Communication Server 1000• Nortel Communication Server 2000/2100• SIP Server• Spectrum• Siemens HiPath 4000 v (including family: 4000, 4300, 4500, 4900)
See Supported Operating Environment Reference Guide for a list of switches that are supported by
Supported systems and switches Customizing display names
Workspace Desktop Edition Deployment Guide 419
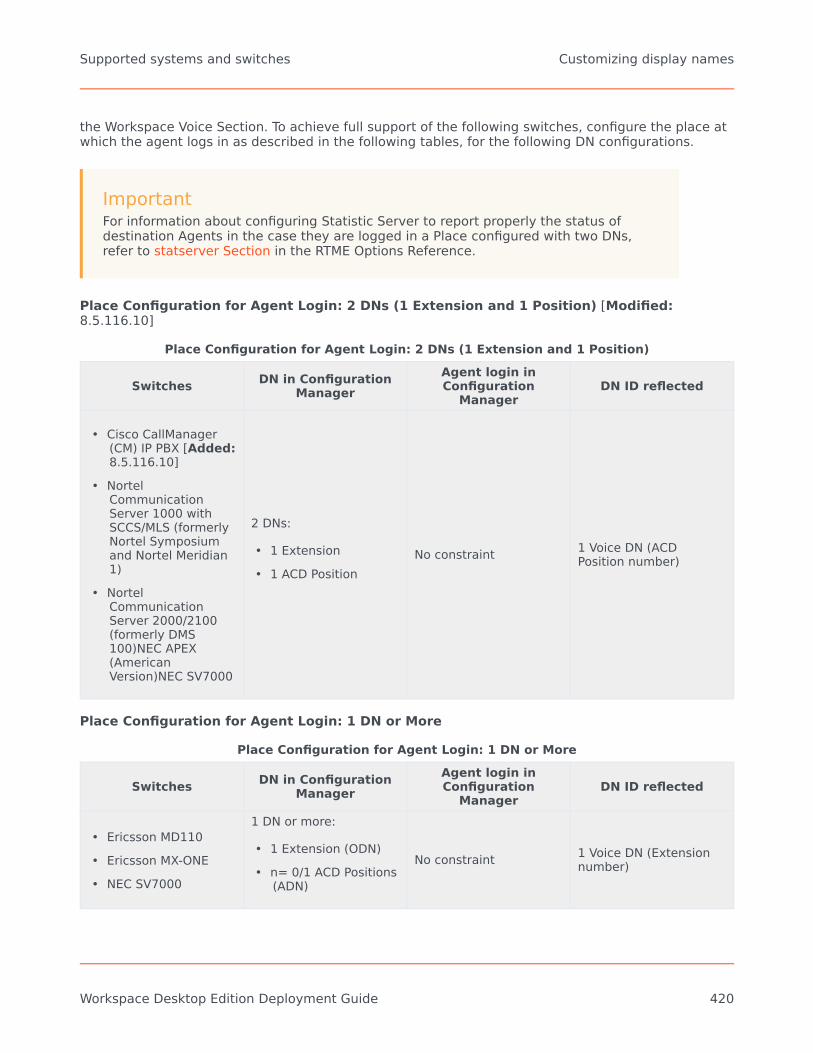
the Workspace Voice Section. To achieve full support of the following switches, configure the place atwhich the agent logs in as described in the following tables, for the following DN configurations.
ImportantFor information about configuring Statistic Server to report properly the status ofdestination Agents in the case they are logged in a Place configured with two DNs,refer to statserver Section in the RTME Options Reference.
Place Configuration for Agent Login: 2 DNs (1 Extension and 1 Position) [Modified:8.5.116.10]
Place Configuration for Agent Login: 2 DNs (1 Extension and 1 Position)
Switches DN in ConfigurationManager
Agent login inConfiguration
ManagerDN ID reflected
• Cisco CallManager(CM) IP PBX [Added:8.5.116.10]
• NortelCommunicationServer 1000 withSCCS/MLS (formerlyNortel Symposiumand Nortel Meridian1)
• NortelCommunicationServer 2000/2100(formerly DMS100)NEC APEX(AmericanVersion)NEC SV7000
2 DNs:
• 1 Extension• 1 ACD Position
No constraint 1 Voice DN (ACDPosition number)
Place Configuration for Agent Login: 1 DN or More
Place Configuration for Agent Login: 1 DN or More
Switches DN in ConfigurationManager
Agent login inConfiguration
ManagerDN ID reflected
• Ericsson MD110• Ericsson MX-ONE• NEC SV7000
1 DN or more:
• 1 Extension (ODN)• n= 0/1 ACD Positions
(ADN)
No constraint 1 Voice DN (Extensionnumber)
Supported systems and switches Customizing display names
Workspace Desktop Edition Deployment Guide 420
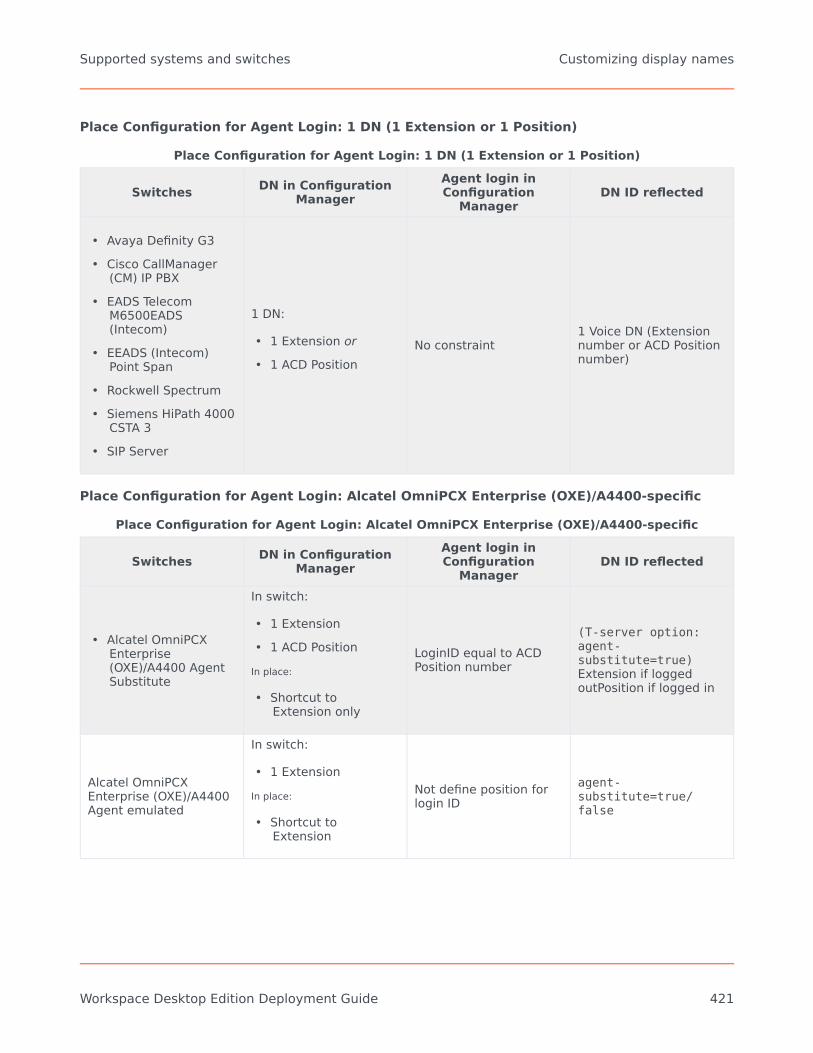
Place Configuration for Agent Login: 1 DN (1 Extension or 1 Position)
Place Configuration for Agent Login: 1 DN (1 Extension or 1 Position)
Switches DN in ConfigurationManager
Agent login inConfiguration
ManagerDN ID reflected
• Avaya Definity G3• Cisco CallManager
(CM) IP PBX• EADS Telecom
M6500EADS(Intecom)
• EEADS (Intecom)Point Span
• Rockwell Spectrum• Siemens HiPath 4000
CSTA 3• SIP Server
1 DN:
• 1 Extension or
• 1 ACD PositionNo constraint
1 Voice DN (Extensionnumber or ACD Positionnumber)
Place Configuration for Agent Login: Alcatel OmniPCX Enterprise (OXE)/A4400-specific
Place Configuration for Agent Login: Alcatel OmniPCX Enterprise (OXE)/A4400-specific
Switches DN in ConfigurationManager
Agent login inConfiguration
ManagerDN ID reflected
• Alcatel OmniPCXEnterprise(OXE)/A4400 AgentSubstitute
In switch:
• 1 Extension• 1 ACD Position
In place:
• Shortcut toExtension only
LoginID equal to ACDPosition number
(T-server option:agent-substitute=true)Extension if loggedoutPosition if logged in
Alcatel OmniPCXEnterprise (OXE)/A4400Agent emulated
In switch:
• 1 ExtensionIn place:
• Shortcut toExtension
Not define position forlogin ID
agent-substitute=true/false
Supported systems and switches Customizing display names
Workspace Desktop Edition Deployment Guide 421

TipIn some cases, for some of the switches that are listed in the Table - PlaceConfiguration for Agent Login: 2 DNs (1 Extension and 1 Position), an agentcannot see all of the DNs in the place configuration; sometimes only one DN is visiblethat includes the features of all of the other DNs.
For some switches you must set the spl.switch-policy-label option in either the switch annex orthe DN annex to specify the operating mode of the switch if it is different from the default modechosen by Workspace.
Workspace automatically assigns the best switch policy for the switch that you are using. If you wantto override the default policy, you can force Workspace to use a different policy.
Section: interaction-workspacespl.switch-policy-label
[Modified: 8.5.116.10, 8.5.117.18]
Possible values:
• Default Value: Depends on Switching office type. The default value is only available if Workspacedetects an ACD Position\Extension pair.
• Valid Values:• Nortel CS 1000 switch: NortelMeridianCallCenter::MLS (default),
NortelMeridianCallCenter::SCCS
• Nortel Communication Server 2000 switch: Valid Values: NortelDMS100 (default),NortelDMS100::PDNMode
• Cisco CallManager switch for 2 DNs configuration [Added: 8.5.116.10]: Valid Values:• CiscoCM::MultiDN::Position (default): Position is used for ThisDn for the MakeCall request.• CiscoCM::MultiDN::Extension: Extension is used for ThisDn for the MakeCall request.
• Microsoft Lync Switch: SIPSwitch::Lync: Prevents Workspace from starting Workspace SIP Endpointfor Lync DNs and also applies the specific Switch Policy for Lync. This option is required in hybridenvironments where agents are configured to work with Places that contain at least one Voice DNfrom SIP Server and one Voice DN from Lync TServer [Added: 8.5.117.18].
Supported systems and switches Customizing display names
Workspace Desktop Edition Deployment Guide 422

Configuration Options Reference
ImportantFor the most up to date information about Workspace configuration options, refer to the GenesysConfiguration Options Database.
• Search for options• Browse options
This article is an appendix of Workspace configuration options, grouped by Configuration Section.This category contains the following sections:
• Introduction To Configuration Options• Section: interaction-workspace• Section: interaction-queue-presence• Section: queue-presence• Section: routing-point-presence• Section: KPIName• Section: ObjectStatisticName• Not Ready Reason Codes• Role Privileges
ImportantAll options in the interaction-workspace section can be defined hierarchically at the following levels:
• Application• Tenant• Agent Group• User (agent)
As you move down the hierarchy, the option setting overrides the previous level. That means that the valuethat you set for a User overrides what has been configured for the same option at a higher level, such asthe value specified for the Agent Group of which the agent is a member.
The values specified for many options can also be overridden by Routing Strategies that referenceTransaction objects.
Configuration Options Reference Customizing display names
Workspace Desktop Edition Deployment Guide 423
For detailed information on this topic, refer to Configuration And Administration By Using Options AndAnnexes.
Configuration Options Reference Customizing display names
Workspace Desktop Edition Deployment Guide 424

Introduction to configuration optionsAs with all other Genesys 8 applications, the Workspace configuration options are loaded into theconfiguration layer by using an XML metadata file that is delivered with Genesys AdministratorExtension. Use Genesys Administrator Extension to view, access, and configure Workspaceconfiguration options.
KPI and statistics options are not part of the XML metadata file, because they are not composed offixed key names. To use the KPIs section, create as many option blocks as the number of KPIs thatyou want to declare. For details, see Section: KPIName. To use the Statistics section, create as manyoption blocks as the number of statistics that you want to declare. For details, see Section:ObjectStatisticName.
Lists of privileges are currently implemented as Boolean options in the Annex of individual agents(see Role Privileges). For information on how to secure your deployment, see the Security optionsthat are contained in the Genesys 8 Security Deployment Guide. For general information onconfiguring and extension, refer to Configuration And Administration By Using Options And Annexes.
For general procedures on how to configure specific agent functionality, refer to ProvisioningFunctionality.
Some options can be configured on the Application, the Tenant, an Agent Group, or an Access Group,while others must be configured on a Person object in the Agent Annex. The description of eachconfiguration option specifies to what object the option is applicable. Options that are specific to thePerson object (Agent Annex) are listed separately in this appendix.
The security.disable-rbac configuration option in the interaction-workspace section determineswhether agents have all privileges allowed or whether the Role Based Access Control (RBAC) controlsystem is used. Refer to Role Privileges for a list of all the privileges.
WarningRBAC requires Configuration Server 8.0.2 or higher.
Refer to Genesys Administrator Extension Help and Genesys 8 Security Deployment Guide fordetailed information on how to use Genesys Administrator Extension and Management Framework toconfigure access permissions
Configuration Options Reference Introduction to configuration options
Workspace Desktop Edition Deployment Guide 425

Section interaction-workspace
TipFor the most up to date Workspace Desktop Edition configuration options, see theGenesys Configuration Option Database.
These options can be configured on the following Configuration Layer objects:
• Workspace Application object• Tenant• Agent Group• Agent
The options are grouped into the following categories:
• Accessibility: Options that enhance the application for hearing and visually impaired agents• Active Recording: Options that control how agents use Active Call Recording and Screen Capture
functionality.• Agent status: Options that control how agents set their Ready status• Alert: Options that control the display of warning messages.• Application: Options that control the default window display behavior.• Broadcast: Options that control how broadcast messages appear and behave• Business Continuity: Options that control the behavior of Workspace during a long term loss of
connection to the primary host site.• Callback Options: Options that control the various features of the Callback view.• Case Data: Options that control the display of Case Data.• Channel Information: Options that control the display of the media prompt window.• Chat: Options that control the appearance and behavior of the Chat interface• Chatserver: Options that control the connectivity parameters, like ADDP settings, between Workspace
and Chat Server.• Contact: Options that control contact management• Disaster Recovery: Options that control the behavior of Workspace during a long term loss of
connection to the primary host site. See Business Continuity options.• Display formats: Options that control the appearance of various text elements in the various
application windows• E-Mail: Options that control the appearance and behavior of the E-Mail interface
Configuration Options Reference Section interaction-workspace
Workspace Desktop Edition Deployment Guide 426
• Editor: Options that control the display of fonts in text editor boxes in Workspace.• eServices: Options that control the use of eServices licenses• Expression: Options that control the parsing of phone numbers in contact interaction• Statistics Gadget: Options that control the use and appearance of the Statistics Gadget• General: Options that control the general behavior of Workspace.• GUI: Options that control the availability of themes in the user interface.• IM: Options that control the appearance and behavior of the Internal Instant Messaging interface• Interaction: Options that control the behavior and appearance of various elements related to the
Interaction window• Interaction Bar: Options that control the display of the Interaction Bar.• Interaction Management: Options that control the way that Team Leads view and manage
interactions in Queues and Workbins for their team members.• Intercommunication: Options that control the routing of internal IM and voice interactions• Keyboard: Options that enable keyboard shortcuts• KPI: Options that control the display of My Statistics (KPIs) on the agent Workspace• License: Options that control how Workspace interacts with License Reporting Manager.• Log: Options that control logging of the application• Login: Options that control the appearance and behavior of the agent login window• Logout: Options that control the behavior of agent log out from Workspace.• Main view: Options that control the behavior of the Main Window• Open Media: Options that enable open media features• Options: Options that specify where the agent object configuration is stored.• Outbound: Options that enable agents to participate in outbound campaigns• Presence: Options that control how agent presence is evaluated and displayed.• Printing: Options that control the display of the Print Preview feature.• Reporting: Otpions that specify how agent activities are reported to the Genesys back-end.• Security: Options that control the timing and behavior of the keyboard and mouse inactivity timeout
feature and other security features• SIP Endpoint: Options that control the functionality and display of Workspace SIP Endpoint enabled
interactions• Screen Recording: Options that control the automatic Screen Recording functionality.• SMS: Options that control the appearance and behavior of the SMS interface• Sounds: Options that specify the name and location in the application folder of audio files that are to
be pre-loaded when an agent logs in.• Spellchecker: Options that control the use of corporate dictionaries in the spelling check feature• Standard Responses: Options that control the functionality and display of the Response view• Statistics: Options that control the display of contact center statistics on the agent Workspace
Configuration Options Reference Section interaction-workspace
Workspace Desktop Edition Deployment Guide 427

• System Tray: Options that control the display of the tooltip that is displayed in the System Tray.• Team Communicator: Options that control the appearance and behavior of the Team Communicator• Team Lead: Options that specify the scope of monitoring that is to be used for voice interactions in
environments that use SIP Server or Cisco UCM• Toast (Interactive Notification): Options that control the appearance and behavior of the interaction
preview Interactive Notification• View: Options that control the tab order and activation order of windows and menus• Voice: Options that control various features of the Voice channel• Voicemail: Options that control access to your system voicemail• Web Callback: Options that control the various features of the Web Callback channel• Webproxy: Options that control the use of a Webproxy for environments where Internet proxies require
user authentication• Workbin: Options that control various features of Workbins• Workitem: Options that control various features of the Workitem channel• Miscellaneous: Options that control the appearance of the Workspace application windows, the
recording of options, the evaluation of presence, the enabling of RBAC, and many other miscellaneousfeatures
Configuration Options Reference Section interaction-workspace
Workspace Desktop Edition Deployment Guide 428

<media-type> options[Modified: 8.5.143.08]
TipFor the most up to date Workspace Desktop Edition configuration options, see theGenesys Configuration Option Database.
The following options can be configured for any supported media type in Workspace. When settingthese options, replace <media-type> with the name of the media type you want to configure. Forexample, chat.auto-answer.
• <media-type>.auto-answer• <media-type>.auto-answer.enable-reject• <media-type>.auto-answer.timer• <media-type>.contact-history.enable-combine-ixn-with-current [Added: 8.5.143.08]• <media-type>.prompt-for-done• <media-type>.pull-from-history-isenabled• <media-type>.ringing-bell• <media-type>.toast-information-key
Related Resources
The following topics discuss the implementation of these options:
Configuration Options Reference Section interaction-workspace
Workspace Desktop Edition Deployment Guide 429

Accessibility options
TipFor the most up to date Workspace Desktop Edition configuration options, see theGenesys Configuration Option Database.
• accessibility.agent-state-change-bell• accessibility.disable-hyperlinks• accessibility.focus-on-interaction-toast• accessibility.interaction-state-change-bell• accessibility.visual-impairment-profile• accessibility.warning-message-bell• accessibility.<media-type>.focus-on-interaction-toast
Related Resources
The following topics discuss the implementation of these options:
• Accessibility and navigation• 8. Enabling accessibility features• Workspace And Genesys 8
Configuration Options Reference Section interaction-workspace
Workspace Desktop Edition Deployment Guide 430

Active Recording options
TipFor the most up to date Workspace Desktop Edition configuration options, see theGenesys Configuration Option Database.
• active-recording.voice.recording-type• active-recording.voice.recorder-uri
Related Resources
The following topic discusses the implementation of these options:
• Call recording and screen recording
Configuration Options Reference Section interaction-workspace
Workspace Desktop Edition Deployment Guide 431
Agent Status options
TipFor the most up to date Workspace Desktop Edition configuration options, see theGenesys Configuration Option Database.
• agent-status.enabled-actions-by-channel• agent-status.enabled-actions-global• agent-status.not-ready-reasons
Related Resources
The following topics discuss the implementation of these options:
• 6. Declaring and using new Not-Ready Reason codes• Managing agent inactivity
Configuration Options Reference Section interaction-workspace
Workspace Desktop Edition Deployment Guide 432
Alert options
TipFor the most up to date Workspace Desktop Edition configuration options, see theGenesys Configuration Option Database.
• alert.timeout
Related Resources
The following topic discusses the implementation of this option:
• 8. Enabling accessibility features
Configuration Options Reference Section interaction-workspace
Workspace Desktop Edition Deployment Guide 433
Application options
TipFor the most up to date Workspace Desktop Edition configuration options, see theGenesys Configuration Option Database.
• application.available-layouts• application.secondary-audio-out-device• application.wiki-help-locale• application.wiki-help-welcome-page
Configuration Options Reference Section interaction-workspace
Workspace Desktop Edition Deployment Guide 434

Broadcast options
TipFor the most up to date Workspace Desktop Edition configuration options, see theGenesys Configuration Option Database.
• broadcast.color.minimal-priority• broadcast.color.low-priority• broadcast.color.normal-priority• broadcast.color.high-priority• broadcast.color.important-priority• broadcast.displayed-columns• broadcast.dn• broadcast.enable-removal• broadcast.enable-removal-priority• broadcast.mark-read-timeout• broadcast.message-content• broadcast.preview-timeout• broadcast.sound.minimal-priority• broadcast.sound.low-priority• broadcast.sound.normal-priority• broadcast.sound.high-priority• broadcast.sound.important-priority• broadcast.subscribed.topics• broadcast.system-messages-auto-mark-read• broadcast.toast-summary• broadcast.value-business-attribute
Related Resources
The following topics discuss the implementation of these options:
• Broadcast Messages
Configuration Options Reference Section interaction-workspace
Workspace Desktop Edition Deployment Guide 435

• Broadcast Message privileges• 5. Enabling Workspace to play ring tones
Configuration Options Reference Section interaction-workspace
Workspace Desktop Edition Deployment Guide 436

Business Continuity options
TipFor the most up to date Workspace Desktop Edition configuration options, see theGenesys Configuration Option Database.
Options that have the disaster-recovery.* prefix are used to configure the Business Continuityfunctionality.
• disaster-recovery.auto-restore• disaster-recovery.disable-login-errors• disaster-recovery.enabled• disaster-recovery.eservices-random-delay-range• disaster-recovery.eservices-site• disaster-recovery.peer-site• disaster-recovery.preferred-site• disaster-recovery.restore-agent-state• disaster-recovery.timeout• disaster-recovery.wait-for-sipphone-timeout
Related Resources
The following topics discuss the implementation of these options:
• Business Continuity for SIP Server, Configuration Server, and Statistic Server• eServices Business Continuity with UCS 9.1• eServices Business Continuity with UCS 8.5• 4. Pre-Defining HA for Configuration Server• Load Balancing using clusters
Configuration Options Reference Section interaction-workspace
Workspace Desktop Edition Deployment Guide 437
Callback options
TipFor the most up to date Workspace Desktop Edition configuration options, see theGenesys Configuration Option Database.
• callback.callback-information.content• callback.callback-information.frame-color• callback.callback-information.header-foreground-color• callback.callback-types-business-attribute• callback.gms-url• callback.ringing-bell
Related Resources
The following topics discuss the implementation of these options:
• Callback• Callback privileges• Web Callback• Web Callback options• Web Callback privileges• Outbound campaigns• Outbound options
Configuration Options Reference Section interaction-workspace
Workspace Desktop Edition Deployment Guide 438

Case Data options
TipFor the most up to date Workspace Desktop Edition configuration options, see theGenesys Configuration Option Database.
• case-data.float-separator
Related Resources
The following topics discuss the implementation of these options:
• Case Data• Case Information editing
Configuration Options Reference Section interaction-workspace
Workspace Desktop Edition Deployment Guide 439
Channel Information options
TipFor the most up to date Workspace Desktop Edition configuration options, see theGenesys Configuration Option Database.
• channel-information.window-title
Configuration Options Reference Section interaction-workspace
Workspace Desktop Edition Deployment Guide 440

Chat options
TipFor the most up to date Workspace Desktop Edition configuration options, see theGenesys Configuration Option Database.
• chat.agent.prompt-color• chat.agent.text-color• chat.attachment-download-timeout• chat.auto-answer• chat.auto-answer.enable-reject• chat.auto-answer.timer• chat.auto-mark-done-non-owner-agent• chat.auto-mark-done-non-owner-agent.timer• chat.auto-mark-done-owner-agent• chat.auto-mark-done-owner-agent.timer• chat.client.prompt-color• chat.client.text-color• chat.emojis-business-attribute• chat.enable-auto-disconnect• chat.historical.maximum-age• chat.max-attachments-files• chat.max-attachments-size• chat.max-file-size• chat.new-message-bell• chat.nickname• chat.on-hold-queue• chat.other-agent.prompt-color• chat.other-agent.text-color• chat.pending-response-to-customer• chat.pending-response-to-customer-bell• chat.prompt-for-end
Configuration Options Reference Section interaction-workspace
Workspace Desktop Edition Deployment Guide 441

• chat.reconnect-attempts• chat.reconnect-timeout• chat.restricted-attachment-file-types• chat.ringing-bell• chat.show-attachment-image-thumbnail• chat.show-unread-notification• chat.simple-transcript• chat.system.text-color• chat.time-stamp• chat.toast-information-key• chat.transcript-enable-history-filters• chat.typing-isenabled• chat.typing-timeout
Related Resources
The following topics discuss the implementation of these options:
• Chat• MonitoringChatInteractions• Chat Server options• Chat privileges
Configuration Options Reference Section interaction-workspace
Workspace Desktop Edition Deployment Guide 442

Chat Server options
TipFor the most up to date Workspace Desktop Edition configuration options, see theGenesys Configuration Option Database.
• chatserver.addp.local-timeout• chatserver.addp.remote-timeout• chatserver.addp.trace-mode
Related Resources
The following topics discuss the implementation of these options:
• Configuring the Workspace application object• Load Balancing using clusters• eServices Business Continuity with UCS 9.1• eServices Business Continuity with UCS 8.5• Chat• Chat options• Chat privileges
Configuration Options Reference Section interaction-workspace
Workspace Desktop Edition Deployment Guide 443

Contact options[Modified: 8.5.144.05]
TipFor the most up to date Workspace Desktop Edition configuration options, see theGenesys Configuration Option Database.
• contact.all-interactions-default-time-filter-main• contact.all-interactions-displayed-columns• contact.all-interactions-displayed-columns-
treeview• contact.all-interactions-quick-search-attributes• contact.available-directory-page-sizes• contact.cache-timeout-delay• contact.date-search-types• contact.default-directory-page-size• contact.directory-advanced-default• contact.directory-auto-append-star-to-search• contact.directory-default-mode• contact.directory-displayed-columns• contact.directory-enabled-modes• contact.directory-
permissions.<ContactAttributeName>• contact.directory-search-attributes• contact.directory-search-types• contact.displayed-attributes• contact.editable-attributes• contact.history-auto-append-star-to-search• contact.history-custom-attributes-search-types• contact.history.filters-<attribute>• contact.history.highlight-current-interaction• contact.history.media-filters• contact.history-advanced-default
• contact.history-custom-attribute-values.<attribute-name>
• contact.history-default-time-filter-main• contact.history-displayed-columns• contact.history-displayed-columns-treeview• contact.history-quick-search-attributes• contact.history-search-attributes• contact.history-search-attribute-group.<group-
name>• contact.history.voice-detail-attributes• contact.last-called-agent.enable• contact.last-called-agent.<media-type>.enable• contact.lookup.auto-assign-mode• contact.lookup.enable• contact.lookup.enable-create-contact• contact.lookup.<media-type>.auto-assign-mode• contact.lookup.<media-type>.enable• contact.lookup.<media-type>.enable-create-
contact• contact.lookup.voice.use-dialed-phone-number• contact.mandatory-attributes• contact.metrics.enable-interactions-in-progress• contact.metrics.time-frame-customer-
notification• contact.multiple-value-attributes• contact.myhistory-default-time-filter-main
Configuration Options Reference Section interaction-workspace
Workspace Desktop Edition Deployment Guide 444

• contact.myhistory-displayed-columns• contact.myhistory-displayed-columns-treeview• contact.myhistory-quick-search-attributes• contact.threading-ucs-interaction.enable• contact.timeout-delay
• contact.ucs-interaction.<media-type>.enable-create
• contact.ucs-interaction.<media-type>.enable-lookup
• contact.ucs-interaction.<media-type>.use-server-date
Related Resources
The following topics discuss the implementation of these options:
• Exposing Contacts to Agents• Exposing History to agents• Triggering contact look-up and populating History• Contact Management privileges
Configuration Options Reference Section interaction-workspace
Workspace Desktop Edition Deployment Guide 445
Display Format options[Moadified: 8.5.143.08, 8.5.144.05]
TipFor the most up to date Workspace Desktop Edition configuration options, see theGenesys Configuration Option Database.
• display-format.acd-queue.name• display-format.action-code.name• display-format.agent-group.name• display-format.agent-name• display-format.business-attribute.name• display-format.caller-name• display-format.case-name-format• display-format.chat-agent-name• display-format.contact-name• contact.multi-value-attribute-display.<contact-
attribute>• display-format.current-agent-name• display-format.customer-name-format• display-format.field.name• display-format.folder.name• display-format.interaction-callback-name• display-format.interaction-chat-name
• display-format.interaction-email-name• display-format.interaction-im-name• display-format.interaction-outbound-pull-
preview-name• display-format.interaction-outbound-push-
preview-name• display-format.interaction-queue.name• display-format.interaction-sms-name• display-format.interaction-voice-name• display-format.interaction-workitem-name• display-format.outbound-record-name• display-format.party-name-format• display-format.routing-point.name• display-format.skill.name• display-format.virtual-queue.name• display-format.workbin.name
Related Resources
The following topic discusses the implementation of these options:
• Customizing display names for configuration objects
Configuration Options Reference Section interaction-workspace
Workspace Desktop Edition Deployment Guide 446

Email options[Modified: 8.5.143.08]
TipFor the most up to date Workspace Desktop Edition configuration options, see theGenesys Configuration Option Database.
• email.attachment-download-timeout• email.auto-answer• email.auto-answer.enable-reject• email.auto-answer.timer• email.can-change-text-direction• email.default-queue• email.forward.enable-cc-addresses• email.forward.enable-instructions• email.forward.enable-multiple-to-addresses• email.forward-queue• email.from-addresses• email.from-addresses.force-default-on-reply• email.html-format• email.include-original-text-in-reply• email.include-standard-response-subject-on-
insert• email.inline-forward-prefix• email.inline-forward-queue• email.mandatory-subject• email.max-attachments-size• email.move-inbound-to-in-progress-workbin-on-
reply
• email.outbound.copy-editable-case-data-in-inbound
• email.outbound-queue• email.outbound.editable-bcc-addresses• email.outbound.editable-cc-addresses• email.outbound.editable-to-addresses• email.prompt-for-done• email.pull-from-history-isenabled• email.qa-review-dispositions-business-attribute• email.quote-char• email.quote-header• email.reply-copy-category-id• email.reply-format• email.reply-prefix• email.restricted-attachment-file-types• email.resend-prefix• email.ringing-bell• email.set-ownerid-on-send• email.signature• email.toast-information-key
Configuration Options Reference Section interaction-workspace
Workspace Desktop Edition Deployment Guide 447
Related Resources
The following topics discuss the implementation of these options:
• Email• E-Mail Privileges• Email Quality Assurance
Configuration Options Reference Section interaction-workspace
Workspace Desktop Edition Deployment Guide 448

Editor options
TipFor the most up to date Workspace Desktop Edition configuration options, see theGenesys Configuration Option Database.
• editor.font-size-units• editor.shortcuts.prefix• editor.user-agent-http-header
Configuration Options Reference Section interaction-workspace
Workspace Desktop Edition Deployment Guide 449
eServices Options
TipFor the most up to date Workspace Desktop Edition configuration options, see theGenesys Configuration Option Database.
• eservices.disconnect-on-logoff• eservices.session-restore-mediatype• eservices.session-restore-timeout
Related Resources
The following topics discuss the implementation of these options:
• eServices Business Continuity with UCS 9.1• eServices Business Continuity with UCS 8.5
Configuration Options Reference Section interaction-workspace
Workspace Desktop Edition Deployment Guide 450

Expression options
TipFor the most up to date Workspace Desktop Edition configuration options, see theGenesys Configuration Option Database.
• expression.callable-phone-number• expression.email-address• expression.outbound-campaign-phone-number• expression.phone-number• expression.phone-number.supported-characters• expression.team-communicator-phone-number• expression.url
Related Resources
The following topics discuss the implementation of these options:
• Email• Setting up manual dialing of alternate numbers• 4. Provisioning a hybrid voice agent
Configuration Options Reference Section interaction-workspace
Workspace Desktop Edition Deployment Guide 451

Statistics Gadget options
TipFor the most up to date Workspace Desktop Edition configuration options, see theGenesys Configuration Option Database.
• gadget-statistics.displayed-call-center-statistics• gadget-statistics.displayed-kpis• gadget-statistics.nb-tagged-stats-per-page• gadget-statistics.show
Related Resources
The following topics discuss the implementation of these options:
• 3. Enabling an agent to view My Statistics and Contact Center Statistics in the Statistics Gadget• Statistics privileges
Configuration Options Reference Section interaction-workspace
Workspace Desktop Edition Deployment Guide 452
General options
TipFor the most up to date Workspace Desktop Edition configuration options, see theGenesys Configuration Option Database.
• general.configuration-agent-collection-loading-method• general.configuration-business-attribute-cache-preload• general.configuration-object-collection-cache-timeout• general.configuration-transaction-cache-preload• general.configuration-update-notification• general.gad.attached-data• general.non-unicode-connection-encoding• general.writable-downloaded-attachment-file-types
Configuration Options Reference Section interaction-workspace
Workspace Desktop Edition Deployment Guide 453

GUI options
TipFor the most up to date Workspace Desktop Edition configuration options, see theGenesys Configuration Option Database.
• gui.editor-zoom-range• gui.emoji-font-name• gui.magnification-factor• gui.themes
Related Resources
The following topics discuss the implementation of these options:
• Accessibility and navigation• Setting up agents on the system• Chat
Configuration Options Reference Section interaction-workspace
Workspace Desktop Edition Deployment Guide 454
IM options
TipFor the most up to date Workspace Desktop Edition configuration options, see theGenesys Configuration Option Database.
• im.agent.prompt-color• im.agent.text-color• im.auto-answer• im.new-message-bell• im.other-agent.prompt-color• im.other-agent.text-color• im.prompt-for-end• im.ringing-bell• im.simple-transcript• im.system.text-color• im.time-stamp• im.toast-timeout
Related Resources
The following topics discuss the implementation of these options:
• Instant Messaging• Communicating inside your business• IM privileges
Configuration Options Reference Section interaction-workspace
Workspace Desktop Edition Deployment Guide 455

Interaction options
TipFor the most up to date Workspace Desktop Edition configuration options, see theGenesys Configuration Option Database.
• interaction.auto-focus• interaction.auto-focus.<media-type>• interaction.case-data.content• interaction.case-data.enable-url-preview• interaction.case-data.format-business-attribute• interaction.case-data.frame-color• interaction.case-data.header-foreground-color• interaction.case-data.is-read-only-on-idle• interaction.consult-user-data• interaction.disposition.display-mode• interaction.disposition.email.mandatory-actions• interaction.disposition.is-mandatory• interaction.disposition.is-read-only-on-idle• interaction.disposition.key-name• interaction.disposition.use-attached-data• interaction.disposition.use-connection-id• interaction.disposition.value-business-attribute• interaction.evaluate-real-party-for-agent• interaction.evaluate-real-party-for-agent.expression• interaction.override-option-key• interaction.reject-route• interaction.unconditional-force-close• interactions.window.allows-transparency-on-winos6• interaction.window.popup-topmost-z-order• interaction.window.show-case-interaction-panel-button• interaction.window.show-in-taskbar
Configuration Options Reference Section interaction-workspace
Workspace Desktop Edition Deployment Guide 456

• interaction.window-title
Related Resources
The following topics discuss the implementation of these options:
• Configuring the behavior of incoming interactions• Reporting• Case Data• Workbin and Interaction Queue management• Planning Your Deployment• Disposition codes• Overriding Workspace options• Standard Responses Library• Channels and interaction handling
Configuration Options Reference Section interaction-workspace
Workspace Desktop Edition Deployment Guide 457

Interaction Bar options
TipFor the most up to date Workspace Desktop Edition configuration options, see theGenesys Configuration Option Database.
• interaction-bar.detail-tooltip.max-height• interaction-bar.enable-quick-access• interaction-bar.quick-access-auto-open• interaction-bar.quick-access-auto-open.<media-type>• interaction-bar.quick-access-modes• interaction-bar.quick-access-modes.<media-type>
Related Resources
The following topics discuss the implementation of these options:
• Interaction Bar• Main Window privileges
Configuration Options Reference Section interaction-workspace
Workspace Desktop Edition Deployment Guide 458

Interaction Management Options
TipFor the most up to date Workspace Desktop Edition configuration options, see theGenesys Configuration Option Database.
• interaction-management.available-interaction-page-sizes• interaction-management.filters• interaction-management.interactions-filter.displayed-columns• interaction-management.snapshot-timeout-delay
Related Resources
The following topics discuss the implementation of these options:
• Workbin and Interaction Queue management• Interaction Management privileges
Configuration Options Reference Section interaction-workspace
Workspace Desktop Edition Deployment Guide 459
Intercommunication options
TipFor the most up to date Workspace Desktop Edition configuration options, see theGenesys Configuration Option Database.
• intercommunication.chat.conference.invite-timeout• intercommunication.chat.queue• intercommunication.chat.routing-based-actions• intercommunication.chat.routing-based-targets• intercommunication.email.queue• intercommunication.email.routing-based-actions• intercommunication.email.routing-based-targets• intercommunication.im.routing-based-actions• intercommunication.im.routing-based-targets• intercommunication.im.routing-points• intercommunication.sms.queue• intercommunication.sms.routing-based-actions• intercommunication.sms.routing-based-targets• intercommunication.voice.routing-based-actions• intercommunication.voice.routing-based-targets• intercommunication.voice.routing-points• intercommunication.voicemail.enabled-target-types• intercommunication.voicemail.routing-points• intercommunication.<media-type>.queue• intercommunication.<media-type>.routing-based-actions• intercommunication.<media-type>.routing-based-targets
Related Resources
The following topics discuss the implementation of these options:
• Enabling Team Communicator calling features
Configuration Options Reference Section interaction-workspace
Workspace Desktop Edition Deployment Guide 460
• Instant Messaging• Chat• Email• Voicemail
Configuration Options Reference Section interaction-workspace
Workspace Desktop Edition Deployment Guide 461

Keyboard options
TipFor the most up to date Workspace Desktop Edition configuration options, see theGenesys Configuration Option Database.
Important• Keyboard.hotkey.* options relate to keyboard shortcuts that have global workstation
scope, meaning they can work while another application is in focus; therefore, theypotentially conflict with hot keys subscribed by other applications in the system.
• Keyboard.shortcut.* options have Workspace Application scope. There is no conflictwith shortcut keys of other applications, but Workspace must be in focus for thesekeyboard shortcuts to function.
• keyboard.hotkey.agent-not-ready• keyboard.hotkey.agent-not-ready-with-reason.<action-code>• keyboard.hotkey.agent-ready• keyboard.hotkey.decrease-microphone-volume-active-sip-call• keyboard.hotkey.decrease-speaker-volume-active-sip-call• keyboard.hotkey.hold-active-call• keyboard.hotkey.increase-microphone-volume-active-sip-call• keyboard.hotkey.increase-speaker-volume-active-sip-call• keyboard.hotkey.mute-microphone-active-sip-call• keyboard.hotkey.mute-speaker-active-sip-call• keyboard.hotkey.release-active-call• keyboard.hotkey.toaster.accept• keyboard.hotkey.toaster.decline• keyboard.shortcut.action.help• keyboard.shortcut.campaign.get-record• keyboard.shortcut.contact.assigncontact• keyboard.shortcut.contact.reset• keyboard.shortcut.contact.save
Configuration Options Reference Section interaction-workspace
Workspace Desktop Edition Deployment Guide 462

• keyboard.shortcut.hamburger.open• keyboard.shortcut.interaction.chat.conference• keyboard.shortcut.interaction.chat.end• keyboard.shortcut.interaction.chat.hold• keyboard.shortcut.interaction.chat.transfer• keyboard.shortcut.interaction.consult• keyboard.shortcut.interaction.email.add-attachments• keyboard.shortcut.interaction.email.delete• keyboard.shortcut.interaction.email.forward• keyboard.shortcut.interaction.email.inline-forward• keyboard.shortcut.interaction.email.interim-send• keyboard.shortcut.interaction.email.print• keyboard.shortcut.interaction.email.put-back-to-origin-queue• keyboard.shortcut.interaction.email.reply• keyboard.shortcut.interaction.email.reply-all• keyboard.shortcut.interaction.email.save• keyboard.shortcut.interaction.email.save-in-workbin• keyboard.shortcut.interaction.email.send• keyboard.shortcut.interaction.email.transfer• keyboard.shortcut.interaction.im.release• keyboard.shortcut.interaction.mark-done• keyboard.shortcut.interaction.preview.call-record• keyboard.shortcut.interaction.preview.cancel-record• keyboard.shortcut.interaction.preview.mark-done• keyboard.shortcut.interaction.preview.mark-done-get-next• keyboard.shortcut.interaction.preview.reject-record• keyboard.shortcut.interaction.pull-preview.mark-done• keyboard.shortcut.interaction.pull-preview.mark-done-get-next• keyboard.shortcut.interaction.sms.delete• keyboard.shortcut.interaction.sms.transfer• keyboard.shortcut.interaction.voice.answer-call• keyboard.shortcut.interaction.voice.hold-call• keyboard.shortcut.interaction.voice.pause-recording-call• keyboard.shortcut.interaction.voice.reconnect-call• keyboard.shortcut.interaction.voice.release-call
Configuration Options Reference Section interaction-workspace
Workspace Desktop Edition Deployment Guide 463

• keyboard.shortcut.interaction.voice.resume-call• keyboard.shortcut.interaction.voice.resume-recording-call• keyboard.shortcut.interaction.voice.single-step-conference• keyboard.shortcut.interaction.voice.single-step-transfer• keyboard.shortcut.interaction.voice.start-recording-call• keyboard.shortcut.interaction.voice.stop-recording-call• keyboard.shortcut.interaction.webcallback.call-contact• keyboard.shortcut.interaction.webcallback.mark-done• keyboard.shortcut.interaction.workitem.move-to-workbin• keyboard.shortcut.interaction.workitem.put-back-to-origin-queue• keyboard.shortcut.interaction.workitem.transfer• keyboard.shortcut.state.logout• keyboard.shortcut.state.not-ready• keyboard.shortcut.state.not-ready-after-call-work• keyboard.shortcut.state.ready• keyboard.shortcut.team-communicator.focus• keyboard.shortcut.teamlead.chat.bargein• keyboard.shortcut.teamlead.chat.stop-monitoring• keyboard.shortcut.teamlead.stop-monitoring• keyboard.shortcut.teamlead.voice.bargein• keyboard.shortcut.teamlead.voice.stop-monitoring• keyboard.shortcut.toaster.accept• keyboard.shortcut.toaster.decline
Related Resources
The following topics discuss the implementation of these options:
• Accessibility and navigation• Configuring the appearance and content of the user interface• Workspace And Genesys 8
Configuration Options Reference Section interaction-workspace
Workspace Desktop Edition Deployment Guide 464

KPI options
TipFor the most up to date Workspace Desktop Edition configuration options, see theGenesys Configuration Option Database.
• kpi.displayed-kpis• kpi.refresh-time• kpi.show-agent-groups
Related Resources
The following topics discuss the implementation of these options:
• KPIs and Contact Center Statistics• Section KPI Name• Statistics Gadget options
Configuration Options Reference Section interaction-workspace
Workspace Desktop Edition Deployment Guide 465
License options
TipFor the most up to date Workspace Desktop Edition configuration options, see theGenesys Configuration Option Database.
• license.lrm-enabled
Configuration Options Reference Section interaction-workspace
Workspace Desktop Edition Deployment Guide 466
Log options
TipFor the most up to date Workspace Desktop Edition configuration options, see theGenesys Configuration Option Database.
• log.default-filter-type• log.filter-data.<keyName>• log.max-age• log.PSDK• log.PSDK.SwitchPolicy• log.segment• log.Trace• log.verbose
Related Resources
The following topics discuss the implementation of these options:
• Hiding selected data in logs
Configuration Options Reference Section interaction-workspace
Workspace Desktop Edition Deployment Guide 467

Login options
TipFor the most up to date Workspace Desktop Edition configuration options, see theGenesys Configuration Option Database.
• login.available-place-groups• login.chat.auto-not-ready-reason• login.chat.can-unactivate-channel• login.chat.is-auto-ready• login.default-place• login.email.auto-not-ready-reason• login.email.can-unactivate-channel• login.email.is-auto-ready• login.enable-login-without-channel• login.enable-place-completion• login.enable-same-agent-place• login.im.auto-not-ready-reason• login.im.available-queues• login.im.can-unactivate-channel• login.im.is-auto-ready• login.im.prompt-agent-login-id• login.im.prompt-dn-password• login.im.prompt-queue• login.place-location-source• login.place-selection-type• login.place-state-timeout• login.prompt-place• login.sms.auto-not-ready-reason• login.sms.can-unactivate-channel• login.sms.is-auto-ready• login.store-recent-place
Configuration Options Reference Section interaction-workspace
Workspace Desktop Edition Deployment Guide 468

• login.store-username• login.voice.auto-not-ready-reason• login.voice.available-queues• login.voice.can-unactivate-channel• login.voice.force-relogin• login.voice.is-auto-ready• login.voice.prompt-agent-login-id• login.voice.prompt-dn-less-phone-number• login.voice.prompt-dn-password• login.voice.prompt-queue• login.voice.use-dn-less-login-extension• login.webcallback.auto-not-ready-reason• login.webcallback.can-unactivate-channel• login.webcallback.is-auto-ready• login.workmode• login.<media-type>.auto-not-ready-reason• login.<media-type>.can-unactivate-channel• login.<media-type>.is-auto-ready
Related Resources
The following topic discusses the implementation of these options:
• Agent login, authentication, and logout
Configuration Options Reference Section interaction-workspace
Workspace Desktop Edition Deployment Guide 469

Logout options
TipFor the most up to date Workspace Desktop Edition configuration options, see theGenesys Configuration Option Database.
• logout.enable-exit-on-logoff-error• logout.voice.use-login-queue-on-logout
Related Resources
The following topic discusses the implementation of these options:
• Agent login, authentication, and logout
Configuration Options Reference Section interaction-workspace
Workspace Desktop Edition Deployment Guide 470

Main Window options
TipFor the most up to date Workspace Desktop Edition configuration options, see theGenesys Configuration Option Database.
• main-window.auto-hide-display-delay• main-window.bypass-auto-hide-conditions• main-window.window-title
Related Resources
The following topics discuss the implementation of these options:
• Configuring the appearance and content of the user interface• Main Window privileges
Configuration Options Reference Section interaction-workspace
Workspace Desktop Edition Deployment Guide 471

Open Media options
TipFor the most up to date Workspace Desktop Edition configuration options, see theGenesys Configuration Option Database.
• openmedia.bundle.sms• openmedia.workitem-channels
Related Resources
The following topics discuss the implementation of these options:
• Workitems• SMS and MMS
Configuration Options Reference Section interaction-workspace
Workspace Desktop Edition Deployment Guide 472

Options options
TipFor the most up to date Workspace Desktop Edition configuration options, see theGenesys Configuration Option Database.
• options.clean-up-former-record-location• options.record-location• options.record-option-locally-only
Related Resources
The following topics discuss the implementation of these options:
• Configuring the appearance and content of the user interface• Setting up agents on the system• Planning Your Deployment• Chat
Configuration Options Reference Section interaction-workspace
Workspace Desktop Edition Deployment Guide 473

Outbound options
TipFor the most up to date Workspace Desktop Edition configuration options, see theGenesys Configuration Option Database.
• outbound-callback.ringing-bell• outbound.callback-types• outbound.call-result-is-mandatory• outbound.call-result-values• outbound.campaign-stale-timeout• outbound.complete-record-before-transfer• outbound.fields.float-separator-in-db• outbound.load-at-startup• outbound.push-preview.auto-answer• outbound.push-preview.auto-answer.enable-reject• outbound.push-preview.auto-answer.timer• outbound.push-preview.media-types• outbound.record-information.frame-color• outbound.record-information.header-foreground-color• outbound.reschedule-inherit-parent-availability-interval• outbound.sound.campaign-updated• outbound.timed-preview-auto-dial• outbound.treatment-mode• <media-type>.ringing-bell
Related Resources
The following topic discusses the implementation of these options:
• Outbound campaigns
Configuration Options Reference Section interaction-workspace
Workspace Desktop Edition Deployment Guide 474

Presence options
TipFor the most up to date Workspace Desktop Edition configuration options, see theGenesys Configuration Option Database.
• presence.evaluate-presence
Configuration Options Reference Section interaction-workspace
Workspace Desktop Edition Deployment Guide 475

Printing options
TipFor the most up to date Workspace Desktop Edition configuration options, see theGenesys Configuration Option Database.
• printing.use-print-preview
Related Resources
The following topics discuss the implementation of this options:
• Email• E-Mail Privileges
Configuration Options Reference Section interaction-workspace
Workspace Desktop Edition Deployment Guide 476

Reporting options
TipFor the most up to date Workspace Desktop Edition configuration options, see theGenesys Configuration Option Database.
• reporting.case.report-case-in-focus-duration
Related Resources
The following topic discusses the implementation of these options:
• Reporting
Configuration Options Reference Section interaction-workspace
Workspace Desktop Edition Deployment Guide 477

Screen Recording options[Modified: 8.5.143.08]
TipFor the most up to date Workspace Desktop Edition configuration options, see theGenesys Configuration Option Database.
• screen-recording.client.address [Added: 8.5.143.08]• screen-recording.client.max-attempts• screen-recording.client.ping-interval• screen-recording.client.port• screen-recording.client.secure-connection• screen-recording.htcc.peer_uri• screen-recording.htcc.uri
Related Resources
The following topics discuss the implementation of these options:
• Call recording and screen recording• Recording privileges
Configuration Options Reference Section interaction-workspace
Workspace Desktop Edition Deployment Guide 478

Security options
TipFor the most up to date Workspace Desktop Edition configuration options, see theGenesys Configuration Option Database.
• security.disable-rbac• security.enable-debug-information• security.inactivity-force-not-ready-state• security.inactivity-not-ready-reason• security.inactivity-set-agent-not-ready• security.inactivity-timeout• security.session-lock-force-not-ready-state• security.session-lock-not-ready-reason• security.session-lock-set-agent-not-ready
Related Resources
The following topics discuss the implementation of these options:
• Agent login, authentication, and logout• Configuring system-access permissions• Deployment overview• Deployment prerequisites• Managing agent inactivity• Setting up agents on the system• Client-side port security• Security privileges
Configuration Options Reference Section interaction-workspace
Workspace Desktop Edition Deployment Guide 479

Workspace SIP Endpoint options
TipFor the most up to date Workspace Desktop Edition configuration options, see theGenesys Configuration Option Database.
ImportantSignificant changes are made to the SIP Endpoint configuration options between SIPEndpoint 8.0.2 and SIP Endpoint 8.5.0. For a list of the changes, refer to the SIPEndpoint 8.0.2 versus SIP Endpoint 8.5.0 options table. If you want to continueto use Interaction Workspace SIP Endpoint 8.0.2, use the configuration options thatare described in the Interaction Workspace 8.1.4 Deployment Guide.
• sipendpoint.authenticate-with-dn-password• sipendpoint.codecs.g729/8000.fmtp• sipendpoint.codecs.h264.fmtp• sipendpoint.core-deadlock-detection-delay• sipendpoint.exit-on-voice-logoff• sipendpoint.headset-enforce-configured-usage• sipendpoint.headset-unplugged-set-not-ready• sipendpoint.headset-unplugged.not-ready-
reason• sipendpoint.headset-replugged-set-ready• sipendpoint.init-attempt-nb• sipendpoint.init-attempt-timer• sipendpoint.log.verbose• sipendpoint.policy.device.audio_in_device• sipendpoint.policy.device.audio_out_device• sipendpoint.policy.device.capture_device• sipendpoint.policy.device.headset_name• sipendpoint.policy.device.use_headset• sipendpoint.policy.endpoint.defer_device_release• sipendpoint.policy.endpoint.include_mac_address
• sipendpoint.policy.endpoint.public_address• sipendpoint.policy.endpoint.rtp_inactivity_timeout• sipendpoint.policy.endpoint.rtp_port_max• sipendpoint.policy.endpoint.rtp_port_min• sipendpoint.policy.endpoint.sip_port_max• sipendpoint.policy.endpoint.sip_port_min• sipendpoint.policy.endpoint.tcp_port_min• sipendpoint.policy.endpoint.tcp_port_max• sipendpoint.policy.endpoint.video_max_bitrate• sipendpoint.policy.endpoint.webrtc_audio_layer• sipendpoint.policy.session.agc_mode• sipendpoint.policy.session.auto_accept_video• sipendpoint.policy.session.auto_answer• sipendpoint.policy.session.dtmf_method• sipendpoint.policy.session.dtx_mode• sipendpoint.policy.session.echo_control• sipendpoint.policy.session.noise_suppression• sipendpoint.policy.session.reject_session_when_headset_na• sipendpoint.policy.session.ringback_enabled• sipendpoint.policy.session.ringback_file
Configuration Options Reference Section interaction-workspace
Workspace Desktop Edition Deployment Guide 480

• sipendpoint.policy.session.rx_agc_mode• sipendpoint.policy.session.sip_code_when_headset_na• sipendpoint.policy.session.vad_level• sipendpoint.proxies.proxy0.domain• sipendpoint.proxies.proxy0.nat.ice_enabled• sipendpoint.proxies.proxy0.nat.stun_server• sipendpoint.proxies.proxy0.nat.stun_server_port• sipendpoint.proxies.proxy0.nat.turn_password• sipendpoint.proxies.proxy0.nat.turn_relay_type• sipendpoint.proxies.proxy0.nat.turn_server• sipendpoint.proxies.proxy0.nat.turn_server_port• sipendpoint.proxies.proxy0.nat.turn_user_name• sipendpoint.proxies.proxy0.reg_interval• sipendpoint.proxies.proxy0.reg_timeout• sipendpoint.proxies.proxy1.domain• sipendpoint.proxies.proxy1.nat.ice_enabled• sipendpoint.proxies.proxy1.nat.stun_server• sipendpoint.proxies.proxy1.nat.stun_server_port• sipendpoint.proxies.proxy1.nat.turn_password• sipendpoint.proxies.proxy1.nat.turn_relay_type• sipendpoint.proxies.proxy1.nat.turn_server• sipendpoint.proxies.proxy1.nat.turn_server_port• sipendpoint.proxies.proxy1.nat.turn_user_name• sipendpoint.proxies.proxy1.reg_interval• sipendpoint.proxies.proxy1.reg_timeout• sipendpoint.retain-volume-settings-between-
sessions
• sipendpoint.sbc-register-address• sipendpoint.sbc-register-address.peer• sipendpoint.sbc-register-port• sipendpoint.sbc-register-port.peer• sipendpoint.standalone.certificate-search-value• sipendpoint.standalone.port• sipendpoint.standalone.protocol• sipendpoint.standalone.security-level• sipendpoint.standalone.subject-criteria• sipendpoint.standalone.subject-matching-
properties• sipendpoint.standalone.vdi-detection-model• sipendpoint.system.diagnostics.enable_logging• sipendpoint.system.diagnostics.log_filter• sipendpoint.system.diagnostics.log_level• sipendpoint.system.diagnostics.log_options_provider• sipendpoint.system.security.cert_file• sipendpoint.system.security.tls_enabled• sipendpoint.system.security.use_srtp• sipendpoint.transport-protocol• sipendpoint.video.always-on-top• sipendpoint.video.auto-activate• sipendpoint.video.camera-frame-rate• sipendpoint.video.camera-frame-size• sipendpoint.video.camera-render-format• sipendpoint.video.thumbnail-ratio
Related Resources
The following topics discuss the implementation of these options:
• Workspace SIP Endpoint• Video• Configuring Workspace Desktop Edition to use Genesys Softphone
Configuration Options Reference Section interaction-workspace
Workspace Desktop Edition Deployment Guide 481

• Genesys Softphone
Configuration Options Reference Section interaction-workspace
Workspace Desktop Edition Deployment Guide 482

SMS options
TipFor the most up to date Workspace Desktop Edition configuration options, see theGenesys Configuration Option Database.
• sms.agent.prompt-color• sms.agent.text-color• sms.auto-answer• sms.auto-answer.enable-reject• sms.auto-answer.timer• sms.client.prompt-color• sms.client.text-color• sms.default-queue• sms.from-numbers-business-attribute• sms.max-message-number• sms.other-agent.prompt-color• sms.other-agent.text-color• sms.outbound-queue• sms.prompt-for-done• sms.ringing-bell• sms.simple-transcript• sms.subject-max-chars• sms.system.text-color• sms.time-stamp• sms.transcript-enable-history-filters• sms.transcript-time-frame
Related Resources
The following topics discuss the implementation of these options:
• SMS and MMS
Configuration Options Reference Section interaction-workspace
Workspace Desktop Edition Deployment Guide 483

• SMS privileges
Configuration Options Reference Section interaction-workspace
Workspace Desktop Edition Deployment Guide 484

Sounds options
TipFor the most up to date Workspace Desktop Edition configuration options, see theGenesys Configuration Option Database.
• sounds.preloadfiles
Related Resources
The following topic discusses the implementation of these options:
• 5. Enabling Workspace to play ring tones
Configuration Options Reference Section interaction-workspace
Workspace Desktop Edition Deployment Guide 485
Spellchecker options
TipFor the most up to date Workspace Desktop Edition configuration options, see theGenesys Configuration Option Database.
• spellchecker.corporate-dictionary• spellchecker.corporate-dictionary-file• spellchecker.<media-type>.prompt-on-send
Related Resources
The following topic discusses the implementation of these options:
• Setting up Spelling Check
Configuration Options Reference Section interaction-workspace
Workspace Desktop Edition Deployment Guide 486

Standard Responses options[Modified: 8.5.144.05]
TipFor the most up to date Workspace Desktop Edition configuration options, see theGenesys Configuration Option Database.
• standard-response.auto-append-star-to-search• standard-response.categories• standard-response.field.<CustomFieldCode>• standard-response.categories• standard-response.default-search-type• standard-response.enable-usage-feedback• standard-response.languages• standard-response.shortcuts.<keyword>• standard-response.suggested-responses-min-relevancy
Related Resources
The following topics discuss the implementation of these options:
• Standard Responses• Standard Response privileges• Standard Responses Library• Email• Chat• Chat privileges
Configuration Options Reference Section interaction-workspace
Workspace Desktop Edition Deployment Guide 487

Statistics options
TipFor the most up to date Workspace Desktop Edition configuration options, see theGenesys Configuration Option Database.
• statistics.displayed-statistics• statistics.queues• statistics.refresh-time• statistics.routing-points
Related Resources
The following topics discuss the implementation of these options:
• KPIs and Contact Center Statistics• Section Object Statistic Name• Section KPI Name• Section interaction-queue-presence• Section routing-point-presence• Statistics privileges• Introduction to configuration options
Configuration Options Reference Section interaction-workspace
Workspace Desktop Edition Deployment Guide 488
System Tray options
TipFor the most up to date Workspace Desktop Edition configuration options, see theGenesys Configuration Option Database.
• system-tray.tooltip
Related Resources
The following topics discuss the implementation of this option:
• Configuring the behavior of incoming interactions• Managing agent inactivity
Configuration Options Reference Section interaction-workspace
Workspace Desktop Edition Deployment Guide 489
Team Communicator options
TipFor the most up to date Workspace Desktop Edition configuration options, see theGenesys Configuration Option Database.
• teamcommunicator.add-recent-filters.voice• teamcommunicator.always-clear-textbox-on-new-interaction• teamcommunicator.contact-favorite-fields• teamcommunicator.corporate-favorites• teamcommunicator.corporate-favorites-file• teamcommunicator.custom-favorite-fields• teamcommunicator.interaction-queue-presence-metrics• teamcommunicator.internal-favorite-fields• teamcommunicator.list-filter-showing• teamcommunicator.list-status-reachable• teamcommunicator.load-at-startup• teamcommunicator.max-favorites-size• teamcommunicator.max-suggestion-size• teamcommunicator.queue-presence-metrics• teamcommunicator.recent-max-records• teamcommunicator.request-start-timer• teamcommunicator.routing-point-presence-metrics
Related Resources
The following topics discuss the implementation of these options:
• Enabling Team Communicator calling features• 10. Creating Corporate Favorites• Planning Your Deployment
Configuration Options Reference Section interaction-workspace
Workspace Desktop Edition Deployment Guide 490

Team Lead options
TipFor the most up to date Workspace Desktop Edition configuration options, see theGenesys Configuration Option Database.
• teamlead.agent-status.enabled-agent-group-security-mode• teamlead.agent-status.enabled-remote-actions• teamlead.monitoring-scope
Related Resources
The following topic discusses the implementation of these options:
• Team Leads and Supervisors
Configuration Options Reference Section interaction-workspace
Workspace Desktop Edition Deployment Guide 491

Toast options
TipFor the most up to date Workspace Desktop Edition configuration options, see theGenesys Configuration Option Database.
These options control the Interactive Notification features.
• toast.case-data.content• toast.case-data.format-business-attribute• toast.window-title
Related Resources
The following topic discusses the implementation of these options:
• Callback
Configuration Options Reference Section interaction-workspace
Workspace Desktop Edition Deployment Guide 492

View options
TipFor the most up to date Workspace Desktop Edition configuration options, see theGenesys Configuration Option Database.
These options control two different types of regions within the various views, sortable and selectableregions, and sortable regions.
Sortable and Selectable Regions
• views.CaseContactRegion.activate-order• views.CaseContactRegion.order• views.ContactInfoHistoryMultiRegion.activate-order• views.ContactInfoHistoryMultiRegion.order• views.ContactTabBottomHistoryMultiRegion.activate-order• views.ContactTabBottomHistoryMultiRegion.order• views.InteractionDetailsRegion.activate-order• views.InteractionDetailsRegion.order• views.ToolbarWorkplaceRegion.activate-order• views.ToolbarWorkplaceRegion.order• views.WorkbinsTabBottomHistoryMultiRegion.activate-order• views.WorkbinsTabBottomHistoryMultiRegion.order
Sortable Regions
• views.ToolbarWorksheetButtonRegion.order
Configuration Options Reference Section interaction-workspace
Workspace Desktop Edition Deployment Guide 493

Voice options
TipFor the most up to date Workspace Desktop Edition configuration options, see theGenesys Configuration Option Database.
• voice.after-call-work-extension• voice.auto-answer• voice.auto-answer.enable-reject• voice.auto-answer.timer• voice.cancel-after-call-work-on-done• voice.complete-conference-requires-connected-consultation-call• voice.device-type• voice.dtmf-inactivity-typing-timeout• voice.enable-agent-reservation• voice.enable-init-conference• voice.end-consultation-method• voice.hold-indicator-timer• voice.hot-standby.backup-retry-delay• voice.hybrid-switch-preference• voice.mark-done-on-release• voice.nb-max-independent-calls• voice.one-step-trsf-mode• voice.prompt-for-end• voice.ringing-bell• voice.show-hold-duration• voice.show-post-call-duration• voice.sip-preview-bell
Related Resources
The following topics discuss the implementation of these options:
Configuration Options Reference Section interaction-workspace
Workspace Desktop Edition Deployment Guide 494

• 3. Provisioning Workspace for the Voice channel• Voice• Voice privileges
Configuration Options Reference Section interaction-workspace
Workspace Desktop Edition Deployment Guide 495

Voicemail options
TipFor the most up to date Workspace Desktop Edition configuration options, see theGenesys Configuration Option Database.
ImportantRefer to the following Genesys documentation for information about setting up voicemail boxes in yourGenesys system:
• Genesys SIP Voicemail (Voicemail deployment, administration, and use)• Feature Server Deployment Guide (mailbox configuration)
• voicemail.access-number• voicemail.notification-types
Related Resources
The following topics discuss the implementation of these options:
• Voicemail• Voicemail privileges• Intercommunication options• Communicating inside your business
Configuration Options Reference Section interaction-workspace
Workspace Desktop Edition Deployment Guide 496

Warm-Standby options
TipFor the most up to date Workspace Desktop Edition configuration options, see theGenesys Configuration Option Database.
• warm-standby.reconnection-random-delay-range• warm-standby.retry-delay
Related Resources
The following topics discuss the implementation of these options:
• Load Balancing using clusters• eServices Business Continuity with UCS 9.1• eServices Business Continuity with UCS 8.5• Business Continuity for SIP Server, Configuration Server, and Statistic Server
Configuration Options Reference Section interaction-workspace
Workspace Desktop Edition Deployment Guide 497

Web Callback options
TipFor the most up to date Workspace Desktop Edition configuration options, see theGenesys Configuration Option Database.
• webcallback.auto-answer• webcallback.auto-answer.enable-reject• webcallback.auto-answer.timer• webcallback.auto-dial• webcallback.complete-queue• webcallback.park-queue• webcallback.reschedule-queue• webcallback.ringing-bell• webcallback.callback-information.content• webcallback.callback-information.frame-color• webcallback.callback-information.header-foreground-color
Related Resources
The following topics discuss the implementation of these options:
• Web Callback• Web Callback privileges• Callback• Callback options• Callback privileges• Outbound campaigns• Outbound options
Configuration Options Reference Section interaction-workspace
Workspace Desktop Edition Deployment Guide 498

Webproxy options
TipFor the most up to date Workspace Desktop Edition configuration options, see theGenesys Configuration Option Database.
• webproxy.address• webproxy.password• webproxy.username
Related Resources
The following topic discusses the implementation of these options:
Configuration Options Reference Section interaction-workspace
Workspace Desktop Edition Deployment Guide 499
Workbin options
TipFor the most up to date Workspace Desktop Edition configuration options, see theGenesys Configuration Option Database.
• workbin.email.draft• workbin.email.draft.displayed-columns• workbin.email.in-progress• workbin.email.in-progress.displayed-columns• workbin.<media_type>.in-progress• workbin.<media_type>.in-progress.displayed-columns• workbin.<media-type>.<workbin-nickname>• workbin.<media-type>.<workbin-nickname>.auto-update• workbin.<media-type>.<workbin-nickname>.displayed-columns• workbin.<media-type>.<workbin-nickname>.max-results• workbin.<media-type>.<nick-name>.notify-property-changed• workbin.<media-type>.<workbin-nickname>.quick-search-attributes
Related Resources
The following topics discuss the implementation of these options:
• Setting up agents to use workbins• Workbin and Interaction Queue management• Workbins privileges• Interaction Management privileges• Email• Workitems• Email Quality Assurance
Configuration Options Reference Section interaction-workspace
Workspace Desktop Edition Deployment Guide 500
Workitem options
TipFor the most up to date Workspace Desktop Edition configuration options, see theGenesys Configuration Option Database.
• <media-type>.auto-answer• <media-type>.auto-answer.enable-reject• <media-type>.auto-answer.timer• <media-type>.prompt-for-done• <media-type>.pull-from-history-isenabled• <media-type>.ringing-bell• <media-type>.toast-information-key
Related Resources
The following topics discuss the implementation of these options:
• Workitems• Workitem privileges• Open Media options
Configuration Options Reference Section interaction-workspace
Workspace Desktop Edition Deployment Guide 501

Miscellaneous options
TipFor the most up to date Workspace Desktop Edition configuration options, see theGenesys Configuration Option Database.
Options that were formally listed on this page each now appear on a dedicated page for the optioncategory.
• alert.timeout• application.available-layouts• case-data.float-separator• channel-information.window-title• editor.font-size-units• interaction-bar.detail-tooltip.max-height• license.lrm-enabled• logout.enable-exit-on-logoff-error• options.record-option-locally-only• presence.evaluate-presence• printing.use-print-preview• sounds.preloadfiles• system-tray.tooltip• teamlead.monitoring-scope
Configuration Options Reference Section interaction-workspace
Workspace Desktop Edition Deployment Guide 502

Section interaction-queue-presence
TipFor the most up to date Workspace Desktop Edition configuration options, see theGenesys Configuration Option Database.
The interaction queue presence options enable agents to view interaction queue statisticsinformation in Team Communicator. Refer to the Enabling Team Communicator Calling Features andEnabling the E-Mail Channel for information about how to use these options.
• associated-object-ids• associated-statistic-type• error-level• object-ids• statistic-name• statistic-text• warning-level
Configuration Options Reference Section interaction-queue-presence
Workspace Desktop Edition Deployment Guide 503

Section queue-presence
TipFor the most up to date Workspace Desktop Edition configuration options, see theGenesys Configuration Option Database.
The queue presence options enable agents to view queue statistics information in TeamCommunicator. Refer to the Enabling Team Communicator Calling Features and Enabling the E-MailChannel for information about how to use these options.
• associated-object-ids• associated-statistic-type• error-level• object-ids• statistic-name• statistic-text• warning-level
Configuration Options Reference Section queue-presence
Workspace Desktop Edition Deployment Guide 504

Section routing-point-presence
TipFor the most up to date Workspace Desktop Edition configuration options, see theGenesys Configuration Option Database.
The routing point presence options enable agents to view routing point statistics information in TeamCommunicator. Refer to the Enabling Team Communicator Calling Features and Enabling the E-MailChannel for information about how to use these options.
• associated-object-ids• associated-statistic-type• error-level• object-ids• statistic-name• statistic-text• warning-level
Configuration Options Reference Section routing-point-presence
Workspace Desktop Edition Deployment Guide 505

Section KPI NameEach KPI that you want to define and use must have its own section defined in the WorkspaceApplication object in the Configuration Database.
TipKPIs are not part of the XML metadata file because they are not composed of fixedsection names.
Defining a KPI sectionUse Genesys Administrator Extension to define a new section at the level at which you want the KPIto be displayed. Use the KPI name as the name of the section. Define the values that are to bedisplayed for the KPI as the Options and Values of the Section.
For example, for the TotalTalkStatusTime KPI, define a section that is named TalkTime, and thendefine a set of Options and specify values for those options. The Table - Sample Options andValues for the KPI Section provides a sample of Option names and values that you might definefor this KPI.
Sample Options and Values for the KPI SectionOption Value Mandatory
statistic-name TotalTalkStatusTime Yesperiod OneMinute Yestarget-value 40 Yeswarning-level-low Nowarning-level-high Noerror-level-low Noerror-level-high Noworst-value-low 0 Noworst-value-high Nodescription Total talk time for the agent Yes
filter
The value must be the filter forthe statistic calculation. Thisshould correspond to an optionname that is defined by theFilters section of Statistics Server.
No
evaluation-display Evaluation Yes
Configuration Options Reference Section KPI Name
Workspace Desktop Edition Deployment Guide 506

Displaying KPIsWorkspace enables you to display the KPIs that you have defined on the Application object at one ormore of the following levels:
• Application level -- Display KPI to all agents.• Tenant level -- Display KPI to all the agents of the Tenant.• Agent Group level -- Display KPI to all the agents of the Agent Group.• Agent level -- Display KPI to the agent.
To display a KPI at a specific level, define and configure the kpi.displayed-kpis option in theinteraction-workspace section of the level. The value of this option is a comma-separated list ofKPI sections that are to be displayed.
Setting the Warning, Error, and Worst LevelsWorkspace provides eight non-mandatory options that you can use to define low and/or high levels ofwarning and error and low and/or high levels of worst values.
Some statistics are in an error state when they are below a certain value, while others are in an errorstate when they are above a certain value; for some statistics both a lower error threshold and ahigher error threshold are required. The following non-mandatory options enable you to set a low andhigh threshold for a statistic:
• error-level-low--Values below this value are in an error state for the statistic.• error-level-high--Values above this value are in an error state for the statistic.
Some statistics are in a warning state when they are below a certain value, while others are in awarning state when they are above a certain value; for some statistics both a lower warningthreshold and a higher warning threshold are required. The following non-mandatory options enableyou to set a low and high threshold for a statistic:
• warning-level-low--Values below this value are in a warning state for the statistic.• warning-level-high--Values above this value are in a warning state for the statistic.
Use the error and warning options to specify ranges that are most suitable for the statistic.
Some statistics are performance based. The agent's result is compared to a target value to determinethe agent's level of performance. Some statistics require a lower worst value and some require ahigher worst value. For some statistics, both a lower and a higher worst value are required.
• worst-value-low--Values below this value result in a negative evaluation for the KPI.• worst-value-high--Values above this value result in a negative evaluation for the KPI.• target-value--The target value to be reached by the agent.• evaluation-display--Specifies which value is displayed to the agent, a performance indicator or the
raw statistic in the format of the statistic (for example, number, date, or percentage). If the option isset to Result, the actual statistic value is displayed. If the option is set to Evaluation, theperformance of the agent is calculated by using the following formulae:
Configuration Options Reference Section KPI Name
Workspace Desktop Edition Deployment Guide 507

If the statistic value is lower than the target value, the following evaluation is applied: AgentPerformance = (Agent Result - worst-value-low) / (Target Value -worst-value-low) x 100 or: If thestatistic value is higher than the target value, the following evaluation is applied: Agent Performance= (worst-value-high - Agent Result) / (worst-value-high - Target Value) x 100
TipFor the most up to date Workspace Desktop Edition configuration options, see theGenesys Configuration Option Database.
Configuration Options Reference Section KPI Name
Workspace Desktop Edition Deployment Guide 508
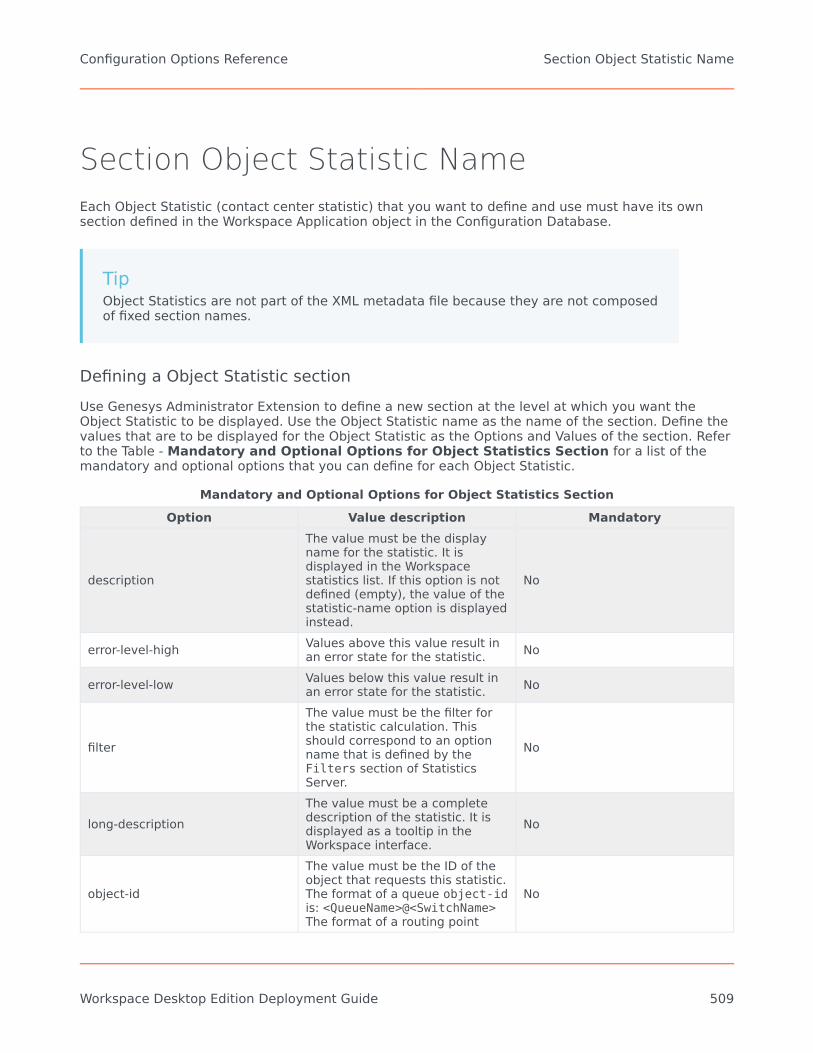
Section Object Statistic NameEach Object Statistic (contact center statistic) that you want to define and use must have its ownsection defined in the Workspace Application object in the Configuration Database.
TipObject Statistics are not part of the XML metadata file because they are not composedof fixed section names.
Defining a Object Statistic sectionUse Genesys Administrator Extension to define a new section at the level at which you want theObject Statistic to be displayed. Use the Object Statistic name as the name of the section. Define thevalues that are to be displayed for the Object Statistic as the Options and Values of the section. Referto the Table - Mandatory and Optional Options for Object Statistics Section for a list of themandatory and optional options that you can define for each Object Statistic.
Mandatory and Optional Options for Object Statistics SectionOption Value description Mandatory
description
The value must be the displayname for the statistic. It isdisplayed in the Workspacestatistics list. If this option is notdefined (empty), the value of thestatistic-name option is displayedinstead.
No
error-level-high Values above this value result inan error state for the statistic. No
error-level-low Values below this value result inan error state for the statistic. No
filter
The value must be the filter forthe statistic calculation. Thisshould correspond to an optionname that is defined by theFilters section of StatisticsServer.
No
long-descriptionThe value must be a completedescription of the statistic. It isdisplayed as a tooltip in theWorkspace interface.
No
object-id
The value must be the ID of theobject that requests this statistic.The format of a queue object-idis: <QueueName>@<SwitchName>The format of a routing point
No
Configuration Options Reference Section Object Statistic Name
Workspace Desktop Edition Deployment Guide 509

Option Value description Mandatoryobject-idis:<RPName>@<SwitchName>
period
The value must be the period forthe statistic calculation. Thisshould correspond to an optionname that is defined by theTimeProfiles section ofStatistics Server.
No
refresh-timeThe value must be the length oftime, in seconds, between eachupdate request from StatisticsServer.
No
statistic-nameThe value must be the name ofthe Statistic as defined in theStatistics Server options.
Yes
statistic-type
The value must be the type ofthe object—such as Queue,RoutePoint, or GroupQueues—asdefined for the Object Statistic inStatistics Server.
Yes
time-range
The value must be the timerange for the statistic calculation.This should correspond to anoption name that is defined bythe TimeRanges section ofStatistics Server. Time ranges areused to calculate certainstatistics such as those thatspecify a percentage.
No
time-range2
The value must be the secondarytime range for the statisticcalculation. This shouldcorrespond to an option namethat is defined by theTimeRanges section of StatisticsServer. Time ranges are used tocalculate certain statistics suchas those specify a percentage.
No
warning-level-high Values above this value result inan error state for the statistic. No
warning-level-low Values below this value result inan error state for the statistic. No
Setting the Warning and Error levelsWorkspace provides four non-mandatory options that you can use to define low and/or high levels ofwarning and error.
Some statistics are in an error state when they are below a certain value, while others are in an errorstate when they are above a certain value; for some statistics both a lower error threshold and a
Configuration Options Reference Section Object Statistic Name
Workspace Desktop Edition Deployment Guide 510

higher error threshold are required. The following non-mandatory options enable you to set a low andhigh threshold for a statistic:
• error-level-low--Values below this value result in an error state for the statistic.• error-level-high--Values above this value result in an error state for the statistic.
Some statistics are in a warning state when they are below a certain value, while others are in awarning state when they are above a certain value; for some statistics both a lower warningthreshold and a higher warning threshold are required. The following non-mandatory options enableyou to set a low and high threshold for a statistic:
• warning-level-low--Values below this value result in an error state for the statistic.• warning-level-high--Values above this value result in an error state for the statistic.
Use the error and warning options to specify ranges that are most suitable for the statistic.
Displaying Object StatisticsWorkspace enables you to display the Object Statistics that you have defined on the Applicationobject at one or more of the following levels:
• Application level -- Display Object Statistic to all agents• Tenant level -- Display Object Statistic to all the agents of the Tenant• Agent Group level -- Display Object Statistic to all the agents of the Agent Group• Agent level -- Display Object Statistic to the agent
To display an Object Statistic at a specific level, define and configure the statistics.displayed-statistics option in the interaction-workspace section of the level. The value of this option is acomma-separated list of Object Statistic sections that are to be displayed.
The Figure - Sample section defined in Genesys Administrator Extension for the WorkspaceApplication object provides an example of a statistic section that is defined on the WorkspaceApplication object.
Configuration Options Reference Section Object Statistic Name
Workspace Desktop Edition Deployment Guide 511

Configuration Options Reference Section Object Statistic Name
Workspace Desktop Edition Deployment Guide 512

Sample section defined in Genesys Administrator Extension for the Workspace Application object
TipFor the most up to date Workspace Desktop Edition configuration options, see theGenesys Configuration Option Database.
Configuration Options Reference Section Object Statistic Name
Workspace Desktop Edition Deployment Guide 513

Not Ready Reason codesWorkspace provides "reasons" with which agents can specify details about their NotReady status;these are configured by creating as many Action Code objects of type Not Ready as you require.
Each Not Ready Reason can be customized by creating a section named interaction-workspace inthe annexes of Action Code objects that are used to define Not Ready Reason codes, and thendefining and configuring options in that section to customize the way that not-ready reasons are sentto your T-Server.
Define the following options in the interaction-workspace section that you create:
workmode
• Default Value: ""• Valid Values: "", aux-work• Changes take effect: At next login.• Description: Refines and extends the customized NotReady status monitoring, when it is supported by
the switch.
extensions
• Default Value: false• Valid Values: true, false• Changes take effect: At next login.• Description: Available only if the workmode option is not defined or if it is set to none. If your switch does
not support the aux-work value, this option creates and enters extensions as the option name, andeither false (as the default value) or true (as a valid value).
reason-extension-key
• Default Value: ReasonCode• Valid Values: ReasonCode, <any string>• Changes take effect: At next login.• Description: The name that is set as the key of the key-value pair added to the Not Ready Reason or
Extensions map. The corresponding value is set according to the Action Code that is defined in theConfiguration Layer and the value of the reason-extension-value option.If the value of this option is empty, the key of the key-value pair is the Name attribute of the selectedAction Code.
Configuration Options Reference Not Ready Reason codes
Workspace Desktop Edition Deployment Guide 514

TipGenesys Workforce Management requires a specific configuration of the Workspacereason-extension-key and extensions options to ensure WFM Data Aggregator canread agent state reason codes. To read more about its dependency on these options,see Configuring Data Aggregator to process reason codes in the WorkforceManagement Administrators Guide.
reason-extension-request-attribute
• Default Value: ""• Valid Values: "", reasons, extensions• Changes take effect: At next login.• Description: Specifies whether the reason code is published in the reason attribute or in the extension
attribute. Empty means that the legacy behavior is preserved, where the reason code is published inthe ‘reasons’ or ‘extensions’ attribute, depending on the selected workmode. Note: not all switchessupport the capability to pass Not Ready Reason through the extensions attribute. Refer to T-Serverand switch vendor documentation.
reason-extension-value
• Default Value: code• Valid Values: name, code• Changes take effect: At next login.• Description: The type of content that is set as the value of the key-value pair added to the Not Ready
Reason or Extensions map.• If the option is empty or not correct, the default value is: code.• The corresponding key is set according to the value of the option reason-extension-key.• When set to code the key is the Code attribute of the selected Action Code.• When set to name the key is the Name attribute of the selected Action Code.
TipFor the most up to date Workspace Desktop Edition configuration options, see theGenesys Configuration Option Database.
Configuration Options Reference Not Ready Reason codes
Workspace Desktop Edition Deployment Guide 515
Role privilegesIn the privilege-based model that is implemented by Workspace, an agent is assigned privilegesbased on the role of the agent. Privileges are enabled or disabled depending on the role that isassigned to the agent. Privileges are assigned as configuration options in the Role Privileges tabof the Role object in Genesys Administrator Extension (refer to the Procedure: Creating a Role,allowing a Workspace privilege, and assigning a Role to an agent or agent group).
Refer to Genesys Administrator Extension Help and Genesys Security Guide for detailed informationon how to use Genesys Administrator Extension and Management Framework to configure accesspermissions. The following tables list and describe the privileges that you can set for Workspaceagent roles:
• Broadcast Message Privileges lists the Broadcast Message privileges in the Workspace BroadcastMessage Privileges section of the Role Privileges tab that can be enabled for a role.
• Callback Privileges lists the Callback Privileges in the Workspace Callback Privileges sectionof the Role Privileges section that can be enabled for a role.
• Case Information Privileges lists the Case Information privilege in the Workspace CaseInformation Tasks section of the Role Privileges tab that can be enabled for a role.
• Chat Privileges lists the Chat privileges in the Workspace Chat Access section of the RolePrivileges tab that can be enabled for a role.
• Contact Management Privileges lists the Contact Management privileges in the Workspace ContactPrivileges section of the Role Privileges tab that can be enabled for a role.
• E-Mail Privileges lists the E-Mail privileges in the Workspace E-Mail Privileges section of the RolePrivileges tab that can be enabled for a role.
• IM Privileges lists the internal IM privileges in the Workspace Instant Messaging Privilegessection of the Role Privileges tab that can be enabled for a role.
• Interaction Management Privileges lists the Interaction Management privileges in the WorkspaceInteraction Management Privileges section of the Role Privileges tab that can be enabled for arole.
• Main Window Privileges lists the Main Window privileges in the Workspace Workspace Privilegessection of the Role Privileges tab that can be enabled for a role.
• Outbound Campaign Privileges lists the outbound campaign privileges in the Workspace OutboundPrivileges section of the Role Privileges tab that can be enabled for a role.
• Recording Privileges lists the voice privileges in the Workspace Recording Privileges section ofthe Role Privileges tab that can be enabled for a role.
• Security Privileges lists the Security privileges in the Workspace Security Privileges section ofthe Role Privileges tab that can be enabled for a role.
• SMS Privileges lists the SMS privileges in the Workspace SMS Access section of the Role Privilegestab that can be enabled for a role.
• Standard Response Privileges lists the Standard Resource Library (SRL) privileges in the WorkspaceStandard Response Privileges section of the Role Privileges tab that can be enabled for a role.
• Statistics Privileges lists the Statistics privileges in the Workspace Statistics Privileges sectionof the Role Privileges tab that can be enabled for a role.
Role privileges Not Ready Reason codes
Workspace Desktop Edition Deployment Guide 516

• Team Communicator Privileges lists the Team Communicator privileges in the Workspace TeamCommunicator Privileges section of the Role Privileges tab that can be enabled for a role.
• Team Lead Privileges lists the Team Lead privileges in the Workspace Team Lead Privileges sectionof the Role Privileges tab that can be enabled for a role.
• Voice Privileges lists the voice privileges in the Workspace Voice Privileges section of the RolePrivileges tab that can be enabled for a role.
• Voicemail Privileges lists the voicemail privileges in the Workspace Voice Privileges section of theRole Privileges tab that can be enabled for a role.
• Web Callback Privileges lists the Web Callback privileges in the Workspace Web Callback Accesssection of the Role Privileges tab that can be enabled for a role.
• Workbins Privileges lists the Workbin privileges in the Workspace Workbin Privileges section ofthe Role Privileges tab that can be enabled for a role.
• Workitem Privileges lists the Workitem privileges in the Workspace Workitem Privileges section ofthe Role Privileges tab that can be enabled for a role.
• Workspace SIP Endpoint Privileges lists the Workspace SIP Endpoint privileges in the WorkspaceSIP Tasks section of the Role Privileges tab that can be enabled for a role.
Role privileges Not Ready Reason codes
Workspace Desktop Edition Deployment Guide 517

Broadcast Message privilegesThe following table lists the Broadcast Message privileges in the Interaction Workspace BroadcastMessage Privileges section of the Role Privileges tab that can be enabled for a role. Privilegesare assigned as configuration options in the Role Privileges tab of the Role object in GenesysAdministrator Extension (refer to the Procedure: Creating a Role and allowing an InteractionWorkspace privilege and assigning a Role to an agent or agent group).
Broadcast Message PrivilegesRole privilege Description
Broadcast - Can Use The agent is permitted to receive and viewbroadcast messages.
Role privileges Broadcast Message privileges
Workspace Desktop Edition Deployment Guide 518

Callback privileges[Added: 8.5.111.21]
The following table lists the Callback privileges in the Workspace Callback section of the RolePrivileges tab that can be enabled for a role. Privileges are assigned as configuration options in theRole Privileges tab of the Role object in Genesys Administrator Extension (refer to the Procedure:Creating a Role, allowing a Workspace privilege, and assigning a Role to an agent or agent group).
Callback PrivilegesRole privilege Description
Callback - Can Use Callback The agent is permitted to use the Callback media.
Callback - Can Reject InvitationThe agent is permitted to decline a Callback so thatit can be processed by a different agent. Dependson 'Callback - Can Use Callback Channel'.
Callback - Can Reschedule Current CallbackThe agent is permitted to reschedule the currentCallback interaction. Depends on 'Callback - CanUse Callback Channel'.
Callback - Can Reschedule Or Submit On NewNumber
The agent is permitted to reschedule a Callbackinteraction or submit a new Callback by using anew phone number. Depends on 'Callback - CanUse Callback' and 'Callback - Can RescheduleCurrent Callback' or 'Callback - Can Submit NewCallback'.
Callback - Can Submit New CallbackThe agent is permitted to create a new Callbackinteraction from another interaction or by using theTeam Communicator. Depends on 'Callback - CanUse Callback Channel'.
Role privileges Callback privileges
Workspace Desktop Edition Deployment Guide 519

Case Information privilegesThe following table lists the Case Information privilege in the Workspace Case Information Taskssection of the Role Privileges tab that can be enabled for a role. Privileges are assigned asconfiguration options in the Role Privileges tab of the Role object in Genesys AdministratorExtension (refer to the Procedure: Creating a Role, allowing a Workspace privilege, and assigning aRole to an agent or agent group).
Case Information PrivilegesRole privilege Description
Case Information - Can Edit Enables agents to edit case information that isconfigured to be editable.
Case Information - Can Add Enable agents, agent groups, or roles to edit caseinformation.
Role privileges Case Information privileges
Workspace Desktop Edition Deployment Guide 520

Chat privileges[Modified: 8.5.108.11, 8.5.115.17, 8.5.128.07]
The following table lists the Chat privileges in the Interaction Workspace Chat Access section ofthe Role Privileges tab that can be enabled for a role. Privileges are assigned as configurationoptions in the Role Privileges tab of the Role object in Genesys Administrator Extension (refer tothe Procedure: Creating a Role, allowing a Workspace privilege, and assigning a Role to an agent oragent group).
Chat PrivilegesRole privilege Description
Chat - Can Use Chat Channel The agent is permitted to use the chat mediachannel.
Chat - Can Decline The agent is permitted to reject chat interactionsthat are directed to the agent.
Chat - Can Use Emojis The agent is permitted to add emojis to a chatinteraction. [Added: 8.5.115.17]
Chat - Can ReleaseThe agent is permitted to manually terminate astandard non-asynchronous chat conversation.[Modified: 8.5.128.07]
Chat - Can One Step Transfer The agent is permitted to use the instant-transferfunctionality.
Chat - Can Two Step TransferThe agent is permitted to contact and chat(consultation) prior to transferring the chatinteraction to the target.
Chat - Can One Step Conference The agent is permitted to use the instant-conference functionality.
Chat - Can Two Step Conference The agent is permitted to contact and chat(consultation) prior to starting a chat conference.
Chat - Can Transfer File From File SystemThe agent is permitted to select a file and transferit to the other parties in the interaction. [Added:8.5.115.17]
Chat - Can Transfer File From Standard ResponseThe agent is permitted to transfer a file from aselected standard response to the other parties inthe interaction. [Added: 8.5.115.17]
Chat - Can Push Url The agent is permitted to send URLs to contactsduring chat interactions.
Chat - Can Save Attached filesThe agent is permitted to save files from the chattranscript to their local workstation. [Added:8.5.115.17]
Chat - Can Set Interaction Disposition The agent is permitted to set the disposition codeof a chat interaction.
Chat - Show Silent Monitoring The agent is permitted to know when a supervisoris monitoring the agent during a chat interaction.
Role privileges Chat privileges
Workspace Desktop Edition Deployment Guide 521

Role privilege Description
Chat - Can Preview Customer TypingThe agent can see the text as it is typed by thecontact on the your web site chat interface beforethe contact clicks Send. [Added: 8.5.108.11]
Chat - Can Place On Hold The agent is permitted to leave and rejoin anasynchronous chat session. [Added: 8.5.128.07]
Chat - Can Release Async The agent is permitted to manually terminate anasynchronous chat session.[Added: 8.5.128.07]
WarningIf the Chat - Can Preview Customer Typing privilege is also granted, and you have configured eServices tohide sensitive personal information that is entered by the contact during the chat, agents will be able to seethe information as it is entered, but not after the contact sends it.Added: 8.5.108.11
Role privileges Chat privileges
Workspace Desktop Edition Deployment Guide 522

Contact Management privileges[Modified: 8.5.110.13, 8.5.126.07]
The following table lists the Contact Management privileges in the Workspace Contact Privilegessection of the Role Privileges tab that can be enabled for a role. Privileges are assigned asconfiguration options in the Role Privileges tab of the Role object in Genesys AdministratorExtension (refer to the Procedure: Creating a Role, allowing a Workspace privilege, and assigning aRole to an agent or agent group).
Contact Management PrivilegesRole privilege Description
Contact - Can UseThe agent is permitted to perform contactmanagement privileges. The other contactmanagement privileges cannot be configured if thevalue is Not Assigned.
Contact - Can Create Contact The agent is permitted to create a new contact inthe Universal Contact Server database.
Contact - Can Delete ContactThe agent is permitted to delete an existingcontact from the Universal Contact Serverdatabase.
Contact - Can Edit Contact
The agent is permitted to edit contact informationin the Universal Contact Server database. Note:Agents can save new contacts when the Contact -Can Create privilege is assigned even if the Contact- Can Edit Contact privilege is not assigned.Previously in this scenario, if the Contact - CanCreate privilege was granted to agents and theContact - Can Edit Contact privilege was not,agents could not save a new contact.
Contact - Can Mark Done Voice Interaction The agent is permitted to mark an interaction asdone.
Contact - Can Merge Contact The agent is permitted to merge two contacts inthe Universal Contact Server database.
Contact - Can Assign ContactThe agent is permitted to assign an interaction toan existing contact if the interaction has anunknown contact or is incorrectly assigned to adifferent contact.
Contact - Can Use Interaction Notepad The agent is permitted to use the Notepad to viewand edit notes that are included in the interaction.
Contact - Can Merge Interaction To ContactThe agent is permitted to merge interactions to anexisting contact in the Universal Contact Serverdatabase.
Contact - Can Undo Merge ContactThe agent is permitted to unmerge a previouslymerged contact in the Universal Contact Serverdatabase.
Contact - Can Use Contact Directory The agent is permitted to use the Contact Directory
Role privileges Contact Management privileges
Workspace Desktop Edition Deployment Guide 523
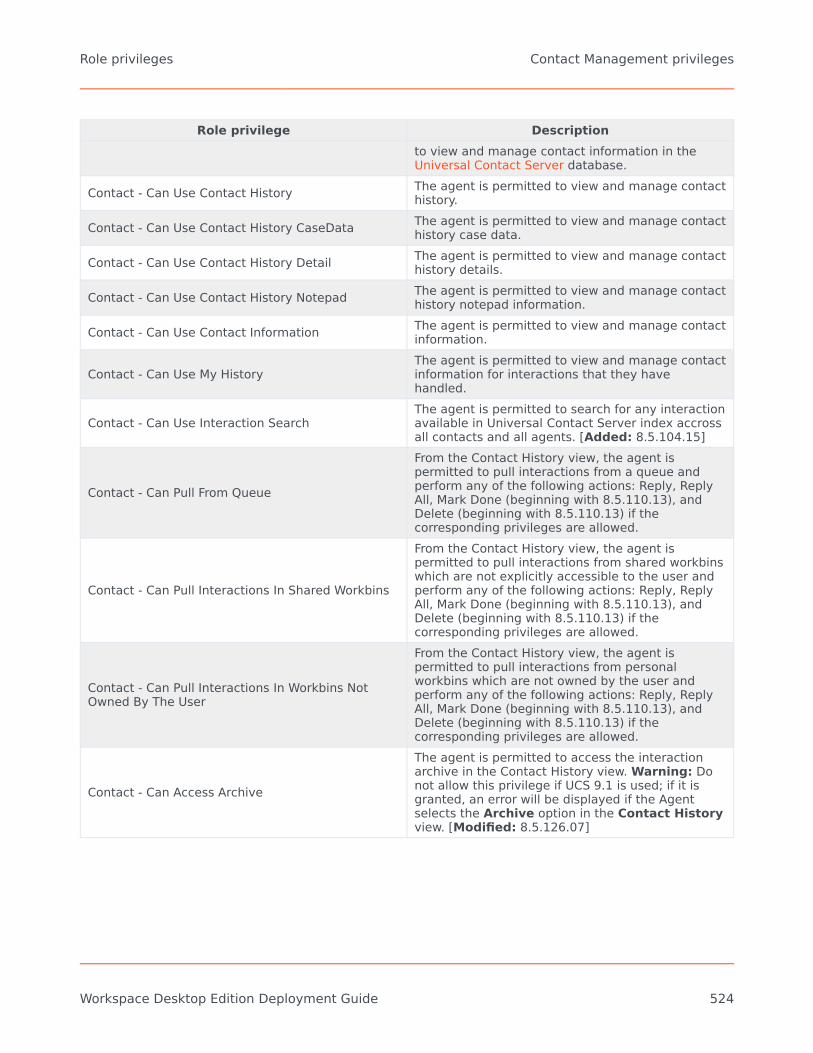
Role privilege Descriptionto view and manage contact information in theUniversal Contact Server database.
Contact - Can Use Contact History The agent is permitted to view and manage contacthistory.
Contact - Can Use Contact History CaseData The agent is permitted to view and manage contacthistory case data.
Contact - Can Use Contact History Detail The agent is permitted to view and manage contacthistory details.
Contact - Can Use Contact History Notepad The agent is permitted to view and manage contacthistory notepad information.
Contact - Can Use Contact Information The agent is permitted to view and manage contactinformation.
Contact - Can Use My HistoryThe agent is permitted to view and manage contactinformation for interactions that they havehandled.
Contact - Can Use Interaction SearchThe agent is permitted to search for any interactionavailable in Universal Contact Server index accrossall contacts and all agents. [Added: 8.5.104.15]
Contact - Can Pull From Queue
From the Contact History view, the agent ispermitted to pull interactions from a queue andperform any of the following actions: Reply, ReplyAll, Mark Done (beginning with 8.5.110.13), andDelete (beginning with 8.5.110.13) if thecorresponding privileges are allowed.
Contact - Can Pull Interactions In Shared Workbins
From the Contact History view, the agent ispermitted to pull interactions from shared workbinswhich are not explicitly accessible to the user andperform any of the following actions: Reply, ReplyAll, Mark Done (beginning with 8.5.110.13), andDelete (beginning with 8.5.110.13) if thecorresponding privileges are allowed.
Contact - Can Pull Interactions In Workbins NotOwned By The User
From the Contact History view, the agent ispermitted to pull interactions from personalworkbins which are not owned by the user andperform any of the following actions: Reply, ReplyAll, Mark Done (beginning with 8.5.110.13), andDelete (beginning with 8.5.110.13) if thecorresponding privileges are allowed.
Contact - Can Access Archive
The agent is permitted to access the interactionarchive in the Contact History view. Warning: Donot allow this privilege if UCS 9.1 is used; if it isgranted, an error will be displayed if the Agentselects the Archive option in the Contact Historyview. [Modified: 8.5.126.07]
Role privileges Contact Management privileges
Workspace Desktop Edition Deployment Guide 524
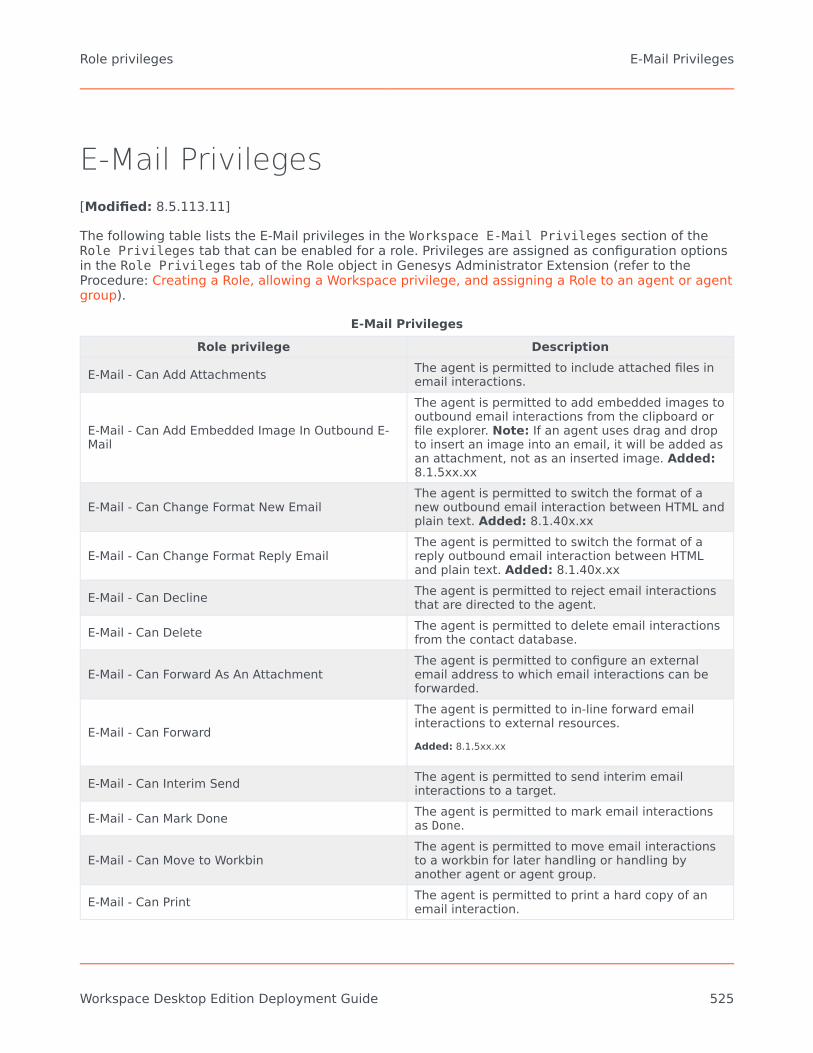
E-Mail Privileges[Modified: 8.5.113.11]
The following table lists the E-Mail privileges in the Workspace E-Mail Privileges section of theRole Privileges tab that can be enabled for a role. Privileges are assigned as configuration optionsin the Role Privileges tab of the Role object in Genesys Administrator Extension (refer to theProcedure: Creating a Role, allowing a Workspace privilege, and assigning a Role to an agent or agentgroup).
E-Mail PrivilegesRole privilege Description
E-Mail - Can Add Attachments The agent is permitted to include attached files inemail interactions.
E-Mail - Can Add Embedded Image In Outbound E-Mail
The agent is permitted to add embedded images tooutbound email interactions from the clipboard orfile explorer. Note: If an agent uses drag and dropto insert an image into an email, it will be added asan attachment, not as an inserted image. Added:8.1.5xx.xx
E-Mail - Can Change Format New EmailThe agent is permitted to switch the format of anew outbound email interaction between HTML andplain text. Added: 8.1.40x.xx
E-Mail - Can Change Format Reply EmailThe agent is permitted to switch the format of areply outbound email interaction between HTMLand plain text. Added: 8.1.40x.xx
E-Mail - Can Decline The agent is permitted to reject email interactionsthat are directed to the agent.
E-Mail - Can Delete The agent is permitted to delete email interactionsfrom the contact database.
E-Mail - Can Forward As An AttachmentThe agent is permitted to configure an externalemail address to which email interactions can beforwarded.
E-Mail - Can ForwardThe agent is permitted to in-line forward emailinteractions to external resources.Added: 8.1.5xx.xx
E-Mail - Can Interim Send The agent is permitted to send interim emailinteractions to a target.
E-Mail - Can Mark Done The agent is permitted to mark email interactionsas Done.
E-Mail - Can Move to WorkbinThe agent is permitted to move email interactionsto a workbin for later handling or handling byanother agent or agent group.
E-Mail - Can Print The agent is permitted to print a hard copy of anemail interaction.
Role privileges E-Mail Privileges
Workspace Desktop Edition Deployment Guide 525
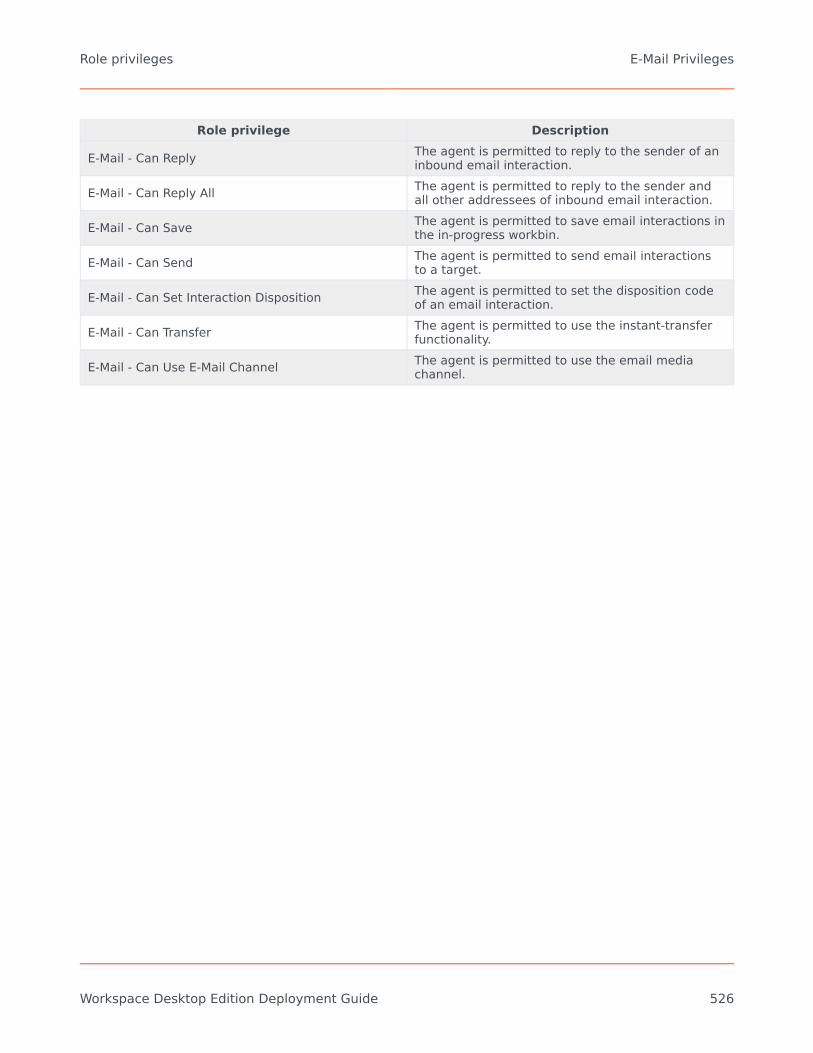
Role privilege Description
E-Mail - Can Reply The agent is permitted to reply to the sender of aninbound email interaction.
E-Mail - Can Reply All The agent is permitted to reply to the sender andall other addressees of inbound email interaction.
E-Mail - Can Save The agent is permitted to save email interactions inthe in-progress workbin.
E-Mail - Can Send The agent is permitted to send email interactionsto a target.
E-Mail - Can Set Interaction Disposition The agent is permitted to set the disposition codeof an email interaction.
E-Mail - Can Transfer The agent is permitted to use the instant-transferfunctionality.
E-Mail - Can Use E-Mail Channel The agent is permitted to use the email mediachannel.
Role privileges E-Mail Privileges
Workspace Desktop Edition Deployment Guide 526

IM privilegesThe following table lists the internal IM privileges in the Workspace Instant Messaging Privilegessection of the Role Privileges tab that can be enabled for a role. Privileges are assigned asconfiguration options in the Role Privileges tab of the Role object in Genesys AdministratorExtension (refer to the Procedure: Creating a Role, allowing a Workspace privilege, and assigning aRole to an agent or agent group).
IM PrivilegesRole privilege Description
Instant Messaging - Can Release The agent is permitted to end Instant Messagingsessions.
Instant Messaging - Can Make The agent is permitted to initiate Instant Messagingsessions.
Instant Messaging - Can UseThe agent is permitted to use the InstantMessaging media. The other IM privileges cannotbe configured if the value is Not Assigned.
Role privileges IM privileges
Workspace Desktop Edition Deployment Guide 527

Interaction Management privileges[Modified: 8.5.110.13]
The following table lists the Interaction Management privileges in the Workspace InteractionManagement Privileges section of the Role Privileges tab that can be enabled for a role.Privileges are assigned as configuration options in the Role Privileges tab of the Role object inGenesys Administrator Extension (refer to the Procedure: Creating a Role, allowing a Workspaceprivilege, and assigning a Role to an agent or agent group).
Interaction Management PrivilegesRole privilege Description
Interaction Management - Can Edit Case Data
The agent is permitted to edit the case informationof an interaction in a queue or a workbin. Requires'Workbins - Can Use My Workbins' or 'Workbins -Can Use My Team Workbins' or 'Interaction QueueManagement - Can Use'.
Interaction Management - Can Search In InteractionQueues
The agent is permitted to use the search filterfunction in the My Interaction Queues view.Added: 8.5.110.13
Interaction Management - Can Move to Queue
The agent is permitted to move an interaction froma workbin or from a queue to a queue. Requires'Workbins - Can Use My Workbins' or 'Workbins -Can Use My Team Workbins' or 'Interaction QueueManagement - Can Use'.
Interaction Management - Can Move to Workbin
The agent is permitted to move an interaction froma workbin or from a queue to a workbin. Requires'Workbins - Can Use My Workbins' or 'Workbins -Can Use My Team Workbins' or 'Interaction QueueManagement - Can Use'.
Interaction Management - Can Use The agent is permitted to access the interactionqueue management functions.
Role privileges Interaction Management privileges
Workspace Desktop Edition Deployment Guide 528

Main Window privilegesThe following table lists the interaction bar privileges, in the Workspace Main Window Privilegessection of the Role Privileges tab, that can be enabled for a role. Privileges are assigned asconfiguration options in the Role Privileges tab of the Role object in Genesys AdministratorExtension (refer to the Procedure: Creating a Role, allowing a Workspace privilege, and assigning aRole to an agent or agent group).
Main Window PrivilegesRole privilege Description
Main Window - Can Use Interaction Bar Enables the use of the Interaction bar in the MainWindow.
Main Window - Can Dock the Main Window Enables the use of the docking of the Main Windowto the top of the agent's display.
Main Window - Can Auto-hide the Main Window Enables the automatic hiding of the Main Windowwhen it is docked.
Role privileges Main Window privileges
Workspace Desktop Edition Deployment Guide 529

Outbound Campaign privileges[Modified: 8.5.115.17]
The following table lists the outbound campaign privileges in the Workspace Outbound Privilegessection of the Role Privileges tab that can be enabled for a role. Privileges are assigned asconfiguration options in the Role Privileges tab of the Role object in Genesys AdministratorExtension (refer to the Procedure: Creating a Role, allowing a Workspace privilege, and assigning aRole to an agent or agent group).
Outbound Campaign PrivilegesRole privilege Description
Outbound - Can Use The agent is permitted to use the OutboundCampaign functions.
Outbound - Can Reject RecordThe agent is permitted to decline a preview recordso that it can be processed by somebody else inthe campaign.
Outbound - Can Cancel RecordThe agent is permitted to decline a preview recordso that it is not processed at all during the currentcampaign.
Outbound - Can Dial Alternative Chained RecordThe agent is permitted to dial a number from thepreview record chain that is different than thenumber selected by the system.
Outbound - Can Dial On New Number
The agent is permitted to dial an outbound contactusing a new number. This results in a new recordbeing added to the chain. Depends on Outbound -Can Use and Outbound - Can Dial AlternativeChained Record. [Added: 8.5.115.17]
Outbound - Can Get Next Preview RecordThe agent is permitted to request a new previewrecord while the processing of the previous oneterminates.
Outbound - Can Use Push Preview The agent is permitted to actively take part inOutbound Push Preview campaigns.
Outbound - Push Preview Can Decline The agent is permitted to decline Outbound PushPreview interactions.
Outbound - Can Mark Do Not Call The agent is permitted to mark a contact as Do NotCall.
Outbound - Can Set Call Result The agent is permitted to set a call result to theoutbound record.
Outbound - Can Reschedule
The agent is permitted to reschedule an outboundrecord for an active call. Use the Outbound - CanReschedule Before Call privilege to allowrescheduling before the call is dialed. Depends onOutbound - Can Use.
Outbound - Can Reschedule Before CallThe agent is permitted to reschedule an outboundrecord before calling the contact (in Pull and PushPreview Mode). Requires privilege Outbound - Can
Role privileges Outbound Campaign privileges
Workspace Desktop Edition Deployment Guide 530
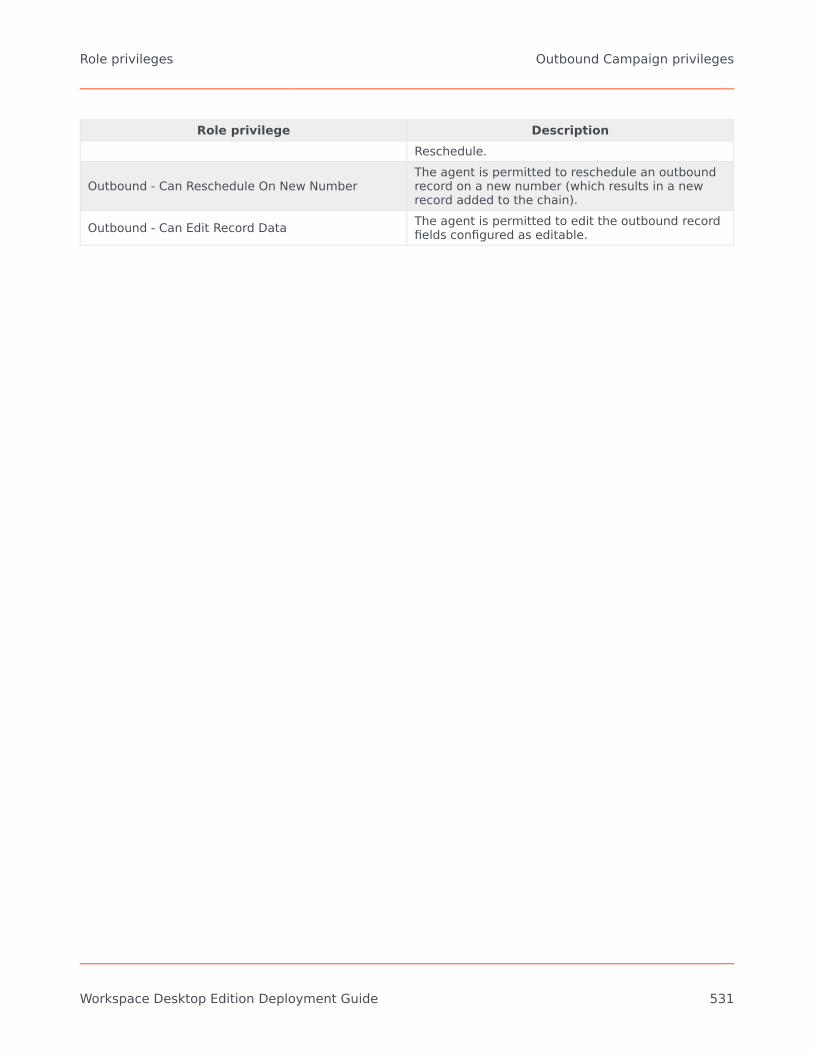
Role privilege DescriptionReschedule.
Outbound - Can Reschedule On New NumberThe agent is permitted to reschedule an outboundrecord on a new number (which results in a newrecord added to the chain).
Outbound - Can Edit Record Data The agent is permitted to edit the outbound recordfields configured as editable.
Role privileges Outbound Campaign privileges
Workspace Desktop Edition Deployment Guide 531

Recording privilegesThe following table lists the voice and screen recording privileges in the Workspace RecordingPrivileges section of the Role Privileges tab that can be enabled for a role. Privileges areassigned as configuration options in the Role Privileges tab of the Role object in GenesysAdministrator Extension (refer to the Procedure: Creating a Role, allowing a Workspace privilege, andassigning a Role to an agent or agent group).
ImportantA new privilege for Screen Recording was added in 8.5.106.19: Recording - Can UseScreen Recording. It allows a Workspace instance to activate a Screen RecorderClient when it is installed on the workstation. It applies to voice interactions andeServices.
Active Recording PrivilegesRole privilege Description
Recording - Can Use MSML-based and ScreenRecording
This privilege is a pre-requisite to permit an agentto use MSML-based and Screen Recordingfunctionality. This privilege is required to:
• Control and monitor call recording in MSMLmode. In this case it depends on 'Voice - CanUse Voice Channel'
• Enable screen recording
Recording - Can Monitor Call RecordingThe agent is permitted display the status of aMSML-based recorded call. Depends on 'Voice - CanUse Voice Channel' and 'Recording - Can UseMSML-based and Screen Recording'.
Recording - Can Control Call Recording
The agent is permitted to control call recording (notavailable on all switches). Depends on 'Voice - CanUse Voice Channel'. The type of recording dependson the value specified for the active-recording.voice.recording-type option. For MSML-based recording, it depends on 'Recording - CanUse MSML-based Recording'.
Recording - Can Use Screen Recording[Added: 8.5.106.19]
Enables a Workspace instance to activate a ScreenRecorder Client if one is installed on theworkstation. It applies to voice and eServicesinteractions. Depends on 'Recording - Can UseMSML-based and Screen Recording'
Recording - Can Control Screen Recording The agent is permitted to control screen recording.Depends on 'Recording - Can Use MSML-based and
Role privileges Recording privileges
Workspace Desktop Edition Deployment Guide 532
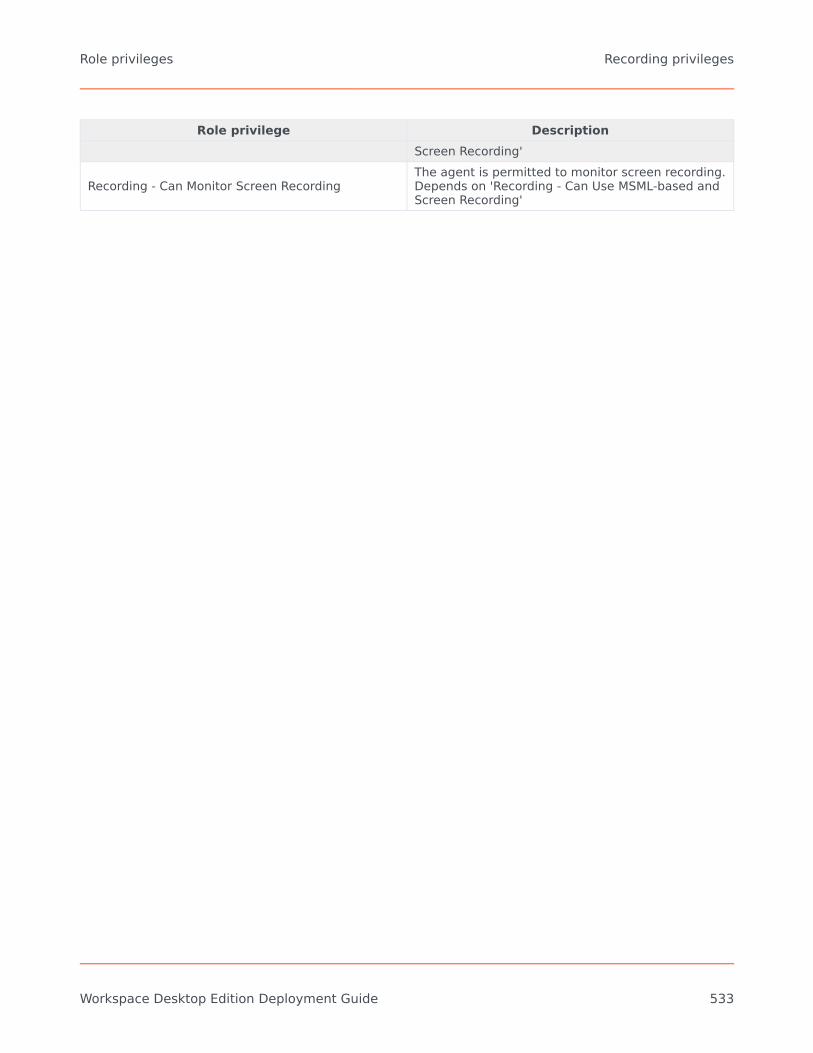
Role privilege DescriptionScreen Recording'
Recording - Can Monitor Screen RecordingThe agent is permitted to monitor screen recording.Depends on 'Recording - Can Use MSML-based andScreen Recording'
Role privileges Recording privileges
Workspace Desktop Edition Deployment Guide 533

Security privilegesThe following table lists the Security privileges in the Workspace Security Privileges section ofthe Role Privileges tab that can be enabled for a role. Privileges are assigned as configurationoptions in the Role Privileges tab of the Role object in Genesys Administrator Extension (refer tothe Procedure: Creating a Role, allowing a Workspace privilege, and assigning a Role to an agent oragent group).
Security PrivilegesRole privilege Description
Security - Can Manually Change PasswordThe agent is permitted to change their ownpassword. This can be done by using a menuaction, or it can be a requirement.
Role privileges Security privileges
Workspace Desktop Edition Deployment Guide 534
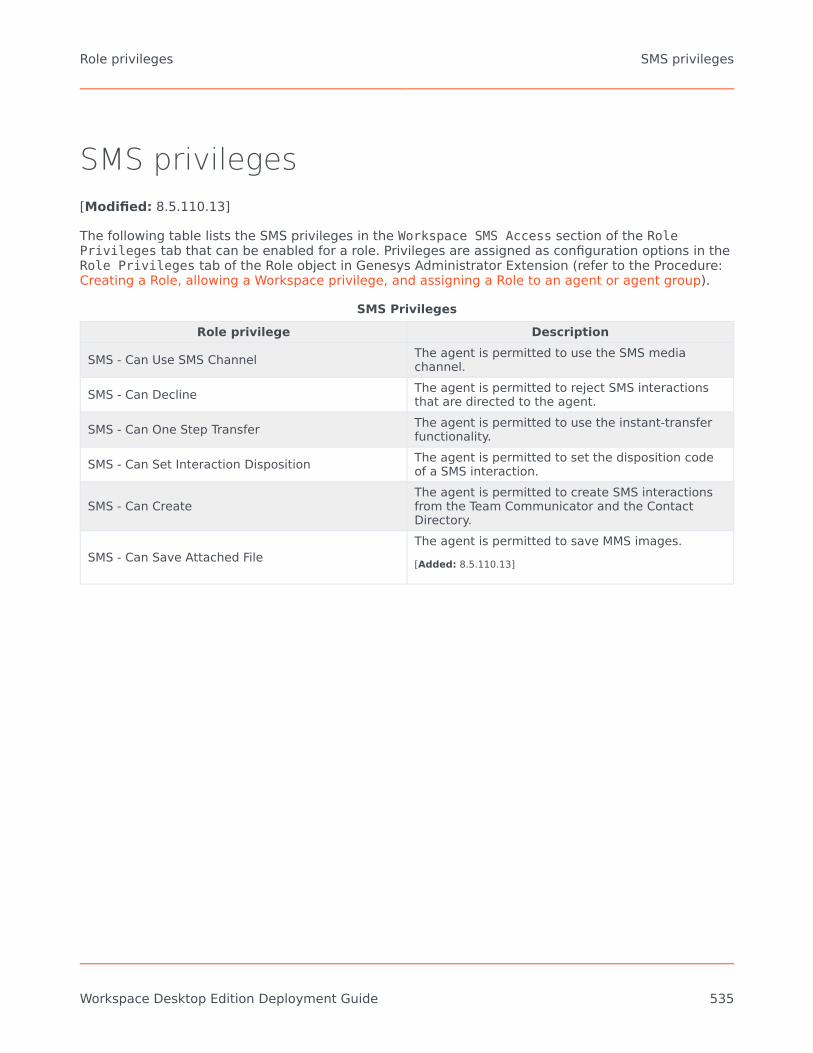
SMS privileges[Modified: 8.5.110.13]
The following table lists the SMS privileges in the Workspace SMS Access section of the RolePrivileges tab that can be enabled for a role. Privileges are assigned as configuration options in theRole Privileges tab of the Role object in Genesys Administrator Extension (refer to the Procedure:Creating a Role, allowing a Workspace privilege, and assigning a Role to an agent or agent group).
SMS PrivilegesRole privilege Description
SMS - Can Use SMS Channel The agent is permitted to use the SMS mediachannel.
SMS - Can Decline The agent is permitted to reject SMS interactionsthat are directed to the agent.
SMS - Can One Step Transfer The agent is permitted to use the instant-transferfunctionality.
SMS - Can Set Interaction Disposition The agent is permitted to set the disposition codeof a SMS interaction.
SMS - Can CreateThe agent is permitted to create SMS interactionsfrom the Team Communicator and the ContactDirectory.
SMS - Can Save Attached FileThe agent is permitted to save MMS images.[Added: 8.5.110.13]
Role privileges SMS privileges
Workspace Desktop Edition Deployment Guide 535
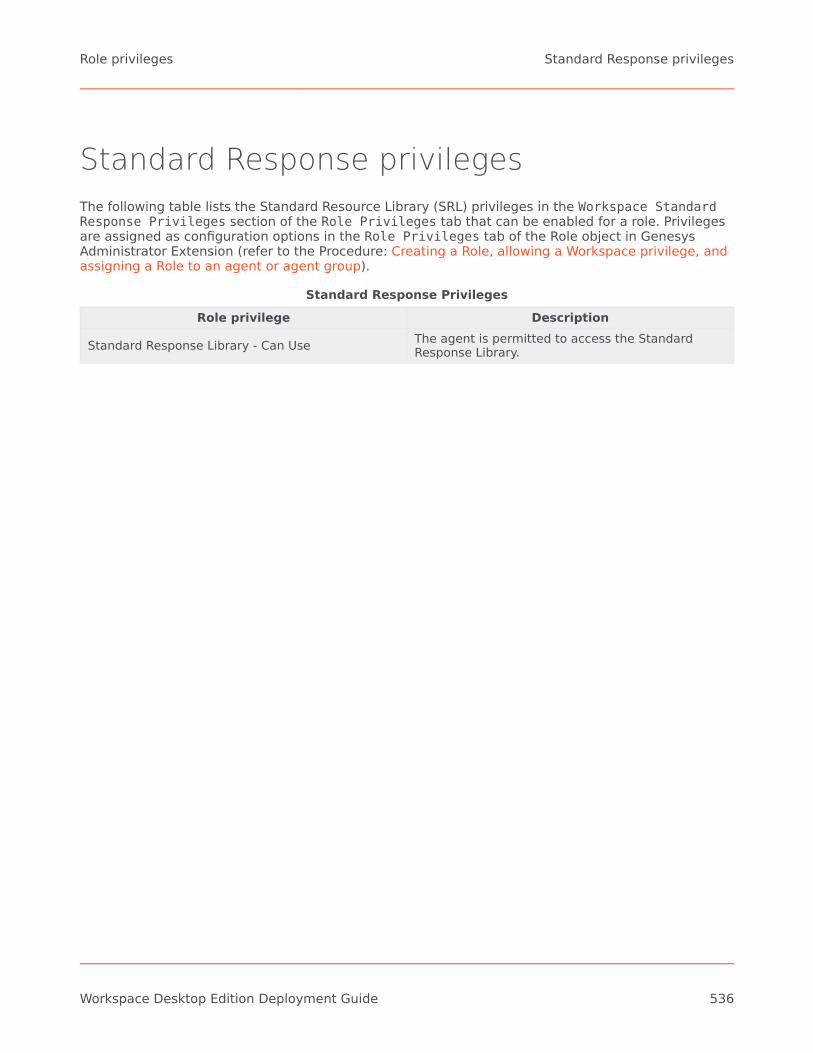
Standard Response privilegesThe following table lists the Standard Resource Library (SRL) privileges in the Workspace StandardResponse Privileges section of the Role Privileges tab that can be enabled for a role. Privilegesare assigned as configuration options in the Role Privileges tab of the Role object in GenesysAdministrator Extension (refer to the Procedure: Creating a Role, allowing a Workspace privilege, andassigning a Role to an agent or agent group).
Standard Response PrivilegesRole privilege Description
Standard Response Library - Can Use The agent is permitted to access the StandardResponse Library.
Role privileges Standard Response privileges
Workspace Desktop Edition Deployment Guide 536

Statistics privilegesThe following table lists the Statistics privileges in the Workspace Statistics Privileges section ofthe Role Privileges tab that can be enabled for a role. Privileges are assigned as configurationoptions in the Role Privileges tab of the Role object in Genesys Administrator Extension (refer tothe Procedure: Creating a Role, allowing a Workspace privilege, and assigning a Role to an agent oragent group).
Statistics PrivilegesRole privilege Description
Statistics - Can Use My Statistics The agent is permitted to use the My Statistics tabto view Key Performance Indicators.
Statistics - Can Use Contact Center StatisticsThe agent is permitted to use the Contact CenterStatistics tab to view Object Metrics (ContactCenter Statistics).
Statistics - Can Use Gadget StatisticsThe agent is permitted to use the Statistics Gadgetto view Key Performance Indicator and ContactCenter Statistics.
Role privileges Statistics privileges
Workspace Desktop Edition Deployment Guide 537

Team Communicator privilegesThe following table lists the Team Communicator privileges in the Workspace Team CommunicatorPrivileges section of the Role Privileges tab that can be enabled for a role. Privileges areassigned as configuration options in the Role Privileges tab of the Role object in GenesysAdministrator Extension (refer to the Procedure: Creating a Role, allowing a Workspace privilege, andassigning a Role to an agent or agent group).
Team Communicator PrivilegesRole privilege Description
Team Communicator - Can UseThe agent is permitted to use the TeamCommunicator. The other Team Communicatorprivileges cannot be configured if the value is NotAssigned.
Team Communicator - Can Manage FavoritesThe agent is permitted to add, edit, and removepersonal favorite internal targets and contacts inthe Team Communicator. This privilege isdependent on Team Communicator - Can Use.
Team Communicator - Can View FavoritesThe agent is permitted to see and use the favoriteinternal targets and contacts that they have savedin the Team Communicator. This privilege isdependent on Team Communicator - Can Use.
Team Communicator - Can View Recent Calls
The agent is permitted to see and use the recentcall list of internal targets and contacts that theyhave saved in the Team Communicator. Thisprivilege is dependent on Team Communicator -Can Use.
Team Communicator - Can Search AllThe agent is permitted to search within all internaltargets and contacts in the Team Communicator.This privilege is dependent on Team Communicator- Can Use. Added: 8.1.40x.xx
Role privileges Team Communicator privileges
Workspace Desktop Edition Deployment Guide 538

Team Lead privileges[Modified: 8.5.126.07]
The following table lists the Team Lead privileges in the Workspace Team Lead Privileges sectionof the Role Privileges tab that can be enabled for a role. Privileges are assigned as configurationoptions in the Role Privileges tab of the Role object in Genesys Administrator Extension (refer tothe Procedure: Creating a Role, allowing a Workspace privilege, and assigning a Role to an agent oragent group). Also, refer to the Procedure: Enabling agents to be Team Leads.
Team Lead PrivilegesRole privilege Description
Team Lead - Can Use Allows the agent to use Team Lead functionality.
Team Lead - Can Auto Coach Voice Interactions Permits a Team Lead to automatically coach all thevoice interactions of a selected agent.
Team Lead - Can Auto Coach Chat Interactions Permits a Team Lead to automatically coach all thechat interactions of a selected agent.
Team Lead - Can Auto Monitor Chat Interactions Allows the automatic monitoring of all the chatinteractions of a selected agent.
Team Lead - Can Auto Monitor Voice Interactions Allows the automatic monitoring of all the voiceinteractions of a selected agent.
Team Lead - Can Barge-in Chat Allows the team lead to Barge in to Chatinteractions.
Team Lead - Can Barge-in Voice Allows the team lead to barge in to voiceinteractions.
Team Lead - Can Change Agent State Allows the team lead to change the status of asupervised agent. Added: 8.5.126.07
Team Lead - Can Coach Chat Via Chat Allows the team lead to coach an agent via thechat channel for a monitored chat interaction.
Team Lead - Can Coach Chat Via Voice Allows the team lead to coach an agent via thevoice channel during a monitored chat interaction.
Team Lead - Can Coach Chat and Voice Via IMAllows the team lead to coach an agent via theinstant messaging channel during a monitored chator voice interaction.
Team Lead - Can Coach Current Voice Interactions Permits a Team Lead to coach the current voiceinteractions of a selected agent.
Team Lead - Can Coach Current Chat interactions Permits a Team Lead to coach the current chatinteractions of a selected agent.
Team Lead - Can Monitor Current Monitor ChatInteractions
Allows the monitoring of a selected active chatinteraction of a selected agent.
Team Lead - Can Monitor Current Voice Interactions Allows the monitoring of the currently active voiceinteraction of a selected agent.
Team Lead - Can Stop Supervising Chat Allows the team lead to stop supervising chatinteractions for the selected agent.
Role privileges Team Lead privileges
Workspace Desktop Edition Deployment Guide 539

Role privilege Description
Team Lead - Can Stop Supervising Voice Allows the team lead to stop supervising voiceinteractions for the selected agent.
Role privileges Team Lead privileges
Workspace Desktop Edition Deployment Guide 540

Voice privilegesThe following table lists the voice privileges in the Workspace Voice Privileges section of the RolePrivileges tab that can be enabled for a role. Privileges are assigned as configuration options in theRole Privileges tab of the Role object in Genesys Administrator Extension (refer to the Procedure:Creating a Role, allowing a Workspace privilege, and assigning a Role to an agent or agent group).
Voice PrivilegesRole privilege Description
Voice - Can Use Voice ChannelThe agent is permitted to use the voice channel.The other voice privileges cannot be configured ifthe value is Not Assigned.
Voice - Can Answer CallThe agent can choose to answer a voice interactionthat is routed to their desktop. Auto-answer isdisabled.
Voice - Can Delete From Conference The agent can remove a party from a voiceconference.
Voice - Can Forward Call The agent is permitted to configure a call forwardto a different number for voice interactions.
Voice - Can Hold/Retrieve CallThe agent is permitted to put voice interactions onhold and retrieve voice interactions that are onhold.
Voice - Can Make Call The agent is permitted to call both internal targetsand contacts.
Voice - Can End Consultation CallThe agent is permitted to manually end a voiceconsultation call. The behavior of this privilegedepends on the option voice.end-consultation-method.
Voice - Can One Step Conference The agent is permitted to start conferences withoutspeaking with the target first (Instant Conference).
Voice - Can One Step Transfer The agent is permitted to transfer calls withoutspeaking with the target first (Instant Transfer).
Voice - Can Suspend or Reinstate A ConferenceParty [Modified: 8.5.109.16]
Enables a conference member to suspend anothermember from the conference or reinstate amember to the conference. Enables agents in aconference to prevent a party in the conferencefrom listening to the call (Suspend the party fromthe conference). Once listening is denied, anyagent can then re-allow the party to listen to theconference (Reinstate the party to the conference).If you use SIP Server to control the voice channel,SIP Server version 8.1.101.81 or higher is requiredto support this feature. This privilege was formallyVoice - Can Deny Or Authorize Listening For AConference Party.
Voice - Can Reject Call The agent can choose to reject a voice interactionthat is routed to their desktop.
Role privileges Voice privileges
Workspace Desktop Edition Deployment Guide 541

Role privilege DescriptionVoice - Can Release Call The agent is permitted to manually end calls.
Voice - Can Send DTMF The agent is permitted to attach DTMF to the calldata.
Voice - Can Set Interaction Disposition The agent is permitted to specify the call outcomeby setting the disposition code.
Voice - Can Two Step Conference The agent is permitted to contact and speak(consultation) prior to starting a conference.
Voice - Can Two Step TransferThe agent is permitted to contact and speak(consultation) prior to transferring the voiceinteraction to the target.
Voice - Show Silent Monitoring The agent is permitted to know when they arebeing silently monitored by a supervisor.
Role privileges Voice privileges
Workspace Desktop Edition Deployment Guide 542

Voicemail privileges[Added: 8.5.100.05] [Modified: 8.5.118.10]
The following table lists the Voicemail privileges in the Workspace Voicemail Privileges section ofthe Role Privileges tab that can be enabled for a role. Privileges are assigned as configurationoptions in the Role Privileges tab of the Role object in Genesys Administrator Extension (refer tothe Procedure: Creating a Role, allowing a Workspace privilege, and assigning a Role to an agent oragent group).
Voicemail PrivilegeRole privilege Description
Voice Mail - Can Use The agent is permitted to use the voicemail featureto use, control, and monitor Voicemail boxes.
Voice Mail - Can Deposit Message The agent is permitted to call the voicemail box ofanother agent or agent group. [Added: 8.5.118.10]
Voice Mail - Can Transfer MessageThe agent is permitted to transfer a call to thevoicemail box of another agent or agent group.[Added: 8.5.118.10]
Role privileges Voicemail privileges
Workspace Desktop Edition Deployment Guide 543

Web Callback privilegesThe following table lists the Web Callback privileges in the Workspace Web Callback Access sectionof the Role Privileges tab that can be enabled for a role. Privileges are assigned as configurationoptions in the Role Privileges tab of the Role object in Genesys Administrator Extension (refer tothe Procedure: Creating a Role, allowing a Workspace privilege, and assigning a Role to an agent oragent group).
Web Callback PrivilegesRole privilege Description
Web Callback - Can CancelPermits an agent to decline a Web Callback so thatit is not processed. Depends on 'Web Callback -Can Use Web Callback Channel'. Added:8.1.40x.xx
Web Callback - Can Use Callback Channel The agent is permitted to use the Web Callbackmedia channel.
Web Callback - Can Decline The agent is permitted to reject Web Callbackinteractions that are directed to the agent.
Web Callback - Can RejectPermits an agent to decline a Web Callback so thatit can be processed by a different agent. Dependson 'Web Callback - Can Use Web Callback Channel'.Added: 8.1.40x.xx
Web Callback - Can Reschedule
The agent is permitted to reschedule a WebCallback interaction. Use the Web Callback - CanReschedule Before Call privilege to allowrescheduling before the call is dialed. Depends onWeb Callback - Can Use Web Callback Channel.Modified: 8.1.40x.xx
Can Reschedule Before Call
The agent is permitted to reschedule a WebCallback Preview at a different date and/or time.The Can Reschedule privilege must be enabled forthis privilege to be active. If Can Reschedule isenabled but Can Reschedule Before Call isdisabled, agents can still reschedule the WebCallback Preview after they have connected anddisconnected the call. Depends on 'Web Callback -Can Reschedule'. Added: 8.1.40x.xx
Web Callback - Can Reschedule On New Number The agent is permitted to reschedule a WebCallback interaction by using a new phone number.
Web Callback - Can Set Interaction Disposition The agent is permitted to set the disposition codeof a Web Callback interaction.
Web Callback - Can Mark DoneThe agent is permitted to mark inbound WebCallback interactions as Done without processingthem further.
Role privileges Web Callback privileges
Workspace Desktop Edition Deployment Guide 544

Workbins privileges[Modified: 8.5.110.13]
The following table lists the Workbin privileges in the Workspace Workbin Privileges section of theRole Privileges tab that can be enabled for a role. Privileges are assigned as configuration optionsin the Role Privileges tab of the Role object in Genesys Administrator Extension (refer to theProcedure: Creating a Role, allowing a Workspace privilege, and assigning a Role to an agent or agentgroup).
Workbin PrivilegesRole privilege Description
Workbins - Can Search in WorkbinsThe agent is permitted to use the search filterfunction in the My Workbins and My Team Workbinsviews. Added: 8.5.110.13
Workbins - Can Use My Workbins The agent is permitted to access the My Workbinsfunctions. Modified: 8.1.40x.xx
Workbins - Can Use My Team Workbins The agent is permitted to access the My TeamWorkbin functions. Added: 8.1.40x.xx
Workbin - Can search in Workbins
Role privileges Workbins privileges
Workspace Desktop Edition Deployment Guide 545
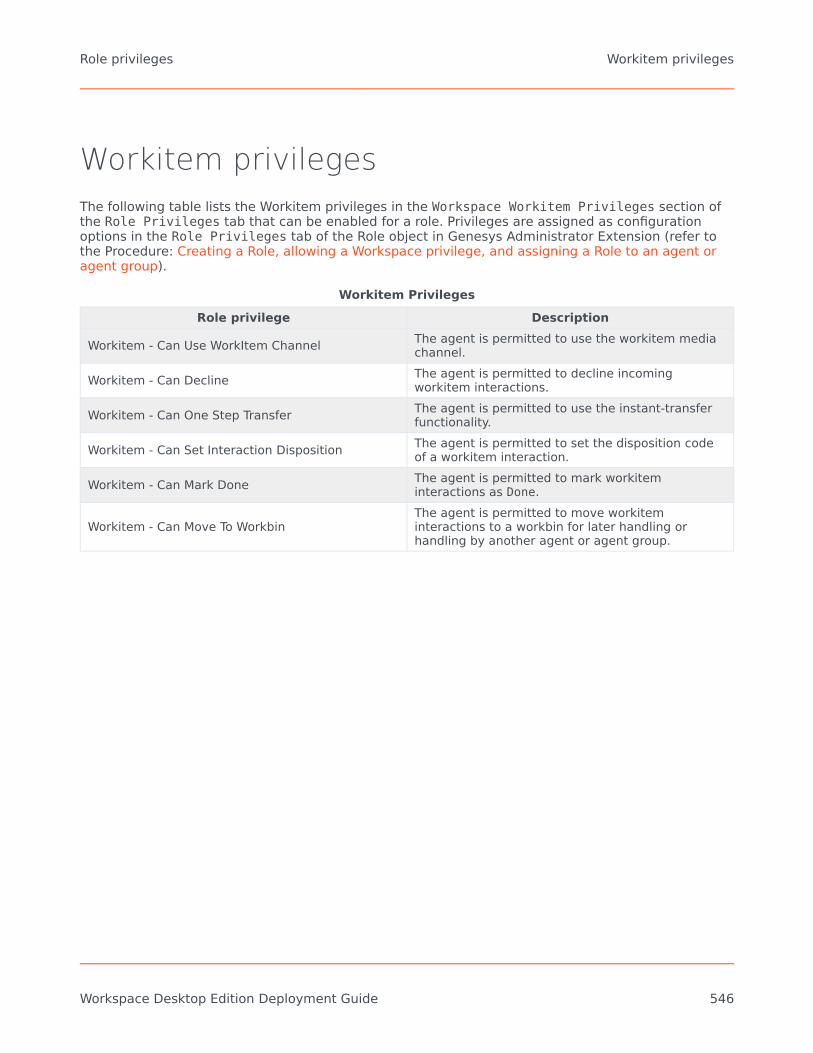
Workitem privilegesThe following table lists the Workitem privileges in the Workspace Workitem Privileges section ofthe Role Privileges tab that can be enabled for a role. Privileges are assigned as configurationoptions in the Role Privileges tab of the Role object in Genesys Administrator Extension (refer tothe Procedure: Creating a Role, allowing a Workspace privilege, and assigning a Role to an agent oragent group).
Workitem PrivilegesRole privilege Description
Workitem - Can Use WorkItem Channel The agent is permitted to use the workitem mediachannel.
Workitem - Can Decline The agent is permitted to decline incomingworkitem interactions.
Workitem - Can One Step Transfer The agent is permitted to use the instant-transferfunctionality.
Workitem - Can Set Interaction Disposition The agent is permitted to set the disposition codeof a workitem interaction.
Workitem - Can Mark Done The agent is permitted to mark workiteminteractions as Done.
Workitem - Can Move To WorkbinThe agent is permitted to move workiteminteractions to a workbin for later handling orhandling by another agent or agent group.
Role privileges Workitem privileges
Workspace Desktop Edition Deployment Guide 546

Workspace SIP Endpoint privilegesThe following table lists the Workspace SIP Endpoint privileges in the Workspace SIP Tasks sectionof the Role Privileges tab that can be enabled for a role. Privileges are assigned as configurationoptions in the Role Privileges tab of the Role object in Genesys Administrator Extension (refer tothe Procedure: Creating a Role, allowing a Workspace privilege, and assigning a Role to an agent oragent group).
Workspace SIP Endpoint PrivilegesRole privilege Description
SIP Endpoint - Can Use Embedded SIP EndpointIndicates if Workspace will start automatically anembedded SIP Endpoint for the SIP Agent. If set tofalse, you will require an external SIP Endpointapplication.
Role privileges Workspace SIP Endpoint privileges
Workspace Desktop Edition Deployment Guide 547