Oracle eMail Center - Oracle Help Center
126
Oracle eMail Center Concepts and Procedures Release 11i July 2001 Part No. A86084-03
-
Upload
khangminh22 -
Category
Documents
-
view
3 -
download
0
Transcript of Oracle eMail Center - Oracle Help Center
Oracle eMail Center
Concepts and Procedures
Release 11i
July 2001
Part No. A86084-03
Oracle eMail Center, Concepts and Procedures, Release 11i
Part No. A86084-03
Copyright © 1996, 2001, Oracle Corporation. All rights reserved.
The Programs (which include both the software and documentation) contain proprietary information of Oracle Corporation; they are provided under a license agreement containing restrictions on use and disclosure and are also protected by copyright, patent, and other intellectual and industrial property laws. Reverse engineering, disassembly, or decompilation of the Programs, except to the extent required to obtain interoperability with other independently created software or as specified by law, is prohibited.
The information contained in this document is subject to change without notice. If you find any problems in the documentation, please report them to us in writing. Oracle Corporation does not warrant that this document is error free. Except as may be expressly permitted in your license agreement for these Programs, no part of these Programs may be reproduced or transmitted in any form or by any means, electronic or mechanical, for any purpose, without the express written permission of Oracle Corporation.
If the Programs are delivered to the U.S. Government or anyone licensing or using the programs on behalf of the U.S. Government, the following notice is applicable:
Restricted Rights Notice Programs delivered subject to the DOD FAR Supplement are "commercial computer software" and use, duplication, and disclosure of the Programs, including documentation, shall be subject to the licensing restrictions set forth in the applicable Oracle license agreement. Otherwise, Programs delivered subject to the Federal Acquisition Regulations are "restricted computer software" and use, duplication, and disclosure of the Programs shall be subject to the restrictions in FAR 52.227-19, Commercial Computer Software - Restricted Rights (June, 1987). Oracle Corporation, 500 Oracle Parkway, Redwood City, CA 94065.
The Programs are not intended for use in any nuclear, aviation, mass transit, medical, or other inherently dangerous applications. It shall be the licensee's responsibility to take all appropriate fail-safe, backup, redundancy, and other measures to ensure the safe use of such applications if the Programs are used for such purposes, and Oracle Corporation disclaims liability for any damages caused by such use of the Programs.
Oracle is a registered trademark, and Oracle eMail Center is a trademark or registered trademark of Oracle Corporation. Other names may be trademarks of their respective owners.
Contents
Send Us Your Comments ................................................................................................................... ix
Preface............................................................................................................................................................ xi
1 Understanding Oracle eMail Center
1.1 Overview of eMail Center.................................................................................................... 1-21.2 How Does eMail Center Work? .......................................................................................... 1-21.3 Overview of Application Architecture............................................................................... 1-21.3.1 Other Modules, Servers and Components ................................................................. 1-31.4 eMail Processing.................................................................................................................... 1-41.5 Desktop Processing ............................................................................................................... 1-91.5.0.1 My Messages Screen ............................................................................................... 1-91.5.0.2 Preview Screen ........................................................................................................ 1-91.5.0.3 Respond Screen ..................................................................................................... 1-101.5.0.4 Compose Screen .................................................................................................... 1-111.5.0.5 Knowledge Base Screen ....................................................................................... 1-111.5.0.6 History Screen ....................................................................................................... 1-111.6 Inbound Server Processing ................................................................................................ 1-121.7 Desktop Processing ............................................................................................................. 1-131.8 Overview of System Process Flows .................................................................................. 1-171.9 Inbound eMail Processing.................................................................................................. 1-18
2 Using Oracle eMail Center
2.1 Adding a Folder..................................................................................................................... 2-1
iii
2.2 Deleting a Folder ................................................................................................................... 2-22.3 Moving Messages to a different folder............................................................................... 2-22.4 Viewing an inbound eMail Message .................................................................................. 2-22.4.1 Transferring an eMail Message .................................................................................... 2-32.4.2 Rerouting an eMail Message......................................................................................... 2-32.4.3 Delete an eMail Message ............................................................................................... 2-32.4.4 Responding to an eMail Message ................................................................................ 2-32.4.5 Responding to eMail Message...................................................................................... 2-32.4.6 Inserting / Attaching Suggested Response Documents........................................... 2-42.4.7 Inserting / Attaching Documents from Knowledge Base........................................ 2-42.4.8 Attaching a Document from Local or Network File System.................................... 2-52.4.9 Composing an eMail ...................................................................................................... 2-52.4.10 Inserting Templates into the New Composed eMail ................................................ 2-52.4.11 Inserting / Attaching Documents from Knowledge Base........................................ 2-62.4.12 Attaching a Document from Local or Network File System.................................... 2-62.5 Search Functionality.............................................................................................................. 2-7
3 Implementing Oracle eMail Center
3.1 Planning the Implementation .............................................................................................. 3-13.1.1 Implementation Planning Questionnaire ................................................................... 3-13.2 Integration Dependencies .................................................................................................... 3-43.2.1 Oracle eMail Server (OES)............................................................................................. 3-43.2.1.1 IMAP server ............................................................................................................. 3-43.2.1.2 Message Store .......................................................................................................... 3-43.2.1.3 SMTP Server............................................................................................................. 3-53.2.1.4 OES PL/SQL APIs .................................................................................................. 3-53.2.2 Oracle inter Media Text (iMT)...................................................................................... 3-53.2.3 Oracle Telephony Manager (OTM).............................................................................. 3-63.2.4 Routing Server ................................................................................................................ 3-63.2.5 Work Blending................................................................................................................ 3-73.2.6 Universal Work Queue.................................................................................................. 3-73.2.7 Interaction History (IH)................................................................................................. 3-73.2.8 Forms Business Application ......................................................................................... 3-73.2.9 Knowledge Management Systems (KMS) .................................................................. 3-73.2.9.1 Solution Management System (SMS) ................................................................... 3-8
iv
3.2.9.2 Marketing Encyclopedia Systems (MES/KB)..................................................... 3-83.2.9.3 Platform Dependencies .......................................................................................... 3-83.2.10 Concurrent Manager...................................................................................................... 3-83.2.10.1 Platform Dependencies .......................................................................................... 3-83.2.11 Installation....................................................................................................................... 3-83.2.12 The Auto-Installation Process ...................................................................................... 3-93.2.13 Post-Installation Steps ................................................................................................... 3-93.2.13.1 Installing and Configuring Oracle eMail Server (OES)................................... 3-103.2.14 Installing and Configuring Interaction Center Servers .......................................... 3-113.2.14.1 Installing and Configuring eMail Center Server (eMC).................................. 3-123.3 Implementation ................................................................................................................... 3-143.3.1 Creating eMail Accounts on the eMail Server ......................................................... 3-143.3.2 Creating User Accounts .............................................................................................. 3-143.3.2.1 Creating an Employee with HRMS .................................................................... 3-153.3.2.2 Creating an Application User and Assigning Responsibilities ...................... 3-163.3.2.3 Setting JTF Default Profiles ................................................................................. 3-173.3.2.4 Setting UWQ Profiles ........................................................................................... 3-193.3.2.5 Setting CRM Resources ........................................................................................ 3-213.3.3 Defining eMail Server Accounts ................................................................................ 3-223.3.3.1 High-Level Steps ................................................................................................... 3-223.3.3.2 Worksheets............................................................................................................. 3-223.3.3.3 Detailed Steps ........................................................................................................ 3-253.3.4 Creating an eMail Center Agent ................................................................................ 3-303.3.4.1 Setting CRM Resources ........................................................................................ 3-303.3.5 Setting up Routing for Inbound eMail ...................................................................... 3-313.3.5.1 Defining Groups.................................................................................................... 3-323.3.5.2 Defining Routes..................................................................................................... 3-353.3.5.3 Defining Route Priorities ..................................................................................... 3-393.3.5.4 Defining Routing Classifications ........................................................................ 3-403.3.6 Configuring eMail Center Properties........................................................................ 3-433.3.7 Configuring UWQ to Launch the Business Application ........................................ 3-443.3.8 Creating Classifications and Themes ........................................................................ 3-453.3.8.1 Creating Classifications and Themes by Sending eMail ................................. 3-463.3.9 Creating Classifications from the Operations Manager Console.......................... 3-483.3.9.1 Creating Themes from the Operations Manager Console .............................. 3-48
v
3.3.10 Creating Suggested Response Documents and Associated Queries .................... 3-493.3.10.1 Create an Associated Query ................................................................................ 3-493.3.10.2 Associate the Suggested Response Document and the Query ....................... 3-503.3.10.3 Uploading Suggested Response Documents and Message Format
Templates ............................................................................................................... 3-513.3.10.4 Creating a Category in MES ................................................................................ 3-523.3.10.5 Defining a Hierarchy Among Categories .......................................................... 3-533.3.10.6 Uploading Documents Into MES........................................................................ 3-543.3.10.7 Verifying the Document Uploaded Successfully ............................................. 3-563.3.11 Using eMail Processing Workflow ............................................................................ 3-563.3.11.1 inbound eMail Processing Workflow................................................................. 3-573.3.11.2 Creating Additional eMail Workflow Processes .............................................. 3-583.3.11.3 Using a Workflow Node ...................................................................................... 3-603.3.11.4 Guidelines for Error Processing .......................................................................... 3-613.3.12 Administering eMail Center Concurrent Processes ................................................ 3-613.4 Troubleshooting................................................................................................................... 3-623.5 Abbreviations ....................................................................................................................... 3-68
4 Administering Oracle eMail Center With the Admin Console
4.1 Creating Agent Accounts ..................................................................................................... 4-24.2 Viewing Account Information............................................................................................. 4-34.3 Editing Account Information............................................................................................... 4-34.4 Creating Server Groups ........................................................................................................ 4-44.5 Modifying Server Groups..................................................................................................... 4-54.6 Deleting Server Groups ........................................................................................................ 4-64.7 Creating EMC Servers........................................................................................................... 4-64.8 Modifying EMC Servers ....................................................................................................... 4-74.9 Deleting EMC Servers........................................................................................................... 4-84.10 Creating Database Servers ................................................................................................... 4-94.11 Modifying Database Servers .............................................................................................. 4-104.12 Deleting Database Servers.................................................................................................. 4-104.13 Creating Database Links..................................................................................................... 4-114.14 Deleting Database Links..................................................................................................... 4-124.15 Creating eMail Servers........................................................................................................ 4-134.16 Modifying eMail Servers .................................................................................................... 4-14
vi
4.17 Deleting eMail Servers........................................................................................................ 4-154.18 Enabling and Disabling Advanced Queues .................................................................... 4-15
5 Administering Oracle eMail Center With the Op Manager Console
5.1 Creating Classifications ........................................................................................................ 5-25.2 Deleting Classifications ........................................................................................................ 5-25.3 Creating Queries.................................................................................................................... 5-35.4 Modifying Queries ................................................................................................................ 5-35.5 Creating Datasource Files .................................................................................................... 5-4
vii

viii
Send Us Your Comments
Oracle eMail Center Concepts and Procedures, Release 11i
Part No. A86084-03
Oracle Corporation welcomes your comments and suggestions on the quality and usefulness of this document. Your input is an important part of the information used for revision.
■ Did you find any errors?■ Is the information clearly presented?■ Do you need more information? If so, where?■ Are the examples correct? Do you need more examples?■ What features did you like most?
If you find any errors or have any other suggestions for improvement, please indicate the document title and part number, and the chapter, section, and page number (if available). You can send com-ments to us in the following ways:
■ Electronic mail: [email protected] ■ FAX: telephone number Attn: Oracle Your Product Name Here■ Postal service:
Oracle Corporation Oracle Your Product Name Here DocumentationStreet Address, MailstopCity, State Postal CodeCountry
If you would like a reply, please give your name, address, telephone number, and (optionally) elec-tronic mail address.
If you have problems with the software, please contact your local Oracle Support Services.
ix

x
Preface
This manual describes using Oracle eMail Center.
Intended AudienceThis manual is intended for consultants and system administrators who are interested in setting up and using Oracle eMail Center.
StructureThe Understanding Chapter explains the basic concepts and provides and overview of Oracle eMail Center.
The Using Chapter gives step by step instructions of using certain features of Oracle eMail Center.
Related DocumentsFor more information, see the following manuals:
■ Oracle eMail Center Implementation Guide
ConventionsIn this manual, Windows refers to the Windows95, Windows98, and the Windows NT operating sys-tems.
Other Product One refers to Oracle Other Product One for Windows and Oracle Other Product One for UNIX software.
Version 7.0 of Oracle Other Product One software may be referred to as Other Product Two7.
xi
The SQL interface to Oracle Other Product One is referred to as SQL. This interface is the Oracle Other Product One implementation of the SQL standard ANSI X3.135-1992, ISO 9075:1992, com-monly referred to as the ANSI/ISO SQL standard or SQL92.
In examples, an implied carriage return occurs at the end of each line, unless otherwise noted. You must press the Return key at the end of a line of input.
The following conventions are also used in this manual:
Convention Meaning
. . .
Vertical ellipsis points in an example mean that information not directly related to the example has been omitted.
. . . Horizontal ellipsis points in statements or commands mean that parts of the statement or command not directly related to the exam-ple have been omitted
boldface text Boldface type in text indicates a term defined in the text, the glos-sary, or in both locations.
< > Angle brackets enclose user-supplied names.
[ ] Brackets enclose optional clauses from which you can choose one or none.
xii
Understanding Oracle eMail C
1
Understanding Oracle eMail CenterThis topic group provides overviews of the application and its components, explanations of key concepts, features, and functions, as well as the application’s relationships to other Oracle or third-party applications.
This topic group covers the following topics:
■ Overview of eMail Center
■ How Does eMail Center Work?
■ Application Architecture Overview
■ eMail Processing
■ Inbound Server Processing
■ Desktop Processing
■ Overview of System Process Flows
■ Inbound Process Flow
■ Inbound eMail Processing
■ Routing, Queuing, and Delivery
■ Inbound eMail Processing
■ Desktop Interaction Delivery
■ Outbound Processing
■ Usage Scenarios
enter 1-1
Overview of eMail Cente r
1.1 Overview of eMail CenterOracle eMail Center is a complete solution for managing eMail based interactions with customers, partners, suppliers, employees, or other entities that interact with or within an organization.
eMail Center is a powerful enabler for rapidly implementing flexible self-service and process automation oriented eBusiness solutions, using eMail as a communication channel.
1.2 How Does eMail Center Work?Incoming eMails are categorized as inbound (unstructured) types and are typically free form text messages.
Oracle eMail Center invokes appropriate, customize processes that are targeted to handle different types of inbound eMail interactions. Workflow processes are setup to automatically resolve inbound eMail, which passes through Oracle inter Media Text processing to determine the intent of the message. Workflow processes are then setup to attempt automatic resolution of these interactions based on the message intent/classification. Inbound interactions that cannot be automatically resolved are routed to the appropriate human agent in the Interaction Center using both rule and skill based routing schemes.
Once an eMail message gets to an agent, the eMail Center provides tools and capabilities to maximize agent productivity and effectiveness by providing fully-formed suggested responses for inbound eMails and a high-performance point-and-click agent interface that minimizes the need for typing and includes the ability to attach or insert appropriate documents. Oracle eMail Center allows storage and retrieval of documents, URLs and images from Marketing Encyclopedia System (MES). eMail Center also allows inter Media text queries on both the Marketing Encyclopedia System (MES) and the Solution Management System (SMS) knowledge bases.
1.3 Overview of Application ArchitectureOracle eMail Center is comprised of the following main components.
eMail Center Agent User InterfaceA Java Server Pages (JSP) based application that runs on the agent desktop in an Internet browser. The supported browser is Microsoft Internet Explorer 5.0 and higher. It utilizes two Java Applets, an editor applet that allows the user to compose
1-2 Oracle eMail Center Concepts and Procedures

Overview of Application Architecture
messages, select font, select color, and formatting options, and it also allows importing of images, both .gif and .jpg files. The second is a hidden applet, which maintains a connection with the Universal Work Queue (UWQ). This applet allows the exchange of information between eMC Agent UI and UWQ.
eMail Center System Administration InterfaceA Java Server Page (JSP) based graphical user interface allows defining and viewing of various eMail Center components. An administrator can define eMail accounts, IMAP servers, SMTP servers and database links.
eMail Center Operations Manager InterfaceA Java Server Page (JSP) based graphical user interface allows authorized interaction center domain experts (operations managers) to configure operational rules or business practices for eMail Center. The Operations Manager can create and fine tune eMail classifications and themes from this interface.
eMail Center ServerThe eMail Center Server is a multi-threaded Java based server that delivers information derived from an eMail message to the Oracle Telephony Manager server for routing and delivery to the appropriate agents.
eMail Center WorkfloweMail Center Workflow is the workflow based engine that process all inbound eMail messages. It can be customized to process eMails based on different business needs.
Oracle eMail Server (OES)OES is the mail server that receives and sends the eMails for the eMail Center.
1.3.1 Other Modules, Servers and ComponentsOracle eMail Center also uses the following other modules, servers and components.
CRM ModuleseMail Center uses several features of the CRM products, such as the Marketing Encyclopedia System (MES), Universal Work Queue and Interaction History.
Understanding Oracle eMail Center 1-3

eMail Processing
Oracle Telephony Manager ServerOracle Telephony Manager (OTM) holds the state of all the agents and maintains the distribution queues for all interaction center media. OTM drives the routing server to determine the agents who are available to receive eMails. OTM receives the eMail from eMail Center and sends it to the routing server. The output of the routing server is a list of agents qualified to handle the interaction. Based on this list, OTM distributes eMail. Distribute, in this case means, putting the eMail into the agent queues that the routing engine identified.
This process occurs once for every new eMail. Although many agents might see the eMail in their queue, only one agent will service the interaction. Upon delivering the eMail to an agent, OTM removes it from all other agent queues. When an agent selects the eMail from the queue, OTM fires an event to the agent desktop. When this happens, the agent will see a screen pop with a subset of the information contained in the eMail interaction.
1.4 eMail ProcessingWhen an incoming eMail arrives at Oracle eMail Server (OES) component of the Oracle eMail Center, OES queues the eMail for the workflow to process and make available to an agent. The information from the eMail header and readable attachments are then extracted from the eMail and is concatenated to the body of the eMail.
The data from the incoming eMail (along with the header and attachment data) is then analyzed by the inter Media Text (iMT), which then provides a string or signature of keywords or themes. The signature is then used by the classification engine to categorize or classify the eMail and also scan the knowledge base repository for related response documents. The meta-data regarding the eMail and top classifications (based on the calculated confidence score or percent probability) and top suggested response documents is then made available to Oracle Telephony Manager (OTM) through the Oracle eMail Center server.
The routing engine then uses the meta-data and applies user-defined rules to route the eMail to an account or queue. The OTM server then provides the queue information to the Universal Work Queue (UWQ), which displays the totals for every account or queue to which an agent is assigned.
When an agent selects a particular eMail queue in the UWQ and request the next interaction, the UWQ informs the OTM server regarding the agents request, which in turn requests the Oracle eMail Server to assign the next eMail in the queue to that particular agent. Oracle eMail Server transports the eMail to the agent’s personal folder.
1-4 Oracle eMail Center Concepts and Procedures
eMail Processing
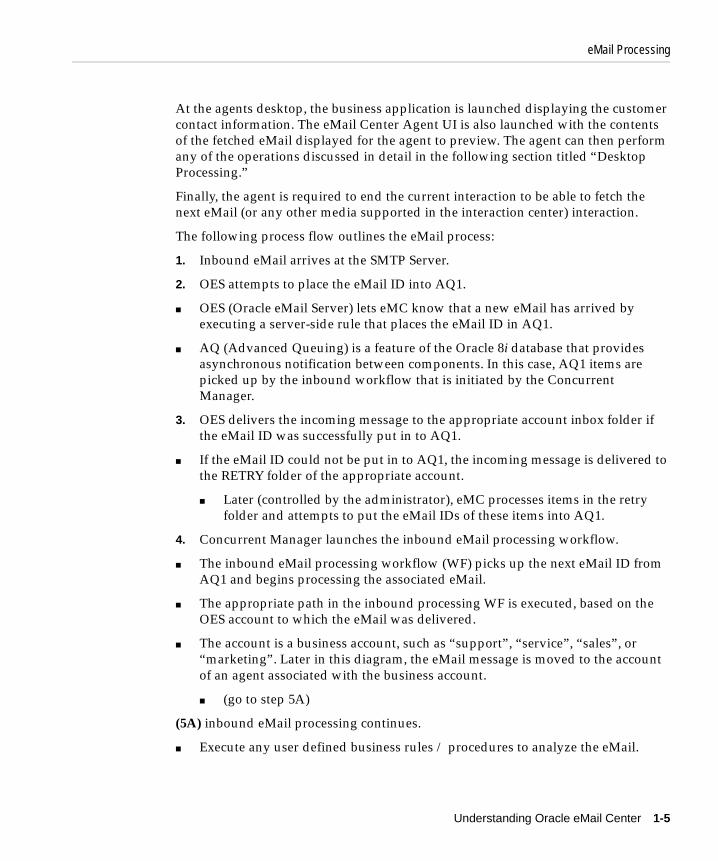
At the agents desktop, the business application is launched displaying the customer contact information. The eMail Center Agent UI is also launched with the contents of the fetched eMail displayed for the agent to preview. The agent can then perform any of the operations discussed in detail in the following section titled “Desktop Processing.”
Finally, the agent is required to end the current interaction to be able to fetch the next eMail (or any other media supported in the interaction center) interaction.
The following process flow outlines the eMail process:
1. Inbound eMail arrives at the SMTP Server.
2. OES attempts to place the eMail ID into AQ1.
■ OES (Oracle eMail Server) lets eMC know that a new eMail has arrived by executing a server-side rule that places the eMail ID in AQ1.
■ AQ (Advanced Queuing) is a feature of the Oracle 8i database that provides asynchronous notification between components. In this case, AQ1 items are picked up by the inbound workflow that is initiated by the Concurrent Manager.
3. OES delivers the incoming message to the appropriate account inbox folder if the eMail ID was successfully put in to AQ1.
■ If the eMail ID could not be put in to AQ1, the incoming message is delivered to the RETRY folder of the appropriate account.
■ Later (controlled by the administrator), eMC processes items in the retry folder and attempts to put the eMail IDs of these items into AQ1.
4. Concurrent Manager launches the inbound eMail processing workflow.
■ The inbound eMail processing workflow (WF) picks up the next eMail ID from AQ1 and begins processing the associated eMail.
■ The appropriate path in the inbound processing WF is executed, based on the OES account to which the eMail was delivered.
■ The account is a business account, such as “support”, “service”, “sales”, or “marketing”. Later in this diagram, the eMail message is moved to the account of an agent associated with the business account.
■ (go to step 5A)
(5A) inbound eMail processing continues.
■ Execute any user defined business rules / procedures to analyze the eMail.
Understanding Oracle eMail Center 1-5
eMail Processing
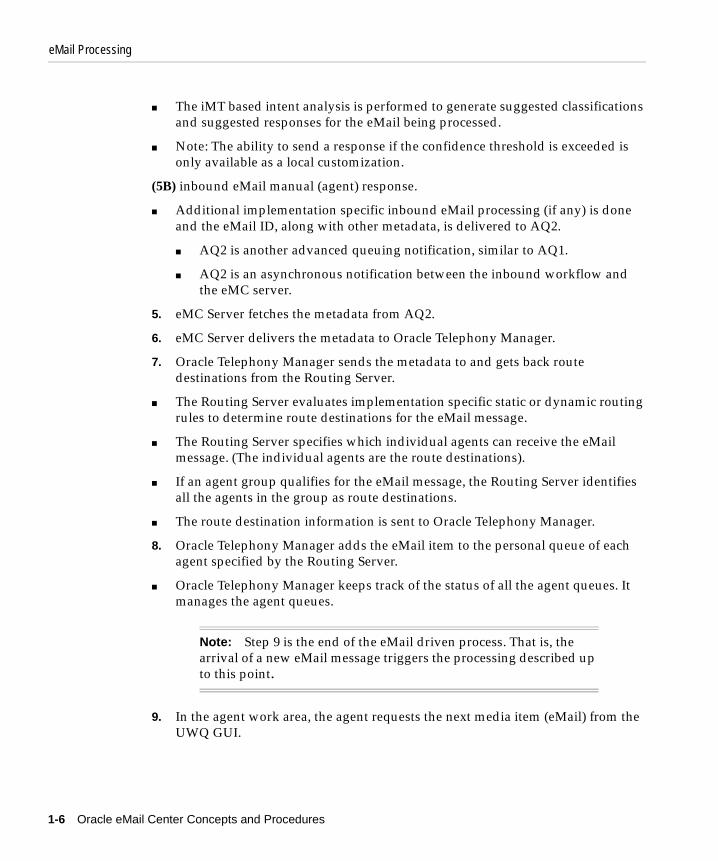
■ The iMT based intent analysis is performed to generate suggested classifications and suggested responses for the eMail being processed.
■ Note: The ability to send a response if the confidence threshold is exceeded is only available as a local customization.
(5B) inbound eMail manual (agent) response.
■ Additional implementation specific inbound eMail processing (if any) is done and the eMail ID, along with other metadata, is delivered to AQ2.
■ AQ2 is another advanced queuing notification, similar to AQ1.
■ AQ2 is an asynchronous notification between the inbound workflow and the eMC server.
5. eMC Server fetches the metadata from AQ2.
6. eMC Server delivers the metadata to Oracle Telephony Manager.
7. Oracle Telephony Manager sends the metadata to and gets back route destinations from the Routing Server.
■ The Routing Server evaluates implementation specific static or dynamic routing rules to determine route destinations for the eMail message.
■ The Routing Server specifies which individual agents can receive the eMail message. (The individual agents are the route destinations).
■ If an agent group qualifies for the eMail message, the Routing Server identifies all the agents in the group as route destinations.
■ The route destination information is sent to Oracle Telephony Manager.
8. Oracle Telephony Manager adds the eMail item to the personal queue of each agent specified by the Routing Server.
■ Oracle Telephony Manager keeps track of the status of all the agent queues. It manages the agent queues.
9. In the agent work area, the agent requests the next media item (eMail) from the UWQ GUI.
Note: Step 9 is the end of the eMail driven process. That is, the arrival of a new eMail message triggers the processing described up to this point.
1-6 Oracle eMail Center Concepts and Procedures
eMail Processing
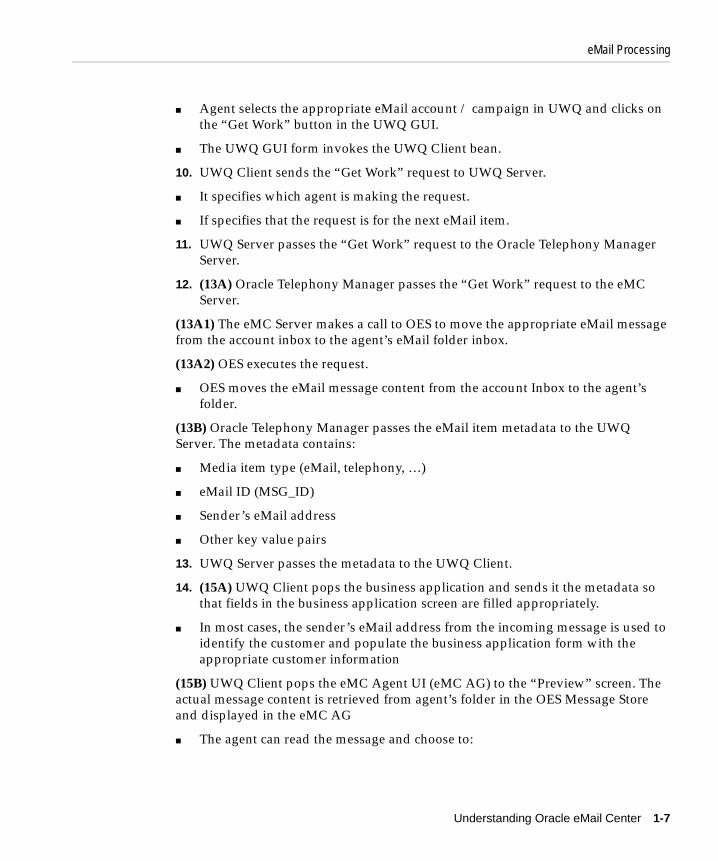
■ Agent selects the appropriate eMail account / campaign in UWQ and clicks on the “Get Work” button in the UWQ GUI.
■ The UWQ GUI form invokes the UWQ Client bean.
10. UWQ Client sends the “Get Work” request to UWQ Server.
■ It specifies which agent is making the request.
■ If specifies that the request is for the next eMail item.
11. UWQ Server passes the “Get Work” request to the Oracle Telephony Manager Server.
12. (13A) Oracle Telephony Manager passes the “Get Work” request to the eMC Server.
(13A1) The eMC Server makes a call to OES to move the appropriate eMail message from the account inbox to the agent’s eMail folder inbox.
(13A2) OES executes the request.
■ OES moves the eMail message content from the account Inbox to the agent’s folder.
(13B) Oracle Telephony Manager passes the eMail item metadata to the UWQ Server. The metadata contains:
■ Media item type (eMail, telephony, …)
■ eMail ID (MSG_ID)
■ Sender’s eMail address
■ Other key value pairs
13. UWQ Server passes the metadata to the UWQ Client.
14. (15A) UWQ Client pops the business application and sends it the metadata so that fields in the business application screen are filled appropriately.
■ In most cases, the sender’s eMail address from the incoming message is used toidentify the customer and populate the business application form with the appropriate customer information
(15B) UWQ Client pops the eMC Agent UI (eMC AG) to the “Preview” screen. The actual message content is retrieved from agent’s folder in the OES Message Store and displayed in the eMC AG
■ The agent can read the message and choose to:
Understanding Oracle eMail Center 1-7
eMail Processing
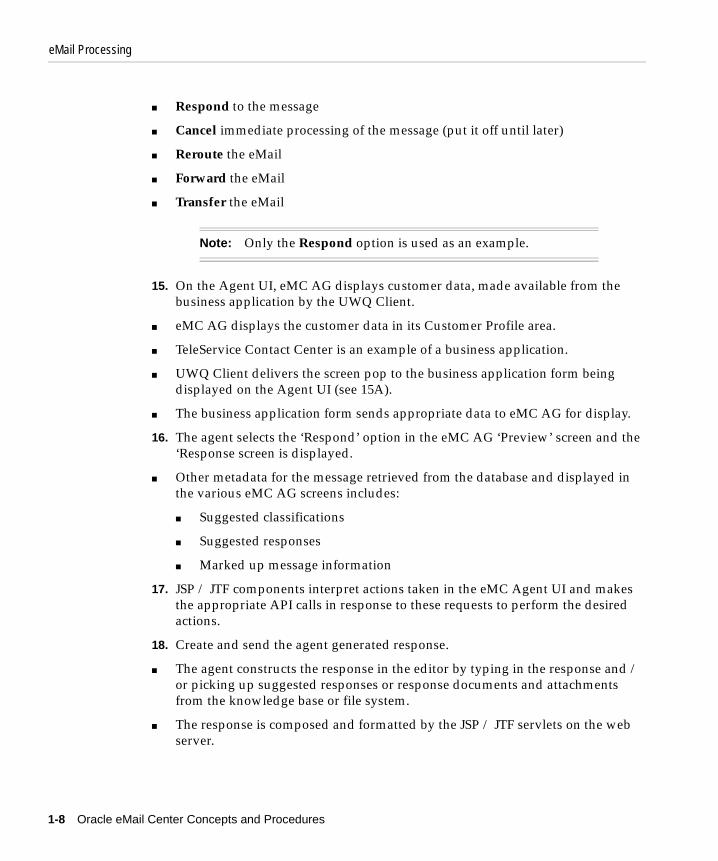
■ Respond to the message
■ Cancel immediate processing of the message (put it off until later)
■ Reroute the eMail
■ Forward the eMail
■ Transfer the eMail
15. On the Agent UI, eMC AG displays customer data, made available from the business application by the UWQ Client.
■ eMC AG displays the customer data in its Customer Profile area.
■ TeleService Contact Center is an example of a business application.
■ UWQ Client delivers the screen pop to the business application form being displayed on the Agent UI (see 15A).
■ The business application form sends appropriate data to eMC AG for display.
16. The agent selects the ‘Respond’ option in the eMC AG ‘Preview’ screen and the ‘Response screen is displayed.
■ Other metadata for the message retrieved from the database and displayed in the various eMC AG screens includes:
■ Suggested classifications
■ Suggested responses
■ Marked up message information
17. JSP / JTF components interpret actions taken in the eMC Agent UI and makes the appropriate API calls in response to these requests to perform the desired actions.
18. Create and send the agent generated response.
■ The agent constructs the response in the editor by typing in the response and / or picking up suggested responses or response documents and attachments from the knowledge base or file system.
■ The response is composed and formatted by the JSP / JTF servlets on the web server.
Note: Only the Respond option is used as an example.
1-8 Oracle eMail Center Concepts and Procedures
Desktop Processing
19. The outbound eMail submitted is sent to the SMTP server process running on the host machine.
1.5 Desktop ProcessingThe eMail Center Agent UI provides an agent with the capability and functionality to respond to incoming eMails, as well as the ability to compose outgoing eMails with sheer point-click action of the mouse button, thereby increasing the productivity of the agent. Below, we discuss the various screens available to the agent, while processing an incoming eMail or generating an outgoing eMail and the functionality provided in each screen.
1.5.0.1 My Messages ScreenIn this screen all folders pertaining to that agent are displayed. For every account that the agent handles an inbox is created along with a Draft folder. The agents can add/delete other personal folders and move messages within the folders using the self-explanatory buttons provided on this screen. Only eMails fetched by the agent, which have yet to be responded to, are displayed in the Inbox. Once an agent responds to an eMail, the eMail is moved out of the agent’s folder into a universal Resolved folder for that account. If the agent decides to delete an eMail, then the eMail is moved from the agents folder to the universal Delete folder for that account. The agent can preview an eMail by clicking on the subject line of the eMail or compose an outbound eMail by clicking on the Compose button. The agent is also provided an option to fetch multiple eMails from this screen, rather than attend to single interactions. However, the agent has to end the current interaction prior to fetching future interactions.
1.5.0.2 Preview ScreenWhen the agent selects the next eMail interaction from the Universal Work Queue, the contents of the eMail are displayed in the Preview screen. In the Preview screen, the agent is provided with the following options:
■ Respond
■ Agent will select this option if they wish to respond to the incoming eMail inquiry.
■ Transfer
■ If the agent feels that they are not the expert on the subject that eMail is referring to, they can transfer the eMail to another agent, who is known to be the expert on that particular subject.
Understanding Oracle eMail Center 1-9
Desktop Processing
■ Forward
■ Forward option enables the agent to forward the eMail to anybody inside the organization (external to the interaction center) or outside the organization.
■ Reroute
■ Reroute directs the eMail back to the routing server to route it again. This is primarily useful if the agent is not an expert on the subject and is not aware of the agent who has the expertise.
■ Prints the eMail currently displayed in the preview screen.
■ Delete
■ Enables the agent to delete the eMail they are currently reviewing. The eMail Center does not physically delete the eMail but stores the eMail in a Delete folder for that eMail account.
■ Cancel
■ If the agent does not wish to take any action at this time, then they can cancel the preview operation without taking any action.
1.5.0.3 Respond ScreenThis screen provides the agent with the functionality to respond to incoming eMails by selecting the top classifications and the top responses for each classification and customizing the response by using the full featured editor. The agent also has the option of attaching or inserting documents from the Knowledge Base or their personal hard drive. The top classifications or categories displayed in the bin on the left hand side. When the agent clicks on the classification name, the list of top suggested responses for that classification is displayed in a separate pop-up window. The agent can then view the contents of any of the suggested responses by clicking on the response document title. The customer name will be automatically merged into the response document as a result of the integration of eMail Center with the business application. The agent can then insert the document into the response or attach it to the response. In the response screen, the agent has the following options:
■ Send
■ When the agent has composed a response to the incoming eMail, the agent can send the response back to the customer by clicking the Send button.
■ Cooperate
1-10 Oracle eMail Center Concepts and Procedures
Desktop Processing
■ The Cooperate functionality enables the agent to collaborate with another agent on a multi-issue eMail. The eMail response drafted by the first agent is then forwarded to the second agent who adds to the response and sends the response to the customer.
■ Attach
■ The attach feature allows agents to add documents from their personal hard drives to responses.
■ Save
■ Using the save option, agents can save the draft of the response if they wish to complete it later.
1.5.0.4 Compose ScreenThe agent can compose an outgoing eMail (which is not a reply to an incoming eMail) to a customer by clicking on Compose from the agent’s messages screen. The Compose screen provides the agents with templates or style sheets that they can use as building blocks for composing eMails. The agent can click on the Knowledge Base tab to view documents stored in the repository and to add/insert to the same eMail.
1.5.0.5 Knowledge Base ScreenWhen an agent clicks on the Knowledge Base tab, the documents stored within the Marketing Encyclopedia System are displayed. The agent can either search for a document or flow through the navigation tree to view a particular document. An agent is able to insert the contents of a document into the response or attach it.
1.5.0.6 History ScreenThe History screen enables an agent to view the contents of an archived eMail. However, the agent needs to know the message ID of the archived eMail.
Note: In the current release, documents that contain embedded image files can ONLY be inserted into the response, they CANNOT be attached to it.
Understanding Oracle eMail Center 1-11
Inbound Server Processing
1.6 Inbound Server ProcessingInbound processing begins when the eMail Server receives a customer message and passes it to the eMail Center Server.
CustomerThe customer creates an eMail message.
Message arrives at Oracle eMail Server
The server must be Oracle eMail Server.
Inbound Message ProcessingIf the eMail is type inbound, the process takes this path.
Extract message header information
Read the header information associated with the eMail. It includes the sender’s return address and the subject line.
Apply linguistic processing on message body & readable attachment contents
Extract readable attachments and concatenate their text to the eMail body. Using linguistic processing, generate themes for the concatenated message.
Generate classifications
Analyze the themes, comparing them to classification theme signatures in the classification table. Select the top classification matches.
Select suggested responses from the knowledge base for each classification
Suggest responses for the top classification matches. Do this by using a mix of the theme signatures identified in the eMail and theme signatures of the top classification matches. With the theme signature mix, get suggested responses from the knowledge bases, MES and SMS.
Is top classification score greater than the auto-response classification threshold?
If the classification score inspires confidence, then go to the next test.
If the classification score does not inspire confidence, route the message to an agent. Go to Route message to appropriate agents.
Route message to appropriate agents
The eMail is routed to the appropriate agent, based on user-defined routing rules set up during implementation.
1-12 Oracle eMail Center Concepts and Procedures
Desktop Processing
1.7 Desktop ProcessingDesktop processing begins the first time when the agent requests an eMail work item in the Universal Work Queue (UWQ). It repeats itself each time the agent requests another eMail item.
The desktop process handles inbound or outbound eMails. Inbound eMails do not require agent intervention unless an error occurs. The only outbound eMail the agent handles is that which the agent initiated manually. Outbound eMail generated by a business application does not require agent intervention.
Agent DesktopIn an interaction center, agents can be assigned to multiple communications media, including inbound telephone calls, outbound telephone calls, and eMail. In this scenario, the agent or Oracle Interaction Blending indicates that the agent is working with eMail.
The agent begins working with eMail by requesting an eMail item from the Universal Work Queue.
At the end of the each eMail item the Desktop Processing loop returns to this point and presents the agent with two options:
■ Agent requests next eMail work item in Universal Work Queue
■ Agent views folders / messages screen in the eMC (eMail Center) Application
Agent requests next eMail work item in Universal Work QueueThe agent begins one eMail cycle by requesting an eMail item from the UWQ.
Is the previous interaction ended in the business application?
Normally, the agent handles only one customer interaction at a time. If Customer Care or some other business application still has an open interaction, it must close the interaction before UWQ will issue an eMail item to the agent.
Select message in folder
If no interaction is open, then the agent can select a message from one of the folders.
eMail and associated meta data delivered to eMC application and business application
eMail Center releases an eMail item to the agent. This includes the meta data, which is message header information and other properties.
Understanding Oracle eMail Center 1-13
Desktop Processing
Business application popped with customer information
If the agent is in a business application, such as Oracle Customer Care, eMail Center sends the message to that application. The message meta data frequently contains enough information for the business application to find the customer’s record -- assuming an existing customer -- and pops it on the screen.
Agent views the preview screen
The agent can preview the message before responding to it by clicking the subject of the message in the inbox. At this point, the agent is looking at a preview of the eMail message, and has not taken any action on it. The agent could cancel the preview and request another eMail item.
The agent has several options to choose amongst that include:
■ Forward eMail
■ Forward the eMail outside eMail Center or outside the interaction center.
■ Transfer eMail
■ Transfer the eMail to another agent handling the same account. For example, an agent assigned to the Support account can only transfer eMails to other agents handling the Support account.
■ Reroute eMail
■ Reroute the eMail to another agent queue. This might indicate that the workflow has an error in its agent group routing.
■ Print eMail
■ Print the eMail and return to the preview.
■ Delete eMail
Delete the eMail and return the agent to a display of eMail folders and message screens. Go to Agent views folders / messages screen in the eMC Application.
■ Cancel preview
■ Cancel the preview without taking any action. Return the agent to a display of eMail folders and message screens. Go to Agent views folders / messages screen in the eMC Application
■ Respond
■ Take action on the eMail. Go to Agent selects Respond and views the eMC response screen.
1-14 Oracle eMail Center Concepts and Procedures
Desktop Processing
Agent selects Respond and views the eMC response screen
In choosing to respond to the eMail, the agent has several choices, including:
■ Accept the suggested classification and response. This leads to three nodes in the process flow:
■ Select Classification
■ Select suggested response
■ Insert/Attach suggested response
These steps are self explanatory. The agent can repeat them several times for each issue marked up in a multi-issue eMail, and for as many classifications and responses as are available in the suggestion lists.
■ Attach desktop document
■ Customize the response
■ The agent can customize the response by typing free form text using the full-featured editor available. The agent may also wish to respond to the message manually rather than use a suggested response. In this case the agent either type the message or can select a "template" from the standard set of templates available.
■ Search KB (knowledge base) and attach / insert KB document
These three options, Attach, Type, and Search, also are self explanatory. They present three options in the process flow as well:
■ Edit eMail headers (subject, addresses) and select Send
When the agent selects Send, the eMail is sent to the node labeled, To Outbound Server Processing (Insert message tracking information)
■ Select Cooperate and send transfer mail and partial response to another agent
■ Save message
On completing each of these three options, Edit, Cooperate, or Save, the process flow takes the agent to the node, End interaction in business flow.
End interaction in business application
This is the end of one eMail item process cycle. The agent starts another cycle in one of the first nodes:
■ Agent views folders / messages screen in the eMC Application
Understanding Oracle eMail Center 1-15
Desktop Processing
■ Agent requests next eMail work item in Universal Work Queue
Agent views folders / messages screen in the eMC ApplicationThis is an alternate point for the agent to begin an eMail cycle, the first being Agent requests next eMail work item in Universal Work Queue.
If the agent chooses this path, the Desktop Process offers these options:
■ Select message in folder
■ Select eMail history tab and view eMail history
■ Select knowledge base (KB) tab to navigate and search the KB
■ Add eMail folder
■ Delete eMail folder
■ Refresh
■ Acquire new eMails
■ Select All
■ Deselect All
■ Move eMails between subfolders
■ Compose new message
These options are self explanatory. When the selected option is completed, the Desktop Process returns the agent to this node.
One of the options, Compose new message, takes the agent though several pro-cess nodes before returning to this node.
Select Message in folder
This entry in the description is repeating an option of its parent node. It is needed to continue describing the process of this node.
If the agent selects a message in the folder, Desktop Processing routes the agent to the same flow path described earlier:
■ Go to the first node, labeled Agent requests next eMail work item in Universal Work Queue, and
■ Look at the next step in the Desktop Processing, labeled Is the previous interaction ended in the business application? The process follows that path.
Compose new message
1-16 Oracle eMail Center Concepts and Procedures
Overview of System Process Flows
This entry in the description is repeating an option of its parent node. It is needed to continue describing the process of this node.
If the agent chooses to compose a new message, Desktop Processing offers these options (they are similar to, but slightly different from, the options offered by the Agent selects Respond and views the eMC response screen node):
■ Attach desktop document
■ Type response text
When selecting to respond manually, the agent has two options not shown in the process flow:
■ Respond to messages manually, typing free form text
■ Respond to messages using a response template. Here, the agent manually selects a template category. Then the Merge screen appears with a list of suggested responses under the selected template category.
■ Search KB (knowledge base) and attach / insert KB document
These three options, Attach, Type, and Search, also are self explanatory. They present three options in the process flow as well:
■ Edit eMail headers (subject, addresses) and select Send
When the agent selects Send, the eMail is sent to the node labeled, To Outbound Server Processing (Insert message tracking information)
■ Save message
On completing each of these three options, Edit, Cooperate, or Save, the process flow takes the agent to the node, End interaction in business flow.
End interaction in business application
This is the end of one eMail item process cycle. The agent starts another cycle in one of the first nodes:
■ Agent views folders / messages screen in the eMC Application
■ Agent requests next eMail work item in Universal Work Queue
1.8 Overview of System Process FlowsClick one of the following to view its system process flow diagram:
■ Inbound eMail Processing
Understanding Oracle eMail Center 1-17
Inbound eMail Processing
■ Routing, Queuing, and Delivery
■ Desktop Interaction Delivery
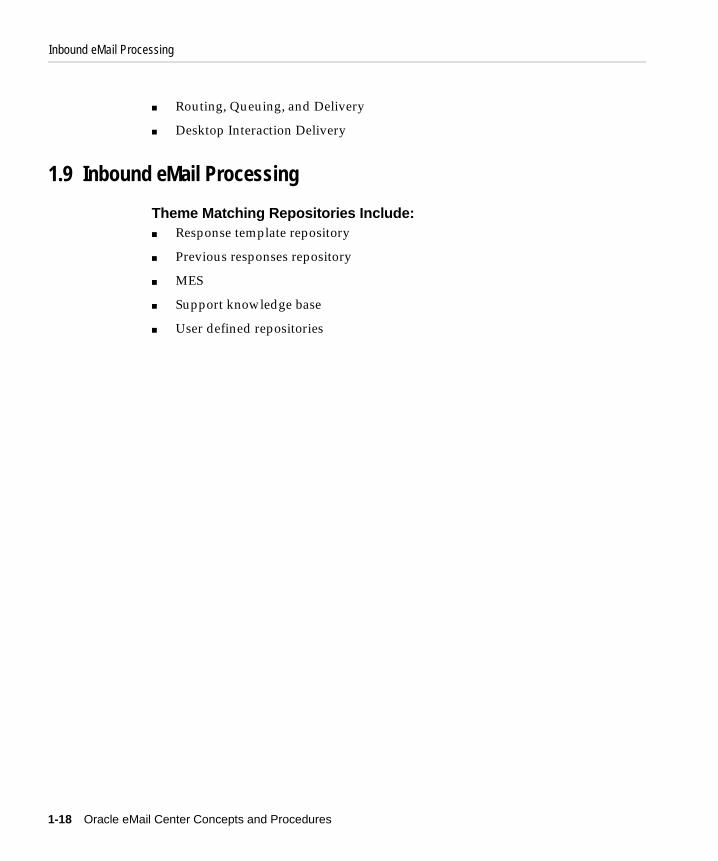
1.9 Inbound eMail Processing
Theme Matching Repositories Include:■ Response template repository
■ Previous responses repository
■ MES
■ Support knowledge base
■ User defined repositories
1-18 Oracle eMail Center Concepts and Procedures
Using Oracle eMail C
2
Using Oracle eMail CenterThis topic group provides process-oriented, task-based procedures for using the application to perform essential business tasks.
This topic group covers the following topics:
■ Adding a Folder
■ Deleting a Folder
■ Moving Messages to a Different Folder
■ Viewing an Inbound eMail Message
■ Reroute an eMail Message
■ Delete and eMail Message
■ Respond to an eMail Message
■ Compose an eMail
■ Search Functionality
2.1 Adding a FolderBy default, the inbox and drafts folders are created for every account the agent has access. In addition, if the agent wishes to create any personal folders, they can click on Add link in the Folders bin.
Steps20. Click on the name of the folder, in the Folder Bin, of which you would like to
create a folder.
21. Click Add link in the My Messages screen.
enter 2-1
Deleting a Folder
A window prompting you to enter a name for the new folder appears.
22. Type the name of folder.
23. Click OK.
The new folder should be created and will appear in the screen.
2.2 Deleting a FolderAn agent cannot delete a system created folder, such as the inbox or the drafts folder, for the account. To delete any custom defined folder, perform following steps.
Steps1. Select the folder to be deleted by clicking on its name in the folder bin.
2. Click Delete in My Messages screen.
A confirmation screen pops up.
3. Click OK.
2.3 Moving Messages to a different folderAn agent can move messages from one folder to another.
Steps1. Click on respective check boxes.
If all messages need to be moved, click Select All.
2. Click Move.
3. Click the drop-down list
4. Select the name of the folder you wish to move the messages.
5. Click OK.
2.4 Viewing an inbound eMail MessageAn inbound eMail is previewed in the Preview screen. When the agent fetches an eMail interaction from UWQ, the contents of the eMail message are displayed in the Preview screen. The agent can also view the contents on an eMail by clicking on the
2-2 Oracle eMail Center Concepts and Procedures
Viewing an inbound eMail Message
subject of the eMail from within any folder. In the Preview screen, the agent is provided with the following options:
2.4.1 Transferring an eMail MessageAn agent can transfer an eMail to another agent who has access to the same account.
Steps1. Click Transfer.
List of agents pops up.
2. Scroll down the list and select agent by double-clicking on the name.
3. Click Go.
The eMail is now transferred to the next agent and is no longer accessible by the first agent.
2.4.2 Rerouting an eMail MessageIf agent cannot respond to an eMail and is not sure to whom it should be transferred, the agent can request the eMail to be queued again by clicking Reroute. The eMail is pushed back into the queue where another agent can pick it up.
2.4.3 Delete an eMail MessageAn agent cannot physically delete an eMail. When an agent clicks on Delete, the inbound eMail message is moved to a system folder called, Deleted, and it is archived until a system administrator purges the folder.
2.4.4 Responding to an eMail MessageThe agent can respond to an inbound message by clicking on Respond.
2.4.5 Responding to eMail MessageWhen the agent wishes to respond to an inbound message, by clicking on the Respond icon in Preview screen, the inbound message is displayed in the Reply screen.
Using Oracle eMail Center 2-3
Viewing an inbound eMail Message
The classifications or intents of the eMail are displayed in the Classifications bin on the left hand side. Below, the customer information is displayed. The match for the customer is based on the eMail address.
The inbound eMail message is automatically inserted into the response. The agent can now compose the response by inserting or attaching one or more suggested response documents, or other documents stored, in the Knowledge Base. The agent can also attach documents from their local (or network) file system. Using the editor, the agent can customize the response by typing any text and formatting the response.
2.4.6 Inserting / Attaching Suggested Response Documents1. Select the most appropriate Classification (usually the top most one) by clicking
on its name.
A list of suggested response document titles for that classification are displayed in a pop up window.
2. To view the contents of a document, click on the document title.
If the document has merge fields that could not be automatically populated, enter the value for merge parameters and click on Merge. The query associated with the document will be executed and the merge fields will be populated.
3. To undo a merge operation, click Undo Merge.
4. Click Insert to insert the suggested response document within the response.
5. Click Attach to attach the suggested response document to the response.
A window prompting you for the name of the attachment will appear.
6. Type in a name and click OK.
2.4.7 Inserting / Attaching Documents from Knowledge Base1. Click on the Knowledge Base tab.
Browse through the categories using the tree sub-tab or search for a specific document using the search sub-tab.
2. To view the document click on the document title.
If the document has merge fields that could not be automatically populated, enter the value for merge parameters and click on Merge. The query associated with the document will be executed and the merge fields will be populated.
2-4 Oracle eMail Center Concepts and Procedures
Viewing an inbound eMail Message
To undo a merge operation, click on Undo Merge.
3. Click Insert to insert the suggested response document within the response
4. Click Attach to attach the suggested response document to the response.
A window prompting you for the name of the attachment will appear.
5. Type in a name and click OK.
2.4.8 Attaching a Document from Local or Network File System1. Click Attach in the Response screen.
A window pops-up.
2. Click the Browse button.
A standard windows browser allows you to browse through the file system.
3. Select the file and click Open.
4. Click Attach.
5. Click Done.
To customize the response by typing and formatting text, use the editor function. To save the composed response as a draft and send it later, click Save. The response is then moved to the Drafts folder. To send the response click on Send.
2.4.9 Composing an eMail An agent can also compose an eMail, which is not a response to an incoming eMail, by clicking Compose in the My Messages screen. The compose option provides the agent with an option to insert standard style sheets or templates into the eMail to give it a consistent look and feel.
2.4.10 Inserting Templates into the New Composed eMail 1. Click on a template name displayed in the templates bin.
The contents of the document are displayed in a separate pop up window.
If the document has merge fields then enter the value for merge parameters and click on Merge. The query associated with the document will be executed and the merge fields will be populated.
To undo a merge operation, click on Undo Merge.
Using Oracle eMail Center 2-5
Viewing an inbound eMail Message
2. Click Insert to insert the template within the body of the new eMail being composed.
2.4.11 Inserting / Attaching Documents from Knowledge Base1. Click on the Knowledge Base tab.
Browse through the categories using the tree sub-tab or search for a specific document using the search sub-tab.
2. To view the document click on the document title.
If the document has merge fields that could not be automatically populated, enter the value for merge parameters and click on Merge. The query associated with the document will be executed and the merge fields will be populated.
To undo a merge operation, click on Undo Merge.
1. Click Insert to insert the suggested response document within the response.
2. Click Attach to attach the suggested response document to the response.
A window prompting you for the name of the attachment will appear.
3. Type in a name and click OK.
2.4.12 Attaching a Document from Local or Network File System1. Click Attach in the Response screen.
A window pops-up.
2. Click the Browse button.
A standard windows browser allows you to browse through the file system.
3. Select the file and click Open.
4. Click Attach.
5. Click Done.
To customize the response by typing and formatting text, use the editor function. To save the composed response as a draft and send it later, click Save. The response is then moved to the Drafts folder. To send the response click on Send.
2-6 Oracle eMail Center Concepts and Procedures
Search Functionality
2.5 Search FunctionalityThe search functionality enables the agent to retrieve eMails archived in one of the three system folders:
Resolved - Stores all inbound messages that have been responded.
Deleted - Stores all inbound messages that have been deleted.
Sent - Stores a copy of all outbound eMails (responses as well as new composed eMails).
The agent can search for archived messages based on the From, To, Subject, Date Sent, and message ID attributes. Use of multiple search fields supports efficient searching of archived messages.
In effect, this search implements logic across input search criteria. For From, To, Subjec,t and Message ID fields, partial entries (e.g., sub-strings) and wild cards are accepted. Also, search is case insensitive.
Date search may be open-ended or restricted within a From and To range. The header information of eMails that match the search criteria is displayed in a tabular format.
The subject of every eMail is a hyper-link. When the hyper-link is clicked, it will display the content of the eMail in a Preview window. The agent can then either resend a copy of a response or respond to an inbound eMail that was earlier marked as resolved or deleted.
Steps1. Click Search tab.
2. Select an account name from drop down list.
3. Select a folder name (Resolved, Deleted or Sent) from a drop down list.
4. Enter the search criteria.
5. Click on Search.
The search results are displayed in a tabular format.
6. Click on the subject of an eMail to preview it.
The contents of the eMail are displayed in a preview window.
7. Click on the Copy and Reply button to resend a copy of a response that was sent earlier or respond to an inbound eMail that had been resolved or deleted.
Using Oracle eMail Center 2-7
Search Functionality
The content of the archived eMail is displayed in the Compose window. The agent is provided with the same set of options that would be provided if the agent were composing a new eMail message.
2-8 Oracle eMail Center Concepts and Procedures
Implementing Oracle eMail C
3
Implementing Oracle eMail Center3.1 Planning the ImplementationImplementing Oracle eMail Center is a complex process that requires knowledge of a variety of technologies and processes. People implementing Oracle eMail Center should have a working knowledge of Oracle Forms, HTML, Java, installation platform (Windows NT or Unix), an understanding of the operational requirements of an interaction center.
This topic group contains an implementation planning questionnaire that will help you determine and collect information you will need during the implementation process.
3.1.1 Implementation Planning QuestionnaireThe following questions provide a high level overview of the information necessary to successfully implement Oracle eMail Center. This is information that should be decided upon prior to beginning the implementation process.
Use the following questionnaire to gather information crucial to the implementation process:
1. What eMail addresses does the business want to set up to receive eMail?
2. You will need to define the corresponding eMail accounts on OES to which inbound eMail will be directed. Examples might be [email protected], [email protected], [email protected], and [email protected].
3. For each eMail account to be defined, which agents will be processing interactions?
enter 3-1
Planning the Implementation
4. An agent may be defined for multiple accounts, i.e., an agent might need to work on eMail interactions sent to the support account and those sent to the info account.
5. How will agents be grouped for each account?
6. Is it sufficient to define only one group for all the agents assigned to a particular account, or does it make sense to divide the agents into groups?
7. It would make sense to define multiple agent groups for a particular account if there will be different agents who focus on working on certain types of issues / classifications for the account, so that routing rules can be set up appropriately.
8. For each account, what’s the set of classifications that need to be defined?
9. These classifications are essentially labels for the buckets into which the customer wants to sort incoming eMails for a particular account. Classifications can be used to route individual eMails to agents as well as select the appropriate responses from the knowledge base. The subject matter for each classification should be mutually exclusive and collectively exhaustive for eMails expected to be received in that account.
10. What are good sample messages for each classification?
■ Does the customer already have sample data?
■ Do you need to create samples for classifications?
■ Do the samples completely represent the different subject matter anticipated in eMails belonging to the classification?
Note: Setting up multiple groups for a given account does not mean that you cannot route a given interaction to multiple groups. Defining multiple groups provides additional granularity for routing purposes.
3-2 Oracle eMail Center Concepts and Procedures
Planning the Implementation
11. What are good sample responses for each classification?
■ Does the customer already have sample data?
■ Do you need to create samples for classifications?
■ Do the samples completely represent the different types of responses for the classification?
Ideally, there should be at least one sample response for each sample message. As is the case with sample messages, the quality of the sample responses directly impacts the effectiveness of the response selection functionality and should only contain text that is directly relevant to the response subject matter.
12. What documents need to be uploaded to the knowledge bases?
13. What static routing rules need to be defined?
14. What should be the destination agents / agent groups for each static route?
15. What dynamic routing procedures / workflows need to be developed?
16. What are the implementation details for creating the stored procedures / workflows?
17. What keywords or key phrases in the headers or contents of a message indicate which eMC account a message belongs to?
For example, a message with the key phrase service request belongs in the support account; and, if it was sent to the [email protected] account, it should be redirected to [email protected].
18. What are the business requirements for processing inbound eMails?
■ What information from the CRM DB needs to be extracted to make processing decisions for an eMail message?
Note: The quality of the sample messages directly impacts the effectiveness of the classification functionality. Sample messages should only contain text that is directly relevant to the subject matter for that classification (the text can be regular sentences as opposed to a list of keywords, but should not contain text such as ‘Thank you in advance for your prompt attention to this matter,’ or other extraneous text).
Implementing Oracle eMail Center 3-3
Integration Dependencies
■ What information should the system look for in the incoming message to use in rules processing?
19. How should bounced messages and other responses to tagged eMails be handled?
Responses routed directly to the agent who sent out the message or routed according to the routing server rules?
20. Notify sending application on message bounce?
21. What are the default outbound eMail header values for each account?
From address, reply-to address, etc.
3.2 Integration DependenciesThis topic group contains a list of the core products with which Oracle eMail Center integrates and a brief description or each core product.
3.2.1 Oracle eMail Server (OES)Oracle eMail Server is the core eMail system. The native eMail functionality is supported by this system. Oracle eMail Server has both PL/SQL and IMAP interfaces and is bundled with the Sendmail implementation of SMTP service.
The topics in this section describe its important sub-components.
3.2.1.1 IMAP serverOracle eMail Server implements the server section of the IMAP protocol. The server is mainly used by the IMAP implementation of JMA (middle tier) to access eMails stored in the Message Store.
3.2.1.2 Message StoreThe Message Store resides in an Oracle database (8.1.6), and it is a collection of database tables and stored procedures that implement the various eMail specific operations. eMail accounts including folders, all incoming eMails, and all outgoing eMails are stored here.
3-4 Oracle eMail Center Concepts and Procedures
Integration Dependencies
3.2.1.3 SMTP ServerCurrently Oracle eMail Server is bundled with the Send mail’s implementation of the SMTP protocol. Various options like third party spam and virus checks can be added to make a more robust system.
3.2.1.4 OES PL/SQL APIsThe Oracle eMail Server PL/SQL APIs extend the normal eMail functionality to implement rule based notifications, account maintenance, and inter Media Text (iMT) processing of incoming eMail messages. This additional functionality results in a close integration with the Oracle eMail Server product.
Known Limitations:■ Oracle eMail Center is tightly integrated with this product. Other eMail
Services, existing or new, must integrate with this product.
■ Spam and Virus check features are currently missing.
■ eMail encryption/decryption features are missing in the Oracle eMail Server release 5.1.x.
■ Oracle inter Media Text’s linguistic processing currently work only on English text. Other languages are being supported in the future releases.
Platform Dependencies:Oracle eMail Server and its components are ported to most major platforms.
Configuration Options:Oracle eMail Center can integrate to multiple instances of Oracle eMail Server. In some cases there will be multiple instances of Oracle eMail Server Message store, which share a common IMAP server and SMTP components.
3.2.2 Oracle inter Media Text (iMT)Oracle inter Media Text is a text/linguistic-processing module bundled as a component of Oracle 8.x database. It is mainly used to determine the intent of each incoming eMail message.
Known Limitations■ Oracle inter Media Text’s linguistic processing currently work only on English
text. Other languages are being supported in the future releases.
Implementing Oracle eMail Center 3-5
Integration Dependencies
■ Only bundled with Oracle 8 and higher versions. Not available on earlier versions.
Platform DependenciesPorted to most major platforms.
Configuration OptionsYou can customize the linguistic processing module by modifying the theme and iMT Knowledge Base sections. This focuses the linguistic processor to look for more relevant information and enables you to fine-tune eMail processing.
3.2.3 Oracle Telephony Manager (OTM)The Oracle Telephony Manager maintains the agent distribution queues and agent states for any Interaction Center. It also provides access to a common routing engine. OTM is media independent and can route all types of interactions (eMail, telephony, faxes, web calls) to the interaction center agents.
Known LimitationsOnly one OTM server can exist per Interaction Center.
Platform DependenciesA Java Server; Runs on Solaris and NT platforms.
Configuration OptionsThere is a 1:1 relationship between an OTM and an the eMC Server; however, the rest of the eMail Center modules are shared.
3.2.4 Routing ServerThe Routing Server determines which agent(s)/agent groups get a new interaction. The routing can be skill and/or rule based. The routes are defined for various classifications and parameters.
Platform DependenciesA Java Server; Runs on Solaris and NT platforms.
3-6 Oracle eMail Center Concepts and Procedures
Integration Dependencies
3.2.5 Work BlendingThe Work Blending server determines the type (eMail, phone call, fax, etc.) of interaction an agent should service next. To make this determination, Work Blending obtains real time information about the agent from UWQ.
3.2.6 Universal Work QueueUWQ Client and Server code work in unison to do the following:
1. Relay information between OTM and the Forms Application.
2. Capture certain information for statistical purposes.
3. Capture certain information for work blending purposes.
UWQ also works in conjunction with Work Blending to determine what type of interaction the agent should service next.
Platform Dependencies■ A Java Server; Runs on Solaris and NT platforms.
3.2.7 Interaction History (IH)The Interaction History maintains all interaction life-cycle segments, i.e. accounts for the entire time duration beginning at the moment an Interaction (fax, phone call, eMail.) is registered in the system to the instant it is resolved. This is a cumulative record of all interactions passing through the system. It also records information about various agents who handled the interaction in the recorded time duration.
3.2.8 Forms Business ApplicationThis can be any Oracle CRM Forms application (Oracle Service, Oracle TeleSales, Customer Care). These forms applications embed the UWQ client, enabling them to work with the Oracle eMail Center Agent UI. This is done via Java socket communication between the UWQ client and the eMC Agent UI. The business applications contain the necessary profiles and business intelligence.
3.2.9 Knowledge Management Systems (KMS)At present, the Knowledge Management system consists of SMS and MES. All KMS interactions are channeled through the SMS system which exposes a single set of
Implementing Oracle eMail Center 3-7
Integration Dependencies
APIs hiding the complexity of the various sub-systems. Both PL/SQL and Java APIs exist to enable inter Media based queries and retrievals.
Both MES and SMS are knowledge bases. eMail Center uses MES to store eMC specific documents. SMS is currently optional for eMail Center.
3.2.9.1 Solution Management System (SMS)A repository of problem, diagnosis, related symptoms and their solutions.
3.2.9.2 Marketing Encyclopedia Systems (MES/KB)MES is also known as the Knowledge Base (KB). It is a repository of various documents, URL, images and such. MES is partitioned into various application spaces, each application (e.g Tele-Sales, Oracle eMC, etc.) can store documents, URLs, images and such in its own private space in this system. Various PL/SQL and Java APIs and a JSP UI exists to create/upload, list, categorize and order these entities.
3.2.9.3 Platform DependenciesA database module; Oracle 8.x ported to most platforms.
3.2.10 Concurrent ManagerConcurrent Manager is a component of Oracle Application Object Library. It is responsible for scheduling and running various concurrent programs submitted by the user. It uses Distributed Concurrent Processing and can simultaneously run concurrent requests on several different server machines or CPUs. Oracle eMail Center makes use of this facility to schedule and run various eMail processing modules.
3.2.10.1 Platform DependenciesA database module; Oracle 8.x ported to most platforms.
3.2.11 Installation This topic group covers the following topics:
■ Installation by Rapid Install
■ Post-installation steps
3-8 Oracle eMail Center Concepts and Procedures
Integration Dependencies
3.2.12 The Auto-Installation ProcessThis topic provides a high level overview of the auto-installer (Rapid Install) process. This process installs the schema and core functionality (Foundation Components) for Oracle applications. There are five steps in the process, as well as some finishing steps that need to be performed to successfully complete the installation process.
Steps1. Choose the desired install environment (production, test, or demo).
2. Select the products to install.
3. Select the NLS settings.
4. Select the location of the top-level directories.
5. Select the name of the configuration file.
6. Complete the finishing steps necessary for the products you selected to install.
ReferencesFor more detailed information on the Rapid Install process, please refer to the How Rapid Install Works topic group in the Installation Overview section, and the Running Rapid Install topic group in the Starting Your Installation section of the Oracle Applications Installing Oracle Applications documentation.
3.2.13 Post-Installation StepsTwo post-installation procedures are necessary for the eMail Center server side. The first procedure consists of installing and configuring the eMail Server. The second procedure involves installing and configuring the eMC Server. For the second process, you will need the Oracle Call Center Applications Setup CD.
■ Installing and Configuring Oracle eMail Server (OES)
■ Installing and Configuring Oracle eMail Center Server (eMC)
Note: Make sure Oracle eMail server and interMedia Text are certified on your operating system platform before starting the installation. Oracle eMail Center requires these Oracle products to function.
Implementing Oracle eMail Center 3-9
Integration Dependencies
3.2.13.1 Installing and Configuring Oracle eMail Server (OES)Use this procedure to install and configure Oracle eMail Server.
PrerequisitesBefore configuring the eMail Server, you should complete the initial Rapid Install process. The Oracle eMail Server documentation provides detailed instructions on installing eMail Server with Rapid Install.
Steps1. Install Oracle eMail Server (OES) 5.1 (patch set 3) on the same or on a separate
instance as the Oracle Applications Instance. Follow the instructions provided in the Oracle eMail Server Installation Guide (Installing Oracle eMail Server section). Oracle eMail Server was formerly known as Oracle Internet Messaging (IM).
In the post-install eMail Server configuration, select NO for LDAP install. For more information on this step, refer to the Oracle eMail Server Installation Guide (Configuring Oracle eMail Server section).
Once the installation process is complete, you can configure the Oracle eMail Server instance to talk with the Oracle Applications Instance.
2. Connect to the Oracle eMail Server database instance with the OO user and password. Grant privilege on IM_IMT_EXTN to an office.
3. Create a sqlnet names entry on the Oracle eMail Server machine to point to the Oracle Applications Instance. (If installed on an instance separate from Oracle Applications Instance).
4. Create a Database Link to the CRM instance from the Oracle eMail Server instance. You need the following:
■ Password for the Oracle Applications APPS schema.
■ Password for the Oracle eMail Server OO schema.
Note: The default configuration is single instance. Single instance implies that Oracle Applications data and Oracle eMail Server data reside in the same database.
3-10 Oracle eMail Center Concepts and Procedures
Integration Dependencies
Use SQLPLUS to login to Oracle eMail Server as user OO (using the OO password entered during Oracle eMail Server installation) and use the following to create the database link:
CREATE DATABASE LINK <link name> CONNECT TO <APPS username> IDENTIFIED BY <APPS password> USING <tns / service name>;
3.2.14 Installing and Configuring Interaction Center ServersUse the following procedures to install and configure interaction center servers. eMail Center will not work without these servers installed, configured and running.
To install and implement the Interaction Center servers that are required to implement eMail Center, read the following documentation and follow the specified installation and implementation procedures.
Additional Required DocumentationInstall the interaction center servers by reading Oracle Call Center Application Setup Guide, “Installing Call Center Applications Setup Components.”
Implement the interaction center servers by reading the Oracle Telephony Manager Implementation Guide, “Defining an Oracle Interaction Center Server Group.”
Basic Universal Work Queue setup is done with the other interaction server setup in the previous procedure. For additional questions or troubleshooting on UWQ, refer to the Oracle Universal Work Queue Implementation Guide.
Note: The name of the above mentioned database link <link name> is used later to configure other eMC components.
Implementing Oracle eMail Center 3-11

Integration Dependencies
3.2.14.1 Installing and Configuring eMail Center Server (eMC)
OvervieweMC Server is installed as part of the Call Center Applications installation process.
PrerequisitesBefore you can create an eMC Server, you must create a Server Group for the eMC Server.
Perform the following steps to create a server group:
1. Open the Server Administration module from the Front Office Navigator, the Call Center Administration module, or the Routing Server Administration module.
2. The Server Locator Window opens at the Server Group tab screen.
3. In the Server Group Registration area, enter the server Group Name, Location, and Description.
4. From the File menu, choose Save.
Steps1. From the Forms application login screen, login using the default system
administrator user name and password.
2. From the list of application responsibilities, select Call Center Server Administration.
Note: Oracle eMail Center follows the Oracle standard for User Interfaces and the following field colors indicate:
Yellow - required field
White - optional field
Grey - read only field
Light blue - query mode
Note: The server group you create here will be referenced in the Create Account screen as an Interaction Center.
3-12 Oracle eMail Center Concepts and Procedures

Integration Dependencies
The Call Center Server Administration module appears.
3. From the Call Center Server Administration module, double-click UWQ Server Locator (if it doesn’t open automatically).
The Server Locator screen appears.
4. From the Server Locator screen, click the Server tab.
5. In the Server Registration area, type data for the following fields:
■ Server Name
■ Server Location
■ Type Name - select iCenter Server from the drop-down list, click OK
■ Member Group Name - select the server group you want this server to belong to, click OK
■ Using Group Name - select the using group ID from the drop-down list, click OK This identifies other groups that have permission to use this server.
■ User Address - optional field, enter information if you wish
■ Description - optional field, enter information if you wish
■ Server Parameter - not required for configuring eMC Server
■ Value - not required for configuring eMC Server
6. From the File menu, click Save.
ReferencesFor detailed information on installing eMC Server, please refer to the Oracle Call Center Applications Setup documentation.
Refer to the Oracle Telephony Manager Concepts and Procedures documentation for detailed information on creating a server group.
Note: DNS Name and IP Address will be automatically assigned after the eMC Server is run for the first time.
Implementing Oracle eMail Center 3-13
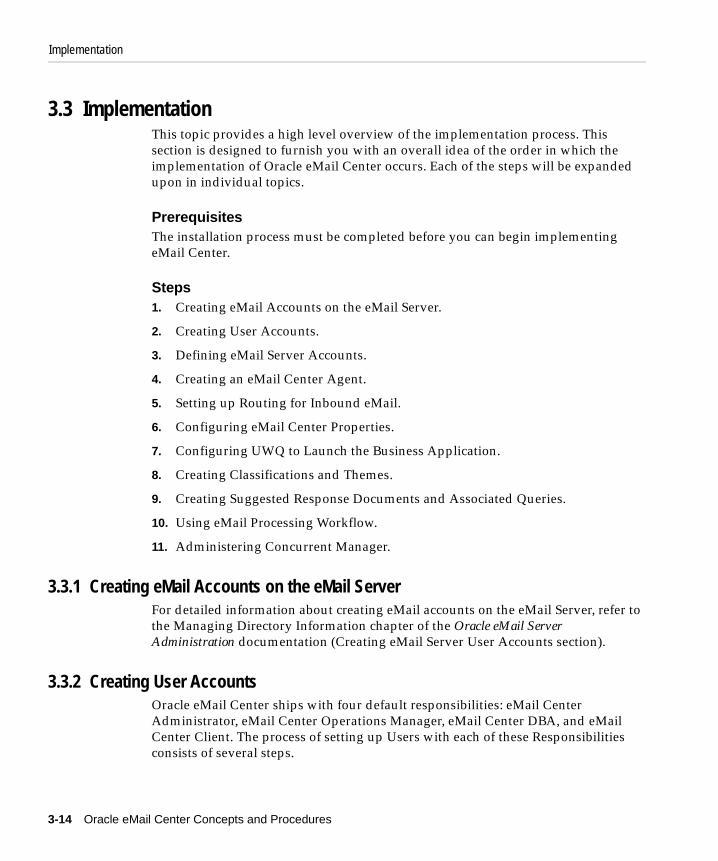
Implementation
3.3 ImplementationThis topic provides a high level overview of the implementation process. This section is designed to furnish you with an overall idea of the order in which the implementation of Oracle eMail Center occurs. Each of the steps will be expanded upon in individual topics.
PrerequisitesThe installation process must be completed before you can begin implementing eMail Center.
Steps1. Creating eMail Accounts on the eMail Server.
2. Creating User Accounts.
3. Defining eMail Server Accounts.
4. Creating an eMail Center Agent.
5. Setting up Routing for Inbound eMail.
6. Configuring eMail Center Properties.
7. Configuring UWQ to Launch the Business Application.
8. Creating Classifications and Themes.
9. Creating Suggested Response Documents and Associated Queries.
10. Using eMail Processing Workflow.
11. Administering Concurrent Manager.
3.3.1 Creating eMail Accounts on the eMail ServerFor detailed information about creating eMail accounts on the eMail Server, refer to the Managing Directory Information chapter of the Oracle eMail Server Administration documentation (Creating eMail Server User Accounts section).
3.3.2 Creating User AccountsOracle eMail Center ships with four default responsibilities: eMail Center Administrator, eMail Center Operations Manager, eMail Center DBA, and eMail Center Client. The process of setting up Users with each of these Responsibilities consists of several steps.
3-14 Oracle eMail Center Concepts and Procedures
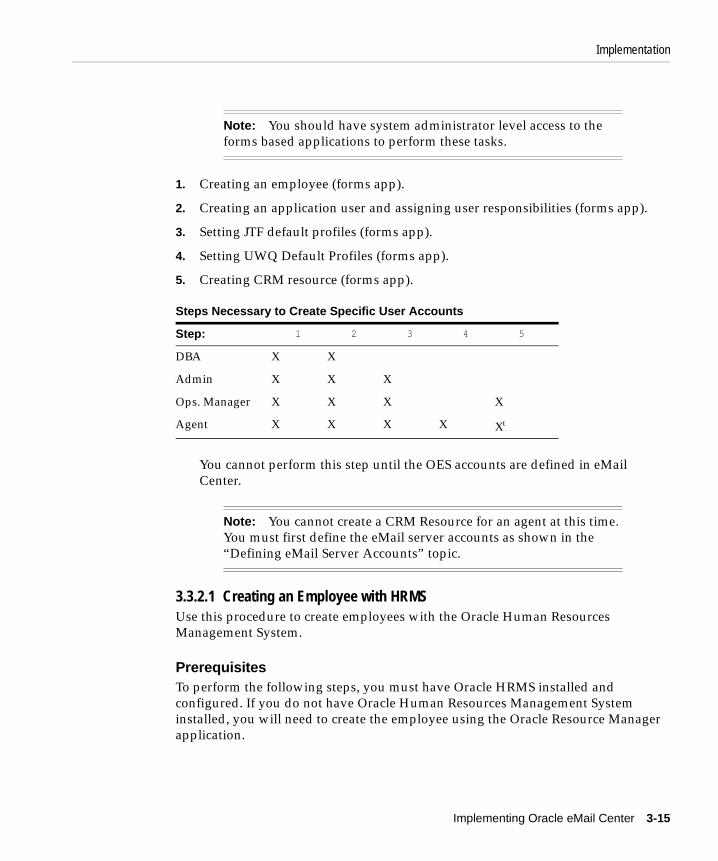
Implementation
1. Creating an employee (forms app).
2. Creating an application user and assigning user responsibilities (forms app).
3. Setting JTF default profiles (forms app).
4. Setting UWQ Default Profiles (forms app).
5. Creating CRM resource (forms app).
You cannot perform this step until the OES accounts are defined in eMail Center.
3.3.2.1 Creating an Employee with HRMSUse this procedure to create employees with the Oracle Human Resources Management System.
PrerequisitesTo perform the following steps, you must have Oracle HRMS installed and configured. If you do not have Oracle Human Resources Management System installed, you will need to create the employee using the Oracle Resource Manager application.
Note: You should have system administrator level access to the forms based applications to perform these tasks.
Steps Necessary to Create Specific User Accounts
Step: 1 2 3 4 5
DBA X X
Admin X X X
Ops. Manager X X X X
Agent X X X X Xt
Note: You cannot create a CRM Resource for an agent at this time. You must first define the eMail server accounts as shown in the “Defining eMail Server Accounts” topic.
Implementing Oracle eMail Center 3-15
Implementation
Steps1. From the Forms application login screen, login using the default system
administrator user name and password.
2. From the list of application responsibilities, select US HRMS Manager.
3. The Navigator-HRMS Manager screen appears, displaying a list of functions.
4. From the list of functions, double-click People.
5. Double-click Enter and Maintain.
6. The Find Person screen appears.
7. In the Find Person screen, click New.
8. The People form appears.
9. On the form, enter all information in required fields, for example:
■ Last - (name)
■ First - (name)
■ Title - (select from the drop-down list)
■ Type - (select from the drop-down field)
■ Employee Number
■ Birth Date
■ Social Security Number (for US version only)
10. Save the record to complete the process of creating an employee.
ReferencesFor more information and detailed steps on creating employees, refer to the Oracle HRMS/Payroll documentation.
3.3.2.2 Creating an Application User and Assigning ResponsibilitiesUse this procedure to create application users and assign responsibilities.
Note: If the employee already exists, you do not need to perform this step.
3-16 Oracle eMail Center Concepts and Procedures
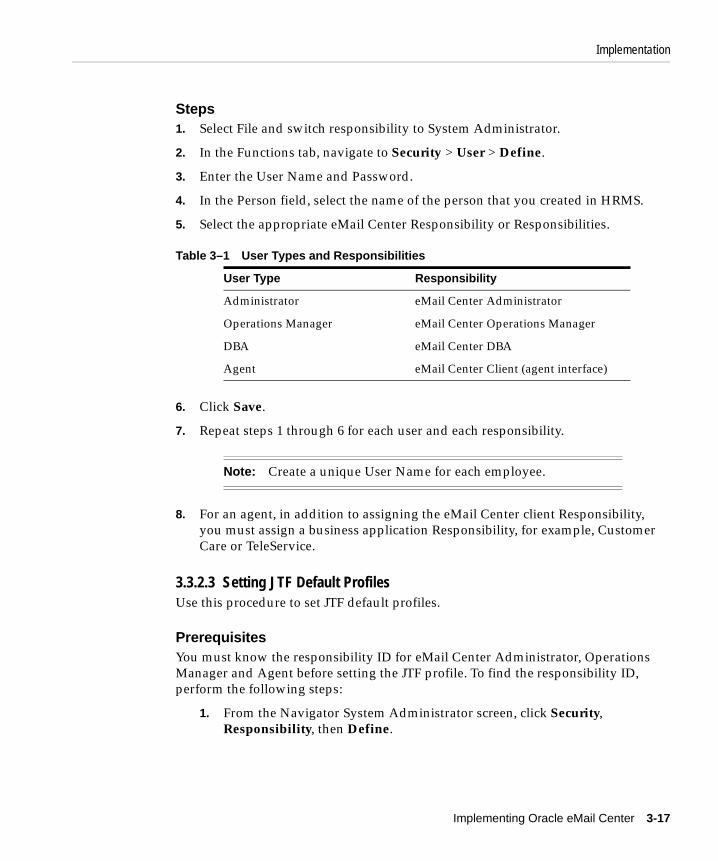
Implementation
Steps1. Select File and switch responsibility to System Administrator.
2. In the Functions tab, navigate to Security > User > Define.
3. Enter the User Name and Password.
4. In the Person field, select the name of the person that you created in HRMS.
5. Select the appropriate eMail Center Responsibility or Responsibilities.
6. Click Save.
7. Repeat steps 1 through 6 for each user and each responsibility.
8. For an agent, in addition to assigning the eMail Center client Responsibility, you must assign a business application Responsibility, for example, Customer Care or TeleService.
3.3.2.3 Setting JTF Default ProfilesUse this procedure to set JTF default profiles.
Prerequisites You must know the responsibility ID for eMail Center Administrator, Operations Manager and Agent before setting the JTF profile. To find the responsibility ID, perform the following steps:
1. From the Navigator System Administrator screen, click Security, Responsibility, then Define.
Table 3–1 User Types and Responsibilities
User Type Responsibility
Administrator eMail Center Administrator
Operations Manager eMail Center Operations Manager
DBA eMail Center DBA
Agent eMail Center Client (agent interface)
Note: Create a unique User Name for each employee.
Implementing Oracle eMail Center 3-17

Implementation
2. Query the desired responsibility based on the table below:
3. From the Help menu, click Diagnostics > Examine.
4. The Examine Field and Variable Values screen appears.
5. If the password prompt appears, enter the ORACLE password for the APPS account.
6. Click the drop-down list in Field.
7. The Choose a Field screen appears.
8. From the list in the Choose a Field screen, select the RESPONSIBILITY_ID.
9. Click OK.
10. The value of the RESPONSIBILITY_ID is displayed in the Value Field of the Examine Field and Variable Value screen.
11. Click OK.
Steps1. From the Navigator System Administrator screen, click Profile, then System.
The Find System Profile Values screen appears.
2. Click the User check box and from the drop-down list in the User field, and select the user name.
3. In the Profile field, type JTF_PROFILE_DEFAULT% and click Find.
A list of system profile values appears.
Table 3–2 User Types and Responsibilities
User Type Responsibility
Administrator eMail Center Administrator
Operations Manager eMail Center Operations Manager
Agent eMail Center Client (agent interface)
3-18 Oracle eMail Center Concepts and Procedures
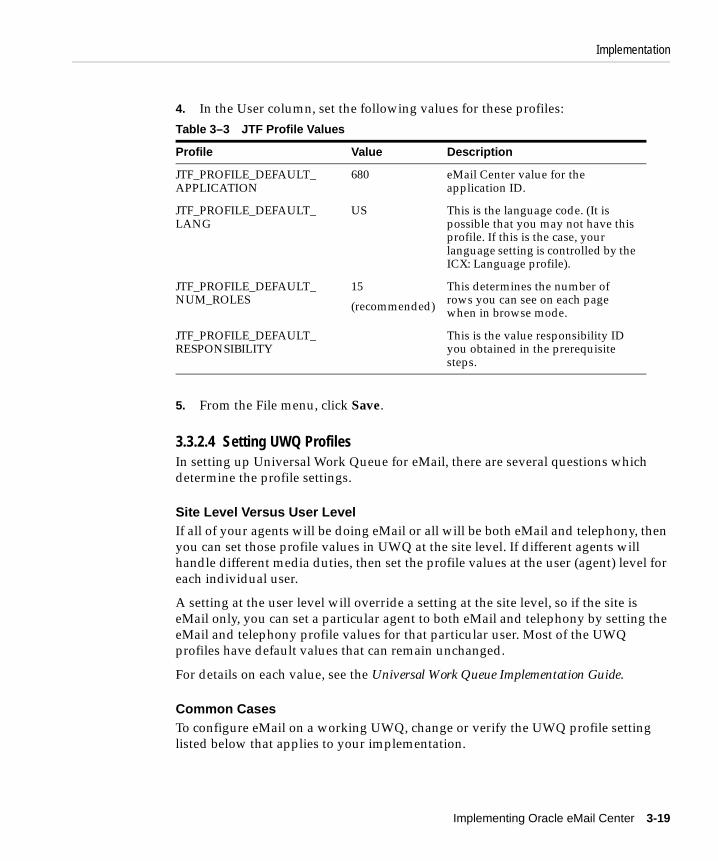
Implementation
4. In the User column, set the following values for these profiles:
5. From the File menu, click Save.
3.3.2.4 Setting UWQ ProfilesIn setting up Universal Work Queue for eMail, there are several questions which determine the profile settings.
Site Level Versus User LevelIf all of your agents will be doing eMail or all will be both eMail and telephony, then you can set those profile values in UWQ at the site level. If different agents will handle different media duties, then set the profile values at the user (agent) level for each individual user.
A setting at the user level will override a setting at the site level, so if the site is eMail only, you can set a particular agent to both eMail and telephony by setting the eMail and telephony profile values for that particular user. Most of the UWQ profiles have default values that can remain unchanged.
For details on each value, see the Universal Work Queue Implementation Guide.
Common CasesTo configure eMail on a working UWQ, change or verify the UWQ profile setting listed below that applies to your implementation.
Table 3–3 JTF Profile Values
Profile Value Description
JTF_PROFILE_DEFAULT_APPLICATION
680 eMail Center value for the application ID.
JTF_PROFILE_DEFAULT_LANG
US This is the language code. (It is possible that you may not have this profile. If this is the case, your language setting is controlled by the ICX: Language profile).
JTF_PROFILE_DEFAULT_NUM_ROLES
15
(recommended)
This determines the number of rows you can see on each page when in browse mode.
JTF_PROFILE_DEFAULT_RESPONSIBILITY
This is the value responsibility ID you obtained in the prerequisite steps.
Implementing Oracle eMail Center 3-19
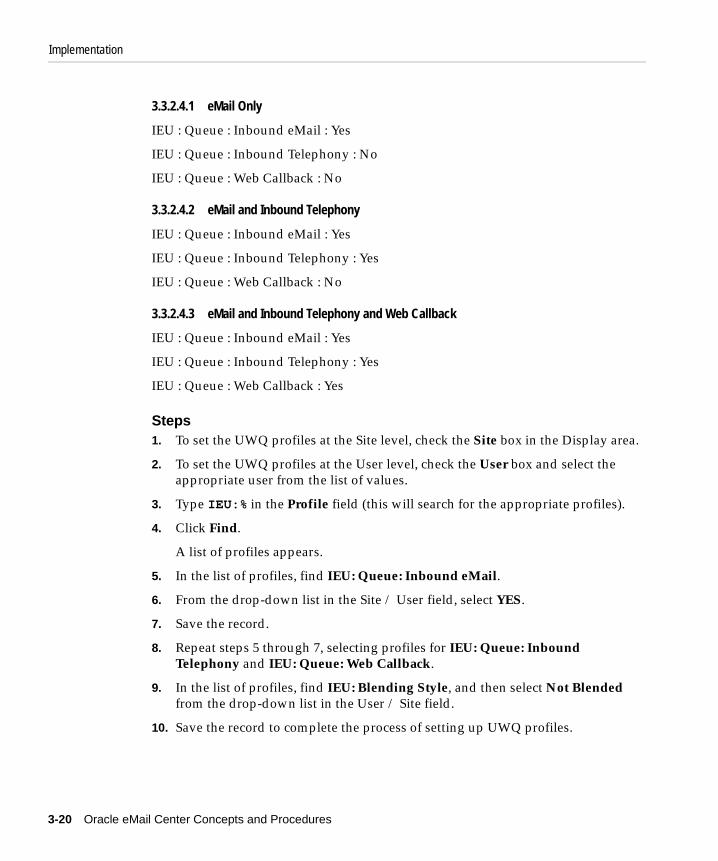
Implementation
3.3.2.4.1 eMail Only
IEU : Queue : Inbound eMail : Yes
IEU : Queue : Inbound Telephony : No
IEU : Queue : Web Callback : No
3.3.2.4.2 eMail and Inbound Telephony
IEU : Queue : Inbound eMail : Yes
IEU : Queue : Inbound Telephony : Yes
IEU : Queue : Web Callback : No
3.3.2.4.3 eMail and Inbound Telephony and Web Callback
IEU : Queue : Inbound eMail : Yes
IEU : Queue : Inbound Telephony : Yes
IEU : Queue : Web Callback : Yes
Steps1. To set the UWQ profiles at the Site level, check the Site box in the Display area.
2. To set the UWQ profiles at the User level, check the User box and select the appropriate user from the list of values.
3. Type IEU:% in the Profile field (this will search for the appropriate profiles).
4. Click Find.
A list of profiles appears.
5. In the list of profiles, find IEU: Queue: Inbound eMail.
6. From the drop-down list in the Site / User field, select YES.
7. Save the record.
8. Repeat steps 5 through 7, selecting profiles for IEU: Queue: Inbound Telephony and IEU: Queue: Web Callback.
9. In the list of profiles, find IEU: Blending Style, and then select Not Blended from the drop-down list in the User / Site field.
10. Save the record to complete the process of setting up UWQ profiles.
3-20 Oracle eMail Center Concepts and Procedures
Implementation
3.3.2.5 Setting CRM ResourcesThese steps should be performed to set CRM Resources for users with the Operations Manager responsibility.
Use this procedure to set the CRM resources.
Steps1. From the Navigator System Administrator screen, click File, then Switch
Responsibility.
2. Select the CRM Administrator responsibility.
A screen appears, displaying a list of functions.
3. From the list of functions, double-click the Resource Manager.
4. Double-click Maintain Resources.
5. Double-click Import Resources.
The Selection Criteria screen appears.
6. From the Resource Category field, select Employee.
7. From the Name field, select the new employee’s name.
8. Click Search.
The Search Results list appears, displaying a row of data with Category set to Employee and Name set to the new employee’s name.
9. Click Create Resource.
The Default Values screen appears.
10. Click OK.
The Selected Resource screen appears.
11. In the Selected Resources screen, click Save Resource.
12. Click Details.
The Resource screen appears.
13. In the Roles tab, select Marketing Encyclopedia from the drop-down list for Role Type and select MES Administrator from the drop-down list for Roles (this allows integration with the MES application).
14. Accept the default values on the remaining tabs.
Implementing Oracle eMail Center 3-21
Implementation
15. From the File menu, click Save to save the resource.
3.3.3 Defining eMail Server AccountsThis topic group provides a high-level overview of the steps necessary to define eMail Server accounts in the eMail Center System Administrator Interface, a worksheet for gathering all the necessary information, and detailed steps for performing each part of the defining eMail Server accounts procedure.
3.3.3.1 High-Level Steps
PrerequisitesTo perform the following steps, you must have an administrator level status.
Steps1. Create a Server Group entry.
2. Define an eMC Server entry and assign the eMC Server entry to the previously created Server Group.
3. Define an eMail Db entry and assign this eMail Db entry to the previously created Server Group.
4. Define one database link and create two others. You will define the link from OES to the Apps instance created earlier, and you will create two links to your eMail Db (your Oracle eMail Server database). One link for user <oraoffice> and one for user <OO>. In a single instance scenario, the database link would be self-referencing.
5. Define two eMail Server entries, one IMAP and one SMTP, and assign them to the previously created Server Group.
6. Create an account for every user.
3.3.3.2 WorksheetsUse the following worksheet to gather all the necessary information for completing the detailed tasks in the Defining eMail accounts procedure.
Note: The eMail Center System Administrator Interface is an HTML based console and is separate from the Oracle Applications forms based Admin console.
3-22 Oracle eMail Center Concepts and Procedures
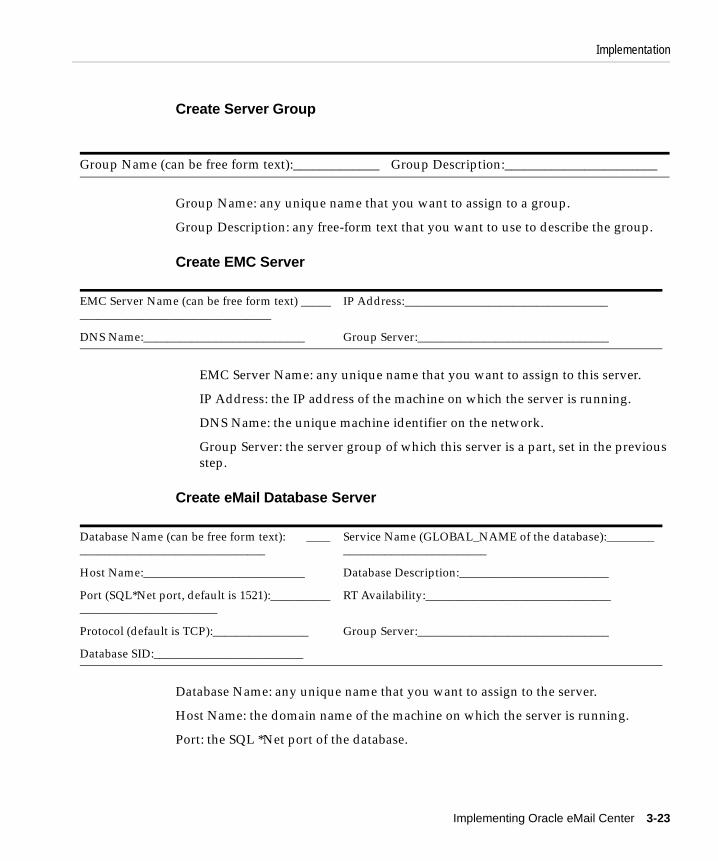
Implementation
Create Server Group
Group Name: any unique name that you want to assign to a group.
Group Description: any free-form text that you want to use to describe the group.
Create EMC Server
EMC Server Name: any unique name that you want to assign to this server.
IP Address: the IP address of the machine on which the server is running.
DNS Name: the unique machine identifier on the network.
Group Server: the server group of which this server is a part, set in the previous step.
Create eMail Database Server
Database Name: any unique name that you want to assign to the server.
Host Name: the domain name of the machine on which the server is running.
Port: the SQL *Net port of the database.
Group Name (can be free form text):_____________ Group Description:_______________________
EMC Server Name (can be free form text) _____________________________________
IP Address:__________________________________
DNS Name:___________________________ Group Server:________________________________
Database Name (can be free form text): ___________________________________
Service Name (GLOBAL_NAME of the database):________________________________
Host Name:___________________________ Database Description:_________________________
Port (SQL*Net port, default is 1521):_________________________________
RT Availability:_______________________________
Protocol (default is TCP):________________ Group Server:________________________________
Database SID:_________________________
Implementing Oracle eMail Center 3-23
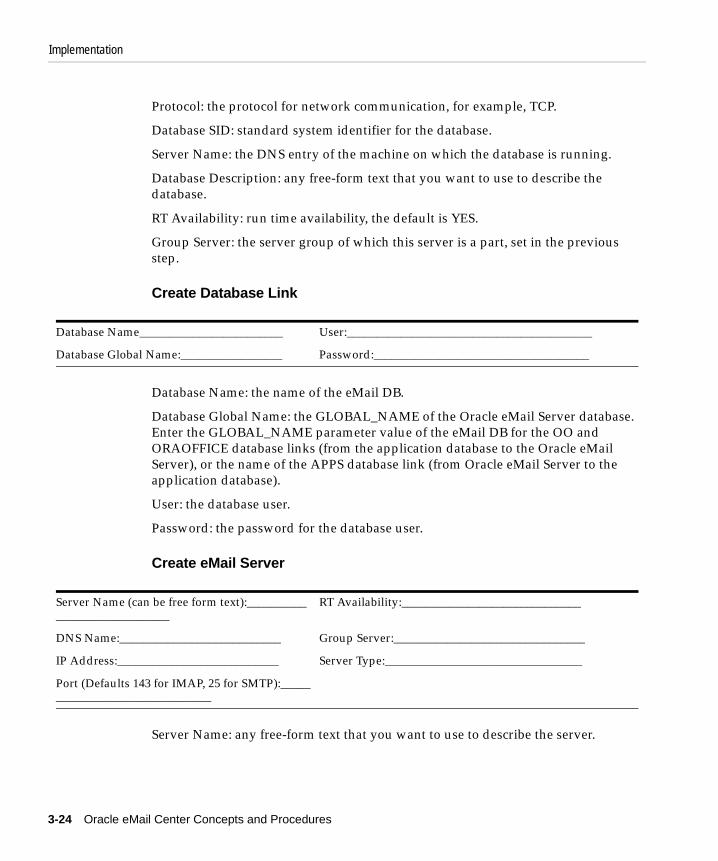
Implementation
Protocol: the protocol for network communication, for example, TCP.
Database SID: standard system identifier for the database.
Server Name: the DNS entry of the machine on which the database is running.
Database Description: any free-form text that you want to use to describe the database.
RT Availability: run time availability, the default is YES.
Group Server: the server group of which this server is a part, set in the previous step.
Create Database Link
Database Name: the name of the eMail DB.
Database Global Name: the GLOBAL_NAME of the Oracle eMail Server database. Enter the GLOBAL_NAME parameter value of the eMail DB for the OO and ORAOFFICE database links (from the application database to the Oracle eMail Server), or the name of the APPS database link (from Oracle eMail Server to the application database).
User: the database user.
Password: the password for the database user.
Create eMail Server
Server Name: any free-form text that you want to use to describe the server.
Database Name________________________ User:_________________________________________
Database Global Name:_________________ Password:____________________________________
Server Name (can be free form text):_____________________________
RT Availability:______________________________
DNS Name:___________________________ Group Server:________________________________
IP Address:___________________________ Server Type:_________________________________
Port (Defaults 143 for IMAP, 25 for SMTP):_______________________________
3-24 Oracle eMail Center Concepts and Procedures
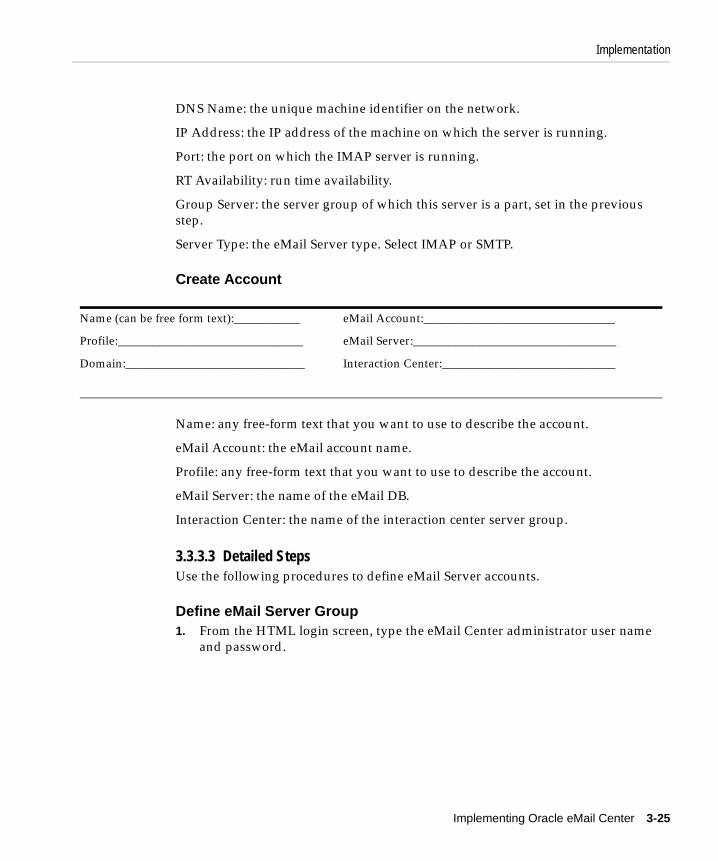
Implementation
DNS Name: the unique machine identifier on the network.
IP Address: the IP address of the machine on which the server is running.
Port: the port on which the IMAP server is running.
RT Availability: run time availability.
Group Server: the server group of which this server is a part, set in the previous step.
Server Type: the eMail Server type. Select IMAP or SMTP.
Create Account
Name: any free-form text that you want to use to describe the account.
eMail Account: the eMail account name.
Profile: any free-form text that you want to use to describe the account.
eMail Server: the name of the eMail DB.
Interaction Center: the name of the interaction center server group.
3.3.3.3 Detailed StepsUse the following procedures to define eMail Server accounts.
Define eMail Server Group1. From the HTML login screen, type the eMail Center administrator user name
and password.
Name (can be free form text):___________ eMail Account:________________________________
Profile:_______________________________ eMail Server:__________________________________
Domain:______________________________ Interaction Center:_____________________________
Implementing Oracle eMail Center 3-25
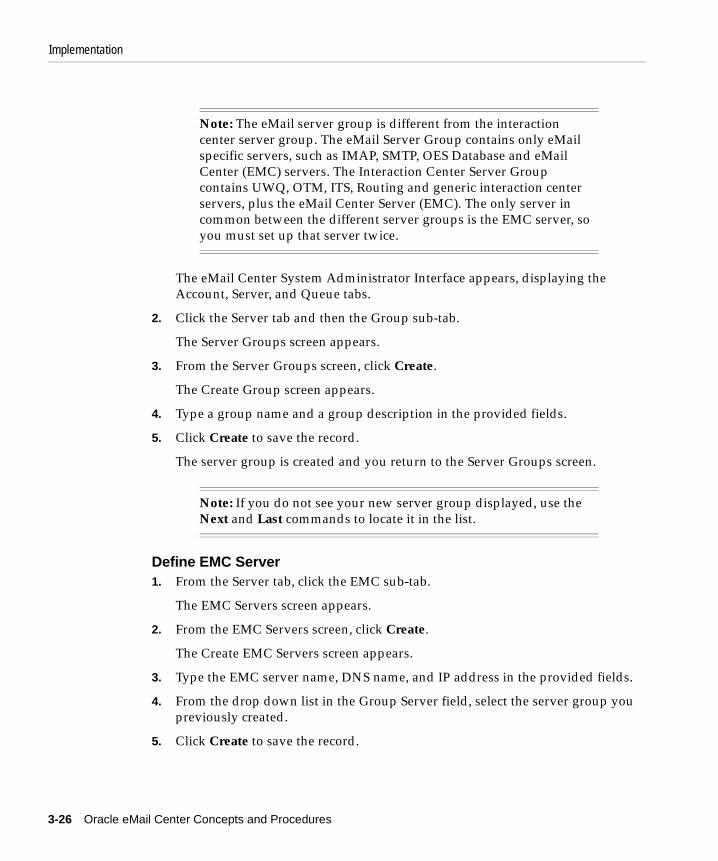
Implementation
The eMail Center System Administrator Interface appears, displaying the Account, Server, and Queue tabs.
2. Click the Server tab and then the Group sub-tab.
The Server Groups screen appears.
3. From the Server Groups screen, click Create.
The Create Group screen appears.
4. Type a group name and a group description in the provided fields.
5. Click Create to save the record.
The server group is created and you return to the Server Groups screen.
Define EMC Server1. From the Server tab, click the EMC sub-tab.
The EMC Servers screen appears.
2. From the EMC Servers screen, click Create.
The Create EMC Servers screen appears.
3. Type the EMC server name, DNS name, and IP address in the provided fields.
4. From the drop down list in the Group Server field, select the server group you previously created.
5. Click Create to save the record.
Note: The eMail server group is different from the interaction center server group. The eMail Server Group contains only eMail specific servers, such as IMAP, SMTP, OES Database and eMail Center (EMC) servers. The Interaction Center Server Group contains UWQ, OTM, ITS, Routing and generic interaction center servers, plus the eMail Center Server (EMC). The only server in common between the different server groups is the EMC server, so you must set up that server twice.
Note: If you do not see your new server group displayed, use the Next and Last commands to locate it in the list.
3-26 Oracle eMail Center Concepts and Procedures
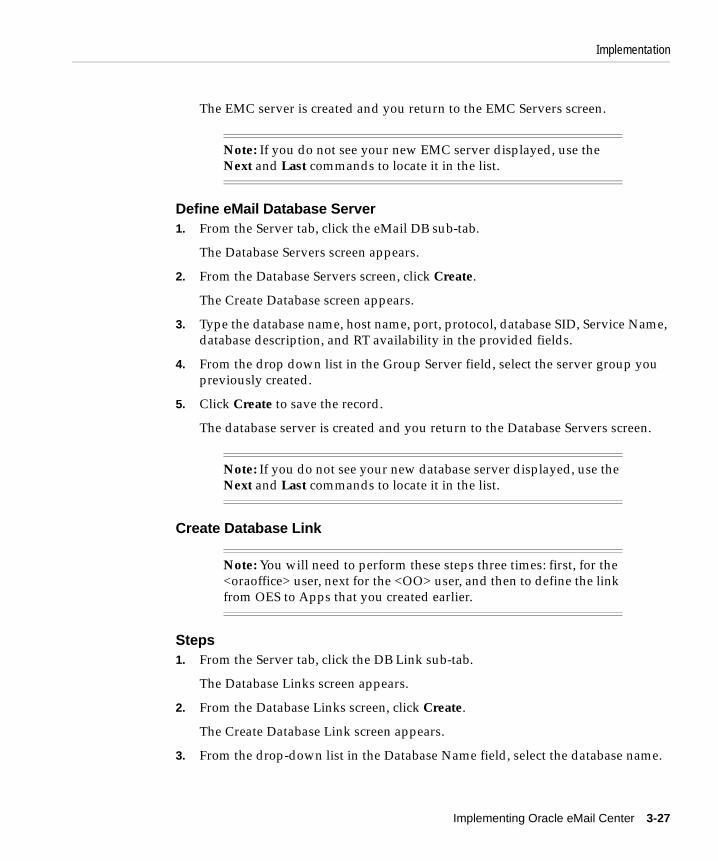
Implementation
The EMC server is created and you return to the EMC Servers screen.
Define eMail Database Server1. From the Server tab, click the eMail DB sub-tab.
The Database Servers screen appears.
2. From the Database Servers screen, click Create.
The Create Database screen appears.
3. Type the database name, host name, port, protocol, database SID, Service Name, database description, and RT availability in the provided fields.
4. From the drop down list in the Group Server field, select the server group you previously created.
5. Click Create to save the record.
The database server is created and you return to the Database Servers screen.
Create Database Link
Steps1. From the Server tab, click the DB Link sub-tab.
The Database Links screen appears.
2. From the Database Links screen, click Create.
The Create Database Link screen appears.
3. From the drop-down list in the Database Name field, select the database name.
Note: If you do not see your new EMC server displayed, use the Next and Last commands to locate it in the list.
Note: If you do not see your new database server displayed, use the Next and Last commands to locate it in the list.
Note: You will need to perform these steps three times: first, for the <oraoffice> user, next for the <OO> user, and then to define the link from OES to Apps that you created earlier.
Implementing Oracle eMail Center 3-27
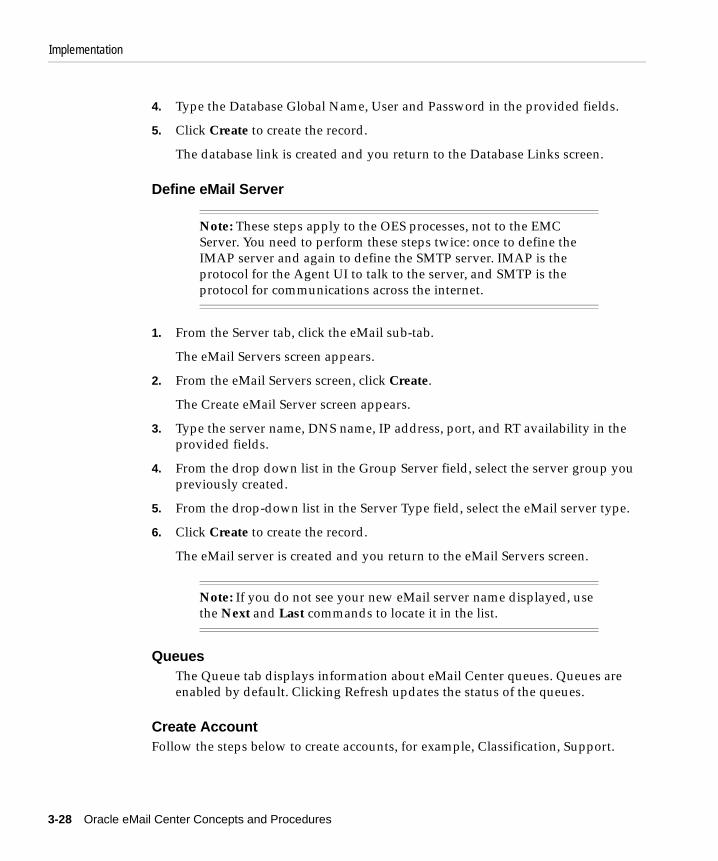
Implementation
4. Type the Database Global Name, User and Password in the provided fields.
5. Click Create to create the record.
The database link is created and you return to the Database Links screen.
Define eMail Server
1. From the Server tab, click the eMail sub-tab.
The eMail Servers screen appears.
2. From the eMail Servers screen, click Create.
The Create eMail Server screen appears.
3. Type the server name, DNS name, IP address, port, and RT availability in the provided fields.
4. From the drop down list in the Group Server field, select the server group you previously created.
5. From the drop-down list in the Server Type field, select the eMail server type.
6. Click Create to create the record.
The eMail server is created and you return to the eMail Servers screen.
QueuesThe Queue tab displays information about eMail Center queues. Queues are enabled by default. Clicking Refresh updates the status of the queues.
Create AccountFollow the steps below to create accounts, for example, Classification, Support.
Note: These steps apply to the OES processes, not to the EMC Server. You need to perform these steps twice: once to define the IMAP server and again to define the SMTP server. IMAP is the protocol for the Agent UI to talk to the server, and SMTP is the protocol for communications across the internet.
Note: If you do not see your new eMail server name displayed, use the Next and Last commands to locate it in the list.
3-28 Oracle eMail Center Concepts and Procedures
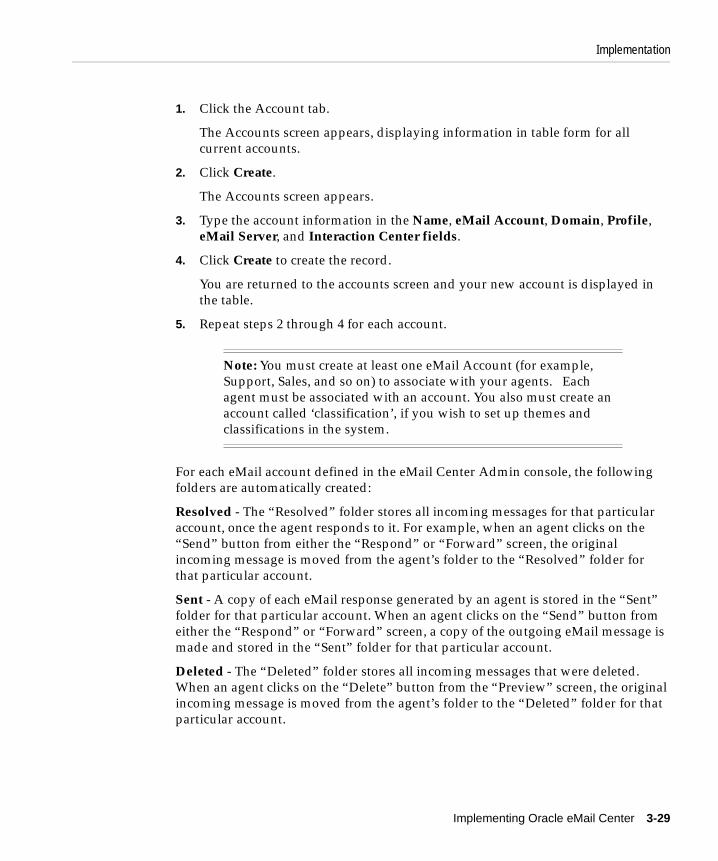
Implementation
1. Click the Account tab.
The Accounts screen appears, displaying information in table form for all current accounts.
2. Click Create.
The Accounts screen appears.
3. Type the account information in the Name, eMail Account, Domain, Profile, eMail Server, and Interaction Center fields.
4. Click Create to create the record.
You are returned to the accounts screen and your new account is displayed in the table.
5. Repeat steps 2 through 4 for each account.
For each eMail account defined in the eMail Center Admin console, the following folders are automatically created:
Resolved - The “Resolved” folder stores all incoming messages for that particular account, once the agent responds to it. For example, when an agent clicks on the “Send” button from either the “Respond” or “Forward” screen, the original incoming message is moved from the agent’s folder to the “Resolved” folder for that particular account.
Sent - A copy of each eMail response generated by an agent is stored in the “Sent” folder for that particular account. When an agent clicks on the “Send” button from either the “Respond” or “Forward” screen, a copy of the outgoing eMail message is made and stored in the “Sent” folder for that particular account.
Deleted - The “Deleted” folder stores all incoming messages that were deleted. When an agent clicks on the “Delete” button from the “Preview” screen, the original incoming message is moved from the agent’s folder to the “Deleted” folder for that particular account.
Note: You must create at least one eMail Account (for example, Support, Sales, and so on) to associate with your agents. Each agent must be associated with an account. You also must create an account called ‘classification’, if you wish to set up themes and classifications in the system.
Implementing Oracle eMail Center 3-29
Implementation
Retry - The “Retry” folder stores all messages that fail with API errors while they are being processed. There is a concurrent manager request ’Process Retry Folder’ that can be scheduled to reprocess these messages.
Admin - The “Admin” folder stores all messages that fail while reprocessing from the Retry folder. An administrator manually monitors this folder.
Using the above default folders, eMail Center provides the mechanism to store all incoming eMails and a copy of all outgoing eMails.
3.3.4 Creating an eMail Center Agent
3.3.4.1 Setting CRM ResourcesWhen logged in to Forms, perform these steps to set CRM Resources for each eMC Agent user.
Use this procedure to set the CRM resources.
Steps1. From the Navigator System Administrator screen, click File, then Switch
Responsibility.
2. Select the CRM Administrator responsibility.
A screen appears, displaying a list of functions.
3. From the list of functions, double-click Resource Manager.
1. Double-click Maintain Resources.
2. Double-click Import Resources.
The Selection Criterion screen appears.
3. From the Resource Category field, select Employee.
4. In the Name field, select the name of the new employee that you created previously in the HRMS or Resources.
5. Click Search.
The Search Results list appears, displaying a row of data with Category set to Employee and Name set to the new employee’s name.
6. Within the Search Results list, click the Select box for the appropriate employee.
7. Click Create Resource.
3-30 Oracle eMail Center Concepts and Procedures
Implementation
The Default Values screen appears.
8. Click OK.
The Selected Resources screen appears.
9. From the Selected Resources screen, click Save Resource.
10. Click Details.
The Resource screen appears.
11. In the Interaction Center tab, from the drop-down list in the Interaction Center field, select the interaction center that you defined previously.
12. Continuing in the Interaction Center tab, eMail Parameters area, from the drop-down list in the eMail Account field, select the desired eMail Account. Select Default from the drop-down list for the Parameter field and click the Value field to select the default value (IEM_DEFAULT_VALUE).
13. In the Roles tab, select Call Center from the drop-down list for Role Type and select Call Center Agent or Call Center Manager from the drop-down list for Roles. This is required for integration with the Routing Server.
14. From the File menu, click Save to save the resource.
Default folders created for every agentFor every eMail Center user to whom eMC Agent responsibilities are assigned, the following folders are created automatically in the Oracle eMail Server:
Agent’s User Name - For every account that an agent is assigned to, a folder bearing the agent’s user name will be created.
Draft - For every account that an agent is assigned to, a “Draft” folder will be automatically created under the folder bearing the agent’s user name.
3.3.5 Setting up Routing for Inbound eMailUse the steps in the following chart to set up rules-based routing. The Window Name(s) column shows you in which window(s) you perform a step, and for which
Note: Use the default values for all tabs except the Interaction Center tab and the Roles tab. Do not perform any changes to the other tabs unless explicitly directed to do so.
Implementing Oracle eMail Center 3-31
Implementation
responsibility the window is available. The Required column shows you if the step is required, optional, required with defaults, or conditionally required.
3.3.5.1 Defining GroupsThere are two types of groups for rules-based routing: static and dynamic. A static group requires that you manually edit information about individual group members. In a dynamic group, information about group members is updated automatically as the result of a SQL query.
For procedures, see:
■ Defining a Static Group
■ Defining a Dynamic Group
3.3.5.1.1 Defining a Static Group
Use this procedure to configure a static group for routing.
PrerequisitesNone
Step Number Required? Oracle Sales Setup Step Description Window Name(s) Responsibility
❏ Step 1 Required for rules-based routing
Define a group.
See: “Defining Groups” in this document
Define Groups window; Dynamic Groups window
CRM Resource Manager
❏ Step 2 Required for rules-based routing
Define a route.
See: “Defining Routes” in this document
Routing Administration window
Oracle Call Centers
❏ Step 3 Required for rules-based routing
Define the route priorities.
See: “Defining Route Priorities” in this document
Routing Priority window
Oracle Call Centers
❏ Step 4 Required for rules-based routing
Define the classifications.
See: “Defining Routing Classifications” in this document
Classification Administration window
Oracle Call Centers
3-32 Oracle eMail Center Concepts and Procedures
Implementation
Steps1. Navigate to the Define Groups window.
a. In the Navigator window, on the Functions tab, choose Call Center Admin > Routing Server Administration.
The Routing Administration window appears.
b. Click Static Groups.
The Define Groups window appears.
2. In the Name field, enter a unique descriptive name of the group.
3. In the Active Dates area, select or enter the Start Date.
4. To assign agents exclusively to this group, check the Exclusive Flag box. This means the agent may not be a member of any other group.
5. Click the Members tab.
6. In the Category field, select Employee from the list of values.
7. In the Number field, select the resource number of the appropriate agent. You can assign as many group members as you want.
The Name and Operating Unit fields are populated automatically.
8. Click the Usages tab.
9. In the Usage field, select Call Center from the list of values.
Note: The Accounting Code and eMail Address fields are not required in eMail routing.
Caution: Enter an End Date only if you want to terminate the group. If you do not have an active group, the routing will fail and eMail Center will not be functional.
Use extreme caution when using this feature!
Implementing Oracle eMail Center 3-33
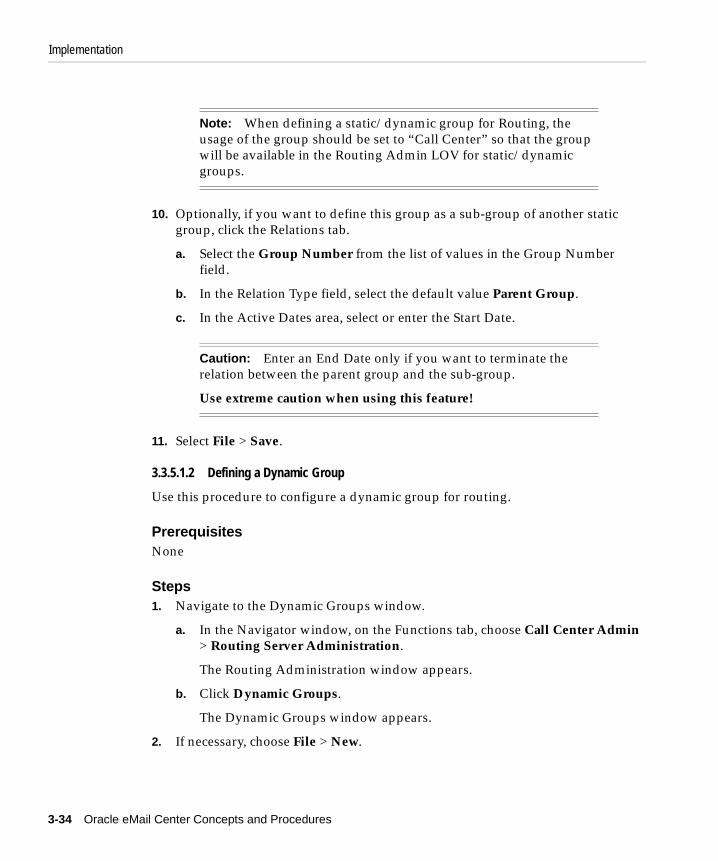
Implementation
10. Optionally, if you want to define this group as a sub-group of another static group, click the Relations tab.
a. Select the Group Number from the list of values in the Group Number field.
b. In the Relation Type field, select the default value Parent Group.
c. In the Active Dates area, select or enter the Start Date.
11. Select File > Save.
3.3.5.1.2 Defining a Dynamic Group
Use this procedure to configure a dynamic group for routing.
PrerequisitesNone
Steps1. Navigate to the Dynamic Groups window.
a. In the Navigator window, on the Functions tab, choose Call Center Admin > Routing Server Administration.
The Routing Administration window appears.
b. Click Dynamic Groups.
The Dynamic Groups window appears.
2. If necessary, choose File > New.
Note: When defining a static/dynamic group for Routing, the usage of the group should be set to “Call Center” so that the group will be available in the Routing Admin LOV for static/dynamic groups.
Caution: Enter an End Date only if you want to terminate the relation between the parent group and the sub-group.
Use extreme caution when using this feature!
3-34 Oracle eMail Center Concepts and Procedures
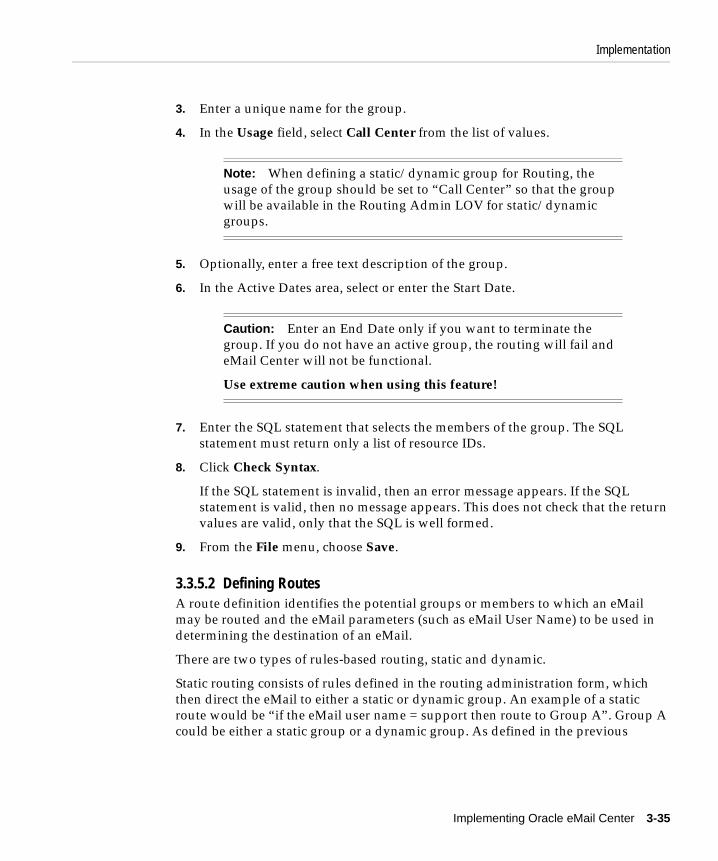
Implementation
3. Enter a unique name for the group.
4. In the Usage field, select Call Center from the list of values.
5. Optionally, enter a free text description of the group.
6. In the Active Dates area, select or enter the Start Date.
7. Enter the SQL statement that selects the members of the group. The SQL statement must return only a list of resource IDs.
8. Click Check Syntax.
If the SQL statement is invalid, then an error message appears. If the SQL statement is valid, then no message appears. This does not check that the return values are valid, only that the SQL is well formed.
9. From the File menu, choose Save.
3.3.5.2 Defining RoutesA route definition identifies the potential groups or members to which an eMail may be routed and the eMail parameters (such as eMail User Name) to be used in determining the destination of an eMail.
There are two types of rules-based routing, static and dynamic.
Static routing consists of rules defined in the routing administration form, which then direct the eMail to either a static or dynamic group. An example of a static route would be “if the eMail user name = support then route to Group A”. Group A could be either a static group or a dynamic group. As defined in the previous
Note: When defining a static/dynamic group for Routing, the usage of the group should be set to “Call Center” so that the group will be available in the Routing Admin LOV for static/dynamic groups.
Caution: Enter an End Date only if you want to terminate the group. If you do not have an active group, the routing will fail and eMail Center will not be functional.
Use extreme caution when using this feature!
Implementing Oracle eMail Center 3-35
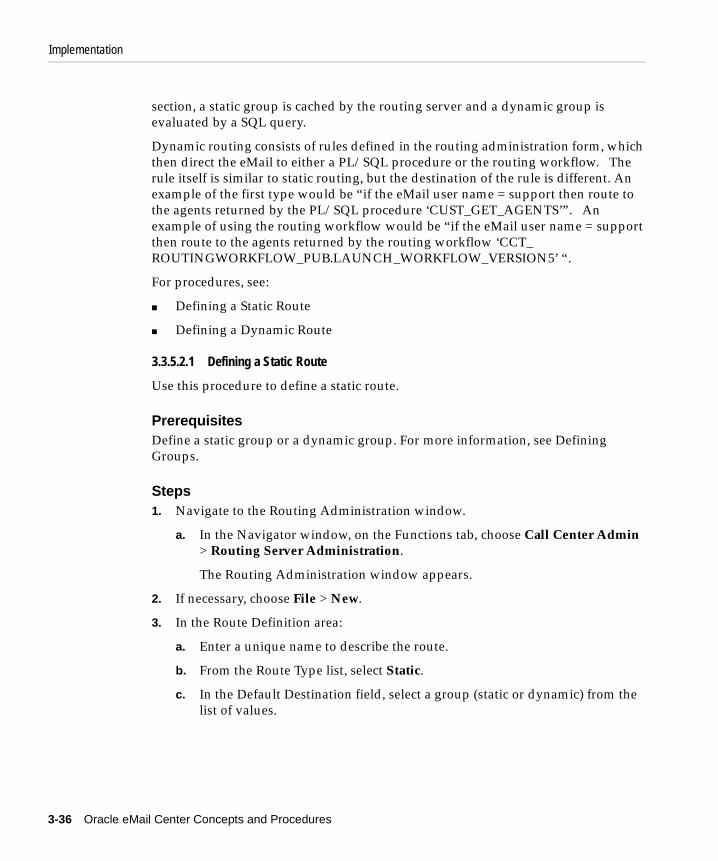
Implementation
section, a static group is cached by the routing server and a dynamic group is evaluated by a SQL query.
Dynamic routing consists of rules defined in the routing administration form, which then direct the eMail to either a PL/SQL procedure or the routing workflow. The rule itself is similar to static routing, but the destination of the rule is different. An example of the first type would be “if the eMail user name = support then route to the agents returned by the PL/SQL procedure ‘CUST_GET_AGENTS’”. An example of using the routing workflow would be “if the eMail user name = support then route to the agents returned by the routing workflow ‘CCT_ROUTINGWORKFLOW_PUB.LAUNCH_WORKFLOW_VERSION5’ “.
For procedures, see:
■ Defining a Static Route
■ Defining a Dynamic Route
3.3.5.2.1 Defining a Static Route
Use this procedure to define a static route.
PrerequisitesDefine a static group or a dynamic group. For more information, see Defining Groups.
Steps1. Navigate to the Routing Administration window.
a. In the Navigator window, on the Functions tab, choose Call Center Admin > Routing Server Administration.
The Routing Administration window appears.
2. If necessary, choose File > New.
3. In the Route Definition area:
a. Enter a unique name to describe the route.
b. From the Route Type list, select Static.
c. In the Default Destination field, select a group (static or dynamic) from the list of values.
3-36 Oracle eMail Center Concepts and Procedures
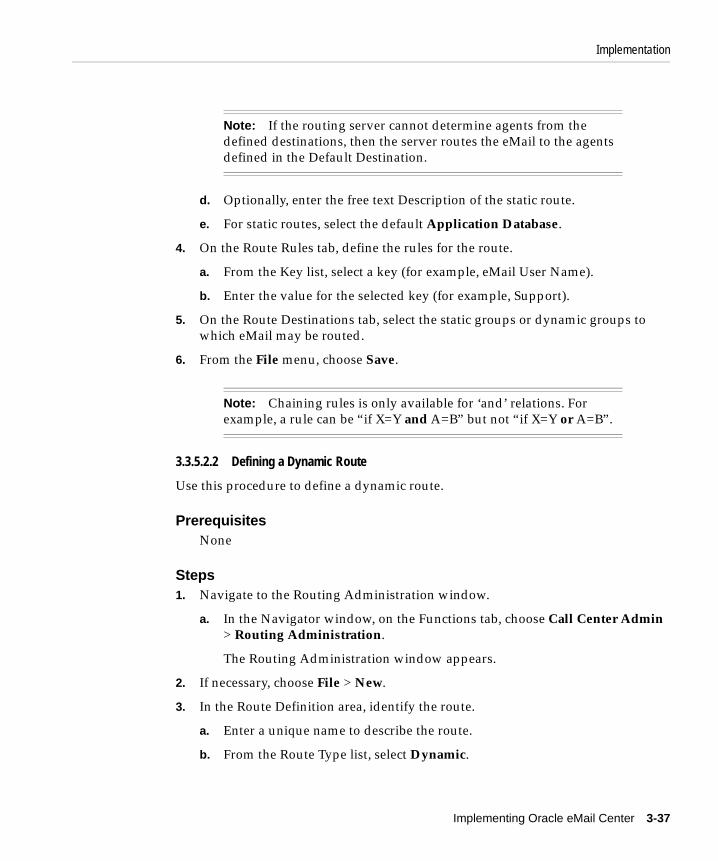
Implementation
d. Optionally, enter the free text Description of the static route.
e. For static routes, select the default Application Database.
4. On the Route Rules tab, define the rules for the route.
a. From the Key list, select a key (for example, eMail User Name).
b. Enter the value for the selected key (for example, Support).
5. On the Route Destinations tab, select the static groups or dynamic groups to which eMail may be routed.
6. From the File menu, choose Save.
3.3.5.2.2 Defining a Dynamic Route
Use this procedure to define a dynamic route.
PrerequisitesNone
Steps1. Navigate to the Routing Administration window.
a. In the Navigator window, on the Functions tab, choose Call Center Admin > Routing Administration.
The Routing Administration window appears.
2. If necessary, choose File > New.
3. In the Route Definition area, identify the route.
a. Enter a unique name to describe the route.
b. From the Route Type list, select Dynamic.
Note: If the routing server cannot determine agents from the defined destinations, then the server routes the eMail to the agents defined in the Default Destination.
Note: Chaining rules is only available for ‘and’ relations. For example, a rule can be “if X=Y and A=B” but not “if X=Y or A=B”.
Implementing Oracle eMail Center 3-37

Implementation
c. In the Default Destination field, select a group (static or dynamic) from the list of values.
d. Optionally, enter the free text description of the dynamic route.
e. If either of the following conditions is true, select Application Database:
The PL/SQL procedure that is the route destination is stored in the Oracle Applications database.
OR
The routing workflow is the route destination.
f. If the following condition is true, select Non Application Database: The PL/SQL procedure that is the route destination is stored in the Non Applications database. Also, enter a Database Driver and Database URL for the Non Application database.
4. On the Route Rules tab, define the rules for the route.
a. From the Key list, select a key (for example, eMail User Name).
b. Enter the value for the selected key (for example, Support).
5. On the Route Destinations tab:
a. In the Dynamic Destination area, enter the name of the custom procedure (Package.Procedure) that will be used to derive the list of agents for this eMail. The custom procedure must return nothing but a semi-colon delimited list of agents.
OR
Select the routing workflow from LOV.
b. If you are using a custom procedure, in the Procedure Parameters area, enter the procedure parameters. This allows the system to know about each input and output parameter for your custom procedure:
Parameter: The name of the parameter for the procedure (either input and/or output).
Note: If the routing server cannot determine agents from the defined destinations, then the server routes the eMail to the agents defined in the Default Destination.
3-38 Oracle eMail Center Concepts and Procedures
Implementation
Value: Choose the Value from the list of values, or enter a custom value for this parameter.
Data Type: Choose the Data Type of the parameter from the list of values.
Direction: Choose the direction of the parameter from the list of values to determine if it is an input and/or output parameter.
Sequence: A generated number that indicates the position of the parameter in the PL/SQL procedure. Verify that the accuracy of the parameter Sequence.
Define all parameters for the procedure.
6. From the File menu, choose Save.
3.3.5.3 Defining Route PrioritiesYou can define and change the priority of route definitions. Logically, the route rules will be evaluated in order or priority, starting with 1. The first route rule which evaluates as true will determine the routing destination.
Changing the value of a route priority affects the values of other route priorities. If you increase the value of a priority, then the priorities of all the routes with a value equal to or greater than the original value decrease by one. If you decrease the value of a priority, then the value of all the routes with a value equal to or less than the original value increase by one. For example, if you decrease 6 to 3, then 3 increases to 4, 4 increases to 5, and so on. If you increase 3 to 6, then 4 decreases to 3, 3 decreases to 2, and so on.
Use the following procedure to set the priority for a route.
PrerequisitesNone
Steps1. Navigate to the Routing Priority window.
a. In the Navigator window, on the Functions tab, choose Call Center Admin > Routing Priority Administration.
Note: By default, newly defined routes have the lowest priority among the existing routes.
Implementing Oracle eMail Center 3-39
Implementation
The Routing Priority window appears.
2. From the Priority list of values, select a priority.
3. Click Change Priority.
4. From the File menu, choose Save.
3.3.5.4 Defining Routing ClassificationsClassifications specify which business application is launched on the agent desktop and how an interaction is listed in the UWQ screen. Classifications are of two types: literal and database procedure. A literal classification assigns the string specified to be the classification of an interaction. A database procedure classification derives the classification value from a stored procedure and then assigns it to an interaction.
Every classification must have rules that define the conditions under which the classification occurs. For example, if Customer Name=Oracle Corporation then the classification=Gold Support.
A classification can have multiple rules associated with it. Every classification rule has a Key and a Value whose relationship is defined by one of the available Operations (=, !=, >, >=, <, <=).
For procedures, see:
■ Defining a Literal Classification
■ Defining a Database Procedure Classification
3.3.5.4.1 Defining a Literal Classification
Use this procedure to define a literal classification.
PrerequisitesNone
Note: Routing Classification is different from eMail Classification. eMail classification is the intent of the eMail. Routing Classification determines how an interaction is tracked in UWQ and Business Intelligence, and which business application is popped when the media arrives on the desktop.
3-40 Oracle eMail Center Concepts and Procedures
Implementation
Steps1. Navigate to the Classification Administration window.
a. In the Navigator window, on the Functions tab, choose Call Center Admin > Classification Administration.
The Classification Administration window appears.
2. If necessary, choose File > New.
3. In the Classification Definition area, define the classification.
a. Enter a unique name to describe the classification.
b. From the Type list, select Literal.
c. In the Time Out field, enter the number of minutes you want to use as your time out period.
After a eMail is routed, it waits in the OTM queues for one of the agents in the group to become available. The Time Out field sets the maximum length of time that the eMail waits in the OTM queues. By the end of that period, if an agent does not become available, the eMail is sent back to the Routing server to be re-routed to another group of agents. The Time Out field is set in minutes.
For eMail, if you do not want the eMail to be rerouted for a long period, Oracle recommends that you enter the number 100000 in this field.
d. Choose the default Application Database.
4. On the Classification Rules tab, define the rules for routing based on the keys identified in the route definition.
a. From the Key list, select a key.
b. From the Operation list, select an operator.
c. Enter the value for the selected key.
5. From the File menu, choose Save.
3.3.5.4.2 Defining a Database Procedure Classification
Use this procedure to define a database procedure classification.
PrerequisitesNone
Implementing Oracle eMail Center 3-41
Implementation
Steps1. Navigate to the Classification Administration window.
a. In the Navigator window, on the Functions tab, choose Call Center Admin > Classification Administration.
The Classification Administration window appears.
2. In the Classification Definition area, define the classification.
a. Enter the name of the database procedure that will determine the classification of the eMail, for example, GET_CLASSIFICATION_FROM_SUBJECT.
b. From the Type list, select Database Procedure.
c. In the Time Out field, enter the number of minutes you want to use as your time out period.
After a eMail is routed, it waits in the OTM queues for one of the agents in the group to become available. The Time Out field sets the maximum length of time that the eMail waits in the OTM queues. By the end of that period, if an agent does not become available, the eMail is sent back to the Routing server to be re-routed to another group of agents. The Time Out field is set in minutes.
For eMail, if you do not want the eMail to be rerouted for a long period, Oracle recommends that you enter the number 100000 in this field.
d. Choose the default Application Database.
e. If the following condition is true, select Non Application Database:
The PL/SQL procedure that determines the classification is stored in the Non Applications database. Also, enter a Database Driver and Database URL for the Non Application database.
3. On the Classification Rules tab, define the rules for classification.
a. From the Key list, select a key.
b. From the Operation list, select an operator.
Note: The value entered in the Classification field is not verified against the stored procedures. Be sure to enter the correct procedure name.
3-42 Oracle eMail Center Concepts and Procedures
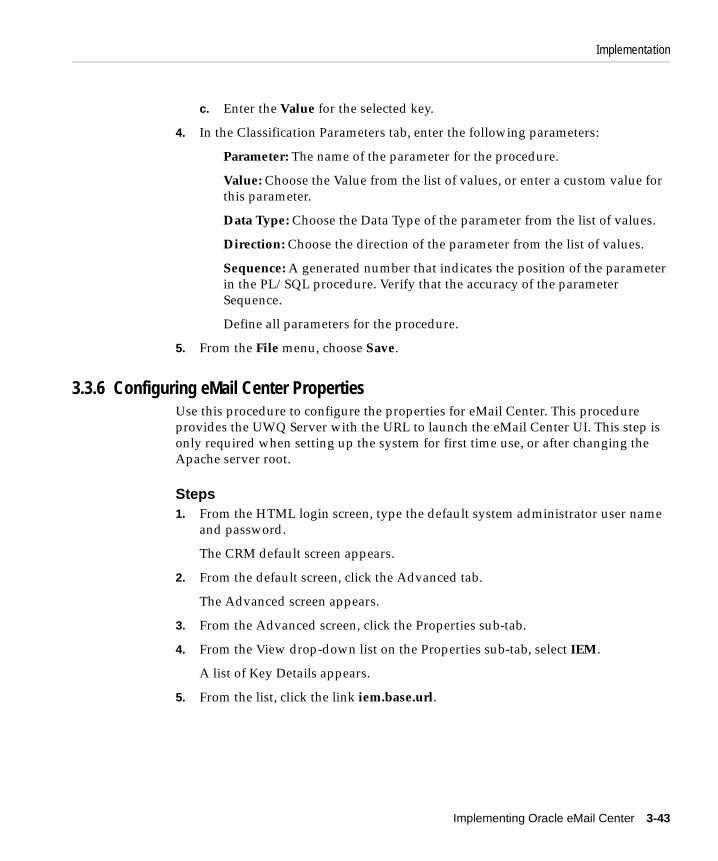
Implementation
c. Enter the Value for the selected key.
4. In the Classification Parameters tab, enter the following parameters:
Parameter: The name of the parameter for the procedure.
Value: Choose the Value from the list of values, or enter a custom value for this parameter.
Data Type: Choose the Data Type of the parameter from the list of values.
Direction: Choose the direction of the parameter from the list of values.
Sequence: A generated number that indicates the position of the parameter in the PL/SQL procedure. Verify that the accuracy of the parameter Sequence.
Define all parameters for the procedure.
5. From the File menu, choose Save.
3.3.6 Configuring eMail Center PropertiesUse this procedure to configure the properties for eMail Center. This procedure provides the UWQ Server with the URL to launch the eMail Center UI. This step is only required when setting up the system for first time use, or after changing the Apache server root.
Steps1. From the HTML login screen, type the default system administrator user name
and password.
The CRM default screen appears.
2. From the default screen, click the Advanced tab.
The Advanced screen appears.
3. From the Advanced screen, click the Properties sub-tab.
4. From the View drop-down list on the Properties sub-tab, select IEM.
A list of Key Details appears.
5. From the list, click the link iem.base.url.
Implementing Oracle eMail Center 3-43
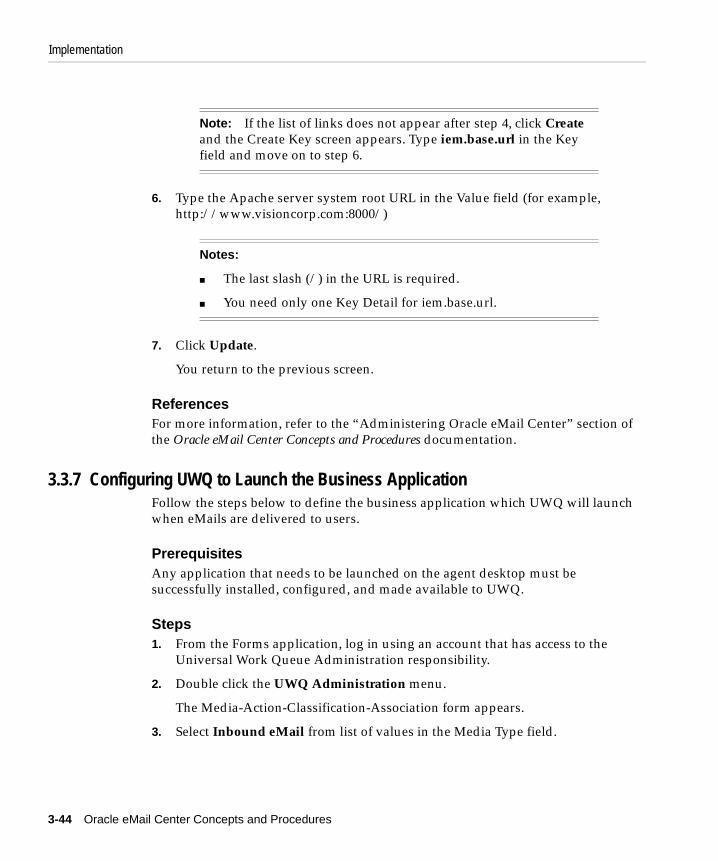
Implementation
6. Type the Apache server system root URL in the Value field (for example, http://www.visioncorp.com:8000/)
7. Click Update.
You return to the previous screen.
ReferencesFor more information, refer to the “Administering Oracle eMail Center” section of the Oracle eMail Center Concepts and Procedures documentation.
3.3.7 Configuring UWQ to Launch the Business ApplicationFollow the steps below to define the business application which UWQ will launch when eMails are delivered to users.
PrerequisitesAny application that needs to be launched on the agent desktop must be successfully installed, configured, and made available to UWQ.
Steps1. From the Forms application, log in using an account that has access to the
Universal Work Queue Administration responsibility.
2. Double click the UWQ Administration menu.
The Media-Action-Classification-Association form appears.
3. Select Inbound eMail from list of values in the Media Type field.
Note: If the list of links does not appear after step 4, click Create and the Create Key screen appears. Type iem.base.url in the Key field and move on to step 6.
Notes:
■ The last slash (/) in the URL is required.
■ You need only one Key Detail for iem.base.url.
3-44 Oracle eMail Center Concepts and Procedures
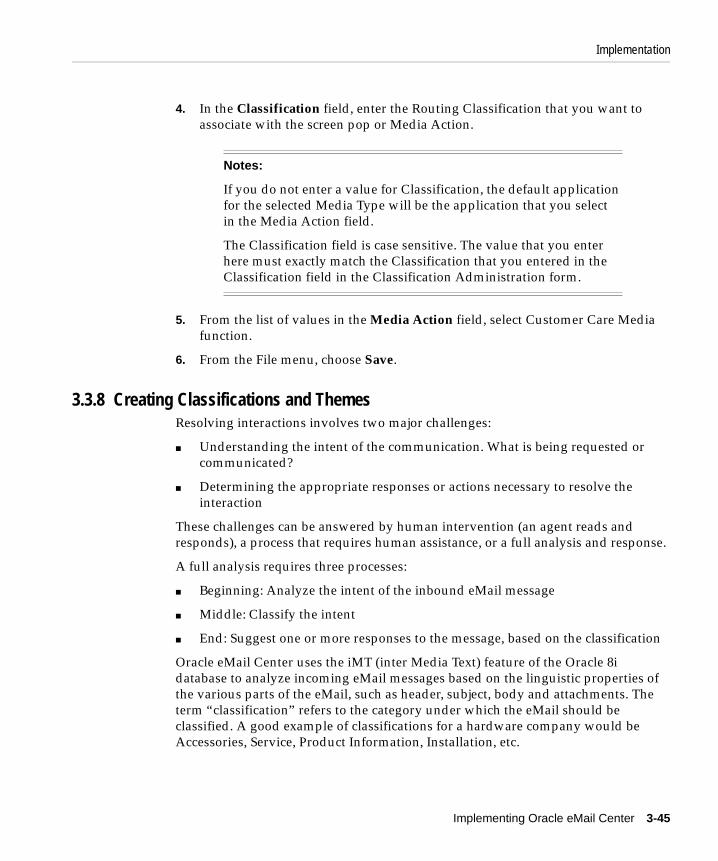
Implementation
4. In the Classification field, enter the Routing Classification that you want to associate with the screen pop or Media Action.
5. From the list of values in the Media Action field, select Customer Care Media function.
6. From the File menu, choose Save.
3.3.8 Creating Classifications and ThemesResolving interactions involves two major challenges:
■ Understanding the intent of the communication. What is being requested or communicated?
■ Determining the appropriate responses or actions necessary to resolve the interaction
These challenges can be answered by human intervention (an agent reads and responds), a process that requires human assistance, or a full analysis and response.
A full analysis requires three processes:
■ Beginning: Analyze the intent of the inbound eMail message
■ Middle: Classify the intent
■ End: Suggest one or more responses to the message, based on the classification
Oracle eMail Center uses the iMT (inter Media Text) feature of the Oracle 8i database to analyze incoming eMail messages based on the linguistic properties of the various parts of the eMail, such as header, subject, body and attachments. The term “classification” refers to the category under which the eMail should be classified. A good example of classifications for a hardware company would be Accessories, Service, Product Information, Installation, etc.
Notes:
If you do not enter a value for Classification, the default application for the selected Media Type will be the application that you select in the Media Action field.
The Classification field is case sensitive. The value that you enter here must exactly match the Classification that you entered in the Classification field in the Classification Administration form.
Implementing Oracle eMail Center 3-45
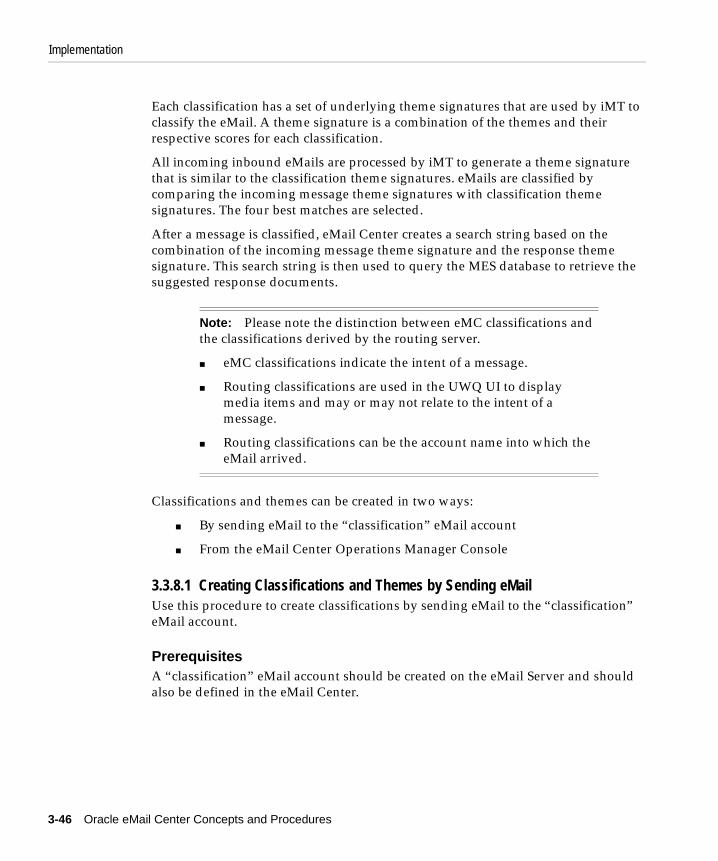
Implementation
Each classification has a set of underlying theme signatures that are used by iMT to classify the eMail. A theme signature is a combination of the themes and their respective scores for each classification.
All incoming inbound eMails are processed by iMT to generate a theme signature that is similar to the classification theme signatures. eMails are classified by comparing the incoming message theme signatures with classification theme signatures. The four best matches are selected.
After a message is classified, eMail Center creates a search string based on the combination of the incoming message theme signature and the response theme signature. This search string is then used to query the MES database to retrieve the suggested response documents.
Classifications and themes can be created in two ways:
■ By sending eMail to the “classification” eMail account
■ From the eMail Center Operations Manager Console
3.3.8.1 Creating Classifications and Themes by Sending eMailUse this procedure to create classifications by sending eMail to the “classification” eMail account.
PrerequisitesA “classification” eMail account should be created on the eMail Server and should also be defined in the eMail Center.
Note: Please note the distinction between eMC classifications and the classifications derived by the routing server.
■ eMC classifications indicate the intent of a message.
■ Routing classifications are used in the UWQ UI to display media items and may or may not relate to the intent of a message.
■ Routing classifications can be the account name into which the eMail arrived.
3-46 Oracle eMail Center Concepts and Procedures
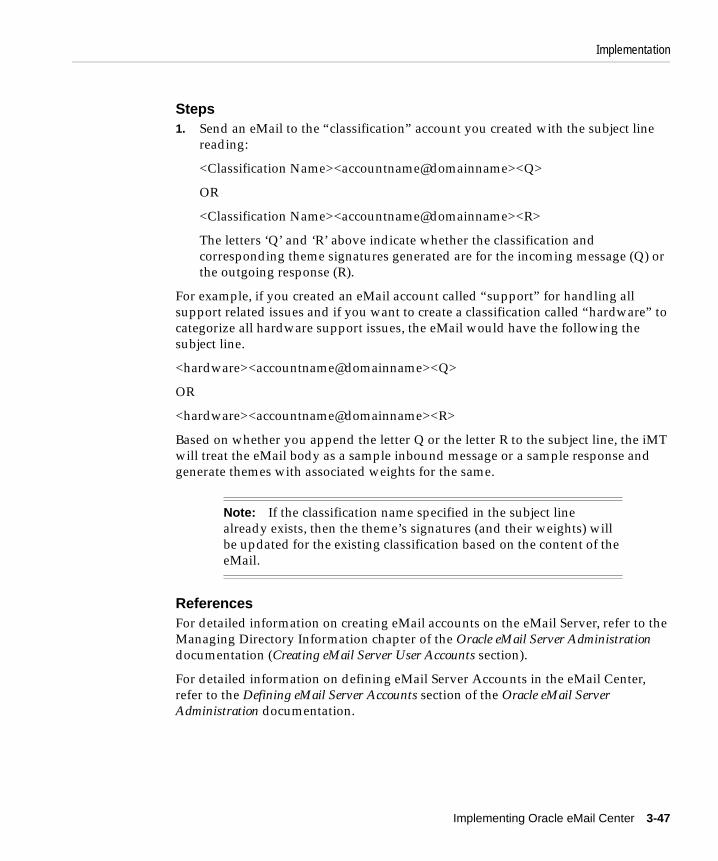
Implementation
Steps1. Send an eMail to the “classification” account you created with the subject line
reading:
<Classification Name><accountname@domainname><Q>
OR
<Classification Name><accountname@domainname><R>
The letters ‘Q’ and ‘R’ above indicate whether the classification and corresponding theme signatures generated are for the incoming message (Q) or the outgoing response (R).
For example, if you created an eMail account called “support” for handling all support related issues and if you want to create a classification called “hardware” to categorize all hardware support issues, the eMail would have the following the subject line.
<hardware><accountname@domainname><Q>
OR
<hardware><accountname@domainname><R>
Based on whether you append the letter Q or the letter R to the subject line, the iMT will treat the eMail body as a sample inbound message or a sample response and generate themes with associated weights for the same.
ReferencesFor detailed information on creating eMail accounts on the eMail Server, refer to the Managing Directory Information chapter of the Oracle eMail Server Administration documentation (Creating eMail Server User Accounts section).
For detailed information on defining eMail Server Accounts in the eMail Center, refer to the Defining eMail Server Accounts section of the Oracle eMail Server Administration documentation.
Note: If the classification name specified in the subject line already exists, then the theme’s signatures (and their weights) will be updated for the existing classification based on the content of the eMail.
Implementing Oracle eMail Center 3-47
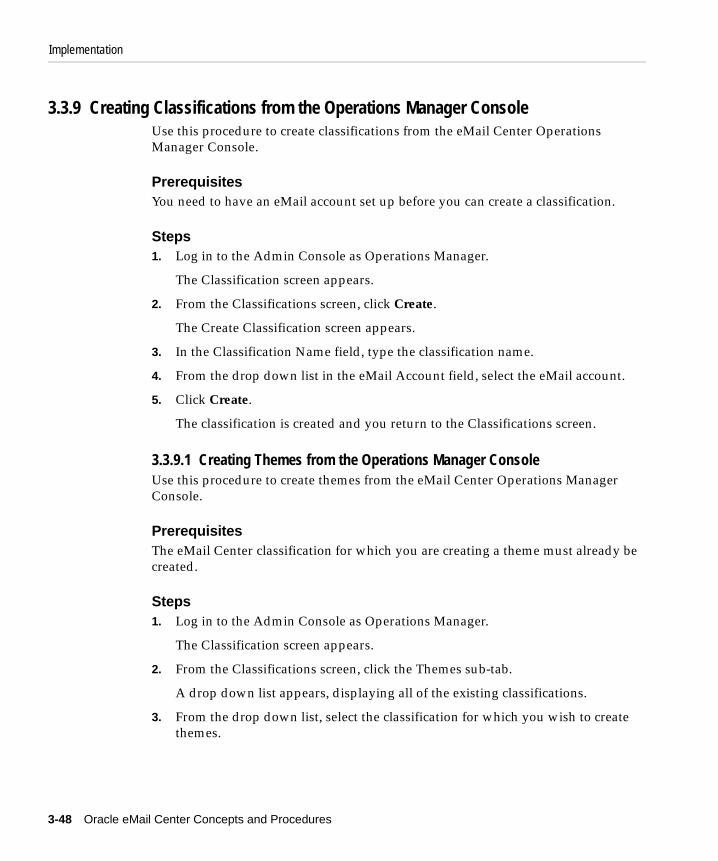
Implementation
3.3.9 Creating Classifications from the Operations Manager ConsoleUse this procedure to create classifications from the eMail Center Operations Manager Console.
PrerequisitesYou need to have an eMail account set up before you can create a classification.
Steps1. Log in to the Admin Console as Operations Manager.
The Classification screen appears.
2. From the Classifications screen, click Create.
The Create Classification screen appears.
3. In the Classification Name field, type the classification name.
4. From the drop down list in the eMail Account field, select the eMail account.
5. Click Create.
The classification is created and you return to the Classifications screen.
3.3.9.1 Creating Themes from the Operations Manager ConsoleUse this procedure to create themes from the eMail Center Operations Manager Console.
PrerequisitesThe eMail Center classification for which you are creating a theme must already be created.
Steps1. Log in to the Admin Console as Operations Manager.
The Classification screen appears.
2. From the Classifications screen, click the Themes sub-tab.
A drop down list appears, displaying all of the existing classifications.
3. From the drop down list, select the classification for which you wish to create themes.
3-48 Oracle eMail Center Concepts and Procedures
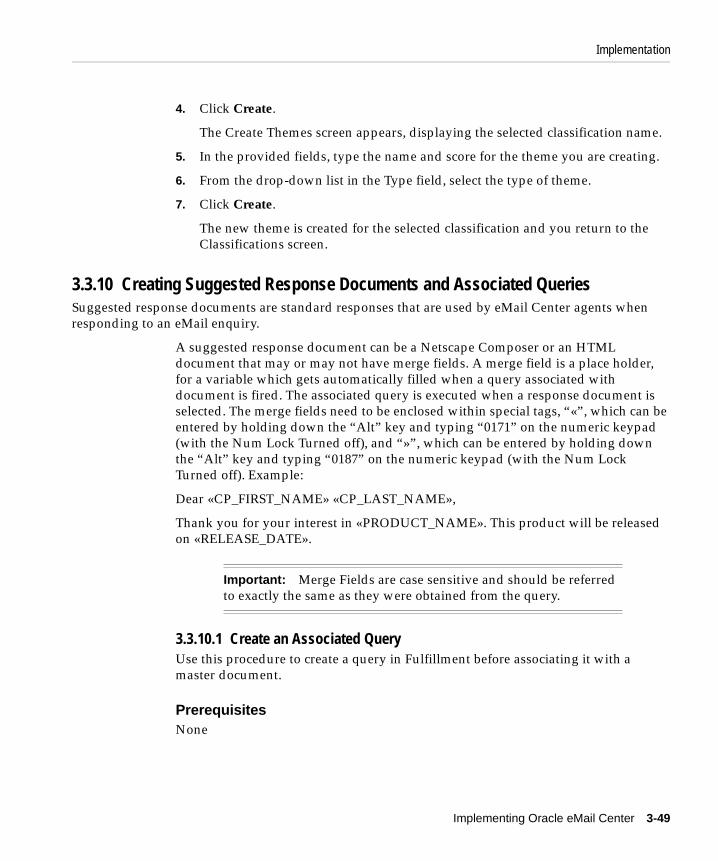
Implementation
4. Click Create.
The Create Themes screen appears, displaying the selected classification name.
5. In the provided fields, type the name and score for the theme you are creating.
6. From the drop-down list in the Type field, select the type of theme.
7. Click Create.
The new theme is created for the selected classification and you return to the Classifications screen.
3.3.10 Creating Suggested Response Documents and Associated QueriesSuggested response documents are standard responses that are used by eMail Center agents when responding to an eMail enquiry.
A suggested response document can be a Netscape Composer or an HTML document that may or may not have merge fields. A merge field is a place holder, for a variable which gets automatically filled when a query associated with document is fired. The associated query is executed when a response document is selected. The merge fields need to be enclosed within special tags, “«”, which can be entered by holding down the “Alt” key and typing “0171” on the numeric keypad (with the Num Lock Turned off), and “»”, which can be entered by holding down the “Alt” key and typing “0187” on the numeric keypad (with the Num Lock Turned off). Example:
Dear «CP_FIRST_NAME» «CP_LAST_NAME»,
Thank you for your interest in «PRODUCT_NAME». This product will be released on «RELEASE_DATE».
3.3.10.1 Create an Associated QueryUse this procedure to create a query in Fulfillment before associating it with a master document.
PrerequisitesNone
Important: Merge Fields are case sensitive and should be referred to exactly the same as they were obtained from the query.
Implementing Oracle eMail Center 3-49
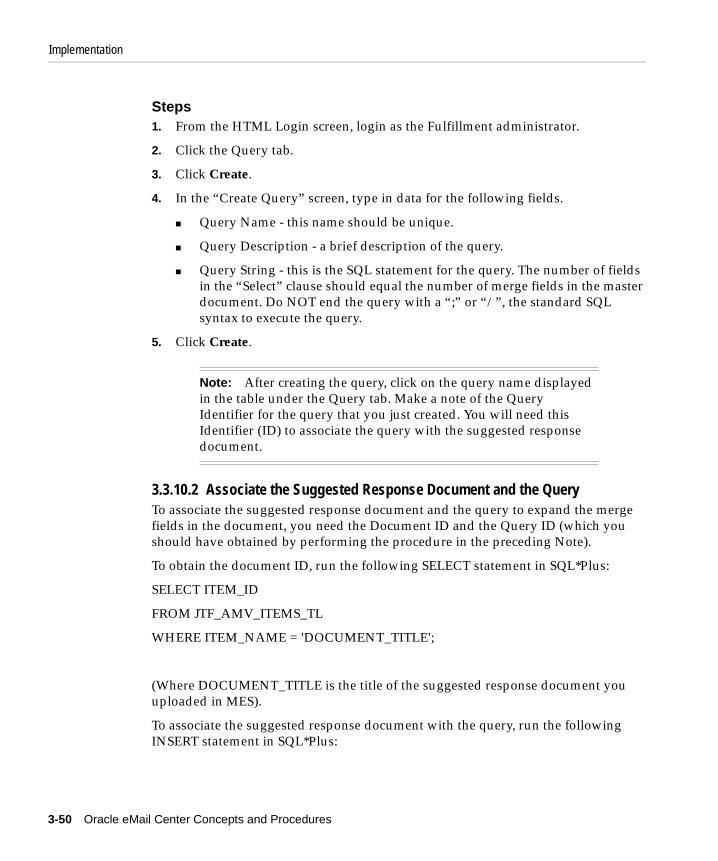
Implementation
Steps1. From the HTML Login screen, login as the Fulfillment administrator.
2. Click the Query tab.
3. Click Create.
4. In the “Create Query” screen, type in data for the following fields.
■ Query Name - this name should be unique.
■ Query Description - a brief description of the query.
■ Query String - this is the SQL statement for the query. The number of fields in the “Select” clause should equal the number of merge fields in the master document. Do NOT end the query with a “;” or “/”, the standard SQL syntax to execute the query.
5. Click Create.
3.3.10.2 Associate the Suggested Response Document and the QueryTo associate the suggested response document and the query to expand the merge fields in the document, you need the Document ID and the Query ID (which you should have obtained by performing the procedure in the preceding Note).
To obtain the document ID, run the following SELECT statement in SQL*Plus:
SELECT ITEM_ID
FROM JTF_AMV_ITEMS_TL
WHERE ITEM_NAME = 'DOCUMENT_TITLE';
(Where DOCUMENT_TITLE is the title of the suggested response document you uploaded in MES).
To associate the suggested response document with the query, run the following INSERT statement in SQL*Plus:
Note: After creating the query, click on the query name displayed in the table under the Query tab. Make a note of the Query Identifier for the query that you just created. You will need this Identifier (ID) to associate the query with the suggested response document.
3-50 Oracle eMail Center Concepts and Procedures
Implementation
INSERT INTO JTF_FM_QUERY_MES
VALUES (DOCUMENT_ID, QUERY_ID, SYSDATE, USER_ID, SYSDATE, USER_ID, NULL, NULL, NULL);
Where DOCUMENT_ID is the document ID of the suggested response document obtained by running the SELECT statement above.
QUERY_ID is the ID of the uploaded query (noted when the query was uploaded)
SYSDATE is a system variable provided by SQL*Plus that always has the value of the current system date.
USER_ID is the user ID for the account you used to log in, e.g. 11001.
NULL values are inserted in the final three columns since they are not related to our product.
3.3.10.3 Uploading Suggested Response Documents and Message Format TemplatesOracle eMail Center (eMC) uses the Marketing Encyclopedia System (MES) as its document repository. This topic group describes the process of uploading response documents into the response document repository (also referred to as KB or the knowledge base). MES stores documents under different categories.
eMail Center requires a category called “eMail Center” to store suggested response documents. These documents are standard eMail responses that an agent may respond to an enquiry. Currently, eMail Center searches all available categories for suggested response documents.
eMail Center requires a category called “EMC Templates” to store the message format templates. These templates are style sheets used when composing an eMail in the eMail Center Agent UI. Currently, eMail Center ONLY searches the “EMC Templates” category for message format templates.
Implementing Oracle eMail Center 3-51
Implementation
High-level steps1. Create the category in MES (only performed once).
2. Define a hierarchy among categories (only performed once).
3. Upload the documents into MES.
4. Verify the document was uploaded.
ReferencesFor more information on MES categories, refer to the Oracle Marketing Online and Oracle Marketing Encyclopedia System documentation.
3.3.10.4 Creating a Category in MESUse this procedure to create a category in MES for the response templates.
PrerequisitesYou must have a valid administrator login account.
Steps1. Login to Oracle Marketing Online application (which owns the MES repository)
as an administrator.
2. From the default screen in Marketing Online, click the MES tab.
3. From the MES tab, click the Administration sub-tab.
4. From the MES Administration sub-tab, click Category Manager.
The Category Manager screen appears.
5. In the provided fields, enter the category Name and a Description.
Important: To be created, eMail Center requires a minimum of two categories:
■ eMail Center
■ EMC Templates
3-52 Oracle eMail Center Concepts and Procedures
Implementation
6. Click Update.
Oracle Marketing Online creates the new category.
7. To create additional categories, repeat steps 5 and 6.
3.3.10.5 Defining a Hierarchy Among CategoriesUse this procedure to define a hierarchy among categories by creating sub-categories.
PrerequisitesBefore you can define a hierarchy among categories, you must first create the categories as shown in the “Creating a Category in MES” topic.
Steps1. Login to Oracle Marketing Online application (which owns the MES repository)
as an administrator.
2. From the default screen in Marketing Online, click the MES tab.
3. From the MES tab, click the Administration sub-tab.
4. From the MES Administration sub-tab, click Hierarchy Manager.
The Hierarchy Manager screen appears, displaying a list of child and parent categories.
5. From the drop-down list in the Parent Name (left) column, select the corresponding parent category.
Important: To be created, eMail Center requires a minimum of two categories:
■ eMail Center
■ EMC Templates
Implementing Oracle eMail Center 3-53
Implementation
6. Click Update.
Oracle Marketing Online links the child category to the selected parent category.
7. If you created additional categories, create the appropriate hierarchies using steps 5 and 6.
3.3.10.6 Uploading Documents Into MESUse this procedure to upload suggested response documents and message format templates into MES.
PrerequisitesBefore you upload response documents into MES, you must first create a category.
Steps1. Login to Oracle Marketing Online application (which owns the MES repository)
as an administrator.
2. From the default screen in Marketing Online, click the MES tab.
3. From the MES tab, click the Publish sub-tab.
4. From the drop-down list in the Item Type field, select the item type File.
5. In the provided fields, enter a Title, Author Name, and Description.
6. From the drop-down list in the Content Type field, select the content type Master Document.
7. Leave the Content Creation Date and Effective Start Date fields blank.
8. Select the Permanent radio button.
Important:
■ For the category eMail Center, leave the parent name as “-None-”.
■ For the category EMC Templates, select the parent name “eMail Center” from the list of values.
3-54 Oracle eMail Center Concepts and Procedures
Implementation
9. From the Category field, click Find.
The Find screen appears, displaying a list of the categories.
10. From the list, select the corresponding category.
■ If the document that you are publishing is a message format template, expand the category tree for the category eMail Center and select the category “EMC Templates.”
■ You can expand the category tree by clicking the (+). Once the parent category expands, click the desired child category name to select it.
11. Click Upload File.
12. Click Browse to browse through the file system.
13. From the file system, select the document or template that you want to upload.
14. Click Open.
The entire path for the selected document or template is now displayed under File Name.
15. Click Attach File.
The file uploads. Once the file has fully uploaded, the File Name is no longer displayed.
16. When the file or files have uploaded and the File Name disappears, click Finished.
The file name should display under Files.
17. Click Publish.
Caution: If you enter a value for a specific time period, the document will not be available after the time period has expired.
Important: Do not click any other button until the file has fully uploaded, or the upload process will fail. Also, if the response document contains one or more inline images, repeat steps 11 through 15 for every image file (.gif or .jpeg) that needs to be included in the document or template.
Implementing Oracle eMail Center 3-55
Implementation
A success message appears on the top of the screen in red letters.
3.3.10.7 Verifying the Document Uploaded SuccessfullyUse this procedure to verify the document successfully uploaded into MES.
PrerequisitesBefore you verify the success of your upload, you must first complete all the steps in the “Uploading Suggested Response Documents and Message Format Templates” topic.
Steps1. Login to Oracle Marketing Online application (which owns the MES repository)
as an administrator.
2. From the default screen in Marketing Online, click the MES tab.
3. From the MES tab, click the Categories sub-tab.
4. Click the category name under which you uploaded your response documents.
5. The name of the file and its description should appear. If not, go back and repeat the steps listed in the “Uploading Suggested Response Documents and Message Format Templates” topic.
3.3.11 Using eMail Processing WorkfloweMail Processing Workflow can be used out of the box without any configuration or customizing. The backbone of eMail processing is created by using Oracle Workflow, which is a part of Oracle Applications 11i. The name of the workflow for inbound eMail Processing is “Mail Preprocessing.”
This topic group provides an overview of inbound workflow, a high-level view of the steps involved in configuring operations for workflow, and detailed instructions for performing each of the configuration steps.
Note: To publish another document you must start by clicking the Publish sub-tab again. Do not try to use (recycle) data entered for a previous file.
3-56 Oracle eMail Center Concepts and Procedures
Implementation
Defining WorkflowsTo build or modify workflows, you use the Oracle Workflow Builder application. Oracle Workflow Builder lets you create, view, or modify a business process with simple drag and drop operations. Using the Workflow Builder, you can create and modify all workflow objects, including activities, item types, and messages.
Terms to KnowActivity - A unit of work performed during a business process.
Node - An instance of an activity in a process diagram as shown in the Process window.
Process - A set of activities that need to be performed to accomplish a business goal.
Workflow - A workflow is a processing path, consisting of a series of process nodes linked together to form paths that support a particular business rule or set of business rules.
3.3.11.1 inbound eMail Processing WorkflowThe “Mail Preprocessing” workflow contains some mandatory nodes, which must be present to get messages processed and passed to the eMail Center server.
Mandatory Workflow Nodes
Node Name Function
Check AuthorizationChecks whether the message coming for the user has a valid eMail account. If not, it discards the message.
Check User Group
Routes the message depending on the account for which it was sent. For example, if the message was sent to the “Support “account, then it branches to the path for Support. If there is no path for the “Support” account, it branches to the default path.
Classification Theme Repository
This node processes eMails that are sent to the “Classification” account. Processes the classification and theme. Stores the query and response themes for each account.
Message Header Processing
Extracts the standard eMail message headers, for example, subject, date, from, to, and so on.
Extended Header Processing
Extracts the standard eMail extended headers, for example, SMTP ID, language, and so on.
Implementing Oracle eMail Center 3-57
Implementation
The Mail Preprocessing workflow also contains a node that is not mandatory, but is essential to enhance the functionality.
3.3.11.2 Creating Additional eMail Workflow ProcessesThe following steps comprise configuring additional eMail workflow processes. For using default eMail workflow processes, no configuration is required.
3.3.11.2.1 Creating the Lookup Codes
Lookup codes are used in the workflow to link the eMail accounts with their respective workflow paths or processes. eMail Center ships with a set of default Lookup Codes, such as Support. These lookup codes should match the eMail accounts created in the eMail Server (Refer to Creating eMail Server Accounts) and defined in the eMail Center (Refer to Defining eMail Server Accounts). If the account name does not match the default lookup codes, follow the steps below to create a new lookup code.
Steps1. Log in to Oracle Workflow Builder.
2. Select process->Mail Preproc (this selects the mail preprocessing workflow).
3. Double-click the screen.
4. In the Workflow Builder, Mail Preproc gets loaded.
Theme Classification Processing Classifies the incoming message and extracts the themes.
KB Specific SearchSearches the knowledge base to retrieve related response documents.
Entering Queue
Places the message in a queue after Processing. eMC Server retrieves the message from this queue and processes it further.
Table 3–4 Non-Mandatory Workflow Node
Node Name Function
Extract Key Value This node searches the message body of an eMail for the occurrence of a character or word(s).
Mandatory Workflow Nodes (Cont.)
Node Name Function
3-58 Oracle eMail Center Concepts and Procedures
Implementation
5. From the Navigator screen of Oracle Workflow Builder, click Lookup Type.
6. Select IM User Address.
7. A list of default lookup codes appears.
8. Right-click IM User Address.
9. Select New Lookup Code.
10. The Lookup Code screen appears.
11. Enter the following data:
■ Internal Name - this is the eMail account name that was created in IM and defined in the eMail Center. For example, you can enter “Marketing” for the Marketing account.
■ Display Name - this is the descriptive name that appears in the lookup code. (The Oracle Workflow Builder recommends that the Internal Name and Display Name are different).
12. Click OK.
3.3.11.2.2 Configuring the Global Attributes Use this procedure to customize the global attributes for inbound workflow.
Steps1. Log in to the Oracle Workflow Builder as Oracle Applications User.
2. The Show Item screen appears, displaying a list of items.
3. From the list of items in the Show Item screen, select eMail Preprocessing for inbound.
4. Click OK.
5. The Workflow Builder loads the workflow.
6. Configure the global attributes for inbound+ workflow.
Table 3–5 Global Attributes
Attribute Name Value
Repository Name
Pre-seeded with SMS,MES.
If other repositories are required, they must be added here.
Implementing Oracle eMail Center 3-59
Implementation
3.3.11.3 Using a Workflow NodeThis topic provides a high-level overview of the steps necessary to use nodes when building a workflow.
Steps1. Login to Oracle Workflow Builder.
2. Select process->Mail Preproc.
3. Double-click the screen.
In the Workflow Builder, Mail Preproc gets loaded.
4. From the Workflow Builder navigator, select Function.
All available nodes appear.
5. Drag and drop the desired nodes into the Process diagram.
6. Select either TRUE or FALSE for boolean return types.
7. Repeat steps 5 and 6 until you have made all desired changes to the workflow.
8. From the Workflow Builder main menu, select Verify.
Application IDApplication ID that loaded, and therefore owns, documents into Marketing applications.
Extended Headers
Currently picking up five extended headers that come with a message. The headers are pre-seeded with the following values:
Extended Header 1: MESSAGE-ID
Extended Header 2: ORGANIZATION
Extended Header 3: MAILER
Extended Header 4: LANGUAGE
Extended Header 5: CONTENT-TYPE
These attributes are retrieved from the messages and passed to the eMC Server.
These values can be changed to meet user requirements.
Table 3–5 Global Attributes (Cont.)
Attribute Name Value
3-60 Oracle eMail Center Concepts and Procedures
Implementation
Workflow Builder checks the verification of the new workflow.
9. If the verification is successful, save the new workflow to the database.
3.3.11.4 Guidelines for Error ProcessingErrors that occur during eMail Center processing cannot be directly returned to the agent, since the agent and/or caller generally does not know how to respond to the error (in fact, eMail Center may be a background engine with no human operator). You can use Oracle Workflow Builder to define the events you want to occur in case of an error. Use Oracle Workflow Builder to modify the default error process associated with the process or create your own custom error process.
The error process can include branches based on error codes, send notifications, and attempt to deal with the error using rules for resetting, retrying, or skipping the failed activity. Once you define your error process you can associate it with any activity.
3.3.12 Administering eMail Center Concurrent ProcessesThe eMail Center Concurrent Processes use Concurrent Manager, which is a component of Oracle Application Object Library, and it is responsible for scheduling and running various concurrent programs submitted by the user. Oracle eMail Center makes use of this facility to schedule and run various eMail Center Concurrent Processes.
eMail Center uses the Oracle Applications Standard Manager to submit batch jobs for processing eMails. All eMail Center concurrent programs with the exception of the eMail Center Workflow Worker are submitted from the Standard Request Submission (SRS) screen.
A concurrent process will run:
■ until the specified number of messages has been processed, then
■ wait for the specified time between workers to elapse, then
■ if there are messages present, re-start the process.
Note: Oracle does not recommend any specific number of concurrent processes that can be run at the same time for eMail Center, because the number of processes is strictly hardware dependent.
Implementing Oracle eMail Center 3-61
Troubleshooting
If eMail processing takes longer than approximated, the process will continue until the specified number of eMails has been processed and your calculated throughput will be in invalidated. A batch of processes must finish before the next batch starts.
Throughput CalculationLine five from the above table shows 3 processes, processing 100 eMails each, with a delay of 20 minutes having a throughput of 600 eMails per hour.
■ Estimate the time required to process 600 messages.
In this example, 10 minutes is required to process 100 eMails.
■ Do the math: 3* 100 = 300 * 2 = 600 messages per hour.
In this example, each of the four workers will need to run twice for a throughput of 600/hr.
■ Determine your idle time requirement per worker.
In this example, each workers processes 100 eMails in approximately 10 minutes and must run twice. The remaining time is idle time.
3.4 TroubleshootingThis topic group describes ways of troubleshooting various problems that arise while installing, starting, and running Oracle eMail center. This chapter discusses problems in the following areas:
eMails not getting through to Inbox folder of my eMail accountHere is a check list of things to trace your eMail:
■ Check if your eMail has bounced because of a bad eMail address. Re-send the eMail to the correct eMail address.
■ Check if your eMail has reached the host machine where your Oracle eMail Server is running. Check your system logs.
■ Check if the eMail has reached Oracle eMail Server inbound SMTP gateway. Check your Oracle eMail Server logs.
■ Check if your Postman process is running and delivering messages as they come. Check your Oracle eMail Server logs.
3-62 Oracle eMail Center Concepts and Procedures
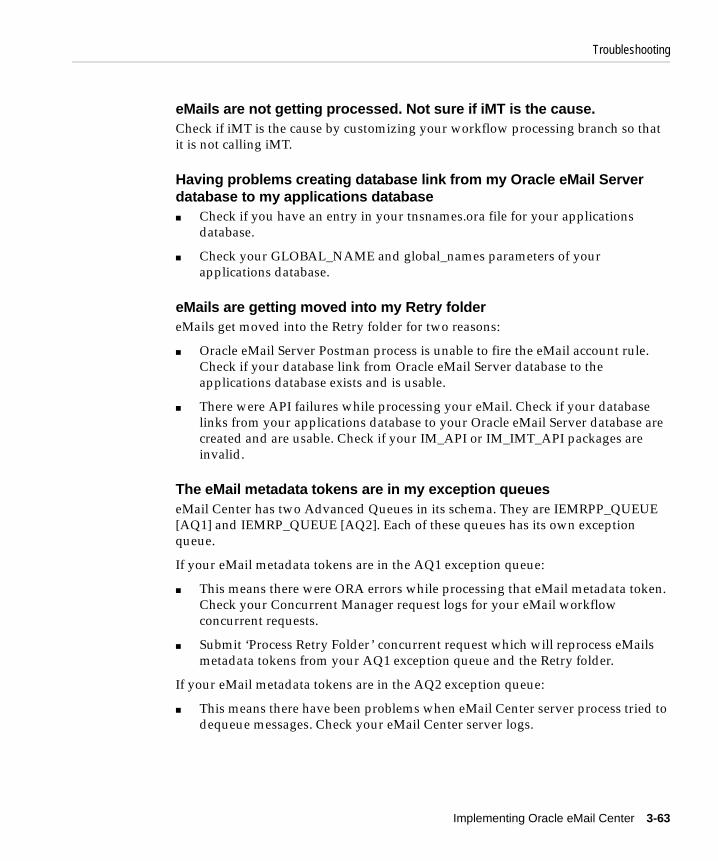
Troubleshooting
eMails are not getting processed. Not sure if iMT is the cause.Check if iMT is the cause by customizing your workflow processing branch so that it is not calling iMT.
Having problems creating database link from my Oracle eMail Server database to my applications database■ Check if you have an entry in your tnsnames.ora file for your applications
database.
■ Check your GLOBAL_NAME and global_names parameters of your applications database.
eMails are getting moved into my Retry foldereMails get moved into the Retry folder for two reasons:
■ Oracle eMail Server Postman process is unable to fire the eMail account rule. Check if your database link from Oracle eMail Server database to the applications database exists and is usable.
■ There were API failures while processing your eMail. Check if your database links from your applications database to your Oracle eMail Server database are created and are usable. Check if your IM_API or IM_IMT_API packages are invalid.
The eMail metadata tokens are in my exception queueseMail Center has two Advanced Queues in its schema. They are IEMRPP_QUEUE [AQ1] and IEMRP_QUEUE [AQ2]. Each of these queues has its own exception queue.
If your eMail metadata tokens are in the AQ1 exception queue:
■ This means there were ORA errors while processing that eMail metadata token. Check your Concurrent Manager request logs for your eMail workflow concurrent requests.
■ Submit ‘Process Retry Folder’ concurrent request which will reprocess eMails metadata tokens from your AQ1 exception queue and the Retry folder.
If your eMail metadata tokens are in the AQ2 exception queue:
■ This means there have been problems when eMail Center server process tried to dequeue messages. Check your eMail Center server logs.
Implementing Oracle eMail Center 3-63
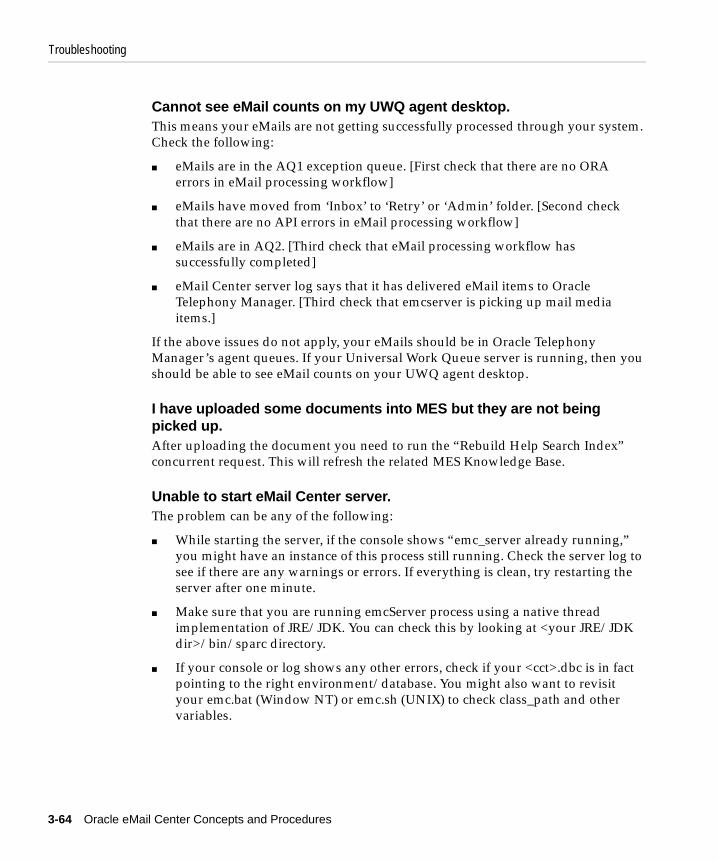
Troubleshooting
Cannot see eMail counts on my UWQ agent desktop.This means your eMails are not getting successfully processed through your system. Check the following:
■ eMails are in the AQ1 exception queue. [First check that there are no ORA errors in eMail processing workflow]
■ eMails have moved from ‘Inbox’ to ‘Retry’ or ‘Admin’ folder. [Second check that there are no API errors in eMail processing workflow]
■ eMails are in AQ2. [Third check that eMail processing workflow has successfully completed]
■ eMail Center server log says that it has delivered eMail items to Oracle Telephony Manager. [Third check that emcserver is picking up mail media items.]
If the above issues do not apply, your eMails should be in Oracle Telephony Manager’s agent queues. If your Universal Work Queue server is running, then you should be able to see eMail counts on your UWQ agent desktop.
I have uploaded some documents into MES but they are not being picked up.After uploading the document you need to run the “Rebuild Help Search Index” concurrent request. This will refresh the related MES Knowledge Base.
Unable to start eMail Center server.The problem can be any of the following:
■ While starting the server, if the console shows “emc_server already running,” you might have an instance of this process still running. Check the server log to see if there are any warnings or errors. If everything is clean, try restarting the server after one minute.
■ Make sure that you are running emcServer process using a native thread implementation of JRE/JDK. You can check this by looking at <your JRE/JDK dir>/bin/sparc directory.
■ If your console or log shows any other errors, check if your <cct>.dbc is in fact pointing to the right environment/database. You might also want to revisit your emc.bat (Window NT) or emc.sh (UNIX) to check class_path and other variables.
3-64 Oracle eMail Center Concepts and Procedures
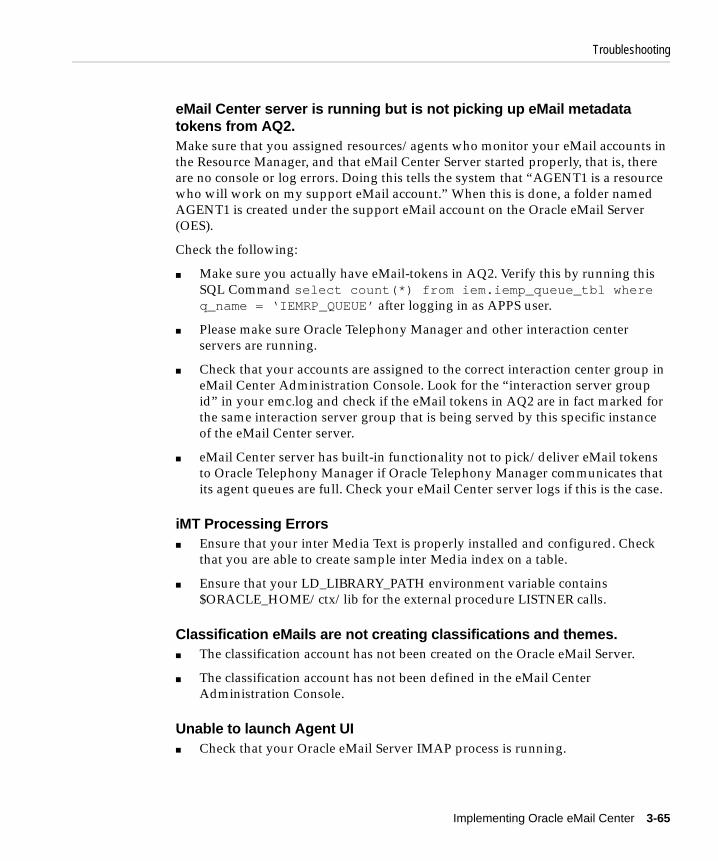
Troubleshooting
eMail Center server is running but is not picking up eMail metadata tokens from AQ2.Make sure that you assigned resources/agents who monitor your eMail accounts in the Resource Manager, and that eMail Center Server started properly, that is, there are no console or log errors. Doing this tells the system that “AGENT1 is a resource who will work on my support eMail account.” When this is done, a folder named AGENT1 is created under the support eMail account on the Oracle eMail Server (OES).
Check the following:
■ Make sure you actually have eMail-tokens in AQ2. Verify this by running this SQL Command select count(*) from iem.iemp_queue_tbl where q_name = ‘IEMRP_QUEUE’ after logging in as APPS user.
■ Please make sure Oracle Telephony Manager and other interaction center servers are running.
■ Check that your accounts are assigned to the correct interaction center group in eMail Center Administration Console. Look for the “interaction server group id” in your emc.log and check if the eMail tokens in AQ2 are in fact marked for the same interaction server group that is being served by this specific instance of the eMail Center server.
■ eMail Center server has built-in functionality not to pick/deliver eMail tokens to Oracle Telephony Manager if Oracle Telephony Manager communicates that its agent queues are full. Check your eMail Center server logs if this is the case.
iMT Processing Errors■ Ensure that your inter Media Text is properly installed and configured. Check
that you are able to create sample inter Media index on a table.
■ Ensure that your LD_LIBRARY_PATH environment variable contains $ORACLE_HOME/ctx/lib for the external procedure LISTNER calls.
Classification eMails are not creating classifications and themes.■ The classification account has not been created on the Oracle eMail Server.
■ The classification account has not been defined in the eMail Center Administration Console.
Unable to launch Agent UI■ Check that your Oracle eMail Server IMAP process is running.
Implementing Oracle eMail Center 3-65
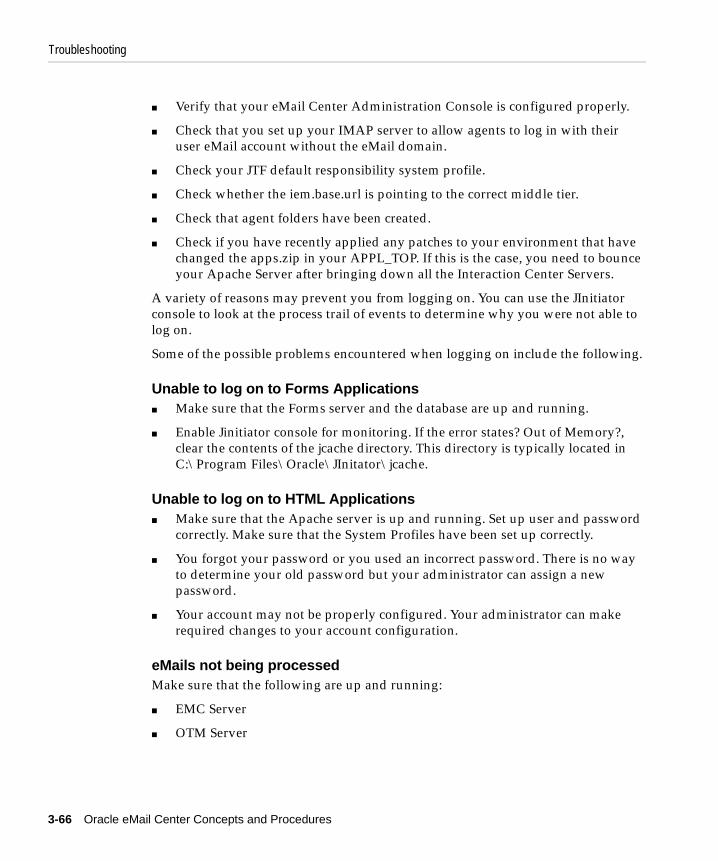
Troubleshooting
■ Verify that your eMail Center Administration Console is configured properly.
■ Check that you set up your IMAP server to allow agents to log in with their user eMail account without the eMail domain.
■ Check your JTF default responsibility system profile.
■ Check whether the iem.base.url is pointing to the correct middle tier.
■ Check that agent folders have been created.
■ Check if you have recently applied any patches to your environment that have changed the apps.zip in your APPL_TOP. If this is the case, you need to bounce your Apache Server after bringing down all the Interaction Center Servers.
A variety of reasons may prevent you from logging on. You can use the JInitiator console to look at the process trail of events to determine why you were not able to log on.
Some of the possible problems encountered when logging on include the following.
Unable to log on to Forms Applications■ Make sure that the Forms server and the database are up and running.
■ Enable Jinitiator console for monitoring. If the error states? Out of Memory?, clear the contents of the jcache directory. This directory is typically located in C:\Program Files\Oracle\JInitator\jcache.
Unable to log on to HTML Applications■ Make sure that the Apache server is up and running. Set up user and password
correctly. Make sure that the System Profiles have been set up correctly.
■ You forgot your password or you used an incorrect password. There is no way to determine your old password but your administrator can assign a new password.
■ Your account may not be properly configured. Your administrator can make required changes to your account configuration.
eMails not being processedMake sure that the following are up and running:
■ EMC Server
■ OTM Server
3-66 Oracle eMail Center Concepts and Procedures

Troubleshooting
■ UWQ Server
■ Concurrent Manager
■ Oracle eMail Server
Documents not being retrievedLoad documents into MES.
Template merge is incompleteTwo types of merge fields, straight-insert and query, are supported in the eMail CenterTemplate/Suggested Response Merge functionality. This error generally means that not all of the straight-insert data was available.
eMail failed to reach AQ1■ Check whether your Oracle eMail Server is receiving eMails.
■ Check that you have defined the eMail account in the eMail Center Administration Console.
■ Check if the database link from Oracle eMail Server to the applications database exists and is usable.
eMail fails to reach account inbox■ This generally means that the Oracle eMail Server is not functioning properly.
■ Check if the eMails are in the Retry folder. eMails might have failed while processing and have been moved to the Retry folder.
eMail goes to Retry folderThis means there have been API errors while processing the eMail. Check if your inter Media Text is properly installed and configured.
Customer Support/Universal Work Queue Selector responsibility is not displayedCheck that the user is assigned the correct responsibility.
Unable to display UWQ desktopCheck that your Forms server and the UWQ server are running.
Implementing Oracle eMail Center 3-67
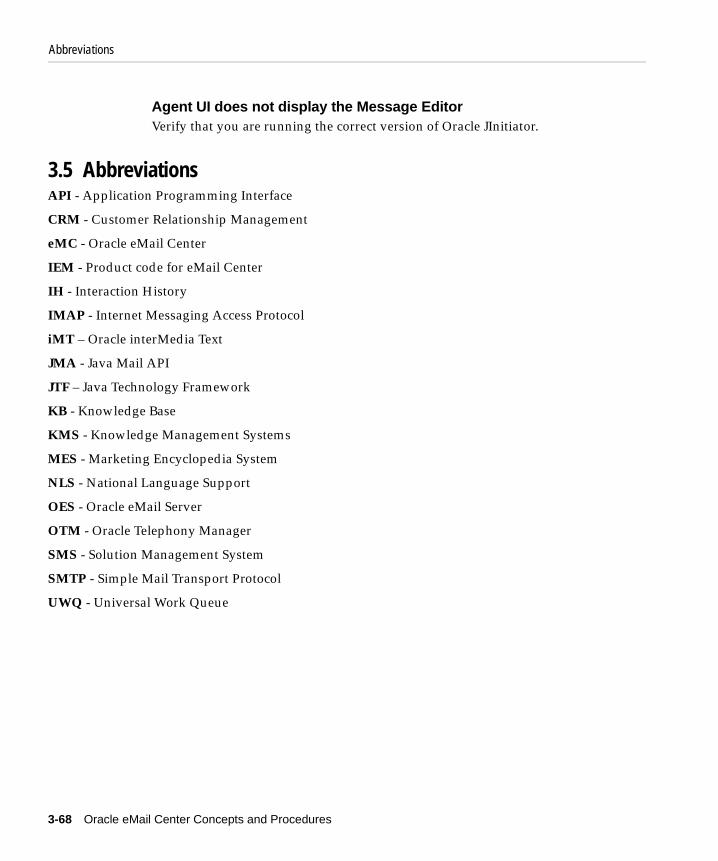
Abbreviations
Agent UI does not display the Message EditorVerify that you are running the correct version of Oracle JInitiator.
3.5 Abbreviations API - Application Programming Interface
CRM - Customer Relationship Management
eMC - Oracle eMail Center
IEM - Product code for eMail Center
IH - Interaction History
IMAP - Internet Messaging Access Protocol
iMT – Oracle interMedia Text
JMA - Java Mail API
JTF – Java Technology Framework
KB - Knowledge Base
KMS - Knowledge Management Systems
MES - Marketing Encyclopedia System
NLS - National Language Support
OES - Oracle eMail Server
OTM - Oracle Telephony Manager
SMS - Solution Management System
SMTP - Simple Mail Transport Protocol
UWQ - Universal Work Queue
3-68 Oracle eMail Center Concepts and Procedures
Administering Oracle eMail Center With the Admin Co
4
Administering Oracle eMail Center With theAdmin Console
The Admin console allows you to:
- enable and disable advanced queues
-create, modify, or delete:
■ accounts
■ server groups
■ EMC servers
■ database servers
■ database links
■ eMail servers
This topic group covers the following topics:
■ Creating Agent Accounts
■ Viewing Account Information
■ Editing Account Information
■ Creating Server Groups
■ Modifying Server Groups
■ Deleting Server Groups
■ Creating EMC Servers
■ Modifying EMC Servers
nsole 4-1
Creating Agent Accounts
■ Deleting EMC Servers
■ Creating Database Servers
■ Modifying Database Servers
■ Deleting Database Servers
■ Creating Database Links
■ Deleting Database Links
■ Creating eMail Servers
■ Modifying eMail Servers
■ Deleting eMail Servers
■ Enabling and Disabling Advanced Queues
4.1 Creating Agent AccountsUse this procedure to create accounts.
PrerequisitesYou must have an administrator level login ID to be able to create accounts.
Steps1. From the eMail Center Admin screen, click the Account tab.
The Accounts screen appears, displaying information in table form on all current accounts.
2. Click Create.
The Create Account screen appears.
3. Type the account information in the provided fields.
4. Once you have provided the required information, click Create.
You are returned to the Accounts screen and your new account is displayed in the table.
References■ Viewing Account Information
■ Editing Account Information
4-2 Oracle eMail Center Concepts and Procedures
Editing Account Information
4.2 Viewing Account InformationUse this procedure to view account information.
PrerequisitesYou must have a valid login ID to view account information.
Steps1. From the eMail Center Admin screen, click the Account tab.
The Accounts screen appears.
2. From the account information table on the Accounts screen, locate the account you wish to view.
3. From the Name column, double-click the desired account name.
The Account Details screen appears and the detailed information for the selected account is displayed.
References■ Creating Agent Accounts
■ Editing Account Information
4.3 Editing Account InformationUse this procedure to edit account information.
PrerequisitesYou must have an administrator level login ID to be able to create accounts.
Note: All fields with an asterix (*) next to the field name are required and must have information entered into them.
Note: If you do not see your new account displayed, use the First, Previous, Next and Last commands to locate it in the information table. If the information table is large, use the quick find search feature.
Administering Oracle eMail Center With the Admin Console 4-3
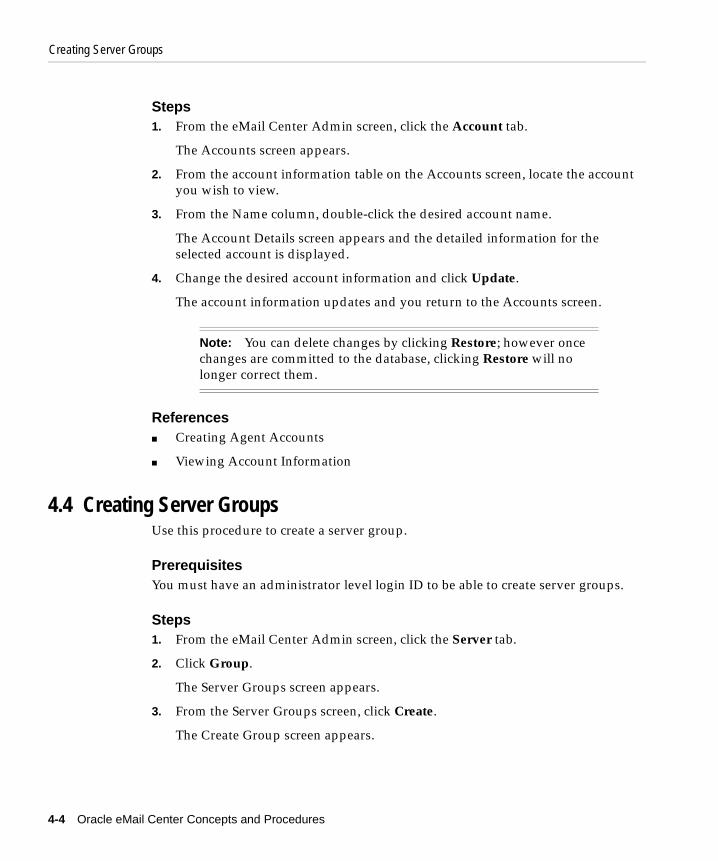
Creating Server Groups
Steps1. From the eMail Center Admin screen, click the Account tab.
The Accounts screen appears.
2. From the account information table on the Accounts screen, locate the account you wish to view.
3. From the Name column, double-click the desired account name.
The Account Details screen appears and the detailed information for the selected account is displayed.
4. Change the desired account information and click Update.
The account information updates and you return to the Accounts screen.
References■ Creating Agent Accounts
■ Viewing Account Information
4.4 Creating Server GroupsUse this procedure to create a server group.
PrerequisitesYou must have an administrator level login ID to be able to create server groups.
Steps1. From the eMail Center Admin screen, click the Server tab.
2. Click Group.
The Server Groups screen appears.
3. From the Server Groups screen, click Create.
The Create Group screen appears.
Note: You can delete changes by clicking Restore; however once changes are committed to the database, clicking Restore will no longer correct them.
4-4 Oracle eMail Center Concepts and Procedures
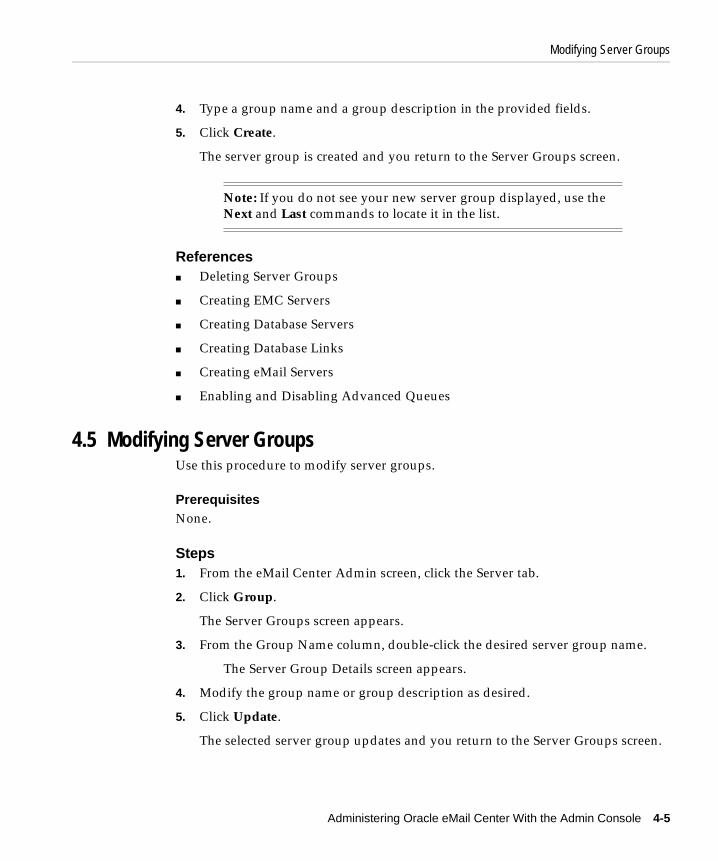
Modifying Server Groups
4. Type a group name and a group description in the provided fields.
5. Click Create.
The server group is created and you return to the Server Groups screen.
References■ Deleting Server Groups
■ Creating EMC Servers
■ Creating Database Servers
■ Creating Database Links
■ Creating eMail Servers
■ Enabling and Disabling Advanced Queues
4.5 Modifying Server GroupsUse this procedure to modify server groups.
PrerequisitesNone.
Steps1. From the eMail Center Admin screen, click the Server tab.
2. Click Group.
The Server Groups screen appears.
3. From the Group Name column, double-click the desired server group name.
The Server Group Details screen appears.
4. Modify the group name or group description as desired.
5. Click Update.
The selected server group updates and you return to the Server Groups screen.
Note: If you do not see your new server group displayed, use the Next and Last commands to locate it in the list.
Administering Oracle eMail Center With the Admin Console 4-5
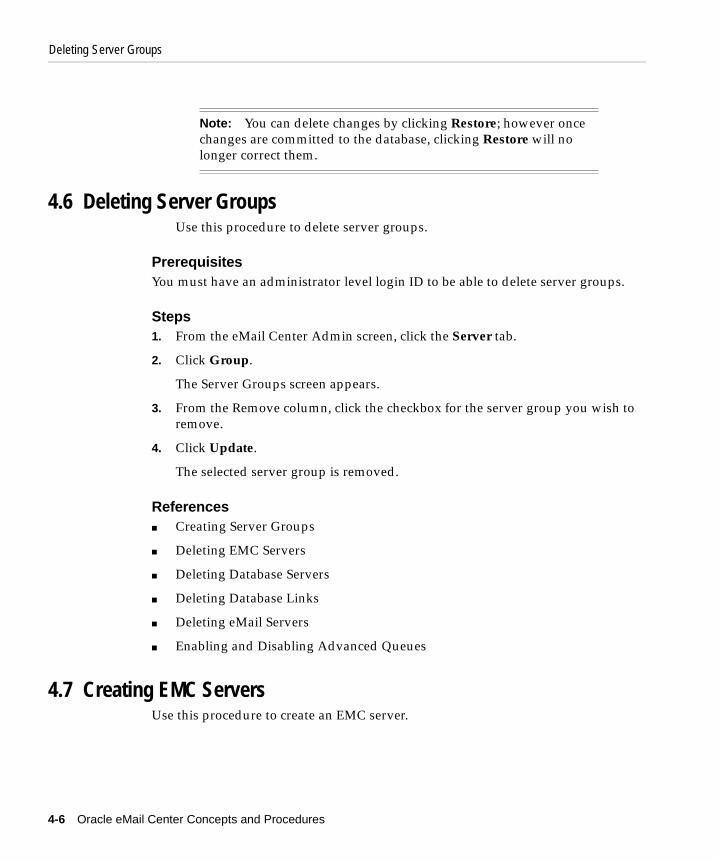
Deleting Server Groups
4.6 Deleting Server GroupsUse this procedure to delete server groups.
PrerequisitesYou must have an administrator level login ID to be able to delete server groups.
Steps1. From the eMail Center Admin screen, click the Server tab.
2. Click Group.
The Server Groups screen appears.
3. From the Remove column, click the checkbox for the server group you wish to remove.
4. Click Update.
The selected server group is removed.
References■ Creating Server Groups
■ Deleting EMC Servers
■ Deleting Database Servers
■ Deleting Database Links
■ Deleting eMail Servers
■ Enabling and Disabling Advanced Queues
4.7 Creating EMC ServersUse this procedure to create an EMC server.
Note: You can delete changes by clicking Restore; however once changes are committed to the database, clicking Restore will no longer correct them.
4-6 Oracle eMail Center Concepts and Procedures
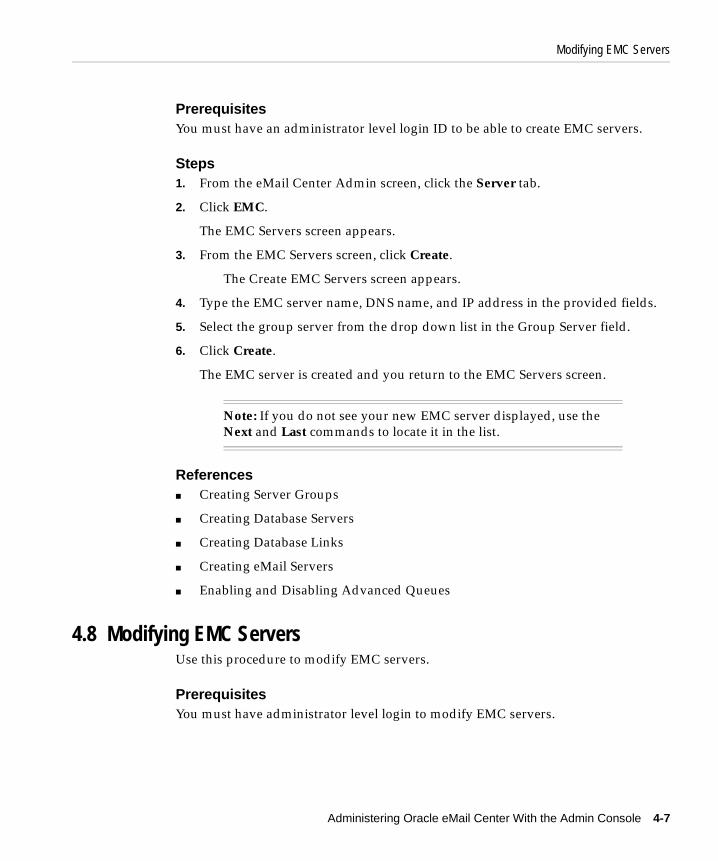
Modifying EMC Servers
PrerequisitesYou must have an administrator level login ID to be able to create EMC servers.
Steps1. From the eMail Center Admin screen, click the Server tab.
2. Click EMC.
The EMC Servers screen appears.
3. From the EMC Servers screen, click Create.
The Create EMC Servers screen appears.
4. Type the EMC server name, DNS name, and IP address in the provided fields.
5. Select the group server from the drop down list in the Group Server field.
6. Click Create.
The EMC server is created and you return to the EMC Servers screen.
References■ Creating Server Groups
■ Creating Database Servers
■ Creating Database Links
■ Creating eMail Servers
■ Enabling and Disabling Advanced Queues
4.8 Modifying EMC ServersUse this procedure to modify EMC servers.
PrerequisitesYou must have administrator level login to modify EMC servers.
Note: If you do not see your new EMC server displayed, use the Next and Last commands to locate it in the list.
Administering Oracle eMail Center With the Admin Console 4-7

Deleting EMC Servers
Steps1. From the eMail Center Admin screen, click the Server tab.
2. Click EMC.
The EMC Servers screen appears.
3. From the EMC Server Name column, double-click the desired EMC server name.
The EMC Server Details screen appears.
4. Modify the EMC server name, DNS name, IP address, and group server as desired.
5. Click Update.
The EMC Server is updated and you return to the EMC Servers screen.
4.9 Deleting EMC ServersUse this procedure to delete EMC servers.
PrerequisitesYou must have an administrator level login ID to be able to delete EMC servers.
Steps1. From the eMail Center Admin screen, click the Server tab.
2. Click EMC.
The EMC Servers screen appears.
3. From the Remove column, click the checkbox for the EMC server you wish to remove.
4. Click Update.
The selected EMC server is removed.
Note: You can delete changes by clicking Restore; however once changes are committed to the database, clicking Restore will no longer correct them.
4-8 Oracle eMail Center Concepts and Procedures
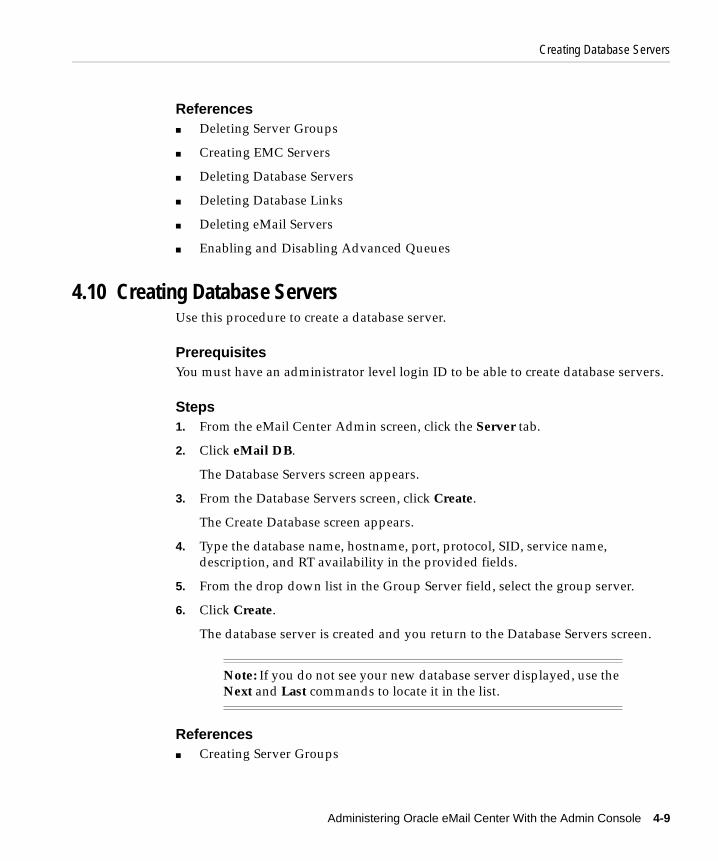
Creating Database Servers
References■ Deleting Server Groups
■ Creating EMC Servers
■ Deleting Database Servers
■ Deleting Database Links
■ Deleting eMail Servers
■ Enabling and Disabling Advanced Queues
4.10 Creating Database ServersUse this procedure to create a database server.
PrerequisitesYou must have an administrator level login ID to be able to create database servers.
Steps1. From the eMail Center Admin screen, click the Server tab.
2. Click eMail DB.
The Database Servers screen appears.
3. From the Database Servers screen, click Create.
The Create Database screen appears.
4. Type the database name, hostname, port, protocol, SID, service name, description, and RT availability in the provided fields.
5. From the drop down list in the Group Server field, select the group server.
6. Click Create.
The database server is created and you return to the Database Servers screen.
References■ Creating Server Groups
Note: If you do not see your new database server displayed, use the Next and Last commands to locate it in the list.
Administering Oracle eMail Center With the Admin Console 4-9

Modifying Database Servers
■ Creating EMC Servers
■ Deleting Database Servers
■ Creating Database Links
■ Creating eMail Servers
■ Enabling and Disabling Advanced Queues
4.11 Modifying Database ServersUse this procedure to modify database servers.
PrerequisitesYou must have an administrator level login to modify database servers.
Steps1. From the eMail Center Admin screen, click the Server tab.
2. Click eMail DB.
The Database Servers screen appears.
3. From the Database Servers screen, double-click the desired database server name.
The Database Server Details screen appears.
4. Modify the database name, hostname, port, protocol, database SID, service name, database description, RT availability and group server as necessary.
5. From the Database Server Details screen, click Update.
The database server is updates and you return to the Database Servers screen.
4.12 Deleting Database ServersUse this procedure to delete database servers.
Note: You can delete changes by clicking Restore; however once changes are committed to the database, clicking Restore will no longer correct them.
4-10 Oracle eMail Center Concepts and Procedures
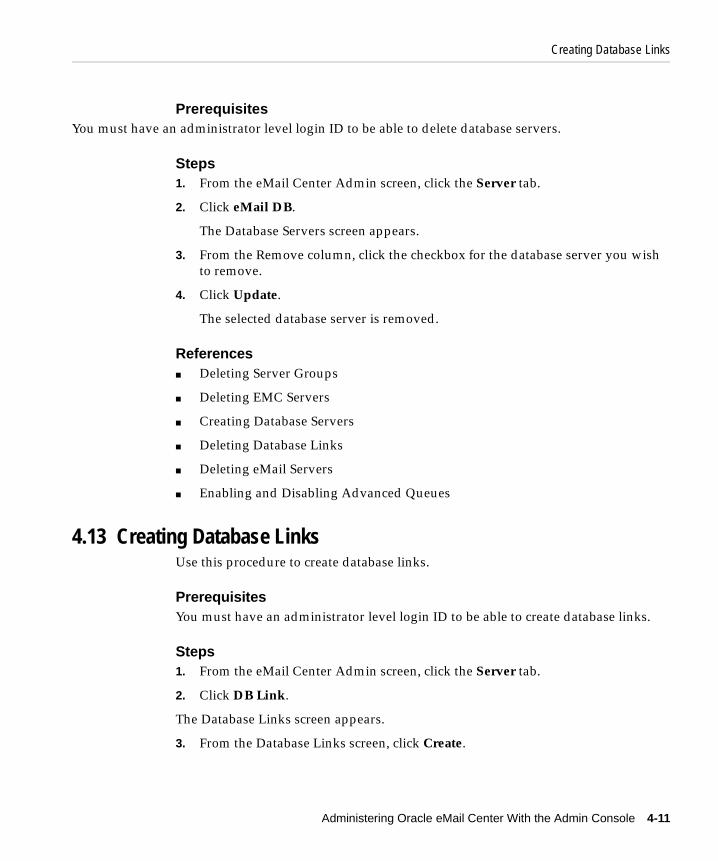
Creating Database Links
PrerequisitesYou must have an administrator level login ID to be able to delete database servers.
Steps1. From the eMail Center Admin screen, click the Server tab.
2. Click eMail DB.
The Database Servers screen appears.
3. From the Remove column, click the checkbox for the database server you wish to remove.
4. Click Update.
The selected database server is removed.
References■ Deleting Server Groups
■ Deleting EMC Servers
■ Creating Database Servers
■ Deleting Database Links
■ Deleting eMail Servers
■ Enabling and Disabling Advanced Queues
4.13 Creating Database LinksUse this procedure to create database links.
PrerequisitesYou must have an administrator level login ID to be able to create database links.
Steps1. From the eMail Center Admin screen, click the Server tab.
2. Click DB Link.
The Database Links screen appears.
3. From the Database Links screen, click Create.
Administering Oracle eMail Center With the Admin Console 4-11
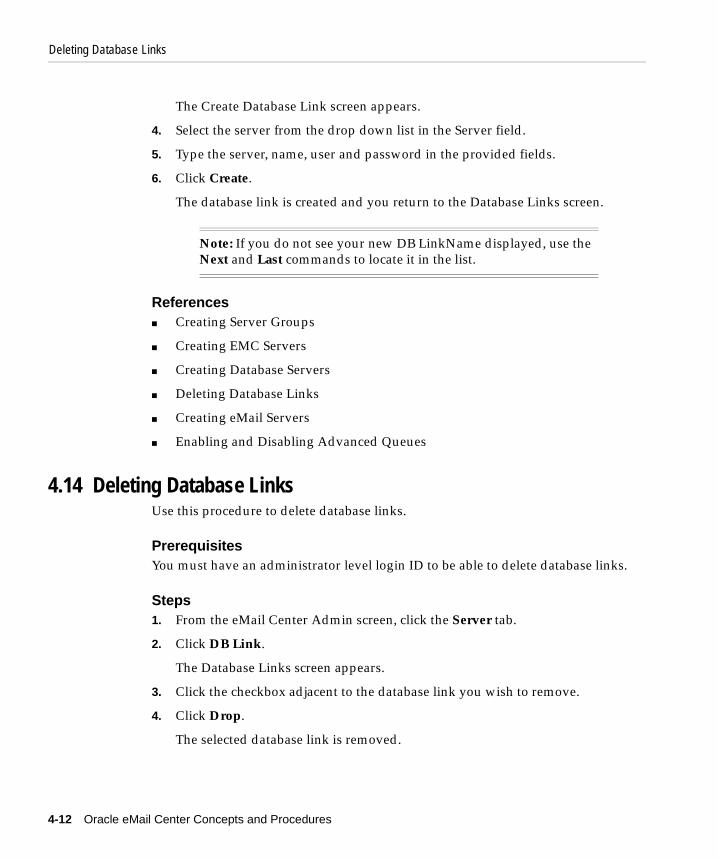
Deleting Database Links
The Create Database Link screen appears.
4. Select the server from the drop down list in the Server field.
5. Type the server, name, user and password in the provided fields.
6. Click Create.
The database link is created and you return to the Database Links screen.
References■ Creating Server Groups
■ Creating EMC Servers
■ Creating Database Servers
■ Deleting Database Links
■ Creating eMail Servers
■ Enabling and Disabling Advanced Queues
4.14 Deleting Database LinksUse this procedure to delete database links.
PrerequisitesYou must have an administrator level login ID to be able to delete database links.
Steps1. From the eMail Center Admin screen, click the Server tab.
2. Click DB Link.
The Database Links screen appears.
3. Click the checkbox adjacent to the database link you wish to remove.
4. Click Drop.
The selected database link is removed.
Note: If you do not see your new DB LinkName displayed, use the Next and Last commands to locate it in the list.
4-12 Oracle eMail Center Concepts and Procedures
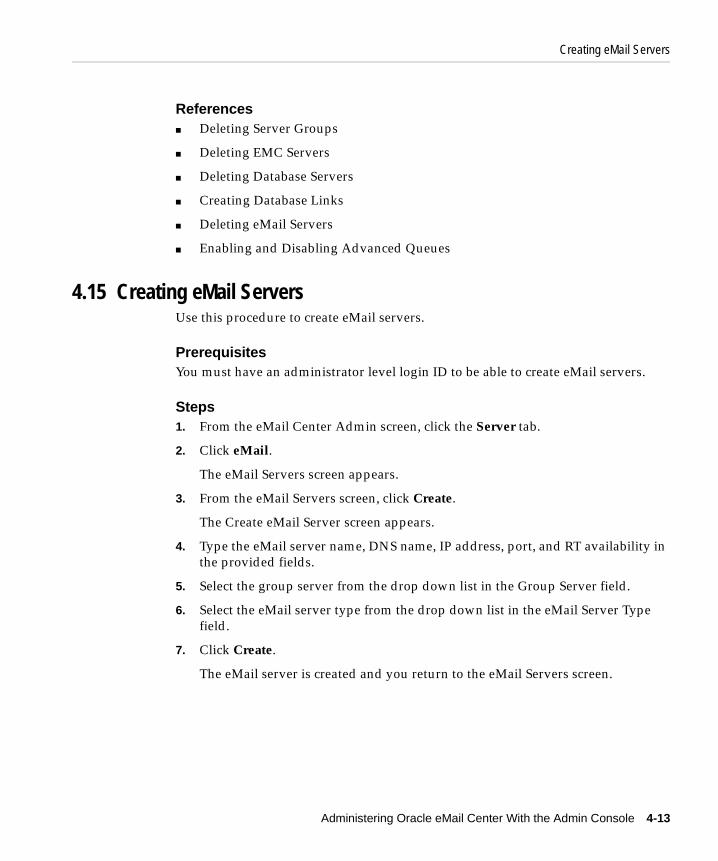
Creating eMail Servers
References■ Deleting Server Groups
■ Deleting EMC Servers
■ Deleting Database Servers
■ Creating Database Links
■ Deleting eMail Servers
■ Enabling and Disabling Advanced Queues
4.15 Creating eMail ServersUse this procedure to create eMail servers.
PrerequisitesYou must have an administrator level login ID to be able to create eMail servers.
Steps1. From the eMail Center Admin screen, click the Server tab.
2. Click eMail.
The eMail Servers screen appears.
3. From the eMail Servers screen, click Create.
The Create eMail Server screen appears.
4. Type the eMail server name, DNS name, IP address, port, and RT availability in the provided fields.
5. Select the group server from the drop down list in the Group Server field.
6. Select the eMail server type from the drop down list in the eMail Server Type field.
7. Click Create.
The eMail server is created and you return to the eMail Servers screen.
Administering Oracle eMail Center With the Admin Console 4-13
Modifying eMail Servers
References■ Creating Server Groups
■ Creating EMC Servers
■ Creating Database Servers
■ Creating Database Links
■ Creating eMail Servers
■ Deleting eMail Servers
■ Enabling and Disabling Advanced Queues
4.16 Modifying eMail ServersUse this procedure to modify eMail servers.
PrerequisitesYou must have an administrator level login to modify eMail servers.
Steps1. From the eMail Center Admin screen, click the Server tab.
2. Click eMail.
The eMail Servers screen appears.
3. From the Server Name column, double-click the server name for the eMail Server you wish to modify.
The eMail Server Details screen appears.
4. Update the eMail server name, DNS address, IP address, port, RT availability, group server and eMail server type as desired.
5. Click Update.
The eMail Server is updated and you return to the eMail Servers screen.
Note: If you do not see your new eMail server name displayed, use the Next and Last commands to locate it in the list.
4-14 Oracle eMail Center Concepts and Procedures
Enabling and Disabling Advanced Queues
4.17 Deleting eMail ServersUse this procedure to delete eMail servers.
PrerequisitesYou must have an administrator level login ID to be able to delete eMail servers.
Steps1. From the eMail Center Admin screen, click the Server tab.
2. Click eMail.
The eMail Servers screen appears.
3. From the Remove column, click the checkbox for the server group you wish to remove.
4. Click Update.
The selected eMail server is removed.
References■ Deleting Server Groups
■ Deleting EMC Servers
■ Deleting Database Servers
■ Deleting Database Links
■ Creating eMail Servers
■ Enabling and Disabling Advanced Queues
4.18 Enabling and Disabling Advanced QueuesUse this procedure to enable or disable advanced queues.
Note: You can delete changes by clicking Restore; however once changes are committed to the database, clicking Restore will no longer correct them.
Administering Oracle eMail Center With the Admin Console 4-15
Enabling and Disabling Advanced Queues
PrerequisitesYou must have an administrator level login ID to be able to enable and disable advanced queues.
Steps1. From the eMail Center Admin screen, click the Queue tab.
The Advanced Queues screen appears.
2. From the Select column, click the check box for the desired queue.
3. To enable the queue, click Enable.
4. To disable the queue, click Disable.
5. Once you have enabled or disabled the desired queues, click Refresh.
The Advanced Queues screen updates to reflect the new queue status.
References■ Creating Server Groups
■ Creating EMC Servers
■ Creating Database Servers
■ Creating Database Links
■ Creating eMail Servers
4-16 Oracle eMail Center Concepts and Procedures

Administering Oracle eMail Center With the Op Manager Co
5
Administering Oracle eMail Center With theOp Manager Console
The Operations Manager console allows you to create, modify, or delete:
■ classifications
■ queries
■ datasource files
■ templates
■ master documents
■ collateral
This topic group covers the following topics:
■ Creating Classifications
■ Modifying Classifications
■ Deleting Classifications
■ Creating Queries
■ Modifying Queries
■ Creating Datasource Files
nsole 5-1
Creating Classifications
5.1 Creating ClassificationsUse this procedure to create classifications.
PrerequisitesYou must have an administrator or operations manager level login to create classifications.
Steps1. From the Oracle Applications Operations Manager screen, click the
Classification tab.
The Classification screen appears.
2. From the Classifications screen, click Create.
The Create Classification screen appears.
3. Type the classification name in the Classification Name field.
4. Select the eMail account from the drop down list in the eMail Account field.
5. Click Create.
The classification is created and you return to the Classification screen.
5.2 Deleting ClassificationsUse this procedure to delete classifications.
PrerequisitesYou must have an administrator or operations manager level login to delete classifications.
Steps1. From the Oracle Applications Operations Manager screen, click the
Classification tab.
The Classification screen appears.
2. From the Remove column, click the checkbox for the classification you wish to remove.
3. Click Clear.
5-2 Oracle eMail Center Concepts and Procedures
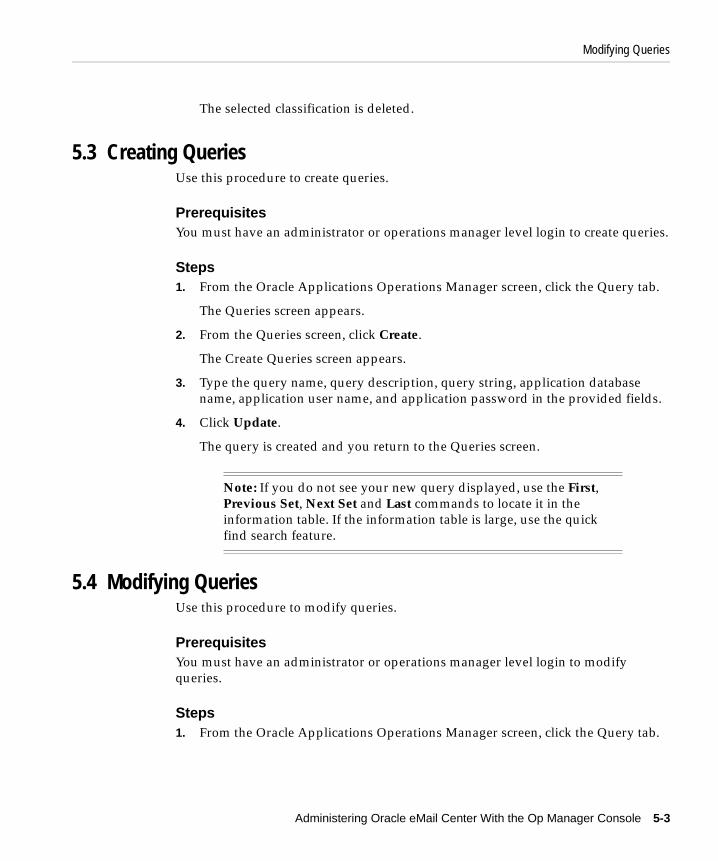
Modifying Queries
The selected classification is deleted.
5.3 Creating QueriesUse this procedure to create queries.
PrerequisitesYou must have an administrator or operations manager level login to create queries.
Steps1. From the Oracle Applications Operations Manager screen, click the Query tab.
The Queries screen appears.
2. From the Queries screen, click Create.
The Create Queries screen appears.
3. Type the query name, query description, query string, application database name, application user name, and application password in the provided fields.
4. Click Update.
The query is created and you return to the Queries screen.
5.4 Modifying QueriesUse this procedure to modify queries.
PrerequisitesYou must have an administrator or operations manager level login to modify queries.
Steps1. From the Oracle Applications Operations Manager screen, click the Query tab.
Note: If you do not see your new query displayed, use the First, Previous Set, Next Set and Last commands to locate it in the information table. If the information table is large, use the quick find search feature.
Administering Oracle eMail Center With the Op Manager Console 5-3
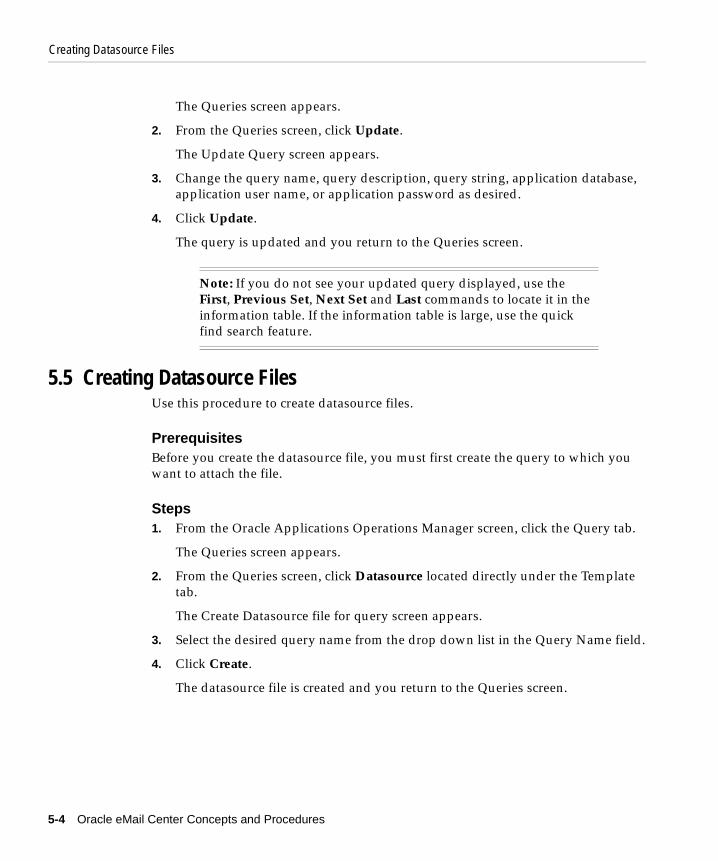
Creating Datasource Files
The Queries screen appears.
2. From the Queries screen, click Update.
The Update Query screen appears.
3. Change the query name, query description, query string, application database, application user name, or application password as desired.
4. Click Update.
The query is updated and you return to the Queries screen.
5.5 Creating Datasource FilesUse this procedure to create datasource files.
PrerequisitesBefore you create the datasource file, you must first create the query to which you want to attach the file.
Steps1. From the Oracle Applications Operations Manager screen, click the Query tab.
The Queries screen appears.
2. From the Queries screen, click Datasource located directly under the Template tab.
The Create Datasource file for query screen appears.
3. Select the desired query name from the drop down list in the Query Name field.
4. Click Create.
The datasource file is created and you return to the Queries screen.
Note: If you do not see your updated query displayed, use the First, Previous Set, Next Set and Last commands to locate it in the information table. If the information table is large, use the quick find search feature.
5-4 Oracle eMail Center Concepts and Procedures