
BPMUG.pdf - Oracle Help Center
296
Oracle ® Fusion Middleware Managing and Monitoring Processes with Oracle Business Process Management 12c (12.2.1) E59336-04 November 2016 Documentation for process participants, process owners, administrators, and supervisors using Oracle Business Process Management Workspace to act on tasks, activity guides, and process instances.
-
Upload
khangminh22 -
Category
Documents
-
view
2 -
download
0
Transcript of BPMUG.pdf - Oracle Help Center

Oracle® Fusion MiddlewareManaging and Monitoring Processes with Oracle Business
Process Management
12c (12.2.1)
E59336-04
November 2016
Documentation for process participants, process owners,administrators, and supervisors using Oracle Business ProcessManagement Workspace to act on tasks, activity guides, andprocess instances.
Oracle Fusion Middleware Managing and Monitoring Processes with Oracle Business Process Management,12c (12.2.1)
E59336-04
Copyright © 2010, 2016, Oracle and/or its affiliates. All rights reserved.
Primary Author: Oracle Corporation
This software and related documentation are provided under a license agreement containing restrictions onuse and disclosure and are protected by intellectual property laws. Except as expressly permitted in yourlicense agreement or allowed by law, you may not use, copy, reproduce, translate, broadcast, modify, license,transmit, distribute, exhibit, perform, publish, or display any part, in any form, or by any means. Reverseengineering, disassembly, or decompilation of this software, unless required by law for interoperability, isprohibited.
The information contained herein is subject to change without notice and is not warranted to be error-free. Ifyou find any errors, please report them to us in writing.
If this is software or related documentation that is delivered to the U.S. Government or anyone licensing it onbehalf of the U.S. Government, then the following notice is applicable:
U.S. GOVERNMENT END USERS: Oracle programs, including any operating system, integrated software,any programs installed on the hardware, and/or documentation, delivered to U.S. Government end users are"commercial computer software" pursuant to the applicable Federal Acquisition Regulation and agency-specific supplemental regulations. As such, use, duplication, disclosure, modification, and adaptation of theprograms, including any operating system, integrated software, any programs installed on the hardware,and/or documentation, shall be subject to license terms and license restrictions applicable to the programs.No other rights are granted to the U.S. Government.
This software or hardware is developed for general use in a variety of information management applications.It is not developed or intended for use in any inherently dangerous applications, including applications thatmay create a risk of personal injury. If you use this software or hardware in dangerous applications, then youshall be responsible to take all appropriate fail-safe, backup, redundancy, and other measures to ensure itssafe use. Oracle Corporation and its affiliates disclaim any liability for any damages caused by use of thissoftware or hardware in dangerous applications.
Oracle and Java are registered trademarks of Oracle and/or its affiliates. Other names may be trademarks oftheir respective owners.
Intel and Intel Xeon are trademarks or registered trademarks of Intel Corporation. All SPARC trademarks areused under license and are trademarks or registered trademarks of SPARC International, Inc. AMD, Opteron,the AMD logo, and the AMD Opteron logo are trademarks or registered trademarks of Advanced MicroDevices. UNIX is a registered trademark of The Open Group.
This software or hardware and documentation may provide access to or information about content, products,and services from third parties. Oracle Corporation and its affiliates are not responsible for and expresslydisclaim all warranties of any kind with respect to third-party content, products, and services unlessotherwise set forth in an applicable agreement between you and Oracle. Oracle Corporation and its affiliateswill not be responsible for any loss, costs, or damages incurred due to your access to or use of third-partycontent, products, or services, except as set forth in an applicable agreement between you and Oracle.

Contents
Preface ................................................................................................................................................................ xi
Audience ....................................................................................................................................................... xi
Documentation Accessibility ..................................................................................................................... xi
Related Documents...................................................................................................................................... xi
Conventions.................................................................................................................................................. xi
What's New in This Guide........................................................................................................................ xiii
New and Changed Features 12c (12.2.1) ................................................................................................ xiii
Part I Using Oracle Business Process Management Workspace
1 Getting Started with Process Workspace
1.1 Understanding Process Workspace .............................................................................................. 1-1
1.1.1 Starting and Logging In to Process Workspace ............................................................... 1-3
1.1.2 Setting Accessibility Preferences in Process Workspace ................................................ 1-3
1.1.3 Providing a Digital Certificate in Process Workspace .................................................... 1-4
1.1.4 Accessing Administration Capabilities............................................................................. 1-6
1.1.5 Setting Your Preferences in Process Workspace.............................................................. 1-7
1.2 Navigating Process Workspace ..................................................................................................... 1-8
1.2.1 About Task States ............................................................................................................... 1-10
1.3 About the Process Workspace Tasks Page................................................................................. 1-11
1.3.1 Navigating the Process Workspace Tasks Page............................................................. 1-12
1.3.2 Using the Process Workspace Task Details Page........................................................... 1-15
1.3.3 Customizing the Task List in Process Workspace ......................................................... 1-20
1.3.4 Searching for Tasks in Process Workspace..................................................................... 1-32
1.3.5 Defining and Testing Screenflows in Process Workspace............................................ 1-33
1.4 About the Process Workspace Activity Guides Page............................................................... 1-33
1.5 About the Process Workspace Process Tracking Page............................................................. 1-34
1.5.1 Navigating the Process Workspace Process Tracking Page......................................... 1-35
1.6 About Process Workspace Dashboards...................................................................................... 1-37
iii

2 Working on Tasks in Process Workspace
2.1 Claiming and Releasing Tasks in Process Workspace ............................................................... 2-1
2.2 Modifying History Approval Options in the Task Details Page .............................................. 2-2
2.2.1 Combining Repeated Approvals of a Task in the History ............................................. 2-3
2.2.2 Excluding System Approvals from a Task ....................................................................... 2-3
2.2.3 Including New Participants in the History Table for an Existing Task........................ 2-4
2.3 Reassigning and Delegating Tasks in Process Workspace ........................................................ 2-4
2.4 Requesting Information in Process Workspace........................................................................... 2-5
2.5 Adding Comments and Attachments to Tasks in Process Workspace.................................... 2-6
2.5.1 How to Add a Comment to a Task .................................................................................... 2-7
2.5.2 How to Add an Attachment to a Task .............................................................................. 2-7
2.5.3 How to Delete An Attachment......................................................................................... 2-10
2.6 Setting Rules, Vacation Periods, and Notification Preferences in Process Workspace ....... 2-10
2.6.1 How to Create User Rules in Process Workspace ......................................................... 2-11
2.6.2 How to Create Group Rules in Process Workspace ...................................................... 2-13
2.6.3 How to Enable a Vacation Period in Process Workspace............................................. 2-15
2.6.4 How to Avoid Circular Logic in Reassigned Vacation Rules ...................................... 2-16
2.6.5 How to Specify Notification Settings .............................................................................. 2-17
2.7 Creating To-Do Tasks in Process Workspace ............................................................................ 2-23
2.8 Creating Subtasks in Tasks in Process Workspace ................................................................... 2-24
2.8.1 What You May Need to Know About Creating Subtasks ............................................ 2-25
2.8.2 Creating Subtasks from the Actions List......................................................................... 2-25
2.8.3 Creating Subtasks from an Existing Task ....................................................................... 2-27
2.9 Acting on Tasks that Require Passwords in Process Workspace ........................................... 2-28
2.10 Acting on a Task that Requires a Digital Signature in Process Workspace ........................ 2-28
2.11 Routing Tasks in Process Workspace ....................................................................................... 2-29
2.12 Using the Evidence Store Service and Digital Signatures...................................................... 2-30
2.13 Exporting Tasks to Microsoft Excel........................................................................................... 2-32
2.13.1 How to Export Tasks to Excel......................................................................................... 2-33
2.14 Creating Worklist Reports.......................................................................................................... 2-33
2.14.1 How To Create Reports ................................................................................................... 2-34
2.14.2 What Happens When You Create Reports ................................................................... 2-35
3 Working on Process Instances in Process Workspace
3.1 Initiating Process Instances in Process Workspace..................................................................... 3-1
3.2 Searching for Process Instances in Process Workspace.............................................................. 3-2
3.2.1 How to Perform a Basic Search for Process Instances .................................................... 3-2
3.2.2 How to Perform an Advanced Search for Process Instances ......................................... 3-3
3.3 Viewing the Details of a Process Instance in Process Workspace ............................................ 3-3
3.3.1 Viewing History ................................................................................................................... 3-5
3.3.2 Associating Comments and Attachments with a Process Instance .............................. 3-6
3.4 Performing a Bulk Operation in Process Workspace ................................................................. 3-7
iv

3.5 Canceling a Process Instance in Process Workspace .................................................................. 3-7
3.6 Customizing the Presentation of Process Instances in Process Workspace ............................ 3-7
4 Working with Activity Guides in Process Workspace
4.1 Understanding Activity Guides .................................................................................................... 4-1
4.1.1 Using Activity Guides ......................................................................................................... 4-2
4.2 Navigating Activity Guides ........................................................................................................... 4-2
4.3 Showing or Hiding the Activity Guide Tab Page ....................................................................... 4-4
5 Creating and Editing Custom Pages in Process Workspace
5.1 Understanding Custom Pages in Process Workspace................................................................ 5-1
5.2 Creating and Editing Custom Pages in Process Workspace ..................................................... 5-2
5.2.1 How to Create a Custom Page in Process Workspace .................................................... 5-2
5.2.2 How to Add an External URL to a Customized Page in Process Workspace ............. 5-3
5.2.3 How to Add an Applications Panel to a Customized Page in Process Workspace.... 5-3
5.2.4 How to Add a Dashboards Panel to a Customized Page in Process Workspace ....... 5-3
5.2.5 How to Add a Process Instance Panel to a Customized Page ....................................... 5-5
5.2.6 How to Grant and Manage Access to Customized Pages in Process Workspace....... 5-6
5.3 Establishing Communication Between Panels in Process Workspace..................................... 5-7
5.3.1 Establishing Communication Between Panels in Process Workspace ......................... 5-7
6 Using Dashboards in Process Workspace
6.1 About Process Monitor and Standard Dashboards .................................................................... 6-1
6.1.1 Accessing Process Monitor and Standard Dashboards .................................................. 6-1
6.2 Using the Process Monitor Dashboard......................................................................................... 6-1
6.2.1 Process Monitor Dashboard................................................................................................ 6-1
6.2.2 About the Activity Details Dialog...................................................................................... 6-4
6.3 Using Standard Dashboards .......................................................................................................... 6-6
6.3.1 Participant Dashboards ....................................................................................................... 6-7
6.3.2 Process Dashboards ............................................................................................................. 6-7
6.4 Creating Custom Dashboards........................................................................................................ 6-9
6.4.1 Specifying Graph Content................................................................................................... 6-9
6.5 Understanding Data Visibility Rules in Dashboards ............................................................... 6-12
6.5.1 Workload Sampling Data.................................................................................................. 6-13
6.5.2 Activity and Measurement Sampling Data .................................................................... 6-13
6.5.3 Process Level Sampling Data............................................................................................ 6-13
7 Managing Workloads Among Users in Process Workspace
7.1 Managing the Availability of Users in Process Workspace....................................................... 7-1
7.2 Distributing Work among Users in a Group ............................................................................... 7-1
7.3 Setting Rules ..................................................................................................................................... 7-2
7.3.1 How To Create User Rules.................................................................................................. 7-2
7.3.2 How To Create Group Rules .............................................................................................. 7-4
v

7.4 Setting Assignment Rules for Tasks with Multiple Assignees ................................................. 7-5
7.5 Reassigning or Delegating Tasks in Process Workspace ........................................................... 7-6
7.6 Using Reports to Manage Workflows in Process Workspace ................................................... 7-8
7.7 Using Dashboards to Manage Workflows in Process Workspace............................................ 7-8
7.8 Handling Escalations in Process Workspace ............................................................................... 7-8
8 Working with Adaptive Case Management in Process Workspace
8.1 About Adaptive Case Management.............................................................................................. 8-1
8.2 Navigating Cases ............................................................................................................................. 8-1
8.2.1 About the Case Page ............................................................................................................ 8-2
8.2.2 About the Navigation Bar ................................................................................................... 8-2
8.2.3 Using the Navigation Bar.................................................................................................... 8-3
8.3 Viewing Case Information.............................................................................................................. 8-5
8.3.1 Viewing Case Instances ....................................................................................................... 8-6
8.3.2 Viewing the Case List .......................................................................................................... 8-6
8.3.3 Working With Case Activities .......................................................................................... 8-10
8.3.4 Working with Linked Cases ............................................................................................. 8-11
8.3.5 Viewing the Audit Trail..................................................................................................... 8-12
8.3.6 Data Panel............................................................................................................................ 8-13
8.3.7 Documents Panel................................................................................................................ 8-14
8.3.8 Viewing Milestones............................................................................................................ 8-16
8.3.9 Working with Stakeholders .............................................................................................. 8-17
Part II Administering Process Workspace
9 Managing Process Workspace
9.1 Setting the Display of the Work Items Panel in Process Workspace ....................................... 9-1
9.1.1 How to Specify the Login Page Realm Label in Process Workspace............................ 9-2
9.1.2 How to Specify the Resource Bundle in Process Workspace......................................... 9-3
9.1.3 How to Enable or Disable Vacation Rules Delegation in Process Workspace ............ 9-3
9.1.4 How to Specify the Language Locale Information in Process Workspace .................. 9-3
9.1.5 How to Specify After Tasks Completion Behavior of Task Details Pop Up Window
....................................................................................................................................................... 9-4
9.1.6 How to Specify the User Name Format ............................................................................ 9-4
9.1.7 How to Specify a Branding Logo in Process Workspace................................................ 9-5
9.1.8 How to Specify the Branding Title in Process Workspace ............................................. 9-5
9.1.9 How to Choose a Skin in Process Workspace .................................................................. 9-6
9.1.10 How to Enable Customized Applications and Links in Process Workspace ............ 9-7
9.1.11 How to Set a Timeout Parameter for Screenflows......................................................... 9-7
9.1.12 How to Register Customized Application URLs in Process Workspace ................... 9-8
9.1.13 How to Map Task Actions to the Bulk Approval Task Actions Buttons ................... 9-8
9.1.14 How to Show or Hide the Default Tab Pages in Process Workspace......................... 9-9
9.1.15 How to Show or Hide the Worklist Action Menu in Process Workspace ............... 9-10
vi

9.1.16 Specifying Additional Process Workspace Settings.................................................... 9-10
9.2 Administering Approval Groups in Process Workspace ........................................................ 9-10
9.2.1 How to Use Task Forms .................................................................................................... 9-11
9.2.2 How to Create Mapped Attribute Labels ....................................................................... 9-16
9.2.3 How to View Approval Groups....................................................................................... 9-18
9.2.4 How to Search for an Approval Group........................................................................... 9-19
9.2.5 How to Add a Static Approval Group ............................................................................ 9-20
9.2.6 How to Add a New Member to a Static Approval Group ........................................... 9-20
9.2.7 How to Delete a Member from an Approval Group..................................................... 9-22
9.2.8 How to Move an Approval Group's Members ............................................................. 9-22
9.2.9 How to Nest Approval Groups........................................................................................ 9-23
9.2.10 How to Rename an Approval Group ............................................................................ 9-23
9.2.11 Using Dynamic Approval Groups................................................................................. 9-24
9.2.12 How to Delete an Approval Group ............................................................................... 9-26
9.3 Managing Mapped Attributes (Flex Fields) in Process Workspace ....................................... 9-26
9.3.1 How to Specify Mapped Attributes................................................................................. 9-27
9.4 Using Task Configuration in Process Workspace..................................................................... 9-29
9.4.1 How to Access the Task Configuration Page ................................................................. 9-30
9.4.2 How to Edit Workflow Task Settings.............................................................................. 9-32
9.4.3 How to Specify Routing Settings ..................................................................................... 9-33
9.4.4 How to Specify an Expiration Policy............................................................................... 9-33
9.4.5 How to Extend an Expiration Policy Period .................................................................. 9-33
9.4.6 How to Specify an Escalation Policy ............................................................................... 9-34
9.4.7 How to Specify Participant Notification Preferences.................................................... 9-35
9.4.8 How to Enable Task Access .............................................................................................. 9-39
9.4.9 How to Specify Actions for Acting Upon Tasks ........................................................... 9-40
9.4.10 How to View Settings for Rules ..................................................................................... 9-41
9.4.11 How to Add a Rule to a Ruleset in Process Workspace ............................................. 9-42
9.4.12 How to Add and Customize Decision Tables .............................................................. 9-45
9.4.13 How to Add a Variable to a Rule ................................................................................... 9-49
9.5 Using Evidence Search in Process Workspace .......................................................................... 9-50
9.6 Managing Exceptions in Process Workspace ............................................................................ 9-51
9.7 Using the User Metadata Migration Utility ............................................................................... 9-51
9.8 Integrating with Oracle WebCenter Portal ................................................................................ 9-51
9.8.1 Configuring Oracle WebCenter Portal Integration ....................................................... 9-52
9.8.2 Integrating BPM Functionality into WebCenter Portal ................................................ 9-53
9.8.3 Customizing an Integrated BPM Task List in WebCenter Portal................................ 9-54
9.8.4 Adding support for ADF task details.............................................................................. 9-57
9.8.5 Configuring with Enterprise Manager............................................................................ 9-57
10 Managing Your Organization in Process Workspace
10.1 Understanding Deployment of Organization Entities in Process Workspace.................... 10-1
10.2 Managing Holiday Rules in Process Workspace .................................................................... 10-1
vii

10.2.1 To Create a Holiday Rule ................................................................................................ 10-2
10.2.2 To Import a Calendar File ............................................................................................... 10-3
10.2.3 To Edit a Holiday Rule .................................................................................................... 10-4
10.2.4 To Delete a Holiday Rule List......................................................................................... 10-4
10.2.5 To Delete a Holiday Rule ................................................................................................ 10-4
10.3 Managing Calendars in Process Workspace............................................................................ 10-5
10.3.1 To create a calendar rule ................................................................................................. 10-5
10.3.2 To edit a calendar rule ..................................................................................................... 10-6
10.3.3 To associate a calendar rule with a role and an organization unit............................ 10-6
10.3.4 To associate a calendar with an organization unit ...................................................... 10-7
10.3.5 To delete a calendar rule ................................................................................................. 10-7
10.4 Managing Other Users' or Groups' Rules in Process Workspace......................................... 10-7
10.5 Managing Roles in Process Workspace .................................................................................... 10-8
10.5.1 How to Add New Application Roles ............................................................................ 10-9
10.5.2 How to Specify the Escalation Path for a Role ........................................................... 10-10
10.5.3 How to Grant Roles ....................................................................................................... 10-10
10.5.4 How to Revoke Roles..................................................................................................... 10-11
10.5.5 How to Create and Manage Role-Specific Views and Layouts ............................... 10-11
10.6 Managing Parametric Roles in Process Workspace.............................................................. 10-11
10.6.1 Parametric Roles Used for Querying Members of an Organization Unit .............. 10-12
10.6.2 Parametric Roles Used in Assigning Tasks ................................................................ 10-12
10.6.3 How to Create a Parametric Role................................................................................. 10-12
10.6.4 How to Modify a Parametric Role ............................................................................... 10-16
10.6.5 How to Delete a Parametric Role ................................................................................. 10-17
10.7 Managing Extended User Properties in Process Workspace .............................................. 10-17
10.7.1 To Add Extended User Properties ............................................................................... 10-18
10.7.2 To Modify Extended User Properties.......................................................................... 10-19
10.7.3 To Delete Extended User Properties............................................................................ 10-19
10.7.4 To Associate Extended User Properties to Users....................................................... 10-20
10.8 Managing Organization Units in Process Workspace.......................................................... 10-20
10.8.1 To Create an Organization Unit ................................................................................... 10-21
10.8.2 To Edit an Organization Unit ....................................................................................... 10-23
10.8.3 To Delete an Organization Unit ................................................................................... 10-23
11 Modifying Running Process Instances in Oracle Business ProcessManagement Workspace
11.1 Altering the Flow of Running Process Instances in Process Workspace............................. 11-1
11.1.1 How to Alter the Flow of Running Process Instances in Process Workspace......... 11-1
11.2 Migrating Process Instances in Process Workspace ............................................................... 11-3
11.2.1 How to Migrate a Process Instance in Process Workspace ........................................ 11-4
11.2.2 How to Resume a Suspended Component................................................................... 11-6
11.3 What You May Need to Know About Redeploying a Process ............................................. 11-8
11.4 Moving Running Composite Instances from One Revision to Another.............................. 11-9
viii

11.4.1 Important Considerations ............................................................................................. 11-10
11.4.2 How to Perform a Migration ........................................................................................ 11-10
11.4.3 Restrictions for Components ........................................................................................ 11-10
11.4.4 Ant Tasks Elements........................................................................................................ 11-12
11.4.5 Migration Elements........................................................................................................ 11-13
Part III Appendices
A Creating Custom ADF Applications with Oracle Business ProcessManagement Workspace Task Flows
A.1 User-Related Task Flows ............................................................................................................... A-1
A.2 Process Task Flows......................................................................................................................... A-4
A.3 Process Analytics Task Flows ....................................................................................................... A-6
A.4 .JAR files for the Task Flows ......................................................................................................... A-9
A.5 Samples: Customizing ADF Applications with Process Workspace Task Flows ................. A-9
A.6 Sample: Wf_client_config.xml File............................................................................................. A-24
A.7 Sample: Bean Returning WorkflowServicesClientConfigurationType Object .................... A-26
B Customizing a Resource Bundle
B.1 How to Customize a Resource Bundle......................................................................................... B-1
C Customizing Applications in Process Workspace and BPM Worklist
C.1 How to Customize an Application............................................................................................... C-1
D Deploying Images and JAR files as Part of a Shared Library JAR file
D.1 How to Deploy Images and JAR Files as Part of a Shared Library JAR File ......................... D-1
ix

x

Preface
This guide describes how to interact with tasks and business processes in OracleBusiness Process Management Workspace.
AudienceThis document is intended for all users of Oracle Business Process ManagementWorkspace.
Documentation AccessibilityFor information about Oracle's commitment to accessibility, visit the OracleAccessibility Program website at http://www.oracle.com/pls/topic/lookup?ctx=acc&id=docacc.
Access to Oracle Support
Oracle customers that have purchased support have access to electronic supportthrough My Oracle Support. For information, visit http://www.oracle.com/pls/topic/lookup?ctx=acc&id=info or visit http://www.oracle.com/pls/topic/lookup?ctx=acc&id=trs if you are hearing impaired.
Related DocumentsFor more information, see the following Oracle resources:
• Developing Business Processes with Oracle Business Process Management Studio
• Developing Business Processes with Oracle Business Process Composer
• Administering Oracle SOA Suite and Oracle Business Process Management Suite
ConventionsThe following text conventions are used in this document:
Convention Meaning
boldface Boldface type indicates graphical user interface elements associatedwith an action, or terms defined in text or the glossary.
italic Italic type indicates book titles, emphasis, or placeholder variables forwhich you supply particular values.
xi

Convention Meaning
monospace Monospace type indicates commands within a paragraph, URLs, codein examples, text that appears on the screen, or text that you enter.
xii

What's New in This Guide
This preface introduces the new and changed features of Oracle Business ProcessManagement Workspace and provides pointers to additional information. Thisdocument is the new edition of the formerly titled Oracle Fusion Middleware User'sGuide for Oracle Business Process Management.
Screens shown in this guide might differ from your implementation, depending on theskin used. Any differences are cosmetic.
For a list of known issues (release notes), see http://www.oracle.com/technetwork/middleware/soasuite/documentation/soaknown-2644661.html.
New and Changed Features 12c (12.2.1)Oracle Business Process Management Workspace release 12c (12.2.1) includes thefollowing new and changed features:
• Process Spaces is not supported in this release. The chapters in Part III UsingOracle Business Process Management Process Spaces were removed.
• Support for Adaptive Case Management in Process Workspace. This new feature isdescribed in Working with Adaptive Case Management in Process Workspace .
• Support for Process Monitor Dashboard. This new feature is described in Using theProcess Monitor Dashboard.
• Support to define the after task completion behavior of task details pop upwindow. This new feature is described in How to Specify After Tasks CompletionBehavior of Task Details Pop Up Window.
xiii

Part IUsing Oracle Business Process
Management Workspace
Oracle Business Process Management Workspace (Process Workspace) is a web-basedend user tool that organizes work, provides process analytics and dashboards, and useAdaptive Case Management to model and run unstructured business processes.
This part includes the following chapters:
• Getting Started with Process Workspace
• Working on Tasks in Process Workspace
• Working on Process Instances in Process Workspace
• Working with Activity Guides in Process Workspace
• Creating and Editing Custom Pages in Process Workspace
• Using Dashboards in Process Workspace
• Managing Workloads Among Users in Process Workspace
• Working with Adaptive Case Management in Process Workspace

1Getting Started with Process Workspace
Oracle Business Process Management Workspace (Process Workspace) is acustomizable web-based interface enabling you to access and manage tasks andprocess instances according to roles and responsibilities.
This chapter discusses how to start and log in to Process Workspace, navigate itsinterface, and configure your preferences. This chapter includes the following sections:
• Understanding Process Workspace
• Navigating Process Workspace
• About the Process Workspace Tasks Page
• About the Process Workspace Activity Guides Page
• About the Process Workspace Process Tracking Page
• About Process Workspace Dashboards
1.1 Understanding Process WorkspaceProcess Workspace enables process participants to interact with the applications youcreate using Oracle BPM.
The Process Workspace user interface provides tabs for each of the following:
• Tasks: This page enables process participants to view and work with their assignedtasks.
• Case Management: Adaptive Case Management supports the modeling andrunning of very flexible and data-intensive business processes.
• Process Tracking: This page enables process participants to view running processinstances.
• Standard Dashboards: This page provides out-of-the-box dashboards formonitoring process performance, task performance, and workload.
• Custom Dashboards: This page enables process participants to define and usecustom dashboards based on the measurement data generated by processinstances.
Business administrators typically configure and maintain organizations and roles. Formore information, see "Modeling Your Organization" in the Developing BusinessProcesses with Oracle Business Process Management Studio guide.
Process analysts typically use the Oracle Business Process Analysis Suite or BusinessProcess Composer to create process models. They can also use the process analyst rolewithin Oracle BPM Studio.
Getting Started with Process Workspace 1-1
Process developers typically use Oracle BPM Studio to model and implement thecomponents of a business application. They may occasionally use Business ProcessComposer for modeling basic processes.
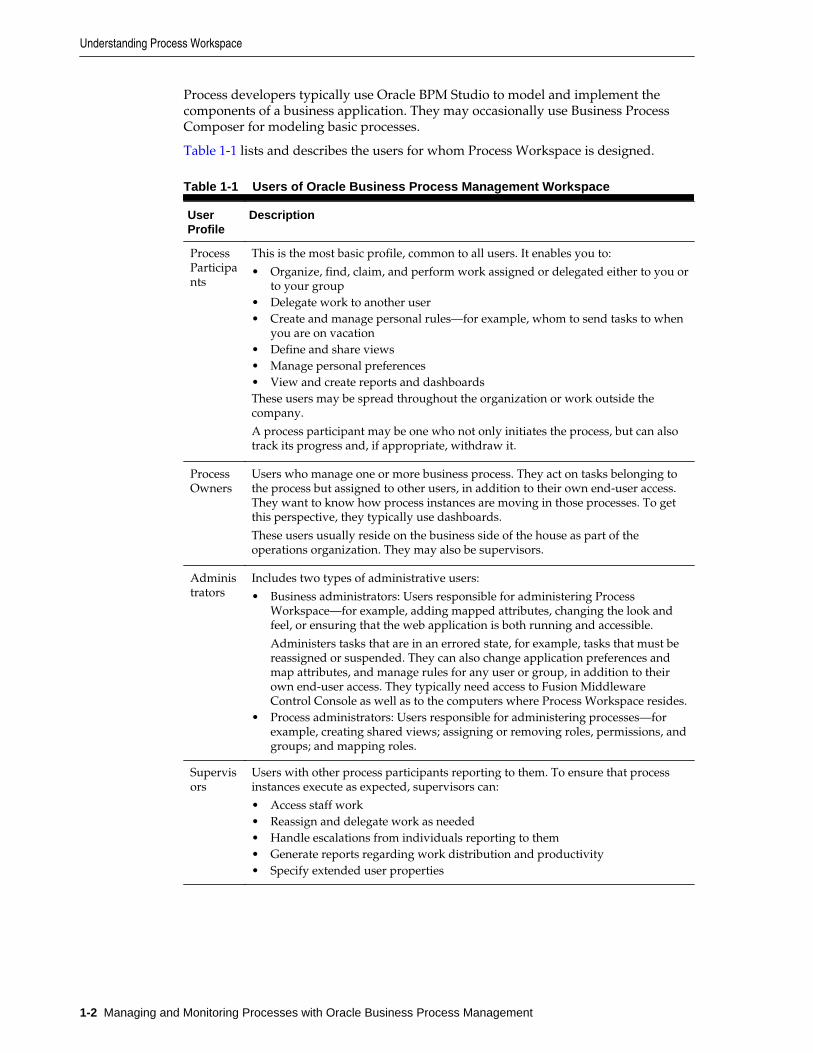
Table 1-1 lists and describes the users for whom Process Workspace is designed.
Table 1-1 Users of Oracle Business Process Management Workspace
UserProfile
Description
ProcessParticipants
This is the most basic profile, common to all users. It enables you to:
• Organize, find, claim, and perform work assigned or delegated either to you orto your group
• Delegate work to another user• Create and manage personal rules—for example, whom to send tasks to when
you are on vacation• Define and share views• Manage personal preferences• View and create reports and dashboardsThese users may be spread throughout the organization or work outside thecompany.
A process participant may be one who not only initiates the process, but can alsotrack its progress and, if appropriate, withdraw it.
ProcessOwners
Users who manage one or more business process. They act on tasks belonging tothe process but assigned to other users, in addition to their own end-user access.They want to know how process instances are moving in those processes. To getthis perspective, they typically use dashboards.
These users usually reside on the business side of the house as part of theoperations organization. They may also be supervisors.
Administrators
Includes two types of administrative users:
• Business administrators: Users responsible for administering ProcessWorkspace—for example, adding mapped attributes, changing the look andfeel, or ensuring that the web application is both running and accessible.
Administers tasks that are in an errored state, for example, tasks that must bereassigned or suspended. They can also change application preferences andmap attributes, and manage rules for any user or group, in addition to theirown end-user access. They typically need access to Fusion MiddlewareControl Console as well as to the computers where Process Workspace resides.
• Process administrators: Users responsible for administering processes—forexample, creating shared views; assigning or removing roles, permissions, andgroups; and mapping roles.
Supervisors
Users with other process participants reporting to them. To ensure that processinstances execute as expected, supervisors can:
• Access staff work• Reassign and delegate work as needed• Handle escalations from individuals reporting to them• Generate reports regarding work distribution and productivity• Specify extended user properties
Understanding Process Workspace
1-2 Managing and Monitoring Processes with Oracle Business Process Management

1.1.1 Starting and Logging In to Process WorkspaceTo start Process Workspace, you must install Oracle SOA Suite, and make sure that theService Integration server is running. See your installation documentation for moreinformation.
To start and log into Process Workspace:
1. Go to
http://host_name:port_number/bpm/workspace/
The host_name is the name of the host computer on which Oracle SOA Suite isinstalled.
The port_number is the one used at installation.
2. Enter the user name and password.
You can use the preseeded user name to log in as an administrator. If you haveloaded the demo user community in the identity store, you can use the other userssuch as jstein or jcooper.
The user name and password must exist in the user community provided to JAZN.
3. Click Login.
Note:
• If you expect to have a large number of users using Process Workspacesimultaneously, then set the session time-out value to no more than 5minutes. To do this, expand the Process Workspace .ear file, open theweb.xml file, and update the time-out parameter. This value overrides thetimeout value set in weblogic.xml.
• Alternatively, in the WebLogic console, click Deployments, thenOracleBPMWorkspace (not oracle.bpm.workspace), then the Configurationtab. Set the Session Timeout (in seconds) value. This updatesweblogic.xml.
• If user identities are stored in Microsoft Active Directory, thenauthentication can fail at times because Oracle WebLogic Server, whereProcess Workspace is running, cannot communicate with the ActiveDirectory installation. This can occur when Oracle WebLogic Server andActive Directory are in separate domains.
To resolve this issue, add the entry for the Active Directory host's addressto the /etc/hosts file on machine where Process Workspace is running.
1.1.2 Setting Accessibility Preferences in Process WorkspaceAfter logging in to Process Workspace, you can configure accessibility options fromany page. This changes the user preferences, which are retained through all sessionsuntil you change them again.
Understanding Process Workspace
Getting Started with Process Workspace 1-3

To set accessibility options:
1. In the upper right corner of Process Workspace, click Preferences.
The Preferences page appears.
2. In the Preferences pane, click Accessibility.
The Select Accessibility page appears, as shown in Figure 1-1.
Figure 1-1 Select Accessibility panel
3. Select I use a screen reader if you use a screen reader.
4. Select I use high contrast colors to increase the contrast between objects on theconsole.
5. Select I use large fonts to increase the font size.
6. Click OK.
1.1.3 Providing a Digital Certificate in Process WorkspaceA digital certificate establishes the participant's credentials. It is issued by acertification authority (CA). It contains your name, a serial number, expiration dates, acopy of the certificate holder's public key (used for encrypting messages and digitalsignatures), and the digital signature of the certificate-issuing authority so that arecipient can verify that the certificate is real. For more information, see Using theEvidence Store Service and Digital Signatures.
To provide a digital certificate:
1. In the upper right corner of Process Workspace, click Preferences.
2. In the Preferences pane, click Certificates.
3. Upload the certificate you want to use to sign your decision, as shown in Figure1-2.
When signing a task outcome using your certificate, you must upload the entirechain of certificates through Process Workspace as a .P7B (PKCS7 format) file,not just the one certificate issued to you by the certificate issuer. The entire chaincan be exported through Internet Explorer. Mozilla Firefox does not let you exportthe chain as a .P7B file. Therefore, you can perform the following steps:
a. Export the chain from Mozilla Firefox as a .P12 file (PKCS12 format that alsocontains your private key).
b. Import the .P12 file in Internet Explorer.
Understanding Process Workspace
1-4 Managing and Monitoring Processes with Oracle Business Process Management

c. Export it again from Internet Explorer as a .P7B file.
d. Upload it through Process Workspace.
Figure 1-2 Uploading a Certificate
Note the following important points when providing your certificate to thesystem. Otherwise, you cannot use your certificate to sign your decisions on tasks.
• The PKCS7 file format is a binary certificate format. Select this option if youhave a standalone certificate file stored on your disk.
• The PKCS12 file format is a keystore format. Select this option if you have yourcertificate stored inside a keystore.
Note: An important point to note if you have the certificate stored inside akeystore. The Process Workspace only needs the public key for signatureverification. It does not need the private key. Typically, a PKCS12 format maycontain the user's private key (if you exported it from the browser). You canprevent access to the private key by following one of the options below:
– Create a PKCS12 keystore with only the public key and the certificationchain, but exclude the private key. Upload this keystore to ProcessWorkspace.
– Protect the private key with a separate password that is not entered intothe Process Workspace preferences. The private key is normally containedin the PKCS12 within a separately encrypted PKCS8 structure. While thePKCS8 is often encrypted using the same password as the enclosingPKCS12, that is not mandatory. If the PKCS8 private key is encrypted usinga different password, then provide the PKCS12 password at upload time.
Understanding Process Workspace
Getting Started with Process Workspace 1-5

• If you want to copy and paste the contents of the certificate, select Type orPaste Certificate Contents and paste the BASE64-encoded text into the field.Do not paste a certificate in any other format into this field. Likewise, if youchoose to upload a certificate, do not upload a BASE64-encoded certificate.Only PKCS12- and PKCS7- formatted files are supported for uploads.
4. Return to the task list by clicking the Home link in the upper right corner ofProcess Workspace.
5. Click a task to approve or reject.
The task details are displayed.
6. Click either Approve or Reject.
Details about the digital signature are displayed.
7. For a task that has a signature policy, click Sign.
The Text Signing Report dialog box appears.
8. Select the certificate from the list to use to sign your decision.
9. Enter the master password of the Web browser that you are using.
10. Click OK.
The Web browser signs the string displayed in the upper half of the Text SigningRequest with the certificate you selected and invokes the action (approval orrejection) that you selected. The task status is appropriately updated in the humanworkflow service.
If you are a developer and want more information about how certificates are uploadedand used, see Oracle Fusion Middleware Developer's Guide for Oracle SOA Suite.
1.1.4 Accessing Administration CapabilitiesThe upper right toolbar contains an Administration link that takes you to theAdministration Areas.
Table 1-2 lists and describes the categories in the Administration Areas and tells whereto find more information about each one.
Table 1-2 Categories in the Administration Areas
Category
Description Information
Organization
Model an organization by defining organization units, businesscalendars, business holidays, roles, and other user properties.
Note: If you are logged into Process Workspace, and changes aremade to your organizational membership, you will not see thesechanges reflected in the interface until you log out and log back inagain. This is because, for better performance, the organizationunit information is cached when you log into Process Workspace.
ManagingYourOrganizationin ProcessWorkspace
Understanding Process Workspace
1-6 Managing and Monitoring Processes with Oracle Business Process Management

Table 1-2 (Cont.) Categories in the Administration Areas
Category
Description Information
FlexFields(MappedAttributes)
Create mappings needed for populating mapped attributes. ManagingMappedAttributes(Flex Fields)in ProcessWorkspace
TaskAdministration
Administer approval groups, task configuration, evidence search,and exceptions
Using TaskConfigurationin ProcessWorkspace
ApplicationPreferences
Customize the appearance of the worklist.
Specify your preferred language and time zone.
Setting theDisplay of theWork ItemsPanel inProcessWorkspace
How toSpecify theLanguageLocaleInformationin ProcessWorkspace
1.1.5 Setting Your Preferences in Process WorkspaceThe upper right toolbar contains a Preferences link.
Table 1-3 lists and describes the preferences you can set and tells you where to findinformation for setting each preference.
Table 1-3 Preferences
Preference Description Information
Providing adigital certificate
Provide a digital certificate from a certificationauthority to verify your credentials.
Providing aDigital Certificatein ProcessWorkspace.
Setting rules Set rules for tasks assigned to a user or group. How to CreateUser Rules inProcessWorkspace
How to CreateGroup Rules inProcessWorkspace
Understanding Process Workspace
Getting Started with Process Workspace 1-7

Table 1-3 (Cont.) Preferences
Preference Description Information
Settingnotificationpreferences
Configure the notification settings to control how,when, and where you receive messages in caseswhen you have access to multiple communicationchannels (delivery types).
SpecifyingNotificationSettings.
Settingaccessibilitypreferences
Select accessibility preferences such as using a screenreader, using high contrast colors, and large fonts.
SettingAccessibilityPreferences inProcessWorkspace
In addition to the preferences mentioned in this section, administrators can also setvarious preferences for how the Work Items panel is displayed in Process Workspace.For information about setting these application preferences, see Setting the Display ofthe Work Items Panel in Process Workspace.
1.2 Navigating Process WorkspaceYou can easily navigate Process Workspace. This chapter describes the varioustoolbars, buttons, and panels.
Figure 1-3 shows an example of Process Workspace Home page as it appears bydefault when you log in.
Figure 1-3 Example of Process Workspace Home
Use the top links to act on tasks, cases, process instances, dashboards, activity guides,reports, and to add custom pages. The links to these parts of Process Workspace arelisted and described in Table 1-4.
Table 1-4 Toolbar for Tasks, Activity Guides, Process Instances, Dashboards, andMore
Toolbar Link Description
Tasks The Tasks page displays tasks for the user based on the user's permissionsand assigned groups and roles.
Navigating Process Workspace
1-8 Managing and Monitoring Processes with Oracle Business Process Management

Table 1-4 (Cont.) Toolbar for Tasks, Activity Guides, Process Instances,Dashboards, and More
Toolbar Link Description
Case The Case page displays Adaptive Case Management cases, which are lessstructured ad-hoc processes. See Working with Adaptive Case Managementin Process Workspace .
ProcessTracking
The Process Tracking page enables you to interact with business processesbased on the roles assigned to you.
Dashboards Dashboards provide analytical information to monitor process execution aswell as user workloads. They provide summary information and enable youto navigate to instance-specific information.
More:ActivityGuides,Reports, andAdd CustomPage
• Activity guides organize your tasks into milestones. Each milestone is aspecific set of tasks for you to complete, either on your own or incollaboration with others.
• Reports provide analysis of various aspects of tasks and their life cycles.
The following reports are available: Unattended Tasks Report, TasksPriority Report, Tasks Cycle Time Report, Tasks Productivity Report, andTasks Time Distribution Report. For more information about reports, see How To Create Reports.
• Process Workspace provides its own default layout, but you cancustomize that layout by adding new pages and panels. For moreinformation, see Creating and Editing Custom Pages in ProcessWorkspace.
The global navigation bar at the top right is for configuring and acting on ProcessWorkspace itself—for example, logging out, and setting user preferences. If you are anadministrator, then an Administration link also appears. Administrative tasks caninclude the choice to either show or hide the default tabs, or specify which tab page isdisplayed by default when the user logs in.
Table 1-5 describes the pages you access through the Home, Administration, andPreferences links.
Table 1-5 Toolbar for Oracle Business Process Management Workspace
Page Description
Home As described in Table 1-4, the logged-in user's list of tasks, details for a selected task, and all thefunctions needed to start acting on a task are provided.
Administration
The following administrative functions are available:
• Organization administration• Specifying mapped attributes• Specifying application preferences• Administering tasks, including configuring tasks, performing evidence search, and
administering approval groups
Navigating Process Workspace
Getting Started with Process Workspace 1-9

Table 1-5 (Cont.) Toolbar for Oracle Business Process Management Workspace
Page Description
Preferences
Preference settings include:
• Setting rules for users or groups, including vacation rules, and setting vacation periods• Uploading certificates• Specifying user notification channels and message filters• Specifying accessibility for screen readers, contrast colors, and font size
For more information about creating custom pages, see Creating and Editing CustomPages in Process Workspace.
For information on specifying, showing, and hiding default tabs, see How to Specify_Show_ or Hide the Default Tab Pages in Process Workspace.
1.2.1 About Task StatesEvery task has a state value assigned to it at all times to indicate the status of the task.As tasks are created, processed, and closed, their state value changes appropriately,depending on what is happening with the task.
Table 1-6 Task State Descriptions
Task State Description Common Action FromState
ALERTED When there is a recoverable fault that hashappened with task assignment, the task ismoved to ALERTED state and assigned to theerror assignee.
Reassign
Route
Error
Withdraw
ASSIGNED The assignee state indicates a task has beenassigned to a user, role, or group and its readyfor action by a user.
Claim (if assigned to agroup, role, or set ofusers).
Reassign
Custom actions, such asApprove, Reject
Escalate
Route
Delegate
Request information
COMPLETED The task is complete. This is a terminal state. -
DELETED Task is deleted logically. Only To-Do tasks canbe deleted. DELETED is a terminal state.
Purge to remove the taskfrom the database
ERRORED The task has encountered an unrecoverableerror. This is a terminal state.
-
EXPIRED The task is past its expiration date and hasexpired. This is a terminal state.
-
Navigating Process Workspace
1-10 Managing and Monitoring Processes with Oracle Business Process Management
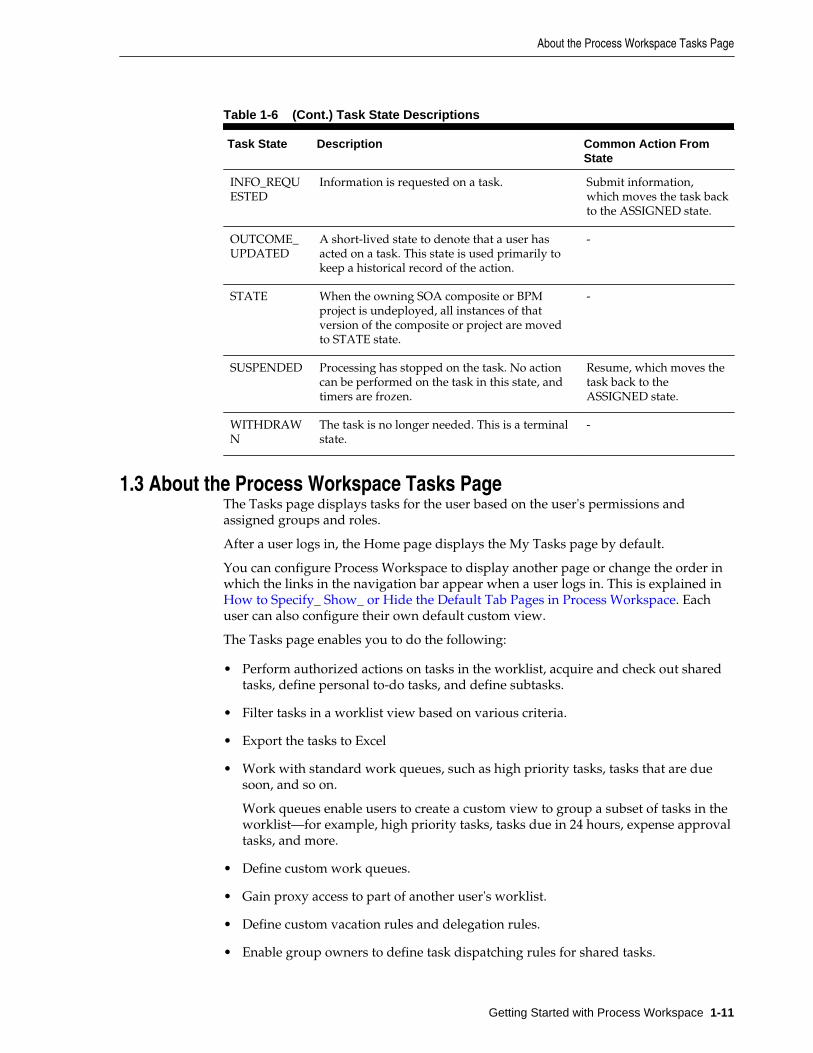
Table 1-6 (Cont.) Task State Descriptions
Task State Description Common Action FromState
INFO_REQUESTED
Information is requested on a task. Submit information,which moves the task backto the ASSIGNED state.
OUTCOME_UPDATED
A short-lived state to denote that a user hasacted on a task. This state is used primarily tokeep a historical record of the action.
-
STATE When the owning SOA composite or BPMproject is undeployed, all instances of thatversion of the composite or project are movedto STATE state.
-
SUSPENDED Processing has stopped on the task. No actioncan be performed on the task in this state, andtimers are frozen.
Resume, which moves thetask back to theASSIGNED state.
WITHDRAWN
The task is no longer needed. This is a terminalstate.
-
1.3 About the Process Workspace Tasks PageThe Tasks page displays tasks for the user based on the user's permissions andassigned groups and roles.
After a user logs in, the Home page displays the My Tasks page by default.
You can configure Process Workspace to display another page or change the order inwhich the links in the navigation bar appear when a user logs in. This is explained in How to Specify_ Show_ or Hide the Default Tab Pages in Process Workspace. Eachuser can also configure their own default custom view.
The Tasks page enables you to do the following:
• Perform authorized actions on tasks in the worklist, acquire and check out sharedtasks, define personal to-do tasks, and define subtasks.
• Filter tasks in a worklist view based on various criteria.
• Export the tasks to Excel
• Work with standard work queues, such as high priority tasks, tasks that are duesoon, and so on.
Work queues enable users to create a custom view to group a subset of tasks in theworklist—for example, high priority tasks, tasks due in 24 hours, expense approvaltasks, and more.
• Define custom work queues.
• Gain proxy access to part of another user's worklist.
• Define custom vacation rules and delegation rules.
• Enable group owners to define task dispatching rules for shared tasks.
About the Process Workspace Tasks Page
Getting Started with Process Workspace 1-11

• Collect a complete workflow history and audit trail.
• Use digital signatures for tasks.
• Display a pop-up showing details about the process instance related to this task.
• Export tasks to Microsoft Excel.
• The admin can map the task outcomes of all the task types (approve, reject,complete, resolve, and so on.) to the images available through the workflow globalconfiguration in Enterprise Manager.
After mapping the task outcome to the images, you can take task outcome actionsfrom the worklist task list tool bar by clicking on the available images.
Note:
If you change a user's privileges in Fusion Middleware Control Console whilethe user is logged in to Process Workspace, the changes take effect only after asubsequent login by the user. This is true for situations in which there are twoactive worklist sessions: one in which the user is logged in before theprivileges are changed, and another in which the same user logs in after theprivileges are changed. In the first case, the changes to the user's privileges donot take effect while the user is logged in. In the second case, when the userlogs in to the second instance of Process Workspace, the changes to the user'sprivileges do take effect.
1.3.1 Navigating the Process Workspace Tasks PageFigure 1-3 shows a sample Process Workspace tasks page as it appears by defaultwhen a user first logs in.
This page lists all the tasks and work items assigned to you, depending on your role.
At the far left is a list with My Tasks selected. Expand this list to select:
• A particular view showing the number of open tasks for each view.
Selecting a particular view refreshes the task count to the latest number.
• A list of applications deployed to Process Workspace.
• Any links or applications you may have specified.
To keep this list visible while you work on tasks, click Pin. To hide it, click Unpin.
Table 1-7 lists and describes the items in the list of views, applications, and links.
About the Process Workspace Tasks Page
1-12 Managing and Monitoring Processes with Oracle Business Process Management
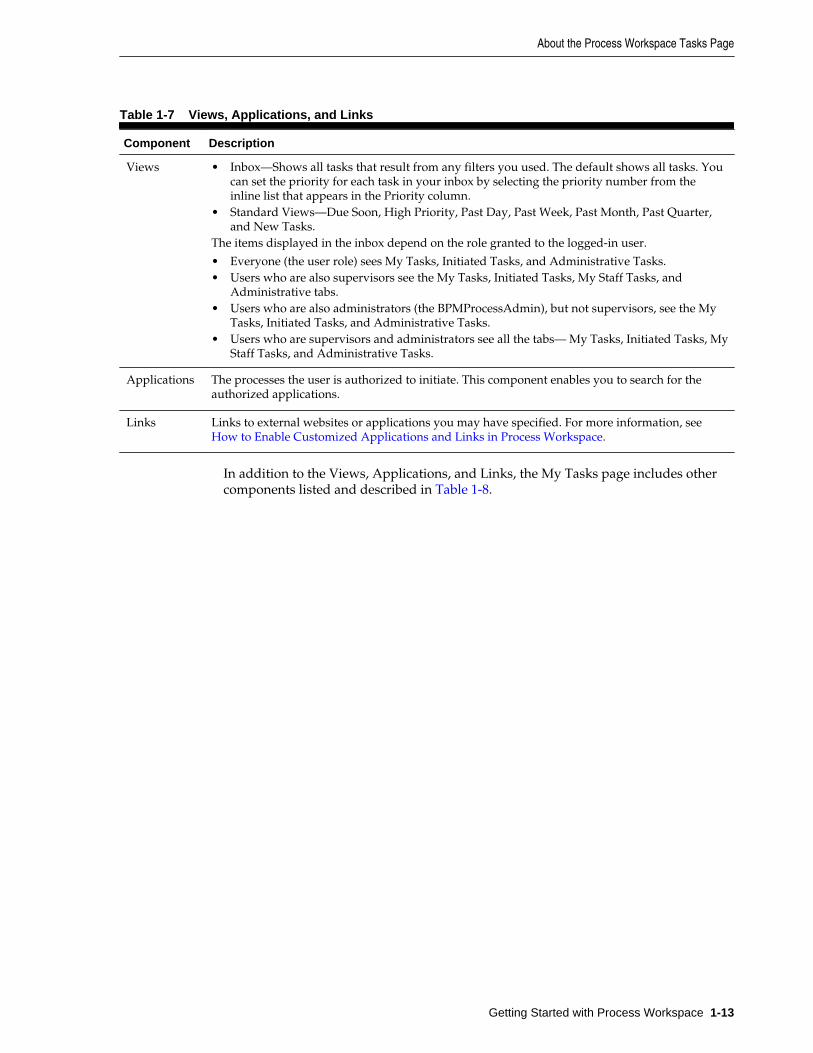
Table 1-7 Views, Applications, and Links
Component Description
Views • Inbox—Shows all tasks that result from any filters you used. The default shows all tasks. Youcan set the priority for each task in your inbox by selecting the priority number from theinline list that appears in the Priority column.
• Standard Views—Due Soon, High Priority, Past Day, Past Week, Past Month, Past Quarter,and New Tasks.
The items displayed in the inbox depend on the role granted to the logged-in user.
• Everyone (the user role) sees My Tasks, Initiated Tasks, and Administrative Tasks.• Users who are also supervisors see the My Tasks, Initiated Tasks, My Staff Tasks, and
Administrative tabs.• Users who are also administrators (the BPMProcessAdmin), but not supervisors, see the My
Tasks, Initiated Tasks, and Administrative Tasks.• Users who are supervisors and administrators see all the tabs— My Tasks, Initiated Tasks, My
Staff Tasks, and Administrative Tasks.
Applications The processes the user is authorized to initiate. This component enables you to search for theauthorized applications.
Links Links to external websites or applications you may have specified. For more information, see How to Enable Customized Applications and Links in Process Workspace.
In addition to the Views, Applications, and Links, the My Tasks page includes othercomponents listed and described in Table 1-8.
About the Process Workspace Tasks Page
Getting Started with Process Workspace 1-13
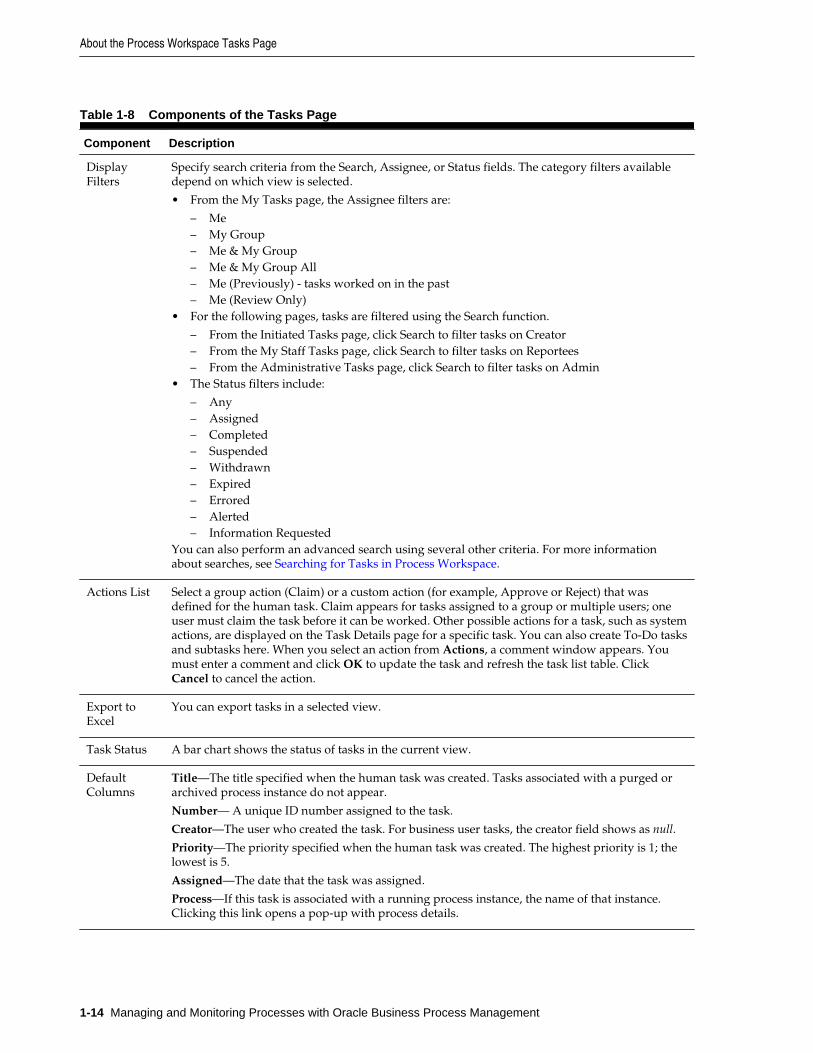
Table 1-8 Components of the Tasks Page
Component Description
DisplayFilters
Specify search criteria from the Search, Assignee, or Status fields. The category filters availabledepend on which view is selected.
• From the My Tasks page, the Assignee filters are:
– Me– My Group– Me & My Group– Me & My Group All– Me (Previously) - tasks worked on in the past– Me (Review Only)
• For the following pages, tasks are filtered using the Search function.
– From the Initiated Tasks page, click Search to filter tasks on Creator– From the My Staff Tasks page, click Search to filter tasks on Reportees– From the Administrative Tasks page, click Search to filter tasks on Admin
• The Status filters include:
– Any– Assigned– Completed– Suspended– Withdrawn– Expired– Errored– Alerted– Information Requested
You can also perform an advanced search using several other criteria. For more informationabout searches, see Searching for Tasks in Process Workspace.
Actions List Select a group action (Claim) or a custom action (for example, Approve or Reject) that wasdefined for the human task. Claim appears for tasks assigned to a group or multiple users; oneuser must claim the task before it can be worked. Other possible actions for a task, such as systemactions, are displayed on the Task Details page for a specific task. You can also create To-Do tasksand subtasks here. When you select an action from Actions, a comment window appears. Youmust enter a comment and click OK to update the task and refresh the task list table. ClickCancel to cancel the action.
Export toExcel
You can export tasks in a selected view.
Task Status A bar chart shows the status of tasks in the current view.
DefaultColumns
Title—The title specified when the human task was created. Tasks associated with a purged orarchived process instance do not appear.
Number— A unique ID number assigned to the task.
Creator—The user who created the task. For business user tasks, the creator field shows as null.
Priority—The priority specified when the human task was created. The highest priority is 1; thelowest is 5.
Assigned—The date that the task was assigned.
Process—If this task is associated with a running process instance, the name of that instance.Clicking this link opens a pop-up with process details.
About the Process Workspace Tasks Page
1-14 Managing and Monitoring Processes with Oracle Business Process Management

Table 1-8 (Cont.) Components of the Tasks Page
Component Description
Task Details To view task details, select the task in the Inbox. The task details are displayed in the lower halfof the worklist. You can double-click a task to display task details in a pop-up browser window.You can also view a task in the same window or a new window by hiding the task details pane inEdit Inbox Settings.
Buttons on the Task Details page indicate available actions.
Once you complete a task,• The task details page closes or loads the next task based on settings in each task form.• The task details page shows the next available task.• The task details page closes, and takes the screen back to the task list. The task list refreshes to
show the remaining tasks. Select a task to see the details page.The behavior of Task details page depends on the options you choose for After Task Completionoption in the How to Specify After Tasks Completion Behavior of Task Details Pop Up Window.
1.3.2 Using the Process Workspace Task Details PageFigure 1-4 shows an example of a Task Details page. This page is invoked by selectinga task from the inbox on the Process Workspace Tasks page. You can also view it in apop-up browser window by double-clicking the task.
The Task Details page may appear differently depending on the tool used duringdesign time to develop the task form it displays.
Figure 1-4 Example of a Task Details Page
The task details page has the following components:
About the Process Workspace Tasks Page
Getting Started with Process Workspace 1-15

• Basic information including the title of the task—for example, task 1—task number,creator, assignees, state, created date, the person who acquired the task, priority,expiration date, and other flex fields.
• Previous Task/Next Task icons—For moving from one task to the previous or nexttask in the task list.
• Action buttons—For custom actions defined for this human task during designtime—for example, Resolved and Unresolved for a help desk request, or Approveand Reject for a loan request. After you complete your role in a task, for example,by making an approval, the task list refreshes accordingly and moves you to thenext task in the task list.
For the administrator, the task initiator, or the manager, Withdraw may alsoappear.
The available task actions depend on the user role and the task. The task actions donot depend on the which view you have selected.
• Other Actions—System task actions, beyond the custom actions defined for the task—as described in Performing System Actions in Process Workspace.
• Content—The payload. The fields displayed are specific to how the human taskwas created during design time.
• History Details—These are described in Task History.
• Comments and Attachments:
– Comments entered by various users who have participated in the workflow. Anewly added comment and the commenter's user name are appended to theexisting comments. A trail of comments is maintained throughout the life cycleof the task. To add a comment, you must have permission to update the task.
For information about how to add a comment, see Adding Comments andAttachments to Tasks in Process Workspace.
– Attachments are documents or reference URLs associated with a task. These aretypically associated with the workflow as defined in the human task duringdesign time, or attached and modified by any of the participants using the tasklist. To add or delete an attachment, you must have permission to update thetask. When adding file attachments, you can use an absolute path name orbrowse for a file.
1.3.2.1 Task History
The task history maintains an audit trail of the actions performed by the participantsin the workflow and a snapshot of the task payload and attachments at various pointsin the workflow. The short history for a task lists all versions created by the followingtasks:
• Initiate task
• Reinitiate task
• Update outcome of task
• Completion of task
• Erroring of task
About the Process Workspace Tasks Page
1-16 Managing and Monitoring Processes with Oracle Business Process Management
• Expiration of task
• Withdrawal of task
• Alerting of task to the error assignee
You can include the following actions in the short history list by modifying theshortHistoryActions element.
• Acquire
• Ad hoc route
• Auto release of task
• Delegate
• Escalate
• Information request on task
• Information submit for task
• Override routing slip
• Update outcome and route
• Push back
• Reassign
• Release
• Renew
• Resume
• Skip current assignment
• Suspend
• Update
The history provides a graphical view of a task flow, as shown in Figure 1-5.
About the Process Workspace Tasks Page
Getting Started with Process Workspace 1-17

Figure 1-5 History: Graphical View
Table 1-9 describes the icons used in the History section.
Table 1-9 Icons for Task History
Icon Description
Indicates an approver in an ad hoc routing scenario.
Indicates that the task has been approved.
Indicates that the participant just receives a notification task and the businessprocess does not wait for the participant's response. Participant cannot directlyimpact the outcome of a task, but in some cases can provide comments or addattachments.
Indicates that a set of people must work in parallel. This pattern is commonly usedfor voting.
Indicates that the participant belongs to a management chain.
Indicates the simple case in which a participant maps to a user, group, or role.
Indicates that the task is untouched.
Indicates the end of the task flow.
About the Process Workspace Tasks Page
1-18 Managing and Monitoring Processes with Oracle Business Process Management
Note:
The history of a parent task also displays the history of any subtasks itcontains.
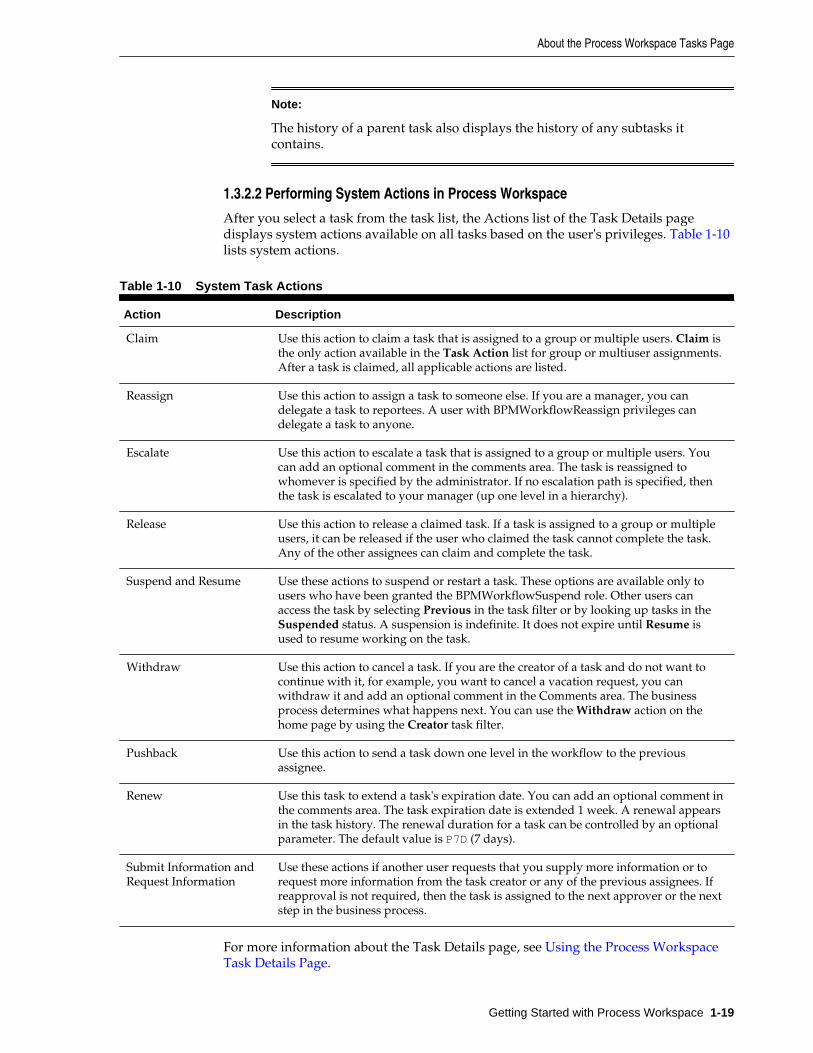
1.3.2.2 Performing System Actions in Process Workspace
After you select a task from the task list, the Actions list of the Task Details pagedisplays system actions available on all tasks based on the user's privileges. Table 1-10lists system actions.
Table 1-10 System Task Actions
Action Description
Claim Use this action to claim a task that is assigned to a group or multiple users. Claim isthe only action available in the Task Action list for group or multiuser assignments.After a task is claimed, all applicable actions are listed.
Reassign Use this action to assign a task to someone else. If you are a manager, you candelegate a task to reportees. A user with BPMWorkflowReassign privileges candelegate a task to anyone.
Escalate Use this action to escalate a task that is assigned to a group or multiple users. Youcan add an optional comment in the comments area. The task is reassigned towhomever is specified by the administrator. If no escalation path is specified, thenthe task is escalated to your manager (up one level in a hierarchy).
Release Use this action to release a claimed task. If a task is assigned to a group or multipleusers, it can be released if the user who claimed the task cannot complete the task.Any of the other assignees can claim and complete the task.
Suspend and Resume Use these actions to suspend or restart a task. These options are available only tousers who have been granted the BPMWorkflowSuspend role. Other users canaccess the task by selecting Previous in the task filter or by looking up tasks in theSuspended status. A suspension is indefinite. It does not expire until Resume isused to resume working on the task.
Withdraw Use this action to cancel a task. If you are the creator of a task and do not want tocontinue with it, for example, you want to cancel a vacation request, you canwithdraw it and add an optional comment in the Comments area. The businessprocess determines what happens next. You can use the Withdraw action on thehome page by using the Creator task filter.
Pushback Use this action to send a task down one level in the workflow to the previousassignee.
Renew Use this task to extend a task's expiration date. You can add an optional comment inthe comments area. The task expiration date is extended 1 week. A renewal appearsin the task history. The renewal duration for a task can be controlled by an optionalparameter. The default value is P7D (7 days).
Submit Information andRequest Information
Use these actions if another user requests that you supply more information or torequest more information from the task creator or any of the previous assignees. Ifreapproval is not required, then the task is assigned to the next approver or the nextstep in the business process.
For more information about the Task Details page, see Using the Process WorkspaceTask Details Page.
About the Process Workspace Tasks Page
Getting Started with Process Workspace 1-19
1.3.3 Customizing the Task List in Process WorkspaceYou can customize your task list in several ways, including adding worklist views,selecting which columns to display, setting the sorting order, and displaying a subsetof the tasks based on filter criteria. You can customize your inbox view as well as anyother view including views you have created yourself.
To increase the number of tasks retrieved, resize the task list display area.
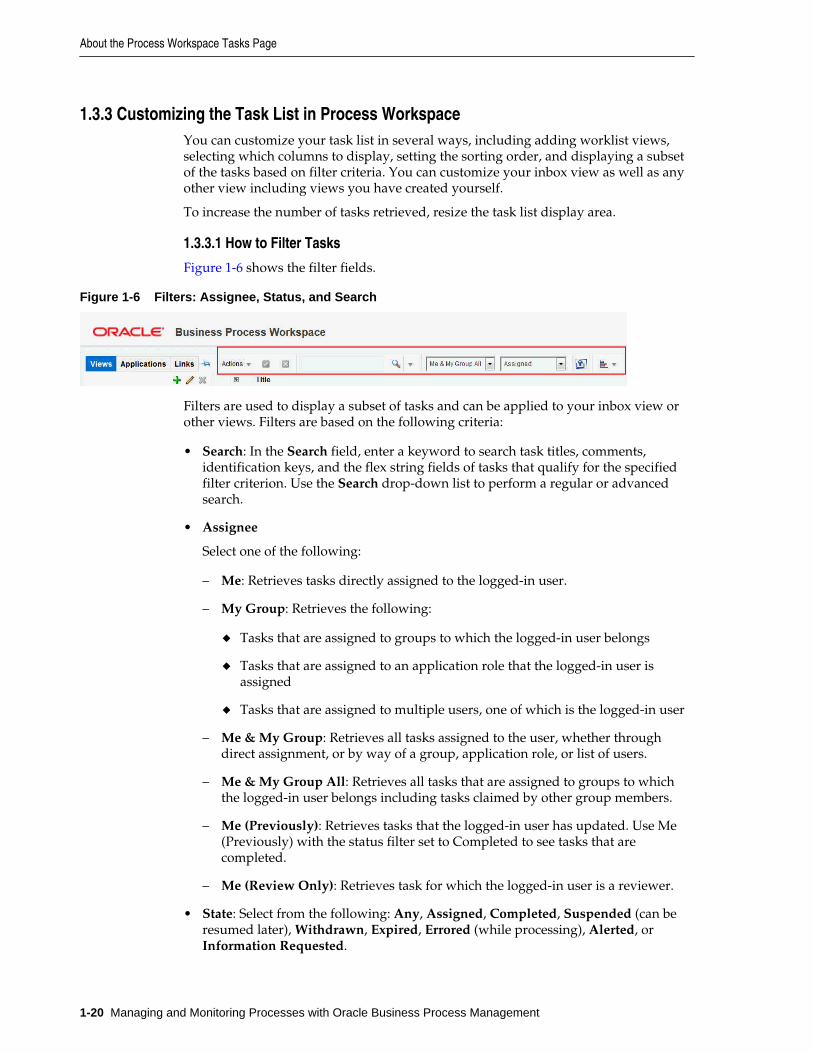
1.3.3.1 How to Filter Tasks
Figure 1-6 shows the filter fields.
Figure 1-6 Filters: Assignee, Status, and Search
Filters are used to display a subset of tasks and can be applied to your inbox view orother views. Filters are based on the following criteria:
• Search: In the Search field, enter a keyword to search task titles, comments,identification keys, and the flex string fields of tasks that qualify for the specifiedfilter criterion. Use the Search drop-down list to perform a regular or advancedsearch.
• Assignee
Select one of the following:
– Me: Retrieves tasks directly assigned to the logged-in user.
– My Group: Retrieves the following:
◆ Tasks that are assigned to groups to which the logged-in user belongs
◆ Tasks that are assigned to an application role that the logged-in user isassigned
◆ Tasks that are assigned to multiple users, one of which is the logged-in user
– Me & My Group: Retrieves all tasks assigned to the user, whether throughdirect assignment, or by way of a group, application role, or list of users.
– Me & My Group All: Retrieves all tasks that are assigned to groups to whichthe logged-in user belongs including tasks claimed by other group members.
– Me (Previously): Retrieves tasks that the logged-in user has updated. Use Me(Previously) with the status filter set to Completed to see tasks that arecompleted.
– Me (Review Only): Retrieves task for which the logged-in user is a reviewer.
• State: Select from the following: Any, Assigned, Completed, Suspended (can beresumed later), Withdrawn, Expired, Errored (while processing), Alerted, orInformation Requested.
About the Process Workspace Tasks Page
1-20 Managing and Monitoring Processes with Oracle Business Process Management

Note:
If a task is assigned separately to multiple reportees, when a manager looks atthe My Staff Tasks list, the manager sees as many copies of that task as thenumber of reportees to whom that task is assigned.
1.3.3.1.1 Seeing your completed tasks
When you mark a task as Completed, it is no longer displayed in your Task List. Tosee all completed tasks, select Me (Previously) from the Assignee filter and Completedfrom the Status filter. The task list is automatically updated to show your completedtasks.
1.3.3.1.2 To filter tasks based on assignee or state
Select options from the Assignee and State lists. The task list is automatically updatedbased on the filter selections.
1.3.3.1.3 To filter tasks based on keyword search
1. In the Search field, enter a keyword to search task titles, comments, identificationkeys, and the flex string fields of tasks that qualify for the specified filter criterion.
2. Press Enter or click Search.
1.3.3.1.4 To filter tasks based on an advanced search
Mapped attribute labels can be used in an advanced search if you select task types forwhich mapped attribute have been defined.
See How to Specify Mapped Attributes for more information.
1. From the Search drop-down list, click Advanced.
2. (Optional) Select Save As View, provide a view name, and use the Display pageto provide other information, as shown in Figure 1-7 and Figure 1-8. If you do notselect Save As View, the Display page is not available and the Definition page isas seen in Figure 1-9.
Note:
Selecting Save As View creates a customized view. The saved view appearsunder My Views.
About the Process Workspace Tasks Page
Getting Started with Process Workspace 1-21

Figure 1-7 Advanced Search: Definition Page
Figure 1-8 Advanced Search: Display Page
About the Process Workspace Tasks Page
1-22 Managing and Monitoring Processes with Oracle Business Process Management

Figure 1-9 Advanced Search Definition Tab - Display Tab Not Available
Table 1-11 describes the advanced search view columns available in the Displaypage.
Note:
The titles: User Conditions, Advanced Condition, Time Conditions, BasicConditions and Custom Conditions correspond to the menu categories foradding conditions (see Figure 1-12).
The saved view appears in the Views panel under My Views, as shown in Figure1-10.
About the Process Workspace Tasks Page
Getting Started with Process Workspace 1-23

Figure 1-10 Saving a View
3. Select an assignee, as shown in Figure 1-11.
Figure 1-11 Selecting an Assignee for an Advanced Search
4. Select Any or All for matching multiple filters.
5. Add conditions (filters), as shown in Figure 1-12.
About the Process Workspace Tasks Page
1-24 Managing and Monitoring Processes with Oracle Business Process Management
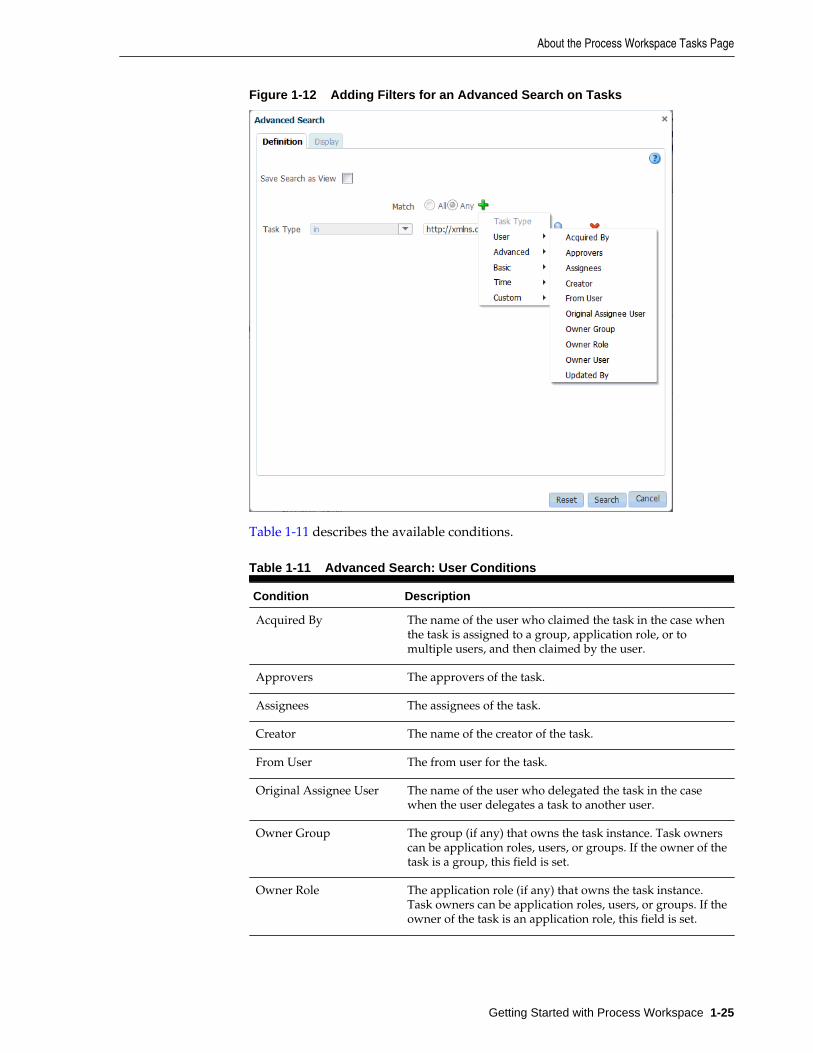
Figure 1-12 Adding Filters for an Advanced Search on Tasks
Table 1-11 describes the available conditions.
Table 1-11 Advanced Search: User Conditions
Condition Description
Acquired By The name of the user who claimed the task in the case whenthe task is assigned to a group, application role, or tomultiple users, and then claimed by the user.
Approvers The approvers of the task.
Assignees The assignees of the task.
Creator The name of the creator of the task.
From User The from user for the task.
Original Assignee User The name of the user who delegated the task in the casewhen the user delegates a task to another user.
Owner Group The group (if any) that owns the task instance. Task ownerscan be application roles, users, or groups. If the owner of thetask is a group, this field is set.
Owner Role The application role (if any) that owns the task instance.Task owners can be application roles, users, or groups. If theowner of the task is an application role, this field is set.
About the Process Workspace Tasks Page
Getting Started with Process Workspace 1-25

Table 1-11 (Cont.) Advanced Search: User Conditions
Condition Description
Owner User The user (if any) that owns the task instance. Task ownerscan be application roles, users, or groups. If the owner of thetask is a user, this field is set.
Updated By The user who last updated the task.
Table 1-12 Advanced Search: Advanced Conditions
Condition Description
Application Context The application to which any application roles associatedwith the tasks (such as assignees, owners, and so on) belong.
Component The name of the task component that defines the taskinstance.
Composite The name of the composite that contains the task componentthat defines the task instance.
Composite DistinguishedName
The unique name for the particular deployment of thecomposite that contains the task component that defines thetask instance.
Composite Version The version of the composite that contains the taskcomponent that defines the task instance.
Partition The domain to which the composite that contains the taskcomponent that defines the task instance belongs.
Task Display URL The URL to display the details for the task.
Workflow Pattern -
Table 1-13 Advanced Search: Basic Conditions
Condition Description
Category The category of the task.
Identifier The (optional) custom unique identifier for the task. This isan additional unique identifier to the standard task number.
Long Summary -
Number An integer that uniquely identifies the task instance. Thistask number is different from the instance ID shown inEnterprise Manager.
Outcome The outcome of the task, for example approved or rejected.This is only set on completed task instances.
Percentage Complete The percentage of the task completed (used with To-Dotasks).
About the Process Workspace Tasks Page
1-26 Managing and Monitoring Processes with Oracle Business Process Management

Table 1-13 (Cont.) Advanced Search: Basic Conditions
Condition Description
Priority An integer that defines the priority of the task. A lowernumber indicates a higher priority; typically numbers 1 to 5are used.
Short Summary -
State The state of the task instance.
Task Definition Name The name of the task component that defines the taskinstance.
Title The title of the task.
Table 1-14 Advanced Search: Time Conditions
Condition Description
Assigned The date that this task was assigned.
Created The date that the task instance was created.
Due Date The due date of the task (used with To-Do tasks).
End Date The end date of the task (used with To-Do tasks).
Expires The date on which the task instance expires.
Start Date The start date of the task (used with To-Do tasks).
Updated Date The date that the task instance was last updated.
Table 1-15 Advanced Search: Custom Conditions
Condition Description
Custom Date 1 Custom flex field 1 with Date datatype
Custom Date 2 Custom flex field 2 with Date datatype
Custom Number 1 Custom flex field 1 with Number datatype
Custom Number 2 Custom flex field 2 with Number datatype
Custom String 1 Custom flex field 1 with String datatype
Custom String 2 Custom flex field 2 with String datatype
6. Add parameter values as exemplified in Figure 1-13.
About the Process Workspace Tasks Page
Getting Started with Process Workspace 1-27

Figure 1-13 Advanced Search
7. Browse for a task type or leave the field blank for all types. Mapped attributelabels can be selected in the query and display columns dialog boxes if theselected task types have mapped attribute mappings defined. Use the searchoption to search by task type, process name or category as shown in Figure 1-14.
Figure 1-14 Task Type Browser
8. Specify whether to share either this view's definition or its data, and the users orgroups to share it with.
9. Click Search.
The task list appears with the tasks filtered according to your criteria.
About the Process Workspace Tasks Page
1-28 Managing and Monitoring Processes with Oracle Business Process Management

1.3.3.2 How to Create and Customize Worklist Views
The Views menu, shown in Figure 1-15, displays your inbox, standard views, and anycustom views you have created. Use it to create, share, and customize views.
Figure 1-15 Views Menu
To create a worklist view:
1. In the Views section, click Add View.
The Create User View dialog box appears as shown in Figure 1-16
About the Process Workspace Tasks Page
Getting Started with Process Workspace 1-29
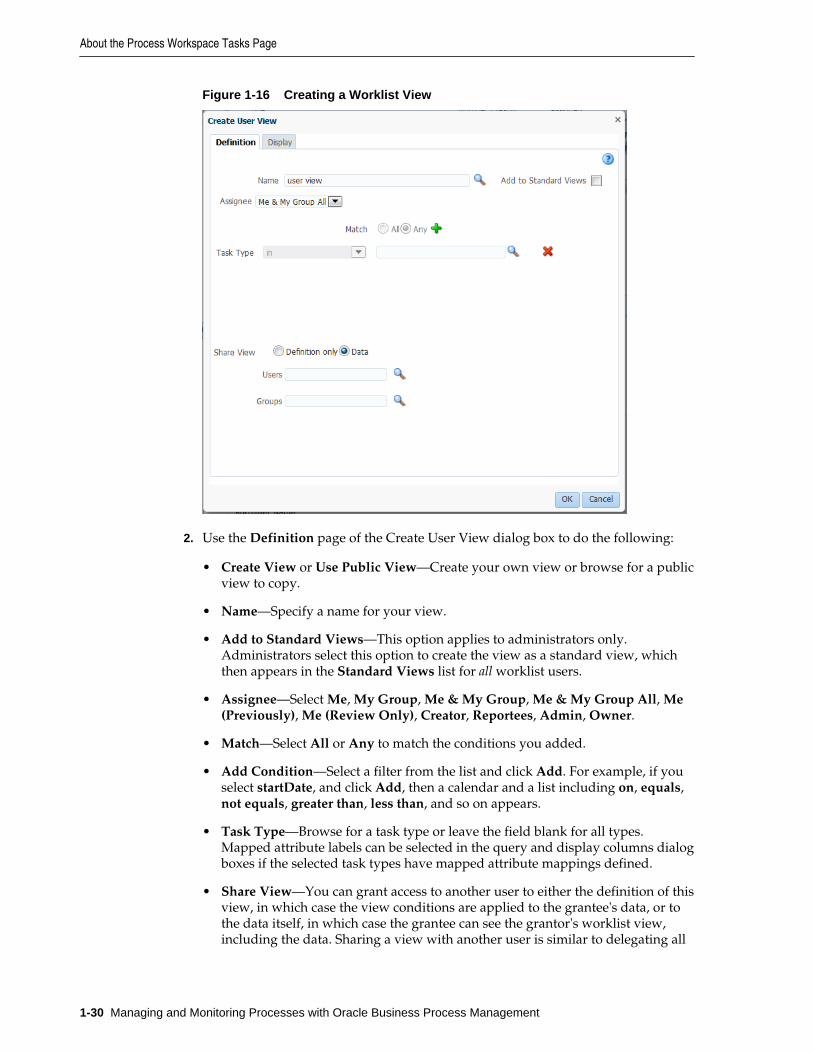
Figure 1-16 Creating a Worklist View
2. Use the Definition page of the Create User View dialog box to do the following:
• Create View or Use Public View—Create your own view or browse for a publicview to copy.
• Name—Specify a name for your view.
• Add to Standard Views—This option applies to administrators only.Administrators select this option to create the view as a standard view, whichthen appears in the Standard Views list for all worklist users.
• Assignee—Select Me, My Group, Me & My Group, Me & My Group All, Me(Previously), Me (Review Only), Creator, Reportees, Admin, Owner.
• Match—Select All or Any to match the conditions you added.
• Add Condition—Select a filter from the list and click Add. For example, if youselect startDate, and click Add, then a calendar and a list including on, equals,not equals, greater than, less than, and so on appears.
• Task Type—Browse for a task type or leave the field blank for all types.Mapped attribute labels can be selected in the query and display columns dialogboxes if the selected task types have mapped attribute mappings defined.
• Share View—You can grant access to another user to either the definition of thisview, in which case the view conditions are applied to the grantee's data, or tothe data itself, in which case the grantee can see the grantor's worklist view,including the data. Sharing a view with another user is similar to delegating all
About the Process Workspace Tasks Page
1-30 Managing and Monitoring Processes with Oracle Business Process Management
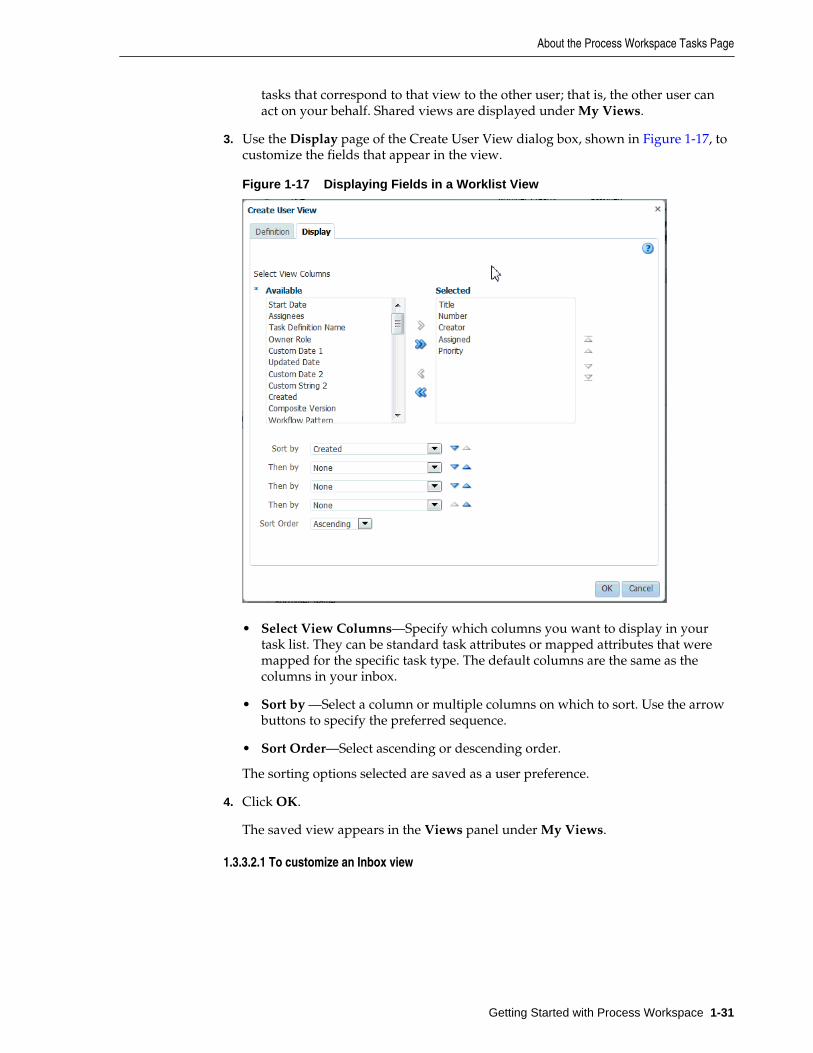
tasks that correspond to that view to the other user; that is, the other user canact on your behalf. Shared views are displayed under My Views.
3. Use the Display page of the Create User View dialog box, shown in Figure 1-17, tocustomize the fields that appear in the view.
Figure 1-17 Displaying Fields in a Worklist View
• Select View Columns—Specify which columns you want to display in yourtask list. They can be standard task attributes or mapped attributes that weremapped for the specific task type. The default columns are the same as thecolumns in your inbox.
• Sort by —Select a column or multiple columns on which to sort. Use the arrowbuttons to specify the preferred sequence.
• Sort Order—Select ascending or descending order.
The sorting options selected are saved as a user preference.
4. Click OK.
The saved view appears in the Views panel under My Views.
1.3.3.2.1 To customize an Inbox view
About the Process Workspace Tasks Page
Getting Started with Process Workspace 1-31

Note:
If you select to display the Task Display URL column, you must have anassociated taskflow for the deployed task. The taskflow registration isperformed during deployment. At that time, the Task Display URL columnvalue is set. If the taskflow is not associated during deployment, the TaskDisplay URL column does not display generic URL details for a task.
1. In the Views, Applications, and Links pane, select Views, then select the view youwant to customize.
2. Click Edit View.
The Edit User View dialog box appears as shown in Figure 1-18.
Figure 1-18 Customizing Fields in a Worklist View
3. Use the Edit User View dialog box to customize the view.
When you select and move items from the Available Columns list to the SelectedColumns list (or vice-versa), the items remain selected. Therefore, if you selectitems to move back, the previously selected items are also moved. Ensure that youdeselect items after moving them between the lists if you intend to moveadditional columns.
When you have finished making your settings, click OK.
1.3.4 Searching for Tasks in Process WorkspaceFor instructions on searching for tasks, see the following topics:
About the Process Workspace Tasks Page
1-32 Managing and Monitoring Processes with Oracle Business Process Management

• To filter tasks based on keyword search
• To filter tasks based on an advanced search
1.3.5 Defining and Testing Screenflows in Process WorkspaceScreenflows enable users to work on all of the tasks in a process in sequence. Forexample, when a user completes a task in a process, and if the next task is assigned tothe same user, then the next task is automatically shown in the same flow, without theuser having to return to the task list.
After deploying the BPM process and human tasks you can test if the screenflowworks. Start the process instance and open the human task in Workspace. When youfinish a task that is part of the screenflow, it immediately jumps to the next text in thescreenflow without you going back to the tasklist.
For more information about defining a screenflow, see Working with Screenflows inthe BPM Studio Guide.
To test screenflows:
1. Deploy the BPM Process.
2. Deploy all the Human Tasks that are part of the process. Make sure you have theScreenFlowMode parameter added in all human tasks that are part of thescreenflow, except the last task.
(Optional) Enter the result of the step here.
3. Instantiate the process.
4. Open the human task that is part of the process in Workspace.
5. Act on the task.
If the task is part of the screenflow, you will see the next available task.
You can set a timeout parameter for screenflows. For more information, see How toSet a Timeout Parameter for Screenflows.
1.4 About the Process Workspace Activity Guides PageActivity guides organize your tasks into milestones. Each milestone is a specific set oftasks for you to complete, either on your own or in collaboration with others.
For each milestone, the activity guide tells you which tasks to complete and in whichorder. You complete a milestone by completing all the tasks it contains for you.Depending on the nature of the task, you can save an unfinished task and resume itlater.
Figure 1-19 shows an example of an activity guide.
About the Process Workspace Activity Guides Page
Getting Started with Process Workspace 1-33

Figure 1-19 Sample Activity Guide
Using an activity guide, you can:
• Expand a milestone to see and act on the tasks it includes.
• View the status and percent completion of the overall business process in whichyou participate.
For more information about navigating the Activity Guides page, see NavigatingActivity Guides.
1.5 About the Process Workspace Process Tracking PageUse the Process Tracking page to interact with business processes based on the rolesassigned to you.
Using the Process Tracking tab, you can do the following:
• View the list of process instances pending in your inbox.
• Execute tasks, that is, carry out a human task on a particular instance.
• Search for instances by different criteria.
• Save the searches as a view.
• View the details of an instance, including the audit trail.
• Create a new instance, if you have permission to do so.
• Attach a file to an instance.
• Add notes to an instance.
About the Process Workspace Process Tracking Page
1-34 Managing and Monitoring Processes with Oracle Business Process Management

1.5.1 Navigating the Process Workspace Process Tracking Page
Figure 1-20 Process Workspace Process Tracking Page
The Process Tracking page has these sections:
• The Applications panel, which shows the list of applications available to you. Hereyou can perform basic Process Workspace actions, such as creating a new instanceperforming a given activity, or sorting applications.
Hovering over the name of an application in the Applications panel displays a tooltip with the application's full name and revision number.
The applications available in Process Workspace depend on the process design andthe roles assigned to the user currently logged in. The list of available applicationsalso depends on the BPM processes that are deployed and running. If no processesare running, or if you are not a participant able to execute an application in any ofthe processes currently running, then the applications panel is empty.
In the applications panel, you can sort either of the following:
– Only the default versions of applications
– All active versions of applications
You can sort either by name or by process version. You can filter the sameapplications by entering in the Search field either full or partial names or full orpartial versions.
• The Views panel, on the lower left half, displays the views available to you in anexpandable tree
About the Process Workspace Process Tracking Page
Getting Started with Process Workspace 1-35
• The Pending Components panel shows all suspended processes. If a new version ofa process is deployed, and the previously deployed process has instances not yetmigrated to the new version, then the previously deployed process is suspended.To resume it, either migrate or suspend any non-migrated instances. Forinformation about resuming suspended processes, see How to Resume theSuspended Process Flow in Oracle Fusion Middleware Developing Business Processeswith Oracle Business Process Management Studio.
• The Work Items panel, on the upper right half, shows the task items correspondingto the view you have selected in the Views panel. In this panel, you can choose thecolumns that are presented in a given view. A particular column arrangement isknown as a presentation. Clicking Add/Remove columns displays the Presentationdialog box in which you can define columns.
The following columns are available:
– Actions
– Activity
– Activity Due Date
– Copy
– Creation Time
– Deadline
– Description
– Has Attachments
– Has Notes
– Initiated
– Initiator
– Initiator Name
– Instance #
– Parent Copy
– Participant
– poID
– Priority
– Process Name
– Process Due Date
– Received
– Status
– Task Participant (that is, the participant that is currently executing an instance.)
– Title
About the Process Workspace Process Tracking Page
1-36 Managing and Monitoring Processes with Oracle Business Process Management
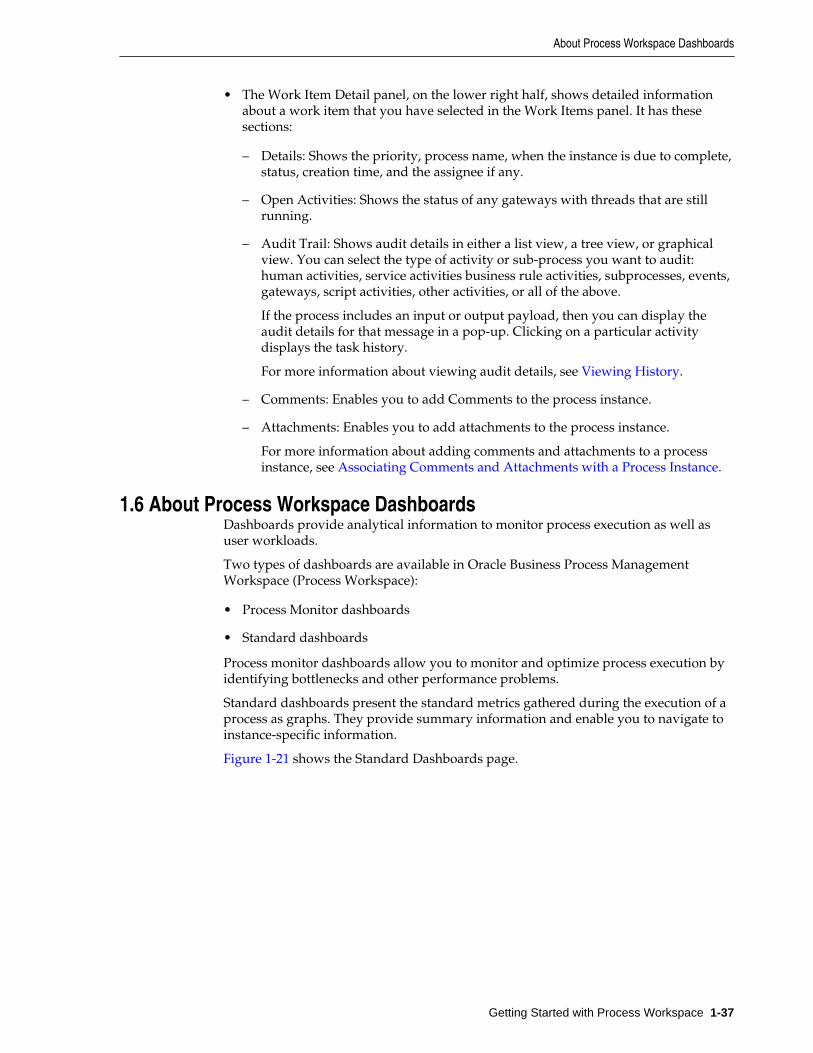
• The Work Item Detail panel, on the lower right half, shows detailed informationabout a work item that you have selected in the Work Items panel. It has thesesections:
– Details: Shows the priority, process name, when the instance is due to complete,status, creation time, and the assignee if any.
– Open Activities: Shows the status of any gateways with threads that are stillrunning.
– Audit Trail: Shows audit details in either a list view, a tree view, or graphicalview. You can select the type of activity or sub-process you want to audit:human activities, service activities business rule activities, subprocesses, events,gateways, script activities, other activities, or all of the above.
If the process includes an input or output payload, then you can display theaudit details for that message in a pop-up. Clicking on a particular activitydisplays the task history.
For more information about viewing audit details, see Viewing History.
– Comments: Enables you to add Comments to the process instance.
– Attachments: Enables you to add attachments to the process instance.
For more information about adding comments and attachments to a processinstance, see Associating Comments and Attachments with a Process Instance.
1.6 About Process Workspace DashboardsDashboards provide analytical information to monitor process execution as well asuser workloads.
Two types of dashboards are available in Oracle Business Process ManagementWorkspace (Process Workspace):
• Process Monitor dashboards
• Standard dashboards
Process monitor dashboards allow you to monitor and optimize process execution byidentifying bottlenecks and other performance problems.
Standard dashboards present the standard metrics gathered during the execution of aprocess as graphs. They provide summary information and enable you to navigate toinstance-specific information.
Figure 1-21 shows the Standard Dashboards page.
About Process Workspace Dashboards
Getting Started with Process Workspace 1-37

Figure 1-21 Process Workspace Standard Dashboards Page
For additional information about dashboards, see Using Dashboards in ProcessWorkspace.
About Process Workspace Dashboards
1-38 Managing and Monitoring Processes with Oracle Business Process Management

2Working on Tasks in Process Workspace
You can set user preferences and act on tasks with Oracle Business ProcessManagement Workspace (Process Workspace), including claiming and releasing tasks;reassigning, delegating, and routing tasks; associating comments and attachments totasks, and setting rules and vacation periods.
This chapter includes the following sections:
• Claiming and Releasing Tasks in Process Workspace
• Modifying History Approval Options in the Task Details Page
• Reassigning and Delegating Tasks in Process Workspace
• Requesting Information in Process Workspace
• Adding Comments and Attachments to Tasks in Process Workspace
• Setting Rules_ Vacation Periods_ and Notification Preferences in ProcessWorkspace
• Creating To-Do Tasks in Process Workspace
• Creating Subtasks in Tasks in Process Workspace
• Acting on Tasks that Require Passwords in Process Workspace
• Acting on a Task that Requires a Digital Signature in Process Workspace
• Routing Tasks in Process Workspace
• Using the Evidence Store Service and Digital Signatures
• Creating Worklist Reports
2.1 Claiming and Releasing Tasks in Process WorkspaceIf a task is assigned to a group or multiple users, then the task must be claimed first.Claim is the only action available in the Task Action list for group or multiuserassignments. After a task is claimed, all applicable actions are listed.
Note:
If the task has the auto claim option set, then the user must not claim the task.The custom action is available for the user.
If a task is assigned to a group or multiple users, it can be released by the user whoclaimed it. Any of the other assignees can then claim and complete the task.
Working on Tasks in Process Workspace 2-1
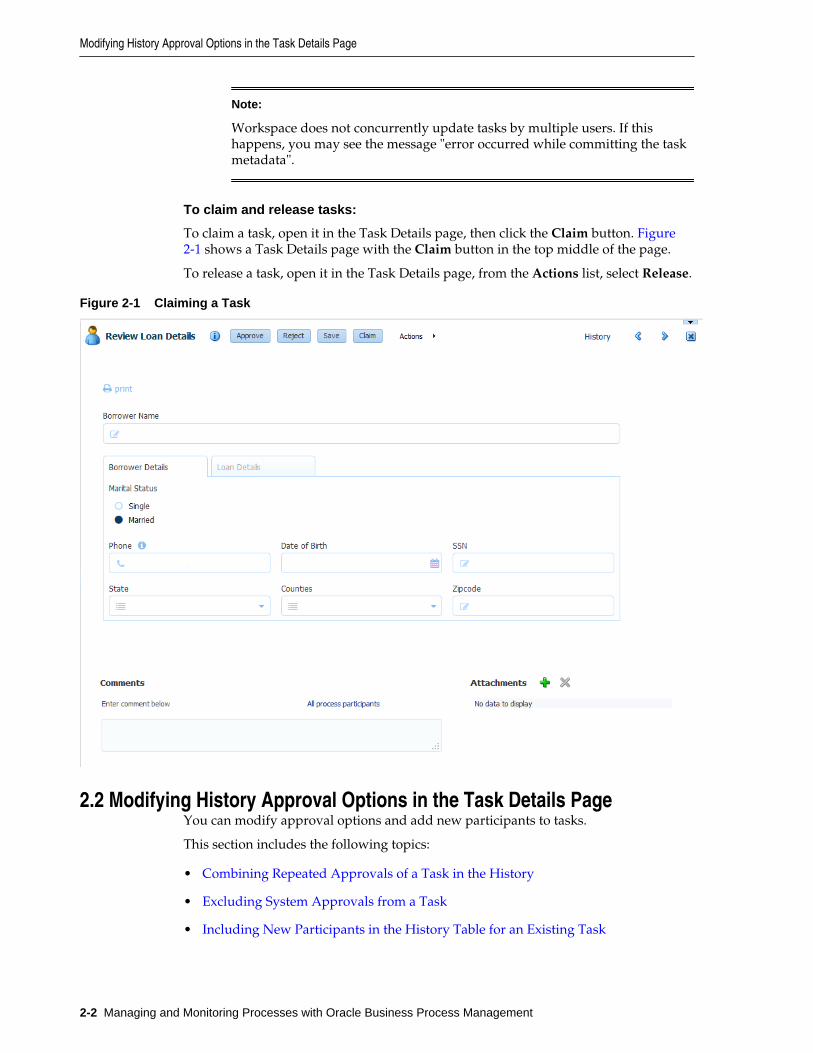
Note:
Workspace does not concurrently update tasks by multiple users. If thishappens, you may see the message "error occurred while committing the taskmetadata".
To claim and release tasks:
To claim a task, open it in the Task Details page, then click the Claim button. Figure2-1 shows a Task Details page with the Claim button in the top middle of the page.
To release a task, open it in the Task Details page, from the Actions list, select Release.
Figure 2-1 Claiming a Task
2.2 Modifying History Approval Options in the Task Details PageYou can modify approval options and add new participants to tasks.
This section includes the following topics:
• Combining Repeated Approvals of a Task in the History
• Excluding System Approvals from a Task
• Including New Participants in the History Table for an Existing Task
Modifying History Approval Options in the Task Details Page
2-2 Managing and Monitoring Processes with Oracle Business Process Management

2.2.1 Combining Repeated Approvals of a Task in the HistoryAt times you may want to combine tasks that have identical approval sequences intoone combined approval—for example, to approve a purchase order that has manyidentical line items each requiring its own approval. Rather than approving each lineitem one-by-one, you can combine them into a single approval and then approve thatcombined task.
After you combined tasks into one repeated approval, you cannot alter the sequence ofthose tasks; for example, you cannot add, edit, or delete a participant in that task.
To combine repeated approvals of a task:
1. In the Process Workspace task list, select a task.
The task opens in the Task Details pane.
2. In the Task Details pane, click History.
The history for the task appears.
3. Click Options as shown in Figure 2-2.
Figure 2-2 History - Options
4. Verify that Combine Repeated Approvals is selected. This is the default setting.
To separate the tasks, clear the check box Combine Repeated Approvals.
5. Click Apply.
2.2.2 Excluding System Approvals from a TaskTo remove all system generated updates from the task history, you must select theoption to exclude system approvals.
To select Exclude System Approvals:
1. In the Process Workspace task list, select a task.
The task opens in the Task Details pane.
2. In the Task Details pane, click History.
The history for the task appears.
3. Click Options as shown in Figure 2-2.
4. Select Exclude system approvals.
5. Click Apply.
Modifying History Approval Options in the Task Details Page
Working on Tasks in Process Workspace 2-3

2.2.3 Including New Participants in the History Table for an Existing TaskTo include new participants in a task, you must select the Including Future Approvalsoption from the task history. This option adds participants to the task history anddisplays the actions they perform on the task.
This is enabled only when the task is configured with the following options:
• Participants are allowed to invite other participants
• Editing of future approvers is allowed
To Include New Participants:
1. In the Process Workspace task list, select a task.
The task opens in the Task Details pane.
2. In the Task Details pane, click History.
The history for the task appears.
3. Click Options as shown in Figure 2-2.
4. Verify that either Include Future approvals or Show All is selected. The default isfor Include Future approvals to be selected.
To disable this option, clear the check box Include Future approvals.
5. Click Apply.
2.3 Reassigning and Delegating Tasks in Process WorkspaceYou may go on vacation and need to reassign your tasks to someone else, or you mayneed to delegate your tasks to an administrative assistant.
To reassign or delegate a task:
1. In the Process Workspace task list, select a task.
The task opens in the Task Details pane.
2. In the Task Details pane, from the Actions list, select Reassign.
The Reassign Task dialog box appears.
3. Select either Reassign or Delegate.
Delegate differs from Reassign in that the privileges of the delegatee are based onthe delegator's privileges. This function can be used by managers' assistants, forexample.
4. Enter a user or group name or browse for a user or group name, as shown in Figure2-3. You can use an asterisk (*) as a wildcard.
Reassigning and Delegating Tasks in Process Workspace
2-4 Managing and Monitoring Processes with Oracle Business Process Management

Figure 2-3 Reassigning a Task
A supervisor can reassign tasks to any of his or her subordinates at any time.
5. Select the users or groups to which you are reassigning and click OK.
You can reassign to multiple users or groups. One of the assignees must claim thetask.
Note:
When task details have been upgraded from an earlier release, you may see a"Request Failed" error when executing the Reassign action. Actually, thereassign completes, and when you click OK again, a popup says the task isalready assigned.
To eliminate the error message, upgrade your taskflow applications byopening them in Oracle JDeveloper, then redeploy the taskform.
2.4 Requesting Information in Process WorkspaceYou can request more information about a task from another user.
To request information:
1. In the Process Workspace task list, select a task.
The task opens in the Task Details pane.
2. In the Task Details pane, from the Actions list, select Request Information.
3. Request information from a task participant or from another user, as shown in Figure 2-4.
Requesting Information in Process Workspace
Working on Tasks in Process Workspace 2-5

Figure 2-4 Requesting More Information from Past Approvers or Another User,or Pushing the Task Back
If you use the Search icon to find a user name, the Identity Browser appears, asshown in Figure 2-5.
Figure 2-5 Identity Browser
In Figure 2-5, in the ID column, the identifier, jstein, is a link. Clicking this linkdisplays a details window with more information about this user.
Note:
If you are in a multi-tenancy environment, search for a user simply by the useridentifier and not by the tenant identifier. For example, if the user identifier isjstein and the tenant identifier is company_name.jstein, you would search byusing jstein.
4. Add your comment.
5. Choose one of the following:
• Route directly back to me.
• Require subsequent participants to retake action (Previous approvers mustreapprove the task after the user submits the information).
6. Click OK.
2.5 Adding Comments and Attachments to Tasks in Process WorkspaceYou can add comments and attachments to a task using the Task Details page.
This section includes the following topics:
• How to Add a Comment to a Task
Adding Comments and Attachments to Tasks in Process Workspace
2-6 Managing and Monitoring Processes with Oracle Business Process Management
• How to Add an Attachment to a Task
• How to Delete An Attachment
For details about the Task Details page, see Using the Process Workspace Task DetailsPage.
2.5.1 How to Add a Comment to a TaskYou can add comments to a task.
To add a comment to a task:
1. In the Process Workspace task list, select a task.
The task opens in the Task Details pane.
2. In the Comments section of the Task Details page, specify who can see thecomment by clicking either:
• Only task participants. This option shares the comment with previous andfuture assignees of this particular task.
• All process participants. This option shares the comment with all participantsin the process, regardless of the tasks assigned to them.
3. In the Comment dialog box, enter your comment.
Note:
• If you are the initiator of the task, your comment is shared with all processparticipants and not only with task assignees. The option to share withonly task participants is not available to you.
• Comments added to a task also appear in any subtasks of that task.
2.5.2 How to Add an Attachment to a TaskYou can add an attachment to a task. However, you cannot add documents to ahuman task using task user interface once the task is associated with a case.
To add an attachment to a task:
1. In the Process Workspace task list, select a task.
The task opens in the Task Details pane.
2. In the Attachments section of the Task Details page, click Add.
The Add Attachment dialog box appears.
3. In the Add Attachment dialog box, select to share the attachment with either of thefollowing:
• Only task participants. This option shares the attachment with previous andfuture assignees of this particular task.
Adding Comments and Attachments to Tasks in Process Workspace
Working on Tasks in Process Workspace 2-7

• All process participants. This option shares the attachment with all participantsin the process, regardless of the tasks assigned to them.
4. Select the attachment type and specify the file location.
If the task does not use Oracle WebCenter Content, then you see the followingoptions:
• URL. Selecting this option opens fields in which you specify the name and URLof the file.
• Desktop File. Selecting this option opens a search field from which to browsefor the file on your computer.
If the task does use Oracle WebCenter Content, then you see the following options:
• URL. Selecting this option opens fields in which you specify the name and URLof the file.
• Upload File to UCM. Selecting this option uploads the desktop file to OracleWebCenter Content. When you select it, another dialog box prompts you forsome or all of the following depending on how the task is modeled:
– Description (optional)
– Folder name: The folder in WebCenter Content server to which theattachment is uploaded. You must type the full folder path in WebCenterContent server. To display the Contribution Folders level in WebCenterContent, enter a forward slash (/), as shown in Figure 2-6. To display a list ofdestination folder within the Contribution Folders level, enter a forwardslash (/), as shown in Figure 2-7.
Figure 2-6 Uploading an Attachment to Oracle WebCenter Content
Adding Comments and Attachments to Tasks in Process Workspace
2-8 Managing and Monitoring Processes with Oracle Business Process Management

Figure 2-7 Possible Destination Folders
– Document type: From this list, select the WebCenter Content document type.
– Account (optional): From this list, select the account name.
– Revision (optional): Type an integer for revision.
Note:
Enter only integer as the revision number. UCM does not allow any other typeof revision numbers.
– Release Date (optional): Select the date at which the document is released.Prior to this date, the WebCenter Content document is not visible toWebCenter Content users.
– Expiration Date (optional): The date when the document expires. After thisdate, the WebCenter Content document is no longer visible to OracleWebCenter Content users.
– Security Setup:
• Associate UCM document. Selecting this option opens another dialog boxprompting you for the document identifier. You can search for it by clicking thespyglass icon and, after you have located it, clicking OK.
5. Click OK.
Adding Comments and Attachments to Tasks in Process Workspace
Working on Tasks in Process Workspace 2-9

6. In the Task Details pane, from the Actions list, select Save as shown in Figure 2-8.
Figure 2-8 Saving an Attachment to a Task
2.5.3 How to Delete An AttachmentYou can delete an attachment.
To delete an attachment from a task:
1. In the Process Workspace task list, select a task.
The task opens in the Task Details pane.
2. In the Task Details pane, in the Attachments section, select the attachment youwant to delete and click Delete.
The Delete Attachment dialog box prompts you to confirm the deletion from UCM.
3. Confirm the deletion and click OK.
Note:
If the attachment is stored in a content server, such as WebCenter Content,then it is not deleted from the content server. If the attachment is stored in theSOA workflow repository, then you can access it by viewing the task snapshotfrom the task history.
2.6 Setting Rules, Vacation Periods, and Notification Preferences inProcess Workspace
Rules act on tasks, either a specific task type or all the tasks assigned to a user orgroup.
To set rules, from the Process Workspace global toolbar, select Preferences. ThePreferences window appears as shown in Figure 2-9.
Setting Rules, Vacation Periods, and Notification Preferences in Process Workspace
2-10 Managing and Monitoring Processes with Oracle Business Process Management

Figure 2-9 Preferences: My Rules Page
A rule cannot always apply to all circumstances in which it is used. For example, if arule applies to multiple task types, it may not be possible to set the outcome for alltasks, because different tasks can have different outcomes.
Rules are executed in the order in which they are listed.
If a rule meets its filter conditions, then it is executed and no other rules are evaluated.For your rule to execute, you must be the only user assigned to that task. If the task isassigned to multiple users (including you), the rule does not execute.
You cannot specify business rules for To-Do tasks.
This section contains the following topics:
• How to Create User Rules in Process Workspace
• How to Create Group Rules in Process Workspace
• How to Enable a Vacation Period in Process Workspace
• Specifying Notification Settings
2.6.1 How to Create User Rules in Process Workspace
Note:
The task type browser does not support a search using NLS strings for taskname and category.
To create a user rule:
1. From the Process Workspace global toolbar, select Preferences.
The User Preferences pane is displayed.
2. In the User Preferences area, click Rules.
The My Rules and Other Rules pages appear in the right pane. The My Rules pageis selected by default.
Setting Rules, Vacation Periods, and Notification Preferences in Process Workspace
Working on Tasks in Process Workspace 2-11

3. In the My Rules page, in the Rules section, select My Rules, then click Add NewRule.
The My Rule screen appears in the right pane.
4. Provide a name for the rule.
5. If the rule is a vacation rule, select Use as a vacation rule. The start and end datesof the rule are automatically synchronized with the vacation period.
For instructions about setting a vacation period that is synchronized with thevacation rule, see How to Enable a Vacation Period in Process Workspace.
6. Select Execute rule only between these dates and provide rule execution dates.
7. From the Tasks list, select either All Tasks or Tasks matching these conditions.
If you select All Tasks, then no conditions must be specified. If you select Tasksmatching these conditions, then specify the conditions by clicking Add Condition.The conditions are described in Table 1-9. You cannot search by translated text.
These conditions further define the rule, such as specifying that a rule acts onpriority 1 tasks only, or that a rule acts on tasks created by a specific user. Theconditions can be based on standard task attributes and any mapped attributes thatwere mapped for the specific tasks. See How to Specify Mapped Attributes formore information.
8. In the ACTION area, select actions to be taken. User rules perform the followingactions:
• Reassign to—You can reassign tasks to subordinates or groups you manage. Ifyou were granted the BPMWorkflowReassign role, then you can reassign tasksto any user or group.
• Delegate to—You can delegate to any user or group. Any access rights orprivileges for completing the task are determined according to the original userwho delegated the task. (Any subsequent delegations or reassignments do notchange this from the original delegating user.)
• Set outcome to—You can specify an automatic outcome if the workflow taskwas designed for those outcomes, for example, accepting or rejecting the task.The rule must be for a specific task type. If a rule is for all task types, then thisoption is not displayed.
• Take no action—Use this action to prevent other more general rules fromapplying. For example, to reassign all your tasks to another user while you areon vacation, except for loan requests, for which you want no action taken, thencreate two rules. The first rule specifies that no action is taken for loan requests;the second rule specifies that all tasks are reassigned to another user. The firstrule prevents reassignment for loan requests.
9. Click Save.
The new rule appears under the My Rules node.
Setting Rules, Vacation Periods, and Notification Preferences in Process Workspace
2-12 Managing and Monitoring Processes with Oracle Business Process Management

2.6.2 How to Create Group Rules in Process Workspace
Note:
The task type browser does not support a search using NLS strings for taskname and category.
Creating a group rule is similar to creating a user rule, with the addition of a list of thegroups that you (as the logged-in user) manage. Examples of group rules include:
• Assigning tasks from a particular customer to a member of the group
• Ensuring an even distribution of task assignments to members of a group by usinground-robin assignment
• Ensuring that high-priority tasks are routed to the least busy member of a group
Group rules do the following actions:
• Assign to member via—You can specify a criterion to determine which member ofthe group gets the assignment. This dynamic assignment criterion can includeround-robin assignment, assignment to the least busy group member, orassignment to the most productive group member. You can also add your customfunctions for allocating tasks to users in a group.
• Assign to—As with user rules, you can assign tasks to subordinates or groups youdirectly manage. If you have been granted the BPMWorkflowReassign role, thenyou can reassign tasks to any user or group (outside your management hierarchy).
• Take no action—As with user rules, you can create a rule with a condition thatprevents a more generic rule from being executed.
To create a group rule:
1. From the Process Workspace global toolbar, select Preferences.
The Preferences pane is displayed.
2. In the User Preferences area, click Rules.
The My Rules and Other Rules pages appear in the right pane. The My Rules pageis selected.
3. Click the Other Rules tab.
4. Select My Group from the list.
5. Enter a group name and click Show Rules, or click the Search icon to search for agroup name, then click Show Rules.
If you search for a group name, then the Identity Browser dialog box opens for youto find and select a group.
6. Select the group name under the Group Rules node and click Add New Rule, asshown in Figure 2-10.
Setting Rules, Vacation Periods, and Notification Preferences in Process Workspace
Working on Tasks in Process Workspace 2-13
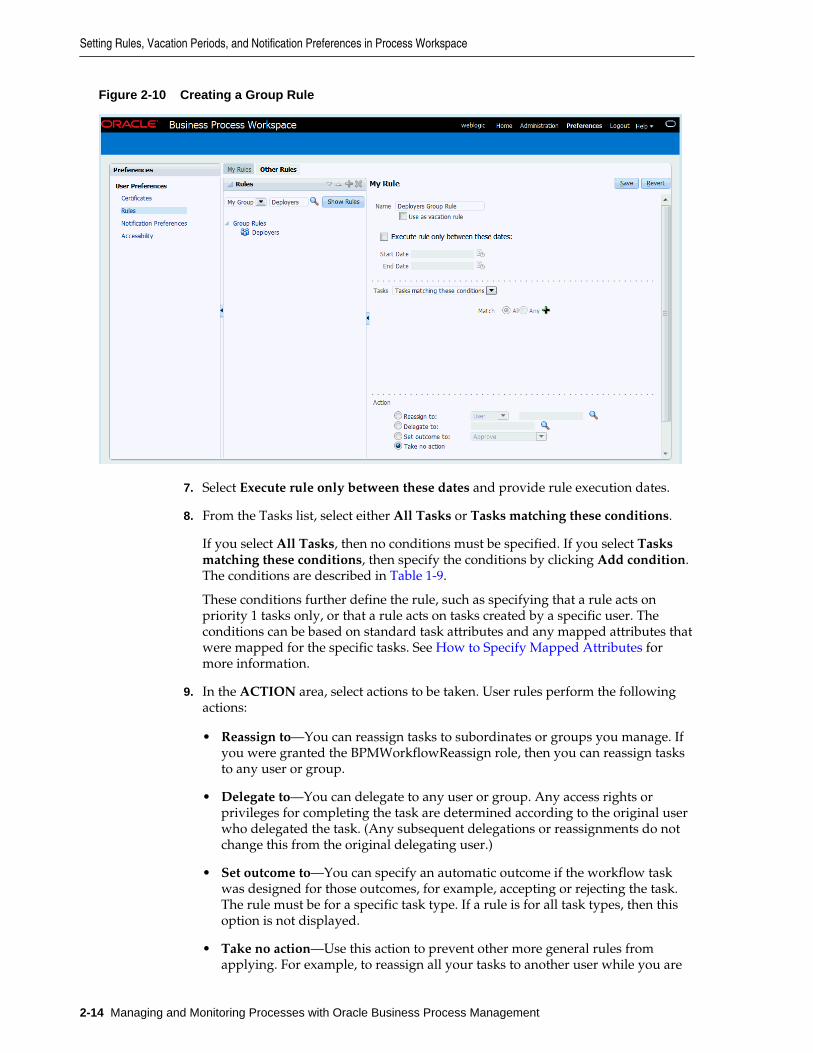
Figure 2-10 Creating a Group Rule
7. Select Execute rule only between these dates and provide rule execution dates.
8. From the Tasks list, select either All Tasks or Tasks matching these conditions.
If you select All Tasks, then no conditions must be specified. If you select Tasksmatching these conditions, then specify the conditions by clicking Add condition.The conditions are described in Table 1-9.
These conditions further define the rule, such as specifying that a rule acts onpriority 1 tasks only, or that a rule acts on tasks created by a specific user. Theconditions can be based on standard task attributes and any mapped attributes thatwere mapped for the specific tasks. See How to Specify Mapped Attributes formore information.
9. In the ACTION area, select actions to be taken. User rules perform the followingactions:
• Reassign to—You can reassign tasks to subordinates or groups you manage. Ifyou were granted the BPMWorkflowReassign role, then you can reassign tasksto any user or group.
• Delegate to—You can delegate to any user or group. Any access rights orprivileges for completing the task are determined according to the original userwho delegated the task. (Any subsequent delegations or reassignments do notchange this from the original delegating user.)
• Set outcome to—You can specify an automatic outcome if the workflow taskwas designed for those outcomes, for example, accepting or rejecting the task.The rule must be for a specific task type. If a rule is for all task types, then thisoption is not displayed.
• Take no action—Use this action to prevent other more general rules fromapplying. For example, to reassign all your tasks to another user while you are
Setting Rules, Vacation Periods, and Notification Preferences in Process Workspace
2-14 Managing and Monitoring Processes with Oracle Business Process Management
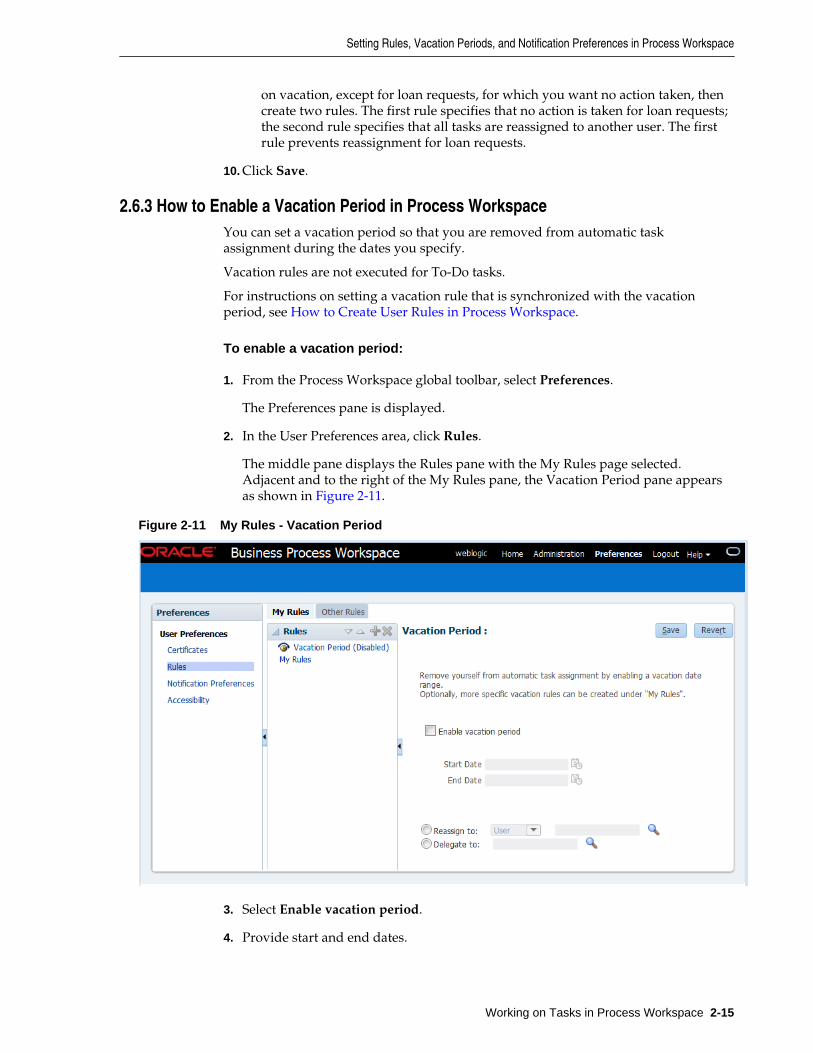
on vacation, except for loan requests, for which you want no action taken, thencreate two rules. The first rule specifies that no action is taken for loan requests;the second rule specifies that all tasks are reassigned to another user. The firstrule prevents reassignment for loan requests.
10. Click Save.
2.6.3 How to Enable a Vacation Period in Process WorkspaceYou can set a vacation period so that you are removed from automatic taskassignment during the dates you specify.
Vacation rules are not executed for To-Do tasks.
For instructions on setting a vacation rule that is synchronized with the vacationperiod, see How to Create User Rules in Process Workspace.
To enable a vacation period:
1. From the Process Workspace global toolbar, select Preferences.
The Preferences pane is displayed.
2. In the User Preferences area, click Rules.
The middle pane displays the Rules pane with the My Rules page selected.Adjacent and to the right of the My Rules pane, the Vacation Period pane appearsas shown in Figure 2-11.
Figure 2-11 My Rules - Vacation Period
3. Select Enable vacation period.
4. Provide start and end dates.
Setting Rules, Vacation Periods, and Notification Preferences in Process Workspace
Working on Tasks in Process Workspace 2-15
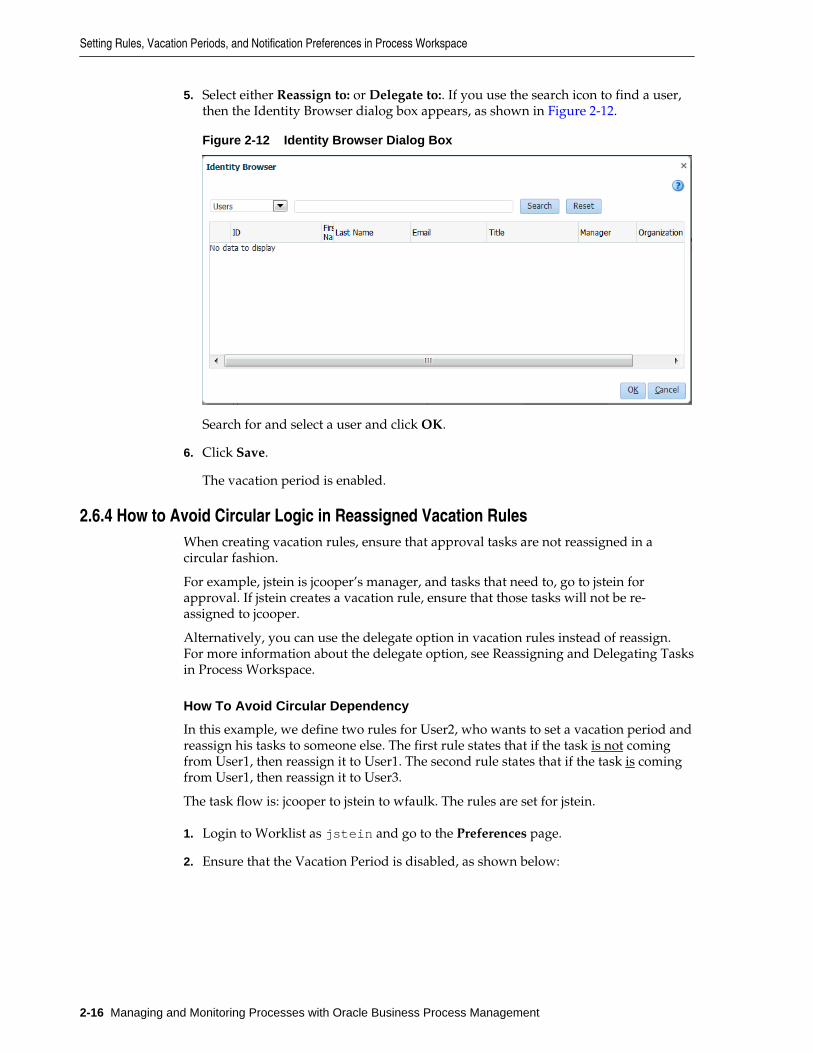
5. Select either Reassign to: or Delegate to:. If you use the search icon to find a user,then the Identity Browser dialog box appears, as shown in Figure 2-12.
Figure 2-12 Identity Browser Dialog Box
Search for and select a user and click OK.
6. Click Save.
The vacation period is enabled.
2.6.4 How to Avoid Circular Logic in Reassigned Vacation RulesWhen creating vacation rules, ensure that approval tasks are not reassigned in acircular fashion.
For example, jstein is jcooper’s manager, and tasks that need to, go to jstein forapproval. If jstein creates a vacation rule, ensure that those tasks will not be re-assigned to jcooper.
Alternatively, you can use the delegate option in vacation rules instead of reassign.For more information about the delegate option, see Reassigning and Delegating Tasksin Process Workspace.
How To Avoid Circular Dependency
In this example, we define two rules for User2, who wants to set a vacation period andreassign his tasks to someone else. The first rule states that if the task is not comingfrom User1, then reassign it to User1. The second rule states that if the task is comingfrom User1, then reassign it to User3.
The task flow is: jcooper to jstein to wfaulk. The rules are set for jstein.
1. Login to Worklist as jstein and go to the Preferences page.
2. Ensure that the Vacation Period is disabled, as shown below:
Setting Rules, Vacation Periods, and Notification Preferences in Process Workspace
2-16 Managing and Monitoring Processes with Oracle Business Process Management
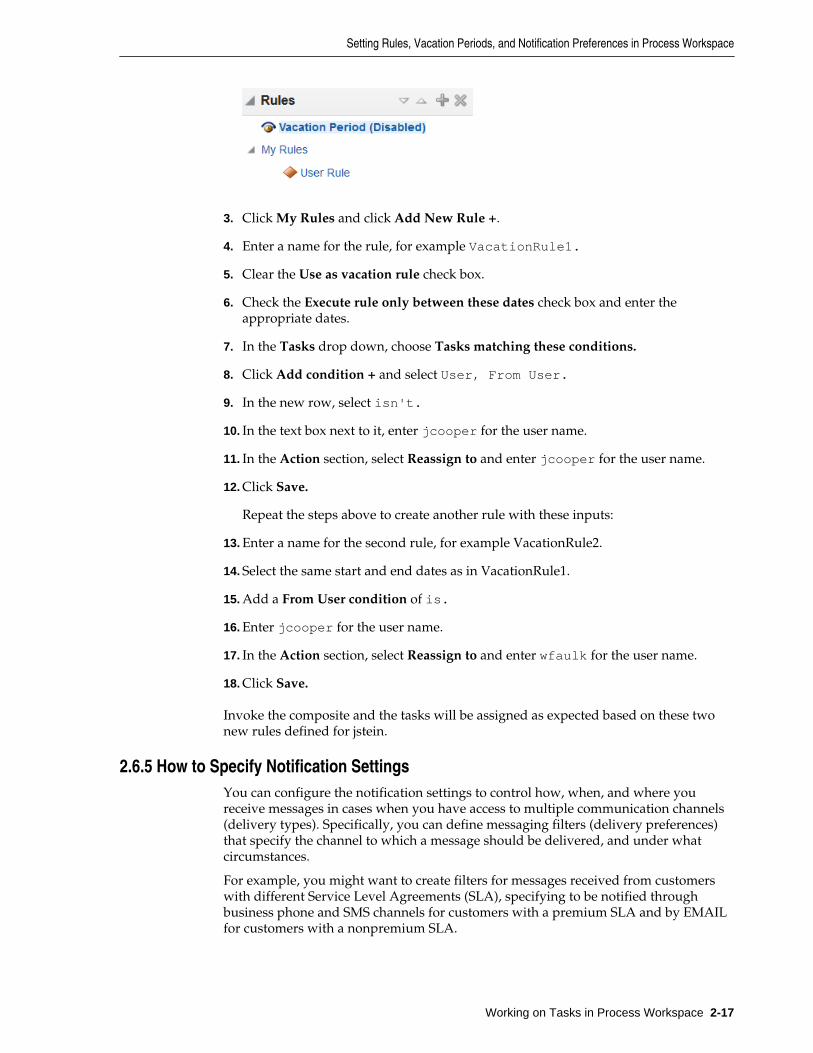
3. Click My Rules and click Add New Rule +.
4. Enter a name for the rule, for example VacationRule1.
5. Clear the Use as vacation rule check box.
6. Check the Execute rule only between these dates check box and enter theappropriate dates.
7. In the Tasks drop down, choose Tasks matching these conditions.
8. Click Add condition + and select User, From User.
9. In the new row, select isn't.
10. In the text box next to it, enter jcooper for the user name.
11. In the Action section, select Reassign to and enter jcooper for the user name.
12. Click Save.
Repeat the steps above to create another rule with these inputs:
13. Enter a name for the second rule, for example VacationRule2.
14. Select the same start and end dates as in VacationRule1.
15. Add a From User condition of is.
16. Enter jcooper for the user name.
17. In the Action section, select Reassign to and enter wfaulk for the user name.
18. Click Save.
Invoke the composite and the tasks will be assigned as expected based on these twonew rules defined for jstein.
2.6.5 How to Specify Notification SettingsYou can configure the notification settings to control how, when, and where youreceive messages in cases when you have access to multiple communication channels(delivery types). Specifically, you can define messaging filters (delivery preferences)that specify the channel to which a message should be delivered, and under whatcircumstances.
For example, you might want to create filters for messages received from customerswith different Service Level Agreements (SLA), specifying to be notified throughbusiness phone and SMS channels for customers with a premium SLA and by EMAILfor customers with a nonpremium SLA.
Setting Rules, Vacation Periods, and Notification Preferences in Process Workspace
Working on Tasks in Process Workspace 2-17

2.6.5.1 Messaging Filter Rules
A messaging filter rule consists of rule conditions and rule actions. A rule conditionconsists of a rule attribute, an operator, and an associated value. A rule action is theaction to be taken if the specified conditions in a rule are true.
2.6.5.1.1 Data Types
Table 2-1 lists data types supported by messaging filters. Each attribute has anassociated data type, and each data type has a set of predefined comparison operators.
Table 2-1 Data Types Supported by Messaging Filters
Data Type Comparison Operators
Date isEqual, isNotEqual, isGreaterThan, isGreaterThanOrEqual,isLessThan, isLessThanOrEqual, Between, isWeekday, isWeekend
Time isEqual, isNotEqual, Between
Number isEqual, isNotEqual, Between, isGreaterThan, isGreaterThanOrEqual,isLessThan, isLessThanOrEqual
String isEqual, isNotEqual, Contains, NotContains
Note:
The String data type does not support regular expressions.
2.6.5.1.2 Attributes
Table 2-2 lists the predefined attributes for messaging filters.
Table 2-2 Predefined Attributes for Messaging Filters
Attribute Data Type
Total Cost Number
From String
Expense Type String
To String
Application Type String
Duration Number
Application String
Process Type String
Status String
Subject String
Customer Type String
Setting Rules, Vacation Periods, and Notification Preferences in Process Workspace
2-18 Managing and Monitoring Processes with Oracle Business Process Management

Table 2-2 (Cont.) Predefined Attributes for Messaging Filters
Attribute Data Type
Time Time
Group Name String
Processing Time Number
Date Date
Due Date Date
User String
Source String
Amount Number
Role String
Priority String
Customer Name String
Expiration Date Date
Order Type String
Organization String
Classification String
Service Request Type String
2.6.5.2 Rule Actions
For a given rule, a messaging filter can define the following actions:
• Send No Messages: Do not send a message to any channel.
• Send Messages to All Selected Channels: Send a message to all specified channelsin the address list.
• Send to the First Available Channel: Send a message serially to channels in theaddress list until one successful message is sent. This entails performing a send tothe next channel when the current channel returns a failure status. This filter actionis not supported for messages sent from the human workflow layer.
2.6.5.3 Managing Messaging Channels
In Oracle BPM Worklist, messaging channels represent both physical channels, such asbusiness mobile phones, and also email client applications running on desktops.Specifically, Oracle BPM Worklist supports the following messaging channels:
• IM
Setting Rules, Vacation Periods, and Notification Preferences in Process Workspace
Working on Tasks in Process Workspace 2-19

• MOBILE
• SMS
• VOICE
• WORKLIST
Note the following about message channels:
• Addresses for messaging channels are fetched from the configured identity store.
• SMS and MOBILE notifications are sent to the mobile phone number.
• VOICE notifications are sent to the business phone number.
• No special notification is sent when the messaging channel preference isWORKLIST. Instead, log in to Oracle BPM Worklist to view tasks.
• EMAIL is the default messaging channel preference when a preferred channel hasnot been selected.
You can use the Messaging Channels tab to view, create, edit, and delete messagingchannels.
2.6.5.3.1 Viewing Your Messaging Channels
You can display your existing messaging channels.
To view messaging channels:
1. From the Process Workspace global toolbar, select Preferences.
The Preferences pane is displayed.
2. In the User Preferences area, click Notification Preferences.
3. Expand Available Channels.
The Available Channels list appears (Figure 2-13) and displays the followinginformation:
• Name: The name of the messaging channel.
• Type: The type of messaging channel, such as EMAIL or SMS.
• Address: The address for the channel, such as a phone number or emailaddress.
• Default: Specifies whether this channel is the default messaging channel.
Setting Rules, Vacation Periods, and Notification Preferences in Process Workspace
2-20 Managing and Monitoring Processes with Oracle Business Process Management

Figure 2-13 Available Channels and Messaging Filters
4. Click View, click Columns and select the columns to display or hide.
You can also click View > Reorder Columns to display a dialog to reorder thedisplayed columns.
Messaging channel names and addresses are retrieved from the underlyingidentity store, such as Oracle Internet Directory.
2.6.5.3.2 Creating, Editing, and Deleting a Messaging Channel
Oracle BPM Worklist uses an underlying identity store, such as Oracle InternetDirectory, to manage messaging channels and addresses. Therefore, you cannotdirectly create, modify, or delete messaging channels using Oracle BPM Worklist.
To perform these actions, contact the system administrator responsible for managingyour organization's identity store.
2.6.5.4 Managing Messaging Filters
You can use the Messaging Filters tab to define filters that specify the types ofnotifications you want to receive along with the channels through which to receivethese notifications. You can do this through a combination of comparison operators(such as is equal to, is not equal to), attributes that describe the notification type, content,or source, and notification actions, which send the notifications to the first availablemessaging channels, all messaging channels, or to no channels (effectively blockingthe notification).
For example, you can create a messaging filter called Messages from Lise, that retrievesall messages addressed to you from your boss, Lise. Notifications that match all of thefilter conditions might first be directed to your business mobile phone, for instance,and then to your business email if the first messaging channel is unavailable.
2.6.5.4.1 Viewing Messaging Filters
You can display your existing messaging filters.
To view your messaging filters:
1. From the Process Workspace global toolbar, select Preferences.
Setting Rules, Vacation Periods, and Notification Preferences in Process Workspace
Working on Tasks in Process Workspace 2-21

The Preferences pane is displayed.
2. In the User Preferences area, click Notification Preferences.
3. Expand Messaging Filters.
The Messaging Filters list appears and displays the following information:
• Filter Name: The name of the messaging filter.
• Description: An optional description of the messaging filter.
4. Click View, click Columns and select the columns to display or hide.
You can also click View > Reorder Columns to display a dialog to reorder thedisplayed columns.
2.6.5.4.2 Creating Messaging Filters
To create a messaging filter:
1. Click Create.
The Create Filter dialog box appears, as shown in Figure 2-14.
Figure 2-14 Adding a Messaging Filter
2. Specify the following information:
• Filter Name: The name of the messaging filter.
• Description: An optional description for the messaging filter.
• Enabled: By default this option is checked. Uncheck if you do not want thisfilter used in message handling.
3. Select whether notifications must meet all of the conditions or any of theconditions by selecting either the match all of the following conditions or thematch any of the following conditions options.
4. Click Create.
Define the filter conditions in the Create Condition dialog box as follows:
a. Select the attribute from the list.
Setting Rules, Vacation Periods, and Notification Preferences in Process Workspace
2-22 Managing and Monitoring Processes with Oracle Business Process Management
b. Select the operator, such as isEqual, from the list.
c. Type the value of the condition in the text box.
d. Click OK to add the condition to the list.
e. Repeat these steps to add more filter conditions. To remove a filter condition,click Delete.
5. Select from the following messaging options in the Action section:
• Do not send messages: Do not send a message to any channel.
• Send to first available channel: Send a message serially to channels in theaddress list until one successful message is sent. This entails performing a sendto the next channel when the current channel returns a failure status.
• Send to all selected channels: Send a message to all specified channels in theaddress list.
6. To set the delivery channel, select a channel from the Add Notification Channellist and click Add. To remove a channel, click Delete.
7. Use the up and down arrows to prioritize channels. If available, the top-mostchannel receives messages meeting the filter criteria if you select Send to the FirstAvailable Channel.
8. Click OK.
The messaging filter appears under the Messaging Filters area. The MessagingFilters area enables you to edit or delete the channel. Click Cancel to dismiss thedialog without creating the filter.
2.6.5.4.3 Editing a Messaging Filter
To edit a messaging filter:
1. Select the filter from the Messaging Filters area.
2. Click Edit.
3. Click OK to update the messaging filter. Click Cancel to dismiss the dialogwithout modifying the filter.
2.6.5.4.4 Deleting a Messaging Filter
To delete a messaging filter:
1. Select the filter from the Messaging Filters area.
2. Click Delete. A confirmation dialog appears.
3. Click OK to delete the messaging filter. Click Cancel to dismiss the dialog withoutdeleting the filter.
2.7 Creating To-Do Tasks in Process WorkspaceYou can create a To-Do task for yourself or for others. To-Do tasks are not associatedwith business tasks.
Creating To-Do Tasks in Process Workspace
Working on Tasks in Process Workspace 2-23

Use the Create To-Do Task dialog, shown in Figure 2-15, to create a top-level To-Dotask for yourself or others.
Figure 2-15 The Create To-Do Task Dialog Box
To-Do tasks appear in the assignee's Inbox.
To-Do tasks can be reassigned, escalated, and so on, and deleted (logical delete) andpurged (physical delete). Reassignment, escalation, and so on of the task does notaffect the assignment of any child To-Do tasks. The completion percentage of a To-Dotask can be reset to less than 100 percent after it is completed.
Assignment rules (such as vacation rules) are not applied to To-Do tasks. You cannotspecify business rules for To-Do tasks.
To create a To-Do task:
1. From the Actions list, select Create To-Do Task.
2. In the Create To-Do Task dialog box, shown in Figure 2-15, provide the followingdetails:
• Task Title: Enter anything that is meaningful to you.
• Category: Enter anything that is meaningful to you.
• Priority: Select from 1 (highest) to 5 (lowest).
• Percentage Complete: This attribute indicates how much of the task iscompleted. 100 percent sets the attribute as completed.
• StartDate: The task start date.
• Due Date: The due date does not trigger an expiration.
You can also see overdue tasks. The start date need not be the current date.
• Assignee: You can assign yourself or someone else.
3. Click OK.
2.8 Creating Subtasks in Tasks in Process WorkspaceA subtask is a child of a task, either a To-Do task or a business task.
Creating a subtask can be helpful, for example, when a purchase order containsseveral line items and you need a separate approval process for one of them.
Creating Subtasks in Tasks in Process Workspace
2-24 Managing and Monitoring Processes with Oracle Business Process Management

2.8.1 What You May Need to Know About Creating SubtasksHere are some important points to keep in mind when creating subtasks:
• A To-Do task can only have To-Do subtasks. When all To-Do subtasks are 100percent complete, the To-Do task is also marked as complete. If the To-Do task iscompleted, then To-Do subtasks are at 100 percent within the workflow system.
If the task is a business task and that task is completed, then the subtasks of thattask are withdrawn. You can only create a business tasks for other business tasks.
• If you explicitly set a To-Do task to 100 percent, there is no aggregation on the task.
• If you are using a release of Oracle BPM that is prior to 11g Release 1 (11.1.1.7.0),then, when you create a subtask from the Actions list of the task list, that subtaskappear in the task list of the assignee for that subtask.
However, to enable subtask creation from the Actions list of the task details pageand display of subtask section in the task details page, you must re-generate theform by using 11g Release 1 (11.1.1.7.0). You may continue to use processes thatwere deployed in earlier releases even if you do not re-create the task form.
• Sub Tasks created in Process Workspace are not included as composite audit trailin Oracle Enterprise Manager Cloud Control Console.
• Parallel tasks are created when a parallel flow pattern is specified for scenariossuch as voting. In this pattern, the parallel tasks have a common task. You cancreate subtasks using different pattern lines: Single approver, Sequential approverand Parallel approver.
The subtasks are included in the Tasks Details page of the task. To view thesubtasks for a task, select the task from the Task List to display the Task Detailspage. The subtasks are displayed under the Sub Tasks section.
2.8.2 Creating Subtasks from the Actions List
1. From the Task List, select a task.
2. From the Actions list, select Create Sub Task....
The Create Subtask dialog box appears as shown in Figure 2-16.
Creating Subtasks in Tasks in Process Workspace
Working on Tasks in Process Workspace 2-25

Figure 2-16 Create Subtask Dialog Box - Task List
3. In the Create Subtask dialog box, define the subtask and provide the followingdetails, if required:
• Title: Enter anything that is meaningful to you (required field).
• Priority: Select from 1 (highest) to 5 (lowest).
• Comments: Enter anything that is meaningful to you.
• Routing Type: Select Single Approver, Group Vote or Chain of SingleApprovers.
For more information on these options, see Routing Tasks in ProcessWorkspace.
• Provide or search for user or group names and select the approvers by selectingthe check box next to the user or group name.
4. When you have finished specifying the subtask, in the Create Subtask dialog box,click OK.
This refreshes the task list. When you select the task, the Task Details page nowincludes a Subtasks section displaying the details about the subtask you created forthat task.
Note:
• If you specified more than one participant for the subtask, then the Subtaskregion displays a separate item for each participant.
• If a participant completes a subtask, then you must manually refresh thetask to show the details for that completed subtask.
• If you create a subtask, the assignee becomes the creator.
Creating Subtasks in Tasks in Process Workspace
2-26 Managing and Monitoring Processes with Oracle Business Process Management

2.8.3 Creating Subtasks from an Existing Task
1. From the Task List, select a task.
2. In the Task Details pane, from the Actions list, select Create Subtask... as shown in Figure 2-17.
Figure 2-17 Creating a Subtask from the Task Details Page
The Create Subtask dialog box appears as shown in Figure 2-18.
Figure 2-18 Create Subtask Dialog Box - Task Details Page
3. In the Create Subtask dialog box, define the subtask and provide the followingdetails, if required:
• Title: Enter anything that is meaningful to you (required field).
• Priority: Select from 1 (highest) to 5 (lowest).
• Comments: Enter anything that is meaningful to you.
• Routing Type: Select Single Approver, Group Vote or Chain of SingleApprovers.
For more information on these options, see Routing Tasks in ProcessWorkspace.
• Provide or search for user or group names and select the approvers by selectingthe check box next to the user or group name.
Creating Subtasks in Tasks in Process Workspace
Working on Tasks in Process Workspace 2-27

4. When you have finished specifying the subtask, in the Create Subtask dialog box,click OK.
This refreshes the task list. When you select the task, the Task Details page nowincludes a Subtasks section displaying the details about the subtask you created forthat task.
Note:
• If you specified more than one participant for the subtask, then the Subtaskregion displays a separate item for each participant.
• If a participant completes a subtask, then you must manually refresh thetask to show the details for that completed subtask.
• If you create a subtask, the assignee becomes the creator.
2.9 Acting on Tasks that Require Passwords in Process WorkspaceWhen you act to approve or reject a human task that was set up to require a password,you must provide the password when prompted.
2.10 Acting on a Task that Requires a Digital Signature in ProcessWorkspace
A digital signature is an electronic signature that authenticates the identity of amessage sender or document signer. This ensures that the original content of themessage or document sent is unchanged.
Oracle Business Process Management Workspace supports the signature policycreated in the human task:
• No signature required — Participants can send and act on tasks without providinga signature.
• Password required — Participants must specify their login passwords.
• Digital certificate (signature) required —Participants must possess a digitalcertificate before being able to send and act on tasks. A digital certificate containsthe digital signature of the certificate-issuing authority so that anyone can verifythat the certificate is real. A digital certificate establishes the participant'scredentials. It is issued by a certification authority (CA). It contains your name, aserial number, expiration dates, a copy of the certificate holder's public key (usedfor encrypting messages and digital signatures), and the digital signature of thecertificate-issuing authority so that a recipient can verify that the certificate is real.
The evidence store service is used for digital signature storage and non-repudiation ofdigitally-signed human workflows.
For more information about digital signatures and the evidence store service, see Using the Evidence Store Service and Digital Signatures.
When you act on a task that has a signature policy, the Sign button appears, as shownin Figure 2-19.
Acting on Tasks that Require Passwords in Process Workspace
2-28 Managing and Monitoring Processes with Oracle Business Process Management

Figure 2-19 Digital Signature Task Details
To use a certificate for digitally signing tasks, you must first upload the certificate asdescribed in Providing a Digital Certificate in Process Workspace.
2.11 Routing Tasks in Process WorkspaceIf a human task was designed to permit ad hoc routing, the task can be routed in anad-hoc fashion in the worklist.
For such tasks, a Route button appears on the task details page. From the Route Taskdialog box, you can look up one or more users for routing. When you specify multipleassignees, you can select whether the list of assignees is for simple (group assignmentto all users), sequential, or parallel assignment.
If you are a developer and want more information about designing tasks to permit adhoc routing, see Oracle Fusion Middleware Developer's Guide for Oracle SOA Suite.
To route a task:
1. From the Actions list, select Adhoc Route.
2. Select an action and a routing option, as shown in Figure 2-20.
Routing Tasks in Process Workspace
Working on Tasks in Process Workspace 2-29
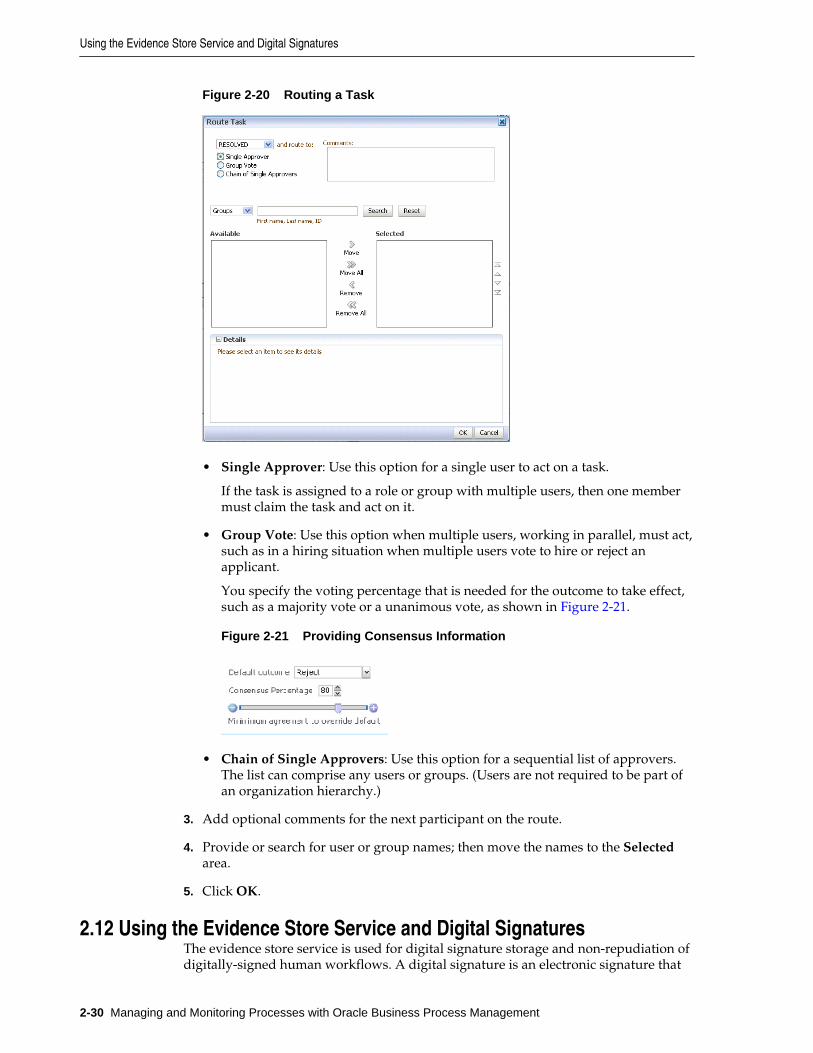
Figure 2-20 Routing a Task
• Single Approver: Use this option for a single user to act on a task.
If the task is assigned to a role or group with multiple users, then one membermust claim the task and act on it.
• Group Vote: Use this option when multiple users, working in parallel, must act,such as in a hiring situation when multiple users vote to hire or reject anapplicant.
You specify the voting percentage that is needed for the outcome to take effect,such as a majority vote or a unanimous vote, as shown in Figure 2-21.
Figure 2-21 Providing Consensus Information
• Chain of Single Approvers: Use this option for a sequential list of approvers.The list can comprise any users or groups. (Users are not required to be part ofan organization hierarchy.)
3. Add optional comments for the next participant on the route.
4. Provide or search for user or group names; then move the names to the Selectedarea.
5. Click OK.
2.12 Using the Evidence Store Service and Digital SignaturesThe evidence store service is used for digital signature storage and non-repudiation ofdigitally-signed human workflows. A digital signature is an electronic signature that
Using the Evidence Store Service and Digital Signatures
2-30 Managing and Monitoring Processes with Oracle Business Process Management

authenticates the identity of a message sender or document signer. This ensures thatthe original content of the message or document sent is unchanged. Digital signaturesare transportable, cannot be imitated by others, and are automatically time-stamped.The ability to ensure that the original signed message arrived means that the sendercannot repudiate it later.
Digital signatures ensure that a human workflow document:
• Is authentic.
• Has not been forged by another entity.
• Has not been altered.
• Cannot be repudiated by the sender.
A cryptographically-based digital signature is created when a public key algorithmsigns a sender's message with a sender's private key.
During design time, signatures are enabled for the task. During runtime in ProcessWorkspace, when a user approves or rejects the task, the web browser:
• Asks the user to choose the private key to use for signing.
• Generates a digital signature using the private key and task content provided byOracle BPM Worklist.
Note:
• The certificate refers to a Personal Information Exchange Syntax Standard(PFX) file that includes a certificate and a private key, and is protected by asimple text password. PFX specifies a portable format for storing ortransporting a user's private keys, certificates, miscellaneous secrets, and soon.
• The possession of a private key that corresponds to the public key of acertificate is sufficient to sign the data, because the signature is verifiablethrough the public key in the certificate. However, no attempt is made tocorrelate the name of a user of a certificate with the person updating it. Forexample, user jstein can sign using the private key of user cdickens if jsteinhas that private key.
The following digital signature features are supported:
• PKCS7 signatures based on X.509 certificates.
• Browser-based, digitally-signed content without attachments.
You can search the evidence store, as shown in Figure 2-22.
Using the Evidence Store Service and Digital Signatures
Working on Tasks in Process Workspace 2-31

Figure 2-22 The Evidence Store
2.13 Exporting Tasks to Microsoft ExcelYou can export tasks to Excel based on a selected view.
The export downloads all rows and columns displayed in the selected view. Forexample, if you select My Tasks view, you will download 16 tasks. If you select theAdministrative Tasks view, you will download 49,694 tasks, as shown in Figure 2-23:
Figure 2-23 Tasks Views
Exporting Tasks to Microsoft Excel
2-32 Managing and Monitoring Processes with Oracle Business Process Management

2.13.1 How to Export Tasks to ExcelAny logged-in user can export tasks.
To export tasks:
1. Select the appropriate View from the list.
2. Click the Export button
3. Choose a folder location and enter a filename for the download and click Save.
4. Open the file in Excel to view the downloaded tasks.
2.14 Creating Worklist ReportsTable 2-3 lists the worklist reports available for task analysis.
Table 2-3 Worklist Report Types
Report Name Description Input Parameters
UnattendedTasks
Provides an analysis oftasks assigned to users'groups or reportees'groups that have notyet been acquired (the"unattended" tasks).
• Assignee—This option (required) selects tasks assigned to theuser's group (My Group), tasks assigned to the reportee's groups(Reportees), tasks where the user is a creator (Creator), or taskswhere the user is an owner (Owner).
• Creation Date—An optional date range• Expiration Date—An optional date range• Task State—The state (optional) can be Any, Assigned, Expired,
or Information Requested.• Priority—The priority (optional) can be Any, Highest, High,
Normal, Low, or Lowest.
Tasks Priority Provides an analysis ofthe number of tasksassigned to a user,reportees, or theirgroups, broken downby priority.
• Assignee—Depending on the assignee that you select, thisrequired option includes tasks assigned to the logged-in user(My), tasks assigned to the user and groups that the userbelongs to (My & Group), or tasks assigned to groups to whichthe user's reportees belong (Reportees).
• Creation Date—An optional date range• Ended Date—An optional date range for the end dates of the
tasks to be included in the report• Priority—The priority (optional) can by Any, Highest, High,
Normal, Low, or Lowest.
Tasks CycleTime
Provides an analysis ofthe time taken tocomplete tasks fromassignment tocompletion based onusers' groups orreportees' groups.
• Assignee—Depending on the assignee that you select, thisrequired option includes your tasks (My) or tasks assigned togroups to which your reportees belong (Reportees).
• Creation Date—An optional date range• Ended Date—An optional date range for the end dates of the
tasks to be included in the report• Priority—The priority (optional) can by Any, Highest, High,
Normal, Low, or Lowest.
Creating Worklist Reports
Working on Tasks in Process Workspace 2-33
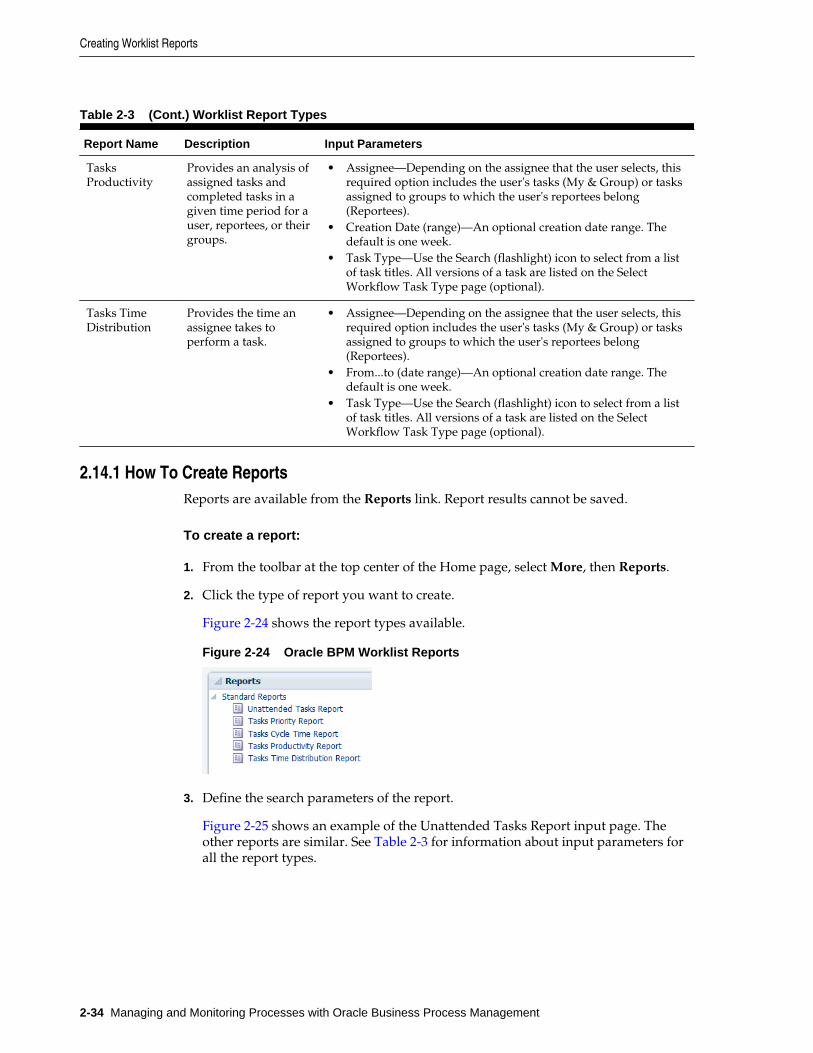
Table 2-3 (Cont.) Worklist Report Types
Report Name Description Input Parameters
TasksProductivity
Provides an analysis ofassigned tasks andcompleted tasks in agiven time period for auser, reportees, or theirgroups.
• Assignee—Depending on the assignee that the user selects, thisrequired option includes the user's tasks (My & Group) or tasksassigned to groups to which the user's reportees belong(Reportees).
• Creation Date (range)—An optional creation date range. Thedefault is one week.
• Task Type—Use the Search (flashlight) icon to select from a listof task titles. All versions of a task are listed on the SelectWorkflow Task Type page (optional).
Tasks TimeDistribution
Provides the time anassignee takes toperform a task.
• Assignee—Depending on the assignee that the user selects, thisrequired option includes the user's tasks (My & Group) or tasksassigned to groups to which the user's reportees belong(Reportees).
• From...to (date range)—An optional creation date range. Thedefault is one week.
• Task Type—Use the Search (flashlight) icon to select from a listof task titles. All versions of a task are listed on the SelectWorkflow Task Type page (optional).
2.14.1 How To Create ReportsReports are available from the Reports link. Report results cannot be saved.
To create a report:
1. From the toolbar at the top center of the Home page, select More, then Reports.
2. Click the type of report you want to create.
Figure 2-24 shows the report types available.
Figure 2-24 Oracle BPM Worklist Reports
3. Define the search parameters of the report.
Figure 2-25 shows an example of the Unattended Tasks Report input page. Theother reports are similar. See Table 2-3 for information about input parameters forall the report types.
Creating Worklist Reports
2-34 Managing and Monitoring Processes with Oracle Business Process Management

Figure 2-25 Unattended Tasks Report—Input Page for Task Analysis
4. Click Run.
2.14.2 What Happens When You Create ReportsAs shown in Figure 2-26, report results (for all report types) are displayed in both atable format and a bar chart format.
Figure 2-26 Report Display
2.14.2.1 Unattended Tasks Report
Figure 2-27 shows an example of an Unattended Tasks report.
Creating Worklist Reports
Working on Tasks in Process Workspace 2-35
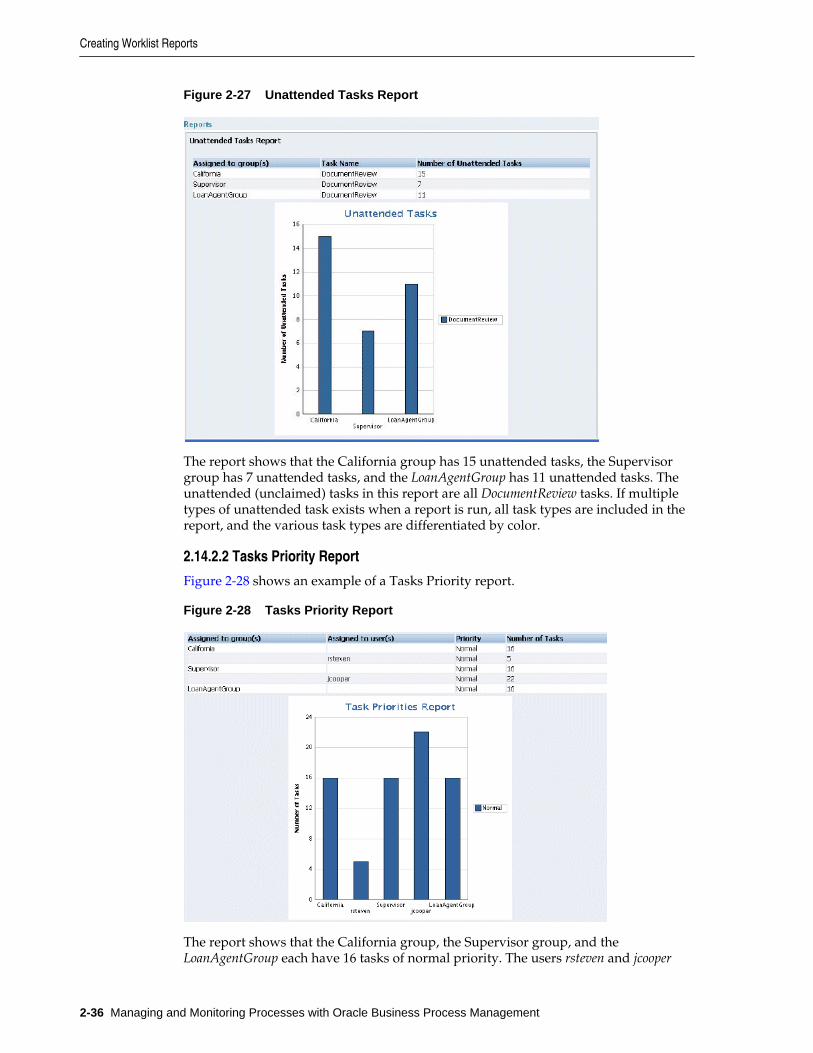
Figure 2-27 Unattended Tasks Report
The report shows that the California group has 15 unattended tasks, the Supervisorgroup has 7 unattended tasks, and the LoanAgentGroup has 11 unattended tasks. Theunattended (unclaimed) tasks in this report are all DocumentReview tasks. If multipletypes of unattended task exists when a report is run, all task types are included in thereport, and the various task types are differentiated by color.
2.14.2.2 Tasks Priority Report
Figure 2-28 shows an example of a Tasks Priority report.
Figure 2-28 Tasks Priority Report
The report shows that the California group, the Supervisor group, and theLoanAgentGroup each have 16 tasks of normal priority. The users rsteven and jcooper
Creating Worklist Reports
2-36 Managing and Monitoring Processes with Oracle Business Process Management
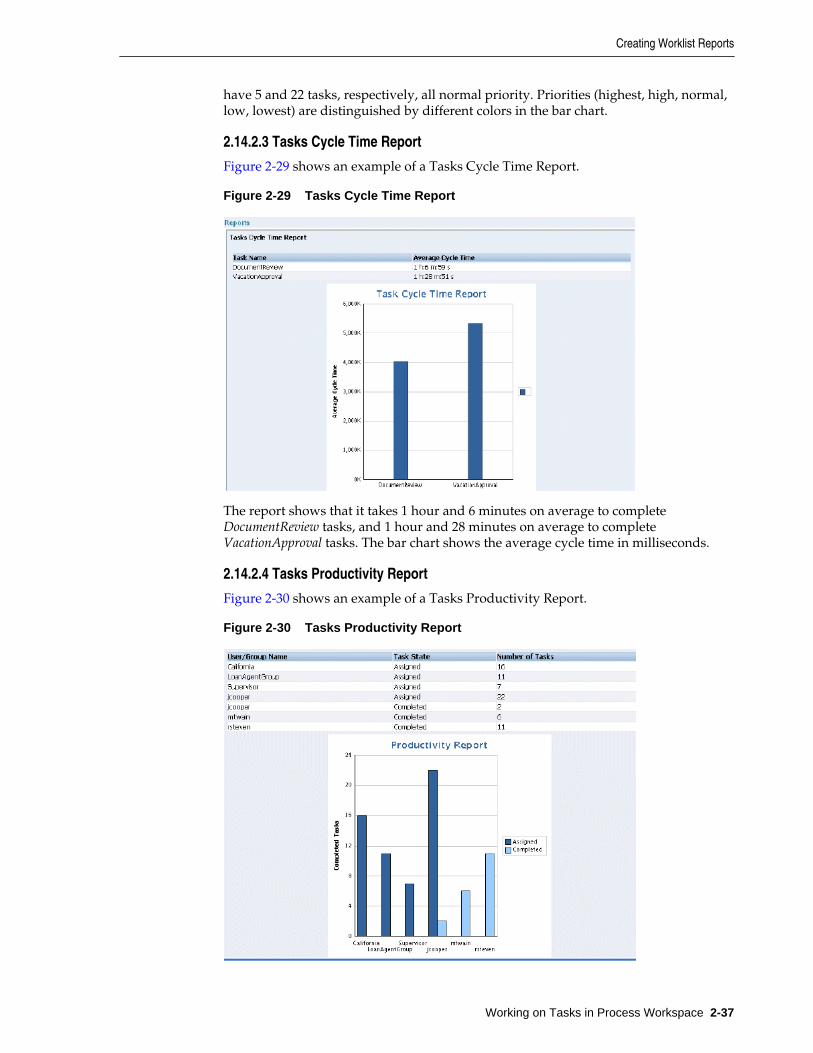
have 5 and 22 tasks, respectively, all normal priority. Priorities (highest, high, normal,low, lowest) are distinguished by different colors in the bar chart.
2.14.2.3 Tasks Cycle Time Report
Figure 2-29 shows an example of a Tasks Cycle Time Report.
Figure 2-29 Tasks Cycle Time Report
The report shows that it takes 1 hour and 6 minutes on average to completeDocumentReview tasks, and 1 hour and 28 minutes on average to completeVacationApproval tasks. The bar chart shows the average cycle time in milliseconds.
2.14.2.4 Tasks Productivity Report
Figure 2-30 shows an example of a Tasks Productivity Report.
Figure 2-30 Tasks Productivity Report
Creating Worklist Reports
Working on Tasks in Process Workspace 2-37
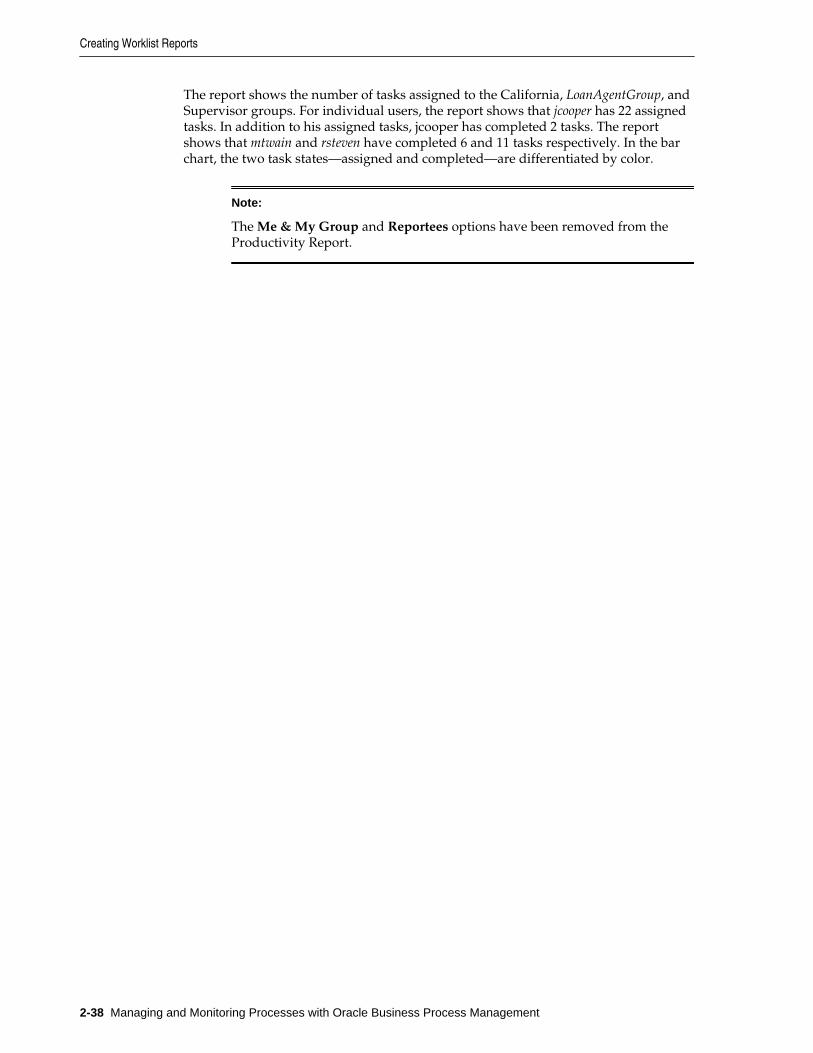
The report shows the number of tasks assigned to the California, LoanAgentGroup, andSupervisor groups. For individual users, the report shows that jcooper has 22 assignedtasks. In addition to his assigned tasks, jcooper has completed 2 tasks. The reportshows that mtwain and rsteven have completed 6 and 11 tasks respectively. In the barchart, the two task states—assigned and completed—are differentiated by color.
Note:
The Me & My Group and Reportees options have been removed from theProductivity Report.
Creating Worklist Reports
2-38 Managing and Monitoring Processes with Oracle Business Process Management

3Working on Process Instances in Process
Workspace
You can use Oracle Business Process Management Workspace (Process Workspace) toinitiate and cancel process instances, search, view details, associate comments andattachments, perform bulk operations, and customize the presentation of processinstances.
This chapter is primarily for owners of process instances in Process Workspace. Thischapter includes the following sections:
• Initiating Process Instances in Process Workspace
• Searching for Process Instances in Process Workspace
• Viewing the Details of a Process Instance in Process Workspace
• Performing a Bulk Operation in Process Workspace
• Canceling a Process Instance in Process Workspace
• Customizing the Presentation of Process Instances in Process Workspace
3.1 Initiating Process Instances in Process WorkspaceTo initiate a process instance, you begin with the Applications panel located at the topof the navigation pane.
To initiate a process:
1. In the Process Tracking page, in the Applications panel, click the process youwant to initiate.
The dialog box for that process instance appears.
Note:
If your browser has pop-up blocking enabled, then enable pop-ups for taskflow servers; otherwise the application does not launch and the dialog boxdoes not appear.
2. Create any comments or add any attachments.
To add a comment:
a. In the comments section, click Create. The Create Comment dialog boxappears.
Working on Process Instances in Process Workspace 3-1

b. Enter your comment and click OK. The comment is added at the processlevel.
To add an attachment:
a. In the Attachments section, click Add. The Add Attachment dialog boxappears.
b. Select the attachment type.
If you select Desktop File, a dialog box enables you to enter the path name ofthe file or browse to find it. If you select URL, you are prompted for the nameof the file and the URL.
c. After you have specified the attachment, click OK. The attachment is added atthe process level.
The process instance is initiated and is assigned to you as the initiator.
3.2 Searching for Process Instances in Process WorkspaceYou can perform either a basic search or an advanced search for process instances.This section contains the following topics:
• How to Perform a Basic Search for Process Instances
• Performing an Advanced Search for Process Instances
3.2.1 How to Perform a Basic Search for Process InstancesFor a basic search, you enter all or part of the name of a process instance in the Searchfield.
To perform a basic search for a process instance:
1. Select the Process Tracking page.
2. In the Search field, enter all or part of the name of the instance for which you aresearching.
Note:
the search results are based on the Description column of the Process Trackingpage.
3. To retrieve a list of all instances, enter a percent sign (%).
Search results are displayed as shown in the example in Figure 3-1.
The Details section displays the priority, process name, when the instance is due tocomplete, status, creation time, and the assignee.
If the process instance has any gateways resulting in multiple threads (paths) thatare still running, the Open Activities section display the status of each thread.
The History section displays audit information—in either tabular form, tree view,or graphically depending on your selection.
Searching for Process Instances in Process Workspace
3-2 Managing and Monitoring Processes with Oracle Business Process Management
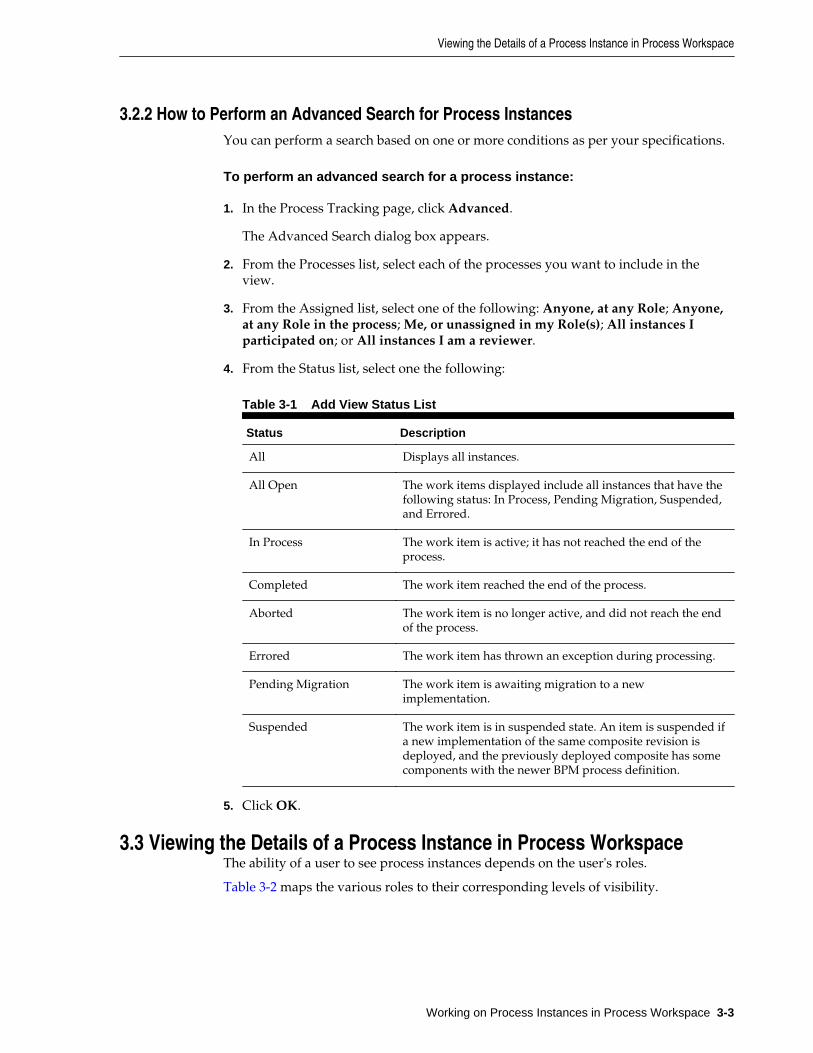
3.2.2 How to Perform an Advanced Search for Process InstancesYou can perform a search based on one or more conditions as per your specifications.
To perform an advanced search for a process instance:
1. In the Process Tracking page, click Advanced.
The Advanced Search dialog box appears.
2. From the Processes list, select each of the processes you want to include in theview.
3. From the Assigned list, select one of the following: Anyone, at any Role; Anyone,at any Role in the process; Me, or unassigned in my Role(s); All instances Iparticipated on; or All instances I am a reviewer.
4. From the Status list, select one the following:
Table 3-1 Add View Status List
Status Description
All Displays all instances.
All Open The work items displayed include all instances that have thefollowing status: In Process, Pending Migration, Suspended,and Errored.
In Process The work item is active; it has not reached the end of theprocess.
Completed The work item reached the end of the process.
Aborted The work item is no longer active, and did not reach the endof the process.
Errored The work item has thrown an exception during processing.
Pending Migration The work item is awaiting migration to a newimplementation.
Suspended The work item is in suspended state. An item is suspended ifa new implementation of the same composite revision isdeployed, and the previously deployed composite has somecomponents with the newer BPM process definition.
5. Click OK.
3.3 Viewing the Details of a Process Instance in Process WorkspaceThe ability of a user to see process instances depends on the user's roles.
Table 3-2 maps the various roles to their corresponding levels of visibility.
Viewing the Details of a Process Instance in Process Workspace
Working on Process Instances in Process Workspace 3-3

Table 3-2 Visibility into Process Instances
Role Visibility into Process Instance
Administrator—that is, a userwith the WorkflowAdmin role orthe Administrator role
Can see all information related to all process instances.
Process owner At any given time, can see the instance details of theprocess instance.
User with a swimlane role Can see any unassigned instance associated with thatrole.
Task assignee Can see the instance details of that task.
To view the details of a process instance:
In the Process Tracking page, select an instance from the process instance list. TheWork Item Details panel opens in the lower right section of the page as shown in Figure 3-1.
Figure 3-1 Work Item Details Panel
For information about the Work Item Details panel, see Navigating the ProcessWorkspace Process Tracking Page.
You can also use this panel to create comments and add attachments as described in Associating Comments and Attachments with a Process Instance.
Viewing the Details of a Process Instance in Process Workspace
3-4 Managing and Monitoring Processes with Oracle Business Process Management

3.3.1 Viewing HistoryThe History section of the Work Item Details panel includes audit details, which canbe displayed in three different ways - in a list view, a tree view, or a graphical view.Select the view from the drop-down list in the upper left corner of the History asshown in Figure 3-2.
Figure 3-2 Selecting the History View
You can select the type of activity, sub-process, gateway, or event you want to view.To do this, select from the list at the top of the History section as shown in Figure 3-3.
Figure 3-3 Selecting Activities for History Details
If you are an administrator or process owner, and if the selected activity includes aninput or output payload, then you can display the input or output message for thatactivity. To do this, select the activity, then click either Input Message or OutputMessage, The message appears in a pop-up as shown in Figure 3-4.
Viewing the Details of a Process Instance in Process Workspace
Working on Process Instances in Process Workspace 3-5
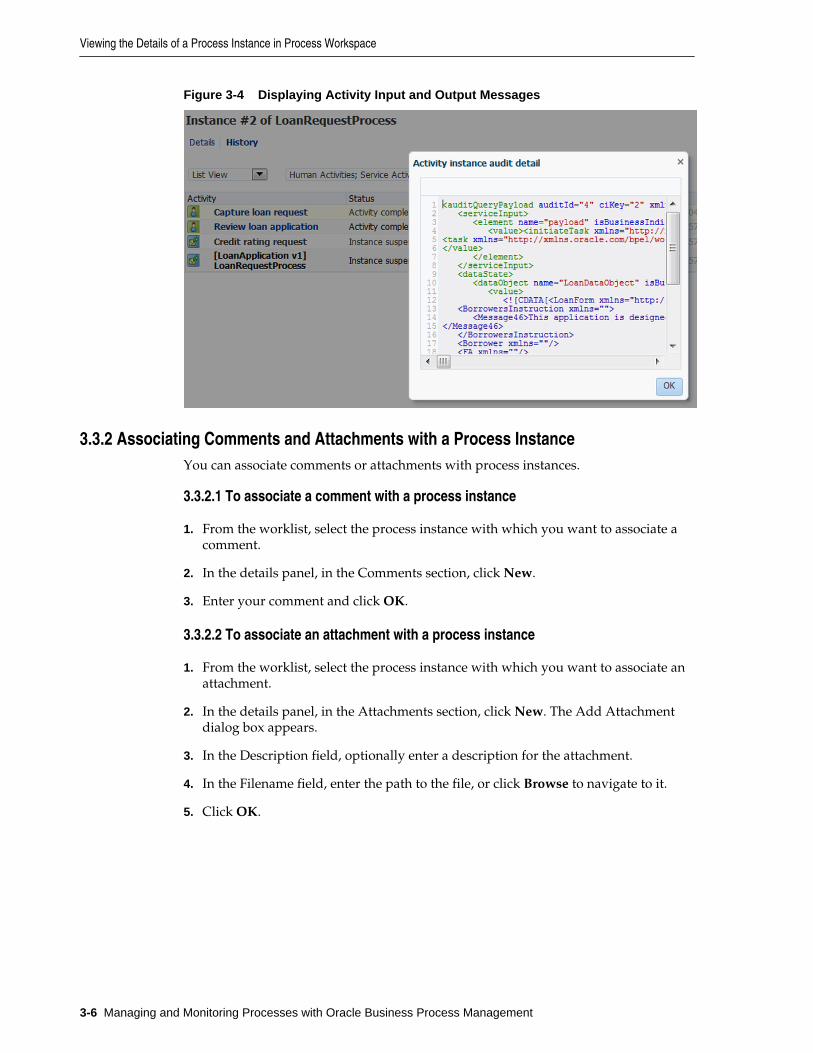
Figure 3-4 Displaying Activity Input and Output Messages
3.3.2 Associating Comments and Attachments with a Process InstanceYou can associate comments or attachments with process instances.
3.3.2.1 To associate a comment with a process instance
1. From the worklist, select the process instance with which you want to associate acomment.
2. In the details panel, in the Comments section, click New.
3. Enter your comment and click OK.
3.3.2.2 To associate an attachment with a process instance
1. From the worklist, select the process instance with which you want to associate anattachment.
2. In the details panel, in the Attachments section, click New. The Add Attachmentdialog box appears.
3. In the Description field, optionally enter a description for the attachment.
4. In the Filename field, enter the path to the file, or click Browse to navigate to it.
5. Click OK.
Viewing the Details of a Process Instance in Process Workspace
3-6 Managing and Monitoring Processes with Oracle Business Process Management

Note:
• If you add an attachment to a process instance, and later delete it from thecorresponding task, then the attachment is also deleted from the processinstance.
• In an environment with servers clustered for high availability purposes,file uploading is not supported in the event of a failover. If the active servershuts down, then the uploading process is not assumed by the other server,and the upload fails.
3.4 Performing a Bulk Operation in Process WorkspaceYou can perform Cancel as the only available bulk operation.
To perform a bulk operation:
1. In the Process Tracking page, from the process instance list, select several instances.
In the Instance Details panel, a message indicates how many instances are currentlyselected to be processed. Also, the Actions list is updated with the options that canbe performed over the group of instances that were selected.
2. Select the operation in the Actions list. The selected operation is performed on theinstances you specified.
3.5 Canceling a Process Instance in Process WorkspaceOnly process owners can cancel a process instance.
To cancel a process instance:
1. From the Actions list at the end of the row for the instance you want to cancel,select Cancel.
2. Select the instance, and from the Actions list on the toolbar of the Process Trackingpage, select Cancel.
3.6 Customizing the Presentation of Process Instances in ProcessWorkspace
A presentation is the column arrangement used when viewing instances in the WorkItems panel. You can use an existing presentation or create a new one to be associatedwith that view. You can choose the columns that are presented in any view displayedin the Work Items panel.
To customize the presentation of a process instance:
1. From the Views panel, select the view whose presentation you want to customize.The view is displayed in the Work Items panel.
2. From the Work Items toolbar, click Edit Presentation. This displays thePresentation dialog box in which you can select and sort the columns in yourpresentation.
Performing a Bulk Operation in Process Workspace
Working on Process Instances in Process Workspace 3-7

3. From the Available Columns list, select the columns you want to include in yourview and move them to the Presentation Columns list by clicking the right arrow.
4. To sort the columns:
a. Select an individual item in the Presentation Columns list.
b. Move it into place by using the vertical arrows to the right of the list.
c. Repeat for each column you want to sort.
5. Click OK.
Note:
The Work Items panel displays process instances in two places: in the ProcessTracking page and when using the Standard Dashboards page. You cancustomize the presentation of this panel as it appears in both places. However,if you first change the presentation in the Process Tracking page, and thenchange the presentation in the Standard Dashboards page, the latterconfiguration overrides whatever presentation you have configured in theProcess Tracking page. When you navigate back to the Process Tracking page,the presentation is what you configured in the Standard Dashboards page.
Customizing the Presentation of Process Instances in Process Workspace
3-8 Managing and Monitoring Processes with Oracle Business Process Management

4Working with Activity Guides in Process
Workspace
You can use activity guides in Oracle Business Process Management Workspace(Process Workspace) to organize and lead you through the various processes in whichyou have assigned tasks.
This chapter includes the following sections:
• Understanding Activity Guides
• Navigating Activity Guides
• Showing or Hiding the Activity Guide Tab Page
4.1 Understanding Activity GuidesActivity guides organize your tasks into milestones. Each milestone has a specific setof tasks for you to complete, either on your own or in collaboration with others. Foreach milestone, the activity guide tells you which task to complete and in which order.You complete a milestone by completing all the tasks it contains for you. Dependingon the nature of the task, you can save an unfinished task and resume it later.
Figure 4-1 shows an example of an activity guide.
Working with Activity Guides in Process Workspace 4-1

Figure 4-1 Sample Activity Guide
Using an activity guide, you can:
• Expand a milestone to see and act on the tasks it includes.
• View the status and percent completion of the overall business process in whichyou participate.
4.1.1 Using Activity GuidesAs in the example in Figure 4-1, an activity guide can help organize the tasks involvedin an process. The activity guide moves the user through the correct sequence of stepsin the process. In this example, one milestone is MS3, which includes the task HumanTask.
In an activity guide, users can act on only those tasks that presently need theirattention in the current milestone. After they have completed all the tasks for thatmilestone, they can act on the tasks for the next milestone. They cannot act on tasks infuture milestones or on those assigned to other users.
4.2 Navigating Activity GuidesWhen you select the Activity Guides tab, the tab page displays the Activity Guide List.
The upper section of the Activity Guide List shows a process list displaying all theprocesses currently moving through the system.
• To get the latest updates to these processes, click the Refresh Activity Guideprocess list icon.
Navigating Activity Guides
4-2 Managing and Monitoring Processes with Oracle Business Process Management
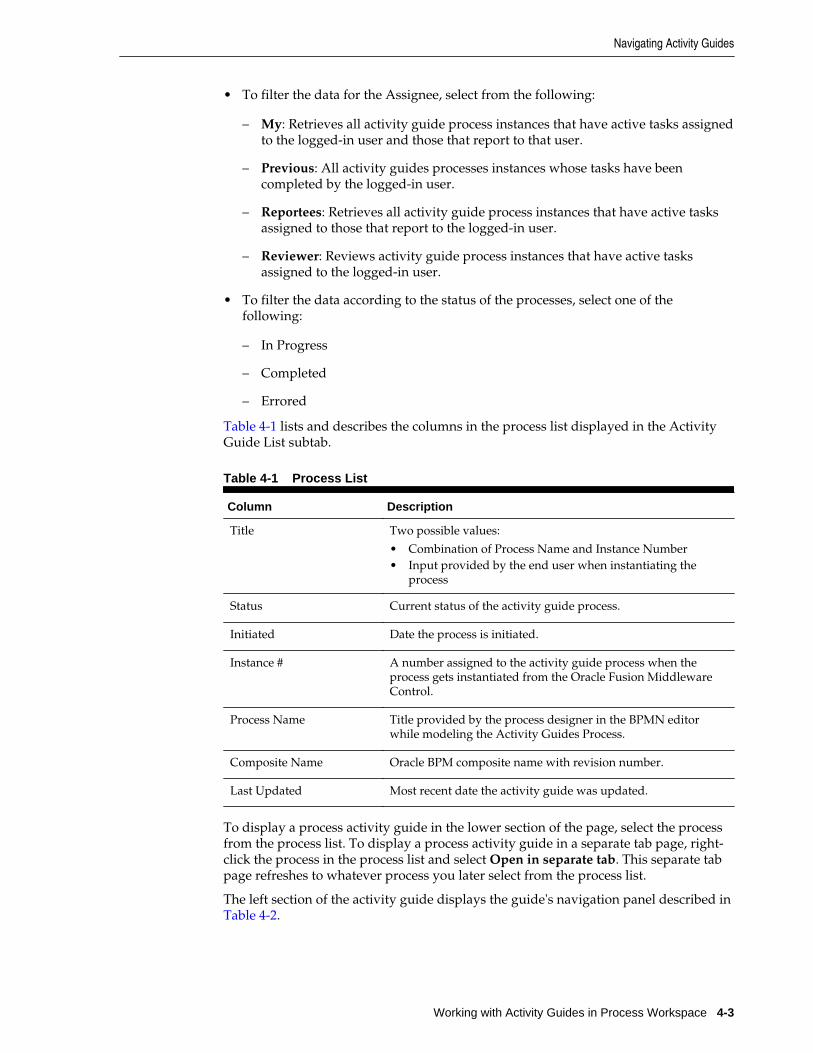
• To filter the data for the Assignee, select from the following:
– My: Retrieves all activity guide process instances that have active tasks assignedto the logged-in user and those that report to that user.
– Previous: All activity guides processes instances whose tasks have beencompleted by the logged-in user.
– Reportees: Retrieves all activity guide process instances that have active tasksassigned to those that report to the logged-in user.
– Reviewer: Reviews activity guide process instances that have active tasksassigned to the logged-in user.
• To filter the data according to the status of the processes, select one of thefollowing:
– In Progress
– Completed
– Errored
Table 4-1 lists and describes the columns in the process list displayed in the ActivityGuide List subtab.
Table 4-1 Process List
Column Description
Title Two possible values:
• Combination of Process Name and Instance Number• Input provided by the end user when instantiating the
process
Status Current status of the activity guide process.
Initiated Date the process is initiated.
Instance # A number assigned to the activity guide process when theprocess gets instantiated from the Oracle Fusion MiddlewareControl.
Process Name Title provided by the process designer in the BPMN editorwhile modeling the Activity Guides Process.
Composite Name Oracle BPM composite name with revision number.
Last Updated Most recent date the activity guide was updated.
To display a process activity guide in the lower section of the page, select the processfrom the process list. To display a process activity guide in a separate tab page, right-click the process in the process list and select Open in separate tab. This separate tabpage refreshes to whatever process you later select from the process list.
The left section of the activity guide displays the guide's navigation panel described in Table 4-2.
Navigating Activity Guides
Working with Activity Guides in Process Workspace 4-3

Table 4-2 Activity Guide Navigation Panel
Element Description
Activity Guide Refresh Refreshes the navigation panel if any action is performed in thecurrent activity guide process outside of Process Workspace.
Activity Guide Completionprogress bar
Shows the percentage of completion of the current activityguide process.
Completed Tasks Number of tasks the currently logged-in user has completedout of the total number tasks in the current activity guideprocess.
Task Filter For the current activity guide process, specifies the type of taskto display in the task details pane. Options:
• All• Required• In Progress• Completed• Optional (Tasks that are not mandatory in the process, but
that still require a user to explicitly skip)
The right section of the activity guide displays the details of the selected node in theactivity guide process tree.
For information about the Task Details page, see Using the Process Workspace TaskDetails Page.
4.3 Showing or Hiding the Activity Guide Tab PageIf you are an administrator, you can specify whether to show or hide the ActivityGuide tab page. If you choose to show it, you can make it the default tab when a userlogs in.
For instructions on how to show or hide the Activity Guide tab, and to make it thedefault, see How to Specify_ Show_ or Hide the Default Tab Pages in ProcessWorkspace.
Showing or Hiding the Activity Guide Tab Page
4-4 Managing and Monitoring Processes with Oracle Business Process Management

5Creating and Editing Custom Pages in
Process Workspace
You can customize the default layout in Oracle Business Process ManagementWorkspace (Process Workspace). Process designers and administrators can create newlayouts and associate them with different sets of roles. This enables them to define theexperience for the various kinds of users of each project.
This chapter includes the following sections:
• Understanding Custom Pages in Process Workspace
• Creating and Editing Custom Pages in Process Workspace
• Establishing Communication Between Panels in Process Workspace
5.1 Understanding Custom Pages in Process WorkspaceProcess Workspace provides its own default layout, but you can customize the layoutby adding new pages and panels. You can set permissions for the group of pages byassigning a role.
You can choose which pages to hide or show by selecting from the Hide Tabs list inthe toolbar. Depending on your roles, you may see several layouts at the same time.
The custom page has three sections:
• Panel Label, which has a text field for specifying a name for the page.
• Panel Properties, which has a field labeled Data Source, in which you can enter allor part of the name of a data source.
You can also click the adjacent Browse button to search for a data source. Thissection also has a field labeled When clicking on the widget. It has an adjacent listfrom which you select the action you want triggered when clicking a widget.
• Communication with Other Panels described in Establishing CommunicationBetween Panels in Process Workspace.
This editable display of the panel enables you to define the name and properties forthe new page and establish communication with other panels. In addition, the icons inthe upper right corner of the new page enable you to:
• Switch to View Mode—that is, the manner in which the page is ordinarily viewed.After you switch to View Mode, you can switch back to Edit Mode.
• Move the panel up, right, left, or down.
• Add another panel to the right, left, above, or below this one.
• Remove this panel.
Creating and Editing Custom Pages in Process Workspace 5-1

5.2 Creating and Editing Custom Pages in Process WorkspaceYou can design and add new pages and panels to customize your layout.
This section contains the following topics:
• How to Create a Custom Page in Process Workspace
• How to Add an External URL to a Customized Page in Process Workspace
• How to Add an Applications Panel to a Customized Page in Process Workspace
• How to Add a Dashboards Panel to a Customized Page in Process Workspace
• How to Add a Process Instance Panel to a Customized Page
• How to Grant and Manage Access to Customized Pages in Process Workspace
5.2.1 How to Create a Custom Page in Process Workspace
To create a custom page:
1. In the Process Workspace navigation bar, select More, then select Add CustomPage.
The new page appears.
2. Enter a Name for your new page and click Apply.
3. In the upper right corner of the new page, click Add Panel.
The Add Panel dialog box appears with the Applications item selected, as shownin Figure 5-1.
Figure 5-1 Adding an Applications Panel
4. You can choose the type of application panel to add: application, dashboard, orprocess instance.
For more information, see:
• How to Add an Applications Panel to a Customized Page in Process Workspace
• How to Add a Dashboards Panel to a Customized Page in Process Workspace
• How to Add a Process Instance Panel to a Customized Page
Creating and Editing Custom Pages in Process Workspace
5-2 Managing and Monitoring Processes with Oracle Business Process Management

5.2.2 How to Add an External URL to a Customized Page in Process WorkspaceYou can set your customized page to open any other application you build byconfiguring the custom page to use that external application's link. For example, youcan include a link to a custom application that enables users to complete a new servicerequest. To do this, in the newly created page, check the Show External URL checkbox and add the URL.
Note:
Do not enter the external URL of a website that has frame bursting enabled. Toinclude such websites, add them as external applications as explained in Howto Enable Customized Applications and Links in Process Workspace.
5.2.3 How to Add an Applications Panel to a Customized Page in Process Workspace
To add an Applications panel to a customized page:
1. In the Process Workspace navigation bar, select More, then select Add CustomPage.
The new page appears.
2. In the upper right corner of the new page, click Add Panel.
The Add Panel dialog box appears with the Applications item selected.
3. From the Add Panel dialog box, select Applications, then click Ok.
The Applications panel appears on the page.
4. Specify the name of the Applications panel and any configurable properties.
5. Click Apply.
5.2.4 How to Add a Dashboards Panel to a Customized Page in Process WorkspaceFrom the Add Panel dialog box, you can also select Dashboards (Charts), as shown in Figure 5-2.
Figure 5-2 Adding a Dashboards (Charts) Panel
This dialog box enables you to include either charts or a chart selector in your newpage. Choosing either one provides you with the corresponding preview image.
Creating and Editing Custom Pages in Process Workspace
Creating and Editing Custom Pages in Process Workspace 5-3

To add a Dashboards panel to a customized page:
1. In the Process Workspace navigation bar, select More, then select Add CustomPage.
The new page appears.
2. In the upper right corner of the new page, click Add Panel.
The Add Panel dialog box appears with the Applications item selected.
3. From the Add Panel dialog box, select Dashboards (Charts), then click Ok.
The Dashboards panel appears on the page. See Using Standard Dashboards foran explanation of the standard dashboards.
4. In the Panel Label section, specify the name of the Dashboards panel.
5. In the Panel Properties section, from the Data Source list, select a data source forthis dashboard panel. The default options are:
• Workload per process
• Performance per process
• Workload per participant
• Performance per participant
You can also specify a custom data source. To do this:
a. In the Dashboards panel, in the Panel Properties section, to the right of theData Source field, click the Search icon.
The Data Sources dialog box appears as shown in Figure 5-3.
Figure 5-3 Custom Data Source
b. In the navigator pane on the left, click New.
A Data Source dialog box appears for you to create a new data source.
c. Specify the fields as described in Specifying Graph Content.
d. When you are finished specifying the data source, click Ok.
6. Specify the action to be triggered when clicking the graph or widget. Options are:
Creating and Editing Custom Pages in Process Workspace
5-4 Managing and Monitoring Processes with Oracle Business Process Management
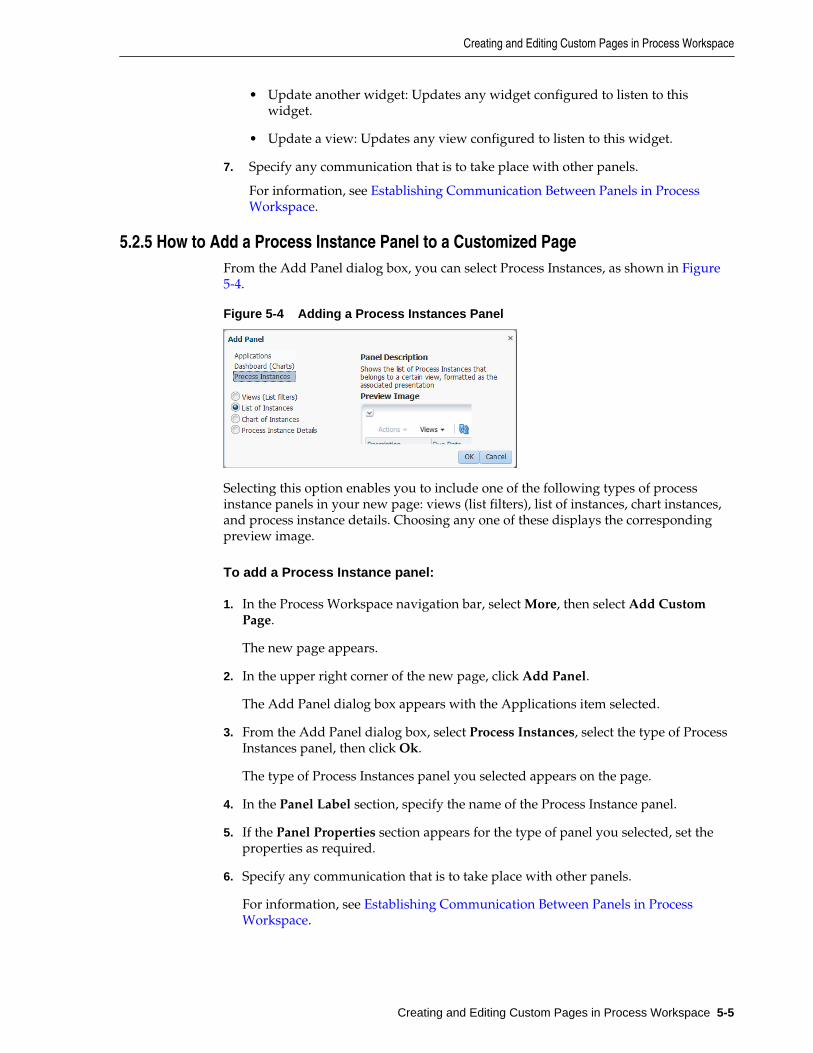
• Update another widget: Updates any widget configured to listen to thiswidget.
• Update a view: Updates any view configured to listen to this widget.
7. Specify any communication that is to take place with other panels.
For information, see Establishing Communication Between Panels in ProcessWorkspace.
5.2.5 How to Add a Process Instance Panel to a Customized PageFrom the Add Panel dialog box, you can select Process Instances, as shown in Figure5-4.
Figure 5-4 Adding a Process Instances Panel
Selecting this option enables you to include one of the following types of processinstance panels in your new page: views (list filters), list of instances, chart instances,and process instance details. Choosing any one of these displays the correspondingpreview image.
To add a Process Instance panel:
1. In the Process Workspace navigation bar, select More, then select Add CustomPage.
The new page appears.
2. In the upper right corner of the new page, click Add Panel.
The Add Panel dialog box appears with the Applications item selected.
3. From the Add Panel dialog box, select Process Instances, select the type of ProcessInstances panel, then click Ok.
The type of Process Instances panel you selected appears on the page.
4. In the Panel Label section, specify the name of the Process Instance panel.
5. If the Panel Properties section appears for the type of panel you selected, set theproperties as required.
6. Specify any communication that is to take place with other panels.
For information, see Establishing Communication Between Panels in ProcessWorkspace.
Creating and Editing Custom Pages in Process Workspace
Creating and Editing Custom Pages in Process Workspace 5-5

5.2.6 How to Grant and Manage Access to Customized Pages in Process WorkspaceAn administrator can specify the roles that can access a custom page that theadministrator has created. Non-administrative users cannot grant access to custompages.
5.2.6.1 To specify access to a custom page
1. In the custom page you are adding, next to the Access field, click Add AccessProperties.
Figure 5-5 Specifying Access to a Custom Page
The Add Access Properties dialog appears.
2. In the Add Access Properties dialog box:
• Enter an identifier and a name for this page layout.
• From the Roles list on the left, select the roles to which you are granting accessin this layout. Move them to the list on the right by clicking the arrow icons,then click OK.
Note:
– Every user can create custom pages, however an administrator can create apage and share that page with multiple users by providing access to a rolewhich consists of multiple users.
– To grant access to a role, the administrator must be associated with thatrole, else it will not appear in the Role list.
The layout you have just created appears in the Access list. That layout nowspecifies the roles with access to this custom page.
5.2.6.2 To edit access properties for a custom page
1. In the custom page you are adding, next to the Access field, click Edit AccessProperties.
The Edit Access Properties dialog box appears.
2. Enter your changes, then click OK.
The layout as you have just edited appears in the Access list. It now specifies theroles with access to this custom page.
Creating and Editing Custom Pages in Process Workspace
5-6 Managing and Monitoring Processes with Oracle Business Process Management

Note:
You can add new roles to a layout without removing previously granted roles.
5.2.6.3 To delete access properties for a custom page
In the custom page you are adding, next to the Access field, click Delete AccessProperties.
If the layout is a custom one, then you are prompted to confirm the deletion.
To maintain the custom page for the current user when a custom layout is deleted, theuser must first save the page to the default layout. Only then should the user createthe custom layout, modify the page, and save it to the new layout. If the user does notfirst save the page to the default layout, then the page is deleted for all members of theroles defined in the custom layout, including the current user.
If the user had immediately created the custom layout and set it on the page beforesaving the page, then any custom pages previously associated with this custom layoutremain, but are now associated with the default layout.
If the custom page uses the default layout, then the custom page is deleted. Userspreviously authorized to see this custom page will no longer see it.
5.3 Establishing Communication Between Panels in Process WorkspaceYou can establish communication between two panels so that an action in one panel istriggered by an action in the other.
For example, you can configure a Process Instance panel to listen for actions that occurin a View List panel. Then, when a user selects a given view in the View List panel,that action triggers the use of that view in the Process Instance panel.
5.3.1 Establishing Communication Between Panels in Process WorkspaceTo establish communication between panels, you configure one panel, designed withlistening capabilities, to monitor actions in one or more source panels. An actionoccurring in a source panel then triggers an action in the listening panel.
Note:
Communication can be established only between panels on the same page.
To establish communication between panels:
1. In the custom page, click Edit Mode.
The entire page is available for editing.
2. Create a source panel and select the appropriate option from the Data Source list.
3. Create a listening panel. This time, do not select anything from the Data Sourcelist.
4. Expand Communication with other panels, and, in the Selected event sourceswindow, select the source panel created in step 2.
Establishing Communication Between Panels in Process Workspace
Creating and Editing Custom Pages in Process Workspace 5-7
5. In each panel, click Apply.
After you have completed the above step, any action in the source panel triggers acorresponding action in the listening panel. For example, when two dashboard panelsare communicating, clicking any graphical bars in the source panel triggers the use ofthat view in the listening panel.
Establishing Communication Between Panels in Process Workspace
5-8 Managing and Monitoring Processes with Oracle Business Process Management

6Using Dashboards in Process Workspace
Users of Oracle Business Process Management Workspace (Process Workspace) canuse and customize process monitor and standard dashboards—that is, the displays,graphs and drill-downs based on data previously computed in a process cube schema.Dashboards reflect the standard metrics gathered during the execution of a process.
This chapter includes the following sections:
• About Process Monitor and Standard Dashboards
• Using the Process Monitor Dashboard
• Using Standard Dashboards
• Creating Custom Dashboards
• Understanding Data Visibility Rules in Dashboards
6.1 About Process Monitor and Standard DashboardsProcess Workspace has two types of dashboards: process monitor dashboards andstandard dashboards.
Process monitor dashboards enable you to monitor and optimize process execution byidentifying bottlenecks and other performance problems.
Standard dashboards present the standard metrics gathered during the execution of aprocess as graphs and drill-downs. The information displayed is based on datapreviously computed in a process cube schema.
6.1.1 Accessing Process Monitor and Standard DashboardsTo access the Process Monitor dashboard, from the Process Workspace home page,select Dashboards, then Process Monitor.
To access the standard dashboards, from the Process Workspace home page, selectDashboards, then Standard Dashboards.
6.2 Using the Process Monitor DashboardUse the Process Monitor dashboard to monitor process execution performance andidentify problems with processes and activities.
6.2.1 Process Monitor DashboardUse the process monitor dashboard to select the process to monitor, the time intervalover which to view statistics, and to view information and see alerts that enable you toidentify process issues that are affecting performance.
Using Dashboards in Process Workspace 6-1

In addition, other activity performance statistics related to the activities in theprocesses are generated and accessible for inspection.
Figure 6-1 Process Monitor Dashboard
The process monitor dashboard, as shown in Figure 6-1 includes the followingcontrols:
• Process - select the process to monitor
• Time Interval - select the time interval to view. Choices include:
– Last 24 Hours
– Last Five Days
– Last One Month
– Last Six Months
– Last One Year
– All
• Completed Instances - the number of completed process instances over the selectedtime period
• Faulted Instances - the number of process instances that failed or had other faults
• Avg Time - the average processing time of process instances
• Processing time - deviation (plus or minus times) from the average processing timefor process instances
• Zoom control
• Process diagram - interactive diagram of the process, including swimlanes showingroles.
Using the Process Monitor Dashboard
6-2 Managing and Monitoring Processes with Oracle Business Process Management

• Restore Pane - displays the performance graphs
6.2.1.1 Identifying and Viewing Alerts and Other Activity Metrics
Activities that have processing issues such as bottlenecks, appear with a yellow or redhalo around them, as shown in Figure 6-1.
Alert types include:
• Time Problem
• Queue Problem
• Major Increment From Average
• Bottleneck
In addition to alert details, you can view additional process and activity and statistics
• Metrics
• Human Task
See About the Activity Details Dialog for details on the fields available for each of thealerts and statistics categories.
The color of the halo reflects the type and severity of the processing issue:
• Yellow - the issue is a time problem or a queue problem
• Red - the issue is both a time problem and a queue problem and is therefore abottleneck, or the issue is a major increase in the historical average processingmetrics for an activity
6.2.1.2 Viewing Performance Graphs
To view performance graphs, click Restore Pane in the lower right corner of theprocess monitor dashboard. This opens the performance graphs pane as shown in Figure 6-2
Figure 6-2 Process Monitor Dashboard Performance Graphs
Two graphs are provided - Workload per activity, and Performance per activity. Clickthe graph elements to display more information about them. These are similar to thegraphs discussed in Using Standard Dashboards.
Using the Process Monitor Dashboard
Using Dashboards in Process Workspace 6-3
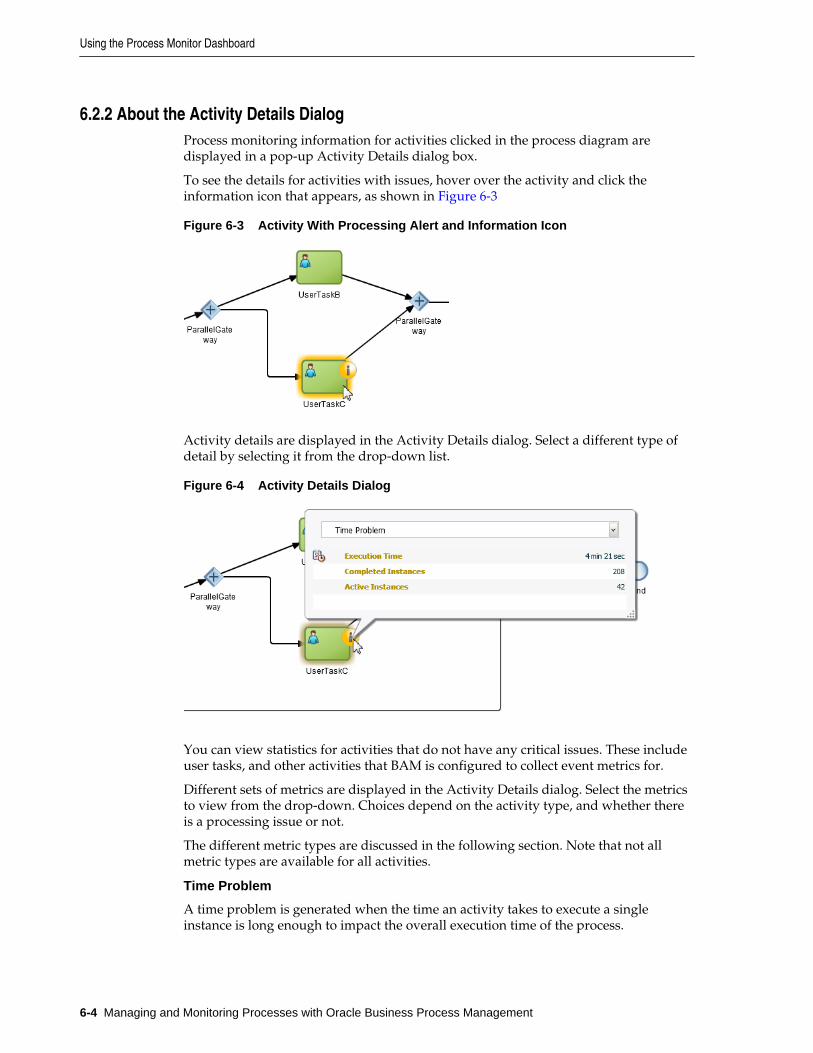
6.2.2 About the Activity Details DialogProcess monitoring information for activities clicked in the process diagram aredisplayed in a pop-up Activity Details dialog box.
To see the details for activities with issues, hover over the activity and click theinformation icon that appears, as shown in Figure 6-3
Figure 6-3 Activity With Processing Alert and Information Icon
Activity details are displayed in the Activity Details dialog. Select a different type ofdetail by selecting it from the drop-down list.
Figure 6-4 Activity Details Dialog
You can view statistics for activities that do not have any critical issues. These includeuser tasks, and other activities that BAM is configured to collect event metrics for.
Different sets of metrics are displayed in the Activity Details dialog. Select the metricsto view from the drop-down. Choices depend on the activity type, and whether thereis a processing issue or not.
The different metric types are discussed in the following section. Note that not allmetric types are available for all activities.
Time Problem
A time problem is generated when the time an activity takes to execute a singleinstance is long enough to impact the overall execution time of the process.
Using the Process Monitor Dashboard
6-4 Managing and Monitoring Processes with Oracle Business Process Management

For each process, both the elapsed time and estimated time to completion arecalculated (as well as their average, maximum, minimum and variance). These arebased on previously completed process instances that have followed the sameexecution paths as the in-progress processes.
Fields displayed include:
• Execution Time
• Completed Instances
• Active Instances
Queue Problem
A queue problem exists when the number of instances waiting to be executed cause animpact on the process execution time, even though the execution time for a singleactivity may be acceptable.
Fields displayed include:
• Execution Time
• Completed Instances
• Active Instances
Major Increment From Average
This problem is flagged when the execution time for an activity has increasedsignificantly from the historical average. The analysis is not related to the processexecution time per se, but is based on a comparison between how the process behavedin the past and how it is currently behaving.
Fields displayed include:
• Execution Time
• Completed Instances
• Active Instances
Bottleneck
A bottleneck appears when there are activities that are taking significantly longer thanthe execution time average, and there is a queue problem at the same time. In otherwords, there are many instances of an activity and the execution time for each of theinstances is expected to be too long. As a result, process execution time is negativelyaffected.
The bottleneck detection algorithm considers the average execution time per activityand deviation from the average, and calculates a threshold value. When activities areover the threshold, they can impact the overall processing times. An estimate ofcurrently running activities is calculated. The total execution time and deviation arecalculated to give a threshold value. When total activity execution time is over thisthreshold, a queue problem is indicated.
Fields displayed in the Activity Details dialog include:
• Execution Time
• Completed Instances
Using the Process Monitor Dashboard
Using Dashboards in Process Workspace 6-5

• Active Instances
Metrics
These are generic metrics related to the number of instances that completed that theactivity, including elapsed and estimated completion time statistics. This informationis available for any activity that is gathering process metrics information.
Fields displayed include:
• Instances
• Avg Elapsed Time
• Max Elapsed Time
• Min Elapsed Time
• Std Dev for Elapsed Time
• Avg Time to Completion
• Max Time to Completion
• Std Dev for Time to Completion
Human Task
These are metrics obtained from the related task execution. This information isavailable for any human task.
Fields displayed include:
• Total Processing Time
• Total Waiting Time
• Total Unattended Time
• Expired Task
• Tasks Violating Deadline
• Total Time for <user> - the user name appears instead of the <user> placeholder
6.3 Using Standard DashboardsStandard dashboards are the graphs and drill-downs based on data previouslycomputed in a process cube schema. They reflect the standard metrics gathered duringthe execution of a process.
In each of the standard dashboards, clicking a bar graph in the left pane causes data tobe displayed graphically in the right pane. Clicking an item in the right pane displayscertain data in the Work Items panel in the lower pane. This section explains how eachtype of dashboard operates.
You can customize the presentation of the Work Items panel in the lower pane. Forinformation on how to do this, see Customizing the Presentation of Process Instancesin Process Workspace.
This section contains the following topics:
• Participant Dashboards
Using Standard Dashboards
6-6 Managing and Monitoring Processes with Oracle Business Process Management
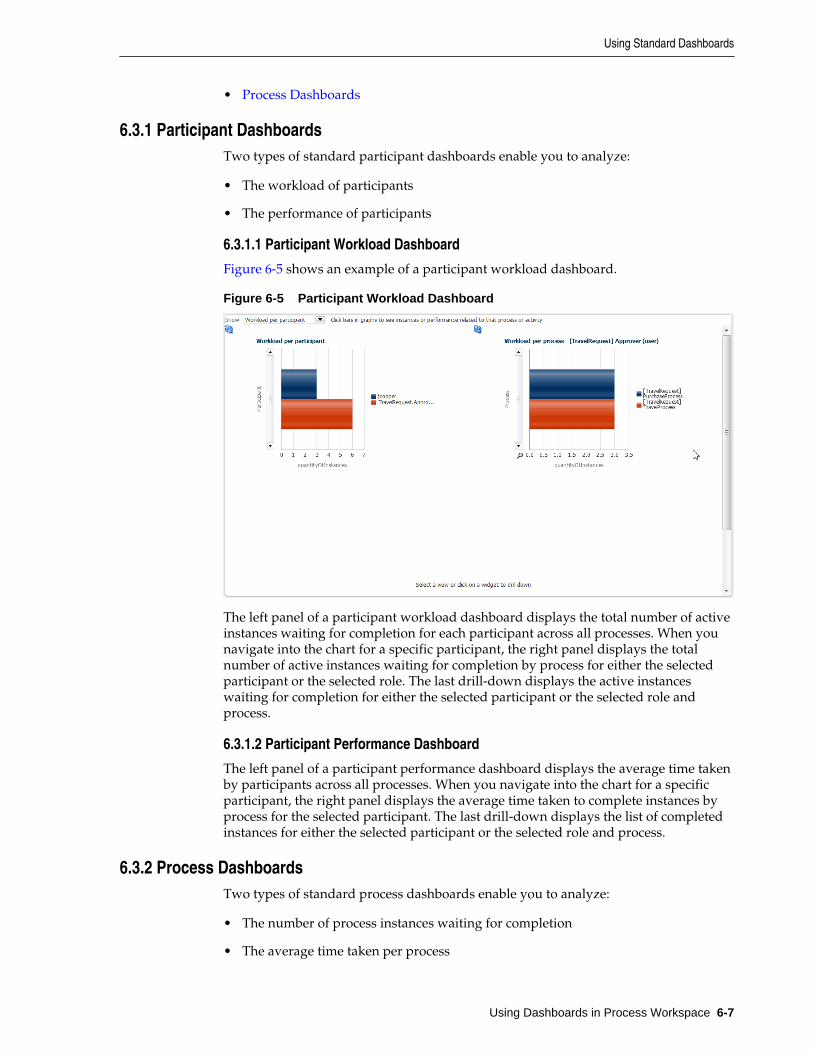
• Process Dashboards
6.3.1 Participant DashboardsTwo types of standard participant dashboards enable you to analyze:
• The workload of participants
• The performance of participants
6.3.1.1 Participant Workload Dashboard
Figure 6-5 shows an example of a participant workload dashboard.
Figure 6-5 Participant Workload Dashboard
The left panel of a participant workload dashboard displays the total number of activeinstances waiting for completion for each participant across all processes. When younavigate into the chart for a specific participant, the right panel displays the totalnumber of active instances waiting for completion by process for either the selectedparticipant or the selected role. The last drill-down displays the active instanceswaiting for completion for either the selected participant or the selected role andprocess.
6.3.1.2 Participant Performance Dashboard
The left panel of a participant performance dashboard displays the average time takenby participants across all processes. When you navigate into the chart for a specificparticipant, the right panel displays the average time taken to complete instances byprocess for the selected participant. The last drill-down displays the list of completedinstances for either the selected participant or the selected role and process.
6.3.2 Process DashboardsTwo types of standard process dashboards enable you to analyze:
• The number of process instances waiting for completion
• The average time taken per process
Using Standard Dashboards
Using Dashboards in Process Workspace 6-7

6.3.2.1 Process Workload Dashboard
Figure 6-6 shows a process workload dashboard.
Figure 6-6 Process Workload Dashboard
The left panel in the process workload dashboard displays the total number of activeinstances waiting for completion per process. When you navigate into a specificprocess, the right panel displays the total number of active instances waiting forcompletion for activities in the selected process. The last drill-down displays the activeinstances waiting for completion for the selected activity and process.
6.3.2.2 Process Performance Dashboard
The left panel in the process performance dashboard displays the average time takenper process. When you navigate into a specific process, the right panel displays theaverage time taken to complete by activities in the selected process. The last drill-down displays the completed instances for the selected activity and process.
Figure 6-7 shows a process performance dashboard.
Using Standard Dashboards
6-8 Managing and Monitoring Processes with Oracle Business Process Management

Figure 6-7 Process Performance Dashboard
6.4 Creating Custom DashboardsAs with standard dashboards, custom dashboards are the graphs and drill-downsbased on data previously computed in a process cube schema. They reflect thestandard and user-defined metrics gathered during the execution of the process. Theyenable you to define new graphs using both standard metrics and user-defined metricsspecified by using business indicators.
Note:
From BPM 12c onwards, users are encouraged to model any customdashboards from BAM 12c composer to leverage the rich dashboardcapabilities in BAM 12c.
Workspace 12c custom dashboards created using the participant dimensioncontinue to display participant data with 11g compatibility. That is, forworkload custom dashboards, the physical role corresponding to theswimlane for the user task is shown as a participant. For participantperformance dashboards, only the last user who acted on the user task isshown as the participant.
For instructions about adding a custom dashboard, see How to Create a Custom Pagein Process Workspace.
6.4.1 Specifying Graph ContentGraph content is specified by defining a data source.
For information about invoking the data source dialog box, see How to Add aDashboards Panel to a Customized Page in Process Workspace.
Specify the following data source information:
• Name: Provide a data source identifier.
• Title: Provide the title used while displaying the data source.
Creating Custom Dashboards
Using Dashboards in Process Workspace 6-9

• Graph Type: Select one of the following list of graph types:
– Area
– Percent Area
– Stacked Area
– Horizontal Bar
– Horizontal Percent Bar
– Horizontal Stacked Bar
– Bar
– Percent Bar
– Stacked Bar
– Line
– Percent Line
– Stacked Line
– Pie
– Pie Bar
– Multiple Pie
• Process: Select the process from the list.
All business indicators associated with the selected process become available forthe data source definition.
• Data Type: Select one of the following supported data types:
– Workload
– Activity and Measurement Sampling
– Process Level Sampling
Dimensions
• Series: Specify the dimension.
Series variables categorize the data. The series variable values are displayed in thelegend area labels in the chart.
Use Range: Select to use ranges for dimensions with ranges.
• Group: Specify the dimension used to group the dimensions used in a series.
Group variables also categorize the data. The group variable values are displayedas labels along one of the axis in the chart.
Use Range: Select to use ranges for dimensions with ranges.
Creating Custom Dashboards
6-10 Managing and Monitoring Processes with Oracle Business Process Management
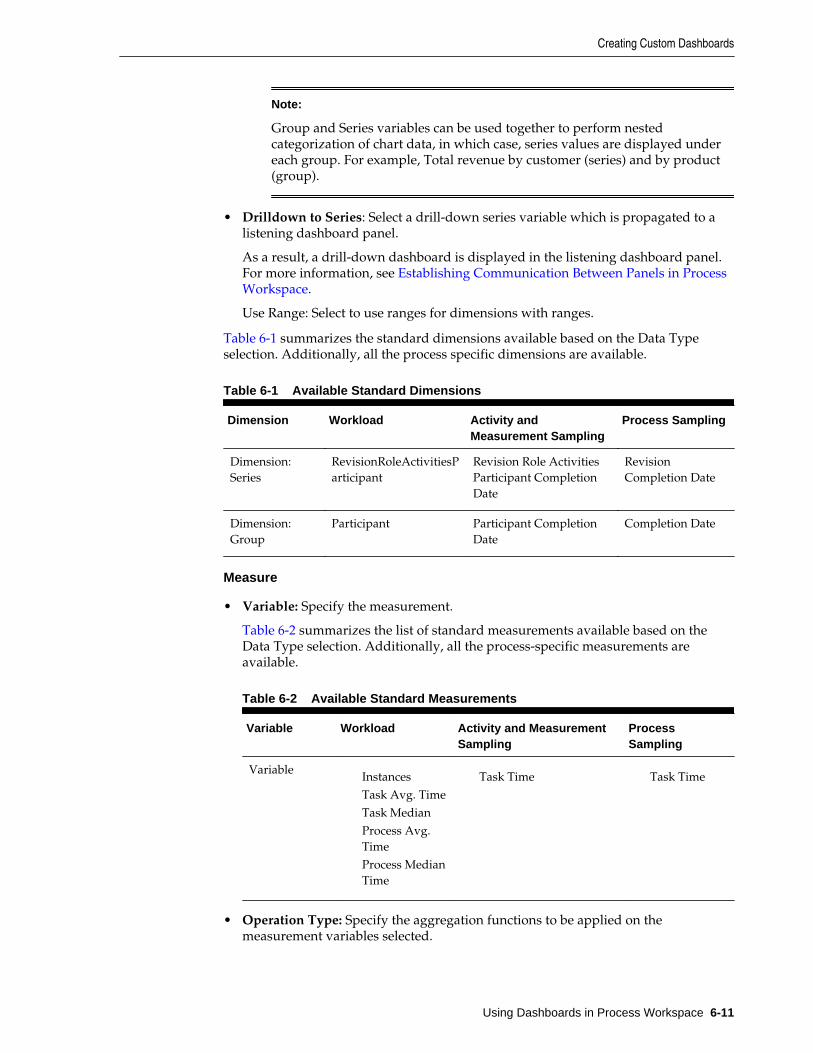
Note:
Group and Series variables can be used together to perform nestedcategorization of chart data, in which case, series values are displayed undereach group. For example, Total revenue by customer (series) and by product(group).
• Drilldown to Series: Select a drill-down series variable which is propagated to alistening dashboard panel.
As a result, a drill-down dashboard is displayed in the listening dashboard panel.For more information, see Establishing Communication Between Panels in ProcessWorkspace.
Use Range: Select to use ranges for dimensions with ranges.
Table 6-1 summarizes the standard dimensions available based on the Data Typeselection. Additionally, all the process specific dimensions are available.
Table 6-1 Available Standard Dimensions
Dimension Workload Activity andMeasurement Sampling
Process Sampling
Dimension:Series
RevisionRoleActivitiesParticipant
Revision Role ActivitiesParticipant CompletionDate
RevisionCompletion Date
Dimension:Group
Participant Participant CompletionDate
Completion Date
Measure
• Variable: Specify the measurement.
Table 6-2 summarizes the list of standard measurements available based on theData Type selection. Additionally, all the process-specific measurements areavailable.
Table 6-2 Available Standard Measurements
Variable Workload Activity and MeasurementSampling
ProcessSampling
Variable InstancesTask Avg. TimeTask MedianProcess Avg.TimeProcess MedianTime
Task Time Task Time
• Operation Type: Specify the aggregation functions to be applied on themeasurement variables selected.
Creating Custom Dashboards
Using Dashboards in Process Workspace 6-11
Table 6-3 summarizes the operation types that can be used with various Data Typeselections.
Table 6-3 Allowed Operation Types
Operation Workload Activity and MeasurementSampling
Process Sampling
Operation Type AvgSum
AvgSumMinMax
AvgSumMinMax
• Value Type: Select one of the following values: Value, Day(s), Hours, Minutes,Seconds, or Percentage.
Note:
If a new process is deployed while you have a dashboards page open, the newprocess is not listed in the Data Sources dialog box until you log out of ProcessWorkspace and then log back in.
Filters
You can add filter conditions based on the measure variables, series, and groups. Youcan add the filter condition only if a process is selected from the Process list. If "All" isselected in the Process list, then the Filters section is disabled.
Note:
If you add a filter for business indicators, that filter filters out the valuesinitially based on the condition given. Aggregation—either the sum or theaverage—then applies to the resulting set of items.For example, if the usertries to compute the average of all business indicator values greater than 1000,the user sets a filter for this—for example: BI <Greater or equals> 1000 and setOperation type as "avg". The result is that the business indicator values greaterthan 1000 are collected first, and then the computation for the averagecalculation takes place.
6.5 Understanding Data Visibility Rules in DashboardsThis section discusses data visibility rules applicable to dashboards in ProcessWorkspace.
This section contains the following topics:
• Workload Sampling Data
• Activity and Measurement Sampling Data
• Process Level Sampling Data
Understanding Data Visibility Rules in Dashboards
6-12 Managing and Monitoring Processes with Oracle Business Process Management
6.5.1 Workload Sampling DataThe section discusses the restrictions applicable to workload sampling data and theapplication roles a user must have in order to view certain activities in ProcessWorkspace. The restrictions are:
• The workload for activities and user task participants is seen by the member of thecorresponding swimlane application role, processowner application role orbpmprocessadmin application role or BPMDashboardViewer application role.
• If a process is associated with an organization unit, the corresponding workloadsampling data is restricted to organization unit members, bpmprocessadminapplication role or BPMDashboardViewer application role members.
6.5.2 Activity and Measurement Sampling DataThis section discusses the restrictions applicable to activity and measurementsampling data and the application roles a user must have in order to view certainactivities in Process Workspace. The restrictions are:
• Activities are seen by the member of the corresponding swimlane application role,processowner application role, bpmprocessadmin application role orBPMDashboardViewer application role.
• If a process is associated with an organization unit, the corresponding activity andmeasurement sampling data is restricted to organization unit members,bpmprocessadmin application role or BPMDashboardViewer application rolemembers.
6.5.3 Process Level Sampling DataThis section discusses the restrictions applicable to process level sampling data andthe application roles a user must have in order to view certain activities in ProcessWorkspace. The restrictions are:
• If a process is associated with an organization unit, the process data is visible to theorganization unit members or bpmprocessadmin or BPMDashboardviewerapplication role members.
• If a process is not associated with an organization unit, it is visible to all users.
Understanding Data Visibility Rules in Dashboards
Using Dashboards in Process Workspace 6-13

Understanding Data Visibility Rules in Dashboards
6-14 Managing and Monitoring Processes with Oracle Business Process Management
7Managing Workloads Among Users in
Process Workspace
Supervisors can use Oracle Business Process Management Workspace (ProcessWorkspace) to view and update all tasks assigned to the users who report to them.
This chapter includes the following sections:
• Managing the Availability of Users in Process Workspace
• Distributing Work among Users in a Group
• Setting Rules
• Setting Assignment Rules for Tasks with Multiple Assignees
• Reassigning or Delegating Tasks in Process Workspace
• Using Reports to Manage Workflows in Process Workspace
• Using Dashboards to Manage Workflows in Process Workspace
• Handling Escalations in Process Workspace
For information about troubleshooting human workflow issues, see Human WorkflowTroubleshooting in Administering Oracle SOA Suite and Oracle Business ProcessManagement Suite.
7.1 Managing the Availability of Users in Process WorkspaceIf a user is unavailable for a period of time and must delegate some or all assignedtasks to another user, then the user rules can automatically reassign the tasks based oncertain conditions.
More specifically, if a user is going on vacation, then a vacation period can beassociated with a rule to create a vacation rule.
For more information about creating user rules, see How to Create User Rules inProcess Workspace.
For more information about setting a vacation rule, see How to Enable a VacationPeriod in Process Workspace.
7.2 Distributing Work among Users in a GroupTo distribute work among users in a group, create rules for that group.
Creating group rules is similar to creating a user rule, with the addition of a list of thegroups that you, as the logged-in user, manage.
For information about creating user rules, see How to Create User Rules.
Managing Workloads Among Users in Process Workspace 7-1

Examples of group rules include:
• Assigning tasks from a particular customer to a member of the group.
• Ensuring an even distribution of task assignments to members of a group by usinground-robin assignment.
• Ensuring that high-priority tasks are routed to the least busy member of a group.
For information about creating a group rule, see How to Create Group Rules.
7.3 Setting RulesRules act on tasks. These tasks can be a specific task type or all of the tasks assigned toa user or group.
Figure 7-1 shows where you set rules, including vacation rules (different from thevacation period settings described in How to Enable a Vacation Period in ProcessWorkspace).
Figure 7-1 Creating a Rule
A rule cannot always apply in all circumstances in which it is used. For example, if arule applies to multiple task types, it may not be possible to set the outcome for alltasks, since different tasks can have different outcomes.
Rules are executed in the order in which they are listed. Rules can be reordered byusing the up and down buttons in the header, as shown in Figure 7-1.
If a rule meets its filter conditions, then it is executed and no other rules are evaluated.For your rule to be executed, you must be the only user assigned to that task. If thetask is assigned to multiple users (including you), the rule does not execute.
You cannot specify business rules for To-Do tasks.
7.3.1 How To Create User RulesSpecify the following when creating a user rule:
Setting Rules
7-2 Managing and Monitoring Processes with Oracle Business Process Management

• Rule name.
• If the rule is a vacation rule, see How to Enable a Vacation Period in ProcessWorkspace, for how to set the vacation period that is synchronized with thevacation rule.
• Which task or task type the rule applies to—If unspecified, then the rule applies toall tasks.
If a task type is specified, then any attributes mapped for that task type can be usedin the rule condition.
• When the rule applies.
• Conditions on the rule—These are filters that further define the rule, such asspecifying that a rule acts on priority 1 tasks only, or that a rule acts on taskscreated by a specific user.
The conditions can be based on standard task attributes and any mapped attributesthat have been mapped for the specific tasks. See How to Specify MappedAttributes, for more information.
User rules do the following actions:
• Reassign to—You can reassign tasks to subordinates or groups you manage.
• Delegate to—You can delegate to any user or group. Any access rights orprivileges for completing the task are determined according to the original userwho delegated the task. (Any subsequent delegations or re-assignments do notchange this from the original delegating user).
• Set outcome to—You can specify an automatic outcome if the workflow task wasdesigned for those outcomes, for example, accepting or rejecting the task. The rulemust be for a specific task type. If a rule is for all task types, then this option is notdisplayed.
• Take no action—Use this action to prevent other more general rules fromapplying. For example, to reassign all your tasks to another user while you are onvacation, except for loan requests, for which you want no action taken, then createtwo rules. The first rule specifies that no action is taken for loan requests; thesecond rule specifies that all tasks are reassigned to another user. The first ruleprevents reassignment for loan requests.
To create a user rule:
1. Click the Preferences link
The Preferences pane is displayed.
2. In the Preferences pane, click Rules.
The corresponding pane appears in the middle of the screen.
3. Click My Rules and then click Add.
The My Rule pane appears on the right.
4. In the My Rule pane, do the following and click Save:
• Provide a name for the rule.
Setting Rules
Managing Workloads Among Users in Process Workspace 7-3

• Select Use as a vacation rule if you are creating a vacation rule.
The start and end dates of the rule are automatically synchronized with thevacation period.
• Browse for task types to which the rule applies.
• Select Execute rule only between these dates and provide rule execution dates.
• In the IF area, add rule conditions.
• In the THEN area, select actions to be taken: Reassign to, Delegate to, Setoutcome to, or Take no action), as shown in Figure 7-2.
The new rule appears under the My Rules node.
7.3.2 How To Create Group RulesCreating a group rule is similar to creating a user rule, with the addition of a list of thegroups that you (as the logged-in user) manage. Examples of group rules include:
• Assigning tasks from a particular customer to a member of the group
• Ensuring an even distribution of task assignments to members of a group by usinground-robin assignment
• Ensuring that high-priority tasks are routed to the least busy member of a group
Group rules do the following actions:
• Assign to member via—You can specify a criterion to determine which member ofthe group gets the assignment.
This dynamic assignment criterion can include round-robin assignment,assignment to the least busy group member, or assignment to the most productivegroup member. You can also add your custom functions for allocating tasks tousers in a group.
• Assign to—As with user rules, you can assign tasks to subordinates or groups youdirectly manage.
• Take no action—As with user rules, you can create a rule with a condition thatprevents a more generic rule from being executed.
To create a group rule:
1. Click the Preferences link.
The Preferences pane is displayed.
2. In the Preferences pane, click Rules.
The corresponding pane appears in the middle of the screen.
3. Click the Other Rules tab.
4. Select My Group from the list.
5. Enter a group name and click Show Rules, or click the Search icon to search for agroup name, then click Show Rules.
Setting Rules
7-4 Managing and Monitoring Processes with Oracle Business Process Management
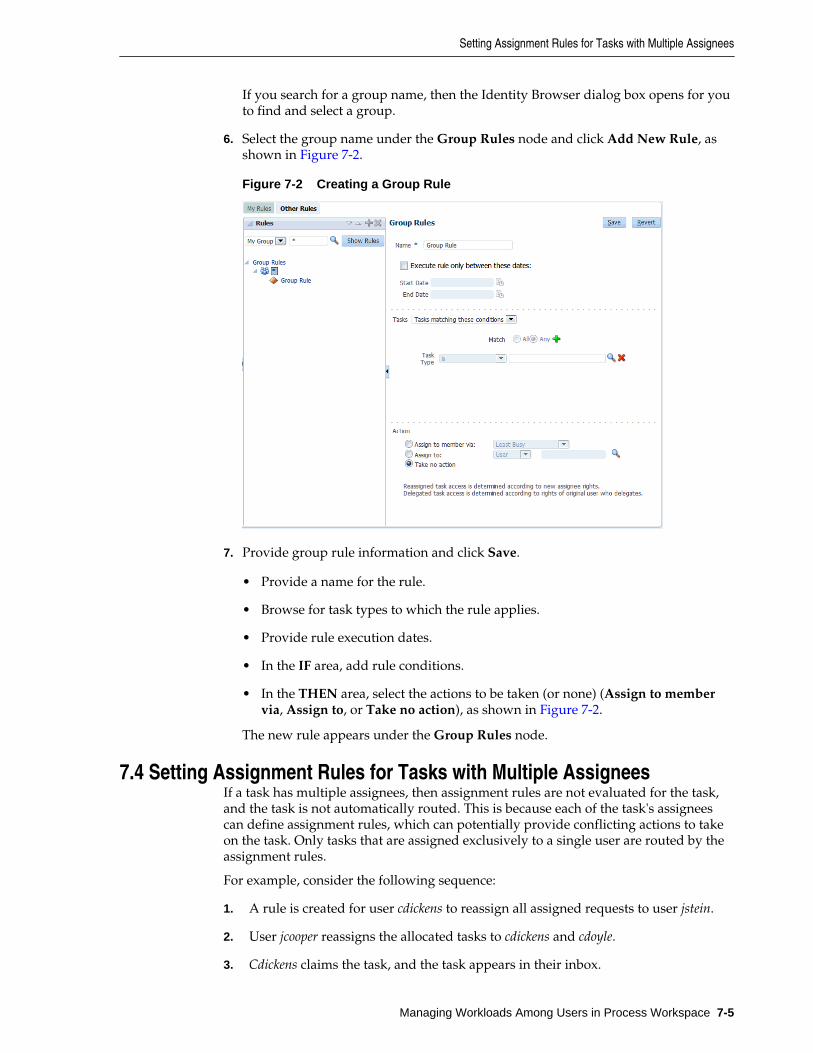
If you search for a group name, then the Identity Browser dialog box opens for youto find and select a group.
6. Select the group name under the Group Rules node and click Add New Rule, asshown in Figure 7-2.
Figure 7-2 Creating a Group Rule
7. Provide group rule information and click Save.
• Provide a name for the rule.
• Browse for task types to which the rule applies.
• Provide rule execution dates.
• In the IF area, add rule conditions.
• In the THEN area, select the actions to be taken (or none) (Assign to membervia, Assign to, or Take no action), as shown in Figure 7-2.
The new rule appears under the Group Rules node.
7.4 Setting Assignment Rules for Tasks with Multiple AssigneesIf a task has multiple assignees, then assignment rules are not evaluated for the task,and the task is not automatically routed. This is because each of the task's assigneescan define assignment rules, which can potentially provide conflicting actions to takeon the task. Only tasks that are assigned exclusively to a single user are routed by theassignment rules.
For example, consider the following sequence:
1. A rule is created for user cdickens to reassign all assigned requests to user jstein.
2. User jcooper reassigns the allocated tasks to cdickens and cdoyle.
3. Cdickens claims the task, and the task appears in their inbox.
Setting Assignment Rules for Tasks with Multiple Assignees
Managing Workloads Among Users in Process Workspace 7-5

The task is not automatically reassigned to jstein. The task is routed to jstein, followingthe assignment rule set for cdickens, only if user jcooper explicitly reassigns the task tocdickens alone, instead of reassigning the task to multiple users (cdickens and cdoyle).
7.5 Reassigning or Delegating Tasks in Process WorkspaceSupervisors and users can reassign or delegate tasks.
A supervisor can reassign or delegate tasks to reportees. A user withBPMWorkflowReassign privileges can delegate a task to anyone.
To reassign or delegate a task:
1. From the Task Actions list, select Reassign, as shown in Figure 7-3.
Figure 7-3 Reassigning a Task
2. Select Reassign or Delegate.
Delegate differs from Reassign in that the privileges of the delegate are based onthe delegator's privileges. This function can be used by managers' assistants, forexample.
3. Provide or browse for a user or group name, as shown in Figure 7-4.
Reassigning or Delegating Tasks in Process Workspace
7-6 Managing and Monitoring Processes with Oracle Business Process Management
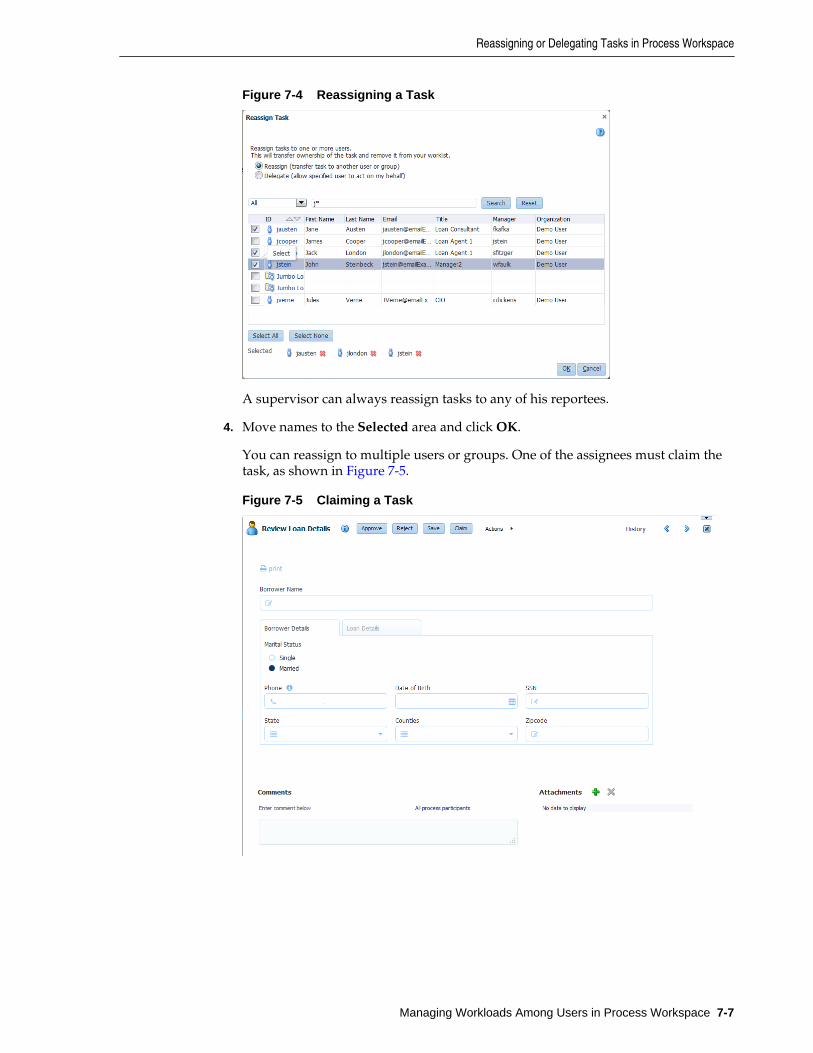
Figure 7-4 Reassigning a Task
A supervisor can always reassign tasks to any of his reportees.
4. Move names to the Selected area and click OK.
You can reassign to multiple users or groups. One of the assignees must claim thetask, as shown in Figure 7-5.
Figure 7-5 Claiming a Task
Reassigning or Delegating Tasks in Process Workspace
Managing Workloads Among Users in Process Workspace 7-7

Note:
When task details have been upgraded from an earlier release, you can see a"Request Failed" error when executing the Reassign action. Actually, thereassign completes, and when you click OK again, a popup says the task isalready assigned.
To eliminate the error message, upgrade your taskflow applications byopening them in Oracle JDeveloper, then redeploy the task form.
7.6 Using Reports to Manage Workflows in Process WorkspaceReports are available on the Tasks page in the Reports panel. Report results cannot besaved.
Figure 7-6 shows the Reports panel displaying the standard report types available.
Figure 7-6 Oracle Business Process Management Workspace Reports
For more information about reports, see Oracle Fusion Middleware Developer's Guide forOracle SOA Suite.
7.7 Using Dashboards to Manage Workflows in Process WorkspaceDashboards provide a variety of analytical information about the workload on usersfor the different processes being executed.
For example, if a specific user has many tasks assigned to her, and she is making littleprogress, this would indicate that all those corresponding processes are blocked.Having this information enables you to reassign those tasks to someone else and, ifnecessary some user or group routing rules can be specified to manage the issue in theshort term.
For more information about dashboards, see Using Dashboards in Process Workspace.
7.8 Handling Escalations in Process WorkspaceEscalations are among the system actions you can perform from the Task Details page.If a user escalates a task, it is automatically assigned to whomever is specified in theescalation path.
The escalation path is specified by the administrator. If no escalation path is specified,then the task escalates to the user's supervisor who can reassign it from there.
If a task is assigned to a role, but none of the role members have claimed the task, thenthe task is escalated as specified in the escalation path for that role. If the task isassigned to a role and a role member has claimed the task, then the escalation goes tothe role member's supervisor.
Using Reports to Manage Workflows in Process Workspace
7-8 Managing and Monitoring Processes with Oracle Business Process Management
For information about how an administrator specifies the escalation path, see How toSpecify the Escalation Path for a Role.
For more information about the Task Details page, see Using the Process WorkspaceTask Details Page.
Handling Escalations in Process Workspace
Managing Workloads Among Users in Process Workspace 7-9

Handling Escalations in Process Workspace
7-10 Managing and Monitoring Processes with Oracle Business Process Management

8Working with Adaptive Case Management
in Process Workspace
Oracle Business Process Management Workspace (Process Workspace) supports theprocessing of cases implemented using Oracle Business Process Management'sAdaptive Case Management.
This chapter includes the following sections:
• About Adaptive Case Management
• Navigating Cases
• Viewing Case Information
8.1 About Adaptive Case ManagementAdaptive Case Management supports modeling and running of ad hoc andunstructured business processes.
A case is a business process that is not rigidly predefined in the way a typical BusinessProcess Management process is. Cases are less structured ad-hoc processes thatinclude information, tasks, rules, and services. The tasks you perform while workingon a case change as information and activities related to the case are processed.Decisions you make while managing a case can change which processes and tasks areexecuted.
Some examples of cases that are suitable to be modeled and run using Adaptive CaseManagement include:
• Insurance claims
• Incident investigations
• Customer complaints
For additional information on Adaptive Case Management, see Oracle FusionMiddleware Developing Business Processes with Oracle Business Process Management Studio.
8.2 Navigating CasesCases are accessed through the Case page in the Process Workspace GUI.
To access the Case page, click the Case link at the top of the GUI page.
Note: Workspace GUI does not validate XSD or values of input arguments.Implement validator in ADF for validations.
Working with Adaptive Case Management in Process Workspace 8-1

8.2.1 About the Case PageThe Case page displays information for the currently selected case.
Use the Case page to:
• View a list of cases and select one to view or work on.
• View case details for open or closed cases.
• Add comments or raise events on a case.
• View case activities and their details, create new case activities, and filter thedisplay of case activities by their status.
• Link cases.
• View an Audit Trail of case events. Filter the display of case events by event type.View and add new documents to a case. View and modify case data.
• View or add documents to the case.
• View case milestones and mark them as complete.
• View case stakeholders. Add stakeholders. Add stakeholder members tostakeholders.
• View user information for case details.
• Close cases.
8.2.2 About the Navigation BarUse the Navigation bar (shown in Figure 8-1) to identify the current case, to movebetween cases, to close cases, and to get information about cases.
Figure 8-1 Navigation Bar
The Navigation bar provides the following elements:
Element Description
Case Listing Click the down arrow on the Case Listing control to see a list of currentcases. Click a case to navigate to it.
Status Icon The Status icon indicates the case's status. Hover over the icon to see a textdisplay of the case's status, for example, ACTIVE.
Case Numberand Name
The case number and name are displayed in the Navigation bar.
Navigating Cases
8-2 Managing and Monitoring Processes with Oracle Business Process Management
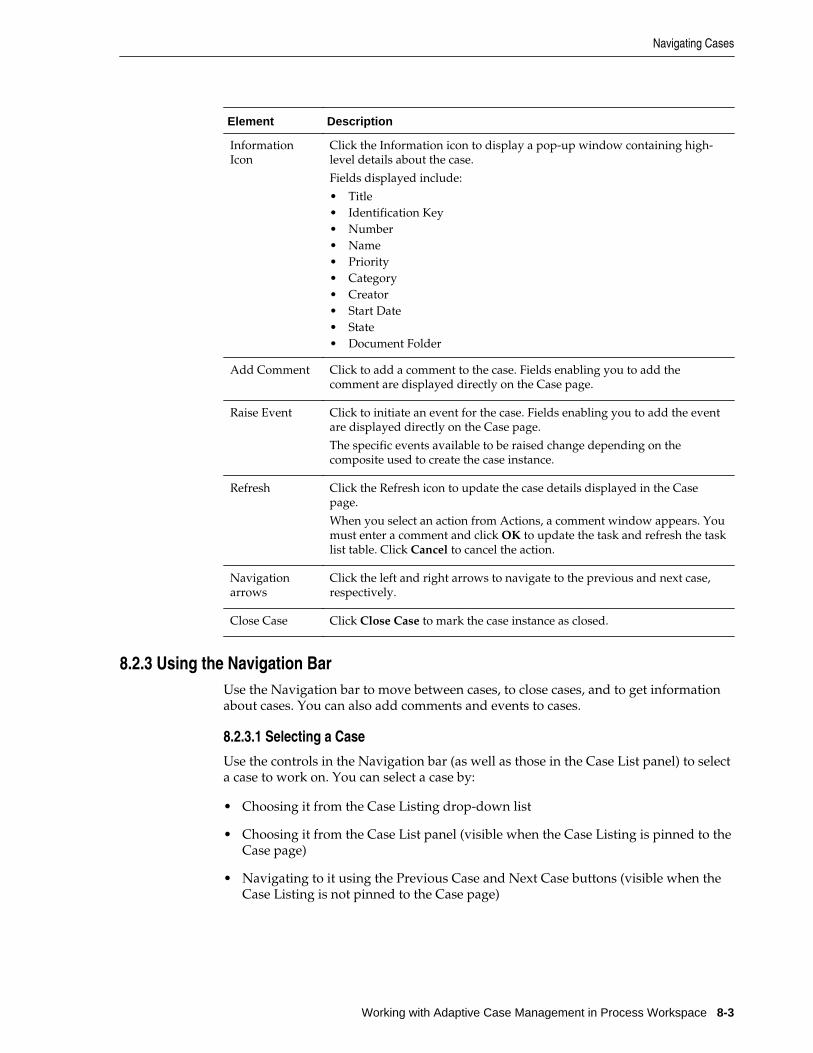
Element Description
InformationIcon
Click the Information icon to display a pop-up window containing high-level details about the case.
Fields displayed include:
• Title• Identification Key• Number• Name• Priority• Category• Creator• Start Date• State• Document Folder
Add Comment Click to add a comment to the case. Fields enabling you to add thecomment are displayed directly on the Case page.
Raise Event Click to initiate an event for the case. Fields enabling you to add the eventare displayed directly on the Case page.
The specific events available to be raised change depending on thecomposite used to create the case instance.
Refresh Click the Refresh icon to update the case details displayed in the Casepage.
When you select an action from Actions, a comment window appears. Youmust enter a comment and click OK to update the task and refresh the tasklist table. Click Cancel to cancel the action.
Navigationarrows
Click the left and right arrows to navigate to the previous and next case,respectively.
Close Case Click Close Case to mark the case instance as closed.
8.2.3 Using the Navigation BarUse the Navigation bar to move between cases, to close cases, and to get informationabout cases. You can also add comments and events to cases.
8.2.3.1 Selecting a Case
Use the controls in the Navigation bar (as well as those in the Case List panel) to selecta case to work on. You can select a case by:
• Choosing it from the Case Listing drop-down list
• Choosing it from the Case List panel (visible when the Case Listing is pinned to theCase page)
• Navigating to it using the Previous Case and Next Case buttons (visible when theCase Listing is not pinned to the Case page)
Navigating Cases
Working with Adaptive Case Management in Process Workspace 8-3

Figure 8-2 Case Listing Drop-down List
See “Viewing Hidden Panels” for more information about pinning and unpinning theCase List panel.
8.2.3.2 Closing a Case
Close cases using the Close Case button on the Navigation bar.
To close a case:
1. Navigate to the case.
2. Click Close Case.
The Close Case details dialog box is displayed.
3. Select an outcome from the Outcome drop-down list.
4. Optionally enter a comment.
5. Click Close Case.
An information dialog box is displayed indicating the results of the close action.
6. Click OK.
8.2.3.3 Viewing a Closed Case
You can view closed cases.
To view a closed case:
1. If the Case List panel is not displayed, pin the Case Listing drop-down list todisplay it.
2. Click Advanced Search.
The Advanced Search dialog box is displayed.
3. Ensure that Closed is selected in the State section of the search criteria.
4. Click Search.
The Case List panel is updated with a list of closed cases matching the other searchcriteria you used in the Advanced Search dialog box.
5. Click the case to view.
The Case page is updated with the information for the selected case.
Navigating Cases
8-4 Managing and Monitoring Processes with Oracle Business Process Management
8.2.3.4 Adding a Comment to a Case
Add comments to a case using the Add Comment link in the Navigation bar.
To add a comment to a case:
1. Click Add Comment.
The comment entry controls appear at the top of the Case page.
2. Enter the text for your comment.
3. Select a permission level from the Permission drop-down list. This determines theuser permission level needed to be able to view the comment.
4. Click Post to add the comment to the case.
Note: to close the comment controls without posting the comment, click Close.
Comments can be viewed in the Audit Trail panel. See Viewing the Audit Trail
8.2.3.5 Raising an Event on a Case
Raise events on a case using the Raise Event link in the Navigation bar. The eventsthat are available to be raised on a case are preconfigured using Oracle BusinessProcess Management Studio JDeveloper.
To raise a comment on a case:
1. Click Raise Event.
The raise event controls appear at the top of the Case page.
2. Select an event name from the Event Name drop-down list to specify the type ofevent.
3. Enter a comment.
4. Select a permission level from the Permission drop-down list. This determines theuser permission level needed to be able to view the event.
5. Click Raise Event to add the event to the case.
Note: to close the Raise Event controls without posting the event, click Close.
Events can be viewed in the Audit Trail panel. See Viewing the Audit Trail
8.3 Viewing Case InformationThis section describes the panels available on the Case page and the kinds ofinformation displayed on it, how to filter the displayed information, and how to findand view cases.
You interact with cases using the information provided on the Case page, and usingthe controls and links on the page to perform work related to the case, such as addingcomments or events, reviewing and modifying milestones, creating new case activitiesand so on.
Viewing Case Information
Working with Adaptive Case Management in Process Workspace 8-5

8.3.1 Viewing Case InstancesTo view the details for a case, navigate to it using the Navigation bar. Select the case inthe Case Listing control, or use the Previous Case and Next Case icons to navigatebetween cases.
See Navigating Cases for more information.
Figure 8-3 shows the Case page, which is divided into the following sections:
• Navigation bar
• Activities
• Linked Cases
• Details (which can display Audit Trail, Data, or Comments information)
• Milestones
• Stakeholders
Figure 8-3 Case Page
8.3.2 Viewing the Case ListYou can view (and select) cases in two ways:
• Click the Case Listing drop-down list in the Navigation bar to display a list ofcases. (See Figure 8-2.)
Viewing Case Information
8-6 Managing and Monitoring Processes with Oracle Business Process Management
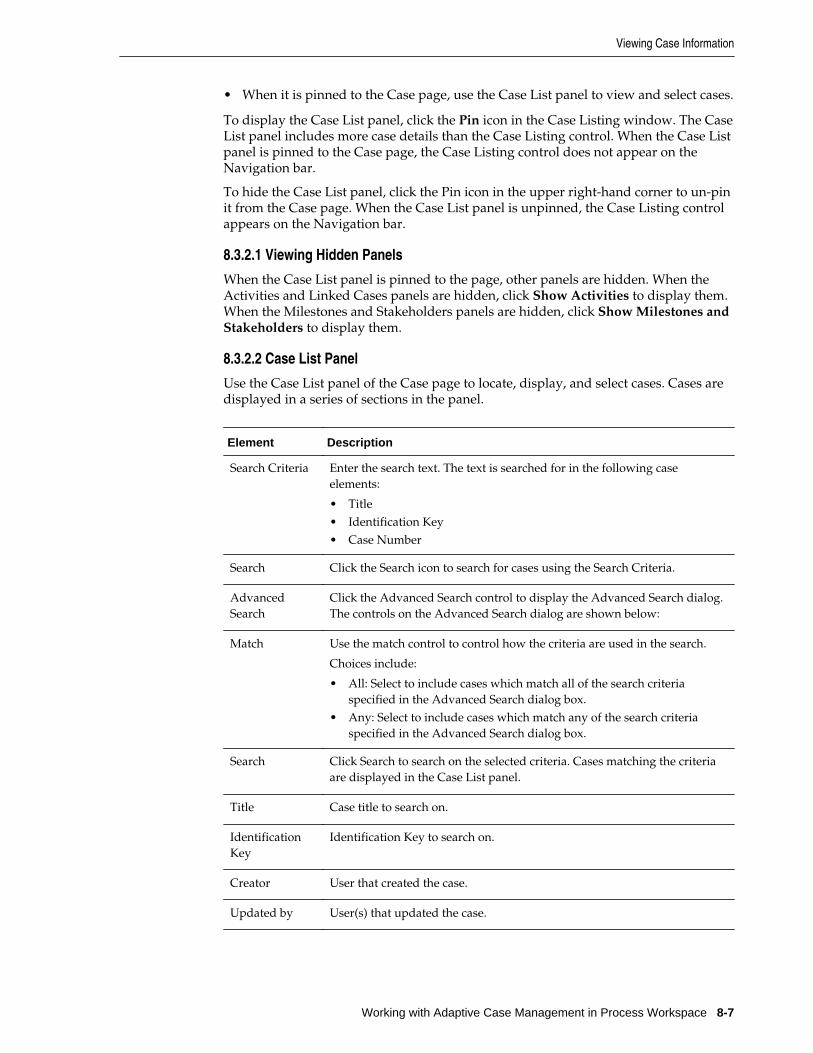
• When it is pinned to the Case page, use the Case List panel to view and select cases.
To display the Case List panel, click the Pin icon in the Case Listing window. The CaseList panel includes more case details than the Case Listing control. When the Case Listpanel is pinned to the Case page, the Case Listing control does not appear on theNavigation bar.
To hide the Case List panel, click the Pin icon in the upper right-hand corner to un-pinit from the Case page. When the Case List panel is unpinned, the Case Listing controlappears on the Navigation bar.
8.3.2.1 Viewing Hidden Panels
When the Case List panel is pinned to the page, other panels are hidden. When theActivities and Linked Cases panels are hidden, click Show Activities to display them.When the Milestones and Stakeholders panels are hidden, click Show Milestones andStakeholders to display them.
8.3.2.2 Case List Panel
Use the Case List panel of the Case page to locate, display, and select cases. Cases aredisplayed in a series of sections in the panel.
Element Description
Search Criteria Enter the search text. The text is searched for in the following caseelements:
• Title• Identification Key• Case Number
Search Click the Search icon to search for cases using the Search Criteria.
AdvancedSearch
Click the Advanced Search control to display the Advanced Search dialog.The controls on the Advanced Search dialog are shown below:
Match Use the match control to control how the criteria are used in the search.
Choices include:
• All: Select to include cases which match all of the search criteriaspecified in the Advanced Search dialog box.
• Any: Select to include cases which match any of the search criteriaspecified in the Advanced Search dialog box.
Search Click Search to search on the selected criteria. Cases matching the criteriaare displayed in the Case List panel.
Title Case title to search on.
IdentificationKey
Identification Key to search on.
Creator User that created the case.
Updated by User(s) that updated the case.
Viewing Case Information
Working with Adaptive Case Management in Process Workspace 8-7

Element Description
State Select the case state(s) to search on using the check boxes. Choices include:
• All: Search on all states as listed:• Active• Closed• Expired• Aborted• Suspended• Errored• Stale
Updated Select an update day to search on. Choices include:
• None• Today• Yesterday• Last Week
Due Select a due date to search on. Choices include:
• None• Overdue• In one day• In one week
Created Select a creation date to search on. Choices include:
• None• Today• Yesterday• Last Week
Sort By Sorts the cases displayed in the Case List. Choose from:
• Created Date• Case Number• Creator• Due Date
Load MoreItems
This link appears when there are more items than fits in the default panelsize. Click to display additional items.
8.3.2.3 Sorting the Case List
Sort the cases displayed in the Case List by selecting a sort criteria from the Sort Bydrop-down list. When you make a selection, the cases are re-displayed in the selectedorder. Choose from the following sort criteria:
• Created Date
• Case Number
• Creator
• Due Date
Viewing Case Information
8-8 Managing and Monitoring Processes with Oracle Business Process Management
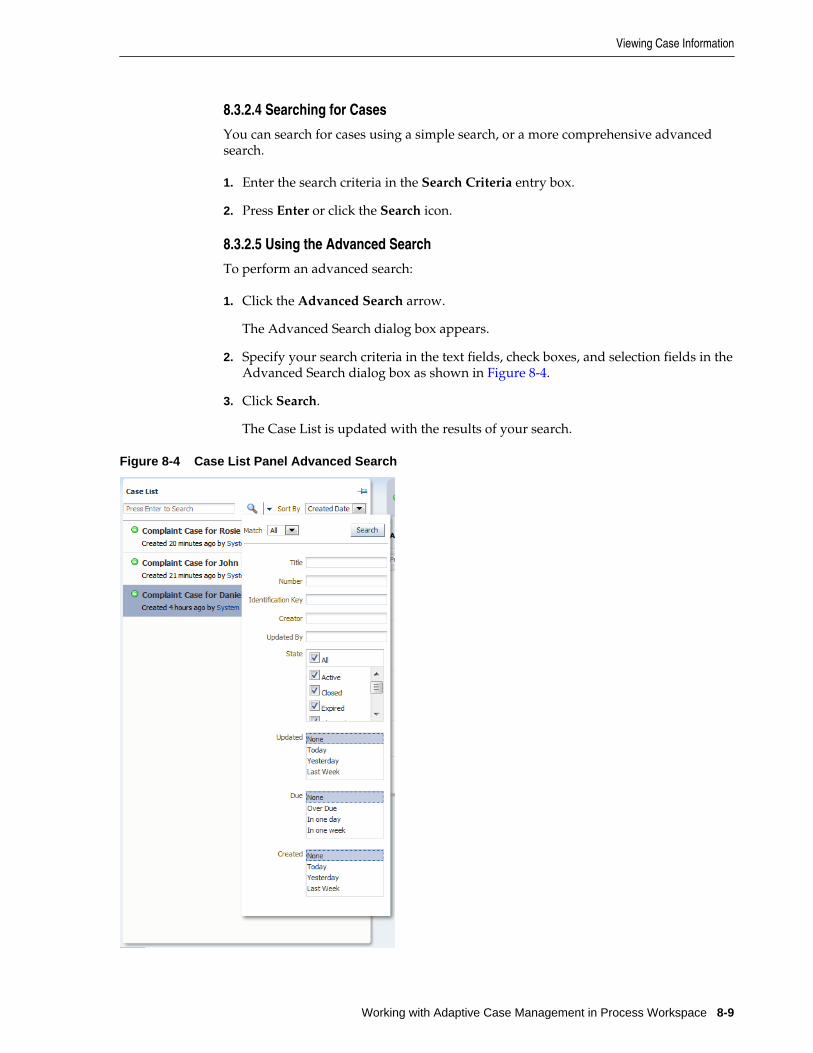
8.3.2.4 Searching for Cases
You can search for cases using a simple search, or a more comprehensive advancedsearch.
1. Enter the search criteria in the Search Criteria entry box.
2. Press Enter or click the Search icon.
8.3.2.5 Using the Advanced Search
To perform an advanced search:
1. Click the Advanced Search arrow.
The Advanced Search dialog box appears.
2. Specify your search criteria in the text fields, check boxes, and selection fields in theAdvanced Search dialog box as shown in Figure 8-4.
3. Click Search.
The Case List is updated with the results of your search.
Figure 8-4 Case List Panel Advanced Search
Viewing Case Information
Working with Adaptive Case Management in Process Workspace 8-9

8.3.3 Working With Case ActivitiesActivities for the selected case are displayed in the Activities panel.
When the Activities panel is hidden, click Show Activities to display it.
8.3.3.1 Activities Panel
Use the Activities panel of the Case page to view activities and their details, and toinitiate new activities. Activities are displayed in a series of sections in the panel.
Element Description
Activities Filter Select the type of activities to display. Choices are:
• All• Available• Running• Completed• Errored
Activities List Activities are displayed in sections, grouped by type. If no activities of aparticular type exist, the section is not displayed. Section types include:
• Available• Running• Completed• Errored
Add Activities Click to select an activity to add to the case. The choices available in thedrop-down list depend on the case configuration, and whether the activityhas already been added.
Load MoreItems
This link appears when there are more items than fits in the default panelsize. Click to display additional items.
8.3.3.2 Filtering the Activities Displayed
Use the Activities drop-down list to select which activities are displayed. Choose from:
• All
• Available
• Running
• Completed
• Errored
Activities for the case are displayed in their own section.
To see the details for an activity, click it.
8.3.3.3 Initiating an Activity
Activities that can be initiated are displayed in the Available section of the Activitiespanel. Activities that are required for a case are marked with an asterisk.
Viewing Case Information
8-10 Managing and Monitoring Processes with Oracle Business Process Management

To initiate an activity, click its link in the Activities panel. Provide any requiredinformation in the dialog box that is displayed and click Initiate.
Note that, in an Activity Form, if a DateTime popup appears, only the date can bechosen. Choosing the time is currently unsupported.
8.3.3.4 Viewing Activity Details
Activities that can be viewed are displayed in the Available, Running, Completedand Errored sections of the Activities panel.
To view details for an activity, hover the mouse over its link in the Activities panel.Click More Details... in the pop-up window that is displayed.
8.3.4 Working with Linked CasesCases can be linked with other cases in order to express a relationship between them.Cases can be:
• related
• dependent on another case
• marked as duplicates
• a subcase of another case
8.3.4.1 Linked Cases Panel
Use the Linked Cases panel of the Case page to view cases linked to the current case,and to link additional cases to the current case. Linked cases are displayed in a list inthe panel.
Element Description
Link Cases Click to link another case to the current case.
Case Each case linked to the current case is displayed in the list under a headingexpressing the type of relationship the cases have. The headings include:
• This case depends on - lists cases the current case depends on• This case is duplicate of - lists duplicate cases of the current case• This case is parent of - lists subcases to the current case• Cases related to this case
Go to case Click to go to a linked case.
8.3.4.2 Linking Cases
You can link cases so that when viewing one case, other cases related to it are listed inthe Linked Cases panel.
To link a case to the current case:
1. In the Linked Cases panel, click Link Cases.
The Link Cases dialog is displayed.
Viewing Case Information
Working with Adaptive Case Management in Process Workspace 8-11

2. Optionally filter the list of cases in the dialog box by entering a search criteria andclicking Search.
3. Click a case in the list to select it.
4. Select the relationship between cases from the This Case drop-down.
5. Optionally, enter a comment in the comment text box.
6. Click Link.
8.3.5 Viewing the Audit TrailThe Audit Trail panel is displayed by default when viewing a case. If it is not visible,click the Audit Trail link below the Navigation bar to display it.
You can view only one of the following panels at a time:
• Audit Trail panel
• Data panel: see Data Panel
• Documents panel: see Documents Panel
8.3.5.1 Audit Trail Panel
Use the Audit Trail panel to view case events, details on the users who executed theevents, and to set permissions for events. Events are displayed in a series of sections inthe panel.
Element Description
Search Criteria Enter the text to search for events by title.
Search Click the Search icon to search for events using the Search Criteria.
All Click to display all events.
Comments Click to display only events that are comments.
Note that comments related to all case activities are displayed.
Event Use the event drop-down list to filter which event types are displayed inthe Audit Trail panel.
Choices include:
• Activity• Lifestyle• Document• Milestone• User Defined• Data Upload
UpdatePermission
Click to change the user permissions for the currently selected event. If noevent is selected, the Update Permission icon is disabled.
Viewing Case Information
8-12 Managing and Monitoring Processes with Oracle Business Process Management
Element Description
Audit TrailDetails
Audit trail events are displayed as a series of sections in the Audit trailpanel. Each event includes:
• Event type icon• Event name• Event timestamp• Event detail summary (optionally)• User information
Load MoreItems
This link appears when there are more items than fits in the default panelsize. Click to display additional items.
8.3.5.2 Viewing Events in the Audit Trail
Case events are displayed in the Audit Trail panel. Each event is displayed in a sectionof the panel and includes the following information:
• Event type icon
• Event name
• Event timestamp
• Event detail summary (optionally)
• User who performed the event
To see additional information about the user associated with an event, hover yourmouse over the user name.
8.3.5.3 Updating Event Permissions
You can change the user permissions for an event.
To update user permissions for an event
1. Select the event from the Audit Trail panel.
2. Click the Update Permissions icon.
The Permission dialog box displays.
3. Select the desired permission for the event from the drop-down list.
4. Click Apply.
8.3.6 Data PanelUse the Data panel to view and modify the data associated with a case.
The data panel only shows links to case data objects that have been instantiated. Whena link is disabled, it indicates that there is no data form registered to display the casedata. A case data form must be generated and deployed to enable viewing of the casedata in the data panel.
Viewing Case Information
Working with Adaptive Case Management in Process Workspace 8-13
If you are a developer and want more information about designing data forms, seeWorking with Adaptive Case Management in Oracle Fusion Middleware DevelopingBusiness Processes with Oracle Business Process Management Studio.
To view the Data panel, click the Data link on the Case page.
You can only view one of the following panels at a time:
• Audit Trail panel: see Viewing the Audit Trail
• Data panel
• Documents panel: see Documents Panel
8.3.6.1 Working with Data Forms in the Data Panel
The specific forms, tabs, fields, and controls that appear in the Data panel aredependent on the Case project design for the case you are working on, and not pre-determined by Process Workspace.
If a Workspace user (an Administrator or a regular user) selects data as “External” inJDeveloper at design-time in Case Management, then during runtime in Workspace,the data displays as external and is disabled and you cannot edit the form for thatdata. The Save and Edit buttons are also disabled and you will get a messageindicating that you do not have permission to edit the data.
If you are a developer and want more information about designing data forms, seeWorking with Adaptive Case Management in Oracle Fusion Middleware DevelopingBusiness Processes with Oracle Business Process Management Studio.
8.3.7 Documents PanelUse the Documents panel to view and add documents attached to a case.
To view the Documents panel, click the Documents link on the Case page.
You can view only one of the following panels at a time:
• Audit Trail panel: see Viewing the Audit Trail
• Data panel: see Data Panel
• Documents panel
8.3.7.1 Documents Panel
Use the Documents panel to view documents attached to the case and details on theusers who uploaded them. Without an explicit Read access, you may not be able toview documents in the Documents List, but only upload documents.
You can also upload additional documents, and set permissions for the documents.
Note:
• You cannot add documents to a human task using task user interface oncethe task is associated with a case.
• If you are uploading a duplicate document, the duplicate copy is saved asCopy of <filename>. There is no error message displayed.
Viewing Case Information
8-14 Managing and Monitoring Processes with Oracle Business Process Management
The case project for the case you are working on may be configured to use eitherdatabase or Enterprise Content Manager-based storage. The controls on this dialogchange depending on whether database or Enterprise Content Manager storage isused in the case project.
When the case project is configured to use Enterprise Content Manager, there areoptions to check out and check in documents. Note that check out does not actuallycheck out and download the document - it marks the document as checked out in theEnterprise Content Manager.
Documents are displayed in a series of sections in the panel.
Element Description
Upload File Click to upload a new document to the case. The Upload File dialog box isdisplayed. The controls on this dialog change depending on whetherdatabase or Enterprise Content Manager storage is used in the case project.
DocumentDetails
Documents are displayed as a series of sections in the Documents panel.Each document includes:
• Document icon• Document title• Document comment• Creator name• Timestamp• Action List control
Action List Use the Action List to choose an action to perform on the document, suchas Delete.
Load MoreItems
This link appears when there are more items than fits in the default panelsize. Click to display additional items.
8.3.7.2 Viewing Documents in the Documents Panel
Documents attached to the case are displayed in the Documents panel. Each documentis displayed in a section of the Documents panel and includes the following:
• Document icon
• Document title
• Document comment
• Creator name
• Timestamp
To download the document, click the Document title. A pop-up window is displayedcontaining the contents of the document.
8.3.7.3 Performing Actions on a Document
You can perform actions on a document attached to a case. For example, you candelete a document if you have the permissions required to do so.
To perform an action on a document
1. Select the document from the Documents panel.
Viewing Case Information
Working with Adaptive Case Management in Process Workspace 8-15

2. Click the Action List drop-down list.
A list of actions available to your user account displays.
3. Select the desired action for the document from the drop-down list.
The action is taken immediately.
8.3.8 Viewing MilestonesMilestones are checkpoints that indicate the progress of the case.
8.3.8.1 Milestones Panel
Use the Milestones panel on the Case page to view case milestones, and to change thestatus of milestones. Milestones are displayed in a series of sections in the panel.
Element Description
MilestoneDetails
Each milestone section includes:
• Status icon: color-coded icons are used to indicate the status of themilestone. See below for details.
• Milestone name• Milestone status. See below for details.• Timestamp (optional): includes completion information and the user
who completed the milestone• Comment (optional): includes comment information provided when
the milestone changed.
Status icon Color-coded icons indicate the status of the milestone:
• Blue: Open.• Green: Completed• Amber: Reopened
MilestoneStatus
Change the status of a milestone by selecting a value from the milestonestatus drop-down list.
Milestones with status:
• Open: can be changed to Completed
• Closed: can be changed to Reopened (only if the milestone can bereopened).
• Reopened: can be changed to Completed
Load MoreItems
This link appears when there are more items than fits in the default panelsize. Click to display additional items.
8.3.8.2 Changing a Milestone's Status
You can change the status of a milestone. For example, a milestone with statusCompleted can be changed to Reopened.
Note that in most cases, milestone status changes occur automatically when certaincase activities happen.
Viewing Case Information
8-16 Managing and Monitoring Processes with Oracle Business Process Management

To change a milestone's status
1. Select the desired status from the Milestone Status drop-down list.
The Comment entry dialog box is displayed.
2. Enter an appropriate comment for the action you are taking.
3. Click OK.
The milestone is updated with the new status.
8.3.9 Working with StakeholdersStakeholders represent interested parties in the case. Stakeholders can have users,groups or roles associated with them that are involved in the processing of a case.Stakeholders can also be added without members. Case elements such as activities canbe restricted to certain stakeholders, and therefore, to particular users, groups or roles.
8.3.9.1 Stakeholders Panel
Use the Stakeholders panel on the Case page to view and modify case stakeholders.Stakeholders are displayed in a series of sections in the panel.
Element Description
AddStakeholder
Click to add a new stakeholder definition to the case. When you click AddStakeholder, the Add Stakeholder dialog is displayed.
EditStakeholder
Click to edit the currently selected stakeholder in order to add a new user,role, or group. When you click Edit Stakeholder, the Edit Stakeholderdialog is displayed.
At least one member must be added in order to save your changes.
StakeholdersDetails
Each section in the Stakeholders details panel includes:
• Stakeholder name• Stakeholder member icons (user, role or group) and stakeholder
members (if any)
Load MoreItems
This link appears when there are more items than fits in the default panelsize. Click to display additional items.
8.3.9.2 Adding Stakeholders
You can add new stakeholders to a case.
To add a new stakeholder
1. Click the Add Stakeholder button (green plus sign).
The Add Stakeholder dialog displays.
2. Enter a name for the new stakeholder.
3. Optionally, specify users, roles or groups.
4. Click OK.
Viewing Case Information
Working with Adaptive Case Management in Process Workspace 8-17

8.3.9.3 Editing Stakeholders
You can edit a case's stakeholders (if permissions allow it).
To edit a stakeholder
1. Select the stakeholder you wish to edit from the Stakeholders panel.
2. Click the Edit Stakeholder button. The Edit Stakeholder dialog displays.
3. Modify the stakeholder values.
4. Click OK.
Viewing Case Information
8-18 Managing and Monitoring Processes with Oracle Business Process Management
Part IIAdministering Process Workspace
Oracle Business Process Management Workspace (Process Workspace) enablesAdministrators to configure task-related information, the user interface, model theorganization, users and roles, and manage process instances.
This part includes the following chapters:
• Managing Process Workspace
• Managing Your Organization in Process Workspace
• Modifying Running Process Instances in Oracle Business Process ManagementWorkspace


9Managing Process Workspace
Administrators can perform various tasks in Oracle Business Process ManagementWorkspace (Process Workspace), including setting the display of the Work Itemspanel, and administering and configuring task-related information.
When an end user launches an application from the Applications panel of the ProcessTracking page, the application is launched and a form appears. If the user dismissesthat form, then that process instance continues to run as a superfluous instance neverto be processed or used. Such superfluous instances can be cleaned up by abackground instance that can be specified and scheduled by the administrator of theBPMN service engine. If you are the administrator of the BPMN service engine andwant more information about specifying this background instance, see AdministeringOracle SOA Suite and Oracle Business Process Management Suite.
This chapter includes the following sections:
• Setting the Display of the Work Items Panel in Process Workspace
• Administering Approval Groups in Process Workspace
• Managing Mapped Attributes (Flex Fields) in Process Workspace
• Using Task Configuration in Process Workspace
• Using Evidence Search in Process Workspace
• Managing Exceptions in Process Workspace
• Using the User Metadata Migration Utility
9.1 Setting the Display of the Work Items Panel in Process WorkspaceAdministrators can specify various application preferences to set the display of theWork Items panel.
To set application preferences:
1. From the Process Workspace global toolbar, click Administration.
2. Then click Application Preferences.
The Application Preferences window appears.
Managing Process Workspace 9-1

Figure 9-1 Setting Application Preferences
This section includes the following topics:
• How to Specify the Login Page Realm Label in Process Workspace
• How to Specify the Resource Bundle in Process Workspace
• How to Specify the Language Locale Information in Process Workspace
• How to Specify a Branding Logo in Process Workspace
• How to Specify the Branding Title in Process Workspace
• How to Choose a Skin in Process Workspace
• How to Enable Customized Applications and Links in Process Workspace
• How to Specify, Show, or Hide the Default Tab Pages in Process Workspace
• Specifying Additional Process Workspace Settings
9.1.1 How to Specify the Login Page Realm Label in Process WorkspaceIf the identity service is configured with multiple realms, then, when a user logs in toOracle BPM Worklist, the login page displays a list of realm names.LABEL_LOGIN_REALM specifies the resource bundle key used to look up the label todisplay these realms. All settings are application specific, set by the Admin user, andapply to all users.
You can change the term realm to fit the user community—terms such as country,company, division, or department may be more appropriate.
Setting the Display of the Work Items Panel in Process Workspace
9-2 Managing and Monitoring Processes with Oracle Business Process Management

To change the term realm, customize the resource bundle, specify a resource bundlekey for the string, and then set the Login page realm label parameter on theApplication Preferences page (see Figure 9-1)to point to that resource bundle key.
For information about customizing the resource bundle, see Customizing a ResourceBundle.
For information about specifying a resource bundle, see How to Specify the ResourceBundle in Process Workspace.
9.1.2 How to Specify the Resource Bundle in Process WorkspaceThe resource bundle provides the strings displayed in the Worklist Application. Bydefault, the class path to the resource bundle is:
As an administrator, you can add or modify strings shown in the application bycreating a custom resource bundle. You can then use the Resource Bundle field in theApplication Preferences page to specify the class path to your custom resource bundle.
For more information about customizing the resource bundle, see Customizing aResource Bundle.
9.1.3 How to Enable or Disable Vacation Rules Delegation in Process WorkspaceIndividual users can set up vacation rules that specify re-assignment or automaticdelegation of their tasks when a vacation rule is in effect. Re-assignment/delegationcan be enabled or disabled for all users using the Enable Delegate/automatic outcomesetting in vacation rules property on the Application Preferences page, as shown in Figure 9-1.
9.1.4 How to Specify the Language Locale Information in Process WorkspaceFrom the Application Preferences page, you can specify how the Process Workspacedisplay language is determined. Information about the language locale can be derivedfrom either the user's browser or the identity provider that stores information aboutProcess Workspace users.
You reach the Application Preferences page by clicking Administration on the globaltoolbar at the very top of Process Workspace, then, under Administration Areas,selecting Application Preferences. The Application Preferences panel appears in theright pane. To specify the display language, in the Use language settings of field,select either Browser or Identity Provider.
Figure 9-2 Specifying Language Local Information
Setting the Display of the Work Items Panel in Process Workspace
Managing Process Workspace 9-3
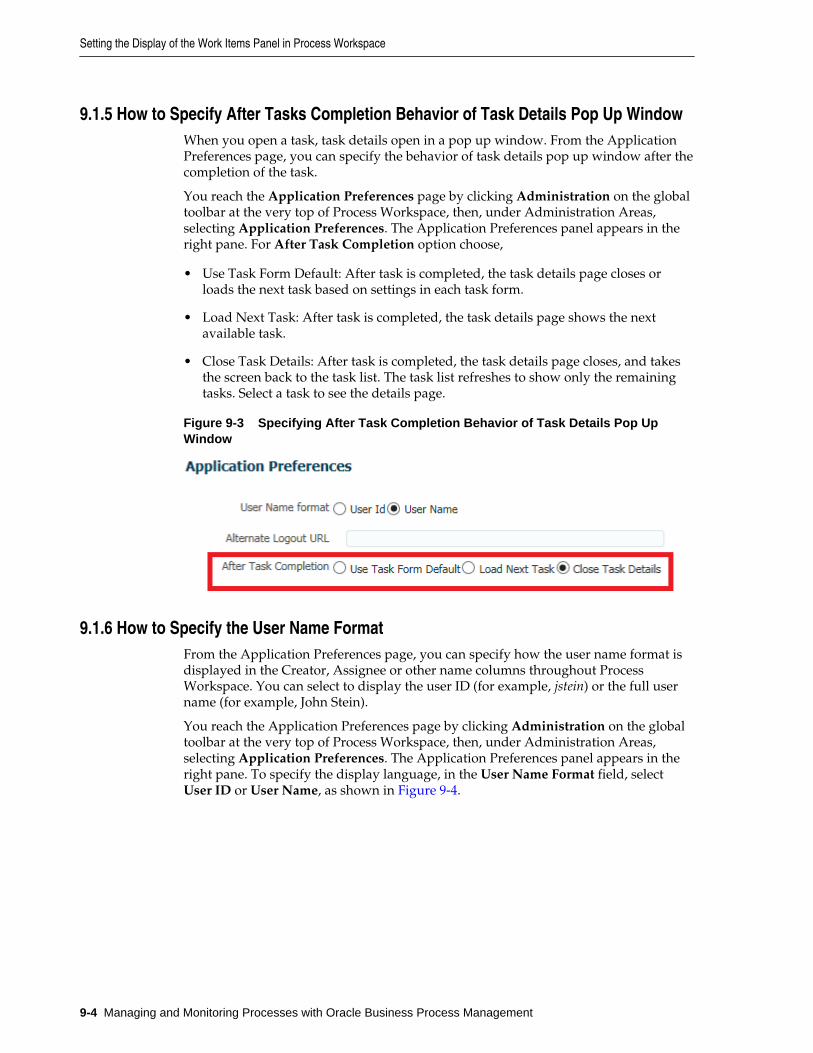
9.1.5 How to Specify After Tasks Completion Behavior of Task Details Pop Up WindowWhen you open a task, task details open in a pop up window. From the ApplicationPreferences page, you can specify the behavior of task details pop up window after thecompletion of the task.
You reach the Application Preferences page by clicking Administration on the globaltoolbar at the very top of Process Workspace, then, under Administration Areas,selecting Application Preferences. The Application Preferences panel appears in theright pane. For After Task Completion option choose,
• Use Task Form Default: After task is completed, the task details page closes orloads the next task based on settings in each task form.
• Load Next Task: After task is completed, the task details page shows the nextavailable task.
• Close Task Details: After task is completed, the task details page closes, and takesthe screen back to the task list. The task list refreshes to show only the remainingtasks. Select a task to see the details page.
Figure 9-3 Specifying After Task Completion Behavior of Task Details Pop UpWindow
9.1.6 How to Specify the User Name FormatFrom the Application Preferences page, you can specify how the user name format isdisplayed in the Creator, Assignee or other name columns throughout ProcessWorkspace. You can select to display the user ID (for example, jstein) or the full username (for example, John Stein).
You reach the Application Preferences page by clicking Administration on the globaltoolbar at the very top of Process Workspace, then, under Administration Areas,selecting Application Preferences. The Application Preferences panel appears in theright pane. To specify the display language, in the User Name Format field, selectUser ID or User Name, as shown in Figure 9-4.
Setting the Display of the Work Items Panel in Process Workspace
9-4 Managing and Monitoring Processes with Oracle Business Process Management

Figure 9-4 User Name Format
9.1.7 How to Specify a Branding Logo in Process WorkspaceA branding logo is the image displayed in the top left corner of every page of theWorklist Application. The Oracle logo is the default, and you can change it to one ofyour choosing.
Note:
The ideal image size is 120px x 40px (length x width) for proper display.Although images with high resolution and size are compressed to fit thebranding logo size, smaller images display better.
To specify the branding logo, do one of the following:
• Refer to an external image-hosting website. To do this, in the Branding Logo field,enter the URL of the image.
• Upload an image to a particular location on the server and, in the Branding Logofield, enter its relative path, for example, /afr/my_logo.png.
• Refer to an image from the shared library. To do this, in the Branding Logo field,enter the path of the logo name as found in the shared library, for example, /my_logo.png
Note:
Customizing the branding logo from either the Worklist Application orProcess Workspace changes the logo in both applications. For example, if youchange the logo from Worklist Application, then the Process Workspace logois changed automatically.
For more information about deploying images in a shared library, see DeployingImages and JAR files as Part of a Shared Library JAR file.
9.1.8 How to Specify the Branding Title in Process WorkspaceYou can specify the title for your site, changing the default title, BPM Worklist, to onethat you choose.
Setting the Display of the Work Items Panel in Process Workspace
Managing Process Workspace 9-5

To specify the branding title, do one of the following:
• In the Branding Title field, enter a simple string for your title.
• In the Branding Title field, enter a label that refers to a key-value pair in theResource Bundle. In this way, you can internationalize your title, for example,LABEL_WORKLIST_TITLE.
9.1.9 How to Choose a Skin in Process WorkspaceA skin determines the look and feel of your graphical interface.
9.1.9.1 To choose a skin, do one of the following
• From the Choose a Skin list, select one of the default ADF skins.
If you want the Human Task flow application to use the skin selected in ProcessWorkspace, you must verify that the trinidad-config.xml file (found in theHuman Task flow application) includes the following:
<skin-family>#{param.sf}</skin-family>
• Upload your own customized skin .css file in a .JAR file and deploy it as a partof shared library. Then, when you restart your application from the console, yourcustom skin appears in the Choose a Skin list.
9.1.9.2 To create a customized skin
You can create a customized skin.
1. Create a directory structure similar to the following example:
C:\temp\META-INF\adf\oracle\skin\images META-INF\skins\custom.css META-INF\trinidad-skins.xml
Note that, in this example, you can change the word custom to the name of yourown customized skin.
2. Make sure the content of trinidad-skins.xml file is as follows:
<?xml version="1.0" encoding="ISO-8859-1"?><skins xmlns="http://myfaces.apache.org/trinidad/skin"> <skin> <id>custom.desktop</id> <family>custom</family> <extends>custom.desktop</extends> <render-kit-id>org.apache.myfaces.trinidad.desktop</render-kit-id> <style-sheet-name>skins/custom.css</style-sheet-name> </skin></skins>
3. Create the .JAR file by issuing the following command from the c:\tempdirectory:
jar -cvf customSkin.jar META-INF/
4. Copy this Jar file to the directory /scratch/username/sharedLib.
Setting the Display of the Work Items Panel in Process Workspace
9-6 Managing and Monitoring Processes with Oracle Business Process Management

Note:
Refer to the images in your CSS file this way:
../adf/oracle/skin/images/example.gif (include the two leadingdots).
This allows the search for the META-INF root to start one directory above theMETA-INF/skin directory in which the .css file is located.
For more information about deploying images in a shared library, see DeployingImages and JAR files as Part of a Shared Library JAR file.
9.1.10 How to Enable Customized Applications and Links in Process WorkspaceIn Process Workspace, you can create customized external applications and links thatbecome available in the Links pane. Moreover, in both Process Workspace and theWorklist Application you can specify the columns that appear in the inbox.
To enable customized applications:
1. In the Application Preferences page, enter the class name of your customapplication in the Application customization class name field.
2. Restart the application from the console.
Depending on your customization, you can now see its effects. If yourcustomization is for Process Workspace and involves either creating an externalapplication or specifying inbox columns in the Task Details pane or both, you seethe following:
• Your custom application listed in the Links pane.
• The columns of the inbox adjusted according to your specifications.
For information about customizing applications, see Customizing Applications inProcess Workspace and the Worklist Application.
9.1.11 How to Set a Timeout Parameter for ScreenflowsScreenflows enable users to work on all of the tasks in a process in sequence. Forexample, when a user completes a task in a process, and if the next task is assigned tothe same user, then the next task is automatically shown in the same flow, without theuser having to return to the task list.
A timeout defines the length of time a completed screenflow task will wait for the nexttask to become available before processing continues. The default wait time is 5000milliseconds.
Do not use the timeout parameter as an alternative to not setting the ScreenFlowModeparameter in the last task of the screenflow. It should be used only to increase ordecrease the wait time for all tasks except the last one in the screenflow.
To set the timeout parameter, specify the milliseconds in the Screenflow TimeoutInterval in ms field, as shown in Figure 9-5
Setting the Display of the Work Items Panel in Process Workspace
Managing Process Workspace 9-7

Figure 9-5 Screenflow Timeout Interval
9.1.12 How to Register Customized Application URLs in Process WorkspaceUsers with the Administration or Process owner roles can register customizedapplication URLs in Process Workspace. These are displayed in the Applicationspanel.
To register a custom application URL:
1. In the Applications panel, click the Add (+) button (Add a new customapplication Url).
The Custom Application Registration dialog displays.
2. Provide the information to register your URL.
The Display Name and URL fields are required. If you specify a Category, theURL appears under the Category name in the Applications panel. Optionally,specify a Description.
3. In the Accessible to field, specify the users or groups that have access to thecustom application URL.
If required, click Select Users, Groups to launch the Identity Browser, from whichyou can search for and select Users and Groups.
4. Click OK.
Depending on your customization, you can now see its effects in the Applicationspanel.
9.1.13 How to Map Task Actions to the Bulk Approval Task Actions ButtonsIn Process Workspace, you can select multiple tasks, and then approve or reject themusing the Task Actions buttons. These buttons appear as a green check mark or red Xon the Tasks page. Each of these icons can be configured by an administrator toperform one or more than one approval or rejection task actions.
Setting the Display of the Work Items Panel in Process Workspace
9-8 Managing and Monitoring Processes with Oracle Business Process Management

To specify the task actions which map to an image:
1. Select Administration, then Application Preferences.
2. From the lists in the Map task actions to an image field, select the task actions youwant to map to either the approve (green check mark) or reject (red X) buttons.
3. Click Save.
9.1.14 How to Show or Hide the Default Tab Pages in Process WorkspaceIf you are an administrator, then you can specify whether to show or hide the ProcessWorkspace standard tabs, such as Tasks, Case, Process Tracking, and Dashboards.Also, from the tabs you decide to show, you can select the one to be the default tabwhen a user logs in.
To show or hide the standard Process Workspace tabs:
1. Select Administration, then Application Preferences.
2. From the Show Standard Tabs row, select the check boxes for the tabs you want toshow, or clear the check boxes for the tabs you want to hide.
3. For the tabs you decide to show, specify which tab is to be the default when a userlogs in.
Do this by selecting the radio button next to the check box for that tab. If you donot select a default tab, then the standard tabs do not show or hide as youspecified.
4. Click Save.
Figure 9-6 shows the Application Preferences page with the Show Standard Tabs rowhighlighted.
Figure 9-6 Show Standard Tabs Selection
Setting the Display of the Work Items Panel in Process Workspace
Managing Process Workspace 9-9

9.1.15 How to Show or Hide the Worklist Action Menu in Process WorkspaceIf you are an administrator, then you can specify whether to show or hide the Actionsdrop-down in the header area of a screen in the Process Workspace.
To show or hide the standard Process Workspace tabs:
1. Select Administration, then Application Preferences.
2. From the Worklist Action Menu row, select either show or hide option.
3. Click Save.
Actions that can be performed for that screen are shown or hidden in the header areaof the screen under Actions drop-down, depending on whether you choose show orhide options.
9.1.16 Specifying Additional Process Workspace SettingsFrom the Application Preferences page, you can specify additional configurationitems. These include:
• 10g Workspace Application URL - specifies the URL for an ALBPM 10g Workspaceto view from within Process Workspace.
• Flex Field INTEGER Display.
• Activity Guide poll request interval - interval in seconds to wait between polls forthe next Activity Guide task.
• Activity Guide poll retries - maximum number of times the Activity Guide shouldpoll to move to the next task.
• File types to upload - Specify the file types that can be uploaded by a user. Enterthe file type extensions in the field.
• View task details in separate window - Choose theEnable option, if you want thetask details to be opened in a separate window.
9.2 Administering Approval Groups in Process WorkspaceAn approval group consists of a name and a predefined set of users configured to acton a task in a certain pattern. This pattern is similar to a human workflow routing slippattern where users can act on tasks in serial or in parallel. An approval group alsocan contain a nested approval group in the pattern.
The name of an approval group is necessary when specifying the approval group listbuilder. The pattern configured in the approval group is used by default to order theusers who must act on the task. However, when creating the list builder, the defaultpattern can be overridden by specifying the voting method.
Process Workspace enables with administrator rights to manage approval groups.
For more information on any of the following tasks, see Using Approval Managementin Developing Business Processes with Oracle Business Process Management Studio
This section contains the following topics:
Administering Approval Groups in Process Workspace
9-10 Managing and Monitoring Processes with Oracle Business Process Management
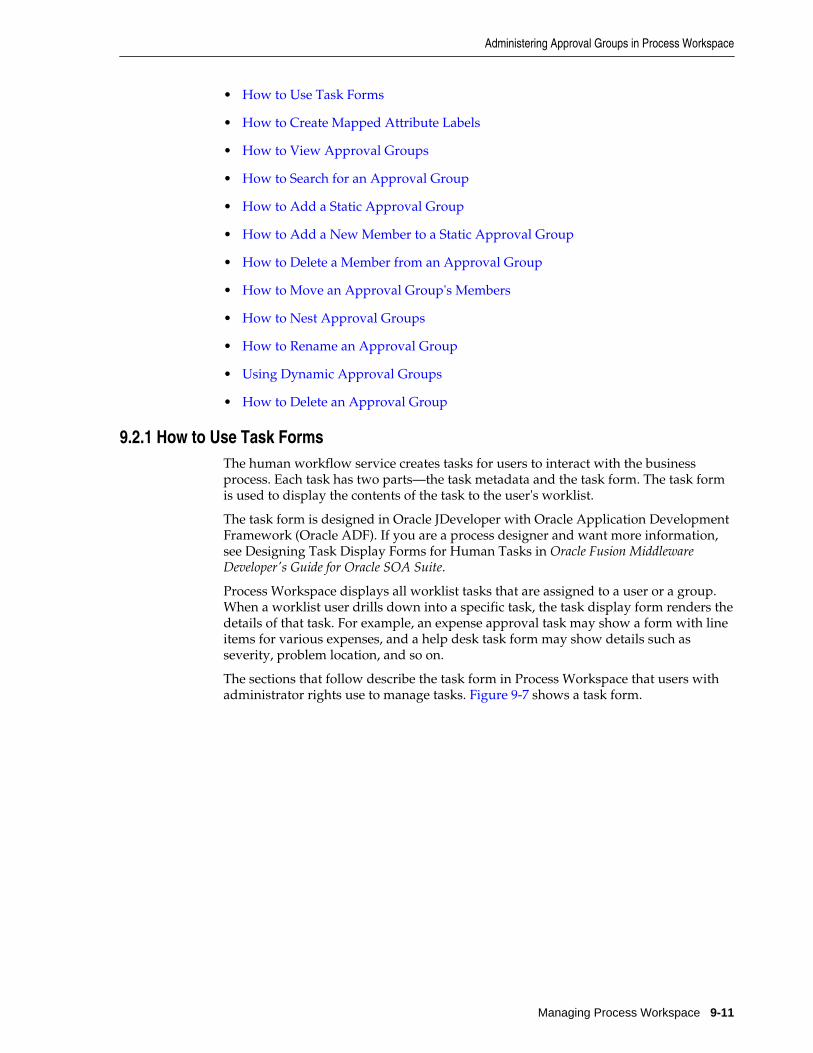
• How to Use Task Forms
• How to Create Mapped Attribute Labels
• How to View Approval Groups
• How to Search for an Approval Group
• How to Add a Static Approval Group
• How to Add a New Member to a Static Approval Group
• How to Delete a Member from an Approval Group
• How to Move an Approval Group's Members
• How to Nest Approval Groups
• How to Rename an Approval Group
• Using Dynamic Approval Groups
• How to Delete an Approval Group
9.2.1 How to Use Task FormsThe human workflow service creates tasks for users to interact with the businessprocess. Each task has two parts—the task metadata and the task form. The task formis used to display the contents of the task to the user's worklist.
The task form is designed in Oracle JDeveloper with Oracle Application DevelopmentFramework (Oracle ADF). If you are a process designer and want more information,see Designing Task Display Forms for Human Tasks in Oracle Fusion MiddlewareDeveloper's Guide for Oracle SOA Suite.
Process Workspace displays all worklist tasks that are assigned to a user or a group.When a worklist user drills down into a specific task, the task display form renders thedetails of that task. For example, an expense approval task may show a form with lineitems for various expenses, and a help desk task form may show details such asseverity, problem location, and so on.
The sections that follow describe the task form in Process Workspace that users withadministrator rights use to manage tasks. Figure 9-7 shows a task form.
Administering Approval Groups in Process Workspace
Managing Process Workspace 9-11
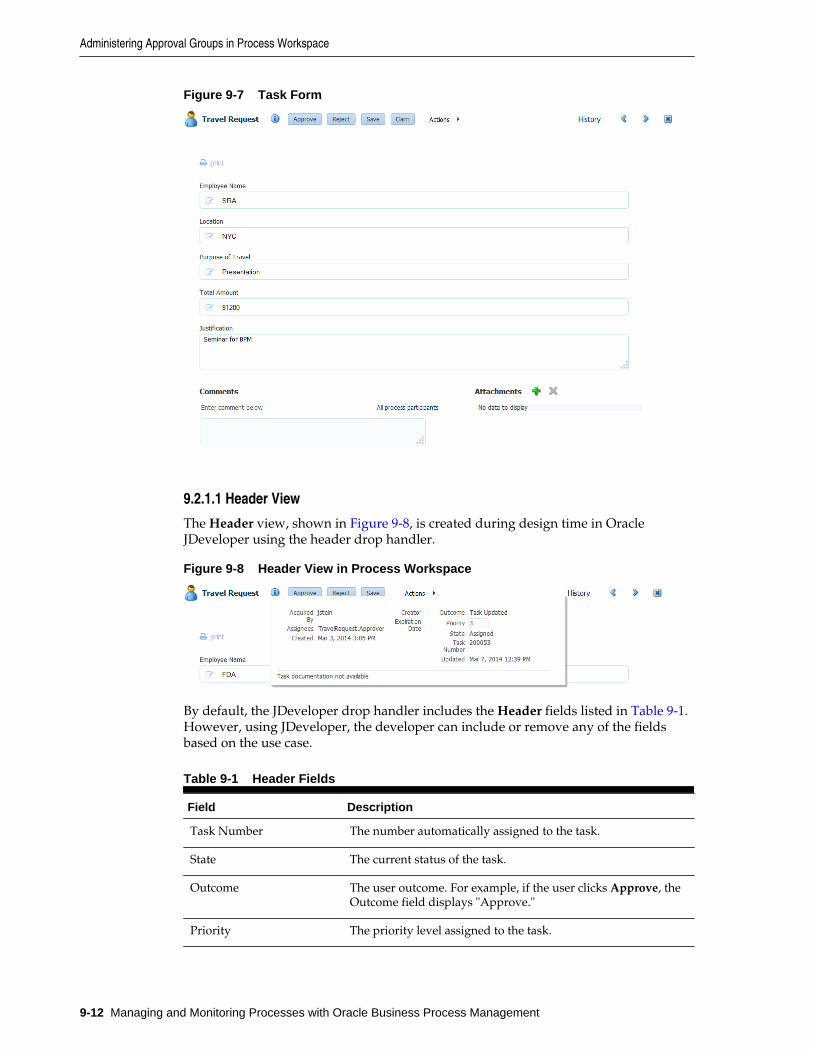
Figure 9-7 Task Form
9.2.1.1 Header View
The Header view, shown in Figure 9-8, is created during design time in OracleJDeveloper using the header drop handler.
Figure 9-8 Header View in Process Workspace
By default, the JDeveloper drop handler includes the Header fields listed in Table 9-1.However, using JDeveloper, the developer can include or remove any of the fieldsbased on the use case.
Table 9-1 Header Fields
Field Description
Task Number The number automatically assigned to the task.
State The current status of the task.
Outcome The user outcome. For example, if the user clicks Approve, theOutcome field displays "Approve."
Priority The priority level assigned to the task.
Administering Approval Groups in Process Workspace
9-12 Managing and Monitoring Processes with Oracle Business Process Management
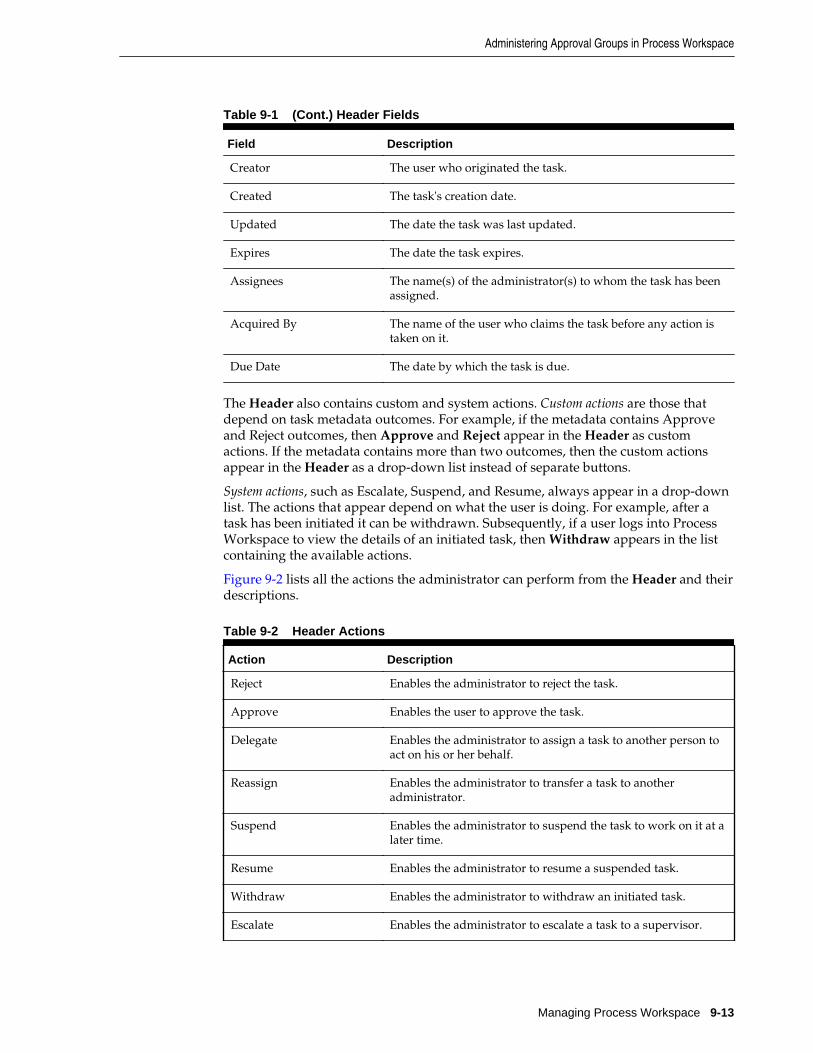
Table 9-1 (Cont.) Header Fields
Field Description
Creator The user who originated the task.
Created The task's creation date.
Updated The date the task was last updated.
Expires The date the task expires.
Assignees The name(s) of the administrator(s) to whom the task has beenassigned.
Acquired By The name of the user who claims the task before any action istaken on it.
Due Date The date by which the task is due.
The Header also contains custom and system actions. Custom actions are those thatdepend on task metadata outcomes. For example, if the metadata contains Approveand Reject outcomes, then Approve and Reject appear in the Header as customactions. If the metadata contains more than two outcomes, then the custom actionsappear in the Header as a drop-down list instead of separate buttons.
System actions, such as Escalate, Suspend, and Resume, always appear in a drop-downlist. The actions that appear depend on what the user is doing. For example, after atask has been initiated it can be withdrawn. Subsequently, if a user logs into ProcessWorkspace to view the details of an initiated task, then Withdraw appears in the listcontaining the available actions.
Figure 9-2 lists all the actions the administrator can perform from the Header and theirdescriptions.
Table 9-2 Header Actions
Action Description
Reject Enables the administrator to reject the task.
Approve Enables the user to approve the task.
Delegate Enables the administrator to assign a task to another person toact on his or her behalf.
Reassign Enables the administrator to transfer a task to anotheradministrator.
Suspend Enables the administrator to suspend the task to work on it at alater time.
Resume Enables the administrator to resume a suspended task.
Withdraw Enables the administrator to withdraw an initiated task.
Escalate Enables the administrator to escalate a task to a supervisor.
Administering Approval Groups in Process Workspace
Managing Process Workspace 9-13

Table 9-2 (Cont.) Header Actions
Action Description
Delete Enables the administrator to delete a task. Appears for all "ToDo" tasks.
Purge Enables the administrator to purge a task. Appears for all "ToDo" tasks.
Go Enables the administrator to "go" to the action selected from thedrop-down list.
Save Enables the administrator to save the task.
9.2.1.2 Task Payload View
The Task Payload view, shown in Figure 9-9, displays the details of the taskparameters and provides the ability to update them. Any parameter that has beendesigned based on SDOs also can be viewed here. While the values of the generalparameters are based on what was passed to the task or update by any user, the valuesof the SDO-based parameters reflect the current value of the business object as it wasupdated in the underlying application.
Figure 9-9 Task Payload
9.2.1.3 Task History View
The Task History view, shown in Figure 9-10, provides a graphical and tabular viewof events in the task life cycle. In addition, if the Edit Approver Configuration optionwas selected in the designer, special controls in the tabular view that allow futureapprovers to be edited, are available. Any approver added manually can be deletedand new approvers can be added. Approver changes made in the tabular view areimmediately reflected in the graphical view. When the task is saved or a customaction, such as approve or reject, is performed on the task, all approver-relatedchanges are also saved.
Administering Approval Groups in Process Workspace
9-14 Managing and Monitoring Processes with Oracle Business Process Management

Figure 9-10 Task History in Process Workspace
If the Allow all participants to edit future participants option is selected whileconfiguring the approval task, the history region displays additional actions that allowa participant to edit the future participants list.
Figure 9-11 shows the addition of the Apply and Reset buttons.
Figure 9-11 Task History - Additional Actions
Table 9-3 describes all additional approval-task actions.
Table 9-3 Edit Future Participants List Actions
Action Description
Add Enabled when the user selects a future participant. When thisoption is selected, the Add Participant dialog opens and theuser can insert ad- hoc participants.
Edit Enabled when the user selects a participant that has beeninserted ad hoc. When this option is selected, the EditParticipant dialog opens and user can move the position of aninserted participant.
Delete Enabled when the user selects a participant that has beeninserted ad hoc. When this option is selected, the correspondingparticipant is deleted.
Apply Persists the edits to the future participant list.
Administering Approval Groups in Process Workspace
Managing Process Workspace 9-15
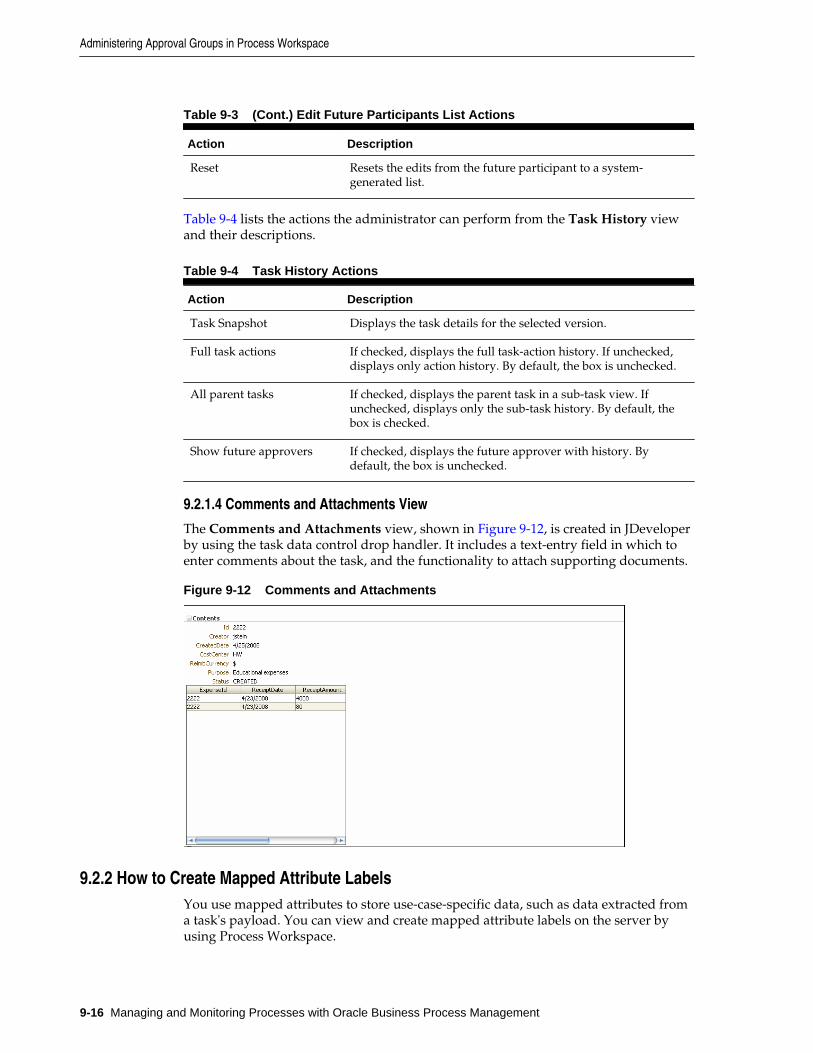
Table 9-3 (Cont.) Edit Future Participants List Actions
Action Description
Reset Resets the edits from the future participant to a system-generated list.
Table 9-4 lists the actions the administrator can perform from the Task History viewand their descriptions.
Table 9-4 Task History Actions
Action Description
Task Snapshot Displays the task details for the selected version.
Full task actions If checked, displays the full task-action history. If unchecked,displays only action history. By default, the box is unchecked.
All parent tasks If checked, displays the parent task in a sub-task view. Ifunchecked, displays only the sub-task history. By default, thebox is checked.
Show future approvers If checked, displays the future approver with history. Bydefault, the box is unchecked.
9.2.1.4 Comments and Attachments View
The Comments and Attachments view, shown in Figure 9-12, is created in JDeveloperby using the task data control drop handler. It includes a text-entry field in which toenter comments about the task, and the functionality to attach supporting documents.
Figure 9-12 Comments and Attachments
9.2.2 How to Create Mapped Attribute LabelsYou use mapped attributes to store use-case-specific data, such as data extracted froma task's payload. You can view and create mapped attribute labels on the server byusing Process Workspace.
Administering Approval Groups in Process Workspace
9-16 Managing and Monitoring Processes with Oracle Business Process Management

Note:
You must have the workflow.mapping.protectedFlexfield privilege to createprotected flex field attributes. The default administrative user, weblogic, hasthis privilege.
For more information, see How to Specify Mapped Attributes.
9.2.2.1 To view attribute labels
1. Click the Administration in the upper-right corner of the page.
2. In the Administration pane, click the Protected Flex Fields link. A Flex FieldMapping page as shown in Figure 9-13 appears.
Figure 9-13 Flex Field Mapping: Protected
The page displays a list of existing attribute labels. You can filter the list byselecting an attribute type from the Show list. Clicking a specific label displays thelist of mappings the attribute uses in the Details panel.
9.2.2.2 To create an attribute label
1. Click the Create Label (+) button.
The Create Label dialog displays.
2. Select an attribute type and task attribute from the drop-down lists.
3. Enter a unique label name and a description.
4. Click Create.
The label is created and is made available for mapping in task components.
Administering Approval Groups in Process Workspace
Managing Process Workspace 9-17

9.2.2.3 To delete an attribute label
1. Select the label you want to delete from the list of attribute labels.
2. Then click the Delete Label (-) button.
Note:
Attribute labels can be deleted only if they are not used in any mappings.
9.2.2.4 Importing and Exporting Attribute-Label Definitions
If attribute labels have been defined on one server and must be re-created on another,then you can use the user metadata migration utility to export a list of protectedattribute labels from the server on which they were defined to an XML file. The utilitythen can deploy the attribute labels from this file to a new server. This eliminates thenecessity to manually re-create the attribute labels manually in Process Workspace.
For more information, see Using the User Metadata Migration Utility.
9.2.2.5 Internationalizing Attribute Labels
When attribute labels are displayed to end users, for example in the task listing pageof the Process Workspace, the label name that is used is the one specified when thelabel was created. In cases where users of different nationalities may see the label, atranslation of the label name appropriate to Process Workspace user's locale can bedisplayed instead. Translations of attribute labels can be customized using theWorkflowLabels.properties resource bundle.
For more information, see How to Specify the Language Locale Information in ProcessWorkspace.
9.2.3 How to View Approval Groups
To view approval groups:
1. From the Process Workspace toolbar, click Administration.
The Administration Areas panel appears in the left pane.
2. Under Task Administration, click Approval Groups.
The Groups page appears in the right pane.
3. In the navigation pane of the Approval Groups page, select an approval group.
A details page for that approval group appears in the right pane, similar to the oneshown in Figure 9-14.
Administering Approval Groups in Process Workspace
9-18 Managing and Monitoring Processes with Oracle Business Process Management

Figure 9-14 Process Workspace: Approval Group Detail
The figure shows that the Disbursement Team approval group has two users, jcooperand jstein. These users act on a task in a specific sequence configuration.
9.2.4 How to Search for an Approval GroupYou can search for an approval group either by user name or group name.
9.2.4.1 To search by user name
1. From the Process Workspace toolbar, click Administration.
The Administration Areas panel appears in the left pane.
2. Under Task Administration, click Approval Groups.
The Approval Groups page appears in the right pane.
3. Select User from the list.
4. Enter the full user name for the user in the field.
You also can perform a wildcard search (*) with a partial user name.
5. Click the action (>) button.
A list of all approval groups to which the user belongs displays in the left pane, asshown in Figure 9-15.
Figure 9-15 User Name Search Results
Clicking the approval group name refreshes the details pane on the right with thestructure of that group.
Administering Approval Groups in Process Workspace
Managing Process Workspace 9-19

9.2.4.2 To search by group name
1. From the Process Workspace toolbar, click Administration.
The Administration Areas panel appears in the left pane.
2. Under Task Administration, click Approval Groups.
The Groups page appears in the right pane.
3. In the left pane of the Groups page, enter the full group name in the field.
You also can perform a wildcard search (*) with a partial group name and clickSearch. A list of all matching approval groups displays in the left pane.
Clicking the approval group name refreshes the Details pane on the right with thestructure of that group.
9.2.5 How to Add a Static Approval GroupYou can add a static approval group.
1. From the Process Workspace toolbar, click Administration.
The Administration Areas panel appears in the left pane.
2. Under Task Administration, click Approval Groups.
The Groups page appears in the middle pane.
3. Click the Add (+) button and select Create Static Approval Group from the list, asshown in Figure 9-16.
Figure 9-16 Create Approval Group: Select Static Group
4. Enter a new name for the group.
5. Click Apply.
You can add members to the new approval group.
9.2.6 How to Add a New Member to a Static Approval GroupMembers of a static approval group can be either users or other approval groups.
To add a new user member to an approval group:
1. From the Process Workspace toolbar, click Administration.
Administering Approval Groups in Process Workspace
9-20 Managing and Monitoring Processes with Oracle Business Process Management
The Administration Areas panel appears in the left pane.
2. Under Task Administration, click Approval Groups.
The Groups page appears in the middle pane.
3. In the Groups pane, select an approval group.
4. From the Details page shown in Figure 9-17, click the Add (+) icon.
The other icons enable you to edit, delete, and reorder members in the approvalsequence.
The Add to Group dialog box appears.
5. Select User.
6. Do one of the following:
• Enter a full user name and click OK.
The dialog box closes and the new member appears in the Members section ofthe Details pane.
• Click the magnifying glass to search for a user.
If you click the magnifying glass, an Identity Browser pop-up dialog appears.
7. Select Users from the list.
8. Enter a full name in the text-entry field and click Search. (You also can perform awildcard search (*) with a partial user name.)
The Identity Browser dialog refreshes and the search results appear.
9. Choose a user from the list.
The details for that user appear in the Details section of the dialog.
10. Click OK.
11. Click OK again to close the Add to Group dialog.
A node representing the selected user appears in the approval group structure inthe Members section of the Details pane.
You can add more members to the approval group by repeating the steps above. Theresulting approval group structure looks similar to the one shown in Figure 9-17.
Administering Approval Groups in Process Workspace
Managing Process Workspace 9-21

Figure 9-17 Approval Group Structure: Multiple Members
9.2.7 How to Delete a Member from an Approval GroupYou can delete members from approval groups.
To delete a member from an approval group:
1. From the Process Workspace toolbar, click Administration.
The Administration Areas panel appears in the left pane.
2. Under Task Administration, click Approval Groups.
The Groups page appears in the middle pane.
3. In the Groups pane, select an approval group.
The corresponding Details pane appears to the right.
4. Choose the appropriate member node from the approval group structure.
5. Click the Delete icon.
The approval group structure refreshes and the member node has been deleted.
9.2.8 How to Move an Approval Group's MembersYou can change the order of approval groups.
To change the sequence order of an approval group:
1. From the Process Workspace toolbar, click Administration.
The Administration Areas panel appears in the left pane.
2. Under Task Administration, click Approval Groups.
The Groups page appears in the right pane.
Administering Approval Groups in Process Workspace
9-22 Managing and Monitoring Processes with Oracle Business Process Management
3. In the Groups pane, select an approval group.
The corresponding Details pane appears to the right.
4. Choose a member node to move.
5. Use the Push Member Up (^) and Push Member Down (v) icons to move themember to the desired location.
9.2.9 How to Nest Approval GroupsNesting an approval group means making it part of another approval group.
To nest an approval group:
1. From the Process Workspace toolbar, click Administration.
The Administration Areas panel appears in the left pane.
2. Under Task Administration, click Approval Groups.
The Groups page appears in the right pane.
3. In the Groups pane, select an approval group.
The corresponding Details pane appears to the right.
4. Click the Add icon.
The Add to Group dialog box appears.
5. Select Approval Group.
6. From the Member list, choose the approval group you want to add.
Its structure appears in the right pane.
7. Click OK again to close the Add to Group dialog box.
The new approval group appears in the approval group's structure.
9.2.10 How to Rename an Approval GroupYou can rename approval groups.
To rename an approval group:
1. From the Process Workspace toolbar, click Administration.
The Administration Areas panel appears in the left pane.
2. Under Task Administration, click Approval Groups.
The Groups page appears in the right pane.
3. In the Groups pane, select an approval group.
The corresponding Details pane appears to the right.
Administering Approval Groups in Process Workspace
Managing Process Workspace 9-23

4. Enter the new name of the approval group in the Name field.
5. Click Apply.
The name change is reflected in other approvals groups in which this approval groupis nested.
9.2.11 Using Dynamic Approval GroupsDynamic Approval Groups provide a way to create approval groups through acustom Java class at runtime. This requires the following:
• Writing a custom dynamic approval group class for the custom implementation bythe developer.
• Registering the custom dynamic approval group using the worklist apps UI by theIT department.
• Making the class file available in a globally well-known directory that is part of theService Integration class path.
9.2.11.1 How to Write a Custom Dynamic Approval Group Class
To define a dynamic approval group, the user must define an implementation classusing the interface file IDynamicApprovalGroup.java, defined by AMX fordynamic approval groups in the package oracle.bpel.services.workflow.task. This packagecontains only one public method that gets the approval group members. The Taskobject is the only input parameter. The primary key list can be obtained from the task:task/systemAttributes/collectionTarget.
Example 9-2 shows a code snippet for a sample dynamic approval group class.
Example 9-1 Implementation Class
************** IDynamicApprovalGroup.java ******************
public interface IDynamicApprovalGroup {
/** * Get members of this dynamic approval group * @param task Property bag containing information required to generate the approver list * @return list of IApprovalListMember including sequence, member, member_type; null for empty group * The primary key list can be obtained from task:task/systemAttributes/collectionTarget */
public List getMembers(Task task ) throws WorkflowException;}
Example 9-2 Code for Dynamic Approval Group Class
************** IDynamicApprovalGroup.java ******************package oracle.bpel.services.workflow.repos.test;import java.util.ArrayList;import java.util.List;import oracle.bpel.services.worlflow.WorkflowException;import oracle.bpel.services.worlflow.task.IDynamicApprovalGroup;import oracle.bpel.services.worlflow.runtimeconfig.impl.RuntimeConfigUtil;
Administering Approval Groups in Process Workspace
9-24 Managing and Monitoring Processes with Oracle Business Process Management
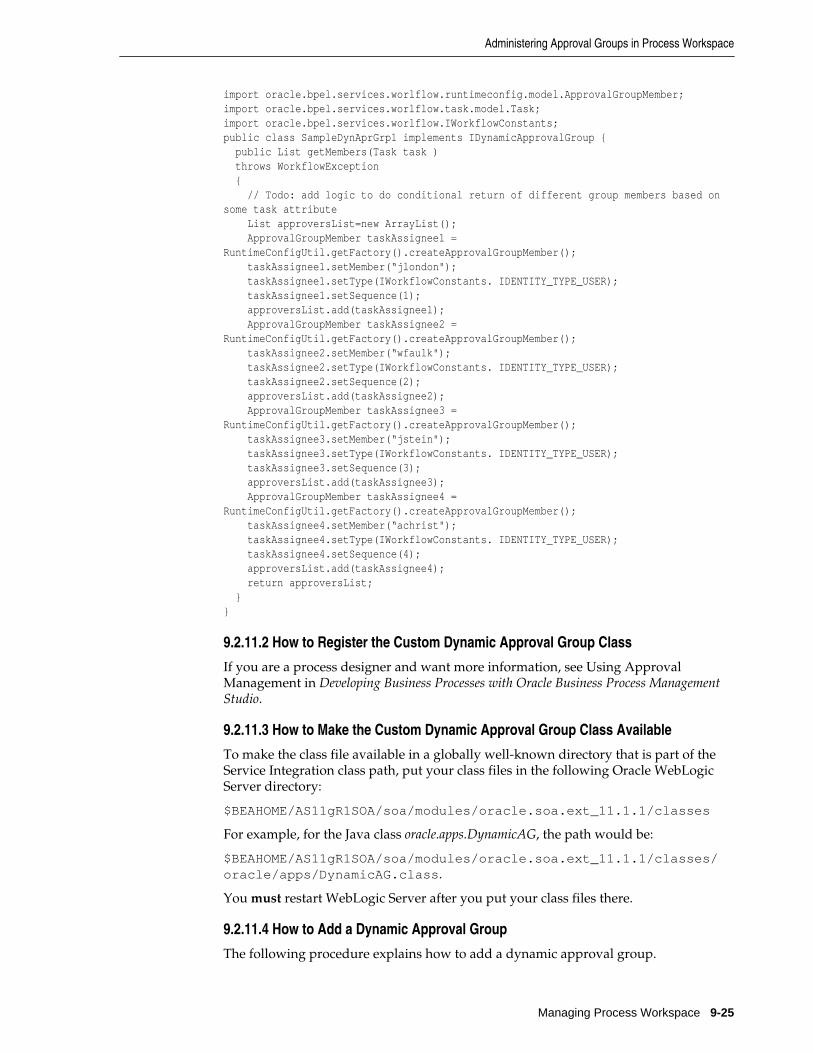
import oracle.bpel.services.worlflow.runtimeconfig.model.ApprovalGroupMember;import oracle.bpel.services.worlflow.task.model.Task;import oracle.bpel.services.worlflow.IWorkflowConstants;public class SampleDynAprGrp1 implements IDynamicApprovalGroup { public List getMembers(Task task ) throws WorkflowException { // Todo: add logic to do conditional return of different group members based on some task attribute List approversList=new ArrayList(); ApprovalGroupMember taskAssignee1 = RuntimeConfigUtil.getFactory().createApprovalGroupMember(); taskAssignee1.setMember(“jlondon"); taskAssignee1.setType(IWorkflowConstants. IDENTITY_TYPE_USER); taskAssignee1.setSequence(1); approversList.add(taskAssignee1); ApprovalGroupMember taskAssignee2 = RuntimeConfigUtil.getFactory().createApprovalGroupMember(); taskAssignee2.setMember(“wfaulk"); taskAssignee2.setType(IWorkflowConstants. IDENTITY_TYPE_USER); taskAssignee2.setSequence(2); approversList.add(taskAssignee2); ApprovalGroupMember taskAssignee3 = RuntimeConfigUtil.getFactory().createApprovalGroupMember(); taskAssignee3.setMember(“jstein"); taskAssignee3.setType(IWorkflowConstants. IDENTITY_TYPE_USER); taskAssignee3.setSequence(3); approversList.add(taskAssignee3); ApprovalGroupMember taskAssignee4 = RuntimeConfigUtil.getFactory().createApprovalGroupMember(); taskAssignee4.setMember(“achrist"); taskAssignee4.setType(IWorkflowConstants. IDENTITY_TYPE_USER); taskAssignee4.setSequence(4); approversList.add(taskAssignee4); return approversList; }}
9.2.11.2 How to Register the Custom Dynamic Approval Group Class
If you are a process designer and want more information, see Using ApprovalManagement in Developing Business Processes with Oracle Business Process ManagementStudio.
9.2.11.3 How to Make the Custom Dynamic Approval Group Class Available
To make the class file available in a globally well-known directory that is part of theService Integration class path, put your class files in the following Oracle WebLogicServer directory:
$BEAHOME/AS11gR1SOA/soa/modules/oracle.soa.ext_11.1.1/classes
For example, for the Java class oracle.apps.DynamicAG, the path would be:
$BEAHOME/AS11gR1SOA/soa/modules/oracle.soa.ext_11.1.1/classes/oracle/apps/DynamicAG.class.
You must restart WebLogic Server after you put your class files there.
9.2.11.4 How to Add a Dynamic Approval Group
The following procedure explains how to add a dynamic approval group.
Administering Approval Groups in Process Workspace
Managing Process Workspace 9-25

1. From the Process Workspace toolbar, click Administration.
The Administration Areas panel appears in the left pane.
2. Under Task Administration, click Approval Groups.
The Groups page appears in the right pane.
3. In the left pane, click the Add (+) button and select Create Dynamic ApprovalGroup from the list
4. Enter a name and a class for the group.
5. Click Save.
9.2.12 How to Delete an Approval GroupYou can delete members from approval groups.
To delete an approval group:
1. From the Process Workspace toolbar, click Administration.
The Administration Areas panel appears in the left pane.
2. Under Task Administration, click Approval Groups.
The Groups page appears in the right pane.
3. In the Groups page, choose the approval group you want to delete.
4. Click the Delete (-) button.
A confirmation dialog box appears.
5. Click OK.
The approval group is deleted.
Note:
If the approval group you deleted is nested in other approval groups, it also isdeleted from those parent groups.
9.3 Managing Mapped Attributes (Flex Fields) in Process WorkspaceHuman workflow mapped attributes (formerly referred to as flex fields) store andquery use case-specific custom attributes. These custom attributes typically come fromthe task payload values.
Storing custom attributes in mapped attributes provides the following benefits:
• They can be displayed as a column in the task listing.
• They can filter tasks in custom views and advanced searches.
• They can be used for a keyword-based search.
Managing Mapped Attributes (Flex Fields) in Process Workspace
9-26 Managing and Monitoring Processes with Oracle Business Process Management

For example the Requester, PurchaseOrderID, and Amount fields in a purchase orderrequest payload of a task can be stored in the mapped attributes. An approver logginginto Process Workspace can see these fields as column values in the task list anddecide which task to access. The user can define views that filter tasks based on themapped attributes. For example, a user can create views for purchase order approvalsbased on different amount ranges. If the user must also retrieve tasks related to aspecific requester or a purchase order ID, the user can specify this in the keyword fieldand perform a search to retrieve the relevant tasks.
For the mapped attributes to be populated, an administrator must create mappedattribute mappings, as follows:
1. Specify a label for the mapped attribute to be populated.
2. Map the payload attribute that contains the data to the label.
These mappings are valid for a certain task type. Therefore, each task type can havedifferent mapped attribute mappings. After the mapping is complete and a new task isinitiated, the value of the payload is transferred to the mapped attribute that has justbeen mapped. Tasks initiated before the mapping do not contain the value in themapped attribute. Only top-level simple type attributes in the payload can betransferred to a mapped attribute. Complex attributes or simple types nested inside acomplex attribute cannot be promoted. It is important to define the payload for a taskin the Human Task Editor, keeping in mind which attributes from the payload maymust promoted to a mapped attribute. All text and number mapped attributes areautomatically included in the keyword-based search.
Essentially, the Human Task Editor is used only when defining the payload for a task.All other operations are performed at runtime.
Directory naming is not available concomitantly with the flex file naming convention.
Note:
Mapped attributes must be defined before instances of the business processare generated. Only instances generated after mapped attributes are createdreflect the correct mapped attributes. Older instances of the business processdo not reflect subsequent mapped attribute changes.
9.3.1 How to Specify Mapped AttributesAn administrator, or users with the necessary privileges, can use mapped attributes,shown in Figure 9-18, to transfer data from the payload to inline mapped attributes. Bypromoting data to mapped attributes, the data becomes searchable and can bedisplayed as columns on the task list.
Administrators and users with the appropriate privileges can map both public andprotected mapped attributes. They see both a Public Flex Fields node and a ProtectedFlex Fields node in the Administration panel as shown in Figure 9-18.
Managing Mapped Attributes (Flex Fields) in Process Workspace
Managing Process Workspace 9-27

Figure 9-18 Specifying a Mapped Attribute
To create a mapped attribute mapping, an administrator first defines a semantic label,which provides a more meaningful display name for the mapped attribute. Click Addto use the Create Label dialog box shown in Figure 9-19.
Figure 9-19 Creating a Label
As the figure shows, labelName is mapped to the task attribute TextAttribute1. Thepayload attribute is also mapped to the label. In this example, the Text attribute type isassociated with labelName. The result is that the value of the Text attribute is storedin the TextAttribute3 column, and labelName is the column label displayed in theuser's task list. Labels can be reused for different task types. You can delete a labelonly if it is not used in any mappings.
A mapped payload attribute can also be displayed as a column in a custom view andused as a filter condition in both custom views and workflow rules. The display nameof the payload attribute is the attribute label that is selected when doing the mapping.
Note the following restrictions:
• Only simple type payload attributes can be mapped.
• A mapped attribute (and thus a label) can be used only once per task type.
Managing Mapped Attributes (Flex Fields) in Process Workspace
9-28 Managing and Monitoring Processes with Oracle Business Process Management
• Data type conversion is not supported for the number or date data types. Forexample, you cannot map a payload attribute that is assigned the string datatypeto a label that is assigned the datatype number.
9.3.1.1 To browse all mappings
1. Click Browse all mappings.
2. Select a row in the label table to display all the payload attributes mapped to aparticular label.
9.3.1.2 To edit mappings by task type
1. Click Edit mappings by task type, optionally provide a task type, and click Search.
2. Select a task type and click OK.
3. With the task type displayed in the Edit mappings by task type field, click Go.
4. Select a mapping label and click Select.
9.4 Using Task Configuration in Process WorkspaceTask Configuration is a web-based application in Process Workspace that enablesbusiness users and administrators to review and modify rules that were predefined bythe workflow designer. These predefined rules can be changed for a specific customerbased on the customer's applicable corporate policies.
For example, suppose that a corporate policy requires two levels of approvals forexpense amounts greater than 1000. Suppose further that this policy is changed torequire three levels. You can use Task Configuration to change the rule rather thanhaving your IT department modify the rule in the underlying process and then deployit again. Any change to the rule is applied starting with the next instance, andinstances already in progress use the current rule definitions.
Task Configuration enables you to edit the event driven and data-driven rulesassociated with an approval flow at runtime—that is, when the workflow has alreadybeen deployed.
This section contains the following topics:
• How to Access the Task Configuration Page
• How to Edit Workflow Task Settings
• How to Specify Routing Settings
• How to Specify an Expiration Policy
• How to Specify an Escalation Policy
• How to Extend an Expiration Policy Period
• How to Specify Participant Notification Preferences
• How to Enable Task Access
• How to Specify Actions for Acting Upon Tasks
• How to View Settings for Rules
Using Task Configuration in Process Workspace
Managing Process Workspace 9-29
• How to Add a Rule to a Ruleset in Process Workspace
• How to Add and Customize Decision Tables
• How to Add a Variable to a Rule
9.4.1 How to Access the Task Configuration PageUse the task configuration tab to set aggregation, access, expiration, and notificationsettings.
To access the Task Configuration page:
1. From the Process Workspace toolbar, click Administration.
The Administration Panel appears in the left pane.
2. In the Administration Panel, under Task Administration, click TaskConfigurations.
The Task Configuration page appears in the right pane.
3. To edit the task, click Edit task. The task becomes editable, as illustrated in Figure9-20.
Using Task Configuration in Process Workspace
9-30 Managing and Monitoring Processes with Oracle Business Process Management

Figure 9-20 Task Configuration: Editable Task Page
The Tasks to be configured section in the middle pane lists all workflow tasksconfigured to use approval-flow rules. It also provides a search capability. When youclick a link to one of the tasks, the corresponding data appears in the right pane in twotab pages: Task, shown in Figure 9-20, which displays the default configuration for thetask, and Rules, shown in Figure 9-21, which you can use to override the approval-flow list builder configuration. The rule configurations are displayed graphicallybased on the stages defined in the approval flow.
Using Task Configuration in Process Workspace
Managing Process Workspace 9-31
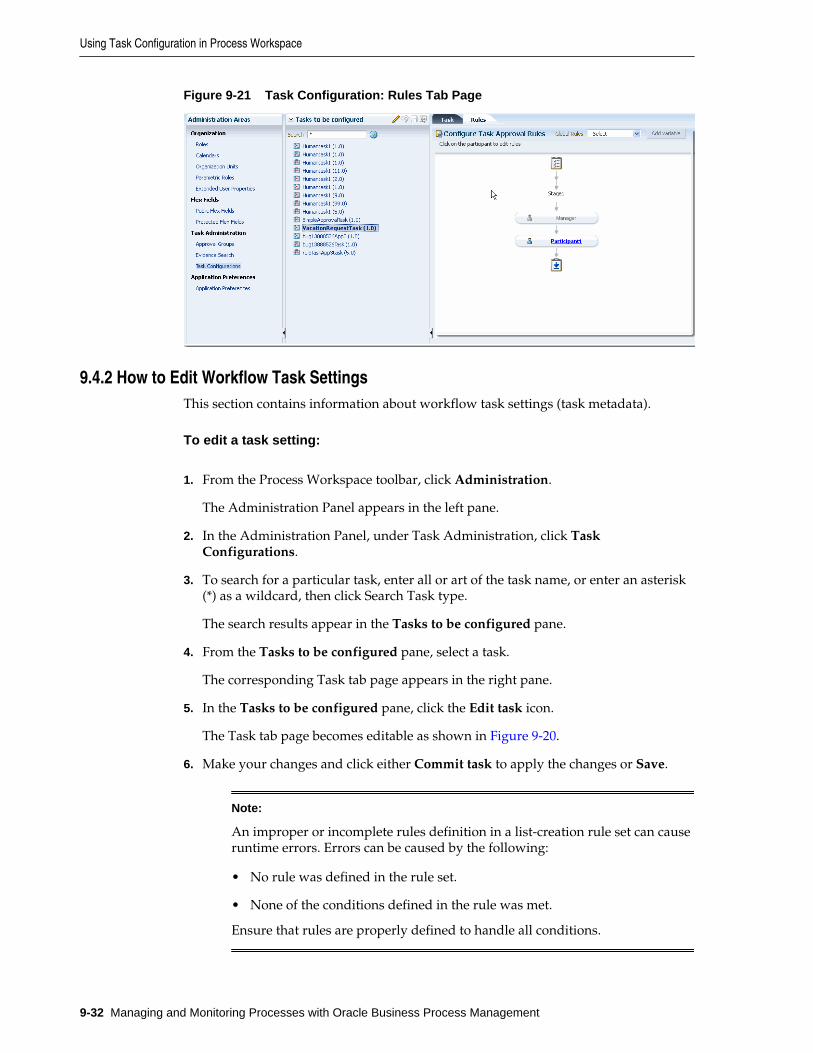
Figure 9-21 Task Configuration: Rules Tab Page
9.4.2 How to Edit Workflow Task SettingsThis section contains information about workflow task settings (task metadata).
To edit a task setting:
1. From the Process Workspace toolbar, click Administration.
The Administration Panel appears in the left pane.
2. In the Administration Panel, under Task Administration, click TaskConfigurations.
3. To search for a particular task, enter all or art of the task name, or enter an asterisk(*) as a wildcard, then click Search Task type.
The search results appear in the Tasks to be configured pane.
4. From the Tasks to be configured pane, select a task.
The corresponding Task tab page appears in the right pane.
5. In the Tasks to be configured pane, click the Edit task icon.
The Task tab page becomes editable as shown in Figure 9-20.
6. Make your changes and click either Commit task to apply the changes or Save.
Note:
An improper or incomplete rules definition in a list-creation rule set can causeruntime errors. Errors can be caused by the following:
• No rule was defined in the rule set.
• None of the conditions defined in the rule was met.
Ensure that rules are properly defined to handle all conditions.
Using Task Configuration in Process Workspace
9-32 Managing and Monitoring Processes with Oracle Business Process Management
9.4.3 How to Specify Routing SettingsPerform the following steps:
1. From the Process Workspace toolbar, click Administration.
The Administration Panel appears in the left pane.
2. In the Administration Panel, under Task Administration, click TaskConfigurations.
3. From the Tasks to be configured pane, select a task.
The corresponding Task tab page appears in the right pane.
4. In the Tasks to be configured pane, click the Edit task icon.
The Task tab page becomes editable as shown in Figure 9-20.
The Task tab page contains a limited set of the routing options. Approval aggregationrequirements can be any of the following:
• None
• Once per task
• Once per stage
9.4.4 How to Specify an Expiration PolicyPerform the following steps:
1. From the Process Workspace toolbar, click Administration.
The Administration Panel appears in the left pane.
2. In the Administration Panel, under Task Administration, click TaskConfigurations.
3. From the Tasks to be configured pane, select a task.
The corresponding Task tab page appears in the right pane.
4. In the Tasks to be configured pane, click the Edit task icon.
The Task tab page becomes editable as shown in Figure 9-20.
5. In the Task tab page, in the Expiration and Escalation Policy section, select one ofthe following:
• Never Expire
• Expire After. Select Fixed Duration to specify the amount of days, hours, andminutes for completing the task. Alternatively, select By Expression todynamically enter a value as an XPath expression.
9.4.5 How to Extend an Expiration Policy PeriodYou can extend the expiration period when the user does not respond within theallotted time. You do this by specifying the number of times the task can be renewed
Using Task Configuration in Process Workspace
Managing Process Workspace 9-33
upon expiration (for example, renew it an additional three times) and the duration ofeach renewal (for example, three days for each renewal period).
To extend an expiration policy period:
1. From the Process Workspace toolbar, click Administration.
The Administration Panel appears in the left pane.
2. In the Administration Panel, under Task Administration, click TaskConfigurations.
3. From the Tasks to be configured pane, select a task.
The corresponding Task tab page appears in the right pane.
4. In the Tasks to be configured pane, click Edit task.
The Task tab page becomes editable as shown in Figure 9-20.
5. In the Task tab page, in the Expiration and Escalation Policy section, select Renewafter.
6. Specify the maximum number of times to continue renewing this task.
9.4.6 How to Specify an Escalation PolicyPerform the following steps:
1. From the Process Workspace toolbar, click Administration.
The Administration Panel appears in the left pane.
2. In the Administration Panel, under Task Administration, click TaskConfigurations.
3. From the Tasks to be configured pane, select a task.
The corresponding Task tab page appears in the right pane.
4. In the Tasks to be configured pane, click Edit task.
The Task tab page becomes editable as shown in Figure 9-20.
5. In the Task tab page, in the Expiration and Escalation Policy section, select Escalateafter.
6. Specify the following additional values. When both are set, the escalation policy ismore restrictive.
• Maximum Escalation Levels
Number of management levels to which to escalate the task. This field isrequired.
• Highest Approver Title
The title of the highest approver (for example, self, manager, director, or CEO).These titles are compared against the title of the task assignee in thecorresponding user repository. This field is optional.
Using Task Configuration in Process Workspace
9-34 Managing and Monitoring Processes with Oracle Business Process Management

The escalation policy specifies the number of times the task can be escalated onexpiration and the renewal duration.
9.4.7 How to Specify Participant Notification PreferencesNotifications indicate when a user or group is assigned a task or informed that thestatus of the task has changed. Notifications can be sent through email, voice message,instant message, or SMS. Notifications are sent to different types of participants fordifferent actions. Notifications are configured by default with default messages. Forexample, a notification message is sent to indicate that a task has completed andclosed. You can create your own or modify existing configurations.
Note:
Embedded LDAP does not support group email addresses. Therefore, when atask is assigned to a group ID, emails are sent to all of its members instead ofto the group email address.
The notification message should be a valid xpath expression. If you mustspecify a simple string, then specify it in either double quotes or use the stringfunction.
9.4.7.1 How to Make Email Messages Actionable
Perform the following steps:
To make email messages actionable:
1. From the Process Workspace toolbar, click Administration.
The Administration Panel appears in the left pane.
2. In the Administration Panel, under Task Administration, click TaskConfigurations.
3. From the Tasks to be configured pane, select a task.
The corresponding Task tab page appears in the right pane.
4. In the Tasks to be configured pane, click the Edit task icon.
The Task tab page becomes editable as shown in Figure 9-20.
5. In the Notification Settings section, select Make notification actionable.
This action enables you to perform task actions through email.
Note:
FYI tasks are not actionable and cannot be acknowledged from emailmessages.
9.4.7.2 How to Secure Notifications to Exclude Details
Perform the following steps:
Using Task Configuration in Process Workspace
Managing Process Workspace 9-35

To secure notifications, make messages actionable, and send attachments:
1. a. From the Process Workspace toolbar, click Administration.
The Administration Panel appears in the left pane.
b. In the Administration Panel, under Task Administration, click TaskConfigurations.
c. From the Tasks to be configured pane, select a task.
The corresponding Task tab page appears in the right pane.
d. In the Tasks to be configured pane, click the Edit task icon.
The Task tab page becomes editable as shown in Figure 9-20.
e. In Task tab page, in the Notification section, select Make notifications secure(exclude details).
If selected, a default notification message is used. There are no HTMLworklist task details, attachments, or actionable links in the email. Only thetask number is in the message.
9.4.7.3 How to Set Up Reminders
You can send task reminders, which can be based on the time the task was assigned toa user or the expiration time of a task. The number of reminders and the intervalbetween the reminders can also be configured.
To set up reminders:
1. From the Process Workspace toolbar, click Administration.
The Administration Panel appears in the left pane.
2. In the Administration Panel, under Task Administration, click TaskConfigurations.
3. From the Tasks to be configured pane, select a task.
The corresponding Task tab page appears in the right pane.
4. In the Tasks to be configured pane, click the Edit task icon.
The Task tab page becomes editable as shown in Figure 9-20.
5. In the Notification Settings section, select the number of reminders to send.
6. If you selected to remind the assignee one, two, or three times, select the intervalbetween reminders, and whether to send the reminder before or after theassignment.
9.4.7.4 How to Notify Recipients of Changes to Task Status
Three default status types display in the Task Status column: Assign, Complete, andError. You can select other status types for which to receive notification messages.
Notifications can be sent to users involved in the task in various capacities. When thetask is assigned to a group, and there is no notification endpoint available for thegroup, then each user in the group is sent a notification.
Using Task Configuration in Process Workspace
9-36 Managing and Monitoring Processes with Oracle Business Process Management

To notify recipients of changes to task status:
1. From the Process Workspace toolbar, click Administration.
The Administration Panel appears in the left pane.
2. In the Administration Panel, under Task Administration, click TaskConfigurations.
3. From the Tasks to be configured pane, select a task.
The corresponding Task tab page appears in the right pane.
4. In the Tasks to be configured pane, click the Edit task icon.
The Task tab page becomes editable as shown in Figure 9-20.
5. In the Task tab page, navigate to the Notification Settings area.
6. In the Task Status column, select a type to display the complete list of task types:
• Assign
When the task is assigned to users or a group, this captures the followingactions:
– Task is assigned to a user.
– Task is assigned to a new user in a serial workflow.
– Task is renewed.
– Task is delegated.
– Task is reassigned.
– Task is escalated.
– Information for a task is submitted.
• Complete
• Error
• Expire
• Request Info
• Resume
• Suspend
• Update
– Task payload is updated.
– Task is updated.
– Comments are added.
– Attachments are added and updated.
Using Task Configuration in Process Workspace
Managing Process Workspace 9-37

• Update Outcome
• Withdraw
• All Other Actions
– Any action not covered in the above task types. This includes acquiring atask.
7. In the Recipient column, click an entry to display a list of possible recipients for thenotification message:
• Assignees
The users or groups to whom the task is currently assigned.
• Initiator
The user who created the task.
• Approvers
The users who have acted on the task up to this point. This applies in a serialparticipant type in which multiple users have approved the task and anotification must be sent to all of them.
• Owner
The task owner.
• Reviewer
The user who can add comments and attachments to a task.
9.4.7.5 How to Edit the Notification Message
A default notification message is available for delivery to the selected recipient. Youcan modify the default message text.
To edit the notification message:
1. From the Process Workspace toolbar, click Administration.
The Administration Panel appears in the left pane.
2. In the Administration Panel, under Task Administration, click TaskConfigurations.
3. From the Tasks to be configured pane, select a task.
The corresponding Task tab page appears in the right pane.
4. In the Tasks to be configured pane, click the Edit task icon.
The Task tab page becomes editable as shown in Figure 9-20.
5. In the Task tab page, navigate to the Notification Settings area.
6. In the Notification Header column, click the Edit icon to display the defaultnotification message.
Using Task Configuration in Process Workspace
9-38 Managing and Monitoring Processes with Oracle Business Process Management

This message applies to all the supported notification channels: email, voice,instant messaging, and SMS. Email messages can also include the worklist taskdetail defined in this message. The channel by which the message is delivered isbased upon the notification preferences you specify.
7. Modify the message wording as necessary.
8. Click OK.
9.4.7.6 How to Prevent Multiple Email Notifications for a Human Task Event
Perform the following steps:
To prevent multiple email notifications for a human task event:
1. From the Process Workspace toolbar, click Administration.
The Administration Panel appears in the left pane.
2. In the Administration Panel, under Task Administration, click TaskConfigurations.
3. From the Tasks to be configured pane, select a task.
The corresponding Task tab page appears in the right pane.
4. In the Tasks to be configured pane, click the Edit task icon.
The Task tab page becomes editable as shown in Figure 9-20.
5. In the Notification Settings section, select Don't send multiple notifications forthe same human task event.
This action enables you to perform task actions through email.
9.4.8 How to Enable Task AccessAccess-rule settings can be set to control the actions a user can perform. Content andaction permissions can be specified based on the logical role of a user, such as creator(inititator), owner, assignee, and reviewers.
To enable task access:
1. From the Process Workspace toolbar, click Administration.
The Administration Panel appears in the left pane.
2. In the Administration Panel, under Task Administration, click TaskConfigurations.
3. From the Tasks to be configured pane, select a task.
The corresponding Task tab page appears in the right pane.
4. In the Tasks to be configured pane, click the Edit task icon.
The Task tab page becomes editable as shown in Figure 9-20.
5. In the Task tab page, expand the Task Access section at the bottom of the page,then select the Task Content tab.
Using Task Configuration in Process Workspace
Managing Process Workspace 9-39
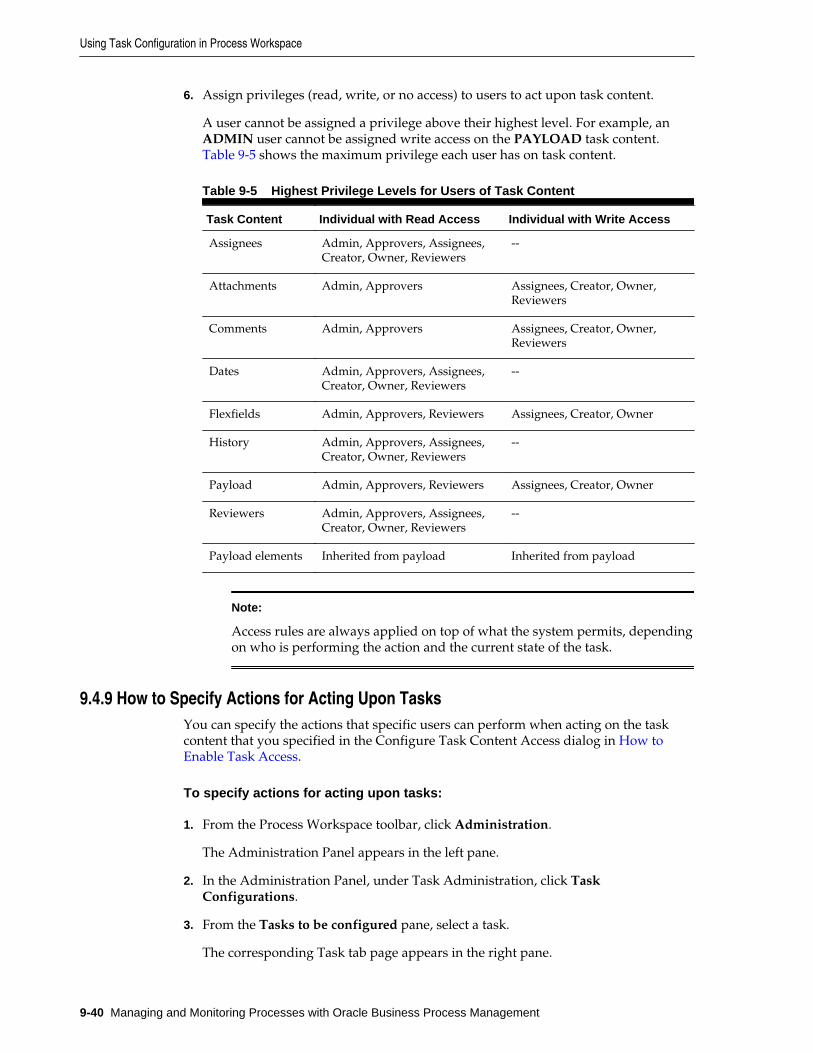
6. Assign privileges (read, write, or no access) to users to act upon task content.
A user cannot be assigned a privilege above their highest level. For example, anADMIN user cannot be assigned write access on the PAYLOAD task content. Table 9-5 shows the maximum privilege each user has on task content.
Table 9-5 Highest Privilege Levels for Users of Task Content
Task Content Individual with Read Access Individual with Write Access
Assignees Admin, Approvers, Assignees,Creator, Owner, Reviewers
--
Attachments Admin, Approvers Assignees, Creator, Owner,Reviewers
Comments Admin, Approvers Assignees, Creator, Owner,Reviewers
Dates Admin, Approvers, Assignees,Creator, Owner, Reviewers
--
Flexfields Admin, Approvers, Reviewers Assignees, Creator, Owner
History Admin, Approvers, Assignees,Creator, Owner, Reviewers
--
Payload Admin, Approvers, Reviewers Assignees, Creator, Owner
Reviewers Admin, Approvers, Assignees,Creator, Owner, Reviewers
--
Payload elements Inherited from payload Inherited from payload
Note:
Access rules are always applied on top of what the system permits, dependingon who is performing the action and the current state of the task.
9.4.9 How to Specify Actions for Acting Upon TasksYou can specify the actions that specific users can perform when acting on the taskcontent that you specified in the Configure Task Content Access dialog in How toEnable Task Access.
To specify actions for acting upon tasks:
1. From the Process Workspace toolbar, click Administration.
The Administration Panel appears in the left pane.
2. In the Administration Panel, under Task Administration, click TaskConfigurations.
3. From the Tasks to be configured pane, select a task.
The corresponding Task tab page appears in the right pane.
Using Task Configuration in Process Workspace
9-40 Managing and Monitoring Processes with Oracle Business Process Management

4. In the Tasks to be configured pane, click the Edit task icon.
The Task tab page becomes editable as shown in Figure 9-20.
5. In the Task tab page, expand Task Access at the bottom of the page, and select theTask Actions tab.
6. Select the task action for which to specify users.
7. Specify whether participants can or cannot perform the selected actions.
9.4.10 How to View Settings for RulesPerform the following steps:
To view a rule set for a rule-based participant:
1. From the Process Workspace toolbar, click Administration.
The Administration Panel appears in the left pane.
2. In the Administration Panel, under Task Administration, click Task Configuration.
The Tasks to Be Configured page appears in the middle pane.
3. In the Tasks to Be Configured page, select a rule whose settings you want tomodify.
The corresponding details appear in the Tasks tab page in the right pane.
4. Select Edit task. The right pane refreshes in edit mode.
5. In the right pane, select the Rules tab.
The Rules tab page displays the Configure Task Approval Rules page, similar towhat is shown in the example in Figure 9-22.
Figure 9-22 Editing a Task Rule
The Configure Task Approval Rules page graphically shows the approval flow forthe task. The icon in each participant node indicates the type of participant: single,parallel, serial, or FYI.
Using Task Configuration in Process Workspace
Managing Process Workspace 9-41

To see a tool tip displaying the name of the ruleset for a participant in this task,hover over the link for that participant.
Note that value- based participants are shown but are disabled.
9.4.11 How to Add a Rule to a Ruleset in Process WorkspaceYou can add a rule to a ruleset, specifying not only conditions, but also a description,the effective date, and priority.
To add rules for a rule-based participant:
1. From the Process Workspace toolbar, click Administration.
The Administration Panel appears in the left pane.
2. In the Administration Panel, under Task Administration, click Task Configuration.
The Tasks to Be Configured pane appears as the middle pane.
3. In the Tasks to Be Configured pane, select a rule whose settings you want tomodify.
The corresponding details appear in the Tasks tab page in the right pane.
4. Select Edit task.
The right pane refreshes in edit mode.
5. In the right pane, select the Rules tab.
The Rules tab page displays the Configure Task Approval Rules page showing theapproval flow for the task. The icon in each participant node indicates the type ofparticipant: single, parallel, serial, or FYI.
6. To edit the rules, click the link for the participant.
The rules editor page appears with the participant node (ruleset) selected. Here youcan either add or edit rules defined for the rule set. (You can also add or editdecision tables as explained in How to Add and Customize Decision Tables.)
7. Click Add Rule as shown in Figure 9-23.
Using Task Configuration in Process Workspace
9-42 Managing and Monitoring Processes with Oracle Business Process Management

Figure 9-23 Adding a Rule
8. To specify the rule, click the Expand icon to the left of the rule field.
This enables you to specify the conditions for the rule as described in How toDefine Rule Conditions. To provide a description and specify the effective date andpriority, click the Show Advanced Settings icon to the left of the rule field.
9. When you have finished making your changes, in the Tasks to Be Configured pane,click Save.
The changes are saved to the rule definitions in the rules dictionary. To commit thechanges to MDS, click Commit. The task is refreshed and no longer editable.
For more information about adding rules, see Working with Rulesets and Rules inOracle Fusion Middleware User's Guide for Oracle Business Rules.
9.4.11.1 How to Define Rule Conditions
You can set the left and right sides of a condition by selecting operands from conditionbrowsers. Clicking the magnifying glass icon displays the browsers.
The operator for comparing the operands of the condition change based on the type ofoperand selected for the left side of the condition. You also can define more complexconditions using the Expression Builder.
For more information, see Creating ADF Data Binding EL Expressions in FusionDeveloper's Guide for Oracle Application Development Framework. See also Creating ELExpressions in Web User Interface Developer's Guide for Oracle Application DevelopmentFramework.
9.4.11.2 How to Add Actions
You can add actions to a rule.
To add an action:
1. From the Process Workspace toolbar, click Administration.
The Administration Panel appears in the left pane.
2. In the Administration Panel, under Task Administration, click Task Configuration.
Using Task Configuration in Process Workspace
Managing Process Workspace 9-43

The Tasks to Be Configured pane appears as the middle pane.
3. In the Tasks to Be Configured pane, select a rule.
The corresponding details appear in the Tasks tab page in the right pane.
4. Select Edit task.
The right pane refreshes in edit mode.
5. In the right pane, select the Rules tab.
The Rules tab page displays the Configure Task Approval Rules page showing theapproval flow for the task. The icon in each participant node indicates the type ofparticipant: single, parallel, serial, or FYI.
6. To add an action, click the link for the participant.
The rules editor page appears with the participant node (ruleset) selected.
7. From the View drop-down field, select IF/THEN Rules.
8. If there are no rules defined, add a rule as described in How to Add a Rule to aRuleset in Process Workspace
If there are rules defined for the ruleset, go to step 9.
9. Expand the rule as shown in Figure 9-24.
Figure 9-24 Adding Actions to a Rule
10. Under the THEN pane, click the add icon to add an action.
Select the action you want to add from the displayed list as shown in Figure 9-25.
Using Task Configuration in Process Workspace
9-44 Managing and Monitoring Processes with Oracle Business Process Management

Figure 9-25 Available Actions for Rules
You can add multiple actions for any rule by repeating step 10.
11. After adding a rule, you can perform the following commands:
• Delete
• Copy
• Cut
• Paste
• Up and Down (to change the order of the listed actions)
9.4.11.2.1 To perform commands on an action
Perform the following steps:
1. Select the action by clicking the check box next to the action as shown in Figure9-26.
Figure 9-26 Delete, Up, Down, Copy, Cut and Paste Commands
2. Select any of the possible actions such as Delete, Cut, Copy or Paste by clickingthe corresponding icons.
3. If you have multiple actions, you can change the order of the actions by using theup and down arrows.
9.4.12 How to Add and Customize Decision TablesYou can customize existing decision tables or add new ones.
Using Task Configuration in Process Workspace
Managing Process Workspace 9-45

9.4.12.1 How to Customize an Existing Decision Table in Process Workspace
You can specify the actions for a ruleset that were specified in a previously createddecision table.
To customize an existing decision table in a ruleset in Process Workspace:
1. From the Process Workspace toolbar, click Administration.
The Administration Panel appears in the left pane.
2. In the Administration Panel, under Task Administration, click Task Configuration.
The Tasks to Be Configured pane appears as the middle pane.
3. In the Tasks to Be Configured pane, select a rule whose settings you want tomodify.
The corresponding details appear in the Tasks tab page in the right pane.
4. Select Edit task.
The right pane refreshes in edit mode.
5. In the right pane, select the Rules tab.
The Rules tab page displays the Configure Task Approval Rules page showing theapproval flow for the task. The icon to the left of each participant in the flowindicates the type of participant: single, parallel, serial, or FYI.
6. To edit the rules, click the link for the participant.
This displays the ruleset associated with that participant.
7. From the View list, select the decision table you want to customize.
The selected decision table appears in the lower half of the page.
8. Edit any of the existing rows in the decision table.
9. To add an action, in the decision table, from the Add list, select the action you wantto add as shown in the example in Figure 9-27.
Using Task Configuration in Process Workspace
9-46 Managing and Monitoring Processes with Oracle Business Process Management

Figure 9-27 Adding Actions to a Decision Table
The corresponding actions appear in the table for you to specify.
9.4.12.2 How to Edit an Action (Multiple Parameters: All Rules at a Time)
In the Rules tab, you can edit multiple parameters of an action from the DecisionTable.
To edit multiple parameters:
1. From the View list, select the decision table that contains the action you want toedit.
The selected decision table appears in the lower half of the page as shown in Figure9-28.
Figure 9-28 Decision Table with Editable Actions
Using Task Configuration in Process Workspace
Managing Process Workspace 9-47

2. Select the action you want to edit and click Edit Action.
3. An Action Editor dialog box appears as shown in Figure 9-29.
You can modify the values available for the action you selected. You can choose notto specify values for all the parameters in the Action Editor dialog box.
Figure 9-29 Action Editor
4. Click OK.
The values appear in the Decision Table for the selected action for all rules. Formore information on Decision Tables, see How to Add and Customize DecisionTables.
9.4.12.3 How to Edit an Action (Single Cell Editing)
You have to option to edit one of the parameters of an action in the Decision Table.
To edit a single cell of any action:
1. From the View list, select the decision table that contains the action you want toedit.
The selected decision table appears in the lower half of the page as shown in Figure9-28.
2. In the Decision Table, click the cell you want to modify.
This makes the cell editable as shown in Figure 9-30.
Figure 9-30 Single Cell Editing
3. Update the parameter with the specific value/option.
9.4.12.4 How to Add a New Decision Table to a Ruleset in Process Workspace
You can add a table to a ruleset and specify the actions it contains.
Using Task Configuration in Process Workspace
9-48 Managing and Monitoring Processes with Oracle Business Process Management

To add a new decision table to a ruleset in Process Workspace:
1. From the Process Workspace toolbar, click Administration.
The Administration Panel appears in the left pane.
2. In the Administration Panel, under Task Administration, click Task Configuration.
The Tasks to Be Configured pane appears as the middle pane.
3. In the Tasks to Be Configured pane, select a rule whose settings you want tomodify.
The corresponding details appear in the Tasks tab page in the right pane.
4. Select Edit task. The right pane refreshes in edit mode.
5. In the right pane, select the Rules tab.
The Rules tab page displays the Configure Task Approval Rules page showing theapproval flow for the task. The icon to the left of each participant in the flowindicates the type of participant: single, parallel, serial, or FYI.
6. To edit the rules, click the link for the participant.
This displays the ruleset associated with that participant.
7. In the ruleset, from the View list, select Add Decision Table as shown in Figure9-31.
Figure 9-31 Adding a Decision Table
The new decision table appears in the lower half of the page.
8. To add an action, in the decision table, from the Add list, select the action you wantto add as shown in the example in Figure 9-27.
The corresponding actions appear in the table for you to specify.
9.4.13 How to Add a Variable to a RulePerform the following steps:
Using Task Configuration in Process Workspace
Managing Process Workspace 9-49
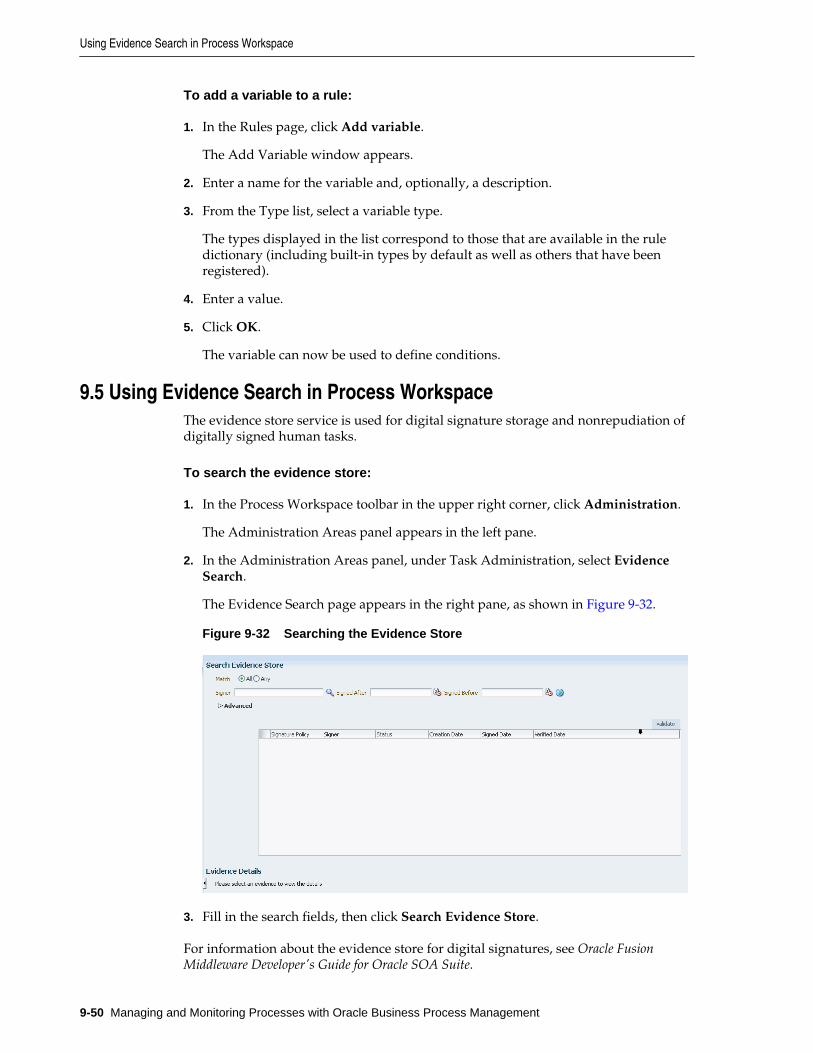
To add a variable to a rule:
1. In the Rules page, click Add variable.
The Add Variable window appears.
2. Enter a name for the variable and, optionally, a description.
3. From the Type list, select a variable type.
The types displayed in the list correspond to those that are available in the ruledictionary (including built-in types by default as well as others that have beenregistered).
4. Enter a value.
5. Click OK.
The variable can now be used to define conditions.
9.5 Using Evidence Search in Process WorkspaceThe evidence store service is used for digital signature storage and nonrepudiation ofdigitally signed human tasks.
To search the evidence store:
1. In the Process Workspace toolbar in the upper right corner, click Administration.
The Administration Areas panel appears in the left pane.
2. In the Administration Areas panel, under Task Administration, select EvidenceSearch.
The Evidence Search page appears in the right pane, as shown in Figure 9-32.
Figure 9-32 Searching the Evidence Store
3. Fill in the search fields, then click Search Evidence Store.
For information about the evidence store for digital signatures, see Oracle FusionMiddleware Developer's Guide for Oracle SOA Suite.
Using Evidence Search in Process Workspace
9-50 Managing and Monitoring Processes with Oracle Business Process Management

9.6 Managing Exceptions in Process WorkspaceUnder certain circumstances—for example, an employee who has left the companybeing assigned to a task—an exception can occur. When an exception occurs, the taskgets put into an alerted state. The task then gets assigned to the error assignee or, ifone is not specified, to the administrator.
For information about configuring the error assignee, see Oracle Fusion MiddlewareDeveloper's Guide for Oracle SOA Suite.
There are other scenarios in which an exception can happen.
9.7 Using the User Metadata Migration UtilityThe user metadata migration utility, hwfMigrator, is a tool that automates theprocess of migrating workflow user-configurable data from one Service Integrationserver to another by executing a shell script.
The tool also includes a property file that contains key-value pairs and all the inputparameters required to perform the migration operation. You customize the propertyfile and then perform the migration by executing the shell script.
If you are a process designer and want more information about using the UserMetadata Migration Utility, see Oracle Fusion Middleware Developing Business Processeswith Oracle Business Process Management Studio.
For information about moving from a test site to a production site, see Moving from aTest to a Production Environment in Administering Oracle Fusion Middleware.
9.8 Integrating with Oracle WebCenter PortalYou can integrate some Oracle Business Process Management functionality into OracleWebCenter Portal portals and pages, including task lists from which you can view andexecute tasks.
WebCenter Portal Integration Architecture — WebCenter Portal
BPM is integrated into WebCenter Portal using a BPEL connection, and a WebCenterPortal resource catalog. With the BPEL connection established, the resource catalogprovides task flows that can be embedded in a WebCenter Portal page.
In the WebCenter Portal portal or page, an ADF taskflow contains an in-line frame.The frame’s URL points to a page that provides BPM functionality (such as the TaskList). This page is hosted from the BPM Workspace application, which resides on theBPM server.
Managing Exceptions in Process Workspace
Managing Process Workspace 9-51

Figure 9-33 WebCenter Portal BPM Integration Architecture
WebCenter Portal Integration Architecture — BPM
The components needed to integrate BPM Task List functionality into WebCenterPortal are built in to the BPM server application. No additional BPM serverconfiguration is needed.
WebCenter Portal Integration Setup Overview
To set up WebCenter Portal integration with BPM, you create a connection to the BPMBPEL server, load the BPM Process Portal Catalog resource catalog, and then integrateBPM resources into a WebCenter Portal portal. Interactive BPM functionality is thenavailable.
For configuration details and steps, see Configuring Oracle WebCenter PortalIntegration. For implementation details, see Integrating BPM Functionality intoWebCenter Portal.
9.8.1 Configuring Oracle WebCenter Portal IntegrationConfigure BPM Workspace functionality integration into Oracle WebCenter Portal bycreating a BPEL connection to the BPM BPEL server, and loading the BPM ProcessPortal Catalog resource catalog.
A high level overview of the tasks needed to integrate BPM into WebCenter Portal is:
• create a BPEL connection to the BPM BPEL server
• load the BPM Process Portal Catalog resource catalog
• use the BPM Process Portal Catalog resources to integrate BPM functionality into aportal or page
To configure WebCenter Portal Integration with BPM in a WebCenter Portalinstallation, with an existing WebCenter Portal portal:
Integrating with Oracle WebCenter Portal
9-52 Managing and Monitoring Processes with Oracle Business Process Management
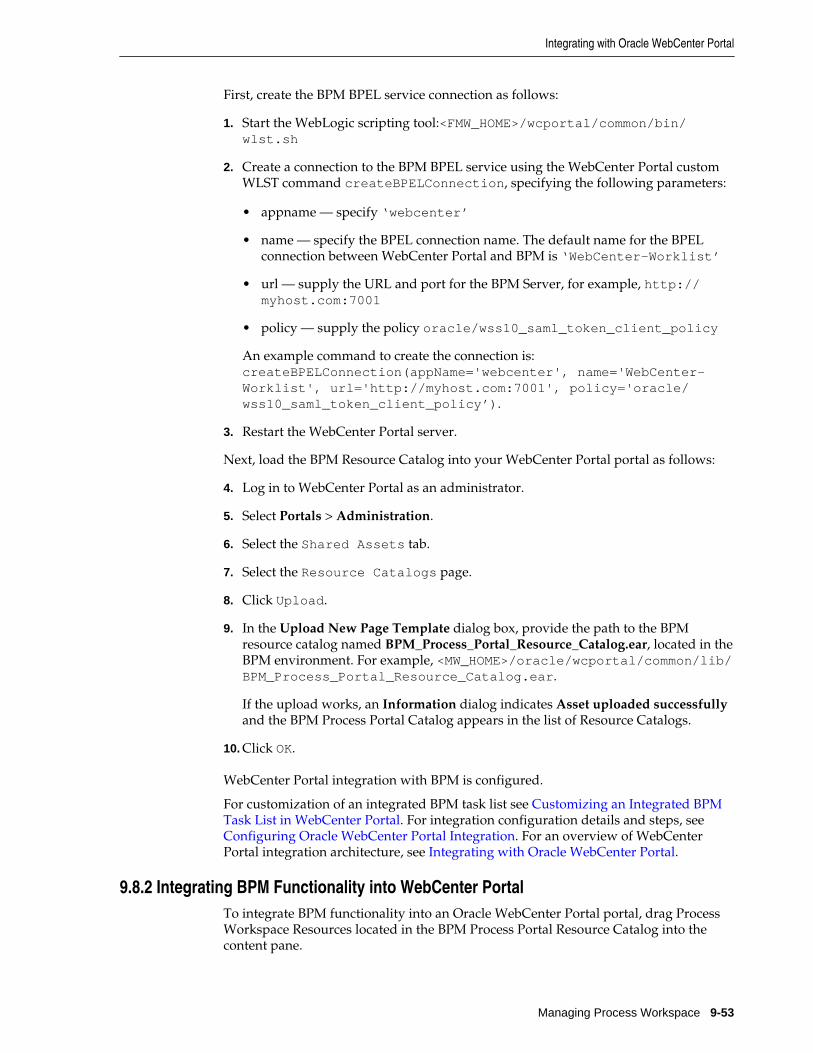
First, create the BPM BPEL service connection as follows:
1. Start the WebLogic scripting tool:<FMW_HOME>/wcportal/common/bin/wlst.sh
2. Create a connection to the BPM BPEL service using the WebCenter Portal customWLST command createBPELConnection, specifying the following parameters:
• appname — specify ‘webcenter’
• name — specify the BPEL connection name. The default name for the BPELconnection between WebCenter Portal and BPM is ‘WebCenter-Worklist’
• url — supply the URL and port for the BPM Server, for example, http://myhost.com:7001
• policy — supply the policy oracle/wss10_saml_token_client_policy
An example command to create the connection is:createBPELConnection(appName='webcenter', name='WebCenter-Worklist', url='http://myhost.com:7001', policy='oracle/wss10_saml_token_client_policy’).
3. Restart the WebCenter Portal server.
Next, load the BPM Resource Catalog into your WebCenter Portal portal as follows:
4. Log in to WebCenter Portal as an administrator.
5. Select Portals > Administration.
6. Select the Shared Assets tab.
7. Select the Resource Catalogs page.
8. Click Upload.
9. In the Upload New Page Template dialog box, provide the path to the BPMresource catalog named BPM_Process_Portal_Resource_Catalog.ear, located in theBPM environment. For example, <MW_HOME>/oracle/wcportal/common/lib/BPM_Process_Portal_Resource_Catalog.ear.
If the upload works, an Information dialog indicates Asset uploaded successfullyand the BPM Process Portal Catalog appears in the list of Resource Catalogs.
10. Click OK.
WebCenter Portal integration with BPM is configured.
For customization of an integrated BPM task list see Customizing an Integrated BPMTask List in WebCenter Portal. For integration configuration details and steps, see Configuring Oracle WebCenter Portal Integration. For an overview of WebCenterPortal integration architecture, see Integrating with Oracle WebCenter Portal.
9.8.2 Integrating BPM Functionality into WebCenter PortalTo integrate BPM functionality into an Oracle WebCenter Portal portal, drag ProcessWorkspace Resources located in the BPM Process Portal Resource Catalog into thecontent pane.
Integrating with Oracle WebCenter Portal
Managing Process Workspace 9-53

To add BPM functionality to a portal:
1. Open the portal into which you want to integrate BPM functionality.
2. From the Pages and Portals Actions menu, select Edit Portal.
3. Click the Settings icon.
4. In the Resource Catalog for... section, in the Pages dropdown, select BPM ProcessPortal Catalog.
5. On the left, click the Edit Portal icon.
6. Click Show Catalog.
7. Click the Process Workspace Resources catalog.
The list of available BPM resources is displayed
8. Drag and drop desired the BPM resource to integrate into your portal to the AddContent pane. For example, choose Task List to add a BPM Task List to the page.
The live BPM content is displayed
9. If desired, customize the look of the new content by clicking the View Actionsdropdown menu from the upper right corner of the panel, and selecting ContentStyle. For example, you can specify a larger Height value, such as 800px, to showmore of the BPM functionality in the panel. Click OK when done customizing.
10. Click Save to save the portal changes.
A similar approach can be used to integrate BPM functionality into a page in a portal.
For an overview of WebCenter Portal integration architecture, see Integrating withOracle WebCenter Portal. For configuration details and steps, see Configuring OracleWebCenter Portal Integration.
9.8.3 Customizing an Integrated BPM Task List in WebCenter PortalYou can customize which components of the Task List are displayed in integratedBPM functionality in an Oracle WebCenter Portal page, as well as some of theirdefault values.
From the Pages and Portals Actions dropdown menu, select Edit Portal. Click theView Actions dropdown menu from the upper right corner of the panel containingthe Task List, and select Parameters.
Integrating with Oracle WebCenter Portal
9-54 Managing and Monitoring Processes with Oracle Business Process Management

Table 9-6 Parameters, and Default and Possible Values for Customizing anIntegrated BPM Task List
Parameter Description Data Type Default Value Notes
AssignmentFilter
Value of theAssigneedropdown tasklist filter
String My+Group Possible valuesare BPM task listAssignee values:
• My• My Group• My+Group• My+Group
+All• Reviewer• Previous
ConnectionName
Name of theBPEL connectionto the BPMinstance
String WebCenter-Worklist
If an additionalBPMenvironment isconnected toyour WebCenterPortalenvironment,specify theconnection nameof the additionalBPEL connectionhere. With asingle BPMenvironment,use the defaultvalue,WebCenter-Worklist.
ShowApplicationsPanel
Shows/hidesthe Applicationspanel
Boolean false Over-ridden bythe Show LeftNavigationPanel setting
ShowAssignmentFilter
Shows/hidesthe Assignmentfilter in the tasklist toolbar
Boolean true
Show ExternalLinks Panel
Shows/hidesthe Links panel
Boolean false Over-ridden bythe Show LeftNavigationPanel setting
Integrating with Oracle WebCenter Portal
Managing Process Workspace 9-55

Table 9-6 (Cont.) Parameters, and Default and Possible Values for Customizing anIntegrated BPM Task List
Parameter Description Data Type Default Value Notes
Show LeftNavigationPanel
Shows/Hidesthe navigationpanel whichappears to theleft of the tasklist
Boolean false
Show StatusFilter
Shows/hidesthe Status filterin the task listtoolbar
Boolean true
Show TaskDetails Panel
Shows/hidesthe task detailspanel
Boolean true User settingsoverride thisvalue
Show ViewFilter
Shows/hidesthe View Filterabove the tasklist table
Boolean true
Show ViewsPanel
Shows/hidesthe Views panel
Boolean false Over-ridden bythe Show LeftNavigationPanel setting
Status Filter Value of theStatusdropdown tasklist filter
String ASSIGNED Possible valuesare BPM taskstatus values.For example,Any, Assigned,Completed,Suspended,Withdrawn,Expired,Errored,Alerted,InformationRequested.
View Filter View to use forthe task list
String My Tasks Possible valuesare BPM task listview values. Forexample, Inbox,Due Soon, HighPriority.
See Integrating with Oracle WebCenter Portal for more information.
Integrating with Oracle WebCenter Portal
9-56 Managing and Monitoring Processes with Oracle Business Process Management

9.8.4 Adding support for ADF task detailsAdd /workflow to mod_wl_ohs to view task details (ADF Form) in WebcenterPortal.
To view task details (ADF Form) in Webcenter Portal add /workflow to mod_wl_ohsconfiguration in the Location table. For information on the how to add, see Configuringthe WebLogic Proxy Plug-In for Oracle HTTP Server in Oracle® Fusion Middleware UsingOracle WebLogic Server Proxy Plug-Ins.
9.8.5 Configuring with Enterprise ManagerThe task details are redirected to the internal URL and frame busting comes into playpreventing the task form from getting loaded.
You must add the URL where task details should be displayed in the OracleEnterprise Manager. To add the URL:
1. In the Weblogic server that is running BPM, navigate to System MBean Browser.
2. Click on the Binocular symbol to activate search, and search for WorkFlowConfig.
3. Expand WorkFlowConfig and select human-workflow.
On the right side parameters related to human-workflow are displayed.
4. Add the value http://webcenterhost:7777 forFusionAppsFrontEndHostURL parameter.
Integrating with Oracle WebCenter Portal
Managing Process Workspace 9-57

Integrating with Oracle WebCenter Portal
9-58 Managing and Monitoring Processes with Oracle Business Process Management

10Managing Your Organization in Process
Workspace
Administrators of Oracle Business Process Management Suite can model anorganization by defining organization units, business calendars, business holidays,roles, and other user properties.
This chapter includes the following sections:
• Understanding Deployment of Organization Entities in Process Workspace
• Managing Holiday Rules in Process Workspace
• Managing Calendars in Process Workspace
• Managing Other Users' or Groups' Rules in Process Workspace
• Managing Roles in Process Workspace
• Managing Parametric Roles in Process Workspace
• Managing Extended User Properties in Process Workspace
• Managing Organization Units in Process Workspace
10.1 Understanding Deployment of Organization Entities in ProcessWorkspace
When a process is deployed, the various organization entities—for example, theorganization unit, calendar, and so on—are created. Those entities can then bemodified only through Process Workspace. Later, when the process is redeployed,data in Oracle BPM Studio does not overwrite any changes made during runtime.
For information about organizational units, see Oracle Fusion Middleware DevelopingBusiness Processes with Oracle Business Process Management Studio.
10.2 Managing Holiday Rules in Process WorkspaceBusiness holidays are collections of holidays that can be applied to calendar rules.Then, when computing the duration of a process, the calendar takes into account thespecified holidays.
You can create as many holiday rules as needed for different calendar rules. Forexample, if you apply holiday rules for India, the United States, and China to a givencalendar, then those various national holidays are taken into account when theduration of a process is computed.
Managing Your Organization in Process Workspace 10-1

Figure 10-1 Holiday Rules
When you create a business holiday rule, you specify the holiday name, date, andholiday type. Table 10-1 lists and describes the holiday types.
Table 10-1 Holiday Types
Holiday Type Description
Same Day Every Year On the same day each year.
Current Year In the current year only.
Nth Week Day of Month In a specified week, on a specified day, in a specified montheach year—for example, in the United States, Thanksgiving Dayis celebrated each year on the fourth Thursday of November.
Nth Day of ReferenceHoliday
On a day in relation to another specified holiday—for example,on the day after Thanksgiving Day.
Closest week day The closest day to a given date—for example, in the UnitedStates, the Independence Day holiday may be celebrated on theweekday closest to the Fourth of July.
Note:
For Holiday Types, only yearly frequency type holidays are supported. SameDay Every Year and Nth Week Day Of Month are supported in Release12.1.3.0. Other monthly and weekly frequencies like Nth Day of ReferenceHoliday and Closest week day are not supported.
10.2.1 To Create a Holiday RulePerform the following steps to create a holiday rule.
To create a holiday rule:
1. From the Process Workspace toolbar, select Administration.
The Administration Areas panel appears.
2. In the Organization panel, click Calendars.
The Calendars page appears.
3. In the Holidays List section, click Add Holiday List.
The Add Holiday List dialog prompts you for the name of the new holiday list.You can import a holiday list by using the Import iCalendar option. The Import
Managing Holiday Rules in Process Workspace
10-2 Managing and Monitoring Processes with Oracle Business Process Management
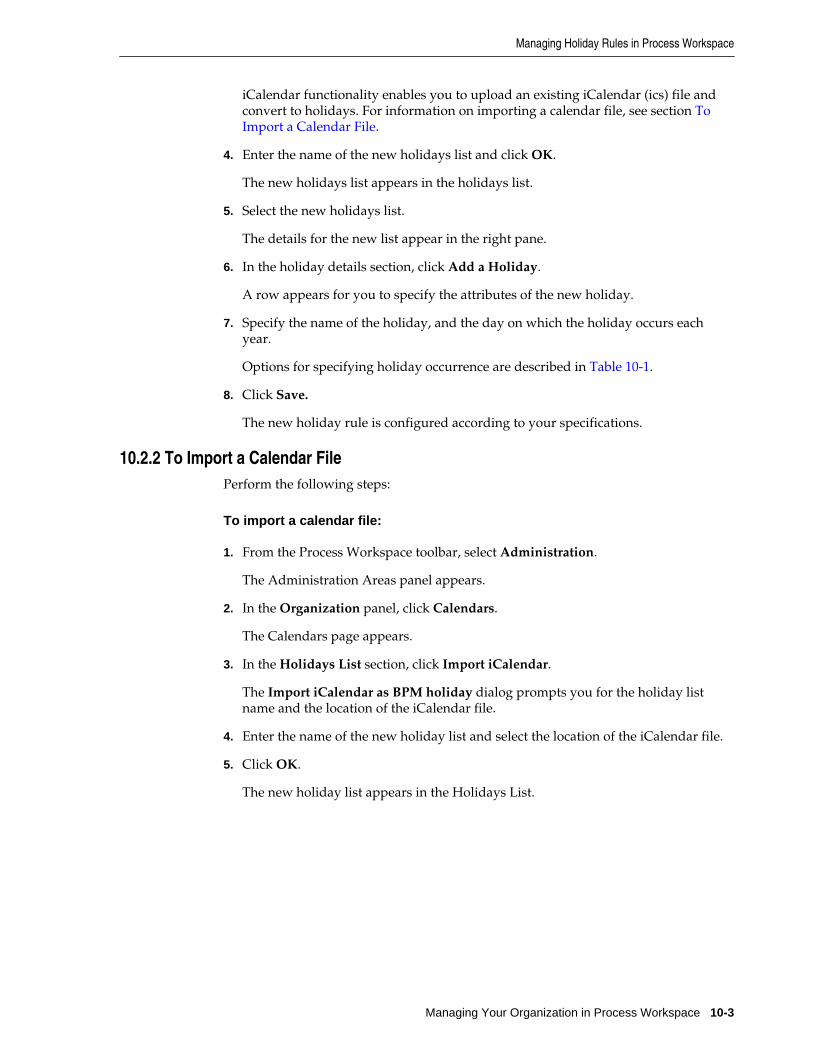
iCalendar functionality enables you to upload an existing iCalendar (ics) file andconvert to holidays. For information on importing a calendar file, see section ToImport a Calendar File.
4. Enter the name of the new holidays list and click OK.
The new holidays list appears in the holidays list.
5. Select the new holidays list.
The details for the new list appear in the right pane.
6. In the holiday details section, click Add a Holiday.
A row appears for you to specify the attributes of the new holiday.
7. Specify the name of the holiday, and the day on which the holiday occurs eachyear.
Options for specifying holiday occurrence are described in Table 10-1.
8. Click Save.
The new holiday rule is configured according to your specifications.
10.2.2 To Import a Calendar FilePerform the following steps:
To import a calendar file:
1. From the Process Workspace toolbar, select Administration.
The Administration Areas panel appears.
2. In the Organization panel, click Calendars.
The Calendars page appears.
3. In the Holidays List section, click Import iCalendar.
The Import iCalendar as BPM holiday dialog prompts you for the holiday listname and the location of the iCalendar file.
4. Enter the name of the new holiday list and select the location of the iCalendar file.
5. Click OK.
The new holiday list appears in the Holidays List.
Managing Holiday Rules in Process Workspace
Managing Your Organization in Process Workspace 10-3

Note:
Limitations when importing iCalendar file:
• Multiple holidays with the same name in the iCalendar (ics) file are notsupported. If there are repeated holiday names within the same ics file, anerror message is displayed.
• Only Event components in the iCalendar file are supported. If there areunsupported components in the file, for example VTimeZone format, theimport fails and an error message is displayed specifying the unsupportedcomponent name.
10.2.3 To Edit a Holiday RulePerform the following steps:
1. From the Process Workspace toolbar, select Administration.
The Administration Areas panel appears.
2. Under Organization, click Calendars.
The Calendars panel appears in the right pane.
3. In the Holidays List section, select the holiday list you want to edit.
The Details page for the list appears in the right pane. Holidays are listed in atable.
4. Select a row in the table and click Update Holiday.
All the holiday entries in the table become editable.
5. Edit holiday details, and click Save.
10.2.4 To Delete a Holiday Rule ListPerform the following steps:
1. Access the Holidays List as in To Edit a Holiday Rule.
2. Select the Holiday List to delete.
3. Click Delete Holiday List.
10.2.5 To Delete a Holiday RulePerform the following steps:
1. Access the Holidays List Details as in To Edit a Holiday Rule.
2. Select the Holiday rule to delete.
3. Click Delete Holiday.
Managing Holiday Rules in Process Workspace
10-4 Managing and Monitoring Processes with Oracle Business Process Management

10.3 Managing Calendars in Process WorkspaceA business calendar defines a work pattern for each day and a work week structurefor each week. In addition, a calendar also defines non-working days by usingbusiness holiday rules—that is, the business calendar and holiday rule together definethe work period.
Figure 10-2 Calendar Rules
When you create a business calendar, you define the following:
• Calendar name
• Time zone
• Working days in week
• Start time and end time for each day
• Optional holiday rule
You can create as many calendars as necessary.
You can associate business calendars to roles (see How to Add New Application Rolesand to organization units (see Managing Organization Units in Process Workspace).For example, you can specify that the InsuranceAgents role in the US-Californiaorganization unit follows the US-California business calendar.
Note:
After the project is deployed, you cannot make changes to the calendar rules.
10.3.1 To create a calendar rulePerform the following steps:
1. From the Process Workspace toolbar, select Administration.
The Administration Areas panel appears.
2. In the Organization panel, click Calendars.
The Calendars page appears in the right pane.
3. In the Calendars section, click Add Calendar.
Managing Calendars in Process Workspace
Managing Your Organization in Process Workspace 10-5

The Add a Calendar dialog prompts you for the name of the new calendar.
4. Enter the name of the new calendar, and click OK.
The new calendar appears in the Calendars list.
5. Select the new calendar.
The details for the new rule appears in the right pane.
6. Specify the following:
• The time zone
• The holiday list, if any, that applies
• The appropriate starting and finishing times
7. Click Save.
The new calendar is now configured according to your specifications.
10.3.2 To edit a calendar rulePerform the following steps:
1. From the Process Workspace toolbar, select Administration.
The Administration Areas panel appears.
2. In the Organization panel, click Calendars.
The Calendars page appears in the right pane.
3. Select the calendar rule you want to edit.
The details page for the new rule appears in the right pane.
4. Change the settings, and click Save.
The calendar rule is now modified according to your specifications.
10.3.3 To associate a calendar rule with a role and an organization unitPerform the following steps:
1. From the Process Workspace toolbar, select Administration.
The Administration Areas panel appears.
2. In the Organization panel, click Roles.
The Roles panel displays a list of the roles you are authorized to administer.
3. In the Details panel, in the Calendars section, click Associate a new calendar ruleto an organization unit for the application role.
Calendar and Organization Unit lists appear in the Calendar section.
4. Using Calendar and Organization Unit lists, specify the calendar and organizationunit to which you want to associate this role.
Managing Calendars in Process Workspace
10-6 Managing and Monitoring Processes with Oracle Business Process Management
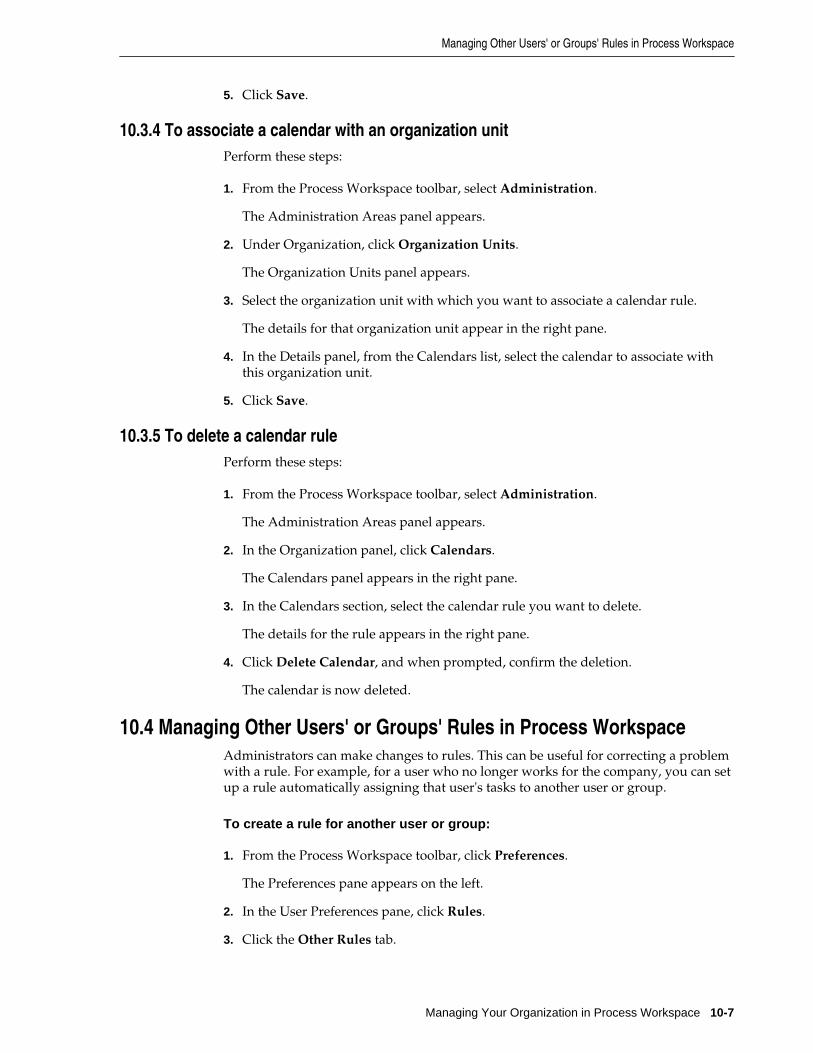
5. Click Save.
10.3.4 To associate a calendar with an organization unitPerform these steps:
1. From the Process Workspace toolbar, select Administration.
The Administration Areas panel appears.
2. Under Organization, click Organization Units.
The Organization Units panel appears.
3. Select the organization unit with which you want to associate a calendar rule.
The details for that organization unit appear in the right pane.
4. In the Details panel, from the Calendars list, select the calendar to associate withthis organization unit.
5. Click Save.
10.3.5 To delete a calendar rulePerform these steps:
1. From the Process Workspace toolbar, select Administration.
The Administration Areas panel appears.
2. In the Organization panel, click Calendars.
The Calendars panel appears in the right pane.
3. In the Calendars section, select the calendar rule you want to delete.
The details for the rule appears in the right pane.
4. Click Delete Calendar, and when prompted, confirm the deletion.
The calendar is now deleted.
10.4 Managing Other Users' or Groups' Rules in Process WorkspaceAdministrators can make changes to rules. This can be useful for correcting a problemwith a rule. For example, for a user who no longer works for the company, you can setup a rule automatically assigning that user's tasks to another user or group.
To create a rule for another user or group:
1. From the Process Workspace toolbar, click Preferences.
The Preferences pane appears on the left.
2. In the User Preferences pane, click Rules.
3. Click the Other Rules tab.
Managing Other Users' or Groups' Rules in Process Workspace
Managing Your Organization in Process Workspace 10-7
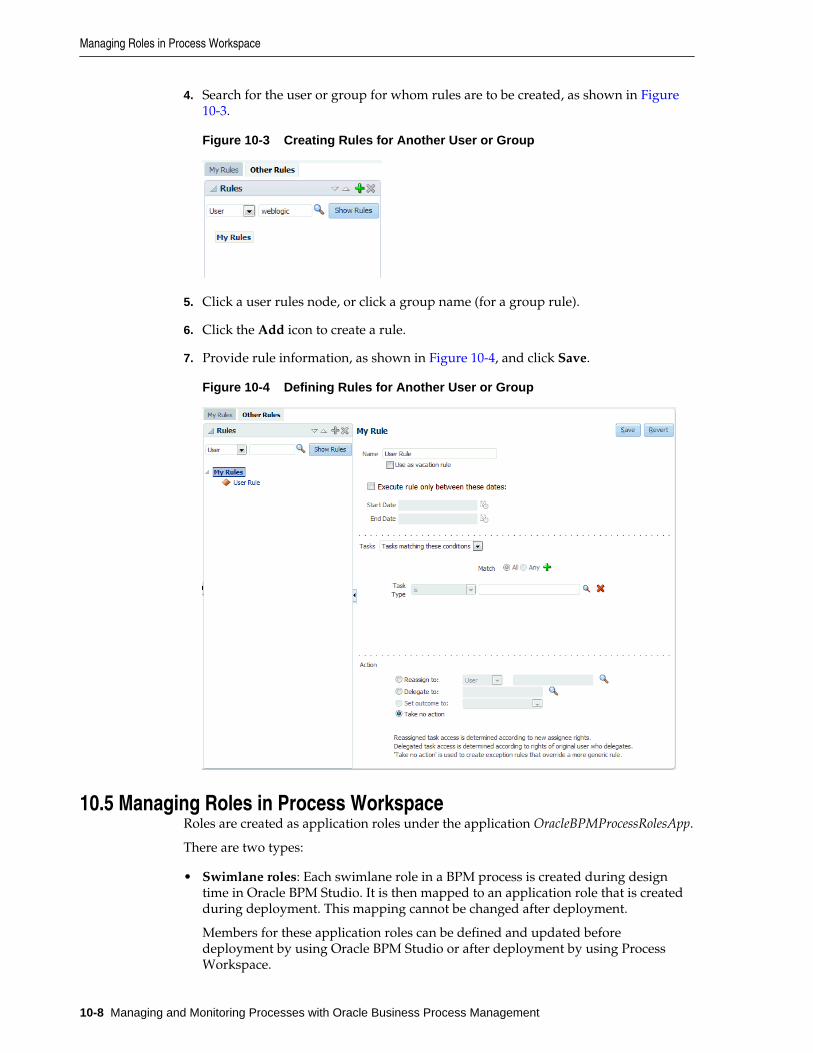
4. Search for the user or group for whom rules are to be created, as shown in Figure10-3.
Figure 10-3 Creating Rules for Another User or Group
5. Click a user rules node, or click a group name (for a group rule).
6. Click the Add icon to create a rule.
7. Provide rule information, as shown in Figure 10-4, and click Save.
Figure 10-4 Defining Rules for Another User or Group
10.5 Managing Roles in Process WorkspaceRoles are created as application roles under the application OracleBPMProcessRolesApp.
There are two types:
• Swimlane roles: Each swimlane role in a BPM process is created during designtime in Oracle BPM Studio. It is then mapped to an application role that is createdduring deployment. This mapping cannot be changed after deployment.
Members for these application roles can be defined and updated beforedeployment by using Oracle BPM Studio or after deployment by using ProcessWorkspace.
Managing Roles in Process Workspace
10-8 Managing and Monitoring Processes with Oracle Business Process Management

Swimlanes define the default task assignee and how to initiate a process if theinitiator task pattern is used. During runtime, only members of those roles canperform actions such as viewing and acting on tasks and initiating processes.
• Application roles: These represent any roles in the organization, and they can becreated in addition to the swimlane roles defined during design time. Anapplication role can be used as a task assignee or as a grantee of anotherapplication role. They can be created by using either Oracle BPM Studio or ProcessWorkspace.
When you create a role, you define both the role name and the grantees of the role.The grantees can be users, groups, or other application roles. If users are logged inwhen you grant them a new role, they must log out and log back in to exercise thenewly granted role.
10.5.1 How to Add New Application RolesPerform these steps:
To add a new application role:
1. From the Process Workspace toolbar, click Administration.
The Administration Areas panel appears.
2. In the Organization panel, click Roles.
The Roles panel displays a list of the roles you are authorized to administer.
3. In the upper-right corner of the Roles panel, click Add a new role.
The Add Role dialog box appears.
4. Specify a name, optionally, a description for the new role. Click OK.
The new role is now listed in the Roles panel.
Note:
It is recommended that you do not include spaces in Role names.
5. To grant this role to users, groups or application roles, follow the steps in How toGrant Roles .
6. To associate a calendar and its corresponding organization unit with this newrole, in the Calendar section:
a. Select Associate a new calendar rule to an organization unit for theapplication role.
b. From the Calendar list, select the calendar you want to associate with thisnew role.
c. From the Organization Unit list, select the unit that you want to associatewith the calendar you just specified.
Managing Roles in Process Workspace
Managing Your Organization in Process Workspace 10-9

Note:
When a calendar is associated with an organization unit for a role, thiscalendar overrides the calendar associated with the calendar page when theparticular role is used.
10.5.2 How to Specify the Escalation Path for a RoleAn administrator can specify the path an escalated task is to follow.
For more information about the escalation path, see Handling Escalations in ProcessWorkspace.
To specify an escalation path:
1. From the toolbar at the top of the Process Workspace, click Administration.
The Administration Areas page appears in the navigation pane, Roles ishighlighted, and the corresponding information appears in the right pane.
2. If you want to set the escalation path for an existing role, select that role from thelist.
The corresponding information appears in the lower half of the right pane.
If you are creating a new role, click Add a new role and follow the instructions in How to Add New Application Roles. The new role appears in the list, and itscorresponding information appears in the lower half of the right pane.
3. From the list, select either User, Group, or Role. You may also enter or browse for aspecific name.
4. When you have specified the escalation path, click Save.
10.5.3 How to Grant RolesYou can grant roles to, and revoke them from, users, groups, or application roles.
To grant a role to a user, group, or application role:
1. From the Process Workspace toolbar, select Administration.
The Administration Areas panel appears.
2. In the Organization panel, click Roles.
The Roles panel displays a list of the roles you are authorized to administer.
3. Select a role.
The Details panel displays the details for the selected role.
4. In the Members section, click Grant the role to user, group, or role.
5. Specify the parameters of your search, click Search, then select the user, group, orapplication role to whom you want to grant this role.
The Details section for your selection appears.
Managing Roles in Process Workspace
10-10 Managing and Monitoring Processes with Oracle Business Process Management

6. Click OK.
The user or group you specified now appears in the list in the Members section.
7. In the Details panel, click Save.
10.5.4 How to Revoke RolesYou can revoke roles from users, groups, or application roles
To revoke a role from a user, group, or application role:
1. From the Process Workspace toolbar, select Administration.
The Administration Areas panel appears.
2. In the Organization panel, click Roles.
The Roles panel displays a list of the roles you are authorized to administer.
3. Select a role.
The Details panel displays the details for the selected role.
4. In the Members section, click Revoke the role from user, group, or role.
5. Click OK.
The user or group you specified no longer appears in the Members box.
6. In the Details panel, click Save.
Note:
If, during design time, you update a process by removing a member from arole and then re-deploy the process, the member you removed is still listed asa member of that role. This is because permission to remove members fromroles is limited to administrators during runtime.
10.5.5 How to Create and Manage Role-Specific Views and LayoutsFor information about creating a role-specific layout, see Creating and Editing CustomPages in Process Workspace.
10.6 Managing Parametric Roles in Process WorkspaceParametric roles are logical roles created by the administrator. Members of parametricroles are dynamically evaluated at runtime by specifying them as a parameterizedquery.
Parametric roles can be based only on process roles that are created by processdeployment or created by using the Administration panel in Process Workspace. Morespecifically, they can be based on any role defined in the application contextOracleBPMProcessRolesApp that is already seeded and displayed in the Roles section ofthe Administration panel.
Parametric roles define either members of an organization unit or the assignees of atask.
Managing Parametric Roles in Process Workspace
Managing Your Organization in Process Workspace 10-11

10.6.1 Parametric Roles Used for Querying Members of an Organization UnitThese parametric roles are groups of users specified by using a query—for example,all grantees of role InsuranceAgent with expertise in HomeInsurance where expertiseis an extended user property.
The query can contain one or more of the following parts:
• Group membership
• Role membership
• Extended user properties from which users select from a list of pre-defined values
For information about extended user properties, see Managing Extended UserProperties in Process Workspace.
Note:
Deleting an extended user property already in use by an parametric rolecauses an error when administering that role.
10.6.2 Parametric Roles Used in Assigning TasksParametric roles have one or more defined parameters that specify the type of personto whom a task can be assigned—for example, a task can be assigned as a parallel taskto all users belonging to the Western region and whose skillsets include JAVA. Theassignees that are returned by the dynamic parametric role can be used for any type oflist builder—for example, sequential, parallel, or management chain.
The parameter values are defined at design time either as plain values or XPathexpressions.
10.6.3 How to Create a Parametric RolePerform these steps:
To create a parametric role:
1. From the Process Workspace toolbar, click Administration.
The Administration Areas panel appears in the left pane.
2. Select Parametric Role.
The Parametric Role panel appears in the right pane.
3. In the Parametric Role panel, click Create Parametric Role.
This opens an editable Details panel.
4. Enter a name for this parametric role.
5. If you do not want this parametric role to be attached to a task assignee, then skipto Step 6.c.
If you want this parametric role to be attached to a task assignee, then you mustdefine the parameters to specify the assignee.
Managing Parametric Roles in Process Workspace
10-12 Managing and Monitoring Processes with Oracle Business Process Management

To define parameters for a parametric role used in assigning a task:
a. Expand Parameters and click Add Parameter.
An editable table enables you to specify the name and type of the parameteras in the example in Figure 10-5.
b. Define the parameter by specifying the name and type.
c. To add another parameter, click Add Parameter again and repeat.
Figure 10-5 Defining Parameters
Note:
You are not required to use any or all of the parameters that you define.
After a parameter is defined, the role is treated as a parametric role regardlessof whether the defined parameters are used in a query.
6. From the Grantees list, select either Group or Application Roles.
If you select Group specify the name of the group in either of the following ways:
• Enter the name of the group in the text field.
• Click Select Group to begin a search.
The Select Group dialog box appears. Specify your search, or use an asterisk (*)as a wildcard, then click OK.
The group you specified is listed as the grantee of this parametric role.
If you select Application Role:
a. From the Application Role list, select OracleBPMProcessRolesApp.
b. Specify a parameter by entering a dollar sign ($), then selecting from the listthat appears next to the field.
c. Configure the conditions for the inclusion of the grantees.
To do this, from the Add Condition list, select a condition. The listedconditions include the standard LDAP attribute conditions of LDAPrepository. There are 2 condition types listed:
Managing Parametric Roles in Process Workspace
Managing Your Organization in Process Workspace 10-13

• LDAP attribute condition: The LDAP attribute condition appears in titlecase in the condition list.
• Extended User Properties: The extended user properties condition appearsin upper case in the condition list.
d. Click Add Criteria Row and specify the values for each condition.
The values can be any of the following: (1) The application role or group towhich the users must belong, (2) The extended user properties the users mustmatch. You specified the extended user properties in Managing ExtendedUser Properties in Process Workspace, and (3) Any parameters you may havedefined for a parametric role used in assigning a task. When you beginentering a value, precede it with a dollar sign ($). The list of definedparameters appears next to the field as in the example in Figure 10-6.
Figure 10-6 Selecting Defined Parameters as Conditions of Users withParametric Roles
e. After you have selected one or more conditions, the conditions you specifiedappear in the list of users you want to include.
You can then specify the filter for that condition.
7. Click Save.
8. In addition to the standard LDAP attribute condition which is listed by default inthe condition list, adding a condition based on custom LDAP attributes issupported.
For custom LDAP attributes condition additional configuration is to be done fromOracle Enterprise Manager Fusion Middleware Control. To add the custom LDAPattribute condition:
a. Log in to the Oracle Enterprise Manager Fusion Middleware Control(http://<server name>:<port number>/em/)
b. Expand Farm_soainfra, SOA, soa-infra (AdminServer)
c. Navigate to SOA Infrastructure, Administration, System Mbean Browser asshown in Figure 10-7.
Managing Parametric Roles in Process Workspace
10-14 Managing and Monitoring Processes with Oracle Business Process Management

Figure 10-7 Customizing LDAP Attributes in Enterprise Manager
d. Expand Application Defined MBeans, oracle.as.soainfra.config, Server:Admin Server, WorkflowIdentityConfig, human-workflow,WorkflowIdentityConfig.ConfigurationType, jazn.com,WorkflowIdentityConfig.ConfigurationType.ProviderType as shown in Figure 10-8.
Figure 10-8 Viewing Attributes Tab for JpsProvider
e. Click JpsProvider .
The Attributes tab appears on the right pane.
SearchableUserAttributeMap contains the custom attribute mapping a user canadd.
f. Navigate to the Operations tab as shown in Figure 10-9.
Managing Parametric Roles in Process Workspace
Managing Your Organization in Process Workspace 10-15
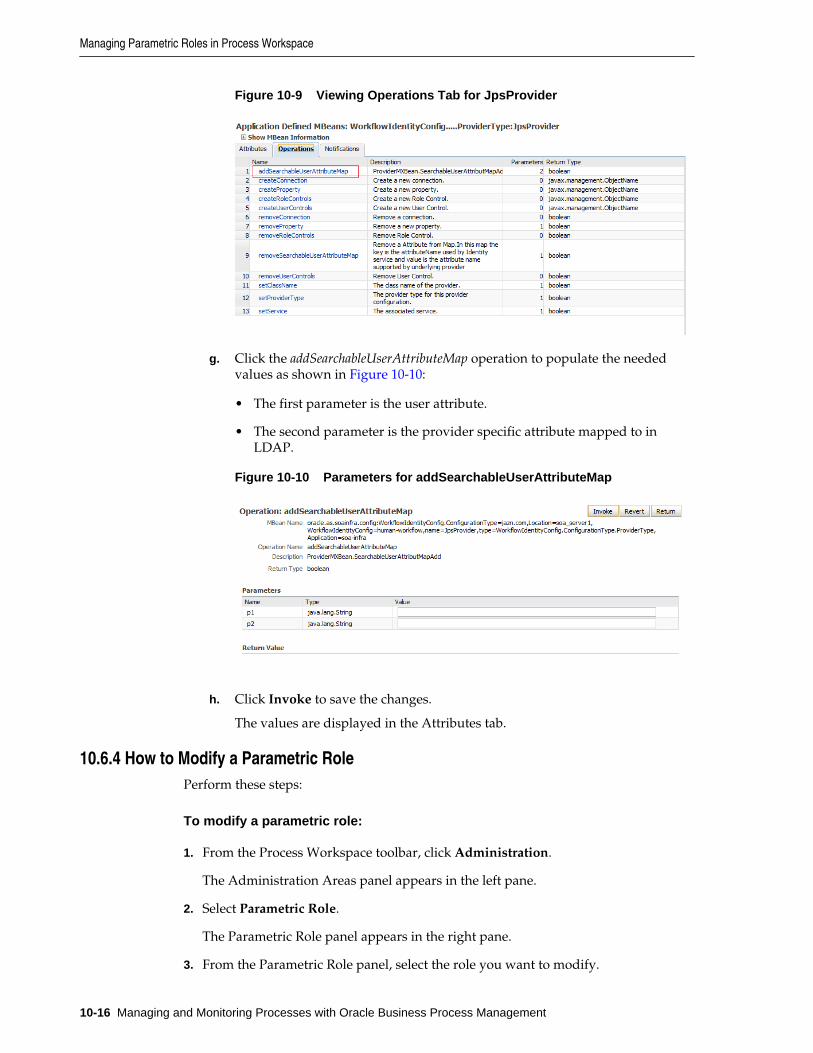
Figure 10-9 Viewing Operations Tab for JpsProvider
g. Click the addSearchableUserAttributeMap operation to populate the neededvalues as shown in Figure 10-10:
• The first parameter is the user attribute.
• The second parameter is the provider specific attribute mapped to inLDAP.
Figure 10-10 Parameters for addSearchableUserAttributeMap
h. Click Invoke to save the changes.
The values are displayed in the Attributes tab.
10.6.4 How to Modify a Parametric RolePerform these steps:
To modify a parametric role:
1. From the Process Workspace toolbar, click Administration.
The Administration Areas panel appears in the left pane.
2. Select Parametric Role.
The Parametric Role panel appears in the right pane.
3. From the Parametric Role panel, select the role you want to modify.
Managing Parametric Roles in Process Workspace
10-16 Managing and Monitoring Processes with Oracle Business Process Management

The Details panel for that role appears to the right.
4. Enter the new values for the role just as you did when you created the role.
See To create a parametric role: for more information.
5. Click Save.
10.6.5 How to Delete a Parametric RolePerform these steps:
To delete a parametric role:
1. From the Process Workspace toolbar, click Administration.
The Administration Areas panel appears in the left pane.
2. Select Parametric Role.
The Parametric Role panel appears in the right pane.
3. From the Parametric Role panel, select the role you want to delete.
The Details panel for that role appears to the right.
4. Click Delete Parametric Role and, when prompted, confirm the deletion.
The Parametric Role is now deleted.
10.7 Managing Extended User Properties in Process WorkspaceExtended user properties are used in defining parametric roles, which are described in Managing Parametric Roles in Process Workspace.
Typically, users have some properties specified in Oracle Internet Directory or someother LDAP directory. Often, however, additional properties specific to theirorganization and roles are necessary. At times, these properties are added on demandwhen newer business processes are created. At that time, it might not be possible toextend the company's global LDAP directory. In these cases, extended user propertiesare useful. For example, you can specify that a given user with the sales representativerole is located in California. Although, from a functional point of view, there is onlyone role, the individual user is associated with a property, and that property has avalue assigned for that user.
Figure 10-11 shows an example of the Extended User Properties page.
Managing Extended User Properties in Process Workspace
Managing Your Organization in Process Workspace 10-17

Figure 10-11 Sample Extended User Properties Page
Extended user properties can be assigned to users, groups, or roles.
When you create extended user properties, you define the following:
• Property name.
• Property type, which can be of the following data types: string, number, date andfree form text. String data types are enumerated values. Free form strings can haveany value.
• Enumeration in case of a string data type.
Note that only string-typed properties can be assigned values at the time ofdefinition and only those values can be assigned to users when the property isassociated with a user.
After properties are defined, they can be associated with any user. During association,values must be assigned to the property for that user
Only users who have Administrator privileges can define new properties.
10.7.1 To Add Extended User PropertiesPerform these steps:
1. From the Process Workspace toolbar, select Administration.
The Administration Areas panel appears.
2. In the Organization panel, click Extended User Properties.
The Extended User Properties page appears in the right pane.
3. In the Properties pane, click Add Property.
Property fields appear in the table. An Extended User Property has the followingfields:
• Name—The name can be any user defined string that is meaningful to the useror the company. Case does not matter. The system converts all names touppercase.
Managing Extended User Properties in Process Workspace
10-18 Managing and Monitoring Processes with Oracle Business Process Management

• Type—The type field is a drop-down list from which the user must select thedata type of the values that the property is expected to hold when it isassociated with various users in the organization.
• Value—The value field is meaningful only when the property is assigned thedata type string because only string typed properties can be assignedenumerations of values. This value can be a comma-delimited list.
For all other data types (number, date, and freeform text) no values can beassigned to the property.
For number, date, and freeform text-typed properties, a value is assigned to theproperty only when the property is associated to a user and the value assigned canbe different for each user.
4. After you specify the property, click Save.
A column for this property appears in the Map Properties pane.
10.7.2 To Modify Extended User PropertiesPerform these steps:
To modify extended user properties:
1. From the Process Workspace toolbar, select Administration.
The Administration Areas panel appears.
2. In the Organization panel, click Extended User Properties.
The Extended User Properties page appears in the right pane.
3. In the Properties pane, select the property you want to edit, then click EditProperty.
The row for that property becomes editable.
4. Enter your changes, then click Save.
10.7.3 To Delete Extended User PropertiesPerform these steps:
To delete extended user properties:
Note:
Deleting an extended user property already in use by an parametric rolecauses an error when administering that role.
1. From the Process Workspace toolbar, select Administration.
The Administration Areas panel appears.
2. In the Organization panel, click Extended User Properties.
The Extended User Properties page appears in the right pane.
Managing Extended User Properties in Process Workspace
Managing Your Organization in Process Workspace 10-19

3. In the Properties pane, select the property you want to delete, then click DeleteProperty.
A Confirm Delete dialog box advises you that deleting a property dissociates thisproperty from and associated user, if any. If you are sure you want to proceed,click Yes.
4. In the Properties pane, click Save.
10.7.4 To Associate Extended User Properties to UsersPerform these steps:
To associate extended user properties to users:
1. To specify the user with whom this property is to be associated, in the MapProperties pane, click Add User.
The User field appears.
2. Specify the user.
You can do this either by entering the user identifier in the field or by clickingSelect User, and, in the Identity Browser window that appears, performing asearch for the user and clicking OK.
3. If the property is a string type, then, in the Map Properties pane, from the columnfor the property, select the property to assign to this user.
If the property is a number, enter the appropriate value in the text field.
Note:
The All check box means that you wish to assign all the values defined on thestring property to a particular user. It does not mean that you are assigning allthe properties defined in the system to the user. The purpose of the All checkbox must be understood in the context that a user can be assigned multiplevalues for a string and a freeform text-typed property. For string-typedproperties the values that you can assign to a user are enumerated at the timeof property definition itself and the All check box enables you to assign all ofthem to a user at once. Freeform text-typed properties do not have any valuesdefined on them. To assign multiple values to a freeform text-typed propertyat the time of associating it to a user, enter the multiple values and separateeach value by a comma.
4. After you map the property to the user, in the Map Properties pane, click Save.
10.8 Managing Organization Units in Process WorkspaceAn organization unit represents departments or divisions within an organization.Organization units can contain child organization units creating a hierarchy thatcorresponds to your organization.
When you create an organization unit, you define the following:
• General parameters - such as the organization unit name, comments and calendar
Managing Organization Units in Process Workspace
10-20 Managing and Monitoring Processes with Oracle Business Process Management

• Members - members of the organization unit, which can include users, groups,application roles, or parametric roles. These can be specifically added using theIdentity Browser, or added based on user attributes.
• Business Constants - links to pre-defined business parameters.
When a process is associated with an organization unit, only members of thatorganization unit and its children can see that process and the tasks initiated by it.
Note:
A manager is not a member of an organization unit by default. The managermust be added to the organization unit in order to see the processes and thetasks within it.
If a process is associated with an organization unit, then the tasks initiated by theprocess can use the business calendar associated with the organization unit. See Managing Calendars in Process Workspace for more information.
10.8.1 To Create an Organization UnitPerform these steps:
To create an organization unit:
1. From the Process Workspace toolbar, select Administration.
The Administration Areas panel appears.
2. Under Organization, click Organization Units.
The Organization Units panel appears.
3. From the Add Organization Unit list, select either Root Organization Unit orChild Organization Unit.
The Create Organization Unit dialog box prompts you for the name of theorganization unit.
4. Enter the name of the organization unit, and click OK.
The new organization unit appears in the Organization Units list as shown in Figure 10-12.
The controls shown in the Members section change depending on whether theAdd member control is set to Manually or Based on user attributes.
Managing Organization Units in Process Workspace
Managing Your Organization in Process Workspace 10-21
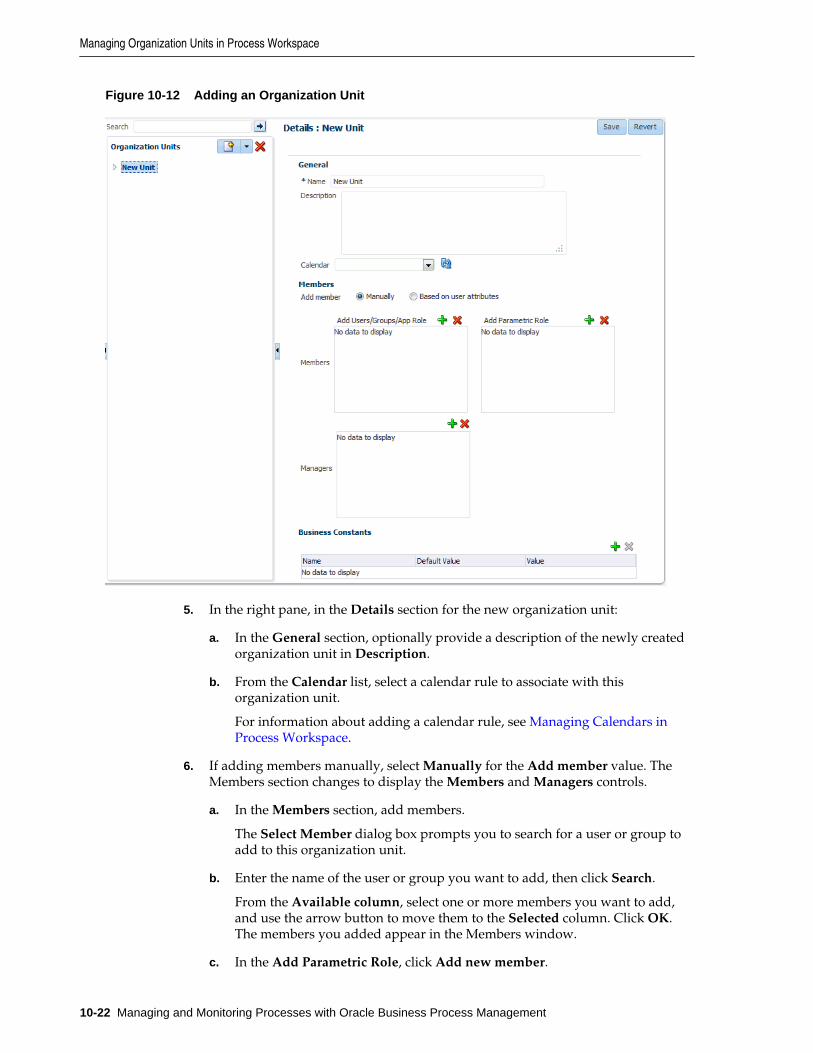
Figure 10-12 Adding an Organization Unit
5. In the right pane, in the Details section for the new organization unit:
a. In the General section, optionally provide a description of the newly createdorganization unit in Description.
b. From the Calendar list, select a calendar rule to associate with thisorganization unit.
For information about adding a calendar rule, see Managing Calendars inProcess Workspace.
6. If adding members manually, select Manually for the Add member value. TheMembers section changes to display the Members and Managers controls.
a. In the Members section, add members.
The Select Member dialog box prompts you to search for a user or group toadd to this organization unit.
b. Enter the name of the user or group you want to add, then click Search.
From the Available column, select one or more members you want to add,and use the arrow button to move them to the Selected column. Click OK.The members you added appear in the Members window.
c. In the Add Parametric Role, click Add new member.
Managing Organization Units in Process Workspace
10-22 Managing and Monitoring Processes with Oracle Business Process Management

The Select Member dialog prompts you to select a parametric role. Click OK.The parametric roles you added appear in the Parametric Role window.
d. Similarly, in the Managers window, click Add new manager.
The Select Manager dialog box prompts you to search for a user or group toadd to this organization unit.
e. Enter the name of the manager you want to add, then click Search.
From the Available column, select one or more managers you want to add,and use the arrow button to move them to the Selected column. Click OK.The managers you added appear in the Managers window.
7. If adding members using a logical search, select Based on user attributes for theAdd member value. The Members section changes to display the Name andEquals controls.
a. Specify a user attribute from the Name drop-down.
b. Specify a search term in the Equals text entry box. Members with the selecteduser attribute matching the search term is added to the organization unit.
8. In the Business Constants area, add any business parameters you want associatedwith the organization unit to act as business constants. Click Add BusinessConstants and select the desired items from the Select Business Parametersdialog box.
9. Click Save.
10.8.2 To Edit an Organization UnitPerform these steps:
To edit an organization unit:
1. From the Process Workspace toolbar, select Administration.
The Administration Areas panel appears.
2. Under Organization, click Organization Units.
The Organization Units panel appears.
3. In the Organization Units panel, select the organization unit you want to edit.
4. In the right pane, in the Details section for the new organization unit, make thechanges you want, then click Save.
10.8.3 To Delete an Organization UnitPerform these steps:
To delete an organization unit:
1. From the Process Workspace toolbar, select Administration.
The Administration Areas panel appears.
Managing Organization Units in Process Workspace
Managing Your Organization in Process Workspace 10-23

2. Under Organization, click Organization Units.
The Organization Units panel appears.
3. In the Organization Units panel, select the organization unit you want to delete,and click Delete Organization Unit, and when prompted, confirm the deletion.
The Organization Unit is now deleted.
Managing Organization Units in Process Workspace
10-24 Managing and Monitoring Processes with Oracle Business Process Management

11Modifying Running Process Instances in
Oracle Business Process ManagementWorkspace
Process owners and Oracle Business Process Management Workspace (ProcessWorkspace) administrators can alter the flow of running process instances in ProcessWorkspace. They can also migrate instances in Process Workspace.
This chapter includes the following sections:
• Altering the Flow of Running Process Instances in Process Workspace
• Migrating Process Instances in Process Workspace
• What You May Need to Know About Redeploying a Process
• Moving Running Composite Instances from One Revision to Another
11.1 Altering the Flow of Running Process Instances in ProcessWorkspace
You can move the token of a running process instance from a current activity toanother, but only within the following structural constraints:
• You can move an instance only to an activity defined at the same process level.
• You cannot move an instance to a boundary event.
• You cannot move an instance into a boundary event flow unless the boundaryevent is interrupting and is defined at the same level.You cannot move an instanceinside or outside an event subprocess.
• You cannot move an instance outside a gateway branch. You can, however, move itto the merging gateway to merge that path.
Note:
When using an exclusive gateway, you can move the instance outside theexclusive gateway branch.
11.1.1 How to Alter the Flow of Running Process Instances in Process WorkspacePerform these steps:
Modifying Running Process Instances in Oracle Business Process Management Workspace 11-1

To alter the flow of a running process instance:
1. From the Process Tracking tab page, select a process instance.
The details of that instance appear.
2. From the Actions list, select Alter Flow and Suspend.
If you select a single process instance, then the Alter Flow dialog box appears asshown in the example in Figure 11-1.
Figure 11-1 Altering the Flow of a Process Instance
By default, the Alter Flow dialog box shows only the Process and Project dataattributes. When you select one of the open activities, it shows the data objectswithin the context of that open activity. For example, if the open activity is asubprocess, then the Alter Flow dialog box displays any subprocess level dataobjects.
3. In the Alter Flow dialog box, you can do any or all of the following:
• View the list of current activities in a running process instance in the OpenActivities table.
You can select the new activity where you want to move the token. Note thatthe New Activity list includes only those locations to which a token can bemoved validly.
• Include the correlation keys in the list of data objects as shown in Figure 11-1.The correlation keys are visible only if the process is using correlation.
To do this, select Show correlation key. If you select a correlation key, then thedetails section shows the correlation property that comprises the key. To resetthe correlation key, select Reset correlation key.
For information about correlation keys, see Oracle Fusion Middleware DevelopingBusiness Processes with Oracle Business Process Management Studio.
Altering the Flow of Running Process Instances in Process Workspace
11-2 Managing and Monitoring Processes with Oracle Business Process Management

• Include process instance attributes in the list of data objects as shown in Figure11-1.
To do this, select Show instance attributes. To display the details of a particularinstance attribute, select the attribute. Note that only those instance attributesthat can be modified appear as editable. Others are read-only.
• Add any comments in the Comments field.
4. Click one of the following:
• Resume to move the token to another activity and return the process to arunning state.
• Save to suspend the process instance. You can return to it later to alter its flowand resume it.
• Cancel to return the process instance to its last saved state. The processcontinues in the running state.
Note:
• If you have opened the Alter Flow dialog box and the session times outbefore you have taken any action, then the process instance is suspended.
• If an activity has more than one running token associated with it, youcannot alter the flow to select and move just one of the tokens to anothervalid target activity. If you alter the flow for that open activity, then all thetokens move.
• The process instance state may not update to show the new state. ClickRefresh in the table toolbar to see the updated state.
11.2 Migrating Process Instances in Process WorkspaceIf a new implementation of the same composite revision is deployed, and thepreviously deployed composite has some components with the newer BPM processdefinition, then the affected components go into a suspended state. To resume asuspended component, either migrate or suspend process instances that are in thepending migration state.
Unless you resume the component—either explicitly or automatically when allpending migration instance are resumed—the new process instances are not created asa result of the token having been moved.
Oracle BPM provides a way to retain the existing running instances for a process whenthat process is redeployed. To do this, while redeploying the process in FusionMiddleware Control Console, select Keep running instances. If the redeploymentsucceeds, then the instance goes into pending migration state and the processcomponent is suspended.
Migrating Process Instances in Process Workspace
Modifying Running Process Instances in Oracle Business Process Management Workspace 11-3
Note:
If the composite being redeployed has more than 100 existing instances, only100 are migrated during the redeployment and the component is suspended.This limit is used to minimize the deployment time.
To migrate the rest of the instances, use Process Management APIs or ProcessWorkspace.
This section details how to migrate a pending migration instance and how to resume asuspended component.
It contains these topics:
• How to Migrate a Process Instance in Process Workspace
• How to Resume a Suspended Component
Note:
When migrating an environment prior to 11g Release 1 (11.1.1.5.0 FeaturePack), allow any existing active task instances to complete before migrating.
Active task instances in this scenario have their states changed to STALEduring the migration.
11.2.1 How to Migrate a Process Instance in Process WorkspaceYou can migrate a process instance in either of two ways:
• Migrate as is: Migrate the instance without moving the token or updating thepayload
• Make changes and migrate: Move the token to the new activity you specify, andupdate the payload as you specify, then migrate the instance
To migrate process instances:
1. Select one or more process instances. From the Actions list, select Migrate.
The Migrate dialog box appears. The elements in this dialog box depend on yourselection. If you select Migrate as is, then only the Comments field is available. Ifyou select a single instance and then select Make changes and migrate, then theMigrate dialog box appears as shown in Figure 11-2.
Migrating Process Instances in Process Workspace
11-4 Managing and Monitoring Processes with Oracle Business Process Management
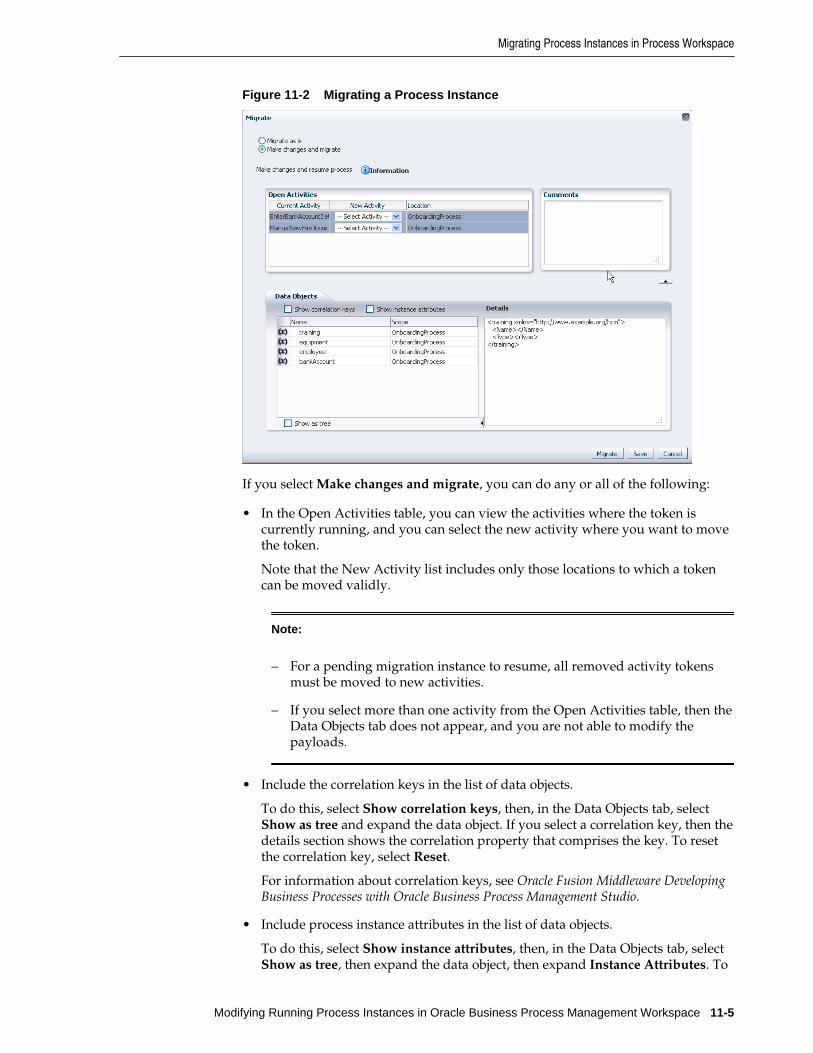
Figure 11-2 Migrating a Process Instance
If you select Make changes and migrate, you can do any or all of the following:
• In the Open Activities table, you can view the activities where the token iscurrently running, and you can select the new activity where you want to movethe token.
Note that the New Activity list includes only those locations to which a tokencan be moved validly.
Note:
– For a pending migration instance to resume, all removed activity tokensmust be moved to new activities.
– If you select more than one activity from the Open Activities table, then theData Objects tab does not appear, and you are not able to modify thepayloads.
• Include the correlation keys in the list of data objects.
To do this, select Show correlation keys, then, in the Data Objects tab, selectShow as tree and expand the data object. If you select a correlation key, then thedetails section shows the correlation property that comprises the key. To resetthe correlation key, select Reset.
For information about correlation keys, see Oracle Fusion Middleware DevelopingBusiness Processes with Oracle Business Process Management Studio.
• Include process instance attributes in the list of data objects.
To do this, select Show instance attributes, then, in the Data Objects tab, selectShow as tree, then expand the data object, then expand Instance Attributes. To
Migrating Process Instances in Process Workspace
Modifying Running Process Instances in Oracle Business Process Management Workspace 11-5

display the details of a particular instance attribute, select the attribute. Notethat only those instance attributes that can be modified appear as editable.Others are read-only.
• Add any comments in the Comments field.
2. Click one of the following:
• Save to keep the process in the pending migration state.
• Migrate to migrate the process and put it in the running state.
• Cancel to return the process instance to its last saved state.
If for some reason the migration fails, then the Migration Confirmation dialog box tellsyou why, as shown in Figure 11-3.
Figure 11-3 Migration Confirmation: Failure Message
11.2.2 How to Resume a Suspended ComponentAll suspended components are listed in the Pending Components panel, as shown inthe example in Figure 11-4.
Migrating Process Instances in Process Workspace
11-6 Managing and Monitoring Processes with Oracle Business Process Management

Figure 11-4 Pending Components Panel in the Process Tracking Tab Page
To resume a suspended component:
1. From the Pending Components panel, select the component you want to resume.
The Resume Component dialog box appears as shown in the example in Figure11-5. It tells you how many instances are pending migration for that component.
Figure 11-5 Resume Component Dialog Box
2. In the Resume Component dialog box, choose whether you want the pendingmigration process instances to be:
• Migrated as is
• Suspended
If there are instances that cannot be migrated-as-is, and you want to resume thecomponent, then select Leave non-migrated instances as suspended. If you do not
Migrating Process Instances in Process Workspace
Modifying Running Process Instances in Oracle Business Process Management Workspace 11-7

select this option, and there are instances that cannot be migrated as-is, then thecomponent cannot be resumed.
3. Click Resume.
The component is resumed and it no longer appears in the Pending Componentspanel. A Resume Component Confirmation dialog box tells you the result and howmany instances are suspended. A new process instance can now be initiated and itsrequests are processed.
Note:
You can initiate a process instance even if a component is suspended. In thiscase, however, the requests are queued and are not processed until thecomponent is resumed.
11.3 What You May Need to Know About Redeploying a ProcessIf you are redeploying a process, and, during design time, the Keep running instanceoption is selected, then redeployment fails in the following scenarios:
• Parallel or inclusive gateway pair is removed
• Inclusive-complex gateway pair is changed to inclusive-inclusive gateway pair
• Subprocess is removed or its loop characteristic is changed
• User task is moved to another branch in gateway pair or outside the gateway pair
• Activity level is changed, for example, the activity is moved inside a subprocess orgateway structure
• Subprocess or event subprocess or a call activity is added
• Event subprocess is changed from interrupting to non-interrupting
• Boundary event is changed from interrupting to non- interrupting
• Boundary event is added
• User task implementation is changed to use another human task
To avoid failure of process redeployment in these scenarios, set the force.deployflag manually by editing the composite.xml file in Oracle JDeveloper.
Note:
Ensure that the change to the workflow is compatible with the process, beforeyou set the force.deploy flag. If the change to the workflow is notcompatible with the process, the deployment process fails and the componentis suspended. Resume the suspended component.
To set force.deploy at the component level, enter the following:
<component name="T4"> <property name="oracle.bpm.bpmn.force.deploy">true</property>
What You May Need to Know About Redeploying a Process
11-8 Managing and Monitoring Processes with Oracle Business Process Management

<implementation.bpmn src="processes/T4.bpmn"/></component>
To set the force.deploy at the composite level, you can use the same .xml elementas a child of the composite element as shown in the example in Figure 11-6.
Figure 11-6 Setting the force.deploy Property in Oracle JDeveloper
11.4 Moving Running Composite Instances from One Revision to AnotherInstance Migration enables you to migrate selected composite instances betweenexisting compatible composite revisions or from an existing revision to a new revision.Compatibility is driven by the component compatibility within a composite. Aftermigration is complete, the instance audit trail is visible under the new compositerevision.
In contrast to Instance Patching, migration is not a part of deployment. It is a separateactivity accomplished through Ant tasks and xml files that provide declarativespecification of what instances migrate and what actions should be taken (for example,data and flow updates). You can select which instances to migrate.
This section discusses Instance Migration and includes the following topics:
• Important Considerations
• How to Perform a Migration
• Restrictions for Components
• Ant Tasks Elements
• Migration Elements
Moving Running Composite Instances from One Revision to Another
Modifying Running Process Instances in Oracle Business Process Management Workspace 11-9

11.4.1 Important ConsiderationsThese are important considerations you must take into account before performing amigration:
• The same constraints apply when migrating as when performing instance patching.
For example, you cannot move tokens to a non-interrupting boundary event.
• During migration, composite revision of a source instance is suspended soinstances of that revision do not process incoming requests.
• This feature is implemented by using Ant commands.
These commands require the following artifact that is part of your installation:
/AS11gR1SOA/bin/ant-composite-instance-migration.xml.
Note that this artifact requires wlfullclient.jar in the following directory:
$FMW_HOME/wlserver_10.3/server/lib
To generate the Oracle WebLogic Server client library:
cd $fmw.home/wlserver_10.3/server/libjava -jar wljarbuilder.jar
11.4.2 How to Perform a MigrationThis section provides an overview of the steps you must perform to migrate aninstance. The steps involved in migrating an instance are:
1. Identify the scope of instances to be migrated and create the composite filter tospecify them.
2. Run the migration feasibility report for the specified instances and review theoutput.
The output report includes which instances can be automatically migrated, whichrequire a plan to accomplish the migration (for example, an active activity wasremoved), and which instance cannot be migrated.
3. Develop the migration plan.
4. Run the migration and review the output.
11.4.3 Restrictions for ComponentsThe composite compatibility depends on the components defined inside thecomposite. If the change to any component is not compatible, then the composite is noteligible for instance migration. Only compatible changes in BPEL, BPMN, HumanWorkflow, and Business Rules are accepted. Changes in any other components makethe composite ineligible for instance migration.
This section describes the restrictions you must consider for each component. Itincludes the following topics:
• BPEL Components
• BPMN Components
Moving Running Composite Instances from One Revision to Another
11-10 Managing and Monitoring Processes with Oracle Business Process Management

• Human Task Components
• Business Rules Components
• Mediator Components
11.4.3.1 BPEL Components
The only eligible BPEL component for migration is sync process. The syncprocess does not include a durable activity like HumanTask, Wait, or Receive.
For sync process instances, BPEL changes the revision for all the completed instancesthat are part of a running composite instance.
Any other BPEL process is not compatible for instance migration.
11.4.3.2 BPMN Components
The following changes to BPMN components are compatible with automatic instancemigration:
• Add Script task
• Change data associations
• Add new data object
• Add any new activities except boundary events
The following changes to BPMN components are compatible with manual instancemigration using migration plans:
• Removal of an activity except for sub process, boundary event and merging gateways
The following changes are not compatible with instance migration:
• Delete Gateway (except Exclusive)
• Delete Subprocess
• Update Human Task implementation
• Update Subprocess Loop Characteristics
• Add a Boundary Event
• Update Boundary Event interrupting to non-interrupting
• Add an Event Subprocess
• Update Event Subprocess interrupting to non-interrupting
• Update Activity level (Move an activity inside a Subprocess or Gateway structure)
• Contains Call Activity
11.4.3.3 Human Task Components
Human workflow supports moving instances for all running and completed humantasks. A human task stores the routing slip after initiating the task, so the taskmetadata change does not affect the running task.
Moving Running Composite Instances from One Revision to Another
Modifying Running Process Instances in Oracle Business Process Management Workspace 11-11
11.4.3.4 Business Rules Components
There are no restrictions for Business Rules Components because the migration isexecuted synchronously.
11.4.3.5 Mediator Components
The following restrictions apply to Mediator components:
• Routing Rules: the older revision of Mediator must have only sequential routingrules.
• Mediator Instance State: the Mediator instance must be completed or faulted.
• Message Patterns: the supported message patterns are request only or requestresponse.
11.4.4 Ant Tasks ElementsThe elements of the Ant Tasks are (see Figure 11-7):
• CompositeInstanceFilter: specifies the criteria to migrate the instance anddefines the scope of the migration. This scope is determined by filtering compositeinstances based on:
– compositeDN
– domainName
– compositeName
– revision
– label
– ecid
– conversationId
– compositeInstanceId
– tenantId
– title
– maxCreationDate
– minCreationDate
– maxModifyDate
– minModifyDate
– like
– pageStart
– pageSize
Moving Running Composite Instances from One Revision to Another
11-12 Managing and Monitoring Processes with Oracle Business Process Management

• Task to run feasibility report: The results are Not Possible, Automatic, or Manual.You can review the report and change the criteria to reduce or remove some of theinstances from the migration by modifying the CompositeInstanceFilter.
• Task to run migration.
Figure 11-7 Example of Ant Task
11.4.5 Migration ElementsThe migration elements are:
• Migration Report: describes the feasibility of migrating the proposed compositeinstances. The migration report includes:
– Composite Instance Details
◆ Name: Component instance name
◆ ID: Component instance Id
◆ State: Composite instance state
◆ Migrate-ability: Automatic, Migration Plan required (and the requiredchange plan, where applicable)
◆ Component Instance Data: Associated component instance details
– Summary Data:
◆ The target revision
◆ Total number of matching composite instances
Moving Running Composite Instances from One Revision to Another
Modifying Running Process Instances in Oracle Business Process Management Workspace 11-13

◆ Number of composite instances that can be automatically migrated
◆ Number of composite instances that cannot be automatically migrated
• Migration Result: describes the outcome of migrating composite instances:
• Migration Plan: provides the XML description of what to do with non-trivialcomposite or component changes. The migration plan is based on theMigrationPlan XML schema.
Migration Plan objects are created using MigrationPlanFactory.
Note:
For more information on instance migration, navigate to the BPM Suite 11gSamples Web page [http://java.net/projects/oraclebpmsuite11g/pages/Samples] and review the demo samples listed. For a detaileddescription of the samples, download the PDFs available for each sample.
Moving Running Composite Instances from One Revision to Another
11-14 Managing and Monitoring Processes with Oracle Business Process Management

Part IIIAppendices
This part includes the following appendices:
• Creating Custom ADF Applications with Oracle Business Process ManagementWorkspace Task Flows
• Customizing a Resource Bundle
• Customizing Applications in Process Workspace and the Worklist Application
• Deploying Images and JAR files as Part of a Shared Library JAR file


ACreating Custom ADF Applications withOracle Business Process Management
Workspace Task Flows
Different features available in Oracle Business Process Management Workspace(Process Workspace) are exposed as standalone reusable components, called taskflows. This appendix provides basic information about the features in each task flow.
You can embed task flows in any Oracle Application Development Framework (ADF)application. These standalone task flows provide many parameters that enable you tobuild customized applications. All the task flows are bundled in an ADF library thatyou can include in the application in which you are embedding.
Later, in Samples: Customizing ADF Applications with Process Workspace TaskFlows, a sample task flow using TaskListTaskFlow shows detailed steps forembedding the task flow in the application as well as customizing, deploying, andrunning it.
This appendix contains the following sections:
• User-Related Task Flows
• Process Task Flows
• Process Analytics Task Flows
• .JAR files for the Task Flows
• Samples: Customizing ADF Applications with Process Workspace Task Flows
• Sample: Wf_client_config.xml File
• Sample: Bean Returning WorkflowServicesClientConfigurationType Object
Note:
This appendix assumes that you are familiar with both Oracle ApplicationDevelopment Framework and security.
A.1 User-Related Task FlowsThis section contains the following topics:
• Task List Task Flow
• Certificates Task Flow
A-1
• Reports Task Flow
• Application Preferences Task Flow
• Flex Fields Task Flow
• Rules Task Flow
A.1.1 Task List Task Flow
The task flow takes in the parameters to control how the embedded region displays.This section discusses the following parameters:
• federatedMode
• federatedServers
• showServerColumn
• wfCtxID
A.1.1.1 federatedMode
If you set this parameter to true, then the task list is shown in the federated mode. Forthe task flow to run in federated mode, you must pass the list of federated servers tothe task flow. For instructions about how to pass a list of federated servers to the taskflow, see federatedServers.
A.1.1.2 federatedServers
To pass the federated servers list to the task flow, do one of the following:
• Provide the client configuration file, wf_client_config.xml, in the class path.The class path is either APP-INF\classes\wf_client_config.xml at the earlevel or the WEB-INF\classes of the web application. The client configurationfile contains all federated server details.
For a sample wf_client_config.xml file, see Sample: Wf_client_config.xmlFile.
• Construct a JAXB object that contains the federated servers list. This JAXB objectcan be passed to the task flow through the federatedServers parameter. The objectshould be returned by a backing bean method.
For a sample bean with the method returning theWorkflowServicesClientConfigurationType object, see Sample: BeanReturning WorkflowServicesClientConfigurationType Object.
If you provide both the client configuration file wf_client_config.xml and theJAXB object to the task flow, the JAXB object takes precedence.
A.1.1.3 showServerColumn
If the task flow is run in federated mode, the server column in the task list is notshown by default. To show the server column in the task list, this parameter must bepassed as "true".
A.1.1.4 wfCtxID
This is a workflow context token string. It is used to create workflow context inside thetask flow.
A-2 Managing and Monitoring Processes with Oracle Business Process Management
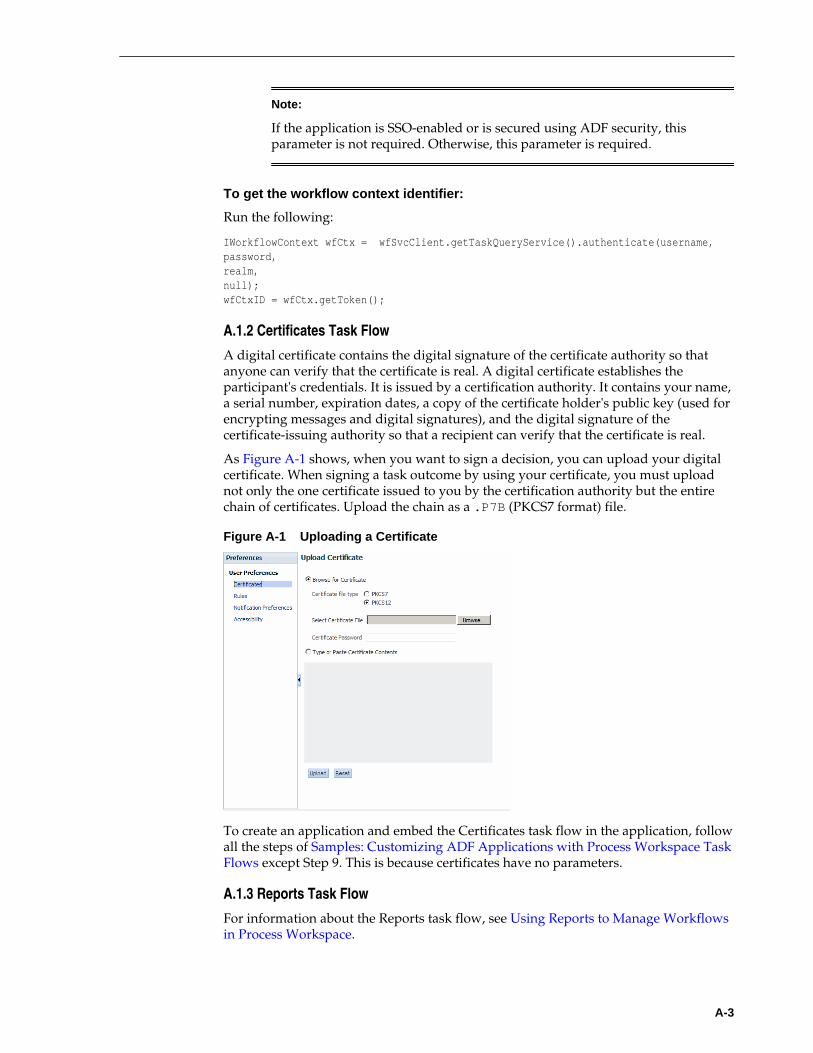
Note:
If the application is SSO-enabled or is secured using ADF security, thisparameter is not required. Otherwise, this parameter is required.
To get the workflow context identifier:
Run the following:
IWorkflowContext wfCtx = wfSvcClient.getTaskQueryService().authenticate(username,password,realm,null);wfCtxID = wfCtx.getToken();
A.1.2 Certificates Task Flow
A digital certificate contains the digital signature of the certificate authority so thatanyone can verify that the certificate is real. A digital certificate establishes theparticipant's credentials. It is issued by a certification authority. It contains your name,a serial number, expiration dates, a copy of the certificate holder's public key (used forencrypting messages and digital signatures), and the digital signature of thecertificate-issuing authority so that a recipient can verify that the certificate is real.
As Figure A-1 shows, when you want to sign a decision, you can upload your digitalcertificate. When signing a task outcome by using your certificate, you must uploadnot only the one certificate issued to you by the certification authority but the entirechain of certificates. Upload the chain as a .P7B (PKCS7 format) file.
Figure A-1 Uploading a Certificate
To create an application and embed the Certificates task flow in the application, followall the steps of Samples: Customizing ADF Applications with Process Workspace TaskFlows except Step 9. This is because certificates have no parameters.
A.1.3 Reports Task Flow
For information about the Reports task flow, see Using Reports to Manage Workflowsin Process Workspace.
A-3
To create an application and embed the Reports task flow in the application, follow allthe steps of Samples: Customizing ADF Applications with Process Workspace TaskFlows except Step 9. This is because Reports have no parameters.
A.1.4 Application Preferences Task Flow
For information about the Application Preferences task flow, see Setting the Display ofthe Work Items Panel in Process Workspace.
To create an application and embed the Application Preferences task flow in it, followall the steps of Samples: Customizing ADF Applications with Process Workspace TaskFlows except Step 9. This is because application preferences have no parameters.
A.1.5 Flex Fields Task Flow
For information about the Flex Fields task flow, see Managing Mapped Attributes(Flex Fields) in Process Workspace.
To create an application and embed the Flex Fields task flow in it, follow all the stepsof Samples: Customizing ADF Applications with Process Workspace Task Flowsexcept Step 9. This is because flex fields have no parameters.
A.1.6 Rules Task Flow
For information about the Rules task flow, see How to Create User Rules in ProcessWorkspace.
The showOtherUsersRules parameter takes a Boolean value. When it is passed asTrue, other users rules are displayed; when it is passed as False, other user rules arenot shown. In addition, this user must have the required permission to view other userrules.
To create an application and embed the Rules task flow in it, follow all the steps of Samples: Customizing ADF Applications with Process Workspace Task Flows exceptStep 9. This is because rules fields have no parameters.
A.2 Process Task FlowsThis section contains the following topics:
• Process Application Task Flow
• Process Instances Task Flow
• Process Instance Details Task Flow
A.2.1 Process Application Task Flow
The applications available in Process Workspace depend on the process design and theroles assigned to the user currently logged in. The list of applications available alsodepends on the BPM processes that are deployed and running. The applications panelis empty if no processes are running, or if the user is not able to execute an applicationin any of the processes currently running. Figure A-2 shows the location of theApplications panel in Process Workspace.
A-4 Managing and Monitoring Processes with Oracle Business Process Management

Figure A-2 Applications Panel
Table A-1 Process Applications Task Flow
Field Description
Task Flow definition file: processApplicationsTaskflow.xml
Description: Renders the list of applications available to the user, that is, the list of tasks that,when executed, creates instances in the different deployed processes.
Arguments: None.
A.2.2 Process Instances Task Flow
Table A-2 Process Instances Task Flow
Field Description
Task Flow definition file: processInstancesTaskflow.xmll
Description: Renders the list of instances corresponding to a certain view (by default, Inbox view)in a table format. The columns that this table show are defined by the presentationassociated to the selected view, which can be edited from here. It also providessearch capabilities.
Arguments: viewId: specifies the view that is rendered initially. By default, Inbox is assumed.
A.2.3 Process Instance Details Task Flow
Table A-3 Process Instances Task Flow
Field Description
Task Flow definition file: processInstanceDetailTaskflow.xmll
A-5

Table A-3 (Cont.) Process Instances Task Flow
Field Description
Description: Renders the instance details, including open activities, audit trail (both tabular andgraphical), comments and attachments.
Arguments: instanceId: Task Flow renders the details associated to this instance ID.
A.3 Process Analytics Task FlowsThis section contains the following topics:
• Dashboard Widget Task Flow
• Application Roles Task Flow
• Organization Units Task Flow
• Parametric Roles Task Flow
• Business Calendar and Holiday Lists Task Flow
• Extended User Properties Task Flow
A.3.1 Dashboard Widget Task Flow
Table A-4 Dashboard Widget Task Flow
Field Description
Task Flow definition file: widgetTaskflow.xml
Description: Renders a widget, that is, a graph displaying information stored in Cubes. Thiswidget could be one of the out of the box ones (like Workload per Participant,Performance per Process, and so on) or a custom one.
Arguments: widgetId: The ID of the widget that is rendered.
showSelector: A Boolean value (true/false) stating whether the task flow rendersa drop-down listing all available widgets, so that the user can select and change fromone widget to other.
A-6 Managing and Monitoring Processes with Oracle Business Process Management

Figure A-3 Process Performance Dashboard
A.3.2 Application Roles Task Flow
Application Roles task flow displays the list of application roles defined in the systemfor application context OracleBPMProcessRolesApp. The user can search forapplication roles, select a role and add members (users, groups or other roles) to it oreven define business calendar-organization unit mappings for the role.
Figure A-4 shows the Roles Detail Panel.
Figure A-4 Role Details Panel
A-7
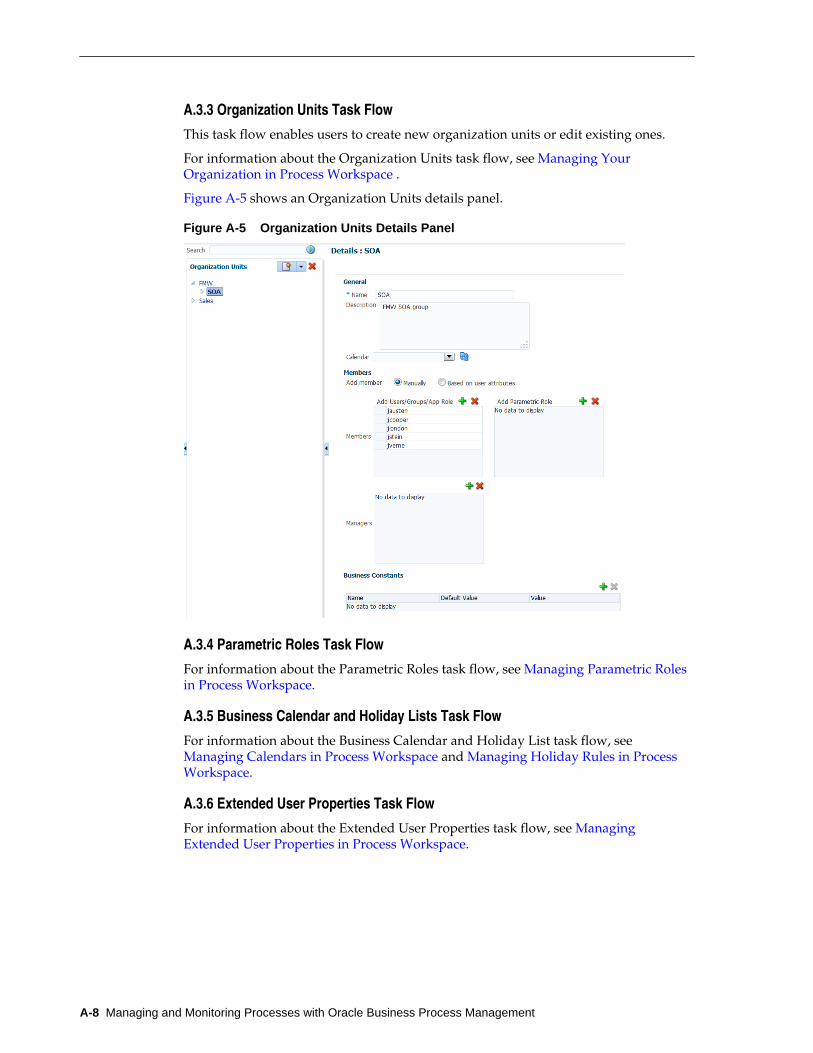
A.3.3 Organization Units Task Flow
This task flow enables users to create new organization units or edit existing ones.
For information about the Organization Units task flow, see Managing YourOrganization in Process Workspace .
Figure A-5 shows an Organization Units details panel.
Figure A-5 Organization Units Details Panel
A.3.4 Parametric Roles Task Flow
For information about the Parametric Roles task flow, see Managing Parametric Rolesin Process Workspace.
A.3.5 Business Calendar and Holiday Lists Task Flow
For information about the Business Calendar and Holiday List task flow, see Managing Calendars in Process Workspace and Managing Holiday Rules in ProcessWorkspace.
A.3.6 Extended User Properties Task Flow
For information about the Extended User Properties task flow, see ManagingExtended User Properties in Process Workspace.
A-8 Managing and Monitoring Processes with Oracle Business Process Management

A.4 .JAR files for the Task Flows
Table A-5 JAR Files for Task Flows
JAR File Location
adflibTaskListTaskFlow.jar $FMW_HOME/Oracle_WC1/soa/modules/oracle.bpm.spaces_11.1.1
oracle.bpm.workspace-adflib.jar
This .jar file is packaged only with a Process Spaces installation. Itincludes the following libraries that you must specify in your customADF application:
• adf.oracle.domain• oracle.bpm.runtime• oracle.bpm.client• oracle.soa.workflow.wc• oracle.bpm.webapp.common• oracle.bpm.workspace• oracle.bpm.projectlib
adflibWorkspaceTaskFlows.jar
$FMW_HOME/AS11gR1SOA/soa/modules/oracle.soa.worklist_11.1.1
A.5 Samples: Customizing ADF Applications with Process Workspace Task FlowsThis section contains the following topics:
• Sample 1: Creating an Application with an Embedded Tasklist Task Flow
• Sample 2: Creating an ADF Page with Task Flows
A.5.1 Sample 1: Creating an Application with an Embedded Tasklist Task Flow
The sample explains how to create an application and embed the TaskList task flow init.
Use these same steps to create a new sample.
To embed the Tasklist task flow in your application:
1. Create a new Fusion Web Application in Oracle JDeveloper and name itTaskListTaskFlowSample as shown in Figure A-6.
A-9
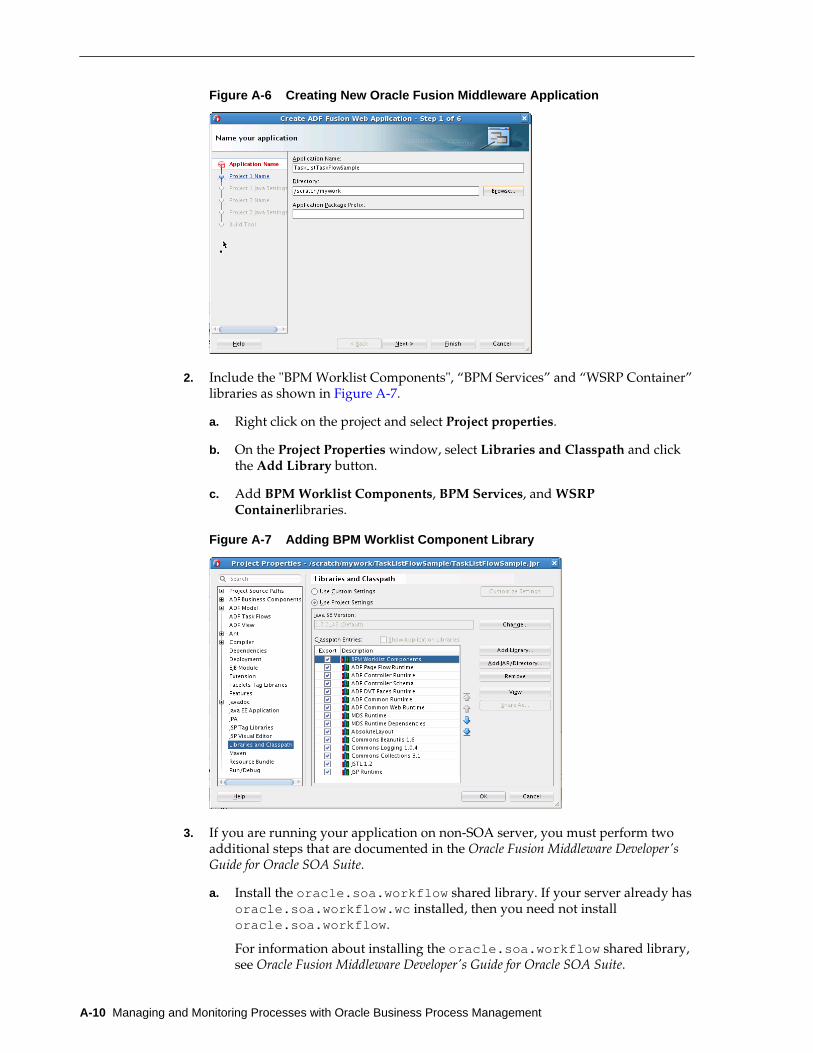
Figure A-6 Creating New Oracle Fusion Middleware Application
2. Include the "BPM Worklist Components", “BPM Services” and “WSRP Container”libraries as shown in Figure A-7.
a. Right click on the project and select Project properties.
b. On the Project Properties window, select Libraries and Classpath and clickthe Add Library button.
c. Add BPM Worklist Components, BPM Services, and WSRPContainerlibraries.
Figure A-7 Adding BPM Worklist Component Library
3. If you are running your application on non-SOA server, you must perform twoadditional steps that are documented in the Oracle Fusion Middleware Developer'sGuide for Oracle SOA Suite.
a. Install the oracle.soa.workflow shared library. If your server already hasoracle.soa.workflow.wc installed, then you need not installoracle.soa.workflow.
For information about installing the oracle.soa.workflow shared library,see Oracle Fusion Middleware Developer's Guide for Oracle SOA Suite.
A-10 Managing and Monitoring Processes with Oracle Business Process Management

b. Configure foreign JNDI on the non-SOA server.
For information about configuring a foreign JNDI on the non-soa server, see Oracle Fusion Middleware Programming JNDI for Oracle WebLogic Server.
4. Create a JSPX file testSample.jspx as shown in Figure A-8.
Figure A-8 Creating a a JSPX File
5. Choose adflibTaskListTaskFlow.jar from the component palette.
It contains the list of all the Task Flows as shown in Figure A-9.
A-11

Figure A-9 Choosing adflibTaskListTaskFlow.jar
6. Drag and drop one of the Task Flow onto the JSPX page as a region.
Figure A-10 shows, by way of example, the TaskListTaskFlow being dropped ontothe JSPX page as a region.
Figure A-10 Oracle JDeveloper with TaskList Task Flow on the JSPX Test Page
A-12 Managing and Monitoring Processes with Oracle Business Process Management

When you drag a task flow onto a JSPX page, a popup shows a list of the availableparameters.
The Edit Task Flow Binding dialog box appears.
7. In the Edit Task Flow Binding dialog box, pass the task flow parameters as shownin Figure A-11.
Figure A-11 Passing Task Flow Parameters
Create the following entry in testSamplePagedef.xml.
<taskFlow id="taskListtaskflowdefinition1"taskFlowId="/WEB-INF/taskList-task-flow-definition.xml#taskList-task-flow-definition"xmlns="http://xmlns.oracle.com/adf/controller/binding"> <parameters>
<parameter id="federatedMode" value="true" xmlns="http://xmlns.oracle.com/adfm/uimodel"/>
<parameter id="showServerColumn" value="true" xmlns="http://xmlns.oracle.com/adfm/uimodel"/>
</parameters></taskFlow>
Note:
Set the federatedMode value according to your needs. See how to use taskflow in federatedMode.
8. Open and edit the WAR deployment profile. To do this:
a. Right-click ViewController.
A-13

b. Select Deployment.
c. Select WAR File.
d. Click Edit.
e. Check adflibTaskListTaskFlow.jar,adflibWorklistComponents.jar and wsrp-container.jar.
Figure A-12 shows an edited WAR deployment profile.
Figure A-12 Editing the WAR Deployment Profile
9. Secure the application using ADF Security by navigating to Secure thenConfigure ADF Security… from the application-level menu as shown in FigureA-13.
A-14 Managing and Monitoring Processes with Oracle Business Process Management

Figure A-13 Navigating to Secure the Application
The Enable ADF Security dialog box appears.
10. Select ADF Authentication as shown in Figure A-14.
A-15
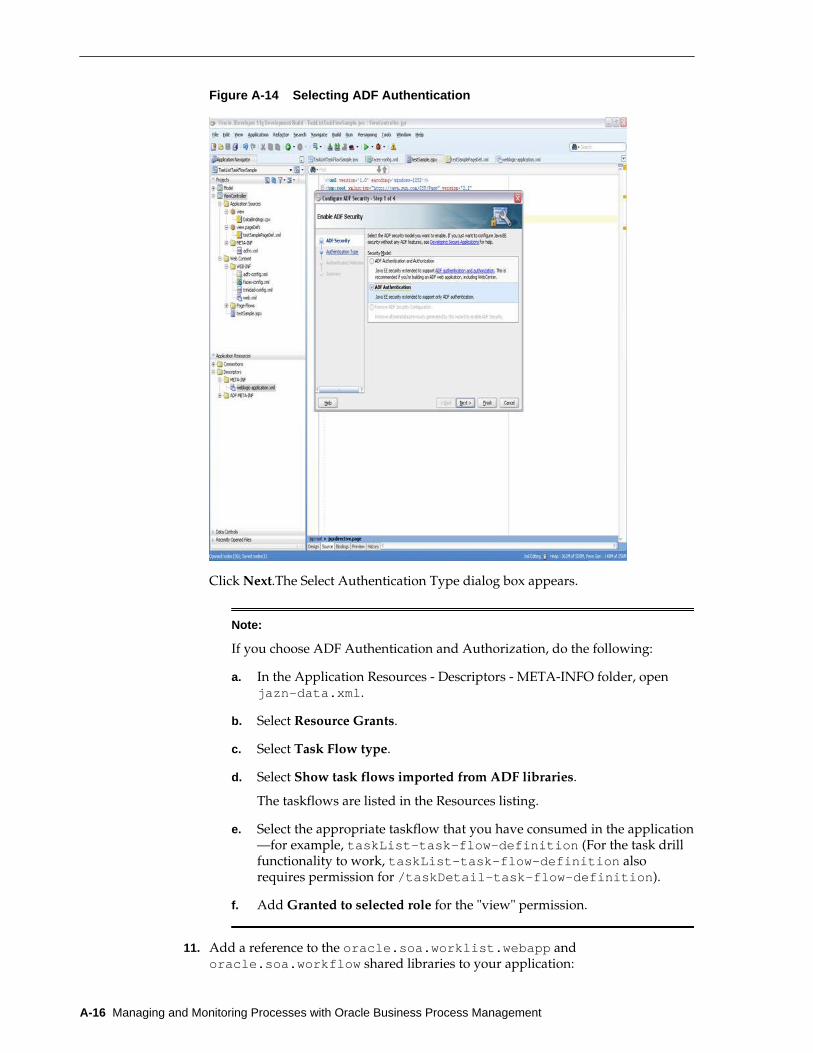
Figure A-14 Selecting ADF Authentication
Click Next.The Select Authentication Type dialog box appears.
Note:
If you choose ADF Authentication and Authorization, do the following:
a. In the Application Resources - Descriptors - META-INFO folder, openjazn-data.xml.
b. Select Resource Grants.
c. Select Task Flow type.
d. Select Show task flows imported from ADF libraries.
The taskflows are listed in the Resources listing.
e. Select the appropriate taskflow that you have consumed in the application—for example, taskList-task-flow-definition (For the task drillfunctionality to work, taskList-task-flow-definition alsorequires permission for /taskDetail-task-flow-definition).
f. Add Granted to selected role for the "view" permission.
11. Add a reference to the oracle.soa.worklist.webapp andoracle.soa.workflow shared libraries to your application:
A-16 Managing and Monitoring Processes with Oracle Business Process Management

a. Locate the weblogic.xml file in the WebContent / WEB-INF folder. "
Note:
If there is no weblogic.xml file, create it. To create, select New, FromGallery, General, Deployment Descriptors, Weblogic DeploymentDescriptor and in the resulting screen, select the weblogic.xml .
b. Add the following entries to the weblogic.xml.
<library-ref> <library-name>oracle.soa.worklist.webapp</library-name></library-ref><library-ref> <library-name>oracle.soa.workflow</library-name></library-ref>
12. Select HTTP Basic Authentication as shown in Figure A-15.
Figure A-15 Selecting HTTP Basic Authentication
For information about enabling ADF security in a Fusion web application see Oracle Fusion Middleware Fusion Developer's Guide for Oracle Application DevelopmentFramework.
13. Click Finish.
A-17
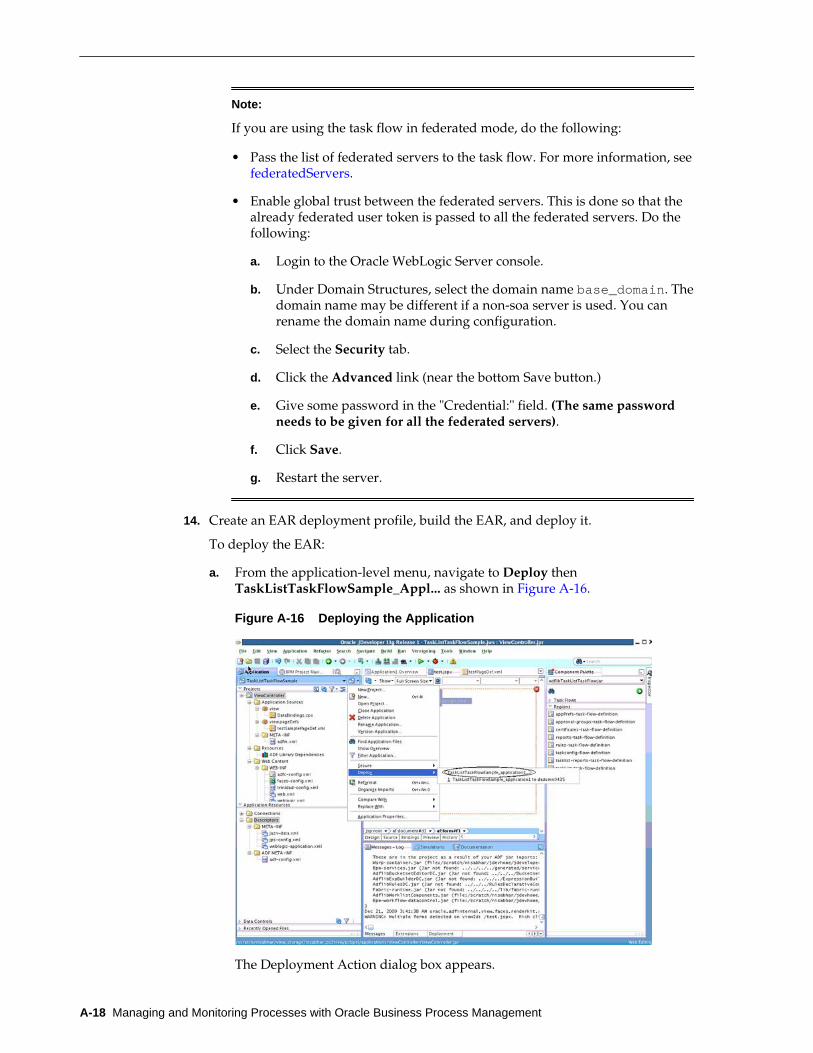
Note:
If you are using the task flow in federated mode, do the following:
• Pass the list of federated servers to the task flow. For more information, see federatedServers.
• Enable global trust between the federated servers. This is done so that thealready federated user token is passed to all the federated servers. Do thefollowing:
a. Login to the Oracle WebLogic Server console.
b. Under Domain Structures, select the domain name base_domain. Thedomain name may be different if a non-soa server is used. You canrename the domain name during configuration.
c. Select the Security tab.
d. Click the Advanced link (near the bottom Save button.)
e. Give some password in the "Credential:" field. (The same passwordneeds to be given for all the federated servers).
f. Click Save.
g. Restart the server.
14. Create an EAR deployment profile, build the EAR, and deploy it.
To deploy the EAR:
a. From the application-level menu, navigate to Deploy thenTaskListTaskFlowSample_Appl... as shown in Figure A-16.
Figure A-16 Deploying the Application
The Deployment Action dialog box appears.
A-18 Managing and Monitoring Processes with Oracle Business Process Management
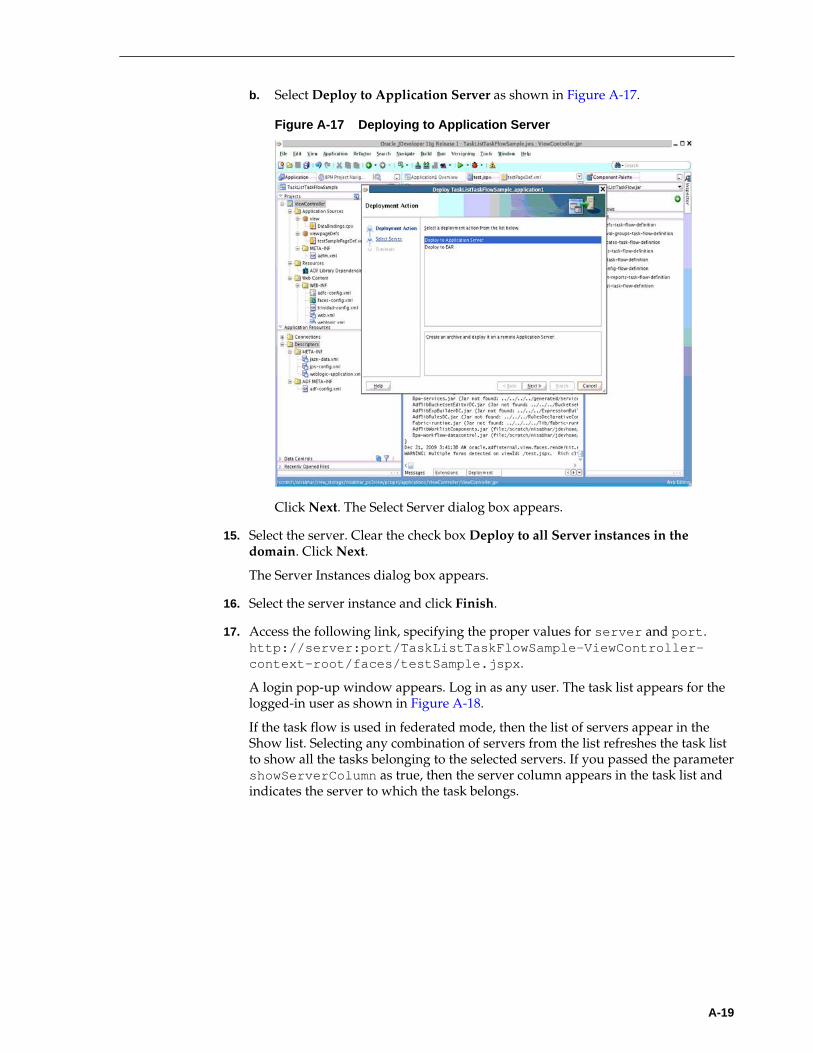
b. Select Deploy to Application Server as shown in Figure A-17.
Figure A-17 Deploying to Application Server
Click Next. The Select Server dialog box appears.
15. Select the server. Clear the check box Deploy to all Server instances in thedomain. Click Next.
The Server Instances dialog box appears.
16. Select the server instance and click Finish.
17. Access the following link, specifying the proper values for server and port.http://server:port/TaskListTaskFlowSample-ViewController-context-root/faces/testSample.jspx.
A login pop-up window appears. Log in as any user. The task list appears for thelogged-in user as shown in Figure A-18.
If the task flow is used in federated mode, then the list of servers appear in theShow list. Selecting any combination of servers from the list refreshes the task listto show all the tasks belonging to the selected servers. If you passed the parametershowServerColumn as true, then the server column appears in the task list andindicates the server to which the task belongs.
A-19

Figure A-18 Process Workspace Task List
Click any of the tasks title links to see the task details in a new browser window.
If your application is authorized for taskList-task-flow-definition.xml (the tasklistdropped into the page in the above procedure), the relevant security permissions mustbe granted for the task detail navigate functionality to work.
Connect to the Common domain using wlst.sh and run the following WLST commandto grant the task flow view permission for "/WEB-INF/taskDetail-task-flow-definition.xml#taskDetail-task-flow-definition" to the authenticated-role:
grantPermission(appStripe="YOUR_APP_STRIPE_NAME",principalClass="oracle.security.jps.internal.core.principals.JpsAuthenticatedRoleImpl",principalName="authenticated-role", permClass="oracle.adf.controller.security.TaskFlowPermission", permTarget="/WEB-INF/taskDetail-task-flow-definition.xml#taskDetail-task-flow-definition", permActions="view")
A.5.2 Sample 2: Creating an ADF Page with Task Flows
This sample shows how to create an ADF page and add three task flows to the page.
The page is divided into two parts. If the user selects TaskFlow from left side, thecorresponding task flow appears on the right side.
To create the ADF page with task flows:
1. Follow Steps 1 to 4 of Sample 1: Creating an Application with an EmbeddedTasklist Task Flow.
2. Configure the JSPX page as follows:
a. In Component Palette, select ADF Faces.
b. Drag and drop the Panel Stretch Layout on to the JSPX page.
A-20 Managing and Monitoring Processes with Oracle Business Process Management

c. Delete Top, Start, Bottom, and End from the JSPX page.
The JSPX page looks like Figure A-19.
Figure A-19 Configuring the JSPX Page
3. Drag and drop the Panel Splitter from the Component Palette into the JSPX page.
The JSPX page now appears as shown in Figure A-20.
Figure A-20 Split Panel in the JSPX Page
4. In the navigator, right-click View Controller and create a new Java Class. Name itSampleController.java.
Add private transient UIComponent rightPanel = null; withgetters and setters as shown in Figure A-21.
A-21

Figure A-21 Creating SampleController.java
5. In the navigator, select the Faces-config.xml file. Specify the Managed Bean, namingit as sampleControllerBean as shown in Figure A-22.
Figure A-22 Specifying the Managed Bean
6. Drag and drop the Panel Stretch Layout on to the Second Facet.
Delete Top, Start, Bottom, and End from it. Specify a binding forPanelStrechLayout from the Property Inspector as#{sampleControllerBean.rightPanel}.
7. Drag and drop a link from the Component Palette into the JSPX page.
In the Property Inspector specify the text as Rules. In SampleController Javafile, add the following code:
A-22 Managing and Monitoring Processes with Oracle Business Process Management

private String selectedLink = "RULES"; with getter and setterspublic void displayRules(ActionEvent event){ setSelectedLink("RULES"); if(getRightPanel()!= null){ RequestContext.getCurrentInstance().addPartialTarget(getRightPanel()); }}
Add the Action Listener property for the rules as follows:
#{sampleControllerBean.displayRules}
8. Drag and drop a link from the Component Palette into the JSPX page.
In the Property Inspector, specify the text as Certificates. In theSampleController Java file, add following code:
public void displayCertificates(ActionEvent event){ setSelectedLink("CERTIFICATES"); if(getRightPanel() != null){ RequestContext.getCurrentInstance().addPartialTarget(getRightPanel()); }}
Add the Action Listener property for the certificates as follows:
#{sampleControllerBean.displayCertificates}
9. Drag and drop a link from the Component Palette into the JSPX page.
In the Property Inspector, specify the text as Reports. In the SampleControllerJava file, add following code:
public void displayReports(ActionEvent event){ setSelectedLink("REPORTS"); if(getRightPanel() != null){ RequestContext.getCurrentInstance().addPartialTarget(getRightPanel()); }}
Add the Action Listener property for the reports as follows:
#{sampleControllerBean. displayReports}
10. Drag and drop a switcher from the Component Palette into the center facet of thesecond facet as shown in Figure A-23.
In the Property Inspector, specify the facet name as#{sessionScope.sampleControllerBean.selectedLink}" and thedefault faces as RULES.
A-23

Figure A-23 Adding and Specifying a Switcher
11. Inside af:switcher define a facet and name it f:facet name="RULES".
Inside this facet, drag and drop Rules-Task-Flow-Definition from the ComponentPalette (inside adflibTaskListTaskFlow.jar).
12. Inside af:switcher define another facet and name it f:facetname="CERTIFICATES".
Inside this facet, drag and drop Certificates-Task-Flow-Definition from theComponent Palette (inside adflibTaskListTaskFlow.jar)
13. Inside af:switcher define another facet and name it f:facetname="REPORTS".
Inside this facet drag and drop Reports-Task-Flow-Definition from theComponent Palette (inside adflibTaskListTaskFlow.jar)
14. Save your work.
15. Follow Steps #unique_375/unique_375_Connect_42_BACJAGFF to 17 of Sample1: Creating an Application with an Embedded Tasklist Task Flow.
A.6 Sample: Wf_client_config.xml FileThis section provides a sample of the client configuration file,Wf_client_config.xml.
If you don't want to include the server in the federated servers list, putexcludeFromFederatedList="true" in the <server> element.
The client type needs to be specified explicitly on the <server> element in the XML.
• If you are using a remote client, enter clientType="REMOTE".
• If you are using a SOAP client, enter clientType="SOAP".
In Example A-1, REMOTE client type is used.
A-24 Managing and Monitoring Processes with Oracle Business Process Management

Example A-1 Wf_client_config.xml
<?xml version="1.0" encoding="UTF-8" standalone="yes"?><workflowServicesClientConfigurationxmlns="http://xmlns.oracle.com/bpel/services/client"><server name="default" default="true" excludeFromFederatedList="true" clientType="REMOTE"> <localClient> <participateInClientTransaction>false</participateInClientTransaction> </localClient> <remoteClient> <serverURL>t3://sta00048.ex.example.com:7001</serverURL> <initialContextFactory>weblogic.jndi.WLInitialContextFactory</initialContextFactory> <participateInClientTransaction>false</participateInClientTransaction> </remoteClient> <soapClient> <rootEndPointURL>http://sta00048.ex.example.com:7001</rootEndPointURL> <identityPropagation mode="dynamic" type="saml"> <policy-references> <policy-reference enabled="true" category="security" uri="oracle/wss10_saml_token_client_policy"/> </policy-references> </identityPropagation> </soapClient> </server><server name="ERP" clientType="REMOTE"> <soapClient> <rootEndPointURL>http://sta00147.ex.example.com:7001</rootEndPointURL> <identityPropagation mode="dynamic" type="saml"> <policy-references> <policy-reference enabled="true" category="security" uri="oracle/wss10_saml_token_client_policy"/> </policy-references> </identityPropagation> </soapClient> <remoteClient> <serverURL>t3://sta00147.ex.example.com:7001</serverURL> <initialContextFactory>weblogic.jndi.WLInitialContextFactory</initialContextFactory> <participateInClientTransaction>false</participateInClientTransaction> </remoteClient></server><server name="CRM" clientType="REMOTE"> <soapClient> <rootEndPointURL>http://sta00048.ex.example.com:7001</rootEndPointURL> <identityPropagation mode="dynamic" type="saml"> <policy-references> <policy-reference enabled="true" category="security" uri="oracle/wss10_saml_token_client_policy"/> </policy-references> </identityPropagation> </soapClient> <remoteClient> <serverURL>t3://sta00048.ex.example.com:7001</serverURL> <initialContextFactory>weblogic.jndi.WLInitialContextFactory</initialContextFactory> <participateInClientTransaction>false</participateInClientTransaction> </remoteClient></server></workflowServicesClientConfiguration>
A-25
A.7 Sample: Bean Returning WorkflowServicesClientConfigurationType ObjectThis section provides a sample: bean with the method returning theWorkflowServicesClientConfigurationType object.
Note:
You must set the client type explicitly while building the JAXB object. Forexample:
ServerType server1 = new ServerType();server1.setClientType("REMOTE"); // If REMOTE client is to be used.
Or:
server1.setClientType("SOAP"); // If SOAP client is to be used.
If you do not specify anything for the client type, the default is SOAP.
package view;
import java.util.List;
import oracle.bpel.services.workflow.client.config.IdentityPropagationType;import oracle.bpel.services.workflow.client.config.PolicyReferenceType;import oracle.bpel.services.workflow.client.config.PolicyReferencesType;import oracle.bpel.services.workflow.client.config.RemoteClientType;import oracle.bpel.services.workflow.client.config.ServerType;import oracle.bpel.services.workflow.client.config.SoapClientType;import oracle.bpel.services.workflow.client.config.WorkflowServicesClientConfigurationType;import weblogic.nodemanager.common.ServerType;
public class WorklistBackingBean { WorkflowServicesClientConfigurationType wscct = null;
public WorklistBackingBean() { super(); }
public WorkflowServicesClientConfigurationType getWSCC() { if (wscct == null) { wscct = new WorkflowServicesClientConfigurationType(); List<ServerType> servers = wscct.getServer(); /**** Setting default server in the list ****/ ServerType defaultServer = new ServerType(); defaultServer.setClientType("SOAP"); servers.add(defaultServer); defaultServer.setDefault(true); //If this is true, the server is excluded from federated server list //By defalut it is false //defalutServer.setExcludeFromFederatedList(true); defaultServer.setName("default"); RemoteClientType rct = new RemoteClientType(); rct.setServerURL("t3://defaultHost:port"); rct.setInitialContextFactory("weblogic.jndi.WLInitialContextFactory"); rct.setParticipateInClientTransaction(false); defaultServer.setRemoteClient(rct);
A-26 Managing and Monitoring Processes with Oracle Business Process Management
SoapClientType sct = new SoapClientType(); PolicyReferencesType prts = new PolicyReferencesType(); PolicyReferenceType prt = new PolicyReferenceType(); prt.setEnabled(true); prt.setCategory("security"); prt.setUri("oracle/wss10_saml_token_client_policy"); prts.getPolicyReference().add(prt); IdentityPropagationType ipt = new IdentityPropagationType(); ipt.setMode("dynamic"); ipt.setType("saml"); ipt.setPolicyReferences(prts); sct.setRootEndPointURL("http://defaultHost:port"); sct.setIdentityPropagation(ipt); defaultServer.setSoapClient(sct); /****** Setting Federated Server 1 to the list ****/ ServerType server1 = new ServerType(); server1.setClientType("SOAP"); servers.add(server1); server1.setName("Human Resource"); RemoteClientType rct1 = new RemoteClientType(); rct1.setServerURL("t3://HumanResourcesHost:port"); rct1.setInitialContextFactory("weblogic.jndi.WLInitialContextFactory"); rct1.setParticipateInClientTransaction(false); server1.setRemoteClient(rct1); SoapClientType sct1 = new SoapClientType(); PolicyReferencesType prts1 = new PolicyReferencesType(); PolicyReferenceType prt1 = new PolicyReferenceType(); prt1.setEnabled(true); prt1.setCategory("security"); prt1.setUri("oracle/wss10_saml_token_client_policy"); prts1.getPolicyReference().add(prt1); IdentityPropagationType ipt1 = new IdentityPropagationType(); ipt1.setMode("dynamic"); ipt1.setType("saml"); ipt1.setPolicyReferences(prts1); sct1.setRootEndPointURL("http://HumanResourcesHost:port"); sct1.setIdentityPropagation(ipt1); server1.setSoapClient(sct1); } return wscct; }}
A-27

A-28 Managing and Monitoring Processes with Oracle Business Process Management
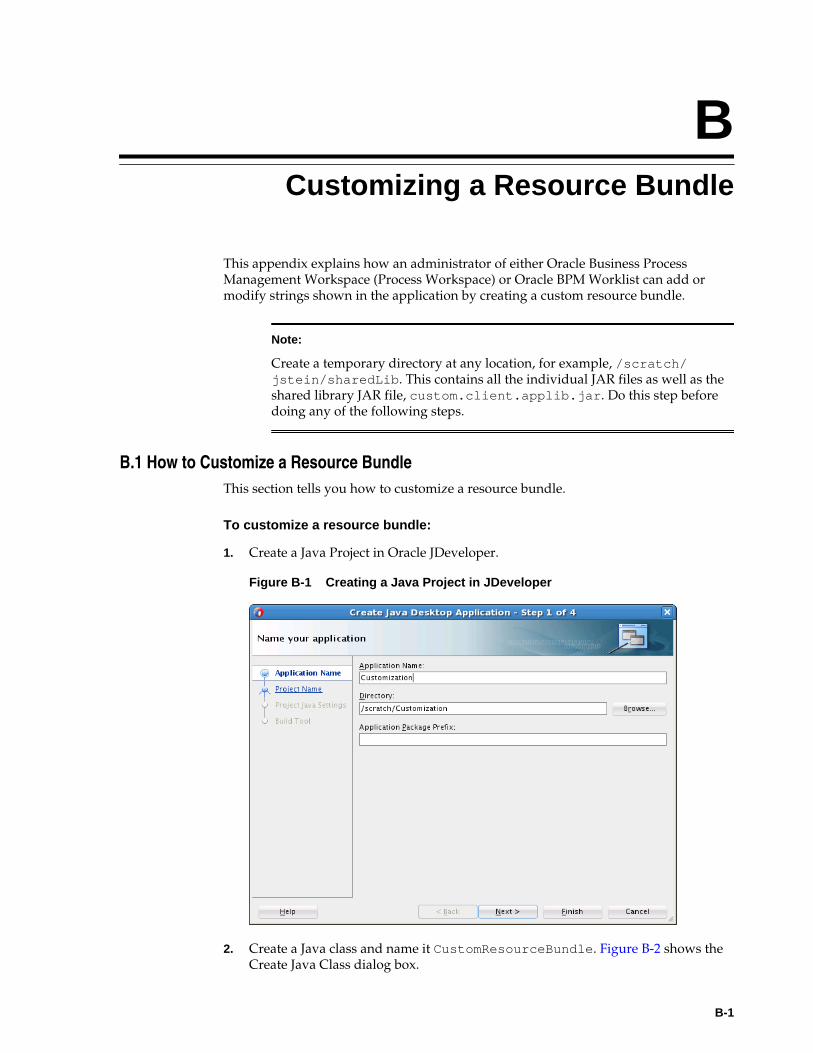
BCustomizing a Resource Bundle
This appendix explains how an administrator of either Oracle Business ProcessManagement Workspace (Process Workspace) or Oracle BPM Worklist can add ormodify strings shown in the application by creating a custom resource bundle.
Note:
Create a temporary directory at any location, for example, /scratch/jstein/sharedLib. This contains all the individual JAR files as well as theshared library JAR file, custom.client.applib.jar. Do this step beforedoing any of the following steps.
B.1 How to Customize a Resource BundleThis section tells you how to customize a resource bundle.
To customize a resource bundle:
1. Create a Java Project in Oracle JDeveloper.
Figure B-1 Creating a Java Project in JDeveloper
2. Create a Java class and name it CustomResourceBundle. Figure B-2 shows theCreate Java Class dialog box.
B-1

Figure B-2 Creating a Java Class
3. Include Worklist Application JAR files. Figure B-3 shows the BPM WorklistComponents library being added.
To include the Worklist Application JAR files:
a. From the Project Properties panel, select Libraries and Classpath.
b. Select Add Library.
c. From the Libraries list, select BPM Worklist Components.
d. Click OK.
B-2 Managing and Monitoring Processes with Oracle Business Process Management
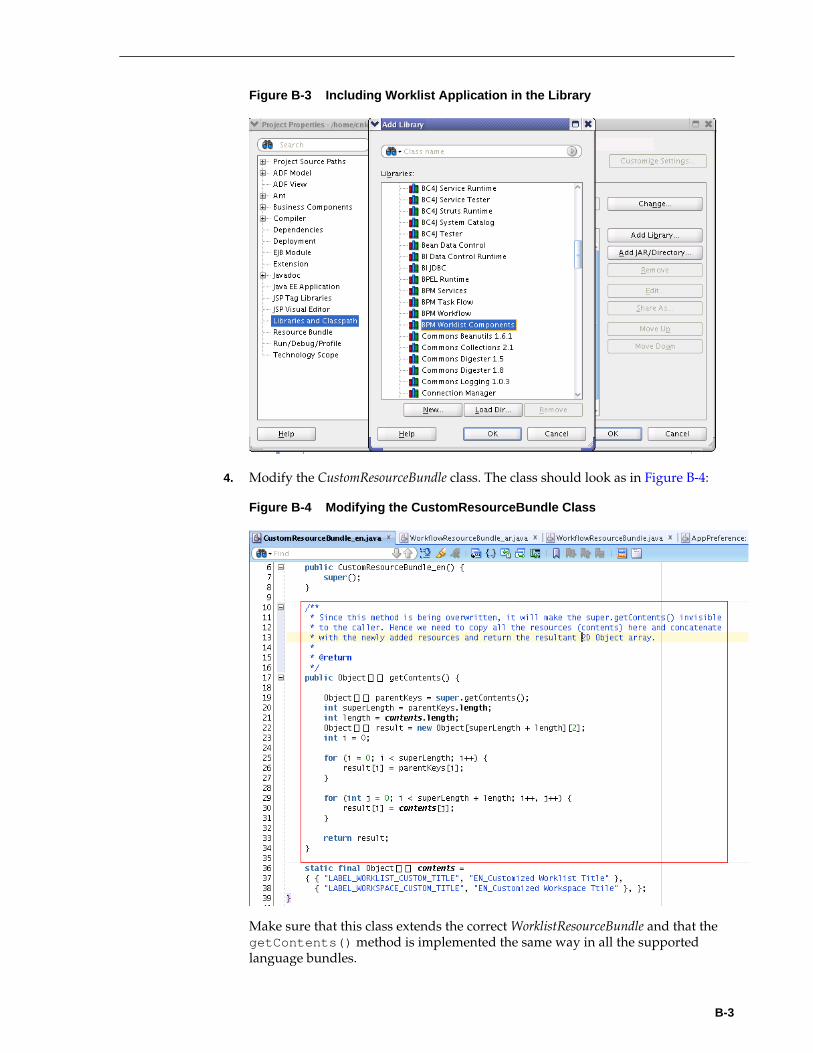
Figure B-3 Including Worklist Application in the Library
4. Modify the CustomResourceBundle class. The class should look as in Figure B-4:
Figure B-4 Modifying the CustomResourceBundle Class
Make sure that this class extends the correct WorklistResourceBundle and that thegetContents() method is implemented the same way in all the supportedlanguage bundles.
B-3

5. Create various custom resource bundles for other language support.
You can create various custom resource bundles with different names under thesame package. When you do so, you must append the locale to the file name. Forexample, for English US, your Custom Resource Bundle name isCustomResourceBundle_en.java. Make sure you implement thegetContents() method the same way as described in Step 4.
Note:
By default, you must create both the file CustomResourceBundle.javaand the file CustomResourceBundle_en.java. This is because we use theEnglish (_en) resource bundle by default during the application login.Otherwise, login would fail.
6. Create a new JAR deployment profile as shown in Figure B-5.
Figure B-5 Creating a Deployment Profile for a JAR File
7. Make sure your JAR deployment profile looks like what is shown in Figure B-6.
B-4 Managing and Monitoring Processes with Oracle Business Process Management

Figure B-6 Verifying JAR Deployment Profile
8. Edit the JAR file location to point to the newly created directory as shown in Figure B-7.
Figure B-7 Editing the JAR Deployment Profile
9. Deploy the resource bundle as a JAR file as shown in Figure B-8.
B-5

Figure B-8 Deploying the Resource Bundle
The file is then deployed to the pre-defined location, namely, the shared librarydirectory.
For more information about resources bundles and how to customize them, see OracleFusion Middleware Developer's Guide for Oracle SOA Suite.
B-6 Managing and Monitoring Processes with Oracle Business Process Management

CCustomizing Applications in Process
Workspace and BPM Worklist
This appendix explains how, for Oracle Business Process Management Workspace(Process Workspace), you can create customized external applications and links thatbecome available in the Favorites list of the Views, Applications, and Favorites pane. Italso explains how, for both Process Workspace and BPM Worklist, you can specify thecolumns that appear in the inbox.
Note:
Create a temporary directory at any location, for example, /scratch/jstein/sharedLib. This contains all the individual JAR files as well as theshared library JAR file, custom.client.applib.jar. Do this step beforedoing any of the following steps.
C.1 How to Customize an Application
To customize and application:
1. Create an Oracle Application Development Framework Project in OracleJDeveloper.
Figure C-1 shows the Create Fusion Web Application (ADF) dialog box.
C-1
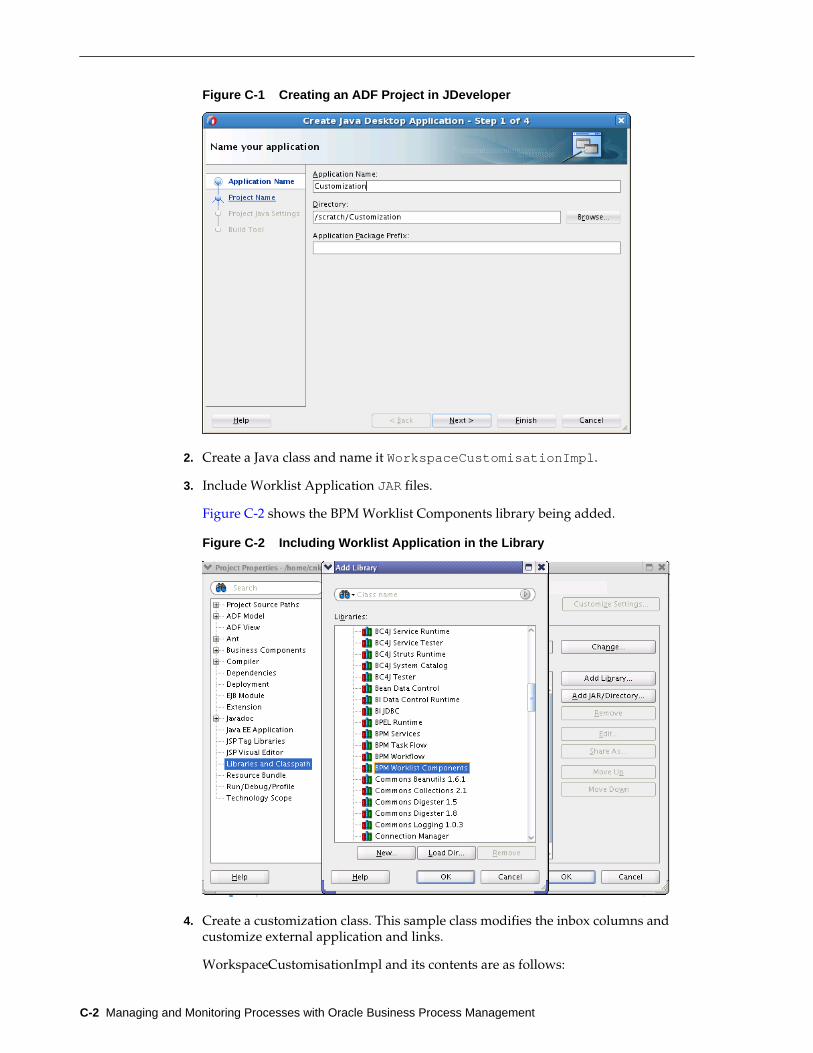
Figure C-1 Creating an ADF Project in JDeveloper
2. Create a Java class and name it WorkspaceCustomisationImpl.
3. Include Worklist Application JAR files.
Figure C-2 shows the BPM Worklist Components library being added.
Figure C-2 Including Worklist Application in the Library
4. Create a customization class. This sample class modifies the inbox columns andcustomize external application and links.
WorkspaceCustomisationImpl and its contents are as follows:
C-2 Managing and Monitoring Processes with Oracle Business Process Management

package view.customisationimpl; import java.util.ArrayList;import java.util.HashMap;import java.util.List;import java.util.Map; import oracle.bpel.services.workflow.client.IWorkflowServiceClient;import oracle.bpel.services.workflow.runtimeconfig.IRuntimeConfigService;import oracle.bpel.services.workflow.runtimeconfig.model.AttributeLabelType;import oracle.bpel.services.workflow.runtimeconfig.model.AttributeLabelUsageList;import oracle.bpel.services.workflow.runtimeconfig.model.AttributeLabelUsages; import oracle.bpel.services.workflow.verification.IWorkflowContext; import oracle.bpm.ui.customization.CustomLink;import oracle.bpm.ui.customization.IBPMUICustomizations; public class WorkspaceCustomisationImpl implements IBPMUICustomizations { private static Map displayNameMap = new HashMap(); public WorkspaceCustomisationImpl() { displayNameMap.put("instanceId", "Instance Id"); displayNameMap.put("protectedTextAttribute1", "Business Status"); } public List<CustomLink> getCustomGlobalLinks() { CustomLink globalLink1 = new CustomLink("Oracle Home Page", "www.oracle.com", null); CustomLink globalLink2 = new CustomLink("Self Services Application", "http://global-ebusiness.example.com/", null); CustomLink globalLink3 = new CustomLink("BUG DB", "https://bug.example.com/", null); List<CustomLink> globalLinks = new ArrayList<CustomLink>(); globalLinks.add(globalLink1); globalLinks.add(globalLink2); globalLinks.add(globalLink3); return globalLinks; } public String getColumnNames() { return "title,taskNumber,instanceId,creator,protectedTextAttribute1"; } private static void initDisplayMap(IWorkflowServiceClient client, IWorkflowContext context) { // u can use service to load all label name for text attributes if (displayNameMap == null) { synchronized (String.class) { if (displayNameMap == null) { displayNameMap = new HashMap(); try { IRuntimeConfigService service = client.getRuntimeConfigService(); AttributeLabelUsageList list = service.getAttributeLabelUsages(context, "Text"); List<AttributeLabelUsages> list1 = list.getAttributeLabelUsages(); for (AttributeLabelUsages usage : list1) { AttributeLabelType type = usage.getLabel(); displayNameMap.put(type.getTaskAttribute(), type.getLabelName());
C-3
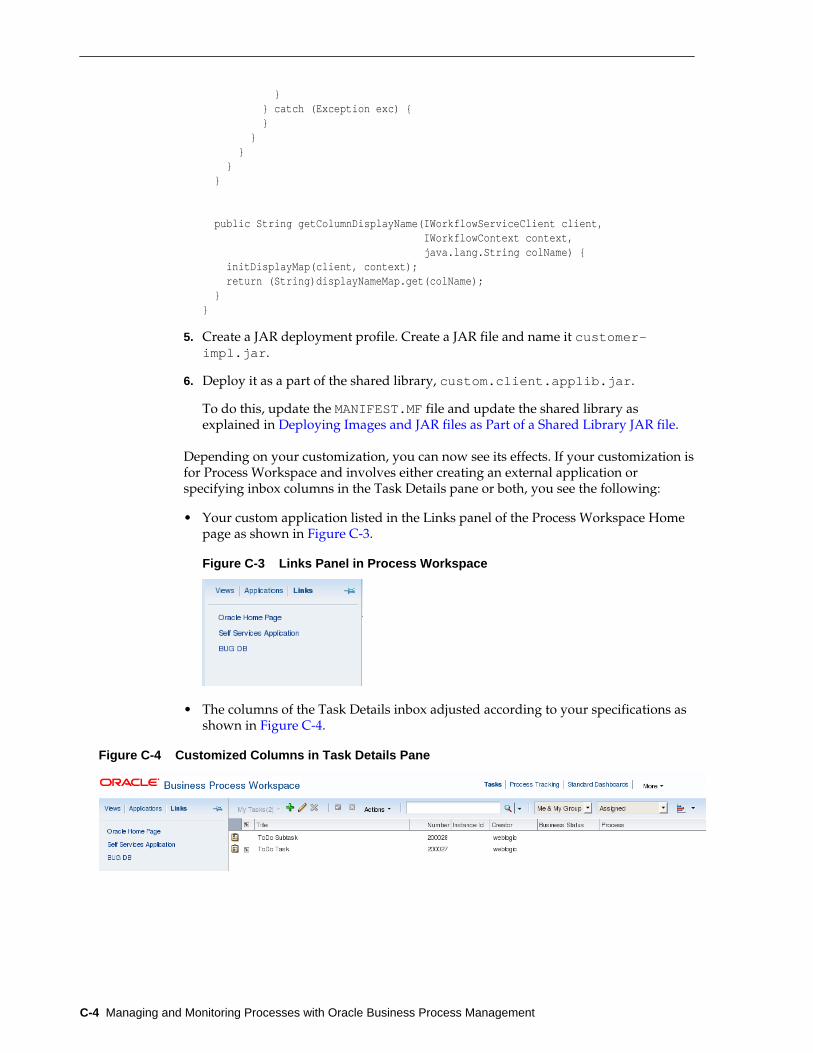
} } catch (Exception exc) { } } } } } public String getColumnDisplayName(IWorkflowServiceClient client, IWorkflowContext context, java.lang.String colName) { initDisplayMap(client, context); return (String)displayNameMap.get(colName); }}
5. Create a JAR deployment profile. Create a JAR file and name it customer-impl.jar.
6. Deploy it as a part of the shared library, custom.client.applib.jar.
To do this, update the MANIFEST.MF file and update the shared library asexplained in Deploying Images and JAR files as Part of a Shared Library JAR file.
Depending on your customization, you can now see its effects. If your customization isfor Process Workspace and involves either creating an external application orspecifying inbox columns in the Task Details pane or both, you see the following:
• Your custom application listed in the Links panel of the Process Workspace Homepage as shown in Figure C-3.
Figure C-3 Links Panel in Process Workspace
• The columns of the Task Details inbox adjusted according to your specifications asshown in Figure C-4.
Figure C-4 Customized Columns in Task Details Pane
C-4 Managing and Monitoring Processes with Oracle Business Process Management

DDeploying Images and JAR files as Part of a
Shared Library JAR file
This appendix explains how to deploy images and JAR files as part of a shared libraryJAR file. If you have customized an application, a skin, or a resource bundle, you mustdeploy it as a JAR file within a shared library JAR file.
D.1 How to Deploy Images and JAR Files as Part of a Shared Library JAR FileIn this section, we use an example in which you include in a shared library JAR file thefiles you previously created:
• customSkin.jar as described in How to Choose a Skin in Process Workspace
• customer-impl.jar as described in Customizing Applications in ProcessWorkspace and the Worklist Application
• ResourceBundle.jar as described in Customizing a Resource Bundle.
To deploy images and JAR files as part of a shared library JAR file:
1. Create a temp directory, mkdir temp.
2. Unzip all the jar files into the temp folder.
unzip customSkin.jar -d temp/unzip customer-impl.jar -d temp/unzip ResourceBundle.jar -d temp/
After you do this, you can see a META-INF folder included in the temp folder.
Note:
You can create an images directory inside the temp directory and copy yourcustomized logo file into it. Then from the application preferences, you canrefer to it as /images/customizedLogo.jpg.
3. Create a MANIFEST.MF file under META-INF directory.
This file should contain the following:
Manifest-Version: 1.0Ant-Version: Apache Ant 1.7.1Created-By: 19.1-b02 (Sun Microsystems Inc.)Implementation-Vendor: OracleImplementation-Title: Custom Client ApplibImplementation-Version: 1.0Product-Name: Custom Client Applib
D-1
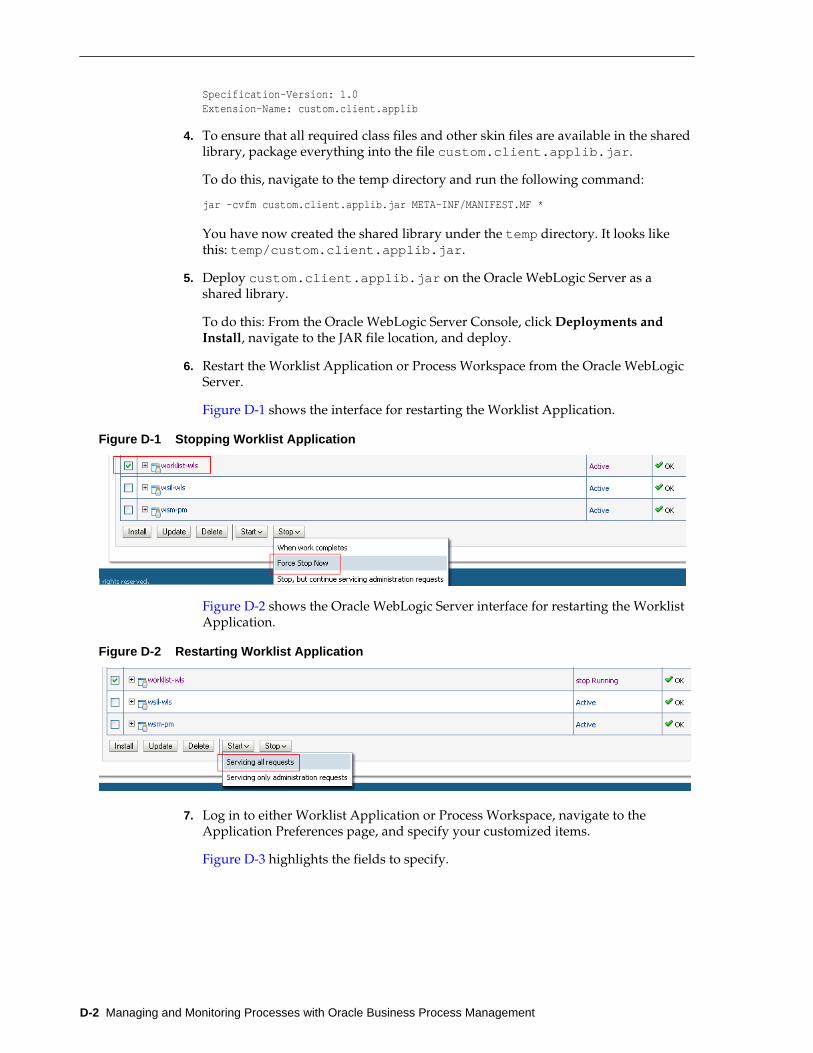
Specification-Version: 1.0Extension-Name: custom.client.applib
4. To ensure that all required class files and other skin files are available in the sharedlibrary, package everything into the file custom.client.applib.jar.
To do this, navigate to the temp directory and run the following command:
jar -cvfm custom.client.applib.jar META-INF/MANIFEST.MF *
You have now created the shared library under the temp directory. It looks likethis: temp/custom.client.applib.jar.
5. Deploy custom.client.applib.jar on the Oracle WebLogic Server as ashared library.
To do this: From the Oracle WebLogic Server Console, click Deployments andInstall, navigate to the JAR file location, and deploy.
6. Restart the Worklist Application or Process Workspace from the Oracle WebLogicServer.
Figure D-1 shows the interface for restarting the Worklist Application.
Figure D-1 Stopping Worklist Application
Figure D-2 shows the Oracle WebLogic Server interface for restarting the WorklistApplication.
Figure D-2 Restarting Worklist Application
7. Log in to either Worklist Application or Process Workspace, navigate to theApplication Preferences page, and specify your customized items.
Figure D-3 highlights the fields to specify.
D-2 Managing and Monitoring Processes with Oracle Business Process Management
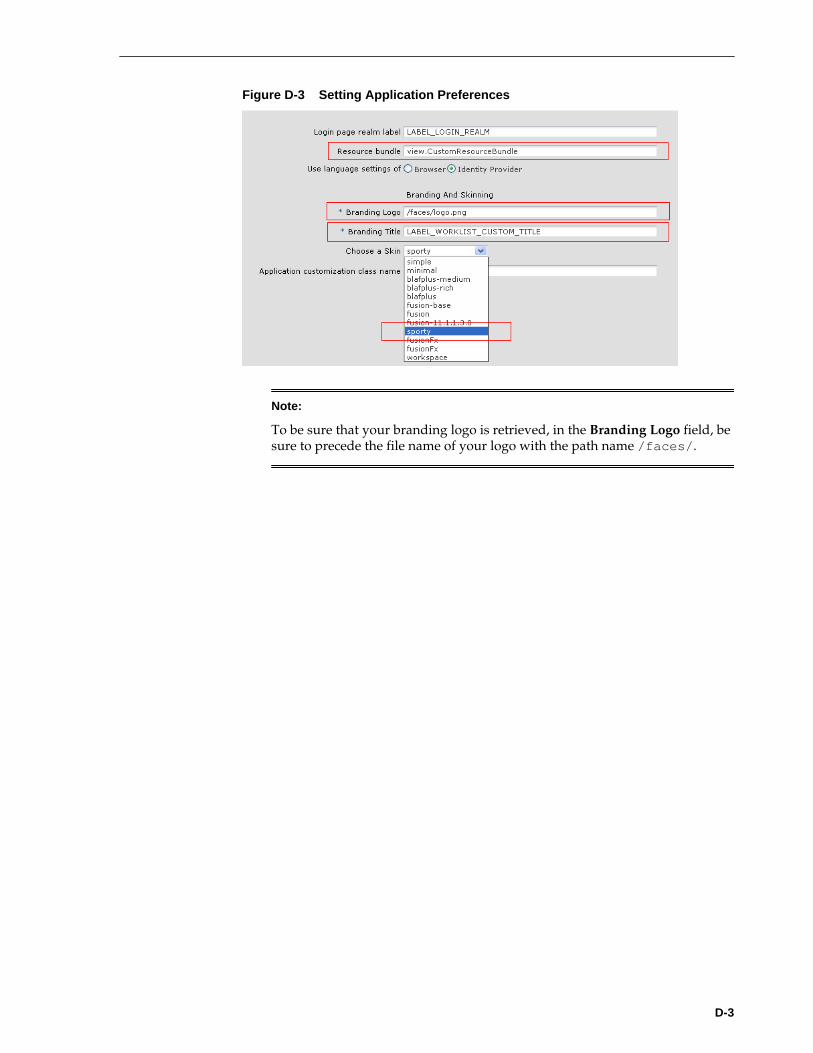
Figure D-3 Setting Application Preferences
Note:
To be sure that your branding logo is retrieved, in the Branding Logo field, besure to precede the file name of your logo with the path name /faces/.
D-3

D-4 Managing and Monitoring Processes with Oracle Business Process Management