Installation Guide - Oracle Help Center
106
Oracle® Big Data Discovery Installation Guide Version 1.3.2 • Revision C • January 2017
-
Upload
khangminh22 -
Category
Documents
-
view
4 -
download
0
Transcript of Installation Guide - Oracle Help Center
Oracle® Big Data Discovery
Installation Guide
Version 1.3.2 • Revision C • January 2017

Copyright and disclaimerCopyright © 2015, 2017, Oracle and/or its affiliates. All rights reserved.
Oracle and Java are registered trademarks of Oracle and/or its affiliates. Other names may be trademarks oftheir respective owners. UNIX is a registered trademark of The Open Group.
This software and related documentation are provided under a license agreement containing restrictions onuse and disclosure and are protected by intellectual property laws. Except as expressly permitted in yourlicense agreement or allowed by law, you may not use, copy, reproduce, translate, broadcast, modify, license,transmit, distribute, exhibit, perform, publish or display any part, in any form, or by any means. Reverseengineering, disassembly, or decompilation of this software, unless required by law for interoperability, isprohibited.
The information contained herein is subject to change without notice and is not warranted to be error-free. Ifyou find any errors, please report them to us in writing.
If this is software or related documentation that is delivered to the U.S. Government or anyone licensing it onbehalf of the U.S. Government, the following notice is applicable:
U.S. GOVERNMENT END USERS: Oracle programs, including any operating system, integrated software,any programs installed on the hardware, and/or documentation, delivered to U.S. Government end users are"commercial computer software" pursuant to the applicable Federal Acquisition Regulation and agency-specific supplemental regulations. As such, use, duplication, disclosure, modification, and adaptation of theprograms, including any operating system, integrated software, any programs installed on the hardware,and/or documentation, shall be subject to license terms and license restrictions applicable to the programs. Noother rights are granted to the U.S. Government.
This software or hardware is developed for general use in a variety of information management applications. Itis not developed or intended for use in any inherently dangerous applications, including applications that maycreate a risk of personal injury. If you use this software or hardware in dangerous applications, then you shallbe responsible to take all appropriate fail-safe, backup, redundancy, and other measures to ensure its safeuse. Oracle Corporation and its affiliates disclaim any liability for any damages caused by use of this softwareor hardware in dangerous applications.
This software or hardware and documentation may provide access to or information on content, products andservices from third parties. Oracle Corporation and its affiliates are not responsible for and expressly disclaimall warranties of any kind with respect to third-party content, products, and services. Oracle Corporation andits affiliates will not be responsible for any loss, costs, or damages incurred due to your access to or use ofthird-party content, products, or services.
Oracle® Big Data Discovery : Installation Guide Version 1.3.2 • Revision C • January 2017

Table of Contents
Copyright and disclaimer ..........................................................2
Preface..........................................................................6About this guide ................................................................6Audience......................................................................6Conventions ...................................................................6Contacting Oracle Customer Support .................................................7
Part I: Before You Install
Chapter 1: Introduction ............................................................9The Big Data Discovery software package .............................................9Integration with Hadoop..........................................................10Integration with WebLogic ........................................................11Integration with Jetty ............................................................11Cluster configurations and diagrams.................................................11A note about component names....................................................14
Chapter 2: Prerequisites ..........................................................15Supported platforms ............................................................15Hardware requirements ..........................................................19Memory requirements ...........................................................19Disk space requirements .........................................................20Network requirements ...........................................................21Supported operating systems......................................................21Required Linux utilities...........................................................21
Installing the required Perl modules .............................................22OS user requirements ...........................................................23
Enabling passwordless SSH ..................................................24Hadoop requirements ...........................................................24
YARN setting changes.......................................................26Required Hadoop client libraries................................................27Required HDP JARs ........................................................28MapR-specific requirements...................................................28
Updating the YARN ResourceManager configuration.............................29Applying the MapR patches ...............................................29
JDK requirements ..............................................................30Security options................................................................31
Kerberos.................................................................31Sentry...................................................................32TLS/SSL.................................................................33
Oracle® Big Data Discovery : Installation Guide Version 1.3.2 • Revision C • January 2017

Table of Contents 4
HDFS data at rest encryption..................................................34Other security options .......................................................35
Dgraph database requirements ....................................................35HDFS ...................................................................36
Setting up cgroups .....................................................36Installing the HDFS NFS Gateway service ....................................38Installing FUSE ........................................................38
NFS ....................................................................39Increasing the numbers of open file descriptors and processes .........................39
Studio database requirements .....................................................40Sample commands for production databases ......................................41
Supported Web browsers.........................................................42Screen resolution requirements ....................................................42Studio support for iPad ..........................................................42
Part II: Installing Big Data Discovery
Chapter 3: Prerequisite checklist...................................................44
Chapter 4: QuickStart Installation ..................................................49Installing BDD with quickstart......................................................49
Chapter 5: Single-Node Installation.................................................51Installing BDD on a single node ....................................................51Configuring a single-node installation ................................................52
Chapter 6: Cluster Installation .....................................................57The BDD installer ..............................................................57
Silent installation ...........................................................57Installer behavior...........................................................59
Setting up the install machine......................................................60Downloading the BDD media pack ..................................................61Downloading a WebLogic Server patch ..............................................62Configuring BDD ...............................................................62
Required settings ..........................................................63Running the prerequisite checker ...................................................70Installing BDD on a cluster........................................................70
Chapter 7: Troubleshooting a Failed Installation .....................................72Failed ZooKeeper check .........................................................72Failure to download the Hadoop client libraries .........................................72Failure to generate the Hadoop fat JAR ..............................................73Rerunning the installer...........................................................73
Oracle® Big Data Discovery : Installation Guide Version 1.3.2 • Revision C • January 2017

Table of Contents 5
Part III: After You Install
Chapter 8: Post-Installation Tasks..................................................76Verifying your installation .........................................................76
Verifying your cluster's health..................................................76Verifying Data Processing ....................................................77
Navigating the BDD directory structure ...............................................77Enabling Kerberos for the Transform Service ..........................................81Configuring load balancing........................................................82
Configuring load balancing for Studio ............................................82Configuring load balancing for the Transform Service ................................82
Updating the DP CLI whitelist and blacklist ............................................83Signing in to Studio as an administrator ..............................................83Backing up your cluster ..........................................................84Replacing certificates............................................................84Increasing Linux file descriptors ....................................................84Customizing the WebLogic JVM heap size ............................................85Configuring Studio database caching ................................................85
Customizing Studio database caching ...........................................85Disabling Studio database caching..............................................86Clearing the Studio database cache .............................................87
Chapter 9: Using Studio with a Reverse Proxy .......................................88About reverse proxies ...........................................................88Types of reverse proxies .........................................................88Example sequence for a reverse proxy request.........................................89Recommendations for reverse proxy configuration ......................................89
Preserving HTTP 1.1 Host: headers .............................................90Enabling the Apache ProxyPreserveHost directive ..................................90
Reverse proxy configuration options for Studio .........................................91Simple Studio reverse proxy configuration ........................................91Studio reverse proxy configuration without preserving Host: headers .....................91Configuring Studio to support an SSL-enabled reverse proxy...........................92
Part IV: Uninstalling Big Data Discovery
Chapter 10: Uninstallation ........................................................94The uninstallation script ..........................................................94Running the uninstallation script....................................................95
Appendix A: Optional and Internal BDD PropertiesOptional settings ...............................................................96Internal settings...............................................................102
Oracle® Big Data Discovery : Installation Guide Version 1.3.2 • Revision C • January 2017
PrefaceOracle Big Data Discovery is a set of end-to-end visual analytic capabilities that leverage the power of ApacheSpark to turn raw data into business insight in minutes, without the need to learn specialist big data tools orrely only on highly skilled resources. The visual user interface empowers business analysts to find, explore,transform, blend and analyze big data, and then easily share results.
About this guideThis guide describes how to configure and install Oracle Big Data Discovery. It also provides information ontasks you can perform after deployment and instructions for uninstalling the product.
This guide relates specifically to Big Data Discovery version 1.3.2. The most up-to-date version of thisdocument is available on the http://www.oracle.com/technetwork/index.html.
Note: This guide does not describe how to install Big Data Discovery on the Oracle Big DataAppliance. If you want to install on the Big Data Appliance, see the Oracle Big Data ApplianceOwner's Guide Release 4 (4.7) and the corresponding MOS note.
AudienceThis guide addresses administrators and engineers who need to install and deploy Big Data Discovery withintheir existing Hadoop environment.
ConventionsThe following conventions are used in this document.
Typographic conventions
The following table describes the typographic conventions used in this document.
Typeface Meaning
User Interface Elements This formatting is used for graphical user interface elements such aspages, dialog boxes, buttons, and fields.
Code Sample This formatting is used for sample code segments within a paragraph.
Variable This formatting is used for variable values.
For variables within a code sample, the formatting is Variable.
File Path This formatting is used for file names and paths.
Oracle® Big Data Discovery : Installation Guide Version 1.3.2 • Revision C • January 2017

Preface 7
Path variable conventions
This table describes the path variable conventions used in this document.
Path variable Meaning
$ORACLE_HOME Indicates the absolute path to your Oracle Middleware home directory,where BDD and WebLogic Server are installed.
$BDD_HOME Indicates the absolute path to your Oracle Big Data Discovery homedirectory, $ORACLE_HOME/BDD-<version>.
$DOMAIN_HOME Indicates the absolute path to your WebLogic domain home directory. Forexample, if your domain is named bdd-<version>_domain, then$DOMAIN_HOME is $ORACLE_HOME/user_projects/domains/bdd-<version>_domain.
$DGRAPH_HOME Indicates the absolute path to your Dgraph home directory,$BDD_HOME/dgraph.
Contacting Oracle Customer SupportOracle customers that have purchased support have access to electronic support through My Oracle Support.This includes important information regarding Oracle software, implementation questions, product and solutionhelp, as well as overall news and updates from Oracle.
You can contact Oracle Customer Support through Oracle's Support portal, My Oracle Support athttps://support.oracle.com.
Oracle® Big Data Discovery : Installation Guide Version 1.3.2 • Revision C • January 2017

Part I
Before You Install

Chapter 1
Introduction
The following sections describe Oracle Big Data Discovery and how it integrates with other software products.They also describe some of the different cluster configurations Big Data Discovery supports.
The Big Data Discovery software package
Integration with Hadoop
Integration with WebLogic
Integration with Jetty
Cluster configurations and diagrams
A note about component names
The Big Data Discovery software packageOracle Big Data Discovery has a number of distinct components, which are installed simultaneously.
Studio
Studio is Big Data Discovery's front-end web application. It provides tools that you can use to create andmanage data sets and projects, as well as administrator tools for managing end user access and othersettings. Studio stores its project data and the majority of its configuration in a relational database.
Studio is a Java-based application. It runs inside the WebLogic Server, along with the Dgraph Gateway.
Dgraph Gateway
The Dgraph Gateway is a Java-based interface that routes requests to the Dgraph instances and providescaching and business logic. It also leverages Hadoop ZooKeeper to handle cluster services for the Dgraphinstances.
The Dgraph Gateway runs inside WebLogic Server, along with Studio.
Transform Service
The Transform Service processes end user-defined changes to data sets (called transformations) on behalf ofStudio. It enables you to preview the effects your transformations will have on your data before saving them.
The Transform Service is a web application that runs inside a Jetty container. It is separate from Studio andthe Dgraph Gateway.
Oracle® Big Data Discovery : Installation Guide Version 1.3.2 • Revision C • January 2017
Introduction 10
Data Processing
Data Processing collectively refers to a set of processes and jobs that discover, sample, profile, and enrichsource data. Many of these processes run within Hadoop, so Data Processing must be installed on Hadoopnodes.
Data Processing CLI
The Data Processing Command Line Interface (CLI) provides a way to manually launch Data Processing jobsand invoke the Hive Table Detector (see below). It can also be configured to run as a cron job.
The CLI is automatically installed on all Managed Servers and Dgraph nodes. It can later be moved to anynode that has access to the Big Data Discovery deployment.
Hive Table Detector
The Hive Table Detector is a Data Processing component that monitors the Hive database for new or deletedtables, and launches Data Processing workflows as needed.
The Hive Table Detector is invoked by the CLI, either manually by the Hive administrator or via the CLI cronjob. If you enable the CLI to run as a cron job, the Hive Table Detector runs at each invocation of the cron job.
Dgraph
The Dgraph indexes the data sets produced by Data Processing and stores them in databases on eitherHDFS or a shared NFS. It also responds to end user queries for data routed to it by the Dgraph Gateway. It isdesigned to be stateless, so each Dgraph instance can respond to queries independently of the others.
The nodes the Dgraph instances can be hosted on depend on whether the databases are stored on HDFS oran NFS. These nodes form a Dgraph cluster inside the BDD cluster.
Dgraph HDFS Agent
The Dgraph HDFS Agent acts as a data transport layer between the Dgraph and the HDFS environment. Itexports records to HDFS on behalf of the Dgraph, and imports records from HDFS during data ingestoperations.
The HDFS Agent is automatically installed on the same nodes as the Dgraph.
Integration with HadoopBDD runs on top of an existing Hadoop cluster, which provides a number of components and tools that BDDrequires to process and manage data. For example, the Hadoop Distributed File System (HDFS) stores yoursource data and Hadoop Spark on YARN runs all Data Processing jobs.
BDD supports the following Hadoop distributions:
• Cloudera Distribution for Hadoop (CDH) 5.5.x (min. 5.5.2), 5.6, 5.7.x (min. 5.7.1), 5.8
• Hortonworks Data Platform (HDP) 2.3.4.17-5, 2.4.x (min. 2.4.2)
• MapR Converged Data Platform (MapR) 5.1
Oracle® Big Data Discovery : Installation Guide Version 1.3.2 • Revision C • January 2017

Introduction 11
You must have one of these installed on your cluster before installing BDD, as the configuration of yourHadoop cluster determines where some of the BDD components will be installed. However, Hadoop doesn'tneed to be on every node that will host BDD, as some BDD components don't require Hadoop to function. Formore information, see Hadoop requirements on page 24.
Note: You can't connect BDD to more than one Hadoop cluster.
Integration with WebLogicWebLogic Server provides a J2EE container for hosting and managing Studio and the Dgraph Gateway, whichare J2EE applications. Additionally, WebLogic's Admin Server plays an important role in the installationprocess and administering BDD after installing.
WebLogic Server 12c (12.1.3) is included in the BDD media pack and automatically installed on all nodes thatwill host Studio and the Dgraph Gateway.
Note: BDD does not currently support integration with an existing WebLogic installation. You must usethe version included with the BDD packages.
The WebLogic Admin Server serves as a central point of control for your BDD cluster. Before installing, youselect a node to be the Admin Server and perform the entire installation from it. After installation, you canperform script-based administrative tasks—such as starting individual components and updating the clusterconfiguration—from this node.
You can also use the WebLogic Administration Console and WLST (WebLogic Server Scripting Tool) forstarting and stopping the Managed Servers that host Studio and the Dgraph Gateway.
Integration with JettyJetty provides an open-source javax.servlet container for hosting the Transform Service.
BDD supports Jetty 9, which is included in the BDD package. The BDD installer will automatically install Jettyand deploy the Transform Service within its own Jetty container.
Cluster configurations and diagramsBDD supports many different cluster configurations. You should determine the one that best suits your needsbefore installing.
The following sections describe three configurations suitable for demonstration, development, and productionenvironments, and their possible variations.
Note: You aren't limited to the deployment configurations described below. You can deploy BDD intoany configuration that meets your data processing needs.
Single-node demo environment
You can install BDD in a demo environment running on a single physical or virtual machine. This configurationcan only handle a limited amount of data, so it is recommended solely for demonstrating the product'sfunctionality with small a small sample database.
Oracle® Big Data Discovery : Installation Guide Version 1.3.2 • Revision C • January 2017
Introduction 12
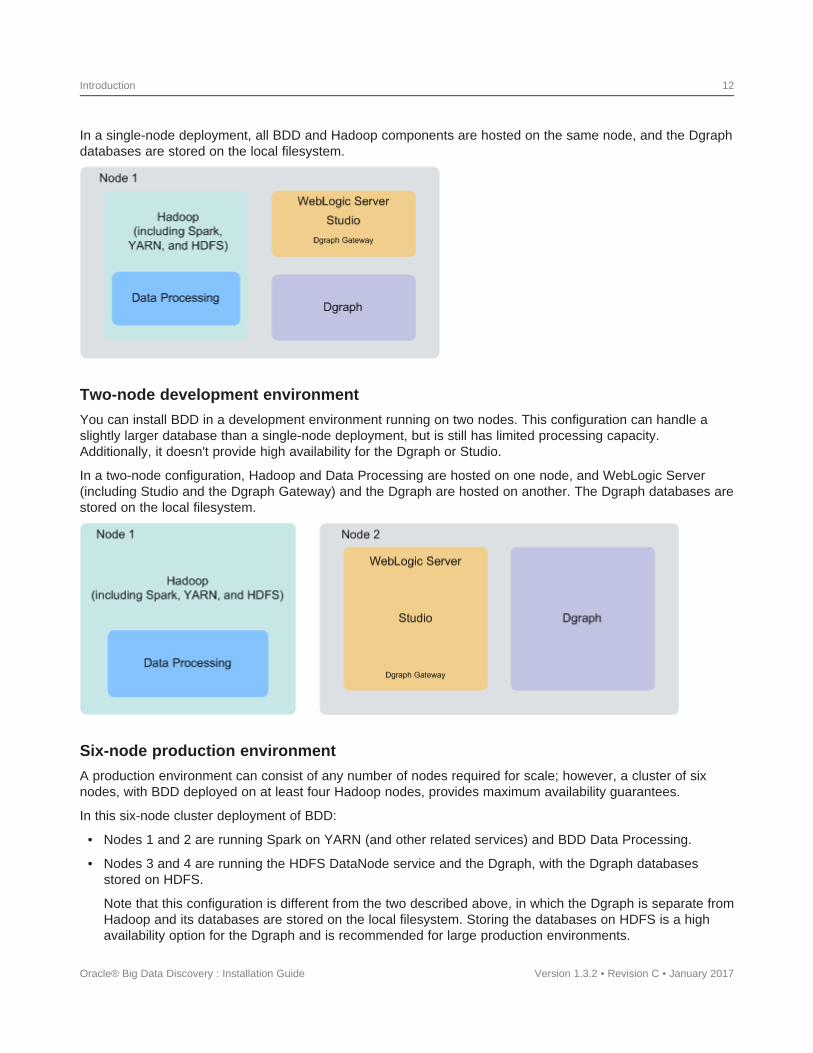
In a single-node deployment, all BDD and Hadoop components are hosted on the same node, and the Dgraphdatabases are stored on the local filesystem.
Two-node development environment
You can install BDD in a development environment running on two nodes. This configuration can handle aslightly larger database than a single-node deployment, but is still has limited processing capacity.Additionally, it doesn't provide high availability for the Dgraph or Studio.
In a two-node configuration, Hadoop and Data Processing are hosted on one node, and WebLogic Server(including Studio and the Dgraph Gateway) and the Dgraph are hosted on another. The Dgraph databases arestored on the local filesystem.
Six-node production environment
A production environment can consist of any number of nodes required for scale; however, a cluster of sixnodes, with BDD deployed on at least four Hadoop nodes, provides maximum availability guarantees.
In this six-node cluster deployment of BDD:
• Nodes 1 and 2 are running Spark on YARN (and other related services) and BDD Data Processing.
• Nodes 3 and 4 are running the HDFS DataNode service and the Dgraph, with the Dgraph databasesstored on HDFS.
Note that this configuration is different from the two described above, in which the Dgraph is separate fromHadoop and its databases are stored on the local filesystem. Storing the databases on HDFS is a highavailability option for the Dgraph and is recommended for large production environments.
Oracle® Big Data Discovery : Installation Guide Version 1.3.2 • Revision C • January 2017

Introduction 13
• Nodes 4 and 5 are running WebLogic Server, Studio, and the Dgraph Gateway. Having two of thesenodes ensures minimal redundancy of the Studio instances.
Remember that you aren't restricted to the above configuration—your cluster can contain as many DataProcessing, WebLogic Server, and Dgraph nodes as necessary. You can also co-locate WebLogic Server andHadoop on the same nodes, or host your databases on a shared NFS and run the Dgraph on its own node.Be aware that these decisions may impact your cluster's overall performance and are dependent on your site'sresources and requirements.
About the number of nodes
Although this document doesn't include sizing recommendations, you can use the following guidelines alongwith your site's specific requirements to determine an appropriate size for your cluster. You can also add moreDgraph and Data Processing nodes later on, if necessary; for more information, see the Administrator's Guide.
Note: You can't add more WebLogic Server nodes without reinstalling, so be sure to determine thenumber you need beforehand.
• Data Processing nodes: Your BDD cluster must include at least one Hadoop node running DataProcessing. For high availability, Oracle recommends having at least three. (Note: Your pre-existingHadoop cluster may have more than three nodes. The Hadoop nodes discussed here are those that BDDhas also been installed on.) The BDD installer will automatically install Data Processing on all Hadoopnodes running Spark on YARN, YARN, and HDFS.
• WebLogic Server nodes: Your BDD cluster must include at least one WebLogic Server node runningStudio and the Dgraph Gateway. There is no recommended number of Studio instances, but if you expectto have a large number of end users making queries at the same time, you might want two.
Oracle® Big Data Discovery : Installation Guide Version 1.3.2 • Revision C • January 2017

Introduction 14
• Dgraph nodes: Your deployment must include at least one Dgraph instance. If there are more than one,they will run as a cluster within the BDD cluster. Having a cluster of Dgraphs is desirable because itenhances high availability of query processing. Note that if your Dgraph databases are on HDFS, theDgraph must be installed on HDFS DataNodes.
Note: You can add and remove nodes from your Hadoop cluster without reinstalling BDD.
Co-locating Hadoop, WebLogic Server, and the Dgraph
One way to configure your cluster is to co-locate different components on the same nodes. This is a moreefficient use of your hardware, since you don't have to devote an entire node to any specific BDD component.
Be aware, however, that the co-located components will compete for memory, which can have a negativeimpact on performance. The decision to host different components on the same nodes depends on your site'sproduction requirements and your hardware's capacity.
Any combination of Hadoop and BDD components can run on a single node, including all three together.Possible combinations include:
• The Dgraph and Hadoop. The Dgraph can run on Hadoop DataNodes. This is required if you store yourdatabases on HDFS, and is also an option if you store them on an NFS.
For best performance, you shouldn't host the Dgraph on a node running Spark on YARN as bothprocesses require a lot of memory. However, if you have to co-locate them, you can use cgroups topartition resources for the Dgraph. For more information, see Setting up cgroups on page 36.
• The Dgraph and WebLogic Server. The Dgraph and WebLogic Server can be hosted on the same node.If you do this, you should configure the WebLogic Server to consume a limited amount of memory toensure the Dgraph has access to sufficient resources for its query processing.
• WebLogic Server and Hadoop. WebLogic Server can run on any of your Hadoop nodes. If do this, youshould configure WebLogic Server to consume a limited amount of memory to ensure that Hadoop hasaccess to sufficient resources for processing.
A note about component namesSome of the installation files and scripts may contain references to the Endeca Server, which is a legacy namefor the Dgraph Gateway. This document refers to the component as the Dgraph Gateway, and notes anydiscrepancies to avoid confusion.
Oracle® Big Data Discovery : Installation Guide Version 1.3.2 • Revision C • January 2017
Chapter 2
Prerequisites
The following sections describe the hardware and software requirements your environment must meet beforeyou can install BDD.
Supported platforms
Hardware requirements
Memory requirements
Disk space requirements
Network requirements
Supported operating systems
Required Linux utilities
OS user requirements
Hadoop requirements
JDK requirements
Security options
Dgraph database requirements
Studio database requirements
Supported Web browsers
Screen resolution requirements
Studio support for iPad
Supported platformsThe following tables list the platforms and versions supported in each BDD release.
Note that this is not an exhaustive list of BDD's requirements. Be sure to read through the rest of this chapterbefore installing for more information about the components and configuration changes BDD requires.
Supported Hadoop distributions
Big Data Discovery version Hadoop distribution Supported version(s)
1.0 Cloudera Distribution for Hadoop 5.3.0
Oracle® Big Data Discovery : Installation Guide Version 1.3.2 • Revision C • January 2017

Prerequisites 16
Big Data Discovery version Hadoop distribution Supported version(s)
1.1.x Cloudera Distribution for Hadoop 5.3.x, 5.4.x, 5.5.2
Hortonworks Data Platform 2.2.4-2.3.x
1.2.0 Cloudera Distribution for Hadoop 5.5.2+
Hortonworks Data Platform 2.3.4.17-5
1.2.2 Cloudera Distribution for Hadoop 5.5.x (min. 5.5.2), 5.6, 5.7.1
Hortonworks Data Platform 2.3.4.17-5, 2.4.x (min. 2.4.2)
1.3.x Cloudera Distribution for Hadoop 5.5.x (min. 5.5.2), 5.6, 5.7.x (min.5.7.1), 5.8
Hortonworks Data Platform2.3.4.17-5, 2.4.x (min. 2.4.2)
MapR Converged Data Platform5.1
Supported Big Data Appliance versions
Big Data Discovery version Supported Big Data Appliance version(s)
1.0 N/A
1.1.x 4.3, 4.4
1.2.0 4.4
1.2.2 4.4, 4.5
1.3.x 4.5, 4.6, 4.7
Supported operating systems
Big Data Discovery version Operating system Supported version(s)
1.0 Oracle Enterprise Linux 6
Red Hat Enterprise Linux 6
1.1.x Oracle Enterprise Linux 6.4+
Red Hat Enterprise Linux 6.4+
1.2.0 Oracle Enterprise Linux 6.4+, 7.1
Red Hat Enterprise Linux 6.4+, 7.1
Oracle® Big Data Discovery : Installation Guide Version 1.3.2 • Revision C • January 2017

Prerequisites 17
Big Data Discovery version Operating system Supported version(s)
1.2.2 Oracle Enterprise Linux 6.4+, 7.1
Red Hat Enterprise Linux 6.4+, 7.1
1.3.x Oracle Enterprise Linux 6.4+, 7.1
Red Hat Enterprise Linux 6.4+, 7.1
Supported application servers
Big Data Discovery version Application server Supported version(s)
1.0 Oracle WebLogic Server 12c 12.1.3
1.1.x Oracle WebLogic Server 12c 12.1.3
1.2.0 Oracle WebLogic Server 12c 12.1.3
1.2.2 Oracle WebLogic Server 12c 12.1.3
1.3.x Oracle WebLogic Server 12c 12.1.3
Supported JDK versions
Big Data Discovery version Supported JDK version(s)
1.0 HotSpot jdk 7U67+ x64
1.1.x HotSpot JDK 7u67+ x64
HotSpot JDK 8u45+ x64
1.2.0 HotSpot JDK 7u67+ x64
HotSpot JDK 8u45+ x64
1.2.2 HotSpot JDK 7u67+ x64
HotSpot JDK 8u45+ x64
1.3.x HotSpot JDK 7u67+ x64
HotSpot JDK 8u45+ x64
Oracle® Big Data Discovery : Installation Guide Version 1.3.2 • Revision C • January 2017
Prerequisites 18
Supported Studio database servers
Big Data Discovery version Database server Supported version(s)
1.0 Oracle 11g, 12c 12.1.0.1.0+
MySQL 5.5.3+
Hypersonic (non-prod environments, only) N/A
1.1.x Oracle 11g, 12c 12.1.0.1.0+
MySQL 5.5.3+
Hypersonic (non-prod environments, only) N/A
1.2.0 Oracle 11g, 12c 12.1.0.1.0+
MySQL 5.5.3+
Hypersonic (non-prod environments, only) N/A
1.2.2 Oracle 11g, 12c 12.1.0.1.0+
MySQL 5.5.3+
Hypersonic (non-prod environments, only) N/A
1.3.x Oracle 11g, 12c 12.1.0.1.0+
MySQL 5.5.3+
Hypersonic (non-prod environments, only) N/A
Supported browsers
Big Data Discovery version Supported browsers
1.0 Internet Explorer 10, 11
Firefox ESR
Chrome for Business
Safari Mobile 7.x
1.1.x Internet Explorer 10, 11
Firefox ESR
Chrome for Business
Safari Mobile 8.x
Oracle® Big Data Discovery : Installation Guide Version 1.3.2 • Revision C • January 2017
Prerequisites 19
Big Data Discovery version Supported browsers
1.2.0 Internet Explorer 11
Firefox ESR
Chrome for Business
Safari Mobile 9.x
1.2.2 Internet Explorer 11
Firefox ESR
Chrome for Business
Safari Mobile 9.x
1.3.x Internet Explorer 11
Firefox ESR
Chrome for Business
Safari Mobile 9.x
Hardware requirementsThe hardware requirements for your BDD installation depend on the amount of data you will process. Oraclerecommends the following minimum requirements:
Note: In this guide, the term "x64" refers to any processor compatible with the AMD64/EM64Tarchitecture. You might need to upgrade your hardware, depending on the data you are processing.All run-time code must fit entirely in RAM. Likewise, hard disk capacity must be sufficient based on thesize of your data set. Please contact your Oracle representative if you need more information onsizing your hardware.
• x86_64 dual-core CPU for Dgraph nodes
• x86_64 quad-core CPU for WebLogic Managed Servers, which will run Studio and the Dgraph Gateway
Note: Oracle recommends turning off hyper-threading for Dgraph nodes. Because of the way theDgraph works, hyper-threading is actually detrimental to cache performance.
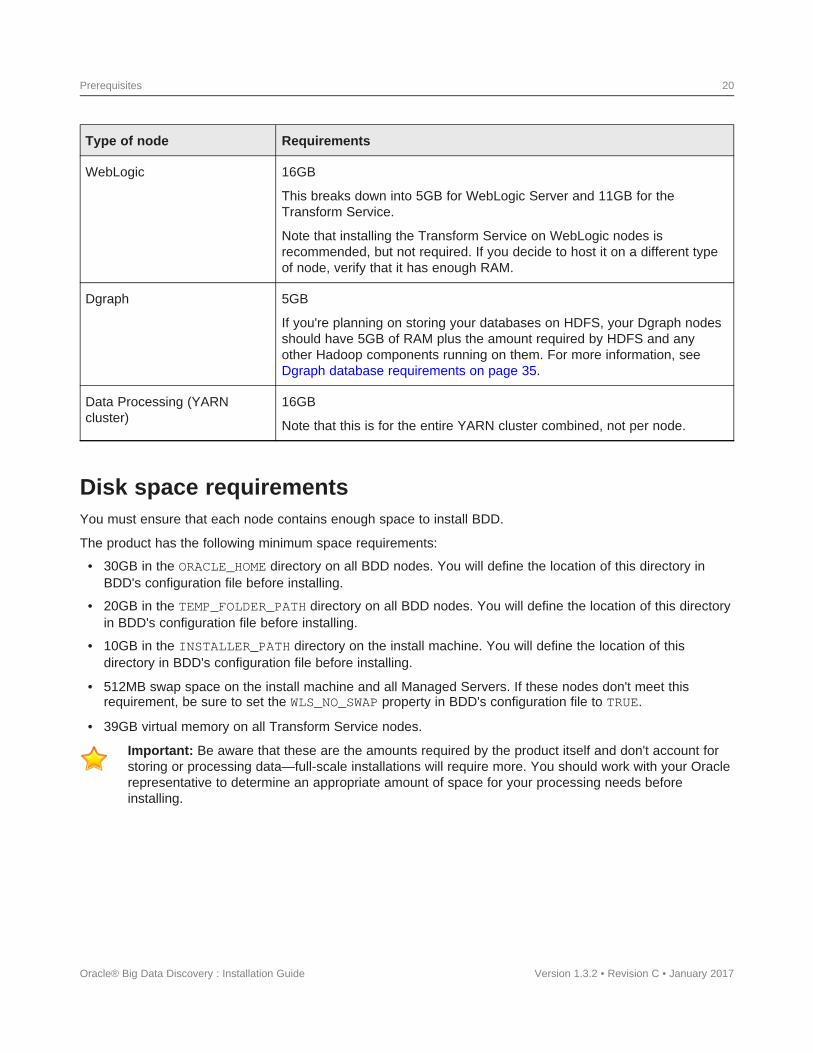
Memory requirementsThe amount of RAM your system requires depends on the amount of data you plan on processing.
The following table lists the minimum amounts of RAM required to install BDD on each type of node.
Important: Be aware that these are the amounts required by the product itself and don't account forstoring or processing data—full-scale installations will require more. You should work with your Oraclerepresentative to determine an appropriate amount for your processing needs before installing.
Oracle® Big Data Discovery : Installation Guide Version 1.3.2 • Revision C • January 2017
Prerequisites 20
Type of node Requirements
WebLogic 16GB
This breaks down into 5GB for WebLogic Server and 11GB for theTransform Service.
Note that installing the Transform Service on WebLogic nodes isrecommended, but not required. If you decide to host it on a different typeof node, verify that it has enough RAM.
Dgraph 5GB
If you're planning on storing your databases on HDFS, your Dgraph nodesshould have 5GB of RAM plus the amount required by HDFS and anyother Hadoop components running on them. For more information, seeDgraph database requirements on page 35.
Data Processing (YARN 16GBcluster)
Note that this is for the entire YARN cluster combined, not per node.
Disk space requirementsYou must ensure that each node contains enough space to install BDD.
The product has the following minimum space requirements:
• 30GB in the ORACLE_HOME directory on all BDD nodes. You will define the location of this directory inBDD's configuration file before installing.
• 20GB in the TEMP_FOLDER_PATH directory on all BDD nodes. You will define the location of this directoryin BDD's configuration file before installing.
• 10GB in the INSTALLER_PATH directory on the install machine. You will define the location of thisdirectory in BDD's configuration file before installing.
• 512MB swap space on the install machine and all Managed Servers. If these nodes don't meet thisrequirement, be sure to set the WLS_NO_SWAP property in BDD's configuration file to TRUE.
• 39GB virtual memory on all Transform Service nodes.
Important: Be aware that these are the amounts required by the product itself and don't account forstoring or processing data—full-scale installations will require more. You should work with your Oraclerepresentative to determine an appropriate amount of space for your processing needs beforeinstalling.
Oracle® Big Data Discovery : Installation Guide Version 1.3.2 • Revision C • January 2017
Prerequisites 21
Network requirementsThe hostname of each BDD machine must be externally-resolvable and accessible using the machine's IPaddress. Oracle recommends using only Fully Qualified Domain Names (FQDNs).
Supported operating systemsBDD supports the following operating systems:
• Oracle Enterprise Linux 6.4+, 7.1 x64
• Red Hat Enterprise Linux 6.4+, 7.1 x64
One of these must be installed on all nodes in the cluster, including Hadoop nodes.
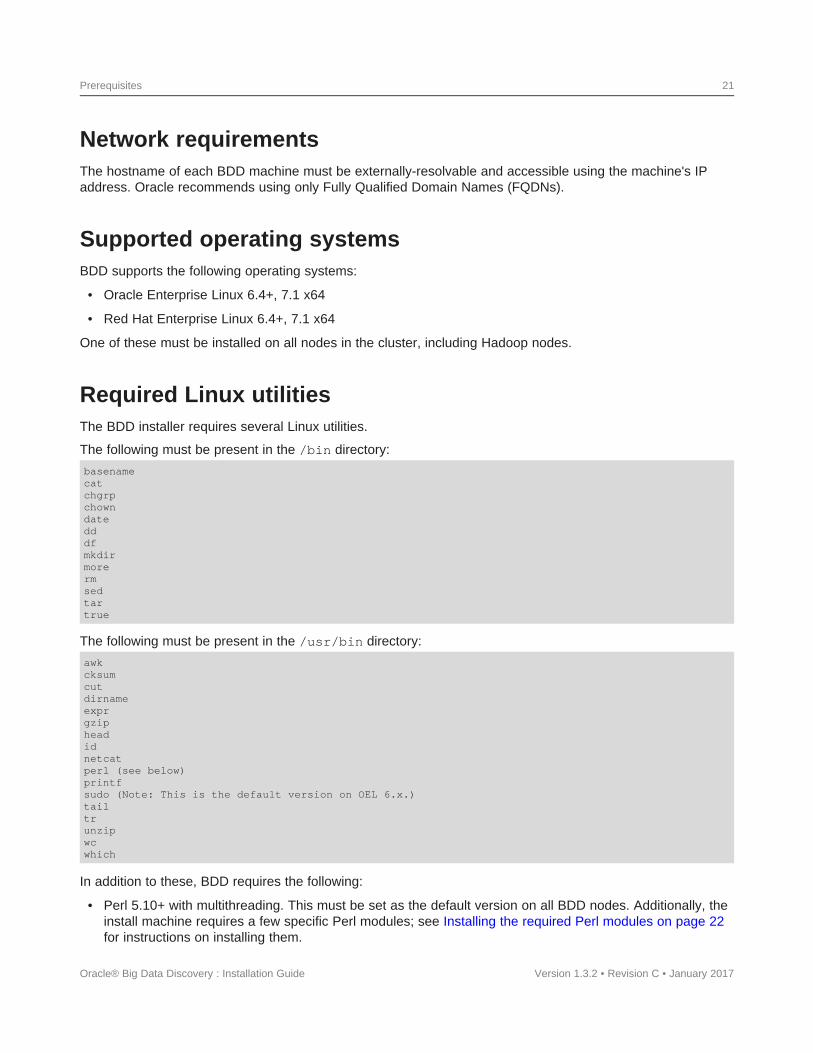
Required Linux utilitiesThe BDD installer requires several Linux utilities.
The following must be present in the /bin directory:
basenamecatchgrpchowndatedddfmkdirmorermsedtartrue
Version 1.3.2 • Revision C • January 2017
The following must be present in the /usr/bin directory:
awkcksumcutdirnameexprgzipheadidnetcatperl (see below)printfsudo (Note: This is the default version on OEL 6.x.)tailtrunzipwcwhich
In addition to these, BDD requires the following:
• Perl 5.10+ with multithreading. This must be set as the default version on all BDD nodes. Additionally, theinstall machine requires a few specific Perl modules; see Installing the required Perl modules on page 22for instructions on installing them.
Oracle® Big Data Discovery : Installation Guide

Prerequisites 22
• The default umask set to 022 on all BDD nodes, including Hadoop nodes.
• curl 7.19.7+, with support for the --tlsv1.2 and --negotiate options. This must be installed on allnodes that will host Studio.
• Network Security Services (NSS) 3.16.1+ on all nodes that will host Studio.
• nss-devel on all nodes that will host Studio. This contains the nss-config command, which must beinstalled in /usr/bin.
nss-devel is included in Linux 6.7 and higher, but needs to be installed manually on older versions. Tosee if it's installed, run:
sudo rpm -q nss-devel
Version 1.3.2 • Revision C • January 2017
If nss-devel is installed, the above command should return its version number. You should also verifythat nss-config is available in /usr/bin.
If you don't have nss-devel, install it by running:
sudo yum install nss-devel
nss-config will be installed in /usr/bin by default.
• tty disabled for sudo. If it's currently enabled, comment out the line Defaults requiretty in/etc/sudoers on all nodes:
#Defaults requiretty
Installing the required Perl modules
Installing the required Perl modules
Three Perl modules are required on the install machine.
These are:
• Mail::Address
• XML::Parser
• JSON-2.90
Note: You only need to perform this procedure on the install machine. These modules aren't requiredon any other nodes.
To install the required Perl modules:
1. Install Mail::Address:
(a) Download Mail::Address from http://pkgs.fedoraproject.org/repo/pkgs/perl-MailTools/MailTools-2.14.tar.gz/813ae849683367bb75e6be89e4e8cc46/MailTools-2.14.tar.gz.
(b) Extract MailTools-2.14.tar.gz:
tar -xvf MailTools-2.14.tar.gz
This creates a directory called /MailTools-2.14.
(c) Go to /MailTools-2.14 and run the following commands to install the module:
perl Makefile.PL
Oracle® Big Data Discovery : Installation Guide
Prerequisites 23
makemake testsudo make install
Version 1.3.2 • Revision C • January 2017
2. Install XML::Parser:
(a) Download XML::Parser from http://search.cpan.org/CPAN/authors/id/T/TO/TODDR/XML-Parser-2.44.tar.gz.
(b) Extract XML-Parser-2.44.tar.gz:
tar -xvf XML-Parser-2.44.tar.gz
This creates a directory called /XML-Parser-2.44.
(c) Go to /XML-Parser-2.44 and run the following commands to install the module:
perl Makefile.PLmakemake testsudo make install
3. Install JSON-2.90:
(a) Download JSON-2.90 from http://search.cpan.org/CPAN/authors/id/M/MA/MAKAMAKA/JSON-2.90.tar.gz.
(b) Extract JSON-2.90.tar.gz:
tar -xvf JSON-2.90.tar.gz
This creates a directory called /JSON-2.90.
(c) Go to /JSON-2.90 and run the following commands to install the module:
perl Makefile.PLmakemake testsudo make install
OS user requirementsThe entire installation must be performed by a single OS user, called the bdd user. After installing, this userwill run all BDD processes.
You must create this user or select an existing one to fill this role before installing. Although this documentrefers to it as the bdd user, its name is arbitrary.
The user you choose must meet the following requirements:
• It can't be the root user.
• Its UID must be the same on all nodes in the cluster, including Hadoop nodes.
• It must have passwordless sudo enabled on all nodes in the cluster, including Hadoop nodes.
• It must have passwordless SSH enabled on all nodes in the cluster, including Hadoop nodes, so that itcan log into each node from the install machine. For instructions on enabling this, see Enablingpasswordless SSH on page 24.
• It must have bash set as its default shell on all nodes in the cluster, including Hadoop nodes.
Oracle® Big Data Discovery : Installation Guide
Prerequisites 24
• It must have permission to create the directory BDD will be installed in on all nodes in the cluster,including Hadoop nodes. This directory is defined by the ORACLE_HOME property in the BDD configurationfile.
If your databases are located on HDFS, the bdd user has additional requirements. These are described inDgraph database requirements on page 35.
Enabling passwordless SSH
Enabling passwordless SSHYou must enable passwordless SSH on all nodes in the cluster for the bdd user.
To enable passwordless SSH for the bdd user:
1. Generate SSH keys on all nodes in the cluster, including Hadoop nodes.
2. Copy the keys to the install machine to create known_hosts and authorized_keys files.
3. Copy the known_hosts and authorized_keys files to all servers in the cluster.
Hadoop requirementsOne of the following Hadoop distributions must be running on your cluster before you install BDD:
• Cloudera Distribution for Hadoop (CDH) 5.5.x (min. 5.5.2), 5.6, 5.7.x (min. 5.7.1), 5.8. Enterprise edition isrecommended.
• Hortonworks Data Platform (HDP) 2.3.4.17-5, 2.4.x (min. 2.4.2)
• MapR Converged Data Platform (MapR) 5.1
Note: You can switch to a different version of your Hadoop distribution after installing BDD, ifnecessary. See the Administrator's Guide for more information.
BDD doesn't require all of the components each distribution provides, and the components it does requiredon't need to be installed on all nodes. The following table lists the required Hadoop components and thenode(s) they must be installed on.
Oracle® Big Data Discovery : Installation Guide Version 1.3.2 • Revision C • January 2017

Prerequisites 25
Note: If you are installing on a single machine, that machine must be running all required Hadoopcomponents.
Component Description
Cluster manager Your cluster manager depends on your Hadoop distribution:
• CDH: Cloudera Manager
• HDP: Ambari
• MapR: MapR Control System (MCS)
The installer uses a RESTful API to query your cluster manager for information aboutyour Hadoop nodes, such as their hostnames and port numbers.
Your cluster manager must be installed on at least one node in your cluster, although itdoesn't have to be on any that will host BDD.
ZooKeeper BDD uses ZooKeeper to manage the Dgraph instances and ensure high availability ofDgraph query processing. ZooKeeper must be installed on at least one node in yourHadoop cluster, although it doesn't have to be on any that will host BDD. For moreinformation on ZooKeeper and how it affects BDD's high availability, see theAdministrator's Guide.
All Managed Servers must be able to connect to a node running ZooKeeper.
HDFS/MapR-FS The Hive tables that contain your source data are stored in HDFS. HDFS must beinstalled on at least one node in your cluster.
You can also store your Dgraph databases on HDFS. If you choose to do this, theDgraph must be installed on HDFS DataNode service must be installed on all nodes thatwill run the Dgraph.
Note: MapR uses the MapR File System (MapR-FS) instead of standard HDFS,although this document typically refers to HDFS only for simplicity. Anyrequirements specific to MapR-FS will be called out explicitly.
HCatalog The Data Processing Hive Table Detector monitors HCatalog for new and deleted tablesthat require processing. HCatalog must be installed on at least one node in your Hadoopcluster, although it doesn't have to be one that will host BDD.
Hive All of your data is stored as Hive tables on HDFS. When BDD discovers a new ormodified Hive table, it launches a Data Processing workflow for that table.
Spark on YARN BDD uses Spark on YARN to run all Data Processing jobs. Spark on YARN must beinstalled on all nodes that will run Data Processing.
Hue You can use Hue to load your source data into Hive and to view data exported fromStudio.
Note: HDP doesn't include Hue. If you have HDP, you must install Hueseparately and set the HUE_URI property in BDD's configuration file. You canalso use the bdd-admin script to update this property after installation, ifnecessary. For more information, see the Administrator's Guide.
Oracle® Big Data Discovery : Installation Guide Version 1.3.2 • Revision C • January 2017

Prerequisites 26
Component Description
YARN YARN worker nodes run all Data Processing jobs. YARN must be installed on all nodesthat will run Data Processing.
Note: Data Processing will automatically be installed on nodes running the following Hadoopcomponents:
• Spark on YARN
• YARN
• HDFS
If you want to store your Dgraph databases on HDFS, the Dgraph must be installed on HDFSDataNodes. For more information, see Dgraph database requirements on page 35.
You must also make a few changes within your Hadoop cluster to ensure that BDD can communicate withyour Hadoop nodes. These changes are described below.
YARN setting changes
Required Hadoop client libraries
Required HDP JARs
MapR-specific requirements
YARN setting changes
To ensure that each YARN worker node has access to sufficient resources during processing, you need toupdate the following YARN-specific Hadoop properties.
You can access these properties in your Hadoop cluster manager (Cloudera Manager, Ambari, or MCS). Ifyou need help locating any of them, refer to your Hadoop distribution's documentation.
Property Description
yarn.nodemanager.resource.me The total amount of memory available to your entire YARN cluster.mory-mb This should be at least 16GB, although you might need to set it
higher depending on the amount of data you plan on processing.
yarn.scheduler.maximum- The maximum number of virtual CPU cores allocated to each YARNallocation-vcores container per request.
If your Hadoop cluster contains only one YARN worker node, thisshould be less than or equal to half of that node's cores. If itcontains multiple YARN worker nodes, this should be less than orequal to each node's total number of cores.
Oracle® Big Data Discovery : Installation Guide Version 1.3.2 • Revision C • January 2017
Prerequisites 27
Property Description
yarn.scheduler.maximum- The maximum amount of RAM allocated to each YARN containerallocation-mb per request.
If your Hadoop cluster contains only one YARN worker node, thisshould be less than or equal to half of that node's RAM. If it containsmultiple YARN worker nodes, this should be less than or equal toeach node's total amount of RAM.
yarn.scheduler.capacity.maxi The maximum number of concurrently-running jobs allowed on eachmum-applications node. This can be between 2 and 8.
Note that setting this value higher could cause jobs submitted at thesame time to hang indefinitely.
Required Hadoop client libraries
BDD requires a number of client libraries to interact with Hadoop. When the installer runs, it adds theselibraries to a single JAR, called the Hadoop fat JAR, which it then distributes to all BDD nodes.
How you obtain the client libraries depends on your Hadoop distribution:
• CDH: The installer downloads the required libraries automatically. Note that this requires an internetconnection on the install machine. If the script can't download all of the client libraries, it will fail and youwill have to download them manually. See Failure to download the Hadoop client libraries on page 72 formore information.
• HDP: Locate the following directories on your Hadoop nodes and copy them to the install machine. Notethat they might not all be on the same node.
• /usr/hdp/<version>/hive/lib/
• /usr/hdp/<version>/spark/lib/
• /usr/hdp/<version>/hadoop/
• /usr/hdp/<version>/hadoop/lib/
• /usr/hdp/<version>/hadoop-hdfs/
• /usr/hdp/<version>/hadoop-hdfs/lib/
• /usr/hdp/<version>/hadoop-yarn/
• /usr/hdp/<version>/hadoop-yarn/lib/
• /usr/hdp/<version>/hadoop-mapreduce/
• /usr/hdp/<version>/hadoop-mapreduce/lib/
• MapR: Locate the following directories on your Hadoop nodes and copy them to the install machine. Notethat they might not all be on the same node.
• /opt/mapr/spark/spark-1.6.1/lib
• /opt/mapr/hive/hive-1.2/lib
• /opt/mapr/zookeeper/zookeeper-3.4.5
Oracle® Big Data Discovery : Installation Guide Version 1.3.2 • Revision C • January 2017

Prerequisites 28
• /opt/mapr/zookeeper/zookeeper-3.4.5/lib
• /opt/mapr/hadoop/hadoop-2.7.0/share/hadoop/common
• /opt/mapr/hadoop/hadoop-2.7.0/share/hadoop/common/lib
• /opt/mapr/hadoop/hadoop-2.7.0/share/hadoop/hdfs
• /opt/mapr/hadoop/hadoop-2.7.0/share/hadoop/hdfs/lib
• /opt/mapr/hadoop/hadoop-2.7.0/share/hadoop/mapreduce
• /opt/mapr/hadoop/hadoop-2.7.0/share/hadoop/mapreduce/lib
• /opt/mapr/hadoop/hadoop-2.7.0/share/hadoop/tools/lib
• /opt/mapr/hadoop/hadoop-2.7.0/share/hadoop/yarn
• /opt/mapr/hadoop/hadoop-2.7.0/share/hadoop/yarn/lib
Required HDP JARs
If you have HDP, make sure that the following JAR files are present on all of your Hadoop nodes.
Note: This isn't required if you have CDH or MapR.
• /usr/hdp/<version>/hive/lib/hive-metastore.jar
• /usr/hdp/<version>/spark/lib/spark-assembly-1.2.1.2.3.X-hadoop2.6.0.2.3.X.jar
If any are missing, copy them over from one of your Hive or Spark nodes.
MapR-specific requirements
If you have MapR, your system must meet a few additional requirements.
• The MapR Client must be installed and added to the $PATH on all non-MapR nodes that will host theDgraph, Studio, and the Transform Service (if different from Studio nodes). Note that the Client isn'trequired on these nodes if they host any MapR processes.
For instructions on installing the MapR Client, see Installing the MapR Client in MapR's documentation.
• Pluggable authentication modules (PAMs) must be disabled for the installation.
• The yarn.resourcemanager.hostname property in yarn-site.xml must be set to the fully-qualifieddomain name (FQDN) of your YARN ResourceManager. For instructions on updating this property, seeUpdating the YARN ResourceManager configuration on page 29.
• The directories /user/HDFS_DP_USER_DIR/<bdd> and /user/HDFS_DP_USER_DIR/edp/data mustbe either nonexistent or mounted with a volume. HDFS_DP_USER_DIR is defined in BDD's configurationfile, and <bdd> is be the name of the bdd user.
• The /opt/mapr/zkdata and /opt/mapr/zookeeper/zookeeper-3.4.5/logs directories musthave their permissions set to 755.
• If you want to store your Dgraph databases on MapR-FS, the directory defined by DGRAPH_INDEX_DIR inBDD's configuration file must be either nonexistent or mounted with a volume. Additionally, the MapR NFS
Oracle® Big Data Discovery : Installation Guide Version 1.3.2 • Revision C • January 2017

Prerequisites 29
service must be installed on all nodes that will host the Dgraph. For more information, see HDFS on page36.
• The required Spark, ZooKeeper, and Hive patches must be installed as described in Applying the MapRpatches on page 29.
Updating the YARN ResourceManager configuration
If you have MapR, you must set the yarn.resourcemanager.hostname property in yarn-site.xml tothe fully-qualified domain name (FQDN) of your YARN ResourceManager.
Note: This procedure isn't required if you have CDH or HDP.
The property is set to 0.0.0.0 by default. To update it, run the following command on the machine hostingMCS:
/opt/mapr/server/configure.sh -C <cldb_host>[:<cldb_port>][,<cldb_host>[:<cldb_port>]...]-Z <zk_host>[:<zk_port>][,<zk_host>[:<zk_port>]...] [-RM <rm_host>] [-HS <hs_host>] [-L <logfile>][-N <cluster_name>]
Version 1.3.2 • Revision C • January 2017
Where:
• <cldb_host> and <cldb_port> are the FQDNs and ports of your container location database (CLDB)nodes
• <zk_host> and <zk_port> are the FQDNs and ports of your ZooKeeper nodes
• <rm_host> is the FQDN of your ResourceManager
• <hs_host> is the FQDN of your HistoryServer
• <logfile> is the log file configure.sh will write to
• <cluster_name> is the name of your MapR cluster
For more information on updating node configuration, see configure.sh in MapR's documentation.
Applying the MapR patches
If you have MapR, you must apply three sets of patches to your Hadoop cluster before installing BDD.
Note: These patches aren't required if you have CDH or HDP.
The patches are required to upgrade the versions of Spark, ZooKeeper, and Hive you have installed.Otherwise, BDD won't be able to work with them.
To apply the patches:
1. To apply the Spark patches, do the following on each Spark node:
(a) Download the following patches from http://archive.mapr.com/releases/ecosystem-5.x/redhat/:
• mapr-spark-master-1.6.1.201605311547-1.noarch.rpm
• mapr-spark-1.6.1.201605311547-1.noarch.rpm
• mapr-spark-historyserver-1.6.1.201605311547-1.noarch.rpm
Oracle® Big Data Discovery : Installation Guide
Prerequisites 30
(b) Go to the directory you put the patches in and install each by running:
rmp -ivh <patch>
Version 1.3.2 • Revision C • January 2017
If the patches succeeded, your Spark nodes should contain the directory/opt/mapr/spark/spark-1.6.1/.
2. To apply the ZooKeeper patch, do the following on each ZooKeeper node:
(a) Download the following patch from http://package.mapr.com/patches/releases/v5.1.0/redhat/:
• mapr-patch-5.1.0.37549.GA-38290.x86_64.rpm
(b) Apply the patch according to the instructions in MapR's Patch Installation Guide.
(c) Restart ZooKeeper by running:
sudo service mapr-zookeeper restart
(d) Verify that the patch succeeded by running:
echo status|nc <hostname> 5181|grep "Zookeeper version"
Where <hostname> is the hostname of the current ZooKeeper node.
The output should report ZooKeeper's current version as 1604, and not 1503:
Zookeeper version: 3.4.5-mapr-1604--1, built on 05/18/2016 14:50 GMT
3. To apply the Hive patches:
(a) Download the following patches from http://archive.mapr.com/releases/ecosystem-5.x/redhat/ andcopy them to each Hive node:
• mapr-hive-1.2.201606020917-1.noarch.rpm
• mapr-hivemetastore-1.2.201606020917-1.noarch.rpm
• mapr-hiveserver2-1.2.201606020917-1.noarch.rpm
• mapr-hivewebhcat-1.2.201606020917-1.noarch.rpm
(b) On each Hive node, go to the directory you put the patches in and install them by running:
rpm -Uvh <patch>
(c) Go to MCS and restart the HiveServer 2, Hivemeta, and WebHcat services.
4. Update your MapR cluster's configuration by running the following command:
/opt/mapr/server/configure.sh -R
JDK requirementsBDD requires one of the following JDK versions:
Note: BDD requires a JDK that includes the HotSpot JVM, which must support the MD5 algorithm.These requirements will be met by any version you download using the following links, as long as youdon't select a version from the JRockit Family.
• JDK 7u67+ x64
Oracle® Big Data Discovery : Installation Guide

Prerequisites 31
• JDK 8u45+ x64
The JDK must be installed in the same location on all nodes.
Note: If a supported JDK is installed on your Hadoop nodes, you can copy it to your BDD nodes.
Also, be sure to set the $JAVA_HOME environment variable on all nodes. If you have multiple versions of theJDK installed, be sure that this points to the correct one. If the path is set to or contains a symlink, the symlinkmust be identical on all other nodes.
Security optionsThe following sections describe methods for securing your BDD cluster.
Additional information on BDD security is available in the Security Guide.
Kerberos
Sentry
TLS/SSL
HDFS data at rest encryption
Other security options
Kerberos
The Kerberos network authentication protocol enables client/server applications to identify one another in asecure manner, even when communicating over an unsecured network.
In Kerberos terminology, individual applications are called principals. Each principal has a keytab file, whichcontains its key, or password. When one principal wants to communicate with another, it presents its keytabfile for authentication and is only granted access to the other principal if its name and key are recognized.Because keytab files are protected using strong encryption, this process still works over unsecured networks.
You can configure BDD to use Kerberos authentication for its communications with Hadoop. This is required ifKerberos is already enabled in your Hadoop cluster, and strongly recommended for production environmentsin general. BDD supports integration with Kerberos 5+.
Note: This procedure assumes you already have Kerberos enabled in your Hadoop cluster.
To enable Kerberos:
1. Create the following directories in HDFS:• /user/<bdd user>, where <bdd user> is the name of the bdd user.
• /user/<HDFS_DP_USER_DIR>, where <HDFS_DP_USER_DIR> is the value ofHDFS_DP_USER_DIR in BDD's configuration file.
The owner of both directories must be the bdd user. Their group must be the HDFS super usersgroup, which is defined by the dfs.permissions.supergroup configuration parameter. Thedefault value is supergroup.
Oracle® Big Data Discovery : Installation Guide Version 1.3.2 • Revision C • January 2017
Prerequisites 32
2. Add the bdd user to the hive group.
3. Add the bdd user to the hdfs group on all BDD nodes.
4. Create a BDD principal.
The primary component must be the name of the bdd user. The realm must be your default realm.
5. Generate a keytab file for the BDD principal and copy it to the install machine.
The name and location of this file are arbitrary. The installer will rename it bdd.keytab and copy it toall BDD nodes.
6. Copy the krb5.conf file from one of your Hadoop nodes to the install machine.
The location you put it in is arbitrary. The installer will copy it to /etc on all BDD nodes.
7. Install the kinit and kdestroy utilities on all BDD nodes.
8. If you have HDP, set the hadoop.proxyuser.hive.groups property in core-site.xml to *.
You can do this in Ambari.
You also need to manually configure Kerberos for the Transform Service after installing BDD. For instructions,see Enabling Kerberos for the Transform Service on page 81.
Sentry
Sentry provides role-based authorization in Hadoop clusters. Among other things, it can be used to restrictaccess to Hive data at a granular level.
Oracle strongly recommends using Sentry to protect your data from outside users. If you already have it set upin your Hadoop cluster, you must do a few things to enable BDD to work with it.
Note: The first two steps in this procedure are also required to enable Kerberos. If you've alreadydone them, you can skip them.
To enable Sentry:
1. If you haven't already, create the following directories in HDFS:• /user/<bdd user>, where <bdd user> is the name of the bdd user.
• /user/<HDFS_DP_USER_DIR>, where <HDFS_DP_USER_DIR> is the value ofHDFS_DP_USER_DIR in BDD's configuration file.
The owner of both directories must be the bdd user. Their group must be the HDFS super usersgroup, which is defined by the dfs.permissions.supergroup configuration parameter. Thedefault value is supergroup.
2. If you haven't already, add the bdd user to the hive group.
3. Create a new role for BDD:
create role <BDD_role>;grant all on server server1 to role <BDD_role>;show grant role <BDD_role>;grant role <BDD_role> to group hive;
Version 1.3.2 • Revision C • January 2017Oracle® Big Data Discovery : Installation Guide

Prerequisites 33
TLS/SSL
BDD can be installed on Hadoop clusters secured with TLS/SSL.
TLS/SSL can be configured for specific Hadoop services to encrypt communication between them. If you haveit enabled in Hadoop, you can enable it for BDD to encrypt its communications with your Hadoop cluster.
If your Hadoop cluster has TLS/SSL enabled, verify that your system meets the following requirements:
• Kerberos is enabled for both Hadoop and BDD. Note that this isn't required, but is strongly recommended.For more information, see Kerberos on page 31.
• TLS/SSL is enabled in your Hadoop cluster for the HDFS, YARN, Hive, and/or Key Management Server(KMS) services.
• The KMS service is installed in your Hadoop cluster. You should have already done this as part ofenabling TLS/SSL.
To enable BDD to run on a Hadoop cluster secured with TLS/SSL:
1. Export the public key certificates for all nodes running TLS/SSL-enabled HDFS, YARN, Hive, and/orKMS.
You can do this with the following command:
keytool -exportcert -alias <alias> -keystore <keystore_filename> -file <export_filename>
Version 1.3.2 • Revision C • January 2017
Where:
• <alias> is the certificate's alias.
• <keystore_filename> is the absolute path to your keystore file. You can find this in ClouderaManager, Ambari, or MCS.
• <export_filename> is the name of the file you want to export the keystore to.
2. Copy the exported certificates to a single directory on the install machine.
The location of this directory is arbitrary, as you will define it in BDD's configuration file beforeinstalling. Don't remove this directory after installing, as you will use it if you have to update thecertificates.
3. Verify that the password for $JAVA_HOME/jre/lib/security/cacerts is set to the default,changeit.
This is required by the installer. If it has been changed, be sure to set it back to the default.
When the installer runs, it imports the certificates to the custom truststore file, then copies the truststore to$BDD_HOME/common/security/cacerts on all BDD nodes.
Oracle® Big Data Discovery : Installation Guide

Prerequisites 34
HDFS data at rest encryption
HDFS data at rest encryption allows data to be stored in encrypted HDFS directories called encryption zones.All files within an encryption zone are transparently encrypted and decrypted on the client side, meaningdecrypted data is never stored in HDFS.
If HDFS data at rest encryption is enabled in your Hadoop cluster, you must enable it for BDD, as well. Verifythat your system meets the following requirements:
• The key trustee KMS and key trustee server are installed and configured in your Hadoop cluster. Youshould have already done this as part of enabling HDFS data at rest encryption.
• Kerberos is enabled for both Hadoop and BDD. Note that this isn't required, but is strongly recommended.For more information, see Kerberos on page 31.
• TLS/SSL is enabled for both Hadoop and BDD. Note that this isn't required, but is strongly recommended.For more information, see TLS/SSL on page 33.
To enable HDFS data at rest encryption for BDD:
1. Create an encryption zone in HDFS for your BDD files.
For instructions, refer to the documentation for your Hadoop distribution.
2. Grant the bdd user the GENERATE_EEK and DECRYPT_EEK privileges for the encryption anddecryption keys.
You can do this in Cloudera Manager, Ambari, or MCS by adding the following properties to the KMSservice's kms-acls.xml file. If you need help locating them, refer to your distribution'sdocumentation.
<property><name>key.acl.bdd_key.DECRYPT_EEK</name><value>bdd,hdfs supergroup</value><description>
ACL for DECRYPT_EEK operations on key 'bdd_key'.</description>
</property><property>
<name>key.acl.bdd_key.GENERATE_EEK</name><value>bdd supergroup</value><description>
ACL for GENERATE_EEK operations on key 'bdd_key'.</description>
</property>
Version 1.3.2 • Revision C • January 2017
Be sure to replace bdd in the above code with the name of the bdd user and supergroup with thename of the HDFS super users group, which is defined by the dfs.permissions.supergroupconfiguration parameter.
Also note that the hdfs user is included in the value of the DECRYPT_EEK property. This is required ifyou're storing your Dgraph databases on HDFS, but can be omitted otherwise. For more information,see Installing the HDFS NFS Gateway service on page 38.
Oracle® Big Data Discovery : Installation Guide

Prerequisites 35
Other security options
You can further protect BDD by installing it behind a firewall and enabling TLS/SSL on Studio's outward-facingports.
Firewalls
Oracle recommends using a firewall to protect your network and BDD cluster from external entities. A firewalllimits traffic into and out of your network, creating a secure barrier around it. It can consist of a combination ofsoftware and hardware, including routers and dedicated gateway machines.
There are multiple types of firewalls, so be sure to choose one that suits your resources and specific needs.One option is to use a reverse proxy server as part of your firewall, which you can configure after installingBDD. For instructions, see Using Studio with a Reverse Proxy on page 87.
TLS/SSL in Studio
You can enable TLS/SSL on Studio's outward-facing ports in one or both of the following ways:
• Enable encryption through WebLogic Server. You can do this by setting WLS_SECURE_MODE to TRUE inBDD's configuration file.
This method activates WebLogic's default demo keystores, which you should replace with your owncertificates after deployment. For more information, see Replacing certificates on page 84.
• Set up a reverse-proxy server. For instructions on how to do this, see About reverse proxies on page 88.
Note: These methods don't enable encryption on the inward-facing port on which the Dgraph Gatewaylistens for requests from Studio.
Dgraph database requirementsThe data sets the Dgraph queries are stored in databases. For high availability, these can be stored onHDFS/MapR-FS or a shared NFS. They can also be stored on the local disk for a non-HA option.
The location you choose determines the database requirements, as well as where the Dgraph will be installedand its behavior.
Note: You can install with pre-existing BDD-formatted databases if you have any you want to use. Todo this, put them in the directory you want to store your databases in and point BDD's configurationfile to it. For more information, see Configuring BDD on page 62.
Regardless of where you put your Dgraph databases, you must increase the maximum numbers of open filedescriptors and processes on all nodes in your cluster (including Hadoop nodes), or the Dgraph may crashduring processing.
HDFS
NFS
Increasing the numbers of open file descriptors and processes
Oracle® Big Data Discovery : Installation Guide Version 1.3.2 • Revision C • January 2017
Prerequisites 36
HDFS
Storing your databases on HDFS provides increased high availability for the Dgraph—the contents of thedatabases are distributed across multiple nodes, so the Dgraph can continue to process queries if a nodegoes down. It also increases the amount of data your databases can contain.
Note: This information also applies to MapR-FS.
To store your databases on HDFS, your system must meet the following requirements:
• The HDFS DataNode service must be running on all nodes that will host the Dgraph. For bestperformance, this should be the only Hadoop service running on your Dgraph nodes. In particular, theDgraph shouldn't be co-located with Spark, as both services require a lot of resources.
If you have to co-locate the Dgraph with Spark or any other Hadoop services, you should use cgroups toisolate resources for it. For more information, see Setting up cgroups on page 36.
• For best performance, configure short-circuit reads in HDFS. This enables the Dgraph to access the localdatabase files directly, rather than using the DataNode's network sockets to transfer the data. Forinstructions, refer to the documentation for your Hadoop distribution.
• The bdd user must have read and write permissions for the HDFS directory where the databases will bestored. Be sure to set this on all Dgraph nodes.
• If you have HDFS data at rest encryption enabled in Hadoop, you must store your databases in anencryption zone. For more information, see HDFS data at rest encryption on page 34.
• If you decide to not use the default HDFS mount point (the local directory where the Dgraph mounts theHDFS root directory), make sure the one you use is empty and has read, write, and execute permissionsfor the bdd user. This must be set on all Dgraph nodes.
• Be sure to set the DGRAPH_HDFS_USE_MOUNT property in BDD's configuration file to TRUE.
Additionally, to enable the Dgraph to access its databases in HDFS, you must install either the HDFS NFSGateway (called MapR NFS in MapR) service or FUSE. The option you use depends on your Hadoop cluster:
• You must use the NFS Gateway if have any of the following:
• MapR
• CDH 5.7.x or higher
• HDFS data at rest encryption enabled
For more information, see Installing the HDFS NFS Gateway service on page 38.
• In all other cases, you can use either FUSE or the NFS Gateway. For more information on FUSE, seeInstalling FUSE on page 38.
Setting up cgroups
Control groups, or cgroups, are a Linux kernel feature that enable you to allocate resources like CPU time andsystem memory to specific processes or groups of processes. If you need to host the Dgraph on nodesrunning Spark, you should use cgroups to ensure sufficient resources are available to it.
Note: Installing the Dgraph on Spark nodes is not recommended and should only be done ifabsolutely necessary.
Oracle® Big Data Discovery : Installation Guide Version 1.3.2 • Revision C • January 2017
Prerequisites 37
To do this, you enable cgroups in Hadoop and create one for YARN that limits the amounts of CPU andmemory it can consume. You then create a separate cgroup for the Dgraph.
To set up cgroups:
1. If your system doesn't currently have the libcgroup package, install it as root.
This creates /etc/cgconfig.conf, which is used to configure cgroups.
2. Enable the cgconfig service to run automatically:
chkconfig cgconfig on
Version 1.3.2 • Revision C • January 2017
3. Create a cgroup for YARN. You must do this within Hadoop. For instructions, refer to thedocumentation for your Hadoop distribution.
The YARN cgroup should limit the amounts of CPU and memory allocated to all YARN containers.The appropriate limits to set depend on your system and the amount of data you will process. At aminimum, you should reserve the following for the Dgraph:
• 5GB of RAM
• 2 CPU cores
The number of CPU cores YARN is allowed to use must be specified as a percentage. For example,on a quad-core machine, YARN should only get two cores, or 50%. On an eight-core machine, YARNcould get up to six of them, or 75%. When setting this amount, remember that allocating more cores tothe Dgraph will boost its performance.
4. Create a cgroup for the Dgraph by adding the following to cgconfig.conf:
# Create a Dgraph cgroup named "dgraph"group dgraph {# Specify which users can edit this group
perm {admin {
uid = $BDD_USER;}# Specify which users can add tasks for this grouptask {
uid = $BDD_USER;}
}# Set the memory and swap limits for this group
memory {# Sets memory limit to 10GBmemory.limit_in_bytes = 10000000000;
# Sets memory + swap limit to 12GBmemory.memsw.limit_in_bytes = 12000000000;
}}
Where $BDD_USER is the name of the bdd user.
Important: The values given for memory.limit_in_bytes andmemory.memsw.limit_in_bytes above are the absolute minimum requirements. Youshould use higher values, if possible.
5. Restart cfconfig to enable your changes.
Oracle® Big Data Discovery : Installation Guide

Prerequisites 38
Installing the HDFS NFS Gateway service
If you have MapR, CDH 5.7.x or higher, or HDFS data at rest encryption, and you want to store your Dgraphdatabases on HDFS, you must install the HDFS NFS Gateway service (called the MapR NFS service inMapR).
The NFS Gateway service enables client applications to mount HDFS as part of the local file system. Clientscan then search for, read from, and write to HDFS files as if they were stored locally. In the context of BDD,the NFS Gateway allows the Dgraph to access its databases when they're stored in HDFS.
To enable this for BDD, the NFS Gateway service must be installed on all Dgraph nodes. For instructions oninstalling it, refer to the documentation for your Hadoop distribution.
The NFS Gateway service must be running when you install BDD. The installer will automatically detect it atruntime and add the following properties to BDD's configuration file:
NFS_GATEWAY_SERVERS=<list of NFS Gateway nodes>DGRAPH_USE_NFS_MOUNT=TRUE
Version 1.3.2 • Revision C • January 2017
After installing, the Dgraph will mount HDFS via the NFS Gateway when it starts.
Installing FUSE
Filesystem in Userspace (FUSE) enables unprivileged users to access filesystems without having to makechanges to the kernel. In the context of BDD, it enables the Dgraph to read and write data to HDFS by makingHDFS behave like a mountable local disk. The Dgraph supports FUSE 2.8+.
Note: FUSE isn't supported for Hadoop clusters that have MapR, CDH 5.7.x or higher, or HDFS dataat rest encryption.
If you're not using the HDFS NFS Gateway service, FUSE must be installed on all HDFS DataNodes that willhost the Dgraph. Additionally, the bdd user requires extra permissions to enable the Dgraph process tointegrate with FUSE, and socket timeouts in HDFS must be increased to prevent FUSE and the Dgraph fromcrashing during parallel ingests.
To install FUSE:
1. Download the FUSE client from https://github.com/libfuse/libfuse/releases.
The fuse-<version>.tar.gz file is downloaded to your machine.
2. Extract fuse-<version>.tar.gz:
tar xvf fuse-<version>.tar.gz
This creates a directory called /fuse-<version>.
3. Copy /fuse-<version> to all nodes that will host the Dgraph.
4. On each node, install FUSE by going to /fuse-<version> and running:
./configuremake -j8make install
5. On each Dgraph node:
(a) Add the bdd user to the fuse group.
(b) Give the bdd user read and execute permissions for fusermount.
Oracle® Big Data Discovery : Installation Guide
Prerequisites 39
(c) Give the bdd user read and write permissions for /dev/fuse.
6. Update your HDFS configuration:
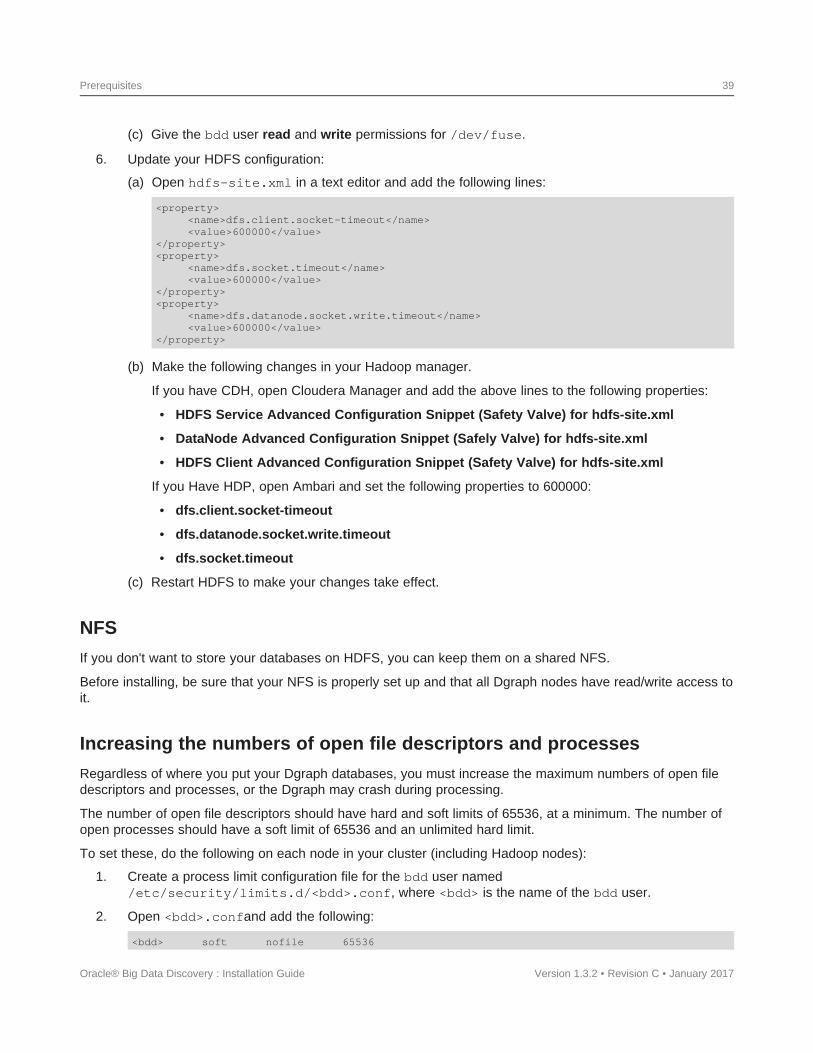
(a) Open hdfs-site.xml in a text editor and add the following lines:
<property><name>dfs.client.socket-timeout</name><value>600000</value>
</property><property>
<name>dfs.socket.timeout</name><value>600000</value>
</property><property>
<name>dfs.datanode.socket.write.timeout</name><value>600000</value>
</property>
Version 1.3.2 • Revision C • January 2017
(b) Make the following changes in your Hadoop manager.
If you have CDH, open Cloudera Manager and add the above lines to the following properties:
• HDFS Service Advanced Configuration Snippet (Safety Valve) for hdfs-site.xml
• DataNode Advanced Configuration Snippet (Safely Valve) for hdfs-site.xml
• HDFS Client Advanced Configuration Snippet (Safety Valve) for hdfs-site.xml
If you Have HDP, open Ambari and set the following properties to 600000:
• dfs.client.socket-timeout
• dfs.datanode.socket.write.timeout
• dfs.socket.timeout
(c) Restart HDFS to make your changes take effect.
NFS
If you don't want to store your databases on HDFS, you can keep them on a shared NFS.
Before installing, be sure that your NFS is properly set up and that all Dgraph nodes have read/write access toit.
Increasing the numbers of open file descriptors and processes
Regardless of where you put your Dgraph databases, you must increase the maximum numbers of open filedescriptors and processes, or the Dgraph may crash during processing.
The number of open file descriptors should have hard and soft limits of 65536, at a minimum. The number ofopen processes should have a soft limit of 65536 and an unlimited hard limit.
To set these, do the following on each node in your cluster (including Hadoop nodes):
1. Create a process limit configuration file for the bdd user named/etc/security/limits.d/<bdd>.conf, where <bdd> is the name of the bdd user.
2. Open <bdd>.confand add the following:
<bdd> soft nofile 65536
Oracle® Big Data Discovery : Installation Guide
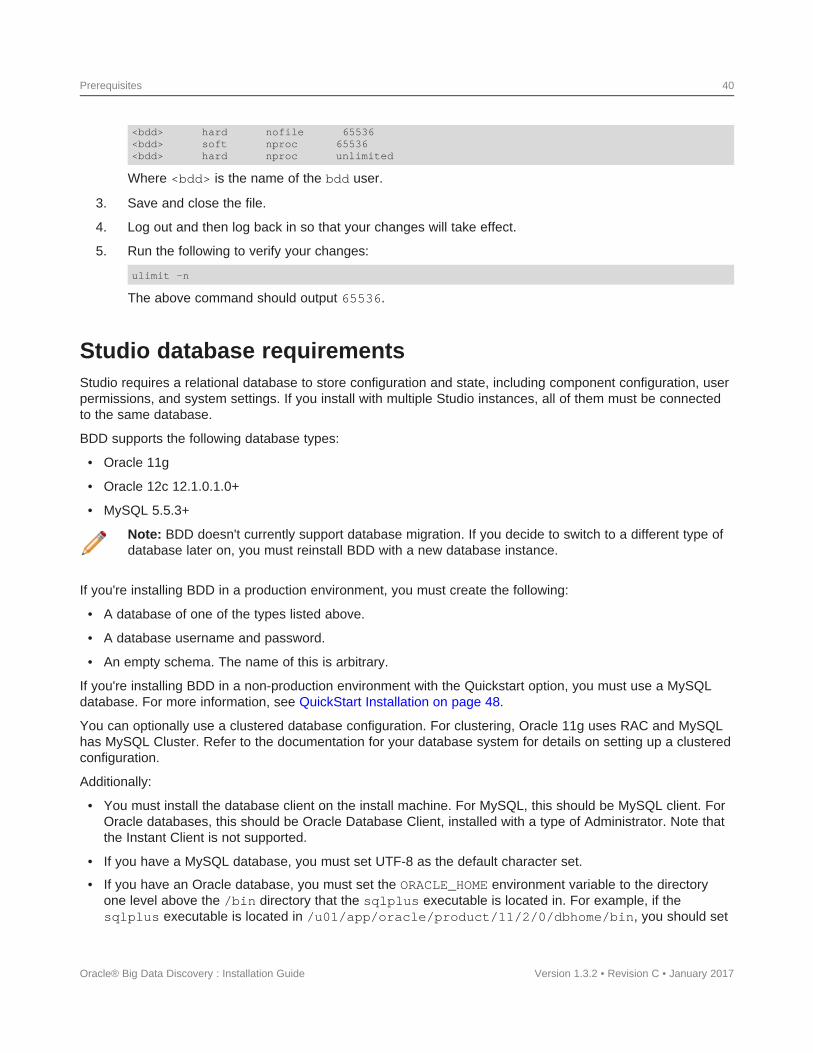
Prerequisites 40
<bdd> hard nofile 65536<bdd> soft nproc 65536<bdd> hard nproc unlimited
Version 1.3.2 • Revision C • January 2017
Where <bdd> is the name of the bdd user.
3. Save and close the file.
4. Log out and then log back in so that your changes will take effect.
5. Run the following to verify your changes:
ulimit -n
The above command should output 65536.
Studio database requirementsStudio requires a relational database to store configuration and state, including component configuration, userpermissions, and system settings. If you install with multiple Studio instances, all of them must be connectedto the same database.
BDD supports the following database types:
• Oracle 11g
• Oracle 12c 12.1.0.1.0+
• MySQL 5.5.3+
Note: BDD doesn't currently support database migration. If you decide to switch to a different type ofdatabase later on, you must reinstall BDD with a new database instance.
If you're installing BDD in a production environment, you must create the following:
• A database of one of the types listed above.
• A database username and password.
• An empty schema. The name of this is arbitrary.
If you're installing BDD in a non-production environment with the Quickstart option, you must use a MySQLdatabase. For more information, see QuickStart Installation on page 48.
You can optionally use a clustered database configuration. For clustering, Oracle 11g uses RAC and MySQLhas MySQL Cluster. Refer to the documentation for your database system for details on setting up a clusteredconfiguration.
Additionally:
• You must install the database client on the install machine. For MySQL, this should be MySQL client. ForOracle databases, this should be Oracle Database Client, installed with a type of Administrator. Note thatthe Instant Client is not supported.
• If you have a MySQL database, you must set UTF-8 as the default character set.
• If you have an Oracle database, you must set the ORACLE_HOME environment variable to the directoryone level above the /bin directory that the sqlplus executable is located in. For example, if thesqlplus executable is located in /u01/app/oracle/product/11/2/0/dbhome/bin, you should set
Oracle® Big Data Discovery : Installation Guide

Prerequisites 41
ORACLE_HOME to /u01/app/oracle/product/11/2/0/dbhome. Note that this is different from theORACLE_HOME property in BDD's configuration file.
Sample commands for creating Oracle and MySQL database users and schemas are available in Samplecommands for production databases on page 41.
Studio database requirements in demo environments
In demo environments, Studio supports Hypersonic (HSQL) databases in addition to the types listed above.Hypersonic is an embedded database that runs inside the JVM. It is useful for getting Studio up and runningquickly, but can't be used in a production environment due to performance issues and its inability to supportmultiple Studio nodes.
Note: The Connector Service and the Component Registry don't support Hypersonic databases, evenin demo environments.
If you want to use a Hypersonic database, the installer will create it for you. You can enable this in BDD'sconfiguration file.
Important: If you install in a demo environment with a Hypersonic database and later decide to scaleup to a production environment, you must reinstall BDD with one of the supported MySQL or Oracledatabases listed above.
Sample commands for production databases
Sample commands for production databases
Below are sample commands you can use to create users and schemas for Oracle and MySQL databases.You are not required to use these exact commands when setting up your component databases—these arejust examples to help get you started.
Oracle database
You can use the following commands to create a user and schema for an Oracle 11g or 12c database.
CREATE USER <username> PROFILE "DEFAULT" IDENTIFIED BY <password> DEFAULT TABLESPACE "USERS"TEMPORARY TABLESPACE "TEMP" ACCOUNT UNLOCK;GRANT CREATE PROCEDURE TO <username>;GRANT CREATE SESSION TO <username>;GRANT CREATE SYNONYM TO <username>;GRANT CREATE TABLE TO <username>;GRANT CREATE VIEW TO <username>;GRANT UNLIMITED TABLESPACE TO <username>;GRANT CONNECT TO <username>;GRANT RESOURCE TO <username>;
Version 1.3.2 • Revision C • January 2017
MySQL database
You can use the following commands to create a user and schema for a MySQL database.
Note: MySQL databases must use UTF-8 as the default character encoding.
Oracle® Big Data Discovery : Installation Guide
Prerequisites 42
create user '<username>'@'%' identified by '<password>';create database <database name> default character set utf8 default collate utf8_general_ci;grant all on <database name>.* to '<username>'@'%' identified by '<password>' with grant option;flush privileges;
Version 1.3.2 • Revision C • January 2017
Supported Web browsersStudio supports the following Web browsers:
• Firefox ESR
• Internet Explorer 11 (compatibility mode is not supported)
• Chrome for Business
• Safari 9+ (for mobile)
Screen resolution requirementsBDD has the following screen resolution requirements:
• Minimum: 1366x768
• Recommended: 1920x1080
Studio support for iPadYou can use the Safari Web browser on an iPad running iOS 7+ to sign in to Studio and view projects. Youcannot use an iPad to create, configure, or export projects.
While the iPad can support most component functions, the component export option is disabled.
Oracle® Big Data Discovery : Installation Guide
Part II
Installing Big Data Discovery

Chapter 3
Prerequisite checklist
Before installing, run through the following checklist to verify you've satisfied all prerequisites.
For more information on each prerequisite, refer to the relevant section in Prerequisites on page 14.
Prerequisite Description
Hardware Minimum requirements:
• WebLogic nodes: quad-core CPU
• Dgraph nodes: dual-core CPU
Note that these are the minimum amounts required to install BDD. A full-scaleinstallation will require more.
Memory Minimum requirements:
• Managed Servers: 16GB (5GB for WebLogic Server and 11GB for the TransformService)
• Dgraph nodes: 5GB (excluding requirements for HDFS, if applicable)
• YARN cluster: 16GB (combined)
Note that these are the minimum amounts required to install BDD. A full-scaleinstallation will require more.
Disk space Minimum requirements:
• 30GB in ORACLE_HOME on all BDD nodes
• 20GB in TEMP_FOLDER_PATH on all BDD nodes
• 10GB in INSTALLER_PATH on the install machine
• 512MB swap space on the install machine and all Managed Servers
• 39GB virtual memory on all Transform Service nodes
Note that these are the minimum amounts required to install BDD. A full-scaleinstallation will require more.
Network The hostname of each BDD machine can be externally resolved and accessed usingthe machine's IP address.
Operating system• OEL 6.4+, 7.1
• RHEL 6.4+, 7.1
Oracle® Big Data Discovery : Installation Guide Version 1.3.2 • Revision C • January 2017
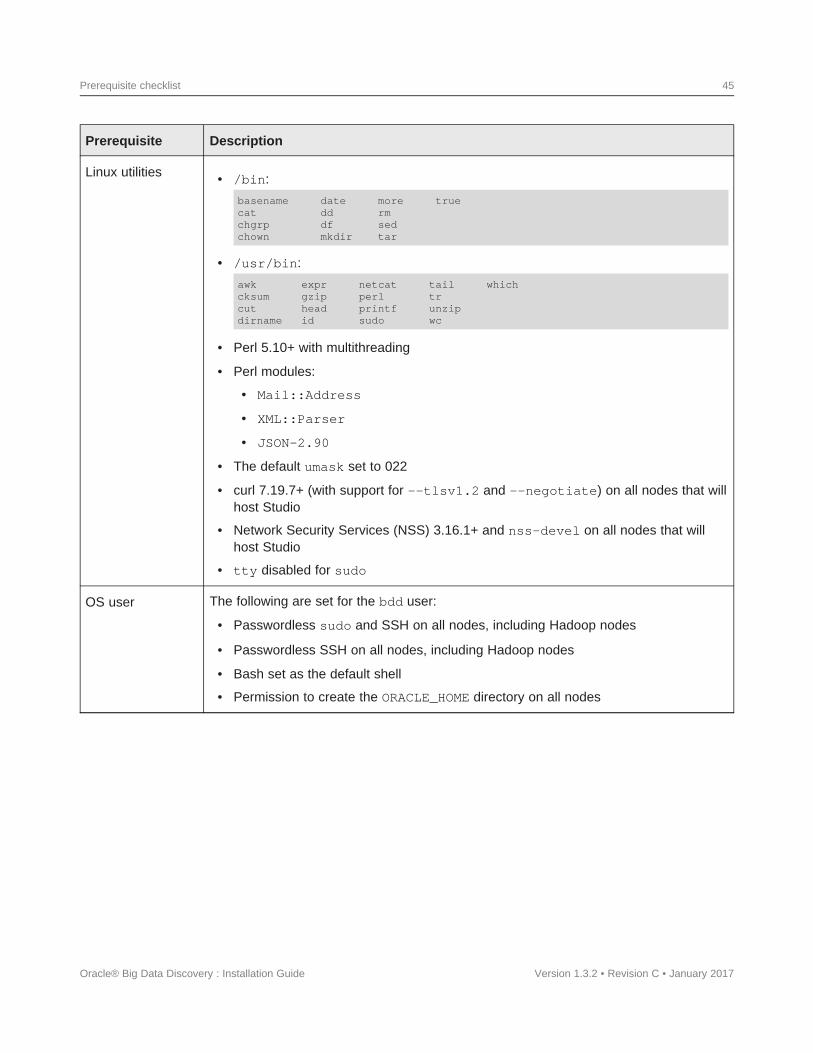
Prerequisite checklist 45
Prerequisite Description
Linux utilities • /bin:
basename date more truecat dd rmchgrp df sedchown mkdir tar
• /usr/bin:
awk expr netcat tail whichcksum gzip perl trcut head printf unzipdirname id sudo wc
• Perl 5.10+ with multithreading
• Perl modules:
• Mail::Address
• XML::Parser
• JSON-2.90
• The default umask set to 022
• curl 7.19.7+ (with support for --tlsv1.2 and --negotiate) on all nodes that willhost Studio
• Network Security Services (NSS) 3.16.1+ and nss-devel on all nodes that willhost Studio
• tty disabled for sudo
OS user The following are set for the bdd user:
• Passwordless sudo and SSH on all nodes, including Hadoop nodes
• Passwordless SSH on all nodes, including Hadoop nodes
• Bash set as the default shell
• Permission to create the ORACLE_HOME directory on all nodes
Oracle® Big Data Discovery : Installation Guide Version 1.3.2 • Revision C • January 2017

Prerequisite checklist 46
Prerequisite Description
Hadoop• Distributions:
• CDH 5.5.x (min. 5.5.2), 5.6, 5.7.x (min. 5.7.1), 5.8
• HDP 2.3.4.17-5, 2.4.x (min. 2.4.2)
• MapR 5.1
• Components:
• Cluster manager: Cloudera Manager, Ambari, or MCS
• ZooKeeper
• HDFS
• HCatalog
• Hive
• Spark on YARN
• Hue
• YARN
• Spark on YARN, YARN, and HDFS are on all Data Processing nodes
• YARN configuration has been updated
HDP-specific• The required client libraries are on the install machine
requirements• The hive-metastore and spark-assembly JARs are on all Hadoop nodes
MapR-specific• The MapR Client is installed on all non-MapR nodes that will host the Dgraph,
requirementsStudio, and the Transform Service
• PAMs are disabled
• The YARN Resource Manager IP is configured correctly on the machine hostingMCS
• The directories /user/HDFS_DP_USER_DIR/<bdd> and/user/HDFS_DP_USER_DIR/edp/data are either nonexistent or mounted with avolume
• The permissions for the /opt/mapr/zkdata and/opt/mapr/zookeeper/zookeeper-3.4.5/logs directories are set to 755
• The required Spark, ZooKeeper, and Hive patches have been applied
JDK• JDK 7u67+
• JDK 8u45+
• The installed JDK contains the HotSpot JVM, which supports MD5
• $JAVA_HOME set on all nodes
Oracle® Big Data Discovery : Installation Guide Version 1.3.2 • Revision C • January 2017

Prerequisite checklist 47
Prerequisite Description
Kerberos • /user/<bdd_user> and /user/<HDFS_DP_USER_DIR> created in HDFS
• bdd user is a member of the hive and hdfs groups
• bdd principal and keytab file have been generated
• bdd keytab file and krb5.conf are on the install machine
• kinit and kdestroy are installed on BDD nodes
• core-site.xml has been updated (HDP only)
Sentry • /user/<bdd_user> and /user/<HDFS_DP_USER_DIR> in HDFS
• bdd user is a member of the hive group
• BDD role
TLS/SSL• Kerberos enabled for BDD and Hadoop
• KMS is installed and configured
• TLS/SSL enabled in Hadoop for HDFS, YARN, Hive, and/or KMS
• The public key certificates for all TLS/SSL enabled services (HDFS, YARN, Hive,and/or KMS) have been exported and copied to the install machine
• The password for cacerts is set to the default (chageit)
HDFS data at rest• Kerberos and TLS/SSL enabled for BDD and Hadoop
encryption• The key trustee KMS and key trustee server installed and configured in Hadoop
• HDFS data at rest encryption enabled in Hadoop
• A BDD encryption zone has been created in HDFS
• The bdd user nas GENERATE_EEK and DECRYPT_EEK privileges for the encryptionand decryption keys
Oracle® Big Data Discovery : Installation Guide Version 1.3.2 • Revision C • January 2017
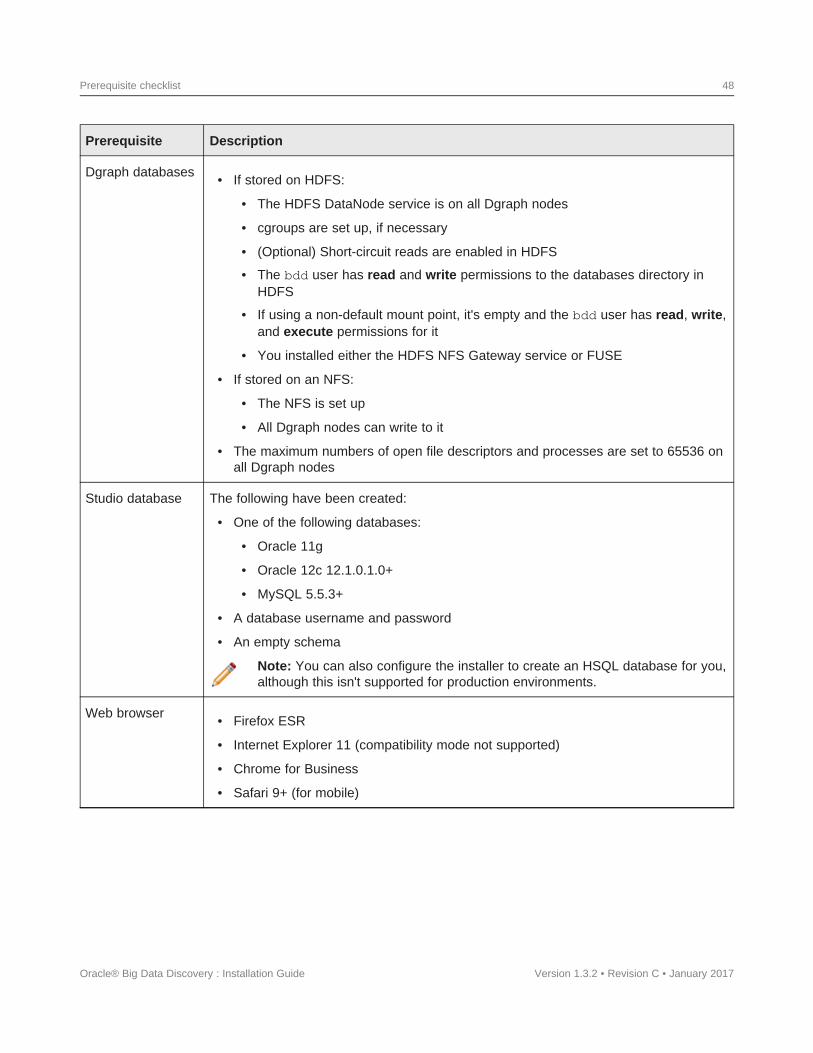
Prerequisite checklist 48
Prerequisite Description
Dgraph databases• If stored on HDFS:
• The HDFS DataNode service is on all Dgraph nodes
• cgroups are set up, if necessary
• (Optional) Short-circuit reads are enabled in HDFS
• The bdd user has read and write permissions to the databases directory inHDFS
• If using a non-default mount point, it's empty and the bdd user has read, write,and execute permissions for it
• You installed either the HDFS NFS Gateway service or FUSE
• If stored on an NFS:
• The NFS is set up
• All Dgraph nodes can write to it
• The maximum numbers of open file descriptors and processes are set to 65536 onall Dgraph nodes
Studio database The following have been created:
• One of the following databases:
• Oracle 11g
• Oracle 12c 12.1.0.1.0+
• MySQL 5.5.3+
• A database username and password
• An empty schema
Note: You can also configure the installer to create an HSQL database for you,although this isn't supported for production environments.
Web browser• Firefox ESR
• Internet Explorer 11 (compatibility mode not supported)
• Chrome for Business
• Safari 9+ (for mobile)
Oracle® Big Data Discovery : Installation Guide Version 1.3.2 • Revision C • January 2017
Chapter 4
QuickStart Installation
The BDD installer includes a quickstart option, which installs the software on a single machine with defaultconfiguration suitable for a demo environment. You can use quickstart to install BDD quickly and easily,without having to worry about setting it up yourself.
Important: Single-node installations can only be used for demo purposes; you can't host a productionenvironment on a single machine. If you want to install BDD in a production environment, see ClusterInstallation on page 56.
Before you can install BDD with quickstart, you must satisfy all of the prerequisites described inPrerequisites on page 14, with a few exceptions:
• You must use CDH. HDP and MapR aren't supported.
• You must have a MySQL database.
• You can't have Kerberos installed.
• You can't use any existing Dgraph databases.
Note: If you want to install BDD on a single machine but need more control and flexibility thanquickstart offers, see Single-Node Installation on page 50.
Installing BDD with quickstart
Installing BDD with quickstartOnce you've satisfied all of BDD's prerequisites, you can download and install the software.
Before installing, verify that:
• CDH is installed.
• You satisfied all requirements described in Prerequisites on page 14.
• The bdd user meets all requirements described in OS user requirements on page 23.
• You set up a MySQL database (including its username, password, and schema) for Studio.
• The following Hadoop components are running:
• Cloudera Manager
• ZooKeeper
• HDFS
• Hive
• Spark on YARN
Oracle® Big Data Discovery : Installation Guide Version 1.3.2 • Revision C • January 2017
QuickStart Installation 50
• YARN
• Hue
To install BDD with quickstart:
1. On your machine, create a new directory or choose an existing one to be the installation sourcedirectory.
This directory must contain at least 10GB of free space.
2. Within the installation source directory, create a new directory named packages.
3. Download the BDD media pack from the Oracle Software Delivery Cloud.
Be sure to download all packages in the media pack. Make a note of each file's part number, as youwill need this to identify it later.
4. Move the BDD installer, BDD binary, and WebLogic Server packages from the download location tothe packages directory.
5. Rename the first BDD binary package bdd1.zip and the second bdd2.zip.
This ensures that the installer will recognize them.
6. Extract the WebLogic Server package.
This creates a file called fmw_12.1.3.0.0_wls.jar, which contains the WebLogic Server installer.
7. Navigate back to the installation source directory and extract the BDD installer package:
unzip packages/<BDD_installer_package>.zip
Version 1.3.2 • Revision C • January 2017
This creates a new directory called installer, which contains the install script and other files itrequires.
8. Go to the installer directory and run:
./setup.sh --quickstart
9. Enter the following when prompted:
• The username and password for Cloudera Manager.
• A username and password for the WebLogic Server admin. The password must contain at least 8characters, one of which must be a number, and can't begin with a number.
• The username and password for the Studio database.
• The password for the Studio admin. This must contain at least 6 characters, one of which must bea non-alphanumeric character.
If the script succeeded, BDD is now installed under the current directory and ready for you to begin workingwith it. See Post-Installation Tasks on page 75 to learn more about your installation and how to verify it.
If the script failed, see Troubleshooting a Failed Installation on page 71.
Oracle® Big Data Discovery : Installation Guide
Chapter 5
Single-Node Installation
If you want to demo BDD before committing to a full-cluster installation, you can install it on a single node.This gives you the chance to learn more about the software and see how it performs on a smaller scale. Thefollowing sections describe how to get BDD running on your machine quickly and easily.
Important: Single-node installations can only be used for demo purposes; you can't host a productionenvironment on a single machine. If you want to install BDD in a production environment, see ClusterInstallation on page 56.
Installing BDD on a single node
Configuring a single-node installation
Installing BDD on a single nodeOnce you've satisfied all of BDD's prerequisites, you can download and install the software.
Before installing, verify that:
• You satisfied all requirements described in Prerequisites on page 14.
• The bdd user meets the requirements described in OS user requirements on page 23.
• The Studio database (including its username, password, and schema) is set up.
• The following Hadoop components are running:
• Cloudera Manager/Ambari/MCS
• ZooKeeper
• HDFS
• Hive
• Spark on YARN
• YARN
• Hue
To install BDD:
1. On your machine, create a new directory or choose an existing one to be the installation sourcedirectory.
This directory must contain at least 10GB of free space.
2. Within the installation source directory, create a new directory named packages.
Oracle® Big Data Discovery : Installation Guide Version 1.3.2 • Revision C • January 2017
Single-Node Installation 52
3. Download the BDD media pack from the Oracle Software Delivery Cloud.
Be sure to download all packages in the media pack. Make a note of each file's part number, as youwill need this to identify it later.
4. Move the BDD installer, BDD binary, and WebLogic Server packages from the download location tothe packages directory.
5. Rename the first BDD binary package bdd1.zip and the second bdd2.zip.
This ensures that the installer will recognize them.
6. Extract the WebLogic Server package.
This creates a file called fmw_12.1.3.0.0_wls.jar, which contains the WebLogic Server installer.
7. Navigate back to the installation source directory and extract the BDD installer package:
unzip packages/<BDD_installer_package>.zip
Version 1.3.2 • Revision C • January 2017
This creates a new directory called installer, which contains the install script and other files itrequires.
8. Open BDD's configuration file, bdd.conf, in a text editor and update the Required Settings section.
See Configuring a single-node installation on page 52 for instructions on how to do this.
9. Go to the installer directory and run:
./setup.sh
10. Enter the following when prompted:
• The username and password for your cluster manager.
• A username and password for the WebLogic Server admin. The password must contain at least 8characters, one of which must be a number, and can't begin with a number.
• The username and password for the database.
• The password for the Studio admin. This must contain at least 6 characters, one of which must bea non-alphanumeric character.
If the script succeeded, BDD is now installed on your machine and ready for you to begin working with it. SeePost-Installation Tasks on page 75 to learn more about your installation and how to verify it.
If the script failed, see Troubleshooting a Failed Installation on page 71.
Configuring a single-node installationThe table below describes the properties you should set for a single-node installation. You can modifybdd.conf in any text editor.
Keep the following in mind when editing the file:
• The accepted values for some properties are case-sensitive and must be entered exactly as they appearin the table below.
• All hostnames must be Fully Qualified Domain Names (FQDNs).
• Each port setting must have a unique value.
Oracle® Big Data Discovery : Installation Guide

Single-Node Installation 53
• Some of the directories defined in bdd.conf have location requirements. These are specified below.
Configuration property Description
ORACLE_HOME The path to the directory BDD will be installed in. This must not existand the system must contain at least 30GB of free space to createthis directory. Additionally, its parent directories' permissions must beset to either 755 or 775.
Note that this setting is different from the ORACLE_HOME environmentvariable required by the Studio database.
ORACLE_INV_PTR The absolute path to the Oracle inventory pointer file, which theinstaller will create when it runs. This can't be located in theORACLE_HOME directory.
If you have any other Oracle software products installed, this file willalready exist. Update this property to point to it.
INSTALLER_PATH The absolute path to the installation source directory.
DGRAPH_INDEX_DIR The absolute path to the Dgraph databases. This directory shouldn'tbe located under ORACLE_HOME, or it will be deleted.
The script will create this directory if it doesn't currently exist. If you'reinstalling with existing databases, set this property to their parentdirectory.
HADOOP_UI_HOST The hostname of the machine running your Hadoop manager(Cloudera Manager, Ambari, or MCS). Set this to your machine'shostname.
STUDIO_JDBC_URL The JDBC URL for your Studio database, which Studio requires toconnect to it.
There are three templates for this property. Copy the template thatcorresponds to your database type to STUDIO_JDBC_URL andupdate the URL to point to your database.
• If you have a MySQL database, use the first template and updatethe URL as follows:
jdbc:mysql://<database hostname>:<port number>/<database name>?useUnicode=true&characterEncoding=UTF-8&useFastDateParsing=false
• If you have an Oracle database, use the first template and updatethe URL as follows:
jdbc:oracle:thin:@<database hostname>:<port number>:<database SID>
• If you're not installing on a production environment and want theinstaller to create a Hypersonic database for you, use the thirdtemplate. The script will create the database for you in thelocation defined by the URL.
Oracle® Big Data Discovery : Installation Guide Version 1.3.2 • Revision C • January 2017

Single-Node Installation 54
Configuration property Description
INSTALL_TYPE Determines the installation type according to your hardware andHadoop distribution. Set this to one of the following:
• CDH
• HW
• MAPR
JAVA_HOME The absolute path to the JDK install directory. This should have thesame value as the $JAVA_HOME environment variable.
If you have multiple versions of the JDK installed, be sure that thispoints to the correct one.
TEMP_FOLDER_PATH The temporary directory used by the installer. This must exist andcontain at least 20GB of free space.
HADOOP_UI_PORT The port number for the Hadoop manager.
HADOOP_UI_CLUSTER_NAME The name of your Hadoop cluster, which is listed in the manager. Besure to replace any spaces in the cluster name with %20.
HUE_URI The hostname and port for Hue, in the format <hostname>:<port>.This property is only required for HDP installations.
HADOOP_CLIENT_LIB_PATHS A comma-separated list of the absolute paths to the Hadoop clientlibraries.
Note: You only need to set this property before installing ifyou have HDP or MapR. For CDH, the installer will downloadthe required libraries and set this property automatically. Thisrequires an internet connection. If the script is unable todownload the libraries, it will fail; see Failure to download theHadoop client libraries on page 72 for instructions on solvingthis issue.
To set this property, copy the template that corresponds to yourHadoop distribution to HADOOP_CLIENT_LIB_PATHS and update thepaths to point to the libraries you copied to the install machine.
Don't change the order of the paths in the list as they must bespecified as they appear.
HADOOP_CERTIFICATES_PATH Only required for Hadoop clusters with TLS/SSL enabled. Theabsolute path to the directory on the install machine where you putthe certificates for HDFS, YARN, Hive, and the KMS.
Don't remove this directory after installing, as you will use it if youhave to update the certificates.
Oracle® Big Data Discovery : Installation Guide Version 1.3.2 • Revision C • January 2017

Single-Node Installation 55
Configuration property Description
ENABLE_KERBEROS Enables Kerberos. If you have Kerberos 5+ installed, set this value toTRUE; if not, set it to FALSE.
KERBEROS_PRINCIPAL The name of the BDD principal. This should include the name of yourdomain; for example, [email protected].
This property is only required if ENABLE_KERBEROS is set to TRUE.
KERBEROS_KEYTAB_PATH The absolute path to the BDD keytab file. This property is onlyrequired if ENABLE_KERBEROS is set to TRUE.
KRB5_CONF_PATH The absolute path to the krb5.conf file. This property is onlyrequired if ENABLE_KERBEROS is set to TRUE.
ADMIN_SERVER The hostname of the WebLogic Admin Server. This will default toyour machine's hostname, so you don't need to set it.
MANAGED_SERVERS The hostname of the Managed Server. Leave this set to${ADMIN_SERVER}.
DGRAPH_SERVERS The Dgraph hostname. Leave this set to ${ADMIN_SERVER}.
DGRAPH_THREADS The number of threads the Dgraph starts with. This will default to thenumber of cores your machine has minus 2, so you don't need to setit.
DGRAPH_CACHE The size of the Dgraph cache, in MB. This will default to either 50%of your RAM or the total amount of free memory minus 2GB(whichever is larger), so you don't need to set it.
ZOOKEEPER_INDEX The index of the Dgraph cluster in the ZooKeeper ensemble, whichZooKeeper uses to identify it.
HDFS_DP_USER_DIR The location within the HDFS /user directory that stores the Avrofiles created when Studio users export data. The installer will createthis directory if it doesn't already exist. The name of this directorycan't include spaces or slashes (/).
YARN_QUEUE The YARN queue Data Processing jobs are submitted to.
HIVE_DATABASE_NAME The name of the Hive database that stores the source data for Studiodata sets.
Oracle® Big Data Discovery : Installation Guide Version 1.3.2 • Revision C • January 2017

Single-Node Installation 56
Configuration property Description
SPARK_ON_YARN_JAR The absolute path to the Spark on YARN JAR on your Hadoopnodes. This will be added to the CLI classpath.
There are two templates for this property. Copy the value of thetemplate that corresponds to your Hadoop distribution toSPARK_ON_YARN_JAR and update its value as follows:
• For CDH, use the first template. This should be the absolute pathto spark-assembly.jar.
• For HDP, use the second template. This should be the absolutepaths to hive-exec.jar and spark-assembly.jar,separated by a colon:
<path/to/hive-exec.jar>:<path/to/spark-assembly.jar>
• For MapR, use the third template. This should be the absolutepath to spark-assembly-1.5.2-mapr-1602-hadoop2.7.0-mapr-1602.jar.
TRANSFORM_SERVICE_SERVERS A comma-separated list of the Transform Service nodes. For bestperformance, these should all be Managed Servers. In particular, theyshouldn't be Dgraph nodes, as both the Dgraph and the TransformService require a lot of memory.
TRANSFORM_SERVICE_PORT The port the Transform Service listens on for requests from Studio.
ENABLE_CLUSTERING_SERVICE For use by Oracle Support only. Leave this property set to FALSE.
CLUSTERING_SERVICE_SERVERS For use by Oracle Support only. Don't modify this property.
CLUSTERING_SERVICE_PORT For use by Oracle Support only. Don't modify this property.
Oracle® Big Data Discovery : Installation Guide Version 1.3.2 • Revision C • January 2017

Chapter 6
Cluster Installation
The following sections describe how to install BDD on multiple nodes, and provide tips on troubleshooting afailed installation.
The BDD installer
Setting up the install machine
Downloading the BDD media pack
Downloading a WebLogic Server patch
Configuring BDD
Running the prerequisite checker
Installing BDD on a cluster
The BDD installerBDD uses a single script to install and deploy its components all at once. When the script finishes, BDD will becompletely installed, and your cluster will be up and running.
The installer is contained in one of the BDD installation packages, which you will download to a singledirectory on the install machine. You must perform the entire installation process, including running theinstaller, from this location.
The same installation package also contains the script's configuration file, bdd.conf, which defines theconfiguration of your cluster and provides the script with information it requires at runtime. You must updatethis file with information specific to your system and BDD cluster configuration before you run the installer.
Silent installation
Installer behavior
Silent installation
You can optionally run the installer in silent mode. This means that instead of prompting you for information itrequires at runtime, it obtains that information from environment variables you set beforehand.
Normally, the script prompts you to enter the following:
• The username and password for your cluster manager (Cloudera Manager, Ambari, or MCS), which thescript uses to query your cluster manager for information related to your Hadoop cluster.
• The username and password for the WebLogic Server admin. The script will create this user when itdeploys WebLogic.
Oracle® Big Data Discovery : Installation Guide Version 1.3.2 • Revision C • January 2017
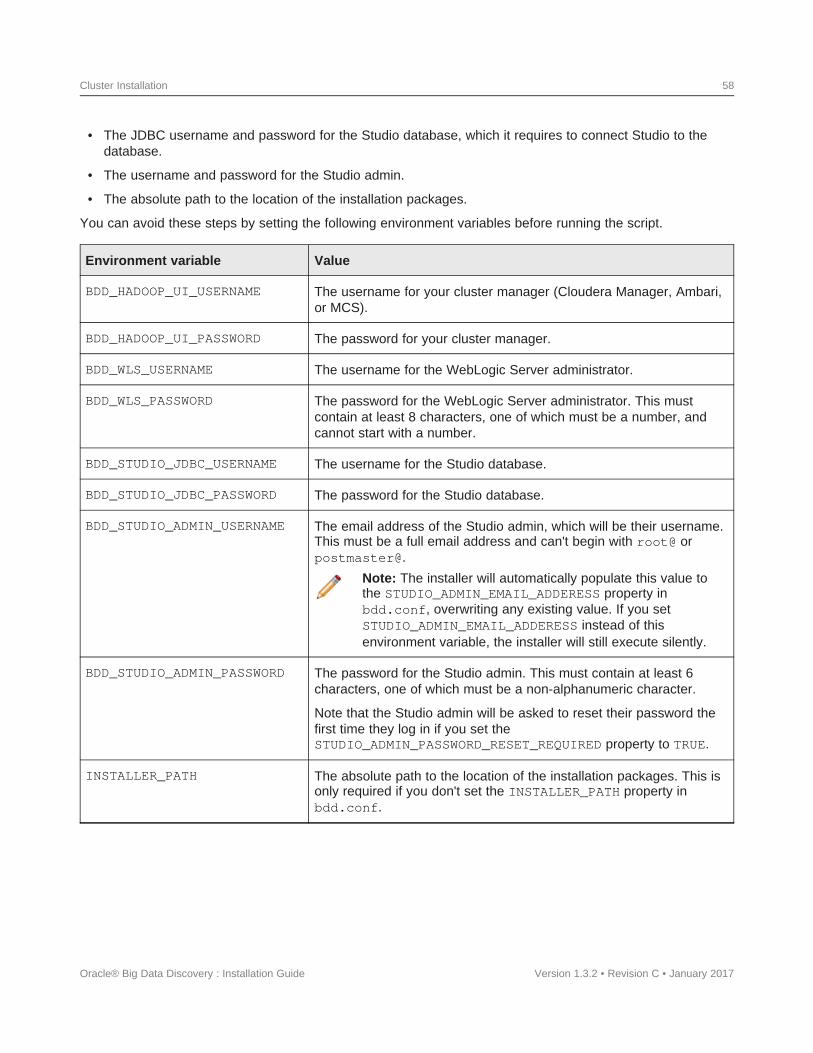
Cluster Installation 58
• The JDBC username and password for the Studio database, which it requires to connect Studio to thedatabase.
• The username and password for the Studio admin.
• The absolute path to the location of the installation packages.
You can avoid these steps by setting the following environment variables before running the script.
Environment variable Value
BDD_HADOOP_UI_USERNAME The username for your cluster manager (Cloudera Manager, Ambari,or MCS).
BDD_HADOOP_UI_PASSWORD The password for your cluster manager.
BDD_WLS_USERNAME The username for the WebLogic Server administrator.
BDD_WLS_PASSWORD The password for the WebLogic Server administrator. This mustcontain at least 8 characters, one of which must be a number, andcannot start with a number.
BDD_STUDIO_JDBC_USERNAME The username for the Studio database.
BDD_STUDIO_JDBC_PASSWORD The password for the Studio database.
BDD_STUDIO_ADMIN_USERNAME The email address of the Studio admin, which will be their username.This must be a full email address and can't begin with root@ orpostmaster@.
Note: The installer will automatically populate this value tothe STUDIO_ADMIN_EMAIL_ADDERESS property inbdd.conf, overwriting any existing value. If you setSTUDIO_ADMIN_EMAIL_ADDERESS instead of thisenvironment variable, the installer will still execute silently.
BDD_STUDIO_ADMIN_PASSWORD The password for the Studio admin. This must contain at least 6characters, one of which must be a non-alphanumeric character.
Note that the Studio admin will be asked to reset their password thefirst time they log in if you set theSTUDIO_ADMIN_PASSWORD_RESET_REQUIRED property to TRUE.
INSTALLER_PATH The absolute path to the location of the installation packages. This isonly required if you don't set the INSTALLER_PATH property inbdd.conf.
Oracle® Big Data Discovery : Installation Guide Version 1.3.2 • Revision C • January 2017

Cluster Installation 59
Installer behavior
The diagram below illustrates the behavior of the installer.
Note: This diagram shows how the installer distributes the BDD components to the different nodes inyour cluster. This diagram is not intended to illustrate the number of nodes you can have. For variousinstallation configurations, including options for co-locating different BDD components on the samenode, see Cluster configurations and diagrams on page 11.
When the installer runs, it:
1. Reads and validates bdd.conf and the Hadoop client libraries.
2. If running in normal (non-silent) mode, prompts you for the values it requires, including the username andpassword for the WebLogic Server admin.
3. Queries the cluster manager for information on your Hadoop cluster, including the host names and portnumbers of specific Hadoop nodes.
4. Distributes the installation packages to each node in the cluster according to the configuration defined inbdd.conf.
5. Generates the Hadoop fat JAR.
6. If the FORCE property in bdd.conf is set to TRUE, deletes the ORACLE_HOME directory from each node.
7. Verifies that each node meets all requirements.
8. Installs the components:
• Installs WebLogic Server (including Studio and the Dgraph Gateway) on the Admin Server node andall Managed Server nodes.
Oracle® Big Data Discovery : Installation Guide Version 1.3.2 • Revision C • January 2017
Cluster Installation 60
• Installs the Dgraph and HDFS Agent on all Dgraph nodes.
• Installs the Data Processing CLI on all Managed Server and Dgraph nodes.
• Installs Data Processing on all qualified Spark nodes.
• Installs Jetty and the Transform Service.
• Distributes the Hadoop fat JAR all BDD nodes.
• If Kerberos is enabled, distributes the keytab file to all BDD nodes.
• Installs the bdd-admin script on all Managed Server nodes, Dgraph nodes, and Data Processingnodes (not shown in the diagram).
9. Deploys the Transform Service:
• Starts and configures Jetty.
• Deploys the Transform Service.
10. Deploys Data Processing:
• Deploys Data Processing.
• If configured to do so, deploys the cron job that runs the Hive Table Detector and starts it.
• Deploys the Data Processing CLI to all Managed Server and Dgraph nodes.
11. Deploys WebLogic Server:
• Creates the WebLogic domain and the Managed Servers.
• Deploys the Dgraph Gateway and Studio as applications within the WebLogic domain.
• Deploys WebLogic as a service on all Managed Servers.
• Starts all Managed Servers.
12. Deploys the Dgraph and the Dgraph HDFS Agent:
• Deploys both components.
• Creates the database directory if it doesn't currently exist.
• Starts the components.
• If the databases are stored on HDFS, creates and tests the local Dgraph mount directory.
13. Verifies that the entire BDD deployment cluster is running.
Setting up the install machineThe first step in the installation process is to set up the install machine.
To set up the install machine:
1. Select one machine in your cluster to be the install machine.
This can be any machine in your cluster that has the following:
• A supported operating system and JDK
• Perl 5.10+ with multithreading
Oracle® Big Data Discovery : Installation Guide Version 1.3.2 • Revision C • January 2017

Cluster Installation 61
• The Mail::Address, XML::Parser, and JSON-2.90 Perl modules
• Passwordless sudo and SSH enabled for the bdd user
• Bash set as the default shell for the bdd user
2. Choose an existing directory or create a new one to be the installation source directory.
You'll perform the entire installation process from this directory. Its name and location are arbitrary andit must contain at least 10GB of free space.
3. Within the installation source directory, create a new directory named packages.
Next, download the BDD media pack.
Downloading the BDD media packAfter you set up the install machine, you can download the BDD media pack from the Oracle SoftwareDelivery Cloud.
To download the media pack:
1. Go to the Oracle Software Delivery Cloud and sign in.
2. Accept the Export Restrictions.
3. Check Programs if it isn't already.
4. In the Product text box, enter Oracle Big Data Discovery.
5. Click Select Platform and check Linux x86-64.
Oracle Big Data Discovery displays in the Selected Products table.
6. Click Continue.
7. Verify that Available Release and Oracle Big Data Discovery 1.3.x.x.x for Linux x86-64 are bothchecked, then click Continue.
8. Accept the Oracle Standard Terms and Restrictions and click Continue.
9. In the File Download popup, click Download All.
This downloads the following packages to your machine:
• First of two parts of the Oracle Big Data Discovery binary
• Second of two parts of the Oracle Big Data Discovery binary
• Installer for Oracle Big Data Discovery
• SDK for Oracle Big Data Discovery
• Documentation for Oracle Big Data Discovery
• Oracle Fusion Middleware 12c (12.1.3.0.0) WebLogic Server and Coherence
You should also make a note of each file's part number, as you will need this information to identify it.
10. Move the BDD installer, BDD binary, and WebLogic Server packages from the download location tothe packages directory.
11. Rename the first BDD binary package bdd1.zip and the second bdd2.zip.
This ensures that the installer will recognize them.
Oracle® Big Data Discovery : Installation Guide Version 1.3.2 • Revision C • January 2017
Cluster Installation 62
12. Extract the WebLogic Server package.
This creates a file called fmw_12.1.3.0.0_wls.jar, which contains the WebLogic Server installer.
13. Navigate back to the installation source directory and extract the installer package:
unzip packages/<installer_package>.zip
Version 1.3.2 • Revision C • January 2017
This creates a new directory within the installation source directory called installer, which containsthe installer, bdd.conf, and other files required by the installer.
Next, you can download a WebLogic Server patch for the installer to apply. If you don't want to patchWebLogic Server, you should configure your BDD installation.
Downloading a WebLogic Server patchYou can optionally download a WebLogic Server patch for the installer to apply when it runs.
You can only apply one patch when installing. If the patch fails, the installer will remove it and continuerunning.
For more information on patching WebLogic Server, see Oracle Fusion Middleware Patching with OPatch.
To download a WebLogic Server patch:
1. Within the installation source directory, create a new directory called WLSPatches.
Don't change the name of this directory or the installer won't recognize it.
2. Go to My Oracle Support and log in.
3. On the Patches & Updates tab, find and download the patch you want to apply.
4. Move all ZIP files associated with the patch to WLSPatches/.
Don't extract the files. The installer will do this when it runs.
Next, you should configure your BDD installation.
Configuring BDDAfter you download the required Hadoop client libraries, you must configure your installation by updating thebdd.conf file, which is located in the /<installation_src_dir>/installer directory.
Important: bdd.conf defines the configuration of your BDD cluster and provides the installer withparameters it requires to run. Updating this file is the most important step of the installation process. Ifyou don't modify the file, or if you modify it incorrectly, the installer could fail or your cluster could beconfigured differently than you intended.
You can edit the file in any text editor. Be sure to save your changes before closing.
The installer validates bdd.conf at runtime and fails if it contains any invalid values. To avoid this, keep thefollowing in mind when updating the file:
• The accepted values for some properties are case-sensitive and must be entered exactly as they appearin this document.
Oracle® Big Data Discovery : Installation Guide

Cluster Installation 63
• All hostnames must be Fully Qualified Domain Names (FQDNs).
• Any symlinks in paths must be identical on all nodes. If any are different or don't exist, the installation mayfail.
• Each port setting must have a unique value.
• Some of the directories defined in bdd.conf have location requirements. These are specified in thisdocument.
bdd.conf is divided into three parts:
• Required settings: You must update these properties with information specific to your system andinstallation, or the installer may fail.
• Optional settings: You can update these settings if you want to further customize your installation, butthe defaults will work for most.
• Internal settings: These are intended for use by Oracle Support, only. Don't edit these unless instructedto do so by a support representative.
The required properties are described below. Information about the optional and internal properties is availablein Optional and Internal BDD Properties on page 95.
Required settings
Required settingsThe first part of bdd.conf contains required settings. You must update these with information specific to yoursystem, or the installer could fail.
Must Set
This section contains blank settings that you must provide values for. If you don't set these, the installation willfail.
Configuration property Description
ORACLE_HOME The path to the BDD root directory, where BDD will be installed on eachnode in the cluster. This directory must not exist and its parent directories'permissions must be set to either 755 or 775. There must be at least 30GBof space available on each BDD node to create this directory.
Note that this is different from the ORACLE_HOME environment variablerequired by the Studio database.
Important: You must ensure that the installer can create thisdirectory on all nodes that will host BDD components, includingHadoop nodes that will host Data Processing.
ORACLE_INV_PTR The absolute path to the Oracle inventory pointer file, which the installerwill create. This file can't be located in the ORACLE_HOME directory.
If you have any other Oracle software products installed, this file willalready exist. Update this property to point to it.
Oracle® Big Data Discovery : Installation Guide Version 1.3.2 • Revision C • January 2017
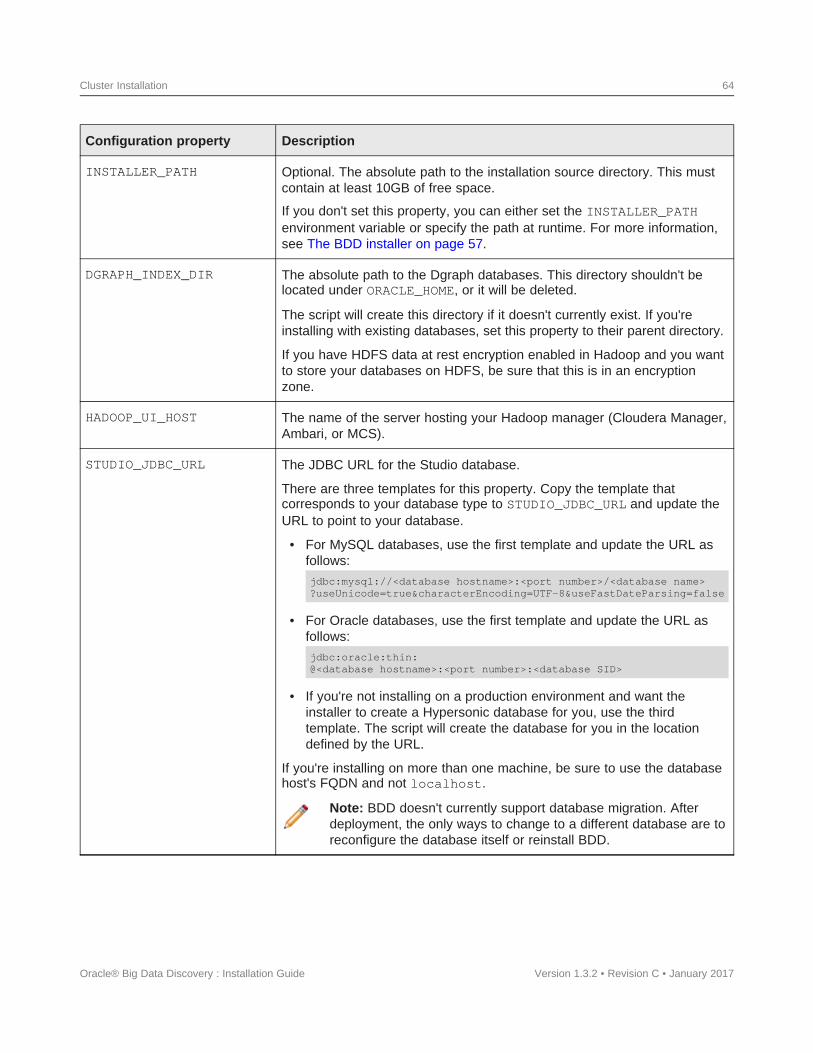
Cluster Installation 64
Configuration property Description
INSTALLER_PATH Optional. The absolute path to the installation source directory. This mustcontain at least 10GB of free space.
If you don't set this property, you can either set the INSTALLER_PATHenvironment variable or specify the path at runtime. For more information,see The BDD installer on page 57.
DGRAPH_INDEX_DIR The absolute path to the Dgraph databases. This directory shouldn't belocated under ORACLE_HOME, or it will be deleted.
The script will create this directory if it doesn't currently exist. If you'reinstalling with existing databases, set this property to their parent directory.
If you have HDFS data at rest encryption enabled in Hadoop and you wantto store your databases on HDFS, be sure that this is in an encryptionzone.
HADOOP_UI_HOST The name of the server hosting your Hadoop manager (Cloudera Manager,Ambari, or MCS).
STUDIO_JDBC_URL The JDBC URL for the Studio database.
There are three templates for this property. Copy the template thatcorresponds to your database type to STUDIO_JDBC_URL and update theURL to point to your database.
• For MySQL databases, use the first template and update the URL asfollows:
jdbc:mysql://<database hostname>:<port number>/<database name>?useUnicode=true&characterEncoding=UTF-8&useFastDateParsing=false
• For Oracle databases, use the first template and update the URL asfollows:
jdbc:oracle:thin:@<database hostname>:<port number>:<database SID>
• If you're not installing on a production environment and want theinstaller to create a Hypersonic database for you, use the thirdtemplate. The script will create the database for you in the locationdefined by the URL.
If you're installing on more than one machine, be sure to use the databasehost's FQDN and not localhost.
Note: BDD doesn't currently support database migration. Afterdeployment, the only ways to change to a different database are toreconfigure the database itself or reinstall BDD.
Oracle® Big Data Discovery : Installation Guide Version 1.3.2 • Revision C • January 2017
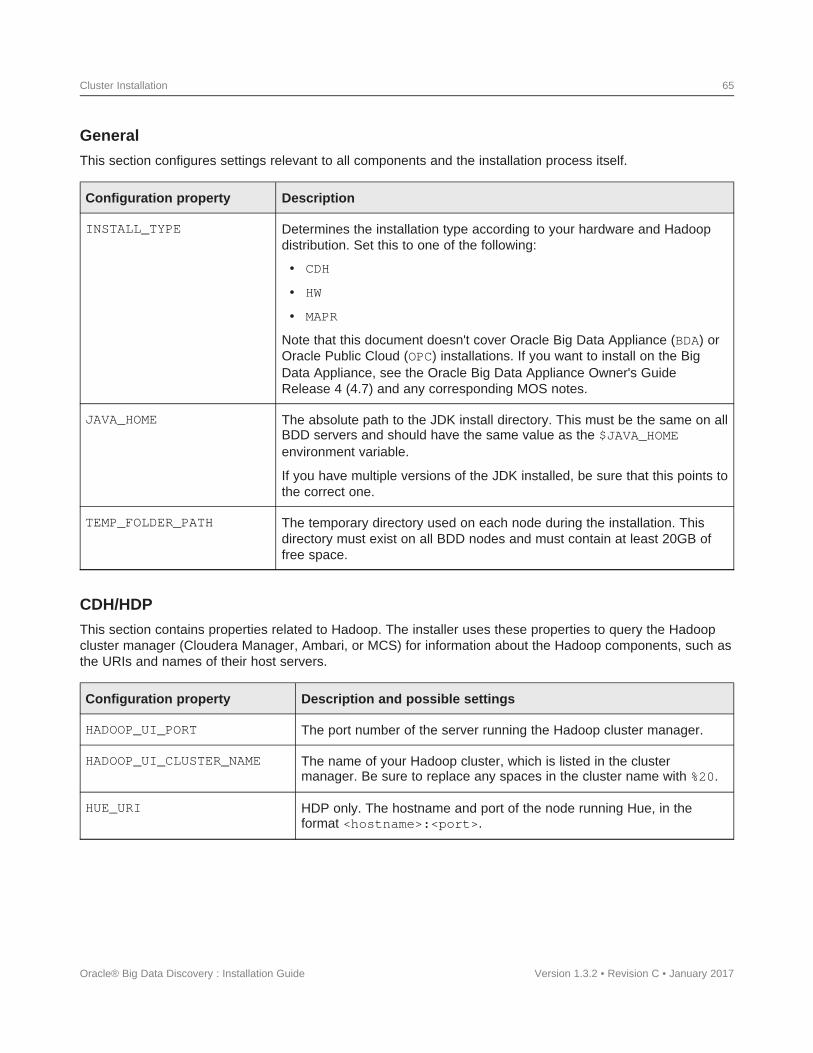
Cluster Installation 65
General
This section configures settings relevant to all components and the installation process itself.
Configuration property Description
INSTALL_TYPE Determines the installation type according to your hardware and Hadoopdistribution. Set this to one of the following:
• CDH
• HW
• MAPR
Note that this document doesn't cover Oracle Big Data Appliance (BDA) orOracle Public Cloud (OPC) installations. If you want to install on the BigData Appliance, see the Oracle Big Data Appliance Owner's GuideRelease 4 (4.7) and any corresponding MOS notes.
JAVA_HOME The absolute path to the JDK install directory. This must be the same on allBDD servers and should have the same value as the $JAVA_HOMEenvironment variable.
If you have multiple versions of the JDK installed, be sure that this points tothe correct one.
TEMP_FOLDER_PATH The temporary directory used on each node during the installation. Thisdirectory must exist on all BDD nodes and must contain at least 20GB offree space.
CDH/HDP
This section contains properties related to Hadoop. The installer uses these properties to query the Hadoopcluster manager (Cloudera Manager, Ambari, or MCS) for information about the Hadoop components, such asthe URIs and names of their host servers.
Configuration property Description and possible settings
HADOOP_UI_PORT The port number of the server running the Hadoop cluster manager.
HADOOP_UI_CLUSTER_NAME The name of your Hadoop cluster, which is listed in the clustermanager. Be sure to replace any spaces in the cluster name with %20.
HUE_URI HDP only. The hostname and port of the node running Hue, in theformat <hostname>:<port>.
Oracle® Big Data Discovery : Installation Guide Version 1.3.2 • Revision C • January 2017

Cluster Installation 66
Configuration property Description and possible settings
HADOOP_CLIENT_LIB_PATHS A comma-separated list of the absolute paths to the Hadoop clientlibraries.
Note: You only need to set this property before installing if youhave HDP or MapR. For CDH, the installer will download therequired libraries and set this property automatically. Note thatthis requires an internet connection. If the script is unable todownload the libraries, it will fail; see Failure to download theHadoop client libraries on page 72 for instructions on solvingthis issue.
To set this property, copy the template for your Hadoop distribution toHADOOP_CLIENT_LIB_PATHS and update the paths to point to theclient libraries you copied to the install machine.
Don't change the order of the paths in the list as they must be specifiedas they appear.
HADOOP_CERTIFICATES_PATH Only required for Hadoop clusters with TLS/SSL enabled. The absolutepath to the directory on the install machine where you put thecertificates for HDFS, YARN, Hive, and the KMS.
Don't remove this directory after installing, as you will use it if you haveto update the certificates.
Kerberos
This section configures Kerberos for BDD.
Note: You only need to modify these properties if you want to enable Kerberos.
Configuration property Description and possible settings
ENABLE_KERBEROS Enables Kerberos in the BDD cluster. If Kerberos is installed on yourcluster and you want BDD to integrate with it, set this value to TRUE; if not,set it to FALSE.
KERBEROS_PRINCIPAL The name of the BDD principal. This should include the name of yourdomain; for example, [email protected].
This property is only required if ENABLE_KERBEROS is set to TRUE.
KERBEROS_KEYTAB_PATH The absolute path to the BDD keytab file on the install machine.
The installer will rename this to bdd.keytab and copy it to$BDD_HOME/common/kerberos/ on all BDD nodes.
This property is only required if ENABLE_KERBEROS is set to TRUE.
Oracle® Big Data Discovery : Installation Guide Version 1.3.2 • Revision C • January 2017
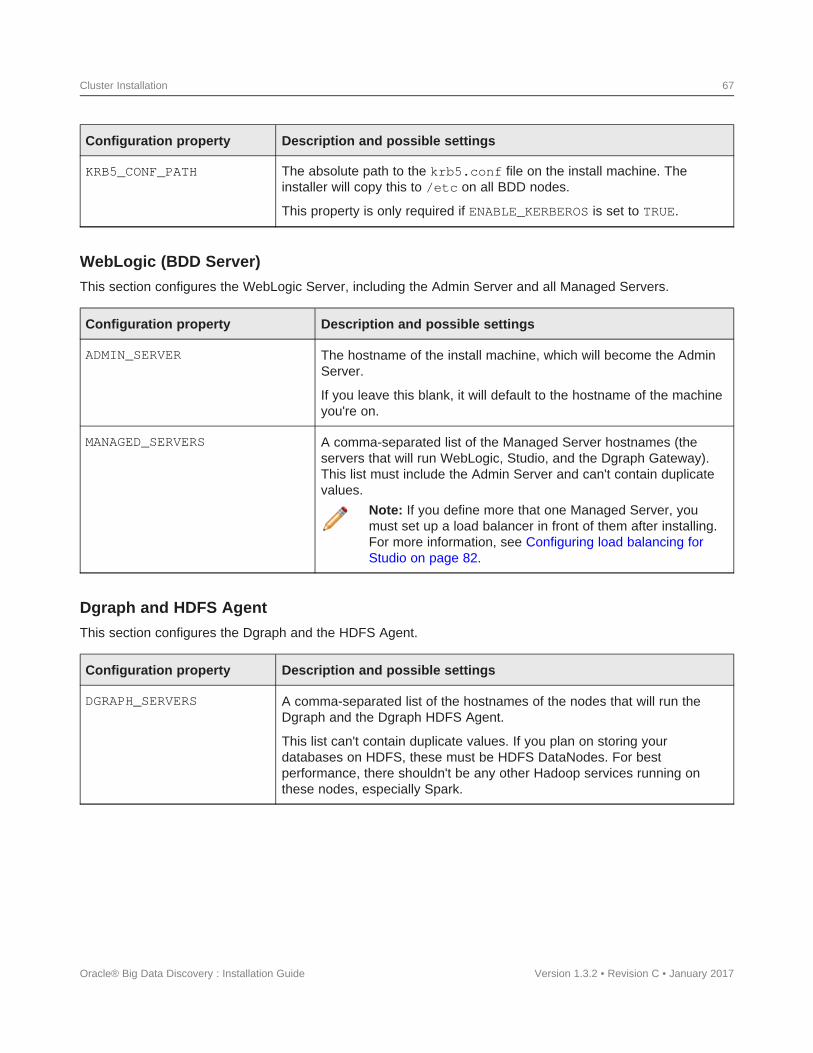
Cluster Installation 67
Configuration property Description and possible settings
KRB5_CONF_PATH The absolute path to the krb5.conf file on the install machine. Theinstaller will copy this to /etc on all BDD nodes.
This property is only required if ENABLE_KERBEROS is set to TRUE.
WebLogic (BDD Server)
This section configures the WebLogic Server, including the Admin Server and all Managed Servers.
Configuration property Description and possible settings
ADMIN_SERVER The hostname of the install machine, which will become the AdminServer.
If you leave this blank, it will default to the hostname of the machineyou're on.
MANAGED_SERVERS A comma-separated list of the Managed Server hostnames (theservers that will run WebLogic, Studio, and the Dgraph Gateway).This list must include the Admin Server and can't contain duplicatevalues.
Note: If you define more that one Managed Server, youmust set up a load balancer in front of them after installing.For more information, see Configuring load balancing forStudio on page 82.
Dgraph and HDFS Agent
This section configures the Dgraph and the HDFS Agent.
Configuration property Description and possible settings
DGRAPH_SERVERS A comma-separated list of the hostnames of the nodes that will run theDgraph and the Dgraph HDFS Agent.
This list can't contain duplicate values. If you plan on storing yourdatabases on HDFS, these must be HDFS DataNodes. For bestperformance, there shouldn't be any other Hadoop services running onthese nodes, especially Spark.
Oracle® Big Data Discovery : Installation Guide Version 1.3.2 • Revision C • January 2017
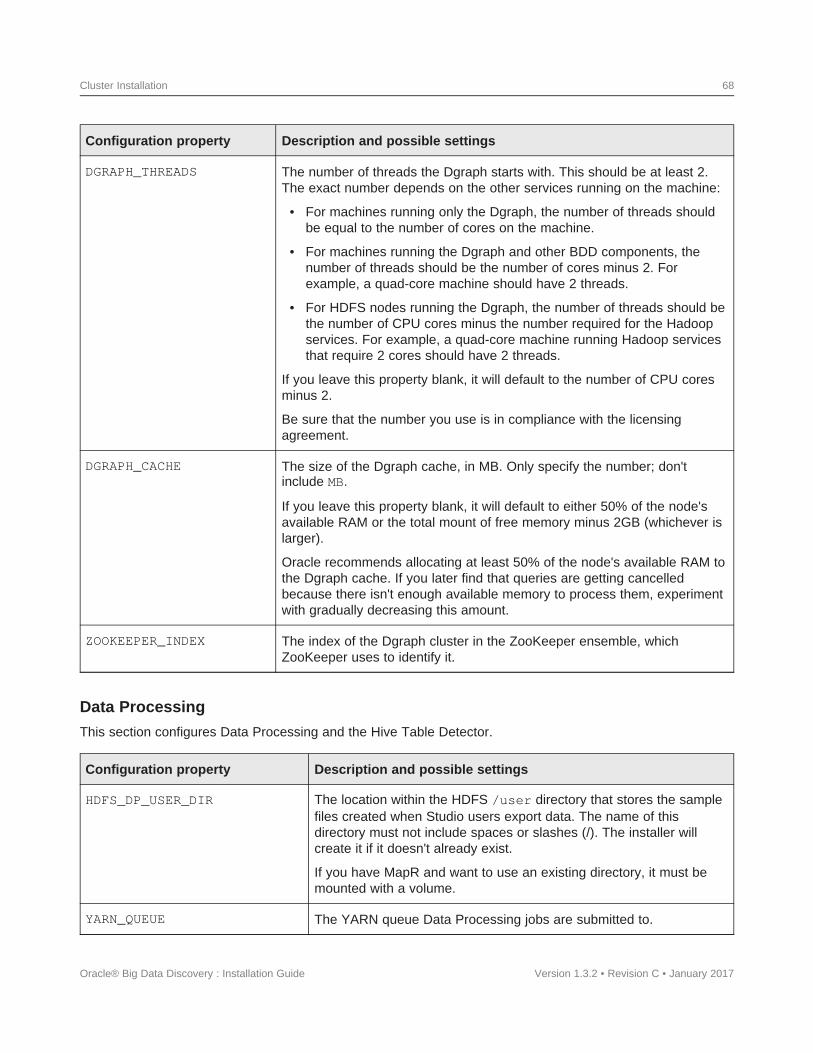
Cluster Installation 68
Configuration property Description and possible settings
DGRAPH_THREADS The number of threads the Dgraph starts with. This should be at least 2.The exact number depends on the other services running on the machine:
• For machines running only the Dgraph, the number of threads shouldbe equal to the number of cores on the machine.
• For machines running the Dgraph and other BDD components, thenumber of threads should be the number of cores minus 2. Forexample, a quad-core machine should have 2 threads.
• For HDFS nodes running the Dgraph, the number of threads should bethe number of CPU cores minus the number required for the Hadoopservices. For example, a quad-core machine running Hadoop servicesthat require 2 cores should have 2 threads.
If you leave this property blank, it will default to the number of CPU coresminus 2.
Be sure that the number you use is in compliance with the licensingagreement.
DGRAPH_CACHE The size of the Dgraph cache, in MB. Only specify the number; don'tinclude MB.
If you leave this property blank, it will default to either 50% of the node'savailable RAM or the total mount of free memory minus 2GB (whichever islarger).
Oracle recommends allocating at least 50% of the node's available RAM tothe Dgraph cache. If you later find that queries are getting cancelledbecause there isn't enough available memory to process them, experimentwith gradually decreasing this amount.
ZOOKEEPER_INDEX The index of the Dgraph cluster in the ZooKeeper ensemble, whichZooKeeper uses to identify it.
Data Processing
This section configures Data Processing and the Hive Table Detector.
Configuration property Description and possible settings
HDFS_DP_USER_DIR The location within the HDFS /user directory that stores the samplefiles created when Studio users export data. The name of thisdirectory must not include spaces or slashes (/). The installer willcreate it if it doesn't already exist.
If you have MapR and want to use an existing directory, it must bemounted with a volume.
YARN_QUEUE The YARN queue Data Processing jobs are submitted to.
Oracle® Big Data Discovery : Installation Guide Version 1.3.2 • Revision C • January 2017

Cluster Installation 69
Configuration property Description and possible settings
HIVE_DATABASE_NAME The name of the Hive database that stores the source data for Studiodata sets.
The default value is default. This is the same as the default valueof DETECTOR_HIVE_DATABASE, which is used by the Hive TableDetector. It is possible to use different databases for these properties,but it is recommended that you start with one for a first timeinstallation.
SPARK_ON_YARN_JAR The absolute path to the Spark on YARN JAR on your Hadoopnodes. This will be added to the CLI classpath.
There are two templates for this property. Copy the value of thetemplate that corresponds to your Hadoop distribution toSPARK_ON_YARN_JAR and update its value as follows:
• If you have CDH, use the first template. This should be theabsolute path to spark-assembly.jar.
• If you have HDP, use the second template. This should be theabsolute paths to hive-exec.jar and spark-assembly.jar,separated by a colon:
<path/to/hive-exec.jar>:<path/to/spark-assembly.jar>
• If you have MapR, use the third template. This should be theabsolute path to spark-assembly-1.5.2-mapr-1602-hadoop2.7.0-mapr-1602.jar.
This JAR must be located in the same location on all Hadoop nodes.
Micro Service
This section configures the Transform Service.
Configuration property Description and possible settings
TRANSFORM_SERVICE_SERVERS A comma-separated list of the Transform Service nodes.
For best performance, these should all be Managed Servers. Inparticular, they shouldn't be Dgraph nodes, as both the Dgraph andthe Transform Service require a lot of memory.
Note: If you define multiple Transform Service nodes, youmust set up a load balancer in front of them after installing.For instructions, see Configuring load balancing for theTransform Service on page 82.
TRANSFORM_SERVICE_PORT The port the Transform Service listens on for requests from Studio.
ENABLE_CLUSTERING_SERVICE For use by Oracle Support only. Leave this property set to FALSE.
Oracle® Big Data Discovery : Installation Guide Version 1.3.2 • Revision C • January 2017

Cluster Installation 70
Configuration property Description and possible settings
CLUSTERING_SERVICE_SERVERS For use by Oracle Support only. Don't modify this property.
CLUSTERING_SERVICE_PORT For use by Oracle Support only. Don't modify this property.
Running the prerequisite checkerBefore installing, you should run the prerequisite checker script to determine whether all requirements havebeen satisfied.
This script checks your system to make sure it meets each requirement and verifies that bdd.conf is properlyconfigured. When it completes, it outputs the results to an HTML file, which you can view in your browser.
To run the prerequisite checker:
1. On the install machine, open a new terminal window and go to<install_source_dir>/installer/linux/utils/prerequisite_validation/.
2. Run the following command:
python prerequisite_validation.py <path_to_bdd.conf>
Version 1.3.2 • Revision C • January 2017
Where <path_to_bdd.conf> is the absolute path to bdd.conf.
3. Enter the username and password for your Hadoop manager when prompted.
4. When the script completes, go to the timestamped output directory and open test_report.html ina browser.
The report lists all BDD requirements and whether each passed, failed, or was ignored. Ignored requirementsaren't applicable to your system.
If everything passed, you're ready to install BDD. If any requirement failed, update your system or bdd.confaccordingly and rerun the prerequisite checker.
Installing BDD on a clusterAfter you update bdd.conf and verify that you satisfied all prerequisites, you can install BDD.
Before running the installer, verify that all of BDD's prerequisites have been satisfied. Specifically, make surethat:
• You satisfied all requirements described in Prerequisites on page 14.
• The bdd user meets the requirements described in OS user requirements on page 23.
• You are working on the install machine, which is properly set up.
• The Studio database (including its username, password, and schema) is set up.
• If you are installing with existing Dgraph databases, the files are on either HDFS or the NFS andDRAPH_INDEX_DIR points to the correct location.
• If you want to run the script in silent mode, you set the environment variables described in Silentinstallation on page 57.
Oracle® Big Data Discovery : Installation Guide
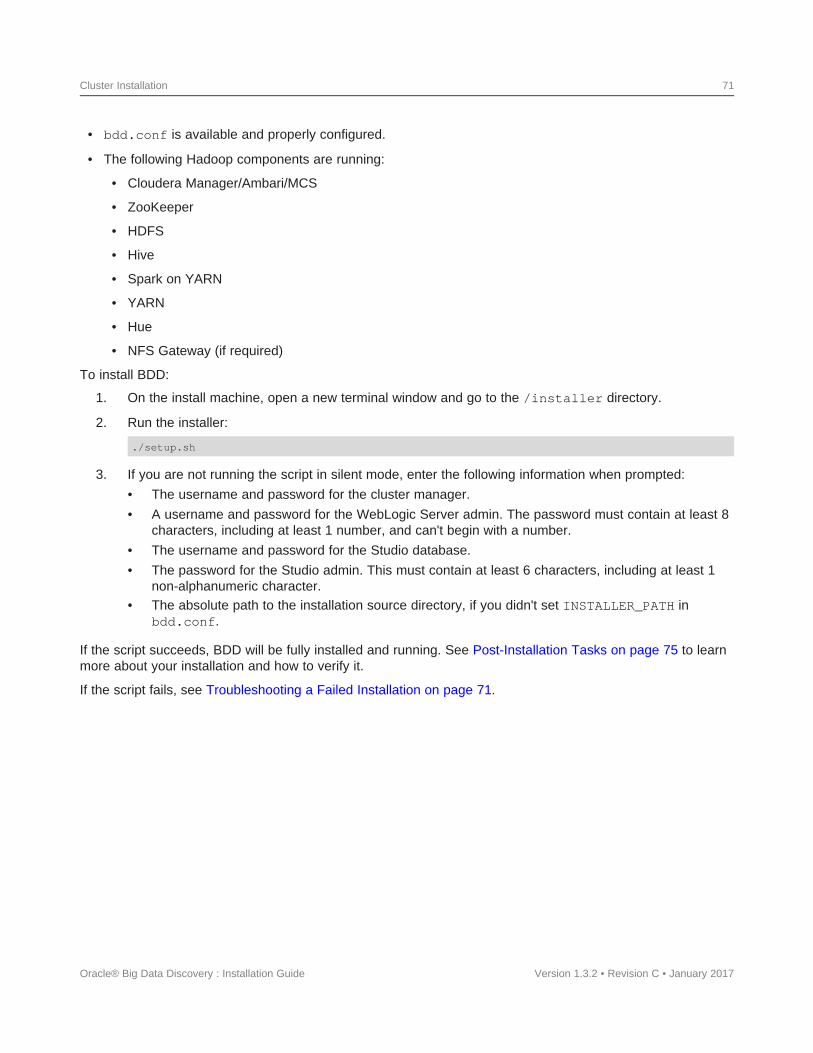
Cluster Installation 71
• bdd.conf is available and properly configured.
• The following Hadoop components are running:
• Cloudera Manager/Ambari/MCS
• ZooKeeper
• HDFS
• Hive
• Spark on YARN
• YARN
• Hue
• NFS Gateway (if required)
To install BDD:
1. On the install machine, open a new terminal window and go to the /installer directory.
2. Run the installer:
./setup.sh
Version 1.3.2 • Revision C • January 2017
3. If you are not running the script in silent mode, enter the following information when prompted:
• The username and password for the cluster manager.
• A username and password for the WebLogic Server admin. The password must contain at least 8characters, including at least 1 number, and can't begin with a number.
• The username and password for the Studio database.
• The password for the Studio admin. This must contain at least 6 characters, including at least 1non-alphanumeric character.
• The absolute path to the installation source directory, if you didn't set INSTALLER_PATH inbdd.conf.
If the script succeeds, BDD will be fully installed and running. See Post-Installation Tasks on page 75 to learnmore about your installation and how to verify it.
If the script fails, see Troubleshooting a Failed Installation on page 71.
Oracle® Big Data Discovery : Installation Guide
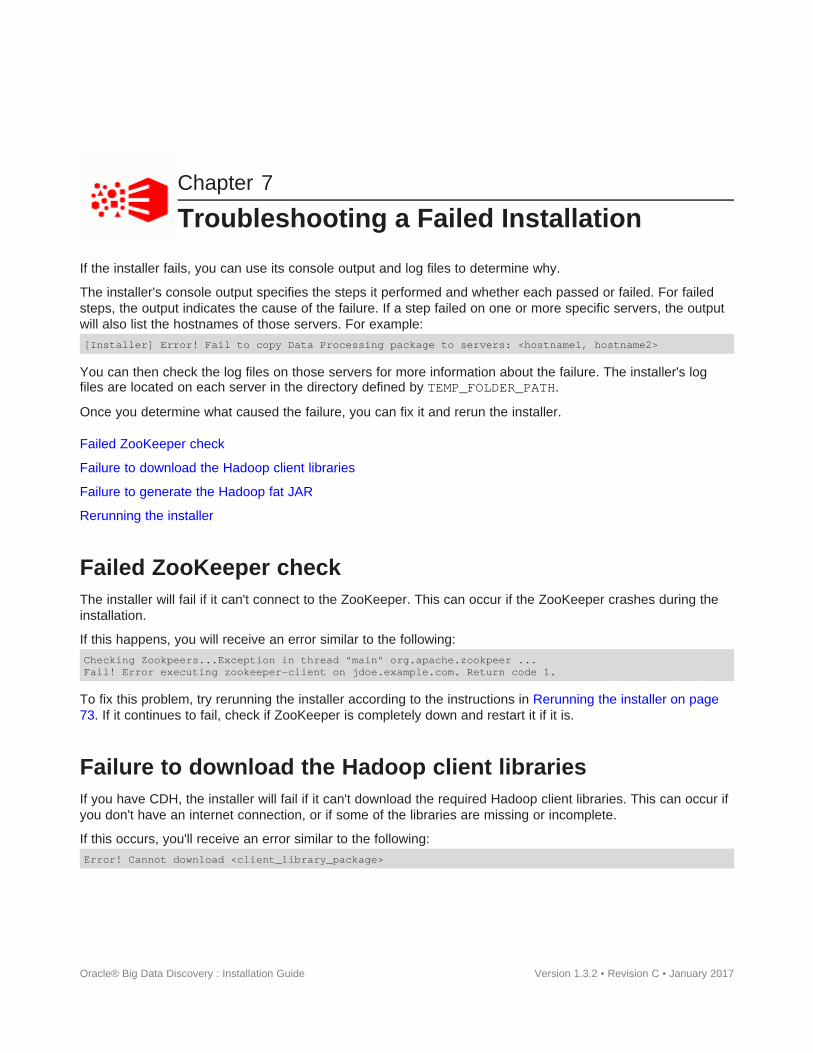
Chapter 7
Troubleshooting a Failed Installation
If the installer fails, you can use its console output and log files to determine why.
The installer's console output specifies the steps it performed and whether each passed or failed. For failedsteps, the output indicates the cause of the failure. If a step failed on one or more specific servers, the outputwill also list the hostnames of those servers. For example:
[Installer] Error! Fail to copy Data Processing package to servers: <hostname1, hostname2>
Version 1.3.2 • Revision C • January 2017
You can then check the log files on those servers for more information about the failure. The installer's logfiles are located on each server in the directory defined by TEMP_FOLDER_PATH.
Once you determine what caused the failure, you can fix it and rerun the installer.
Failed ZooKeeper check
Failure to download the Hadoop client libraries
Failure to generate the Hadoop fat JAR
Rerunning the installer
Failed ZooKeeper checkThe installer will fail if it can't connect to the ZooKeeper. This can occur if the ZooKeeper crashes during theinstallation.
If this happens, you will receive an error similar to the following:
Checking Zookpeers...Exception in thread "main" org.apache.zookpeer ...Fail! Error executing zookeeper-client on jdoe.example.com. Return code 1.
To fix this problem, try rerunning the installer according to the instructions in Rerunning the installer on page73. If it continues to fail, check if ZooKeeper is completely down and restart it if it is.
Failure to download the Hadoop client librariesIf you have CDH, the installer will fail if it can't download the required Hadoop client libraries. This can occur ifyou don't have an internet connection, or if some of the libraries are missing or incomplete.
If this occurs, you'll receive an error similar to the following:
Error! Cannot download <client_library_package>
Oracle® Big Data Discovery : Installation Guide

Troubleshooting a Failed Installation 73
To fix this problem:
1. On the install machine, download the following packages from http://archive-primary.cloudera.com/cdh5/cdh/5/ and extract them:
Note: It is recommended that you use a browser other than Chrome for this.
• spark-<spark_version>.cdh.<cdh_version>.tar.gz
• hive-<hive_version>.cdh.<cdh_version>.tar.gz
• hadoop-<hadoop_version>.cdh.<cdh_version>.tar.gz
• avro-<avro_version>.cdh.<cdh_version>.tar.gz
The location you extract them to is arbitrary.
2. Open bdd.conf in a text editor and locate the HADOOP_CLIENT_LIB_PATHS property.
Note that there are three templates below this property.
3. Copy and paste the value of the first template to HADOOP_CLIENT_LIB_PATHS and replace eachinstance of $UNZIPPED_<COMPONENT>_BASE with the absolute path to that library's location on theinstall machine.
4. Rerun the installer.
For instructions on rerunning the installer, see Rerunning the installer on page 73.
Failure to generate the Hadoop fat JARIf you have HDP, the installer will fail if it's unable to generate the Hadoop fat JAR. This can occur if it can'tfind the ojdbc6.jar file.
To fix this problem:
1. On the install machine, create a directory called /usr/share/java.
2. Download ojdbc6.jar from http://www.oracle.com/technetwork/apps-tech/jdbc-112010-090769.htmland copy it to /usr/share/java.
3. Rerun the installer.
For instructions on rerunning the installer, see Rerunning the installer on page 73.
Rerunning the installerAfter you have fixed the errors that caused the installer to fail, you can reinstall BDD.
To rerun the installer:
1. On the install machine, go to $BDD_HOME/uninstall/ and run:
./uninstall.sh bdd.conf
Version 1.3.2 • Revision C • January 2017
This removes many of the files created the last time you ran the installer and cleans up yourenvironment.
Oracle® Big Data Discovery : Installation Guide

Troubleshooting a Failed Installation 74
2. If the installer was previously run by a different Linux user, delete the TEMP_FOLDER_PATH directoryfrom all nodes.
3. Go to the installation source directory and open bdd.conf in any text editor.
4. Set the value of FORCE to TRUE.
Be sure to enter TRUE in all caps.
5. Rerun the installer.
The installer removes any files created the last time it ran and runs again on the clean system.
Oracle® Big Data Discovery : Installation Guide Version 1.3.2 • Revision C • January 2017

Part III
After You Install

Chapter 8
Post-Installation Tasks
The following sections describe tasks you can perform after you install BDD, such as verifying your installationand increasing Linux file descriptors.
Verifying your installation
Navigating the BDD directory structure
Enabling Kerberos for the Transform Service
Configuring load balancing
Updating the DP CLI whitelist and blacklist
Signing in to Studio as an administrator
Backing up your cluster
Replacing certificates
Increasing Linux file descriptors
Customizing the WebLogic JVM heap size
Configuring Studio database caching
Verifying your installationOnce the installer completes, you can verify that each of the major BDD components were installed properlyand are running.
Verifying your cluster's health
Verifying Data Processing
Verifying your cluster's healthUse the bdd-admin script to verify the overall health of your cluster.
More information on the bdd-admin script is available in the Administrator's Guide.
To verify the deployed components:
1. On the Admin Server, open a new terminal window and navigate to the$BDD_HOME/BDD_manager/bin directory.
2. Run the following:
./bdd-admin.sh status --health-check
Version 1.3.2 • Revision C • January 2017Oracle® Big Data Discovery : Installation Guide
Post-Installation Tasks 77
If your cluster is healthy, the script's output should be similar to the following:
[2015/06/19 04:18:55 -0700] [Admin Server] Checking health of BDD cluster...[2015/06/19 04:20:39 -0700] [web009.us.example.com] Check BDD functionality......Pass![2015/06/19 04:20:39 -0700] [web009.us.example.com] Check Hive Data Detector health......Hive Data Detectorhas previously run[2015/06/19 04:20:39 -0700] [Admin Server] Successfully checked statuses.
Version 1.3.2 • Revision C • January 2017
Verifying Data Processing
To verify that Data Processing is running, you must launch a Data Processing workflow. You can do this intwo ways:
• Use the CLI to launch a Data Processing workflow. For more information, see the Data Processing Guide.
• Create a data set in Studio. For more information, see the Studio User's Guide.
Note: If you use the CLI to verify Data Processing, you must first add the table(s) you want processedto the CLI whitelist. For more information, see Updating the DP CLI whitelist and blacklist on page 83.
Navigating the BDD directory structureYour BDD installation consists of two main directories: $BDD_HOME and $DOMAIN_HOME.
$BDD_HOME$BDD_HOME is the root directory of your BDD installation. Its default path is:
$ORACLE_HOME/BDD-<version>
Oracle® Big Data Discovery : Installation Guide

Post-Installation Tasks 78
$BDD_HOME contains the following subdirectories.
Directory name Description
/BDD_manager Directories related to the bdd-admin script:
• /bin: The bdd-admin script, which you can use to administer yourcluster from the command line.
• /commands: Scripts invoked by bdd-admin.
• /conf: Contains bdd.conf.
• /lib: Additional files required by bdd-admin.
• /log: The bdd-admin log files.
• /utils: Additional scripts required by bdd-admin.
• version.txt: Version information for bdd-admin.
More information on the bdd-admin script is available in theAdministrator's Guide.
Note: Although the bdd-admin script can only be run from theAdmin Server, this directory is created on all nodes BDD isinstalled on because it's required for updating clusterconfiguration post-installation.
/bdd-shell Files related to the optional BDD Shell component. For more information,see the BDD Shell Guide.
/clusteringservice For use by Oracle Support, only. Files and directories related to theCluster Analysis service.
/common Files and directories required by all BDD components:
• /edp: Libraries and OLT files required by Data Processing.
• /hadoop: The Hadoop fat JAR generated from the client libraries,and other Hadoop configuration files required by BDD.
• /security/cacerts: Only available when BDD is installed onsecure Hadoop clusters. Contains the certificates for HDFS, YARN,Hive, and the KMS services.
• /templates: Additional JARs required by BDD components.
/dataprocessing/edp_cli The DP CLI and related files.
Oracle® Big Data Discovery : Installation Guide Version 1.3.2 • Revision C • January 2017
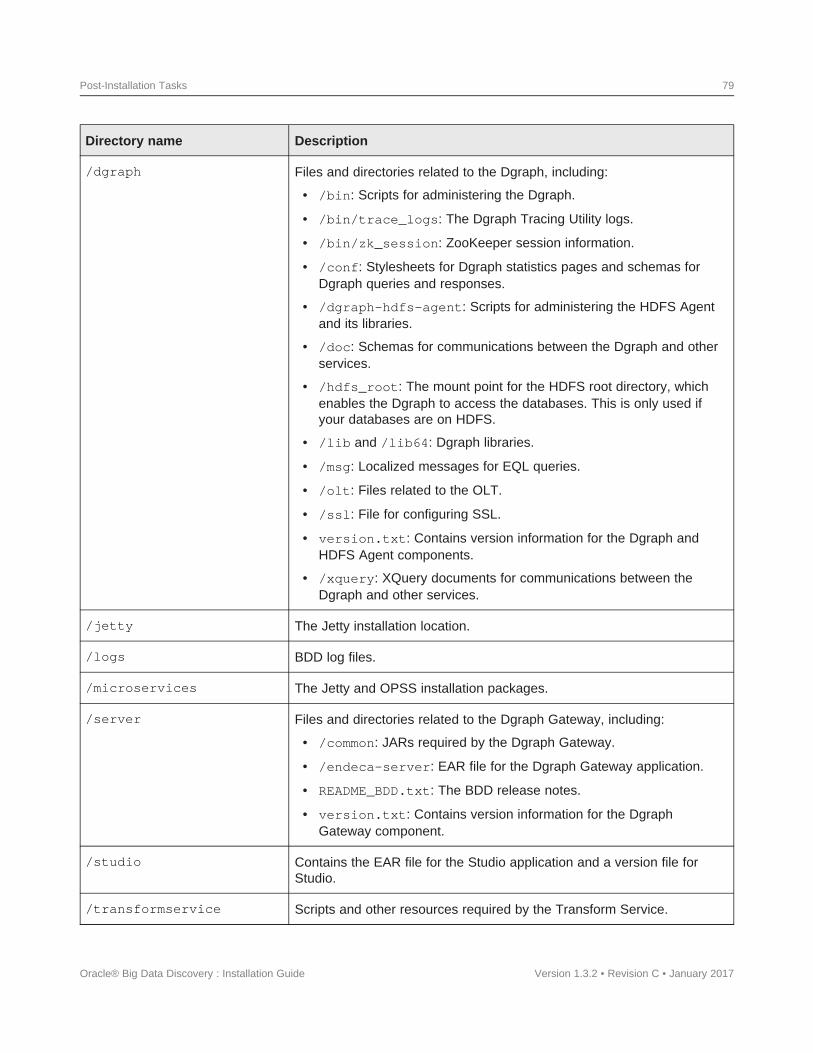
Post-Installation Tasks 79
Directory name Description
/dgraph Files and directories related to the Dgraph, including:
• /bin: Scripts for administering the Dgraph.
• /bin/trace_logs: The Dgraph Tracing Utility logs.
• /bin/zk_session: ZooKeeper session information.
• /conf: Stylesheets for Dgraph statistics pages and schemas forDgraph queries and responses.
• /dgraph-hdfs-agent: Scripts for administering the HDFS Agentand its libraries.
• /doc: Schemas for communications between the Dgraph and otherservices.
• /hdfs_root: The mount point for the HDFS root directory, whichenables the Dgraph to access the databases. This is only used ifyour databases are on HDFS.
• /lib and /lib64: Dgraph libraries.
• /msg: Localized messages for EQL queries.
• /olt: Files related to the OLT.
• /ssl: File for configuring SSL.
• version.txt: Contains version information for the Dgraph andHDFS Agent components.
• /xquery: XQuery documents for communications between theDgraph and other services.
/jetty The Jetty installation location.
/logs BDD log files.
/microservices The Jetty and OPSS installation packages.
/server Files and directories related to the Dgraph Gateway, including:
• /common: JARs required by the Dgraph Gateway.
• /endeca-server: EAR file for the Dgraph Gateway application.
• README_BDD.txt: The BDD release notes.
• version.txt: Contains version information for the DgraphGateway component.
/studio Contains the EAR file for the Studio application and a version file forStudio.
/transformservice Scripts and other resources required by the Transform Service.
Oracle® Big Data Discovery : Installation Guide Version 1.3.2 • Revision C • January 2017

Post-Installation Tasks 80
Directory name Description
/uninstall The uninstall script and required utilities.
version.txt Version information for your BDD installation.
$DOMAIN_HOME$DOMAIN_HOME is the root directory of Studio, the Dgraph Gateway, and your WebLogic domain. Its defaultpath is:
$ORACLE_HOME/user_projects/domains/bdd-<version>_domain
Version 1.3.2 • Revision C • January 2017
$DOMAIN_HOME contains the following subdirectories.
Directory name Description
/autodeploy Provides a way to quickly deploy applications to a development server.You can place J2EE applications in this directory; these will beautomatically deployed to the WebLogic Server when it is started indevelopment mode.
/bin Scripts for migrating servers and services, setting up domain andstartup environments, and starting and stopping the WebLogic Serverand other components.
/config Data sources and configuration files for Studio and the DgraphGateway.
/console-ext Console extensions. This directory is only used on the Admin Server.
edit.lok Ensures can only edit the domain's configuration one at a time. Don'tedit this file.
fileRealm.properties Configuration file for the file realm.
/init-info Schemas used by the Dgraph Gateway.
/lib The domain library. JAR files placed in this directory will bedynamically added to the end of the Dgraph Gateway's classpathwhen the Dgraph Gateway is started. You use this directory to addapplication libraries to the Dgraph Gateway's classpath.
/nodemanager Files used by the Node Manager. nodemanager.domains lists thelocations of directories created by the configuration wizard, andnodemanager.properties configures the Node Manager.
/pending Stores pending configuration changes.
/security Files related to domain security.
Oracle® Big Data Discovery : Installation Guide
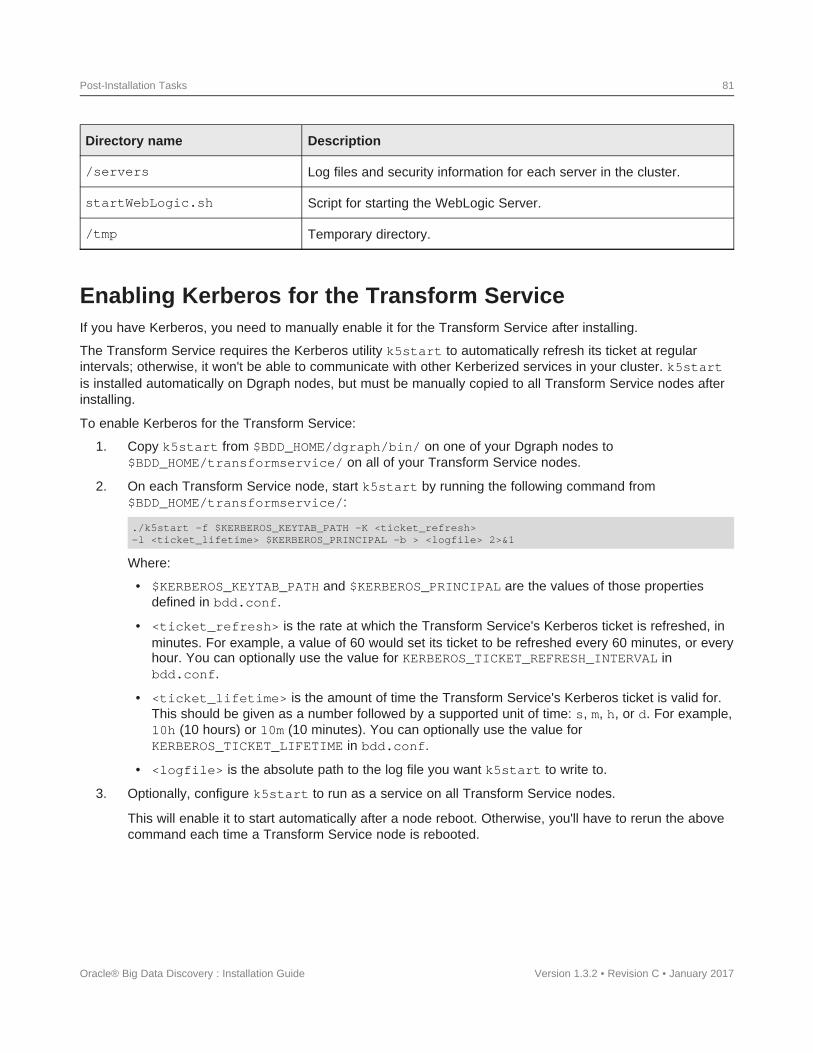
Post-Installation Tasks 81
Directory name Description
/servers Log files and security information for each server in the cluster.
startWebLogic.sh Script for starting the WebLogic Server.
/tmp Temporary directory.
Enabling Kerberos for the Transform ServiceIf you have Kerberos, you need to manually enable it for the Transform Service after installing.
The Transform Service requires the Kerberos utility k5start to automatically refresh its ticket at regularintervals; otherwise, it won't be able to communicate with other Kerberized services in your cluster. k5startis installed automatically on Dgraph nodes, but must be manually copied to all Transform Service nodes afterinstalling.
To enable Kerberos for the Transform Service:
1. Copy k5start from $BDD_HOME/dgraph/bin/ on one of your Dgraph nodes to$BDD_HOME/transformservice/ on all of your Transform Service nodes.
2. On each Transform Service node, start k5start by running the following command from$BDD_HOME/transformservice/:
./k5start -f $KERBEROS_KEYTAB_PATH -K <ticket_refresh>-l <ticket_lifetime> $KERBEROS_PRINCIPAL -b > <logfile> 2>&1
Version 1.3.2 • Revision C • January 2017
Where:
• $KERBEROS_KEYTAB_PATH and $KERBEROS_PRINCIPAL are the values of those propertiesdefined in bdd.conf.
• <ticket_refresh> is the rate at which the Transform Service's Kerberos ticket is refreshed, inminutes. For example, a value of 60 would set its ticket to be refreshed every 60 minutes, or everyhour. You can optionally use the value for KERBEROS_TICKET_REFRESH_INTERVAL inbdd.conf.
• <ticket_lifetime> is the amount of time the Transform Service's Kerberos ticket is valid for.This should be given as a number followed by a supported unit of time: s, m, h, or d. For example,10h (10 hours) or 10m (10 minutes). You can optionally use the value forKERBEROS_TICKET_LIFETIME in bdd.conf.
• <logfile> is the absolute path to the log file you want k5start to write to.
3. Optionally, configure k5start to run as a service on all Transform Service nodes.
This will enable it to start automatically after a node reboot. Otherwise, you'll have to rerun the abovecommand each time a Transform Service node is rebooted.
Oracle® Big Data Discovery : Installation Guide

Post-Installation Tasks 82
Configuring load balancingStudio and the Transform Service require load balancing when installed on multiple nodes.
A load balancer distributes client requests to individual nodes within a cluster. It improves the speed andefficiency of the cluster by ensuring individual nodes aren't overwhelmed with requests while others remainidle.
The following sections describe how to configure load balancing for Studio and the Transform Service.
Configuring load balancing for Studio
Configuring load balancing for the Transform Service
Configuring load balancing for Studio
If you installed Studio on multiple nodes, you need to set up a load balancer in front of them to ensure thatuser requests are always routed to available nodes.
Note: A load balancer isn't required if Studio is only installed on one node.
There are many load balancing options available. Oracle recommends an external HTTP load balancer, butyou can use whatever option is best suited to your needs and available resources. Just be sure the option youchoose uses session affinity (also called sticky sessions).
Session affinity forces all requests from a given session to be routed to the same node, resulting in onesession token. Without this, requests from a single session could be handled by multiple nodes, which wouldcreate multiple session tokens.
Configuring load balancing for the Transform Service
If you installed the Transform Service on multiple nodes, you need to set up a load balancer in front of them.
Note: A load balancer isn't required if the Transform Service is installed on one node.
There are many load balancing options available. Be sure to choose one that:
• Uses session affinity, or "sticky sessions". For more information, see Configuring load balancing for Studioon page 82.
• Can assign a virtual IP address to the Transform Service cluster. This is required for Studio tocommunicate with the cluster; without it, Studio will only send requests to the first Transform Serviceinstance.
To configure load balancing for the Transform Service:
1. Set up the load balancer and configure a virtual IP address for the Transform Service cluster.
Oracle® Big Data Discovery : Installation Guide Version 1.3.2 • Revision C • January 2017

Post-Installation Tasks 83
2. On all Studio nodes, open $DOMAIN_HOME/config/studio/portal-ext.properties andchange the hostname portion of bdd.microservice.transformservice.url to the virtual IP forthe Transform Service cluster.
Don't change the port number or anything after it. The new value should be similar tohttp://<virtual_IP>:7203/bdd.transformservice/v1.
Additionally, don't change the value of TRANSFORM_SERVICE_NODES in bdd.conf, as it's used byother BDD components to locate the Transform Service.
Updating the DP CLI whitelist and blacklistIn order to create data sets from existing Hive tables, you must update the DP CLI white- and blacklists thatdefine which tables are processed by Data Processing.
The DP CLI whitelist specifies which Hive tables should be processed. Tables not included in this list areignored by the Hive Table Detector and any Data Processing workflows invoked by the DP CLI. Similarly, theblacklist specifies the Hive tables that should not be processed. You can use one or both of these lists tocontrol which of your Hive tables are processed and which are not.
Once you have updated the whitelist and/or blacklist as needed, you can either wait for the Hive TableDetector to process your tables automatically or use the DP CLI to start a Data Processing workflowimmediately.
For information on the DP CLI white- and blacklists, see the Data Processing Guide.
Signing in to Studio as an administratorAfter you complete the BDD installation and deployment, you can sign in to Studio as an administrator, beginto create new users, explore data sets, re-configure Studio settings as necessary, and so on.
To sign in to Studio as an administrator:
1. Ensure the WebLogic Server on the Admin Server node is running.
(This is the WebLogic instance running Studio.)
2. Open a Web browser and load Studio.
By default, the URL is http://<Admin Server Name>:7003/bdd.
3. Specify the admin username and password set during the installation and click Sign In.
If the admin username and password weren't set, login with the default values.
Table 8.1: Sign in Values
Field Value
Login [email protected]
Password Welcome123
Oracle® Big Data Discovery : Installation Guide Version 1.3.2 • Revision C • January 2017

Post-Installation Tasks 84
4. Reset the password, if prompted.
The new password must contain:
• At least 6 characters
• At least one non-alphabetic character
Now you can add additional Studio users. There are several ways to add new Studio Users:
• Integrate Studio with an Oracle Single Sign On (SSO) system. For details, see the Administrator's Guide.
• Integrate Studio with an LDAP system. For details, see the Administrator's Guide.
• Or, while you are signed in as an administrator, you can create users manually in Studio from the ControlPanel>Users page.
Backing up your clusterOracle recommends that you back up your BDD cluster immediately after deployment.
You can do this with the bdd-admin script. For more information, see the Administrator's Guide.
Replacing certificatesEnabling SSL for Studio activates WebLogic Server's default Demo Identity and Demo Trust Keystores. Astheir names suggest, these keystores are untrusted and meant for demo purposes only. After deployment, youshould replace them with your own certificates.
More information on WebLogic's demo keystores is available in section Configure keystores of WebLogic'sAdministration Console Online Help.
Increasing Linux file descriptorsYou should increase the number of file descriptors from the 1024 default.
Having a higher number of file descriptors ensures that the WebLogic Server can open sockets under highload and not abort requests coming in from clients.
Note: On Dgraph nodes, the recommended number of open file descriptors is 65536. For moreinformation, see Increasing the numbers of open file descriptors and processes on page 39.
To increase the number of file descriptors on Linux:
1. Edit the /etc/security/limits.conf file.
2. Modify the nofile limit so that soft is 4096 and hard is 8192. Either edit existing lines or add these twolines to the file:
* soft nofile 4096* hard nofile 8192
Version 1.3.2 • Revision C • January 2017
The "*" character is a wildcard that identifies all users.
Oracle® Big Data Discovery : Installation Guide
Post-Installation Tasks 85
Customizing the WebLogic JVM heap sizeYou can change the default JVM heap size to fit the needs of your deployment.
The default JVM heap size for WebLogic is 3GB. The size is set in the setDomainEnv.sh file, which is in the$DOMAIN_HOME/bin directory. The heap size is set with the -Xmx option.
To change the WebLogic JVM heap size:
1. Open the setDomainEnv file in a text editor.
2. Search for this comment line:
# IF USER_MEM_ARGS the environment variable is set, use it to override ALL MEM_ARGS values
Version 1.3.2 • Revision C • January 2017
3. Add the following line immediately after the comment line:
export USER_MEM_ARGS="-Xms128m -Xmx3072m ${MEM_DEV_ARGS} ${MEM_MAX_PERM_SIZE}"
4. Save and close the file.
5. Re-start WebLogic Server.
Configuring Studio database cachingAll Studio instances are automatically configured to use synchronized database caching, so that informationcached on one instance is available to the others.
Studio uses Ehcache (www.ehcache.org), which uses RMI (Remote Method Invocation) multicast to notifyeach instance when the cache has been updated.
Although the default caching configuration will work in most cases, you may want to customize it. You mightalso want to disable it entirely, depending on your environment.
Customizing Studio database caching
Disabling Studio database caching
Clearing the Studio database cache
Customizing Studio database caching
You can customize Studio's database cache configuration, if needed.
The most likely change you'd want to make would be to update the IP address and port number at the top ofeach configuration file:
<cacheManagerPeerProviderFactoryclass="net.sf.ehcache.distribution.RMICacheManagerPeerProviderFactory"properties="peerDiscovery=automatic,multicastGroupAddress=230.0.0.1,multicastGroupPort
=4446,timeToLive=1"propertySeparator=","
/>
Note that any changes you make must be made on all Studio nodes.
Oracle® Big Data Discovery : Installation Guide
Post-Installation Tasks 86
To customize Studio's database caching:
1. Extract the default files from the ehcache directory in portal-impl.jar.
The file is in the WEB-INF/lib directory, which is located in endeca-portal.war, which is in bdd-studio.ear.
2. Update the files as needed.
To ensure that Studio uses the correct files, you may want to rename the customized files tosomething like:
• hibernate-clustered-custom.xml
• liferay-multi-vm-clustered-custom.xml
3. Deploy the customized files:
(a) Undeploy bdd-studio.ear.
Use the appropriate method to undeploy the file based on whether you auto-deployed the .ear fileor installed it.
(b) Update bdd-studio.ear to add a subdirectory APP-INF/classes/ehcache/ that containsthe customized XML files.
(c) Redeploy the updated .ear file.
4. If needed, update portal-ext.properties to reflect the customized file names:
net.sf.ehcache.configurationResourceName=/ehcache/hibernate-clustered-custom.xmlehcache.multi.vm.config.location=/ehcache/liferay-multi-vm-clustered-custom.xml
Version 1.3.2 • Revision C • January 2017
Disabling Studio database caching
Database caching is enabled for Studio by default. This provides better network efficiency for most clusters,but can in some cases cause issues in Studio.
You will likely want to disable database caching if you installed or plan on installing Studio on multiple nodesand either of the following is true:
• Your network or host environment doesn't support multicast UDP traffic. This is sometimes true of VMenvironments.
• Your Studio nodes are on separate LANs that don't use multicast routing.
To disable database caching for Studio:
1. Before installing, set STUDIO_JDBC_CACHE to FALSE in bdd.conf.
You can also do this after installing. For instructions on updating BDD's configuration post-install, seethe Administrator's Guide.
2. After installing, open $DOMAIN_HOME/bin/setUserOverrides.sh on each Studio node and addthe following argument to JAVA_OPTIONS, before the final quotation mark:
-Dnet.sf.ehcache.disabled=true
3. Restart each Studio node.
Oracle® Big Data Discovery : Installation Guide
Post-Installation Tasks 87
Clearing the Studio database cache
As part of troubleshooting issues with Studio, you can clear the cache for either a single Studio instance or theentire Studio cluster.
To clear the Studio cache:
1. Click the Configuration Options icon, then click Control Panel.
2. Click Server > Server Administration.
3. In the Actions tab at the bottom of the page:
• To clear the cache for the current instance only, click the Execute button next to Clear contentcached by this VM.
• To clear the cache for the entire Studio cluster, click the Execute button next to Clear contentcached across the cluster.
Oracle® Big Data Discovery : Installation Guide Version 1.3.2 • Revision C • January 2017

Chapter 9
Using Studio with a Reverse Proxy
Studio can be configured to use a reverse proxy.
About reverse proxies
Types of reverse proxies
Example sequence for a reverse proxy request
Recommendations for reverse proxy configuration
Reverse proxy configuration options for Studio
About reverse proxiesA reverse proxy provides a more secure way for users to get access to application servers by retrievingresources on behalf of a client from one or more servers and returning them to the client as though they camefrom the server itself.
A reverse proxy is located between the client and the proxied server(s). Clients access content through theproxy server. The reverse proxy server assumes the public hostname of the proxied server. The hostname(s)of the actual/proxied servers are often internal and unknown to the client browser.
Some common reasons for implementing a reverse proxy include:
• Security or firewalling
• SSL termination
• Load balancing and failover
• Resource caching/acceleration
• URL partitioning
Types of reverse proxiesReverse proxies may be either devices/appliances or specially configured web servers.
A very popular software-based reverse proxy is the Apache HTTP Server configured with the mod_proxymodule. Many commercial web servers and reverse proxy solutions are built on top of Apache HTTP Server,including Oracle HTTP Server.
Oracle® Big Data Discovery : Installation Guide Version 1.3.2 • Revision C • January 2017
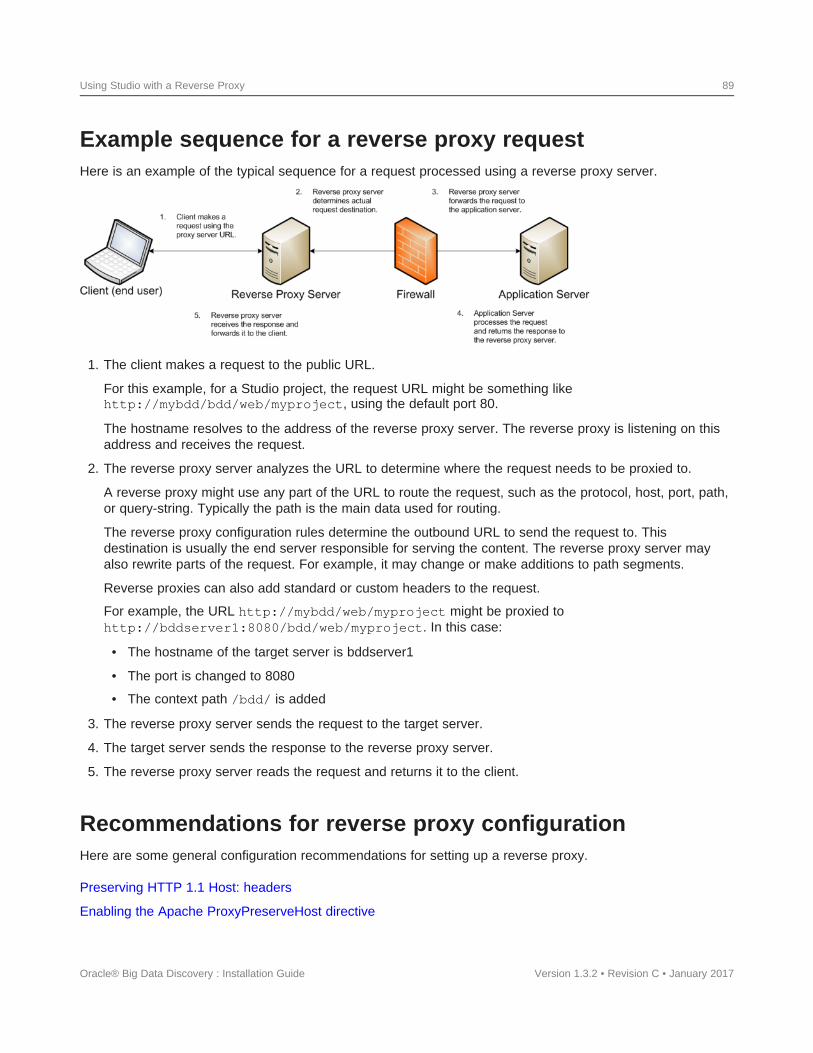
Using Studio with a Reverse Proxy 89
Example sequence for a reverse proxy requestHere is an example of the typical sequence for a request processed using a reverse proxy server.
1. The client makes a request to the public URL.
For this example, for a Studio project, the request URL might be something likehttp://mybdd/bdd/web/myproject, using the default port 80.
The hostname resolves to the address of the reverse proxy server. The reverse proxy is listening on thisaddress and receives the request.
2. The reverse proxy server analyzes the URL to determine where the request needs to be proxied to.
A reverse proxy might use any part of the URL to route the request, such as the protocol, host, port, path,or query-string. Typically the path is the main data used for routing.
The reverse proxy configuration rules determine the outbound URL to send the request to. Thisdestination is usually the end server responsible for serving the content. The reverse proxy server mayalso rewrite parts of the request. For example, it may change or make additions to path segments.
Reverse proxies can also add standard or custom headers to the request.
For example, the URL http://mybdd/web/myproject might be proxied tohttp://bddserver1:8080/bdd/web/myproject. In this case:
• The hostname of the target server is bddserver1
• The port is changed to 8080
• The context path /bdd/ is added
3. The reverse proxy server sends the request to the target server.
4. The target server sends the response to the reverse proxy server.
5. The reverse proxy server reads the request and returns it to the client.
Recommendations for reverse proxy configurationHere are some general configuration recommendations for setting up a reverse proxy.
Preserving HTTP 1.1 Host: headers
Enabling the Apache ProxyPreserveHost directive
Oracle® Big Data Discovery : Installation Guide Version 1.3.2 • Revision C • January 2017
Using Studio with a Reverse Proxy 90
Preserving HTTP 1.1 Host: headersHTTP 1.1 requests often include a Host: header, which contains the hostname from the client request. Thisis because a server may use a single IP address or interface to accept requests for multiple DNS hostnames.
The Host: header identifies the server requested by the client. When a reverse proxy proxies an HTTP 1.1request between a client and a target server, when it makes the request, it must add the Host: header to theoutbound request. The Host: header it sends to the target server should be the same as the Host: header itreceived from the client. It should not be the Host: header that would be sent if accessing the target serverdirectly.
When the application server needs to create an absolute, fully-qualified URL, such as for a redirect URL or anabsolute path to an image or CSS file, it must provide the correct hostname to the client to use in asubsequent request.
For example, a Java application server sends a client-side redirect to a browser (HTTP 302 Moved). It usesthe ServletRequest.getServerName() method to fetch the hostname in the request, then constructs aHost: header.
The URL sent by the client is http://mystudio/web/myapp. The actual internal target URL generated bythe reverse proxy will be http://studioserver1:8080/bdd/web/myapp.
If there is no specific configuration for the target server, then if the reverse proxy retains the Host: header,the header is:
Host: http://mystudio
Version 1.3.2 • Revision C • January 2017
If the reverse proxy does not retain the Host: header, the result is:
Host: http://studioserver1:8080
In the latter case, where the header uses the actual target server hostname, the client may not have access tostudioserver1, or may not be able to resolve the hostname. It also will bypass the reverse proxy on thenext request, which may cause security issues.
If the Host: header cannot be relied on as correct for the client, then it must be configured specifically for theweb or application server, so that it can render correct absolute URLs.
Most reverse proxy solutions should have a configuration option to allow the Host: header to be preserved.
Enabling the Apache ProxyPreserveHost directiveThe ProxyPreserveHost directive is used to instruct Apache mod_proxy, when acting as a reverse proxy,to preserve and retain the original Host: header from the client browser when constructing the proxiedrequest to send to the target server.
The default setting for this configuration directive is Off, indicating to not preserve the Host: header andinstead generate a Host: header based on the target server's hostname.
Because this is often not what is wanted, you should add the ProxyPreserveHost On directive to theApache HTTPD configuration, either in httpd.conf or related/equivalent configuration files.
Oracle® Big Data Discovery : Installation Guide

Using Studio with a Reverse Proxy 91
Reverse proxy configuration options for StudioHere are some options for configuring reverse proxy for Studio.
Simple Studio reverse proxy configuration
Studio reverse proxy configuration without preserving Host: headers
Configuring Studio to support an SSL-enabled reverse proxy
Simple Studio reverse proxy configuration
Here is a brief overview of a simple reverse proxy configuration for Studio. The configuration preserves theHost: header, and does not use SSL or path remapping. Studio only supports matching context paths.
In this simple configuration:
• A reverse proxy server is in front of a single Studio application server.
• The reverse proxy server is configured to preserve the Host: header.
• The context paths match.
• Neither the reverse proxy nor the application server is configured for SSL.
With this setup, you should be able to access Studio correctly using the reverse proxy without additionalconfiguration.
Studio reverse proxy configuration without preserving Host: headersIf a reverse proxy used by Studio does not preserve the Host: header, and instead makes a request with aHost: header referring to the target application server, Studio and the application server receive an incorrecthostname. This causes Studio to generate absolute URLs that refer to the proxied application server insteadof to the reverse proxy server.
If the reverse proxy cannot be configured to preserve the Host: header, you must configure a fixed hostnameand port. To do this, you can either:
• Configure the application server to have a fixed hostname and port
• Use portal-ext.properties to configure Studio with a fixed hostname and port
Configuring a fixed hostname for the application server
In WebLogic, set up a virtual host with the fixed hostname and port.
Configuring Studio with a fixed hostnameTo configure Studio with a fixed hostname and port, add the following properties to portal-ext.properties:
web.server.host=<reverseProxyHostName>web.server.http.port=<reverseProxyPort>
Version 1.3.2 • Revision C • January 2017Oracle® Big Data Discovery : Installation Guide

Using Studio with a Reverse Proxy 92
Configuring Studio to support an SSL-enabled reverse proxy
If Studio is installed behind a reverse proxy that has SSL capabilities, and the client SSL is terminated on thereverse proxy, you must configure Studio to set the preferred protocol to HTTPS, and provide the host andport for the reverse proxy server.
To do this, add the following settings to portal-ext.properties:
web.server.protocol=httpsweb.server.host=<reverseProxyHostName>web.server.https.port=<reverseProxyPort>
Version 1.3.2 • Revision C • January 2017
Where:
• reverseProxyHostName is the host name of the reverse proxy server.
• reverseProxyPort is the port number for the reverse proxy server.
Oracle® Big Data Discovery : Installation Guide

Part IV
Uninstalling Big Data Discovery

Chapter 10
Uninstallation
This section describes how to uninstall BDD.
The uninstallation script
Running the uninstallation script
The uninstallation scriptYou uninstall BDD by running the uninstall.sh script, which is located in $BDD_HOME/uninstall.
You must run the script from the Admin Server. It doesn't require any arguments, but it does need access tobdd.conf, which it assumes is located in $BDD_HOME/BDD_manager/conf.
When the script runs, it:
1. Reads bdd.conf.
2. Terminates all currently running processes.
3. Deletes the WebLogic domain.
4. Cleans up the Hive Table Detector cron job.
5. Deletes the Data Processing CLI.
6. Deletes all Data Processing libraries.
7. Deletes the contents of the $ORACLE_HOME directory, including WebLogic Server and all BDDcomponents, and the WebLogic domain.
8. Deletes the .dataIngestSwamp directory from HDFS.
9. Deletes the znode for the Dgraph cluster from the ZooKeeper namespace.
Note: If you upgraded BDD at any point, the script also removes any remaining files from the previousBDD versions.
Although the script deletes most of the BDD data from your system, it leaves behind some BDD-related filesand directories, including:
• The empty BDD directories. For example, the script removes everything inside of $ORACLE_HOME, butleaves the directory itself. You can remove these manually when the script finishes running, although thisisn't required if you're going to reinstall.
• The Dgraph databases. If you plan on reinstalling BDD, you can leave them where they are and reusethem.
• The sample files created by Data Processing.
• The /oraInventory directory and the oraInst.lok file.
Oracle® Big Data Discovery : Installation Guide Version 1.3.2 • Revision C • January 2017
Uninstallation 95
Running the uninstallation scriptYou uninstall BDD by running uninstall.sh from the Admin Server.
Note: If you upgraded BDD at any point, the script also removes any remaining files from the previousBDD versions.
To run the uninstallation script:
1. On the Admin Server, open a command prompt and go to $BDD_HOME/uninstall.
2. Run the uninstallation script:
./uninstall.sh [--silent]
Version 1.3.2 • Revision C • January 2017
The optional [--silent] option runs the script in silent mode, which enables you to skip thefollowing confirmation step.
3. Enter yes or y when asked if you're sure you want to uninstall BDD.
Oracle® Big Data Discovery : Installation Guide
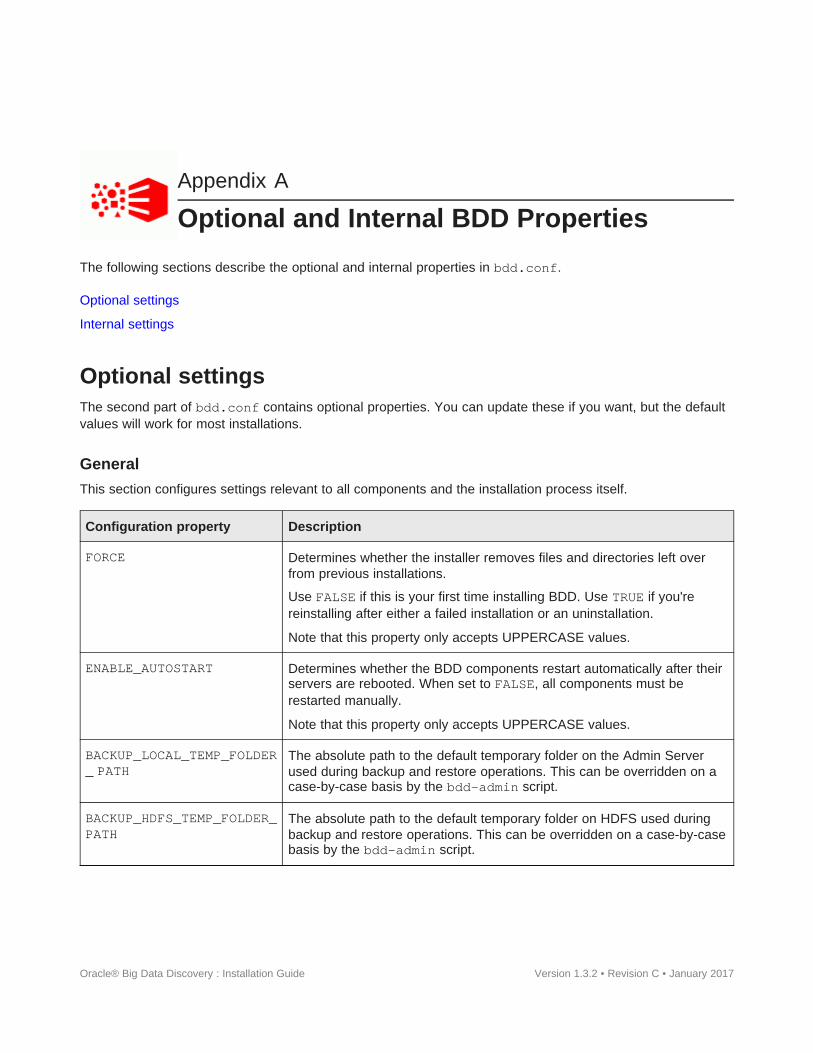
Appendix A
Optional and Internal BDD Properties
The following sections describe the optional and internal properties in bdd.conf.
Optional settings
Internal settings
Optional settingsThe second part of bdd.conf contains optional properties. You can update these if you want, but the defaultvalues will work for most installations.
General
This section configures settings relevant to all components and the installation process itself.
Configuration property Description
FORCE Determines whether the installer removes files and directories left overfrom previous installations.
Use FALSE if this is your first time installing BDD. Use TRUE if you'rereinstalling after either a failed installation or an uninstallation.
Note that this property only accepts UPPERCASE values.
ENABLE_AUTOSTART Determines whether the BDD components restart automatically after theirservers are rebooted. When set to FALSE, all components must berestarted manually.
Note that this property only accepts UPPERCASE values.
BACKUP_LOCAL_TEMP_FOLDER The absolute path to the default temporary folder on the Admin Server_ PATH used during backup and restore operations. This can be overridden on a
case-by-case basis by the bdd-admin script.
BACKUP_HDFS_TEMP_FOLDER_ The absolute path to the default temporary folder on HDFS used duringPATH backup and restore operations. This can be overridden on a case-by-case
basis by the bdd-admin script.
Oracle® Big Data Discovery : Installation Guide Version 1.3.2 • Revision C • January 2017

Optional and Internal BDD Properties 97
WebLogic (BDD Server)
This section configures WebLogic Server, including the Admin Server and all Managed Servers. It doesn'tconfigure Studio or the Dgraph Gateway.
Configuration property Description and possible settings
WLS_START_MODE Defines the mode WebLogic Server starts in:
• prod: Starts WebLogic in production mode, which requires ausername and password when it starts. Use this if you'reinstalling on a production environment, as its more secure.
• dev: Starts WebLogic in development mode, which doesn'trequire a username or password. The installer will still promptyou for a username and password at runtime, but these will notbe required when starting WebLogic Server.
Note that this property only accepts lowercase values.
WLS_NO_SWAP Determines whether the installer checks for the required amount offree swap space (512MB) on the Admin Server and all ManagedServers before installing WebLogic Server.
Use TRUE (no swap space check) if you're installing WebLogicServer on nodes that don't meet the swap space requirement.
For more information, see Disk space requirements on page 20.
WEBLOGIC_DOMAIN_NAME The name of the WebLogic domain, which Studio and the DgraphGateway run in. This is automatically created by the installer.
ADMIN_SERVER_PORT The Admin Server's port number. This number must be unique.
MANAGED_SERVER_PORT The port used by the Managed Server (i.e., Studio). This numbermust be unique.
This property is still required if you're installing on a single server.
WLS_SECURE_MODE Toggles SSL for Studio's outward-facing ports.
When set to TRUE, the Studio instances on the Admin Server andthe Managed Servers listen for requests on theADMIN_SERVER_SECURE_PORT andMANAGED_SERVER_SECURE_PORT, respectively.
Note that this property doesn't enable SSL for any other BDDcomponents.
ADMIN_SERVER_SECURE_PORT The secure port on the Admin Server that Studio listens on whenWLS_SECURE_MODE is set to TRUE.
Note that when SSL is enabled, Studio still listens on the un-secureADMIN_SERVER_PORT for requests from the Dgraph Gateway.
Oracle® Big Data Discovery : Installation Guide Version 1.3.2 • Revision C • January 2017

Optional and Internal BDD Properties 98
Configuration property Description and possible settings
MANAGED_SERVER_SECURE_PORT The secure port on the Managed Server that Studio listens on whenWLS_SECURE_MODE is set to TRUE.
Note that when SSL is enabled, Studio still listens on the un-secureMANAGED_SERVER_PORT for requests from the Dgraph Gateway.
ENDECA_SERVER_LOG_LEVEL The log level used by the Dgraph Gateway:
• INCIDENT_ERROR
• ERROR
• WARNING
• NOTIFICATION
• TRACE
More information on Dgraph Gateway log levels is available in theAdministrator's Guide.
SERVER_TIMEOUT The timeout value (in milliseconds) used when responding torequests sent to all Dgraph Gateway web services except the DataIngest Web Service. A value of 0 means there is no timeout.
SERVER_INGEST_TIMEOUT The timeout value (in milliseconds) used when responding torequests sent to the Data Ingest Web Service. A value of 0 meansthere is no timeout.
SERVER_HEALTHCHECK_TIMEOUT The timeout value (in milliseconds) used when checking data sourceavailability when connections are initialized. A value of 0 meansthere is no timeout.
STUDIO_JDBC_CACHE Enables/disables database caching for Studio.
You may want to set this to FALSE, depending on your environment.For more information, see Disabling Studio database caching onpage 86.
STUDIO_ADMIN_SCREEN_NAME The Studio admin's screen name. This can only containalphanumeric characters, periods (.), and hyphens (-).
STUDIO_ADMIN_EMAIL_ADDRESS The Studio admin's email address, which will be their username.This must be a full email address and can't begin with root@ orpostmaster@.
Note: If you set the BDD_STUDIO_ADMIN_USERNAMEenvironment variable for a silent installation, you don't needto set this property. If you do, the installer will overwrite thisvalue with the value of BDD_STUDIO_ADMIN_USERNAME.
STUDIO_ADMIN_PASSWORD_RESET_ Determines whether the Studio admin is asked to reset theirREQUIRED password the first time they log in.
Oracle® Big Data Discovery : Installation Guide Version 1.3.2 • Revision C • January 2017

Optional and Internal BDD Properties 99
Configuration property Description and possible settings
STUDIO_ADMIN_FIRST_NAME The Studio admin's first name.
STUDIO_ADMIN_MIDDLE_NAME The Studio admin's middle name.
STUDIO_ADMIN_LAST_NAME The Studio admin's last name.
Dgraph and HDFS Agent
This section configures the Dgraph and the HDFS Agent.
Configuration property Description and possible settings
DGRAPH_WS_PORT The port the Dgraph listens on for requests.
DGRAPH_BULKLOAD_PORT The port that the Dgraph listens on for bulk load ingest requests.
DGRAPH_OUT_FILE The path to the Dgraph's stdout/stderr file.
DGRAPH_LOG_LEVEL Defines the log levels for the Dgraph's out log subsystems. This must beformatted as:
"subsystem1 level1|subsystem2,subsystem3level2|subsystemN levelN"
Be sure to include the quotes. For example:
DGRAPH_LOG_LEVEL= "bulk_ingest WARNING|cluster ERROR|dgraph, eql, eveINCIDENT_ERROR"
You can include as many subsystems as you want. Unspecifiedsubsystems and unsupported/improperly formatted values default toNOTIFICATION.
For more information on the Dgraph's out log subsystems and theirsupported levels, see the Administrator's Guide.
DGRAPH_ADDITIONAL_ARG Note: This property is only intended for use by Oracle Support.Don't provide a value for this property when installing BDD.
Defines one or more flags to start the Dgraph with. More information onDgraph flags is available in the Administrator's Guide.
DGRAPH_USE_MOUNT_HDFS Specifies whether the Dgraph databases are stored on HDFS. When setto TRUE, the Dgraph runs on Hadoop DataNodes and mounts HDFSwhen it starts, through either the NFS Gateway or FUSE.
Oracle® Big Data Discovery : Installation Guide Version 1.3.2 • Revision C • January 2017

Optional and Internal BDD Properties 100
Configuration property Description and possible settings
DGRAPH_HDFS_MOUNT_DIR The absolute path to the local directory where the Dgraph mounts theHDFS root directory.
Use a nonexistent directory when installing. If this location changes afterinstalling, the new location must be empty and have read, write, andexecute permissions for the bdd user.
This setting is only required if DGRAPH_USE_MOUNT_HDFS is set toTRUE.
DGRAPH_ENABLE_MPP For use by Oracle Support only. Don't modify this property.
DGRAPH_MPP_PORT For use by Oracle Support only. Don't modify this property.
KERBEROS_TICKET_REFRESH_ The interval (in minutes) at which the Dgraph's Kerberos ticket isINTERVAL refreshed. For example, if set to 60, the Dgraph's ticket would be
refreshed every 60 minutes, or every hour.
This setting is only required if DGRAPH_USE_MOUNT_HDFS andENABLE_KERBEROS are set to TRUE.
KERBEROS_TICKET_LIFETIME The amount of time that the Dgraph's Kerberos ticket is valid. Thisshould be given as a number followed by a supported unit of time: s, m,h, or d. For example, 10h (10 hours), or 10m (10 minutes).
This setting is only required if DGRAPH_USE_MOUNT_HDFS andENABLE_KERBEROS are set to TRUE.
DGRAPH_ENABLE_CGROUP Enables cgroups for the Dgraph. This must be set to TRUE if you createda cgroup for the Dgraph.
If set to TRUE, DGRAPH_CGROUP_NAME must also be set.
DGRAPH_CGROUP_NAME The name of the cgroup that controls the Dgraph. This is required ifDGRAPH_ENABLE_CGROUP is set to TRUE. You must create this beforeinstalling; for more information, see Setting up cgroups on page 36.
AGENT_PORT The port that the HDFS Agent listens on for HTTP requests.
AGENT_EXPORT_PORT The port that the HDFS Agent listens on for requests from the Dgraph.
AGENT_OUT_FILE The path to the HDFS Agent's stdout/stderr file.
Oracle® Big Data Discovery : Installation Guide Version 1.3.2 • Revision C • January 2017
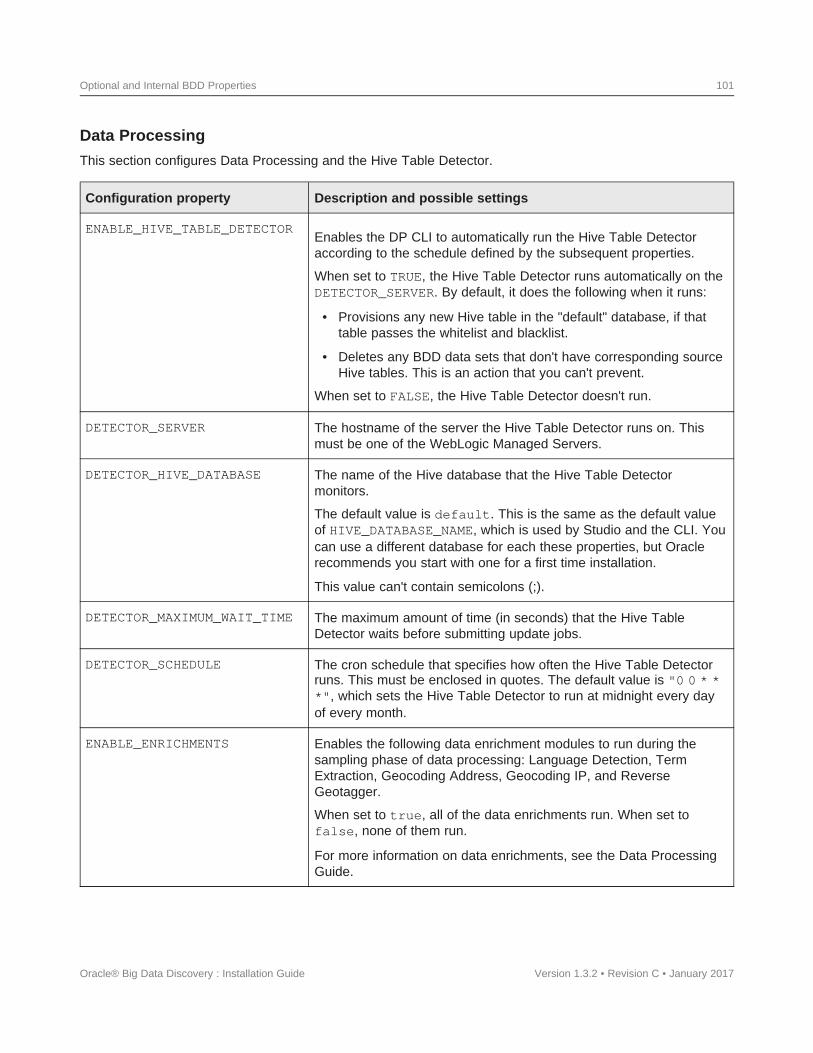
Optional and Internal BDD Properties 101
Data Processing
This section configures Data Processing and the Hive Table Detector.
Configuration property Description and possible settings
ENABLE_HIVE_TABLE_DETECTOREnables the DP CLI to automatically run the Hive Table Detectoraccording to the schedule defined by the subsequent properties.
When set to TRUE, the Hive Table Detector runs automatically on theDETECTOR_SERVER. By default, it does the following when it runs:
• Provisions any new Hive table in the "default" database, if thattable passes the whitelist and blacklist.
• Deletes any BDD data sets that don't have corresponding sourceHive tables. This is an action that you can't prevent.
When set to FALSE, the Hive Table Detector doesn't run.
DETECTOR_SERVER The hostname of the server the Hive Table Detector runs on. Thismust be one of the WebLogic Managed Servers.
DETECTOR_HIVE_DATABASE The name of the Hive database that the Hive Table Detectormonitors.
The default value is default. This is the same as the default valueof HIVE_DATABASE_NAME, which is used by Studio and the CLI. Youcan use a different database for each these properties, but Oraclerecommends you start with one for a first time installation.
This value can't contain semicolons (;).
DETECTOR_MAXIMUM_WAIT_TIME The maximum amount of time (in seconds) that the Hive TableDetector waits before submitting update jobs.
DETECTOR_SCHEDULE The cron schedule that specifies how often the Hive Table Detectorruns. This must be enclosed in quotes. The default value is "0 0 * **", which sets the Hive Table Detector to run at midnight every dayof every month.
ENABLE_ENRICHMENTS Enables the following data enrichment modules to run during thesampling phase of data processing: Language Detection, TermExtraction, Geocoding Address, Geocoding IP, and ReverseGeotagger.
When set to true, all of the data enrichments run. When set tofalse, none of them run.
For more information on data enrichments, see the Data ProcessingGuide.
Oracle® Big Data Discovery : Installation Guide Version 1.3.2 • Revision C • January 2017

Optional and Internal BDD Properties 102
Configuration property Description and possible settings
MAX_RECORDS The maximum number of records included in a data set. For example,if a Hive table has 1,000,000 records, you could restrict the totalnumber of sampled records to 100,000.
Note that the actual number of records in each data set may beslightly higher or less than this value.
SANDBOX_PATH The path to the HDFS directory where the Avro files created whenStudio users export data are stored.
LANGUAGE Specifies either a supported ISO-639 language code (en, de, fr,etc.) or a value of unknown to set the language property for allattributes in the data set. This controls whether Oracle LanguageTechnology (OLT) libraries are invoked during indexing.
A language code requires more processing but produces betterprocessing and indexing results by using the OLT libraries for thespecified language. If the value is unknown, the processing time isfaster but the processing and indexing results are more generic andOLT is not invoked.
For a complete list of the languages BDD supports, see the DataProcessing Guide.
DP_ADDITIONAL_JARS A colon-separated list of the absolute paths to additional JARs, suchas custom SerDe JARs, used during data processing. These areadded to the CLI classpath.
Note that you must manually copy each SerDe JAR to the samelocation on all cluster nodes before installing.
Internal settingsThe third part of bdd.conf contains internal settings either required by the installer or intended for use byOracle Support. Note that the installer will automatically add properties to this section when it runs.
Note: Don't modify any properties in this part unless instructed to by Oracle Support.
Configuration property Description
DP_POOL_SIZE The maximum number of concurrent calls Studio can make to DataProcessing.
DP_TASK_QUEUE_SIZE The maximum number of jobs Studio can add to the DataProcessing queue.
Oracle® Big Data Discovery : Installation Guide Version 1.3.2 • Revision C • January 2017
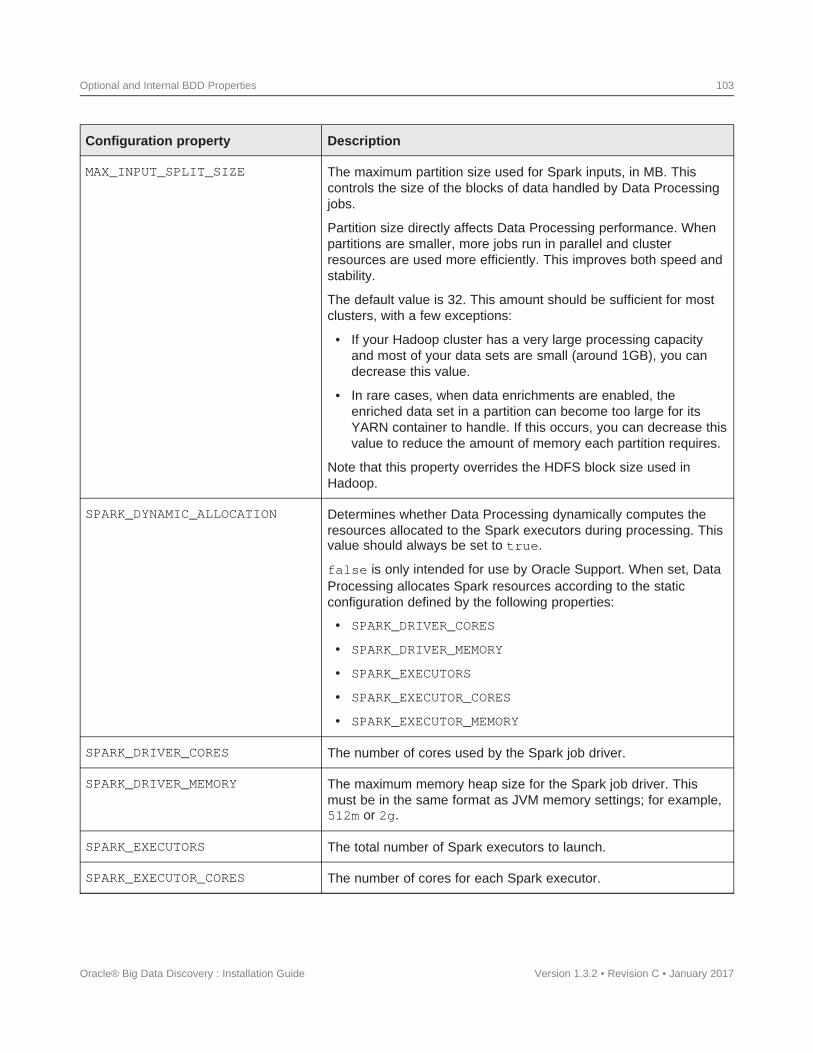
Optional and Internal BDD Properties 103
Configuration property Description
MAX_INPUT_SPLIT_SIZE The maximum partition size used for Spark inputs, in MB. Thiscontrols the size of the blocks of data handled by Data Processingjobs.
Partition size directly affects Data Processing performance. Whenpartitions are smaller, more jobs run in parallel and clusterresources are used more efficiently. This improves both speed andstability.
The default value is 32. This amount should be sufficient for mostclusters, with a few exceptions:
• If your Hadoop cluster has a very large processing capacityand most of your data sets are small (around 1GB), you candecrease this value.
• In rare cases, when data enrichments are enabled, theenriched data set in a partition can become too large for itsYARN container to handle. If this occurs, you can decrease thisvalue to reduce the amount of memory each partition requires.
Note that this property overrides the HDFS block size used inHadoop.
SPARK_DYNAMIC_ALLOCATION Determines whether Data Processing dynamically computes theresources allocated to the Spark executors during processing. Thisvalue should always be set to true.
false is only intended for use by Oracle Support. When set, DataProcessing allocates Spark resources according to the staticconfiguration defined by the following properties:
• SPARK_DRIVER_CORES
• SPARK_DRIVER_MEMORY
• SPARK_EXECUTORS
• SPARK_EXECUTOR_CORES
• SPARK_EXECUTOR_MEMORY
SPARK_DRIVER_CORES The number of cores used by the Spark job driver.
SPARK_DRIVER_MEMORY The maximum memory heap size for the Spark job driver. Thismust be in the same format as JVM memory settings; for example,512m or 2g.
SPARK_EXECUTORS The total number of Spark executors to launch.
SPARK_EXECUTOR_CORES The number of cores for each Spark executor.
Oracle® Big Data Discovery : Installation Guide Version 1.3.2 • Revision C • January 2017

Optional and Internal BDD Properties 104
Configuration property Description
SPARK_EXECUTOR_MEMORY The maximum memory heap size for each Spark executor. Thismust be in the same format as JVM memory settings; for example,512M or 2g.
RECORD_SEARCH_THRESHOLD The minimum number of characters the average value of a Stringattribute must contain to be record searchable.
VALUE_SEARCH_THRESHOLD The minimum number of characters the average value of a Stringattribute must contain to be value searchable.
BDD_VERSION The version of BDD. This property is intended for use by OracleSupport and shouldn't be changed.
BDD_RELEASE_VERSION The BDD hotfix or patch version. This property is intended for useby Oracle Support and shouldn't be changed.
Oracle® Big Data Discovery : Installation Guide Version 1.3.2 • Revision C • January 2017

Index
directory structureA$BDD_HOME 77
Admin Server, about 11 $DOMAIN_HOME 80DP CLI whitelist and blacklist, updating 83
Bbackups 84 Ebdd.conf Endeca Server 14
internal settings 102optional settings 96
Foverview 62required settings 63 file descriptors, increasing 84
BDD installerabout 57 Hbehavior 59
Hadoop, about 10rerunning 73silent mode 57 Hadoop requirementstroubleshooting 72 client libraries 27
distributions and components 24Big Data DiscoveryHDP JARs 28about 9YARN setting changes 26configuration options 11
integration with Hadoop 10 HDP-specific requirementsintegration with WebLogic 11 required JARs 28uninstalling 94 Hive Table Detector, about 10
C Icgroups 36 installation and deploymentcluster installation about 57
configuration 62 rerunning the installer 73downloading a WebLogic Server patch 62 troubleshooting 72downloading the media pack 61 install machine, selecting 60installing 71
iPad, using to view projects 42selecting the install machine 60Command Line Interface, about 10
Jconfigurationinternal settings 102 Jetty, about 11optional settings 96 JVM heap size, setting 85required settings 63
KDKerberos 31
Data Processing, about 10Data Processing CLI, about 10 LDgraph, about 10
load balancingDgraph Gateway, about 9 overview 82Dgraph HDFS Agent, about 10 Studio 82
Transform Service 82Dgraph requirementsabout 35file descriptors and processes 39 MFUSE 38
MapRHDFS 36configuration 29NFS Gateway 38patches 29
Oracle® Big Data Discovery : Installation Guide Version 1.3.2 • Revision C • January 2017

Index 106
special requirements 28 signing in 83Studio database caching
clearing cache 87Pcustomizing 85
prerequisite checker, running 70 overview 85prerequisite checklist 44 supported platforms 15prerequisites system requirements
authentication 31 authentication 31authorization 32 authorization 32bdd user 23 bdd user 23bdd user, enabling passwordless SSH 24 bdd user, enabling passwordless SSH 24Dgraph databases 35 Dgraph databases 35encryption 33 encryption 33Hadoop client libraries 27 Hadoop client libraries 27Hadoop requirements 24 Hadoop requirements 24hardware 19 hardware 19HDFS encryption 34 HDFS encryption 34JDK 30 JDK 30memory 19 Linux utilities 21network 21 memory 19operating system 21 operating system 21Perl modules, installing 22 Perl modules, installing 22physical memory and disk space 20 physical memory and disk space 20screen resolution 42 screen resolution 42Studio database 40 Studio database 40Studio database commands 41 Studio database commands 41supported browsers 42 supported browsers 42supported platforms 15 supported platforms 15YARN setting changes 26 YARN setting changes 26
Q Tquickstart Transform Service
about 49 about 9installing BDD 50 Kerberos configuration 81
troubleshootingR about 72
failed ZooKeeper check 72reverse proxy, using with Studio 88failure to download Hadoop client libraries 72failure to generate Hadoop fat JAR 73S
security Ufirewalls 35
uninstallationHadoop encryption 33about 94HDFS encryption 34running the uninstallation script 95Kerberos 31
replacing certificates 84reverse proxy 88 VSentry 32
verificationStudio encryption 35Data Processing 77
Sentry 32 deployed components 76single-node installation
configuring 52 Winstalling 51WebLogic ServerStudio
about 11about 9patches, downloading 62database, creating 41setting JVM heap size 85disabling 86
projects, viewing on iPad 42
Oracle® Big Data Discovery : Installation Guide Version 1.3.2 • Revision C • January 2017