
Oracle Financials Cloud - Oracle Help Center
84
Oracle Financials Cloud Using Financials for the Americas 22A
-
Upload
khangminh22 -
Category
Documents
-
view
6 -
download
0
Transcript of Oracle Financials Cloud - Oracle Help Center
Oracle FinancialsCloud
Using Financials for the Americas
22A

Oracle Financials CloudUsing Financials for the Americas
22A
F48651-01
Copyright © 2011, 2022, Oracle and/or its affiliates.
Authors: Krishna Kumar K S
This software and related documentation are provided under a license agreement containing restrictions on use and disclosure and are protectedby intellectual property laws. Except as expressly permitted in your license agreement or allowed by law, you may not use, copy, reproduce, translate,broadcast, modify, license, transmit, distribute, exhibit, perform, publish, or display in any part, in any form, or by any means. Reverse engineering,disassembly, or decompilation of this software, unless required by law for interoperability, is prohibited.
The information contained herein is subject to change without notice and is not warranted to be error-free. If you find any errors, please reportthem to us in writing.
If this is software or related documentation that is delivered to the U.S. Government or anyone licensing it on behalf of the U.S. Government, thefollowing notice is applicable:
U.S. GOVERNMENT END USERS: Oracle programs, including any operating system, integrated software, any programs installed on the hardware,and/or documentation, delivered to U.S. Government end users are "commercial computer software" pursuant to the applicable Federal AcquisitionRegulation and agency-specific supplemental regulations. As such, use, duplication, disclosure, modification, and adaptation of the programs,including any operating system, integrated software, any programs installed on the hardware, and/or documentation, shall be subject to licenseterms and license restrictions applicable to the programs. No other rights are granted to the U.S. Government.
This software or hardware is developed for general use in a variety of information management applications. It is not developed or intended foruse in any inherently dangerous applications, including applications that may create a risk of personal injury. If you use this software or hardwarein dangerous applications, then you shall be responsible to take all appropriate fail-safe, backup, redundancy, and other measures to ensure its safeuse. Oracle Corporation and its affiliates disclaim any liability for any damages caused by use of this software or hardware in dangerous applications.
Oracle and Java are registered trademarks of Oracle and/or its affiliates. Other names may be trademarks of their respective owners.
Intel and Intel Xeon are trademarks or registered trademarks of Intel Corporation. All SPARC trademarks are used under license and are trademarks orregistered trademarks of SPARC International, Inc. AMD, Opteron, the AMD logo, and the AMD Opteron logo are trademarks or registered trademarksof Advanced Micro Devices. UNIX is a registered trademark of The Open Group.
This software or hardware and documentation may provide access to or information about content, products, and services from third parties. OracleCorporation and its affiliates are not responsible for and expressly disclaim all warranties of any kind with respect to third-party content, products, andservices unless otherwise set forth in an applicable agreement between you and Oracle. Oracle Corporation and its affiliates will not be responsiblefor any loss, costs, or damages incurred due to your access to or use of third-party content, products, or services, except as set forth in an applicableagreement between you and Oracle.
Oracle Financials CloudUsing Financials for the Americas
Contents
Get Help ................................................................................................................................ i
1 Financials for Mexico 1General Ledger Reporting ............................................................................................................................................................. 1
FAQs for General Ledger Reporting ........................................................................................................................................ 34
2 Financials for Brazil 37Fiscal Document Generation ..................................................................................................................................................... 37
Fiscal Document Capture ........................................................................................................................................................... 42
Transaction Taxes ........................................................................................................................................................................ 46
Receivables ..................................................................................................................................................................................... 53
Payables ......................................................................................................................................................................................... 60
3 How To Topics 67Overview of Configuring Fiscal Document for Brazil ........................................................................................................... 67
Overview of Configuring Tax Registrations for Brazil .......................................................................................................... 67
Overview of Managing Fiscal Documents Approvals Through a Third Party ................................................................ 68
Overview of Managing General Fiscal Documents .............................................................................................................. 68
Overview of Managing Fiscal Documents for Manual Receivables Invoices .................................................................. 69
Overview of Managing Fiscal Documents for Imported Receivables Invoices ............................................................... 69
Overview of Managing Fiscal Document Variations ............................................................................................................ 70
Overview of Managing Transaction Taxes for Brazil ........................................................................................................... 70
Overview of Managing Withholding Taxes for Brazil ............................................................................................................ 71
Overview of Managing Fiscal Documents for Internal Material Transfers ....................................................................... 71
Overview of Managing Fiscal Documents for Returns to Supplier .................................................................................... 71
Overview of Creating Fiscal Documents for Fixed Asset Transfers ................................................................................... 72
Overview of Managing Fiscal Documents for Miscellaneous Purposes ........................................................................... 72
Overview of Managing Complementary Fiscal Documents for Brazil .............................................................................. 72
Overview of Capturing Fiscal Documents of Purchase Orders .......................................................................................... 73
Overview of Entering Fiscal Documents in Payables ........................................................................................................... 73
Overview of Managing Payables Collection Documents for Brazil ................................................................................... 74

Oracle Financials CloudUsing Financials for the Americas
4 Financials Reports for the Americas 75Purchase Withholding Certificate for Chile ............................................................................................................................ 75
Purchase Withholding Certificate for Argentina ................................................................................................................... 75
Purchase Withholding Certificate for Colombia .................................................................................................................... 76
Oracle Financials CloudUsing Financials for the Americas
Get Help
Get Help
Get Help in the ApplicationsUse help icons to access help in the application. If you don't see any help icons on your page, click your user imageor name in the global header and select Show Help Icons.
Get SupportYou can get support at My Oracle Support. For accessible support, visit Oracle Accessibility Learning and Support.
Get TrainingIncrease your knowledge of Oracle Cloud by taking courses at Oracle University.
Join Our CommunityUse Cloud Customer Connect to get information from industry experts at Oracle and in the partner community. You canjoin forums to connect with other customers, post questions, and watch events.
Learn About AccessibilityFor information about Oracle's commitment to accessibility, visit the Oracle Accessibility Program. Videos included inthis guide are provided as a media alternative for text-based topics also available in this guide.
Share Your FeedbackWe welcome your feedback about Oracle Applications user assistance. If you need clarification, find an error, or justwant to tell us what you found helpful, we'd like to hear from you.
You can email your feedback to [email protected].
Thanks for helping us improve our user assistance!
i

Oracle Financials CloudUsing Financials for the Americas
Get Help
ii

Oracle Financials CloudUsing Financials for the Americas
Chapter 1Financials for Mexico
1 Financials for Mexico
General Ledger Reporting
Enable the Mexican Reporting Processes To run the Journals for Mexico and Chart of Accounts for Mexico reports, you must enable the processes once to runthem from the Scheduled Processes page in Oracle Fusion Applications.
Enable the ProcessTo enable the processes, perform these steps:
1. Sign in as a IT_SECURITY_MANAGER user.2. Select Tools > Security Console.3. Click Create Role on the Roles page.4. Enter the new role name with Role Code as Mexico_Reports_Custom.5. Click Next to add the required privileges.6. Add the required roles:
a. Click Add Function Security Policy.b. Search for a required role.c. From the search result, select and add the privilege roles and not the OBI roles.d. Click Add Privileges to Role.
7. Similarly, add all the required privileges.8. Verify that all the privileges were added successfully.9. Click Next twice to go to the role hierarchy definition page.
10. Add the roles containing your Mexican Jobs:
◦ JL_GENERATE_CHART_OF_ACCOUNTS_FOR_MEXICO_ELECTRONIC_ACCOUNTING_PRIV_OBI
◦ JL_GENERATE_JOURNAL_ENTRIES_FOR_MEXICO_ELECTRONIC_ACCOUNTING_PRIV_OBI
11. Verify that all the roles have been added12. Click Next to add the job role to the required users, such as the Mexican Manager.13. Once all users are added, click Next and then click Save and Close to complete the job role definition.14. Sign in as an Application_Implementation_Consultant user and navigate to the Setup and Maintenance page.15. In the Setup and Maintenance work area, select these options:
◦ Offering: Financials
◦ Functional area: Enterprise Profile
◦ Task: Manage Reference Data Set Data Access for Users
16. Select the Users with Data Access option and identify the user you need to add data access to.17. Click Search to see all the existing data access privileges for this user.18. Click the Create icon to add the new job role data access.19. Add the required security contexts.
1
Oracle Financials CloudUsing Financials for the Americas
Chapter 1Financials for Mexico
Note: The usual set defined to cover all possible requirements is: Ledger, Data Access Set, Reference DataSet, and Business Unit.
It is advisable to run a final process whenever there is a change in job roles. This is accessed from the Setup andMaintenance page. Just select and click Submit. Follow its progress from the Tools > Scheduled Processes page.
Proving Access to UsersAfter the job role is created and you can add it to a user.
To do this, perform these steps:
1. Open the User Accounts page.2. Select the job role and click Edit.3. Keep clicking Next till you see the Add User page.4. Add the user to the role.
Note: Alternatively, you can select the user on the User Accounts page, click Edit, and add the role.
5. Click Save and Close to complete the setup.
You will also need to add the required data access for this user.
Related Topics
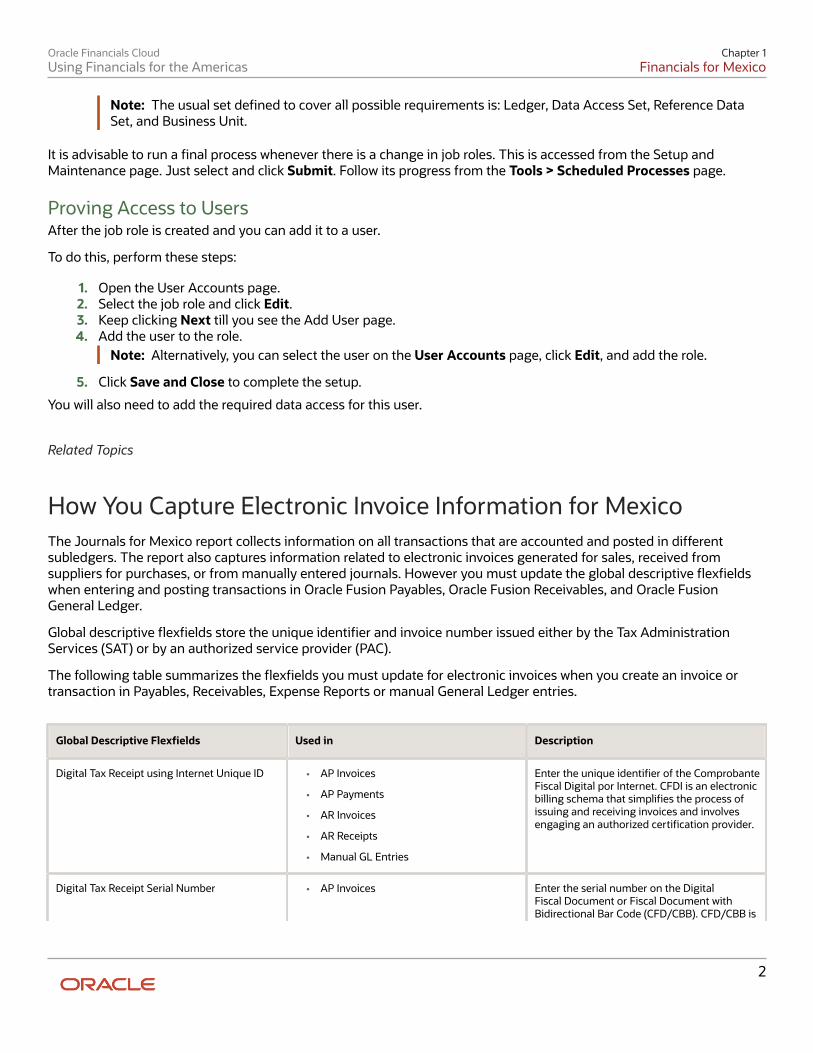
How You Capture Electronic Invoice Information for Mexico The Journals for Mexico report collects information on all transactions that are accounted and posted in differentsubledgers. The report also captures information related to electronic invoices generated for sales, received fromsuppliers for purchases, or from manually entered journals. However you must update the global descriptive flexfieldswhen entering and posting transactions in Oracle Fusion Payables, Oracle Fusion Receivables, and Oracle FusionGeneral Ledger.
Global descriptive flexfields store the unique identifier and invoice number issued either by the Tax AdministrationServices (SAT) or by an authorized service provider (PAC).
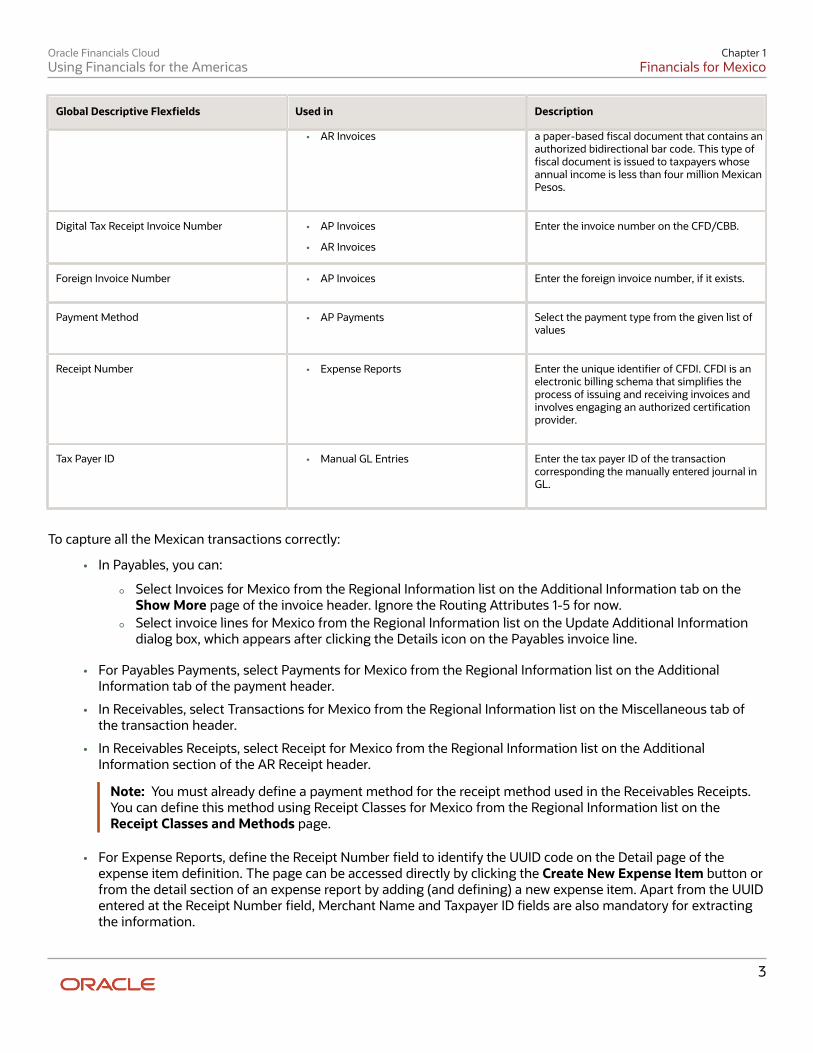
The following table summarizes the flexfields you must update for electronic invoices when you create an invoice ortransaction in Payables, Receivables, Expense Reports or manual General Ledger entries.
Global Descriptive Flexfields Used in Description
Digital Tax Receipt using Internet Unique ID
• AP Invoices
• AP Payments
• AR Invoices
• AR Receipts
• Manual GL Entries
Enter the unique identifier of the ComprobanteFiscal Digital por Internet. CFDI is an electronicbilling schema that simplifies the process ofissuing and receiving invoices and involvesengaging an authorized certification provider.
Digital Tax Receipt Serial Number
• AP Invoices Enter the serial number on the DigitalFiscal Document or Fiscal Document withBidirectional Bar Code (CFD/CBB). CFD/CBB is
2
Oracle Financials CloudUsing Financials for the Americas
Chapter 1Financials for Mexico
Global Descriptive Flexfields Used in Description
• AR Invoices a paper-based fiscal document that contains anauthorized bidirectional bar code. This type offiscal document is issued to taxpayers whoseannual income is less than four million MexicanPesos.
Digital Tax Receipt Invoice Number
• AP Invoices
• AR Invoices
Enter the invoice number on the CFD/CBB.
Foreign Invoice Number
• AP Invoices Enter the foreign invoice number, if it exists.
Payment Method
• AP Payments Select the payment type from the given list ofvalues
Receipt Number
• Expense Reports Enter the unique identifier of CFDI. CFDI is anelectronic billing schema that simplifies theprocess of issuing and receiving invoices andinvolves engaging an authorized certificationprovider.
Tax Payer ID
• Manual GL Entries Enter the tax payer ID of the transactioncorresponding the manually entered journal inGL.
To capture all the Mexican transactions correctly:
• In Payables, you can:
◦ Select Invoices for Mexico from the Regional Information list on the Additional Information tab on theShow More page of the invoice header. Ignore the Routing Attributes 1-5 for now.
◦ Select invoice lines for Mexico from the Regional Information list on the Update Additional Informationdialog box, which appears after clicking the Details icon on the Payables invoice line.
• For Payables Payments, select Payments for Mexico from the Regional Information list on the AdditionalInformation tab of the payment header.
• In Receivables, select Transactions for Mexico from the Regional Information list on the Miscellaneous tab ofthe transaction header.
• In Receivables Receipts, select Receipt for Mexico from the Regional Information list on the AdditionalInformation section of the AR Receipt header.
Note: You must already define a payment method for the receipt method used in the Receivables Receipts.You can define this method using Receipt Classes for Mexico from the Regional Information list on theReceipt Classes and Methods page.
• For Expense Reports, define the Receipt Number field to identify the UUID code on the Detail page of theexpense item definition. The page can be accessed directly by clicking the Create New Expense Item button orfrom the detail section of an expense report by adding (and defining) a new expense item. Apart from the UUIDentered at the Receipt Number field, Merchant Name and Taxpayer ID fields are also mandatory for extractingthe information.
3
Oracle Financials CloudUsing Financials for the Americas
Chapter 1Financials for Mexico
Note: If you provide a valid UUID in the Receipt Number field, the transaction is considered as an expensereport with a UUID. Otherwise, it's treated as a foreign invoice reported under NumFactExt. The Valid UUIDformat is: ad662d33-6934-459c-a188-bdf03930f444.
• For manual General Ledger transactions, select Journals for Mexico from the Regional Information list on theJournal tab of the Show More page of the journals header.
If an invoice is paid in multiple installments, capture each payment separately. Update the GDFs with the details of yourpayments.You can access the GDFs from the:
• Payment Installments dialog box in Payables
• Review Installments dialog box in Receivables
Related Topics
Chart of Accounts for Mexico Report This topic includes details about the Chart of Accounts for Mexico report.
OverviewCompanies in Mexico must submit accounting information to the tax authorities. According to the new governmentregulations, companies must upload accounting information to the Tax Administration Services (SAT) internet portalthrough a registered email account.
Note: You can use your taxpayer identification registry (RFC) to register your email on the SAT portal.
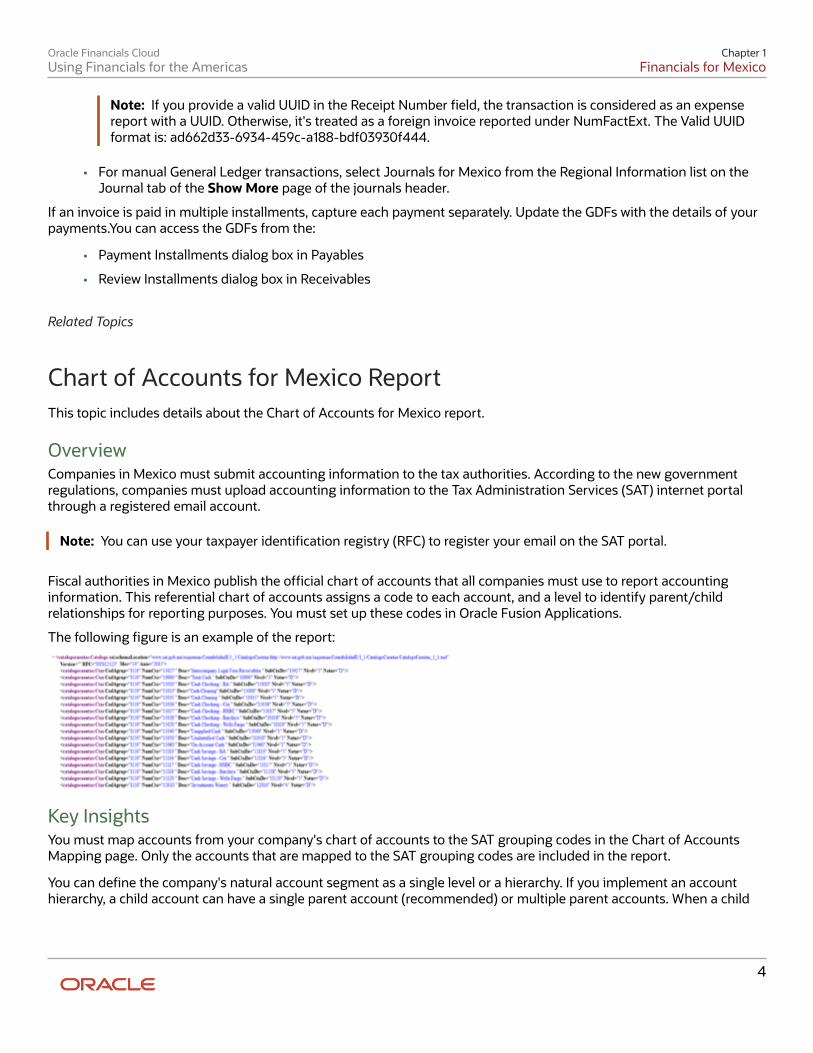
Fiscal authorities in Mexico publish the official chart of accounts that all companies must use to report accountinginformation. This referential chart of accounts assigns a code to each account, and a level to identify parent/childrelationships for reporting purposes. You must set up these codes in Oracle Fusion Applications.
The following figure is an example of the report:
Key InsightsYou must map accounts from your company's chart of accounts to the SAT grouping codes in the Chart of AccountsMapping page. Only the accounts that are mapped to the SAT grouping codes are included in the report.
You can define the company's natural account segment as a single level or a hierarchy. If you implement an accounthierarchy, a child account can have a single parent account (recommended) or multiple parent accounts. When a child
4
Oracle Financials CloudUsing Financials for the Americas
Chapter 1Financials for Mexico
account has multiple parent accounts, only the immediate parent appears on the report. You can map more than oneaccount to a given SAT grouping code.
Before you run the report, ensure the natural accounts appear at the correct level in the account hierarchy. Perform thefollowing steps to update the level of natural account according to the account hierarchy:
1. In the Setup and Maintenance work area, select these options:
◦ Offering: Financials
◦ Functional area: Financial Reporting Structure
◦ Show: All Tasks
◦ Task: Manage Account Hierarchies
2. Select the account.3. From the Actions menu, select Flatten and click Row Flattening.4. Click Force Flatten.5. From the Actions menu, select Flatten and click Column Flattening.6. Click Force Flatten.
Note: To run the Chart of Accounts for Mexico process from the Scheduled Processes page, you must give access tothe user you use to manage the electronic accounting reports for Mexico. For more information, see the Enable theMexican Reporting Processes topic.
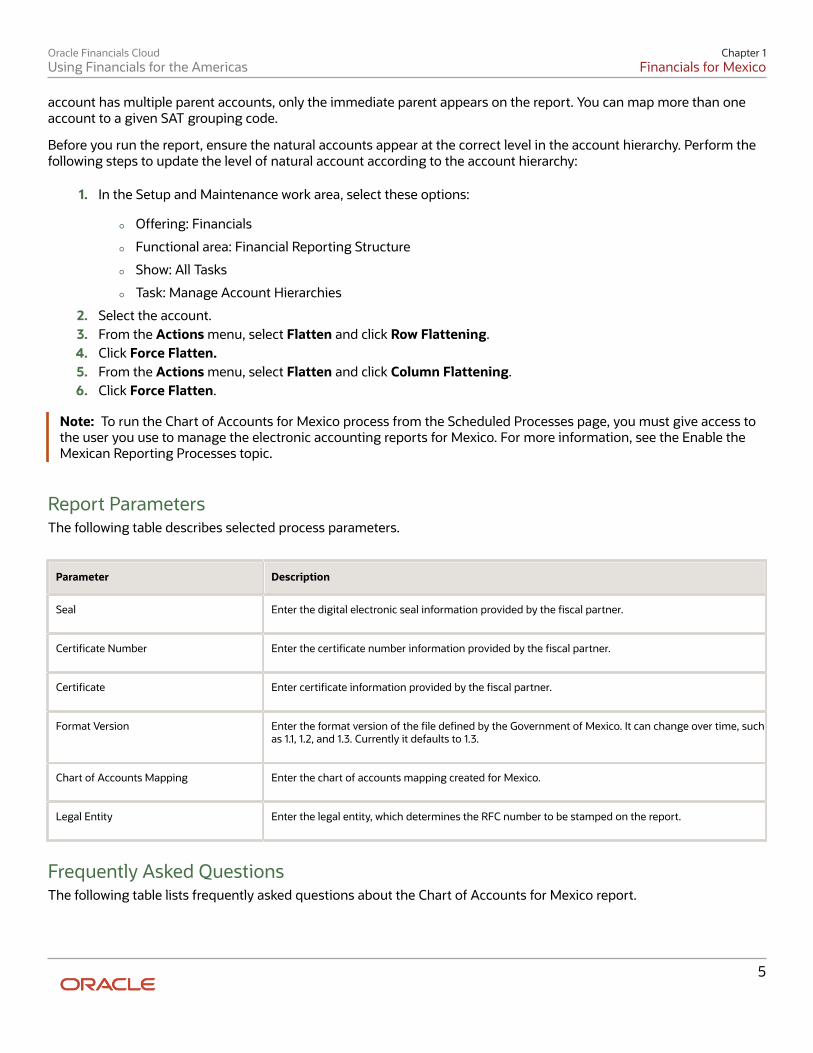
Report ParametersThe following table describes selected process parameters.
Parameter Description
Seal
Enter the digital electronic seal information provided by the fiscal partner.
Certificate Number
Enter the certificate number information provided by the fiscal partner.
Certificate
Enter certificate information provided by the fiscal partner.
Format Version
Enter the format version of the file defined by the Government of Mexico. It can change over time, suchas 1.1, 1.2, and 1.3. Currently it defaults to 1.3.
Chart of Accounts Mapping
Enter the chart of accounts mapping created for Mexico.
Legal Entity
Enter the legal entity, which determines the RFC number to be stamped on the report.
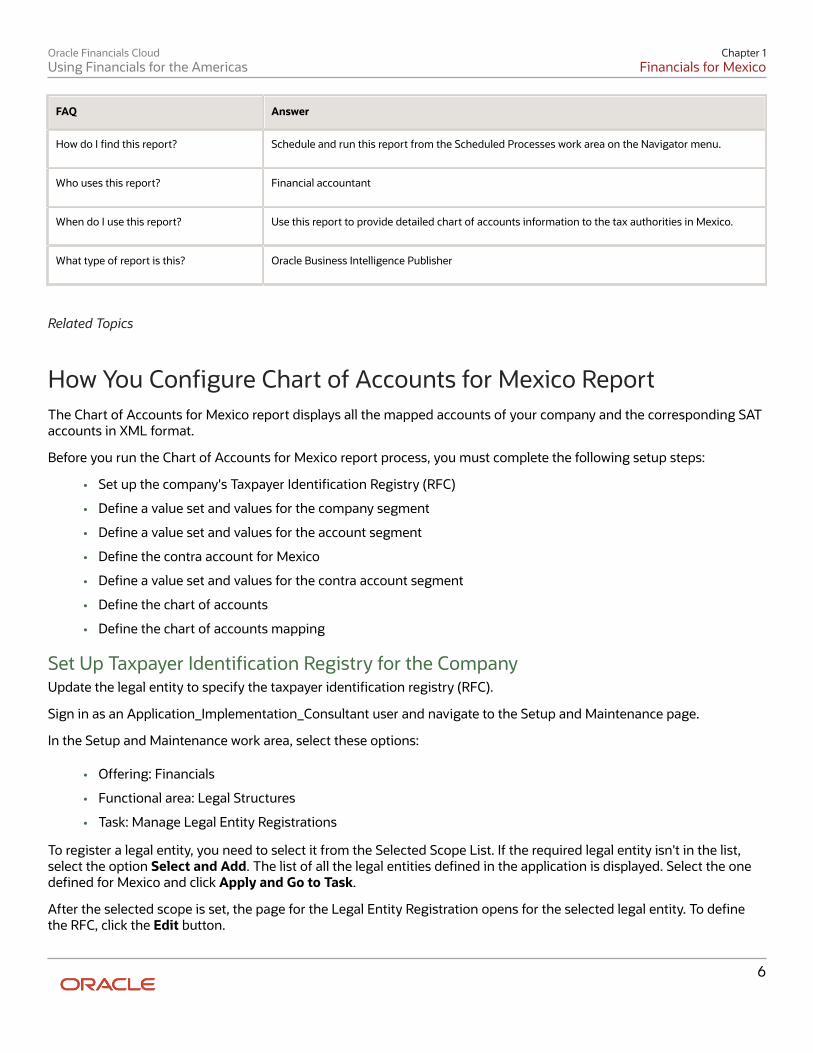
Frequently Asked QuestionsThe following table lists frequently asked questions about the Chart of Accounts for Mexico report.
5
Oracle Financials CloudUsing Financials for the Americas
Chapter 1Financials for Mexico
FAQ Answer
How do I find this report?
Schedule and run this report from the Scheduled Processes work area on the Navigator menu.
Who uses this report?
Financial accountant
When do I use this report?
Use this report to provide detailed chart of accounts information to the tax authorities in Mexico.
What type of report is this?
Oracle Business Intelligence Publisher
Related Topics
How You Configure Chart of Accounts for Mexico Report The Chart of Accounts for Mexico report displays all the mapped accounts of your company and the corresponding SATaccounts in XML format.
Before you run the Chart of Accounts for Mexico report process, you must complete the following setup steps:
• Set up the company's Taxpayer Identification Registry (RFC)
• Define a value set and values for the company segment
• Define a value set and values for the account segment
• Define the contra account for Mexico
• Define a value set and values for the contra account segment
• Define the chart of accounts
• Define the chart of accounts mapping
Set Up Taxpayer Identification Registry for the CompanyUpdate the legal entity to specify the taxpayer identification registry (RFC).
Sign in as an Application_Implementation_Consultant user and navigate to the Setup and Maintenance page.
In the Setup and Maintenance work area, select these options:
• Offering: Financials
• Functional area: Legal Structures
• Task: Manage Legal Entity Registrations
To register a legal entity, you need to select it from the Selected Scope List. If the required legal entity isn't in the list,select the option Select and Add. The list of all the legal entities defined in the application is displayed. Select the onedefined for Mexico and click Apply and Go to Task.
After the selected scope is set, the page for the Legal Entity Registration opens for the selected legal entity. To definethe RFC, click the Edit button.
6
Oracle Financials CloudUsing Financials for the Americas
Chapter 1Financials for Mexico
Note: If RFC value isn't specified in the Legal Entity Registration, RFC will be blank in Journals for Mexico report.
Define Value Set and Values for Company Segment
1. Sign in as an Application_Implementation_Consultant user and navigate to the Setup and Maintenance page.2. In the Setup and Maintenance work area, select these options:
◦ Offering: Financials
◦ Functional area: Financial Reporting Structures
◦ Task: Manage Chart of Accounts Value Set
3. Click the Create icon or Action > Create to create a new value set.4. Search the value set you just created and then click Manage Values.5. On the Manage Values page, click Create to add a value.
Define Value Set and Values for Account SegmentJust as you created the value set for company segment, use the Manage Chart of Accounts Value Set page to create avalue set for the account segment. Use the Manage Values page to create the values for the account segment value set.
It is preferable to enter the GL Accounts after the Chart of Accounts structure is defined and the value set is assigned tothe Natural Account segment. This helps you to define all the qualifiers for each account.
Note: To correctly map the source accounts of your company to the SAT target accounts, don't define the SAT level 1accounts (such as 1, 2, 3 and so on) as parents of SAT level 2 accounts (such as 1.1, 1.2, 2.1, and so on). The SAT accountsegment doesn't require a hierarchy definition.
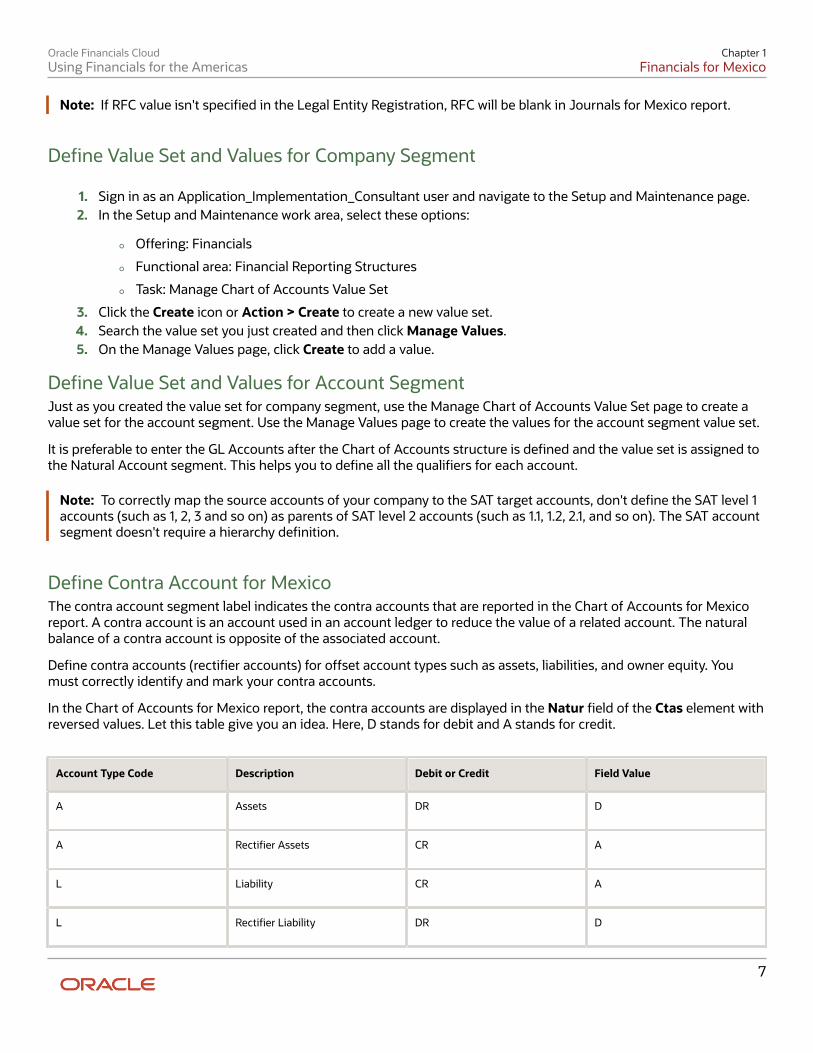
Define Contra Account for MexicoThe contra account segment label indicates the contra accounts that are reported in the Chart of Accounts for Mexicoreport. A contra account is an account used in an account ledger to reduce the value of a related account. The naturalbalance of a contra account is opposite of the associated account.
Define contra accounts (rectifier accounts) for offset account types such as assets, liabilities, and owner equity. Youmust correctly identify and mark your contra accounts.
In the Chart of Accounts for Mexico report, the contra accounts are displayed in the Natur field of the Ctas element withreversed values. Let this table give you an idea. Here, D stands for debit and A stands for credit.
Account Type Code Description Debit or Credit Field Value
A
Assets
DR
D
A
Rectifier Assets
CR
A
L
Liability
CR
A
L
Rectifier Liability
DR
D
7
Oracle Financials CloudUsing Financials for the Americas
Chapter 1Financials for Mexico
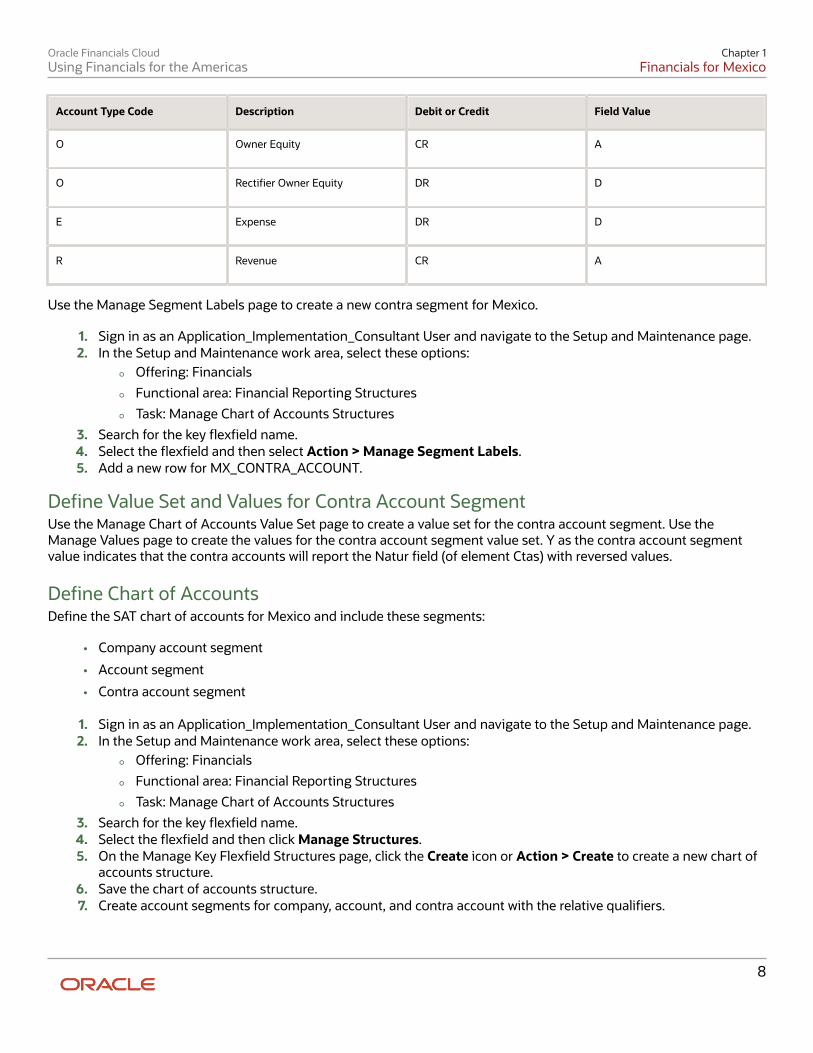
Account Type Code Description Debit or Credit Field Value
O
Owner Equity
CR
A
O
Rectifier Owner Equity
DR
D
E
Expense
DR
D
R
Revenue
CR
A
Use the Manage Segment Labels page to create a new contra segment for Mexico.
1. Sign in as an Application_Implementation_Consultant User and navigate to the Setup and Maintenance page.2. In the Setup and Maintenance work area, select these options:
◦ Offering: Financials
◦ Functional area: Financial Reporting Structures
◦ Task: Manage Chart of Accounts Structures
3. Search for the key flexfield name.4. Select the flexfield and then select Action > Manage Segment Labels.5. Add a new row for MX_CONTRA_ACCOUNT.
Define Value Set and Values for Contra Account SegmentUse the Manage Chart of Accounts Value Set page to create a value set for the contra account segment. Use theManage Values page to create the values for the contra account segment value set. Y as the contra account segmentvalue indicates that the contra accounts will report the Natur field (of element Ctas) with reversed values.
Define Chart of AccountsDefine the SAT chart of accounts for Mexico and include these segments:
• Company account segment
• Account segment
• Contra account segment
1. Sign in as an Application_Implementation_Consultant User and navigate to the Setup and Maintenance page.2. In the Setup and Maintenance work area, select these options:
◦ Offering: Financials
◦ Functional area: Financial Reporting Structures
◦ Task: Manage Chart of Accounts Structures
3. Search for the key flexfield name.4. Select the flexfield and then click Manage Structures.5. On the Manage Key Flexfield Structures page, click the Create icon or Action > Create to create a new chart of
accounts structure.6. Save the chart of accounts structure.7. Create account segments for company, account, and contra account with the relative qualifiers.
8
Oracle Financials CloudUsing Financials for the Americas
Chapter 1Financials for Mexico
After adding all the required segments, define the Accounting Flexfield structure instance.
1. On the Manage Chart of Accounts Structures page, click Manage Structure Instances.2. Select the required chart of accounts structure and click the Edit icon.3. Open each segment in edit mode and select the Required and BI enabled check boxes.
After setting the flexfield structure instance and adding all the natural accounts, you need to deploy the accountingflexfield.
1. Select the accounting flexfield on the Manage Chart of Accounts Structures page.2. Click Deploy Flexfield.
Define Chart of Accounts MappingDefine the chart of accounts mapping with source as the primary chart of accounts of your company and target as theSAT chart of accounts.
1. Sign in as an Application_Implementation_Consultant User and navigate to the Setup and Maintenance page.2. In the Setup and Maintenance work area, select these options:
◦ Offering: Financials
◦ Functional area: Financial Reporting Structures
◦ Show: All Tasks
◦ Task: Manage Chart of Accounts Mappings
3. Click the Create icon to create a new mapping.
It is recommended that you map the natural account segment values between the chart of accounts of your companyand the SAT chart of account. You can do this in multiple ways:
• Assign single value as the mapping method for the company target segment.
• Use rollup rules as the mapping method and Account as the source segment for the account target segment.
• Use rollup rules as the mapping method and Account as the source segment for the contra account targetsegment.
If the source accounts are contra in nature, create a rollup rule. Map the target value to the source account values (theprimary chart of accounts).
To complete the mapping, you need to work on both Segment Rules and Account Rules tabs:
1. Click the Segment Rules tab.
◦ In the Rollup Rules, enter Y as the target value and assign the from and to values for the accounts.
2. Click the Account Rules tab.
a. Enter the target SAT account.b. Specify the source account using the filter conditions.
Related Topics
9
Oracle Financials CloudUsing Financials for the Americas
Chapter 1Financials for Mexico
Journals for Mexico Report This topic includes details about the Journals for Mexico report.
OverviewCompanies in Mexico must submit accounting information to the tax authorities. Companies must upload accountinginformation to the Tax Administration Services (SAT) internet portal through a registered e-mail account.
Note: You can use your taxpayer identification registry (RFC) to register your e-mail address on the SAT portal.
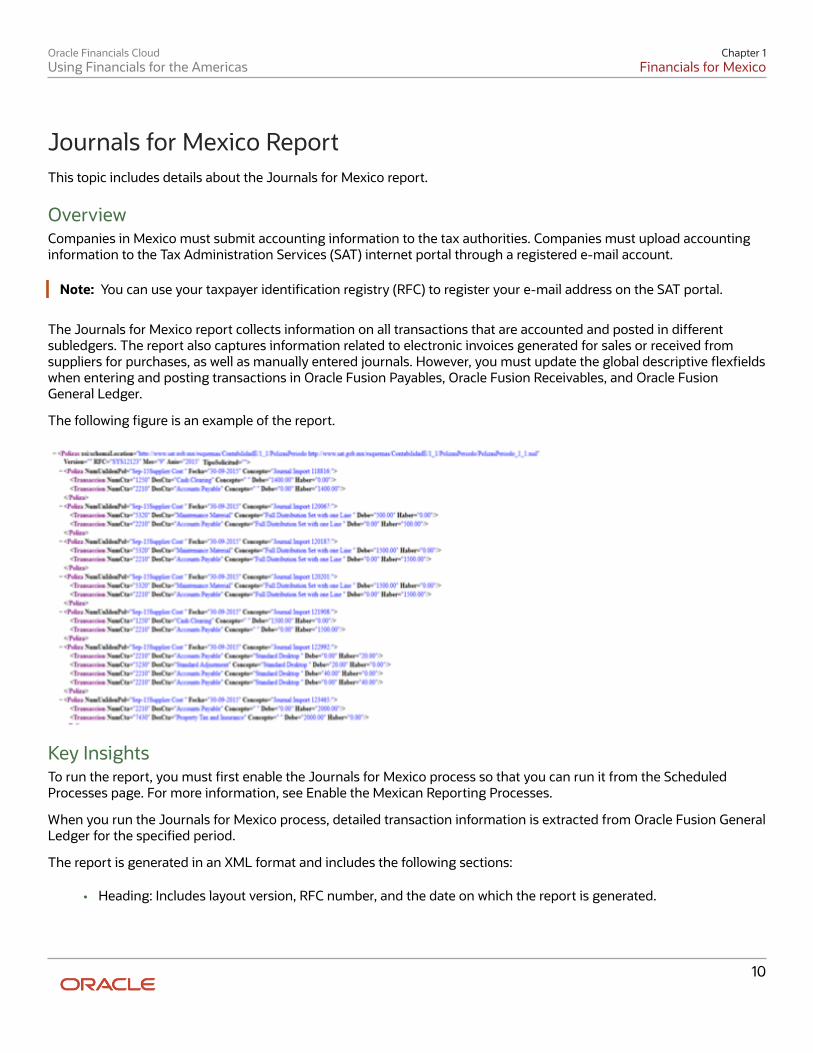
The Journals for Mexico report collects information on all transactions that are accounted and posted in differentsubledgers. The report also captures information related to electronic invoices generated for sales or received fromsuppliers for purchases, as well as manually entered journals. However, you must update the global descriptive flexfieldswhen entering and posting transactions in Oracle Fusion Payables, Oracle Fusion Receivables, and Oracle FusionGeneral Ledger.
The following figure is an example of the report.
Key InsightsTo run the report, you must first enable the Journals for Mexico process so that you can run it from the ScheduledProcesses page. For more information, see Enable the Mexican Reporting Processes.
When you run the Journals for Mexico process, detailed transaction information is extracted from Oracle Fusion GeneralLedger for the specified period.
The report is generated in an XML format and includes the following sections:
• Heading: Includes layout version, RFC number, and the date on which the report is generated.
10
Oracle Financials CloudUsing Financials for the Americas
Chapter 1Financials for Mexico
• Details: Provides accounting information from the journal entries. Note that the UUID information depicted inthe GL journals is extracted directly from the AR and AP transactions. Any change in these at the subledgerlevel, doesn't need additional transfer actions to be included in the journals report.
Note:• Records in the journal entries are grouped based on your Payables and Receivables settings. The information
in the expense reports are tracked from the Payables transactions, while the GL journal entries are depicted asthey're entered in GL.
• Your role requires the data security privilege, Report Person National Identifier, for the report to show theemployee national identification number for payment requests from Expenses.
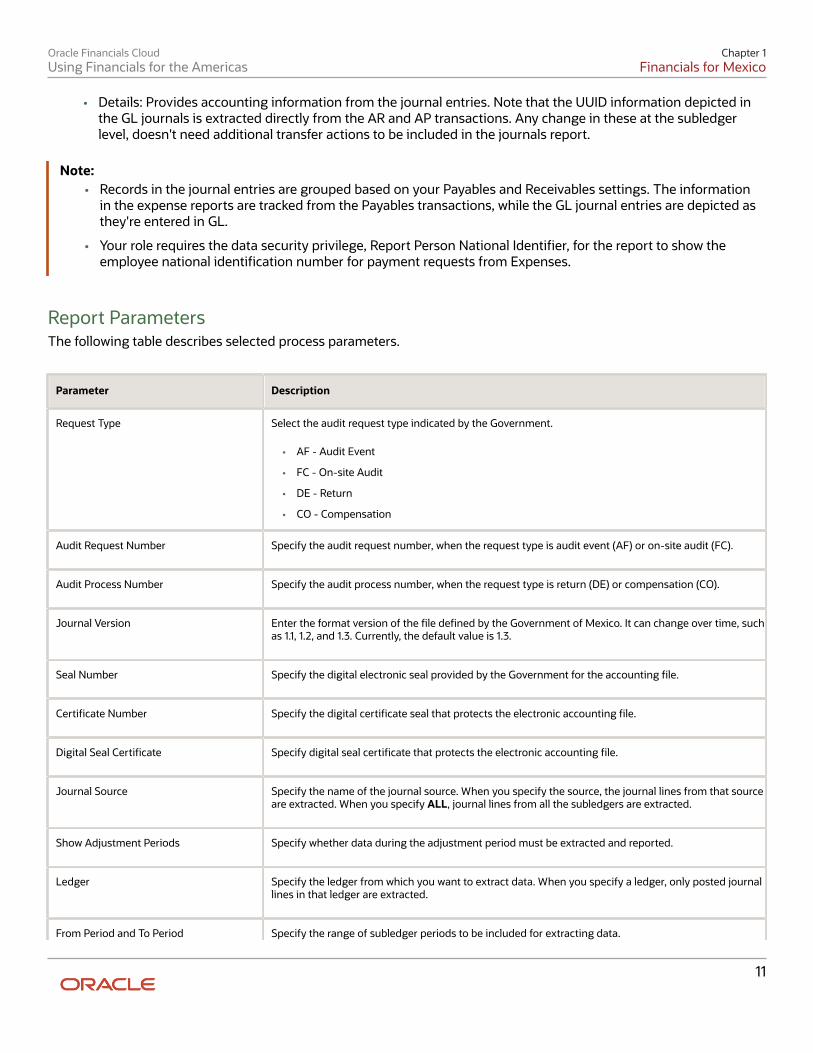
Report ParametersThe following table describes selected process parameters.
Parameter Description
Request Type
Select the audit request type indicated by the Government.
• AF - Audit Event
• FC - On-site Audit
• DE - Return
• CO - Compensation
Audit Request Number
Specify the audit request number, when the request type is audit event (AF) or on-site audit (FC).
Audit Process Number
Specify the audit process number, when the request type is return (DE) or compensation (CO).
Journal Version
Enter the format version of the file defined by the Government of Mexico. It can change over time, suchas 1.1, 1.2, and 1.3. Currently, the default value is 1.3.
Seal Number
Specify the digital electronic seal provided by the Government for the accounting file.
Certificate Number
Specify the digital certificate seal that protects the electronic accounting file.
Digital Seal Certificate
Specify digital seal certificate that protects the electronic accounting file.
Journal Source
Specify the name of the journal source. When you specify the source, the journal lines from that sourceare extracted. When you specify ALL, journal lines from all the subledgers are extracted.
Show Adjustment Periods
Specify whether data during the adjustment period must be extracted and reported.
Ledger
Specify the ledger from which you want to extract data. When you specify a ledger, only posted journallines in that ledger are extracted.
From Period and To Period Specify the range of subledger periods to be included for extracting data.
11
Oracle Financials CloudUsing Financials for the Americas
Chapter 1Financials for Mexico
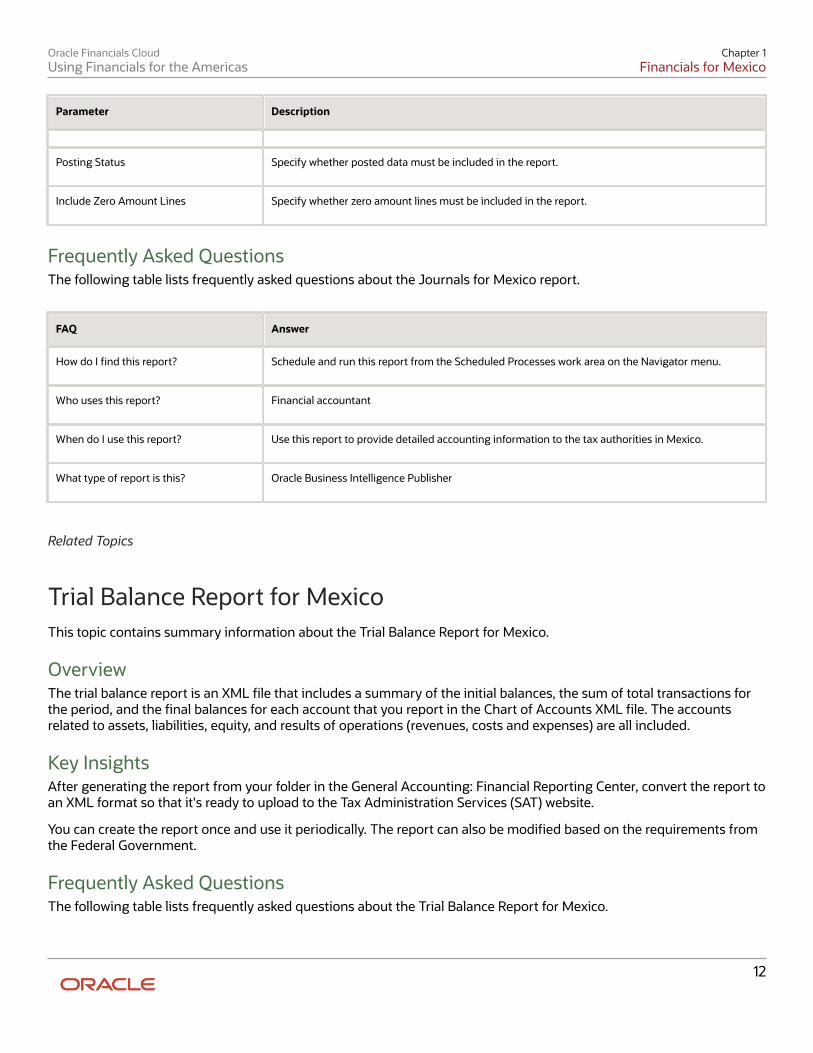
Parameter Description
Posting Status
Specify whether posted data must be included in the report.
Include Zero Amount Lines
Specify whether zero amount lines must be included in the report.
Frequently Asked QuestionsThe following table lists frequently asked questions about the Journals for Mexico report.
FAQ Answer
How do I find this report?
Schedule and run this report from the Scheduled Processes work area on the Navigator menu.
Who uses this report?
Financial accountant
When do I use this report?
Use this report to provide detailed accounting information to the tax authorities in Mexico.
What type of report is this?
Oracle Business Intelligence Publisher
Related Topics
Trial Balance Report for Mexico This topic contains summary information about the Trial Balance Report for Mexico.
OverviewThe trial balance report is an XML file that includes a summary of the initial balances, the sum of total transactions forthe period, and the final balances for each account that you report in the Chart of Accounts XML file. The accountsrelated to assets, liabilities, equity, and results of operations (revenues, costs and expenses) are all included.
Key InsightsAfter generating the report from your folder in the General Accounting: Financial Reporting Center, convert the report toan XML format so that it's ready to upload to the Tax Administration Services (SAT) website.
You can create the report once and use it periodically. The report can also be modified based on the requirements fromthe Federal Government.
Frequently Asked QuestionsThe following table lists frequently asked questions about the Trial Balance Report for Mexico.
12
Oracle Financials CloudUsing Financials for the Americas
Chapter 1Financials for Mexico
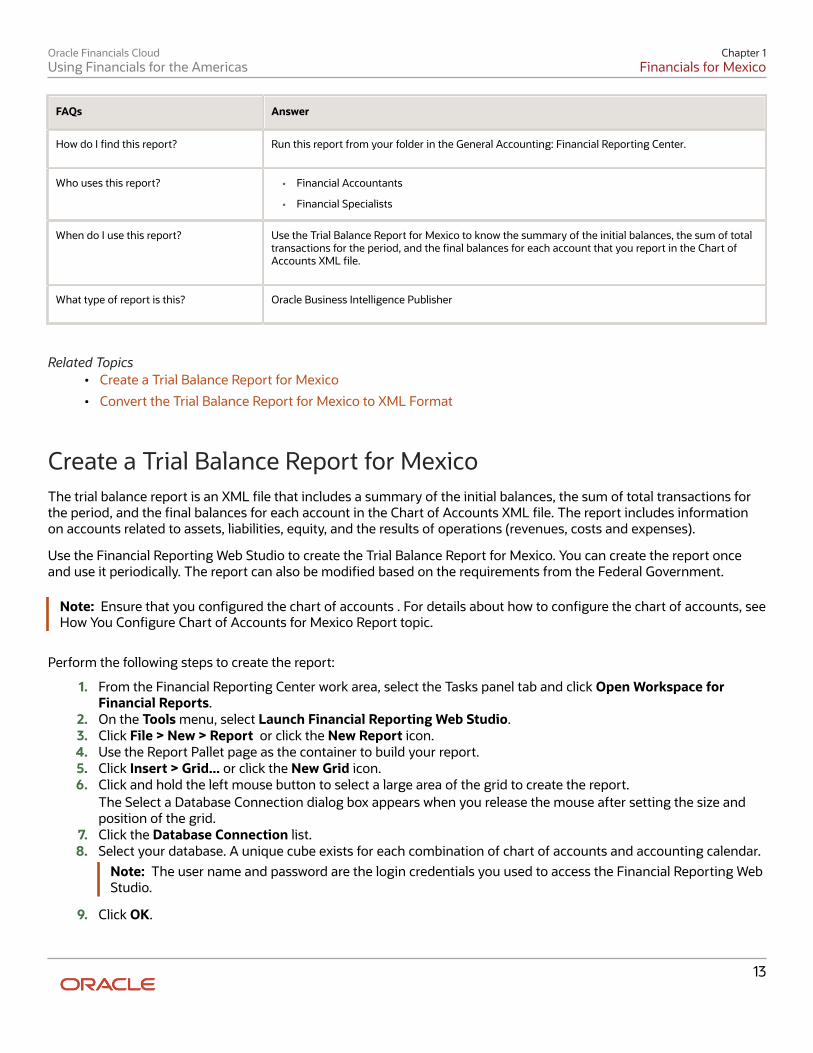
FAQs Answer
How do I find this report?
Run this report from your folder in the General Accounting: Financial Reporting Center.
Who uses this report?
• Financial Accountants
• Financial Specialists
When do I use this report?
Use the Trial Balance Report for Mexico to know the summary of the initial balances, the sum of totaltransactions for the period, and the final balances for each account that you report in the Chart ofAccounts XML file.
What type of report is this?
Oracle Business Intelligence Publisher
Related Topics• Create a Trial Balance Report for Mexico
• Convert the Trial Balance Report for Mexico to XML Format
Create a Trial Balance Report for Mexico The trial balance report is an XML file that includes a summary of the initial balances, the sum of total transactions forthe period, and the final balances for each account in the Chart of Accounts XML file. The report includes informationon accounts related to assets, liabilities, equity, and the results of operations (revenues, costs and expenses).
Use the Financial Reporting Web Studio to create the Trial Balance Report for Mexico. You can create the report onceand use it periodically. The report can also be modified based on the requirements from the Federal Government.
Note: Ensure that you configured the chart of accounts . For details about how to configure the chart of accounts, seeHow You Configure Chart of Accounts for Mexico Report topic.
Perform the following steps to create the report:
1. From the Financial Reporting Center work area, select the Tasks panel tab and click Open Workspace forFinancial Reports.
2. On the Tools menu, select Launch Financial Reporting Web Studio.3. Click File > New > Report or click the New Report icon.4. Use the Report Pallet page as the container to build your report.5. Click Insert > Grid... or click the New Grid icon.6. Click and hold the left mouse button to select a large area of the grid to create the report.
The Select a Database Connection dialog box appears when you release the mouse after setting the size andposition of the grid.
7. Click the Database Connection list.8. Select your database. A unique cube exists for each combination of chart of accounts and accounting calendar.
Note: The user name and password are the login credentials you used to access the Financial Reporting WebStudio.
9. Click OK.
13
Oracle Financials CloudUsing Financials for the Americas
Chapter 1Financials for Mexico
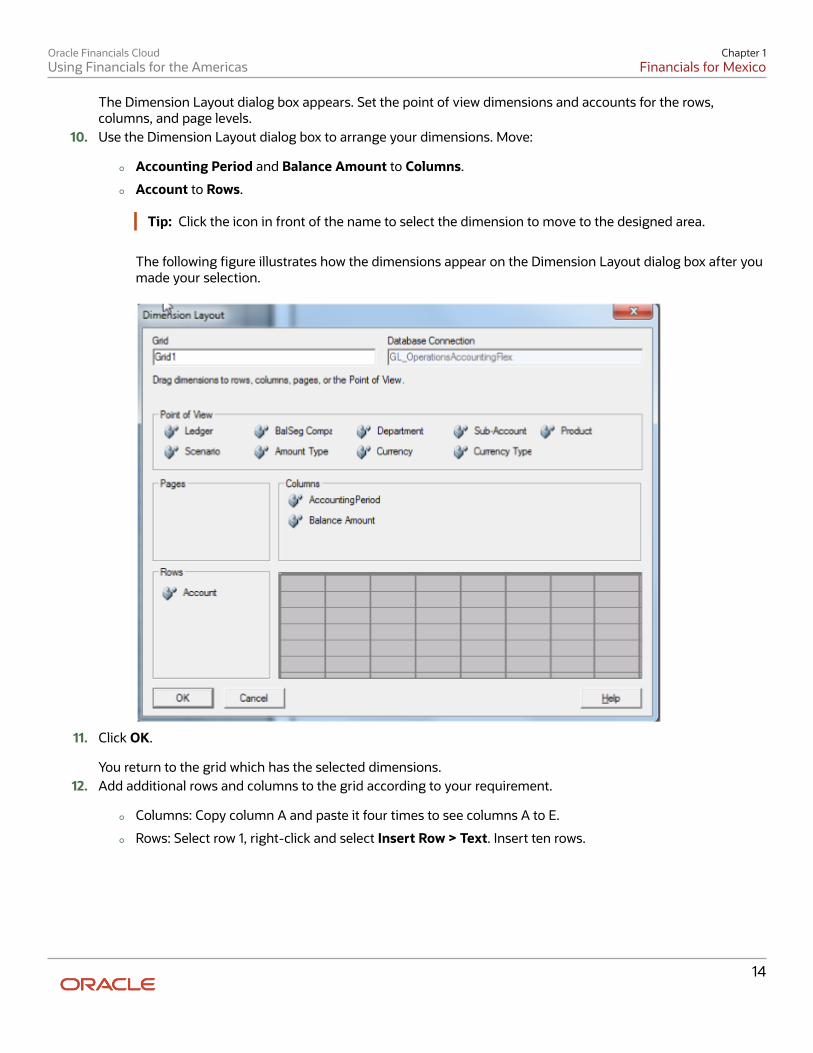
The Dimension Layout dialog box appears. Set the point of view dimensions and accounts for the rows,columns, and page levels.
10. Use the Dimension Layout dialog box to arrange your dimensions. Move:
◦ Accounting Period and Balance Amount to Columns.
◦ Account to Rows.
Tip: Click the icon in front of the name to select the dimension to move to the designed area.
The following figure illustrates how the dimensions appear on the Dimension Layout dialog box after youmade your selection.
11. Click OK.
You return to the grid which has the selected dimensions.12. Add additional rows and columns to the grid according to your requirement.
◦ Columns: Copy column A and paste it four times to see columns A to E.
◦ Rows: Select row 1, right-click and select Insert Row > Text. Insert ten rows.
14
Oracle Financials CloudUsing Financials for the Americas
Chapter 1Financials for Mexico
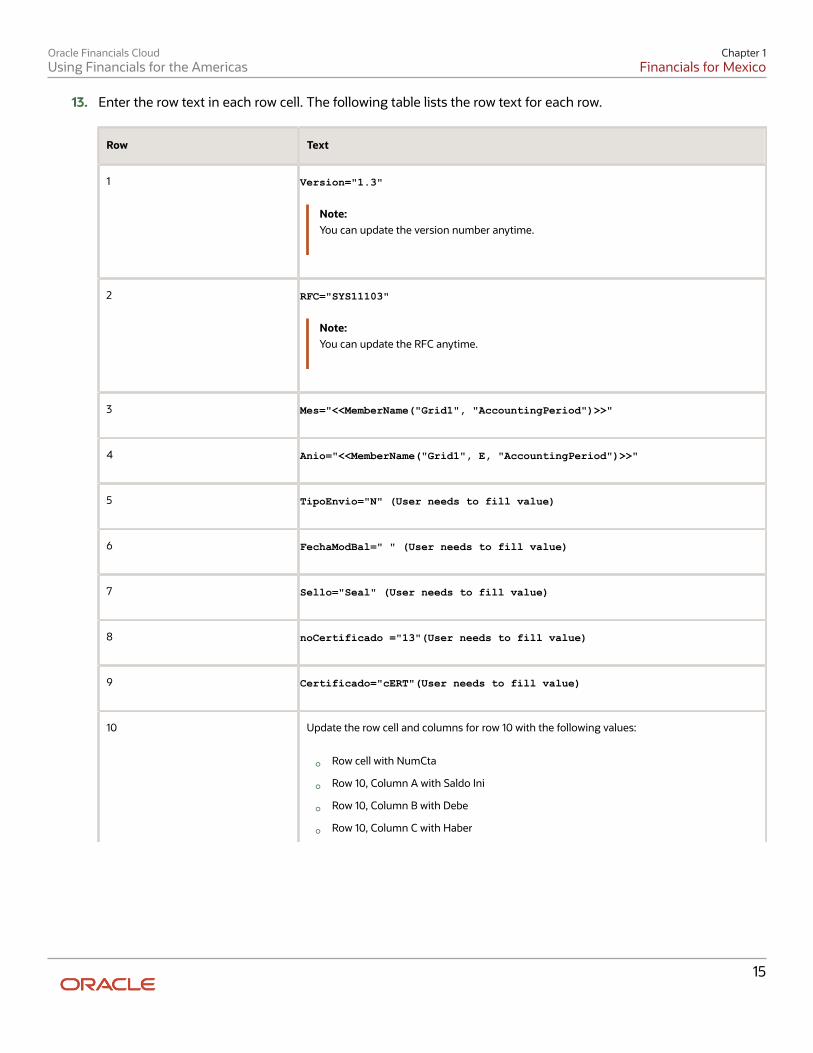
13. Enter the row text in each row cell. The following table lists the row text for each row.
Row Text
1
Version="1.3"
Note:You can update the version number anytime.
2
RFC="SYS11103"
Note:You can update the RFC anytime.
3
Mes="<<MemberName("Grid1", "AccountingPeriod")>>"
4
Anio="<<MemberName("Grid1", E, "AccountingPeriod")>>"
5
TipoEnvio="N" (User needs to fill value)
6
FechaModBal=" " (User needs to fill value)
7
Sello="Seal" (User needs to fill value)
8
noCertificado ="13"(User needs to fill value)
9
Certificado="cERT"(User needs to fill value)
10
Update the row cell and columns for row 10 with the following values:
◦ Row cell with NumCta
◦ Row 10, Column A with Saldo Ini
◦ Row 10, Column B with Debe
◦ Row 10, Column C with Haber
15

Oracle Financials CloudUsing Financials for the Americas
Chapter 1Financials for Mexico
Row Text
◦ Row 10, Column D with SaldoFin
The following figure illustrates how the grid should appear:
14. In the first column on the grid (Column A), double-click the AccountingPeriod cell.The Select Members dialog box appears.
15. Remove the default selection from the Selected pane and assign a user-defined period selection.16. Select the AccountingPeriod in the Selected pane and click Remove.17. Select Current Point of View for Accounting Period from Available pane and click Move to place it in the
Selected pane.18. Select the Place selection into separate columns option.19. Click OK.20. Repeat the steps for Columns B, C, and D.21. In the last column on the grid (Column E), double-click the AccountingPeriod cell to open the Select Members
dialog box.22. Select the AccountingPeriod in the Selected pane and click Remove.23. Select Current Point of View for Accounting Period from Available pane and click Move to place it in the
Selected pane.24. Click the Functions tab and select RelativeMember from the list.25. Click Add.26. Use the Edit RelativeMember Function dialog box to add the parameter values. The following table lists the
values you can enter.
Parameter Value
Member
Current Point of View for Accounting Period
Offset
0
Hierarchy AccountingPeriod
16
Oracle Financials CloudUsing Financials for the Americas
Chapter 1Financials for Mexico
Parameter Value
RelativeMemberList
Fiscal Year
27. Select the Place selection into separate columns option.28. Click OK.29. In the first column on the grid (Column A), double-click the BalanceAmount cell.
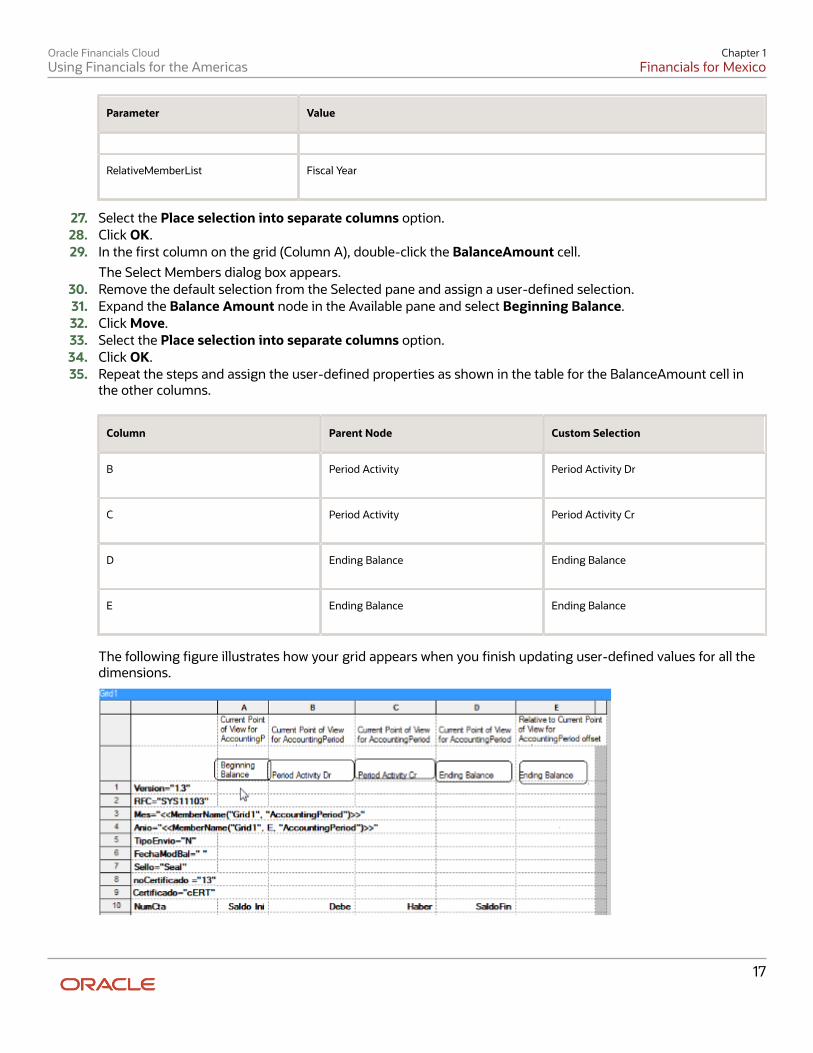
The Select Members dialog box appears.30. Remove the default selection from the Selected pane and assign a user-defined selection.31. Expand the Balance Amount node in the Available pane and select Beginning Balance.32. Click Move.33. Select the Place selection into separate columns option.34. Click OK.35. Repeat the steps and assign the user-defined properties as shown in the table for the BalanceAmount cell in
the other columns.
Column Parent Node Custom Selection
B
Period Activity
Period Activity Dr
C
Period Activity
Period Activity Cr
D
Ending Balance
Ending Balance
E
Ending Balance
Ending Balance
The following figure illustrates how your grid appears when you finish updating user-defined values for all thedimensions.
17
Oracle Financials CloudUsing Financials for the Americas
Chapter 1Financials for Mexico
36. Select column E.The Custom Properties dialog box appears.
37. Select the Hide Always check box.38. Select the first two rows (row 1 and 2).39. Select the Hide Always check box in the Custom Properties dialog box.40. Select row 11, right-click and click Insert Row > Data. Row 12 is added.
Note: For each account in the SAT chart of accounts mapping, add a row.
41. Double-click the Account cell in row 11 to open the Select Members dialog box.42. Select Account in the Selected pane and click Remove.43. Click the Members tab.44. Expand the Account > All Account Values nodes that appear in the Available pane.45. Select 1110 and click Move. The account appears in the Selected pane.46. Select the Place selection into separate columns option.47. Click OK.
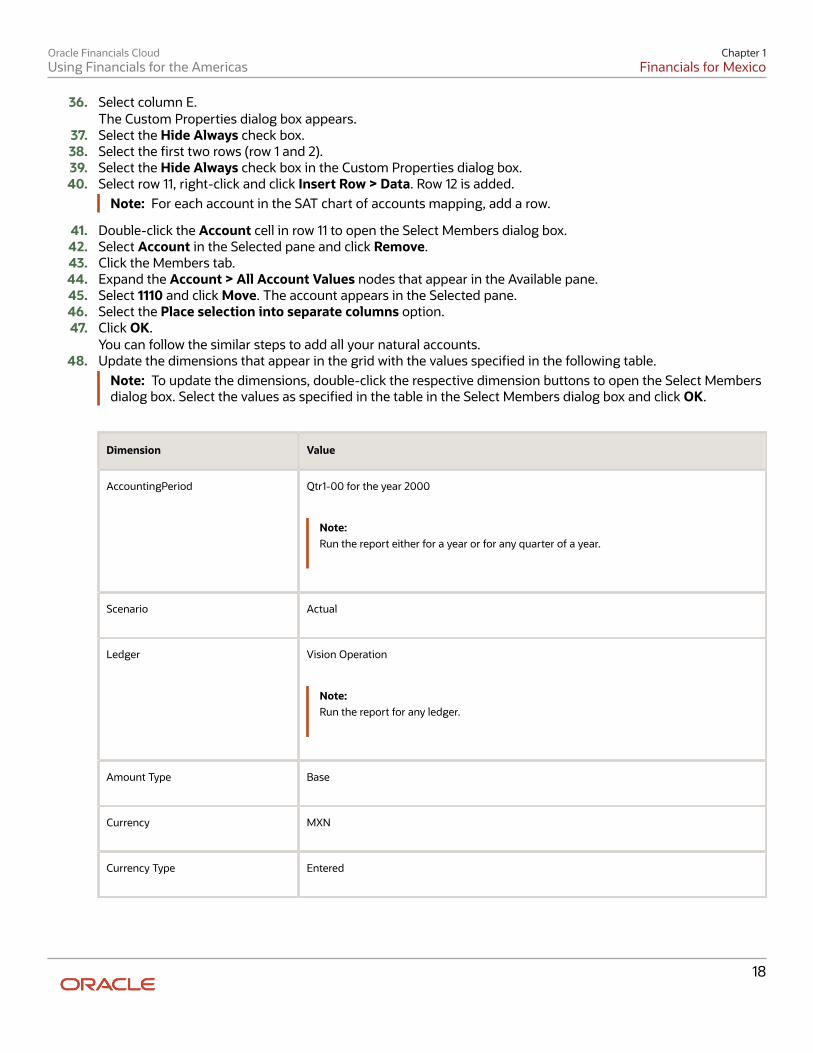
You can follow the similar steps to add all your natural accounts.48. Update the dimensions that appear in the grid with the values specified in the following table.
Note: To update the dimensions, double-click the respective dimension buttons to open the Select Membersdialog box. Select the values as specified in the table in the Select Members dialog box and click OK.
Dimension Value
AccountingPeriod
Qtr1-00 for the year 2000
Note:Run the report either for a year or for any quarter of a year.
Scenario
Actual
Ledger
Vision Operation
Note:Run the report for any ledger.
Amount Type
Base
Currency
MXN
Currency Type
Entered
18
Oracle Financials CloudUsing Financials for the Americas
Chapter 1Financials for Mexico
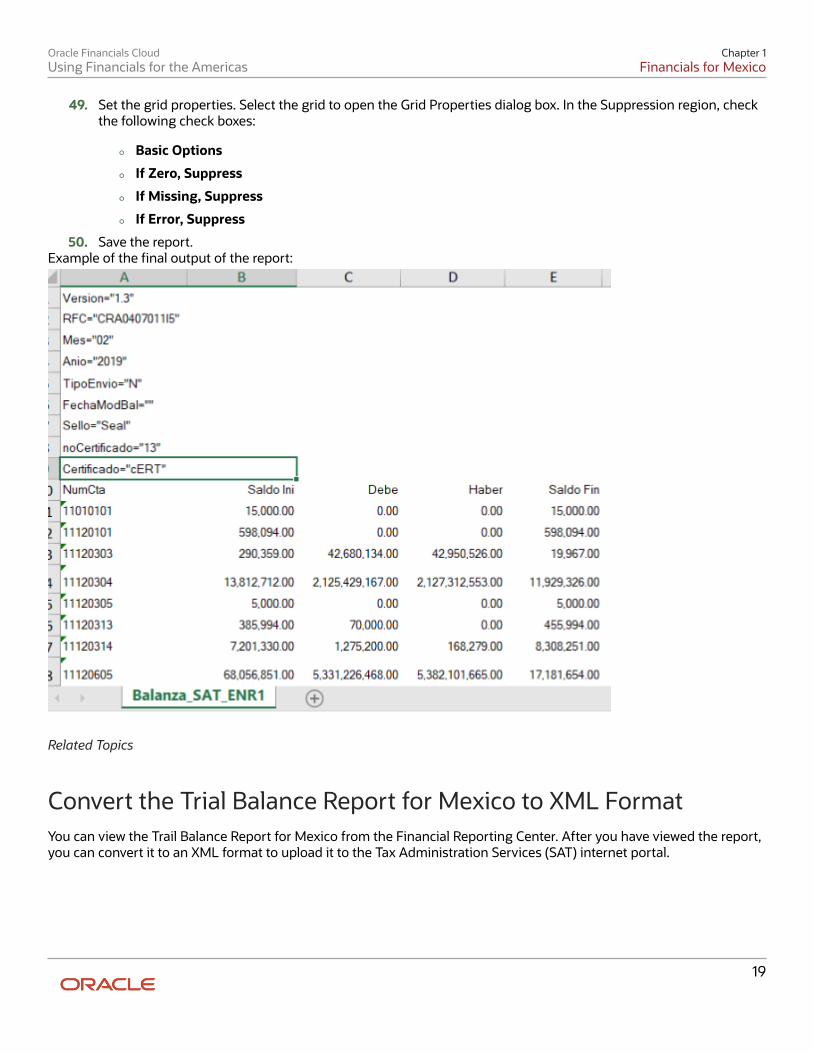
49. Set the grid properties. Select the grid to open the Grid Properties dialog box. In the Suppression region, checkthe following check boxes:
◦ Basic Options
◦ If Zero, Suppress
◦ If Missing, Suppress
◦ If Error, Suppress
50. Save the report.Example of the final output of the report:
Related Topics
Convert the Trial Balance Report for Mexico to XML Format You can view the Trail Balance Report for Mexico from the Financial Reporting Center. After you have viewed the report,you can convert it to an XML format to upload it to the Tax Administration Services (SAT) internet portal.
19
Oracle Financials CloudUsing Financials for the Americas
Chapter 1Financials for Mexico
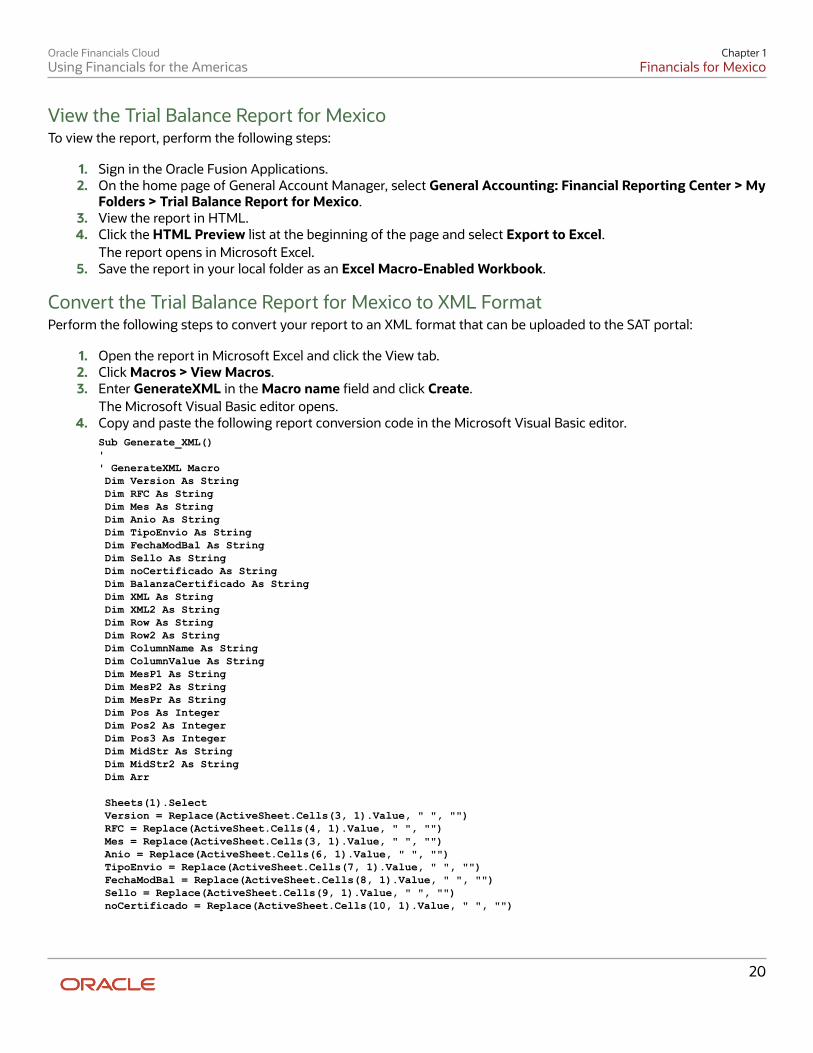
View the Trial Balance Report for MexicoTo view the report, perform the following steps:
1. Sign in the Oracle Fusion Applications.2. On the home page of General Account Manager, select General Accounting: Financial Reporting Center > My
Folders > Trial Balance Report for Mexico.3. View the report in HTML.4. Click the HTML Preview list at the beginning of the page and select Export to Excel.
The report opens in Microsoft Excel.5. Save the report in your local folder as an Excel Macro-Enabled Workbook.
Convert the Trial Balance Report for Mexico to XML FormatPerform the following steps to convert your report to an XML format that can be uploaded to the SAT portal:
1. Open the report in Microsoft Excel and click the View tab.2. Click Macros > View Macros.3. Enter GenerateXML in the Macro name field and click Create.
The Microsoft Visual Basic editor opens.4. Copy and paste the following report conversion code in the Microsoft Visual Basic editor.
Sub Generate_XML()'' GenerateXML Macro Dim Version As String Dim RFC As String Dim Mes As String Dim Anio As String Dim TipoEnvio As String Dim FechaModBal As String Dim Sello As String Dim noCertificado As String Dim BalanzaCertificado As String Dim XML As String Dim XML2 As String Dim Row As String Dim Row2 As String Dim ColumnName As String Dim ColumnValue As String Dim MesP1 As String Dim MesP2 As String Dim MesPr As String Dim Pos As Integer Dim Pos2 As Integer Dim Pos3 As Integer Dim MidStr As String Dim MidStr2 As String Dim Arr
Sheets(1).Select Version = Replace(ActiveSheet.Cells(3, 1).Value, " ", "") RFC = Replace(ActiveSheet.Cells(4, 1).Value, " ", "") Mes = Replace(ActiveSheet.Cells(3, 1).Value, " ", "") Anio = Replace(ActiveSheet.Cells(6, 1).Value, " ", "") TipoEnvio = Replace(ActiveSheet.Cells(7, 1).Value, " ", "") FechaModBal = Replace(ActiveSheet.Cells(8, 1).Value, " ", "") Sello = Replace(ActiveSheet.Cells(9, 1).Value, " ", "") noCertificado = Replace(ActiveSheet.Cells(10, 1).Value, " ", "")
20
Oracle Financials CloudUsing Financials for the Americas
Chapter 1Financials for Mexico
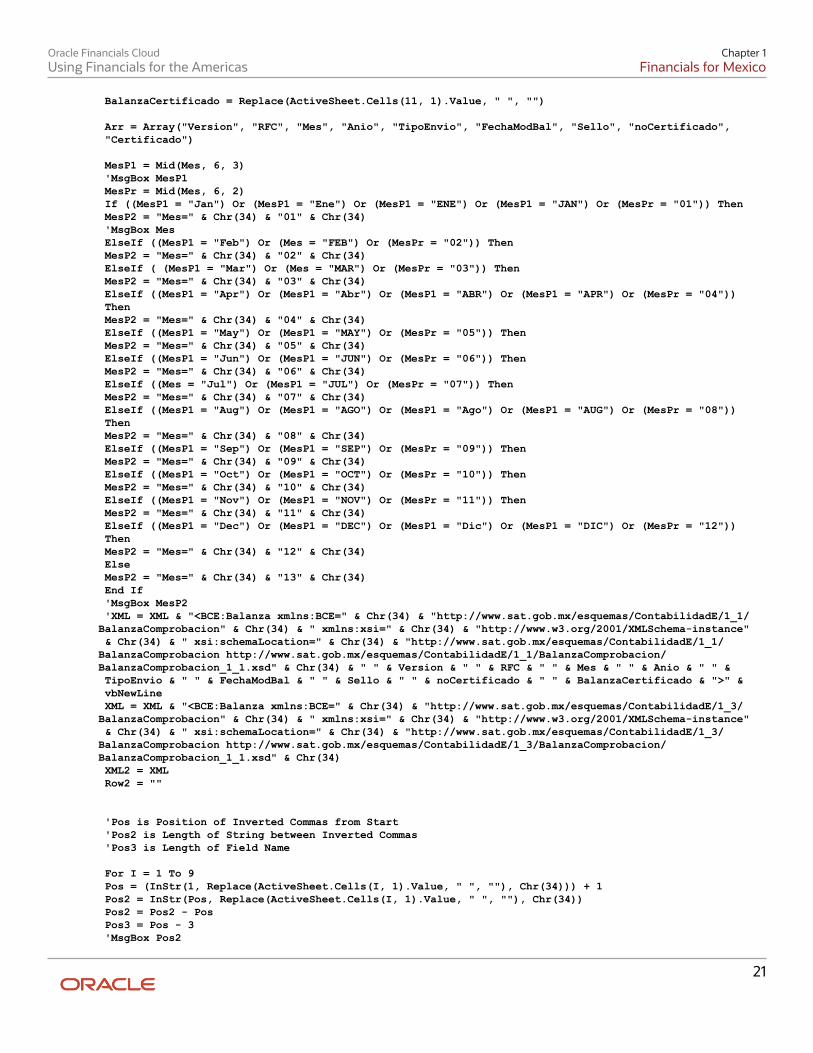
BalanzaCertificado = Replace(ActiveSheet.Cells(11, 1).Value, " ", "") Arr = Array("Version", "RFC", "Mes", "Anio", "TipoEnvio", "FechaModBal", "Sello", "noCertificado", "Certificado") MesP1 = Mid(Mes, 6, 3) 'MsgBox MesP1 MesPr = Mid(Mes, 6, 2) If ((MesP1 = "Jan") Or (MesP1 = "Ene") Or (MesP1 = "ENE") Or (MesP1 = "JAN") Or (MesPr = "01")) Then MesP2 = "Mes=" & Chr(34) & "01" & Chr(34) 'MsgBox Mes ElseIf ((MesP1 = "Feb") Or (Mes = "FEB") Or (MesPr = "02")) Then MesP2 = "Mes=" & Chr(34) & "02" & Chr(34) ElseIf ( (MesP1 = "Mar") Or (Mes = "MAR") Or (MesPr = "03")) Then MesP2 = "Mes=" & Chr(34) & "03" & Chr(34) ElseIf ((MesP1 = "Apr") Or (MesP1 = "Abr") Or (MesP1 = "ABR") Or (MesP1 = "APR") Or (MesPr = "04")) Then MesP2 = "Mes=" & Chr(34) & "04" & Chr(34) ElseIf ((MesP1 = "May") Or (MesP1 = "MAY") Or (MesPr = "05")) Then MesP2 = "Mes=" & Chr(34) & "05" & Chr(34) ElseIf ((MesP1 = "Jun") Or (MesP1 = "JUN") Or (MesPr = "06")) Then MesP2 = "Mes=" & Chr(34) & "06" & Chr(34) ElseIf ((Mes = "Jul") Or (MesP1 = "JUL") Or (MesPr = "07")) Then MesP2 = "Mes=" & Chr(34) & "07" & Chr(34) ElseIf ((MesP1 = "Aug") Or (MesP1 = "AGO") Or (MesP1 = "Ago") Or (MesP1 = "AUG") Or (MesPr = "08")) Then MesP2 = "Mes=" & Chr(34) & "08" & Chr(34) ElseIf ((MesP1 = "Sep") Or (MesP1 = "SEP") Or (MesPr = "09")) Then MesP2 = "Mes=" & Chr(34) & "09" & Chr(34) ElseIf ((MesP1 = "Oct") Or (MesP1 = "OCT") Or (MesPr = "10")) Then MesP2 = "Mes=" & Chr(34) & "10" & Chr(34) ElseIf ((MesP1 = "Nov") Or (MesP1 = "NOV") Or (MesPr = "11")) Then MesP2 = "Mes=" & Chr(34) & "11" & Chr(34) ElseIf ((MesP1 = "Dec") Or (MesP1 = "DEC") Or (MesP1 = "Dic") Or (MesP1 = "DIC") Or (MesPr = "12")) Then MesP2 = "Mes=" & Chr(34) & "12" & Chr(34) Else MesP2 = "Mes=" & Chr(34) & "13" & Chr(34) End If 'MsgBox MesP2 'XML = XML & "<BCE:Balanza xmlns:BCE=" & Chr(34) & "http://www.sat.gob.mx/esquemas/ContabilidadE/1_1/BalanzaComprobacion" & Chr(34) & " xmlns:xsi=" & Chr(34) & "http://www.w3.org/2001/XMLSchema-instance" & Chr(34) & " xsi:schemaLocation=" & Chr(34) & "http://www.sat.gob.mx/esquemas/ContabilidadE/1_1/BalanzaComprobacion http://www.sat.gob.mx/esquemas/ContabilidadE/1_1/BalanzaComprobacion/BalanzaComprobacion_1_1.xsd" & Chr(34) & " " & Version & " " & RFC & " " & Mes & " " & Anio & " " & TipoEnvio & " " & FechaModBal & " " & Sello & " " & noCertificado & " " & BalanzaCertificado & ">" & vbNewLine XML = XML & "<BCE:Balanza xmlns:BCE=" & Chr(34) & "http://www.sat.gob.mx/esquemas/ContabilidadE/1_3/BalanzaComprobacion" & Chr(34) & " xmlns:xsi=" & Chr(34) & "http://www.w3.org/2001/XMLSchema-instance" & Chr(34) & " xsi:schemaLocation=" & Chr(34) & "http://www.sat.gob.mx/esquemas/ContabilidadE/1_3/BalanzaComprobacion http://www.sat.gob.mx/esquemas/ContabilidadE/1_3/BalanzaComprobacion/BalanzaComprobacion_1_1.xsd" & Chr(34) XML2 = XML Row2 = "" 'Pos is Position of Inverted Commas from Start 'Pos2 is Length of String between Inverted Commas 'Pos3 is Length of Field Name
For I = 1 To 9 Pos = (InStr(1, Replace(ActiveSheet.Cells(I, 1).Value, " ", ""), Chr(34))) + 1 Pos2 = InStr(Pos, Replace(ActiveSheet.Cells(I, 1).Value, " ", ""), Chr(34)) Pos2 = Pos2 - Pos Pos3 = Pos - 3 'MsgBox Pos2
21

Oracle Financials CloudUsing Financials for the Americas
Chapter 1Financials for Mexico
' MsgBox I MidStr = Mid(Replace(ActiveSheet.Cells(I, 1).Value, " ", ""), Pos, Pos2) MidStr2 = Mid(Replace(ActiveSheet.Cells(I, 1).Value, " ", ""), 1, Pos3) ' MsgBox MidStr2 If MidStr <> "" Then If MidStr2 = "Mes" Then Row2 = Row2 & MesP2 & " " Else Row2 = Row2 & MidStr2 & "=" & Chr(34) & MidStr & Chr(34) & " " End If 'Row2 = Row2 & " " & Replace(ActiveSheet.Cells(I, 1).Value, " ", "") 'MsgBox Row2 End If Next I 'MsgBox XML2 'MsgBox Row2 XML2 = XML2 & " " & Row2 XML = XML2 & ">" & vbNewLine ActiveSheet.Range("A10").Select Selection.End(xlDown).Select SheetLastRow = ActiveCell.Row ActiveSheet.Range("A10").Select Selection.End(xlToRight).Select SheetLastColumn = ActiveCell.Column For I = 11 To SheetLastRow Row = vbTab & "<BCE:Ctas " For J = 1 To SheetLastColumn ColumnName = Replace(ActiveSheet.Cells(10, J).Value, " ", "") If ColumnName = "SaldoIni" Or ColumnName = "Debe" Or ColumnName = "Haber" Or ColumnName = "SaldoFin" Then 'MsgBox ColumnValue If ActiveSheet.Cells(I, J).Value = "" Or ActiveSheet.Cells(I, J).Value = "0" Then ColumnValue = 0 'MsgBox ColumnValue Else ActiveSheet.Cells(I, J).Value = Format(ActiveSheet.Cells(I, J).Value, "#,###") ColumnValue = ActiveSheet.Cells(I, J).Value 'Selection.NumberFormat = "#,###" Else ColumnValue = ActiveSheet.Cells(I, J).Value End If Row = Row & ColumnName & "=" & Chr(34) & ColumnValue & Chr(34) & " " Next J Row = Row & "/>" & vbNewLine XML = XML & Row Next I XML = XML & "</BCE:Balanza>" fileSaveName = Application.GetSaveAsFilename(ActiveSheet.Name, fileFilter:="XML Files (*.xml), *.xml") Open fileSaveName For Output As #1 Print #1, "<?xml version=" & Chr(34) & "1.0" & Chr(34) & " encoding=" & Chr(34) & "UTF-8" & Chr(34) & "?>" Print #1, XML Close #1'
22
Oracle Financials CloudUsing Financials for the Americas
Chapter 1Financials for Mexico
End Sub
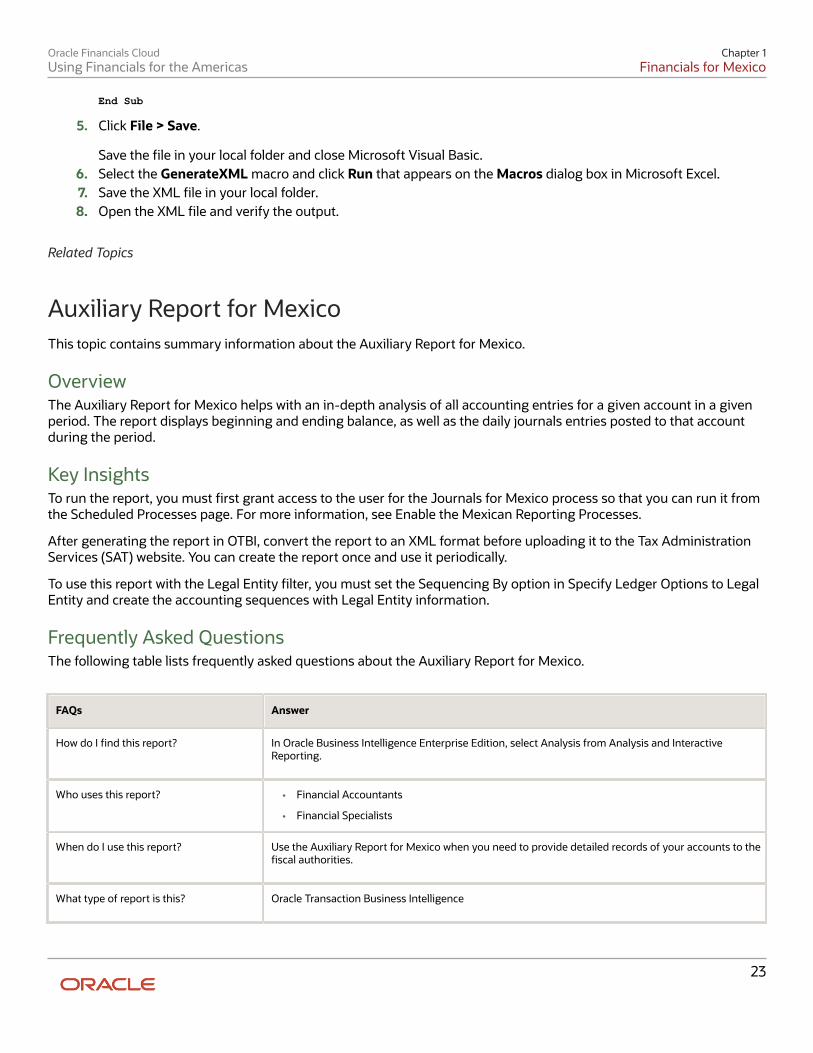
5. Click File > Save.
Save the file in your local folder and close Microsoft Visual Basic.6. Select the GenerateXML macro and click Run that appears on the Macros dialog box in Microsoft Excel.7. Save the XML file in your local folder.8. Open the XML file and verify the output.
Related Topics
Auxiliary Report for Mexico This topic contains summary information about the Auxiliary Report for Mexico.
OverviewThe Auxiliary Report for Mexico helps with an in-depth analysis of all accounting entries for a given account in a givenperiod. The report displays beginning and ending balance, as well as the daily journals entries posted to that accountduring the period.
Key InsightsTo run the report, you must first grant access to the user for the Journals for Mexico process so that you can run it fromthe Scheduled Processes page. For more information, see Enable the Mexican Reporting Processes.
After generating the report in OTBI, convert the report to an XML format before uploading it to the Tax AdministrationServices (SAT) website. You can create the report once and use it periodically.
To use this report with the Legal Entity filter, you must set the Sequencing By option in Specify Ledger Options to LegalEntity and create the accounting sequences with Legal Entity information.
Frequently Asked QuestionsThe following table lists frequently asked questions about the Auxiliary Report for Mexico.
FAQs Answer
How do I find this report?
In Oracle Business Intelligence Enterprise Edition, select Analysis from Analysis and InteractiveReporting.
Who uses this report?
• Financial Accountants
• Financial Specialists
When do I use this report?
Use the Auxiliary Report for Mexico when you need to provide detailed records of your accounts to thefiscal authorities.
What type of report is this?
Oracle Transaction Business Intelligence
23
Oracle Financials CloudUsing Financials for the Americas
Chapter 1Financials for Mexico
Related Topics• Generate the Auxiliary Report for Mexico
• Convert the Auxiliary Report for Mexico to an XML Format
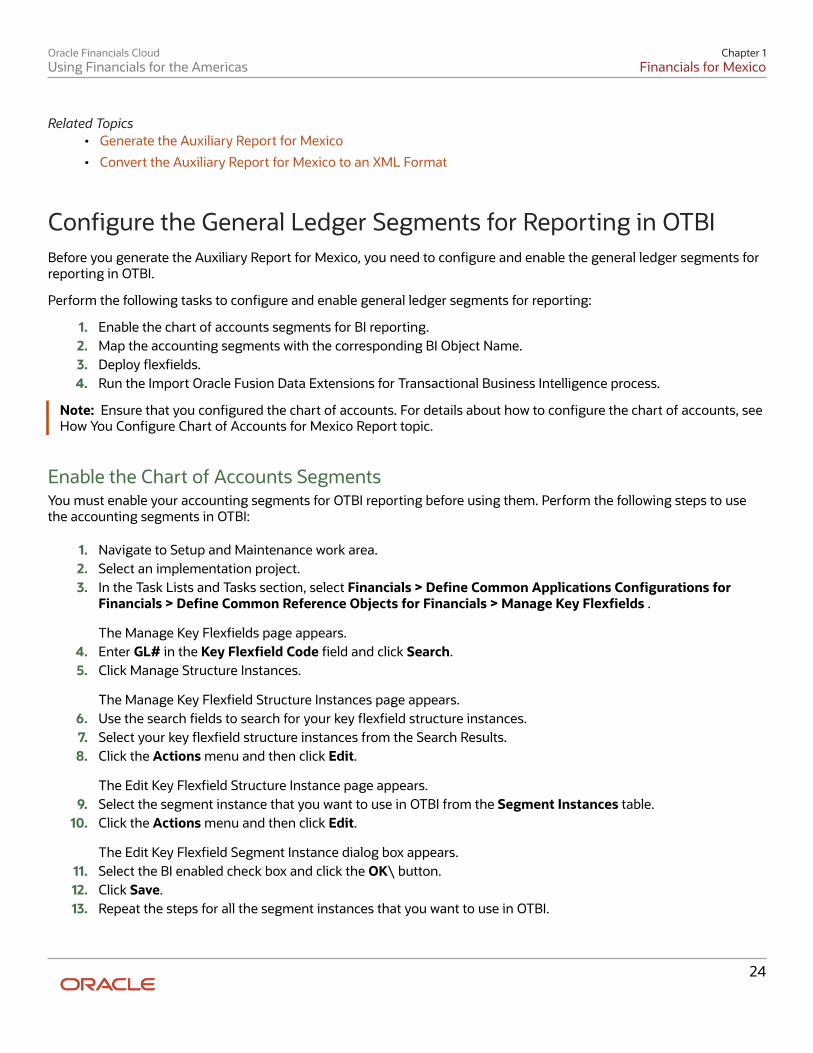
Configure the General Ledger Segments for Reporting in OTBI Before you generate the Auxiliary Report for Mexico, you need to configure and enable the general ledger segments forreporting in OTBI.
Perform the following tasks to configure and enable general ledger segments for reporting:
1. Enable the chart of accounts segments for BI reporting.2. Map the accounting segments with the corresponding BI Object Name.3. Deploy flexfields.4. Run the Import Oracle Fusion Data Extensions for Transactional Business Intelligence process.
Note: Ensure that you configured the chart of accounts. For details about how to configure the chart of accounts, seeHow You Configure Chart of Accounts for Mexico Report topic.
Enable the Chart of Accounts SegmentsYou must enable your accounting segments for OTBI reporting before using them. Perform the following steps to usethe accounting segments in OTBI:
1. Navigate to Setup and Maintenance work area.2. Select an implementation project.3. In the Task Lists and Tasks section, select Financials > Define Common Applications Configurations for
Financials > Define Common Reference Objects for Financials > Manage Key Flexfields .
The Manage Key Flexfields page appears.4. Enter GL# in the Key Flexfield Code field and click Search.5. Click Manage Structure Instances.
The Manage Key Flexfield Structure Instances page appears.6. Use the search fields to search for your key flexfield structure instances.7. Select your key flexfield structure instances from the Search Results.8. Click the Actions menu and then click Edit.
The Edit Key Flexfield Structure Instance page appears.9. Select the segment instance that you want to use in OTBI from the Segment Instances table.
10. Click the Actions menu and then click Edit.
The Edit Key Flexfield Segment Instance dialog box appears.11. Select the BI enabled check box and click the OK\ button.12. Click Save.13. Repeat the steps for all the segment instances that you want to use in OTBI.
24
Oracle Financials CloudUsing Financials for the Americas
Chapter 1Financials for Mexico
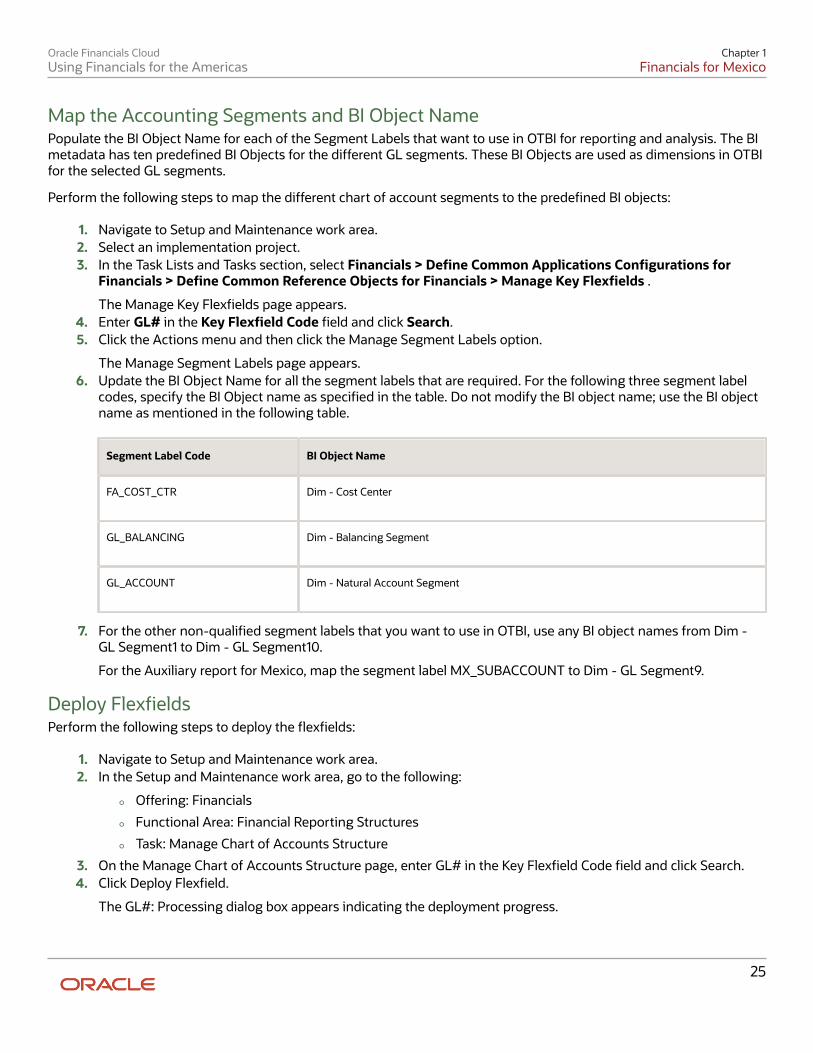
Map the Accounting Segments and BI Object NamePopulate the BI Object Name for each of the Segment Labels that want to use in OTBI for reporting and analysis. The BImetadata has ten predefined BI Objects for the different GL segments. These BI Objects are used as dimensions in OTBIfor the selected GL segments.
Perform the following steps to map the different chart of account segments to the predefined BI objects:
1. Navigate to Setup and Maintenance work area.2. Select an implementation project.3. In the Task Lists and Tasks section, select Financials > Define Common Applications Configurations for
Financials > Define Common Reference Objects for Financials > Manage Key Flexfields .
The Manage Key Flexfields page appears.4. Enter GL# in the Key Flexfield Code field and click Search.5. Click the Actions menu and then click the Manage Segment Labels option.
The Manage Segment Labels page appears.6. Update the BI Object Name for all the segment labels that are required. For the following three segment label
codes, specify the BI Object name as specified in the table. Do not modify the BI object name; use the BI objectname as mentioned in the following table.
Segment Label Code BI Object Name
FA_COST_CTR
Dim - Cost Center
GL_BALANCING
Dim - Balancing Segment
GL_ACCOUNT
Dim - Natural Account Segment
7. For the other non-qualified segment labels that you want to use in OTBI, use any BI object names from Dim -GL Segment1 to Dim - GL Segment10.
For the Auxiliary report for Mexico, map the segment label MX_SUBACCOUNT to Dim - GL Segment9.
Deploy FlexfieldsPerform the following steps to deploy the flexfields:
1. Navigate to Setup and Maintenance work area.2. In the Setup and Maintenance work area, go to the following:
◦ Offering: Financials
◦ Functional Area: Financial Reporting Structures
◦ Task: Manage Chart of Accounts Structure
3. On the Manage Chart of Accounts Structure page, enter GL# in the Key Flexfield Code field and click Search.4. Click Deploy Flexfield.
The GL#: Processing dialog box appears indicating the deployment progress.
25
Oracle Financials CloudUsing Financials for the Americas
Chapter 1Financials for Mexico
5. Click the OK button after the deployment completes.
Run the Import Oracle Fusion Data Extensions for Transactional Business IntelligenceProcessPerform the following steps to run the Import Oracle Fusion Data Extensions for Transactional Business Intelligenceprocess:
1. Navigate to the Scheduled Processes work area.2. Click the Schedule New Process button.
The Schedule New Process dialog box appears.3. Click Name.4. Click Search.
The Search and Select dialog box appears.5. Enter Import Oracle Fusion Data Extensions for Transactional Business Intelligence in the Name field.6. Click Search.7. Select the process name from the Search Results area and click the OK button.8. Click the OK button on the Schedule New Process dialog box.
The Process Details dialog box appears.9. Update the details and click the Submit button.
10. Note the Process ID and click OK to acknowledge that your process was submitted.11. Note the status of your process:
◦ If the status of the process is Succeeded, the process executed successfully. Proceed and generate theAuxiliary Report for Mexico.
◦ If the status of the process is failed, check the log file, make corrections, and submit the process again.
Related Topics
Generate the Auxiliary Report for Mexico The Auxiliary Report for Mexico provides a detailed analysis of all accounting entries for a given account during a givenperiod. The report displays beginning and ending balances, as well as the daily journal entries posted to an accountduring a specific period.
Use the Auxiliary Report for Mexico to provide detailed records of your accounts to the fiscal authorities.
PrerequisitesComplete the following steps before you generate the Auxiliary Report for Mexico:
1. Sign in to Oracle Business Intelligence Enterprise Edition.2. Click Catalog.3. Click New > Folder on the catalog tool bar.4. Create a local folder in My Folders.5. Enter the Name of the folder as Mexico and click OK.
The new folder appears in the folder pane in My Folders.
26
Oracle Financials CloudUsing Financials for the Americas
Chapter 1Financials for Mexico
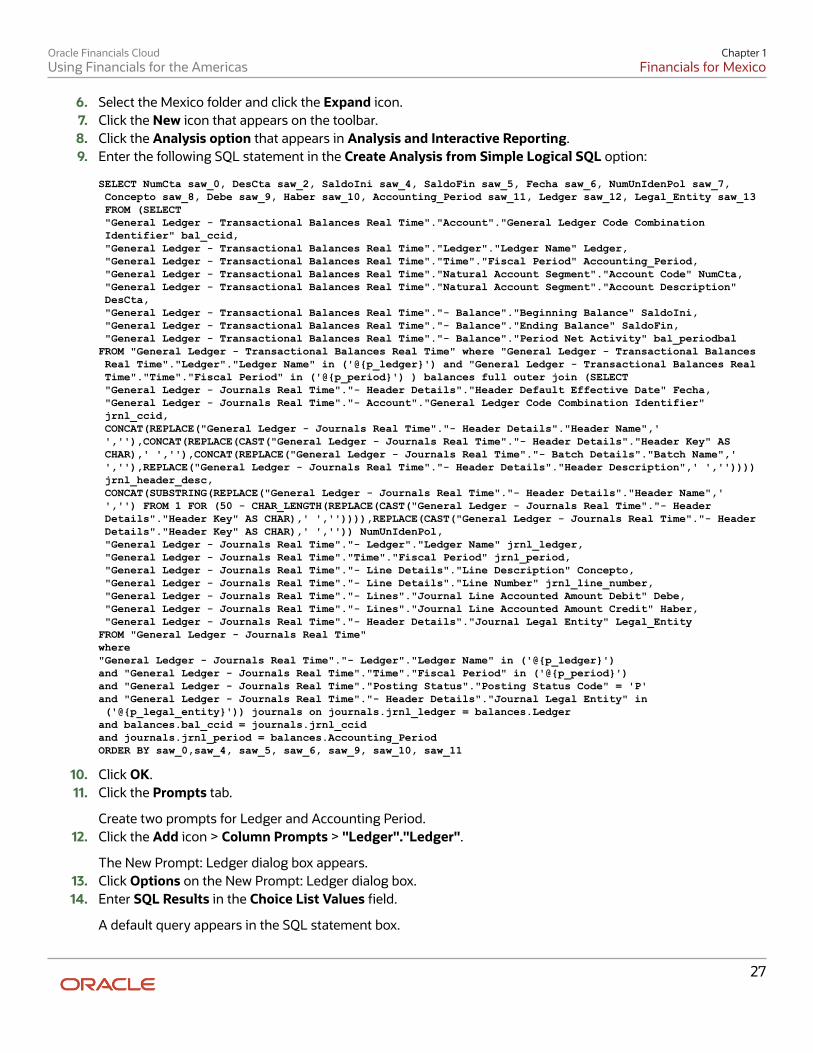
6. Select the Mexico folder and click the Expand icon.7. Click the New icon that appears on the toolbar.8. Click the Analysis option that appears in Analysis and Interactive Reporting.9. Enter the following SQL statement in the Create Analysis from Simple Logical SQL option:
SELECT NumCta saw_0, DesCta saw_2, SaldoIni saw_4, SaldoFin saw_5, Fecha saw_6, NumUnIdenPol saw_7, Concepto saw_8, Debe saw_9, Haber saw_10, Accounting_Period saw_11, Ledger saw_12, Legal_Entity saw_13 FROM (SELECT "General Ledger - Transactional Balances Real Time"."Account"."General Ledger Code Combination Identifier" bal_ccid, "General Ledger - Transactional Balances Real Time"."Ledger"."Ledger Name" Ledger, "General Ledger - Transactional Balances Real Time"."Time"."Fiscal Period" Accounting_Period, "General Ledger - Transactional Balances Real Time"."Natural Account Segment"."Account Code" NumCta, "General Ledger - Transactional Balances Real Time"."Natural Account Segment"."Account Description" DesCta, "General Ledger - Transactional Balances Real Time"."- Balance"."Beginning Balance" SaldoIni, "General Ledger - Transactional Balances Real Time"."- Balance"."Ending Balance" SaldoFin, "General Ledger - Transactional Balances Real Time"."- Balance"."Period Net Activity" bal_periodbalFROM "General Ledger - Transactional Balances Real Time" where "General Ledger - Transactional Balances Real Time"."Ledger"."Ledger Name" in ('@{p_ledger}') and "General Ledger - Transactional Balances Real Time"."Time"."Fiscal Period" in ('@{p_period}') ) balances full outer join (SELECT "General Ledger - Journals Real Time"."- Header Details"."Header Default Effective Date" Fecha, "General Ledger - Journals Real Time"."- Account"."General Ledger Code Combination Identifier" jrnl_ccid, CONCAT(REPLACE("General Ledger - Journals Real Time"."- Header Details"."Header Name",' ',''),CONCAT(REPLACE(CAST("General Ledger - Journals Real Time"."- Header Details"."Header Key" AS CHAR),' ',''),CONCAT(REPLACE("General Ledger - Journals Real Time"."- Batch Details"."Batch Name",' ',''),REPLACE("General Ledger - Journals Real Time"."- Header Details"."Header Description",' ','')))) jrnl_header_desc, CONCAT(SUBSTRING(REPLACE("General Ledger - Journals Real Time"."- Header Details"."Header Name",' ','') FROM 1 FOR (50 - CHAR_LENGTH(REPLACE(CAST("General Ledger - Journals Real Time"."- Header Details"."Header Key" AS CHAR),' ','')))),REPLACE(CAST("General Ledger - Journals Real Time"."- Header Details"."Header Key" AS CHAR),' ','')) NumUnIdenPol, "General Ledger - Journals Real Time"."- Ledger"."Ledger Name" jrnl_ledger, "General Ledger - Journals Real Time"."Time"."Fiscal Period" jrnl_period, "General Ledger - Journals Real Time"."- Line Details"."Line Description" Concepto, "General Ledger - Journals Real Time"."- Line Details"."Line Number" jrnl_line_number, "General Ledger - Journals Real Time"."- Lines"."Journal Line Accounted Amount Debit" Debe, "General Ledger - Journals Real Time"."- Lines"."Journal Line Accounted Amount Credit" Haber, "General Ledger - Journals Real Time"."- Header Details"."Journal Legal Entity" Legal_EntityFROM "General Ledger - Journals Real Time" where "General Ledger - Journals Real Time"."- Ledger"."Ledger Name" in ('@{p_ledger}') and "General Ledger - Journals Real Time"."Time"."Fiscal Period" in ('@{p_period}') and "General Ledger - Journals Real Time"."Posting Status"."Posting Status Code" = 'P' and "General Ledger - Journals Real Time"."- Header Details"."Journal Legal Entity" in ('@{p_legal_entity}')) journals on journals.jrnl_ledger = balances.Ledger and balances.bal_ccid = journals.jrnl_ccid and journals.jrnl_period = balances.Accounting_Period ORDER BY saw_0,saw_4, saw_5, saw_6, saw_9, saw_10, saw_11
10. Click OK.11. Click the Prompts tab.
Create two prompts for Ledger and Accounting Period.12. Click the Add icon > Column Prompts > "Ledger"."Ledger".
The New Prompt: Ledger dialog box appears.13. Click Options on the New Prompt: Ledger dialog box.14. Enter SQL Results in the Choice List Values field.
A default query appears in the SQL statement box.
27
Oracle Financials CloudUsing Financials for the Americas
Chapter 1Financials for Mexico
15. Replace the default query with the following query:
SELECT "General Ledger - Journals Real Time"."- Ledger"."Ledger Name" FROM "General Ledger - Journals Real Time" ORDER BY 1 ASC NULLS LAST FETCH FIRST 65001 ROWS ONLY
16. Enter Presentation Variable in the Set a variable field.17. Enter p_ledger as the presentation variable.18. Click OK.19. Click Add > Column Prompt > "Accounting_Period" . "Accounting_Period".
The New Prompt: Accounting_Period dialog box appears.20. Click Options on the New Prompt: Accounting_Period dialog box.21. Enter SQL Results in the Choice List Values field.
A default query appears in the SQL statement field.22. Replace the default query with the following query:
SELECT "General Ledger - Journals Real Time"."Time"."Fiscal Period" s_1, SORTKEY("General Ledger - Journals Real Time"."Time"."Fiscal Period") s_2 FROM "General Ledger - Journals Real Time" ORDER BY 1,2 ASC NULLS LAST FETCH FIRST 65001 ROWS ONLY
23. Enter Presentation Variable in the Set a variable field.24. Enter p_period as the presentation variable.25. Click OK.26. Click Add > Column Prompt > "Legal_Entity" . "Legal_Entity".
The New Prompt: Legal_Entity dialog box appears.27. Click Options on the New Prompt: Legal_Entity dialog box.28. Enter SQL Results in the Choice List Value box.
A default query appears in the SQL statement box.29. Remove the default query and enter the following query:
SELECT "General Ledger - Journals Real Time"."- Header Details"."Journal Legal Entity" FROM "General Ledger - Journals Real Time" ORDER BY 1 ASC NULLS LAST FETCH FIRST 65001 ROWS ONLY
30. Enter Presentation Variable in the Set a Variable box.31. Enter p_legal_entity as the presentation variable.32. Click OK.
Generating the Auxiliary Report for MexicoAfter completing the prerequisites, perform the following steps to run the report. Select your ledger and accountingperiod every time you run the report.
1. Sign in to Oracle Business Intelligence Enterprise Edition.2. Click Catalog.3. Navigate and select the Mexico folder in My Folders.4. Click Open to open the Balance Journals Detail report.5. Specify the ledger and accounting period in the Ledger and Accounting Period fields.6. Click OK.
The report appears in a tabular format.
Related Topics
28
Oracle Financials CloudUsing Financials for the Americas
Chapter 1Financials for Mexico
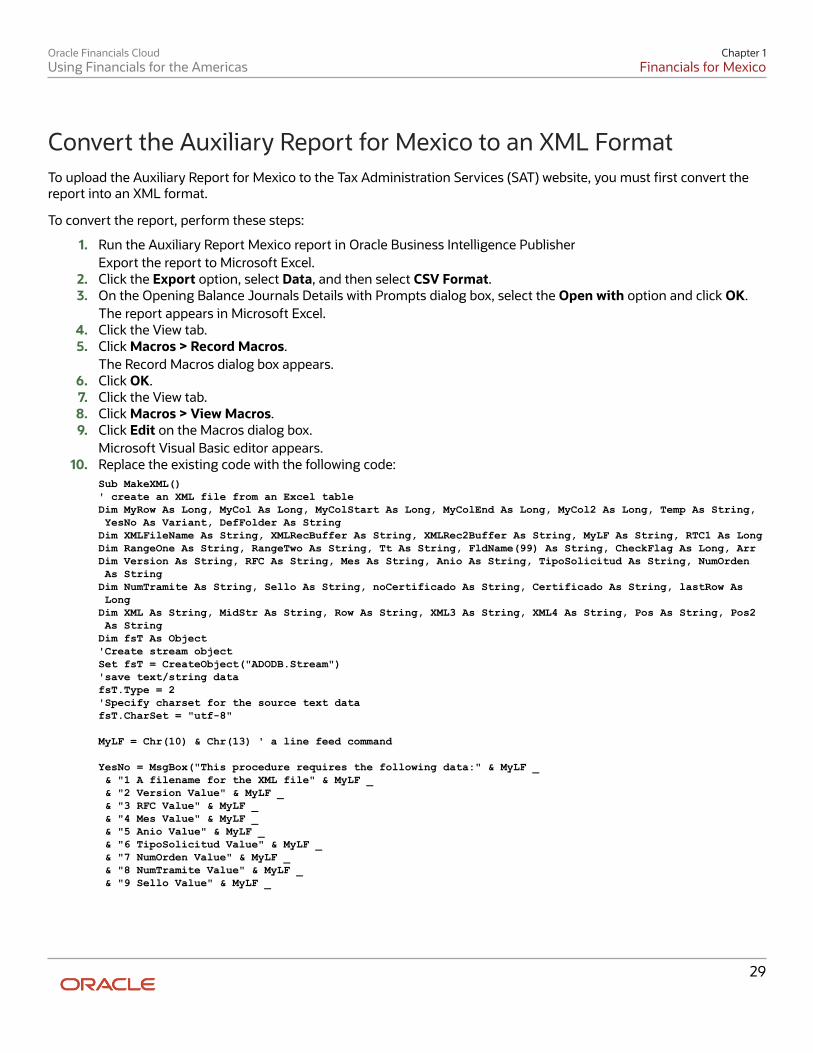
Convert the Auxiliary Report for Mexico to an XML Format To upload the Auxiliary Report for Mexico to the Tax Administration Services (SAT) website, you must first convert thereport into an XML format.
To convert the report, perform these steps:
1. Run the Auxiliary Report Mexico report in Oracle Business Intelligence PublisherExport the report to Microsoft Excel.
2. Click the Export option, select Data, and then select CSV Format.3. On the Opening Balance Journals Details with Prompts dialog box, select the Open with option and click OK.
The report appears in Microsoft Excel.4. Click the View tab.5. Click Macros > Record Macros.
The Record Macros dialog box appears.6. Click OK.7. Click the View tab.8. Click Macros > View Macros.9. Click Edit on the Macros dialog box.
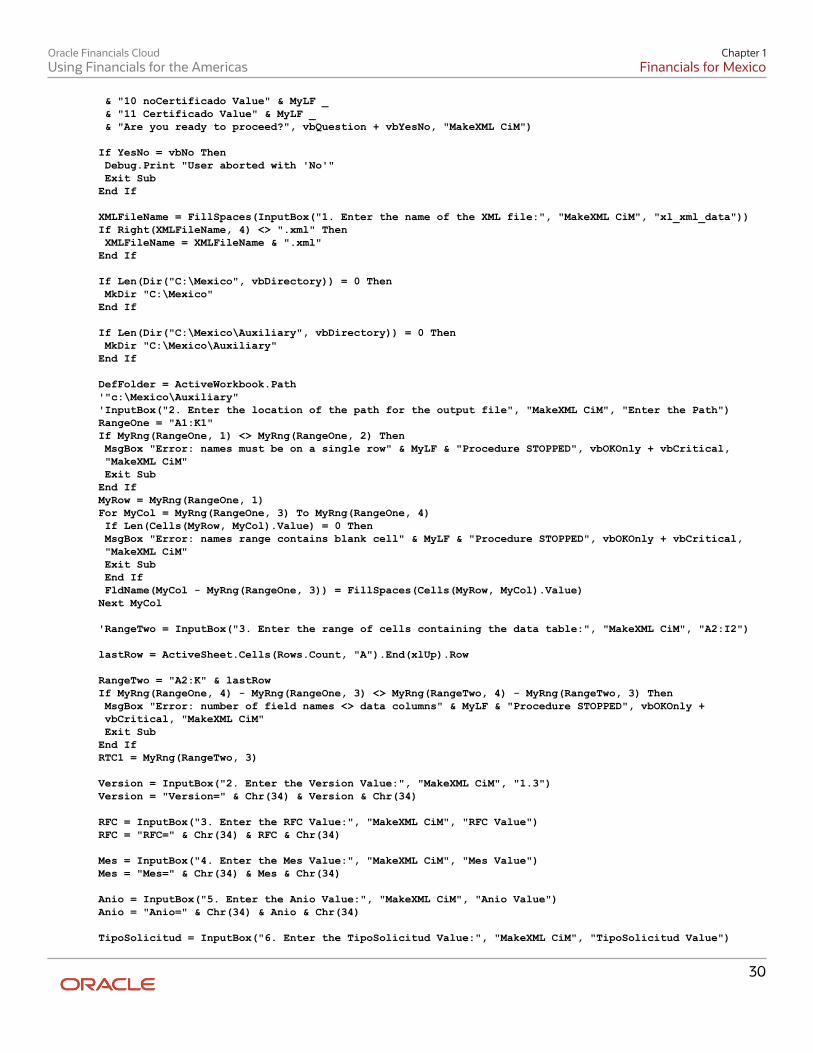
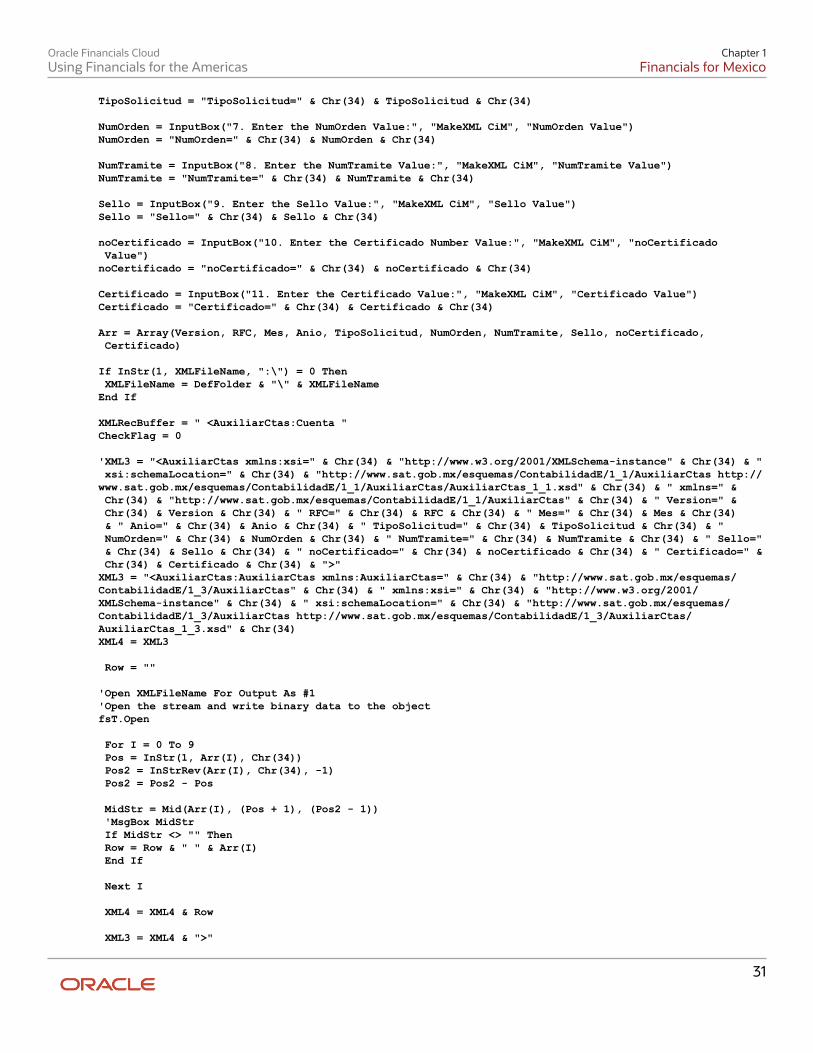
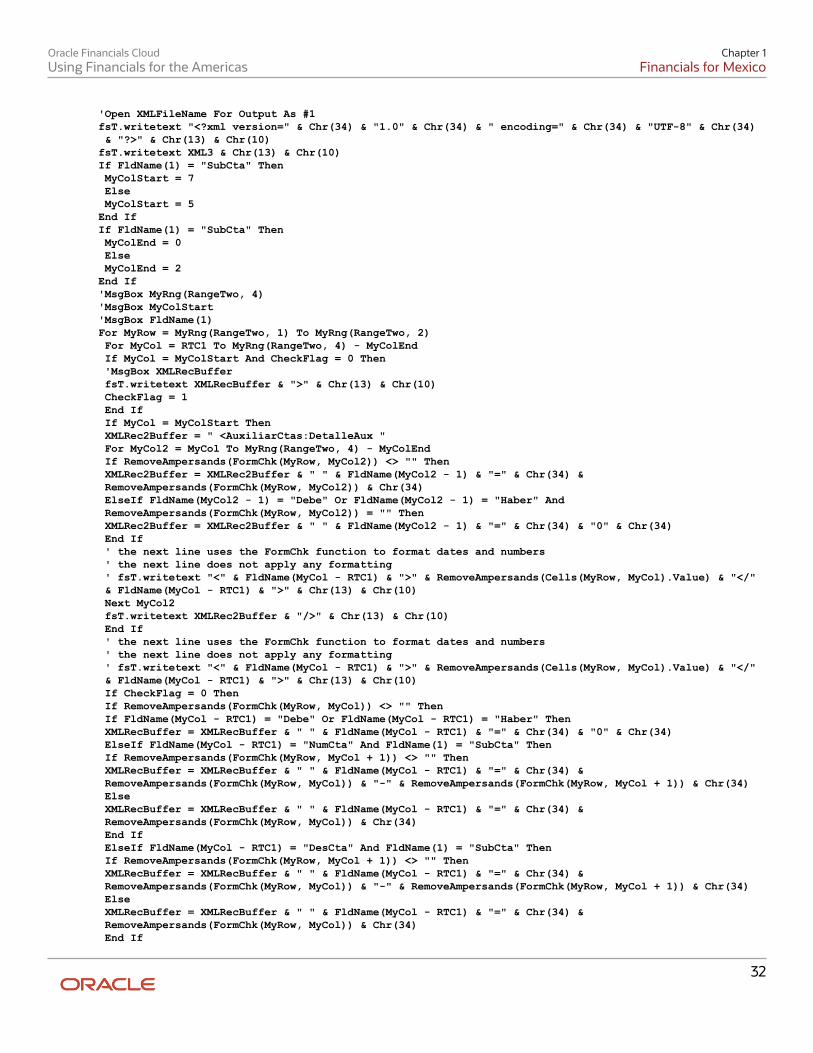
Microsoft Visual Basic editor appears.10. Replace the existing code with the following code:
Sub MakeXML()' create an XML file from an Excel tableDim MyRow As Long, MyCol As Long, MyColStart As Long, MyColEnd As Long, MyCol2 As Long, Temp As String, YesNo As Variant, DefFolder As StringDim XMLFileName As String, XMLRecBuffer As String, XMLRec2Buffer As String, MyLF As String, RTC1 As LongDim RangeOne As String, RangeTwo As String, Tt As String, FldName(99) As String, CheckFlag As Long, ArrDim Version As String, RFC As String, Mes As String, Anio As String, TipoSolicitud As String, NumOrden As StringDim NumTramite As String, Sello As String, noCertificado As String, Certificado As String, lastRow As LongDim XML As String, MidStr As String, Row As String, XML3 As String, XML4 As String, Pos As String, Pos2 As StringDim fsT As Object'Create stream objectSet fsT = CreateObject("ADODB.Stream")'save text/string datafsT.Type = 2'Specify charset for the source text datafsT.CharSet = "utf-8"
MyLF = Chr(10) & Chr(13) ' a line feed command
YesNo = MsgBox("This procedure requires the following data:" & MyLF _ & "1 A filename for the XML file" & MyLF _ & "2 Version Value" & MyLF _ & "3 RFC Value" & MyLF _ & "4 Mes Value" & MyLF _ & "5 Anio Value" & MyLF _ & "6 TipoSolicitud Value" & MyLF _ & "7 NumOrden Value" & MyLF _ & "8 NumTramite Value" & MyLF _ & "9 Sello Value" & MyLF _
29
Oracle Financials CloudUsing Financials for the Americas
Chapter 1Financials for Mexico
& "10 noCertificado Value" & MyLF _ & "11 Certificado Value" & MyLF _ & "Are you ready to proceed?", vbQuestion + vbYesNo, "MakeXML CiM") If YesNo = vbNo Then Debug.Print "User aborted with 'No'" Exit SubEnd If
XMLFileName = FillSpaces(InputBox("1. Enter the name of the XML file:", "MakeXML CiM", "xl_xml_data"))If Right(XMLFileName, 4) <> ".xml" Then XMLFileName = XMLFileName & ".xml"End If
If Len(Dir("C:\Mexico", vbDirectory)) = 0 Then MkDir "C:\Mexico"End If
If Len(Dir("C:\Mexico\Auxiliary", vbDirectory)) = 0 Then MkDir "C:\Mexico\Auxiliary"End If
DefFolder = ActiveWorkbook.Path'"c:\Mexico\Auxiliary"'InputBox("2. Enter the location of the path for the output file", "MakeXML CiM", "Enter the Path")RangeOne = "A1:K1"If MyRng(RangeOne, 1) <> MyRng(RangeOne, 2) Then MsgBox "Error: names must be on a single row" & MyLF & "Procedure STOPPED", vbOKOnly + vbCritical, "MakeXML CiM" Exit SubEnd IfMyRow = MyRng(RangeOne, 1)For MyCol = MyRng(RangeOne, 3) To MyRng(RangeOne, 4) If Len(Cells(MyRow, MyCol).Value) = 0 Then MsgBox "Error: names range contains blank cell" & MyLF & "Procedure STOPPED", vbOKOnly + vbCritical, "MakeXML CiM" Exit Sub End If FldName(MyCol - MyRng(RangeOne, 3)) = FillSpaces(Cells(MyRow, MyCol).Value)Next MyCol
'RangeTwo = InputBox("3. Enter the range of cells containing the data table:", "MakeXML CiM", "A2:I2")
lastRow = ActiveSheet.Cells(Rows.Count, "A").End(xlUp).Row
RangeTwo = "A2:K" & lastRowIf MyRng(RangeOne, 4) - MyRng(RangeOne, 3) <> MyRng(RangeTwo, 4) - MyRng(RangeTwo, 3) Then MsgBox "Error: number of field names <> data columns" & MyLF & "Procedure STOPPED", vbOKOnly + vbCritical, "MakeXML CiM" Exit SubEnd IfRTC1 = MyRng(RangeTwo, 3)
Version = InputBox("2. Enter the Version Value:", "MakeXML CiM", "1.3")Version = "Version=" & Chr(34) & Version & Chr(34)
RFC = InputBox("3. Enter the RFC Value:", "MakeXML CiM", "RFC Value")RFC = "RFC=" & Chr(34) & RFC & Chr(34)
Mes = InputBox("4. Enter the Mes Value:", "MakeXML CiM", "Mes Value")Mes = "Mes=" & Chr(34) & Mes & Chr(34)
Anio = InputBox("5. Enter the Anio Value:", "MakeXML CiM", "Anio Value")Anio = "Anio=" & Chr(34) & Anio & Chr(34)
TipoSolicitud = InputBox("6. Enter the TipoSolicitud Value:", "MakeXML CiM", "TipoSolicitud Value")
30
Oracle Financials CloudUsing Financials for the Americas
Chapter 1Financials for Mexico
TipoSolicitud = "TipoSolicitud=" & Chr(34) & TipoSolicitud & Chr(34)
NumOrden = InputBox("7. Enter the NumOrden Value:", "MakeXML CiM", "NumOrden Value")NumOrden = "NumOrden=" & Chr(34) & NumOrden & Chr(34)
NumTramite = InputBox("8. Enter the NumTramite Value:", "MakeXML CiM", "NumTramite Value")NumTramite = "NumTramite=" & Chr(34) & NumTramite & Chr(34)
Sello = InputBox("9. Enter the Sello Value:", "MakeXML CiM", "Sello Value")Sello = "Sello=" & Chr(34) & Sello & Chr(34)
noCertificado = InputBox("10. Enter the Certificado Number Value:", "MakeXML CiM", "noCertificado Value")noCertificado = "noCertificado=" & Chr(34) & noCertificado & Chr(34)
Certificado = InputBox("11. Enter the Certificado Value:", "MakeXML CiM", "Certificado Value")Certificado = "Certificado=" & Chr(34) & Certificado & Chr(34)
Arr = Array(Version, RFC, Mes, Anio, TipoSolicitud, NumOrden, NumTramite, Sello, noCertificado, Certificado)
If InStr(1, XMLFileName, ":\") = 0 Then XMLFileName = DefFolder & "\" & XMLFileNameEnd If
XMLRecBuffer = " <AuxiliarCtas:Cuenta "CheckFlag = 0
'XML3 = "<AuxiliarCtas xmlns:xsi=" & Chr(34) & "http://www.w3.org/2001/XMLSchema-instance" & Chr(34) & " xsi:schemaLocation=" & Chr(34) & "http://www.sat.gob.mx/esquemas/ContabilidadE/1_1/AuxiliarCtas http://www.sat.gob.mx/esquemas/ContabilidadE/1_1/AuxiliarCtas/AuxiliarCtas_1_1.xsd" & Chr(34) & " xmlns=" & Chr(34) & "http://www.sat.gob.mx/esquemas/ContabilidadE/1_1/AuxiliarCtas" & Chr(34) & " Version=" & Chr(34) & Version & Chr(34) & " RFC=" & Chr(34) & RFC & Chr(34) & " Mes=" & Chr(34) & Mes & Chr(34) & " Anio=" & Chr(34) & Anio & Chr(34) & " TipoSolicitud=" & Chr(34) & TipoSolicitud & Chr(34) & " NumOrden=" & Chr(34) & NumOrden & Chr(34) & " NumTramite=" & Chr(34) & NumTramite & Chr(34) & " Sello=" & Chr(34) & Sello & Chr(34) & " noCertificado=" & Chr(34) & noCertificado & Chr(34) & " Certificado=" & Chr(34) & Certificado & Chr(34) & ">"XML3 = "<AuxiliarCtas:AuxiliarCtas xmlns:AuxiliarCtas=" & Chr(34) & "http://www.sat.gob.mx/esquemas/ContabilidadE/1_3/AuxiliarCtas" & Chr(34) & " xmlns:xsi=" & Chr(34) & "http://www.w3.org/2001/XMLSchema-instance" & Chr(34) & " xsi:schemaLocation=" & Chr(34) & "http://www.sat.gob.mx/esquemas/ContabilidadE/1_3/AuxiliarCtas http://www.sat.gob.mx/esquemas/ContabilidadE/1_3/AuxiliarCtas/AuxiliarCtas_1_3.xsd" & Chr(34)XML4 = XML3
Row = ""
'Open XMLFileName For Output As #1'Open the stream and write binary data to the objectfsT.Open For I = 0 To 9 Pos = InStr(1, Arr(I), Chr(34)) Pos2 = InStrRev(Arr(I), Chr(34), -1) Pos2 = Pos2 - Pos MidStr = Mid(Arr(I), (Pos + 1), (Pos2 - 1)) 'MsgBox MidStr If MidStr <> "" Then Row = Row & " " & Arr(I) End If Next I XML4 = XML4 & Row XML3 = XML4 & ">"
31
Oracle Financials CloudUsing Financials for the Americas
Chapter 1Financials for Mexico
'Open XMLFileName For Output As #1fsT.writetext "<?xml version=" & Chr(34) & "1.0" & Chr(34) & " encoding=" & Chr(34) & "UTF-8" & Chr(34) & "?>" & Chr(13) & Chr(10)fsT.writetext XML3 & Chr(13) & Chr(10)If FldName(1) = "SubCta" Then MyColStart = 7 Else MyColStart = 5End IfIf FldName(1) = "SubCta" Then MyColEnd = 0 Else MyColEnd = 2End If'MsgBox MyRng(RangeTwo, 4)'MsgBox MyColStart'MsgBox FldName(1)For MyRow = MyRng(RangeTwo, 1) To MyRng(RangeTwo, 2) For MyCol = RTC1 To MyRng(RangeTwo, 4) - MyColEnd If MyCol = MyColStart And CheckFlag = 0 Then 'MsgBox XMLRecBuffer fsT.writetext XMLRecBuffer & ">" & Chr(13) & Chr(10) CheckFlag = 1 End If If MyCol = MyColStart Then XMLRec2Buffer = " <AuxiliarCtas:DetalleAux " For MyCol2 = MyCol To MyRng(RangeTwo, 4) - MyColEnd If RemoveAmpersands(FormChk(MyRow, MyCol2)) <> "" Then XMLRec2Buffer = XMLRec2Buffer & " " & FldName(MyCol2 - 1) & "=" & Chr(34) & RemoveAmpersands(FormChk(MyRow, MyCol2)) & Chr(34) ElseIf FldName(MyCol2 - 1) = "Debe" Or FldName(MyCol2 - 1) = "Haber" And RemoveAmpersands(FormChk(MyRow, MyCol2)) = "" Then XMLRec2Buffer = XMLRec2Buffer & " " & FldName(MyCol2 - 1) & "=" & Chr(34) & "0" & Chr(34) End If ' the next line uses the FormChk function to format dates and numbers ' the next line does not apply any formatting ' fsT.writetext "<" & FldName(MyCol - RTC1) & ">" & RemoveAmpersands(Cells(MyRow, MyCol).Value) & "</" & FldName(MyCol - RTC1) & ">" & Chr(13) & Chr(10) Next MyCol2 fsT.writetext XMLRec2Buffer & "/>" & Chr(13) & Chr(10) End If ' the next line uses the FormChk function to format dates and numbers ' the next line does not apply any formatting ' fsT.writetext "<" & FldName(MyCol - RTC1) & ">" & RemoveAmpersands(Cells(MyRow, MyCol).Value) & "</" & FldName(MyCol - RTC1) & ">" & Chr(13) & Chr(10) If CheckFlag = 0 Then If RemoveAmpersands(FormChk(MyRow, MyCol)) <> "" Then If FldName(MyCol - RTC1) = "Debe" Or FldName(MyCol - RTC1) = "Haber" Then XMLRecBuffer = XMLRecBuffer & " " & FldName(MyCol - RTC1) & "=" & Chr(34) & "0" & Chr(34) ElseIf FldName(MyCol - RTC1) = "NumCta" And FldName(1) = "SubCta" Then If RemoveAmpersands(FormChk(MyRow, MyCol + 1)) <> "" Then XMLRecBuffer = XMLRecBuffer & " " & FldName(MyCol - RTC1) & "=" & Chr(34) & RemoveAmpersands(FormChk(MyRow, MyCol)) & "-" & RemoveAmpersands(FormChk(MyRow, MyCol + 1)) & Chr(34) Else XMLRecBuffer = XMLRecBuffer & " " & FldName(MyCol - RTC1) & "=" & Chr(34) & RemoveAmpersands(FormChk(MyRow, MyCol)) & Chr(34) End If ElseIf FldName(MyCol - RTC1) = "DesCta" And FldName(1) = "SubCta" Then If RemoveAmpersands(FormChk(MyRow, MyCol + 1)) <> "" Then XMLRecBuffer = XMLRecBuffer & " " & FldName(MyCol - RTC1) & "=" & Chr(34) & RemoveAmpersands(FormChk(MyRow, MyCol)) & "-" & RemoveAmpersands(FormChk(MyRow, MyCol + 1)) & Chr(34) Else XMLRecBuffer = XMLRecBuffer & " " & FldName(MyCol - RTC1) & "=" & Chr(34) & RemoveAmpersands(FormChk(MyRow, MyCol)) & Chr(34) End If
32
Oracle Financials CloudUsing Financials for the Americas
Chapter 1Financials for Mexico
ElseIf FldName(MyCol - RTC1) = "SubCta" Or FldName(MyCol - RTC1) = "SubDesCta" Then XML3 = "SubCta" Else XMLRecBuffer = XMLRecBuffer & " " & FldName(MyCol - RTC1) & "=" & Chr(34) & RemoveAmpersands(FormChk(MyRow, MyCol)) & Chr(34) 'MsgBox XMLRecBuffer End If End If End If Next MyCol If FormChk(MyRow, 1) <> FormChk(MyRow + 1, 1) Then fsT.writetext " </AuxiliarCtas:Cuenta>" & Chr(13) & Chr(10) XMLRecBuffer = " <AuxiliarCtas:Cuenta " CheckFlag = 0 End IfNext MyRow
fsT.writetext "</AuxiliarCtas:AuxiliarCtas>" & Chr(13) & Chr(10)'Close #1'Save binary data To diskfsT.SaveToFile XMLFileName, 2MsgBox XMLFileName & " created." & MyLF & "Process finished", vbOKOnly + vbInformation, "MakeXML CiM"Debug.Print XMLFileName & " saved"
End SubFunction MyRng(MyRangeAsText As String, MyItem As Long) As Long' analyse a range, where MyItem represents 1=TR, 2=BR, 3=LHC, 4=RHC
Dim UserRange As RangeSet UserRange = Range(MyRangeAsText)Select Case MyItem Case 1 MyRng = UserRange.Row Case 2 MyRng = UserRange.Row + UserRange.Rows.Count - 1 Case 3 MyRng = UserRange.Column Case 4 MyRng = UserRange.Columns(UserRange.Columns.Count).ColumnEnd SelectExit Function
End FunctionFunction FillSpaces(AnyStr As String) As String' remove any spaces and replace with underscore characterDim MyPos As LongMyPos = InStr(1, AnyStr, " ")Do While MyPos > 0 Mid(AnyStr, MyPos, 1) = "_" MyPos = InStr(1, AnyStr, " ")LoopFillSpaces = AnyStrEnd Function
Function FormChk(RowNum As Long, ColNum As Long) As String' formats numeric and date cell values to comma 000's and DD MMM YYFormChk = Cells(RowNum, ColNum).Value'If IsNumeric(Cells(RowNum, ColNum).Value) Then' FormChk = Format(Cells(RowNum, ColNum).Value, "#,##0 ;(#,##0)")'End IfIf IsDate(Cells(RowNum, ColNum).Value) Then FormChk = Format(Cells(RowNum, ColNum).Value, "yyyy-mm-dd")End IfEnd Function
Function RemoveAmpersands(AnyStr As String) As String
33

Oracle Financials CloudUsing Financials for the Americas
Chapter 1Financials for Mexico
Dim MyPos As Long' replace Ampersands (&) with plus symbols (+)
MyPos = InStr(1, AnyStr, "&")Do While MyPos > 0 Mid(AnyStr, MyPos, 1) = "+" MyPos = InStr(1, AnyStr, "&")LoopRemoveAmpersands = AnyStrEnd Function
11. Run the macro.
The MakeXML CiM dialog box appears containing instructions to provide several details in a series of dialogboxes.
12. Click Yes and proceed with information entry on each dialog box as they appear one after the other. Enter thefollowing information:
◦ Name of the output file
◦ Location to save the file
◦ Version of the file
◦ RFC
◦ Mes
◦ Anio
◦ TipoSolicitud
◦ NumOrden
◦ NumTramite
◦ Seal
◦ Certificate number
◦ Certificate details
13. Verify the location where the output files will be saved and click OK.
Open the XML report that's saved at location you specified.
Related Topics
FAQs for General Ledger Reporting
How do parent accounts and subaccounts appear in the Mexicoreports? If you have a combination of account and subaccount, the SubCtaDe field displays the immediate natural accountpreceding a subaccount. This happens because account hierarchy considers only the immediate natural accountpreceding the subaccount as the parent. The original parent account may not always be the immediate parent for asubaccount.
34
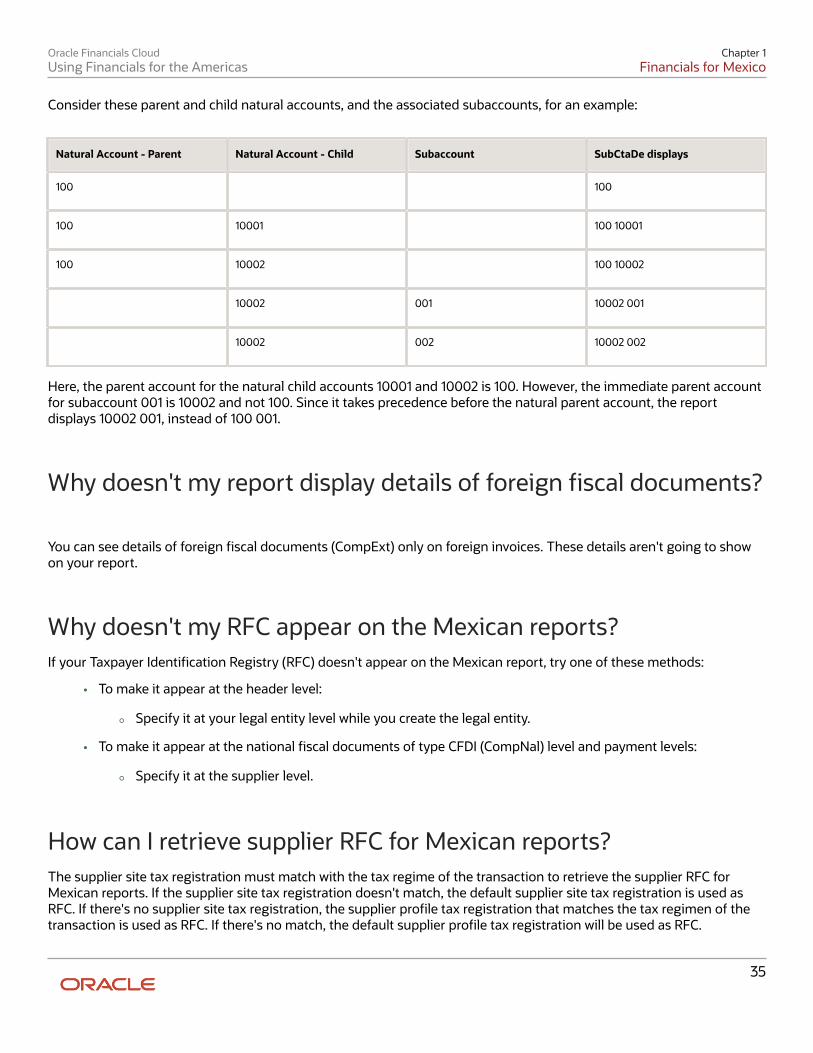
Oracle Financials CloudUsing Financials for the Americas
Chapter 1Financials for Mexico
Consider these parent and child natural accounts, and the associated subaccounts, for an example:
Natural Account - Parent Natural Account - Child Subaccount SubCtaDe displays
100
100
100
10001
100 10001
100
10002
100 10002
10002
001
10002 001
10002
002
10002 002
Here, the parent account for the natural child accounts 10001 and 10002 is 100. However, the immediate parent accountfor subaccount 001 is 10002 and not 100. Since it takes precedence before the natural parent account, the reportdisplays 10002 001, instead of 100 001.
Why doesn't my report display details of foreign fiscal documents? You can see details of foreign fiscal documents (CompExt) only on foreign invoices. These details aren't going to showon your report.
Why doesn't my RFC appear on the Mexican reports? If your Taxpayer Identification Registry (RFC) doesn't appear on the Mexican report, try one of these methods:
• To make it appear at the header level:
◦ Specify it at your legal entity level while you create the legal entity.
• To make it appear at the national fiscal documents of type CFDI (CompNal) level and payment levels:
◦ Specify it at the supplier level.
How can I retrieve supplier RFC for Mexican reports? The supplier site tax registration must match with the tax regime of the transaction to retrieve the supplier RFC forMexican reports. If the supplier site tax registration doesn't match, the default supplier site tax registration is used asRFC. If there's no supplier site tax registration, the supplier profile tax registration that matches the tax regimen of thetransaction is used as RFC. If there's no match, the default supplier profile tax registration will be used as RFC.
35

Oracle Financials CloudUsing Financials for the Americas
Chapter 1Financials for Mexico
36
Oracle Financials CloudUsing Financials for the Americas
Chapter 2Financials for Brazil
2 Financials for Brazil
Fiscal Document Generation
Fiscal Document Generation A fiscal document is generated to represent sale of goods or services and movement of goods or assets from onelocation to another. A fiscal document provides all relevant details of a transaction, including applicable taxes andassociated fiscal attributes.
A fiscal document is created in an XML format and is validated by the tax authorities before it's sent to the customers. Itcan also be sent in a paper format, called DANFE, along with the goods.
You can void or cancel a fiscal document within a specified time period. You can also generate an alternate document incontingency mode, in case there is no response from the tax authority.
You can generate a fiscal document either from the Receivables workflow or Shipment workflow. A receivables invoiceis used to support the generation of a fiscal document for sale of goods, services, or both. From Shipment, you cangenerate fiscal documents for internal material transfers and return to supplier transactions.
You can generate a fiscal document only for transactions that are associated with a business unit operating in Brazil.
To correctly generate the fiscal document, ensure the Enable Fiscal Document Processing check box is enabled on theLocalization System Options page. This lets you capture the appropriate fiscal attributes.
After the fiscal document is generated, it can be extracted in an extract file. You can use third party software to interfacethe document to the tax authority portal and capture back the approval or rejection status. Alternatively, you canmanually upload the fiscal document to the tax authority portal and update the return status in the Oracle Fusionapplication.
A service fiscal document follows a similar flow but it should be approved by a city tax authority, since the service taxesare collected by cities. For service invoices, separate fiscal documents are generated for each invoice line and handledindividually. Similarly, mixed invoices with goods and service lines will generate one mixed fiscal document that'ssubmitted to the state or federal tax authority and one service fiscal document for each service line that's submitted tothe city tax authority.
Fiscal Document Generation Statuses A fiscal document goes through different stages in its life cycle and different statuses are used to track them.
Use the Manage Fiscal Document Generation page to search and track the status of your fiscal document. This page canbe accessed from both the Receivables workflow and Shipment workflow.
Note: You need the Fiscal Document Generation duty role to search and track the fiscal document.
The following table lists the different statuses that can be assigned to a fiscal document:
37
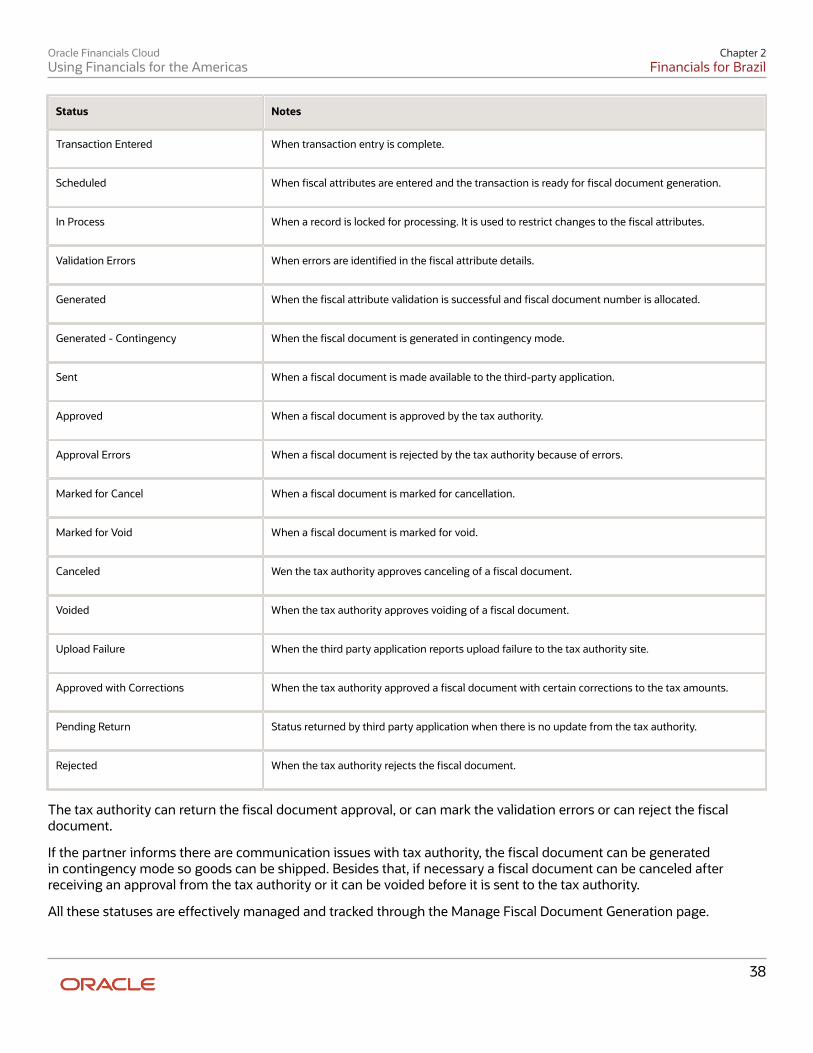
Oracle Financials CloudUsing Financials for the Americas
Chapter 2Financials for Brazil
Status Notes
Transaction Entered
When transaction entry is complete.
Scheduled
When fiscal attributes are entered and the transaction is ready for fiscal document generation.
In Process
When a record is locked for processing. It is used to restrict changes to the fiscal attributes.
Validation Errors
When errors are identified in the fiscal attribute details.
Generated
When the fiscal attribute validation is successful and fiscal document number is allocated.
Generated - Contingency
When the fiscal document is generated in contingency mode.
Sent
When a fiscal document is made available to the third-party application.
Approved
When a fiscal document is approved by the tax authority.
Approval Errors
When a fiscal document is rejected by the tax authority because of errors.
Marked for Cancel
When a fiscal document is marked for cancellation.
Marked for Void
When a fiscal document is marked for void.
Canceled
Wen the tax authority approves canceling of a fiscal document.
Voided
When the tax authority approves voiding of a fiscal document.
Upload Failure
When the third party application reports upload failure to the tax authority site.
Approved with Corrections
When the tax authority approved a fiscal document with certain corrections to the tax amounts.
Pending Return
Status returned by third party application when there is no update from the tax authority.
Rejected
When the tax authority rejects the fiscal document.
The tax authority can return the fiscal document approval, or can mark the validation errors or can reject the fiscaldocument.
If the partner informs there are communication issues with tax authority, the fiscal document can be generatedin contingency mode so goods can be shipped. Besides that, if necessary a fiscal document can be canceled afterreceiving an approval from the tax authority or it can be voided before it is sent to the tax authority.
All these statuses are effectively managed and tracked through the Manage Fiscal Document Generation page.
38
Oracle Financials CloudUsing Financials for the Americas
Chapter 2Financials for Brazil
When a fiscal document represents sale of goods and services through a single transaction, involving reporting andapproval from different tax authorities, a dynamic approval process is built into the application where the approval fromdifferent tax authorities is managed in a queue model, in a synchronous mode.
How You Cancel or Void a Fiscal Document You can void a fiscal document if you want to report to the tax authority that the fiscal document number will notbe used. However, this can be done only after the fiscal document is generated and before it is approved by the taxauthority. Use the Void Fiscal Document button on the Manage Fiscal Document Generation page to void a fiscaldocument.
When a fiscal document is validated and approved by the tax authority, but the goods or services are no longer intendedto be provided or shipped, you can cancel the fiscal document. Use the Cancel Fiscal Document button on the ManageFiscal Document Generation page to cancel a fiscal document.
Provide a valid reason to void or cancel a fiscal document. The reason must be notified to the tax authority. A fiscaldocument can be considered as canceled or voided only after confirmation from the tax authority. When the taxauthority does not approve the cancellation or voiding of a fiscal document, the status of the fiscal document ischanged back to Approved or Generated.
Note: You can void or cancel a fiscal document within a defined time limit. The time limit within which you can cancelor void a fiscal document is specified by each tax authority. Use the Party Tax Profile page to set the time limit.
Fiscal Documents for Fixed Assets and Material Transfer You need to generate a fiscal document when any material or assets move across different locations within anorganization, even though it doesn't involve any sale. When a fixed asset is transferred from one location to another, areceivables invoice is automatically created for supporting the creation of a fiscal document. The invoice captures all thetransfer details of the asset and has a transaction type that doesn't post to General Ledger or create open balances inReceivables.
To be able to create a fiscal document for asset transfer across different locations, ensure the:
• Global descriptive flexfields associated with the Asset Book for creating fiscal documents for asset transfers isenabled.
• Transaction Details section on the Create Fixed Assets Transfer Control page is updated. You can access theCreate Fixed Assets Transfer Control page through the Manage Fiscal Document Generation Controls page.These transaction details are used for creating the Receivables invoice.
• Source and destination locations have legal reporting units assigned to them. The source and destination legalreporting units drive the need for creating a fiscal document. Use the Manage Asset Locations task to specifythe legal reporting units.
When these conditions are met, a Receivables invoice is created with details of the fixed asset transfer. The invoice isthen used to generate a fiscal document.
You can track the Receivables invoices that are created for each fixed asset transfer through the Manage Asset TransfersRequiring Fiscal Document task.
39
Oracle Financials CloudUsing Financials for the Americas
Chapter 2Financials for Brazil
Similarly, when goods are moved from one warehouse to another, the fiscal document representing the internal materialtransfer is generated through the reference of the corresponding shipment.
How You Configure Setup Manager for Fiscal DocumentGeneration Use Oracle Financials Cloud to generate fiscal documents. You can create a fiscal document, get it validated by the taxauthority, and send it to the customers. It is generated as an XML file and provides all relevant details of a transaction,including applicable taxes and associated fiscal attributes.
In the Oracle Fusion Functional Setup Manager, perform the following tasks to be able to generate fiscal documents:
• Regional Localization: Regional Localization for Brazil must be enabled within the feature offerings forFinancials. Select Brazil as the Regional Localization in Financials features.
• Localization System Options: For every business unit operating in Brazil, the country field must be updated andthe option for fiscal document processing must be enabled.
Select Brazil as the Country and check the Enable Fiscal Document Processing check box on the ManageLocalization System Options page. This lets you to:
◦ Capture fiscal attributes for invoice and debit memo in Receivables and for internal material transfershipments and return to supplier shipment in Shipments
◦ Generate and manage fiscal documents.
• Manage Asset Book: Use the Manage Asset Book task to identify the assets within an asset book that requirefiscal document processing.
This set up also enables processing of fiscal document when a fixed asset belonging to an asset book istransferred.
• Manage Fiscal Document Generation Controls: This setup is used to specify various fiscal document generationcontrols, including default fiscal attributes. For fixed assets, this setup specifies the source and destinationlegal reporting units between which any transfer of fixed assets will require a fiscal document. It also providesthe details of key attributes required to generate a receivables invoice that supports generation of a fiscaldocument.
• Manage Asset Locations: Use the Manage Asset Locations task to specify the legal reporting units that must beassigned to each location.
Legal reporting units must be assigned to each location, so that transfer of assets across locations can identifythe source and destination legal reporting units.
• Manage Tax Authority Tax Profiles: Use this task to classify a tax authority and to specify the time controls forperforming various actions on a fiscal document like cancel, void, or generate in contingency.
• Configure Taxes: Specify or configure taxes for applying relevant taxes on transactions which support fiscaldocument generation. This setup includes usage of key tax determinants like transaction business category,product category, and product fiscal classification.
40
Oracle Financials CloudUsing Financials for the Americas
Chapter 2Financials for Brazil
Import Fiscal Document Approval Information You can import tax authority return information related to fiscal documents using the Fiscal Document Tax AuthorityReturn Interface process. The Import Fiscal Document Approval Information process will read from the Tax AuthorityReturn interface tables, which can be populated using the Oracle Fusion Financials Utility web service. This is a part ofthe ERP Cloud Integration Framework.
Use the Load Interface File for Import Process or the Financial Utilities Service web service to load return informationfrom the tax authority. Once data is loaded successfully, use the Import Fiscal Document Approval Information processto handle responses from the tax authority.
To access the template, complete the following steps:
1. Navigate to the File-Based Data Import for Oracle Financials Cloud guide.2. In the Table of Contents, click File-Based Data Imports.3. Click Import Fiscal Document Approval Information.4. In the File Links section, click the link to the Excel template.
Follow these guidelines when preparing your data in the worksheet:
• Prepare the data for each interface table using the corresponding worksheet in this template.
• Refer to the bubble text on each column header either for detailed instructions on preparing the data in thatcolumn, or for a description of the data and data type that the column requires.
• Common tasks for preparing table data include setting up for data merge, and searching for internal identifiers.
Settings That Affect the Fiscal Document Approval Information Import ProcessThe Import Fiscal Document Attributes template contains an instructions tab, plus three tabs that represent the tableswhere the data is loaded:
Spreadsheet Tab Description
Instructions and CSV Generation
Contains instruction information about preparing and loading data, the format of the template, submitting the Import Fiscal Document Approval Information process.
Tax Authority Return (JG_FSCL_TAX_AUTH_RET_INT)
It is the parent table and contains retrieved information related to fiscal documents.
Tax Authority Tax Return (JG_FSCL_TAX_AUTH_TAXES_INT)
It is a child table and contains retrieved information related to taxes. Data in this sheet is linked to theparent entity sheet using Fiscal Document Key and Fiscal Document Event Code.
Tax Authority Message Return (JG_FSCL_TAX_AUTH_MSG_INT)
It is a child table and contains retrieved information related to messages. Data in this sheet is linked tothe parent entity sheet using Fiscal Document Key and Fiscal Document Event Code.
How Fiscal Document Approval Information Import Data Is ProcessedLoading the Data
41

Oracle Financials CloudUsing Financials for the Americas
Chapter 2Financials for Brazil
After you finish preparing the data, you must load the data. To load the data:
1. On the Instructions and CSV Generation tab of the template, click the Generate CSV File button to generate aZip file containing one or more CSV files.
2. From Scheduled Process, use Load Interface File for Import and select Import Fiscal Document ApprovalInformation as the import process.
3. In Data File, select Upload a new file and then select the Zip file you created.
Importing the Loaded Data
To submit the Import Fiscal Document Approval Information process:
1. Navigate to the Scheduled Processes page.2. Click Schedule New Process in the Search Results table.3. Select the Import Fiscal Document Approval Information process and click OK.4. Enter the input parameters as needed:5. Submit the process.6. Monitor the process in the Scheduled Process page.7. If the Import Fiscal Document Approval Information process ends in error or warning, review the log file for
details about the rows that caused the failure.
Fiscal Document Capture
Overview of Tax Processing for Fiscal Document Capture In Brazil, a fiscal document is generated for every sale or shipment involving goods or services. The supplier createsthis document, gets it validated by the tax authority and sends it to the customer. It is generated as an XML file or as aphysical document and provides complete details of the transaction along with applicable taxes.
You can use the fiscal document capture feature to support processing of fiscal documents received from suppliers. Thedocuments can be received either manually or in an XML format.
You can use fiscal document capture to support the processing of fiscal documents received from suppliers orthird parties. You can enter the documents either manually or import them. Several validations are performed likecomparison with source documents, verification of taxes against the tax setup, confirmation of goods received, and soon. After the validations, the corresponding receipts and Payables invoice are automatically created on the basis of theinformation from the fiscal document.
Complementary fiscal documents, which are used to record corrections in quantity, price, or taxes are also handled byfiscal document capture. Similarly, freight fiscal documents covering freight charges against multiple deliveries are alsosupported.
How Taxes on Fiscal Documents Are Calculated Fiscal documents issued by suppliers are validated by the tax authority. So, taxes applied on it are treated as sourceof truth for accounting and reporting purposes. However, during fiscal document capture and processing, taxes areadditionally calculated as per tax setup, compared with the supplier notified taxes and a hold is placed if their difference
42
Oracle Financials CloudUsing Financials for the Americas
Chapter 2Financials for Brazil
is beyond tolerance limits. This hold prompts for either rectification of tax setup (if calculated taxes are incorrect) or forpursuing with the supplier to issue a complementary fiscal document (if supplier notified taxes are incorrect).
Use the Manage Configuration Owner Tax Options page to specify the tolerance limits for the difference between fiscaldocument taxes and calculated taxes. Use fiscal document capture as the application name.
On the Manage Fiscal Document page, the tax amount notified on the fiscal document is captured in the FiscalDocument Tax Amount field and the tax amount calculated according to tax setup is displayed in the Tax Amountfield.
The following table provides the tax handling approach on an XML imported fiscal document for various scenariosinvolving these two attributes:
Scenario Tax Treatment
Tax is notified on the fiscal document andthe same is applicable as per tax setup
Fiscal Document Tax Amount = <Notified Value> Tax Amount= <Calculated Value> Fiscal document goes on hold if their difference is beyond tolerance limit.
Tax is notified on the fiscal document, butit is not applicable as per tax setup
Fiscal Document Tax Amount = <Notified Value> Tax Amount= 0.00 Fiscal document goes on hold.
Tax is not notified on the fiscal document, but it is applicable as per tax setup
Fiscal Document Tax Amount = 0.00 Tax Amount= <Calculated Value> Fiscal document goes on hold.
Updates are made to the calculated taxamount
Fiscal Document Tax Amount = <Notified Value> Tax Amount= <Updated Value> Fiscal document goes on hold if their difference is beyond tolerance limit.
Manual tax line is created
Fiscal Document Tax Amount = 0.00 Tax Amount= <Input Value> Fiscal document goes on hold.
If a fiscal document is received in a physical format, then it is manually entered through the Manage Fiscal Documentspage.
When you click the Calculate Tax or Validate Fiscal Document buttons, taxes are calculated according to the tax setup.Both the Fiscal Document Tax Amount and Tax Amount attributes display the calculated value, you can review andcorrect fiscal document tax amount, if required.
You cannot update the tax information on the fiscal document when the status is Completed Prevalidation.
43
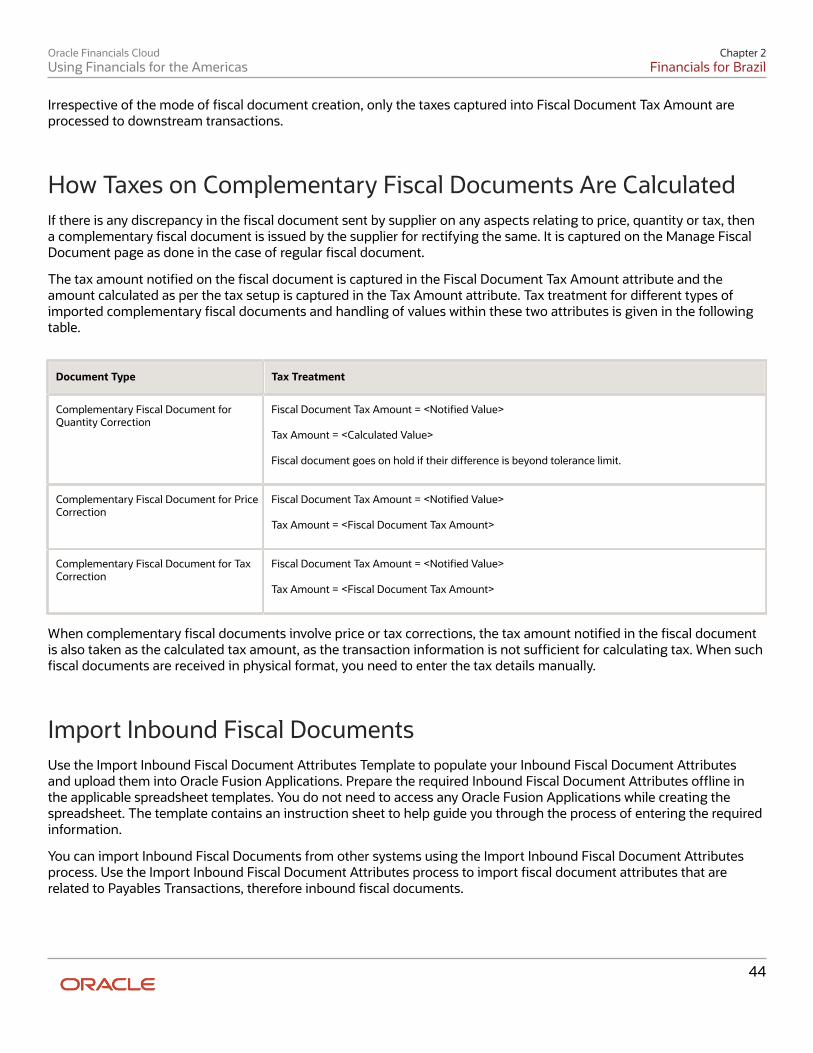
Oracle Financials CloudUsing Financials for the Americas
Chapter 2Financials for Brazil
Irrespective of the mode of fiscal document creation, only the taxes captured into Fiscal Document Tax Amount areprocessed to downstream transactions.
How Taxes on Complementary Fiscal Documents Are Calculated If there is any discrepancy in the fiscal document sent by supplier on any aspects relating to price, quantity or tax, thena complementary fiscal document is issued by the supplier for rectifying the same. It is captured on the Manage FiscalDocument page as done in the case of regular fiscal document.
The tax amount notified on the fiscal document is captured in the Fiscal Document Tax Amount attribute and theamount calculated as per the tax setup is captured in the Tax Amount attribute. Tax treatment for different types ofimported complementary fiscal documents and handling of values within these two attributes is given in the followingtable.
Document Type Tax Treatment
Complementary Fiscal Document forQuantity Correction
Fiscal Document Tax Amount = <Notified Value> Tax Amount = <Calculated Value> Fiscal document goes on hold if their difference is beyond tolerance limit.
Complementary Fiscal Document for PriceCorrection
Fiscal Document Tax Amount = <Notified Value> Tax Amount = <Fiscal Document Tax Amount>
Complementary Fiscal Document for TaxCorrection
Fiscal Document Tax Amount = <Notified Value> Tax Amount = <Fiscal Document Tax Amount>
When complementary fiscal documents involve price or tax corrections, the tax amount notified in the fiscal documentis also taken as the calculated tax amount, as the transaction information is not sufficient for calculating tax. When suchfiscal documents are received in physical format, you need to enter the tax details manually.
Import Inbound Fiscal Documents Use the Import Inbound Fiscal Document Attributes Template to populate your Inbound Fiscal Document Attributesand upload them into Oracle Fusion Applications. Prepare the required Inbound Fiscal Document Attributes offline inthe applicable spreadsheet templates. You do not need to access any Oracle Fusion Applications while creating thespreadsheet. The template contains an instruction sheet to help guide you through the process of entering the requiredinformation.
You can import Inbound Fiscal Documents from other systems using the Import Inbound Fiscal Document Attributesprocess. Use the Import Inbound Fiscal Document Attributes process to import fiscal document attributes that arerelated to Payables Transactions, therefore inbound fiscal documents.
44
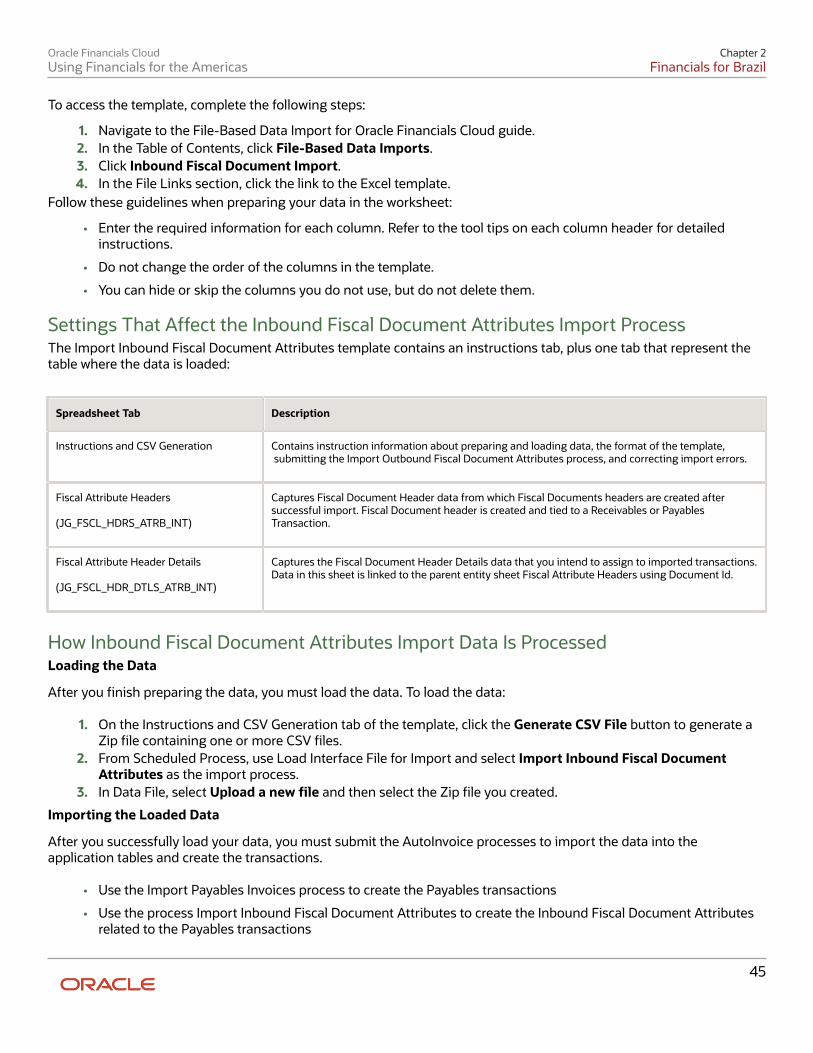
Oracle Financials CloudUsing Financials for the Americas
Chapter 2Financials for Brazil
To access the template, complete the following steps:
1. Navigate to the File-Based Data Import for Oracle Financials Cloud guide.2. In the Table of Contents, click File-Based Data Imports.3. Click Inbound Fiscal Document Import.4. In the File Links section, click the link to the Excel template.
Follow these guidelines when preparing your data in the worksheet:
• Enter the required information for each column. Refer to the tool tips on each column header for detailedinstructions.
• Do not change the order of the columns in the template.
• You can hide or skip the columns you do not use, but do not delete them.
Settings That Affect the Inbound Fiscal Document Attributes Import ProcessThe Import Inbound Fiscal Document Attributes template contains an instructions tab, plus one tab that represent thetable where the data is loaded:
Spreadsheet Tab Description
Instructions and CSV Generation
Contains instruction information about preparing and loading data, the format of the template, submitting the Import Outbound Fiscal Document Attributes process, and correcting import errors.
Fiscal Attribute Headers (JG_FSCL_HDRS_ATRB_INT)
Captures Fiscal Document Header data from which Fiscal Documents headers are created aftersuccessful import. Fiscal Document header is created and tied to a Receivables or PayablesTransaction.
Fiscal Attribute Header Details (JG_FSCL_HDR_DTLS_ATRB_INT)
Captures the Fiscal Document Header Details data that you intend to assign to imported transactions.Data in this sheet is linked to the parent entity sheet Fiscal Attribute Headers using Document Id.
How Inbound Fiscal Document Attributes Import Data Is ProcessedLoading the Data
After you finish preparing the data, you must load the data. To load the data:
1. On the Instructions and CSV Generation tab of the template, click the Generate CSV File button to generate aZip file containing one or more CSV files.
2. From Scheduled Process, use Load Interface File for Import and select Import Inbound Fiscal DocumentAttributes as the import process.
3. In Data File, select Upload a new file and then select the Zip file you created.
Importing the Loaded Data
After you successfully load your data, you must submit the AutoInvoice processes to import the data into theapplication tables and create the transactions.
• Use the Import Payables Invoices process to create the Payables transactions
• Use the process Import Inbound Fiscal Document Attributes to create the Inbound Fiscal Document Attributesrelated to the Payables transactions
45
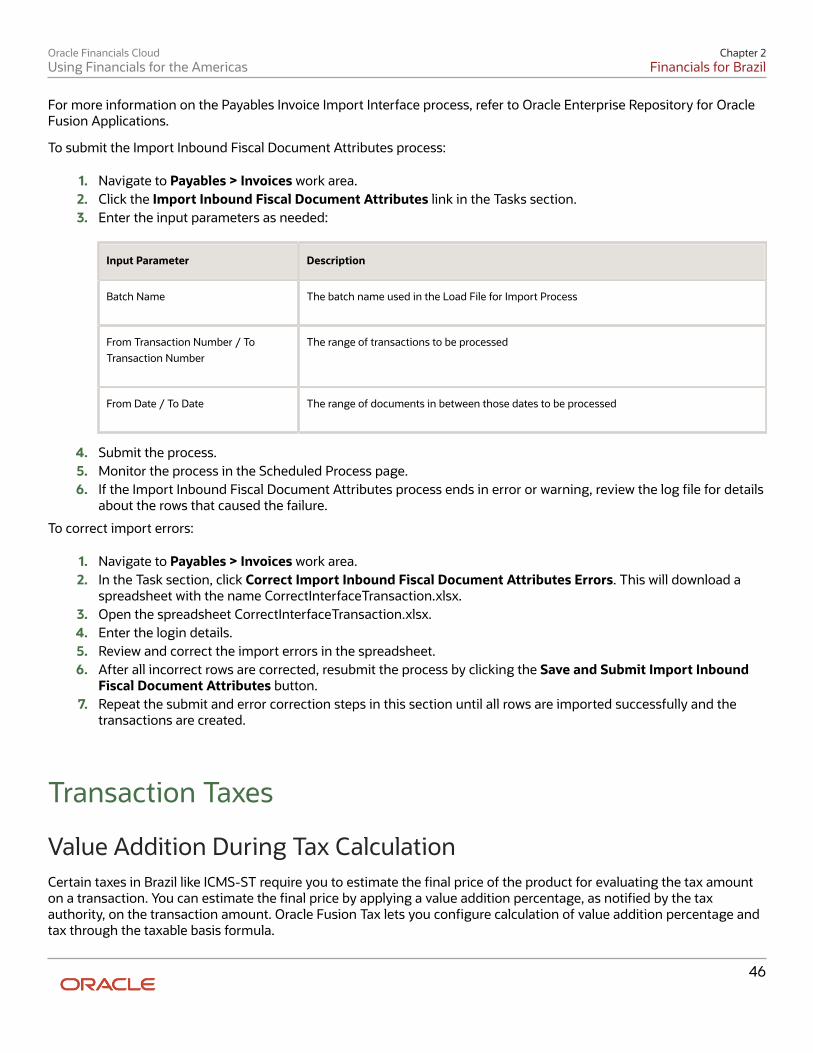
Oracle Financials CloudUsing Financials for the Americas
Chapter 2Financials for Brazil
For more information on the Payables Invoice Import Interface process, refer to Oracle Enterprise Repository for OracleFusion Applications.
To submit the Import Inbound Fiscal Document Attributes process:
1. Navigate to Payables > Invoices work area.2. Click the Import Inbound Fiscal Document Attributes link in the Tasks section.3. Enter the input parameters as needed:
Input Parameter Description
Batch Name
The batch name used in the Load File for Import Process
From Transaction Number / ToTransaction Number
The range of transactions to be processed
From Date / To Date
The range of documents in between those dates to be processed
4. Submit the process.5. Monitor the process in the Scheduled Process page.6. If the Import Inbound Fiscal Document Attributes process ends in error or warning, review the log file for details
about the rows that caused the failure.
To correct import errors:
1. Navigate to Payables > Invoices work area.2. In the Task section, click Correct Import Inbound Fiscal Document Attributes Errors. This will download a
spreadsheet with the name CorrectInterfaceTransaction.xlsx.3. Open the spreadsheet CorrectInterfaceTransaction.xlsx.4. Enter the login details.5. Review and correct the import errors in the spreadsheet.6. After all incorrect rows are corrected, resubmit the process by clicking the Save and Submit Import Inbound
Fiscal Document Attributes button.7. Repeat the submit and error correction steps in this section until all rows are imported successfully and the
transactions are created.
Transaction Taxes
Value Addition During Tax Calculation Certain taxes in Brazil like ICMS-ST require you to estimate the final price of the product for evaluating the tax amounton a transaction. You can estimate the final price by applying a value addition percentage, as notified by the taxauthority, on the transaction amount. Oracle Fusion Tax lets you configure calculation of value addition percentage andtax through the taxable basis formula.
46

Oracle Financials CloudUsing Financials for the Americas
Chapter 2Financials for Brazil
In the taxable basis formula, if the country associated with the tax regime is Brazil, then an option is enabled forspecifying value addition information. Different value addition percentages can be configured based on the followingtransaction parameters:
• Ship-from geography
• Ship-to geography
• Product fiscal classification
• Transaction business category
• Intended use
You can specify the order of evaluation for these transaction parameters.
You can also use base rate modifier as a generic value addition option. However, the taxable basis formula providesbetter control and flexibility as you can specify the required values through a single taxable basis formula, on the basisof various transaction parameters.
Price Thresholds During Tax Calculation Certain taxes in Brazil require applying of notified thresholds on prices of items quoted on a transaction. You canconfigure taxable basis formula in Oracle Fusion Tax to configure handling of price thresholds for tax calculation.
In the taxable basis formula, if the country associated with the tax regime is Brazil, then an option is enabled forspecifying the price threshold information. Use the following transaction parameters to configure the taxes:
• Ship-from geography
• Ship-to geography
• Product fiscal classification
• Transaction business category
• Intended use
You can specify the order of evaluation for these transaction parameters.
You can also define price threshold values through:
• Fixed price: If the fixed price option is set, then the specified price is used as item price for deriving the taxablebasis amount for the transaction line.
• Minimum or maximum threshold options: If minimum or maximum thresholds option is used, then the itemprice is compared against the given range of values and appropriate value is considered if it goes beyond thegiven range.
For example, if the item price on a transaction is quoted as 28 USD and the minimum threshold value is set as 32 USD,then the minimum threshold value gets applied (that is, 32 USD, instead of 28 USD) for calculating the taxable basisamount. However, if the item price is quoted as 48 USD and the maximum threshold value is set as 45 USD, then theitem price is set at the maximum specified value (that is, 45 USD, instead of 48 USD).
You can define price thresholds with minimum and maximum values at the tax or jurisdiction level using the thresholdbasis as Line and type as Unit price. However, during the evaluation process, values notified in the taxable basis formulawill always take first precedence. Also, handling of minimum threshold value derived from the threshold controls of taxor jurisdiction is different from the approach used when it is derived from taxable basis formula. In this case, if the itemprice is less than the specified minimum threshold value, then it is considered as 0.00 USD while calculating the taxablebasis amount.
47
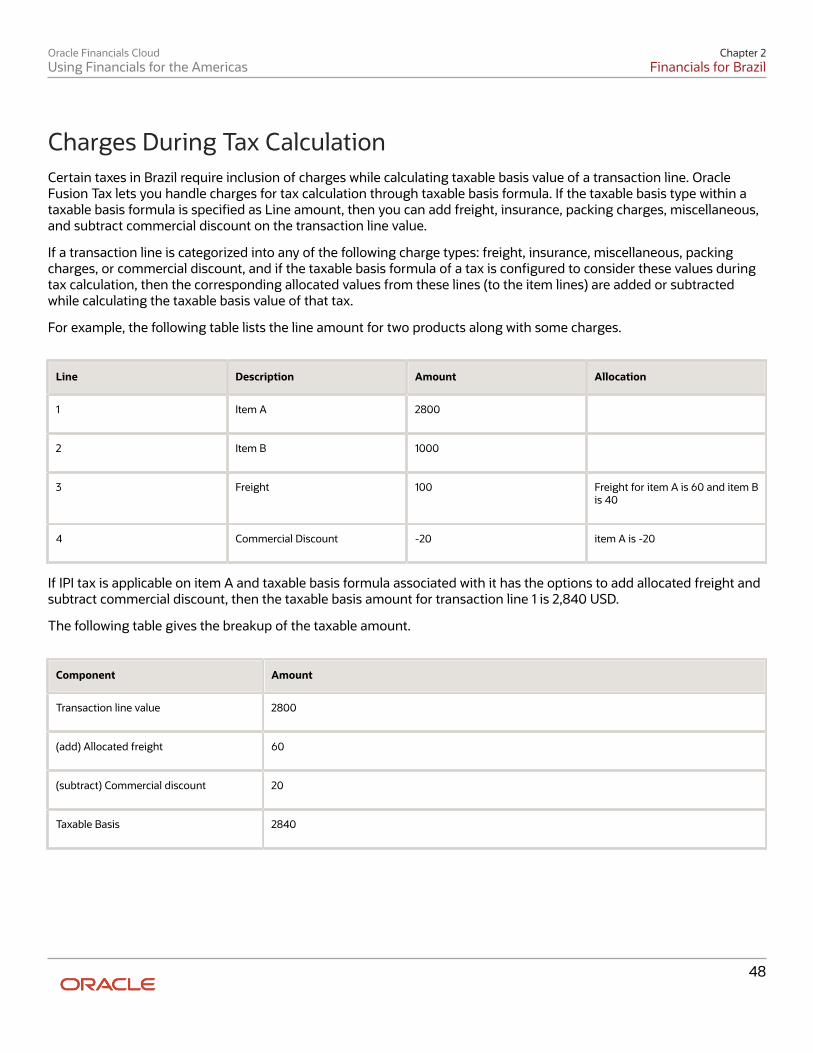
Oracle Financials CloudUsing Financials for the Americas
Chapter 2Financials for Brazil
Charges During Tax Calculation Certain taxes in Brazil require inclusion of charges while calculating taxable basis value of a transaction line. OracleFusion Tax lets you handle charges for tax calculation through taxable basis formula. If the taxable basis type within ataxable basis formula is specified as Line amount, then you can add freight, insurance, packing charges, miscellaneous,and subtract commercial discount on the transaction line value.
If a transaction line is categorized into any of the following charge types: freight, insurance, miscellaneous, packingcharges, or commercial discount, and if the taxable basis formula of a tax is configured to consider these values duringtax calculation, then the corresponding allocated values from these lines (to the item lines) are added or subtractedwhile calculating the taxable basis value of that tax.
For example, the following table lists the line amount for two products along with some charges.
Line Description Amount Allocation
1
Item A
2800
2
Item B
1000
3
Freight
100
Freight for item A is 60 and item Bis 40
4
Commercial Discount
-20
item A is -20
If IPI tax is applicable on item A and taxable basis formula associated with it has the options to add allocated freight andsubtract commercial discount, then the taxable basis amount for transaction line 1 is 2,840 USD.
The following table gives the breakup of the taxable amount.
Component Amount
Transaction line value
2800
(add) Allocated freight
60
(subtract) Commercial discount
20
Taxable Basis
2840
48
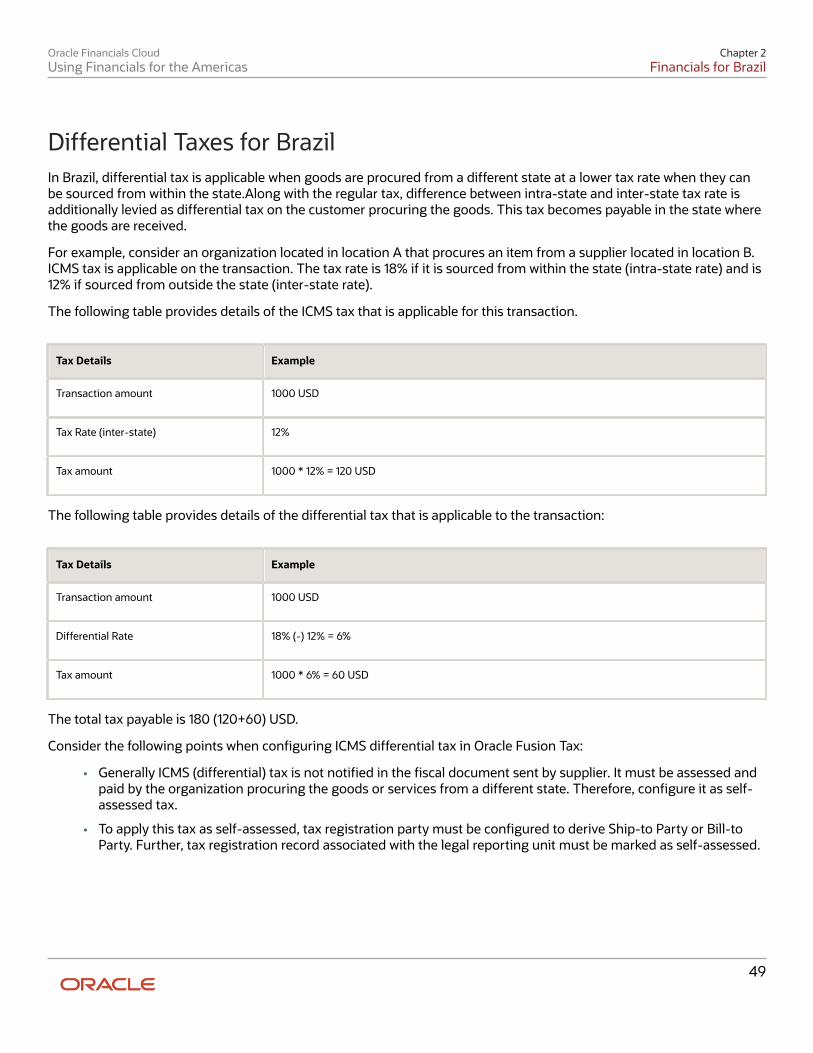
Oracle Financials CloudUsing Financials for the Americas
Chapter 2Financials for Brazil
Differential Taxes for Brazil In Brazil, differential tax is applicable when goods are procured from a different state at a lower tax rate when they canbe sourced from within the state.Along with the regular tax, difference between intra-state and inter-state tax rate isadditionally levied as differential tax on the customer procuring the goods. This tax becomes payable in the state wherethe goods are received.
For example, consider an organization located in location A that procures an item from a supplier located in location B.ICMS tax is applicable on the transaction. The tax rate is 18% if it is sourced from within the state (intra-state rate) and is12% if sourced from outside the state (inter-state rate).
The following table provides details of the ICMS tax that is applicable for this transaction.
Tax Details Example
Transaction amount
1000 USD
Tax Rate (inter-state)
12%
Tax amount
1000 * 12% = 120 USD
The following table provides details of the differential tax that is applicable to the transaction:
Tax Details Example
Transaction amount
1000 USD
Differential Rate
18% (-) 12% = 6%
Tax amount
1000 * 6% = 60 USD
The total tax payable is 180 (120+60) USD.
Consider the following points when configuring ICMS differential tax in Oracle Fusion Tax:
• Generally ICMS (differential) tax is not notified in the fiscal document sent by supplier. It must be assessed andpaid by the organization procuring the goods or services from a different state. Therefore, configure it as self-assessed tax.
• To apply this tax as self-assessed, tax registration party must be configured to derive Ship-to Party or Bill-toParty. Further, tax registration record associated with the legal reporting unit must be marked as self-assessed.
49
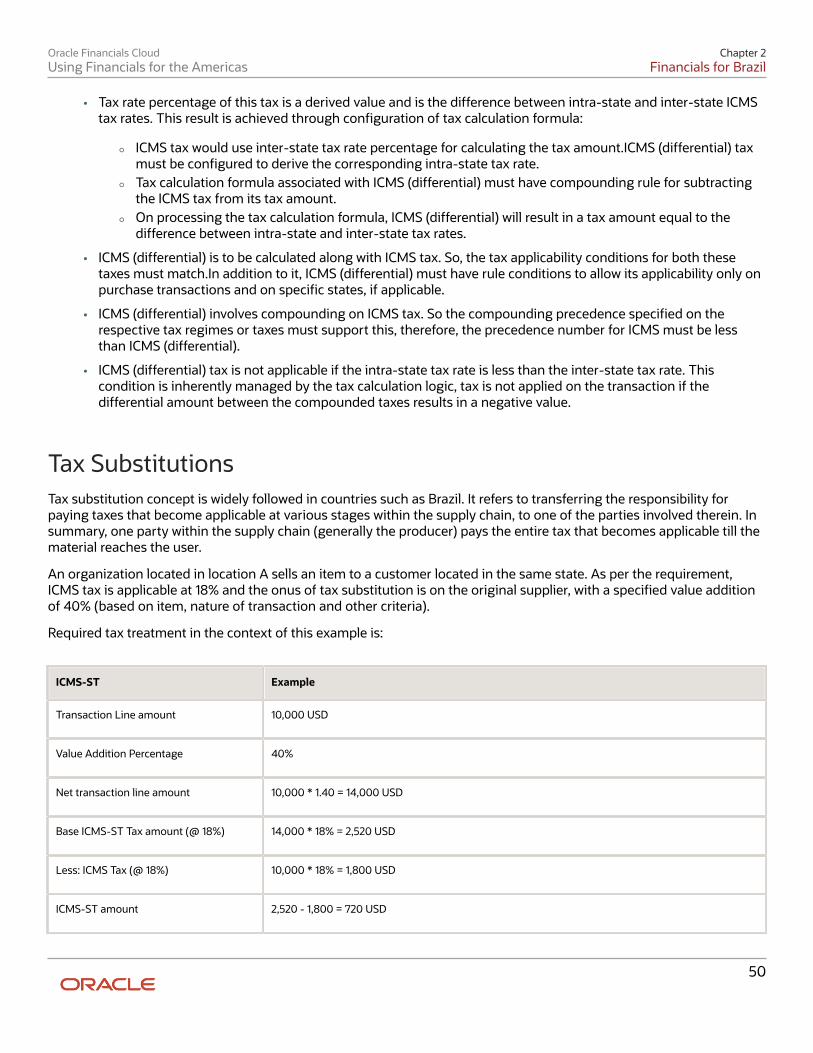
Oracle Financials CloudUsing Financials for the Americas
Chapter 2Financials for Brazil
• Tax rate percentage of this tax is a derived value and is the difference between intra-state and inter-state ICMStax rates. This result is achieved through configuration of tax calculation formula:
◦ ICMS tax would use inter-state tax rate percentage for calculating the tax amount.ICMS (differential) taxmust be configured to derive the corresponding intra-state tax rate.
◦ Tax calculation formula associated with ICMS (differential) must have compounding rule for subtractingthe ICMS tax from its tax amount.
◦ On processing the tax calculation formula, ICMS (differential) will result in a tax amount equal to thedifference between intra-state and inter-state tax rates.
• ICMS (differential) is to be calculated along with ICMS tax. So, the tax applicability conditions for both thesetaxes must match.In addition to it, ICMS (differential) must have rule conditions to allow its applicability only onpurchase transactions and on specific states, if applicable.
• ICMS (differential) involves compounding on ICMS tax. So the compounding precedence specified on therespective tax regimes or taxes must support this, therefore, the precedence number for ICMS must be lessthan ICMS (differential).
• ICMS (differential) tax is not applicable if the intra-state tax rate is less than the inter-state tax rate. Thiscondition is inherently managed by the tax calculation logic, tax is not applied on the transaction if thedifferential amount between the compounded taxes results in a negative value.
Tax Substitutions Tax substitution concept is widely followed in countries such as Brazil. It refers to transferring the responsibility forpaying taxes that become applicable at various stages within the supply chain, to one of the parties involved therein. Insummary, one party within the supply chain (generally the producer) pays the entire tax that becomes applicable till thematerial reaches the user.
An organization located in location A sells an item to a customer located in the same state. As per the requirement,ICMS tax is applicable at 18% and the onus of tax substitution is on the original supplier, with a specified value additionof 40% (based on item, nature of transaction and other criteria).
Required tax treatment in the context of this example is:
ICMS-ST Example
Transaction Line amount
10,000 USD
Value Addition Percentage
40%
Net transaction line amount
10,000 * 1.40 = 14,000 USD
Base ICMS-ST Tax amount (@ 18%)
14,000 * 18% = 2,520 USD
Less: ICMS Tax (@ 18%)
10,000 * 18% = 1,800 USD
ICMS-ST amount
2,520 - 1,800 = 720 USD
50
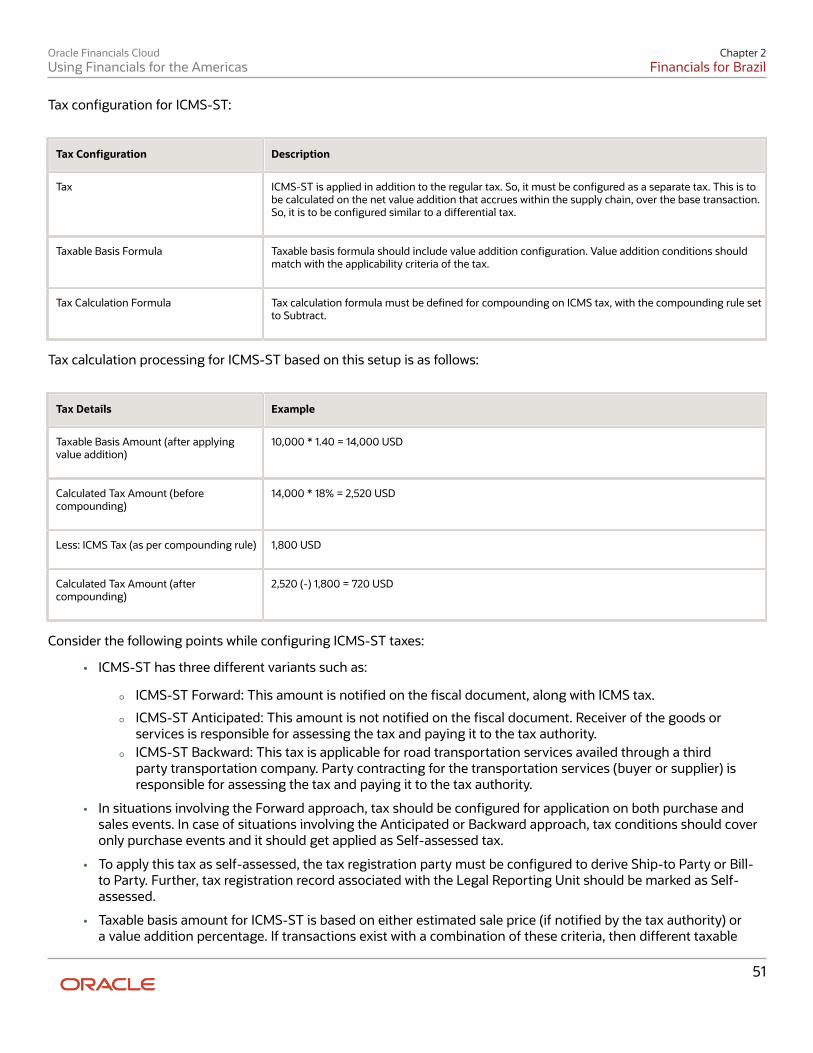
Oracle Financials CloudUsing Financials for the Americas
Chapter 2Financials for Brazil
Tax configuration for ICMS-ST:
Tax Configuration Description
Tax
ICMS-ST is applied in addition to the regular tax. So, it must be configured as a separate tax. This is tobe calculated on the net value addition that accrues within the supply chain, over the base transaction.So, it is to be configured similar to a differential tax.
Taxable Basis Formula
Taxable basis formula should include value addition configuration. Value addition conditions shouldmatch with the applicability criteria of the tax.
Tax Calculation Formula
Tax calculation formula must be defined for compounding on ICMS tax, with the compounding rule setto Subtract.
Tax calculation processing for ICMS-ST based on this setup is as follows:
Tax Details Example
Taxable Basis Amount (after applyingvalue addition)
10,000 * 1.40 = 14,000 USD
Calculated Tax Amount (beforecompounding)
14,000 * 18% = 2,520 USD
Less: ICMS Tax (as per compounding rule)
1,800 USD
Calculated Tax Amount (aftercompounding)
2,520 (-) 1,800 = 720 USD
Consider the following points while configuring ICMS-ST taxes:
• ICMS-ST has three different variants such as:
◦ ICMS-ST Forward: This amount is notified on the fiscal document, along with ICMS tax.
◦ ICMS-ST Anticipated: This amount is not notified on the fiscal document. Receiver of the goods orservices is responsible for assessing the tax and paying it to the tax authority.
◦ ICMS-ST Backward: This tax is applicable for road transportation services availed through a thirdparty transportation company. Party contracting for the transportation services (buyer or supplier) isresponsible for assessing the tax and paying it to the tax authority.
• In situations involving the Forward approach, tax should be configured for application on both purchase andsales events. In case of situations involving the Anticipated or Backward approach, tax conditions should coveronly purchase events and it should get applied as Self-assessed tax.
• To apply this tax as self-assessed, the tax registration party must be configured to derive Ship-to Party or Bill-to Party. Further, tax registration record associated with the Legal Reporting Unit should be marked as Self-assessed.
• Taxable basis amount for ICMS-ST is based on either estimated sale price (if notified by the tax authority) ora value addition percentage. If transactions exist with a combination of these criteria, then different taxable
51
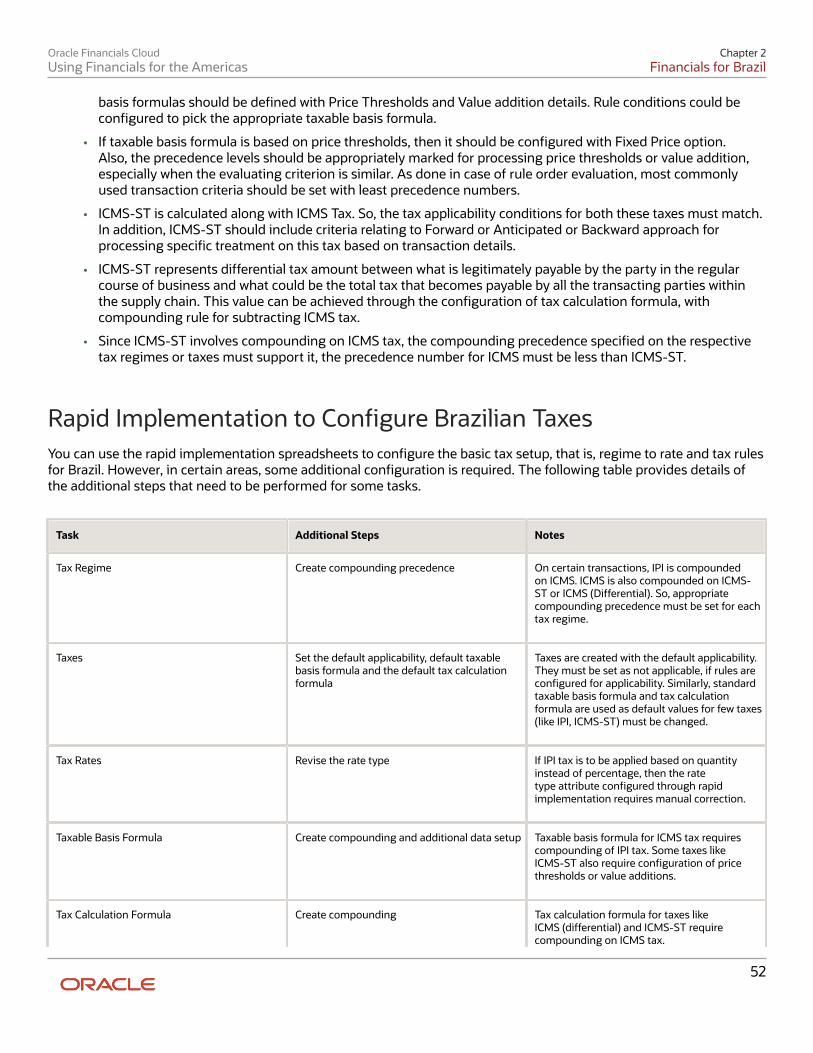
Oracle Financials CloudUsing Financials for the Americas
Chapter 2Financials for Brazil
basis formulas should be defined with Price Thresholds and Value addition details. Rule conditions could beconfigured to pick the appropriate taxable basis formula.
• If taxable basis formula is based on price thresholds, then it should be configured with Fixed Price option.Also, the precedence levels should be appropriately marked for processing price thresholds or value addition,especially when the evaluating criterion is similar. As done in case of rule order evaluation, most commonlyused transaction criteria should be set with least precedence numbers.
• ICMS-ST is calculated along with ICMS Tax. So, the tax applicability conditions for both these taxes must match.In addition, ICMS-ST should include criteria relating to Forward or Anticipated or Backward approach forprocessing specific treatment on this tax based on transaction details.
• ICMS-ST represents differential tax amount between what is legitimately payable by the party in the regularcourse of business and what could be the total tax that becomes payable by all the transacting parties withinthe supply chain. This value can be achieved through the configuration of tax calculation formula, withcompounding rule for subtracting ICMS tax.
• Since ICMS-ST involves compounding on ICMS tax, the compounding precedence specified on the respectivetax regimes or taxes must support it, the precedence number for ICMS must be less than ICMS-ST.
Rapid Implementation to Configure Brazilian Taxes You can use the rapid implementation spreadsheets to configure the basic tax setup, that is, regime to rate and tax rulesfor Brazil. However, in certain areas, some additional configuration is required. The following table provides details ofthe additional steps that need to be performed for some tasks.
Task Additional Steps Notes
Tax Regime
Create compounding precedence
On certain transactions, IPI is compoundedon ICMS. ICMS is also compounded on ICMS-ST or ICMS (Differential). So, appropriatecompounding precedence must be set for eachtax regime.
Taxes
Set the default applicability, default taxablebasis formula and the default tax calculationformula
Taxes are created with the default applicability.They must be set as not applicable, if rules areconfigured for applicability. Similarly, standardtaxable basis formula and tax calculationformula are used as default values for few taxes(like IPI, ICMS-ST) must be changed.
Tax Rates
Revise the rate type
If IPI tax is to be applied based on quantityinstead of percentage, then the ratetype attribute configured through rapidimplementation requires manual correction.
Taxable Basis Formula
Create compounding and additional data setup
Taxable basis formula for ICMS tax requirescompounding of IPI tax. Some taxes likeICMS-ST also require configuration of pricethresholds or value additions.
Tax Calculation Formula
Create compounding
Tax calculation formula for taxes likeICMS (differential) and ICMS-ST requirecompounding on ICMS tax.
52

Oracle Financials CloudUsing Financials for the Americas
Chapter 2Financials for Brazil
Task Additional Steps Notes
Tax Registrations
Mark self-assessment
ICMS (Differential) and ICMS-ST may berequired to be calculated as self-assessed. Taxregistration records will need correction.
Tax Rules
Update list of values
Few tax rules are based on list of values. Allsuch values must be manually configured.
Receivables
Sales Invoice and Customer Receipt Enhancements for Brazil To support the common business practices in Brazil, the payment collection process is enhanced to supporttransactions between suppliers, customers, and their banks. You can now automatically generate and electronicallytransmit collection documents to banks for collecting payments due from customers.
The processes are automated using electronic file transfers that transfer information from companies to banks and thereturn from banks to companies.
You can:
• Process receipt files from banks for the associated collection documents. Include taxes and short payments oncollection documents submitted for Receivables invoices.
• Use city-specific calendars to identify local holidays and ensure due dates are accurately assigned, and latepayment interest is correctly calculated and included in the collection documents for bank transfers.
• Send remittance collection documents to customer banks based on invoice payment terms.
• Send remittance update collection documents for any updates, discounts, or protests to process corrections tofiles that are already sent.
• Receive bank files with information on payments collected from customers, and create and apply receipts.
Create Receivables Invoices and Generate Remittance BatchThe following enhancements are available for generating a remittance batch:
• Create Receivables transactions and complete them by receiving final approval on the associated fiscaldocuments. Receivable invoices associated with approved fiscal documents are then available to be included ina remittance batch for collection.
• Use a remittance batch to send information to the customer's bank for payment collection. The informationsent to a bank includes instructions such as interest charges to be collected and any protest after due date.When generating a remittance batch, selection criteria can be specified to automatically or manually select theinstallments to include in the batch. Collection documents are created in Receivables for the installments. Aftercreating collection documents to be sent to the bank, review the collection documents selected in the batch andremove any, if needed.
53
Oracle Financials CloudUsing Financials for the Americas
Chapter 2Financials for Brazil
• Enter parameters during batch creation to limit selection of records or default information, such as themaximum quantity of documents per remittance batch, minimum or maximum amount for a document, or aminimum or maximum total amount for the remittance batch.
• Assign specific bank remittance formats to each bank. Once the remittance batch details have been reviewed,the remittance batch is generated base upon the assigned format and validated. The batch can be editedto correct errors and re-generated. A remittance batch can also be canceled before a bank return is done ifneeded.
Updates to Collection DocumentsUse bank collection updates to provide additional directions to a bank for collection documents that are already sentin a remittance batch. Once the updates are entered, create a collection update remittance batch to send to a bank.Collection document updates can be created automatically based on certain actions or can be created manually asneeded to process collection document updates.
Bank Returns and ReceiptsReceive information from banks as a file that can be imported. Use the Import Bank Returns for Brazil program toimport and validate the bank return details in the file and to upload and validate records that have been manuallyentered in a spreadsheet. A validation is performed against the associated collection documents and bank returnrecords rejected by this process are shown in the Bank Return Import Report.
Rejected bank return records can be corrected and a Correct Bank Returns spreadsheet used to upload correctedinformation. The uploaded details are also validated by the same import process. After completion of import process,AR receipts are created automatically and can be applied using the standard Receivables processes.
Document Numbering for Sales Transactions You can now automate generation of document numbers for invoices and related transactions for the sales made byyour organization. These document numbers are based on the document class, third-party of the transaction, andtransaction type. The resultant values are the branch number and the sequence, the combination of these values makeup the document number to be stamped on the transaction.
To automate document numbering for your organizations, complete the following set up:
• Localization system options: Use the Manage Localization System Options task to update the country in whichyour business unit operates, use the Country field. Check the Enable Document Numbering check box.
• Define document numbering: Use the Manage Localization Document Numbering task and set the country.Select the business unit for which you want to define document numbering.
• Specify the party fiscal classifications: Select the Configure Context Values option on the Manage LocalizationDocument Numbering page, an ADFDi spreadsheet appears. Specify the party fiscal classifications that willspecify the document letter in document numbering sequence.
• Select the document class, document letter, and the transaction type for which you want specify a documentnumber. Select the document sequence and authorization codes that need to be applied during a given period.
Document numbers are stamped on the transaction to indicate completion of an action.
54

Oracle Financials CloudUsing Financials for the Americas
Chapter 2Financials for Brazil
Import Outbound Fiscal Documents Use the Import Fiscal Document Attributes Template to populate your Fiscal Document Attributes and upload theminto Oracle Fusion Applications. Prepare the required Fiscal Document Attributes offline in the applicable spreadsheettemplates. The template contains an instruction sheet to help guide you through the process of entering the requiredinformation.
You can import Fiscal Documents from other systems using the Import AutoInvoice with Fiscal Attributes process.Use the Import AutoInvoice with Fiscal Attributes process to import fiscal document Attributes that are related toReceivables transactions, therefore, outbound fiscal documents..
To access the template, complete the following steps:
1. Navigate to the File-Based Data Import for Oracle Financials Cloud guide.2. In the Table of Contents, click File-Based Data Imports.3. Click Outbound Fiscal Document Import.4. In the File Links section, click the link to the Excel template.
Follow these guidelines when preparing your data in the worksheet:
• Enter the required information for each column. Refer to the tool tips on each column header for detailedinstructions.
• Do not change the order of the columns in the template.
• You can hide or skip the columns you do not use, but do not delete them.
Settings That Affect the Outbound Fiscal Document Attributes Import ProcessThe Import Fiscal Document Attributes template contains an instructions tab, plus four tabs that represent the tablewhere the data is loaded:
Spreadsheet Tab Description
Instructions and CSV Generation
Contains instruction information about preparing and loading data, the format of the template, submitting the Import Outbound Fiscal Document Attributes process, and correcting import errors.
Fiscal Attribute Headers (JG_FSCL_HDRS_ATRB_INT)
Captures Fiscal Document Header data from which Fiscal Documents headers are created aftersuccessful import. Fiscal Document header is created and tied to a Receivables Transaction.
Fiscal Attribute Header Details (JG_FSCL_HDR_DTLS_ATRB_INT)
Captures the Fiscal Document Header Details data that you intend to assign to imported transactions.Data in this sheet is linked to the parent entity sheet Fiscal Attribute Headers using Document Id.
Fiscal Attribute Lines (JG_FSCL_LINES_ATRB_INT)
Captures Fiscal Document Lines information for imported transactions. Data in this sheet is linked tothe parent entity sheet, Fiscal Attribute Headers, using Document Id.
Fiscal Attribute Line Details (JG_FSCL_LN_DTLS_ATRB_INT)
Captures the Fiscal Document Line Details data that you intend to assign to imported transactions.Data in this sheet is linked to the parent entity sheet, Fiscal Attribute Lines, using Document Id andTransaction Line Number.
55
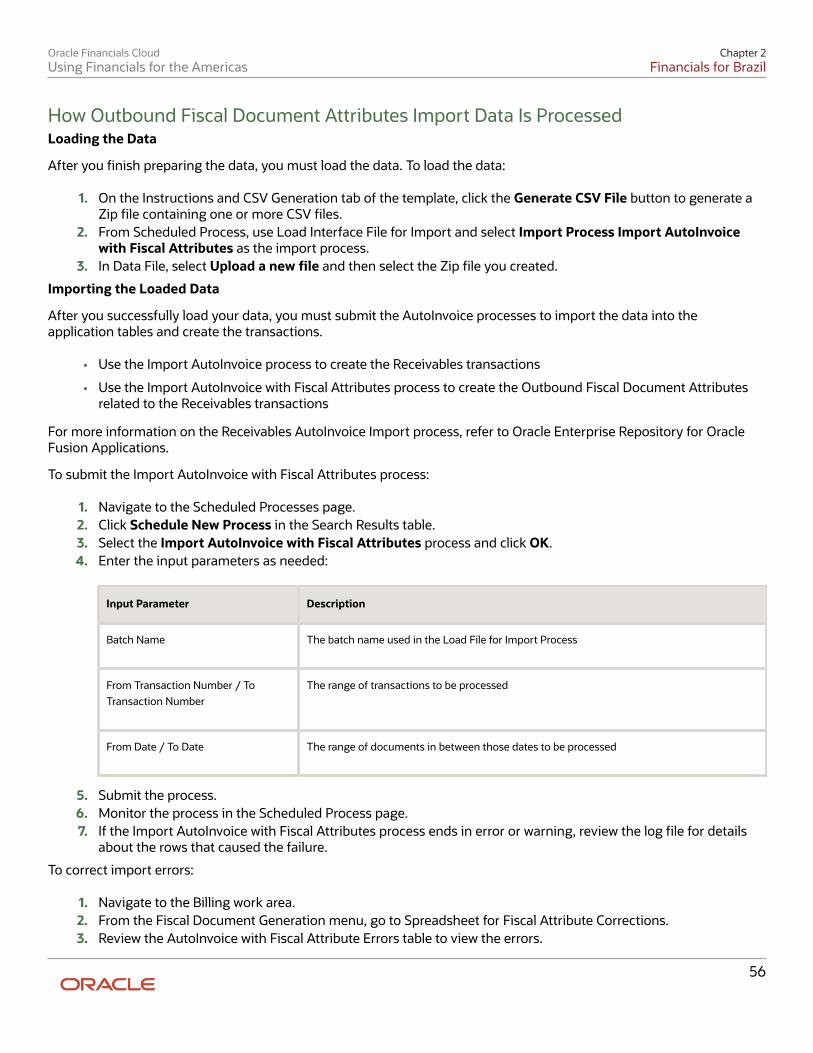
Oracle Financials CloudUsing Financials for the Americas
Chapter 2Financials for Brazil
How Outbound Fiscal Document Attributes Import Data Is ProcessedLoading the Data
After you finish preparing the data, you must load the data. To load the data:
1. On the Instructions and CSV Generation tab of the template, click the Generate CSV File button to generate aZip file containing one or more CSV files.
2. From Scheduled Process, use Load Interface File for Import and select Import Process Import AutoInvoicewith Fiscal Attributes as the import process.
3. In Data File, select Upload a new file and then select the Zip file you created.
Importing the Loaded Data
After you successfully load your data, you must submit the AutoInvoice processes to import the data into theapplication tables and create the transactions.
• Use the Import AutoInvoice process to create the Receivables transactions
• Use the Import AutoInvoice with Fiscal Attributes process to create the Outbound Fiscal Document Attributesrelated to the Receivables transactions
For more information on the Receivables AutoInvoice Import process, refer to Oracle Enterprise Repository for OracleFusion Applications.
To submit the Import AutoInvoice with Fiscal Attributes process:
1. Navigate to the Scheduled Processes page.2. Click Schedule New Process in the Search Results table.3. Select the Import AutoInvoice with Fiscal Attributes process and click OK.4. Enter the input parameters as needed:
Input Parameter Description
Batch Name
The batch name used in the Load File for Import Process
From Transaction Number / ToTransaction Number
The range of transactions to be processed
From Date / To Date
The range of documents in between those dates to be processed
5. Submit the process.6. Monitor the process in the Scheduled Process page.7. If the Import AutoInvoice with Fiscal Attributes process ends in error or warning, review the log file for details
about the rows that caused the failure.
To correct import errors:
1. Navigate to the Billing work area.2. From the Fiscal Document Generation menu, go to Spreadsheet for Fiscal Attribute Corrections.3. Review the AutoInvoice with Fiscal Attribute Errors table to view the errors.
56
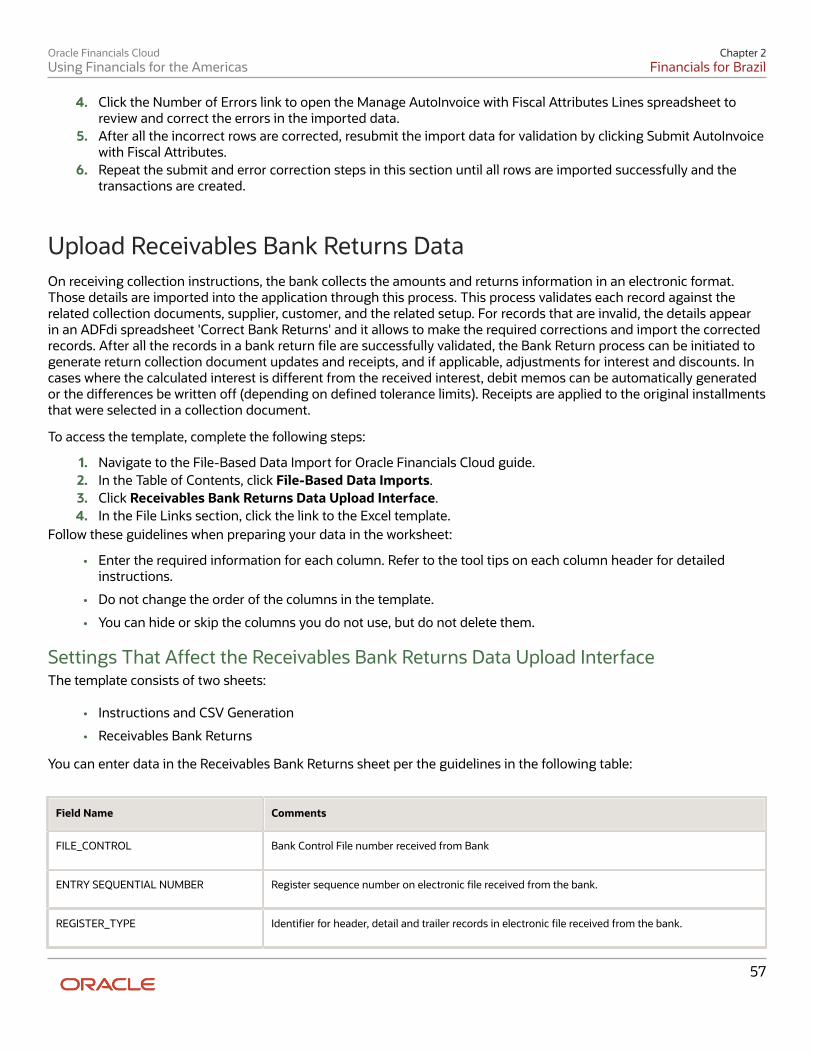
Oracle Financials CloudUsing Financials for the Americas
Chapter 2Financials for Brazil
4. Click the Number of Errors link to open the Manage AutoInvoice with Fiscal Attributes Lines spreadsheet toreview and correct the errors in the imported data.
5. After all the incorrect rows are corrected, resubmit the import data for validation by clicking Submit AutoInvoicewith Fiscal Attributes.
6. Repeat the submit and error correction steps in this section until all rows are imported successfully and thetransactions are created.
Upload Receivables Bank Returns Data On receiving collection instructions, the bank collects the amounts and returns information in an electronic format.Those details are imported into the application through this process. This process validates each record against therelated collection documents, supplier, customer, and the related setup. For records that are invalid, the details appearin an ADFdi spreadsheet 'Correct Bank Returns' and it allows to make the required corrections and import the correctedrecords. After all the records in a bank return file are successfully validated, the Bank Return process can be initiated togenerate return collection document updates and receipts, and if applicable, adjustments for interest and discounts. Incases where the calculated interest is different from the received interest, debit memos can be automatically generatedor the differences be written off (depending on defined tolerance limits). Receipts are applied to the original installmentsthat were selected in a collection document.
To access the template, complete the following steps:
1. Navigate to the File-Based Data Import for Oracle Financials Cloud guide.2. In the Table of Contents, click File-Based Data Imports.3. Click Receivables Bank Returns Data Upload Interface.4. In the File Links section, click the link to the Excel template.
Follow these guidelines when preparing your data in the worksheet:
• Enter the required information for each column. Refer to the tool tips on each column header for detailedinstructions.
• Do not change the order of the columns in the template.
• You can hide or skip the columns you do not use, but do not delete them.
Settings That Affect the Receivables Bank Returns Data Upload InterfaceThe template consists of two sheets:
• Instructions and CSV Generation
• Receivables Bank Returns
You can enter data in the Receivables Bank Returns sheet per the guidelines in the following table:
Field Name Comments
FILE_CONTROL
Bank Control File number received from Bank
ENTRY SEQUENTIAL NUMBER
Register sequence number on electronic file received from the bank.
REGISTER_TYPE
Identifier for header, detail and trailer records in electronic file received from the bank.
57
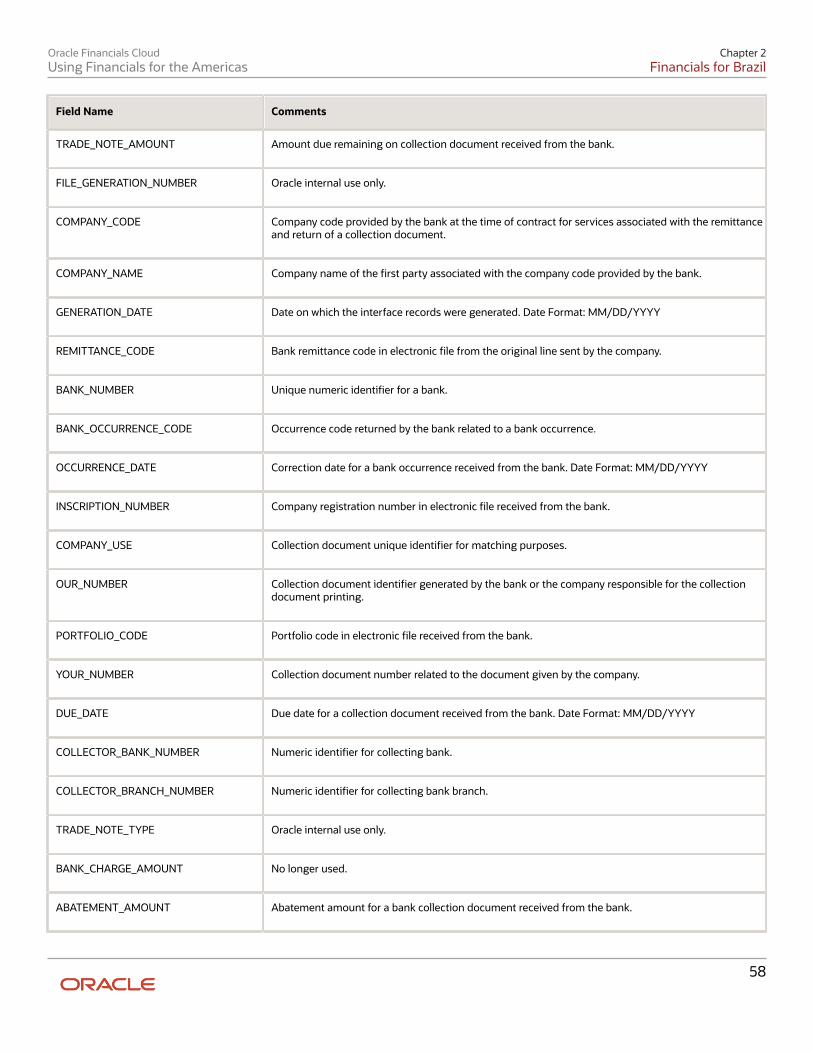
Oracle Financials CloudUsing Financials for the Americas
Chapter 2Financials for Brazil
Field Name Comments
TRADE_NOTE_AMOUNT
Amount due remaining on collection document received from the bank.
FILE_GENERATION_NUMBER
Oracle internal use only.
COMPANY_CODE
Company code provided by the bank at the time of contract for services associated with the remittanceand return of a collection document.
COMPANY_NAME
Company name of the first party associated with the company code provided by the bank.
GENERATION_DATE
Date on which the interface records were generated. Date Format: MM/DD/YYYY
REMITTANCE_CODE
Bank remittance code in electronic file from the original line sent by the company.
BANK_NUMBER
Unique numeric identifier for a bank.
BANK_OCCURRENCE_CODE
Occurrence code returned by the bank related to a bank occurrence.
OCCURRENCE_DATE
Correction date for a bank occurrence received from the bank. Date Format: MM/DD/YYYY
INSCRIPTION_NUMBER
Company registration number in electronic file received from the bank.
COMPANY_USE
Collection document unique identifier for matching purposes.
OUR_NUMBER
Collection document identifier generated by the bank or the company responsible for the collectiondocument printing.
PORTFOLIO_CODE
Portfolio code in electronic file received from the bank.
YOUR_NUMBER
Collection document number related to the document given by the company.
DUE_DATE
Due date for a collection document received from the bank. Date Format: MM/DD/YYYY
COLLECTOR_BANK_NUMBER
Numeric identifier for collecting bank.
COLLECTOR_BRANCH_NUMBER
Numeric identifier for collecting bank branch.
TRADE_NOTE_TYPE
Oracle internal use only.
BANK_CHARGE_AMOUNT
No longer used.
ABATEMENT_AMOUNT
Abatement amount for a bank collection document received from the bank.
58
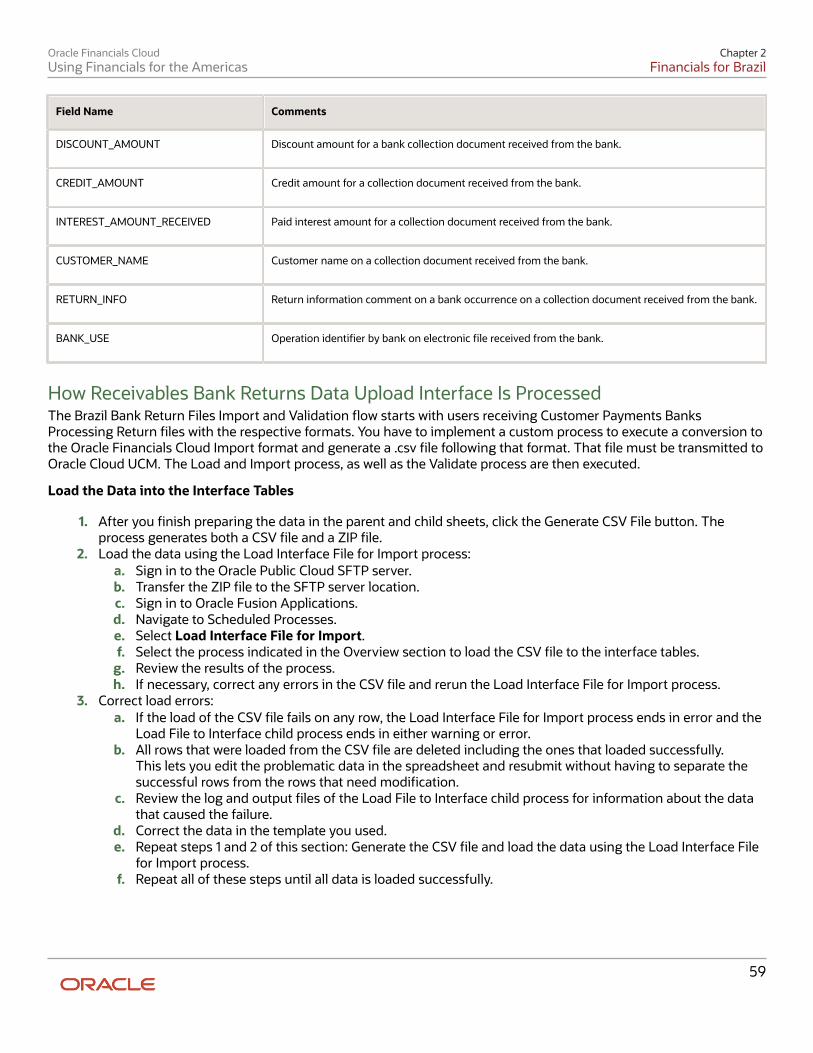
Oracle Financials CloudUsing Financials for the Americas
Chapter 2Financials for Brazil
Field Name Comments
DISCOUNT_AMOUNT
Discount amount for a bank collection document received from the bank.
CREDIT_AMOUNT
Credit amount for a collection document received from the bank.
INTEREST_AMOUNT_RECEIVED
Paid interest amount for a collection document received from the bank.
CUSTOMER_NAME
Customer name on a collection document received from the bank.
RETURN_INFO
Return information comment on a bank occurrence on a collection document received from the bank.
BANK_USE
Operation identifier by bank on electronic file received from the bank.
How Receivables Bank Returns Data Upload Interface Is ProcessedThe Brazil Bank Return Files Import and Validation flow starts with users receiving Customer Payments BanksProcessing Return files with the respective formats. You have to implement a custom process to execute a conversion tothe Oracle Financials Cloud Import format and generate a .csv file following that format. That file must be transmitted toOracle Cloud UCM. The Load and Import process, as well as the Validate process are then executed.
Load the Data into the Interface Tables
1. After you finish preparing the data in the parent and child sheets, click the Generate CSV File button. Theprocess generates both a CSV file and a ZIP file.
2. Load the data using the Load Interface File for Import process:a. Sign in to the Oracle Public Cloud SFTP server.b. Transfer the ZIP file to the SFTP server location.c. Sign in to Oracle Fusion Applications.d. Navigate to Scheduled Processes.e. Select Load Interface File for Import.f. Select the process indicated in the Overview section to load the CSV file to the interface tables.
g. Review the results of the process.h. If necessary, correct any errors in the CSV file and rerun the Load Interface File for Import process.
3. Correct load errors:a. If the load of the CSV file fails on any row, the Load Interface File for Import process ends in error and the
Load File to Interface child process ends in either warning or error.b. All rows that were loaded from the CSV file are deleted including the ones that loaded successfully.
This lets you edit the problematic data in the spreadsheet and resubmit without having to separate thesuccessful rows from the rows that need modification.
c. Review the log and output files of the Load File to Interface child process for information about the datathat caused the failure.
d. Correct the data in the template you used.e. Repeat steps 1 and 2 of this section: Generate the CSV file and load the data using the Load Interface File
for Import process.f. Repeat all of these steps until all data is loaded successfully.
59
Oracle Financials CloudUsing Financials for the Americas
Chapter 2Financials for Brazil
Payables
How You Pay Enhancements for Brazil Use Oracle Financials Cloud to manage your Payables transactions and comply with the local Brazilian businesspractices and government regulations. You can manage the collection documents received from the supplier andassociate it with an invoice or payment schedule in order to pay invoices or installments. If any invoices are paid late,interest is calculated and added to the invoice amount according to the agreed terms between the seller and buyer andin compliance with the locally legislated business calendar.
You can:
• Enter a collection document manually or import an electronic collection document and associate it with one ormore invoices or installments.
• Place holds on invoices or installments that are not associated with any collection document and automaticallyrelease holds after assignment.
• Calculate and pay interest for late payments based on predefined rules from suppliers. The interest is calculatedbased on rules that govern penalties, grace periods, and interest calculation methods. Use local businesscalendars to determine the number of days for interest calculation.
• Process payments by banks using electronic files. Use the Manual Bank Return and Import Bank Returnprocesses to identify and process rejected payments, corrections, and maintain invoice associations.
Use the following features to record a manual collection document or import an electronic collection document, andassociate it with one or more installments:
• Create a Payables invoice.
• Associate collection documents with invoices.
• Calculate interest and pay through Payment Process Request.
• Manual Bank Return and Import Bank Return
Create Payables InvoiceCreate a Payables invoice based on the information received from supplier. When creating an invoice, update theglobal descriptive flexfields. To update the global descriptive flexfields, click the Additional Information tab. You willhave to select the Invoices for Brazil option for the Regional Information field. Select Yes for the Enable CollectionDocument Processing field.
After an invoice is created, an installment is generated for the invoice with due dates and payment amounts. It alsoincludes the information updated in the global descriptive flexfields for the collection document.
When an invoice is validated, the installment is placed on hold until it is associated with a collection document.
For interest calculation, update the relevant information for payment schedules. To update the relevant information,click the Manage Installments from Invoice Actions list and then click the Details button. Select PaymentInstallment Information for Brazil from the Regional Information list. Provide the interest calculation details and saveit.
60
Oracle Financials CloudUsing Financials for the Americas
Chapter 2Financials for Brazil
Associate Collection Documents with Invoices or InstallmentsOnce the collection document is entered into the application either manually or imported, the next step is to associate itwith the installments. The collection document includes information such as barcode number, supplier name, suppliersite, gross amount, due date, the details of bank where payment is to be made, document details, discount details, andso on. This association can be automatic or manual.
There are predefined setups and tolerance limits for automatic association, based on these setups and tolerancesautomatic association is done by the application. If the application cannot perform automatic association, then manualassociation is to be done by the user at a later stage. You can dissociate an installment from a collection document, ifyou think the current installment can't go with the current collection document.
Once the association of the installment is complete, the hold applied on the invoice is removed automatically.
Calculate Interest and Make PaymentsWhen invoices are paid after the due date, interest and penalties are charged on the invoices according to the agreedterms between the buyer and the seller. The interest can be simple interest or compound interest and penalty can beamount or percentage. You can define some grace days based on the type of interest that is charged.
Define a business day calendar and local holidays for the city based on which the due date is determined. Interest iscalculated on the overdue invoices based on the due date.
Based on settings, interest can be calculated for late payments on invoices taking into consideration the number ofgrace days that are defined and whether the payment due date falls on a non-business day.
For the interest calculated, a new interest invoice is automatically created and the same is included in the next batch forpayment.
To ensure the correct interest is collected, a local business day calendar with the correct local holidays for the city ofthe supplier must be defined. Interest is calculated on the overdue invoices based on the due date and taking intoconsideration the number of grace days that are defined and whether the payment due date falls on a non-businessday.
Process Bank ReturnsThe bank sends an electronic fund transfer file that gives the status of the payments made against invoices for thesubmitted collection documents. The electronic fund transfer file provides information on whether the payment wassuccessful or rejected.
When a payment is rejected, the reasons for rejection are recorded against each invoice. Codes and reasons for rejectionare maintained in the application.
Once the EFT file is imported into the application, the application associates the rejected invoice with the relevantreason for return. This enables further action like making a payment for the same in future.
Upload Payables Bank Returns Data Bank return import file contains details sent by the bank on the status of payment requests that have been sent tothe bank for payment. It contains details of each payment using the reference of the Return Identifier, which uniquelyidentifies a specific payment request made to the bank. Different banks use different bank return codes. On importingthe details, the status of the collection documents that are matched with the invoice installments get updated based onthe corresponding return codes.
61
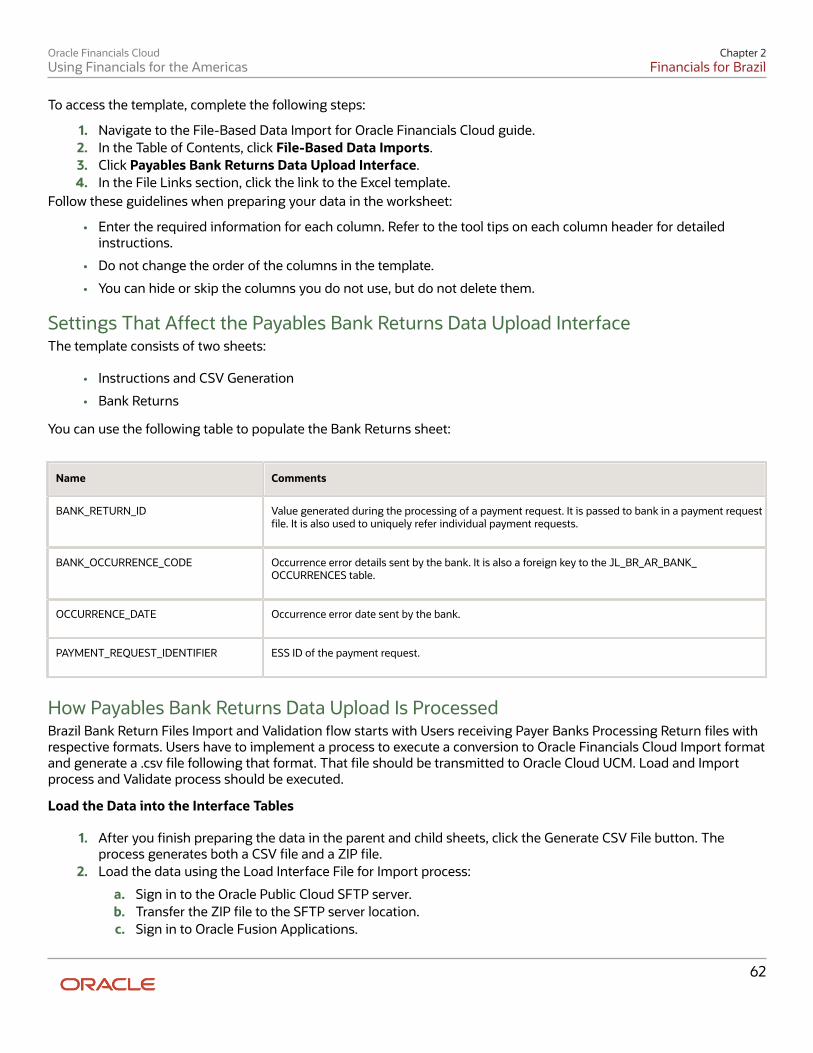
Oracle Financials CloudUsing Financials for the Americas
Chapter 2Financials for Brazil
To access the template, complete the following steps:
1. Navigate to the File-Based Data Import for Oracle Financials Cloud guide.2. In the Table of Contents, click File-Based Data Imports.3. Click Payables Bank Returns Data Upload Interface.4. In the File Links section, click the link to the Excel template.
Follow these guidelines when preparing your data in the worksheet:
• Enter the required information for each column. Refer to the tool tips on each column header for detailedinstructions.
• Do not change the order of the columns in the template.
• You can hide or skip the columns you do not use, but do not delete them.
Settings That Affect the Payables Bank Returns Data Upload InterfaceThe template consists of two sheets:
• Instructions and CSV Generation
• Bank Returns
You can use the following table to populate the Bank Returns sheet:
Name Comments
BANK_RETURN_ID
Value generated during the processing of a payment request. It is passed to bank in a payment requestfile. It is also used to uniquely refer individual payment requests.
BANK_OCCURRENCE_CODE
Occurrence error details sent by the bank. It is also a foreign key to the JL_BR_AR_BANK_OCCURRENCES table.
OCCURRENCE_DATE
Occurrence error date sent by the bank.
PAYMENT_REQUEST_IDENTIFIER
ESS ID of the payment request.
How Payables Bank Returns Data Upload Is ProcessedBrazil Bank Return Files Import and Validation flow starts with Users receiving Payer Banks Processing Return files withrespective formats. Users have to implement a process to execute a conversion to Oracle Financials Cloud Import formatand generate a .csv file following that format. That file should be transmitted to Oracle Cloud UCM. Load and Importprocess and Validate process should be executed.
Load the Data into the Interface Tables
1. After you finish preparing the data in the parent and child sheets, click the Generate CSV File button. Theprocess generates both a CSV file and a ZIP file.
2. Load the data using the Load Interface File for Import process:
a. Sign in to the Oracle Public Cloud SFTP server.b. Transfer the ZIP file to the SFTP server location.c. Sign in to Oracle Fusion Applications.
62
Oracle Financials CloudUsing Financials for the Americas
Chapter 2Financials for Brazil
d. Navigate to Scheduled Processes.e. Select Load Interface File for Import .f. Select the process indicated in the Overview section to load the CSV file to the interface tables.
g. Review the results of the process.h. If necessary, correct any errors in the CSV file and rerun the Load Interface File for Import process.
3. Correct load errors:
a. If the load of the CSV file fails on any row, the Load Interface File for Import process ends in error and theLoad File to Interface child process ends in either warning or error.
b. All rows that were loaded from the CSV file are deleted including the ones that loaded successfully.This lets you edit the problematic data in the spreadsheet and resubmit without having to separate thesuccessful rows from the rows that need modification.
c. Review the log and output files of the Load File to Interface child process for information about the datathat caused the failure.
d. Correct the data in the template you used.e. Repeat steps 1 and 2 of this section: Generate the CSV file and load the data using the Load Interface File
for Import process.f. Repeat all of these steps until all data is loaded successfully.
Upload Payables Collection Documents Data The process starts once the supplier sends a collection document against which payment has to be made. Thiscollection document may include an invoice installment or a group of installments from various invoices. This processis used to import collection documents from the bank, as initiated by the supplier. If the import validation errors optionis set to NO, then the collection lines are auto-matched with the transaction installments. If it's set as YES, then basedon the action set, either the primary or the reference data is changed, or the import lines are rejected and the bank isinformed.
To access the template, complete the following steps:
1. Navigate to the File-Based Data Import for Oracle Financials Cloud guide.2. In the Table of Contents, click File-Based Data Imports.3. Click Payables Collection Documents Data Upload Interface.4. In the File Links section, click the link to the Excel template.
Follow these guidelines when preparing your data in the worksheet:
• Enter the required information for each column. Refer to the tool tips on each column header for detailedinstructions.
• Don't change the order of the columns in the template.
• You can hide or skip the columns you don't not use, but don't delete them.
Settings That Affect Payables Collection Documents Data Upload InterfaceThe template consists of two sheets:
• Instructions and CSV Generation
• Payables Collection Documents
You can enter data in the Payables Collection Documents sheet per the guidelines in the following table:
63
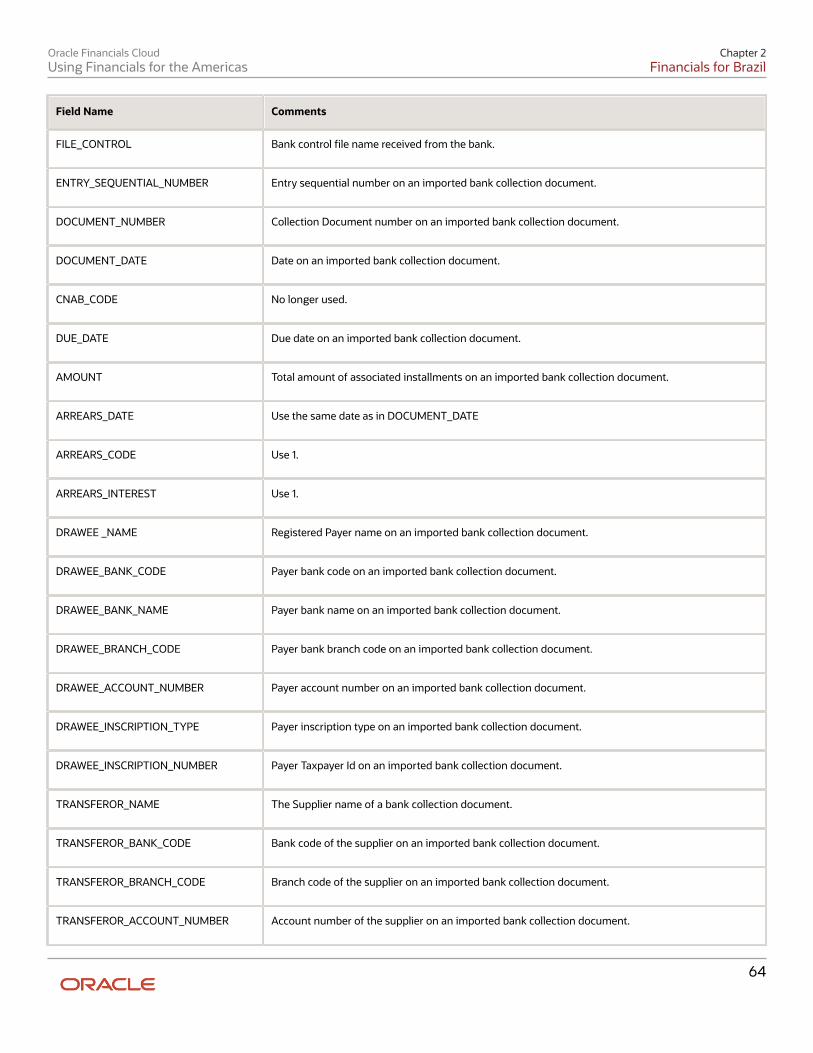
Oracle Financials CloudUsing Financials for the Americas
Chapter 2Financials for Brazil
Field Name Comments
FILE_CONTROL
Bank control file name received from the bank.
ENTRY_SEQUENTIAL_NUMBER
Entry sequential number on an imported bank collection document.
DOCUMENT_NUMBER
Collection Document number on an imported bank collection document.
DOCUMENT_DATE
Date on an imported bank collection document.
CNAB_CODE
No longer used.
DUE_DATE
Due date on an imported bank collection document.
AMOUNT
Total amount of associated installments on an imported bank collection document.
ARREARS_DATE
Use the same date as in DOCUMENT_DATE
ARREARS_CODE
Use 1.
ARREARS_INTEREST
Use 1.
DRAWEE _NAME
Registered Payer name on an imported bank collection document.
DRAWEE_BANK_CODE
Payer bank code on an imported bank collection document.
DRAWEE_BANK_NAME
Payer bank name on an imported bank collection document.
DRAWEE_BRANCH_CODE
Payer bank branch code on an imported bank collection document.
DRAWEE_ACCOUNT_NUMBER
Payer account number on an imported bank collection document.
DRAWEE_INSCRIPTION_TYPE
Payer inscription type on an imported bank collection document.
DRAWEE_INSCRIPTION_NUMBER
Payer Taxpayer Id on an imported bank collection document.
TRANSFEROR_NAME
The Supplier name of a bank collection document.
TRANSFEROR_BANK_CODE
Bank code of the supplier on an imported bank collection document.
TRANSFEROR_BRANCH_CODE
Branch code of the supplier on an imported bank collection document.
TRANSFEROR_ACCOUNT_NUMBER
Account number of the supplier on an imported bank collection document.
64
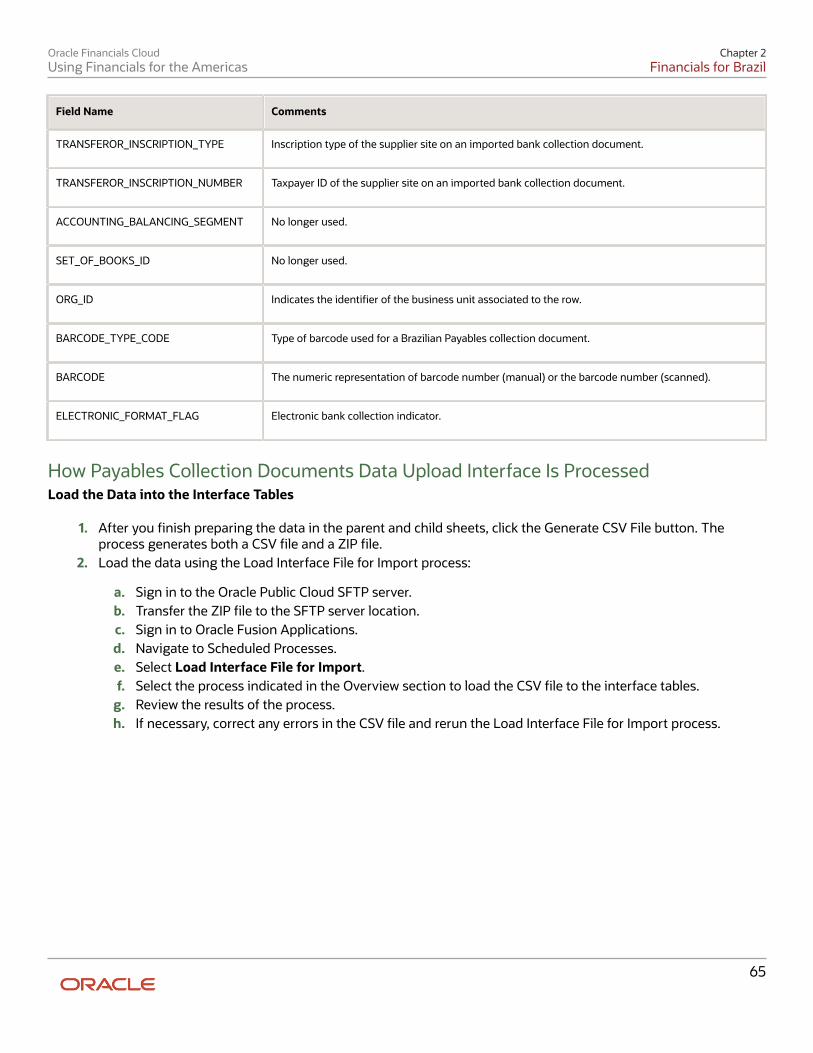
Oracle Financials CloudUsing Financials for the Americas
Chapter 2Financials for Brazil
Field Name Comments
TRANSFEROR_INSCRIPTION_TYPE
Inscription type of the supplier site on an imported bank collection document.
TRANSFEROR_INSCRIPTION_NUMBER
Taxpayer ID of the supplier site on an imported bank collection document.
ACCOUNTING_BALANCING_SEGMENT
No longer used.
SET_OF_BOOKS_ID
No longer used.
ORG_ID
Indicates the identifier of the business unit associated to the row.
BARCODE_TYPE_CODE
Type of barcode used for a Brazilian Payables collection document.
BARCODE
The numeric representation of barcode number (manual) or the barcode number (scanned).
ELECTRONIC_FORMAT_FLAG
Electronic bank collection indicator.
How Payables Collection Documents Data Upload Interface Is ProcessedLoad the Data into the Interface Tables
1. After you finish preparing the data in the parent and child sheets, click the Generate CSV File button. Theprocess generates both a CSV file and a ZIP file.
2. Load the data using the Load Interface File for Import process:
a. Sign in to the Oracle Public Cloud SFTP server.b. Transfer the ZIP file to the SFTP server location.c. Sign in to Oracle Fusion Applications.d. Navigate to Scheduled Processes.e. Select Load Interface File for Import.f. Select the process indicated in the Overview section to load the CSV file to the interface tables.
g. Review the results of the process.h. If necessary, correct any errors in the CSV file and rerun the Load Interface File for Import process.
65
Oracle Financials CloudUsing Financials for the Americas
Chapter 2Financials for Brazil
3. Correct load errors:
a. If the load of the CSV file fails on any row, the Load Interface File for Import process ends in error and theLoad File to Interface child process ends in either warning or error.
b. All rows that were loaded from the CSV file are deleted including the ones that loaded successfully.This lets you edit the problematic data in the spreadsheet and resubmit without having to separate thesuccessful rows from the rows that need modification.
c. Review the log and output files of the Load File to Interface child process for information about the datathat caused the failure.
d. Correct the data in the template you used.e. Repeat steps 1 and 2 of this section: Generate the CSV file and load the data using the Load Interface File
for Import process.f. Repeat all of these steps until all data is loaded successfully.
66
Oracle Financials CloudUsing Financials for the Americas
Chapter 3How To Topics
3 How To Topics
Overview of Configuring Fiscal Document for Brazil You can now create and manage fiscal documents for Brazil by using the fiscal document generation feature in OracleERP Cloud. In Brazil, fiscal documents are required to comply with the regulations of the tax authorities. They alsoregister a transfer of ownership of goods or commercial activity by a company to an individual or to another company.
You can use the fiscal document generation feature to create and manage fiscal documents for the following:
• Sales invoices
• Internal transfer shipments
• Shipments of returns to vendors
• Internal transfer of fixed assets
As the fiscal document generation process is integrated with Receivables , you can perform the following tasks beforeinvoices are completed:
• Enter the appropriate fiscal attributes
• Calculate taxes
• Generate a fiscal document for sales invoices
Since this feature is also integrated with Shipping, you can perform the following actions:
• Capture the fiscal attributes
• Generate and manage the fiscal documents before the internal transfers and RTV shipments are released
For fixed asset transfers, the required transaction information is moved to Receivables, so that a fiscal document can begenerated based on a non-receivable invoice.
For detailed information on configuring fiscal documents for Brazil, see related topics.
Related Topics
Overview of Configuring Tax Registrations for Brazil .
You can use Oracle ERP Cloud to capture, maintain, and validate company registration numbers, such as the NationalRegister of Legal Entities (CNPJ), Individual Taxpayer Registry (CPF), State Inscription Number (IE), Municipal InscriptionNumber (IM), and Superintendence of the Manaus Free Zone (SUFRAMA) in Brazil, for enterprise, suppliers, customers,and other parties. These registration numbers are required by the tax authorities, and defined as tax registrations andtaxpayer IDs. As part of the fiscal document information, they are displayed in the Manage Fiscal Document Generationpage, and extracted for submission to the tax authorities.
For more information on configuring tax registrations for Brazil, see related topics.
67
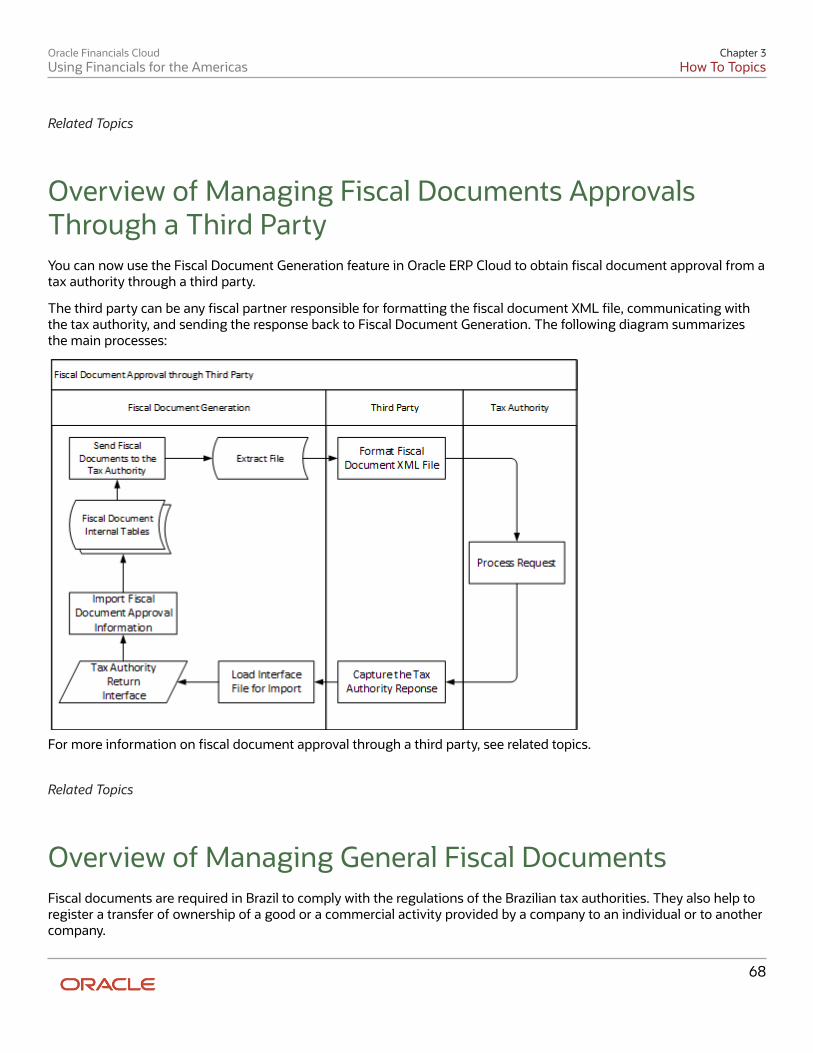
Oracle Financials CloudUsing Financials for the Americas
Chapter 3How To Topics
Related Topics
Overview of Managing Fiscal Documents ApprovalsThrough a Third Party You can now use the Fiscal Document Generation feature in Oracle ERP Cloud to obtain fiscal document approval from atax authority through a third party.
The third party can be any fiscal partner responsible for formatting the fiscal document XML file, communicating withthe tax authority, and sending the response back to Fiscal Document Generation. The following diagram summarizesthe main processes:
For more information on fiscal document approval through a third party, see related topics.
Related Topics
Overview of Managing General Fiscal Documents Fiscal documents are required in Brazil to comply with the regulations of the Brazilian tax authorities. They also help toregister a transfer of ownership of a good or a commercial activity provided by a company to an individual or to anothercompany.
68
Oracle Financials CloudUsing Financials for the Americas
Chapter 3How To Topics
You can use the fiscal document generation feature to create and manage fiscal documents for sales invoices, internaltransfer shipments, returns to supplier shipments , and internal transfer of fixed assets.
For more information on managing general fiscal documents, see related topics.
Related Topics
Overview of Managing Fiscal Documents for ManualReceivables Invoices You can generate fiscal documents based on manually created Receivables transactions. You can perform the followingtasks:
• Create goods invoices to generate fiscal documents for sales of goods approved by SEFAZ, the tax authority inBrazil.
• Create service invoices to generate fiscal documents for sales of services approved by City Tax Authority.
• Create mixed invoices to generate fiscal documents for sales of services and sales of goods approved by boththe tax authorities.
During transaction entry, the following fiscal document information is required:
• Bill to and ship to parties
• Bill to and ship to locations
• Taxes
• Products
• Quantities
• Amounts
For more information on fiscal document for a manual receivables invoice, see related topics.
Related Topics
Overview of Managing Fiscal Documents for ImportedReceivables Invoices Oracle ERP Cloud now enables you to import fiscal attributes to generate fiscal documents based on importedReceivables transactions.
To create transactions in Receivables using AutoInvoice, you can import the transaction data from: and , and from , tocreate transactions in Receivables using AutoInvoice.
• Oracle Cloud Projects
• Oracle Cloud Distributed Order Orchestration
• non-Oracle financial systems
69
Oracle Financials CloudUsing Financials for the Americas
Chapter 3How To Topics
You can also create and transfer order lines from Oracle CPQ Cloud to AutoInvoice using the Receivables Invoice Service.
For more information on managing fiscal documents based on imported Receivables transactions, see related topics.
Related Topics
Overview of Managing Fiscal Document Variations The Fiscal Document Generation feature, in addition to the regular approval flow, enables you to:
• Cancel the fiscal document when it is approved by the tax authority, but the goods or services are no longerintended to be shipped or provided.
• Void a fiscal document if you want to report to Tax Authority that the fiscal document number will not be used.
• Generate the fiscal document in contingency mode so that the goods can be shipped even when there arecommunication issues with tax authority.
• Review taxes returned by city tax authority when they are different from the calculated taxes.
The Fiscal Document Generation tasks to handle these flows are the same, whether the fiscal document is generated inInventory Management or Receivables.
For more information on fiscal document processing variations, see related topics.
Related Topics
Overview of Managing Transaction Taxes for Brazil Now you can manage transaction taxes for Brazil in Oracle ERP Cloud .
You can manage the following tax regimes:
• ICMS : Tax on the Circulation of Merchandise and Interstate and Inter Municipal Transportation Services andCommunications
• IPI: Industrialized Products Tax
• PIS and COFINS : Contribution to the Social Integration Program and Civil Service Asset Formation Program andContribution to Social Security Financing
• ISS : City Tax on Services Billing
For detailed information on managing transaction taxes for Brazil, see related topics.,
70
Oracle Financials CloudUsing Financials for the Americas
Chapter 3How To Topics
Related Topics
Overview of Managing Withholding Taxes for Brazil Now you can manage withholding taxes for Brazil in Oracle ERP Cloud.
Some of the typical withholding taxes that you can manage in Oracle ERP Cloud are::
• IRRF_PF : Federal withholding tax that is applicable for services provided by persons
• IRRF_PJ : Federal withholding tax that is applicable for services provided by companies
• INSS_PF : Social security withholding tax that is applicable for services provided by persons
• INSS_PJ : Social security withholding tax that is applicable for services provided by companies
• PIS/COFINS/CSLL : Federal contribution withhold ing tax that is applicable for services provided by companies
• ISS - City (municipal) withholding tax that is applicable for services provided by companies and persons
For detailed information on managing withholding taxes for Brazil in Oracle ERP Cloud, see related topics.
Related Topics
Overview of Managing Fiscal Documents for InternalMaterial Transfers You can now generate a fiscal document for an internal material transfer shipment independent of its source.
You can create internal material transfer requests from various sources such as Back -to -Back Supply for Sales Orders,Self Service Procurement, Manage Item Quantities from Inventory Management, and so on.
For detailed information on managing fiscal documents for internal material transfers in Oracle ERP Cloud, see relatedtopics.
Related Topics
Overview of Managing Fiscal Documents for Returns toSupplier You can now generate fiscal documents for returns to supplier shipments in Oracle ERP Cloud.
To return items to the supplier, you must generate a return fiscal document for transporting the returned items backto the supplier. Returns are needed when a customer rejects an item from their received shipment, a defect is foundinternally, and so on .
71
Oracle Financials CloudUsing Financials for the Americas
Chapter 3How To Topics
For detailed information on managing fiscal documents for returns to supplier in Oracle ERP Cloud, see related topics.
Related Topics
Overview of Creating Fiscal Documents for Fixed AssetTransfers You can now generate fiscal documents for fixed asset transfers in Oracle ERP Cloud.
If you physically move an asset from one location to another, and if the new location belongs to a different reportingunit within an organization, you must generate a fiscal document for the asset transfer.
For detailed information on creating fiscal documents for fixed asset transfers in Oracle ERP Cloud, see related topics.
Related Topics
Overview of Managing Fiscal Documents forMiscellaneous Purposes You can now use the fiscal document generation feature in Oracle ERP Cloud to create inbound and outbound fiscaldocuments for multiple purposes.
For example, you can use this approach to create fiscal documents for a return from customer, a goods shipment forexportation, a demonstration , a repair, a loan, and so on.
For detailed information on creating managing fiscal documents for miscellaneous purposes in Oracle ERP Cloud, seerelated topics.
Related Topics
Overview of Managing Complementary FiscalDocuments for Brazil Oracle ERP Cloud now enables you to handle tax during the capture of complementary fiscal documents.
For standard business flows, suppliers may want to rectify mistakes made in earlier fiscal documents. They must issue acomplementary fiscal document when there is a change in quantity, price, or taxes. The three types of complementaryfiscal documents are:
• Tax Correction
• Price Correction
72
Oracle Financials CloudUsing Financials for the Americas
Chapter 3How To Topics
• Quantity Correction
For detailed information on capturing complementary fiscal documents, see related topics.
Related Topics
Overview of Capturing Fiscal Documents of PurchaseOrders You can now manage taxes and additional fiscal attributes during the capture of fiscal documents associated withpurchase orders in Oracle ERP Cloud.
You can use the fiscal document capture feature to perform the following actions:
• Enter the fiscal document manually.
• Capture the fiscal document XML file received directly from the supplier .
For detailed information on capturing fiscal documents for purchase orders, see related topics.
Related Topics
Overview of Entering Fiscal Documents in Payables If you have not implemented the Fiscal Document Capture feature, you can record a service fiscal document directlythrough a Payables invoice by calculating taxes and capturing the fiscal attribute details. You can manually enter orimport invoices and their fiscal attributes from other systems. Fiscal Document Capture is the preferred method forentering a fiscal document . You can only enter fiscal documents in Payables if they meet all of the following criteria:
• Service fiscal document
• Fiscal document without recoverable taxes , such as ICMS, PIS, COFINS, and so on
• Fiscal document without services or charges associated with a manufacturing process, as the production cost isnot updated
• Fiscal document for which all lines are payable
For detailed information on entering fiscal documents in payables, see related topics.
73
Oracle Financials CloudUsing Financials for the Americas
Chapter 3How To Topics
Related Topics
Overview of Managing Payables Collection Documentsfor Brazil The Payables process completes with the payment of invoice installments. In Brazil, a collection document is receivedfrom a supplier or supplier bank, in either a manual or electronic format, and is associated with invoice installments ,either manually or automatically .
You can make payments through various methods such as check , Bordero (Payment authorization) , and electronicfile transfer (EFT). EFT is used for the bank collection process. The interest and penalties are calculated for overdueinvoices according to the legislation and agreed terms between the seller and buyer. You can configure these terms inthe application , per business unit, supplier or even supplier sites.
For detailed information on managing payables collection documents for Brazil, see related topics.
Related Topics
74

Oracle Financials CloudUsing Financials for the Americas
Chapter 4Financials Reports for the Americas
4 Financials Reports for the Americas
Purchase Withholding Certificate for Chile This topic contains summary information about the Purchase Withholding Certificate Report for Chile.
OverviewThe Purchase Withholding Certificate Report for Chile helps with an in-depth analysis of all the information fortransactions in the ledger currency that have transaction year within the certificate that is selected. The report displaysthe calendar periods, taxable service fee, as well as the payments on which amounts were withheld.
Key InsightsTo generate the report, the role must be LAD Financial Reporting role, and it can be assigned to any job role. This do notneed any job role exclusively.
Frequently Asked QuestionsThe following table lists frequently asked questions about the Purchase Withholding Certificate for Chile.
FAQs Answer
How do I find this report?
In Oracle Business Intelligence Enterprise Edition, select Analysis from Analysis and InteractiveReporting.
Who uses this report?
• Financial Accountants
• Financial Specialists
When do I use this report?
Use the Purchase Withholding Certificate for Chile when you need to provide detailed records of youraccounts to the fiscal authorities.
What type of report is this?
Oracle Transaction Business Intelligence
Purchase Withholding Certificate for Argentina This topic contains summary information about the Purchase Withholding Certificate for Argentina.
OverviewThe Purchase Withholding Certificate for Argentina provides all the report information for transactions in the ledgercurrency that have the transaction date within the date range that is selected.
75
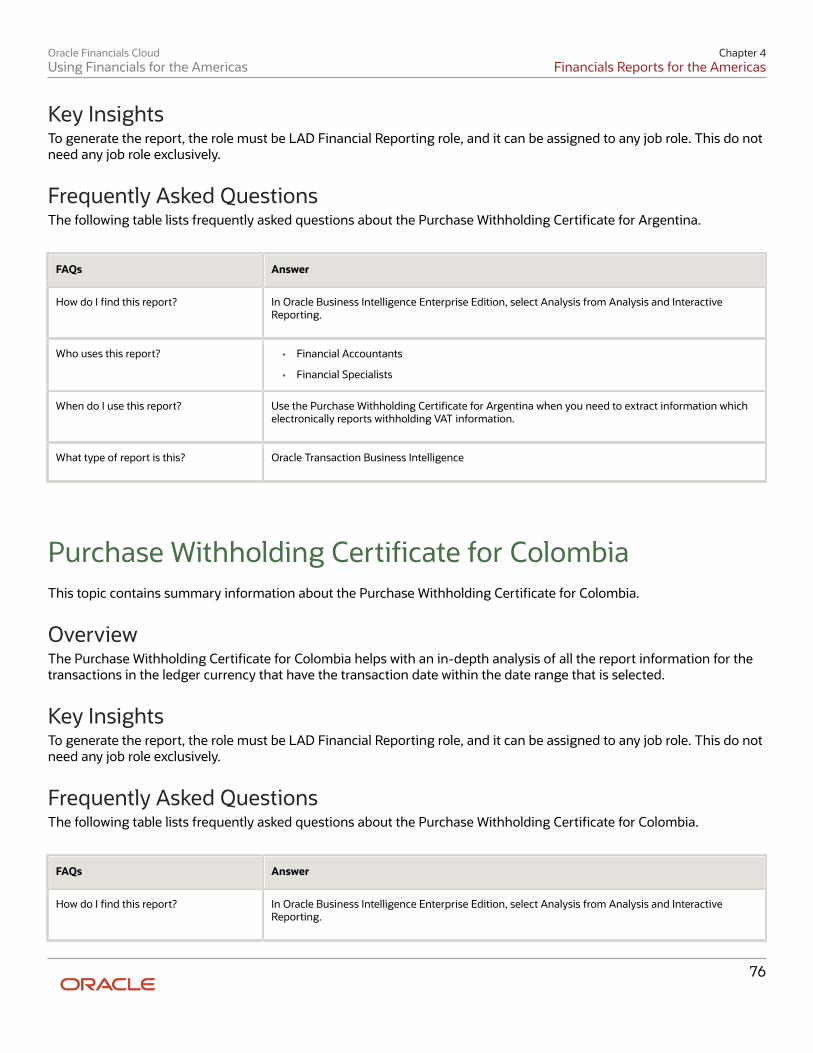
Oracle Financials CloudUsing Financials for the Americas
Chapter 4Financials Reports for the Americas
Key InsightsTo generate the report, the role must be LAD Financial Reporting role, and it can be assigned to any job role. This do notneed any job role exclusively.
Frequently Asked QuestionsThe following table lists frequently asked questions about the Purchase Withholding Certificate for Argentina.
FAQs Answer
How do I find this report?
In Oracle Business Intelligence Enterprise Edition, select Analysis from Analysis and InteractiveReporting.
Who uses this report?
• Financial Accountants
• Financial Specialists
When do I use this report?
Use the Purchase Withholding Certificate for Argentina when you need to extract information whichelectronically reports withholding VAT information.
What type of report is this?
Oracle Transaction Business Intelligence
Purchase Withholding Certificate for Colombia This topic contains summary information about the Purchase Withholding Certificate for Colombia.
OverviewThe Purchase Withholding Certificate for Colombia helps with an in-depth analysis of all the report information for thetransactions in the ledger currency that have the transaction date within the date range that is selected.
Key InsightsTo generate the report, the role must be LAD Financial Reporting role, and it can be assigned to any job role. This do notneed any job role exclusively.
Frequently Asked QuestionsThe following table lists frequently asked questions about the Purchase Withholding Certificate for Colombia.
FAQs Answer
How do I find this report?
In Oracle Business Intelligence Enterprise Edition, select Analysis from Analysis and InteractiveReporting.
76
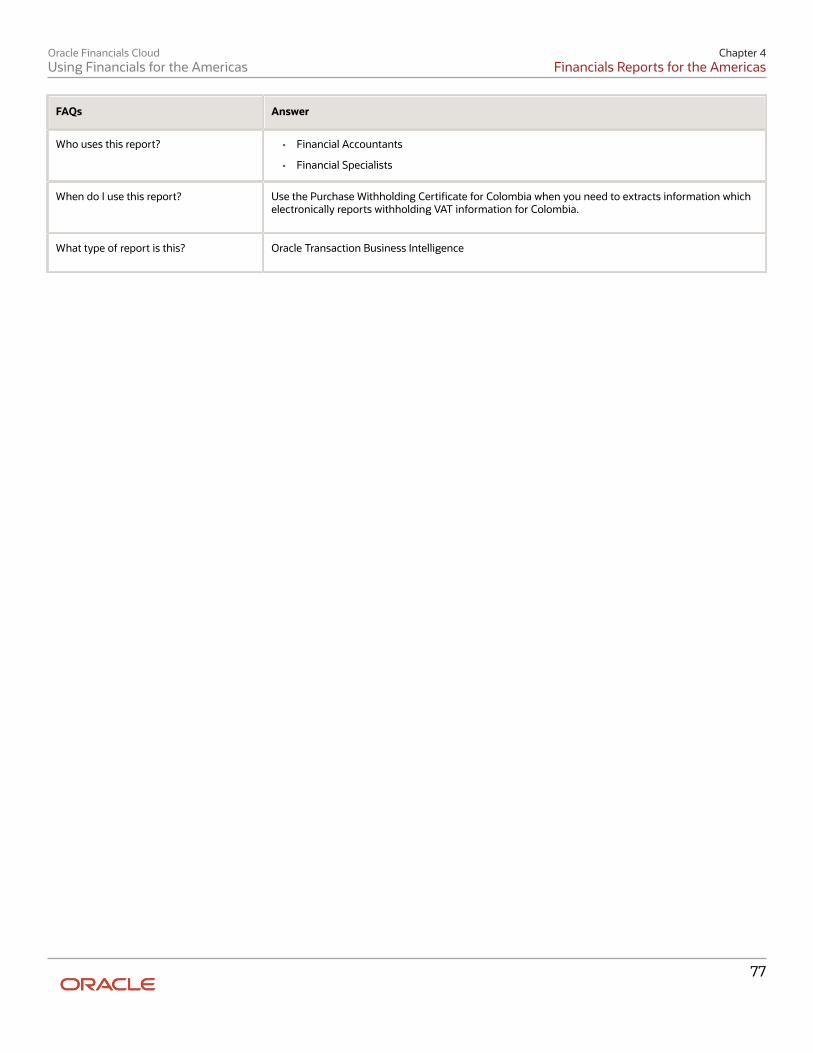
Oracle Financials CloudUsing Financials for the Americas
Chapter 4Financials Reports for the Americas
FAQs Answer
Who uses this report?
• Financial Accountants
• Financial Specialists
When do I use this report?
Use the Purchase Withholding Certificate for Colombia when you need to extracts information whichelectronically reports withholding VAT information for Colombia.
What type of report is this?
Oracle Transaction Business Intelligence
77

Oracle Financials CloudUsing Financials for the Americas
Chapter 4Financials Reports for the Americas
78