Oracle Financials Cloud
440
Oracle Financials Cloud Implementing Receivables Credit to Cash 22A
-
Upload
khangminh22 -
Category
Documents
-
view
1 -
download
0
Transcript of Oracle Financials Cloud
Oracle FinancialsCloud
Implementing Receivables Credit toCash
22A

Oracle Financials CloudImplementing Receivables Credit to Cash
22A
F48638-02
Copyright © 2011, 2022, Oracle and/or its affiliates.
Authors: Robert MacIsaac
This software and related documentation are provided under a license agreement containing restrictions on use and disclosure and are protectedby intellectual property laws. Except as expressly permitted in your license agreement or allowed by law, you may not use, copy, reproduce, translate,broadcast, modify, license, transmit, distribute, exhibit, perform, publish, or display in any part, in any form, or by any means. Reverse engineering,disassembly, or decompilation of this software, unless required by law for interoperability, is prohibited.
The information contained herein is subject to change without notice and is not warranted to be error-free. If you find any errors, please reportthem to us in writing.
If this is software or related documentation that is delivered to the U.S. Government or anyone licensing it on behalf of the U.S. Government, thefollowing notice is applicable:
U.S. GOVERNMENT END USERS: Oracle programs, including any operating system, integrated software, any programs installed on the hardware,and/or documentation, delivered to U.S. Government end users are "commercial computer software" pursuant to the applicable Federal AcquisitionRegulation and agency-specific supplemental regulations. As such, use, duplication, disclosure, modification, and adaptation of the programs,including any operating system, integrated software, any programs installed on the hardware, and/or documentation, shall be subject to licenseterms and license restrictions applicable to the programs. No other rights are granted to the U.S. Government.
This software or hardware is developed for general use in a variety of information management applications. It is not developed or intended foruse in any inherently dangerous applications, including applications that may create a risk of personal injury. If you use this software or hardwarein dangerous applications, then you shall be responsible to take all appropriate fail-safe, backup, redundancy, and other measures to ensure its safeuse. Oracle Corporation and its affiliates disclaim any liability for any damages caused by use of this software or hardware in dangerous applications.
Oracle and Java are registered trademarks of Oracle and/or its affiliates. Other names may be trademarks of their respective owners.
Intel and Intel Xeon are trademarks or registered trademarks of Intel Corporation. All SPARC trademarks are used under license and are trademarks orregistered trademarks of SPARC International, Inc. AMD, Opteron, the AMD logo, and the AMD Opteron logo are trademarks or registered trademarksof Advanced Micro Devices. UNIX is a registered trademark of The Open Group.
This software or hardware and documentation may provide access to or information about content, products, and services from third parties. OracleCorporation and its affiliates are not responsible for and expressly disclaim all warranties of any kind with respect to third-party content, products, andservices unless otherwise set forth in an applicable agreement between you and Oracle. Oracle Corporation and its affiliates will not be responsiblefor any loss, costs, or damages incurred due to your access to or use of third-party content, products, or services, except as set forth in an applicableagreement between you and Oracle.
Oracle Financials CloudImplementing Receivables Credit to Cash
Contents
Get Help ................................................................................................................................ i
1 Define Common Accounts Receivable Configuration 1Overview of Oracle Receivables ................................................................................................................................................... 1
Simple Configuration to Operate Receivables ......................................................................................................................... 2
Predefined Receivables Data in Subledger Accounting ......................................................................................................... 3
FAQs for Define Common Accounts Receivable Configuration ......................................................................................... 16
Ledger and Legal Entity Document Sequencing ................................................................................................................... 16
Receivables Activities ................................................................................................................................................................... 21
AutoCash Rule Sets ..................................................................................................................................................................... 24
Approval Limits ............................................................................................................................................................................. 32
Credit Memo Workflow ............................................................................................................................................................... 33
Statements ..................................................................................................................................................................................... 35
FAQs for Standard Messages .................................................................................................................................................... 39
FAQs for Distribution Sets ......................................................................................................................................................... 40
2 Manage Receivables System Options 41Guidelines for Receivables System Option Settings ............................................................................................................. 41
Example of Header Level Rounding ........................................................................................................................................ 42
Tax Invoice Printing Options ..................................................................................................................................................... 43
AutoInvoice Tuning Segments .................................................................................................................................................. 44
AutoInvoice Log File Message Levels ...................................................................................................................................... 45
FAQs for Manage Receivables System Options .................................................................................................................... 46
Email Delivery ............................................................................................................................................................................... 47
OAGIS 10.1 and UBL 2.1 XML ...................................................................................................................................................... 52
B2B XML ........................................................................................................................................................................................ 60
Multifund Accounting ................................................................................................................................................................. 64
3 Define Customer Billing Configuration 77AutoInvoice .................................................................................................................................................................................... 77
Payment Terms ............................................................................................................................................................................. 84
AutoAccounting ............................................................................................................................................................................ 90
Oracle Financials CloudImplementing Receivables Credit to Cash
Transaction Types ........................................................................................................................................................................ 96
Transaction Sources .................................................................................................................................................................. 100
Memo Lines ................................................................................................................................................................................. 106
Balance Forward Billing ............................................................................................................................................................. 107
Remit-to Addresses .................................................................................................................................................................... 114
FAQs for Salesperson Reference Accounts ............................................................................................................................ 115
4 Define Customer Payments 117Create a Shared Service Model in Receivables ..................................................................................................................... 117
Application Rule Sets .................................................................................................................................................................. 118
Receipt Classes and Methods .................................................................................................................................................. 124
Lockbox ......................................................................................................................................................................................... 129
Transmission Formats for Lockbox ........................................................................................................................................ 146
AutoMatch Rule Sets .................................................................................................................................................................. 155
Application Exception Rule Sets .............................................................................................................................................. 161
Customer Paying Relationships ............................................................................................................................................... 162
FAQs for Receipt Sources ......................................................................................................................................................... 164
5 Configure Payment System Connectivity 167Options for Validations .............................................................................................................................................................. 167
How You Set Up Formats ......................................................................................................................................................... 168
Transmission Protocols .............................................................................................................................................................. 171
Transmission Configurations .................................................................................................................................................... 172
How You Set Up Transmission Configurations .................................................................................................................... 172
How You Configure Pretty Good Privacy (PGP) Encryption and Digital Signature for Outbound and Inbound Messages
.......................................................................................................................................................................................................... 174
How You Configure Two-Factor Authentication Using A Security Key File ................................................................... 179
How You Test the Transmission Configuration ................................................................................................................... 180
How You Configure a Communication Channel to a Payment System .......................................................................... 182
How You Set Up a Payment System ...................................................................................................................................... 183
Payment System Accounts ....................................................................................................................................................... 186
How You Set Up Payment System Connections for Multiple Business Units ................................................................ 187
Import and Export Tokenization Setup Data ....................................................................................................................... 190
Import a Security Credential File ............................................................................................................................................ 192
FAQs for Configure Payment System Connectivity ............................................................................................................ 194
Oracle Financials CloudImplementing Receivables Credit to Cash
6 Define Funds Capture 197Funds Capture Process Profiles .............................................................................................................................................. 197
External Settlement of Credit Card and Bank Accounts .................................................................................................... 198
Examples of Settlement Grouping Rules .............................................................................................................................. 199
Routing Rules ............................................................................................................................................................................. 200
Reevaluate Routing Rules During Receipt Remittance ...................................................................................................... 201
How You Use Oracle BI Publisher Enterprise to Modify Templates for Use with Formats .......................................... 201
FAQs for Define Funds Capture .............................................................................................................................................. 203
7 Define Payments Security 205Options for System Security ................................................................................................................................................... 205
Enable Encryption of Sensitive Payment Information ....................................................................................................... 208
PCI DSS Credit Card Processing Requirements .................................................................................................................. 208
How You Enable Credit Card Tokenization .......................................................................................................................... 209
How Imported Legacy Credit Cards Are Processed ............................................................................................................ 210
Removal of Personally Identifiable Information .................................................................................................................. 214
8 Define Customer 221Define Customer Account ......................................................................................................................................................... 221
Manage Receivables Customer Profile Classes ................................................................................................................... 225
Manage Customers .................................................................................................................................................................... 228
Manage Customer Data Uploads ............................................................................................................................................ 232
Manage Data Import ................................................................................................................................................................. 243
9 Define Bills Receivable 253Enable System Options for Bills Receivable ......................................................................................................................... 253
Create a Bills Receivable Creation Receipt Method ............................................................................................................ 253
Prepare Transactions for Bills Receivable Batches ............................................................................................................. 255
Create a Bills Receivable Remittance Receipt Method ....................................................................................................... 257
Create a Remittance Bank Account for Bills Receivable .................................................................................................... 258
FAQs for Define Bills Receivable ............................................................................................................................................. 259
10 Define Revenue Management Configuration for Receivables 261Guidelines for Defining Revenue Policies ............................................................................................................................. 261
How Event-Based Revenue Management Works ............................................................................................................... 262

Oracle Financials CloudImplementing Receivables Credit to Cash
Revenue Contingencies ............................................................................................................................................................ 263
Payment-Based Revenue Contingencies .............................................................................................................................. 264
Revenue Contingency Removal Events ................................................................................................................................ 266
Revenue Contingency Assignment Rules ............................................................................................................................. 267
FAQs for Define Revenue Management Configuration for Receivables ........................................................................ 268
11 Define Credit Management 271Components of the Credit Profile ........................................................................................................................................... 271
Credit Analysts and Credit Managers .................................................................................................................................... 273
Create a Scoring Model ............................................................................................................................................................ 274
How You Define a Scoring Model Calculation ..................................................................................................................... 277
Create a Credit Case Folder Template ................................................................................................................................... 279
How You Maintain the Summary Tables for Data Points ................................................................................................. 280
How You Import Third-Party Credit Data for Data Points ................................................................................................ 282
How You Import Credit Management Data Points ............................................................................................................. 283
Descriptive Flexfields in Credit Case Folders ...................................................................................................................... 284
FAQs for Define Credit Management .................................................................................................................................... 285
12 Define Cash Management and Banking Configuration 289How Bank, Branch, and Account Components Work Together ....................................................................................... 289
Considerations When You Create Accounts ........................................................................................................................ 290
Cash Management Profile Options ........................................................................................................................................ 291
Overview of Parse Rule Sets ................................................................................................................................................... 293
Overview of Transaction Type Mapping ............................................................................................................................... 294
Overview of Tolerance Rules ................................................................................................................................................... 295
Reconciliation Matching Rules ................................................................................................................................................ 296
Overview of Reconciliation Rules Sets .................................................................................................................................. 302
Overview of Bank Statement Transaction Codes ............................................................................................................... 303
How You Map Configurable BAI2 Transaction Codes ........................................................................................................ 303
Overview of Bank Statement Transaction Creation Rules ................................................................................................ 304
Create Banks, Branches, and Accounts in Spreadsheet ................................................................................................... 304
Set Up Cash Positioning and Forecasting ........................................................................................................................... 306
Bank Account Validation ........................................................................................................................................................... 310
13 Define Advanced Collections Configuration 389Manage Collections Preferences ............................................................................................................................................ 389
Oracle Financials CloudImplementing Receivables Credit to Cash
Manage Aging Methods .......................................................................................................................................................... 394
Manage Collectors ..................................................................................................................................................................... 397
Manage Dunning Configuration ............................................................................................................................................ 408
Define Scoring .............................................................................................................................................................................. 411
Define Strategy ........................................................................................................................................................................... 419
Manage Collections Scoring and Strategy Assignments .................................................................................................. 425
14 Define Bill Management 429Set Up Bill Management .......................................................................................................................................................... 429

Oracle Financials CloudImplementing Receivables Credit to Cash
Oracle Financials CloudImplementing Receivables Credit to Cash
Get Help
Get Help
Get Help in the ApplicationsUse help icons to access help in the application. If you don't see any help icons on your page, click your user imageor name in the global header and select Show Help Icons.
Get SupportYou can get support at My Oracle Support. For accessible support, visit Oracle Accessibility Learning and Support.
Get TrainingIncrease your knowledge of Oracle Cloud by taking courses at Oracle University.
Join Our CommunityUse Cloud Customer Connect to get information from industry experts at Oracle and in the partner community. You canjoin forums to connect with other customers, post questions, and watch events.
Learn About AccessibilityFor information about Oracle's commitment to accessibility, visit the Oracle Accessibility Program. Videos included inthis guide are provided as a media alternative for text-based topics also available in this guide.
Share Your FeedbackWe welcome your feedback about Oracle Applications user assistance. If you need clarification, find an error, or justwant to tell us what you found helpful, we'd like to hear from you.
You can email your feedback to [email protected].
Thanks for helping us improve our user assistance!
i

Oracle Financials CloudImplementing Receivables Credit to Cash
Get Help
ii
Oracle Financials CloudImplementing Receivables Credit to Cash
Chapter 1Define Common Accounts Receivable Configuration
1 Define Common Accounts ReceivableConfiguration
Overview of Oracle Receivables Oracle Receivables provides integrated functionality to perform day-to-day accounts receivable operations. Receivablesfunctionality is managed from these Overview work areas: Billing, Receivables Balances, Revenue Management, andCredit Management.
All work areas provide access to general ledger account activities, including creating accounting, creating manualjournal entries, and reviewing journal entries.
Billing Work AreaUse the Billing work area to perform tasks related to customer billing activities. Monitor and review incompletetransactions, and approve and research pending adjustments. Use AutoInvoice to import transactions from othersystems and generate invoices and credit memos automatically according to your requirements. You can review andcorrect AutoInvoice import errors and resubmit AutoInvoice. Create new invoices, debit memos, credit memos, and on-account credit memos. Perform related activities to manage your transactions: update, duplicate, credit, adjust, dispute,and preview a transaction. You can also create a new customer record and manage existing customers from the Billingwork area.
Receivables Balances Work AreaUse the Receivables Balances work area to perform tasks related to customer payment activities and the managementof accounts receivable balances. Review actionable items, including open receipts and receipt batches, unapplied andon-account receipts and credit memos, receipt remittance batches, and funds transfer errors. Create receipts manually,import receipts using lockbox or spreadsheet, or create automatic receipts. Perform related activities to manage yourreceipts: apply, unapply, reverse, delete; create invoice adjustments or chargebacks during receipt application; andremit, clear, or risk eliminate factored receipts. You can manage receipt remittances: create, modify, and approvereceipt remittance batches. You can also perform tasks related to managing accounts receivables balances, includingreconciling receivables to the general ledger and managing receivables accounting period statuses.
Revenue Management Work AreaUse the Revenue Management work area to perform tasks related to revenue recognition and revenue adjustments.Run the Recognize Revenue program to generate revenue distribution records for invoices and credit memos thatuse invoicing and revenue scheduling rules. Perform revenue adjustments on one or more transactions, includingscheduling and unscheduling revenue; reviewing, adding, and expiring revenue contingencies; and transferring salescredits. You can also manage revenue policies, revenue contingencies, and rules that assign revenue contingencies totransactions automatically.
Credit Management Work AreaUse the Credit Management work area to create credit profiles for your customers. The credit profile contains keyinformation for establishing the creditworthiness of each of your customers, including credit classifications, creditlimits, and credit review cycles. Review and evaluate specific credit authorization requests; run periodic reviews of the
1

Oracle Financials CloudImplementing Receivables Credit to Cash
Chapter 1Define Common Accounts Receivable Configuration
creditworthiness of your existing customers; review customer credit scores, and provide recommendations for customercredit. Build scoring models that calculate a credit score based on credit data specific to a customer; maintain detailedinformation about customer financial and accounting history; and create templates for different types of credit reviewsthat are automatically assigned to specific credit scenarios.
Customer InformationFrom either the Billing or Receivables Balances work area, you have access to manage both customer informationand customer account activities, in summary and in detail. You can review customer account information by a singlebusiness unit, bill-to site, or across all business units and bill-to sites. For each customer account, you can reviewtransactions and receipts, dispute and adjust transactions, and drill down to current or historical customer accountactivity.
Simple Configuration to Operate Receivables You can create an operational Receivables environment with seven configurations. The remaining configurations areeither optional or have predefined values.
If applicable, your Receivables configuration must include a plan to migrate your customer information from your legacysystem.
Receivables Configuration TasksThere are seven configuration tasks necessary to create an operational Receivables environment. Before you performthese tasks, you must ensure that you have completed all of the required implementation tasks for Oracle Financials.
Perform these seven tasks in the order indicated:
1. Set Receivables System Options
Set Receivables system options to define your Receivables environment. During Receivables setup, you specifyyour accounts, customer and invoice parameters, and how the AutoInvoice and Automatic Receipts programsoperate.
2. Define Receivables Activities
Define receivables activities to create default accounting for all activities other than transactions and receipts,including, for example, miscellaneous cash, discounts, late charges, adjustments, and write-offs.
3. Define AutoAccounting Rules
Defining AutoAccounting is a required configuration task for processing customer billing.
Define AutoAccounting to specify how you want Receivables to determine the default general ledger accountsfor transactions. Receivables creates default accounts for revenue, receivable, freight, tax, unearned revenue,unbilled receivables, late charges, and AutoInvoice clearing (suspense) accounts using your AutoAccountingsetup.
2

Oracle Financials CloudImplementing Receivables Credit to Cash
Chapter 1Define Common Accounts Receivable Configuration
4. Define Receipt Classes and Methods
Defining receipt classes and receipt methods is a required configuration task for processing customerpayments.
Receipt classes determine the required processing steps for receipts to which you assign receipt methods withthis class. These steps include confirmation, remittance, and clearance. Receipt methods specify accountingfor receipt entries and applications, determine customer remittance bank account information, and configureautomatic receipt processing and fund transfer error handling.
5. Define Remit-to Addresses
Define remit-to addresses to let your customers know where to send payment for open receivables. Receivablesuses the addresses to provide default remit-to information when you enter transactions.
You must provide a remit-to address to complete a transaction.
If you use AutoInvoice, but you haven't defined a remit-to address for a particular customer site, AutoInvoicerejects all transactions for which it couldn't determine a remit-to address.
6. Define Approval Limits
Define approval limits to determine whether a Receivables user can approve adjustments or credit memorequests. You define approval limits by document type, amount, and currency.
7. Define Statement Cycles
Define statement cycles to control when you create customer statements. You assign statement cycles tocustomer profiles.
Related Topics• How can I use remit-to addresses
• Guidelines for Receivables System Option Settings
• AutoAccounting Account Types and Segment Values
• Receivables Activity Types
Predefined Receivables Data in Subledger Accounting Oracle Receivables provides predefined data for Oracle Subledger Accounting that you can use to integrate the twoapplications.
When you run Create Receivables Accounting, the program accepts the default accounting information fromAutoAccounting without change and uses the predefined data to create accounting in the subledger. SubledgerAccounting transfers the final accounting to General Ledger.
Note: You can optionally define your own subledger accounting rules to overwrite the default accounts from theaccounting events.
Receivables predefines one application in Subledger Accounting named Receivables. Most of the data that Receivablespredefines for Subledger Accounting is associated with the Receivables application.
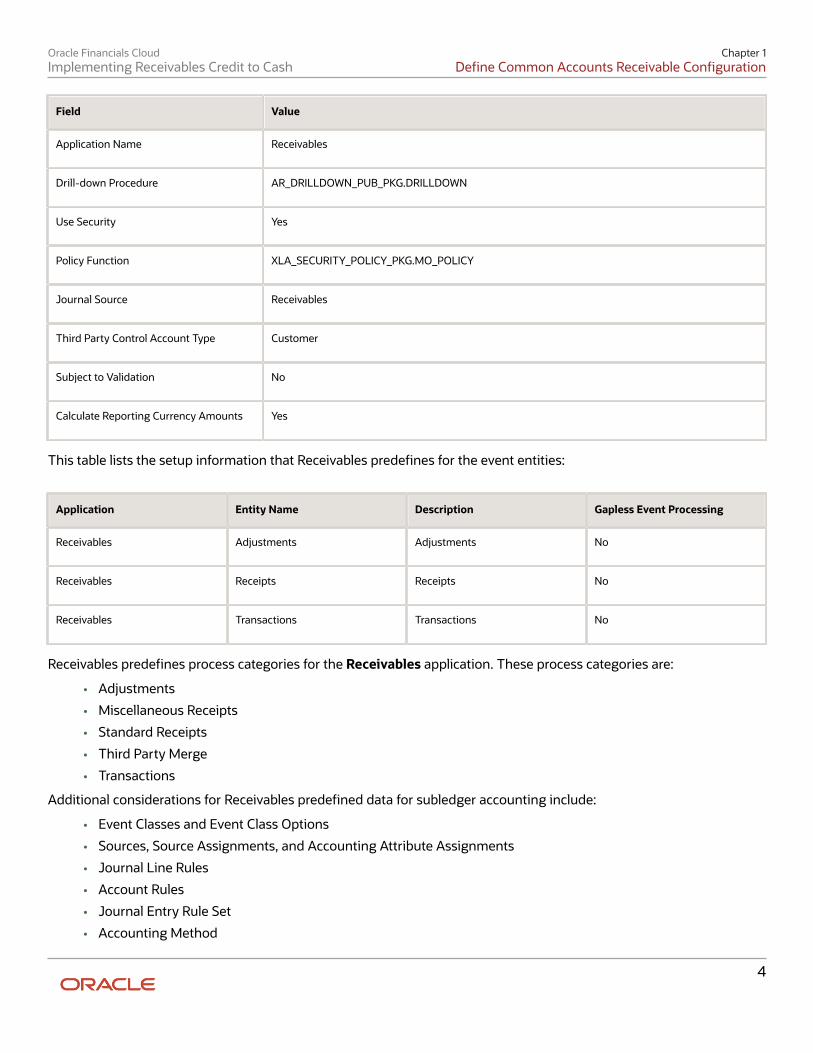
This table shows the attribute values that Receivables predefines for the Receivables application:
3
Oracle Financials CloudImplementing Receivables Credit to Cash
Chapter 1Define Common Accounts Receivable Configuration
Field Value
Application Name
Receivables
Drill-down Procedure
AR_DRILLDOWN_PUB_PKG.DRILLDOWN
Use Security
Yes
Policy Function
XLA_SECURITY_POLICY_PKG.MO_POLICY
Journal Source
Receivables
Third Party Control Account Type
Customer
Subject to Validation
No
Calculate Reporting Currency Amounts
Yes
This table lists the setup information that Receivables predefines for the event entities:
Application Entity Name Description Gapless Event Processing
Receivables
Adjustments
Adjustments
No
Receivables
Receipts
Receipts
No
Receivables
Transactions
Transactions
No
Receivables predefines process categories for the Receivables application. These process categories are:
• Adjustments
• Miscellaneous Receipts
• Standard Receipts
• Third Party Merge
• Transactions
Additional considerations for Receivables predefined data for subledger accounting include:
• Event Classes and Event Class Options
• Sources, Source Assignments, and Accounting Attribute Assignments
• Journal Line Rules
• Account Rules
• Journal Entry Rule Set
• Accounting Method
4

Oracle Financials CloudImplementing Receivables Credit to Cash
Chapter 1Define Common Accounts Receivable Configuration
Event Classes and Event Class OptionsReceivables predefines event classes for each event entity that belongs to the Receivables application.
This table lists the event classes that Receivables predefines for the Receivables application:
Entity Event Class Name
Adjustments
Adjustment
Receipts
Miscellaneous Receipt
Receipts
Receipt
Transactions
Chargeback
Transactions
Credit Memo
Transactions
Debit Memo
Transactions
Invoice
Accounting event class options define attributes of an event class. Receivables defines the accounting event classoptions for each predefined event class.
This table lists the accounting event class options that Receivables predefines for the Receivables application:
Event Class Process Category Default Journal Category Transaction View Balance Types
Adjustment
Adjustments
Adjustment
AR_ADJ_INF_V
Actual
Bills Receivable
Bills Receivable
Bills Receivable
AR_TRX_INF_V
Actual
Miscellaneous Receipt
Miscellaneous Receipts
Misc Receipts
AR_CR_INF_V
Actual
Receipt
Standard Receipts
Receipts
AR_CR_INF_V
Actual
Chargeback
Transactions
Chargebacks
AR_TRX_INF_V
Actual
Credit Memo
Transactions
Credit Memos
AR_TRX_INF_V
Actual
Debit Memo
Transactions
Debit Memos
AR_TRX_INF_V
Actual
Invoice
Transactions
Sales Invoices
AR_TRX_INF_V
Actual
5
Oracle Financials CloudImplementing Receivables Credit to Cash
Chapter 1Define Common Accounts Receivable Configuration
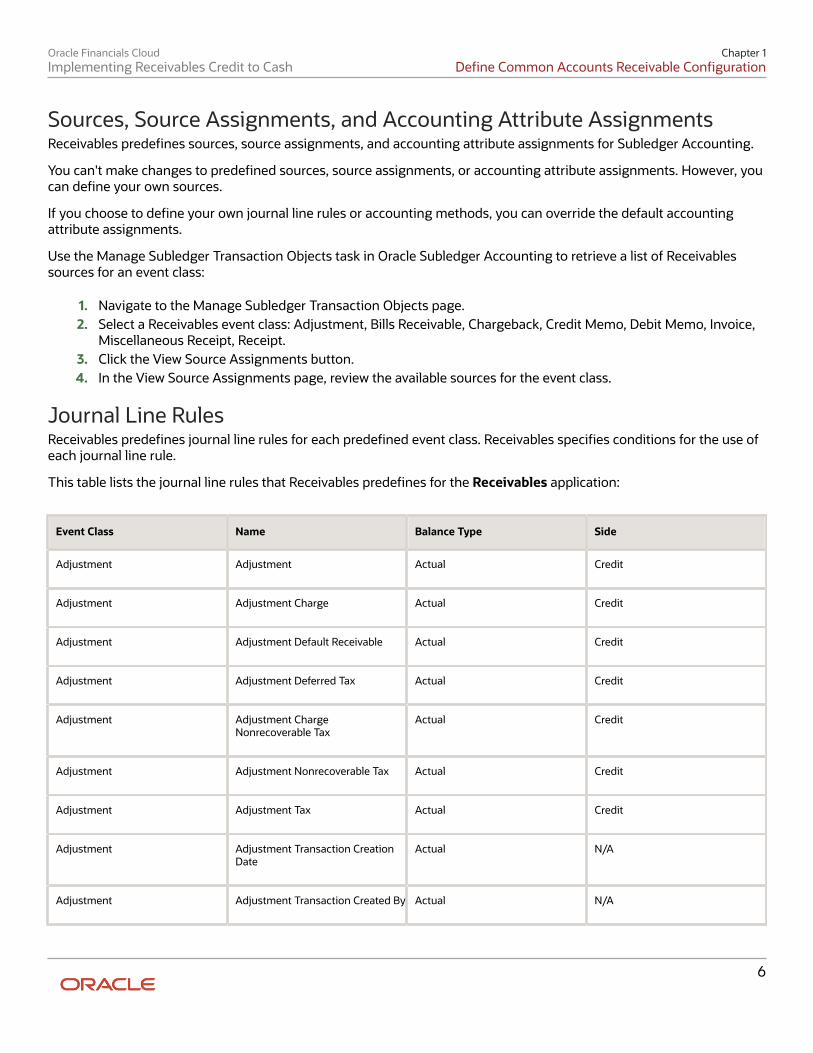
Sources, Source Assignments, and Accounting Attribute AssignmentsReceivables predefines sources, source assignments, and accounting attribute assignments for Subledger Accounting.
You can't make changes to predefined sources, source assignments, or accounting attribute assignments. However, youcan define your own sources.
If you choose to define your own journal line rules or accounting methods, you can override the default accountingattribute assignments.
Use the Manage Subledger Transaction Objects task in Oracle Subledger Accounting to retrieve a list of Receivablessources for an event class:
1. Navigate to the Manage Subledger Transaction Objects page.2. Select a Receivables event class: Adjustment, Bills Receivable, Chargeback, Credit Memo, Debit Memo, Invoice,
Miscellaneous Receipt, Receipt.3. Click the View Source Assignments button.4. In the View Source Assignments page, review the available sources for the event class.
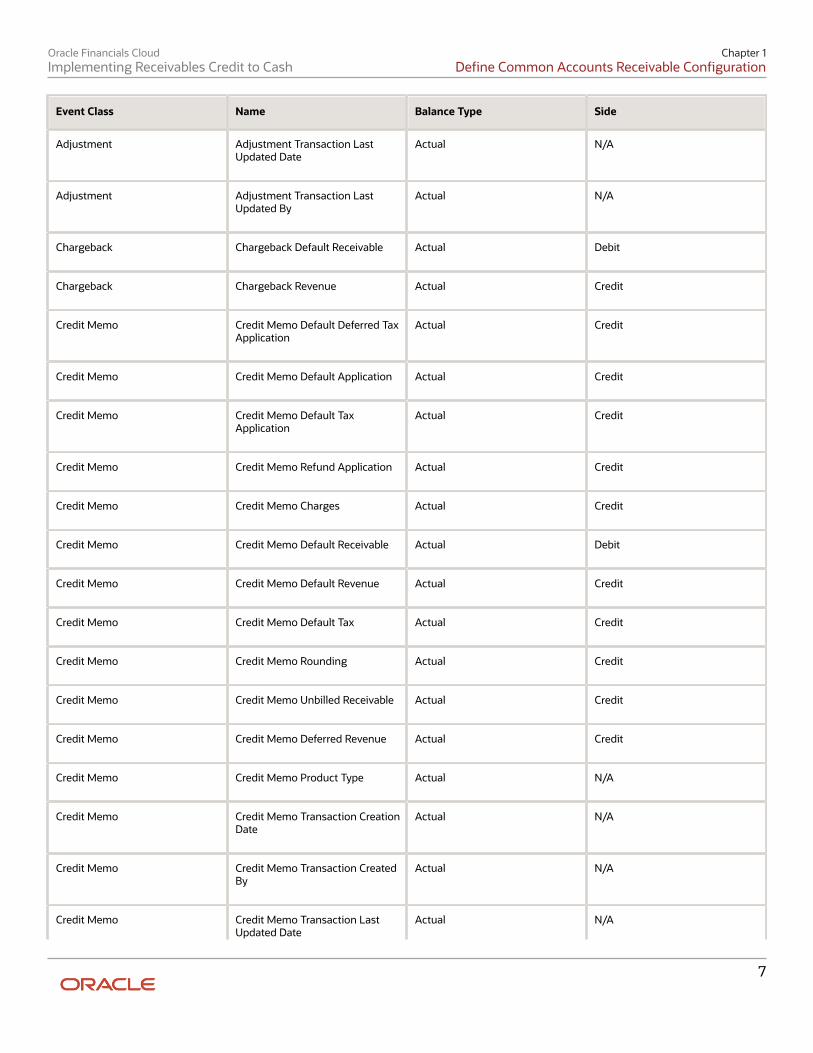
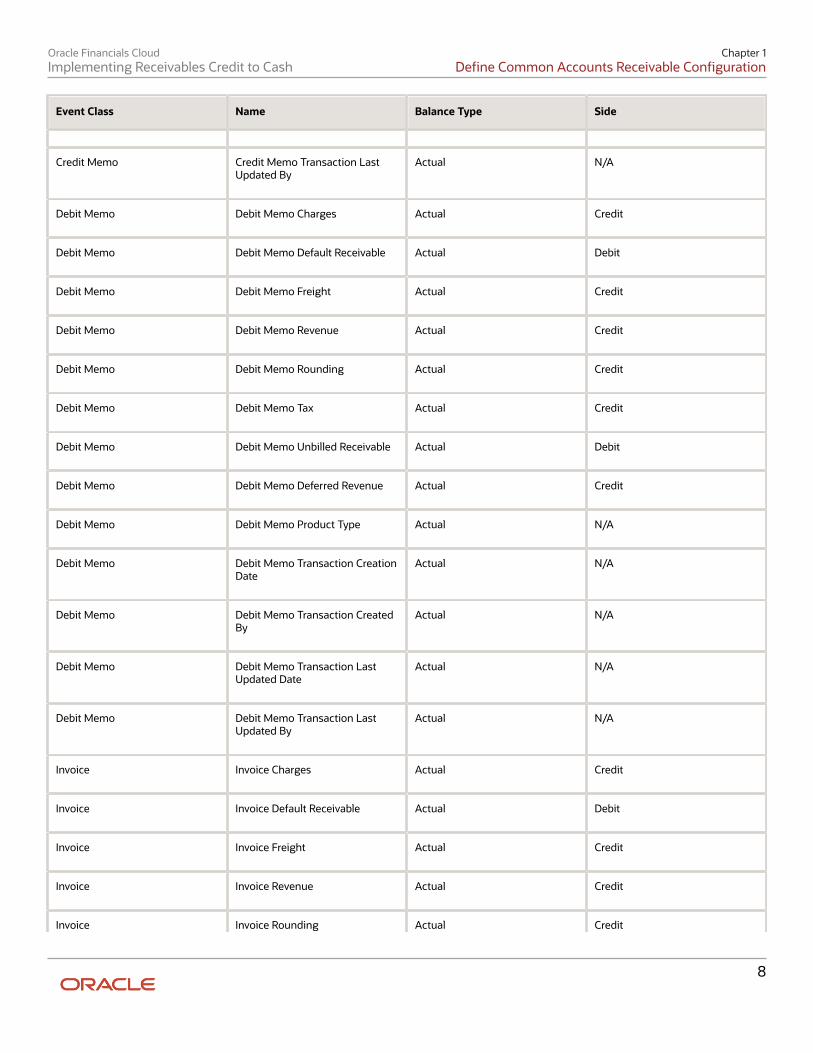
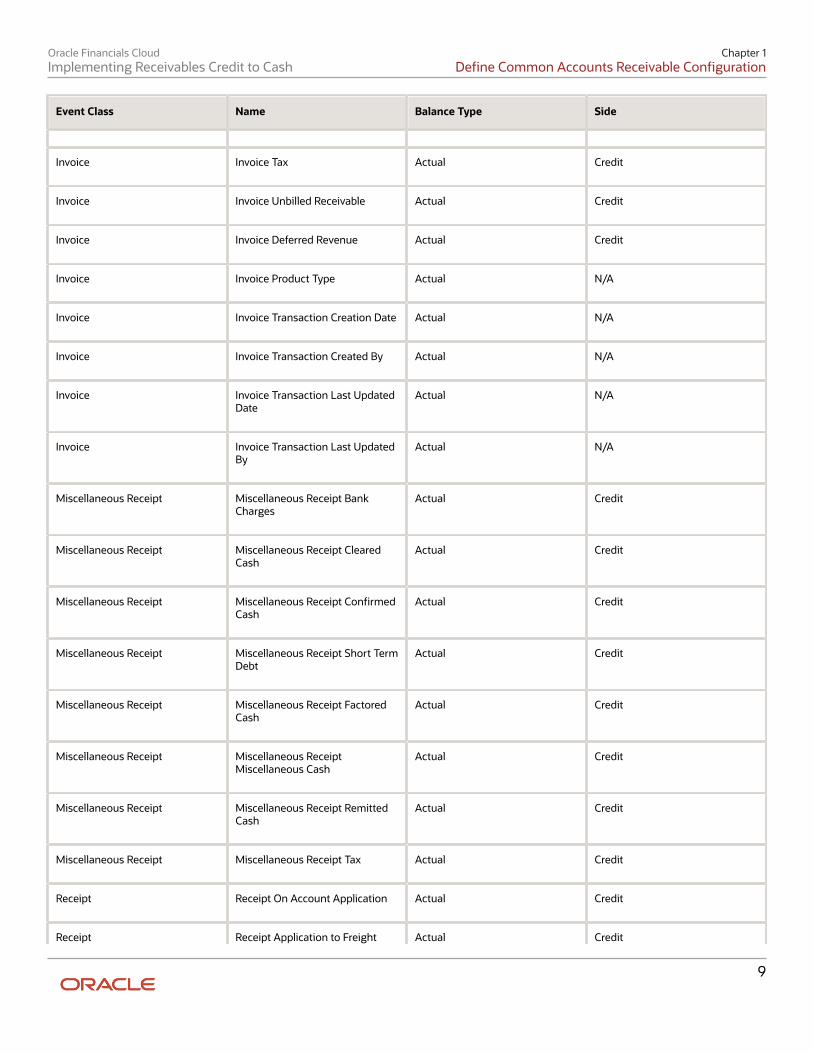
Journal Line RulesReceivables predefines journal line rules for each predefined event class. Receivables specifies conditions for the use ofeach journal line rule.
This table lists the journal line rules that Receivables predefines for the Receivables application:
Event Class Name Balance Type Side
Adjustment
Adjustment
Actual
Credit
Adjustment
Adjustment Charge
Actual
Credit
Adjustment
Adjustment Default Receivable
Actual
Credit
Adjustment
Adjustment Deferred Tax
Actual
Credit
Adjustment
Adjustment ChargeNonrecoverable Tax
Actual
Credit
Adjustment
Adjustment Nonrecoverable Tax
Actual
Credit
Adjustment
Adjustment Tax
Actual
Credit
Adjustment
Adjustment Transaction CreationDate
Actual
N/A
Adjustment
Adjustment Transaction Created By
Actual
N/A
6
Oracle Financials CloudImplementing Receivables Credit to Cash
Chapter 1Define Common Accounts Receivable Configuration
Event Class Name Balance Type Side
Adjustment
Adjustment Transaction LastUpdated Date
Actual
N/A
Adjustment
Adjustment Transaction LastUpdated By
Actual
N/A
Chargeback
Chargeback Default Receivable
Actual
Debit
Chargeback
Chargeback Revenue
Actual
Credit
Credit Memo
Credit Memo Default Deferred TaxApplication
Actual
Credit
Credit Memo
Credit Memo Default Application
Actual
Credit
Credit Memo
Credit Memo Default TaxApplication
Actual
Credit
Credit Memo
Credit Memo Refund Application
Actual
Credit
Credit Memo
Credit Memo Charges
Actual
Credit
Credit Memo
Credit Memo Default Receivable
Actual
Debit
Credit Memo
Credit Memo Default Revenue
Actual
Credit
Credit Memo
Credit Memo Default Tax
Actual
Credit
Credit Memo
Credit Memo Rounding
Actual
Credit
Credit Memo
Credit Memo Unbilled Receivable
Actual
Credit
Credit Memo
Credit Memo Deferred Revenue
Actual
Credit
Credit Memo
Credit Memo Product Type
Actual
N/A
Credit Memo
Credit Memo Transaction CreationDate
Actual
N/A
Credit Memo
Credit Memo Transaction CreatedBy
Actual
N/A
Credit Memo
Credit Memo Transaction LastUpdated Date
Actual
N/A
7
Oracle Financials CloudImplementing Receivables Credit to Cash
Chapter 1Define Common Accounts Receivable Configuration
Event Class Name Balance Type Side
Credit Memo
Credit Memo Transaction LastUpdated By
Actual
N/A
Debit Memo
Debit Memo Charges
Actual
Credit
Debit Memo
Debit Memo Default Receivable
Actual
Debit
Debit Memo
Debit Memo Freight
Actual
Credit
Debit Memo
Debit Memo Revenue
Actual
Credit
Debit Memo
Debit Memo Rounding
Actual
Credit
Debit Memo
Debit Memo Tax
Actual
Credit
Debit Memo
Debit Memo Unbilled Receivable
Actual
Debit
Debit Memo
Debit Memo Deferred Revenue
Actual
Credit
Debit Memo
Debit Memo Product Type
Actual
N/A
Debit Memo
Debit Memo Transaction CreationDate
Actual
N/A
Debit Memo
Debit Memo Transaction CreatedBy
Actual
N/A
Debit Memo
Debit Memo Transaction LastUpdated Date
Actual
N/A
Debit Memo
Debit Memo Transaction LastUpdated By
Actual
N/A
Invoice
Invoice Charges
Actual
Credit
Invoice
Invoice Default Receivable
Actual
Debit
Invoice
Invoice Freight
Actual
Credit
Invoice
Invoice Revenue
Actual
Credit
Invoice Invoice Rounding Actual Credit
8
Oracle Financials CloudImplementing Receivables Credit to Cash
Chapter 1Define Common Accounts Receivable Configuration
Event Class Name Balance Type Side
Invoice
Invoice Tax
Actual
Credit
Invoice
Invoice Unbilled Receivable
Actual
Credit
Invoice
Invoice Deferred Revenue
Actual
Credit
Invoice
Invoice Product Type
Actual
N/A
Invoice
Invoice Transaction Creation Date
Actual
N/A
Invoice
Invoice Transaction Created By
Actual
N/A
Invoice
Invoice Transaction Last UpdatedDate
Actual
N/A
Invoice
Invoice Transaction Last UpdatedBy
Actual
N/A
Miscellaneous Receipt
Miscellaneous Receipt BankCharges
Actual
Credit
Miscellaneous Receipt
Miscellaneous Receipt ClearedCash
Actual
Credit
Miscellaneous Receipt
Miscellaneous Receipt ConfirmedCash
Actual
Credit
Miscellaneous Receipt
Miscellaneous Receipt Short TermDebt
Actual
Credit
Miscellaneous Receipt
Miscellaneous Receipt FactoredCash
Actual
Credit
Miscellaneous Receipt
Miscellaneous ReceiptMiscellaneous Cash
Actual
Credit
Miscellaneous Receipt
Miscellaneous Receipt RemittedCash
Actual
Credit
Miscellaneous Receipt
Miscellaneous Receipt Tax
Actual
Credit
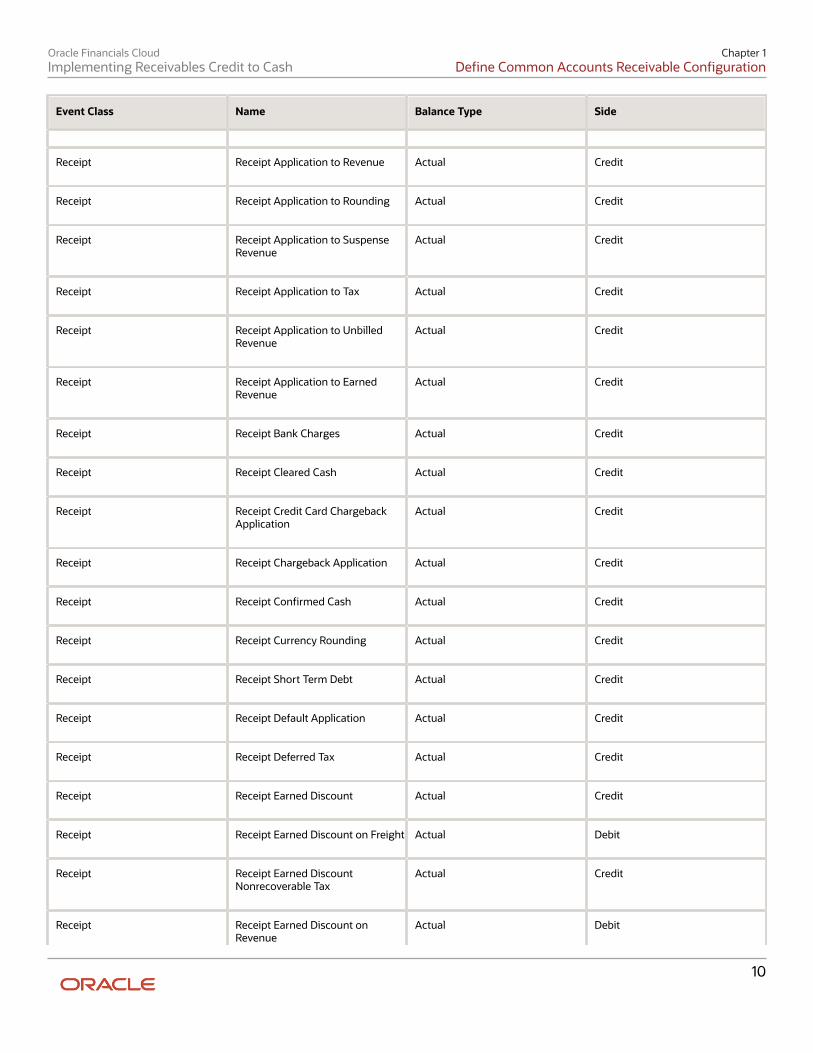
Receipt
Receipt On Account Application
Actual
Credit
Receipt Receipt Application to Freight Actual Credit
9
Oracle Financials CloudImplementing Receivables Credit to Cash
Chapter 1Define Common Accounts Receivable Configuration
Event Class Name Balance Type Side
Receipt
Receipt Application to Revenue
Actual
Credit
Receipt
Receipt Application to Rounding
Actual
Credit
Receipt
Receipt Application to SuspenseRevenue
Actual
Credit
Receipt
Receipt Application to Tax
Actual
Credit
Receipt
Receipt Application to UnbilledRevenue
Actual
Credit
Receipt
Receipt Application to EarnedRevenue
Actual
Credit
Receipt
Receipt Bank Charges
Actual
Credit
Receipt
Receipt Cleared Cash
Actual
Credit
Receipt
Receipt Credit Card ChargebackApplication
Actual
Credit
Receipt
Receipt Chargeback Application
Actual
Credit
Receipt
Receipt Confirmed Cash
Actual
Credit
Receipt
Receipt Currency Rounding
Actual
Credit
Receipt
Receipt Short Term Debt
Actual
Credit
Receipt
Receipt Default Application
Actual
Credit
Receipt
Receipt Deferred Tax
Actual
Credit
Receipt
Receipt Earned Discount
Actual
Credit
Receipt
Receipt Earned Discount on Freight
Actual
Debit
Receipt
Receipt Earned DiscountNonrecoverable Tax
Actual
Credit
Receipt
Receipt Earned Discount onRevenue
Actual
Debit
10
Oracle Financials CloudImplementing Receivables Credit to Cash
Chapter 1Define Common Accounts Receivable Configuration
Event Class Name Balance Type Side
Receipt
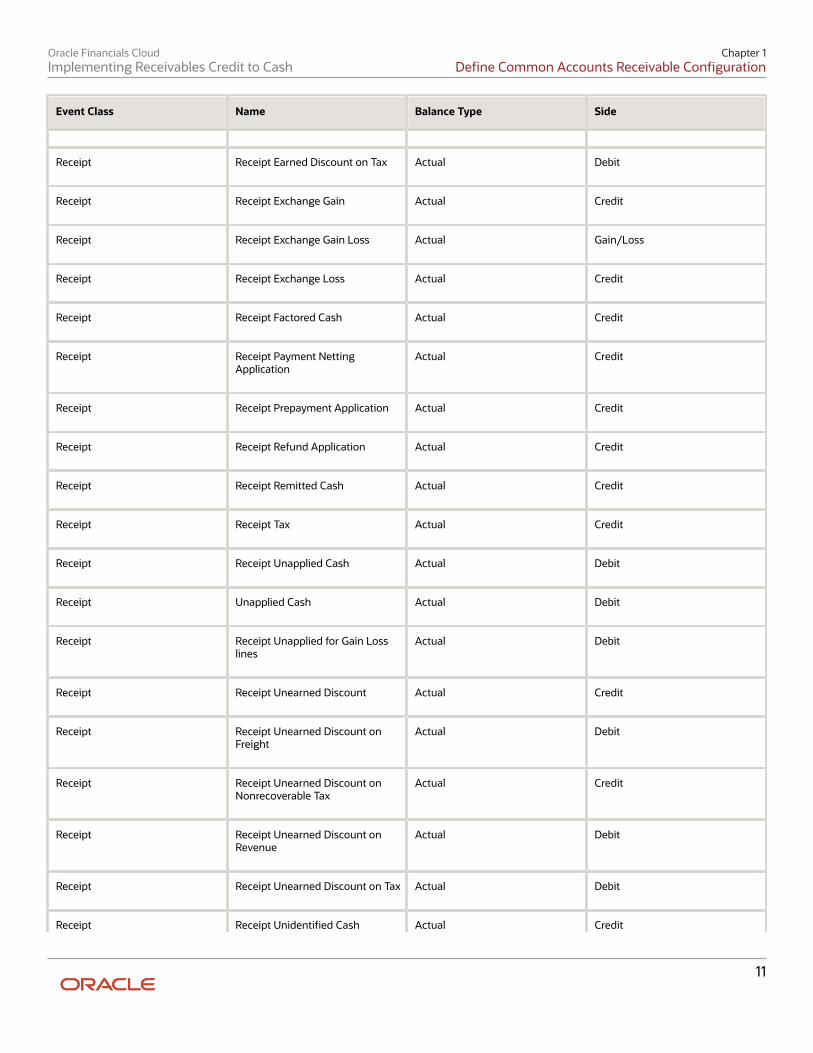
Receipt Earned Discount on Tax
Actual
Debit
Receipt
Receipt Exchange Gain
Actual
Credit
Receipt
Receipt Exchange Gain Loss
Actual
Gain/Loss
Receipt
Receipt Exchange Loss
Actual
Credit
Receipt
Receipt Factored Cash
Actual
Credit
Receipt
Receipt Payment NettingApplication
Actual
Credit
Receipt
Receipt Prepayment Application
Actual
Credit
Receipt
Receipt Refund Application
Actual
Credit
Receipt
Receipt Remitted Cash
Actual
Credit
Receipt
Receipt Tax
Actual
Credit
Receipt
Receipt Unapplied Cash
Actual
Debit
Receipt
Unapplied Cash
Actual
Debit
Receipt
Receipt Unapplied for Gain Losslines
Actual
Debit
Receipt
Receipt Unearned Discount
Actual
Credit
Receipt
Receipt Unearned Discount onFreight
Actual
Debit
Receipt
Receipt Unearned Discount onNonrecoverable Tax
Actual
Credit
Receipt
Receipt Unearned Discount onRevenue
Actual
Debit
Receipt
Receipt Unearned Discount on Tax
Actual
Debit
Receipt Receipt Unidentified Cash Actual Credit
11
Oracle Financials CloudImplementing Receivables Credit to Cash
Chapter 1Define Common Accounts Receivable Configuration
Event Class Name Balance Type Side
Receipt
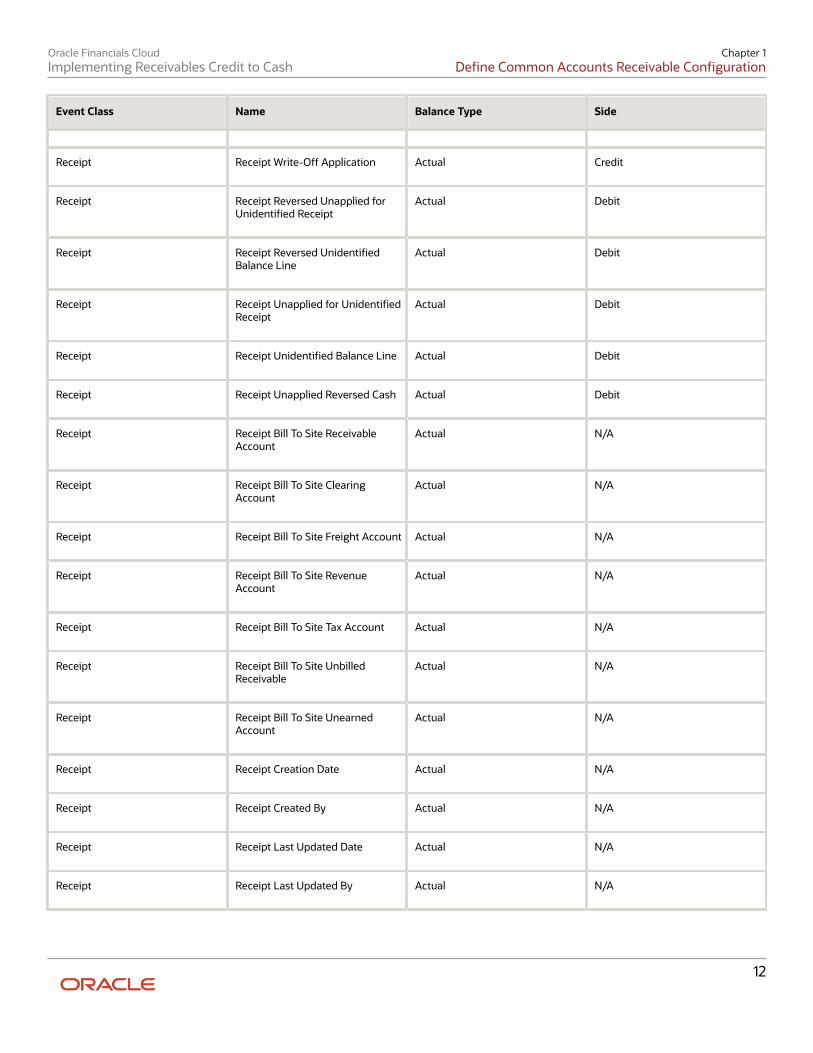
Receipt Write-Off Application
Actual
Credit
Receipt
Receipt Reversed Unapplied forUnidentified Receipt
Actual
Debit
Receipt
Receipt Reversed UnidentifiedBalance Line
Actual
Debit
Receipt
Receipt Unapplied for UnidentifiedReceipt
Actual
Debit
Receipt
Receipt Unidentified Balance Line
Actual
Debit
Receipt
Receipt Unapplied Reversed Cash
Actual
Debit
Receipt
Receipt Bill To Site ReceivableAccount
Actual
N/A
Receipt
Receipt Bill To Site ClearingAccount
Actual
N/A
Receipt
Receipt Bill To Site Freight Account
Actual
N/A
Receipt
Receipt Bill To Site RevenueAccount
Actual
N/A
Receipt
Receipt Bill To Site Tax Account
Actual
N/A
Receipt
Receipt Bill To Site UnbilledReceivable
Actual
N/A
Receipt
Receipt Bill To Site UnearnedAccount
Actual
N/A
Receipt
Receipt Creation Date
Actual
N/A
Receipt
Receipt Created By
Actual
N/A
Receipt
Receipt Last Updated Date
Actual
N/A
Receipt
Receipt Last Updated By
Actual
N/A
12
Oracle Financials CloudImplementing Receivables Credit to Cash
Chapter 1Define Common Accounts Receivable Configuration
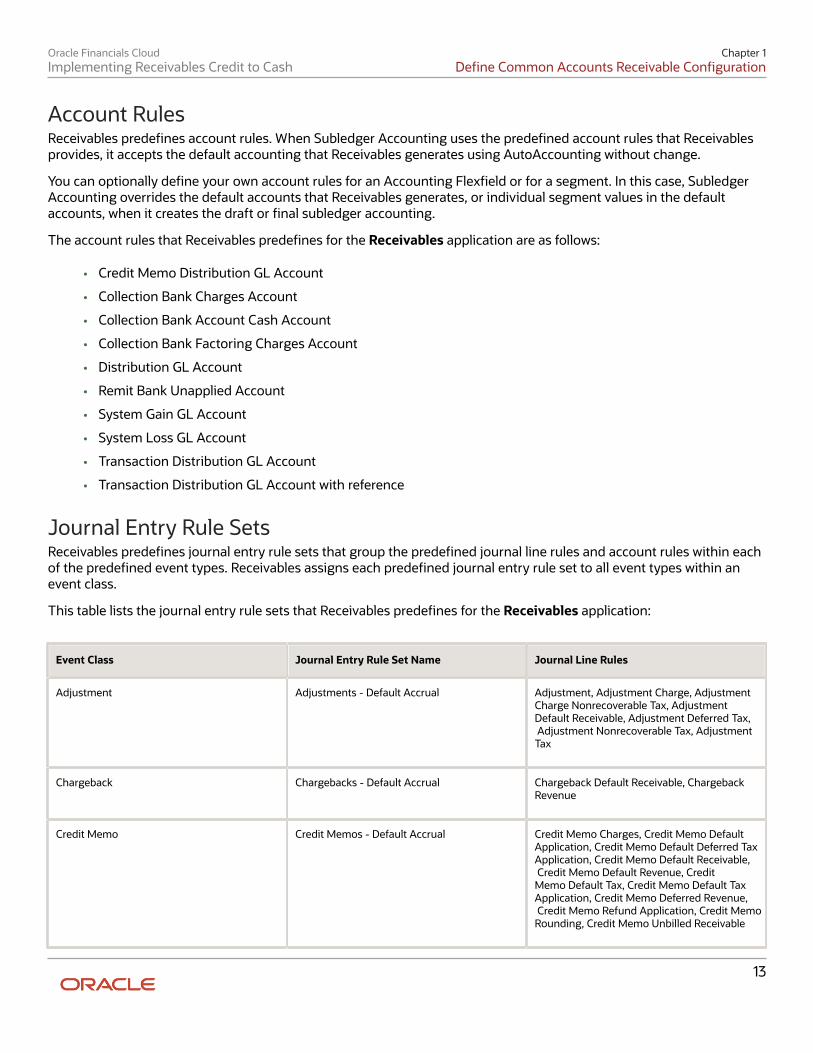
Account RulesReceivables predefines account rules. When Subledger Accounting uses the predefined account rules that Receivablesprovides, it accepts the default accounting that Receivables generates using AutoAccounting without change.
You can optionally define your own account rules for an Accounting Flexfield or for a segment. In this case, SubledgerAccounting overrides the default accounts that Receivables generates, or individual segment values in the defaultaccounts, when it creates the draft or final subledger accounting.
The account rules that Receivables predefines for the Receivables application are as follows:
• Credit Memo Distribution GL Account
• Collection Bank Charges Account
• Collection Bank Account Cash Account
• Collection Bank Factoring Charges Account
• Distribution GL Account
• Remit Bank Unapplied Account
• System Gain GL Account
• System Loss GL Account
• Transaction Distribution GL Account
• Transaction Distribution GL Account with reference
Journal Entry Rule SetsReceivables predefines journal entry rule sets that group the predefined journal line rules and account rules within eachof the predefined event types. Receivables assigns each predefined journal entry rule set to all event types within anevent class.
This table lists the journal entry rule sets that Receivables predefines for the Receivables application:
Event Class Journal Entry Rule Set Name Journal Line Rules
Adjustment
Adjustments - Default Accrual
Adjustment, Adjustment Charge, AdjustmentCharge Nonrecoverable Tax, AdjustmentDefault Receivable, Adjustment Deferred Tax, Adjustment Nonrecoverable Tax, AdjustmentTax
Chargeback
Chargebacks - Default Accrual
Chargeback Default Receivable, ChargebackRevenue
Credit Memo
Credit Memos - Default Accrual
Credit Memo Charges, Credit Memo DefaultApplication, Credit Memo Default Deferred TaxApplication, Credit Memo Default Receivable, Credit Memo Default Revenue, CreditMemo Default Tax, Credit Memo Default TaxApplication, Credit Memo Deferred Revenue, Credit Memo Refund Application, Credit MemoRounding, Credit Memo Unbilled Receivable
13
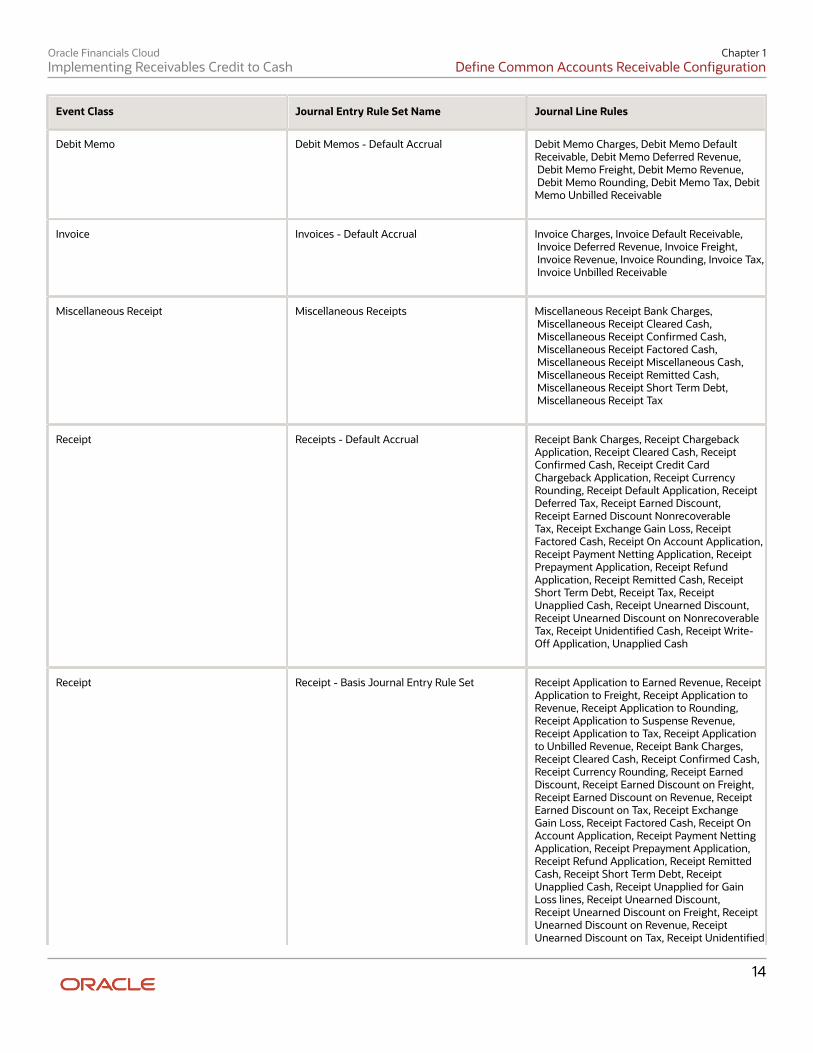
Oracle Financials CloudImplementing Receivables Credit to Cash
Chapter 1Define Common Accounts Receivable Configuration
Event Class Journal Entry Rule Set Name Journal Line Rules
Debit Memo
Debit Memos - Default Accrual
Debit Memo Charges, Debit Memo DefaultReceivable, Debit Memo Deferred Revenue, Debit Memo Freight, Debit Memo Revenue, Debit Memo Rounding, Debit Memo Tax, DebitMemo Unbilled Receivable
Invoice
Invoices - Default Accrual
Invoice Charges, Invoice Default Receivable, Invoice Deferred Revenue, Invoice Freight, Invoice Revenue, Invoice Rounding, Invoice Tax, Invoice Unbilled Receivable
Miscellaneous Receipt
Miscellaneous Receipts
Miscellaneous Receipt Bank Charges, Miscellaneous Receipt Cleared Cash, Miscellaneous Receipt Confirmed Cash, Miscellaneous Receipt Factored Cash, Miscellaneous Receipt Miscellaneous Cash, Miscellaneous Receipt Remitted Cash, Miscellaneous Receipt Short Term Debt, Miscellaneous Receipt Tax
Receipt
Receipts - Default Accrual
Receipt Bank Charges, Receipt ChargebackApplication, Receipt Cleared Cash, ReceiptConfirmed Cash, Receipt Credit CardChargeback Application, Receipt CurrencyRounding, Receipt Default Application, ReceiptDeferred Tax, Receipt Earned Discount,Receipt Earned Discount NonrecoverableTax, Receipt Exchange Gain Loss, ReceiptFactored Cash, Receipt On Account Application,Receipt Payment Netting Application, ReceiptPrepayment Application, Receipt RefundApplication, Receipt Remitted Cash, ReceiptShort Term Debt, Receipt Tax, ReceiptUnapplied Cash, Receipt Unearned Discount,Receipt Unearned Discount on NonrecoverableTax, Receipt Unidentified Cash, Receipt Write-Off Application, Unapplied Cash
Receipt
Receipt - Basis Journal Entry Rule Set
Receipt Application to Earned Revenue, ReceiptApplication to Freight, Receipt Application toRevenue, Receipt Application to Rounding,Receipt Application to Suspense Revenue,Receipt Application to Tax, Receipt Applicationto Unbilled Revenue, Receipt Bank Charges,Receipt Cleared Cash, Receipt Confirmed Cash,Receipt Currency Rounding, Receipt EarnedDiscount, Receipt Earned Discount on Freight,Receipt Earned Discount on Revenue, ReceiptEarned Discount on Tax, Receipt ExchangeGain Loss, Receipt Factored Cash, Receipt OnAccount Application, Receipt Payment NettingApplication, Receipt Prepayment Application,Receipt Refund Application, Receipt RemittedCash, Receipt Short Term Debt, ReceiptUnapplied Cash, Receipt Unapplied for GainLoss lines, Receipt Unearned Discount,Receipt Unearned Discount on Freight, ReceiptUnearned Discount on Revenue, ReceiptUnearned Discount on Tax, Receipt Unidentified
14

Oracle Financials CloudImplementing Receivables Credit to Cash
Chapter 1Define Common Accounts Receivable Configuration
Event Class Journal Entry Rule Set Name Journal Line Rules
Cash, Receipt Write-Off Application, UnappliedCash
Accounting MethodReceivables provides the predefined Receivables Default Accrual accounting method.
Subledger Accounting provides the predefined Standard Accrual subledger accounting method that groups thepredefined accounting methods for subledger applications. You can optionally create your own subledger accountingmethod.
Receivables assigns the predefined Receivables Default Accrual accounting method to the predefined StandardAccrual subledger accounting method. You can assign this subledger accounting method to your ledgers.
This table lists the assignments for the Receivables Default Accrual accounting method that Receivables predefines forthe Receivables application:
Event Class Assignments Event Type Assignments Create Accounting Journal Entry Rule SetAssignments
Adjustment
All
Yes
Adjustments - Default Accrual
Chargeback
All
Yes
Chargebacks - Default Accrual
Credit Memo
All
Yes
Credit Memos - Default Accrual
Debit Memo
All
Yes
Debit Memos - Default Accrual
Invoice
All
Yes
Invoices - Default Accrual
Miscellaneous Receipt
All
Yes
Miscellaneous Receipts
Receipt
All
Yes
Receipts - Default Accrual
You can copy the predefined Receivables Default Accrual accounting method and update the accounting method withnew attributes, according to your business requirements.
The following steps provide general guidelines for copying and updating the predefined Receivables Default Accrualaccounting method:
• Create a mapping set for the new attribute values.
• Create an accounting rule based on the mapping set.
• Duplicate the predefined journal entry rule set you want and assign the new accounting rule.
• Duplicate the predefined accounting method assigned to your ledger.
15
Oracle Financials CloudImplementing Receivables Credit to Cash
Chapter 1Define Common Accounts Receivable Configuration
• In the new accounting method, assign an end date to the applicable predefined journal entry rule setassignment and assign the new journal entry rule set.
• Activate the new accounting method. This sets the journal entry rule sets to Active.
• Assign the new accounting method to your ledger.
Related Topics• Accounting Attribute Assignments
FAQs for Define Common Accounts ReceivableConfiguration
Why can't I create transactions or generate accounting? You must open an accounting period before you can perform basic Receivables activities. This is also true of newinstallations: manually open an accounting period once your installation is complete.
Ledger and Legal Entity Document Sequencing
Ledger and Legal Entity Document Sequencing in Receivables You can set up your primary ledger to use document sequencing in Receivables at the ledger level or legal entity level.
If you enable document sequencing at the legal entity level, then if you have more than one legal entity assigned tothe same ledger, you can assign separate document sequences to Receivables transactions, adjustments, and receiptsbelonging to each legal entity.
Legal entity level document sequencing helps you conform to local and governmental authority requirements, while stillbeing able to organize multiple legal entities under the same primary ledger.
Review these guidelines for document sequencing in Receivables:
• Document Sequencing in Receivables
• Receivables Document Categories
• Chronological Document Sequencing
• Chronological Document Sequencing and Manual Transactions
• Chronological Document Sequencing and AutoInvoice
Document Sequencing in ReceivablesTo use document sequencing in Receivables, in the Sequencing section of the Specify Options page of your primaryledger, perform one or both of these tasks:
1. Set the Sequencing By option to Ledger or Legal Entity.
16
Oracle Financials CloudImplementing Receivables Credit to Cash
Chapter 1Define Common Accounts Receivable Configuration
2. Optionally enable the Enforce Document Sequencing option for Receivables.
If you perform step 1 and step 2, then document sequencing is always used in the ledger or all legal entities assigned tothe ledger. You must assign a document sequence to every document category generated by Receivables events.
If you perform step 1 but not step 2, then you can optionally assign document sequences to the Receivables documentcategories that meet your business requirements. For example, you can use sequential numbering for automatic receiptprocessing only and not for transactions.
Receivables Document CategoriesIf the primary ledger is enabled for document sequencing at the legal entity level (Sequencing By option set to LegalEntity), then Receivables creates a document category for each of these Receivables events in all legal entities assignedto the ledger:
• Invoice transaction type
• Credit memo transaction type
• Debit memo transaction type
• Bills receivable transaction type
• Standard receipt
• Adjustment
To assign a document sequence to a document category:
1. Navigate to the Manage Document Sequence Categories page.2. Search for the document categories that you want.
You can use the Category Code field to limit your search by entering, for example, Invoice or Receipt.3. Review the search results to find the document category that you want4. If necessary, update the category name according to your requirements.5. Save your changes.6. Navigate to the Manage Receivables Document Sequences page.7. Search for the document sequence name that you want, or create a new document sequence.8. In the Search Results section, update or complete the document sequence setup according to your
requirements.9. In the Assignments section, select the document category to assign to this document sequence.
10. Save your changes.
For each Receivables event, the document sequence number is generated when the following related action takes place:
• Transactions: At the time of either saving or completing the transaction, depending on the setting of theReceivables system option Document Number Generation Level for the applicable business units.
• Adjustments: When the adjustment is submitted.
• Receipts: When the receipt is submitted.
• Bills Receivable: When the bill receivable is completed.
17
Oracle Financials CloudImplementing Receivables Credit to Cash
Chapter 1Define Common Accounts Receivable Configuration
These rules apply to Receivables document sequencing:
• Document sequence date is the accounting date (not, for example, the transaction date or receipt date).
Note: If a bill receivable requires drawee acceptance, then Receivables uses the transaction date instead ofthe accounting date to assign the document number. This is because a bills receivable document number isgenerated when the bill is completed, not accepted.
• You can't change the legal entity on any transaction that has a document sequence number.
• By default, you can't delete any transaction or receipt that has a document sequence number. If the Receivablessystem option Allow payment deletion is enabled, then you can delete receipts and bills receivabletransactions only for the applicable business units.
Chronological Document SequencingDocument sequencing uses the accounting date as the document sequence date. To help ensure reliable documentsequencing for your transactions, you can enforce the sequencing of document numbers in chronological order.
Note: Chronological document sequencing applies to invoice, credit memo and debit memo transactions only, eitherentered manually or imported using AutoInvoice. It doesn't apply to receipts, adjustments, or bills receivable.
To enable chronological document sequencing on Receivables transactions, in the Sequencing section of the SpecifyOptions page of your primary ledger perform these three tasks:
1. Set the Sequencing By option to Ledger or Legal Entity.2. Enable the Enforce Document Sequencing option for Receivables.3. Enable the Enforce Chronological Order on Document Date option.
You must perform all three steps for chronological document sequencing. Enabling the Enforce ChronologicalOrder on Document Date option enforces the correlation between the document sequence accounting date and thetransaction accounting date. This prevents Receivables from creating a transaction with an accounting date earlier thanthe accounting date of the last sequenced document within the same document sequence.
For example, you create an invoice with an accounting date of 01-Jan-2014. This invoice is assigned the documentnumber 100. The next invoice you create is assigned the document number 101 provided the accounting date of theinvoice is 01-Jan-2014 or later. If the accounting date is earlier than 01-Jan-2014, then Receivables doesn't create thetransaction.
Chronological Document Sequencing and Manual TransactionsIf you're using document sequencing and the primary ledger option Enforce Chronological Order on DocumentDate is enabled, then you can enforce chronological document sequencing on transactions created manually in yourtransaction type setup.
To enforce chronological document sequencing on transactions created manually:
1. Navigate to the Create or Edit Transaction Type page.2. Enable the No future dates with chronological document sequencing option.3. Complete the transaction type setup according to your requirements.4. Assign this transaction type to the applicable transactions.
When you use this transaction type with transactions you create manually, then Receivables won't create the transactionif both the transaction and accounting dates are in the future.
18
Oracle Financials CloudImplementing Receivables Credit to Cash
Chapter 1Define Common Accounts Receivable Configuration
Chronological Document Sequencing and AutoInvoiceIf you're using document sequencing and the primary ledger option Enforce Chronological Order on Document Dateis enabled, then for AutoInvoice you must set the Receivables system option Accounting Dates Out of Order. Settingthis option determines how AutoInvoice processes transactions when the accounting date is out of order within thedocument sequence.
In the Receivables System Options page: Billing and Revenue tab: AutoInvoice section, set the Accounting Dates Out ofOrder field to Reject or Adjust:
• Reject: If the transaction accounting date is out of order within the document sequence, reject the transactionand transfer it to the error table.
• Adjust: If the transaction accounting date is out of order within the document sequence, adjust the accountingdate to conform to the document sequence accounting date.
Related Topics• What legal entity is assigned to a transaction
• Accounting Date Derivation during AutoInvoice Import
• Document Sequences
• Document Sequence Categories
How AutoInvoice Processes Transactions with DocumentSequencing If the primary ledger is enabled for document sequencing, AutoInvoice validates and assigns document numbers totransactions according to the requirements of the ledger settings.
Note: If an imported transaction line already has a document number, then AutoInvoice accepts this documentnumber without further validation.
Settings That Affect AutoInvoice Processing with Document SequencingIf the primary ledger option Enforce Chronological Order on Document Date is enabled, then you must set theReceivables system option Accounting Dates Out of Order. Setting this option determines how AutoInvoice processestransactions when the accounting date is out of order within the document sequence.
Before you run the Import AutoInvoice program, you must also create and assign document sequences to the documentcategories of the transaction types that you plan to assign to imported transactions.
How Transactions with Document Sequencing Are ProcessedFor the most complete example, if the primary ledger is set for document sequencing at the legal entity level,AutoInvoice processes transactions in this way:
1. Validate and group transaction lines into transactions.2. Derive the legal entity for each transaction and assign the legal entity to the transaction.3. If the transaction doesn't have an accounting date, then derive the accounting date.4. If the primary ledger option Enforce Chronological Order on Document Date isn't enabled:
19
Oracle Financials CloudImplementing Receivables Credit to Cash
Chapter 1Define Common Accounts Receivable Configuration
a. Retrieve the document sequence for the document category of each transaction type assigned totransactions.
b. Assign the document number to the transaction according to the combination of legal entity, transactiontype, document sequence, and accounting date.
5. If the primary ledger option Enforce Chronological Order on Document Date is enabled:
a. Order transactions by legal entity and then by transaction type.b. Retrieve the document sequence for the document category of each transaction type assigned to
transactions.c. Order transactions by document sequence and then by accounting date in ascending chronological
order.d. Compare the document sequence accounting date to the accounting date of the transaction.e. If the transaction accounting date is equal to or later than the document sequence accounting date,
assign the document number to the transaction according to the combination of legal entity, transactiontype, document sequence, and accounting date.
f. If the transaction accounting date is earlier than the document sequence accounting date, retrieve thevalue of the Receivables system option Accounting Dates Out of Order.
g. If the Accounting Dates Out of Order option is set to:
- Reject: Reject the transaction and transfer the transaction to the error table.- Adjust: Update the transaction accounting date with the document sequence accounting date.
Note: If the document sequence accounting date is in a closed period, then adjust this date tothe first open accounting period.
h. Assign the document number to the transaction according to the combination of legal entity, transactiontype, document sequence, and accounting date.
Related Topics• How AutoInvoice Processes Data During Import
• AutoInvoice Validations on Imported Data
FAQs for Ledger and Legal Entity Document Sequencing
Can I share document sequences across ledgers or business units? If document sequencing is enabled for a ledger, it isn't recommended to share the same document sequence acrossledgers or business units.
Document sequencing uses the accounting date as the document sequence date. Because ledgers can have differentaccounting periods open, each ledger could derive a different accounting date for the same document sequence.
Because a document category is created for each transaction type you create, best practice is to create and maintain aseparate set of transaction types in each business unit.
20
Oracle Financials CloudImplementing Receivables Credit to Cash
Chapter 1Define Common Accounts Receivable Configuration
Receivables Activities
Receivables Activity Types Receivables activity types provide default accounting information for all activities in Receivables other than transactionsand receipts.
Using Receivables Activity TypesAdjustments
You use activities of this type when creating adjustments. You must create at least one activity of this type.
There are also three related activities that are reserved for internal use only:
• Chargeback Adjustment
• Adjustment Reversal
• Chargeback Reversal
You must define general ledger accounts for the Chargeback Adjustment activity before creating chargebacks.
When you reverse a receipt, if an adjustment or chargeback exists, Receivables automatically generates off-settingadjustments using the Adjustment Reversal and Chargeback Reversal activities.
Bank Error
You use activities of this type when entering miscellaneous receipts. You can use this type of activity to help reconcilebank statements using Cash Management.
Bills Receivable Funds Recovery
You use activities of this type when you need to unapply a receipt from a bill receivable. Because you can't reversethe receipt in Cash Management, you use this activity to create a negative miscellaneous receipt and apply it to BillsReceivable Funds Recovery.
Claim Investigation
You use activities of this type when you create a claim investigation application against a receipt for a transaction ornon-transaction underpayment or overpayment. You must define a general ledger account for claim investigationreceipts that use the Claim Investigation activity.
Credit Card Chargeback
You use activities of this type when recording credit card chargebacks. You must define a general ledger clearingaccount for the Credit Card Chargeback activity that Receivables provides before recording credit card chargebacks.
Receivables credits the clearing account when you apply a credit card chargeback, and then debits the account aftergenerating the negative miscellaneous receipt. If you later determine the chargeback is invalid, then Receivables debitsthe clearing account when you unapply the credit card chargeback, and then credits the account after reversing thenegative miscellaneous receipt. Only one Credit Card Chargeback activity within a business unit can be active at a time.
Credit Card Refund
21
Oracle Financials CloudImplementing Receivables Credit to Cash
Chapter 1Define Common Accounts Receivable Configuration
You use activities of this type when processing refunds to customer credit card accounts. This activity includesinformation about the general ledger clearing account to use to clear credit card refunds. You must create at least oneactivity of this type to process credit card refunds.
Earned Discount
You use activities of this type to adjust a transaction if payment is received within the discount period, as determined bythe payment terms on the transaction.
Late Charges
You use activities of this type to define a late charge policy. You must define a Late Charges activity if you record latecharges as adjustments against overdue transactions. If you assess penalties in addition to late charges, then define aseparate Late Charges activity for penalties.
Miscellaneous Cash
You use activities of this type when entering miscellaneous receipts. The Miscellaneous Cash activity uses a distributionset to automatically distribute miscellaneous cash across various accounts. You must create at least one activity of thistype.
If the Tax Rate Code Source for this activity is Activity, then you must define asset and liability tax rate codes to accountfor tax on miscellaneous receipts and miscellaneous payments.
Payments
You use activities of this type when applying a receipt against other open receipts. You must define a general ledgerclearing account to use when offsetting one receipt against another receipt. Only one Payments activity within abusiness unit can be active at a time.
Prepayments
You use activities of this type when creating prepayment receipts. You must define a general ledger account forprepayment receipts that use the Prepayments activity. Only one Prepayments activity within a business unit can beactive at a time.
Receipt Write-off
You use activities of this type when writing off receipts. You must define the general ledger account to credit when youwrite off an unapplied amount or an underpayment on a receipt.
Refund
You use activities of this type to process automated non-credit card refunds. You must define the general ledgerclearing account to use to clear refunds. You must create at least one activity of this type. Only one Refund activitywithin a business unit can be active at a time.
Short Term Debt
You use activities of this type to record advances made to creditors by the bank when bills receivable are factored withrecourse. You select a short-term debt receivables activity when you create or update remittance banks to use with billsreceivable remittance receipt methods.
Unearned Discount
You use activities of this type to adjust a transaction if payment is received after the discount period, as determined bythe payment terms on the transaction.
22
Oracle Financials CloudImplementing Receivables Credit to Cash
Chapter 1Define Common Accounts Receivable Configuration
Related Topics• PCI DSS Credit Card Processing Requirements
GL Account Source When you define a Receivables activity, you use the GL Account Source to indicate how Receivables derives theaccounts for the expense or revenue generated by the activity.
GL Account Source OptionsActivity GL Account
Allocate the expense or revenue to the general ledger account that you specify for the Receivables activity. If the activitytype is Bank Error, Late Charges, Prepayments, or Receipt Write-off, you can only select this option.
Distribution Set
Allocate the expense or revenue to the distribution set that you specify. This value is only used with Miscellaneous Cashactivities.
Revenue on Invoice
Allocate the expense or revenue net of any tax to the revenue accounts specified on the invoice. If Tax Rate CodeSource is set to None, allocate the gross amount to these accounts. You can only choose this option if the activity typeis Adjustment, Earned Discount, or Unearned Discount.
If the revenue on the invoice is unearned, then AutoAccounting derives the anticipated revenue accounting distributionaccounts and amounts. Receivables then uses this information to allocate the adjustment or discount amount to thesederived revenue accounts.
Tax Rate Code on Invoice
Allocate the net portion using the expense/revenue accounts specified by the tax rate code on the invoice. If Tax RateCode Source is set to None, allocate the gross amount to these accounts. You can only choose this option if the activitytype is Adjustment, Earned Discount, or Unearned Discount.
Note: In the event of an adjustment to an invoice with zero amount revenue distributions, don’t set the adjustmentactivity GL Account Source to Revenue on Invoice or Tax Rate Code on Invoice.
Related Topics• What are distribution sets
• How Adjustments to Transactions Are Calculated
Tax Rate Code Source When you define a receivables activity, you use the Tax Rate Code Source to indicate how Receivables derives the taxrate code for an activity.
23

Oracle Financials CloudImplementing Receivables Credit to Cash
Chapter 1Define Common Accounts Receivable Configuration
Tax Rate Code Source OptionsNone
Allocates the entire tax amount according to the GL Account Source you specified. You use this option if you don't wantto account for tax separately.
Activity
Allocate the tax amount to the asset or liability tax accounts specified by the activity.
Invoice
Distribute the tax amount to the tax accounts specified by the tax rate code on the invoice. You can't choose this optionif the activity type is Miscellaneous Cash or Late Charges.
Note: In the event of a tax adjustment to an invoice with zero amount tax distributions, you can’t set the adjustmentactivity Tax Rate Code Source to Invoice.
If the Tax Rate Code Source is Activity or Invoice, you must indicate whether tax for this activity is recoverable ornonrecoverable.
Related Topics• Accounting for Tax on Receivables Transactions
AutoCash Rule Sets
Examples of Using Each AutoCash Rule You create an AutoCash rule set from a combination of the six AutoCash rules. You enter the rules in the order in whichyou want to use them to apply a receipt to an open debit item.
The AutoCash rules are:
• Match Payment with Invoice
• Clear the Account
• Clear Past Due Invoices
• Clear Past Due Invoices Grouped by Payment Terms
• Apply to the Oldest Invoice First
• Combo Rule
When you apply a receipt, Receivables uses the first rule in the AutoCash rule set. If the first rule in the set doesn't find amatch, Receivables uses the next rule in the sequence, and so on until it can apply the receipt.
These examples illustrate how each rule applies receipts to transactions and updates customer balances.
24
Oracle Financials CloudImplementing Receivables Credit to Cash
Chapter 1Define Common Accounts Receivable Configuration
Match Payment with InvoiceThe Match Payment with Invoice rule applies a receipt to a single invoice, debit memo, or chargeback only if the receiptamount exactly matches the amount of the debit item. If more than one debit item has an open amount that matchesthe receipt amount, Receivables applies the receipt to the item with the earliest due date. If more than one debit itemhas the same amount and due date, Receivables applies the receipt to the item with the lowest payment schedule IDnumber (internal identifier).
Receivables uses the values specified for the AutoCash rule set open balance calculation and the number of discountgrace days assigned to the customer profile to determine the remaining amount due on the debit item. The rule ignoresthe value of the Apply partial receipts option.
For example, consider the following scenario:
Item/Option Value
Discounts
Earned Only
Late Charges
No
Receipt
$1800
Receipt Date
14-JAN-03
Discount Grace Days
5
The invoice details are:
Invoice Number Invoice Amount Discount Payment Terms Invoice Date Due Date
600
$2000
$20
10% 10/Net 30
01-JAN-03
30-JAN-03
The payment terms assigned to this invoice include a 10% discount if the invoice is paid within 10 days, and the openbalance calculation on the AutoCash rule set allows for earned discounts. Even though the invoice is paid after the 10day period, Receivables adds the 5 discount grace days, making this invoice eligible for a 10% discount.
The remaining amount due on the invoice on January 14 is $1800. Since the remaining amount due matches the receiptamount, the receipt is applied. If there had been no discount grace days, Receivables couldn't apply the receipt becausethe remaining amount of the invoice would be $2000.
Clear the AccountThe Clear the Account rule applies a receipt only if the receipt amount exactly matches the customer open balance.Receivables includes all open debit and credit items when calculating the customer open balance. Open credit itemsinclude credit memos, on-account credits, and on-account and unapplied cash. The rule ignores the value of the Applypartial receipts option.
The Clear the Account rule uses the following equation to calculate the open balance for each debit item:
25
Oracle Financials CloudImplementing Receivables Credit to Cash
Chapter 1Define Common Accounts Receivable Configuration
Open Balance = Original Balance + Late Charges - Discount
Receivables then adds the balance for each debit item to determine the total account balance. The rule uses thisequation for each invoice, chargeback, debit memo, credit memo, and application of an unapplied or on-account receiptto a debit item.
Receivables uses the values specified for the AutoCash rule set open balance calculation and the number of discountgrace days assigned to the customer profile to determine the customer open balance.
For example, consider the following scenario:
Item/Option Value
Late Charges
Yes
Items in Dispute
Yes
Receipt
$590
This table shows the customer activity:
Past Due Debits/Credits Invoice Amount Late Charges In Dispute
Invoice 45
$500
$40
Yes
Invoice 46
$300
$0
N/A
Credit Memo 100
$50
N/A
N/A
Unapplied Cash
$200
N/A
N/A
Since the Late charges and Items in dispute options are enabled, the open balance for this customer is $590. Becausethe receipt amount matches the customer open balance, the receipt can be applied.
If the receipt amount didn't exactly match the customer account balance, Receivables would use the next rule in the setto attempt to apply the receipt.
Clear Past Due InvoicesThe Clear Past Due Invoices rule applies a receipt only if the receipt amount exactly matches the customer past dueaccount balance. Receivables includes all open past due debit and credit items when calculating the past due accountbalance. The rule ignores the value of the Apply partial receipts option.
The Clear Past Due Invoices rule only applies the receipt to items that are currently past due. A debit item is consideredpast due if the invoice due date is earlier than or equal to the date of the receipt currently being applied. Receivablesuses the receipt date for unapplied and on-account cash, and the credit memo date for credit memos and on-accountcredits, to determine whether to include these amounts as part of the customer past due account balance.
26
Oracle Financials CloudImplementing Receivables Credit to Cash
Chapter 1Define Common Accounts Receivable Configuration
For example, if you apply a receipt with a receipt date of 10-JAN-03, all unapplied and on-account cash, and all creditmemos and on-account credits, that have a transaction date (receipt date or credit memo date) equal to or earlier than10-JAN-03 are included when calculating the customer past due account balance.
Receivables uses the values specified for the AutoCash rule set open balance calculation and the number of discountgrace days assigned to the customer profile to determine the customer past due account balance. The settings of theLate charges and Items in dispute options may prevent a past due debit item from being closed, even if the receiptamount matches the customer past due account balance.
For example, consider the following scenario:
Item/Option Value
Late Charges
No
Items in Dispute
No
Receipt
$420
This table shows the customer activity:
Past Due Debits/Credits Invoice Amount Late Charges In Dispute
Invoice 209
$300
$0
N/A
Invoice 89
$250
$0
Yes
Invoice 7
$120
$30
N/A
Since the Late charges and Items in dispute options aren't enabled, Receivables doesn't include Invoice 89 ($250)or late charges for Invoice 7 ($30) in the calculation of the customer past due account balance. Therefore, the pastdue account balance for this customer is $420. Because the receipt amount matches the customer past due accountbalance, the receipt is applied. However, Invoice 7 and Invoice 89 are still open, past due debit items.
Clear Past Due Invoices Grouped by Payment TermsThe Clear Past Due Invoices Grouped by Payment Terms rule applies a receipt only if the receipt amount exactlymatches the sum of the customer credit memos and past due invoices. This rule is similar to the Clear Past Due Invoicesrule, but it first groups past due invoices by payment terms and uses the oldest transaction due date within the group asthe group due date.
A debit item is considered past due if the invoice due date is earlier than the date of the receipt currently being applied.For credit memos, Receivables uses the credit memo date to determine whether to include these amounts in thecustomer account balance.
For example, if you apply a receipt with a receipt date of 10-JAN-03, credit memos that have a transaction date equalto or earlier than 10-JAN-03 are included. Credit memos don't have payment terms, and are therefore included in eachgroup.
27

Oracle Financials CloudImplementing Receivables Credit to Cash
Chapter 1Define Common Accounts Receivable Configuration
Receivables uses the values specified for the AutoCash rule set open balance calculation and the number of discountgrace days assigned to the customer profile to determine the sum of the customer credit memos and past due invoices.The settings of the Late charges and Items in dispute options may prevent a past due debit item from being closed,even if the receipt amount matches the sum of the customer credit memos and past due invoices.
For example, consider a $900 receipt applied on 25-JUN. This table shows the related customer activity:
Transaction Number Payment Terms Due Date Invoice Amount
1
A
25-MAY
$500
2
A
25-JUN
$200
3
A
25-JUN
$200
4
B
20-JUN
$900
5
C
25-MAY
$905
Receivables groups these transactions as follows:
• Group 1: Transactions 1,2,3 Amount: $900 Group Due Date: 25-MAY
• Group 2: Transaction 4 Amount: $900 Group Due Date: 20-JUN
• Group 3: Transaction 5 Amount: $905 Group Due Date: 25-MAY
Since both Groups 1 and 2 match the receipt amount, Receivables selects the group with the oldest due date (Group 1)and applies the receipt to the transactions in this group.
Apply to the Oldest Invoice FirstThe Apply to the Oldest Invoice First rule applies receipts to customer debit and credit items, starting with the itemwith the oldest due date. Receivables uses the values specified for the AutoCash rule set open balance calculation todetermine the oldest outstanding item for the customer.
For example, consider the following scenario:
Item/Option Value
Apply Partial Receipts
Yes
Late Charges
No
Receipt
$200
This table shows the customer activity:
28
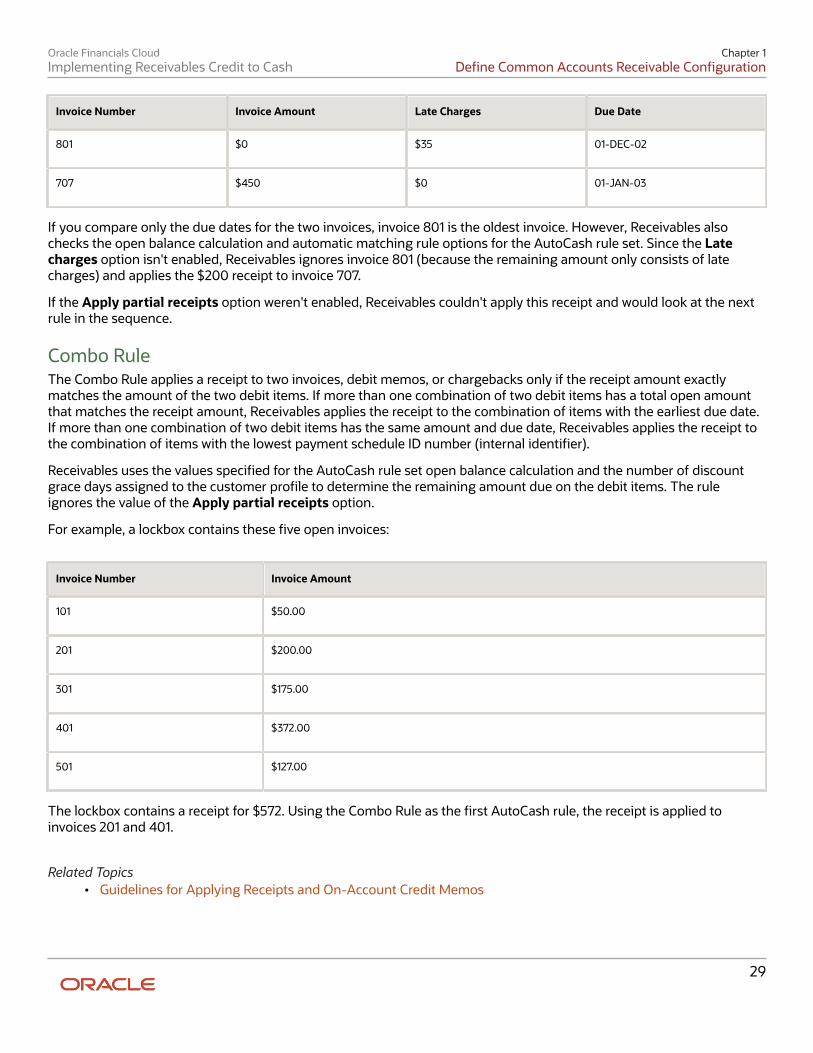
Oracle Financials CloudImplementing Receivables Credit to Cash
Chapter 1Define Common Accounts Receivable Configuration
Invoice Number Invoice Amount Late Charges Due Date
801
$0
$35
01-DEC-02
707
$450
$0
01-JAN-03
If you compare only the due dates for the two invoices, invoice 801 is the oldest invoice. However, Receivables alsochecks the open balance calculation and automatic matching rule options for the AutoCash rule set. Since the Latecharges option isn't enabled, Receivables ignores invoice 801 (because the remaining amount only consists of latecharges) and applies the $200 receipt to invoice 707.
If the Apply partial receipts option weren't enabled, Receivables couldn't apply this receipt and would look at the nextrule in the sequence.
Combo RuleThe Combo Rule applies a receipt to two invoices, debit memos, or chargebacks only if the receipt amount exactlymatches the amount of the two debit items. If more than one combination of two debit items has a total open amountthat matches the receipt amount, Receivables applies the receipt to the combination of items with the earliest due date.If more than one combination of two debit items has the same amount and due date, Receivables applies the receipt tothe combination of items with the lowest payment schedule ID number (internal identifier).
Receivables uses the values specified for the AutoCash rule set open balance calculation and the number of discountgrace days assigned to the customer profile to determine the remaining amount due on the debit items. The ruleignores the value of the Apply partial receipts option.
For example, a lockbox contains these five open invoices:
Invoice Number Invoice Amount
101
$50.00
201
$200.00
301
$175.00
401
$372.00
501
$127.00
The lockbox contains a receipt for $572. Using the Combo Rule as the first AutoCash rule, the receipt is applied toinvoices 201 and 401.
Related Topics• Guidelines for Applying Receipts and On-Account Credit Memos
29

Oracle Financials CloudImplementing Receivables Credit to Cash
Chapter 1Define Common Accounts Receivable Configuration
Example of Using an AutoCash Rule Set This example demonstrates how to create and use an AutoCash rule set. You create an AutoCash rule set to manage thepayments received from Global Freight Carriers. You have an earned discount arrangement with this company but withno payment or discount grace days, and you don't add late charges for payments received beyond the due date.
Create the AutoCash Rule SetCreate the AutoCash Rule set using these values:
Field Value
Open Balance Calculation: Discounts
Earned Only
Open Balance Calculation: Late Charges
No
Open Balance Calculation: Items inDispute
No
Automatic Matching Rules: Apply PartialReceipts
Yes
Automatic Matching Rules: RemainingRemittance Amount
On Account
AutoCash Rule
1. Match Payment with Invoice
AutoCash Rule
2. Clear The Account
AutoCash Rule
3. Apply To The Oldest Invoice First
Process a Payment Using the AutoCash Rule SetGlobal Freight Carriers has the following outstanding invoices, none of which are in dispute:
Number Amount Remaining Due Date Discount Date Discount Amount
123
$200
11-DEC-02
01-DEC-02
$20
124
$300
08-DEC-02
30-NOV-02
$30
125
$150
13-DEC-02
28-NOV-02
$15
30
Oracle Financials CloudImplementing Receivables Credit to Cash
Chapter 1Define Common Accounts Receivable Configuration
A payment was entered for Global Freight Carriers for $600 with a deposit date of 10-DEC-02.
Using the AutoCash rule set that you created, Receivables processes the payment in this way:
1. AutoCash rule 1, Match Payment with Invoice, fails because none of the customer open items have a remainingamount due that is equal to the amount of the receipt ($600).
2. Receivables looks at AutoCash rule 2.3. AutoCash rule 2, Clear the Account, fails because the customer calculated account balance ($650) isn't the
same as the amount of the receipt.4. Receivables looks at AutoCash rule 3.5. Receivables uses AutoCash rule 3, Apply to the Oldest Invoice First.
a. Receivables first applies the receipt to the oldest invoice, Invoice 124 for $300, and performs thesecalculations:
- Since the discount date of 30-NOV-02 has passed and the Discount field is set to Earned Only,the $30 discount is no longer available. The amount due remaining for this invoice is now equal toeither $0 or the amount of any late charges previously assessed for this item.
- Because the Late Charges option is set to No, late charges aren't included in the customer openbalance calculation. The remaining receipt amount is now $300.00.
b. Receivables now applies $200 to the next oldest invoice, Invoice 123, and performs these calculations:- As with Invoice 124, the discount date for Invoice 123 has passed and the $20 discount is no longer
available. The amount due remaining for this invoice is now equal to either $0 or the amount of anylate charges previously assessed for this item.
- Because the Late Charges option is set to No, late charges aren't included in the customer openbalance calculation. The remaining receipt amount is now $100.
c. Receivables applies the remaining $100 to Invoice 125 ($150) as a partial receipt because the Applypartial receipts option is set to Yes.
Note: If the Apply partial receipts option were set to No, Receivables couldn't apply the remainingamount to Invoice 125. Instead, it would be placed on account, because the Remaining RemittanceAmount option is set to On Account.
- As with the other invoices, the discount date for Invoice 125 has passed and the $15 discount is nolonger available.
- If there are no late charges for this invoice, the amount due remaining is reduced from $150 to $50,and remains open.
FAQs for AutoCash Rule Sets
How is an AutoCash rule set selected and used? During payment processing, Receivables uses the Match Receipts By rules to attempt to match receipts to opentransactions, and either apply receipts automatically or present recommendations for receipt application. If transactionscan't be matched or transaction information isn't available, Receivables uses the AutoCash rule set, defined for thecustomer profile either at the customer site or customer account level, to apply the receipt.
If the customer doesn't have an AutoCash rule set assigned to a profile, Receivables uses the AutoCash rule set assignedto system options and the number of discount grace days defined in the customer site or customer account profile toapply the receipt.
31
Oracle Financials CloudImplementing Receivables Credit to Cash
Chapter 1Define Common Accounts Receivable Configuration
If none of the rules in the AutoCash rule set apply, Receivables places the remaining amount either unapplied or on-account, depending on the setting of the Remaining Remittance Amount option on the AutoCash rule set.
Why can't the AutoCash rule apply a receipt to a related customer account? You can only use the Apply to the Oldest Invoice First rule to pay for transactions of a related customer account. Therule applies the receipt to the transaction with the oldest due date selected from all transactions belonging to all sites ofthe related customer account.
How can I use partial receipts? Use the AutoCash rule set Apply partial receipts option with the Apply to the Oldest Invoice First rule. If you enable thisoption, you can apply a receipt to a transaction with an amount less than the amount required to close the debit item.
If the AutoCash rule set doesn't use partial receipts but does include late charges in the open balance calculation, thenReceivables can interpret a receipt application against a transaction amount plus late charges as a partial receipt.
For example, you intend to close a $100 transaction by applying a $100 receipt, but the transaction has sinceaccumulated a $10 late charge. If the Apply partial receipts option isn't enabled, Receivables can't apply the $100receipt to the new $110 open debit item.
Approval Limits
Approval Limits Document Types You can define approval limits for your users for specific transaction activities and amount ranges per currency. Thedocument types identify the transaction activities that a user can approve.
Document TypesAdjustment
Define Adjustment approval limits by currency and amount. Receivables uses approval limits that have a document typeof Adjustment when you create or approve an adjustment.
When you enter an adjustment outside your approval limit range, Receivables assigns the adjustment a status ofPending until someone with the appropriate approval limits either approves or rejects it.
Receipt Write-off
Define Receipt Write-off approval limits by currency and amount. Receivables uses approval limits with this documenttype whenever you attempt to write off either an unapplied receipt amount or an underpayment on a receipt.
You can't write off a receipt amount outside your approval limit range. In addition, the approval limits for write-offs areseparate from, but can't exceed, the Receivables system options write-off amounts.
Credit Memo Refund
Define Credit Memo Refund approval limits by currency and amount. Receivables uses approval limits with thisdocument type whenever you attempt to refund an on-account credit memo.
32
Oracle Financials CloudImplementing Receivables Credit to Cash
Chapter 1Define Common Accounts Receivable Configuration
Related Topics• How Adjustments to Transactions Are Calculated
• Guidelines for Applying Receipts and On-Account Credit Memos
• Write-offs and Receipts
FAQs for Approval Limits
How can I manage the users that have approval limits? You can only assign approval limits to valid users that are defined in your organization. The combination of user,document type, and currency identify a specific approval limit record. You can, for example, define multiple approvallimit ranges for the same user and document type in each currency defined in your system.
Be sure to update approval limits when personnel changes occur.
Credit Memo Workflow
Configure Manual Review of Credit Memo Requests You can configure manual review and approval of credit memo requests against Receivables transactions usingOracle Business Rules. You can also capture additional information about the credit request and its related workflownotifications.
The manual credit memo request approval flow sends email or online notifications to each designated approver. Eachapprover can review the details of the credit request, as well as enter and update information related to credit memoapproval.
Configure the Manual Workflow Notification ProcessConfigure these tasks in sequence to enable the manual credit memo request approval flow:
• FinArTrxnsCreditMemosAutomaticManual: By default this task is set to Automatic, for automatic creation of thecredit memo (business rule 1=1). You can set this task to Manual to initiate the manual review and approval ofthe credit request.
This task by itself doesn't enable the workflow notifications.
• FinArTrxnsCreditMemosCreationPostProcessing: After you enable the manual review of credit requests, usethis task to enable the workflow notifications for manual reviews.
You can configure multiple reviewers for this workflow using the task configuration assignee rules.
To configure the manual workflow notification process:
1. Navigate to the BPM Worklist.2. From the user drop-down list, select Administration.3. Click the Task Configuration tab.
33

Oracle Financials CloudImplementing Receivables Credit to Cash
Chapter 1Define Common Accounts Receivable Configuration
4. In the Tasks to be Configured: Search field, enter *Credit and click the Go icon.
This displays the human tasks (HT) available for Credit Memos.5. Select FinArTrxnsCreditMemosAutomaticManual and configure the task for manual credit request reviews
using the output value HtOutcmeCreateManualCreditMemo.6. Select FinArTrxnsCreditMemosCreationPostProcessing and configure the workflow process for manual
credit request reviews.7. Set up the routing rules for your workflow notifications.8. Set up the BIP template for the notification window according to your requirements.
You can copy the standard template and modify its content using the BIP editing tools.
You can use additional attributes in Assignee rule conditions to configure the workflow routing rules. These attributesinclude:
• Salesperson Name
• Salesperson Email ID
• Sum of all Adjustments Amounts
• Sum of all Receipts Amounts
• Credit Memo Reason Code Descriptive Flexfield Attribute 1-15
• Invoice Line Description
• Collector Descriptive Flexfield Attribute 1-15
• Line Level Credit
• Invoice Line Type
• Invoice or Line Adjustments
• Receipts Applied
• Receivables System Options Descriptive Flexfield Attribute 1-15
• Item Number
• Line Amount Requested
• Transaction Information Descriptive Flexfield Attribute 1-15
• Revenue Scheduling Rule Start Date
• Revenue Scheduling Rule End Date
• Revenue Scheduling Rule Number of Periods
• Revenue Scheduling Rule Rule Type
• Revenue Scheduling Rule Name
• Tax Credit Amount Requested
Enable Privileges for Review Credit Memo RequestUse these three privileges to maintain user access to the Review Credit Memo Request page:
• IEX_REVIEW_CREDIT_REQUEST_PRIV (Review Credit Request): This privilege lets an approver:
◦ Access the Review Credit Request page.
◦ Use the View Transaction Activities button to access the original transaction activities.
34

Oracle Financials CloudImplementing Receivables Credit to Cash
Chapter 1Define Common Accounts Receivable Configuration
◦ Enter comments in the Internal Comments field.
• IEX_UPDATE_DISPUTE_TYPE_PRIV (Update Dispute Type on Credit Request): This privilege lets an approverupdate the value in the Dispute Type field.
• IEX_UPDATE_REBILL_DETAILS_PRIV (Update Rebill Details on Credit Request): This privilege lets an approverupdate the values in the Rebill Number and Rebill Group fields.
The privilege Review Credit Request is included by default with the duty roles Billing Management Duty and CollectionsManagement Basic.
You can add the privileges Update Dispute Type on Credit Request and Update Rebill Details on Credit Request to therequired duty roles according to your business practices for specific users.
Related Topics• How You Use Oracle BI Publisher Enterprise to Modify Templates for Use with Formats
• More Setup for Workflow Email Notifications
• Overview of Financials Configurable Workflow Notifications
How You Define Approval Groups for the Credit Memo Workflow There are two predefined rule sets for the credit memo workflow: Collection agent rule set and Non-collection agentrule set.
These two predefined rule sets refer to two approval groups that aren't predefined. The approval groups are:
• Collection_Manager_Approval_Group
• Billing_Manager_Approval_Group
You must define the two predefined approval groups and assign users to the groups using these steps:
1. Create one approval group called Collection_Manager_Approval_Group and one approval group calledBilling_Manager_Approval_Group.
2. Assign the users that you want to each approval group.
Note: You must assign the user with the Billing Manager role to the Billing_Manager_Approval_Group.
Related Topics• What is the credit memo request approval process
Statements
How You Implement Customer Statements Print statements to provide your customers with a complete record of their invoice, debit memo, chargeback, receipt,on-account credit, credit memo, and adjustment activity for a specified period.
35

Oracle Financials CloudImplementing Receivables Credit to Cash
Chapter 1Define Common Accounts Receivable Configuration
To set up for statements, complete these tasks:
• Set Receivables System Options for Statements
• Define Remit-to Addresses
• Define Statement Cycles
• Define Customer Site Profiles
Set Receivables System Options for StatementsSet the necessary Receivables system options for statement processing.
To set Receivables system options for statements:
1. Navigate to the Create System Options or Edit System Options page.2. Select the applicable business unit.3. Click the Billing and Revenue tab, if it isn't already displayed.4. Enable the Print remit-to address option to print your remit-to addresses on your customer statements.5. Enable the Print home country option to print your home country on transactions and statements that refer to
addresses in that country.6. In the Default Country field, select a country to use as your home country. This is the default country value
for your remit-to addresses. The home country is also used in tax calculations and for taxpayer ID and taxregistration number validation.
7. Complete or update the rest of Receivables system options according to your requirements, and save.
Define Remit-to AddressesDefine remit-to addresses to provide default remit-to information on statements and transactions.
To define a remit-to address:
1. Navigate to the Create Remit-to Address page.2. In the Remit-to Address Set field, select a reference data set.3. The Country field displays the default country defined in Receivables system options. If necessary, select
another country.4. Enter the address details and save.5. In the Receipt from Criteria section, click the Create icon to open the Create Receipt from Criteria window. Use
this window to assign the remit-to address you just created to customer bill-to sites in specified locations.6. In the Country field, select a country to assign customer bill-to sites this remit-to address.7. If necessary, use the State field and Postal Code fields to further limit the remit-to address assignment, and
save.
Define Statement CyclesDefine statement cycles to determine when to send statements to your customers.
To define a statement cycle:
1. Navigate to the Manage Statement Cycles page.2. In the Search Results section, click the Add icon.3. In the Name field, enter a name for this statement cycle.4. In the Interval field, select the interval that determines how often to generate statements: weekly, monthly,
quarterly.5. In the Cycle Dates section, click the Add icon.6. In the Business Unit field, select the business unit that will use this statement cycle.
36
Oracle Financials CloudImplementing Receivables Credit to Cash
Chapter 1Define Common Accounts Receivable Configuration
7. In the Statement Date field, enter the first date on which to print statements for the statement cycle.8. Repeat steps 5 to 7 until you have the appropriate number of rows for the statement cycle interval for each
applicable business unit.For example, enter four rows for a quarterly interval or twelve rows for a monthly interval to cover the period ofone year.
9. Enable the Skip option on a row if you want to skip an interval in the statement cycle.For example, after creating a statement cycle with a monthly interval and twelve monthly statement dates, youdecide to send statements bi-monthly instead of monthly. You can enable the Skip option on every other row toreduce the number of statements to six per year.
10. Complete the remaining fields according to your requirements, and save.
Define Customer Site ProfilesAfter you define remit-to addresses and statement cycles, you must enable the appropriate profile settings on eachcustomer bill-to site to which you plan to send statements. If you aren't using one statement site for the customer,you can, depending on your requirements, assign a different statement cycle to the bill-to sites belonging to the samecustomer account. In this way each bill-to site can have its own statement for its site transactions.
To define customer site profiles for statements:
1. Navigate to the Edit Site page of the applicable customer site.2. Navigate to the Statement and Dunning section.3. Enable the Send statement option.4. In the Statement Cycle field, select the statement cycle to use for this site.5. Click the Late Charges tab.6. Navigate to the Currency Settings section.7. Click the Add icon.8. In the Currency field, select the currency used by this site.9. In the Minimum Statement Amount field, enter a minimum amount to generate statement. Receivables
generates statements for the site whenever the minimum outstanding balance in the given currency is greaterthan this amount.
10. Complete the remaining fields according to your requirements, and save.
Related Topics• How to Use Statement Cycles
• How You Use Customer Profile Classes
• How can I use remit-to addresses
How You Use Statement Cycles Use statement cycles to determine when to send statements to your customers. You assign statement cycles tocustomer and site level profiles.
If you print statements for a specific customer, then:
• If you defined a statement site for the customer, Receivables uses the statement cycle defined in the customeraccount profile as the default statement cycle to use for printing.
• If you didn't define a statement site, Receivables uses the statement cycle defined in the customer site profilefor each applicable bill-to site included in the print run.
37
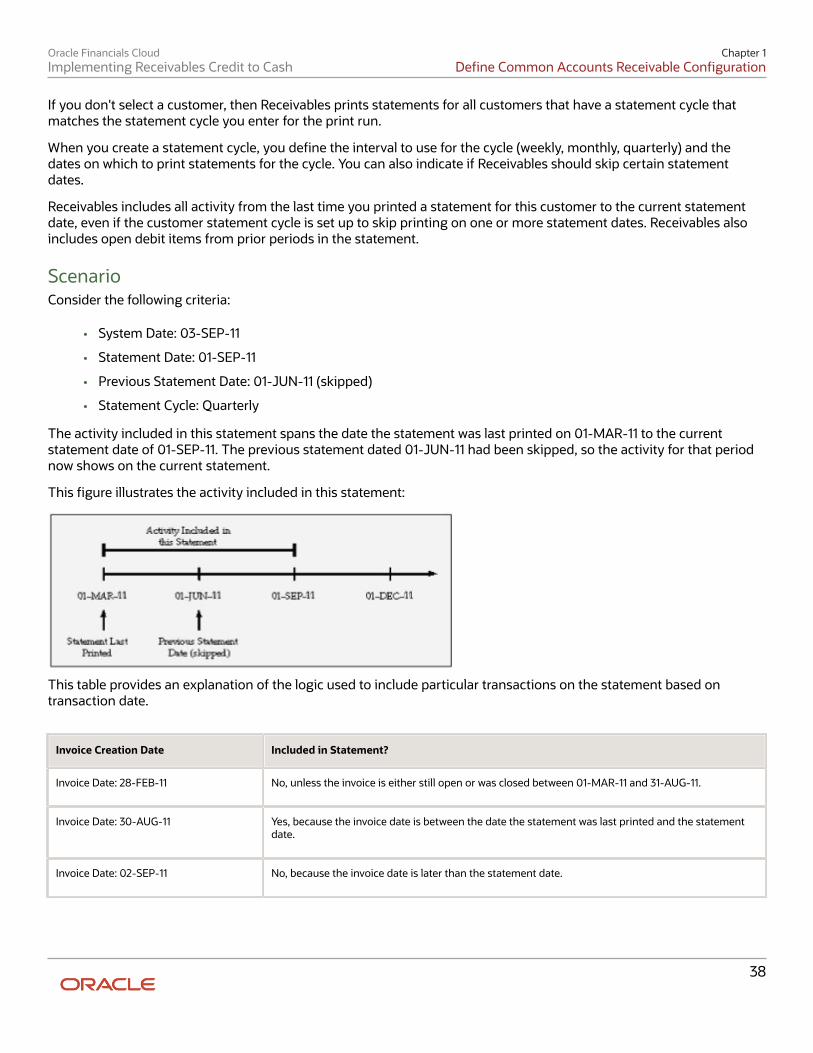
Oracle Financials CloudImplementing Receivables Credit to Cash
Chapter 1Define Common Accounts Receivable Configuration
If you don't select a customer, then Receivables prints statements for all customers that have a statement cycle thatmatches the statement cycle you enter for the print run.
When you create a statement cycle, you define the interval to use for the cycle (weekly, monthly, quarterly) and thedates on which to print statements for the cycle. You can also indicate if Receivables should skip certain statementdates.
Receivables includes all activity from the last time you printed a statement for this customer to the current statementdate, even if the customer statement cycle is set up to skip printing on one or more statement dates. Receivables alsoincludes open debit items from prior periods in the statement.
ScenarioConsider the following criteria:
• System Date: 03-SEP-11
• Statement Date: 01-SEP-11
• Previous Statement Date: 01-JUN-11 (skipped)
• Statement Cycle: Quarterly
The activity included in this statement spans the date the statement was last printed on 01-MAR-11 to the currentstatement date of 01-SEP-11. The previous statement dated 01-JUN-11 had been skipped, so the activity for that periodnow shows on the current statement.
This figure illustrates the activity included in this statement:
This table provides an explanation of the logic used to include particular transactions on the statement based ontransaction date.
Invoice Creation Date Included in Statement?
Invoice Date: 28-FEB-11
No, unless the invoice is either still open or was closed between 01-MAR-11 and 31-AUG-11.
Invoice Date: 30-AUG-11
Yes, because the invoice date is between the date the statement was last printed and the statementdate.
Invoice Date: 02-SEP-11
No, because the invoice date is later than the statement date.
38

Oracle Financials CloudImplementing Receivables Credit to Cash
Chapter 1Define Common Accounts Receivable Configuration
Related Topics• Aging Methods
FAQs for Statements
How can I create a statement site? You can designate one of the sites belonging to a customer account as a statement site. If you create a statement site,Receivables generates a single, consolidated statement for all the customer bill-to sites, rather than a statement for eachsite. You can only define one active statement site per customer account.
To create a statement site:
• Assign the site the Statements business purpose.
• Set the Statement, Dunning, and Late Charges Site Profiles Used profile option to Yes.
How do on-account and unapplied receipts appear on statements? All receipts, including on-account and unapplied receipts, appear on the statement of the corresponding bill-to site.
If you create a statement site for the customer, then Receivables summarizes on-account and unapplied receipts ascredits and prints them on a separate page of the consolidated statement, before a summarized listing of subtotals foreach of the customer bill-to sites.
FAQs for Standard Messages
Can I write messages in different languages? Yes, you can write a message in any language that suits the needs of your enterprise. For any language, the text of astandard message can't exceed 255 characters. Receivables doesn't perform any other validation on messages.
How can I add a message to a document? You can print standard messages on customer statements, and on late charge documents presented as debit memos orinterest invoices.
For statements, active standard messages appear as list of value choices in the Create Customer Statements process.The message you select appears at the end of the customer statement.
For late charge documents, active standard messages appear in the choice list of the Message Text field in the LateCharges tabbed section of the applicable customer or site profile. The message you select appears in the Notes sectionof the late charge document for this customer.
39
Oracle Financials CloudImplementing Receivables Credit to Cash
Chapter 1Define Common Accounts Receivable Configuration
FAQs for Distribution Sets
What are distribution sets? Use distribution sets to account for miscellaneous, or non-invoice related, receipts. Distribution sets are groups ofgeneral ledger code combinations that you define to determine the credit accounts for positive miscellaneous receiptamounts and the debit accounts for negative receipt amounts.
40
Oracle Financials CloudImplementing Receivables Credit to Cash
Chapter 2Manage Receivables System Options
2 Manage Receivables System Options
Guidelines for Receivables System Option Settings Certain Receivables system option settings have critical implications for the way Receivables functions for a givenbusiness unit. You may need to do some advance planning before deciding how to set certain Receivables systemoptions.
Considerations for Receivables system option settings include:
• Salespersons
• Header Level Rounding
• Allow Change to Printed Transactions
• Discounts
SalespersonsIf you intend to use revenue accounting, you must enable the Require salesperson Receivables system option. Revenueaccounting requires that you assign sales credits to all transactions that can be adjusted for either revenue or salescredits.
If you enable the Require salesperson Receivables system option, use the Sales Credit Percent Limit field to limit thepercentage of revenue plus non-revenue sales credit that a salesperson can have on any transaction line.
If you don't enter a value in the Sales Credit Percent Limit field, then no sales credit limit validation is performedduring revenue accounting.
Header Level RoundingDepending on the legal requirements of your home country, you may need to round amounts at the transaction headerlevel for the receivable account, and then account for and post the difference in a separate account between thisrounded amount and the sum of the rounded line amounts for the respective revenue accounts. To do this, enable theUse header level rounding option and define a Header Rounding Account.
The rounding difference between the header level and line level rounding is assigned to the Header RoundingAccount.
If you enable the Use header level rounding option, then Receivables displays a rounding distribution line for alltransactions, regardless of currency. If the transaction is in the ledger currency, then the amount of this line is zero.
If you don't enable the Use header level rounding option, Receivables rounds amounts at the line level and posts anyrounding difference to the receivable account.
CAUTION: Once you enable Header Level Rounding and save the Receivables system options record, you can'tdisable the feature for the applicable business unit.
41

Oracle Financials CloudImplementing Receivables Credit to Cash
Chapter 2Manage Receivables System Options
Allow Change to Printed TransactionsTo allow updates to transactions that have been printed, enable the Allow change to printed transactions option. Thisoption also determines whether you can update a customer address when printed, posted, or applied transactions areassigned to that address.
Note: You can't update a transaction if it has activity against it, regardless of how you set this option. Examples ofactivity include payments, credit memos, adjustments, accounting, and assigning the transaction to a balance forwardbill.
DiscountsTo allow Receivables to accept unearned discounts, enable the Allow unearned discounts option. Unearned discountsare discounts a customer takes after the discount period passes. The Receivables system options record is the onlyplace that determines whether you can accept unearned discounts for the given business unit.
To allow discounts to be taken for partial payments against open debit items, enable the Discount on partial paymentoption. A partial payment is any payment less than the remaining amount due. If this option is enabled, you can stilldecide to disallow discounts on partial payments at the transaction level when defining payment terms.
If you never allow discounts on partial payments, then don't enable the Discount on partial payment option.
Related Topics• Example of Header Level Rounding
• How Discounts Are Calculated
• Implementation Settings for Revenue Recognition
Example of Header Level Rounding This example illustrates how header level rounding processes currency conversions and accounts for roundingdifferences.
ScenarioABC Company uses euros as the ledger currency, and it receives an invoice with three line items in Norwegian krone. Forthis example, the conversion rate between the krone and the euro is 6.55957.
Transaction DetailsThe Use header level rounding Receivables system option is enabled for the applicable business unit and a HeaderRounding Account is defined.
This table shows the calculations performed to convert each line amount on the invoice:
Item/Description Amount in Krone Conversion Rate Amount in Euros Comment
Paper 15.00 6.55957 2.29 rounded up
42

Oracle Financials CloudImplementing Receivables Credit to Cash
Chapter 2Manage Receivables System Options
Item/Description Amount in Krone Conversion Rate Amount in Euros Comment
Pens
12.00
6.55957
1.83
rounded up
Envelopes
25.00
6.55957
3.81
rounded down
Subtotal
52.00
N/A
7.93
sum of items
Rounding Difference
N/A
N/A
- 0.01
N/A
Total Amount
52.00
6.55957
7.92
rounded down
Because the Use header level rounding Receivables system option is enabled, Receivables must calculate the roundingdifference between the currency conversion of the total invoice amount at the header level assigned to the receivableaccount and the sum of the currency conversions at the line level assigned to each revenue account. This difference isplaced in the designated header rounding account.
Conversion ResultsReceivables first converts each line item separately from krone to euros, and then adds them together, for a total of 7.93EUR. Receivables then separately adds the line amounts in the invoice currency (krone) and then converts to the ledgercurrency, for a total of 7.92 EUR.
The rounding difference of .01 is assigned to the header rounding account as defined in Receivables system options.
Tax Invoice Printing Options The Tax Invoice Printing Options Receivables system option identifies the method Receivables uses to print taxamounts on transactions. The value you enter here becomes the default value for customer profile classes.
Tax Invoice Printing OptionsEuropean Tax Format
Doesn’t itemize tax information for each line, but does print tax rates as the last column of invoice lines. Prints freightitems last. At the end of the invoice, the Tax Summary by Tax Name section includes a summary of taxable amounts andtax charged for each tax rate code.
Itemize and Sum
Itemizes tax information for each invoice line. At the end of the invoice, the Tax Summary by Tax Name section includesa summary of the tax charged for each tax rate code. At the end of the invoice, Receivables prints the invoice subtotal,tax, shipping, and invoice total.
Itemize Taxes
43
Oracle Financials CloudImplementing Receivables Credit to Cash
Chapter 2Manage Receivables System Options
Itemizes tax information for each invoice line.
Itemize With Recap
Itemizes tax information for each invoice line. At the end of the invoice, the Tax Summary by Tax Name section includesa summary of the tax charged for each tax rate code.
Recap
Doesn’t itemize tax information for each line. At the end of the invoice, the Tax Summary by Tax Name section includesa summary of the tax charged for each tax rate code.
Sum Taxes
Doesn’t itemize tax information for each line. At the end of the invoice, the Tax Summary by Tax Name section includesa summary of the tax charged for each tax rate code. At the end of the invoice, Receivables prints the invoice subtotal,tax, shipping, and invoice total.
Summarize By Tax Name
Doesn’t itemize tax information for each line. At the end of the invoice, the Tax Summary by Tax Name section includesa summary of the tax charged for each printed tax name and rate.
Total Tax Only
Displays only the total tax amount at the end of the document.
Related Topics• Examples of Tax Handling on Receivables Transactions
• How do I print Receivables transactions
AutoInvoice Tuning Segments Use the AutoInvoice: Tuning Segments section of the Billing and Revenue tab of the Create and Edit ReceivablesSystem Options pages to designate Accounting and System Items flexfield segments as tuning segments. Tuningsegments help increase performance of AutoInvoice. The tuning segment is the segment most frequently accessed byAutoInvoice.
Accounting Flexfield Tuning SegmentIf you want to increase the performance of AutoInvoice and indexes already exist for the GL_CODE_COMBINATIONStable, use the value that you specified for your index as the Accounting Flexfield tuning segment. If you defined aconcatenated index, use the first column of your concatenated index.
If no indexes exist for the GL_CODE_COMBINATIONS table, enter the segment with the most distinct values for yourAccounting Flexfield tuning segment.
System Items Flexfield Tuning SegmentIf you want to increase the performance of AutoInvoice and indexes already exist for the MTL_SYSTEM_ITEMStable, use the value that you specified for your index as your System Items Flexfield tuning segment. If you defined aconcatenated index, use the first column of your concatenated index.
44
Oracle Financials CloudImplementing Receivables Credit to Cash
Chapter 2Manage Receivables System Options
If no indexes exist for the MTL_SYSTEM_ITEMS table, enter the segment with the most distinct values for your SystemItems Flexfield tuning segment.
AutoInvoice Log File Message Levels In the Log File Message Level field of the AutoInvoice section of the Billing and Revenue tab of the Create or EditSystem Options page, enter a value from 0 to 5 to indicate the amount of detail that you want to display in theAutoInvoice log file.
For day-to-day business needs and to improve performance, set the level to 0. If you consistently experience errorswhile running AutoInvoice, you can set the output to a higher level to review more detailed information in the log aboutthe errors.
Log File Message Level DefinitionsMessage Level 0 provides the following entries in the log file:
• Product Version
• Program Name
• AutoInvoice Start Time
• AutoInvoice Concurrent Request Arguments
• Error and Warning Messages
• AutoInvoice End Time
• AutoInvoice Logical Steps
Message Level 1 provides all of the entries for Message Level 0 plus:
• Time-Stamped function labels
Message Level 2 provides all of the entries for Message Levels 0 and 1 plus:
• Sizes of allocated arrays
• Dynamic SQL statements
• Number of rows updated, inserted, and deleted
Message Level 3 provides all of the entries for Message Levels 0, 1, and 2 plus:
• Method IV SQL array values
Message Level 4 provides all of the entries for Message Levels 0, 1, 2, and 3 plus:
• Values of all variables that are used to call FND or Tax routines
Message Level 5 provides all of the entries for Message Levels 0, 1, 2, 3, and 4 plus:
• Details of all bad lines and rejected lines. This provides all messages needed for C debugging of AutoInvoice.
45

Oracle Financials CloudImplementing Receivables Credit to Cash
Chapter 2Manage Receivables System Options
FAQs for Manage Receivables System Options
What's the days per posting cycle? The Days per Posting Cycle setting lets you process the transactions you're posting in smaller groups to ensure thatyou don't run out of rollback space during posting.
For example, if your accounting period is 30 days and you set this value to 30, the posting program uses only one cycle.If your accounting period is 30 days and you set this value to 17, the posting program uses two cycles. Best practice is toset this field to a value less than the number of days in your accounting period.
What happens if I allow transaction deletion? Enable the Allow transaction deletion Receivables system option if you want to let users delete Receivablestransactions after the transactions have been saved. If you don't enable this option, all Receivables users are preventedfrom deleting transactions.
If an installation is legally required to number transactions sequentially with no missing transaction numbers, then bestpractice is to not enable this option.
If you enable the Allow transaction deletion option, you can still control which users can delete transactions usingfunction security.
How can I determine the memory allocation? Enter in the Maximum Memory in Bytes field the value that represents the amount of memory to allocate toAutoInvoice for validation. The default is 65535 bytes. For best results, enter a value equal to the maximum number ofrecords that you import, rounded to an even number, multiplied by 1024. For example, if you use AutoInvoice to importno more than 100 records at a time, enter a value of 102400.
During AutoInvoice processing, if you receive a message that indicates the application failed to allocate memory, thenenter a lower number. If you receive a message that the memory isn't large enough, then enter a higher number.
When do I use days to AutoApply a receipt? Enter in the Days to AutoApply a Receipt field the age in days of receipts that AutoApply considers for applicationagainst customer transactions. Use this field if your customers often pay for transactions before they're created.
AutoApply looks for and attempts to apply open receipts to transactions created within the number of days thatyou specify. For example, if you enter 10, then AutoApply considers all receipts created within the past 10 days forapplication to transactions. Receipts created longer than 10 days ago aren't considered.
If you don't enter a value in this field, AutoApply only attempts to match receipts once.
46
Oracle Financials CloudImplementing Receivables Credit to Cash
Chapter 2Manage Receivables System Options
What are the exception rule activities? The active application exception rule set determines the action to perform on overpayment and underpaymentamounts after receipt application. You can define the default receivables activity to use to process these payments whenthe action is either a billing adjustment or a write-off.
The Exception Rule Adjustment Activity field in the Cash Processing tab of Receivables System Options provides thedefault receivables activity to use for adjustments on overpayments or underpayments. The Exception Rule Write-offActivity field provides the default receivables activity to use for write-offs of overpayments or underpayments.
When are receipts required for a bill-to site? Enable the Require billing location for receipts Receivables system option to require that a bill-to site be associatedwith a receipt. If enabled, Receivables doesn't create receipts that don't have a bill-to site.
Use this option for customers without statement sites. If you don't enable this option, and you have receipts forcustomers without statement sites and without a bill-to site associated with the receipt, the unapplied amount of thereceipt won't appear on any of the statements for this customer.
What's the difference between the realized gains and lossesaccounts and the cross currency rounding account? The realized gains and realized losses accounts are used to account for the conversion rate gain or loss in the ledgercurrency resulting from a cross-currency receipt application. For example, if the conversion rate for a foreign currencyinvoice is 1.7 and the conversion rate of the payment for this invoice is 2.0, Receivables posts the difference as a gain tothe realized gains account.
The cross-currency rounding account is used to record rounding error amounts created during a cross-currency receiptapplication. You must define a rounding error account if you create cross-currency receipts.
Email Delivery
Examples of Using the Transaction and Statement Delivery EmailSubject Lines Use the Email Subject fields in the Transaction Delivery Using Email and Statement Delivery Using Email sections of theBilling and Revenue tabbed region of Receivables system options to create an email subject line for the transactions andstatements you deliver to customers using email.
Receivables inserts a period after the business unit, transaction number, and statement date, and inserts a spacebetween each of the field values.
47
Oracle Financials CloudImplementing Receivables Credit to Cash
Chapter 2Manage Receivables System Options
The following examples illustrate how the subject line appears depending on the settings you use.
Example 1The resulting email subject line for the settings in this table is: "Your invoice is now ready for review. Vision Operations.INV1234."
Field Value
Email Subject
Your invoice is now ready for review.
Include Business Unit in Email Subject
Last
Include Transaction Number in EmailSubject
Last
Example 2The resulting email subject line for the settings in this table is: "Vision Operations. Your statement is now ready forreview. 01-01-2017."
Field Value
Email Subject
Your statement is now ready for review.
Include Business Unit in Email Subject
First
Include Statement Date in Email Subject
Last
Example 3The resulting email subject line for the settings in this table is: "Your invoice is now ready for review. INV1234."
Field Value
Email Subject
Your invoice is now ready for review.
Include Business Unit in Email Subject
Do Not Include
Include Transaction Number in EmailSubject
Last
48
Oracle Financials CloudImplementing Receivables Credit to Cash
Chapter 2Manage Receivables System Options
How Transaction and Statement Delivery Using Email Works Print and send Receivables transactions and statements to designated customers using email.
When you run the Print Receivables Transactions process or the Create Customer Statements process, the respectiveprocess sends transactions or statements as either a PDF or Zipped PDF file to the designated email addresses of thecustomer accounts and sites that are set up for email delivery.
Settings That Affect Delivery Using EmailThese settings affect print delivery using email:
• Print Option: Set the Print Option to Print or Do Not Print at the customer site or customer account level,depending upon whether you want to print for specific customer sites or all sites belonging to a customeraccount.
For transactions, if the Print Option value isn't enabled at the site or account level, then Receivables usesthe required Print Option setting on the transaction type. If necessary, you can exclude or include individualtransactions in a print run by changing the Print Option setting on transactions.
Note: If the transaction type doesn't have the Open Receivable option enabled (for example, a Voidtransaction), then the email delivery process ignores the Print Option settings at the customer site andaccount level and uses the setting assigned to the transaction type. You can still override this setting on thetransaction.
• Preferred Delivery Method: Set the Preferred Delivery Method field to Email at the customer site or customeraccount level, depending upon whether you want to deliver using email for specific customer sites or all sitesbelonging to a customer account.
• Customer contacts: Assign at least one customer contact at the account or site level both an email address andthe Bill-to purpose or Statement purpose. These rules apply to customer contacts:
◦ The contact must be active when the Print Receivables Transactions or Create Customer Statementsprocess is run.
◦ If a customer account or site doesn't have any contact with both an email address and a Bill-to purpose orStatement purpose, then transactions or statements aren't delivered for this customer account or site.
◦ For transactions, if a customer account or site does have a contact with both an email address and a Bill-to purpose, but the same contact email address is also assigned the Collections or Dunning purpose,then this contact is excluded from email delivery.
◦ For statements, if the customer has a statement site, then a consolidated statement is created anddelivered for all billing sites belonging to the customer account.
49
Oracle Financials CloudImplementing Receivables Credit to Cash
Chapter 2Manage Receivables System Options
• Email Receivables system options: Use the Transaction and Statement Delivery Using Email sections of theBilling and Revenue tabbed region of the Receivables System Option pages to set up the details of transactionand statement delivery using email for the applicable business units.
Note: These are all conditionally required fields. If you plan to enable printing and email delivery oftransactions or statements, then you must enter values in these fields to ensure successful delivery.
Enter the appropriate text and values in the corresponding fields:
◦ From Name: Name of your enterprise.
◦ From Email: Email address of your enterprise.
◦ Reply-to Email: Email address of your enterprise that your customers can send an email to.
◦ Email Subject: Text of the email subject line.
◦ Include Business Unit in Email Subject: Option to include the name of your business unit in the subjectline.
◦ Include Transaction Number in Email Subject: Option to include the transaction number in the subjectline.
◦ Include Statement Date in Email Subject: Option to include the statement date in the subject line.
◦ Email Body: Text of the email message. Include appropriate formatting.
Note: You can't use standard messages to create email message text.
How Transactions and Statements are Delivered Using EmailOnce your setup is complete, use the Print Receivables Transactions process to print customer transactions, and theCreate Customer Statements process to print customer statements. Use the Output File Type parameter to specify theoutput to use for the print run. For print delivery using email, you must select either PDF or Zipped PDFs. If you selectZipped PDFs, the file includes an index file of the print run, to identify the first and last page of each printed transaction.
When you create a transaction, Receivables looks in your setup for the Print Option setting to assign to the transactionin this order:
• Customer site profile
• Customer account profile
• Transaction type
During print processing, the email delivery process verifies for each transaction or statement:
• For transactions, the Print Option is set to Print.
You can update the Print Option setting on individual transactions before printing.
• Preferred Delivery Method field is set to Email for the customer account or site.
50

Oracle Financials CloudImplementing Receivables Credit to Cash
Chapter 2Manage Receivables System Options
• At least one active customer contact has both an email address and Bill-to purpose or Statement purpose. Theemail delivery process looks for an email address to send transactions or statements to in this order:
◦ For transactions, email address of the bill-to customer contact on the transaction.
◦ Email addresses of the contacts of the customer site that are assigned a Bill-to purpose or Statementpurpose, but not assigned the Collections or Dunning purpose.
◦ Email addresses of the contacts of the customer account that are assigned a Bill-to purpose or Statementpurpose, but not assigned the Collections or Dunning purpose.
• All fields are completed in the Transaction Delivery or Statement Delivery Using Email section of the Billing andRevenue tabbed region of Receivables System Options.
The name of the output PDF file for transactions delivered using email uses the format:
<INV_NUMBER>_<INSTALLMENT_NUMBER>.PDF
Related Topics• Examples of Using the Transaction and Statement Delivery Email Subject Lines
FAQs for Email Delivery
Why can't I print transactions or statements using email delivery? Your email delivery setup is incomplete.
This is most likely due to one of two settings:
• In Receivables system options, you must enter an active email address in either the From Email field or theReply-to Email field of the Transaction or Statement Delivery Using Email section of the Billing and Revenuetabbed region for the applicable business unit.
• At least one customer contact must have both a Bill-to purpose or Statement purpose assignment and anactive email address.
• For transactions:
◦ If the transaction doesn't have a bill-to customer contact, or if that contact doesn't have an emailaddress, then the email delivery process looks for all active customer contacts at the account or site levelthat have both a Bill-to purpose and an email address.
◦ If any exist, then the transaction is delivered to all of these contacts, with the exception of contact emailaddresses also assigned the Collections or Dunning purpose.
◦ If none exist, then the transaction isn't printed.
51
Oracle Financials CloudImplementing Receivables Credit to Cash
Chapter 2Manage Receivables System Options
OAGIS 10.1 and UBL 2.1 XML
Overview of OAGIS 10.1 XML Transaction Delivery for Receivables Use the Open Applications Group Integration Specification (OAGIS) 10.1 XML format to deliver Receivables transactionsto your customers as XML documents.
XML transaction delivery makes use of the Collaboration Messaging Framework (CMK) to send transactions tocustomers and receive confirmation messages from customers.
Receivables OAGIS 10.1 XML provides these capabilities:
• Deliver invoices, credit memos, debit memos, and chargebacks to customers (trading partners) in OAGIS 10.1XML format using Collaboration Messaging Framework.
• Deliver XML transactions to your trading partners with or without service providers.
• Receive acknowledgment of transaction delivery from customers by means of a Confirmation Business ObjectDocument (CBOD). The CBOD also uses the OAGIS 10.1 XML format.
• Include user-defined attributes, in addition to the standard mapped attributes, in the XML document.Receivables supports the inclusion of UserArea extension attributes at the invoice header, invoice line, andinvoice tax line level of OAGIS 10.1 XML transactions.
• Include transaction header level attachments in the OAGIS 10.1 XML delivery.
• Review the XML transaction delivery using Collaboration Messaging Framework.
Use the Feature Opt-in page in Functional Setup Manager (FSM) to enable Receivables Invoice Delivery in OpenApplications Group Integration Specification (OAGIS) 10.1 XML Format.
You also use the same Feature Opt-in to enable Universal Business Language (UBL) 2.1 XML transaction delivery.
You then need to complete the related setups in Receivables and Collaboration Messaging Framework (CMK) to deliverOAGIS 10.1 or UBL 2.1 XML transactions to customers.
Complete these setups using the related Receivables and Collaboration Messaging Framework setup tasks. If you'reusing service providers to deliver XML documents, you can also use the Customer Import FBDI template to import boththe CMK setup required for XML transaction delivery and the related Receivables customer account profile information.
Note: If you're using the existing Receivables XML Invoicing feature through the Service Oriented Architecture (SOA)business-to-business (B2B) gateway, you should only change over to OAGIS 10.1 XML transaction delivery when yourcustomers are ready to receive transactions in OAGIS 10.1 XML format. When you do change over, you must redo yourservice provider and trading partner setups in Collaboration Messaging Framework.
Related Topics• UBL 2.1 XML Transaction Delivery for Receivables
52
Oracle Financials CloudImplementing Receivables Credit to Cash
Chapter 2Manage Receivables System Options
UBL 2.1 XML Transaction Delivery for Receivables Use the Universal Business Language (UBL) 2.1 XML format to deliver Receivables transactions to your customers asXML documents.
The UBL 2.1 format is now required for business-to-government electronic invoicing in certain countries.
As with OAGIS 10.1, the UBL 2.1 XML transaction delivery makes use of the Collaboration Messaging Framework (CMK) tosend transactions to customers and receive confirmation messages from customers.
How You Configure the Universal Business Language (UBL) 2.1 XML FormatTo use UBL 2.1 XML transaction delivery, you must enable the Receivables Invoice Delivery in Open Applications GroupIntegration Specification (OAGIS) 10.1 XML Format feature in the Feature Opt-in page in Functional Setup Manager. TheUniversal Business Language (UBL) 2.1 format feature is then enabled by default.
You must complete all of the required setups for OAGIS 10.1 XML transaction delivery, but with the followingmodifications and restrictions to use UBL 2.1 XML:
• In the Manage Collaboration Messaging Service Providers task, the supported delivery method types in CMKfor UBL 2.1 XML are B2B Adapter and Email.
• In the Manage Collaboration Messaging Service Providers task, the outbound collaboration message definitionin CMK for UBL 2.1 XML is UBL_2.1_INVOICE_OUT.
• You can add additional attributes to the UBL 2.1 XML transaction using the User-Defined Attributes of theReceivables XML feature.
You map additional attributes to the UBL 2.1 XML transaction by modifying the delivered UBL 2.1 XSLT using theManage Collaboration Message Definitions task, available from the Collaboration Messaging Framework workarea.
Note: If you want to deliver UBL 2.1 XML transactions using any delivery method other than those supported by CMK,or if you need to add certificates and signatures to the UBL 2.1 transaction, you must use a third party service provider.
How You Set Up Receivables for OAGIS 10.1 XML TransactionDelivery Set up Receivables for OAGIS 10.1 XML transaction delivery, as part of the implementation to enable sendingtransactions to customers in OAGIS 10.1 XML format.
Along with completing the setups in Receivables, you must also complete the related setups in Collaboration MessagingFramework. Once you complete the setups in both products, you can make use of XML transaction delivery.
To set up Receivables for OAGIS 10.1 XML transaction delivery, complete these tasks:
• Set up XML invoicing on customer account profiles.
• Set up an attachment category for XML transactions (optional).
53
Oracle Financials CloudImplementing Receivables Credit to Cash
Chapter 2Manage Receivables System Options
Note: You must first use the Feature Opt-in page in Functional Setup Manager to enable Receivables Invoice Deliveryin Open Applications Group Integration Specification (OAGIS) 10.1 XML Format before completing these setups.Enabling OAGIS 10.1 XML transaction delivery also enables the Universal Business Language (UBL) 2.1 XML transactiondelivery.
Set Up XML Invoicing on Customer Account ProfilesSet up the Receivables customer account profiles of customers that you intend to define as trading partners for XMLtransaction delivery. The settings that you use apply to all sites belonging to the customer account.
To set up a customer account for XML transaction delivery:
1. Navigate to the Billing work area.2. Select the Manage Customers task.3. In the Manage Customers page, search for the customer that you want to enable for XML transaction delivery.4. In the Edit Account page, click the Profile History tab.5. In the Invoicing section, set the Preferred Delivery Method to XML.6. Select the Enable for XML Invoicing check boxes for the applicable transactions for this customer: Invoice,
Debit Memo, Chargeback, Credit Memo.
Receivables selects all eligible transactions whenever you run the Generate and Transfer XML Transactionsprocess for this customer account.
7. Save your work.8. Repeat steps 3 to 7 for each applicable customer account.
Set Up an Attachment Category for XML TransactionsYou can optionally define an attachment category for including transaction header attachments in the XML transaction.
During a run of the Generate and Transfer XML Transactions process, attachments to the transaction associated withthe XML attachment category you define are embedded in the OAGIS 10.1 XML.
To set up an attachment category for XML transactions:
1. Navigate to the Setup and Maintenance work area.2. Select the Manage Attachment Categories task.3. In the Manage Attachment Categories page, click the Plus (+) icon to create a new attachment category.
Note: You can also use an existing attachment category.
4. Complete the fields for the XML transaction attachment category. For example:
◦ Category Name: XML_INVOICE
◦ User Name: XML invoice
◦ Description: Attachments embedded in the XML invoice header
5. In the Attachment Entities section, click the Plus (+) icon.6. In the Entity Name field, enter RA_CUSTOMER_TRX_ALL to associate attachments with the transaction header.7. Save your work.8. Select the Manage Receivables Profile Options task.
Now associate the attachment category with the Bill Presentment profile option for printing attachments(AR_BPA_PRINT_ATTACH_CATEGORY).
54
Oracle Financials CloudImplementing Receivables Credit to Cash
Chapter 2Manage Receivables System Options
9. In the Manage Receivables Profile Options page, search for the AR_BPA_PRINT_ATTACH_CATEGORY profileoption.
10. In the Profile Values section, click the Plus (+) icon.11. In the Profile Level field, enter Site.12. In the Profile Value field, enter the name of the attachment category that you defined in step 4.13. Save your work.
This site profile value allows attachments belonging to the AR_BPA_PRINT_ATTACH_CATEGORY category onthe transaction header to be embedded in the XML transaction.
14. In the Attachments window of Create Transaction pages, use the attachment category that you created andassociated with the AR_BPA_PRINT_ATTACH_CATEGORY profile option to add an attachment intended forinclusion in an XML transaction.
Related Topics• Overview of OAGIS 10.1 XML Transaction Delivery for Receivables
• How You Set Up Collaboration Messaging for OAGIS 10.1 XML Transaction Delivery
• UBL 2.1 XML Transaction Delivery for Receivables
How You Set Up Collaboration Messaging for OAGIS 10.1 XMLTransaction Delivery Set up the Collaboration Messaging Framework for OAGIS 10.1 XML transaction delivery, as part of the implementationto enable sending Receivables transactions to customers in XML format.
Along with completing the setups in Collaboration Messaging, you must also complete the related setups inReceivables. Once you complete the setups in both products, you can make use of OAGIS 10.1 XML transaction delivery.
The Collaboration Messaging setup involves enabling Collaboration Messaging for Order to Cash documents, andcreating service providers and trading partners and associating them with trading partner customer accounts.
To set up Collaboration Messaging for XML transaction delivery, complete these tasks:
• Enable collaboration messaging for Receivables.
• Set up service providers.
• Set up B2B trading partners.
• Associate service providers and trading partners with customer accounts.
Note: You must first use the Feature Opt-in page in Functional Setup Manager to enable Receivables Invoice Deliveryin Open Applications Group Integration Specification (OAGIS) 10.1 XML Format before completing these setups.
Enable Collaboration Messaging for ReceivablesConfigure your outbound message processing and enable the Order to Cash business process.
To enable collaboration messaging for Receivables:
1. Navigate to the Setup and Maintenance work area.2. Select the Manage Collaboration Messaging Configuration task.
55

Oracle Financials CloudImplementing Receivables Credit to Cash
Chapter 2Manage Receivables System Options
3. In the General Setup tabbed region of the Manage Collaboration Messaging Configuration page, enter yourcompany identifier in the Global Sender ID field.This identifier is used by your service providers and trading partners to identify you as the sender of XMLtransactions.
4. If you're planning to send attachments with XML transactions, in the Maximum Attachment Size field enter inmegabytes the maximum size of an attachment that can be embedded in an XML transaction.If the size of an attachment in the transaction header exceeds this limit, the attachment isn't embedded in theXML transaction delivery.
5. Click the Business Process Setup tab.6. In the Collaboration Business Process table, check the Enable box for the Order to Cash business process.7. Save your work.
Set Up Service ProvidersUse the Manage Collaboration Messaging Service Providers task to create service providers. Service providers are theintermediaries that exchange messages between Oracle Applications Cloud and trading partners (customers).
For each service provider, define the delivery method, outbound collaboration message, and inbound collaborationmessage for OAGIS 10.1 XML transaction delivery.
Note: If you plan to send XML transactions directly to trading partners without a service provider, skip this taskand complete the tasks to set up B2B trading partners and to associate service providers and trading partners withcustomer accounts.
To set up a service provider:
1. Navigate to the Setup and Maintenance work area.2. Select the Manage Collaboration Messaging Service Providers task.3. In the Manage Collaboration Messaging Service Providers page, click the Plus (+) icon to open the Create
Collaboration Messaging Service Provider window.4. In the Name field, enter the name that you want to use for the service provider.5. In the Provider ID field, enter the identifier for the service provider.6. In the ID Type field, select Generic.7. In the Description field, you can enter a description that identifies this service provider for XML transaction
delivery.8. Click the Save and Close button.9. In the Edit Collaboration Messaging Service Provider page, click the Delivery Methods tab.
10. Click the Plus (+) icon to open a delivery method row.11. In the Name field, enter the name of the XML message delivery method, according to your agreement with the
service provider.12. In the Delivery Method Type field:
◦ Select Web Service for OAGIS 10.1 XML.
◦ Select B2B Adapter or Email for UBL 2.1 XML.
13. In the Service Name field, select CollaborationMessage.Process for synchronous service orCollaborationMessage.ProcessAsync for asynchronous service.
14. Complete the remaining fields for the delivery method according to your business requirements.15. Click the Outbound Collaboration Messages tab.16. Click the Plus (+) icon to open an outbound collaboration messages row.17. In the Name field, enter a name to identify this outbound collaboration message, for example, AR_Invoice.
56
Oracle Financials CloudImplementing Receivables Credit to Cash
Chapter 2Manage Receivables System Options
18. In the Collaboration Message field, select:
◦ OAGIS_10.1_PROCESS_INVOICE_COLLAB_MSG_OUT for outbound OAGIS XML transaction delivery.
◦ UBL_2.1_INVOICE_OUT for outbound UBL 2.1 XML transaction delivery.
19. In the Status field, select Active.20. In the Delivery Method Name field, enter the XML message delivery method you defined in the Delivery
Methods tab.21. If your service provider has agreed to send an acknowledgment in OAGIS 10.1 CBOD format for XML
transactions received, click the Inbound Collaboration Messages tab to define the inbound collaborationmessage.
22. Click the Plus (+) icon to open an inbound collaboration messages row.23. In the Name field, enter a name to identify the inbound collaboration message, for example, AR_CBOD.24. In the Collaboration Message field, select OAGIS_10.1_CONFIRM_BOD_COLLAB_MSG_IN.25. In the Status field, select Active.26. Click the Outbound Collaboration Messages tab again.27. In the Status field, select Inactive.
This lets you edit the fields in the outbound collaboration message.28. In the Confirmation Message Name field enter the name of the CBOD message that you just defined.
This associates the inbound CBOD message with the outbound transaction message to receiveacknowledgment of the XML transaction.
29. In the Status field, select Active.30. Save your work.
Set Up B2B Trading PartnersTrading partners are the customers that you designate to receive Receivables transactions in XML format. Each tradingpartner is required to have a trading partner identifier, known to you and to your service provider. This identifier isincluded in the XML message and is used by the service provider to identify the trading partner receiving the XMLdocument.
You must also set up the Receivables customer account profile for each customer that you intend to define as a tradingpartner for XML transaction delivery.
After you create the trading partner, you must associate the outbound collaboration message and inbound CBODcollaboration message that you defined for the service provider with the trading partner.
To set up a trading partner:
1. Navigate to the Collaboration Messaging work area.2. Select the Manage B2B Trading Partners task.3. In the Manage B2B Trading Partners page, click the Plus (+) icon to open the Create Trading Partner window.4. In the Service Provider field, select the service provider to use for this trading partner for XML delivery.
If you plan to send XML transactions to the trading partner directly without using a service provider, selectNone.
5. In the Trading Partner ID field, enter the identifier for the trading partner.6. In the Partner ID Type field, select the category of the trading partner identifier.
Valid values are: D-U-N-S, Generic (if you use the customer account number to identify the trading partner),GLN, MISC, PHONE, TAXID, Name (if you use the customer account name to identify the trading partner).
7. Click the Save and Close button.
57

Oracle Financials CloudImplementing Receivables Credit to Cash
Chapter 2Manage Receivables System Options
8. In the Collaboration Documents for Service Provider section of the Edit Trading Partner page, enter in theDocuments column the outbound collaboration message and inbound CBOD collaboration message for thisservice provider.
9. Save your work.
Associate Service Providers and Trading Partners with Customer AccountsAfter setting up your service providers and trading partners, associate both the service provider and trading partner tothe related customer account.
If you plan to send XML transactions to the trading partner directly without using a service provider, you must stillassociate the service provider value None with the related customer account.
To associate a service provider and trading partner to a customer account:
1. Navigate to the Collaboration Messaging work area.2. Select the Manage Customer Account Collaboration Configuration task.3. In the Manage Customer Account Collaboration Configuration page, search for the customer account you want.4. Select the customer account and click the Edit Collaboration Configuration button.5. In the Associated Service Providers section of the Edit Customer Account Collaboration Configuration page,
click the Plus (+) icon to open a service provider row.6. Enter the service provider and the related trading partner ID. This associates the service provider and trading
partner with the customer account.7. In the Collaboration Documents for Service Provider section, click the Plus (+) icon to open a collaboration
documents row.8. In the Document field, enter the outbound collaboration message associated with the service provider.
You don't need to enter the inbound CBOD collaboration message, because it's already associated with theservice provider.
9. In the Associated Status field, select Enabled.10. Save your work.
Related Topics• How You Set Up Receivables for OAGIS 10.1 XML Transaction Delivery
Import Setup Data for OAGIS 10.1 XML Transaction Delivery Usingthe Customer Import FBDI Use the Customer Import FBDI (File-Based Data Import) to complete certain setups for OAGIS 10.1 XML transactiondelivery.
You can use the RA_CUSTOMER_PROFILES_INT_ALL worksheet of the Customer Import Template to complete thesesetups in Collaboration Messaging Framework and in Receivables:
• Collaboration Messaging: B2B trading partners.
• Collaboration Messaging: Customer account collaboration configuration.
• Receivables: Customer account profiles. You can either update an existing customer account profile or create anew customer account profile.
The data in this worksheet is imported into the RA_CUSTOMER_PROFILES_INT_ALL interface table for transfer toReceivables.
58
Oracle Financials CloudImplementing Receivables Credit to Cash
Chapter 2Manage Receivables System Options
Note: You can only use the Customer Import FBDI to import setup data for OAGIS 10.1 XML transaction delivery ifyou're using a service provider to send XML documents.
Before you can import setup data using the Customer Import Template, you must complete these tasks:
• Use the Feature Opt-in page in Functional Setup Manager to enable the Receivables Invoice Delivery in OpenApplications Group Integration Specification (OAGIS) 10.1 XML Format feature.
• Use the Manage Collaboration Messaging Service Providers task to create service providers for XMLtransaction delivery.
To import setup data for XML transaction delivery:
1. Download the Customer Import Template.2. Click the RA_CUSTOMER_PROFILES_INT_ALL tab.
The RA_CUSTOMER_PROFILES_INT_ALL worksheet displays the columns for Receivables customer accountprofiles. The Collaboration Messaging columns are hidden by default.
3. Display the Collaboration Messaging columns:
a. Highlight the XML Invoicing for Credit Memo column and the next column.b. Right-click to display the Collaboration Messaging columns.
4. Complete the Collaboration Messaging columns:
a. Enable Collaboration Messaging Configuration: Select Y to import Collaboration Messaging setup datafor the customer account.
b. Service Provider Name: Enter the name of the service provider that you defined using the ManageCollaboration Messaging Service Providers task.
c. Trading Partner ID: Enter the code that identifies the customer account as a trading partner to receiveXML transactions.
d. Trading Partner ID Type: Select the category of the trading partner identifier.
Valid values are: D-U-N-S, Generic (if you use the customer account number to identify the tradingpartner), GLN, MISC, PHONE, TAXID, Name (if you use the customer account name to identify the tradingpartner).
e. Receivables Outbound XML Transaction Document: Select Y to indicate that the trading partner isenabled to receive Receivables transactions in XML format.
f. Receivables Inbound Confirmation Document: Select Y to indicate that the trading partner is enabledto send back a confirmation BOD after receiving an XML transaction.
5. Complete the Receivables customer account profile columns according to your requirements.6. Submit the Data Import Batch to import the Receivables and Collaboration Messaging setup data into the
corresponding tables.
Related Topics• How You Set Up Collaboration Messaging for OAGIS 10.1 XML Transaction Delivery
59
Oracle Financials CloudImplementing Receivables Credit to Cash
Chapter 2Manage Receivables System Options
B2B XML
B2B XML Invoicing in Receivables Send Receivables transactions electronically in XML format to designated customers using the Oracle B2B outboundservice. Oracle B2B is a SOA Suite component that manages the interactions between your enterprise and yourcustomers.
A customer designated for receiving transactions in XML format is called a trading partner. You set up your customertrading partners in Oracle B2B to send XML transactions using one of these transmission methods:
• Directly to the customer.
• Using Oracle Supplier Network.
• Using a third-party service.
In Receivables, you must set up the related customer accounts for B2B XML using the Invoicing section of the accountprofile. The settings that you use apply to all sites belonging to the customer account.
To set up a customer account for B2B XML invoicing:
1. In the Invoicing section of the Account Profile tab, select XML in the Preferred Delivery Method field.2. In the B2B Trading Partner Code field, enter the connecting identifier of the trading partner.
If applicable, you can assign the same trading partner code to multiple customer accounts.
CAUTION: This is a required value for XML delivery. If you don't enter the connecting identifier, then youcan't send transactions in XML format to this customer account.
3. Using the Enable for XML Invoicing check boxes, select the transactions that you want to send to this tradingpartner in XML format. Receivables selects all eligible transactions whenever you run the XML InvoicingProgram for this customer account.
After you set up your customer accounts for B2B XML invoicing, you can use the XML invoice template to enhance theinformation included in the invoice output by mapping Receivables attributes to attributes in the User Area section ofthe template.
Once your setup is complete, use the XML Invoicing Program to send customer transactions in XML format. If anytransactions fail during the transmission process, use the Manage Transactions page to review failed transactions andpursue corrective actions. You can then resend these transactions using the XML Invoicing Program.
Related Topics• XML Transactions in Receivables
XML Transactions in Receivables Use the XML Invoicing Program to send Receivables transactions to your customer trading partners.
60

Oracle Financials CloudImplementing Receivables Credit to Cash
Chapter 2Manage Receivables System Options
These restrictions apply to the transactions you send:
• Transactions belong to customer accounts set up for XML invoicing.
• Transactions are complete.
• Transactions have a status of Print Pending.
• Transactions (invoice, credit memo, debit memo, chargeback) are enabled for XML invoicing in the relatedcustomer account profiles.
• Transactions have the printing option on the transaction type set to Print.
New TransactionsSelect New Transactions Only in the Transactions Included field to send new transactions in XML format to yourcustomers. You can process all eligible transactions for all business units and customers, or you can use the availableparameters to limit the transactions processed according to your needs.
Failed TransactionsTransactions can fail to transmit correctly at one of three stages in the transmission process.
These three stages are:
• Receivables process
• SOA process
• B2B process
This table describes the potential errors that can occur at each stage of the B2B XML transmission process:
XML
Process Error Condition Error Notification Corrective Action
Receivables
Customer Account is missing theB2B trading partner code.
Transaction marked as Failed withcorresponding error reason.
Add the B2B trading partner codeto the appropriate account.
SOA
Receivables system or server isdown.
Transaction isn't marked becauseit wasn't processed. Systemerror notification only on the EMconsole.
System administrator restarts andreinitiates SOA for the transaction.
SOA
Transformation errors.
Transaction marked as Failed withcorresponding error reason.
System administrator fixes thetransformation errors.
SOA
B2B server is down.
Transaction marked as Failed withcorresponding error reason.
System administrator restarts theB2B server.
B2B
B2B setup is either incomplete orincorrect.
Transaction marked as Failed withcorresponding error reason.
B2B administrator fixes the B2Bsetup errors.
61
Oracle Financials CloudImplementing Receivables Credit to Cash
Chapter 2Manage Receivables System Options
Related Topics• B2B XML Invoicing in Receivables
Set Up Oracle B2B to Send Receivables XML Transactions Oracle B2B Server is an Oracle SOA Suite component that manages interactions between deploying companiesand trading partners. Oracle Receivables supports an outbound Oracle B2B flow using Oracle B2B Server to sendtransactions to customer trading partners in XML format.
The setup of the Oracle B2B flow for Receivables makes use of these existing elements:
• XML Schema document guideline
• OAG-7.2.1-PROCESS_INVOICE_002-OAG_DEF document definition
• Host trading partner MyCompany
To set up Oracle B2B to send Receivables transactions in XML:
• Configure the host and remote trading partners
• Configure agreements between the host and remote trading partners
Configure Trading PartnersConfigure your enterprise as the host trading partner, and all of your customers that receive XML documents as remotetrading partners.
To configure trading partners:
1. Log in to the Oracle B2B Server.2. Navigate to the Administration page.3. Click the Document tab.4. Load the OAG-7.2.1-PROCESS_INVOICE_002-OAG_DEF document definition file.5. Click the Types tab.6. Add a new Internal Identifier with the name B2B Trading Partner Code.
This name matches the field name on the customer account profile.7. Navigate to the Partners page.8. In the Partner section, select the default host partner MyCompany.9. If necessary, update the default host partner name to reflect your enterprise.
10. Click the Documents tab.11. Verify that the OAG-7.2.1-PROCESS_INVOICE_002-OAG_DEF document definition is assigned to the host
trading partner.12. Ensure that the Sender option is enabled.13. In the Partner section, click the Add icon.14. Enter the name of a remote trading partner.15. Select the Internal Identifier Type B2B Trading Partner Code that you previously created and enter the Value
for the identifier.
This is the value that you will enter in the B2B Trading Partner Code field on the customer account profile ofthis remote trading partner.
16. Click the Documents tab.
62
Oracle Financials CloudImplementing Receivables Credit to Cash
Chapter 2Manage Receivables System Options
17. Click the Add icon to associate the OAG-7.2.1-PROCESS_INVOICE_002-OAG_DEF document definition with theremote trading partner.
18. Enable the Receiver option.19. Click the Channel tab.20. Define a channel for the remote trading partner.
The channel determines how the XML transaction is delivered to the remote trading partner from B2B: directly;using the Oracle Supplier Network (OSN), or using a third party service.
If you're communicating using Oracle Supplier Network (OSN), select the Generic Identifier and enter the IPAddress for OSN.
21. Repeat steps 13 to 20 for each remote trading partner.
Configure AgreementsA trading partner agreement defines the terms that enable two trading partners, the sender and the receiver, toexchange business documents. The agreement identifies the trading partners, trading partner identifiers, documentdefinitions and channels.
An agreement consists of two trading partners, the host trading partner and one remote trading partner, and representsone type of business transaction between these partners. For example, if the host trading partner MyCompany andthe remote trading partner ABC Solutions regularly exchange both purchase orders and invoices, then two separateagreements are needed for each document definition.
To configure agreements between the host and remote trading partners:
1. Log in to the Oracle B2B Server.2. Navigate to the Partners page.3. In the Agreement section, click the Add icon to open a new agreement for the host trading partner
MyCompany.4. Enter the agreement ID and Name.5. Enter the agreement parameters.6. Select the Document Definition OAG-7.2.1-PROCESS_INVOICE_002-OAG_DEF for this agreement.7. Select the remote trading partner to include in this agreement.8. Select the channel for the remote trading partner.9. Add identifiers for the remote trading partner.
10. Click Save to save the agreement.11. Click Validate to validate the agreement.12. Click Deploy to deploy the agreement.
Deployment is the process of activating an agreement from the design-time repository to the run-timerepository.
13. Repeat steps 3 to 12 for each agreement between the host trading partner and this remote trading partner.
FAQs for B2B XML
Why can't I configure B2B XML on the profile class? You configure and maintain B2B XML invoicing parameters in the related customer account profile. Customer sitesshare the settings of the related customer account.
63
Oracle Financials CloudImplementing Receivables Credit to Cash
Chapter 2Manage Receivables System Options
Multifund Accounting
Overview of Multifund Accounting Multifund Accounting is an optional accounting feature that lets you post transactions, adjustments, and receipts tomultiple balancing segment values or funds. Multifund Accounting is also known as Detailed Receivables Distributions.
In a default accounting model, multiple revenue, freight, and tax lines of a transaction are consolidated and accountedas a single distribution line. When Multifund Accounting is enabled for a business unit and ledger, then the accountingprocess creates detailed distributions for each transaction line according to the balancing segment values of theaccount code combinations.
You can use Multifund Accounting to monitor and track the receipts and usage for each of your balancing segmentvalues. This lets you manage, for example, the disbursement of funds supporting a particular public sector project, suchas a general operating fund, endowment fund, and gift fund. Or you can monitor and extract financial information inyour organization by division, department, and product, without the need for creating separate invoices for each ofthese sectors.
The use of Multifund Accounting is for the setup of a new business unit and primary ledger only. Multifund Accountingapplies to these Receivables event classes only: standard and miscellaneous receipts, invoices, credit memos, debitmemos, and adjustments.
For information about the activities supported for Multifund Accounting in each Receivables event class, see EventsSupported for Multifund Accounting, Document ID 2558258.1, on My Oracle Support.
Example of Multifund AccountingThese tables provide an example of multifund accounting on an invoice. In this example, Invoice 101 makes use offunding from two different fund sources.
Invoice 101 has two invoice lines, one in the amount of $1000 and one in the amount of $500:
Line Number Memo Line Quantity Unit Price Amount
1
1 year support
1
1000
1000
2
1 year additionalconsultations
2
250
500
The accounting for these invoice lines with detailed distributions splits the Receivable and Revenue across the twofunds (the additional $190 is for Tax and Freight):
Line Event Account Class Debit Credit
1
Invoice Created
02-000-1200-0000-000
Receivable
1120.00
2 Invoice Created 03-000-1200-0000-000Receivable 570.00
64

Oracle Financials CloudImplementing Receivables Credit to Cash
Chapter 2Manage Receivables System Options
Line Event Account Class Debit Credit
3
Invoice Created
02-000-4100-0000-000
Revenue
1000.00
4
Invoice Created
03-000-4100-0000-000
Revenue
500.00
Reports for Multifund AccountingUse the available reports to review and reconcile your multifund accounting detailed distributions.
You can manage your multifund accounting detailed distributions using the Receivables to General LedgerReconciliation Report and the Receivables Aging by General Ledger Account for Multifund Accounting Report.
Note: The use of these reports for reviewing multifund accounting detailed distributions applies only to the ledgerand business units set up to use Multifund Accounting.
You can review and reconcile your multifund accounting detailed distributions using the available tools in theReceivables to General Ledger Reconciliation Report. Run the Prepare Receivables to General Ledger Reconciliationprocess, and then access the summary and detailed reports using the Receivables to General Ledger Reconciliation task.
You can generate and review the aging details for the ledger and business units enabled for Multifund Accounting usingthe Receivables Aging by General Ledger Account for Multifund Accounting Report. You schedule this report from theOracle Transactional Business Intelligence Catalog.
Guidelines for Enabling Multifund Accounting You enable Multifund Accounting as part of your Receivables System Options setup for a business unit.
The deployment of Multifund Accounting is for the setup of a new business unit and primary ledger only. The use ofMultifund Accounting involves preliminary planning and an understanding of the ramifications related to its use. Beforeyou enable this feature, review all of the guidelines indicated in this topic.
Enable Multifund AccountingTo enable Multifund Accounting, follow these steps:
1. Navigate to Setup and Maintenance.2. Search for the task Manage Receivables System Options.3. Open the Create or Edit System Options page for the business unit designated for Multifund Accounting.4. If not already displayed, navigate to the Accounting section of the Billing and Revenue tabbed region.5. Enable the Enable multifund accounting option.6. Save your work.
CAUTION: Once you enable the Enable multifund accounting option and save the System Options record, you can'tdisable this feature for this business unit.
65
Oracle Financials CloudImplementing Receivables Credit to Cash
Chapter 2Manage Receivables System Options
To complete your setup for Multifund Accounting, you must also create an accounting method in Subledger Accountingfor the primary ledger assigned to this business unit.
Requirements for Business Units and Primary LedgerEven though you enable the setting for Multifund Accounting as part of the Receivables System Options setup for abusiness unit, the setting actually applies to the primary ledger and all of the Receivables business units associated withthis ledger.
These requirements apply to enabling Multifund Accounting for a business unit:
• When you enable the Multifund Accounting feature for a business unit, this feature is also automaticallyenabled on all business units associated with the same primary ledger.
• If any business unit associated with this primary ledger doesn't require Multifund Accounting, then you mustdisassociate the business unit from this ledger before enabling the feature.
• You can only enable Multifund Accounting on business units that don't have any transactions. Because of this,the use of this feature is only for the implementation of a new business unit and ledger.
Requirements for Migrating Legacy TransactionsThese requirements apply to migrating legacy transactions to a business unit enabled for Multifund Accounting:
• You must enable Multifund Accounting for a business unit before migrating transactions from your legacysystem to this business unit.
• You can use either an FBDI template or Receivables REST API resources to migrate your transactions.
• Migrate your legacy transactions as open balances for each transaction line.
• After migrating your legacy transactions, post all transactions to General Ledger.
To ensure the posting of all migrated transactions to a single journal, in the Edit Accounting Options page for theapplicable ledger, set the General Ledger Journal option Entry Summarization to Summarize by General Ledger Date.
This setting lets you manually reverse the journal so that it won't contradict open balance migrations from GeneralLedger. This also prevents unwanted entries for Revenue, Freight, and Taxes in the current period.
Subledger Accounting Setup for Multifund Accounting After you enable a business unit for Multifund Accounting using the Enable multifund accounting option inReceivables System Options, you must complete related setups in Subledger Accounting to use multifund accounting.
Set Up an Accounting Method and Journal Entry Rule Sets for Multifund AccountingCreate a Multifund Accounting accounting method and journal entry rule set assignments in Subledger Accounting forthe primary ledger assigned to the business unit.
To prepare the primary ledger for Multifund Accounting:
• Create an accounting method for Multifund Accounting.
• Assign the predefined journal entry rule sets for the multifund accounting balancing method to the accountingmethod.
• Associate the accounting method for Multifund Accounting with the primary ledger.
66

Oracle Financials CloudImplementing Receivables Credit to Cash
Chapter 2Manage Receivables System Options
To set up the Multifund Accounting accounting method, complete these steps:
1. Navigate to the Manage Accounting Methods task from the Receivables configuration.2. Search for the Accounting Method Standard Accrual.3. In the Edit Accounting Method page for Standard Accrual, select Duplicate from the Actions menu.4. In the Create Accounting Method window, create an accounting method for Multifund Accounting. Enter for
example:a. In the Name field, enter Multifund Accounting Method.b. In the Short Name field, enter MULTI_FUND_ACCOUNTING_METD.c. In the Description field, enter "Accounting method to support Multifund Accounting."d. In the Chart of Accounts field, select the chart of accounts.e. Click the Save and Close button.
5. In the Journal Entry Rule Set Assignments section of the Edit Accounting Method page for MultifundAccounting, delete the existing rule sets copied from the Duplicate action.
6. Enter the predefined Multifund Accounting rule sets:
◦ Invoices - Multifund Accounting Balancing Method
◦ Credit Memos - Multifund Accounting Balancing Method
◦ Debit Memos - Multifund Accounting Balancing Method
◦ Adjustments - Multifund Accounting Balancing Method
◦ Receipts - Multifund Accounting Balancing Method
◦ Miscellaneous Receipts - Multifund Accounting Balancing Method
7. Activate the Multifund Accounting accounting method.8. Save your work.9. Navigate to the Specify Ledger Options task.
10. Select the primary ledger associated with the business unit enabled for Multifund Accounting.11. In the Accounting Method field of the Subledger Accounting section of the Specify Ledger Options page,
select the accounting method that you defined for Multifund Accounting.12. Complete the remaining fields according to your business requirements13. Save your work.
Set Up Multifund Accounting for Transactions with Invoicing RulesYou can set up Subledger Accounting for multifund accounting to create detailed distributions on Receivablestransactions that use invoicing rules. With the appropriate setup, the Receivables account is split on the basis ofUnearned Revenue for transactions using the In Advance invoicing rule, and Unbilled Receivables for transactions usingthe In Arrears invoicing rule.
Example of Multifund Accounting on an Invoice with an Invoicing Rule
The example in the tables below illustrates how the Receivables account is split on an invoice assigned the In Advanceinvoicing rule. The revenue scheduling rule uses the fixed schedule rule type.
This table shows details of the transaction:
Field Value
Invoice Date
1-Mar-20
67
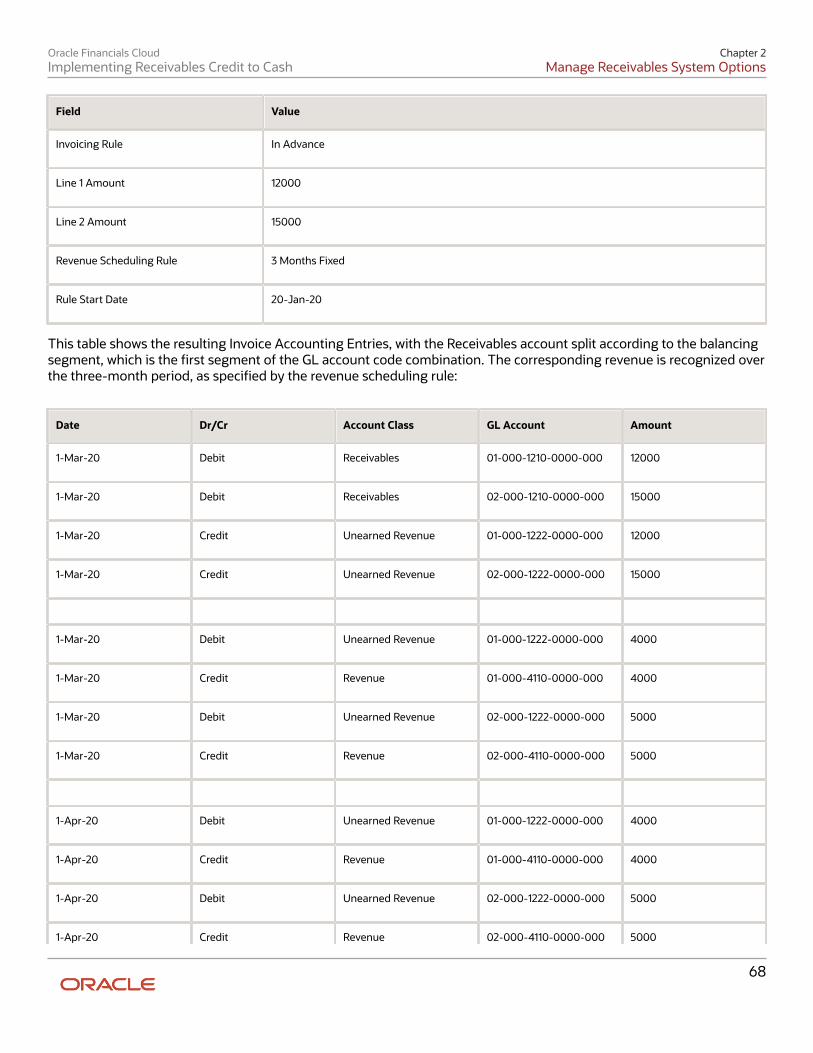
Oracle Financials CloudImplementing Receivables Credit to Cash
Chapter 2Manage Receivables System Options
Field Value
Invoicing Rule
In Advance
Line 1 Amount
12000
Line 2 Amount
15000
Revenue Scheduling Rule
3 Months Fixed
Rule Start Date
20-Jan-20
This table shows the resulting Invoice Accounting Entries, with the Receivables account split according to the balancingsegment, which is the first segment of the GL account code combination. The corresponding revenue is recognized overthe three-month period, as specified by the revenue scheduling rule:
Date Dr/Cr Account Class GL Account Amount
1-Mar-20
Debit
Receivables
01-000-1210-0000-000
12000
1-Mar-20
Debit
Receivables
02-000-1210-0000-000
15000
1-Mar-20
Credit
Unearned Revenue
01-000-1222-0000-000
12000
1-Mar-20
Credit
Unearned Revenue
02-000-1222-0000-000
15000
1-Mar-20
Debit
Unearned Revenue
01-000-1222-0000-000
4000
1-Mar-20
Credit
Revenue
01-000-4110-0000-000
4000
1-Mar-20
Debit
Unearned Revenue
02-000-1222-0000-000
5000
1-Mar-20
Credit
Revenue
02-000-4110-0000-000
5000
1-Apr-20
Debit
Unearned Revenue
01-000-1222-0000-000
4000
1-Apr-20
Credit
Revenue
01-000-4110-0000-000
4000
1-Apr-20
Debit
Unearned Revenue
02-000-1222-0000-000
5000
1-Apr-20 Credit Revenue 02-000-4110-0000-000 5000
68

Oracle Financials CloudImplementing Receivables Credit to Cash
Chapter 2Manage Receivables System Options
Date Dr/Cr Account Class GL Account Amount
1-May-20
Debit
Unearned Revenue
01-000-1222-0000-000
4000
1-May-20
Credit
Revenue
01-000-4110-0000-000
4000
1-May-20
Debit
Unearned Revenue
02-000-1222-0000-000
5000
1-May-20
Credit
Revenue
02-000-4110-0000-000
5000
Setting Up Your Balancing Segment Values
As this example illustrates, you must use the same balancing segment value for the corresponding invoicing rule:
• In Advance: Use the same balancing segment value for the Unearned Revenue and Revenue accounts acrossperiods.
• In Arrears: Use the same balancing segment value for the Unbilled Receivables and Revenue accounts acrossperiods.
Note: Using the same balancing segment values applies whether a balancing segment value is manually overriddenusing the Review Distributions window or overridden through the segment rules in Subledger Accounting. Otherwise,Intracompany and Intercompany balancing entries are generated.
To use Multifund Accounting on transactions that use invoicing rules and revenue scheduling rules, you must modifythe Multifund Accounting accounting method you created for the primary ledger associated with the business unitenabled for Multifund Accounting.
To modify the Multifund Accounting accounting method for invoices with rules, perform these four tasks:
1. Create a journal line rule for the Invoice event class and associate it with the journal entry rule set.2. Create a journal line rule for the Debit Memo event class and associate it with the journal entry rule set.3. Modify the conditions within the journal line rule Receipt Application to Multifund Transaction Receivable
for the Receipt event class.4. Update your Multifund Accounting accounting method with the new rule sets for Invoice, Debit Memo, and
Receipt.
Create a Journal Line Rule for Invoice Event Class and Associate the Rule with the Journal Entry Rule Set
To create a journal line rule for the Invoice event class and associate it with the journal entry rule set, complete thesesteps:
1. Navigate to the Journal Line Rules task from the Receivables configuration.2. In the Name field of the Manage Journal Line Rules: Receivables page, search for the journal line rule
Multifund Invoice Receivable.3. Select Multifund Invoice Receivable and click the Duplicate icon.4. In the Create Journal Line Rule window, enter a Name and Short Name that identifies this new Multifund
Invoice Receivable journal line rule.5. Click the Save and Close button.
69
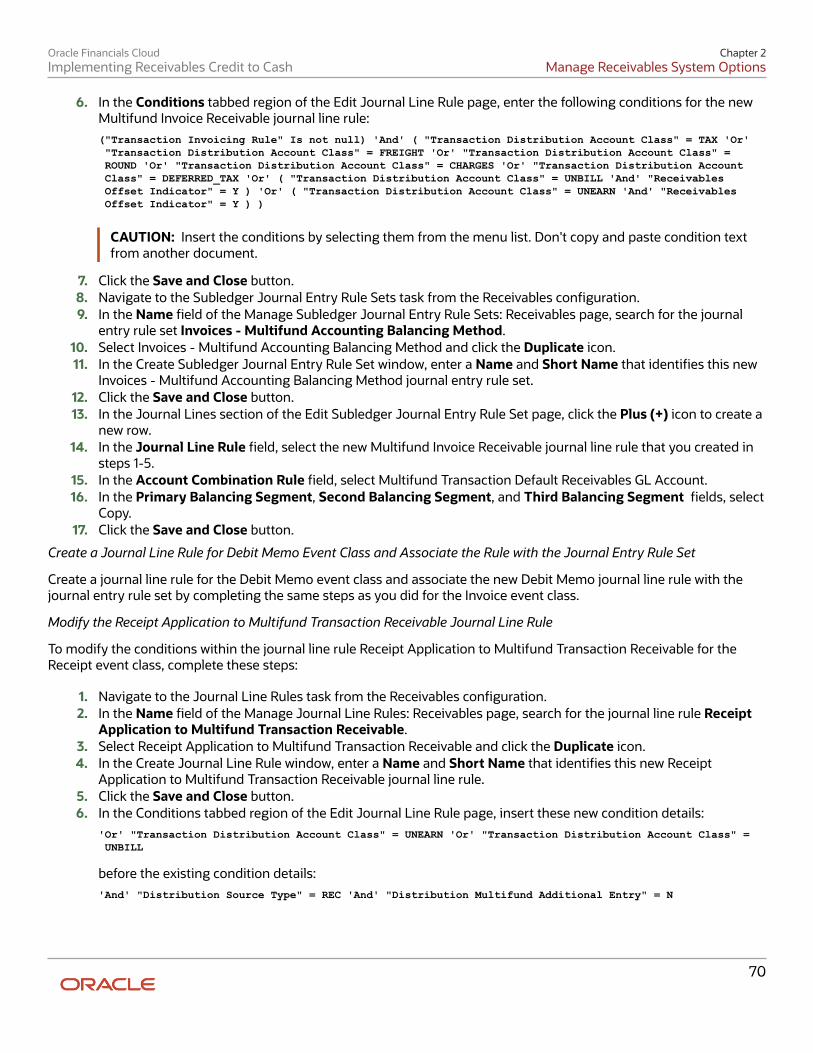
Oracle Financials CloudImplementing Receivables Credit to Cash
Chapter 2Manage Receivables System Options
6. In the Conditions tabbed region of the Edit Journal Line Rule page, enter the following conditions for the newMultifund Invoice Receivable journal line rule:("Transaction Invoicing Rule" Is not null) 'And' ( "Transaction Distribution Account Class" = TAX 'Or' "Transaction Distribution Account Class" = FREIGHT 'Or' "Transaction Distribution Account Class" = ROUND 'Or' "Transaction Distribution Account Class" = CHARGES 'Or' "Transaction Distribution Account Class" = DEFERRED_TAX 'Or' ( "Transaction Distribution Account Class" = UNBILL 'And' "Receivables Offset Indicator" = Y ) 'Or' ( "Transaction Distribution Account Class" = UNEARN 'And' "Receivables Offset Indicator" = Y ) )
CAUTION: Insert the conditions by selecting them from the menu list. Don't copy and paste condition textfrom another document.
7. Click the Save and Close button.8. Navigate to the Subledger Journal Entry Rule Sets task from the Receivables configuration.9. In the Name field of the Manage Subledger Journal Entry Rule Sets: Receivables page, search for the journal
entry rule set Invoices - Multifund Accounting Balancing Method.10. Select Invoices - Multifund Accounting Balancing Method and click the Duplicate icon.11. In the Create Subledger Journal Entry Rule Set window, enter a Name and Short Name that identifies this new
Invoices - Multifund Accounting Balancing Method journal entry rule set.12. Click the Save and Close button.13. In the Journal Lines section of the Edit Subledger Journal Entry Rule Set page, click the Plus (+) icon to create a
new row.14. In the Journal Line Rule field, select the new Multifund Invoice Receivable journal line rule that you created in
steps 1-5.15. In the Account Combination Rule field, select Multifund Transaction Default Receivables GL Account.16. In the Primary Balancing Segment, Second Balancing Segment, and Third Balancing Segment fields, select
Copy.17. Click the Save and Close button.
Create a Journal Line Rule for Debit Memo Event Class and Associate the Rule with the Journal Entry Rule Set
Create a journal line rule for the Debit Memo event class and associate the new Debit Memo journal line rule with thejournal entry rule set by completing the same steps as you did for the Invoice event class.
Modify the Receipt Application to Multifund Transaction Receivable Journal Line Rule
To modify the conditions within the journal line rule Receipt Application to Multifund Transaction Receivable for theReceipt event class, complete these steps:
1. Navigate to the Journal Line Rules task from the Receivables configuration.2. In the Name field of the Manage Journal Line Rules: Receivables page, search for the journal line rule Receipt
Application to Multifund Transaction Receivable.3. Select Receipt Application to Multifund Transaction Receivable and click the Duplicate icon.4. In the Create Journal Line Rule window, enter a Name and Short Name that identifies this new Receipt
Application to Multifund Transaction Receivable journal line rule.5. Click the Save and Close button.6. In the Conditions tabbed region of the Edit Journal Line Rule page, insert these new condition details:
'Or' "Transaction Distribution Account Class" = UNEARN 'Or' "Transaction Distribution Account Class" = UNBILL
before the existing condition details:'And' "Distribution Source Type" = REC 'And' "Distribution Multifund Additional Entry" = N
70

Oracle Financials CloudImplementing Receivables Credit to Cash
Chapter 2Manage Receivables System Options
CAUTION: Insert the conditions by selecting them from the menu list. Don't copy and paste condition textfrom another document.
7. Click the Save and Close button.8. Navigate to the Subledger Journal Entry Rule Sets task from the Receivables configuration.9. In the Name field of the Manage Subledger Journal Entry Rule Sets: Receivables page, search for the journal
entry rule set Receipts - Multifund Accounting Balancing Method.10. Select Receipts - Multifund Accounting Balancing Method and click the Duplicate icon.11. In the Create Subledger Journal Entry Rule Set window, enter a Name and Short Name that identifies this new
Receipts - Multifund Accounting Balancing Method journal entry rule set.12. Click the Save and Close button.13. In the Journal Lines section of the Edit Subledger Journal Entry Rule Set page, select the existing Receipt
Application to Multifund Transaction Receivable journal line rule and delete it.14. Click the Plus (+) icon to create a new row.15. In the Journal Line Rule field, select the new Receipt Application to Multifund Transaction Receivable journal
line rule that you just created and modified.16. Click the Save and Close button.
Update Your Multifund Accounting Method with the New Rule Sets
To replace the existing rule sets for the Invoice, Debit Memo, and Receipt event class in your Multifund Accountingaccounting method, complete these steps:
1. Navigate to the Manage Accounting Methods task from the Receivables configuration.2. In the Manage Accounting Methods page, search for and select your Multifund Accounting Method to navigate
to the Edit Accounting Method page.3. In the Receivables tabbed region of the Journal Entry Rule Set Assignments section of the Edit Accounting
Method page, either delete or apply an end date to the existing rule sets for Invoice, Debit Memo, and Receipt.4. Add the new rule sets that you created for Invoice, Debit Memo, and Receipt and activate them.5. Click the Save and Close button.
Cash Pooling for Multifund Accounting You can use a cash pooling model to record multifund accounting entries on cash receipts.
Cash pooling is a cash management system that notionally consolidates account balances from several accountswithout physically moving funds. An organization can combine credit and debit positions from various bank accountsinto a pooled account to provide better visibility into the current state of an organization's business and to facilitateongoing decision-making.
The cash pool accounting model represents a cash account with the Cleared Cash account class. Other offset cashaccounts that reflect an interim receipt status, such as Confirmed Cash or Remitted Cash, aren't used in the cash poolaccounting model.
You can implement cash pooling for multifund accounting using either of two methods, depending on the fundmanagement requirements and local accounting conventions of your organization. The two methods are:
• Cash Pooling using Source Transaction Fund Allocation: Represent cash receipts as a direct split of cashaccount entries according to the source transaction allocation. Balancing segments of applied transactionreceivable accounts are the basis for cash account split on a regular receipt; balancing segment miscellaneouscash distribution accounts are the basis for cash account split on a miscellaneous receipt.
71

Oracle Financials CloudImplementing Receivables Credit to Cash
Chapter 2Manage Receivables System Options
• Cash Pooling using Intercompany Balancing Entries: Represent cash receipts as offsetting treasurer's equityand cash owed to an affiliate using intercompany balancing entries.
After you set up cash pooling for multifund accounting using either of these methods, you must create anAR_CASHPOOLING lookup code under the AR_FEATURES lookup type.
Note: Cash pooling only applies to a business unit enabled for Multifund Accounting. You must ensure that you havecompleted the base setup for Multifund Accounting on the applicable business unit before configuring Cash Poolaccounting.
Example of Cash Pooling Methods for Multifund AccountingThis example illustrates the accounting entries for both methods of representing cash pooling for MultifundAccounting.
Invoice XYZ contains three transaction lines for a total of $1600. This table represents the three line amounts:
Account Class Amount
Revenue
$600
Revenue
$250
Revenue
$750
This table represents the accounting entries for Invoice XYZ. The first segments in the account code combinations--B,C,D--are the balancing segments that represent the three funds:
Dr/Cr Reference Account Class Account Amount
Debit
Header
Receivables
B.000.1200.0
$600
Debit
Header
Receivables
C.000.1200.0
$250
Debit
Header
Receivables
D.000.1200.0
$750
Credit
Revenue
Revenue
B.000.4100.0
$600
Credit
Revenue
Revenue
C.000.4100.0
$250
Credit
Revenue
Revenue
D.000.4100.0
$750
Here the Receivables entry is split according to the fund allocation on each Revenue account.
Receipt PQR in the amount of $1600 is applied to Invoice XYZ. This table represents the receipt:
72
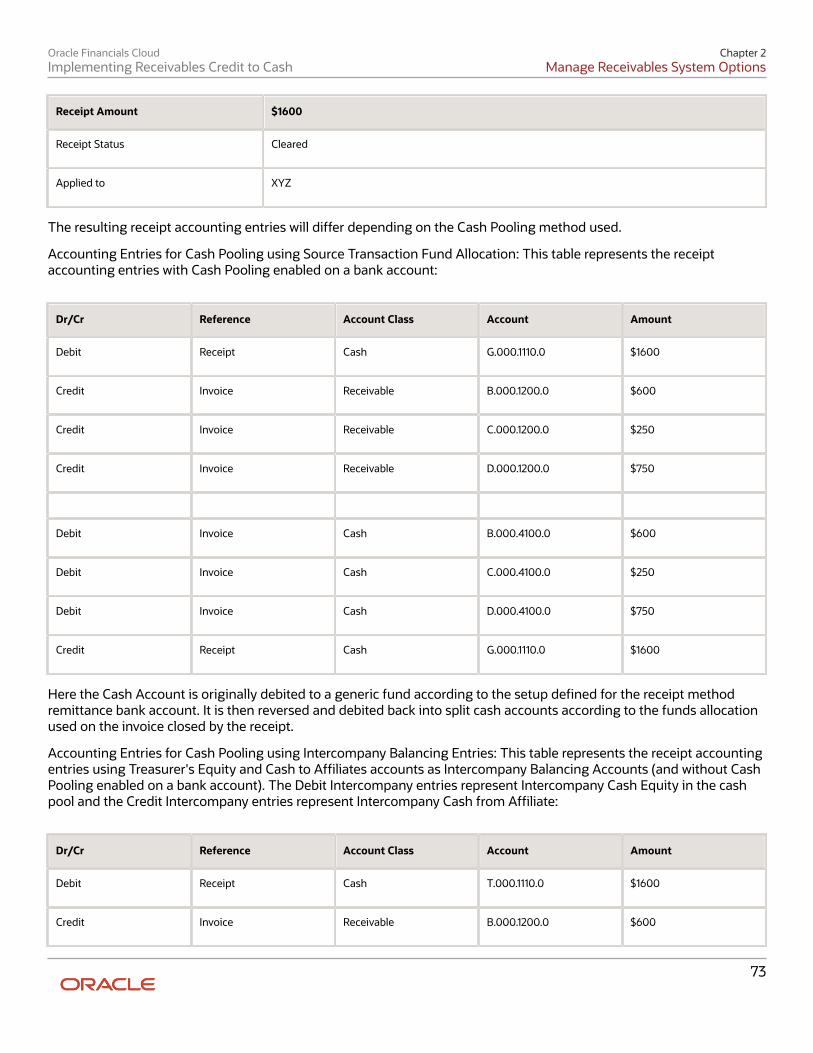
Oracle Financials CloudImplementing Receivables Credit to Cash
Chapter 2Manage Receivables System Options
Receipt Amount $1600
Receipt Status
Cleared
Applied to
XYZ
The resulting receipt accounting entries will differ depending on the Cash Pooling method used.
Accounting Entries for Cash Pooling using Source Transaction Fund Allocation: This table represents the receiptaccounting entries with Cash Pooling enabled on a bank account:
Dr/Cr Reference Account Class Account Amount
Debit
Receipt
Cash
G.000.1110.0
$1600
Credit
Invoice
Receivable
B.000.1200.0
$600
Credit
Invoice
Receivable
C.000.1200.0
$250
Credit
Invoice
Receivable
D.000.1200.0
$750
Debit
Invoice
Cash
B.000.4100.0
$600
Debit
Invoice
Cash
C.000.4100.0
$250
Debit
Invoice
Cash
D.000.4100.0
$750
Credit
Receipt
Cash
G.000.1110.0
$1600
Here the Cash Account is originally debited to a generic fund according to the setup defined for the receipt methodremittance bank account. It is then reversed and debited back into split cash accounts according to the funds allocationused on the invoice closed by the receipt.
Accounting Entries for Cash Pooling using Intercompany Balancing Entries: This table represents the receipt accountingentries using Treasurer's Equity and Cash to Affiliates accounts as Intercompany Balancing Accounts (and without CashPooling enabled on a bank account). The Debit Intercompany entries represent Intercompany Cash Equity in the cashpool and the Credit Intercompany entries represent Intercompany Cash from Affiliate:
Dr/Cr Reference Account Class Account Amount
Debit
Receipt
Cash
T.000.1110.0
$1600
Credit
Invoice
Receivable
B.000.1200.0
$600
73
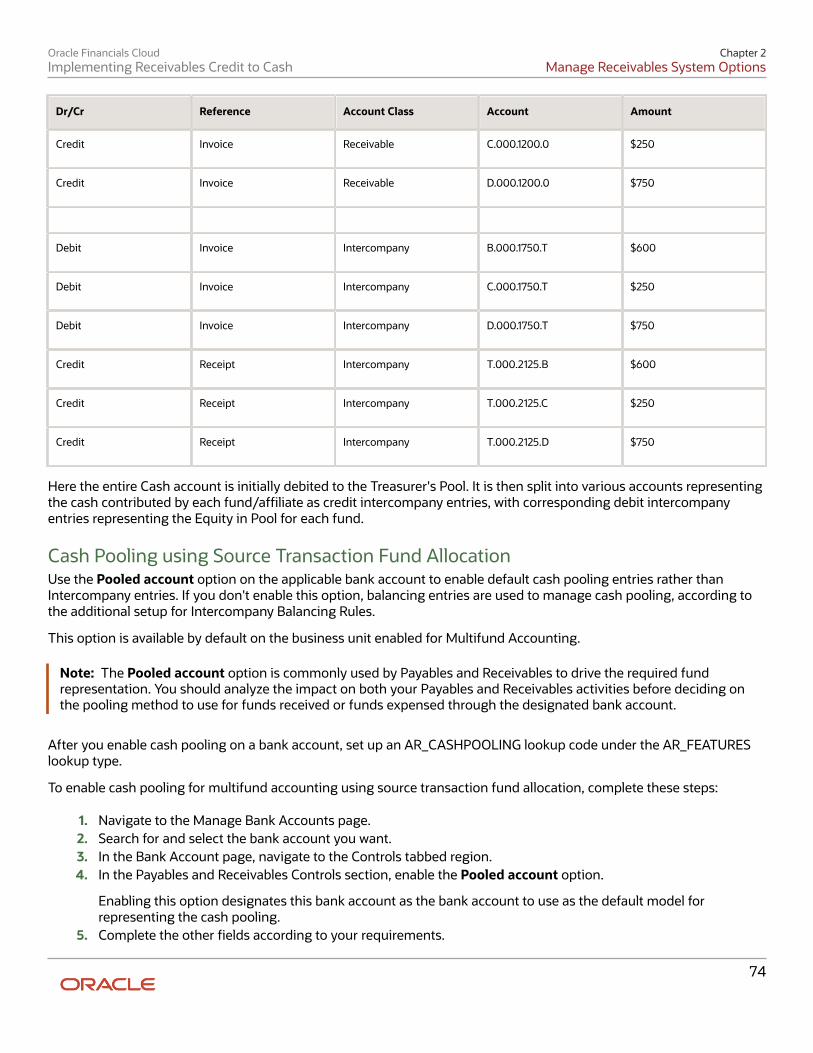
Oracle Financials CloudImplementing Receivables Credit to Cash
Chapter 2Manage Receivables System Options
Dr/Cr Reference Account Class Account Amount
Credit
Invoice
Receivable
C.000.1200.0
$250
Credit
Invoice
Receivable
D.000.1200.0
$750
Debit
Invoice
Intercompany
B.000.1750.T
$600
Debit
Invoice
Intercompany
C.000.1750.T
$250
Debit
Invoice
Intercompany
D.000.1750.T
$750
Credit
Receipt
Intercompany
T.000.2125.B
$600
Credit
Receipt
Intercompany
T.000.2125.C
$250
Credit
Receipt
Intercompany
T.000.2125.D
$750
Here the entire Cash account is initially debited to the Treasurer's Pool. It is then split into various accounts representingthe cash contributed by each fund/affiliate as credit intercompany entries, with corresponding debit intercompanyentries representing the Equity in Pool for each fund.
Cash Pooling using Source Transaction Fund AllocationUse the Pooled account option on the applicable bank account to enable default cash pooling entries rather thanIntercompany entries. If you don't enable this option, balancing entries are used to manage cash pooling, according tothe additional setup for Intercompany Balancing Rules.
This option is available by default on the business unit enabled for Multifund Accounting.
Note: The Pooled account option is commonly used by Payables and Receivables to drive the required fundrepresentation. You should analyze the impact on both your Payables and Receivables activities before deciding onthe pooling method to use for funds received or funds expensed through the designated bank account.
After you enable cash pooling on a bank account, set up an AR_CASHPOOLING lookup code under the AR_FEATURESlookup type.
To enable cash pooling for multifund accounting using source transaction fund allocation, complete these steps:
1. Navigate to the Manage Bank Accounts page.2. Search for and select the bank account you want.3. In the Bank Account page, navigate to the Controls tabbed region.4. In the Payables and Receivables Controls section, enable the Pooled account option.
Enabling this option designates this bank account as the bank account to use as the default model forrepresenting the cash pooling.
5. Complete the other fields according to your requirements.
74
Oracle Financials CloudImplementing Receivables Credit to Cash
Chapter 2Manage Receivables System Options
6. Save your work.7. Navigate to the Manage Standard Lookups page.8. Search for and select the lookup type AR_FEATURES.9. In the AR_FEATURES lookup codes section, click the Plus (+) icon.
10. In the Lookup Code field, enter AR_CASHPOOLING.11. Enter a start date, and a meaning and description for this lookup code.12. Check the Enabled option to activate the lookup code.13. Save your work.
Cash Pooling using Intercompany Balancing EntriesRepresent multifund accounting cash pooling by using intercompany balancing rules to map the Equity Pool(receivables) and Treasurer's Equity (payables) accounts.
After you configure intercompany balancing rules, set up an AR_CASHPOOLING lookup code under the AR_FEATURESlookup type.
Note: If you use intercompany balancing rules to set up cash pooling, then don't enable the Pooled cash option on abank account.
To enable cash pooling for multifund accounting using intercompany balancing entries, complete these steps:
1. Navigate to the Manage Intercompany Balancing Rules page.2. Navigate to the Chart of Accounts Rules tabbed region.3. Click the Plus (+) icon to open the Create Chart of Accounts Balancing Rules page.4. In the Source field, select Receivables.5. In the Category field, select Receipts.6. In the Chart of Accounts field, select the chart of accounts.7. In the Receivables Account field, enter the account segments for the Equity Pool natural account.8. In the Payables Account field, enter the account segments for the Treasurer's Equity natural account.9. In the Start Date field, enter the date this chart of accounts rule becomes active.
10. Save your work.
This chart of accounts rule applies to all ledgers that use this chart of accounts.
Note: If you intend to use more than one balancing segment, use the Additional Intercompany Balancingand Clearing Options page to configure options to balance the second and third balancing segments.These options are used whenever a transaction is balanced by the primary balancing segment, but remainsunbalanced by the second or third balancing segment.
11. Navigate to the Manage Standard Lookups page.12. Search for and select the lookup type AR_FEATURES.13. In the AR_FEATURES lookup codes section, click the Plus (+) icon.14. In the Lookup Code field, enter AR_CASHPOOLING.15. Enter a start date, and a meaning and description for this lookup code.16. Check the Enabled option to activate the lookup code.17. Save your work.
Related Topics• Guidelines for Enabling Multifund Accounting
75

Oracle Financials CloudImplementing Receivables Credit to Cash
Chapter 2Manage Receivables System Options
76
Oracle Financials CloudImplementing Receivables Credit to Cash
Chapter 3Define Customer Billing Configuration
3 Define Customer Billing Configuration
AutoInvoice
AutoInvoice Data Preparation To ensure that the AutoInvoice process works properly, you need to prepare your Receivables environment for any newdata that you want to import. If your original system uses any setup data which isn't yet defined in Receivables, youmust define this data before using AutoInvoice.
Data ChecklistEnsure that you have set up and updated the appropriate records in Receivables and related applications.
Add or update this setup data:
• Add or import customers, if your original system contains data for customers that aren't yet defined inReceivables.
• Add units of measure, if your original system uses units of measure not yet defined.
• Add or update in General Ledger this data:
◦ Currencies, if your original system uses currencies not yet defined.
◦ Accounting flexfield segment values, if your original system uses values not yet defined.
• Add or update in Tax this tax data:
◦ Tax rates assigned to tax rate codes that aren't yet defined.
◦ Tax rates associated with products shipped to specific locations.
◦ Full or partial customer and item tax exemptions.
• Add or update these Receivables lookup codes:
◦ Free on Board (FOB) lookup codes, if your original system uses FOB point codes not yet defined.
◦ Freight carrier lookup codes.
• Add or update this Receivables data:
◦ AutoAccounting (this is a required setup to use AutoInvoice)
◦ Payment terms
◦ Transaction types
◦ Transaction sources
◦ Salespersons
◦ Revenue scheduling rules
77

Oracle Financials CloudImplementing Receivables Credit to Cash
Chapter 3Define Customer Billing Configuration
AutoInvoice SetupReview and update Receivables data specific to AutoInvoice.
Review and update this data:
• AutoInvoice Grouping Rules: Define additional grouping rules or update the default grouping rule provided byReceivables. AutoInvoice uses grouping rules to determine how to create transactions.
AutoInvoice uses the following hierarchy when determining the grouping rule to use:
◦ Transaction source
◦ Customer site
◦ Customer profile
◦ System options
• AutoInvoice Line Ordering Rules: Define line ordering rules for AutoInvoice to determine how to ordertransaction lines. AutoInvoice randomly orders lines on your transactions if you don't define line ordering rules.
• AutoInvoice Transaction Source Automatic Receipt Handling: If you want AutoInvoice to automatically evaluateimported credits for receipt handling, enable the Receipt Handling for Credits option on the AutoInvoicetransaction source.
• Receivables System Options: Set Receivables system options for AutoInvoice in the Billing and Revenue tab:
◦ Customers section: Grouping Rule field: Assign an AutoInvoice grouping rule to use as part of the defaulthierarchy for selecting a grouping rule during transaction processing.
◦ AutoInvoice section: Purge interface tables option: Enable this option to purge data automatically afterrunning AutoInvoice.
◦ AutoInvoice section: Maximum Memory in Bytes field: Enter a value that represents the amount ofmemory to allocate to AutoInvoice for validation.
◦ AutoInvoice section: Log File Message Level field: Enter a level from 0 to 5 to indicate the amount ofdetail that you want to display in the AutoInvoice log file.
◦ AutoInvoice section: Accounting Dates Out of Order field: Select Reject or Adjust to determine howAutoInvoice processes transactions when the accounting date is out of order within the documentsequence.
Note: You only use this setting when the primary ledger is enabled for document sequencing.
• Profile Options: Set these profile options for AutoInvoice:
◦ ID Flexfield Code: Specify the ID of the flexfield code used by AutoInvoice.
◦ Maximum Lines per AutoInvoice Worker: Specify the maximum number of lines per AutoInvoiceworker.
◦ Source Code: Specify the source code used by AutoInvoice.
◦ Use Parallel Hint: Enable parallel hints in AutoInvoice.
◦ AutoInvoice Gather Statistics Allowed: If you set this profile option to Yes, then when yousubmit AutoInvoice, the program first analyzes the interface tables (RA_INTERFACE_LINES_ALL,
78
Oracle Financials CloudImplementing Receivables Credit to Cash
Chapter 3Define Customer Billing Configuration
RA_INTERFACE_DISTRIBUTIONS_ALL, and RA_INTERFACE SALESCREDITS_ALL) and gathers statistics todetermine how best to execute the transaction import.
If the number of records to be imported and the number of worker processes are approximately thesame as the previous submission of AutoInvoice, then you can set this profile option to No and skip thisanalysis.
Transaction FlexfieldReceivables uses the transaction flexfield to uniquely identify each transaction and transaction line you import usingAutoInvoice. Transaction flexfields are also used to reference and link transaction lines.
You must define a Line Transaction Flexfield, and you can optionally define a header-level Invoice Transaction Flexfield.If you define an Invoice Transaction Flexfield, all segments in the Line Transaction Flexfield that refer to headerinformation must also exist in the Invoice Transaction Flexfield. For example, if you define a Line Transaction Flexfieldwith four segments, and the last two segments refer to line-level information only, define the Invoice TransactionFlexfield using the first two segments.
If you don't create Reference and Link-To Transaction Flexfields, then Receivables uses the Line Transaction Flexfieldstructure to link and reference different lines. You don't have to define separate Reference and Link-To TransactionFlexfields in this case.
However, if you want to create your own form to enter interface data to display the Reference and Link-To TransactionFlexfields, then you must define these transaction flexfields. These flexfields must have the same flexfield structure asthe Line Transaction Flexfield.
Related Topics• AutoInvoice Line Ordering Rule Transaction Attributes
• AutoInvoice Grouping Rule Attributes
• Ledger and Legal Entity Document Sequencing in Receivables
Example of an AutoInvoice Grouping Rule This example illustrates how to use grouping rules to group transaction lines into transactions during AutoInvoiceimport.
ScenarioDefine an AutoInvoice grouping rule that specifies that to appear on the same invoice, items mustmatch on all mandatory attributes, such as currency (CURRENCY_CODE) and customer bill-to address(ORIG_SYSTEM_BILL_ADDRESS_ID), and must also match on the optional attribute of sales order type(SALES_ORDER_SOURCE).
Transaction DetailsDuring AutoInvoice import, assume that all mandatory attributes match other than currency and customer bill-toaddress.
79
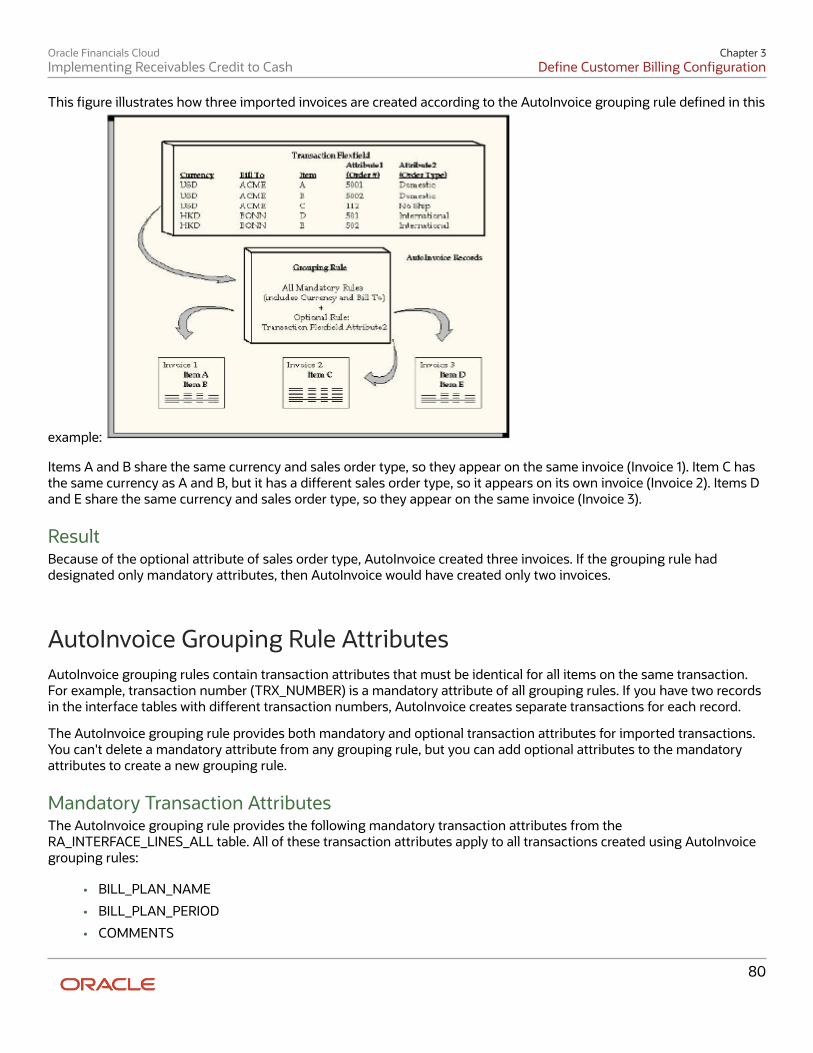
Oracle Financials CloudImplementing Receivables Credit to Cash
Chapter 3Define Customer Billing Configuration
This figure illustrates how three imported invoices are created according to the AutoInvoice grouping rule defined in this
example:
Items A and B share the same currency and sales order type, so they appear on the same invoice (Invoice 1). Item C hasthe same currency as A and B, but it has a different sales order type, so it appears on its own invoice (Invoice 2). Items Dand E share the same currency and sales order type, so they appear on the same invoice (Invoice 3).
ResultBecause of the optional attribute of sales order type, AutoInvoice created three invoices. If the grouping rule haddesignated only mandatory attributes, then AutoInvoice would have created only two invoices.
AutoInvoice Grouping Rule Attributes AutoInvoice grouping rules contain transaction attributes that must be identical for all items on the same transaction.For example, transaction number (TRX_NUMBER) is a mandatory attribute of all grouping rules. If you have two recordsin the interface tables with different transaction numbers, AutoInvoice creates separate transactions for each record.
The AutoInvoice grouping rule provides both mandatory and optional transaction attributes for imported transactions.You can't delete a mandatory attribute from any grouping rule, but you can add optional attributes to the mandatoryattributes to create a new grouping rule.
Mandatory Transaction AttributesThe AutoInvoice grouping rule provides the following mandatory transaction attributes from theRA_INTERFACE_LINES_ALL table. All of these transaction attributes apply to all transactions created using AutoInvoicegrouping rules:
• BILL_PLAN_NAME
• BILL_PLAN_PERIOD
• COMMENTS
80
Oracle Financials CloudImplementing Receivables Credit to Cash
Chapter 3Define Customer Billing Configuration
• CONS_BILLING_NUMBER
• CONVERSION_DATE
• CONVERSION_RATE
• CONVERSION_TYPE
• CREDIT_METHOD_FOR_ACCT_RULE
• CREDIT_METHOD_FOR_INSTALLMENTS
• CURRENCY_CODE
• CUSTOMER_BANK_ACCOUNT_ID
• CUST_TRX_TYPE_ID
• DOCUMENT_NUMBER
• DOCUMENT_NUMBER_SEQUENCE_ID
• GL_DATE
• HEADER_ATTRIBUTE1-15
• HEADER_ATTRIBUTE_CATEGORY
• HEADER_GDF_ATTRIBUTE1-30
• INITIAL_CUSTOMER_TRX_ID
• INTERNAL_NOTES
• INVOICING_RULE_ID
• ORIG_SYSTEM_BILL_ADDRESS_ID
• ORIG_SYSTEM_BILL_CONTACT_ID
• ORIG_SYSTEM_BILL_CUSTOMER_ID
• ORIG_SYSTEM_SHIP_CONTACT_ID
• ORIG_SYSTEM_SHIP_CUSTOMER_ID
• ORIG_SYSTEM_SOLD_CUSTOMER_ID
• ORIG_SYSTEM_BATCH_NAME
• PAYMENT_SERVER_ORDER_ID
• PAYMENT_SET_ID
• PREVIOUS_CUSTOMER_TRX_ID
• PRIMARY_SALESREP_ID
• PRINTING_OPTION
• PURCHASE_ORDER
• PURCHASE_ORDER_DATE
• PURCHASE_ORDER_REVISION
• REASON_CODE
• RECEIPT_METHOD_ID
• RELATED_CUSTOMER_TRX_ID
81

Oracle Financials CloudImplementing Receivables Credit to Cash
Chapter 3Define Customer Billing Configuration
• SET_OF_BOOKS_ID
• TERM_ID
• TERRITORY_ID
• TRX_DATE
• TRX_NUMBER
Optional Transaction AttributesThe AutoInvoice grouping rule provides the following optional transaction attributes from theRA_INTERFACE_LINES_ALL table. You can assign one or more of these attributes to transaction classes within agrouping rule:
• ACCOUNTING_RULE_DURATION
• ACCOUNTING_RULE_ID
• ATTRIBUTE1-15
• ATTRIBUTE_CATEGORY
• INTERFACE_LINE_ATTRIBUTE1-15
• INTERFACE_LINE_CONTEXT
• INVENTORY_ITEM_ID
• REFERENCE_LINE_ID
• RULE_START_DATE
• SALES_ORDER
• SALES_ORDER_DATE
• SALES_ORDER_LINE
• SALES_ORDER_REVISION
• SALES_ORDER_SOURCE
• TAX_CODE
• TAX_RATE
AutoInvoice Line Ordering Rule Transaction Attributes AutoInvoice uses line ordering rules to determine how to order and number each line of a transaction, after AutoInvoicehas grouped transactions into invoices, debit memos, and credit memos. You can specify am AutoInvoice line orderingrule for each AutoInvoice grouping rule that you create.
Transaction AttributesAutoInvoice provides the following transaction attributes from the RA_INTERFACE_LINES_ALL table for use with lineordering rules:
• ACCOUNTING_RULE_DURATION
• ACCOUNTING_RULE_ID
82

Oracle Financials CloudImplementing Receivables Credit to Cash
Chapter 3Define Customer Billing Configuration
• ACCOUNTING_RULE_NAME
• AMOUNT
• ATTRIBUTE_CATEGORY
• ATTRIBUTE1-15
• FOB_POINT
• INTERFACE_LINE_ATTRIBUTE1-15
• INTERFACE_LINE_CONTEXT
• ORIG_SYSTEM_SHIP_ADDRESS_ID
• QUANTITY
• QUANTITY_ORDERED
• REASON_CODE
• REASON_CODE_MEANING
• REFERENCE_LINE_ATTRIBUTE1-15
• REFERENCE_LINE_CONTEXT
• REFERENCE_LINE_ID
• SALES_ORDER
• SALES_ORDER_DATE
• SALES_ORDER_LINE
• SALES_ORDER_SOURCE
• SHIP_DATE_ACTUAL
• SHIP_VIA
• TAX_CODE
• UNIT_SELLING_PRICE
• UNIT_STANDARD_PRICE
• UOM_CODE
• UOM_NAME
• WAYBILL_NUMBER
FAQs for AutoInvoice
Why did AutoInvoice reject transactions? During AutoInvoice processing, if you have transaction lines that fail validation, the import process looks at the value ofthe Invalid Line field in the transaction source to determine what to do about the transaction.
If the value is Reject Invoice, then AutoInvoice rejects all of the transaction lines that make up one invoice accordingto the grouping rule, if any one of the transaction lines are invalid. For example, if a grouping rule specifies that threetransaction lines should be created as one invoice and one of the transaction lines has an error, AutoInvoice rejects allthree transaction lines and doesn't create an invoice.
83
Oracle Financials CloudImplementing Receivables Credit to Cash
Chapter 3Define Customer Billing Configuration
However, if the value is Create Invoice, AutoInvoice rejects the one invalid transaction line and creates an invoice fromthe two remaining valid transaction lines.
Why did AutoInvoice create transactions with duplicate transaction numbers? During AutoInvoice processing, the import process validates that transaction and document numbers are uniqueafter grouping has completed. In certain cases, AutoInvoice will create multiple invoices in the same group with thesame transaction or document number. Once grouping is completed, AutoInvoice checks for duplicate transaction anddocument numbers and reports any lines that fail validation.
For example, two lines are imported with the same transaction number, but they have different currencies. These linesare split into two separate invoices during grouping due to the different currencies. Once grouping has completed, bothof the invoices will fail validation due to identical transaction numbers.
What happens if AutoInvoice processes a transaction class that's not defined for agrouping rule? If AutoInvoice uses grouping rules and is processing a transaction class not defined for a grouping rule, thenAutoInvoice only uses the mandatory transaction attributes to group transactions.
When does a grouping rule need a line ordering rule? Assign an AutoInvoice line ordering rule to an AutoInvoice grouping rule when you want to organize the transactionlines belonging to a transaction created by the grouping rule in a specific order. Use the Order By Type to specifywhether to order the values belonging to a transaction attribute from least to greatest (Ascending) or greatest to least(Descending).
For example, when importing transactions from Distributed Order Orchestration, you can define a line ordering rulewith the attribute SALES_ORDER_LINE to list the items on the invoice in the same order as they appear on the salesorder.
Or, you can define a line ordering rule with the attribute AMOUNT and an Order By Type of Descending to ensure thatthe highest invoice line amounts are listed first on the transactions created by the grouping rule.
Payment Terms
Guidelines for Defining Payment Terms Use payment terms to identify due dates and discount dates on your customer transactions.
After you create payment terms, you can optionally assign them both to customer account and site profiles and totransaction types. The payment terms you assign are then assigned by default to transactions you create manuallyusing the related customer account or site, or transaction type.
Considerations for payment terms include:
• Payment Terms and Customer Profiles
• Payment Terms and Discounts
• Split Payment Terms with Installments
• Prepayment Payment Terms
84

Oracle Financials CloudImplementing Receivables Credit to Cash
Chapter 3Define Customer Billing Configuration
Payment Terms and Customer ProfilesThe setup of payment terms on customer account and site profiles influences the use and availability of payment termson transactions you create manually.
When you create a transaction manually, Receivables looks for payment terms to assign to the transaction in this order:
1. Payment terms assigned to the site profile of the bill-to customer.2. Payment terms assigned to the account profile of the bill-to customer.3. Payment terms assigned to the transaction type.
You must enable the Override terms option on the customer account or site profile in order to change the paymentterms assigned to the transaction. Enabling the Override terms option provides more flexibility in assigning paymentterms to manual transactions.
If you don't enable the Override terms option on customer account and site profiles, then:
• You can't change the payment terms assigned by default.
• If you select a bill-to customer, and no payment terms were assigned either to the account or site profiles of thiscustomer or to the transaction type, then no payment terms are available for use on the transaction.
You can alternatively either select another bill-to customer or select payment terms before selecting acustomer.
• If you select payment terms and then select a bill-to customer, and no payment terms were assigned to theaccount or site profiles of this customer, then you can't change the payment terms originally assigned.
Tip: If you intend to leave the Override terms option disabled on customer account and site profiles, then make surethat you assign payment terms to the transaction types that you intend to use for manual transactions.
Payment Terms and DiscountsDefine standard payment terms for your customers to specify the due date and discount date for their open items.Payment terms can include a discount percent for early payment, and you can assign multiple discounts to each line ofyour payment terms.
For example, the payment terms named 2% 10, Net 30 indicates that a customer is allowed a two percent discount ifpayment is received within 10 days. After 10 days, the entire balance is due within 30 days of the transaction date withno applicable discount.
Enable the Allow discount on partial payments option to let your customers take discounts for partial payments onitems associated with payment terms. A partial payment is a payment less than the remaining amount due. If you dothis, you must also ensure that the Discount on partial payment Receivables system option is enabled.
Use the Discount Basis field to determine what amount to use to calculate discounts for the payment terms. If thepayment terms use installments, you can assign discount percentages to each installment.
Use the Discount Basis Date field to select the date to use to calculate discounts. The choices are:
• Receipt Date: Date the receipt is created.
• Receipt Application Date: Date the receipt is applied to the transaction.
• Deposit Date: Date the receipt is deposited into the remittance bank.
85
Oracle Financials CloudImplementing Receivables Credit to Cash
Chapter 3Define Customer Billing Configuration
The discount is applied if the transaction is paid within the payment terms discount date. The formula is: TransactionDate + Discount Due By Period >= Discount Basis Date (Receipt Date/Receipt Application Date/Deposit Date).
Split Payment Terms with InstallmentsCreate split payment terms for invoice installments that have different due dates. The payment terms determine theamount of each installment.
Use the Installment Option field to determine how to allocate the freight and tax charged to transactions. You caneither distribute tax and freight charges across all installments, or allocate all freight and tax charges to the firstinstallment.
Define the payment schedule for the split payment terms. The payment schedule determines when each installment isdue, how much in each installment is due, and how much discount to offer in each installment.
Prepayment Payment TermsYou can optionally define prepayment payment terms by enabling the Prepayment option. You assign prepaymentpayment terms to transactions to indicate which transactions require prepayment for goods and services.
Prepayment payment terms don't require the capture of funds in advance of invoicing or the delivery of prepaid goodsor services. You must establish specific business practices at your enterprise if you want to capture these funds inadvance.
Split Payment Terms and Amounts Due Split payment terms derive different amounts due in each installment of the payment schedule, depending on thesetting of the Installment Option field.
If the base amount is different from the relative amount, and you set the Installment Option field to Allocate tax andfreight, Receivables prorates the base amount across the relative amounts of the payment schedule based upon theratio you define. Receivables uses the following equation to determine the original amount due for each installment:
Amount Due = Relative Amount/Base Amount * Invoice Amount
If you set the Installment Option field to Include tax and freight in first installment, the base amount and the relativeamounts that you specify for the payment schedule only indicate how the original line amounts of the invoices to whichyou assign these payment terms are distributed across different installments.
In this case, the original freight and tax amounts are included in the first installment, in addition to the line amountallocated by the ratio of the base amount and the relative amount that you specify for the first payment. Receivablesuses the following equation to determine the original amount due for the first installment:
Amount Due = (Relative Amount/Base Amount * Base Line Amount) + Base Freight Amount + Base Tax Amount
Payment Terms Discount Basis The payment terms Discount Basis field determines on what basis Receivables calculates the discount amount.
86
Oracle Financials CloudImplementing Receivables Credit to Cash
Chapter 3Define Customer Billing Configuration
Discount BasisInvoice Amount
Calculates the discount amount based on the sum of the tax, freight, and line amounts of transactions.
Lines Only
Calculates the discount amount based on only the line amounts of transactions.
Lines, Freight Items and Tax
Calculates the discount amount based on the amount of line items and their freight and tax amounts, but excludesfreight and charges at the transaction header level.
Lines and Tax, not Freight Items and Tax
Calculates the discount amount based on the line items and their tax amounts, but excludes freight items and their taxlines.
How Discounts Are Calculated Receivables uses different formulas to calculate discounts, depending on your setup, the payment terms on thetransaction, and the type of payment received.
Receivables provides formulas for these discount events:
• Maximum Discount
• Earned Discounts and Partial Payments Allowed
• Unearned Discounts with Partial Payment Discounts Allowed
• Earned Discounts with Partial Payment Discounts Not Allowed
• Unearned Discounts and Partial Payments Not Allowed
• Discount on Lines Only
Maximum DiscountReceivables uses the following formula to determine the maximum discount amount:
Maximum Discount = (Amount Due Original) * (Highest Discount Percent - Discount Taken)
Earned Discounts and Partial Payments AllowedIf the receipt amount is greater than the remaining amount due, less the discount, Receivables uses the followingformula to determine the earned discount:
Earned Discount = Amount Due Remaining * Discount Percent
If the receipt amount is either the equal to or less than the remaining amount due, less the discount, Receivables usesthe following formula to determine the earned discount:
Earned Discount = (Receipt Amount * Discount Percent) / (1 - Discount Percent)
87
Oracle Financials CloudImplementing Receivables Credit to Cash
Chapter 3Define Customer Billing Configuration
Unearned Discounts with Partial Payment Discounts AllowedReceivables uses the following formula to determine unearned discounts if partial payments are allowed:
Unearned Discount = Maximum Discount - Earned Discount
Earned Discounts with Partial Payment Discounts Not AllowedIf the Allow discount on partial payments option on the payment terms isn't enabled, Receivables only takes earneddiscounts if the receipt amount closes the installment.
Receivables uses the following formula to determine earned discounts, if partial payment discounts aren't allowed andthe receipt amount closes the installment:
Earned Discount = Amount Due Original * Discount Percent
Unearned Discounts and Partial Payments Not AllowedIf the Allow discount on partial payments option on the payment terms isn't enabled, Receivables only takes unearneddiscounts if the receipt amount closes the installment.
Receivables uses the following formula to determine unearned discounts, if partial payments aren't allowed and thereceipt amount closes the installment:
Unearned Discount = (Amount Due Original) * (Maximum Discount Percent - Earned Discount)
Discount on Lines OnlyIf the Discount Basis field on the payment terms is set to Lines Only, Receivables doesn't take discounts on receiptamounts applied to tax, freight, or late charges. Receivables uses the following formula to determine the discountamount:
Line Percent = Discount Percent * (Sum of Lines + Sum of Line Adjustments - Sum of Line Credits) / (Amount Due Original + Sum of Adjustments - Sum of Credits)
Once you determine the discount line percent, use this as the discount percent in all of these formulas.
Example of Deriving Discount Amounts This example illustrates how Receivables derives discount information based on the date of the receipt.
When you enter receipts manually, Receivables determines whether discounts are allowed based on the payment terms,discount grace days, Receivables system options, transaction date, and the payment terms discount basis date (receiptdate, receipt application date, or receipt deposit date). If discounts are allowed, Receivables determines the amount ofboth earned and unearned discounts, as determined by the details of your setup.
ScenarioAssume that you're using the following information:
• Unearned Discounts = Yes
• Payment Terms: 10/10, 5/15, Net 30
• Discount Basis Date: Receipt Date
• Discount Grace Days = 0
88
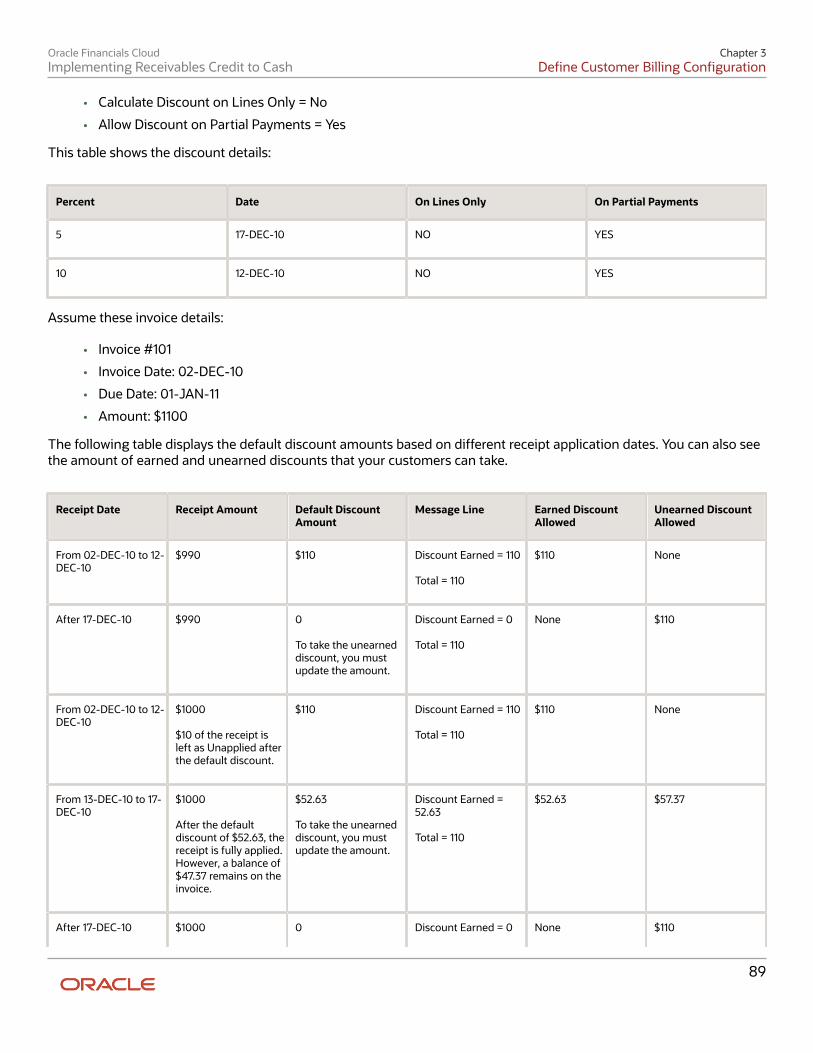
Oracle Financials CloudImplementing Receivables Credit to Cash
Chapter 3Define Customer Billing Configuration
• Calculate Discount on Lines Only = No
• Allow Discount on Partial Payments = Yes
This table shows the discount details:
Percent Date On Lines Only On Partial Payments
5
17-DEC-10
NO
YES
10
12-DEC-10
NO
YES
Assume these invoice details:
• Invoice #101
• Invoice Date: 02-DEC-10
• Due Date: 01-JAN-11
• Amount: $1100
The following table displays the default discount amounts based on different receipt application dates. You can also seethe amount of earned and unearned discounts that your customers can take.
Receipt Date Receipt Amount Default DiscountAmount
Message Line Earned DiscountAllowed
Unearned DiscountAllowed
From 02-DEC-10 to 12-DEC-10
$990
$110
Discount Earned = 110 Total = 110
$110
None
After 17-DEC-10
$990
0 To take the unearneddiscount, you mustupdate the amount.
Discount Earned = 0 Total = 110
None
$110
From 02-DEC-10 to 12-DEC-10
$1000 $10 of the receipt isleft as Unapplied afterthe default discount.
$110
Discount Earned = 110 Total = 110
$110
None
From 13-DEC-10 to 17-DEC-10
$1000 After the defaultdiscount of $52.63, thereceipt is fully applied.However, a balance of$47.37 remains on theinvoice.
$52.63 To take the unearneddiscount, you mustupdate the amount.
Discount Earned =52.63 Total = 110
$52.63
$57.37
After 17-DEC-10
$1000
0
Discount Earned = 0
None
$110
89

Oracle Financials CloudImplementing Receivables Credit to Cash
Chapter 3Define Customer Billing Configuration
Receipt Date Receipt Amount Default DiscountAmount
Message Line Earned DiscountAllowed
Unearned DiscountAllowed
Since there's nodefault discount, the receipt is fullyapplied. A balance of$100 remains on theinvoice.
To take the unearneddiscount, you mustupdate the amount.
Total = 110
FAQs for Payment Terms
What's the difference between balance forward payment terms and other paymentterms? Balance forward billing payment terms pass the balance forward billing cycle to the Create Balance Forward Bill process.The billing cycle determines when customer balance forward bills are generated.
Because balance forward bills can't be split across installments, all settings related to installments on balance forwardbilling payment terms are disabled. You can't change existing payment terms back and forth for use as both non-balance forward billing and balance forward billing payment terms.
AutoAccounting
AutoAccounting Account Types and Segment Values Define AutoAccounting to specify how to determine the default general ledger accounts for transactions that youenter manually or import using AutoInvoice. You must define AutoAccounting before you can enter transactionsin Receivables. When you enter or update transactions, you can override the default general ledger accounts thatAutoAccounting creates.
Account TypesDefine an AutoAccounting record for each type of account. You can then assign either a table name or constantvalue to each segment of the account.
AutoInvoice Clearing
The clearing account for imported transactions. Receivables uses the clearing account to hold any difference betweenthe specified revenue amount and the selling price times the quantity for imported invoice lines. Receivables only usesthe clearing account if you have enabled this option on the transaction source used for imported transactions.
Bills Receivable
The bills receivable account for your transactions. Receivables uses this account when you apply transactions to billsreceivable.
Factored Bills Receivable
90
Oracle Financials CloudImplementing Receivables Credit to Cash
Chapter 3Define Customer Billing Configuration
The factored bills receivable account for your bills receivable transactions.
Freight
The freight account for transactions.
Receivable
The receivable account for transactions.
Remitted Bills Receivable
The remitted bills receivable account for your bills receivable transactions.
Revenue
The revenue and late charges account for transactions.
Tax
The tax account for transactions.
Unbilled Receivable
The unbilled receivable account for transactions. Receivables uses this account when the transaction uses the In Arrearsinvoicing rule. If the revenue scheduling rule on the transaction recognizes revenue before the invoicing rule bills it,Receivables uses this account.
Unearned Revenue
The unearned revenue account for transactions. Receivables uses this account when a transaction uses the In Advanceinvoicing rule. If the revenue scheduling rule on the transaction recognizes revenue after the invoicing rule bills it,Receivables uses this account.
Unpaid Bills Receivable
The unpaid bills receivable account for your bills receivable transactions.
Table NamesEnter either the table name or constant value that you want Receivables to use to retrieve information for eachaccounting flexfield segment of a given account.
Enter a constant value instead of a table name if you want AutoAccounting to always use the same value for agiven segment. You must ensure that you enter valid information for this segment. For example, if you definedyour Company segment as a two-character segment with valid values ranging from 00 to 10, you must enter atwo-character value within this range.
Bill-to Site
Use the bill-to site of the transaction to determine this segment of revenue, freight, receivable, AutoInvoice clearing, tax,unbilled receivable, and unearned revenue accounts.
Drawee Site
Use the drawee site table to determine this segment of your bills receivable, factored bills receivable, remitted billsreceivable, and unpaid bills receivable account.
Remittance Banks
91
Oracle Financials CloudImplementing Receivables Credit to Cash
Chapter 3Define Customer Billing Configuration
Use the remittance banks table to determine this segment of your factored bills receivable and remitted bills receivableaccount.
Salesperson
Use the salesperson table to determine this segment of revenue, freight, receivable, AutoInvoice clearing, tax, unbilledreceivable, and unearned revenue accounts.
If you select this option for AutoInvoice clearing, tax, or unearned revenue accounts, Receivables uses the revenueaccount associated with the salesperson on the transaction. If you select this option for the unbilled receivable account,Receivables uses the receivable account associated with the salesperson on the transaction.
If the transaction has a line type of Line with an inventory item of Freight, AutoAccounting uses the revenue schedulingrules for the freight account rather than the revenue account.
Standard Lines
Use the memo line or inventory item on the transaction to determine this segment of revenue, AutoInvoice clearing,freight, tax, unbilled receivable, and unearned revenue accounts.
If you select this option for AutoInvoice clearing, freight, tax, unbilled receivable or unearned revenue accounts,Receivables uses the revenue account associated to the memo line item or inventory item.
If the transaction has a line type of Line with an inventory item of Freight, AutoAccounting uses the revenue schedulingrules for the freight account rather than the revenue account.
Tax
Use the tax account assigned to the tax rate codes on the transaction.
Transaction Types
Use the transaction types table to determine this segment of revenue, freight, receivable, AutoInvoice clearing, tax,unbilled receivable, and unearned revenue accounts.
If the transaction has a line type of Line with an inventory item of Freight, AutoAccounting uses the revenue schedulingrules for the freight account rather than the revenue account.
Guidelines for Creating an AutoAccounting Structure To implement AutoAccounting, you first define your AutoAccounting structure and then define information for eachsalesperson, transaction type, product, and tax rate code in order for AutoAccounting to properly create your defaultaccounts.
You must define your AutoAccounting structure before you can enter invoices and credit memos, and you can onlydefine one structure for each account type. During transaction creation, if AutoAccounting can't determine all of theaccounting flexfield segments, it derives what it can and displays an incomplete accounting flexfield. You must provideany missing accounting flexfield information before you can complete a transaction.
Review these guidelines for each account type when creating your AutoAccounting structure:
• AutoInvoice Clearing Account
• Freight Account
• Receivable Account
92
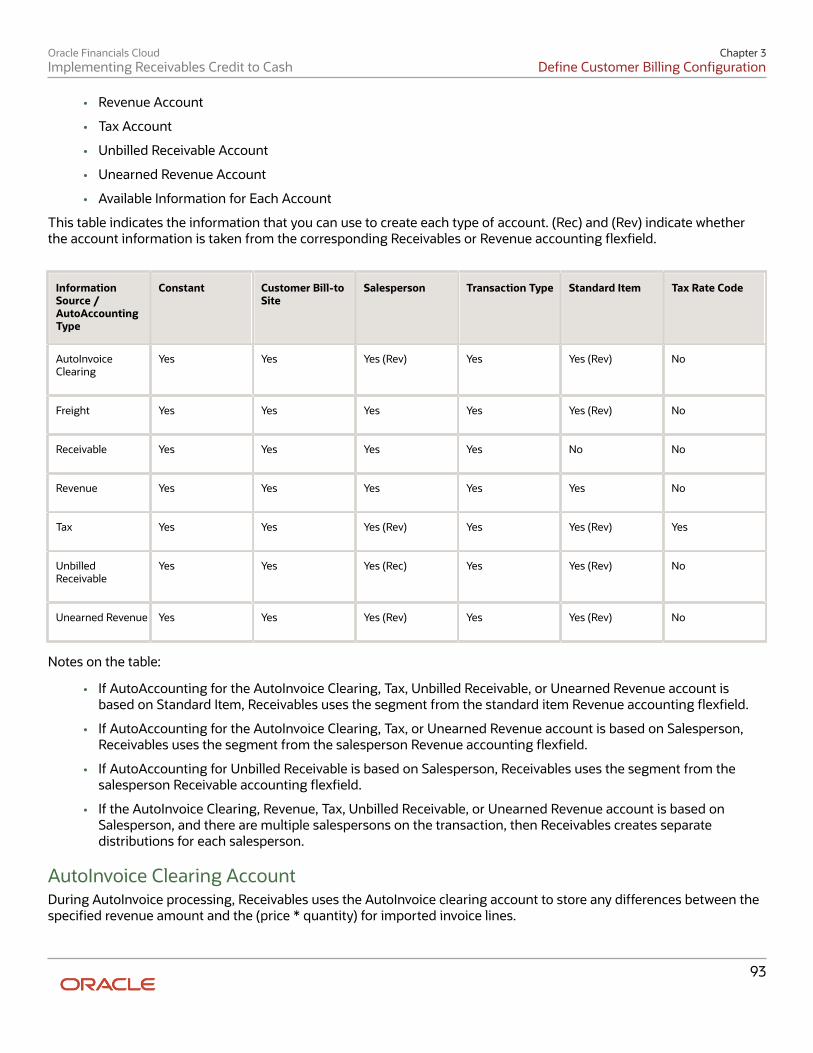
Oracle Financials CloudImplementing Receivables Credit to Cash
Chapter 3Define Customer Billing Configuration
• Revenue Account
• Tax Account
• Unbilled Receivable Account
• Unearned Revenue Account
• Available Information for Each Account
This table indicates the information that you can use to create each type of account. (Rec) and (Rev) indicate whetherthe account information is taken from the corresponding Receivables or Revenue accounting flexfield.
InformationSource /AutoAccountingType
Constant Customer Bill-toSite
Salesperson Transaction Type Standard Item Tax Rate Code
AutoInvoiceClearing
Yes
Yes
Yes (Rev)
Yes
Yes (Rev)
No
Freight
Yes
Yes
Yes
Yes
Yes (Rev)
No
Receivable
Yes
Yes
Yes
Yes
No
No
Revenue
Yes
Yes
Yes
Yes
Yes
No
Tax
Yes
Yes
Yes (Rev)
Yes
Yes (Rev)
Yes
UnbilledReceivable
Yes
Yes
Yes (Rec)
Yes
Yes (Rev)
No
Unearned Revenue
Yes
Yes
Yes (Rev)
Yes
Yes (Rev)
No
Notes on the table:
• If AutoAccounting for the AutoInvoice Clearing, Tax, Unbilled Receivable, or Unearned Revenue account isbased on Standard Item, Receivables uses the segment from the standard item Revenue accounting flexfield.
• If AutoAccounting for the AutoInvoice Clearing, Tax, or Unearned Revenue account is based on Salesperson,Receivables uses the segment from the salesperson Revenue accounting flexfield.
• If AutoAccounting for Unbilled Receivable is based on Salesperson, Receivables uses the segment from thesalesperson Receivable accounting flexfield.
• If the AutoInvoice Clearing, Revenue, Tax, Unbilled Receivable, or Unearned Revenue account is based onSalesperson, and there are multiple salespersons on the transaction, then Receivables creates separatedistributions for each salesperson.
AutoInvoice Clearing AccountDuring AutoInvoice processing, Receivables uses the AutoInvoice clearing account to store any differences between thespecified revenue amount and the (price * quantity) for imported invoice lines.
93
Oracle Financials CloudImplementing Receivables Credit to Cash
Chapter 3Define Customer Billing Configuration
Receivables only uses the AutoInvoice clearing account if you enabled the Create clearing option on the transactionsource assigned to imported transactions. However, you must define a clearing account whether or not you enable thisoption.
You can use constant value, customer bill-to site, salesperson, transaction type, and standard item for your AutoInvoiceclearing account. If you select salesperson or standard item, Receivables uses the specified Revenue accountingflexfield.
Freight AccountThe freight account controls the account in general ledger to which you post freight amounts. You can use constantvalue, customer bill-to site, salesperson, transaction type, and standard item to specify your freight account.
If you choose standard item, Receivables uses the specified Revenue accounting flexfield. In addition, you can't importtransactions with header-level freight through AutoInvoice.
If the transaction has a line type of LINE with an inventory item of freight, AutoAccounting uses the revenue schedulingrules for the freight account rather than the revenue account.
Receivable AccountThe receivable account controls the account in your general ledger to which you post receivable amounts. You can usetransaction type, customer bill-to site, salesperson, and constant value to specify your receivable account.
Revenue AccountThe revenue account controls the account in your general ledger to which you post your revenue amounts. You can usetransaction type, customer bill-to site, standard item, salesperson, and constant value to specify your revenue account.
Tax AccountThe tax account controls the account in your general ledger to which you post tax amounts. You can use tax rate codes,customer bill-to site, salesperson, transaction type, standard item, and constant value to specify your tax account.
If you select salesperson or standard item, Receivables uses the specified Revenue accounting flexfield.
Unbilled Receivable AccountReceivables uses the unbilled receivable account for transactions that have invoicing and revenue scheduling rules.Whenever the revenue scheduling rule recognizes revenue on the transaction before the invoicing rule bills for thetransaction, Receivables posts this amount to the unbilled receivable account.
You can select constant value, customer bill-to site, salesperson, transaction type, and standard item for your unbilledreceivable account.
If you select standard item, Receivables uses the specified Revenue accounting flexfield. If you select salesperson,Receivables uses the salesperson Receivable accounting flexfield.
Unearned Revenue AccountReceivables uses the unearned revenue account for transactions that have invoicing and revenue scheduling rules.Whenever the revenue scheduling rule recognizes revenue on the transaction after the invoicing rule bills for thetransaction, Receivables posts this amount to the unearned revenue account.
You can select constant value, customer bill-to site, salesperson, transaction type, and standard item for your unearnedrevenue account.
94
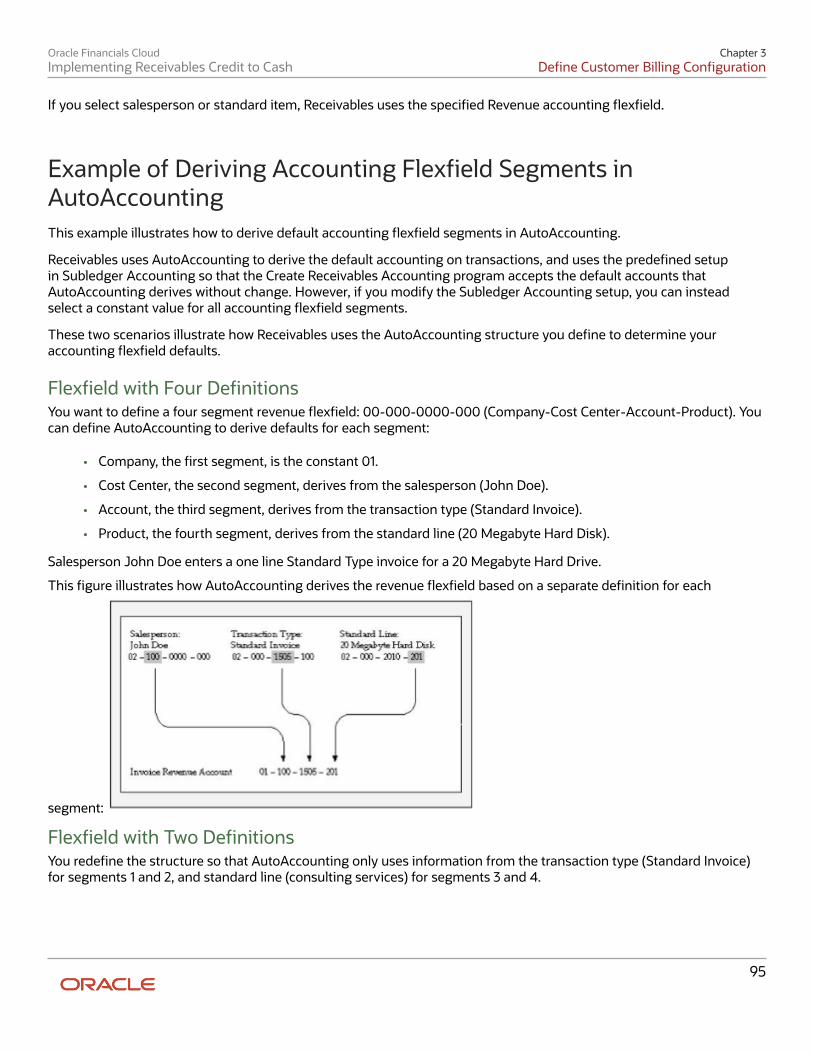
Oracle Financials CloudImplementing Receivables Credit to Cash
Chapter 3Define Customer Billing Configuration
If you select salesperson or standard item, Receivables uses the specified Revenue accounting flexfield.
Example of Deriving Accounting Flexfield Segments inAutoAccounting This example illustrates how to derive default accounting flexfield segments in AutoAccounting.
Receivables uses AutoAccounting to derive the default accounting on transactions, and uses the predefined setupin Subledger Accounting so that the Create Receivables Accounting program accepts the default accounts thatAutoAccounting derives without change. However, if you modify the Subledger Accounting setup, you can insteadselect a constant value for all accounting flexfield segments.
These two scenarios illustrate how Receivables uses the AutoAccounting structure you define to determine youraccounting flexfield defaults.
Flexfield with Four DefinitionsYou want to define a four segment revenue flexfield: 00-000-0000-000 (Company-Cost Center-Account-Product). Youcan define AutoAccounting to derive defaults for each segment:
• Company, the first segment, is the constant 01.
• Cost Center, the second segment, derives from the salesperson (John Doe).
• Account, the third segment, derives from the transaction type (Standard Invoice).
• Product, the fourth segment, derives from the standard line (20 Megabyte Hard Disk).
Salesperson John Doe enters a one line Standard Type invoice for a 20 Megabyte Hard Drive.
This figure illustrates how AutoAccounting derives the revenue flexfield based on a separate definition for each
segment:
Flexfield with Two DefinitionsYou redefine the structure so that AutoAccounting only uses information from the transaction type (Standard Invoice)for segments 1 and 2, and standard line (consulting services) for segments 3 and 4.
95
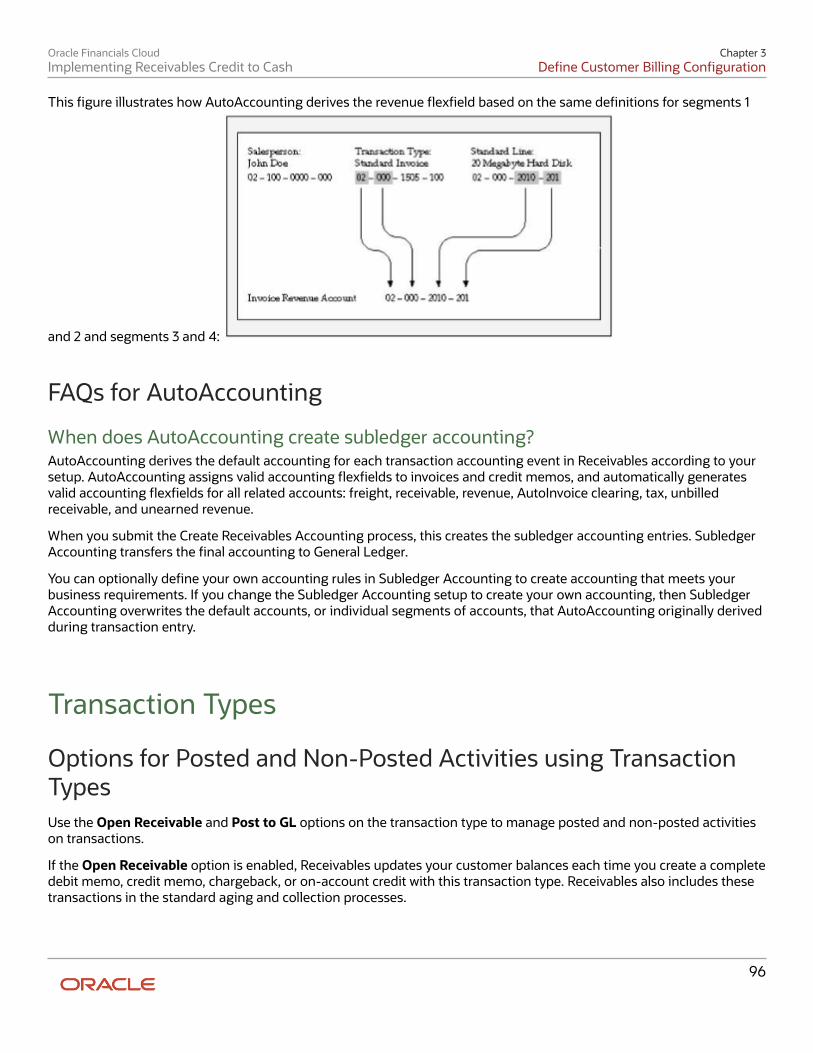
Oracle Financials CloudImplementing Receivables Credit to Cash
Chapter 3Define Customer Billing Configuration
This figure illustrates how AutoAccounting derives the revenue flexfield based on the same definitions for segments 1
and 2 and segments 3 and 4:
FAQs for AutoAccounting
When does AutoAccounting create subledger accounting? AutoAccounting derives the default accounting for each transaction accounting event in Receivables according to yoursetup. AutoAccounting assigns valid accounting flexfields to invoices and credit memos, and automatically generatesvalid accounting flexfields for all related accounts: freight, receivable, revenue, AutoInvoice clearing, tax, unbilledreceivable, and unearned revenue.
When you submit the Create Receivables Accounting process, this creates the subledger accounting entries. SubledgerAccounting transfers the final accounting to General Ledger.
You can optionally define your own accounting rules in Subledger Accounting to create accounting that meets yourbusiness requirements. If you change the Subledger Accounting setup to create your own accounting, then SubledgerAccounting overwrites the default accounts, or individual segments of accounts, that AutoAccounting originally derivedduring transaction entry.
Transaction Types
Options for Posted and Non-Posted Activities using TransactionTypes Use the Open Receivable and Post to GL options on the transaction type to manage posted and non-posted activitieson transactions.
If the Open Receivable option is enabled, Receivables updates your customer balances each time you create a completedebit memo, credit memo, chargeback, or on-account credit with this transaction type. Receivables also includes thesetransactions in the standard aging and collection processes.
96
Oracle Financials CloudImplementing Receivables Credit to Cash
Chapter 3Define Customer Billing Configuration
If the Post to GL option is enabled, Receivables posts transactions with this transaction type to general ledger. If thisoption isn't enabled, then no accounting is generated for transactions with this transaction type.
Considerations for defining transaction types include:
• Void Transaction Type
• Updates to Customer Accounts and Aging
• Updates to Accounting Only
Void Transaction TypeYou can void a debit memo, credit memo, on-account credit, or invoice by defining a Void transaction type andassigning it to the transaction. To define a Void transaction type, set the Open Receivable and Post to GL options toNo. You can void a transaction by changing the transaction type to Void provided:
• No activity exists against the transaction.
• Transaction hasn't posted to general ledger.
This activity isn't included in the Review Customer Account Details page since the activity doesn't modify the customerbalance.
Updates to Customer Accounts and AgingIf you set the Open Receivable option to Yes and the Post to GL option to No, Receivables updates customer accountswith the transaction activity of transactions assigned this transaction type. This has no effect on accounting.
Use transaction types with these settings during your initial implementation, where the transaction amount is includedin the general ledger beginning balance for the receivable account, but activity still needs to be aged and paymentcollected against it. All related activities against the transaction, such as credit memos, payments, and adjustments, areaccounted as affecting the customer balance. You can review these activities on the Review Customer Account Detailspage.
Updates to Accounting OnlyIf you set the Open Receivable option to No and Post to GL option to Yes, Receivables updates accounting without anyimpact on the customer balance.
Use transaction types with these settings when you want to adjust accounting activity, such as when you rebill acustomer in order to reclassify the general ledger account. A credit memo and invoice with the Open Receivable optionset to No are created where the credit memo reverses the general ledger account of the original invoice, and the invoicecreates accounting with the new general ledger account. This activity is transparent to the customer because theoriginal invoice is used for the cash application when payment is received.
This activity isn't included in the Review Customer Account Details page since the activity doesn't modify the customerbalance.
Transactions with the Open Receivable option set to No appear in the Other Accounting section of the Receivables toGeneral Ledger Reconciliation Report, even though transactions post to Receivables accounts assigned the financialcategory of Accounts Receivable.
Related Topics• When do I credit and rebill a transaction
97

Oracle Financials CloudImplementing Receivables Credit to Cash
Chapter 3Define Customer Billing Configuration
Natural Application and Overapplication The transaction type that you assign to a transaction defines the type of application permitted against the transactionbalance. This definition is managed by the Natural Application Only and Allow Overapplication options on thetransaction type.
Natural application only lets you apply a payment or credit to a transaction that brings the transaction balance closeto or equal to zero. For example, if an invoice has a balance due of $400, you can make applications against thistransaction up to $400 only. With natural application, you can only bring the balance to zero.
Overapplication lets you apply more than the balance due on a transaction. For example, if you apply a $500 receipt to a$400 invoice, this overapplies the invoice by $100 and reverses the balance sign from positive to negative.
Use of Natural Application and OverapplicationWhether or not a transaction allows overapplication determines the actions that you can take on that transaction.
If a transaction that allows natural application only is paid in full, then in order to credit the transaction you must firstunapply the receipt from the transaction before creating the credit.
If you want to use AutoInvoice to import credit memos against paid invoices and evaluate these credits for automaticreceipt handling, then the transaction type of the paid invoices must allow natural application only. However, if theReceipt Handling for Credits option isn't enabled on the transaction source of the transaction, AutoInvoice leaves therelated credit memo in the interface tables until you unapply the receipt from the invoice.
Related Topics• How AutoInvoice Processes Credited Amounts
Guidelines for Transaction Type Reference Accounts Define the accounting for transaction types of class Invoice, Chargeback, Credit Memo, and Debit Memo. Receivablesuses this information along with your AutoAccounting definition to determine the accounts to use for transactions withthe applicable transaction type.
RevenueEnter a revenue account, unless the transaction type doesn't allow freight.
If the Invoice Accounting Used for Credit Memos profile option is set to No, then a revenue account isn't required forCredit Memo transaction types.
FreightEnter a freight account, unless the transaction type doesn't allow freight.
ReceivableEnter a receivable account for all transaction types.
98
Oracle Financials CloudImplementing Receivables Credit to Cash
Chapter 3Define Customer Billing Configuration
If the Post To GL option on the transaction type is enabled, Receivables creates a receivable transaction record usingthis account in order to transfer accounting to general ledger and create a journal entry.
For Chargeback transaction types, enter the Receivable Chargeback account. The offset to the receivable account on theoriginal debit transaction is generated by the chargeback adjustment.
If the Invoice Accounting Used for Credit Memos profile option is set to No, then a receivable account isn't requiredfor Credit Memo transaction types.
AutoInvoice ClearingIf this is an Invoice or Debit Memo transaction type, enter an AutoInvoice clearing account. Receivables uses thisaccount to hold any difference between the revenue amount specified for the revenue account and the selling pricetimes the quantity for imported invoice lines.
Receivables only uses the AutoInvoice clearing account for imported transactions that have a transaction source withthe Create clearing option enabled. If the Create clearing option isn't enabled, then AutoInvoice requires that therevenue amount on the invoice be equal to the selling price times the quantity, or the invoice is rejected.
TaxIf this is an Invoice, Credit Memo, or Debit Memo transaction type, enter a tax account.
Unbilled ReceivableIf this is an Invoice or Credit Memo transaction type, enter an unbilled receivable account. This account is fortransactions that use the In Arrears invoicing rule.
Unearned RevenueIf this is an Invoice or Credit Memo transaction type, enter an unearned revenue account. This account is fortransactions that use the In Advance invoicing rule.
Related Topics• What happens if I don't create a clearing account
• Guidelines for Creating an AutoAccounting Structure
FAQs for Transaction Types
How can I arrange the creation of transaction types? Create transaction types for each transaction class, and create them in a way that can account for dependenciesbetween transaction types.
Create your transaction types in the following order:
• Credit memo transaction types
• Invoice transaction types
• Debit memo transaction types
• Chargeback transaction types
99

Oracle Financials CloudImplementing Receivables Credit to Cash
Chapter 3Define Customer Billing Configuration
If applicable, create the transaction types that you want to add to your transaction sources before creating transactionsources.
If you're using late charges, create a transaction type with a class of Debit Memo to present late charges as debitmemos, and a transaction type with a class of Invoice to present late charges as interest invoices. Specify the receivableand revenue accounts for these transaction types. Receivables uses these accounts instead of AutoAccounting whengenerating late charges.
How can I use transaction types to review and update customer balances? Use the Open Receivable option on the transaction type to implement an approval cycle for any temporary orpreliminary transactions.
For example, if you have particularly sensitive debit memos, credit memos, on-account credits, chargebacks, or invoicesthat you want to review after creation, you can define a transaction type called Preliminary with Open Receivable set toNo and assign it to the applicable transactions. This transaction type doesn't update your customer balances.
Once you review and approve these transactions, you can define a transaction type called Final with Open Receivableset to Yes and assign it to the same transactions. This will now update your customer balances on these transactions.
Transaction Sources
Guidelines for Transaction Numbering Use the various options on the transaction source assigned to a transaction to manage your transaction numberingrequirements.
Refer to these guidelines when defining transaction numbering for transactions assigned to specific transactionsources:
• Document Sequences
• Automatic Transaction Numbering
• Copy Document Numbers to Transaction Numbers
• Allow Duplicate Transaction Numbers
• Credit Memo Transaction Source
Document SequencesIf necessary, define document sequences to assign unique numbers to each transaction, in addition to the transactionnumber assigned automatically.
Ensure that the necessary setups for document sequences are completed, according to your requirements.
Automatic Transaction NumberingTo automatically number new transactions you create using a transaction source, enable the Automatic transactionnumbering option and enter a number in the Last Number field.
100
Oracle Financials CloudImplementing Receivables Credit to Cash
Chapter 3Define Customer Billing Configuration
For example, to start numbering transactions with 1000, enter a last number of 999. Receivables automatically updatesthe Last Number fields on transaction sources, so you can review the transaction source later to see the last transactionnumber that was generated.
Note: The last transaction number on the transaction source is an approximation only, due to caching.
You can use automatic transaction numbering with both Imported and Manual transaction sources.
Copy Document Numbers to Transaction NumbersIf you're using document sequences and you want to use the same number as both the document number andthe transaction number for transactions assigned to a transaction source, enable the Copy document number totransaction number option.
If you're using Gapless document sequences, you should enable this option if you require gapless transactionnumbering. This ensures that transaction numbers are generated sequentially with no missing numbers.
Allow Duplicate Transaction NumbersEnable the Allow duplicate transaction numbers option to allow duplicate transaction numbers within a transactionsource.
This option is for manual transaction numbering only.
Credit Memo Transaction SourceAssign a credit memo transaction source to an invoice transaction source, if you want to number credit memosdifferently from the invoices that they credit.
Related Topics• Document Sequences
AutoInvoice and Sales Credit Information During AutoInvoice processing, whether you must provide sales credit information on imported transaction linesdepends on the settings of the Allow sales credits option on the transaction source and the Require salespersonReceivables system option.
These are the requirements for passing sales credit information on imported transaction lines:
• If the Require salesperson system option and the Allow sales credits option on the transaction source areboth enabled, you must provide sales credit information.
• If the Require salesperson system option isn't enabled and the Allow sales credits option on the transactionsource is enabled, you can provide sales credit information, but it isn't required.
• If the Require salesperson system option is enabled and the Allow sales credits option on the transactionsource isn't enabled, you must provide sales credit information.
• If neither the Require salesperson system option nor the Allow sales credits option on the transaction sourceare enabled, you can't provide sales credit information. AutoInvoice ignores any values that you pass.
101

Oracle Financials CloudImplementing Receivables Credit to Cash
Chapter 3Define Customer Billing Configuration
How AutoInvoice Validates Imported Transactions Use the AutoInvoice Options and Import Information sections of an Imported transaction source to define howAutoInvoice validates imported transaction lines.
You don't have to pass values for all of the fields that are referenced in the transaction source. If you don't wantAutoInvoice to pass certain data, then where available you can set the related option to None.
Note: Even if you set a transaction source data option to None in order to avoid importing this information into theinterface tables, AutoInvoice can still validate and reject transaction lines with invalid data.
Settings That Affect the Validation of Imported TransactionsThese settings affect the validation of imported transactions:
• Invalid Line field: Indicate how AutoInvoice handles imported transactions with invalid lines by selecting eitherReject Invoice or Create Invoice.
◦ If you select Reject Invoice, AutoInvoice doesn't import this transaction or any of its lines into theinterface tables.
◦ If you select Create Invoice, AutoInvoice creates a transaction with valid lines only. For example, youimport an invoice with three invoice lines and one of the lines is invalid. AutoInvoice creates the invoicewith the two valid lines only and rejects the invalid line. You can use the Edit Transaction page to add therejected line.
• Accounting Date in a Closed Period field: Indicate how AutoInvoice handles imported transactions that havelines in the interface lines table that are in a closed accounting period.
◦ Select Adjust to have AutoInvoice automatically adjust the accounting dates to the first accounting dateof the next open or future enterable period.
◦ Select Reject to reject these transaction lines.
• In the Import Information sections, where applicable select Number, Value, Segment, or ID for each option toindicate how AutoInvoice validates information:
◦ Select Number to import a record into the interface tables using its assigned number.
◦ Select Value to import a record into the interface tables using its actual name.
Note: Use Value if you intend to use the transaction source to import data from a non-Oracle system.
◦ Select Segment to use the flexfield segment.
◦ Select ID to use the internal identifier of the record.
• Select Amount or Percent to indicate how AutoInvoice validates Sales Credits and Revenue Account Allocationson transaction lines.
How Imported Transactions Are ValidatedAutoInvoice validates imported transactions based on the settings of the assigned Imported transaction source.Transactions that fail validation appear in the Import AutoInvoice Validation report.
102

Oracle Financials CloudImplementing Receivables Credit to Cash
Chapter 3Define Customer Billing Configuration
AutoInvoice ensures that certain column values agree with each other. These values can be within an interface tableor multiple interface tables. For example, if the transaction source indicates that a revenue scheduling rule can't beused, AutoInvoice ignores any values passed for invoicing rule, revenue scheduling rule, and revenue scheduling ruleduration.
AutoInvoice performs these validations on transaction lines with revenue scheduling rules:
• Requires that these transactions also include an invoicing rule, if you import transactions that use revenuescheduling rules.
• Rejects lines, if the revenue scheduling rule has overlapping periods.
• Rejects lines, if the designated accounting periods don't exist for the duration of the revenue scheduling rule.
Related Topics• Why did AutoInvoice reject transactions
How You Implement CPQ Cloud and Receivables Processing Set up CPQ Cloud and Receivables to enable the integrated quote-to-cash cloud service. This integrated service lets youmanage the entire process of quote, pricing, order entry, credit checking and invoicing.
To set up the CPQ Cloud/Receivables integration service, perform one or more of these tasks:
• Set up CPQ Cloud and CPQ Cloud data.
• Set up Receivables transaction sources.
• Set Up for multiple CPQ Cloud Instances.
Set Up CPQ CloudPerform the necessary setups in CPQ Cloud using the CPQ Administration pages.
Create a data table definition for each of the integration services used by the CPQ Cloud/Receivables quote-to-cashcloud service:
• Credit Check Service: Service that verifies customer creditworthiness.
• Receivables Invoice Service: Service that transfers order lines from CPQ Cloud to the AutoInvoice interfacetables in Receivables.
Each data table definition includes these attributes:
• Endpoint URL: The URL to use to contact the service.
• User Name: The valid user name recognized by the service.
• Password: The accompanying password for the valid user.
Set Up the CPQ Cloud Transaction SourceReceivables provides an Imported transaction source under the Common reference set to use to configure the CPQCloud/Receivables integrated service.
103
Oracle Financials CloudImplementing Receivables Credit to Cash
Chapter 3Define Customer Billing Configuration
Use this transaction source to:
• Manage the transfer of transaction information from CPQ Cloud to the AutoInvoice interface tables.
• Manage the Call Back service to send Receivables transaction information to CPQ Cloud after the transactionsare created.
To set up the transaction source for CPQ Cloud:
1. Navigate to the Edit Transaction Source page.2. Open the CPQ Cloud transaction source.3. If applicable, enter the legal entity.4. If applicable, update the From Date and To Date fields.5. In the Oracle CPQ Cloud Integration section, check the Enabled option.6. Click the Define button to open the Define Endpoint Policy window.7. In the URL field, enter the URL to use to contact the Call Back service.8. In the Security Policy field, enter oracle/wss_username_token_over_ssl_client_policy.9. In the User Name field, enter the user name to use for the Call Back service.
10. In the Password field, enter the accompanying password for the valid user.11. Click the Save and Close button to exit the Define Endpoint Policy window.12. Save and close the Edit Transaction Source page.
Set Up for Multiple CPQ Cloud InstancesIf you plan to have more than one CPQ Cloud instance sending data to Receivables, you must represent each CPQinstance as a business unit and define a transaction source for each instance.
To set up for multiple CPQ Cloud instances:
1. Define one reference set for each CPQ Cloud instance.2. Associate this reference set to the business unit for the reference object transaction source.3. Create a transaction source for each reference set:
a. Open the Create Transaction Source page.b. In the Transaction Source Set field, select the applicable reference set for the business unit.c. If applicable, enter the legal entity.d. In the Name and Description fields, enter a name and description for this transaction source.e. In the Type field, select Imported.f. If applicable, update the From Date and To Date fields.
g. Complete the remaining fields in the transaction source with the same settings as the predefinedtransaction source.
h. In the Oracle CPQ Cloud Integration section, check the Enabled option and complete the endpoint policy.i. Save and close the Create Transaction Source page.
FAQs for Transaction Sources
What do I create before creating transaction sources? You may want to create certain records before creating your transaction sources.
104
Oracle Financials CloudImplementing Receivables Credit to Cash
Chapter 3Define Customer Billing Configuration
You can optionally create these objects for Manual or Imported transaction sources:
• Transaction types: Define the transaction types that you want to appear by default on transactions assignedto your transaction sources. You select the transaction type you want for a transaction source in the StandardTransaction Type field.
• Credit memo transaction source: Define one or more transaction sources for credit memos before you definea transaction source for invoices. You then select a credit memo transaction source to accompany the invoicetransaction source in the Credit Transaction Source field.You can use credit memo transaction sources in these ways:
◦ Number the credit memos created against invoices differently from the invoices they're crediting.
◦ Create a manual credit memo transaction source for credit memo request approvals, when the approvedcredit memo amount is greater than the open balance on the invoice. For these transaction sources, setthe Receipt Handling for Credits option to On Account.
You can optionally create these objects for Imported transaction sources only:
• Invoice Transaction Flexfield: Define the reference information that you want to capture in the InvoiceTransaction Flexfield and display on imported transactions, such as a purchase order number.
• AutoInvoice grouping rule: Define the grouping rule to appear by default on imported transaction lines.
• AutoInvoice clearing account: Define an AutoInvoice clearing account, if you intend to enable the Createclearing option. AutoInvoice puts any difference between the revenue amount and the selling price times thequantity for a transaction into this account.
How can I manage credit memos with transaction sources? Special conditions may apply to the creation of transaction sources for credit memos.
Review these considerations for transaction sources assigned to credit memos:
• Define Manual transaction sources for credit memos created by the credit memo request approval process.
• Define credit memo transaction sources to assign to invoice transaction sources using the Credit TransactionSource field. Use credit memo transaction sources on invoice transaction sources under these conditions:
◦ Number the credit memos created against invoices differently from the invoices they're crediting.
◦ Create a manual credit memo transaction source for credit memo request approvals, when the approvedcredit memo amount is greater than the open balance on the invoice. For these transaction sources, setthe Receipt Handling for Credits option to On Account.
• Enable the Copy transaction information flexfield to credit memo option on Manual transaction sourcesused for credit memos, to copy the Invoice Transaction Flexfield reference information to the credit memocrediting the invoice.
• Select the transaction type to assign to the invoice using the Standard Transaction Type field, if the creditmemo transaction source requires invoice transaction types that use natural application only.
What happens if I don't enter an AutoInvoice grouping rule? Assign the AutoInvoice grouping rule to Imported transaction sources that AutoInvoice uses to group importedtransaction lines.
If you don't assign a grouping rule to an Imported transaction source, AutoInvoice uses the following hierarchy todetermine which rule to use:
1. Grouping rule assigned to the transaction source of the transaction line.
105
Oracle Financials CloudImplementing Receivables Credit to Cash
Chapter 3Define Customer Billing Configuration
2. Grouping rule assigned to the bill-to customer site profile of the transaction line.3. Grouping rule assigned to the bill-to customer profile of the transaction line.4. Grouping rule assigned to Receivables system options.
What happens if I don't create a clearing account? If you don't use an AutoInvoice clearing account and enable the Create clearing option on the transaction source,AutoInvoice requires that the revenue amount be equal to the selling price times the quantity for all of the transactionsit processes. AutoInvoice rejects any transaction line that doesn't meet this requirement.
Memo Lines
Revenue Accounts and Memo Lines You can optionally associate a revenue account with a memo line.
If AutoAccounting depends on memo line, Receivables uses the revenue account segment values defined for thememo line, in combination with the rest of your AutoAccounting structure, to determine the default revenue, freight,AutoInvoice clearing, tax, unbilled receivable, unearned revenue, and receivable accounts for invoices that include thememo line.
When you create a debit memo or on-account credit memo with memo lines, Receivables uses the revenue accountfrom the original receivable item as the credit account. However, when you create debit memo reversals or chargebacks,Receivables uses instead the revenue flexfield from the original receivable item as the credit account.
Related Topics• Debit Memo Reversals
• AutoAccounting Account Types and Segment Values
FAQs for Memo Lines
When do I use memo lines? Use memo lines on your transactions when the item isn't an inventory item. For example, you can define a memo linecalled Consulting Services to identify charges for consulting activities. You can assign memo lines to debit memos, on-account credits, debit memo reversals, chargebacks, and invoices.
How can I use tax memo lines? You can use tax memo lines on transactions only if your tax definition lets you enter manual tax lines on transactions.After you enter a tax memo line on a transaction, you can specify the amount of tax to assign to the transaction line.
106

Oracle Financials CloudImplementing Receivables Credit to Cash
Chapter 3Define Customer Billing Configuration
Balance Forward Billing
Balance Forward Billing on Customer Accounts and Sites You can enable and maintain balance forward billing details at the customer account level and customer site level. Therules governing the interaction between the customer account and customer sites determine what sites are included inbalance forward bills.
Rules for Account and Site Balance Forward BillingThese rules apply to balance forward billing at the account level and site level:
• Account level customer profile values become the default values for the related customer sites when you createsite profiles.
• If balance forward billing is enabled at the account level, you still need to enable balance forward billing on therelated site profiles if you want to include these sites in the account-level balance forward bill.
In the Balance Forward Billing section of site profiles:
◦ Set the Enable option.
◦ In the Bill Level field, select Account.
◦ In the Bill Type field, select the bill type defined at the account level.
• You can define separate balance forward billing details for a particular site. In the Balance Forward Billingsection of site profiles:
◦ Set the Enable option.
◦ In the Bill Level field, select Site.
◦ In the Bill Type field, select the bill type to use for this site.
Once you create a site profile and define separate balance forward billing details, the site profile no longerreferences the account profile.
• Balance forward billing definitions at the site level take precedence over balance forward billing definitions atthe account level.
Related Topics• Example of Setting Up Balance Forward Billing
• Overview of Balance Forward Billing
107
Oracle Financials CloudImplementing Receivables Credit to Cash
Chapter 3Define Customer Billing Configuration
Example of Setting Up Balance Forward Billing This example demonstrates how to set up balance forward billing for the customer Business World. The exampleincludes the setup of a balance forward billing cycle, balance forward billing payment terms, and the Business Worldcustomer profile.
This table summarizes key decisions for this scenario.
Decisions to Consider In This Example
What billing cycle is used?
Monthly
What day of the month is used on thepayment terms?
15th
How are balance forward billsconsolidated?
Account level
Can the customer exclude transactionsfrom the balance forward bill?
Yes
Summary of the TasksTo generate balance forward bills for a customer:
1. Define a balance forward billing cycle.2. Define balance forward billing payment terms.3. Set up the customer profile class for balance forward billing.4. Assign the profile class to the Business World customer account.
Define a Balance Forward Billing CycleDefine the balance forward billing cycle to use for this customer:
1. Open the Balance Forward Billing Cycle window.2. Complete the fields, as shown in this table:
Field Value
Name
Name that identifies this balance forward billing cycle for this customer.
Frequency
Monthly
Repeat Every
1 (every month)
108
Oracle Financials CloudImplementing Receivables Credit to Cash
Chapter 3Define Customer Billing Configuration
Field Value
Day of Month
Last Day of Month
Define Balance Forward Billing Payment TermsDefine the balance forward billing payment terms to use for this customer:
1. Open the Create Payment Terms page.2. Complete the fields, as shown in this table:
Field Value
Name
Name that identifies these payment terms for this customer.
Billing Cycle
The billing cycle you defined in the previous step.
Due By Day of Month
15
Set Up the Customer Profile Class for Balance Forward BillingSet up the customer profile for Business World for balance forward billing:
1. Open the Create Receivables Customer Profile Class page.2. Complete the general required fields for the profile class.3. Complete the fields on the Profile Class tab, as shown in this table:
Field Value
Balance Forward Billing Enable
Enable this option.
Bill Level
Account
Bill Type
Detail
Payment Terms
The balance forward billing payment terms you defined in the previous step.
Override terms Enable this option.
109
Oracle Financials CloudImplementing Receivables Credit to Cash
Chapter 3Define Customer Billing Configuration
Field Value
Note: The Override terms option makes available to transactions both non-balance forward billing paymentterms and the one balance forward billing payment terms you defined in the previous step. This lets youexclude individual transactions from balance forward billing by assigning the transaction non-balanceforward payment terms.
Assign the Profile Class to the Business World Customer AccountAssign the profile class to the Business World account:
1. Open the Edit Account page for Business World.2. Click the Profile tab.3. Open the Insert Account Profile page and update the Business World customer account with the profile you
defined in the previous step.4. Make sure that balance forward billing is enabled at the site profile level for all sites belonging to the customer
account that you want to include in balance forward billing.
Related Topics• What's a balance forward billing cycle
• How can I change a customer's billing cycle
• How Transactions for Balance Forward Billing Are Selected
Balance Forward Billing Email Delivery
Email Delivery of Balance Forward Bills Deliver balance forward bills by email as PDF attachments to your customer account or site level contacts.
You can email balance forward bills directly to your customers, in addition to the existing capability of printing bills.
Setups for Email Delivery of Balance Forward BillsYou must opt in to enable this feature, and then complete the related setups in Receivables.
Setups for email delivery of balance forward bills include:
• Receivables System Options: Transaction Delivery Using Email
• Customer account and site profiles
• Customer account and site contacts
Updates to Balance Forward Bill ProcessesOnce you enable and set up Email Delivery of Balance Forward Bills, the following scheduled processes are available forgenerating balance forward bills:
• Create Balance Forward Bills: Generate balance forward bills as PDFs and send them by email.
110

Oracle Financials CloudImplementing Receivables Credit to Cash
Chapter 3Define Customer Billing Configuration
• Deliver Balance Forward Bills: Deliver previously delivered balance forward bills using the designated deliverymethod (Paper or Email).
• Print Summary Balance Forward Bills and Print Detailed Balance Forward Bills: Continue to deliver previouslydelivered balance forward bills using the delivery method Paper.
The Create Balance Forward Bills process contains the additional parameter Draft Email ID. When you create balanceforward bills in Draft mode (Print Option parameter = Print draft balance forward bills), you can use this parameter tosend the draft bill to the email address of your choice for testing and review.
The Draft Email ID parameter is a free text field, but the email address you enter must conform to the standard formatfor email addresses ([email protected]). When you run the Create Balance Forward Bills process with an email address inthis parameter, this email address receives a PDF of all balance forward bills generated by the process run for customersenabled for email delivery only.
The Create Balance Forward Bills process doesn't generate an error under any of the following conditions:
• Email address you entered doesn't exist.
• Email address you entered exists, but it isn't the one you intended.
• Email recipient inbox is full.
Deliver Balance Forward Bills ProcessThe Email Delivery of Balance Forward Bills feature enables the Deliver Balance Forward Bills process to deliver previousbalance forward bills (Paper or Email) for the applicable customers.
Use the Deliver Balance Forward Bills process to deliver previously created balance forward bills to customers. Enterin the Process ID parameter the process ID of a previous run of balance forward bills. The process delivers the bills byemail as a PDF attachment for all customer account and site profiles enabled for email delivery.
How To Set Up for Email Delivery of Balance Forward Bills If you use Balance Forward Billing, you can enable the delivery of balance forward bills by email as PDF attachments toyour customer account or site level contacts.
You must opt in to enable the Email Delivery of Balance Forward Bills feature. After you opt in, you must complete thefollowing setups to deliver balance forward bills by email:
• Set up the Transaction Delivery Using Email section in the Billing and Revenue tab of Receivables SystemOptions.
• Set up the applicable customer account and site profiles for balance forward billing and email delivery.
• Set up contacts for each customer account and site that receives balance forward bills by email.
Receivables System OptionsYou must complete the fields in the Transaction Delivery Using Email section of Receivables System Options for theapplicable business unit.
If you're already using this section for email delivery of transactions, you can either use the same values for balanceforward bills or update individual fields according to your requirements. For example, you may need to edit the EmailSubject and Email Body fields to accommodate both transactions and balance forward bills.
To set up Receivables System options for email delivery of balance forward bills:
1. In the Create or Edit System Options page for the business unit you want, navigate to the Transaction DeliveryUsing Email section of the Billing and Revenue tab.
111

Oracle Financials CloudImplementing Receivables Credit to Cash
Chapter 3Define Customer Billing Configuration
2. Complete all fields in this section for email delivery of balance forward bills.
These fields are conditionally required. You must enter values in these fields to ensure successful delivery ofbalance forward bills by email.
3. Save your work.
Customer Account and Site ProfilesYou must set up balance forward billing in the applicable customer account and site profiles, and set a preferred deliverymethod of Email.
Note: You can't use XML delivery with the Email Delivery of Balance Forward Bills feature. This feature considers apreferred delivery method of XML as Paper.
To set up a customer account or site for email delivery of balance forward bills:
1. Navigate to the Edit Account or Edit Site page for the customer account or site you want.2. Click the Profile History tab.3. Update or Insert a profile for the customer account or site.4. In the Balance Forward Billing section of the Profile tab, complete these fields:
◦ Enable: Enable this option to activate balance forward billing.
◦ Bill Level: Select the level at which to generate balance forward bills: Account or Site.
For customer site profiles, select the bill level Account to include transactions belonging to the site in theaccount-level balance forward bill. Select the bill level Site to deliver a separate balance forward bill fortransactions belonging to the site.
Note: You must set up an active customer profile at both the customer account and site levels forbalance forward billing to process successfully, no matter which Bill Level setting you use.
◦ Bill Type: Select the format to use for balance forward bills.
5. In the Terms section, select in the Payment Terms field the balance forward billing payment terms to use forthis account or site.
6. In the Invoicing section, select Email in the Preferred Delivery Method field:
◦ If the Bill Level setting in the profile is Account, the Create Balance Forward Bills process references thePreferred Delivery Method setting in the customer account profile.
◦ If the Bill Level setting in the profile is Site, the Create Balance Forward Bills process references thePreferred Delivery Method setting in the customer site profile.
7. Complete the profile according to your requirements and save.
Customer Account and Site ContactsYou must set up at least one customer contact for each account or site that receives balance forward bills by email.
To receive balance forward bills by email, a customer contact must have all of these settings:
• Role Type assignment of Contact.
• Active email address.
• Responsibility type assignment of any responsibility other than Collections or Dunning.
112
Oracle Financials CloudImplementing Receivables Credit to Cash
Chapter 3Define Customer Billing Configuration
Note: If you designate a customer contact as Primary, balance forward bills are still sent by email to all contactsassigned to the applicable customer account or site.
To set up a contact for a customer account or site for email delivery of balance forward bills:
1. Navigate to the Edit Account or Edit Site page for the customer account or site you want.2. Click the Communication tab.3. Click the Edit Contacts button.4. Click the applicable Plus (+) icon (Create Contact or Add Contact) either to create a new person record for a
contact or to add an existing person record as a contact.5. Enter the name of the contact and related job information, according to your requirements.6. In the Role Type field, select Contact.7. Optionally click the Set Primary Contact icon for this contact.8. In the Contact Points section, click the Plus (+) icon to open a Create Contact Point window.9. In the Contact Point Type field, select Email.
10. In the Email field, enter the email address for the contact.11. In the From Date and To Date fields, enter the dates that this contact point is active for this contact.12. Optionally click the Set Primary icon for this contact point.13. In the Responsibilities section, click the Plus (+) icon to create a responsibility row.14. In the Responsibility Type field, select a responsibility for this contact.15. Optionally click the Plus (+) icon again to create additional responsibilities for the contact.
For email delivery of balance forward bills, you can assign any responsibilities to a contact except Collections orDunning.
16. To set a primary responsibility for the contact, select a responsibility and click the Set Primary Responsibilityicon.
17. Save your work.
Related Topics• How Transaction and Statement Delivery Using Email Works
FAQs for Balance Forward Billing
What's a balance forward billing cycle? The balance forward billing cycle determines the day, week, or month of the year to generate balance forward bills, andthe customers and customer transactions to include in a balance forward bill.
You assign balance forward billing cycles to payment terms, and assign these balance forward billing payment terms toyour customer accounts and sites.
When you run the Create Balance Forward Bill process, you're required to select a balance forward billing cycle. TheCreate Balance Forward Bill process selects all payment terms assigned this balance forward billing cycle, and thenselects all customers and customer transactions assigned these payment terms.
A run of the Create Balance Forward Bill process includes all transactions not included on a previous balance forwardbill assigned the payment terms with the selected billing cycle, or a subset of these payment terms as determined by theother process parameters.
113

Oracle Financials CloudImplementing Receivables Credit to Cash
Chapter 3Define Customer Billing Configuration
Remit-to Addresses
How You Create a Remit-to Address Create remit-to addresses to specify on transactions and statements where your customers are to send payment fortheir open receivables.
Considerations for remit-to addresses include:
• Receivables system options > Billing and Revenue tab: You can set these Receivables system options as part ofyour remit-to address setup:
◦ Print remit-to address option: Enable this option to print remit-to addresses on your customerstatements.
◦ Print home country option: Enable this option to print your home country on transactions andstatements with addresses in that country.
◦ Default Country field: Select the country to assign by default to the remit-to addresses you create.
• Reference data set: Remit-to addresses belong to a reference data set. You can assign remit-to addresses to theCommon set or to business unit-specific sets.
• Receipt from Criteria section: Use this section to assign remit-to addresses by default to the transactions andstatements of specific customer bill-to sites.
If you don't set up default remit-to addresses for your customer transactions, you must still assign a remit-toaddress in order to complete the transaction.
To create a remit-to address:
1. Navigate to the Create Remit-to Address page.2. In the Remit-to Address Set field, select a reference data set.3. The Country field displays the default country defined in Receivables system options. If necessary, select
another country for the remit-to address.
If you select another country, this may update the required and optional address fields. You may also need toselect the reference data set again.
4. Enter the address details and save. You return to the Manage Remit-to Addresses page.5. In the Manage Remit-to Addresses page, search for and select the remit-to address you just created.6. In the Receipt from Criteria section, click the Create (+) icon to open the Create Receipt from Criteria window
for the remit-to address.
Use this window to assign the remit-to address to customer bill-to sites.7. In the Country field, select the country you want. By default, the remit-to address is assigned to all customer
bill-to sites defined in this country.8. If necessary, use the State and Postal Code fields to restrict the remit-to address assignment to specific
regions of the country.9. Save your work.
114

Oracle Financials CloudImplementing Receivables Credit to Cash
Chapter 3Define Customer Billing Configuration
FAQs for Remit-to Addresses
How can I use remit-to addresses? The remit-to address lets your customers know where to send payment for their open debit items. After you create aremit-to address, you can assign it to the bill-to addresses of the customers and customer sites that you designate bycountry and, if applicable, by region and postal code range.
If the Print remit-to address Receivables system option is enabled, the remit-to address is printed on the relatedcustomer dunning letters and statements.
How does AutoInvoice validate remit-to addresses? During the import process, AutoInvoice rejects all invoices for which it can't determine a remit-to address. In orderfor AutoInvoice to import an invoice, you must either define a remit-to address for the geographical location of eachapplicable bill-to site or define a remit-to address to use as default for one or more locations.
How can I define a default remit-to address? Create or select a remit-to address, then open the Receipts from Criteria window. Select the country that you want toassign to this remit-to address.
If you only select a country, then all customer bill-to sites in this country are assigned this remit-to address.
If you want to assign this remit-to address to specific locations within the country, you can optionally select a state orregion within the country, and a range of postal codes.
Why did the country appear? When you create a remit-to address, a country appears by default if one was defined in Receivables system options. Youcan change the default to the applicable country of the remit-to address.
Why do I verify the address? If you have Trading Community Data Quality installed, you can expose a Verify Address button on the Create and EditRemit-to Address pages for applicable countries.
After you enter a remit-to address, use the Verify Address button to confirm that the address is in the TradingCommunity Model registry. If the address doesn't exist, Receivables either presents alternative addresses or lets youoptionally add the address you entered to the registry.
FAQs for Salesperson Reference Accounts
What are salesperson reference accounts? Assign general ledger accounts to your salespersons. When AutoAccounting depends on salesperson, Receivables usesthe account references that you define here to derive the accounts to use on transactions that are assigned a particularsalesperson.
115

Oracle Financials CloudImplementing Receivables Credit to Cash
Chapter 3Define Customer Billing Configuration
116
Oracle Financials CloudImplementing Receivables Credit to Cash
Chapter 4Define Customer Payments
4 Define Customer Payments
Create a Shared Service Model in Receivables Use service provider relationships to create a shared service model in Receivables to centralize the processing ofcustomer payments.
In the shared service model, you define one servicing business unit for customer payments. You then create a serviceprovider relationship between this servicing business unit and one or more client billing business units.
Note: All business units must belong to the same ledger.
Once you define this relationship, the servicing business unit can receive and process payments for all of its client billingbusiness units. The shared service model for centralized customer payment processing supports all receipt creationmethods in Receivables:
• Manual receipts.
• Receipts uploaded using a spreadsheet.
• Lockbox receipts.
• Automatic receipts.
Receivables provides additional functionality for cross-business unit receipt processing, to facilitate the processing ofcustomer payments:
• Allow a billing business unit outside the service provider relationship to have payments for its transactionsprocessed by any other business unit in the same ledger.
• Allow an individual receipt to be applied to transactions of any business unit in the same ledger.
Perform these procedures to manage shared services in Receivables:
• Define Customer Payments Service Providers
• Define Receivables System Options for Cross-Business Unit Receipt Processing
• Enable a Receipt for Cross-Business Unit Processing
Define Customer Payments Service ProvidersPerform the steps in this procedure to define a servicing business unit and client billing business units.
1. Create a servicing business unit and client business units.2. Assign the appropriate business functions to each business unit:
a. Open the Assign Business Functions page for the servicing business unit.b. Assign business functions to the servicing business unit. At a minimum, you must assign the servicing
business unit the Customer Payments business function.c. Save your work.d. Open the Assign Business Functions page for the first client business unit.e. Assign business functions to the client business unit. At a minimum, you must assign the client business
unit the Billing and Revenue Management business function.
117

Oracle Financials CloudImplementing Receivables Credit to Cash
Chapter 4Define Customer Payments
f. Save your work.g. Repeat steps 4 to 6 for each client business unit.
3. Assign the servicing business unit to each client business unit:
a. From the Manage Service Provider Relationships task, open the Manage Service Providers page for thefirst client business unit.
b. In the Customer Payments Service Providers section, click the Add icon.c. In the Search and Select window, select the servicing business unit.d. Save your work.e. Repeat steps 1 to 4 for each client business unit.
Define Receivables System Options for Cross-Business Unit ReceiptProcessingPerform the steps in this procedure to allow a billing business unit outside the service provider relationship to havepayments for its transactions processed by any other business unit in the same ledger.
1. From the Manage Receivables System Options task, open the Edit System Options page for the business unitthat you want.
2. Navigate to the Billing and Revenue tabbed region.3. Enable the Allow any business unit to process receipts option.4. Save your work.
This business unit can now have payments for its transactions processed by any other business unit in thesame ledger.
Enable a Receipt for Cross-Business Unit ProcessingPerform the steps in this procedure to apply an individual receipt to one or more transactions belonging to any businessunit in the same ledger.
1. Use the Create Receipt page to create a new receipt or the Edit Receipt page to open an unapplied receipt.2. In the Application tabbed section, click the Add Open Receivables button.3. In the Add Open Receivables window, enable the Include transactions from all business units option.4. Search for and select the transactions that you want to apply to the receipt. You can select transactions from
any business unit in the same ledger.5. Click the Add button and then the Done button.6. If necessary, update the figure in the Applied Amount field for each applicable transaction.7. Click the Save button to apply the receipt to the selected transactions.
Application Rule Sets
Rules of the Application Rule Set When you apply a receipt or credit memo to a transaction, the application rule set determines how Receivables reducesthe open balance of the line, tax, freight, and late charge amounts on a transaction.
118
Oracle Financials CloudImplementing Receivables Credit to Cash
Chapter 4Define Customer Payments
Receivables uses the application rule set assigned to the transaction type to process payment applications. If noapplication rule set is assigned to the transaction type, then the application rule set assigned to Receivables systemoptions is used.
You can arrange the order of the line types and application rules in an application rule set according to your needs. Eachline type must appear in an application rule set, and appear only once. The Overapplication rule is always last in thesequence.
Line First - Tax After RuleThe Line First - Tax After rule first applies the payment to open line amounts, and then applies the remaining amount tothe associated tax.
If the payment is greater than the sum of the open line and tax amounts, Receivables attempts to close each remainingopen item by applying the remaining amount in the following order, stopping when the payment has been fully applied:
1. Freight2. Late charges
After the payment is fully applied, if a receipt amount remains, this amount is managed by the Overapplication rule.
Line and Tax ProrateThe Line and Tax Prorate rule applies a proportionate amount of the payment to open line and tax amounts for eachline.
If the payment is greater than the sum of the open line and tax amounts, Receivables attempts to close each remainingopen item by applying the remaining amount in the following order, stopping when the payment has been fully applied:
1. Freight2. Late charges
After the payment is fully applied, if a receipt amount remains, this amount is managed by the Overapplication rule.
Prorate AllThe Prorate All rule applies a proportionate amount of the payment to each open amount associated with a debit item(any line, tax, freight, and late charge amounts for this item).
Receivables uses the following formula to determine the applied amount:
Applied Amount = open application line type amount / sum of application line types in rule details * Receipt Amount
After the payment is fully applied, if a receipt amount remains, this amount is managed by the Overapplication rule.
Overapplication RuleThe Overapplication rule is always the last rule in an application rule set. This rule manages any remaining receiptamount after the open balance of all transaction lines has been reduced to zero.
If the transaction type for the debit item allows overapplication, Receivables applies the remaining amountto transaction lines, making the balance due negative. If the transaction type for the debit item doesn't allowoverapplication, you can either place the remaining amount on-account or leave it unapplied.
Note: Lockbox uses the AutoCash rule set rather than the Application rule set to determine how to apply a remainingamount.
119
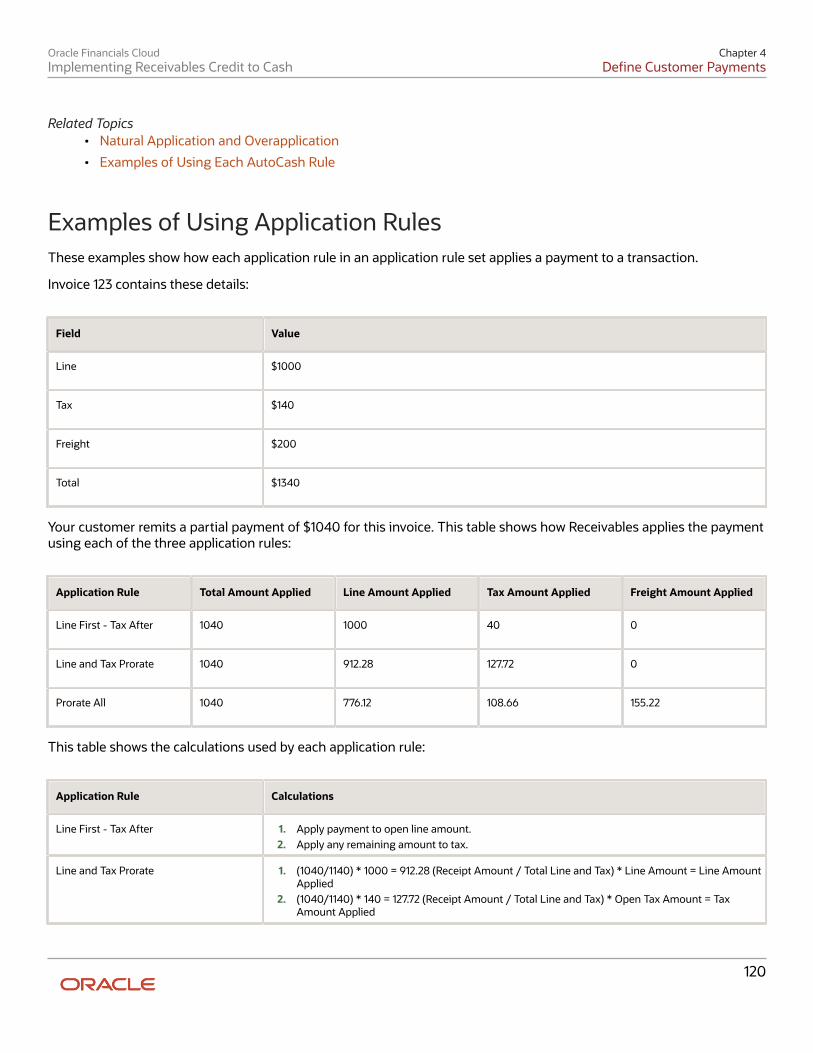
Oracle Financials CloudImplementing Receivables Credit to Cash
Chapter 4Define Customer Payments
Related Topics• Natural Application and Overapplication
• Examples of Using Each AutoCash Rule
Examples of Using Application Rules These examples show how each application rule in an application rule set applies a payment to a transaction.
Invoice 123 contains these details:
Field Value
Line
$1000
Tax
$140
Freight
$200
Total
$1340
Your customer remits a partial payment of $1040 for this invoice. This table shows how Receivables applies the paymentusing each of the three application rules:
Application Rule Total Amount Applied Line Amount Applied Tax Amount Applied Freight Amount Applied
Line First - Tax After
1040
1000
40
0
Line and Tax Prorate
1040
912.28
127.72
0
Prorate All
1040
776.12
108.66
155.22
This table shows the calculations used by each application rule:
Application Rule Calculations
Line First - Tax After
1. Apply payment to open line amount.2. Apply any remaining amount to tax.
Line and Tax Prorate
1. (1040/1140) * 1000 = 912.28 (Receipt Amount / Total Line and Tax) * Line Amount = Line AmountApplied
2. (1040/1140) * 140 = 127.72 (Receipt Amount / Total Line and Tax) * Open Tax Amount = TaxAmount Applied
120

Oracle Financials CloudImplementing Receivables Credit to Cash
Chapter 4Define Customer Payments
Application Rule Calculations
Prorate All
1. (1040/1340) x 1000 = 776.12 (Receipt Amount / Invoice Total) * Open Line Amount = Line AmountApplied
2. (1040/1340) x 140 = 108.66 (Receipt Amount / Invoice Total) * Open Tax Amount = Tax AmountApplied
3. (1040/1340) x 200 = 155.22 (Receipt Amount / Invoice Total) x Open Freight Amount = FreightAmount Applied
Line First - Tax AfterThe Line First - Tax After rule first applies the payment to the line amount, reducing the balance due to zero. Receivablesthen applies the remaining amount ($40) to the tax charges, reducing the open tax amount to $100. Since the paymentisn't enough to close these items, the freight balance isn't affected.
This table compares each line type before and after you apply an amount using the Line First - Tax After rule:
TransactionAmount
RemainingAmount
Line Items Line ItemsRemaining
Tax Tax Remaining Freight FreightRemaining
$1340
$300
$1000
$0
$140
$100
$200
$200
Line and Tax ProrateThe Line and Tax Prorate rule applies a proportionate amount to the open line and tax charges. Since the amountapplied isn't enough to close these items, the freight balance isn't affected.
This table compares each line type before and after you apply an amount using the Line and Tax Prorate rule:
TransactionAmount
RemainingAmount
Line Items Line ItemsRemaining
Tax Tax Remaining Freight FreightRemaining
$1340
$300
$1000
$87.72
$140
$12.28
$200
$200
This table shows the calculations used to arrive at the proportionate amounts:
Item Calculations
Line Items
1000 - 912.28 = 87.72 Amount Line Items - Line Amount Applied = Open Line Amount
Tax
140 - 127.72 = 12.28 Tax Original - Tax Amount Applied = Open Tax Amount
121
Oracle Financials CloudImplementing Receivables Credit to Cash
Chapter 4Define Customer Payments
Prorate AllThe Prorate All rule applies a proportionate amount of the receipt to the line, tax, and freight for this transaction.
This table compares each line type before and after you apply an amount using the Prorate All rule:
TransactionAmount
RemainingAmount
Line Items Line ItemsRemaining
Tax Tax Remaining Freight FreightRemaining
$1340
$300
$1000
$223.88
$140
$31.34
$200
$44.78
This table shows the calculations used to arrive at the proportionate amounts:
Item Calculations
Line Items
1000 - 776.12 = 223.88 Amount Line Items - Line Amount Applied = Open Line Amount
Tax
140 - 108.66 = 31.34 Tax Original - Tax Amount Applied = Open Tax Amount
Freight
200 - 155.22 = 44.78 Freight Original - Freight Amount Applied = Open Freight Amount
Example of Using Application Rules with Transactions with MixedSign Balances This example shows how the Prorate All application rule is used to apply a payment to a transaction that has mixed signbalances. In a transaction with mixed sign balances, the charges that make up the transaction have a combination ofpositive and negative signs.
When you apply a payment to a transaction that has mixed sign balances, Receivables applies the payment only tothose amounts that have the same sign as the payment. For example, if the payment is for a positive amount (meaning,not a credit memo), Receivables only reduces the charges that have a positive balance. Any negative balances aren'taffected.
As with transactions having a same sign balance, Receivables applies any remaining amounts according to theOverapplication rule assigned to the application rule set.
Prorate All with Mixed Sign BalancesInvoice 101 contains these details:
122
Oracle Financials CloudImplementing Receivables Credit to Cash
Chapter 4Define Customer Payments
Field Value
Line
<$100>
Tax
$100
Freight
$30
Late Charges
$10
Assume that you're using the Prorate All application rule. Your customer remits a receipt of $100. Receivables proratesthe positive receipt amount among the positive tax, freight, and late charges amounts. The line amount of <$100> isn'taffected.
This table shows the new balance of Invoice 101 after the receipt application:
Field Value
Line
<$100>
Tax
$28.56
Freight
$8.58
Late Charges
$2.86
This table compares each line type for this invoice before and after you apply the payment using the Prorate All rule:
Line Items Line ItemsRemaining
Tax Tax Remaining Freight FreightRemaining
Late Charges Late ChargesRemaining
<$100>
<$100>
$100
$28.56
$30
$8.58
$10.00
$2.86
This table shows the amount applied to each line type:
Total Amount Applied Line Amount Applied Tax Amount Applied Freight Amount Applied Late Charges AmountApplied
100
0
71.44
21.42
7.14
This table shows the calculations used by the Prorate All application rule:
123

Oracle Financials CloudImplementing Receivables Credit to Cash
Chapter 4Define Customer Payments
Item Calculations
Tax
100 - (21.42 + 7.14) = 71.44
Freight
(30 * 100) / 140 = 21.42
Late Charges
3(10.00 * 100) / 140 = 7.14
FAQs for Application Rule Sets
What's the tax treatment? The Tax Treatment option on the application rule set determines how to reduce the tax amount in relation to the lineamount when a payment is applied.
The tax treatment options are:
• Prorate: Proportionately reduce the net amount of the line and associated tax amounts.
• Before: First reduce the open tax amount, then apply any remaining amount to the line.
• After: Reduce the open line amount, then apply any remaining amount to the associated tax.
How can I use the rounding correction? You assign a rounding correction to one of the line types (Line, Freight, or Charges) belonging to an application rule set.When an amount is prorated across more than one line type, the application rule set uses the line type you indicate toaccount for the rounding adjustment. The line amount of the designated line type is adjusted accordingly to account forany rounding corrections within the application rule set.
Receipt Classes and Methods
Remittance Methods and Clearance Methods Define a remittance method and clearance method for each receipt class. These settings determine the remittance andclearing behavior for receipts with a given receipt class.
Remittance MethodsUse the remittance method to determine the accounts to use for receipts that you create using the receiptmethod assigned to this receipt class.
Standard
Use the remittance account for automatic receipts assigned to a receipt method with this receipt class.
Factoring
124
Oracle Financials CloudImplementing Receivables Credit to Cash
Chapter 4Define Customer Payments
Use the factoring account for automatic receipts assigned to a receipt method with this receipt class.
Standard and Factoring
Receivables selects receipts assigned to this receipt class for remittance regardless of the batch remittance method. Inthis case, you can specify either of these remittance methods when creating your remittance batches.
No Remittance
For Manual receipts only. Remittance isn’t required for manual receipts assigned to this receipt class.
Clearance MethodsUse the clearance method to require receipts created using a receipt method assigned to this receipt class to bereconciled before posting them to the general ledger cash account.
Directly
This method is for receipts that you don't expect to be remitted to the bank and subsequently cleared.
It’s assumed that these receipts are cleared at the time of receipt entry and require no further processing.
By Automatic Clearing
Use this method to clear receipts using the Clear Receipts Automatically program.
Note: You can also clear receipts using this method in Cash Management.
By Matching
Use this method to clear receipts manually in Cash Management.
Related Topics• Considerations for Remitting Receipts
• Automatic Clearing of Receipts
Guidelines for Defining Automatic Receipt Methods Define the attributes of an automatic receipt method to determine how automatic receipts are processed againstselected transactions.
Review these guidelines when defining the attributes of automatic receipt methods:
• Receipts Inherit Transaction Numbers
• ISO Direct Debit
• Number of Receipts Rule
• Receipt Maturity Date Rule
• Automatic Print Template
• Lead Days
• Customer Payment Method
125
Oracle Financials CloudImplementing Receivables Credit to Cash
Chapter 4Define Customer Payments
Receipts Inherit Transaction NumbersIf you're using One per Invoice as the Number of Receipts Rule, you can enable the Receipts inherit transactionnumbers option to ensure that the automatic receipt number is always the same as the transaction number that thereceipt is applied to. Enabling this option helps track automatic receipts.
Note: Don't enable this option if you're using document sequencing with automatic receipts.
ISO Direct DebitEnable the ISO direct debit option to create automatic receipts that automatically debit a customer bank accountaccording to the standards of ISO 20022 direct debit.
Enabling this option assumes that you have created a debit authorization agreement with your customers for ISO 20022direct debit.
Number of Receipts RuleThe Number of Receipts Rule determines the way in which the automatic receipt process creates and applies receiptsagainst transactions.
Note: If you enable the ISO direct debit option, the Number of Receipts Rule is disabled. ISO 20022 direct debitcreates one receipt for the prearranged debit amount from your customer and transfers this amount to the remittancebank account defined in the automatic receipt method.
Select one of these rules:
• One per Customer: Create one receipt for each customer.
• One per Customer Due Date: Create one receipt for each customer and due date. This option creates severalpayments for a customer if the invoices of the customer have several due dates.
• One per Invoice: Create one receipt for each invoice.
• One per Site: Create one receipt for each customer site.
• One per Site Due Date: Create one receipt for each customer site and due date.
Note: The Number of Receipts Rule assumes an additional grouping by payment instrument. For example, if youuse the One per Customer rule, and two invoices belonging to the same customer are to be paid from different bankaccounts, the automatic receipt process creates two receipts, one for each bank account number.
Receipt Maturity Date RuleUse the Receipt Maturity Date Rule to pay invoices that have different due dates with a single receipt.
Select Earliest to use the earliest due date of all of the invoices that the receipt covers as the receipt maturity date.Select Latest to use the latest due date of all of the invoices that the receipt covers as the receipt maturity date.
When you remit a receipt, Receivables uses the maturity date to determine when to transfer funds from the customerbank account to your remittance bank account.
126
Oracle Financials CloudImplementing Receivables Credit to Cash
Chapter 4Define Customer Payments
Automatic Print TemplateEnter the automatic print template to use for transmissions using this receipt method.
Receivables provides one standard receipt print template to format the output of payment selection and creationprograms when you create the receipt document. To use a different receipt print template, you must copy and modifythis standard receipt print template.
Lead DaysThe number of lead days is the number of days before the invoice due date that an invoice can be selected forapplication by the automatic receipt process using this receipt method.
This option is useful, for example, when customer approval is required. You can set the value to the number of daysnormally required to receive customer approval.
Customer Payment MethodSelect the funds capture payment method that the customer will use to remit payment for automatic receipts using thisreceipt method.
Note: If you enable the ISO direct debit option, Bank Account Transfer is the only payment method available.
Oracle Payments provides predefined funds capture payment methods, but you can define your own.
Related Topics• How Automatic Receipts Are Processed
• ISO 20022 Direct Debit Prenotifications
• ISO 20022 Payment Status Reports
Fund Transfer Error Handling on Automatic Receipts Define fund transfer error handling on automatic receipt methods to manage error correction during automatic receiptprocessing.
You define fund transfer error handling to automatically correct errors encountered either during credit cardauthorization or payment capture, or during bank account transfer.
You set up error handling in the Fund Transfer Error Handling section of the Automatic Processing tab of the Create orEdit Receipt Class and Methods page, for the applicable automatic receipt methods.
Mapping Third-Party Error CodesTo define fund transfer error handling for a given automatic receipt method, you map the error codes from a third-partycredit card provider or financial institution to the corrective actions in Receivables for each category of transaction.
When an error occurs during payment processing of automatic receipts with the specified receipt method, Receivablesapplies the corrective action that corresponds to the given third-party error code.
Map each error code to a corresponding action for each category of transaction. This table indicates the correctiveactions available for each category:
127
Oracle Financials CloudImplementing Receivables Credit to Cash
Chapter 4Define Customer Payments
Category Available Actions
Invoice, Debit Memo, Credit Memo
Clear Payment Information, Retry
Receipt
Retry, Reverse Receipt
Refund
Retry, Reverse Receipt
Mapping Error Codes: ExampleYou map a credit card provider error code of GW-0062 to the Invoice category and the Retry action.
When credit card authorization fails and the credit card provider returns the error code of GW-0062 for multipletransactions, then Receivables automatically deletes this error code on these failed transactions. These transactionsthen become available for inclusion in the next automatic receipt batch.
Related Topics• PCI DSS Credit Card Processing Requirements
Remittance Bank Accounts on Receipt Methods Define remittance bank account information for each receipt method assigned to a receipt class. Remittance bankaccount information includes the general ledger accounts to use when you enter or apply receipts.
Remittance Bank Accounts and Receipt CurrenciesIf you remit receipts in one currency only, you can enter more than one remittance bank account for a receipt method,but you must mark one account as the primary bank account for the receipt method.
If you remit receipts in more than one currency for a receipt method, then you must enter at least one remittance bankaccount per currency and mark one account per currency as primary.
During receipt entry and processing, Receivables uses the primary bank account as the default remittance bank accountfor the receipt. You can accept this value or enter any other bank account defined for the receipt method in the samecurrency as the receipt.
Factored ReceiptsIf the receipt class of the receipt method allows factoring, you can specify the number of Risk Elimination Days forfactored receipts for a given bank account.
When you factor receipts, Receivables creates a short term debt to account for risk in case of customer default. Whenyou clear or risk eliminate these receipts, the debt is cleared after the receipt maturity date plus the number of riskelimination days that you enter.
Related Topics• Considerations When You Create Accounts
• What legal entity is assigned to a receipt
128

Oracle Financials CloudImplementing Receivables Credit to Cash
Chapter 4Define Customer Payments
FAQs for Receipt Classes and Methods
What creation method should a receipt class have? Use an Automatic creation method to use the automatic receipt process to create a batch of receipts from selectedtransactions. For automatic receipts, Payments is responsible for the funds capture process. Use a Manual creationmethod for receipts either entered manually or imported using lockbox.
What's the relationship between the receipt class and receipt methods? The receipt methods assigned to a receipt class account for receipt entries and applications. They also determine thecustomer remittance bank information.
The receipt class determines the processing steps that are required for receipts. These steps include automatic ormanual creation, the remittance method, the bank clearance method, and whether receipts require confirmation by thecustomer.
What legal entity is assigned to a receipt? Legal entities are linked to remittance and internal bank accounts. The receipt method determines which remittancebank account, and therefore which legal entity, is assigned to a receipt.
All receipts inherit the legal entity from the bank account, and all refunds inherit the legal entity of the original receipt.
You can perform receipt applications across legal entities, if both the receipt and the transactions the receipt is appliedto are in the same business unit. Receipt applications and receipt clearing across legal entities is recorded in thesubledger as intercompany accounting.
Lockbox
Lockbox Interface Table AR_PAYMENTS_INTERFACE_ALL During the Import step of lockbox processing, Receivables stores receipt data from your bank file in theAR_PAYMENTS_INTERFACE_ALL table. Each column in the AR_PAYMENTS_INTERFACE_ALL table contains informationneeded to run lockbox successfully.
TRANSMISSION_RECORD_IDReceivables assigns a value to this column during the import process.
validation
The import file must leave this column blank.
destination
None.
129
Oracle Financials CloudImplementing Receivables Credit to Cash
Chapter 4Define Customer Payments
CREATION_DATEReceivables assigns a value to this column during the import process.
validation
The import file must leave this column blank.
destination
None.
CREATED_BYReceivables assigns a value to this column during the import process.
validation
The import file must leave this column blank.
destination
AR_BATCHES.CREATED_BY, AR_INTERIM_CASH_RECEIPTS.CREATED_BY, orAR_INTERIM_CASH_RECEIPT_LINES.CREATED_BY.
LAST_UPDATE_LOGINReceivables assigns a value to this column during the import process.
validation
The import file must leave this column blank.
destination
None.
LAST_UPDATED_BYReceivables assigns a value to this column during the import process.
validation
The import file must leave this column blank.
destination
None.
LAST_UPDATE_DATEReceivables assigns a value to this column during the import process.
validation
The import file must leave this column blank.
destination
None.
130
Oracle Financials CloudImplementing Receivables Credit to Cash
Chapter 4Define Customer Payments
RECORD_TYPEEnter the record type. For example, if this is a batch header record, and your bank uses the value 3 to identify batchheaders, enter 3 in this column.
validation
Find out from the bank what character they use to identify each record type. Keep in mind that not all banks use all ofthe record types. Assign values to identify the following types of records: TRANSMISSION HEADER, TRANSMISSIONTRAILER, LOCKBOX HEADERS, LOCKBOX TRAILERS, BATCH HEADERS, BATCH TRAILERS, PAYMENT RECORDS,PAYMENT OVERFLOW RECORDS, and SERVICE HEADER.
destination
None.
STATUSEnter the value AR_PLB_NEW_RECORD_INF for all records inserted into this table. The control files that Receivablesprovides populate this column.
validation
The import file must leave this column blank.
destination
None.
TRANSMISSION_REQUEST_IDReceivables assigns a value to this column during the import process.
validation
The import file must leave this column blank.
destination
None.
TRANSMISSION_IDReceivables assigns a value to this column during the import process.
validation
The import file must leave this column blank.
destination
None.
DESTINATION_ACCOUNTEnter the account number of the sending bank.
validation
None.
131
Oracle Financials CloudImplementing Receivables Credit to Cash
Chapter 4Define Customer Payments
destination
AR_TRANSMISSIONS.DESTINATION
ORIGINATIONEnter the transit routing number of the sending bank.
validation
If this value is included in a transmission header or trailer, you must have the same value here.
destination
AR_TRANSMISSIONS.ORIGIN
DEPOSIT_DATEEnter the date on which the transmission was deposited into your bank account. This date can be on any of the recordtypes in the transmission.
Each unique deposit date determines a batch of transmission records. For example, if you enter two unique depositdates for the transmission, lockbox divides the transmission into two batches of receipts.
validation
None.
destination
AR_BATCHES.DEPOSIT_DATE
GL_DATEReceivables assigns a value to this column during the import process.
validation
The import file must leave this column blank.
destination
AR_BATCHES.GL_DATE, AR_INTERIM_CASH_RECEIPTS.GL_DATE, or AR_CASH_RECEIPT_HISTORY.GL_DATE.
DEPOSIT_TIMEEnter the time the deposit was made.
validation
None.
destination
None.
TRANSMISSION_RECORD_COUNTEnter the number of records in the import file. Include all of the types of records in the count: headers, trailers, receipts,and overflow records.
132
Oracle Financials CloudImplementing Receivables Credit to Cash
Chapter 4Define Customer Payments
validation
If the transmission format includes the transmission header or trailer, lockbox counts all records in this transmission.The validated count includes all receipts and detail records transferred to the interim table.
destination
AR_TRANSMISSIONS.COUNT
TRANSMISSION_AMOUNTEnter the amount of the transmission.
validation
The sum of all of the receipt amounts within the transmission.
destination
AR_TRANSMISSIONS.AMOUNT
TRANSFERRED_RECEIPT_COUNTReceivables assigns a value to this column during the import process.
validation
The import file must leave this column blank.
destination
AR_TRANSMISSIONS.VALIDATED_COUNT
TRANSFERRED_RECEIPT_AMOUNTReceivables assigns a value to this column during the import process.
validation
The import file must leave this column blank.
destination
AR_TRANSMISSIONS.VALIDATED_AMOUNT
LOCKBOX_NUMBERFor lockbox header or trailer records, enter the lockbox name or number specified by the bank.
For batch header and trailer records, enter the lockbox number assigned to receipts in the batch.
For receipt records, enter the lockbox number assigned to receipts.
For overflow records, enter the number of the lockbox for the receipt.
validation
This column is required on all lockbox headers and trailers. If the lockbox number is included in the lockboxtransmission format, it must appear on every batch record. If the lockbox number is included in the lockboxtransmission format and you don't have batch records, it must be entered for each receipt and overflow record.
destination
133
Oracle Financials CloudImplementing Receivables Credit to Cash
Chapter 4Define Customer Payments
None.
LOCKBOX_BATCH_COUNTEnter the number of batches in the lockbox.
validation
None.
destination
None.
LOCKBOX_RECORD_COUNTEnter the number of payment records in the lockbox.
validation
Don’t include payment overflow records.
destination
None.
LOCKBOX_AMOUNTEnter the total value of the receipts in the lockbox.
validation
None.
destination
None.
BATCH_NAMEFor batch header and trailer records, enter the name or number that the bank uses to identify the batch.
For receipt records, enter the batch name for this receipt.
For overflow records, enter the batch for this overflow record.
validation
This column is required for each batch header and trailer record. If the batch name is included in your format, it mustbe entered for every receipt record. Each unique batch name determines a batch of transmission records. For example,if you enter two unique batch names for your transmission, lockbox divides your transmission into two batches ofreceipts. If the batch name is included in your format, you must enter this name for each overflow record.
destination
AR_BATCHES.LOCKBOX_BATCH_NAME
BATCH_AMOUNTEnter the total value of all receipts in this batch.
134
Oracle Financials CloudImplementing Receivables Credit to Cash
Chapter 4Define Customer Payments
validation
None.
destination
AR_BATCHES.CONTROL_AMOUNT
BATCH_RECORD_COUNTEnter the number of receipt records in this batch.
validation
None.
destination
AR_BATCHES.CONTROL_COUNT
ITEM_NUMBEREnter a sequential number to indicate the location of each receipt or overflow record in the batch.
validation
This column is required, even if the lockbox transmission format doesn't have batch, lockbox, or transmission records.The item number must be unique within a batch, a lockbox (if batches aren’t provided), or within a transmission (ifneither batches nor lockboxes are provided). All overflow records for a receipt must have the same item number as thereceipt record. You must enter an item number for each overflow record to reference the receipt.
destination
None.
CURRENCY_CODEEnter the currency for each receipt.
validation
None.
destination
AR_BATCHES.CURRENCY_CODE or AR_INTERIM_CASH_RECEIPTS.CURRENCY_CODE.
EXCHANGE_RATEFor receipts, enter the conversion rate to use for this currency.
validation
None.
destination
AR_BATCHES.EXCHANGE_RATE or AR_INTERIM_CASH_RECEIPTS.EXCHANGE_RATE.
135

Oracle Financials CloudImplementing Receivables Credit to Cash
Chapter 4Define Customer Payments
EXCHANGE_RATE_TYPEEnter the conversion rate type to use for the receipt: Corporate, Spot, or User.
validation
None.
destination
AR_BATCHES.EXCHANGE_RATE_TYPE or AR_INTERIM_CASH_RECEIPTS.EXCHANGE_RATE_TYPE.
REMITTANCE_AMOUNTEnter the value of each receipt in the batch.
validation
A value is required for each receipt record.
destination
AR_INTERIM_CASH_RECEIPTS.AMOUNT
TRANSIT_ROUTING_NUMBEREnter the transit routing number from the receipt.
validation
This column is optional, but you must enter this number if you enter the account number. Receivables uses the transitrouting number and account number together to identify the customer MICR number.
destination
AP_BANK_BRANCHES.BANK_NAME, AP_BANK_BRANCHES.BANK_BRANCH_NAME, orAP_BANK_BRANCHES.BANK_NUM
ACCOUNTEnter the bank account number from the receipt.
validation
This column is optional, but you must enter this number if you enter the transit routing number. Receivables uses thetransit routing number and account number together to identify the customer MICR number.
destination
AP_BANK_ACCOUNTS.BANK_ACCOUNT_NUM
CUSTOMER_BANK_ACCOUNT_IDReceivables assigns a value to this column during the import process.
validation
The import file must leave this column blank.
destination
136
Oracle Financials CloudImplementing Receivables Credit to Cash
Chapter 4Define Customer Payments
AR_INTERIM_CASH_RECEIPTS.CUSTOMER_BANK_ACCOUNT_ID
ANTICIPATED_CLEARING_DATEDate a receipt is expected to clear.
validation
None.
destination
AR_INTERIM_CASH_RECEIPTS.ANTICIPATED_CLEARING_DATE
CHECK_NUMBEREnter the check number printed on the receipt.
validation
A value is required for each receipt record.
destination
AR_INTERIM_CASH_RECEIPTS.RECEIPT_NUMBER or AR_CASH_RECEIPTS.RECEIPT_NUMBER.
SPECIAL_TYPEReceivables assigns a value to this column during the import process.
validation
The import file must leave this column blank.
destination
AR_INTERIM_CASH_RECEIPTS.SPECIAL_TYPE
AUTOAPPLY_FLAGIndicates whether the AutoApply process is used during lockbox processing.
validation
None.
destination
AR_INTERIM_CASH_RECEIPTS.AUTOAPPLY_FLAG
CUSTOMER_NUMBEREnter the customer account number.
validation
This column is optional.
destination
None.
137
Oracle Financials CloudImplementing Receivables Credit to Cash
Chapter 4Define Customer Payments
OVERFLOW_INDICATORReceivables uses this column to indicate overflow records for the current receipt. You must enter a value for all overflowrecords.
validation
To identify the last overflow record, enter a value different from the overflow indicator in the transmission format. Forexample, in the BAI transmission format, 0 indicates an overflow record. You have three overflow records for a receipt,the first two records have 0 as the overflow indicator and the third record has 9. Since the third record isn’t 0, this recordis identified as the last overflow record.
destination
None.
OVERFLOW_SEQUENCEEnter a sequential number to indicate the order of overflow records.
validation
Within each receipt, the Overflow Sequence usually begins with 1.
destination
None.
CUSTOMER_IDReceivables assigns a value to this column during the import process.
validation
The import file must leave this column blank.
destination
AR_INTERIM_CASH_RECEIPTS.PAY_FROM_CUSTOMER or AR_CASH_RECEIPTS.PAY_FROM_CUSTOMER.
BILL_TO_LOCATIONEnter the customer bill-to site for this receipt and include the bill-to site in the transmission format.
validation
If the Require billing location for receipts Receivables system option is enabled, you must enter a value in this column.If the Require billing location for receipts Receivables system option isn’t enabled, you only have to enter a value inthis column if the Require billing location option on the lockbox record is enabled.
destination
None.
CUSTOMER_SITE_USE_IDReceivables assigns a value to this column during the import process.
validation
The import file must leave this column blank.
138
Oracle Financials CloudImplementing Receivables Credit to Cash
Chapter 4Define Customer Payments
destination
AR_INTERIM_CASH_RECEIPTS.SITE_USE_ID or AR_CASH_RECEIPTS.CUSTOMER_SITE_USE_ID.
RECEIPT_DATEFor receipt records, enter the date written on the check.
validation
If you’re using MICR numbers to identify customers, this date must be equal to or earlier than the date of the lockboxsubmission. Otherwise, the receipts are processed as unidentified.
destination
AR_INTERIM_CASH_RECEIPTS.RECEIPT_DATE, AR_INTERIM_CASH_RECEIPTS.EXCHANGE_DATE,AR_CASH_RECEIPTS.RECEIPT_DATE, or AR_CASH_RECEIPTS.EXCHANGE_DATE.
RECEIPT_METHODEnter the receipt method to associate with a receipt.
validation
Receipt methods contain information about the bank, bank account, and receipt distributions. The receipt method inthis column must be the same as the receipt method assigned to the batch source for the lockbox.
destination
None.
RECEIPT_METHOD_IDReceivables assigns a value to this column during the import process.
validation
The import file must leave this column blank.
destination
AR_INTERIM_CASH_RECEIPTS.RECEIPT_METHOD_ID or AR_CASH_RECEIPTS.RECEIPT_METHOD_ID.
INVOICE1-8For receipt records and overflow records, optionally enter the invoice numbers that a receipt is applied to.
validation
You don't have to start with INVOICE1, nor use all eight of the INVOICE columns on a record before you create a receiptrecord or an overflow record. You can find a list of valid values in AR_PAYMENT_SCHEDULES.TRX_NUMBER. You cansupply invoice numbers without specifying the amount applied to each invoice.
destination
None.
MATCHING1_DATE - MATCHING8_DATEFor matching dates.
139
Oracle Financials CloudImplementing Receivables Credit to Cash
Chapter 4Define Customer Payments
validationdestination
None.
RESOLVED_MATCHING_NUMBER1-8For resolved matching numbers.
validationdestination
None.
RESOLVED_MATCHING1_DATE - RESOLVED_MATCHING8_DATEFor resolved matching dates.
validationdestination
None.
MATCH_RESOLVED_USINGFor a match resolved.
validation
GD: No description or validation information is provided.
destination
None.
RESOLVED_MATCHING1_INSTALLMENT - RESOLVED_MATCHING8_INSTALLMENTFor resolved matching installments.
validationdestination
None.
INVOICE1_STATUS - INVOICE8_STATUSStatus of the invoices that a receipt is applied to.
validation
None.
destination
None.
COMMENTSFor batch header and trailer records and for receipt records, enter any free-form comments.
140
Oracle Financials CloudImplementing Receivables Credit to Cash
Chapter 4Define Customer Payments
validation
For receipt records, Receivables stores these comments but doesn't display them on the receipts.
destination
AR_BATCHES.COMMENTS or AR_INTERIM_CASH_RECEIPTS.COMMENTS
ATTRIBUTE_CATEGORYEnter the descriptive flexfield category information for this receipt.
validation
Descriptive flexfield category used to transfer additional information about a receipt.
destination
AR_INTERIM_CASH_RECEIPTS.ATTRIBUTE1-15 or AR_CASH_RECEIPTS.ATTRIBUTE1-15.
ATTRIBUTE1-15Enter the descriptive flexfield attributes of the category designated in the ATTRIBUTE_CATEGORY column.
validation
Use this column to transfer additional information about a receipt. For example, if the bank enters and transmits thecustomer name, use an attribute column to import this name.
destination
AR_INTERIM_CASH_RECEIPTS.ATTRIBUTE1-15 or AR_CASH_RECEIPTS.ATTRIBUTE1-15.
INVOICE1_INSTALLMENT - INVOICE8_INSTALLMENTFor receipt records and overflow records, enter the installment numbers of invoices with multiple payment schedulesthat a receipt is applied to.
validation
If you don't specify the installment number for an invoice with multiple payment schedules, then Receivables appliesthe receipt amount to the oldest payment schedule first. The installment number must be on the same record as theassociated invoice number.
destination
None.
CUSTOMER_NAME_ALTThe alternate name of the customer.
validation
None.
destination
None.
141
Oracle Financials CloudImplementing Receivables Credit to Cash
Chapter 4Define Customer Payments
CUSTOMER_BANK_NAMEThe name of the customer bank. Used for receipt records.
validation
None.
destination
None.
CUSTOMER_BANK_BRANCH_NAMEThe name of the customer bank branch. Used for receipt records.
validation
None.
destination
None.
REMITTANCE_BANK_NAMEThe name of the bank that received the payment. Used for receipt records.
validation
None.
destination
None.
BANK_TRX_CODEThe transaction code of the bank.
validation
None.
destination
None.
AMOUNT_APPLIED1-8Enter the amount of the receipt to apply to the invoice. If the receipt currency and the transaction currency are different,enter the amount of the receipt to apply in the transaction currency.
validation
If you provide invoice numbers without specifying the amount applied to each invoice, Receivables applies the receipt tothe invoices starting with the oldest receipt schedule first. The value of the AMOUNT_APPLIED column must be on thesame record as the invoice number the receipt is applied to. For example, you can't have all of the invoice numbers onthe receipt record and all of the amounts applied on the overflow record.
destination
142
Oracle Financials CloudImplementing Receivables Credit to Cash
Chapter 4Define Customer Payments
AR_INTERIM_CASH_RECEIPTS_ALL.AMOUNT_APPLIED (if a single application) orAR_INTERIM_CASH_RCPT_LINES_ALL.PAYMENT_AMOUNT (if multiple applications).
AMOUNT_APPLIED_FROM1-8For receipt and overflow records, if the receipt currency and the transaction currency are different, enter the amount ofthe receipt to apply in the receipt currency.
validation
None.
destination
AR_INTERIM_CASH_RECEIPTS_ALL.AMOUNT (if a single application) orAR_INTERIM_CASH_RCPT_LINES_ALL.AMOUNT_APPLIED_FROM (if multiple applications).
INVOICE_CURRENCY_CODE1-8For receipt and overflow records, if the receipt currency and the transaction currency are different, enter the currency ofthe transaction. This column is used for cross-currency receipt applications.
validation
This column is optional. If null, lockbox derives this value from AR_PAYMENT_SCHEDULES_ALL.
destination
AR_INTERIM_CASH_RECEIPTS_ALL.INVOICE_CURRENCY_CODE (if a single application) orAR_INTERIM_CASH_RCPT_LINES_ALL.INVOICE_CURRENCY_CODE (if multiple applications).
TRANS_TO_RECEIPT_RATE1-8For receipt and overflow records, if the receipt currency and the transaction currency are different, enter the conversionrate used to convert the receipt to the transaction currency.
validation
This value is used for cross-currency receipt applications when the receipt and transaction currencies don’t have a fixedconversion rate.
destination
TRANS_TO_RECEIPT_RATE.
CUSTOMER_REFERENCE_1-8For customer reference.
validationdestination
CUSTOMER_REASON1-8For customer reason codes.
validationdestination
143

Oracle Financials CloudImplementing Receivables Credit to Cash
Chapter 4Define Customer Payments
Related Topics• How Lockbox File Transmissions Are Validated
• Lockbox Transmission Format Record Types
Receipt Application using the Match Receipts By Rule During lockbox and manual receipt processing, Receivables uses the settings of the Match Receipts By rule to identifythe document type to use to match receipts to transactions when customer information isn't available.
Document Types for Receipt MatchingThe following six document types are used to match receipts to transactions. During receipt processing, Receivablessearches for one of these document types in this order:
• Transaction number
• Sales order number
• Purchase order number
• Balance forward billing number
• Shipping reference
• Contract number
Selection of the Match Receipts By RuleWhen Receivables finds a document type with the same number as the current search to match the receipt with atransaction, the process checks the locations where Match Receipts By rules are enabled in this order:
• Customer bill-to site
• Customer
• Lockbox (for lockbox processing)
• System options
Receivables looks for a rule that matches the document type of the number in the current search, and stops whena value is found. For example, if Receivables finds a matching transaction number in the first search, it checks thecustomer site for the Match Receipts By rule. If the rule is set to Transaction, Receivables matches the receipt with thistransaction and applies the receipt.
If the Match Receipts By rule at the customer site is a document type other than Transaction, Receivables searches for anumber that matches this document type.
If there are no values assigned at the customer site or customer level:
• For lockbox processing, Receivables uses either the Match Receipts By rule assigned to the lockbox or, if theUse match criteria to determine customer option is enabled, the entire document type hierarchy.
• For manual receipt processing, Receivables uses the Match Receipts By settings on the Receivables systemoptions record assigned to the business unit.
144
Oracle Financials CloudImplementing Receivables Credit to Cash
Chapter 4Define Customer Payments
If Receivables can't find a match after searching each document type, the process applies the receipt using theAutoCash rule set defined for the customer.
If the AutoCash rule set is unable to apply the receipt, Receivables assigns the receipt a status of Unapplied. You mustthen manually apply the receipt.
Examples of Matching RulesHere are two examples of using matching rules.
Example 1: During lockbox processing, a receipt record indicates that a receipt should be applied to open debit item12345. Receivables first searches for a transaction (invoice, debit memo, chargeback) with this number. Receivablesfinds an invoice with this number, so the process checks the value of the Match Receipts By parameter at the customersite. The Match Receipts By rule is null for this customer site, so Receivables checks the setting in the customer profile.Match Receipts By is set to Transaction in the customer profile, so Receivables matches and applies the receipt to theinvoice.
Example 2: Using the same receipt record information as Example 1, assume that Receivables fails to find a transactionwith the number 12345. The process then searches for a sales order with this number. Receivables can't find a salesorder with this number, so it now searches for and finds a purchase order with number 12345. Receivables then checksthe Match Receipts By rule at the customer site. The Match Receipts By rule is null for this customer site, so Receivableschecks the setting in the customer profile. The rule is also null in the customer profile, so Receivables checks the rule forthe lockbox. The Match Receipts By rule is set to Purchase Order Number for this lockbox, so the process matches thereceipt with this purchase order and applies the receipt to the transaction.
Related Topics• Examples of Using Each AutoCash Rule
• What are exception trends
FAQs for Lockbox
Why can't I find a receipt source in the lockbox? Receipt sources are created and assigned to a particular business unit. Lockboxes are created and assigned to aparticular lockbox set. The receipt sources available for use with a given lockbox are limited to the receipt sourcescreated and assigned to the business units that belong to the lockbox set.
To define a receipt source for use with lockbox, use these settings:
• Set Receipt Source Type to Manual.
• Provide both a default Receipt Method and a default Bank Account.
• Set Batch Numbering to Automatic.
How can I calculate the lockbox batch size? Use the Batch Size field to enter the number of receipts to assign to each receipt batch during lockbox processing.For example, if you have 991 receipts, and you set the batch size to 10, the lockbox process creates 99 batches with 10receipts and one batch with one receipt.
145
Oracle Financials CloudImplementing Receivables Credit to Cash
Chapter 4Define Customer Payments
If you don't want the lockbox process to separate your lockbox submission into multiple receipt batches, complete thesesteps:
• Enter a number larger than the number of receipts in the lockbox transmission for this lockbox.
• Enable the Complete batches only option when you submit your lockbox transmission.
How can I use the accounting date source? The value in the lockbox Accounting Date Source field determines the accounting date to apply to the receipts in thelockbox.
The accounting date source values for lockbox processing are:
• Constant Date: Use the accounting date that you enter in the lockbox transmission.If you don't enter an accounting date, the lockbox process doesn't validate your data.
• Deposit Date: Use the deposit date that you enter in the lockbox transmission. This is the date that yourremittance bank deposits your receipts.If you don't enter a deposit date, the lockbox process displays an error and prompts for a deposit date to submitthe lockbox.
• Import Date: Use the date you import receipts.
How does AutoApply manage invalid transaction numbers? If lockbox uses AutoApply, then the lockbox process attempts to match customers to receipts and receipts totransactions based on your setup.
If lockbox can't fully apply a receipt due to invalid transaction numbers, then it manages the additional amountsaccording to the Post Partial Amount as Unapplied option. Receipts are applied to valid transactions, and theremaining receipt amounts are marked as Unapplied.
Transmission Formats for Lockbox
How Lockbox File Transmissions Are Validated The first step in lockbox processing is validating the data imported from your bank file using the lockbox filetransmission.
The lockbox process validates the data that you receive from the bank to ensure that:
• entire file was received.
• no duplicate receipts within a batch.
• customers and transactions are valid.
Lockbox also validates that all data is compatible with Receivables by ensuring that the columns in theAR_PAYMENTS_INTERFACE_ALL table reference the appropriate values and columns in Receivables.
Settings That Affect Lockbox ValidationLockbox checks for duplicate receipts and transactions.
146

Oracle Financials CloudImplementing Receivables Credit to Cash
Chapter 4Define Customer Payments
Duplicate receipts have the same receipt number, amount, currency, and customer account number. Lockbox doesn'tallow duplicate receipts within the same receipt source for the same customer. This is the same validation Receivablesperforms when you manually enter receipts.
Transaction numbers are only required to be unique within a receipt source. A customer can have duplicate transactionnumbers as long as they belong to different receipt sources. However, lockbox can't automatically apply a payment tothese transactions.
If a customer has more than one transaction in the lockbox transmission with the same number, then lockbox can'tdetermine to which transaction to apply the payment. In this case, the receipt is either left as Unapplied (if the customeraccount number or MICR number is provided) or Unidentified (if the customer account number or MICR number isn'tprovided).
You can manually apply the receipt according to the transaction recommendations that Receivables presents accordingto your implementation.
How a Lockbox Transmission Is ValidatedWhen you import a bank file, lockbox completes the following validations:
• Transmission Level Validations
• Lockbox Level Validations
• Batch Level Validations
• Receipt Level Validations
• Overflow Level Validations
• Customer Validations
• Currency Validation
Transmission Level ValidationsLockbox validates the lockbox transmission to ensure that transmission information corresponds to the transmissionformat. The following attributes are validated:
• Transmission format contains receipt records.
• Either the lockbox number is part of the transmission format, or you specify the lockbox number when yousubmit the lockbox.
• Accounting date is in an open accounting period.
• Total transmission record count and amount that you supply must match the actual receipt count and amountas determined by lockbox. If the transmission format includes the transmission header or trailer, lockbox countsall records in this transmission. The validated count includes all receipts and detail records transferred to theinterim table.
• Origination number is valid, if provided.
Lockbox Level ValidationsLockbox validates the lockbox records to ensure that lockbox information corresponds to the transmission format. Thefollowing attributes are validated:
• If the transmission format includes the transmission header or trailer, ensure that the lockbox number isincluded and is valid.
147
Oracle Financials CloudImplementing Receivables Credit to Cash
Chapter 4Define Customer Payments
• Lockbox batch count is correct, if provided.
• Lockbox amount is correct, if provided.
• Lockbox record count is correct, if provided.
• Origination number is valid, if provided.
• No duplicate lockbox numbers.
Batch Level ValidationsLockbox validates the batch records to ensure that batch information corresponds to the transmission format. Thefollowing attributes are validated:
• Batch name exists on batch records.
• Batch name is unique within the transmission.
• Batch amount is correct.
• Batch record count is correct.
• Lockbox number exists on batch records, if this number is part of the transmission format.
Receipt Level ValidationsLockbox validates the receipt records to ensure that receipt information corresponds to the transmission format. Thefollowing attributes are validated:
• Remittance amount is specified.
• Check number is specified.
• Item number is specified and is unique within a batch, a lockbox, or the transmission, depending on thetransmission format.
• Lockbox number is specified (if this number isn't part of the lockbox header or trailer of the transmissionformat) and batches aren't imported.
• Batch name is specified, if either batch headers or trailers are part of the transmission format.
• Account number is specified, if transit routing number is part of the transmission format.
• Invoice1-8 are either valid or left blank.
• Installment1-8 are either valid installment numbers or are left blank.
• Invoice, debit memo, credit memo, on-account credit, or chargeback number derived from the matchingnumber doesn't belong to a receipt.
• Transaction number is entered where an application amount is specified.
• Sum of all of the Amount Applied columns for a receipt doesn't exceed the remittance amount.
• Customer account number is valid.
• Customer account number and MICR number both reference the same customer, if both are provided.
• Receipt date is specified.
• Receipt method is valid.
• Currency is valid.
148
Oracle Financials CloudImplementing Receivables Credit to Cash
Chapter 4Define Customer Payments
Overflow Level ValidationsLockbox validates the overflow records to ensure that overflow information corresponds to the transmission format.The following attributes are validated:
• Batch name is specified, if either batch headers or trailers are part of the transmission format.
• Lockbox number is specified, if either the batch header or trailer isn't specified and the transmission formatincludes the lockbox number.
• Item number is specified and matches a receipt record.
• Overflow indicator is specified, unless it's the last overflow record.
• Overflow sequence is specified.
• Invoice1-8 are either valid or are left blank.
• Installment1-8 are either valid installment numbers or are left blank.
• Transaction number derived is entered where an application amount is specified.
Note: For Receipt and Overflow validations of Invoice1-8: If you're using matching numbers and a receipt recordindicates that multiple transactions are to be paid by this receipt, lockbox assumes that all of the transactions arethe same document type, such as invoices, sales orders, or purchase orders. For example, if the first 2 transactionsare invoices, lockbox successfully matches them with this receipt. However, if the next transaction isn't an invoice,lockbox either imports the remaining receipt amount as Unidentified or rejects the entire receipt, depending on thelockbox definition. If lockbox imports the remaining receipt amount as Unapplied, then Receivables retains the invalidmatching numbers.
Customer ValidationsLockbox can either validate customer data based on the following attributes or mark the receipt as Unidentified if nomatch is found:
• Customer account number is valid.
• MICR number is valid.
• Bill-to customer is from a matched invoice, if matching is enabled.
Currency ValidationReceivables lets you process receipts in multiple currencies. If you pass the currency, conversion type, and receipt date,lockbox attempts to determine the conversion rate. If lockbox is unable to determine the conversion rate, the receipt willfail validation.
Related Topics• Lockbox Standard Receipt Import Process
Lockbox Transmission Formats Lockbox receipt processing makes use of transmission formats, also called control files (.ctl), to specify how the data in abank file is organized for import into the Receivables interface tables.
149

Oracle Financials CloudImplementing Receivables Credit to Cash
Chapter 4Define Customer Payments
The control files are based on industry standards that are used by many banks for transferring lockbox receipts.
During Lockbox receipt processing:
• The Load Interface File for Import process identifies the control file to use based on the prefix of the bank filename. For example, because the file Arlockboximportbai2_mmddyyyy.dat begins with arlockboximportbai2, theprocess uses this transmission format.
• The Lockbox validation process uses the structure of the transmission format to ensure that data is transferredfrom the bank file to the tables correctly.
Transmission FormatsThe following list describes predefined Receivables transmission formats. The BAI and EDI823 control files arefixed-length text-based data files.
If the BAI and EDI823 control files can’t meet the specific requirements of a particular customer, Receivables alsoprovides the FBDI comma-delimited control file (arlockboximportc.ctl) and corresponding spreadsheet.
BAI (arlockboximportbai.ctl)
Original format created by the Bank Administration Institute.
BAI 2.0 (arlockboximportbai2.ctl)
Updated format created by the Bank Administration Institute.
BAI2 Extended (arlockboximportextbai2.ctl)
Updated format that provides some extended field lengths.
ORA_BAI2-EXTENDED_GENERIC (arlockboximportgenbai2.ctl)
Updated format similar to the BAI2 Extended format with field lengths similar to database table field lengths holdingcomparable data.
EDI823 (arlockboximportedi823.ctl)
Format used in an Electronic Data Interchange (EDI) environment.
Receivables Standard Receipt Import (FBDI) (arlockboximportc.ctl)
Format similar to Cloud FBDI process control files. These files provide a comma-delimited data file with a correspondingmacro-enabled spreadsheet template.
Zengin Format for Japan (ORA_ZENGIN_LOCKBOX) (arlockboximportzenginr.ctl)
Format that identifies Japanese customers using the alternate payer name.
Lockbox Transmission Format Record Types Enter the record types to include in a lockbox transmission format. Use the Identifier column to uniquely identify eachrecord type.
Your bank file might not contain all of these record types. You should define your transmission format to only includethe record types you actually use.
150

Oracle Financials CloudImplementing Receivables Credit to Cash
Chapter 4Define Customer Payments
Record TypesBatch Header
A Batch Header marks the beginning of a specific batch. Batch Headers usually contain information such as batchnumber, deposit date, and lockbox number.
Batch Trailer
A Batch Trailer marks the end of a specific batch. Batch Trailers usually contain information such as batch number,lockbox number, batch record count, and batch amount.
Lockbox Header
A Lockbox Header marks the beginning of a specific lockbox. Lockbox Headers usually contain information such asdestination account and origination number.
Lockbox Trailer
A Lockbox Trailer marks the end of a specific lockbox. Lockbox Trailers usually contain information such as lockboxnumber, deposit date, lockbox amount, and lockbox record count.
Overflow Receipt
An Overflow Payment usually contains invoice information for a specific payment, such as batch number; itemnumber; sequence number; overflow indicator; invoice, debit memo, or chargeback number; and debit item amounts.Receivables combines the overflow and payment records to create a logical record to submit payment applications.
Receipt
A Receipt usually contains payment information such as MICR number, batch number, item number, check number, andremittance amount.
Service Header
Service Header records contain general information about the transmission.
Transmission Header
A Transmission Header marks the beginning of a specific data file. Transmission Headers usually contain informationsuch as destination account, origination number, deposit date, and deposit time.
Transmission Trailer
A Transmission Trailer marks the end of a specific data file. Transmission Trailers usually contain information such astotal record count.
Lockbox Transmission Format Field Types Enter the lockbox transmission field types to use to identify the characteristics of each lockbox transmission record type.
You specify the size, order, and format of each transmission record. The lockbox transmission program only validatesthe fields that you define in your transmission format. The transmission format must be fully compatible with how youorganize data in your lockbox file.
151

Oracle Financials CloudImplementing Receivables Credit to Cash
Chapter 4Define Customer Payments
Field TypesAccount
Your customer bank account. The bank account number and the transit routing number make up your customer MICRnumber.
Alternate Name
The alternate name for this customer.
Amount Applied 1 to 8
The amount applied to each invoice, debit memo, or chargeback. Each payment or overflow payment record canaccommodate up to eight debit item numbers. For cross-currency applications, this is the amount to apply in thetransaction currency.
Amount Applied From 1 to 8
Used for cross-currency receipt applications, this is the amount applied to each transaction in the receipt currency. Eachpayment or overflow payment record can accommodate up to eight debit item numbers.
Attribute 1 to 15
Use attributes to enter descriptive flexfield segments. Attributes can only be assigned to payment records.
Bank Transaction Code
A code defined for each account, used by your bank to uniquely identify the kind of transaction in a bank statement (forexample, debit, credit, void). This is also used by Cash Management to determine the receipt effective date.
Batch Amount
The total receipt batch amount for a specific bank batch.
Batch Name
The name of the batch for a specific bank batch.
Batch Record Count
The total number of payment records in a specific bank batch. The total number of all batch record counts equals theLockbox Record Count. This doesn't include overflow payments, headers, or trailers.
Billing Location
Your bank transmits the billing location of the payment. You must only specify the field name and the field positionsthat the billing location occupies in the transmitted data file.
Comment
Any comments you want to associate with this transmission.
Conversion Rate
The conversion rate associated with this payment, if you’re using lockbox to import foreign currency receipts.
Conversion Type
The conversion type used to convert a foreign currency receipt to the ledger currency.
152
Oracle Financials CloudImplementing Receivables Credit to Cash
Chapter 4Define Customer Payments
Currency
The currency of the payment. For cross-currency payments, you can also enter the Invoice Currency. If you don't enter avalue in this field, lockbox derives the currency from the information provided in the Amount Applied 1 to 8 and AmountApplied From 1 to 8 fields.
Customer Bank Branch Name
The name of the customer bank branch.
Customer Bank Name
The name of the customer bank.
Customer Number
The identification number of the customer who submitted a payment.
Customer Reason 1 to 8
The customer reason why a payment shows a discrepancy.
Customer Reference 1 to 8
Customer comments about this payment.
Deposit Date
The date the bank receives and deposits the customer payment.
Deposit Time
The time the bank receives and deposits the customer payment.
Destination Account
Your business bank account. Your business may have more than one bank account.
Effective Date
The date on which the bank determines a customer balance to apply interest (used by Cash Management).
Invoice 1 to 8
The invoices, debit memos, and chargebacks to which you apply your payment. Each payment or overflow paymentrecord can accommodate up to eight debit item numbers.
Invoice 1 to 8 Installment
The installment number for this invoice.
Invoice Currency 1 to 8
The currency of the transaction. This field is used for cross-currency receipt applications. This field is optional.
Item Number
A sequence number that your bank assigns to a specific payment. This number associates an invoice with a receipt.
Lockbox Amount
The total payment amount in a specific lockbox.
153

Oracle Financials CloudImplementing Receivables Credit to Cash
Chapter 4Define Customer Payments
Lockbox Batch Count
The total number of bank batches in a specific lockbox.
Lockbox Number
The identification number for a specific lockbox.
Lockbox Record Count
The number of payment records in a specific lockbox. This doesn't include overflow payments, headers, or trailers.
Matching Date 1-8
The dates to use to match receipts with transactions, if you’re using the Match on Corresponding Date option for thislockbox.
Origination
The bank origination number provided by your bank. This number uniquely identifies the bank branch that sends youlockbox information.
Overflow Indicator
Indicates any additional overflow records for this payment.
Overflow Sequence
A sequence number that your bank assigns to each overflow payment.
Receipt Method
The receipt method associated with this lockbox.
Payment Number
The identification number of a payment. For example, a check number.
Receipt Date
The date your customer made a payment.
Record Identifier
A number that identifies the kind of transmission record.
Remittance Amount
The amount of a payment.
Remittance Bank Branch Name
The name of the bank branch from which this payment originated.
Remittance Bank Name
The name of the bank from which this payment originated.
Status
The status of this payment.
154
Oracle Financials CloudImplementing Receivables Credit to Cash
Chapter 4Define Customer Payments
Total Record Count
The total number of transmission records in a bank file. This includes headers, trailers, payments, and overflow records.
Trans to Receipt Rate 1 to 8
The conversion rate used to convert the receipt amount from the receipt currency to the transaction currency. This fieldis used for cross-currency receipt applications, when the receipt and transaction currencies don't have a fixed rate. If thecurrencies have a fixed rate, this field is optional (in this case, lockbox derives the rate to use).
Transit Routing Number
The number that uniquely identifies your customer bank. The transit routing number and the customer bank accountnumber make up the customer MICR number.
Transmission Amount
The total amount of payments for a bank file.
FAQs for Transmission Formats for Lockbox
Can I reformat the transmission amount? Yes, by using the Format Amount field setting. If you set this field to Yes, lockbox rounds the format amount to thesame degree of precision and the same number of decimal places as your ledger currency.
For example, if your ledger currency is USD (precision = 2) and you set this option to Yes, a value of 50000 in the bankdata file is formatted as 500.00. If you set the option to No, then this value isn't formatted and would appear as 50000.
What's an overflow record? An overflow record stores additional receipt information that can't fit on the receipt record. This is typically additionalinvoice numbers and the amount of the receipt to apply to each invoice.
Each overflow record must have a receipt record as a parent. If there are multiple overflow records for a receipt record,each overflow record is assigned an overflow sequence.
AutoMatch Rule Sets
How AutoMatch Recommendations Are Calculated During receipt processing, Receivables applies receipts to transactions based on the transaction information provided.In cases where the transaction information provided doesn't exactly match the transaction numbers on record,the AutoApply process attempts to find as close a match as possible and either apply the receipt to the transactionautomatically or present one or more transactions as recommendations for manual receipt application.
In like manner, during lockbox processing it may happen that a lockbox contains incomplete or inaccurate customerinformation. The AutoApply process attempts to match a customer to a receipt and present one or more customers asrecommendations for the receipt.
155
Oracle Financials CloudImplementing Receivables Credit to Cash
Chapter 4Define Customer Payments
The AutoMatch rule set provides information used by the AutoApply process to complete the process of applyingreceipts to transactions. The settings in the AutoMatch rule set provide these recommendations:
• Customer recommendations: The matching process recommends customers for lockbox receipts that haveinvalid customer information.
• Transaction recommendations: The matching process recommends one or more transactions for receiptapplication for both lockbox and manual receipts.
Settings That Affect AutoMatch RecommendationsRecommendations are based on matching threshold levels defined in the AutoMatch rule set. These threshold settingsdetermine the percentage level necessary to consider a customer or transaction for receipt recommendation:
• Customer Recommendation Threshold: The qualifying percentage necessary to add customer information toa receipt. If the calculated score for a customer account number is above this threshold, then the AutoApplyprocess adds this customer information to the receipt.
• Minimum Match Threshold: The qualifying percentage necessary to recommend a transaction for receiptapplication. If the calculated score for one or more transactions is above this threshold, the AutoApply processrecommends the transactions for receipt application, in order of the highest percentage match.
Note: The minimum match threshold must be less than the customer recommendation threshold and thecombined weighted threshold.
• Combined Weighted Threshold: The qualifying percentage necessary for the AutoApply process to apply areceipt to a transaction automatically. This percentage is the sum of the qualifying percentages defined for thesupplied customer information, transaction information, and actual transaction amount considered for receiptmatching.
• Days of Closed Invoices Threshold: Determines which closed transactions to include in the AutoMatchprocess. All transactions that were closed on or before the number of days provided as the threshold value areconsidered for application or recommendation.
How AutoMatch Recommendations Are CalculatedThe threshold qualifying percentages defined in the AutoMatch rule set are compared to the resulting scores of eachcustomer account number or transaction number analyzed by the matching process.
The matching process derives a recommendation in this way:
1. If applicable, remove characters and spaces from the number as defined by the AutoMatch rule set stringhandling.
2. Apply the formula (Levenshtein algorithm) to the resulting string to obtain the score. This formula is:
1 - (number of changes required to make the recommended string match the provided string / length of the larger string)
3. Compare the resulting score to the applicable threshold.
AutoMatch Recommendation: ExampleThe transaction number 10010 is provided by lockbox for a receipt application. This number doesn't exist, butReceivables finds the number AR10001. The recommendation for this number is calculated in this way:
1. The AutoMatch rule set string handling settings indicate that the first two characters are to be removed from astring under consideration.
156

Oracle Financials CloudImplementing Receivables Credit to Cash
Chapter 4Define Customer Payments
Receivables removes AR, leaving the number 10001.2. It will take one transposition for 10001 to match 10010. Therefore, the score for this match is (1 - 1/5) = 80%.3. The 80% score exceeds the Combined Weighted Threshold value of 70%, so the receipt is automatically applied
to transaction AR10001.
Related Topics• When do I use days to AutoApply a receipt
• How Recommendations for Receipt Application Are Calculated
AutoMatch Combined Weighted Thresholds When you define an AutoMatch rule set, use the weighted threshold fields to qualify the percentage necessary to allowfor an automatic receipt application. This qualifying percentage considers the importance, or weight, that the AutoApplyprocess should give to the three main components of a transaction: customer information, transaction information, andtransaction amount.
How You Use the Combined Weighted ThresholdsEnter the weight, as a percentage, that the AutoApply process should give to the successful matching of customer,transaction, and amount information, when considering a transaction for automatic receipt application.
The total of the three percentages must equal 100. In most cases, you wouldn't give equal weight to each componentof a transaction. That is, you wouldn't enter 33, 33, 34 as the three weighted values. In order for AutoApply to applya receipt to a transaction automatically, the weighted thresholds you enter should reflect your standard businesspractices.
Enter these weighted thresholds:
• Customer Weight: Enter the weight to give to matching the customer information on the transaction.
• Transaction Weight: Enter the weight to give to identifying the correct transaction, either by correct matching orby the Match Receipts By rule document reference.
• Amount Weight: Enter the weight to give to matching the open balance amount. Because the parts of atransaction amount can play a part in this decision, you can use the Amount Weight Exceptions section toprovide additional granularity to the open balance amount considered.
The AutoApply process calculates the percentage score for each match between customer, transaction, and amount. Itthen derives a final score for each weighted threshold as a percentage of the weighted threshold values, and adds theseresults to obtain a final score. This final score is then compared against the combined weighted threshold value.
For example, you enter these weighted threshold values:
Weight Value
Combined Weighted Threshold
75%
Customer
20%
Transaction 70%
157

Oracle Financials CloudImplementing Receivables Credit to Cash
Chapter 4Define Customer Payments
Weight Value
Amount
10%
During lockbox processing, a transaction is presented for receipt application with these details:
• Customer account number: 1001
• Transaction number: 10010
• Amount due remaining : 127
• Amount after discount: 120.65
• Tax remaining: 20
• Freight Remaining: 7
• Unearned Discount: 6.35
Lockbox presents a receipt for application with these details:
• Customer account number: 1005
• Reference number: 1001
• Reference amount: 120.65
AutoApply performs these calculations:
• Customer match: The match between account number 1001 and 1005 has a calculated score of 75%[(1-1/4)*100]. Since the customer weighted threshold value is 20%, this provides a final score of 15%.
• Transaction match: The transaction match has a calculated score of 80% [(1-1/5)*100]. Since the transactionweighted threshold value is 70%, this provides a final score of 56%.
• Amount match: The transaction amount match is 100%. Since the amount weighted threshold value is 10%, thisprovides a final score of 10%.
The sum of the three final scores is 81%, which is greater than the Combined Weighted Threshold value of 75%.Therefore, AutoApply automatically applies the receipt to the transaction.
Note: If the score were below the Combined Weighted Threshold value but above the Minimum Match Thresholdvalue, then AutoApply would generate recommendations for user review. If the score were below the Minimum MatchThreshold value, then AutoApply wouldn't generate recommendations.
AutoMatch Amount Weight Exceptions When you define an AutoMatch rule set, the values you enter in the Amount Weight Exceptions section qualify themeaning of the open balance amount considered by the Amount Weight threshold.
158
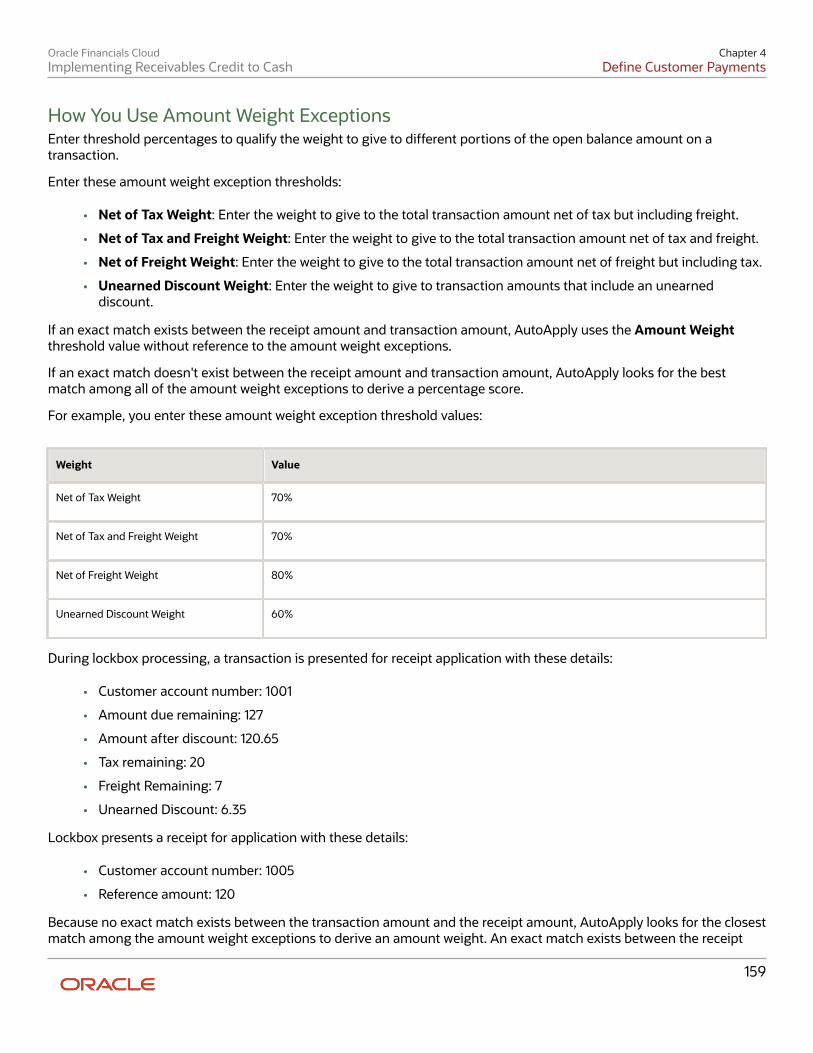
Oracle Financials CloudImplementing Receivables Credit to Cash
Chapter 4Define Customer Payments
How You Use Amount Weight ExceptionsEnter threshold percentages to qualify the weight to give to different portions of the open balance amount on atransaction.
Enter these amount weight exception thresholds:
• Net of Tax Weight: Enter the weight to give to the total transaction amount net of tax but including freight.
• Net of Tax and Freight Weight: Enter the weight to give to the total transaction amount net of tax and freight.
• Net of Freight Weight: Enter the weight to give to the total transaction amount net of freight but including tax.
• Unearned Discount Weight: Enter the weight to give to transaction amounts that include an unearneddiscount.
If an exact match exists between the receipt amount and transaction amount, AutoApply uses the Amount Weightthreshold value without reference to the amount weight exceptions.
If an exact match doesn't exist between the receipt amount and transaction amount, AutoApply looks for the bestmatch among all of the amount weight exceptions to derive a percentage score.
For example, you enter these amount weight exception threshold values:
Weight Value
Net of Tax Weight
70%
Net of Tax and Freight Weight
70%
Net of Freight Weight
80%
Unearned Discount Weight
60%
During lockbox processing, a transaction is presented for receipt application with these details:
• Customer account number: 1001
• Amount due remaining: 127
• Amount after discount: 120.65
• Tax remaining: 20
• Freight Remaining: 7
• Unearned Discount: 6.35
Lockbox presents a receipt for application with these details:
• Customer account number: 1005
• Reference amount: 120
Because no exact match exists between the transaction amount and the receipt amount, AutoApply looks for the closestmatch among the amount weight exceptions to derive an amount weight. An exact match exists between the receipt
159
Oracle Financials CloudImplementing Receivables Credit to Cash
Chapter 4Define Customer Payments
amount and the transaction amount net of freight (127 - 7 = 120). AutoApply therefore uses the Net of Freight Weightthreshold value of 80% as the calculated score for the Amount Weight threshold.
How AutoMatch String Handling Works The String Handling section of the Create and Edit AutoMatch Rule Set pages provides rules that assist in the searchfor transaction matches against the Match Receipts By document type reference used by AutoApply.
The rules indicate what part of a string to remove in order to compare the resulting stripped number against thematching numbers provided during receipt processing. Matching recommendations for the string are processedaccording to the weighted threshold values of the AutoMatch rule set.
You can define rules for transaction strings and remittance strings.
Settings That Affect String HandlingUse the string handling settings to indicate what part of a string to remove before string comparison. This is typically analphanumeric prefix or suffix, or a string of zeros used to pad numbers to equal length.
Enter these settings:
• String Location: Indicate whether to remove characters and digits from the Front or Back of the string.
• String Value: Indicate the type of characters and digits to remove: Zero, Empty Spaces, or Any. Any includeszeros, spaces, and any character, digit, or special character.
• Number of Characters: Indicate the number of places to remove.
How String Handling Is UsedIf the string handling settings for a transaction number are:
• String Location: Front.
• String Value: Any.
• Number of Characters: 5.
Then the string ABC: 10044 is converted to 10044. The string handling process removed the first 5 characters from thestring: the alphanumeric characters ABC, the colon (:), and the space.
If the string handling settings for a transaction number are:
• String Location: Back.
• String Value: Zero.
• Number of Characters: 3.
Then the string:
• ABC: 10044000 is converted to ABC: 10044.
• 985660000 is converted to 985660.
• 985660000000003 isn't processed. This is because AutoApply looks for zeros at the end of the string but findsa number instead.
160
Oracle Financials CloudImplementing Receivables Credit to Cash
Chapter 4Define Customer Payments
Related Topics• Receipt Application using the Match Receipts By Rule
Application Exception Rule Sets
Application Exception Rule Conditions and Actions Use the Exception Rules section of the Create Receivables Application Exception Rule Set page to indicate how toprocess each overpayment and underpayment condition.
Each exception rule consists of:
• A condition.
• The amount and percentage that applies to the condition.
• The action to take when the condition arises.
The Action field contains the Receivables activities that you have defined for Adjustment, Receipt Write-off, or Refund.The underpayment or overpayment amount is accounted for in the general ledger accounts belonging to the applicableReceivables activity.
The User Review Required option indicates whether the action is processed automatically or requires manual reviewand approval.
For example, the exception rule:
Over Payment >= 100 Refund
means that if a receipt application overpays a transaction by $100 or more, then the customer should receive a refund.
The exception rule:
Under Payment < 5 Write-off
means that if a receipt application results in an underpayment of less than $5, then the remaining amount can bewritten off.
You can use the Percent field with the Amount field to further refine the scope of a condition. If you use both fields,then both conditions must be met in order to apply the rule.
For example, the exception rule:
Under Payment < 5 5% Write-off
means that if a receipt application results in an underpayment less than $5 and also less than 5% of the open balance,then the remaining amount can be written off. In this case, if a $10 open balance has a $4 underpayment, then thisexception rule doesn't apply, because $4 is 40% of the open balance. If the $4 underpayment were for an open balanceof $100, then the rule does apply, because $4 is 4% of the open balance.
Related Topics• Approval Limits Document Types
• How Recommendations for Receipt Application Are Calculated
161
Oracle Financials CloudImplementing Receivables Credit to Cash
Chapter 4Define Customer Payments
FAQs for Application Exception Rule Sets
When do I use an application exception rule set? Use an application exception rule set to manage remaining amounts after lockbox or receipt batch processing.
After lockbox or the receipt batch processes and applies receipts, the AutoApply process uses the application exceptionrule set to determine how to manage over and under payments:
• If there's an overpayment, the application exception rule indicates whether to refund the amount to thecustomer, place the amount on account, write off the amount, or leave the amount unapplied.
• If there's an underpayment, the application exception rule indicates whether to allow write off of the remainingopen balance amount on the transaction.
• For integration with Channel Revenue Management, the application exception rule designates theunderpayment or overpayment amount after receipt application for claim settlement.
What's the difference between the AutoMatch rule set and the application exceptionrule set? During lockbox or receipt batch processing, the AutoMatch rule set provides recommendations for matching receiptsto transactions based on the transaction information provided. The AutoApply process attempts to match receipts totransactions and either apply receipts automatically or present for manual processing transaction recommendations forreceipt application.
If the AutoApply process can apply the receipt to all of the transaction references automatically, then it uses the detailsof the application exception rule to refund overpayment to the customer, if there is one, or process underpaymentaccording to the exception rules. For integration with Channel Revenue Management, the application exception ruledesignates the underpayment or overpayment amount after receipt application for claim settlement.
If AutoApply can't apply the receipt to all of the transaction references automatically, then the remaining transactionrecommendations are presented, if available, for manual processing and the application exception rule isn't used.
Note: If a receipt doesn't have a transaction reference, the application exception rule for overpayments isn't used.
Customer Paying Relationships
Customer Hierarchies and Paying Relationships The customer hierarchy describes the structure of an enterprise or portion of an enterprise. Enterprise structures aredefined and maintained in the FND_HIER tables. There are three predefined hierarchies: Customer hierarchy, TradingCommunity party hierarchy, and Duns and Bradstreet hierarchy.
You assign a paying relationship to a hierarchy to indicate how the parties in the hierarchy are able to manage eachother's customer payments. There are two paying relationships:
• Pay Any: Any party within the relationship can pay for the accounts of any other party within the relationship.
162
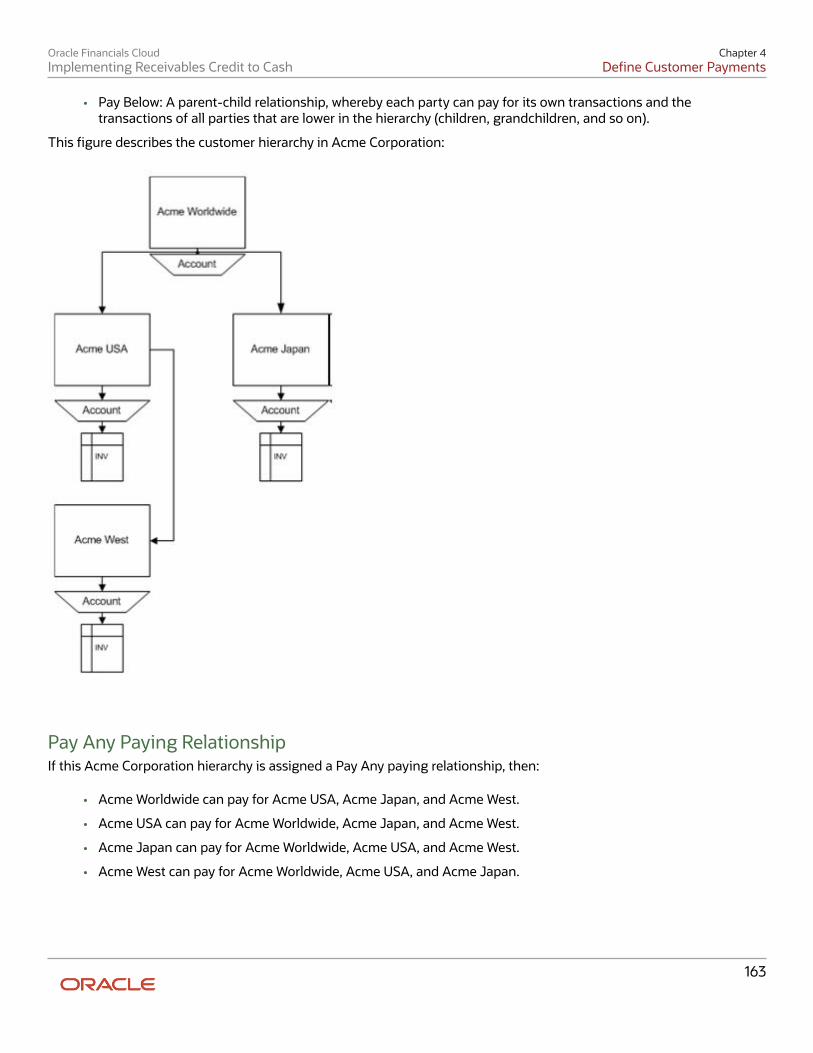
Oracle Financials CloudImplementing Receivables Credit to Cash
Chapter 4Define Customer Payments
• Pay Below: A parent-child relationship, whereby each party can pay for its own transactions and thetransactions of all parties that are lower in the hierarchy (children, grandchildren, and so on).
This figure describes the customer hierarchy in Acme Corporation:
Pay Any Paying RelationshipIf this Acme Corporation hierarchy is assigned a Pay Any paying relationship, then:
• Acme Worldwide can pay for Acme USA, Acme Japan, and Acme West.
• Acme USA can pay for Acme Worldwide, Acme Japan, and Acme West.
• Acme Japan can pay for Acme Worldwide, Acme USA, and Acme West.
• Acme West can pay for Acme Worldwide, Acme USA, and Acme Japan.
163

Oracle Financials CloudImplementing Receivables Credit to Cash
Chapter 4Define Customer Payments
Pay Below Paying RelationshipIf this Acme Corporation hierarchy is assigned a Pay Below paying relationship, then:
• Acme Worldwide can pay for Acme USA, Acme Japan, Acme West, and its own transactions.
• Acme USA can pay for Acme West and its own transactions.
• Acme Japan can pay for its own transactions.
Related Topics• What's the difference between an account relationship and a paying relationship
• How You Manage Hierarchies
FAQs for Customer Paying Relationships
What's the difference between an account relationship and a paying relationship? An account relationship is a flat relationship between two customer accounts only. In an account relationship, eitherone account can pay for the transactions of another account (one-way) or both accounts can pay for the transactions ofeach other (reciprocal).
A paying relationship makes use of a hierarchical structure within an enterprise to allow all corresponding accounts andtransactions that are associated with one party to be accessible to other parties in the structure. In a paying relationshipeither one account can pay for the transactions of accounts lower in the hierarchy (Pay Below) or all accounts anywherein the hierarchy can pay for the transactions of any other party (Pay Any).
What happens if a customer hierarchy type is deactivated? Then the active paying relationship assignments for this hierarchy are no longer valid. You must enter an end date foreach related paying relationship assignment that's on or before the date the customer hierarchy type was deactivated.
FAQs for Receipt Sources
How does automatic batch numbering work? The automatic receipt and remittance processes assign a number to an automatic receipt or remittance batch by adding+1 to the previous batch number. When you define the Automatic Receipts receipt source, enter a number in the BatchNumber Starts After field as the starting point from which to increment the next automatic receipt batch number.
For example, to number automatic receipt batches starting with 1000, enter the number 999. The automatic receiptprocess adds +1 to each subsequent number as new batches are created.
164

Oracle Financials CloudImplementing Receivables Credit to Cash
Chapter 4Define Customer Payments
Where are receipt sources used? You only use receipt sources with receipt batches and remittance batches. This includes automatic receipt batches,lockbox receipts, and receipts created using a spreadsheet.
The Automatic Receipts receipt source is used automatically by the automatic receipt and remittance processes. Youdon't need to enter this receipt source.
165

Oracle Financials CloudImplementing Receivables Credit to Cash
Chapter 4Define Customer Payments
166

Oracle Financials CloudImplementing Receivables Credit to Cash
Chapter 5Configure Payment System Connectivity
5 Configure Payment System Connectivity
Options for Validations Validations are rules that ensure that transactions are valid before they are printed or submitted electronically topayment systems. You use validations to ensure that disbursement transactions, such as invoices, payments, andpayment files meet specific conditions before they can be paid. You can assign validations to payment methods andpayment formats. A validation can be executed at the document payable, payment, or payment file level.
In payment processing, it's critical that payment files sent to payment systems and financial institutions are valid andcorrectly formatted. If this is not done, the payment process is slowed, which results in additional time and cost due toproblem resolution. Oracle Fusion Payments helps you achieve straight-through processing by ensuring that payment-related details are valid. To assign validations, you can select from the following options:
• Assigning validations
• Creating user-defined validations
• Selecting from a predefined library of validations
The following table lists the objects you can validate and when validations are executed for the applicable setup.
Object Payment Method-Driven Validations areEnforced When...
Payment File Format-Driven Validations areEnforced When...
Document Payable
The invoice is saved in the source product. The invoice installment is selected for payment.
The invoice installment is selected for payment.
Payment
The payment is created by building relateddocuments payable together.
The payment is created by building relateddocuments payable together.
Payment File
Not applicable.
The payment file is created.
Assigning ValidationsYou can assign user-defined validations to any:
• Payment method
• Payment file format
You can assign a validation to whichever object drives the requirement for validation. For example, if your bankformat requires a limited number of characters in a specific field, you can assign that validation to the bank format. Bydoing this, you ensure that the validation is enforced only when applicable. However, if you want to enforce a generalvalidation that isn't specific to the payment method or format, you can consider timing in your decision.
Payments always validates as early as possible for a given object and setup. Document payable validations that areassociated with payment methods are enforced earlier in the process than those associated with formats. If you wantvalidation failures handled by the same person who is entering the invoice, you can associate the validation with the
167
Oracle Financials CloudImplementing Receivables Credit to Cash
Chapter 5Configure Payment System Connectivity
payment method. This method is ideal for business processes where each person has full ownership of the itemsentered. However, if you want focused invoice entry with validation failures handled centrally by a specialist, you canassociate the validation with the format. This method is ideal for some shared service centers.
Creating User-Defined ValidationsA user-defined validation explicitly specifies the object to which the validation applies:
• Document payable
• Payment
• Payment file
User-defined validations are basic validations that correspond to simple operations. These validations can be usedas components, or building blocks, to build more complex validations. They enable you to validate, for example, thefollowing conditions:
• Length of a value. Example: Payment Detail must be fewer than 60 characters for your bank-specific paymentfile format.
• Whether a field is populated. Example: Remit to bank account is required when payment method is Electronic.
• Whether content of a field is allowed. Example: Currency must be USD when using your domestic payment fileformat.
Selecting From a Predefined Library of ValidationsPayments provides a library of predefined validations. You can associate these predefined validations with anypayment method or payment file format you create. Many of the payment formats provided by Oracle have predefinedvalidations associated with them by default.
Predefined validations are groups of individual validations that are together for a specific purpose. Many of thepredefined validations that you can associate with payment formats are country-specific. Predefined validations cannotbe modified, although some have parameters you can set to define specific values.
How You Set Up Formats Setting up formats is a mandatory task in Oracle Fusion Payments. A format is a disbursements or a funds capturedata file to which an Oracle Business Intelligence Publisher (Oracle BI Publisher) template is applied. Oracle BI Publishertemplates contain formatting attributes that format data files. Formatted outputs include printed checks, electronicallytransmitted payment files, settlement batches, and reports.
The purpose of setting up formats is to enable payment systems, financial institutions, or countries to understand yourcompany's messages, given their specific formatting requirements for disbursements or funds capture transactions.Inbound messages come from a payment system or financial institution to your company. Outbound messages leaveyour company to your payment system or financial institution.
Setting up formats involves the following actions:
• Using Oracle BI Publisher templates
• Using data extracts
• Using the identity format
168

Oracle Financials CloudImplementing Receivables Credit to Cash
Chapter 5Configure Payment System Connectivity
• Considering best practices
• Setting up formats
• Understanding associations between format entities
• Assigning validations to formats
Note: Before you can set up formats, you must set up the corresponding templates in Oracle BI Publisher. For moreinformation on setting up templates, see Oracle Fusion Middleware Report Designer's Guide for Oracle BusinessIntelligence Publisher at http://docs.oracle.com/cd/E25054_01/bi.1111/e13881/toc.htm.
Using Oracle BI Publisher TemplatesEach Payments format corresponds to one Oracle BI Publisher template. BI Publisher templates specify exactly howformatted output is to be generated. BI Publisher templates can also be used to generate fixed-position, machine-readable files through BI Publisher's eText functionality.
Using Data ExtractsEach disbursement or funds capture format is also associated with a disbursement or funds capture Payments' dataextract. Each data extract contains transactional data. Oracle BI Publisher templates use data extracts to formattransactional data. Transactional data is extracted from Payments' or Oracle Fusion Receivables' transactional tables.
For a disbursements extract, data comes from:
• Payments
• Payment files
• Documents payable tables
For a funds capture extract, data comes from:
• Funds capture transactions
• Settlement batches
• Receivables transactions
For more information on Payments' XML extracts, see How To Generate and View Fusion Payments XML Extract ,Document ID 1428249.1, on My Oracle Support.
Using the Identity FormatThe Identity format outputs the XML extract provided by Payments. It's intended for diagnostic purposes, but youcan also use it to understand how extract fields are populated from transactional and setup entities. This is especiallyhelpful if you intend to create complex configurations using other templates.
The Identity format is an Oracle BI Publisher template called IBY_IDENTITY. It's part of the Funds Capture Authorizationand Settlement report. If you want to use the Identity format for a disbursements report, you must download theRTF template and upload it as part of the intended disbursements report. Then, you can set up a modified formatin Payments using the newly created format with a payment process profile or a funds capture process profile, andexamine the XML output.
169

Oracle Financials CloudImplementing Receivables Credit to Cash
Chapter 5Configure Payment System Connectivity
Considering Best PracticesBefore setting up formats, find out what payment formats your processing bank supports. Consider using standards-based payment formats that can be used with multiple banks:
• EDIFACT formats, such as PAYMUL, MT100, and MT103
• NACHA formats, such as Generic, CCD, or PPD
Setting Up FormatsIn the Setup and Maintenance work area, use the following to select a predefined format type on the Manage Formatspage:
• Offering: Financials
• Functional Area: Payments
• Task: Manage Formats
The format type you select specifies:
• Type of message created
• Oracle BI Publisher template used to format the data file
• Data extract used
On the Create Format page, associate an Oracle BI Publisher template with the format type you selected.
Understanding Associations Between Format EntitiesThe following table describes the association between format types, templates, and data extracts.
Format Types Oracle BI Publisher Template Data Extracts
Disbursement Payment File Formats
Disbursement Payment File Formats
Disbursement Extract
Disbursement Positive Pay File Formats
Disbursement Positive Pay Formats
Disbursement Positive Pay Extract
Disbursement Separate Remittance AdviceFormats
Disbursement Separate Remittance AdviceFormats
Disbursement Extract
Disbursement Accompanying Letter Formats
Disbursement Accompanying Letter Formats
Disbursement Extract
Disbursement Payment Process Request StatusReport Formats
Disbursement Payment Process Request StatusReport
Disbursement Payment Process RequestExtract
Disbursement Payment File Register Formats
Disbursement Payment File Register
Disbursement Extract
Funds Capture Settlement Format
Funds Capture Authorization And SettlementFormats
Funds Capture Extract
170
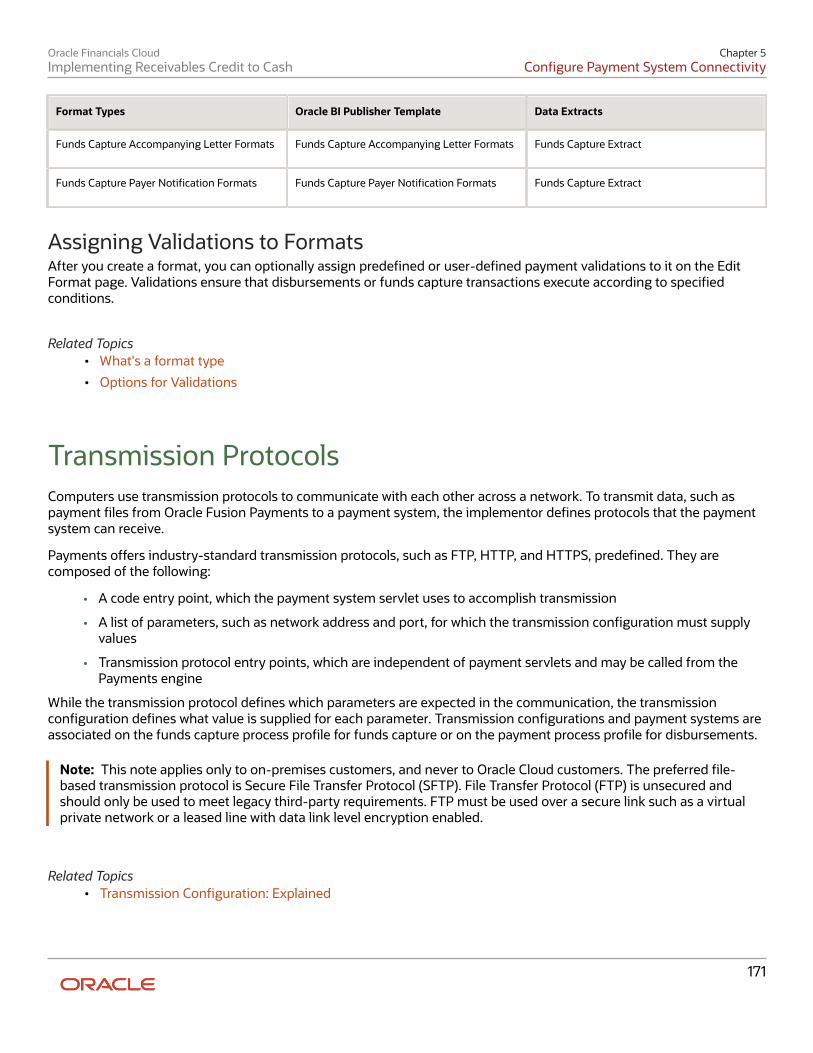
Oracle Financials CloudImplementing Receivables Credit to Cash
Chapter 5Configure Payment System Connectivity
Format Types Oracle BI Publisher Template Data Extracts
Funds Capture Accompanying Letter Formats
Funds Capture Accompanying Letter Formats
Funds Capture Extract
Funds Capture Payer Notification Formats
Funds Capture Payer Notification Formats
Funds Capture Extract
Assigning Validations to FormatsAfter you create a format, you can optionally assign predefined or user-defined payment validations to it on the EditFormat page. Validations ensure that disbursements or funds capture transactions execute according to specifiedconditions.
Related Topics• What's a format type
• Options for Validations
Transmission Protocols Computers use transmission protocols to communicate with each other across a network. To transmit data, such aspayment files from Oracle Fusion Payments to a payment system, the implementor defines protocols that the paymentsystem can receive.
Payments offers industry-standard transmission protocols, such as FTP, HTTP, and HTTPS, predefined. They arecomposed of the following:
• A code entry point, which the payment system servlet uses to accomplish transmission
• A list of parameters, such as network address and port, for which the transmission configuration must supplyvalues
• Transmission protocol entry points, which are independent of payment servlets and may be called from thePayments engine
While the transmission protocol defines which parameters are expected in the communication, the transmissionconfiguration defines what value is supplied for each parameter. Transmission configurations and payment systems areassociated on the funds capture process profile for funds capture or on the payment process profile for disbursements.
Note: This note applies only to on-premises customers, and never to Oracle Cloud customers. The preferred file-based transmission protocol is Secure File Transfer Protocol (SFTP). File Transfer Protocol (FTP) is unsecured andshould only be used to meet legacy third-party requirements. FTP must be used over a secure link such as a virtualprivate network or a leased line with data link level encryption enabled.
Related Topics• Transmission Configuration: Explained
171
Oracle Financials CloudImplementing Receivables Credit to Cash
Chapter 5Configure Payment System Connectivity
Transmission Configurations A transmission configuration is a group of specific transmission details. A transmission configuration defines a valuefor each parameter in a transmission protocol. The values in a transmission configuration are specific to one paymentsystem or financial institution.
For example, suppose a transmission protocol requires parameter values for a Socket IP Address and a SocketPort Number. Your payment system that accepts that protocol will give you the values that it expects to receive forthese parameters. You enter the applicable values in the Socket IP Address and Socket Port Number fields forthe transmission configuration. The transmission configuration is then assigned to the payment system within thefunds capture process profile for funds capture transactions or within the payment process profile for disbursementtransactions.
In the Setup and Maintenance work area, use the following to transmit files to your payment system by setting uptransmission configurations:
• Offering: Financials
• Functional Area: Payments
• Task: Manage Transmission Configurations
On the Manage Transmission Configurations page, click Create. The Create Transmission Configuration page appears.
Related Topics• Setting Up Transmission Configurations: Explained
• Transmission Protocol: Explained
How You Set Up Transmission Configurations In Oracle Fusion Payments, setting up transmission configurations is mandatory if your company wants to transmitpayments to a payment system or a bank. To enable your company to exchange information with your payment systemor bank, a preexisting agreement must exist as to how information is structured and how each side sends and receivesit.
Setting up transmission configurations involves the following actions:
• Understanding protocols
• Understanding transmission configurations
• Understanding tunneling configurations
• Considering best practices
• Setting up transmission configurations
172
Oracle Financials CloudImplementing Receivables Credit to Cash
Chapter 5Configure Payment System Connectivity
Understanding ProtocolsA transmission protocol is a set of rules or procedures for transmitting data between electronic devices, such ascomputers. To transmit data, such as a payment file or a settlement batch from Payments to an external paymentsystem, you must define the transmission protocols that the payment system can receive.
Payments offers industry-standard predefined transmission protocols, such as SFTP, HTTP, HTTPS, and AS2. Theseprotocols include the following:
• A protocol implementation class, which implements the technical details of communication in a generic manner
• A list of parameters, such as network address and port, for which the transmission configuration must supplyvalues
The transmission protocol defines which parameters are expected in the communication between your company and itspayment system or bank.
Understanding Transmission ConfigurationsA transmission configuration is a group of specific transmission details, which is associated with a specific transmissionprotocol. A transmission configuration defines a value for each parameter in a transmission protocol. The values in atransmission configuration are specific to one payment system or financial institution. For example, a transmissionprotocol may require parameters, as well as a Socket IP Address, and a Socket Port Number. Your payment system,which accepts that protocol, gives you the values that it expects to receive for those parameters. You enter those valuesin the Socket IP Address and Socket Port Number fields.
Understanding Tunneling ConfigurationsA tunneling configuration is a type of transmission configuration that helps transmit data through a transmissionservlet that can securely connect to your payment system or bank without exposing internal data. The transmit servletacts as a relay or bridge between the different segments of your network infrastructure, some of which are moresuitable, such as a DMZ zone, from which to open connections to external systems.
Considering Best PracticesBefore selecting a protocol for payment processing, do the following:
• Find out what your processing bank supports.
• Favor transmission protocols predefined in Payments.
• Use funds capture process profiles or payment process profiles for greater ease in configuring transmission andformatting.
Before selecting a transmission configuration for payment processing, note the following:
You may need two transmission configurations as follows if you use a protocol normally blocked by your networksecurity rules:
• A tunneling configuration to exit the fire wall
• A transmission configuration for the payment system server
Your transmission configuration must point to the tunneling configuration.
173
Oracle Financials CloudImplementing Receivables Credit to Cash
Chapter 5Configure Payment System Connectivity
CAUTION: It is always a configuration error for the tunneling configuration to point to any other tunnelingconfiguration, including itself.
Setting Up Transmission ConfigurationsIn the Setup and Maintenance work area, use the following to select a protocol, which is the method of transmission,and click Create on the Manage Transmission Configurations page.
• Offering: Financials
• Functional Area: Payments
• Task: Manage Transmission Configurations
On the Create Transmission Configuration page, enable electronic connectivity with your payment system or bank byspecifying values for each parameter for the protocol you selected.
The transmission configuration is subsequently assigned to a payment system or bank in the funds capture processprofile for funds capture transactions or in the payment process profile for disbursements.
Note: When an environment is refreshed (Production-to-Test or Test-to-Test), these payments transmission-relatedupdates must be performed in the target environment before running any payment batches:
• Migrate Payment Wallet - During Production-to-Test (P2T) process, payments wallet stored in OPSS isn'tmigrated from source to target environment. As part of post P2T tasks, user must perform the wallet migrationusing the steps provided in Payments Wallet Migration Post P2T / T2T Refresh (Doc ID 2407678.1)
• Update Transmission Configuration - As part of post P2T tasks, user must update payments transmissionconfiguration to point to bank's nonproduction server.
Related Topics
How You Configure Pretty Good Privacy (PGP)Encryption and Digital Signature for Outbound andInbound Messages You can secure both outbound and inbound messages using payload security. Payload security is the securing ofpayment files and other files using payment file encryption and digital signature based on the open PGP standard. Youcan update existing transmission configurations to use encryption and digital signature for your existing connectivitywith banks.
For outbound messages, Oracle Payments Cloud supports encryption and digital signature for:
• Payment files and positive pay files for disbursements
• Settlement batch files for funds capture
For inbound messages, the application supports decryption and verification of digitally signed encrypted files for:
• Funds capture acknowledgment files
174
Oracle Financials CloudImplementing Receivables Credit to Cash
Chapter 5Configure Payment System Connectivity
• Bank statements
You can also secure payment data using secured transmission protocols, such as SFTP or HTTPS.
Note: Oracle Applications Cloud supports decryption of payment files that are encrypted using version BCPG 1.45 orlower of the OpenPGP standard.
Configuring encryption and digital signature for outbound and inbound messages includes the following actions:
• Generating keys
• Setting up outbound transmission configuration
• Setting up inbound transmission configuration
• Uploading the bank-provided public key file
• Downloading the system-generated public key file
Generating KeysEncryption and digital signature verification requires a public key. Conversely, decryption and signing a digital signaturerequires a private key. A private key and public key pair is known as the key pair. The party who generates the key pairretains the private key and shares the public key with the other party. You can generate or receive a public key subject tothe agreement with your bank.
The following table provides typical generation details of the public and private key pair:
Key Pair Generated Generates Outbound Messages fromPayments
Generates Inbound Messages to Payments
PGP Public Encryption Key and PGP PrivateSigning Key
Bank
Deploying company
PGP Public Signature Verification Key and PGPPrivate Decryption Key
Deploying company
Bank
If you're generating the key pair, you can automatically generate them within Oracle Applications Cloud.
You must import the public encryption key or the public signature verification key that you receive into the OracleApplication Cloud using UCM.
Setting Up Outbound Transmission ConfigurationFor outbound messages, such as payment files, positive pay files, and settlement batch files, you must:
• Encrypt your payment file using the bank-provided public encryption key.
• Optionally, sign the payment file digitally using the private signing key that you generate.
On the Create Transmission Configuration page, you can see the outbound parameters as described in the followingtable.
175
Oracle Financials CloudImplementing Receivables Credit to Cash
Chapter 5Configure Payment System Connectivity
Outbound Parameters Description
PGP Public Encryption Key
A key given to you by your bank that you use to encrypt your outbound payment file. To upload the bank-provided public encryption key, use UCM by navigating to Tools > File Import andExport. Lastly, on the Create Transmission Configuration page for the PGP Public Encryption Key parameter, select the public encryption key file from the Value choice list.
PGP Private Signing Key
A key generated by you to digitally sign the outbound payment file. To generate the private signing key, select Quick Create from the Value choice list for the PGP PrivateSigning Key parameter. The application:
• Automatically generates the private signing key and links it to your transmission configuration.
• Generates a public encryption key file that you can download from UCM and share with yourbank. The bank uses your public encryption key file to verify the digital signature of the paymentfiles that you transmit to the bank.
Note:You must provide a key password to generate a private signing key using the Quick Create feature.This password is also used for exporting and deleting this key.
Setting Up Inbound Transmission ConfigurationFor inbound payment messages, such as acknowledgments and bank statements, you must:
• Verify the digital signature using the bank-provided public signature verification key.
• Decrypt the file using the private decryption key that you generate.
On the Create Transmission Configuration page, you can see the inbound parameters as described in the followingtable.
Inbound Parameters Description
PGP Public Signature Verification Key
A key given to you by your bank that you use to validate the digital signature of inboundacknowledgment files or bank statements. To upload the bank-provided public signature verification key, use UCM by navigating to Tools > FileImport and Export. After uploading the bank-provided public signature verification key using UCM, you can select thekey file on the Create Transmission Configuration page. Select it in the Value choice list for the PGPPublic Signature Verification Key parameter. After you select the public signature verification key file,it's automatically imported.
PGP Private Decryption Key
A key generated by you to decrypt the inbound encrypted file. To generate the private decryption key, select Quick Create from the Value choice list for the PGP Private Decryption Key parameter. Theapplication:
• Generates the private decryption key and links it to your transmission configuration.
176
Oracle Financials CloudImplementing Receivables Credit to Cash
Chapter 5Configure Payment System Connectivity
Inbound Parameters Description
• Generates a public signature verification key file that you can download from UCM and share withyour bank. The bank uses your public signature verification key file to encrypt acknowledgmentsand bank statements.
Note:You must provide a key password to generate a private signing key using the Quick Create feature.This password is also used for exporting and deleting this key.
Creating Private Keys Using the Advanced Create FeatureYou can also generate private keys by selecting Advanced Create from the Value choice list. Advanced Create featurelets you configure certain properties to generate stronger keys. This enhances the security of payment files transmittedto your bank. Here are the properties you can configure for PGP private signing keys:
Option Description
Key Type
The type of private signing key generated.
• RSA: Key is generated using the RSA algorithm.
Length
The number of bits in the private signing key (or key size).
• 2048: 2048-bit key
• 3072: 3072-bit key
• 4096: 4096-bit key
Expiration Date
The date when this private signing key expires.
Encryption Algorithm
The encryption algorithm of the private signing key.
• AES128: 128-bit cryptographic key generated using Advanced Encryption Standard.
• AES192: 192-bit cryptographic key generated using Advanced Encryption Standard.
• AES256: 256-bit cryptographic key generated using Advanced Encryption Standard.
• 3DES: Cryptographic key generated using Triple Data Encryption Standard.
Hashing Algorithm
The hashing algorithm of the private signing key.
• SHA256: 256-bit hash computed using Secure Hash Algorithm.
• SHA384: 384-bit hash computed using Secure Hash Algorithm.
Compression Algorithm
The compression algorithm of the private signing key.
• ZIP: Cryptographic key compression using ZIP algorithm.
• ZLIB: Cryptographic key compression using ZLIB algorithm.
• BZIP2: Cryptographic key compression using BZIP2 algorithm.
177
Oracle Financials CloudImplementing Receivables Credit to Cash
Chapter 5Configure Payment System Connectivity
Configuring these properties lets you meet bank-specific payment file security requirements. When you generate aprivate key using the Advanced Create option, a corresponding public key is exported to UCM from where you candownload it. Similar to Quick Create, you must provide a key password when you use Advanced Create to generate aprivate key.
Uploading the Bank-Provided Public Key FileTo upload or import the bank-provided PGP Public Encryption Key or the PGP Public Signature Verification Key intoOracle Applications Cloud, perform these steps:
1. Rename the bank-provided key file by including _public.key as the suffix. Ensure that the key file name doesn'thave any special characters other than the underscore.
2. Navigate to: Navigator > Tools > File Import and Export.3. Import the bank-provided key file into account fin/payments/import.4. Navigate to the Create Transmission Configuration page.5. From the Value choice list for the applicable parameter, select the uploaded key file.
Tip: The key name in the choice list is the same as the one you uploaded using UCM.
6. After you select the key and save the transmission configuration, the key is automatically imported into thePayments.
Downloading the System-Generated Public Key FileTo download the system-generated public key file from Payments to share with your bank, perform the follow steps:
1. On the Create Transmission Configuration page, select Quick Create for the applicable parameter.2. Click the Save and Close button.3. Navigate to: Navigator > Tools > File Import and Export.4. From the Account choice list, select fin/payments/import and search for the system-generated public key file.5. Download the system-generated public key file.
Tip: The file name is similar to the private key file that was generated and attached to the transmissionconfiguration.
Note: SSH (Secure Socket Shell) key-generation for SFTP two-factor authentication is generated by Oracle Supportbased on a service request.
Exporting and Deleting KeysThe Export and Delete option lets you securely export a selected private or public key. This lets you use the same key fordifferent environments. When you export a key using this feature, the key is exported to UCM from where you downloadit. If the selected key is a private key, you must provide the key password that was used while generating the key. No keypassword is required for exporting public keys.
You can also use this feature to delete PGP. However, you can't delete a key that's currently attached to a transmissionconfiguration. When you delete a system-generated private key, the corresponding public key is also deleted. Just likehow exporting works, deleting a key also requires the key password, if the selected key is a private one. No password isrequired for deleting a public key.
The Export and Delete feature works not only for the application-generated keys but also for imported keys.
178
Oracle Financials CloudImplementing Receivables Credit to Cash
Chapter 5Configure Payment System Connectivity
How You Configure Two-Factor Authentication Using ASecurity Key File You can enable security key file-based authentication in addition to the user credential-based authentication for moresecured transmission. The key pair can be generated within Payments or can be generated externally and imported. Youcan use the private key within Payments and share the public key with your bank.
Importing an Externally-Generated Security Key FileBefore you import the security key file, ensure that these conditions are met:
• The Master encryption key has already been configured using the Manage System Security Options task.
• Ensure that the key file name doesn’t have any special characters other than the underscore (_).
• Ensure that the key file has the SSH extension (file name has .ssh as suffix).
• Ensure that file name length (including the extension) doesn't exceed 26 characters.
Here’s how you import externally generated private security key file:
1. Upload the file in UCM using the File Import and Export utility. Use this UCM account: fin/payments/import.2. Create or update the SFTP transmission configuration.3. Select the private key file that should now be available in the Client Private Key File choice list.4. Enter the applicable password for this key file in the Client Private Key Password field and then click Save.
Generating a Key FilePerform these steps to generate a key file within the Payments application:
1. In the Setup and Maintenance work area, go to the Manage Transmission Configurations task:
◦ Offering: Financials
◦ Functional Area: Payments
◦ Task: Manage Transmission Configurations
2. Select the transmission protocol for which the key pair must be generated.3. Create a new transmission configuration or select an existing one.4. Enter the transmission details.5. In the Value choice list for the Client Private Key File, select Quick Create to generate a key pair.
Note: You must enter the password for private key file in the Client Key File Password field.
The application generates the key pair and populates the Client Private Key File field with the private key file name.This file name has the SSH extension. You can download the corresponding public key file from the UCM account /fin/payments/import. This public key has the same file name as the private key. However, it has a PUB extension (file namehas .pub as suffix). Share the public key file with the bank to deploy it on the SFTP server.
179
Oracle Financials CloudImplementing Receivables Credit to Cash
Chapter 5Configure Payment System Connectivity
Creating Private Keys Using the Advanced Create FeatureIn addition to the Quick Create feature, you can also generate private keys by selecting Advanced Create from the Valuechoice list. Advanced Create feature lets you configure certain properties to generate stronger keys. You can configurethese properties for client private keys that use SSH encryption:
Option Description
Key Type
The type of SFTP key generated.
• RSA: Key is generated using the RSA algorithm.
Length
The number of bits in the SFTP key (or key size).
• 2048: 2048-bit key
• 3072: 3072-bit key
• 4096: 4096-bit key
When you generate a private key using the Advanced Create option, a corresponding public key is exported to UCMfrom where you can download it. Similar to Quick Create, you must provide a key password when you use AdvancedCreate to generate a private key.
Exporting and Deleting KeysThe Export and Delete option lets you securely export selected private or public keys that use SSH encryption. Thislets you use the same key for different environments. When you export a key using this feature, the key is exported toUCM from where you download it. If the selected key is a private key, you must also provide the key password. No keypassword is required for exporting public keys.
You can also use this feature to delete SSH keys. However, you can’t delete a key that’s currently attached to atransmission configuration. When you delete a system-generated private key, its corresponding public key is alsodeleted. You must also provide the key password when deleting a private key. You don’t need a password to delete apublic key.
The Export and Delete feature works for both application-generated keys and imported keys.
How You Test the Transmission Configuration The transmission configuration setup is used to transmit outbound payment files, settlement batch files, and positivepay files to your payment system or financial institution. It's also used to pull funds capture acknowledgment files.The setup captures various parameters, which may be different for different protocols. You can test your transmissionconfiguration to confirm whether your setup of outbound and inbound transmission protocols is correct.
To confirm the accuracy of the setup, click the Test button on the Create or Edit Transmission Configuration page.The Test button is active only when the values associated with all the mandatory parameters are present. Typicaltransmission configuration parameters that are available to test include:
• Destination server URL
• Destination server IP address
180
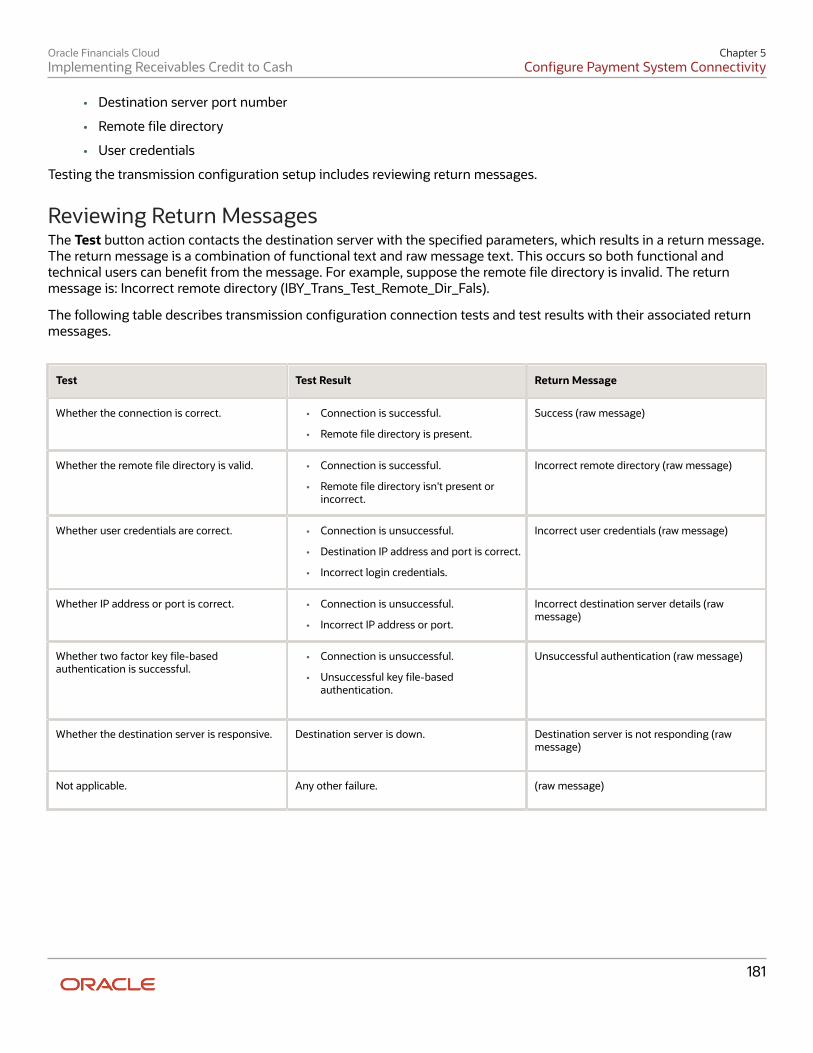
Oracle Financials CloudImplementing Receivables Credit to Cash
Chapter 5Configure Payment System Connectivity
• Destination server port number
• Remote file directory
• User credentials
Testing the transmission configuration setup includes reviewing return messages.
Reviewing Return MessagesThe Test button action contacts the destination server with the specified parameters, which results in a return message.The return message is a combination of functional text and raw message text. This occurs so both functional andtechnical users can benefit from the message. For example, suppose the remote file directory is invalid. The returnmessage is: Incorrect remote directory (IBY_Trans_Test_Remote_Dir_Fals).
The following table describes transmission configuration connection tests and test results with their associated returnmessages.
Test Test Result Return Message
Whether the connection is correct.
• Connection is successful.
• Remote file directory is present.
Success (raw message)
Whether the remote file directory is valid.
• Connection is successful.
• Remote file directory isn't present orincorrect.
Incorrect remote directory (raw message)
Whether user credentials are correct.
• Connection is unsuccessful.
• Destination IP address and port is correct.
• Incorrect login credentials.
Incorrect user credentials (raw message)
Whether IP address or port is correct.
• Connection is unsuccessful.
• Incorrect IP address or port.
Incorrect destination server details (rawmessage)
Whether two factor key file-basedauthentication is successful.
• Connection is unsuccessful.
• Unsuccessful key file-basedauthentication.
Unsuccessful authentication (raw message)
Whether the destination server is responsive.
Destination server is down.
Destination server is not responding (rawmessage)
Not applicable.
Any other failure.
(raw message)
181
Oracle Financials CloudImplementing Receivables Credit to Cash
Chapter 5Configure Payment System Connectivity
How You Configure a Communication Channel to aPayment System To transmit payment information to or receive payment information from a payment system, you must configure thechannel used to communicate with the payment system. This topic discusses the following concepts:
• Proxy server
• Secure sockets layer (SSL) protocol
• Unsecured protocols
Proxy ServerPayments must communicate through a proxy server to its payment system. You can use the standard Java networkingproxy system properties that are in the configuration files when Oracle Fusion Applications were initially set up.Alternatively, you can specify proxy settings for a transmission protocol on the Create Transmission Configuration pageby entering a value for the Proxy Host parameter.
Secure Sockets Layer ProtocolWhen Payments communicates with a payment system, the information exchanged may be sensitive information, suchas credit card numbers. If the communication isn't secure, it poses a security risk. The security risk increases whencommunication to the payment system is across a public network, such as the Internet.
To set up a payment system servlet with a secure sockets layer, enable HTTPS on the application server where theservlet resides. If funds capture process profiles aren't defined for the payment system, change the TransmissionServlet Base URL on the Edit Payment System page to start with HTTPS. If funds capture process profiles are defined,change the value for the Destination URL parameter on the Edit Transmission Configuration page to start with HTTPS.
For secure communication with the payment system, ensure that the most current certification authority (CA)certificates are in the Oracle Fusion secure sockets trust store file. If Payments rejects the payment system's securesockets certificate, you may have to insert the certificates manually.
The following table lists security actions that are applicable to Cloud and on-premise.
Action Cloud On-premise
Set up a payment system servlet with a securesockets layer.
Not applicable.
Enable SSL on the servlet's application server.
Insert certification authority certificates.
File a service request with the help desk.
Enter a value in the Value field for the WalletLocation parameter on the Create or EditTransmission Configuration page.
182

Oracle Financials CloudImplementing Receivables Credit to Cash
Chapter 5Configure Payment System Connectivity
Unsecured ProtocolsThe preferred file-based transmission protocol is Secure File Transfer Protocol (SFTP). File Transfer Protocol (FTP) isunsecured and should only be used to meet legacy third-party requirements. FTP must be used over a secure link suchas a virtual private network or a leased line with data link level encryption enabled.
Related Topics
How You Set Up a Payment System If your company wants to transmit electronic payments or funds capture transactions to a payment system or a bank,you must set up a payment system. A payment system defines the organization that Payments uses to process yourfunds capture and disbursement transactions. Here's what can be considered as a payment system:
• The bank where your company has its bank accounts
• A third-party processor or gateway that connects your company to a financial network
Payment systems aren't required for printed disbursement payments, such as checks, but may be required for relatedservices, such as a positive pay report.
Set up a payment system by completing these actions:
• Selecting a gateway or processor payment system
• Considering best practices
• Defining a payment system
• Specifying payment system settings
• Understanding payment system accounts
Selecting a Gateway or Processor Payment SystemPayments supports both gateway and processor payment systems. A gateway is a service provider that acts as anintermediary between a first party payee and a payment processor. A processor is a service provider that interactsdirectly with banks and card institutions to process financial transactions. Examples of payment processors include Visa,MasterCard, and American Express.
Your choice of integrating with a gateway or a processor payment system is generally determined by your:
• Type of business
• Number of transactions per day
• Your bank
This table describes the differences between gateway and processor payment systems.
Factors Gateways Processors
Connectivity and Security
Provide easy connection, often using SSL-based internet connectivity.
Provide more rigorous security, connectivity, and testing requirements.
183
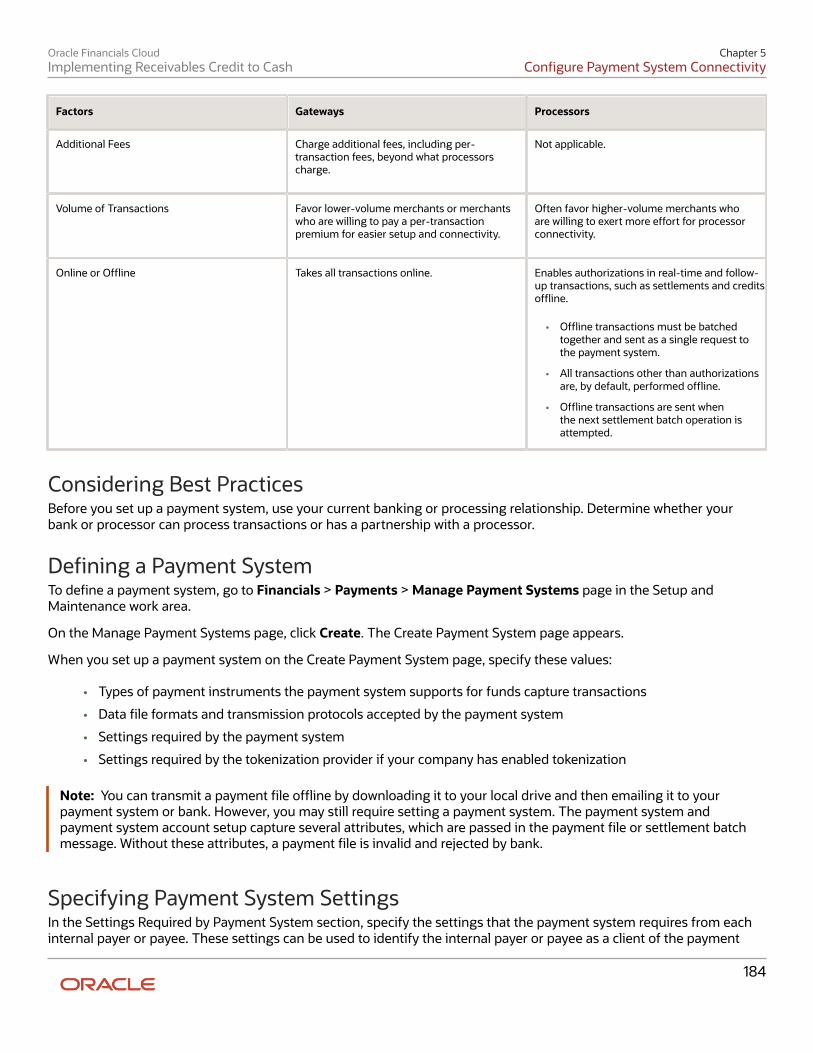
Oracle Financials CloudImplementing Receivables Credit to Cash
Chapter 5Configure Payment System Connectivity
Factors Gateways Processors
Additional Fees
Charge additional fees, including per-transaction fees, beyond what processorscharge.
Not applicable.
Volume of Transactions
Favor lower-volume merchants or merchantswho are willing to pay a per-transactionpremium for easier setup and connectivity.
Often favor higher-volume merchants whoare willing to exert more effort for processorconnectivity.
Online or Offline
Takes all transactions online.
Enables authorizations in real-time and follow-up transactions, such as settlements and creditsoffline.
• Offline transactions must be batchedtogether and sent as a single request tothe payment system.
• All transactions other than authorizationsare, by default, performed offline.
• Offline transactions are sent whenthe next settlement batch operation isattempted.
Considering Best PracticesBefore you set up a payment system, use your current banking or processing relationship. Determine whether yourbank or processor can process transactions or has a partnership with a processor.
Defining a Payment SystemTo define a payment system, go to Financials > Payments > Manage Payment Systems page in the Setup andMaintenance work area.
On the Manage Payment Systems page, click Create. The Create Payment System page appears.
When you set up a payment system on the Create Payment System page, specify these values:
• Types of payment instruments the payment system supports for funds capture transactions
• Data file formats and transmission protocols accepted by the payment system
• Settings required by the payment system
• Settings required by the tokenization provider if your company has enabled tokenization
Note: You can transmit a payment file offline by downloading it to your local drive and then emailing it to yourpayment system or bank. However, you may still require setting a payment system. The payment system andpayment system account setup capture several attributes, which are passed in the payment file or settlement batchmessage. Without these attributes, a payment file is invalid and rejected by bank.
Specifying Payment System SettingsIn the Settings Required by Payment System section, specify the settings that the payment system requires from eachinternal payer or payee. These settings can be used to identify the internal payer or payee as a client of the payment
184
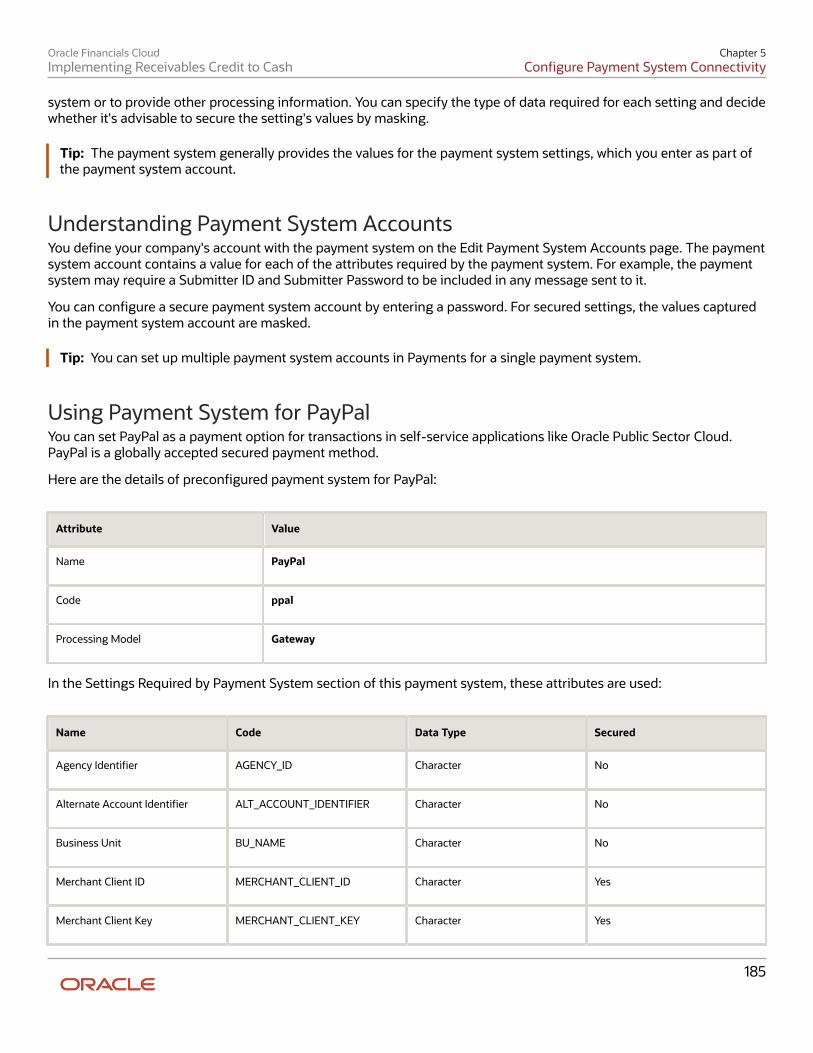
Oracle Financials CloudImplementing Receivables Credit to Cash
Chapter 5Configure Payment System Connectivity
system or to provide other processing information. You can specify the type of data required for each setting and decidewhether it's advisable to secure the setting's values by masking.
Tip: The payment system generally provides the values for the payment system settings, which you enter as part ofthe payment system account.
Understanding Payment System AccountsYou define your company's account with the payment system on the Edit Payment System Accounts page. The paymentsystem account contains a value for each of the attributes required by the payment system. For example, the paymentsystem may require a Submitter ID and Submitter Password to be included in any message sent to it.
You can configure a secure payment system account by entering a password. For secured settings, the values capturedin the payment system account are masked.
Tip: You can set up multiple payment system accounts in Payments for a single payment system.
Using Payment System for PayPalYou can set PayPal as a payment option for transactions in self-service applications like Oracle Public Sector Cloud.PayPal is a globally accepted secured payment method.
Here are the details of preconfigured payment system for PayPal:
Attribute Value
Name
PayPal
Code
ppal
Processing Model
Gateway
In the Settings Required by Payment System section of this payment system, these attributes are used:
Name Code Data Type Secured
Agency Identifier
AGENCY_ID
Character
No
Alternate Account Identifier
ALT_ACCOUNT_IDENTIFIER
Character
No
Business Unit
BU_NAME
Character
No
Merchant Client ID
MERCHANT_CLIENT_ID
Character
Yes
Merchant Client Key
MERCHANT_CLIENT_KEY
Character
Yes
185
Oracle Financials CloudImplementing Receivables Credit to Cash
Chapter 5Configure Payment System Connectivity
Name Code Data Type Secured
Payment endpoint URL
PAYMENT_ENDPOINT
Character
No
Security endpoint URL
SECURITY_ENDPOINT
Character
No
Note: You can use these settings to create a new payment system account.
Payment System Accounts A payment system account is an account identifier that's composed of values for parameters. The payment systemprovides you with the values that it requires to identify each payment or settlement batch file. Stored in the paymentsystem account are values for settings and your company's identifiers. Your company can have multiple paymentsystem accounts with a single payment system.
Payment system accounts are associated with the following setup objects:
• Internal payees
• Funds capture process profiles
• Payment process profiles
The following table lists setup objects and the action they perform relative to the payment system.
Setup Object Setup Object Action
Payment system
• Tells Payments where to send the funds capture transactions.
• Tells Payments where to send the disbursements transaction.
Payment system account
Tells Payments how to identify itself to the payment system
Transmission configuration
Tells Payments how to transmit the transaction to the payment system
Internal PayeesYou can set up routing rules that are assigned to an internal payee. Routing rules specify which payment systemaccount a transaction is transmitted to, based on the values of various transaction attributes.
If you don't need granular routing rules to determine which the correct payment system account for a transaction, or ifyou want a fallback value should none of the routing rules apply, you can set up one default payment system account oneach internal payee for each payment method.
186

Oracle Financials CloudImplementing Receivables Credit to Cash
Chapter 5Configure Payment System Connectivity
Funds Capture Process ProfilesThe funds capture process profile tells Oracle Fusion Payments how to process a funds capture transaction and howto communicate with the payment system. A funds capture process profile is specific to one payment system and itspayment system accounts.
For each payment system account that's enabled on the funds capture process profile, you can select up to threetransmission configurations, one each for authorization, settlement, and acknowledgment.
Payment Process ProfilesThe payment process profile tells Payments how to process a disbursement transaction and how to communicate withthe payment system to transmit a payment file or a positive pay file. When an electronic transmission is required, apayment process profile is specific to one payment system and its payment system accounts. For each payment systemaccount that's enabled on the payment process profile, you select a transmission configuration.
Related Topics• How You Set Up a Payment System
How You Set Up Payment System Connections forMultiple Business Units You can configure separate merchant accounts and secure acceptance profile combinations for each BU in eachcountry. This can be achieved when you implement credit card functionality in multiple countries. A merchant accountis a merchant identifier that you set up with CyberSource, the tokenization service provider. A secure acceptance profilerepresents connection settings that merchants use for their credit card transactions. You can set up payment systemconnections at both the payment system level and at the payment system account level. The payment system levelcaptures parameters that are necessary to connect with CyberSource. You can also capture the same parameters atthe payment system account level, as well as additional parameters, such as the business unit. With these connectionoptions, you can configure separate payment system accounts for each merchant account in CyberSource.
For multiple business units, here's what you do:
1. First, configure connection settings for each merchant account and secure acceptance profile combination inCyberSource for each BU in a country.
2. Then, you must enter corresponding connection settings in Oracle Payments at the payment system accountlevel.
In this scenario, the parameters configured at the payment system level act as the default connection setup. If, however,there is no payment system account for a business unit, the application uses the parameter values from the paymentsystem level. Similarly, if you have only one merchant account, then you configure payment system connections at thepayment system level.
This figure shows how the setup in CyberSource relates to the setup in the application.
187
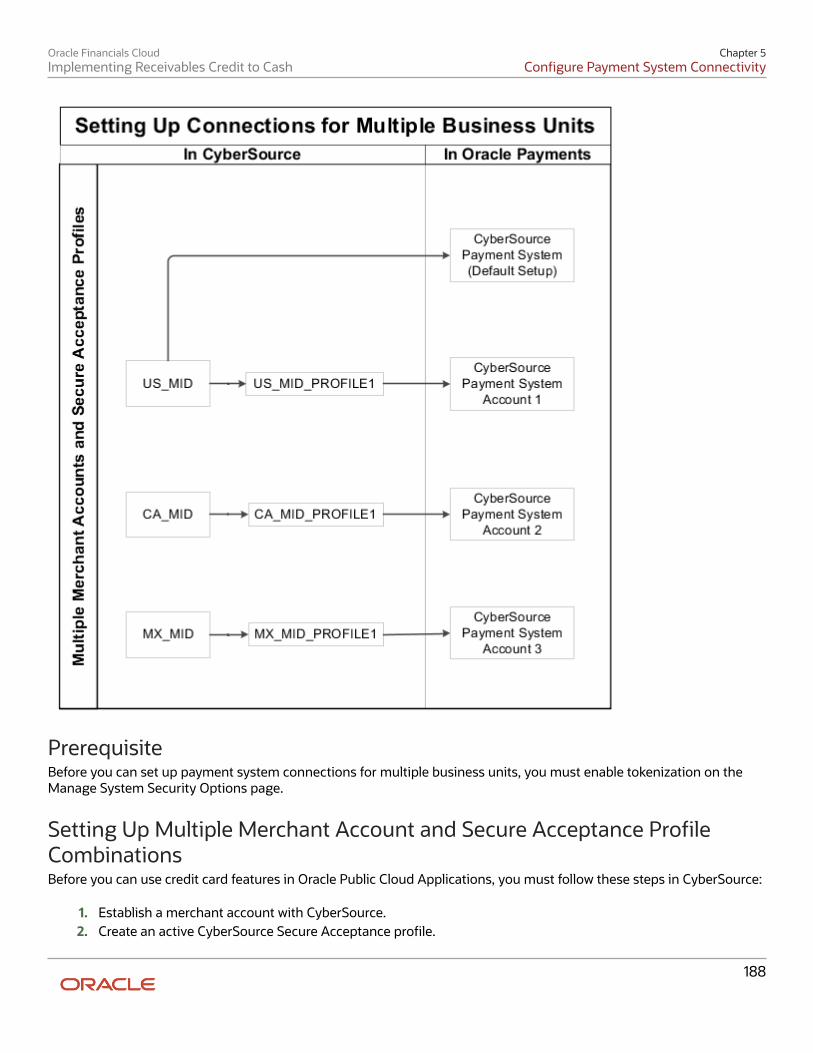
Oracle Financials CloudImplementing Receivables Credit to Cash
Chapter 5Configure Payment System Connectivity
PrerequisiteBefore you can set up payment system connections for multiple business units, you must enable tokenization on theManage System Security Options page.
Setting Up Multiple Merchant Account and Secure Acceptance ProfileCombinationsBefore you can use credit card features in Oracle Public Cloud Applications, you must follow these steps in CyberSource:
1. Establish a merchant account with CyberSource.2. Create an active CyberSource Secure Acceptance profile.
188
Oracle Financials CloudImplementing Receivables Credit to Cash
Chapter 5Configure Payment System Connectivity
Setting Up Payment System ConnectionsIf you have only one merchant account and secure acceptance profile combination, then you must enter the connectionsettings on the Create Payment System page.
These settings are used on the Create Payment System page and on the Create Transmission Configuration page. Enterthese connection settings in the Value fields in the Tokenization Payment System Settings section on both pages.
CyberSource Payments Setting Payments Page Payments Field
Secure Acceptance profilegenerates the Secure AcceptanceAccess Key
Secure Acceptance Access Key
Create Payment System page
Securely cut and paste the SecureAcceptance Access Key in theValue field.
Secure Acceptance profilegenerates the Secure AcceptanceSignature Key
Secure Acceptance Signature Key
Create Payment System page
Securely cut and paste the SecureAcceptance Signature Key in theValue field.
CyberSource Secure AcceptanceHosted Checkout Integration Guide
Tokenization Servlet Base URL
Create Payment System page
Copy this constant value from theCyberSource Secure AcceptanceHosted Checkout Integration Guideand paste the Tokenization ServletBase URL in the Value field.
Note:Tokenization Servlet Base URLis referred to as iFrame CreatePayment Token Endpoint inCyberSource documentation.
Secure Acceptance profileautomatically generates the ProfileID when the profile is saved.
Client Identifier, which is the sameas the Profile ID.
Create Payment System page
Enter the Profile ID in the Valuefield.
Not applicable
Token Creation Module
Create Payment System page
Select CyberSource SecureAcceptance Web from the Valuechoice list.
CyberSource Secure AcceptanceHosted Checkout Integration Guide
Tokenization Payment URL
Create Payment System page
Copy this constant value from theCyberSource Secure AcceptanceHosted Checkout IntegrationGuide and paste the TokenizationPayment URL in the Value field.
Note:Tokenization Payment URLis referred to as iFrameTransaction Endpoint inCyberSource documentation.
189
Oracle Financials CloudImplementing Receivables Credit to Cash
Chapter 5Configure Payment System Connectivity
CyberSource Payments Setting Payments Page Payments Field
CyberSource SOAP Tool Kits forWeb Services Developer Guide
SOAP Transaction URL
Create Transmission Configurationpage
Copy this value from theCyberSource SOAP Tool Kits forWeb Services Developer Guide andpaste the SOAP Transaction URL inthe Value field.
Setting up Merchant ConnectionsIf you have multiple merchant account and secure acceptance profile combinations, enter the connection settings onthe Edit Payment System Accounts page.
Enter these connection settings in the Value fields in the Settings section on the Edit Payment System Accounts page.
CyberSource Payments Setting Payments Page Payments Field
Not applicable
Commerce Indicator
Edit Payment System Accountspage
Enter internet in the Value field.
Transaction Security Key pagegenerates the Transaction SecurityKey.
SOAP API Security Key
Edit Payment System Accountspage
Enter the Transaction SecurityKey in the Value field that youdownloaded previously.
Secure Acceptance profilegenerates the Secure AcceptanceAccess Key
Secure Acceptance Access Key
Edit Payment System Accountspage
Securely cut and paste the SecureAcceptance Access Key in theValue field.
Secure Acceptance profilegenerates the Secure AcceptanceSignature Key
Secure Acceptance Signature Key
Edit Payment System Accountspage
Securely cut and paste the SecureAcceptance Signature Key in theValue field.
Secure Acceptance profileautomatically generates the ProfileID when the profile is saved.
Client Identifier, which is the sameas the Profile ID.
Edit Payment System Accountspage
Enter the Profile ID in the Valuefield.
Related Topics• How You Set Up a Payment System
• How You Configure a Communication Channel to a Payment System
• How You Enable Credit Card Tokenization
Import and Export Tokenization Setup Data Your tokenization setup data is comprised of values, or keys, that are set up on the Create Payment System andPayment System Accounts pages. On these pages in your test environment, you enter values for the Secure AcceptanceAccess Key and the Secure Acceptance Signature Key in the applicable Value fields. Values for the keys come from your
190
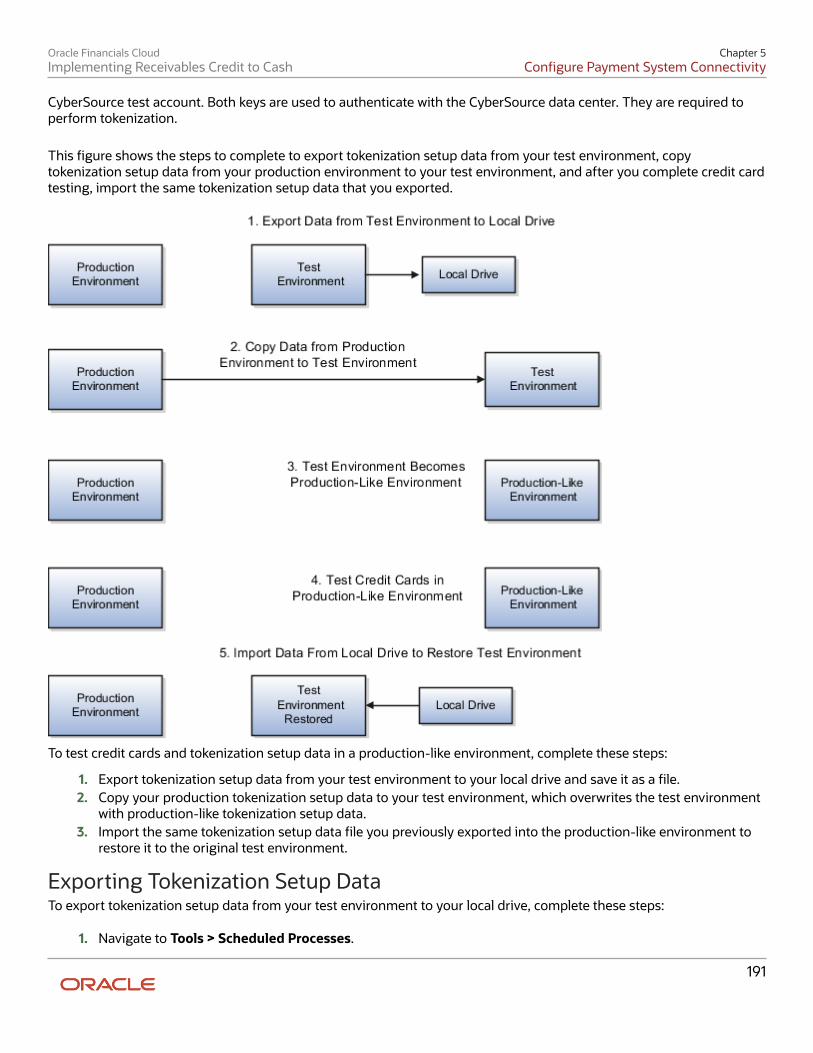
Oracle Financials CloudImplementing Receivables Credit to Cash
Chapter 5Configure Payment System Connectivity
CyberSource test account. Both keys are used to authenticate with the CyberSource data center. They are required toperform tokenization.
This figure shows the steps to complete to export tokenization setup data from your test environment, copytokenization setup data from your production environment to your test environment, and after you complete credit cardtesting, import the same tokenization setup data that you exported.
To test credit cards and tokenization setup data in a production-like environment, complete these steps:
1. Export tokenization setup data from your test environment to your local drive and save it as a file.2. Copy your production tokenization setup data to your test environment, which overwrites the test environment
with production-like tokenization setup data.3. Import the same tokenization setup data file you previously exported into the production-like environment to
restore it to the original test environment.
Exporting Tokenization Setup DataTo export tokenization setup data from your test environment to your local drive, complete these steps:
1. Navigate to Tools > Scheduled Processes.
191
Oracle Financials CloudImplementing Receivables Credit to Cash
Chapter 5Configure Payment System Connectivity
2. On the Overview page, click Schedule New Process.3. On the Schedule New Process page, search and select the Import Security Credential Job.4. From the Credential File Type choice list, select Export Tokenization Setup.5. Click Submit.6. Navigate to Tools > File Import and Export.7. From the Account choice list, select fin/payments/import.8. Click Search.9. In the Search Results section, click your file and save it to your local drive.
Copying Production Tokenization Setup Data to Test EnvironmentTo copy your production tokenization setup data to your test environment, follow your standard practice. Your copyprocedure overwrites your test environment with production tokenization setup data. Now you can test your credit cardsin a production-like environment.
Uploading Exported Tokenization Setup DataBefore you can import the tokenization setup data, you must upload the file you previously downloaded from your localdrive to UCM. To upload the file, complete these steps:
1. Navigate to Tools > File Import and Export.2. Click on the + icon in the Search Results section.3. In the Upload File dialog box, click Choose file to browse to the file you want to upload.4. From the Account choice list, select fin/payments/import.5. Click Save and Close.
Importing Tokenization Setup DataTo import tokenization setup data from your local drive to your production-like environment, complete these steps:
1. Navigate to Tools > Scheduled Processes.2. On the Overview page, click Schedule New Process.3. On the Schedule New Process page, search and select the Import Security Credential Job.4. From the Credential File Type choice list, select Import Tokenization Setup.5. From the UCM File Name choice list, select the file that you uploaded.6. Click Submit.
Related Topics• PCI DSS Credit Card Processing Requirements
Import a Security Credential File To secure your electronic transmissions, you can upload, import, and assign a security credential file to transmissionconfigurations. A security credential file is a digital file that stores your security key. The application uses this key toencrypt or authenticate data transmitted to remote third-party systems such as banks. The security credential file canbe used for transmission security by any future process that runs and references the transmission configuration. Theapplication understands which credential files are used by which protocols and displays only the appropriate ones in thesetup pages.
192
Oracle Financials CloudImplementing Receivables Credit to Cash
Chapter 5Configure Payment System Connectivity
Payments supports a variety of security-related credential files, including wallet files, trust store files, and digitalcertificates.
Note: This procedure is applicable to Oracle Cloud implementations only.
Before you can import a security credential file with its key into Payments, you must first create a Payments masterencryption key.
Creating a Wallet File and a Master Encryption Key AutomaticallyTo create a wallet file and a master encryption key automatically, complete these steps:
1. In the Setup and Maintenance work area, go to Financials > Payments > Manage System Security Options.2. On the Manage System Security Options page, click Apply Quick Defaults.3. Select the Automatically create wallet file and master encryption key check box.4. Click the Save and Close.
Uploading the Wallet Security Credential FileBefore you can import the security credential file, you must first upload it to Payments.
CAUTION: Ensure that the credential file is password-protected when you create it. It must be deleted from OracleFusion Applications as soon as the import process completes.
1. Go to Tools > File Import and Export.2. Click the Upload icon to open the Upload File dialog box3. Browse to the file you created and stored locally.4. From the Account choice list, select fin/payments/import.5. Click the Save and Close button.
Importing the Wallet Security Credential FileTo import security-related credential files, use the Import Security Credential Job process. These files include walletsand private keys used in advanced security features.
1. Go to Tools > Scheduled Processes to open the Scheduled Processes page.2. Click the Schedule New Process button to open the Schedule New Process dialog box.3. Search and select the case-sensitive Import Security Credential Job to open the Process Details dialog box.4. From the Credential File Type choice list, select the appropriate file type for your credential.5. In the Security Credential Name field, enter a name for the credential file.6. From the UCM (Universal Content Management) File Name choice list, select the file you previously uploaded.7. Click the Submit button.
A confirmation message indicates the process ran successfully.8. Click the Close button.9. Click the Refresh icon. The Import Security Credential Job appears in the Search Results section with a status
of Succeeded.
193

Oracle Financials CloudImplementing Receivables Credit to Cash
Chapter 5Configure Payment System Connectivity
Assigning the Wallet File to a Transmission ConfigurationTo assign the credential file to a transmission configuration, complete these steps:
1. In the Setup and Maintenance work area, go to Financials > Payments > Manage TransmissionConfigurations.
2. On the Manage Transmission Configurations page in the Search section, select your protocol from the Protocolchoice list and click Search.
3. In the Search Results section, click the applicable configuration link to open the Edit Transmission Configurationpage.
4. In the Value field for your protocol's applicable parameter, select the file you created, uploaded, and imported.
The name of the specific parameter used to import a security credential file depends upon the protocol.
You can now securely transmit electronic files using this transmission configuration.
FAQs for Configure Payment System Connectivity
What's a format type? A type or categorization that indicates what a format is used for. Examples of format types include payment file,remittance advice, and bank statement. Each format that you create in Oracle Fusion Payments is associated with aformat type so the application knows how the format is used. Format types are either disbursement formats that relateto payment files or funds capture formats that relate to settlements or reports.
The following table lists several examples of format types.
Disbursement Format Types Funds Capture Format Types
Disbursement separate remittance advice
Funds capture authorization and settlement
Disbursement positive pay file
Funds capture accompanying letter
Disbursement payment process requeststatus report
Funds capture payer notification
The format type you associate with a format specifies the following:
• Type of message that is created
• Data extract that is used by the template to format the transaction data
Related Topics• How You Set Up Formats
• How You Use Oracle BI Publisher Enterprise to Modify Templates for Use with Formats
194

Oracle Financials CloudImplementing Receivables Credit to Cash
Chapter 5Configure Payment System Connectivity
Can I set up payment system connections for multiple businessunits? Yes. When you implement credit card functionality in different countries, you can configure separate merchant accountand secure acceptance profile combinations in CyberSource for each business unit in each country. Then, you entercorresponding connection settings in Oracle Payments at the payment system account level. You can set up paymentsystem connections at both the payment system level and at the payment system account level. The payment systemlevel captures parameters that are necessary to connect with CyberSource. The payment system account level capturesthe same parameters as the payment system level, as well as additional parameters, such as the business unit. Withthese connection options, you can configure separate payment system accounts for each merchant account inCyberSource.
Related Topics• How You Set Up Payment System Connections for Multiple Business Units
• How You Configure a Communication Channel to a Payment System
• How You Set Up a Payment System
• How You Enable Credit Card Tokenization
195

Oracle Financials CloudImplementing Receivables Credit to Cash
Chapter 5Configure Payment System Connectivity
196
Oracle Financials CloudImplementing Receivables Credit to Cash
Chapter 6Define Funds Capture
6 Define Funds Capture
Funds Capture Process Profiles A funds capture process profile is a key setup entity that contains all the rules necessary for processing funds capturetransactions. It tells Oracle Fusion Payments how to communicate with a specific payment system, and includes thepayment system accounts to be used for processing transactions. During processing, the funds capture process profileis derived from transaction routing rules, which are created during the setup of internal payees.
A funds capture process profile contains rules that control each of the following steps of the funds capture process:
• Formatting messages
• Building settlements into a settlement batch
• Transmitting messages to the payment system
Formatting MessagesWhen the processing type is Bank Account, a Verification section is displayed on the Create Funds Capture ProcessProfile page. When the processing type is Credit Card, an Authorization section is displayed instead of the Verificationsection. In either case, you select the format in which your payment system expects to receive the online message. Thisoutbound format instructs Oracle Fusion BI Publisher how the message should look. You also select the format in whichyou expect to receive an inbound response from the payment system.
The Settlement section on the Create Funds Capture Process Profile page enables you to select a settlement messageformat that your payment system accepts. The settlement is online for a gateway-type payment system and in a batchfor a processor-type payment system. Online settlement transactions are typically transmitted in a group, althoughthey're processed as individual transactions. You also select the format in which you expect to receive an inboundresponse from the payment system.
You can select formats for contacting your payment system to retrieve an acknowledgment. You can also selectother formats for receiving responses from the payment system that specifies whether a transaction succeeded orfailed. Acknowledgments can be pushed by the payment system to your company, or your company can retrieveacknowledgments from the payment system.
In the Notification to Payer section on the Create Funds Capture Process Profile page, you select a notificationformat and delivery method to the payer. A payer notification is a message sent to each payer after the settlement orsettlement batch is transmitted. The message notifies each payer of a funds capture transaction that charges theircredit card or bank account.
Building Settlements into a Settlement BatchIn the Creation Rules tab on the Create Funds Capture Process Profile page, you select settlement grouping attributes.When a specific grouping attribute is enabled, Payments ensures that settlements within one settlement batch all sharethe same value. Settlements with disparate attribute values trigger the creation of as many settlement batches as thereare unique value combinations. For example, if you select Business Unit as a grouping rule, then only settlements withthe same business unit are grouped in a settlement batch.
You can also limit the size of the settlement batch by amount or number of settlements.
197
Oracle Financials CloudImplementing Receivables Credit to Cash
Chapter 6Define Funds Capture
Transmitting Messages to the Payment SystemA funds capture process profile is specific to one payment system and its payment system accounts. In the Accounts tabon the Create Funds Capture Process Profile page, you specify payment system accounts for use with the funds captureprocess profile. For each payment system account you enable, you select up to three transmission configurations, oneeach for authorizations or verifications, settlements, and acknowledgments. The payment system account identifiesPayments to the payment system, and the transmission configurations tell Payments how to transmit transactions tothe payment system.
Related Topics• Payment System Accounts
• Transmission Configurations
• PCI DSS Credit Card Processing Requirements
External Settlement of Credit Card and Bank Accounts A customer or a deploying organization can integrate Receivables with their legacy application. Receivables handles thebilling and receipt creation, but the actual credit card account handling and integration with service provider may beoutside Oracle Cloud. Receivables can record these transactions. However, the actual settlement and authorization withthe payment system may happen externally.
You can now manage these transactions seamlessly on Oracle Cloud, without creating a settlement batch ortransmission. This option adds the flexibility to meet bank-specific, region-specific, or regulatory compliancerequirements.
Here's how you enable this feature:
1. In the Setup and Maintenance work area, go to the Manage Funds Capture Process Profiles task:
a. Offering: Financialsb. Functional area: Paymentsc. Task: Manage Funds Capture Process Profiles
2. Select the processing type and click Create.
Note: This option is available for all three processing types (Credit Card, Debit Card, and Bank Account).
3. Select the Use for external settlement check box.
Note: Use the external payee bank account as the routing rule condition. The invoice should also use thesame routing rule.
How External Settlement is ProcessedWhen the automatic receipt processing is complete, the authorization and verification status of the receipt is marked asSucceeded. This doesn't involve any actual processing with the payment system.
Similarly, when you create and submit a remittance batch, the settlement is automatically updated with a Succeededstatus. You need not create a settlement batch or submit offline transactions.
198
Oracle Financials CloudImplementing Receivables Credit to Cash
Chapter 6Define Funds Capture
Examples of Settlement Grouping Rules Settlement grouping is configured by selecting one or more check boxes in the Settlement Grouping Rules section onthe Create Funds Capture Process Profile page. Selection of settlement grouping attributes specifies that settlementswith the same attribute are included in a unique settlement batch when that profile is used. The following scenariosillustrate how settlement grouping rule options are used to group settlements into settlement batches using a specificfunds capture process profile.
Funds Capture Process Profile 1In this example, Funds Capture Process Profile 1 has the following settlement grouping options selected:
• Business unit
• First-party legal entity
• Settlement date
Create Settlement BatchesDuring funds capture transaction processing, the Create Settlement Batches program selects the settlements listed inthe following table.
Settlement Amount External Payer Business Unit thatOwns the Transaction
First-Party LegalEntity that Owns theTransaction
Settlement Date
A
1000 USD
Customer 1
California
North America
February 1, 2012
B
250 USD
Customer 2
California
North America
February 1, 2012
C
500 USD
Customer 3
Oregon
North America
February 1, 2012
D
750 USD
Customer 4
California
North America
March 1, 2012
The Create Settlement Batches program then groups the settlements into the following settlement batches:
Settlement Batch 1Settlement Batch 1 contains Settlements A and B because both settlements have the same settlement groupingattributes as follows:
• Business unit = California
• First-Party legal entity = North America
• Settlement date = February 1, 2012
199
Oracle Financials CloudImplementing Receivables Credit to Cash
Chapter 6Define Funds Capture
Settlement Batch 2Settlement Batch 2 contains Settlement C because it has the following settlement grouping attributes:
• Business Unit = Oregon
• First-Party legal entity = North America
• Settlement date = February 1, 2012
Settlement Batch 3Settlement Batch 3 contains Settlement D because it has the following settlement grouping attributes:
• Business Unit = California
• First-Party legal entity = North America
• Settlement date = March 1, 2012
Routing Rules Routing rules route a funds capture transaction to the correct payment system account. Based on attributes of thetransaction, the routing rules determine which funds capture process profile to use. For example, Oracle FusionPayments compares attributes of a transaction, such as payment method, business unit, amount, and currency againstthe conditions in a routing rule. When all conditions are met, the specified payment system account and funds captureprocess profile are used for the transaction. The funds capture process profile is used to define how the transaction isprocessed.
You assign routing rules to internal payees during the setup of internal payees. Each payee can have prioritized routingrules. The routing rule with the highest priority is evaluated by Payments first. If the values in the requested fundscapture transaction match the conditions in the routing rule, that transaction is routed to the applicable paymentsystem account for processing.
In the Setup and Maintenance work area, use the following to create a routing rule:
• Offering: Financials
• Functional Area: Customer Payments
• Task: Manage Internal Payees
On the Manage Internal Payees page in the Payee field, enter a payee and click Search. Select an internal payee ion theSearch Results section and click Manage Routing Rules. The Manage Routing Rules page appears. In the Routing Rulessection, from the Payment Method choice list, select a payment method and click Create. The Create Routing Rule pageappears.
If the attributes in the requested funds capture transaction do not match the conditions in the routing rule, the routingrule is disregarded and Payments evaluates the next routing rule. If all routing rules are evaluated and none apply,Payments looks for a payment system account and funds capture process profile specific to the payment method typeentered for the payee in the Default Routing section on the Set Rules page.
The payment system account and funds capture process profile that are used for an authorization are automaticallyused for additional actions, including settlement and any subsequent refunds.
200
Oracle Financials CloudImplementing Receivables Credit to Cash
Chapter 6Define Funds Capture
Reevaluate Routing Rules During Receipt Remittance Reevaluate routing rules for direct debit transactions during receipt remittance. Receipts can be routed using differentrouting rules if user changes the remittance bank account on the receipt during remittance. For this feature, you canenable the setup in Manage Funds Capture Process Profile.
Users can select 2 different accounts for creating receipts and for the actual remittance. When the receipt creation usesauthorization for direct debits, the routing rules are evaluated at the time of receipt creation. However, these routingrules remain the same for the transactions that follow. If the user selects a different bank account for remittance, therouting rules must be reevaluated.
To enable reevaluation of routing rules, perform the following steps:
1. In the Setup and Maintenance work area, go to the Manage Funds Capture Process Profiles task.
◦ Offering: Financials
◦ Functional area: Payments
◦ Task: Manage Funds Capture Process Profiles
2. Select Bank account as the processing type.
Note: Reevaluation of routing rules is currently available only for bank accounts.
3. In the Settlement section, select Reevaluate routing rules.
Note: If the direct debit authorization isn't enabled, enabling the reevaluation of routing rules has no effect.
How You Use Oracle BI Publisher Enterprise to ModifyTemplates for Use with Formats Each format in Oracle Fusion Payments corresponds to one Business Intelligence Publisher Enterprise (BI PublisherEnterprise) template. Payments uses BI Publisher Enterprise templates to format funds capture and funds disbursementtransactions according to the formatting requirements of financial institutions and payment systems. Each templatecontains prescribed formatting attributes, such as data location. Banks, payment systems, and countries have specificelectronic formatting requirements for payment files and settlement batches.
You can use existing BI Publisher Enterprise templates or modify them with minimal effort by using a standard texteditor, such as Microsoft Word. For example, when a payment system requires a change to its payment file format, youcan quickly make the change by modifying the appropriate template.
Whether you modify an existing template or create a new one, determines whether you also create a new format anda new payment process profile. Each payment process profile is associated with a format. The following table lists twotemplate scenarios and indicates the resulting action you take.
201
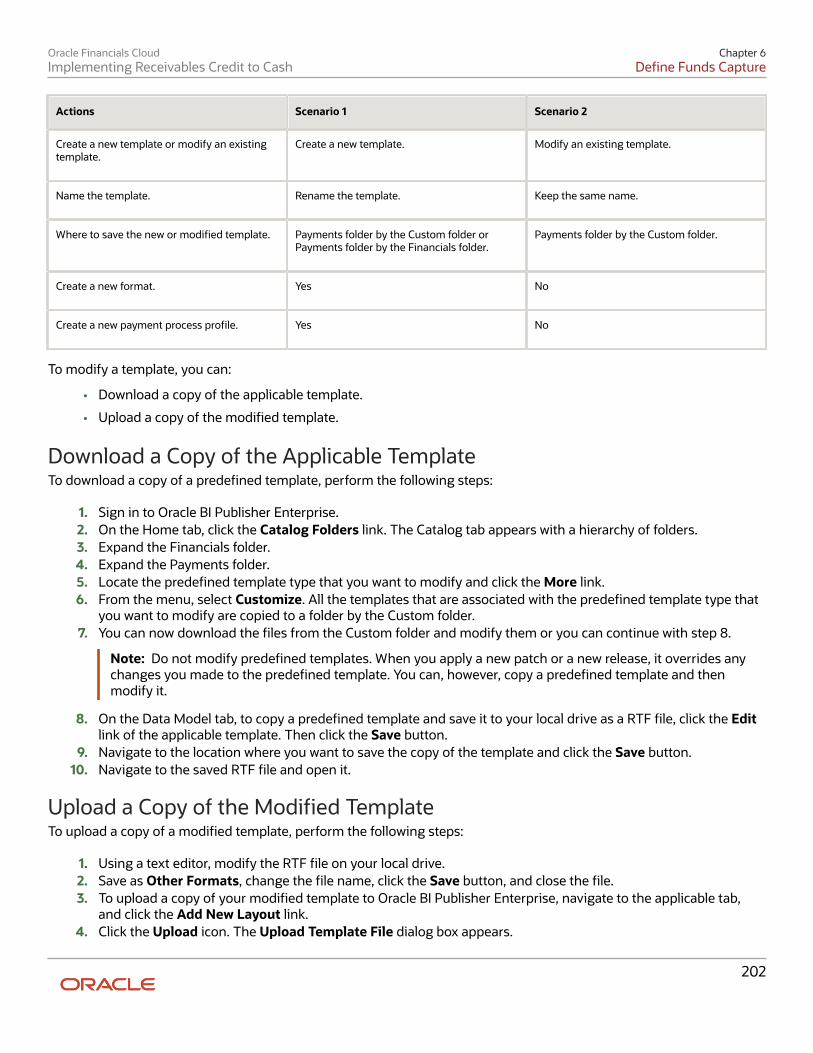
Oracle Financials CloudImplementing Receivables Credit to Cash
Chapter 6Define Funds Capture
Actions Scenario 1 Scenario 2
Create a new template or modify an existingtemplate.
Create a new template.
Modify an existing template.
Name the template.
Rename the template.
Keep the same name.
Where to save the new or modified template.
Payments folder by the Custom folder orPayments folder by the Financials folder.
Payments folder by the Custom folder.
Create a new format.
Yes
No
Create a new payment process profile.
Yes
No
To modify a template, you can:
• Download a copy of the applicable template.
• Upload a copy of the modified template.
Download a Copy of the Applicable TemplateTo download a copy of a predefined template, perform the following steps:
1. Sign in to Oracle BI Publisher Enterprise.2. On the Home tab, click the Catalog Folders link. The Catalog tab appears with a hierarchy of folders.3. Expand the Financials folder.4. Expand the Payments folder.5. Locate the predefined template type that you want to modify and click the More link.6. From the menu, select Customize. All the templates that are associated with the predefined template type that
you want to modify are copied to a folder by the Custom folder.7. You can now download the files from the Custom folder and modify them or you can continue with step 8.
Note: Do not modify predefined templates. When you apply a new patch or a new release, it overrides anychanges you made to the predefined template. You can, however, copy a predefined template and thenmodify it.
8. On the Data Model tab, to copy a predefined template and save it to your local drive as a RTF file, click the Editlink of the applicable template. Then click the Save button.
9. Navigate to the location where you want to save the copy of the template and click the Save button.10. Navigate to the saved RTF file and open it.
Upload a Copy of the Modified TemplateTo upload a copy of a modified template, perform the following steps:
1. Using a text editor, modify the RTF file on your local drive.2. Save as Other Formats, change the file name, click the Save button, and close the file.3. To upload a copy of your modified template to Oracle BI Publisher Enterprise, navigate to the applicable tab,
and click the Add New Layout link.4. Click the Upload icon. The Upload Template File dialog box appears.
202

Oracle Financials CloudImplementing Receivables Credit to Cash
Chapter 6Define Funds Capture
5. In the Layout Name field, enter a name for the template you modified.6. In the Template File field, browse to the location of the modified template on your local drive and click the
Open button.7. From the Type choice list, select RTF Template.8. From the Locale choice list, select the language for the modified template.9. Click the Upload button. The modified template appears on the Data Model tab of the applicable tab.
Note: The modified template is also copied to the Payments folder that is within the Custom folder.
10. To open the modified template, click the Edit link.11. To confirm that the modified template is saved, click the Catalog link. The Catalog tab appears with a hierarchy
of folders.12. Navigate as follows: Custom folder > Financials folder > Payments folder.13. Select the Payments folder.14. For the applicable template, click the Edit link. Your modified template appears.
FAQs for Define Funds Capture
What's a payment code? Oracle Fusion Payments enables you to specify payment codes that are required by financial institutions. Paymentcodes can provide details to banks or payments systems about transaction handling, bank charges, or payment reasonsfor regulatory reporting purposes.
Payment code types include:
• Bank instruction codes
• Delivery channel codes
• Payment reason codes
What's a bank instruction code? Bank instruction codes are values that contain instructions that must be passed to a bank or financial institution at thepayment file level. A payment process profile can have up to two bank instructions. When this payment process profileis used during the creation of a payment file, the bank instruction values are copied directly to it. The extract makes thevalues available to the formatting process. If the payment format specifies the use of bank instructions, the values arepassed to the bank in the header level of the payment file.
Oracle Payments provides many predefined bank instruction codes.
What's a delivery channel code? Delivery channels are instructions that tell the bank how to make the payment to the payee. You can set a defaultdelivery channel for the supplier, supplier address, or supplier site. A value automatically populates from the lowest of
203
Oracle Financials CloudImplementing Receivables Credit to Cash
Chapter 6Define Funds Capture
these levels to the invoice in Oracle Fusion Payables. On the invoice, it's displayed with the installments and you canmanually override it.
When an installment is paid, the delivery channel is copied from the document payable to the payment when paymentdocuments have the same delivery channel. When you select delivery channel as a grouping rule on the profile, alldocuments that share the same delivery channel are grouped into a payment.
Oracle Fusion Payments provides many predefined delivery channel codes.
What's a payment reason code? Payment reason codes are used for regulatory reporting purposes. These country-specific identifiers are used toprovide additional details about a payment reason to the payment system or bank. The country's government or centralbank generates these codes.
Oracle Payments includes many predefined payment reason codes.
What's an online verification? Before capturing funds from a payer's bank account, you can send an online message to the payment systemrequesting that it contact the bank and verify that the payer's bank account is valid. This process does not put a hold onany funds in the account, which is done with a credit card authorization.
You enable online verification in a funds capture process profile by selecting an outbound format and an inboundresponse format for verification.
Note: Online payer verification is an optional feature and is not offered by all payment systems.
How can I record a credit card or bank account settlementperformed outside Oracle Cloud? You can update your funds capture process profile to allow the use of externally-settled receipts. The authorization andverification status of these receipts is marked as successful without any actually processing with the payment system.Remittance batches are also recorded as successfully settled without submitting a separate settlement batch or offlinetransactions.
204
Oracle Financials CloudImplementing Receivables Credit to Cash
Chapter 7Define Payments Security
7 Define Payments Security
Options for System Security Implement application security options on the Manage System Security Options page. You can set the applicationsecurity to align with your company's security policy. You can set security options for encryption and tokenization ofcredit cards and bank accounts, as well as for masking the payment instrument. Both funds capture and disbursementprocesses use security options.
Note: You must enable encryption or tokenization of credit cards in Payments before you can import credit cards intoExpenses.
Ask yourself these security questions to improve the security of your sensitive data:
• Which security practices do I want to employ?
• Do I want to tokenize my credit card data?
• Do I want to encrypt my bank account data?
• Do I want to encrypt my credit card data?
• How frequently do I want to rotate the master encryption key and the subkeys?
• Do I want to mask credit card and bank account numbers? How do I accomplish that?
To set up application security options, go to Financials > Payments > Manage System Security Options in the Setupand Maintenance work area.
Best Security PracticesThese actions are considered best security practices for payment processing:
• Comply with the Payment Card Industry Data Security Standard (PCI DSS). PCI DSS is the security standardrequired for processing most types of credit cards.
◦ Comply with all requirements for accepting credit card payments.
◦ Minimize the risk of exposing sensitive customer data.
• Create the master encryption key.
◦ Rotate the master encryption key periodically.
Implementation Process of Master Encryption Key and EncryptionBefore you can enable encryption for credit card or bank account data, you must automatically create a masterencryption key. Oracle Platform Security Services stores your master encryption key. The application uses your masterencryption key to encrypt your sensitive data.
Automatic creation of the master encryption key ensures that it's created and stored in the proper location and with allnecessary permissions.
205
Oracle Financials CloudImplementing Receivables Credit to Cash
Chapter 7Define Payments Security
Credit Card TokenizationIf you tokenize your credit card data, you're complying with PCI DSS requirements. PCI DSS requires companies to usepayment applications that are PCI DSS compliant.
Tokenization is the process of replacing sensitive data, such as credit card data, with a unique number, or token, thatisn't considered sensitive. The process uses a third-party payment system that stores the sensitive information andgenerates tokens to replace sensitive data in the applications and database fields. Unlike encryption, tokens can't bemathematically reversed to derive the actual credit card number.
Click Edit Tokenization Payment System on the Manage System Security Options page to set up your tokenizationpayment system. Then, click Tokenize in the Credit Card Data section to activate tokenization for credit card data.
Credit Card Data EncryptionYou can encrypt your credit card data to assist with your compliance of cardholder data protection requirements withthese initiatives:
• Payment Card Industry Data Security Standard
• Visa's Cardholder Information Security Program
Credit card numbers entered in Oracle Receivables and Oracle Collections are automatically encrypted. Encryption isbased on the credit card encryption setting you specify on the Manage System Security Options page.
Note: If you import card numbers into Payments, you should run the Encrypt Credit Card Data program immediatelyafterward.
Bank Account Data EncryptionYou can encrypt your supplier and customer bank account numbers.
Bank account encryption doesn't affect internal bank account numbers. Internal bank accounts are set up in CashManagement. They are used as disbursement bank accounts in Payables and as remit-to bank accounts in Receivables.
Supplier, customer, and employee bank account numbers entered in Oracle applications are automatically encrypted.Encryption is based on the bank account encryption setting you specify on the Manage System Security Options page.
Note: If you import bank account numbers into Payments, you should run the Encrypt Bank Account Data programimmediately afterward.
Master Encryption Key and Subkey RotationFor payment instrument encryption, Payments uses a chain key approach. The chain key approach is used for datasecurity where A encrypts B and B encrypts C. In Payments, the master encryption key encrypts the subkeys and thesubkeys encrypt the payment instrument data. This approach enables easier rotation of the master encryption key.
The master encryption key is stored on Oracle Platform Security Services. Oracle Platform Security Services storesdata in an encrypted format. The master encryption key can be rotated, or generated, which also encrypts subkeys, butdoesn't result in encrypting the bank account numbers again.
If your installation has an existing master encryption key, click Rotate to automatically generate a new one.
206
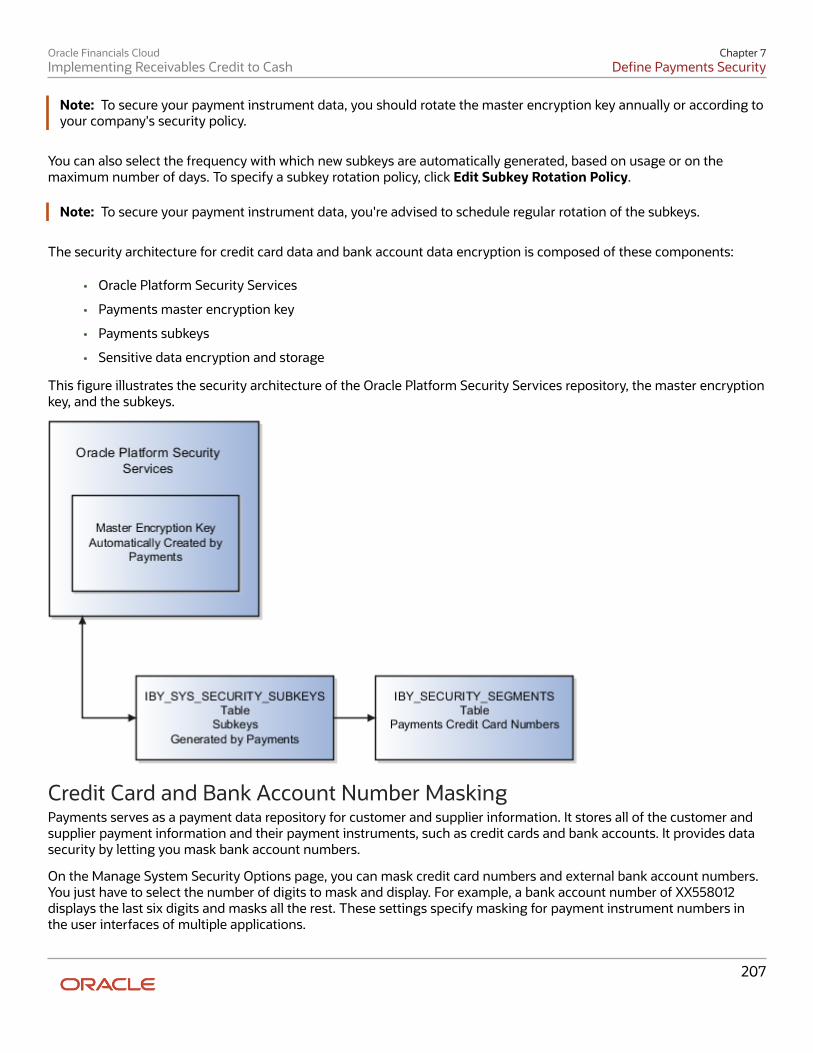
Oracle Financials CloudImplementing Receivables Credit to Cash
Chapter 7Define Payments Security
Note: To secure your payment instrument data, you should rotate the master encryption key annually or according toyour company's security policy.
You can also select the frequency with which new subkeys are automatically generated, based on usage or on themaximum number of days. To specify a subkey rotation policy, click Edit Subkey Rotation Policy.
Note: To secure your payment instrument data, you're advised to schedule regular rotation of the subkeys.
The security architecture for credit card data and bank account data encryption is composed of these components:
• Oracle Platform Security Services
• Payments master encryption key
• Payments subkeys
• Sensitive data encryption and storage
This figure illustrates the security architecture of the Oracle Platform Security Services repository, the master encryptionkey, and the subkeys.
Credit Card and Bank Account Number MaskingPayments serves as a payment data repository for customer and supplier information. It stores all of the customer andsupplier payment information and their payment instruments, such as credit cards and bank accounts. It provides datasecurity by letting you mask bank account numbers.
On the Manage System Security Options page, you can mask credit card numbers and external bank account numbers.You just have to select the number of digits to mask and display. For example, a bank account number of XX558012displays the last six digits and masks all the rest. These settings specify masking for payment instrument numbers inthe user interfaces of multiple applications.
207

Oracle Financials CloudImplementing Receivables Credit to Cash
Chapter 7Define Payments Security
Note: For credit cards, you can unmask only up to the first or last four digits of the credit card number. On the otherhand, you can unmask up to the first or last six digits of a bank account number.
Related Topics• Enable Encryption of Sensitive Payment Information
• PCI DSS Credit Card Processing Requirements
Enable Encryption of Sensitive Payment Information Financial transactions contain sensitive information, which must be protected by a secure, encrypted mode. To protectyour credit card and external bank account information, you can enable encryption. Encryption encodes sensitive data,so it can't be read or copied. To enable encryption, you must create a master encryption key. Oracle Platform SecurityServices is a repository that stores your master encryption key. The application uses your master encryption key toencrypt your sensitive data.
Note: Before you can import credit cards into Expenses, you must enable encryption or tokenization of credit cards inPayments. If you're using credit card data anywhere other than Expenses, you must enable tokenization in Payments.
To secure your credit card or bank account data, complete these steps:
1. In the Setup and Maintenance work area, go to Financials > Payments > Manage System Security Options.2. On the Manage System Security Options page, click Apply Quick Defaults.3. Select all the check boxes:
◦ Automatically create wallet file and master encryption key
◦ Encrypt credit card data
◦ Encrypt bank account data
4. Click Save and Close.
PCI DSS Credit Card Processing Requirements The Payment Card Industry (PCI) has developed security requirements for managing and processing cardholderinformation and has created a published standard called the Payment Card Industry Data Security Standard (PCI DSS).The security requirements defined in the PCI DSS apply to all members, merchants, and service providers that store,process, or transmit cardholder data.
Oracle Payments is engaged in the PCI certification process. Credit card processing is currently available only in theOracle data centers where Oracle Payments is certified by the latest PCI Data Security Standard (PCI DSS v3.2.1). Creditcard processing is included in all Oracle Fusion Applications that use Oracle Payments: Receivables, Payables, Expenses,Advanced Collections, and Bill Management.
208

Oracle Financials CloudImplementing Receivables Credit to Cash
Chapter 7Define Payments Security
Oracle Fusion Cloud ServiceOracle Fusion Cloud Applications Suite provides the integration services that facilitate credit card tokenization andpayment processing using supported payment gateways. Individual organizations are responsible for their ongoingagreements with the supported payment gateway services.
Organization responsibilities for credit card data processing using Oracle Fusion Applications include:
• Credit Card Tokenization and Masking: Credit card numbers must be tokenized or truncated. A truncatedcredit card number displays no more than the first six or last four digits of the full card number, with theremaining digits masked or removed.
• Movement of Credit Card Data: All credit card data, including credit card tokens, must be sent withinthe supported business flows only. Alternative communication flows, including file transfer, email, emailattachments, descriptive flexfields, and other similar attributes are prohibited.
Oracle Payments supports a select number of payment gateways for tokenization and credit card payment processingservices. For details on the certified Oracle data centers and supported gateways, refer to Is Credit Card ProcessingSupported In Oracle Fusion Applications (1949941.1). You can refer to this document as more data centers become PCIcertified.
Related Topics
How You Enable Credit Card Tokenization Credit card tokenization is the process of replacing sensitive data with a unique surrogate number, or token, that is notconsidered sensitive. The process employs services of a third-party token service provider that stores the sensitiveinformation and generates tokens to replace sensitive data in the applications and in database fields.
Note: Before you can import credit cards into Expenses, you must enable encryption or tokenization of credit cards inPayments.
To enable credit card tokenization, you perform steps in the following setup pages:
• Manage System Security Options page
• Create Payment System page
Manage System Security OptionsTo enable credit card tokenization on the Manage System Security Options page, click Edit Tokenization PaymentSystem. Select CyberSource as the tokenization payment system. Now you can view CyberSource as the read-onlytokenization payment system in the Tokenization section.
Create Payment SystemTo enable credit card tokenization on the Create Payment System page, follow these steps:
1. In the Tokenization Payment System Settings subsection, select the Credit card tokenization check box.
209

Oracle Financials CloudImplementing Receivables Credit to Cash
Chapter 7Define Payments Security
2. In the Tokenization Payment System Settings section, enter values that relate to the following fields:
◦ Name
◦ Code
◦ Data Type
◦ Secured: Specify Yes or No.
◦ Value
Note: The tokenization settings are already predefined for the CyberSource payment system. You only need to enterthe values.
Related Topics• PCI DSS Credit Card Processing Requirements
How Imported Legacy Credit Cards Are Processed Use the Import Legacy Credit Cards process to import tokenized legacy credit cards data into Oracle Payments Cloudfrom legacy and external sources through a batch, flat file-based interface. You can download a spreadsheet templateto enter your legacy credit cards data. The spreadsheet template conveniently provides field-level bubble help forassistance.
CAUTION: Before you can import legacy credit card numbers into Payments, you must ensure that they are tokenizedto maintain strict compliance with the PCI (Payment Card Industry) rules protecting Oracle Applications Cloud fromaudit.
This figure illustrates the flow of importing legacy credit cards data into the application, as well as correcting errors.
210

Oracle Financials CloudImplementing Receivables Credit to Cash
Chapter 7Define Payments Security
To access the IbyLegacyCreditCardsImportTemplate.xlsm spreadsheet template, complete these steps:
1. Navigate to the File-Based Data Import for Oracle Financials Cloud guide.2. In the Table of Contents, click the File-Based Data Imports link.3. Click the Import Legacy Credit Cards link.4. In the File Links section, click the link to the Excel template.
Before you can import legacy credit cards data, you must complete these steps:
1. Enable tokenization in Payments.2. Configure at least one payment system with tokenization enabled. The tokenization service provider is
CyberSource.3. Configure the ORA_IBY_DTK_RUN lookup that enables the Import Legacy Credit Cards program.4. Tokenize the legacy credit cards data using a batch file upload process in CyberSource.
211

Oracle Financials CloudImplementing Receivables Credit to Cash
Chapter 7Define Payments Security
Follow these guidelines when preparing your data in the spreadsheet template:
• Enter the required information for each column. Refer to tool tips on each column header for the expected datatype or for detailed instructions.
• Don't change the order of the columns in the spreadsheet template.
If you change the order of the columns, the upload process fails.
• You can hide or skip columns you don't use, but don't delete them.
If you delete columns, the upload process fails.
Spreadsheet Tabs that Affect the Import Legacy Credit Cards ProcessThe following table contains the name of the spreadsheet tabs in the Legacy Credit Cards Import spreadsheet templateand a brief description of their content.
Spreadsheet Tab Description
Instructions and CSV Generation
• Overview of the process
• CSV generation button
• Revision history
Tokenized Credit Card Details
Column headings for entering tokenized card details
How Import Legacy Credit Cards Data Is ProcessedThe following table describes the flow of data when you import tokenized legacy credit cards into Payments.
Sequence Action Result
1
From the guide titled File-Based DataImport for Oracle Financials Cloud,download the spreadsheet template namedIbyLegacyCreditCardsImportTemplate.xlsm. It islocated in the File-Based Data Imports chapter,Legacy Credit Cards Import section.
The file-based data import spreadsheettemplate is downloaded.
2
1. Enter data in the spreadsheet template.2. Refer to the bubble text on each column
header either for detailed instructions onentering the data in that column, or for adescription of the data and data type thatthe column requires.
3. Don't delete row number 5, which showstext in capital letters.
4. Each credit card is assigned to thecustomer at the customer account orcustomer account site use level.
The spreadsheet template is ready for CSV filegeneration.
3
1. Click Generate CSV File.2. Save the CSV file with a unique name.
A CSV file is generated that is compressed intoa ZIP file.
212

Oracle Financials CloudImplementing Receivables Credit to Cash
Chapter 7Define Payments Security
Sequence Action Result
4
To upload the ZIP file to Oracle UniversalContent Management:
1. Navigate: Tools > File Import and Export.2. On the File Import and Export page, click
the plus (Upload) icon. The Upload Filedialog box appears.
3. In the File field, browse for and select yourZIP file.
4. From the Account choice list, select fin/payments/import.
5. Click Save and Close.
The ZIP file is uploaded.
5
To submit the Import Legacy Credit Cardsprocess:
1. Sign in to the central Oracle EnterpriseScheduler server.
2. Navigate: Tools > Scheduled Processes.3. Click Schedule New Process.
The Schedule New Process dialog boxappears.
4. From the Name choice list, search andselect Tokenize Credit Card Data.
5. Click OK.
The Process Details dialog box appears.6. From the Credit Card Data Import File
choice list, select your ZIP file.7. Click Submit.
The Import Legacy Credit Cards process firstvalidates the credit cards and associated dataand then imports the data from the uploadedfile into the following Payments tables:
• IBY_CREDITCARD
• IBY_PMT_INSTR_USES_ALL
After you submit the Import Legacy CreditCards process, the following data appears inPayments:
• Credit card data
• Assignment data
The log output of the Import Legacy CreditCards process reports the number of successfuland rejected records.
6
To correct import errors:
1. View the log output from the ImportLegacy Credit Cards process.
2. Identify the rejected records based ondetails provided in the log file.
3. Create a new spreadsheet that containsonly rejected records that you copy fromthe old spreadsheet template.
4. For the Origin Site Purpose SourceReference column, enter a different uniquevalue.
5. Make necessary corrections to the data.6. Load the data using a new spreadsheet.7. Generate the CSV File, upload the ZIP file,
and continue.
Failed records are visible in the log output fromthe Import Legacy Credit Cards process. Anew spreadsheet that contains only correctedrecords is uploaded and processed again.
7
Import legacy credit cards data at one of thefollowing levels if you have their associatedidentifiers:
• Customer account
• Customer account site
In the spreadsheet, if the Owner Level column isCUST_ACCOUNT, then credit cards are assignedat the customer account level. In the spreadsheet, if the Owner Level columnis CUST_ACCT_SITE_USE, then credit cards areassigned at the customer account site level.
213

Oracle Financials CloudImplementing Receivables Credit to Cash
Chapter 7Define Payments Security
Related Topics• Enabling Credit Card Tokenization: Explained
• Setting Up a Payment System: Explained
• Configuring a Communication Channel to a Payment System: Explained
• Importing Legacy Customer Credit Card Data: Procedures
Removal of Personally Identifiable Information The General Data Protection Regulation is a regulation in European Union (EU) law. It protects the data and privacy of allindividuals within the EU and the European Economic Area. Your organization can comply with the GDPR regarding thecollection and use of personal data of EU residents.
You can remove an individual's personal data:
• If requested by an individual
• If the individual is no longer employed with your organization
CAUTION: If you remove personally identifiable information, it can't be retrieved.
To run the removal process, you must have the duty role of Financial Application Administrator.
To remove an individual's personally identifiable information for any product in Oracle Financials applications, yousubmit the Remove Personally Identifiable Information in Financials process.
1. Navigate: Navigator > Tools > Scheduled Processes.2. On the Scheduled Processes page, click Schedule New Process.3. Search and select Remove Personally Identifiable Information in Financials.4. From the Party choice list, select the person's name for whom you want to remove personally identifiable
information.5. Click Submit.
Table and Column Details for Potential Removal of Personally IdentifiableInformationHere's a table that lists applications and their corresponding tables and columns that store sensitive data. It also lists thedata type stored in each column, whether you can redact the data from the column, and the reason for redaction.
Sequence Numberand Product
Table Column Data Type Redact? Reason for Redaction
1 Oracle Payments
IBY_CREDITCARD
CC_NUMBER_HASH1
VARCHAR2(64 CHAR)
No
Unreadable data.
2 Oracle Payments
IBY_CREDITCARD
CC_NUMBER_HASH2
VARCHAR2(64 CHAR)
No
Unreadable data.
214
Oracle Financials CloudImplementing Receivables Credit to Cash
Chapter 7Define Payments Security
Sequence Numberand Product
Table Column Data Type Redact? Reason for Redaction
3 Oracle Payments
IBY_CREDITCARD
CCNUMBER
VARCHAR2(30 CHAR)
No
Tokenized orencrypted data.
4 Oracle Payments
IBY_CREDITCARD
CHNAME
VARCHAR2(80 CHAR)
No
Nonsensitive sincecard is secured.
5 Oracle Payments
IBY_CREDITCARD
EXPIRYDATE
DATE
No
Nonsensitive sincecard is secured.
6 Oracle Payments
IBY_CREDITCARD
MASKED_CC_NUMBER
VARCHAR2(30 CHAR)
No
Nonsensitive sincecard is secured.
7 Oracle Payments
IBY_EXT_BANK_ACCOUNTS
BANK_ACCOUNT_NAME
VARCHAR2(80 CHAR)
Yes
Sensitive data.
8 Oracle Payments
IBY_EXT_BANK_ACCOUNTS
BANK_ACCOUNT_NAME_ALT
VARCHAR2(320 CHAR)
Yes
Sensitive data.
9 Oracle Payments
IBY_EXT_BANK_ACCOUNTS
BANK_ACCOUNT_NUM
VARCHAR2(100 CHAR)
Yes
Sensitive whenbank account isn'tencrypted or masked.
10 Oracle Payments
IBY_EXT_BANK_ACCOUNTS
BANK_ACCOUNT_NUM_ELECTRONIC
VARCHAR2(100 CHAR)
Yes
Sensitive whenbank account isn'tencrypted or masked.
11 Oracle Payments
IBY_EXT_BANK_ACCOUNTS
BANK_ACCOUNT_NUM_HASH1
VARCHAR2(64 CHAR)
No
Unreadable data.
12 Oracle Payments
IBY_EXT_BANK_ACCOUNTS
BANK_ACCOUNT_NUM_HASH2
VARCHAR2(64 CHAR)
No
Unreadable data.
13 Oracle Payments
IBY_EXT_BANK_ACCOUNTS
IBAN
VARCHAR2(50 CHAR)
Yes
Sensitive whenbank account isn'tencrypted or masked.
14 Oracle Payments
IBY_EXT_BANK_ACCOUNTS
IBAN_HASH1
VARCHAR2(64 CHAR)
No
Unreadable data.
215

Oracle Financials CloudImplementing Receivables Credit to Cash
Chapter 7Define Payments Security
Sequence Numberand Product
Table Column Data Type Redact? Reason for Redaction
15 Oracle Payments
IBY_EXT_BANK_ACCOUNTS
IBAN_HASH2
VARCHAR2(64 CHAR)
No
Unreadable data.
16 Oracle Payments
IBY_EXT_BANK_ACCOUNTS
MASKED_BANK_ACCOUNT_NUM
VARCHAR2(100 CHAR)
Yes
Denormalized value.Sensitive whenbank account isn'tencrypted or masked.
17 Oracle Payments
IBY_EXT_BANK_ACCOUNTS
MASKED_IBAN
VARCHAR2(50 CHAR)
Yes
Denormalized value.Sensitive whenbank account isn'tencrypted or masked.
18 Oracle Payments
IBY_FNDCPT_TX_EXTENSIONS
INSTRUMENT_SECURITY_CODE
VARCHAR2(10 CHAR)
No
No longer store cardverification value.
19 Oracle Payments
IBY_TRXN_SUMMARIES_ALL
DEBIT_ADVICE_EMAIL
VARCHAR2(255 CHAR)
Yes
Denormalized value.Sensitive data.
20 Oracle Payments
IBY_PAYMENTS_ALL
EXT_BANK_ACCOUNT_NAME
VARCHAR2(360 CHAR)
Yes
Nonsensitive whenperson data isredacted.
21 Oracle Payments
IBY_PAYMENTS_ALL
EXT_BANK_ACCOUNT_NUMBER
VARCHAR2(100 CHAR)
Yes
Denormalized value.Sensitive whenbank account isn'tencrypted or masked.
22 Oracle Payments
IBY_PAYMENTS_ALL
EXT_BANK_ACCOUNT_IBAN_NUMBER
VARCHAR2(50 CHAR)
Yes
Denormalized value.Sensitive whenbank account isn'tencrypted or masked.
23 Oracle Payments
IBY_PAYMENTS_ALL
PAYEE_NAME
VARCHAR2(360 CHAR)
Yes
Payee name issensitive data.
24 Oracle Payments
IBY_PAYMENTS_ALL
PAYEE_ADDRESS1
VARCHAR2(240 CHAR)
Yes
Address data.
25 Oracle Payments
IBY_PAYMENTS_ALL
PAYEE_ADDRESS2
VARCHAR2(240 CHAR)
Yes
Address data.
26
IBY_PAYMENTS_ALL
PAYEE_ADDRESS3
VARCHAR2(240 CHAR)
Yes
Address data.
216
Oracle Financials CloudImplementing Receivables Credit to Cash
Chapter 7Define Payments Security
Sequence Numberand Product
Table Column Data Type Redact? Reason for Redaction
Oracle Payments
27 Oracle Payments
IBY_PAYMENTS_ALL
PAYEE_ADDRESS4
VARCHAR2(240 CHAR)
Yes
Address data.
28 Oracle Payments
IBY_PAYMENTS_ALL
PAYEE_CITY
VARCHAR2(60 CHAR)
Yes
Address data.
29 Oracle Payments
IBY_PAYMENTS_ALL
PAYEE_POSTAL_CODE
VARCHAR2(60 CHAR)
Yes
Address data.
30 Oracle Payments
IBY_PAYMENTS_ALL
PAYEE_STATE
VARCHAR2(120 CHAR)
Yes
Address data.
31 Oracle Payments
IBY_PAYMENTS_ALL
PAYEE_PROVINCE
VARCHAR2(120 CHAR)
Yes
Address data.
32 Oracle Payments
IBY_PAYMENTS_ALL
PAYEE_COUNTY
VARCHAR2(120 CHAR)
Yes
Address data.
33 Oracle Payments
IBY_PAYMENTS_ALL
PAYEE_COUNTRY
VARCHAR2(60 CHAR)
Yes
Address data.
34 Oracle Payments
IBY_PAYMENTS_ALL
REMIT_ADVICE_EMAIL
VARCHAR2(255 CHAR)
Yes
Address data.
35 Oracle Payments
IBY_PAYMENTS_ALL
PAYEE_PARTY_NAME
VARCHAR2(360 CHAR)
Yes
Party name is sensitivedata.
36 Oracle Payments
IBY_PAYMENTS_ALL
PAYEE_LE_REGISTRATION_NUM
VARCHAR2 (50 CHAR)
Yes
Denormalized value.Sensitive data.
37 Oracle Payments
IBY_PAYMENTS_ALL
PAYEE_TAX_REGISTRATION_NUM
VARCHAR2 (50 CHAR)
Yes
Denormalized value.Sensitive data.
38 Oracle Payments
IBY_PAYMENTS_ALL
PAYEE_ADDRESS_CONCAT
VARCHAR2 (2000CHAR)
Yes
Address data.
217
Oracle Financials CloudImplementing Receivables Credit to Cash
Chapter 7Define Payments Security
Sequence Numberand Product
Table Column Data Type Redact? Reason for Redaction
39 Oracle Payments
IBY_PAYMENTS_ALL
BENEFICIARY_NAME
VARCHAR2 (360CHAR)
Yes
Beneficiary name issensitive data.
40 Oracle Payments
IBY_PAYMENTS_ALL
PAYEE_ALTERNATE_NAME
VARCHAR2 (360CHAR)
Yes
Payee alternate nameis sensitive data.
41 Oracle Payments
IBY_PAYMENTS_ALL
EXT_BANK_ACCOUNT_ALT_NAME
VARCHAR2 (320CHAR)
Yes
Bank account alternatename is sensitive data.
42 Oracle Payments
IBY_PAYMENTS_ALL
EXT_BANK_ACCOUNT_NUM_ELEC
VARCHAR2 (100CHAR)
Yes
Denormalized value.Sensitive whenbank account isn'tencrypted or masked.
43 Oracle Payments
IBY_PAYMENTS_ALL
EXT_BANK_ACCT_OWNER_PARTY_NAME
VARCHAR2 (360CHAR)
Yes
Owner party name issensitive data.
44 Oracle Payments
IBY_EXTERNAL_PAYEES_ALL
REMIT_ADVICE_EMAIL
VARCHAR2(255 CHAR)
Yes
Sensitive data.
45 Oracle Payments
IBY_EXTERNAL_PAYERS_ALL
DEBIT_ADVICE_EMAIL
VARCHAR2(255 CHAR)
Yes
Sensitive data.
46 Oracle Payables
AP_CHECKS_ALL
ADDRESS_LINE1
VARCHAR2(240 CHAR)
Yes
Address data.
47 Oracle Payables
AP_CHECKS_ALL
ADDRESS_LINE2
VARCHAR2(240 CHAR)
Yes
Address data.
48 Oracle Payables
AP_CHECKS_ALL
ADDRESS_LINE3
VARCHAR2(240 CHAR)
Yes
Address data.
49 Oracle Payables
AP_CHECKS_ALL
CITY
VARCHAR2(60 CHAR)
Yes
Address data.
50 Oracle Payables
AP_CHECKS_ALL
COUNTRY
VARCHAR2(60 CHAR)
Yes
Address data.
218
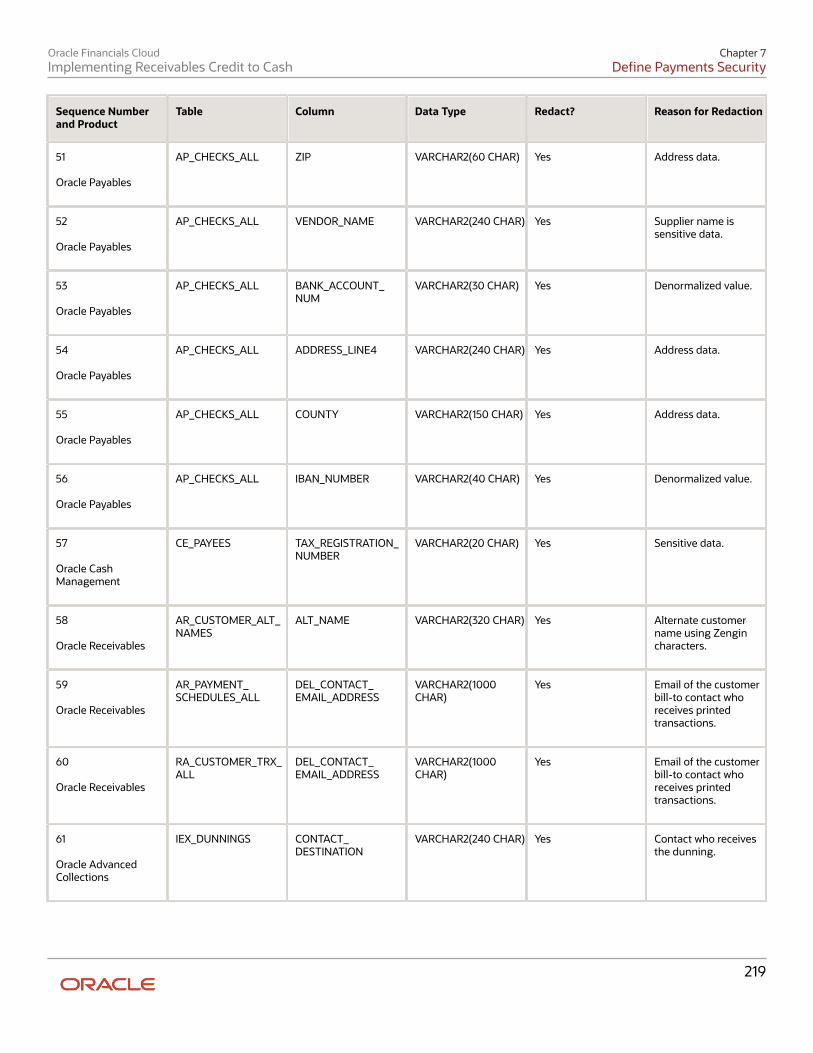
Oracle Financials CloudImplementing Receivables Credit to Cash
Chapter 7Define Payments Security
Sequence Numberand Product
Table Column Data Type Redact? Reason for Redaction
51 Oracle Payables
AP_CHECKS_ALL
ZIP
VARCHAR2(60 CHAR)
Yes
Address data.
52 Oracle Payables
AP_CHECKS_ALL
VENDOR_NAME
VARCHAR2(240 CHAR)
Yes
Supplier name issensitive data.
53 Oracle Payables
AP_CHECKS_ALL
BANK_ACCOUNT_NUM
VARCHAR2(30 CHAR)
Yes
Denormalized value.
54 Oracle Payables
AP_CHECKS_ALL
ADDRESS_LINE4
VARCHAR2(240 CHAR)
Yes
Address data.
55 Oracle Payables
AP_CHECKS_ALL
COUNTY
VARCHAR2(150 CHAR)
Yes
Address data.
56 Oracle Payables
AP_CHECKS_ALL
IBAN_NUMBER
VARCHAR2(40 CHAR)
Yes
Denormalized value.
57 Oracle CashManagement
CE_PAYEES
TAX_REGISTRATION_NUMBER
VARCHAR2(20 CHAR)
Yes
Sensitive data.
58 Oracle Receivables
AR_CUSTOMER_ALT_NAMES
ALT_NAME
VARCHAR2(320 CHAR)
Yes
Alternate customername using Zengincharacters.
59 Oracle Receivables
AR_PAYMENT_SCHEDULES_ALL
DEL_CONTACT_EMAIL_ADDRESS
VARCHAR2(1000CHAR)
Yes
Email of the customerbill-to contact whoreceives printedtransactions.
60 Oracle Receivables
RA_CUSTOMER_TRX_ALL
DEL_CONTACT_EMAIL_ADDRESS
VARCHAR2(1000CHAR)
Yes
Email of the customerbill-to contact whoreceives printedtransactions.
61 Oracle AdvancedCollections
IEX_DUNNINGS
CONTACT_DESTINATION
VARCHAR2(240 CHAR)
Yes
Contact who receivesthe dunning.
219

Oracle Financials CloudImplementing Receivables Credit to Cash
Chapter 7Define Payments Security
220
Oracle Financials CloudImplementing Receivables Credit to Cash
Chapter 8Define Customer
8 Define Customer
Define Customer Account
Customer Account Relationships Use customer account relationships to manage the sharing of billing and shipping services and payment activitiesbetween two accounts.
Account relationships let you identify customer accounts that can receive shipments or invoices for another account, aswell as accounts that can pay for the open debit items of other accounts.
How You Use Customer Account RelationshipsUse the Relationships tab of the Edit Account page to create and maintain account relationships for a particularcustomer account.
A customer account relationship is either a one-way relationship or a reciprocal relationship. By default an accountrelationship is one-way, meaning that the parent account can apply receipts to open debit items of the related account,but receipts in the related account can't be applied to open debit items of the parent account. If you want to allow thetwo accounts to pay for each other's open debit items, then enable the Reciprocal option for the relationship definition.
Enable the Bill To and Ship To options for relationships that involve billing and shipping services. In a one-wayrelationship, the parent account can process invoices and receive shipments for the related account. In a reciprocalrelationship, either account can manage these services for the other account.
You can use the Allow payment of unrelated transactions Receivables system option to help manage customeraccount relationships. Don't enable this option if you want to restrict the sharing of receipt application and billing andshipping services to the account relationships that you define for each customer account.
If you do enable the Allow payment of unrelated transactions Receivables system option, then any customer accountcan pay for the open debit items of any other customer account. You can still use account relationships to managebilling and shipping services.
Related Topics• What's the difference between an account relationship and a paying relationship
Customer Account Information Use the customer account record to maintain detailed information about each of your customer accounts.
Review these activities related to entering and updating customer account information:
• Payment Details
• Communication Information
• Account Relationships
221
Oracle Financials CloudImplementing Receivables Credit to Cash
Chapter 8Define Customer
• Account Profiles
Payment DetailsUse the Payment Details section to maintain active receipt methods and payment instruments for use by eachcustomer account. During transaction and receipt entry, Receivables assigns the primary receipt method and paymentinstruments as the default. You can override these defaults at the transaction or receipt level with another active receiptmethod or payment instrument belonging to the customer account.
• Receipt Methods: Assign automatic and manual receipt methods to each customer account. Start and enddates for each receipt method can't overlap.
◦ Assign automatic receipt methods for use with automatic receipts. Automatic receipt methodsdetermine the required processing steps for automatic receipts, including confirmation, remittance, andreconciliation.
◦ Assign manual receipt methods to indicate which form of receipt to use to collect payment fortransactions belonging to this account.
The primary manual receipt method on bill-to customer accounts and sites is assigned by default to therespective customer invoices and debit memos created manually in the related Create Transaction page.
• Payment Instruments: Assign credit cards and bank accounts to each customer account. The paymentinstrument information that you create for a customer account is stored in Oracle Payments for use duringfunds capture processing.
◦ Assign bank accounts for use with automatic receipts. The bank accounts you specify are used by theautomatic receipt process to transfer funds from these accounts to your remittance bank accounts.
◦ Define multiple customer bank accounts in different currencies and assign bank accounts to customeraddresses. The primary bank account for a particular currency is used as the default account duringautomatic receipt processing. You can define multiple, non-primary accounts in the same currency, evenif the date ranges overlap.
Communication InformationUse the Communication section to maintain customer contact persons for each customer account. Information that youcan maintain for each contact includes:
• Name and job title.
• Contact points, such as phone and fax numbers, email and instant message addresses, and URLs.
• Job responsibilities.
• Addresses. You can either enter new addresses specific to the contact, or you can enter addresses of accountsites belonging to the customer account.
You can create a new contact person or add an existing contact person for a customer account or account site. If you'readding an existing contact person, you must define a party relationship at the customer level for each party and assignthe party the Contact role type.
Account RelationshipsUse customer account relationships to manage the sharing of billing and shipping services and payment activitiesbetween two accounts.
222
Oracle Financials CloudImplementing Receivables Credit to Cash
Chapter 8Define Customer
Account ProfilesThe account profile is the profile class record assigned to a customer account for a specified time period. You use theprofile class record to organize your customer accounts into categories that reflect the needs of your enterprise. If youassign the same profile class to more than one customer account, you can modify individual profiles according to theneeds of a given customer account.
Related Topics• Overview of Extending the CX Sales Applications
Guidelines for Customer Addresses Enter and maintain address information for your Receivables customer records.
When you create a customer, you must enter account and address information. This address becomes an account siterecord of the customer.
When you create additional customer accounts for the customer, you can either enter new address information to createa new account site, or you can use an existing account site. If you assign an existing account site to the new account,you can modify the address information itself, but you will receive a warning if this address is shared by other parties.
These guidelines apply to entering and updating customer addresses:
• Reference Data Set for Account Sites
• Update Sharing
• Account Address Details
• Address Business Purposes
• Reference Accounts
Reference Data Set for Account SitesBefore creating or importing customers, you must create a reference data set for use with customer account sites. Youcan share this reference data set across one or more business units, according to your requirements.
To access the new reference data set on customer account sites, provision the appropriate data role to the designatedusers in order to grant them access to the job role for the given business units and reference data sets.
Update SharingIf you update an address due to incorrect or missing information, these updates are shared with all account sites thatuse this address.
Update sharing applies to address information only, and not to account address details or business purposes.
Account Address DetailsUse the Account Address Details subsection to identify these values for the account site:
• Customer Category Code: Used to classify this customer according to the needs of your enterprise. You definethese category codes using the Trading Community Model.
223

Oracle Financials CloudImplementing Receivables Credit to Cash
Chapter 8Define Customer
• Translated Customer Name: Used to enter the customer name in another language. The translated namereplaces the customer name on external documents.
Address Business PurposesAssign address business purposes to account sites to identify the functions performed by each particular customeraccount site. You can designate one account site as Primary for each address business purpose.
Common address business purposes include:
• Bill-to: Assign the bill-to business purpose to account sites designated to receive and process bills. You mustcreate at least one bill-to site to process transactions for a customer.
• Ship-to: Assign the ship-to business purpose to account sites designated to receive goods purchased by thecustomer account.
If you create a ship-to business purpose, you must indicate the related bill-to site that processes the bills for theshipped goods.
Bill-to sites available for association with ship-to sites either belong to the same customer account or to relatedcustomer accounts.
• Deliver-to: Assign the deliver-to business purpose to sites that receive all or part of goods sent to a ship-to site.
• Bills of lading: Assign the bills of lading business purpose to sites that manage contracts for carriers that shipcustomer goods.
• Dunning: Assign the dunning business purpose to sites that receive dunning letters from you.
• Late Charge: Assign the late charge business purpose to the site assigned the late charge policy for thiscustomer account.
If the Statement, Dunning, and Late Charges Site Profiles Used profile option is set to Yes, then Receivablesuses the late charge policy assigned to the late charge site to calculate late charges on transactions. If theprofile option is set to No, then receivables uses the late charge policy assigned to the bill-to site assigned tothe transaction.
Reference AccountsAssign distributions for revenue, freight, receivable, AutoInvoice clearing, tax, unbilled receivable, and deferred revenueaccounts to customer bill-to sites. If AutoAccounting depends on Bill-to Site, then Receivables uses the bill-to site of thetransaction to determine the related segment for these distributions.
Related Topics• Reference Data Sets
How You Display Additional Customer Sites By default the Manage Customers page displays in the Sites section the account sites assigned to the selected customeraccount.
You can use the Advanced search to search for sites by site number. The search results display all sites across allcustomers and customer accounts that match the search value.
224

Oracle Financials CloudImplementing Receivables Credit to Cash
Chapter 8Define Customer
You can also enable the Show related contact sites option to display in the Sites section additional sites belonging to acustomer account that don't display by default.
Additional sites may belong to related parties that, through some action of the party, were used as account sites. Forexample, an employee placed an order on behalf of the customer account, but used his or her personal address as theshipping address. This created an account site for the customer account with the employee address as the account siteaddress.
Additional sites may also be part of data migration, such as existing account sites from other systems that are linked tothe customer account.
Manage Receivables Customer Profile Classes
How You Use Customer Profile Classes Use profile classes to organize your customer accounts into categories that reflect the needs of your enterprise. Theprofile class record contains generic options that you can set in different ways to group your customers into broadcategories, such as, for example, by industry, location, size, creditworthiness, business volume, or payment cycles.
For example, you might define three profile classes that reflect customer payment behavior: one for customers who paypromptly; one for late paying customers with high late charge rates; and a third for customers who for the most part payon time, with discount incentives for early payment.
Profile Class ManagementWhen you create a customer account, Receivables assigns the profile class DEFAULT. Use the Edit Account page tomodify this profile class or assign another profile class to the customer account.
When you create a customer site, Receivables doesn't assign either the DEFAULT profile class or the profile class of thecustomer account. Instead you must use the Create Site Profile page to assign the first profile class to the site. Use theEdit Site page either to update the existing profile or to assign a new profile class to the site.
After you assign a profile class to a customer account or site, you can modify details of the profile class to meet specificrequirements for that account or site. For example, a particular site may transact business in a separate currency, or thesite may be subject to additional late charges or penalty charges. These updates apply only to that particular account orsite and don't affect the profile class record itself.
Profile class updates and assignments are managed using effective date ranges. Each profile class that you assignor update supersedes the previous profile class for the given date range. In this way you can manage over time thechanges that take place in customer behavior or customer requirements. The date of a given transaction or receiptdetermines which account or site profile applies to the activity. The profile history for an account or site provides detailsof when a given version of a profile class is active.
How You Update and Version Profile Classes After you update an existing profile class, Receivables presents you with three options for how to save your updates.You can update the profile class record only, or you can update the profile class record along with updating in differentways the profiles that make use of this record.
225

Oracle Financials CloudImplementing Receivables Credit to Cash
Chapter 8Define Customer
The three options for updating profile class records are:
• Apply changes to new profiles only.
• Apply changes to unmodified profiles and version existing unmodified profiles
• Apply changes to all profiles and version all existing profiles.
This update process is managed by the Propagate Customer Profile Class Update program.
Apply changes to new profiles onlyThis option updates the profile class record only. It doesn't apply your updates to any account or site profile that usesthis profile class.
The changes you make to this profile class will apply to new account or site profiles that are assigned this profile class.
Apply changes to unmodified profiles and version existing unmodified profilesThis option applies versioning to profiles that don't have modified settings. The update process for this option is:
• Updates the profile class record.
• Applies your updates to unmodified account and site profiles that use this profile class.
• Creates a new version of account and site profiles that use this profile class, using the system date as theeffective start date.
• Assigns the previous version of account and site profiles that use this profile class an effective end date of theday before the system date. This previous version remains valid within its effective date range.
Use the Profile History tab of customer account and site records to view the versions of a profile.
Apply changes to all profiles and version all existing profilesThis option applies versioning to all profiles. The update process for this option is:
• Updates the profile class record.
• Applies your updates to all account and site profiles that use this profile class.
• Creates a new version of account and site profiles that use this profile class, using the system date as theeffective start date.
• Assigns the previous version of account and site profiles that use this profile class an effective end date of theday before the system date. This previous version remains valid within its effective date range.
Use the Profile History tab of customer account and site records to view the versions of a profile.
How You Set Up a Customer Profile for Credit Checks The Credit Check service in the quote-to-cash process evaluates credit authorization requests according to the creditsettings in the customer or customer account profile.
Set up the Credit and Collections section of each customer or customer account profile with the settings that you wantto use to determine credit authorizations.
226
Oracle Financials CloudImplementing Receivables Credit to Cash
Chapter 8Define Customer
The settings used for credit authorization are:
• Credit Limit field: Enter the total credit limit that the customer or customer account has available in the givencurrency.
• Tolerance field: Enter the percentage that a customer can exceed their credit limit.
• Conversion Rate Type field: Enter the conversion rate type to use to convert transaction amounts to the creditcurrency.
• Include in credit check option:
◦ If you enable this option, then the application compares the available credit in the applicable currency tothe requested amount.
◦ If you don't enable this option, then the customer or customer account is excluded from the credit checkprocess.
• Expiration Offset Days field: Enter the number of days to use in the calculation of the expiration date of acredit authorization.
How the Credit Authorization Expiration Date is DerivedReceivables derives the expiration date of a credit authorization depending on the available date information for thetransaction and the value in the Expiration Offset Days field, if there is one.
The logic for deriving the credit authorization expiration date is as follows:
• If the Expiration Offset Days field contains a value, then:
◦ If the fulfillment/shipment date is provided, then: Expiration Date = Fulfillment/Shipment date + OffsetDays.
◦ If fulfillment/shipment date isn't provided, but the sales order date is provided, then: Expiration Date =Sales Order Date + Offset Days.
◦ If neither the fulfillment/shipment date nor the sales order date is provided, then: Expiration Date =Credit Authorization Date + Offset Days.
• If the Expiration Offset Days field doesn't contain a value, then:
◦ If the fulfillment/shipment date is provided, then: Expiration Date = Fulfillment/Shipment date + 5.
◦ If fulfillment/shipment date isn't provided, but the sales order date is provided, then: Expiration Date =Sales Order Date + 5.
◦ If neither the fulfillment/shipment date nor the sales order date is provided, then: Expiration Date =Credit Authorization Date + 5.
Related Topics• Components of the Credit Profile
227
Oracle Financials CloudImplementing Receivables Credit to Cash
Chapter 8Define Customer
FAQs for Manage Receivables Customer Profile Classes
When are profile class defaults used? The customer profile class shares these default settings with other parts of Receivables: Match Receipts By; AutoMatchrule set; AutoCash rule set; AutoInvoice grouping rule; payment terms; and tax printing options. Each of these settings isused according to the hierarchy required by the transaction or receipt process.
For receipt processing:
• Receivables searches for a Match Receipts By document type reference to use for receipt and transactioncomparison in the order: customer site profile, customer account profile, lockbox (for lockbox processing), andReceivables system options.
• Receivables searches for an AutoMatch rule set to determine how receipts are applied automatically andtransactions recommended for manual application in the order: customer site profile, customer account profile,lockbox (for lockbox processing), and Receivables system options.
• If Receivables can't match receipts to transactions, the application searches for an AutoCash rule set to use toapply receipts in the order: customer site profile, customer account profile, and Receivables system options.
For transaction processing:
• During AutoInvoice import, Receivables searches for an AutoInvoice grouping rule to use to group transactionlines into transactions in the order: transaction source, customer site profile, customer account profile, andReceivables system options.
• Receivables searches for the payment terms to use on a transaction in the order: customer site profile,customer account profile, and transaction type. If the payment terms come from the site profile or accountprofile, and the Override terms option is enabled, then you can update the default payment terms on thetransaction.
• Receivables searches for the tax printing option to use to print tax on transactions in the order: customer siteprofile, customer account profile, and Receivables system options. If no value is found, then Receivables usesTotal Tax Only as the default value to print transactions.
Manage Customers
Customer and Party Structure You create customers to properly record and account for sales transactions, as well as to identify other attributes of theselling relationship. Recording a sales transaction requires that a customer, stored as a party in the trading communitymodel, has both a customer account and customer site with a bill-to business purpose.
The key concepts related to customers and customer activities in the trading community model are:
• Party
• Customer
• Customer Account
• Site
228
Oracle Financials CloudImplementing Receivables Credit to Cash
Chapter 8Define Customer
• Relationship
• Contact
PartyA party is an entity that can enter into a business relationship with another party, such as buying and selling goodsor offering services. A party can be either an organization or a person. A party exists separately from any businessrelationship that it enters into with another party.
CustomerA customer is a party, either an organization or a person, with whom you have a selling relationship. This sellingrelationship can result, for example, from the purchase of products and services or from the negotiation of terms andconditions that provide the basis for future purchases.
Customer AccountA customer account represents the attributes of the business relationship that a party can enter into with another party.The customer account has information about the terms and conditions of doing business with the party.
For example, you can create a commercial account for purchases made by a company for internal use, and a reselleraccount for purchases made by the same company for sales of your products to end users.
You can create multiple customer accounts for a party to maintain information about different categories of businessactivities. For example, to track invoices for different types of purchases, you can maintain an account for purchasingoffice supplies and another account for purchasing furniture.
You can also maintain multiple customer accounts for a customer that transacts business with more than one line ofbusiness in your organization.
You can share information about a party, such as profile information, creditworthiness, addresses, and contacts, acrossthe customer accounts of the party. In addition, you can also maintain separate profiles and contacts, along with contactaddresses and contact points, for each customer account.
SiteA site is a point in space described by an address. A party site is the place where a party is physically located.
A customer site is a party site used in the context of a customer account. A single customer account can have multiplesites.
A customer address is a site used for billing, shipping, or other purposes that are part of the selling relationship. Anidentifying address is the party site address that identifies the location of the party. Every party has only one identifyingaddress, but a party can have multiple party sites.
RelationshipA party relationship is the role of the party in the context of another party. Examples include affiliate, subsidiary,partner, employee, or contact.
An account relationship between different customer accounts of a party allows for the sharing of billing, shipping, andpayment information.
229
Oracle Financials CloudImplementing Receivables Credit to Cash
Chapter 8Define Customer
ContactA contact is a person who communicates for or acts on behalf of a party or customer account. A contact can exist for acustomer at the account or site level.
A person usually acts as a contact for an organization, but can also act as a contact for another person. For example, anadministrative assistant is often the contact for an executive.
Related Topics• Customer Hierarchies and Paying Relationships
How You Use Party Relationships Use party relationships to model your customer records according to the way you conduct your business. Partyrelationships can help you better understand and make decisions about the customers that you do business with.
Define party relationships to use with your customer records. A party relationship record contains the name of the partythat relates to the customer, the way in which the party relates to the customer (relationship role), and the period of timethat this particular relationship exists. You can then add these parties as contacts belonging to the accounts or accountsites of a given customer.
A party relationship represents the way two entities interact with each other, based on the role that each entity takeswith respect to the other. For example, the employment relationship between a person and an organization is definedby the role of the person as the employee and the organization as the employer.
A relationship can be reciprocal. Each entity is either the subject or object, depending on the perspective, or direction.The party that you define relationships for is the subject, and the party that you relate to is the object. For example,if Joe is the employee of Oracle, then Joe is the subject and Oracle is the object. Oracle as the employer of Joe, whichreverses the subject and object, still describes the same relationship.
How You Use Customer Tax Profiles Use the tax profile to maintain optional tax information about your customers and customer sites. You create third-party tax profiles using Oracle Tax, and you can update these tax profiles for the applicable customer or customer site.
Receivables doesn't populate a customer site record with the tax profile belonging to the customer record. You mustdefine a separate tax profile for each customer site, according to the requirements of the site. Tax profile records definedat the customer site level take precedence over the tax profile record defined at the customer level.
For example, a customer level tax profile might not include tax exemptions. However, one of the related customersites may be located in a developing country or region, where tax incentives for businesses include tax exemptions onspecific products or services. In this case, you should define and maintain a separate tax profile for this customer site.
Related Topics• Party Tax Profiles
230
Oracle Financials CloudImplementing Receivables Credit to Cash
Chapter 8Define Customer
How You Merge Customers If you have Data Quality installed, the Trading Community Model manages the merging of duplicate and redundantcustomer records.
You can manually merge two customer records from the Manage Customers page in this way:
1. Search for the customer or customers that you want.2. Select a customer.3. Select the Merge Record command from the Actions menu to open the Merge window.4. In the Merge window, select the original record and the duplicate records, and complete the merge request.5. Repeat steps 2 to 4 for each customer that you want.
Related Topics• How you Consolidate Confirmed Duplicate Records
FAQs for Manage Customers
Does a new customer belong to a customer account? No, creating a customer person or organization only establishes this party as having some kind of selling relationshipwith you. You also need to create at least one customer account and one customer account site with a bill-to purposefor the customer record in order to properly record and account for both sales transactions with the party and otherattributes of the selling relationship with the party.
When you create a customer manually, the customer account is assigned the profile DEFAULT. When you importcustomers, there is no default profile assigned to the customer account. You must designate a customer accountprofile in the RA_CUSTOMER_PROFILES_INT_ALL table by specifying information for the CUST_ORIG_SYSTEMand CUST_ORIG_SYSTEM_REFERENCE attributes, and leaving blank the CUST_SITE_ORIG_SYSTEM andCUST_SITE_ORIG_SYS_REF attributes.
What happens if I enter customer information that already exists? If you have Data Quality installed, the Trading Community Model manages the control of duplicate and redundant partyinformation.
If you enter party information resembling or matching existing information, then depending on your setup you'reprompted in different ways to manage this information.
This can include:
• Prevention of data entry.
• Inclusion with confirmation of data entry.
• Review and selection of matching or similar data.
How can I update other customer information? Use the Edit Account pages to update information related to the customer accounts created for this customer.
231
Oracle Financials CloudImplementing Receivables Credit to Cash
Chapter 8Define Customer
Use the Edit Site pages to update information related to the customer sites created for each of the customer accounts.This includes address information and the tax profile for the related account site.
Manage Customer Data Uploads
How You Import Customer Data Use the Customer Import process to upload customer data into Receivables and the Trading Community Model registry.Customer data includes, for example, Parties, Party Sites, Accounts, Account Sites, Site Uses, along with associatedcustomer attributes, such as customer profiles, customer payment methods, and customer bank accounts.
Download a Customer Import FBDI template to prepare your data. The template contains an instruction sheet to helpguide you through the process of entering your information.
Note: You can also use the Upload Customers from Spreadsheet process to perform an upload of customer dataonly, without data for the Trading Community Model registry. Use the Upload Customers from Spreadsheet processto download a simplified Customer Import FBDI template and upload the data for customers, customer contacts,customer bill-to site reference accounts, and customer bank accounts only.
To access the template, complete the following steps:
1. Navigate to the File-Based Data Import for Financials guide.2. In the Table of Contents, click Customer Data Model.3. Click Customer Import.4. In the File Links section, click the link to the Excel template.
Follow these guidelines when preparing your data in the worksheet:
• Enter the required information for each column. Refer to the tool tips on each column header for detailedinstructions.
• Don't change the order of the columns in the template.
• You can hide or skip the columns you don't use, but don't delete them.
• To remove existing values from specific fields in a customer profile, enter the exclamation point character (!) inthe corresponding columns.
After you have completed the template, upload it using the Load Interface File for Import process:
1. In the Import Process field, select Import Trading Community Data in Bulk.2. In the Data File field, enter the completed template.3. The Load Interface File for Import process uploads the data for each customer included in the template.
Settings That Affect the Customer Import TemplateThe Customer Import FBDI template contains an instructions tab and nineteen tabs for each of the interface tables usedto import customer information:
Spreadsheet Tab Description
Instructions and CSV Generation
Contains instruction information about preparing and loading data, the format of the template, submitting the Customer Import process, and correcting import errors.
232
Oracle Financials CloudImplementing Receivables Credit to Cash
Chapter 8Define Customer
Spreadsheet Tab Description
Customer Import Interface Tables
Use the applicable tabs to enter customer data for each of the interface tables. These tables are:
• HZ_IMP_PARTIES_T
• HZ_IMP_PARTYSITES_T
• HZ_IMP_PARTYSITEUSES_T
• HZ_IMP_ACCOUNTS_T
• HZ_IMP_ACCTSITES_T
• HZ_IMP_ACCTSITEUSES_T
• HZ_IMP_ACCOUNTRELS
• HZ_IMP_ACCTCONTACTS_T
• HZ_IMP_CONTACTPTS_T
• HZ_IMP_CONTACTROLES
• HZ_IMP_CONTACTS_T
• HZ_IMP_LOCATIONS_T
• HZ_IMP_RELSHIPS_T
• HZ_IMP_ROLERESP
• HZ_IMP_CLASSIFICS_T
• HZ_IMP_PERSONLANG
• RA_CUSTOMER_PROFILES_INT_ALL
• RA_CUST_PAY_METHOD_INT_ALL
• RA_CUSTOMER_BANKS_INT_ALL
How Customer Data Is ProcessedThe imported data is loaded into the corresponding Receivables and the Trading Community Model tables. You canmonitor and preview data before finally processing data.
For Receivables customer data, each customer must have a unique combination of customer number, customer accountnumber, and customer site number.
Related Topics• Examples of Validations in Customer Spreadsheet Upload Data
• Guidelines for Uploading Customer Data Using a Simplified Spreadsheet
Guidelines for Uploading Customer Data Using a SimplifiedSpreadsheet Use the Upload Customers from Spreadsheet process to upload customer data using the simplified Customer ImportFBDI (File-Based Data Import) template. The single upload process performs all the operations of generating a batch,
233
Oracle Financials CloudImplementing Receivables Credit to Cash
Chapter 8Define Customer
transferring the customer data in the spreadsheet template to the interface tables, and importing the data from theinterface tables into Oracle Applications.
Download the simplified Customer Import FBDI template and prepare your customer data. The template containsan instruction sheet and sample data to help guide you through the process of entering your customer information:Customers, Contacts, Reference Accounts, Customer Bank Accounts.
Note: You can also use the Customer Import process to download a Customer Import FBDI template, available fromthe FBDI Customer Data Model, to prepare and upload customer data into Receivables and the Trading CommunityModel registry.
Set Up Related Customer InformationSet up the business objects you need in advance of the customer data upload.
This can include:
• Account address sets: Set up the reference sets you need for your customer account sites.
• Customer profile classes: Set up one or more profile classes for your customer records.
• Reference accounts: Set up general ledger accounts that you intend to use as reference accounts for customers.
• Customer bank accounts: Set up banks and bank account information.
• Tax information: Set up tax registration numbers and tax rate codes using Oracle Tax.
• Descriptive flexfields.
Enter Data in the Spreadsheet ColumnsEnter data in the designated columns in each of the four worksheets: Customers, Contacts, Reference Accounts,Customer Bank Accounts.
These rules apply to entering data in columns:
• Column labels with an asterisk (*) denote required columns.
• Use the Show Extensible Attributes and Hide Extensible Attributes buttons to show or hide additionalcolumns.
• Don't move or delete existing columns, and don't insert new columns.
• Enter data in the correct format. In most cases, the columns will format the data that you enter according to therequirements of the upload.
• To remove existing values from specific fields in an existing customer profile, enter the exclamation pointcharacter (!) in the corresponding column.
• Each customer must have a unique combination of these values:
◦ Customer number.
◦ Customer account number.
◦ Customer site number.
• Each customer contact must have a unique person number.
234
Oracle Financials CloudImplementing Receivables Credit to Cash
Chapter 8Define Customer
Examples of Validations in Customer Spreadsheet Upload Data During upload processing, the Upload Customers from Spreadsheet process checks for unique values in certaincolumns of the Customers worksheet and Contacts worksheet. If the values are unique, then the record is created. If thevalues aren't unique, then the record fails with an upload error.
The columns with this validation are:
• Customers worksheet:
◦ Customer Number
◦ Account Number
◦ Site Number
• Contacts worksheet:
◦ Person Number
The following sections provide examples of the validation process. The assumption in these examples is that all recordshave the same Source System value.
Customers Worksheet: Customer Number ValidationThe Customer Number validation looks for a unique combination of values across the Customer Number, CustomerSource Reference, and Customer Name columns.
The records in the following table fail the uniqueness validation on the customer number, because, for the samecustomer name, there are two different customer numbers and customer source references.
Customer Number Customer Source Reference Customer Name
VCORP 256113
VCORP 256113
Vision Corporation
VCORP 256114
VCORP 256114
Vision Corporation
The records in the following table also fail the uniqueness validation on the customer number, because, for the samecombination of customer number and customer source reference, there are two different customer names.
Customer Number Customer Source Reference Customer Name
VCORP 256113
VCORP 256113
Vision Corporation
VCORP 256113
VCORP 256113
Vision ABC Corporation
The records in the following table also fail the uniqueness validation on the customer number, because, for the samecustomer number, there are two different customer source references.
235

Oracle Financials CloudImplementing Receivables Credit to Cash
Chapter 8Define Customer
Customer Number Customer Source Reference Customer Name
VCORP 256113
VCORP 256113
Vision Corporation
VCORP 256113
VCORP 256114
Vision Corporation
In like manner, the Account Number validation looks for a unique combination of values across the Account Number,Account Source Reference, and Account Description columns. The Site Number validation looks for a uniquecombination of values across the Site Number, Site Source Reference, and Site Name columns.
Contacts Worksheet: Person Number ValidationThe Person Number validation looks for a unique combination of values across the Person Number, Person SourceReference, and First Name and Last Name columns.
The records in the following table fail the uniqueness validation on the person number, because, for the samecombination of person number and person source reference, there are two different first name and last namecombinations.
Person Number Person Source Reference First Name Last Name
1000228801
1000228801
Rodney
Jones
1000228801
1000228801
John
Jones
The records in the following table also fail the uniqueness validation on person number, because, for the same personnumber, there are two different person source references.
Person Number Person Source Reference First Name Last Name
1000228801
1000228801
Rodney
Jones
1000228801
1000228802
Rodney
Jones
The records in the following table pass the uniqueness validation. The validation process allows a combination of twodifferent person numbers and person source references with the same first name and last name combination. This isbecause two different people may have the same name.
Person Number Person Source Reference First Name Last Name
1000228801
1000228801
Rodney
Jones
1000228802
1000228802
Rodney
Jones
236
Oracle Financials CloudImplementing Receivables Credit to Cash
Chapter 8Define Customer
Customer Listing Report Use the Customer Listing Report to review your customer information. You can review existing customer information,as well as customer information entered manually, uploaded using the Upload Customers from Spreadsheet process, orimported using the Data Import process.
Because customer records can contain large amounts of information, you may find that you need to review customerinformation that isn’t present in the predefined report, or filter the displayed information differently. You can copyand modify the full dashboard or individual reports of the dashboard using features of Oracle Transactional BusinessIntelligence. This lets you replace or add columns to the report that are available from the Receivables Customer RealTime subject area.
The Customer Real Time subject area makes available many additional data attributes for display, including, forexample, customer relationships, customer creditworthiness, preferred billing practices, calculation of late charges andpenalty charges, and payment preferences.
Use this report when entering new customer information or updating existing customer information.
Selected Report ParametersEnter a value in at least one of the required parameters to select customer data.
Use additional parameters to refine your customer selections. Additional parameters are available on each tabof the dashboard to accommodate narrowing the selected data based on the type of data, such as customercontacts, customer addresses, and payment information.
Last Update Date
Use this parameter to review uploaded data.
Enter the submission date of a customer upload:
• Enter a submission date in the first field and leave the second field blank to include all customer data from thesubmission date to the system date.
• Enter the same date in both fields to see the results of customer uploads for a given day.
Tip: If you run the report at the end of the day, and if there were multiple uploads in the course of the day, the reportwill include all of the customer data uploaded. For large volumes of data, you may need to use additional parameters,such as a range of customer names, to filter the data according to your needs.
Because customer records are subject to manual update at any time, best practice is to run the report as soon as thesubmission of the customer upload has completed.
Customer Name
Enter a range of customers to display. The report retrieves and displays customer names in alphanumeric order.
To display one customer only, enter the same name in both fields. If you enter a customer name in the first field only,the report displays all customers in alphanumeric order beginning with the first name you enter.
Customer Registry ID
237
Oracle Financials CloudImplementing Receivables Credit to Cash
Chapter 8Define Customer
Enter the related party identifier for the customer that you want to display. Use this parameter, for example, to ensurethat all accounts for a customer are selected, which in some cases may be more reliable than the customer name.
Customer Class
Display customers belonging to one classification only, for example, Commercial or Government.
Report OutputThe predefined report displays customer information in a format similar to the customer upload spreadsheet template.
There are five tabs:
• Customer General Information: Customer name, customer class, customer profile class, related identifiers(customer registry ID, D-U-N-S, Taxpayer ID, customer account number, site number).
• Customer Address Information: Address of each customer site and all site-related information.
• Customer Contact Information: Contact names for each customer account, with full contact details.
• Customer Reference Account Information: General ledger reference accounts for each customer bill-to site:revenue, freight, receivable, AutoInvoice clearing, tax, unbilled receivable, and deferred revenue.When AutoAccounting depends on Bill-to Site, Receivables uses the bill-to site of the transaction to determinethe related segment values for the transaction distributions.
• Customer Payment Information: Bank account information for each customer account.
The predefined report displays all records for a customer account site, even if a record contains no information, suchas contacts or payment information. This can help, for example, to identify data that may have been missing from acustomer upload. If you don’t need to display records with no values, you can modify the individual reports to displayonly the sites that have the information you need by using the standard functionality of Oracle Transactional BusinessIntelligence.
You can export information from the report in PDF, Excel, or CSV format for viewing offline.
Related Topics• Receivables Subject Areas, Folders, and Attributes
Import Legacy Customer Credit Card Data You can import legacy customer credit card data into Oracle Applications Cloud using a data import process.
The data import process includes the following phases:
• Uploading customer credit card data to CyberSource
• Downloading tokens from CyberSource
• Importing customer addresses using a simplified spreadsheet
• Uploading tokens to Oracle Applications Cloud
CAUTION: Before you import legacy customer credit card data, you must maintain strict compliance with thePayment Card Industry Data Security Standard (PCI DSS) rules that protect Oracle Applications Cloud from audit. ThePCI DSS requires all companies that process, store, or transmit customer credit card information to maintain a secureenvironment. No customer credit card data can interact with any part of the Oracle Applications Cloud deployment.
238

Oracle Financials CloudImplementing Receivables Credit to Cash
Chapter 8Define Customer
PrerequisitesBefore you can import legacy customer credit card data, you must perform the following steps:
• Set up Oracle Payments Cloud as tokenization-enabled.
• Configure at least one payment system as tokenization-enabled.
• Tokenize legacy customer credit card data through your tokenization provider.
Uploading Customer Credit Card Data to CyberSourceSummary: Retrieve and complete the CyberSource spreadsheet with your legacy customer credit card data, and uploadit to CyberSource.
To upload your customer credit card data to CyberSource to generate token numbers, perform the following steps:
1. Navigate to the CyberSource Test Business Center at https://ebctest.cybersource.com/ebctest.2. Sign in to CyberSource with your Merchant ID, user name, and password.3. Navigate to: Tools & Settings > Batch Transactions > Templates to download the spreadsheet from
CyberSource. From the Template choice list, select New subscriptions (Created).4. Save the spreadsheet to your local drive as a .csv file.5. Prepare the CyberSource spreadsheet.
a. Open the CyberSource spreadsheet in EditPlus and complete the following mandatory fields:
- Batch ID: Identifier must be unique for every batch.- Statement billing address- Card holder name: first and last- Actual customer credit card number- Card brand code: For example, Visa has a card type value of 001.- Expiry card details: month and year
6. Navigate to: Tools & Settings > Batch Transactions > Upload to open the Transaction Batch Upload page.
a. Enter a reference note about the batch.b. Enter your email address to receive notifications about the status of your batch.c. Browse for and select the .csv file you just prepared and click Submit. You will receive a confirmation
email when all validations are passed.
Downloading Tokens from CyberSourceTo download your tokenized customer credit card data spreadsheet from CyberSource, perform the following steps:
1. In CyberSource, navigate to: Reports > Report Search to open the Report Search page.
a. From the Report choice list, select the report you want to download that has your batch ID in the name,and select the frequency.
b. Ensure that the daily report search date is the current date, and click Submit.
The Report Search Results page appears.c. Locate your report by the batch ID in the file name, oraclepayments<BATCHID>.reply.aa.csv, click the
download link, and save the report spreadsheet to your local drive.2. On your local drive, open the spreadsheet in EditPlus. A few additional fields appear in the spreadsheet.
239
Oracle Financials CloudImplementing Receivables Credit to Cash
Chapter 8Define Customer
Tip: To view the full content of a cell with scientific notation, select the cell to see the full value in the field.
3. View the token numbers in Column C. An example of a token number is:paySubscriptionCreateReply_subscriptionID=9903000066742619.
Tip: No column exists in the spreadsheet that associates token numbers with corresponding customer creditcard numbers.
Importing Customer Statement Billing AddressesSummary: Retrieve and complete the simplified customer import spreadsheet, generate the .csv consolidated .zip file,and upload it to Oracle Receivables Cloud.
To import your legacy customer credit card statement billing address to Receivables using a simplified customer importspreadsheet, perform the following steps:
1. To retrieve the simplified spreadsheet you, perform the following steps:
a. Sign in to Oracle Applications Cloud as a Receivables manager.b. Navigate to the Setup and Maintenance work area.c. Search for and select the task titled Manage Customer Uploads.d. In the Search Results section, click the Download Customer Spreadsheet Template button to download
the simplified spreadsheet.e. Save the spreadsheet to your local drive.
2. On your local drive, open the spreadsheet, select the Customers tab, and enter data in the required fields.3. In Column AY, Purpose, you must enter CC_Billing as the customer credit card statement billing address. These
addresses are ultimately associated with customer credit card token numbers that you subsequently import toOracle Applications Cloud.
4. Select the Instructions tab and click the Generate CSV File button to create individual spreadsheets, along witha consolidated .zip file that contains one or more .csv files.
5. Navigate to: Receivables > Billing > Billing work area > Tasks icon > Upload Customers from Spreadsheetlink to open the Manage Customer Uploads page.
6. Click the Upload Customers from Spreadsheet button to open the Upload Customers from Spreadsheetdialog box.
7. Enter a batch name.8. Browse for the .zip file you generated in Step 4 and click Submit.
a. You can track the progress of the upload by navigating to: Navigator > Customer Data Management >Data Import. The process may take awhile.
9. In the Search Results section on the Manage Customer Uploads page, verify that the simplified customerimport spreadsheet has a Status of successful as indicated by a green check mark.
10. Verify that customer data was uploaded by querying customer data that was populated in the simplifiedcustomer import spreadsheet.
Uploading Tokens to Oracle Applications CloudSummary: Retrieve and prepare the tokenized spreadsheet, upload it to Oracle Applications Cloud, run the TokenizeCredit Card process, and verify the tokens were imported.
To upload your tokenized customer credit card data to Oracle Applications Cloud, perform the following steps:
1. Prepare the tokenized spreadsheet.
240
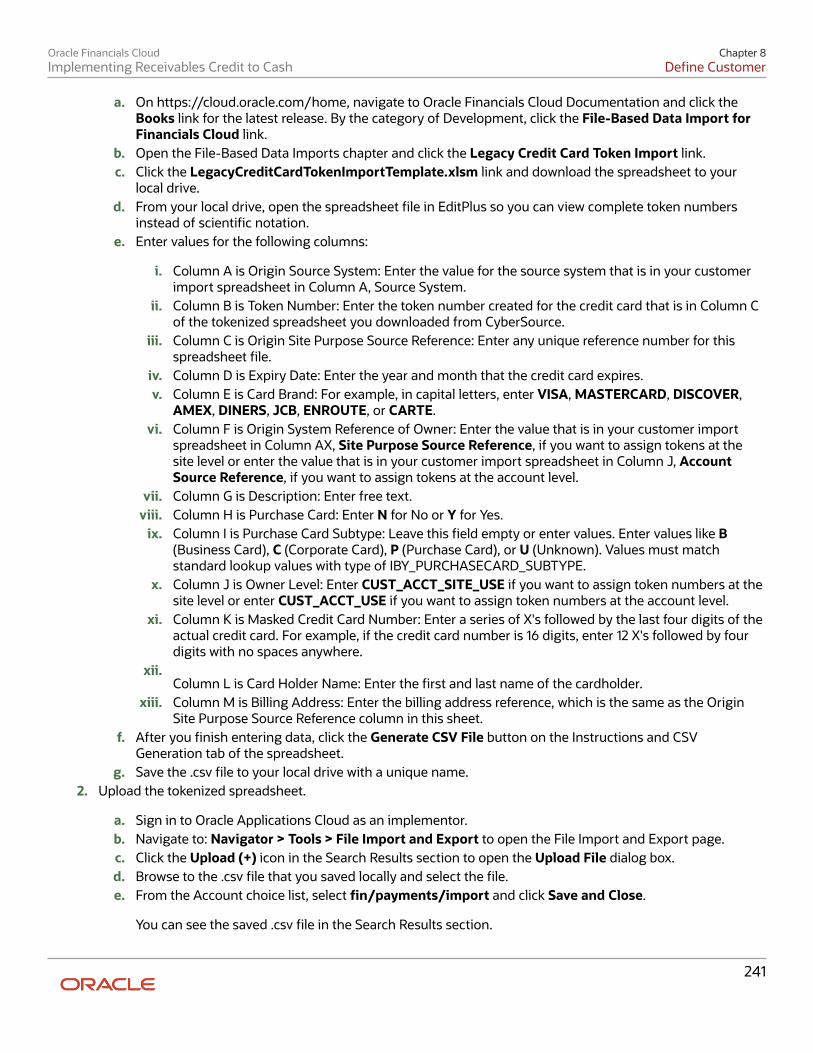
Oracle Financials CloudImplementing Receivables Credit to Cash
Chapter 8Define Customer
a. On https://cloud.oracle.com/home, navigate to Oracle Financials Cloud Documentation and click theBooks link for the latest release. By the category of Development, click the File-Based Data Import forFinancials Cloud link.
b. Open the File-Based Data Imports chapter and click the Legacy Credit Card Token Import link.c. Click the LegacyCreditCardTokenImportTemplate.xlsm link and download the spreadsheet to your
local drive.d. From your local drive, open the spreadsheet file in EditPlus so you can view complete token numbers
instead of scientific notation.e. Enter values for the following columns:
i. Column A is Origin Source System: Enter the value for the source system that is in your customerimport spreadsheet in Column A, Source System.
ii. Column B is Token Number: Enter the token number created for the credit card that is in Column Cof the tokenized spreadsheet you downloaded from CyberSource.
iii. Column C is Origin Site Purpose Source Reference: Enter any unique reference number for thisspreadsheet file.
iv. Column D is Expiry Date: Enter the year and month that the credit card expires.v. Column E is Card Brand: For example, in capital letters, enter VISA, MASTERCARD, DISCOVER,
AMEX, DINERS, JCB, ENROUTE, or CARTE.vi. Column F is Origin System Reference of Owner: Enter the value that is in your customer import
spreadsheet in Column AX, Site Purpose Source Reference, if you want to assign tokens at thesite level or enter the value that is in your customer import spreadsheet in Column J, AccountSource Reference, if you want to assign tokens at the account level.
vii. Column G is Description: Enter free text.viii. Column H is Purchase Card: Enter N for No or Y for Yes.
ix. Column I is Purchase Card Subtype: Leave this field empty or enter values. Enter values like B(Business Card), C (Corporate Card), P (Purchase Card), or U (Unknown). Values must matchstandard lookup values with type of IBY_PURCHASECARD_SUBTYPE.
x. Column J is Owner Level: Enter CUST_ACCT_SITE_USE if you want to assign token numbers at thesite level or enter CUST_ACCT_USE if you want to assign token numbers at the account level.
xi. Column K is Masked Credit Card Number: Enter a series of X's followed by the last four digits of theactual credit card. For example, if the credit card number is 16 digits, enter 12 X's followed by fourdigits with no spaces anywhere.
xii.Column L is Card Holder Name: Enter the first and last name of the cardholder.
xiii. Column M is Billing Address: Enter the billing address reference, which is the same as the OriginSite Purpose Source Reference column in this sheet.
f. After you finish entering data, click the Generate CSV File button on the Instructions and CSVGeneration tab of the spreadsheet.
g. Save the .csv file to your local drive with a unique name.2. Upload the tokenized spreadsheet.
a. Sign in to Oracle Applications Cloud as an implementor.b. Navigate to: Navigator > Tools > File Import and Export to open the File Import and Export page.c. Click the Upload (+) icon in the Search Results section to open the Upload File dialog box.d. Browse to the .csv file that you saved locally and select the file.e. From the Account choice list, select fin/payments/import and click Save and Close.
You can see the saved .csv file in the Search Results section.
241
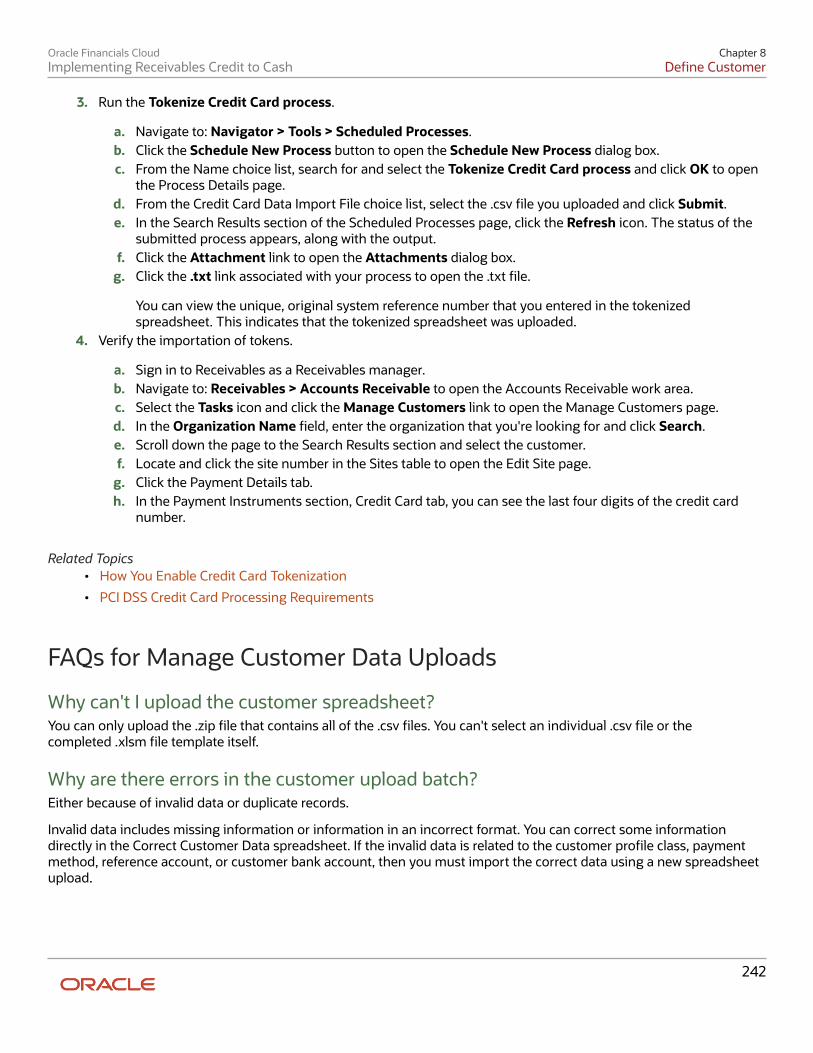
Oracle Financials CloudImplementing Receivables Credit to Cash
Chapter 8Define Customer
3. Run the Tokenize Credit Card process.
a. Navigate to: Navigator > Tools > Scheduled Processes.b. Click the Schedule New Process button to open the Schedule New Process dialog box.c. From the Name choice list, search for and select the Tokenize Credit Card process and click OK to open
the Process Details page.d. From the Credit Card Data Import File choice list, select the .csv file you uploaded and click Submit.e. In the Search Results section of the Scheduled Processes page, click the Refresh icon. The status of the
submitted process appears, along with the output.f. Click the Attachment link to open the Attachments dialog box.
g. Click the .txt link associated with your process to open the .txt file.
You can view the unique, original system reference number that you entered in the tokenizedspreadsheet. This indicates that the tokenized spreadsheet was uploaded.
4. Verify the importation of tokens.
a. Sign in to Receivables as a Receivables manager.b. Navigate to: Receivables > Accounts Receivable to open the Accounts Receivable work area.c. Select the Tasks icon and click the Manage Customers link to open the Manage Customers page.d. In the Organization Name field, enter the organization that you're looking for and click Search.e. Scroll down the page to the Search Results section and select the customer.f. Locate and click the site number in the Sites table to open the Edit Site page.
g. Click the Payment Details tab.h. In the Payment Instruments section, Credit Card tab, you can see the last four digits of the credit card
number.
Related Topics• How You Enable Credit Card Tokenization
• PCI DSS Credit Card Processing Requirements
FAQs for Manage Customer Data Uploads
Why can't I upload the customer spreadsheet? You can only upload the .zip file that contains all of the .csv files. You can't select an individual .csv file or thecompleted .xlsm file template itself.
Why are there errors in the customer upload batch? Either because of invalid data or duplicate records.
Invalid data includes missing information or information in an incorrect format. You can correct some informationdirectly in the Correct Customer Data spreadsheet. If the invalid data is related to the customer profile class, paymentmethod, reference account, or customer bank account, then you must import the correct data using a new spreadsheetupload.
242
Oracle Financials CloudImplementing Receivables Credit to Cash
Chapter 8Define Customer
To avoid duplicating existing records, ensure that each customer in the Customers worksheet has a unique combinationof these values:
• Customer number
• Customer account number
• Customer site number
Ensure that each contact in the Contacts worksheet has a unique person number.
Manage Data Import
Data Import for Customers and Consumers You can use the File-Based Import process to import data from a CSV or XML file. You use the Data Import dashboard tomonitor the import job and view reports and statistics.
You can choose to pause a File-Import batch, and then use the Data Import work area to configure data quality servicesfor the batch. You can pause import activities if the HZ_IMP_PAUSE_FILE_IMPORT profile option is set to Yes. If theprofile option is set to Yes, all submitted import activities are sent for administrator review and appear in the DataImport Batches Overview page.
Before importing data into the registry, you must decide if you want to use the data quality services and if so, how youwant to configure the following data quality services:
• Batch deduplication
• Registry deduplication
• Import to registry options
Batch DeduplicationBatch deduplication lets you identify and resolve duplicates within the imported batch.
To define batch deduplication, you must:
• Select the match configuration rule you want to use to identify duplicates for each entity.
• Specify the action to perform on the duplicate records within the batch. These actions are performed when thedata is imported into the registry.
Registry DeduplicationRegistry deduplication, similar to the batch deduplication, identifies duplicates between the data in the batch andthe data in the registry before the data is imported into the registry. Similar to batch deduplication, with registrydeduplication you select the match configuration and specify the action for duplication records.
Import to Registry OptionsYou use the Import to Registry options for these definitions:
• Import Process mode: You can run the import process in preview mode, or load the data directly into theregistry without previewing the data. In preview mode, you can review information, such as the number of
243
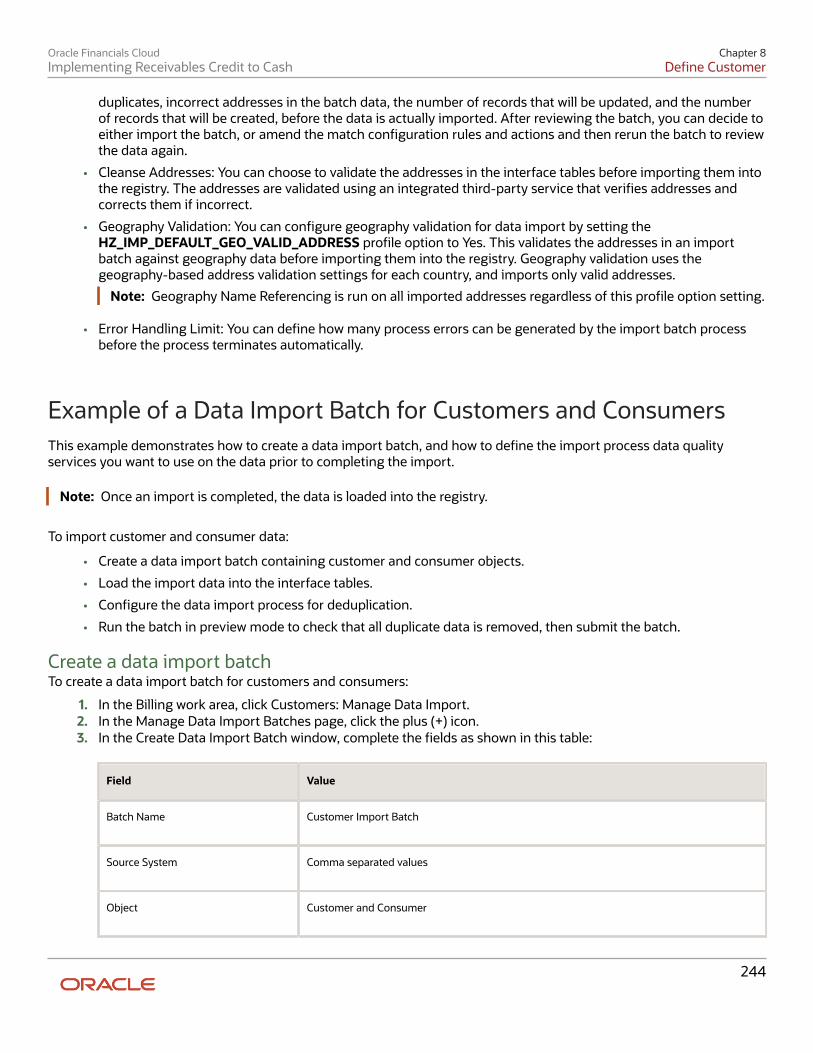
Oracle Financials CloudImplementing Receivables Credit to Cash
Chapter 8Define Customer
duplicates, incorrect addresses in the batch data, the number of records that will be updated, and the numberof records that will be created, before the data is actually imported. After reviewing the batch, you can decide toeither import the batch, or amend the match configuration rules and actions and then rerun the batch to reviewthe data again.
• Cleanse Addresses: You can choose to validate the addresses in the interface tables before importing them intothe registry. The addresses are validated using an integrated third-party service that verifies addresses andcorrects them if incorrect.
• Geography Validation: You can configure geography validation for data import by setting theHZ_IMP_DEFAULT_GEO_VALID_ADDRESS profile option to Yes. This validates the addresses in an importbatch against geography data before importing them into the registry. Geography validation uses thegeography-based address validation settings for each country, and imports only valid addresses.
Note: Geography Name Referencing is run on all imported addresses regardless of this profile option setting.
• Error Handling Limit: You can define how many process errors can be generated by the import batch processbefore the process terminates automatically.
Example of a Data Import Batch for Customers and Consumers This example demonstrates how to create a data import batch, and how to define the import process data qualityservices you want to use on the data prior to completing the import.
Note: Once an import is completed, the data is loaded into the registry.
To import customer and consumer data:
• Create a data import batch containing customer and consumer objects.
• Load the import data into the interface tables.
• Configure the data import process for deduplication.
• Run the batch in preview mode to check that all duplicate data is removed, then submit the batch.
Create a data import batchTo create a data import batch for customers and consumers:
1. In the Billing work area, click Customers: Manage Data Import.2. In the Manage Data Import Batches page, click the plus (+) icon.3. In the Create Data Import Batch window, complete the fields as shown in this table:
Field Value
Batch Name
Customer Import Batch
Source System
Comma separated values
Object
Customer and Consumer
244
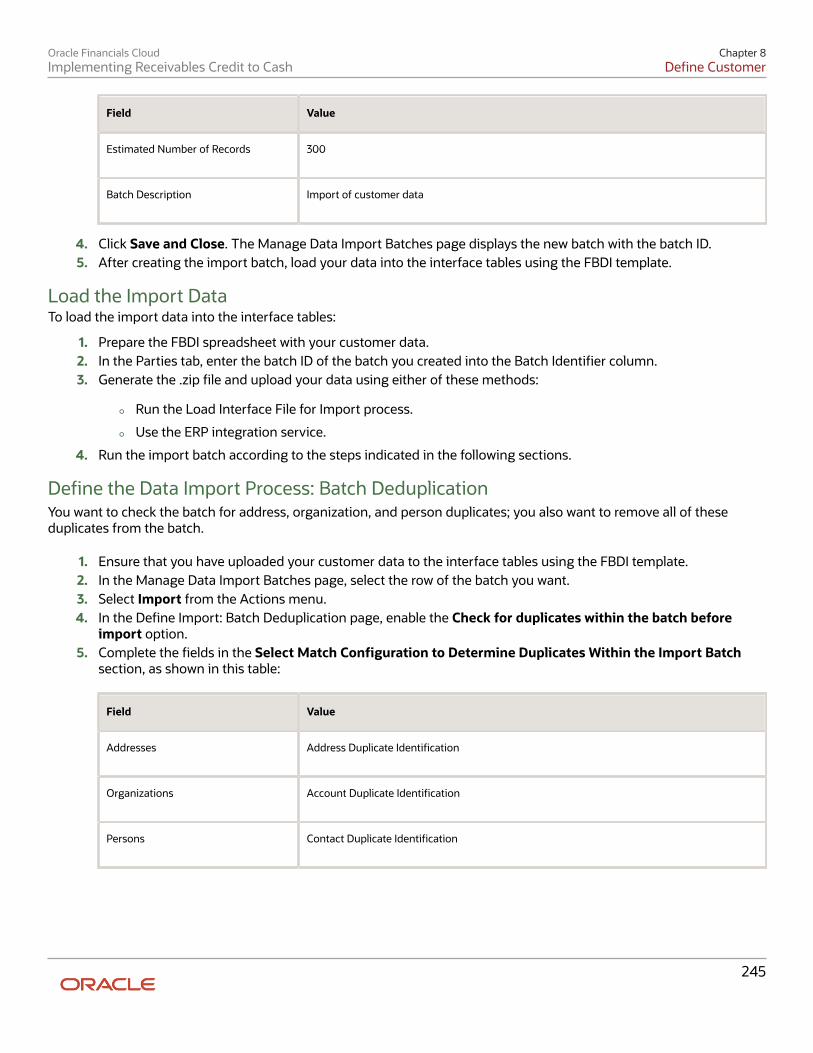
Oracle Financials CloudImplementing Receivables Credit to Cash
Chapter 8Define Customer
Field Value
Estimated Number of Records
300
Batch Description
Import of customer data
4. Click Save and Close. The Manage Data Import Batches page displays the new batch with the batch ID.5. After creating the import batch, load your data into the interface tables using the FBDI template.
Load the Import DataTo load the import data into the interface tables:
1. Prepare the FBDI spreadsheet with your customer data.2. In the Parties tab, enter the batch ID of the batch you created into the Batch Identifier column.3. Generate the .zip file and upload your data using either of these methods:
◦ Run the Load Interface File for Import process.
◦ Use the ERP integration service.
4. Run the import batch according to the steps indicated in the following sections.
Define the Data Import Process: Batch DeduplicationYou want to check the batch for address, organization, and person duplicates; you also want to remove all of theseduplicates from the batch.
1. Ensure that you have uploaded your customer data to the interface tables using the FBDI template.2. In the Manage Data Import Batches page, select the row of the batch you want.3. Select Import from the Actions menu.4. In the Define Import: Batch Deduplication page, enable the Check for duplicates within the batch before
import option.5. Complete the fields in the Select Match Configuration to Determine Duplicates Within the Import Batch
section, as shown in this table:
Field Value
Addresses
Address Duplicate Identification
Organizations
Account Duplicate Identification
Persons
Contact Duplicate Identification
245
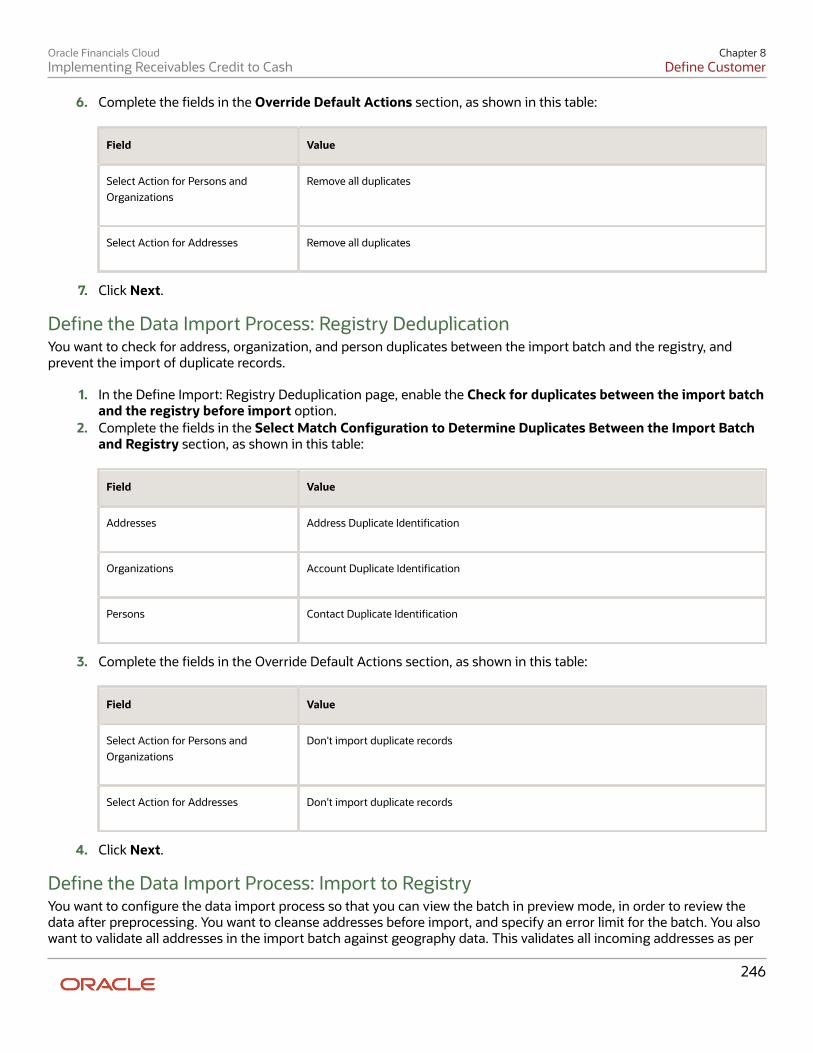
Oracle Financials CloudImplementing Receivables Credit to Cash
Chapter 8Define Customer
6. Complete the fields in the Override Default Actions section, as shown in this table:
Field Value
Select Action for Persons andOrganizations
Remove all duplicates
Select Action for Addresses
Remove all duplicates
7. Click Next.
Define the Data Import Process: Registry DeduplicationYou want to check for address, organization, and person duplicates between the import batch and the registry, andprevent the import of duplicate records.
1. In the Define Import: Registry Deduplication page, enable the Check for duplicates between the import batchand the registry before import option.
2. Complete the fields in the Select Match Configuration to Determine Duplicates Between the Import Batchand Registry section, as shown in this table:
Field Value
Addresses
Address Duplicate Identification
Organizations
Account Duplicate Identification
Persons
Contact Duplicate Identification
3. Complete the fields in the Override Default Actions section, as shown in this table:
Field Value
Select Action for Persons andOrganizations
Don't import duplicate records
Select Action for Addresses
Don't import duplicate records
4. Click Next.
Define the Data Import Process: Import to RegistryYou want to configure the data import process so that you can view the batch in preview mode, in order to review thedata after preprocessing. You want to cleanse addresses before import, and specify an error limit for the batch. You alsowant to validate all addresses in the import batch against geography data. This validates all incoming addresses as per
246
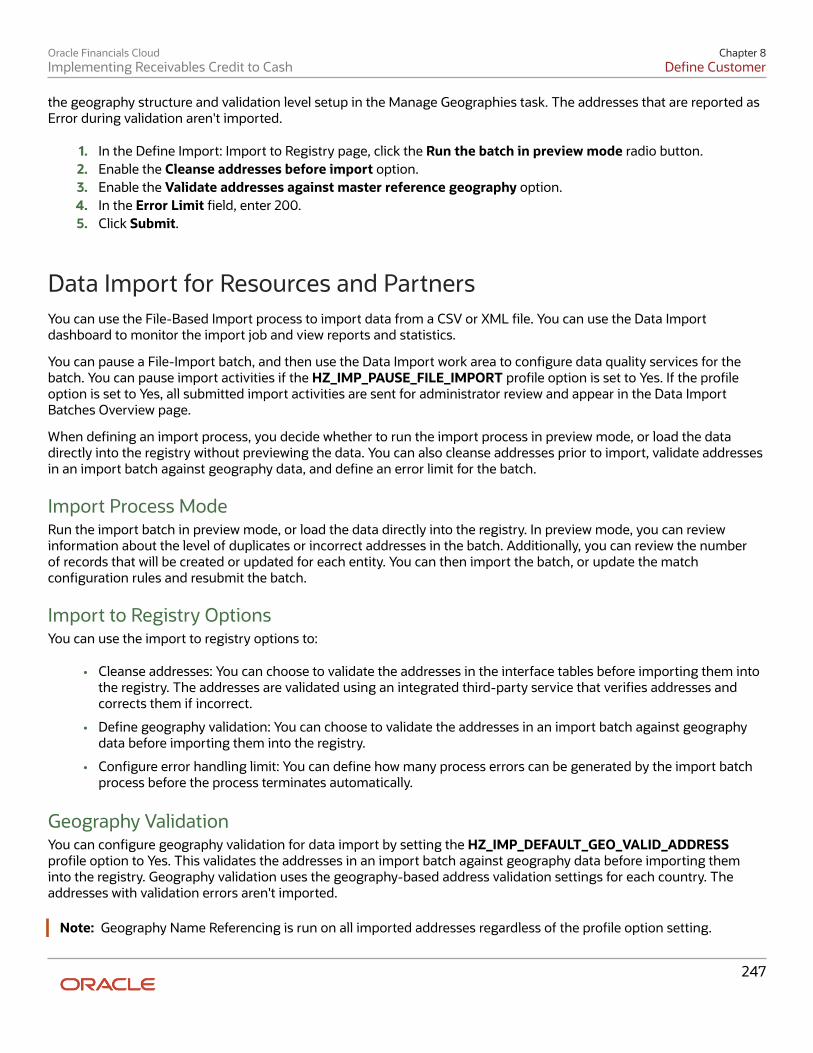
Oracle Financials CloudImplementing Receivables Credit to Cash
Chapter 8Define Customer
the geography structure and validation level setup in the Manage Geographies task. The addresses that are reported asError during validation aren't imported.
1. In the Define Import: Import to Registry page, click the Run the batch in preview mode radio button.2. Enable the Cleanse addresses before import option.3. Enable the Validate addresses against master reference geography option.4. In the Error Limit field, enter 200.5. Click Submit.
Data Import for Resources and Partners You can use the File-Based Import process to import data from a CSV or XML file. You can use the Data Importdashboard to monitor the import job and view reports and statistics.
You can pause a File-Import batch, and then use the Data Import work area to configure data quality services for thebatch. You can pause import activities if the HZ_IMP_PAUSE_FILE_IMPORT profile option is set to Yes. If the profileoption is set to Yes, all submitted import activities are sent for administrator review and appear in the Data ImportBatches Overview page.
When defining an import process, you decide whether to run the import process in preview mode, or load the datadirectly into the registry without previewing the data. You can also cleanse addresses prior to import, validate addressesin an import batch against geography data, and define an error limit for the batch.
Import Process ModeRun the import batch in preview mode, or load the data directly into the registry. In preview mode, you can reviewinformation about the level of duplicates or incorrect addresses in the batch. Additionally, you can review the numberof records that will be created or updated for each entity. You can then import the batch, or update the matchconfiguration rules and resubmit the batch.
Import to Registry OptionsYou can use the import to registry options to:
• Cleanse addresses: You can choose to validate the addresses in the interface tables before importing them intothe registry. The addresses are validated using an integrated third-party service that verifies addresses andcorrects them if incorrect.
• Define geography validation: You can choose to validate the addresses in an import batch against geographydata before importing them into the registry.
• Configure error handling limit: You can define how many process errors can be generated by the import batchprocess before the process terminates automatically.
Geography ValidationYou can configure geography validation for data import by setting the HZ_IMP_DEFAULT_GEO_VALID_ADDRESSprofile option to Yes. This validates the addresses in an import batch against geography data before importing theminto the registry. Geography validation uses the geography-based address validation settings for each country. Theaddresses with validation errors aren't imported.
Note: Geography Name Referencing is run on all imported addresses regardless of the profile option setting.
247
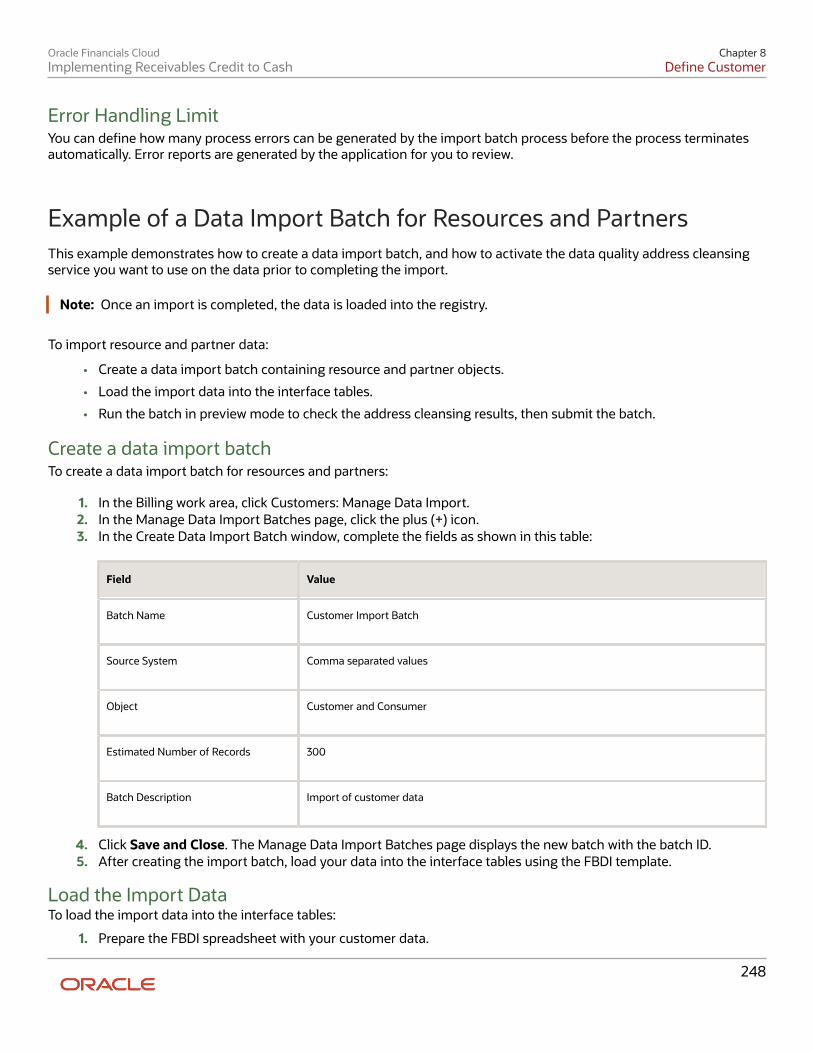
Oracle Financials CloudImplementing Receivables Credit to Cash
Chapter 8Define Customer
Error Handling LimitYou can define how many process errors can be generated by the import batch process before the process terminatesautomatically. Error reports are generated by the application for you to review.
Example of a Data Import Batch for Resources and Partners This example demonstrates how to create a data import batch, and how to activate the data quality address cleansingservice you want to use on the data prior to completing the import.
Note: Once an import is completed, the data is loaded into the registry.
To import resource and partner data:
• Create a data import batch containing resource and partner objects.
• Load the import data into the interface tables.
• Run the batch in preview mode to check the address cleansing results, then submit the batch.
Create a data import batchTo create a data import batch for resources and partners:
1. In the Billing work area, click Customers: Manage Data Import.2. In the Manage Data Import Batches page, click the plus (+) icon.3. In the Create Data Import Batch window, complete the fields as shown in this table:
Field Value
Batch Name
Customer Import Batch
Source System
Comma separated values
Object
Customer and Consumer
Estimated Number of Records
300
Batch Description
Import of customer data
4. Click Save and Close. The Manage Data Import Batches page displays the new batch with the batch ID.5. After creating the import batch, load your data into the interface tables using the FBDI template.
Load the Import DataTo load the import data into the interface tables:
1. Prepare the FBDI spreadsheet with your customer data.
248

Oracle Financials CloudImplementing Receivables Credit to Cash
Chapter 8Define Customer
2. In the Parties tab, enter the batch ID of the batch you created into the Batch Identifier column.3. Generate the .zip file and upload your data using either of these methods:
◦ Run the Load Interface File for Import process.
◦ Use the ERP integration service.
4. Run the import batch according to the steps indicated in the following section.
Define the Data Import Process: Import to RegistryYou can configure the following in the Import to Registry page:
• Select if you want run the batch in preview mode.
• Configure address cleansing.
• Define geography validation. This validates all incoming addresses as per the geography structure andvalidation level setup in the Manage Geographies task. The addresses that are reported as Error duringvalidation aren't imported.
• Specify an error limit.
You want to configure the data import process so that you can view the batch in preview mode, in order to review thedata after preprocessing. You want to cleanse addresses before import, and specify an error limit for the batch. You alsowant to validate all addresses in the import batch against geography data.
To configure registry import options:
1. Ensure that you have uploaded your customer data to the interface tables using the FBDI template.2. In the Manage Data Import Batches page, select the row of the batch you want.3. Select Import from the Actions menu.4. Click Import to Registry in the navigation train.5. In the Define Import: Import to Registry page, click the Run the batch in preview mode radio button.6. Enable the Cleanse addresses before import option.7. Enable the Validate addresses against master reference geography option.8. In the Error Limit field, enter 200.9. Click Submit.
Example of a What-If Analysis on a Data Import Batch This example demonstrates how to perform a What-If analysis on a data import batch that has been processed andcompleted with the status Preimport Completed. The match configuration is redefined and the import process isresubmitted. The batch deduplication actions are then amended, and the batch import is completed.
The following table summarizes key decisions for this scenario:
Decisions to Consider In This Example
Do you want to redefine batchdeduplication match configuration?
Yes, a different match configuration is selected for the Organizations entity.
Do you want to redefine registrydeduplication match configuration?
Yes, a different match configuration is selected for the Persons entity.
249
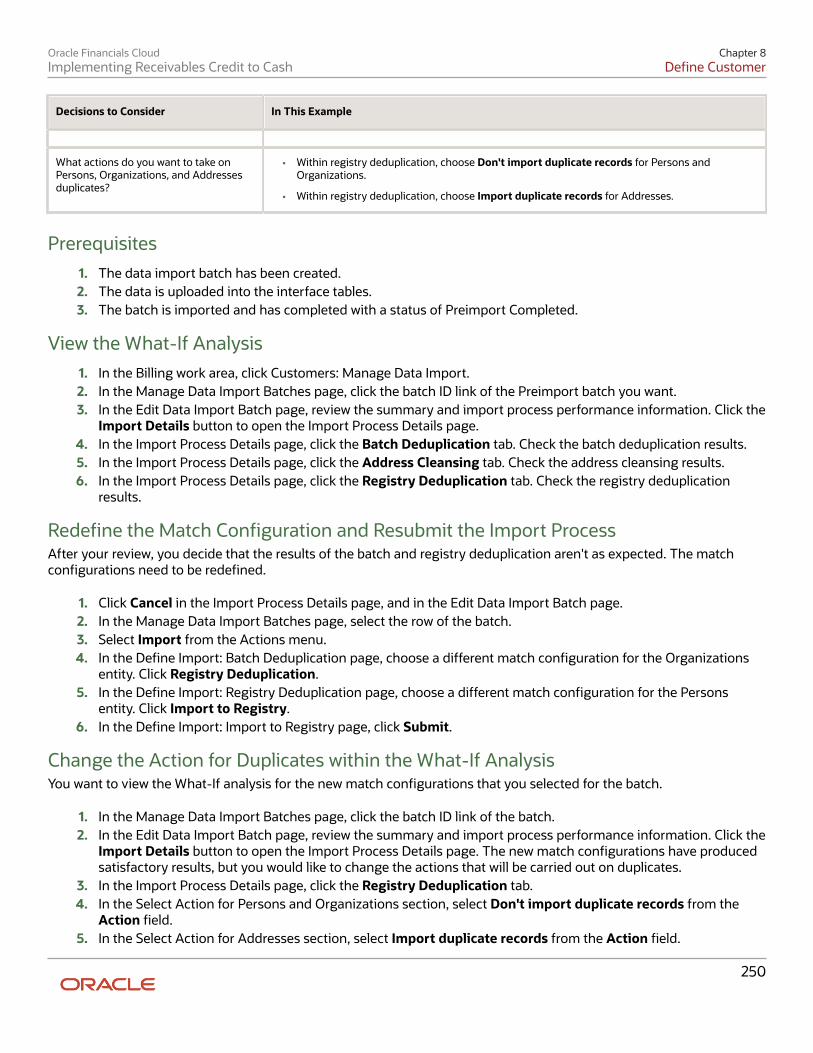
Oracle Financials CloudImplementing Receivables Credit to Cash
Chapter 8Define Customer
Decisions to Consider In This Example
What actions do you want to take onPersons, Organizations, and Addressesduplicates?
• Within registry deduplication, choose Don't import duplicate records for Persons andOrganizations.
• Within registry deduplication, choose Import duplicate records for Addresses.
Prerequisites1. The data import batch has been created.2. The data is uploaded into the interface tables.3. The batch is imported and has completed with a status of Preimport Completed.
View the What-If Analysis1. In the Billing work area, click Customers: Manage Data Import.2. In the Manage Data Import Batches page, click the batch ID link of the Preimport batch you want.3. In the Edit Data Import Batch page, review the summary and import process performance information. Click the
Import Details button to open the Import Process Details page.4. In the Import Process Details page, click the Batch Deduplication tab. Check the batch deduplication results.5. In the Import Process Details page, click the Address Cleansing tab. Check the address cleansing results.6. In the Import Process Details page, click the Registry Deduplication tab. Check the registry deduplication
results.
Redefine the Match Configuration and Resubmit the Import ProcessAfter your review, you decide that the results of the batch and registry deduplication aren't as expected. The matchconfigurations need to be redefined.
1. Click Cancel in the Import Process Details page, and in the Edit Data Import Batch page.2. In the Manage Data Import Batches page, select the row of the batch.3. Select Import from the Actions menu.4. In the Define Import: Batch Deduplication page, choose a different match configuration for the Organizations
entity. Click Registry Deduplication.5. In the Define Import: Registry Deduplication page, choose a different match configuration for the Persons
entity. Click Import to Registry.6. In the Define Import: Import to Registry page, click Submit.
Change the Action for Duplicates within the What-If AnalysisYou want to view the What-If analysis for the new match configurations that you selected for the batch.
1. In the Manage Data Import Batches page, click the batch ID link of the batch.2. In the Edit Data Import Batch page, review the summary and import process performance information. Click the
Import Details button to open the Import Process Details page. The new match configurations have producedsatisfactory results, but you would like to change the actions that will be carried out on duplicates.
3. In the Import Process Details page, click the Registry Deduplication tab.4. In the Select Action for Persons and Organizations section, select Don't import duplicate records from the
Action field.5. In the Select Action for Addresses section, select Import duplicate records from the Action field.
250
Oracle Financials CloudImplementing Receivables Credit to Cash
Chapter 8Define Customer
6. Click Complete Import.
Data Quality Services and Data Import Data Quality Services ensure the quality of data being imported into the registry. You can configure a data import or fileimport process to activate these services before importing data into the database.
You can use the following data quality services:
• Batch Deduplication: Allows you to define deduplication within the data being loaded.
• Registry Deduplication: Allows you to define deduplication of the data being loaded against the records thatalready exist in the registry.
• Import to Registry options: Allows you to define the import process mode, data cleansing, and geographyvalidation.
Data Quality Services for File-Based ImportYou can define Registry deduplication options in the file-based import process. You can't define the other Data QualityServices, such as Batch Deduplication and Import to Registry options, for a file-based import activity during the file-based import process. However, an import activity can be paused and sent for administrator review after preprocessingand before importing the data. The administrator can review the import process and configure data quality services.
Import activities are paused and sent for administrator review if the HZ_IMP_PAUSE_FILE_IMPORT profile option is setto Yes.
Data Quality Services for Data ImportYou can configure data quality services for data import. For both registry and batch deduplication methods, you select amatch configuration to identify duplicates and duplicate resolution action. You can specify:
• Run the import process in preview mode.
• Cleanse data before import.
• Perform geography validation of data before import.
You can configure geography validation for data import at the site level by setting theHZ_IMP_DEFAULT_GEO_VALID_ADDRESS profile option to Yes. The addresses are validated against the masterreference geography data, according to the geography-based address validation settings for each country. Theaddresses with validation errors aren't imported.
FAQs for Manage Data Import
Why can't I view the import process details? The import process details are only available when you run the batch in preview mode, and submit the batch for import.
Can I import a batch again? Yes, you can reimport a batch to correct validation errors if the import process status is one of the following: PreimportCompleted, Completed With Errors, Error, or Terminated When Error Limit Reached.
251
Oracle Financials CloudImplementing Receivables Credit to Cash
Chapter 8Define Customer
Can I redefine the data import process for an already imported batch and reimport it? Yes. If the data is still available in the interface tables and the batch status is Preimport Completed, Completed withErrors, Error, or Terminated when Error Limit Reached, you can redefine the data import process and reimport thebatch.
Once a batch has been successfully imported, you can't reimport the batch, even if the data is present in the interfacetables.
How can I view the errors that occurred during preimport processing? In the Manage Data Import Batches page, click the batch ID of the batch you want. Then in the Edit Data Import Batchpage, click the Report button to display the Error Report window.
What happens if I purge a data import batch? You permanently remove all records in the batch from the import interface tables. You should purge batches after thebatch has been imported successfully, and you have ensured that the data in the interface tables is no longer required.
Purging the interface tables improves import performance. To archive imported data, you should copy the data to a setof custom tables.
Why can't I purge a data import batch? You can't purge data import batches with the status Processing. Purging a batch purges the batch data in the interfacetables; this process can't be carried out while the batch is importing the data from the interface tables into the registry.
252
Oracle Financials CloudImplementing Receivables Credit to Cash
Chapter 9Define Bills Receivable
9 Define Bills Receivable
Enable System Options for Bills Receivable Enable Receivables system options that help you manage the processing of bills receivable transactions and receipts.
Set these Cash Processing Receivables System Options to enable and manage bills receivable:
• Allow payment of unrelated transactions option: Enable this option if you want to apply transactions ofunrelated customers to a bill receivable.
If you don't enable this option, then you can only apply transactions that belong to the customer drawee and itsrelated customers.
• Enable bills receivable option: You must enable this option to use bills receivable.
• Bills Receivable Transaction Source: You can optionally select a default bills receivable transaction source.The transaction source that you select appears by default on all bills receivable transactions.
You must set up bills receivable transaction sources before you can set this option.
• Allow factoring of bills receivable without recourse option: Enable this option if you want to create factoredbills receivable remittances without recourse.
Enabling this option lets you disable the Factored with recourse option on the Bills Receivable RemittanceBatch pages. If you don't enable this option, then the Factored with recourse option is enabled and read only.
Related Topics• What's a drawee
• Bills Receivable Risk
Create a Bills Receivable Creation Receipt Method Create bills receivable creation receipt methods to create bills receivable from transactions automatically using theCreate Bills Receivable Batch process. The receipt method designates the transaction type, maturity date, bill number,and if necessary the minimum and maximum bill amounts, and determines how transactions are grouped into billsreceivable.
After you create bills receivable creation receipt methods, you must assign both a bills receivable creation receiptmethod and a bill-to customer defined as drawee to transactions that you want to automatically batch for billsreceivable.
To create a new bills receivable creation receipt method:
1. Navigate to the Create Receipt Class and Methods page.2. Name the receipt class and, in the Creation Method field, select Bills Receivable.3. Create a receipt method.4. Navigate to the Bills Receivable tab.
253

Oracle Financials CloudImplementing Receivables Credit to Cash
Chapter 9Define Bills Receivable
5. If applicable, enable the Bills receivable inherit transaction numbers option to use the transaction number asthe bill number.
This only applies if there is one transaction in the bill receivable. If the bill receivable contains more than onetransaction, then Receivables assigns the bill number according to the settings in the bills receivable transactionsource.
6. In the Number of Bills Receivable Rule field, select the rule to use to group transactions into bills receivable:
a. One per Customer: Group all transactions belonging to a single customer drawee into one bill receivable.b. One per Customer Due Date: Group all transactions belonging to a single customer drawee that have
the same payment schedule due date into one bill receivable.
If a transaction uses the payment terms Immediate, then this transaction is included in the first availablebill receivable that can accommodate the transaction amount, without regard to the due date. In this casethe effective grouping rule is the same as One per Customer.
c. One per Invoice: Group all payment schedules for a single transaction into one bill receivable.d. One per Payment Schedule: Create a separate bill receivable for each transaction payment schedule (no
grouping).e. One per Site: Group all transactions for a single customer drawee site into one bill receivable.f. One per Site Due Date: Group all transactions for a single customer drawee and bill-to site that have the
same payment schedule due date into one bill receivable.
If a transaction uses the payment terms Immediate, then this transaction is included in the first availablebill receivable that can accommodate the transaction amount, without regard to the due date. In this casethe effective grouping rule is the same as One per Site.
7. In the Bills Receivable Maturity Date Rule field, select Earliest or Latest to indicate whether to derive thematurity date for a bill receivable from the earliest or latest due date of all transactions applied to the bill.
8. Enter the bills receivable transaction type to use with this receipt method. All bills receivable created fromtransactions use the settings of this transaction type.
9. In the Lead Days field, enter the number of days before the transaction due date that a transaction can beapplied to a bill receivable.
10. Use the Minimum Amount and Maximum Amount fields to enter minimum and maximum amounts for billsreceivable created from transactions.
◦ If you enter a minimum amount, then a bill receivable isn't created for the applicable transactions unlesstheir sum is greater than this amount.
◦ If you enter a maximum amount, then the total amount of the bill receivable must match this amountexactly.
After applying a transaction to a bill receivable, a partial transaction amount that exceeds the maximumamount of the bill can remain unapplied. For example, an invoice of $1000 applied to a bill receivable witha maximum amount of $900 leaves an open amount of $100 on the transaction.
Related Topics• Prepare Transactions for Bills Receivable Batches
• Guidelines for Batching Transactions for Bills Receivable
254

Oracle Financials CloudImplementing Receivables Credit to Cash
Chapter 9Define Bills Receivable
Prepare Transactions for Bills Receivable Batches If you plan to generate bills receivable from transactions using the Create Bills Receivable Batch process, you mustprepare transactions to make them eligible for inclusion in a bills receivable batch.
To prepare transactions for bills receivable batches, review and, if necessary, complete tasks related to each of thefollowing activities:
• Prepare Customers
• Assign Bills Receivable Creation Receipt Methods
• Review Eligible Transactions for a Bills Receivable Batch
• Set Up the Customer Drawee Bank Account
Prepare CustomersPrepare customers for bills receivable transactions. You must define customers as drawees, and assign drawees to theapplicable transactions.
Perform these two tasks:
1. Define customers as drawees.
Define bill-to customer sites as drawee sites for bills receivable. You must define a drawee site for eachcustomer account for which you plan to create bills receivable.
For each applicable site already defined as a bill-to site:
a. Navigate to the Edit Site page: Site Details tab.b. Assign the business purpose Drawee.c. Enter the bills receivable reference accounts: bills receivable, unpaid bills receivable, remitted bills
receivable, and factored bills receivable.2. Assign drawees to transactions as the bill-to customer.
Assign a customer drawee to each applicable transaction as the bill-to customer. The drawee, as the responsibleparty for the goods and services on the transaction, must be designated as the bill-to customer.
Assign Bills Receivable Creation Receipt MethodsAssign a bills receivable creation receipt method to each transaction that you want to apply to bills receivable. The billsreceivable creation receipt method designates the transaction type, maturity date, bill receivable number, and minimumand maximum bill amounts for each bill receivable, and determines how transactions are grouped into bills receivable.
You can assign bills receivable creation receipt methods to transactions manually or automatically.
To assign bills receivable creation receipt methods automatically:
1. Open the Edit Site page for a bill-to site that you defined as a customer drawee.2. In the Payment Details tab, add one or more bills receivable creation receipt methods.
255

Oracle Financials CloudImplementing Receivables Credit to Cash
Chapter 9Define Bills Receivable
3. Set one of these receipt methods as Primary.
Receivables automatically assigns the primary receipt method to transactions belonging to this bill-to customerdrawee site that you enter manually or import using AutoInvoice.
To assign a bills receivable creation receipt method manually:
1. Open the transaction in the Edit Transaction page.2. Open the Payment tab and select the receipt method that you want in the Receipt Method field. The Receipt
Method field choice list contains all receipt methods assigned to the bill-to customer drawee.
Note: If the bills receivable creation receipt method uses the Number of Bills Receivable Rule of either One PerCustomer or One Per Customer Due Date, then you must also set Drawee as the primary business purpose for theapplicable bill-to customer drawee site in order to generate bills receivable automatically. This is because the customerdrawee is the defining element of transactions.
Review Eligible Transactions for a Bills Receivable BatchWhen you run the Create Bills Receivable Batch process, the process selects all eligible transactions based on thecustomer drawees belonging to the business unit and the parameter values that you enter for the process run.
This table describes rules that apply to selecting transactions for a bills receivable batch.
Feature Rule
Ineligible Transactions
You can't assign disputed transactions or other bills receivable to a bill receivable using the Create BillsReceivable Batch process.
Currency
If you enter a value in the Currency parameter, the process only selects transactions in this currency tocreate bills receivable. If you don't enter a value in the Currency parameter, the process creates bills receivable in differentcurrencies, according to the currencies of the transactions selected. The process generates bills receivable from all eligible transactions with the same currency andconversion rate.
Debit Memos and Credit Memos
If you're batching debit memos and credit memos with the payment terms Immediate, Receivablesincludes these debit memos and credit memos in the first available bill receivable, without regard to thedue date grouping rule assigned to the bill.
Note:The amounts of debit memos and credit memos must still respect the maximum amount of thebill receivable, if defined. If the sum of debit memos and credit memos applied to a bill exceeds thedesignated maximum amount of the bill, then the process excludes one or more debit memos orcredit memos in order to bring the bill to the proper amount.
Set Up the Customer Drawee Bank AccountThe currency, conversion rate, bill-to customer bank account, and the settings assigned to the bills receivable creationreceipt method determine how transactions are grouped into bills receivable.
256
Oracle Financials CloudImplementing Receivables Credit to Cash
Chapter 9Define Bills Receivable
The customer drawee bank account on eligible transactions acts as an additional rule for grouping transactions into billsreceivable. The Create Bills Receivable Batch process creates individual bills receivable from transactions with the samecustomer drawee bank account.
Note: The customer drawee bank account must be in the same currency as the transactions applied to the billreceivable.
To automatically assign the customer drawee bank account to transactions that you enter manually or import usingAutoInvoice:
1. In the Edit Site page: Site Details tab, for each applicable customer drawee site, assign the additional businesspurpose Bill-to.
2. In the Edit Site page: Payment Details tab: Bank Accounts section, enter the customer drawee bank account forthe bill-to site.
3. Set this bank account as Primary.
Bills receivable created by the Create Bills Receivable Batch process inherit the bank account on the transaction if bothof these conditions apply:
• The customer drawee site is also a bill-to site.
• The bills receivable creation receipt method doesn't use the Number of Bills Receivable Rule of either One PerCustomer or One Per Customer Due Date.
If the Number of Bills Receivable Rule on the bills receivable creation receipt method is One Per Customer or One PerCustomer Due Date, then bills receivable created by the Create Bills Receivable Batch process inherit the bank accounton the transaction only if both of these conditions apply:
• The bank account is assigned to the customer drawee site marked as Primary.
• The primary drawee site is also a bill-to site.
If the bank account on eligible transactions isn't assigned to the primary drawee site, then the process creates billsreceivable without a customer drawee bank account.
Related Topics• Create a Bills Receivable Creation Receipt Method
• Why can't I create bills receivable from transactions
• Guidelines for Batching Transactions for Bills Receivable
Create a Bills Receivable Remittance Receipt Method Create bills receivable remittance receipt methods to use with bills receivable remittance batches. A bills receivableremittance batch processes all eligible bills receivable and prepares them for remittance to your bank.
These settings on the Create and Edit Receipt Class and Methods pages apply to bills receivable remittance receiptmethods:
• Creation Method field: Select Bills Receivable Remittance.
257
Oracle Financials CloudImplementing Receivables Credit to Cash
Chapter 9Define Bills Receivable
• Remittance Method field: Select Standard for standard bills receivable and Factoring for factored billsreceivable with or without recourse.
• Debit Memos Inherit Receipt Numbers option: Enable this option if you want debit memo reversals of receiptsapplied to a bill receivable that are remitted with this receipt method to inherit the receipt number.
• Receipts inherit bills receivable number option: Enable this option if you want receipts created for billsreceivable remitted with this receipt method to inherit the bill numbers.
• Remittance Bank Accounts tab: Click this tab and create a remittance bank account to use with this receiptmethod.
The remittance bank contains both the bank account information to use for remittances and the accounting forremitted bills receivable and the subsequent receipt.
Related Topics• Create a Remittance Bank Account for Bills Receivable
• Overview of Bills Receivable Remittances
• Create a Bills Receivable Remittance Batch
• Create and Clear Receipts for Bills Receivable Remittances
Create a Remittance Bank Account for Bills Receivable Create a remittance bank account to use with bills receivable remittance receipt methods. The remittance bank accountdetermines how bills receivable are grouped and remitted, and provides accounting information for both bills receivabletransactions and receipts.
These settings on the Create and Edit Remittance Bank Account pages apply to bills receivable remittance bankaccounts:
• Primary option: Enable this option if this is the primary bank account for this receipt method. If you're creatingmore than one remittance bank account in the same currency, then you must set one bank account as Primary.
• Override bank option: Enable this option if you want to be able to change the remittance bank information ona bills receivable remittance batch after it's created.
• Clearing Days field:
◦ If this receipt method is for standard remitted bills receivable, enter the number of days it will take for thebank to clear the customer drawee receipt.
◦ If this receipt method is for bills receivable factored with recourse, enter the number of days it will take forthe bank to clear the cash advance (short-term debt) receipt.
• Risk Elimination Days field: If this receipt method is for bills receivable factored with recourse, enter thenumber of days after the maturity date to clear the short-term debt.
• Remitted Bills Receivable and Factored Bills Receivable fields: Enter the remitted bills receivable and factoredbills receivable accounts used for bills receivable transactions.
• Collection Days field: If this receipt method is for standard remitted bills receivable, enter the minimumnumber of days that the remittance bank uses to collect on a bill remitted after the maturity date.
• Short Term Debt field: Enter the short-term debt account to use for factored bills receivable with this receiptmethod.
258
Oracle Financials CloudImplementing Receivables Credit to Cash
Chapter 9Define Bills Receivable
Note: The Factoring field isn't used for bills receivable. Bills receivable receipts aren't factored, but rathercreated as remitted.
Related Topics• Create a Bills Receivable Remittance Batch
• Create and Clear Receipts for Bills Receivable Remittances
FAQs for Define Bills Receivable
How can I create a customer drawee? By creating at least one customer site for the customer account with both the business purposes Drawee and Bill-to.You must create a bill-to customer drawee site for each customer account for which you plan to use bills receivable.
If you plan to create bills receivable from customer transactions, then you must also assign the customer drawee site asthe bill-to customer on these transactions.
What's the difference between a signed and unsigned billreceivable? A signed bill receivable requires acceptance by the customer drawee before you can complete the bill and make itavailable for remittance.
You can initiate an unsigned bill receivable without requiring acceptance by the customer drawee. The unsigned billreceivable itself becomes the document necessary to claim repayment.
To create an unsigned bill receivable transaction type, leave both the Signed and Issued by drawee options unchecked.
When is a bill receivable issued by the drawee? When the customer drawee wants to create a bill receivable with a promise to repay a specific amount on a specific date.This is also called a promissory note. Promissory notes are usually guaranteed by the bank that issues the note.
How can I present late charges on bills receivable? You can only present late charges on bills receivable as a debit memo or invoice. You can't present late charges as anadjustment, because you can't make adjustments to bills receivable transactions.
If you select Adjustment as the late charge type, then late charges are generated for all overdue transactions except billsreceivable.
259

Oracle Financials CloudImplementing Receivables Credit to Cash
Chapter 9Define Bills Receivable
260
Oracle Financials CloudImplementing Receivables Credit to Cash
Chapter 10Define Revenue Management Configuration for Receivables
10 Define Revenue ManagementConfiguration for Receivables
Guidelines for Defining Revenue Policies Use the Manage Revenue Policies page to define revenue policies for each applicable business unit. Receivables usesthe revenue policy definition to make automatic revenue recognition decisions for manually entered and importedtransactions.
Receivables compares each transaction against the revenue policy, and assigns revenue contingencies to thetransaction or transaction lines that deviate from the policy definitions.
Credit ClassificationUse credit classifications to identify your high risk, noncreditworthy customers. You can assign up to three levels of risk.Receivables compares these risk levels to the credit classification assigned to the customer profile.
When you enter or import a transaction for a customer with a credit classification that matches one of the creditclassifications in the revenue policy, Receivables:
• Assigns the Customer Creditworthiness contingency to the transaction.
• Defers revenue on the entire transaction.
• Recognizes revenue on the transaction only to the extent of payments received.
Refund Policy ThresholdUse the Refund Policy Threshold column to enter the standard refund period in days that you typically offer to yourcustomers.
When you enter or import a transaction with a line associated with a contract, Receivables analyzes the contract details.If the contract offers a refund period that exceeds the refund policy, Receivables:
• Assigns the Refund contingency to the transaction line.
• Defers revenue on the transaction line.
• Recognizes revenue on the transaction line only after the refund period on the transaction line expires.
Payment Terms ThresholdUse the Payment Terms Threshold column to enter the maximum time period in days before payment terms becomeextended.
When you enter or import a transaction with payment terms or an installment schedule that exceeds the payment termspolicy, Receivables:
• Assigns the Extended Payment Terms contingency to the transaction.
• Defers revenue on the entire transaction.
261

Oracle Financials CloudImplementing Receivables Credit to Cash
Chapter 10Define Revenue Management Configuration for Receivables
• Recognizes revenue on the transaction only to the extent of payments received.
For example, you enter a payment terms threshold of 180 days on your revenue policy, and you later enter or import aninvoice with payment terms that have four installments:
• Net 60
• Net 90
• Net 120
• Net 200
Receivables defers the entire revenue amount on the invoice because the last installment exceeds the 180-day thresholdby 20 days.
Related Topics• What's a revenue contingency
• Guidelines for Defining Payment Terms
• How You Recognize Revenue on Transactions
How Event-Based Revenue Management Works Receivables automates the timing of revenue recognition for both manually entered transactions and transactionsimported using AutoInvoice. This automated revenue management process helps you to comply with the strict revenuerecognition requirements mandated by US GAAP and International Accounting Standards.
The event-based revenue management process evaluates each transaction and decides whether to immediatelyrecognize revenue, or temporarily defer revenue to an unearned revenue account based on the contingencies assignedto the transaction. Revenue is subsequently recognized according to the removal event assigned to each contingency.
Note: Even if you set up for automated revenue recognition, you can still manually adjust revenue on transactions.Once you manually adjust revenue, Receivables discontinues the automatic monitoring of contingencies.
Settings That Affect Event-Based Revenue ManagementThese settings affect event-based revenue management:
• Require salesperson Receivables system option: You must enable the Require salesperson system option touse revenue recognition.
• AR_INTERFACE_CONTS_ALL table: You can use the AR_INTERFACE_CONTS_ALL table to assign revenuecontingency IDs to billing lines, before importing transactions using AutoInvoice.
Note: When importing parent and child transaction lines, AutoInvoice automatically copies anycontingencies from the parent line to the child lines.
• Revenue Contingencies: The revenue contingencies assigned to transactions, and their corresponding removalevents, determine what revenue is deferred and for how long.
• Revenue Policy: Your revenue policy may trigger the assignment of contingencies to transactions.
262

Oracle Financials CloudImplementing Receivables Credit to Cash
Chapter 10Define Revenue Management Configuration for Receivables
• Revenue Contingency Assignment Rules: Your active revenue contingency assignment rules may trigger theassignment of contingencies to transactions.
• Revenue Scheduling Rules: If a revenue scheduling rule is assigned to the transaction, then revenue isrecognized according to the revenue scheduling rule details and rule start date.
How Event-Based Revenue Management Is CalculatedThe event-based revenue management process for deferring and later recognizing revenue on transactions followsthese steps:
1. Receivables evaluates a transaction either entered manually or imported using AutoInvoice for revenuerecognition.
2. If one or more contingencies exist, Receivables defers the corresponding revenue to an unearned revenueaccount and records the reason for the deferral.
3. Receivables monitors the contingencies until an event occurs that can remove the contingency and triggerrevenue recognition.
4. When a removal event occurs, Receivables recognizes the appropriate amount of unearned revenue on thetransaction.
The revenue is recognized either according to the revenue scheduling rule or the last contingency removal date.
Related Topics• Guidelines for Defining Revenue Policies
• Guidelines for Receivables System Option Settings
Revenue Contingencies You can use predefined revenue contingencies to assign to your customer transactions. You can define your owncontingencies based on the predefined contingencies, and you can define revenue contingency assignment rules tocontrol which contingencies are assigned to which transactions.
This table describes the predefined revenue contingencies and their corresponding contingency removal events.
Contingency Name Contingency Removal Event
Cancellation
Contingency expiration date or expiration period
Customer Creditworthiness
Receipt application
Delivery
Proof of Delivery
Doubtful Collectibility
Receipt application
Explicit Acceptance
Customer acceptance
Extended Payment Terms Receipt application
263
Oracle Financials CloudImplementing Receivables Credit to Cash
Chapter 10Define Revenue Management Configuration for Receivables
Contingency Name Contingency Removal Event
Forfeitures
Contingency expiration date or expiration period
Installation
Customer acceptance
Prior Billing Acceptance
Invoicing
Refund
Contingency expiration date or expiration period
Payment-Based Revenue Contingencies Revenue recognition of payment-based revenue contingencies depends upon payments made against opentransactions. You use payment-based contingencies for customers, or for certain transactions, where you want torecognize revenue only when you receive payment.
If a transaction or transaction line contains payment-based contingencies, these rules apply:
• Receivables initially defers revenue on the sum of all line balances, excluding taxes, freight, and late charges.
If the payment-based contingency is on one line only, then under either of these circumstances Receivablesdefers revenue for the relevant line only:
◦ Payment-based contingency was assigned by default to all the lines of the transaction, and thecontingency was expired manually on certain lines.
◦ Payment-based contingency was manually applied to one or more lines.
• During AutoInvoice import, full or partial receipt application on an imported transaction can trigger automaticrecognition of previously deferred revenue. In such cases, Receivables initiates the distribution of revenuein the amount of the applied receipt from an unearned revenue account to the appropriate earned revenueaccount.
• When you apply a receipt to a transaction with payment-based contingencies, the total amount of revenuerecognized can never exceed the original amount due on the transaction, less any applicable credit memo.
• If you later need to reverse a receipt, then Receivables automatically moves the amount of the reversed receiptback to the unearned revenue account.
Using Payment-Based ContingenciesPayment-based revenue management occurs when deferred revenue exists on a transaction due to any of theserevenue contingencies: Creditworthiness, Extended Payment Terms, Doubtful Collectibility.
• Creditworthiness: You can assign a credit classification that indicates noncreditworthiness to a customer or siteprofile. You can also assign up to three such credit classifications to your revenue policy.
If Receivables can't associate the customer on the transaction with any of these credit classifications, thenthe customer is presumed to be creditworthy. If Receivables can associate a customer with one of these credit
264
Oracle Financials CloudImplementing Receivables Credit to Cash
Chapter 10Define Revenue Management Configuration for Receivables
classifications, then Receivables assigns the Creditworthiness contingency to all transaction lines and defersthe entire transaction amount.
• Extended Payment Terms: You define the payment terms threshold on your revenue policy.
If the payment terms on a transaction exceeds the stated threshold, then Receivables assigns the ExtendedPayment Terms contingency to all transaction lines and defers the entire transaction amount.
• Doubtful Collectibility: Collectibility of late charges is typically in doubt, and isn't considered earned revenueuntil payment is received.
Decisions about doubtful collectibility are typically made in feeder systems, before AutoInvoice import occurs.
Deferred revenue can exist on a transaction due to a combination of these contingencies , as well as time-basedcontingencies. In such cases, applied payments initiate revenue recognition only if time-based contingencies haveexpired.
The following types of receipt application have no impact on revenue recognition:
• You apply a miscellaneous receipt. Only standard receipts have potential revenue recognition implications.
• You apply a receipt against a transaction that had revenue manually deferred.
• You apply a receipt against a transaction that had revenue deferred due to unexpired time-basedcontingencies.
In this case, Receivables keeps the revenue amount for the transaction or transaction line in the unearnedrevenue account, but marks the transaction as revenue pending recognition until after the contingency expires.
Payment-Based Contingencies on In Arrears TransactionsYou can use payment-based contingencies to recognize revenue on transactions that use the In Arrears invoicing rule.The In Arrears invoicing rule normally recognizes revenue based on the revenue scheduling rule assigned to transactionlines.
When you assign a payment-based revenue contingency to a transaction line, this temporarily defers revenuerecognition until payment is received.
Note: You can't assign payment-based contingencies to transaction lines that have the revenue scheduling ruleDeferred Revenue option enabled. You must schedule revenue manually for these transaction lines using the ManageRevenue Adjustments page.
To enable the assignment of payment-based contingencies to transactions that use the In Arrears invoicing rule:
1. Navigate to the Manage Receivables Lookups page.2. Search for the AR_FEATURES lookup type.3. Create and enable the AR_CONT_INV_INARREARS_RULE lookup under AR_FEATURES.
If you make a partial receipt application against an In Arrears transaction, the amount allocated to any transaction linewith a payment-based contingency is considered for relieving the contingency. The applied receipt amount is furtherprorated across the revenue scheduling periods proportionate to the amounts deferred.
Activities such as credit memos and adjustments against an In Arrears transaction after the creation of revenuecontingencies are treated as reductions against unearned revenue. The corresponding amount is reversed from theunearned revenue account as part of the activity accounting.
265

Oracle Financials CloudImplementing Receivables Credit to Cash
Chapter 10Define Revenue Management Configuration for Receivables
Related Topics• How Event-Based Revenue Management Works
Revenue Contingency Removal Events The event-based revenue management process in Receivables manages the recognition of revenue on transactionswith revenue contingencies. If a transaction has one or more revenue contingencies, Receivables defers revenue to anunearned revenue account until the contingencies expire.
The extent of the revenue deferral, and the subsequent timing of revenue recognition, depends on the nature of thecontingency:
• Time-based contingencies must expire before the contingency can be removed and revenue recognized.
• Payment-based contingencies require payment before the contingency can be removed and revenuerecognized.
• Post-billing customer acceptance clauses must expire (implicit acceptance), or be manually accepted (explicitacceptance), before the contingency can be removed and revenue recognized.
• Prior billing customer acceptance clauses require the recording of customer acceptance in the feeder system, orits expiration, before importing into Receivables for invoicing. Customer acceptance or its expiration must occurbefore the contingency can be removed, and the order can be imported into Receivables for invoicing.
Each contingency that Receivables provides has a corresponding removal event. The removal event determines theaction or event necessary to remove the contingency from a transaction or transaction line.
This table lists the revenue contingencies with their corresponding removal events:
Contingency Name Contingency Removal Event
Cancellation
Contingency expiration date or expiration period
Customer Creditworthiness
Receipt application
Delivery
Proof of delivery
Doubtful Collectibility, due to conditionssuch as late charges and other fees
Receipt application
Explicit Acceptance
Customer acceptance
Extended Payment Terms
Receipt application
Installation
Customer acceptance
Prior Billing Acceptance
Invoicing
266
Oracle Financials CloudImplementing Receivables Credit to Cash
Chapter 10Define Revenue Management Configuration for Receivables
Contingency Name Contingency Removal Event
Refund
Contingency expiration date or expiration period
Related Topics• How Event-Based Revenue Management Works
Revenue Contingency Assignment Rules Use the Revenue Contingency Assignment Rules pages to define rules for automatically assigning revenuecontingencies to transactions.
A revenue contingency assignment rule consists of:
• Rule name and optional description.
• Revenue contingency to assign to transactions.
• One or more parameters that contain the conditions under which the contingency is assigned.
The rule parameters available for rule definition include:
• Revenue Scheduling Rule
• Transaction Source
• Bill-to Customer
• Bill-to Site
• Customer Profile Class
• Memo Lines
• Business Unit
• Ship-to Customer
• Ship-to Site
• Transaction Type
You can define multiple rules with different matching criteria that return the same contingency, and you can also definemultiple rules with the same matching criteria that return multiple contingencies.
After you create an assignment rule, you can test the rule to ensure that all expressions are accurate and the rulefunctions as expected.
ScenarioRevenue contingency assignment rules let you automate the assignment of contingencies to transactions in a way thatreflects the practical needs of your enterprise. You typically use these rules to support the contingency assignmentrequirements that aren't supported by your revenue policy setup.
For example, you may want to require Customer ABC to manually accept an item before recognizing revenue on therelated transactions. To make this a mandatory process:
1. Create a new revenue contingency assignment rule.
267
Oracle Financials CloudImplementing Receivables Credit to Cash
Chapter 10Define Revenue Management Configuration for Receivables
2. Select the revenue contingency Explicit Acceptance for this rule.3. Select Bill-to Customer as the rule parameter.4. Enter the related customer condition.
With this defaulting rule in place, Receivables assigns the Explicit Acceptance contingency to all transaction lines forCustomer ABC, and defers revenue until the customer acknowledges acceptance of each line item.
FAQs for Define Revenue Management Configuration forReceivables
What's a revenue contingency? A revenue contingency is the terms and conditions in a sales contract or business agreement that prevents revenuefrom being immediately recognized, based on the revenue recognition requirements mandated by US GAAP andInternational Accounting Standards.
Typical contingencies that can delay revenue recognition include customer creditworthiness, nonstandard paymentterms, and nonstandard refund policies.
When do I use a revenue policy with a contingency? You can assign a contingency to a transaction based on the revenue policy of your enterprise.
You have these options:
• Credit Classification: The contingency is assigned to the transaction if the applicable customer has a creditclassification that matches one of the credit classifications defined in your revenue policy.
• Payment Terms: The contingency is assigned to the transaction if its payment terms exceed the payment termsthreshold of your revenue policy.
• Refund: The contingency is assigned to the transaction if it includes a refund policy that exceeds the refundpolicy threshold of your revenue policy.
Select None if you don't want to consider any details of your revenue policy for the contingency.
When do I create revenue contingency assignment rules? You must create revenue contingency assignment rules if you want to automatically assign contingencies totransactions. For each rule that you define, you specify one or more matching criteria. Whenever the rule criteria match,Receivables assigns the specified contingency to the applicable transaction lines.
There are two cases where you don't need to create revenue contingency assignment rules:
• Revenue policy violations: Receivables automatically assigns the appropriate revenue contingencies totransactions whenever any revenue policy is violated.
268

Oracle Financials CloudImplementing Receivables Credit to Cash
Chapter 10Define Revenue Management Configuration for Receivables
• Deferred revenue scheduling rules: Transactions assigned a deferred revenue scheduling rule have all revenuedeferred until either the related contingency expires or you manually schedule revenue.
269

Oracle Financials CloudImplementing Receivables Credit to Cash
Chapter 10Define Revenue Management Configuration for Receivables
270
Oracle Financials CloudImplementing Receivables Credit to Cash
Chapter 11Define Credit Management
11 Define Credit Management
Components of the Credit Profile Maintain credit profiles for your customers and customer accounts.
The credit profile contains settings that are used to:
• Create a line of credit for a customer.
• Provide an ongoing review of the credit profile of a customer.
• Contribute to the credit review process for a customer.
The credit profile is integral to managing the credit policies of your enterprise and the creditworthiness of each of yourcustomers.
Define a Credit ProfileYou can either enter data directly into a profile page, or use the File-Based Data Import customer import template toenter and upload credit-related information for your customer and customer account profiles.
You can define and maintain credit profiles at the customer level and customer account level only:
• Define a credit-only profile at the customer, or party, level. The customer credit profile facilitates credit reviewsat the company level and contributes to the overall credit picture of a company.By default, the settings of the customer credit profile apply to all accounts of the customer. You can updatethe default settings of the customer credit profile in individual customer account profiles, according to yourbusiness requirements.
• Define a credit profile at the customer account level, as part of your account profile setup. The settings of thecustomer account credit profile apply to all customer sites.
You can also define customer profile classes, with the credit settings you want, and apply individual profile classes tocustomers or customer accounts.
When necessary, you can enter an effective end date for a profile and apply a new or updated profile to the customer orcustomer account, according to your business requirements.
Credit Profile SettingsThe following table describes each of the settings in the credit profile. Some of these settings are used in the customerprofile only or the customer account profile only.
Setting Usage
Effective Start/End Dates
The date range that a customer profile is active. A new effective start date begins the day after aprevious effective end date.
Credit Analyst
The default credit analyst assigned to credit case folders for the customer. This includes case folderscreated due to credit authorization failures or the periodic review process.
271
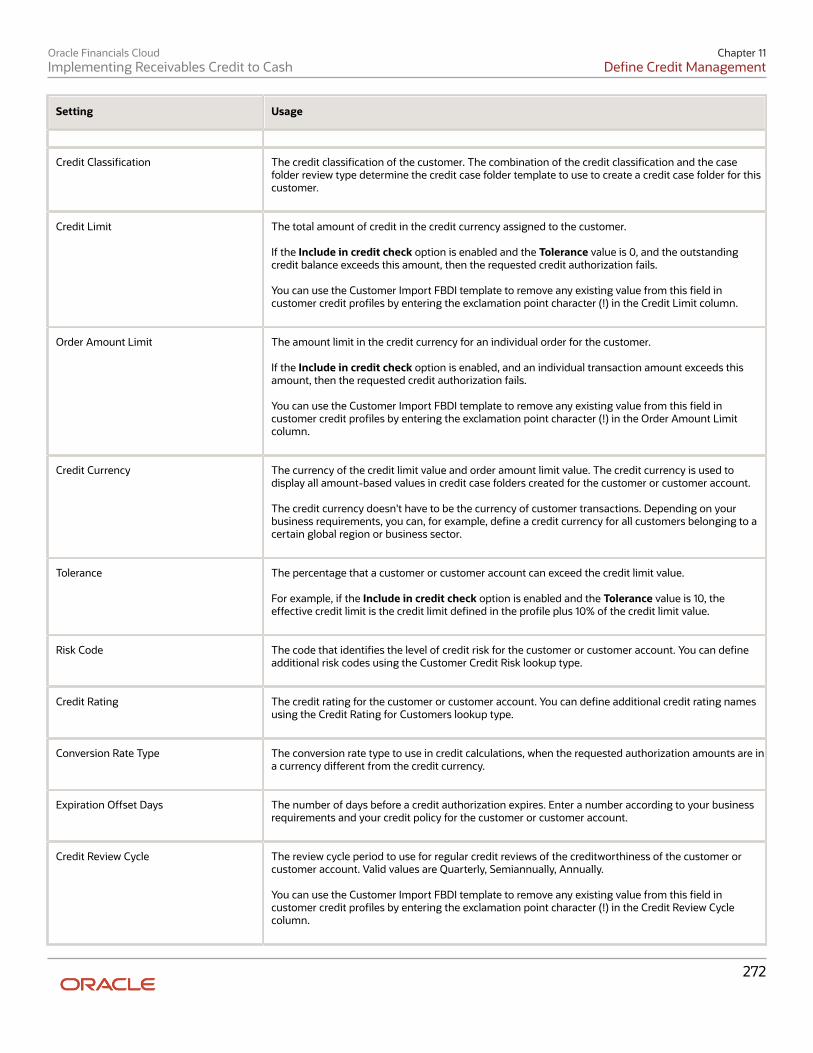
Oracle Financials CloudImplementing Receivables Credit to Cash
Chapter 11Define Credit Management
Setting Usage
Credit Classification
The credit classification of the customer. The combination of the credit classification and the casefolder review type determine the credit case folder template to use to create a credit case folder for thiscustomer.
Credit Limit
The total amount of credit in the credit currency assigned to the customer. If the Include in credit check option is enabled and the Tolerance value is 0, and the outstandingcredit balance exceeds this amount, then the requested credit authorization fails. You can use the Customer Import FBDI template to remove any existing value from this field incustomer credit profiles by entering the exclamation point character (!) in the Credit Limit column.
Order Amount Limit
The amount limit in the credit currency for an individual order for the customer. If the Include in credit check option is enabled, and an individual transaction amount exceeds thisamount, then the requested credit authorization fails. You can use the Customer Import FBDI template to remove any existing value from this field incustomer credit profiles by entering the exclamation point character (!) in the Order Amount Limitcolumn.
Credit Currency
The currency of the credit limit value and order amount limit value. The credit currency is used todisplay all amount-based values in credit case folders created for the customer or customer account. The credit currency doesn't have to be the currency of customer transactions. Depending on yourbusiness requirements, you can, for example, define a credit currency for all customers belonging to acertain global region or business sector.
Tolerance
The percentage that a customer or customer account can exceed the credit limit value. For example, if the Include in credit check option is enabled and the Tolerance value is 10, theeffective credit limit is the credit limit defined in the profile plus 10% of the credit limit value.
Risk Code
The code that identifies the level of credit risk for the customer or customer account. You can defineadditional risk codes using the Customer Credit Risk lookup type.
Credit Rating
The credit rating for the customer or customer account. You can define additional credit rating namesusing the Credit Rating for Customers lookup type.
Conversion Rate Type
The conversion rate type to use in credit calculations, when the requested authorization amounts are ina currency different from the credit currency.
Expiration Offset Days
The number of days before a credit authorization expires. Enter a number according to your businessrequirements and your credit policy for the customer or customer account.
Credit Review Cycle
The review cycle period to use for regular credit reviews of the creditworthiness of the customer orcustomer account. Valid values are Quarterly, Semiannually, Annually. You can use the Customer Import FBDI template to remove any existing value from this field incustomer credit profiles by entering the exclamation point character (!) in the Credit Review Cyclecolumn.
272
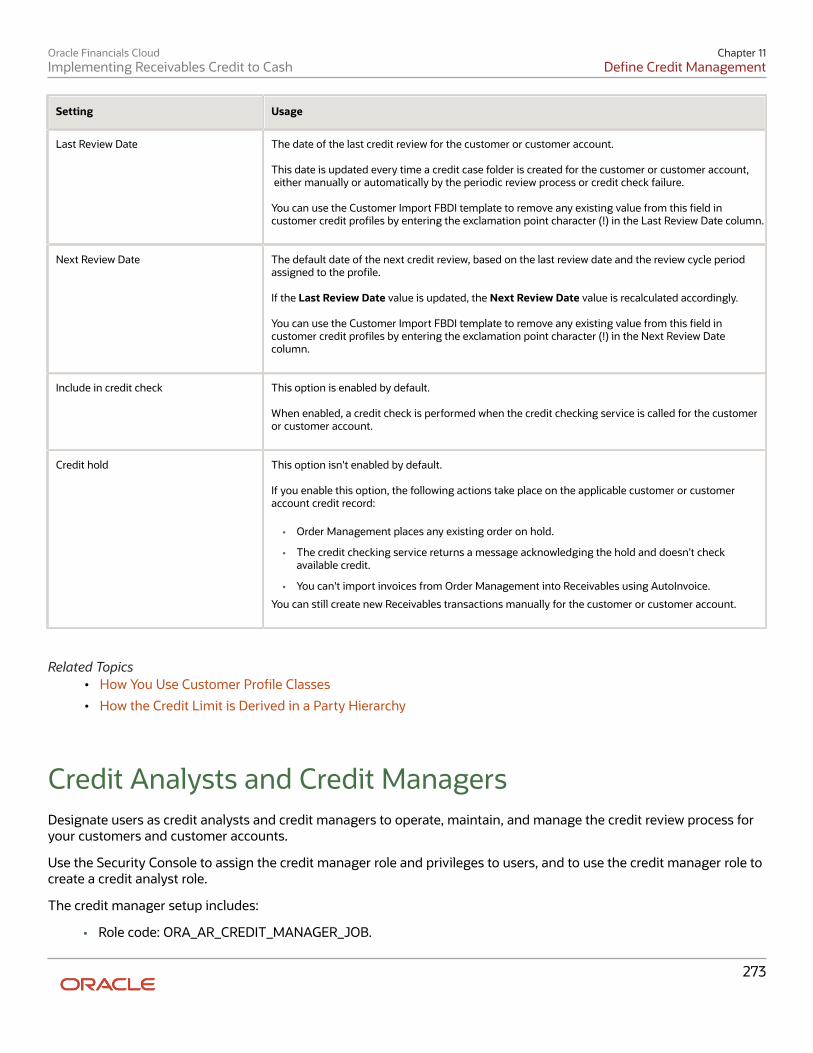
Oracle Financials CloudImplementing Receivables Credit to Cash
Chapter 11Define Credit Management
Setting Usage
Last Review Date
The date of the last credit review for the customer or customer account. This date is updated every time a credit case folder is created for the customer or customer account, either manually or automatically by the periodic review process or credit check failure. You can use the Customer Import FBDI template to remove any existing value from this field incustomer credit profiles by entering the exclamation point character (!) in the Last Review Date column.
Next Review Date
The default date of the next credit review, based on the last review date and the review cycle periodassigned to the profile. If the Last Review Date value is updated, the Next Review Date value is recalculated accordingly. You can use the Customer Import FBDI template to remove any existing value from this field incustomer credit profiles by entering the exclamation point character (!) in the Next Review Datecolumn.
Include in credit check
This option is enabled by default. When enabled, a credit check is performed when the credit checking service is called for the customeror customer account.
Credit hold
This option isn't enabled by default. If you enable this option, the following actions take place on the applicable customer or customeraccount credit record:
• Order Management places any existing order on hold.
• The credit checking service returns a message acknowledging the hold and doesn't checkavailable credit.
• You can't import invoices from Order Management into Receivables using AutoInvoice.
You can still create new Receivables transactions manually for the customer or customer account.
Related Topics• How You Use Customer Profile Classes
• How the Credit Limit is Derived in a Party Hierarchy
Credit Analysts and Credit Managers Designate users as credit analysts and credit managers to operate, maintain, and manage the credit review process foryour customers and customer accounts.
Use the Security Console to assign the credit manager role and privileges to users, and to use the credit manager role tocreate a credit analyst role.
The credit manager setup includes:
• Role code: ORA_AR_CREDIT_MANAGER_JOB.
273
Oracle Financials CloudImplementing Receivables Credit to Cash
Chapter 11Define Credit Management
• Function security policy: ORA_AR_CREDIT_MANAGER_JOB.
The credit analyst setup includes:
• Role code: User-defined.
• Function security policy: Define the credit analyst role using the function security policy ofORA_AR_CREDIT_MANAGER_JOB as a starting point, and then remove the privileges that a credit analystdoesn't need, such as the Manage Credit Review Advanced privilege.
Credit AnalystThe credit analyst is responsible for monitoring the creditworthiness of customer accounts and assisting in theresolution of credit-related issues.
The credit analyst entered on a credit profile is by default assigned all case folders for the customers and customeraccounts with this profile. Credit analysts are also assigned any case folders that they themselves create manually.
Credit analysts can reassign their own case folders to other credit analysts, but can't reassign the case folders of otheranalysts.
Credit ManagerThe credit manager has responsibility for a team of credit analysts.
Credit managers have access to the case folders and credit review information of their own customers and customeraccounts, and of the customers and customer accounts assigned to all credit analysts on their team. Credit managersare responsible for the final approval of a case folder.
The credit manager can perform all of the credit analyst duties. In addition, the credit manager can perform these tasks,as part of the Manage Credit Review Advanced privilege:
• Reassign case folders from one credit analyst to another.
• Approve or reject all case folders belonging to the team.
Create a Scoring Model Create scoring models to use in the calculation of customer credit scores. You can create a different scoring model foreach type of credit review that you need. This lets you apply standard and consistent scoring guidelines across yourcustomers and customer accounts.
You assign scoring models to credit case folder templates. When a credit review is initiated and a case folder created, theappropriate template and scoring model is assigned to the case folder for the credit review process.
A scoring model includes the data points and scoring method that are appropriate for a particular credit review. Whenyou create a scoring model, for each data point:
• Enter all of the ranges of values that you need to define for a given data point.
• Assign a score to each range of values.
• Assign a relative weighting factor to the data point, as it relates to all other data points.
During a credit analysis, the scores that you assigned to each data point range of values are used to calculate the score.
274

Oracle Financials CloudImplementing Receivables Credit to Cash
Chapter 11Define Credit Management
Note: Credit scores are calculated as whole integers, with decimal values .5 or greater rounded up. For example, 70.5becomes 71, and 70.4 becomes 70.
To create a scoring model:
1. Navigate to Setup and Maintenance > Manage Credit Scoring Models page.2. Click the Plus (+) icon to open the Create Credit Scoring Model page.3. In the Name and Description fields, enter the name and description for this scoring model.
You may want to use a name that identifies the type of scoring model, either as it relates to a case foldertemplate or to a subset of your customers.
4. In the Start Date field, enter the date that you want this scoring model to become active. The default is thesystem date, but you can change it to a future date.
5. Use the End Date field to define a limit of active operation for a scoring model. The only valid end date is thecurrent date.
When you create a new case folder or attach a scoring model to a case folder template, you can only select ascoring model that either has no end date or has an end date later than the case folder or case folder templatecreation date.
Note: Once you enter an end date and save your work, you can no longer change or remove the end date.This ensures that your credit policies are strictly enforced and that comparisons across scoring modelsremain meaningful.
6. In the Currency field, select the scoring model currency.
All data point values used in the calculation of the credit score convert to the scoring model currency.7. Use the Convert Null Values to Zero Values option to indicate how the scoring model should treat data points
with null values. This option is enabled by default.
Note: If you disable this option, then the scoring model doesn't calculate a credit score if data points containnull values. In this case, after case folder creation the credit review process stops and the credit analyst mustmanually enter values for these data points.
8. In the Data Points section, click the Plus (+) icon to open the Add Data Points window.9. In the Add Data Points window, search for and select the data points you want.
Use the Category field to display all data points belonging to a particular category. You can select multiple datapoints and click the Apply button to assign them to the scoring model. You can then search for data pointsbelonging to a different category and continuing selecting and applying data points to the scoring model.
10. After adding all of the data points you want, click the OK button to return to the Create Credit Scoring Modelpage.
11. In the Data Points section, select the first data point.12. In the Weight field, enter the relative weight of this data point.
The weight that you assign indicates the relative importance of the data point in the scoring model.13. In the Details section, click the Plus (+) icon to open a row for entering the first range of values and
corresponding score for this range.14. In the From Range and To Range fields, enter the range of values. You can enter up to 15 characters for each
value in the range. Ranges can't have gaps or overlaps.
For numeric data points, the To Range value of the first row must be the same as the From Range value of thesecond row.
275

Oracle Financials CloudImplementing Receivables Credit to Cash
Chapter 11Define Credit Management
This table shows numeric ranges with no gaps:
Range From To Score
Current Balance
0
1000
10
Current Balance
1000
2000
20
Current Balance
2000
3000
30
For alphanumeric data points, enter only one value per row of ranges. This means both the From Range and ToRange values must be the same.
This table shows two range values:
Range From To Score
Range 1
A2B
A2B
10
Range 2
B3B
B3B
5
15. In the Score Value field, enter a numeric score for this range of values.
Though not required, a common principle for assigning a score is: The higher the score, the lower the creditrisk. Your scores then decrease in number as you enter your ranges of values, with the score for the highestlevel of risk at or near zero (0).
16. Continue to add rows and enter ranges of values and corresponding scores for each range.
The ranges that you enter should include all possible values for the given data point, from the point of view ofestablishing credit risk.
17. Repeat steps 11 to 16 for each data point.18. Select the Enabled option to activate the scoring model.
You can later deselect the Enabled option to render the scoring model inactive. You may want to do thisinstead of entering an end date if your credit requirements change temporarily, but you want the scoring modelavailable for later use.
Note: If you disable a scoring model you must ensure that it isn't used by an active case folder or case foldertemplate.
19. Save your work.
Related Topics• Create a Credit Case Folder Template
• Overview of Data Points
276
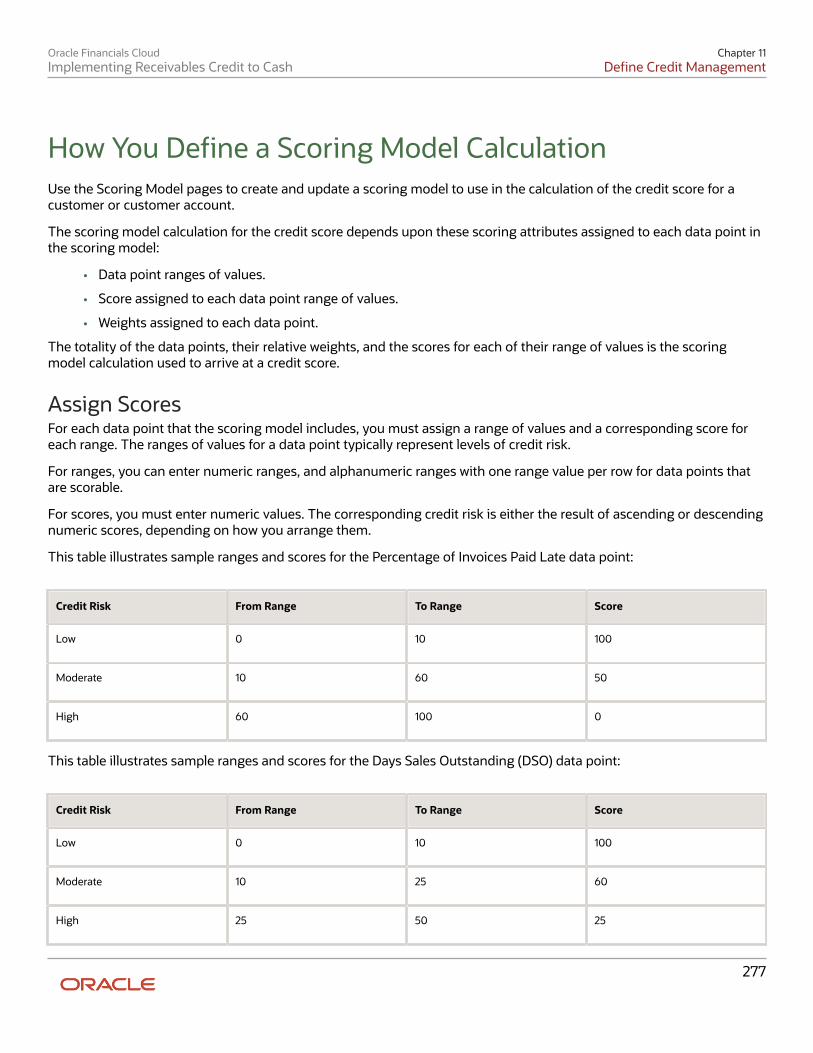
Oracle Financials CloudImplementing Receivables Credit to Cash
Chapter 11Define Credit Management
How You Define a Scoring Model Calculation Use the Scoring Model pages to create and update a scoring model to use in the calculation of the credit score for acustomer or customer account.
The scoring model calculation for the credit score depends upon these scoring attributes assigned to each data point inthe scoring model:
• Data point ranges of values.
• Score assigned to each data point range of values.
• Weights assigned to each data point.
The totality of the data points, their relative weights, and the scores for each of their range of values is the scoringmodel calculation used to arrive at a credit score.
Assign ScoresFor each data point that the scoring model includes, you must assign a range of values and a corresponding score foreach range. The ranges of values for a data point typically represent levels of credit risk.
For ranges, you can enter numeric ranges, and alphanumeric ranges with one range value per row for data points thatare scorable.
For scores, you must enter numeric values. The corresponding credit risk is either the result of ascending or descendingnumeric scores, depending on how you arrange them.
This table illustrates sample ranges and scores for the Percentage of Invoices Paid Late data point:
Credit Risk From Range To Range Score
Low
0
10
100
Moderate
10
60
50
High
60
100
0
This table illustrates sample ranges and scores for the Days Sales Outstanding (DSO) data point:
Credit Risk From Range To Range Score
Low
0
10
100
Moderate
10
25
60
High
25
50
25
277

Oracle Financials CloudImplementing Receivables Credit to Cash
Chapter 11Define Credit Management
Credit Risk From Range To Range Score
Highest
50
100
10
Assign WeightsAssign a weighting factor to each data point to indicate the relative importance of each data point in the scoring model.Your definition of "relative importance" depends on how you plan to use a scoring model.
For example, if you're creating a scoring model to determine a credit limit increase for an existing customer with yearsof credit history with your enterprise, you might assign a higher weighting factor to the Percentages of Invoices PaidLate data point, and a lower weighting factor to, for example, data points that represent credit agency scores or ratings.
To continue with the example, this table illustrates the possible weighting factors for the two data points Percentage ofInvoices Paid Late and the Days Sales Outstanding (DSO) data points:
Data Point Weight
Percentage of Invoices Paid Late
75
Days Sales Outstanding (DSO)
25
In this example, the respective weights contribute to the total credit score in this way:
• Percentage of Invoices Paid Late weight is 75/(25+75)=75% or 0.75
• Days Sales Outstanding (DSO) weight is 25/(25+75)=25% or 0.25
The Percentage of Invoices Paid Late weight contributes 75% toward the total credit score. The Days Sales Outstanding(DSO) weight contributes 25% toward the total credit score.
Calculate the ScoreThis scoring example illustrates how the credit score is calculated, based on the scoring model defined in the previousexamples.
The calculation of a credit score is the sum of the weighted points earned expressed as a percentage. A point earned isthe score assigned to a data point value, determined by the scores assigned to the data point ranges. A weighted pointearned is the product of the point earned and the weight assigned to the data point.
This table shows the points earned for the credit case folder that uses this scoring model:
Category Data Point Value Points Earned
Billing and Payments
Percentage of Invoices Paid Late
57%
50
Billing and Payments
Days Sales Outstanding (DSO)
15 days
60
278

Oracle Financials CloudImplementing Receivables Credit to Cash
Chapter 11Define Credit Management
The Percentage of Invoices Paid Late for this customer is 57%, which in the scoring model falls into the Moderate Riskrange of 10% > 60%. The score assigned to this range is 50, the points earned are 50.
The weight assigned to this data point in the scoring model is 75%, or .75. The weighted points earned (points earned xweight) for the Percentage of Invoices Paid Late data point is 50 x .75 = 37.5.
The Days Sales Outstanding (DSO) for this customer is 15 days, which in the scoring model falls into the Moderate Riskrange of 10 > 25 days. The score assigned to this range is 60, so the points earned are 60.
The weight assigned to this data point in the scoring model is 25%, or .25. The weighted points earned (points earned xweight) for the Days Sales Outstanding (DSO) data point is 60 x .25 = 15.
The credit score formula, as the sum of the weighted points earned expressed as a percentage is:
Credit score = points earned 1 x weight 1 (in percentage) + points earned 2 x weight 2 (in percentage) + ...
In this case, points earned 1 = 50, weight 1 in percentage is 0.75; points earned 2 = 60, weight 2 in percentage is 0.25. So:
Credit score = 50x0.75 + 60x0.25 = 52.5 (out of 100)
Create a Credit Case Folder Template Create credit case folder templates to use in the creation of your credit case folders.
The credit case folder template defines:
• Data points to display in the case folder.
• Definition of the required and optional data points in the case folder that are made available for a given creditreview.
• If applicable, the scoring model to use in a case folder for a customer or customer account.
A credit case folder is created for a combination of credit classification and review type. You can set up your casefolder templates for each of these combinations. You can create more than one case folder template with the samecombination, according to your credit policies, but only one template with a given combination can be active andenabled at any one time.
For example, during an Ad Hoc Review, a High Risk customer might require additional collateral and bank reference datapoints on which to base a credit decision. Or during a Periodic Review of a Moderate Risk with D&B customer, you mayrely mainly on the D&B Paydex Score and D&B Rating data point values.
When a credit review is initiated and a case folder created, a case folder template is assigned based on the creditclassification and review type combination. If a template can't be found with this combination, then the case foldertemplate you designated as the default is used.
To create a case folder template:
1. Navigate to Setup and Maintenance > Manage Credit Case Folder Templates page.2. Click the Plus (+) icon to open the Create Credit Case Folder Template page3. In the Name and Description fields, enter the name and description for this case folder template.
You may want to use a name that identifies the type of case folder template, as it relates to the combination ofcredit classification and review type.
4. In the Start Date field, enter the date that you want this case folder template to become active. The default isthe system date, but you can change it to a date earlier than or later than the system date.
279
Oracle Financials CloudImplementing Receivables Credit to Cash
Chapter 11Define Credit Management
Active and enabled case folder templates are available for use with case folders created on or after the casefolder template start date.
5. Use the End Date field to define a limit of active operation for a case folder template. You can create more thanone case folder template for a given combination of credit classification and review type, if your credit policieschange, or you anticipate that they will change in the near future. To do this, apply a future end date to thecurrent template and create a new template with a start date after the current template end date.
Note: Once you enter an end date and save your work, you can no longer change or remove the end date.
6. In the Scoring Model field, optionally enter the scoring model to use with this case folder template.
If you don't select a scoring model, the data points you set for this template are used by the credit analyst forcredit determination, but no credit score is calculated.
7. In the Data Points section, use the Category field to display the data points of a specific category only. Bydefault, the Data Points section displays all data points for all categories
8. Use the fields in the Include in Case Folder column to identify the data points to include in the case foldertemplate:
◦ No: The default. These data points don't appear in the template after you save it, and don't appear in anycase folder created using this template
◦ Required: The data point is included in the template and a value is required for credit determination andto calculate the credit score in the credit case folder that uses this template.
In the credit case folder, required data points that don't have a value are labeled with a warning icon.
◦ Optional: The data point is included in the template, but a value isn't required. Optional data pointsprovide credit analysts with additional flexibility in determining the values needed for a particular creditdetermination.
Note: If you selected a scoring model for this template, you still need to set the scoring model data pointsas Required or Optional in order for them to appear in a credit case folder that uses this template. If thecredit analyst enters a scorable value in an optional data point, then this value is included in the credit scorecalculation.
9. After you have set all of the data points you want for the template, save your work.
How You Maintain the Summary Tables for Data Points The values for many of the data points are maintained in the Receivables summary tables AR_TRX_BAL_SUMMARY andAR_TRX_SUMMARY.
AR_TRX_BAL_SUMMARYThe AR_TRX_BAL_SUMMARY table maintains summary data related to customers and customer accounts.
The table includes summary data in these data point categories:
• Aging: All open counts and amounts; and past due, adjustment, and at risk amounts.
• Billing and Payments: Payment-related data.
• Business Information and Credit: Current receivables balance.
280
Oracle Financials CloudImplementing Receivables Credit to Cash
Chapter 11Define Credit Management
The lowest level of granularity for a data point value stored in this table is at the level of a customer bill-to site of a givencustomer account in a specified currency.
A data point value from the AR_TRX_BAL_SUMMARY table displayed in the case folder for a customer or customeraccount is derived in this way:
• Add up all values across all bill-to sites (for customer account case folders) or all customer accounts (forcustomer case folders).
• Convert the values to the credit currency using the values defined for currency and conversion rate type in thecustomer or customer account profile.
• If the credit currency defined in the customer or customer account profile isn't the same as the scoring modelcurrency, the data point values used for scoring are converted to the scoring model currency.
AR_TRX_SUMMARYThe AR_TRX_SUMMARY table maintains summary data related to customer and customer account transactions.
The table includes summary data in these data point categories:
• Billing and Payments: Transaction counts, amounts, and percentages.
• Business Information and Credit: Credit amounts and dates.
The data in the AR_TRX_SUMMARY table is over a 12-month time period. The display of summarized order, invoice, andpayment data over this period of time can provide you with an overall picture of your relationship with the customer orcustomer account, and can help you predict future performance.
The lowest level of granularity for a data point value stored in this table is at the level of a customer bill-to site of a givencustomer account in a specified currency in the given 12-month period.
A data point value from the AR_TRX_SUMMARY table displayed in the case folder for a customer or customer account isderived in this way:
• Add up all values with the most recent As-of date across all bill-to sites (for customer account case folders) orall customer accounts (for customer case folders).
• Convert the values to the credit currency using the values defined for currency and conversion rate type in thecustomer or customer account profile.
• If the credit currency defined in the customer or customer account profile isn't the same as the scoring modelcurrency, the data point values used for scoring are converted to the scoring model currency.
Run the Process Receivables Transactions for Customer AccountSummaries ProcessDuring the life of a case folder, customer data is likely to change with new transactions, adjustments, payments,disputes, and other transaction and balance updates.
You can update the data in the AR_TRX_BAL_SUMMARY and AR_TRX_SUMMARY tables to reflect all of these changeby using the Process Receivables Transactions for Customer Account Summaries process.
Schedule a regular run of the Process Receivables Transactions for Customer Account Summaries process to refresh theapplicable customer account summary data for all related data points.
281

Oracle Financials CloudImplementing Receivables Credit to Cash
Chapter 11Define Credit Management
After the AR_TRX_BAL_SUMMARY and AR_TRX_SUMMARY tables are refreshed, you can open any applicable casefolder and select Refresh Data from the Actions menu to refresh the data points in the case folder.
How You Import Third-Party Credit Data for Data Points You can import credit data from third-party credit services for use as data point values in your scoring models.
You can import credit data for these data point categories:
• Bank References
• Business Information and Credit
• Collateral
• Financial Data
• Guarantors
• References
• Trade References
• Venture Funding
• Additional data points (data not covered by the available categories)
Use the Upload Credit Data Template worksheet to enter customer credit data from third parties using data pointcategories, data points, and data point values. Use the Import Credit Data process of the Load Interface File for Importprocess to upload the completed worksheet.
To upload credit data from a third party credit service:
1. Download the Upload Credit Data Template.Review the information on the template Instructions tab.
2. Complete each row in the worksheet for the customers and data point values you want. For each data pointvalue, enter:
◦ Customer party number (registry ID)
◦ Customer account number, if the data is applicable to a customer account only
◦ Data point category
◦ Data point name
◦ Data point value
◦ Data point value currency
Note: You can only enter one data point value for the same combination of customer, customer account,data point category, and data point name.
Note: The Currency column is required for most data points that take a numeric value, such as BankReferences average balance and current balance, Venture Funding amounts, and most Financial Data. See theUpload Customer Credit Data Template instructions for details.
3. After completing the template, generate the .zip file for upload.4. Navigate to Scheduled Processes.
282

Oracle Financials CloudImplementing Receivables Credit to Cash
Chapter 11Define Credit Management
5. Navigate to the Load Interface File for Import process.6. In the Import Process parameter, select Import Credit Data.7. In the Data File parameter, select the .zip file you generated in step 3.8. Submit the Load Interface File for Import process.
Note: If data point values already exist, the newly imported data overwrites the existing values.
9. Review the completed upload process, and review the log file for upload errors and for any rows that failed toimport successfully.
How You Import Credit Management Data Points Use the Import Credit Data process to import credit data from third-party organizations for use as data point values inyour scoring models.
You can download a customer credit data FBDI template to use to prepare your data. The template contains aninstruction sheet to help guide you through the process of entering your information.
To access the template, complete the following steps:
1. Navigate to the File-Based Data Import for Oracle Financials Cloud guide.2. In the Table of Contents, click File-Based Data Imports.3. Click Credit Management Data Points Import.4. In the File Links section, click the link to the Excel template.
Follow these guidelines when preparing your data in the worksheet:
• Enter the required information for each column. Refer to the tool tips on each column header for detailedinstructions.
• Don't change the order of the columns in the template.
• You can hide or skip the columns you don't use, but don't delete them.
After you have completed the template, upload it using the Load Interface File for Import process:
1. In the Import Process field, select Import Credit Data.2. In the Data File field, enter the completed template.3. The Load Interface File for Import process uploads the credit data for each customer included in the template.
The import process checks for the uniqueness of the customer (party) number and customer account number(if entered).
Settings That Affect the Upload Customer Credit Data TemplateThe Upload Customer Credit Data import template contains an instructions tab and a Customer Credit Data tab:
Spreadsheet Tab Description
Instructions and CSV Generation
Contains instruction information about preparing and loading data, the format of the template, submitting the Import Credit Data process, and correcting import errors.
CustomerCreditData
Enter credit data point information for each applicable customer and customer account.
283
Oracle Financials CloudImplementing Receivables Credit to Cash
Chapter 11Define Credit Management
How Customer Credit Data Is ProcessedYou can import credit data from third-party organizations for these data point categories:
• Bank References
• Business Information and Credit
• Collateral
• Financial Data
• Guarantors
• References
• Trade References
• Vendor Funding
• Additional (for user-defined data points)
You enter one data point value for the same combination of customer, customer account, data point category, and datapoint name. If the data point takes a numeric value, then in many cases you need to add a currency.
The validated data points become available for use in scoring models created for the applicable customers andcustomer accounts.
Related Topics• How You Import Third-Party Credit Data for Data Points
• How You Maintain the Summary Tables for Data Points
• Overview of Data Points
Descriptive Flexfields in Credit Case Folders Use descriptive flexfields to pass additional source transaction information for credit check requests. This information ispassed to credit case folders created as a result of a credit checking failure.
You can pass information about the source transaction requesting the credit check, including, for example, ContractStart Date, Contract Billing Frequency, and Contract Invoicing Rule. The descriptive flexfields are displayed in theAdditional Information section of the Edit and View Credit Case Folder pages.
You can edit these additional attribute values before the case folder is approved. Once the case folder is approved, thesevalues are displayed as read-only.
You must ensure that the credit case folder descriptive flexfields you define match the values passed through the creditchecking service. If the data types for the attributes don't match, or if the descriptive flexfields aren't defined, theseadditional attributes don't appear in case folders created as a result of a credit check failure.
Related Topics• Flexfield Components
• Overview of Flexfield Configuration
• Flexfields at Runtime
284

Oracle Financials CloudImplementing Receivables Credit to Cash
Chapter 11Define Credit Management
FAQs for Define Credit Management
What's the difference between credit rating and creditclassification? The credit rating, and the risk code, are user-definable values available for use as internal commentary or notes about acustomer or customer account. These values don't have a programmatic usage.
The credit classification is an integral part of managing the creditworthiness of a customer. The combination of thecredit classification on the credit profile and the case folder review type (Ad Hoc Review, Periodic Review, Credit CheckFailure) determine which credit case folder template to use to create a case folder for a customer credit review.
For example, a customer profile with a credit classification of High Risk and a review type of Credit Checking Failure maycreate a case folder requiring a detailed review of the customer's credit history, while a customer profile with a creditclassification of New Customer and a review type of Ad Hoc Review may require only a formal review process.
What happens if no credit currency is defined? You can use the AR: Default Credit Management Currency profile option to define a default credit currency. The creditchecking process uses this currency if no credit currency is defined in the applicable customer, customer account, orparty profiles.
If the AR: Default Credit Management Currency profile option isn't defined, the credit checking process uses US dollars(USD) as the credit currency.
If no conversion rate type is defined, then the credit checking process uses the conversion rate type Corporate.
Why can't I edit or delete a scoring model? Because it's used by a case folder or case folder template. You can't delete or update the contents of a scoring model inuse.
In the Manage Credit Scoring Models page, you can disable or apply an end date to a scoring model. If you apply an enddate, you must either assign a new scoring model or ensure that a comparable end date is applied to the applicable casefolder or case folder template.
Why can't I add data points to a scoring model? You can only add scorable data points to a scoring model. A scorable data point uses ranges of values that you assignscore values to. These score values are used to calculate the credit score.
285
Oracle Financials CloudImplementing Receivables Credit to Cash
Chapter 11Define Credit Management
Non-scorable data points provide reference information only. You can add non-scorable data points to a case folder tohelp with the evaluation of a customer's credit.
What's the difference between a null data point value and a zerodata point value? A null data point value indicates no activity. A zero data point value indicates that activity has occurred in the past, butno current value exists for the data point.
For example, for the Count of Invoices Paid Late data point, a null value means that no payments have been made, whilea zero value means that all invoices were paid on time.
What's the difference between the credit currency and the scoringmodel currency? You define the credit currency in customer credit profiles.
The credit case folders for a customer or customer account display all amount-based values in the credit currency,including available credit, credit limit, and data point values.
The scoring model currency is used to display all amount-based values for data points and data point ranges in theScoring Model pages.
A scoring model, as part of a case folder template, is used to calculate credit scores for many different customers. If acredit case folder uses a scoring model, the amount-based data point values appear in the credit currency in the CreditCase Folder pages and in the scoring model currency in the Scoring Details page.
Depending on your business requirements, you may want to use a globally recognized currency, such as US dollars orEuros, as the scoring model currency, and a currency representative of a certain global region or business sector as thecredit currency.
Why do I add a scoring model to a case folder template? To calculate a credit score in credit case folders created with this credit case folder template. If all of the data points havevalues during case folder creation, the credit score is calculated automatically. During the credit review, you can enter,add, and update data point values and recalculate the score.
If a case folder template doesn't use a scoring model, then case folders created with this template display the datapoints you set as Required and Optional without calculating a score. You can use these data points to evaluate thecreditworthiness of a customer or customer account. You can also use third-party credit ratings, available as data pointvalues.
286
Oracle Financials CloudImplementing Receivables Credit to Cash
Chapter 11Define Credit Management
How can I assign a default case folder template? The default case folder template is assigned to case folders during a credit review when no template can be found with aspecific credit classification and review type combination.
You can only have one default case folder template. The default case folder template must be enabled and have a startdate on or before the current date, but with no end date. You can't use a case folder template with an end date as thedefault.
In the Manage Credit Case Folder Templates page, select a template and click the Set as Default button. Any previousdefault template is reassigned to the new designated template.
Can I edit a case folder template? Yes. If the template hasn't been used to create a case folder, you can edit the entire contents of the template, except forthe template name.
If the template has been used to create a case folder, you can only apply an end date to the template or deselect theEnabled option. If you make either of these updates, you must ensure that this doesn't affect any current case folders.
287

Oracle Financials CloudImplementing Receivables Credit to Cash
Chapter 11Define Credit Management
288
Oracle Financials CloudImplementing Receivables Credit to Cash
Chapter 12Define Cash Management and Banking Configuration
12 Define Cash Management and BankingConfiguration
How Bank, Branch, and Account Components WorkTogether Banks, branches, and accounts fit together on the premise of the Bank Account model.
The model enables you to define and keep track of all bank accounts in one place and explicitly grant account access to:
• multiple business units
• functions
• users
This eliminates the redundant duplicate bank account setup in different business units when these business units sharethe same bank account.
BanksCreating a bank is the first step in the bank account creation. You can:
• Search for existing banks to view and update
• Create a new bank from an existing party
Consider the following:
• The option to create from an existing party is implicitly implemented by the matching option.
• The option is available only after the existing party has been found with the same bank.
• If you select the matching option, the page repopulates the information from the matched party.
BranchesOnce you have created your bank, the next step is creating a branch or branches associated to the bank. The matchingoption is also available when creating branches. To create a new branch without using the matching option, manuallyenter the required information. You can also define other branch- related attributes in the same page.
If you don't use the matching option when an existing party is found, a branch with the same party name is created.
AccountsThe four areas associated with defining an account are:
• General information
• Control of the account
• Security and access to the account
289

Oracle Financials CloudImplementing Receivables Credit to Cash
Chapter 12Define Cash Management and Banking Configuration
• Business unit assignment
Once the bank and branch are created, proceed to the bank account setup by doing the following:
• Select the bank branch you want to associate to your bank account.
• Assign the owner of the bank account.
Note: To create a bank account for Payables or Receivables, add the Business Unit Access first for thebusiness units to use the bank account.
Consider the following:
• The Oracle Fusion Account Payables or Receivables accounts are identified by the business unit.
• The Oracle Fusion Payroll accounts are identified by the legal entity.
• The program, Inactivates Banks and Bank Branches enables you to inactivate all banks and bank branches thathave no active internal and external bank accounts.
Related Topics• Considerations When You Create Accounts
• Reconciliation Matching Rules
Considerations When You Create Accounts Banks, branches and accounts fit together on the premise of the Bank Account model. The Bank Account model enablesyou to define and keep track of all bank accounts in one place.
The Bank Account Model can explicitly grant account access to multiple business units, functions, and users. Considerthe following when you set up bank accounts:
• Assign a unique general ledger cash account to each account, and use it to record all cash transactions for theaccount. This facilitates book to bank reconciliation.
• Grant bank account security. Bank account security consists of bank account use security, bank account accesssecurity, and user and role security.
Account UseAccount Use refers to accounts created for:
• Oracle Fusion Payables
• Oracle Fusion Receivables
• Oracle Fusion Payroll
Select the appropriate use or uses when creating an account in one or more of these applications.
290

Oracle Financials CloudImplementing Receivables Credit to Cash
Chapter 12Define Cash Management and Banking Configuration
Account AccessPayables and Receivables account access is secured by business unit. Before the bank account is ready for use byPayables or Receivables, you must:
1. Select the appropriate use for the application.2. Grant access to one or more business units.
Note: You can only assign access to the business units that use the same ledger as the bank accounts owning thelegal entity,
User and Role SecurityYou can further secure the bank account so that it can only be used by certain users and roles. The default value forsecure bank account by users and roles is No. For Payables and Receivables, you must have the proper business unitassigned to access a bank account even if the secure bank account by users and roles is No. If the secure bank accountby users and roles is set to Yes, you must be named or carry a role assigned to the bank account to use it.
• You must assign the security duty role Cash Management Administration to the Cash Manager job role toprovide access for setting up banks, branches, and accounts. You must have the assigned Manage BankAccount Security privilege to modify the User and Role Security.
• If you want to restrict the access to the Security tab, you must create a customized role and remove theprivilege Manage Bank Account Security. For example, you would copy the Cash Management Administrationduty role, rename it, and remove the privilege.
GL Cash Account SegmentsConsider selecting the option to enable multiple cash account combinations for reconciliation if you want to reconcilejournal lines of multiple cash account combinations matching the same natural account and other specified segmentvalues.
For example, if you set up 01-000-1110-0000-000 as your cash account, and select Account and Sub-Account as GLCash Account Segments, you're able to manually or automatically reconcile journal lines entered on different accountcode combinations matching the same natural account '1110' and sub-account '0000'.
Cash Management Profile Options Profile options in Oracle Fusion Cash Management provide ways to improve and promote efficiency in your businesspractices. How you configure these profile options can affect the interaction with other applications. Enabling theseprofile options can streamline your processes between those applications.
The following table lists and describes the Cash Management profile options:
Profile Option Profile Display Name Applies To Default Setting
CE_DISABLE_BANK_VAL
Disable Country Specific BankValidations
Internal Bank Accounts External Bank Accounts
No
291
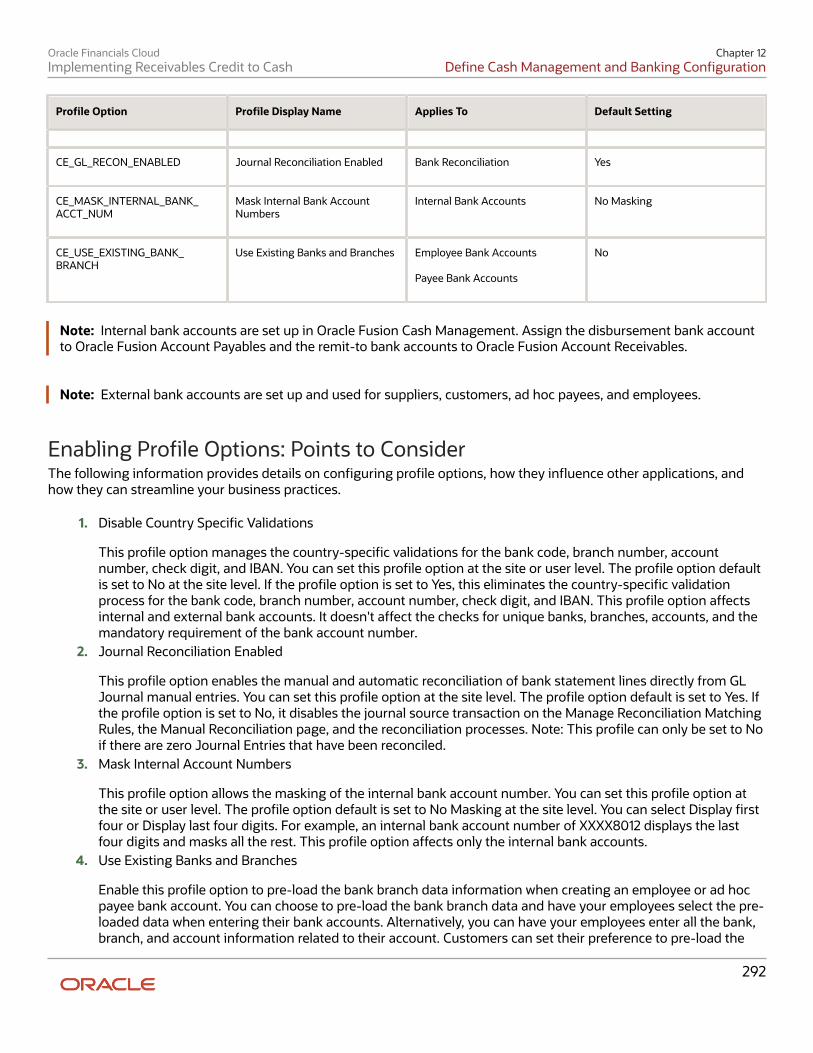
Oracle Financials CloudImplementing Receivables Credit to Cash
Chapter 12Define Cash Management and Banking Configuration
Profile Option Profile Display Name Applies To Default Setting
CE_GL_RECON_ENABLED
Journal Reconciliation Enabled
Bank Reconciliation
Yes
CE_MASK_INTERNAL_BANK_ACCT_NUM
Mask Internal Bank AccountNumbers
Internal Bank Accounts
No Masking
CE_USE_EXISTING_BANK_BRANCH
Use Existing Banks and Branches
Employee Bank Accounts Payee Bank Accounts
No
Note: Internal bank accounts are set up in Oracle Fusion Cash Management. Assign the disbursement bank accountto Oracle Fusion Account Payables and the remit-to bank accounts to Oracle Fusion Account Receivables.
Note: External bank accounts are set up and used for suppliers, customers, ad hoc payees, and employees.
Enabling Profile Options: Points to ConsiderThe following information provides details on configuring profile options, how they influence other applications, andhow they can streamline your business practices.
1. Disable Country Specific Validations
This profile option manages the country-specific validations for the bank code, branch number, accountnumber, check digit, and IBAN. You can set this profile option at the site or user level. The profile option defaultis set to No at the site level. If the profile option is set to Yes, this eliminates the country-specific validationprocess for the bank code, branch number, account number, check digit, and IBAN. This profile option affectsinternal and external bank accounts. It doesn't affect the checks for unique banks, branches, accounts, and themandatory requirement of the bank account number.
2. Journal Reconciliation Enabled
This profile option enables the manual and automatic reconciliation of bank statement lines directly from GLJournal manual entries. You can set this profile option at the site level. The profile option default is set to Yes. Ifthe profile option is set to No, it disables the journal source transaction on the Manage Reconciliation MatchingRules, the Manual Reconciliation page, and the reconciliation processes. Note: This profile can only be set to Noif there are zero Journal Entries that have been reconciled.
3. Mask Internal Account Numbers
This profile option allows the masking of the internal bank account number. You can set this profile option atthe site or user level. The profile option default is set to No Masking at the site level. You can select Display firstfour or Display last four digits. For example, an internal bank account number of XXXX8012 displays the lastfour digits and masks all the rest. This profile option affects only the internal bank accounts.
4. Use Existing Banks and Branches
Enable this profile option to pre-load the bank branch data information when creating an employee or ad hocpayee bank account. You can choose to pre-load the bank branch data and have your employees select the pre-loaded data when entering their bank accounts. Alternatively, you can have your employees enter all the bank,branch, and account information related to their account. Customers can set their preference to pre-load the
292
Oracle Financials CloudImplementing Receivables Credit to Cash
Chapter 12Define Cash Management and Banking Configuration
bank branch data through this profile. You can set this profile option at the site or user level. By default, theprofile option is set to No and that means pre-loaded information can't be used. In this case, the Bank, BankCode, Bank Branch, Branch Number, and BIC Code fields will be displayed as free text field, and a new bank andbank branch will be created for the bank account.
If the bank name isn't entered, the default name CE_EMP_UNSPECIFIED_BANK will be used. If the branch nameisn't entered, the default name CE_EMP_UNSPECIFIED_BRANCH will be used.
If you set the profile option to Yes, the existing bank and branch information is available and displayed in the listof values when creating the employee or ad hoc payee bank account.
Overview of Parse Rule Sets Oracle Fusion Cash Management supports parse rule sets to transform data during the bank statement import process.Parse rules are used to move data from one field to another. The parse rule set is associated to a bank account in thebank account setup. The parse rule set is most commonly used to parse data from the statement line addenda field intomore specific statement line fields. Each parse rule within a parse rule set consists of the following fields:
• Sequence: Determines the order in which to process the rules.
• Transaction Code: The code used to determine the statement line type.
• Source Field: The interface table field that contains the data to be parsed.
• Target Field: The statement line field that the data is to be parsed to.
• Rule: Contains the syntax for determining the data within the source field to be parsed.
• Overwrite: Used to control whether to overwrite existing data in a target field or skip parsing the data.
The parse rule syntax is described in the following:
[LITERAL](<[MATCHING TOKEN],[START-END]>)[LITERAL]
Where
LITERAL represents a string or character value represented by an identifier that should match the source data exactly.
MATCHING TOKEN represents a token (or set of tokens) which describes the data to extract. The following table lists thevalid tokens with their descriptions:
Token Description
N
Extract a valid number
.
Decimal position
X
Extract an alphanumeric
~
Extract everything in the source field from the parse position to either the end of the data or up to thenext literal.
START A position to begin extracting data, offset by the parse position. It must be a valid numeric.
293

Oracle Financials CloudImplementing Receivables Credit to Cash
Chapter 12Define Cash Management and Banking Configuration
Token Description
END
A position to stop extracting data. END can be either a valid numeric or the ~ token.
The following table lists some examples:
Description Source Data Rule Target Data
Extract numeric rate data from asource field
EST/TRX RTE 3.76 USD/LIBORCPTY: PRU
RTE (N.NN)
3.76
Extract value date from a sourcefield
Dt.01/01/2011?Receipt
Dt.(1-10)?Receipt
01/01/2011
Extract check number from asource field
Account Number 1005
Account Number.(X~)
1005
Extract currency from a source field
$^EUR:Dt
$^(1-3):Dt.
EUR
Extract the counterparty of anunknown string length from thesame source field
EST/TRX RTE 3.76 USD/LIBORCPTY:PRU
CPTY: (X~)
PRU
Extract the currency from thesame source field using positionalmatching
PRU EST/TRX RTE 3.76 USD/LIBOR CPTY: PRU
RTE(7-9)
USD
Extract Contract ID from AdditionalEntry Information
TXT:AR:ReceiptNum:CEF-1:For:2010$^USD:Dt.01/01/2011?Receipt Method:CE-Foreign:ReceiptType:Standard:BU:VisionOperations:Customer:World ofBusiness:Account No.1001
Account Number(NNNN)
1001
Extract Transaction ID fromCustomer Reference
CustRef # [email protected]
CustRef (X~).com
# A.23@orlc
Overview of Transaction Type Mapping The transaction type mapping enables you to associate a cash transaction type to an application transaction.
The following must be created to associate and mapped to cash transaction types:
• Oracle Fusion Account Payables payment methods
294

Oracle Financials CloudImplementing Receivables Credit to Cash
Chapter 12Define Cash Management and Banking Configuration
• Oracle Fusion Account Receivables payment methods
• Oracle Fusion Payroll payment types
Assigning cash transaction types to application transactions result in a more efficient bank statement reconciliationprocess.
Bank statement lines are also associated with cash transaction types and matching rules can be created using thiscommon attribute.
Overview of Tolerance Rules Tolerance rules enables you to specify date and amount tolerances that prevent or warn you when reconciliation wouldbe a breach of a defined tolerance.
• Amount tolerances are most often used when reconciling foreign currency transactions where there may bedifferences due to rounding or fluctuations in the conversion rate. They can also be used if a bank includes aprocessing fee in the bank statement line amount.
• Date tolerances are primarily used for checks that may be issued on one day and not clear the bank until daysor weeks later.
Consider the following when defining your tolerance rules:
• Applying tolerances you can automate the reconciliation and accounting for these types of transactions.
• If no date or amount tolerance is defined within a rule, it requires an exact match.
• For manual reconciliation, a tolerance rule can optionally be assigned to a bank account.
• For automatic reconciliation, a tolerance rule can be associated with a matching rule in the Rule Set setupand can be applied if the matching rule matches on date and amount or both. However, when you assigna tolerance rule that includes amount tolerances to a matching rule that isn't a one to one match type, theamount tolerance is ignored.
Date ToleranceReconciliation date tolerances are defined as day ranges. The date tolerances are to validate that the source transactiondate or dates are within a certain number of days before and after the bank statement line date or dates.
In manual reconciliation, if a date tolerance is specified in the tolerance rule assigned to the bank account it applies to allmatching scenarios. In the event of a date tolerance breach, a warning message is displayed, but the user is allowed toreconcile the statement line or lines and the transaction or transactions. If no date tolerance is assigned or specified it'srequired to be an exact date match and a warning message is displayed.
In automatic reconciliation, a tolerance rule that includes date tolerances can be associated with a matching rule. If thematching rule matches on the date, then the date tolerance is applied. In this scenario a date tolerance breach preventsreconciliation.
Amount ToleranceReconciliation amount tolerances can only be used in one to one matching scenarios for both manual and automaticreconciliation. No reconciliation amount tolerances are allowed in one to many, many to one, or many to many matchingscenarios. In these scenarios the amount of the bank statement line or lines must be equal to the amount of the
295
Oracle Financials CloudImplementing Receivables Credit to Cash
Chapter 12Define Cash Management and Banking Configuration
transaction or transactions. Reconciliation amount tolerances can be defined as percentage or amount ranges or both.If both percentages and amounts are applied, the application uses the most conservative tolerance depending upon thestatement line amount.
For example, if the amount tolerance equals plus or minus $5, the percentage tolerance equals plus or minus 1%, andthe statement line amount is $100, the application first calculates the percentage amount (1% of $100 dollars = $1). Itthen compares this to the $5 amount and uses the smaller amount. In this case it's $1 dollar, so to reconcile a transactionto this line it must be between $99 and $101.
In automatic reconciliation, a tolerance rule that includes percentage, amount, or both types of tolerance ranges can beassociated with a matching rule. But the tolerance can only be applied if the matching rule is a one to one match typerule. In this scenario of a one to one type match, any amount difference within tolerance is automatically created as anexternal transaction in cash management.
Related Topics• Reconciliation Matching Rules
• Overview of Reconciliation Rules Sets
Reconciliation Matching Rules Reconciliation Matching rules help you match bank statement lines and system transactions to minimize the need formanual intervention.
Define bank statement automatic reconciliation matching rules and assign them to bank statement automaticreconciliation rule sets. After you assign the rule sets to the bank account, the Autoreconciliation process picks up thereconciliation matching rules to achieve a higher match rate.
Specify the following for each matching rule:
• Transaction Sources: Payables, Receivables, Payroll, Journals, or External.
• Matching Type: One to One, One to Many, Many to One, Many to Many, or Zero Amount. The following tableexplains the different matching types available in Oracle Fusion Cash Management:
Matching Type Description
One to One
A bank statement line is matched with a system transaction and reconciled against each other
One to Many
A bank statement line is reconciled against many system transactions
Many to One
Many bank statement lines are grouped and reconciled against a system transaction
Many to Many
Many statement lines are grouped and reconciled against many system transactions
Zero Amount
Zero amount system transactions not reported in bank statements
296
Oracle Financials CloudImplementing Receivables Credit to Cash
Chapter 12Define Cash Management and Banking Configuration
• Grouping Attributes: Used to group bank statement lines and system transactions based on the matching typeyou select. The combination of the attributes you select also determine what you can use as the matchingcriteria. You can use date, transaction type, and reconciliation reference as matching criteria only after youselect these as grouping attributes. The following table displays the required grouping attributes for a selectedmatching type:
Matching Type Statement Line Grouping Attributes System Transaction Grouping Attributes
One to One
Not applicable
Not applicable
One to Many
Not applicable
Grouping attributes required
Many to One
Grouping attributes required
Not applicable
Many to Many
Grouping attributes required
Grouping attributes required
Zero Amount
Not applicable
Not applicable
Note:
◦ During automatic reconciliation of zero amount system transactions, the transactions aregrouped by transaction date and transaction source selected in the reconciliation matching rule.
◦ The zero amount system transaction date is used as cleared date of the reconciliation group.
In Many to One matching, the grouping attributes are used to group bank statement lines. In One to Manymatching, the grouping attributes are used to group system transactions.
The following is a list of common grouping attributes that can be used to group bank statement lines:
◦ Transaction date
◦ Structured payment reference
◦ Transaction currency
◦ Transaction type
◦ Reconciliation reference
◦ Bank transaction code
◦ Transaction code identifier
◦ Counterparty bank account
◦ Value date
297

Oracle Financials CloudImplementing Receivables Credit to Cash
Chapter 12Define Cash Management and Banking Configuration
◦ Value date in string format
The following is a list of common grouping attributes that can be used to group system transactions:
◦ Bank deposit number
◦ Transaction date
◦ Business unit
◦ Counterparty bank account
◦ Counterparty name
◦ Journal batch name
◦ Journal line description
◦ Journal name
◦ Payment file identifier
◦ Payment process request name
◦ Payment instruction identifier
◦ Payment server order number
◦ Logical group number
◦ Payment method
◦ Structured payment reference
◦ Receipt batch number
◦ Receipt class
◦ Reconciliation match date
◦ Reconciliation reference
◦ Remittance batch number
◦ Unique remittance identifier
◦ Transaction currency
◦ Transaction Type
◦ Transaction source
• Matching Criteria: Includes a list of commonly used matching attributes. You can simply select the attributesto include them in the matching rule you selected. The selected attributes define the matching conditions
298
Oracle Financials CloudImplementing Receivables Credit to Cash
Chapter 12Define Cash Management and Banking Configuration
between the bank statement lines and the system transactions to be matched successfully when they'rereconciled.
Note: On the Create Reconciliation Matching Rule page, the delivered setting for the matching type is One toOne, and the check boxes for Reconciliation Reference, Date and Transaction Type are enabled. When youchange the matching type to One to Many, Many to One, or Many to Many, the check boxes are disabled.
The matching criteria attributes are:
◦ Amount
◦ Date
◦ Reconciliation reference
◦ Transaction type
• Advanced Matching Criteria: Enables you to specify additional matching logic or filtering conditions that mustbe true for the bank statement lines and system transactions to match successfully. Consider the following:
◦ You have the option to enable or disable the Case Sensitive Comparison check box while creating acondition.
◦ The data types on either side of the expressions, must be the same and correspond to each other whenselected to match in the criteria. For example, if the attribute Statement Booking Date is selected on one
299
Oracle Financials CloudImplementing Receivables Credit to Cash
Chapter 12Define Cash Management and Banking Configuration
side, then Transaction Date can be selected as the matching criteria. Date is the data type that's the sameand corresponds to your search.
◦ For literal expression type, the operand value should match the database value. For example:Statement.Transaction Type equals ACH
The list of statement attributes available in the Create Condition page differs according to the matching typeyou select. The following lists some of the common statement attributes:
◦ Statement.Account servicer reference
◦ Statement.Additional entry information
◦ Statement.Booking date
◦ Statement.Check number
◦ Statement.Clearing system reference
◦ Statement.Contract ID
◦ Statement.Counterparty bank account
◦ Statement.Customer reference
◦ Statement.End to End ID
◦ Statement.Instruction ID
◦ Statement.Reconciliation match amount
◦ Statement.Reconciliation reference
◦ Statement Structured Payment reference
◦ Statement.Transaction ID
◦ Statement.Transaction currency
◦ Statement.Transaction type
◦ Statement.Value date
◦ Statement.Value date in string format
The list of transaction attributes available in the Create Condition page differs according to the matching typeyou select. The following lists some of the common transaction attributes:
◦ Transaction.Bank Deposit Number
◦ Transaction.Business Unit Identifier
◦ Transaction.Counterparty Bank Account Identifier
◦ Transaction.Counterparty Name
◦ Transaction.Counterparty Site
◦ Transaction.Journal Batch Name
◦ Transaction.Journal Line Description
◦ Transaction.Journal Line Number
◦ Transaction.Journal Name
◦ Transaction.Logical Group Number
◦ Transaction Payment Process Request Name
300
Oracle Financials CloudImplementing Receivables Credit to Cash
Chapter 12Define Cash Management and Banking Configuration
◦ Transaction Payment Server Order Number
◦ Transaction Payment File Identifier
◦ Transaction Payment Instruction Identifier
◦ Transaction Payment or Receipt Method
◦ Transaction.Payment Reference
◦ Transaction.Receipt Batch Number
◦ Transaction.Receipt Class
◦ Transaction.Reconciliation Match Amount
◦ Transaction.Reconciliation Match Date
◦ Transaction.Reconciliation Reference
◦ Transaction.Remittance Batch Number
◦ Transaction Structured Payment Reference
◦ Transaction.Status
◦ Transaction.Transaction Currency
◦ Transaction.Transaction Date
◦ Transaction.Transaction Number
◦ Transaction.Transaction Source
◦ Transaction.Transaction Type
◦ Transaction.Unique Remittance Identifier
You can select one or multiple transaction sources in a rule. Consider the following:
• If multiple sources are selected in a one to one or many to one matching rule, the autoreconciliation programlooks for a matching transaction across the selected sources.
• If multiple sources are selected in a one to many or many to many matching rule, the program first finds allavailable transactions across the selected sources and then applies grouping rule to the whole data pool. Thismeans that the statement lines can be reconciled to a group that includes transactions across the differentsources.
• If you want transactions included in a group to be from the same transaction source then you can specifyTransaction Source as a grouping attribute.
Note:
◦ Cash Management supports the journal reconciliation reference import using spreadsheet-based tools such as, file-based data import and the Oracle Fusion ADF Desktop Integration.
◦ Once the required setups are completed the reconciliation reference is uploaded and stored tothe journal lines.
301

Oracle Financials CloudImplementing Receivables Credit to Cash
Chapter 12Define Cash Management and Banking Configuration
Related Topics• Overview of Tolerance Rules
• Overview of Reconciliation Rules Sets
• Automatic Reconciliation
• Set Up Clearing Accounts Reconciliation
• Reconciliation References and Journal Lines
Overview of Reconciliation Rules Sets Bank statement reconciliation rule sets are a group of matching rules and tolerance rules. They are assigned to a bankaccount and used to reconcile bank statement lines with transactions.
Consider the following when creating your rules:
• Build the rule set and the rule set detail as a parent-child relationship.
• Each rule set consists of one or more matching rules that can be prioritized or sequenced.
• The rules should be ordered to achieve a greater reconciliation success rate. It's strongly recommended thatone to one rules be sequenced ahead of rules of other types.
• To provide an optimum reconciliation rate, you should change the sequence number depending on howaccurately the given rule is likely to reconcile against the correct bank transactions.
For example, transactions from sources for which the bank provides you a reference ID are likely to have a higherreconciliation rate. These rules should be placed at the beginning with a lower sequence number. Conversely,transactions with no reference ID are likely to have duplicates or lower reconciliation rates, and you should place them atthe end with a higher sequence number.
Automatically Reconciling Rejected Payments
You must enable the Opt in feature, Automatic Reconciliation of Reject Payments to automatically reconcile rejectedpayments reported on the imported bank statement. Follow these steps to enable the feature:
• Select the transaction type as Reversal in the bank transaction code.
• The application identifies the rejections on the bank statement lines with this transaction code and reversalindicator.
• The autoreconciliation process identifies the rejection and un-reconciles the original settled payment andreconciles the original statement line with the rejected statement line.
Related Topics• Reconciliation Matching Rules
• Overview of Tolerance Rules
302

Oracle Financials CloudImplementing Receivables Credit to Cash
Chapter 12Define Cash Management and Banking Configuration
Overview of Bank Statement Transaction Codes Bank statement transaction codes are the internal codes that are used on a bank statement line to identify the type oftransaction being reported. These are also referred to as:
• Transaction codes
• Statement codes
The following codes are examples:
• 115- Lockbox Deposit
• 475- Check paid
• 698- Miscellaneous Fee
Oracle Fusion Cash Management maintains a single set of these codes and transform externally reported transactioncodes from other formats into this single normalized set. You can use code map groups to map transaction codesreported on the external data file to the ones defined internally in the application. This configuration is done throughOracle Fusion Payments Code map group setup.
How You Map Configurable BAI2 Transaction Codes When importing BAI2 bank statements, the flow indicator (DR/CR) of the bank statement line is determined by thetransaction code associated to that line.
Configurable BAI2 transaction codes can be mapped to standard BAI2 codes to derive the desired statement line flowindicator when the file is imported.
Mapping Configurable BAI2 Transaction CodesIn this example, a credit code of 856 and a debit code of 868 are mapped as transaction codes using the following steps:
1. In the Setup and Maintenance work area, go to the following:2. Offering: Financials3. Functional Area: Payments or Customer Payments4. Task: Manage Code Map Groups5. Search for the Name: BAI2 Bank Statements and click edit.6. In Mappings, enter a new record Field: CE_TRX_CODE.7. For the parent CE_TRX_CODE, add 2 rows in the Field values enter the following:
Line Number Input and Output Values
Line 1
Enter Input Value: 856, Output Value: 275 (standard CREDIT BAI2 code).
Line 2
Enter Input Value: 868, Output Value: 575 (standard DEBIT BAI2 code).
8. Save and Close.
303

Oracle Financials CloudImplementing Receivables Credit to Cash
Chapter 12Define Cash Management and Banking Configuration
9. After loading and importing the BAI2 format bank statement, result in the following:
Transaction Code Results
Defined Input Value: 856
Are imported with code 275 and the flow indicator as CREDIT.
Defined Input Value: 868
Are imported with code 575 and the flow indicator as DEBIT.
Overview of Bank Statement Transaction Creation Rules Bank Statement Transaction Creation Rules are used by Oracle Fusion Cash Management to identify an unreconciledbank statement line or lines and create and account for a transaction.
Configure Bank Statement Transaction Creation Rules by specifying some of the attributes and characteristics of thecreated transactions. Consider the following when configuring your rules:
• Create as a separate business object.
• Assign to a bank account in the Manage Bank Account page.
• Arrange in order and group to be processed sequentially.
The group of sequenced rules on the bank account constitutes the bank accounts rule set that's used when running theBank Statement Transaction Creation program.
Process the Bank Statement Transaction Creation Rules by running the Bank Statement Transaction Creationprogram to create transactions from unreconciled bank statement lines. The program is used to create transactions andaccount for first notice items such as bank charges, fees, or interest. You must perform the following prior to runningthe program.
• Run autoreconciliation for the bank statement.
• Perform any manual reconciliation on the bank statement.
This avoids creating external transaction from bank statement lines that already have transactions recorded in theapplication.
Create Banks, Branches, and Accounts in Spreadsheet
Overview of Cash Management Rapid Implementation Use Microsoft Excel templates to rapidly implement the following setup objects:
• Banks
• Bank Branches
• Bank Accounts
304
Oracle Financials CloudImplementing Receivables Credit to Cash
Chapter 12Define Cash Management and Banking Configuration
Functional Setup Manager TasksThe following are the Functional Setup Manager tasks that are required to be performed to rapidly create the setupobjects data. To access these tasks, create an implementation project that includes the Define Financials Configurationfor Rapid Implementation task list:
• Create Banks, Branches, and Accounts in Spreadsheet: Downloads the rapid implementation excel spreadsheettemplate. Enter the bank, branch, and bank account data in this spreadsheet, and generate the data file to beloaded.
• Upload Banks, Branches, and Accounts: Launches the Upload Banks, Branches, and Accounts process with thedata file to be uploaded as the parameter. You must upload the data file generated from the previous task.
Preparing DataPrepare your bank, branch, and account information to enter into the spreadsheet template.
• Bank information requires the country, name, and number.
• Branch information requires name, number, BIC code, and alternate name.
• Account information requires name, number, currency, legal entity, type, and IBAN.
After you finish preparing the data in the spreadsheet, click the Generate Banks, Branches, and Accounts File button.Save the generated XML file.
Loading DataUse the following steps to load your data.
• In the Setup and Maintenance work area, create an implementation project that includes the Define FinancialsConfiguration for Rapid Implementation task list. From your implementation project, go to the Upload Banks,Branches, and Accounts task. This task launches the Upload Banks, Branches, and Accounts process.
• Select the XML file you have saved earlier and submit the process.
• Verify in the process monitor that the process completed successfully.
• Review the banks, branches, and accounts created.
Best PracticesThe following are recommended best practices:
• Determine the Legal Entity for each bank account. The Legal Entity must be associated to a primary ledger.
• Determine the use for each bank account: Payable, Receivable, or both.
• Determine the Cash and Cash Clearing account for each bank account. Enter the entire account combinationbased on your chart of accounts, for example 01-000-1110-0000-000.
Related Topics• Processing Electronic Bank Statements: Explained
305
Oracle Financials CloudImplementing Receivables Credit to Cash
Chapter 12Define Cash Management and Banking Configuration
Set Up Cash Positioning and Forecasting
How You Set Up Oracle Fusion Payments for Cash Management To make ad hoc payments you must do the following:
• Create a payee in Oracle Fusion Cash Management.
• Review the Payment Methods in the tab; Usage Rules, for Cash Management in Oracle Fusion Payments.
• Review the payment method defaulting rules in Oracle Fusion Payments and prioritize the Cash ManagementPayment Method accordingly.
Creating a payee in Cash Management is a separate task than setting up suppliers in procurement. The setup done inCash Management is strictly used for making ad hoc payments from the application. You must also review and edit theset ups in Payments to successfully make payments.
Creating a Payee in Cash Management1. Create the payee in Cash Management. Enter the following payee information:
Field Required Description
Name
Yes
Name of the payee.
Tax Registration Number
No
Description of the payee.
Tax Registration Number
No
Unique identifier assigned to a payee by atax authority.
Active
No, but recommended.
Check box indicating if the payee is active orinactive.
2. Create the bank account information. Enter the following bank account information:
Field Description
Country
Country of the bank where the bank account belongs.
Account Number
Bank account number of the payee bank account.
Currency
Currency of the payee bank account
306
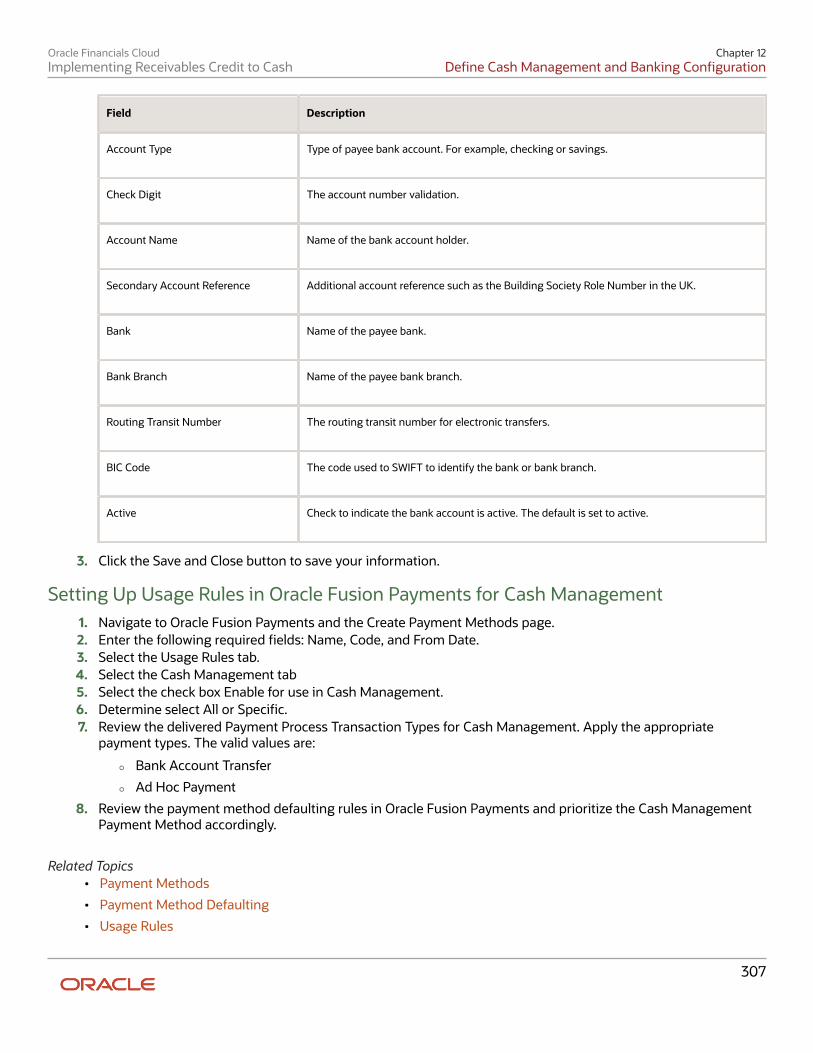
Oracle Financials CloudImplementing Receivables Credit to Cash
Chapter 12Define Cash Management and Banking Configuration
Field Description
Account Type
Type of payee bank account. For example, checking or savings.
Check Digit
The account number validation.
Account Name
Name of the bank account holder.
Secondary Account Reference
Additional account reference such as the Building Society Role Number in the UK.
Bank
Name of the payee bank.
Bank Branch
Name of the payee bank branch.
Routing Transit Number
The routing transit number for electronic transfers.
BIC Code
The code used to SWIFT to identify the bank or bank branch.
Active
Check to indicate the bank account is active. The default is set to active.
3. Click the Save and Close button to save your information.
Setting Up Usage Rules in Oracle Fusion Payments for Cash Management1. Navigate to Oracle Fusion Payments and the Create Payment Methods page.2. Enter the following required fields: Name, Code, and From Date.3. Select the Usage Rules tab.4. Select the Cash Management tab5. Select the check box Enable for use in Cash Management.6. Determine select All or Specific.7. Review the delivered Payment Process Transaction Types for Cash Management. Apply the appropriate
payment types. The valid values are:
◦ Bank Account Transfer
◦ Ad Hoc Payment
8. Review the payment method defaulting rules in Oracle Fusion Payments and prioritize the Cash ManagementPayment Method accordingly.
Related Topics• Payment Methods
• Payment Method Defaulting
• Usage Rules
307

Oracle Financials CloudImplementing Receivables Credit to Cash
Chapter 12Define Cash Management and Banking Configuration
How You Set Up Cash Positioning and Forecasting Use the following to set up your cash positioning and forecasting reporting requirements:
• Specify Cash Positioning and Forecasting Options
• Manage Cash Positioning and Forecasting Transaction Grouping
Specify Cash Positioning and Forecasting OptionsUse the options page to define the extraction period used to transfer data to the Essbase cube. Transactions withtransaction dates within that period are extracted to the cube. You can also select different GL accounting calendars tolay out the time dimension structure in the cubes.
Configure the following options:
Field Name Available Values Default Value
Extraction Duration
• Last 3 months
• Last 6 months
• Last 1 year
• Last 2 years
• Last 3 years
Last 2 years
Reporting Currency
List of currencies defined in the application
USD - US Dollars
Balance Code
Internal Balance Codes lookups (LOV)
Closing booked
Balance Date Threshold Days
Number days defined before a missing bankstatement is reported
2
Transaction Calendar
List of transaction calendars defined in theapplication, if not defined, everyday (7) isconsidered a business day.
No default
Time Periods
List of accounting calendars defined in theapplication
No default
Note: Once the cube is created and locked, the update is disabled in this page. You can't update the cube until yousubmit the Cash Position Data Deletion program to clear the details in the cube.
308

Oracle Financials CloudImplementing Receivables Credit to Cash
Chapter 12Define Cash Management and Banking Configuration
Manage Cash Positioning and Forecasting Transaction GroupingYou create or edit configurable dimensions for cash positioning and forecasting from this page. You must have theManage Cash Positioning and Forecasting Transaction Grouping privilege to access the Create or Edit Cash PositionDimension page:
• Search for the configurable dimensions defined in the application.
• Create configurable dimensions to meet your company-specific requirements
• Modify and edit configurable dimensions to meet reporting requirements.
• Entering a description is optional but recommended.
The following table contains the fields to be completed:
Field Name Description
Name
Required and must be unique
Application
Required and valid values are Oracle Fusion Applications or Other.
Source
Required and the following are possible values:
• Payables invoices
• Payables payments
• Receivables receipts
• Receivables transactions
• Bank statement
• External cash transactions
Source Table
List of tables from the selected Application and Source
Source Column
List of the columns from the selected Source Table.
Note: Once the cube is created and locked, you can't update this page. You must submit the Cash Position DataDeletion program to clear the details in the cube to do an update.
Related Topics• Cash Positioning and Forecasting
• Cash Positioning
• Considerations for Cash Forecasting
309
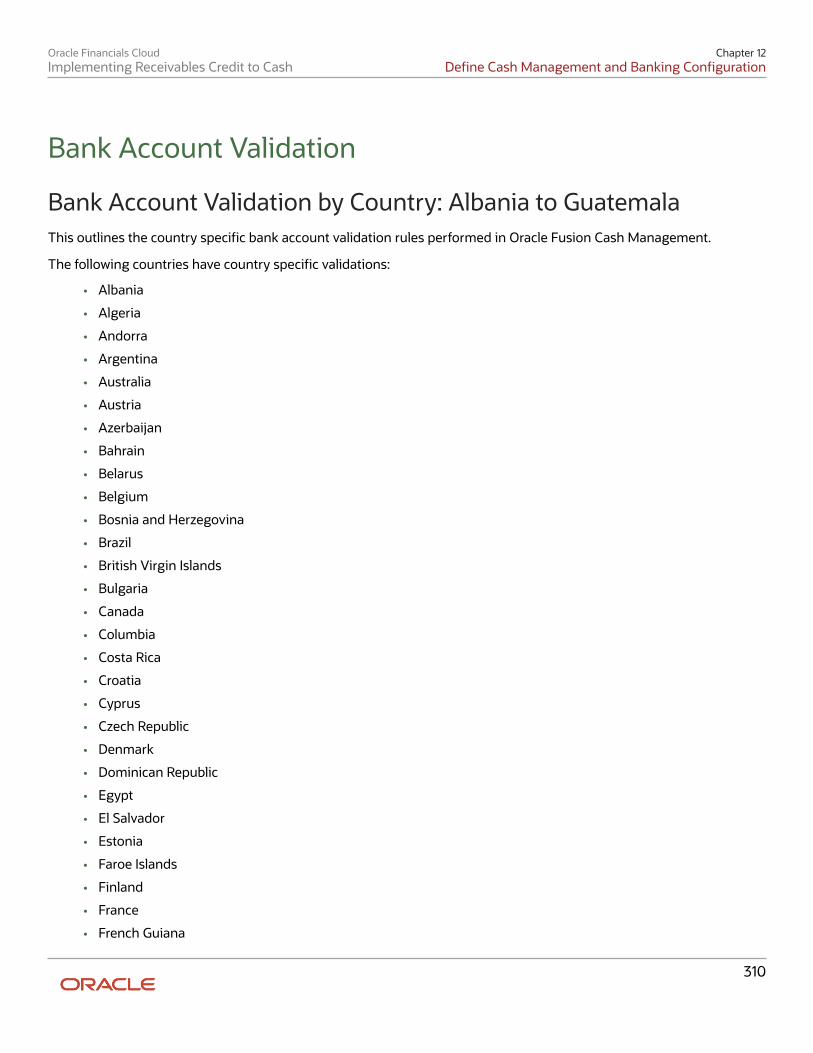
Oracle Financials CloudImplementing Receivables Credit to Cash
Chapter 12Define Cash Management and Banking Configuration
Bank Account Validation
Bank Account Validation by Country: Albania to Guatemala This outlines the country specific bank account validation rules performed in Oracle Fusion Cash Management.
The following countries have country specific validations:
• Albania
• Algeria
• Andorra
• Argentina
• Australia
• Austria
• Azerbaijan
• Bahrain
• Belarus
• Belgium
• Bosnia and Herzegovina
• Brazil
• British Virgin Islands
• Bulgaria
• Canada
• Columbia
• Costa Rica
• Croatia
• Cyprus
• Czech Republic
• Denmark
• Dominican Republic
• Egypt
• El Salvador
• Estonia
• Faroe Islands
• Finland
• France
• French Guiana
310
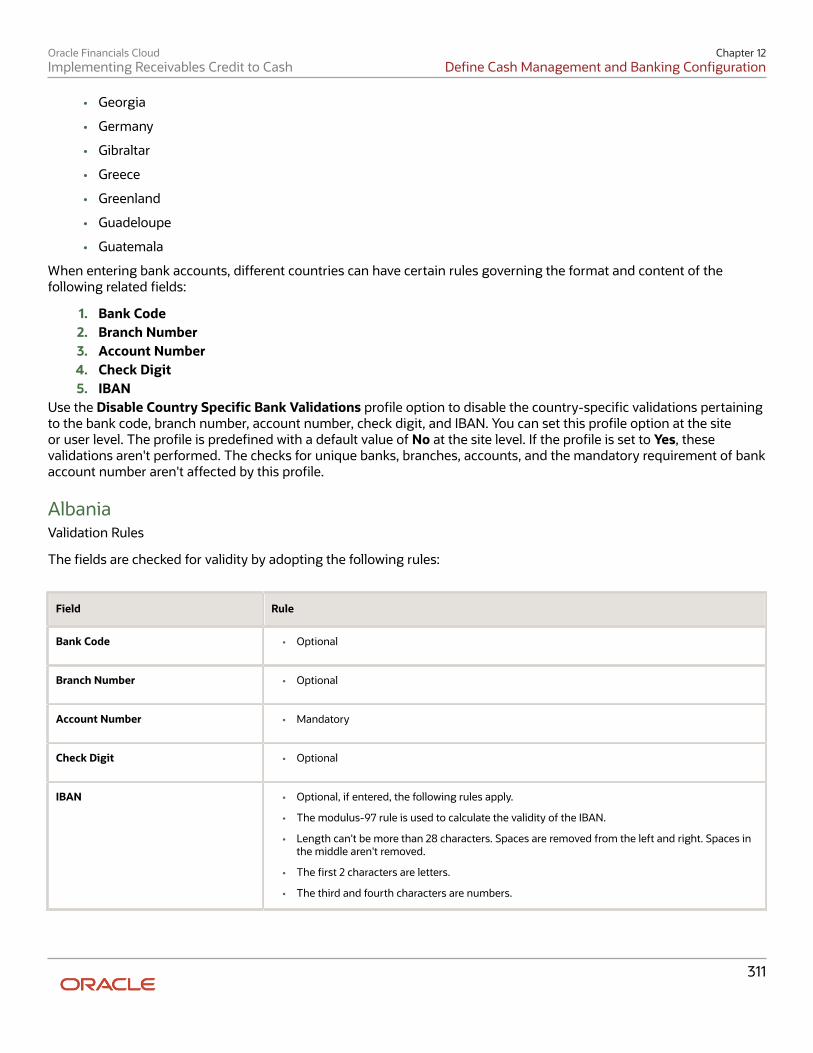
Oracle Financials CloudImplementing Receivables Credit to Cash
Chapter 12Define Cash Management and Banking Configuration
• Georgia
• Germany
• Gibraltar
• Greece
• Greenland
• Guadeloupe
• Guatemala
When entering bank accounts, different countries can have certain rules governing the format and content of thefollowing related fields:
1. Bank Code2. Branch Number3. Account Number4. Check Digit5. IBAN
Use the Disable Country Specific Bank Validations profile option to disable the country-specific validations pertainingto the bank code, branch number, account number, check digit, and IBAN. You can set this profile option at the siteor user level. The profile is predefined with a default value of No at the site level. If the profile is set to Yes, thesevalidations aren't performed. The checks for unique banks, branches, accounts, and the mandatory requirement of bankaccount number aren't affected by this profile.
AlbaniaValidation Rules
The fields are checked for validity by adopting the following rules:
Field Rule
Bank Code
• Optional
Branch Number
• Optional
Account Number
• Mandatory
Check Digit
• Optional
IBAN
• Optional, if entered, the following rules apply.
• The modulus-97 rule is used to calculate the validity of the IBAN.
• Length can't be more than 28 characters. Spaces are removed from the left and right. Spaces inthe middle aren't removed.
• The first 2 characters are letters.
• The third and fourth characters are numbers.
311

Oracle Financials CloudImplementing Receivables Credit to Cash
Chapter 12Define Cash Management and Banking Configuration
AlgeriaValidation Rules
The fields are checked for validity by adopting the following rules:
Field Rule
Bank Code
• Optional
Branch Number
• Optional
Account Number
• Mandatory
Check Digit
• Optional
IBAN
• Optional, if entered, the following rules apply.
• The modulus-97 rule is used to calculate the validity of the IBAN.
• Length can't be more than 26 characters. Spaces are removed from the left and right. Spaces inthe middle aren't removed.
• The first 2 characters are letters.
• The third and fourth characters are numbers.
AndorraValidation Rules
The fields are checked for validity by adopting the following rules:
Field Rule
Bank Code
• Optional
Branch Number
• Optional
Account Number
• Mandatory
Check Digit
• Optional
IBAN
• Optional, if entered, the following rules apply.
• The modulus-97 rule is used to calculate the validity of the IBAN.
• Length should be 24 characters. Spaces are removed from the left and right. Spaces in the middlearen't removed.
• The first 2 characters are letters.
• The third and fourth characters are numbers.
312
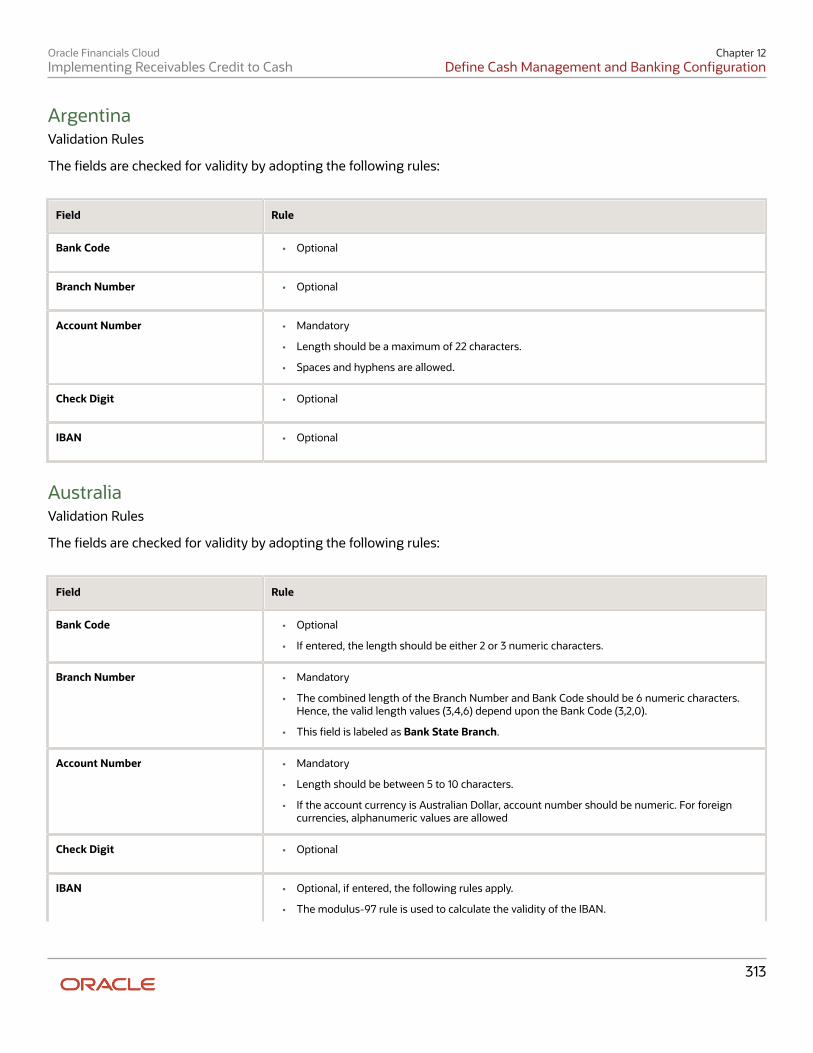
Oracle Financials CloudImplementing Receivables Credit to Cash
Chapter 12Define Cash Management and Banking Configuration
ArgentinaValidation Rules
The fields are checked for validity by adopting the following rules:
Field Rule
Bank Code
• Optional
Branch Number
• Optional
Account Number
• Mandatory
• Length should be a maximum of 22 characters.
• Spaces and hyphens are allowed.
Check Digit
• Optional
IBAN
• Optional
AustraliaValidation Rules
The fields are checked for validity by adopting the following rules:
Field Rule
Bank Code
• Optional
• If entered, the length should be either 2 or 3 numeric characters.
Branch Number
• Mandatory
• The combined length of the Branch Number and Bank Code should be 6 numeric characters.Hence, the valid length values (3,4,6) depend upon the Bank Code (3,2,0).
• This field is labeled as Bank State Branch.
Account Number
• Mandatory
• Length should be between 5 to 10 characters.
• If the account currency is Australian Dollar, account number should be numeric. For foreigncurrencies, alphanumeric values are allowed
Check Digit
• Optional
IBAN
• Optional, if entered, the following rules apply.
• The modulus-97 rule is used to calculate the validity of the IBAN.
313

Oracle Financials CloudImplementing Receivables Credit to Cash
Chapter 12Define Cash Management and Banking Configuration
Field Rule
• Length can't be more than 34 characters. Spaces are removed from the left and right. Spaces inthe middle aren't removed.
• The first 2 characters are letters.
• The third and fourth characters are numbers.
AustriaValidation Rules
The fields are checked for validity by adopting the following rules:
Field Rule
Bank Code
• Optional
• Length should be of 5 numeric characters.
Branch Number
• Optional
• Length should be of 5 numeric characters.
Account Number
• Mandatory
• Length should be between 4 to 11 numeric characters.
Check Digit
• Optional
IBAN
• Mandatory
• If the IBAN isn't entered, a warning message is displayed: IBAN hasn't been entered. This bankaccount is defined in a country that requires IBAN for payment processing.
• The modulus-97 rule is used to calculate the validity of the IBAN
• Length should be 20 characters. Spaces are removed from the left and right. Spaces in the middlearen't removed.
• The first 2 characters are letters.
• The third and fourth characters are numbers.
AzerbaijanValidation Rules
The fields are checked for validity by adopting the following rules:
Field Rule
Bank Code
• Optional
Branch Number
• Optional
314
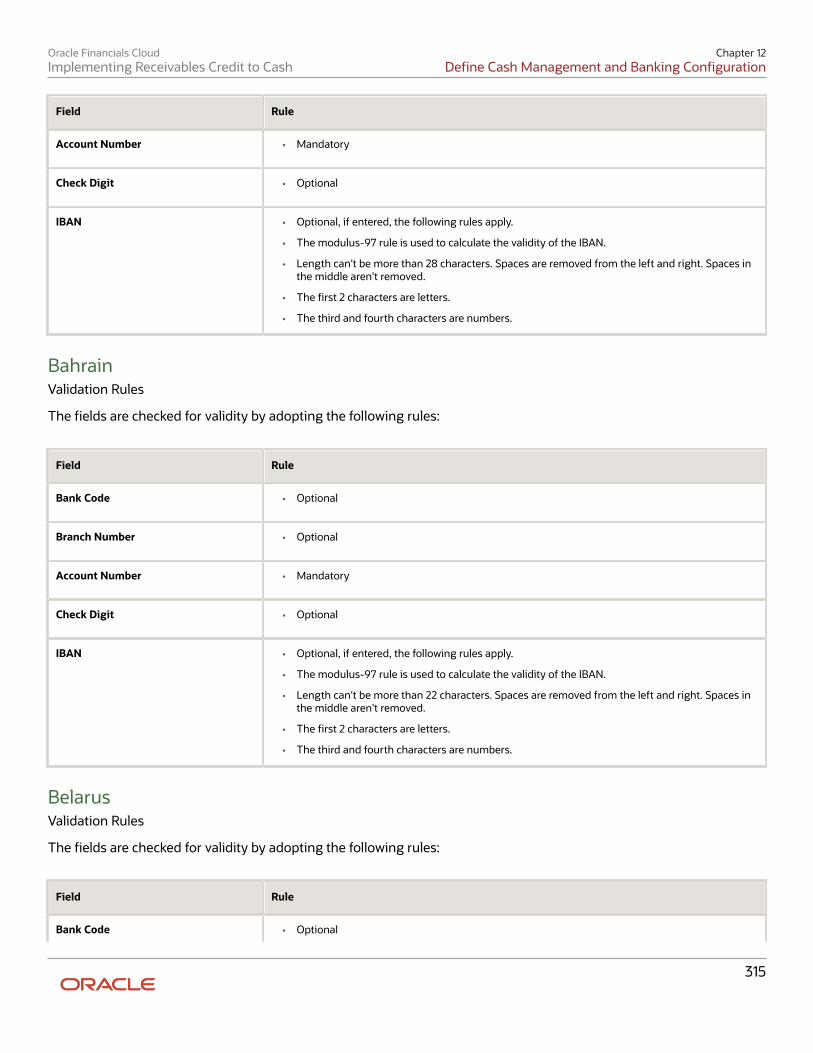
Oracle Financials CloudImplementing Receivables Credit to Cash
Chapter 12Define Cash Management and Banking Configuration
Field Rule
Account Number
• Mandatory
Check Digit
• Optional
IBAN
• Optional, if entered, the following rules apply.
• The modulus-97 rule is used to calculate the validity of the IBAN.
• Length can't be more than 28 characters. Spaces are removed from the left and right. Spaces inthe middle aren't removed.
• The first 2 characters are letters.
• The third and fourth characters are numbers.
BahrainValidation Rules
The fields are checked for validity by adopting the following rules:
Field Rule
Bank Code
• Optional
Branch Number
• Optional
Account Number
• Mandatory
Check Digit
• Optional
IBAN
• Optional, if entered, the following rules apply.
• The modulus-97 rule is used to calculate the validity of the IBAN.
• Length can't be more than 22 characters. Spaces are removed from the left and right. Spaces inthe middle aren't removed.
• The first 2 characters are letters.
• The third and fourth characters are numbers.
BelarusValidation Rules
The fields are checked for validity by adopting the following rules:
Field Rule
Bank Code • Optional
315

Oracle Financials CloudImplementing Receivables Credit to Cash
Chapter 12Define Cash Management and Banking Configuration
Field Rule
Branch Number
• Optional
Account Number
• Mandatory
Check Digit
• Optional
IBAN
• Optional, if entered, the following rules apply.
• The modulus-97 rule is used to calculate the validity of the IBAN.
• Length can't be more than 28 characters. Spaces are removed from the left and right. Spaces inthe middle aren't removed.
• The first 2 characters are letters.
• The third and fourth characters are numbers.
BelgiumValidation Rules
The fields are checked for validity by adopting the following rules:
Field Rule
Bank Code
• Optional
Branch Number
• Optional
Account Number
• Mandatory
• Length should be of 12 numeric characters.
• It should be in the format 999-9999999-99.
• A check algorithm is applied on the Account Number.
Check Digit
• Optional
IBAN
• Mandatory
• If the IBAN isn't entered, a warning message is displayed: IBAN hasn't been entered. This bankaccount is defined in a country that requires IBAN for payment processing.
• The modulus-97 rule is used to calculate the validity of the IBAN.
• Length should be 16 characters. Spaces are removed from the left and right. Spaces in the middlearen't removed.
• The first 2 characters are letters.
• The third and fourth characters are numbers.
316
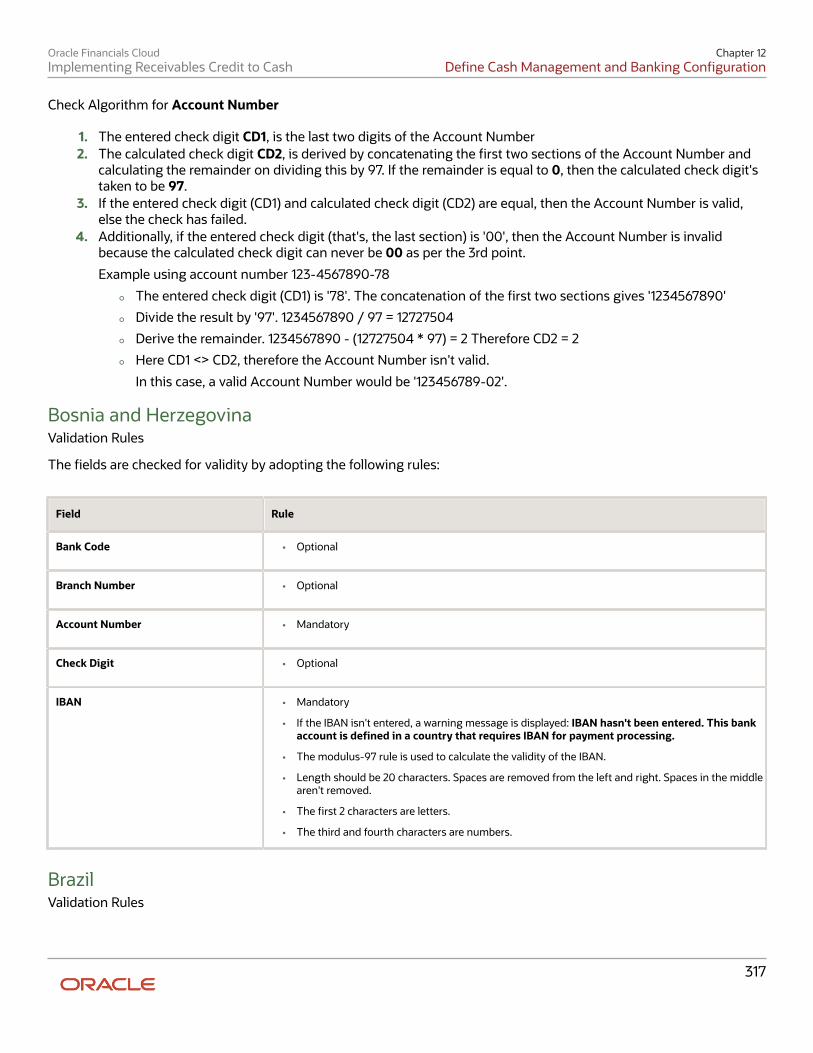
Oracle Financials CloudImplementing Receivables Credit to Cash
Chapter 12Define Cash Management and Banking Configuration
Check Algorithm for Account Number
1. The entered check digit CD1, is the last two digits of the Account Number2. The calculated check digit CD2, is derived by concatenating the first two sections of the Account Number and
calculating the remainder on dividing this by 97. If the remainder is equal to 0, then the calculated check digit'staken to be 97.
3. If the entered check digit (CD1) and calculated check digit (CD2) are equal, then the Account Number is valid,else the check has failed.
4. Additionally, if the entered check digit (that's, the last section) is '00', then the Account Number is invalidbecause the calculated check digit can never be 00 as per the 3rd point.
Example using account number 123-4567890-78
◦ The entered check digit (CD1) is '78'. The concatenation of the first two sections gives '1234567890'
◦ Divide the result by '97'. 1234567890 / 97 = 12727504
◦ Derive the remainder. 1234567890 - (12727504 * 97) = 2 Therefore CD2 = 2
◦ Here CD1 <> CD2, therefore the Account Number isn't valid.
In this case, a valid Account Number would be '123456789-02'.
Bosnia and HerzegovinaValidation Rules
The fields are checked for validity by adopting the following rules:
Field Rule
Bank Code
• Optional
Branch Number
• Optional
Account Number
• Mandatory
Check Digit
• Optional
IBAN
• Mandatory
• If the IBAN isn't entered, a warning message is displayed: IBAN hasn't been entered. This bankaccount is defined in a country that requires IBAN for payment processing.
• The modulus-97 rule is used to calculate the validity of the IBAN.
• Length should be 20 characters. Spaces are removed from the left and right. Spaces in the middlearen't removed.
• The first 2 characters are letters.
• The third and fourth characters are numbers.
BrazilValidation Rules
317
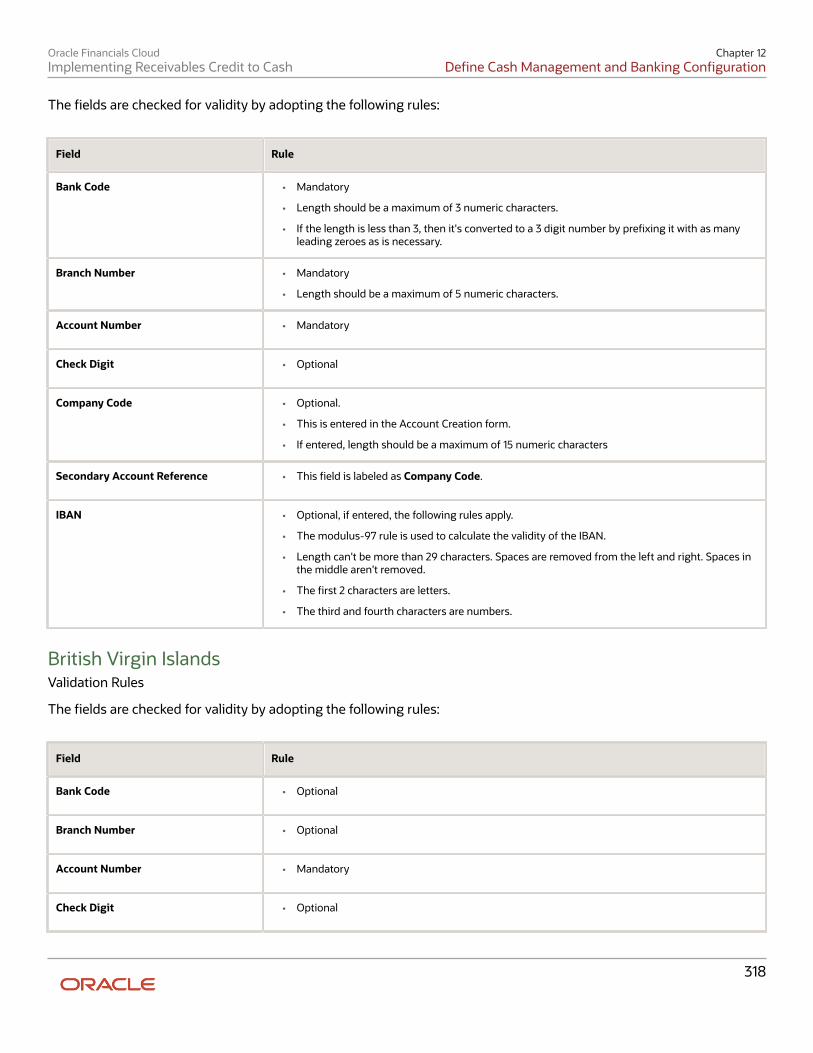
Oracle Financials CloudImplementing Receivables Credit to Cash
Chapter 12Define Cash Management and Banking Configuration
The fields are checked for validity by adopting the following rules:
Field Rule
Bank Code
• Mandatory
• Length should be a maximum of 3 numeric characters.
• If the length is less than 3, then it's converted to a 3 digit number by prefixing it with as manyleading zeroes as is necessary.
Branch Number
• Mandatory
• Length should be a maximum of 5 numeric characters.
Account Number
• Mandatory
Check Digit
• Optional
Company Code
• Optional.
• This is entered in the Account Creation form.
• If entered, length should be a maximum of 15 numeric characters
Secondary Account Reference
• This field is labeled as Company Code.
IBAN
• Optional, if entered, the following rules apply.
• The modulus-97 rule is used to calculate the validity of the IBAN.
• Length can't be more than 29 characters. Spaces are removed from the left and right. Spaces inthe middle aren't removed.
• The first 2 characters are letters.
• The third and fourth characters are numbers.
British Virgin IslandsValidation Rules
The fields are checked for validity by adopting the following rules:
Field Rule
Bank Code
• Optional
Branch Number
• Optional
Account Number
• Mandatory
Check Digit
• Optional
318
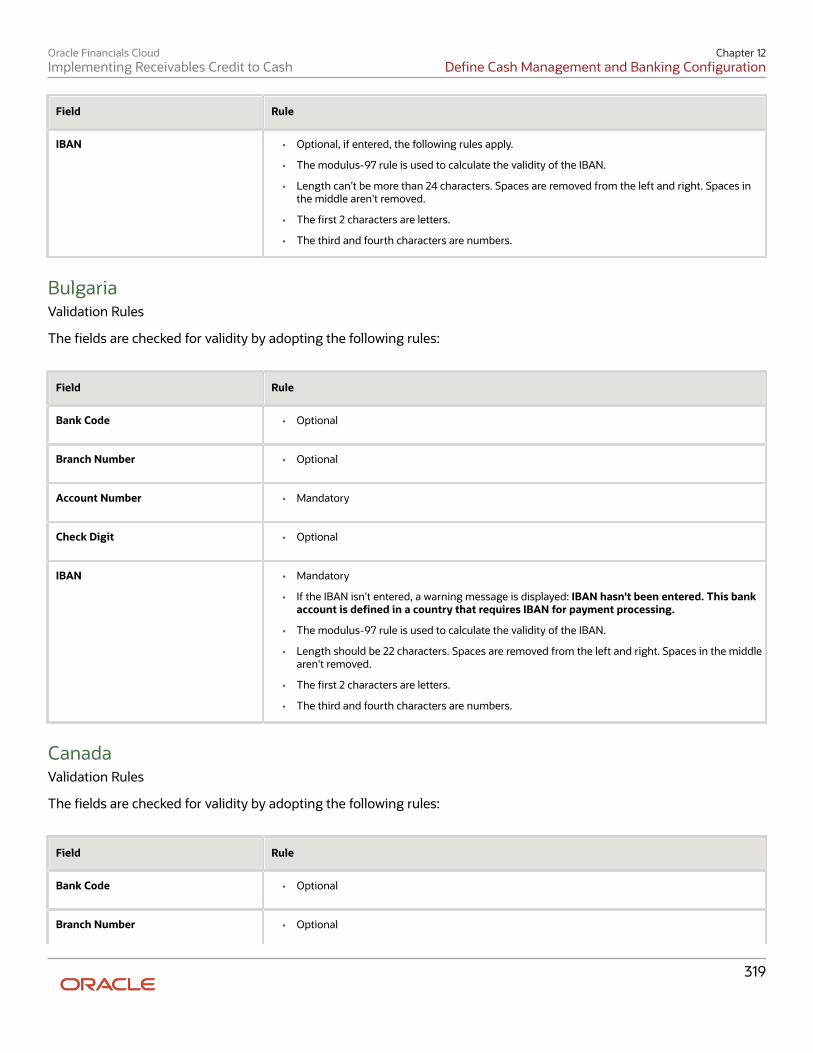
Oracle Financials CloudImplementing Receivables Credit to Cash
Chapter 12Define Cash Management and Banking Configuration
Field Rule
IBAN
• Optional, if entered, the following rules apply.
• The modulus-97 rule is used to calculate the validity of the IBAN.
• Length can’t be more than 24 characters. Spaces are removed from the left and right. Spaces inthe middle aren't removed.
• The first 2 characters are letters.
• The third and fourth characters are numbers.
BulgariaValidation Rules
The fields are checked for validity by adopting the following rules:
Field Rule
Bank Code
• Optional
Branch Number
• Optional
Account Number
• Mandatory
Check Digit
• Optional
IBAN
• Mandatory
• If the IBAN isn't entered, a warning message is displayed: IBAN hasn't been entered. This bankaccount is defined in a country that requires IBAN for payment processing.
• The modulus-97 rule is used to calculate the validity of the IBAN.
• Length should be 22 characters. Spaces are removed from the left and right. Spaces in the middlearen't removed.
• The first 2 characters are letters.
• The third and fourth characters are numbers.
CanadaValidation Rules
The fields are checked for validity by adopting the following rules:
Field Rule
Bank Code
• Optional
Branch Number
• Optional
319
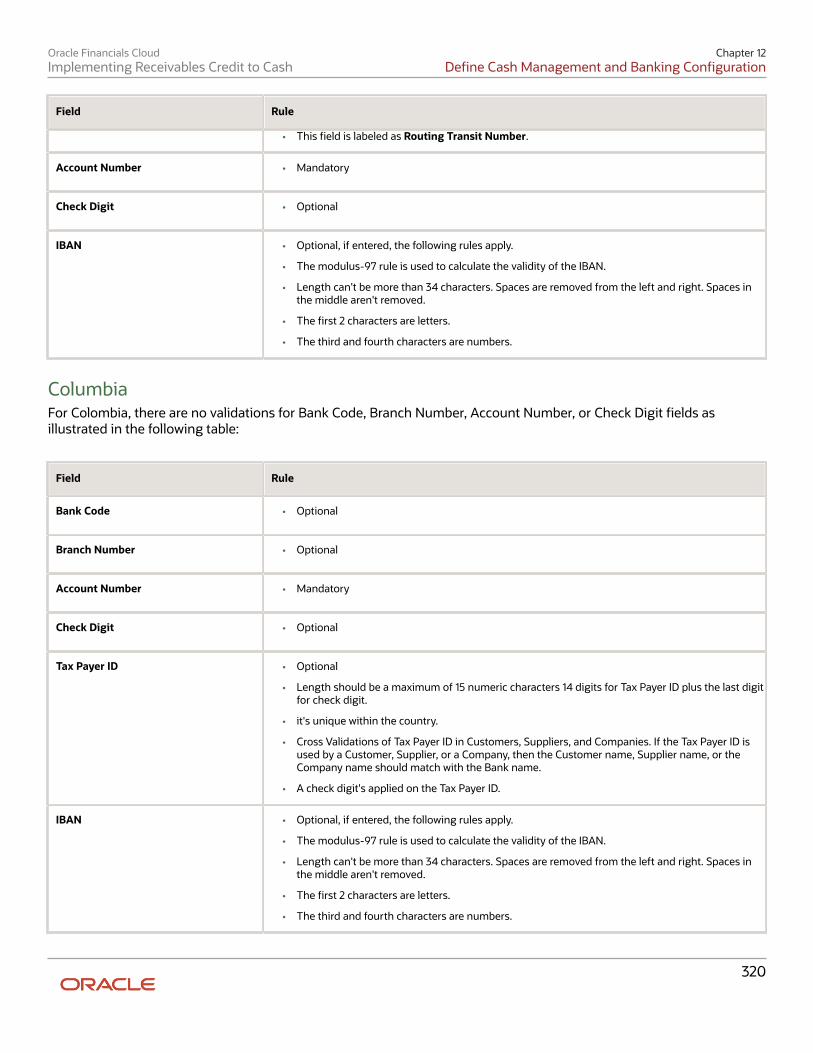
Oracle Financials CloudImplementing Receivables Credit to Cash
Chapter 12Define Cash Management and Banking Configuration
Field Rule
• This field is labeled as Routing Transit Number.
Account Number
• Mandatory
Check Digit
• Optional
IBAN
• Optional, if entered, the following rules apply.
• The modulus-97 rule is used to calculate the validity of the IBAN.
• Length can't be more than 34 characters. Spaces are removed from the left and right. Spaces inthe middle aren't removed.
• The first 2 characters are letters.
• The third and fourth characters are numbers.
ColumbiaFor Colombia, there are no validations for Bank Code, Branch Number, Account Number, or Check Digit fields asillustrated in the following table:
Field Rule
Bank Code
• Optional
Branch Number
• Optional
Account Number
• Mandatory
Check Digit
• Optional
Tax Payer ID
• Optional
• Length should be a maximum of 15 numeric characters 14 digits for Tax Payer ID plus the last digitfor check digit.
• it's unique within the country.
• Cross Validations of Tax Payer ID in Customers, Suppliers, and Companies. If the Tax Payer ID isused by a Customer, Supplier, or a Company, then the Customer name, Supplier name, or theCompany name should match with the Bank name.
• A check digit's applied on the Tax Payer ID.
IBAN
• Optional, if entered, the following rules apply.
• The modulus-97 rule is used to calculate the validity of the IBAN.
• Length can't be more than 34 characters. Spaces are removed from the left and right. Spaces inthe middle aren't removed.
• The first 2 characters are letters.
• The third and fourth characters are numbers.
320

Oracle Financials CloudImplementing Receivables Credit to Cash
Chapter 12Define Cash Management and Banking Configuration
Check Algorithm for Tax Payer ID
The first 15 digits are multiplied by the associated factor, as illustrated in the following table.
Digit Factor
1st
71
2nd
67
3rd
59
4th
53
5th
47
6th
43
7th
41
8th
37
9th
29
10th
23
11th
19
12th
17
13th
13
14th
7
15th
3
1. These 15 products are added and the sum is divided by 11.2. If the remainder is 1 or 0, then the Check Digit should be 1 or 0 respectively.3. If the remainder isn't 1 or 0, then the remainder is subtracted by 11 and that should be the Check Digit.
Costa RicaValidation Rules
The fields are checked for validity by adopting the following rules:
321
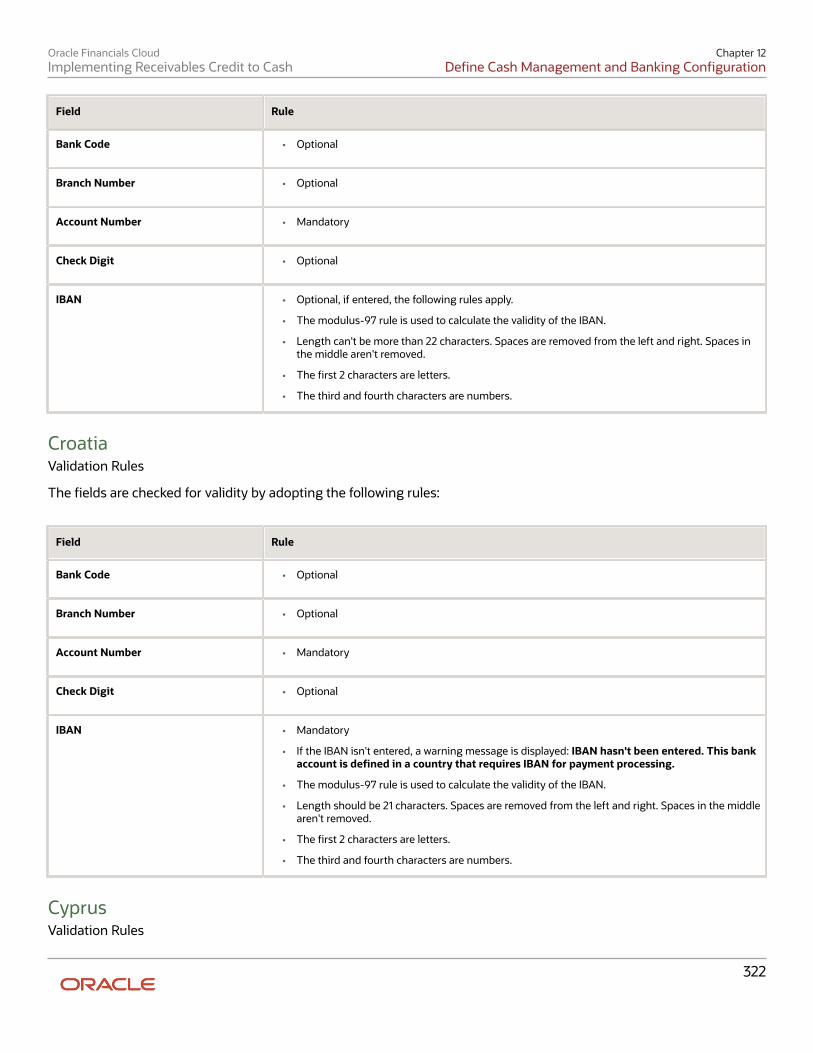
Oracle Financials CloudImplementing Receivables Credit to Cash
Chapter 12Define Cash Management and Banking Configuration
Field Rule
Bank Code
• Optional
Branch Number
• Optional
Account Number
• Mandatory
Check Digit
• Optional
IBAN
• Optional, if entered, the following rules apply.
• The modulus-97 rule is used to calculate the validity of the IBAN.
• Length can't be more than 22 characters. Spaces are removed from the left and right. Spaces inthe middle aren't removed.
• The first 2 characters are letters.
• The third and fourth characters are numbers.
CroatiaValidation Rules
The fields are checked for validity by adopting the following rules:
Field Rule
Bank Code
• Optional
Branch Number
• Optional
Account Number
• Mandatory
Check Digit
• Optional
IBAN
• Mandatory
• If the IBAN isn't entered, a warning message is displayed: IBAN hasn't been entered. This bankaccount is defined in a country that requires IBAN for payment processing.
• The modulus-97 rule is used to calculate the validity of the IBAN.
• Length should be 21 characters. Spaces are removed from the left and right. Spaces in the middlearen't removed.
• The first 2 characters are letters.
• The third and fourth characters are numbers.
CyprusValidation Rules
322
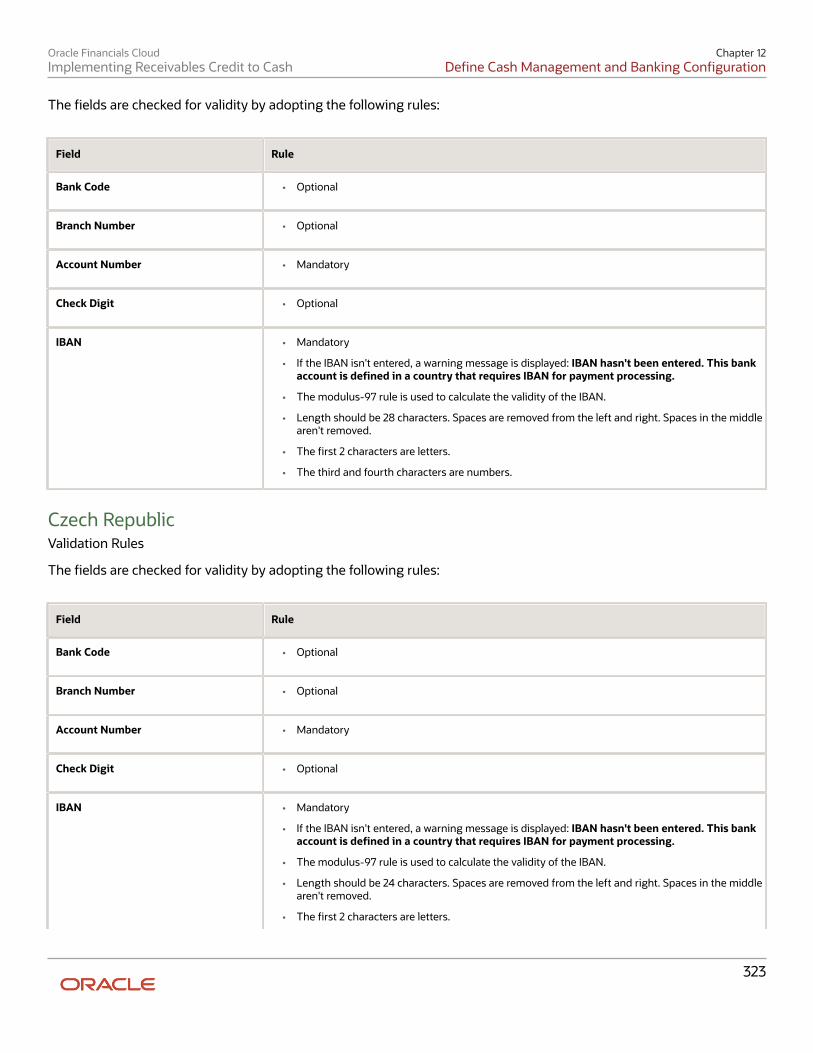
Oracle Financials CloudImplementing Receivables Credit to Cash
Chapter 12Define Cash Management and Banking Configuration
The fields are checked for validity by adopting the following rules:
Field Rule
Bank Code
• Optional
Branch Number
• Optional
Account Number
• Mandatory
Check Digit
• Optional
IBAN
• Mandatory
• If the IBAN isn't entered, a warning message is displayed: IBAN hasn't been entered. This bankaccount is defined in a country that requires IBAN for payment processing.
• The modulus-97 rule is used to calculate the validity of the IBAN.
• Length should be 28 characters. Spaces are removed from the left and right. Spaces in the middlearen't removed.
• The first 2 characters are letters.
• The third and fourth characters are numbers.
Czech RepublicValidation Rules
The fields are checked for validity by adopting the following rules:
Field Rule
Bank Code
• Optional
Branch Number
• Optional
Account Number
• Mandatory
Check Digit
• Optional
IBAN
• Mandatory
• If the IBAN isn't entered, a warning message is displayed: IBAN hasn't been entered. This bankaccount is defined in a country that requires IBAN for payment processing.
• The modulus-97 rule is used to calculate the validity of the IBAN.
• Length should be 24 characters. Spaces are removed from the left and right. Spaces in the middlearen't removed.
• The first 2 characters are letters.
323
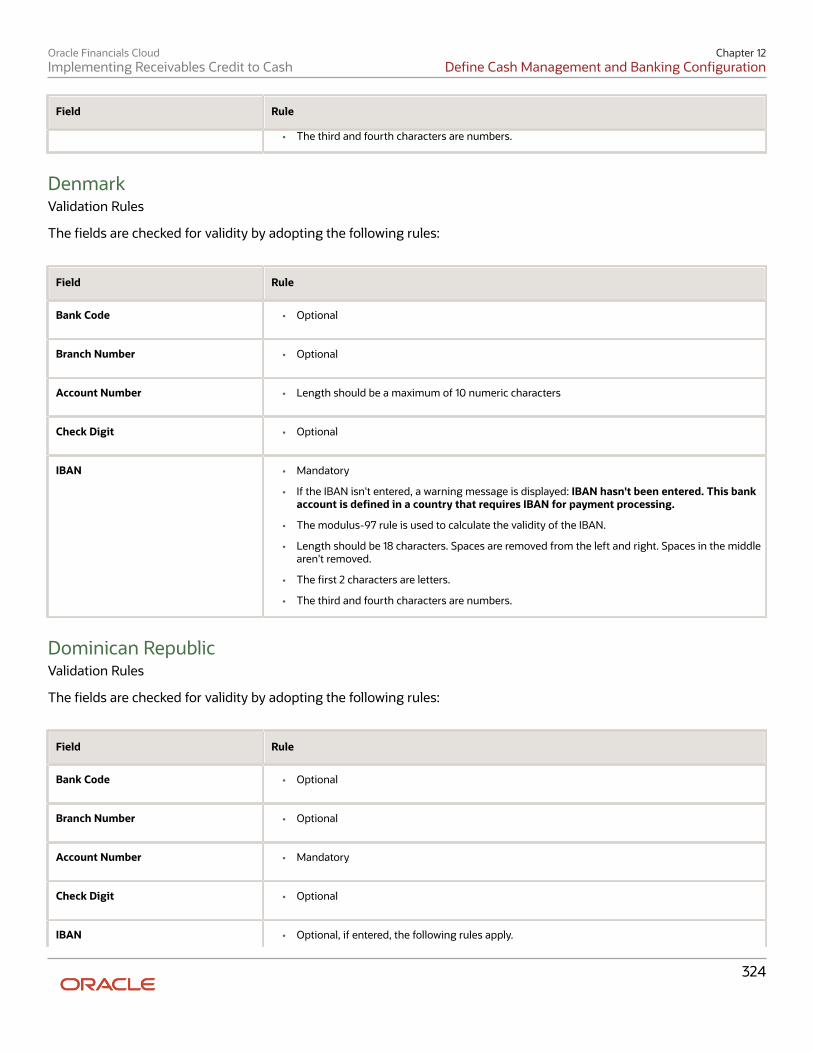
Oracle Financials CloudImplementing Receivables Credit to Cash
Chapter 12Define Cash Management and Banking Configuration
Field Rule
• The third and fourth characters are numbers.
DenmarkValidation Rules
The fields are checked for validity by adopting the following rules:
Field Rule
Bank Code
• Optional
Branch Number
• Optional
Account Number
• Length should be a maximum of 10 numeric characters
Check Digit
• Optional
IBAN
• Mandatory
• If the IBAN isn't entered, a warning message is displayed: IBAN hasn't been entered. This bankaccount is defined in a country that requires IBAN for payment processing.
• The modulus-97 rule is used to calculate the validity of the IBAN.
• Length should be 18 characters. Spaces are removed from the left and right. Spaces in the middlearen't removed.
• The first 2 characters are letters.
• The third and fourth characters are numbers.
Dominican RepublicValidation Rules
The fields are checked for validity by adopting the following rules:
Field Rule
Bank Code
• Optional
Branch Number
• Optional
Account Number
• Mandatory
Check Digit
• Optional
IBAN • Optional, if entered, the following rules apply.
324
Oracle Financials CloudImplementing Receivables Credit to Cash
Chapter 12Define Cash Management and Banking Configuration
Field Rule
• The modulus-97 rule is used to calculate the validity of the IBAN.
• Length can't be more than 28 characters. Spaces are removed from the left and right. Spaces inthe middle aren't removed.
• The first 2 characters are letters.
• The third and fourth characters are numbers.
EgyptValidation Rules
The fields are checked for validity by adopting the following rules:
Field Rule
Bank Code
• Optional
Branch Number
• Optional
Account Number
• Mandatory
Check Digit
• Optional
IBAN
• Optional, if entered, the following rules apply.
• The modulus-97 rule is used to calculate the validity of the IBAN.
• Length can't be more than 29 characters. Spaces are removed from the left and right. Spaces inthe middle aren't removed.
• The first 2 characters are letters.
• The third and fourth characters are numbers.
El Salvador.Validation Rules
The fields are checked for validity by adopting the following rules:
Field Rule
Bank Code
• Optional
Branch Number
• Optional
Account Number
• Mandatory
325

Oracle Financials CloudImplementing Receivables Credit to Cash
Chapter 12Define Cash Management and Banking Configuration
Field Rule
Check Digit
• Optional
IBAN
• Optional, if entered, the following rules apply.
• The modulus-97 rule is used to calculate the validity of the IBAN.
• Length can't be more than 28 characters. Spaces are removed from the left and right. Spaces inthe middle aren't removed.
• The first 2 characters are letters.
• The third and fourth characters are numbers.
EstoniaValidation Rules
The fields are checked for validity by adopting the following rules:
Field Rule
Bank Code
• Optional
Branch Number
• Optional
Account Number
• Mandatory
Check Digit
• Optional
IBAN
• Mandatory
• If the IBAN isn't entered, a warning message is displayed: IBAN hasn't been entered. This bankaccount is defined in a country that requires IBAN for payment processing.
• The modulus-97 rule is used to calculate the validity of the IBAN.
• Length should be 20 characters. Spaces are removed from the left and right. Spaces in the middlearen't removed.
• The first 2 characters are letters.
• The third and fourth characters are numbers.
Faroe IslandsValidation Rules
The fields are checked for validity by adopting the following rules:
Field Rule
Bank Code
• Optional
326
Oracle Financials CloudImplementing Receivables Credit to Cash
Chapter 12Define Cash Management and Banking Configuration
Field Rule
Branch Number
• Optional
Account Number
• Mandatory
Check Digit
• Optional
IBAN
• Optional, if entered, the following rules apply.
• The modulus-97 rule is used to calculate the validity of the IBAN.
• Length can't be more than 18 characters. Spaces are removed from the left and right. Spaces inthe middle aren't removed.
• The first 2 characters are letters.
• The third and fourth characters are numbers.
FinlandValidation Rules
The fields are checked for validity by adopting the following rules:
Field Rule
Bank Code
• Optional
Branch Number
• Optional
• If entered, it should be 6 numeric characters.
Account Number
• Mandatory
• Length should be between 8 to 14 numeric characters.
• A check algorithm is applied on the Account Number.
Check Digit
• Optional
• If entered, it should be 1 numeric digit.
IBAN
• Mandatory
• If the IBAN isn't entered, a warning message is displayed: IBAN hasn't been entered. This bankaccount is defined in a country that requires IBAN for payment processing.
• The modulus-97 rule is used to calculate the validity of the IBAN.
• Length should be 18 characters. Spaces are removed from the left and right. Spaces in the middlearen't removed.
• The first 2 characters are letters.
• The third and fourth characters are numbers.
327
Oracle Financials CloudImplementing Receivables Credit to Cash
Chapter 12Define Cash Management and Banking Configuration
If 1st digit of Account Number is: Check Value Method
1
1
2
1
3
1
4
2
5
2
6
1
7
2
8
1
9
1
Method 1
The check is formed in the following two parts:
• The first part of the check is formed from the first 6 digits of the Account Number. To illustrate, if the accountnumber is 123456789, then the first part of check would be created as 123456.
• The second part of check is formed as an eight digit value, comprising the 8th to 15th digits of the AccountNumber. If the length is less than 8, then it's converted to an 8 digit number by prefixing it with as manyleading zeroes as is necessary. Using the same example, the second part of check would be created as00000089. check is then formed by concatenating the two parts. So, in our example the check is formed as12345600000089.
Method 2
The check is formed in the following three parts:
• The first part of the check is formed from the first 6 digits of the Account Number. To illustrate, if the accountnumber is 123456789, then the first part of check would be created as 123456.
• The second part of check is formed as the 8th digit of the Account Number. Using the same example, thesecond part of check would be created as 8.
• The third part of check is formed as a seven digit value, comprising the 9th to 15th digits of the AccountNumber. If the length is less than 7, then it's converted to a 7 digit number by prefixing it with as many leadingzeroes as is necessary. Using the same example, the second part of check would be created as 0000009.The check is then formed by concatenating the three parts. So, in our example the check is formed as12345680000009.
A computed sum is then calculated based on the value of the check. Different calculations are performed depending onthe first two digits of the formed check value.
328
Oracle Financials CloudImplementing Receivables Credit to Cash
Chapter 12Define Cash Management and Banking Configuration
If the first two digits of the check are '88', then:
• The Finnish government provides the following factor table. The 8th to 13th digits of the check number aremultiplied by the associated factor. The computed sum is then calculated by summing the totals.
Digit Factor
8th
1
9th
3
10th
7
11th
1
12th
3
13th
7
Example using check number 88345600000089: Multiply the given digits with the given factor.
Digit Value Factor Result
8th Digit
0
1
0
9th Digit
0
3
0
10th Digit
0
7
0
11th Digit
0
7
0
12th Digit
0
3
0
13th Digit
8
7
56
Total
N/A
N/A
56
So the computed sum for this example is 56.
The test fails unless either of the following applies:
• The 14th digit of the check should equal the value of 10 minus the last digit of the computed sum. For the checkvalue is '88345600000089', the last digit of the computed sum is 6. So 10 - 6 = 4. So, the 14th digit of the checkshould equal 4. The test fails here as the 14th digit's 9.
329

Oracle Financials CloudImplementing Receivables Credit to Cash
Chapter 12Define Cash Management and Banking Configuration
• Both the 14th digit of the check and the last digit of the computed sum are 0. Using the same example, the testfails here as both values aren't 0.
If the first two digits of the check aren't '88', then the computed sum is calculated for each of the first 13 digits by addingthe even numbered digits to the following calculated sum for each odd numbered digit :
• Multiply the digit by 2.
• Divide the result by 10.
• From the result add the integer to the remainder.
Example using account number 123456800000089:
Digit Value Multiply (a) Divide (b) Integer Remainder Result
1st
1
2
0.2
0
2
2
2nd
2
N/A
N/A
N/A
N/A
2
3rd
3
6
0.6
0
6
6
4th
4
N/A
N/A
N/A
N/A
4
5th
5
10
1
1
0
1
6th
6
N/A
N/A
N/A
N/A
6
7th
0
16
1.6
1
6
0
8th
0
N/A
N/A
N/A
N/A
0
9th
0
0
0
0
0
0
10th
0
N/A
N/A
N/A
N/A
0
11th
0
0
0
0
0
0
12th
0
N/A
N/A
N/A
N/A
0
13th
8
16
1.6
1
6
7
Total
N/A
N/A
N/A
N/A
N/A
28
330
Oracle Financials CloudImplementing Receivables Credit to Cash
Chapter 12Define Cash Management and Banking Configuration
The computed sum is then converted using the following process, before being used to see if the Account Number isvalid:
1. Computed sum is added to 9.2. The result is divided by 10.3. The integer result is multiplied by 10.4. The result is subtracted by the original computed sum.
So the computed sum '282 is converted to '2' as:
1. 28 + 9 = 372. 37/10 = 3.7. Integer result therefore = 33. 3 * 10 = 304. 30 - 28 = 2
This number is then compared to the 14th digit of the Account Number. If it matches, then the test is passed, else it'sfailed.
In our example, the test fails as the 14th digit of the account number is 9. If the 14th digit had been 2, then the test wouldhave been passed.
FranceValidation Rules
The fields are checked for validity by adopting the following rules:
Field Rule
Bank Code
• Mandatory
• Length should be a maximum of 5 numeric characters.
• If the length is less than 5, then it's converted to a 5 digit number by prefixing it with as manyleading zeroes as is necessary.
Branch Number
• Mandatory
• Length should be a maximum of 5 numeric characters.
• If the length is less than 5, then it's converted to a 5 digit number by prefixing it with as manyleading zeroes as is necessary.
Account Number
• Mandatory
• Length should be a maximum of 11 numeric characters
• Special characters and spaces aren't allowed
Check Digit
• Optional
• If entered, length should be a maximum of 2 numeric characters.
• A check algorithm is applied on the check digit.
Account Type
• This field is labeled as Deposit Type.
IBAN
• Mandatory
331
Oracle Financials CloudImplementing Receivables Credit to Cash
Chapter 12Define Cash Management and Banking Configuration
Field Rule
• If the IBAN isn't entered, a warning message is displayed: IBAN hasn't been entered. This bankaccount is defined in a country that requires IBAN for payment processing.
• The modulus-97 rule is used to calculate the validity of the IBAN.
• Length should be 27 characters. Spaces are removed from the left and right. Spaces in the middlearen't removed.
• The first 2 characters are letters.
• The third and fourth characters are numbers.
Check Algorithm for Check Digit
A check digit's calculated (CD1) from the Account Number, Bank Code, and Branch Number in the following manner.This is then used as the basis for the check digit validity test.
CDI
For the check algorithm, the digits of the Account Number entered as characters A to Z. are converted to numericvalues, the French government provides the following conversion table:
Value Conversion
A, J
1
B, K, S
2
C, L, T
3
D, M, U
4
E, N, V
5
F, O, W
6
G, P, X
7
H, Q, Y
8
I, R, Z
9
Example using account number A1234567890:
The letter A is converted by applying the table to 1, so the account number becomes 11234567890.
332
Oracle Financials CloudImplementing Receivables Credit to Cash
Chapter 12Define Cash Management and Banking Configuration
A value for CD1 is formed by joining together the bank fields in the following way:
• The Bank Code is concatenated with Branch Number concatenated to the converted Account Number. Toillustrate with the Bank Code as 12345, the Branch Number as 67890 and the converted Account Number as11234567890. Then CD1 is created as 123456789011234567890.
• To this concatenated value, 00 is added as a suffix and the resulting value is divided by 97. The remainderobtained as result of this division is then subtracted from 97. The result of this subtraction is the calculatedcheck digit.
• In our example, suffixing 00 gives 12345678901123456789000. Dividing by 97 and deriving the remainder. Mod(12345678901123456789000, 97) = 86 Subtract from 97. 97 - 86 = 11
• If the user entered Check Digit's equal to this calculated value, then the validation is successful.
In the given example, as the user entered check digit'sn't 11, the check isn't valid.
French GuianaValidation Rules
The fields are checked for validity by adopting the following rules:
Field Rule
Bank Code
• Optional
Branch Number
• Optional
Account Number
• Mandatory
Check Digit
• Optional
IBAN
• Mandatory
• If the IBAN isn't entered, a warning message is displayed: IBAN hasn't been entered. This bankaccount is defined in a country that requires IBAN for payment processing.
• The modulus-97 rule is used to calculate the validity of the IBAN.
• Length should be 34 characters. Spaces are removed from the left and right. Spaces in the middlearen't removed.
• The first 2 characters are letters.
• The third and fourth characters are numbers.
GeorgiaValidation Rules
The fields are checked for validity by adopting the following rules:
333

Oracle Financials CloudImplementing Receivables Credit to Cash
Chapter 12Define Cash Management and Banking Configuration
Field Rule
Bank Code
• Optional
Branch Number
• Optional
Account Number
• Mandatory
Check Digit
• Optional
IBAN
• Optional, if entered, the following rules apply.
• The modulus-97 rule is used to calculate the validity of the IBAN.
• Length should be 24 characters. Spaces are removed from the left and right. Spaces in the middlearen't removed.
• The first 2 characters are letters.
• The third and fourth characters are numbers.
GermanyValidation Rules
The fields are checked for validity by adopting the following rules:
Field Rule
Bank Code
• Optional
• If entered, then the length should be 8 numeric characters.
Branch Number
• Optional
• If entered, then the length should be 8 numeric characters.
• If the Bank Code and Branch Number are entered, then both values must match.
Account Number
• Mandatory
• Length should be a maximum of 10 numeric characters.
Check Digit
• Optional
• If a value is entered for the check digit, then it must be a single digit and must match the last digitof the Account Number.
IBAN
• Mandatory
• If the IBAN isn't entered, a warning message is displayed: IBAN hasn't been entered. This bankaccount is defined in a country that requires IBAN for payment processing.
• The modulus-97 rule is used to calculate the validity of the IBAN.
• Length should be 22 characters. Spaces are removed from the left and right. Spaces in the middlearen't removed.
• The first 2 characters are letters.
334
Oracle Financials CloudImplementing Receivables Credit to Cash
Chapter 12Define Cash Management and Banking Configuration
Field Rule
• The third and fourth characters are numbers.
GibraltarValidation Rules
The fields are checked for validity by adopting the following rules:
Field Rule
Bank Code
• Optional
Branch Number
• Optional
Account Number
• Mandatory
Check Digit
• Optional
IBAN
• Mandatory
• If the IBAN isn't entered, a warning message is displayed: IBAN hasn't been entered. This bankaccount is defined in a country that requires IBAN for payment processing.
• The modulus-97 rule is used to calculate the validity of the IBAN.
• Length should be 23 characters. Spaces are removed from the left and right. Spaces in the middlearen't removed.
• The first 2 characters are letters.
• The third and fourth characters are numbers.
GreeceValidation Rules
The fields are checked for validity by adopting the following rules:
Field Rule
Bank Code
• Optional
• If entered, then the length should be of 3 numeric characters.
Branch Number
• Optional
• If entered, then the length should be of 4 numeric characters.
Account Number
• Mandatory
• Length should be between 8 to 16 alphanumeric characters.
335
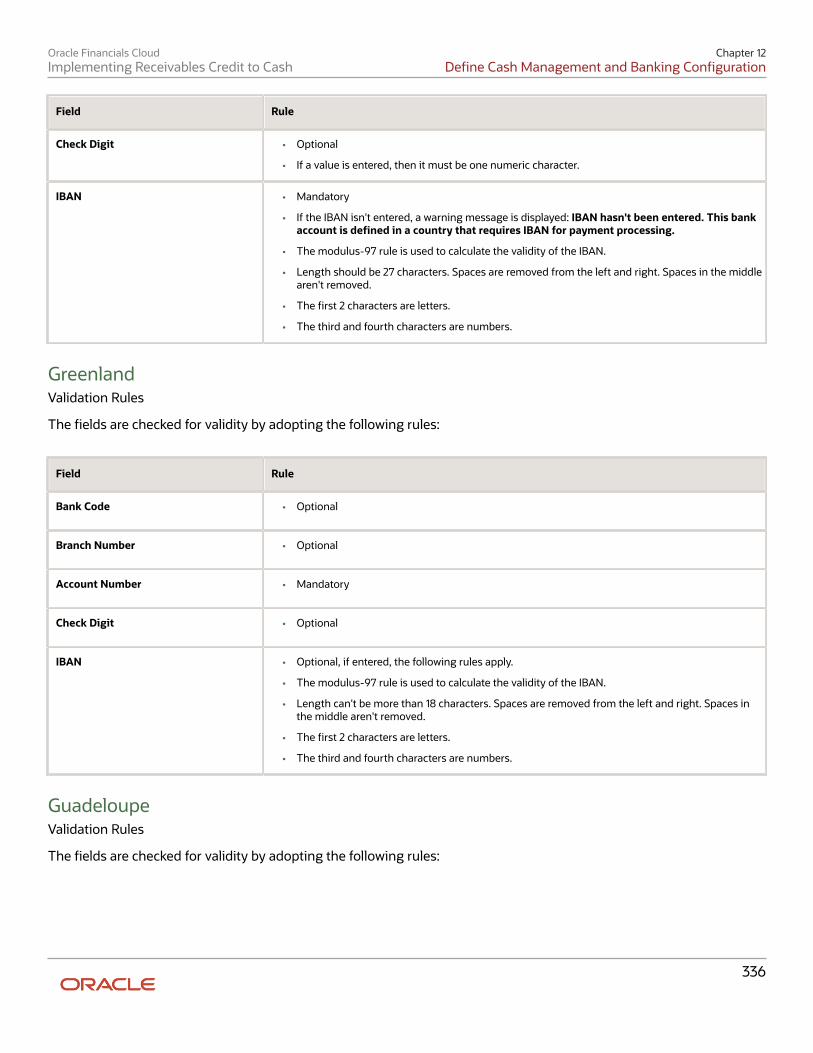
Oracle Financials CloudImplementing Receivables Credit to Cash
Chapter 12Define Cash Management and Banking Configuration
Field Rule
Check Digit
• Optional
• If a value is entered, then it must be one numeric character.
IBAN
• Mandatory
• If the IBAN isn't entered, a warning message is displayed: IBAN hasn't been entered. This bankaccount is defined in a country that requires IBAN for payment processing.
• The modulus-97 rule is used to calculate the validity of the IBAN.
• Length should be 27 characters. Spaces are removed from the left and right. Spaces in the middlearen't removed.
• The first 2 characters are letters.
• The third and fourth characters are numbers.
GreenlandValidation Rules
The fields are checked for validity by adopting the following rules:
Field Rule
Bank Code
• Optional
Branch Number
• Optional
Account Number
• Mandatory
Check Digit
• Optional
IBAN
• Optional, if entered, the following rules apply.
• The modulus-97 rule is used to calculate the validity of the IBAN.
• Length can't be more than 18 characters. Spaces are removed from the left and right. Spaces inthe middle aren't removed.
• The first 2 characters are letters.
• The third and fourth characters are numbers.
GuadeloupeValidation Rules
The fields are checked for validity by adopting the following rules:
336
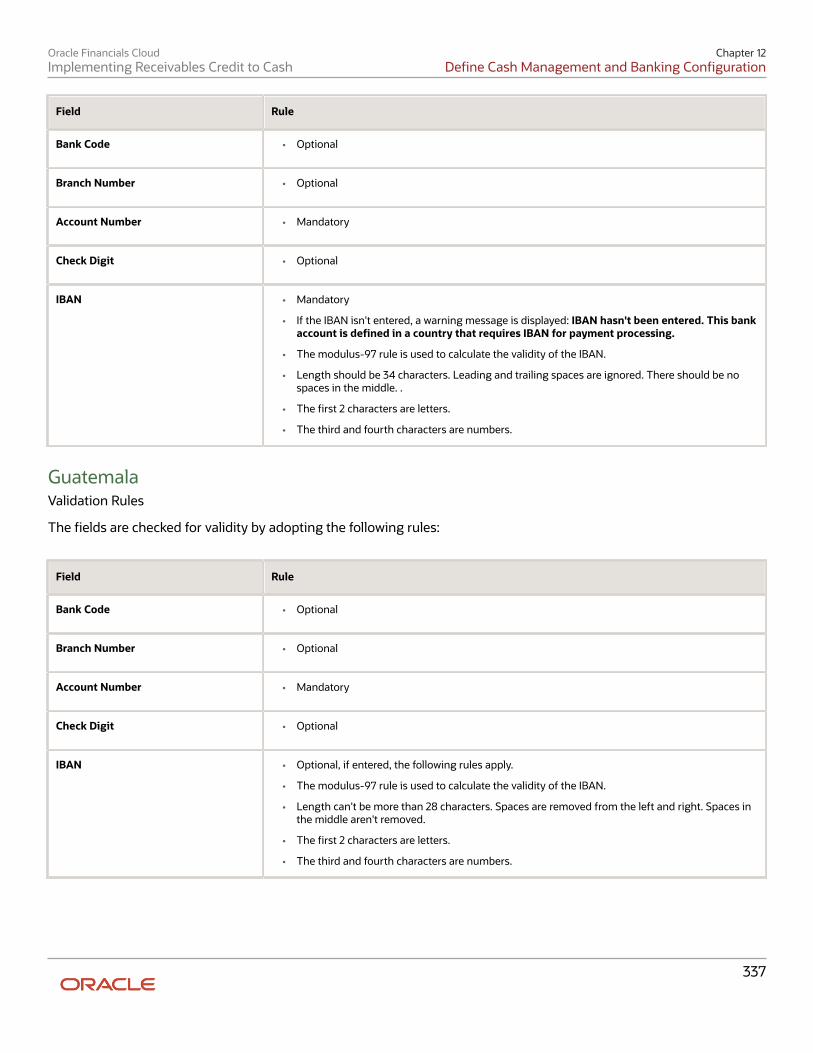
Oracle Financials CloudImplementing Receivables Credit to Cash
Chapter 12Define Cash Management and Banking Configuration
Field Rule
Bank Code
• Optional
Branch Number
• Optional
Account Number
• Mandatory
Check Digit
• Optional
IBAN
• Mandatory
• If the IBAN isn't entered, a warning message is displayed: IBAN hasn't been entered. This bankaccount is defined in a country that requires IBAN for payment processing.
• The modulus-97 rule is used to calculate the validity of the IBAN.
• Length should be 34 characters. Leading and trailing spaces are ignored. There should be nospaces in the middle. .
• The first 2 characters are letters.
• The third and fourth characters are numbers.
GuatemalaValidation Rules
The fields are checked for validity by adopting the following rules:
Field Rule
Bank Code
• Optional
Branch Number
• Optional
Account Number
• Mandatory
Check Digit
• Optional
IBAN
• Optional, if entered, the following rules apply.
• The modulus-97 rule is used to calculate the validity of the IBAN.
• Length can't be more than 28 characters. Spaces are removed from the left and right. Spaces inthe middle aren't removed.
• The first 2 characters are letters.
• The third and fourth characters are numbers.
337

Oracle Financials CloudImplementing Receivables Credit to Cash
Chapter 12Define Cash Management and Banking Configuration
Related Topics• Bank Account Validation by Country: Hungary to Norway
• Bank Account Validation by Country: Pakistan to the United States
Bank Account Validation by Country: Hungary to Norway This outlines the country-specific bank account validation rules performed in Oracle Fusion Cash Management.
The following countries have country-specific validations:
• Hungary
• Iceland
• India
• Ireland
• Israel
• Iran
• Iraq
• Italy
• Ivory Coast
• Japan
• Jordan
• Kazakhstan
• Kosovo
• Kuwait
• Latvia
• Lebanon
• Liechtenstein
• Lithuania
• Luxembourg
• Malta
• Martinique
• Mauritania
• Mauritius
• Mayotte
• Mexico
• Moldova
• Monaco
• Montenegro
338

Oracle Financials CloudImplementing Receivables Credit to Cash
Chapter 12Define Cash Management and Banking Configuration
• Morocco
• Netherlands
• New Zealand
• Norway
When entering bank accounts, different countries can have certain rules governing the format and content of thefollowing related fields:
1. Bank Code2. Branch Number3. Account Number4. Check Digit5. IBAN
Use the Disable Country Specific Bank Validations profile option to disable the country-specific validations pertainingto the bank code, branch number, account number, check digit, and IBAN. You can set this profile option at the siteor user level. The profile is predefined with a default value of No at the site level. If the profile is set to Yes, thesevalidations aren't performed. The checks for unique banks, branches, accounts, and the mandatory requirement of bankaccount number aren't affected by this profile.
HungaryValidation Rules
The fields are checked for validity by adopting the following rules:
Field Rule
Bank Code
• Optional
Branch Number
• Optional
Account Number
• Mandatory
Check Digit
• Optional
IBAN
• Mandatory
• If the IBAN isn't entered, a warning message is displayed: IBAN hasn't been entered. This bankaccount is defined in a country that requires IBAN for payment processing.
• The modulus-97 rule is used to calculate the validity of the IBAN
• Length should be 28 characters. Spaces are removed from the left and right. Spaces in the middlearen't removed.
• The first 2 characters are letters.
• The third and fourth characters are numbers.
IcelandValidation Rules
The fields are checked for validity by adopting the following rules:
339

Oracle Financials CloudImplementing Receivables Credit to Cash
Chapter 12Define Cash Management and Banking Configuration
Field Rule
Bank Code
• Optional
• If entered, then the length should be of 4 numeric characters.
• If the length is less than 4, then it's converted to a 4 digit number by prefixing it with as manyleading zeroes as is necessary.
Branch Number
• Optional
• If entered, then the length should be of 4 numeric characters.
• If the Bank Code and Branch Number are entered, then both values must match.
Account Number
• Mandatory
• Length should be a maximum of 18 numeric characters.
• If the length is less than 18, then it's converted to an 18 digit number by prefixing it with as manyleading zeroes as is necessary.
• A check algorithm is applied on the Account Number.
Check Digit
• Optional
• If a value is entered for the check digit, then it must be a single digit and must match theseventeenth digit of the Account Number.
IBAN
• Mandatory
• If the IBAN isn't entered, a warning message is displayed: IBAN hasn't been entered. This bankaccount is defined in a country that requires IBAN for payment processing.
• The modulus-97 rule is used to calculate the validity of the IBAN
• Length should be 26 characters. Spaces are removed from the left and right. Spaces in the middlearen't removed.
• The first 2 characters are letters.
• The third and fourth characters are numbers.
Check Algorithm for Account Number
1. Check algorithm is performed against the Account Number (from digit 9 to 16). Each of these digits ismultiplied with the factors as given in the following table:
Digit Factor
9th
3
10th
2
11th
7
12th
6
13th 5
340
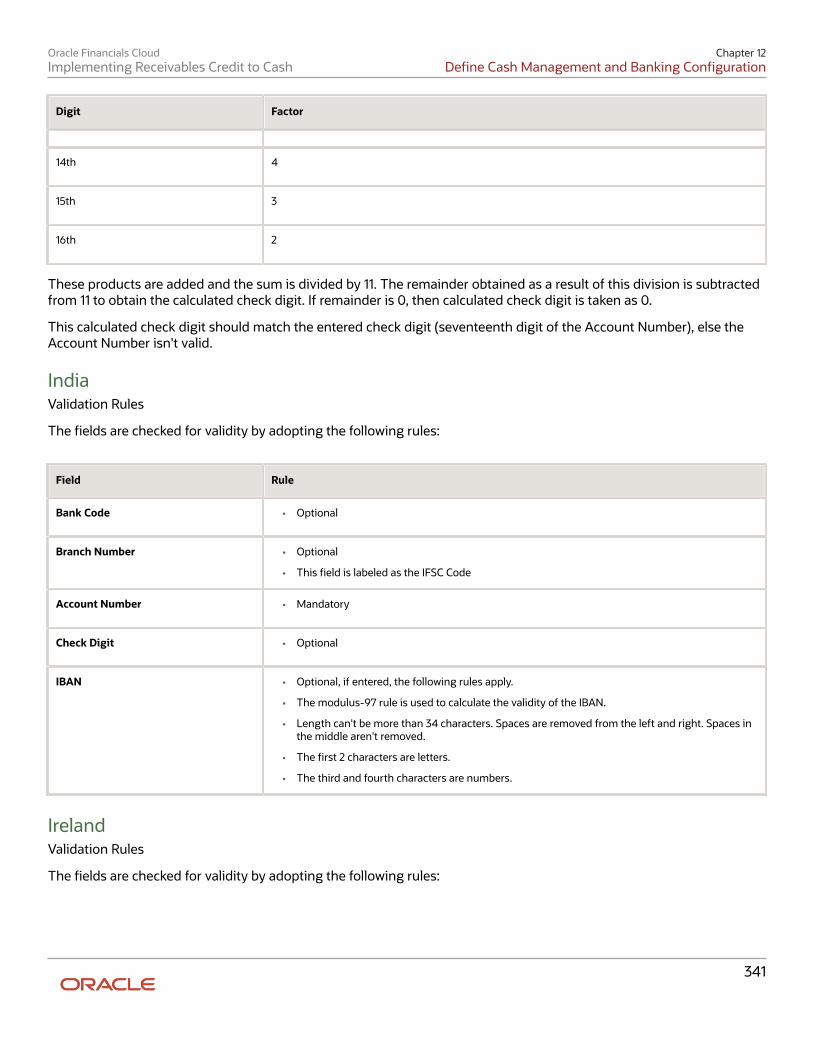
Oracle Financials CloudImplementing Receivables Credit to Cash
Chapter 12Define Cash Management and Banking Configuration
Digit Factor
14th
4
15th
3
16th
2
These products are added and the sum is divided by 11. The remainder obtained as a result of this division is subtractedfrom 11 to obtain the calculated check digit. If remainder is 0, then calculated check digit is taken as 0.
This calculated check digit should match the entered check digit (seventeenth digit of the Account Number), else theAccount Number isn't valid.
IndiaValidation Rules
The fields are checked for validity by adopting the following rules:
Field Rule
Bank Code
• Optional
Branch Number
• Optional
• This field is labeled as the IFSC Code
Account Number
• Mandatory
Check Digit
• Optional
IBAN
• Optional, if entered, the following rules apply.
• The modulus-97 rule is used to calculate the validity of the IBAN.
• Length can't be more than 34 characters. Spaces are removed from the left and right. Spaces inthe middle aren't removed.
• The first 2 characters are letters.
• The third and fourth characters are numbers.
IrelandValidation Rules
The fields are checked for validity by adopting the following rules:
341

Oracle Financials CloudImplementing Receivables Credit to Cash
Chapter 12Define Cash Management and Banking Configuration
Field Rule
Bank Code
• Optional
• If entered, then the length should be of 6 numeric characters.
Branch Number
• Optional
• If entered, then the length should be of 6 numeric characters.
• If the Bank Code and Branch Number are entered, then both values must match.
Account Number
• Mandatory
• Length should be 8 numeric characters.
Check Digit
• Optional
IBAN
• Mandatory
• If the IBAN isn't entered, a warning message is displayed: IBAN hasn't been entered. This bankaccount is defined in a country that requires IBAN for payment processing.
• The modulus-97 rule is used to calculate the validity of the IBAN
• Length should be 22 characters. Spaces are removed from the left and right. Spaces in the middlearen't removed.
• The first 2 characters are letters.
• The third and fourth characters are numbers.
IsraelValidation Rules
The fields are checked for validity by adopting the following rules:
Field Rule
Bank Code
• Mandatory
• If entered, the length should be a maximum 2 numeric characters
Branch Number
• Mandatory
• Length should be 3 numeric characters.
Account Number
• Mandatory
• Length should be a maximum of 13 numeric characters.
• Spaces aren't allowed.
Check Digit
• Optional
IBAN
• Optional, if entered, the following rules apply.
• The modulus-97 rule is used to calculate the validity of the IBAN.
342

Oracle Financials CloudImplementing Receivables Credit to Cash
Chapter 12Define Cash Management and Banking Configuration
Field Rule
• Length can't be more than 23 characters. Spaces are removed from the left and right. Spaces inthe middle aren't removed.
• The first 2 characters are letters.
• The third and fourth characters are numbers.
IranValidation Rules
The fields are checked for validity by adopting the following rules:
Field Rule
Bank Code
• Optional
Branch Number
• Optional
Account Number
• Mandatory
Check Digit
• Optional
IBAN
• Optional, if entered, the following rules apply.
• The modulus-97 rule is used to calculate the validity of the IBAN.
• Length can't be more than 26 characters. Spaces are removed from the left and right. Spaces inthe middle aren't removed.
• The first 2 characters are letters.
• The third and fourth characters are numbers.
IraqValidation Rules
The fields are checked for validity by adopting the following rules:
Field Rule
Bank Code
• Optional
Branch Number
• Optional
Account Number
• Mandatory
Check Digit
• Optional
343

Oracle Financials CloudImplementing Receivables Credit to Cash
Chapter 12Define Cash Management and Banking Configuration
Field Rule
IBAN
• Optional, if entered, the following rules apply.
• The modulus-97 rule is used to calculate the validity of the IBAN.
• Length can't be more than 23 characters. Spaces are removed from the left and right. Spaces inthe middle aren't removed.
• The first 2 characters are letters.
• The third and fourth characters are numbers.
ItalyValidation Rules
The fields are checked for validity by adopting the following rules:
Field Rule
Bank Code
• Mandatory
• Length should be a maximum of 5 numeric characters.
Branch Number
• Mandatory
• Length should be a maximum of 5 numeric characters.
Account Number
• Mandatory
• Length should be a maximum of 12 alphanumeric characters.
• If the length is less than 12, then it's converted to a 12 digit number by prefixing it with as manyleading zeroes as is necessary.
Check Digit
• Optional
• If entered, length should be a single alphabetic character and a check algorithm is applied on theCheck Digit.
IBAN
• Mandatory
• If the IBAN isn't entered, a warning message is displayed: IBAN hasn't been entered. This bankaccount is defined in a country that requires IBAN for payment processing.
• The modulus-97 rule is used to calculate the validity of the IBAN
• Length should be 27 characters. Spaces are removed from the left and right. Spaces in the middlearen't removed.
• The first 2 characters are letters.
• The third and fourth characters are numbers.
Check Algorithm for Check Digit
The check digit is used to validate against the Bank Code, Branch Number, and Account Number. These areconcatenated to obtain a 22 character string.
Each character is assigned a value depending upon whether the character is in an odd position or an even position inthe string as given in the following table:
344
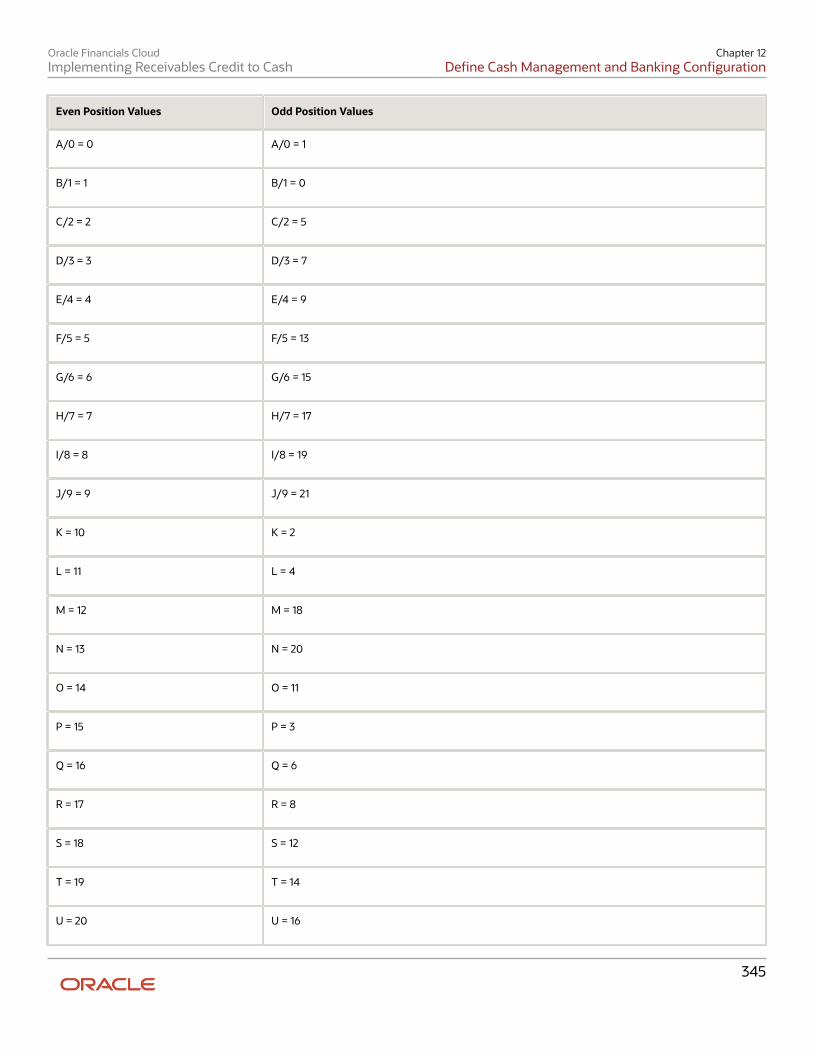
Oracle Financials CloudImplementing Receivables Credit to Cash
Chapter 12Define Cash Management and Banking Configuration
Even Position Values Odd Position Values
A/0 = 0
A/0 = 1
B/1 = 1
B/1 = 0
C/2 = 2
C/2 = 5
D/3 = 3
D/3 = 7
E/4 = 4
E/4 = 9
F/5 = 5
F/5 = 13
G/6 = 6
G/6 = 15
H/7 = 7
H/7 = 17
I/8 = 8
I/8 = 19
J/9 = 9
J/9 = 21
K = 10
K = 2
L = 11
L = 4
M = 12
M = 18
N = 13
N = 20
O = 14
O = 11
P = 15
P = 3
Q = 16
Q = 6
R = 17
R = 8
S = 18
S = 12
T = 19
T = 14
U = 20
U = 16
345

Oracle Financials CloudImplementing Receivables Credit to Cash
Chapter 12Define Cash Management and Banking Configuration
Even Position Values Odd Position Values
V = 21
V = 10
W = 22
W = 22
X = 23
X = 25
Y = 24
Y = 24
Z = 25
Z = 23
The first character is an odd position. The values assigned are added up and the sum is divided 26.
The remainder obtained as a result of this division is converted into an alphabet as given in the following table:
Transformation Algorithm
Calculation Calculation Calculation
0 = A
9 = J
18 = S
1 = B
10 = K
19 = T
2 = C
11 = L
20 = U
3 = D
12 = M
21 = V
4 = E
13 = N
22 = W
5 = F
14 = O
23 = X
6 = G
15 = P
24 = Y
7 = H
16 = Q
25 = Z
8 = I
17 = R
N/A
This value should be the same as the user entered check digit or else the Check Digit validation fails.
Ivory CoastValidation Rules
The fields are checked for validity by adopting the following rules:
346
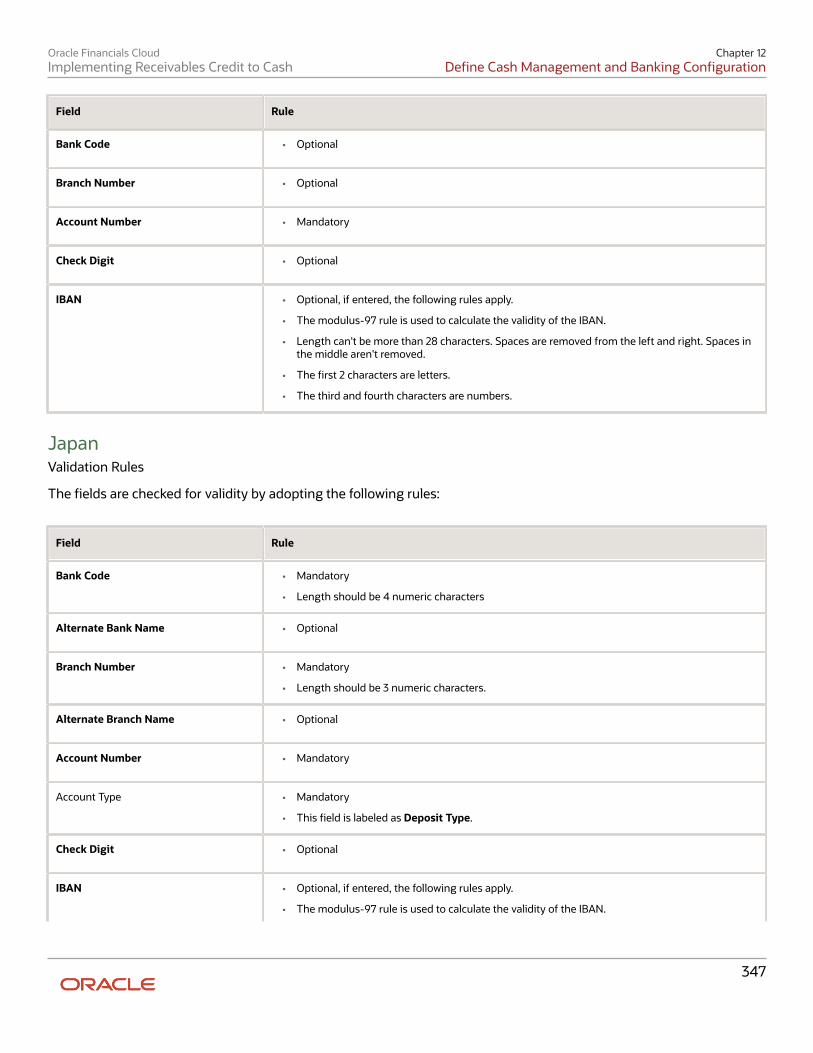
Oracle Financials CloudImplementing Receivables Credit to Cash
Chapter 12Define Cash Management and Banking Configuration
Field Rule
Bank Code
• Optional
Branch Number
• Optional
Account Number
• Mandatory
Check Digit
• Optional
IBAN
• Optional, if entered, the following rules apply.
• The modulus-97 rule is used to calculate the validity of the IBAN.
• Length can't be more than 28 characters. Spaces are removed from the left and right. Spaces inthe middle aren't removed.
• The first 2 characters are letters.
• The third and fourth characters are numbers.
JapanValidation Rules
The fields are checked for validity by adopting the following rules:
Field Rule
Bank Code
• Mandatory
• Length should be 4 numeric characters
Alternate Bank Name
• Optional
Branch Number
• Mandatory
• Length should be 3 numeric characters.
Alternate Branch Name
• Optional
Account Number
• Mandatory
Account Type
• Mandatory
• This field is labeled as Deposit Type.
Check Digit
• Optional
IBAN
• Optional, if entered, the following rules apply.
• The modulus-97 rule is used to calculate the validity of the IBAN.
347
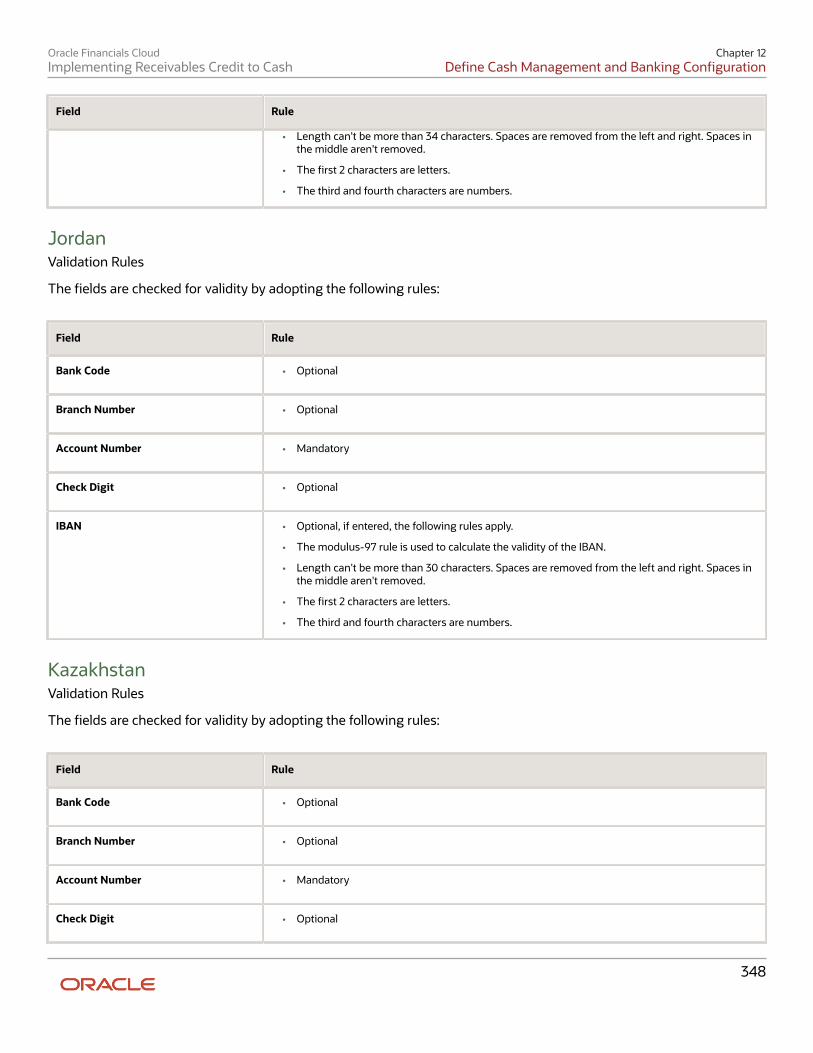
Oracle Financials CloudImplementing Receivables Credit to Cash
Chapter 12Define Cash Management and Banking Configuration
Field Rule
• Length can't be more than 34 characters. Spaces are removed from the left and right. Spaces inthe middle aren't removed.
• The first 2 characters are letters.
• The third and fourth characters are numbers.
JordanValidation Rules
The fields are checked for validity by adopting the following rules:
Field Rule
Bank Code
• Optional
Branch Number
• Optional
Account Number
• Mandatory
Check Digit
• Optional
IBAN
• Optional, if entered, the following rules apply.
• The modulus-97 rule is used to calculate the validity of the IBAN.
• Length can't be more than 30 characters. Spaces are removed from the left and right. Spaces inthe middle aren't removed.
• The first 2 characters are letters.
• The third and fourth characters are numbers.
KazakhstanValidation Rules
The fields are checked for validity by adopting the following rules:
Field Rule
Bank Code
• Optional
Branch Number
• Optional
Account Number
• Mandatory
Check Digit
• Optional
348
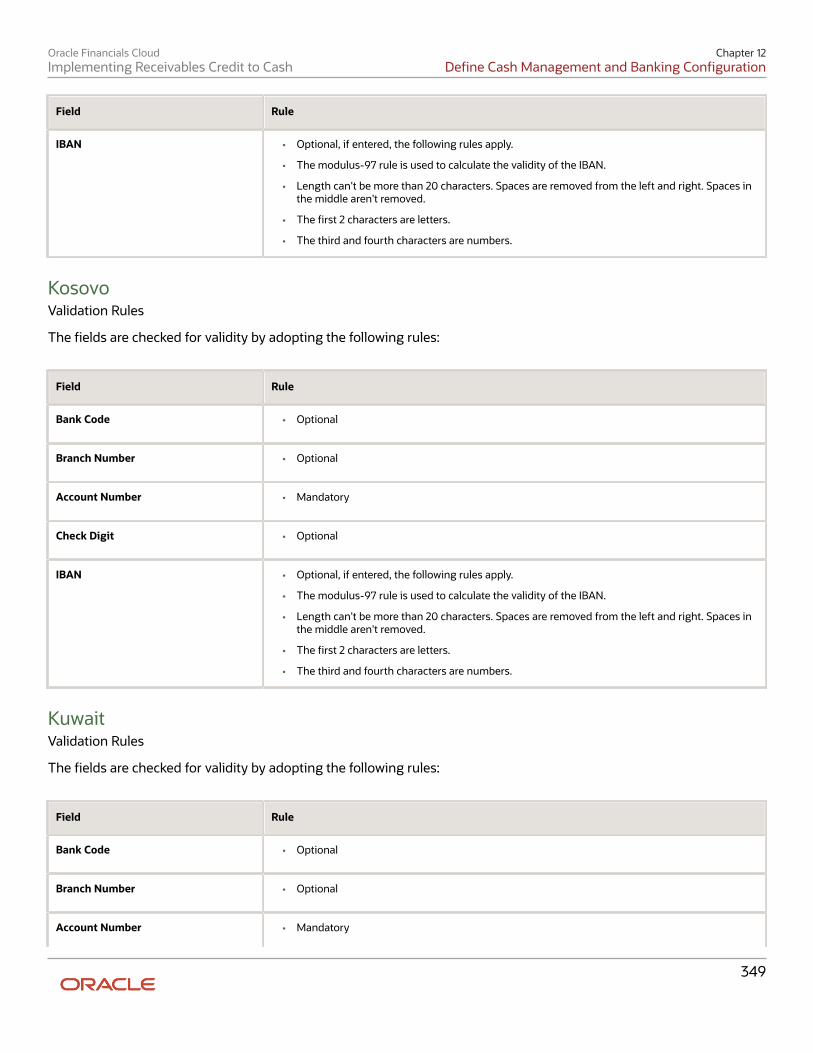
Oracle Financials CloudImplementing Receivables Credit to Cash
Chapter 12Define Cash Management and Banking Configuration
Field Rule
IBAN
• Optional, if entered, the following rules apply.
• The modulus-97 rule is used to calculate the validity of the IBAN.
• Length can't be more than 20 characters. Spaces are removed from the left and right. Spaces inthe middle aren't removed.
• The first 2 characters are letters.
• The third and fourth characters are numbers.
KosovoValidation Rules
The fields are checked for validity by adopting the following rules:
Field Rule
Bank Code
• Optional
Branch Number
• Optional
Account Number
• Mandatory
Check Digit
• Optional
IBAN
• Optional, if entered, the following rules apply.
• The modulus-97 rule is used to calculate the validity of the IBAN.
• Length can't be more than 20 characters. Spaces are removed from the left and right. Spaces inthe middle aren't removed.
• The first 2 characters are letters.
• The third and fourth characters are numbers.
KuwaitValidation Rules
The fields are checked for validity by adopting the following rules:
Field Rule
Bank Code
• Optional
Branch Number
• Optional
Account Number
• Mandatory
349
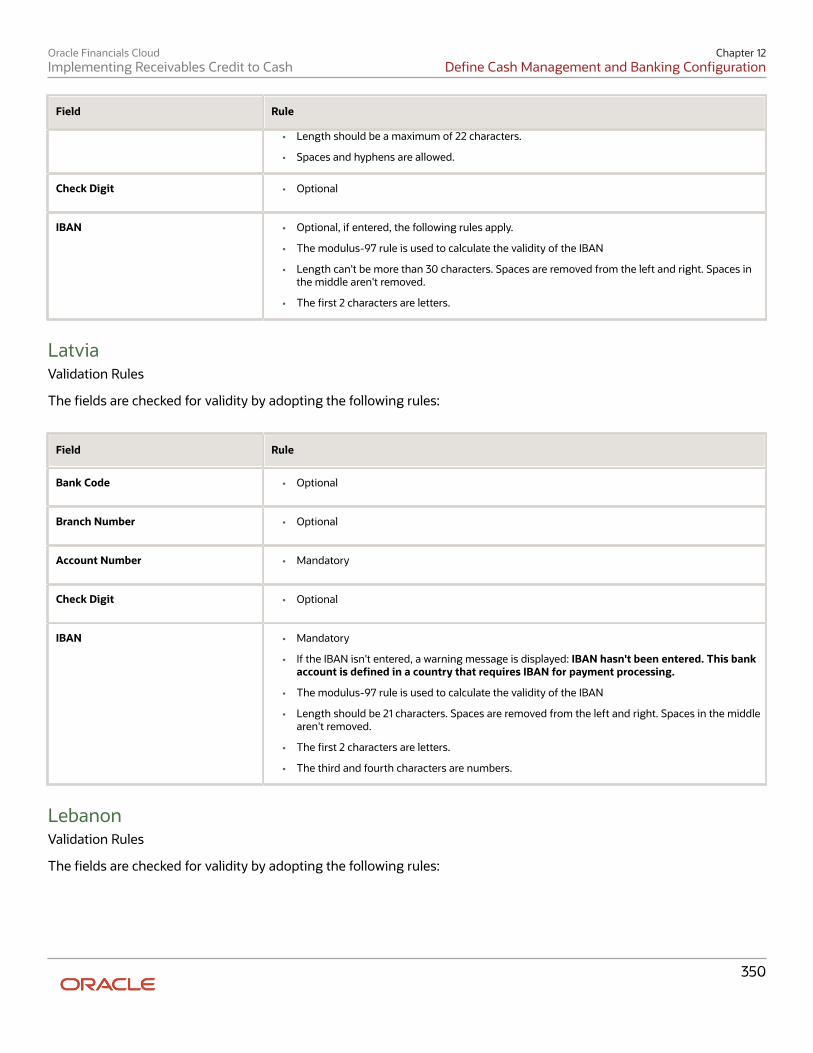
Oracle Financials CloudImplementing Receivables Credit to Cash
Chapter 12Define Cash Management and Banking Configuration
Field Rule
• Length should be a maximum of 22 characters.
• Spaces and hyphens are allowed.
Check Digit
• Optional
IBAN
• Optional, if entered, the following rules apply.
• The modulus-97 rule is used to calculate the validity of the IBAN
• Length can't be more than 30 characters. Spaces are removed from the left and right. Spaces inthe middle aren't removed.
• The first 2 characters are letters.
LatviaValidation Rules
The fields are checked for validity by adopting the following rules:
Field Rule
Bank Code
• Optional
Branch Number
• Optional
Account Number
• Mandatory
Check Digit
• Optional
IBAN
• Mandatory
• If the IBAN isn't entered, a warning message is displayed: IBAN hasn't been entered. This bankaccount is defined in a country that requires IBAN for payment processing.
• The modulus-97 rule is used to calculate the validity of the IBAN
• Length should be 21 characters. Spaces are removed from the left and right. Spaces in the middlearen't removed.
• The first 2 characters are letters.
• The third and fourth characters are numbers.
LebanonValidation Rules
The fields are checked for validity by adopting the following rules:
350

Oracle Financials CloudImplementing Receivables Credit to Cash
Chapter 12Define Cash Management and Banking Configuration
Field Rule
Bank Code
• Optional
Branch Number
• Optional
Account Number
• Mandatory
Check Digit
• Optional
IBAN
• Optional, if entered, the following rules apply.
• The modulus-97 rule is used to calculate the validity of the IBAN.
• Length can't be more than 28 characters. Spaces are removed from the left and right. Spaces inthe middle aren't removed.
• The first 2 characters are letters.
• The third and fourth characters are numbers.
LiechtensteinValidation Rules
The fields are checked for validity by adopting the following rules:
Field Rule
Bank Code
• Optional
Branch Number
• Optional
Account Number
• Mandatory
Check Digit
• Optional
IBAN
• Mandatory
• If the IBAN isn't entered, a warning message is displayed: IBAN hasn't been entered. This bankaccount is defined in a country that requires IBAN for payment processing.
• The modulus-97 rule is used to calculate the validity of the IBAN
• Length should be 21 characters. Spaces are removed from the left and right. Spaces in the middlearen't removed.
• The first 2 characters are letters.
• The third and fourth characters are numbers.
LithuaniaValidation Rules
351
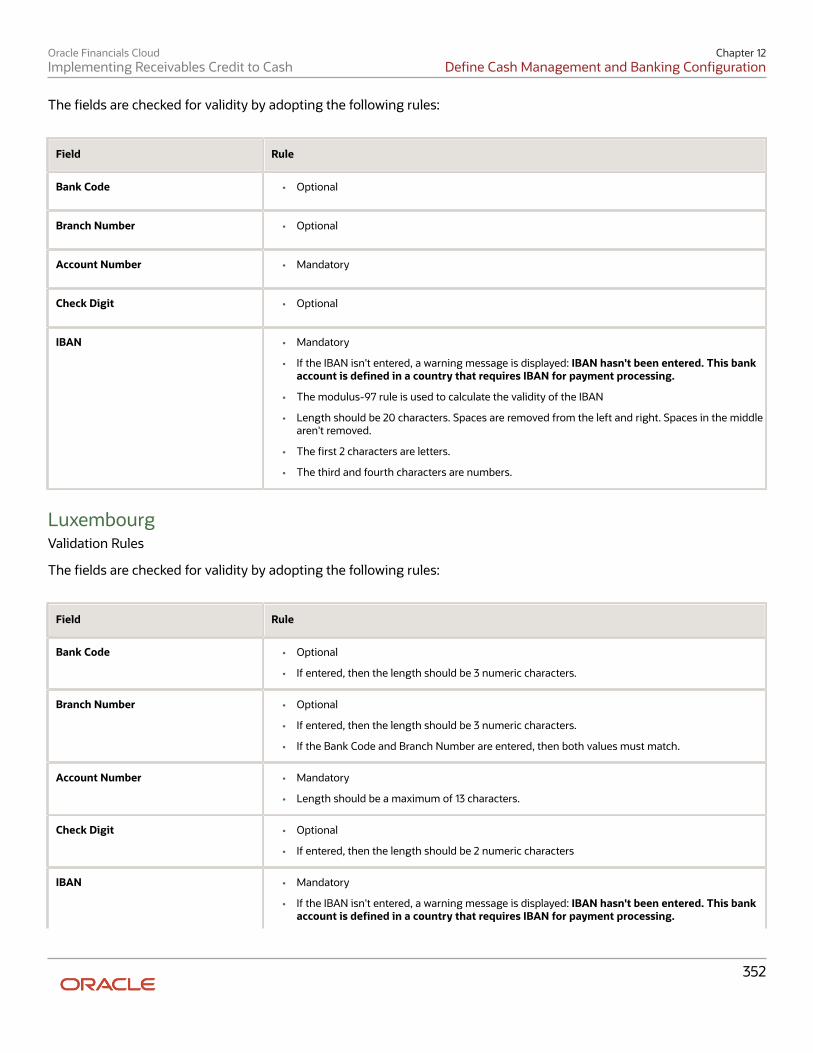
Oracle Financials CloudImplementing Receivables Credit to Cash
Chapter 12Define Cash Management and Banking Configuration
The fields are checked for validity by adopting the following rules:
Field Rule
Bank Code
• Optional
Branch Number
• Optional
Account Number
• Mandatory
Check Digit
• Optional
IBAN
• Mandatory
• If the IBAN isn't entered, a warning message is displayed: IBAN hasn't been entered. This bankaccount is defined in a country that requires IBAN for payment processing.
• The modulus-97 rule is used to calculate the validity of the IBAN
• Length should be 20 characters. Spaces are removed from the left and right. Spaces in the middlearen't removed.
• The first 2 characters are letters.
• The third and fourth characters are numbers.
LuxembourgValidation Rules
The fields are checked for validity by adopting the following rules:
Field Rule
Bank Code
• Optional
• If entered, then the length should be 3 numeric characters.
Branch Number
• Optional
• If entered, then the length should be 3 numeric characters.
• If the Bank Code and Branch Number are entered, then both values must match.
Account Number
• Mandatory
• Length should be a maximum of 13 characters.
Check Digit
• Optional
• If entered, then the length should be 2 numeric characters
IBAN
• Mandatory
• If the IBAN isn't entered, a warning message is displayed: IBAN hasn't been entered. This bankaccount is defined in a country that requires IBAN for payment processing.
352

Oracle Financials CloudImplementing Receivables Credit to Cash
Chapter 12Define Cash Management and Banking Configuration
Field Rule
• The modulus-97 rule is used to calculate the validity of the IBAN
• Length should be 20 characters. Spaces are removed from the left and right. Spaces in the middlearen't removed.
• The first 2 characters are letters.
• The third and fourth characters are numbers.
MaltaValidation Rules
The fields are checked for validity by adopting the following rules:
Field Rule
Bank Code
• Optional
Branch Number
• Optional
Account Number
• Mandatory
Check Digit
• Optional
IBAN
• Mandatory
• If the IBAN isn't entered, a warning message is displayed: IBAN hasn't been entered. This bankaccount is defined in a country that requires IBAN for payment processing.
• The modulus-97 rule is used to calculate the validity of the IBAN
• Length should be 31 characters. Spaces are removed from the left and right. Spaces in the middlearen't removed.
• The first 2 characters are letters.
• The third and fourth characters are numbers.
MartiniqueValidation Rules
The fields are checked for validity by adopting the following rules:
Field Rule
Bank Code
• Optional
Branch Number
• Optional
Account Number • Mandatory
353
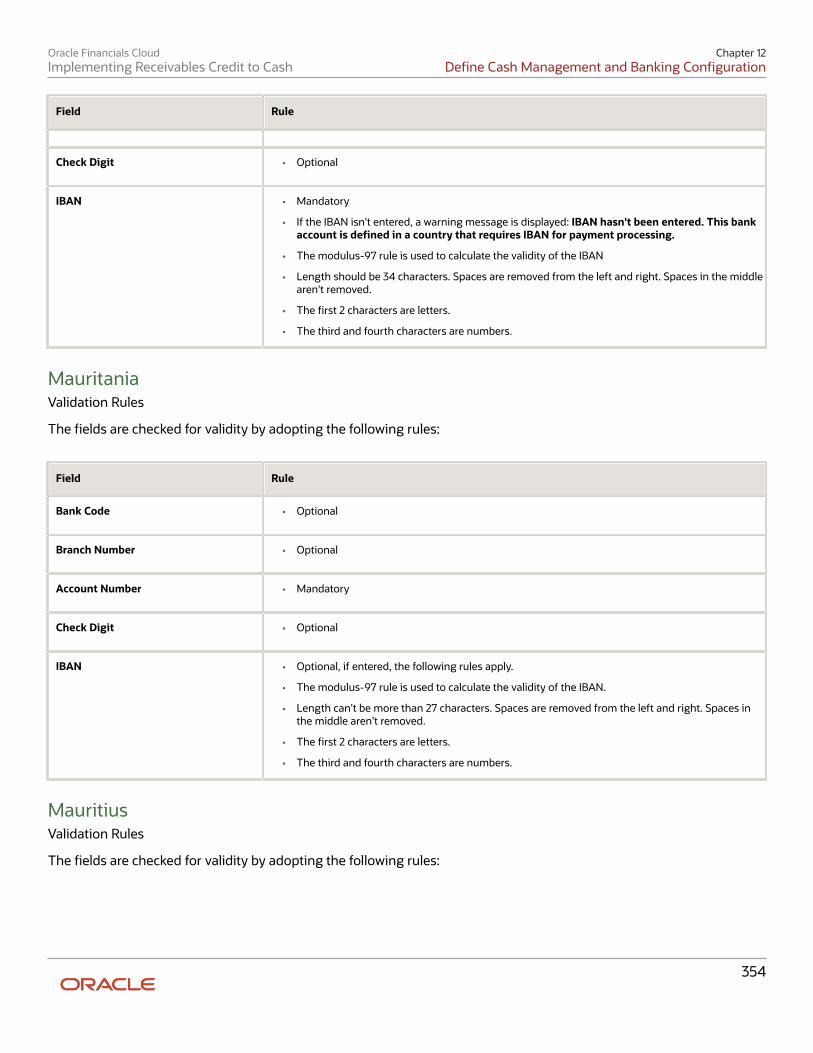
Oracle Financials CloudImplementing Receivables Credit to Cash
Chapter 12Define Cash Management and Banking Configuration
Field Rule
Check Digit
• Optional
IBAN
• Mandatory
• If the IBAN isn't entered, a warning message is displayed: IBAN hasn't been entered. This bankaccount is defined in a country that requires IBAN for payment processing.
• The modulus-97 rule is used to calculate the validity of the IBAN
• Length should be 34 characters. Spaces are removed from the left and right. Spaces in the middlearen't removed.
• The first 2 characters are letters.
• The third and fourth characters are numbers.
MauritaniaValidation Rules
The fields are checked for validity by adopting the following rules:
Field Rule
Bank Code
• Optional
Branch Number
• Optional
Account Number
• Mandatory
Check Digit
• Optional
IBAN
• Optional, if entered, the following rules apply.
• The modulus-97 rule is used to calculate the validity of the IBAN.
• Length can't be more than 27 characters. Spaces are removed from the left and right. Spaces inthe middle aren't removed.
• The first 2 characters are letters.
• The third and fourth characters are numbers.
MauritiusValidation Rules
The fields are checked for validity by adopting the following rules:
354
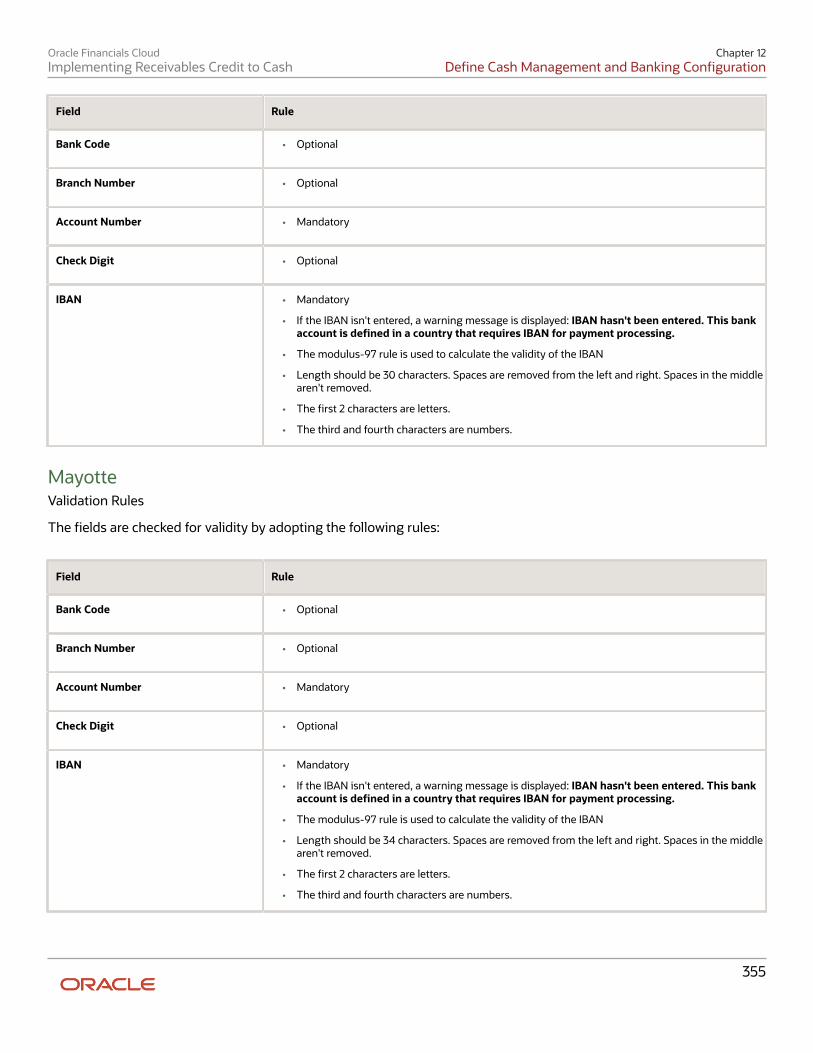
Oracle Financials CloudImplementing Receivables Credit to Cash
Chapter 12Define Cash Management and Banking Configuration
Field Rule
Bank Code
• Optional
Branch Number
• Optional
Account Number
• Mandatory
Check Digit
• Optional
IBAN
• Mandatory
• If the IBAN isn't entered, a warning message is displayed: IBAN hasn't been entered. This bankaccount is defined in a country that requires IBAN for payment processing.
• The modulus-97 rule is used to calculate the validity of the IBAN
• Length should be 30 characters. Spaces are removed from the left and right. Spaces in the middlearen't removed.
• The first 2 characters are letters.
• The third and fourth characters are numbers.
MayotteValidation Rules
The fields are checked for validity by adopting the following rules:
Field Rule
Bank Code
• Optional
Branch Number
• Optional
Account Number
• Mandatory
Check Digit
• Optional
IBAN
• Mandatory
• If the IBAN isn't entered, a warning message is displayed: IBAN hasn't been entered. This bankaccount is defined in a country that requires IBAN for payment processing.
• The modulus-97 rule is used to calculate the validity of the IBAN
• Length should be 34 characters. Spaces are removed from the left and right. Spaces in the middlearen't removed.
• The first 2 characters are letters.
• The third and fourth characters are numbers.
355

Oracle Financials CloudImplementing Receivables Credit to Cash
Chapter 12Define Cash Management and Banking Configuration
MexicoValidation Rules
The fields are checked for validity by adopting the following rules:
Field Rule
Bank Code
• Optional
Branch Number
• Optional
Account Number
• Mandatory
• Length should be between 10 to 11 numeric characters.
• Spaces and hyphens are allowed.
Check Digit
• Optional
IBAN
• Optional
Secondary Account Reference
• Optional
• If entered:
◦ Should be of 18 digits
◦ Should be numeric
MoldovaValidation Rules
The fields are checked for validity by adopting the following rules:
Field Rule
Bank Code
• Optional
Branch Number
• Optional
Account Number
• Mandatory
Check Digit
• Optional
IBAN
• Optional, if entered, the following rules apply.
• The modulus-97 rule is used to calculate the validity of the IBAN.
356

Oracle Financials CloudImplementing Receivables Credit to Cash
Chapter 12Define Cash Management and Banking Configuration
Field Rule
• Length can't be more than 24 characters. Spaces are removed from the left and right. Spaces inthe middle aren't removed.
• The first 2 characters are letters.
• The third and fourth characters are numbers.
MonacoValidation Rules
The fields are checked for validity by adopting the following rules:
Field Rule
Bank Code
• Optional
Branch Number
• Optional
Account Number
• Mandatory
Check Digit
• Optional
IBAN
• Mandatory
• If the IBAN isn't entered, a warning message is displayed: IBAN hasn't been entered. This bankaccount is defined in a country that requires IBAN for payment processing.
• The modulus-97 rule is used to calculate the validity of the IBAN
• Length can't be more than 27 characters. Spaces are removed from the left and right. Spaces inthe middle aren't removed.
• The first 2 characters are letters.
• The third and fourth characters are numbers.
MontenegroValidation Rules
The fields are checked for validity by adopting the following rules:
Field Rule
Bank Code
• Optional
Branch Number
• Optional
Account Number
• Mandatory
357
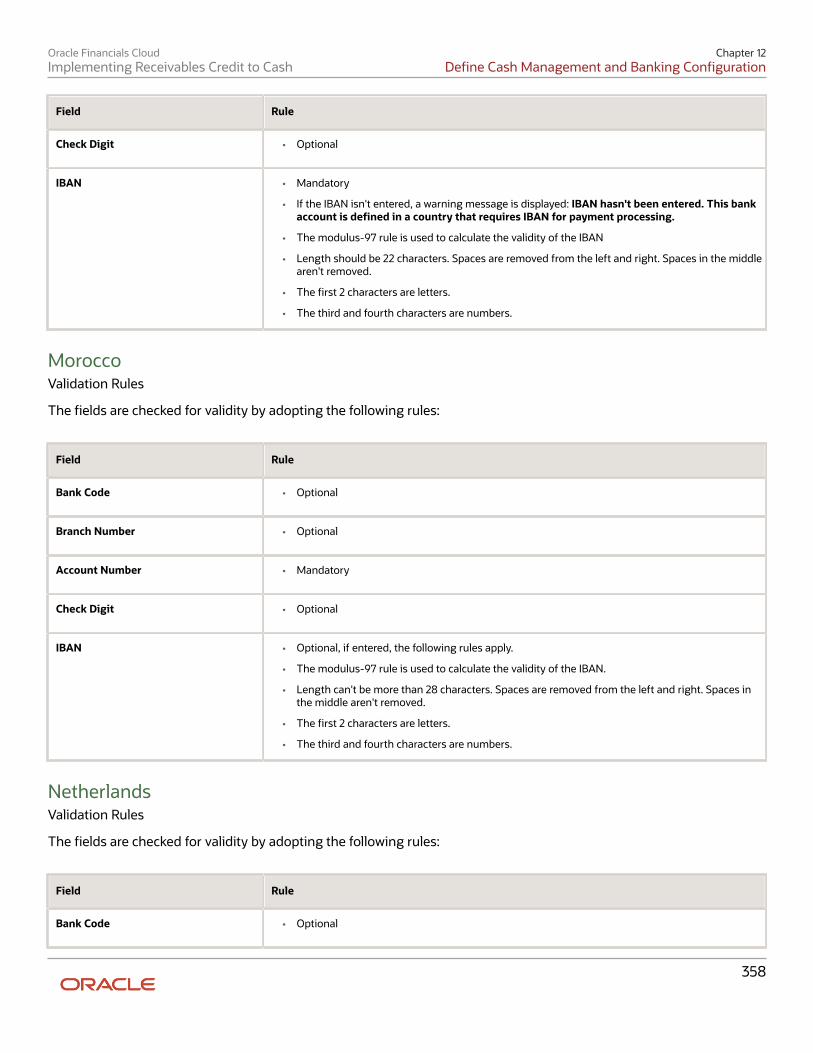
Oracle Financials CloudImplementing Receivables Credit to Cash
Chapter 12Define Cash Management and Banking Configuration
Field Rule
Check Digit
• Optional
IBAN
• Mandatory
• If the IBAN isn't entered, a warning message is displayed: IBAN hasn't been entered. This bankaccount is defined in a country that requires IBAN for payment processing.
• The modulus-97 rule is used to calculate the validity of the IBAN
• Length should be 22 characters. Spaces are removed from the left and right. Spaces in the middlearen't removed.
• The first 2 characters are letters.
• The third and fourth characters are numbers.
MoroccoValidation Rules
The fields are checked for validity by adopting the following rules:
Field Rule
Bank Code
• Optional
Branch Number
• Optional
Account Number
• Mandatory
Check Digit
• Optional
IBAN
• Optional, if entered, the following rules apply.
• The modulus-97 rule is used to calculate the validity of the IBAN.
• Length can't be more than 28 characters. Spaces are removed from the left and right. Spaces inthe middle aren't removed.
• The first 2 characters are letters.
• The third and fourth characters are numbers.
NetherlandsValidation Rules
The fields are checked for validity by adopting the following rules:
Field Rule
Bank Code
• Optional
358
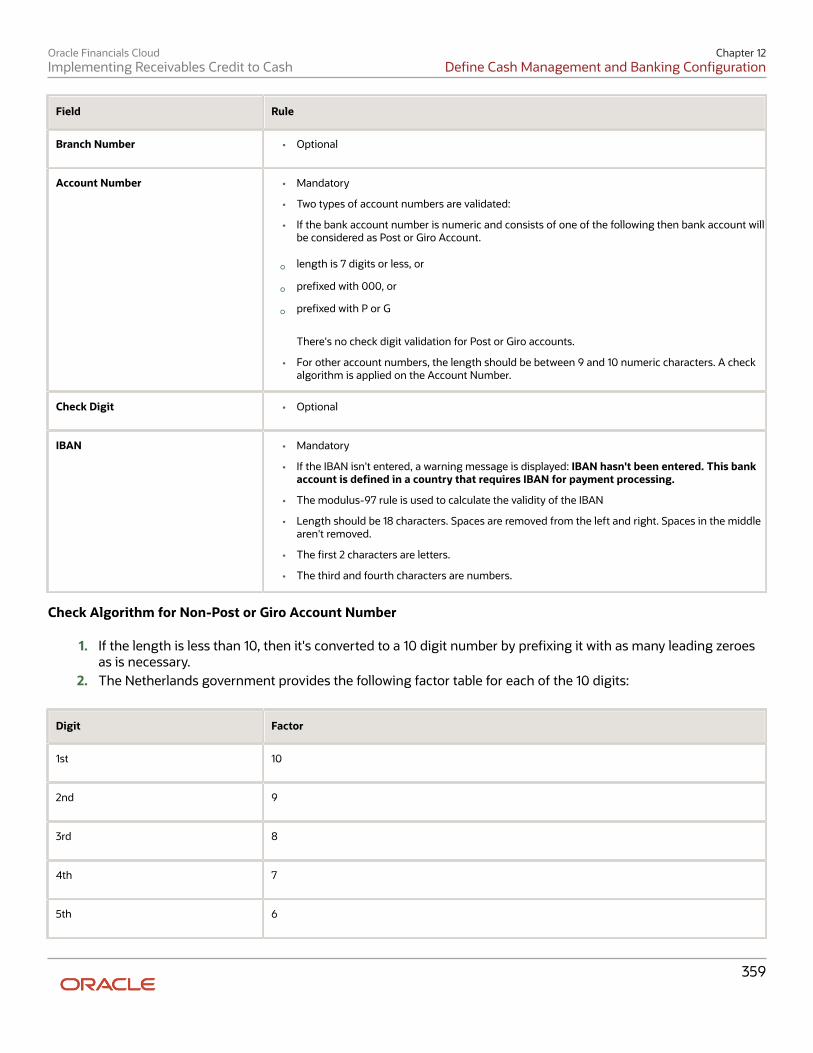
Oracle Financials CloudImplementing Receivables Credit to Cash
Chapter 12Define Cash Management and Banking Configuration
Field Rule
Branch Number
• Optional
Account Number
• Mandatory
• Two types of account numbers are validated:
• If the bank account number is numeric and consists of one of the following then bank account willbe considered as Post or Giro Account.
◦ length is 7 digits or less, or
◦ prefixed with 000, or
◦ prefixed with P or G
There's no check digit validation for Post or Giro accounts.
• For other account numbers, the length should be between 9 and 10 numeric characters. A checkalgorithm is applied on the Account Number.
Check Digit
• Optional
IBAN
• Mandatory
• If the IBAN isn't entered, a warning message is displayed: IBAN hasn't been entered. This bankaccount is defined in a country that requires IBAN for payment processing.
• The modulus-97 rule is used to calculate the validity of the IBAN
• Length should be 18 characters. Spaces are removed from the left and right. Spaces in the middlearen't removed.
• The first 2 characters are letters.
• The third and fourth characters are numbers.
Check Algorithm for Non-Post or Giro Account Number
1. If the length is less than 10, then it's converted to a 10 digit number by prefixing it with as many leading zeroesas is necessary.
2. The Netherlands government provides the following factor table for each of the 10 digits:
Digit Factor
1st
10
2nd
9
3rd
8
4th
7
5th
6
359

Oracle Financials CloudImplementing Receivables Credit to Cash
Chapter 12Define Cash Management and Banking Configuration
Digit Factor
6th
5
7th
4
8th
3
9th
2
10th
1
These are multiplied and the sum of the products is calculated 4.
If the result so obtained is perfectly divisible by 11 (that's, no remainder on division by 11), then the test is successful,otherwise the account number entered isn't valid.
New ZealandValidation Rules
The fields are checked for validity by adopting the following rules:
Field Rule
Bank Code
• Mandatory
• Length should be 2 numeric characters.
Branch Number
• Mandatory
• Length should be 4 numeric characters.
• This field is labeled Bank State Branch.
Account Number
• Mandatory
• Length should be a maximum of 8 numeric characters.
• Account Suffix should be between 2 to 4 numeric characters.
Check Digit
• Optional
Description
• This field is labeled Reference.
IBAN
• Optional, if entered, the following rules apply.
• The modulus-97 rule is used to calculate the validity of the IBAN.
• Length can't be more than 34 characters. Spaces are removed from the left and right. Spaces inthe middle aren't removed.
• The first 2 characters are letters.
• The third and fourth characters are numbers.
360

Oracle Financials CloudImplementing Receivables Credit to Cash
Chapter 12Define Cash Management and Banking Configuration
NorwayValidation Rules
The fields are checked for validity by adopting the following rules:
Field Rule
Bank Code
• Optional
Branch Number
• Optional
Account Number
• Mandatory
• Length should be of 11 numeric characters.
• A check algorithm is applied on the Account Number, if the 5th and 6th digits of the accountnumber aren't 00.
For example, for Account Number, 1234001234, the check algorithm won't be applied but for AccountNumber 02056439653, the check algorithm will be applied as outlined in the Check Algorithm forAccount Number, following this table.
Check Digit
• Optional
IBAN
• Mandatory
• If the IBAN isn't entered, a warning message is displayed: IBAN hasn't been entered. This bankaccount is defined in a country that requires IBAN for payment processing.
• The modulus-97 rule is used to calculate the validity of the IBAN
• Length should be 15 characters. Spaces are removed from the left and right. Spaces in the middlearen't removed.
• The first 2 characters are letters.
• The third and fourth characters are numbers.
Check Algorithm for Account Number
1. The check digit is set as the last (that's, the 11th digit) of the Account Number. For example, if the account number is02056439653, then the check digit is set to 3.
2. The Norwegian government provides the following factor table:
Digit Factor
1st
5
2nd
4
3rd
3
4th 2
361

Oracle Financials CloudImplementing Receivables Credit to Cash
Chapter 12Define Cash Management and Banking Configuration
Digit Factor
5th
7
6th
6
7th
5
8th
4
9th
3
10th
2
The first ten digits of the account number are multiplied by the associated factor. The computed sum is then calculatedby summing the totals.
3. Example using account number 02056439653:
Multiply each digit with the given factor. The following table illustrates the factors that determine validation:
Digit Value Factor Result
1st
0
5
0
2nd
2
4
8
3rd
0
3
0
4th
5
2
10
5th
6
7
42
6th
4
6
24
7th
3
5
15
8th
9
4
36
9th
6
3
18
10th
5
2
10
362
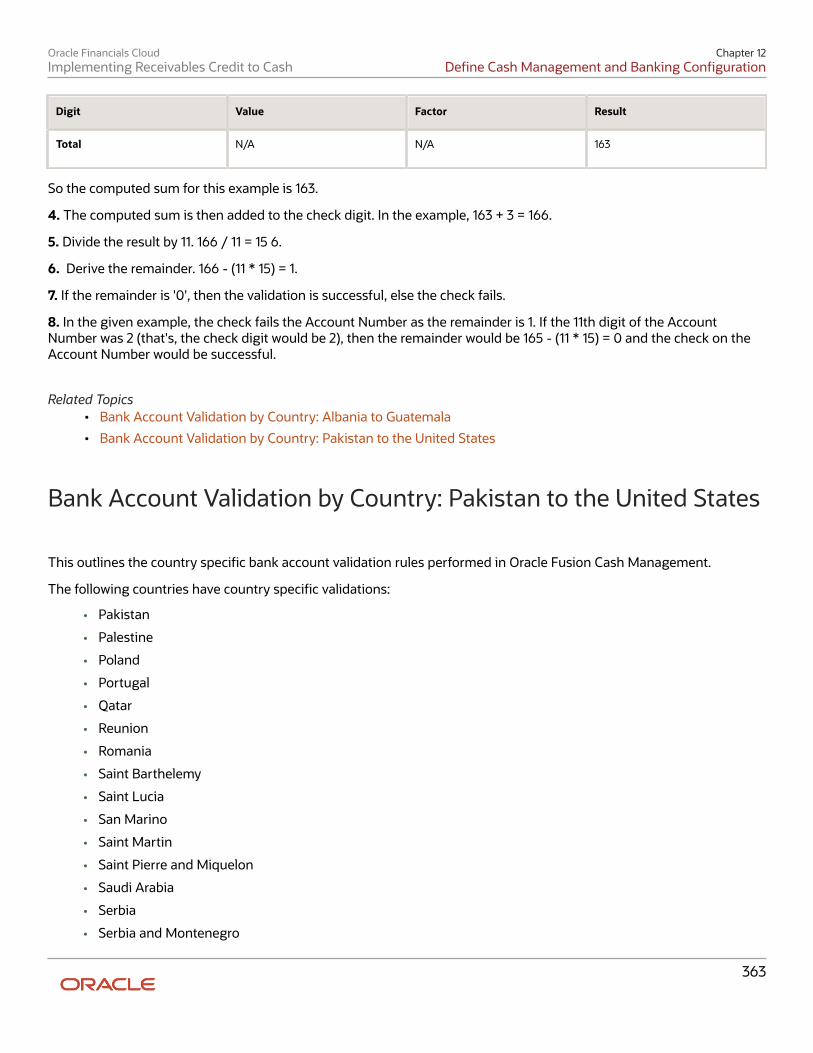
Oracle Financials CloudImplementing Receivables Credit to Cash
Chapter 12Define Cash Management and Banking Configuration
Digit Value Factor Result
Total
N/A
N/A
163
So the computed sum for this example is 163.
4. The computed sum is then added to the check digit. In the example, 163 + 3 = 166.
5. Divide the result by 11. 166 / 11 = 15 6.
6. Derive the remainder. 166 - (11 * 15) = 1.
7. If the remainder is '0', then the validation is successful, else the check fails.
8. In the given example, the check fails the Account Number as the remainder is 1. If the 11th digit of the AccountNumber was 2 (that's, the check digit would be 2), then the remainder would be 165 - (11 * 15) = 0 and the check on theAccount Number would be successful.
Related Topics• Bank Account Validation by Country: Albania to Guatemala
• Bank Account Validation by Country: Pakistan to the United States
Bank Account Validation by Country: Pakistan to the United States This outlines the country specific bank account validation rules performed in Oracle Fusion Cash Management.
The following countries have country specific validations:
• Pakistan
• Palestine
• Poland
• Portugal
• Qatar
• Reunion
• Romania
• Saint Barthelemy
• Saint Lucia
• San Marino
• Saint Martin
• Saint Pierre and Miquelon
• Saudi Arabia
• Serbia
• Serbia and Montenegro
363

Oracle Financials CloudImplementing Receivables Credit to Cash
Chapter 12Define Cash Management and Banking Configuration
• Senegal
• Seychelles
• Singapore
• Slovakia
• Slovenia
• Spain
• Sweden
• Switzerland
• The Former Yugoslav Republic of Macedonia
• Tunisia
• Turkey
• Ukraine
• United Arab Emirates
• United Kingdom
• United States
When entering bank accounts, different countries can have certain rules governing the format and content of thefollowing related fields:
1. Bank Code2. Branch Number3. Account Number4. Check Digit5. IBAN
Use the Disable Country Specific Bank Validations profile option to disable the country-specific validations pertainingto the bank code, branch number, account number, check digit, and IBAN. You can set this profile option at the siteor user level. The profile is predefined with a default value of No at the site level. If the profile is set to Yes, thesevalidations aren't performed. The checks for unique banks, branches, accounts, and the mandatory requirement of bankaccount number aren't affected by this profile.
PakistanValidation Rules
The fields are checked for validity by adopting the following rules:
Field Rule
Bank Code
• Optional
Branch Number
• Optional
Account Number
• Mandatory
Check Digit
• Optional
364

Oracle Financials CloudImplementing Receivables Credit to Cash
Chapter 12Define Cash Management and Banking Configuration
Field Rule
IBAN
• Optional, if entered, the following rules apply.
• The modulus-97 rule is used to calculate the validity of the IBAN.
• Length can't be more than 24 characters. Spaces are removed from the left and right. Spaces inthe middle aren't removed..
• The first 2 characters are letters.
PalestineValidation Rules
The fields are checked for validity by adopting the following rules:
Field Rule
Bank Code
• Optional
Branch Number
• Optional
Account Number
• Mandatory
Check Digit
• Optional
IBAN
• Optional, if entered, the following rules apply.
• The modulus-97 rule is used to calculate the validity of the IBAN.
• Length can't be more than 29 characters. Spaces are removed from the left and right. Spaces inthe middle aren't removed.
• The first 2 characters are letters.
PolandValidation Rules
The fields are checked for validity by adopting the following rules:
Field Rule
Bank Code
• Optional
• If entered, the length should be of 8 numeric characters.
Branch Number
• Optional
• If entered, the length should be of 8 numeric characters.
• If the Bank Code and Branch Number are entered, then both values must match
Account Number • Mandatory
365

Oracle Financials CloudImplementing Receivables Credit to Cash
Chapter 12Define Cash Management and Banking Configuration
Field Rule
• Length should be a maximum of 16 alphanumeric characters.
Check Digit
• Optional
IBAN
• Mandatory
• If the IBAN isn't entered, a warning message is displayed: IBAN hasn't been entered. This bankaccount is defined in a country that requires IBAN for payment processing.
• The modulus-97 rule is used to calculate the validity of the IBAN
• Length should be 28 characters. Spaces are removed from the left and right. Spaces in the middlearen't removed.
• The first 2 characters are letters.
• The third and fourth characters are numbers.
PortugalValidation Rules
The fields are checked for validity by adopting the following rules:
Field Rule
Bank Code
• Mandatory
• Length should be of 4 numeric characters.
Branch Number
• Mandatory
• Length should be of 4 numeric characters.
Account Number
• Mandatory
• Length should be a maximum of 11 numeric characters.
Check Digit
• Optional
• Length should be of 2 numeric characters.
• If entered, a check algorithm is applied on the Check Digit.
IBAN
• Mandatory
• If the IBAN isn't entered, a warning message is displayed: IBAN hasn't been entered. This bankaccount is defined in a country that requires IBAN for payment processing.
• The modulus-97 rule is used to calculate the validity of the IBAN
• Length should be 25 characters. Spaces are removed from the left and right. Spaces in the middlearen't removed.
• The first 2 characters are letters.
• The third and fourth characters are numbers.
366
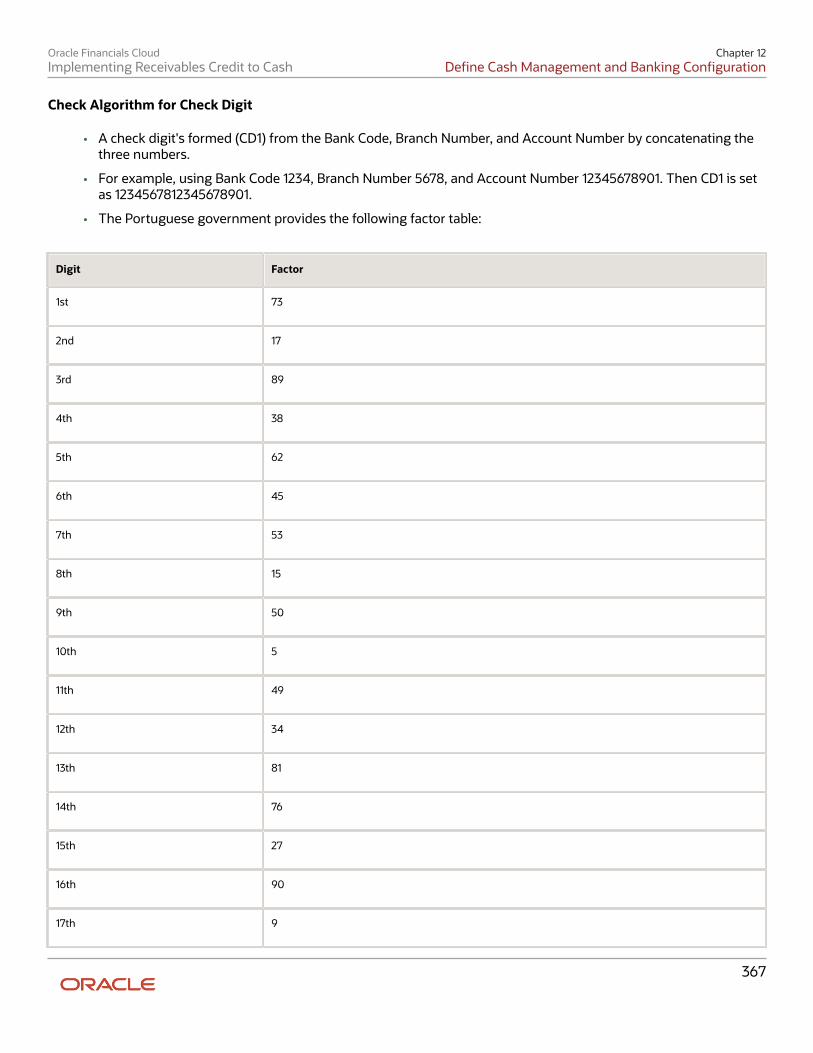
Oracle Financials CloudImplementing Receivables Credit to Cash
Chapter 12Define Cash Management and Banking Configuration
Check Algorithm for Check Digit
• A check digit's formed (CD1) from the Bank Code, Branch Number, and Account Number by concatenating thethree numbers.
• For example, using Bank Code 1234, Branch Number 5678, and Account Number 12345678901. Then CD1 is setas 1234567812345678901.
• The Portuguese government provides the following factor table:
Digit Factor
1st
73
2nd
17
3rd
89
4th
38
5th
62
6th
45
7th
53
8th
15
9th
50
10th
5
11th
49
12th
34
13th
81
14th
76
15th
27
16th
90
17th
9
367
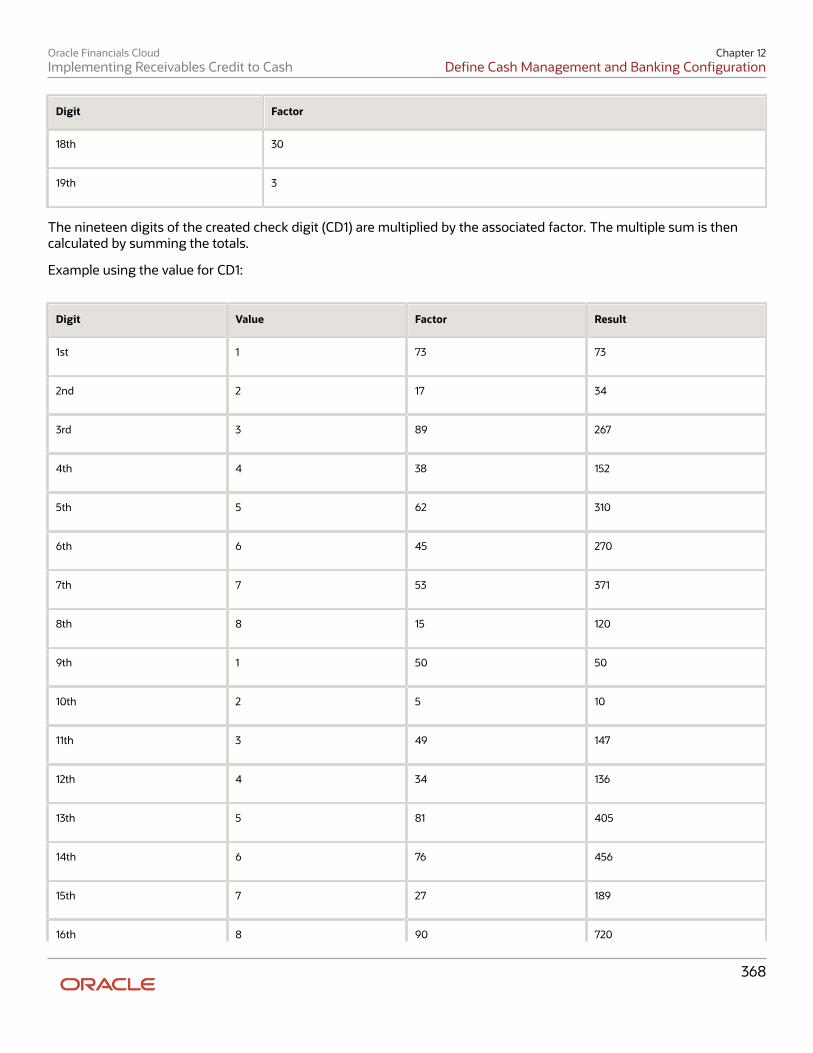
Oracle Financials CloudImplementing Receivables Credit to Cash
Chapter 12Define Cash Management and Banking Configuration
Digit Factor
18th
30
19th
3
The nineteen digits of the created check digit (CD1) are multiplied by the associated factor. The multiple sum is thencalculated by summing the totals.
Example using the value for CD1:
Digit Value Factor Result
1st
1
73
73
2nd
2
17
34
3rd
3
89
267
4th
4
38
152
5th
5
62
310
6th
6
45
270
7th
7
53
371
8th
8
15
120
9th
1
50
50
10th
2
5
10
11th
3
49
147
12th
4
34
136
13th
5
81
405
14th
6
76
456
15th
7
27
189
16th 8 90 720
368
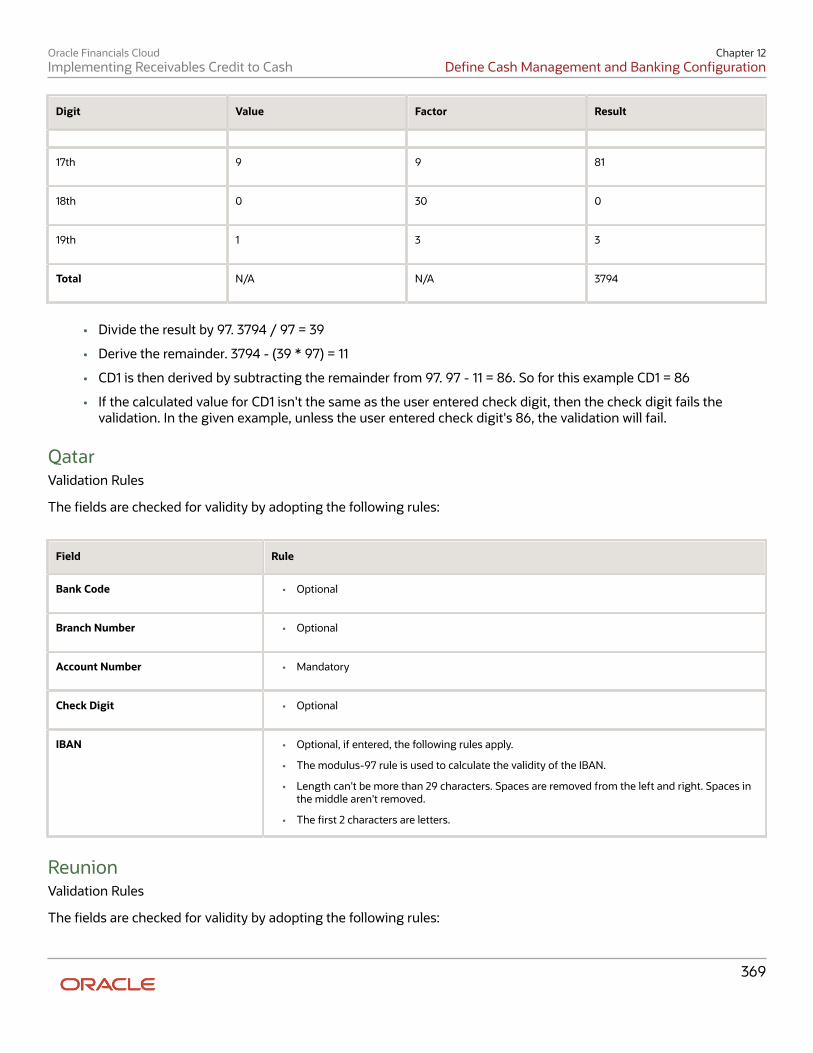
Oracle Financials CloudImplementing Receivables Credit to Cash
Chapter 12Define Cash Management and Banking Configuration
Digit Value Factor Result
17th
9
9
81
18th
0
30
0
19th
1
3
3
Total
N/A
N/A
3794
• Divide the result by 97. 3794 / 97 = 39
• Derive the remainder. 3794 - (39 * 97) = 11
• CD1 is then derived by subtracting the remainder from 97. 97 - 11 = 86. So for this example CD1 = 86
• If the calculated value for CD1 isn't the same as the user entered check digit, then the check digit fails thevalidation. In the given example, unless the user entered check digit's 86, the validation will fail.
QatarValidation Rules
The fields are checked for validity by adopting the following rules:
Field Rule
Bank Code
• Optional
Branch Number
• Optional
Account Number
• Mandatory
Check Digit
• Optional
IBAN
• Optional, if entered, the following rules apply.
• The modulus-97 rule is used to calculate the validity of the IBAN.
• Length can't be more than 29 characters. Spaces are removed from the left and right. Spaces inthe middle aren't removed.
• The first 2 characters are letters.
ReunionValidation Rules
The fields are checked for validity by adopting the following rules:
369
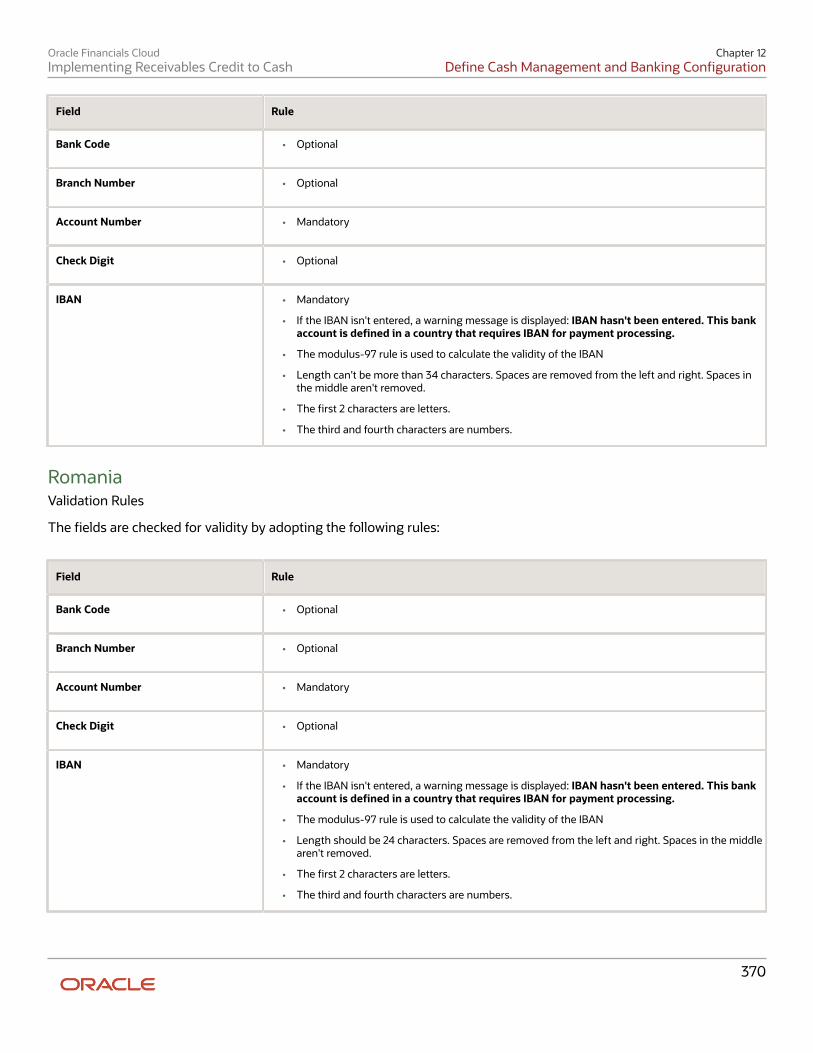
Oracle Financials CloudImplementing Receivables Credit to Cash
Chapter 12Define Cash Management and Banking Configuration
Field Rule
Bank Code
• Optional
Branch Number
• Optional
Account Number
• Mandatory
Check Digit
• Optional
IBAN
• Mandatory
• If the IBAN isn't entered, a warning message is displayed: IBAN hasn't been entered. This bankaccount is defined in a country that requires IBAN for payment processing.
• The modulus-97 rule is used to calculate the validity of the IBAN
• Length can't be more than 34 characters. Spaces are removed from the left and right. Spaces inthe middle aren't removed.
• The first 2 characters are letters.
• The third and fourth characters are numbers.
RomaniaValidation Rules
The fields are checked for validity by adopting the following rules:
Field Rule
Bank Code
• Optional
Branch Number
• Optional
Account Number
• Mandatory
Check Digit
• Optional
IBAN
• Mandatory
• If the IBAN isn't entered, a warning message is displayed: IBAN hasn't been entered. This bankaccount is defined in a country that requires IBAN for payment processing.
• The modulus-97 rule is used to calculate the validity of the IBAN
• Length should be 24 characters. Spaces are removed from the left and right. Spaces in the middlearen't removed.
• The first 2 characters are letters.
• The third and fourth characters are numbers.
370
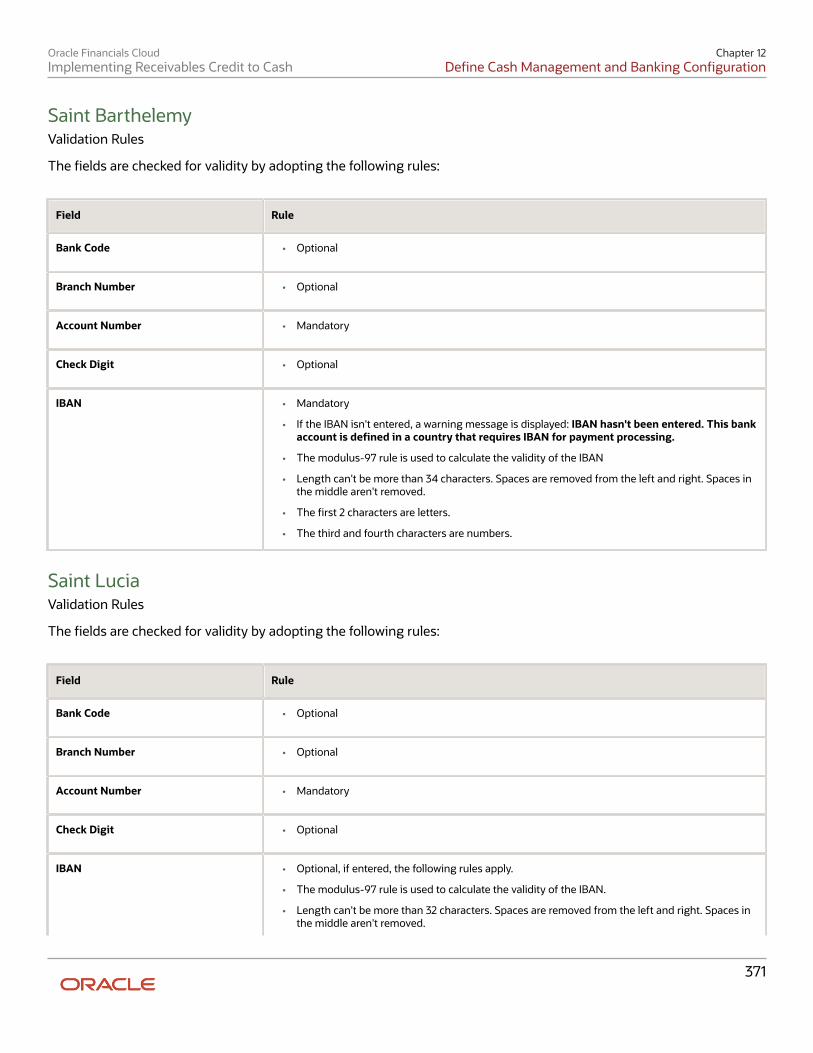
Oracle Financials CloudImplementing Receivables Credit to Cash
Chapter 12Define Cash Management and Banking Configuration
Saint BarthelemyValidation Rules
The fields are checked for validity by adopting the following rules:
Field Rule
Bank Code
• Optional
Branch Number
• Optional
Account Number
• Mandatory
Check Digit
• Optional
IBAN
• Mandatory
• If the IBAN isn't entered, a warning message is displayed: IBAN hasn't been entered. This bankaccount is defined in a country that requires IBAN for payment processing.
• The modulus-97 rule is used to calculate the validity of the IBAN
• Length can't be more than 34 characters. Spaces are removed from the left and right. Spaces inthe middle aren't removed.
• The first 2 characters are letters.
• The third and fourth characters are numbers.
Saint LuciaValidation Rules
The fields are checked for validity by adopting the following rules:
Field Rule
Bank Code
• Optional
Branch Number
• Optional
Account Number
• Mandatory
Check Digit
• Optional
IBAN
• Optional, if entered, the following rules apply.
• The modulus-97 rule is used to calculate the validity of the IBAN.
• Length can't be more than 32 characters. Spaces are removed from the left and right. Spaces inthe middle aren't removed.
371
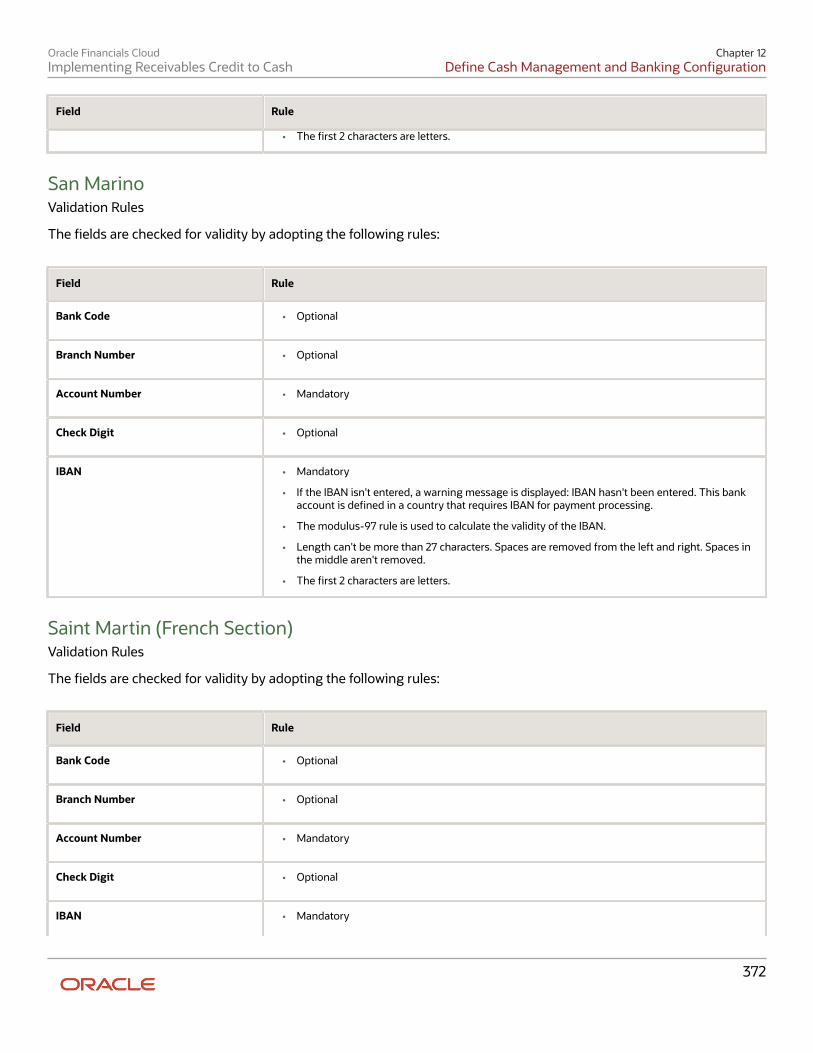
Oracle Financials CloudImplementing Receivables Credit to Cash
Chapter 12Define Cash Management and Banking Configuration
Field Rule
• The first 2 characters are letters.
San MarinoValidation Rules
The fields are checked for validity by adopting the following rules:
Field Rule
Bank Code
• Optional
Branch Number
• Optional
Account Number
• Mandatory
Check Digit
• Optional
IBAN
• Mandatory
• If the IBAN isn't entered, a warning message is displayed: IBAN hasn't been entered. This bankaccount is defined in a country that requires IBAN for payment processing.
• The modulus-97 rule is used to calculate the validity of the IBAN.
• Length can't be more than 27 characters. Spaces are removed from the left and right. Spaces inthe middle aren't removed.
• The first 2 characters are letters.
Saint Martin (French Section)Validation Rules
The fields are checked for validity by adopting the following rules:
Field Rule
Bank Code
• Optional
Branch Number
• Optional
Account Number
• Mandatory
Check Digit
• Optional
IBAN
• Mandatory
372
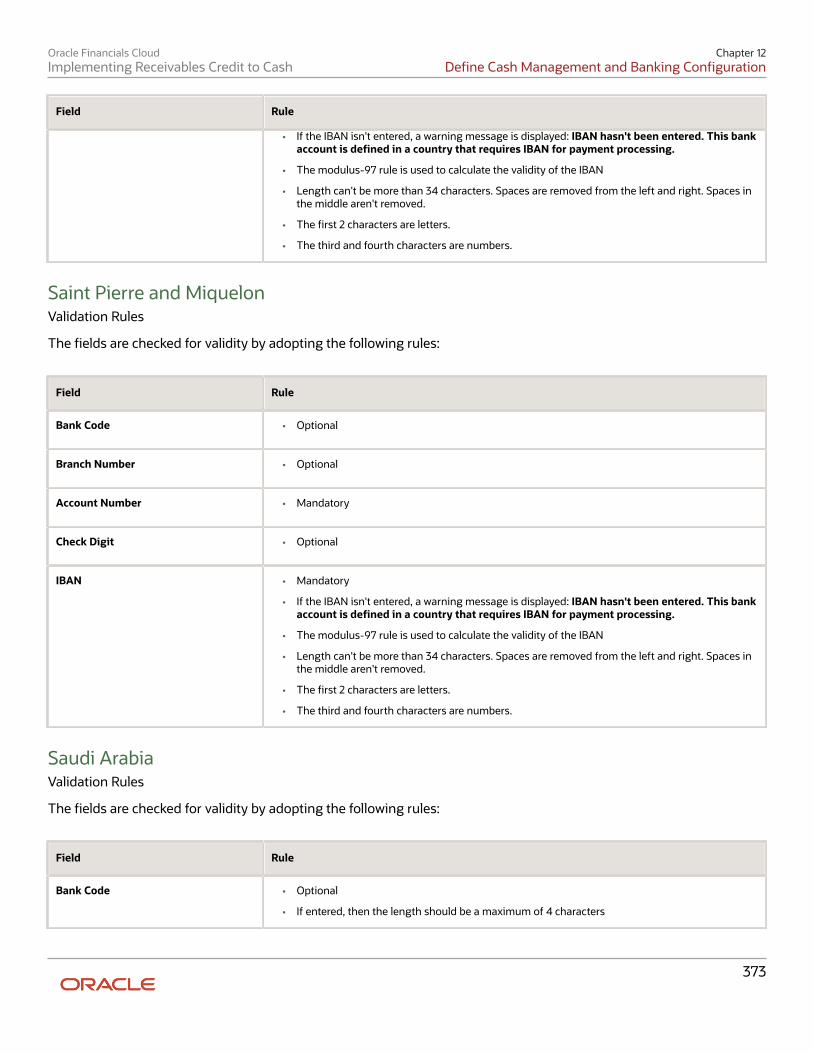
Oracle Financials CloudImplementing Receivables Credit to Cash
Chapter 12Define Cash Management and Banking Configuration
Field Rule
• If the IBAN isn't entered, a warning message is displayed: IBAN hasn't been entered. This bankaccount is defined in a country that requires IBAN for payment processing.
• The modulus-97 rule is used to calculate the validity of the IBAN
• Length can't be more than 34 characters. Spaces are removed from the left and right. Spaces inthe middle aren't removed.
• The first 2 characters are letters.
• The third and fourth characters are numbers.
Saint Pierre and MiquelonValidation Rules
The fields are checked for validity by adopting the following rules:
Field Rule
Bank Code
• Optional
Branch Number
• Optional
Account Number
• Mandatory
Check Digit
• Optional
IBAN
• Mandatory
• If the IBAN isn't entered, a warning message is displayed: IBAN hasn't been entered. This bankaccount is defined in a country that requires IBAN for payment processing.
• The modulus-97 rule is used to calculate the validity of the IBAN
• Length can't be more than 34 characters. Spaces are removed from the left and right. Spaces inthe middle aren't removed.
• The first 2 characters are letters.
• The third and fourth characters are numbers.
Saudi ArabiaValidation Rules
The fields are checked for validity by adopting the following rules:
Field Rule
Bank Code
• Optional
• If entered, then the length should be a maximum of 4 characters
373
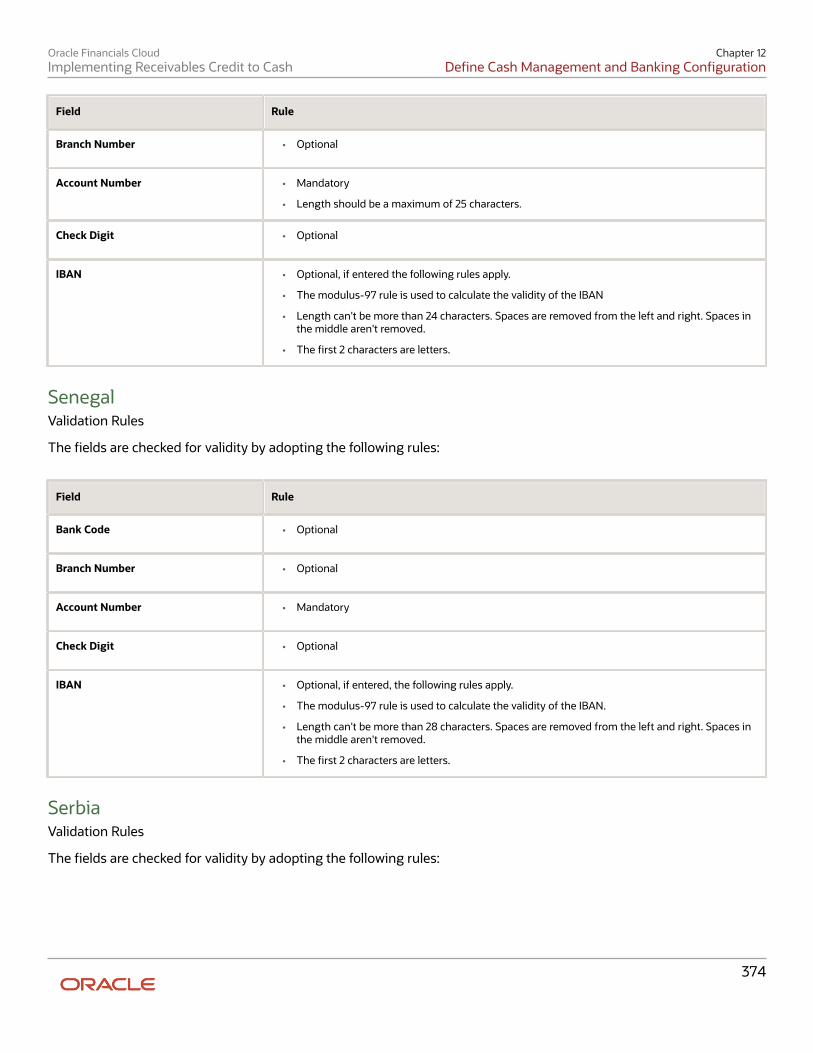
Oracle Financials CloudImplementing Receivables Credit to Cash
Chapter 12Define Cash Management and Banking Configuration
Field Rule
Branch Number
• Optional
Account Number
• Mandatory
• Length should be a maximum of 25 characters.
Check Digit
• Optional
IBAN
• Optional, if entered the following rules apply.
• The modulus-97 rule is used to calculate the validity of the IBAN
• Length can't be more than 24 characters. Spaces are removed from the left and right. Spaces inthe middle aren't removed.
• The first 2 characters are letters.
SenegalValidation Rules
The fields are checked for validity by adopting the following rules:
Field Rule
Bank Code
• Optional
Branch Number
• Optional
Account Number
• Mandatory
Check Digit
• Optional
IBAN
• Optional, if entered, the following rules apply.
• The modulus-97 rule is used to calculate the validity of the IBAN.
• Length can't be more than 28 characters. Spaces are removed from the left and right. Spaces inthe middle aren't removed.
• The first 2 characters are letters.
SerbiaValidation Rules
The fields are checked for validity by adopting the following rules:
374
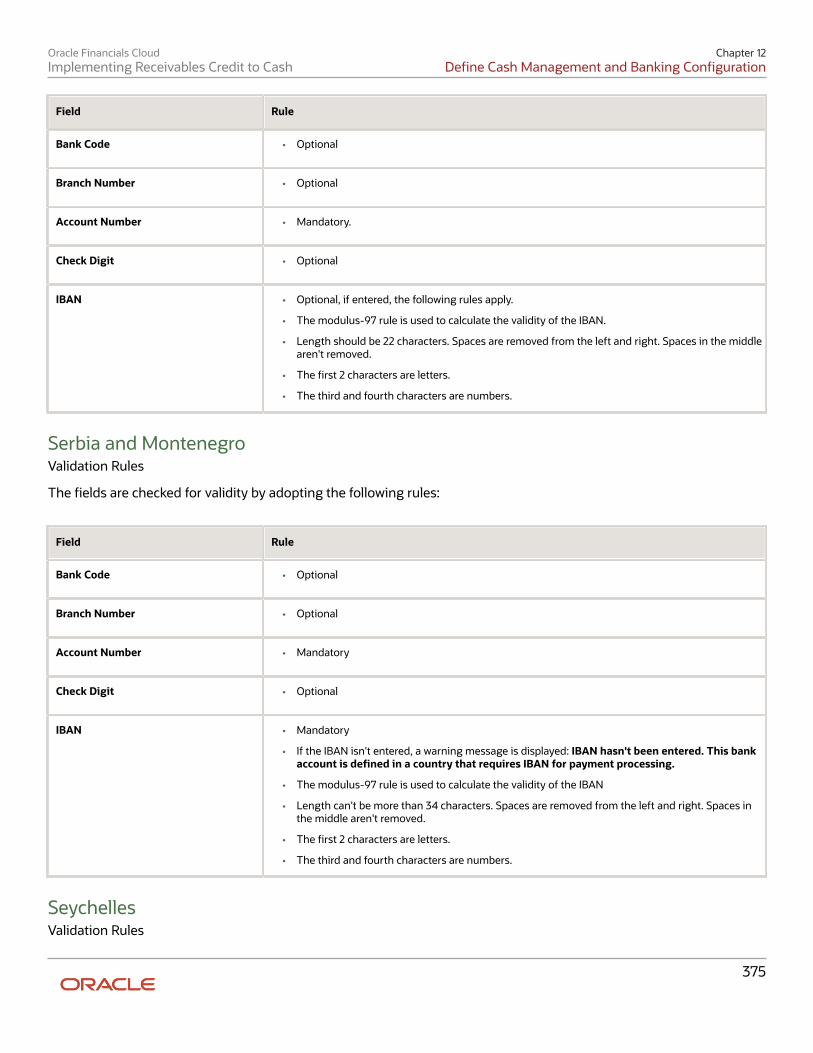
Oracle Financials CloudImplementing Receivables Credit to Cash
Chapter 12Define Cash Management and Banking Configuration
Field Rule
Bank Code
• Optional
Branch Number
• Optional
Account Number
• Mandatory.
Check Digit
• Optional
IBAN
• Optional, if entered, the following rules apply.
• The modulus-97 rule is used to calculate the validity of the IBAN.
• Length should be 22 characters. Spaces are removed from the left and right. Spaces in the middlearen't removed.
• The first 2 characters are letters.
• The third and fourth characters are numbers.
Serbia and MontenegroValidation Rules
The fields are checked for validity by adopting the following rules:
Field Rule
Bank Code
• Optional
Branch Number
• Optional
Account Number
• Mandatory
Check Digit
• Optional
IBAN
• Mandatory
• If the IBAN isn't entered, a warning message is displayed: IBAN hasn't been entered. This bankaccount is defined in a country that requires IBAN for payment processing.
• The modulus-97 rule is used to calculate the validity of the IBAN
• Length can't be more than 34 characters. Spaces are removed from the left and right. Spaces inthe middle aren't removed.
• The first 2 characters are letters.
• The third and fourth characters are numbers.
SeychellesValidation Rules
375
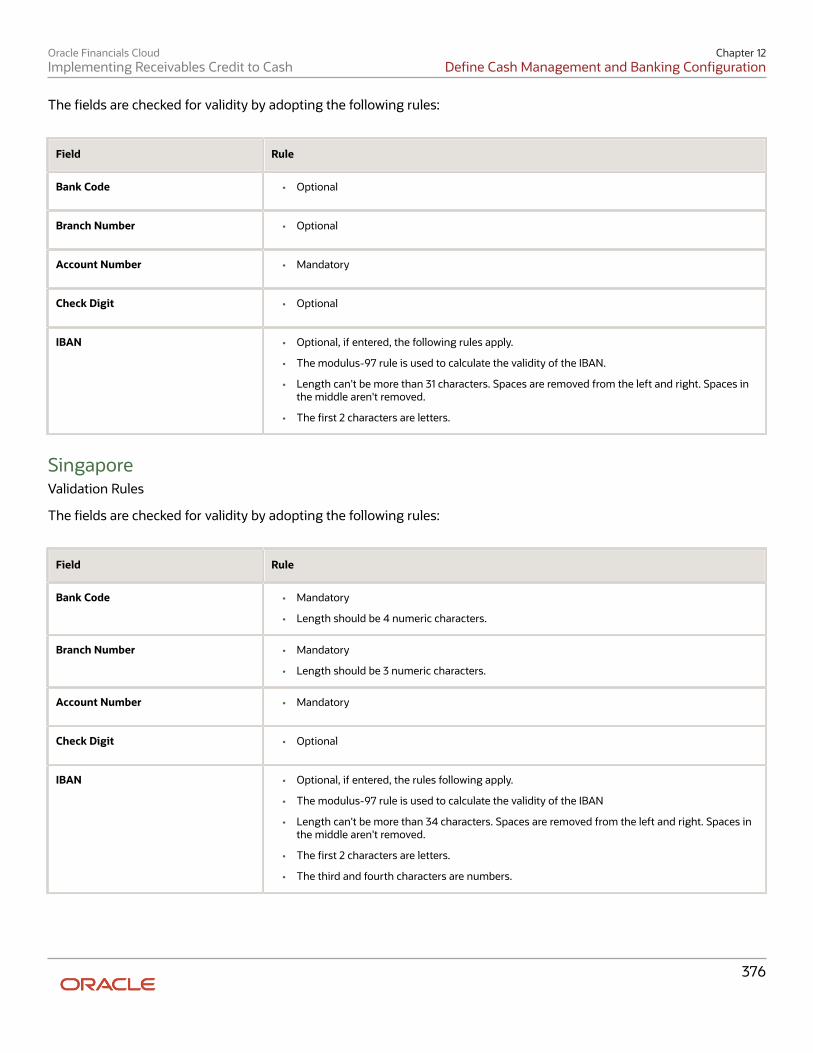
Oracle Financials CloudImplementing Receivables Credit to Cash
Chapter 12Define Cash Management and Banking Configuration
The fields are checked for validity by adopting the following rules:
Field Rule
Bank Code
• Optional
Branch Number
• Optional
Account Number
• Mandatory
Check Digit
• Optional
IBAN
• Optional, if entered, the following rules apply.
• The modulus-97 rule is used to calculate the validity of the IBAN.
• Length can't be more than 31 characters. Spaces are removed from the left and right. Spaces inthe middle aren't removed.
• The first 2 characters are letters.
SingaporeValidation Rules
The fields are checked for validity by adopting the following rules:
Field Rule
Bank Code
• Mandatory
• Length should be 4 numeric characters.
Branch Number
• Mandatory
• Length should be 3 numeric characters.
Account Number
• Mandatory
Check Digit
• Optional
IBAN
• Optional, if entered, the rules following apply.
• The modulus-97 rule is used to calculate the validity of the IBAN
• Length can't be more than 34 characters. Spaces are removed from the left and right. Spaces inthe middle aren't removed.
• The first 2 characters are letters.
• The third and fourth characters are numbers.
376
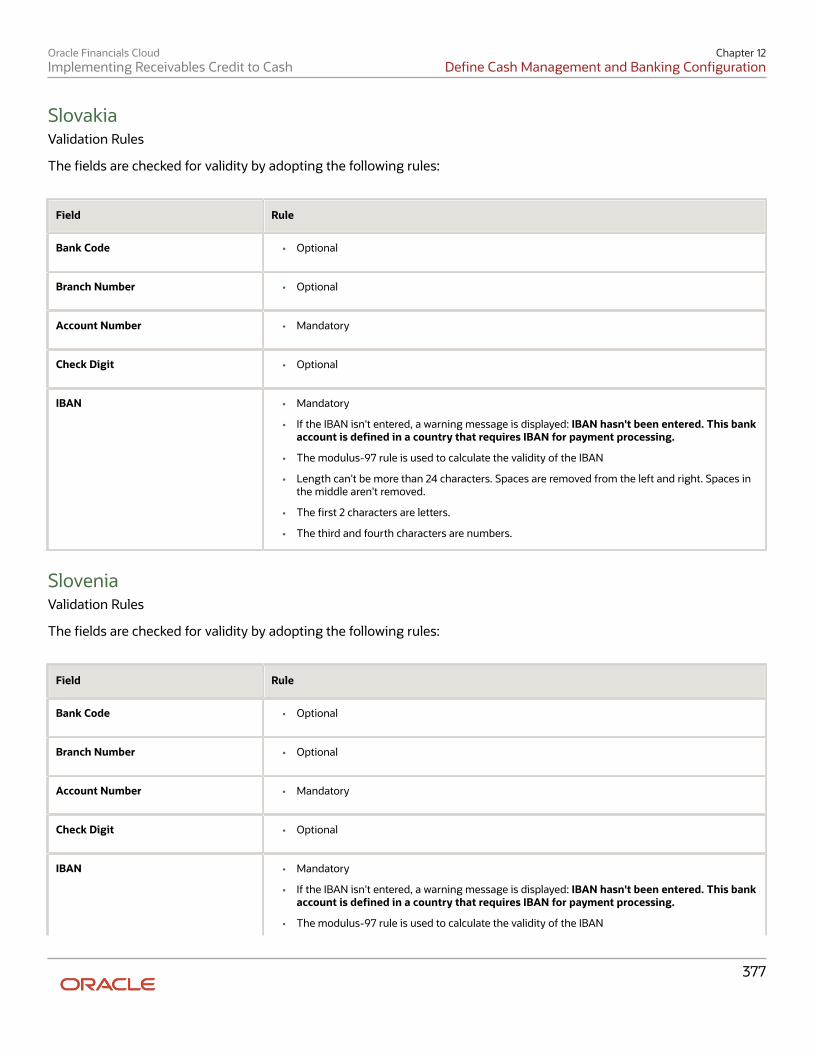
Oracle Financials CloudImplementing Receivables Credit to Cash
Chapter 12Define Cash Management and Banking Configuration
SlovakiaValidation Rules
The fields are checked for validity by adopting the following rules:
Field Rule
Bank Code
• Optional
Branch Number
• Optional
Account Number
• Mandatory
Check Digit
• Optional
IBAN
• Mandatory
• If the IBAN isn't entered, a warning message is displayed: IBAN hasn't been entered. This bankaccount is defined in a country that requires IBAN for payment processing.
• The modulus-97 rule is used to calculate the validity of the IBAN
• Length can't be more than 24 characters. Spaces are removed from the left and right. Spaces inthe middle aren't removed.
• The first 2 characters are letters.
• The third and fourth characters are numbers.
SloveniaValidation Rules
The fields are checked for validity by adopting the following rules:
Field Rule
Bank Code
• Optional
Branch Number
• Optional
Account Number
• Mandatory
Check Digit
• Optional
IBAN
• Mandatory
• If the IBAN isn't entered, a warning message is displayed: IBAN hasn't been entered. This bankaccount is defined in a country that requires IBAN for payment processing.
• The modulus-97 rule is used to calculate the validity of the IBAN
377
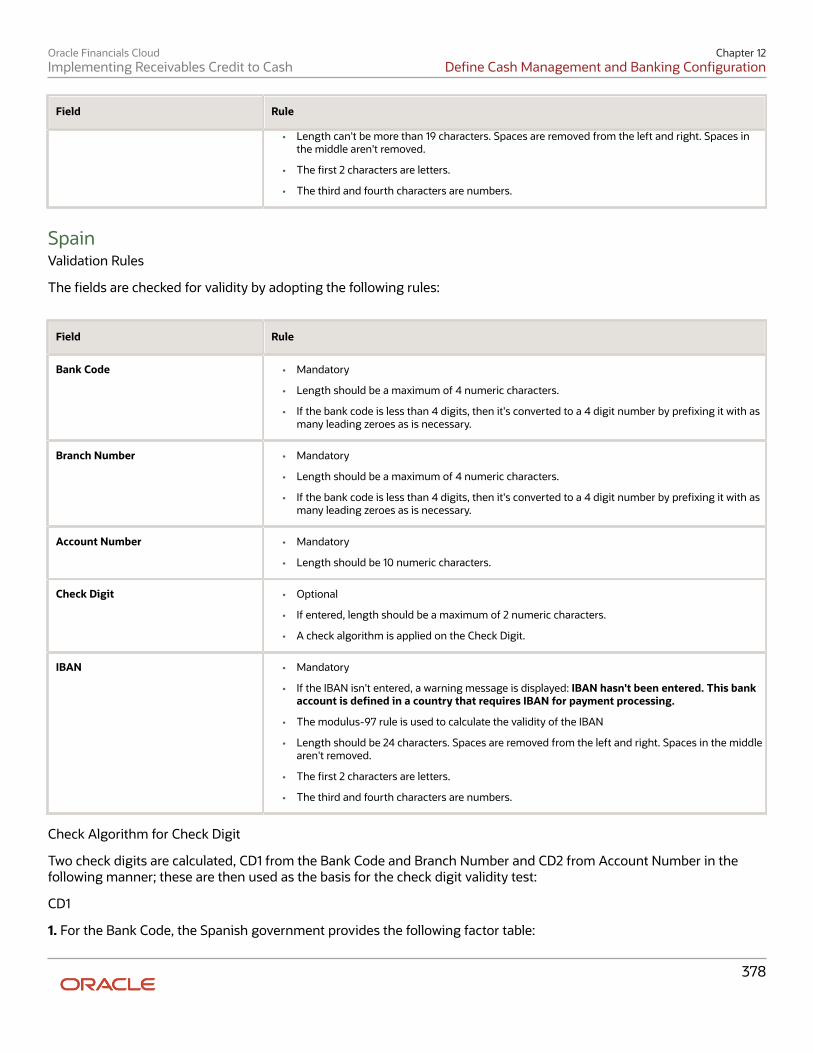
Oracle Financials CloudImplementing Receivables Credit to Cash
Chapter 12Define Cash Management and Banking Configuration
Field Rule
• Length can't be more than 19 characters. Spaces are removed from the left and right. Spaces inthe middle aren't removed.
• The first 2 characters are letters.
• The third and fourth characters are numbers.
SpainValidation Rules
The fields are checked for validity by adopting the following rules:
Field Rule
Bank Code
• Mandatory
• Length should be a maximum of 4 numeric characters.
• If the bank code is less than 4 digits, then it's converted to a 4 digit number by prefixing it with asmany leading zeroes as is necessary.
Branch Number
• Mandatory
• Length should be a maximum of 4 numeric characters.
• If the bank code is less than 4 digits, then it's converted to a 4 digit number by prefixing it with asmany leading zeroes as is necessary.
Account Number
• Mandatory
• Length should be 10 numeric characters.
Check Digit
• Optional
• If entered, length should be a maximum of 2 numeric characters.
• A check algorithm is applied on the Check Digit.
IBAN
• Mandatory
• If the IBAN isn't entered, a warning message is displayed: IBAN hasn't been entered. This bankaccount is defined in a country that requires IBAN for payment processing.
• The modulus-97 rule is used to calculate the validity of the IBAN
• Length should be 24 characters. Spaces are removed from the left and right. Spaces in the middlearen't removed.
• The first 2 characters are letters.
• The third and fourth characters are numbers.
Check Algorithm for Check Digit
Two check digits are calculated, CD1 from the Bank Code and Branch Number and CD2 from Account Number in thefollowing manner; these are then used as the basis for the check digit validity test:
CD1
1. For the Bank Code, the Spanish government provides the following factor table:
378

Oracle Financials CloudImplementing Receivables Credit to Cash
Chapter 12Define Cash Management and Banking Configuration
Digit Factor
1st
4
2nd
8
3rd
5
4th
10
The four digits of the Bank Code are multiplied by the associated factor. The computed sum is then calculated bysumming the totals.
Example using Bank Code '1234':
Multiply each digit with the given factor.
Digit Value Factor Result Digit Value Factor Result Digit Value Factor Result Digit Value Factor Result
1st
1
4
4
2nd
2
8
16
3rd
3
5
15
4th
4
10
40
Total
N/A
N/A
75
So the computed sum for this example is 75.
2. For the Branch Number, the Spanish government provides the following factor table:
Digit Factor
1st
9
2nd
7
3rd
3
4th
6
379
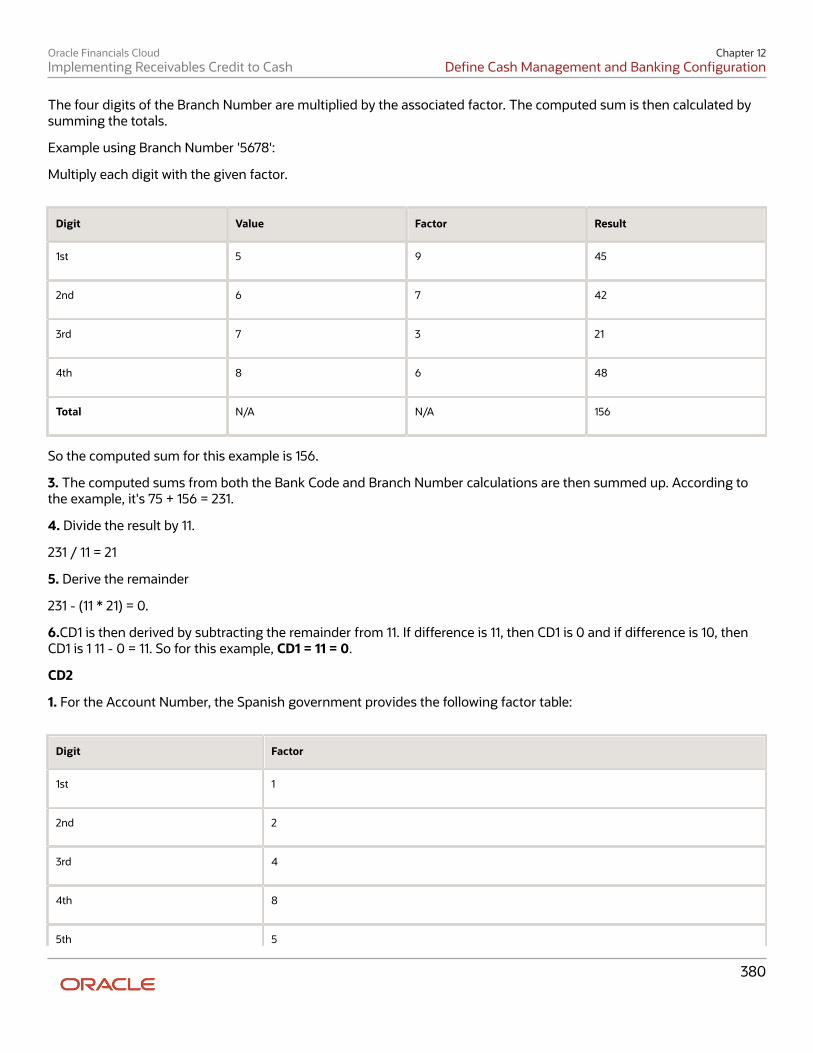
Oracle Financials CloudImplementing Receivables Credit to Cash
Chapter 12Define Cash Management and Banking Configuration
The four digits of the Branch Number are multiplied by the associated factor. The computed sum is then calculated bysumming the totals.
Example using Branch Number '5678':
Multiply each digit with the given factor.
Digit Value Factor Result
1st
5
9
45
2nd
6
7
42
3rd
7
3
21
4th
8
6
48
Total
N/A
N/A
156
So the computed sum for this example is 156.
3. The computed sums from both the Bank Code and Branch Number calculations are then summed up. According tothe example, it's 75 + 156 = 231.
4. Divide the result by 11.
231 / 11 = 21
5. Derive the remainder
231 - (11 * 21) = 0.
6.CD1 is then derived by subtracting the remainder from 11. If difference is 11, then CD1 is 0 and if difference is 10, thenCD1 is 1 11 - 0 = 11. So for this example, CD1 = 11 = 0.
CD2
1. For the Account Number, the Spanish government provides the following factor table:
Digit Factor
1st
1
2nd
2
3rd
4
4th
8
5th 5
380

Oracle Financials CloudImplementing Receivables Credit to Cash
Chapter 12Define Cash Management and Banking Configuration
Digit Factor
6th
10
7th
9
8th
7
9th
3
10th
6
The ten digits of the bank number are multiplied by the associated factor. The computed sum is then calculated bysumming the totals.
Example using account number '1234567890':
Multiply each digit with the given factor.
Digit Value Factor Result
1st
1
1
1
2nd
2
2
4
3rd
3
4
12
4th
4
8
32
5th
5
5
25
6th
6
10
60
7th
7
9
63
8th
8
7
56
9th
9
3
27
10th
0
6
0
Total
N/A
N/A
280
381
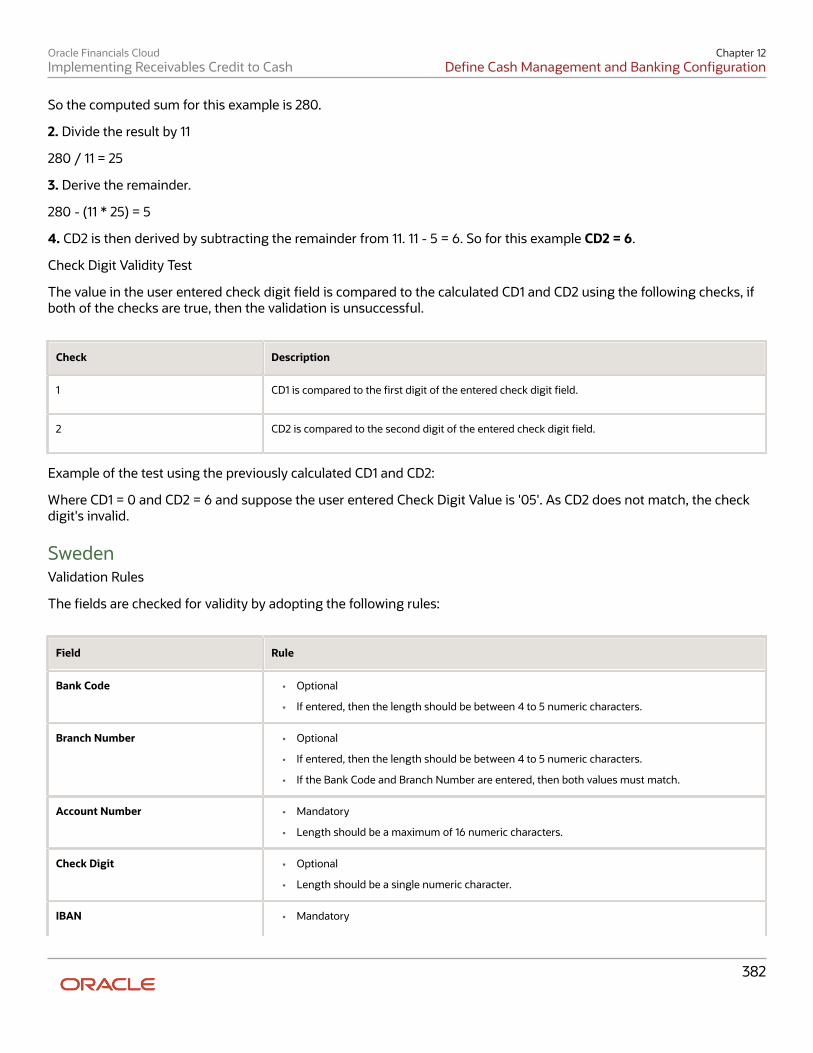
Oracle Financials CloudImplementing Receivables Credit to Cash
Chapter 12Define Cash Management and Banking Configuration
So the computed sum for this example is 280.
2. Divide the result by 11
280 / 11 = 25
3. Derive the remainder.
280 - (11 * 25) = 5
4. CD2 is then derived by subtracting the remainder from 11. 11 - 5 = 6. So for this example CD2 = 6.
Check Digit Validity Test
The value in the user entered check digit field is compared to the calculated CD1 and CD2 using the following checks, ifboth of the checks are true, then the validation is unsuccessful.
Check Description
1
CD1 is compared to the first digit of the entered check digit field.
2
CD2 is compared to the second digit of the entered check digit field.
Example of the test using the previously calculated CD1 and CD2:
Where CD1 = 0 and CD2 = 6 and suppose the user entered Check Digit Value is '05'. As CD2 does not match, the checkdigit's invalid.
SwedenValidation Rules
The fields are checked for validity by adopting the following rules:
Field Rule
Bank Code
• Optional
• If entered, then the length should be between 4 to 5 numeric characters.
Branch Number
• Optional
• If entered, then the length should be between 4 to 5 numeric characters.
• If the Bank Code and Branch Number are entered, then both values must match.
Account Number
• Mandatory
• Length should be a maximum of 16 numeric characters.
Check Digit
• Optional
• Length should be a single numeric character.
IBAN
• Mandatory
382

Oracle Financials CloudImplementing Receivables Credit to Cash
Chapter 12Define Cash Management and Banking Configuration
Field Rule
• If the IBAN isn't entered, a warning message is displayed: IBAN hasn't been entered. This bankaccount is defined in a country that requires IBAN for payment processing.
• The modulus-97 rule is used to calculate the validity of the IBAN
• Length should be 24 characters. Spaces are removed from the left and right. Spaces in the middlearen't removed.
• The first 2 characters are letters.
• The third and fourth characters are numbers.
SwitzerlandValidation Rules
The fields are checked for validity by adopting the following rules:
Field Rule
Bank Code
• Optional
• If entered, then the length should be between 3 to 5 numeric characters.
Branch Number
• Optional
• If entered, then the length should be between 3 to 9 numeric characters.
Account Number
• Mandatory
• Length should be a maximum of 17 numeric characters.
Check Digit
• Optional
Account Type
• Optional
IBAN
• Mandatory
• If the IBAN isn't entered, a warning message is displayed: IBAN hasn't been entered. This bankaccount is defined in a country that requires IBAN for payment processing.
• The modulus-97 rule is used to calculate the validity of the IBAN
• Length should be 21 characters. Spaces are removed from the left and right. Spaces in the middlearen't removed.
• The first 2 characters are letters.
• The third and fourth characters are numbers.
The Former Yugoslav Republic of MacedoniaValidation Rules
The fields are checked for validity by adopting the following rules:
383

Oracle Financials CloudImplementing Receivables Credit to Cash
Chapter 12Define Cash Management and Banking Configuration
Field Rule
Bank Code
• Optional
Branch Number
• Optional
Account Number
• Mandatory
Check Digit
• Optional
IBAN
• Mandatory
• If the IBAN isn't entered, a warning message is displayed: IBAN hasn't been entered. This bankaccount is defined in a country that requires IBAN for payment processing.
• The modulus-97 rule is used to calculate the validity of the IBAN
• Length should be 19 characters. Spaces are removed from the left and right. Spaces in the middlearen't removed.
• The first 2 characters are letters.
• The third and fourth characters are numbers.
TunisiaValidation Rules
The fields are checked for validity by adopting the following rules:
Field Rule
Bank Code
• Optional
Branch Number
• Optional
Account Number
• Mandatory.
Check Digit
• Optional
IBAN
• Optional, if entered, the following rules apply.
• The modulus-97 rule is used to calculate the validity of the IBAN.
• Length should be 22 characters. Spaces are removed from the left and right. Spaces in the middlearen't removed.
• The first 2 characters are letters.
• The third and fourth characters are numbers.
TurkeyValidation Rules
384

Oracle Financials CloudImplementing Receivables Credit to Cash
Chapter 12Define Cash Management and Banking Configuration
The fields are checked for validity by adopting the following rules:
Field Rule
Bank Code
• Optional
Branch Number
• Optional
Account Number
• Mandatory.
Check Digit
• Optional
IBAN
• Mandatory
• If the IBAN isn't entered, a warning message is displayed, IBAN hasn't been entered. This bankaccount is defined in a country that requires IBAN for payment processing.
• The modulus-97 rule is used to calculate the validity of the IBAN.
• Length should be 26 characters. Spaces are removed from the left and right. Spaces in the middlearen't removed.
• The first 2 characters are letters.
• The third and fourth characters are numbers.
UkraineValidation Rules
The fields are checked for validity by adopting the following rules:
Field Rule
Bank Code
• Optional
Branch Number
• Optional
Account Number
• Mandatory
Check Digit
• Optional
IBAN
• Optional, if entered, the following rules apply.
• The modulus-97 rule is used to calculate the validity of the IBAN.
• Length can't be more than 29 characters. Spaces are removed from the left and right. Spaces inthe middle aren't removed.
• The first 2 characters are letters.
385
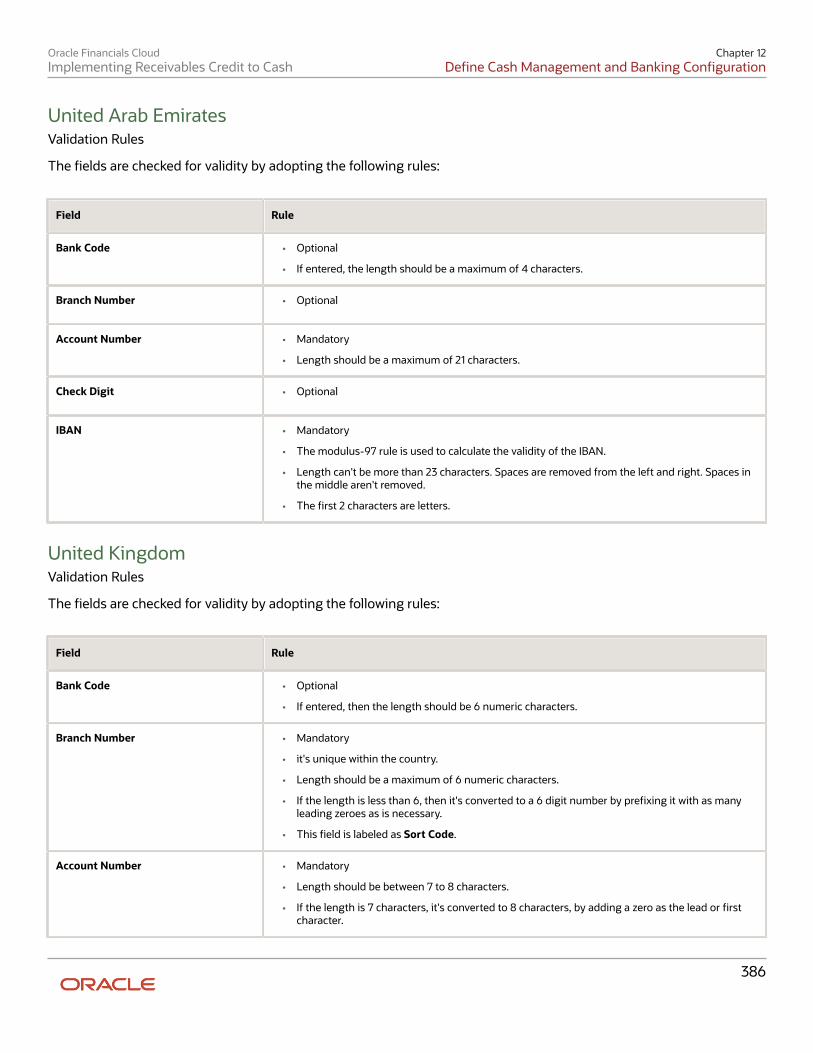
Oracle Financials CloudImplementing Receivables Credit to Cash
Chapter 12Define Cash Management and Banking Configuration
United Arab EmiratesValidation Rules
The fields are checked for validity by adopting the following rules:
Field Rule
Bank Code
• Optional
• If entered, the length should be a maximum of 4 characters.
Branch Number
• Optional
Account Number
• Mandatory
• Length should be a maximum of 21 characters.
Check Digit
• Optional
IBAN
• Mandatory
• The modulus-97 rule is used to calculate the validity of the IBAN.
• Length can't be more than 23 characters. Spaces are removed from the left and right. Spaces inthe middle aren't removed.
• The first 2 characters are letters.
United KingdomValidation Rules
The fields are checked for validity by adopting the following rules:
Field Rule
Bank Code
• Optional
• If entered, then the length should be 6 numeric characters.
Branch Number
• Mandatory
• it's unique within the country.
• Length should be a maximum of 6 numeric characters.
• If the length is less than 6, then it's converted to a 6 digit number by prefixing it with as manyleading zeroes as is necessary.
• This field is labeled as Sort Code.
Account Number
• Mandatory
• Length should be between 7 to 8 characters.
• If the length is 7 characters, it's converted to 8 characters, by adding a zero as the lead or firstcharacter.
386
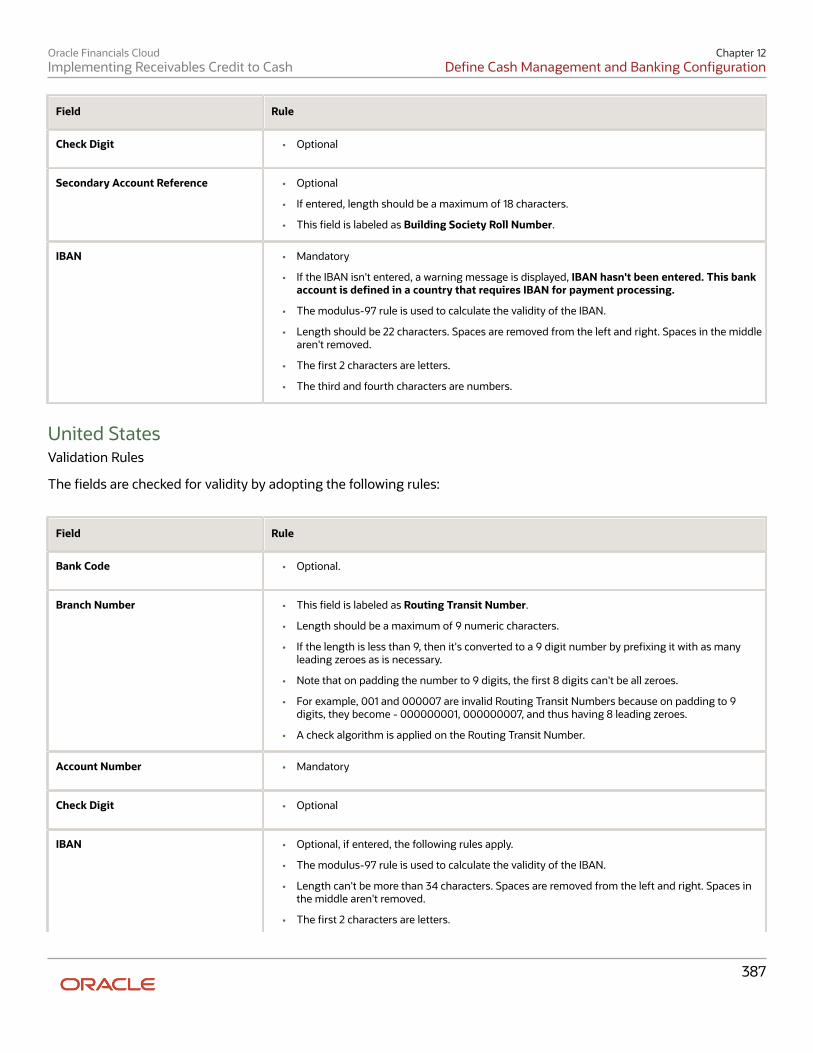
Oracle Financials CloudImplementing Receivables Credit to Cash
Chapter 12Define Cash Management and Banking Configuration
Field Rule
Check Digit
• Optional
Secondary Account Reference
• Optional
• If entered, length should be a maximum of 18 characters.
• This field is labeled as Building Society Roll Number.
IBAN
• Mandatory
• If the IBAN isn't entered, a warning message is displayed, IBAN hasn't been entered. This bankaccount is defined in a country that requires IBAN for payment processing.
• The modulus-97 rule is used to calculate the validity of the IBAN.
• Length should be 22 characters. Spaces are removed from the left and right. Spaces in the middlearen't removed.
• The first 2 characters are letters.
• The third and fourth characters are numbers.
United StatesValidation Rules
The fields are checked for validity by adopting the following rules:
Field Rule
Bank Code
• Optional.
Branch Number
• This field is labeled as Routing Transit Number.
• Length should be a maximum of 9 numeric characters.
• If the length is less than 9, then it's converted to a 9 digit number by prefixing it with as manyleading zeroes as is necessary.
• Note that on padding the number to 9 digits, the first 8 digits can't be all zeroes.
• For example, 001 and 000007 are invalid Routing Transit Numbers because on padding to 9digits, they become - 000000001, 000000007, and thus having 8 leading zeroes.
• A check algorithm is applied on the Routing Transit Number.
Account Number
• Mandatory
Check Digit
• Optional
IBAN
• Optional, if entered, the following rules apply.
• The modulus-97 rule is used to calculate the validity of the IBAN.
• Length can't be more than 34 characters. Spaces are removed from the left and right. Spaces inthe middle aren't removed.
• The first 2 characters are letters.
387
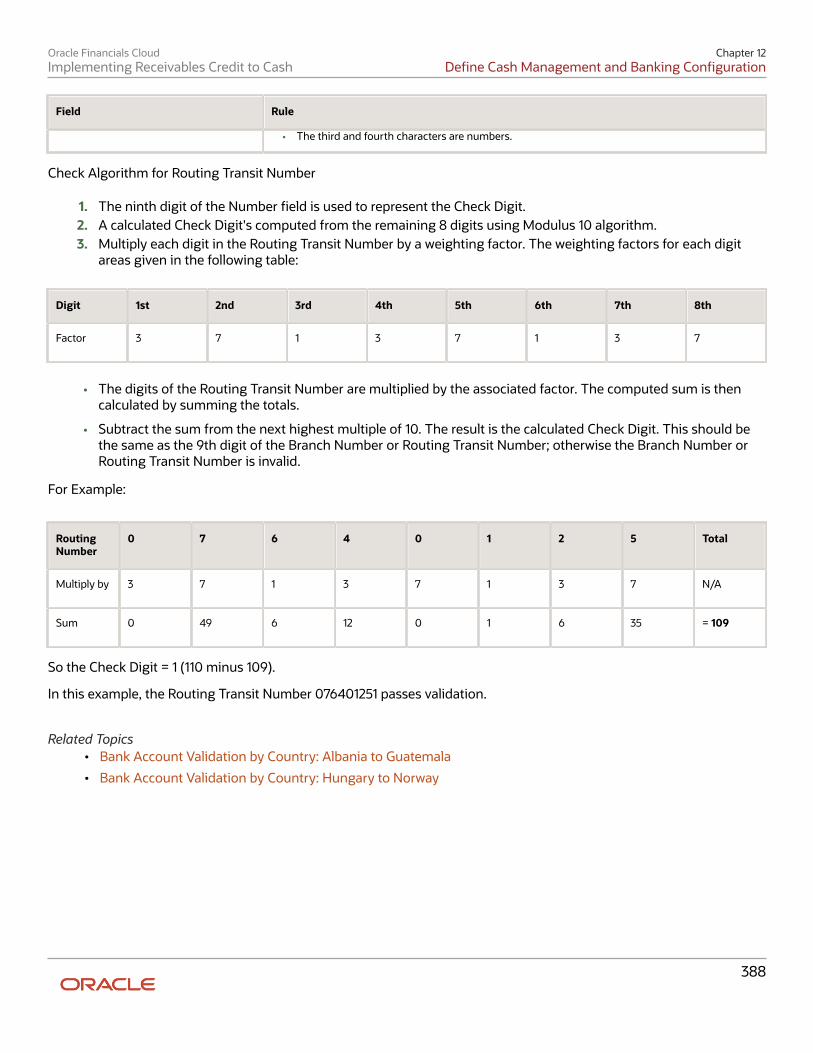
Oracle Financials CloudImplementing Receivables Credit to Cash
Chapter 12Define Cash Management and Banking Configuration
Field Rule
• The third and fourth characters are numbers.
Check Algorithm for Routing Transit Number
1. The ninth digit of the Number field is used to represent the Check Digit.2. A calculated Check Digit's computed from the remaining 8 digits using Modulus 10 algorithm.3. Multiply each digit in the Routing Transit Number by a weighting factor. The weighting factors for each digit
areas given in the following table:
Digit 1st 2nd 3rd 4th 5th 6th 7th 8th
Factor
3
7
1
3
7
1
3
7
• The digits of the Routing Transit Number are multiplied by the associated factor. The computed sum is thencalculated by summing the totals.
• Subtract the sum from the next highest multiple of 10. The result is the calculated Check Digit. This should bethe same as the 9th digit of the Branch Number or Routing Transit Number; otherwise the Branch Number orRouting Transit Number is invalid.
For Example:
RoutingNumber
0 7 6 4 0 1 2 5 Total
Multiply by
3
7
1
3
7
1
3
7
N/A
Sum
0
49
6
12
0
1
6
35
= 109
So the Check Digit = 1 (110 minus 109).
In this example, the Routing Transit Number 076401251 passes validation.
Related Topics• Bank Account Validation by Country: Albania to Guatemala
• Bank Account Validation by Country: Hungary to Norway
388
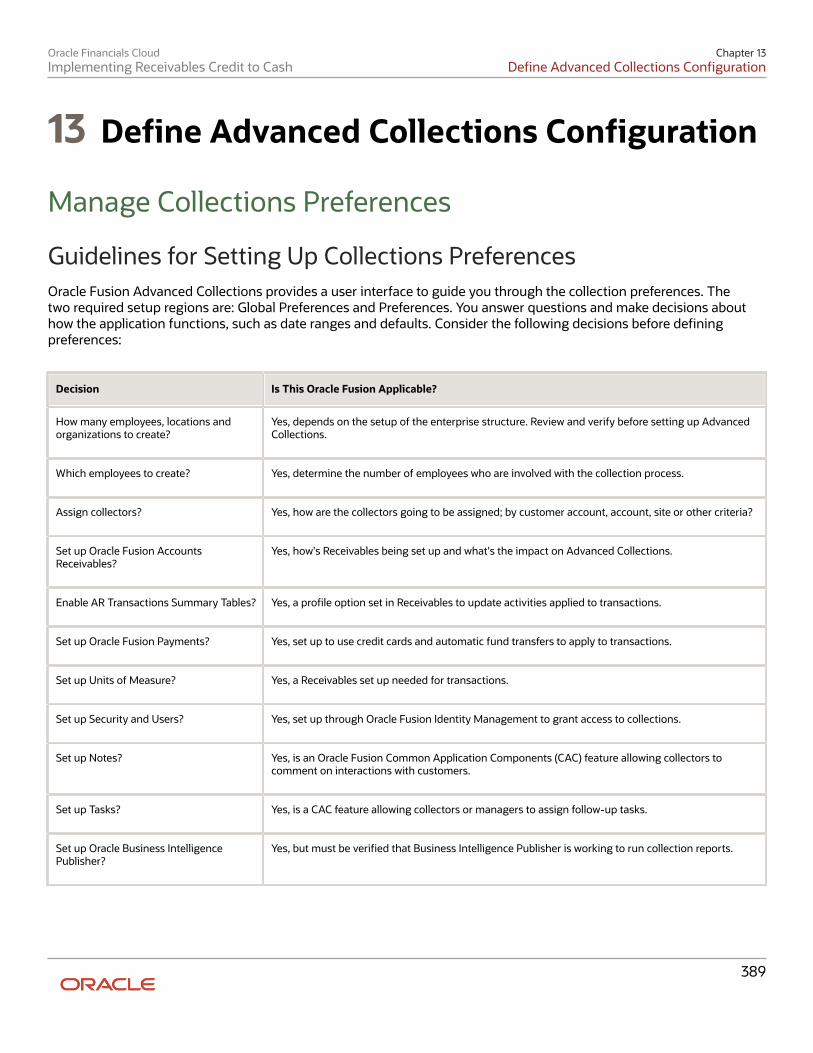
Oracle Financials CloudImplementing Receivables Credit to Cash
Chapter 13Define Advanced Collections Configuration
13 Define Advanced Collections Configuration
Manage Collections Preferences
Guidelines for Setting Up Collections Preferences Oracle Fusion Advanced Collections provides a user interface to guide you through the collection preferences. Thetwo required setup regions are: Global Preferences and Preferences. You answer questions and make decisions abouthow the application functions, such as date ranges and defaults. Consider the following decisions before definingpreferences:
Decision Is This Oracle Fusion Applicable?
How many employees, locations andorganizations to create?
Yes, depends on the setup of the enterprise structure. Review and verify before setting up AdvancedCollections.
Which employees to create?
Yes, determine the number of employees who are involved with the collection process.
Assign collectors?
Yes, how are the collectors going to be assigned; by customer account, account, site or other criteria?
Set up Oracle Fusion AccountsReceivables?
Yes, how's Receivables being set up and what's the impact on Advanced Collections.
Enable AR Transactions Summary Tables?
Yes, a profile option set in Receivables to update activities applied to transactions.
Set up Oracle Fusion Payments?
Yes, set up to use credit cards and automatic fund transfers to apply to transactions.
Set up Units of Measure?
Yes, a Receivables set up needed for transactions.
Set up Security and Users?
Yes, set up through Oracle Fusion Identity Management to grant access to collections.
Set up Notes?
Yes, is an Oracle Fusion Common Application Components (CAC) feature allowing collectors tocomment on interactions with customers.
Set up Tasks?
Yes, is a CAC feature allowing collectors or managers to assign follow-up tasks.
Set up Oracle Business IntelligencePublisher?
Yes, but must be verified that Business Intelligence Publisher is working to run collection reports.
389
Oracle Financials CloudImplementing Receivables Credit to Cash
Chapter 13Define Advanced Collections Configuration
Global PreferencesSelections made in the Global Preference region impact the view the collectors see from the Collections Customer WorkArea and Collections Dashboard. Global Preferences define the following:
• Default transaction class that appears
• Display of open transactions
• Display of closed transactions
• Number of days for prior and future transactions to be displayed
• Number of days to reschedule work on the dashboard
• Default aging method
• Delimiter used to separate data and the number of characters required to do a search
• Sender or return E-mail address for dunning correspondence
• Maximum grace days before a promise is broken
• Maximum number of days for a promise due date
• Enable bankruptcy
PreferencesSelections made in the Preference region impact the defaults the collector encounters when going through thecollection process. Preferences define the following
• Preference set
• Collections business level
• Summarize or age credits
• default conversion rate
• Send method of dunning
• Default contact for unknown dunning recipients
CorrespondenceSelections made in the Correspondence table impact the defaults the collector encounters when sendingcorrespondence during the collection process. Correspondence defines the following:
• Preference Set
• Send Dispute Notice
• Dispute Template
• Send Payment Notice
• Payment Template
390
Oracle Financials CloudImplementing Receivables Credit to Cash
Chapter 13Define Advanced Collections Configuration
• Send Promise to Pay Notice
• Promise to Pay Template
Dunning Delivery Using EmailUse the Dunning Delivery Using Email section to configure the email body content of a dunning email. You canconfigure the email body content in the Email Body field by selecting the Dunning Letter Templates from the DunningLetter Template drop-down list.
You can create the message with enhanced rich text content in the email body. You can choose various fonts, modifyfont size and style, and insert logos and links using HTML. The enhanced content improves the user experience forcustomers who receive dunning letters as an email attachment.
Note: If you've a custom data model, then replace it with the predefined Collections Send Dunning Letters datamodel to use this feature.
Define Collections Preferences This example demonstrates how to set preferences for Oracle Fusion Advanced Collections.
You have been tasked to set up the two sections for preferences: Global and Preferences. Configure your preferencesbased on the following requirements:
• Your company requires collectors to review transaction that are 90 days past due and current ones 30 days intothe future.
• Collectors review customers by account and send out past due notices by E-mail.
• Notices are sent to the accounts payable manager if no contact information is available.
• Reviewing a customer's history requires viewing current and closed transactions.
• Your company allows up to two days for rescheduling work on the dashboard.
• Adjustments and disputes are handled within 1 business day of being recorded.
• Credits on an account are summarized.
• Aging is displayed by a 5 bucket aging method.
• The conversion rate is based on a rate set by the corporation.
• The delimiter symbol used to separate data is a pipe.
• A three-character minimum is required and recommended to perform a search on customer accounts.
Use the following tables to define the two sections for preferences:
Configuring Collections Preferences1. Defining Global Preferences
Field Value
Select the default Transaction Type forthe Transactions tab
Select Invoice, other transaction choices are all, credit, or debit memos.
391

Oracle Financials CloudImplementing Receivables Credit to Cash
Chapter 13Define Advanced Collections Configuration
Field Value
Automatically display closedtransactions on Transaction tab
Yes is select to view closed transactions as part of the customers history.
Automatically display currenttransactions on Transaction tab
Yes is selected to view current or open transaction the customer has pending.
Enter the number of days before thecurrent date the transaction date rangeshould start
In this example, 90 days gives the collector 3 months of history. 1 to 9999 is the range that canbe used.
Enter the number of days after thecurrent date the transaction date rangeshould end
30 days of current or open transactions are displayed. 1-9999 is the range that can be used.
Enter the maximum number of dayswork can be rescheduled on thedashboard
Two days is the allowable change in schedule for work. 1-9999 is the range that can be used.
Enter the number of days aftersubmitting an adjustment or disputethat an activity is generated
One day generates the disputes and adjustments. 1-9999 is the range that can be used.
Select the default Aging Method
5 Bucket Aging, several aging buckets can be defined and may be available.
Enter the delimiter used to separatecustomer, account and site on theCollections Dashboard
The pipe symbol, other available choices are the greater than, dash, and colon symbols.
Enter the minimum number ofcharacters required to perform a search
Three characters is the Oracle recommended number for a search. 1-9999 is the range that canbe used.
Enter the sender or return E-mail fordunning correspondence
The default return E-mail for customers to respond
2. Defining Preferences
Preferences Table Column Name Field Value
Collections Preference Set Select the value; Common Set.
392

Oracle Financials CloudImplementing Receivables Credit to Cash
Chapter 13Define Advanced Collections Configuration
Preferences Table Column Name Field Value
Select the Collections Business Level
Account, other choices are customer and site.
Select whether open credits should beaged or summarized by default
Summarized, credits can be displayed as aged.
Select the conversion rate type forconverting multicurrency transactions
Corporate, several choices can be defined and are displayed.
Select the default method to sendcollections notifications
Select E-mail, other methods are fax or print.
Enter the default contact for unknowndunning recipients
Accounts Payable Manager. User defined if no contact is listed.
Correspondence Table Column Name Field Value
Collections Preference Set
Select the value; Common Set.
Send Adjustment Notice
Select yes to notify the customer of adjustments made to their account.
Adjustment Template
Select the delivered template.
Send Dispute Notice
Select yes to notify the customer of disputes made to their account.
Dispute Template
Select the delivered template.
Send Payment Notice
Select yes to notify the customer of payments made to their account.
Payment Template
Select the delivered template.
Send Promise Notice
Select yes to notify the customer of promises to pay on their account.
Promise Template
Select the delivered template.
393

Oracle Financials CloudImplementing Receivables Credit to Cash
Chapter 13Define Advanced Collections Configuration
3. Save or Save and Close to enable your preferences.
Related Topics• What's the difference between customer, account, and site at the Business Level
• Guidelines for Setting Up Collections Preferences
FAQs for Manage Collections Preferences
What's the difference between Global Preferences and Preferences? The global preferences affect your Collections Customer Work Area. Using global preferences, you can change thedisplay of closed or open transactions and set date range parameters.
The preferences can be set uniquely for a specific business unit. Using preferences, you can change the default settings,such as the method to send notifications.
What's the difference between customer, account, and site at the Business Level? Transactions set at the customer level to view or modify, encompasses all of the transaction activity associated with thecustomer. For example, a dunning letter at the customer level is inclusive of transactions at the customer and accountlevel.
Transactions set at the account level to view or modify, are for a particular account and include transactions for all thebill to sites in that account.
Transactions set at the site level to view or modify, are specific to the bill-to location.
What's the difference between minimum dunning amount and minimum dunninginvoice amount? The minimum dunning amount is the total amount set for all overdue transactions to generate the correspondence. Ifyour minimum dunning amount is set to $100 and you have three overdue transactions of $25, $35, and $55. totaling to$105. A dunning letter is generated listing all the three invoices as overdue.
The minimum dunning invoice amount is the amount set for a single overdue transaction to generate correspondence.If your minimum dunning invoice amount is set to $25 and you have three overdue transactions of $15, $50, and $75. Adunning letter is generated only for the $50 and $75 transactions.
Manage Aging Methods
Aging Methods Aging methods are periods of time used to group receivables, debit and credit items to achieve an understanding of acustomer's delinquency profile.
394
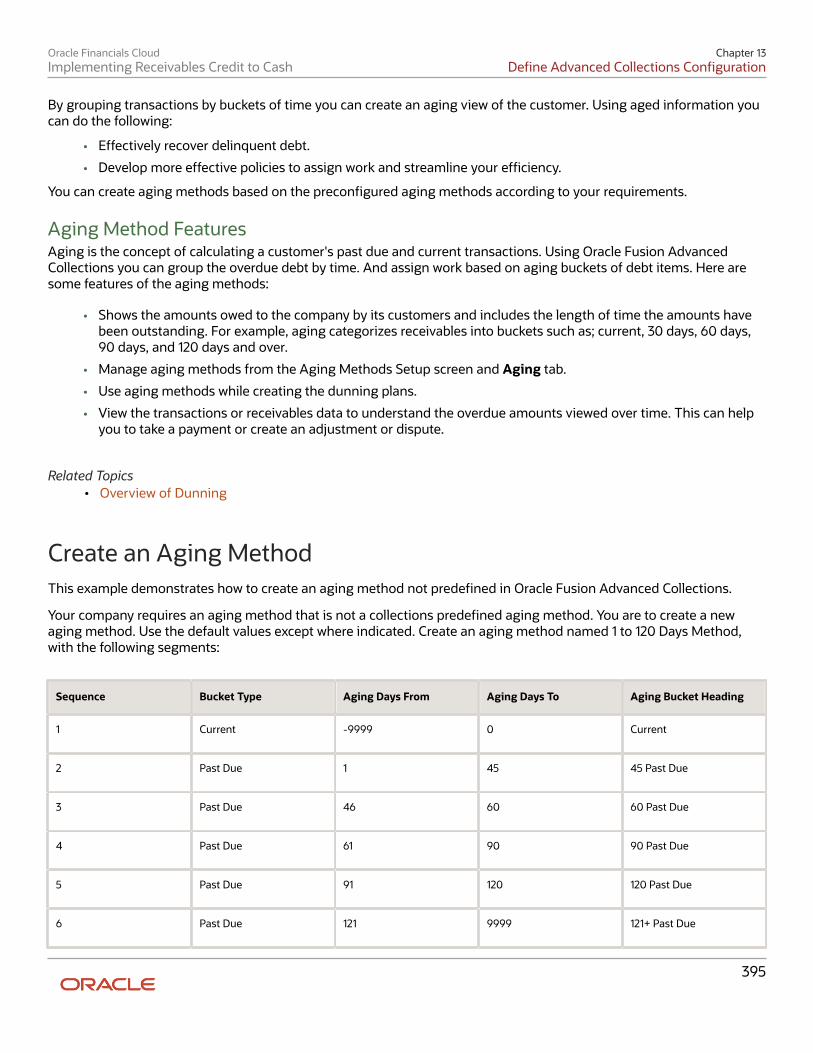
Oracle Financials CloudImplementing Receivables Credit to Cash
Chapter 13Define Advanced Collections Configuration
By grouping transactions by buckets of time you can create an aging view of the customer. Using aged information youcan do the following:
• Effectively recover delinquent debt.
• Develop more effective policies to assign work and streamline your efficiency.
You can create aging methods based on the preconfigured aging methods according to your requirements.
Aging Method FeaturesAging is the concept of calculating a customer's past due and current transactions. Using Oracle Fusion AdvancedCollections you can group the overdue debt by time. And assign work based on aging buckets of debt items. Here aresome features of the aging methods:
• Shows the amounts owed to the company by its customers and includes the length of time the amounts havebeen outstanding. For example, aging categorizes receivables into buckets such as; current, 30 days, 60 days,90 days, and 120 days and over.
• Manage aging methods from the Aging Methods Setup screen and Aging tab.
• Use aging methods while creating the dunning plans.
• View the transactions or receivables data to understand the overdue amounts viewed over time. This can helpyou to take a payment or create an adjustment or dispute.
Related Topics• Overview of Dunning
Create an Aging Method This example demonstrates how to create an aging method not predefined in Oracle Fusion Advanced Collections.
Your company requires an aging method that is not a collections predefined aging method. You are to create a newaging method. Use the default values except where indicated. Create an aging method named 1 to 120 Days Method,with the following segments:
Sequence Bucket Type Aging Days From Aging Days To Aging Bucket Heading
1
Current
-9999
0
Current
2
Past Due
1
45
45 Past Due
3
Past Due
46
60
60 Past Due
4
Past Due
61
90
90 Past Due
5
Past Due
91
120
120 Past Due
6
Past Due
121
9999
121+ Past Due
395

Oracle Financials CloudImplementing Receivables Credit to Cash
Chapter 13Define Advanced Collections Configuration
Creating an Aging Method1. Start from the Manage Aging Methods page.2. From the Aging Method region, click the green plus sign to create an aging method.3. Complete the fields, as shown in this table.
Field Value
Aging Method Name
1 to 120 Aging Day Method
Aging Type
Statement Aging; 4 bucket and 7 bucket aging are options, depends on the number of bucketsfor your aging method.
Enable
Yes
Aging Method Set
Common Set
Aging Method Description
Current to 120 Day Aging method.
4. Click Save.5. From the 1 to 120 Aging Day Method: Details, complete the fields, as shown in this table.
Field Value
Sequence
1
Bucket Type
Past Due
Aging Days From
1
Aging Days To
45
Aging Bucket Heading
45 Past Due; Click the Create icon to create the row for the next sequence.
Sequence
2
Bucket Type
Past Due
Aging Days From
46
396

Oracle Financials CloudImplementing Receivables Credit to Cash
Chapter 13Define Advanced Collections Configuration
Field Value
Aging Days To
60
Aging Bucket Heading
60 Past Due
6. Repeat the steps for sequences 4 to 6 and increase the Aging Days From and Aging Days To accordingly.7. Click the Save and Close to complete the creation of a new aging method.
The following validation rules are in place when creating or modifying an aging method:
◦ A bucket must contain at least 2 bucket lines and at most 7 lines.
◦ A Bucket Type passes from the user interface as a fixed constant value.
◦ A bucket must have Aging Days From less than Aging Days To.
◦ All buckets must cover the range from -9999 to 9999 and there is no way to update a field with the valueof -9999 or 9999.
◦ Aging buckets cannot have any gaps between -9999 to 9999.
FAQs for Manage Aging Methods
How can I modify a predefined aging method? You can't modify the predefined aging methods. However, you can copy the predefined aging method to create aduplicate and then modify the duplicate aging method.
To modify, go to the Manage Aging Methods page, select one of the delivered aging methods and click the Duplicatebutton. By default, the duplicate aging method is renamed with copy as prefix. For example, 5 Bucket Aging becomesCopy 5 Bucket Aging. Make the required changes and save the duplicate aging method.
Manage Collectors
Guidelines for Setting Up a Collector A collector is an individual or a group of individuals, assigned to a customer to conduct various collections work. Tasksinclude:
• Sending correspondence
• Reviewing customer history
• Collecting payment from customers
397

Oracle Financials CloudImplementing Receivables Credit to Cash
Chapter 13Define Advanced Collections Configuration
Note: Prior to creating a collector, the individual must be set up as an employee in Oracle Fusion Human Resourcesand as a resource in Oracle Fusion Customer Relationships Management (CRM) applications.
Setting Up CollectorsConsider the following when setting up individuals as collectors:
• A collector can individually be assigned to one or more customers or can be a group member that collects fromone or more customers. Evaluate the most appropriate collection needs for your organizations.
• Collectors can be assigned at the customer, account or site level. Determine how your organization interactswith customers.
• Research how your organization divides the work and tasks among collectors.
• Collections organization structures can be created in several ways based on the number of customers. Forexample, you can group customers according to size, small to large or divide customers regionally or by themonetary volume you do with a customer.
Using Collector GroupsA collector group consists of a primary collector and one or more individual collectors. You use the collector group toperform collection tasks as a team. The collectors in a collector group can perform the same collections tasks.
All collectors belonging to a collector group have the same visibility to the delinquent customers and strategy tasksin the Collections work area. The Strategy Tasks info tile shows the list of open manual strategy tasks for the group.Collectors from the group can reassign a task to themselves or to any other collector in the group. The Strategy Task listdisplays the primary collector and the assigned collector for the tasks.
The activity assigned to a primary collector are not included in the count and listing of the activities of any collector inthe group.
Consider the following rules when adding a collector to a group:
• A collector can be designated as either a group member or a backup collector for a specified date range.
• A collector can belong to only one active collector group for a specified date range.
Related Topics• What's the difference between an employee assignment and a group assignment
• What's the difference between customer, account, and site at the Business Level
Create Collectors Let's understand how you can create collectors and allocate them as employee or group assignment.
Let's say your company wants to create five individuals as collectors. Set up your collectors based on the followinginformation:
• The Collections Department collects on a regional basis, north, south, east and west.
• Acme Corporation is a large customer and they want to assign one collector to this account.
398

Oracle Financials CloudImplementing Receivables Credit to Cash
Chapter 13Define Advanced Collections Configuration
• All five individuals have been created as a Person Party and Employee, a prerequisite to creating a collector.
• Collector groups can be setup for each region.
Here are the details required for each individual:
Field Action
Name
Employee Name
Description
Optional; detail information
Correspondence
Name used on sent correspondence
Telephone Number
Contact number
Employee Name
Active employee list
Active or Inactive
Collector status
Create an Employee Assignment1. Navigate to the Collectors Setup page in Functional Setup Manager. You can search or create a new collector
from this page.2. Click the Add or Create Collector icon to create a new collector.3. Enter the Collector Name.4. Ensure to select Employee as the type of collector.5. Select the name of the employee from the list of values in the Employee column.6. The Enabled field is set to Yes by default.7. Select the appropriate Collector Set.8. Click the Save and Close button.
Create a Collector GroupA collections manager can create a collector group. Perform the following steps to create a collector group:
1. Navigate to the Manage Resources page.2. Select a primary collector for the collector group you want to set up.3. Navigate to the Collector Group section of the page.4. Click the New icon to add a new collector group.5. Enter a unique collector group name. The Enabled field is set to Yes by default.6. Add members to the group by selecting their names from the Collector list. The Enabled field is set to Yes by
default along with the start date.7. After adding all collectors to the group, click Save or Save and Close.
Related Topics• About Resource Role Assignment
• Can I create an employee or contingent worker resource
399
Oracle Financials CloudImplementing Receivables Credit to Cash
Chapter 13Define Advanced Collections Configuration
Overview of Collectors Descriptive Flexfield You can use the Collectors Descriptive Flexfield to add custom attributes for collector information such as ageographical region and collections experience.
For example you can create a descriptive flexfield to identify the collector location that can be used to assign them tocustomers in or near their location. Tracking the experience of a collector can be used to determine which customeraccounts get assigned to a collector.
One descriptive flexfield is available in Oracle Fusion Advanced Collections.
Descriptive Flexfield Description
Collectors
15 segment available to display additional information about collectors.
Defining Descriptive Flexfield Segments
Use the Manage Descriptive Flexfields task to define a segment or segments for a descriptive flexfield. You can addmore information related to collectors based on your collection needs and level of detail information about them.
Activating Descriptive Flexfields
Activate a descriptive flexfield after you have defined value sets and segment values by deploying the flexfield. Youmust sign out and sign in to the application to see your descriptive flexfield.
Note: The Global segments for the Collectors Descriptive Flexfield are not available.
Related Topics• Set Up the Collectors Descriptive Flexfield
• Overview of Descriptive Flexfields
• Considerations for Managing Descriptive Flexfields
Set Up the Collectors Descriptive Flexfield The Manage Collectors descriptive flexfield provides 15 segments to capture additional information. These segmentsare made available to you as individual fields in the Manage Collectors page. This example illustrates how to set up thedescriptive flexfield using the context-sensitive segments, based on the following scenario
ScenarioYou have been tasked with setting up collectors and want to capture more information about the collectors geographicallocation and collections experience. You want to be able to search on this information and associate this information toeach collector you create. Set up the additional fields using the following information
400
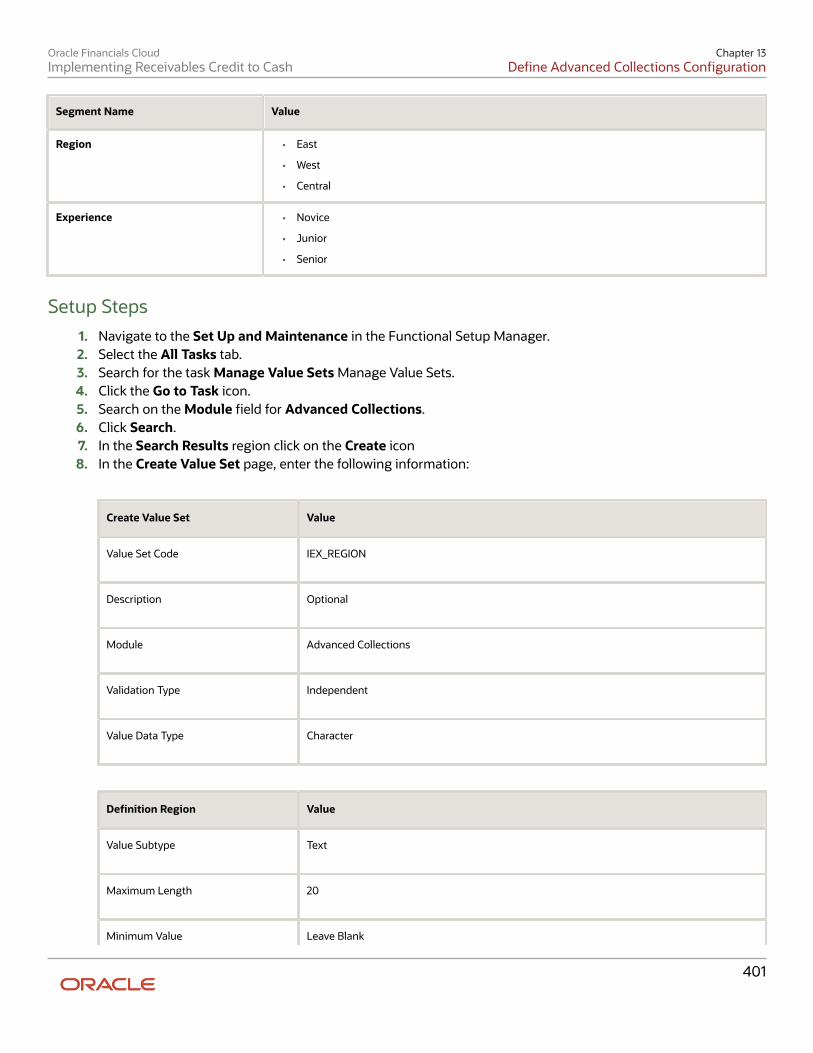
Oracle Financials CloudImplementing Receivables Credit to Cash
Chapter 13Define Advanced Collections Configuration
Segment Name Value
Region
• East
• West
• Central
Experience
• Novice
• Junior
• Senior
Setup Steps1. Navigate to the Set Up and Maintenance in the Functional Setup Manager.2. Select the All Tasks tab.3. Search for the task Manage Value Sets Manage Value Sets.4. Click the Go to Task icon.5. Search on the Module field for Advanced Collections.6. Click Search.7. In the Search Results region click on the Create icon8. In the Create Value Set page, enter the following information:
Create Value Set Value
Value Set Code
IEX_REGION
Description
Optional
Module
Advanced Collections
Validation Type
Independent
Value Data Type
Character
Definition Region Value
Value Subtype
Text
Maximum Length
20
Minimum Value Leave Blank
401
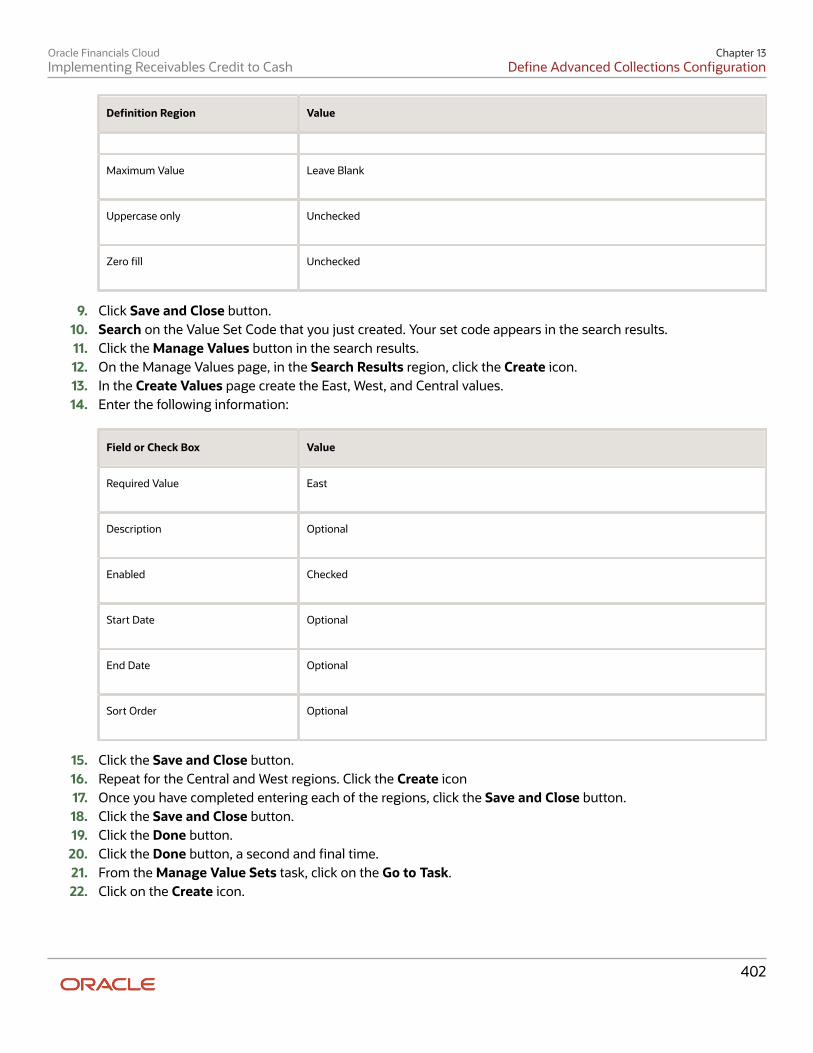
Oracle Financials CloudImplementing Receivables Credit to Cash
Chapter 13Define Advanced Collections Configuration
Definition Region Value
Maximum Value
Leave Blank
Uppercase only
Unchecked
Zero fill
Unchecked
9. Click Save and Close button.10. Search on the Value Set Code that you just created. Your set code appears in the search results.11. Click the Manage Values button in the search results.12. On the Manage Values page, in the Search Results region, click the Create icon.13. In the Create Values page create the East, West, and Central values.14. Enter the following information:
Field or Check Box Value
Required Value
East
Description
Optional
Enabled
Checked
Start Date
Optional
End Date
Optional
Sort Order
Optional
15. Click the Save and Close button.16. Repeat for the Central and West regions. Click the Create icon17. Once you have completed entering each of the regions, click the Save and Close button.18. Click the Save and Close button.19. Click the Done button.20. Click the Done button, a second and final time.21. From the Manage Value Sets task, click on the Go to Task.22. Click on the Create icon.
402
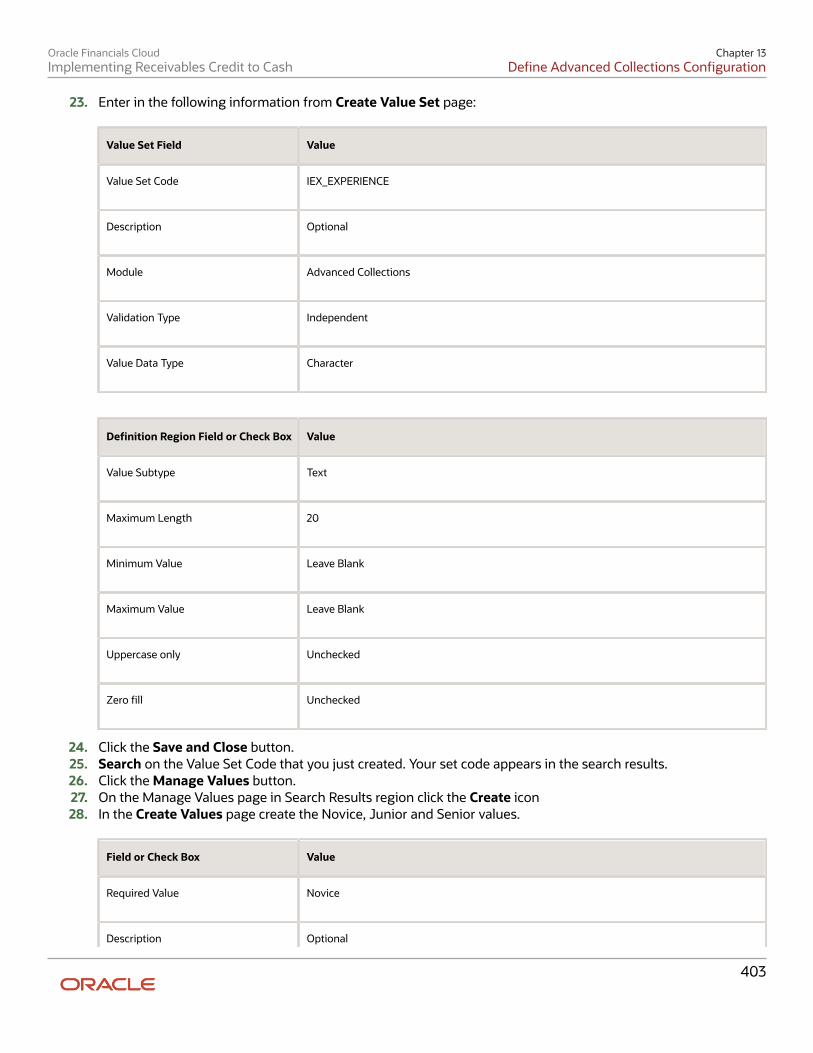
Oracle Financials CloudImplementing Receivables Credit to Cash
Chapter 13Define Advanced Collections Configuration
23. Enter in the following information from Create Value Set page:
Value Set Field Value
Value Set Code
IEX_EXPERIENCE
Description
Optional
Module
Advanced Collections
Validation Type
Independent
Value Data Type
Character
Definition Region Field or Check Box Value
Value Subtype
Text
Maximum Length
20
Minimum Value
Leave Blank
Maximum Value
Leave Blank
Uppercase only
Unchecked
Zero fill
Unchecked
24. Click the Save and Close button.25. Search on the Value Set Code that you just created. Your set code appears in the search results.26. Click the Manage Values button.27. On the Manage Values page in Search Results region click the Create icon28. In the Create Values page create the Novice, Junior and Senior values.
Field or Check Box Value
Required Value
Novice
Description Optional
403

Oracle Financials CloudImplementing Receivables Credit to Cash
Chapter 13Define Advanced Collections Configuration
Field or Check Box Value
Enabled
Checked
Start Date
Optional
End Date
Optional
Sort Order
Optional
29. Repeat the information for Junior and Senior values.30. Click the Save and Close button.31. Click the Save and Close button. a second time.32. Click the Done button.33. Click the Done button a second time.34. From the All Task tab, search for the Manage Descriptive Flexfields.35. Click the Go to Task icon36. In the Name field enter Collectors.37. Click the Search button38. In the Search Results region for Collectors, click the Edit icon.39. In the Context Segment region in the Prompt field, enter Additional Information as the name for the Prompt
to be displayed on the Manage Collectors page.40. Click the Manage Contexts button.41. From the Manage Contexts page click the Create icon and enter the following:
Field Value
Display Name
Additional Information
Context Code
IEX ADD INFO (uppercase recommended)
42. Click the Save button.43. In the Context Sensitive region click the Create icon and enter the following:
Field Value
Name
Region
Code
IEX REGION
Description Optional
404
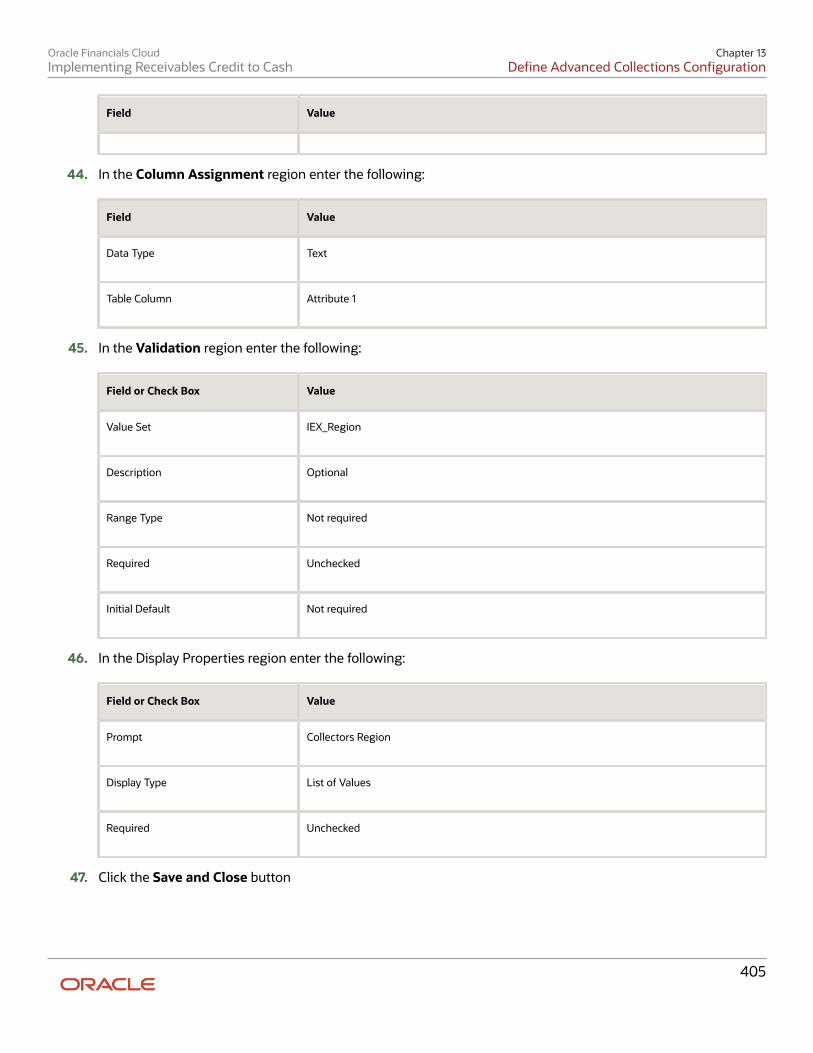
Oracle Financials CloudImplementing Receivables Credit to Cash
Chapter 13Define Advanced Collections Configuration
Field Value
44. In the Column Assignment region enter the following:
Field Value
Data Type
Text
Table Column
Attribute 1
45. In the Validation region enter the following:
Field or Check Box Value
Value Set
IEX_Region
Description
Optional
Range Type
Not required
Required
Unchecked
Initial Default
Not required
46. In the Display Properties region enter the following:
Field or Check Box Value
Prompt
Collectors Region
Display Type
List of Values
Required
Unchecked
47. Click the Save and Close button
405
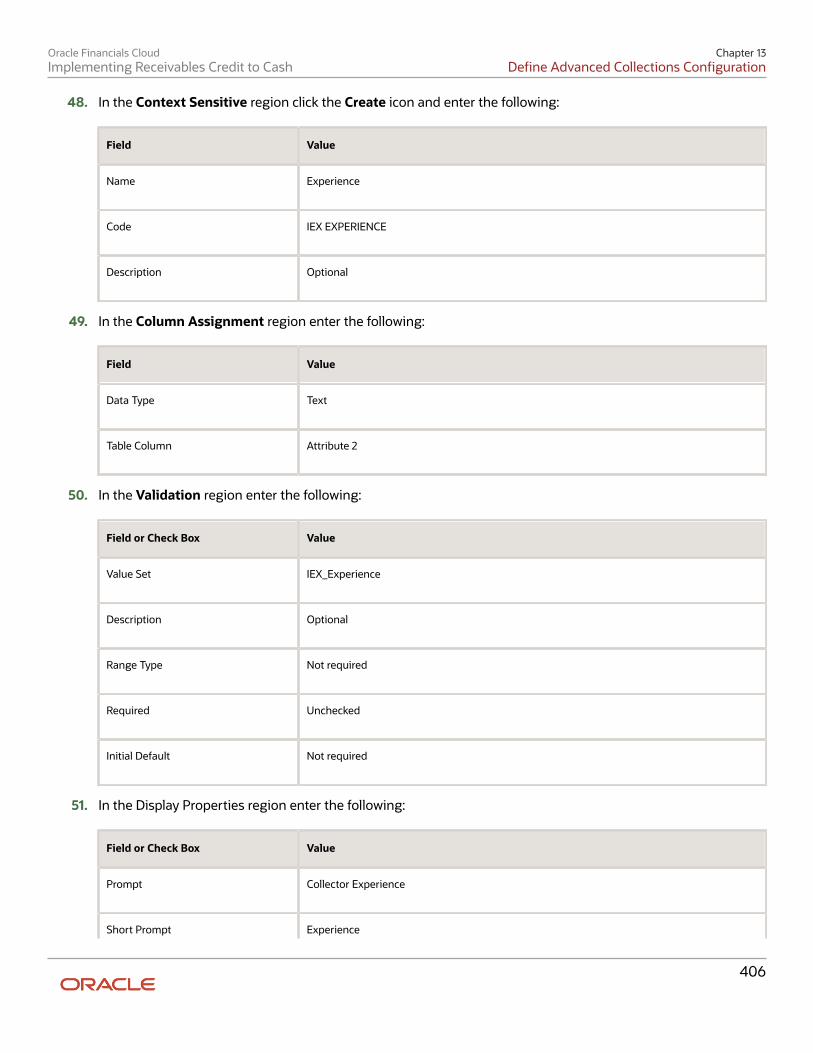
Oracle Financials CloudImplementing Receivables Credit to Cash
Chapter 13Define Advanced Collections Configuration
48. In the Context Sensitive region click the Create icon and enter the following:
Field Value
Name
Experience
Code
IEX EXPERIENCE
Description
Optional
49. In the Column Assignment region enter the following:
Field Value
Data Type
Text
Table Column
Attribute 2
50. In the Validation region enter the following:
Field or Check Box Value
Value Set
IEX_Experience
Description
Optional
Range Type
Not required
Required
Unchecked
Initial Default
Not required
51. In the Display Properties region enter the following:
Field or Check Box Value
Prompt
Collector Experience
Short Prompt Experience
406

Oracle Financials CloudImplementing Receivables Credit to Cash
Chapter 13Define Advanced Collections Configuration
Field or Check Box Value
Display Type
List of Values
Required
Unchecked
52. Click the Save and Close button.53. click the Save and Close button, a second time.54. Click the Done button.55. Click the Save and Close button.56. In the Manage Descriptive Flexfields page, search in name field for Collector.57. In the Search Results region, the Descriptive Flexfield appears.58. Click the Deploy Flexfield button.59. Click OK in the pop-up window.60. Activate the Descriptive Flexfield by signing out and signing back into the environment.61. Navigate to Set Up and Maintenance. Search for Manage Collectors using All Tasks tab.62. Click the Go to Task icon.63. Verify the Additional Information field appears in the Search region with a List of Values of Region and
Experience.64. Create a new collector and Expand the row. Verify the Additional Information with the 2 segments Region and
Experience appear with the appropriate values for each.
Related Topics• Overview of Collectors Descriptive Flexfield
• Considerations for Managing Descriptive Flexfields
• Overview of Descriptive Flexfields
FAQs for Manage Collectors
What's the difference between an employee assignment and a group assignment? An employee assignment is a collector assigned to one customer. You must create individuals as employees before youcan set them up as users, resources, and collectors.
A group assignment is created to assign work and customers to a group of collectors. You can have multiple employeesor collectors in one group.
407

Oracle Financials CloudImplementing Receivables Credit to Cash
Chapter 13Define Advanced Collections Configuration
Manage Dunning Configuration
Aged or Staged Dunning The following two dunning methods can be used to set up customer correspondence:
1. Aged2. Staged
The dunning methods are supported at the following levels:
• Customer
• Account
• Bill-to Site
Aged Dunning MethodThe Aged Dunning method can be used by companies sending collection letters to their customers based on the oldestaged transaction. Delinquent transactions are identified automatically when the Delinquency Identification concurrentprocess is run. Preconfigured dunning notice templates are available, or the deploying company can create their owndunning notice templates. As the oldest aged transaction moves into the next aging bucket, the content of the dunningletter can change. A single consolidated letter can be sent to eliminate sending multiple aged dunning letters to thesame customer who has more than one delinquent transaction. The templates are associated to aging buckets in thedunning configuration process.
Staged Dunning MethodThe Staged Dunning method is based on the number of days since the last dunning letter was sent, rather than thenumber of days transactions are past due. A single consolidated letter can be sent to eliminate sending multiple stageddunning letters to the same customer who has more than one delinquent transaction. Delinquent transactions areidentified automatically when the Delinquency Identification concurrent process is run. In cases where transactionshave installment due dates, the staged dunning letter includes each overdue installment date in the body of theconsolidated letter. Staged dunning letters are sent at delayed intervals defined in the Dunning Configuration process.These intervals control the timing of each letter sent. Use preconfigured dunning templates or create new ones.
Related Topics• Customer Dunning Configuration : Points to Consider
Customer Dunning Configuration Options Configure dunning plans and letters to facilitate regular correspondence with your customers.
408
Oracle Financials CloudImplementing Receivables Credit to Cash
Chapter 13Define Advanced Collections Configuration
All of the following options except rerun the dunning process are created in the Correspondence Configuration inFunctional Setup Manager.
• Dunning letter options
• Delivery options for dunning letters
• Dunning configuration set
• Dunning transactions
• Rerun the dunning process
Dunning Letter OptionsUse the preconfigured aged or staged dunning letters delivered by the application or create new dunning letters to meetunique requirements. Configure dunning to run in one of two methods:
1. Aged Dunning is based on the oldest past due debit item.2. Staged Dunning is based on the number of days since the previous letter was sent.
Delivery Options for Dunning LettersDelivery of dunning letters to customer is:
• Fax
• Regular mail
Dunning TransactionsSelect the transactions and charges to include in the dunning letters.
• The Dunning Letter Generate program can include current invoices, disputed invoices, and credit memos.
• The dunning letters can include current transactions.
• Finance charges can be included as a line item.
• When you select the Include Disputed Invoices, the transactions awaiting dispute resolution are displayed andincluded in the total.
Dunning Configuration SetDunning can be configured by one business unit or multiple business units. Consider the following when defining sets:
• A Set defines a subset of a master list of business objects, such as suppliers, customers, or in this case aDunning Configuration Set.
• A Set Determinant is a business object, usually a type of organizational unit, that has a 1 to 1 relationship to Set.When Set Determinant is visible, Set can be hidden.
• A Set of business objects can be associated with an organizational unit, such as Business Unit or Legal Entity, toenforce data security. Then, when you are associated with organizational units, they automatically see only thesubset of business objects appropriate for their organizational units.
409
Oracle Financials CloudImplementing Receivables Credit to Cash
Chapter 13Define Advanced Collections Configuration
• A Set or Set Determinant field appears to you as a lookup code that determines which subset of a master list ofobjects their organizational unit uses. For example, if you are performing a Purchasing transaction, the Set orSet Determinant value would determine which Suppliers can be used.
Rerun the Dunning ProcessRerun the dunning process to correct errors or regenerate dunning letters:
• Rerun the dunning process should there be an error during any phase of the program.
• Regenerate a previous dunning letter if a customer request another copy.
Keep customers from receiving dunning letters by indicating them as Exclude from dunning on the Profile tab.
Post Installation for Dunning Configuration Oracle Fusion Advanced Collections Dunning feature utilizes Oracle Business Intelligence Publisher to distributedunning letters to customers by Email, fax, or print. To use this feature, you must configure Oracle Business IntelligencePublisher to connect to the deploying company's internal Email, or the print or fax servers.
Configuring Oracle Business Intelligence Publisher: Configure Oracle Business Intelligence Publisher by adding an Emailserver. Refer to the Oracle Fusion Middleware Administrator's Guide for Oracle Business Intelligence Publisher (OracleFusion Applications Edition).
Adding the EMail ServerTo add an Email server:
1. From the Administration page select Email. This displays the list of servers that have been added. Select AddServer.
2. Enter the Server Name, Host, and Port for the Email server.3. Select a Secure Connection method to use for connections with the Email server. The options are: None or
SSL. Use Secure Socket Layer. TLS (Transport Layer Security). Use TLS when the server supports the protocol;SSL is accepted in the response. TLS Required. If the server does not support TLS, then the connection is notmade.
4. Optionally enter the following fields if appropriate: General fields; Port Security fields User name and Password.
FAQs for Manage Dunning Configuration
What's the difference between an aged and staged dunning method? Aged dunning sends dunning letters based on the age of the oldest transaction. Managers identify the dunning letter tobe sent for each aging bucket.
Staged dunning sends dunning letters based on the age of the oldest transaction and the number of days since the lastletter was sent. Managers specify how long to wait before executing the next stage.
For both methods, managers decide whether or not to manually schedule a follow-up call if the delinquency isn'tresolved.
410
Oracle Financials CloudImplementing Receivables Credit to Cash
Chapter 13Define Advanced Collections Configuration
Define Scoring
Scoring Formulas Scoring formulas are the foundation for your collections activities.
Scoring FormulasOracle Fusion Advanced Collections uses scoring in two ways:
1. Determines transaction status as current, delinquent, or predelinquent. Collections scores invoices anddebit memos from Oracle Fusion Accounts Receivables. A customer is delinquent when they have past duetransactions.
2. Determines the collectability of each customer at the customer, account, or bill-to site level. Use data pointsabout the customer to determine collectability.
Scoring formulas consist of:
• High and low scores
• One or more weighted data points that must sum to 1
• Data point details
• Status used only in the case of scoring transactions
• A segment which enables you to run against a subset or segment of the database
• A review where you can test your formula
A Scoring formula provides you an effective way to manage your collections resources and strategies.
Collections delivers a set of scoring formulas you can apply or copy and modify to your specific business needs.
Considerations and RecommendationsConsider the following:
• You should test all data points and scoring formulas in a test environment using a portion or all of yourproduction data
• Once you're satisfied with the scoring results and performance, you can move your tested scoring formulas toyour production environment
411
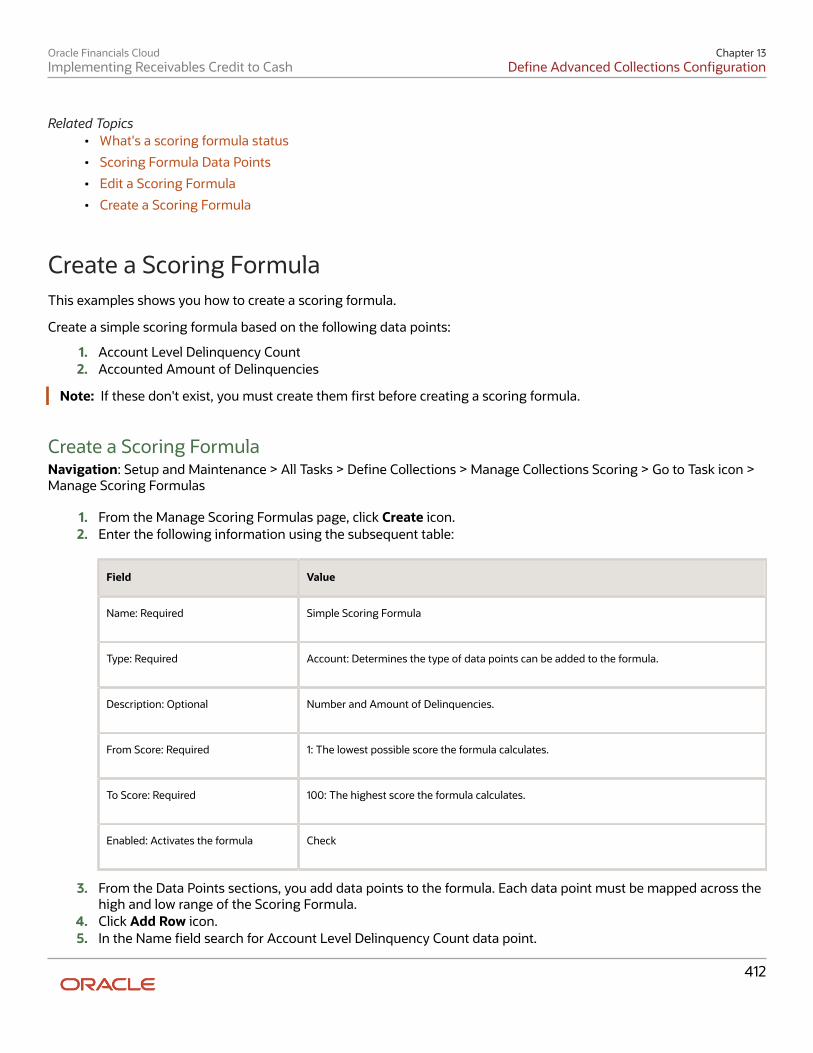
Oracle Financials CloudImplementing Receivables Credit to Cash
Chapter 13Define Advanced Collections Configuration
Related Topics• What's a scoring formula status
• Scoring Formula Data Points
• Edit a Scoring Formula
• Create a Scoring Formula
Create a Scoring Formula This examples shows you how to create a scoring formula.
Create a simple scoring formula based on the following data points:
1. Account Level Delinquency Count2. Accounted Amount of Delinquencies
Note: If these don't exist, you must create them first before creating a scoring formula.
Create a Scoring FormulaNavigation: Setup and Maintenance > All Tasks > Define Collections > Manage Collections Scoring > Go to Task icon >Manage Scoring Formulas
1. From the Manage Scoring Formulas page, click Create icon.2. Enter the following information using the subsequent table:
Field Value
Name: Required
Simple Scoring Formula
Type: Required
Account: Determines the type of data points can be added to the formula.
Description: Optional
Number and Amount of Delinquencies.
From Score: Required
1: The lowest possible score the formula calculates.
To Score: Required
100: The highest score the formula calculates.
Enabled: Activates the formula
Check
3. From the Data Points sections, you add data points to the formula. Each data point must be mapped across thehigh and low range of the Scoring Formula.
4. Click Add Row icon.5. In the Name field search for Account Level Delinquency Count data point.
412
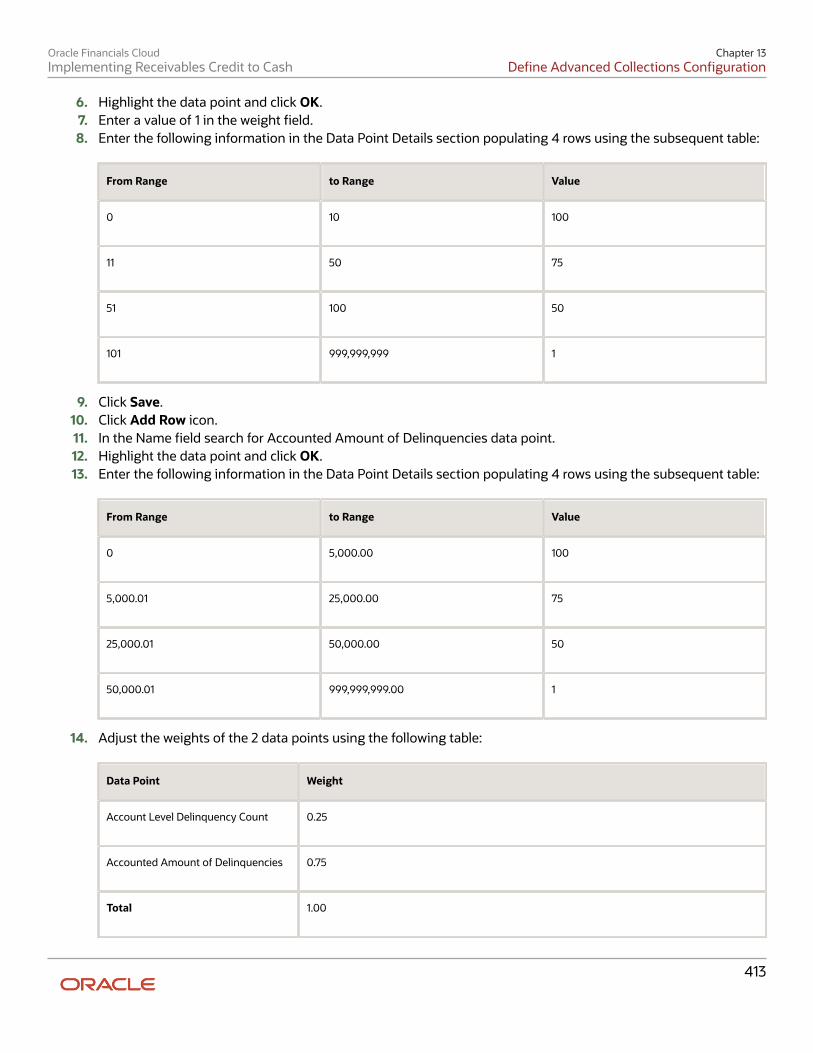
Oracle Financials CloudImplementing Receivables Credit to Cash
Chapter 13Define Advanced Collections Configuration
6. Highlight the data point and click OK.7. Enter a value of 1 in the weight field.8. Enter the following information in the Data Point Details section populating 4 rows using the subsequent table:
From Range to Range Value
0
10
100
11
50
75
51
100
50
101
999,999,999
1
9. Click Save.10. Click Add Row icon.11. In the Name field search for Accounted Amount of Delinquencies data point.12. Highlight the data point and click OK.13. Enter the following information in the Data Point Details section populating 4 rows using the subsequent table:
From Range to Range Value
0
5,000.00
100
5,000.01
25,000.00
75
25,000.01
50,000.00
50
50,000.01
999,999,999.00
1
14. Adjust the weights of the 2 data points using the following table:
Data Point Weight
Account Level Delinquency Count
0.25
Accounted Amount of Delinquencies
0.75
Total
1.00
413
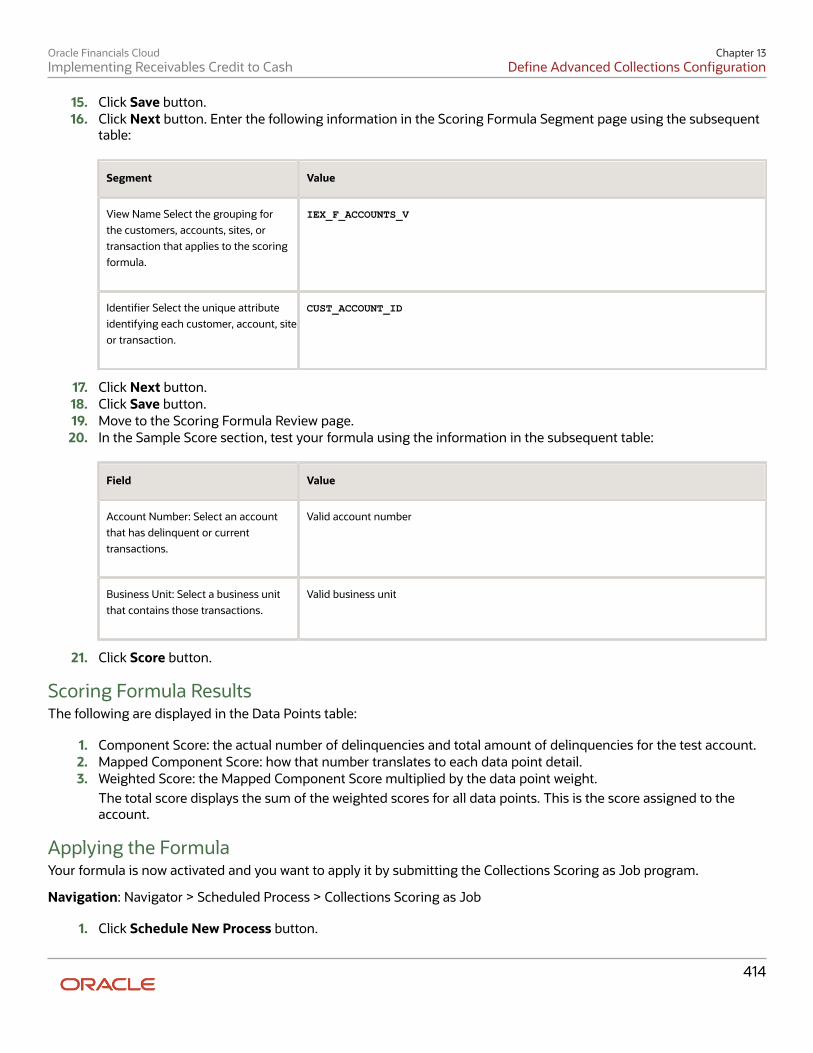
Oracle Financials CloudImplementing Receivables Credit to Cash
Chapter 13Define Advanced Collections Configuration
15. Click Save button.16. Click Next button. Enter the following information in the Scoring Formula Segment page using the subsequent
table:
Segment Value
View Name Select the grouping forthe customers, accounts, sites, ortransaction that applies to the scoringformula.
IEX_F_ACCOUNTS_V
Identifier Select the unique attributeidentifying each customer, account, siteor transaction.
CUST_ACCOUNT_ID
17. Click Next button.18. Click Save button.19. Move to the Scoring Formula Review page.20. In the Sample Score section, test your formula using the information in the subsequent table:
Field Value
Account Number: Select an accountthat has delinquent or currenttransactions.
Valid account number
Business Unit: Select a business unitthat contains those transactions.
Valid business unit
21. Click Score button.
Scoring Formula ResultsThe following are displayed in the Data Points table:
1. Component Score: the actual number of delinquencies and total amount of delinquencies for the test account.2. Mapped Component Score: how that number translates to each data point detail.3. Weighted Score: the Mapped Component Score multiplied by the data point weight.
The total score displays the sum of the weighted scores for all data points. This is the score assigned to theaccount.
Applying the FormulaYour formula is now activated and you want to apply it by submitting the Collections Scoring as Job program.
Navigation: Navigator > Scheduled Process > Collections Scoring as Job
1. Click Schedule New Process button.
414
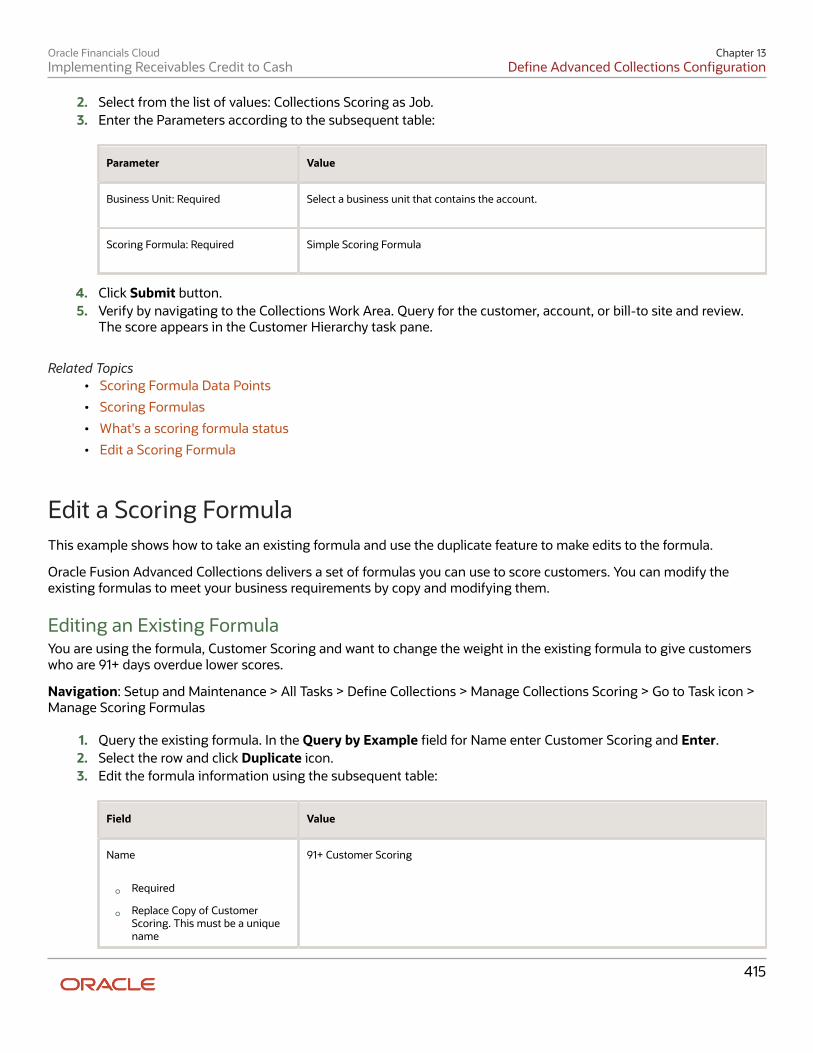
Oracle Financials CloudImplementing Receivables Credit to Cash
Chapter 13Define Advanced Collections Configuration
2. Select from the list of values: Collections Scoring as Job.3. Enter the Parameters according to the subsequent table:
Parameter Value
Business Unit: Required
Select a business unit that contains the account.
Scoring Formula: Required
Simple Scoring Formula
4. Click Submit button.5. Verify by navigating to the Collections Work Area. Query for the customer, account, or bill-to site and review.
The score appears in the Customer Hierarchy task pane.
Related Topics• Scoring Formula Data Points
• Scoring Formulas
• What's a scoring formula status
• Edit a Scoring Formula
Edit a Scoring Formula This example shows how to take an existing formula and use the duplicate feature to make edits to the formula.
Oracle Fusion Advanced Collections delivers a set of formulas you can use to score customers. You can modify theexisting formulas to meet your business requirements by copy and modifying them.
Editing an Existing FormulaYou are using the formula, Customer Scoring and want to change the weight in the existing formula to give customerswho are 91+ days overdue lower scores.
Navigation: Setup and Maintenance > All Tasks > Define Collections > Manage Collections Scoring > Go to Task icon >Manage Scoring Formulas
1. Query the existing formula. In the Query by Example field for Name enter Customer Scoring and Enter.2. Select the row and click Duplicate icon.3. Edit the formula information using the subsequent table:
Field Value
Name
◦ Required
◦ Replace Copy of CustomerScoring. This must be a uniquename
91+ Customer Scoring
415
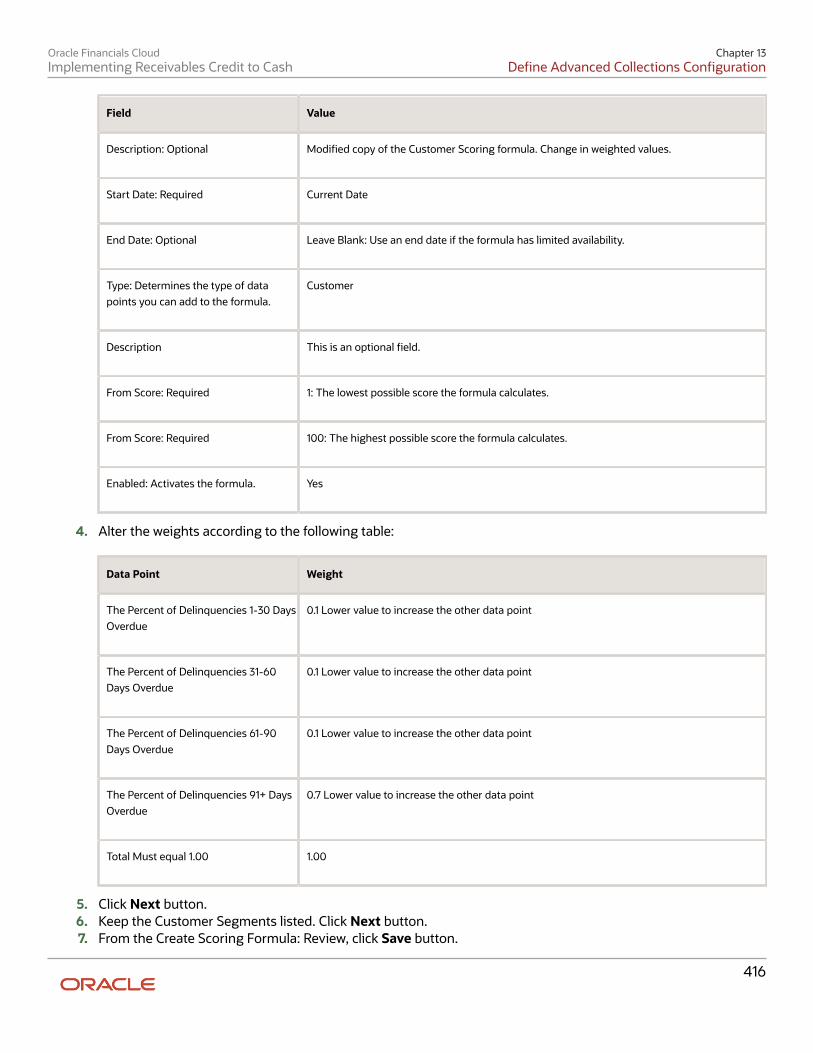
Oracle Financials CloudImplementing Receivables Credit to Cash
Chapter 13Define Advanced Collections Configuration
Field Value
Description: Optional
Modified copy of the Customer Scoring formula. Change in weighted values.
Start Date: Required
Current Date
End Date: Optional
Leave Blank: Use an end date if the formula has limited availability.
Type: Determines the type of datapoints you can add to the formula.
Customer
Description
This is an optional field.
From Score: Required
1: The lowest possible score the formula calculates.
From Score: Required
100: The highest possible score the formula calculates.
Enabled: Activates the formula.
Yes
4. Alter the weights according to the following table:
Data Point Weight
The Percent of Delinquencies 1-30 DaysOverdue
0.1 Lower value to increase the other data point
The Percent of Delinquencies 31-60Days Overdue
0.1 Lower value to increase the other data point
The Percent of Delinquencies 61-90Days Overdue
0.1 Lower value to increase the other data point
The Percent of Delinquencies 91+ DaysOverdue
0.7 Lower value to increase the other data point
Total Must equal 1.00
1.00
5. Click Next button.6. Keep the Customer Segments listed. Click Next button.7. From the Create Scoring Formula: Review, click Save button.
416

Oracle Financials CloudImplementing Receivables Credit to Cash
Chapter 13Define Advanced Collections Configuration
8. In the Sample Score section test your formula using the information in the subsequent table:
Field Value
Account Number
Select an account known to have 91+ delinquent transactions.
Business Unit
Select a Business Unit that contains those transactions.
9. Click Score button.
The following are displayed in the Data Points table:
a. Component Score: the actual number of delinquencies and total amount of delinquencies for the testaccount.
b. Mapped Component Score: how that number translates to each data point detail.c. Weighted Score: the Mapped Component Score multiplied by the data point weight.
The Total Score displays the sum of the weighted scores for all data points.
Assigning the FormulaYour formula is now activated and you want to apply it by doing the following:
Navigation: Navigator > Scheduled Process > Collections Scoring as Job
1. Click Schedule New Process button.2. Select from the list of values: Collections Scoring as Job.3. Enter the parameters according to the subsequent table:
Parameter Value
Business Unit
Select a Business Unit that contains the account you tested previously.
Scoring Formula
91+ Customer Scoring
4. Click Submit button.5. Verify by navigating to the Collections Work Area. Query for the customer, account, or bill-to site and review.
The score appears in the Customer Hierarchy task pane.
Related Topics• Scoring Formulas
• Scoring Formula Data Points
• What's a scoring formula status
• Create a Scoring Formula
417

Oracle Financials CloudImplementing Receivables Credit to Cash
Chapter 13Define Advanced Collections Configuration
Scoring Formula Data Points A data point is a component of a scoring formula.
Data PointsData points can be one of the following two types:
1. A select statement2. A database function, an example would be asking for the total number of delinquent transactions or the total
delinquent amount of customer delinquencies
Note: You must know how to create PL/SQL statements or functions for either type.
The following are criteria for data point details:
• They must return a single numeric value
• They must be created for a certain element which is the database entity to be scored
• Can be positive or negative
• Must account for the range of numbers from -999,999,999 to 999,999,999
• Must be contiguous and don't overlap
The values calculated by a data point are weighted and used in the scoring formula. Collections deliver formulas wherea higher score indicates a better chance of collectability and a lower score indicates a lower chance of collectability. Youcan configure formulas where higher scores result in lower chance of collectability and lower scores a higher chance ofcollectability.
Related Topics• Scoring Formulas
• What's a scoring formula status
• Create a Scoring Formula
• Edit a Scoring Formula
FAQs for Define Scoring
What's a scoring formula status? You can assign the scoring formula status only when the scoring formula type is Transaction. Assign one of thefollowing statuses:
• Current
• Delinquent
418

Oracle Financials CloudImplementing Receivables Credit to Cash
Chapter 13Define Advanced Collections Configuration
• Predelinquent
What's a scoring formula segment? A segment is a subset of the objects being scored.
For example, to score customers in US based on different criteria than customers based in Japan. You can just createtwo different formulas and attach two different segments to those formulas.
The segment is a database view and must be created by your Database Administrator.
Define Strategy
Processing Strategies You must complete a series of processes before using the strategies.
Here's how you process the strategies:
• Score collections objects by running the Collections Scoring program
• Aggregate customer data by running the Update Collections Summary Data program
• Run the Strategy Management concurrent program to create a strategy for each delinquent object
• Each strategy is assigned based on the score applied to it
• This score determines how aggressively or softly the strategy treats delinquent customers
How You Process a StrategyLet's understand how you can process a strategy with help of an example.
Say you have created delinquencies and scored collections objects, such as 30 day and 60 day past due invoices. Thereare two strategies that exist with the following information:
Strategy Name Tasks
Soft
1. Send reminder letter2. Make call3. Follow-up call4. Send dunning letter
Hard
1. Send dunning letter2. Make call3. Call escalation by supervisor
Results
The following scores result after the Strategy Management program runs:
419
Oracle Financials CloudImplementing Receivables Credit to Cash
Chapter 13Define Advanced Collections Configuration
Score Results
50
Higher Score results in a softer strategy
30
Lower score results in a harder strategy
Analysis
• If the program can't find a strategy to match the exact score, it assigns a more aggressive strategy.
• If the delinquency score returned by the scoring engine is 35, then the selection module in the program looksfor strategies ranked 35, and if not found, looks for 34, then 33, until a valid score is found. Like in this example,the program assigns the Hard Strategy to the delinquent object.
Related Topics• Collections Strategies
• Create a Task
• Create a Collections Strategy
• How can I assign a strategy to a customer
Collections Strategies Oracle Fusion Advanced Collections strategies are a series of manual or automated activities, known as tasks. Thesetasks are linked together in the order they're to be executed.
You can use these tasks to collect from your delinquent customers. Here are some examples of these tasks:
• Call the customer
• Send a letter, fax, or email
• Escalate to a supervisor
If you escalate a task. A notification is sent to your manager automatically.
Note: You can create several tasks and reuse them in many strategies.
Collections strategies support activities based on the following:
• Your business requirements
• Scoring rules
• Alternative to dunning plans
• To collect on delinquent transactions
• Simple to complex collection activities
Note: You can use either strategies or dunning plans to manage your delinquencies, but not both methods.
420

Oracle Financials CloudImplementing Receivables Credit to Cash
Chapter 13Define Advanced Collections Configuration
Use strategies in the following way:
• Associate with customers, accounts, or bill-sites depending on the data level you do business.
• Leverage information from the Advanced Collections scoring engines that identifies delinquent transactionsand score delinquent objects.
Setting Up StrategiesSetup your strategies in the following order:
1. Create collections tasks.2. Create collections strategies.3. Assign collections method name.4. Assign task to strategies.
Strategy Processing and ResultsTo assign appropriate strategies to the collections objects, run the Strategy Management concurrent program for all thebusiness units at once.
The strategies are based on the scoring engine results. The concurrent program results in the following:
• Oracle SOA BPEL initiates and manages tasks and sends notifications to the designated person
• Oracle BI Publisher sends correspondence
Related Topics• Processing Strategies
• Create a Collections Strategy
• Create a Task
• How can I assign a strategy to a customer
• How do scoring engines and strategies work together
Create a Collections Strategy This exercise show you how to create a strategy, assign tasks, and assign them sequentially.
Strategies are a series of manual or automated tasks and linked together in the order they're to be executed. A strategyconsists of the following:
• Create Strategy Template Group: Used to define your general information about the strategy
• Customer Segment: Identifies the grouping and unique attribute for this strategy
• Strategies: Lists the various stages and scores for your strategy
• Tasks: Lists the tasks in sequential order and defines the details for each
Create a StrategyNavigation: Setup and Maintenance > All Tasks > Manage Collections Strategies> Go to Task icon > Manage Strategies
1. From the Manage Collections Strategies section click Create icon.2. Enter the following information:
421

Oracle Financials CloudImplementing Receivables Credit to Cash
Chapter 13Define Advanced Collections Configuration
Create Strategy Template Group page:
Field Value
Group Name
US Customers
Strategy Level
Account
Change Strategy per Tolerance
No
Enabled
Yes
Start Date
Select the current date.
End Date
Blank
Customer Segment section
Field Value
View Name
Account
Identifier
ID
Strategies section
Field Value
Method Name
USA Strategy Good
Lowest Applicable Score
50
Method Name (Add row icon)
USA Strategy Bad
Lowest Applicable Score 0
422
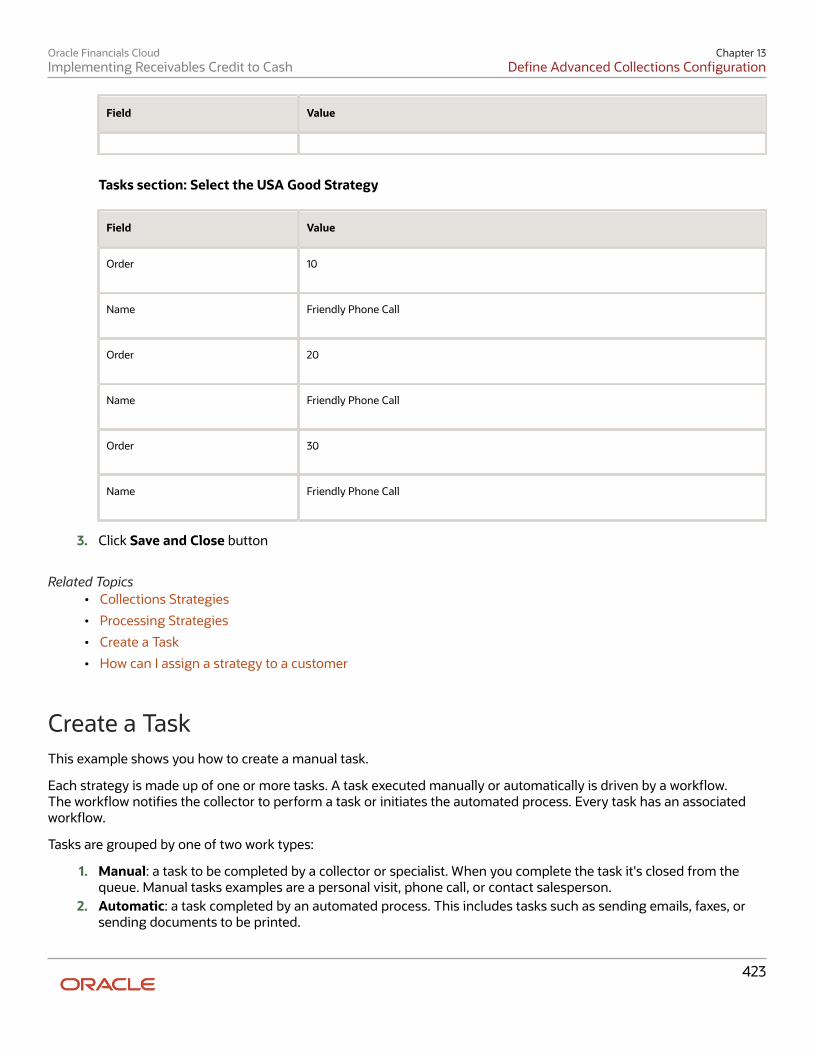
Oracle Financials CloudImplementing Receivables Credit to Cash
Chapter 13Define Advanced Collections Configuration
Field Value
Tasks section: Select the USA Good Strategy
Field Value
Order
10
Name
Friendly Phone Call
Order
20
Name
Friendly Phone Call
Order
30
Name
Friendly Phone Call
3. Click Save and Close button
Related Topics• Collections Strategies
• Processing Strategies
• Create a Task
• How can I assign a strategy to a customer
Create a Task This example shows you how to create a manual task.
Each strategy is made up of one or more tasks. A task executed manually or automatically is driven by a workflow.The workflow notifies the collector to perform a task or initiates the automated process. Every task has an associatedworkflow.
Tasks are grouped by one of two work types:
1. Manual: a task to be completed by a collector or specialist. When you complete the task it's closed from thequeue. Manual tasks examples are a personal visit, phone call, or contact salesperson.
2. Automatic: a task completed by an automated process. This includes tasks such as sending emails, faxes, orsending documents to be printed.
423
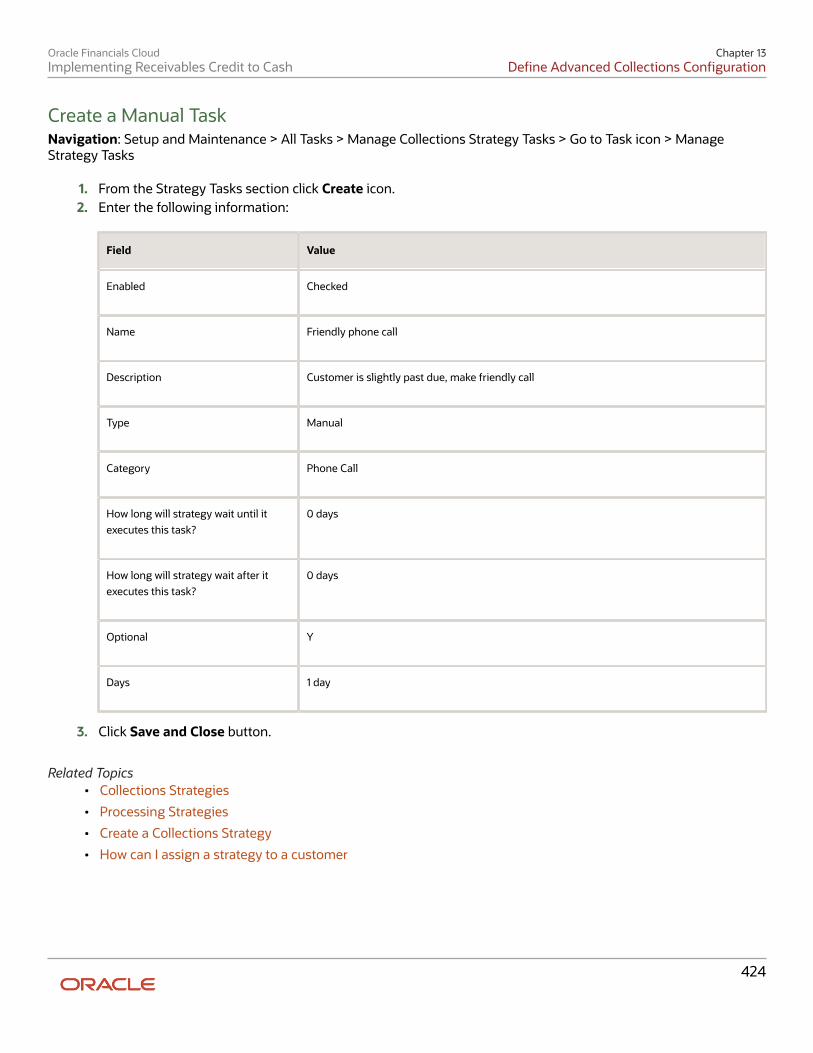
Oracle Financials CloudImplementing Receivables Credit to Cash
Chapter 13Define Advanced Collections Configuration
Create a Manual TaskNavigation: Setup and Maintenance > All Tasks > Manage Collections Strategy Tasks > Go to Task icon > ManageStrategy Tasks
1. From the Strategy Tasks section click Create icon.2. Enter the following information:
Field Value
Enabled
Checked
Name
Friendly phone call
Description
Customer is slightly past due, make friendly call
Type
Manual
Category
Phone Call
How long will strategy wait until itexecutes this task?
0 days
How long will strategy wait after itexecutes this task?
0 days
Optional
Y
Days
1 day
3. Click Save and Close button.
Related Topics• Collections Strategies
• Processing Strategies
• Create a Collections Strategy
• How can I assign a strategy to a customer
424
Oracle Financials CloudImplementing Receivables Credit to Cash
Chapter 13Define Advanced Collections Configuration
Enable Collections Strategy for Individual Transactions Generally, you can assign collections strategies at a client level. However, you may have business requirements to assignthese strategies for individual transactions. To assign collections strategies for individual transactions, you must enablethe Collections Strategies for Individual Transactions feature.
To enable this feature:
1. Click Navigator > My Enterprise > Offerings.2. On the Offerings page, select Financials.3. Click Opt In Features.4. On the Opt In: Financials page, click the Features icon for Collections. A list of Collections features is
displayed.5. Select the Enable check box for the Collections Strategies for Individual Transactions feature and save the
changes.
Note: Before you enable this feature, you must enable these prerequisite features:• Collections Scoring and Strategy Assignments by Segment
• Automatically Initiate or Fulfill Collections Tasks in Third Party Systems
Manage Collections Scoring and Strategy Assignments
Scoring and Strategy Assignments by Segment Using Advanced Collections Scoring and Strategy Assignments by Segment feature you can do the following:
• Manage the scoring and strategy assignments of your customers.
• Increase your collections efficiency.
• Improve the cash flow.
As a collector, you can categorize your customers based on various segments such as business unit, profile class, andremaining amount due. You can assign different scoring formulas and delinquent strategy groups to the customers,and collectors can define the pre-delinquency options. You can also assign the predelinquent strategy groups to thecustomers.
You can manage this feature from your work area and the Customer page. For example, you can view the multiplestrategies running against the same customer under the Strategies tab on the Customer page. If the setup process iscomplete, the predelinquent strategies are also displayed on the landing page.
The assignments are defined as the default scoring formula. The delinquent strategy group assignments are defined ateach business level. The scoring formulas and delinquent strategy groups are displayed automatically. You can changethe groups to any scoring formulas or strategy groups that are defined based on your business requirements..
Related Topics• Overview of Advanced Collections Work Area
425
Oracle Financials CloudImplementing Receivables Credit to Cash
Chapter 13Define Advanced Collections Configuration
Define Scoring Formula and Delinquent Strategy Assignments bySegment You can use the Manage Collections Scoring and Strategy Assignments task to define the scoring formula anddelinquent strategy assignments. You must specify the segments and enter the detailed assignments in the DelinquentStrategy Assignments by Segment region under the Manage Collections Scoring and Strategy Assignments task.A segment is defined as a set or subset of various objects identified for scoring. The segmentation is implementedthrough each business unit and profile class, and define the segmentation for the Customer, Account, or Site businesslevels. For example, define the segment name Business Level + BU + Profile + High / Low Amount, for each segmentincluding the default values.
Define the Amount Due Lower or Upper Threshold and the corresponding delinquent strategy groups to use whenthe amount due is below the lower threshold or above the upper threshold. You can define one, both, or none of thethresholds.
• Amount Overdue Lower Threshold: The lower threshold for the customer's amount overdue below which theBelow Threshold Strategy Group is used.
• Below Threshold Strategy Group: The strategy group assignment when the customer's amount overdue is lessthan the Amount Overdue Lower Threshold.
• Amount Overdue Upper Threshold: The upper threshold for the customer's amount overdue above which theAbove Threshold Strategy Group is used.
• Above Threshold Strategy Group: The strategy group assignment when the customer's amount overdue ismore than the Amount Overdue Upper Threshold.
Here are the various scenarios to specify default scoring and strategy assignments:
1. Scoring and strategy assignments for various business levels: You can set up the default scoring formulaand strategy group for all the three business levels. The scores are calculated based on the default scoringformula for the business level of customers, and delinquent strategies which are assigned based on the defaultstrategy group for each business level.
2. Scoring and strategy assignments by business unit: The scoring formula is different based on your businessunit. You can use different scoring formulas and strategy groups for the selected business units, and you canuse one scoring formula and strategy group for the remaining business units.
3. Scoring and strategy assignments by profile class: The delinquent customers who belong to the differentprofile classes, and their scores are calculated based on the different scoring formulas and the strategies areassigned based on the different strategy groups.
4. Scoring and strategy assignments by amount overdue lower threshold: You can specify the amountoverdue lower threshold for each business unit and the strategy groups for the below threshold. If a customer'samount remaining due is less than the amount overdue lower threshold, then the strategy group specifiedfor the below threshold is assigned. Otherwise, by default the delinquent strategy group defined in theassignments is assigned.
5. Scoring and strategy assignments by business unit and profile class: The scores are calculated based on thevarious scoring formula for that specific business unit and profile class, and the strategies are assigned basedon the various strategy groups.
426

Oracle Financials CloudImplementing Receivables Credit to Cash
Chapter 13Define Advanced Collections Configuration
6. Scoring and strategy assignments by amount overdue lower and upper thresholds:
◦ If a customer's amount remaining due is less than the amount overdue lower threshold, then the strategygroup specified for the below threshold is assigned.
◦ If a customer's amount remaining due is more than the amount overdue upper threshold, then thestrategy group specified for the above threshold is assigned. Otherwise, the delinquent strategy groupdefined in the assignments is assigned.
Related Topics• Scoring and Strategy Assignments by Segment
• Overview of Advanced Collections Work Area
Define Predelinquent Strategy Assignments by Segment Using the Collections Delinquency Management process you can identify the delinquency and pre-delinquency statusesfor your customers, customer transactions, accounts, and sites based on the business level and pre-delinquencyoptions.
Collections Scoring and Strategy Assignments Scheduled ProcessAfter the Collections Delinquency Management process is successfully completed, run the second process CollectionsScoring and Strategy Assignments. This process assigns the scoring formula based on the segmentation, calculate thescores, and then assign strategies also based on the segmentation.
To run the Scoring and Strategy Assignments Scheduled Process:
1. Navigate to Scheduled Process.2. Click Schedule New Process.3. Enter or select the required parameters.4. Click Submit.
Note: You must enable the Manage Collections Scoring and Strategy Assignments before you run the process.
To run the Update Collections Summary Data:
This process refreshes the data on the Collections landing page that contains the details about delinquent customersand strategy tasks.
1. Navigate to the Collections work area.2. The Collections work area is displayed with all the four infotiles information. Select the delinquent customer or
account infotile:
◦ The delinquent customers and the corresponding details of the customers are displayed by default.
◦ The scores are calculated and delinquent strategies are assigned based on the Manage Scoring andStrategy Assignments by Segment setup data.
◦ In addition, a predelinquent strategy is assigned to the customers that are predelinquent based on thesetup information.
◦ Run the Delinquent strategies and predelinquent strategies at the same time, since one customer may bedelinquent and predelinquent at the same time.
427

Oracle Financials CloudImplementing Receivables Credit to Cash
Chapter 13Define Advanced Collections Configuration
3. Select the Strategies tab to view the details of the strategies. In this case, both the strategies are running, and itdisplays the strategy type, and the name of the strategy assignment for reference.
Related Topics• Scoring and Strategy Assignments by Segment
• Define Scoring Formula and Delinquent Strategy Assignments by Segment
• Overview of Advanced Collections Work Area
428
Oracle Financials CloudImplementing Receivables Credit to Cash
Chapter 14Define Bill Management
14 Define Bill Management
Set Up Bill Management Using Oracle Fusion Bill Management, you can set up bill management to enable the various bills receivables processessuch as reviewing outstanding transactions, credit memos, monitoring disputes, and making online payments. Afteryou configure bill management you can define the system options to register the external users, customer accounts,and process various payment options.
Here's how you can set up bill management:
1. Enable bill management using the standard lookups.2. Provide data access to the internal users.3. Manage system options to enable preferences.
After you complete the set-up, these are the key features enabled for the users:
• Analyze open and closed transactions
• Download transactions
• Monitor disputes
• Process payments options
Enable Bill ManagementYou must enable the application feature using the standard lookups available for Bill Management.
Here are the steps to enable Bill Management:
1. In the Setup and Maintenance work area, select the Offering as Financials.2. Go to Manage Standard Lookups.3. On the Manage Standard Lookups page, search for the lookup type ARB_FEATURES.4. Add a lookup code BILL_MANAGEMENT to the same lookup type.5. Save the changes.
Provide Data Access to Internal UsersAssign a job role to the users. You can provide the users the permission to access data and transactions belonging to abusiness unit.
Here are the steps to provide data access to the internal users:
1. In the Setup and Maintenance work area, select the Offering as Financials, Functional Area as Users andSecurity, and Task as Manage Data Access for Users.
2. On the Manage Data Access for Users page, select the user name, role, security context and security contextvalue, to create the data access for the user.
3. Save the changes.
429
Oracle Financials CloudImplementing Receivables Credit to Cash
Chapter 14Define Bill Management
Manage System OptionsYou can use the system options to set up external user role assignments, transaction and payment processingconditions, enable preferences, and setup email notifications for the external users.
Here's how you can manage bill management system options for the external users:
1. In the Setup and Maintenance work area, select the Offering as Financials, Functional Area as Bill Management,and Task as Manage Bill Management System Options.
2. In the Registration section, select Customer Accounts Payable Specialist to assign the role for external user.3. In the Transaction and Payment Processing section, select transactions history in months, aging method, and
maximum future payment days allowed.4. In the Preferences section, set up the required preferences. Here's the list of preference items that you can
configure for each Business Unit:
◦ Bank Payment: Restrict or allow payment through bank.
◦ Credit Card Payment: Restrict or allow payment through credit card.
Note: redit card processing is currently available only in the Oracle data centers where OraclePayments is certified by the latest PCI Data Security Standard (PCI DSS v3.2.1).
◦ Credit Card Payment Limit: Restrict payments based on credit card limit value. If the limit is less than totalpayment amount, it restricts the payment.
◦ Ledger Currency Only: Restrict or allow payment using ledger currency only.
◦ Print Invoice: Restrict or allow to print the invoice.
5. In the Notifications section, configure the email notifications for the user registration process for each businessunit. Select a Business Unit and enter the required email addresses.
6. Save the changes.
Related Topics• How Bank, Branch, and Account Components Work Together
• Overview of Cash Management Rapid Implementation
• Remittance Bank Accounts on Receipt Methods
• Guidelines for Applying Receipts and On-Account Credit Memos
• Register External Users
430