Oracle SCM Cloud
396
Oracle SCM Cloud Using Supply Planning 22B
-
Upload
khangminh22 -
Category
Documents
-
view
0 -
download
0
Transcript of Oracle SCM Cloud

Oracle SCM Cloud
Using Supply Planning
22B

Oracle SCM CloudUsing Supply Planning
22B
F53745-03
Copyright © 2011, 2022, Oracle and/or its affiliates.
This software and related documentation are provided under a license agreement containing restrictions on use and disclosure and are protectedby intellectual property laws. Except as expressly permitted in your license agreement or allowed by law, you may not use, copy, reproduce, translate,broadcast, modify, license, transmit, distribute, exhibit, perform, publish, or display any part, in any form, or by any means. Reverse engineering,disassembly, or decompilation of this software, unless required by law for interoperability, is prohibited.
The information contained herein is subject to change without notice and is not warranted to be error-free. If you find any errors, please reportthem to us in writing.
If this is software, software documentation, data (as defined in the Federal Acquisition Regulation), or related documentation that is delivered to theU.S. Government or anyone licensing it on behalf of the U.S. Government, then the following notice is applicable:
U.S. GOVERNMENT END USERS: Oracle programs (including any operating system, integrated software, any programs embedded, installed, oractivated on delivered hardware, and modifications of such programs) and Oracle computer documentation or other Oracle data delivered to oraccessed by U.S. Government end users are "commercial computer software," "commercial computer software documentation," or "limited rightsdata" pursuant to the applicable Federal Acquisition Regulation and agency-specific supplemental regulations. As such, the use, reproduction,duplication, release, display, disclosure, modification, preparation of derivative works, and/or adaptation of i) Oracle programs (including anyoperating system, integrated software, any programs embedded, installed, or activated on delivered hardware, and modifications of such programs),ii) Oracle computer documentation and/or iii) other Oracle data, is subject to the rights and limitations specified in the license contained in theapplicable contract. The terms governing the U.S. Government's use of Oracle cloud services are defined by the applicable contract for such services.No other rights are granted to the U.S. Government.
This software or hardware is developed for general use in a variety of information management applications. It is not developed or intended foruse in any inherently dangerous applications, including applications that may create a risk of personal injury. If you use this software or hardwarein dangerous applications, then you shall be responsible to take all appropriate fail-safe, backup, redundancy, and other measures to ensure its safeuse. Oracle Corporation and its affiliates disclaim any liability for any damages caused by use of this software or hardware in dangerous applications.
Oracle®, Java, and MySQL are registered trademarks of Oracle and/or its affiliates. Other names may be trademarks of their respective owners.
Intel and Intel Inside are trademarks or registered trademarks of Intel Corporation. All SPARC trademarks are used under license and are trademarksor registered trademarks of SPARC International, Inc. AMD, Epyc, and the AMD logo are trademarks or registered trademarks of Advanced MicroDevices. UNIX is a registered trademark of The Open Group.
This software or hardware and documentation may provide access to or information about content, products, and services from third parties. OracleCorporation and its affiliates are not responsible for and expressly disclaim all warranties of any kind with respect to third-party content, products, andservices unless otherwise set forth in an applicable agreement between you and Oracle. Oracle Corporation and its affiliates will not be responsiblefor any loss, costs, or damages incurred due to your access to or use of third-party content, products, or services, except as set forth in an applicableagreement between you and Oracle.

Oracle SCM CloudUsing Supply Planning
Contents
Get Help ................................................................................................................................ i
1 Supply Planning Overview 1Business Flows for Supply Planning ........................................................................................................................................... 1
Overview of Supply Chain Planning Work Areas .................................................................................................................... 3
Overview of the Supply Planning Work Area .......................................................................................................................... 4
Access Tasks as Quick Actions on a Home Page .................................................................................................................... 5
Manage Page Layouts in Supply Planning ............................................................................................................................... 5
Overview of Supply Chain Planning Plan Types ..................................................................................................................... 7
Actions to Manage Your Plans .................................................................................................................................................... 8
Planners for Supply Chain Planning ........................................................................................................................................ 10
Review Plan Messages ................................................................................................................................................................. 12
Manage Notes in Supply Chain Planning ................................................................................................................................ 13
Assign Time Zones to Locations in Supply Chain Planning ............................................................................................... 15
2 Tables, Graphs, Analysis Sets, Tiles, and Tile Sets 19Overview of Tables, Graphs, Analysis Sets, Tiles, and Tile Sets ......................................................................................... 19
Use Advanced Options in the Selector Tool ........................................................................................................................... 23
Create an Analysis Set ................................................................................................................................................................ 24
Create a Tile in Supply Chain Planning .................................................................................................................................. 24
Set Measure Targets for Use in Tiles ....................................................................................................................................... 25
Create a Tile Set in Supply Chain Planning ............................................................................................................................ 25
Use Table Drilling ......................................................................................................................................................................... 26
Use Table Linking ......................................................................................................................................................................... 26
Graph Layout Options ................................................................................................................................................................. 27
Configure Filters for Graphs ...................................................................................................................................................... 28
Set Your Axis Scale ...................................................................................................................................................................... 29
Format how Measures are Displayed in Tables and Graphs .............................................................................................. 30
Configure Color by Measure to Display in Graphs ................................................................................................................ 31
How You Can Edit Measures at an Aggregate Time Level ................................................................................................. 33
How Time Periods Are Calculated and Displayed in Tables, Graphs, and the Selector Tool ........................................ 33
Measure Data in Tables .............................................................................................................................................................. 35

Oracle SCM CloudUsing Supply Planning
3 Planning Exceptions 39Exceptions in Plans ...................................................................................................................................................................... 39
Exceptions and Exception Sets ................................................................................................................................................. 44
Predefined Planning Exceptions ............................................................................................................................................... 46
User-Defined Exceptions ............................................................................................................................................................ 56
4 Planning Analytics 69Overview of Planning Analytics ................................................................................................................................................ 69
Configure Planning Analytics .................................................................................................................................................... 69
Dimensions and Dimensions Catalogs .................................................................................................................................... 72
Measure Catalogs ........................................................................................................................................................................ 76
Levels and Attributes ................................................................................................................................................................... 77
User-Defined Hierarchies ........................................................................................................................................................... 78
5 Planning Measures 85Predefined Measures in Supply Chain Planning ................................................................................................................... 85
How You Manage Planning Measures .................................................................................................................................... 85
Import Measure Data Into a Planning Table .......................................................................................................................... 88
Configure Units for a Measure ................................................................................................................................................. 89
Configure Currencies for a Measure ....................................................................................................................................... 90
Configure Conditional Formatting for a Measure ................................................................................................................. 91
Aggregate Levels for Measure Data Imports ......................................................................................................................... 92
View the Audit Trail for a Measure .......................................................................................................................................... 92
Manage User-Defined Measures .............................................................................................................................................. 93
6 Planning Data Collections 99Overview of Data Collections for Supply Chain Planning ................................................................................................... 99
Global Entities ............................................................................................................................................................................. 100
Data Collection Types for Supply Chain Planning ............................................................................................................... 101
Manage Planning Source Systems for Data Collections .................................................................................................... 102
How the Order Orchestration and Order Promising Processes Use the Collected Planning Data ............................ 104
How You Enable Cross-References of Entities by Data Collections ................................................................................ 105
How Planning Processes Collect Different Work Definitions and Item Structures ....................................................... 105
Enable External Data Collection for the Oracle Fusion Source System .......................................................................... 107
Collect Planning Data from the Oracle Fusion Source System ........................................................................................ 108
Load Planning Data from Others and External Source Systems ...................................................................................... 114
Oracle SCM CloudUsing Supply Planning
Verify Collection Processes ....................................................................................................................................................... 137
Purge Data .................................................................................................................................................................................... 139
Aggregate Customer Data ........................................................................................................................................................ 142
View and Refresh Collected Measure Data .......................................................................................................................... 146
7 Supply Plans 151Manage Supply Plans ................................................................................................................................................................. 151
Define Scope Plan Options ...................................................................................................................................................... 158
Safety Stock Parameters ............................................................................................................................................................ 161
Forecast Allocation and Consumption .................................................................................................................................. 166
Supply Plan Inputs ...................................................................................................................................................................... 171
Supply Plan Options for Organizations and Schedules ..................................................................................................... 183
How You Calculate Safety Stock Based on Multiple Demand Schedules ....................................................................... 185
Configure Measure Levels for Demand Schedules ............................................................................................................. 185
Run a Supply Plan or an Integrated Plan .............................................................................................................................. 186
Publish Plan Data ....................................................................................................................................................................... 189
Supply Planning Concepts ........................................................................................................................................................ 191
Telescoping Time Buckets ....................................................................................................................................................... 203
Modeling a Supply Chain ......................................................................................................................................................... 209
Work with Supply Plans ............................................................................................................................................................. 212
8 Analyze Supply Plans 223Build Plan View ........................................................................................................................................................................... 223
Supplies and Demands View ................................................................................................................................................... 229
Forecast Consumption View .................................................................................................................................................... 236
Material Plan View ..................................................................................................................................................................... 238
Pegging Analysis View .............................................................................................................................................................. 238
Demand Fulfillment View ......................................................................................................................................................... 239
Late Demand Analysis View .................................................................................................................................................... 242
9 Constraint-Based Supply Planning 245Overview of Constraint-Based Supply Planning ................................................................................................................. 245
Configure Constraints and Decision Rules .......................................................................................................................... 246
Plan Considering Resource Constraints in a Constrained Supply Plan .......................................................................... 248
Plan Based on Workday Patterns in a Resource Calendar ............................................................................................... 249
Plan Considering Material Constraints ................................................................................................................................. 250
Plan Considering Process Manufacturing Work Definitions ............................................................................................ 254

Oracle SCM CloudUsing Supply Planning
Automatically Evaluate and Select Alternatives to Meet Demand on Time .................................................................. 258
Exceptions in a Constrained Supply Plan ............................................................................................................................. 259
Diagnose Planning Issues in Constrained Supply Plans .................................................................................................... 261
Simulate Changes in a Constrained Supply Plan ................................................................................................................ 267
Safety Stock in a Constrained Supply Plan ........................................................................................................................... 271
How Supply Planning Respects Reservations in a Constrained Plan ............................................................................. 275
How You Prevent Creating Planned Orders in a Constrained Supply Plan ................................................................... 276
10 Project-Specific Supply Planning 279Overview of Project-Specific Supply Planning .................................................................................................................... 279
How You Plan Project-Specific Supply .................................................................................................................................. 280
Data Collection for Project-Specific Supply Planning ........................................................................................................ 281
Planning Data for Project-Specific Supply Planning .......................................................................................................... 282
Attribute-Based Netting Rules with Project Attributes ...................................................................................................... 287
Manage Attribute-Based Netting Rules with Project Attributes ...................................................................................... 293
Project Groups ............................................................................................................................................................................ 294
Manage Project Groups ............................................................................................................................................................ 294
How You Configure a Project-Specific Supply Plan ........................................................................................................... 295
How Supply Planning Uses Netting Rules ........................................................................................................................... 296
Examples of Project Netting ................................................................................................................................................... 296
Example of Supply Creation .................................................................................................................................................... 302
Project-Specific Safety Stock Planning ................................................................................................................................. 303
Example of Project-Specific Safety Stock Planning ........................................................................................................... 303
Example of Project-Specific Safety Stock Planning with Days of Cover ........................................................................ 305
Review Supplies and Demands with Project Pegging ....................................................................................................... 308
Release Project-Specific Supply Recommendations ........................................................................................................... 311
OTBI Analytics for Project-Specific Supply Plans ................................................................................................................ 313
Troubleshoot ................................................................................................................................................................................ 314
11 Attribute-Based Planning 317Overview of Attribute-Based Planning .................................................................................................................................. 317
Segment Groups and Criteria .................................................................................................................................................. 317
Planning Attributes ..................................................................................................................................................................... 318
Predefined Measures for Planning Attribute Dimensions ................................................................................................. 321
Attribute-Based Netting Rules ................................................................................................................................................ 323
How Supply Planning Uses Attribute-Based Netting Sequences .................................................................................... 327
How You Review Attribute-Based Planning Results ........................................................................................................... 328

Oracle SCM CloudUsing Supply Planning
How You Simulate Changes to Attribute-Based Planning Results .................................................................................. 329
12 Archive Plans 331Overview of Plan Archival in Supply Chain Planning ......................................................................................................... 331
Configure Archiving Parameters ............................................................................................................................................. 332
Overview of Archival for Calculating MAPE Statistics ........................................................................................................ 333
Archival for Calculating MAPE Statistics .............................................................................................................................. 334
Delete Archives in Supply Chain Planning ........................................................................................................................... 335
13 Extract Plan Data 337Overview of Planning Measure Data Extractions from Plan Output .............................................................................. 337
Configure Plan Extract Parameters ........................................................................................................................................ 338
Files Created by the Plan Extract Process ........................................................................................................................... 340
Dimension Data Files Created by the Plan Extract Process ............................................................................................. 342
Dimension Definition Files Created by the Plan Extract Process .................................................................................... 343
Measure Data Files Created by the Plan Extract Process ................................................................................................. 345
Measure Definition Files Created by the Plan Extract Process ........................................................................................ 346
Dimension Codes Used by the Plan Extract Process ......................................................................................................... 347
Dimensionality Group Codes Used by the Plan Extract Process ..................................................................................... 348
14 Supply Network Model 351How You Maintain Your Supply Network Model ................................................................................................................. 351
Publish Order Forecasts to Suppliers .................................................................................................................................... 353
How You Define the Approved Supplier List for Supply Chain Planning ....................................................................... 353
Associate Calendars with Supplier Sites ............................................................................................................................... 354
Assignment Sets, Sourcing Rules, and Bills of Distribution ............................................................................................. 354
Create an Assignment Set ....................................................................................................................................................... 358
Specify Catalogs for Assignment Sets .................................................................................................................................. 367
Create a Sourcing Rule ............................................................................................................................................................. 368
Export Planning Data to CSV Files ........................................................................................................................................ 368
Item Attributes and Order Modifiers for Supply Planning ................................................................................................ 369
Drop Shipment ............................................................................................................................................................................ 373
Plan Outside Processing Operations ..................................................................................................................................... 377
Back-to-Back Fulfillment .......................................................................................................................................................... 379
15 Simulation Sets 381Simulations in Supply Planning .............................................................................................................................................. 381

Oracle SCM CloudUsing Supply Planning
Create a Simulation Set ............................................................................................................................................................. 381
Edit a Simulation Set ................................................................................................................................................................. 382
Edit a Simulation Set from a Spreadsheet ........................................................................................................................... 383
Copy Data to Simulation Sets in Supply Planning ............................................................................................................. 384
Add Data from Plan Inputs to Simulation Sets ................................................................................................................... 384

Oracle SCM CloudUsing Supply Planning
Get Help
Get HelpThere are a number of ways to learn more about your product and interact with Oracle and other users.
Get Help in the ApplicationsUse help icons Help icon to access help in the application. If you don't see any help icons on your page, click your userimage or name in the global header and select Show Help Icons.
Get SupportYou can get support at My Oracle Support. For accessible support, visit Oracle Accessibility Learning and Support.
Get TrainingIncrease your knowledge of Oracle Cloud by taking courses at Oracle University.
Join Our CommunityUse Cloud Customer Connect to get information from industry experts at Oracle and in the partner community. Youcan join forums to connect with other customers, post questions, suggest ideas for product enhancements, and watchevents.
Learn About AccessibilityFor information about Oracle's commitment to accessibility, visit the Oracle Accessibility Program. Videos included inthis guide are provided as a media alternative for text-based topics also available in this guide.
Share Your FeedbackWe welcome your feedback about Oracle Applications user assistance. If you need clarification, find an error, or justwant to tell us what you found helpful, we'd like to hear from you.
You can email your feedback to [email protected].
Thanks for helping us improve our user assistance!
i

Oracle SCM CloudUsing Supply Planning
Get Help
ii

Oracle SCM CloudUsing Supply Planning
Chapter 1Supply Planning Overview
1 Supply Planning Overview
Business Flows for Supply Planning You use the Supply Planning work area, a modern planning cloud solution, to run business flows to transform demandto supply.
You can perform the following in the Supply Planning work area:
• Process data collection, inventory planning, and supply planning.
• Automate the entire sequence of planning processes or run a subset of the processes.
• Analyze and adjust your data at any stage.
The following figure illustrates the sequence of a supply planning business flow, starting from data collection, inventoryplanning, supply planning, and ending with execution and archival.
Data CollectionData collection is the first step of the planning business flow. You can collect data from various Oracle Supply ChainManagement cloud applications and use the data in planning applications.
You can collect data that are primarily of three types:
• Master data: Primarily sourced from Oracle Supply Chain Management Cloud.
• Demand data: Two potential sources of demand data are sales orders that flow from the Oracle OrderManagement Cloud and the shipment history from the Oracle Materials Management Cloud.
1

Oracle SCM CloudUsing Supply Planning
Chapter 1Supply Planning Overview
• Supply data: The supply data are collected from three sources:
◦ Oracle Inventory Management Cloud
◦ Oracle Manufacturing Cloud
◦ Oracle Purchasing Cloud
Apart from collecting data from an Oracle Fusion source system, you can also collect data from an external sourcesystem. Use the predefined collection templates (XLSM files) to collect data from an external source system.
Inventory PlanningYou can use inventory planning capability to calculate the statistical safety stock based on the volatility of demand andstocking targets. It addresses diverse supply and demand patterns with multiple algorithms based on mean absolutedeviation in units (MAD), mean absolute percentage error (MAPE), and arrival rate. You can set the target service levelsat any dimension of the hierarchy, which enables you to segment your stocking policies by customer, channel, productfamily, warehouse, or other factors. You can also set the inventory manually by using mass updates when appropriate.For example, you can set the inventory manually when you launch a new product.
Supply PlanningUsing supply planning, you can calculate resource and material requirements based on customer and safety stockrequirements, lead times, calendars, availability, and other parameters.
You can generate unconstrained supply plans, meaning that you ignore limited resource or supplier capacity, whichprovides the following advantages:
• Balances supply and demand and recommends new supplies as needed.
• Recommends when to reschedule or cancel a supply.
• Identifies material shortages, resource overloads, and supplier capacity overloads.
• Identifies when supplies don't have sufficient lead time (lead time compression).
• Plans your entire supply chain, including contract manufacturers.
Supply plans can model outsourced manufacturing and delivery scenarios, including drop ship and back-to-back orders.It also supports hub and spoke planning configurations, such as using an MPS plan as a demand schedule to an MRPplan.
Plan ExecutionYou can share the order recommendations and save the plan to drive execution.
By default, the supply planning processes are integrated with other Oracle SCM Cloud applications. During the planexecution, the integration helps in the following:
• Automatically releases planned orders and reschedules of existing supplies.
• Manually releases groups of orders when necessary.
• Manages changes and cancellations.
• Manage back-to-back and drop ship orders.
Planners can set up automatic release rules or release orders manually.
2

Oracle SCM CloudUsing Supply Planning
Chapter 1Supply Planning Overview
Overview of Supply Chain Planning Work Areas The Oracle Supply Chain Planning Cloud solution is comprised of products designed for specific supply chain planningbusiness processes and tasks.
You perform these processes and tasks by using work areas. Each of the Supply Chain Planning products providesaccess to one or more work areas.
The Supply Chain Planning work areas that you can use are determined by these factors:
• The products that your enterprise has licensed and configured
• The security privileges assigned to your user account
To use the Supply Chain Planning work areas, you must be aware of these points:
• Navigation to work areas
• List of Supply Chain Planning work areas and the products to which they're applicable
Navigation to Work AreasYou can use different paths to navigate to a specific work area including:
• From the Navigator: Click the Navigator icon to see the work areas that you have access to. The Supply ChainPlanning work areas are listed within the Supply Chain Planning heading. The work area names are links. Click aspecific work area link to access that work area.
• From the Springboard: On your home page you might have one or more springboard icons that representa group of work areas, such as the group of Supply Chain Planning work areas. Click on the Supply ChainPlanning springboard to access a set of icons, each of which represents a specific Supply Chain Planning workarea. Click a specific icon to access that work area.
List of Supply Chain Planning Work AreasThe following table lists the Supply Chain Planning work areas and the Supply Chain Planning products that areapplicable to each of the work areas.
Work Area Products
Demand Management
Oracle Fusion Demand Management
Supply Planning
Oracle Fusion Supply Planning
Demand and Supply Planning
Both of these products must be configured:
• Oracle Fusion Demand Management
• Oracle Fusion Supply Planning
Planning Central
Oracle Fusion Planning Central
3

Oracle SCM CloudUsing Supply Planning
Chapter 1Supply Planning Overview
Work Area Products
Sales and Operations Planning
Oracle Fusion Sales and Operations Planning
Backlog Management
Oracle Fusion Backlog Management
Production Scheduling
Oracle Fusion Production Scheduling
Replenishment Planning
Oracle Fusion Replenishment Planning
Plan Inputs
Use the Plan Inputs work area to perform tasks that don't require creating or accessing a plan. This work area can also be opened from other Supply Chain Planning work areas.
Note: The Global Order Promising work area is bundled within the Order Management solution.
Related Topics• Overview of the Supply Planning Work Area
• Overview of the Demand Management Work Area
• Overview of the Sales and Operations Planning Work Area
• Overview of the Order Promising Work Area
• Overview of the Replenishment Planning Work Area
Overview of the Supply Planning Work Area You use the Supply Planning work area to configure, view, and analyze your real world business processes.
You can use the Supply Planning work area to do the following:
• View multiple plans and plan inputs simultaneously.
• Use predefined page layouts or create user-defined page layouts to view plan data tailored for yourorganization.
To access the Supply Planning work area and open a plan:
1. In the Navigator, click the Supply Planning work area link.2. Click the Plans drawer, expand Plans.3. Right-click a plan and select Open.
Your plan by default opens in the Edit Plan page. This page consists of two main areas:
• Header
• Configurable pane
4

Oracle SCM CloudUsing Supply Planning
Chapter 1Supply Planning Overview
HeaderThe header area contains the page layout information and actionable buttons, such as Save Layout, Change, Open,Actions, Save, and Cancel. Header displays the plans, simulation sets, and plan inputs that are currently opened.
Configurable PaneYou can display the content of your plan in the configurable pane area. You can add multiple panes on the page todisplay your content. The Page Layout drop-down list in the header area determines the number of panes in yourplanning interface page.
Access Tasks as Quick Actions on a Home Page Some tasks that are accessible by using the tasks panel drawer in a supply chain planning work area are also availablefrom the home page as quick actions.
Click the Show More link on the home page to display all of the available quick actions for which you have access. Youdon't have to first navigate to a supply chain planning work area to take an action. For example, use quick actions tocreate a sourcing rule to purchase components from a new supplier without having to first select a planning work area.
In addition, there are work area-specific preferences that enable you to change your default page layout without havingto first launch the work area. These preferences are useful if you configured a content-heavy default page layout that'staking too long to load. In such cases, you can change your default page to a different page layout that opens quickerand then edit the content-heavy page layout to make it perform better.
Here's some additional information about quick actions on a home page:
• You must have the applicable privileges associated with the task to see the task as a quick action on thehome page. Each quick action is secured by its related privilege or privileges. For example, if you have theManage Planning Sourcing privilege, then you should see the Manage Sourcing Rules task in the tasks paneldrawer in the work area. You should also see the task as a quick action on the Supply Chain Planning or OrderManagement (in the case of Global Order Promising) home pages.
• You must have access to the work area to see the associated manage preferences quick actions. For example,you must have access to the Supply Planning work area to see the Edit Supply Planning Preferences quickaction.
• You can't navigate to any other UI or open other tabs. When you click a quick access link, the UI opens in thepage, but you aren't in a work area.
• You can only return to the Supply Chain Planning home page when you close out of a task that you initiatedfrom the Supply Chain Planning home page.
Manage Page Layouts in Supply Planning You can create and manage your page layouts. Use the Manage Page Layout action to modify the properties of yourexisting page layouts.
You access a plan interface page by opening a plan from the Plans section of the Tasks pane in the Supply Planningwork area.
5

Oracle SCM CloudUsing Supply Planning
Chapter 1Supply Planning Overview
This topic discusses how to do the following:
• Create a page layout
• Edit a page layout
• Manage a page layout
• Use the Plan Summary page layout
Create a Page LayoutPage layouts are reusable across plans, simulation sets, and plan inputs. You can create page layouts or copy and thenedit a page layout to create page layouts that are tailored to specific business needs.
Follow these steps to create a page layout:
1. In the Supply Planning work area, click the Plans panel tab.2. In the Plans panel drawer, expand Plans list. Open a plan for which you want to create a page layout.3. From the Page Layout drop-down list, click Create.4. Specify the following details and click Save and Close:
◦ Enter a page layout name and description.
◦ Select the access level as Public or Private.
- Select Public to make the plan accessible for all users.- Select Private to restrict the plan accessible to you and to a list of users that you want to provide
access.
This creates an empty pane page layout.5. Click the Change drop-down list and select any layout.
For example, select a two pane horizontal layout.6. Click Open and select the pane and add the content using the Open Table, Graph, or Tile Set dialog.7. Click Save Layout.
Edit a Page LayoutYou can edit an existing page layout in two ways:
• Use the Save button to save the current page layout as it's currently displayed. For example, you can changethe current page layout from a one pane layout to two pane layout. The next time you use this page, the layoutappears as a two pane layout.
• You can also change a page layout by using the Manage action from the page layout drop-down list.
• You can't edit the predefined page layouts. You can copy and then edit the copy.
Manage a Page LayoutYou can use Manage Page Layout to perform the following:
• Edit the page layouts that you created. You can move one pane to other using Manage page layouts. However,if you're using a public page layout, where you aren't the owner, then you can't make changes to the layout. Youcan only set the layout to your default layout.
6
Oracle SCM CloudUsing Supply Planning
Chapter 1Supply Planning Overview
• Change the layout that's used as your default layout when you initially open a plan, simulation set, or planinputs.
• Delete layouts that you created, but are no longer needed.
Use the Plan Summary LayoutPlan Summary is a predefined page layout that contains a set of tiles and high level graphics you can use to review thebusiness value of a plan.
Using the Plan Summary layout, you can do the following:
• Measure the performance of a plan.
• Review plan information through the individual Key Performance Indicators (KPIs).
• Perform plan analysis using the contextual based navigation.
• Copy and configure the components of the Plan Summary page layout for your specific need.
The structure of the Plan Summary layout is a predefined set of tiles, also referred to as infotiles. Using tiles you canview the key metrics of your plan. You can further drill to the predefined analytics using the following tables or graphs:
• Revenue and Margin
• Inventory Turns
• Demand at Risk in thousands
• Rescheduling Exceptions
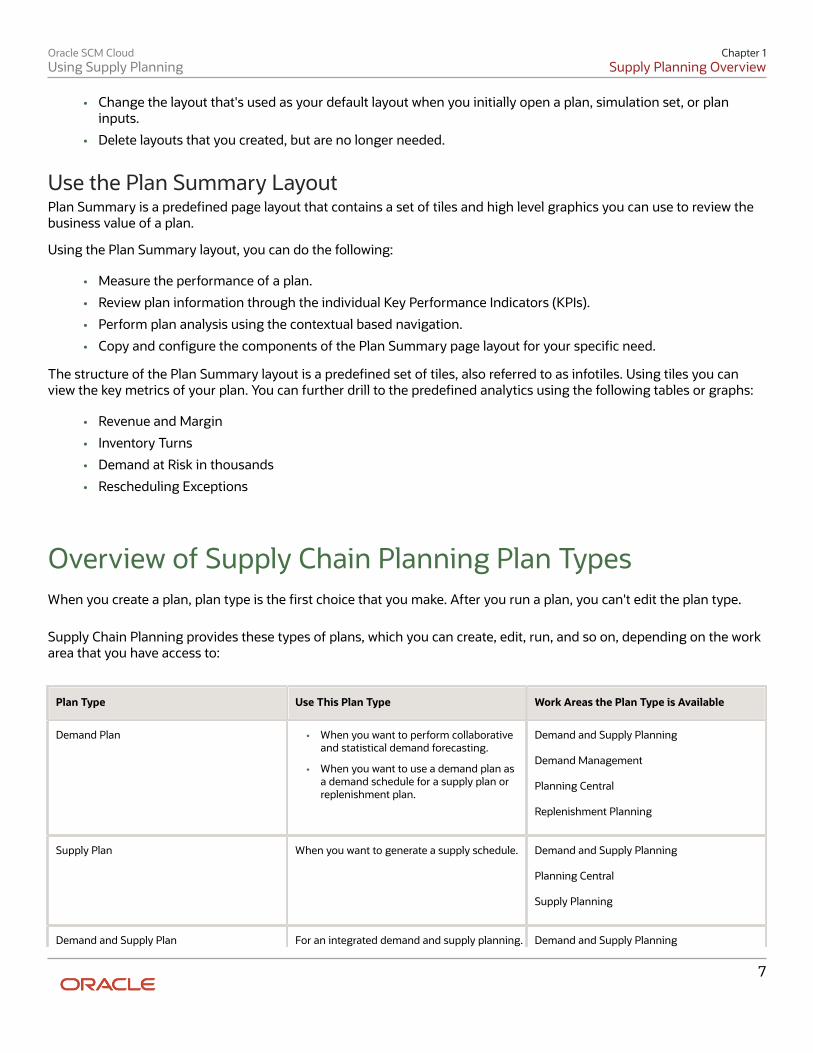
Overview of Supply Chain Planning Plan Types When you create a plan, plan type is the first choice that you make. After you run a plan, you can't edit the plan type.
Supply Chain Planning provides these types of plans, which you can create, edit, run, and so on, depending on the workarea that you have access to:
Plan Type Use This Plan Type Work Areas the Plan Type is Available
Demand Plan
• When you want to perform collaborativeand statistical demand forecasting.
• When you want to use a demand plan asa demand schedule for a supply plan orreplenishment plan.
Demand and Supply Planning Demand Management Planning Central Replenishment Planning
Supply Plan
When you want to generate a supply schedule.
Demand and Supply Planning Planning Central Supply Planning
Demand and Supply Plan For an integrated demand and supply planning. Demand and Supply Planning
7

Oracle SCM CloudUsing Supply Planning
Chapter 1Supply Planning Overview
Plan Type Use This Plan Type Work Areas the Plan Type is Available
Planning Central
Sales and Operations Plan
For aggregate planning.
Sales and Operations Planning
Backlog Plan
For backlog management.
Backlog Management
Replenishment Plan
For replenishment planning.
Replenishment Planning
Related Topics• Actions to Manage Your Plans
Actions to Manage Your Plans The Actions menu on the Manage Plans and the Edit Plan pages are integrated plan management pages for all plantypes. When you open the Edit Plan page, note that only the plan name displays in the heading.
Note: Not all action options are available on both the Manage Plans page and the Edit Plan page. For example,the Compare action is only available when you're in an open plan on the Edit Plan page. Also, not all action optionsare available for all plan types or work areas. For example, the Planning Central work area doesn't include Archive,Compare, or Copy to Simulation Set in the Actions menu.
The following table lists the available options in the Actions menu and the description of each option.
Action Description
Approve
Initiate and complete the approval process for a plan. When you rerun the plan, the Approved status is removed from the Approval Status column.
Archive
Archive a plan.
Cancel Compare
Cancel the comparison of plan data.
Close
Close a loaded plan from memory. This option isn't available for Demand Plan types.
Compare
Compare plan data with another plan.
8

Oracle SCM CloudUsing Supply Planning
Chapter 1Supply Planning Overview
Action Description
Copy to Simulation Set
Open the Copy to Simulation Set dialog box to copy plan data to an existing simulation set. Plan dataincludes items, resource availability, bill of resources, and so on. This option is available only for SupplyPlan and Demand and Supply Plan types.
Create
Open the Create Plan dialog box where you can define the plan options for your new plan. Dependingon your plan type, define the scope, demand, safety stock, and supply options. The Safety Stock tabisn't available for Sales and Operations Plan types.
Delete
Delete a plan and its archive versions. This irrevocable action purges the plan from memory and thedatabase.
Duplicate
Create a copy of an existing plan to leverage previously defined plans or to perform what-if simulationanalysis. You can decide whether you want to copy only the plan options or copy the plan optionsincluding plan data.
Edit Plan Options
Open the Plan Options dialog box where you can edit your plan options. Depending on your plan type, you can change the scope, demand, safety stock, and supply options.
Export
Export the data from the Search Results table on the Manage Plans page to a spreadsheet.
Export Plan Data
Extract all multidimensional plan data from a plan into a set of files for offline reporting and analysis.
Load
Load the plan into memory. This option is available only for Supply Plan, Sales and Operations Plan, and Demand and Supply Plan types.
Manage Tables, Graphs, and Analysis Sets
Open the Manage Tables, Graphs, and Analysis Sets dialog box. You can search for tables, graphs, tiles, tile sets, and analysis sets and manage them.
Open
Open the Edit Plan page for an existing plan. Note that only the plan name displays in the pageheading.
Publish Order Forecast
Starts the Publish Order Forecast job. You can publish the order forecast without saving the plan tothe database. This option is available in the Actions menu on the Items, Supplies and Demands, andManage Plans page. This option is available only for Supply Plan, and Demand and Supply Plan types.
Publish Data
Export measure data from a plan based on a pivot table. You can export the data available in planningdata measures at any aggregation level based on an existing pivot table to a file in a comma delimited(CSV) file format.
Release
Release the plan from the Supply Chain Planning work area to another plan execution system. Thisoption is available only for Supply Plan, and Demand and Supply Plan types. The Release action integrates Supply Chain Planning with other plan execution systems by publishingapproved planning recommendations to execution systems. These plan recommendations can be inthe form of new planned orders, rescheduled existing supplies, and canceled existing supplies.
Request Approval
Request approval of a plan. This option is available only for Sales and Operations Plan types.
9

Oracle SCM CloudUsing Supply Planning
Chapter 1Supply Planning Overview
Action Description
Reset Approval Status
Reset the approval status. This option isn't available for Supply Plan types.
Review Plan Messages
Open the Review Plan Messages tab to review the warning and error messages generated by theplanning processes, such as forecast generation and supply plan generation. You can also review therecommendations to address the warning and error conditions.
Run
Run the plan and generate data. When you click Run, the Run Plan dialog box opens. In the Run Plan dialog box, you can select datarefresh options, scope options, and demand and supply plan run options to generate planning data.
Save Plan to Database
Save the plan from the memory to the database. The benefit of saving a plan to the database is that you can perform plan analysis without first loadingthe plan. This option is available only for Supply Plan and Demand and Supply Plan types.
View Status Details
Open the Plan Status Details dialog box to view all of the actions performed by any user for theselected plan. You can also export status details to a spreadsheet.
Related Topics• Overview of Supply Chain Planning Plan Types
Planners for Supply Chain Planning
How You Define Planners for Supply Chain Planning Planners are the people in your organization who are responsible for a set of items, their inventory levels, supply anddemand, and so forth. For example, some typical titles of planners are Material Planner, Supply Chain Planner, andDemand Planner.
All supply chain planning products use planners. You can define a specific person as a supply chain planner forthe Oracle Fusion source system or for any other source system. You can also associate a planner to an item at theorganization level.
Use the ScpPlannersImportTemplate.xlsm import template to create the CSV file for the Load Planning Data from Filestask for planners. You can also use the Manage Planners page to define supply chain planners for each source system.Access the Manage Planners page from a Supply Chain Planning work area. Click the Tasks panel drawer and then clickthe Manage Planners link.
For Oracle Fusion source systems, associate the employee identification number with the planner name becauseOracle Fusion Purchasing requires a valid employee identification number. When a planner releases a planned order,purchasing checks the employee identification number before creating the purchase requisition.
For external source systems, determine if the employee identification number is required when releasing plannedorders. If required, use the Manage Planners page to associate the planner with their employee identification number.
10
Oracle SCM CloudUsing Supply Planning
Chapter 1Supply Planning Overview
Or, you can use the ScpPlannersImportTemplate.xlsm template to associate the employee identification number withthe planner name.
Use Oracle Fusion Product Hub to assign planners at the item-organization level. During data collections, the planningprocesses collect the planner-item-organization assignment. Planners can then use the planner name to search thedata on most of the demand and supply planning pages.
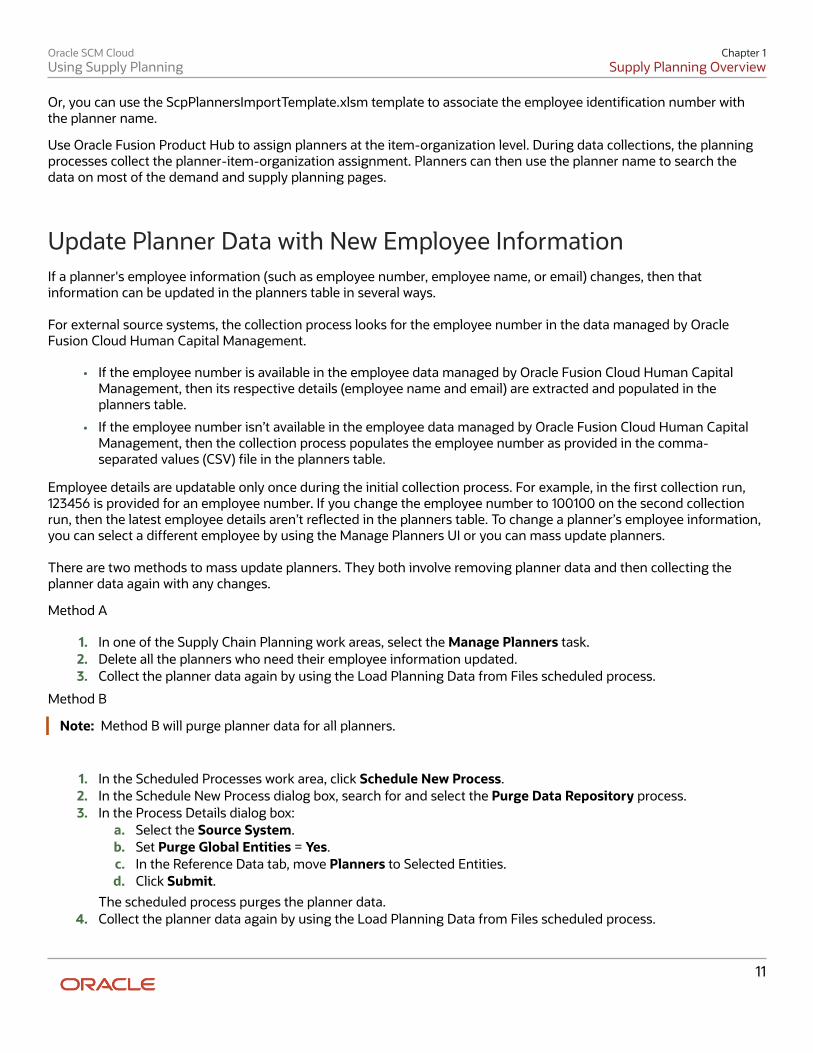
Update Planner Data with New Employee Information If a planner's employee information (such as employee number, employee name, or email) changes, then thatinformation can be updated in the planners table in several ways.
For external source systems, the collection process looks for the employee number in the data managed by OracleFusion Cloud Human Capital Management.
• If the employee number is available in the employee data managed by Oracle Fusion Cloud Human CapitalManagement, then its respective details (employee name and email) are extracted and populated in theplanners table.
• If the employee number isn’t available in the employee data managed by Oracle Fusion Cloud Human CapitalManagement, then the collection process populates the employee number as provided in the comma-separated values (CSV) file in the planners table.
Employee details are updatable only once during the initial collection process. For example, in the first collection run,123456 is provided for an employee number. If you change the employee number to 100100 on the second collectionrun, then the latest employee details aren’t reflected in the planners table. To change a planner’s employee information,you can select a different employee by using the Manage Planners UI or you can mass update planners.
There are two methods to mass update planners. They both involve removing planner data and then collecting theplanner data again with any changes.
Method A
1. In one of the Supply Chain Planning work areas, select the Manage Planners task.2. Delete all the planners who need their employee information updated.3. Collect the planner data again by using the Load Planning Data from Files scheduled process.
Method B
Note: Method B will purge planner data for all planners.
1. In the Scheduled Processes work area, click Schedule New Process.2. In the Schedule New Process dialog box, search for and select the Purge Data Repository process.3. In the Process Details dialog box:
a. Select the Source System.b. Set Purge Global Entities = Yes.c. In the Reference Data tab, move Planners to Selected Entities.d. Click Submit.
The scheduled process purges the planner data.4. Collect the planner data again by using the Load Planning Data from Files scheduled process.
11

Oracle SCM CloudUsing Supply Planning
Chapter 1Supply Planning Overview
How You Reassign Item Definitions to a Different Planner When a planner leaves an organization and that planner's items need to be reassigned, there are two ways you canreassign the planner’s item definitions.
• Method A: Do not change the planner code but instead reassign the existing code to a different employee onthe Manage Planners page. In this case, there’s no need to change the planner codes for the item.
• Method B: Create one or more new planner codes (or use an existing one) and then either manually reassignthe items to those one or more new planners individually or use the item mass changes feature in the ProductInformation Management work area.
Review Plan Messages In Supply Chain Planning, you can view root causes for technical plan process failures and the recommendations to fixthe issues.
After running a plan, open the Review Plan Messages table to review the warning and error messages generated by theplanning processes, such as forecast generation and supply plan generation. You can also review the recommendationsto address the warning and error conditions. Access the plan messages from either the Manage Plans page or the EditPlan page.
Plan messages are available for all plan types (for example, Supply Plan or Sales and Operations Plan types) and areaccessible from your respective Supply Chain Planning work area. There are three message types:
• Warning: Indicates an issue that can result in a future run plan error if not resolved.
• Error: Indicates a plan failure.
• Recommendation: Indicates a recommendation to resolve a plan failure or how to achieve a better runperformance.
If you repeatedly run the plan, the same messages appear on the Review Plan Messages tab for each plan run. Themessages will have different process identifiers and submission times.
You can delete plan messages based on the submission date. On the Review Plan Messages tab, click the Purge button.In the Purge Messages dialog box, enter a submission date with one of the operators: Equals, Before, On or before, After,On or after, Between, or Not between.
Use the following steps to open the Review Plan Messages table from the Manage Plans page:
1. From a Supply Chain Planning work area, click the Task drawer and select Manage Plans.2. On the Manage Plans page, search for a plan.3. In the Search Results region, select a plan.4. Click the Actions list and then select Review Plan Messages to access the Review Plan Messages tab.
From the Search Results region, you can export the messages to a Microsoft Excel spreadsheet.Use the following steps to open the Review Plan Messages table from the Edit Plans page:
1. From a Supply Chain Planning work area, click the Task drawer and select Manage Plans.2. On the Manage Plans page, search for a plan.
12
Oracle SCM CloudUsing Supply Planning
Chapter 1Supply Planning Overview
3. In the Search Results region, select a plan. Next, click the Actions list and then select Open.4. On the Edit Plan page, click Open.5. In the Open Table, Graph, or Tile Set dialog box, search for the Review Plan Messages table. Select the table and
then click OK.6. On the Review Plan Messages tab, click the Search button.7. In the Search Results region, view the plan messages.
From the Search Results region, you can export the messages to a Microsoft Excel spreadsheet.
Related Topics• Actions to Manage Your Plans
• Overview of Supply Chain Planning Plan Types
Manage Notes in Supply Chain Planning Use Notes in Supply Chain Planning to document and communicate important information about your plan.
You can use notes to provide reasons for any changes made to a plan or to record decisions and assumptions that led tothose changes. You can save these notes for future reference or to provide details to other users. Participants in the planmanagement process can annotate the data with notes to document changes and assumptions.
Notes functionality is available in the Demand Management, Supply Planning, Planning Central, and Sales andOperations work areas. You can create notes for the following:
• Plans
• Planning level members, such as items, organization, and customers
• Planning combinations, such as a specific item-organization-date-measure combination
• Exceptions
When you create a note, you must specify a note type. Note types enable notes to be categorized, which you can use asa search criteria. The following lists the predefined note types:
• General
• Assumption
• Decision
• Issue
• Possibility
• Risk
• Reference
• Special
You also specify whether the note is private or public. Private notes are visible only to the user who created the note.Public notes are visible to all the users with whom the object is associated.
From the Demand Management or the Sales and Operations work area, you can access the Notes table to displayplanning level members for Product hierarchies. You can create a layout to view the Notes table as part of the layoutinstead of as a dialog box. The Notes table is not available for Supply Planning or Planning Central.
13

Oracle SCM CloudUsing Supply Planning
Chapter 1Supply Planning Overview
Notes for PlansYou can create notes for plans. When you copy a plan, any notes associated with the plan are copied into the new plan.
To create a note for a plan, do the following:
1. Open the Plan Options page for your plan and click the Manage Notes icon.2. In the Manage Notes dialog box, click Actions > Add.3. In the Add Notes dialog box, add your notes.4. Click OK.5. Click Save and Close.
Notes for Planning Level MembersYou can associate notes with planning-level members, such as items, organizations, and customers. You can createnotes at any level of the hierarchy, such as on an individual item, on a brand, or on a product category.
Notes that you create on planning level members at lower levels in the hierarchy are visible when you open ManageNotes from an aggregate level. Notes that you create on level members are not plan-specific. This means that a noteassociated with a level member is visible from any plan that contains that member.
To create a note on a level member, click Create Note from the Actions menu.
To view, edit, or delete an existing note, select the level member, click Manage Notes from the Actions menu.
Notes for Planning CombinationsYou can associate notes for the planning combinations, such as a specific item, organization, date, and measurecombination. Planning combinations appear as cells within a table.
You can create a note at any level; however, they are only visible at the level at which they are created. For example,if you create a note at a brand, month, and measure combination, you cannot view that note at the item, day, andmeasure level.
If you copy a plan, then any plan-specific notes on planning combinations are also copied.
To create a note for the planning combinations, do the following:
1. Select the associated table's cell in the table.2. Click Create Note from the Actions menu.3. Add your notes.4. Click Save and Close.
To view, edit or delete an existing note on a planning combination, do the following:
1. Select the Note icon from the table's cell level.2. Click Manage Notes from the Actions menu.
Note: If you create a note on a planning combination and the associated measure is shared across plans, then thenote is not plan-specific. In this case, the note is visible across all plans. If you create a note on a planning combinationand the associated measure is not shared across plans, then the note is plan-specific. In this case, the note is visiblewithin the plan in which you created it.
14
Oracle SCM CloudUsing Supply Planning
Chapter 1Supply Planning Overview
Notes for ExceptionsYou can associate notes for exceptions. Notes on exceptions persist across plan runs. If an exception still exists aftera plan is run again, then any notes associated with the exception are retained. When an exception is resolved, theexception is removed from the application. In that case, any notes associated with the exception are also removed.
To create notes for an exception, do the following:
1. Click the Note icon on the table row of the exception.2. Add your notes.3. Click Save and Close.
Related Topics• Overview of Oracle Social Network
Assign Time Zones to Locations in Supply ChainPlanning You can view supplies and demands in your Supply Chain Planning work area based on the time zone of theorganization, customer site, or supplier site.
In addition, you can calculate precise in-transit time because supply chain planning considers the time zone differencebetween the source and destination locations.
The following points discuss in detail how you can collect time zone details and view orders depending on the locations'time zone:
• Update Time Zones Using Data Collections
• Assign Time Zones in Supply Network Model
• Calculate In-Transit Time
• View Time Zones in Supplies and Demands
• Release to Execution
Update Time Zones Using Data CollectionsUse data collections to update organizations, customer site, or supplier site time zones. You can update the time zone inone of following three ways:
• Collect the organization's time zone from an Oracle Fusion source system.
• Collect time zones from an external source system using the organization, customer, and supplier importtemplates.
• Update the time zone on Customers and Suppliers tabs of the Maintain Supply Network Model page.
If you are collecting from an Oracle Fusion source system, then you can update the organization's time zone using thedata collections method only. You cannot manually update the organization's time zone using the Maintain SupplyNetwork Model page in your Supply Chain Planning work area.
15
Oracle SCM CloudUsing Supply Planning
Chapter 1Supply Planning Overview
Assign Time Zones in Supply Network ModelBefore collecting time zones or converting time zones to a local time, you must first assign time zones to organizations,customer sites, and supplier sites. A new time zone field is available on the Organizations, Customers, and Suppliers tabof the Maintain Supply Network Model page in your Supply Chain Planning wok area.
You cannot collect customer site and supplier site time zones from an Oracle Fusion source system. To update thecustomer site or supplier site time zone, use one of the following options:
• Use the customer or supplier import template to update the customer site or supplier site time zone. You canalso use this template if you are collecting from an external source system.
• Update the customer site and supplier site time zones directly in the Maintain Supply Network Model page.
When you recollect new customer and supplier data from an Oracle Fusion source system, the existing customer siteand supplier site time zone information is preserved. If you do not collect or update the customer site or supplier sitetime zone, then planning calculations assume that the customer site or supplier site is located in the same time zone asthe organization that is associated with the demand or supply.
When you collect the supplies and demands, collections automatically convert the associated dates from the databaseserver time zone (Coordinated Universal Time or UTC) to the local time zone based on where the event takes place. Inaddition, when you collect shipments and booking history from the Oracle Fusion source system for use in the DemandManagement or the Demand and Supply Planning work area, collections converts the historical data from the databaseserver time zone (UTC) to the associated organization's time zone.
Calculate In-Transit TimeWhen calculating in-transit times, supply chain planning considers the time zone difference between the shippingand receiving locations. The following example shows how supply chain planning calculates the in-transit time. In thisexample, the customer site is located in Sydney (UTC+10) and the shipping organization is in Sacramento, California(UTC-8).
1. When planning collects a sales order with a requested arrival date of 25-March-2018, 21:00 (UTC) on thedatabase server, the requested arrival date is offset to the customer site's time zone. The customer site's timezone is Sydney time zone (UTC+10 hours). The requested arrival date becomes 26-March-2018, 7:00 in planinputs (Sydney time zone).
2. When you run the plan with the Refresh with current data option, the sales order is included in the plan andsupply chain planning uses this date to calculate the scheduled ship date.
3. Consider the in-transit time for the selected shipping method (Air Freight) is 36 hours. Supply chain planningfirst calculates the scheduled ship date as 25-March-2018, 19:00 hours (Sydney time) and then converts thedate to the Sacramento time. The product is shipped from Sacramento. The time zone difference is appliedto the scheduled ship date by subtracting 18 hours. The scheduled ship date becomes 25-March-2018, 1:00Sacramento time, which is used to generate the pegged supplies.
4. After completing the calculations, supply chain planning moves all the dates to the end of the day. All dateshave the time stamp of 23:59:00. The time stamp is not available on the UI, but you can query the time stampfrom the planning database.
Supply chain planning makes similar in-transit calculations when shipping supplies from a supplier site to anorganization, or when transferring product from one organization to another.
16
Oracle SCM CloudUsing Supply Planning
Chapter 1Supply Planning Overview
View Time Zones in Supplies and DemandsOn the Supplies and Demands page, use the following three columns to view supplies and demands in relation to thetime zone:
• Organization Time Zone
• Source Time Zone
• Destination Time Zone
The columns are not included in any predefined table layout. Create a user-defined table layout and include thesecolumns in your table.
To display supply and demand measure values within a table such as Material Plan or Build Plan, supply chain planningassigns the measure value to the day based on the organization's local time zone. The supply and demand measurevalue is not assigned to a date based on a common time zone.
Release to ExecutionWhen you release orders that are marked for release to Oracle Cloud execution system, the release action offsets thedate from the location's time zone to the database server time zone (UTC).
For example, when you release a planned make order, supply chain planning converts the need-by date from theorganization's time zone to UTC.
17

Oracle SCM CloudUsing Supply Planning
Chapter 1Supply Planning Overview
18
Oracle SCM CloudUsing Supply Planning
Chapter 2Tables, Graphs, Analysis Sets, Tiles, and Tile Sets
2 Tables, Graphs, Analysis Sets, Tiles, and TileSets
Overview of Tables, Graphs, Analysis Sets, Tiles, and TileSets You can configure the entities for tables, graphs, analysis sets, tiles (also referred to as infotiles), or tile sets by using theSelector Tool.
You can also create and manage groups on the Selector Tool page and associate your tables and graphs with the group.Navigate to the Selector Tool from an open plan or from the Actions menu on a table or graph toolbar.
To create a table, graph, analysis set, tile set, or tile, open the Selector Tool:
1. From an open plan, click Actions and then select Manage Tables, Graphs, and Analysis Sets.2. In the Manage Tables, Graphs, and Analysis Sets dialog box, click Actions and then select Create.3. Select one of the following to open the Selector Tool:
◦ Table
◦ Graph
◦ Analysis Set
◦ Tile Set
◦ Tile
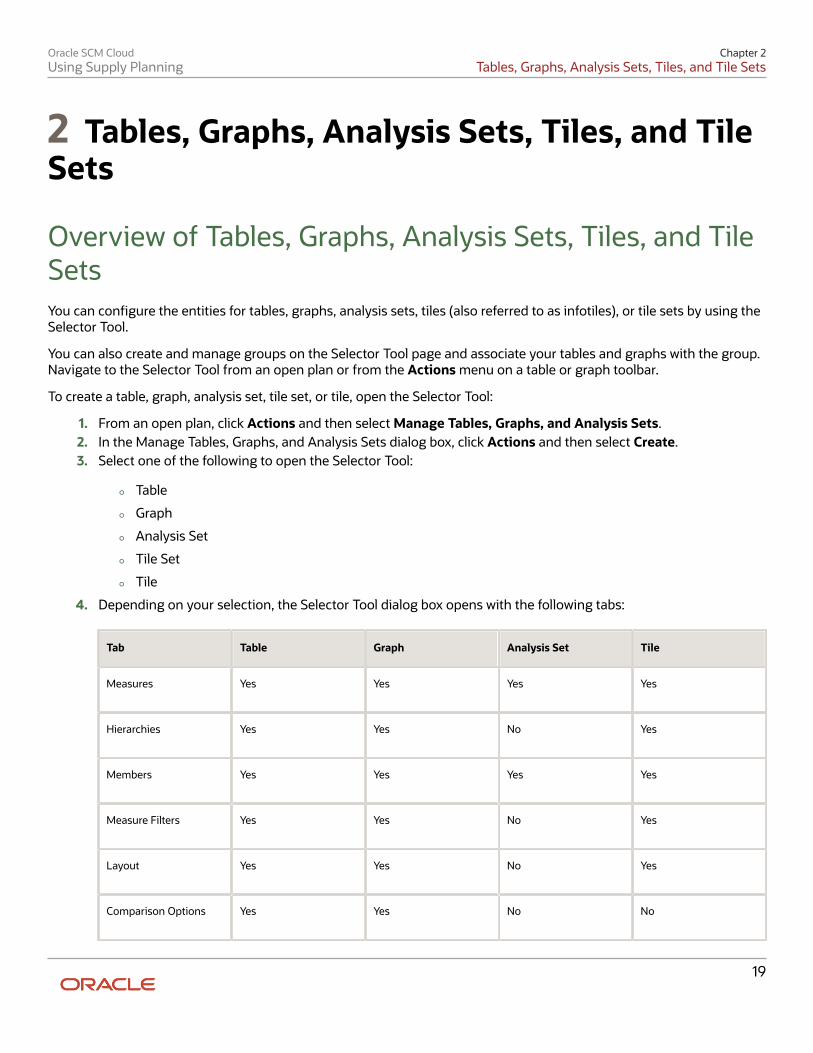
4. Depending on your selection, the Selector Tool dialog box opens with the following tabs:
Tab Table Graph Analysis Set Tile
Measures
Yes
Yes
Yes
Yes
Hierarchies
Yes
Yes
No
Yes
Members
Yes
Yes
Yes
Yes
Measure Filters
Yes
Yes
No
Yes
Layout
Yes
Yes
No
Yes
Comparison Options
Yes
Yes
No
No
19

Oracle SCM CloudUsing Supply Planning
Chapter 2Tables, Graphs, Analysis Sets, Tiles, and Tile Sets
Tab Table Graph Analysis Set Tile
Details
No
No
Yes
No
Note: In the Selector Tool, the member values displayed are based on what's configured in the Member Identifier toDisplay column on the Configure Planning Analytics page, Levels and Attributes tab. For example, for item, you canconfigure your tables and graphs to show the item description instead of the item name, which is what also appearswhen you're in the Selector Tool.
MeasuresUse the Measures tab to select measures for a table or graph by moving measures from the Available Measures pane tothe Selected Measures pane. The measures that you select determine the content of the other tabs. The dimensions ofthe measures determine the dimensions available on the Hierarchies tab and the dimension members on the Memberstab. For example, if a measure has the Product, Organization, and Time dimensions, those dimensions and theirhierarchies are visible on the other tabs. You can display the available measures by measure group or alphabetically byusing the Tree View or List View icon.
A measure is usually a named time series of values that represent the following at a particular intersection of theCustomer, Organization, Product, Supplier, and Resource dimensions:
• Historical performance (Bookings History). This measure isn't applicable for supply planning.
• Future projections (Shipments Forecast)
• A key performance indicator (KPI), such as Gross Margin Percentage, or a derived calculation, such as ProjectedAvailable Balance
The planning process aggregates measure data from lower levels to higher levels or computes KPIs and derivescalculations from other values at the same level as needed. The planning process can also allocate or spread updatesmade at an aggregate level to the affected cells at lower levels. Measures can be expressed in different units of measure,such as inches, dollars, kilos, or liters. Depending on the context, you can display, update, or compare measures that arein different units. The planning process can convert values among different units and among different currencies (formonetary values).
Note: Text-based measures aren't supported in graphs and aren't displayed in the Available Measures pane on theMeasures tab of the Selector Tool during the configuration of graphs.
HierarchiesUse the Hierarchies tab to select the dimensions, hierarchies, and levels to include or exclude in the table or graph.
For each dimension, select the hierarchies and levels that you want to include in the graph or table. Checking thebox in the Display column includes that dimension in the table or graph. Expand the dimension to view the availablehierarchies. Expand the hierarchy to view the levels of the hierarchy. Checking a level includes it in the table or graph. Ifmultiple levels are checked, the top level is displayed in the table or graph by default. Each level in the table or graph canbe expanded until all checked levels are visible. The Show Unassociated check box determines whether the measurevalues that aren't associated with a specific dimension in the table or graph are hidden or displayed. For example, atable could include Shipments Forecast and Net Resource Availability. Shipments Forecast has product, organization,
20

Oracle SCM CloudUsing Supply Planning
Chapter 2Tables, Graphs, Analysis Sets, Tiles, and Tile Sets
and time as dimensions. Net Resource Availability has resource, organization, and time as dimensions. With the checkbox selected, the Resource column displays the word Unassociated when you view Shipments Forecast rows.
For a demand plan that uses a hybrid time hierarchy, only the hierarchy that was selected as the planning calendar onthe Scope tab on the Plan Options page is displayed for the Time dimension along with the other, corresponding hybridtime hierarchies that were created when the Create Hybrid Time Hierarchies scheduled process was run.
You can select the levels of only one hybrid time hierarchy.
MembersYou use the Members tab to manually select dimension members by moving members from the Available Memberspane to the Selected Members pane. If no selections are made on this tab for a dimension, the graph or table displaysthe dimension starting at the top level checked on the Hierarchies tab. For example, if you selected the GregorianCalendar hierarchy with Quarter and Month on the Hierarchies tab, the graph or table displays all quarters; each quarterhas an icon to drill to its months.
Measure FiltersUse the Measure Filters tab to filter results based on measure values across dimension member combinations that meetthe criteria that you specify. You can filter your measure data to return only multidimensional combinations that meetthe measure criteria for selected dimensions of the measure.
Note: The measures listed are those that are of data type number, currency, or percent that aren't dimensioned bytime. Measures that are time dimensioned and of data types date and text are excluded from the list. If the tablecontains any configure-to-order (CTO) measures, then the Measure Filters tab is disabled.
When you create or edit a table or graph, make your selections on the Measures, Hierarchies, and Members tabs. Next,on the Measure Filters tab, specify the measure criteria to apply across combinations of your dimension selections, suchas Item and Customer. The table or graph displays only the combinations that meet your specified measure criteria.
You can compare measures to fixed values or to other measures, and you can apply multiple measure conditions:
• Multiple AND conditions are allowed
• Multiple OR conditions are allowed
• Combinations of AND and OR conditions aren't allowed.
You can apply the measure filters in a table or graph to a linked table or graph in the Manage Links dialog box. On the ToTable, Graph, or Layout tab, select the Include measure filters check box. This check box is enabled after you select thePass user-specified parameters check box.
LayoutUse the Layout tab to format tables, graphs, or tiles. The following are the key layout options for tables, graphs, andtiles:
• Tables: Use table layout options to drag and drop dimensions to change the table layout and configure drillsettings.
• Graphs: Use the graph layout options to select the graph type and the formatting options for the graph typethat you select. In the Filters section, you can specify the filter criteria that you want displayed in the graph.
21

Oracle SCM CloudUsing Supply Planning
Chapter 2Tables, Graphs, Analysis Sets, Tiles, and Tile Sets
• Tiles: Use the tile layout options to select the graph type and add tables and graphs to the content area of thetile you're creating.
Comparison OptionsThe Comparison Options tab is applicable only for tables and graphs. On the Comparison Options tab, you can compareyour current plan with an archived version or an alternate plan. Use this tab to compare how specific measures havevaried over time. The Comparison Options tab contains three sections: Waterfall Analysis, Trend Analysis, and PlanComparison.
Note: The Comparison Options tab isn't available for Oracle Planning Central Cloud.
• In the Waterfall Analysis section, you can compare selected measures in a table or a graph with an archivedplan.
Select the Use MAPE calculations check box if you have scheduled your plan archival process. Mean absolutepercentage error (MAPE) calculations use the system administrator archive and not an on-demand archive.
In the Measure Archives to Use list, select one or more archives to reference. The number of weeks refers tohow long ago the archive was created. The planning process uses the following logic for when to use an archive:
◦ Match the exact dates. If multiple versions of an archive are within the waterfall time frame, use theclosest, most current version.
◦ If no match is found on the exact date, use the match closest inside the range, which is +3/-3 days of aselected weekly waterfall time frame, or +15/-15 days for a monthly archive.
◦ If no match is found within +3/-3 days of a selected weekly waterfall time frame, or +15/-15 days for amonthly archive, then nothing is returned.
For example, if you select 4 weeks ago, the planning process searches for the archive 4 weeks prior to today'sdate, for instance, March 6. If your archives are stored at the month level and nothing is found on February 5,the planning process searches for the most recent archive within +15/-15 days.
• In the Trend Analysis section, you can provide the number of archives that you want to reference. The planningprocess selects the latest archives. For example, you have five archives, where number five is the latest archiveand you have selected 3 in the Number of Previous Versions to Include field. The planning process selectsarchive number five, four, and three for the comparison. The difference between Waterfall Analysis and TrendAnalysis is that in Waterfall Analysis you can choose an archive created within each selected time frame thatyou want to compare. In Trend Analysis, you can select the number of archives that you want to compare, andonly the latest archives are used for comparison.
• The Plan Comparison section pertains to both archived plans and alternate plans that you consider forcomparison. You can select the type of difference to display in tables or graphs for comparison. For example,you can choose to view the difference in percentage or absolute percentage.
Related Topics• Use Advanced Options in the Selector Tool
• Use Table Drilling
• Create a Tile in Supply Chain Planning
• Create a Tile Set in Supply Chain Planning
• How You Use Levels and Attributes in Supply Chain Planning
22

Oracle SCM CloudUsing Supply Planning
Chapter 2Tables, Graphs, Analysis Sets, Tiles, and Tile Sets
Use Advanced Options in the Selector Tool You can use the Advanced Filter dialog box to filter data and select specific members that fulfill some criteria.
Click the Advanced Filter icon on the Members tab to open the Advanced Filter dialog box. You can use the followingfilter criteria tools:
• Levels: Select by level. Select the members in a level such as Customer Site for the Customer dimension, orPeriod for the Time dimension.
• Family: Select parent or child of a dimension member. Select members based on a parent or child relationship,such as selecting the Days in a Week.
• Attributes: Select based on name. For example, select members based on items whose name containsEconomy.
• Measure Criteria: Select based on meeting measure criteria. Select members that meet the criteria, such asProducts for which the gross margin is greater than a particular value.
• Time Range: Select a range of dates. Select time periods based on a range, a start date, or today's date.
The advanced filter criteria tools are used in conjunction with action keywords to refine selections. The following fouractions determine how to apply the criteria:
• Replace with: Replace the current selection, if any, with members meeting the criteria.
• Add: Add members meeting the criteria to the current selection.
• Keep: Keep only the members in the current selection that meet the criteria.
• Remove: Remove the members from the current selection that meet the criteria.
You can apply filter criteria tools sequentially to refine your selection. For example, select all the items for a category,and then keep the top 10 items based on sales.
Click the Show Results button to see the filtered list of members based on the criteria. Removed members are shownbelow the filtered list. You have the option of accepting the results or resetting to the previous members.
When you accept the results, the criteria used to retrieve the accepted members appear in the Criteria Steps section onthe tab. These criteria are evaluated when the table or graph is displayed. You can remove criteria steps.
Note: Ensure that the criteria steps defined for each dimension are needed and relevant. Remove all unwanted orunnecessary criteria steps so that your table or graph displays the correct information.
• To remove a step, click the Remove icon in a row.
• To view the result of removing a criteria, click Show Criteria Change.
• To accept the Show Criteria Change results, click Accept and then OK.
• To make the change permanent, click Save or Save and Close.
• To view the results without making the change permanent, click Apply and Close.
Related Topics• Overview of Tables, Graphs, Analysis Sets, Tiles, and Tile Sets
23

Oracle SCM CloudUsing Supply Planning
Chapter 2Tables, Graphs, Analysis Sets, Tiles, and Tile Sets
Create an Analysis Set An analysis set is a named set of criteria that can contain selected measures, dimension members, or both measuresand dimension members.
Use the Apply Analysis Set and Save as Analysis Set buttons to apply previously made selections or to save theselections made in the Selector Tool.
Applying an existing analysis set to a table or graph is a quick way to select the measures and dimension members thatyou frequently use.
You have the option to save measures and dimension members. You can save the dimension members as a list or asa script. For example, you can select the top 10 items based on sales for January. If saved as a list, the same 10 itemswould always be displayed in the table or graph, regardless of the current month. However, as sales data changes overtime, you would want to see the top items in the current month in your table or graph. To accomplish this, save thedimension members in a script that would evaluate the criteria whenever the table or graph is displayed.
Related Topics• Overview of Tables, Graphs, Analysis Sets, Tiles, and Tile Sets
Create a Tile in Supply Chain Planning A tile is a component used to present a graphical summary of the data. A tile is also referred to as an infotile in SupplyChain Planning.
Each tile has one or more related tables or graphs with predefined drill-to actions to display additional informationabout that key performance indicator (KPI).
To create a tile:
1. In a Supply Chain Planning work area, open a plan.2. Click Actions > Manage Tables, Graphs, and Analysis Sets.3. In the Manage Tables, Graphs, and Analysis Sets dialog box, in the Search Results region, click Actions and then
select Create > Tile.4. In the Selector Tool - Create Tile dialog box, on the Measures tab, select the required measures and move them
from the Available Measures pane to the Selected Measures pane.5. On the Hierarchies tab, select the dimensions, hierarchies, and levels to include or exclude in the tile.6. On the Members tab, select the required dimension members and move them from the Available Members
pane to the Selected Members pane. If you don't select a dimension member, the tile displays the dimensionstarting at the top level selected in the Hierarchies tab.
7. On the Layout tab, do the following:
◦ Select the graph type for the infotile.
◦ Expand the Content Area panel, and then click the Add Row button. You can add up to four tables orgraphs to display them in the content area for that tile.
8. Click Save and Close.
24

Oracle SCM CloudUsing Supply Planning
Chapter 2Tables, Graphs, Analysis Sets, Tiles, and Tile Sets
Related Topics• Overview of Tables, Graphs, Analysis Sets, Tiles, and Tile Sets
• Create a Tile Set in Supply Chain Planning
Set Measure Targets for Use in Tiles You can enter or update goals for a measure to track performance against the goals. Set targets by editing a measureand updating the measure goal. When the plan summary displays the measure, the goal or target for that measure isvisible.
You can define goals only for measures that are of data type currency, number, or percent.
For global goals, you can provide a low range or a high range. The ranges are displayed on the user interface when youview a measure in comparison with its goal. Global goals are measure level parameters and aren't defined specifically fora data population.
To enter or update measure target goals, follow these steps:
1. Open the Manage Planning Measures page:
a. In a Supply Chain Planning work area, open a plan.b. On the Edit Plan page, click the Tasks panel tab.c. In the Tasks panel drawer, click the Manage Planning Measures link.
2. On the Manage Planning Measures page, select the measure and click the Edit icon.3. On the Edit Measure page, navigate to the Advanced tab, Goals subtab.4. In the Goals subtab, select whether low values or high values are better.
For example, high values are better for Gross Margin, but low values are better for Demand at Risk.5. In the Global Goals section, provide a low range or a high range.6. Click Save and Close.
Create a Tile Set in Supply Chain Planning You can create a tile set to group individual tiles.
Tiles are also referred to as infotiles in Supply Chain Planning. Creating tile sets can be useful in cases where you want totrack various metrics on a single page. You can add tile sets to a pane in a page layout.
Tip: Before you create a tile set, check whether you need to create the tiles that you will be adding to the tile set.
To create a tile set:
1. In a Supply Chain Planning work area, open a plan.2. Click Actions > Manage Table, Graphs, and Analysis Sets.3. On the Search table toolbar, from the Actions menu, select Create > Tile Set.4. In the Selector Tool - Create Tile Set dialog box, specify the following details:
25

Oracle SCM CloudUsing Supply Planning
Chapter 2Tables, Graphs, Analysis Sets, Tiles, and Tile Sets
◦ Enter a name and description for the tile set.
◦ Select a group for the tile set.
5. From the Available Tiles pane, select the tiles to include in the tile set and move them to the Selected Tiles pane.6. Click Save and Close.
Related Topics• Create a Tile in Supply Chain Planning
Use Table Drilling After you create a table, use drilling in the table to expand and collapse the levels within the hierarchy by which you canview different levels of aggregation.
When viewing a table or graph, the dimensions and hierarchies selected on the Hierarchies tab are visible. The topselected level is visible; use drilling to view lower levels.
To drill across hierarchies or dimensions, the levels must be adjacent. Drilling is automatically available for the levelswithin the predefined hierarchies, but you can also configure drill pairs to drill across hierarchies or dimensions.
To display a table showing Final Shipments History with the ability to drill from customer to item, the columns Customerand Item must be adjacent:
1. On the Layout tab, use the View menu to select Configure Drill Settings.2. Click the Add Row icon to add a new drill pair.3. In the Drill From column, select Customer. In the Drill To column, select Item.
With this configuration, you can view the shipments history values by item for each customer in the table.
Note: Drilling is only active between the adjacent levels in the table.
Related Topics• Overview of Tables, Graphs, Analysis Sets, Tiles, and Tile Sets
• Use Advanced Options in the Selector Tool
• Use Table Linking
Use Table Linking You can link a table or graph to another table or graph or a page layout by selecting Manage Links from the Actionsmenu on the toolbar.
The links enable you to pass the context of a table or graph to another table or graph or a page layout.
In the Manage Links dialog box, there are two tabs:
• To Table, Graph, or Page Layout: Create a link to another table or graph or to a page layout.
26

Oracle SCM CloudUsing Supply Planning
Chapter 2Tables, Graphs, Analysis Sets, Tiles, and Tile Sets
• From Table or Graph: Link to the open table or graph from another table or graph.
Use the Add Row icon to add a link.
• Enable dynamic linking: Select this check box to enable dynamic linking. If selected, then the target table orgraph is refreshed when the selections in the source table or graph change.
• Pass highlighted selections and selected members: If you select this option, then whatever you highlight inthe current table or graph is passed as the context along with the filters in the Selector Tool to the target table,graph, or page layout.
• Pass user-specified parameters: If you select this option, then you can select the level and context of the sourcetable or graph to pass as link parameters to the target table, graph, or page layout.
• Include measure filters: Select this check box to apply measure filters that you defined in the Measure Filterstab in the Selector Tool to a linked table of graph. This check box is enabled:
◦ After you select the Pass user-specified parameters check box.
◦ If the From Table contains measure filters.
After you define the link, use the Drill icon on the toolbar to drill to the linked table, graph, or page layout.
Related Topics• Overview of Tables, Graphs, Analysis Sets, Tiles, and Tile Sets
• Use Advanced Options in the Selector Tool
• Use Table Drilling
Graph Layout Options The graph layout option is available in the Selector Tool dialog box, on the Layout tab when you create or edit a graphusing the Manage Tables, Graphs, and Analysis Sets option.
In the Graph Layout Options section, you can define the type of graph and configure layouts and the dimension of axes.In the Filters section you can specify the filter criteria that you want displayed in the graph.
The layout options vary according to the type of graph. For example, a bar graph has X and Y-axis layout optionswhereas a Pie chart doesn't have any X or Y axis. General Options is common for all layout options and includes genericinformation for a graph such as title, font, and position of the graph. You can also preview a graph from the Layouttab before you save the graph. In the preview mode, you can format measures, change the layout, and modify the drillsettings.
The following types of graphs are available:
• X and Y axes graphs
◦ Vertical bar
◦ Horizontal bar
◦ Line graph
• X and Y axes graphs with additional parameters
◦ Area graph
27

Oracle SCM CloudUsing Supply Planning
Chapter 2Tables, Graphs, Analysis Sets, Tiles, and Tile Sets
◦ Combination graph
◦ Bubble graph
• Pie graph
• Sunburst graph and Treemap graph
• Funnel graph and Radar graph
• Gauge graph
For graphs with an X, Y, or dual Y axes, you can select up to three entities in total: measures are mandatory, and you canselect one or two dimension hierarchies. A dual Y-axis graph requires the measures on the Y axis. You must select onemeasure for the Y2 axis in the Y2 -Axis panel. Axis title and tick label rotation options are available for all axes. Tick labeloptions are also available for the X-axis. For example, skip a certain number of labels for legibility. The Formatting panelcontains visual effect options for the graph, such as 2 dimension or 3 dimension, and bar or line style.
Here's additional information about some of the graphs:
Graph Type Comments
Combination
A Combination graph includes an area, bar, and line. The measures represented by each of theseoptions are specified in the Formatting panel.
Bubble
A Bubble graph requires selections for the bubble component of the graph in addition to the X and Yaxes options. Select the hierarchy and the bubble sizing measure in the Bubble panel.
Sunburst
A Sunburst graph is comprised of rings. Select the number of rings to display. Each ring representsa level of the hierarchy. The rings are divided into sectors for each member of the level. The size andcolor of the sector is determined by the measures selected for those options.
Treemap
A Treemap graph is comprised of rectangles. Select the depth of the rectangles for a hierarchy. Therectangles for a level of the hierarchy are nested within the parent level rectangle. The size and color ofthe rectangles are determined by the measures selected for those options.
Funnel and Radar
Funnel and Radar graphs require only a hierarchy and measure selection.
Gauge
Gauge graphs, which are used in infotiles, require measures with goals defined.
Related Topics• Overview of Tables, Graphs, Analysis Sets, Tiles, and Tile Sets
Configure Filters for Graphs You can configure graphs that specify filter criteria that enables you to page through data in the graph by one or morehierarchy levels. For example, you might want to filter for product category when analyzing your plan.
28

Oracle SCM CloudUsing Supply Planning
Chapter 2Tables, Graphs, Analysis Sets, Tiles, and Tile Sets
After you analyze one product category, you can select another product category to review from the filter bar above thegraph. Specify the filter criteria in the Selector Tool dialog box, Layout tab, Filters section.
The hierarchy levels that you selected on the Hierarchies tab are available to select as filters. You can select one or morelevels of a hierarchy for a filter. However, if you also selected the hierarchy for the X-axis or Y-axis, then you can't selectall of the hierarchy levels for filters. At least one hierarchy level must be used for the X-axis or Y-axis.
The members of the levels that you select are used to filter the data shown in your graph. You can select the levelmember value of interest from a set of values in the filter bar above the graph.
Let's work through an example of setting up filters for a graph:
1. In the Selector Tool dialog box, on the Hierarchies tab, select the Time, Product, Organization, and Customerdimensions.
All levels are selected by default. The levels that you select for the dimensions become visible in the Filterssection.
2. On the Layout tab, in the X-Axis section, select Gregorian Calendar.3. In the Y-Axis section select the Product hierarchy and Measures.4. In the Filters section, select to filter on Quarter and Zone.5. Click Apply and Close.
When you display the graph, you can see the Quarter and Zone filters above the graph. Months are on the X-Axis anditems are on the Y-Axis. The months shown are determined by the selected quarter, based on the Gregorian calendar.So, for Quarter 1, the graph displays January, February, and March on the X-Axis. Levels not selected on the axes or inthe Filters section, such as Organization, aren't included in the graph.
For the X-axis and Y-axis, if one or more levels are selected on the Hierarchies tab, such as Year, Quarter, and Month,the graph displays with the highest level. You can drill to lower levels that aren't selected in the Filters section.
Note: Filters for graphs are similar to filters for tables. However, you can't drag and drop filters onto the X-axis or Y-axis of the graph.
Set Your Axis Scale Use Axis Scale Options to refine your scale.
• Axis Scale Options applies to the Y axis and Y2 axis and you can use it only for bar, line, area, or combinationgraphs.
• Minimum is the starting point of the axis.
• Maximum is the ending point of the axis.
• Increment is the increase in values between maximum and minimum.
Specify the behavior.
• Automatic. Promising automatically adjusts the scale for the Y axis and the Y2 axis.
• Manual. You have to manually specify the scale for the Y axis and the Y2 axis.
Assume you set Minimum to 3, Maximum to 10, and Increment to 2. The graph will display 3 as the lowest value, 10 asthe highest value, and 5, 7, and 9 as incremental values for the Y axis or the Y2 axis.
29

Oracle SCM CloudUsing Supply Planning
Chapter 2Tables, Graphs, Analysis Sets, Tiles, and Tile Sets
Format how Measures are Displayed in Tables andGraphs You can make measure formatting changes to tables and graphs to reflect your individual preferences or requirementsfor how you want the tables or graphs to display.
For example, you can override the name of a measure and its measure of unit. When you format measures in a planningtable or graph, your measure formatting can't be overridden by another user. Any formatting changes done by otherusers, including the owner of the table or graph, don't take precedence over your changes. To make user-specificmeasure formatting changes, open a table or graph and select View > Format Measures to open the Format Measuresdialog box.
If you're the owner of the table or graph, then your formatting changes are visible to you and to other users who haven'tdefined their own formatting. These changes can include overriding the measure label, applying conditional formatting,or changing the unit of measure that you want displayed in your table or graph. Formatting changes made by otherswon't impact your specific measure formatting.
If you're not the owner of the table or graph, then any measure formatting you define takes precedence over theowner's measure formatting and is visible only to you. For example, if you change decimal positions to 0 (zero) for allmeasures in a table, you're the only user that sees those changes. When you save your measure formatting, you'll nolonger see future formatting changes made by the table or graph owner. For example, if you save measure formattingand then the table owner adds conditional formatting on a measure, you won't see that conditional formatting.
Use the Reset to Default button in the Format Measures dialog box to remove your user-specific measure formatting.
• If you're the owner of the table or graph, then your measure formatting is removed. Any measure formatting bynon-owners won't be impacted.
• If you're not the owner of the table or graph, then all of your measure formatting is removed. The table or graphdisplays all existing measure formatting saved by the owner of the table or graph.
If you duplicate a measure, the duplicated measure is added as the last measure in the table. For example, you canduplicate a measure with a different currency or unit of measure. If you're the owner of the table, the duplicatedmeasure is visible to you and to other users who haven't defined their own formatting. If you're not the owner of thetable, the duplicated measure is visible only to you. You can reorder the duplicated measures, but you must save yourlayout to preserve the measure order.
You can make user-specific measure formatting changes in the following work areas:
• Demand Management
• Demand and Supply Planning
• Planning Central
• Replenishment Planning
• Sales and Operations Planning
• Supply Planning
30

Oracle SCM CloudUsing Supply Planning
Chapter 2Tables, Graphs, Analysis Sets, Tiles, and Tile Sets
Configure Color by Measure to Display in Graphs You can configure the color by measure and then use that color for every graph that the measure appears in. Forexample, always show Final Shipments Forecast in blue and Final Sales Forecast in green.
This functionality is helpful when viewing a specific measure in several graphs in one layout. You can also specify thecolor to display for a measurein a specific graph.
The configure color by measure to display in graphs functionality is available in the following Supply Chain Planningwork areas:
• Demand Management
• Demand and Supply Planning
• Planning Central
• Replenishment Planning
• Sales and Operations Planning
• Supply Planning
Configure Color by Measure for All GraphsWhen you configure graphs, you can have a consistent color for a specific measure in your graphs. For example, youhave multiple graphs that display the forecast. You can quickly identify the forecast measure by using the same color forthe measure in all of your graphs.
To configure a graph color for a specific measure to use in all graphs, select the graph color for the measure in the EditMeasure dialog box.
1. In a Supply Chain Planning work area, click the Tasks panel tab.2. In the Tasks panel drawer, click the Manage Planning Measures link in the Configuration section.3. On the Manage Planning Measures page, select a measure, click Actions, and then select Edit.4. In the Edit Measure dialog box, click the Advanced tab.5. In the Properties subtab, click the Graph Color drop down arrow and select a color to use for the measure in all
graphs.
Configure Color by Measure for a Specific GraphYou can configure a color for a measure in a specific graph, which overrides the color configured for the measure in theEdit Measure dialog box.
To configure a graph color for a specific measure for a specific graph, select the graph color for the measure in theFormat Measures dialog box.
1. In an open table or graph, click View and then select Format Measures.2. In the Format Measures dialog box, in the Graph Color column, click the drop down arrow and select a color to
use.
31

Oracle SCM CloudUsing Supply Planning
Chapter 2Tables, Graphs, Analysis Sets, Tiles, and Tile Sets
Automatically Assign Graph ColorIf a graph color is already configured for a measure for all graphs, but you want the graph color assigned automaticallyfor that measure for a specific graph, then select the Assign Graph Color Automatically check box on the FormatMeasures page.
1. In an open table or graph, click View and then select Format Measures.2. In the Format Measures dialog box, in the Assign Graph Color Automatically column, click the check box in
the row for the measure.
Tips and Considerations for Assigning Graph Colors to MeasuresThe following is additional information about the configure color by measure to display in graphs functionality:
• Duplicate Colors: You might have a situation where you have two measures with the same color in a graph.If the color you configure for a measure is the same color as one of the colors automatically assigned to ameasure in a specific graph, then you must select a different color for the measure you're configuring.
• Predefined measures: By default, predefined measures initially don't have a graph color selected on theManage Planning Measures page. In this case, when used in a graph the planning process automaticallyassigns a color for the measure.
• Bar, line, and radar graphs: Only measures located in the Y-axis display the graph color settings. This is only incase the measures aren't combined with one or more hierarchies in the Y-axis. Automatically-assigned colorsare used in this case.
• Plan Comparison: When comparing plans, the configured measure color in the graph is honored only for themeasure itself. The measures that represent the compared plans get an automatically-assigned color, selectedrandomly by the planning process.
• Archive Plan: When archiving a plan and using Waterfall Analysis or Trend Analysis graphs, the configuredmeasure color is honored only for the measure itself. The measures that represent the archive get anautomatically-assigned color, selected randomly by the planning process.
• Export and Import: When exporting and importing measure settings from one environment to another, theexport and import keeps the graph color settings in Manage Planning Measures and Format Measures.
• Graph Types: The graph color functionality isn't available for the following graph types:
◦ Pie
◦ Sunburst
◦ Treemap
◦ Gauge
◦ Funnel
◦ Bubble
Related Topics• How You Manage Planning Measures
• Predefined Measures in Supply Chain Planning
32
Oracle SCM CloudUsing Supply Planning
Chapter 2Tables, Graphs, Analysis Sets, Tiles, and Tile Sets
How You Can Edit Measures at an Aggregate Time Level
This topic explains how you can edit measures at an aggregate time level in tables in demand, demand and supply,replenishment, sales and operations, and supply plans.
You can edit a measure with an edit range that's set to only the future at an aggregate time level in only those table cellsthat don't contain time periods for the past. For example, if the current date is Wednesday, August 11, 2021, and you'reviewing the data at a weekly level, you can't edit the forecast for the week starting August 09 or any aggregate levelsuch as the year 2021. Instead, you can edit the forecasts for the days of August 11 and later as well as the weeks startingAugust 16 and later.
You can edit a measure with an edit range that's set to only the history at an aggregate time level in only those tablecells that don't contain time periods for the future. For example, if the current date is Wednesday, August 11, 2021, andyou're viewing the data at a weekly level, you can't edit the history for the year 2021. Instead, you can edit the history forthe days before August 11 and the weeks starting August 02 and earlier.
The same behavior applies when you summarize data across time in tables. For example, the Adjusted ShipmentsForecast measure has an edit range that's set to only the future. If you summarize the measure by time in a table, thesummarized value is editable only if all the included values are editable. If the current month is August 2021, you can'tedit the summary for 2021, but you can edit the summary for 2022.
The same behavior also applies to plans with aggregate planning time levels. For example, if the planning time levelis week, and the current month is August 2021, you can't edit measures at aggregate time levels such as quarter andyear if the underlying weeks aren't editable. Instead, you can view the data at the weekly level to update the values foreditable weeks.
The edit ranges of measures are enforced at the Hybrid time level in demand plans. For example, for the week startingMonday, December 31, 2029, there are two Hybrid time level members, one starting on Monday, December 31, 2029,and the other starting on Tuesday, January 01, 2030. If the forecasting time level is set to week, and the plan is run onWednesday, January 02, the forecast would begin on Monday, December 31. But, the first Hybrid time level member isbefore the plan run date and considered as history. Therefore, any measure with an edit range that's set to the future,such as Adjusted Shipments Forecast, isn't editable for the first Hybrid time level member.
Thus, data integrity is ensured because you can't make changes to the values of measures outside of their configurededit ranges.
How Time Periods Are Calculated and Displayed inTables, Graphs, and the Selector Tool This topic explains how time periods are calculated and displayed in tables, graphs, and the Selector Tool in the DemandManagement, Demand and Supply Planning, Planning Central, Replenishment Planning, and Sales and OperationsPlanning work areas.
33

Oracle SCM CloudUsing Supply Planning
Chapter 2Tables, Graphs, Analysis Sets, Tiles, and Tile Sets
Settings That Affect the Calculation and Display of Time PeriodsThe following settings affect the calculation and display of time periods in tables and graphs for a demand, demand andsupply, replenishment planning, or sales and operations plan:
• The value in the Demand History Days field in the Demand: Advanced Options dialog box that you open fromthe Demand tab on the Plan Options page
• The selection on the Time Range tab of the Advanced Filter dialog box that's available on the Members tab inthe Selector Tool
• The selected members for the Time dimension on the Members tab in the Selector Tool
• Shared measures
The following settings affect the calculation and display of available members for the Time dimension on the Memberstab in the Selector Tool for the plan:
• The value in the Demand History Days field
• The planning horizon
The default value for the Demand History Days field is 182 days.
Note: If data isn't available, blank rows are displayed for the time periods included in tables and graphs. Also, theamount of historical data that's considered for the forecast depends on the value in the Historical Buckets field onthe Demand tab on the Plan Options page.
How Time Periods Are Calculated and DisplayedTime periods are calculated and displayed in a table or graph as follows:
• If you select members of the Time dimension on the Members tab in the Selector Tool, they're displayed in thetable or graph.
• If you don't select members of the Time dimension on the Members tab in the Selector Tool, time periods aredisplayed as follows:
◦ If the table or graph has shared measures, time periods are displayed for the combination of the demandhistory days and planning horizon.
◦ If the table or graph doesn't have shared measures, time periods are displayed for the planning horizon.
The display of available members for the Time dimension on the Members tab in the Selector Tool is for thecombination of the demand history days and planning horizon.
Related Topics• Overview of Tables, Graphs, Analysis Sets, Tiles, and Tile Sets
34

Oracle SCM CloudUsing Supply Planning
Chapter 2Tables, Graphs, Analysis Sets, Tiles, and Tile Sets
Measure Data in Tables
How You Can Edit Measure Data While working in one of the Supply Chain Planning work areas, you might be editing measure data in a table.
The following table provides a list of some features you can use when doing so, and where each feature is located:
Feature Location
Configure Summaries
View menu
Data Calculation Options
Table toolbar
Lock and Unlock Cells
If at least one summary is configured: Action menu, table toolbar, right-click in cell
Related Topics• Manage Data Calculations When Editing Measure Data in a Supply Chain Planning Table
• How You Lock Cells While Editing Measure Data or Allocating Values in a Table
Copy and Paste Values in Tables Use the Copy and Paste options in the Actions menu for a table to copy cell values and paste them in editable cells. Youcan also copy values from one table to another within the same plan.
Pasting overwrites any existing values, and any measures that are dependent on the overwritten measures arerecalculated.
If your data is in an external application such as Microsoft Excel, you can use the following procedure to copy and pasteyour data:
1. Copy your data from the external application.2. In your work area table, click the first editable cell from which you want the data to be pasted, and select
Actions > Paste from Clipboard. The Paste from Clipboard dialog box opens.3. Press Ctrl+V to paste your content in the dialog box. You can further edit your data in the dialog box.4. Click Paste and Close. The copied content is pasted into the editable cells of the table.
Alternatively, you can export your table data to Microsoft Excel using the Export icon, work with your data in thatapplication, copy your data, and bring it back into your table by using the Paste from Clipboard option. To copy databetween plans, export the table data to Microsoft Excel from one plan, and use the Paste from Clipboard option tocopy data into the other plan.
35

Oracle SCM CloudUsing Supply Planning
Chapter 2Tables, Graphs, Analysis Sets, Tiles, and Tile Sets
Note: You can paste values in only those cells that fall within your plan horizon. The number and orientation of thecells from which data is copied and the cells into which data is pasted must match. Only numeric data can be copiedand pasted. Non-editable cells that are within a range of editable cells are skipped when data is pasted, and a warningis displayed to this effect.
Related Topics• How can I highlight editable cells in a table?
Manage Data Calculations When Editing Measure Data in a SupplyChain Planning Table When you are working in a Supply Chain Planning work area, you might be editing measure data in tables that includedependent measures.
You can use the Data Calculation Options menu to determine when calculations are performed. You access the DataCalculation Options menu from the table toolbar for the table you are editing.
The Data Calculation Options choices are:
• Enable Automatic Calculations
• Calculate Now
Enable Automatic CalculationsWhen you edit data with this option selected, each time you edit a value, calculations are performed for any applicablesummaries or other measures that include an expression. The Enable Automatic Calculations choice is the defaultselection.
Calculate NowTo choose when calculations are performed, you must first deselect Enable Automatic Calculations. When you makeedits with the Enable Automatic Calculations choice deselected, you must click the Calculate Now choice when you wantcalculations to be performed. Calculations will be performed for all edits made since the last time calculations wereperformed.
If you save a table after making edits, any needed calculations will be performed, but you must refresh the table to seethe results.
How You Lock Cells While Editing Measure Data or AllocatingValues in a Table When you are working in a Supply Chain Planning work area, you might be editing measure data in a table.
When you have locked cells, edits, including those that spread allocations to other cells, do not change locked cells.
Note: You must configure at least one summary to enable the Lock and Unlock actions.
36
Oracle SCM CloudUsing Supply Planning
Chapter 2Tables, Graphs, Analysis Sets, Tiles, and Tile Sets
Lock cells by performing one of the following:
• Click the Lock action in the Actions menu.
• Click the Lock icon on the table toolbar.
• Right-click in an editable cell.
Related Topics• How do I enable the Lock and Unlock actions for a table while editing measure data in a Supply Chain Planning
table?
• Can I unlock all cells at once while editing measure data in a Supply Chain Planning table?
How do I enable the Lock and Unlock actions for a table whileediting measure data in a Supply Chain Planning table? Configure at least one summary to enable the Lock and Unlock actions. Use the View menu for the table to configuresummaries.
Can I unlock all cells at once while editing measure data in aSupply Chain Planning table? Yes, you can unlock all cells at once by using the Unlock All action from the Actions menu. This action is available in theActions menu only if you have configured summaries.
How can I highlight editable cells in a table? In the View menu for a table, select Highlight Editable Cells to provide a background color for cells that contain editablemeasures.
Do note that any conditional formatting that has been applied to an editable measure or a table takes precedence overthe highlight color. You can choose to save your page layout with this setting.
37

Oracle SCM CloudUsing Supply Planning
Chapter 2Tables, Graphs, Analysis Sets, Tiles, and Tile Sets
38

Oracle SCM CloudUsing Supply Planning
Chapter 3Planning Exceptions
3 Planning Exceptions
Exceptions in Plans
Overview of Plan Exceptions Exceptions are a key element to evaluate and improve your plan in Supply Chain Planning.
After you run a plan, view the exceptions to understand the quality of the plan and to get visibility of key problem areas.You can focus on key exceptions to understand their root causes. From the exceptions tables, you can drill down toother plan views for more details into the problem areas. After taking actions to resolve exceptions, run the plan againto evaluate whether the plan is now acceptable.
Oracle provides several predefined exceptions that the Supply Chain Planning processes compute after you run aplan. View these exceptions to identify problem areas in the plan that might need your attention. To view a list of theexceptions, open your plan and then open the Exceptions table.
The exception types and their calculation logic are predefined. However, to ensure that only significant deviationsare highlighted, you can edit the conditions under which the exceptions are generated. You control which exceptionsto calculate for a plan by specifying an exception set on the Plan Options page. View the metrics associated withexceptions, such as by count or by quantity, in tables or graphs at different hierarchical levels.
You can also create user-defined exceptions based on specific conditions in the supply chain that you want to identify.Base these user-defined exceptions on your business requirements and focus on specific areas to improve your supplychain planning capabilities. Use the Configure Exception task to create a user-defined exception.
Note: You can't create user-defined exceptions in the Planning Central work area. Also, there are no predefinedexceptions for Replenishment Planning.
Plan Exception TypesFrom within your plan, you can open the Exceptions table to view the exceptions grouped within the following folders:
Exception Folder Accessible from these work areas:
Demand Planning Exceptions
Demand Management Planning Central Sales and Operations Planning
Replenishment Planning Exceptions
Replenishment Planning (user-defined exceptions only)
Sales and Operations Planning Exceptions
Sales and Operations Planning
Supply Planning Exceptions
Supply Planning
39

Oracle SCM CloudUsing Supply Planning
Chapter 3Planning Exceptions
Exception Folder Accessible from these work areas:
Planning Central
Views for Multiple Exceptions
Supply Planning Planning Central
Exception CategoriesThere are two categories of exceptions:
• Measure-based exceptions
• Order-based exceptions
Oracle provides several predefined exceptions for most Supply Chain Planning products. You can also create user-defined exceptions from most Supply Chain Planning work areas. The following table lists the Supply Chain Planningproducts, the type of exception, whether the product has predefined exceptions, and whether you can create user-defined exceptions.
Product Type of Exception Predefined Exceptions User-Defined Exceptions
Demand Management
Measure-based exceptions
Yes
Yes
Planning Central
Measure-based exceptions
Yes
No
Replenishment Planning
Measure-based exceptions
No
Yes
Sales and Operations Planning
Measure-based exceptions
Yes
Yes
Supply Planning (constrained andunconstrained)
Order-based exceptions Measure-based exceptions
Yes
Yes
View Exceptions for Your PlanWhen you open the Exceptions table, you can see the number of exceptions generated within parentheses after theexception name. Click the exception name to view a table with details of the exception. From the Exceptions table, youcan:
• Search for exceptions for a specific item and organization within a specified date range.
• Save the search criteria for future searches.
• Export the table to a spreadsheet, rearrange columns, and perform other standard table actions on the table.
Predefined views within the Views for Multiple Exceptions folder enable you to view all exceptions for an item, resource,or supplier within the same table. The Views for Multiple Exceptions folder is available only in the Supply Planning andPlanning Central work areas.
40

Oracle SCM CloudUsing Supply Planning
Chapter 3Planning Exceptions
From tables that show exception data, you can navigate in context to other plan data. This navigation capability is usefulwhen, for example, you view exceptions for an item and you also want to see its supply or resource availability.
Related Topics• How You Edit Exceptions
• Configure Exception Thresholds
• Overview of Exceptions and Exception Sets
• Overview of Predefined Planning Exceptions
• Overview of User-Defined Exceptions
Configure Exception Thresholds You can control the number of exceptions that your plan generates by changing the levels at which an exception iscomputed and its threshold value. A higher threshold value typically results in fewer exceptions.
To configure exception thresholds, do the following:
1. From a Supply Chain Planning work area, select the Configure Exceptions task.2. On the Configure Exceptions page, select an exception.3. Click Actions and then select Edit.
Demand planning, replenishment planning, and sales and operations planning exceptions are measure-basedexceptions. A base measure forms the foundation for these exceptions.
In the Planning Central work area, you can't change the base measure, but you can edit the level at which the exceptionis computed and its threshold value.
Most supply planning exception calculations are for a specific order and aren't associated with a base measure. Forthese types of exceptions, select the fact associated with the exception and modify the condition that specifies when togenerate the exception. Think of a fact as an attribute of the exception. Typical facts are quantity and value.
Related Topics• How You Edit Exceptions
• Overview of Plan Exceptions
• Overview of User-Defined Exceptions
Create Tables and Graphs for Exceptions Create a table or graph for plan exceptions based on their measures, such as number of exceptions generated and thequantity associated with the exception.
Create a Table for Exceptions
1. In a Supply Chain Planning work area, open a plan.2. Click the Actions button and select Manage Tables, Graphs, and Analysis Sets from the list.
41

Oracle SCM CloudUsing Supply Planning
Chapter 3Planning Exceptions
3. In the Manage Tables, Graphs, Analysis Sets dialog box, click Actions. Next, select Create and then select Table.4. On the Create Table page, do the following:
◦ Enter a name for your table.
◦ Select a group.
◦ Enter a description.
◦ Select the type of access (public or private).
5. On the Measures tab, do the following:
a. In the Available Measures section, expand the Overall Plan Health folder.
The Overall Plan Health folder contains the measures associated with exceptions.b. Select the exception facts that you want to view in the table.
6. On the Hierarchies tab, include the Exception Type hierarchy.7. On the Members tab, select the exception types to display in the table.8. Click Save and Close.
Create a Graph for Exceptions
1. In a Supply Chain Planning work area, open a plan.2. Click the Actions button and select Manage Tables, Graphs, and Analysis Sets from the list.3. In the Manage Tables, Graphs, Analysis Sets dialog box, click Actions. Next, select Create and then select
Graph.4. On the Create Graph page, do the following:
◦ Enter a name for your graph.
◦ Select a group.
◦ Enter a description.
◦ Select the type of access (public or private).
5. On the Measures tab, do the following:
a. In the Available Measures section, expand the Overall Plan Health folder.
The Overall Plan Health folder contains the measures associated with exceptions.b. Select the exception facts that you want to view in the graph.
6. On the Hierarchies tab, include the Exception Type hierarchy.7. On the Members tab, select the exception types to display in the graph.8. On the Layout tab, do the following:
a. In the Graph Layout Options section, select a type of graph.b. Configure your graph in the horizontal panels below the Graph Layout Options.
The horizontal panels below the Graph Layout Options section vary, depending on the type of graph thatyou select. For example, if you select Pie Graph for your graph type, the horizontal panels include GeneralOptions, Pie Slice, and Formatting.
9. Click Save and Close.
42

Oracle SCM CloudUsing Supply Planning
Chapter 3Planning Exceptions
Related Topics• How You Edit Exceptions
• Overview of Tables, Graphs, Analysis Sets, Tiles, and Tile Sets
• Overview of Plan Exceptions
How Exceptions are Calculated in Supply Plans That UseTelescoping Time Buckets When you use telescoping buckets in your supply plan, the planning process handles exception messages based onwhat you specify for Planning Time Buckets in plan options.
This table explains how the planning process calculates exceptions when you use time buckets larger than days.
Exception Type Calculation Logic
• Orders To Be Rescheduled In
• Orders To Be Rescheduled Out
The planning process generates reschedule exceptions only if the supply orders get rescheduledacross planning time buckets. Any reschedules of the order due dates within a planning time bucket doesn't trigger rescheduleexceptions.
• Late Supply Pegged to Sales Order
• Late Supply Pegged to Forecast
• Late Replenishment for Sales Order
• Late Replenishment for Forecast
The planning process generates late supply or late replenishment exceptions only if the supply anddemand dates are in different planning time buckets. For example, a sales order suggested due date is in the middle of a week. The suggested due date ofthe supply is the last working day of the week. In this case, the planning process doesn't generate aLate Supply Pegged to Sales Order or Late Replenishment for Sales Order exception. However, suppose you have a sales order suggested due date in the middle of a week. The suggesteddue date of the supply is the first working day of the following week. In this case, the planning processgenerates an exception.
• Items with a Shortage
• Items Below Safety Stock
The planning process creates an exception only if the available quantity is less than the requiredquantity at the planning time bucket level. The planning process evaluates item shortages by using theprojected available balance on the last day of the planning time bucket. The planning process ignores daily fluctuations within a planning time bucket.
• Items with Excess Inventory The planning process creates an exception only if the available quantity is greater than the requiredquantity at the planning time bucket level. The planning process evaluates item excesses by using theprojected available balance on the last day of the planning time bucket. The planning process ignores daily fluctuations within a planning time bucket.
• Resource Overloaded
• Supplier Capacity Overloaded
The planning process creates an exception only if the available capacity is less than the requiredcapacity at the planning time bucket level. For example, in a weekly bucket, a resource can have some overloads within the week on a few days. Aslong as the available capacity at the week level is more than the required capacity, the planning processdoesn't generate a resource overload exception.
43

Oracle SCM CloudUsing Supply Planning
Chapter 3Planning Exceptions
Exception Type Calculation Logic
The planning process ignores daily fluctuations within a planning time bucket.
Exceptions and Exception Sets
Overview of Exceptions and Exception Sets On the Configure Exceptions page, you can select an exception and edit the thresholds for reporting. You can configureonly those exceptions that are relevant to your Supply Chain Planning work area.
On the Configure Exception Sets page, you can restrict the exceptions that are computed as part of the plan run. Youcan also control the organizations, item categories, time period, and so on for which to compute exceptions.
A defined exception set is associated with a plan. The plan evaluates the exceptions using the filters associated with theexception set. Select the exception set to use during the plan run on the Plan Options page, Scope tab.
Related Topics• How You Edit Exceptions
• Configure Exception Sets
• Set Filters on Planning Dimensions for Exceptions
• Define Scope Plan Options
• Overview of User-Defined Exceptions
How You Edit Exceptions To edit exception parameters, select an exception on the Configure Exceptions page. You can configure only thoseexceptions that are relevant to your Supply Chain Planning work area.
In the Edit Exception dialog box, there is an area for General Properties and Exception Detail. Depending on the SupplyChain Planning work area that you're in, you can see the following tabs in the Exception Detail section:
• Demand Management work area: Level, Threshold, and Notification
• Planning Central work area: Level and Threshold
• Replenishment Planning work area: Level, Threshold, and Notification
• Sales and Operations work area: Level, Threshold, and Notification
• Supply Planning work area: Level, Threshold, and Notification
You can edit Level and Threshold only for those exceptions whose basis is Measure. For exceptions whose basis isOrder, you can edit only the Threshold.
44
Oracle SCM CloudUsing Supply Planning
Chapter 3Planning Exceptions
Level TabOn the Level tab, the dimensions for the exception are derived from the base measure. You can edit the default valuesfor hierarchy and level. You can also enable and disable each of the available dimensions to control the level that theexception is evaluated at.
Note: Ensure that the selected hierarchy is in the dimension catalog for the plan. The Configure Exceptions task isoutside of the plan context. It's possible to select a product hierarchy that's not used in the plan's dimension catalog,in which case the plan exceptions output won't display data for items.
Threshold TabOn the Threshold tab, the base measure used in the exception is compared to either a value or another measure. Ifthe threshold is specified in terms of a value, the value is interpreted in terms of the data type of the base measure. Toensure that exceptions return meaningful values, set the threshold to an appropriately high or low value.
Notifications TabOn the Notification tab, set up notification rules for exceptions. Configure exceptions to trigger notifications to specificusers or roles. In the Details section specify the entity and condition for notifications. Notifications are automaticallysent at the end of the plan run.
Related Topics• Configure Exception Sets
• Set Filters on Planning Dimensions for Exceptions
• Overview of Predefined Planning Exceptions
• Overview of User-Defined Exceptions
• Overview of Plan Exceptions
Configure Exception Sets Use the Configure Exception Sets page to create, modify, or copy an exception set.
The set of exceptions and their scope that's calculated by the plan is configured on the Create or Edit Exception Setpage. When creating an exception set, you must first specify the exceptions to include in the set, which can includeuser-defined exceptions. User-defined exceptions aren't available in Planning Central.
The exception set also enables you to restrict the generation of exceptions for specific organizations, categories,suppliers, and customers. You can then point to the exception set on the Plan Options page for a plan.
When you create a constrained supply plan in Supply Planning, the Exception Set plan option defaults to theConstrained Supply Planning Default exception set.
Use the following steps to configure exception sets:
1. In a Supply Chain Planning work area, click the Tasks panel drawer and click Configure Exception Sets.2. On the Configure Exception Sets page, select an existing exception set. Next, click Actions and select
Duplicate.
45

Oracle SCM CloudUsing Supply Planning
Chapter 3Planning Exceptions
3. In the Create Exception Sets dialog box:
a. Expand the group of exceptions in the Available Exceptions section. For example, expand SupplyPlanning Exceptions.
b. Select the exception from the Available Exceptions section and move it to the Selected Exceptionssection.
4. Click Save and Close to return to your plan.
Note: To generate exceptions, you must include the exception set in the plan options for your plan.
Related Topics• How You Edit Exceptions
• Set Filters on Planning Dimensions for Exceptions
• Overview of Plan Exceptions
• Overview of Predefined Planning Exceptions
• Overview of User-Defined Exceptions
Set Filters on Planning Dimensions for Exceptions After selecting available exceptions for an exception set to use in a plan, you can add filters on some of the key planningdimensions. The levels on which you can define filters are organizations, categories, suppliers, and customers.
On the Configure Exception Sets page, Filters tab, select one or more organizations, suppliers, categories, andcustomers in each of the tables for which to generate exceptions. If you don't specify a filter for a level, you will generateexceptions for all records in that level. For example, if you don't specify an organization, exceptions will be generated forall planning organizations when you run the plan. If any of the organizations, categories, suppliers, or customers in theexception set aren't available in the plan, they will be ignored.
In the Exception Cutoff Days field, specify the number of calendar days, starting from the plan start date, from whichto generate the exceptions. If this field is blank, exceptions will be generated for the full planning horizon.
Related Topics• Configure Exception Sets
• How You Edit Exceptions
• Overview of Plan Exceptions
Predefined Planning Exceptions
Overview of Predefined Planning Exceptions The planning process computes several predefined exceptions after you run a plan.
46

Oracle SCM CloudUsing Supply Planning
Chapter 3Planning Exceptions
View these exceptions to obtain quick visibility of problem areas in the plan that might need your attention. To view alist of the exceptions, from a Supply Chain Planning work area, open a plan and then open the Exceptions table.
The Exceptions table is grouped into different folders, depending on the plan type:
• Demand Planning Exceptions
• Sales and Operations Planning Exceptions
• Supply Planning Exceptions
• Views for Multiple Exceptions: View exceptions for an item, resource, or supplier within the same table. (Thisfolder is available only in the Supply Planning and Planning Central work areas.)
Note: There are no predefined exceptions for Replenishment Planning, only user-defined exceptions that reside inthe Replenishment Planning Exceptions folder.
Related Topics• Overview of Plan Exceptions
• How You Edit Exceptions
• Predefined Supply Planning Exceptions
• Predefined Demand Planning Exceptions
• Predefined Sales and Operations Planning Exceptions
Predefined Supply Planning Exceptions The basis for all predefined supply planning exceptions is Order. The following table lists the predefined supply planningexception reports, their descriptions, and if the exception is available for constrained and unconstrained supply plans.
Supply PlanningException Name
Description Calculation Constrained Unconstrained Exception Set
Demand Quantity NotSatisfied
No supply is available.The planning processfinds demand peggedto supplies and thesupply quantities areless than the demandquantity. The planningprocess issues thisexception for demandsat all levels of thesupply chain bill ofmaterials. This exceptiontypically occursdue to inconsistentsetups. For example, aconfigured item can'tbe sourced becausetoo many option-specific exclusions
When PeggedQuantity < OrderQuantity for all supplyorders pegged to ademand order For order types ofSales order, Forecast, and Manual demand.
No
Yes
Default
47

Oracle SCM CloudUsing Supply Planning
Chapter 3Planning Exceptions
Supply PlanningException Name
Description Calculation Constrained Unconstrained Exception Set
prevent any sourcefrom being used.
Demand at Risk Due toInsufficient Lead Time
A demand is peggedto a supply that'sscheduled withinsufficient leadtimes. The salesorder or forecast isplanned on time eventhough the lead timerequired to meet it ontime is insufficient.The exception thentraverses up thesupply chain anddetermines all of thesupplies that wouldbe short on lead timeif the demand wereto be met on time.The planning processreports one exceptionfor every supply thatdoesn't have sufficientlead time.
All three of theseconditions mustbe met before theplanning processgenerates theexception:
• Contributesto DemandLateness = YES
• RescheduleDays for existingsupply isless than 0(Reschedule inRecommendations).
• Firm Status is setto Not Firm
(For order types ofSales order, Forecast, and Manual demand.)
Yes
Yes
Default Constrained SupplyPlanning Default
Demand at Risk Due toResource Shortage
A demand is peggedto a resource with aresource overloadexception. The salesorder or forecast isstill planned on timeeven in the absence ofresource availability.This exception detailsthe end demands thatare at risk becausethey're peggedagainst suppliers withinsufficient capacity.
When ResourceAvailability < ResourceRequirements (For order types ofSales order, Forecast, and Manual demand)
Yes
Yes
Default Constrained SupplyPlanning Default Default Constrained SupplyPlanning Default
Demand at Risk Dueto Supplier CapacityShortage
A demand is peggedto a supply where thesupplier capacity isconstrained. The salesorder or forecast isstill planned on timeeven in the absenceof supplier capacity.This exception detailsthe end demands thatare at risk becausethey're peggedagainst suppliers withinsufficient capacity.
When SupplierCapacity Availability< Supplier CapacityRequired (For order typesof Sales order andForecast)
Yes
Yes
Default Constrained SupplyPlanning Default
48

Oracle SCM CloudUsing Supply Planning
Chapter 3Planning Exceptions
Supply PlanningException Name
Description Calculation Constrained Unconstrained Exception Set
Items Below SafetyStock
The projectedavailable balance fora planning bucket isbelow the specifiedsafety stock level forthe planning bucket. If the exceptionextends over severaldays, the planningprocess reports oneexception with thestart and end dates toreflect the duration.If the magnitudeof the exceptionworsens, the planningprocess creates a newexception.
When ProjectedAvailable Balance< Safety Stock in abucket for an item, organization
No
Yes
Default
Items with ExcessInventory
The projectedavailable balance ishigher than the safetystock level.
When ProjectedAvailable Balance> Safety Stock in abucket for an item, organization
No
Yes
Default
Items with ExpiredLots
The planning processdetects a potentialexpired lot. A potentialexpired lot:
• Has a lotexpiration dateduring theplanning horizon.
• isn't pegged toa demand thatresults in its usebefore its lotexpiration date.
This exception occursagainst items underfull lot control. Thecalculation for lotexpiration date is LotReceipt Date + ShelfLife Days. In addition toreporting thisexception, theplanning processplans for you toflush the inventoryon its lot expirationdate. This processprevents you fromusing the lot after its
When order attributeOrder Type = Expiredlot
No
Yes
Default
49

Oracle SCM CloudUsing Supply Planning
Chapter 3Planning Exceptions
Supply PlanningException Name
Description Calculation Constrained Unconstrained Exception Set
lot expiration date tosatisfy demands.
Items with a Shortage
The item has negativeon hand at the endof the day. If theexception extendsover several days, the planning processreports one exceptionwith the start andend dates to reflectthe duration. If themagnitude of theexception worsens, the planning processcreates a newexception.
When ProjectedAvailable Balance < 0in a bucket for an item, organization
No
Yes
Default
Items with a Shortagein a Project Task
The item has negativeon hand at the endof the day for anitem in a projecttask. If the exceptionextends over severaldays, the planningprocess reports oneexception with thestart and end dates toreflect the duration.If the magnitudeof the exceptionworsens, the planningprocess creates a newexception.
When ProjectedAvailable Balance <0 in a bucket for anitem, project task, organization
No
Yes
Default
Late Replenishmentfor Forecast
The planning processdetects that thesupplies for a forecastare due later thanthe forecast's duedate. This exceptiontypically occursbecause planning timefences are enabled.
When order attributeDays Late > 0 (For order type ofForecast)
No
Yes
Default
Late Replenishmentfor Sales Order
The planning processdetects that thesupplies for a salesorder line are duelater than the salesorder line's scheduleddate. This exceptiontypically occursbecause planning timefences are enabledor when a reservedsupply is firmed late.
When order attributeDays Late > 0 (For order type ofSales Order)
No
Yes
Default
50

Oracle SCM CloudUsing Supply Planning
Chapter 3Planning Exceptions
Supply PlanningException Name
Description Calculation Constrained Unconstrained Exception Set
Late Supply Peggedfor Forecast
The planning processdetects suppliesthat peg againstindependent forecastdemand that'ssatisfied late. Throughthis exception, you canquickly detect whichsupplies are peggedagainst a late forecast.
When componentsupply attribute DaysLate > 0
Note:For ManualDemand, the LateSupply Pegged toForecast is alsogenerated when theDays Late > 0
(For order types ofForecast and ManualDemand)
Yes
Yes
Default Constrained SupplyPlanning Default
Late Supply Pegged toSales Order
The planning processdetects suppliesthat peg sales order
When componentsupply attribute DaysLate > 0
Yes
Yes
Default
51
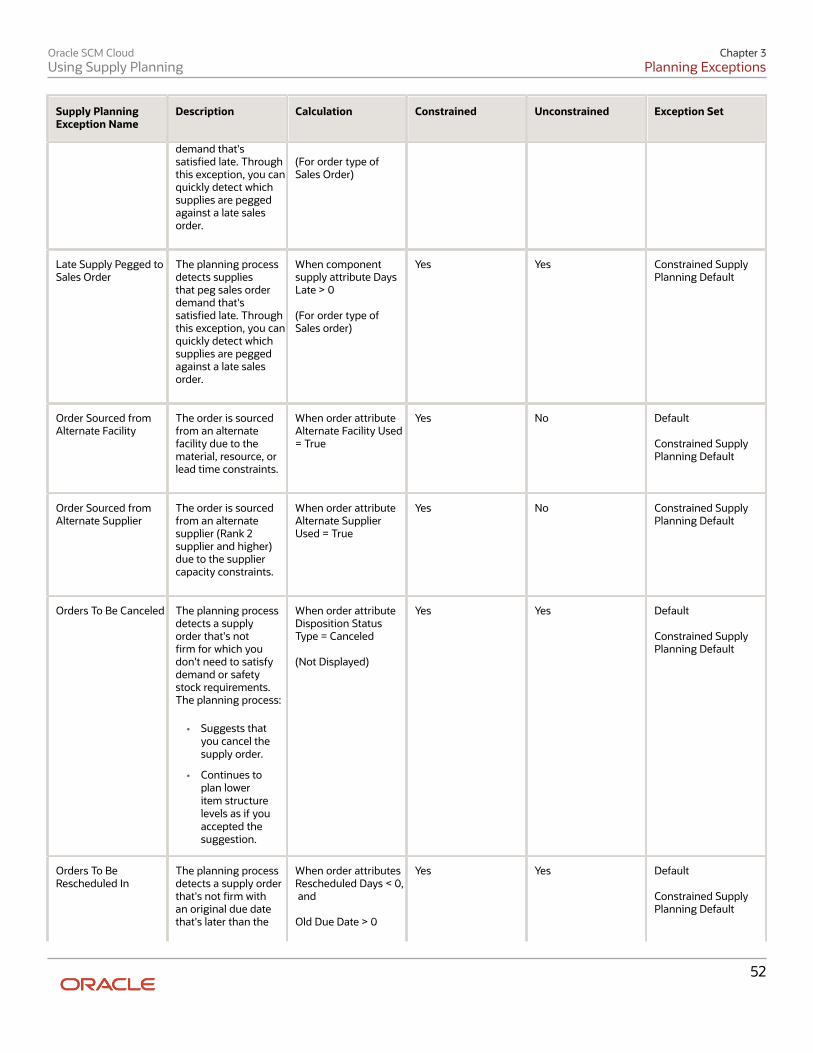
Oracle SCM CloudUsing Supply Planning
Chapter 3Planning Exceptions
Supply PlanningException Name
Description Calculation Constrained Unconstrained Exception Set
demand that'ssatisfied late. Throughthis exception, you canquickly detect whichsupplies are peggedagainst a late salesorder.
(For order type ofSales Order)
Late Supply Pegged toSales Order
The planning processdetects suppliesthat peg sales orderdemand that'ssatisfied late. Throughthis exception, you canquickly detect whichsupplies are peggedagainst a late salesorder.
When componentsupply attribute DaysLate > 0 (For order type ofSales order)
Yes
Yes
Constrained SupplyPlanning Default
Order Sourced fromAlternate Facility
The order is sourcedfrom an alternatefacility due to thematerial, resource, orlead time constraints.
When order attributeAlternate Facility Used= True
Yes
No
Default Constrained SupplyPlanning Default
Order Sourced fromAlternate Supplier
The order is sourcedfrom an alternatesupplier (Rank 2supplier and higher)due to the suppliercapacity constraints.
When order attributeAlternate SupplierUsed = True
Yes
No
Constrained SupplyPlanning Default
Orders To Be Canceled
The planning processdetects a supplyorder that's notfirm for which youdon't need to satisfydemand or safetystock requirements.The planning process:
• Suggests thatyou cancel thesupply order.
• Continues toplan loweritem structurelevels as if youaccepted thesuggestion.
When order attributeDisposition StatusType = Canceled (Not Displayed)
Yes
Yes
Default Constrained SupplyPlanning Default
Orders To BeRescheduled In
The planning processdetects a supply orderthat's not firm withan original due datethat's later than the
When order attributesRescheduled Days < 0, and Old Due Date > 0
Yes
Yes
Default Constrained SupplyPlanning Default
52

Oracle SCM CloudUsing Supply Planning
Chapter 3Planning Exceptions
Supply PlanningException Name
Description Calculation Constrained Unconstrained Exception Set
suggested due date.The planning process:
• Suggests thatyou reschedulethe supply orderto an earlier date.
• Continues toplan loweritem structurelevels as if youaccepted thesuggestion.
Orders To BeRescheduled Out
The planning processdetects a supply orderthat's not firm withan original due datethat's earlier than thesuggested due date.The planning process:
• Suggests thatyou reschedulethe supply orderto a later date.
• Continues toplan loweritem structurelevels as if youaccepted thesuggestion.
When order attributeRescheduled Days > 0
Yes
Yes
Default Constrained SupplyPlanning Default
Orders withInsufficient Lead Time
The planning processdetects that a supplyorder must becompleted in less timethan its minimumprocessing time tomeet demand. If theplanning process plansthe order accordingto its lead time, itwould start before theplanning horizon startdate. To report compressiondays, the planningprocess calculates theorder start date byusing the item leadtimes and backwardscheduling. Theplanning processconsiders all calendarsassociated with thesupply chain model.
All three of theseconditions mustbe met before theplanning processgenerates theexception:
• CompressionDays is greaterthan zero
• RescheduleDays for existingsupply isless than 0(Reschedule inRecommendations)
• Firm Status is setto Not Firm
(For supply ordertypes)
Yes
Yes
Default Constrained SupplyPlanning Default
53
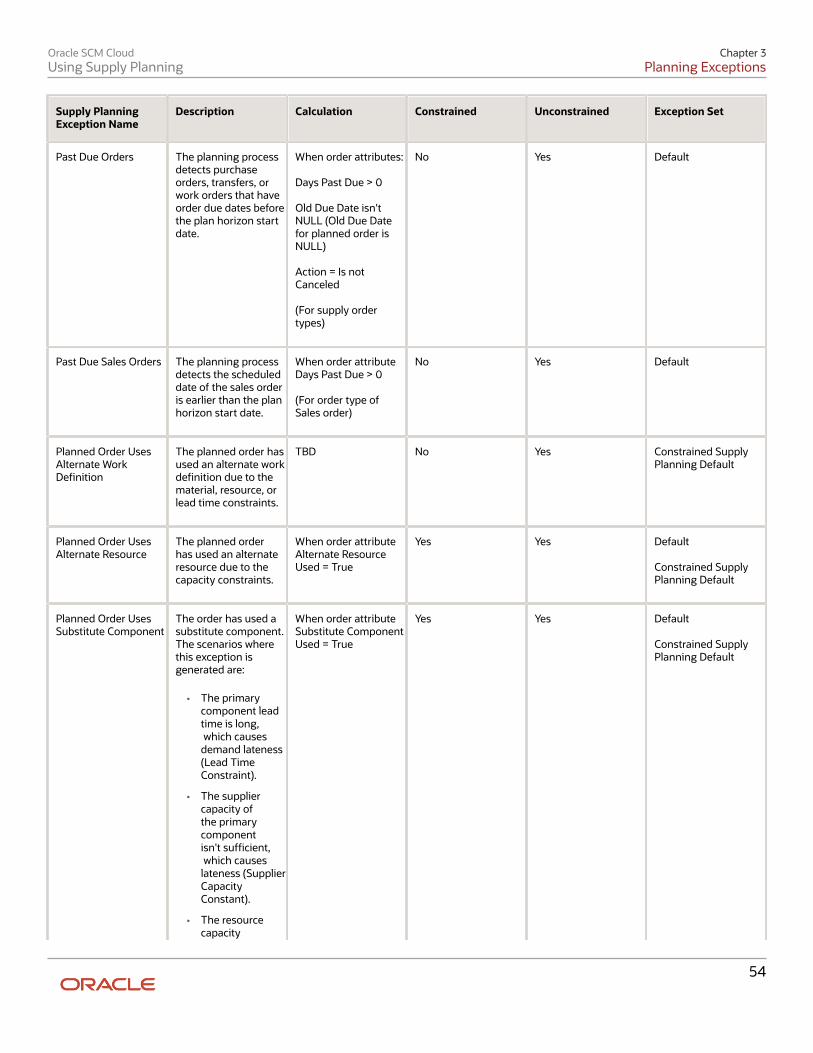
Oracle SCM CloudUsing Supply Planning
Chapter 3Planning Exceptions
Supply PlanningException Name
Description Calculation Constrained Unconstrained Exception Set
Past Due Orders
The planning processdetects purchaseorders, transfers, orwork orders that haveorder due dates beforethe plan horizon startdate.
When order attributes: Days Past Due > 0 Old Due Date isn'tNULL (Old Due Datefor planned order isNULL) Action = Is notCanceled (For supply ordertypes)
No
Yes
Default
Past Due Sales Orders
The planning processdetects the scheduleddate of the sales orderis earlier than the planhorizon start date.
When order attributeDays Past Due > 0 (For order type ofSales order)
No
Yes
Default
Planned Order UsesAlternate WorkDefinition
The planned order hasused an alternate workdefinition due to thematerial, resource, orlead time constraints.
TBD
No
Yes
Constrained SupplyPlanning Default
Planned Order UsesAlternate Resource
The planned orderhas used an alternateresource due to thecapacity constraints.
When order attributeAlternate ResourceUsed = True
Yes
Yes
Default Constrained SupplyPlanning Default
Planned Order UsesSubstitute Component
The order has used asubstitute component.The scenarios wherethis exception isgenerated are:
• The primarycomponent leadtime is long, which causesdemand lateness(Lead TimeConstraint).
• The suppliercapacity ofthe primarycomponentisn't sufficient, which causeslateness (SupplierCapacityConstant).
• The resourcecapacity
When order attributeSubstitute ComponentUsed = True
Yes
Yes
Default Constrained SupplyPlanning Default
54

Oracle SCM CloudUsing Supply Planning
Chapter 3Planning Exceptions
Supply PlanningException Name
Description Calculation Constrained Unconstrained Exception Set
for makingthe primarycomponent isn'tsufficient, whichcauses lateness(ResourceConstraint).
• The CreateSupply planoption is setto No forthe primarycomponent andthere's enoughon hand orcapacity availableon the substitutecomponent.
Resource Overloaded
Exception occurswhen, in a planningtime bucket, theresource requiredcapacity is morethan the resourceavailable capacity. Inunconstrained plans, resources can beoverloaded to meetdemand requirementson time. If the exceptionextends over severaldays, the exceptiondisplays the startand end dates toreflect the durationof the exception.If the magnitudeof the exceptionworsens, the planningprocess reports a newexception.
When ResourceUtilization Percentage> 100 in a bucket for aresource, organization
Yes
Yes
Default Constrained SupplyPlanning Default
Supplier CapacityOverloaded
Exception occurswhen, in a planningtime bucket, thesupplier requiredcapacity is more thanthe supplier availablecapacity. If the exceptionextends over severaldays, the exceptiondisplays the startand end dates toreflect the durationof the exception.
When SupplierCapacity UtilizationPercentage > 100 ina bucket for an item, supplier site
Yes
Yes
Default Constrained SupplyPlanning Default
55

Oracle SCM CloudUsing Supply Planning
Chapter 3Planning Exceptions
Supply PlanningException Name
Description Calculation Constrained Unconstrained Exception Set
If the magnitudeof the exceptionworsens, the planningprocess reports a newexception.
User-Defined Exceptions
Overview of User-Defined Exceptions You can create user-defined exceptions based on specific conditions in the supply chain that you want to identify.
Base these user-defined exceptions on your business requirements and focus on specific areas to improve your supplychain planning capabilities. Use the Configure Exception task to create a user-defined exception.
There are two categories of exceptions: Measure-based exceptions and order-based exceptions. You can create and useexceptions for the following Supply Chain Planning products:
Product Exception Type
Demand Management
Measure-based exceptions
Replenishment Planning
Measure-based exceptions
Sales and Operations Planning
Measure-based exceptions
Supply Planning (constrained andunconstrained)
Order-based exceptions Measure-based exceptions
Note: User-defined exceptions aren't available for Planning Central.
For user-defined exceptions that are measure based, the measure forms the foundation for that exception. After youselect a measure, you can specify the dimension hierarchy and level for that measure, and the threshold value ormeasure to generate the exception. You can create an exception based on the following thresholds:
• Value: Set the value and the specific operation, such as less than, equal, and larger than, against the basemeasure.
• Measure: Select the measure based on your business requirement and select the specific operation that meetsthe condition against the base measure.
56

Oracle SCM CloudUsing Supply Planning
Chapter 3Planning Exceptions
Related Topics• Configure Measure-Based Exceptions
Configure Order-Based Exceptions for Constrained Supply Plans You can configure order-based exceptions as user-defined exceptions for constrained supply plans. In this topic, wediscuss the predefined order-based exceptions that are available for unconstrained supply plans, but aren't available aspredefined exceptions for constrained supply plans.
Configure Exceptions That Are Order BasedUse these general steps to configure exceptions for constrained supply plans that are order based.
1. Open a constrained supply plan and access the Supplies and Demands table.2. In the Search section, click the Advanced button.3. Click the Add Fields button and select an order attribute from the list of values.4. Define a condition and value for the order attribute.5. To save the search, click the Save button.
a. In the Create Save Search dialog box, enter a name.b. Click OK.
6. In the Supplies and Demands table, click Search.
The Supplies and Demands table displays the records that conform to the defined condition.
The following sections provide specific details for some user-defined exceptions that you can configure for constrainedsupply plans.
Past Due Sales OrdersIn an unconstrained supply plan, the planning process generates the Past Due Sales Orders exception when it detectsthat the scheduled date of the sales order is earlier than the plan horizon start date. A past due sales order line is a salesorder line with a scheduled date earlier than the plan horizon start date.
To see demand where quantity isn't met in your constrained supply plan, follow these steps:
1. Open the Supplies and Demands table.2. In the Search section, click the Advanced button.
57

Oracle SCM CloudUsing Supply Planning
Chapter 3Planning Exceptions
3. Click the Add Fields button and select Days Past Due.4. In the Order Type field:
a. Set the operation to Equalsb. For the value, select Sales order
5. In the Days Past Due field:a. Set the operation to Greater thanb. Set the value to 0 (zero)
6. Click the Search button.All past due sales orders appear in the Search Results section in the Supplies and Demands table.
Late Replenishment for ForecastThe planning process generates the Late Replenishment for Forecast exception when it detects supplies that pegagainst independent forecast demand that's satisfied late. Through this exception, you can quickly detect whichsupplies are pegged against a late forecast.
A sales order becomes past due when it hasn't been satisfied by the time you run the plan. In other words, the OriginalDue Date of the sales order falls before the Plan Start Date. This exception usually occurs because of a materialconstraint, resource constraint, or a planning time fence.
Let's work through an example to see all late replenishments for forecasts in your constrained supply plan using thefollowing criteria:
• Component C feeds end item F.
• There's a forecast for end item F with a due date of Day 17.
• Due to manufacturing constraints, the component is available on Day 16. As a result, the Material Available Datefor end item F is Day 20.
In this example, the availability of material is late with respect to the due date. As a result, the planning processgenerates a Late Replenishment for Forecast exception for end item F.
To see all late replenishments for forecasts in your constrained supply plan, follow these steps:
1. Open the Supplies and Demands table.2. In the Search section, click the Advanced button.3. Click the Add Fields button and select Days Late.
58

Oracle SCM CloudUsing Supply Planning
Chapter 3Planning Exceptions
4. In the Order Type field:
a. Set the operation to Equalsb. For the value, select Forecast
5. In the Days Late field:
a. Set the operation to Greater thanb. Set the value to 0 (zero)
6. Click the Search button.
All late replenishments for forecasts appear in the Supplies and Demands table.
Late Replenishment for Sales OrdersThe planning process generates a Late Replenishment for Sales Order exception when it detects that the supplies fora sales order line are due later than the sales order line's scheduled date. In other words, the Material Available Date isafter its Suggested Due Date. This exception typically occurs due to any of these issues:
• There's a resource constraint
• Planning time fences are enabled
• A reserved supply is firmed late
Let's work through an example to see all late replenishments for sales orders in your constrained supply plan using thefollowing criteria:
• Component A feeds end item B
• End item B planning time fence is Day 20
• There's a sales order for end item B with a due date of Day 10
• Due to the item B planning time fence, item B can't be planned before Day 20. As a result, the Material AvailableDate for the end item B is Day 20.
In this example, the availability of material is late with respect to the due date. As a result, a Late Replenishment forSales Order exception is generated for the end item B.
To see all late replenishment for sales orders in your constrained supply plan, follow these steps:
1. Open the Supplies and Demands table.2. In the Search section, click the Advanced button.3. Click the Add Fields button and select Days Late.
59

Oracle SCM CloudUsing Supply Planning
Chapter 3Planning Exceptions
4. In the Order Type field:
a. Set the operation to Equalsb. For the value, select Sales order
5. In the Days Late field:
a. Set the operation to Greater thanb. Set the value to 0 (zero)
6. Click the Search button.
All late replenishments for sales orders appear in the Supplies and Demands table.
Past Due OrdersThe planning process generates the Past Due Orders exception when it detects purchase orders, transfer orders, or workorders that have order due dates before the plan horizon start date. If the order is firm, the planning process retains theorder's firmed duration as it schedules all of its operations beyond the planning horizon start date. For supply ordersthat aren't firm, the planning process also issues an Orders to be rescheduled out exception message.
The calculation for the Days Past Due exception is:
Plan Start Date - Order Original Due Date, when Plan Start Date is after the Order Original Due Date
To see past due orders in a constrained supply plan, follow these steps:
1. Open the Supplies and Demands table.2. In the Search section, click the Advanced button.3. Click the Add Fields button to add the following attributes to the search section:
◦ Old Due Date
◦ Days Past Due
◦ Action
4. Set the operations and values for the following fields in the Search section:
Field Operation Value Note
Order Type
Equals
All supplies
N/A
Old Due Date
Is not
NULL
Planned order is NULL
60

Oracle SCM CloudUsing Supply Planning
Chapter 3Planning Exceptions
Field Operation Value Note
Days Past Due
Greater than
0 (zero)
N/A
Action
Is not
Canceled
You must select all values exceptCancel
5. Click the Search button.
All past due orders are displayed in the Supplies and Demands table.
Items with Expired LotsThe planning process generates an Items with Expired Lots exception when it detects a potential expired lot. Item lotscan satisfy demands before their expiration dates. A potential expired lot:
• Has a lot expiration date during the planning horizon.
• Isn't pegged to a demand that results in its use before its lot expiration date.
This exception occurs against items under full lot control.
In addition to reporting this exception, the planning process plans for you to flush the inventory on its lot expirationdate. This process prevents you from using the lot after its lot expiration date to satisfy demands.
The calculation for Items with Expired Lots is: Lot Receipt Date + Shelf Life Days
In the following example, lot A001 of item A can only satisfy sales order 1 with a due date before the lot A001 expirationdate.
To see all items with expired lots in your constrained supply plan, follow these steps:
1. Open the Supplies and Demands table.2. In the Order Type field in the Search section:
a. Set the operation to Equalsb. For the value, select Expired lot
3. Click the Search button.
All items with expired lots appear in the Search Results section in the Supplies and Demands table.
Demand Quantity Not SatisfiedThe planning process generates a Demand Quantity Not Satisfied exception when there isn't enough supply available.The planning process finds demand pegged to supplies and the supply quantities are less than the demand quantity.The planning process issues this exception for demands at all levels of the supply chain bill of materials.
61

Oracle SCM CloudUsing Supply Planning
Chapter 3Planning Exceptions
This exception typically occurs due to inconsistent setups. For example, a configured item can't be sourced because toomany option-specific exclusions prevent any source from being used.
To see demand where quantity isn't met in your constrained supply plan, follow these steps:
1. Open the Supplies and Demands table.2. In the search section, click the Advanced button.3. Click the Add Fields button and select Unmet Demand Quantity.4. In the Unmet Demand Quantity field:
a. Set the operation to Greater than.b. Set the value to 0 (zero).
5. Click the Search button.
All demand quantities that aren't satisfied appear in the Search section in the Supplies and Demands table.
Configure Measure-Based Exceptions This topic covers how to configure measure-based exceptions in Supply Planning, Sales and Operations Planning,Demand Management, and Replenishment Planning.
You can create measure-based exceptions where the measure forms the foundation for that exception. After you selecta measure, you can specify the dimension hierarchy and level for that measure, and the threshold value or measureto generate the exception. For example, you can create an exception to identify resource overloads when the resourceutilization percentage is greater than 110%.
Configure Exceptions That Are Measure BasedUse the following general steps to configure a user-defined exception that's measure based.
1. In a Supply Chain Planning work area, click the Tasks panel drawer and click Configure Exceptions.2. On the Configure Exceptions page, click Actions and then select Create.3. In the Create Exception dialog box, General Properties section, specify or enter information for the following
fields:
a. Exceptionb. Display Namec. Exception Groupd. Base Measure
4. In the Exception Detail section, on the Level tab, select the dimension and its corresponding hierarchy and levelto use for your exception
What you select for levels determines the combination at which the exception condition is evaluated. Forexample, if you select levels Item and Organization, then the exception criteria is evaluated for each uniquecombination of Item and Organization.
Note: Configure Exceptions is a task defined outside of plan context. When configuring exceptions formeasure-based plans, ensure the selected hierarchy is in the plan's dimension catalog in plan options.Otherwise item level exceptions might be blank after running a plan.
5. On the Threshold tab:
62

Oracle SCM CloudUsing Supply Planning
Chapter 3Planning Exceptions
a. Select an operation.b. Define a threshold for the base measure, which can be defined based on a value or another measure.
6. On the Notification tab, define the notification attributes.7. When done, click Save and Close.
Exception Detail SectionIn the Create Exception dialog box, the Level tab in the Exception Detail section is populated based on the basemeasure. The Level tab consists of dimension, hierarchy, and level.
For example, for the user-defined exception Fill Rate Shortfall Percentage, the details are populated based on the basemeasure Fill Rate Shortfall Percentage. As defined on the Threshold tab, the planning process generates this exceptionwhen the Fill Rate Shortfall percentage is greater than 10%.
For this exception, the populated dimensions are Organization and Product. You can select dimensions and theircorresponding hierarchy and levels. In this example for the Product dimension, you can select either Item or Category asthe level.
If you select the Item level, the planning process generates this exception for any item with the Fill Rate ShortfallPercentage of greater than 10% as defined in the Threshold tab. This case enables you to analyze the plan output inmore detail. At the same time, the number of exceptions could be large enough that analyzing each exception might notbe possible.
On the other hand, if you select the Category level, the planning process generates this exception for any category withthe Fill Rate Shortfall Percentage of greater than 10%. In this case, the number of exceptions is lower than the item levelscenario. But, potentially some issues that exists at the item level aren't visible since the planning process generates anexception only when the specified criterion holds at the category level.
Related Topics• Overview of User-Defined Exceptions
• Overview of Plan Exceptions
Configure Measure-Based Exceptions for Constrained SupplyPlans This topic covers predefined measure-based exceptions that are available in unconstrained Supply Planning but aren'tavailable as predefined exceptions in constraint-based Supply Planning. You can configure these exceptions as user-defined exceptions in constraint-based Supply Planning.
Items Below Safety StockThe planning process generates the Items Below Safety Stock exception when the projected available balance for aplanning bucket is below the specified safety stock level for the planning bucket. Safety stock is maintained to mitigaterisk of stockouts caused by uncertainties in supply and demand. When the projected material balance drops below thesafety stock level, you have a potential stockout. You can increase your supply orders by creating new purchase ordersor rescheduling existing ones to bring the material balance above the safety stock level.
63

Oracle SCM CloudUsing Supply Planning
Chapter 3Planning Exceptions
Use these steps to configure an Items Below Safety Stock exception for a constrained supply plan.
1. Navigate to the Tasks panel. In the Configuration section, click the Configure Exceptions link.2. On the Manage Planning Measures page, click Actions and then select Create.3. In the Create Exceptions dialog box, in the General Properties section, enter or select the following:
Parameter Value
Exception
Items Below Safety Stock
Display Name
Items Below Safety Stock
Exception Group
Supply Planning Exceptions
Base Measure
Projected Available Balance
4. On the Level tab, specify the dimension and its corresponding hierarchy and level.5. On the Threshold tab, define the threshold for the base measure as Projected Available Balance Less than
Safety Stock.
◦ In the Operation field, select Less than
◦ In the Threshold field, select Measure and then select Safety Stock from the list of values.
6. Click Save and Close.
Items with a ShortageThe planning process generates the Items with a Shortage exception when the item has a negative on hand at the endof the day. The items with a shortage refers to the situation when the projected material balance suggests that thereis less than zero of the item or items in question. You can rectify this situation by increasing your supply orders, suchas creating new purchase orders or rescheduling existing ones. In addition you can analyze your forecast demand todetermine whether the forecasts are too optimistic and they can be lowered to remove the shortages.
Use these steps to configure an Items with a Shortage exception for a constrained supply plan.
1. Navigate to the Tasks panel. In the Configuration section, click the Configure Exceptions link.2. On the Manage Planning Measures page, click Actions and then select Create.3. In the Create Exceptions dialog box, in the General Properties section, enter or select the following:
Parameter Value
Exception
Items with a Shortage
Display Name
Items with a Shortage
Exception Group Supply Planning Exceptions
64

Oracle SCM CloudUsing Supply Planning
Chapter 3Planning Exceptions
Parameter Value
Base Measure
Projected Available Balance
4. On the Level tab, specify the dimension and its corresponding hierarchy and level.5. On the Threshold tab, define the threshold for the base measure as Projected Available Balance Less than
Safety Stock.
◦ In the Operation field, select Less than
◦ In the Threshold field, select Value and then enter 0 (zero) in the value field.
6. Click Save and Close.
Items with Excess InventoryThe planning process generates the Items with Excess Inventory exception when the projected available balance for aplanning bucket is higher than the specified safety stock level for the planning bucket. The excess inventory is a productthat hasn't yet been sold and exceeds the projected consumer demand for that product.
The Items with Excess Inventory exception usually represents some type of mismanagement of stock demand due tofactors such as over-buying, inaccurate projections, canceled orders, a bad economy, unforeseen weather changes,unpredictable consumer demand, or late or early delivery of goods.
Use these steps to configure an Items with Excess Inventory exception for a constrained supply plan.
1. Navigate to the Tasks panel. In the Configuration section, click the Configure Exceptions link.2. On the Manage Planning Measures page, click Actions and then select Create.3. In the Create Exceptions dialog box, in the General Properties section, enter or select the following:
Parameter Value
Exception
Items with Excess Inventory
Display Name
Items with Excess Inventory
Exception Group
Supply Planning Exceptions
Base Measure
Projected Available Balance
4. On the Level tab, specify the dimension and its corresponding hierarchy and level.5. On the Threshold tab, define the threshold for the base measure as Projected Available Balance Less than
Safety Stock.
◦ In the Operation field, select Greater than
◦ In the Threshold field, select Measure and then select Safety Stock from the list of values.
6. Click Save and Close.
65
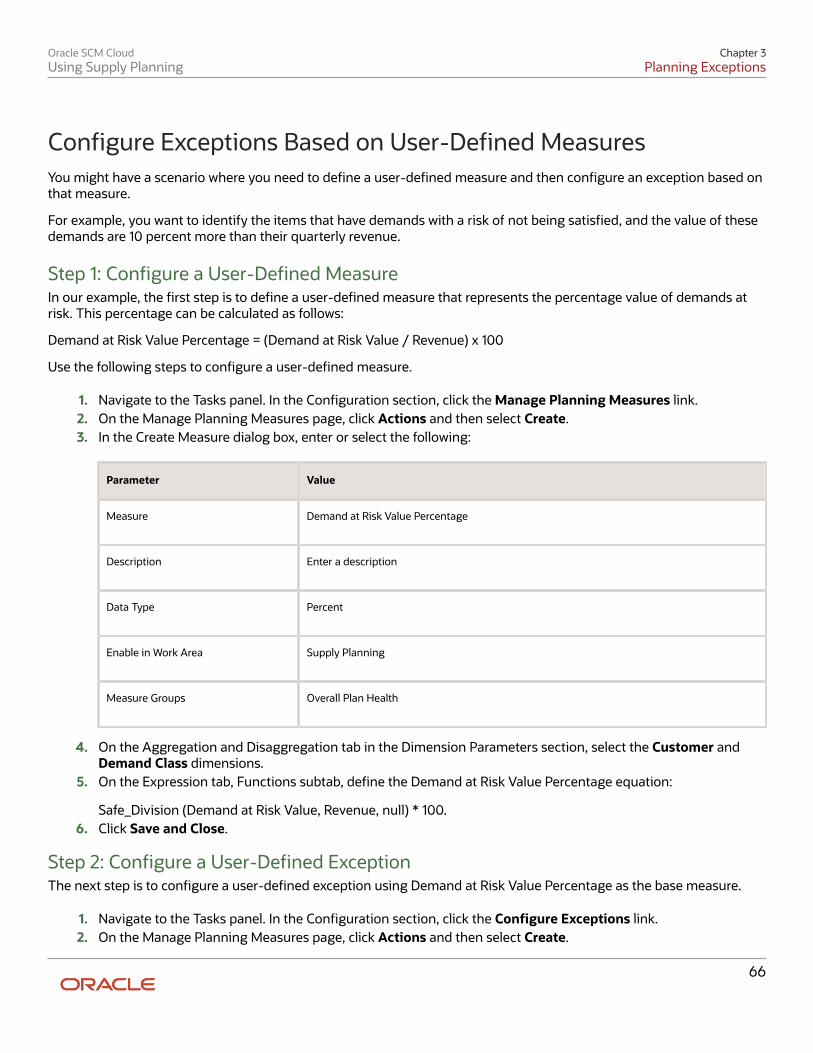
Oracle SCM CloudUsing Supply Planning
Chapter 3Planning Exceptions
Configure Exceptions Based on User-Defined Measures You might have a scenario where you need to define a user-defined measure and then configure an exception based onthat measure.
For example, you want to identify the items that have demands with a risk of not being satisfied, and the value of thesedemands are 10 percent more than their quarterly revenue.
Step 1: Configure a User-Defined MeasureIn our example, the first step is to define a user-defined measure that represents the percentage value of demands atrisk. This percentage can be calculated as follows:
Demand at Risk Value Percentage = (Demand at Risk Value / Revenue) x 100
Use the following steps to configure a user-defined measure.
1. Navigate to the Tasks panel. In the Configuration section, click the Manage Planning Measures link.2. On the Manage Planning Measures page, click Actions and then select Create.3. In the Create Measure dialog box, enter or select the following:
Parameter Value
Measure
Demand at Risk Value Percentage
Description
Enter a description
Data Type
Percent
Enable in Work Area
Supply Planning
Measure Groups
Overall Plan Health
4. On the Aggregation and Disaggregation tab in the Dimension Parameters section, select the Customer andDemand Class dimensions.
5. On the Expression tab, Functions subtab, define the Demand at Risk Value Percentage equation:
Safe_Division (Demand at Risk Value, Revenue, null) * 100.6. Click Save and Close.
Step 2: Configure a User-Defined ExceptionThe next step is to configure a user-defined exception using Demand at Risk Value Percentage as the base measure.
1. Navigate to the Tasks panel. In the Configuration section, click the Configure Exceptions link.2. On the Manage Planning Measures page, click Actions and then select Create.
66

Oracle SCM CloudUsing Supply Planning
Chapter 3Planning Exceptions
3. In the Create Exceptions dialog box, in the General Properties section, enter or select the following:
Parameter Value
Exception
Demand at Risk Value over 10 Percent of Revenue
Display Name
Demand at Risk Value over 10 Percent of Revenue
Exception Group
Supply Planning Exceptions
Base Measure
Demand at Risk Value Percentage
4. In the Exception Detail section, on the Level tab, specify the dimension and its corresponding hierarchy andlevel.
5. On the Threshold tab, define the threshold for the base measure as Demand at Risk Value Percentage Greaterthan 10%:
Parameter Value
Base Measure
Demand at Risk Value Percentage
Description
Demand at Risk Value Percentage
Operation
Greater than
Threshold Value
10%
6. Click Save and Close.
67

Oracle SCM CloudUsing Supply Planning
Chapter 3Planning Exceptions
68

Oracle SCM CloudUsing Supply Planning
Chapter 4Planning Analytics
4 Planning Analytics
Overview of Planning Analytics Configuring planning dimensions and hierarchies on the Configure Planning Analytics page is a key setup to use theanalytics in Supply Chain Planning work areas.
It has a unified dimensional hierarchy for various uses. Depending on your security privilege, you can also open theConfigure Planning Analytics page from the Setup and Maintenance work area by selecting the following:
• Offering: Supply Chain Planning
• Functional Area: Supply Chain Planning Configuration
• Task: Configure Planning Analytics
To run plans successfully, you must complete the following Configure Planning Analytics tasks:
• Set Up Dimension Catalogs
• Set Up Measure Catalogs
• Set Up Levels and Attributes
You can use the default hierarchies for most of the dimensions.
If the default product catalog named Product is not collected, then you must select at least one product hierarchy. If adefault product catalog is collected, then the predefined Product hierarchy is selected as a product hierarchy by default.You can optionally add or change the product hierarchy. You must include at least one product hierarchy when creatinga dimension catalog.
On the Configure Planning Analytics page, Levels and Attributes tab, you can configure your planning table and graphsto display descriptions instead of codes for the following entities: Items, Organizations, Resource, Work Center, andWork Area.
Related Topics• Considerations for Setting Up Dimension Catalogs
• Configure Planning Analytics
• How You Use Dimensions and Dimension Catalogs in Supply Chain Planning
• How You Use Levels and Attributes in Supply Chain Planning
• Can I modify the default dimension catalog?
Configure Planning Analytics To run plans successfully, you must set up dimensions and dimension catalogs, measure catalogs, and levels andattributes.
69

Oracle SCM CloudUsing Supply Planning
Chapter 4Planning Analytics
You can open the Configure Planning Analytics task from one of the Supply Chain Planning work areas. Depending onyour security privilege, you can also open the Configure Planning Analytics page from the Setup and Maintenance workarea.
Note: Default Catalog is the name of the predefined dimension catalog. It contains predefined hierarchies. Oraclerecommends that you make a copy of the Default Catalog if changes are required, instead of editing the defaultcatalog.
To configure planning analytics:
1. In the Navigator, click one of the Supply Chain Planning work areas or click the Setup and Maintenance workarea.
◦ If you clicked one of the Supply Chain Planning work areas, do the following:
i. Click the Tasks panel tab.ii. In the Tasks panel drawer, click the Configure Planning Analytics link.
◦ If you clicked the Setup and Maintenance work area, select the following:
- Offering: Supply Chain Planning- Functional Area: Supply Chain Planning Configuration- Task: Configure Planning Analytics
2. On the Configure Planning Analytics page, Dimension Catalogs tab, do the following:
a. Create a dimension catalog using the Add Row button, or duplicate the default dimension catalog usingthe Duplicate button.
b. Specify what hierarchies to use in the dimension catalog by moving hierarchies from the Available paneto the Selected pane.
c. Assign the dimension catalog to a plan that will use the set of hierarchies for analysis during the plancreation from Manage Plans.
3. Each Supply Chain Planning work area has a default measure catalog. Create a new measure catalog to add orremove measures.
a. Use the Add Row button to create a new catalog or use the Duplicate button to duplicate an existingcatalog.
b. Specify the measures for the catalog by moving the measures from the Available pane to the Selectedpane.
c. Assign the measure catalog to a plan that will use the set of measures during the plan creation fromManage Plans.
After you create and define a measure catalog, you can select the measure catalog for a plan from the Edit PlanOptions page.
4. Click the Levels and Attributes tab and select the desired dimension and hierarchy.
a. In the Dimension list, select a dimension.b. Optionally, in the Hierarchy list, select a hierarchy.c. Click the Search icon button.d. To change how the level name appears in pivot tables and graphs, select the row and enter the level
name in the Level Name to Display field.
Note: You can't edit the Level Name to Display field for the lowest level of the hierarchy.
70

Oracle SCM CloudUsing Supply Planning
Chapter 4Planning Analytics
e. To display a particular member identifier in your tables and graphs, select a dimension (Product,Organization, or Resource) and level, and then select a value in the Member Identifier to Displaycolumn:
Dimension Level Member Identifier to Display Options
Product
Item
Item Name, Item Description, Item Nameand Description, or Item Description andName
Organization
Organization
Organization Name or Organization Code
Resource
Resource
Resource Code, Resource Name, orResource Description
Resource
Work Center
Work Center Code, Work Center Name, orWork Center Description
Resource
Work Area
Work Area Code, Work Area Name, orWork Area Description
Resource
Organization
Organization Name or Organization Code
Tip: The organization level in the Organization dimension and the organization level in the Resourcedimension are separate settings. Oracle recommends that you set them to use the same identifier.
f. To add an attribute for the lowest level of the hierarchy, click the Edit Page button in the Attributescolumn.
i. In the Manage Attribute List dialog box, click the Add Row button.ii. In the Attribute list, select an attribute.
iii. In the Attribute Label text box, enter a label name and click OK.5. On the Configure Analytics page, click the Save and Close button.
Related Topics• How You Use Dimensions and Dimension Catalogs in Supply Chain Planning
• Considerations for Setting Up Dimension Catalogs
• How You Use Levels and Attributes in Supply Chain Planning
• Overview of Planning Analytics
• How You Use Measure Catalogs in Supply Chain Planning
71

Oracle SCM CloudUsing Supply Planning
Chapter 4Planning Analytics
Dimensions and Dimensions Catalogs
How You Use Dimensions and Dimension Catalogs in SupplyChain Planning Oracle Fusion Supply Chain Planning has hierarchy levels by which you can view, compare, and analyze demands andsupplies of your products over various dimensions, such as geography and organizations.
Supply Chain Planning uses a single set of dimensions and hierarchies to drive aggregation context for demandplanning, supply planning, embedded analytics, and management analytics.
Supply Chain Planning provides predefined planning dimensions. Each of those dimensions has a predefined hierarchy.When you implement the Supply Chain Planning offering, you must decide which dimensions and hierarchies to use fordemand and supply analysis.
Each dimension catalog has a collection of hierarchies in different dimensions that is enabled for use in the planoptions. By default, all predefined hierarchies are available in Planning Analytics. You can disable certain dimensionsthat are not relevant for your plans. For example:
• If you are only using demand plans, then supplier, resource, and order type dimensions may not be relevant
• If you are using sales and operations plans, then the order type dimension is not relevant
The following hierarchies are predefined in Supply Chain Planning:
• Customer
• Demand Class
• Exception Type
• Order Type
• Organization
• Plan
• Product
• Resource
• Supplier
• Source
• Time
Access the Configure Planning Analytics page from a Supply Chain Planning work area. Depending on your securityprivilege, you can also open the Configure Planning Analytics page from the Setup and Maintenance work area.
• To access the Configure Planning Analytics page from a Supply Chain Planning work area:
a. Click the Tasks panel tab.b. In the Tasks panel drawer, click the Configure Planning Analytics link
• To access the Configure Planning Analytics page from the Setup and Maintenance work area, select thefollowing:
72

Oracle SCM CloudUsing Supply Planning
Chapter 4Planning Analytics
◦ Offering: Supply Chain Planning
◦ Functional Area: Supply Chain Planning Configuration
◦ Task: Configure Planning Analytics
In the Dimension Catalogs tab, several hierarchies are available in various dimensions. You can specify which hierarchyto use in a particular dimension catalog. For example, you can select an organization type hierarchy, a product typehierarchy, or a customer hierarchy to use in plans for analysis. After you define a dimension catalog, you can assign it toa plan that will use the set of hierarchies for analysis.
You can select one of your dimension catalogs to be used as the default dimension catalog in plans. If you do not selecta default catalog, the predefined catalog named Default Catalog is used.
Related Topics• Considerations for Setting Up Dimension Catalogs
• How can I use dimensions in Supply Chain Planning?
• Overview of Planning Analytics
• What's a dimension in Supply Chain Planning?
• Why You Disable or Enable Dimensions for Supply Plan Measures
Considerations for Setting Up Dimension Catalogs Supply Chain Planning provides predefined planning dimensions and each of those dimensions have predefinedhierarchies. The predefined hierarchies are included in the default dimension catalog and are available in all plans.
Hierarchy Selections for the Product DimensionA predefined Product hierarchy is included in the default dimension. The default Product hierarchy has three fixedlevels: Item, Category 1, and Category 2. Other Product hierarchies (other item catalogs in Oracle Fusion Product Modelthat are collected into Supply Chain Planning work areas) can be optionally enabled as user-defined product hierarchies.
For Oracle Fusion Sales and Operations Planning, the Lifecycle Phase attribute is also included in the default dimension.
By default, Oracle Fusion Product Model's planning functional area catalog is collected into the Product hierarchy.For the collection to run successfully, you must create the planning functional area catalog in Product Model with thefollowing attributes:
• Controlled at = Master-Level (not Org-Level)
• Allow hierarchy of categories = No
• Default category must be selected
• Allow multiple item category assignments = Not selected
• Catalog Content = Items at Leaf Level
If this catalog is not set up with these attributes, the planning functional area catalog is not collected and the Producthierarchy will not be populated. This will result in the forecasting engine not being able to use the product aggregationand some of the predefined tables and graphs will not work correctly.
73

Oracle SCM CloudUsing Supply Planning
Chapter 4Planning Analytics
Hierarchy Selections for the Organization DimensionEnterprise is the default organization hierarchy and has three fixed levels: Organization, Business Unit, and Legal Entity.This default organization is defined in Oracle Fusion HCM and you can only modify it there. Optionally, you can enableother Organization hierarchies (based on regions, one per country).
Hierarchy Selections for the Customer DimensionThe default Customer hierarchy has three fixed levels: Customer site, Customer, and Customer Class. This defaultcustomer hierarchy is defined in the trading community model and you can only modify it there.
Hierarchy Selections for the Resource DimensionThe default Resource hierarchy has four fixed levels: Resource, Work Center, Work Area, and Organization. This defaultresource hierarchy is defined in Oracle Fusion Manufacturing and you cannot modify it.
Hierarchy Selections for the Supplier dimensionThe default Supplier hierarchy has two fixed levels: Supplier Site and Supplier.
Hierarchy Selections for the Exception Type, Order Type, and Source DimensionsPredefined Exception Type, Order Type, and Source dimensions are included in the Default dimension catalog. Each hasonly a single hierarchy with a single level.
Hierarchy Selections for the Time DimensionIn the Time dimension, Gregorian calendar is the only predefined hierarchy. All other hierarchies can be optionallyincluded as user-defined hierarchies. These include workday calendars of inventory organizations collected from OracleFusion Supply Chain Management and fiscal calendars from Oracle Fusion Financials.
Related Topics• How You Use Dimensions and Dimension Catalogs in Supply Chain Planning
• How can I use dimensions in Supply Chain Planning?
• Can I modify the default dimension catalog?
• Overview of Planning Analytics
• Why You Disable or Enable Dimensions for Supply Plan Measures
What's a dimension in Supply Chain Planning? A dimension is a structure that organizes data. It categorizes data to enable you to answer business questions.Commonly used dimensions are customers, products, and time.
74

Oracle SCM CloudUsing Supply Planning
Chapter 4Planning Analytics
Related Topics• Configure Planning Analytics
• How can I use dimensions in Supply Chain Planning?
• How You Use Dimensions and Dimension Catalogs in Supply Chain Planning
• Considerations for Setting Up Dimension Catalogs
How can I use dimensions in Supply Chain Planning? Supply Chain Planning applications come with predefined hierarchies in the Product dimension.
These predefined hierarchies are part of the Dimension catalog structure in Oracle Fusion Product Model. Integrationswith Oracle E-Business Suite and third-party systems where the product dimensions can still be maintained anduploaded for use by the Oracle Supply Chain Planning Cloud applications is supported.
Related Topics• How You Use Dimensions and Dimension Catalogs in Supply Chain Planning
• Considerations for Setting Up Dimension Catalogs
• What's a dimension in Supply Chain Planning?
What's a dimension catalog in Supply Chain Planning? In Supply Chain Planning, a dimension catalog is a selected list of dimensions enabled for use in plans.
In Supply Chain Planning, a dimension catalog is a selected list of hierarchies in different dimensions that is enabled foruse in plans. The Default dimension catalog appears by default, but can be changed to another dimension catalog thathas been defined.
Related Topics• Can I modify the default dimension catalog?
• What's a dimension in Supply Chain Planning?
• Considerations for Setting Up Dimension Catalogs
• How You Use Dimensions and Dimension Catalogs in Supply Chain Planning
Can I modify the default dimension catalog? Yes, you can modify the Supply Chain Planning default dimension catalog. However, if you want to make any changes,Oracle recommends that you create a duplicate of the default dimension catalog.
75

Oracle SCM CloudUsing Supply Planning
Chapter 4Planning Analytics
Related Topics• How You Use Dimensions and Dimension Catalogs in Supply Chain Planning
• Considerations for Setting Up Dimension Catalogs
• What's a dimension catalog in Supply Chain Planning?
Measure Catalogs
How You Use Measure Catalogs in Supply Chain Planning The measure catalog is similar to the dimension catalog.
Each measure catalog has a collection of measures that you can enable for use in plans in one of the Supply ChainPlanning work areas. While Oracle provides predefined measures, you can also create measures in some work areas andadd them to a measure catalog.
On the Configure Planning Analytics page, Measure Catalogs tab, you can create a measure catalog and add or removemeasures from a measure catalog.
The predefined measure catalog is the default. When you create a new plan, the measure catalog that is used is basedon the catalog check box located on the Measure Catalogs tab. For example, the catalog check box in the:
• Planning Central work area is Planning Central Catalog
• Sales and Operations Planning work area is Sales and Operations Planning Catalog
• Demand Management work area is Demand Management Catalog
• Supply Planning work area is Supply Planning Catalog
If you change the default catalog later, the plan continues to use the same measure catalog that it was created with.
Related Topics• Can I modify the default measure catalog?
Can I modify the default measure catalog? No. Although you cannot modify the default measure catalog, you can create a measure catalog, modify the list ofmeasures, and assign it to plans on the Plan Options page.
Related Topics• How You Use Measure Catalogs in Supply Chain Planning
76

Oracle SCM CloudUsing Supply Planning
Chapter 4Planning Analytics
Levels and Attributes
How You Use Levels and Attributes in Supply Chain Planning On the Levels and Attributes tab, you can enable certain item attributes (standard fields or flexfields) and organizationattributes (standard fields) to be available in Planning Analytics as filters.
For example, you can enable PLANNER_CODE to use in an analysis to group metrics and measures by that particularattribute.
You can create a display name to use in the various pivot tables and graph configurations. For example, if thepredefined level name is Product Category 2, you can enter a display name of Laptops. You can also configure whichidentifier to display in tables and graphs for selected hierarchies. For example, you can choose to display item name oritem description in your tables and graphs.
Displaying Descriptions in Tables and GraphsYou can analyze planning data in planning tables and graphs by using the description fields of entities in hierarchies,such as items and organizations. You can use the description fields when their primary identifier is a difficult tounderstand alphanumeric code. You can toggle between the code and description, or display both, in planning tablesand graphs for the following entities:
• Items
• Organizations
• Resources
• Work Centers
• Work Areas
Tip: The organization level in the Organization dimension and the organization level in the Resource dimension areseparate settings. Oracle recommends that you set them to use the same identifier.
Changing a member identifier can impact the advanced criteria in tables and graphs. If you use an advanced filtercriteria in a table or graph, then the criteria will be compared to the new member identifier, which can affect the searchresults. The change to the member identifier can result in different or no members meeting the filter criteria. Forexample, many names might start with AB, but no descriptions start with AB. After you make this change, you shouldverify that any advanced filter criteria used are still valid.
Note: In the Selector Tool, the member values displayed are based on what's configured in the Member Identifier toDisplay column on the Configure Planning Analytics page, Levels and Attributes tab. For example, for item, you canconfigure your tables and graphs to show item description instead of item name, which is what also appears whenyou're in the Selector Tool.
Related Topics• Overview of Planning Analytics
• Configure Planning Analytics
77

Oracle SCM CloudUsing Supply Planning
Chapter 4Planning Analytics
User-Defined Hierarchies
Overview of User-Defined Hierarchies You can create and update user-defined hierarchies for your demand, demand and supply, sales and operations, orsupply plan using the file-based data import (FBDI) template named Supply Chain Planning User-Defined Hierarchy(ScpUser-DefinedHierarchyImportTemplate.xlsm).
You can do the following using the import template:
• Create a user-defined hierarchy for these dimensions:
◦ Customer
◦ Demand Class
◦ End Demand Organization
◦ End Demand Product
◦ Organization
◦ Product
◦ Resource
◦ Sales Organization
◦ Supplier
• Add members to or remove members from an existing level in the user-defined hierarchy.
• Modify the user-defined hierarchy by adding or deleting levels.
• Delete the user-defined hierarchy.
Note: After creating your user-defined hierarchy, you can’t rename its levels and level members.
Related Topics• Create a User-Defined Hierarchy
• Add or Remove Members
• Add or Delete Levels
• Delete a User-Defined Hierarchy
Create a User-Defined Hierarchy You can’t create a user-defined hierarchy with only the lowest level.
78
Oracle SCM CloudUsing Supply Planning
Chapter 4Planning Analytics
To create the user-defined hierarchy, do these steps:
1. In the Supply Chain Planning User-Defined Hierarchy import template (ScpUser-DefinedHierarchyImportTemplate.xlsm), enter the structure of the user-defined hierarchy on the User-DefinedHierarchyMaster_ worksheet.
The lowest level for each supported dimension is LEVEL_0, and the name for this level is predefined and can’tbe changed. The highest-possible level is LEVEL_10.
If the hierarchy is for the Product dimension, you can enter Yes in the Default Indicator column to enable thehierarchy by default in the Selector Tool.
2. Enter the details of the level members on the User-DefinedHierarchyDetail_ worksheet.3. Generate the .csv files for the import template, and compress them into a single file.4. Click Navigator > Tools > File Import and Export, and import the compressed file.5. In the Scheduled Processes work area, run the Load Planning Data from Flat Files scheduled process.
a. In the Process Details dialog box, in Source System, select the source system.b. In Collection Type, select Net change.c. In Data File, select the compressed file.d. Ignore the fields for organization group collection because this functionality isn’t relevant to user-defined
hierarchies.6. Click Submit.
The user-defined hierarchy is created.
7. Add the user-defined hierarchy to the dimension catalog that’s used by your plan.
Note: If you’ve created your demand, demand and supply, or supply plan in the Planning Central work area,add the hierarchy to the Default Catalog, which is the only dimension catalog that can be used in plans thatare created in this work area.
8. Run your plan with the Refresh with current data option selected on the Parameters tab in the Run Plan dialogbox.
Select other options as required.
9. Modify your selections on the Hierarchies and Members tabs in the Selector Tool for the affected tables andgraphs.
Related Topics• Overview of User-Defined Hierarchies
• Overview of Tables, Graphs, Analysis Sets, Tiles, and Tile Sets
Add or Remove Members You can add members to or remove members from any level of your user-defined hierarchy.
Note these points about adding members to or deleting members from your user-defined hierarchy:
• At the lowest level (LEVEL_0), you can add only those members that have already been collected from yourOracle Fusion application or third-party source system. When you delete members at the lowest level of youruser-defined hierarchy, the deletion is restricted to the user-defined hierarchy, and the members continue toexist in your source system.
79

Oracle SCM CloudUsing Supply Planning
Chapter 4Planning Analytics
If you're only adding or deleting members at Level_0, you must run the Load Planning Data from Flat Filesscheduled process in the Net change mode.
In the Supply Chain Planning User-Defined Hierarchy import template (ScpUser-DefinedHierarchyImportTemplate.xlsm), you don't need to enter anything on the User-DefinedHierarchyMaster_ worksheet or generate the .csv file for this worksheet. On the User-DefinedHierarchyDetail_ worksheet, you can enter Yes in the Delete Indicator column for the members you'regoing to delete.
• If you're only adding members to an intermediate level or the top level of your user-defined hierarchy, you mustrun the Load Planning Data from Flat Files scheduled process in the Net change mode.
In the Supply Chain Planning User-Defined Hierarchy import template, you don't need to enter anythingon the User-DefinedHierarchyMaster_ worksheet or generate the .csv file for this worksheet. On the User-DefinedHierarchyDetail_ worksheet, you need to enter only the details for the new members. If required, for thenew members at intermediate levels, you can also enter child members at lower levels.
• If you're only deleting members from an intermediate level or the top level of your user-defined hierarchy, youmust run the Load Planning Data from Flat Files scheduled process in the Targeted mode. Effectively, you'regoing to delete and recreate the user-defined hierarchy.
In the Supply Chain Planning User-Defined Hierarchy import template, you must enter all the levels on theUser-DefinedHierarchyMaster_ worksheet and all the level members on the User-DefinedHierarchyDetail_worksheet and generate the .csv files for both worksheets.
You must also delete all members for which you're deleting the parent member. Otherwise, you'll haveorphaned members in your user-defined hierarchy. You can delete the members by not including the applicablerows on the User-DefinedHierarchyDetail_ worksheet instead of entering Yes in the Delete Indicator column.
To add members to or remove members from levels of the user-defined hierarchy, do these steps:
1. If you previously imported measure values using the Supply Chain Planning Measures import template(ScpMeasuresImportTemplate.xlsm) for existing members that you’re going to delete, delete the measure datafor these members using the same import template.
On the Measures_ worksheet, for the values that you want to delete, enter Yes in the Delete Indicator column.
2. Generate the .csv file for the import template, and compress it.3. Click Navigator > Tools > File Import and Export, and import the compressed file.4. In the Scheduled Processes work area, run the Load Planning Data from Flat Files scheduled process.
a. In the Process Details dialog box, in Source System, select the source system.b. In Collection Type, select Net change.c. In Data File, select the compressed file.d. Ignore the fields for organization group collection because this functionality isn’t relevant to user-defined
hierarchies.e. Click Submit.
Data is removed for the level members that you're going to delete.
5. In the Supply Chain Planning User-Defined Hierarchy import template, enter information as required on theUser-DefinedHierarchyMaster_ and User-DefinedHierarchyDetail_ worksheets.
6. Generate the .csv files for the import template, and compress them into a single file.7. Click Navigator > Tools > File Import and Export, and import the compressed file.8. In the Scheduled Processes work area, run the Load Planning Data from Flat Files scheduled process.
a. In the Process Details dialog box, in Source System, select the source system.
80

Oracle SCM CloudUsing Supply Planning
Chapter 4Planning Analytics
b. In Collection Type, make the required selection.c. In Data File, select the compressed file.d. Ignore the fields for organization group collection because this functionality isn’t relevant to user-defined
hierarchies.e. Click Submit.
The members are created or deleted.
9. Run your plan with the Refresh with current data option selected on the Parameters tab in the Run Plan dialogbox.
Select other options as required.
10. Add members to or remove members from the Selected Members pane on the Members tab in the SelectorTool for the affected tables and graphs.
Related Topics• Overview of User-Defined Hierarchies
• Overview of Tables, Graphs, Analysis Sets, Tiles, and Tile Sets
Add or Delete Levels If you want to make changes to the levels of an existing user-defined hierarchy, then you must delete and recreate theentire hierarchy using the Targeted collection type for the Load Planning Data from Flat Files scheduled process.
You can’t delete the lowest level (LEVEL_0) of the user-defined hierarchy.
Note: Oracle doesn’t recommend deleting a level from the user-defined hierarchy if you’ve loaded or stored data atthat level because level deletion also requires data removal.
To modify the user-defined hierarchy by adding or deleting levels, do these steps:
1. If your measures are storing data for a level that you’re going to delete, delete the level data in these measuresusing the Supply Chain Planning Measures import template (ScpMeasuresImportTemplate.xlsm).
On the Measures_ worksheet, for the values that you want to delete, enter Yes in the Delete Indicator column.
If you previously imported measure values for an existing level that’s going to move up or down in your user-defined hierarchy, you don’t have to reimport measure values for that level because the IDs for the level andlevel members remain unchanged.
2. Generate the .csv file for the import template, and compress it.3. Click Navigator > Tools > File Import and Export, and import the compressed file.4. In the Scheduled Processes work area, run the Load Planning Data from Flat Files scheduled process.
a. In the Process Details dialog box, in Source System, select the source system.b. In Collection Type, select Net change.c. In Data File, select the compressed file.d. Ignore the fields for organization group collection because this functionality isn’t relevant to user-defined
hierarchies.5. Click Submit.
Measure values are deleted.
81

Oracle SCM CloudUsing Supply Planning
Chapter 4Planning Analytics
6. In the Supply Chain Planning User-Defined Hierarchy import template (ScpUser-DefinedHierarchyImportTemplate.xlsm), enter the levels that must be added or deleted on the User-DefinedHierarchyMaster_ worksheet.
Consider an example in which your user-defined hierarchy structure for the Organization dimension isOrganization (LEVEL_0), District (LEVEL_1), and Region (LEVEL_2):
◦ If you want to add a level called State that’s at the highest level, you should enter Organization (LEVEL_0),District (LEVEL_1), Region (LEVEL_2), and State (LEVEL_3).
◦ If you want to add a level called Borough that’s in between Organization and District, you should enterOrganization (LEVEL_0), Borough (LEVEL_1), District (LEVEL_2), and Region (LEVEL_3).
◦ If you want to delete the District level, you should enter Organization (LEVEL_0) and Region (LEVEL_1).
If the hierarchy is for the Product dimension, you can enter Yes in the Default Indicator column to enable thehierarchy by default in the Selector Tool.
You don’t need to enter anything on the User-DefinedHierarchyDetail_ worksheet for the deleted levels.For the new and modified (existing) levels, you must enter the all the level members on the User-DefinedHierarchyDetail_ worksheet.
7. Generate the .csv files for the import template, and compress them into a single file.8. Click Navigator > Tools > File Import and Export, and import the compressed file.9. In the Scheduled Processes work area, run the Load Planning Data from Flat Files scheduled process.
a. In the Process Details dialog box, in Source System, select the source system.b. In Collection Type, select Targeted.c. In Data File, select the compressed file.d. Ignore the fields for organization group collection because this functionality isn’t relevant to user-defined
hierarchies.10. Click Submit.
The user-defined hierarchy is deleted and recreated.
11. Using the Supply Chain Planning Measures import template, import measure values for newly added levels ifyou need to.
12. Generate the .csv file for the import template, and compress it.13. Click Navigator > Tools > File Import and Export, and import the compressed file.14. In the Scheduled Processes work area, run the Load Planning Data from Flat Files scheduled process.
a. In the Process Details dialog box, in Source System, select the source system.b. In Collection Type, select Net change.c. In Data File, select the compressed file.d. Ignore the fields for organization group collection because this functionality isn’t relevant to user-defined
hierarchies.15. Click Submit.
Measure values are populated.
16. Run your plan with the Refresh with current data option selected on the Parameters tab in the Run Plan dialogbox.
Select other options as required.
17. Modify your selections on the Hierarchies and Members tabs in the Selector Tool for the affected tables andgraphs.
82

Oracle SCM CloudUsing Supply Planning
Chapter 4Planning Analytics
Related Topics• Overview of User-Defined Hierarchies
• Overview of Tables, Graphs, Analysis Sets, Tiles, and Tile Sets
Delete a User-Defined Hierarchy This topic explains how you can delete a user-defined hierarchy.
Across your user-defined hierarchies, the IDs of the lowest levels and their members are the same. You can't delete thelowest levels, their members, and the measure data that's associated with these members. These members are sharedacross your user-defined hierarchies.The intermediate levels and top level of your user-defined hierarchy are specific to it. These levels and their membershave unique IDs and aren't shared. When you delete the user-defined hierarchy, the intermediate levels and top leveland their members are deleted.
To delete a user-defined hierarchy, do these steps:
1. If your measures are storing data for an intermediate level or the top level that you’re going to delete, deletethe data in these measures, and reload them at an existing level of a different user-defined hierarchy using theSupply Chain Planning Measures import template (ScpMeasuresImportTemplate.xlsm).
On the Measures_ worksheet, make the changes that you require.
2. Generate the .csv file for the import template, and compress it.3. Click Navigator > Tools > File Import and Export, and import the compressed file.4. In the Scheduled Processes work area, run the Load Planning Data from Flat Files scheduled process.
a. In the Process Details dialog box, in Source System, select the source system.b. In Collection Type, select Net change.c. In Data File, select the compressed file.d. Ignore the fields for organization group collection because this functionality isn’t relevant to user-defined
hierarchies.5. Click Submit.
Measure values are deleted or populated.
6. In the Supply Chain Planning User-Defined Hierarchy import template (ScpUser-DefinedHierarchyImportTemplate.xlsm), on the User-DefinedHierarchyMaster_ worksheet, enter the name andlevel names of the user-defined hierarchy that you want to delete.
Enter Yes in the Delete Indicator column.
You don’t need to enter anything on the User-DefinedHierarchyDetail_ worksheet or generate the .csv file forthis worksheet.
7. Generate the .csv file for the import template, and compress it.8. Click Navigator > Tools > File Import and Export, and import the compressed file.9. In the Scheduled Processes work area, run the Load Planning Data from Flat Files scheduled process.
a. In the Process Details dialog box, in Source System, select the source system.b. In Collection Type, select Net change.c. In Data File, select the compressed file.d. Ignore the fields for organization group collection because this functionality isn’t relevant to user-defined
hierarchies.
83

Oracle SCM CloudUsing Supply Planning
Chapter 4Planning Analytics
10. Click Submit.
The user-defined hierarchy is deleted from dimension catalogs that it exists in.
Note: The user-defined hierarchy is still available in tables and graphs that are using it.
11. Run your plan with the Refresh with current data option selected on the Parameters tab in the Run Plan dialogbox.
Select other options as required.
The user-defined hierarchy is removed from the tables and graphs of the plan.
12. Modify your selections on the Hierarchies and Members tabs in the Selector Tool for the affected tables andgraphs.
Related Topics• Overview of User-Defined Hierarchies
• Overview of Tables, Graphs, Analysis Sets, Tiles, and Tile Sets
84
Oracle SCM CloudUsing Supply Planning
Chapter 5Planning Measures
5 Planning Measures
Predefined Measures in Supply Chain Planning When you use one of the Supply Chain Planning work areas, you have access to many predefined measures.
To review the details of each predefined measure, use the following:
• The Manage Planning Measures task
• A spreadsheet available at My Oracle Support
The Manage Planning Measures TaskOn the Manage Planning Measures page, select a measure, and then select edit. You can review the details of themeasure on the Edit Measure page even if you can't make changes to the measure.
A Spreadsheet Available at My Oracle SupportUse Doc ID 2374816.1, Oracle Supply Chain Planning Cloud: List of Predefined Measures.
The List of Predefined Measures spreadsheet contains only the core measure attributes. You can use the Edit Measurespage to view all the attributes associated with a particular measure.
How You Manage Planning Measures Use the Manage Planning Measures task to review Supply Chain Planning measures.
You can edit several measures, but some measures you can only view. You use the pivot table to view the data youedited at different aggregations. The results of the edits are stored based on definitions of a measure.
This topic discusses how you can perform these tasks:
• Update the definition of a measure
• Update aggregation parameters
• Update disaggregation parameters
• Edit data of a measure
Update the Definition of a MeasureTo update the definition of a measure:
1. In a Supply Chain Planning work area, click the Tasks panel tab.2. In the Tasks panel, click the Manage Planning Measures link.3. Expand a measure group and scroll manually or use the search option to find all measures that match the
search criteria.4. Select the measure that you want to modify and then click the Edit icon.
85
Oracle SCM CloudUsing Supply Planning
Chapter 5Planning Measures
Note: Look for a check mark next to Allow editing at the top of the measure definition controls to confirmthat the measure is editable.
5. Click the Aggregation and Disaggregation tab to view measure definitions.
The dimensions, hierarchies, and levels at which data persists vary from measure to measure. For thedimensions with a check mark, the measure is defined on the current dimension. For these dimensions, eachmeasure is defined on a single hierarchy as listed on the dialog box.
6. Click Save and Close.
Update Aggregation ParametersAggregation parameters control the way in which data of a measure is aggregated from the storage level to a table,graph, or infotile. Calculation Order enables you to chose between the following options:
• Calculate and Aggregate: Calculates the measure's expression at the lowest data level and then aggregate up.
• Aggregate and Calculate: Aggregates all measures referenced in the measure's expression and then calculatethe expression.
Update Disaggregation ParametersThe disaggregation methodology is driven by the definitions of the disaggregation parameters. Disaggregation fordefinitions that include time can be different from disaggregation for definitions that don't include time. For noneditablemeasures there are no configuration in the disaggregation parameters.
Here are the four different allocation methods:
• Same: Indicates that all lower-level entries into which the data is being saved will receive the same value.Service level would be a good measure to use Same Value settings as the percentage being entered should notbe allocated between different items and organizations.
• Equal: Spreads the edited value among the lower level entries into which data is being saved. Each entryreceives an equal share of the update. This could commonly be seen on the time dimension, where data maybe updated for a week or month, but there is no guidance on how it should be allocated to the common storagelevel of days. It is typically set to the time dimension to equal value to support equal allocation between thedays.
• Self: Uses a measure's own pre-calculated values to allocate the data to the dimension member combinations.
For example, item-organization. The weights for each combination are calculated and stored for the measureduring plan run. These weights are used to allocate the data. For example, the forecasts for P1-Org1 and P2-Org1 are 40 and 60 respectively. Therefore, the weights used for allocation would be 40% for P1-Org1 and 60%for P2-Org1.
• Measure: Uses values of a different measure to allocate.
Edit Data of a MeasureTo edit the data of a measure, open a table containing the measure, double-click the cell where the data is to be enteredand then enter the data. In a table, editable and noneditable cells look similar. However, when you double-click a cell ofan editable measure, the cell enables you to enter values.
86

Oracle SCM CloudUsing Supply Planning
Chapter 5Planning Measures
Copy Data from One Measure to AnotherIn a Supply Chain Planning table, you can update the value of one measure by using values from another measure. Inseveral cases, a measure can have other related measures that enable you to override the value of a base measure. Forexample, Sales Forecast is one of those measures:
• Sales Forecast: Base measure.
• Adjusted Sales Forecast: You can override what's in Sales Forecast.
• Final Sales Forecast: The planning process takes the Adjusted Sales Forecast, if there is one, or uses the SalesForecast. The planning process uses the Final Sales Forecast, which takes into account any manual adjustmentsthat you made.
You can specify the data source whose values you want to copy to the selected range of cells in the target measure.Using a table containing the three measures listed in our previous example, select a range of cells associated with theAdjusted Sales Forecast measure, click Actions and then select Edit. In the Edit Measures dialog box, use the SalesForecast measure as the source measure for Adjusted Sales Forecast and increase it by 10 percent. If your Sales Forecastis 200, then Adjusted Sales Forecast now reflects 220.
For a measure to appear in the list of values for Source Measure in the Edit Measures dialog box, the measure must beincluded in the table. The measure must also conform to the same dimensions as the measure you're editing.
When editing a measure's value at an aggregate level, the value is allocated down to the lowest level. For example, whenediting weekly data, the value will be allocated down to the day.
You can also edit multiple measures at a time; however, you can't have circular references. In the following example,Measure3 is used as a source measure for Measure1. But, Measure3 is also being edited at the same time to increase themeasure by 10 percent.
Measure Source Measure Action Value
Measure1
Measure3
Increase by percentage
10
Measure2
Measure2
Increase by percentage
10
Measure3
Measure3
Increase by percentage
10
In this scenario, the planning engine won't know which value of the source measure to use: the original Measure3 value,or the value of Measure3 after increasing it by 10 percent. To avoid circular references, you must handle these editsseparately.
Related Topics• Configure Units for a Measure
• Configure Currencies for a Measure
• Configure Conditional Formatting for a Measure
• Configure Color by Measure to Display in Graphs
87

Oracle SCM CloudUsing Supply Planning
Chapter 5Planning Measures
Import Measure Data Into a Planning Table When working with large volumes of data, you can export data from a planning pivot table to Microsoft Excel.
After you export the data, you can edit and make adjustments to any planning measure in the spreadsheet. Whenyou're done making changes offline in the spreadsheet, you can then import the updated planning data back into thesame table. To initiate the Upload Planning Table Data scheduled process, click the Import icon on the toolbar in theopened table and then select the spreadsheet.
The spreadsheet that you import must have the same structure and format as the planning table. The importedspreadsheet can be at any level of aggregation, as long as the levels match all of the levels displayed in the table. Afteryou select the file to import, the Upload Planning Table Data scheduled process updates the table in the background inbatch mode. While the import process uploads data in the background, you can work on other supply chain planningtasks. When the upload process completes, the Import icon in the table displays a green check mark for the plannerwho uploaded the data.
Note: To see the uploaded data in your planning table, refresh the table after the Upload Planning Table Datascheduled process completes.
Importing data into planning tables is available for all pivot tables in Supply Planning, Sales and Operations Planning,Demand Management, Replenishment Planning, and Planning Central. Importing data isn't available for non-pivotviews like standard grids or other views such as the Build Plan table.
Tips for Importing Measure DataHere are some tips to successfully import data from a spreadsheet into a planning table:
• The imported file must be a Microsoft Excel file with the .xlsx file extension.
• The import process only updates editable measures.
• The imported file must have the exact same format at the planning table. This includes the following:
◦ The uploaded file and the target table must contain the same number of rows and columns.
◦ The levels specified in the spreadsheet must match. The level names, such as Item or Organization, don'thave to appear as the header columns, but the columns and rows that represent the level must match.
◦ The members in each of the level rows and columns must be identical and in the same order. No membercan be omitted and new members can't be added.
◦ The measures column must have the same measures as the planning table for all combinations.
• The imported file must have the exact member combinations and their order listed in the column and rowheaders of the table. All member names, such as item names and time periods, must be present in the sameorder in the file being imported even if there are no updates for those combinations. Typically, you can achievethe required order by exporting the table, making the edits offline, and then using the same file for import.
• All date values must be in the correct date format.
• If you update data directly in a table when the update process is still in progress, your updates can beoverwritten if they're for the same combination and measure.
88

Oracle SCM CloudUsing Supply Planning
Chapter 5Planning Measures
• If multiple users import files into the same table, the import process that finishes last overrides the others. Forplanning tables that need frequent updates by multiple users, Oracle recommends that you create differenttables with appropriate filters.
Additional Information about the Import ProcessHere's some additional information about importing data into planning tables:
• Tables with page filters aren't enabled for import. To use the table for import, remove the page filter or usemember filters in the table configuration. Filters specified as member filters in the table configuration arerespected.
• The import process evaluates and imports only the first worksheet in the workbook. If the workbook containsother worksheets, the import process ignores them.
• The worksheet can contain native Excel comments and conditional formatting. The import process ignoresthese comments and conditional formatting.
• If a cell has a formula based on another cell, the import process evaluates the formula and uses the result. Theother cell can be in the same worksheet or a different worksheet in the same workbook.
• The import process uses the data security rules assigned to the planner doing the import.
Configure Units for a Measure You can view a measure in several units of measure (UOM) and currencies side by side without needing separatemeasures. By converting a single measure into various values and currencies, you get superior data consistency anddon't require recalculation and data synchronization.
In addition, sometimes different products and organizations have data that's loaded externally using different units ofmeasure. For example, vitamins sold in Europe may be shipped in bottles, while in Asia the quantities are by pill count.By defining units, you enable these values to be converted into a cohesive value, which can be aggregated in a seamlessmanner.
To configure units for a measure:
1. In a Supply Chain Planning work area, click the Tasks panel tab.2. In the Tasks panel, click Manage Planning Measures.3. Locate the measure for which you want to configure units and click Edit.4. On the Advanced tab, select the Properties tab.5. Select UOM from the list as the default value for the Base Units of Measure.
The base units of measure define the default unit of measure to which displayed data is converted. It is editableonly for numeric measures, which don't have product and organization-based levels. For measures that haveproduct and organization, the definition comes from the data source. When using the measure, you mustattempt to select only the relevant UOM entries for the measure to streamline the user process.
6. Select the relevant units of measure from the Display Unit of Measure.You completed defining the unit of measure. You can view the measure using a specific table or graph.
Note: To show the same measure with different unit of measures, you can create a copy from the original measure.Rename the duplicated measure to use another unit of measure of your choice. You can show the same measure asboth numbers and currencies.
89

Oracle SCM CloudUsing Supply Planning
Chapter 5Planning Measures
To override the default unit of measure:
1. Open a table and select View, Format Measures to find the measure.2. Click the measure you want to modify and select the value from the Unit of Measure list.3. Click Save and Close.
Related Topics• How You Manage Planning Measures
Configure Currencies for a Measure You can view a measure in several units of measure and currencies side by side without having separate measures. Byconverting a single measure into various values and currencies, you get superior data consistency and don't requirerecalculation and data synchronization.
To configure currencies for a measure:
1. In a Supply Chain Planning work area, click the Tasks panel tab.2. In the Tasks panel, click the Manage Planning Measures link.3. Locate the measure for which you want to configure currencies and click Edit.4. On the Advanced tab, select the Properties tab.5. Select Currency from the list as the default value for the Base Currency.
The base currency defines the default currency to which displayed data is converted and is editable only forcurrency type measures.
6. Select the relevant currencies from the Display Currency.
You completed defining the currencies for a measure. You can view the measure using a specific table or graph.The currency value is editable only if the measure type is Currency. For numeric measures, you can change the typefrom Number to Currency. Select the currency that you want to use in this instance of the measure.
Note: To show the same measure with different currencies, you can create a copy from the original measure. Renamethe duplicated measure to use another unit of measure of your choice. You can show the same measure as bothnumbers and currencies.
To override the default currency:
1. Open a table and select View, Format Measures to find the measure.2. Click the measure you want to modify and select the value from the Currency list.3. Click Save and Close.
Related Topics• How You Manage Planning Measures
90

Oracle SCM CloudUsing Supply Planning
Chapter 5Planning Measures
Configure Conditional Formatting for a Measure Use conditional formatting to change the background color of a cell when a specific condition occurs.
Conditional formatting is useful to draw the attention of the user for information that requires action. You defineconditions for an individual measure. A measure can have one or more formats applied. The condition is evaluatedat the table level using the configured units and currencies. Two tables with different units of measure or currenciesdefined can have different cells trigger the conditional formats.
To configure global conditions:
1. In a Supply Chain Planning work area, click the Tasks panel tab.2. In the Tasks panel, click the Manage Planning Measures link.3. Locate the measure for which you want to apply conditions and click Edit.4. On the Advanced tab, select the Conditional Formatting tab.5. Click the + icon to add a row and complete the information.
Field Name Description
Measure
Locate the measure you want to use to evaluate. Conditional format for a measure can be basedon another measure.
Condition
Compares the selected measure to a value or another measure
Compare to Measure
Measure to which the selected measure is compared
Value
When the Compare to Measure is empty, this value is used to compare the selected measure
Color
Defines the color for the cell background when the condition is met
6. Click Save and Close.To configure local overrides to conditions:
1. Open a table and select View, Format Measures.2. Locate the measure that you want to modify and then select the Use Override Conditional Formatting check
box.3. The Conditional Formatting section appears. Select a new conditional format to use in your table.4. For only the Build Plan table accessed through a Supply Planning work area, the Conditional Formatting section
also includes the Apply and Name columns.
In the Apply column, select whether you want the conditional formatting to be highlighted in your Build Plantable all the time or only when you select it from the Highlight Exceptions drop-down list.
For example, if you set up a conditional format named Resource Overload and select When selected, ResourceOverload appears in the Highlight Exceptions drop-down list in your Build Plan.
91

Oracle SCM CloudUsing Supply Planning
Chapter 5Planning Measures
5. Click Save and Close.
Related Topics• How You Manage Planning Measures
Aggregate Levels for Measure Data Imports Use the file-based data import (FBDI) template named Supply Chain Planning Measures(ScpMeasuresImportTemplate.xlsm) to import measure data.
In Demand Management, you can allocate the loaded forecast measure data to the Day level. In Sales and OperationsPlanning, you can allocate the loaded forecast measure data at the planning level as part of a snapshot. For example, ifthe Financial Forecast Value measure is loaded at the Quarterly and Product Category levels, then the measure data isallocated to the month and item respectively.
You can import measure data at the following aggregate levels:
• Category level in Product dimension
• Week for a manufacturing calendar in Time dimension. Month and Quarter for a Gregorian or fiscal calendar inTime dimension.
For a demand plan that's using a hybrid time hierarchy, you can import data to any aggregate level for thehybrid time hierarchy that you selected as the planning calendar or a corresponding hybrid time hierarchy. Ifyou're not importing data at the time level of the measure, enter the name of the hybrid time hierarchy in theTime Hierarchy Name column of the template.
• Customer level in Customer dimension
• Business Unit or Legal Entity level in Organization dimension
• Division, Region, or Territory level in Sales Organization dimension
You cannot import data at aggregate levels for shared measures, such as Shipments History, Adjusted ShipmentsHistory, Bookings History, and Adjusted Bookings History.
Related Topics• Import Templates Used to Create CSV Files for Supply Chain Planning
View the Audit Trail for a Measure Use the Audit Trail of Measure Updates table to view the audit trail for a measure.
The table displays details of changes made to measure values for auditing purposes. You can view the audit trail for allmeasure types, such as numeric, date, and string.
The Audit Trail of Measure Updates table is available for Demand Plan, Supply Plan, Demand and Supply Plan, and Salesand Operations Plan types. You can access the audit trail from your respective Supply Chain Planning work area.
Only editable measures that are part of the plan's measure catalog appear in the Audit Trail of Measure Updates table.
92

Oracle SCM CloudUsing Supply Planning
Chapter 5Planning Measures
Note: Only the user who updated the measure can view the previous value and new value in the audit row. Otherusers, who have permissions to view the audit trail, must open the Audit Trail Details page to view the details.
The security permissions are set according to the job roles on a measure group or on a specific hierarchies, such asItem, Organization, Customer or Supplier. For additional details, open the Administer Planning Security page from thetask drawer of the Plan Inputs work area.
Use the following steps to view the audit trail for a measure:
1. From a Supply Chain Planning work area, click the Open button and then select a pane.2. In the Open Table, Graph, or Tile Set dialog box, search for the Audit Trail of Measure Updates table. Select the
table and then click OK.3. On the Audit Trail of Measure Updates tab, type a specific measure name and click Search.
You can click the Search button without typing any search criteria to display all the measures that have the audittrails.
4. In the Search Results region, you can view the audit trails for a measure, which includes the followinginformation:
◦ Measure Name: Name of the measure on which the updates were made.
◦ Last Updated Date: Date and time when updates were made to the measure.
◦ Updated By: Name of the user who made the updates.
◦ Previous Value: Previous value for the measure.
◦ New Value: New value for the measure.
◦ Details: When you click Details, the Audit Trail Details page opens. You can review additional details, suchas levels, members, filtered levels, and filtered members.
Manage User-Defined Measures
Create Measures and Assign to a Measure Catalog In addition to reviewing measures, you use the Manage Planning Measure task to create, edit, duplicate, and deletemeasures. You can also create measure groups and add predefined and user-defined measures in them.
This topic discusses the following:
• Creating measures
• Assigning measures to a measure catalog
Create MeasuresIf you have the required privileges, you can create measures if the predefined ones don't meet your requirements. Themeasures that you create have the same features and functionality as predefined measures.
93

Oracle SCM CloudUsing Supply Planning
Chapter 5Planning Measures
To create a measure:
1. In a Supply Chain Planning work area link, click the Tasks panel tab.
You can create measures from one of the following work areas: Demand Management, ReplenishmentPlanning, Supply Planning, Sales and Operations Planning, Demand and Supply Planning, or Plan Inputs.
2. In the Tasks panel, click the Manage Planning Measures link.3. Click Create from the Actions menu.
a. On the Create Measure page, enter a measure name and description.b. Select a measure group.c. Select a data type.d. Select the Allow editing check box if you want the measure to be editable in a pivot table.e. Select Edit Range to enable the Edit Lock tab, which controls the editable status of the measure
The Edit Range value determines the time range over which the measure is editable. The available valuesare: History, Future, History and Future.
f. On the Aggregation and Disaggregation tab, define the dimension parameters. Select the dimensions,hierarchy, and hierarchy level within the dimension to store the measure data. When a dimension andhierarchy are selected, the default setting for the Stored Level is the lowest level of the dimension'shierarchy. You can modify the level to store by selecting the hierarchy from the list and setting the storedlevel parameter within that hierarchy.
- Aggregation Parameters: The Aggregation parameters control the way a measure's data isaggregated. You have two options:
◦ Calculate and aggregate: Calculate and Aggregate calculates the measure's expression at thelowest data level and then aggregate up.
◦ Aggregate then calculate: Aggregate and Calculate aggregates all measures referenced inthis measure's expression and then calculate the expression.
In the Time Dimension field, select the aggregation function that controls how data is aggregatedfor the time dimension. The Other Dimensions fields are the same as the Time dimension fields.These options control how the data is aggregated across all the dimensions except for time. TheWeighted By field is enabled only if you select Weighted Average as the aggregation parameterfor either Time or Other Dimensions. It enables you to select the measure to drive the weightedaverage calculation.
The aggregation types include: Sum, Average, Weighted Average, Minimum, Maximum, Count,Latest, Median, Variance, and Standard Deviation.
- Disaggregation Parameters: The Disaggregation Parameters control how changes to the data atan aggregated level are allocated down for storage. This is used when data changes are made in apivot table, but also when made by the demand forecast. The weights for each combination, suchas item-organization, are calculated and stored for the measure during plan run. These weightsare used to allocate the data. For example, the forecasts for P1-Org1 and P2-Org1 are 40 and 60respectively. Therefore, the weights used for allocation would be 40% for P1-Org1 and 60% for P2-Org1.
The parameters for the Disaggregation Type field are: By Measure, By Self, Equal, and Same Value.The default parameter is Equal.
The Disaggregation Basis field is enabled only if you select the Disaggregation Type as By Measure.Select the measure to use as the disaggregation basis from the list of measures.
94

Oracle SCM CloudUsing Supply Planning
Chapter 5Planning Measures
The Secondary Basis field is enabled only if you have selected the Disaggregation Type field asBy Measure or By Self. The values for Secondary Basis are Booking History Average or ShipmentHistory Average.
The Secondary Basis measure is selected in case the basis measure has no value. You can selectonly measures that contain pre-calculated proportions as a secondary basis. That is, they'recalculated during plan run.
g. On the Expression tab, define any new expressions for a measure. You create an expression when youhave to show any value other than its stored information. The expression provides a flexible frameworkfor an extensive variety of calculations and information. An expression for a measure references othermeasures, operators, and numbers.
In the Expressions subtabs:
- The Functions tab lists the available functions, a description, an example of the function's use.- The Measures tab lists the available measures, their descriptions, and data type. The Insert button
inserts the highlighted measure into the expression building area where functions or arithmeticoperations can be specified.
- The Attribute tab lists the attributes available for the Product dimension at Item level. Thedescription and data type of the attribute is shown in the description pane.
After you complete the expression, use the Validate button to ensure the syntax is correct. An error orsucceeded messaged is displayed.
h. On the Edit Lock tab, you can define a new expression similar to the measure expression. The differenceis rather than evaluating and displaying the expression result, the expression result is used to control orrefine the editable status of the measure. If the expression evaluates as true, the measure is locked fromediting. The expression is evaluated every time the table is run, and may change as relevant measures orattributes are modified.
i. On the Advanced tab, click the Properties tab and review the following parameters:
- If you select the Shared measure check box, then the measure is shared across plans. By default,the parameter isn't selected, and the measure is plan-specific.
Note: You can share measures across only demand plans with the day planning time level oracross demand and supply plans. In such plans, shared measures are common, and the entriesyou make in one plan apply to other plans. For plans of other types, even if you select the checkbox, the measures are plan-specific.
- If you select the Refresh with current data check box, then the current measure value needs aplaceholder to store the result in the application. For example, a noneditable measure where thedata is imported from a legacy or other application. Selecting this check box allocates a space tostore the measure by the defined dimensions.
- Conversion Type enables you to define the valid Unit of Measure (UOM) and Currency conversionsthat are available for a measure in a table.
Base Units of Measure defines the default unit of measure used to convert displayed data. The fieldis editable only for Numeric measures, which don't have Product and Organization-based levels(for measures that have product and organization, the definition comes from the data source).
95

Oracle SCM CloudUsing Supply Planning
Chapter 5Planning Measures
Select any relevant units of measure, which may be useful in a table, graph, or tile. Only the UOMsthat you select are available for selection in a table or graph.
Base currency defines the default currency to which displayed data are converted. The field iseditable for only Currency type measures.
You use Price lists to convert quantities into values, which are then converted to a currency.- Data Lookup value enables you to identify a data lookup source that displays the measure as a list
of value. The source attributes have 3 options: None (Default), Level, and List.
◦ If Source=Level, you must identify the level and the attribute to display in the measure list.
◦ If Source=List, then you can create and maintain the list of values. You can either add orremove members in this list.
j. On the Advanced tab, click the Goals tab to define if low or high values are better for measure goals.k. On the Advanced tab, click the Conditional Formatting tab to define conditional formatting settings for
the measure.4. Click Save and Close.
Assign Measures to a Measure CatalogTo use the user-defined measure in your plan, add the new measure to the plan's measure catalog. Navigate toConfigure Planning Analytics, find the plan's measure catalog on the Measures Catalog tab. In the Available Measurespane, search for the new user-defined measure, and add it to the Selected Measures. After you perform a plan run youcan create a table or use an existing table, and add your new measure to the table.
Related Topics• Configure Global Goals for Measures
• Duplicate, Edit, and Delete Measures
• Create Measure Groups
Duplicate, Edit, and Delete Measures You can duplicate, edit, or delete user-defined measures using the Manage Planning Measures task, which is available inthe Tasks drawer.
To duplicate the measure: Select a measure from the list of measures, select the Action menu on the toolbar, and thenclick Duplicate. Duplicating the existing measure gives you a starting point for creating a new measure definition. Whenyou duplicate a measure the default name is Copy of <original measure name>. Other definitions of the duplicatedmeasure remain the same as the original measure.
To edit the measure: Select a measure from the list of measures, select Actions menu, and then click Edit. Editing ameasure enables you to select an existing measure and edit its attributes.
To delete the measure: Select a measure from the list of measures, select Actions menu, and then Delete. A completelist of all objects including tables and measure groups are be displayed to ensure you are aware of impacts of deleting ameasure.
96

Oracle SCM CloudUsing Supply Planning
Chapter 5Planning Measures
Related Topics• Create Measure Groups
• Configure Global Goals for Measures
Create Measure Groups Use Manage Planning Measures task to create a measure group. Measure groups are created to group measurestogether that you need frequently. Depending on your business need you can create measure groups and associatemeasures with appropriate groups.
To create a measure group:
1. In the Navigator, click a Supply Chain Planning work area link.2. Click the Tasks panel tab.3. In the Tasks panel drawer, select the Manage Planning Measures link.4. Select Create Group from the Actions menu.
◦ Enter a name and description.
◦ From the Available Measures pane you can select measures and move them to the Selected Measurespane.
5. Click Save and Close.
Related Topics• Create Measures and Assign to a Measure Catalog
• Duplicate, Edit, and Delete Measures
Configure Global Goals for Measures You can define global goals for a measure using the Goals tab when you create or edit a measure. On the CreateMeasure page, click the Advanced tab and then select the Goals tab to configure global goals.
Define if low or high values are better. For example, a high value is good for revenue; a low value is good for expenses.
For global goals, you can provide a low range or a high range.
Goals option is available only for measures of type Currency, Number, and Percent. Using Global Goals, you can firstdefine if low or high values are better for a measure. The ranges are displayed on the page when you are viewing ameasure in comparison with its goal, for example, in an infotile. Global goals are measure level parameters and arenot defined specifically for a subset of the data. For example, you cannot have a goal of 1000 for one organization and50000 for another.
Related Topics• Create Measures and Assign to a Measure Catalog
• Duplicate, Edit, and Delete Measures
97

Oracle SCM CloudUsing Supply Planning
Chapter 5Planning Measures
98

Oracle SCM CloudUsing Supply Planning
Chapter 6Planning Data Collections
6 Planning Data Collections
Overview of Data Collections for Supply Chain Planning To run plans from one of the Supply Chain Planning work areas, you must collect data into a planning data repository.Order promising and order management processes also use the planning data repository to promise and manageorders.
To collect data into the planning data repository, you can perform these tasks from one of the Supply Chain Planningwork areas:
• Collect Planning Data: Use this task when you collect data from the Oracle Fusion source system.
• Load Planning Data from Files: Use this task when you collect data from a completely external source system.
Depending on your security privileges, you may need to manually add these tasks. In the Setup and Maintenance workarea, use the following:
• Offering: Supply Chain Planning
• Functional Area: Supply Chain Planning Configuration
• Task: Collect Planning Data
The following figure illustrates the collections processes that you can use to populate the planning data repository.
99

Oracle SCM CloudUsing Supply Planning
Chapter 6Planning Data Collections
Collect Planning DataThere are two steps involved in the data collection process. The Collect Planning Data process first pulls data from theOracle Fusion source system into staging tables. The process then loads data from the staging tables into the planningdata repository.
On the Collect Planning Data page, use the following tabs to select what data you want to collect:
• Reference Data
• Demand Planning Data
• Supply Planning Data
Most of the reference data are global entities. Global entities are common for all source systems. For example, Units ofMeasure (UOM) is common for all source systems. The supply planning and demand planning data are transactionaldata. Most of the transactional data are local entities. Local entities are specific to each source system. For example, On-hand Quantity is specific for each source system.
You can also select collection filters to further refine what data you want to collect. You can save your selections tocollection templates.
Load Planning Data from FilesUse this option to populate the planning data repository using CSV files:
To load the planning data from files, follow these steps:
1. Create the CSV files. To create the CSV files, you can use a predefined set of Microsoft Excel files as importtemplates.
2. Import the CSV files. From the navigator, click File Import and Export, and create a new import. Specify scm/planningDataLoader/Import for the account.
3. Submit the Load Planning Data from Files process. When you submit the process, the process first pushes thedata from the CSV files into the staging tables. The process then loads the data from the staging tables into theplanning data repository.
Related Topics• Update Existing Setup Data
Global Entities Within data collections, Oracle Fusion Supply Chain Planning refers to certain business entities as global entities.
Global entities are specific for each instance and are common for all source systems. They are common without regardto whether they are collected from the Oracle Fusion source system or collected from an external source system usingthe file-based data import (FBDI) method.
When collecting data for a global entity, the planning data repository stores only one record for each instance of theglobal entity. The data collections process removes the source system reference from the global entity and stores thedata in the data repository. If the data collections process collects the same instance of a global entity from more thanone source system, the data repository stores the value from the last collection.
100

Oracle SCM CloudUsing Supply Planning
Chapter 6Planning Data Collections
For example, the following scenario describes the collection method of the global entity called units of measure (UOM)from three source systems, namely source system A, B, and C respectively.
• Source system A has an instance of UOM. During the collection of UOMs from source system A, the kilogramUOM is collected. This is the first time the kilogram UOM is collected. The data collections process creates akilogram record in the data repository.
• Source system B does not have any instances of UOM. During the collection of UOMs from source system B,the data collections process does not collect the kilogram value. Since there was no record for the kilogramUOM in source system B, the data collections process does not change the kilogram record in the datarepository. The record of the kilogram value from source system A is still valid.
• Source system C has an instance of UOM. During the collection of UOMs from source system C, the kilogramUOM is again collected. The data collections process registers the kilogram record in the data repository tomatch the values from source system C.
Note: When you use the FBDI collection method, the global entity files require a source system. The collectionsframework validates that the source system matches each record's source system. A source system identifier markseach data record.
In Supply Chain Planning, the following entities are classified as global entities:
• Order Orchestration Reference Objects
• Units of Measure and UOM Conversions
• Demand Classes
• Currency and Currency Conversion Class
• Shipping Methods (Carrier, Mode of Transport, Service Level)
• Customer and Customer Site
• Suppliers and Supplier Sites
• Regions and Zones
• Approved Supplier List
• Supplier Capacity
• Planners
Data Collection Types for Supply Chain Planning When you collect planning data, one of the parameters you specify for the Collect Planning Data task is the CollectionType parameter.
You can select this task from any of your Supply Chain Planning work areas. For the Collection Type parameter, you canselect one of the following values:
• Targeted: Choose the Targeted collection type when you want to collect a significant volume of source systemdata. Typically, you use the Targeted collection type in scenarios such as bulk upload of transaction data,instance upgrade, and change in collection filters.
• Net change: Choose the Net change collection type when you want to collect changed data and new recordssince the last successful collection cycle.
101

Oracle SCM CloudUsing Supply Planning
Chapter 6Planning Data Collections
• Automatic selection: Choose the Automatic collection type when you want the planning process to decide andautomatically select an appropriate collection type for each of the entities.
TargetedYou use the Targeted collection type when you want to perform a complete refresh of the data in the data repository.In this mode, the planning process deletes the existing data for the selected entities from the data repository. Next, ifsubsequently collected from the source, the data for the selected entities replaces the deleted data.
Note: For the following data collection entities, you can use only the Targeted collection type: Item Costs, ResourceAvailability, Fiscal Calendars, and all Shipment and Booking History data.
Net changeWhen you use the Net Change collection type, you collect data incrementally. The Net Change collection type collectsonly changed or new data. Collecting data using the Net Change collection type is usually faster than using the Targetedcollection type. You typically use the Net Change collection type when you have previously performed a Targetedcollection, and now you want to keep your planning data current with your execution system data. You cannot select thedemand planning data when the collection type is Net Change.
Automatic selectionYou use the Automatic collection type when you are not sure which collection type to select and you want the planningprocess to decide the collection type for each entity. The planning process evaluates each entity on multiple factors,such as the last collected date for an entity, and decides whether to perform a Targeted or a Net Change collection forthe entity. You can manually select the entities that you want to collect or you can use one of the predefined templatesto select your entities. If you select one of the predefined templates, you can't make any changes in the Reference Data,Demand Planning Data, and Supply Planning Data tabs.
Manage Planning Source Systems for Data Collections To populate the planning data repository, also known as the order orchestration and planning data repository, youcollect data from the Oracle Fusion source system.
On the Manage Planning Source Systems page in one of the Supply Chain Planning work areas, enable organizations forcollections. Depending on your security privilege, you can also enable organizations from the Setup and Maintenancework area.
In the Setup and Maintenance work area, use the following:
• Offering: Supply Chain Planning
• Functional Area: Supply Chain Planning Configuration
• Task: Manage Planning Source Systems
The Oracle Fusion Source SystemThe Oracle Fusion source system is included as a source system for data collection. Supply chain planning, orderorchestration, and order promising processes use data that are stored in the planning data repository. You ensure theCollections Allowed check box is enabled and manage which organizations you enable for collections.
102

Oracle SCM CloudUsing Supply Planning
Chapter 6Planning Data Collections
To open the Manage Trading Community Source Systems page, navigate to the Setup and Maintenance work area anduse the following:
• Offering: Supply Chain Planning
• Functional Area: Supply Chain Planning Configuration
• Task: Manage Trading Community Source System
External Source SystemsYou can also allow collections for external source systems if you will be loading planning data from files for OracleFusion Global Order Promising. You must first define the external source system on the Manage Trading CommunitySource Systems.
There are two types of external source systems: Others and External.
Version ExternalThe version External source system indicates that the source system is not connected to any other Oracle Fusionapplications. This source system is not integrated with Oracle Fusion Product Data Model, Oracle Fusion TradingCommunity Model, and Oracle Fusion Order Management Cloud. The external source system is also referred as acompletely external source system. You cannot enable any other source system settings that are related to other OracleFusion applications. You can select the Collections allowed check box now or later depending on when you want to startcollecting data. This enables the source system for data collections using the file-based import process.
Version OthersThe version Others source system indicates that the source system is connected to other Oracle Fusion applications.This source system is integrated for Oracle Fusion Product Data Model, Oracle Fusion Trading Community Model, andOracle Fusion Order Management Cloud. The following conditions are applicable when the external source is Others.
• External system data for Items, Item Structures, and Catalogs is uploaded to Oracle Product Data Model Cloud
• External system data for Customers, Customer Sites, Regions and Zones is uploaded to Oracle TradingCommunity Model Cloud
• External system data for Sales Orders is uploaded to Oracle Order Management Cloud
For more information on types of data that can be collected for each source system, see the Import Templates Used toCreate CSV Files for Supply Chain Planning topic.
Organizations Enabled for Data CollectionsThe process for enabling organizations varies depending on the version of the source system.
To enable organizations for data collections when the source system version is Oracle Fusion, perform the followingsteps:
1. Click the Manage Organization List button for your Oracle Fusion source system.2. Click the Refresh Organization List button to update the organizations list.
When adding organizations to the Oracle Fusion source system to be collected into planning, you must click theRefresh Organization List button and then enable the organizations for collections.
3. Select the Enable for Collections check box for the organizations from which you want to collect data.
103

Oracle SCM CloudUsing Supply Planning
Chapter 6Planning Data Collections
Tip: When performing collections during your initial setup, collect order orchestration reference objects from thepredefined Oracle Fusion source system, and consider collecting organizations. After enabling organizations forcollection, collect organizations first. You can confirm the collection results on the Supply Network Model page.
To enable organizations for data collections when the source system version is External (completely external sourcesystem), upload organizations using the file-based import process. The organizations are automatically enabled forcollections.
To enable organizations for data collections when the source system version is Others, perform the following steps:
1. Define an organization as an item-organization in the product data model.2. Upload the organization using the file-based import process and associate the organization with Others source
system.
Related Topics• Import Templates Used to Create CSV Files for Supply Chain Planning
• Considerations for Enabling Organizations for Data Collections
• Define Flexfield Mappings
How the Order Orchestration and Order PromisingProcesses Use the Collected Planning Data You perform data collections to populate the planning data repository. In addition to being used by Supply ChainPlanning processes, the collected data is used by Oracle Fusion Order Management order orchestration processes andby Oracle Fusion Global Order Promising processes.
Data CollectionsYou must perform data collections to populate the planning data repository, also called the order orchestration andplanning data repository, with data from the Oracle Fusion source system or from a completely external source system.When you load data from an external source system, use the XLSM files to organize your data in the required formatand then convert the data into CSV files. You can then upload the CSV files to the planning data repository.
Order OrchestrationOrder orchestration processes use some reference data directly from the planning data repository. You must performdata collections for the order orchestration reference entities even if you are not using the Supply Chain Planning workareas.
Note: Before collecting data from your Oracle Fusion source system, you must define at least one organization forthe source system. After you have set up at least one organization, you must update the organization list on theManage Planning Source Systems page and then enable at least one of the organizations for collections. If you havenot enabled any organization, then the collections process ends with an error.
104

Oracle SCM CloudUsing Supply Planning
Chapter 6Planning Data Collections
Order PromisingThe Global Order Promising processes use an in-memory copy of the data from the planning data repository. Whenorder orchestration processes send a scheduling request or a check availability request to Oracle Fusion Global OrderPromising, the order promising processes use the data stored in main memory to determine the response to send backto order orchestration. You must refresh the Global Order Promising data store after every collections so that the mainmemory always reflect the current.
Related Topics• Collect Data and Refresh the Server
How You Enable Cross-References of Entities by DataCollections Cross-references enable you to locate the correct source value for each cross-referenced entity. When you enableentities for cross-referencing, data collection pays attention to the cross-references that you have set up for certainvalues.
To enable cross-referencing of entities, click the Manage Planning Data Collection Processes task from your supplychain planning work area. Select the source system from the list, and then enable the available entities that you want tocross-reference during data collections.
You can view the cross-referenced data for each entity on the Cross-Reference Relationships for Collected Data page inthe Plan Inputs work area.
How Planning Processes Collect Different WorkDefinitions and Item Structures You may be concerned that the work definition and item structure data in your supply chain planning work area doesnot match with what was defined in Oracle Manufacturing Cloud.
You don't need to worry. The planning application collects and uses data based on how the work definitions and itemstructures are defined and associated in the manufacturing source system.
Work Definitions and Item Structures in the Source SystemThe work definition is a primary source of data for the planning application. The planning process uses the workdefinition of make order items to determine component and resource requirements. In case the work definition is notdefined, the planning process uses the defined item structure, but to plan for components only. If a work definitionis defined and no item structure is associated to it, then you can manually add ad hoc components to it. If an itemstructure is associated to it, you can still add ad hoc components to the work definition, alongside the components inthe item structure. Remember that while a work definition can be associated with only one item structure, one itemstructure can be associated with several work definitions within the parent item.
105

Oracle SCM CloudUsing Supply Planning
Chapter 6Planning Data Collections
Work Definitions and Item Structures in the Planning Data RepositoryIn the manufacturing source system, the work definitions and item structures for an item can be defined and associatedin different ways. The following table lists the most common source system combinations and how the collections andrun plan processes proceed accordingly:
Manufacturing Cloud Definition Item Structure Name and Work DefinitionName in the Planning Data Repository
Planning Collections Processes
Only item structure is defined for an item. Nowork definition is defined.
Item structure name exists, no work definitionname
The planning process collects the item structureinformation but does not collect information forrouting, operations, or item resources. The planning process uses item structure toplan components and does not plan resources.
Only work definition is defined for an item. Noitem structure is defined.
Work definition name exists, no item structurename
The planning process collects the workdefinition information to populate the itemstructure and routing information. The planning process populates the componentinformation and operation sequence numberin the item structure based on the ad hoccomponents and operation assignmentavailable in the work definition. The planning process uses the work definitioninformation to plan both components andresources.
Both item structure and work definition aredefined for the item.
Both work definition name and item structurename exist
The planning process uses the componentsthat are associated with the work definition toplan. The planning process does not considerany components of item structure that are notassociated with the work definition. You canoverride the item structure component usagewithin the work definition. The planning process collects componentattributes (such as component effectivity)from the item structure if the components areassociated with the work definition. The planning process uses the work definitionto plan resources.
Both item structure and work definition aredefined for the item, but the work definitiondoes not refer to the item structure. Ad hoccomponents are assigned to the work definitionoperations.
Work definition name exists, no item structurename
The planning process collects the componentsfrom the work definition and not from theitem structure in the Oracle Fusion ProductInformation Management solution. The process plans components based on workdefinition operation assignments and plansresources based on the work definition.
106

Oracle SCM CloudUsing Supply Planning
Chapter 6Planning Data Collections
Enable External Data Collection for the Oracle FusionSource System Enable external data collection if you want to load transactional data from external systems. Typically, you do this ifsome of your supply chain processes are managed in external applications. You load the transactional data from theseapplications using file-based data imports (FBDI).
You can use external data sources for these functional areas: Inventory and Materials Management, Procurement, OrderManagement, and Manufacturing. When you enable external data collection for a functional area, be aware of theserestrictions:
• You can't use configure-to-order, drop shipment, and back-to-back fulfillment.
• The entities associated with the functional area are no longer available for Oracle Fusion source collection. Forexample, if you enable Order Management, the Sales Orders entity won't be available on the Collect PlanningData page for you to select for Oracle Fusion source collection.
This table lists the entities for each functional area.
Functional Area Entities
Inventory and Materials Management
On-hand Quantity and Transfer Orders
Procurement
Purchase Orders and Requisitions
Order Management
Sales Orders and Reservations
Manufacturing
Work Order Supplies, Resource Availability, Resources, Work Definitions, and Item Structures
Enable External Data CollectionUse these steps to enable external data collection:
1. Select the Manage Planning Source Systems task in the Tasks panel from any Supply Planning work areapage. Or use this task in the Setup and Maintenance work area:
◦ Offering: Supply Chain Planning
◦ Functional Area: Supply Chain Planning Configuration
◦ Task: Manage Planning Source Systems
2. In the list of source systems, select the row that has Oracle Fusion in the Version column.3. In the Actions menu, click Select Data Sources.4. Select the Enable External Data check box, and then select the functional areas that you want to source
transactional entities for.
107

Oracle SCM CloudUsing Supply Planning
Chapter 6Planning Data Collections
Note: Every time you enable or disable external data collection, you must run a targeted data collection to ensurecomplete refresh of data in the data repository.
Related Topics• How You Load Planning Data from Files
Collect Planning Data from the Oracle Fusion SourceSystem
How You Collect Different Data Types for Supply Chain Planning When you collect data, you collect data from three categories: reference data, demand data, and supply data. On theCollect Planning Data page there is a tab for each of these categories.
The collected data are stored in the planning data repository.
The following figure illustrates the three categories of data that you collect from the Oracle Fusion source system to theplanning data repository.
Explanation of Callouts
1. Reference data is primarily sourced from Oracle Fusion SCM Cloud2. Demand data comes from Oracle Order Management Cloud Service and Oracle Materials Management Cloud
Service3. Supply data is sourced from Oracle Inventory Management Cloud Service, Oracle Manufacturing Cloud Service,
and Oracle Purchasing Cloud Service
108

Oracle SCM CloudUsing Supply Planning
Chapter 6Planning Data Collections
Reference DataThe collection process begins with reference data, which is primarily sourced from Oracle Fusion SCM Cloud. You collectthe data collection entities, such as basic item, resource, organization, customers and suppliers, and calendar data.
Note: Oracle Fusion Sales and Operations Planning uses the Bill of Resources entity to link the make items with theirassociated components and resource requirements. For more information on collecting Bill of Resources from anexternal source system, see the Loading Planning Data from Files section.
You also use Oracle Supply Chain Planning Cloud to collect the following items:
• Item structures: To explode item-level demand into component demands and supplies.
• Work Definitions: To assign the component and resource requirements for make items.
• Units of measure: To align plan data and to convert plans from one set of units to another.
• Costs: To review plans in financial terms and evaluate the financial impact of planning decisions.
Demand DataYou collect demand data from two potential sources:
• Sales orders that flow from Oracle Order Management Cloud Service: You can use this as the basis of thedemand forecast, while current orders can consume the demand in near-term forecast time buckets.
• Shipment history from Oracle Materials Management Cloud Service: You can use this to generate a shipmentsforecast.
Supply DataYou collect supply data from three sources:
• Oracle Inventory Management Cloud Service: This provides data related to on hand inventory, reservations,material transfers, in-transit supplies, and receipts.
• Oracle Manufacturing Cloud Service: This provides work in process status and any manufacturing work orders.
• Oracle Purchasing Cloud Service: This provides purchase requisitions and purchase orders.
Related Topics• How You Load Planning Data from Files
• Run the Load Planning Data from Files Process
• Import Templates Used to Create CSV Files for Supply Chain Planning
Collection Filters and Collection Templates You use collection filters and collection templates when you need to collect some common set of entities repeatedly.
The collection filters and collection templates are located on the Collect Planning Data page. To open the CollectPlanning Data page, click the Collect Planning Data task from one of the Supply Chain Planning work areas.
109

Oracle SCM CloudUsing Supply Planning
Chapter 6Planning Data Collections
Depending on your security privileges, you can also open the Collect Planning Data page from the Setup andMaintenance work area. In the Setup and Maintenance work area, use the following:
• Offering: Supply Chain Planning
• Functional Area: Supply Chain Planning Configuration
• Task: Collect Planning Data
Collection FiltersUse collection filters to improve the performance and efficiency of the collections process, and to avoid accumulation ofirrelevant data in the planning data repository. You can use several filter criteria while performing collections, such as byemploying catalogs, order types, and price lists. You can also use date-based filters for collecting shipment and bookinghistory information.
Enabling Collection FiltersTo enable collection filters, you must first run the schedule process called Load Filter Names for Planning DataCollection from the Scheduled Processes work area. When you run the scheduled process, the filters get enabled in theCollect Planning Data page. Then, you can apply the filters from the next collection.
Collection TemplatesUse collection templates when you want to collect a set of data repeatedly over a period. You can select either one of thepredefined templates that serves your specific need, or you can create your own template and save it for future use.
When you select a predefined template from the list, the Collection Type field is defaulted to Automatic selection andyou cannot edit the field. Also, when you select a predefined template, the Select Collection Filters field is disabled.
You can create a collection template on the Collect Planning Data page by selecting the data collection entities andsaving the template for future use. For example, if you frequently collect certain supply planning transactional entities,such as On Hand, Purchase Orders, and Purchase Requisitions, then save these entities as a collection template. Itreduces the overhead of selecting the same entities for subsequent collection cycles.
If the template file contains any error during the upload process, rectify the issue found in the log file and upload thetemplate file again.
Collect Data Using the Targeted Collection Type To perform a complete refresh of the data repository used by the Supply Chain Planning products, run a targetedcollection.
You can run the targeted collection immediately or you can schedule the process to run later. Demand planning datacan only be collected by using the Targeted collection type.
Note: Before collecting demand planning data, you must successfully run the Load Filter Names for Planning DataCollection scheduled process.
Perform the following steps to collect reference data, demand planning data, and supply planning data using theTargeted collection type.
1. Access the Collect Planning Data page from a Supply Planning work area or the Setup and Maintenance workarea.
110

Oracle SCM CloudUsing Supply Planning
Chapter 6Planning Data Collections
◦ If you are in one of the Supply chain Planning work areas:
i. Click the Tasks panel tab.ii. In the Tasks panel drawer, click the Collect Planning Data link.
◦ If you are in the Setup and Maintenance work area, then select the following:
- Offering: Supply Chain Planning- Functional Area: Supply Chain Planning Configuration- Task: Collect Planning Data
2. On the Collect Planning Data page, complete the following steps.
◦ On the Parameters tab:
i. Select your source system.ii. For the collection type, select Targeted.
Demand planning data can only be collected by using the Targeted collection type.iii. Click Select Collection Filters to select the collection filters.
◦ On the Reference Data subtab, move the required reference entities to the Selected Entities area.
◦ On the Demand Planning Data subtab, set options to collect the historical demand data in the planningdata repository. The planning process uses the historical demand data for statistical forecasting.
- Collection Time Frame Options: You can specify a fixed or rolling date range for which to collectdata.
The Fixed Date Range option enables you to collect history data within a fixed date range that youspecify.
The Rolling Date Range option enables you to collect the history data for the number of days thatyou specify. For example, if you forecast weekly, specify 7 in the Number of Days to Collect fieldto collect the demand history data once per week. The data collections collect the demand historydata for the latest week.
Select Roll off time periods automatically to truncate the history data by the number of days thatyou specify in the Number of days to keep field each time you run collections for the demandhistory data. For example, if you prefer to forecast each week based on the history data of 52weeks, select the Roll off time periods automatically check box and specify Number of daysto keep as 364 days. This setting ensures that as you collect data every week, you keep the mostrecent history of 52 weeks and automatically purge history data older than 52 weeks.
- History Measures and Attributes: Select your shipments history and bookings history measures.- Collection for ETO Items: Select Collect history from associated base models to collect
bookings and shipments history for Engineer to Order (ETO) items from the associated basemodels. When you don't select this option, the history is collected from the standard ETO items.
111

Oracle SCM CloudUsing Supply Planning
Chapter 6Planning Data Collections
- History Data Options: To collect only specific order types, select from the Order Types to Includelist of values. By default, all order types are included.
Select Organization - Consumption Inventory Transactions to Include to collect consumptioninventory transactions at the organization level. You can collect only the transfer orders inventorytransactions or all consumption inventory transactions.
Select Subinventory - Consumption Inventory Transactions to Include to collect consumptioninventory transactions at the subinventory level. You can collect only the transfer orders inventorytransactions or all consumption inventory transactions for the organizations that you enabled forsubinventory planning.
Select the Collect amount data for history check box to collect amount data.- Additional Options: Select additional options for collections.
Collect Price Lists: Collect the price lists specified in the collections filter for price lists, or collect allprice lists if no filter is specified.
Collect Configure to Order Data: If you selected history measures and attributes, then select therelevant check boxes to collect shipment history options and booking history options.
Sales Organization Hierarchy: Select Enable sales organization hierarchy collection to collectone or more sales hierarchies.
◦ On the Supply Planning Data subtab:
i. Move the required supply entities to the Selected Entities area.ii. If you collect resource availability, then select a date range type: Fixed or Relative to collection
run date.
If you selected Fixed, then provide a start date and an end date for collecting resource availability.
If you selected Relative to collection run date, then enter a number of days in the CollectionWindow in Days field. The number that you enter determines a collection window in days tocollect resource availability based on a rolling time window. That rolling time window adjusts itself,based on the date that you run collections. For example, if you specify 90, then resource availabilityis collected for the next 90 days each time from the date of the collection run.
Note: You can save your date range type selection for resource availability collection as acollection template to use later.
iii. You can collect the existing data for the resource availability.iv. You can also regenerate the resource availability data and then collect the data. If you select the
Regenerate data, and then collect option, the collections process runs the Update ResourceAvailability Job scheduled process first and then collects the resource availability data.
3. (Optional) Click the Schedule tab and set collections to run as soon as possible or schedule to run at a differenttime.
4. Click Submit to start the collections process.5. Monitor the collection status using the Scheduled Processes page.6. Review the collected data in the Plan Inputs work area.
112

Oracle SCM CloudUsing Supply Planning
Chapter 6Planning Data Collections
Related Topics• Verify the Load Planning Data from Files Process
• Review Data in the Planning Data Repository
• Set Up Forecast Consumption for Transfer Orders
Collect Data Using the Net Change Collection Type You can collect data from the Oracle Fusion source system by running the net change collection or by scheduling to runthe process later.
Before running a Net Change collection, you must run a Targeted collection for the selected entities. After the firstTargeted collection, you can run Net Change collections.
Perform the following procedure to collect reference data and supply planning data using the net change collectiontype:
1. If you are in one of the Supply Chain Planning work areas, then click the Tasks panel tab. In the Tasks paneldrawer, click the Collect Planning Data task. If you are in the Setup and Maintenance work area, then use thefollowing:
◦ Offering: Supply Chain Planning
◦ Functional Area: Supply Chain Planning Configuration
◦ Task: Collect Planning Data
2. Complete the following parameters for the Collect Planning Data process:
a. Select your source system.b. Select the collection type as Net change.
Note: You cannot make any changes to the filter criteria and demand planning data in the net changecollection type.
c. In the Reference Data tab, move the required reference entities to the Selected Entities area.d. In the Supplies Planning Data tab, move the required supply entities to the Selected Entities area.
3. (Optional) Click the Schedule tab and set collections to run as soon as possible or schedule to run at a differenttime.
4. Click Submit to initiate the collections process.5. Monitor the collection status using the Scheduled Processes page.6. Review the collected data in the Plan Inputs work area.
Related Topics• Verify the Load Planning Data from Files Process
• Review Data in the Planning Data Repository
• Update Existing Setup Data
113

Oracle SCM CloudUsing Supply Planning
Chapter 6Planning Data Collections
Enable Organization Group Collection for the Net ChangeCollection Type You can use organization groups to limit the net change data collection from a source system to specific organizations.
Using organization groups for collection also eliminates the chances of data overlap when multiple instances of netchange collections are run at a time. Planners can run collections for their organizations without waiting for each other.
Let's take a simple example where your organization considers only the D1 and D2 distribution centers in your sourcesystem for shipments to your customers. In such a case, you can create an organization group, assign D1 and D2 to theorganization group, and collect net change data specifically for this group.
Note: Before you begin, ensure that you have your organization groups created. A supply planner creates andmanages organization groups using the Manage Organization Groups button on the Maintain Supply Network Modelpage.
Do these to collect net change data for an organization group.
1. Access the Collect Planning Data page or Load Planning Data from Files page from a Supply Planning workarea.
2. Select the source system. Organization groups are managed within the source systems.3. Select the Net Change collection type. You can select an organization group for data collection only when the
collection type is Net Change.4. Enable the organization group collection, and then select an organization group.5. Perform the net change data collection. Refer to the Collect Data Using Net Change Collection Type topic in this
chapter for instructions.
Note: After selecting your organization group and other data collection entities, you can also save your selections asa template. Refer to the Collection Filters and Collection Templates topic in this chapter for additional information.
Related Topics• Collect Data Using the Net Change Collection Type
• Collection Filters and Collection Templates
• How You Maintain Your Supply Network Model
Load Planning Data from Others and External SourceSystems
How You Load Planning Data from Files You upload data using CSV files for specific business objects using the targeted or net change method.
114

Oracle SCM CloudUsing Supply Planning
Chapter 6Planning Data Collections
Note: To create the CSV files, you can use a set of Microsoft Excel template files that are provided for this purpose.You can download the templates from the File-Based Data Import for SCM Cloud guide in the Oracle Help Center.
You use the targeted mode when you want to refresh data for selected entities in the planning data repository. You usethe net change mode to collect data incrementally. The net change collections mode collects only the changed or newdata. Data collection using the net change mode is fast compared to the targeted mode. The net change mode is usedto retain planning data to current with that of the executing system.
The following figure illustrates the process of collecting data from files.
To load planning data from files, you perform the following steps:
1. Create CSV files using Microsoft Excel template2. Run the process to load planning data from files3. Verify the load planning data process4. Review the loaded data
Related Topics• Create CSV Files to Load Planning Data
• Import Templates Used to Create CSV Files for Supply Chain Planning
• Run the Load Planning Data from Files Process
• Verify the Load Planning Data from Files Process
• Review Data in the Planning Data Repository
115

Oracle SCM CloudUsing Supply Planning
Chapter 6Planning Data Collections
Create CSV Files to Load Planning Data To perform the Load Planning Data from Files task in one of the Supply Chain Planning work areas or Setup andMaintenance work area, you must prepare the data you want to load.
You must create the necessary CSV files used to create files for import. This procedure explains how to create CSV filesto prepare planning data for loading.
1. Locate the applicable file import templates (XLSM files) in the following guide: File Based Data Import for OracleSupply Chain Management Cloud. Extract the templates to a local space.
For additional information about creating and importing CSV files, see the following section in the Oracle SCMCloud Implementing Common Features for Oracle SCM Cloud guide: External Integration chapter, External DataIntegration Services for Oracle Cloud section.
2. Open the template file for the entity you are preparing and complete the file import template worksheet.
You must enable the macros in the template file before generating the CSV file.
CAUTION: For the cells that contain dates, ensure that the data is set to the correct format in the data type.For example, date must be set to YYYY/MM/DD.
3. After you finish preparing the data in the worksheet, generate the CSV file. The Generate CSV File button islocated in the Instructions and CSV Generation worksheet of the workbook.
4. When you save the generated CSV file, you must use the suggested name of the entity. You can addunderscore and add additional characters to the file name. For example, you can name the CSV file asShipmentHistory_abc.csv and you can name the file as LoadingCSV.zip.
5. Compress the CSV file into a zipped file format using a compression utility. You can provide any name to thezipped file.
Note: You can include multiple CSV files in a single compressed file for a source system. The load processuploads them in a sequential order. Select the CSV files and compress them directly. Do not compress theparent folder that contains the files.
This completes the preparation of a file that you will upload to collect planning data.
Related Topics• How You Load Planning Data from Files
• Run the Load Planning Data from Files Process
Data Collection Sequence This topic explores the sequence that you should follow for data collection.
Data collection involves collecting entities in a predefined sequence. The collected entities form the basis for supplyplanning calculations. To have accurate data, you must ensure to collect the entities in a proper sequence. You cannotcollect some entities without collecting their precursor entities. The data collection sequence is very crucial when youcollect data from an external source system using CSV files.
116

Oracle SCM CloudUsing Supply Planning
Chapter 6Planning Data Collections
If you run targeted collections for all entities, you can ignore the sequence for collections because targeted collectionsautomate the collection sequence for all entities within a single collections request. If you collect many entities in asingle request, collections will process them according to the sequences shown in this topic. If you collect only a fewentities, then you must be aware of the collections sequence information. For example, you should not collect workorders before you collect items or resources.
To make the workflow simple, the collection sequence is divided into two parts - Part A and Part B. The collectionentities in Part B are dependent on the collection entities in Part A. You must collect the entities in Part A before youcollect the entities in Part B. Also, the collection entities are grouped together for easier presentation. The data groupsin Part A are:
• Collections Sequence Part A for Item Data
• Collections Sequence Part A for Region, Location, and Customer Data
• Collections Sequence Part A for Currency, Calendar, Demand Class, and UOM Data
The data groups in Part B are:
• Collections Sequence Part B for Sales Order and Assignment Sets
• Collection Sequence Part B for Work Orders, Work Definition, and Item Structure
Every collection sequence in Part A starts with defining a source system where the collected data will reside. If you arecollecting data to the same source system, you define the source system only once. Then, use the same source systemto collect all the entities.
The following figure provides an overview of the data collection sequence. The overview shows how Part A and Part Bfit together to form a complete data collection flow.
Collections Sequence Part A for Item DataThe following image shows the collections sequence to follow while collecting Item data from external source systems.This image represents only half of the entities for collecting Item data.
117

Oracle SCM CloudUsing Supply Planning
Chapter 6Planning Data Collections
Note: The Organization entity is marked with an asterisk because you can collect other entities such as Planner, ItemCost, Subinventory, Carrier, Calendar Assignment, Supplier, and Supplier Site after collecting Organization. For moreinformation on the collection sequence for these entities, see the Collections Sequence Part A for Currency, Calendar,Demand Class, and UOM Data figure. Refer to the entities that are collected after Organization. Also, ensure that youcollect Location before collecting Supplier Site.
When you collect the data described here, continue to the collection sequence Part B described in the followingsubsections.
• Collection Sequence Part B for Sales and Order and Assignment Sets
• Collection Sequence Part B for Work Orders, Work Definition, and Item Structure
118

Oracle SCM CloudUsing Supply Planning
Chapter 6Planning Data Collections
Collections Sequence Part A for Region, Location, and Customer DataThe following image shows the collections sequence to follow while collecting Regions and Customers data fromexternal source systems. This image represents only half of the entities for Item data.
When you collect the data described here, continue to the collection sequence Part B described in the followingsubsections.
• Collection Sequence Part B for Sales and Order and Assignment Sets
• Collection Sequence Part B for Work Orders, Work Definition, and Item Structure
Collections Sequence Part A for Currency, Calendar, Demand Class, and UOM DataThe following image shows the collections sequence to follow while collecting Currency, Calendar, Demand Class, andUOM data from external source systems. Also, ensure that you collect Location before collecting Supplier Site.
119
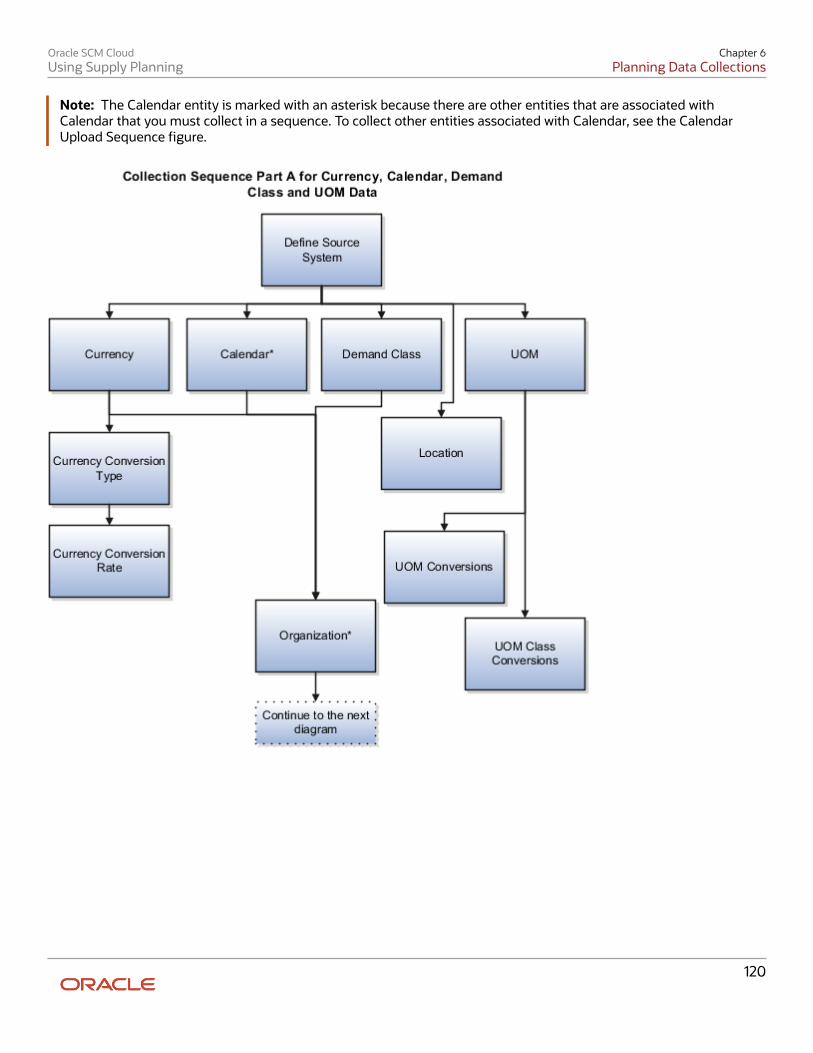
Oracle SCM CloudUsing Supply Planning
Chapter 6Planning Data Collections
Note: The Calendar entity is marked with an asterisk because there are other entities that are associated withCalendar that you must collect in a sequence. To collect other entities associated with Calendar, see the CalendarUpload Sequence figure.
120

Oracle SCM CloudUsing Supply Planning
Chapter 6Planning Data Collections
When you collect the data described here, continue to the collection sequence Part B described in the followingsubsections.
• Collection Sequence Part B for Sales and Order and Assignment Sets
• Collection Sequence Part B for Work Orders, Work Definition, and Item Structure
Collection Sequence for Calendar DataThe following image shows the collections sequence to follow for collecting the Calendar data. Calendar data is a partof the data collection in Part A. You collect the Calendar data in the following subsection: Collection Sequence Part A forCurrency, Calendar, Demand Class, and UOM Data.
121

Oracle SCM CloudUsing Supply Planning
Chapter 6Planning Data Collections
Collections Sequence Part B for Sales Order and Assignment SetsThe following image shows the collections sequence to follow while collecting Sales Order and Assignment Sets datafrom external source systems. The data entities in Part B are dependent on Part A. So, you must collect entities listed inPart A before you collect the entities in Part B.
122

Oracle SCM CloudUsing Supply Planning
Chapter 6Planning Data Collections
Collection Sequence Part B for Work Orders, Work Definition, and Item StructuresThe following image shows the collections sequence to follow while collecting Work Orders, Work Definition, and ItemStructure data from external source systems. The data entities in Part B are dependent on Part A. So, you must collectentities listed in Part A before you collect the entities in Part B.
123

Oracle SCM CloudUsing Supply Planning
Chapter 6Planning Data Collections
Import Templates Used to Create CSV Files for Supply ChainPlanning You can use the Microsoft Excel templates (XLSM files) to prepare the data for the supported collection entities.
The templates are listed in the following guide: File-Based Data Import for Oracle Supply Chain Management Cloud.Extract the templates to a local drive, enter appropriate data as described in the template, and generate CSV files.Compress the CSV files to a zipped file format and upload the .zip file to the Universal Content Manager using the FileImport and Export utility. The data is then loaded from the Universal Content Manager to the planning data repository.
Collect Data from the Oracle Fusion Source
The following table lists the collections entities that can be loaded into the planning data repository for the OracleFusion source. The Collection Entity column provides the name of the entities for which you can collect the data.
124

Oracle SCM CloudUsing Supply Planning
Chapter 6Planning Data Collections
The XLSM File Name column provides the template name that you will download for the respective collection entity.Download the XLSM template from the File-Based Data Import for Oracle Supply Chain Management Cloud guide (FBDIguide). The Link in Data Import Guide column provides the name of the topic in the FBDI guide from where you willdownload the template. For example, to collect data for the Item Costs collection entity, refer to the Item Cost Importtopic in the FBDI guide.
Collections Entity Link in Data Import Guide XLSM File Name
Item Costs
Supply Chain Planning Item Cost
ScpItemCostImportTemplate.xlsm
Customer Specific Item Relationships
Supply Chain Planning Item Substitute
ScpItemSubstituteImportTemplate.xlsm
Planners
Supply Chain Planning Planners
ScpPlannersImportTemplate.xlsm
Item Suppliers
Supply Chain Planning Approved Supplier List
ScpApprovedSupplierListImportTemplate.xlsm
Demand Classes
Supply Chain Planning Demand Classes
ScpDemandClassImportTemplate.xlsm
Allocation Assignments and Allocation Rules
Supply Chain Planning Planning AllocationRules
ScpPlanningAllocationRulesImportTemplate.xlsm
ATP Assignments and ATP Rules
Supply Chain Planning Available-to-PromiseRules
ScpATPRulesImportTemplate.xlsm
Supply Update Rules
Supply Chain Planning Real Time SupplyUpdates
ScpRealTimeSupplyUpdatesImportTemplate.xlsm
Measures
Supply Chain Planning Measures
ScpMeasuresImportTemplate.xlsm
Note:You must use separate CSV files to collectmeasure data for measures with differentdimensional granularity.
Booking History
Supply Chain Planning Bookings History
ScpBookingHistoryImportTemplate.xlsm
Option Booking History
Supply Chain Planning Option Bookings History
ScpOptionBookingHistoryImportTemplate.xlsm
Shipment History
Supply Chain Planning Shipments History
ScpShipmentHistoryImportTemplate.xlsm
Option Shipment History
Supply Chain Planning Option ShipmentsHistory
ScpOptionShipmentHistoryImportTemplate.xlsm
Price Lists
Supply Chain Planning Price List
ScpPriceListImportTemplate.xlsm
Causal Factors Supply Chain Planning Causal Factors ScpCausalFactorsImportTemplate.xlsm
125

Oracle SCM CloudUsing Supply Planning
Chapter 6Planning Data Collections
Collections Entity Link in Data Import Guide XLSM File Name
Forecast Measures
Supply Chain Planning Forecast Measures
ScpForecastMeasureImportTemplate.xlsm
Note:This template has been supersededby the generic templateScpMeasuresImportTemplate.xlsm, butwill continue to be supported. Futureenhancements will be made only to thegeneric measures template.
Fiscal Calendars
Supply Chain Planning Fiscal Calendars
ScpFiscalCalendarImportTemplate.xlsm
Forecasts
Supply Chain Planning External Forecasts
ScpExternalForecastImportTemplate.xlsm
Safety Stock Levels
Supply Chain Planning Safety Stock Levels
ScpSafetyStockLevelImportTemplate.xlsm
Supplier Capacity
Supply Chain Planning Approved SupplierCapacity
ScpApprovedSupplierCapacityImportTemplate.xlsm
Planned Order Supplies
Supply Chain Planning Planned Order Supply
ScpPlannedOrderSupplyImportTemplate.xlsm
Note:This template is only used to load plannedorder supply to Global Order Promising.
Sourcing Rule and Assignments
Supply Chain Planning Sourcing Rules
ScpSourcingImportTemplate.xlsm
Cross-Reference Mapping Information
Supply Chain Planning Cross-Reference Data
ScpCrossReferenceDataImportTemplate.xlsm
Collect Data from External Source - Version Others
The following table lists the collections entities that can be loaded into the planning data repository from an externalsource, where the version is Others. The Collection Entity column provides the name of the entities for which you cancollect the data. The XLSM File Name column provides the template name that you will download for the respectivecollection entity. Download the XLSM template from the File-Based Data Import for Oracle Supply Chain ManagementCloud guide (FBDI guide). The Link in Data Import Guide column provides the name of the topic in the FBDI guide fromwhere you will download the template. For example, to collect data for the Items and Item Costs collection entities, referto the Item Cost Import topic in the FBDI guide.
Collections Entity Link in Data Import Guide XLSM File Name
Item Costs
Supply Chain Planning Item Cost
ScpItemCostImportTemplate.xlsm
126
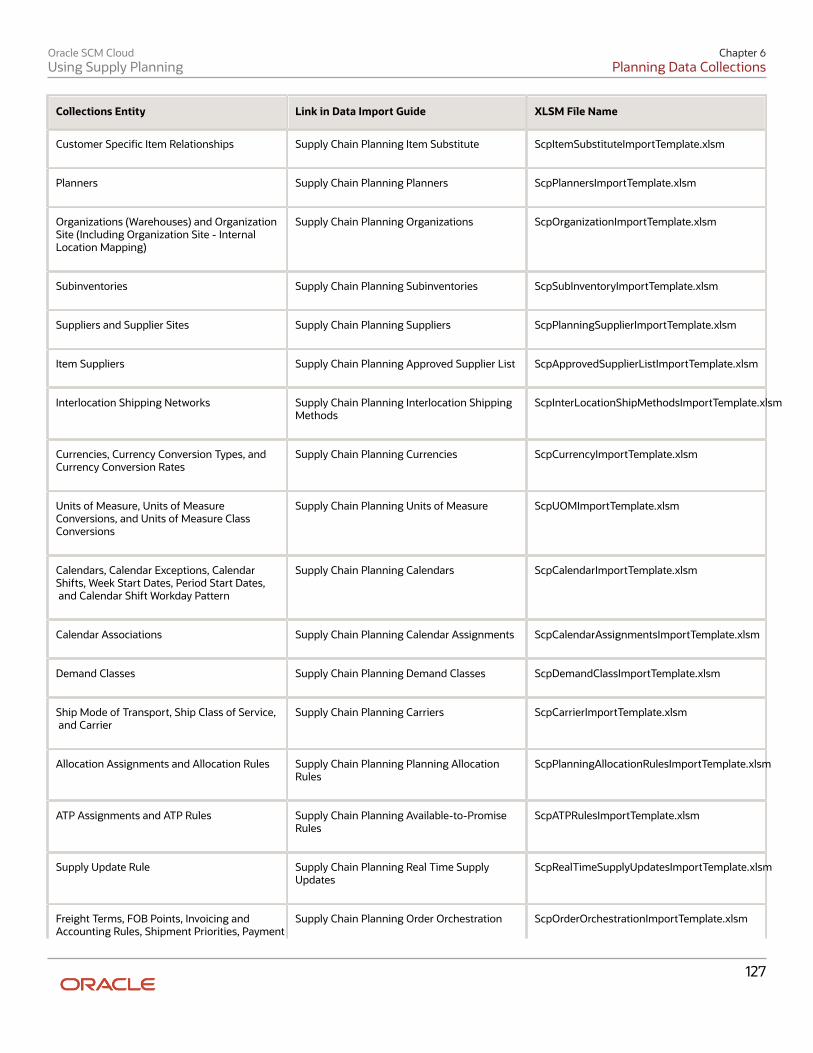
Oracle SCM CloudUsing Supply Planning
Chapter 6Planning Data Collections
Collections Entity Link in Data Import Guide XLSM File Name
Customer Specific Item Relationships
Supply Chain Planning Item Substitute
ScpItemSubstituteImportTemplate.xlsm
Planners
Supply Chain Planning Planners
ScpPlannersImportTemplate.xlsm
Organizations (Warehouses) and OrganizationSite (Including Organization Site - InternalLocation Mapping)
Supply Chain Planning Organizations
ScpOrganizationImportTemplate.xlsm
Subinventories
Supply Chain Planning Subinventories
ScpSubInventoryImportTemplate.xlsm
Suppliers and Supplier Sites
Supply Chain Planning Suppliers
ScpPlanningSupplierImportTemplate.xlsm
Item Suppliers
Supply Chain Planning Approved Supplier List
ScpApprovedSupplierListImportTemplate.xlsm
Interlocation Shipping Networks
Supply Chain Planning Interlocation ShippingMethods
ScpInterLocationShipMethodsImportTemplate.xlsm
Currencies, Currency Conversion Types, andCurrency Conversion Rates
Supply Chain Planning Currencies
ScpCurrencyImportTemplate.xlsm
Units of Measure, Units of MeasureConversions, and Units of Measure ClassConversions
Supply Chain Planning Units of Measure
ScpUOMImportTemplate.xlsm
Calendars, Calendar Exceptions, CalendarShifts, Week Start Dates, Period Start Dates, and Calendar Shift Workday Pattern
Supply Chain Planning Calendars
ScpCalendarImportTemplate.xlsm
Calendar Associations
Supply Chain Planning Calendar Assignments
ScpCalendarAssignmentsImportTemplate.xlsm
Demand Classes
Supply Chain Planning Demand Classes
ScpDemandClassImportTemplate.xlsm
Ship Mode of Transport, Ship Class of Service, and Carrier
Supply Chain Planning Carriers
ScpCarrierImportTemplate.xlsm
Allocation Assignments and Allocation Rules
Supply Chain Planning Planning AllocationRules
ScpPlanningAllocationRulesImportTemplate.xlsm
ATP Assignments and ATP Rules
Supply Chain Planning Available-to-PromiseRules
ScpATPRulesImportTemplate.xlsm
Supply Update Rule
Supply Chain Planning Real Time SupplyUpdates
ScpRealTimeSupplyUpdatesImportTemplate.xlsm
Freight Terms, FOB Points, Invoicing andAccounting Rules, Shipment Priorities, Payment
Supply Chain Planning Order Orchestration
ScpOrderOrchestrationImportTemplate.xlsm
127

Oracle SCM CloudUsing Supply Planning
Chapter 6Planning Data Collections
Collections Entity Link in Data Import Guide XLSM File Name
Terms, Return Reason, Tax Classification Code, Tax Exemption Reason, Sales Credit Type, Activity Type, Document Categories, PaymentMethods, and Receipt Methods
Measures
Supply Chain Planning Measures
ScpMeasuresImportTemplate.xlsm
Note:You must use separate CSV files to collectmeasure data for measures with differentdimensional granularity.
Booking History
Supply Chain Planning Bookings History
ScpBookingHistoryImportTemplate.xlsm
Option Booking History
Supply Chain Planning Option Bookings History
ScpOptionBookingHistoryImportTemplate.xlsm
Shipment History
Supply Chain Planning Shipments History
ScpShipmentHistoryImportTemplate.xlsm
Option Shipment History
Supply Chain Planning Option ShipmentsHistory
ScpOptionShipmentHistoryImportTemplate.xlsm
Price Lists
Supply Chain Planning Price Lists
ScpPriceListImportTemplate.xlsm
Causal Factors
Supply Chain Planning Causal Factors
ScpCausalFactorsImportTemplate.xlsm
Forecasts Measures
Supply Chain Planning Forecast Measures
ScpForecastMeasureImportTemplate.xlsm
Note:This template has been supersededby the generic templateScpMeasuresImportTemplate.xlsm, butwill continue to be supported. Futureenhancements will be made only to thegeneric measures template.
Fiscal Calendars
Supply Chain Planning Fiscal Calendars
ScpFiscalCalendarImportTemplate.xlsm
Forecasts
Supply Chain Planning External Forecast
ScpExternalForecastImportTemplate.xlsm
User-Defined Hierarchies
Supply Chain Planning User-DefinedHierarchies
ScpUser-DefinedHierarchyImportTemplate.xlsm
Safety Stock Levels
Supply Chain Planning Safety Stock Levels
ScpSafetyStockLevelImportTemplate.xlsm
Supply Reservations to Sales Orders Supply Chain Planning Reservations ScpReservationImportTemplate.xlsm
128

Oracle SCM CloudUsing Supply Planning
Chapter 6Planning Data Collections
Collections Entity Link in Data Import Guide XLSM File Name
On Hand
Supply Chain Planning Supply On Hand
ScpOnhandImportTemplate.xlsm
Purchase Orders, Purchase Requisitions, PO inReceiving, and In Transits
Supply Chain Planning Purchase OrderRequisitions
ScpPurchaseOrderRequisitionImportTemplate.xlsm
Transfer Orders
Supply Chain Planning Transfer Orders
ScpTransferOrderImportTemplate.xlsm
Supplier Capacity
Supply Chain Planning Approved SupplierCapacity
ScpApprovedSupplierCapacityImportTemplate.xlsm
Resources and Resource Shifts
Supply Chain Planning Resources
ScpResourcesImportTemplate.xlsm
Resource Availability
Supply Chain Planning Resource Availability
ScpResourceAvailabilityImportTemplate.xlsm
Work Definition (Including mapping betweenItem Structures and Work Definitions), WorkDefinition Operations, and Work DefinitionOperation Resources
Supply Chain Planning Routings
ScpRoutingsImportTemplate.xlsm
Work Order Supply
Supply Chain Planning Work Order Supplies
ScpWorkOrderSuppliesImportTemplate.xlsm
Work Order Material Requirements
Supply Chain Planning Work Order ComponentDemands
ScpWIPComponentDemandsImportTemplate.xlsm
Work Order Resource Requirements
Supply Chain Planning Work Order OperationResources
ScpWIPOperationResourceImportTemplate.xlsm
Planned Order Supplies
Supply Chain Planning Planned Order Supply
ScpPlannedOrderSupplyImportTemplate.xlsm
Note:This template is only used to load plannedorder supply to Global Order Promising.
Sourcing Rule and Assignments
Supply Chain Planning Sourcing Rules
ScpSourcingImportTemplate.xlsm
Cross Reference Mapping Information
Supply Chain Planning Cross-Reference Data
ScpCrossReferenceDataImportTemplate.xlsm
Key Customer Options
Supply Chain Planning Key Customer Options
ScpKeyCustomerOptionsImportTemplate.xlsm
Collect Data from External Source - Version External
The following table lists the collections entities that can be loaded into the planning data repository from an externalsource, where the version is External. The Collection Entity column provides the name of the entities for which you can
129

Oracle SCM CloudUsing Supply Planning
Chapter 6Planning Data Collections
collect the data. The XLSM File Name column provides the template name that you will download for the respectivecollection entity. Download the XLSM template from the File-Based Data Import for Oracle Supply Chain ManagementCloud guide. The Link in Data Import Guide column provides the name of the topic in the File-Based Data Import forOracle Supply Chain Management Cloud guide (FBDI guide) from where you will download the template. For example,to collect data for the Items and Item Costs collection entities, refer to the Item Cost Import topic in the File-BasedData Import for Oracle Supply Chain Management Cloud guide. All the planning-related entity names are prefixed withSupply Chain Planning in the FBDI guide.
Collection Entities Link in FBDI Guide XLSM File Name
Items
Supply Chain Planning Items
ScpItemImportTemplate.xlsm
Item Costs
Supply Chain Planning Item Cost
ScpItemCostImportTemplate.xlsm
Item Relationships
Supply Chain Planning Item Substitute
ScpItemSubstituteImportTemplate.xlsm
Catalogs, Categories, and Item Categories
Supply Chain Planning Catalogs
ScpCatalogImportTemplate.xlsm.xlsm
Item Structures
Supply Chain Planning Item Structures
ScpBillofMaterialImportTemplate.xlsm
Bill of Resources
Supply Chain Planning Bill of Resources
ScpBillOfResourcesImportTemplate.xlsm
Planners
Supply Chain Planning Planners
ScpPlannersImportTemplate.xlsm
Customers and Customer Sites
Supply Chain Planning Customers
ScpCustomerImportTemplate.xlsm
Regions
Supply Chain Planning Regions
ScpRegionsImportTemplate.xlsm
Zones
Supply Chain Planning Zones
ScpZonesImportTemplate.xlsm
Region-Zone Mapping
Supply Chain Planning Region Zone Mappings
ScpRegionZoneMappingImportTemplate.xlsm
Locations and Region-Location Mapping
Supply Chain Planning Locations
ScpLocationsImportTemplate.xlsm
Organizations and Organization Sites
Supply Chain Planning Organizations
ScpOrganizationImportTemplate.xlsm
Subinventories
Supply Chain Planning Subinventories
ScpSubInventoryImportTemplate.xlsm
Suppliers and Supplier Sites
Supply Chain Planning Suppliers
ScpSupplierImportTemplate.xlsm
Item Suppliers (Approved Supplier List)
Supply Chain Planning Approved Supplier List
ScpApprovedSupplierListImportTemplate.xlsm
Interlocation Shipping Networks and TransitTimes
Supply Chain Planning Interlocation ShippingMethods
ScpInterLocationShipMethodsImportTemplate.xlsm
130

Oracle SCM CloudUsing Supply Planning
Chapter 6Planning Data Collections
Collection Entities Link in FBDI Guide XLSM File Name
Currencies and Currency Conversions
Supply Chain Planning Currencies
ScpCurrencyImportTemplate.xlsm
Units of Measure, Units of MeasureConversions, and Units of Measure ClassConversions
Supply Chain Planning Units of Measure
ScpUOMImportTemplate.xlsm
Calendars, Calendar Exceptions, Shifts, ShiftWorkday Pattern, Week Start Dates, and PeriodStart Dates
Supply Chain Planning Calendars
ScpCalendarImportTemplate.xlsm
Calendar Associations
Supply Chain Planning Calendar Assignments
ScpCalendarAssignmentsImportTemplate.xlsm
Demand Classes
Supply Chain Planning Demand Classes
ScpDemandClassImportTemplate.xlsm
Carrier, Ship Mode of Transport, and Ship Classof Service
Supply Chain Planning Carriers
ScpCarrierImportTemplate.xlsm
GOP Allocation Rules and Rule Assignments
Supply Chain Planning Planning AllocationRules
ScpPlanningAllocationRulesImportTemplate.xlsm
GOP ATP Rules and Rule Assignments
Supply Chain Planning Available-to-PromiseRules
ScpATPRulesImportTemplate.xlsm
GOP Supply Update Rules
Supply Chain Planning Real Time SupplyUpdates
ScpRealTimeSupplyUpdatesImportTemplate.xlsm
Order Orchestration Reference Objects: FreightTerms, FOB Points, Invoicing and AccountingRules, Shipment Priorities, Payment Terms, Return Reason, Tax Classification Code, TaxExemption Reason, Sales Credit Type, ActivityType, Document Categories, Payment Methods, and Receipt Methods
Supply Chain Planning Order Orchestration
ScpOrderOrchestrationImportTemplate.xlsm
Cross Reference Mapping Information
Supply Chain Planning Cross-Reference Data
ScpCrossReferenceDataImportTemplate.xlsm
Measures
Supply Chain Planning Measures
ScpMeasuresImportTemplate.xlsm
Note:You must use separate CSV files to collectmeasure data for measures with differentdimensional granularity.
Booking History
Supply Chain Planning Bookings History
ScpBookingHistoryImportTemplate.xlsm
Option Booking History
Supply Chain Planning Option Bookings History
ScpOptionBookingHistoryImportTemplate.xlsm
131

Oracle SCM CloudUsing Supply Planning
Chapter 6Planning Data Collections
Collection Entities Link in FBDI Guide XLSM File Name
Shipment History
Supply Chain Planning Shipments History
ScpShipmentHistoryImportTemplate.xlsm
Option Shipment History
Supply Chain Planning Option ShipmentsHistory
ScpOptionShipmentHistoryImportTemplate.xlsm
Price Lists
Supply Chain Planning Price Lists
ScpPriceListImportTemplate.xlsm
Causal Factors
Supply Chain Planning Causal Factors
ScpCausalFactorsImportTemplate.xlsm
Forecast Measures
Supply Chain Planning Forecast Measures
ScpForecastMeasureImportTemplate.xlsm
Note:This template has been supersededby the generic templateScpMeasuresImportTemplate.xlsm, butwill continue to be supported. Futureenhancements will be made only to thegeneric measures template.
Fiscal Calendars
Supply Chain Planning Fiscal Calendars
ScpFiscalCalendarImportTemplate.xlsm
Measures, Sales and Operations PlanningBacklog, Inventory, and Production History
Supply Chain Planning Measures
ScpMeasuresImportTemplate.xlsm
Note:You must use separate CSV files to collectmeasure data for measures with differentdimensional granularity.
User-Defined Hierarchies
Supply Chain Planning User-DefinedHierarchies
ScpUser-DefinedHierarchyImportTemplate.xlsm
Forecasts
Supply Chain Planning External Forecasts
ScpExternalForecastImportTemplate.xlsm
Sales Orders
Supply Chain Planning Sales Orders
ScpSalesOrderImportTemplate.xlsm
Safety Stock Levels
Supply Chain Planning Safety Stock Levels
ScpSafetyStockLevelImportTemplate.xlsm
Supply Reservations to Sales Orders
Supply Chain Planning Reservations
ScpReservationImportTemplate.xlsm
On Hand
Supply Chain Planning Supply On Hand
ScpOnhandImportTemplate.xlsm
Purchase Orders, Purchase Requisitions, PO inReceiving, In Transits
Supply Chain Planning Purchase OrderRequisitions
ScpPurchaseOrderRequisitionImportTemplate.xlsm
132
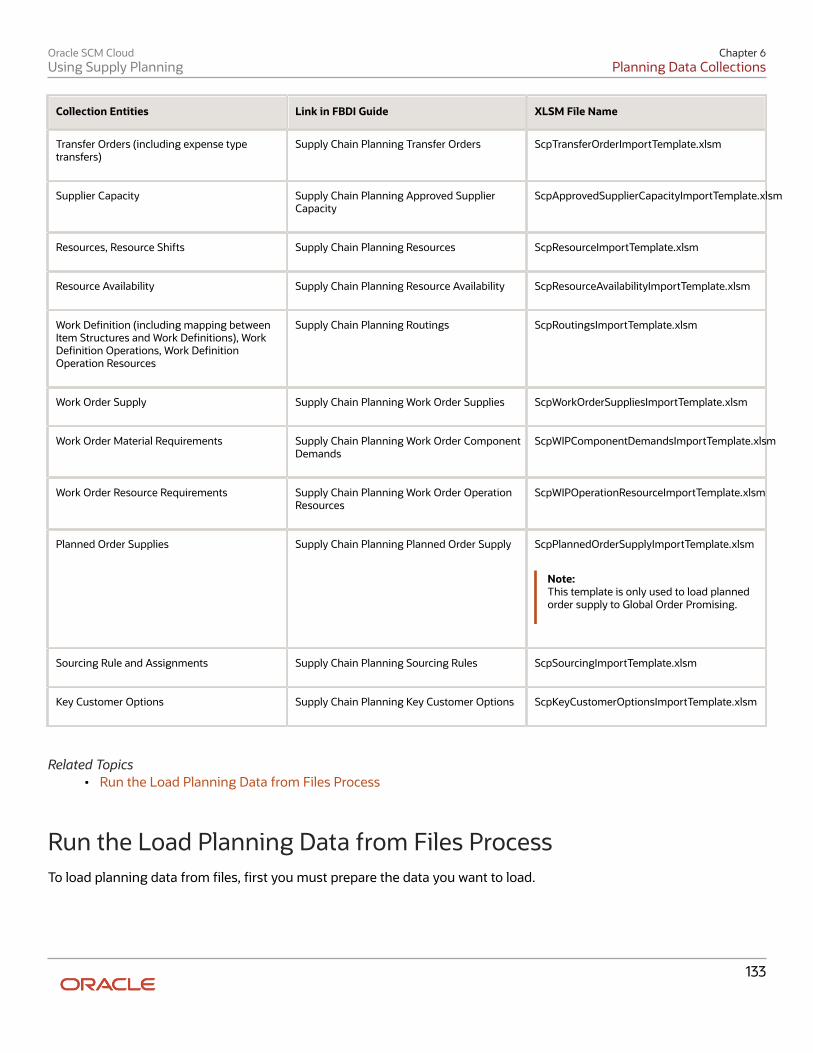
Oracle SCM CloudUsing Supply Planning
Chapter 6Planning Data Collections
Collection Entities Link in FBDI Guide XLSM File Name
Transfer Orders (including expense typetransfers)
Supply Chain Planning Transfer Orders
ScpTransferOrderImportTemplate.xlsm
Supplier Capacity
Supply Chain Planning Approved SupplierCapacity
ScpApprovedSupplierCapacityImportTemplate.xlsm
Resources, Resource Shifts
Supply Chain Planning Resources
ScpResourceImportTemplate.xlsm
Resource Availability
Supply Chain Planning Resource Availability
ScpResourceAvailabilityImportTemplate.xlsm
Work Definition (including mapping betweenItem Structures and Work Definitions), WorkDefinition Operations, Work DefinitionOperation Resources
Supply Chain Planning Routings
ScpRoutingsImportTemplate.xlsm
Work Order Supply
Supply Chain Planning Work Order Supplies
ScpWorkOrderSuppliesImportTemplate.xlsm
Work Order Material Requirements
Supply Chain Planning Work Order ComponentDemands
ScpWIPComponentDemandsImportTemplate.xlsm
Work Order Resource Requirements
Supply Chain Planning Work Order OperationResources
ScpWIPOperationResourceImportTemplate.xlsm
Planned Order Supplies
Supply Chain Planning Planned Order Supply
ScpPlannedOrderSupplyImportTemplate.xlsm
Note:This template is only used to load plannedorder supply to Global Order Promising.
Sourcing Rule and Assignments
Supply Chain Planning Sourcing Rules
ScpSourcingImportTemplate.xlsm
Key Customer Options
Supply Chain Planning Key Customer Options
ScpKeyCustomerOptionsImportTemplate.xlsm
Related Topics• Run the Load Planning Data from Files Process
Run the Load Planning Data from Files Process To load planning data from files, first you must prepare the data you want to load.
133

Oracle SCM CloudUsing Supply Planning
Chapter 6Planning Data Collections
To prepare the data, download the relevant XLSM template, update the XLSM template with required data, and createthe necessary CSV files for upload. This procedure explains how to load planning data from files after you haveprepared the data and created CSV files.
1. From the Navigator, use the File Import and Export page to upload the previously prepared and zipped CSVfiles to the Universal Content Manager. Use the account scm/planningDataLoader/Import to upload the zippedfile.
Note: For more information about uploading files to the Universal Content Manager server, see the followingsection in the Oracle SCM Cloud Implementing Common Features for Oracle SCM Cloud guide: ExternalIntegration chapter, External Data Integration Services for Oracle Cloud section.
2. From one of the Supply Chain Planning work areas or Setup and Maintenance work area, Supply ChainPlanning offering, select the Load Planning Data from Files task.
3. Complete the following parameters on the Load Planning Data from Files page:
a. Select the source system.b. Select Collection Type: Net change or Target.c. Select the .zip file you previously imported into the Universal Content Manager.
4. Click Submit. Make a note of the process ID. You will need this process ID to review the status of the process.
Related Topics• Create CSV Files to Load Planning Data
Load Planning Data from Files for a Selected Group ofOrganizations When you load planning data from files with the collection type set to Targeted, you can enable organization groupcollection and then select an organization group.
Data is collected for only the organizations in the organization group, and the purge of data prior to the load of thenew data is also done for only the organizations in the organization group. In other words, previously collected datafor organizations that aren't included in the organization group will be retained when you're doing targeted collectionsusing the file-based data import (FBDI) process.
Note: Enabling organization group collection isn't applicable to entities for demand management, such as history,measure, and price list.
Parameters for Load Planning Data from FilesThe parameters for the Load Planning Data from Files task:
• Source System: The source system for the data determines which organization groups are applicable.
• Collection Type: You must select the Targeted collection type to enable organization group collection.
• Data File: The file previously uploaded to the universal content manager.
• Enable Organization Group Collection: You must have selected Targeted for the collection type to select Yes forthis parameter.
134

Oracle SCM CloudUsing Supply Planning
Chapter 6Planning Data Collections
• Organization Group: You must have selected Yes for the Enable Organization Group Collection parameter toselect an organization group.
Organization GroupsThe list of organization groups you can select from for the Organization Group parameter is determined by:
• Which source system you select for the Source System parameter
• What organization groups are set up for that source system
Organization groups are set up using the Maintain Supply Network Model task, Manage Organization Groups dialog.On the Maintain Supply Network Model page, Organizations tab, you click the Manage Organization Groups button tocreate or manage organization groups.
ExampleHere's an example that shows how data is retained for organizations in other organization groups when you loadplanning data for a selected organization group.
For this example, let's say you have 3 organizations and 2 organization groups, and the source for your data is the EX1source system.
• Organization group OG1 includes organization M1
• Organization group OG2 includes organizations B1 and B2
First you load planning data for the OG1 organization group for the Work Order Supplies entity. 2 rows of data arecollected for the OG1 organization group.
Item Organization Order Type Order Quantity Suggested Due Date
Item 1
EX1:M1
Work order
10
2/14/22
Item 2
EX1:M1
Work order
15
2/11/22
Then you load planning data for the OG2 organization group for the Work Order Supplies entity.
• 3 rows of data are collected for the OG2 organization group
• The 2 rows that were previously collected for the OG1 collection group are retained
Item Organization Order Type Order Quantity Suggested Due Date
Item 1
EX1:M1
Work order
10
2/14/22
Item 2
EX1:M1
Work order
15
2/11/22
Item 1
EX1:B1
Work order
11
2/09/22
Item 1 EX1:B2 Work order 16 1/31/22
135

Oracle SCM CloudUsing Supply Planning
Chapter 6Planning Data Collections
Item Organization Order Type Order Quantity Suggested Due Date
Item 2
EX1:B2
Work order
10
2/09/22
Applicable EntitiesYou can use file-based data import (FBDI) to load data for a selected group of organizations using the Targetedcollection type for these entities:
Source Entities
From an SCM Cloud source
• External Forecasts
• Planned Order Supply
• Safety Stock Levels
From an SCM Cloud source only whenthe Enable External Data option has beenenabled for the entities in the ManagePlanning Source System task
• On Hand
• Transfer Orders
• Purchase Orders and Purchase Requisitions
• Sales Order and Associated Reservations
• Work Order Component Demands
• Work Order Supplies, Work Order By-Product and Co-Product Supplies, Work Order OperationResources
• Resource Availability
From an external source
• External Forecasts
• Movement Requests
• Planned Order Supply
• Purchase Orders and Purchase Requisitions
• Reservations
• Safety Stock Levels
• Sales Orders
• Transfer Orders
• On Hand
• Work Order Component Demands
• Work Order Supplies, Work Order By-Product and Co-Product Supplies, Work Order OperationResources
• Resource Availability
Loading data for a selected group of organization isn't applicable to:
• Entities for demand management, such as History, Measures, Price Lists
• Entities categorized as reference entities
136

Oracle SCM CloudUsing Supply Planning
Chapter 6Planning Data Collections
Additional DetailsHere are a few more details to know about loading planning data from files for a selected group of organizations:
• If you have included the History, Measure, or Price List entities in a data file used during a targeted collectionwith organization group collection enabled, targeted collections will be done for these entities, but will be donefor all organizations, not for only the organizations in the group.
• If you have included reference data entities in a data file used during a targeted collection with organizationgroup collection enabled, these entities will be ignored during collections.
• Data security created and enabled at organization level for any role isn't applied to the Manage OrganizationGroups task.
• If you also use the Collect Planning Data task to collect some of your data, note that you can use organizationgroups for the Net Change collection type, but not for the Targeted collection type. For the Targeted collectiontype for the Collect Planning Data task, you use the Organizations Filter for Transaction Data filter instead.
• You can submit the Load Planning Data from Flat Files process multiple times to specify a different organizationgroup for each submission. The submissions are processed serially in the order of submission.
• You can specify an organization group when you submit the Load Planning Data from Flat Files process for theTargeted collection type from the Scheduled Processes work area or when using a scheduled process job set.
• You can specify an organization group when you submit the Load Planning Data from Flat Files process for theTargeted collection type from the Enterprise Resource Planning integration service.
Verify Collection Processes
Verify the Load Planning Data from Files Process Perform the following steps to verify the process status of the uploaded file and review log file for any errors orwarnings.
1. In the Navigator, click Scheduled Processes.2. In the search area, enter the process ID you noted when you submitted during the Load Planning Data from
Files process. Click Search.3. Monitor the process to verify completion.
If the process completes with warnings, select the request that shows the warning status and click the ViewLog button to review the details.
4. For the rows with errors, resolve the issues found in the log file, and then upload the CSV file again. To load onlythe revised rows, use the Net Change option.
Review Data in the Planning Data Repository You can review the data collected or loaded into the planning data repository using two different options. The optionyou use depends on which data collection entities you want to review.
137

Oracle SCM CloudUsing Supply Planning
Chapter 6Planning Data Collections
To review the data collected or loaded into the planning data repository, use one of the following options:
• Review data using the Plan Inputs page layout
• Review data using the Maintain Supply Network Model page
To review the following entities, use the Maintain Supply Network Model page:
• Organizations
• Customers
• Suppliers
• Carriers
• Interlocation Shipping Networks
To review data that's not part of the supply network model, use the Plan Inputs page layout. You can view the followingdata in the Plan Inputs page layout
• Supply data
• Demand data
You can view Carriers and Suppliers using either option.
Review Data Using the Plan Inputs Page LayoutPerform the following steps to review the planning data that you loaded.
1. In the Navigator, click Plan Inputs.2. From the Plans menu, right-click Plan Inputs, and click Open.
Tip: You can set the preview pane to Full Pane for viewing your data in full pane. Click Change and selectFull Pane.
3. On the Plan Inputs page, click Open, and click Full Pane.4. On the Open Table, Graph, or Tile Set page, search for the table name.5. Enter the criteria for the data you want to verify and click Search.6. Review the data in the Search Results table.
Review Data Using the Maintain Supply Network Model PagePerform the following steps to review the planning data using the Maintain Supply Network Model page.
1. In the Navigator, click Plan Inputs.2. From the Tasks menu, click Maintain Supply Network Model.3. Enter the criteria for the data you want to verify and click Search.
138

Oracle SCM CloudUsing Supply Planning
Chapter 6Planning Data Collections
4. Review the data in the Search Results table.
Purge Data
How You Purge Collected Data from the Data Repository forSupply Chain Planning Use the Purge Data Repository scheduled process to purge data collected by supply chain planning collectionsprocesses into the database tables that comprise the planning data repository.
Delete data from these tables to free up space and improve performance. Use the Scheduled Processes work areato run the scheduled process. This topic explains the parameters of the Purge Data Repository scheduled process.For information on how to run scheduled processes, refer to the Scheduled Processes chapter in the ImplementingCommon Features for SCM guide.
The parameters for the Purge Data Repository scheduled process are in one of these categories:
• The Source System and Purge Global Entities parameters
• Parameters on the Reference Data tab
• Parameters on the Demand Planning Data tab
• Parameters on the Supply Planning Data tab
The Source System and Purge Global Entities ParametersProvide values for these parameters to determine which data records for reference data will be purged from the stagingtables when you run the Purge Data Repository scheduled process.
Parameter Notes
Source System
You must select a source system.
• For data collected from the Oracle Fusion source system, select OPS.
• For data collected from an external system, select the applicable source system code.
Purge Global Entities
You can select Yes if you want to delete data for the entities for which the planning data repositorystores only one record for each instance of the global entity so there's no reference to a source system.The default is No.
Parameters on the Reference Data TabProvide values for these parameters on the Reference Data tab to determine which data records for reference data willbe purged from the staging tables when you run the Purge Data Repository scheduled process.
139

Oracle SCM CloudUsing Supply Planning
Chapter 6Planning Data Collections
Parameter Notes
The set of entities categorized as referenceentities. The entities you haven't selectedyet are included in the Reference Entitieslist on the Reference Data tab.
You select which reference entities you want data deleted for. The entities you select are included inthe Selected Entities list on the Reference Data tab.
Parameters on the Demand Planning Data TabProvide values for these parameters on the Demand Planning Data tab to determine which data records for demandplanning data will be purged from the staging tables when you run the Purge Data Repository scheduled process.
Parameter Notes
The set of entities categorized as referenceentities. The entries you haven't selectedyet are included in the Demand Entities liston the Demand Planning Data tab.
You select which demand entities you want data deleted for. The entities you select are included in theSelected Entities list on the Demand Planning Data tab.
Limit the Days to Purge
You can choose to limit the number of days to purge by selecting one of three choices. For each choiceyou must also specify the additional details needed for that choice:
• By date range, followed by a from date and a to date
• By number of days in the future, followed by a number of most recent days to keep
• By number of days in the past, followed by either a number of most recent days to keep or anumber of oldest days to purge
Parameters on the Supply Planning Data TabProvide values for these parameters on the Supply Planning Data tab to determine which data records for supply datawill be purged from the staging tables when you run the Purge Data Repository scheduled process.
Parameter Notes
The set of entities categorized as supplyentities. The entities you haven't selectedyet are included in the Supply Entities liston the Supply Planning Data tab.
You select which supply entities you want data deleted for. The entities you select are included in theSelected Entities list on the Supply Planning Data tab.
How You Purge Staging Tables for Supply Chain Planning Use the Purge Staging Tables scheduled process to delete data from the staging tables used during collectionsprocesses for supply chain planning.
Delete data from the staging tables to free up space and improve performance. Use the Scheduled Processes workarea to run the scheduled process. This topic explains the parameters of the Purge Staging Tables scheduled process.
140

Oracle SCM CloudUsing Supply Planning
Chapter 6Planning Data Collections
For information on how to run scheduled processes, refer to the Scheduled Processes chapter in the ImplementingCommon Features for SCM guide.
Provide values for these parameters to determine which data records will be purged from the staging tables when yourun the Purge Staging Tables scheduled process.
Parameter Notes
Source System
You must select a source system.
• For data collected from the Oracle Fusion source system, select OPS.
• For data collected from an external system, select the applicable source system code.
Record Type
You must select a record type, but you can select All if you want to purge all records that meet thevalues of the other parameters, regardless of their record type. The record types other than the All typeare the status of records in the staging tables in regard to the next stage of the collections process. Thenext stage of the collections process is the import of the records that are in the staging tables into thetables that comprise the planning data repository.
• All: All records regardless of status.
• Complete: Records that were successfully imported into the tables that comprise the planningdata repository.
• Error: Records that are in the Error status in the staging tables after import into the planning datarepository was tried, but not successful.
• New: Records that were collected into the staging tables, but import into the planning datarepository hasn't been tried yet.
• Retry: Records in the staging tables for which import into the planning data repository is beingtried again.
• Warning: Records in the staging tables for which a warning occurred when the record wasimported into the planning data repository.
Collection Cycle ID
You can enter a request number if you want to do so.
Collected From Date and Collected To Date
You can provide these dates if you want to purge data within a specific time frame.
The set of specific entities for which data iscollected and deletion of the data from thestaging tables is supported.
Each entity is a parameter for the scheduled process. You can select No for any of the parameters ifyou don't want to purge the data for that entity. The default value for each parameter is Yes.
141

Oracle SCM CloudUsing Supply Planning
Chapter 6Planning Data Collections
Aggregate Customer Data
How You Aggregate Customer Data Use the key customer data options collections template to identify key customers.
The data for these customers will be visible. For each Zone, all non-key customers' data will be aggregated to a membernamed All Other. By aggregating the planning data for non-key customers, you can focus your analysis on the keycustomers. You use the Supply Chain Planning Key Customer Options (ScpKeyCustomerOptionsImportTemplate.xlsm)import template to identify the key customers; the rest of the customers' data will be aggregated under an All Othermember.
The data that are not identified in the upload template are aggregated to an all other member for each zone. You canview the key customers and the All Other member containing the aggregated non-key customer data when you analyzethe forecasts and other data.
Identifying key customers and aggregating non-key customer data helps you to do the following:
• Organize key customer data that are required for planning
• Save time by collecting only the required data from Oracle Supply Chain Management Cloud
• Build a plan specifically for your key customers
Related Topics• Collection Filters and Collection Templates
How can I reset the key customer aggregated data for a plan? After you make changes to the aggregation level values in the ScpKeyCustomerOptionsImportTemplate.xlsm file, youmust upload the file and run the plan again.
To reset the key customer aggregated data for a plan, do the following:
1. Review the ScpKeyCustomerOptionsImportTemplate.xlsm file.2. Update the Aggregation Level values for all of the Level Name values (for example, Customer) and upload the
CSV file.3. From your Supply Chain Planning work area, open the plan and enable the Aggregate non-key customer data
to All Other level member check box. Run the plan again.
Related Topics• Considerations for Collecting Key Customer Information
142

Oracle SCM CloudUsing Supply Planning
Chapter 6Planning Data Collections
Considerations for Collecting Key Customer Information Use the ScpKeyCustomerOptionsImportTemplate.xlsm file to identify the key customers for which nonaggregated datamust be made available.
For non-key customers, the aggregation level that you define in the import template determines whether the data isretained or aggregated. You can differentiate between key customers and non-key customers and use the aggregatedkey customer data to build a plan specifically for your key customers.
Note: For details regarding the ScpKeyCustomerOptionsImportTemplate.xlsm file, refer to the File-Based DataImport for Oracle Supply Chain Management Cloud guide. This guide is one of the guides in the Oracle Help Centerfor Oracle Supply Chain Management Cloud. Use the Books link for a list of the guides by category, and look for theDevelopment category.
In the ScpKeyCustomerOptionsImportTemplate.xlsm file template:
1. Define your key customers on the KeyCusOptnHeader tab. Enter the name of a valid customer hierarchy in theHierarchy Name column.
2. Next, enter the level of that hierarchy in the Level Name column. All customers in this level are identified as keycustomers.
3. To have only certain customers identified as key customers, enter the specific customer names on theKeyCusOptnMembers detail tab.
4. Set the aggregation level values for both key and non-key customers. Use the settings in the template to set thedata to different aggregation levels, such as 1, 2, or 3.
5. Upload the template.
Ignore Aggregate by ZoneThere are two Customer hierarchies--Customer and Customer Zone--where the lowest level of each hierarchy isCustomer Site. If you don't have any key customers, leave the Hierarchy Name and Hierarchy Level columns blank onthe KeyCusOptnHeader tab. All customers not named in the template (non-key customers) are aggregated into an AllOther member for the hierarchy.
The upload also creates All Other Zone members for the non-key customers in the Customer Zone hierarchy. If youdon't want to aggregate by zone, enter #ignore_zone in the Hierarchy Name column in the KeyCusOptnHeader.csv andleave the Level Name column blank.
Aggregation LevelsThe aggregation levels are listed in the following table.
Aggregation Level Description
1
Retain all customer sites, and aggregate non-key customer sites. In addition to key customer databeing available, non-key customer data is retained for plans that require data that's not aggregated.Aggregated customer data is available for plans that require aggregated non-key customer data.
2
Aggregate non-key customer sites. Customers that aren't identified as key customers are aggregatedto an All Other site by zone. However, if the Hierarchy Name and Level Name columns are blank, allcustomers are identified as non-key customers and aggregated to an All Other site by zone. Thismeans that there are no key customers.
143
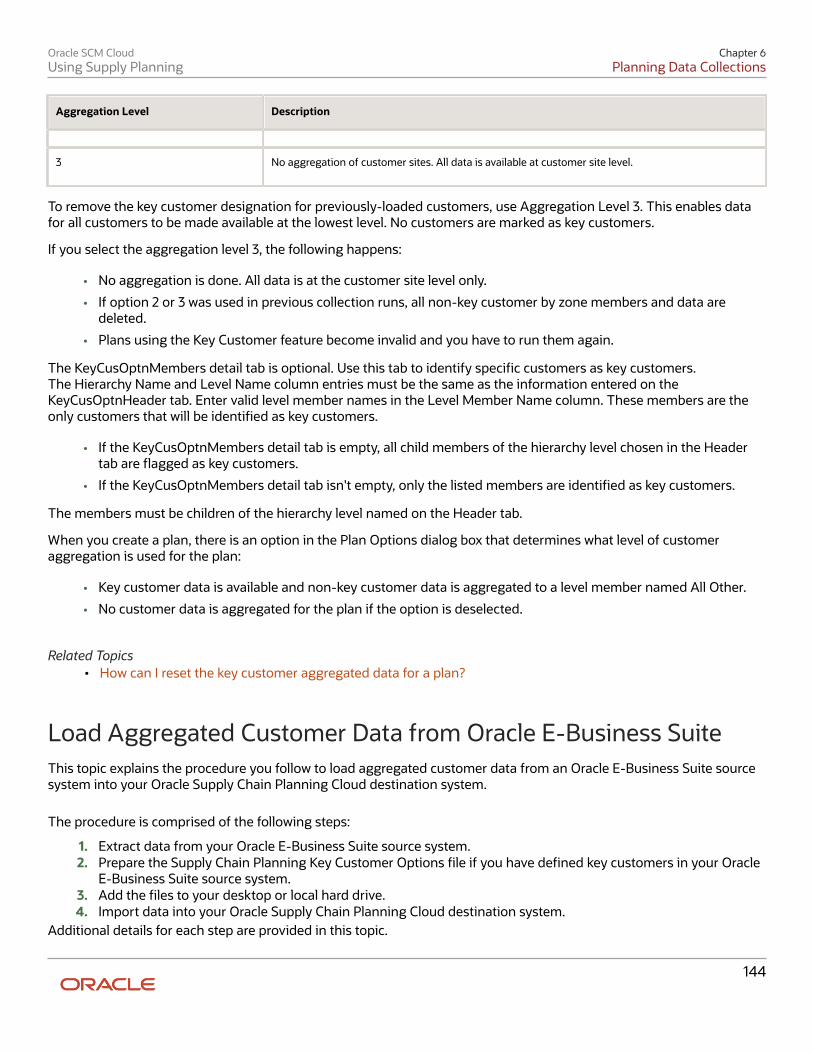
Oracle SCM CloudUsing Supply Planning
Chapter 6Planning Data Collections
Aggregation Level Description
3
No aggregation of customer sites. All data is available at customer site level.
To remove the key customer designation for previously-loaded customers, use Aggregation Level 3. This enables datafor all customers to be made available at the lowest level. No customers are marked as key customers.
If you select the aggregation level 3, the following happens:
• No aggregation is done. All data is at the customer site level only.
• If option 2 or 3 was used in previous collection runs, all non-key customer by zone members and data aredeleted.
• Plans using the Key Customer feature become invalid and you have to run them again.
The KeyCusOptnMembers detail tab is optional. Use this tab to identify specific customers as key customers.The Hierarchy Name and Level Name column entries must be the same as the information entered on theKeyCusOptnHeader tab. Enter valid level member names in the Level Member Name column. These members are theonly customers that will be identified as key customers.
• If the KeyCusOptnMembers detail tab is empty, all child members of the hierarchy level chosen in the Headertab are flagged as key customers.
• If the KeyCusOptnMembers detail tab isn't empty, only the listed members are identified as key customers.
The members must be children of the hierarchy level named on the Header tab.
When you create a plan, there is an option in the Plan Options dialog box that determines what level of customeraggregation is used for the plan:
• Key customer data is available and non-key customer data is aggregated to a level member named All Other.
• No customer data is aggregated for the plan if the option is deselected.
Related Topics• How can I reset the key customer aggregated data for a plan?
Load Aggregated Customer Data from Oracle E-Business Suite This topic explains the procedure you follow to load aggregated customer data from an Oracle E-Business Suite sourcesystem into your Oracle Supply Chain Planning Cloud destination system.
The procedure is comprised of the following steps:
1. Extract data from your Oracle E-Business Suite source system.2. Prepare the Supply Chain Planning Key Customer Options file if you have defined key customers in your Oracle
E-Business Suite source system.3. Add the files to your desktop or local hard drive.4. Import data into your Oracle Supply Chain Planning Cloud destination system.
Additional details for each step are provided in this topic.
144
Oracle SCM CloudUsing Supply Planning
Chapter 6Planning Data Collections
PrerequisitesTo perform the process required to extract data from your Oracle E-Business Suite source system, you must have anadministrator role (Advanced Planning Administrator or Advanced Supply Chain Planner).
Your source system must be set up as one of the Trading Community Source Systems for Oracle Supply Chain PlanningCloud.
You can perform the steps to import data into your Oracle Supply Chain Planning Cloud destination system from one ofthe Supply Chain Planning work areas. You do not need an administrator role to perform these steps.
Extract DataTo extract the data from your Oracle E-Business Suite source system, run the Extract Data for Oracle Supply ChainPlanning Cloud process.
Consider the following conditions for the MSD_DEM_CUSTOMER attribute when you run the process:
• If the MSD_DEM_CUSTOMER_ATTRIBUTE is set to null, then all sites are extracted.
• If the MSD_DEM_CUSTOMER_ATTRIBUTE is set to none, then all records are aggregated to Default CustomerSite.
• If the MSD_DEM_CUSTOMER_ATTRIBUTE is set to a valid customer attribute, then all sites are extracted.
The extracted data is stored in a file in the zipped file format in the middle tier of your source system.
Prepare the Key Customer Options FileIf you have defined key customers in your Oracle E-Business Suite source system, then perform these steps to preparethe Supply Chain Planning Key Customer Option file:
1. Download the template for file-based data loads for the Supply Chain Planning Key Customer Options object.2. Add your data to the file.3. Generate the CSV file.
For details on preparing files for loading planning data, refer to these help topics: Loading Planning Data from Files:Overview and Creating CSV Files Used to Load Planning Data: Procedure.
Add the Files to Your Desktop or Local Hard DriveLocate the extracted Zip file on your Oracle E-Business Suite middle tier, and download or transfer the file to yourdesktop or local hard drive.
If you have defined key customers in the Oracle E-Business Suites source system, then include the Key CustomerOptions file in the Zip file.
Import Data into Your Oracle Supply Chain Planning Cloud Destination SystemTo import the data into your Oracle Supply Chain Planning Cloud destination system, perform these steps:
1. From the Navigator, click File Import and Export.2. On the File Import and Export page, perform the upload action using these values:
◦ File: The file you created
◦ Account: scm/planning DataLoader/Import
145

Oracle SCM CloudUsing Supply Planning
Chapter 6Planning Data Collections
3. From one of the Supply Chain Planning work areas, perform the Manage Planning Source Systems task tocheck if your source system is already created. If your source system is not already created, then create it withthe following values:
◦ Version: External.
◦ Code: Must be the same as the one used for your Oracle E-Business Suite source system.
4. From a Supply Chain Planning work area, perform the Load Planning Data from Files task.
View and Refresh Collected Measure Data
View Collected Data for Measures Before Running a Plan The Collected Measure Data table enables you to view imported or collected records and their statuses without havingto examine log files or run a plan. The table lists measures that were successfully populated as well as also those thatweren’t for your plan. By using this table, you can quickly resolve problems in the data load process.
Just as you can use the Supplies and Demands table to view the collected or imported supplies and demands, you canuse the Collected Measure Data table to view bookings, shipments, and other entities.
For example, Small Inc. imported its shipments history data using the Supply Chain Planning Shipments History file-based data import (FBDI) template. To save time and work efficiently, the company wants to ensure that data wascorrectly imported before running its plan. The company uses the Collected Measure Data table and selects the optionto view only records with errors. The company notices that several records have an error pertaining to invalid names forthe Customer Site level member. Now that the reason behind the error has been identified, Small Inc. can fix the datain the FBDI file, import the data again, and run the plan. By using the Collected Measure Data table, Small Inc. quicklyidentified data import-related problems and didn’t have to spend time analyzing the log files for the import or analyzingthe plan after running it.
1. In the Plan Inputs work area, click the Open drop-down button.The Open Table, Graph, or Tile Set dialog box opens.
2. Select the Collected Measure Data table and click OK.The Collected Measure Data table opens in a new tab.
3. Specify your search criteria, and click Search.Use the Errors field to limit the records to those with errors or those without errors.
Note: By default, the table displays only the first 10,000 records that meet your searchcriteria. To change this limit, you need to create and use a profile option with theMSC_COLLECTED_MEASURE_DATA_MAX_ROWS code. No indication is provided if the table has records thataren’t displayed because the predefined or user-defined limit has been exceeded.
4. Analyze the records that are returned according to your search criteria.The Last Updated Date column displays the date on which the records were created or last updated.The Refresh Number column displays the refresh numbers of the collection job sets through which themeasures were populated when the FBDI templates or collections feature was used.
146

Oracle SCM CloudUsing Supply Planning
Chapter 6Planning Data Collections
5. Optionally, to export the records to a Microsoft Excel file for further analysis, click Actions > Export to Excel.The records available in the Collected Measure Data table are exported to the file. The predefined or user-defined limit is applied when the records are exported.
Tip: When you export the records to an Excel file, you can view more than 15 records at a time. You may findit helpful during your error analysis to view more than 15 records at a time.
Additional Points About the Collected Measure Data Table These are some additional points about the Collected Measure Data table:
• The table displays records that are successfully uploaded to the MSC_MEASURE_DATA table.
• For records with errors, the table displays records from the MSC_ST_MEASURE_DATA staging table that haveinformation in the ERROR_TEXT column.
The table doesn't display records from the staging table that weren't moved to the MSC_MEASURE_DATA tableand don't have error information.
• The table filters records by the applicable security privileges of the user. For example, if you have access to onlycertain organizations, you can view measure values for only those organizations.
• The table lists both predefined and user-defined measures.
• The table displays measure data that’s imported through these file-based data import (FBDI) templates:
◦ Supply Chain Planning Bookings History
◦ Supply Chain Planning Causal Factors
◦ Supply Chain Planning Forecast Measures
◦ Supply Chain Planning Measures
◦ Supply Chain Planning Option Bookings History
◦ Supply Chain Planning Option Shipments History
◦ Supply Chain Planning Shipments History
• The table doesn’t display measure data that’s imported through the Supply Chain Planning External Forecastsand Supply Chain Planning Price Lists FBDI templates.
To troubleshoot imported data for external forecasts or price lists, examine the log files or run your plan.
• The table also displays any measure for which information is collected from Oracle Fusion applications orimported from Oracle E-Business Suite.
• To view aggregated non-key customer data in the table for demand, demand and supply, and sales andoperations plans, before collecting or importing measure data, select the Aggregate non-key customer datato an All Other level member check box on the Demand tab on the Plan Options page for the plan. Then, enterthe required aggregation levels in the Supply Chain Planning Key Customer Options FBDI template, and importcustomer data with the template. After you collect or import measure data, when you filter your records by theplan name in the table, you can view the aggregated data for non-key customers. For aggregated records, thevalue displayed in the Customer column is “<zone name>:All Other.”
• To avoid reduced performance, don’t sort the records if you increase the maximumnumber of records displayed in the table by creating and using a profile option with theMSC_COLLECTED_MEASURE_DATA_MAX_ROWS code.
147

Oracle SCM CloudUsing Supply Planning
Chapter 6Planning Data Collections
Related Topics• How You Aggregate Customer Data
Refresh Collected Measure Data The Orchestrate Refresh Measures Processes scheduled process lets you update the plan data for collected planningmeasures without running the plan.
You can refresh a subset of predefined or user-defined measures such as shipments and bookings history, sales andmarketing forecasts, and financial measures such as Budget Value and Financial Forecast Value. This process retainsthe measure data for statistical and simulation demand forecasts usually purged when running your plan. By defining ajob set, you can automate this scheduled process to refresh measures immediately after loading external measure datafrom flat files.
For example, an enterprise has a weekly demand planning cycle. They need to generate a baseline statistical forecastonce a week but continue to get daily updates for recent shipments, bookings, and sales forecast. Instead of runningthe plan daily, they modify their planning process to run it at the start of the week and then refresh the key collectedmeasures daily.
Orchestrate Refresh Measures Processes Use these steps to configure the Orchestrate Refresh Measures Processes scheduled process using a measure catalogcontaining only a subset of plan measures:
1. In the Scheduled Processes work area, click Schedule New Process on the Overview page.2. In the Schedule New Process dialog box, search for and select Orchestrate Refresh Measures Processes, and
then click OK.3. In the Process Details dialog box, Basic Options section, do the following:
◦ Plan: Select a plan name.
◦ Measure Catalog: Select a measure catalog.
4. Click Advanced and navigate to the Schedule tab. You can set up the process to run as soon as possible orestablish a schedule.
5. When done, click Submit.
The Confirmation dialog box opens and displays the process number. You can use this process number to search for theprocess result in the Scheduled Processes work area.
148

Oracle SCM CloudUsing Supply Planning
Chapter 6Planning Data Collections
Additional Information about Orchestrate Refresh MeasuresProcesses Here’s some additional information about the Orchestrate Refresh Measures Processes scheduled process:
• You can schedule the Orchestrate Refresh Measures Processes scheduled process to refresh collected measuredata for one time or on a repetitive schedule from the Scheduled Processes page. You can configure a job setthat contains the Orchestrate Refresh Measures Processes scheduled process after the Load Planning Datafrom Flat Files scheduled process to sequence and automate these planning processes.
• When copying a plan, you get the following options:
◦ Copy plan options only
◦ Copy plan with reference to the base plan
◦ Copy plan with no reference to the base plan
If the copied plan was created using the second option (Copy plan with reference to the base plan), then it doesnot support the Refresh Collected Measure Data capability. Such plans do not appear in the Plan field of theOrchestrate Refresh Measures Processes scheduled process.
• The Orchestrate Refresh Measures Processes scheduled process considers the measure data uploaded usingfile-based data import (FBDI) templates, including planning measures and demand history. The process doesnot consider transactional data such as sales orders, price changes, or new items and organizations that arenot already included in a plan. For supply plans, measure data loaded using the Supply Chain Planning ExternalForecasts (FBDI) template can't be refreshed.
• When introducing a new measure to a plan defined with the Refresh with current data option in ManagePlanning Measures, you must first run the plan to refresh with the current data before you can refresh thatmeasure's data using this process.
Note: Run your plan after a release upgrade before using this process.
• You need to include both the Shipments History (or Bookings History) measure and the default measure usedto refresh Shipments History in your measure catalog. For example, if the default measure used for the DefaultShipments History Measure profile option is Shipments History: Requested Item by Shipped Date, then includeboth this measure and the Shipments History measure in the measure catalog used to refresh your plan.
149

Oracle SCM CloudUsing Supply Planning
Chapter 6Planning Data Collections
150

Oracle SCM CloudUsing Supply Planning
Chapter 7Supply Plans
7 Supply Plans
Manage Supply Plans
Create a Plan You can create plans and then duplicate them to save time and perform planning activities incrementally. For example,you have defined the line of business associated with an existing plan, such as organizations and items.
You can create a copy from that existing plan rather than define a new plan.
Use this generic procedure to create a plan.
1. In a Supply Chain Planning work area, click the Tasks panel tab.2. In the Tasks panel drawer, click the Manage Plans link.3. In the Search Results region, from the Actions menu, select Create.4. On the Create Plan page, complete the general information for the plan:
a. Enter a name.b. (Optional) Provide a description for the plan.c. Select the plan type.d. Select a supply planning mode.
Note: The Supply Planning Mode attribute is only available for a supply plan, demand and supply plan,or a sales and operations plan type.
- Supply plan and demand and supply plan types: Options are Constrained and Unconstrained.Constrained is only available if you have opted in for Constraint-Based Supply Planning. Otherwise,the supply planning mode defaults to Unconstrained.
- Sales and operations plan type: The supply planning mode defaults to Aggregate.e. (Optional) Select the Enable for OTBI reporting check box to make measures from a plan available in
Oracle Transactional Business Intelligence (OTBI) for reporting.f. Select the owner.
g. Define the access level:
i. Select Public to make the plan accessible for all users.ii. Select Private to restrict the plan accessible to you and to a list of users that you want to provide
access.5. Based on the type of plan that you selected, complete the required information in one or more tabs (Scope,
Demand, Safety Stock, and Supply).6. Click Save and Close.
Related Topics• Copy a Plan
• View a Plan
151

Oracle SCM CloudUsing Supply Planning
Chapter 7Supply Plans
Copy a Plan You can create plans and then duplicate them to save time and perform planning activities incrementally.
For example, you have defined the line of business associated with an existing plan, such as organizations and items.You can create a copy from that existing plan rather than define a new plan.
Use the Duplicate procedure to:
• Create a copy of an existing plan that includes the plan data.
• Create only a copy of plan options.
Use these steps to copy a plan.
1. Navigate to the Duplicate Plan dialog box:
a. In a Supply Chain Planning work area link, click the Tasks panel tab.b. In the Tasks panel drawer, click the Manage Plans link.c. Enter the search parameters and click the Search button.d. In the Search Results region, select the plan that you want to copy, click Actions, and then select
Duplicate.2. In the Duplicate Plan dialog box, complete the following information for the plan:
a. Select a copy type:
- Copy plan options only: The planning process copies plan options to the duplicate plan, but notthe plan data.
Typically, when you duplicate the plan with the Copy plan options only option, the next step is toedit the plan options before running the plan.
- Copy plan with reference to base plan: When you duplicate the plan with reference to the baseplan, the next step is to open the copied plan as you're likely to make edits before running the plan.On the Manage Plans page, the Copied From column displays the name of the plan that you copiedfrom.
CAUTION: If you delete the base plan or rerun the base plan with the Refresh with current dataoption, plans copied from the base plan become invalid.
- Copy all plan data with no reference to base plan: The planning process makes a full, standalonecopy of the plan, which can include archived measures. For approved sales and operations plans,
152

Oracle SCM CloudUsing Supply Planning
Chapter 7Supply Plans
this option enables you to create a full backup copy of your plans at the end of every planningcycle.
On the Manage Plans page, the Copied From column is empty for the new plan because it's astandalone copy of the base plan. Therefore, there's no reference to the base plan.
The Copy all plan data with no reference to base plan option isn't available for demand plan types.b. Enter a name and a description.c. Define the access level:
- Select Public to make the plan accessible for all users.- Select Private to restrict the plan accessible to you and to a list of users that you want to provide
access.d. (Optional) Select the Load plan after copy check box to load the copied plan to memory. This check box
isn't available for demand plan or sales and operations plan types.e. Select the owner.f. (Optional) Select the Include archives check box to make a standalone copy of your plan that includes
archived measures. The copies of the archived versions are relabeled to remain consistent with the newplan name. This relabeling applies to both scheduled and ad hoc archive versions.
The transaction history of when archived versions were created in the original plan isn't copied to thenew plan. However, the new archived version names retain the date stamp and sequence number ofwhen the archives were originally run.
The Include archives check box is available only when:
- The Enable for archiving check box is selected in the Scope: Advanced Options dialog box in theplan options.
- The Copy all plan data with no reference to base plan is selected as the copy type in theDuplicate Plan dialog box.
3. Click Save and Close
Related Topics• Create a Plan
• View a Plan
View a Plan If you already have an existing plan, you can open the plan from the Plans drawer or by using the Manage Plans task.You must always run a plan before you can view it.
To open an existing plan from the Plans drawer to view it, do the following:
1. In a Supply Chain Planning work area link, click the Plans drawer.2. Expand Plans, and select the plan of your choice.
153

Oracle SCM CloudUsing Supply Planning
Chapter 7Supply Plans
3. Click the Actions button and select Open.
Tip: If you have many plans, you have an option to search a plan by using the Manage Plans task. In thiscase, provide appropriate search criteria and click Search. In the search results area, select your plan and clickthe Action button and select Open. Oracle recommends this method to view sales and operations plans.
Related Topics• Create a Plan
Enable Plans for OTBI Reporting Oracle Transactional Business Intelligence (OTBI) is a real-time, self-service reporting solution that helps you createuser-defined and interactive reports.
You can enable OTBI reporting for plans created in your Supply Chain Planning work area to:
• Run reports in real-time to analyze supply, demand, and sales and operations planning plans
• Generate user-configurable and easy-to-use reports by using business intelligence tools and charts
• Analyze key metrics, such as exception metrics, inventory balances, pegged quantity, and orders to be released
• Compare two or more plans that are enabled for OTBI reporting
To improve your supply chain performance, you can monitor and identify problem areas by using strategic insights intolive and operational data. Compare different scenarios in real-time by using key measures to decide the best course ofaction. You can respond to changes by modeling complex strategies and plans to analyze and compare them. You canalso define native OTBI capabilities like alerts based on exception conditions, user-defined measures, and conditionalformatting to monitor or track problem areas.
To create OTBI reports, navigate to the Oracle Fusion Reports and Analytics work area. You can build reports by usingthe base measures available in your Supply Chain Planning work area. You can also create user-defined measures basedon the base measures by using the standard business intelligence tools.
To open OTBI reports in a Supply Chain Planning work area, save the OTBI reports into the Report Componentssubfolder within the Transactional Analysis Samples folder. The Report Components folder is located in the sharedSupply Chain Planning folder in the Reports and Analytics work area.
To enable OTBI reporting for plans, you must do the following:
• Select the Enable for OTBI reporting check box on the Plan Options page of your supply, demand, or sales andoperations plan.
Note: You must run the plan after you enable it for OTBI reporting.
• Set up reporting hierarchies by configuring the Product and Time hierarchies in the dimension catalog namedReporting Catalog. To configure the Product and Time hierarchies, use the Configure Planning Analytics taskin your Supply Chain Planning work area. Depending on the reports that you want to generate, move theProduct and Time hierarchies from the Available Hierarchies pane to the Selected Hierarchies pane. If you selectmultiple Product and Time hierarchies, ensure that you select a default hierarchy for the Product and Timehierarchies. The default hierarchies are used by default in the predefined reports.
You can build reports by using the base measures available in your Supply Chain Planning work area. You can alsocreate user-defined measures based on the base measures by using the standard business intelligence tools.
154
Oracle SCM CloudUsing Supply Planning
Chapter 7Supply Plans
Accessing the OTBI ReportsPerform these steps to access the OTBI reports:
1. In a Supply Chain Planning work area, open a plan that is enabled for OTBI reporting.2. Click the Open button and then select a pane.3. In the Open Table, Graph, or Tile Set dialog box, do one of the following:
◦ Search for your report.
◦ Filter the list by selecting Type and then Report.
4. Select a report and then click OK.The OTBI report opens in the context of the current, open plan.
When you search for reports, the list of reports in the search results includes predefined reports and user-definedreports created by you. You must save the user-defined reports into the Reports Components subfolder within theTransactional Analysis Samples folder to make them available in the Supply Chain Planning work areas. The followingpredefined reports are available only in the Oracle Fusion Supply Planning and Oracle Fusion Planning Central workareas:
• Build Plan by End Item
• Exception Summary by Item Order
• Details by Item
• Pegging Details by End Item
• Plan Recommendations Summary Graph
Available MeasuresThe following measures are available in the Oracle Fusion Reports and Analytics work area:
• Configure to Order Forecast Metrics: The following configure to order forecast metrics are available for demandplans, and demand and supply plans:
◦ Final Option Demand Forecast
◦ Final Planning Percent
◦ Option Demand ForecastConfigure to order forecast metrics support dimensions, such as Plan, Time, Product, Organization,Customer, Top Model, and Demand Class.
• Demand Management Metrics: The following demand management metrics are available for demand plans,and demand and supply plans:
◦ Bookings Forecast
◦ Bookings History
◦ Bookings History Value
◦ Final Bookings Forecast
◦ Final Shipments Forecast
◦ Shipments Forecast
155

Oracle SCM CloudUsing Supply Planning
Chapter 7Supply Plans
◦ Shipments Forecast Value
◦ Shipments History
◦ Shipments History Value
Demand management metrics support dimensions, such as Time, Product, Organization, Customer, andDemand Class.
• Exception Metrics: The following exception metrics are available for supply plans, and demand and supplyplans:
◦ Exception Count
◦ Exception Quantity
◦ Exception Days
◦ Exception Ratio
◦ Exception Value
Exception metrics support dimensions, such as Plan, Time, Product, Organization, Customer, Supplier,Manufacturing Resource, and Exception Type.
• Order Metrics: The following order metrics are available for supply plans, and demand and supply plans:
◦ Order Quantity
◦ Implemented Supply Quantity
◦ Order Value
Order metrics support dimensions, such as Plan, Time, Product, Organization, Order Details, and OrderType.
• Pegging Metrics: The following pegging metric is available for supply plans, and demand and supply plans:
◦ Pegged Quantity
Pegging metric supports dimensions, such as Plan, Time, Product, Organization, Customer, Supplier, EndDemand, and Order Type.
• Sales and Operations Planning Metrics: The following sales and operations planning metrics are available forsales and operations plans:
◦ Consensus Forecast
◦ Consensus Forecast Value
◦ Final Sales Forecast
◦ Final Sales Forecast Value
◦ Sales Forecast
◦ Sales Forecast Value
Sales and operations planning metrics support dimensions, such as Plan, Time, Product, Organization,Customer, and Demand Class.
156

Oracle SCM CloudUsing Supply Planning
Chapter 7Supply Plans
How You Compare Supply Plans and Orders You can compare a plan with another plan or an archive of the same plan, and show the difference between them byselecting a metric.
You compare plans at two different levels:
• Compare aggregate plan metrics: You can compare two plans and understand what changed at an aggregatelevel. For example, you can compare metrics such as Revenue, Demand at Risk, and Exception Count.
• Compare plans at detail level: You can query the supplies and demands when something is different betweentwo plans using the Order Comparison screen. For example, you can compare the baseline plan with thesimulation plan and filter to show only those orders where the suggested due date has changed by more than aspecified number of days.
Comparing orders in the Order Comparison report is unrelated to the Compare Plan functionality for aggregateplan metrics.
Plan ComparisonThe comparison of plans in a table displays the data for each plan side-by-side. To see the differences between theplans, you can select the metrics in the Comparison Options tab when creating or editing the table. The Show Differenceicon in the table or graph toolbar redraws the table or graph with the selected difference metrics.
The comparison metric options are the following:
• Difference
• Percent Difference
• Absolute Percent Difference
To compare a plan:
1. In a Supply Chain Planning work area, open a plan.2. From the Actions menu, select Compare, and then click Plans.3. In the Search and Select: Plan dialog box, search for and select the plan that you want to compare with the
current plan. Only plans that use the same supply planning calendar are displayed. After you select a plan, clickOK.
You can view the table with both plans displayed.
Tip: Click the Graph icon on the toolbar of the table to view the results in a graph.
4. Click Show Difference to view the difference between the current plan and the comparison plan.
To stop comparing the plans, select Cancel Compare from the Actions menu.
Order ComparisonUse Order Comparison to identify the orders that have changed between two plans.
The Order Comparison page displays the demands and supplies whose key values, such as order quantity, late quantity,or suggested due date have changed between plans. Use Order Comparison to view values of key fields from each of
157

Oracle SCM CloudUsing Supply Planning
Chapter 7Supply Plans
the two plans. Also, you can filter based on how much the values differ between plans. For example, you can filter toonly show orders whose suggested due date differs by more than five days.
Open the Order Comparison page using the Open action from the page level toolbar.
After you open the Order Comparison page, the first thing you must do is select the plan you want to compare. Theunderlying plan that's already opened is the current plan.
Note: Order comparison works independently from the Compare Plan action that's available in the page-level toolbarreviewed in the previous section. The Compare Plan action has no impact on the Order Comparison page.
After you select the comparison plan, the Changed Demands and Changed Supplies tabs appear. If you performa search without providing any search criteria, the application displays all changed demands (or changed suppliesdepending on tab where you perform the search). Any demands or supplies that are the same between plans aren'tdisplayed. The values displayed in the table come from the current plan. The current plan is the plan that you openedfirst.
The default layout only displays a subset of the available fields for the tab. The fields available are relevant to the tab, forexample, Changed Demand has demand fields; Changed Supplies have supply fields.
To display values from both plans, use the Columns to Compare action from the view menu. For example, by selectingthe Order Quantity field, the table redraws and Order Quantity has a column for the current plan and the compared plan.The same functionality is available on the Changed Supplies tab.
The orders of the current plan are the driver of the tables content. This shows the following:
• Orders that are in both plans
• Orders that are in current plan and don't exist in the compared plan
Orders that are in the compared plan but not in the current plan aren't shown.
In the redrawn table, the Order Quantity has a column for the current plan and the compared plan. The samefunctionality is available on the Changed Supplies tab.
Define Scope Plan Options Scope options determine the scope of the plan. Define or modify scope plan options on the Scope tab on the PlanOptions page. You can configure the plan organizations, items, plan horizon, and planning level for demand forecasting.
You can also define the filters for a plan, such as the hierarchy, level, and level members.
The Scope tab includes the following sections:
• Plan Organizations
• Plan Items (available only for demand plans or demand and supply plans)
• Supply Planned Items (available only for demand and supply plans or supply plans)
• Plan Parameters
158

Oracle SCM CloudUsing Supply Planning
Chapter 7Supply Plans
Plan OrganizationsSpecify a hierarchy, level, and level members by which to filter the plan. Also, select the source system code to usefor filtering organizations. Fields in the Plan Organizations section are required. If you select a level that's above theorganization level, then organizations that belong to that parent level are included in the plan.
Plan ItemsSpecify a hierarchy, level, and level members by which to filter specific items for demand planning. Your selections areused with your selections in the Plan Organizations section. Items that belong to a parent level are included. Fields inthis section aren't required. However, if you don't specify a hierarchy, level, and level members, then you can't filterplanned items. In this situation, your plan includes all planned items in the selected organizations, which can haveperformance implications.
Note: The Plan Items section isn't available for supply-only plans.
Supply Planned ItemsFor Supply Planned Item Type, select Manufacturing Plan (MRP) or Production Plan (MPS).
For Supply Planned Items, select the option to control the items to include in the supply plan. Options are:
• All planned items: This option can have performance implications.
• Demand plan items and all sales orders
• Demand plan and WIP components
• Demand plan items only
• Demand plan items, WIP components, and all sales orders
Select the Include items with only safety stock as demand check box to plan items with safety stock targets, even ifthere is no demand yet for the items. For example, you want enough safety stock to support demand for new productswith long lead times even when you can't formally forecast for the new products or don't have any sales orders.
Note: The Supply Planned Items section isn't available for demand-only plans.
Plan ParametersThe Plan Parameters section is available for plans of the demand, demand and supply, and supply plan types.
The following table describes the plan parameters.
Parameter Definition Plan Types
Plan Horizon Days
Number of days in the plan. Set horizon daysto forecast and plan for future needs. Minimizehorizon days to avoid long-running plans.Default is 180 days.
Demand Plan
159
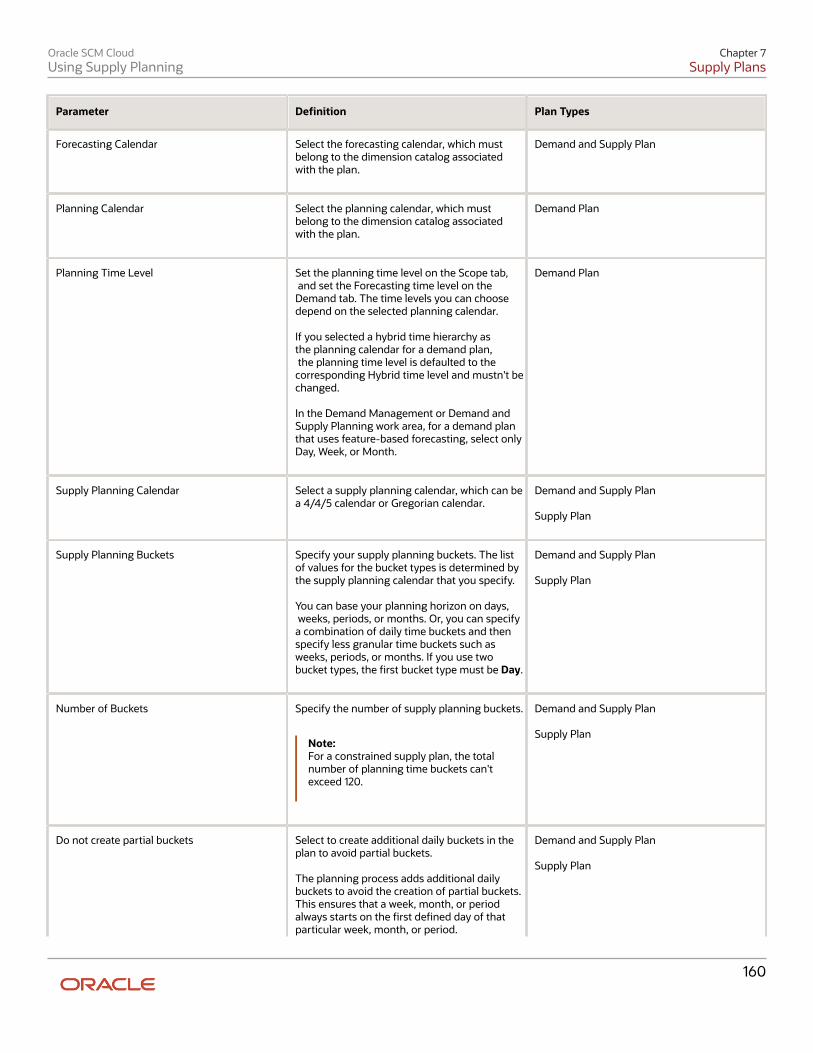
Oracle SCM CloudUsing Supply Planning
Chapter 7Supply Plans
Parameter Definition Plan Types
Forecasting Calendar
Select the forecasting calendar, which mustbelong to the dimension catalog associatedwith the plan.
Demand and Supply Plan
Planning Calendar
Select the planning calendar, which mustbelong to the dimension catalog associatedwith the plan.
Demand Plan
Planning Time Level
Set the planning time level on the Scope tab, and set the Forecasting time level on theDemand tab. The time levels you can choosedepend on the selected planning calendar. If you selected a hybrid time hierarchy asthe planning calendar for a demand plan, the planning time level is defaulted to thecorresponding Hybrid time level and mustn't bechanged. In the Demand Management or Demand andSupply Planning work area, for a demand planthat uses feature-based forecasting, select onlyDay, Week, or Month.
Demand Plan
Supply Planning Calendar
Select a supply planning calendar, which can bea 4/4/5 calendar or Gregorian calendar.
Demand and Supply Plan Supply Plan
Supply Planning Buckets
Specify your supply planning buckets. The listof values for the bucket types is determined bythe supply planning calendar that you specify. You can base your planning horizon on days, weeks, periods, or months. Or, you can specifya combination of daily time buckets and thenspecify less granular time buckets such asweeks, periods, or months. If you use twobucket types, the first bucket type must be Day.
Demand and Supply Plan Supply Plan
Number of Buckets
Specify the number of supply planning buckets.
Note:For a constrained supply plan, the totalnumber of planning time buckets can'texceed 120.
Demand and Supply Plan Supply Plan
Do not create partial buckets
Select to create additional daily buckets in theplan to avoid partial buckets. The planning process adds additional dailybuckets to avoid the creation of partial buckets.This ensures that a week, month, or periodalways starts on the first defined day of thatparticular week, month, or period.
Demand and Supply Plan Supply Plan
160

Oracle SCM CloudUsing Supply Planning
Chapter 7Supply Plans
Parameter Definition Plan Types
If you don't select this option, the plan doesn'tadd any additional daily buckets. Instead, theplanning process creates a partial bucket andcounts that partial bucket as the first week, period, or month, as specified in the planoptions.
Measure Catalog
Group multiple sets of measures for use in aplan. By enabling only those measures that areneeded for any specific plan, you can performa focused analysis with improved performance.A planning administrator can create and modifymeasure catalogs.
Demand Plan Demand and Supply Plan Supply Plan
Price Lists
Price list used in revenue calculations. Thedefault price list for use in value calculationsis Item List Price, defined in the Items table forOrganization and Item. Item List Price is alwaysused to calculate revenue, even if a collectedprice list is marked as the primary.
Demand Plan Demand and Supply Plan Supply Plan
Exception Set
Lists exceptions to compute as part of a planand also filters on Organizations and Categoriesfor computing exceptions.
Demand Plan Demand and Supply Plan Supply Plan
Simulation Set
Lists simulation sets to use in your plan. Asimulation set is a set of adjustments to planinputs. Apply a simulation set to a plan tomodel different business scenarios.
Demand Plan Demand and Supply Plan Supply Plan
Related Topics• Actions to Manage Your Plans
• How You Use Dimensions and Dimension Catalogs in Supply Chain Planning
• Plan Items with Safety Stock Targets with No Demand
• Plan Items with Only Transfer Order Demand
• Why can't I select Supply Planned Items?
Safety Stock Parameters
Safety Stock Planning Methods You can select a Safety Stock Planning Method to plan safety stock for your plan.
161
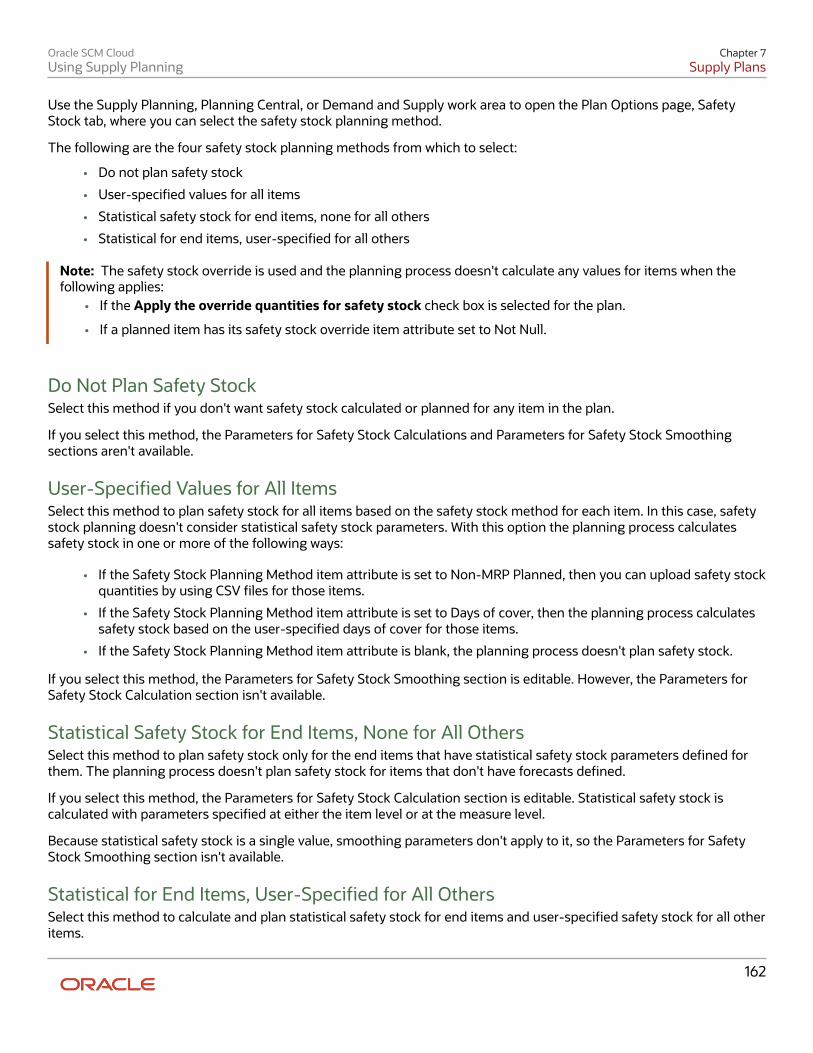
Oracle SCM CloudUsing Supply Planning
Chapter 7Supply Plans
Use the Supply Planning, Planning Central, or Demand and Supply work area to open the Plan Options page, SafetyStock tab, where you can select the safety stock planning method.
The following are the four safety stock planning methods from which to select:
• Do not plan safety stock
• User-specified values for all items
• Statistical safety stock for end items, none for all others
• Statistical for end items, user-specified for all others
Note: The safety stock override is used and the planning process doesn't calculate any values for items when thefollowing applies:
• If the Apply the override quantities for safety stock check box is selected for the plan.
• If a planned item has its safety stock override item attribute set to Not Null.
Do Not Plan Safety StockSelect this method if you don't want safety stock calculated or planned for any item in the plan.
If you select this method, the Parameters for Safety Stock Calculations and Parameters for Safety Stock Smoothingsections aren't available.
User-Specified Values for All ItemsSelect this method to plan safety stock for all items based on the safety stock method for each item. In this case, safetystock planning doesn't consider statistical safety stock parameters. With this option the planning process calculatessafety stock in one or more of the following ways:
• If the Safety Stock Planning Method item attribute is set to Non-MRP Planned, then you can upload safety stockquantities by using CSV files for those items.
• If the Safety Stock Planning Method item attribute is set to Days of cover, then the planning process calculatessafety stock based on the user-specified days of cover for those items.
• If the Safety Stock Planning Method item attribute is blank, the planning process doesn't plan safety stock.
If you select this method, the Parameters for Safety Stock Smoothing section is editable. However, the Parameters forSafety Stock Calculation section isn't available.
Statistical Safety Stock for End Items, None for All OthersSelect this method to plan safety stock only for the end items that have statistical safety stock parameters defined forthem. The planning process doesn't plan safety stock for items that don't have forecasts defined.
If you select this method, the Parameters for Safety Stock Calculation section is editable. Statistical safety stock iscalculated with parameters specified at either the item level or at the measure level.
Because statistical safety stock is a single value, smoothing parameters don't apply to it, so the Parameters for SafetyStock Smoothing section isn't available.
Statistical for End Items, User-Specified for All OthersSelect this method to calculate and plan statistical safety stock for end items and user-specified safety stock for all otheritems.
162

Oracle SCM CloudUsing Supply Planning
Chapter 7Supply Plans
If you select this method, the Parameters for Safety Stock Calculations and Parameters for Safety Stock Smoothingsections are available.
Related Topics• Parameters for Safety Stock Smoothing
• Parameters for Safety Stock Calculation
Parameters for Safety Stock Calculation You can configure parameters in which to calculate safety stock quantities as part of Run Plan. The safety stockcalculation process outputs to plan data for the related safety stock fields for each item-organization attribute.
The process calculates statistical safety stock levels based on forecasts and forecast error measures.
Define or modify safety stock plan options on the Plan Options page, Safety Stock tab. The safety stock calculationprocess also outputs values to the plan simulation set specified on the Plan Options page, Scope tab.
Note: The Parameters for Safety Stock Calculations section is available only when one of the following safety stockplanning methods is selected:
• Statistical safety stock for end items, none for all others
• Statistical for end items, user-specified for all others
The following table lists safety stock calculation parameters that you can select or configure.
Parameter Description
Use item-specific values
Select to specify whether the supply plan run uses item-specific values in safety stock calculations.
Service Level Percentage
Enter a value between 0 and 100 to set the level of customer service that you want in satisfying theproduct demand immediately out of inventory.
Forecast Error Type
Determines whether the quality of a forecast is measured by using MAD, MAPE, Intermittent, orDemand schedule specific.
Overwrite
Select a value to use to overwrite the previously generated or entered safety stock levels.
Save to collected data
If selected, then the collected data is updated with the safety stock quantities that are calculated andwith safety stock quantity overrides.
Related Topics• Safety Stock Planning Methods
• Parameters for Safety Stock Smoothing
• How You Calculate Safety Stock Based on Multiple Demand Schedules
163

Oracle SCM CloudUsing Supply Planning
Chapter 7Supply Plans
Parameters for Safety Stock Smoothing You use the Parameters for Safety Stock Smoothing section on the Plan Options page, Safety Stock tab to configure thefollowing options:
• Apply safety stock change interval to all items
• Smoothing method to calculate safety stock within change interval
• Safety stock change interval in days
• Safety stock bucket start offset days
• Maximum percentage variation in safety stock values
• Minimum percentage variation in safety stock values
Note: The Parameters for Safety Stock Smoothing section on the Plan Options page, Safety Stock tab is available onlywhen one of the following safety stock planning methods is selected:
• User-specified values for all items
• Statistical for end items, user-specified for all others
Apply Safety Stock Change Interval to All ItemsIf you enable this option, the planning process applies safety stock change interval to all items. If you disable this option,then the safety stock change interval applies only to items with Days of Cover safety stock method. Safety stock changeinterval is the time interval used for the smoothing within time interval functionality. If you specify an interval of 20days, then starting from the application date, the planning process groups the safety stock calculation in 20-daysbucket. The planning process then uses the smoothing method to calculate the safety stock within change interval todetermine the safety stock level for the bucket.
Smoothing Method to Calculate Safety Stock Within Change IntervalUse this option for smoothing raw safety stock quantities in every interval, starting from the plan horizon. You canselect Minimum, Maximum, or Average from the drop-down list. The result is always rounded up to nearest integer.
Safety Stock Change Interval in DaysSafety stock change interval is the number of working days used for smoothing safety stock within the time interval. Ifyou specify an interval of 20 days, then starting from the application date, the planning process groups the safety stockcalculation in 20-day buckets. The planning process then uses Smoothing method to calculate the safety stock withinchange interval to determine the safety stock level for the bucket. Enter a value greater than zero (0).
Safety Stock Bucket Start Offset DaysUse the current day for this option to ignore the impacts of high near-term demand that's possible due to high backlogdemand. Enter a value greater than zero (0).
Maximum Percentage Variation in Safety Stock ValuesWhen you use this option, the planning process doesn't let the safety stock deviate by more than the specified valuewhen changing the time interval. Enter a value greater than zero (0). For example, if you specify 25 percent, theplanning process sets 25 percent as the maximum percentage of change in safety stock quantity between buckets.
164

Oracle SCM CloudUsing Supply Planning
Chapter 7Supply Plans
Minimum Percentage Variation in Safety Stock ValuesWhen you use this option, the planning process keeps the safety stock constant across time intervals if the deviation iswithin the specified percentage. Enter a value greater than zero (0).
Related Topics• Safety Stock Planning Methods
• Parameters for Safety Stock Calculation
Plan Items with Safety Stock Targets with No Demand You can plan items with safety stock targets even if there is no demand yet for the items.
For example, you want enough safety stock to support demand for new products with long lead times even when youcan't formally forecast for the new products or don't have any sales orders.
Where there are no forecasts or actual demand yet for items, use the safety stock planning method Safety StockQuantity to plan safety stock. Also, select the Include items with only safety stock as demand option on the PlanOptions page, Scope tab. The supply planning process plans for safety stock, even if there's no actual demand to ensurethat there's stock on hand to support any unexpected demand.
The Include items with only safety stock as demand check box is available for supply plan and demand and supplyplan types for constrained and unconstrained supply planning. This check box isn't available if the Supply Planned Itemsplan option is set to All planned items.
Steps to Include Items with Only Safety Stock as DemandPerform the following steps to plan items with safety stock targets in your plan for which there is no demand.
1. In the Product Information Management work area, use the Manage Items task to set the Safety StockPlanning Method item organization attribute to the Safety Stock Quantity value.
2. In the Supply Planning work area, open your plan and navigate to the Plan Options page, Scope tab. In theSupply Planned Items section, select the Include items with only safety stock as demand check box.
3. Navigate to the Plan Options page, Safety Stock tab and set the options to one of the following:
◦ Set the Safety Stock Planning Method field to the User-specified values for all items value.
◦ Set the Safety Stock Planning Method field to the Statistical for end items, user-specified for allothers value. Next, select the Apply the override quantities for safety stock check box.
◦ Set the Safety Stock Planning Method field to the Statistical safety stock for end items, none for allothers value. Next, select the Apply the override quantities for safety stock check box.
Related Topics• Define Scope Plan Options
165

Oracle SCM CloudUsing Supply Planning
Chapter 7Supply Plans
Forecast Allocation and Consumption
Forecast Processing Forecast processing adjusts the forecast received as a demand schedule to make it suitable for use in supply planning.Forecast processing is a multi-step process that involves the following.
1. Forecast Explosion: If enabled, this step explodes the forecast of a model item into separate forecasts for allunderlying option classes and options.
2. Forecast Spreading and Rounding: If enabled, this step spreads the forecasts received at a higher level of timeaggregation to working days per the forecast spreading calendar. When the daily forecast quantity is calculated,it may be rounded up to a whole number, depending on the Rounding attribute for the item.
3. Forecast Consumption: In this step the forecast quantities, after spreading and rounding, are reduced, at thespecified consumption level, by the open sales order quantities to produce a net forecast quantity.
You can define the following aspects of forecast processing on the Plan Options page, Supply tab, Forecast Allocationand Consumption subtab:
• Forecast Explosion
• Forecast Spreading
• Forecast Consumption
• Past Due Demands
Related Topics• Forecast Explosion
• Forecast Spreading
• Forecast Consumption
• Past Due Demands
• Forecast Consumption View
Forecast Explosion
Forecast explosion explodes the forecast of a model item into separate forecasts for all underlying option classes andoptions.
Select Explode model forecasts to specify whether a top model forecast from a demand schedule is exploded in supplyplanning.
Select Use forecasted planning percentages instead of collected data to specify whether the planning percentagesused for the forecast explosion process in supply planning are from demand planning or the Oracle Fusion ProductModel.
Configure the forecast explosion parameters on the Plan Options page, Supply tab, Forecast Allocation andConsumption subtab.
166
Oracle SCM CloudUsing Supply Planning
Chapter 7Supply Plans
Related Topics• Forecast Processing
• Forecast Spreading
• Forecast Consumption
• Past Due Demands
Forecast Spreading When you enable forecast spreading, the planning process breaks down the forecast at an aggregate time level to theday level. This is known as forecast spreading. Configure the forecast spreading parameters on the Plan Options page,Supply tab, Forecast Allocation and Consumption subtab.
Use the Forecast Spreading option to decide whether to spread the forecast evenly or to not spread the forecast at all.
• Spread forecast evenly: The planning process spreads forecast to daily buckets if the demand is planned at anaggregate level, such as a weekly or monthly level.
If selected, then select a calendar from the Forecast Spreading Calendar drop-down list to determine the startand end date of the consumption buckets as well as the working days. You can only spread the forecast evenlyacross all working days.
Let’s say that you have a monthly demand forecast of 100 and you enable forecast spreading. There are 20working days in the month. The planning process spreads the forecast quantity of 5 to each working day of themonth.
• Do not spread forecast: The planning process retains the forecast at the weekly or monthly level. The planningprocess puts the forecast at the first day of the week or the first day of the month.
Note: You can enable the Rounding item attribute in the product data model or a simulation set. This ensures thatthe spread forecast is in integers and helps plan for items that aren't divisible.
Related Topics• Forecast Processing
• Forecast Explosion
• Forecast Consumption
• Past Due Demands
Forecast Consumption Forecast consumption is the process that replaces forecast demand with sales order demand. Each time you placea sales order, you create actual demand. If you have actual demand, you want to reduce the forecast demand by thesales order quantity to avoid overstating demand. The forecast consumption process deducts sales orders (actualdemand) from the gross forecast, after spreading and rounding, to come up with a net forecast. Configure the forecastconsumption parameters on the Plan Options page, Supply tab, Forecast Allocation and Consumption subtab.
167

Oracle SCM CloudUsing Supply Planning
Chapter 7Supply Plans
Use the Consumption Calendar and Consumption Bucket Type options to specify the calendar and bucket type to usefor forecast consumption. Depending on the type of calendar that you select, such as a 4-4-5 or Gregorian calendar, youcan then specify the time bucket to use for forecast consumption.
If you select the Consume by forecast bucket check box, then consumption happens within a single forecast bucket.For example, if the Forecast Time Level is set to week, then sales orders are deducted from the gross forecast of thatsame week.
If you don’t select the Consume by forecast bucket check box and specify values for the options BackwardConsumption Buckets and Forward Consumption Buckets, forecast consumption is affected. These choices create aforecast consumption window of time consisting of the backward and forward consumption buckets. When consumingthe forecast, these choices determine whether planning nets sales orders from the prior or subsequent time buckets.
For example, you specify 5 backward and 5 forward days and the forecast consumption is in daily buckets. Theconsumption search first moves 5 working days backward from the forecast date, deducting open sales order quantitiesfrom the forecast quantity until the forecast quantity is depleted. If there is any remaining forecast quantity, thenconsumption moves 5 working days forward from the forecast bucket, deducting open sales order quantities from theforecast quantity.
You can specify additional forecast consumption parameters for a plan by defining the following options:
• Consume Forecast Inside Demand Time Fence
• Time Frame for Consuming Forecasts with No Demand Class
• Prefer Consumption Within Forecast Bucket
• Consumption Detail Cutoff Days
Consume Forecast Inside Demand Time FenceIf you enable this option, forecast consumption occurs before enforcing the demand time fence control. The forecastentries within the demand time fence are used for consumption but not as a demand. After consumption, any forecastentries within the demand time fence are removed.
If you disable this option, the demand time fence control is implemented before the forecast consumption. Forecastentries in the demand time fence are dropped as demand statements and are not used for consumption.
Note: Forecast spreading and rounding always take place prior to forecast consumption or applying the demand timefence control.
Time Frame for Consuming Forecasts with No Demand ClassUse this option to instruct the forecast consumption process about the order to use to consume forecast entries whensome of the forecasts have a demand class and others don’t have a demand class.
If you select Within each bucket from the drop-down list, the forecast consumption process starts by consumingforecast entries within the consumption bucket of the sales order. At first, it consumes entries with matching demandclass and then entries with no demand class. Then it consumes forecast entries within the backward and forwardconsumption buckets. For each bucket, it uses the matching demand class first and then the no demand class.
If you select After consuming forecasts specific to the demand class from the drop-down list, the forecastconsumption process starts by consuming forecast entries within the consumption bucket of the sales orders withmatching demand class only. Then it consumes forecast entries within the backward and forward consumption bucketswith matching demand class only. If there are any remaining sales order quantity, it repeats the process for forecast
168

Oracle SCM CloudUsing Supply Planning
Chapter 7Supply Plans
entries with no demand class. At first the process runs within the consumption bucket of the sales order and then withinthe backward and forward consumption buckets.
Prefer Consumption Within Forecast BucketSelect to specify whether to spread forecasts evenly and then consume if a sales order falls in the same time bucket asthe forecast using Backward Consumption Buckets first followed by Forward Consumption Buckets.
If you enable the option, the planning process consumes the forecast within the forecast bucket. This option takes effectwhen you select Spread forecast evenly for forecast spreading and deselect the Consume by forecast bucket checkbox.
Consumption Detail Cutoff DaysEnter a value for the planning process to use to write forecast consumption detail records for a supply plan. The valuethat you enter is the number of days forward from the plan start date that the planning process writes the consumptiondetails for sales orders or transfer order demands.
View the sales orders or transfer order demands that consumed a particular forecast in the Forecast Consumption table,which you access from the Supplies and Demands or Material Plan table.
Here’s some additional information about the Consumption Detail Cutoff Days parameter:
• The number entered must be greater than or equal to zero. If the value is null or zero, then the planning processwon’t calculate any consumption details.
• The number must be less than or equal to the plan horizon in days.
• The number entered is added to the plan start date to get a cutoff date and identify the eligible sales orders.The planning process writes the corresponding forecast consumption details in the Forecast Consumptiontable.
The cutoff date is calculated based on the supply planning calendar associated with the plan. The planningprocess writes the forecast consumption details for any sales order or transfer order demand with a due dateless than or equal to the cutoff date.
Note: If the forecast consumption starts before the plan start date based on past due sales orders andforecasts that are snapshot into the plan, the planning process clears the forecast consumption details,beginning with the first consumption bucket.
Related Topics• Forecast Processing
• Forecast Spreading
• Past Due Demands
• Forecast Consumption View
• Review and Improve Your Demand Fulfillment
Past Due Demands
169

Oracle SCM CloudUsing Supply Planning
Chapter 7Supply Plans
You can specify parameters to include past-due demands within a supply plan or a demand and supply plan by usingplan option values instead of the supply network model. Configure the past due demands parameters on the PlanOptions page, Supply tab, Forecast Allocation and Consumption subtab.
Parameter Description
Source for Including Past Due Demands Indicates the source to determine whether to include past due demands in the plan. Source optionsare:
• Plan option values: If selected, then the values specified in the past due demand section of planoptions are used instead of the past due values found within the supply network model.
The past due demands plan options in this section apply to all organizations included in theplan's scope. The values found in the supply network model can vary by organization.
• Supply network model: If selected, then the past due values found in the supply network modelis used to determine what past due demands are copied into the plan.
Past Due Demand Calendar Calendar to use to determine which past due demands to include in the plan. The type of calendarselected determines the list of values for Past Due Demand Bucket Type.If the past due demand calendar is a 4/4/5 calendar, the past due demand bucket type list of valuesincludes Day, Week, and Period. If the past due demand calendar is a Gregorian calendar, the past due demand bucket type list ofvalues includes only Day and Month.
Past Due Demand Bucket Type The level of time, such as day, week, or month, to use to determine whether to include a past duedemand in a plan.
Past Due Open Sales Order Buckets Number of time buckets, such as three weeks or two months. Determines how much earlier than theplan start date to use as a threshold for copying past due open sales orders into a plan.
Past Due Shipped Sales Order Buckets Number of time buckets, such as three weeks or two months. Determines how much earlier than theplan start date to use as a threshold for copying past due shipped sales orders into a plan.
Past Due Forecast Buckets Number of time buckets, such as three weeks or two months. Determines how much earlier than theplan start date to use as a threshold for copying past due forecasts into a plan.The planning process aggregates all of the forecasts within the past due dates of the plan and placesthe result at the plan start.
Related Topics• Forecast Processing
• Forecast Spreading
• Forecast Consumption
• Forecast Consumption View
• Review and Improve Your Demand Fulfillment
170

Oracle SCM CloudUsing Supply Planning
Chapter 7Supply Plans
Supply Plan Inputs
Considerations for Configuring Supply Plan Attributes On the Plan Options page, Supply tab, General subtab, you can describe the generic attributes of a supply plan in theSupply Plan Attributes section, such as:
• Demand time fence control
• Planning time fence control
• Assignment set
• Overwrite firm planned orders
• Netting rule
• Date used to plan sales orders
Plan Start Date and Plan End Date are read-only fields. The planning process calculates the plan end date from thePlan Horizon Date that you define in the Scope tab. Plan End Date is the sum of Plan Start Date and Plan Horizon Date.
Demand Time Fence ControlWhen you enable this option, planning calculations ignore forecast demands before the demand time fence date andconsiders only sales order demand when calculating gross requirements. Demand time fence is the time duration withinwhich the planning process doesn't consider forecast demand when calculating actual demand. The demand time fencestart date is the current date and the end date is specified by users.
Planning Time Fence ControlPlanning time fence is the time duration within which the planning process doesn't alter the plan. For planned itemswithin the planning fence, the planning process doesn't reschedule in order due dates or create planned orders for theitem to satisfy net demand requirements. This applies to all order types including make, buy, and transfers.
However, the planning process can reschedule out or cancel an order when it determines that such an order createsexcess supply. For planned items outside the planning time fence, the planning process can generate suggestions tocreate, reschedule, or cancel supplies in the plan.
The planning process calculates a planning time fence date for each planned item. The date is calculated based on thevalues of the item attributes Planning Time Fence Type and Planning Time Fence Days. The date is calculated based onthe working days in the organization calendar. For all planned orders, the suggested due date can't be earlier than theplanning time fence date.
Assignment SetAssignment set includes the sourcing rules (hierarchy) and bills of distribution (BOD) for material flow within the supplychain. If you have already created assignment sets, you can select the required assignment set from the drop-down list.You can create an assignment set in Manage Assignment Sets from the Tasks panel drawer.
Overwrite Firm Planned OrdersUse this option to determine whether firm planned orders are retained between plan runs. When you select All fromthe drop-down list, the planning process overwrites all entries, planned and firm planned, from the current material
171

Oracle SCM CloudUsing Supply Planning
Chapter 7Supply Plans
plan. When you select None from the drop-down list, the planning process doesn't overwrite any firm planned orders.However, it overwrites any suggested planned orders that aren't firm.
Netting RuleThis option is available when the project-specific supply planning is enabled for your enterprise. You use this option toassociate an attribute-based netting rule to your supply plan.
You create and manage your project netting rules on the Manage Attribute-Based Netting Rules page. You can accessthe Manage Attribute-Based Netting Rules page from the Plan Inputs, Supply Planning, or Demand and Supply Planningwork area.
When you associate a netting rule to your plan, the planning process nets and shares supplies at the project group,project, or project and task levels. Netting of supplies depends on the netting sequences you define in your netting rule.
Date Used to Plan Sales OrdersThe Date Used to Plan Sales Orders option enables you to plan customer orders by either the scheduled ship date or bythe customer-requested ship date. This option is available for constrained and unconstrained supply plans and demandand supply plans.
Schedule ship date: The planning process plans supplies based on the sales order line scheduled ship date.
Requested ship date: The planning process plans supplies based on the request date on the sales order line andpopulates the suggested due date based on the following:
• If the order date type on a standard sales order line is Ship Date, then the planning process populates theSuggested Due Date the same as the Requested Ship Date.
• If the order date type on a standard sales order line is Arrival Date, then the planning process populates theSuggested Due date as the Requested Arrival Date after reducing the transit time from it and adjusting the dateby the appropriate calendar.
• If the sales order is a drop ship sales order, the Suggested Due Date on the sales order line is the ScheduledArrival Date. Drop ship purchase orders are aligned with schedule arrival dates, and planning by request datecan cause unnecessary reschedules on drop ship purchase orders. Forecasts are still consumed based on therequested ship dates.
Note: You must provide forecast dates that match your choice of the Date Used to Plan Sales Order plan option. Forexample, if you select Requested Ship Date in the plan option, then you must ensure that the forecast dates are interms of the requested ship dates.
Related Topics• Time Fence Options
• How the Planning Time Fence Date is Calculated
Automatic Release Options Automatic release uses scheduled processes to release planned orders automatically after the plan run completes.
172
Oracle SCM CloudUsing Supply Planning
Chapter 7Supply Plans
The following options are available in the Automatic Release Parameters section on the Plan Options page, Supply Tab,General subtab in one of the Supply Chain Planning work areas:
• Release planned orders automatically
• Include rescheduled and canceled supplies in automatic releases
Release Planned Orders AutomaticallyTo release planned orders automatically, you must perform these steps before you run the plan:
• Select the Release planned orders automatically check box on the Plan Options page, Supply Tab, Generalsubtab.
• Select the Refresh with Current Data option in the Run Plan dialog box.
The planned orders are automatically released after the run plan successfully completes.
For a supply plan or a demand and supply plan, the Release planned orders automatically plan option isn't copiedwhen you copy a plan. The planning process won't release planned orders when you use the duplicated plan to performsimulations.
Note: Release time fence is an item-organization attribute and isn't defined in plan options.
Include Rescheduled and Canceled Supplies in Automatic ReleasesWhen you select the Include rescheduled and canceled supplies in automatic releases check box, the planningprocess automatically releases rescheduled and canceled supplies. This option is active only if you selected Releaseplanned orders automatically.
Note: The Include rescheduled and canceled supplies in automatic releases check box isn't available in theReplenishment Planning work area.
To navigate to the Automatic Release Parameters section, follow these steps:
1. On the Edit Plan page, click the Tasks panel drawer.2. In the Tasks panel drawer, click Manage Plans.3. In the Search area, search for your plan.4. Select the plan from the displayed search result. Click Actions and then click Edit Plan Options.5. On the Plan Options page, click the Supply tab.
The General subtab appears. The Automatic Release Parameters section is a part of this tab.
Related Topics
Horizons for the Average Daily Demand You use Average Daily Demand to calculate Projected Available Balance: Days of Cover. Specify a value greater than zero(0). The default value is seven. You can configure the average daily demand in the Supply: Advanced Options dialog box.
173

Oracle SCM CloudUsing Supply Planning
Chapter 7Supply Plans
Why You Include Drop Ship Demands and Supplies in SupplyChain Planning When you select the Include drop ship demands and supplies option in the Supply: Advanced Options dialog box, alldrop ship demands and supplies for planned source systems are included in the planning process.
Supply chain planning supports only one source system per plan. Item-organization attributes for the drop shipvalidation organization are included by the snapshot. Drop ship validation organization is defined in the Organizationtab of manage supply network. If you don't select this option, the planning process removes drop ship demands andsupplies from the plan.
Supplier Capacity Options You use the Supplier Capacity Parameters section to configure the following options on the Edit Plan Options page inone of the Supply Chain Planning work areas:
• Consume supplier capacity with purchase order
• Supplier capacity accumulation multiplier
Consume Supplier Capacity with Purchase OrderWhen you select the check box, the planning process consumes supplier capacity with all purchase orders. When you donot select the check box, the planning process consumes supplier capacity with planned orders.
Supplier Capacity Accumulation MultiplierUse this option to set the date for the planning process to begin the supplier capacity accumulation. You provide anumber which acts as a multiplier of the Supplier Item Processing Lead-time. The number must be greater than zero.Supplier capacity is the number of units per day for a specific item that the supplier can produce. To decide the date, theplanning process uses the following formula for supplier capacity accumulation:
[Multiplier *(multiplication symbol) Processing lead time] + 1
For example, if the multiplier = 2 and the processing lead time = 7 days, then the supplier capacity accumulation beginson day 15.
To navigate to the Supplier Capacity Parameters section, follow these steps:
1. On the Edit Plan page, click the Tasks panel drawer.2. In the Tasks panel drawer, click Manage Plans.3. In the Search area, search for your plan.4. Select the plan from the displayed search result. Click Actions and then click Edit Plan Options.5. On the Edit Plan Options page, click the Supply tab.6. On the General tab, click Select Advanced Options.
The Supply: Advanced Options dialog box opens, which include the Supplier Capacity Parameters section.
174

Oracle SCM CloudUsing Supply Planning
Chapter 7Supply Plans
Related Topics• How You Define the Approved Supplier List for Supply Chain Planning
Release Recommendation Options Use the Release Recommendations Parameters section in the Supply: Advanced Options dialog box to configure thefollowing supply plan options:
• Compression days tolerance for automatic release
• Requisition load group by
• Transfer load group by
• Released only by user
Access the Release Recommendations Parameters section from a Supply Planning, Demand and Supply Planning,Replenishment Planning, or Planning Central work area.
Compression Days Tolerance for Automatic ReleaseUse this option to indicate the number of compression days allowed for the automatic release of planned orders. Thenumber of compression days applies only to automatic release of planned orders and recommendations. Compressiondays means the number of days reduced between the start date and due date as suggested by the planning process.
The Compression Days Tolerance for Automatic Release field isn't available in the Supply: Advanced Options dialogbox for a replenishment plan.
Requisition Load Group ByUse this option to indicate the requisition load group when loading requisitions to purchasing. For each option, exceptAll, the planning process creates one line for each planned order within each requisition.
• All: The planning process creates one purchase requisition for all recommended orders.
• Item: The planning process creates one purchase requisition for each item.
• Buyer: The planning process creates one purchase requisition for each buyer.
• Supplier: The planning process creates one purchase requisition for each supplier.
• Category: The planning process creates one purchase requisition for each item category.
• Location: The planning process creates one purchase requisition for each location.
• Project: The planning process creates one purchase requisition for each project. This option is available onlywhen the project-specific supply planning is enabled for your enterprise.
Transfer Load Group ByUse this option to indicate the transfer load group when loading transfers to logistics. The value of Transfer LoadGroup By determines how the actual transfer order is created.
• All: The planning process creates all transfers in one transfer order.
• Source and destination and ship date: The planning process creates one transfer order for each Ship Fromand Ship To organization, and each ship date.
175

Oracle SCM CloudUsing Supply Planning
Chapter 7Supply Plans
• Source and destination, shipping method and ship date: The planning process creates one transfer for eachShip From and Ship To organization pair, and shipping method and ship date.
Released Only by UserUse this option to specify whether to restrict implementation of planned orders and recommendations to the currentuser. If you enable this option, the planning process implements only those planned orders and recommendationsthat the current user has marked. If you disable this option, the planning process implements planned orders andrecommendations that are marked by any user.
Note: This option applies only to the manual release of planned orders.
Use these steps to navigate to the Release Recommendations Parameters section in the Supply: Advanced Optionsdialog box:
1. Open a plan:
a. In a Supply Planning, Demand and Supply Planning, Replenishment Planning, or Planning Central workarea, click the Tasks panel drawer.
b. In the Tasks panel drawer, click Manage Plans.c. In the Search area, search for your plan.d. Select the plan from the displayed search result.
2. On the Edit Plan page, click Actions and then click Edit Plan Options.3. On the Plan Options page, click the Supply tab.4. On the General subtab, click Select Advanced Options.
The Supply: Advanced Options dialog box opens, which includes the Release Recommendations Parameterssection.
Time Fence Options Use the Time Fence Parameters section to configure the following options:
• Create time fence
• Create firm planned order time fence
Create Time FenceSelect the Create time fence check box to instruct the planning process to create a natural time fence for an item at thecompletion date of the latest firm discrete job, purchase order, or transfer. The natural time fence indicates a new timefence that's set at the latest date of firm supplies. Completion date means the due date of the supply.
The Create time fence check box and the Planning time fence control check box on the Plan Options page, Supplytab, General subtab work together.
When Planning time fence control check boxis:
And when Create time fence check box is: Results
Not selected
Not selected
Planning time fences aren't used in the plan.
176

Oracle SCM CloudUsing Supply Planning
Chapter 7Supply Plans
When Planning time fence control check boxis:
And when Create time fence check box is: Results
Selected
Not selected
Only planning time fence item-organizationattributes are used in the plan to create the timefence.
Not selected
Selected
Only natural time fences are used in the plan.
Selected
Selected
The planning process considers both planningtime fence item-organization attributes andnatural time fences. The latest date calculated by the planningprocess, using either the planning time fenceitem-organization attributes or the natural timefence, is used as the planning time fence date inthe plan.
Create Firm Planned Order Time FenceUse this option to instruct the planning process to create a natural time fence for an item at the completion date of thelatest firm planned order. Completion date means the suggested due date of the firm planned order.
Note: To enable the Create Firm Planned Order Time Fence plan option, you must first select the Create timefence check box on the General tab in the Supply: Advanced Options dialog box.
To navigate to the Time Fence Parameters section, follow these steps:
1. On the Edit Plan page, click the Tasks panel drawer.2. In the Tasks panel drawer, click Manage Plans.3. In the Search area, search for your plan.4. Select the plan from the displayed search result. Click Actions and then select Edit Plan Options.5. On the Edit Plan Options page, click the Supply tab.6. On the General tab, click Select Advanced Options.
The Supply: Advanced Options dialog box opens, which includes the Time Fence Parameters section.
Related Topics• How the Planning Time Fence Date is Calculated
How the Planning Time Fence Date is Calculated Planning Time Fence Date is an item attribute calculated by planning prior to generating any planned orders. Thesuggested due date of a planned order is always greater than or equal to the Planning Time Fence Date.
Other dates, such as the suggested ship date, can be earlier than the planning time fence date.
You can view the planning time fence date calculated by planning and planning time fence days (an input intocalculating planning time fence date) from the Items UI.
177
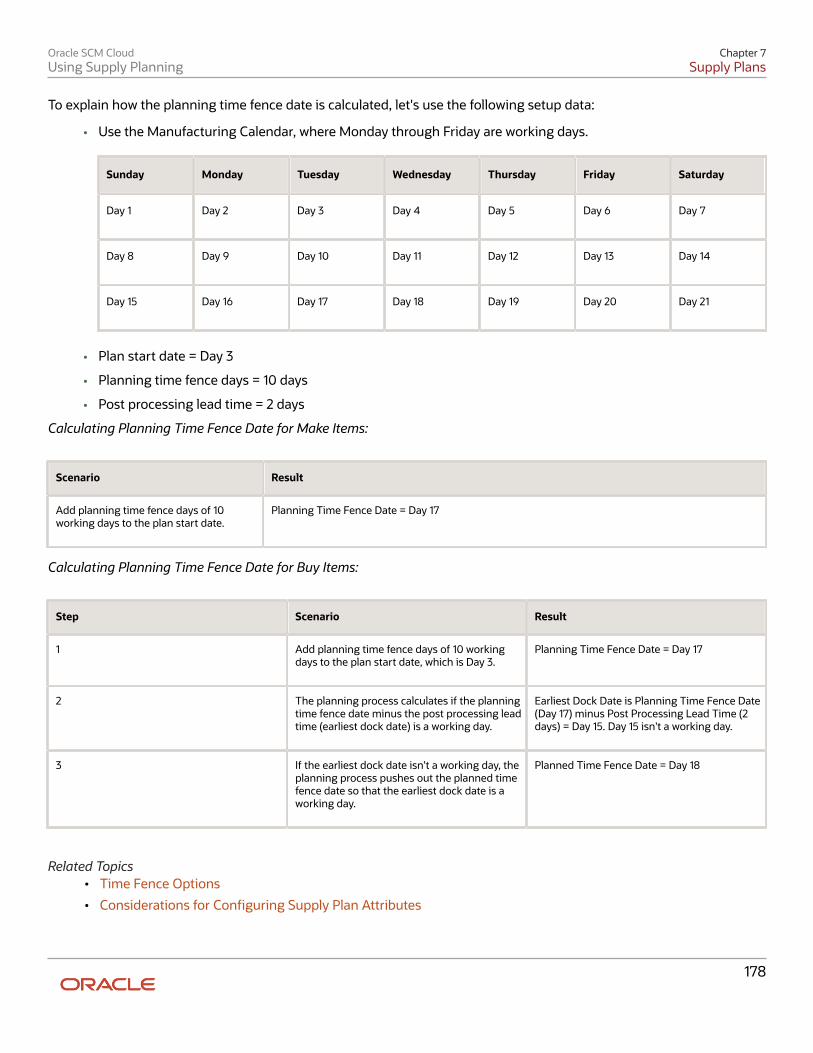
Oracle SCM CloudUsing Supply Planning
Chapter 7Supply Plans
To explain how the planning time fence date is calculated, let's use the following setup data:
• Use the Manufacturing Calendar, where Monday through Friday are working days.
Sunday Monday Tuesday Wednesday Thursday Friday Saturday
Day 1
Day 2
Day 3
Day 4
Day 5
Day 6
Day 7
Day 8
Day 9
Day 10
Day 11
Day 12
Day 13
Day 14
Day 15
Day 16
Day 17
Day 18
Day 19
Day 20
Day 21
• Plan start date = Day 3
• Planning time fence days = 10 days
• Post processing lead time = 2 days
Calculating Planning Time Fence Date for Make Items:
Scenario Result
Add planning time fence days of 10working days to the plan start date.
Planning Time Fence Date = Day 17
Calculating Planning Time Fence Date for Buy Items:
Step Scenario Result
1
Add planning time fence days of 10 workingdays to the plan start date, which is Day 3.
Planning Time Fence Date = Day 17
2
The planning process calculates if the planningtime fence date minus the post processing leadtime (earliest dock date) is a working day.
Earliest Dock Date is Planning Time Fence Date(Day 17) minus Post Processing Lead Time (2days) = Day 15. Day 15 isn't a working day.
3
If the earliest dock date isn't a working day, theplanning process pushes out the planned timefence date so that the earliest dock date is aworking day.
Planned Time Fence Date = Day 18
Related Topics• Time Fence Options
• Considerations for Configuring Supply Plan Attributes
178
Oracle SCM CloudUsing Supply Planning
Chapter 7Supply Plans
Define a Time Window for Plan Pegging Calculations Planning cycle times depend on the volume of data that you want to evaluate and the complexity of the calculationsthat you want to perform. One time-consuming aspect of a plan run is the generation of the pegging data for the supplyplan.
In some manufacturing and distribution environments, pegging information outside a near-term horizon isn't used tomake business decisions, so it might not be necessary to calculate that data. You can configure how much of the planhorizon for which to generate full pegging. The planning process calculates pegging for all end demands with bucketeddue dates that fall on or before the defined time window. The planning process doesn't generate pegging data outsidethe horizon. The Number of Days to Calculate Pegging field is available for constrained and unconstrained supply plansor demand and supply plans.
For example, you set the Number of Days to Calculate Pegging to 10 days. The planning process calculates all enddemands with bucketed due dates that fall on or before Day 10. The planning process doesn't calculate any pegging onDay 11 or later. This parameter only impacts generation and display of pegging and not the demand and supply netting,which occurs as usual for the entire plan horizon.
Steps to Enable Pegging Calculations for a Time WindowFollow these steps to enable pegging calculations for a time window.
1. In the Supply Planning or Demand and Supply work area, open a supply plan or a demand and supply plan. Thesupply plan can be constrained or unconstrained.
2. In an open plan, click Actions and then select Edit Plan Options.3. On the Edit Plan Options page, click the Supply tab.4. On the Edit Plan Options page, Supply tab, click the Select Advanced Options button.5. In the Supply: Advanced Options dialog box, Pegging Parameters section, specify a value in the Number of
Days to Calculate Pegging field to define the demand window for pegging calculations. This value is thenumber of days from the plan start date that the planning process calculates the pegging relationship betweendemands and supplies.
Tips and ConsiderationsYou should consider the extent of impact on planning output when you select a value for the Number of Days toCalculate Pegging parameter. Here are some things to consider when you use this pegging parameter:
• For all existing plans and any copy of these plans, the planning process continues to calculate the pegging forthe full plan unless you update the Number of Days to Calculate Pegging plan option.
• You can use the pegging parameter for all demand types except reservations in an unconstrained supply plan.
• In addition to the Pegged Quantity, these order attributes that rely on pegging aren't calculated for all demandand supplies not pegged to end demands inside the new demand window:
◦ Quantity by Due Date
◦ Material Available Date
◦ Planned Arrival Date
◦ Planned Ship Date
◦ Days Late
179

Oracle SCM CloudUsing Supply Planning
Chapter 7Supply Plans
◦ Contributes to Demand Lateness
◦ Contributes to Overload
◦ Shared Supply Pegged to Firm
The Supplies and Demands and Gantt Chart views won't show values for these attributes for orders that don'tmeet the criterion.
• The Demand Fulfillment table won't show expedite or capacity recommendations for demands outside the timewindow.
Pegging Related ExceptionsThe planning process doesn't calculate these exceptions, which rely on pegging, for demands and supplies not peggedto end demands inside the new demand window:
• Late Supply Pegged for Forecast
• Late Supply Pegged to Sales Order
• Demand at Risk due to Material Shortage
• Demand at Risk due to Resource Shortage
• Demand at Risk due to Supplier Capacity Shortage
• Demand at Risk due to Insufficient Lead Time
The Exceptions table won't show these exceptions for supplies and demands that don't meet the criterion.
Order Modifier Options You can control the planning cycle time by deciding whether to use the order policies for an item in aggregate timebuckets, such as a week or period.
To control order policy enforcement in aggregate time buckets for supply plans, use the Order Modifier Parameterssection in the Supply: Advanced Options dialog box, General tab to configure the following options:
• Enforce order modifiers in aggregate time buckets
• Maximum number of planned orders per item-ORG per time bucket
Enforce Order Modifiers in Aggregate Time BucketsSelect the checkbox to enforce order modifiers in aggregate time buckets in constrained and unconstrained supplyplans. This plan option applies to aggregate time bucket types of Week and Period.
Maximum Number of Planned Orders per Item-ORG per Time BucketThe maximum number of planned orders that the planning system can create in a planning time bucket for each itemand organization combination. The default value is 100. This plan option applies to all time bucket types (Day, Week, andPeriod).
Related Topics• Control Order Policy Enforcement in Aggregate Time Buckets
180

Oracle SCM CloudUsing Supply Planning
Chapter 7Supply Plans
Control Order Policy Enforcement in Aggregate Time Buckets You can control the planning cycle time by deciding whether to use the order policies for an item in aggregate timebuckets, such as a week or period.
You will have shorter plan run times if you choose to not enforce order policies in aggregate time buckets. However, youmight have planned supply quantities aggregated for the entire time bucket. You can control order policy enforcementfor constrained and unconstrained supply plans by using the order modifier parameters in the Supply: AdvancedOptions dialog box, General tab.
Let’s see how this functionality works. For our example, we have a Fixed Order Quantity of 50 that’s respected in theweekly bucket.
• If you don’t select the Enforce order modifiers in aggregate time buckets check box, the order policy isn’tenforced. You might have planned supply quantities aggregated for the entire time bucket.
Demand/Planned Orders Week 1 Week 2 Week 3
Demand 80 120 90
Planned Orders 80 120 90
• If you do select the Enforce order modifiers in aggregate time buckets check box, the order policy isenforced. When you enforce order modifiers in aggregate time buckets, you will have multiple planned orders ineach week. In our example, the Maximum Number of Planned Orders per Item-ORG per Time Bucket is set to 3.You will have 2 planned orders for Week 1, 3 planned orders for Week 2, and 2 planned orders for Week 3.
Demand/Planned Orders Week 1 Week 2 Week 3
Demand 80 120 90
Planned Orders 50 + 30 50 + 50 + 20 50 + 40
Note that the last planned order in each bucket can be less than the Fixed Order Quantity.
Let’s use the following parameters to show you another example of how the control order policy enforcement inaggregate time buckets functionality works.
• Enforce order modifiers in aggregate time buckets check box is selected
• Maximum Number of Planned Orders per Item-ORG per Time Bucket is set to 5
• Fixed Order Quantity is 2
• Forecast demand is 20
When you look at the Supplies and Demands table for your plan, you will see the following information for the item:
181

Oracle SCM CloudUsing Supply Planning
Chapter 7Supply Plans
Order Type Order Quantity Uses Order Modifier
Planned Order 2 Yes
Planned Order 2 Yes
Planned Order 2 Yes
Planned Order 2 Yes
Planned Order 12 No
Forecast -20 n/a
In this example, the plan created 5 planned orders for the forecast demand of 20. The order quantity for the first 4planned orders is 2, which respects the Fixed Order Quantity. However, the last planned order has a quantity of 12 tosatisfy the remaining balance of demand, which is 12.
The Uses Order Modifier column in the Supplies and Demands table is read-only and indicates whether the planningprocess respected the order modifiers in aggregate time buckets. For the last planned order in our second example, theplanning process needed more than the fixed order quantity to satisfy demand, so the Uses Order Modifier column willindicate No. Also, the Uses Order Modifier column is No if the Enforce order modifiers in aggregate time bucketscheck box isn’t selected in the Supply: Advanced Options dialog box, General tab.
Related Topics• Order Modifier Options
Technical Control Parameters You can use multithreading to decrease the overall runtime of a supply plan.
In the plan options, navigate to the Supply: Advanced Options dialog box, Technical tab and select the Enablemultithreading check box. When selected, the planning process implements multithreading during the plan run.
Why You Disable or Enable Dimensions for Supply Plan Measures In your organization, you might not use all of the preconfigured dimensions to analyze your supply plans. To improvesystem and application performance while working with your supply plans, you can decide which dimensions areapplicable to measures.
You can disable the Customer, Supplier, Demand Class, Order Type, and Exception Type dimensions to optimize datavolumes and improve query performance. The Organization, Item, Resource, and Time dimensions are always used andyou can't disable them.
When you disable a specific dimension, the planning engine preaggregates the related measures along that dimension.For example, measures such as Revenue or Sales Order Value are computed by default at the most detailed levelof Organization, Item, Day, Customer Site, and Demand Class. However, this type of detailed analysis might not benecessary. You can configure your plan to compute the measure at only the Organization, Item, and Day level andignore calculating the measure at the Customer Site and Demand Class levels.
182

Oracle SCM CloudUsing Supply Planning
Chapter 7Supply Plans
Configure the dimensions in the Dimensions for Supply Measures section in the Supply: Advanced Options dialog box,which you open from the Plan Options page, Supply tab. The Supply: Advanced Options dialog box is accessible only forsupply plans from a Supply Planning, Demand and Supply Planning, or Planning Central work area.
Note: The dimension catalog that is configured in the Configure Planning Analytics task and specified in theplan options governs the hierarchies that are available in a plan for any selected dimension. If any of the optionaldimensions are not selected in the dimension catalog, those dimensions are automatically disabled in the advancedplan options.
Because tables are shared across work areas, the selector in pivot tables displays all dimensions (enabled and disabled),and you can add a disabled dimension to a table or graph. In this case, the dimension does not show individualmembers, but shows one aggregated row or column of All.
When you enable a supply plan for Oracle Transactional Business Intelligence (OTBI), the reports won't have anymembers in the disabled dimensions of a supply plan.
Related Topics• How You Use Dimensions and Dimension Catalogs in Supply Chain Planning
• Considerations for Setting Up Dimension Catalogs
• Enable Plans for OTBI Reporting
Supply Plan Options for Organizations and Schedules Use the Organizations and Schedules subtab on the Plan Options page to configure subinventory netting, demand andsupply netting, and the forecast spreading calendar, depending on the organization for a supply plan.
You can also specify the demands that you want to consider in the supply plan.
Configure the supply plan options for organizations and demand schedules on the Plan Options page, Supply tab,Organizations and Schedules subtab.
OrganizationsThe organizations are based on the organization level members that you specify on the Scope tab of the Plan Optionspage.
Subinventory Netting: Enable or disable subinventories that you want to include in the netting. The subinventoriesare based on the organization. During data collections, the planning process collects the organization based on yourconfiguration of the organization in the source system. If you enable the subinventory netting for a new subinventory inthe source, the plan automatically includes the new subinventories that are collected after the initial plan run.
Demand and Supply Netting: Run plans with only demands or supply types depending on your requirement. You caninclude or exclude sales orders, reservations, on hand, purchases, transfers, and work orders for each organization inyour plan. A new plan enables all the demand and supply netting options by default.
Forecast Spreading Calendar: Select a user-defined forecast spreading calendar for each organization.
• The supply planning process uses the calendar to spread aggregate forecast demand across daily buckets.
183

Oracle SCM CloudUsing Supply Planning
Chapter 7Supply Plans
• If you don't specify any calendar at the organization level, then the supply planning process spreads theaggregate forecast evenly across daily buckets.
• The planning process uses this calendar only when you select the User-defined calendar value for the ForecastSpreading Calendar attribute in the Forecast Allocation and Consumption section. The Forecast Allocation andConsumption section is available on the Plan Options page, Supply tab, General subtab.
Demand SchedulesSelect the demands to include in the supply plan. If the plan type is demand and supply, the demand schedule isautomatically included in the supply plan. The supported types of demand schedules are:
• Demand (demand plan)
• External (external forecast)
• Production (production plan used in manufacturing plan)
Demand Measures: Click the Select button to access the Demand Measures dialog box where you can select thefollowing measures:
• End Item Demand
• Option Demand
• Planning Percentage
The Select button for Demand Measures is enabled when the demand schedule type is Demand or Sales andOperations. The Select button isn't available for an external demand schedule type.
Forecast Accuracy Measures: Click the Select button to access the Forecast Accuracy Measures dialog box where youcan select the following measures:
• Forecast Error Type for Nonintermittent Demand
• Measure for MAD or MAPE
• Measure for Intermittent Demand
• Measure for Average Interarrival Time
The Select button for Forecast Accuracy Measures is enabled when both of the following attributes are set on the PlanOptions page, Safety Stock tab:
• Safety Stock Planning Method is set to Statistical safety stock for end items, none for all others.
• Forecast Error Type is set to Demand schedule specific.
Measure Levels: Select dimension levels at which to load the measure. If the demand schedule type is external orproduction, then the measure level option isn't available.
Ship-to Consumption Level: Select a forecast consumption level for the local demand plan.
Related Topics• Configure Measure Levels for Demand Schedules
184

Oracle SCM CloudUsing Supply Planning
Chapter 7Supply Plans
How You Calculate Safety Stock Based on MultipleDemand Schedules For supply plans or supply and demand plans, you can plan statistical safety stock for end items whose forecasts aredistributed across multiple demand schedules. The planning engine calculates safety stock based on forecasts in eachdemand schedule.
The calculation uses either the measure values generated in each of the demand schedules or item-specific valuesspecified for each item and organization combination.
Select your demand schedules in the Demand Schedules section on the Plan Options page, Supply tab, Organizationsand Schedules subtab. The planning engine uses the forecasts and other measures from these demand schedules toplan statistical safety stock for the respective item-organization combinations.
The planning engine uses each demand schedule to drive safety stock calculations for the items that belong to thatdemand schedule. If the same item is present in two or more demand schedules, the planning engine selects only onedemand schedule to use for safety stock calculation. Oracle recommends that you ensure that forecasts for an item inan organization are restricted to just one demand schedule.
Related Topics• Parameters for Safety Stock Calculation
Configure Measure Levels for Demand Schedules You can select dimension levels in the Measure Levels dialog box at which to load measures into a plan. Afterconfiguring your measure levels for demand schedules, run your demand plan to generate the forecasts.
Next, run the supply plan and then review the Supplies and Demands table.
You can configure dimension levels for a supply plan or a demand and supply plan from the Planning Central, SupplyPlanning, or Demand and Supply Planning work area. To access the Measure Levels dialog box, navigate to the PlanOptions page, Supply tab, Organizations and Schedules subtab. In the Demand Schedule section, click the Select buttonin the Measure Levels column.
Note: If the demand schedule type is External or Production, then the Select button under the Measure Levelscolumn isn't available.
In the Measure Levels dialog box, you can configure measure levels for the following dimensions:
• Time: The time hierarchy and level choices are based on the planning calendar used for the demand plan. Youset the planning calendar on the Plan Options page, Scope tab, in the Plan Parameters section.
If the demand plan uses a hybrid time hierarchy, the available levels are parent levels of the Hybrid time levelfor the selected hybrid time hierarchy. For a manufacturing hybrid hierarchy, the available levels are Week andPeriod. For a Gregorian hybrid hierarchy, the available levels are Month, Quarter, and Year. For a fiscal hybridhierarchy, the available levels are Month, Quarter, and Year.
185

Oracle SCM CloudUsing Supply Planning
Chapter 7Supply Plans
• Demand Class: If you leave the Demand Class level and Customer level blank and select Day for the Time level,then the forecast that comes from the demand schedule into Supply Planning will be aggregated at the item-organization-day level.
• Customer: If you want an aggregated forecast by day or month, leave the customer level blank.
If you select the Customer Site level, the forecast for each day is broken down into forecasts for each customersite in the demand plan. For example, you have 20 customer sites for your demand plan and select theCustomer Site level and Day for the Time level. You will see 20 forecasts for each day in the Supplies andDemands table.
• Organization: The organization hierarchy and level are fixed for the organization dimension. The Enterprisehierarchy only supports the Organization level.
• Product: The product hierarchy and level are fixed for the product dimension. The Product hierarchy onlysupports the Item level.
Related Topics• Supply Plan Options for Organizations and Schedules
Run a Supply Plan or an Integrated Plan Run a supply plan or an integrated plan to generate forecasts and safety stock levels and to create replenishment.
An integrated plan includes both a demand and a supply plan. You can run a supply plan or a demand and supply planfrom the Supply Planning, Planning Central, or Demand and Supply Planning work areas.
When you run a supply plan or an integrated plan, you can specify the scope of the plan that you want to run. You candecide whether to refresh the plan input data before running it. Also, you can run the plan immediately or you can runthe plan in the background at a set time or on a repetitive schedule, such as daily or weekly.
Note: For a constrained supply plan, you can only run the plan in Batch mode.
After you create a supply plan or a demand and supply plan, you must run the plan to generate the data. In the Run Plandialog box, Parameters tab, run plan options are sequenced in the order of operations: scope, demand, and supply. Youalso have an option to recalculate safety stock levels. The forecasting process runs first, safety stock is calculated next,and then the output is used for supply planning calculations. You can configure the following options, depending on theplan type:
• Data Refresh Options
• Scope Options
• Demand Plan Run Options
• Supply Plan Run Options
Data Refresh OptionsThe following data refresh options are available:
• Do not refresh with current data: Select this option to run your plan with no changes to demand, including noadvancement of the plan start date.
186
Oracle SCM CloudUsing Supply Planning
Chapter 7Supply Plans
• Refresh with selected current data: Select this option to partially refresh your data. You can refreshtransaction data and some reference data without performing a full refresh. For example, selectively refreshingDemand history and measures and Forecasts covers the following scenarios:
◦ Demand history and measures: You have reloaded external or third-party forecasts and the plan mustreflect these recent updates (for example, Sales Forecast, Marketing Forecast, Financial Forecast, andShipments Forecasts).
◦ Forecast: You have changed the input measure level on the Plan Options page, Supply tab, Organizationsand Schedules subtab, in the Demand Schedules section. For example, you copy a plan, change theinput measure level to another forecast within the same plan, and want to rerun the plan. In this scenario,specify the Refresh with selected current data option for Forecast. Because you changed the planoptions but didn't edit the plan, the plan doesn't require a full refresh.
• Refresh with current data: Select this option to refresh the complete plan with the latest collected data. Whenyou run the plan for the first time, this is the only data refresh option available and it's selected by default. Ifyou select this option for an integrated plan (Demand and Supply Plan type), the Plan demand and Plan supplycheck boxes in the Scope Options section are selected by default and can't be deselected.
Scope OptionsScope options restrict the focus of the replan. The following scope options are available:
• Plan demand: Select to forecast demand when running a plan. If you selected Refresh with current data inthe Data Refresh Options section, then this option is selected by default for an integrated plan. This option isavailable for Demand and Supply Plan types in the Planning Central and Demand and Supply Planning workareas.
• Approve plan: Select to approve the plan during the plan run. This option is available for Demand and SupplyPlan types in the Demand and Supply Planning work area.
• Recalculate safety stock: Select to recalculate safety stock quantities when running a plan. This option isavailable for Supply Plan or Demand and Supply Plan types in the Planning Central, Supply Planning, andDemand and Supply Planning work areas.
The Recalculate safety stock check box is available only when one of the following safety stock planningmethods is selected on the Plan Options page, Safety Stock tab:
◦ Statistical safety stock for end items, none for all others
◦ Statistical for end items, user-specified for all others
• Plan supply: Select to have the planning process calculate only the supply. If you selected the Refresh withcurrent data check box in the Data Refresh Options section, then this option is selected by default for anintegrated plan. This option is available for Demand and Supply Plan types in the Planning Central and Demandand Supply Planning work areas.
• Archive plan: Select to archive data from the plan. This option is available for Supply Plan or Demand andSupply Plan types in the Supply Planning and Demand and Supply Planning work areas.
Demand Plan Run OptionsThe Demand Plan Run Options section is available for Demand and Supply Plan types, but isn't available for Supply Plantypes.
Forecast Profiles: Select the forecasting profiles that you want to include as part of the plan. If you don't select aforecasting profile, then the forecasting process doesn't run.
187

Oracle SCM CloudUsing Supply Planning
Chapter 7Supply Plans
Include details of forecast methods: Select to specify whether to provide details of the forecast methods that make upthe forecast. This option is available for Demand and Supply Plan types in the Demand and Supply Planning work area.
Include details of causal factors: Select to specify whether to provide details of the causal factors that make up theforecast. This option is available for Demand and Supply Plan types in the Demand and Supply Planning work area.
Supply Plan Run OptionsThe Supply Plan Run Options section appears for unconstrained supply plans but not for constrained supply plans. Youcan only run constrained supply plans in batch mode. The following supply plan run options are available:
• Interactive: Select this option to run a plan into memory, without saving the plan to the database. If a typicalplan is scheduled to run on weekends, you can use the Interactive option to run the plan during the week. If youselect Interactive, the Schedule tab is disabled and the plan is set to run as soon as possible.
Note: Interactive option isn't available for a constrained supply plan.
• Batch: Select this option to run the plan per a schedule. When you select this option, the Schedule tab becomesavailable where you can set up when to run the plan.
Use Batch to save all plan data to a database, including calculated totals. To save a plan to a database, you mustrun the plan at least once. The plan will be available for analysis without loading into memory.
Run a Supply Plan or an Integrated PlanUse these generic steps to run a supply plan or an integrated demand and supply plan:
1. Open the Run Plan dialog box:
a. From a Supply Chain Planning work area, click the Plans panel tab and expand the Plans list.b. Select the plan that you want to run, click Actions, and then select Run.
2. In the Run Plan dialog box, Parameters, tab, expand Details to review the plan options:
a. In the Data Refresh Options section, review the options and make appropriate selections.
Note: When you run the plan for the first time, you must select Refresh with selected current data.This option refreshes historical data, imports sales orders, and advances the plan start date to alignwith the current date.
b. In the Scope Options section, select the options that you want for the plan run.c. For demand and supply plan types: In the Demand Plan Run Options section, select the appropriate
demand plan run options, including the forecasting profiles that you want to include as part of the planrun.
d. For unconstrained supply plans: In the Supply Plan Run Options section, select the options that you wantfor the plan run.
3. If you selected Batch in the Supply Plan Run Options section, or for constrained supply plans, click the Scheduletab to set up the frequency parameters:
a. To run the plan immediately, select As soon as possible.b. To run the plan in the background at a set time, select Using a schedule and then select a Frequency,
such as Daily or Weekly.4. Click OK to run the plan.
188

Oracle SCM CloudUsing Supply Planning
Chapter 7Supply Plans
Publish Plan Data You can publish data for a plan in the Demand Management, Demand and Supply Planning, Planning Central,Replenishment Planning, Sales and Operations Planning, or Supply Planning work area to a compressed file.
You can then use the file for data integration between your Supply Chain Planning application and other Oracle orexternal applications.
By submitting a scheduled process from your Supply Chain Planning work area or the Scheduled Processes work area,you can publish the data in a pivot table within your plan to a file on the content server of Oracle Universal ContentManagement (UCM).
Using APIs of Oracle's ERP integration service for automating the data integration between your Supply Chain Planningapplication and an external application, you can submit the scheduled process, check its status, and get the details ofthe published document.
The file name is in the <plan name>_<pivot table name>.zip format.
Publish Plan Data from a Supply Chain Planning Work AreaHere's how you can publish data for your plan from your Supply Chain Planning work area:
1. Do one of the following to open the Publish Data dialog box:
◦ On the Manage Plans page, select the plan and click Actions > Publish Data.
The Publish Data dialog box opens.
◦ Open your plan and click Actions > Publish Data.
The Publish Data dialog box opens.2. Optionally, enter submission notes for your scheduled process.3. On the Parameters tab, optionally, select the Append request number to output file name check box.
Selecting this check box results in the request number being appended to the file name, which enableseasy identification of the file on the content server. The resulting file name (<plan name>_<pivot tablename>_<request number>) is also used as the document title.
If you don't select this check box, the document title is PUBLISHPLANDATA.4. In Table Name, select the pivot table of your plan for which you want to publish data.
The available tables are enabled for the work area of the plan, and you have the required access to these tables.5. In Source System, select the source system that's specified on the Scope tab of the Plan Options page for the
plan.6. On the Schedule tab, specify whether you want to run the process as soon as possible or according to a
schedule.
If you publish the file according to a schedule, you can specify the frequency and start and end dates for theprocess.
189

Oracle SCM CloudUsing Supply Planning
Chapter 7Supply Plans
7. Click Submit.
The Status dialog box opens and displays the request number. Make a note of this number and then click OK.
You can use this number to search for the result of your request in the Scheduled Processes work area.
If you appended this number to the compressed file's name, you can use this number to search for the file inthe File Import and Export work area. You can then download and check the file.
Publish Plan Data from the Scheduled Processes Work AreaHere's how you can publish data for your plan from the Scheduled Processes work area:
1. On the Overview page, click the Schedule New Process button.
The Schedule New Process dialog box opens.2. In Name, select the Publish Plan job, and click OK.
The Process Details dialog box opens.3. To be notified when the process ends regardless of the result, select the Notify me when this process ends
check box.4. Optionally, enter submission notes for your scheduled process.5. On the Parameters tab, in Plan Name, select your plan.6. Optionally, select the Append request number to output file name check box.
Selecting this check box results in the request number being appended to the file name, which enableseasy identification of the file on the content server. The resulting file name (<plan name>_<pivot tablename>_<request number>) is also used as the document title.
If you don't select this check box, the document title is PUBLISHPLANDATA.7. In Table Name, select the pivot table of your plan for which you want to publish data.
The available tables are enabled for the work area of the plan, and you have the required access to these tables.8. In Source System, select the source system that's specified on the Scope tab of the Plan Options page for the
plan.9. To set a schedule for your request and notify other users about the result, click the Advanced button.
The Schedule and Notification tabs are displayed.
◦ On the Schedule tab, specify whether you want to run the process as soon as possible or according to aschedule.
If you publish the file according to a schedule, you can specify the frequency and start and end dates forthe process.
◦ On the Notification tab, specify the recipients to whom result notifications should be sent and theconditions under which the notifications are sent.
10. Click Submit.
The Confirmation dialog box opens and displays the process number. Make a note of this number, and click OK.
You can use this number to search for the result of your request in the Scheduled Processes work area.
If you appended this number to the compressed file's name, you can use this number to search for the file inthe File Import and Export work area. You can then download and check the file.
190

Oracle SCM CloudUsing Supply Planning
Chapter 7Supply Plans
Supply Planning Concepts
Daily Buckets in Supply Planning The planning process always plans in daily buckets because it considers that demands are due at the end of the day.The planning process doesn't plan demands and supplies at weekly, period, or monthly level.
Demands and supplies are balanced at the end of the day. The shortages or excess in demand and supplies are carriedover to the next day. However, tables and graphs can aggregate daily planning results into weekly, period, or monthlylevel.
Demands and supplies don't have time stamps. The planning process considers that the capacity during the day can beused for resource or supplier requirements scheduled for the same day. If a planned work order can be completed in lessthan a day, it's scheduled on the same day as the demand due date. Also, if the work order is less than a day, the startdate and the end date are same.
The planning process supports three calendars for aggregation in the planning output:
• Manufacturing calendars: Supports aggregation by week and period.
• Fiscal calendars: Supports aggregation by week and period in the tables.
• Gregorian calendars: Supports daily bucketing and aggregation by calendar month. The Gregorian calendardoesn't support bucketing by week.
Requirements Explosion for Make Items When you run a supply plan or a supply and demand plan, one of the processes that take place is requirementsexplosion for make items.
The supply planning process reviews the supply chain item structure to ensure that there is enough supply on handand on order to meet demand. The shortage of one item creates a demand for the items one level below it in thesupply chain item structure. This process of analyzing the demand of individual components that make up an item andcreating a demand for those components is known as requirements explosion.
The planning process uses the work definition of make order items to determine component requirements. Theplanning process makes suggestions accordingly to replenish the components that are in low supply to make the supplyof the make order item easier.
Settings that Affect Requirements Explosion for Make ItemsSupply planning respects component effective dates. The planning process determines a new date for the plannedmake order after it takes into consideration the following:
• The components that are part of the work definition
• The operations that are part of the work definition
• The component effective dates for the make item on or before the order start date of the planned order
• The operation effective dates for the make item on or before the order start date of the planned order
191

Oracle SCM CloudUsing Supply Planning
Chapter 7Supply Plans
Note: Requirements explosion is performed only for make items. If you mark a make item as a buy item, the planningprocess does not suggest replenishing any of its components.
How Requirements Explosion for Make Items is CalculatedConsider the following scenario:
• Item A is a make order for which there is a sales order of 100.
• It takes two of item B and three of item C to make one of item A.
The planning process explodes the demand to a component level and creates a demand of 200 for item B and 300of item C. The demand quantity on an item is the shortage of its parent item multiplied by the usage of the childcomponent in the parent item.
Related Topics• How Resource Scheduling Is Done
How Resource Scheduling Is Done Resource scheduling can be calculated when you know the planned make order duration. The planning process useslead times, both fixed and variable, to calculate planned make order duration. For existing work orders, the lead time isthe duration of the work order.
The planning process does not change the duration of the work order. You can also manually set fixed and manual leadtimes.
Tip: If you manually configure the lead times, then set larger values for a conservative planning result. Set smallervalues for an aggressive planning result.
For example, suppose the fixed lead time = 1
Variable lead time = 0.2.
The planned order size = 10 units
Make planned order lead time = fixed + variable multiplied by order size = 1 + 0.2 multiplied by 10 = 1 + 2 = 3 days
Demand due date = Day 5
Make planned order: Suggested start date = Day 2; Suggested due date = Day 5
The calculation assumes that day 5 ends at 23:59 and so one full day of lead time pushes the start date to day 4 at 23:59.So in the example, the 3-day lead time pushes the start date to day 2.
The following calculations are used to calculate planned make order duration, routing resource duration, operationduration, and resource duration"
• Planned make order duration: The planned make order quantity is determined by total quantity of demandsand order modifiers. Total make order lead time (days) = fixed lead time + quantity multiplied with variable leadtime.
192

Oracle SCM CloudUsing Supply Planning
Chapter 7Supply Plans
• Routing resource duration: Resource requirement (in hours) is calculated for item-based resource usages.Resource requirement = Quantity multiplied by Usage hours. Operation duration (in hours) is calculated byadding each resource requirement adjusted for any simultaneous resources. Total Routing Duration = Sum ofthe operation duration (hours).
• The operation duration and resource duration calculations are shown in the following illustrations. Eachoperation and resource requirement is spread over the total make lead time.
The following figure illustrates the calculation for operation duration.
The following figure illustrates the calculation for resource duration.
For a planned make order, the planning process performs the following task:
• Calculates duration based on fixed and variable lead times.
• Calculates required resource hours from the work definition.
• Spreads the required resource hours evenly across the calculated work order duration. If the work order hasmultiple operations, the duration for each operation is calculated and the resource hours are spread out withinthe operations for assigned resources.
Rescheduling Existing Work OrderFor an existing work order, you can either continue with the existing schedule or change the schedule and assign newdates. If the work order is not rescheduled, then the planning process:
• Does not change the work order start and end dates
• Does not change the operation and resource requirement start and end dates
• Spreads each resource usage evenly over the days of the resource requirement
For example, if the resource requirement start date is Day 5 and end date is Day 6, and resource usage is 14 hours, thenthe planning process allocates 7 hours on Day 5 and 7 hours on Day 6. If you reschedule a work order, the job duration ispreserved and does not change. The lead time for each operation and for each resource requirement remain the same.Only the start and end dates change.
Planning calculations follow these guidelines while rescheduling a work order:
• Allocate the same number of days for work order start and end dates. For example, if the end date is moved bytwo days, then move the start date by two days.
• Allocate the same number of days to each operation and resource requirement date. Using the previousexample, move each operation and resource requirement date by two days.
• Spread each resource usage evenly over the days of the resource requirement. For example, if the resourcerequirement start date is Day 5 and end date is Day 6, and resource usage is 14 hours, then allocate 7 hours onDay 5 and 7 hours on Day 6.
193
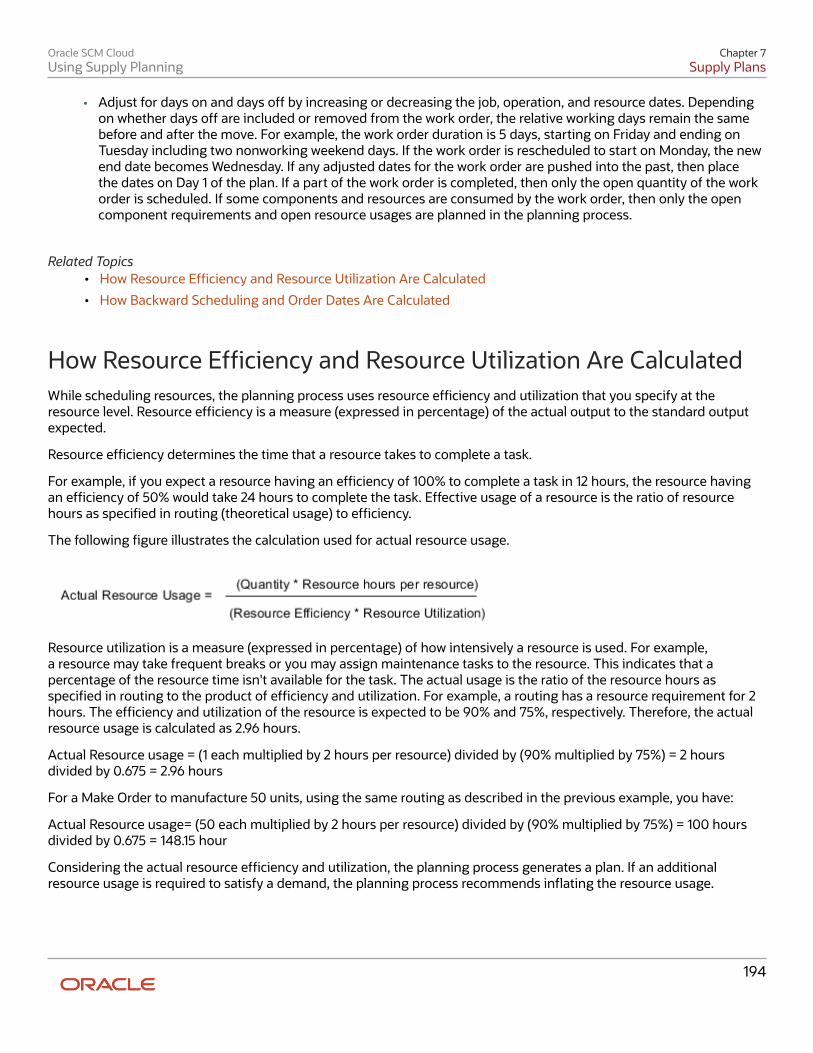
Oracle SCM CloudUsing Supply Planning
Chapter 7Supply Plans
• Adjust for days on and days off by increasing or decreasing the job, operation, and resource dates. Dependingon whether days off are included or removed from the work order, the relative working days remain the samebefore and after the move. For example, the work order duration is 5 days, starting on Friday and ending onTuesday including two nonworking weekend days. If the work order is rescheduled to start on Monday, the newend date becomes Wednesday. If any adjusted dates for the work order are pushed into the past, then placethe dates on Day 1 of the plan. If a part of the work order is completed, then only the open quantity of the workorder is scheduled. If some components and resources are consumed by the work order, then only the opencomponent requirements and open resource usages are planned in the planning process.
Related Topics• How Resource Efficiency and Resource Utilization Are Calculated
• How Backward Scheduling and Order Dates Are Calculated
How Resource Efficiency and Resource Utilization Are Calculated While scheduling resources, the planning process uses resource efficiency and utilization that you specify at theresource level. Resource efficiency is a measure (expressed in percentage) of the actual output to the standard outputexpected.
Resource efficiency determines the time that a resource takes to complete a task.
For example, if you expect a resource having an efficiency of 100% to complete a task in 12 hours, the resource havingan efficiency of 50% would take 24 hours to complete the task. Effective usage of a resource is the ratio of resourcehours as specified in routing (theoretical usage) to efficiency.
The following figure illustrates the calculation used for actual resource usage.
Resource utilization is a measure (expressed in percentage) of how intensively a resource is used. For example,a resource may take frequent breaks or you may assign maintenance tasks to the resource. This indicates that apercentage of the resource time isn't available for the task. The actual usage is the ratio of the resource hours asspecified in routing to the product of efficiency and utilization. For example, a routing has a resource requirement for 2hours. The efficiency and utilization of the resource is expected to be 90% and 75%, respectively. Therefore, the actualresource usage is calculated as 2.96 hours.
Actual Resource usage = (1 each multiplied by 2 hours per resource) divided by (90% multiplied by 75%) = 2 hoursdivided by 0.675 = 2.96 hours
For a Make Order to manufacture 50 units, using the same routing as described in the previous example, you have:
Actual Resource usage= (50 each multiplied by 2 hours per resource) divided by (90% multiplied by 75%) = 100 hoursdivided by 0.675 = 148.15 hour
Considering the actual resource efficiency and utilization, the planning process generates a plan. If an additionalresource usage is required to satisfy a demand, the planning process recommends inflating the resource usage.
194
Oracle SCM CloudUsing Supply Planning
Chapter 7Supply Plans
Configure the Precision of Resource Usage CalculationsYou can configure the level of decimal precision to which resource usage calculations are rounded to accuratelycalculate resource requirements in supply planning. Use the Decimal Precision for Resource Usage profile option toset the decimal precision to up to 9 digits.
Related Topics• How Resource Scheduling Is Done
• How You Manage Planning Profile Options
Sourcing Allocation Splits The planning process creates supplies based on the sourcing splits (rank one only). Supply planning uses splitpercentages that can be specified on sourcing rules.
You can rank the sources of supply that are named in the rules and bills, giving one priority over another when theplanning process generates recommendations. You can also assign sourcing percentages to these sources, which letsyou to allocate a portion of the total orders to each source. Sourcing allocation considers all supply sources: buy, make,and transfer.
If there are no order modifiers, then when supplies are required on a day, the planned orders for the day are split into asmany planned orders as required to meet the rank one sourcing allocation splits. If there are item-attribute or supplier-order modifiers, the supply is created for the highest allocation split percent source (rank one) respecting the ordermodifiers. Then a supply is created for the next source, again respecting the order modifiers. The supply sources areused in allocation percent order. As each order is created, the next lower allocation percentage source is considered.If all rank one sources are used, then an order is created for the remaining top allocation percent source again and soforth through the top rank sources. This is repeated until enough supply is created.
The calculation attempts to balance supply sources over the plan horizon to meet the rank one allocation percents. Ifsupplies don't respect the split due to existing purchase orders or order modifiers, then the planning process selectsources each day to bring the plan horizon supplies into alignment with the sourcing splits. You have to create supplyon the source that leads to the lowest deviation of the cumulative sourcing split from the split percentages specified inthe sourcing rule. The planning process doesn't consider historical receipts when calculating sourcing splits. Only openpurchase orders, transfer orders, and make orders are considered.
The following formula is used to calculate the sourcing split each day:
If Total Supply multiplied by Source A allocation percentage > Supply for Source A, then create a new planned order forSource A (respecting order modifiers) so that supply for Source A > or = Source A allocation percentage multiplied byTotal Supply, until Total Supply > or = Total Demand.
Sourcing allocation and effective dates: If a sourcing rule becomes effective on a certain date, then the planning processrespects the allocation percentages from the effective date and after. The planning process doesn't consider allocationthat has happened before the effective date.
For example, a plan runs on March 1st and the sourcing rule is:
• Effective January 1st until May 31st: 40 % Acme, 60 % Business World
• Effective June 1st: 50 % Acme, 50 % Consolidated
195

Oracle SCM CloudUsing Supply Planning
Chapter 7Supply Plans
Starting June 1st, the allocation process splits 50/50 between Acme and Consolidated. The allocation process ignoresthe history before the effective date. The allocation process doesn't consider whether Acme has 40% or 60% of theorders before June 1st.
Guidelines for Using Alternate Resources and SubstituteComponents for Planned Orders Use alternate resources and substitute components to plan your orders to meet high-priority demands. You can planyour orders effectively if you can firm a resource or component to a particular plan.
You can select alternate resources and substitute components for a planned order from the Supplies and Demands pagein the Supply Planning work area.
• To select and firm alternate resources, select a planned order on the Supplies and Demands page and clickthe Edit icon from the Firm Resources column. You can also firm alternate resources by selecting the FirmResources option in the Actions menu.
• To select and firm substitute components, select a planned order on the Supplies and Demands page andclick the Edit icon from the Firm Components column. You can also firm components by selecting the FirmComponents option in the Actions menu.
On the Supplies and Demands page, if Firm Resources and Firm Components columns are not visible, enable thecolumns by clicking View > Columns > Firm Resources and Firm Components.
Points to Consider for Firm ResourcesConsider the following points before you firm resources:
• The order type must be a planned order and the item must have a work definition.
• The planned order is firmed when you select a resource from the Firm Resource dialog box.
• The start date of the planned order needs to be within the effective date range of the operation for which thefirm resource is selected.
• To save the changes that you make in the Firm Resources dialog box, close the Firm Resources dialog box andsave the Supplies and Demands page. You must rerun the plan so that the planning process can select thefirmed resources.
Points to Consider for Firm ComponentsConsider the following points before you firm components:
• The order type must be a planned order and the item must have an item structure defined.
• For items or organizations that have work definitions: You can either change the work definition and itemstructure name, or select a work definition and item structure name from the Work Definition drop-down list.When you change the work definition and item structure, the planning process firms the underlying plannedorders.
You can also select an item structure and work definition name from the Item Structure drop-down list. Ifyou select an item structure and work definition, the planning process firms the underlying planned orders.Selecting a firm component in the Firm Component dialog box firms the planned order.
196

Oracle SCM CloudUsing Supply Planning
Chapter 7Supply Plans
• The Operation Sequence Number column in the Firm Components dialog box includes the list of values(operation sequence number, effective start date) contained within the work definition.
• You must select an operation in the Firm Components dialog box to firm a component. The start date ofthe planned order must be within the effective date range of the operation for which the firm component isselected.
Using the Actions Menu to Firm Resources and ComponentsConsider the following points before you firm resources and components using the Actions menu:
• When you select multiple orders, you can select Firm Resources and Firm Components from the Actions menu.
• To firm resources, all selected rows must have the same item, organization, and the order type must be aplanned order. The item and organization must have at least one work definition defined.
• To firm components, all selected rows must have the same item, organization, and the order type must be aplanned order. The item and organization must have at least one work definition or one item structure defined.
Related Topics• Considerations for Creating Work Orders from Planning With Alternate Resources and Substitute Components
Reservations in Supply Chain Planning You can collect information about all reservations that are created by the inventory processes and view them in one ofthe Supply Chain Planning work areas. You can view the amount of supply that is pegged to order fulfillment lines.
Supply Chain Planning does not create reservations; it just displays all the reservations that are created by the inventoryprocesses. You cannot edit the quantity or kind of supply that is reserved to a sales order in the configurable planners'workbench.
The following types of supply can be reserved to a sales order in the inventory:
• On hand inventory
• Work orders
• Purchase orders
• Transfer orders
Multiple sources and quantities of supply can be reserved to a single sales order fulfillment line.
There are two ways by which sales orders are pegged to supplies:
• Multiple sales orders can be pegged to a single source of supply: In this case, the pegged quantity does notexceed the total supply quantity. This type of reservation is done when a single source of supply is adequateenough to fulfill many sales orders.
For example, there are 50 sales orders for item A. Each sales order is for a single unit of A. You have defined oneof your supply sources as an inter-organization transfer that supplies 100 units of A. Therefore, 50 units out ofthe 100 units from the transfer supply can be pegged to the different sales order fulfillment lines.
• Multiple sources of supply can be pegged to a single sales order: In this case, the pegged quantity does notexceed the total demand quantity. This type of reservation is done when a single supply source is not adequateto fulfill a sales order which demands a large quantity of supply for an item.
197

Oracle SCM CloudUsing Supply Planning
Chapter 7Supply Plans
If a sales order is recorded for an item that has a high demand, multiple sources of supply can be pegged invaried quantities to that single sales order. For example, you have defined two supply sources A and B as thefollowing: A is an inter-organization transfer and B is a purchase from an external supplier. If a sales order of800 units for this item is recorded, a part of the supply from A and a part of the supply from B will be reserved.Those reserved quantities are then pegged to the single order fulfillment line.
Supply planning respects a demand reservation to a lot without regard to the lot expiration dates. A lot that expires onday 6 can be reserved to a demand that is due on day 10. Supply Chain Planning collects this reservation as it is andreflects all reservations on the Supplies and Demands page. You can only view reservations in a Supply Chain Planningwork area, but you cannot modify them.
Related Topics• View Pegging for Reservations
• How FIFO Pegging Is Used in Supply Chain Planning
View Pegging for Reservations You can view all of the reservations that the inventory process creates. To view the sales order fulfillment lines that arepegged to different supplies and the amount of supply reserved against each sales order, follow these steps:
1. Open a plan:
a. In the Navigator, click a Supply Chain Planning work area.b. Click the Plans drawer.c. Expand Plans, and select the plan of your choice.d. Click the Action menu and select Open.
2. Open the Supplies and Demands table and search for all sales orders. You can search by defining one or moreattributes in the search criteria, such as Item, Organization, or Order Type.
3. In the Search Results area, click View and then select Manage Columns.4. In the Manage Columns dialog box, move Reserved Quantity and Reservation Type from the Hidden Columns
section to the Visible Columns section.5. Optionally, use the Move selected items to the top of list button to move these two columns to the beginning
of the row. This enables you to view all information related to reservations at once.6. Click OK to return to the Supplies and Demands table.
Tip: You can also enhance your search by setting an Advanced search criteria such as Reserved Quantity > 0. Thiswill display only those sales orders that have some amount of reserved supply pegged to them.
Related Topics• Reservations in Supply Chain Planning
198

Oracle SCM CloudUsing Supply Planning
Chapter 7Supply Plans
How You View Model Forecast and Sales Order Together In the configure-to-order process, the execution system transacts the configured item using a unique item identifierthat's different from the model item identifier. To make effective planning decisions, you need to view the modelforecast, and the supply and demand orders together.
You can view the model forecast and the sales order together in the Material Plan table.
By viewing the model forecast and sales order together, you can analyze and make effective supply and demanddecisions in a configure-to-order environment.
Enable the Measure for a Combined View of the Model Forecast and Sales OrderTo view the model forecast and the sales order together, you must enable the Configured Item Sales Orders measure.Before you enable the measure, add the measure to the measure catalog. To view the measure, assign a category to themodel.
Follow these steps to enable the measure:
1. From your Supply Chain Planning work area, open a plan, and click Open > Full Pane.2. From the Open Table, Graph, or Tile Set page, search and open the Material Plan.3. From the Material Plan table, click the Selector Tool View Table Configuration icon from the material plan
tool bar.4. In the Measures tab, move the Configured Item Sales Orders measure from the Available Measures column to
the Selected Measures column.5. Click Save and Close.
Considerations for Changing the Organization for a Sales Order You can change the organization for a drop ship sales order or a regular sales order, depending on the associatedsupplier or supplier site. The following situations summarize how the drop ship or regular sales order is affected whenyou change the organization.
Drop ship sales order for an outsourced manufacturing organizationYou can change the current organization to any other organization. Consider the following points when you change theorganization:
• If you change the current organization to another organization that has an associated supplier or supplier site,the sales order remains a drop ship sales order. The supplier and supplier site on the sales order will reflect thevalue associated with the new organization on the sales order.
• If you change the current organization to a drop ship validation organization, you have to manually provide asupplier or supplier site. List of values for the supplier or supplier site includes only those suppliers or suppliersites that are not associated with any organization.
• If you change the current organization to an internal organization, the supplier and supplier site are set to blankvalues. The drop ship sales order becomes a regular sales order.
199

Oracle SCM CloudUsing Supply Planning
Chapter 7Supply Plans
You cannot make line edits to the supplier or supplier site in the drop ship sales order on the Supplies and Demandpage.
Drop ship sales order for a drop ship validation organizationYou can change your current organization to any other organization. Consider the following points when you change theorganization:
• If you change the current organization to an organization that has an associated supplier or supplier site, thenthe supplier and supplier site on the drop ship sales order gets changed to reflect the ones associated with thenew organization. The sales order still remains a drop ship sales order.
• If you change the current organization to an internal organization, the supplier and supplier site are set to blankvalues. The drop ship sales order becomes a regular sales order.
You can make line edits to the supplier or supplier site in the drop ship sales order on the Supplies and Demands page.List of values for the supplier or supplier site includes only those suppliers or supplier sites that are not associated withany organization.
Regular sales order for an internal organizationYou can change your current organization to any other organization. Consider the following points when you change theorganization:
• If you change the current organization to an organization that has an associated supplier or supplier site, theregular sales order is converted into a drop ship sales order. The supplier or supplier site in the newly converteddrop ship sales order reflects the supplier or supplier site associated with the new organization.
• If you change the current organization to the drop ship validation organization, you have to manually providea supplier or supplier site. List of values for a supplier or supplier site includes only those suppliers or suppliersites that are not associated with any organization.
• If you change the current organization to another internal organization, the sales order still remains an internalsales order.
Regular sales order for an outsourced manufacturing organizationYou cannot make any changes to the organization, or to the supplier or supplier site.
How You Plan and Collaborate with Drop Ship Manufacturers Using supply planning, you can plan and collaborate with your contract manufacturers in a configure-to-orderenvironment. You can plan and collaborate with your contract manufacturers to drop ship customer orders directly fromcontract manufacturers to customers.
Add each contract manufacturer as an organization in Oracle Fusion Product Information Management so that you canplan and collaborate with the contract manufacturers. You can add the contract manufacturers as item organizations,if you do not plan to enable transactions at these organizations. After you add the contract manufacturers as anorganization, you can share the model and option forecast with your contract manufacturers and plan to fulfill theorders.
Using demand management, you can forecast demands for models and options at contract manufacturing locations.The planning percentages for an option can vary according to the top model, where the option is a part of the model.The planning percentages for an option can also vary by the demand class of the forecast.
200

Oracle SCM CloudUsing Supply Planning
Chapter 7Supply Plans
You can consume forecasts for models and options in supply planning using the drop ship sales orders that the contractmanufacturers fulfill. Supply planning also generates planned orders to fulfill the demand for models and options atcontract manufacturing organizations. You can publish the planned order as an order forecast to Oracle Fusion SupplyChain Collaboration. You can collaborate with your contract manufacturers to receive supply commits for models andoptions.
Plan Demands from Maintenance Work Orders You can plan supplies for components required by maintenance work orders, such as the components created tomaintain production equipment and transportation fleets.
Before you can use this functionality for constrained or unconstrained supply planning, your enterprise must opt in tothe Plan Demands from Maintenance Work Orders feature. For more information and detailed instructions on opting into new features for your offering, refer to the Using Functional Setup Manager guide.
With this feature, you can plan demands from maintenance work orders in your constrained or unconstrained supplyplans. This functionality ensures that you have the right components on hand to minimize the downtime of your assetsand return them to service as quickly as possible.
For example, an international chemical manufacturer uses modular spectrometers in their production operations.These spectrometers require regular and timely maintenance to ensure progress of manufacturing operations withminimal downtime. To ensure that all of the required components are available at the time of scheduled maintenance,the maintenance planner creates maintenance work orders a month earlier than the scheduled maintenance. Theplanner ensures that the work order scheduled dates conform to the scheduled maintenance dates. The planner usessupply planning to collect maintenance work orders and suggest planned orders for the materials required in thesemaintenance work orders.
Only asset items that are planned items based on the Product Information Management Planning Method attribute arecollected:
• All collected assets are available in the plan.
• Asset items are planned as normal.
• All item attributes of these asset items are collected and you can edit the editable attributes in the plan.
You can view the maintenance work orders and maintenance work order demands in the Supplies and Demands table.The table also displays the asset name for the maintenance work orders and maintenance work order demand, but theAsset column is blank for all other supply order types.
The planning process collects the maintenance work orders as firm work orders, and you can't edit the Firm Statusattribute. This means that you can't edit the date or quantity of the maintenance work order in the Supplies andDemands table. Also, the maintenance work orders aren't included in the Work Order measure.
The maintenance work order of collected assets are available in the plan. The maintenance work order demands areplanned; however, the resources used to maintain the asset item aren't planned. Also, the maintenance work order:
• Can't be edited.
• Has an Action attribute of None, and it can't be released.
• Isn't considered as a valid supply and the planning process pegs it to excess.
Checklist to Set Up Plan Demands from Maintenance Work OrdersBefore you can use the Plan Demands from Maintenance Work Orders feature, you must set up your system.
201

Oracle SCM CloudUsing Supply Planning
Chapter 7Supply Plans
Set up step Comments
Opt in to the feature
Your enterprise must first opt in to the Plan Demands from Maintenance Work Orders feature. Refer tothe Using Functional Setup Manager guide for more information about opting in to features.
Collect planning data for work ordersupplies
In the Collect Planning Data dialog box, Supply Planning Data tab, select Work Order Supplies tocollect all work orders, including maintenance work orders.
Select a Planning Method
In the Product Information Management work area, select a planning method on the Manage Itempage, Specifications tab, in the Planning section. The asset item is planned if it's a planned item, based on the planning method attribute:
• If the planning method is anything but Not Planned (for example, MRP Planning or MPSPlanning), the asset item will be collected.
• If the planning method is Not Planned, then the asset item won't be collected.
Select the Include in Planning check box
To select the Include in Planning check box to collect and plan maintenance work order components:
1. In the Maintenance Management work area, select the Manage Maintenance Work Orders task.2. On the Maintenance Work Order page, select the work order.3. On the Edit Work Order page, Operations tab, click on the item.4. In the Edit Operation Items dialog box, select the Include in Planning check box.
Plan Items with Only Transfer Order Demand You can plan for item and organization combinations that have no demand other than transfer order demand from adownstream organization, such as a distribution center.
For example, ABC Enterprises has multiple distribution centers where it receives sales orders from different customers.It replenishes the distribution centers either by transferring existing supplies or by manufacturing the supplies inmanufacturing organizations based on demand from distribution centers. ABC Enterprises can focus on planning onlymanufacturing organizations in a supply plan with transfer order demands from distribution organizations withoutrunning the supply plan with all planned items.
To plan items with only transfer order demands in an organization, select one of the following from the Supply PlannedItems drop-down list on the Scope tab in plan options:
• All planned items
• Demand plan items and all sales orders
• Demand plan items, WIP components, and all sales orders
You can plan items with only transfer order demand from a Supply Planning or Demand and Supply Planning work areafor constrained and unconstrained supply plans.
If your plan includes both transfer order demands and sales orders, you can modify a setting to plan only the transferorder demands. To plan only transfer order demands but not sales orders, deselect the Enable Netting check box forsales orders in Demand and Supply Netting dialog box in plan options.
202

Oracle SCM CloudUsing Supply Planning
Chapter 7Supply Plans
To deselect the Enable Netting check box for sales orders:
1. In the Supply Planning work area, open the Manage Plans page.2. Create a plan or edit plan options for an existing plan.3. Click the Supply tab in Plan Options and navigate to the Organizations and Schedules subtab.4. Select an organization and then click the Select button in the Demand and Supply Netting column.5. In the Demand and Supply Netting dialog box, deselect the Enable Netting check box for sales orders.
Related Topics• Plan Items with Safety Stock Targets with No Demand
• Define Scope Plan Options
• Supply Plan Options for Organizations and Schedules
• Why can't I select Supply Planned Items?
Telescoping Time Buckets
Overview of Telescoping Time Buckets With telescoping time buckets, you determine the low-level time bucket for the near term of your planning horizon. Andif you want, you can also determine a different time bucket for the remainder of the planning horizon.
You set up telescoping time buckets on the Plan Options page, Scope tab, in the Plan Parameters section.
Filtering, graphing, conditional formatting, and setting exception message thresholds all play a part in facilitating planmanagement by exception. And certainly the time dimension levels that you select for your tables and graphs help. Forexample, if you don't need to see plan output in days, then select weeks, periods, or months for your plan output.
You can also use telescoping time buckets to handle information overload. For example, instead of your plan calculatingand planning in 100 daily buckets for a 100-day plan, the horizon can be telescoped as follows: The first 1.5 months in 45daily buckets, and the remaining 2 months in 8 weekly buckets.
Telescoping a plan's planning time buckets reduces granularity of calculation and the number of data points in yourplan. By selecting a larger planning time bucket, you eliminate unnecessary plan precision and detail for the entire plan,or just the portion of the horizon beyond the near term. The plan consolidates output into larger time buckets that youdetermine, such as weekly instead of daily, monthly instead of weekly or daily, and so on. The end result is improvedplan runtime performance and visibility further out into the plan without having to scroll as much.
Keep in mind that telescoping does affect the available levels for you to view and edit measure data in a supply plan.In our 45 daily plus 8 weekly buckets planning horizon, if you look beyond day 45 of the supply plan, daily viewing andediting is no longer possible. However, if you view data in a demand and supply plan, you can drill down to the dailylevel, even if you use telescoping time buckets. This is because demand planning allocates demand measures down tothe day level.
Configure Telescoping Buckets in a Supply Plan You can configure your supply plan to use telescoping buckets. You can set your planning horizon to include only days,weeks, periods, or months. Or you can set your supply planning buckets at two levels of granularity.
203
Oracle SCM CloudUsing Supply Planning
Chapter 7Supply Plans
For two levels, select a planning horizon that's a combination of daily time buckets and less granular time bucketssuch as week, period, or month. The planning process calculates detailed plan information for the shorter time horizon(days), and plans the later part of the planning horizon with less granularity. You improve your plan run time byeliminating unneeded precision and detail for the later parts of the planning horizon.
Before you use telescoping time buckets, think about how many daily time buckets and less granular time buckets youwant to use.
To use telescoping buckets, configure the plan parameters for your supply plan.
1. In a Supply Planning, Planning Central, or Demand and Supply Planning work area, open a plan and navigate tothe Plan Options page, Scope tab.
2. In the Plan Parameters section on the Scope tab, select a supply planning calendar, which can be a 4/4/5calendar or a Gregorian calendar.
3. Next, select your supply planning buckets. The list of values for the bucket types is determined by the calendarthat you specify.
You can base your planning horizon on days, weeks, periods, or months. Or, you can specify a combination ofdaily time buckets and then specify less granular time buckets such as weeks, periods, or months. If you usetwo bucket types, the first bucket type must be Days.
4. Specify the number of buckets for each supply planning bucket.5. Select Do not create partial buckets to create additional daily buckets in the plan to avoid partial buckets.
Select this option to ensure that a week, month, or period always starts on the first defined day for thatparticular week, month, or period. For example, a weekly bucket starts on a Monday when you designateMonday as the week start date. A monthly bucket starts on the first day of the month.
If you don't select this option, the plan doesn't add any additional daily buckets. Instead, the planning processcreates a partial bucket and counts that partial bucket as the first week, period, or month, as specified in theplan options.
Related Topics• Define Scope Plan Options
How Demands and Supplies are Impacted in Supply Plans that UseTelescoping Time Buckets When you configure your supply plan to use telescoping time buckets, you can set your planning horizon to include onlydays, weeks, periods, or months.
Or you can use telescoping buckets to plan in a combination of daily time buckets and more aggregate time buckets,such as weeks, months, or periods.
Let's say that you have a plan with time buckets larger than days.
• The net forecast quantities that remain after forecast spreading and forecast consumption are aggregated upto the planning time bucket level.
• These net forecast quantities are placed on the last working day of the planning time bucket.
• The supply planning process considers each combination of item, organization, demand schedule, demandclass, customer, and customer site.
204

Oracle SCM CloudUsing Supply Planning
Chapter 7Supply Plans
For example, suppose the net forecast quantity is 10 units per working day per combination of item, organization,and demand class in a plan with all daily buckets. Your organization is set up for 5 working days per week. The sameplan with weekly buckets displays an aggregated net forecast for a quantity of 50 units for each demand class. Thisaggregated forecast has a suggested due date of the last working day of each weekly bucket.
These are other ways that demands and supplies are impacted when you use weekly, monthly, or period time buckets.
• All supply and demand orders and all resource requirement dates are subject to bucketing logic. In other words,for time buckets larger than days, dates calculated on supply and demand orders are bucketed to the lastworking day of the bucket. The working days specification is based on the supply planning calendar that youselect on the Plan Options page, Scope tab, not the organization calendar.
• When you release make or transfer planned orders created in planning time buckets larger than days, theorders have a suggested due date that corresponds to the last working day of the time bucket. Buy plannedorders also have a suggested due date that corresponds to the last calendar day of the bucket. However, theimplement date is set as the first calendar day of the bucket. This implement date ensures that the supplierdelivers the material in time to meet the entire planning time bucket's demand for the item.
• Firm dates, implement dates, and dates in the input data such as requested ship date or scheduled ship datesaren't subject to the bucketing logic. For example, you can firm a planned order that was previously bucketedto the last working day of the month to any day, regardless of whether day is the last day of the supply planningbucket or even a working day.
How Safety Stock is Calculated for Supply Plans That UseTelescoping Time Buckets If you use days of cover for your safety stock calculation method, then the calculation method factors in the telescopingtime buckets. If you don't use days of cover, then telescoping buckets has no impact on how safety stock is calculated.
For days of cover based safety stock calculations, the planning process prorates demand in the supply planning bucketsbased on the specified demand period.
Let's suppose you have an item with the safety stock planning method of Days of Cover. The Demand Period and Daysof Cover values are set to 4 days. Additionally, the organization calendar has 7 working days.
205
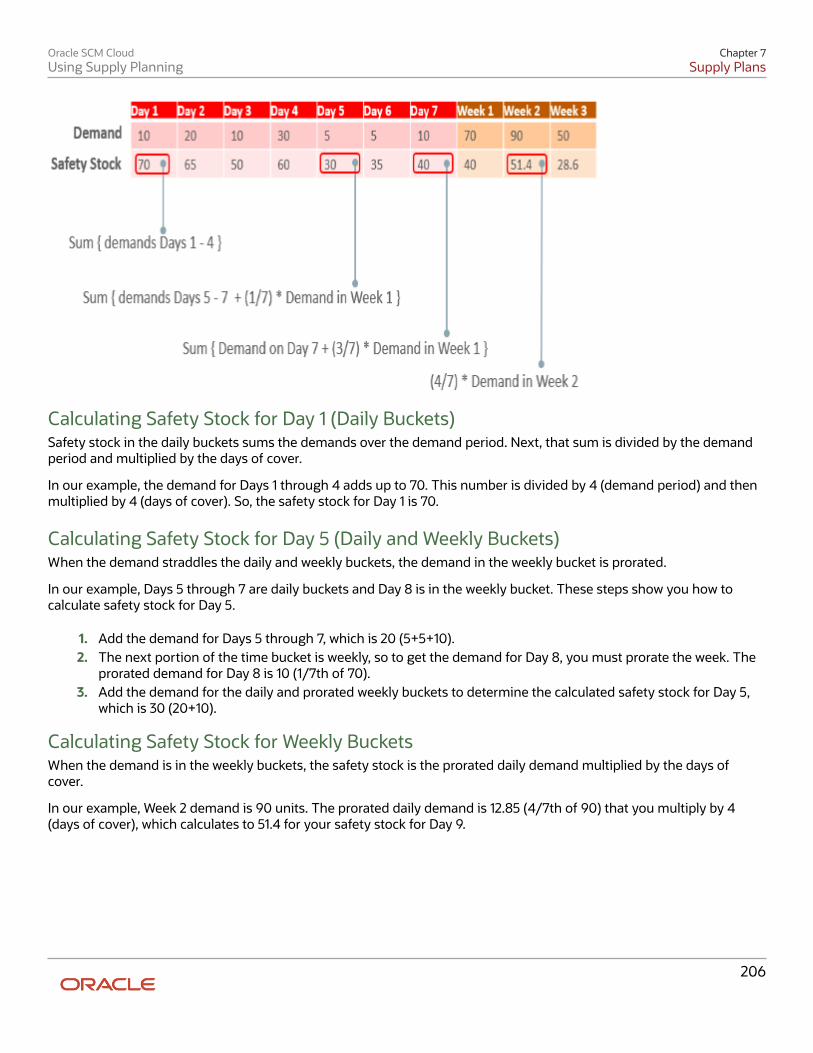
Oracle SCM CloudUsing Supply Planning
Chapter 7Supply Plans
Calculating Safety Stock for Day 1 (Daily Buckets)Safety stock in the daily buckets sums the demands over the demand period. Next, that sum is divided by the demandperiod and multiplied by the days of cover.
In our example, the demand for Days 1 through 4 adds up to 70. This number is divided by 4 (demand period) and thenmultiplied by 4 (days of cover). So, the safety stock for Day 1 is 70.
Calculating Safety Stock for Day 5 (Daily and Weekly Buckets)When the demand straddles the daily and weekly buckets, the demand in the weekly bucket is prorated.
In our example, Days 5 through 7 are daily buckets and Day 8 is in the weekly bucket. These steps show you how tocalculate safety stock for Day 5.
1. Add the demand for Days 5 through 7, which is 20 (5+5+10).2. The next portion of the time bucket is weekly, so to get the demand for Day 8, you must prorate the week. The
prorated demand for Day 8 is 10 (1/7th of 70).3. Add the demand for the daily and prorated weekly buckets to determine the calculated safety stock for Day 5,
which is 30 (20+10).
Calculating Safety Stock for Weekly BucketsWhen the demand is in the weekly buckets, the safety stock is the prorated daily demand multiplied by the days ofcover.
In our example, Week 2 demand is 90 units. The prorated daily demand is 12.85 (4/7th of 90) that you multiply by 4(days of cover), which calculates to 51.4 for your safety stock for Day 9.
206

Oracle SCM CloudUsing Supply Planning
Chapter 7Supply Plans
How Exceptions are Calculated in Supply Plans That UseTelescoping Time Buckets When you use telescoping buckets in your supply plan, the planning process handles exception messages based onwhat you specify for Planning Time Buckets in plan options.
This table explains how the planning process calculates exceptions when you use time buckets larger than days.
Exception Type Calculation Logic
• Orders To Be Rescheduled In
• Orders To Be Rescheduled Out
The planning process generates reschedule exceptions only if the supply orders get rescheduledacross planning time buckets. Any reschedules of the order due dates within a planning time bucket doesn't trigger rescheduleexceptions.
• Late Supply Pegged to Sales Order
• Late Supply Pegged to Forecast
• Late Replenishment for Sales Order
• Late Replenishment for Forecast
The planning process generates late supply or late replenishment exceptions only if the supply anddemand dates are in different planning time buckets. For example, a sales order suggested due date is in the middle of a week. The suggested due date ofthe supply is the last working day of the week. In this case, the planning process doesn't generate aLate Supply Pegged to Sales Order or Late Replenishment for Sales Order exception. However, suppose you have a sales order suggested due date in the middle of a week. The suggesteddue date of the supply is the first working day of the following week. In this case, the planning processgenerates an exception.
• Items with a Shortage
• Items Below Safety Stock
The planning process creates an exception only if the available quantity is less than the requiredquantity at the planning time bucket level. The planning process evaluates item shortages by using theprojected available balance on the last day of the planning time bucket. The planning process ignores daily fluctuations within a planning time bucket.
• Items with Excess Inventory The planning process creates an exception only if the available quantity is greater than the requiredquantity at the planning time bucket level. The planning process evaluates item excesses by using theprojected available balance on the last day of the planning time bucket. The planning process ignores daily fluctuations within a planning time bucket.
• Resource Overloaded
• Supplier Capacity Overloaded
The planning process creates an exception only if the available capacity is less than the requiredcapacity at the planning time bucket level. For example, in a weekly bucket, a resource can have some overloads within the week on a few days. Aslong as the available capacity at the week level is more than the required capacity, the planning processdoesn't generate a resource overload exception. The planning process ignores daily fluctuations within a planning time bucket.
207

Oracle SCM CloudUsing Supply Planning
Chapter 7Supply Plans
Guidelines to View and Edit Measure Data in Tables for SupplyPlans That Use Telescoping Buckets When you use telescoping buckets in your supply plan, there are some things to understand before you view planoutput or edit measure data in tables.
If you use a table to view the plan output in a supply plan that includes the time dimension, the time hierarchy selectedin this table must be the Supply Planning Calendar. Use this time hierarchy to ensure consistency between the level atwhich planning is performed and the level at which you view the plan output.
When you use telescoping buckets in a supply plan, you can't edit measure data in a table at a level lower than thesupply planning bucket. For example, you can't edit data at the day level if your data in the table is at a weekly bucket.However, you can view and edit the measure data at or above the planning time bucket level.
Note: If you view data in a demand and supply plan, you can drill down to the daily level, even if you use telescopingtime buckets. This is because demand planning allocates demand measures down to the day level.
Let's walk through how viewing and editing measure data in tables works in a bit more detail.
If you're viewing the portion of the planhorizon that's planned in:
Measure data that you can view or edit in tables
Daily Buckets
You can view or edit the measure values in either daily, weekly, period, or monthly levels in the table.
Weekly Buckets
• You can view or edit the measure values in either weekly or period levels in the table.
• You can't view the data at the daily granularity, even though the planning process allocates somemeasure data down to the day level.
• You can't drill down from the week to the day level.
• Any edit that you make at the period level is allocated to the last day of each of the underlyingweeks within that period.
Period Buckets
• You can only view or edit the measure at the period granularity.
• You can't drill down from the period to the week or day level.
• Any edit that you make at the period level is allocated to the last day of the period.
Monthly Buckets
• You can only view or edit the measure at the monthly granularity.
• You can't drill down from the month to the day level.
• Any edit that you make at the monthly level is allocated to the last day of the month.
These four measures work differently when you edit them.
• Gross Forecast
• Net Forecast
• Manual Demand
208

Oracle SCM CloudUsing Supply Planning
Chapter 7Supply Plans
• Planned Orders
You can view the portion of the plan horizon that's planned in weekly buckets. Any edit that you make at the week levelis allocated to the last day of the week for these four measures. After you save your plan, the supply planning processupdates or creates demands and supplies. These demands and supplies have a suggested due date that's the lastworking day of the supply planning bucket.
Modeling a Supply Chain
How Phantom Assemblies Are Used in Supply Chain Planning A phantom assembly, also known as phantom bill, is a nonstocked assembly that lets you group materials requiredto produce a subassembly. When you create a bill of material for a parent item, you can specify a component as aphantom.
One bill of material can represent a phantom subassembly for one parent item, and a stocked subassembly for anotherparent item. A phantom bill of material enables you to manufacture and stock the assembly when necessary. Forexample, you can use phantoms to build and stock occasional spares for field service requirements. The planningprocess explodes through a phantom subassembly to the components.
Settings That Affect Phantom AssemblyThe planning process ignores phantom assembly routing when you define a job or repetitive schedule. To avoid anyadditional lead time offset for components, you set the lead time of the phantom to zero.
How Phantoms Are Used in PlanningWhen model bills or option class bills are components to another bill of material, the component supply type isa phantom. Instead of passing the parent's planned orders to the phantom, netting the phantom, and passingrequirements to the phantom's components, the planning process blows through the phantom to create componentplanned orders. For the organization parameter, you have only the Material Only option for Phantom OperationSequence Inheritance. The planning process ignores order modifiers for items that have a phantom supply type. Theplanning process plans the phantom subassembly using the lot-for-lot lot-sizing technique.
Typically, phantom assemblies act as normal assemblies when they represent a top-level assembly, such as when youmaster schedule them or manufacture them using a discrete job. As a subassembly, however, they lose their identityas distinct assemblies and are a collection of their components. The components of the phantom subassembly areincluded on the job and in the planned supplies, but not the phantom itself. Using the bill of material to determinephantoms, has two advantages: it allows for more flexibility (because a component can be a phantom in one bill and notanother), and treatment of phantoms in the planning process is consistent with Oracle WIP.
How FIFO Pegging Is Used in Supply Chain Planning Pegging is a process that the planning calculations use to link the supply with the demand, and the demand with thesupply. FIFO is first in, first out. In FIFO pegging, demands are linked to supplies on a day-by-day basis.
The planning processes sort demands by day, demand type, and supply quantity in ascending order. The planningprocesses sort supplies by day, supply type, and supply quantity in ascending order.
209

Oracle SCM CloudUsing Supply Planning
Chapter 7Supply Plans
For all reserved demands and supplies, the planning processes first pegs demands with reservations (existing orrecommended) to the reserved supply without regard to the demand type, the supply type, and dates. Pegging alwaysrespects reservations. For unreserved demands and supplies, the planning processes sort demands day by day in thefollowing sort order:
• Past due sales orders
• All sales orders
• Manual demands
For all other demands, including forecasts and dependents demands, the planning processes sort supplies day by day inthe following sort order:
• On hand
• Past-due supplies (firm by definition)
• Existing firm supplies
• Existing non-firm supplies
• Planned orders
During demand and supply netting in planning calculations, if safety stock levels are specified for an item organization,then the netting is performed considering the daily safety stock level. The planning calculations do not use the notionof safety stock demand. As there is no concept of safety stock demand, there is no pegging of a supply to a safety stockdemand. The planning calculations do not peg some or all of a supply to anything when some or all of the supply isused to meet the required safety stock level. A supply, which meets a safety stock level, pegs to either future demand oris not pegged. Excess supplies because of order modifiers can peg to nothing at the end of the planning horizons.
How Shrinkage Is Calculated The planned quantities of products sometimes decrease or shrink as they move through the production process.Shrinkage rate is an item-organization attribute, which determines the expected scrap and other losses in inventory.
To overcome the inventory shrinkage, the planning process begins with production quantities greater than the requiredquantity to meet the demand. The planning process considers the value that you specify for shrinkage and uses it toplan for shrinkage of an item in an organization. The planning process plans for demand by starting with a quantitythat considers shrinkage and then arrive at the required order quantity. The order quantity is the quantity after theshrinkage is applied. The planning process uses the shrinkage rate and the required order quantity to determine thestart quantity. The planned order needs the start quantity to account for the shrinkage.
For example, consider an item that has a shrinkage of 10%. For a demand of 100, the planning process starts with aquantity that will shrink by 10% to arrive at 100.
The planning process derives the start quantity based on the following equation:
Start Quantity = {Order Quantity divided by (1 minus Shrinkage)} multiplied by 100
Start Quantity = {Order Quantity / (1-Shrinkage)} * 100
(100 / (100-10)) * 100 = 111.11
The supply planning process considers shrinkage for both planned orders and existing supplies. As work orders can beincomplete at the time of planning, you can track the status of the work order from your Supply Chain Planning workarea.
210
Oracle SCM CloudUsing Supply Planning
Chapter 7Supply Plans
Firming SuppliesWhen you firm a supply order, you can select either the start quantity or the order quantity as the firm quantity on theSupplies and Demands page. You can update either the Firm Quantity or the Firm Start Quantity column to a differentvalue.
When you firm a planned order, the planning process updates the Firm Quantity column with the value in the OrderQuantity column. You can also edit the Firm Quantity column based on your planning needs. Alternatively, you canspecify the Firm Start Quantity column on a firm planned order. When you enter a value in the Firm Start Quantitycolumn, the planning process clears the value from the Firm Quantity column.
When you rerun the plan in a simulation mode, you can see the following data:
• For the Planned Order with Firm Start Quantity specified, the Start Quantity column displays the Firm StartQuantity value. The Order Quantity column displays a value based on the following calculations:
Order Quantity = Firm Start Quantity * (1 - Shrinkage) = Firm Start Quantity multiplied by (1 - Shrinkage)
• For the Planned Order with Firm Quantity specified, the Order Quantity column displays the Firm Quantityvalue. The Start Quantity column displays a value based on the following calculation:
Start Quantity = Firm Quantity / (1 - Shrinkage) - Firm Quantity divided by (1 minus Shrinkage)
Calculating Shrinkage for Work OrdersA work order can be fully complete or partially complete during collections. When you collect a work order, the collectedquantity represents the start quantity. The planning process populates these three columns only for work orders. Theplanning process calculates the new order quantity based on the current state of completion and the expected scrap.You can review the following parameters on the Supply Planning, Planning Central, and Demand and Supply Planningwork areas to track the status of the work order:
• Start Quantity
• Completed Quantity
• Scrapped Quantity
• Remaining Quantity
• Expected Scrap Quantity
• Order Quantity
During collections, the planning process collects the start quantity from the execution systems. When you release aplanned order, the planning process releases the releases the start quantity back to the execution systems.
Measures Enabled to Display Start QuantityTo view the start quantity and the start dates, the planning process uses the following three measures:
• Supply Start Quantity
• Reserved Supply on Start Date
• Reserved Supply Value on Start Date
211

Oracle SCM CloudUsing Supply Planning
Chapter 7Supply Plans
Work with Supply Plans
How Purchase Orders Are Scheduled Purchase orders, also known as buy orders, enable you to accurately measure the transit time from the supplier to theorganization. The following fields are included on the purchase order schedule:
• Requested Ship Date
• Promised Ship Date
• Requested Delivery Date
• Promised Delivery Date
• Buyer-managed Transportation Indicator
• Shipping Method
Buyer-managed Transportation specifies that the buying company is responsible for arranging the transportation,from picking up the requested goods to delivering to ship-to locations specified in the order. When the Buyer-managedTransportation indicator is not selected, delivery dates are populated on the purchase order and ship dates are notpopulated on the purchase order. When it is selected, the ship dates are populated on the purchase order and deliverydates may be populated on the purchase order.
When Buyer-managed Transportation is selected, the buyer communicates a requested ship date on Purchase Ordersand the supplier provides a promised ship date in response. When not selected, delivery dates are communicatedbetween buyer and supplier. In both cases, the purchase order also contains shipping method at the line level. Transittimes can be defined between a supplier site and organization location for shipping methods. The planning process canconsider transit times for purchase orders.
When the planning process creates planned purchase orders, the planning process uses the shipping method fromthe sourcing rule to calculate the transit time. The total lead time from planned purchase order start date to dock dateincludes both processing lead time and transit lead time.
When you release a planned purchase order from a Supply Chain Planning work area, the following information is sentto purchasing:
• Shipping method
• Requested ship date and requested delivery date. If Buyer-managed Purchasing is selected, then both ship anddelivery dates are populated on the purchase order. If Buyer-managed Purchasing is not selected, then only thedelivery dates are populated on the purchase order.
Purchase orders are scheduled backward from the order due date. Scheduling purchase order respects all validshipping, receiving, transit, manufacturing, and supplier capacity calendars. In supply chain planning, if any dates are inthe past, then the dates are set to the plan start date. The planning process issues reschedule recommendations for thefollowing conditions:
• When the purchase order Buyer-managed Transportation indicator is selected and the old ship date isdifferent from the new ship date calculated by planning.
• When the purchase order Buyer-managed Transportation indicator is not selected and the old delivery date isdifferent from the new dock date calculated by planning.
212

Oracle SCM CloudUsing Supply Planning
Chapter 7Supply Plans
Example of Backward Scheduling CalculationsConsider that the suggested due date is Day 10, where postprocessing = 1 day, transit time = 2 days, processing = 4 days,and preprocessing = 2 days. The following calculations are used for backward scheduling:
• Suggested Due Date = Day 10
• Suggested Dock Date = Day 9 (Dock Date = Due Date minus Postprocessing Lead Time)
• Suggested Ship Date = Day 7 (Ship date = Dock Date minus Transit Lead Time)
• Suggested Start Date = Day 3 (Start Date = Ship Date minus Processing Lead Time)
• Suggested Order Date = Day 1 (Start Date = Preprocessing Lead Time)
Related Topics• How Backward Scheduling and Order Dates Are Calculated
How Backward Scheduling and Order Dates Are Calculated Backward scheduling is the process by which lead time is applied to supply orders. When the planning mode isunconstrained, backward scheduling is performed by the planning process.
When you run a supply plan, the planning process reports constraint violations as capacity overloads and lead timeexceptions so that you're alerted to supply problems. The supply for your sales order becomes due on the end demanddate.
Settings That Affect Backward Scheduling and Order DatesWhen supply is just in time for a demand, the supply completion date is the demand date. The supply is then scheduledbackward to arrive at the start dates for each operation that must be completed and due dates for supply of lower-levelcomponents that make up the final supply.
During backward scheduling of dates, if the plan start date is crossed, then all earlier dates are bucketed to the planstart date. This process is referred to as compression.
Backward scheduling affects order due dates in the following ways for different types of items:
• For make items, compression begins at preprocessing lead time. The first operation and each successiveoperation are then compressed to zero duration until there is sufficient lead time for the remaining operationsto complete using the resource duration.
• For transfer and buy items, the preprocessing lead time is compressed first. The processing lead time is thencompressed and if insufficient lead time remains, postprocessing lead time is compressed.
Note: The processing time for a buy item is independent of item quantity.
You can set organization and customer receiving and shipping schedules and carrier transit schedules in the ManageTransportation Schedules section in Logistics. The only valid dates that planning calculations use for backward
213
Oracle SCM CloudUsing Supply Planning
Chapter 7Supply Plans
scheduling are the working days on the manufacturing and shipping calendars. Calendar defaulting rules are used byplanning to determine order dates calculations. The defaulting rules are:
• Valid Supplier Capacity Calendar: Either the Supplier Site Capacity Calendar is used or a fully open calendar of7 days, 24 hours. If the Supplier Site Capacity Calendar in the Approved Supplier List is blank, then the SupplierSite Calendar from the Supply Network Model is used.
• Valid Supplier Shipping Calendar: The Carrier, or Supplier, or Supplier Site Calendar, the Supplier, or SupplierSite Shipping Calendar, the Carrier, or Supplier Calendar, the Supplier Shipping Calendar, or a fully opencalendar of 7 days, 24 hours is used.
• Valid Organization Receiving Calendar: Either the Carrier or Organization Calendar is used, or the OrganizationReceiving Calendar, or the Organization Manufacturing Calendar.
Note: The defaulting rules are also applied to determine different calendars, such as Valid OrganizationManufacturing Calendar, Valid Organization Shipping Calendar, Valid Customer Shipping Calendar, and Valid TransitCalendar.
How Backward Scheduling Is CalculatedBackward scheduling is calculated based on the following:
• Planned Make Order: If your order is for a make item, the component due date is the start date for the operationthat requires it and supply is scheduled backward. The work definition provides the information about thecomponent and resource requirements for such an order. The new order due date becomes the date of the enddemand.
Note: A make planned order exists only as a planned order in supply chain planning, and isn't part ofmanufacturing yet.
• Work Order: If your order is for an item that already exists as a work order, the component and resourcerequirements are collected from the work order. The planning process can shift the work order to a new set ofdates without making alterations to the relationship of dates in the work order. The component due dates forthat end item are collected from manufacturing.
For example, take the following scenario:
• A is an end item with two components B and C that have different start dates.
• C is a make item with two components D and E that also have different start dates.
Components D and E are in the lower level of the work definition for item C and they're needed for the assembly of themake planned order C. Similarly, components B and C are in the lower level of the work definition for item A and they'reneeded for the assembly of the work order A.
The following figure illustrates the relationship between components A, B, C, D, and E that are used to make an enditem.
214

Oracle SCM CloudUsing Supply Planning
Chapter 7Supply Plans
The planned make order rescheduled dates are determined by total quantity of demands and order modifiers. Totalmake order lead time (days) = fixed lead time + quantity multiplied by variable lead time.
The work order rescheduled dates are determined by component requirement start dates and end dates. If the end dateis moved by 3 days, the start date is also moved by 3 days.
Related Topics• How Purchase Orders Are Scheduled
How You Prioritize Work Orders with Ready to Build Items The Ready to Build Quantity value of a supply order represents the quantity of the supply order that can be built usingonly on-hand supplies of components.
You can estimate the supply quantity that can be built using the pegged, on-hand components of the supply. You candecide which orders are ready to work upon and which orders you need to wait for the components to be available.
The planning process uses the Ready to Build Quantity to calculate the Ready to Build Percentage.
Ready to Build Percentage = Ready to Build Quantity divided by Supply Quantity
The Ready to Build Quantity uses the Consider in Clear-to-Build item attribute to determine the components thatparticipate in the ready to build calculation for assembly items. Consider in Clear-to-Build is an item attribute which youmust specify in the Items page. If you set this attribute to Yes for specific components, the calculations will consider onlythose components for Ready to Build calculations of the assembly items. If you set this attribute to No, those specificcomponents don't affect the Ready to Build calculations of the assembly item.
For the component items that you want to include in the Ready to Build calculation of assembly items, you must firstset the Consider in Clear-to-Build attribute to Yes in the Items page. This attribute isn't available in Oracle ProductInformation Management. You must set this attribute in a plan or within a simulation set.
Ready to Build Quantity and Ready to Build Percentage are calculated for supplies of Make items only. Also, the Readyto Build Quantity and Ready to Build Percentage fields are available in the Supply Planning and Demand and SupplyPlanning work areas. These fields aren't available in the Planning Central work area.
215
Oracle SCM CloudUsing Supply Planning
Chapter 7Supply Plans
Rework and Transform Work Orders Rework and transform work orders are collected during the data collections process and they are shown as nonstandardwork orders in Planning Central, Supply Planning, and Demand and Supply Planning work areas.
You create rework work orders in Oracle Manufacturing Cloud to perform rework activities on items that have issues ordefects. The objective of rework is to make those items usable to satisfy customer demand.
You create transform work orders in Oracle Manufacturing Cloud to enhance or upgrade existing items by adding orremoving selective components from existing items. The objective of transform work orders is to transform the existingitem into a new item.
The rework and transform activities can result in the removal of components from the item being reworked ortransformed. You can use the removed components to satisfy future demands. Data collection collects the removedcomponents and you can search for the removed components when you select the order type as nonstandard workorder by-product in the Supplies and Demands table. The data collection process filters out all work order demands foran item, when the item itself is manufactured by the rework work order.
The planning process considers all nonstandard work orders as firm orders. Like other firm orders, nonstandard workorders will be included in the calculation of the natural time fence for an item.
How Plan Recommendations Are Processed Supply chain planning can generate plan recommendations. These are suggestions to take actions that can create abalance between supply and demand. You can view these suggestions in the Supplies and Demands table.
The planning process can release two primary kinds of plan recommendations.
• It can suggest new planned orders: The planning process suggests that you order some new supply to meet thedemand for a certain product. All of these supply suggestions are released by planning to Oracle Fusion SupplyChain Orchestration in the form of new planned orders. This new supply can be in the form of a manufacturingjob, in which case the planned order is released to manufacturing. If the new supply suggestion is a purchaserequisition, Supply Chain Orchestration releases the planned order to purchasing. If the new supply suggestionis a transfer, Supply Chain Orchestration releases the planned order to logistics.
• It can suggest rescheduling or cancellation of existing supplies: The planning process suggests that youreschedule or cancel a current supply because the total supply for a product might be in excess compared tothe demand for it. You can cancel current planned orders that exist as discrete jobs or as purchase orders ortransfer orders. Similarly, planning can also suggest that you reschedule some of the existing supply to meetfuture demand. The rescheduling is done for supplies that exist as discrete manufacturing jobs, purchaseorders or transfer orders.
If the planning process suggests new supply, and the planner releases the planned order, the released planned order issent to Oracle Fusion Supply Chain Orchestration. The planned order has the following details specified in it:
• Item
• Organization
• Start date, dock date and if applicable, ship date
• Source
216

Oracle SCM CloudUsing Supply Planning
Chapter 7Supply Plans
◦ If it's a make item, the organization remains the same.
◦ If it's a transfer item, the source organization must be specified.
◦ If it's a buy item, the supplier and supplier site must be specified.
You can open the Supplies and Demands table to view individual planned orders. You can also open the material planto view the aggregate total supply for your plan.
You can't view rescheduled plan recommendations in the material plan. The material plan accepts therecommendations from supply chain planning and uses the rescheduled dates when aggregating supply. The planningcalculations assume that the rescheduled recommendations are already incorporated within the aggregate supplycalculations and use the rescheduled dates.
Related Topics• How Plan Recommendations Are Released
How Plan Recommendations Are Released One of the key execution capabilities that supply chain planning offers is that you can release plan recommendations toimplement standard plan-to-produce business flows. You can release plan recommendations either from a supply planor from a demand and supply plan.
You can either manually review and release each supply chain planning recommendation or automatically approve andrelease them.
The following table illustrates the plan recommendations that either the planning processes can release automaticallyfor different order types, or you can manually release the orders:
Order Type Updates Suggested by Planning Calculations Actions You Can Take
Purchase Orders
Quantity, Delivery Date, Firm Status
Reschedule, Cancel
Purchase Requisitions
Cancellation
Cancel
Work Orders
Start Date, Completion Date, Firm Status
Reschedule, Cancel
Transfer Orders
Start Date, Arrival Date, Shipping Method
Reschedule, Cancel
Sales Orders
Scheduled Arrival Date, Scheduled Ship Date, Shipping Method
Reschedule
Note: In all cases, cancellation entails releasing an order quantity of zero.
For purchase orders and transfer orders, you can manually change the input values for the updates suggested by theplan recommendations. You can do this in the planners' workbench.
217

Oracle SCM CloudUsing Supply Planning
Chapter 7Supply Plans
The following recommendations are released by supply chain planning to Oracle Fusion Supply Chain Orchestration:
• New planned orders for make, buy, and transfer of supplies
• Reschedules of existing make, buy, and transfer supplies
Oracle Fusion Supply Chain Orchestration processes these recommendations and sends both new releases andreschedules to manufacturing, purchasing, and logistics depending on the type of supply.
The following recommendations are released by supply chain planning to Oracle Fusion Order Management:
• Reschedules of sales orders
• New planned orders for drop shipments
Related Topics• How Plan Recommendations Are Processed
• Manually Release Plan Recommendations
• Automatic Release Options
• Release Recommendation Options
Manually Release Plan Recommendations You can review the plan recommendations generated by the planning process and then manually release them forexecution. You can either release new planned orders as supply, or reschedule the supplies that exist in the form of workorders, transfer orders, and purchase orders.
To review and release plan recommendations, perform the following steps:
1. Open the Supplies and Demands table and search for your orders.2. Select one or multiple rows that show planned orders that you want to release for execution.3. At the order level, click Actions and then select Mark for Release.
Note: Verify that the Release Status field is updated to Marked for Release for all of the selected rows.
4. Save your changes.5. At the page level, click Actions and then select Release. This action initiates the release plan process. A dialog
box displays the status of the process.6. You can also verify the status of this process by navigating to the Scheduled Processes page. Follow these steps
to verify release results on the Scheduled Process page:
a. Use the Hierarchy view. The top-level process name is Release Plan.b. Drill down to Release Planning Recommendations and select Load Interface Tables.c. Check the log file of each table to confirm the release. Also, check the submission notes for each process.
The notes identify the type of release.After you release the plan recommendations, all new, rescheduled, or canceled planned orders are sent to OracleSupply Chain Orchestration Cloud. Navigate to the Supply Chain Orchestration work area to view requests that weren'tprocessed and check why these exceptions were created.
218

Oracle SCM CloudUsing Supply Planning
Chapter 7Supply Plans
Release Planned Make OrdersAfter you mark a planned make order for release, you can specify a work order number to use when the planned makeorder is released. In the Implement Work Order Number column, the number that you enter must be valid based onyour source system. No validation is performed in the Supplies and Demands UI. For example, if you're using an OracleFusion source system, the number that you enter must be unique within the organization. Release planned make orderswith duplicate work order number appears in Oracle Supply Chain Orchestration with an error.
Related Topics• How Plan Recommendations Are Released
• How Plan Recommendations Are Processed
Release Plan Recommendations to an External Execution System You can release plan recommendations or planned orders from Oracle SCM Cloud applications to an external executionsystem. When you release a planned order, the planning process generates a CSV file for the planned order.
The planning process attaches the generated CSV file to the scheduled process called Release PlanningRecommendations: Release to External Source Systems. You can download the CSV file from the scheduled processes.The planning process also saves the CSV file in a .zip file format in the Universal Content Manager. The name of the .zipfile is ReleasetoExternal.zip.
PrerequisiteBefore you can release planned orders from Oracle SCM Cloud applications to an external execution system, you mustdo the following:
1. Assign your organization as an external source system.2. Run collections from the external source system.
After you successfully run collections, you can plan your orders and release them to the external source system. Therelease process is same for an Oracle Fusion source system and an external source system.
Release Planned OrdersFollow these steps to release the planned orders:
1. From your Supply Chain Planning work area, click the Tasks panel.2. Click Manage Plans and then search your plan.3. Open the plan, mark the orders for release, and then click Actions > Release.
The planning process exports the plan in the CSV format and attaches the CSV file to the scheduled process. Also, theplanning process saves the CSV file in a .zip file format in the Universal Content Manager. You can download the .zip filefrom the File Import and Export link in the Navigator.
For more information, see Releasing Plan Recommendations to External Systems (Doc ID 2305394.1) on My OracleSupport at https://support.oracle.com.
219

Oracle SCM CloudUsing Supply Planning
Chapter 7Supply Plans
Create and Release Manual Planned Orders You can create manual planned orders for buy, make, and transfer order types. For each planned order type, you canselect your source specifications.
After you create the manual planned orders, you can then release the orders to the relevant source application. Creatingand releasing manual planned orders enables you to respond quickly to issues by creating supplies in the sourceapplications. You can create and release manually created planned orders from the Planning Central, Supply Planning,Demand and Supply Planning, or Replenishment Planning work area.
To create a manual planned order from the Supplies and Demands page, click the Create icon. The Create Order dialogbox opens. In the Create Order dialog box, select the source type. The source type that you select enables additionalparameters for the supply source.
Source Type Additional Parameters
Buy
• Supplier
• Supplier Site
• Shipping Method
Make (Not relevant to Oracle FusionReplenishment Planning)
• Item Structure Name
• Work Definition
Transfer
• Source Organization
• Shipping Method
After you create the manual planned orders, optionally rerun your plan to determine if the new planned orders can beexecuted. You can then mark the manually created planned orders for release on the Supplies and Demands page. Next,run the release process and the planning process releases your manually created planned orders.
Circular Transfer Orders Use circular transfer orders to rebalance your inventory at both the source and destination organizations. In OraclePlanning Central Cloud and Oracle Supply Planning Cloud, supply planning can process a transfer order that is a circularorder in the plan.
The supply plan considers the circular transfer order and treats it as a supply at the destination organization. The supplyplanning process marks both the transfer order supply and the transfer order demand as firm. This means that the planwon't recommend reschedules or cancellations for the circular transfer order, which can generate late supply exceptionsor excess inventory exceptions.
For example, your sourcing rule is set to transfer supply from source organization ORG1 to destination organizationORG2. You discover that you have excess inventory in ORG2 due to a canceled sales order. You decide that you wantto transfer supply from ORG2 back to ORG1, so you manually create a transfer order to move the excess inventory. The
220

Oracle SCM CloudUsing Supply Planning
Chapter 7Supply Plans
planning process includes your circular transfer order in the plan as a supply to ORG1 and is marked as a firm supply inthe plan.
The planning process pegs the circular transfer demand to an existing supply. In our example scenario, the excessinventory is pegged to the transfer order demand in destination organization ORG2. The transfer supply is pegged tosome demand in source organization ORG1. If there is no demand in the source organization, then the transfer ordersupply doesn't peg to anything.
The transfer order supply in the destination organization can be early, on time, or late for some demand. However, itcan't be rescheduled by the planning process.
If the transfer order is inside the planning time fence, it can cause these supply exceptions because new supplies cannotbe created:
• Late Supply Pegged to Forecast
• Late Supply Pegged to Sales Order
If the transfer order is outside the planning time fence, it can cause supply exceptions because the transfer is firm. TheItems with Excess Inventory exception is generated when the Projected Available Balance on a particular day exceedsthe Safety Stock Level quantity.
If the transfer order is in the past, it causes the Past Due Orders exception.
Note: If you create a transfer order in error, there may not be supply in the ship-from organization to use for thetransfer. Circular pegging occurs in this case, with the transfer demand pegging to the transfer supply. In thissituation, you should cancel the circular transfer.
How You Publish Supply Order Details One of the important aspects of collaborating with suppliers is to provide them an insight into the open supply orders.Collaborating with suppliers on open supply orders enables you and your suppliers to plan supply chain activities moreefficiently.
Supply orders are of four types: purchase order, purchase requisition, shipment in receiving, and in-transit shipment.
You can publish supply orders along with planned orders to Oracle Supply Chain Collaboration Cloud using the PublishOrder Forecast scheduled process. Use the Navigator to access the Scheduled Processes page where you can select thePublish Order Forecast scheduled process. In the Process Details dialog box for the Publish Order Forecast scheduledprocess, you can select the following check boxes:
• Include purchase orders in order forecast: Includes purchase orders within the order forecast. All the openpurchase orders for an item on a day are added to the planned orders on that day and published as orderforecast at the supplier or supplier site level.
• Include requisitions in order forecast: Includes purchase requisitions within the order forecast. All the openpurchase requisitions for an item on a day are added to the planned orders on that day and published as orderforecast at the supplier or supplier site level.
• Run the Supply Planning Collaboration Decomposition job: Runs the Supply Planning CollaborationDecomposition scheduled process along with the Publish Order Forecast scheduled process.
• Publish order details: Publishes all four types of supply orders along with the planned orders.
221

Oracle SCM CloudUsing Supply Planning
Chapter 7Supply Plans
How You Publish Order Forecasts You publish order forecast for your suppliers. The suppliers can view the forecast and send their commits to you as asupplier capacity. You don't have to save the plan to the database before publishing the order forecast.
You can publish order forecast from the following pages in the Supply Planning, Demand and Supply Planning, orPlanning Central work area:
• Items
• Supplies and Demands
• Manage Plans or individual plan
When you select Publish Order Forecast from the Actions menu, the planning process submits a job in ScheduledProcesses. The planning process deselects all additional parameters that are available in the Publish Order Forecastjob and submits the job. If you want to select various additional parameters that are available for the Publish OrderForecast scheduled process, you must submit the job manually from the Scheduled Processes work area and select yourparameters.
Points to RememberConsider the following points before you publish the order forecast:
• When you publish the order forecast from the Manage Plans page, you publish the order forecast for all thevalid suppliers within the plan.
• When you're in the Items table or the Supplies and Demand table, you can publish order forecast that belongsto one Item-Organization at a time. You can't publish two rows of items with different Item-Organizationcombinations.
• The Publish Order Forecast job also launches the Supply Planning Collaboration Decomposition job. You don'thave to run the decomposition job separately.
222
Oracle SCM CloudUsing Supply Planning
Chapter 8Analyze Supply Plans
8 Analyze Supply Plans
Build Plan View
Build Plan View Use the Build Plan view to analyze the end-to-end supply chain relationships that span end items, components,suppliers, and resources. You can identify inventory and capacity shortages, find the root causes, and modify your planto resolve issues.
For example, you can select specific orders, firm dates and quantities, or select alternate resourcesand substitutecomponents for those orders.
From the Build Plan table, you can:
• Analyze your plan by looking at all or a subset of subassemblies, resources, and components that relate to anend item.
• Direct your focus to only those components, resources, and measures that are important to your business.
• Track the supplies of the end item and its components that are pegged to a selected demand of the end item.
• Track the resource requirements that are pegged to a selected demand of the end item.
• View individual orders that make up an aggregate quantity.
• Edit measures such as Planned Orders or Manual Demands.
• Perform a bottom-up analysis by looking at end items that use a certain component.
• Perform a resource-centric analysis by looking at all or a subset of items produced on a resource.
The Build Plan view provides a time-phased summary of supply and demand for an end item as well as a selected listof components that are used to make the end item. It also provides a time-phased summary of resource availability andresource usage of a selected list of resources used to make the end item or one of its subassemblies or components.
You can easily spot exception conditions, such as inventory shortages or resource capacity overloads. You can thentrace the pegging relationships between supplies and demands across supply chain levels to determine the root causesfor these exceptions. And then you can take corrective action by adding capacity, increasing supply quantities, orexpediting supplies.
When you're viewing your Build Plan, you can click buttons or drop-down lists for additional functionality.
• Configure Build Plan: Opens the Configure Build Plan dialog box where you can configure the list of items,resources, and suppliers to include in your Build Plan.
• Criteria: Select a criteria, manage existing criteria, or create a new criteria.
• Save: Save the current contents of the Build Plan into a named criteria.
• Layout: Select a layout or manage your existing layouts.
• Highlight Exceptions: Select an exception to highlight in your Build Plan. You set up the exception by doing thefollowing:
a. In your Build Plan, select View, Format Measures.
223
Oracle SCM CloudUsing Supply Planning
Chapter 8Analyze Supply Plans
b. In the Format Measures: Build Plan dialog box, select a measure and then select the Use OverrideConditional Formatting check box.
c. In the Conditional Formatting section, set up your condition.d. Next, in the Apply column, select whether you want the conditional formatting to be highlighted in your
Build Plan table all the time or only when you select it from the Highlight Exceptions drop-down list:Always or When selected.
e. If you selected When Selected in the Apply column, enter a name for your highlight exception, whichappears in the Highlight Exceptions drop-down list.
• Show Details: Click to show the order details and make some edits. You can firm orders and also specify thework definition, source organization, shipping method, supplier, and supplier site at the order level in theDetails section of the Build Plan.
• Highlight Related Cells: Select an option to highlight cells in the Build Plan table relative to the selected cell.
Highlight Related Cells Action Measures this Action Applies To What this Action Does
Dependent Demands
Any cell corresponding to a supply measure
The Total Demand cells that contain thedependent demands related to the selectedsupply cell are highlighted.
Pegged End Demands
Any cell corresponding to a supply measure
The Net Forecast, Manual Demand, SalesOrders, or Total Demand cells that containthe end demands pegged to the selectedsupplies are highlighted.
Pegged Supplies
Any cell corresponding to a demandmeasure
The supply measure cells corresponding tothe supplies that end peg to the selecteddemand are highlighted.
Pegged Upstream Supplies
Any cell corresponding to a supply measure
The supply measure cells correspondingto the upstream supplies that peg tothe selected supply are highlighted.For example, if the selected supply isa subassembly supply, the componentsupplies are highlighted.
Pegged Downstream Supplies
Any cell corresponding to a supply measure
The supply measure cells correspondingto the downstream supplies that pegto the selected supply are highlighted.For example if the selected supplyis a component supply, the peggedsubassembly and finished good supplies arehighlighted.
Substitute Components
Total Demand measure
The Projected Available Balance measureand the Total Supply measure of thesubstitute components in the time buckets
224
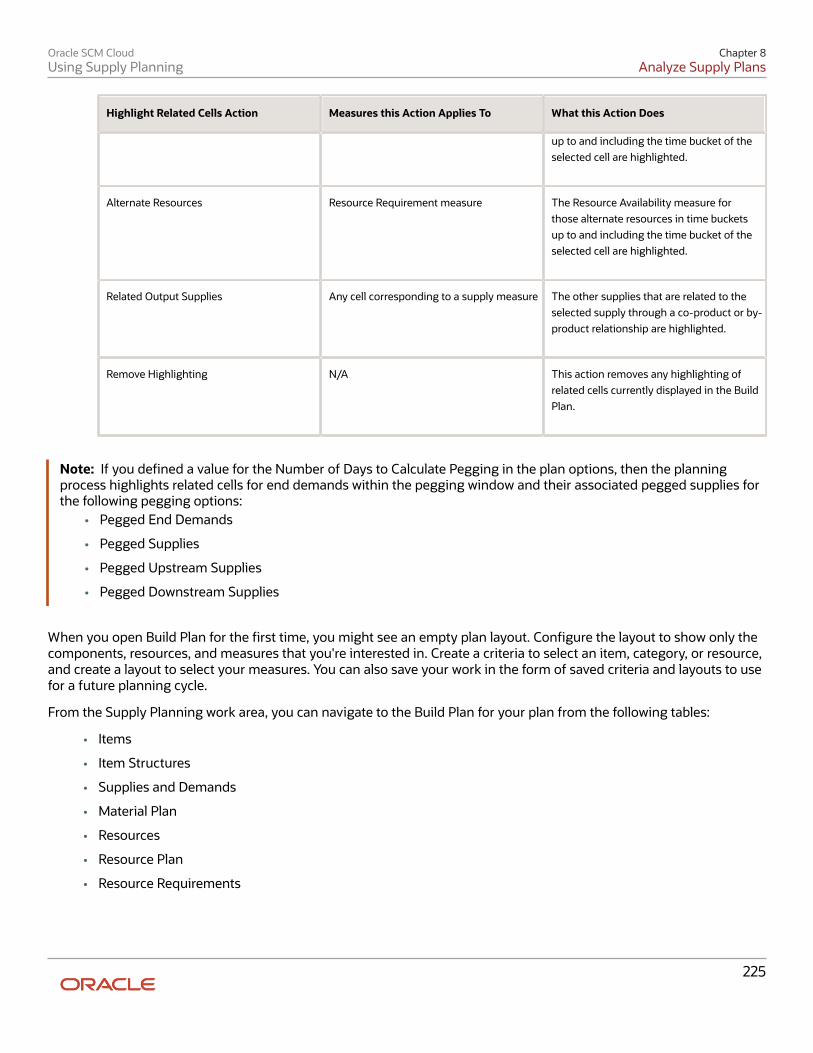
Oracle SCM CloudUsing Supply Planning
Chapter 8Analyze Supply Plans
Highlight Related Cells Action Measures this Action Applies To What this Action Does
up to and including the time bucket of theselected cell are highlighted.
Alternate Resources
Resource Requirement measure
The Resource Availability measure forthose alternate resources in time bucketsup to and including the time bucket of theselected cell are highlighted.
Related Output Supplies
Any cell corresponding to a supply measure
The other supplies that are related to theselected supply through a co-product or by-product relationship are highlighted.
Remove Highlighting
N/A
This action removes any highlighting ofrelated cells currently displayed in the BuildPlan.
Note: If you defined a value for the Number of Days to Calculate Pegging in the plan options, then the planningprocess highlights related cells for end demands within the pegging window and their associated pegged supplies forthe following pegging options:
• Pegged End Demands
• Pegged Supplies
• Pegged Upstream Supplies
• Pegged Downstream Supplies
When you open Build Plan for the first time, you might see an empty plan layout. Configure the layout to show only thecomponents, resources, and measures that you're interested in. Create a criteria to select an item, category, or resource,and create a layout to select your measures. You can also save your work in the form of saved criteria and layouts to usefor a future planning cycle.
From the Supply Planning work area, you can navigate to the Build Plan for your plan from the following tables:
• Items
• Item Structures
• Supplies and Demands
• Material Plan
• Resources
• Resource Plan
• Resource Requirements
225

Oracle SCM CloudUsing Supply Planning
Chapter 8Analyze Supply Plans
Related Topics• Create Build Plan Criteria
• Create a Build Plan Layout
• Add or Replace Items in Your Build Plan
Add or Replace Items in Your Build Plan Use the Configure Build Plan dialog box to configure the list of items, resources, and suppliers that you want to includein your Build Plan.
Select components and resources that relate to an end item, items that are produced on a specific resource, or the set ofend items that relate to a specific component.
Follow these steps to add or replace items in your Build Plan.
1. Open your plan:
a. In the Navigator, click the Supply Planning work area.b. Click the Tasks panel tab.c. In the Tasks panel drawer, click the Manage Plans link.d. Search for and open your plan.
2. Open the Build Plan table:
a. From your plan, click the Open button.b. In the Open Table, Graph, or Tile Set dialog box, search for the Build Plan table.c. Select Build Plan and then click OK.
3. In the Build Plan table, click the Levels to Display drop-down list and select a level. This action determines thelist of available items, resources, and supplier items that you can pick from.
Levels to Display Choice Results Shown
All levels down
For the selected item or category, all the lower-level items and resources are shown.Components that have buy from sourcing rules are also shown in the Items section.
Next level down
The items, item-suppliers, and resources one level down from the selected item are shown.
All levels up
All the items whose multilevel supply chain bill includes the selected item are shown. Item-suppliers or resources are never displayed with this choice.
Next level up
All the items whose single level supply chain bill includes the selected item are shown. Item-suppliers or resources are never displayed with this choice.
Lowest level
For the selected item, all the lower level components and their suppliers are shown. Resourcesare never displayed with this choice.
226

Oracle SCM CloudUsing Supply Planning
Chapter 8Analyze Supply Plans
Levels to Display Choice Results Shown
End items
The end items related to the selected item or resource are shown. Item-suppliers or resourcesare never displayed with this choice. If you defined a value for the Number of Days to Calculate Pegging in the plan options, thenthe planning process only considers end items that have demands within the specified timewindow to calculate pegging.
Produced items
The items whose work definitions include the selected resource are shown. Item-suppliers orresources are never displayed with this choice.
Related output items
For the selected item/organization or category, all items that appear as output items in thework definitions are shown.
4. After you select a level to display, you can do the following in the Items, Resources, and Suppliers sections:
◦ Filter items and suppliers by catalog.
◦ Filter items and suppliers by category.
◦ Perform a query by example on columns.
◦ Select all or a subset of rows to include in your Build Plan.
5. After you select the set of items, resources, and suppliers, do one of the following:
◦ Click the Add button to add the selected items and resources to your Build Plan.
◦ Click the Replace button to replace the current contents of your Build Plan with the selected items andresources.
Related Topics• Build Plan View
Create a Build Plan Layout When you open the Build Plan table for the first time, you see a predefined layout. You can create your own layout withpreferred measures for the items, resources, and suppliers.
Follow these steps to create a layout for your Build Plan.
1. Open your plan:
a. In a Supply Planning or a Demand and Supply Planning work area, click the Tasks panel tab.b. In the Tasks panel drawer, click the Manage Plans link.c. Search for and open your plan.
227

Oracle SCM CloudUsing Supply Planning
Chapter 8Analyze Supply Plans
2. Open the Build Plan table:a. From your plan, click the Open button.b. In the Open Table, Graph, or Tile Set dialog box, search for the Build Plan table.c. Select Build Plan and then click OK.
3. From the Build Plan table, click the Layout drop-down list and then click Manage.4. In the Manage Layouts dialog box, click the Add icon and enter values for the Name, Description, Access, and
Time fields.The Time field contains options for Day, Week, Period, Month, and Supply planning buckets. Select Supplyplanning buckets to display the time dimension in your Build Plan that's in alignment with the planning timebuckets specified in the plan options. Configure the planning time buckets on the Plan Options page, Scope tab,in the Plan Parameters section.
5. Optionally, select the Default check box to mark this layout as the default layout for your Build Plan.6. Select your preferred measures in the Available column and move them to the Selected column for your item,
resource, and supplier measures.7. When you are done, click Save and Close.
Related Topics• Build Plan View
Create Build Plan Criteria When you open the Build Plan table for the first time, you might see an empty plan layout. Use the Criteria drop-downlist in the Build Plan toolbar to create criteria or manage existing criteria.
Create a criteria to select an item, category, or resource. You can set this criteria as the default criteria for all other plans.
Follow these steps to create a Build Plan criteria.
1. Open you plan:a. In the Navigator, click the Supply Planning work area.b. Click the Tasks panel tab.c. In the Tasks panel drawer, click the Manage Plans link.d. Search for and open your plan.
2. Open the Build Plan table:a. From your plan, click the Open button.b. In the Open Table, Graph, or Tile Set dialog box, search for the Build Plan table.c. Select Build Plan and then click OK.
3. From the Build Plan table, click the Criteria list and then click Create.4. In the Create Criteria dialog box:
a. Enter values for Name and Description.b. Select Public or Private for the type of access.c. Select the Favorite check box to use this criteria for all of your plans.d. Select the criteria as either Item, Category, or Resource.
- If you selected Item, then select an item and organization from the list. Organization is optional.- If you selected Category, then select a catalog and category from the list.
228

Oracle SCM CloudUsing Supply Planning
Chapter 8Analyze Supply Plans
- If you selected Resource, then select a resource from the list.5. Click Save and Close.
Related Topics• Build Plan View
Supplies and Demands View
Filter Supplies and Demands Based On Conditions You can narrow your search in the Supplies and Demands table by selecting a condition from the search filter.Conditions are a group of supply-related attributes with a specific value. A condition can have one or more attributes.
From an open plan, open the Supplies and Demands table and click the Manage Conditions button in the Search region.When you open the Manage Conditions dialog box, you can create and manage conditions. When you create conditions,you specify attributes for your conditions and provide a value to those attributes. The value could be a specific date oryou can specify the number of days relative to another date for a given attribute.
The relative comparison options are available only for date-based attributes, such as Requested Ship Date or ActualArrival Date. The values for relative comparison options are enabled when you select one of the following operators:
• Before
• After
• On or before
• On or after
For example, consider a scenario where you make the following selections for a condition:
Condition Values
Attribute
Suggested Start Date
Operator
On or before
Relative Date
Scheduled Ship Date
Number of Days
10
In this case, the condition would consider the Suggested Start Date as 10 days on or before the Scheduled Ship Date. Ifthe Scheduled Ship Date is 10-January-2020, then the condition would filter all orders whose Suggested Start Date is onor before 01-January-2020.
229
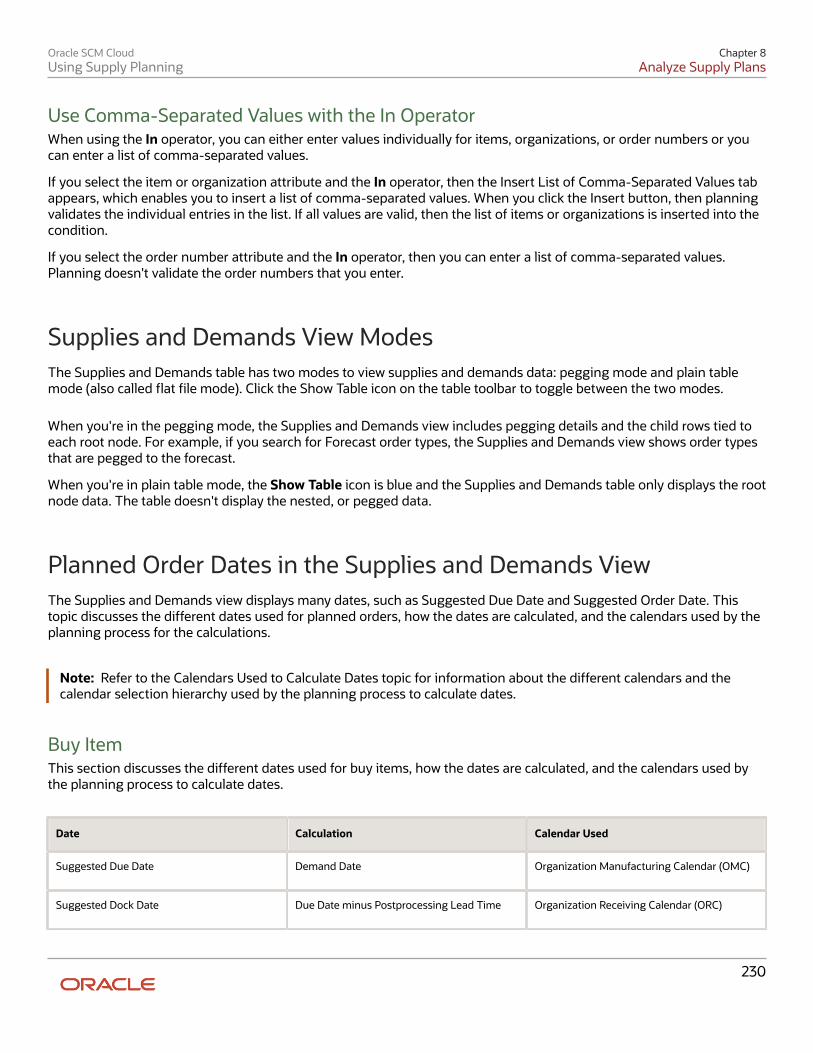
Oracle SCM CloudUsing Supply Planning
Chapter 8Analyze Supply Plans
Use Comma-Separated Values with the In OperatorWhen using the In operator, you can either enter values individually for items, organizations, or order numbers or youcan enter a list of comma-separated values.
If you select the item or organization attribute and the In operator, then the Insert List of Comma-Separated Values tabappears, which enables you to insert a list of comma-separated values. When you click the Insert button, then planningvalidates the individual entries in the list. If all values are valid, then the list of items or organizations is inserted into thecondition.
If you select the order number attribute and the In operator, then you can enter a list of comma-separated values.Planning doesn't validate the order numbers that you enter.
Supplies and Demands View Modes The Supplies and Demands table has two modes to view supplies and demands data: pegging mode and plain tablemode (also called flat file mode). Click the Show Table icon on the table toolbar to toggle between the two modes.
When you're in the pegging mode, the Supplies and Demands view includes pegging details and the child rows tied toeach root node. For example, if you search for Forecast order types, the Supplies and Demands view shows order typesthat are pegged to the forecast.
When you're in plain table mode, the Show Table icon is blue and the Supplies and Demands table only displays the rootnode data. The table doesn't display the nested, or pegged data.
Planned Order Dates in the Supplies and Demands View The Supplies and Demands view displays many dates, such as Suggested Due Date and Suggested Order Date. Thistopic discusses the different dates used for planned orders, how the dates are calculated, and the calendars used by theplanning process for the calculations.
Note: Refer to the Calendars Used to Calculate Dates topic for information about the different calendars and thecalendar selection hierarchy used by the planning process to calculate dates.
Buy ItemThis section discusses the different dates used for buy items, how the dates are calculated, and the calendars used bythe planning process to calculate dates.
Date Calculation Calendar Used
Suggested Due Date
Demand Date
Organization Manufacturing Calendar (OMC)
Suggested Dock Date
Due Date minus Postprocessing Lead Time
Organization Receiving Calendar (ORC)
230

Oracle SCM CloudUsing Supply Planning
Chapter 8Analyze Supply Plans
Date Calculation Calendar Used
Suggested Shipment Date
Dock Date minus Transit Lead Time
Supplier Shipping Calendar (SSC)
Suggested Start Date
Shipment Date minus Processing Lead Time
Supplier Capacity Calendar (SCC) from theApproved Suppliers List (ASL)
Suggested Order Date
Start Date minus Preprocessing Lead Time
Manufacturing Organization Calendar (not fromthe SSC)
If there is no sourcing rule, then the following applies:
• Suggested Shipment Date is the Dock Date
• Suggested Start Date is the Shipment Date minus the item's Processing Lead Time
Make ItemThis section discusses the different dates used for make items, how the dates are calculated, and the calendars used bythe planning process to calculate dates.
Date Calculation Calendar Used
Suggested Due Date
Demand Date
Organization Manufacturing Calendar (OMC)
Suggested Dock Date
Due Date minus Postprocessing Lead Time
Organization Manufacturing Calendar (OMC)
Suggested Start Date
Dock Date minus Processing Lead Time
Organization Manufacturing Calendar (OMC)
Suggested Order Date
Start Date minus Preprocessing Lead Time
Organization Manufacturing Calendar (OMC)
Processing Lead Time equals Item attribute Fixed Lead Time plus (quantity multiplied by item attribute Variable LeadTimes).
Transfer ItemThis section discusses the different dates used for transfer items, how the dates are calculated, and the calendars usedby the planning process to calculate dates.
Date Calculation Calendar Used
Suggested Due Date
Demand Date
Valid date on the Destination OrganizationManufacturing Calendar
Suggested Dock Date
Suggested Due Date minus PostprocessingLead Time
Valid date on the Destination OrganizationReceiving Calendar
231
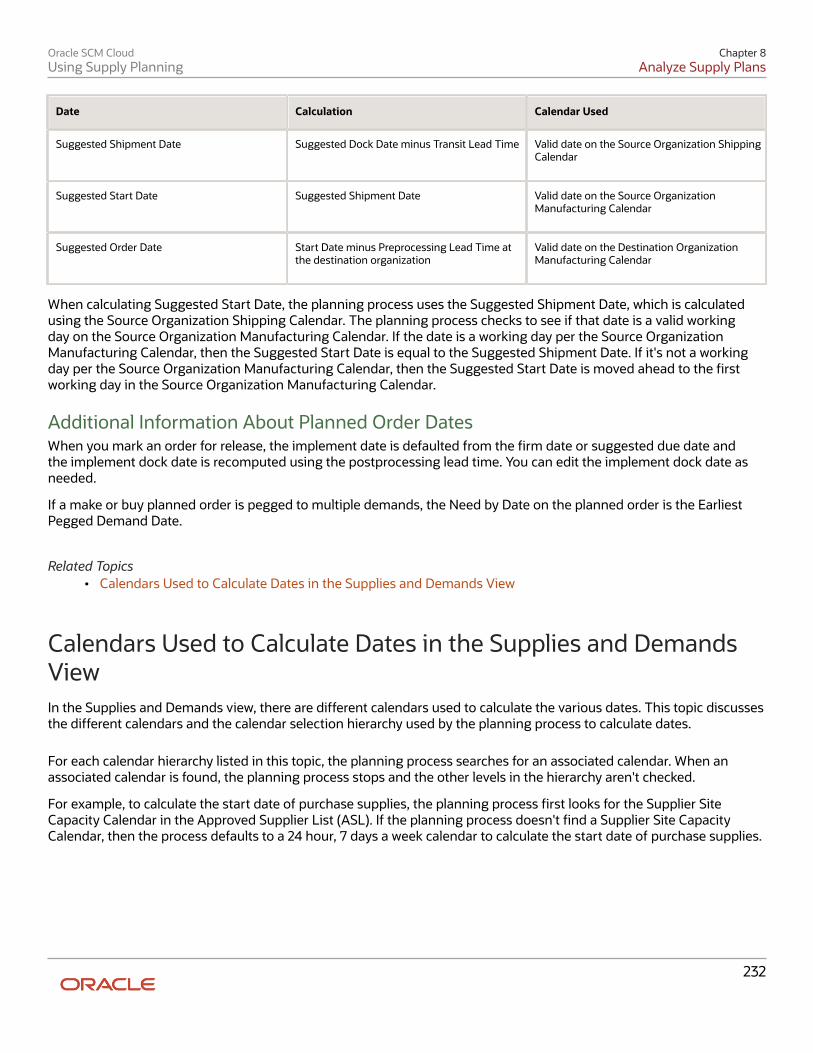
Oracle SCM CloudUsing Supply Planning
Chapter 8Analyze Supply Plans
Date Calculation Calendar Used
Suggested Shipment Date
Suggested Dock Date minus Transit Lead Time
Valid date on the Source Organization ShippingCalendar
Suggested Start Date
Suggested Shipment Date
Valid date on the Source OrganizationManufacturing Calendar
Suggested Order Date
Start Date minus Preprocessing Lead Time atthe destination organization
Valid date on the Destination OrganizationManufacturing Calendar
When calculating Suggested Start Date, the planning process uses the Suggested Shipment Date, which is calculatedusing the Source Organization Shipping Calendar. The planning process checks to see if that date is a valid workingday on the Source Organization Manufacturing Calendar. If the date is a working day per the Source OrganizationManufacturing Calendar, then the Suggested Start Date is equal to the Suggested Shipment Date. If it's not a workingday per the Source Organization Manufacturing Calendar, then the Suggested Start Date is moved ahead to the firstworking day in the Source Organization Manufacturing Calendar.
Additional Information About Planned Order DatesWhen you mark an order for release, the implement date is defaulted from the firm date or suggested due date andthe implement dock date is recomputed using the postprocessing lead time. You can edit the implement dock date asneeded.
If a make or buy planned order is pegged to multiple demands, the Need by Date on the planned order is the EarliestPegged Demand Date.
Related Topics• Calendars Used to Calculate Dates in the Supplies and Demands View
Calendars Used to Calculate Dates in the Supplies and DemandsView In the Supplies and Demands view, there are different calendars used to calculate the various dates. This topic discussesthe different calendars and the calendar selection hierarchy used by the planning process to calculate dates.
For each calendar hierarchy listed in this topic, the planning process searches for an associated calendar. When anassociated calendar is found, the planning process stops and the other levels in the hierarchy aren't checked.
For example, to calculate the start date of purchase supplies, the planning process first looks for the Supplier SiteCapacity Calendar in the Approved Supplier List (ASL). If the planning process doesn't find a Supplier Site CapacityCalendar, then the process defaults to a 24 hour, 7 days a week calendar to calculate the start date of purchase supplies.
232
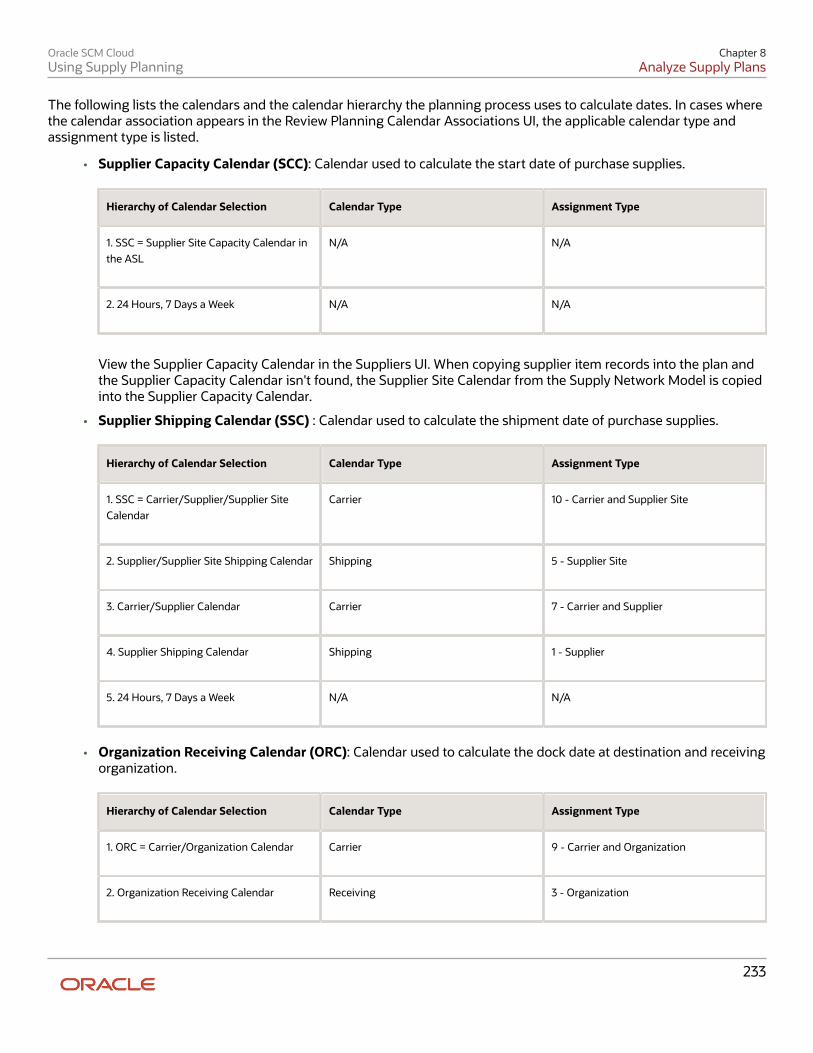
Oracle SCM CloudUsing Supply Planning
Chapter 8Analyze Supply Plans
The following lists the calendars and the calendar hierarchy the planning process uses to calculate dates. In cases wherethe calendar association appears in the Review Planning Calendar Associations UI, the applicable calendar type andassignment type is listed.
• Supplier Capacity Calendar (SCC): Calendar used to calculate the start date of purchase supplies.
Hierarchy of Calendar Selection Calendar Type Assignment Type
1. SSC = Supplier Site Capacity Calendar inthe ASL
N/A
N/A
2. 24 Hours, 7 Days a Week
N/A
N/A
View the Supplier Capacity Calendar in the Suppliers UI. When copying supplier item records into the plan andthe Supplier Capacity Calendar isn't found, the Supplier Site Calendar from the Supply Network Model is copiedinto the Supplier Capacity Calendar.
• Supplier Shipping Calendar (SSC) : Calendar used to calculate the shipment date of purchase supplies.
Hierarchy of Calendar Selection Calendar Type Assignment Type
1. SSC = Carrier/Supplier/Supplier SiteCalendar
Carrier
10 - Carrier and Supplier Site
2. Supplier/Supplier Site Shipping Calendar
Shipping
5 - Supplier Site
3. Carrier/Supplier Calendar
Carrier
7 - Carrier and Supplier
4. Supplier Shipping Calendar
Shipping
1 - Supplier
5. 24 Hours, 7 Days a Week
N/A
N/A
• Organization Receiving Calendar (ORC): Calendar used to calculate the dock date at destination and receivingorganization.
Hierarchy of Calendar Selection Calendar Type Assignment Type
1. ORC = Carrier/Organization Calendar
Carrier
9 - Carrier and Organization
2. Organization Receiving Calendar
Receiving
3 - Organization
233

Oracle SCM CloudUsing Supply Planning
Chapter 8Analyze Supply Plans
Hierarchy of Calendar Selection Calendar Type Assignment Type
3. Organization Manufacturing Calendar(OMC)
N/A
N/A
5. 24 Hours, 7 Days a Week
N/A
N/A
• Organization Manufacturing Calendar (OMC): Calendar used to calculate the order date and due date ofpurchase supplies. This calendar is used to calculate all dates of make supplies. You can view the OrganizationManufacturing Calendar in the Supply Network Model UI.
Hierarchy of Calendar Selection Calendar Type Assignment Type
1. OMC = Organization ManufacturingCalendar
N/A
N/A
2. 24 Hours, 7 Days a Week
N/A
N/A
• Organization Shipping Calendar (OSC): Calendar used to calculate the ship date at the source and shippingorganization for transfer orders.
Hierarchy of Calendar Selection Calendar Type Assignment Type
1. OSC = Carrier/Organization Calendar
Carrier
9 - Carrier and Organization
2. Organization Shipping Calendar
Shipping
3 - Organization
3. Organization Manufacturing Calendar(OMC)
N/A
N/A
5. 24 Hours, 7 Days a Week
N/A
N/A
• Customer Receiving Calendar (CRC): Calendar used to calculate the arrival date on end demands (salesorders).
Hierarchy of Calendar Selection Calendar Type Assignment Type
1. CRC = Carrier/Customer/Customer SiteCalendar
Carrier
11 - Carrier and Customer Site
234
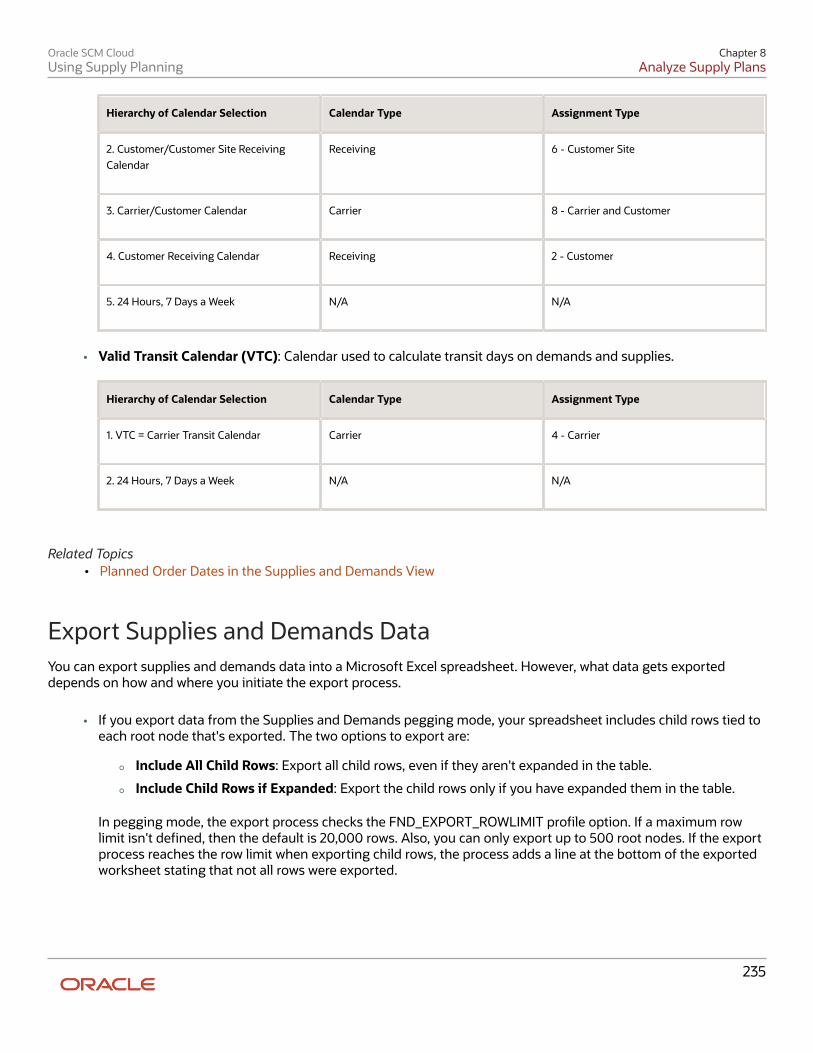
Oracle SCM CloudUsing Supply Planning
Chapter 8Analyze Supply Plans
Hierarchy of Calendar Selection Calendar Type Assignment Type
2. Customer/Customer Site ReceivingCalendar
Receiving
6 - Customer Site
3. Carrier/Customer Calendar
Carrier
8 - Carrier and Customer
4. Customer Receiving Calendar
Receiving
2 - Customer
5. 24 Hours, 7 Days a Week
N/A
N/A
• Valid Transit Calendar (VTC): Calendar used to calculate transit days on demands and supplies.
Hierarchy of Calendar Selection Calendar Type Assignment Type
1. VTC = Carrier Transit Calendar
Carrier
4 - Carrier
2. 24 Hours, 7 Days a Week
N/A
N/A
Related Topics• Planned Order Dates in the Supplies and Demands View
Export Supplies and Demands Data You can export supplies and demands data into a Microsoft Excel spreadsheet. However, what data gets exporteddepends on how and where you initiate the export process.
• If you export data from the Supplies and Demands pegging mode, your spreadsheet includes child rows tied toeach root node that's exported. The two options to export are:
◦ Include All Child Rows: Export all child rows, even if they aren't expanded in the table.
◦ Include Child Rows if Expanded: Export the child rows only if you have expanded them in the table.
In pegging mode, the export process checks the FND_EXPORT_ROWLIMIT profile option. If a maximum rowlimit isn't defined, then the default is 20,000 rows. Also, you can only export up to 500 root nodes. If the exportprocess reaches the row limit when exporting child rows, the process adds a line at the bottom of the exportedworksheet stating that not all rows were exported.
235

Oracle SCM CloudUsing Supply Planning
Chapter 8Analyze Supply Plans
• If you export data from the Supplies and Demands plain table mode (also called flat file mode), the exporteddata includes only the records retrieved by your search, but doesn't include pegged data.
The export process exports all rows that match your criteria until it reaches the maximum allowed by MicrosoftExcel. If the export process reaches the row limit, the process adds a line at the bottom of the exportedworksheet that not all rows were exported.
Related Topics• Supplies and Demands View Modes
Forecast Consumption View Use the Forecast Consumption table to quickly understand the misalignments between the forecast and actual sales atdifferent levels such as item, organization, customer, and demand class. The Forecast Consumption table, which youdrill to from the Supplies and Demands or Material plan table, enables you to analyze the sales orders or transfer orderdemands that consumed a particular forecast. You can also determine the portion of the plan horizon for which theforecast consumption details must be calculated.
The Forecast Consumption table displays the details for your plan based on the forecast consumption parameters,including the Consumption Detail Cutoff Days plan option. Configure these parameters on the Plan Options page,Supply tab, Forecast Allocation and Consumption subtab. After you configure the forecast allocation and consumptionparameters, run your plan. The planning process calculates forecast consumption for the entire plan based on theforecast consumption parameters. Use the Consumption Detail Cutoff Days parameter to limit the number of days inwhich to view the forecast consumption details.
After you run the plan, navigate to the Supplies and Demands or the Material Plan table. In the Supplies andDemand table, select a sales order, forecast, or transfer order and then drill to the Forecast Consumption table. In theMaterial Plan table, select either a sales order, transfer order, or a net forecast measure and then drill to the ForecastConsumption table. Review the forecast consumption details in the context of the table that you drilled from, which caninclude the following information:
• Multiple sales orders or transfer orders for a forecast entry. A forecast entry can be consumed by multiple salesorders or transfer orders.
• Multiple forecast entries for a sales order or transfer order. A sales order or transfer order can consume multipleforecasts.
• The original item of the sales order consuming the forecast where the sales order item has been changed to asubstitute item.
This table describes the various columns in the Forecast Consumption table:
Column Description
Consumption Sequence Sequence of forecast consumed by sales orders or transfer order demand for an item.
Consumed Item Forecast of the item for which consumption occurred. This item can be the same item that’s available inthe sales order, and can be a requested item for an end item substitution.
Organization Inventory organization in which the sales order or transfer order demand consumed the forecast.
Forecast Customer Name of the customer in the forecast.
236

Oracle SCM CloudUsing Supply Planning
Chapter 8Analyze Supply Plans
Column Description
Forecast Customer Site Name of the customer site in the forecast.
Demand Schedule Name of the demand schedule from which forecast was consumed by the sales order or transfer orderdemand.
Ship-to Consumption Level Consumption level used by the forecast consumption process in the plan to consume forecasts.
Consumption Date Date on which the forecast was consumed.
Forecast Quantity Original quantity of the forecast before consumption.
Consumed Quantity Consumed quantity of the forecast by a sales order or transfer order demand.
Sales or Transfer Order Number Sales order or transfer order demand number that consumed the forecast.
Sales or Transfer Order Line Specific sales order line or transfer order demand line number that consumed the forecast.
Sales Order or Transfer Order Item Item in the sales order or transfer order demand that consumed the forecast.
Sales Order or Transfer Order Original ShipDate
Original ship date of the sales order line or transfer order demand line that consumed the forecast.
Sales or Transfer Order Quantity Quantity of the sales order line or transfer order demand line.
Order Type Order type, which is either sales order or transfer order.
Sales Order Customer Customer name on the sales order.
Sales Order Customer Site Customer site name on the sales order.
Demand Class Name of the demand class on the sales order.
The Forecast Consumption table is sorted by the Consumption Sequence column by default. You can change the defaultsetting and sort the table by other columns. Use the Manage Columns actions on the View menu to configure whichcolumns are visible. The layout persists across sessions until changed.
The Forecast Consumption table is available in the Supply Planning, Demand and Supply Planning, and Planning Centralwork areas for constrained and unconstrained supply plans.
You can add the Forecast Consumption table as a link to drill to from the context of a new forecast measure in any user-defined table.
Related Topics• Forecast Processing
• Forecast Consumption
• Supplies and Demands View Modes
• Material Plan View
• Review and Improve Your Demand Fulfillment
237

Oracle SCM CloudUsing Supply Planning
Chapter 8Analyze Supply Plans
Material Plan View The Material Plan is a predefined table in Supply Chain Planning. The Material Plan table is a time-phased view of thedemands, supplies, and daily balances across the plan horizon for any item and organization combination.
The item, organization, and measures are displayed for the row headings, while the time periods are displayed for thecolumn headings. Access the Material Plan table from the Planning Central or Supply Planning work area.
CAUTION: If you open the predefined Material Plan table without using any filters, it can take a long time to displaythe results. Oracle recommends that you create a copy of the Material Plan and add filters to reduce the item countand horizon of the material plan.
You can edit the measures at aggregate levels and allocate the measures to lower levels. For example, you can edit themanual demand measure by organization, item, and period, and then allocate that measure down to the day.
You can edit a measure's value inline by clicking in a cell and changing the value. Or, you can use mass editingcapabilities that are available to adjust several cells at the same time. For example, you can increase the forecast of itemX for the next three months by 30 percent.
You can also display the material plan as a graph. Each measure is plotted along the x-axis, which is the time dimension.
From the Material Plan table, you can drill down to the following tables:
• Item Exceptions
• Items
• Supplies and Demands
• Supply Chain Bill
Although you cannot modify the layout of the material plan, you can copy the material plan and configure the newlayout in the following ways:
• Add or remove members and measures
• Filter members, such as items or categories
• Add conditional formatting, such as font, background color, and status icons
• Add user-defined drill-to actions
Pegging Analysis View
Pegging Analysis View Using the Pegging Analysis view, you can analyze pegging relationships between supplies and demands of differentitems. For example, you can analyze how supplies of component items are pegged to sales orders and forecasts.
The view displays the quantity of supplies that are pegged to demands.
238

Oracle SCM CloudUsing Supply Planning
Chapter 8Analyze Supply Plans
You can group supplies by the Item, Order Type, Organization, Suggested Due Date, or Supplier attributes. Similarly,you can group demands by the Item, Order Type, Organization, Suggested Due Date, or Customer attributes. You canchoose to look at demand items one level below the supply items or look at the end demand items that are peggedto the supply items. You can view the pegged supply quantity as it is or as a percentage of the total supply quantity.Pegging Criteria controls the layout of the pegging analysis view. The Application Default pegging criteria is thepredefined layout. You can save the group by criteria and display options as Pegging Criteria. You can later select thisPegging Criteria from within the Pegging Analysis view. You can mark the criteria as Public or Private.
You can open the Pegging Analysis view using the drill-down action from the Items, Supplies and Demands, andDemand Fulfillment page. From the Pegging Analysis view, you can further drill down to supplies or demandsdepending on your need. When you drill down to supplies, you open the Supplies and Demand view where you see onlythe supply items. Similarly, if you drill down to demands, you open the Supplies and Demands view where you see onlythe demand items. You can also drill down to Items and Item Structure pages.
Create a Pegging Criteria Layout Use Pegging Criteria to create a layout to view the pegging details. Create a pegging criteria from the Pegging Analysisview. After you create a criteria, you can use the criteria as the default criteria for future needs.
Use these steps to create a pegging criteria.
1. In the Supply Planning work area, open your plan:
a. Click the Tasks panel tab.b. In the Tasks panel drawer, click Manage Plans.c. Search and open your plan.
2. After you open your plan, click Actions and then click Open.3. In the Open Table, Graph, or Tile Set dialog box, search for and select the Items, Supplies and Demands, or
Demand Fulfillment table.4. Click OK.5. Search the demands or items.6. Select the demands or items for which you want to perform pegging analysis.7. Click Actions, Drill to, Pegging Analysis.8. In the Pegging Analysis dialog box, click the Pegging Analysis drop-down list and click Create.9. In the Create Pegging Criteria dialog box, enter the details and click Save and Close.
Note: To make this criteria your default criteria, select the Set as default check box in the Create PeggingCriteria dialog box.
Demand Fulfillment View
Review and Improve Your Demand Fulfillment To improve the demand fulfillment of your plan, use the Demand Fulfillment table to review the at-risk demands in yourplan and their related recommendations. You can take actions to accept recommendations from this page.
239

Oracle SCM CloudUsing Supply Planning
Chapter 8Analyze Supply Plans
In the Demand Fulfillment UI, you can:
• View prioritized at-risk demands based on order values weighted by the number of associatedrecommendations.
• Take actions to accept or mark recommendations as complete.
• Review summary information provided for the current demand fulfillment position of your plan to analyze thepotential for improvement based on selected at-risk demands. The information also provides an understandingof the expected demand fulfillment position based on accepted and completed recommendations.
To review and improve your demand fulfillment:
1. In a Supply Planning, Planning Central, or Demand and Supply work area, select the Manage Plans task.2. On the Manage Plans page, search for and open your plan.3. In the Page Layout list, select Plan Summary.
Note that the tiles in the Plan Summary layout include a Demand at Risk in thousands tile.4. In the Demand at Risk in thousands tile, click the Select Tile bar to review the Demand at Risk Summary data.
You can review the demand at risk data through a treemap view or a table view, the treemap view is the default.To switch to the table view, click the Show Table icon.
5. To review the demand at risk data:
◦ Using the treemap: Click an area in the treemap. Typically, you want to start with the area that has thehighest demand at risk value. From the Drill To actions, click Demand Fulfillment.
◦ Using the table: Click the Show Table icon. In the Demand at Risk Summary table, click a cell. Typically,you want to start with the cell that has the highest demand at risk value. From the Drill To actions, clickDemand Fulfillment.
6. The Demand Fulfillment UI shows the individual orders that are at-risk and their related recommendations.
Tip: You can open the Demand Fulfillment table directly without drilling from the Plan Summary. After youopen a plan, click the Open button at the page level. In the Open Table, Graph, or Tile Set dialog box, searchfor and select the Demand Fulfillment table. In the Demand Fulfillment UI, you can search for at-risk demandsby using the filter fields in the search panel.
Review the At-Risk Demand section and the Recommendations section, and then take further actions.
How You Filter Recommendation Summaries The recommendation summary information available on the Demand Fulfillment page can assist you in selecting at-riskdemands to work on. You have a summary graph, a summary table, and a cumulative at-risk demand value slider forfiltering the information to analyze the recommendations.
Recommendation Summary GraphThe recommendation summary graph shows the cumulative at-risk demand value and the related number ofrecommendations associated with that value. To maximize effort, aim for a low number of recommendations with theassociated at-risk demand value substantial enough to make a difference in demand fulfillment percentage. Use theslider to filter by top n, the cumulative demand value.
240

Oracle SCM CloudUsing Supply Planning
Chapter 8Analyze Supply Plans
For example, move the slider to the marker most closely matching $500,000 and click Go or arrow button to the rightof the slider. After moving the slider to the left, the graph shows the at-risk demands that make up the top n of at-riskdemand value.
Recommendation Summary TableIn addition to the recommendation summary graph, demand fulfillment also provides a summary table that shows youinformation about demand fulfillment position.
Column Name Description
Actual
Indicates the demand fulfillment position based on selection criteria coming from the search panel.This column is not impacted when you move the cumulative at-risk demand value slider.
Potential
Indicates the demand fulfillment position for a product category if all the selected at-risk demandswere no longer at risk. Moving the slider to the left selects only the top n cumulative at-risk demandsthat meet the selection criteria coming from the search panel, thereby applying an additional filter ontop of the selection criteria.
Accepted
Indicates the demand fulfillment position when the recommendations are accepted or completed. Thevalues in this column change when you accept or complete the recommendations.
Considerations for Resolving Demand FulfillmentRecommendations You take actions on the demand fulfillment recommendations by accepting recommendations. Five types ofrecommendations are associated with an at-risk demand. They are displayed in tabs under the Recommendationssection on the Demand Fulfillment page.
Following are the recommendation tabs:
• Expedite Buy Orders
• Expedite Make Orders
• Expedite Transfer Orders
• Add Resource Availability
• Add Supplier Capacity
You can choose to view all recommendations associated with all at-risk demands, or choose to view therecommendations associated with the demands that you have selected.
Expedite RecommendationsYou can review and accept three types of expedite recommendations:
• Expedite buy orders: This includes purchase orders, requisitions, and planned buy orders.
• Expedite make orders: This includes work orders and planned make orders.
241

Oracle SCM CloudUsing Supply Planning
Chapter 8Analyze Supply Plans
• Expedite transfer orders: This includes transfer orders and planned transfer orders.
Expedite recommendations show when the supply is needed (expedite date) and how many days earlier (expedite days)the supply is required than currently planned.
Regardless of the type of expedite recommendation, many columns of an expedite recommendation are the same. Forexample, organization, item, order, expedite date, and expedite days are common to all expedite recommendations.However, some columns are specific to certain types of expedite recommendations. For example, processing lead timeis specific to the make order recommendation tab.
When you accept an expedite recommendation, the order is firmed using the expedite date as the firm date. When theplan is run after accepting the recommendation, the planning process assumes the supply is available on the firm date.
Add Resource Availability RecommendationThe add resource availability and add supplier capacity recommendations are handled in similar ways. The add resourceavailability recommendation indicates how many hours a resource is overloaded. To resolve an add resource availabilityrecommendation, you must increase the available hours through Oracle Fusion Manufacturing applications and thenrecollect the data.
If you have increased the available hours, but have not run collections yet, you can mark the recommendation ascomplete to indicate that you have taken action against the recommendation.
Add Supplier Capacity RecommendationThe add supplier capacity recommendation indicates how many additional units of capacity are required. To resolve anadd supplier capacity recommendation, you must increase the supplier capacity. Use the CSV file method to upload anincreased supplier capacity for the item.
If you have increased the capacity, but have not run collections yet, you can mark the recommendation as complete toindicate that you have taken action against the recommendation.
Late Demand Analysis View As a supply planner, you want to readily understand which supply is the root cause for a demand that is at risk offulfilling late in a multilevel supply chain with a complex bill of material. Access the Late Demand Analysis table toidentify the supplies at any level of the bill of material that are causing an end demand to be at risk of being late.
Note: You must be opted in to the feature named Constraint-Based Planning to access the Late Demand Analysistable.
Constrained supply plans consider lead times as a hard constraint while resource or supplier capacity can beoverloaded. A plan can have late demand satisfaction due to lead time or time fence constraints. The Late DemandAnalysis table enables you to pinpoint the components or subassemblies that are the root cause of demands being atrisk. You can then choose specific activities to resolve the issues. You can’t edit the data in the Late Demand Analysistable. However, you can edit the data elsewhere, such as in the Supplies and Demands table or a simulation set. Forexample, you can select an alternate shipment method to expedite the supplies causing the lateness. After you makechanges, rerun the supply plan to check if demands are satisfied on time.
242

Oracle SCM CloudUsing Supply Planning
Chapter 8Analyze Supply Plans
To access the Late Demand Analysis table from an open constrained supply plan, open the Open Table, Graph, or TileSet dialog box and search for the table. You can also drill to the Late Demand Analysis table to analyze late end demandfrom the following tables after selecting one or more end demands:
• Build Plan
• Exceptions
• Material Plan
• Supplies and Demands
You can also drill from the following exception reports to the Late Demand Analysis table:
• Late Replenishment for Sales Order
• Late Replenishment for Forecast
• Late Supply Pegged to Sales Order
• Late Supply Pegged to Forecast
• Demand at Risk Due to Insufficient Lead Time
The Late Demand Analysis table displays the supply pegging chain of only those components or subassembliesthat are causing demand to satisfy late. The table displays the constrained supply path when one or more selectedend demands are satisfied late. However, the table won’t display all pegged supplies to the end demand. Additionalcalculated attributes, such as slack days, are available to further understand the degree of flexibility for manual changesto the plan.
When you access the Late Demand Analysis table, select a Late Demand Analysis Type in the Search section to searchfor constrained supplies to analyze any late demands:
• All supply paths causing late demand: When selected, the table displays the pegging chain of all potentialsupplies that might cause end demands to satisfy late.
• Most constrained supply path: When selected, the table displays the supply pegging chain that’s caused themaximum delay to an end demand.
The following table describes some of the columns in the Late Demand Analysis table:
Column Header Description
Assembly Item Assembly item name for the end demand.
Component Item Subassembly or component of finished good present in the constrained supply plan.
Component Supply Organization Organization of the assembly or component supply.
Due Date of End Demand Due date of end demands such as sales order, forecast, and manual demand.
Earliest Start Date Earliest date on which the supply can start.
End Demand Value Value of the end demand.
Latest Start Date for Pegged Supply Latest date when the pegged supply should have been started to complete demand on time.
Level Pegging level of assembly or components. The level for the end item is 0 (zero). The end item’simmediate component is level 1, and so on.
Need-by Date Date on which the supply should be complete in order to meet the demand on time.
Number of Occurrences Number of occurrences of a particular supply record for a subassembly or component in the selectedsearch.
243

Oracle SCM CloudUsing Supply Planning
Chapter 8Analyze Supply Plans
Column Header Description
Order Number Order number of pegged supply.
Order Number for End Supply Order number of the supply pegged to end demand in constrained supply path.
Order Quantity Order quantity of late supply pegged to demand.
Order Type Order type of supplies present in constrained supply path.
Order Type for End Demand End demand’s order type, such as sales order, forecast, and so on.
Organization Organization for the end demand.
Shared Supply If Yes, the supply is consumed by multiple demands; if No, then the supply isn’t consumed by multipledemands.
Slack Days The number of days between the earliest start date and the latest start date for pegged supply. Thesupply planning process calculates this number.
Suggested Due Date Suggested due date of pegged supply.
244
Oracle SCM CloudUsing Supply Planning
Chapter 9Constraint-Based Supply Planning
9 Constraint-Based Supply Planning
Overview of Constraint-Based Supply Planning With constraint-based supply planning, you can create and run supply plans that consider material and capacityconstraints. Constraint-based planning improves productivity by automating the process of applying lead time andsupplier capacity constraints to make planning decisions.
You can focus on meeting demand on time by evaluating allpossible alternatives, such as using different sources,substitute components, or alternative work definitions.
A constrained supply plan respects constraints by moving orders to earlier time buckets or offloading to an alternateresource, work definition, or supply source. If these measures are insufficient, then the constrained supply plan, as alast resort, overloads resource and supplier capacity to meet demands on time. In this sense, resource and suppliercapacities are soft constraints that the planning process violates only when necessary.
In contrast to the soft constraints, a constrained supply plan in general treats lead times as hard constraints. A demandsuddenly arising inside of manufacturing or procurement lead time causes the constrained supply plan to fulfill thedemand late. An exception to this rule can be made for buy supplies. If the Enforce Purchasing Lead Time item attributeis set to No, then the supply planning process compresses the purchasing lead time to meet demands on time.
Now, you already know that to create a plan, the first thing that you do is define your plan options. For constraint-basedsupply planning, you must set the Supply Planning Mode to Constrained when you create your plan. You can specify theconstrained mode only for a supply plan type or a demand and supply plan type. There are additional plan options thatdrive planning behavior for a constrained supply plan.
• Plan Options page, Scope tab, Plan Parameters section: Specify a combination of bucket types to define theplanning horizon of a constrained plan.
• Plan Options page, Supply tab, Constraints and Decision Rules subtab.
◦ Specify capacity constrained resources to indicate how your plan applies capacity constraints toresources.
◦ Specify whether to apply supplier capacity constraints.
◦ Select the types of alternate sources of supply that your plan can evaluate if the primary source of supplyis unable to meet demand on time.
• Supply: Plan Options dialog box, Optimization Parameters tab: Do not change these default values unlessadvised to do so by your Oracle help desk.
Run a Constrained Supply PlanUnlike unconstrained plans that can be run in interactive mode or in batch mode, you can only run a constrained plan inbatch mode.
Constraint-Based Supply Planning BehaviorHere are some important points about the constraint-based planning behavior.
• In constraint-based supply planning, supply quantity is determined based on capacity within the processinglead time.
245

Oracle SCM CloudUsing Supply Planning
Chapter 9Constraint-Based Supply Planning
In unconstrained planning, the supply quantity is determined first and then the lead time of the supply iscalculated using fixed and variable lead times.
• Internal lead time rollup is used to determine the Processing Lead Time of items with order modifiers, if theuser-specified value isn't feasible.For example, suppose an item has a fixed order quantity of 100, and based on the routing-level processingtime, the time required to make 100 units is 5 days.
◦ If the processing lead time for the item is 3 days, the planning process uses 5 days as the lead time sinceit's not feasible to make 100 units in a 3 day lead time.
◦ If the processing lead time for the item is 7 days, the planning process uses 7 days as the lead time sincethe user-specified value is more than the value calculated by the internal lead time rollup.
Prioritization of DemandDemands are prioritized in a particular sequence in a constrained supply plan. This prioritization drives decisions madein constrained planning on how existing supplies such as on-hand supplies are allocated to meet competing demands.
1. Sales orders by schedule date2. Sales orders by request date3. Sales orders by order value4. Forecasts by suggested due date5. Forecasts by order value
Related Topics• Configure Constraints and Decision Rules
• Overview of Calculated Order Attributes and the Gantt Chart
• Overview of How You Plan Considering Material Constraints
• Automatically Evaluate and Select Alternatives to Meet Demand on Time
• Plan Considering Resource Constraints in a Constrained Supply Plan
Configure Constraints and Decision Rules Configure constraints and decision rules for your constrained supply plan on the Plan Options page, Scope tab,Constraints and Decision Rules subtab. You can access the Constraints and Decision Rules subtab in a Supply Planningor a Demand and Supply Planning work area.
When configured, the planning process evaluates alternate sources, alternate work definitions, alternate resources, andsubstitute components to ensure that supply orders meet demand on time.
Perform these steps to configure the constraints and decision rules for your constrained supply plan.
1. Access the Constraints and Decision rules subtab:a. In a Supply Planning or Demand and Supply Planning work area, open a constrained supply plan.b. Click Actions and then select Edit Plan Options.c. Click the Supply tab.d. Click the constraints and Decision Rules subtab.
246

Oracle SCM CloudUsing Supply Planning
Chapter 9Constraint-Based Supply Planning
2. In the Capacity Constrained Resources drop-down list, select how you want your plan to apply capacityconstraints to resources. The two types of capacity constrained resources are:
◦ All resources: The plan treats every resource as a potential constrained resource and applies capacityconstraints on all resources when calculating the plan output.
◦ Bottleneck resources only: the plan only considers resources that have the Bottleneck attribute set toYes as a capacity constrained resource.
Note: The resource attribute Bottleneck isn't a source attribute. It can be specified on the Resourcespage. The default value for the bottleneck attribute is set to No.
3. Select Apply Supplier Capacity Constraints to have the plan constrain by supplier capacity when generatingpurchase recommendations.
4. In the Decision Rules section, select the alternate sources of supply that the plan can evaluate if the primarysource of supply can't meet demand on time.
This table describes the decision rules that you can use in your constrained plan. The table also describes howthe planning process evaluates each alternative to ensure that supply orders meet demand on time.
Decision Rule Functionality
Use alternate resources
The planning process uses alternate resources to avoid overloads on a primary resource.
Use substitute components
The planning process uses substitute components to minimize demand lateness or capacityoverloads. Existing supplies on primary components are used first to satisfy demand on timebefore the planning process selects substitutes. You can have multiple substitute components for a primary component. Supply Planning also minimizes excess inventory at the end of the planning horizon.
Use alternate item structures and workdefinitions
The planning process uses alternate item structures and work definitions when material orresource (or both) in the primary work definition and item structure are causing delay, or havingoverloads, in meeting demand on time. You can define priorities for alternate item structuresand work definitions. The planning process uses alternate item structures and work definitions to meet demand ontime. You can define priorities for alternate item structures and work definitions.
Use alternate suppliers and sourceorganizations
The planning process uses alternate suppliers and source organizations to meet demand ontime. By default, the planning process tries to minimize using alternate sources and alternatesupplies to meet demand on time. However, if it's necessary to use alternate sources oralternate suppliers, then the planning process uses the priority rank that's assigned to selectthe alternates.
247

Oracle SCM CloudUsing Supply Planning
Chapter 9Constraint-Based Supply Planning
Decision Rule Functionality
Define the priority of alternate sources and alternate supplies in the sourcing rule in SupplyPlanning.
5. Click Save and Close.
Related Topics• Create a Plan
• Define Scope Plan Options
• Overview of How You Plan Considering Material Constraints
• Automatically Evaluate and Select Alternatives to Meet Demand on Time
Plan Considering Resource Constraints in a ConstrainedSupply Plan You can generate a supply plan where resource capacity is a soft constraint that drives the selection of alternate sourcesof supply.
In a constrained supply plan, the planning process solves resource capacity constraints by moving orders to earliertime buckets or offloading to an alternate resource. When a constraint is encountered, the planning process generatesrecommendations where resource capacity is available so that the demand can be fulfilled on time. For example, therecommendations can be to use an alternate resource, alternate work definition, or alternate source. The constrainedsupply plan only overloads resource capacity if there's no other alternative to meet demand on time.
Let's suppose a frame manufacturer can't satisfy customer demands due to the overloaded labor resource in its cuttingdepartment. To resolve this issue, they add an additional labor as an alternate in the cutting department. As a result, theplanning process uses the alternate resource when the primary resource is overloaded, which resolves the overloadedissue.
Supply orders can use resource capacity in any planning time bucket within their lead time. If the lead time is largerthan the required resource usage, the capacity is used up in earlier time buckets first and then in later time buckets. Thesupply due date is still planned as late as possible to meet the demand on time.
Resource capacity constraints impact order sizing for items without order modifiers. Consider an item with a lead timeof 3 days whose production rate is 10 units per hour. A demand for this item for 480 units on Day 6, which results in theplanning process creating 2 planned orders for 240 units each.
Orders that use non-bottleneck resources won't take capacity constraints into account during order sizing. These orderswill be sized based on demand and will overload capacity within the lead time.
Order in Which Capacity Constraints Are AppliedThe planning process applies capacity constraints in a specific order.
1. Prebuild in earlier time buckets2. Offload to an alternate resource3. Overload capacity
248
Oracle SCM CloudUsing Supply Planning
Chapter 9Constraint-Based Supply Planning
Now, let's look at an example of how the planning process handles the capacity constraints. Consider a demand for 500units of widgets on Day 3. The production rate is 10 widgets an hour.
• The plan uses the primary resource for Days 1, 2, and 3 to produce 80 widgets per day for a total of 240 widgets.
• The plan then uses the designated alternate resource for Days 1, 2, and 3 to produce 80 widgets a day for a totalof 240 widgets.
• Finally, the plan overloads the primary resource on Day 3 to produce the remaining 20 widgets needed to meetthe demand of 500 widgets.
Capacity Constrained ResourcesResource constraints are applied based on the Capacity Constrained Resources attribute in plan options. The CapacityConstrained Resources attribute is on the Plan Options page, Supply Tab, Constraints and Decision rules subtab. Thetwo types of capacity constrained resources are:
• All resources: The plan treats every resource as a potential constrained resource and apply capacity constraintson all resources when calculating the plan output.
• Bottleneck resources only: The plan only considers resources that have the Bottleneck indicator set to Yes as acapacity constrained resource in the Resources view.
Related Topics• Configure Constraints and Decision Rules
Plan Based on Workday Patterns in a Resource Calendar Manufacturing organizations use calendars most commonly applicable for a plant and assign workday patterns that areapplicable to specific resources in that plant.
In a constrained supply plan, you can configure a plan option parameter to consider more granular workday patterns ina resource shift instead of using the manufacturing calendar.
Use the EnableResCalendar=true parameter to instruct the planning process to honor the resource availability of thefirst and last resource in a work definition. The suggested start date and suggested dock date of a make supply willthen fall on days when respective resources are available. This process enables more accurate planning calculations byconsidering the actual resource availability in a constrained supply plan.
Perform these steps to configure the Setting for Multithread parameter to enable the resource calendar.
Note: Before you can set the multithread parameter, you must first opt in to the Plan Based on Workday Patterns in aResource Calendar feature.
1. Open a constrained supply plan and navigate to the Plan Options page, Supply tab, General subtab, and clickthe Select Advanced Options button.
2. In the Supply: Advanced Options dialog box, navigate to the Optimization Parameters tab.3. In the Setting for Multithread text box, enter EnableResCalendar=true.
If there is another value set for this parameter, add the EnableResCalendar=true value at the end, separated bya comma.
249

Oracle SCM CloudUsing Supply Planning
Chapter 9Constraint-Based Supply Planning
The following provides some insight into how supply planning plans based on workday patterns in a resource calendarwhen the Setting for Multithread parameter is set to EnableResCalendar=true.
• The planning process honors only the shift calendar assigned to the first and last resource of a work definition.
• The planning process determines the first resource as the first scheduled resource associated with the firstoperation in the work definition.
The planning process determines the last resource as the last scheduled resource associated with the lastoperation of the work definition.
• The suggested start date of a make supply will fall on a working day of the resource shift calendar associatedwith the first resource.
The suggested dock date falls on a working day of the resource shift calendar associated with the last resourceof the work definition.
• While planning, if the suggested start date falls on a nonworking day for a resource, then the planning processstarts the order early by moving the start date into a working date.
If the suggested dock date falls on a nonworking day of the last resource, then the planning process willprebuild the order by moving the dock date to an earlier working day of the resource.
• The planning process respects processing lead times. If the planning process doesn't find a working day in anearlier bucket, the suggested start date or dock date can fall on a nonworking day of a resource shift calendar.
• If supply planning selects alternate resources during the planning process, then the start date or dock date forthe make supply falls on a valid workday of the shift calendar for the alternate resource.
• If the Capacity Constrained Resources plan options parameter is All resources, then resource shift calendar isconsidered for all resources that are assigned as first and last resource of work definitions as described above.
If Bottleneck resources only is selected, then resource shift calendar is considered only for bottleneckresources based on criteria as described above.
• The resource requirements of intermediate resources in a work definition can fall on days when a resource isn'tavailable but is a working day in the organization's manufacturing calendar.
Plan Considering Material Constraints
Overview of How You Plan Considering Material Constraints You can generate a supply plan where the lead time or supplier capacity is a constraint.
When you use the constrained planning mode for a supply plan, the planning process respects material lead timesas hard constraints, which can't be compressed to meet demand due dates. The planning process respects suppliercapacity as soft constraints and willonly overload supplier capacity if there aren't other alternatives to meet demandon time. To control whether purchasinglead time constraints are applied during the planning process, use the EnforcePurchasing Lead Time attribute.
Note: You can set the Enforce Purchasing Lead Time item attribute in Item Organization: Planning attributes whenyou define an item in the Product Information Management work area. Or you can set this item attribute in the Itemsview in the Supply Planning work area.
250

Oracle SCM CloudUsing Supply Planning
Chapter 9Constraint-Based Supply Planning
When the supply planning process encounters a constraint, it provides recommendations to help you to fulfill thedemand on time. For example, it might recommend that you build ahead, use a substitute component, or use analternative source.
Let's dig a little deeper into how the planning process handles lead time constraints and supplier capacity constraints ina constrained supply plan.
Lead Time Constraints Lead time constraints determine how soon new material can be made available. Within the lead time, only on-handinventory and scheduled receipts are used to satisfy demands. Beyond the lead time or planning time fence, you cancreate planned orders.
The quantity of these planned orders is constrained by the available supplier capacity. The planning process honors leadtimes, and orders can be fulfilled late to respect lead time constraints.
Purchase orders within the planning time fence or lead time can only be rescheduled out, but not rescheduled in. If apurchase order is outside of the planning time fence or lead time, then the purchase order can be rescheduled out. Also,the purchase order can be rescheduled in only until the planning time fence or lead time.
How to Offset Dependent Demand Due Dates in Aggregate TimeBuckets For constrained supply plans, you can offset dependent demand due dates when planning in aggregate time buckets.You can enforce a more granular control over lead times for subassemblies and components whose dates need to beoffset by user-specified lead times.
Use the following attributes in an items simulation set to offset dependent demands into a previous aggregate timebucket:
• Lead Time Offset in Week Buckets: The planning process offsets the lead time by number of days used in thisattribute for an item and organization when planning in week buckets.
• Lead Time Offset in Period or Month Buckets: The planning process offsets the lead time by number of daysused in this attribute for an item and organization when planning in period or month buckets.
By using these attributes, you can ensure that subassemblies and components of manufacturing assemblies withlengthy cumulative manufacturing lead times are manufactured and procured on time in the correct aggregate timebucket.
Define the item attributes in a simulation set to adjust the lead times in aggregate buckets. You can also update theseattributes in the Items table in plan output and then simulate the plan to correctly offset the lead time.
When planning in aggregate buckets, the planning process considers the lead times based on specific criteria withrespect to the two attributes.
• For make planned orders, the planning process uses the maximum of processing lead time and aggregatebucket lead time offset attribute for that item.
• For planned transfer supplies, the planning process uses the maximum in transit lead time and aggregatebucket lead time offset item attribute value.
251

Oracle SCM CloudUsing Supply Planning
Chapter 9Constraint-Based Supply Planning
• For new buy orders, the planning process uses the maximum of processing lead time in the approved supplierlist (or processing lead time at item if ASL isn't defined), and aggregate bucket lead time offset item attributevalue.
Example of How to Offset Dependent Demand Due Dates inAggregate Time Buckets Let's look at an example of how you can offset dependent demand due dates when you plan in aggregate time buckets.
For our example, your constrained supply plan is run in weekly buckets and the planning calendar is a 5,2 calendar (5days working, 2 days nonworking). The demand for a finished good is on day 21.
• The demand for a finished good (FG) is in distribution organization D1.
• The finished good is sourced from manufacturing organization M1 and is manufactured in M1.
• The in transit lead time between organization D1 and M1 is 3 days.
• The finished good and subassembly (SA) are make items and the raw material is a purchased item.
• The processing lead time for each item is 4 days and there are no other lead times.
You can set the item attribute for aggregate time buckets to offset the dates. For our example, let's set the Lead TimeOffset in Week Buckets attribute for the finished good and subassembly to 7 in the M1 organization.
The constrained supply planning process looks at the Lead Time Offset in Week Buckets attribute value. If the value isgreater than the processing lead time for the item, the planning process replaces the processing lead time with the LeadTime Offset in Week Buckets attribute value. In our example, processing lead time is 4 days, which is less than a week.So, the planning process picks up the value in the Lead Time Offset in Week Buckets attribute, which is 7.
For the finished good in the M1 organization, the due date and dock date falls on week 3 (postprocessing led time is 0in our example). However, the start date is offset by one week and falls on week 2 (dock date minus Lead Time Offset inWeek Buckets attribute value). Since it's a weekly bucket, the start date is bucketed to the end of week 2.
Similarly, for the subassembly (SA), the dock date and due date is on the end of week 2, but the start date is bucketed onweek 1.
For the raw material (RM), the Lead Time Offset in Week Buckets attribute value is blank. The planning processconsiders the processing lead time and buckets all dates (start date, ship date, dock date, and due date) on the end ofweek 1.
The planning process considered the Lead Time Offset in Week Buckets item attribute in this example because ofplanning in week buckets. If the item is planned in period or month buckets, then the planning process considers theLead Time Offset in Period or Month Buckets attribute.
252

Oracle SCM CloudUsing Supply Planning
Chapter 9Constraint-Based Supply Planning
Supplier Capacity Constraints Supplier capacity constraints determine how much new material can be ordered from a supplier within a given timebucket. If the supply planning process can't find any alternatives to meet demand on time, then supplier capacity isoverloaded to fulfill the demand on time.
Here are some additional points about supplier capacity constraints:
• Supplier capacity is applied as a soft constraint when planning supplies for buy items.
• Supplier capacity constraint can result in the selection of an alternate supplier.
• Supplier capacity is consumed on the suggested dock date of buy orders.
• Supplier capacity is cumulative and any unused capacity from one planning time bucket carries forward into thenext bucket.
• For configure-to-order items in a constraint-based supply plan, the planning process considers capacity at themodel-item level. Supplies for configurations consume supplier capacity of the base model.
Supplier Capacity Constraint Parameters For your constrained supply plan, you can establish parameters to determine when supplier capacity startsaccumulating and whether purchase orders consume supplier capacity or not.
For these supplier capacity constraints, you can set two attributes in plan options in the Supply: Advanced Optionsdialog box, Supplier Capacity Parameters section.
• Supplier Capacity Accumulation Multiplier
• Consume supplier capacity with purchase orders
Supplier Capacity Accumulation MultiplierThe Supplier Capacity Accumulation Multiplier attribute determines when supplier capacity starts accumulating.Supplier capacity accumulates from the time bucket corresponding to the item lead time, multiplied by the suppliercapacity accumulation multiplier. This attribute is located in plan options in the Supply: Advanced Options dialog box,Supplier Capacity Parameters section.
For example, you have an item with a 5-day lead time that has a supplier capacity of 20 units per day. If the suppliercapacity accumulation multiplier is zero, then capacity is accumulated starting on Day 1. If supplier capacityaccumulation multiplier is set to 1, then capacity is accumulated starting on Day 6.
253

Oracle SCM CloudUsing Supply Planning
Chapter 9Constraint-Based Supply Planning
Consume Supplier Capacity with Purchase OrdersThe Consume supplier capacity with purchase orders attribute determines whether purchase orders consumesupplier capacity or not. This attribute is located in plan options in the Supply: Advanced Options dialog box, SupplierCapacity Parameters section.
If you select this option, purchase orders consume supplier capacity. Use this setting when the supplier capacity statedfor your supplier is inclusive of any capacity they're going to use for purchase orders you have already placed againstthe supplier.
If you don't select this option, purchase orders don't consume supplier capacity. Use this setting when the suppliercapacity stated for your supplier excludes any commitment they have already made to fulfill existing purchase orders.
Plan Considering Process Manufacturing WorkDefinitions
Overview of How You Plan Considering Process ManufacturingWork Definitions In a constrained supply plan, you can plan supply based on the process manufacturing work definition as specified inOracle Fusion Manufacturing or in other manufacturing applications. You can use a manufacturing plant to supportproduction needs for process manufacturing and discrete manufacturing.
You can plan appropriate batch quantities and account for the creation of co-products and by-product supplies alongwith the primary product specified in theprocess work definition.
Process manufacturing environments are characterized by a set of unique planning challenges. These include products,co-products, and by-products that are generated at various steps in the manufacturing process, not all of which are atthe end of the process. When using Oracle Fusion Manufacturing, you can specify a work definition that captures thebatch quantity and the manufacturing process. You can also specify the work definition to take into account the stepsand quantities at which products, by-products, and co-products are generated, in addition to the ingredients required
254

Oracle SCM CloudUsing Supply Planning
Chapter 9Constraint-Based Supply Planning
for the manufacturing. Supply Planning honors these work definitions when the planning process generates the plan.Additionally, you can analyze the plan in the context of the co-products and by-products generated.
Use File-Based Data Imports to upload process manufacturing work definitions into Supply Planning for sources otherthan Oracle Fusion Manufacturing .
Use the Recalculate action to recalculate a subset of your plan output to quickly see the impact of changes to yourconstrained supply plan.
Related Topics• Recalculate for Process Manufacturing Work Definitions
Supply Planning Behavior and Concepts for ProcessManufacturing Let's talk about the business logic employed by Supply Planning when it plans process manufacturing facilities andactivities.
In a constrained supply plan, you need to understand some of the behavior and concepts for process manufacturing,such as the following:
• Supply planning behavior
• Considerations when you define and plan for process manufacturing
• Batch quantity concepts
Supply Planning BehaviorThe following are some supply planning behaviors for process manufacturing:
• The supply planning process plans for existing process work orders and recommends new supplies, based onprocess work definitions.
• The planning process recommends new supplies in proportion to the output quantities for primary, co-product,and by-product supplies.
• The batch quantity linearly scales to the primary output quantity and all the output and input items on the workdefinition.
• For existing process work orders, the supply planning process considers operation level scrap to determine theremaining planned quantities of output products associated with current and future operations.
• If an item is the primary output in one work definition and a co-product in another work definition, the workdefinition in which it's the primary output is used to create a supply for this item to meet demand.
Considerations When You Define and Plan for Process ManufacturingConsider these points when you define and plan for process manufacturing work definitions in a constrained supplyplan.
• The unique criteria for work definition selection by supply planning is based on primary output item, workdefinition name, and highest production priority.
• At any given point in time, an output item can be associated to one and only one operation. The same productcan't be completed from multiple operations.
255

Oracle SCM CloudUsing Supply Planning
Chapter 9Constraint-Based Supply Planning
• A work definition operation can complete more than one output item.
• Output of one operation can't be the input product at the last operation.
• It's not mandatory to attach any output product at the last operation.
• Item shrinkage is supported for process work orders and planned orders.
Batch Quantity ConceptsUsing batch quantity while defining a work definition helps you to specify the product outputs, ingredients, andresource usages with a user-friendly range of numbers instead of small fractions or large numbers.
There are some additional batch quantity concepts. Batch quantity:
• Is the quantity of the production batch used for batch sizing and scaling.
• Is the quantity that moves between the operations in a work order.
• Linearly scales to the primary output quantity and all the output and input items in the work definition.
• Can't add up to the sum of the quantities for the output items, or the sum of the input items, or both.
Analyze Process Manufacturing Plans In constraint-based supply planning, you can analyze the process manufacturing work definitions in your plansfrom several views. There are also some specific measures that support process manufacturing work definitions in aconstrained supply plan.
Routings ViewWhen you create a work definition or work order, the Routings view displays the Work Method attribute. The WorkMethod attribute represents the production process, or manufacturing work method. Valid values are Discretemanufacturing and Process manufacturing.
Item Structures ViewIn a constrained supply plan, the Item Structures view distinguishes between ingredients and output products.
• The Component Items tab contains the details about ingredients required to build an assembly, includingsubstitute components.
• The Output Item tab shows various output types, such as primary product, co-products, and by-productsproduced at different operations of a process work definition. The Output Items tab is read-only.
Supplies and Demands ViewThese attributes in the Supplies and Demands view support process manufacturing work definitions in a constrainedsupply plan
Attribute Description
Suggested Completion Date
The completion date for work orders and planned orders. The suggested completion date can be laterthan the due date of the primary product for process manufacturing.
256

Oracle SCM CloudUsing Supply Planning
Chapter 9Constraint-Based Supply Planning
Attribute Description
Batch Quantity
The quantity of the production batch used for batch sizing and scaling. It is also the quantity thatmoves between the operations in a work order. The batch quantity linearly scales to the primary output quantity and all the output and input items onthe work definition.
Batch Quantity UOM
The unit of measure code of the work definition quantity (Batch Quantity).
Work Method
The manufacturing work method. You can select the work method in the Routings view. Value are:
• Process manufacturing
• Discrete manufacturing
Build Plan ViewIn the Build Plan view, you can select Related Output Supplies from the Highlight Related Cells drop-down list. Theother supplies that are related to the selected supply through a co-product or by-product relationship are highlighted.
In the Configure Build Plan dialog box, you can select the Related Output Items option in the Levels to Displaydrop-down list. For the selected item/organization or category, all items that appear as output items in the work definitionsare shown in the Build Plan.
Measures to Support Process Manufacturing Work DefinitionsThese measures support process manufacturing work definitions in a constrained supply plan.
Measure Description
Planned Order Co-Product Supply
Measure contains the supplies for products recommended by the supply planning process, which getsproduced with primary product in the manufacturing process.
Work Order Co-Product Supply
Measure contains work order supplies for products that are getting produced during themanufacturing process of the primary finished good work order.
Planned Order By-Product supply
Measure contains the supplies recommended by the supply planning process for residual items thatgets produced in the manufacturing process of the primary finished good.
Work Order By-Product supply
Measure contains supplies that are produced as a residual of, or incidental to, the production processof the primary finished good work order. By-product supplies aren't inventoried.
257

Oracle SCM CloudUsing Supply Planning
Chapter 9Constraint-Based Supply Planning
Automatically Evaluate and Select Alternatives to MeetDemand on Time You can run a constraint-based supply plan that evaluates the use of alternate sources of supply to overcome demandfulfillment issues.
Configure constraints and decision rules on the Plan Options page, Scope tab, Constraints and Decision Rules subtabin a Supply Planning or Demand and Supply Planning work area. When configured, the planning process evaluatesalternate sources, alternate work definitions, alternate resources, and substitute components to ensure that supplyorders meet demand on time.
Supply Planning Logic to Automatically Evaluate and Select AlternativesConstrained supply planning prioritizes satisfaction of demand due dates higher than the need to respect resource orsupplier capacity constraints. When a capacity constraint exists, the planning process will:
1. First try to satisfy the demand in an earlier time bucket by using the primary sources of supply.2. If there is no capacity available on the primary on or before the demand due date, the planning process selects
alternate sources of supply.3. If there is no capacity available on the primary or the alternate on or before the demand due date to fulfill
demand on time, then the planning process overloads capacity.
Supply Planning Sequence to Automatically Evaluate and SelectAlternativesThe planning process uses a specific sequence for alternate selections.
1. Use alternate resources2. Use substitute components3. Use alternate item structures and work definitions4. Use alternate suppliers and source organizations
Before Setting Up Constraints and Decision RulesBefore you set up your constraints and decision rules to automatically evaluate and select alternatives to meet demandon time, consider the following implementation advice:
• Define the alternates in the supply chain to meet our specific business needs. Understand that some alternatesare expensive.
• Select only those alternate options in supply planning for which there is corresponding data in the source.
Alternate Resource RulesYou can use alternate resources with these supported setups:
• One alternate resource is specified for one primary resource.
258
Oracle SCM CloudUsing Supply Planning
Chapter 9Constraint-Based Supply Planning
• One alternate resource is specified for one primary resource, and one alternate resource is specified for thesimultaneous resource.
• Multiple ranked alternate resources specified for one primary resource.
These setups aren't supported with respect to alternate resources:
• Multiple alternate resources (used simultaneously) to replace one primary resource.
• A set of alternate resources (used simultaneously) to replace a set of primary resources (used simultaneously).
Exceptions in a Constrained Supply Plan You can evaluate a plan and prioritize the manual changes to perform based on the exceptions generated from a plan.Oracle Supply Planning Cloud provides several exception messages for constraint-based supply planning.
You can drill down on an exception to obtain more detailed information about the exception. These are the four types ofexceptions for a constrained supply plan.
• Demands at Risk Exceptions
• Late Supply Exceptions
• Overloaded Capacities Exceptions
• Usage of Alternates and Substitutes Exceptions
Demands at Risk ExceptionsThis table shows the demands at risk exceptions for unconstrained and constrained supply plans.
Exception Exception is generated for the following conditions:
Demand at Risk Due to Insufficient LeadTime
• Suggested order date is less than plan start date.
• Reschedule days is less than 0 (Reschedule in Recommendations).
• Firm status is set to Not Firm.
Note:All three conditions must be met before the planning process generates the exception.
Demand at Risk Due to a ResourceCapacity Shortage
Resource availability is less than the resource requirements for the resource capacity measures of anyresource used in making any supply that's end-pegged to the demand.
Demand at Risk Due to a Supplier CapacityShortage
Supplier capacity availability is less than the supplier capacity required for the supplier capacitymeasures of any item that's end pegged to the demand.
Late Supply ExceptionsThis table shows the late supply exceptions for unconstrained and constrained supply plans.
259

Oracle SCM CloudUsing Supply Planning
Chapter 9Constraint-Based Supply Planning
Exception Exception is generated for the following conditions:
Late Supply Pegged to Forecast
Days late is greater than 0 for the Days Late demand order attribute. This condition means that the demand could be at risk due to the late supply.
Late Supply Pegged to Sales Order
Days late is greater than 0 for the Days Late demand order attribute. This condition means that the demand could be at risk due to the late supply.
Orders with Insufficient Lead Time
• Suggested order date is less than plan start date.
• Reschedule days is less than 0 (Reschedule in Recommendations).
• Firm status is set to Not Firm.
Note:All three conditions must be met before the planning process generates the exception
Orders To Be Canceled
The planning process detects a supply order that's not firm for which you don't need to satisfy demandor safety stock requirements. The planning process:
• Suggests that you cancel the supply order.
• Continues to plan lower item structure levels as if you accepted the suggestion.
Orders To Be Rescheduled In
The planning process detects a supply order that's not firm with an original due date that's later thanthe suggested due date. The planning process:
• Suggests that you reschedule the supply order to an earlier date.
• Continues to plan lower item structure levels as if you accepted the suggestion.
Orders To Be Rescheduled Out
The planning process detects a supply order that's not firm with an original due date that's earlier thanthe suggested due date. The planning process:
• Suggests that you reschedule the supply order to a later date.
• Continues to plan lower item structure levels as if you accepted the suggestion.
Overload Capacities ExceptionsThis table shows the overload capacity exceptions for unconstrained and constrained supply plans.
Exception Exception is generated for the following conditions:
Resource Overloaded
Resource utilization percentage is greater than 100.
Supplier Capacity Overloaded
Supplier capacity utilization percentage is greater than 100.
260

Oracle SCM CloudUsing Supply Planning
Chapter 9Constraint-Based Supply Planning
Use of Alternates and Substitutes ExceptionsThis table shows the use of alternates and substitutes exceptions for only constrained supply plans.
Exception Exception is generated for the following conditions:
Order Sourced from Alternate Facility
Alternate Facility Used attribute is set to True. The order is sourced from an alternate facility due to the material, resource, or lead time constraints.
Order Sourced from Alternate Supplier
Alternate Supplier Used attribute is set to True. The order is sourced from an alternate supplier (Rank 2 supplier and higher) due to the suppliercapacity constraints.
Planned Order Uses Alternate WorkDefinition
Alternate Work Definition Used attribute is set to True. The planned order has used an alternate work definition due to the material, resource, or lead timeconstraints.
Planned Order Uses Alternate Resources
Alternate Resource Used attribute is set to True. The planned order has used an alternate resource due to the capacity constraints.
Planned Order Uses SubstituteComponent
Substitute Component Used attribute is set to True. The order has used a substitute component. The scenarios where this exception is generated are:
• The primary component lead time is long, which causes demand lateness (Lead Time Constraint).
• The supplier capacity of the primary component isn't sufficient, which causes lateness (SupplierCapacity Constant).
• The resource capacity for making the primary component isn't sufficient, which causes lateness(Resource Constraint).
• The Create Supply plan option is set to No for the primary component and there's enough onhand or capacity available on the substitute component.
Diagnose Planning Issues in Constrained Supply Plans
Overview of Calculated Order Attributes and the Gantt Chart Calculations are more complex in a constrained supply plan than in an unconstrained plan. So, there are additionaldiagnostic attributes to help you diagnose issues in your constrained supply plan.
The calculated order and resourcerequirement attributes help you understand why the supply planning process madecertain decisions during thecalculation process. In conjunction with these diagnostic attributes for a constrained supplyplan, you can also use theGantt Chart to:
• View orders and resource requirement duration on a timeline along with the calculated attributes.
261

Oracle SCM CloudUsing Supply Planning
Chapter 9Constraint-Based Supply Planning
• Visualize the timing of supplies to be manufactured and sourced to support the demand.
• Visualize how orders consume capacity on a resource.
• Interactively modify the planned dates of a supply or resource requirement. For example, use drag and drop tochange a supply order or a resource activity to an earlier time or a later time.
Calculated Order Attributes Constraint-based supply planning includes several calculated order and resource requirement attributes to help youdiagnose issues in your plan. Some attributes are based on milestones on an order that are calculated as part of a planrun, such as Earliest Start Date.
Other attributes are explanatory order attributes, such as Shared Supply.
MilestonesThese attributes are based on milestones.
Diagnostic Attribute Applies to Description
Need by Date
Supply and resource requirement
The date when the supply or resourcerequirement must complete to satisfy demandon time.
Earliest Start Date
Supply and resource requirement
The earliest possible date that a supply orresource activity can start, based on thenominal lead times of all pegged upstreamsupplies and resource activities.
Consumption Start Date
Supply and resource requirement
The date when a downstream supply orresource activity starts consuming the outputof the supply or resource activity. If the supplyor resource activity has multiple consumers, theearliest consumer is used to calculate this date.
Material Available Date
Supply and resource requirement
The date when the upstream supply or resourceactivity that feeds the supply or resourceactivity is planned to complete. If the supplyor resource activity has multiple upstreamsupplies or resource activities feeding it, thelatest producer is used to calculate this date.
Latest Start Date
Supply
The latest possible date that a supply can startso that it can complete by its need-by date.
Explanatory Order AttributesThese attributes are based on explanatory order attributes.
262
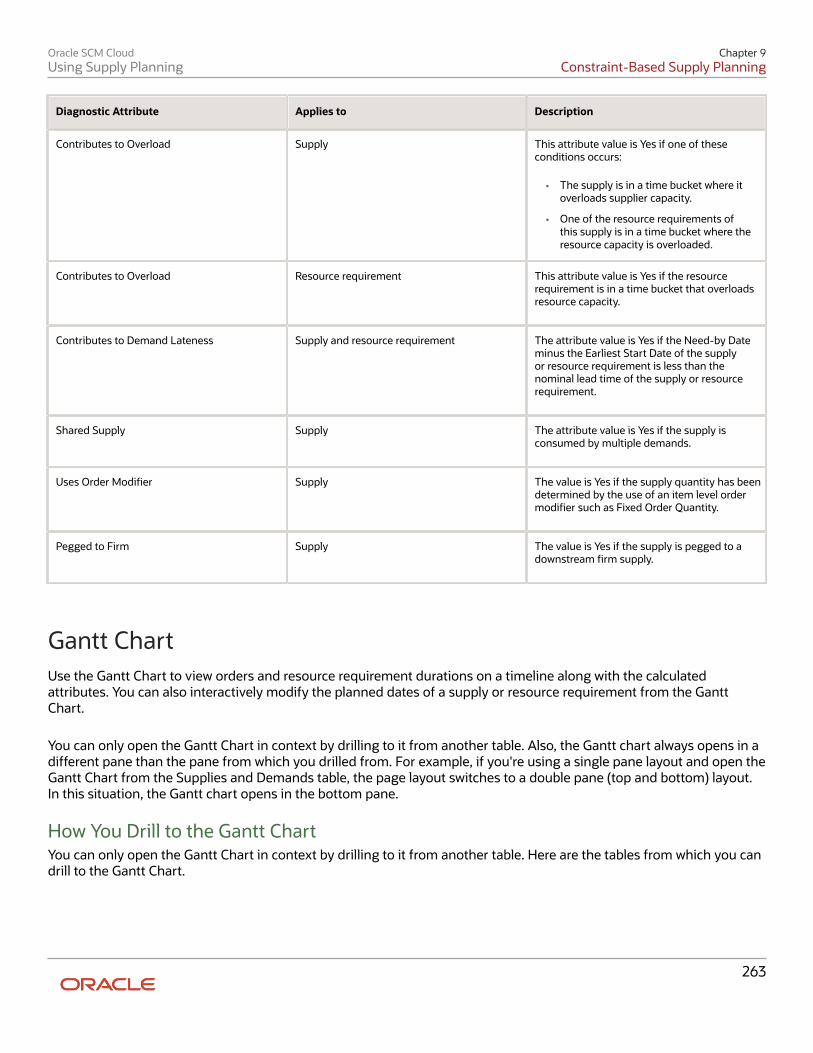
Oracle SCM CloudUsing Supply Planning
Chapter 9Constraint-Based Supply Planning
Diagnostic Attribute Applies to Description
Contributes to Overload
Supply
This attribute value is Yes if one of theseconditions occurs:
• The supply is in a time bucket where itoverloads supplier capacity.
• One of the resource requirements ofthis supply is in a time bucket where theresource capacity is overloaded.
Contributes to Overload
Resource requirement
This attribute value is Yes if the resourcerequirement is in a time bucket that overloadsresource capacity.
Contributes to Demand Lateness
Supply and resource requirement
The attribute value is Yes if the Need-by Dateminus the Earliest Start Date of the supplyor resource requirement is less than thenominal lead time of the supply or resourcerequirement.
Shared Supply
Supply
The attribute value is Yes if the supply isconsumed by multiple demands.
Uses Order Modifier
Supply
The value is Yes if the supply quantity has beendetermined by the use of an item level ordermodifier such as Fixed Order Quantity.
Pegged to Firm
Supply
The value is Yes if the supply is pegged to adownstream firm supply.
Gantt Chart Use the Gantt Chart to view orders and resource requirement durations on a timeline along with the calculatedattributes. You can also interactively modify the planned dates of a supply or resource requirement from the GanttChart.
You can only open the Gantt Chart in context by drilling to it from another table. Also, the Gantt chart always opens in adifferent pane than the pane from which you drilled from. For example, if you're using a single pane layout and open theGantt Chart from the Supplies and Demands table, the page layout switches to a double pane (top and bottom) layout.In this situation, the Gantt chart opens in the bottom pane.
How You Drill to the Gantt ChartYou can only open the Gantt Chart in context by drilling to it from another table. Here are the tables from which you candrill to the Gantt Chart.
263

Oracle SCM CloudUsing Supply Planning
Chapter 9Constraint-Based Supply Planning
Drill to Context What is Displayed in the Gantt Chart
Supplies and Demands
Supply orders
Resource Requirements
Resource requirements
Cells corresponding to these measures inthe Material Plan, Build Plan, or a user-defined table:
• Total Supply
• Planned Orders
• Scheduled Receipts
• Purchase Orders
• Purchase Requisitions
• Transfer Orders
• Work Orders
• Dependent Demands
Supply orders
Cells corresponding to the ResourceRequirements measure in the ResourcePlan, Build Plan, or a user-defined table.
Resource requirements
Drill From the Gantt Chart to Other TablesFrom the Gantt Chart, here are the tables that you can drill to and what the tables display.
Drill From Drill to Table What the Table Displays
Supply bar
Supplies and Demands
Supply order details
Supply bar
Material Plan
Material plan for the item-organization
Supply bar
Items
Item corresponding to the supply
Supply bar
Item Structure
Item structure corresponding to the item ofsupply
Supply bar
Routings
Routing of the item of the supply
Supply bar
Suppliers
Suppliers for the item corresponding to thesupply
Resource Requirement bar
Resources
Resource corresponding to the resourcerequirement
264

Oracle SCM CloudUsing Supply Planning
Chapter 9Constraint-Based Supply Planning
Drill From Drill to Table What the Table Displays
Resource Requirement bar
Resource Availability
Resource availability of the resource
Resource Requirement bar
Resource Plan
Resource plan for the resource correspondingto the resource requirement
Resource Requirement bar
Resource Requirements
Resource requirement details
List of Order Attributes You Can DisplayYou can display these order attributes in the left pane of your Gantt Chart:
Order Attribute Automatically Displayed
Item
Yes
Organization
Yes
Order Number
Yes
Order Quantity
Yes
Order Type
Yes
Supplier
No
Supplier Site
No
Source Organization
No
Ship Method
No
Work Definition
No
Item Structure
No
Supply Bar and Resource Requirements BarLet's discuss the characteristics of the supply bar and the resource requirement bar in your Gantt Chart.
• Supply bars span from the suggested start date to the suggested due date of the supply. If the suggested startand suggest due dates are the same, the supply bar appears as a thin line.
265
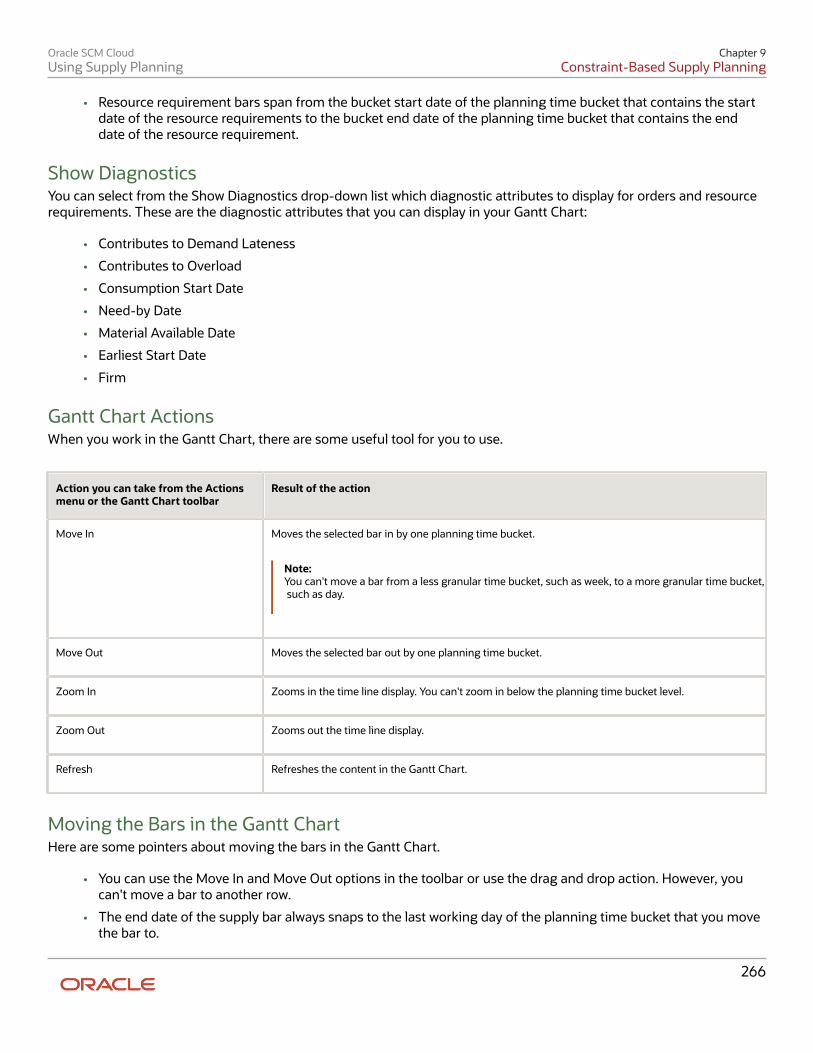
Oracle SCM CloudUsing Supply Planning
Chapter 9Constraint-Based Supply Planning
• Resource requirement bars span from the bucket start date of the planning time bucket that contains the startdate of the resource requirements to the bucket end date of the planning time bucket that contains the enddate of the resource requirement.
Show DiagnosticsYou can select from the Show Diagnostics drop-down list which diagnostic attributes to display for orders and resourcerequirements. These are the diagnostic attributes that you can display in your Gantt Chart:
• Contributes to Demand Lateness
• Contributes to Overload
• Consumption Start Date
• Need-by Date
• Material Available Date
• Earliest Start Date
• Firm
Gantt Chart ActionsWhen you work in the Gantt Chart, there are some useful tool for you to use.
Action you can take from the Actionsmenu or the Gantt Chart toolbar
Result of the action
Move In
Moves the selected bar in by one planning time bucket.
Note:You can't move a bar from a less granular time bucket, such as week, to a more granular time bucket, such as day.
Move Out
Moves the selected bar out by one planning time bucket.
Zoom In
Zooms in the time line display. You can't zoom in below the planning time bucket level.
Zoom Out
Zooms out the time line display.
Refresh
Refreshes the content in the Gantt Chart.
Moving the Bars in the Gantt ChartHere are some pointers about moving the bars in the Gantt Chart.
• You can use the Move In and Move Out options in the toolbar or use the drag and drop action. However, youcan't move a bar to another row.
• The end date of the supply bar always snaps to the last working day of the planning time bucket that you movethe bar to.
266

Oracle SCM CloudUsing Supply Planning
Chapter 9Constraint-Based Supply Planning
• If you move a bar to a non-working day within the daily bucket portion of the plan horizon, you will be asked ifyou want to move it to the previous working day.
• The time durations of the bars remain the same as you move them across planning time buckets. A replan orrecalculate action can change the durations.
How to Diagnose Plan Output Using Order Attributes and theGantt Chart Here we have some details that show you how you can diagnose a plan output. You can view the order attributesreferenced in this table from within the Supplies and Demands table or the Gantt Chart.
Data Conditions Inference
• Need by Date < Earliest Start Date
• (Need by Date - Earliest Start Date) <Lead Time
The supply is on the critical path of demands that are within the lead time. In this case, the supply isplanned to start on its earliest start date to minimize demand lateness.
• (Need by Date - Earliest Start Date) >Lead Time
• Suggested Due Date < Need by Date
You can move the supply to an earlier time by pulling it in to start on or after the material available datewithout impacting upstream feeding supplies. You can also pull in the supply to start on or after the earliest start date without impacting the leadtime of any of the upstream supplies. However, the upstream supplies should be re-pegged orrescheduled to ensure that projected available balance of the upstream materials remain greater thanor equal to zero.
• (Need by Date - Earliest Start Date) >Lead Time
• Suggested Due Date < ConsumptionStart Date
You can move the supply to a later time by pushing it out to end on or before the consumption startdate. This action doesn't impact any of the downstream consuming supplies and end demands. You can also push out the supply to complete on or before the need-by date without impacting thelead time of any of the downstream supplies. However, the downstream supplies might need to berescheduled or re-pegged to ensure that projected available balance stays at or above zero.
Contributes to Overload order attribute isYes for some supplies in the pegging treeof an end demand
You can filter the list of supplies in the pegging tree in the Supplies and Demands table to only showthose supplies that have the Contributes to Overload order attribute set to Yes. This filtering helps youto quickly understand the items that need action to make the plan feasible.
Simulate Changes in a Constrained Supply Plan
Overview of the Recalculate Action Use the plan level Recalculate action to recalculate a subset of the plan output to quickly see the impact of changes toyour constrained supply plan.
267

Oracle SCM CloudUsing Supply Planning
Chapter 9Constraint-Based Supply Planning
When planning, you can make changes to planning assumptions, such as a change in resource capacity or supply anddemand quantities and dates. You can also simulate the impact of plan changes by running your plan without a freshsnapshot. The output of the recalculation process is persisted into the plan. The output is also visible in different views,such as Supplies and Demands, Resource Requirements, Material Plan, Resource Plan, and Build Plan.
After you make changes in your plan, run the Recalculate process. You immediately see the effects of your changes onkey relevant metrics, such as the projected available balance of affected items. You don't have to wait for the results of afull replan.
What the Recalculate Process Does This table shows you how the Recalculate process affects your constrained supply plan when you make changes.
If you change: The Recalculate process:
A demand date or quantity, or add ademand
Note:You can perform this change onlyon end demands, but not dependentdemands.
• Updates the projected available balance of the item.
• Updates a subset of the order attributes of the demand: Suggested Due Date, Order Quantity, Days Late and Quantity by Due Date.
• Doesn't generate any new supplies in response to a demand increase or a new demand.
The supply due date or quantity for aplanned order or existing supply
Note:For existing supplies, such as workorders, you can only set the firmquantity to 0. You can't set the firmquantity value lower or higher than theoriginal supply quantity.
• Updates the projected available balance of the item and the items for which this supply generatesdependent demands.
• Updates a subset of the order attributes of the supply including Suggested Due Date, Compression days, Days Late, Reschedule Days and others.
• Updates a subset of the order attributes of the demands pegged to this supply: Days Late, Quantity by Due Date, Material Available Date.
• Recalculates the resource requirement dates and hours based on updated supply dates andquantities.
• Recalculates the Consumption Start date attribute and the Material Available date attribute of thepegged supplies one level up and down.
• Recalculates the dependent demand dates and quantities based on updated supply dates andquantities.
• Doesn't generate any new supplies in response to new or increased quantities of the dependentdemands resulting from this supply change.
Add a supply or change the work definitionof an existing planned order
• Updates the projected available balance of the item and the items for which the supply generatesdependent demands.
• Calculates the key order attributes for the new supply.
• Calculates new resource requirements for the order if this is a make order.
• Calculates new dependent demands for the order. All dependent demands are placed on the startdate of the order and not on operation start date.
• Doesn't generate any new supplies in response to new or increased quantities of the dependentdemands resulting from this supply change.
268

Oracle SCM CloudUsing Supply Planning
Chapter 9Constraint-Based Supply Planning
If you change: The Recalculate process:
Add or modify the resource availability
Recalculates these measures:
• Net Resource Availability
• Cumulative Net Resource Availability
• Resource Availability
• Resource Utilization Percentage
Supplies won't be rescheduled in or out in response to the change in resource availability.
Add or modify supplier capacity
Recalculates these measures:
• Net Supplier Capacity Availability
• Supplier Capacity Availability
• Supplier Capacity Utilization Percentage
Supplies won't be rescheduled in or out in response to the change in supplier capacity.
Reschedule a resource activity using theGantt Chart
Assumes that if a resource activity is moved in or moved out by a certain number of days, that theparent supply is also moved in or out by the same number of days. Based on this assumption, the same recalculation logic that's applied to the action of moving a supplyis also applied in this case.
Choose an alternate resource for aresource requirement
• Updates the original resource requirement with the new resource.
• Calculates the resource hours for the newly-selected resource based on work definitionspecifications.
• Equally apportions the calculated resource hours across the time buckets that are included in themake span of the original resource requirement.
• Updates the resource-related planning measures, such as resource requirements and resourceutilization percentage, for the old and the new resource. The planning process assumes that theold and new source have approximately the same processing rates.
Choose a substitute component for aplanned order
• Updates the dependent demand for the original component to a quantity of 0.
• Inserts a new dependent demand for the substitute component.
• Updates the supply, demand, and projected available balance measures for the old and the newcomponents.
Differences Between the Recalculate and Run Plan Actions Let's look at the differences between the Recalculate action and the Run Plan action for constrained supply plans.
Recalculate action Run Plan action (without a fresh snapshot)
Is a near real-time process
Is a batch process
269
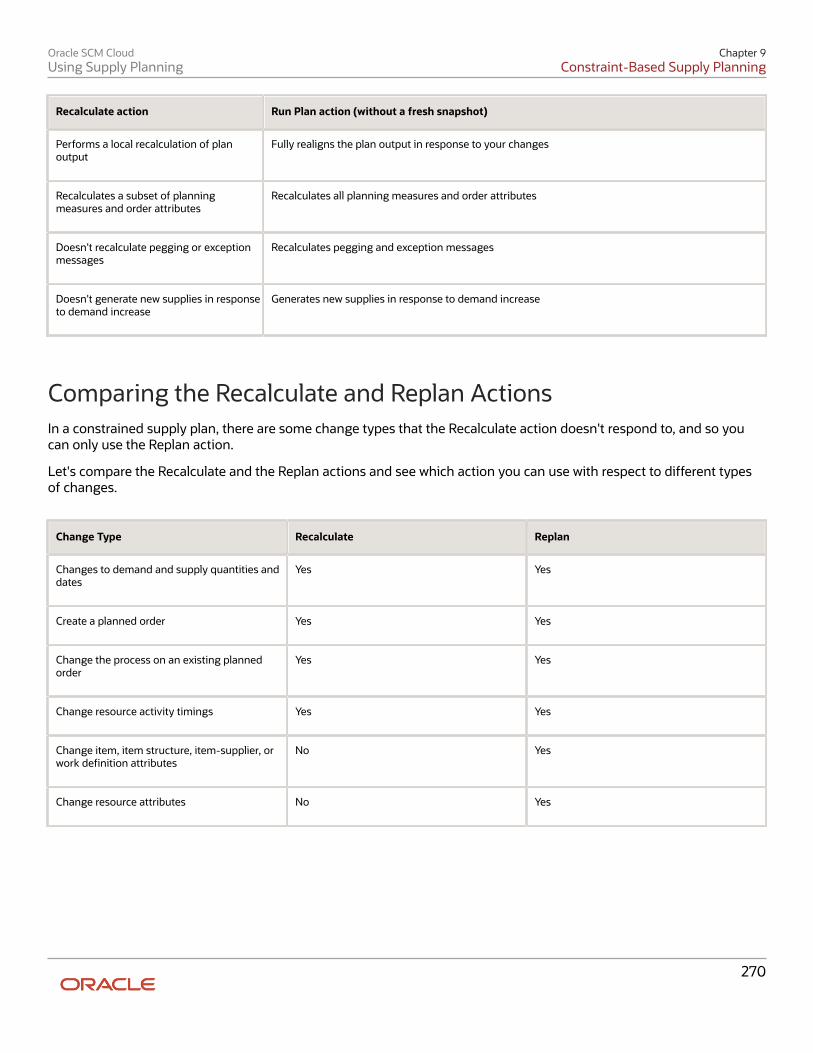
Oracle SCM CloudUsing Supply Planning
Chapter 9Constraint-Based Supply Planning
Recalculate action Run Plan action (without a fresh snapshot)
Performs a local recalculation of planoutput
Fully realigns the plan output in response to your changes
Recalculates a subset of planningmeasures and order attributes
Recalculates all planning measures and order attributes
Doesn't recalculate pegging or exceptionmessages
Recalculates pegging and exception messages
Doesn't generate new supplies in responseto demand increase
Generates new supplies in response to demand increase
Comparing the Recalculate and Replan Actions In a constrained supply plan, there are some change types that the Recalculate action doesn't respond to, and so youcan only use the Replan action.
Let's compare the Recalculate and the Replan actions and see which action you can use with respect to different typesof changes.
Change Type Recalculate Replan
Changes to demand and supply quantities anddates
Yes
Yes
Create a planned order
Yes
Yes
Change the process on an existing plannedorder
Yes
Yes
Change resource activity timings
Yes
Yes
Change item, item structure, item-supplier, orwork definition attributes
No
Yes
Change resource attributes
No
Yes
270

Oracle SCM CloudUsing Supply Planning
Chapter 9Constraint-Based Supply Planning
Recalculate for Process Manufacturing Work Definitions You can use the Recalculate action to recalculate a subset of your plan output to quickly see the impact of changes toyour constrained supply plan.
• You can update the date and quantity of a planned order for primary output item. For existing work orders forthe primary item, you can only set the firm quantity to 0.
• If you change the planned order quantity of the primary output item, then the planned orders for co-productand by-product supplies are recalculated proportionally with due dates unchanged.
• If you move in or out the supply due date of primary item, the corresponding dates for co-product and by-product supplies also move in or out by the same offset.
• If you manually create a planned order, the planned order co-product and planned order by-product suppliesare also created in proportional quantities based on the work definition of the primary output item. The duedates of co-product and by-product planned order supplies remain the same as of suggested due date ofprimary item's supply. The suggested completion date will also be same as of suggested due date of primaryitem's supply.
Related Topics• Overview of How You Plan Considering Process Manufacturing Work Definitions
Safety Stock in a Constrained Supply Plan
Overview of Using Safety Stock in a Constrained Supply Plan You can plan safety stock in a constrained supply plan based on user-specified values or days of cover for all items inthe organizations associated with your plan.
You can calculate and plan statistical safety stock for end items and plansafety stock in daily buckets and in bucketslarger than days, such weeks or periods. You can also:
• Manually override safety stock quantities for items
• Recalculate safety stock quantities
• Override statistical calculation parameters
When in the constraint-based planning mode, the supply planning process fulfills safety stock demand as long as itdoesn't violate any constraints. If there isn't enough material or resource capacity to build to safety stock demand,then the supply to meet safety stock demand is shifted out in time until there is enough capacity. The supply planningprocess calculates the days of cover-based safety stock levels in the absence of any constraints. Then those calculatedlevels are applied as a target when the plan is run with the constraints turned on. This process provides greatertransparency to you regarding how safety stock levels are calculated for items with days of cover-based safety stock.
For more information about safety stock, refer to the Safety Stock in Planning Central and Supply Planning white paperon Oracle Cloud Customer Connect, available at this URL: https://cloudcustomerconnect.oracle.com/posts/e8a4eaff7a
271

Oracle SCM CloudUsing Supply Planning
Chapter 9Constraint-Based Supply Planning
Safety Stock Planning Differences Between Constrained and Unconstrained SupplyPlansThere are some differences to planning safety stock in a constrained supply plan compared to an unconstrained supplyplan. The way safety stock is calculated for days of cover and the way the supplies are recommended for safety stock ina constrained plan are important to note. In a constrained supply plan:
• Safety stock based on days of cover is calculated based on unconstrained dependent demand instead ofconstrained dependent demand.
• Orders aren't compressed to meet safety stock when purchasing lead time is enforced.
• Resource and supplier capacity won't be overloaded just to meet safety stock.
Additional Measures for Constrained Supply PlanFor constrained supply plans, the planning process calculates two additional measures for items with days of coversafety stock. These measures are only available for constrained supply plans.
• Unconstrained Dependent Demand is the unconstrained demand on the need-by date of a supply. Thiscalculated measure is the sum of production forecast, planned order demand, transfer order demand,nonstandard job demand, and work order demand on the need-by date.
• Unconstrained Average Daily Demand is the daily average for unconstrained demand over a user-specifieddemand period days for the item.
Safety Stock MethodsYou can use these safety stock methods in a constrained supply plan:
• Days of Cover
• User-Specified Safety Stock Level
• User-Specified Time Phased Safety Stock Level
• Calculated Safety Stock Levels Based on Forecast Error
Example of Safety Stock Planning with Lead Time Constraints This example shows how the supply planning process plans safety stock in a constrained supply plan with a lead timeconstraint.
Safety Stock Planning with Lead Time ConstraintFor this example, let's use these parameters:
• Nonworking days: Days 6, 7, 13, and 14
• Purchasing lead time: 3 days
• Enforce Purchasing Lead Time item attribute: Yes
272
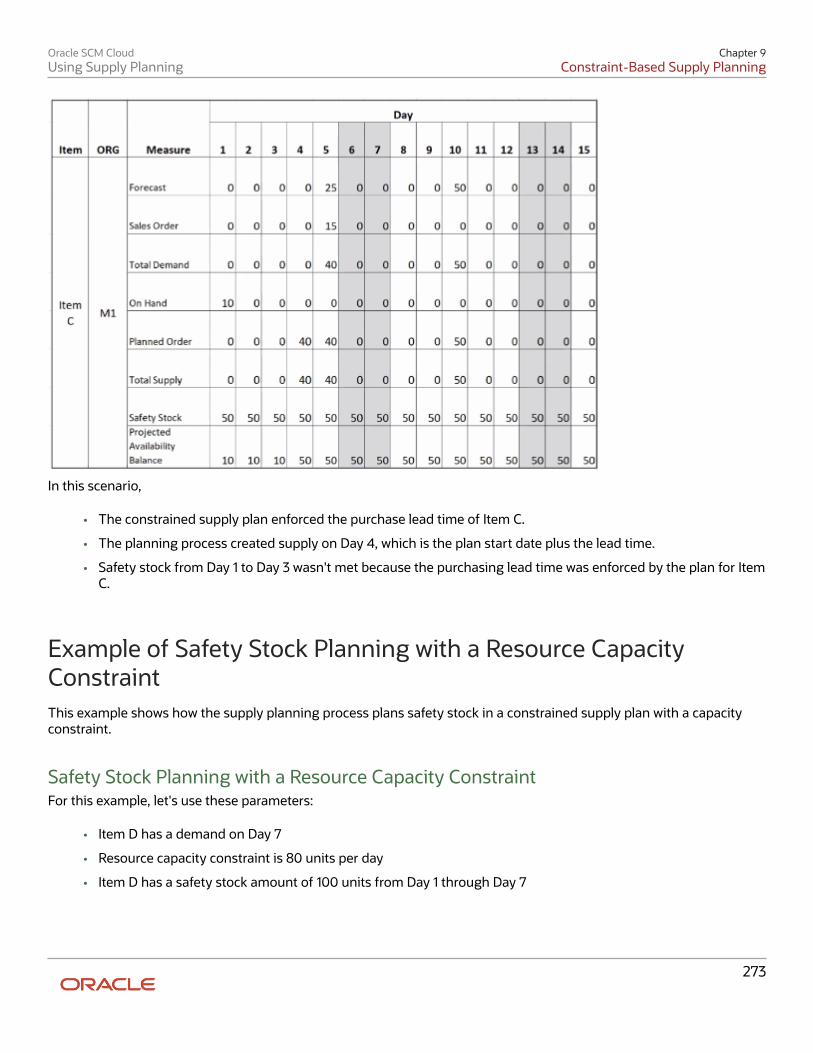
Oracle SCM CloudUsing Supply Planning
Chapter 9Constraint-Based Supply Planning
In this scenario,
• The constrained supply plan enforced the purchase lead time of Item C.
• The planning process created supply on Day 4, which is the plan start date plus the lead time.
• Safety stock from Day 1 to Day 3 wasn't met because the purchasing lead time was enforced by the plan for ItemC.
Example of Safety Stock Planning with a Resource CapacityConstraint This example shows how the supply planning process plans safety stock in a constrained supply plan with a capacityconstraint.
Safety Stock Planning with a Resource Capacity ConstraintFor this example, let's use these parameters:
• Item D has a demand on Day 7
• Resource capacity constraint is 80 units per day
• Item D has a safety stock amount of 100 units from Day 1 through Day 7
273

Oracle SCM CloudUsing Supply Planning
Chapter 9Constraint-Based Supply Planning
In this scenario,
• The planning process created supply for 80 units only on Day 1.
• The safety stock quantity of 100 units on Day 1 can't be completely satisfied because the plan can't exceed theresource capacity constraint (80 units) to meet the safety stock quantity.
Example of Safety Stock Planning with Primary and AlternateResources This example shows how the supply planning process plans safety stock in a constrained supply plan that uses primaryand alternate resources.
Safety Stock Planning with Primary and Alternate ResourcesFor this example, let's use these parameters:
• Item D has a demand on Day 7
• Item D has safety stock of 100 units from Day 1 to Day 7
• Primary resource capacity per day is 80 units
• Alternate resource capacity per day is 160 units
274

Oracle SCM CloudUsing Supply Planning
Chapter 9Constraint-Based Supply Planning
In this scenario,
• To meet the safety stock quantity of 100 units, the planning process created supply for 80 units on the primaryresource and 20 units on the alternate resource on Day 1.
• The safety stock quantity of 100 units on Day 1 is satisfied because the plan creates supplies on the primary andalternate resource without violating the capacity constraint.
How Supply Planning Respects Reservations in aConstrained Plan When you use the constrained planning mode for your supply plan, the planning process respects reservations betweensupplies and demands. This ensures that reservations of on-hand or on-order supplies to sales orders are honored andthat the supply is treated as firm.
This functionality enables you to allocate available supplies to high priority customersor high value sales orders. Therewon't be any recommendations to pull-in or push-out supply when there is a change inthe sales order schedule date.
The planning process supports reservations for these existing supplies:
• On-hands
• Purchase orders
275

Oracle SCM CloudUsing Supply Planning
Chapter 9Constraint-Based Supply Planning
• Purchase Requisitions
• WIP jobs
• Transfer orders from the Oracle Fusion source system
There are some of the key points for reservations in a constrained supply plan to keep in mind.
• All reserved supplies are considered firm by the planning process.
• For a reservation, the supply is pegged to the sales orders in the amount of the reserved quantity.
• If the reserved quantity causes resource or supply capacity overloads, the planning process overloads therespective resource or supplier capacity. In this situation, the planning process also creates an overloadexception.
• If a supply is partially reserved for a demand, the rest of the supply is eligible to be pegged to other demands.
• If a demand is met only partially with reserved supplies, other unreserved supplies (existing or planned) areused to meet the rest of the demand.
• The planning process respects a demand reservation to a lot without regard to the lot expiration date.
• The planning process uses the reserved supplies and demands in the calculation of Projected Available Balance(PAB). The reserved supplies aren't used to meet safety stock requirements.
• Reservations or reserved supply quantities can't be edited in Supply Planning.
In the Supplies and Demands table, the Reserved Quantity column displays the total reserved quantity for a supply ofdemand. You can't edit this field.
• For a supply, the Reserved Quantity column displays the total quantity reserved across all of the demands forwhich the supply is reserved.
• For a demand, the Reserved Quantity column displays the total of all supply quantities reserved for it.
• For back-to-back items, the Reserved Quantity column isn't populated by any planned supply quantities.
In the Material Plan table, these columns display information about reservations.
• Reserved Supply Quantity: Indicates the total supply quantity that's reserved for demands in a bucket.
• Reserved Supply Value: Indicates the monetary value of the total supply quantity that's reserved for demandsin a bucket.
How You Prevent Creating Planned Orders in aConstrained Supply Plan In some business cases, you might want to prevent the creation of planned orders for particular items. You can use theCreate Supply attribute to manage scenarios such as end-of-life items or phasing out of components.
The Create Supply attribute also applies to end items. If set to No for an end item, all remaining demands for the enditem are marked as unmet demands after using up all on-hand inventory and on-order inventory.
To prevent creating planned orders in a constrained supply plan:
1. Define your Supply Planning Mode as Constrained in the plan options for your plan.2. Set the Create Supply attribute to No for an item-organization.3. (Optional) Select your decision rules in the plan options. This step is required if you defined substitutes or
alternates in your plan and want the supply plan to use existing supplies or recommend planned orders onthem.
276

Oracle SCM CloudUsing Supply Planning
Chapter 9Constraint-Based Supply Planning
CAUTION: Set the Create Supply attribute to No only on required items for which you don't want to create any newsupplies. Setting the attribute on the wrong items can lead to unmet demands.
Set the Create Supply AttributeTo prevent the planning process from creating planned orders for a particular item, set the Create Supply attribute toNo for an item-organization. To set this attribute, from the Product Information Management work area, navigate to theItems page, Specifications tab. You can also set the Create Supply attribute in the Item simulation set that's available inSupply Chain Planning.
This table describes how the planning process manages supplies when the Create Supply indicator is set to No.
When Create Supply indicator is set toNo for:
The planning process does this:
End items
All on-hand inventory and on-order inventory is used up to satisfy demands. All remaining demandsfor the end item are marked as unmet demands.
Primary components
All demands for end items whose item structure includes this component is unmet after on-hand andexisting supplies are used up to satisfy demands.
Primary components that have substitutecomponents defined in Item Structures
A substitute component is used to satisfy the demand of an end item. The Use substitutecomponents decision rule must be selected on the Plan Options page, Supply tab, Constraints andDecisions Rules subtab.
A component in a primary bill of materialthat has alternate bill of materials defined
An alternate item structure that doesn't have this component is used. The Use alternate itemstructure and work definitions decision rule must be selected on the Plan Options page, Supply tab, Constraints and Decisions Rules subtab.
Configure Your Decision RulesTo configure the decision rules for your constrained supply plan, navigate to the Plan Options page, Supply tab,Constraints and Decision Rules subtab. The Constraints and Decision Rules subtab is available in a Supply Planning orDemand and Supply Planning work area. Select decision rules as applicable to your business use case.
277

Oracle SCM CloudUsing Supply Planning
Chapter 9Constraint-Based Supply Planning
278

Oracle SCM CloudUsing Supply Planning
Chapter 10Project-Specific Supply Planning
10 Project-Specific Supply Planning
Overview of Project-Specific Supply Planning Project-specific supply planning is one of the features of the Project-Driven Supply Chain solution. Project-DrivenSupply Chain is an end-to-end, integrated solution across the Oracle Supply Chain and Project Management Cloudapplications that supports business processes to plan supplies based on projects.
PrerequisitesThe following points must be true for project-specific supply planning:
• The Project-Driven Supply Chain and Plan Project-Specific Supply features must be enabled. These featurescan be enabled even if you're not using other Oracle Cloud applications for your supply chain executions. Fordetails on how to enable these features, refer to the Implementing Supply Chain Planning guide, Enable SupplyChain Planning Features chapter on the Oracle Help Center.
• You can use the Project-Driven Supply Chain feature in the Supply Chain Planning work area by opting inattribute-based planning.
Note: Opt in Project-Driven Supply Chain to enable attribute-based planning in Oracle Supply ChainManagement.
• You must create your plans in the Unconstrained supply planning mode.
• You must define an attribute-based netting rule so that you can associate the rule to your supply plan.
Project-Specific Supply Planning CapabilitiesProject-specific supply planning improves your order fulfillment accuracy by ensuring components availability to buildand fulfill orders. It also ensures completion of projects on time without excessive inventory. Here's how you can useproject-specific supply planning capabilities:
• Plan project-specific supply based on your project-specific forecast, demand, on-hand supply, and incomingsupply.
• Enable attribute-based netting to net project-specific supply or net excess project supply in a project group or aproject within the project group or net common supply.
• Create project and task-specific planned orders for hard pegged items. Also, create planned order for items forwhich the hard pegging level is set to none. You can view the pegging of supplies and demands with projectand task attributes.
• Configure attribute-based netting rules to net supplies from certain designated tasks within a project.
• Plan project-specific safety stock.
• Create project-specific manual demands or planned orders and use simulations to analyze what-if scenarios.
• Review order-related exceptions and exceptions related to shortage of supply in a project and task.
• Use Oracle REST API services to manage supply and demand with project references.
279

Oracle SCM CloudUsing Supply Planning
Chapter 10Project-Specific Supply Planning
• Enable Oracle Transactional Business Intelligence (OTBI) reporting for your project-specific supply plans toanalyze key metrics such as planned orders with project group, project, and task details.
Related Topics• How to Enable Project-Specific Supply Planning
How You Plan Project-Specific Supply Let's understand the high-level process flow of project-specific supply planning. You can find more details about theseprocesses in different topics of this chapter.
1. You start your project-specific supply planning with the collection of these entities:
◦ Project and task attribute values and their relationships from Project Portfolio Management
◦ Supplies and demands with project and task values from Inventory, Order Management, Purchasing, andManufacturing
◦ Forecast and safety stock that are specific to project and task
◦ Organization attribute with project references
◦ Item attributes, such as Hard Pegging Level and Allow Use of Common Supplies, required for project-specific supply planning
2. You then create project groups and assign projects to the groups. Creating project groups enables the planningprocess to net supplies within a project group across multiple projects and their tasks.
3. The next step is to create attribute-based netting rules. The planning process uses the netting rule to net andshare supplies at the project group, project, and task levels.
4. You create a plan and associate the netting rule to the plan. You then run the plan from the Supply Planning orthe Demand and Supply Planning work area.
5. You review your plan output for project-specific supplies and demands and release planned orders with projectand task attributes to Manufacturing, Purchasing, or Inventory.
Here's an illustration that explains the high-level process flow of project-specific supply planning:
280

Oracle SCM CloudUsing Supply Planning
Chapter 10Project-Specific Supply Planning
Data Collection for Project-Specific Supply Planning Collect these data for project-specific supply planning:
• Project-enabled organization attribute
• Project group, project, and project and task attribute values and their relationships
• Item attribute values required for project-specific supply planning (values for Hard Pegging Level and Allow Useof Common Supplies)
• Supplies and demands with project and task values
• Supply and demand reservations with project and task values
How You Collect Planning Data for Project-Specific Supply PlanningHow you collect planning data depends on which one of these two scenarios is applicable to your enterprise:
Scenario How to Collect
When your supply chain executionproducts are Oracle Cloud applications.
You collect data from the Oracle Fusion source system. To do that, select the Collect Planning Datatask from a Supply Planning work area or from the Setup and Maintenance work area.
When your supply execution productsaren't Oracle Cloud applications.
You collect data from an external source system. To do that, select the Load Planning Data from Filestask from a Supply Planning work area or the Setup and Maintenance work area and upload data usingpredefined collection templates (XLSM files).
281

Oracle SCM CloudUsing Supply Planning
Chapter 10Project-Specific Supply Planning
Refer to the Planning Data Collections chapter of this guide for detailed instructions. You can verify and review thecollected data using the Plan Inputs page layout.
Note: Ensure that you upload all your XLSM files in one zipped file. In case you upload your XLSM files separately,follow this order:
1. Organization attribute2. Project and task attribute values and their relationships3. Item attributes4. Supplies and demands5. Supply and demand reservations
Related Topics• Collect Data Using the Targeted Collection Type
• Collect Data Using the Net Change Collection Type
• Run the Load Planning Data from Files Process
• Verify the Load Planning Data from Files Process
Planning Data for Project-Specific Supply Planning
Project-Enabled Organization Attribute Select the Organizations entity on the Reference Data tab of the Collect Planning Data page to collect the value of theProject Enabled parameter for your organizations.
This organization-specific parameter appears on the Maintain Supply Network Model page only when your organizationis enabled for project-driven supply chain and project-specific supply planning.
The Project Enabled parameter governs whether your inventory organization is enabled for inventory tracking byproject. The value for this parameter can be Yes or No for an organization.
When the value of this parameter is Yes for an inventory organization, the organization performs inventory trackingby project. Collection of supplies and demands with project and task is possible, and the project-specific planningreleases planned orders with project and task. The value for this parameter is No for a supplier-modeled organization ora contract manufacturing organization.
For external source systems, use this XLSM file to upload the value of Project Enabled parameter for your organization:
Planning Data XLSM File Name Link in FBDI Guide
Project Enabled
ScpOrganizationImportTemplate.xlsm
Supply Chain Planning Organizations
282

Oracle SCM CloudUsing Supply Planning
Chapter 10Project-Specific Supply Planning
Related Topics• Collect Data Using the Targeted Collection Type
• Collect Data Using the Net Change Collection Type
• Run the Load Planning Data from Files Process
• How You Maintain Your Supply Network Model
Project Control Level Attribute The Project Control Level parameter allows you to:
• Collect the project control level of an external source organization.
• Collect supplies and demands from external source systems at the project or project and task level basedon the project control of the organization. For example, if the parameter is set to project and task, you cancollect the supplies and demands which contain both project and task attribute values. If the parameter is set toproject, you can collect the supplies and demands with only the project attribute value or with the project andtask attribute value.
• Plan project supplies for organizations at the project or project and task level.
• Release plan recommendations based on the project control level of the organization.
This feature applies to unconstrained supply planning and demand and supply planning with an attribute-based nettingrule using project group, project and task planning attributes.
For external source systems, use this XLSM file to upload the value of Project Control Level parameter for yourorganization:
Planning Data XLSM File Name Link in FBDI Guide
Project Control Level
ScpOrganizationImportTemplate.xlsm
Supply Chain Planning Organizations
Project Group, Project, and Project and Task Attribute Values Project group, project, and project and task are planning attributes with one of these relationships:
• Parent and child relationship: For example, a project group is the parent for the associated projects, or a projectis the parent for its tasks.
• Peer relationship: For example, projects in the same project group are peers or tasks of the same project arepeers.
The Planning Attribute Values entity governs the collection of project group, project, and project and task attributevalues and their relationships. This entity appears on the Reference Data tab of the Collect Planning Data page whenyour organization is enabled for project-driven supply chain and project-specific supply planning. You can select thisentity for Net change, Targeted, or Automatic selection collection types.
283

Oracle SCM CloudUsing Supply Planning
Chapter 10Project-Specific Supply Planning
For external source system collection, use this XLSM file:
Planning Data XLSM File Name
Project group, project, and project andtask
ScpPlanningAttributeValuesImportTemplate.xlsm
Here's what you can define in your XLSM file:
• Project group, project, and project and task attribute values and their relationships. The Attribute Set Name forthe project and task relationship must be Project_Task_Set only.
• Start date, end date, planner, and the Net Common Supply values of your project groups.
• Attribute-based planning netting sequences to designate tasks and net them to your project demands.
Note: You can also use Planning Attribute Values to purge project group, project, and project and task values andtheir relationships for a specific instance.
Related Topics• Collect Data Using the Targeted Collection Type
• Collect Data Using the Net Change Collection Type
• Run the Load Planning Data from Files Process
Item Attributes for Project-Specific Supply Planning Select the Items entity on the Reference Data tab of the Collect Planning Data page to collect item attribute values forproject-specific supply planning. You can collect these item attributes when your organization is enabled for project-driven supply chain and project-specific supply planning.
Let's understand what these item attributes are and how these attributes influence project-specific supply planning.
Hard Pegging LevelThis item attribute determines if the item and its supplies and demands can participate in the project-based nettingwhen the plan is associated with an attribute-based netting rule. You can use the hard pegging level to create itemsegments and segment-specific netting sequences based on the hard pegging level of the item.
In project-specific supply planning, the hard pegging level can have one of these values:
• None: An item with this hard pegging level doesn't participate in the project-based netting. The planningprocess performs netting of supplies and demands at the item-organization level.
• Project and Task, Project, Project Group: The planning process performs project-based planning for the item’ssupplies and demands. The attributes for planned orders in the attribute-based netting rule provide theplanned order quantity and striping.
284

Oracle SCM CloudUsing Supply Planning
Chapter 10Project-Specific Supply Planning
Allow Use of Common SuppliesThis item attribute is used to segment items and create segment specific netting sequences in attribute-based netting.The common supply is allocated based on the item segments. The common supply can be an on hand, a purchaseorder, a work order, or a transfer order. The planning process verifies this item attribute while it executes the Netcommon supply netting sequence during the project-specific planning.
The value of this attribute depends on these hard pegging level values:
Hard Pegging Level Allow Use of Common Supplies
None
Null
Project and Task
Yes or No
Project
Yes or No
Project Group
Yes or No
Collection of Item Attributes from External Source SystemsFor external source systems, use this XLSM file:
Planning Data XLSM File Name Link in FBDI Guide
Hard Pegging Level, Allow Use of CommonSupplies
ScpItemImportTemplate.xlsm
Supply Chain Planning Items
Related Topics• Collect Data Using the Targeted Collection Type
• Collect Data Using the Net Change Collection Type
• Run the Load Planning Data from Files Process
Supplies and Demands with Project and Task Select these entities on the Supply Planning tab to collect supplies and demands with project and task attributes. Youcan collect supplies and demands with project and task attributes when your organization is enabled for project-drivensupply chain and project-specific supply planning.
• Purchase Orders and Requisitions
• Sales Orders
• Transfer Orders
• On Hand
285
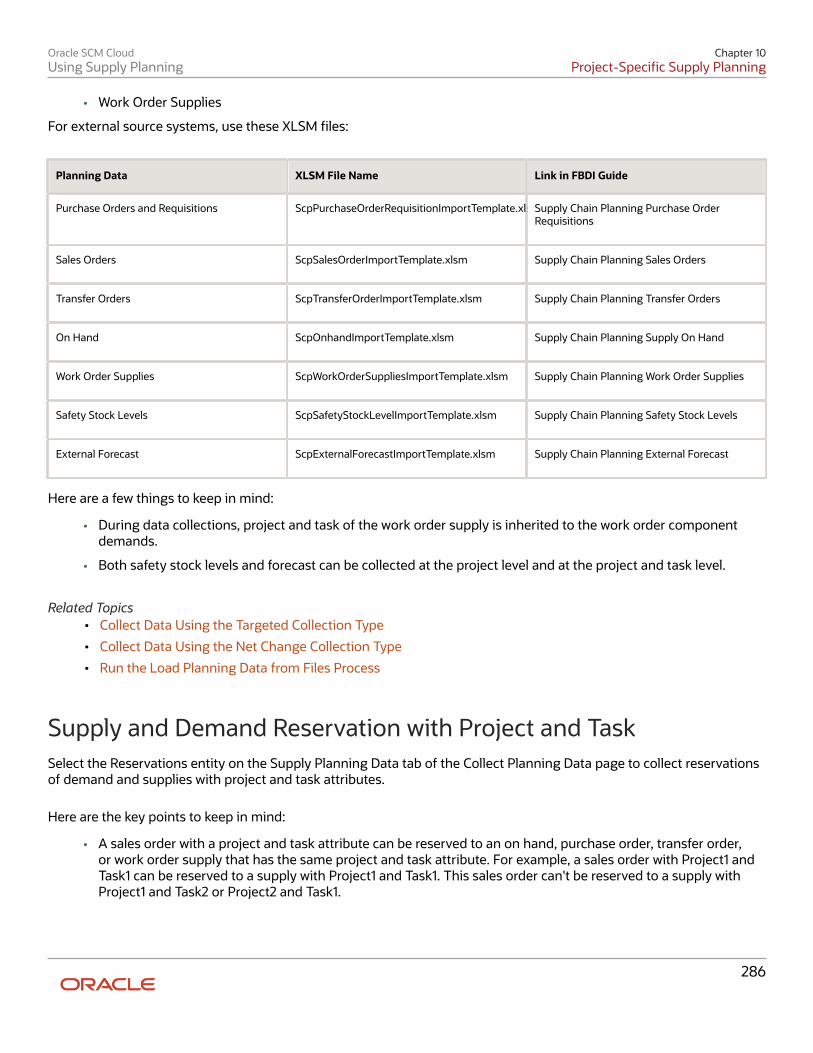
Oracle SCM CloudUsing Supply Planning
Chapter 10Project-Specific Supply Planning
• Work Order Supplies
For external source systems, use these XLSM files:
Planning Data XLSM File Name Link in FBDI Guide
Purchase Orders and Requisitions
ScpPurchaseOrderRequisitionImportTemplate.xlsm
Supply Chain Planning Purchase OrderRequisitions
Sales Orders
ScpSalesOrderImportTemplate.xlsm
Supply Chain Planning Sales Orders
Transfer Orders
ScpTransferOrderImportTemplate.xlsm
Supply Chain Planning Transfer Orders
On Hand
ScpOnhandImportTemplate.xlsm
Supply Chain Planning Supply On Hand
Work Order Supplies
ScpWorkOrderSuppliesImportTemplate.xlsm
Supply Chain Planning Work Order Supplies
Safety Stock Levels
ScpSafetyStockLevelImportTemplate.xlsm
Supply Chain Planning Safety Stock Levels
External Forecast
ScpExternalForecastImportTemplate.xlsm
Supply Chain Planning External Forecast
Here are a few things to keep in mind:
• During data collections, project and task of the work order supply is inherited to the work order componentdemands.
• Both safety stock levels and forecast can be collected at the project level and at the project and task level.
Related Topics• Collect Data Using the Targeted Collection Type
• Collect Data Using the Net Change Collection Type
• Run the Load Planning Data from Files Process
Supply and Demand Reservation with Project and Task Select the Reservations entity on the Supply Planning Data tab of the Collect Planning Data page to collect reservationsof demand and supplies with project and task attributes.
Here are the key points to keep in mind:
• A sales order with a project and task attribute can be reserved to an on hand, purchase order, transfer order,or work order supply that has the same project and task attribute. For example, a sales order with Project1 andTask1 can be reserved to a supply with Project1 and Task1. This sales order can't be reserved to a supply withProject1 and Task2 or Project2 and Task1.
286

Oracle SCM CloudUsing Supply Planning
Chapter 10Project-Specific Supply Planning
• A sales order can also be reserved to a common supply if the item in the sales order is allowed to use commonsupplies. The common supply can be an on hand with no project and task. For example, a sales order withProject1 and Task1 can use common supplies when Allow Use of Common Supplies for the item is Yes.
You can collect reservations of demand and supplies with project and task attributes when your organization is enabledfor project-driven supply chain and project-specific supply planning.
For external source systems, use this XLSM file:
Planning Data XLSM File Name Link in FBDI Guide
Reservations
ScpReservationImportTemplate.xlsm
Supply Chain Planning Reservations
Related Topics• Collect Data Using the Targeted Collection Type
• Collect Data Using the Net Change Collection Type
• Run the Load Planning Data from Files Process
Attribute-Based Netting Rules with Project Attributes A key factor in the planning of project-specific supply is the sequence in which the available supplies are allocated toproject demands. When you create a netting rule, you define netting sequence steps and attributes for planned ordersbased on your business needs for project-driven supply planning.
You then assign the rule to one of your project-specific supply plans.
Here’s how the planning process uses the netting sequence steps equivalent to the reservation levels that were usedwhen project netting rules could be used instead of attribute-based nettng rules, such as project group, project, andproject and task:
• The planning process uses the order in which you defined the netting sequences to allocate available projectsupplies to project demands.
• The process then refers to the attributes selected in Demand Grouping and Striping in Attributes for PlannedOrders in your attribute-based netting rule to group unmet demands to create a planned order and stripe withattributes in a time bucket.
Let's understand the netting sequence in detail.
Attribute-Based Netting SequenceThe netting sequence in your attribute-based netting rule determines how the planning process should net the suppliesand demands within the project group, project, and task. The planning process follows the ascending order of sequencenumbers of the netting sequences defined in your rule to allocate project supplies and common supplies to projectdemands.
This table lists the attribute-based netting sequences that you can use in your netting rule and includes a column thatreferences applicable sequence name when project netting rules were applicable.
287

Oracle SCM CloudUsing Supply Planning
Chapter 10Project-Specific Supply Planning
Netting SequenceName in ProjectNetting Rule
Project Netting Logic in Attribute-Based Netting Rule
Equivalent Netting Sequence Step in Attribute-Based Netting Rule
Net project tasksupply
Net a supply whose project and taskattributions exactly matches thedemand attributions. In the netting sequence step of theattribute-based netting rule, for theProject, Project Group, and Taskattributes, select:
• Demand Operator as Any
• Supply Operator as MatchesDemand Value
The configuration of the nettingsequence step ensures the planningprocess nets supplies whose projectgroup, project, and task match theproject group, project, and taskattribute’s values of the demand in anetting window.
Net excess projectsupply
When the reservation level is Project, use supplies from any tasks of thesame project for project demands. When the reservation level is ProjectGroup, use supplies from any tasks orany projects of the same project groupfor demands across any project in thesame project group. The configuration in the attribute-based netting rule consists of twonetting sequence steps. In the first netting sequence step, select:
• Demand Operator for the Project,Project Group, and Task attributesas Any
• Supply Operator as MatchesDemand Value for the Project andProject Group attributes.
• Supply Operator as Any for Taskattribute.
This configuration of netting sequencesteps ensures the planning processnets supplies whose project andproject group match the project andproject group attribute’s values of thedemand in a netting window. In the second netting sequence step, select:
288

Oracle SCM CloudUsing Supply Planning
Chapter 10Project-Specific Supply Planning
Netting SequenceName in ProjectNetting Rule
Project Netting Logic in Attribute-Based Netting Rule
Equivalent Netting Sequence Step in Attribute-Based Netting Rule
• Demand Operator for the Project,Project Group, and Task attributesas Any
• Supply Operator as MatchesDemand Value for the ProjectGroup attribute.
• Supply operator as Any forProject and Task attributes
This configuration of the nettingsequence step ensures the planningprocess nets supplies whose projectgroup matches the project groupattributes values of the demand in anetting window. The two netting sequence stepsin the attribute-based netting ruleare similar to netting excess projectsupplies within a project, tasks, andprojects within a project group whenthe reservation level in the projectnetting rule is set to the project group.
Net common supply
Net a supply that doesn't have anyproject or task attribution. It can bean on-hand supply, purchase ordersupply, work order supply, and so on.Such supplies can be used for anyproject, any task, or any commondemand. In the netting sequence step of theattribute-based netting rule, for theProject, Project Group, and Taskattributes, select:
• Demand Operator as Any
• Supply Operator as Blank
This configuration of netting sequencesteps ensures that the planningprocess nets common supplies projectdemands in a netting window.
Net designator 1 and2 supply
Net the supply from the taskdesignated to project demands byselecting a specific task attribute valuefor a project in the attribute-basednetting rule. The attribute-based netting rulesnetting sequence step equivalentto Net designator 1 supply or Netdesignator 2 supply netting sequenceof project-based netting rule are asfollows.
289

Oracle SCM CloudUsing Supply Planning
Chapter 10Project-Specific Supply Planning
Netting SequenceName in ProjectNetting Rule
Project Netting Logic in Attribute-Based Netting Rule
Equivalent Netting Sequence Step in Attribute-Based Netting Rule
In an attribute-based netting rule,select
• Demand Operator as Any for theProject Group and Task attributes.
• Demand Operator as Equal To forthe Project attribute for which atask designates whose suppliesshould be used in netting.
• Supply Operator as MatchesDemand Value for Project Groupattribute.
• Supply Operator as Equals Tofor Project and Task attributesand then select the task attributevalue that is designated asdesignator 1 or designator 2for the project attribute valuepreviously selected.
This configuration of netting sequencesteps ensures the planning processnets supplies from the task withina project which is designated asdesignator 1 or designator 2 to projectdemands in a netting sequencewindow.
Netting Steps Equivalent to Reservation LevelWhen project netting rules were used, reservation level determined the level at which the planning process groupedunmet demands to create planned orders. The combination of netting sequence steps in the attribute-based nettingrule is equivalent to reservation levels project group, project, and project and task. For example, if the reservation levelwas set to Project Group, the unmet demands in a time bucket were grouped at the project group level to create plannedorders. The project and task attributions of such planned orders were determined based on the hard pegging level ofthe item in the planned orders.
You can set one of these reservation levels for your attribute-based netting rule based on your business needs:
Reservation Level in Project NettingRule
Equivalent Netting Sequence Steps in Attrbute-Based Planning Netting Rule
Project Group
The planning process nets supplies at the project group level. The process nets supplies of one projectfor demands of another project belonging to the same project group. Any unmet demands in a timebucket are aggregated at the project group level to create planned orders.
Project
The planning process nets supplies at the project level. Excess supplies of a task in a project arenetted against demands from another task of the same project. Unmet demands in a time bucket areaggregated at the project level to create planned orders.
290
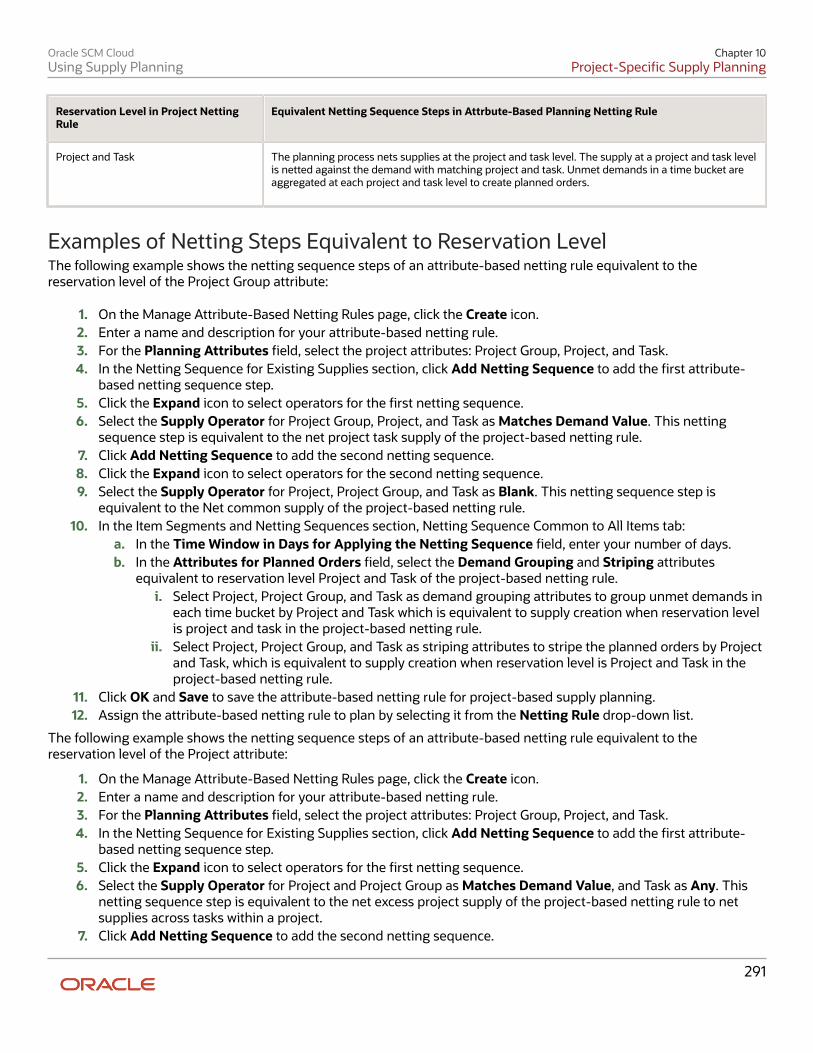
Oracle SCM CloudUsing Supply Planning
Chapter 10Project-Specific Supply Planning
Reservation Level in Project NettingRule
Equivalent Netting Sequence Steps in Attrbute-Based Planning Netting Rule
Project and Task
The planning process nets supplies at the project and task level. The supply at a project and task levelis netted against the demand with matching project and task. Unmet demands in a time bucket areaggregated at each project and task level to create planned orders.
Examples of Netting Steps Equivalent to Reservation LevelThe following example shows the netting sequence steps of an attribute-based netting rule equivalent to thereservation level of the Project Group attribute:
1. On the Manage Attribute-Based Netting Rules page, click the Create icon.2. Enter a name and description for your attribute-based netting rule.3. For the Planning Attributes field, select the project attributes: Project Group, Project, and Task.4. In the Netting Sequence for Existing Supplies section, click Add Netting Sequence to add the first attribute-
based netting sequence step.5. Click the Expand icon to select operators for the first netting sequence.6. Select the Supply Operator for Project Group, Project, and Task as Matches Demand Value. This netting
sequence step is equivalent to the net project task supply of the project-based netting rule.7. Click Add Netting Sequence to add the second netting sequence.8. Click the Expand icon to select operators for the second netting sequence.9. Select the Supply Operator for Project, Project Group, and Task as Blank. This netting sequence step is
equivalent to the Net common supply of the project-based netting rule.10. In the Item Segments and Netting Sequences section, Netting Sequence Common to All Items tab:
a. In the Time Window in Days for Applying the Netting Sequence field, enter your number of days.b. In the Attributes for Planned Orders field, select the Demand Grouping and Striping attributes
equivalent to reservation level Project and Task of the project-based netting rule.i. Select Project, Project Group, and Task as demand grouping attributes to group unmet demands in
each time bucket by Project and Task which is equivalent to supply creation when reservation levelis project and task in the project-based netting rule.
ii. Select Project, Project Group, and Task as striping attributes to stripe the planned orders by Projectand Task, which is equivalent to supply creation when reservation level is Project and Task in theproject-based netting rule.
11. Click OK and Save to save the attribute-based netting rule for project-based supply planning.12. Assign the attribute-based netting rule to plan by selecting it from the Netting Rule drop-down list.
The following example shows the netting sequence steps of an attribute-based netting rule equivalent to thereservation level of the Project attribute:
1. On the Manage Attribute-Based Netting Rules page, click the Create icon.2. Enter a name and description for your attribute-based netting rule.3. For the Planning Attributes field, select the project attributes: Project Group, Project, and Task.4. In the Netting Sequence for Existing Supplies section, click Add Netting Sequence to add the first attribute-
based netting sequence step.5. Click the Expand icon to select operators for the first netting sequence.6. Select the Supply Operator for Project and Project Group as Matches Demand Value, and Task as Any. This
netting sequence step is equivalent to the net excess project supply of the project-based netting rule to netsupplies across tasks within a project.
7. Click Add Netting Sequence to add the second netting sequence.
291

Oracle SCM CloudUsing Supply Planning
Chapter 10Project-Specific Supply Planning
8. Click the Expand icon to select operators for the second netting sequence.9. Select the Supply Operator for Project as Matches Demand Value, and Project Group and Task as Any. This
netting sequence step is equivalent to the net excess project supply of the project-based netting rule to netsupplies across projects within a project group.
10. Click Add Netting Sequence to add the third netting sequence.11. Select the Supply Operator for Project, Project Group, and Task as Blank. This netting sequence step is
equivalent to the net common supply of the project-based netting rule.12. In the Item Segments and Netting Sequences section, Netting Sequence Common to All Items tab:
a. In the Time Window in Days for Applying the Netting Sequence field, enter your number of days.b. In the Attributes for Planned Orders field, select the Demand Grouping and Striping attributes
equivalent to reservation level Project and Task of the project-based netting rule.i. Select Project Group as the Demand Attribute to group unmet demands by project group in a
time bucket to create planned order. This is equivalent to the grouping of unmet demands byreservation level Project Group in the project-based netting rule.
ii. Select Project Group, Project, and Task attributes for Striping, to stripe planned orders by projectand task. This is equivalent to the striping of planned orders by Project and Task when reservationlevel is Project Group in the project-based netting rule.
13. Click OK and Save to save the attribute-based netting rule for project-based supply planning.14. Assign the attribute-based netting rule to plan by selecting it from the Netting Rule drop-down list.
The following example shows the netting sequence steps of an attribute-based netting rule equivalent to thereservation level of the Task attribute:
1. On the Manage Attribute-Based Netting Rules page, click the Create icon.2. Enter a name and description for your attribute-based netting rule.3. For the Planning Attributes field, select the project attributes: Project Group, Project, and Task.4. In the Netting Sequence for Existing Supplies section, click Add Netting Sequence to add the first attribute-
based netting sequence step.5. Click the Expand icon to select operators for the first netting sequence.6. Select the Supply Operator for Project, Project Group, and Task as Matches Demand Value. This netting
sequence step is equivalent to the net project task supply of the project-based netting rule.7. Click Add Netting Sequence to add the second netting sequence.8. Click the Expand icon to select operators for the second netting sequence.9. Select the Supply Operator for Project, and Project group as Matches Demand Value, and Task as Any. This
netting sequence step is equivalent to the net excess project supply of the project-based netting rule.10. Click Add Netting Sequence to add the third netting sequence.11. Select the Supply Operator for Project, Project Group, and Task as Blank. This netting sequence step is
equivalent to the net common supply of the project-based netting rule.12. In the Item Segments and Netting Sequences section, Netting Sequence Common to All Items tab:
a. In the Time Window in Days for Applying the Netting Sequence field, enter your number of days.b. In the Attributes for Planned Orders field, select the Demand Grouping and Striping attributes
equivalent to reservation level Project and Task of the project-based netting rule.i. Select Project Group as the Demand Attribute to group unmet demands by Project Group in a
time bucket to create planned order. This is equivalent to the grouping of unmet demands byreservation level Project Group in the project-based netting rule.
ii. Select Project Group, Project, and Task attributes for Striping, to stripe planned orders by Projectand Task. This is equivalent to the striping of planned orders by project and task when thereservation level is Project Group in the project-based netting rule.
13. Click OK and Save to save the attribute-based netting rule for project-based supply planning.14. Assign the attribute-based netting rule to plan by selecting it from the Netting Rule drop-down list.
292

Oracle SCM CloudUsing Supply Planning
Chapter 10Project-Specific Supply Planning
Manage Attribute-Based Netting Rules with ProjectAttributes You can manage your netting rules on the Manage Attribute-Based Netting Rules page. You access this page from thePlan Inputs, Supply Planning, or Demand and Supply Planning work area.
Go to the work area, open the Tasks panel, and click the Manage Attribute-Based Netting Rules link.
Use the Manage Attribute-Based Netting Rules page to search and edit your existing netting rule or to create a new rule.
You can delete a netting rule only when the rule isn't associated to a plan.
Create an Attribute-Based Netting RuleYou can create an attribute-based netting rule for project-based supply planning with one of the following nettingsequences:
• Netting sequence common to all items
• Netting sequence specific to item segments
• Both netting sequences
Use these steps to create a new attribute-based netting rule with a netting sequence common to all items:
1. On the Manage Attribute-Based Netting Rules page, click the Create icon.2. Provide a name and description for your attribute-based netting rule.3. For the Planning Attributes field, select the project attributes: Project Group, Project, and Task.4. In the Item Segments and Netting Sequences section, Netting Sequence Common to All Items tab:
a. In the Time Window in Days for Applying the Netting Sequence field, enter your number of days.b. In the Attributes for Planned Orders field, select the Demand Grouping and Striping attributes.
5. In the Netting Sequence for Existing Supplies section, click Add Netting Sequence to add the attribute-basednetting sequence steps.
6. For each netting sequence, click the Expand icon to select Supply Operators.7. Click Save.
Use these steps to create a new attribute-based netting rule with netting sequence specific to items segments:
1. On the Manage Attribute-Based Netting Rules page, click the Create icon.2. Provide a name and description for your attribute-based netting rule.3. For the Planning Attributes field, select the project attributes: Project Group, Project, and Task.4. In the Item Segments and Netting Sequences section, Netting Sequence Specific to Item Segments tab, take
these steps for each segment:a. Select the value for the Source System field.b. Search the value for the Segment Group field.c. Add segments. For each segment, specify the segment name, description, time window in days, and
attributes for planned orders. You can add up to ten steps in the netting sequence.5. In the Netting Sequence for Existing Supplies section, click Add Netting Sequence to add the attribute-based
netting sequence steps.6. For each netting sequence, click the Expand icon to select Supply Operators.
293

Oracle SCM CloudUsing Supply Planning
Chapter 10Project-Specific Supply Planning
7. Click Save.
For an attribute-based netting rule for both sequences, complete the steps for both tabs in a single rule.
Project Groups Use project groups to group a set of related projects that can share supplies for a project demand in the group. Creatingproject groups enables the planning process to net supplies across multiple projects and tasks within the group.
You can create project groups on the Manage Project Groups page after collecting the project and task attribute valuesand their relationships from the Oracle Fusion source system. The page also displays the project groups that you uploadfrom an external source system using CSV files.
Manage Project Groups You can create, edit, or delete project groups on the Manage Project Groups page. You access the Manage ProjectGroups page from the Tasks panel of the Plan Inputs, Supply Planning, or Demand and Supply Planning work area.
Go to the work area, open the Tasks panel, and click the Manage Project Groups link.
Create a Project GroupUse these steps to create a project group:
1. Add a project group to the Manage Project Groups page.2. Assign projects to the project groups.
Add a Project GroupFollow these steps to add your project group to the Manage Project Groups page:
1. On the Manage Project Groups page, click the Add Row icon.2. Provide a name and description for your project group.3. Specify the start or end date for your project group. The start date is required and automatically takes up the
current date. You can change the start date to a future date. The end date is optional.4. Select the planner for the project group.5. If the attribute-based netting rule you used for the plan is configured to Net common supply, the common
supply is netted for project demands belonging to this group. You can ignore common supply netting bycreating an attribute-based netting rule that doesn’t net common supply.
6. Click Save.
Assign Projects to a Project GroupFollow these steps to assign projects to your project group:
1. On the Manage Project Groups page, select the project group and click the Edit icon.
294

Oracle SCM CloudUsing Supply Planning
Chapter 10Project-Specific Supply Planning
2. Click the Add Row icon.3. In the Project list, select a project to assign to your project group.4. Click OK.
Validity of a Project GroupHere are a few things to keep in mind:
• After a project group reaches its end date, the project assignment to the group is considered invalid. Theplanning process considers the assigned projects as ungrouped.
• The process also ignores the netting sequence associated with the task designators of the expired projectgroup.
• To reassign projects of an expired project group to another project group, you first need to unassign thoseprojects from the expired project group.
How You Configure a Project-Specific Supply Plan To configure plan options for a project-specific supply plan, follow the standard procedure you use to configure yoursupply plans. The only additional setup you need to perform for the project-specific supply planning is to associate anattribute-based netting rule with the plan.
You get the option to associate attribute-based netting rules to the plan only when you have the Project-Driven SupplyChain and Plan Project-Specific Supply features enabled.
To plan project-specific supply, your plan must be in Unconstrained supply planning mode.
High-Level Steps to Configure a Project-Specific Supply PlanLet's look at the high-level steps to configure a project-specific supply plan:
1. Start by creating a new plan or copying an existing plan. Ensure that the supply planning mode for the plan isUnconstrained.
2. Complete the required information on the Scope, Safety Stock, and Supply tabs based on your business needs.3. To make the plan project-specific, associate a netting rule with the plan. Select the netting rule on the Supply
tab. To search a netting rule, ensure that you select planning attribute-based as your netting rule type withother search operators.
4. Save your plan option settings.
You can get more information about how to create a plan, copy a plan, configure different plan options, or run a supplyplan in the Supply Plans chapter of the Using Supply Planning guide.
Key Points to Consider for Plan Option ConfigurationHere are the key points to consider when you configure your plan:
• A project-based plan is configured to group buy planned orders by project. When you associate a planningattribute-based netting rule with project group, project and task, the Requisition load group by option in theSupply: Advanced Options dialog box is automatically set to Project.
• Safety stock override is possible only for common safety stocks.
295

Oracle SCM CloudUsing Supply Planning
Chapter 10Project-Specific Supply Planning
Related Topics• Create a Plan
• Run a Supply Plan or an Integrated Plan
• Attribute-Based Netting Rules with Project Attributes
How Supply Planning Uses Netting Rules
Refer to the Attribute-Based Planning chapter of this guide for more details on operators or other additionalconfigurations in the attribute-based netting rule.
Examples of Project Netting These examples help you understand how the planning process nets available supplies to project demands and createsplanned orders for unmet demands:
• Example 1 explains how the planning process performs project netting across different projects in a projectgroup.
• Example 2 explains how the planning process performs attribute-based netting with multiple project groups.
Example 1: Project Netting Across Different Projects in a Project GroupLet's assume that you have these setups for your attribute-based netting rule, item attributes, and project group:
Item Attributes
Item Attribute Value
Hard pegging Level Project and task
Allow Use of Common Supplies Yes
Attributes for Planned Orders
Demand Grouping Striping
Project Group Project Group
Project Project
Task Task
Project Group
Project Group Project Task
Project Group 1 Project P1 Task P1T1 Task P1T2
296
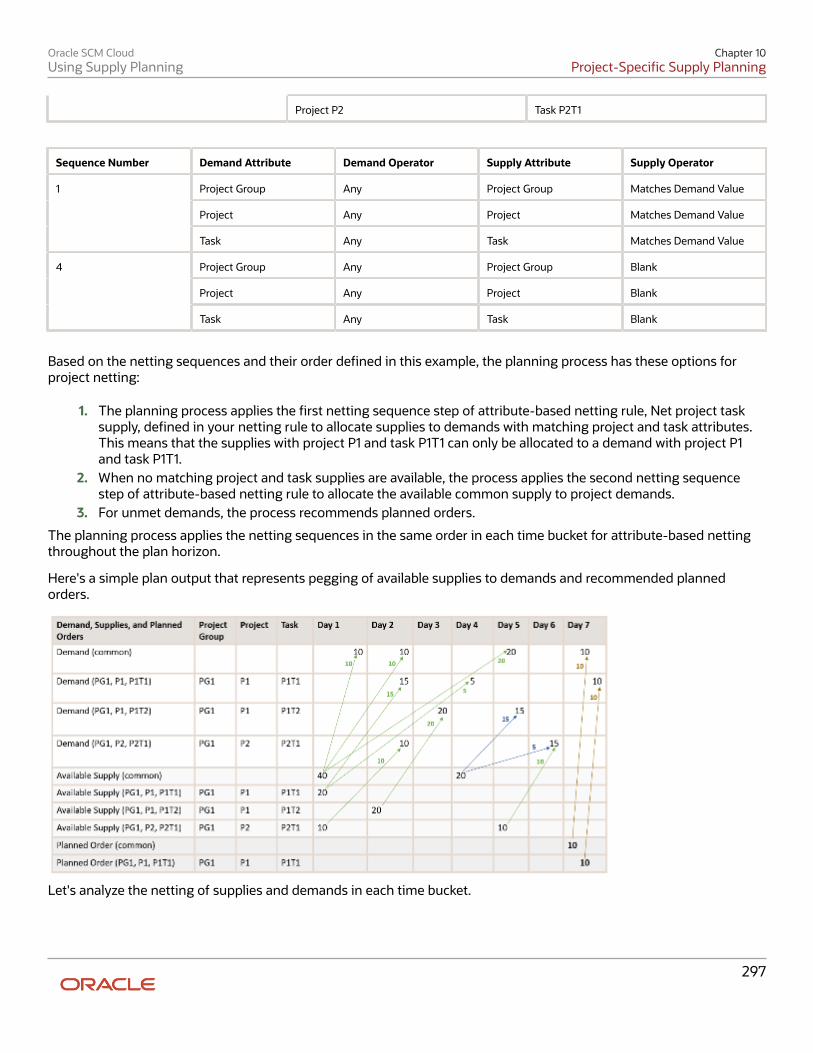
Oracle SCM CloudUsing Supply Planning
Chapter 10Project-Specific Supply Planning
Project P2 Task P2T1
Sequence Number Demand Attribute Demand Operator Supply Attribute Supply Operator
Project Group Any Project Group Matches Demand Value
Project Any Project Matches Demand Value
1
Task Any Task Matches Demand Value
Project Group Any Project Group Blank
Project Any Project Blank
4
Task Any Task Blank
Based on the netting sequences and their order defined in this example, the planning process has these options forproject netting:
1. The planning process applies the first netting sequence step of attribute-based netting rule, Net project tasksupply, defined in your netting rule to allocate supplies to demands with matching project and task attributes.This means that the supplies with project P1 and task P1T1 can only be allocated to a demand with project P1and task P1T1.
2. When no matching project and task supplies are available, the process applies the second netting sequencestep of attribute-based netting rule to allocate the available common supply to project demands.
3. For unmet demands, the process recommends planned orders.
The planning process applies the netting sequences in the same order in each time bucket for attribute-based nettingthroughout the plan horizon.
Here's a simple plan output that represents pegging of available supplies to demands and recommended plannedorders.
Let's analyze the netting of supplies and demands in each time bucket.
297

Oracle SCM CloudUsing Supply Planning
Chapter 10Project-Specific Supply Planning
Day Project Netting
Day 1
The planning process pegs 10 units of common supply to 10 units of common demand (a demandwithout any project and task attributes). The remaining common supply after this pegging is 30 units.
Day 2
The process identifies 20 units of (P1, P1T2) supply. The process pegs 10 units of common supply to 10 units of common demand. The remaining commonsupply after this pegging is 20 units. The process applies the first netting sequence step of the attribute-based netting rule to identifysupplies and demands with matching project and task attributes. It pegs 15 units of (P1, P1T1) supply to15 units of (P1, P1T1) demand. The remaining (P1, P1T1) supply after this pegging is 5 units. The process also pegs 10 units of (P2, P2T1) supply to 10 units of (P2, P2T1) demand. This peggingcompletely consumes the (P2, P2T1) supply.
Day 3
The process applies the first netting sequence step of the attribute-based netting rule to peg 20 unitsof (P1, P1T2) supply to 20 units of (P1, P1T2) demand. This pegging completely consumes the (P1, P1T2)supply.
Day 4
The process identifies an additional common supply of 20 units. The process applies the first netting sequence step of the attribute-based netting rule to peg 5 unitsof (P1, P1T1) supply to 5 units of (P1, P1T1) demand. This pegging completely consumes the (P1, P1T1)supply.
Day 5
The process pegs 20 units of common supply to 20 units of common demand. The remaining commonsupply after this pegging is 20 units. The process applies the second netting sequence step of the attribute-based netting rule for 15 units of(P1, P1T2) demand but doesn't find any supplies with matching project and task attributes. The process then applies the second netting sequence step of the attribute-based netting rule andpegs 15 units of the common supply to 15 units of (P1, P1T2) demand. The remaining common supplyafter this pegging is 5 units.
Day 6
The process applies the first netting sequence step of the attribute-based netting rule to peg 10 unitsof (P2, P2T1) supply to 15 units of (P2, P2T1) demand. This pegging completely consumes the (P2, P2T1)supply. The process then applies the second netting sequence step of the attribute-based netting rule to peg5 units of common supply to the remaining 5 units of (P2, P2T1) demand. This pegging completelyconsumes the common supply.
Day 7
The process applies the second netting sequence step of the attribute-based netting rule for 10 unitsof (P1, P1T1) demand but doesn't find any supplies with matching project and task attributes. Theplanning process also applies the Net common supply netting sequence but doesn't find any commonsupplies. The process then recommends a common planned order for the unmet common demand and aproject planned order for the unmet project demand. It then assigns the project and task values to theproject planned order.
298

Oracle SCM CloudUsing Supply Planning
Chapter 10Project-Specific Supply Planning
Example 2: Project Netting with Multiple ProjectsLet's assume that you have these setups for your attribute-based netting rule, item attributes, and project groups:
Item Attributes
Item Attribute Value
Hard pegging Level Project and task
Allow Use of Common Supplies Yes
Fixed Order Quantity 20
Attributes for Planned Orders
Demand Grouping Striping
Project Group Project Group
Project
Task
Project Group
Project Group Project Task
Project P1 Task P1T1 Task P1T2Project Group 1
Project P2 Task P2T1
Project Group 2 Project P3 Task P3T1
Sequence Number Demand Attribute Demand Operator Demand AttributeValue 1
Supply Attribute Supply Operator
Project Group Any Project Group Matches DemandValue
Project Any Project Matches DemandValue
1
Task Any Task Matches DemandValue
Project Group Any Project Group Matches DemandValue
Project Any Project Matches DemandValue
2
Task Any Task Any
Project Group Any Project Group Matches DemandValue
Project Any Project Any
3
Task Any Task Any
299

Oracle SCM CloudUsing Supply Planning
Chapter 10Project-Specific Supply Planning
Project Group Equals PG1 Project Group Blank
Project Any Project Blank
4
Task Any Task Blank
Based on the netting sequences and their order defined in this example, the planning process has these options forproject netting:
1. The planning process applies the first netting sequence step of the attribute-based netting rule, Net projecttask supply, defined in your netting rule to allocate supplies to demands with matching project and taskattributes. This means that the supplies with project P1 and task P1T1 can only be allocated to a demand withproject P1 and task P1T1.
2. When no matching project and task supplies are available, the process applies the second netting sequencestep of the attribute-based netting rule. Because the Reservation Level in the rule is Project group, the planningprocess nets supplies that belong to any task in the same project group. This means that the supplies of anytasks of P1 can be allocated to any tasks of P1 because they're in the same group PG1.
3. When no matching task supplies are available within the same project, the process applies the sequencenumber 3 netting step of attribute-based netting rule to net the supplies that belong to any project or anytask within the same group. This means that the supplies of any tasks of P1 can be allocated to any tasks of P2because they are in same group.
4. In the absence of any excess supplies within the project group, the process applies the fourth netting sequencestep of the attribute-based netting rule to allocate the common supply to project demands.
5. For unmet demands, the process recommends planned orders.
The planning process applies the netting sequences in the same order in each time bucket for attribute-basedthroughout the plan horizon.
Here's a plan output that represents pegging of available supplies to demands and recommended planned orders.
Let's analyze the netting of supplies and demands in each time bucket of this plan.
300

Oracle SCM CloudUsing Supply Planning
Chapter 10Project-Specific Supply Planning
Day Attribute-Based Netting
Day 1
The planning process pegs 20 units of common supply to 20 units of common demand (a demandwithout any project and task attributes). The remaining common supply after this pegging is 5 units. The process applies the first netting sequence step of the attribute-based netting rule to identifysupplies and demands with matching project and task attributes. It pegs 10 units of (P1, P1T1) supply to10 units of (P1, P1T1) demand. The remaining (P1, P1T1) supply after this pegging is 15 units.
Day 2
The process identifies 20 units of (P3, P3T1) supply. The process applies the first netting sequence step of the attribute-based netting rule to peg 20 unitsof (P3, P3T1) supply to 20 units of (P3, P3T1) demand. This pegging completely consumes the (P3,P3T1) supply. The process then applies the second and third netting sequence steps of the attribute-based nettingrule to identify excess supplies from a project and task within the same project group. It pegs 10 unitsof (P1, P1T1) supply to 10 units of (P1, P1T2) demand. It also pegs 5 units of (P1, P1T1) supply to 10 unitsof (P2, P2T2) demand. This pegging completely consumes the (P1, P1T1) supply. The process then applies the fourth netting sequence step of the attribute-based netting rule toidentify a common supply that it can peg to the remaining 5 units of (P2, P2T2) demand. The commonsupply is allocated to P2 project demand since it belongs to project group PG1. This project group isallowed to net common supply as per sequence number 4 netting sequence step of the attribute-based netting rule. The process then pegs 5 units of common supply to 5 units of (P2, P2T2) demand.This pegging completely consumes the common supply.
Day 4
The process identifies an additional common supply of 10 units. The process applies the first, second, and third netting sequence steps of the attribute-based nettingrule but doesn't find any matching or excess supplies. The process then applies the fourth netting sequence step of the attribute-based netting rule toidentify a common supply that it can peg to 10 units of (P3, P3T1) demand. Because P3 belongs toproject group PG2, and as per the fourth netting sequence step of the attribute-based netting rule,only project demands of project group PG1 can net common supply. For this 10 units of unmet demand, the process recommends a planned order. Because the fixed orderquantity defined for the item is 20, the process creates a planned order of 20 units.
Day 5
The process pegs 10 units of common supply to 10 units of common demand. This pegging completelyconsumes the common supply.
Day 6
The process applies the first, second, third, and fourth netting sequence steps of the attribute-basednetting rule but doesn't find any available supplies. For the 10 units of unmet (P1, P1T1) demand, the process recommends a planned order of 20 units afterconsidering the fixed order quantity defined for the item.
Day 7
The planning process aggregates unmet demands at the project group level to recommend plannedorders. Because P1 and P2 belong to the same project group PG1, the process aggregates the unmet(P1, P1T1) demand and (P2, P2T2) demand. The process recommends a planned order of 20 units after considering the fixed order quantitydefined for the item based on the attributes selected in Attributes for Planned Orders of the attribute-based netting rules. The process then assigns the project and task attribute to the planned order basedon the attribute of the first demand, which is project P1 and task P1T1.
301

Oracle SCM CloudUsing Supply Planning
Chapter 10Project-Specific Supply Planning
Example of Supply Creation The planning process aggregates unmet demands based on the attributes selected for Demand Grouping in Attributesfor Planned Orders of the attribute-based netting rules. Let's understand this with an example.
Let's assume that the attribute-based netting rule and the item associated with the plan have these configurations:
• Reservation Level: Project group
• Item Hard Pegging Level: Project and Task
• Item Fixed Order Quantity: 40
Attributes for Planned Orders
Demand Grouping Striping
Project Group Project Group
Project
Task
Here's the supply recommendation for unmet demands:
In this example, the planning process identifies an aggregated unmet demand of 20 units at the project group level onDay 1 and Day 3.
The process considers the fixed order quantity and creates a planned order of 40 units for Day 1 and Day 3. The plannedorders acquire the project and task attributes of the first project demand.
The process allocates the remaining 20 units from Day 1 to the demand on Day 2 and 20 units from Day 3 to the demandon Day 4.
302
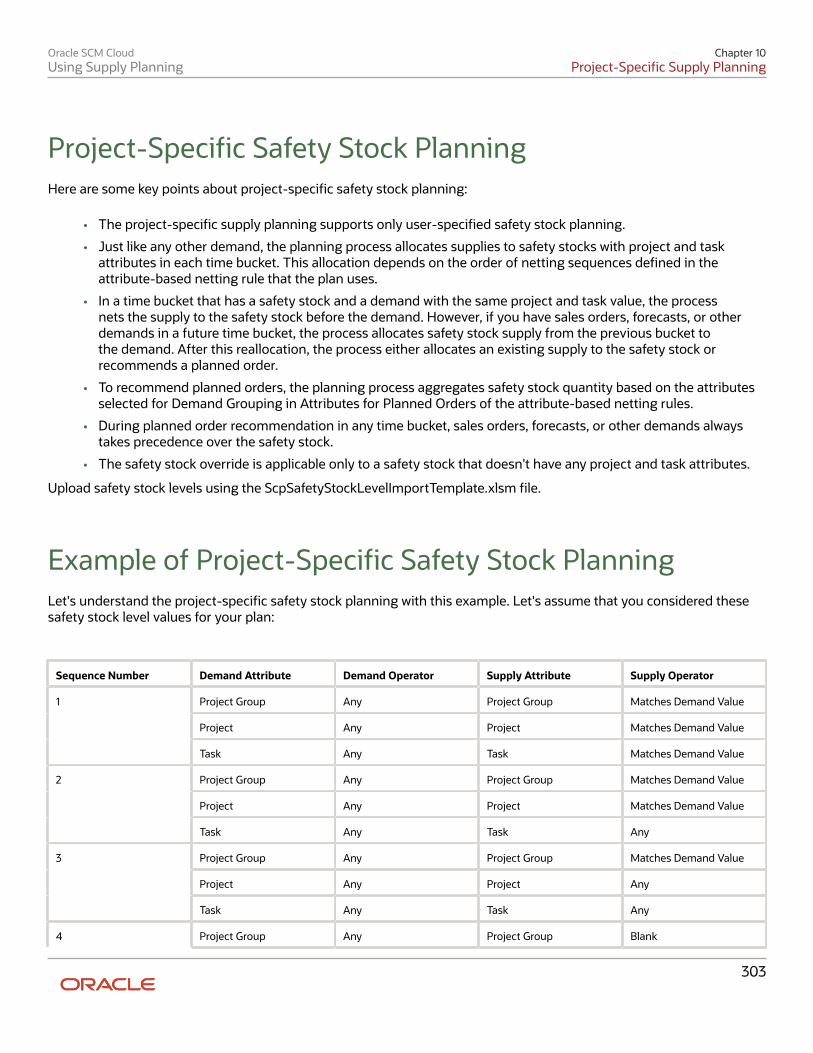
Oracle SCM CloudUsing Supply Planning
Chapter 10Project-Specific Supply Planning
Project-Specific Safety Stock Planning Here are some key points about project-specific safety stock planning:
• The project-specific supply planning supports only user-specified safety stock planning.
• Just like any other demand, the planning process allocates supplies to safety stocks with project and taskattributes in each time bucket. This allocation depends on the order of netting sequences defined in theattribute-based netting rule that the plan uses.
• In a time bucket that has a safety stock and a demand with the same project and task value, the processnets the supply to the safety stock before the demand. However, if you have sales orders, forecasts, or otherdemands in a future time bucket, the process allocates safety stock supply from the previous bucket tothe demand. After this reallocation, the process either allocates an existing supply to the safety stock orrecommends a planned order.
• To recommend planned orders, the planning process aggregates safety stock quantity based on the attributesselected for Demand Grouping in Attributes for Planned Orders of the attribute-based netting rules.
• During planned order recommendation in any time bucket, sales orders, forecasts, or other demands alwaystakes precedence over the safety stock.
• The safety stock override is applicable only to a safety stock that doesn't have any project and task attributes.
Upload safety stock levels using the ScpSafetyStockLevelImportTemplate.xlsm file.
Example of Project-Specific Safety Stock Planning Let's understand the project-specific safety stock planning with this example. Let's assume that you considered thesesafety stock level values for your plan:
Sequence Number Demand Attribute Demand Operator Supply Attribute Supply Operator
Project Group Any Project Group Matches Demand Value
Project Any Project Matches Demand Value
1
Task Any Task Matches Demand Value
Project Group Any Project Group Matches Demand Value
Project Any Project Matches Demand Value
2
Task Any Task Any
Project Group Any Project Group Matches Demand Value
Project Any Project Any
3
Task Any Task Any
4 Project Group Any Project Group Blank
303

Oracle SCM CloudUsing Supply Planning
Chapter 10Project-Specific Supply Planning
Project Any Project Blank
Task Any Task Blank
Here's how the planning process nets supplies for safety stock and the demand of the project group PG1 with the projectP1 and Task T1.
These are the conditions that the planning process fulfills during the project-specific safety stock planning:
• If you have a safety stock and a demand with the same project and task value in a time bucket, the process netsthe supply to the safety stock before the demand. In this example, we have 30 units of supply on day 1. Theplanning process nets 20 units of supply for the safety stock and nets 10 units of supply for the demand on day1. The process maintains 20 units of safety stock from day 1 to day 5 to ensure that the net safety stock is zero.
• In case you have sales orders, forecasts, or other demands in a future time bucket, the process allocates safetystock supply from the previous bucket to the demand. In this example, the process identifies a demand of 20units on day 6 and nets 20 units of supply from Day 1 to the demand.
• After such allocations, the process either allocates an existing supply to the safety stock or recommends aplanned order for the safety stock. In this example, the process recommends a planned order of 20 units on day6 to net the supply to safety stock on day 6 and day 7.
304

Oracle SCM CloudUsing Supply Planning
Chapter 10Project-Specific Supply Planning
Example of Project-Specific Safety Stock Planning withDays of Cover You can use days of cover calculations while determining the safety stock used in planning for unexpected changes inproject demands. Let's use an example to understand how days of cover are calculated.
Scenario
How Days of Cover Are CalculatedLet's say you're working on a project-based plan with these netting rule specifications:
• Reservation level is Project Group
• Netting sequence order:
a. Net project task supplyb. Net excess project supplec. Net common supply
Sequence Number Demand Attribute Demand Operator Supply Attribute Supply Operator
Project Group Any Project Group Matches Demand Value
Project Any Project Matches Demand Value
1
Task Any Task Matches Demand Value
Project Group Any Project Group Matches Demand Value
Project Any Project Matches Demand Value
2
Task Any Task Any
Project Group Any Project Group Matches Demand Value
Project Any Project Any
3
Task Any Task Any
Project Group Any Project Group Blank
Project Any Project Blank
4
Task Any Task Blank
Let's also assume these are your item attributes:
• Safety stock planning method is Days of Cover
• Days of Cover Demand period is 5 days
305

Oracle SCM CloudUsing Supply Planning
Chapter 10Project-Specific Supply Planning
• Days of Cover period is 2 days
This table lists out the daily number of demand units for each task.
Project Task Day 1(CommonDemand = 30units)
Day 2(CommonDemand = 30units)
Day 3(CommonDemand = 30units)
Day 4(CommonDemand = 30units)
Day 5(CommonDemand = 30units)
Day 6(CommonDemand = 30units)
Day 7(CommonDemand = 30units)
P1
T1
10
-
20
20
-
20
20
P1
T2
10
10
25
25
-
25
25
P2
T1
-
-
-
10
10
-
10
Here's how the total demand, average daily demand and safety stock days of cover duration are calculated:
• The total demand is the sum of the common demand and the demand for each project and task combination.For Day 1, the total demand is 30+10+10=50 units.
• The average daily demand is the sum of total daily demands from the day in question divided by the days ofcover demand period. For Day 1, it's (50+40+75+85+85)/5 = 67 units.
• The safety stock days of cover is the product of the average daily demand and the days of cover. For Day 1, it's67*2 = 134 days.
Day Day 1 Day 2 Day 3 Day 4 Day 5 Day 6 Day 7
Total Demand
50
40
75
85
85
85
85
Average DailyDemand
67
74
83
68
51
34
17
Days of Cover
2
2
2
2
2
2
2
Safety StockDays of Cover
134
148
166
136
102
68
34
How Plans Maintain the Safety Stock Calculated Using Days of CoverLet's now use the safety stock days of cover calculation to understand how supply plans maintain the safety stock byassessing available on-hand supply and safety stock to determine a projected available balance. When the numberof projected available balance units is less than the number of safety stock units, the creation of more supply units isrecommended to make up the difference.
• The project-based plan calculates days of cover safety stock levels at common for common and projectdemands.
306
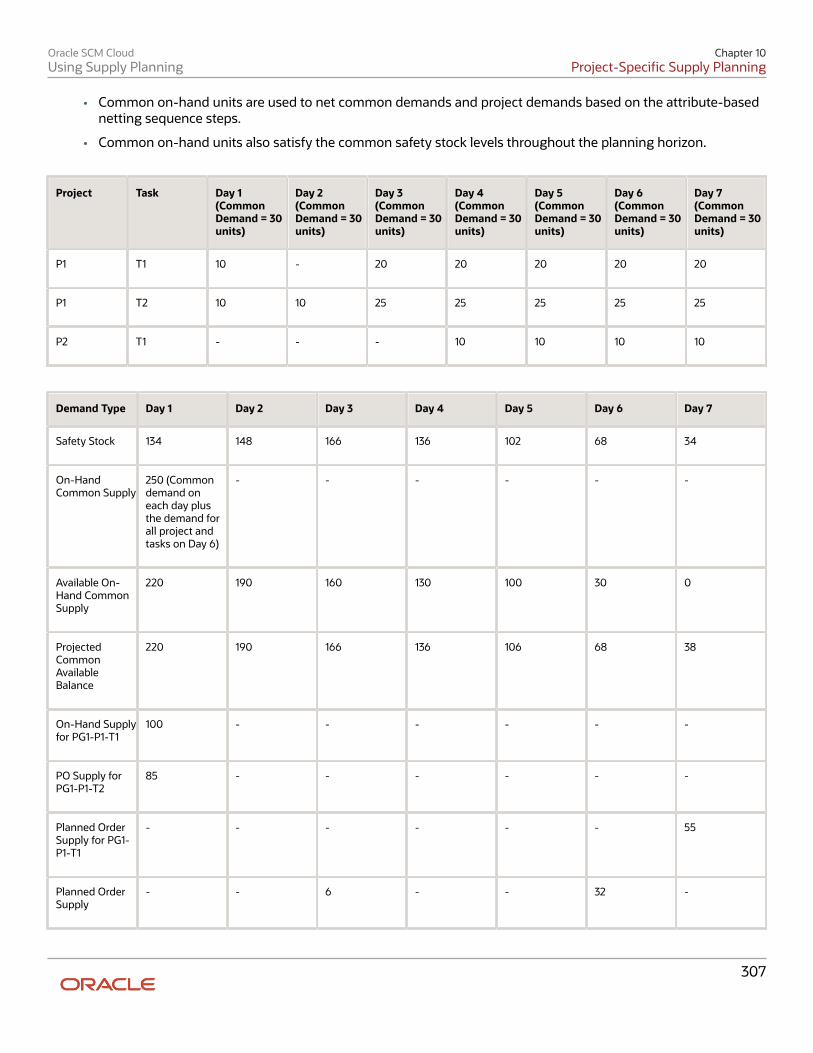
Oracle SCM CloudUsing Supply Planning
Chapter 10Project-Specific Supply Planning
• Common on-hand units are used to net common demands and project demands based on the attribute-basednetting sequence steps.
• Common on-hand units also satisfy the common safety stock levels throughout the planning horizon.
Project Task Day 1(CommonDemand = 30units)
Day 2(CommonDemand = 30units)
Day 3(CommonDemand = 30units)
Day 4(CommonDemand = 30units)
Day 5(CommonDemand = 30units)
Day 6(CommonDemand = 30units)
Day 7(CommonDemand = 30units)
P1
T1
10
-
20
20
20
20
20
P1
T2
10
10
25
25
25
25
25
P2
T1
-
-
-
10
10
10
10
Demand Type Day 1 Day 2 Day 3 Day 4 Day 5 Day 6 Day 7
Safety Stock
134
148
166
136
102
68
34
On-HandCommon Supply
250 (Commondemand oneach day plusthe demand forall project andtasks on Day 6)
-
-
-
-
-
-
Available On-Hand CommonSupply
220
190
160
130
100
30
0
ProjectedCommonAvailableBalance
220
190
166
136
106
68
38
On-Hand Supplyfor PG1-P1-T1
100
-
-
-
-
-
-
PO Supply forPG1-P1-T2
85
-
-
-
-
-
-
Planned OrderSupply for PG1-P1-T1
-
-
-
-
-
-
55
Planned OrderSupply
-
-
6
-
-
32
-
307

Oracle SCM CloudUsing Supply Planning
Chapter 10Project-Specific Supply Planning
The common on-hand 250 units satisfies the common demand from Day 1 to Day 7. Additionally, the plan maintainssufficient supply to satisfy common safety stock levels calculated based on days of cover. On Day 3, a common supplyof 6 units is recommended by the plan to maintain sufficient stock for the common safety stock level calculatedusing days of cover. On Day 6, the plan nets 40 units of the common on-hand units to project demands based onproject- netting sequences. On Day 6, because the common stock isn't sufficient to maintain safety stock level, the planrecommends 32 units of common supply. On Day 7, the planned order supply of 55 units with the project and task isrecommended by the plan based on the attributes selected for Demand Grouping in Attributes for Planned Orders ofthe attribute-based netting rules.
Review Supplies and Demands with Project Pegging After you run a project-specific supply plan, you can navigate to the plan and review the plan details.
Follow these steps to navigate to the plan:
1. From one of the Supply Chain Planning work areas, click the Task drawer and select Manage Plans.2. Select your project-specific plan, click Actions, and then click Open.3. On the Edit Plan page, click Open.4. In the Open Table, Graph, or Tile Set page, search for the Items, Supplies and Demands, or Exceptions table.5. Select the table and click OK to open the table and review plan details.
Review Plan DetailsYou can review these details of your project-specific plan:
Plan Detail How You Review the Plan Detail
Pegging relationships between suppliesand demands of the item
Navigate to the Supplies and Demands table to review pegging of project demands and supplies.Here's how you can review the plan:
• Review how the planning process shared project supplies across demands of the same project ordemands of multiple projects of the same project group.
• Analyze how supplies of the end item and their components are pegged to sales orders andforecasts.
• Select a demand and view supplies pegged to the demand. You can identify the attribution on thepegged supplies for a project demand.
• Understand how the planning process applied the netting sequences in your project-specific planto satisfy project demands.
Sharing of project supplies
The planning process shares project supplies across project demands based on the netting ruleassociated to the plan. You can select a supply and review its pegged quantity across various projectdemands. Here's how you can review the plan:
• Review how the planning process shared project supplies across demands of the same project ordemands of multiple projects of the same project group.
308

Oracle SCM CloudUsing Supply Planning
Chapter 10Project-Specific Supply Planning
Plan Detail How You Review the Plan Detail
• Analyze how the attribute-based netting sequences influenced pegging of supplies acrossvarious task demands within the same project or across various project demands within the sameproject group.
You can review the shared quantity for each demand from the pegged quantity of the projectsupply.
Exceptions
Exceptions are key elements to evaluate and improve your plan. After you run a project-specific plan,view the exceptions to understand the quality of the plan and to get visibility of key problem areas. In the Exceptions table, you can review project group, project, and task details in these order-relatedexceptions:
• Demand Quantity Not Satisfied
• Demand at Risk Due to Insufficient Lead Time
• Demand at Risk Due to Resource Shortage
• Demand at Risk Due to Supplier Capacity Shortage
• Late Replenishment for Forecast
• Late Replenishment for Sales Order
• Late Supply Pegged to Forecast
• Late Supply Pegged to Sales Order
• Orders to be Canceled
• Orders to be Rescheduled In
• Orders to be Rescheduled Out
• Orders with Insufficient Lead Time
• Past Due Orders
• Past Due Sales Orders
You can search orders in an exception for a specific project group, project, and task. You can includeproject group, project, and task in your search on the Exceptions table using the Add Fields option.
Build Plan view Capabilities in the Build Plan view for plan supplies and demands in attribute-based planning:• View project group, project and task attributes for orders in the Build Plan view.
• Drill to from build plan supports the planning attribute combination to Supplies and Demands orException user interfaces.
• View the project group, project, and task attributes details for a combination by selecting a celland clicking Show Details.
• Options in Highlight Related Cells list in a build plan are supported with the project group, project, and task attribute values.
Order Comparison view Capabilities in the Order Comparison view for plan supplies and demands in attribute-based planning:• View the project group, project, and task attributes for orders in the Order Comparison view's
Changed Demands and Changed Supplies tabs.
• Search the project group, project, and task attribute values with query by example for planningattributes.
• Drill to other supply planning user interfaces and planning analytics with the project group, project, and task attributes.
309

Oracle SCM CloudUsing Supply Planning
Chapter 10Project-Specific Supply Planning
Plan Detail How You Review the Plan Detail
Demand Fulfillment view Capabilities in the Demands Fulfillment view for plan supplies and demands in attribute-basedplanning:
• View the project group, project, and task attributes for orders in the Demand Fulfillment view forat-risk demands and recommendations.
• View the project group, project, and task attributes in Expedite Buy Orders, Expedite Make Orders, and Expedite Transfer Orders in recommendations in the Demand Fulfillment table.
• Search the project group, project, and task attribute values with query by example for projectgroup, project, and task attributes.
• Drill to other supply planning user interfaces and planning analytics with the project group, project, and task attributes.
Items with a Shortage in a Project Task
The Items with a Shortage in a Project Task exception is a project-specific supply planning exceptionthat evaluates item shortages in a specific project and task. The planning process calculates thisexception for a project and its associated tasks for an item and assists in analyzing item shortages andresolving project demand shortages issues. The exception calculation can be controlled by providingthreshold details. This exception appears in the same circumstances as the Items with a Shortage exception. However, inthis exception, the planning process uses only the supplies and demands that belong to a project andtask. You get the following details in this exception:
• Organization
• Item
• From Date: The start date of the planning time bucket with shortage quantity in a project andtask.
• To Date: The end date of the planning time bucket with shortage quantity in a project task.
• Shortage Days
• Project group
• Project
• Task
Note:To generate this exception, you must include the exception in the exception set that you associate toyour project-specific plan.
Analyze Project-Based Plan using Project DimensionsHere’s how you can analyze a project-based plan using project dimensions:
• The project group, project, and task attributes are displayed as levels of a the project hierarchy in a pivot table,graph, or tile for analysis.
• Measure values are aggregated if the values are viewed at aggregate levels in the project hierarchy, such asproject or project group.
• Edits performed at the aggregate level in the project hierarchy at project group or project for editable measuresare disaggregated to the lowest level combinations available in the plan.
• The supplies and demands with no task and project control level as a project are displayed with the task-levelmember as NO TASK ASSIGNED in planning analytics.
310

Oracle SCM CloudUsing Supply Planning
Chapter 10Project-Specific Supply Planning
Refer to the Planning Attributes section of the Attribute-Based Planning chapter for additional information on theassociation of measures in a measure context and deploying the measures for an attribute-based plan.
Simulate Project Demand and SupplyYou can perform simulations by changing or editing data in your project-specific plan to understand impact of changeson your plan and evaluate various what-if scenarios. After simulation, you can use the plan comparison capability tocompare the proposed plan with an existing base plan.
You can simulate these aspects of you project-specific plan:
• The effect of editing the project group, project, and task for planned orders. You can use mass editingcapabilities to edit a set of planned orders for simulation.
• The effect of date and quantity updates to project-specific supplies such as work order, purchase order, ortransfer order.
• The effect of creating a manual demand, planned order, or on hand with project and task attributes. To createthe manual order, click the Create icon on the Supplies and Demands page, and select the source type in theCreate Order dialog box. When you select the project group, project, and task, the planning process retains theirrelationships for the order.
Run the plan with the Do not refresh with current data option selected to see the results of your simulation. Theplanning process refers to the attribute-based netting rule of the plan to perform netting and creates supplies.
You can use the Edit in Spreadsheet option to edit project groups, project, and task for planned orders, manualdemand, or on hand and then perform simulation. You can also edit gross forecast, net forecast, planned order, ormanual demand measure values in a pivot table. Here's how it works:
• When you edit a cell containing an existing measure value, the spread will be same as prior updates. Theupdates are spread across underlying combinations irrespective of whether the net forecast, gross forecast,planned order, or manual demand has a project and task or not.
• When you edit a cell containing a null value, planned orders are created without a project and task. You cannavigate to supplies and demands view from the pivot table and add project group, project, and task.
Related Topics• Simulations in Supply Planning
Release Project-Specific Supply Recommendations Supply chain planning generates plan recommendations with project and task details to suggest actions for balancingsupplies and demands. The planning process can either suggest requesting new supplies to fulfill unmet demands orsuggest rescheduling or canceling existing supplies to balance excess supplies.
Planned Order RecommendationsWhen the planning process recommends a new planned order, the order can be released to an Oracle Fusion sourcesystem or an external source system, including Oracle E-Business Suite. The planned order can be a make plannedorder, a buy planned order, or a transfer planned order.
311

Oracle SCM CloudUsing Supply Planning
Chapter 10Project-Specific Supply Planning
If you have an Oracle Fusion source system, the planning process releases your planned orders with project and taskattributes to Oracle Fusion Supply Chain Orchestration. The planned orders are validated with additional project-relateddetails and then released to these execution systems:
• Release of a make planned order creates a work order with project and task attributes in Oracle FusionManufacturing Cloud.
• Release of a buy planned order creates a purchase requisition and then a purchase order with project and taskattributes in Oracle Fusion Procurement Cloud.
• Release of a transfer planned order creates a transfer order with project and task attributes in Oracle FusionInventory Cloud.
If you have external source systems, the plan release process generates respective CSV files for planned orders withproject and task attributes.
For planned orders with the Project hard pegging level value, the planning process recommends supplies only withproject. If you release a planned order to a source system without any task attribute, the planning process assigns thefirst task of the project for supply recommendation.
The planning process can also reschedule in, reschedule out, or cancel a purchase order, transfer order, or work order tobalance supplies and demands.
Note: Supplies aren't rescheduled in within the time fence. The project-specific plan nets firm supplies within thetime fence by following attribute-based netting sequences.
Planned orders with project and task attributes can't be released for these organizations:
• An organization for which the Project Enabled attribute is set to No on the Maintain Supply Network Modelpage.
• A Contract Manufacturing organization.
• An organization for which the Plan External Manufacturer Supplies is enabled.
• A drop ship validation organization.
Note: Publish of order forecasts won't be striped with project and task.
By default, the planning process releases buy planned orders with project and tasks attributes after grouping them atthe project level. The process does that by automatically selecting Project for the Requisition load group by option inthe Supply: Advanced Options dialog box when you select a netting rule for your plan.
You can either manually review and release each project-specific planned order recommendation or set up automaticrelease rules.
Related Topics• How Plan Recommendations Are Released
• Manually Release Plan Recommendations
• Release Plan Recommendations to an External Execution System
312

Oracle SCM CloudUsing Supply Planning
Chapter 10Project-Specific Supply Planning
OTBI Analytics for Project-Specific Supply Plans Oracle Transactional Business Intelligence (OTBI) is a real-time, self-service reporting solution that helps you createuser-defined and interactive reports. You can use OTBI reports to analyze key metrics, such as plan recommendations,order details, supply pegging, and so on.
How You Enable OTBI ReportingTo get OTBI reports, configure these setups for your project-specific plans:
• Select the Enable for OTBI reporting option when you configure the plan options.
• Set up reporting hierarchies by configuring the Product and Time hierarchies in the dimension catalog namedReporting Catalog. To configure the Product and Time hierarchies, use the Configure Planning Analytics task inyour Supply Chain Planning work area.
Predefined and User-Defined OTBI Reports for Project-Specific SupplyPlanningTo get useful insights about your project-specific supply plan, you can access these predefined reports in the SupplyPlanning or Demand and Supply Planning work area:
Predefined Report Description
Plan Recommendations Summary GraphProject Detail
This report provides plan recommendation graph for project-specific plans. You can review andanalyze the recommendation type, order number, order quantity, project group, project, and taskvalues for each recommendation in the graph.
Order Details by Item Project Detail
This report is categorized based on items, suppliers, and order types and provides supply and demanddetails for each item in an organization. You can review and analyze the order quantity, order value, project group, project, and task values for each order of the item in the report.
Pegging Details by End Item Project Detail
This report is categorized based on end items, customers, and order types. You can review and analyzethe pegged quantity along with the project group, project, and task values for each end item. Youcan also review the pegging details of component items in each time bucket with their project group, project, and task values.
Build Plan by End Item Project Detail
This report is categorized based on organizations and end items. You can review and analyze thepegged quantity along with the project group, project, and task values for each end item in anorganization. You can also review the pegging details of component items with their project group, project, and task values.
To create user-defined reports or analysis set, navigate to the Reports and Analytics work area. Select the Supply ChainPlanning Real Time subject area and add Project, Project Group, and Task from the Order Details folder in the DataSource pane to your report. Save your user-defined report or analysis set in the path /shared folders/custom/SupplyChain Planning, to view the report or analysis set in the Supply Planning or Demand and Supply Planning work area.
313

Oracle SCM CloudUsing Supply Planning
Chapter 10Project-Specific Supply Planning
Related Topics• Enable Plans for OTBI Reporting
Troubleshoot
Checklist to Set Up Project-Specific Supply Planning Use this checklist to set up your project-specific supply planning correctly:
Item Details
Collect data required for project-specificsupply planning.
Ensure that the Project-Driven Supply Chain and Plan Project-Specific Supply features are opted in tobefore you collect project-specific planning data. Run collections to collect data from the Oracle Fusion source system or external source systems,including Oracle E-Business Suite, to the planning data repository.
Create Project Groups.
Create project groups on the Manage Project Groups page and associate projects and task designatorsto the groups. You can also collect project groups using the FBDI file.
Define Attribute-Based Netting Rules.
Define your attribute-based netting rules on Manage Attribute-Based Netting Rules page.
Define assignment set for project-specificsupply planning.
Define the assignment set to enable the planning process to:
• Search for supplies across various supply sources.
• Create make, buy, or transfer planned orders with project and task.
Ensure that the items that take part inproject-specific supply planning have thehard pegging level value set to Projectand Task, Project, or Project Group.
Items can participate in project-specific supply planning only when the hard pegging level is set to avalue other than None.
Assign attribute-based netting rule to yourproject-specific plan.
To make a plan project-specific, you need to assign an attribute-based netting rule to the plan. You canassign the default netting rule or the netting rule you created based on your business needs.
Troubleshoot Common Setup Issues Use this table to resolve some common setup issues related to project-specific supply planning:
314
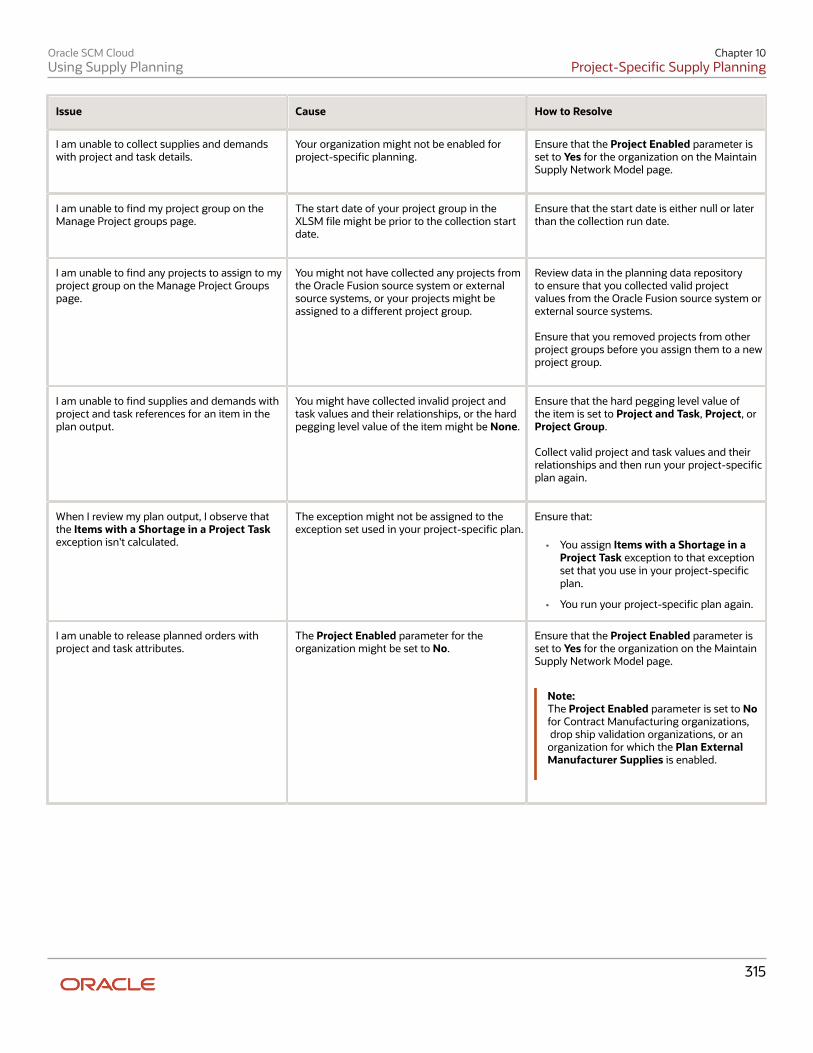
Oracle SCM CloudUsing Supply Planning
Chapter 10Project-Specific Supply Planning
Issue Cause How to Resolve
I am unable to collect supplies and demandswith project and task details.
Your organization might not be enabled forproject-specific planning.
Ensure that the Project Enabled parameter isset to Yes for the organization on the MaintainSupply Network Model page.
I am unable to find my project group on theManage Project groups page.
The start date of your project group in theXLSM file might be prior to the collection startdate.
Ensure that the start date is either null or laterthan the collection run date.
I am unable to find any projects to assign to myproject group on the Manage Project Groupspage.
You might not have collected any projects fromthe Oracle Fusion source system or externalsource systems, or your projects might beassigned to a different project group.
Review data in the planning data repositoryto ensure that you collected valid projectvalues from the Oracle Fusion source system orexternal source systems. Ensure that you removed projects from otherproject groups before you assign them to a newproject group.
I am unable to find supplies and demands withproject and task references for an item in theplan output.
You might have collected invalid project andtask values and their relationships, or the hardpegging level value of the item might be None.
Ensure that the hard pegging level value ofthe item is set to Project and Task, Project, orProject Group. Collect valid project and task values and theirrelationships and then run your project-specificplan again.
When I review my plan output, I observe thatthe Items with a Shortage in a Project Taskexception isn't calculated.
The exception might not be assigned to theexception set used in your project-specific plan.
Ensure that:
• You assign Items with a Shortage in aProject Task exception to that exceptionset that you use in your project-specificplan.
• You run your project-specific plan again.
I am unable to release planned orders withproject and task attributes.
The Project Enabled parameter for theorganization might be set to No.
Ensure that the Project Enabled parameter isset to Yes for the organization on the MaintainSupply Network Model page.
Note:The Project Enabled parameter is set to Nofor Contract Manufacturing organizations, drop ship validation organizations, or anorganization for which the Plan ExternalManufacturer Supplies is enabled.
315

Oracle SCM CloudUsing Supply Planning
Chapter 10Project-Specific Supply Planning
316

Oracle SCM CloudUsing Supply Planning
Chapter 11Attribute-Based Planning
11 Attribute-Based Planning
Overview of Attribute-Based Planning Your enterprise enables attribute-based planning to maximize supply availability for specific planning attributes. Asa supply planner who uses attributes in planning, you can control the granularity with which supplies are netted withdemands.
Here's an overview of the tasks you need to conduct attribute-based planning:
1. Create segment groups and carry out item segmentation.2. Create planning attributes and corresponding attribute dimensions.3. Associate planning attribute values with dimension levels.4. Add attribute dimensions to measures by configuring attribute measure contexts.5. Create attribute-based netting rules and add planning attributes.6. Create an unconstrained plan and associate a measure catalog, measure context, and netting rule to the plan.7. Run the plan and review planning results.
Note: This chapter calls out the features of planning with attributes, but existing planning setup and processescontinue to apply.
The release of planned orders with planning attribute values to SCM Cloud flexfield segments is based on the planningattribute mapping. Here's how your planning results are used:
• The release of a make planned order with planning attribute values to SCM Cloud creates a work order withattribute values in work order header descriptive flexfield segments.
• The release of a buy planned order with planning attribute values to SCM Cloud creates a purchase requisitionwith attribute values in purchase requisition line descriptive flexfield segments.
• The release of a transfer planned order with planning attribute values to SCM Cloud creates a transfer orderwith attribute values in transfer order line descriptive flexfield segments.
Here's how the release of planned orders with planning attribute values to external sources happens:
• Make or Buy or Transfer planned orders with planning attribute values released from planning creates releaseCSV files with planning attribute values.
• Planning attribute values are updated in the release CSV files in the planning attribute number column.
• The planning attribute number column updated in the release CSV file will be the attribute number of thecorresponding planning attribute in the planned order released.
Segment Groups and Criteria Define segment groups and criteria for use in attribute-based netting sequences. Use the Manage Segment Groups andCriteria task to set up segment groups.
317

Oracle SCM CloudUsing Supply Planning
Chapter 11Attribute-Based Planning
Define a Segment Group
1. Click the Manage Segment Groups and Criteria task.2. Click the add icon.3. In the Create Segment Group dialog box, enter a name and description.4. Select a source system.5. Define segment granularity by selecting a dimension and level. Use either the Product or Organization
dimensions to define segment groups for attribute-based planning.6. In the Segments section, select a catalog.7. Add and define segments.8. In the Segment Criteria section, define criteria for each segment.
a. Click the add icon.b. Select a dimension.c. Click the edit icon in the Plan Name column. Select the plan type and plans to include.d. Select a measure evaluation table.e. Select an attribute.f. Select Operator, From, and To values.
9. Save your segment group and criteria.
Associate Segment Groups with CriteriaAfter defining your segment group, run the Execute Segmentation process to associate segments to items based onsegment criteria. Use the View Segmentation Summary task to review the results of the segmentation and associationprocess.
For more information about segmentation, refer to the Segmentation chapter in the Using Replenishment Planningguide.
Planning Attributes
Overview of Planning Attributes You use planning attributes for granular supply and demand netting during supply chain planning. Use the ManagePlanning Attributes task to define and manage supply chain planning attributes. The first two attributes are, by default,Project and Task.
You can define up to 13 more attributes.
Define a Planning Attribute Here's how you define a planning attribute:
1. Navigate to the Plan Inputs, Supply Planning, or Demand and Supply Planning work areas.
318

Oracle SCM CloudUsing Supply Planning
Chapter 11Attribute-Based Planning
2. Click the Manage Planning Attributes task.3. In the Search Results table, click the create icon.4. In the Create Planning Attribute dialog box, enter details for the new attribute.
a. Enter an attribute name.b. Specify whether the data type is an alphabetic character or a number.c. Select the Oracle Fusion value set.
5. Save your attribute.
Attribute NumbersWhen you create an attribute, an attribute number is assigned to it, in sequence. Attributes 1 and 2 are Project and Task,respectively, and are predefined. You can create up to 13 more attributes. For project grouping needs you can use thepredefined Project Group attribute.
The planning attribute number is used for reference during the preparation of supplies and demands file-based dataimport files used to collect supplies and demands striped with planning attribute values from an external source system.
Attribute DimensionsWhen you create an attribute, corresponding dimension, hierarchy, and level with the planning attribute name will alsobe created. The selected for Oracle Fusion value set will be associated with the planning attribute.
Considerations for Attribute Name EditingYou can edit an attribute name to consequently update the Oracle Fusion value set. After you edit the name, run atargeted refresh of planning attribute values. You can't edit attribute names when these conditions apply:
• When the planning attribute is assigned to a netting rule.
• When the planning attribute dimension is enabled for the creation of a user-defined measure.
• When the planning attribute dimension is deployed for any predefined or user-defined measure across projector planning attribute measure contexts.
• When collection processes are run for attribute values.
• When attribute mappings are defined for the attribute.
Considerations While Deleting AttributesPlanning attributes can't be deleted when these conditions apply:
• When the planning attribute is assigned to an attribute-based netting rule.
• When the planning attribute dimension is deployed to a predefined or user-defined measure in a project orplanning attribute measure context.
• When the planning attribute has attribute values and relationship in collected data
• When a planning attribute mapping has been defined. The mapping must be deleted first.
319

Oracle SCM CloudUsing Supply Planning
Chapter 11Attribute-Based Planning
Define a Planning Attribute Mapping Use attribute mappings to create supply and demand collection entity-wise mapping for supported SCM Cloudflexfields and associated flexfield segments for a planning attribute. You can define a planning attribute mapping in thePlan Inputs, Supply Planning, and Demand and Supply Planning work areas.
1. Open the Manage Planning Attributes task.2. In the search results, select the attribute you want to define up mapping for.3. In the Define Planning Attribute Mapping section, complete the mapping details.
a. In the Collection Entity from Source column, select what type of collected entity you're mapping for. Forexample, a work order.
b. In the Entity Additional Details column, select the entity subtype. The subtypes listed are the descriptiveor extensible flexfield name for the selected collection entity. If your collection entity is Work Order, yourentity additional detail will be Work Order Header.
c. In the Source Attribute Reference column, search for and select the context for your entity. Your contextcan be Global or Standard.
d. In the Source Attribute Name column, search for and select the planning attribute name, based on yourreference context.
4. Save your changes.5. Run a targeted supply planning data refresh.
How You Configure Planning Attributes as Planning Dimensions When you create a planning attribute, a corresponding dimension-hierarchy-level combination is created for thatattribute. Planning attribute dimensions, hierarchies, and levels are supported for unconstrained planning in the SupplyPlanning and the Demand and Supply Planning work areas.
Use the Create Trees for Dimensions scheduled process to associate planning attribute values as members of ahierarchy level.
For more information about dimensions, refer to the Planning Analytics chapter in this guide
How You Add Attribute Dimensions to Measures Use the Manage Planning Measures task to add attribute dimensions to measures, from the Plan Inputs, SupplyPlanning, or Demand and Supply Planning work areas. Measure contexts are of three types:
• Default: All predefined and user-defined measures contain only predefined dimensions, their hierarchies, andtheir stored levels.
• Project: Predefined measures contain project dimensions and other applicable predefined dimensions. User-defined measures can also have the project dimension selected during creation or the project dimension can beadded using Change Granularity.
320
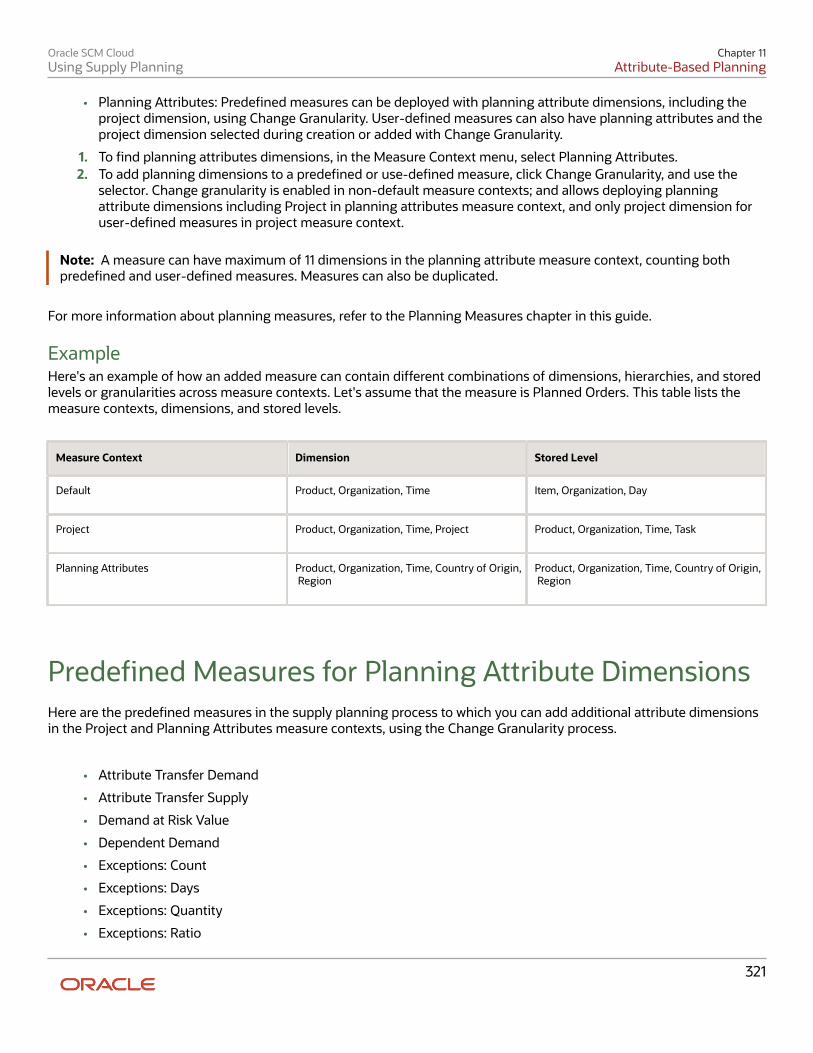
Oracle SCM CloudUsing Supply Planning
Chapter 11Attribute-Based Planning
• Planning Attributes: Predefined measures can be deployed with planning attribute dimensions, including theproject dimension, using Change Granularity. User-defined measures can also have planning attributes and theproject dimension selected during creation or added with Change Granularity.
1. To find planning attributes dimensions, in the Measure Context menu, select Planning Attributes.2. To add planning dimensions to a predefined or use-defined measure, click Change Granularity, and use the
selector. Change granularity is enabled in non-default measure contexts; and allows deploying planningattribute dimensions including Project in planning attributes measure context, and only project dimension foruser-defined measures in project measure context.
Note: A measure can have maximum of 11 dimensions in the planning attribute measure context, counting bothpredefined and user-defined measures. Measures can also be duplicated.
For more information about planning measures, refer to the Planning Measures chapter in this guide.
ExampleHere's an example of how an added measure can contain different combinations of dimensions, hierarchies, and storedlevels or granularities across measure contexts. Let's assume that the measure is Planned Orders. This table lists themeasure contexts, dimensions, and stored levels.
Measure Context Dimension Stored Level
Default
Product, Organization, Time
Item, Organization, Day
Project
Product, Organization, Time, Project
Product, Organization, Time, Task
Planning Attributes
Product, Organization, Time, Country of Origin, Region
Product, Organization, Time, Country of Origin, Region
Predefined Measures for Planning Attribute Dimensions Here are the predefined measures in the supply planning process to which you can add additional attribute dimensionsin the Project and Planning Attributes measure contexts, using the Change Granularity process.
• Attribute Transfer Demand
• Attribute Transfer Supply
• Demand at Risk Value
• Dependent Demand
• Exceptions: Count
• Exceptions: Days
• Exceptions: Quantity
• Exceptions: Ratio
321
Oracle SCM CloudUsing Supply Planning
Chapter 11Attribute-Based Planning
• Exceptions: Value
• Excess On Hand
• Gross Forecast
• In Receiving
• In Transit
• Independent Demand
• Manual Demand
• Net Forecast
• On Hand
• Order Quantity
• Order Value
• Planned Order By-Product Supply
• Planned Order Co-Product Supply
• Planned Orders
• Purchase Order Demand
• Purchase Orders
• Purchase Requisitions
• Reserved Supply
• Sales Orders
• Sales Orders by Request Date
• Sales Orders Value
• Scheduled Receipts
• Scheduled Receipts Value
• Supplies Pegged to Excess
• Total Demand
• Total Supply
• Transfer Order Demand
• Transfer Orders
• Value On Hand
• Work Order By-Product Supply
• Work Order Co-Product Supply
• Work Orders
322

Oracle SCM CloudUsing Supply Planning
Chapter 11Attribute-Based Planning
Attribute-Based Netting Rules
Overview of Attribute-Based Netting Rules You use attribute-based netting rules to manage the sequence in which supply-demand netting happens for enterprise-specific attributes, such as netting based on the country of origin. With attribute-based netting rules, you can configurewhich attribute-striped supplies can be used to satisfy specific attribute-striped demands.
While defining attribute-based netting rules, you Specify the sequence in which various attribute-striped existingsupplies should be explored in order to meet attribute-striped demands This existing supply netting sequence willbe explored one time window at a time. You specify the size in days of this time window. When existing supplies areinsufficient to meet the demand, you specify what attribute values should be placed on to the planned orders.
Define an Attribute-Based Netting Rule Here's how you define an attribute-based netting rule.
1. Navigate to the Plan Inputs, Supply Planning, or Demand and Supply Planning work area.2. Click the Manage Attribute-Based Netting Rules task.3. Specify a rule name.4. Specify a description.5. Select planning attributes to include in the rule. You can select up to four attributes per rule.6. Define a netting sequence common to all items or for item segments. Segment-based sequences override
common sequences when both are applied.7. Save your rule.
Define an Attribute-Based Netting Sequence Your netting sequence can be common to all items or segment-based. A netting sequence can have up to ten steps.
Define a Common Netting Sequence for Items
1. Click the Netting Sequence Common to All Items tab.2. Specify the netting sequence time window.3. Select attributes for planned orders.4. In the Netting Sequence for Existing Supplies section, create or delete netting sequences.
a. Click on a row for an existing sequence.b. Select the demand attribute, demand attribute operator, and demand attribute values.c. Select the supply attribute, supply attribute operator, and supply attribute values.
323

Oracle SCM CloudUsing Supply Planning
Chapter 11Attribute-Based Planning
Define a Segment-Based Netting Sequence for Items
1. Click the Netting Sequence Specific to Item Segments tab.2. Select a source system.3. Select a segment group.4. Add segments. For each segment, specify the segment name, description, and time window in days, and
attributes for planned orders. You can add up to ten steps in the netting sequence.
Example of How You Add a Netting Sequence for Existing SuppliesLet's understand how netting sequences get applied using an example.
Let's assume a two-step sequence. In both steps, the demand attributes are country of origin and region, and thedemand operator for both steps is Any. In both steps, the supply attributes are country of origin and region, and thesupply operator for country of origin and for region in the first step is Matches Demand Value, and for the second step,the supply operator for country of origin is Any and the supply operator for region is Matches Demand Value.
Here's how the netting happens:
• Existing supplies with the supply attributes Region and Country of Origin are allocated to demands withdemand attributes Region and Country Of Origin.
• The planning process explores supplies with supply attributes Region and Country Of Origin, where supplyattribute of Country Of Origin can be of any value, and the supply attribute Region value should match attributevalue of Region for any demand selected during the allocation process. The demand being allocated can alsohave any value for the Country Of Origin demand attribute.
Netting Sequence Operators Here are the netting sequence operators and operator data types you need to use while defining netting sequences.
For the following operators, planning attributes can use the Number or Character data types:
• Any
• Equal to
• Not equal to
• Blank
• Not Blank
• In
• Not In
• Matches demand value
Note: There are two additional operators, Blank and Not Blank, for which you don't specify demand or supplyattribute values.
For the following operators, planning attributes can use the Number data type only:
• Less than
324

Oracle SCM CloudUsing Supply Planning
Chapter 11Attribute-Based Planning
• Less than or equal to
• Greater than
• Greater than or equal to
• Between
• Isn't between
Considerations While Specifying the Netting Sequence TimeWindow You specify a time window for applying a common or segment-based netting sequence. Within each time window, thesequence is carried out based on the sequence number, for existing supplies.
If your window is larger than the scheduling bucket, future time buckets are explored to find existing supplies that mightbe a better attribute match for the current time bucket's demand shortfall. But this may result in temporary materialshortfalls because the chosen existing supplies may have dates later than the planning time bucket of the demandshortfall.
If you want the netting sequence restarted with every new planning bucket, set the time window as 1 day. This ensuresthat the demand shortfall is met. But it may result in less-than-perfect netting matches because the plan uses existingsupplies that are further down in the netting sequence.
Examples of How the Netting Sequence Time Window Is UsedLet's understand how the time window is used when the window is 1 day.
When the time window value is lesser than the supply planning bucket duration, the planning process creates a nettingwindow for time buckets based on the bucket type that's set in the plan options. So let's say the bucket type is Days,and has a value of 60, and the netting sequence time window is 1 day long, then each daily bucket duration is the sameas the netting sequence time window's, 1 day. And if the bucket type is Week, or Period, or Month, and has a value of 5weeks, and the netting sequence time window is 1 day, then each weekly bucket is a netting window.
Scenario 1
Daily Buckets Netting Sequence Application Netting Windows
30
Applied every day for 30 days.
30
Scenario 2
Daily Buckets Weekly Buckets Netting Sequence Application Netting Windows
30
2
Applied every day for the first 30days and then every week for 2weeks.
32
325

Oracle SCM CloudUsing Supply Planning
Chapter 11Attribute-Based Planning
Scenario 3
Weekly Buckets Netting Sequence Application Netting Windows
1
Applied every week for 10 weeks.
10
Scenario 4
Periodic Buckets Netting Sequence Application Netting Windows
5
Applied every period for 5 periods.
5
Now, let's understand how the time window is applied when its duration is 7 days.
Scenario 1
Daily Buckets Netting Sequence Application Netting Windows
35
Applied every 7 days in daily buckets.
5
Scenario 2
Daily Buckets Weekly Buckets Netting Sequence Application Netting Windows
35
2
Applied every 7 days in dailybuckets for the first 35 days andthen every week for 2 weeks.
7
The netting sequence applied for every 7 days for first 35 days and later every week for 2 weeks when the time windowfor netting sequence is equal to the number of days in a week.
Scenario 3
Weekly Buckets Netting Sequence Application Netting Windows
10
Applied every week for 10 weeks.
10
The netting sequence is applied for every weekly bucket for 10 weeks because the time window in days for applying thenetting sequence matches the number of days in a week.
Scenario 4
326

Oracle SCM CloudUsing Supply Planning
Chapter 11Attribute-Based Planning
Periodic Buckets Netting Sequence Application Netting Windows
5
Applied every period for 5 periods.
5
The netting sequence is applied for every period because the time window in days for applying netting sequence islesser than the number of days in a period.
Considerations While Creating Planning Orders with PlanningAttributes You select attributes for planned order supplies while defining common or segment-based netting sequences. Theseattributes may be for demand grouping or for order striping.
• Based on attributes for demand grouping, unmet demands are aggregated for planned order creation in eachtime bucket. Order modifiers are respected.
• Based on attributes for striping, planned orders created will be striped.
Considerations for Attribute-Based PlanningFor attribute-based planning, select the same attributes for demand grouping and for striping.
Considerations for Project-Based PlanningFor project-based planning, your attribute selection can vary based on whether you want to create supplies forreservation-level shortfalls or hard-pegging-level shortfalls.
• Attributes for reservation-level considerations: Select Project Group or Project Group and Project for demandgrouping and Project Group and Project or Project Group, Project, and Task for striping.
• Attributes for hard-pegging level considerations: Select either Project Group and Project or Project Group,Project, and Task for both demand grouping and striping.
How Supply Planning Uses Attribute-Based NettingSequences The planning process nets demand with supply using attribute-based planning rules. Planned orders are recommendedfor unmet safety stock level values with planning attributes based on Attributes for Planned Orders.
Order modifiers are respected while creating planned orders during aggregating of unmet demands in a time bucketbased on the attributes specified in the Demand Grouping tab in the Attributes for Planned Order task.
327

Oracle SCM CloudUsing Supply Planning
Chapter 11Attribute-Based Planning
Settings That Affect Attribute-Based Planning
• The netting rule selected during plan options configuration.
• The items scoped in during plan options configuration.
How Demand and Supply Netting Happens
1. The netting sequence is considered.◦ For items that are supply-planned, the segment-based netting sequence is applied.
◦ .For items that aren't associated with item segments, the common netting sequence defined for existingsupplies is applied.
◦ Items that aren't associated with item segments or existing supply are assigned. at an item-organizationassignment level.
2. The safety stock is considered.◦ To meet safety stock, the attributes selected for planned orders are used.
◦ To calculate days of cover safety stock, demand for safety-stock enabled items with or without planningattributes are aggregated in each time bucket. While aggregating unmet demand in a time bucket, ordermodifiers are respected, based on attributes selected for demand grouping
◦ Existing common supply is allocated to common safety stock that was created with days of covercalculations using netting sequences.
How You Review Attribute-Based Planning Results Here's how you can review attribute-based planning results:
• Use the Supplies and Demands table to review netting-based planning results:◦ Review the pegging of supplies and demands with planning attributes. You can examine how the netting
sequence impacted your plan.◦ Review how attribute-specific supplies have been shared among demands grouped with those attributes.
◦ Review the netting sequence details for item segments. Expand the supply pegging for a demand, selectan existing supply, and in the View menu click View Netting Sequence Step. You can also review this inthe Items table.
• Use the Exceptions tab to find and review exceptions. The Supply Planning Exceptions folder containssubfolders for your planning attributes.
• Use the Demand Fulfillment tab to review at-risk demands and recommendations. Planning attributes aredisplayed for expedited buy, expedited make, and expedited transfer orders.
• Use the Order Comparison tab to review changed demands and changed supplies. Planning attributes aredisplayed for both changed demands and changed supplies.
Here's how you analyze plans by planning attribute dimensions:
• You can edit the measure value for editable measures like Net Forecast, Gross Forecast, Manual Demand orPlanned Orders at planning attribute combination level in a pivot table.
328
Oracle SCM CloudUsing Supply Planning
Chapter 11Attribute-Based Planning
• Either edit an existing combination measure value or enter a value for time bucket for a combination at anyhierarchy level. Measure values are disaggregated to lowest levels even for planning attribute dimensions
• Drill to from pivot table or material plan to Supplies and Demands or Exceptions or Build Plan. The context ofthe planning attribute combination will be passed during the drill-to action.
• Format measures.
• Compare plans.
• Project Group, Project and Task are displayed as levels of project hierarchy in a pivot table or graph or tile foranalysis.
• Measure values are aggregated if the values are viewed at aggregate levels in project hierarchy like project orproject group. Edits performed at aggregate level in project hierarchy at project group or project for editablemeasures are disaggregated to lowest level combinations available in the plan.
• Supplies and demands with no task with project control level as projects will be displayed with task levelmember as NO TASK ASSIGNED in analytics.
• Measure Context and Change Granularity are applicable only for the Dimension Parameters section ofAggregation and Disaggregation tab in a measure definition. All other measure parameters are common acrossany measure context for a given measure.
• Planning measures with planning attribute dimensions can be used in measure expression.
• Load Measures from Other Plans from demand and supply plans to demand plan or sales and operations plansdoesn't support measure context and planning measures with planning attribute dimensions.
• You must have a default measure context for the following measures: Projected Available Balance, ProjectedOn Hand, Safety Stock, Project Available Balance Value, Safety Stock Value. Even for plans without a defaultmeasure context, these measures are computed by the planning process at item, organization, and timedimensions only.
How You Simulate Changes to Attribute-Based PlanningResults Use the Create Order dialog box in the Supplies and Demands tab to assess alternative planning scenarios.
• Modify the firm date and firm quantity and review the change impact on attribute-specific supplies.
• Modify attribute values and review the change impact.
• Create a manual demand, a planned order, or on-hand supply and review the change impact.
• Compare results of your simulated plan with an existing plan.
You can also update attribute values for supplies and demands in a simulation set in the Plan Inputs work area andassociate them to a plan, to explore a simulation.
329

Oracle SCM CloudUsing Supply Planning
Chapter 11Attribute-Based Planning
330

Oracle SCM CloudUsing Supply Planning
Chapter 12Archive Plans
12 Archive Plans
Overview of Plan Archival in Supply Chain Planning Supply Chain Planning provides two archival types, one that a planner can run for a plan and another archive type thatonly an administrator with proper security privileges can set up for MAPE statistics.
For a planner, plan archival enables you to archive measures in a plan with plan context and save multiple versions of aplan's archived measures over time. When you archive a plan, you archive a set of measures contained in the measurecatalog that you chose as the archive measure catalog for the plan.
Note: You can create archives for demand, supply, integrated demand and supply, and sales and operations plans.Archival isn't available for Oracle Planning Central Cloud.
Plan ArchivesPlan archival enables you to save multiple versions of the plan where you archive the key measures at a point in time.The Waterfall Analysis and Trend Analysis tables and graphs use the plan archive to compare the current plan's datato past versions of the plan. When viewing past versions of the plan, you can see the impact of strategic and tacticalchanges made to the plan. You can also compare the individual archives to the plan by selecting Compare > Archivefrom the Actions menu in a plan.
For example, you archive a plan in May and then market conditions in September cause adjustments to be made tothe plan. You can analyze the impact of the adjustments on the plan by viewing the changes in the key performanceindicators between the plan version archived in May and the current plan.
A supply chain planner can run the archiving process from an open plan by selecting the Archive option from theActions menu. A planner can also run the archiving process by selecting the Archive plan check box on the Run Planpage. Alternatively, you can run the archive process independently of running the plan by selecting the Archive optionfrom the Actions menu on the Manage Plans page.
Before you can archive a plan, you must enable the plan for archiving and set up the archiving parameters. Theparameters that you configure determine the time hierarchy, time level, and the measure catalog to use for the archives.Set up the archiving parameters in the Scope: Advanced Options dialog box, which you navigate to from the PlanOptions page, Scope tab.
It's good practice to back up your archive data by making a full copy of your plan that includes archives. You can accessthe backup plan data in the event of any temporary issue with the plan of record. On the other hand, if you want tocreate a standalone plan to simulate a business scenario, you probably don't need to include archived measures.
MAPE ArchivesAn administrator with the correct security privileges can create an archive for MAPE statistics by running the BuildPlan Archive scheduled process from the Tools work area. Generally, a supply chain planner doesn't have the privilegesto create a MAPE archive. However, an administrator with the required privileges can see the Enable for MAPEcalculations check box in the Build Archive dialog box. The administrator can create archives at weekly, monthly, orquarterly time levels. The archive level pertains to the planning time level, so the administrator would archive a quarter-level plan at the quarter level.
331

Oracle SCM CloudUsing Supply Planning
Chapter 12Archive Plans
Note: To calculate predefined measures for demand plans and sales and operations plans that use archived data, youmust use a MAPE archive. The statistics calculated for the MAPE archive are used to generate the Waterfall Analysisand Trend Analysis tables and graphs.
Related Topics• Configure Archiving Parameters
• Copy a Plan
Configure Archiving Parameters Before you can archive plans, you must enable the archiving options.
Note: You can create archives for demand, supply, demand and supply, and sales and operations plans. Archival isn'tavailable for Oracle Planning Central Cloud.
To configure the archiving plan options:
1. In a Supply Chain Planning work area, open a plan and then select Edit Plan Options from the Actions menu.2. On the Plan Options page, Scope tab, click the Select Advanced Options button.3. In the Scope: Advanced Options dialog box, Archive Options section, review and make changes to the archive
parameters for the plan.
Parameter Description
Enable for archiving
Select to set parameters used to archive measure data for your plan. When selected, thearchiving options are enabled.
Archive Time Hierarchy
Select the time hierarchy to use to archive the measure data for the plan, such as Gregoriancalendar. For a demand plan that uses a hybrid time hierarchy, the field value is defaulted to the hybridtime hierarchy that you selected as the planning calendar and can't be changed.
Archive Time Level
Select the time level to archive measure data for the plan, such as day or week. The time level isbased on the selection made for the archive time hierarchy. For a demand plan that uses a hybrid time hierarchy, the field value is defaulted to the Hybridtime level corresponding to the hybrid time hierarchy that you selected as the planningcalendar and can't be changed.
Measure Catalog for Archival
Select the measure catalog to use for archiving.
332
Oracle SCM CloudUsing Supply Planning
Chapter 12Archive Plans
Parameter Description
Note:Oracle recommends that you create a measure catalog containing only measures thatprovide insight to the plan's changes instead of archiving every measure in the plan.
Do not delete archives
Select if you don't want to delete any archives for the plan.
Delete archives automatically
Select to automatically delete archives when the archives are older than the Most Recent Daysto Keep parameter.
Most Recent Days to Keep
Enter the number of days for which to retain archives. Archives older than this number areautomatically deleted.
4. Click Done.
Related Topics• Overview of Plan Archival in Supply Chain Planning
Overview of Archival for Calculating MAPE Statistics A Supply Chain Planning administrator with the Manage Rolling Archives security privilege can create archives for thecalculation of the MAPE statistics at a week or month level.
These archives are used to calculate predefined measures for demand plans and sales and operations plans that usearchived data. The administrator runs the Build Plan Archive scheduled process from the Tools work area.
Shipments or bookings measures are required in the archive for MAPE statistics calculations, based on the measureused to create the forecast. If your plan forecasts shipments data, then only the shipments forecast measures areneeded. If your plan forecasts bookings data, then only the bookings measures are needed. The following shipments orbookings measures are required:
• Final Shipments Forecast
• Final Shipments Forecast 3 Months Ago
• Final Shipments Forecast 3 Months Ago Latest Archive
• Final Bookings Forecast
• Final Bookings Forecast 3 Months Ago
• Final Bookings Forecast 3 Months Ago Latest Archive
To use the archives in a waterfall or trend analysis, select the Use MAPE calculations check box in the Selector ToolComparison Options tab.
MAPE archives created on a rolling basis can be referenced in a user-defined measure expression that uses the Archivefunction. The archive type is a parameter of this function. The valid values for archive type are "Rolling" and "Adhoc."
333

Oracle SCM CloudUsing Supply Planning
Chapter 12Archive Plans
Related Topics• Archival for Calculating MAPE Statistics
Archival for Calculating MAPE Statistics A Supply Chain Planning administrator with the Manage Rolling Archives security privilege can create archives for thecalculation of the MAPE statistics at a week or month level.
Perform the following steps to run the Build Plan Archive schedule process:
1. In the Navigator, under the Tools section, click the Scheduled Processes link to access the ScheduledProcesses page.
2. Access the Process Details page for the Build Plan Archive process:
a. On the Schedule Processes page, click the Schedule New Process button.b. In the Schedule New Process dialog box, click the Name list, and then click the Search link.c. In the Search and Select: Name dialog box, enter Build Plan Archive and click Search.d. Select Build Plan Archive and click OK to return to the Schedule New Process dialog box.e. In the Schedule New Process dialog box, click OK.
3. In the Process Details dialog box, select the plan to archive and then click the Advanced button.4. On the Parameters tab, select Do not delete archives or Delete archives automatically.
If you select to delete archives automatically, enter a number in the Most Recent Days to Keep field. The archiveprocess automatically deletes older archives based on this parameter.
5. Select the Enable for MAPE calculations check box and enter or select the following parameters:
a. Archive Time Hierarchy: Select the calendar to use for the archive.b. Archive Time Level: Select the time level to use for the archive.c. Measure Catalog for Archival: Select the measure catalog to use when archiving.
Note: Oracle recommends that you create a measure catalog for archived measures instead ofarchiving every measure in the plan.
d. Use default archive name: Select to use the default archive name.e. Use user-defined archive name: Select to overwrite the default name with a user-defined name.
6. Click the Schedule tab to set up the frequency parameters.
◦ To run the plan immediately, select As soon as possible.
◦ To run the plan in the background at a set time, select Using a schedule. Next, select a Frequency, suchas Monthly or Weekly, to create MAPE rolling archives for use in waterfall and trend analyses.
7. Click Submit.
Related Topics• Overview of Archival for Calculating MAPE Statistics
334
Oracle SCM CloudUsing Supply Planning
Chapter 12Archive Plans
Delete Archives in Supply Chain Planning A planner can automatically delete plan archives by setting parameters in the Scope: Advanced Options dialog box,accessed from the Plan Options page, Scope tab.
Only a Supply Chain Planning administrator with the Manage Rolling Archives security privilege can delete MAPEarchives. In the Tools work area, the administrator can use the Delete Plan Archive schedule process to clean upunwanted archived data versions. You can delete the archives of a plan based on an archive version, a time range, or allarchives for a plan.
Note: When you use the Delete Plan action, the process not only deletes the plan, but it also deletes all of the archiveversions associated with that plan.
Perform the following steps to run the Delete Plan Archive schedule process:
1. In the Navigator, under the Tools section, click the Scheduled Processes link to access the ScheduledProcesses page.
2. Access the Process Details page for the Delete Plan Archive process:
a. On the Schedule Processes page, click the Schedule New Process button.b. In the Schedule New Process dialog box, click the Name list, and then click the Search link.c. In the Search and Select: Name dialog box, enter Delete Plan Archive and click Search.d. Select Delete Plan Archive and click OK to return to the Schedule New Process dialog box.e. In the Schedule New Process dialog box, click OK.
3. In the Process Details dialog box, select the plan that you want to delete the archives for and then click theAdvanced button.
4. On the Parameters tab, in the Plan section, select one of the following options, which are only available toadministrators with the Manage Rolling Archives security privilege:
a. Include MAPE archivesb. Delete MAPE archives only
5. On the Parameters tab, in the Archive Parameters section, configure the following parameters:
a. Archives to deleteb. Delete archives with time range
The Delete Plan Archive process filters the selected archive parameters by which MAPE archiving option youselected in the Plan section.
6. Click the Schedule tab to set up the frequency parameters.
a. To run the plan immediately, select As soon as possible.b. To run the plan in the background at a set time, select Using a schedule and then select a frequency,
such as Monthly or Weekly.7. Click Submit.
335

Oracle SCM CloudUsing Supply Planning
Chapter 12Archive Plans
336

Oracle SCM CloudUsing Supply Planning
Chapter 13Extract Plan Data
13 Extract Plan Data
Overview of Planning Measure Data Extractions fromPlan Output Planning information is an important component of supply chain analytics. It's important to extract planning measuredata from any plan to build offline reports or integrate with any external system.
Planners can use the Export Plan Data action from the Manage Plans page to run the Prepare Supply Chain PlanningData for Export scheduled process. You can also run the process or schedule as a job from the Scheduled Processespage under the Tools menu in the Navigator.
When analyzing a plan, you can extract detail supply chain planning multidimensional plan output data, includingmeasures and hierarchies. The extract is based on the measure catalog and dimension catalog assigned to the plan.The Prepare Supply Chain Planning Data for Export scheduled process extracts plan output data into a set of files forexternal reporting and analysis.
The extract process exports plan data to Oracle Universal Content Management in the comma-separated value (CSV)data format. This extract includes measure data, including any measures that you configured that are either stored orcalculated. For calculated measures, the planning process extracts the data after evaluating the measure expressions.The extract is based on the measure catalog and dimension catalog assigned to the plan and includes user-definedhierarchies and levels. Supporting information such as hierarchies for multidimensional analysis is also exported.
Before you can run the Prepare Supply Chain Planning Data for Export scheduled process for a plan, you must:
1. As a one-time setup, create an application integration with login credentials.
a. Navigate to Navigator > Others > Setup and Maintenance > Manage Setup Contentb. On the Manage Integration of Additional Applications page, set up the following:
- Application Name: SCP_BICC_REST_CREDENTIALS- Full URL: Enter the host name of the application. For example: https://
example.fa.app.oraclecloud.com- Partner Name: SCP_BICC_REST_CREDENTIALS- Security Policy: oracle/wss_username_token_over_ssl_client_policy
2. Ensure that the user running the extract has access to the Upload and download data from on-premise systemto cloud system role: OBIA_EXTRACTTRANSFORMLOAD_RWD.
3. Configure the extract options for your plan. Navigate to the Plan Options page, Scope tab and click theAdvanced Options button. In the Scope: Advanced options dialog box, in the Extract Options section, configurethe extract parameters.
4. Navigate to the Manage Plans page and select a plan. Select Export Plan Data to run the Prepare Supply ChainPlanning Data for Export scheduled process.
You can extract data at the lowest level from any of these plan types:
• Demand plan
• Demand and Supply plan
• Replenishment plan
337
Oracle SCM CloudUsing Supply Planning
Chapter 13Extract Plan Data
• Sales and Operations plan
• Supply plan
Configure Plan Extract Parameters Before you can select the Export Plan Data action from the Manage Plans page, you must configure the extract optionsfor your plan.
1. Navigate to the Plan Options page, Scope tab and click the Select Advanced Options button.2. In the Scope: Advanced options dialog box, in the Extract Options section, select the Enable for extract check
box to enable plan data to be extracted.3. Configure the extract parameters for the plan.
Dimension Catalog for ExtractSelect a dimension catalog to use for the extract process. The list of values includes all dimension catalogs valid forthe plan type. The list of hierarchies included in this list must be a subset of the hierarchies available in the dimensioncatalog associated with the plan. The list of hierarchies includes preconfigured and user-defined hierarchies. Note thefollowing:
• The maximum number of levels per hierarchy is limited to 10 levels.
• The maximum number of hierarchies in the segment dimension is limited to two hierarchies.
Measure Catalog for ExtractSelect a measure catalog to use for the extract process. The list of values includes all measure catalogs valid for thisplan type. The measure catalog must contain only the measures that are part of the measure catalog for the plan. Theplanning process evaluates measures with expressions and includes the results in the extract.
Extract Time HierarchySelect a time hierarchy to use for the extract process. Data extraction is done only at the lowest level for all dimensionsexcept for the time dimension. You can have only one time hierarchy per plan and it must be part of the dimensioncatalog used for the extract process. If it contains other time hierarchies, the extract process ignores them for extract.
The extract time hierarchy depends on the plan type, the planning calendar associated with the plan, and the planningtime level. Validation rules apply for the Extract Time Hierarchy field, based on the type of plan.
338
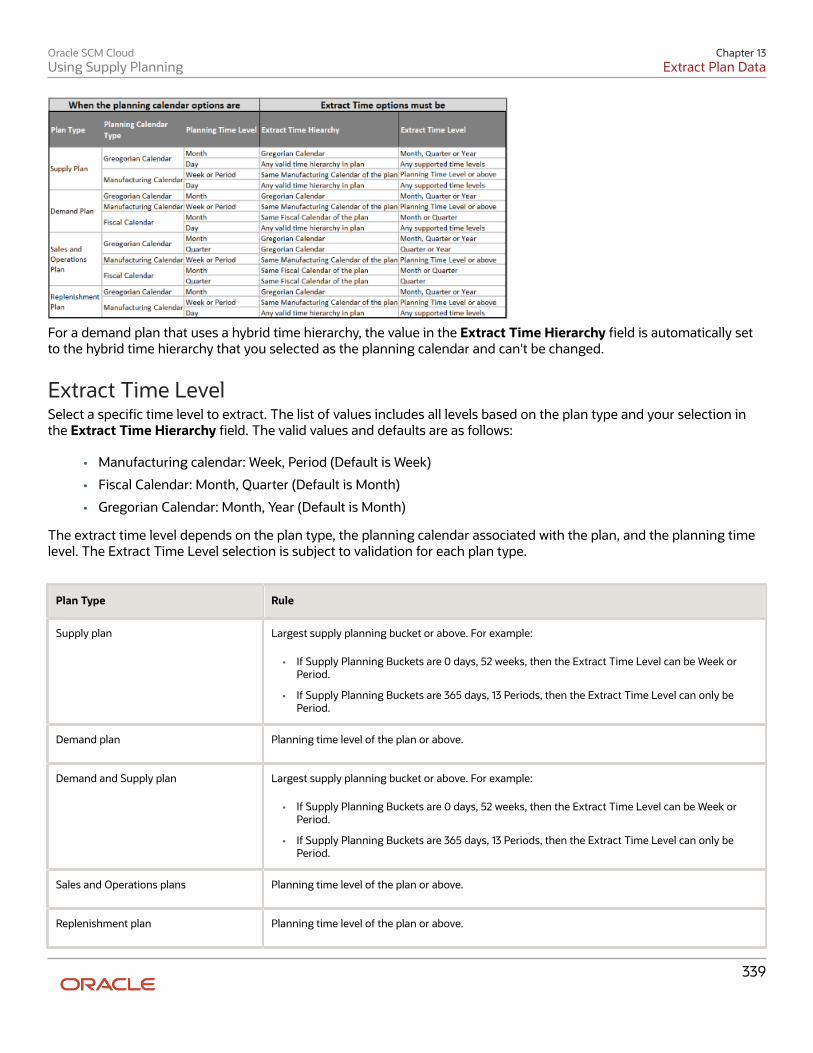
Oracle SCM CloudUsing Supply Planning
Chapter 13Extract Plan Data
For a demand plan that uses a hybrid time hierarchy, the value in the Extract Time Hierarchy field is automatically setto the hybrid time hierarchy that you selected as the planning calendar and can't be changed.
Extract Time LevelSelect a specific time level to extract. The list of values includes all levels based on the plan type and your selection inthe Extract Time Hierarchy field. The valid values and defaults are as follows:
• Manufacturing calendar: Week, Period (Default is Week)
• Fiscal Calendar: Month, Quarter (Default is Month)
• Gregorian Calendar: Month, Year (Default is Month)
The extract time level depends on the plan type, the planning calendar associated with the plan, and the planning timelevel. The Extract Time Level selection is subject to validation for each plan type.
Plan Type Rule
Supply plan
Largest supply planning bucket or above. For example:
• If Supply Planning Buckets are 0 days, 52 weeks, then the Extract Time Level can be Week orPeriod.
• If Supply Planning Buckets are 365 days, 13 Periods, then the Extract Time Level can only bePeriod.
Demand plan
Planning time level of the plan or above.
Demand and Supply plan
Largest supply planning bucket or above. For example:
• If Supply Planning Buckets are 0 days, 52 weeks, then the Extract Time Level can be Week orPeriod.
• If Supply Planning Buckets are 365 days, 13 Periods, then the Extract Time Level can only bePeriod.
Sales and Operations plans
Planning time level of the plan or above.
Replenishment plan
Planning time level of the plan or above.
339
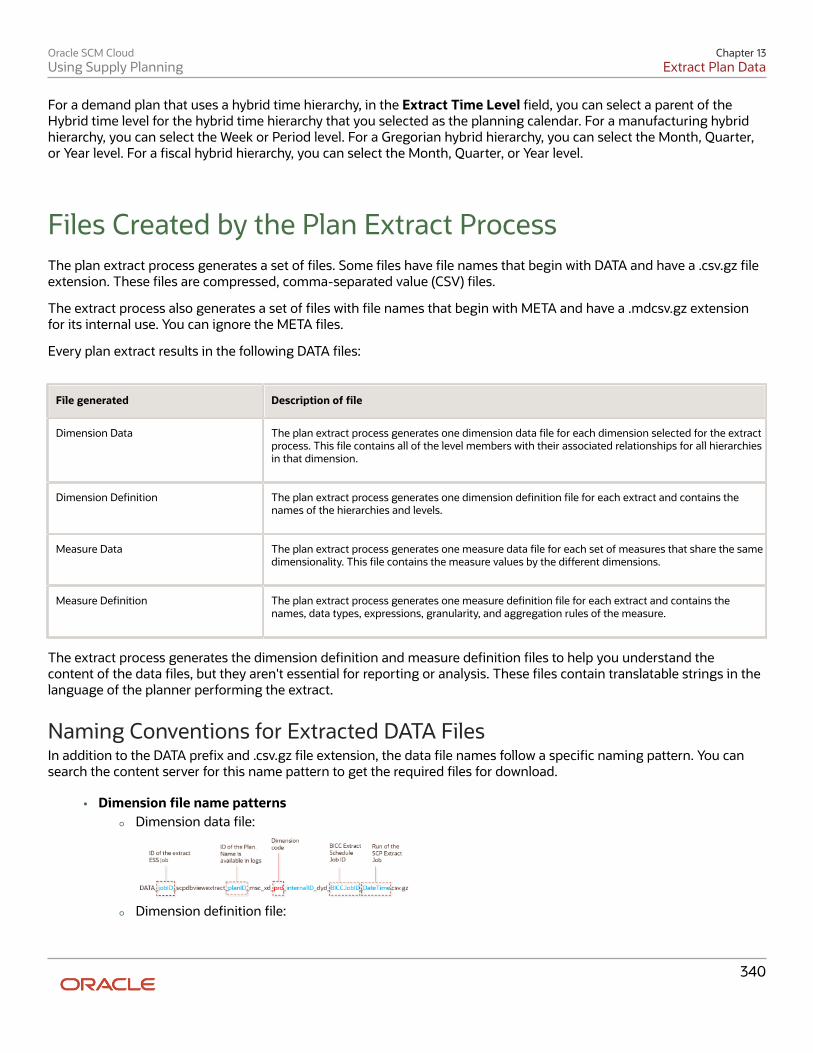
Oracle SCM CloudUsing Supply Planning
Chapter 13Extract Plan Data
For a demand plan that uses a hybrid time hierarchy, in the Extract Time Level field, you can select a parent of theHybrid time level for the hybrid time hierarchy that you selected as the planning calendar. For a manufacturing hybridhierarchy, you can select the Week or Period level. For a Gregorian hybrid hierarchy, you can select the Month, Quarter,or Year level. For a fiscal hybrid hierarchy, you can select the Month, Quarter, or Year level.
Files Created by the Plan Extract Process The plan extract process generates a set of files. Some files have file names that begin with DATA and have a .csv.gz fileextension. These files are compressed, comma-separated value (CSV) files.
The extract process also generates a set of files with file names that begin with META and have a .mdcsv.gz extensionfor its internal use. You can ignore the META files.
Every plan extract results in the following DATA files:
File generated Description of file
Dimension Data
The plan extract process generates one dimension data file for each dimension selected for the extractprocess. This file contains all of the level members with their associated relationships for all hierarchiesin that dimension.
Dimension Definition
The plan extract process generates one dimension definition file for each extract and contains thenames of the hierarchies and levels.
Measure Data
The plan extract process generates one measure data file for each set of measures that share the samedimensionality. This file contains the measure values by the different dimensions.
Measure Definition
The plan extract process generates one measure definition file for each extract and contains thenames, data types, expressions, granularity, and aggregation rules of the measure.
The extract process generates the dimension definition and measure definition files to help you understand thecontent of the data files, but they aren't essential for reporting or analysis. These files contain translatable strings in thelanguage of the planner performing the extract.
Naming Conventions for Extracted DATA FilesIn addition to the DATA prefix and .csv.gz file extension, the data file names follow a specific naming pattern. You cansearch the content server for this name pattern to get the required files for download.
• Dimension file name patterns
◦ Dimension data file:
◦ Dimension definition file:
340

Oracle SCM CloudUsing Supply Planning
Chapter 13Extract Plan Data
Dimension file name parts Description
jobID
The job ID of the extract scheduled process.
planID
The ID of the plan. This name is available in log files.
Dimension code
The dimension code that the hierarchies in the file belong to. Used in the dimension data file, but not the dimension definition file.
BICCJobID
The job ID of the extract scheduled job of the BI Cloud Connector (BICC) tool.
DateTime
Date and time the extract scheduled process began.
• Measure file name patterns
◦ Measure data file:
◦ Measure definition file:
Measure file name parts Description
jobID
The job ID of the extract scheduled process.
planID
The ID of the plan. This name is available in log files.
Dimensionality group code
Name of the dimensionality group code. Used in the measure data file, but not the measuredefinition file.
BICCJobID
The job ID of the extract scheduled job of the BI Cloud Connector (BICC) tool.
DateTime
Date and time the extract scheduled process began.
341

Oracle SCM CloudUsing Supply Planning
Chapter 13Extract Plan Data
Dimension Data Files Created by the Plan Extract Process The plan extract process generates one dimension data file for each dimension and contains all of the hierarchies inthat dimension. Each dimension file contains information for all of the selected hierarchies.
For example, if the planner selects two product hierarchies, an item appears twice--once for each hierarchy.
Column name Content
HIERARCHY_ID
Internal hierarchy identifier
[dimension]_LVL_MEMBER_ID
ID of the lowest-level member. Each dimension file contains its own lowest level member. For example:
• PRD_LVL_MEMBER_ID
• ORG_LVL_MEMBER_ID
BASE_MBR_NAME
Name of the lowest level member
L2-MBR_ID
Level 2 member ID
L2_MBR_NAME
Level 2 member name
L3-MBR_ID
Level 3 member ID
L3_MBR_NAME
Level 3 member name
L4-MBR_ID
Level 4 member ID
L4_MBR_NAME
Level 4 member name
L5-MBR_ID
Level 5 member ID
L5_MBR_NAME
Level 5 member name
L6-MBR_ID
Level 6 member ID
L6_MBR_NAME
Level 6 member name
L7-MBR_ID
Level 7 member ID
L7_MBR_NAME Level 7 member name
342

Oracle SCM CloudUsing Supply Planning
Chapter 13Extract Plan Data
Column name Content
L8-MBR_ID
Level 8 member ID
L8_MBR_NAME
Level 8 member name
L9-MBR_ID
Level 9 member ID
L9_MBR_NAME
Level 9 member name
L10-MBR_ID
Level 10 member ID
L10_MBR_NAME
Level 10 member name
SR_BASE_MBR_ID
Internal use only
Dimension Definition Files Created by the Plan ExtractProcess The dimension definition file contains information for all of the dimensions and hierarchies specified in the dimensioncatalog for extract. The plan extract process creates only one file per extract.
Column name Description
DIMENSION_ID
Unique ID of the dimension
HIERARCHY_ID
Unique ID of the hierarchy
BASE_LEVEL_ID
Lowest level (Level 1) ID
LEVEL_2_ID
Level 2 ID
LEVEL_3_ID
Level 3 ID
LEVEL_4_ID
Level 4 ID
LEVEL_5_ID
Level 5 ID
LEVEL_6_ID Level 6 ID
343

Oracle SCM CloudUsing Supply Planning
Chapter 13Extract Plan Data
Column name Description
LEVEL_7_ID
Level 7 ID
LEVEL_8_ID
Level 8 ID
LEVEL_9_ID
Level 9 ID
LEVEL_10_ID
Level 10 ID
DIMENSION_CODE
Unique code for the dimension
DIMENSION_NAME
Dimension name
HIERARCHY_NAME
Hierarchy name
BASE_LEVEL_NAME
Base level name
LEVEL_2_NAME
Level 2 name
LEVEL_3_NAME
Level 3 name
LEVEL_4_NAME
Level 4 name
LEVEL_5_NAME
Level 5 name
LEVEL_6_NAME
Level 6 name
LEVEL_7_NAME
Level 7 name
LEVEL_8_NAME
Level 8 name
LEVEL_9_NAME
Level 9 name
LEVEL_10_NAME
Level 10 name
344

Oracle SCM CloudUsing Supply Planning
Chapter 13Extract Plan Data
Measure Data Files Created by the Plan Extract Process The plan extract process generates one measure data file for each set of measures that share the same dimensionalityor granularity. Use the measure definition file to obtain more details about the measure, including its full name,description, aggregation methods, and so on.
The following table is an example measure data file for a specific dimensionality with a selected list of measures. Theactual format depends on the dimensionality and the measures selected by users for extract.
Column name Description
PLAN_ID
ID of the plan
PRD_LVL_MEMBER_ID
Product dimension lowest level member ID
ORG_LVL_MEMBER_ID
Organization dimension lowest level member ID
TIM_LVL_MEMBER_ID
Time dimension lowest level member ID
FACT_DATE
Date
AVG_DAILY_DMD
Value of this measure
GROSS_MARGIN_PCT
Value of this measure
IN_TRANSIT
Value of this measure
INV_TURNS
Value of this measure
ITEM_STD_COST
Value of this measure
ONHAND
Value of this measure
PAB
Value of this measure
PAB_VALUE
Value of this measure
PO_QTY
Value of this measure
PR_QTY
Value of this measure
PROJECTED_ONHAND Value of this measure
345

Oracle SCM CloudUsing Supply Planning
Chapter 13Extract Plan Data
Column name Description
SCHED_RCPT
Value of this measure
SS
Value of this measure
TF_QTY
Value of this measure
TOTAL_DEMAND
Value of this measure
TOTAL_DEMAND_VALUE
Value of this measure
TOTAL_SUPPLY
Value of this measure
TTL_END_ITEM_CST
Value of this measure
GROSS_MARGIN
Value of this measure
The extract process generates one measure data file for each set of measures that share the same dimensionality orgranularity. The measure data files contain information for all measures that share that same dimensionality. A listof predefined dimensionality groups is listed in the Dimensionality Group Codes Used by the Plan Extract Processtopic. The lowest level of each of these dimensions appears in each file. They will be different for each dimensionality,based on the dimensions that are part of that group. Each measure column name is a measure code from the measuredefinition file. Use the measure definition file to obtain more details about the measure, including its full name,description, aggregation, and so on.
Measure Definition Files Created by the Plan ExtractProcess The measure definition file contains information for all of the measures specified in the measure catalog for extract. Theplan extract process creates only one file per extract.
Column name Description
GRANULARITY_ID
Dimensionality group ID
POSITION
Internal use only
MEASURE_CODE
Used as the column name in measure data files
346

Oracle SCM CloudUsing Supply Planning
Chapter 13Extract Plan Data
Column name Description
MEASURE_ID
ID that uniquely identifies a measure
NAME
Name of the measure
DESCRIPTION
Brief description of the measure
DATA_TYPE
Data type
EXPRESSION
Internal use only
AGGR_ORDER
Aggregation rule: 1 = Calculate, then aggregate 2 = Aggregate, then calculate
AGGR_METHOD_OTHER
Aggregation method on dimensions other than the Time dimension
AGGR_METHOD_TIME
Aggregation method on the Time dimension
WEIGHTED_BY
ID of the measure to be used when aggregation method is WAVG (weighted average)
The MEASURE_CODE column in this file contains all the measure codes for all measures. The actual measure datafiles use this measure code as data column name. Using this code, you can look up additional information about themeasure in the definition file. Note that the expression indicated is only for internal use and is already evaluated beforethe extract. Aggregation methods (Sum, Latest, Average, Weighted Average, and so on) can be used to configure youranalytics to aggregate these measures across various dimensions.
Dimension Codes Used by the Plan Extract Process The plan extract process uses preconfigured dimension codes related to a list of valid dimension.
Code Dimension name
tim
Time
res
Resource
cus
Customer
prd Product
347

Oracle SCM CloudUsing Supply Planning
Chapter 13Extract Plan Data
Code Dimension name
org
Organization
dcs
Demand Class
sup
Supplier
fcm
Forecasting Method
cto
Configure to Order
src
Source
exp
Exception Type
ord
Order Type
cig
Decomposition Method
seg
Segment
Dimensionality Group Codes Used by the Plan ExtractProcess The extracted files use codes related to a list of valid dimensionality groups. Dimensionality group codes shown in thistopic list all of the valid preconfigured dimension groups.
For example, code 125 is for all measures that are dimensioned only by the Organization, Product, and Time dimensions.The measure data file for that dimensionality contains all measures extracted for that dimensionality.
Dimensionality Group Code Dimensionality Group
10
org, prd, tim, cus, cto
15
org, prd
20
org, res, tim
25 tim
348

Oracle SCM CloudUsing Supply Planning
Chapter 13Extract Plan Data
Dimensionality Group Code Dimensionality Group
35
org, prd, tim, cus
40
org, prd, res, tim, cus, sup, exp
45
org, prd, tim, sup
50
org, prd, tim, cus, sup, src
55
org, prd, tim, cus, dcs, ord
60
org, prd, tim, ord
65
org, prd, tim, cus, sup, dcs, ord
70
org, prd, tim, sup, ord
75
org, prd, dcs
95
org, prd, cus, dcs, fcm, clg, tim, cto
100
org, prd, tim, cus, dcs, cto
105
org, prd, cus
110
org, prd, cus, dcs
125
org, prd, tim
130
org, prd, tim, cus
135
org, prd, tim, cus, dcs
145
prd, tim, cus
150
prd, tim, cus, dcs
155
org, prd, tim, cus, sup, dcs
160
prd, cus
165 org, prd, tim, exp
349

Oracle SCM CloudUsing Supply Planning
Chapter 13Extract Plan Data
Dimensionality Group Code Dimensionality Group
170
org, tim
175
prd
180
org, prd, tim, cus, dcs, fcm, clg
185
org, prd, cus, dcs, fcm, clg
190
org, prd, cus, fcm, clg
350

Oracle SCM CloudUsing Supply Planning
Chapter 14Supply Network Model
14 Supply Network Model
How You Maintain Your Supply Network Model Use the Maintain Supply Network Model page to view your collected data that includes details of organizations,customers, suppliers, carriers, and interlocation shipping networks.
To open the Maintain Network Model page, navigate to a Supply Chain Planning work area. Click the Tasks panel taband then select the Maintain Supply Network Model link.
You use organizations to represent your business facilities or functions. Typically, if your business has a single physicalfacility that performs two different functions, then you model it as two organizations. For example, you have one facilitythat's a manufacturing plant and a distribution center. You can model them as two separate organizations. Additionally,if your business has one function located in two separate physical facilities, you can model those as one organization. Ifyou modeled your facilities as one organization, you can create separate subinventories to represent inventory for eachfacility.
Review the Collected DataBased on your search results, use the Organization tab to do the following:
• Review organizations, including the time zones associated with the organizations, for all source systems.
• Create customer and supplier associations to organizations. This is used when creating the buy-sell transfers.
• Select the drop ship validation organization. For each source system, you can select only one organization asthe drop ship validation organization. You can also assign a calendar to a drop ship validation organization.
• Set past due parameters for each organization, which include:
◦ Past due forecast days
◦ Past due sales order days
◦ Past due supply days
• Set up organizations for subinventory-level replenishment planning by selecting Yes under PlanSubinventories.
Use the Customers and Supplier tabs to review collected data and assign time zones to customer sites and suppliersites. If the customer site or supplier site doesn't have an associated time zone, then the customer site or supplier site isassumed to be in the same time zone as the organization that's associated with the demand or supply.
Use the Carriers and Interlocation Shipping Networks tabs to review collected data on carriers, shipping methods, andtransit times.
Manage Organization GroupsClick the Manage Organization Groups button on the Organizations tab to create and manage organization groups.Organization groups are managed within the source systems and are used to:
• Limit the net change data collection from a source system to specific organizations.
351

Oracle SCM CloudUsing Supply Planning
Chapter 14Supply Network Model
• Load planning data from files for a specific organization group when collection type is Targeted.
Enable Inventory Organization Tracking by ProjectThis parameter appears on the Maintain Supply Network Model page only when your organization is enabled forproject-specific supply planning.
The Project Enabled parameter governs whether your inventory organization is enabled for inventory tracking byproject. The value for this parameter can be Yes or No for an organization.
When the parameter value is Yes for an organization, the data collection process collects project-and-task-specificsupplies and demands, and the project-specific planning releases planned orders to the organization. The value for thisparameter is No for a supplier-modeled organization or a contract manufacturing organization.
Buy and Sell TransfersYou can conduct material transfers between two organizations in a single Oracle Fusion source system by using thepurchase order and sales order documents. The sales order at the source organization is used to ship the transfer. Thepurchase order at the destination organization is used to receive the transfer.
In the supply network model for the purchase order supply at the receiver organization:
• Define the supplier to source organization relationship and for the sales order demand at the shippingorganization.
• Define the customer to destination organization relationship.
To model an organization as a supplier, update the Supplier and Supplier Site columns of the associated organization.
To model an organization as a customer, update Customer and Customer Site columns of the associated organization.
Forecast and Consume Internal OrdersTo forecast and consume internal orders, assign a customer and customer site to the organization that's the destinationof the transfers. Use a customer name that makes sense for the destination organization, such as M1 Transfers. Afteryou assign a customer and customer site on the Organizations tab, select the Use Customer and Customer Site forInterorganization Transfers check box for the organization.
Note: To complete the setup to forecast and consume internal orders, you must also do the following:• On the Collect Planning Data page, Parameters tab, Demand Planning Data subtab, select the Organization -
Consumption Inventory Transactions to Include check box.
• In the plan options for your plan, select the Include transfer orders check box in the Demand: AdvancedOptions dialog box. This check box is only available from a Demand Management, Planning Central, or Demandand Supply Planning work area.
352

Oracle SCM CloudUsing Supply Planning
Chapter 14Supply Network Model
Related Topics• Overview of Data Collections for Supply Chain Planning
• How You Collect Different Data Types for Supply Chain Planning
• How You Load Planning Data from Files
• How You Define the Approved Supplier List for Supply Chain Planning
• Set Up Forecast Consumption for Transfer Orders
Publish Order Forecasts to Suppliers You publish order forecasts to your suppliers to enable them to commit supply and indicate their ability to meet thedemand. Collaborating with suppliers by publishing an order forecast enables:
• Suppliers to send supply commits to the Original Equipment Manufacturer (OEM)
• OEMs to receive supply commits as supplier capacity
Collaboration enables suppliers to get an insight into the demand that the OEMs forecast and plan supply chainactivities to meet the demand. Additionally, collaboration with suppliers enables OEMs to plan their downstreamactivities in the supply chain more efficiently.
Use the Collaboration Basis column in the Suppliers tab on the Maintain Supply Network Model page to indicate thebasis on which you want to publish the order forecast to your suppliers. You can choose to publish the order forecast atthe supplier and supplier site levels based on one of the following dates:
• Start date: Suppliers use the start date to know when they need to start manufacturing an order to fulfill theorder on time
• Dock date: Suppliers use the dock date to know the date by which they need to fulfill the order
How You Define the Approved Supplier List for SupplyChain Planning An approved supplier list (ASL) is a repository of information that links items to the suppliers and supplier sites thatprovide them to either a specific ship-to organization or the entire enterprise.
An ASL can be global or specific to an organization; however, supply planning only recognizes global ASLs.
To determine the supplier and supplier sites for items, the planning process collects ASLs from the CSV file upload,Oracle Fusion Procurement, or both.
• Use the Load Planning Data from Flat Files process to load data directly into the planning ASL by using theApproved Supplier List CSV template (ScpApprovedSupplierListImportTemplate.xlsm).
• You can also define some ASL attributes in Oracle Fusion Procurement and then upload a CSV file that definesthe attributes that you want supply planning to use. For example, define the following item-to-supplierrelationships and order modifiers in Oracle Fusion Procurement:
◦ Supplier
353

Oracle SCM CloudUsing Supply Planning
Chapter 14Supply Network Model
◦ Supplier site
◦ Minimum order quantity
◦ Fixed lot multiple
To upload additional attributes for supply planning to use, you can create and collect the ASL from purchasing. You canthen use the CSV file upload to define additional attributes such as the following:
• Item-supplier lead time
• Supplier capacity calendar
• Daily supplier capacity
Oracle Fusion Supply Planning supports the approved supplier list for a base model. However, approved supplier listsaren't supported for configured items and won't be copied into a supply plan.
Related Topics• Supplier Capacity Options
• How You Maintain Your Supply Network Model
Associate Calendars with Supplier Sites Use a supplier site calendar to measure processing lead times for purchases from a supplier site. You can associate aSupply Chain Planning calendar with a supplier site to use for all items sourced from that supplier site.
The calendar is in the collected planning data.
You can associate a calendar with supplier sites to use if there is no calendar defined through the Approved Supplier Listupload for a supplier site-item combination. From a Supply Chain Planning work area, navigate to the Maintain SupplyNetwork Model page, Suppliers tab. In the Supplier Site Calendar column for a supplier, select a calendar name fromthe list of collected calendars. You can only edit this field if the supplier row contains a supplier site.
When you run the plan, the planning process uses the selected calendar on the Maintain Supply Network Mode pageif the approved supplier list calendar for the supplier site-item is blank. If the approved supplier list calendar for thesupplier site-item is blank, and you do not associate a calendar with a supplier site on the Maintain Supply NetworkModel page, then the planning process uses the 24/7 calendar.
Related Topics• How You Define the Approved Supplier List for Supply Chain Planning
Assignment Sets, Sourcing Rules, and Bills ofDistribution You use assignment sets in a Supply Chain Planning work area to link sourcing rules and bills of distribution to items.
354

Oracle SCM CloudUsing Supply Planning
Chapter 14Supply Network Model
Using sourcing rules, bills of distribution, and assignment sets together, you can specify how material is supplied,manufactured, and transferred across a supply chain.
Note: This topic is applicable to only the Planning Central, Sales and Operations Planning, Supply Planning, Demandand Supply Planning, and Replenishment Planning work areas.
When you create sourcing rules and bills of distribution, you create descriptions of the means by which you canreplenish items. However, items aren't specified anywhere on the definition forms, and so a defined sourcing rule orbill of distribution can later be assigned to any item or group of items. Use assignment sets to associate specific items,categories, or organizations with the sourcing rules and bills of distribution.
You must use sourcing to describe the supply chain to the planning process. Use the following three structures to do so:
• Sourcing rules
• Bills of distribution
• Assignment sets
Sourcing RulesSourcing rules and bills of distribution determine the movement of material between organizations. Theseorganizations include supplier, manufacturing, and distribution facilities. You can navigate to a Supply Chain Planningwork area and click Manage Sourcing Rules from the Tasks drawer to create or search for an existing sourcing rule.
The three types of sources are:
• Transfer From: Interorganization shipping functionality accomplishes the transfer between internalorganizations. Enter the source organization in the Organization column.
• Make At: The item is manufactured at this internal organization. Enter the manufacturing organization in theOrganization column.
Oracle Fusion Replenishment Planning doesn't support make at sourcing rules.
• Buy From: Purchase the item from an external enterprise. Data entry in the Supplier and Supplier Site columnsis enabled, and the Organization column is disabled.
Allocation Percent and Rank: The total allocation percentage for all sources within a rank must add up to 100 percent.The sources with the highest rank (lowest numeric value) get the highest priority in allocations. Planning Central andReplenishment Planning only consider sources of rank one. Replenishment Planning also doesn't support sourcingsplits.
Bills of DistributionWhen material flows through three or more organizations, bills of distribution describe supply chain links moreefficiently than sourcing rules. However, any relationship that can be described by bills of distribution can also bedescribed by a set of sourcing rules. Typically, most users use sourcing rules rather than bills of distribution. You cannavigate to a Supply Chain Planning work area and click Manage Bills of Distribution from the Tasks drawer to createor search for existing bills of distribution.
Replenishment Planning supports bills of distribution of only rank one and doesn't support split bills of distribution.
Note: Despite the name, bills of distribution don't describe an outward bound or push type of sourcing relationship.Both sourcing rules and bills of distribution are used only to pull material from sources to destinations.
355
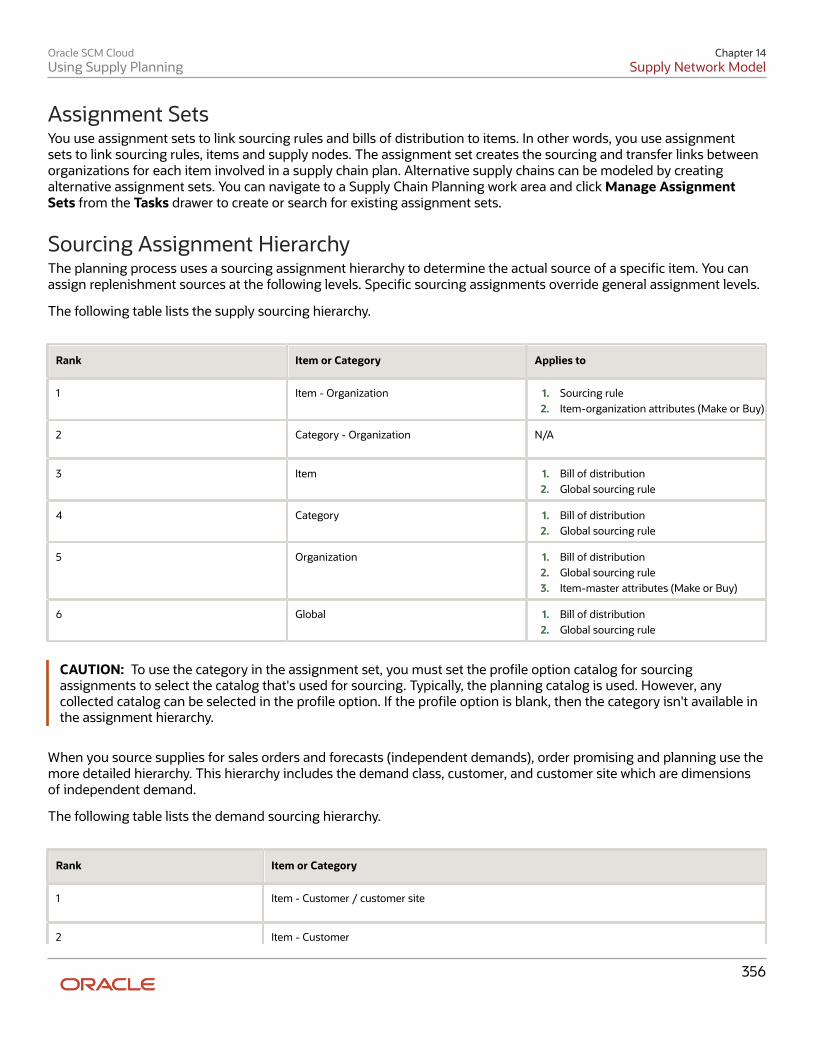
Oracle SCM CloudUsing Supply Planning
Chapter 14Supply Network Model
Assignment SetsYou use assignment sets to link sourcing rules and bills of distribution to items. In other words, you use assignmentsets to link sourcing rules, items and supply nodes. The assignment set creates the sourcing and transfer links betweenorganizations for each item involved in a supply chain plan. Alternative supply chains can be modeled by creatingalternative assignment sets. You can navigate to a Supply Chain Planning work area and click Manage AssignmentSets from the Tasks drawer to create or search for existing assignment sets.
Sourcing Assignment HierarchyThe planning process uses a sourcing assignment hierarchy to determine the actual source of a specific item. You canassign replenishment sources at the following levels. Specific sourcing assignments override general assignment levels.
The following table lists the supply sourcing hierarchy.
Rank Item or Category Applies to
1
Item - Organization
1. Sourcing rule2. Item-organization attributes (Make or Buy)
2
Category - Organization
N/A
3
Item
1. Bill of distribution2. Global sourcing rule
4
Category
1. Bill of distribution2. Global sourcing rule
5
Organization
1. Bill of distribution2. Global sourcing rule3. Item-master attributes (Make or Buy)
6
Global
1. Bill of distribution2. Global sourcing rule
CAUTION: To use the category in the assignment set, you must set the profile option catalog for sourcingassignments to select the catalog that's used for sourcing. Typically, the planning catalog is used. However, anycollected catalog can be selected in the profile option. If the profile option is blank, then the category isn't available inthe assignment hierarchy.
When you source supplies for sales orders and forecasts (independent demands), order promising and planning use themore detailed hierarchy. This hierarchy includes the demand class, customer, and customer site which are dimensionsof independent demand.
The following table lists the demand sourcing hierarchy.
Rank Item or Category
1
Item - Customer / customer site
2 Item - Customer
356

Oracle SCM CloudUsing Supply Planning
Chapter 14Supply Network Model
Rank Item or Category
3
Item - Demand Class
4
Item - Region
5
Category - Customer / customer site
6
Category - Customer
7
Category - Demand Class
8
Item
9
Category - Region
10
Category
11
Customer / customer site
12
Customer
13
Demand Class
14
Region
15
Global
Using the demand sourcing hierarchy, if a demand line includes a value for demand class, then if no sourcing rule existsfor Item - Customer / customer site or Item - Customer, but a rule exists for Item-Demand Class, then that rule is usedto determine supply sources for the demand line.
When using the sourcing hierarchy, if two rules conflict, the more granular rule is used. To verify which source isused for an assignment set, from within the set, click the View Sourcing button after entering the following requiredparameters:
• Assignment set
• Organization
• Item
• Date
The dialog box displays which assignments apply to the item-organization-date that you selected. If multiple rulesapply, then the Active Rule is marked in the form.
357

Oracle SCM CloudUsing Supply Planning
Chapter 14Supply Network Model
Related Topics• Item Attributes and Order Modifiers for Supply Planning
• Support for Sourcing Rules and Bills of Distribution in Oracle Fusion Replenishment Planning
Create an Assignment Set Learn how to create an assignment set.
Assume you sell the AS54888 Computer. You're releasing a new version of it, AS54888.1 to all your customers, but youwant to make sure your highest valued customer, Computer Service and Rentals, gets first dibs on it.
Here's your supply chain.
358

Oracle SCM CloudUsing Supply Planning
Chapter 14Supply Network Model
Note.
• You are in the Vision Operations organization.
• You fulfill all computers that you have in the Computers category from:
• ◦ Vision Distribution Center 1 (DC1)
◦ Vision Distribution Center 2 (DC2)
◦ Superfly Supply (S1)
You will create one sourcing rule to meet this need:
• You fulfill the AS54888.1 only from Distribution Center 1 and Distribution Center 2.
359

Oracle SCM CloudUsing Supply Planning
Chapter 14Supply Network Model
You will create a second sourcing rule to meet this need:
• You fulfill sales orders from Computer Service and Rentals that have the AS54888.1 only from DistributionCenter 1.
You will create a third sourcing rule to meet this need:
• You fulfill all items that are in the Computers category from Distribution Center 1, Distribution Center 2, orSuperfly.
So you need to implement this set up.
Sourcing Rule Item Category Item Fulfillment Source
1 Computers - Vision Distribution Center 1 (DC1) Vision Distribution Center 2 (DC2) Superfly Supply (S1)
2 - AS54888.1 Vision Distribution Center 1 (DC1) Vision Distribution Center 2 (DC2)
3 - AS54888.1 Vision Distribution Center 1 (DC1)
Summary of the Setup
1. Create your sourcing rules.2. Assign your sourcing rules.
Create Your Sourcing Rules1. Go to the Global Order Promising work area, then click Tasks > Manage Sourcing Rules.2. Create your first sourcing rule.
◦ On the Manage Sourcing Rules page, click Actions > Create.
◦ On the Create Sourcing Rules page, set the values.
Attribute Value
Name Transfer Computers From D1, D2, and S1
Description Sourcing rule to transfer supply for all items that are in the Computers category from ourdistribution centers and from Superfly Supply.
Organization Assignment Type Global
◦ In the Sourcing Rule Effective Dates, click Actions > Add Row, then set the Start Date to today's date. Youwant this rule to last forever, so leave the End Date attribute empty.
If you ever need to stop using this rule, you can always come back and set the end date.
◦ In the Sources area, use Actions > Add Row 3 times to add these rows.
360

Oracle SCM CloudUsing Supply Planning
Chapter 14Supply Network Model
Type Organization Allocation Percent Rank
Transfer From D1 100 1
Transfer From D2 100 1
Buy From S1 100 1
3. Create your second sourcing rule.
◦ Repeat step 2, but with these values.
Attribute Value
Name Transfer Computers from D1 and D2
Description Sourcing rule to transfer supply for the AS54888.1 item from our distribution centers.
Organization Assignment Type Global
◦ Add these sources.
Type Organization Allocation Percent Rank
Transfer From D1 100 1
Transfer From D2 100 1
4. Create your third sourcing rule.
◦ Repeat step 2, but with these values.
Attribute Value
Name Transfer Computers from D1
Description Sourcing rule to transfer supply for the AS54888.1 item from our D1 distribution center.
Organization Assignment Type Global
◦ Add this source.
Type Organization Allocation Percent Rank
Transfer From D1 100 1
5. Click Save and Close.
361
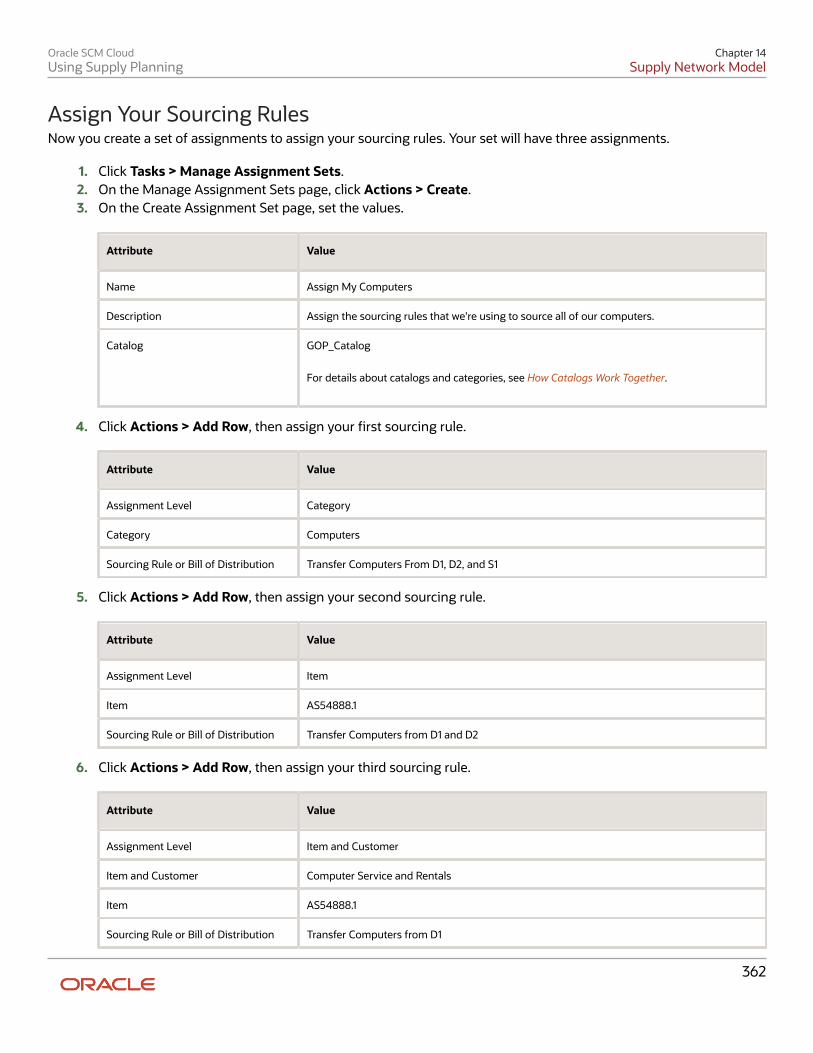
Oracle SCM CloudUsing Supply Planning
Chapter 14Supply Network Model
Assign Your Sourcing RulesNow you create a set of assignments to assign your sourcing rules. Your set will have three assignments.
1. Click Tasks > Manage Assignment Sets.2. On the Manage Assignment Sets page, click Actions > Create.3. On the Create Assignment Set page, set the values.
Attribute Value
Name Assign My Computers
Description Assign the sourcing rules that we're using to source all of our computers.
Catalog GOP_Catalog For details about catalogs and categories, see How Catalogs Work Together.
4. Click Actions > Add Row, then assign your first sourcing rule.
Attribute Value
Assignment Level Category
Category Computers
Sourcing Rule or Bill of Distribution Transfer Computers From D1, D2, and S1
5. Click Actions > Add Row, then assign your second sourcing rule.
Attribute Value
Assignment Level Item
Item AS54888.1
Sourcing Rule or Bill of Distribution Transfer Computers from D1 and D2
6. Click Actions > Add Row, then assign your third sourcing rule.
Attribute Value
Assignment Level Item and Customer
Item and Customer Computer Service and Rentals
Item AS54888.1
Sourcing Rule or Bill of Distribution Transfer Computers from D1
362

Oracle SCM CloudUsing Supply Planning
Chapter 14Supply Network Model
7. Click Save and Close.
Another Example of Creating an Assignment SetCreate an assignment set that Promising can use when your first choice for supply can't fulfill the demand.
Consider this supply chain.
Assume:
• You're in the Vision Operations organization.
• You sell the AS54888 Computer item, and its in the Vision Pro category of computers.
• The Western Warehouse and the Eastern Warehouse are each an organization in Vision Corporation.
363
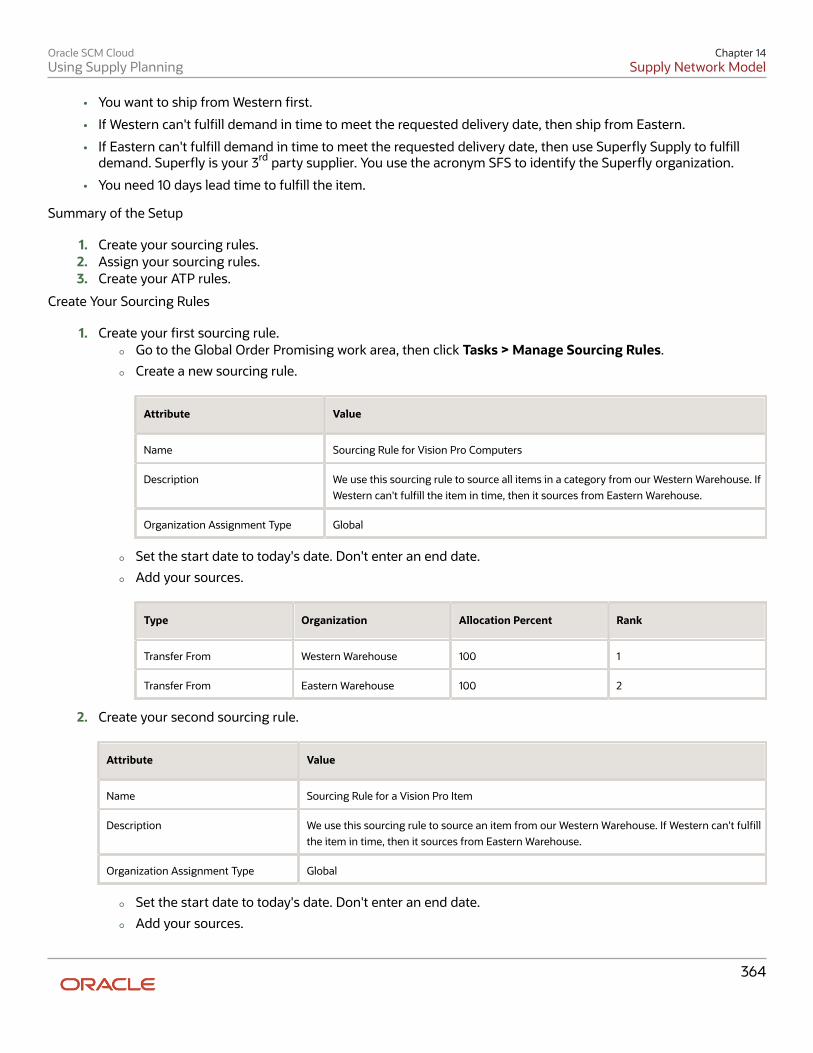
Oracle SCM CloudUsing Supply Planning
Chapter 14Supply Network Model
• You want to ship from Western first.
• If Western can't fulfill demand in time to meet the requested delivery date, then ship from Eastern.
• If Eastern can't fulfill demand in time to meet the requested delivery date, then use Superfly Supply to fulfilldemand. Superfly is your 3rd party supplier. You use the acronym SFS to identify the Superfly organization.
• You need 10 days lead time to fulfill the item.
Summary of the Setup
1. Create your sourcing rules.2. Assign your sourcing rules.3. Create your ATP rules.
Create Your Sourcing Rules
1. Create your first sourcing rule.
◦ Go to the Global Order Promising work area, then click Tasks > Manage Sourcing Rules.
◦ Create a new sourcing rule.
Attribute Value
Name Sourcing Rule for Vision Pro Computers
Description We use this sourcing rule to source all items in a category from our Western Warehouse. IfWestern can't fulfill the item in time, then it sources from Eastern Warehouse.
Organization Assignment Type Global
◦ Set the start date to today's date. Don't enter an end date.
◦ Add your sources.
Type Organization Allocation Percent Rank
Transfer From Western Warehouse 100 1
Transfer From Eastern Warehouse 100 2
2. Create your second sourcing rule.
Attribute Value
Name Sourcing Rule for a Vision Pro Item
Description We use this sourcing rule to source an item from our Western Warehouse. If Western can't fulfillthe item in time, then it sources from Eastern Warehouse.
Organization Assignment Type Global
◦ Set the start date to today's date. Don't enter an end date.
◦ Add your sources.
364

Oracle SCM CloudUsing Supply Planning
Chapter 14Supply Network Model
Type Organization Allocation Percent Rank
Transfer From Western Warehouse 100 1
Transfer From Eastern Warehouse 100 2
3. Create your third sourcing rule.
Attribute Value
Name Sourcing Rule for Superfly Supply
Description We use this sourcing rule to source an item from our Superfly Supply supplier.
Organization Assignment Type Local
Organization SFS
◦ Set the start date to today's date. Don't enter an end date.
◦ Add your source.
Type Organization Allocation Percent Rank
Buy From Superfly Supply 100 1
Assign Your Sourcing Rules
1. Click Tasks > Manage Assignment Sets.2. On the Manage Assignment Sets page, click Actions > Create.3. On the Create Assignment Set page, set the values.
Attribute Value
Name Assign My Vision Pro Computers
Description Assign the sourcing rules that we're using to source all of our computers in the Vision Procategory.
Catalog GOP_Catalog
4. Click Actions > Add Row, then assign your first sourcing rule.
Attribute Value
Assignment Level Category
Category Vision Pro
365

Oracle SCM CloudUsing Supply Planning
Chapter 14Supply Network Model
Attribute Value
Sourcing Rule or Bill of Distribution Sourcing Rule for Vision Pro Computers
5. Click Actions > Add Row, then assign your second sourcing rule.
Attribute Value
Assignment Level Item
Item AS54888
Sourcing Rule or Bill of Distribution Sourcing Rule for a Vision Pro Item
6. Click Actions > Add Row, then assign your third sourcing rule.
Attribute Value
Assignment Level Organization
Organization SFS
Sourcing Type Sourcing Rule
Sourcing Rule or Bill of Distribution Sourcing Rule for Superfly Supply
7. Click Save and Close.
Create Your ATP Rules
1. Click Tasks > Manage ATP Rules.2. Create your first ATP rule.
Click Actions > Create, then set the values.
Attribute Value
Name ATP Rule for the AS54888
Description ATP rule that we're using to promise the AS54888 item.
Promising Mode Lead-Time Based
Lead Time Considered User-Defined Lead Time
User-Defined Lead Time in Days 10
Assignment Basis Item
Assigned-to Item AS54888
3. Create your second ATP rule.
366

Oracle SCM CloudUsing Supply Planning
Chapter 14Supply Network Model
Click Actions > Create, then set the values.
Attribute Value
Name ATP Rule for the Vision Pro Category
Description ATP rule that we're using to promise items that are in the Vision Pro category.
Promising Mode Lead-Time Based
Lead Time Considered User-Defined Lead Time
User-Defined Lead Time in Days 10
Assignment Basis Category
Assigned-to Item Category Vision Pro
Specify Catalogs for Assignment Sets A catalog is a group of categories that you can use to classify an item. Use it to organize your item into a hierarchy.
A catalog can have a flat or a one level structure of categories. You can also have a hierarchical structure of categories.
You must specify a catalog for each assignment set when you create the set. You associate the set with a catalog to:
• Use categories associated to that catalog in your assignment set.
• Link the sourcing assignments to the categories.
Use the Manage Assignment Sets task in the Global Order Promising work areas to create an assignment set and specifythe catalog. Don't use assignment sets in the Demand Management work area.
If you don't specify a catalog, then the assignment set uses the Catalog for Sourcing Assignments(MSC_SRC_ASSIGNMENT_CATALOG) profile option as the catalog. Here's how you can modify it.
1. Go to the Setup and Maintenance work area, then go to the task.
◦ Offering: Supply Chain Planning
◦ Functional area: Supply Chain Planning Configuration
◦ Task: Manage Planning Profile Options
2. On the Manage Planning Profile Options page, search for the value.
Attribute Value
Profile Display Name Catalog for Sourcing Assignments
3. In the search results, set the Profile Value to the catalog you want to use.
367

Oracle SCM CloudUsing Supply Planning
Chapter 14Supply Network Model
For details about catalogs and categories, including how create a catalog and add categories and items to it, see HowCatalogs Work Together.
Create a Sourcing Rule Learn how to create a sourcing rule.
1. Collect the reference data that you need to create your sourcing rule, such as organizations, items, and so on.Make sure the collected data is up to date on the server.
For details, see Collect Data and Refresh the Server.2. Go to the Global Order Promising work area, then click Tasks > Manage Sourcing Rules.3. On the Manage Sourcing Rules page, click Actions > Create.4. On the Create Sourcing Rule page, enter a name and description.5. Set the Organization Assignment Type attribute to Global or Local.
If you set it to Local, then set a value in the Organization attribute. Select the one organization that you willapply this sourcing rule to.
6. In the Sourcing Rule Effective Dates section, click Actions > Add Row, then set the dates when you want thesourcing rule to be in effect.
7. In the Sources section, click Actions > Add Row, then set the values.
Attribute Value
Type Choose one:
◦ Transfer From
◦ Make At
◦ Buy From
8. Set other attribute values depending on the type that you selected. The page will help you. It will make someattributes available depending on the type.
9. Click Save and Close.
Related Topics• How You Collect Different Data Types for Supply Chain Planning
• Support for Sourcing Rules and Bills of Distribution in Oracle Fusion Replenishment Planning
Export Planning Data to CSV Files You can replicate sourcing rules and assignment set data from your supply chain planning cloud instance to anotherinstance or application without manually reentering data.
368
Oracle SCM CloudUsing Supply Planning
Chapter 14Supply Network Model
For example, you can replicate the sourcing rules in your supply chain planning cloud production instance into areporting system or a test instance.
Use the Export Supply Chain Planning Data scheduled process job to extract sourcing rules and assignment set datainto a comma-delimited values (CSV) file format. The generated file is in the standard file-based import (FBDI) fileformat that you can then use to do the following:
• Check for missing or incorrect sourcing rules or sourcing assignments. For example, does a particular item-organization have a valid sourcing assignment?
• Replicate and then modify existing sourcing rules and assignment sets in a spreadsheet. You can then uploadthe new setups into another instance or application to create new sourcing rule and assignment set setups.
• Copy the sourcing rule and assignment set setups from one instance to another instance or application, such asfrom a test instance to a production instance.
The format of the CSV files, including the header content, is the same as the format of the corresponding files in thesource instance. This enables you to import the same data directly into another production or test instance. Use theLoad Planning Data from Files process to upload your imported files to staging tables.
The following steps show you how to export sourcing rules and assignment set data to a CSV file:
1. In the Scheduled Processes work area, click the Schedule New Process button on the Overview page.2. In the Schedule New Process dialog box, search for and select Export Supply Chain Planning Data and then
click OK.3. In the Process Details dialog box, Basic Options section, select Sourcing Rules and Assignment Sets from the
Entities to Export drop down list.4. Optionally, click the Filter button to filter your export with specific assignment sets. If you don't select any
filters, then the process exports all sourcing rules and assignment sets.5. In the Process Details dialog box, click the Submit button to submit the scheduled process job.
After you submit your job, you will receive a confirmation with a confirmation number. The planning processappends the confirmation number to the extracted CSV file names, such as AssignmentSets_65960.csv andSourcingRules_65960.csv, where 65960 is the confirmation number.
Item Attributes and Order Modifiers for Supply Planning Items represent the material that you use in manufacturing and distribution processes and store in inventory. Itemattributes specify properties of each item. You set the item attributes for supply planning through the ProductInformation Management work area.
Use these steps to set item organization attributes for supply planning:
1. Navigate to the Product Information Management work area and open the Manage Items task from the Tasksdrawer.
2. Search for your items.3. Select an item and edit attributes on the specification tab. You can locate the Planning attributes under the
planning section.This table lists the attributes related to supply planning.
Item Attribute Item Structure
Item Overview Unit of Measure
369

Oracle SCM CloudUsing Supply Planning
Chapter 14Supply Network Model
Item Attribute Item Structure
Manufacturing
Structure Item Type
Manufacturing
Base Model
Manufacturing
Autocreated Configuration
Manufacturing
Assemble to Order
Manufacturing
Build in WIP
Manufacturing
Supply Type
Inventory
Inventory Item
Inventory
Stockable
Inventory
Transactable
Order Management
Customer Orders Enabled
Order Management
Transfer Orders Enabled
Planning
Make or Buy
Planning
Safety Stock Method
Planning
Planner Code
Planning
Planning Method
Planning
Forecast Control
Planning
Time Fences: Demand
Planning
Time Fences: Release
Planning
Time Fences: Planning
Planning
Cost
Planning Carrying Percentage
370

Oracle SCM CloudUsing Supply Planning
Chapter 14Supply Network Model
Item Attribute Item Structure
Planning
Shrinkage Rate
Planning
Acceptable Early Days
Planning
Lead Times: Processing
Planning
Lead Times: Preprocessing
Planning
Lead Times: Postprocessing
Planning
Lead Times: Fixed
Planning
Lead Times: Variable
Planning
Minimum Order Quantity
Planning
Maximum Order Quantity
Planning
Fixed Order Quantity
Planning
Fixed Lot Multiplier
Planning
Fixed Days Supply
Planning
Rounding
Purchasing
Purchasable
Purchasing
Approved Supplier List
You can use these attributes for specific purposes:
• Make or Buy: This attribute is used by default if no sourcing rule is present.
• Planning Method: Use either MRP planned or MPS planned as the planning method.
• Time Fences: All are used by planning.
• Buy items use the processing lead times. Make items use fixed and variable.
• Make, buy, transfer all use preprocessing lead time. Buy and transfer use post processing lead time.
• Acceptable Early Days is used if you need to reschedule existing supplies. If the supply due date is within theacceptable early days, then no reschedule out recommendation is issued.
371
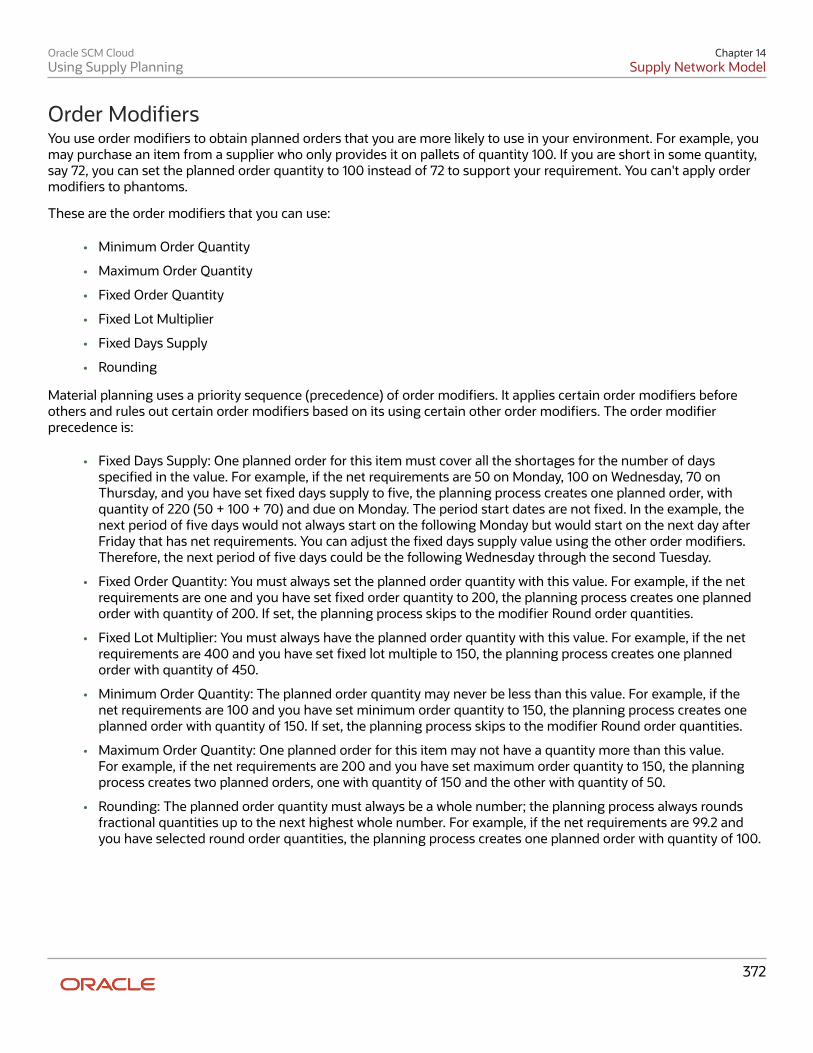
Oracle SCM CloudUsing Supply Planning
Chapter 14Supply Network Model
Order ModifiersYou use order modifiers to obtain planned orders that you are more likely to use in your environment. For example, youmay purchase an item from a supplier who only provides it on pallets of quantity 100. If you are short in some quantity,say 72, you can set the planned order quantity to 100 instead of 72 to support your requirement. You can't apply ordermodifiers to phantoms.
These are the order modifiers that you can use:
• Minimum Order Quantity
• Maximum Order Quantity
• Fixed Order Quantity
• Fixed Lot Multiplier
• Fixed Days Supply
• Rounding
Material planning uses a priority sequence (precedence) of order modifiers. It applies certain order modifiers beforeothers and rules out certain order modifiers based on its using certain other order modifiers. The order modifierprecedence is:
• Fixed Days Supply: One planned order for this item must cover all the shortages for the number of daysspecified in the value. For example, if the net requirements are 50 on Monday, 100 on Wednesday, 70 onThursday, and you have set fixed days supply to five, the planning process creates one planned order, withquantity of 220 (50 + 100 + 70) and due on Monday. The period start dates are not fixed. In the example, thenext period of five days would not always start on the following Monday but would start on the next day afterFriday that has net requirements. You can adjust the fixed days supply value using the other order modifiers.Therefore, the next period of five days could be the following Wednesday through the second Tuesday.
• Fixed Order Quantity: You must always set the planned order quantity with this value. For example, if the netrequirements are one and you have set fixed order quantity to 200, the planning process creates one plannedorder with quantity of 200. If set, the planning process skips to the modifier Round order quantities.
• Fixed Lot Multiplier: You must always have the planned order quantity with this value. For example, if the netrequirements are 400 and you have set fixed lot multiple to 150, the planning process creates one plannedorder with quantity of 450.
• Minimum Order Quantity: The planned order quantity may never be less than this value. For example, if thenet requirements are 100 and you have set minimum order quantity to 150, the planning process creates oneplanned order with quantity of 150. If set, the planning process skips to the modifier Round order quantities.
• Maximum Order Quantity: One planned order for this item may not have a quantity more than this value.For example, if the net requirements are 200 and you have set maximum order quantity to 150, the planningprocess creates two planned orders, one with quantity of 150 and the other with quantity of 50.
• Rounding: The planned order quantity must always be a whole number; the planning process always roundsfractional quantities up to the next highest whole number. For example, if the net requirements are 99.2 andyou have selected round order quantities, the planning process creates one planned order with quantity of 100.
372

Oracle SCM CloudUsing Supply Planning
Chapter 14Supply Network Model
Drop Shipment
Drop Shipments in Supply Planning Drop shipments are direct shipments of material from a supplier to a customer. It's an order fulfillment strategy wherethe seller doesn't keep products in inventory.
Instead, the seller relies on suppliers or contract manufacturers to build, store, and then ship orders directly tocustomers. The internal organization manages the process but never handles the material. In a drop shipment flow,there is one sales order to one supplier purchase order. Customer information is shared with the supplier. The internalorganization bills the customer and pays the supplier.
To properly plan for drop shipments in Supply Planning, you must define the drop shipment supply chain network.
• Define drop shipment sourcing rules that determine which supplier sites support drop shipments.
• Define transit times between supplier and customer sites.
• Set up a drop ship validation organization.
• Enable the Drop Ship Validation item organization for collections.
How Drop Shipments Are Processed in Supply Planning Supply planning recommends new planned orders for drop shipments and manages drop shipment purchase orders.
The planning process pegs supply to a sales order when both of the following conditions are met:
• A sales order line is marked as a drop shipment.
• There's an existing purchase order that's shipped directly to the customer site on the sales order.
Although not actually a reservation, the supply planning process treats the drop shipment purchase order as areservation. In this case, the drop shipment purchase order can't be used for any other demand.
Set Up a Drop Shipment Validation Organization The supply planning process uses a special organization called drop shipment organization for drop ship demands andsupplies.
Use the drop shipment validation organization to get various item organization attributes, such as lead times and timefences, for drop ship items. You must specify a drop shipment validation organization for each source system thatsupports drop shipments. Specify the drop shipment validation organization value on the Manage Organizations pagein the Maintain Supply Network Model task.
CAUTION: Supply Planning sources all demands against the drop shipment validation organization with dropshipment planned orders. For this reason, the drop shipment validation organization should not be a standardinventory organization with transactions, as there could be unexpected results.
373

Oracle SCM CloudUsing Supply Planning
Chapter 14Supply Network Model
Use the drop shipment validation organization for the following purposes:
• As the source for organization-item attributes when creating drop shipment planned orders.
• As a proxy for the organization for drop shipment forecasts and manual demands.
• As a proxy for the organization during the collections of drop shipment sales orders and drop shipment history.
Specify the drop shipment validation organization when you generate a forecast or create a manual demand. Dropshipment sales order bookings and shipments history are collected with the drop shipment validation organizationwhen items are shipped from the warehouse. Demand forecasting can create forecasts for the drop shipment validationorganization and release the forecasts for planning supplies. The drop shipment validation organization can be the itemmaster for a source system, but it's not required.
The drop ship validation organization can be the item master for a source system, but it's not required.
Note: The drop shipment validation organization must be an item organization. When you set up the drop shipmentvalidation organization, if the item master holds any transactions, create a new drop shipment validation organization.
To set up a drop shipment validation organization:
1. Define an item organization in the Product Information Management work area.2. Enable the new item organization for collection from the Oracle Fusion source system.3. Run collections to collect organization entities.4. Perform the following steps in a Supply Chain Planning work area to complete the drop shipment sourcing
setup:
a. Navigate to a Supply Chain Planning work area.b. Click the Tasks panel tab.c. In the Tasks panel, click Maintain Supply Network Model.
Note: You can enable only one organization for each source system as the drop shipment validationorganization.
d. In the Organizations region, select the Drop Ship Validation Organization option.
You have completed the drop shipment validation organization setup.
Set Up Drop Shipment Sourcing Rules To properly plan for drop shipments, you must first define the drop shipment sourcing rules that determine whichsupplier sites support drop shipments.
These are sourcing rules with a buy from supplier and supplier site source. When defined, you can assign the dropshipment sourcing rule to various aggregate levels of item and customer location. Valid item levels are item andcategory. Valid customer location levels are customer site, region/zone, and all locations. When you assign a dropshipment sourcing rule, you determine which supplier sites can drop ship to which customer sites.
You can apply drop shipment sourcing rules only to the independent demands. The demand sourcing hierarchy isapplied for drop ship cases. If a level 1 rule is found for an item and customer or customer site, then that rule is used.Otherwise, if the highest level rule is assigned to a category-customer level, then that rule is used.
The following table lists the ranking of various demand sourcing hierarchies:
374

Oracle SCM CloudUsing Supply Planning
Chapter 14Supply Network Model
Rank Demand Sourcing Hierarchy
1
Item - Customer or Customer Site
2
Item - Customer
3
Item-Demand Class
4
Item - Region
5
Category - Customer or Customer Site
6
Category - Customer
7
Category - Demand Class
8
Item
9
Category - Region
10
Category
11
Customer or Customer Site
12
Customer
13
Demand Class
14
Region
15
Global
If an assignment set contains drop shipment rules that are already assigned to an item or a category, then youmust define organization-specific rules for an item or category that's both drop shipped and also shipped to aninventory organization. If the sourcing rule for the drop ship demand includes a transfer from source or a make at,the transfer from source and make at is ignored. If there are multiple buy from sources, then the buy from sources arereapportioned to equal 100%.
Create Drop Shipment Sourcing RulesTo create drop shipment sourcing rules:
1. Define a global sourcing rule and specify a buy from supplier, supplier site, and supplier source system.
375

Oracle SCM CloudUsing Supply Planning
Chapter 14Supply Network Model
2. In the assignment set, assign the global sourcing rule to an assignment level that includes an item or acategory. Assign the global sourcing rule to a customer or a zone as required, but you can't assign the rule to anorganization.
Define Transit Times Between Supplier and Customer Sites forDrop Shipment After you create your drop shipment sourcing rules, you must define transit times between supplier and customer sites.There are multiple ways to define transit times between a specific supplier and a specific customer, all created in theDefine Transit Times page.
Constraint-based supply planning supports the following transit time lane combinations for drop shipments:
• External location to external location
• External location to region/zone
• Region/zone to region/zone
Set Up a Drop Shipment Plan When you set up a plan for drop shipment, you can include both drop shipment sales order and standard sales orders(forecasts and supplies) from a direct shipment organization in the same plan.
To set up your plan for drop shipment:
1. From a Supply Chain Planning work area, open your supply plan or demand and supply plan.2. From your plan, click Actions > Edit Plan Options.3. On the Edit Plan Options page, click the Supply tab and then click Select Advanced Options.4. On the Supply: Advanced Options page, select Include drop ship demands and supplies.5. Optionally, you can include other direct shipment organizations.6. Set the other plan parameters, as needed.
For example, select Create time fence to apply time fences to drop shipment forecasts.7. Save the plan.8. Run the plan to include the drop shipments in the plan output.
Note: In your drop shipment plan, search for supplies and demand in the drop shipment validationorganization. Note that the customer information appears on the purchase order and the supplierinformation appears on the sales order.
Drop Shipment Forecast Create a drop shipment forecast based on the drop shipment shipping history or booking history. You can also createplans using drop shipment forecasts to see the projected drop shipment planned orders.
376

Oracle SCM CloudUsing Supply Planning
Chapter 14Supply Network Model
To enable the drop shipment history, the collections process sets the ship from organization value of drop shipshipments and bookings history to the drop ship validation organization.
Drop shipment history has an organization reference to the drop shipment validation organization. Collecting andusing the history facilitates creating a forecast for future drop ship shipments or bookings. The forecast uses the dropshipment validation organization. You can use this forecast as a demand schedule for a supply plan that includes dropshipments.
Plan Outside Processing Operations
Overview of Outside Processing Outside processing is a business process where one or more operations of a work order are outsourced to a supplierwho provides specialized manufacturing services.
These services may vary depending on the nature of the industry.
Outside processing is often adopted as a strategic alternative to in-house manufacturing for the following reasons:
• To lower manufacturing costs due to production costs
• To leverage state of the art manufacturing technology
• To increase capacity to overcome production bottlenecks
• To focus on core competencies
Here's a figure which explains a business flow where three operations are required to completea work order. Operation 10 which is machining, followed by operation 20 which is plating, andoperation 30 which is assembly. Operation 20 is a supplier operation performed by outside processing.
• An Original Equipment Manufacturer (OEM) performs the first operation in-house and ships the machinedparts to a supplier for plating.
• The supplier performs the plating operation and sends the plated parts to the Original EquipmentManufacturer (OEM).
377

Oracle SCM CloudUsing Supply Planning
Chapter 14Supply Network Model
• The OEM receives the plated parts and pays the supplier for performing the value added services.
In the entire process, the OEM retains the ownership of the goods that are sent to and received back from the supplier.
Note: The outside processing flow is supported for both discrete and process manufacturing.
Plan Outside Processing Operations For constrained and unconstrained supply planning, you can plan one or more operations that are outsourced tosuppliers. These operations are part of routings of items that are manufactured in-house.
The outsourced supplier operations are part of manufacturing a product, where the rest of the operations are processedin-house.
Outside Processing Calculations for Constrained and Unconstrained Supply PlanningThe planning process for constrained supply planning calculates duration of outside processing operations based onfixed and variable lead times:
Fixed Lead Time + (Variable Lead Time multiplied by Lead Time Lot Size)
The planning process for unconstrained supply planning calculates duration of outside processing operations a littledifferently:
Fixed Lead Time + (Variable Lead Time multiplied by Operation Quantity)
Here's some additional information about outside processing calculations in Supply Planning:
• The fixed and variable lead times are the operation level attribute values.
• The lead time lot size is the item level attribute value. If there are no operation yields on the subsequentoperations in the work definition, the lead time lot size is the same as the supply quantity.
• The operation duration is equal to the fixed lead time when the lead time lot size is zero or null.
• The supplier operation duration is based on the organization manufacturing calendar.
For example, the duration of an operation is 7.5 hours and the organization manufacturing calendar hasSaturday and Sunday on nonworking days. A supplier operation that starts on Friday at 23:00 will complete onMonday at 6:30. A supplier operation that starts on Monday at 23:00 will complete on Tuesday at 6:30.
Planning Work Orders with Outside Processing OperationsThe following describes the supply planning behavior for firm and non-firm work orders.
• Firm work orders: The collected values for operation start date and operation end date of the outsideprocessing operation within the work order is treated as firm.
378

Oracle SCM CloudUsing Supply Planning
Chapter 14Supply Network Model
• Non-firm work orders: If the supply planning process must reschedule a non-firm work order, it reschedules theoperation based on the following:
◦ For a constrained plan, the planning process reschedules the operation based on the fixed and variablelead times at the operation level and the lead time lot size.
◦ For an unconstrained plan, the planning process reschedules the operation based on the fixed andvariable lead times at the operation level and the operation quantity.
Planning Data Collections for Outside Processing OperationsPlanning Data Collections collects these outside processing operation attributes for work orders and work definitions.
• Operation type: Either in-house or supplier
• Supplier
• Supplier site
• Fixed lead time
• Variable lead time
• Operation cost: Operation cost must be collected as the standard cost of the outside processing item that'sassociated with the outside processing operation.
If the operation type is In-House, then the Supplier, Supplier Site, Fixed Lead Time, and Variable Lead Time attributesaren't collected.
It's important to collect the operation attributes at the work order level. A nonstandard work order in Oracle FusionManufacturing Cloud can include an outside processing operation that's been previously defined as a standardoperation. Such operations can exist only in the context of specific nonstandard work orders and can't be part of anyitem work definition.
Back-to-Back Fulfillment
Promise Sales Orders In Your Back-To-Back Flow Back-to-back is a supply chain management technique where you receive supply at a warehouse then ship it directly toyour customer. You can use Global Order Promising to help fulfill a back-to-back order.
You typically use back-to-back fulfillment to fulfill a high cost or a slow moving item. You usually don't stock the item ininventory but instead build it in reply to demand.
Here's the general flow:
• You create a sales order and submit it to fulfillment.
• Promising creates and schedules supply for the order.
• You procure and receive supply in your warehouse.
• Promising reserves the supply until shipping ships it.
You set up your implementation to automatically do this work, including selecting the source, reserving supply until itsfulfilled, and automatically adjusting fulfillment when supply or demand changes.
379

Oracle SCM CloudUsing Supply Planning
Chapter 14Supply Network Model
For details, see Overview of Back-to-Back Fulfillment.
How Back-to-Back Fulfillment Is Processed in Supply Planning Use back-to-back fulfillment to improve revenues and margins by increasing on time fill rates while reducing yourinventory levels. Back-to-back ordering is a special type of ordering that matches each supply order with each salesorder on a one-for-one basis.
Typically, back-to-back is a purchase order matched to a sales order and cross-docked at the warehouse. OrderPromising recommends a supply source and the recommendation is sent to Supply Chain Orchestration. Supply ChainOrchestration creates the supply and always creates a reservation between the supply and the sales order line.
Supply planning collects back-to-back demands and supplies, and respects the reservations between them. Theplanning process generates exceptions if back-to-back supplies fall short of demands or cause resource or suppliercapacity overloads. Constrained supply planning generates planned supply for back-to-back orders that are missingsupplies, but these planned orders can't be released from the plan. You can notify Order Management to checkthe order line and use Order Promising to promise the line and send the supply recommendation to Supply ChainOrchestration.
To properly plan for back-to-back orders in Supply Planning, you must define the back-to-back supply chain network.
• Set the item-organization attribute Back-to-Back Enabled to Yes in the Product Information Managementwork area.
• Set the item-organization attribute Planning Method to either MRP Planned or MPS Planned.
• Specify sourcing rules for the item, which tells supply planning how to:
◦ Determine the ship from organization for sales orders.
◦ Determine the supply sources for bringing material in to the ship from organization.
• Add the sourcing rules to the Order Promising assignment set.
• Set up your supply plan to plan for drop shipments.
◦ In the Advanced Plan Options dialog box, set the Include drop ship demands and supplies attribute toYes.
◦ Optionally, select a demand schedule that represents a drop shipment forecast.
380

Oracle SCM CloudUsing Supply Planning
Chapter 15Simulation Sets
15 Simulation Sets
Simulations in Supply Planning You can use simulations in Supply Planning to analyze various what-if scenarios by changing or editing data in a plan.
You can then run the plan with the Do not refresh with current data option selected and save the changes to asimulationset, if needed. The simulation set can then be used in future plan runs.
Simulation sets are collection of changed data that you would want to include in plan options before running a plan. Asimulation set enables you to modify data on the plan output and see the impact of the changed data. For example, youcan test planning results by changing item lead times or order modifiers. You can add simulation sets in Plan Options.
You can edit the attributes of the following entities before running a simulation. If you can click the attribute and itaccepts a value, you can edit that attribute.
• Items
• Item Structures
• Resources
• Resource Availability
• Routings
• Routing Resources
• Supplies and Demands
• Suppliers
• Supplier Capacity
Create a Simulation Set Perform the following steps to create a simulation set from the Plan Inputs work area:
1. In the Navigator, click the Plan Inputs work area link.2. On the Plan Inputs page, click the Open button.3. In the Open Table, Graph, or Tile Set dialog box, do the following:
a. In the Search drop-down list, select: Name.b. In the Search text box, enter the name of a table, such as Items or Resources.c. Click the Search icon button.d. Select the Items (or Research) table and click OK.
4. On the Plan Inputs page, Items tab (or Resources tab), click the Search button.5. In the Search Results region, select one or more rows and do the following:
a. Click Actions and then select Add to Simulation Set.b. In the Add to Simulation Set dialog box, click the Search: Simulation Set down arrow for a list of values,
and then click Create Simulation Set.
381

Oracle SCM CloudUsing Supply Planning
Chapter 15Simulation Sets
c. In the Create Simulation Set dialog box, in the Simulation Set field, enter the name of the simulation setyou want to create.
d. Click Save and Close.e. In the Add to Simulation Set dialog box, click Save and Close.
Related Topics• Simulations in Supply Planning
• Edit a Simulation Set
• Copy Data to Simulation Sets in Supply Planning
• Add Data from Plan Inputs to Simulation Sets
• Overview of Simulation Sets
Edit a Simulation Set Perform the following steps to edit a simulation set from the Plan Inputs work area:
1. In the Navigator, click the Plan Inputs work area link.2. On the Plan Inputs page, click the Plans panel tab.3. In the Plans panel drawer, do the following:
a. Expand the list of Simulation Sets.b. Select a simulation set, right-click on it and select Open.
4. On the Simulation Set page, click Open and then select Full Pane.5. In the Open Table, Graph, or Tile Set dialog box, select a table, such as Resources or Items, and then click OK.
On the Simulation Set page, a new tab opens for the table that you selected, such as the Resources tab or theItems tab.
6. In the Search region, click Search.7. In the Search Results region, select one or more rows. Click Actions and then select Edit from the drop-down
list.
8. In the edit dialog box, you can edit some of the attributes and drill down to additional tables, depending on thetable that you accessed. For example:
◦ For the Resources table, you can change the Bottleneck value. You can also drill down to the ResourceAvailability table.
◦ For the Items table, you can change the Processing Lead Time value. You can also drill down to theSuppliers table.
9. When done, click OK to return to the Simulation Set page. Changed rows and fields are marked with smallcolored dots.
Related Topics• Create a Simulation Set
• Edit a Simulation Set from a Spreadsheet
• Overview of Simulation Sets
• Simulate Demand and Supply Changes
382

Oracle SCM CloudUsing Supply Planning
Chapter 15Simulation Sets
Edit a Simulation Set from a Spreadsheet You can download simulation set data into a spreadsheet, make edits, including certain updates, additions, anddeletions, and then upload it back to the simulation set.
In the Plan Inputs work area, while working with the Items or Supplies and Demands table in a simulation set, use theEdit in Spreadsheet option in the Actions menu to download the table rows into a Microsoft Excel file.
Note: Before working with spreadsheets, you must download and install the desktop integration installer that isavailable under Navigator > Tools. Otherwise, you can't download information into or upload information fromspreadsheets.
To edit the data in the Items or Supplies and Demands table of the simulation set in a Microsoft Excel spreadsheet,follow these steps:
1. In the Plan Inputs work area, click the Plans panel tab.
Note: The simulation set can also be edited from the Planning Central, Sales and Operations Planning, andSupply Planning work areas. However, the Supplies and Demands table is available in the simulation set onlywhen it is edited in the Supply Planning work area.
2. In the Plans panel drawer, do the following:
a. Expand the list of simulation sets.b. Select the simulation set that you want to edit, right-click, and click Open. The simulation set opens.
3. In the Open menu, select Full Pane. The Open Table, Graph, or Tile Set dialog box opens.4. Select the Items or Supplies and Demands table, and click OK. The table opens in a page in the simulation set.5. Perform a search for the table rows in the simulation set.6. In the Actions menu for the table, click Edit in Spreadsheet. A dialog box opens and prompts you to save or
open a Microsoft Excel file.7. Open the spreadsheet. The Connect dialog box opens and prompts you to connect to the URL for the
application.8. Click Yes. A dialog box opens and prompts you to type your credentials.9. Sign in with your Oracle Applications Cloud credentials. The spreadsheet is refreshed with the data in the
simulation set.10. Edit the data.
Task Steps
To add an item to the Items table of thesimulation set
Click the Add Item icon in the Items menu of the spreadsheet, and provide values in the AddItem dialog box that opens. You can add an existing item or create an item that is based on anexisting item.
To create an order in the Supplies andDemands table of the simulation set
Click the Create Order icon in the Supplies and Demands menu of the spreadsheet, andprovide values in the Create Order dialog box that opens. (Not applicable to sales andoperations planning.)
383

Oracle SCM CloudUsing Supply Planning
Chapter 15Simulation Sets
Task Steps
To edit a row
Modify the values in the row cells that are not grayed out. A symbol appears in the cell underthe Changed column for the row.
To delete a row
Click the corresponding cell in the Mark for Deletion column. A symbol appears in the cell tomark the table row for deletion. To deselect the row, click the cell again.
11. Click the Upload icon in the Items or Supplies and Demands menu. In the Upload Options dialog box thatappears, select the check boxes for the options that you want to use, and click OK. The data is uploaded to thesimulation set.
12. Save the simulation set. The changes are displayed and marked with colored symbols.13. Save and close the spreadsheet.
Copy Data to Simulation Sets in Supply Planning If you have updated any data, then you can add the changed data to a simulation set. After you copy the data to asimulation set, you can run the simulation to verify your data.
Then, you can include this changed data to subsequentplan runs.
Follow these steps to copy plan data to a simulation set:
1. In the Navigator, click the Supply Planning work area.2. Click the Plans panel drawer, right-click Plan Inputs, and click Open.3. In the Open, Table, Graph or Tile Set dialog box, search the entity that has the edited data. For example, search
the items that you edited.4. Select the rows that you have edited and saved.5. Click the Actions menu in the Items tab and click Copy to Simulation Set.6. Select one of the copy options:
Copy Selected: Copies data from the selected cells.Copy All: Copies all the data in a row.
7. Add the highlighted changes to an existing simulation set or click Create Simulation Set in the Copy toSimulation Set dialog to create a new simulation set.
8. Click Save and Close.9. Add this simulation set in Plan Options, Scope tab of the plan.
Add Data from Plan Inputs to Simulation Sets You can make changes to data in Plan Inputs without running the plan and then include the data directly into simulationsets. You can verify the result of the simulation after the plan is run.
Follow these steps to add plan data from plan inputs to a simulation set:
1. In the Navigator, click the Supply Planning work area.
384

Oracle SCM CloudUsing Supply Planning
Chapter 15Simulation Sets
2. Click the Plans panel drawer, right-click Plan Inputs, and click Open.3. On the Open, Table, Graph or Tile Set page, search the entity that you want to edit. For example, search the
items that you want to edit..4. Edit the data on the required rows and save the data.5. Select the rows of edited data, click the Actions menu in the Items tab and click Add to Simulation Set.6. Add the highlighted changes to an existing simulation set or click Create Simulation Set in the Copy to
Simulation Set dialog to create a new simulation set.7. Click Save and Close.8. Add this simulation set in Plan Options, Scope tab of the plan.
385

Oracle SCM CloudUsing Supply Planning
Chapter 15Simulation Sets
386