Administration Guide - SAP for Oracle iDataAgent - Bull On ...
193
Administration Guide - SAP for Oracle iDataAgent TABLE OF CONTENTS OVERVIEW Introduction Key Features Full Range of Backup and Recovery Options SnapProtect Backup Command Line Support Backup and Recovery Failovers Efficient Job Management and Reporting Block Level Deduplication Terminology SYSTEM REQUIREMENTS - SAP FOR ORACLE IDATAAGENT SUPPORTED FEATURES - SAP FOR ORACLE IDATAAGENT GETTING STARTED - DEPLOYING ON WINDOWS Installation Method 1: Interactive Install Method 2: Install Software from the CommCell Console GETTING STARTED - DEPLOYING IN A GLOBAL ZONE OR UNIX SERVERS Where to Install Installation Method 1: Interactive Install Method 2: Install Software from the CommCell Console GETTING STARTED - DEPLOYING IN A NON-GLOBAL ZONE Where to Install Installation Method 1: Interactive Install Method 2: Install Software from the CommCell Console GETTING STARTED - SAP FOR ORACLE CONFIGURATION GETTING STARTED - SAP FOR ORACLE BACKUP Perform a Backup What Gets Backed Up What Does Not Get Backed Up GETTING STARTED - SAP FOR ORACLE RESTORE Perform a Restore ADVANCED - SAP FOR ORACLE CONFIGURATION Understanding the CommCell Console Choosing the Backup Interface RMAN_UTIL UTIL_FILE UTIL_FILE_ONLINE Optimizing Performance Creating subclient for Offline Backups Creating Subclient for Online Backups Administration Guide - SAP for Oracle iDataAgent Page 1 of 193
-
Upload
khangminh22 -
Category
Documents
-
view
3 -
download
0
Transcript of Administration Guide - SAP for Oracle iDataAgent - Bull On ...
Administration Guide - SAP for Oracle iDataAgentTABLE OF CONTENTS
OVERVIEWIntroduction
Key FeaturesFull Range of Backup and Recovery OptionsSnapProtect BackupCommand Line SupportBackup and Recovery FailoversEfficient Job Management and ReportingBlock Level Deduplication
Terminology
SYSTEM REQUIREMENTS - SAP FOR ORACLE IDATAAGENT
SUPPORTED FEATURES - SAP FOR ORACLE IDATAAGENT
GETTING STARTED - DEPLOYING ON WINDOWSInstallation
Method 1: Interactive Install
Method 2: Install Software from the CommCell Console
GETTING STARTED - DEPLOYING IN A GLOBAL ZONE OR UNIX SERVERSWhere to Install
Installation
Method 1: Interactive Install
Method 2: Install Software from the CommCell Console
GETTING STARTED - DEPLOYING IN A NON-GLOBAL ZONEWhere to Install
Installation
Method 1: Interactive Install
Method 2: Install Software from the CommCell Console
GETTING STARTED - SAP FOR ORACLE CONFIGURATION
GETTING STARTED - SAP FOR ORACLE BACKUPPerform a Backup
What Gets Backed UpWhat Does Not Get Backed Up
GETTING STARTED - SAP FOR ORACLE RESTOREPerform a Restore
ADVANCED - SAP FOR ORACLE CONFIGURATIONUnderstanding the CommCell Console
Choosing the Backup InterfaceRMAN_UTILUTIL_FILEUTIL_FILE_ONLINE
Optimizing Performance
Creating subclient for Offline Backups
Creating Subclient for Online Backups
Administration Guide - SAP for Oracle iDataAgent
Page 1 of 193

Creating Subclient to Backup Online DatabasesCreating Subclient to Backup Individual DataFiles/Tablespaces
Creating Subclient for Selective Online Full Backups
Creating Subclient for Log Backups
Registering the Client with SAP SLD
Modifying an Instance or Subclient
Deleting an Instance or SubclientDelete an InstanceDelete a Subclient
ADVANCED - SAP FOR ORACLE BACKUPChoosing the Backup Interface
Full Backup
Selective Copy - Full Backup
Incremental Backups
Command Line Backups
Offline Backups
Online Backups
Selective Online Full Backup
Archive Log Backups
Scheduling A BackupManaging Jobs
Restarting JobsControlling Jobs
Additional Options
ADVANCED - SAP FOR ORACLE RESTOREChoosing Restore Types
Choosing the Restore Destination
Restoring to a Different Client (Cross Machine Restore)Cross Machine Restore from CommCell ConsoleCross Machine Restore Using util_file Interface from Command LineCross Machine Restore Using rman_Util Interface from Command Line
Restoring Entire Database
Restoring Individual Data Files/Table Spaces
Restoring Archive LogsRestoring with Specific Log TimeRestoring with Log Serial Number
Restoring Control Files
Restoring Data From a Specific Time Range
Recovering a Database
Scheduling a Restore
Restoring from Command Line
Browse DataBrowsing Data From Before the Most Recent Full Backup
List MediaListing Media For a SubclientListing Media For a Backup Set or Instance
Restore by Jobs
Manage Restore JobsRestart JobsResubmit JobsControl Jobs
Additional Restore Options
DATA AGING - SAP FOR ORACLE
Administration Guide - SAP for Oracle iDataAgent
Page 2 of 193
DISASTER RECOVERY - SAP FOR ORACLE Planning for a Disaster Recovery
Restoring SAP for Oracle Database from CommCell Console
Restoring SAP for Oracle Database from SAP Command Line Interface
ADDITIONAL OPERATIONSAudit Trail
Storage Policy
Schedule Policy
Auxiliary Copy
Operation Window
Operating System and Application Upgrades
Uninstalling Components
Online Help Links
FREQUENTLY ASKED QUESTIONS
TROUBLESHOOTING - SAP FOR ORACLE BACKUPBackup Failure
Command Line Errors
Pending State for SAP for Oracle Backups
SAP for Oracle RMAN Backup Failure
Oracle Errors
TROUBLESHOOTING - SAP FOR ORACLE RESTORERestore Failure
Virtual Machine not powering on after restore of Independent Disk/Physical RDM
SAN Mode restore slower than NBD Transport Mode restore
While Restoring Virtual Machine as Template, registering Template Virtual Machine Fails
Recovering Data Associated with Deleted Clients and Storage Policies
Administration Guide - SAP for Oracle iDataAgent
Page 3 of 193
Overview - SAPTABLE OF CONTENTS
Introduction
Key FeaturesFull Range of Backup and Recovery OptionsSelective Online Full BackupSnapProtect BackupCommand Line SupportBackup and Recovery FailoversEfficient Job Management and ReportingBlock Level Deduplication
Terminology
INTRODUCTION
Calypso software provides a simplified end-to-end data protection for large scale SAP environments. It helps deliver a robust and comprehensive backup and recovery with significant speed performance and efficient use of disk and tape drives. It also assists you in full system rebuilds and eliminates recovery failures.
KEY FEATURES
The SAP iDataAgents offers the following key features:
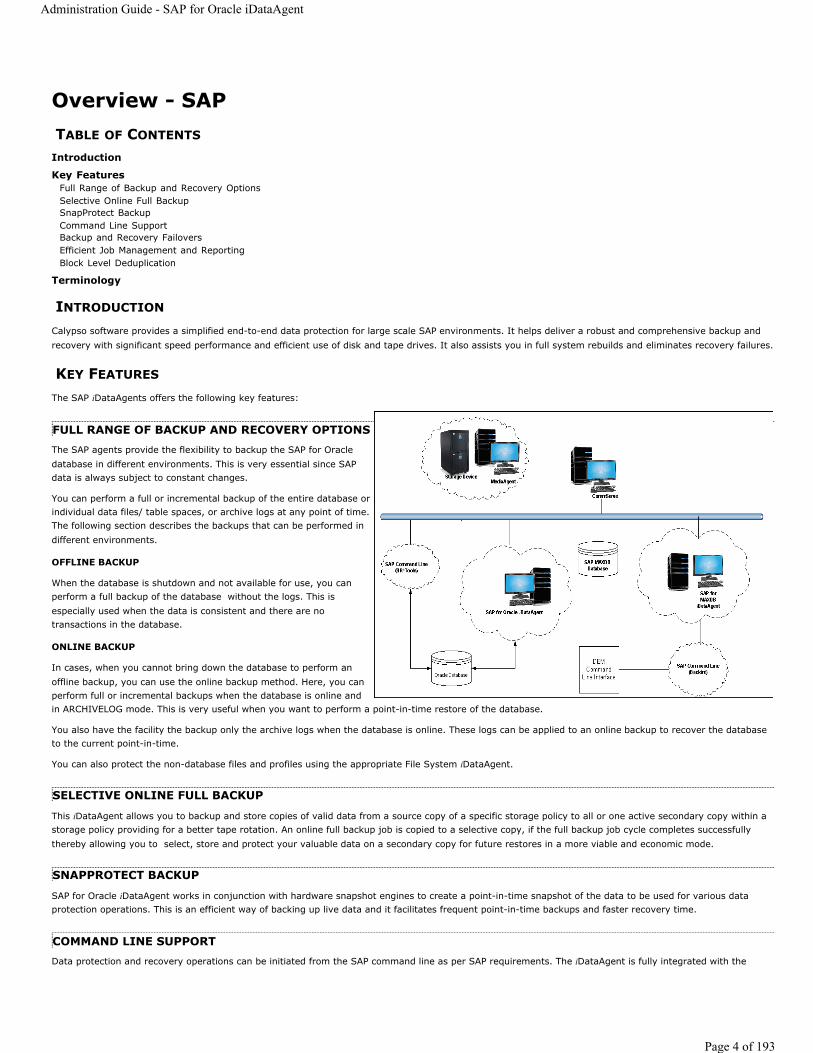
FULL RANGE OF BACKUP AND RECOVERY OPTIONSThe SAP agents provide the flexibility to backup the SAP for Oracle database in different environments. This is very essential since SAP data is always subject to constant changes.
You can perform a full or incremental backup of the entire database or individual data files/ table spaces, or archive logs at any point of time. The following section describes the backups that can be performed in different environments.
OFFLINE BACKUP
When the database is shutdown and not available for use, you can perform a full backup of the database without the logs. This is especially used when the data is consistent and there are no transactions in the database.
ONLINE BACKUP
In cases, when you cannot bring down the database to perform an offline backup, you can use the online backup method. Here, you can perform full or incremental backups when the database is online and in ARCHIVELOG mode. This is very useful when you want to perform a point-in-time restore of the database.
You also have the facility the backup only the archive logs when the database is online. These logs can be applied to an online backup to recover the database to the current point-in-time.
You can also protect the non-database files and profiles using the appropriate File System iDataAgent.
SELECTIVE ONLINE FULL BACKUP
This iDataAgent allows you to backup and store copies of valid data from a source copy of a specific storage policy to all or one active secondary copy within a storage policy providing for a better tape rotation. An online full backup job is copied to a selective copy, if the full backup job cycle completes successfully thereby allowing you to select, store and protect your valuable data on a secondary copy for future restores in a more viable and economic mode.
SNAPPROTECT BACKUP
SAP for Oracle iDataAgent works in conjunction with hardware snapshot engines to create a point-in-time snapshot of the data to be used for various data protection operations. This is an efficient way of backing up live data and it facilitates frequent point-in-time backups and faster recovery time.
COMMAND LINE SUPPORTData protection and recovery operations can be initiated from the SAP command line as per SAP requirements. The iDataAgent is fully integrated with the
Administration Guide - SAP for Oracle iDataAgent
Page 4 of 193
Oracle database using BRTOOLS and with the SAP MAXDB database through DBM CLI, a database management tool provided by SAP and supports backup and restore operations of database and parameter files using BACKINT interface from SAP Command Line.
In addition to SAP command line, you can also perform data protection and recovery operations from the command line interface using qcommands. You also have the facility to save the operations as a script file and execute them from the command line at a later point of time.
BACKUP AND RECOVERY FAILOVERS
In the event that a MediaAgent used for the backup or recovery operation fails, it is automatically resumed on alternate MediaAgents. In such cases, the backup or restore job will not restart from the beginning, but will resume from the point of failure. This is especially useful for backups and restores on large SAP databases.
In the event, that a network goes down, the backup and recovery jobs are resumed on alternate data paths. Similarly, in the event of a device failure, the jobs are automatically switched to alternate disk and tape drives.
EFFICIENT JOB MANAGEMENT AND REPORTINGYou can view and verify the status of SAP backup and recovery operations from the Job Controller and Event Viewer windows within the CommCell Console. You can also track the status of the jobs using Reports, which can be saved and easily distributed. Reports can be generated for different aspects of data management. You also have the flexibility to customize the reports to display only the required data and save them to any specified location in different formats. For example, you can create a backup job summary report to view at-a-glance the completed backup jobs. Y
In addition, you can also schedule these reports to be generated and send them on email without user intervention.
BLOCK LEVEL DEDUPLICATIONDeduplication provides a smarter way of storing data by identifying and eliminating the duplicate items in a data protection operation.
Deduplication at the data block level compares blocks of data against each other. If an object (file, database, etc.) contains blocks of data that are identical to each other, then block level deduplication eliminates storing the redundant data and reduces the size of the object in storage. This way dramatically reduces the backup data copies on both the disk and tapes.
TERMINOLOGY
The SAP documentation uses the following terminology:
Back to Top
CLIENTThe computer in which the iDataAgent is installed and contains the data to be secured.
INSTANCEThe SAP for Oracle database to be used for the backup and restore operations.
SUBCLIENTThe SAP data to be backed up.
DBM CLIDBM CLI (DBM Command Line Interface) is a Database Management Tool supplied with every SAP MAXDB that is used to perform backup and restore operations.
BACKINTBackint is an interface program that allows DBM CLI to communicate with SAP MAXDB using streams/pipes to perform backup and restore operations.
Administration Guide - SAP for Oracle iDataAgent
Page 5 of 193
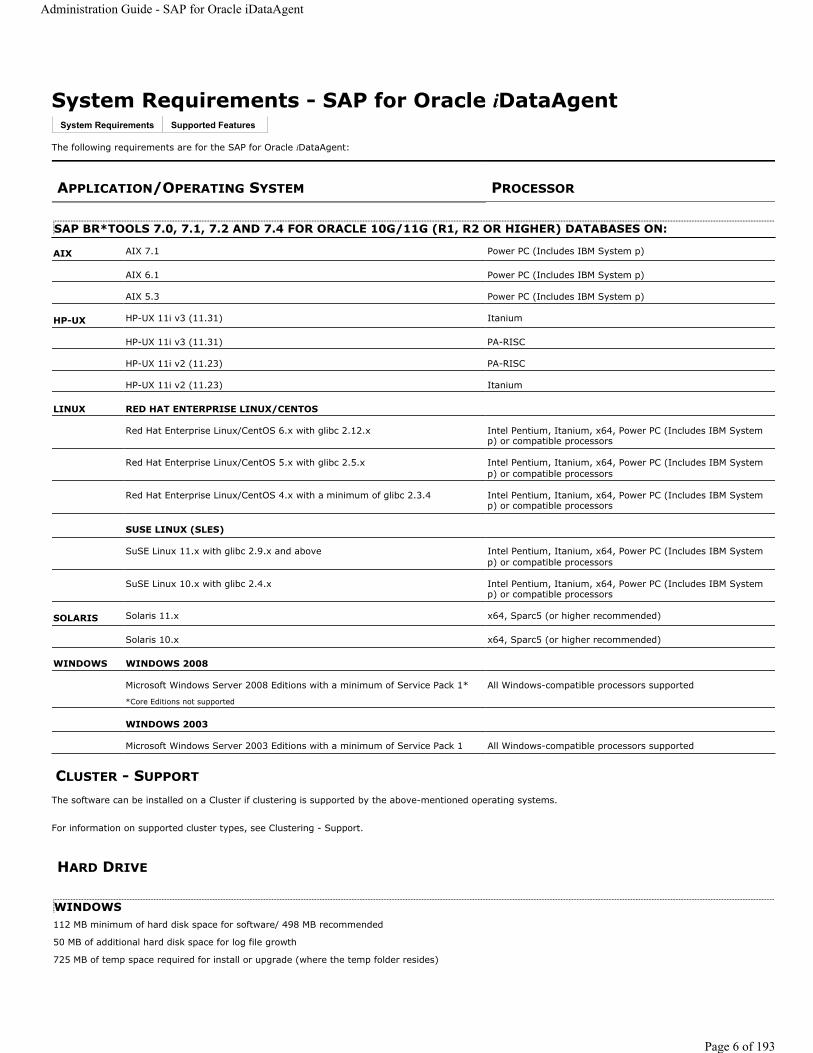
System Requirements - SAP for Oracle iDataAgent
The following requirements are for the SAP for Oracle iDataAgent:
CLUSTER - SUPPORT
The software can be installed on a Cluster if clustering is supported by the above-mentioned operating systems.
For information on supported cluster types, see Clustering - Support.
System Requirements Supported Features
APPLICATION/OPERATING SYSTEM PROCESSOR
SAP BR*TOOLS 7.0, 7.1, 7.2 AND 7.4 FOR ORACLE 10G/11G (R1, R2 OR HIGHER) DATABASES ON:
AIX AIX 7.1 Power PC (Includes IBM System p)
AIX 6.1 Power PC (Includes IBM System p)
AIX 5.3 Power PC (Includes IBM System p)
HP-UX HP-UX 11i v3 (11.31) Itanium
HP-UX 11i v3 (11.31) PA-RISC
HP-UX 11i v2 (11.23) PA-RISC
HP-UX 11i v2 (11.23) Itanium
LINUX RED HAT ENTERPRISE LINUX/CENTOS
Red Hat Enterprise Linux/CentOS 6.x with glibc 2.12.x Intel Pentium, Itanium, x64, Power PC (Includes IBM System p) or compatible processors
Red Hat Enterprise Linux/CentOS 5.x with glibc 2.5.x Intel Pentium, Itanium, x64, Power PC (Includes IBM System p) or compatible processors
Red Hat Enterprise Linux/CentOS 4.x with a minimum of glibc 2.3.4 Intel Pentium, Itanium, x64, Power PC (Includes IBM System p) or compatible processors
SUSE LINUX (SLES)
SuSE Linux 11.x with glibc 2.9.x and above Intel Pentium, Itanium, x64, Power PC (Includes IBM System p) or compatible processors
SuSE Linux 10.x with glibc 2.4.x Intel Pentium, Itanium, x64, Power PC (Includes IBM System p) or compatible processors
SOLARIS Solaris 11.x x64, Sparc5 (or higher recommended)
Solaris 10.x x64, Sparc5 (or higher recommended)
WINDOWS WINDOWS 2008
Microsoft Windows Server 2008 Editions with a minimum of Service Pack 1*
*Core Editions not supported
All Windows-compatible processors supported
WINDOWS 2003
Microsoft Windows Server 2003 Editions with a minimum of Service Pack 1 All Windows-compatible processors supported
HARD DRIVE
WINDOWS112 MB minimum of hard disk space for software/ 498 MB recommended
50 MB of additional hard disk space for log file growth
725 MB of temp space required for install or upgrade (where the temp folder resides)
Administration Guide - SAP for Oracle iDataAgent
Page 6 of 193
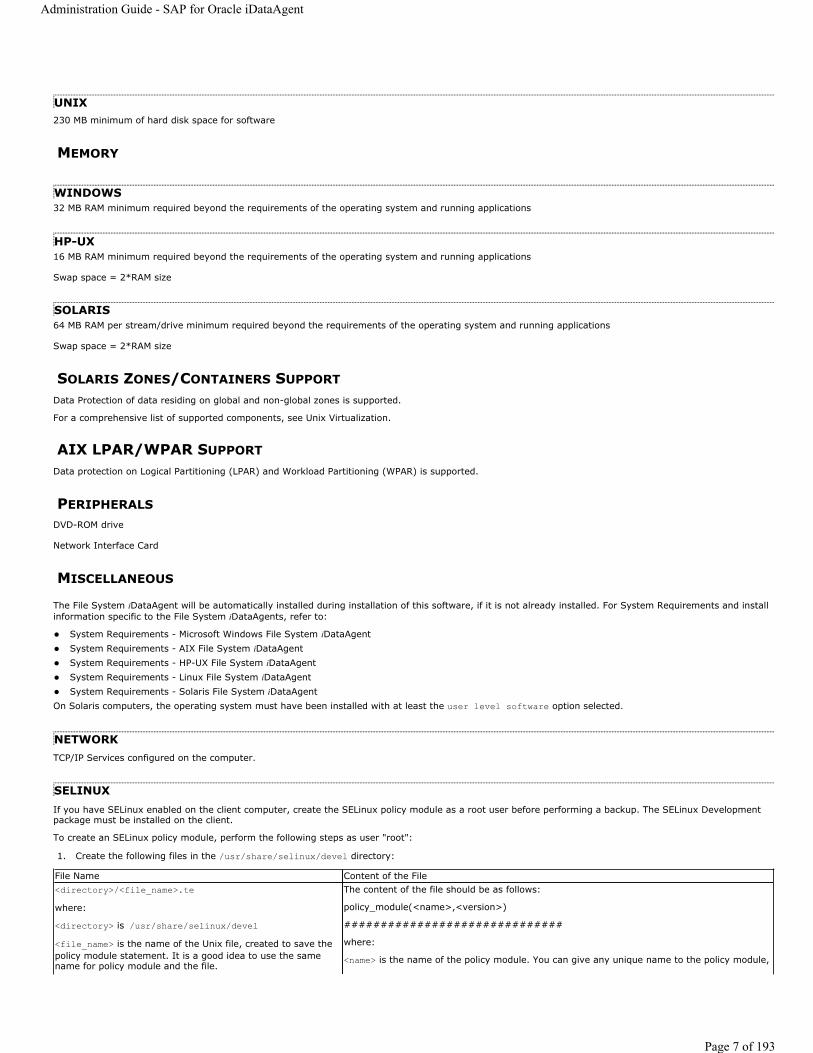
UNIX230 MB minimum of hard disk space for software
MEMORY
WINDOWS32 MB RAM minimum required beyond the requirements of the operating system and running applications
HP-UX16 MB RAM minimum required beyond the requirements of the operating system and running applications
Swap space = 2*RAM size
SOLARIS64 MB RAM per stream/drive minimum required beyond the requirements of the operating system and running applications
Swap space = 2*RAM size
SOLARIS ZONES/CONTAINERS SUPPORTData Protection of data residing on global and non-global zones is supported.
For a comprehensive list of supported components, see Unix Virtualization.
AIX LPAR/WPAR SUPPORTData protection on Logical Partitioning (LPAR) and Workload Partitioning (WPAR) is supported.
PERIPHERALSDVD-ROM drive
Network Interface Card
MISCELLANEOUS
The File System iDataAgent will be automatically installed during installation of this software, if it is not already installed. For System Requirements and install information specific to the File System iDataAgents, refer to:
System Requirements - Microsoft Windows File System iDataAgentSystem Requirements - AIX File System iDataAgentSystem Requirements - HP-UX File System iDataAgentSystem Requirements - Linux File System iDataAgentSystem Requirements - Solaris File System iDataAgent
On Solaris computers, the operating system must have been installed with at least the user level software option selected.
NETWORKTCP/IP Services configured on the computer.
SELINUXIf you have SELinux enabled on the client computer, create the SELinux policy module as a root user before performing a backup. The SELinux Development package must be installed on the client.
To create an SELinux policy module, perform the following steps as user "root":
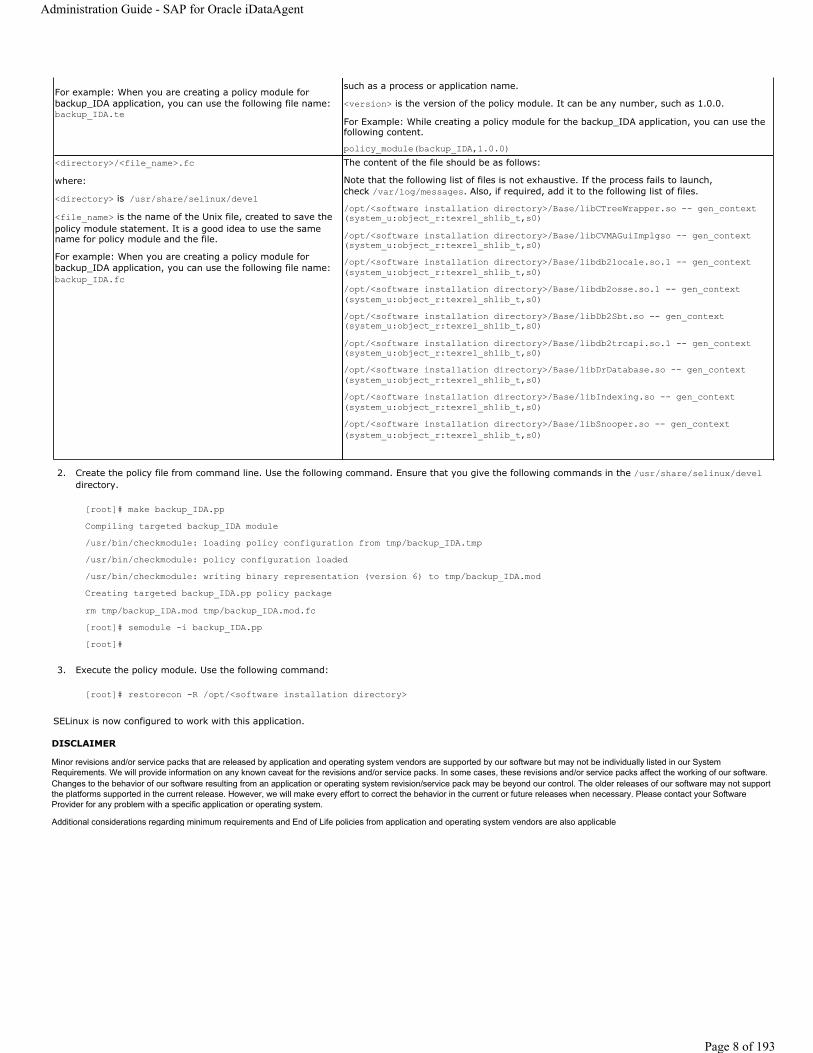
1. Create the following files in the /usr/share/selinux/devel directory:
File Name Content of the File<directory>/<file_name>.tewhere:
<directory> is /usr/share/selinux/devel<file_name> is the name of the Unix file, created to save the policy module statement. It is a good idea to use the same name for policy module and the file.
The content of the file should be as follows:
policy_module(<name>,<version>)
##############################
where:
<name> is the name of the policy module. You can give any unique name to the policy module,
Administration Guide - SAP for Oracle iDataAgent
Page 7 of 193
DISCLAIMER
Minor revisions and/or service packs that are released by application and operating system vendors are supported by our software but may not be individually listed in our System Requirements. We will provide information on any known caveat for the revisions and/or service packs. In some cases, these revisions and/or service packs affect the working of our software. Changes to the behavior of our software resulting from an application or operating system revision/service pack may be beyond our control. The older releases of our software may not support the platforms supported in the current release. However, we will make every effort to correct the behavior in the current or future releases when necessary. Please contact your Software Provider for any problem with a specific application or operating system.
Additional considerations regarding minimum requirements and End of Life policies from application and operating system vendors are also applicable
2. Create the policy file from command line. Use the following command. Ensure that you give the following commands in the /usr/share/selinux/develdirectory.
[root]# make backup_IDA.ppCompiling targeted backup_IDA module/usr/bin/checkmodule: loading policy configuration from tmp/backup_IDA.tmp/usr/bin/checkmodule: policy configuration loaded/usr/bin/checkmodule: writing binary representation (version 6) to tmp/backup_IDA.modCreating targeted backup_IDA.pp policy packagerm tmp/backup_IDA.mod tmp/backup_IDA.mod.fc[root]# semodule -i backup_IDA.pp[root]#
3. Execute the policy module. Use the following command:
[root]# restorecon -R /opt/<software installation directory>
SELinux is now configured to work with this application.
For example: When you are creating a policy module for backup_IDA application, you can use the following file name: backup_IDA.te
such as a process or application name.
<version> is the version of the policy module. It can be any number, such as 1.0.0.
For Example: While creating a policy module for the backup_IDA application, you can use the following content.
policy_module(backup_IDA,1.0.0)<directory>/<file_name>.fcwhere:
<directory> is /usr/share/selinux/devel<file_name> is the name of the Unix file, created to save the policy module statement. It is a good idea to use the same name for policy module and the file.
For example: When you are creating a policy module for backup_IDA application, you can use the following file name: backup_IDA.fc
The content of the file should be as follows:
Note that the following list of files is not exhaustive. If the process fails to launch, check /var/log/messages. Also, if required, add it to the following list of files.
/opt/<software installation directory>/Base/libCTreeWrapper.so -- gen_context(system_u:object_r:texrel_shlib_t,s0)/opt/<software installation directory>/Base/libCVMAGuiImplgso -- gen_context(system_u:object_r:texrel_shlib_t,s0)/opt/<software installation directory>/Base/libdb2locale.so.1 -- gen_context(system_u:object_r:texrel_shlib_t,s0)/opt/<software installation directory>/Base/libdb2osse.so.1 -- gen_context(system_u:object_r:texrel_shlib_t,s0)/opt/<software installation directory>/Base/libDb2Sbt.so -- gen_context(system_u:object_r:texrel_shlib_t,s0)/opt/<software installation directory>/Base/libdb2trcapi.so.1 -- gen_context(system_u:object_r:texrel_shlib_t,s0)/opt/<software installation directory>/Base/libDrDatabase.so -- gen_context(system_u:object_r:texrel_shlib_t,s0)/opt/<software installation directory>/Base/libIndexing.so -- gen_context(system_u:object_r:texrel_shlib_t,s0)/opt/<software installation directory>/Base/libSnooper.so -- gen_context(system_u:object_r:texrel_shlib_t,s0)
Administration Guide - SAP for Oracle iDataAgent
Page 8 of 193
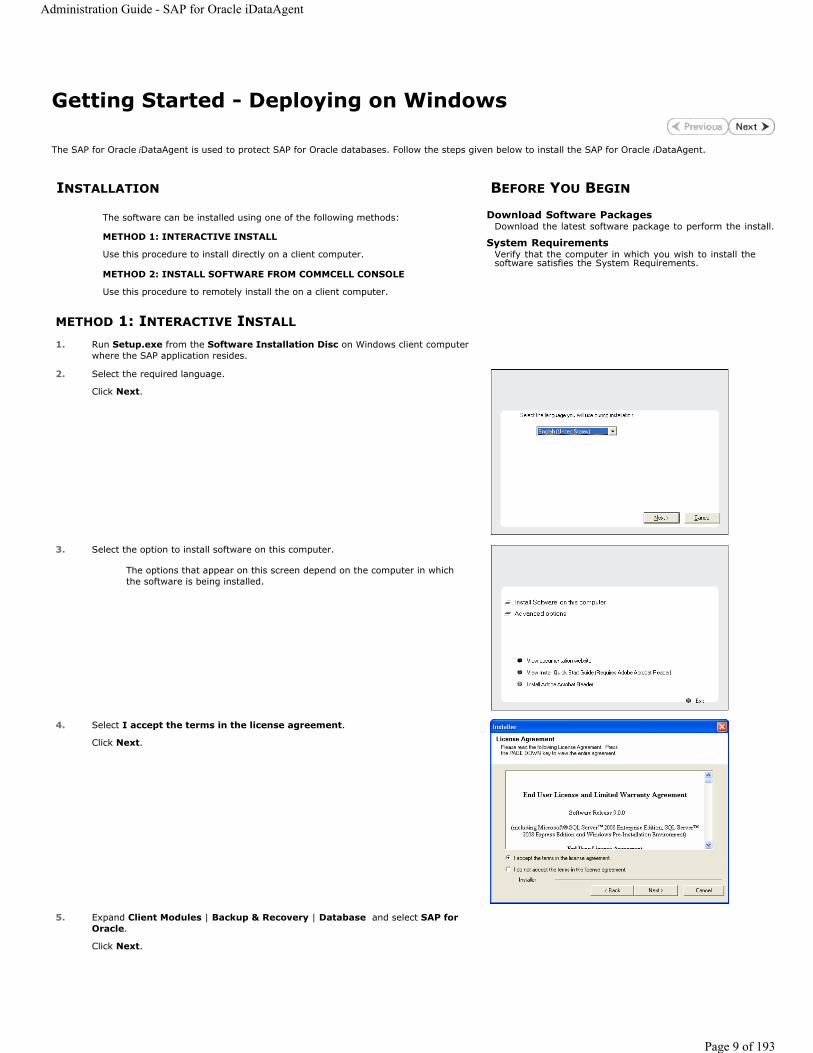
Getting Started - Deploying on Windows
The SAP for Oracle iDataAgent is used to protect SAP for Oracle databases. Follow the steps given below to install the SAP for Oracle iDataAgent.
METHOD 1: INTERACTIVE INSTALL
INSTALLATION BEFORE YOU BEGIN
The software can be installed using one of the following methods:
METHOD 1: INTERACTIVE INSTALL
Use this procedure to install directly on a client computer.
METHOD 2: INSTALL SOFTWARE FROM COMMCELL CONSOLE
Use this procedure to remotely install the on a client computer.
Download Software PackagesDownload the latest software package to perform the install.
System RequirementsVerify that the computer in which you wish to install the software satisfies the System Requirements.
1. Run Setup.exe from the Software Installation Disc on Windows client computer where the SAP application resides.
2. Select the required language.
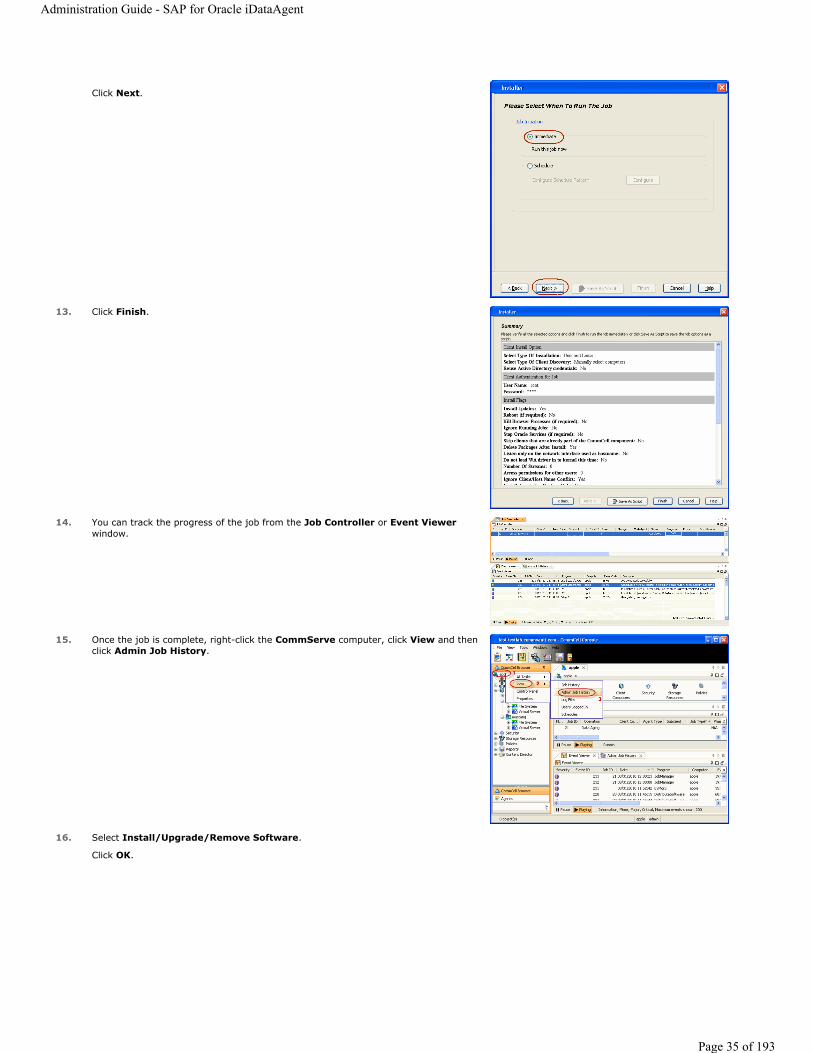
Click Next.
3. Select the option to install software on this computer.
The options that appear on this screen depend on the computer in which the software is being installed.
4. Select I accept the terms in the license agreement.
Click Next.
5. Expand Client Modules | Backup & Recovery | Database and select SAP for Oracle.
Click Next.
Administration Guide - SAP for Oracle iDataAgent
Page 9 of 193
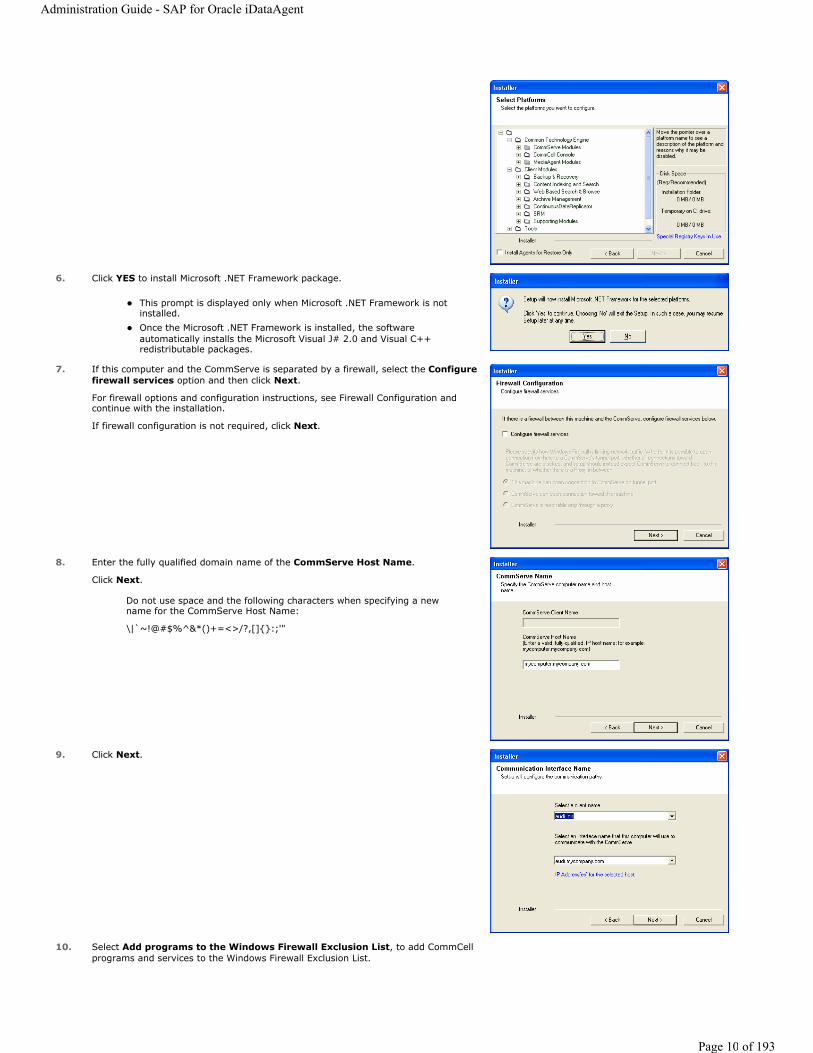
6. Click YES to install Microsoft .NET Framework package.
This prompt is displayed only when Microsoft .NET Framework is not installed. Once the Microsoft .NET Framework is installed, the software automatically installs the Microsoft Visual J# 2.0 and Visual C++ redistributable packages.
7. If this computer and the CommServe is separated by a firewall, select the Configure firewall services option and then click Next.
For firewall options and configuration instructions, see Firewall Configuration and continue with the installation.
If firewall configuration is not required, click Next.
8. Enter the fully qualified domain name of the CommServe Host Name.
Click Next.
Do not use space and the following characters when specifying a new name for the CommServe Host Name:
\|`~!@#$%^&*()+=<>/?,[]{}:;'"
9. Click Next.
10. Select Add programs to the Windows Firewall Exclusion List, to add CommCell programs and services to the Windows Firewall Exclusion List.
Administration Guide - SAP for Oracle iDataAgent
Page 10 of 193
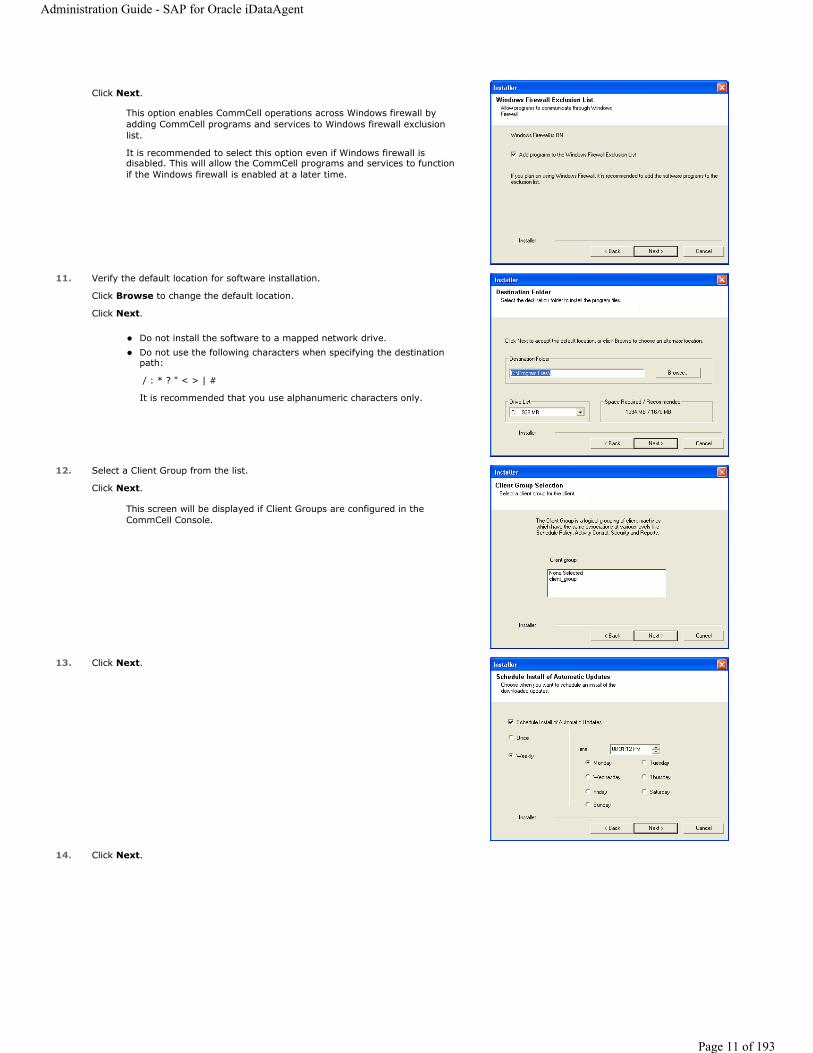
Click Next.
This option enables CommCell operations across Windows firewall by adding CommCell programs and services to Windows firewall exclusion list.
It is recommended to select this option even if Windows firewall is disabled. This will allow the CommCell programs and services to function if the Windows firewall is enabled at a later time.
11. Verify the default location for software installation.
Click Browse to change the default location.
Click Next.
Do not install the software to a mapped network drive. Do not use the following characters when specifying the destination path:
/ : * ? " < > | #
It is recommended that you use alphanumeric characters only.
12. Select a Client Group from the list.
Click Next.
This screen will be displayed if Client Groups are configured in the CommCell Console.
13. Click Next.
14. Click Next.
Administration Guide - SAP for Oracle iDataAgent
Page 11 of 193

15. Select a Storage Policy.
Click Next.
If you do not have Storage Policy created, this message will be displayed.
Click OK.
You can create the Storage Policy later in step 19.
16. Click Next.
17. Click Next.
18. Click Finish.
Administration Guide - SAP for Oracle iDataAgent
Page 12 of 193
METHOD 2: INSTALL SOFTWARE FROM COMMCELL CONSOLE
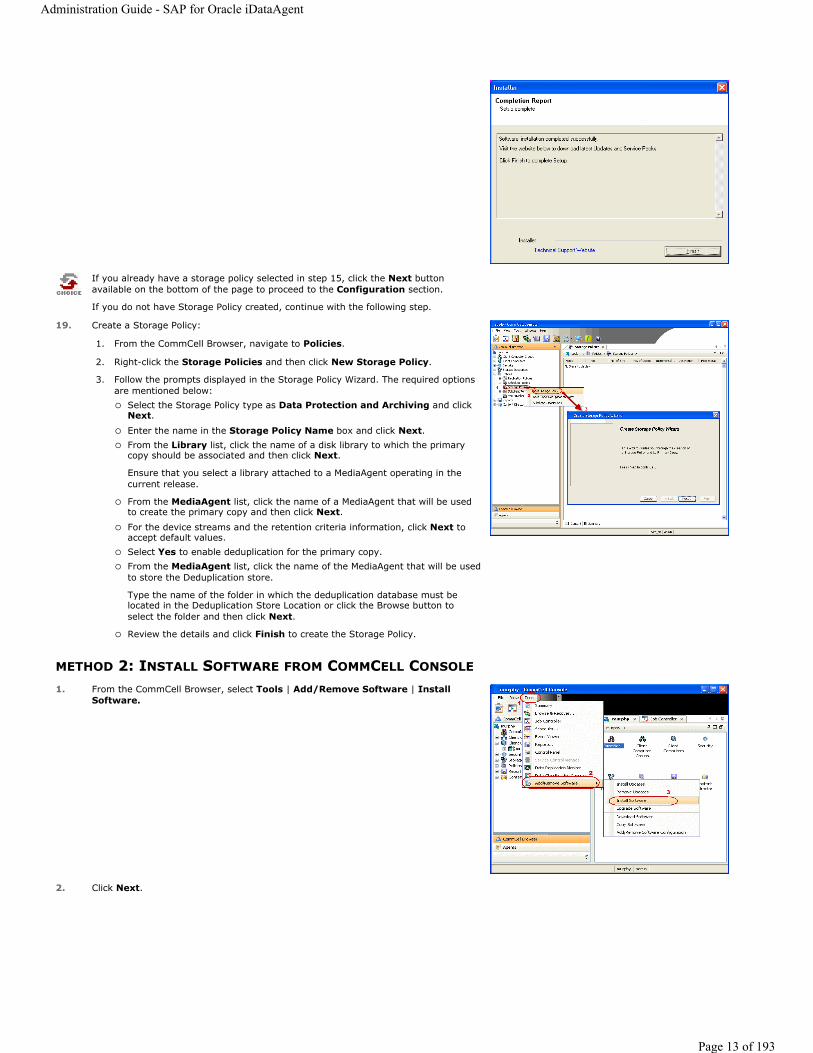
If you already have a storage policy selected in step 15, click the Next button available on the bottom of the page to proceed to the Configuration section.
If you do not have Storage Policy created, continue with the following step.
19. Create a Storage Policy:
1. From the CommCell Browser, navigate to Policies.
2. Right-click the Storage Policies and then click New Storage Policy.
3. Follow the prompts displayed in the Storage Policy Wizard. The required options are mentioned below:
Select the Storage Policy type as Data Protection and Archiving and click Next. Enter the name in the Storage Policy Name box and click Next. From the Library list, click the name of a disk library to which the primary copy should be associated and then click Next.
Ensure that you select a library attached to a MediaAgent operating in the current release.
From the MediaAgent list, click the name of a MediaAgent that will be used to create the primary copy and then click Next. For the device streams and the retention criteria information, click Next to accept default values. Select Yes to enable deduplication for the primary copy. From the MediaAgent list, click the name of the MediaAgent that will be used to store the Deduplication store.
Type the name of the folder in which the deduplication database must be located in the Deduplication Store Location or click the Browse button to select the folder and then click Next.
Review the details and click Finish to create the Storage Policy.
1. From the CommCell Browser, select Tools | Add/Remove Software | Install Software.
2. Click Next.
Administration Guide - SAP for Oracle iDataAgent
Page 13 of 193
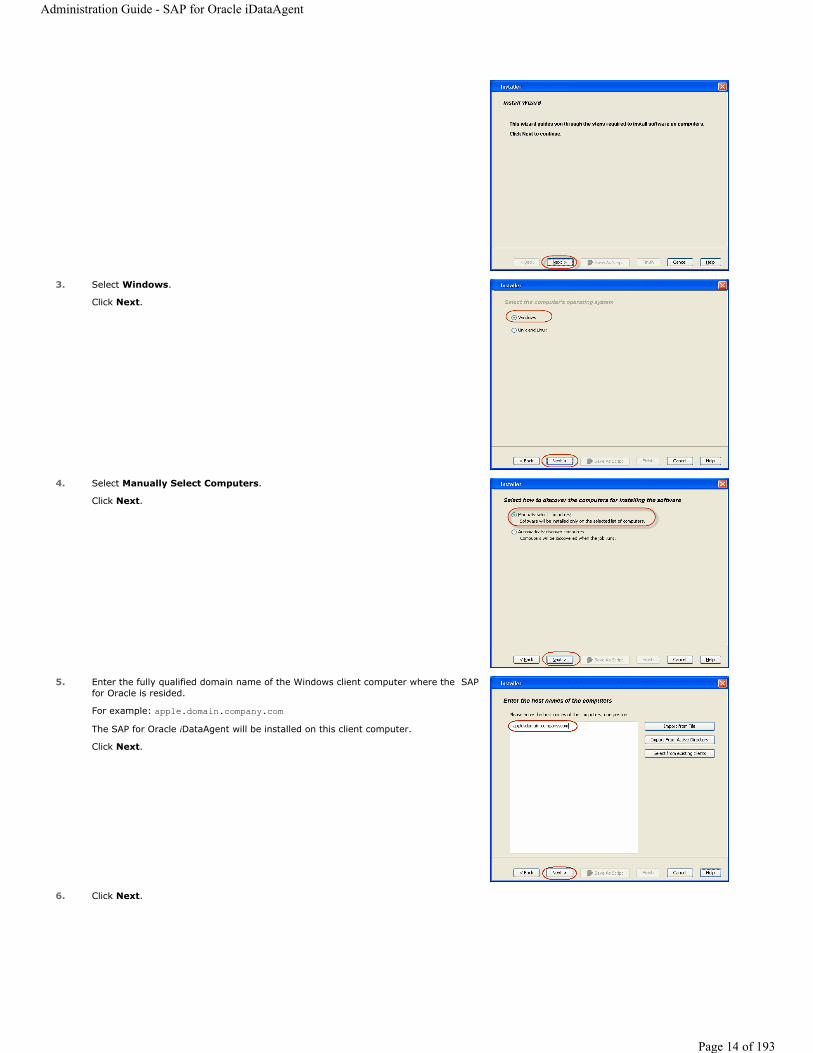
3. Select Windows.
Click Next.
4. Select Manually Select Computers.
Click Next.
5. Enter the fully qualified domain name of the Windows client computer where the SAP for Oracle is resided.
For example: apple.domain.company.comThe SAP for Oracle iDataAgent will be installed on this client computer.
Click Next.
6. Click Next.
Administration Guide - SAP for Oracle iDataAgent
Page 14 of 193
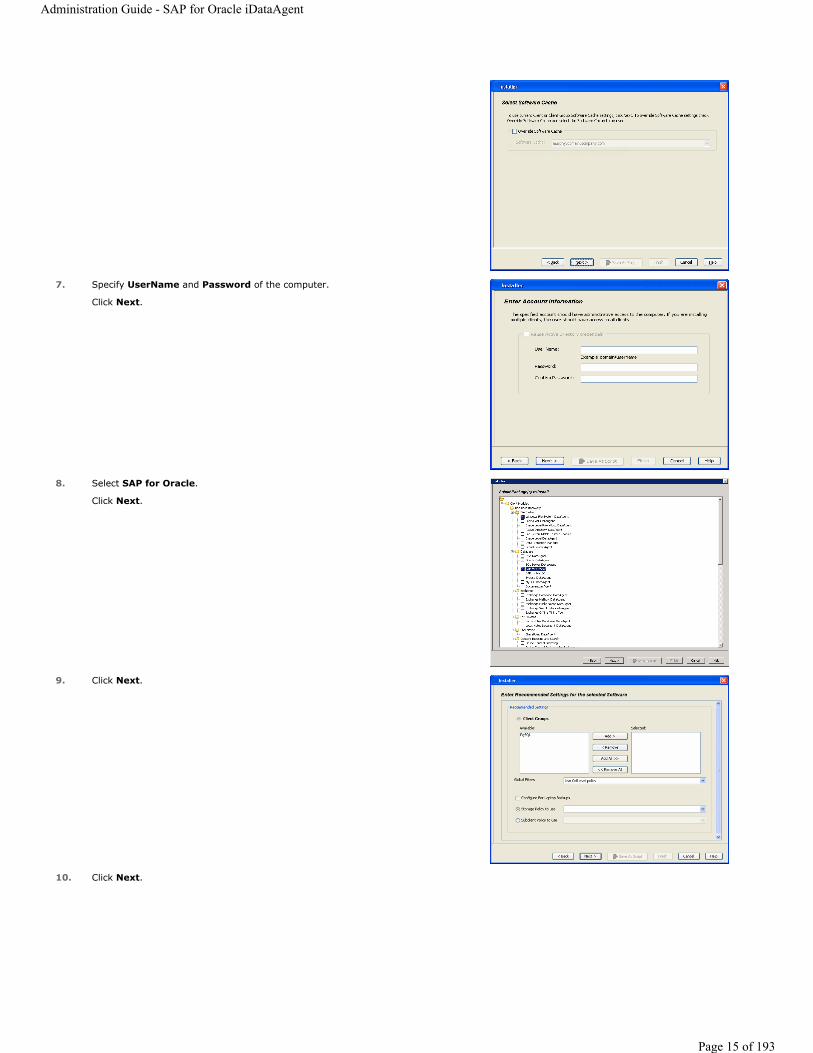
7. Specify UserName and Password of the computer.
Click Next.
8. Select SAP for Oracle.
Click Next.
9. Click Next.
10. Click Next.
Administration Guide - SAP for Oracle iDataAgent
Page 15 of 193

11. Click Next.
12. Select Immediate.
Click Next.
13. Click Finish.
Administration Guide - SAP for Oracle iDataAgent
Page 16 of 193
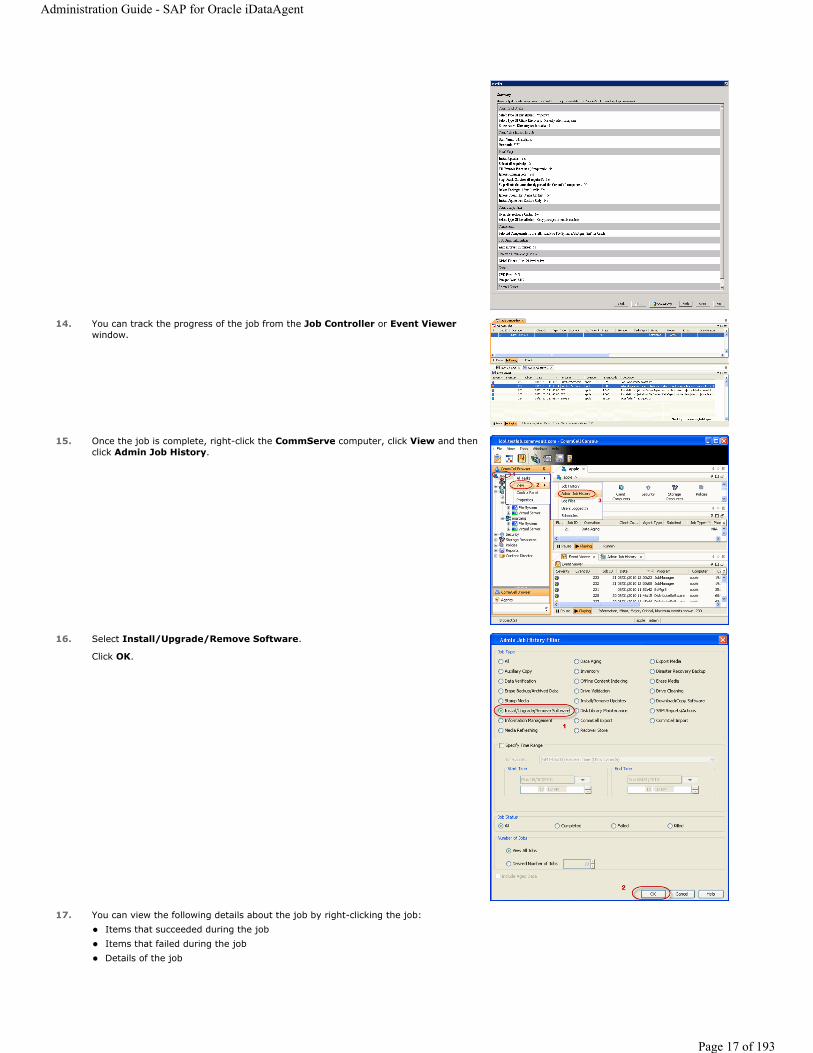
14. You can track the progress of the job from the Job Controller or Event Viewerwindow.
15. Once the job is complete, right-click the CommServe computer, click View and then click Admin Job History.
16. Select Install/Upgrade/Remove Software.
Click OK.
17. You can view the following details about the job by right-clicking the job: Items that succeeded during the job Items that failed during the job Details of the job
Administration Guide - SAP for Oracle iDataAgent
Page 17 of 193

Events of the job Log files of the job
Administration Guide - SAP for Oracle iDataAgent
Page 18 of 193
Getting Started - Deploying in a Global Zone or Unix Servers
WHERE TO INSTALL
Install the software directly on the computer hosting the global zone or the Unix Server that you wish to protect. Make sure the computer satisfies the minimum requirements specified in the System Requirements.
It is recommended to install the software on the global zone to protect non-changing or static data on non-global zones. If the data is dynamic or contains application data, install the software on the non-global zone.
Use the following steps to install the SAP for Oracle iDataAgent on the following:
Global Zone or a Solaris Server
Any other supported Unix Server
METHOD 1: INTERACTIVE INSTALL
INSTALLATION RELATED TOPICS
The software can be installed using one of the following methods:
METHOD 1: INTERACTIVE INSTALL
Use this procedure to install the software directly on client computer.
METHOD 2: INSTALL SOFTWARE FROM COMMCELL CONSOLE
Use this procedure to remotely install the software on a client computer.
System RequirementsVerify that the computer in which you wish to install the software satisfies the System Requirements.
FirewallProvides comprehensive information on firewall.
1. Run the following command from the Software Installation Disc:
./cvpkgadd2. The product banner and other information is displayed.
Press Enter.
3. Read the license agreement. Type y and press Enter.
4. Press Enter. Please select a setup task you want to perform from the list below:Advance options provide extra setup features such as creating custom package, recording/replaying user selections and installing External Data Connector software.1) Install data protection agents on this computer2) Advance options3) Exit this menuYour choice: [1]
5. If your computer is 32-bit, press Enter.
If your computer is 64-bit, see Install Unix Agents on 64-bit Platform for step-by-step procedure.
This machine supports both 32 bit and 64 bit binaries. By default, we will install 32 bit binary set that has full support for all the modules included in this package. Please note that 64 bit binary set currently only support limited modules.1) All platform (32 bit)2) FS and MA only (64 bit)Your choice: [1]
6. Press Enter. Certain Calypso packages can be associated with a virtual IP, or in other words, installed on a "virtual machine" belonging to some cluster. At any given time the virtual machine's services and IP address are active on only one of the cluster's servers. The virtual machine can "fail-over" from one server to another, which includes stopping services and deactivating IP address on the first server and activating the IP address/services on the other server.You now have a choice of performing a regular Calypso install on the physical host or installing Calypso on a virtual machine for operation within a cluster. Most users should select "Install on a physical machine" here. 1) Install on a physical machine
Administration Guide - SAP for Oracle iDataAgent
Page 19 of 193

2) Install on a virtual machine 3) Exit Your choice: [1]
7. If you have only one network interface, press Enter to accept the default network interface name and continue.
If you have multiple network interfaces, enter the interface name that you wish to use as default, and then press Enter.
The interface name and IP addresses depend on the computer in which the software is installed and may be different from the example shown.
We found one network interface available on your machine. We will associate it with the physical machine being installed, and it will also be used by the CommServe to connect to the physical machine. Note that you will be able to additionally customize Datapipe Interface Pairs used for the backup data traffic later in the Calypso Java GUI.Please check the interface name below, and make connections if necessary:Physical Machine Host Name: [angel.company.com]
8. Press Enter. Please specify the client name for this machine.It does not have to be the network host name: you can enter any word here without spaces. The only requirement is that it must be unique on the CommServe.Physical Machine Client name: [angel]
9. Type the appropriate number to install SAP for Oracle iDataAgent.
A confirmation screen will mark your choice with an "X".
Type d for Done, and press Enter.
Install Calypso on physical machine 172.19.99.62Please select the Calypso module(s) that you would like to install.[ ] 1) MediaAgent [1301] [CVGxMA]>[ ] 2) UNIX File System iDataAgent [1101] [CVGxIDA][a=all n=none r=reverse q=quit d=done >=next <=previous ?=help]Enter number(s)/one of "a,n,r,q,d,>,<,?" here:
10. Press Enter. Do you want to use the agents for restore only without consuming licenses? [no]
11. Type the appropriate number to install the latest software scripts and press Enter to continue.
Select Download from the software provider website to download the latest software scripts from your software provider website.
Make sure you have internet connectivity when you are using this option.
Select Use the one in the installation media, to install the software scripts from the disc or share from which the installation is performed. Select Use the copy I already have by entering its unix path, to specify the path if you have the software script in an alternate location.
Installation Scripts Pack provides extra functions and latest support and fix performed during setup time. Please specify how you want to get this pack.If you choose to download it from the website now, please make sure you have internet connectivity at this time. This process may take some time depending on the internet connectivity.1) Download from the software provider website.2) Use the one in the installation media3) Use the copy I already have by entering its unix pathYour choice: [1] 2
12. Press Enter. Keep Your Install Up to Date - Latest Service Pack Latest Service Pack provides extra functions and latest support and fix for the packages you are going to install. You can download the latest service pack from software provider website.If you decide to download it from the website now, please make sure you have internet connectivity at this time. This process may take some time depending on the internet connectivity.Do you want to download the latest service pack now? [no]
13. Press Enter to accept the default path and continue, or
Enter a path to modify the default path and press Enter.
Do not use the following characters when specifying the path:
!@#$%^&*():/?\
Please specify where you want us to install Calypso binaries. It must be a local directory and there should be at least 176MB of free space available. All files will be installed in a "calypso" subdirectory, so if you enter "/opt", the files will actually be placed into "/opt/calypso".Installation Directory: [/opt]
14. Press Enter to accept the default location for the log files and continue, or
Enter a path to modify the default location and press Enter.
All the modules installed on the computer will store the log files in this directory.
Please specify where you want to keep Calypso log files.It must be a local directory and there should be at least 100MB of free space available. All log files will be created in a "calypso/Log_Files" subdirectory, so if you enter "/var/log", the logs will actually be placed into "/var/log/calypso/Log_Files".Log Directory: [/var/log]
15. Type no.
If entering Yes, go to Step 17.
Most of Software processes run with root privileges, but some are launched by databases and inherit database access rights. To make sure that registry and log files can be written to by both kinds of processes we can either make such files world-writeable or we can grant write access only to processes belonging to a particular group, e.g. a
Administration Guide - SAP for Oracle iDataAgent
Page 20 of 193
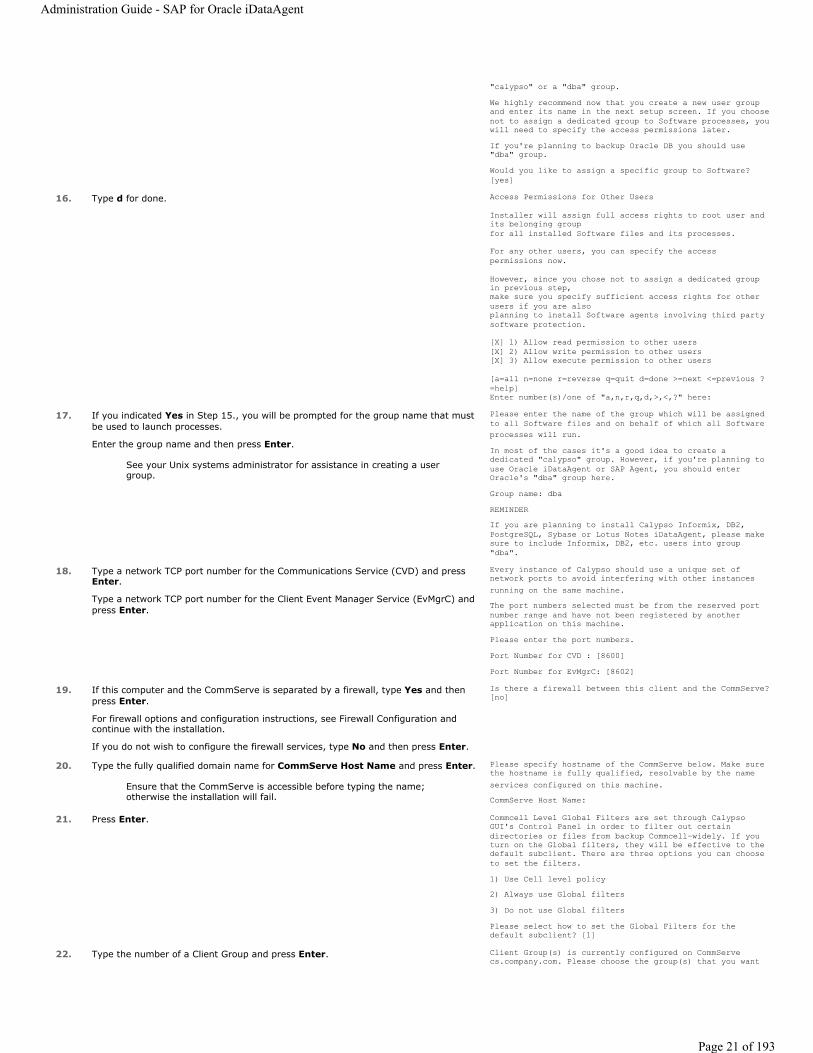
"calypso" or a "dba" group.We highly recommend now that you create a new user group and enter its name in the next setup screen. If you choose not to assign a dedicated group to Software processes, you will need to specify the access permissions later. If you're planning to backup Oracle DB you should use "dba" group. Would you like to assign a specific group to Software? [yes]
16. Type d for done. Access Permissions for Other Users
Installer will assign full access rights to root user and its belonging groupfor all installed Software files and its processes.
For any other users, you can specify the access permissions now.
However, since you chose not to assign a dedicated group in previous step,make sure you specify sufficient access rights for other users if you are alsoplanning to install Software agents involving third party software protection.
[X] 1) Allow read permission to other users[X] 2) Allow write permission to other users[X] 3) Allow execute permission to other users
[a=all n=none r=reverse q=quit d=done >=next <=previous ?=help]Enter number(s)/one of "a,n,r,q,d,>,<,?" here:
17. If you indicated Yes in Step 15., you will be prompted for the group name that must be used to launch processes.
Enter the group name and then press Enter.
See your Unix systems administrator for assistance in creating a user group.
Please enter the name of the group which will be assigned to all Software files and on behalf of which all Software processes will run.In most of the cases it's a good idea to create a dedicated "calypso" group. However, if you're planning to use Oracle iDataAgent or SAP Agent, you should enter Oracle's "dba" group here.Group name: dbaREMINDERIf you are planning to install Calypso Informix, DB2, PostgreSQL, Sybase or Lotus Notes iDataAgent, please make sure to include Informix, DB2, etc. users into group "dba".
18. Type a network TCP port number for the Communications Service (CVD) and press Enter.
Type a network TCP port number for the Client Event Manager Service (EvMgrC) and press Enter.
Every instance of Calypso should use a unique set of network ports to avoid interfering with other instances running on the same machine.The port numbers selected must be from the reserved port number range and have not been registered by another application on this machine.Please enter the port numbers.Port Number for CVD : [8600]Port Number for EvMgrC: [8602]
19. If this computer and the CommServe is separated by a firewall, type Yes and then press Enter.
For firewall options and configuration instructions, see Firewall Configuration and continue with the installation.
If you do not wish to configure the firewall services, type No and then press Enter.
Is there a firewall between this client and the CommServe? [no]
20. Type the fully qualified domain name for CommServe Host Name and press Enter.
Ensure that the CommServe is accessible before typing the name; otherwise the installation will fail.
Please specify hostname of the CommServe below. Make sure the hostname is fully qualified, resolvable by the name services configured on this machine.CommServe Host Name:
21. Press Enter. Commcell Level Global Filters are set through Calypso GUI's Control Panel in order to filter out certain directories or files from backup Commcell-widely. If you turn on the Global filters, they will be effective to the default subclient. There are three options you can choose to set the filters. 1) Use Cell level policy2) Always use Global filters3) Do not use Global filtersPlease select how to set the Global Filters for the default subclient? [1]
22. Type the number of a Client Group and press Enter. Client Group(s) is currently configured on CommServe cs.company.com. Please choose the group(s) that you want
Administration Guide - SAP for Oracle iDataAgent
Page 21 of 193
A confirmation screen will mark your choice with an "X". Type d for done with the selection, and press Enter to continue.
This screen will be displayed only if Client Groups are configured for the CommCell.
to add this client client.company.com to. The selected group(s) will be marked (X) and can be deselected if you enter the same number again. After you are finished with the selection, select "Done with the Selection".[ ] 1) Unix[ ] 2) DR[a=all n=none r=reverse q=quit d=done >=next <=previous ?=help]Enter number(s)/one of "a,n,r,q,d,>,<,?" here: 2
23. Enter the number corresponding to the storage policy through which you want to back up the External Data Connector and press Enter.
Please select one storage policy for this IDA from the list below:1) SP_StandAloneLibrary2_22) SP_Library3_33) SP_MagLibrary4_4Storage Policy: [1]
If you do not have Storage Policy created, this message will be displayed.
You may not be prompted for user input.
You can create the Storage Policy later in step 26.
There seem to be no Storage Policies configured on the CommServe. Before youcan run any backups of this IDA, you will need to install a MediaAgent, create a Storage Policy Adjusting modes and permissions of files Successfully installed Calypso
24. Type the path of the SAPEXE directory and then press Enter. Please specify the location of SAPEXE directory.SAPEXE: /usr/sap/CER/sys/exe/run
25. Type 3 to the Exit option and press Enter.
The installation is now complete.
Certain Calypso packages can be associated with a virtual IP, or in other words, installed on a "virtual machine" belonging to some cluster. At any given time the virtual machine's services and IP address are active on only one of the cluster's servers. The virtual machine can "fail-over" from one server to another, which includes stopping services and deactivating IP address on the first server and activating the IP address/services on the other server. Currently you have Calypso installed on physical node stone.company.com.Now you have a choice of either adding another package to the existing installation or configure Calypso on a virtual machine for use in a cluster.1) Add another package to stone.company.com 2) Install Calypso on a virtual machine 3) Exit Your choice: [1]
If you already have a storage policy selected in step 24, click the Next button available on the bottom of the page to proceed to the Configuration section.
If you do not have Storage Policy created, follow the procedure given below.
26.1. From the CommCell Browser, navigate to Policies.
2. Right-click the Storage Policies and then click New Storage Policy.
3. Follow the prompts displayed in the Storage Policy Wizard. The required options are mentioned below:
Select the Storage Policy type as Data Protection and Archiving and click Next. Enter the name in the Storage Policy Name box and click Next. From the Library list, click the name of a disk library to which the primary copy should be associated and then click Next.
Ensure that you select a library attached to a MediaAgent operating in the current release.
From the MediaAgent list, click the name of a MediaAgent that will be used to create the primary copy and then click Next. For the device streams and the retention criteria information, click Next to accept default values. Select Yes to enable deduplication for the primary copy. From the MediaAgent list, click the name of the MediaAgent that will be used to store the Deduplication store.
Type the name of the folder in which the deduplication database must be located in the Deduplication Store Location or click the Browse button to select the folder and then click Next.
Review the details and click Finish to create the Storage Policy.
Administration Guide - SAP for Oracle iDataAgent
Page 22 of 193

METHOD 2: INSTALL SOFTWARE FROM COMMCELL CONSOLE
1. From the CommCell Browser, select Tools | Add/Remove Software | Install Software.
2. Click Next.
3. Select Unix and Linux.
Click Next.
4. Select Manually Select Computers.
Click Next.
Administration Guide - SAP for Oracle iDataAgent
Page 23 of 193

5. Enter the fully qualified domain name of the computer in which you wish to install.
For example: apple.domain.company.comThe SAP for Oracle iDataAgent will be installed on this client computer.
Click Next.
6. Click Next.
7. Specify UserName and Password of client computer.
Click Next.
8. Select SAP For Oracle.
Click Next.
Administration Guide - SAP for Oracle iDataAgent
Page 24 of 193
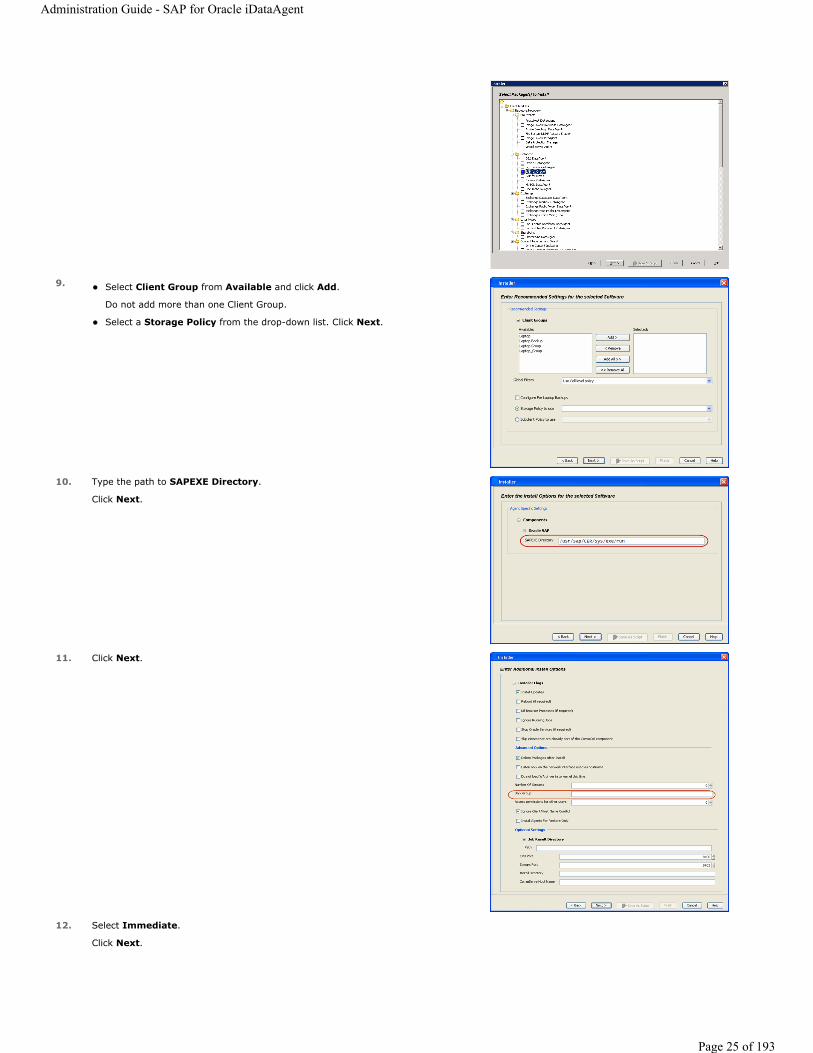
9. Select Client Group from Available and click Add.
Do not add more than one Client Group.
Select a Storage Policy from the drop-down list. Click Next.
10. Type the path to SAPEXE Directory.
Click Next.
11. Click Next.
12. Select Immediate.
Click Next.
Administration Guide - SAP for Oracle iDataAgent
Page 25 of 193
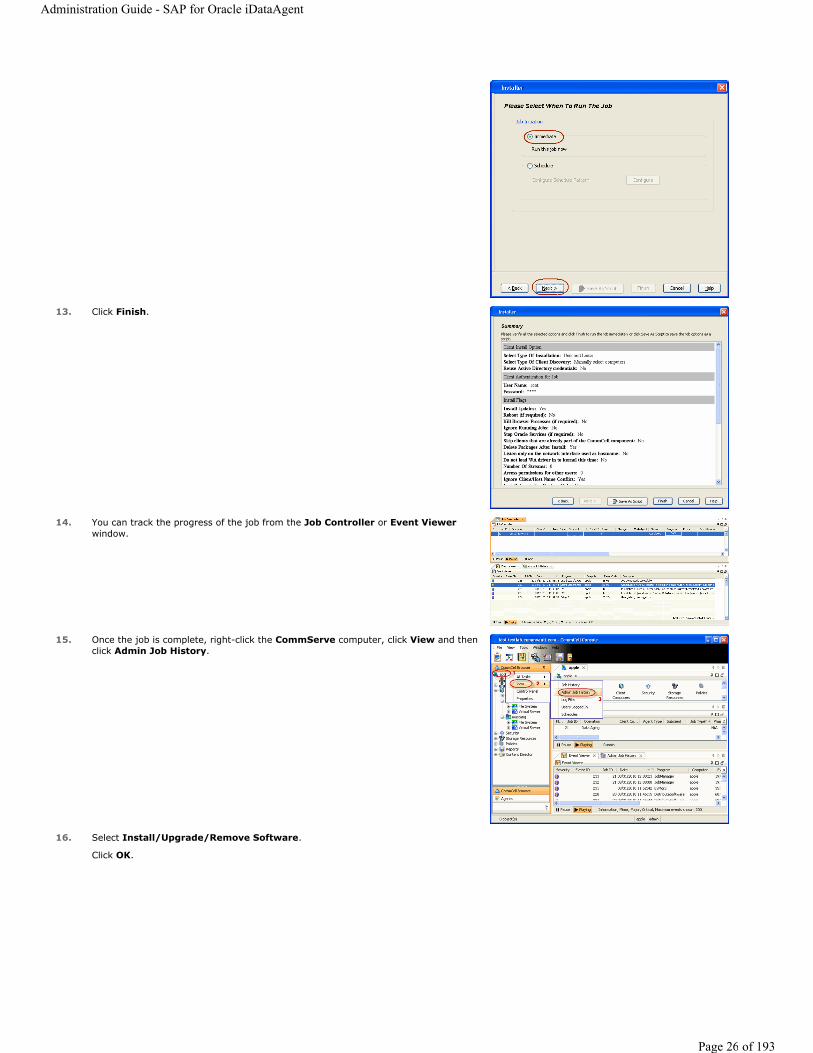
13. Click Finish.
14. You can track the progress of the job from the Job Controller or Event Viewerwindow.
15. Once the job is complete, right-click the CommServe computer, click View and then click Admin Job History.
16. Select Install/Upgrade/Remove Software.
Click OK.
Administration Guide - SAP for Oracle iDataAgent
Page 26 of 193
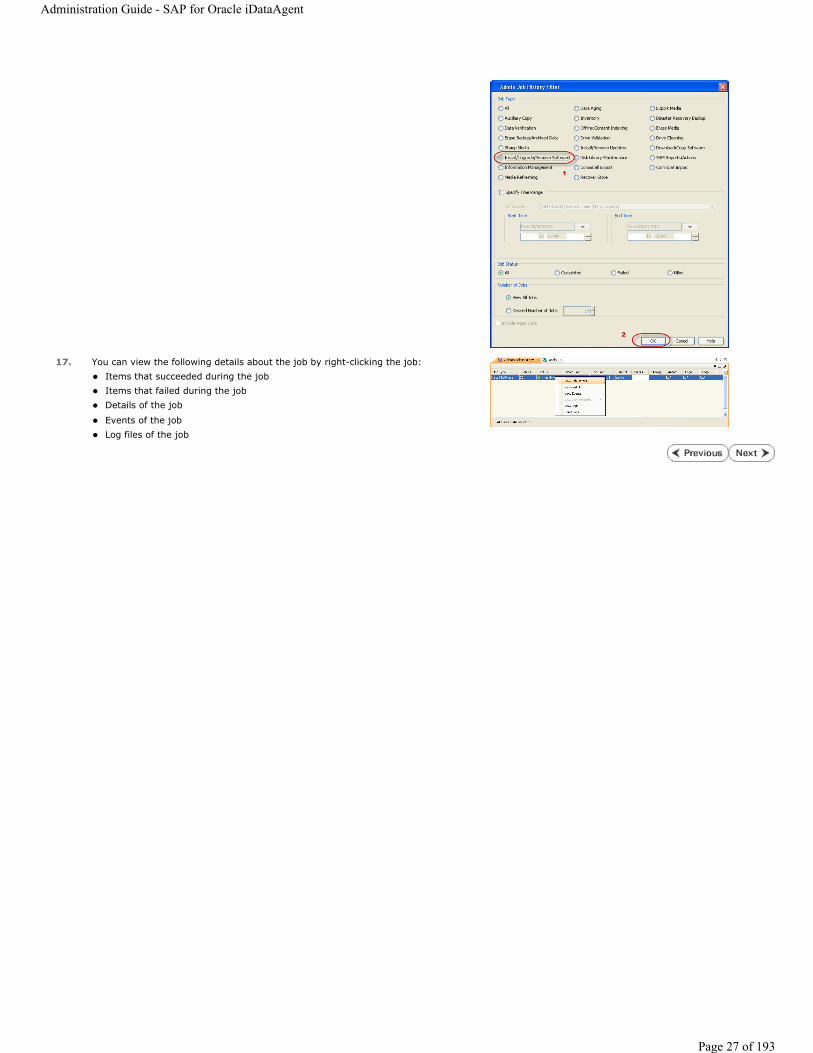
17. You can view the following details about the job by right-clicking the job: Items that succeeded during the job Items that failed during the job Details of the job
Events of the job Log files of the job
Administration Guide - SAP for Oracle iDataAgent
Page 27 of 193

Getting Started - Deploying in a Non-Global Zone
WHERE TO INSTALL
Install the software on each of the non-global zones where you have application data.
It is recommended to install the software on the global zone to protect non-changing or static data on non-global zones. If the data is dynamic or contains application data, install the software on the non-global zone.
METHOD 1: INTERACTIVE INSTALL
INSTALLATION RELATED TOPICS
The software can be installed using one of the following methods:
METHOD 1: INTERACTIVE INSTALL
Use this procedure to install the software directly on client computer.
METHOD 2: INSTALL SOFTWARE FROM COMMCELL CONSOLE
Use this procedure to remotely install the software on a client computer.
System RequirementsVerify that the computer in which you wish to install the software satisfies the System Requirements.
FirewallProvides comprehensive information on firewall.
1. Mount the installation disc on the non-global zone.
mkdir <Non-Global Zone root location>/<Non-Global Zone local directory> mount –F lofs <Global zone software Install Disc mount point> <Non-Global Zone root location>/<Non-Global Zone local directory>Connect to Non-Global Zone terminal
2. Run the following command from the Software Installation Disc:
./cvpkgadd
3. The product banner and other information is displayed.
Press Enter.
4. Read the license agreement. Type y and press Enter.
5. Press Enter. Please select a setup task you want to perform from the list below:Advance options provide extra setup features such as creating custom package, recording/replaying user selections and installing External Data Connector software.1) Install data protection agents on this computer2) Advance options3) Exit this menuYour choice: [1]
6. If your computer is 32-bit, press Enter.
If your computer is 64-bit, see Install Unix Agents on 64-bit Platform for step-by-step procedure.
This machine supports both 32 bit and 64 bit binaries. By default, we will install 32 bit binary set that has full support for all the modules included in this package. Please note that 64 bit binary set currently only support limited modules.1) All platform (32 bit)2) FS and MA only (64 bit)Your choice: [1]
7. Press Enter. Certain Calypso packages can be associated with a virtual IP, or in other words, installed on a "virtual machine" belonging to some cluster. At any given time the virtual machine's services and IP address are active on only one of the cluster's servers. The virtual machine can "fail-over" from one server to another, which includes stopping services and deactivating IP address on the first server and activating the IP address/services on the other server.You now have a choice of performing a regular Calypso install on the physical host or installing Calypso on a virtual machine for operation within a cluster. Most users should select "Install on a physical machine" here.
Administration Guide - SAP for Oracle iDataAgent
Page 28 of 193

1) Install on a physical machine 2) Install on a virtual machine 3) Exit Your choice: [1]
8. If you have only one network interface, press Enter to accept the default network interface name and continue.
If you have multiple network interfaces, enter the interface name that you wish to use as default, and then press Enter.
The interface name and IP addresses depend on the computer in which the software is installed and may be different from the example shown.
We found one network interface available on your machine. We will associate it with the physical machine being installed, and it will also be used by the CommServe to connect to the physical machine. Note that you will be able to additionally customize Datapipe Interface Pairs used for the backup data traffic later in the Calypso Java GUI.Please check the interface name below, and make connections if necessary:Physical Machine Host Name: [angel.company.com]
9. Press Enter. Please specify the client name for this machine.It does not have to be the network host name: you can enter any word here without spaces. The only requirement is that it must be unique on the CommServe.Physical Machine Client name: [angel]
10. Type the appropriate number to install SAP for Oracle iDataAgent.
A confirmation screen will mark your choice with an "X".
Type d for Done, and press Enter.
Install Calypso on physical machine 172.19.99.62Please select the Calypso module(s) that you would like to install.[ ] 1) MediaAgent [1301] [CVGxMA]>[ ] 2) UNIX File System iDataAgent [1101] [CVGxIDA][a=all n=none r=reverse q=quit d=done >=next <=previous ?=help]Enter number(s)/one of "a,n,r,q,d,>,<,?" here:
11. Press Enter. Do you want to use the agents for restore only without consuming licenses? [no]
12. Type the appropriate number to install the latest software scripts and press Enter to continue.
Select Download from the software provider website to download the latest software scripts from your software provider website.
Make sure you have internet connectivity when you are using this option.
Select Use the one in the installation media, to install the software scripts from the disc or share from which the installation is performed. Select Use the copy I already have by entering its unix path, to specify the path if you have the software script in an alternate location.
Installation Scripts Pack provides extra functions and latest support and fix performed during setup time. Please specify how you want to get this pack.If you choose to download it from the website now, please make sure you have internet connectivity at this time. This process may take some time depending on the internet connectivity.1) Download from the software provider website.2) Use the one in the installation media3) Use the copy I already have by entering its unix pathYour choice: [1] 2
13. Press Enter. Keep Your Install Up to Date - Latest Service Pack Latest Service Pack provides extra functions and latest support and fix for the packages you are going to install. You can download the latest service pack from software provider website.If you decide to download it from the website now, please make sure you have internet connectivity at this time. This process may take some time depending on the internet connectivity.Do you want to download the latest service pack now? [no]
14. Press Enter to accept the default path and continue, or
Enter a path to modify the default path and press Enter.
Do not use the following characters when specifying the path:
!@#$%^&*():/?\
Please specify where you want us to install Calypso binaries. It must be a local directory and there should be at least 176MB of free space available. All files will be installed in a "calypso" subdirectory, so if you enter "/opt", the files will actually be placed into "/opt/calypso".Installation Directory: [/opt]
15. Press Enter to accept the default location for the log files and continue, or
Enter a path to modify the default location and press Enter.
All the modules installed on the computer will store the log files in this directory.
Please specify where you want to keep Calypso log files.It must be a local directory and there should be at least 100MB of free space available. All log files will be created in a "calypso/Log_Files" subdirectory, so if you enter "/var/log", the logs will actually be placed into "/var/log/calypso/Log_Files".Log Directory: [/var/log]
16. Type no.
If entering Yes, go to Step 18.
Most of Software processes run with root privileges, but some are launched by databases and inherit database access rights. To make sure that registry and log files can be written to by both kinds of processes we can either make such files world-writeable or we can grant write access
Administration Guide - SAP for Oracle iDataAgent
Page 29 of 193
only to processes belonging to a particular group, e.g. a "calypso" or a "dba" group.We highly recommend now that you create a new user group and enter its name in the next setup screen. If you choose not to assign a dedicated group to Software processes, you will need to specify the access permissions later. If you're planning to backup Oracle DB you should use "dba" group. Would you like to assign a specific group to Software? [yes]
17. Type d for done. Access Permissions for Other Users
Installer will assign full access rights to root user and its belonging groupfor all installed Software files and its processes.
For any other users, you can specify the access permissions now.
However, since you chose not to assign a dedicated group in previous step,make sure you specify sufficient access rights for other users if you are alsoplanning to install Software agents involving third party software protection.
[X] 1) Allow read permission to other users[X] 2) Allow write permission to other users[X] 3) Allow execute permission to other users
[a=all n=none r=reverse q=quit d=done >=next <=previous ?=help]Enter number(s)/one of "a,n,r,q,d,>,<,?" here:
18. If you indicated Yes in Step 16., you will be prompted for the group name that must be used to launch processes.
Enter the group name and then press Enter.
See your Unix systems administrator for assistance in creating a user group.
Please enter the name of the group which will be assigned to all Software files and on behalf of which all Software processes will run.In most of the cases it's a good idea to create a dedicated "calypso" group. However, if you're planning to use Oracle iDataAgent or SAP Agent, you should enter Oracle's "dba" group here.Group name: dbaREMINDERIf you are planning to install Calypso Informix, DB2, PostgreSQL, Sybase or Lotus Notes iDataAgent, please make sure to include Informix, DB2, etc. users into group "dba".
19. Type a network TCP port number for the Communications Service (CVD) and press Enter.
Type a network TCP port number for the Client Event Manager Service (EvMgrC) and press Enter.
Every instance of Calypso should use a unique set of network ports to avoid interfering with other instances running on the same machine.The port numbers selected must be from the reserved port number range and have not been registered by another application on this machine.Please enter the port numbers.Port Number for CVD : [8600]Port Number for EvMgrC: [8602]
20. If this computer and the CommServe is separated by a firewall, type Yes and then press Enter.
For firewall options and configuration instructions, see Firewall Configuration and continue with the installation.
If you do not wish to configure the firewall services, type No and then press Enter.
Is there a firewall between this client and the CommServe? [no]
21. Type the fully qualified domain name for CommServe Host Name and press Enter.
Ensure that the CommServe is accessible before typing the name; otherwise the installation will fail.
Please specify hostname of the CommServe below. Make sure the hostname is fully qualified, resolvable by the name services configured on this machine.CommServe Host Name:
22. Press Enter. Commcell Level Global Filters are set through Calypso GUI's Control Panel in order to filter out certain directories or files from backup Commcell-widely. If you turn on the Global filters, they will be effective to the default subclient. There are three options you can choose to set the filters. 1) Use Cell level policy2) Always use Global filters3) Do not use Global filtersPlease select how to set the Global Filters for the default subclient? [1]
23. Type the number of a Client Group and press Enter. Client Group(s) is currently configured on CommServe
Administration Guide - SAP for Oracle iDataAgent
Page 30 of 193
A confirmation screen will mark your choice with an "X". Type d for done with the selection, and press Enter to continue.
This screen will be displayed only if Client Groups are configured for the CommCell.
cs.company.com. Please choose the group(s) that you want to add this client client.company.com to. The selected group(s) will be marked (X) and can be deselected if you enter the same number again. After you are finished with the selection, select "Done with the Selection".[ ] 1) Unix[ ] 2) DR[a=all n=none r=reverse q=quit d=done >=next <=previous ?=help]Enter number(s)/one of "a,n,r,q,d,>,<,?" here: 2
24. Enter the number corresponding to the storage policy through which you want to back up the External Data Connector and press Enter.
Please select one storage policy for this IDA from the list below:1) SP_StandAloneLibrary2_22) SP_Library3_33) SP_MagLibrary4_4Storage Policy: [1]
If you do not have Storage Policy created, this message will be displayed.
You may not be prompted for user input.
You can create the Storage Policy later in step 27.
There seem to be no Storage Policies configured on the CommServe. Before youcan run any backups of this IDA, you will need to install a MediaAgent, createa Storage PolicyAdjusting modes and permissions of files
Successfully installed Calypso
25. Type the path of the SAPEXE directory and then press Enter. Please specify the location of SAPEXE directory.SAPEXE: /usr/sap/CER/sys/exe/run
26. Type 3 to the Exit option and press Enter.
The installation is now complete.
Certain Calypso packages can be associated with a virtual IP, or in other words, installed on a "virtual machine" belonging to some cluster. At any given time the virtual machine's services and IP address are active on only one of the cluster's servers. The virtual machine can "fail-over" from one server to another, which includes stopping services and deactivating IP address on the first server and activating the IP address/services on the other server. Currently you have Calypso installed on physical node stone.company.com.Now you have a choice of either adding another package to the existing installation or configure Calypso on a virtual machine for use in a cluster.1) Add another package to stone.company.com 2) Install Calypso on a virtual machine 3) Exit Your choice: [1]
If you already have a storage policy selected in step 24, click the Next button available on the bottom of the page to proceed to the Configuration section.
If you do not have Storage Policy created, follow the procedure given below.
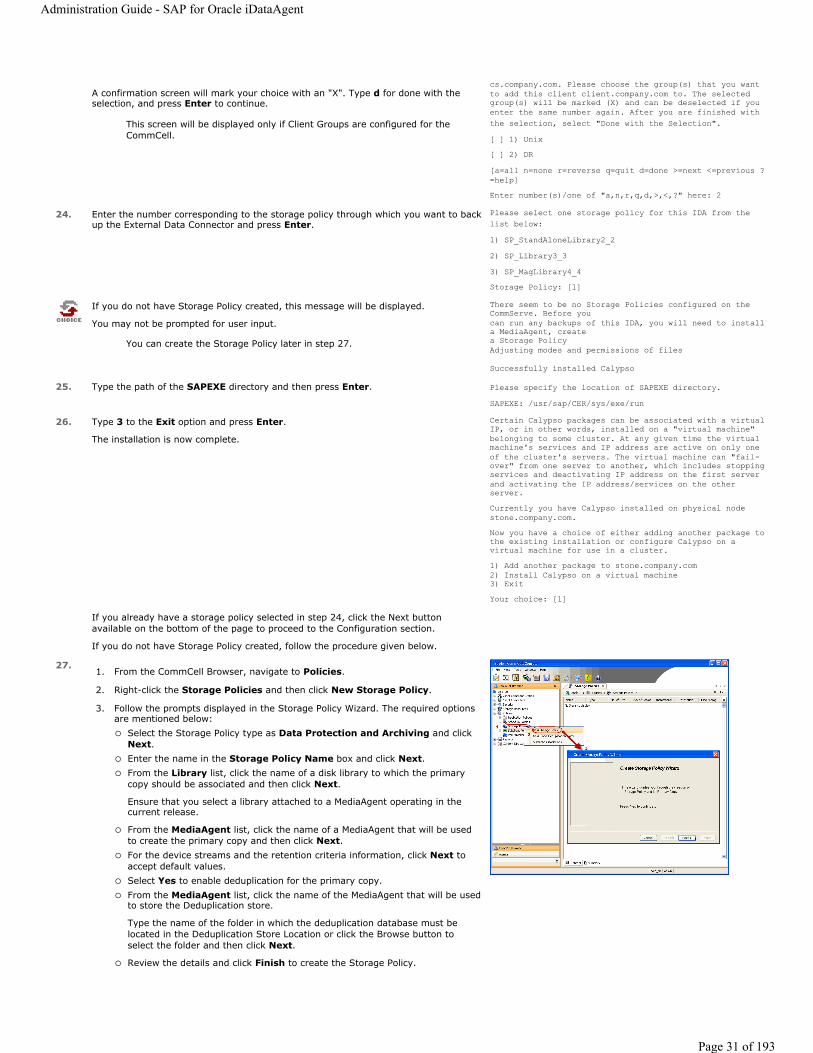
27.1. From the CommCell Browser, navigate to Policies.
2. Right-click the Storage Policies and then click New Storage Policy.
3. Follow the prompts displayed in the Storage Policy Wizard. The required options are mentioned below:
Select the Storage Policy type as Data Protection and Archiving and click Next. Enter the name in the Storage Policy Name box and click Next. From the Library list, click the name of a disk library to which the primary copy should be associated and then click Next.
Ensure that you select a library attached to a MediaAgent operating in the current release.
From the MediaAgent list, click the name of a MediaAgent that will be used to create the primary copy and then click Next. For the device streams and the retention criteria information, click Next to accept default values. Select Yes to enable deduplication for the primary copy. From the MediaAgent list, click the name of the MediaAgent that will be used to store the Deduplication store.
Type the name of the folder in which the deduplication database must be located in the Deduplication Store Location or click the Browse button to select the folder and then click Next.
Review the details and click Finish to create the Storage Policy.
Administration Guide - SAP for Oracle iDataAgent
Page 31 of 193
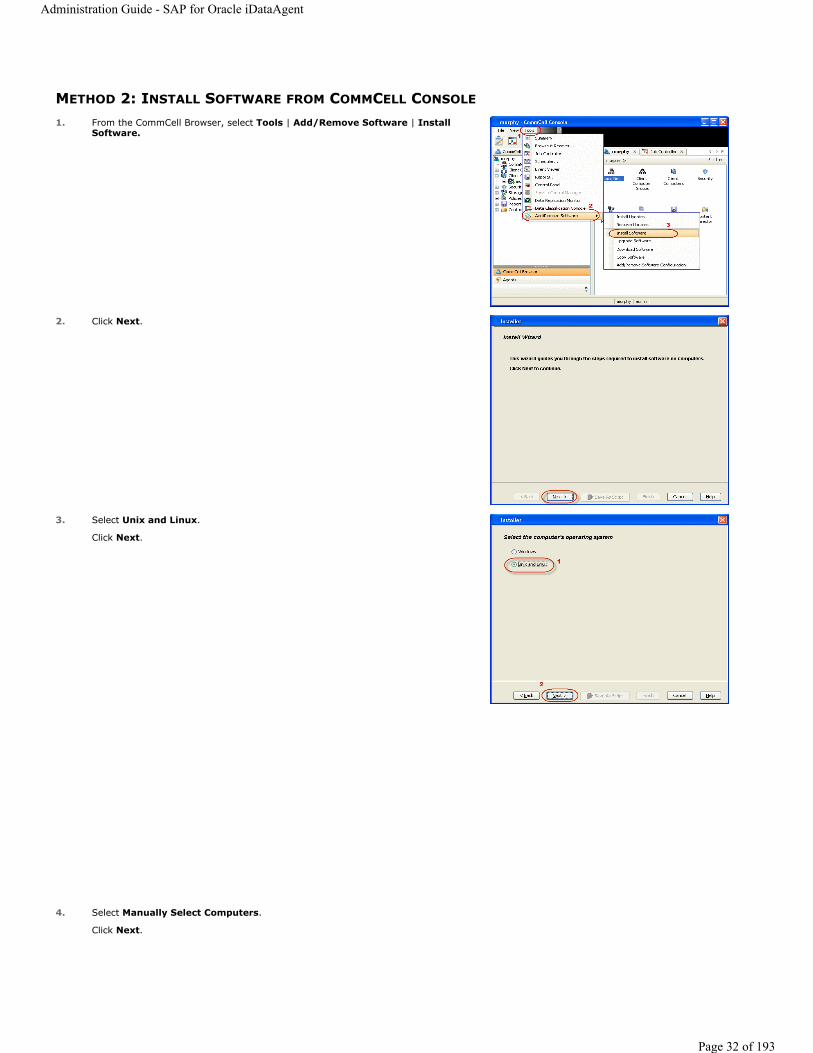
METHOD 2: INSTALL SOFTWARE FROM COMMCELL CONSOLE
1. From the CommCell Browser, select Tools | Add/Remove Software | Install Software.
2. Click Next.
3. Select Unix and Linux.
Click Next.
4. Select Manually Select Computers.
Click Next.
Administration Guide - SAP for Oracle iDataAgent
Page 32 of 193

5. Enter the fully qualified domain name of the computer in which you wish to install.
For example: apple.domain.company.comThe SAP for Oracle iDataAgent will be installed on this client computer.
Click Next.
6. Click Next.
7. Specify UserName and Password of client computer.
Click Next.
8. Select SAP For Oracle.
Click Next.
Administration Guide - SAP for Oracle iDataAgent
Page 33 of 193
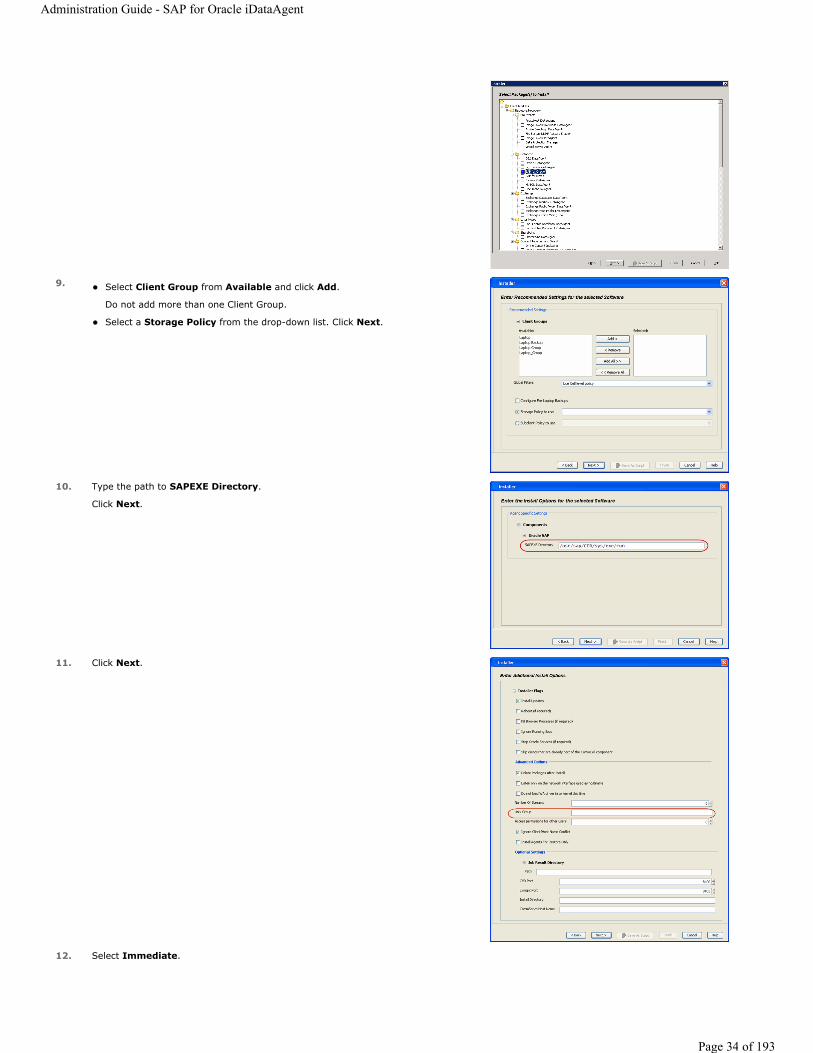
9. Select Client Group from Available and click Add.
Do not add more than one Client Group.
Select a Storage Policy from the drop-down list. Click Next.
10. Type the path to SAPEXE Directory.
Click Next.
11. Click Next.
12. Select Immediate.
Administration Guide - SAP for Oracle iDataAgent
Page 34 of 193
Click Next.
13. Click Finish.
14. You can track the progress of the job from the Job Controller or Event Viewerwindow.
15. Once the job is complete, right-click the CommServe computer, click View and then click Admin Job History.
16. Select Install/Upgrade/Remove Software.
Click OK.
Administration Guide - SAP for Oracle iDataAgent
Page 35 of 193

17. You can view the following details about the job by right-clicking the job: Items that succeeded during the job Items that failed during the job Details of the job
Events of the job Log files of the job
Administration Guide - SAP for Oracle iDataAgent
Page 36 of 193

Getting Started - SAP for Oracle Configuration
CONFIGURATIONOnce the SAP for Oracle iDataAgent has been installed, configure an Instance to facilitate backups. Each instance references an Oracle database. Also it is recommended to create separate subclients for data and log backups. The following sections provide the necessary steps required to create and configure these components for a first backup of an Oracle database.
CREATING AN INSTANCE
1. From the CommCell Browser, navigate to <Client> | SAP for Oracle. Right-click SAP for Oracle | All Tasks and click New Instance (ORACLE SID).
2. Enter the Instance Name. Browse or enter the path to the Oracle application files in Oracle Home. Browse or enter the path to the Oracle data and control files in SAP DATA PATH.
Select a Storage Policy from the drop down list.
If you do not have a Storage Policy created, follow the steps given below to create a Storage Policy.
If you have already created a Storage Policy skip to step 4.
3. Create a Storage Policy:
1. From the CommCell Browser, navigate to Policies.
2. Right-click the Storage Policies and then click New Storage Policy.
3. Follow the prompts displayed in the Storage Policy Wizard. The required options are mentioned below:
Select the Storage Policy type as Data Protection and Archiving and click Next. Enter the name in the Storage Policy Name box and click Next. From the Library list, click the name of a disk library to which the primary copy should be associated and then click Next.
Ensure that you select a library attached to a MediaAgent operating in the current release.
From the MediaAgent list, click the name of a MediaAgent that will be used to create the primary copy and then click Next. For the device streams and the retention criteria information, click Next to accept default values.
Select Yes to enable deduplication for the primary copy. From the MediaAgent list, click the name of the MediaAgent that will be used to store the Deduplication store.
Type the name of the folder in which the deduplication database must be located in the Deduplication Store Location or click the Browse button to select the folder and then click Next.
Review the details and click Finish to create the Storage Policy.
Administration Guide - SAP for Oracle iDataAgent
Page 37 of 193
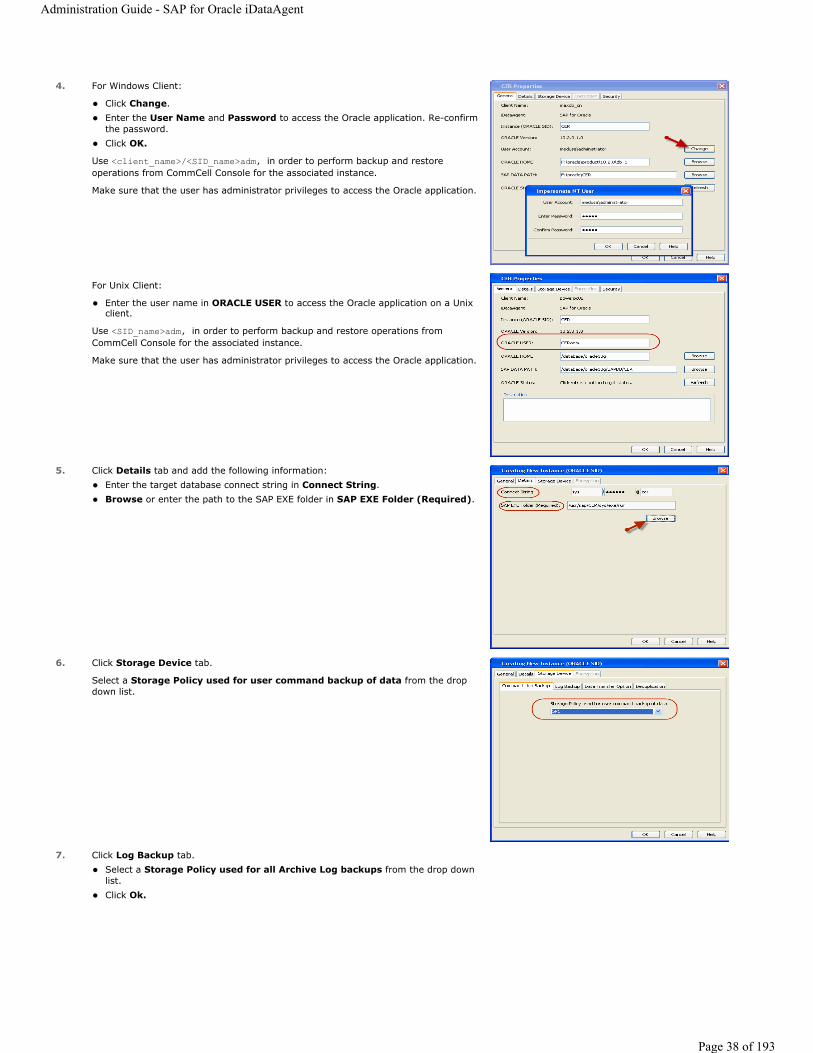
4. For Windows Client:
Click Change. Enter the User Name and Password to access the Oracle application. Re-confirm the password. Click OK.
Use <client_name>/<SID_name>adm, in order to perform backup and restore operations from CommCell Console for the associated instance.
Make sure that the user has administrator privileges to access the Oracle application.
For Unix Client:
Enter the user name in ORACLE USER to access the Oracle application on a Unix client.
Use <SID_name>adm, in order to perform backup and restore operations from CommCell Console for the associated instance.
Make sure that the user has administrator privileges to access the Oracle application.
5. Click Details tab and add the following information: Enter the target database connect string in Connect String. Browse or enter the path to the SAP EXE folder in SAP EXE Folder (Required).
6. Click Storage Device tab.
Select a Storage Policy used for user command backup of data from the drop down list.
7. Click Log Backup tab. Select a Storage Policy used for all Archive Log backups from the drop down list. Click Ok.
Administration Guide - SAP for Oracle iDataAgent
Page 38 of 193
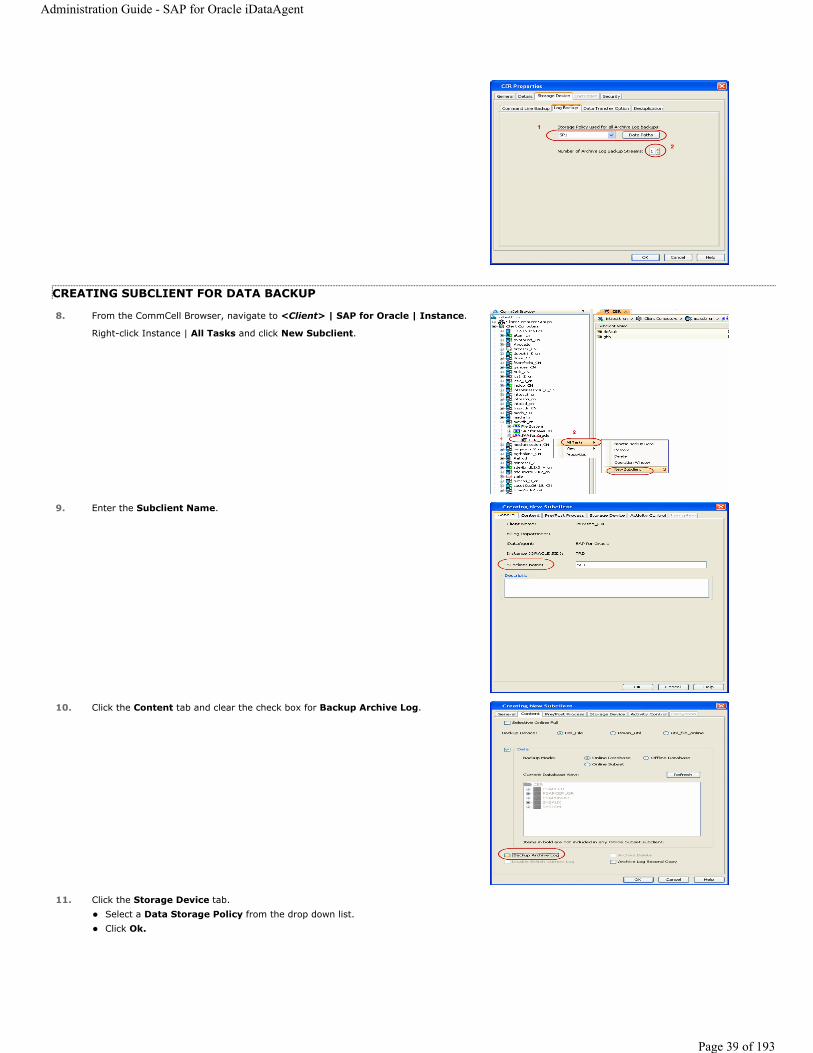
CREATING SUBCLIENT FOR DATA BACKUP
8. From the CommCell Browser, navigate to <Client> | SAP for Oracle | Instance.
Right-click Instance | All Tasks and click New Subclient.
9. Enter the Subclient Name.
10. Click the Content tab and clear the check box for Backup Archive Log.
11. Click the Storage Device tab. Select a Data Storage Policy from the drop down list. Click Ok.
Administration Guide - SAP for Oracle iDataAgent
Page 39 of 193

CREATING SUBCLIENT FOR LOG BACKUP
12. From the CommCell Browser, navigate to <Client> | SAP for Oracle | Instance.
Right-click Instance | All Tasks and click New Subclient.
13. Enter the Subclient Name.
14. Click the Content tab and clear the check box for Data.
15. Click the Storage Device tab. Select a Data Storage Policy from the drop down list. Click Ok.
Make sure that the storage policy selected uses the same
Administration Guide - SAP for Oracle iDataAgent
Page 40 of 193
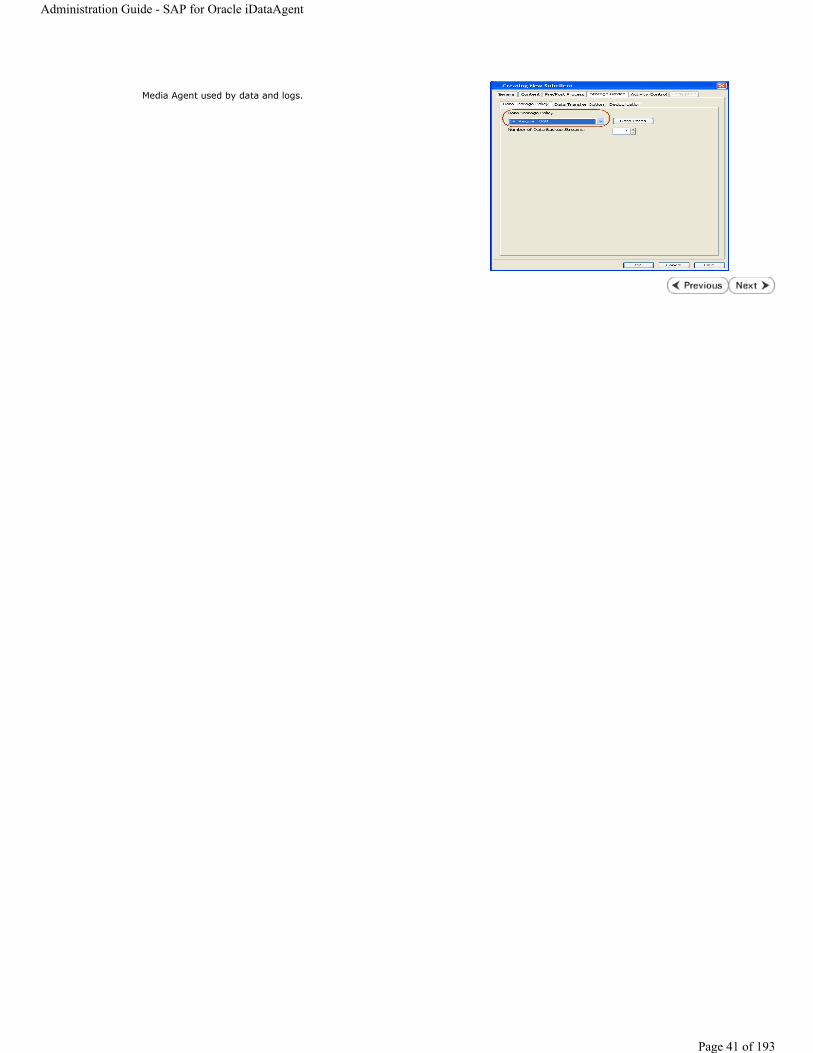
Media Agent used by data and logs.
Administration Guide - SAP for Oracle iDataAgent
Page 41 of 193
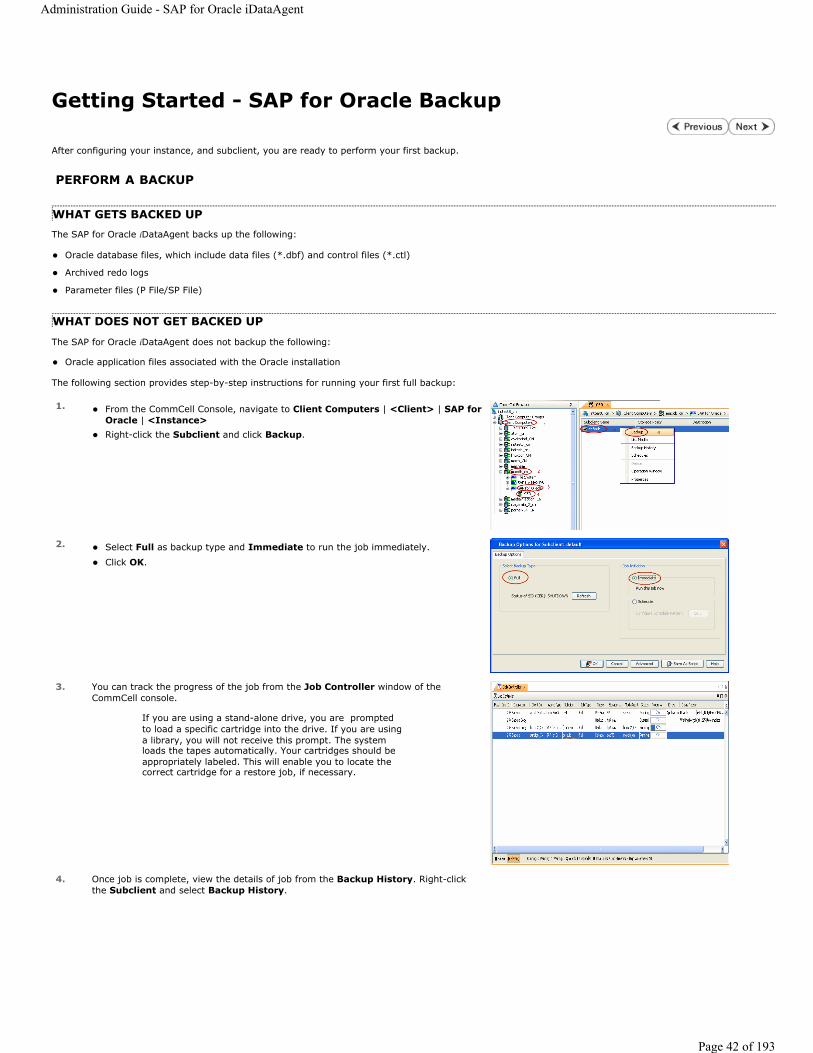
Getting Started - SAP for Oracle Backup
After configuring your instance, and subclient, you are ready to perform your first backup.
PERFORM A BACKUP
WHAT GETS BACKED UPThe SAP for Oracle iDataAgent backs up the following:
Oracle database files, which include data files (*.dbf) and control files (*.ctl)
Archived redo logs
Parameter files (P File/SP File)
WHAT DOES NOT GET BACKED UP
The SAP for Oracle iDataAgent does not backup the following:
Oracle application files associated with the Oracle installation
The following section provides step-by-step instructions for running your first full backup:
1. From the CommCell Console, navigate to Client Computers | <Client> | SAP for Oracle | <Instance>Right-click the Subclient and click Backup.
2. Select Full as backup type and Immediate to run the job immediately.
Click OK.
3. You can track the progress of the job from the Job Controller window of the CommCell console.
If you are using a stand-alone drive, you are prompted to load a specific cartridge into the drive. If you are using a library, you will not receive this prompt. The system loads the tapes automatically. Your cartridges should be appropriately labeled. This will enable you to locate the correct cartridge for a restore job, if necessary.
4. Once job is complete, view the details of job from the Backup History. Right-click the Subclient and select Backup History.
Administration Guide - SAP for Oracle iDataAgent
Page 42 of 193

5. Click OK.
6. You can view the following details about the job by right-clicking the job: Items that failed during the job Items that succeeded during the job Details of the job
Events of the job Log files of the job Media associated with the job
Administration Guide - SAP for Oracle iDataAgent
Page 43 of 193
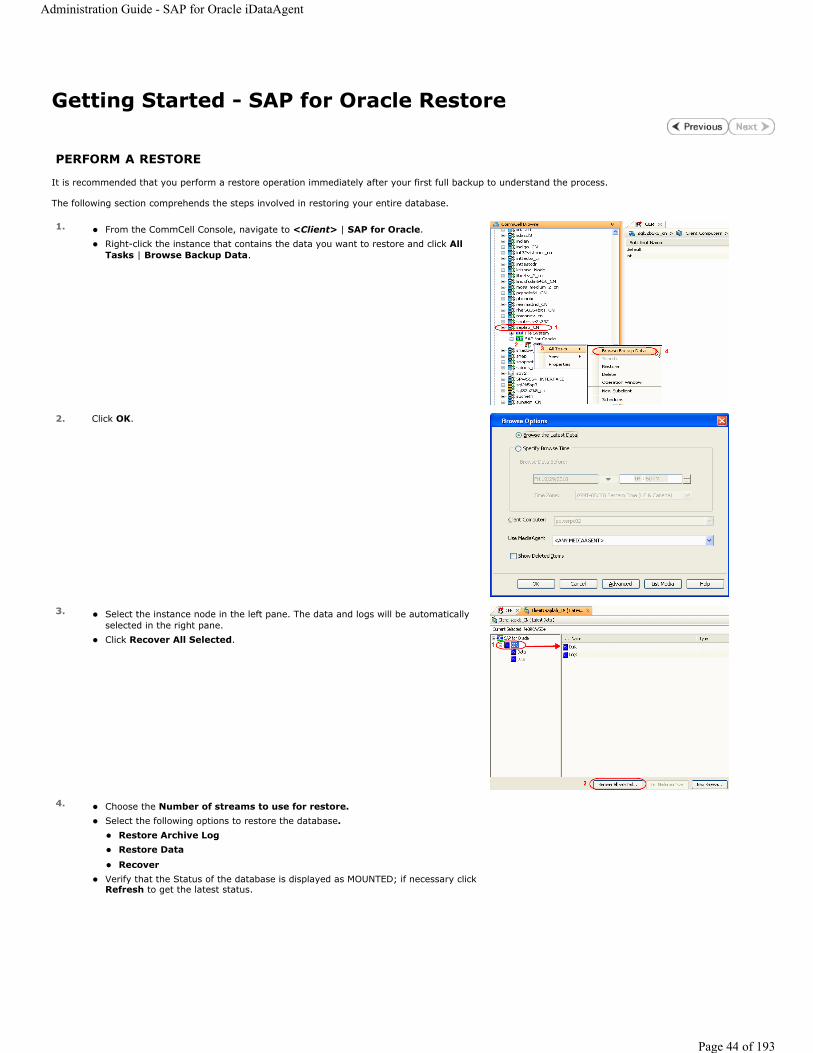
Getting Started - SAP for Oracle Restore
PERFORM A RESTORE
It is recommended that you perform a restore operation immediately after your first full backup to understand the process.
The following section comprehends the steps involved in restoring your entire database.
1. From the CommCell Console, navigate to <Client> | SAP for Oracle. Right-click the instance that contains the data you want to restore and click All Tasks | Browse Backup Data.
2. Click OK.
3. Select the instance node in the left pane. The data and logs will be automatically selected in the right pane. Click Recover All Selected.
4. Choose the Number of streams to use for restore.Select the following options to restore the database.
Restore Archive LogRestore DataRecover
Verify that the Status of the database is displayed as MOUNTED; if necessary click Refresh to get the latest status.
Administration Guide - SAP for Oracle iDataAgent
Page 44 of 193
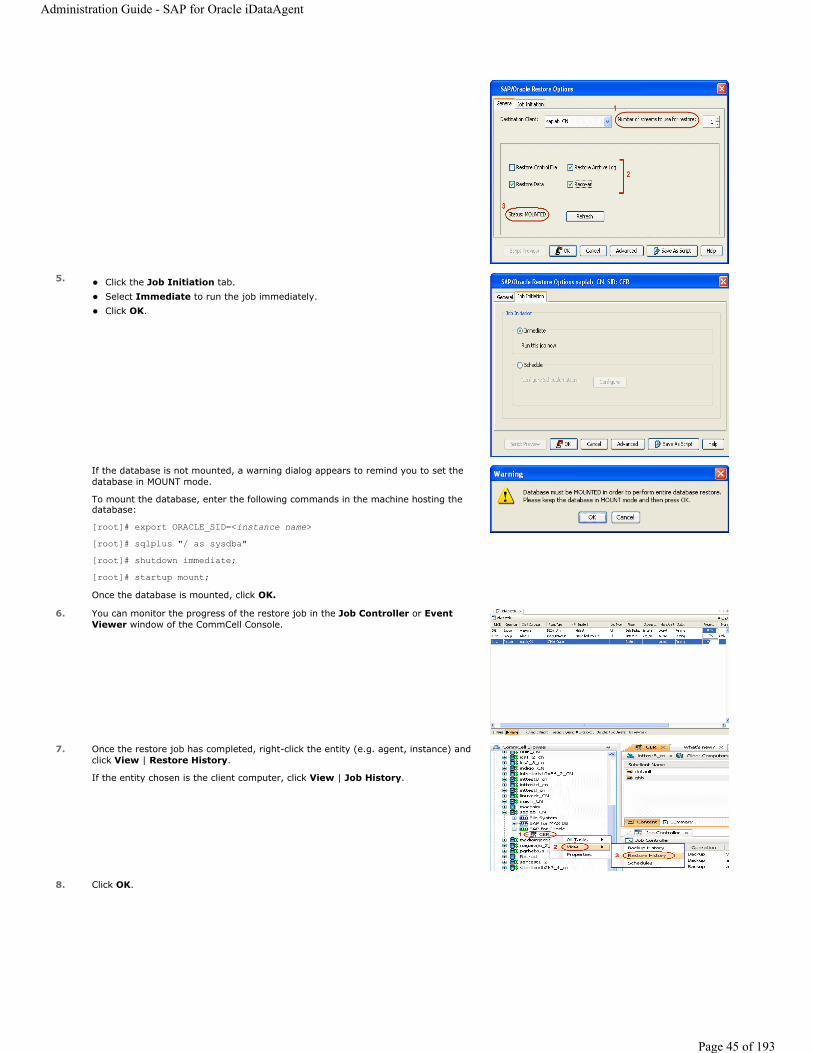
5. Click the Job Initiation tab. Select Immediate to run the job immediately. Click OK.
If the database is not mounted, a warning dialog appears to remind you to set the database in MOUNT mode.
To mount the database, enter the following commands in the machine hosting the database:
[root]# export ORACLE_SID=<instance name>[root]# sqlplus "/ as sysdba"[root]# shutdown immediate;[root]# startup mount;Once the database is mounted, click OK.
6. You can monitor the progress of the restore job in the Job Controller or Event Viewer window of the CommCell Console.
7. Once the restore job has completed, right-click the entity (e.g. agent, instance) and click View | Restore History.
If the entity chosen is the client computer, click View | Job History.
8. Click OK.
Administration Guide - SAP for Oracle iDataAgent
Page 45 of 193
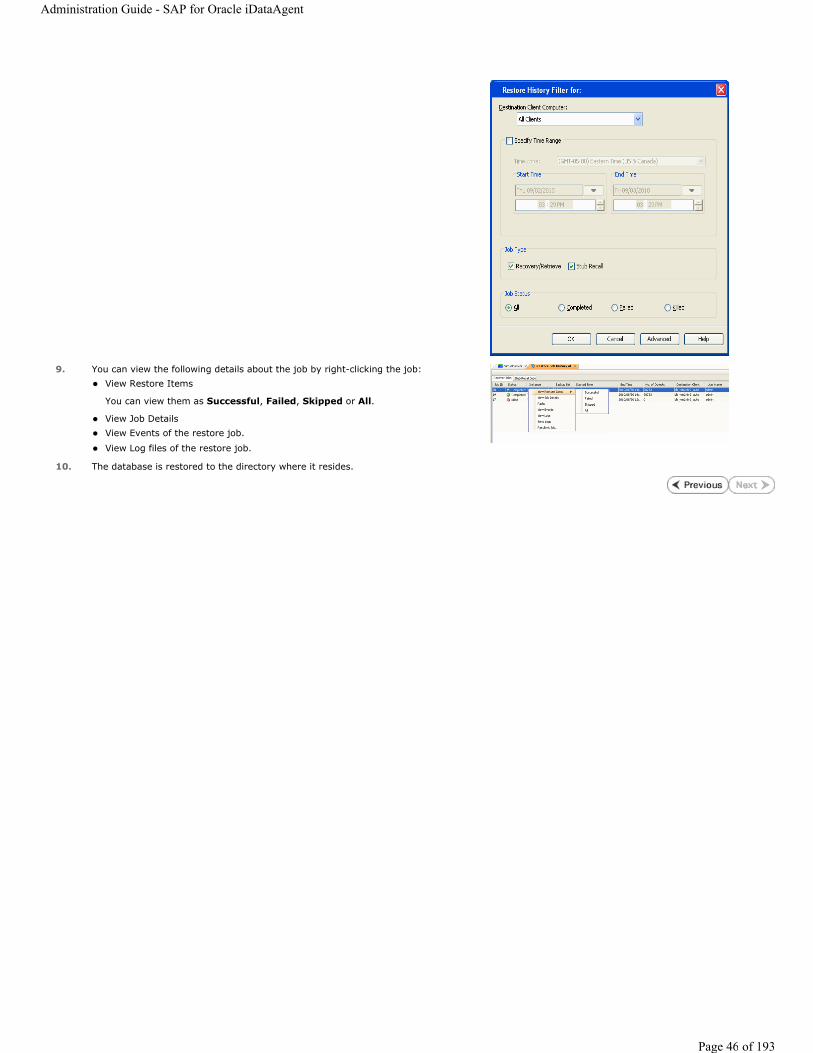
9. You can view the following details about the job by right-clicking the job: View Restore Items
You can view them as Successful, Failed, Skipped or All.
View Job Details View Events of the restore job.
View Log files of the restore job.
10. The database is restored to the directory where it resides.
Administration Guide - SAP for Oracle iDataAgent
Page 46 of 193
Advanced - SAP for Oracle ConfigurationTABLE OF CONTENTS
UNDERSTANDING THE COMMCELL CONSOLE
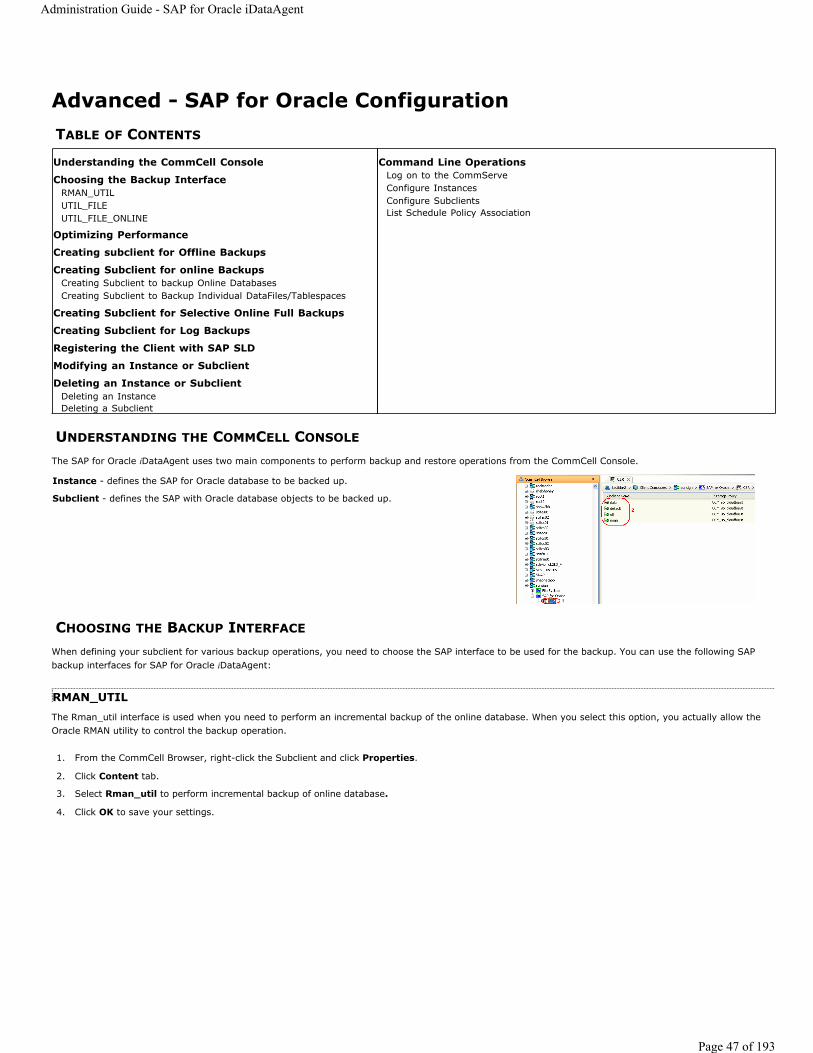
The SAP for Oracle iDataAgent uses two main components to perform backup and restore operations from the CommCell Console.
CHOOSING THE BACKUP INTERFACE
When defining your subclient for various backup operations, you need to choose the SAP interface to be used for the backup. You can use the following SAP backup interfaces for SAP for Oracle iDataAgent:
RMAN_UTILThe Rman_util interface is used when you need to perform an incremental backup of the online database. When you select this option, you actually allow the Oracle RMAN utility to control the backup operation.
Understanding the CommCell Console
Choosing the Backup InterfaceRMAN_UTILUTIL_FILEUTIL_FILE_ONLINE
Optimizing Performance
Creating subclient for Offline Backups
Creating Subclient for online BackupsCreating Subclient to backup Online DatabasesCreating Subclient to Backup Individual DataFiles/Tablespaces
Creating Subclient for Selective Online Full Backups
Creating Subclient for Log Backups
Registering the Client with SAP SLD
Modifying an Instance or Subclient
Deleting an Instance or SubclientDeleting an InstanceDeleting a Subclient
Command Line OperationsLog on to the CommServeConfigure InstancesConfigure SubclientsList Schedule Policy Association
Instance - defines the SAP for Oracle database to be backed up.
Subclient - defines the SAP with Oracle database objects to be backed up.
1. From the CommCell Browser, right-click the Subclient and click Properties.
2. Click Content tab.
3. Select Rman_util to perform incremental backup of online database.
4. Click OK to save your settings.
Administration Guide - SAP for Oracle iDataAgent
Page 47 of 193

UTIL_FILE
The util_file interface is used when you need to perform a full backup of the SAP for Oracle data files as File System data. When selecting this option for online backup, the Oracle database is locked till the full backup operation is completed.
UTIL_FILE_ONLINE
The util_file_online interface is similar to the util_file interface. you can use this interface to perform a full or selective online full backup operations. When selecting this option for online backup, the Oracle database locks each table space that is being backed up and releases it once that table space backup is completed.
1. From the CommCell Browser, right-click the Subclient and click Properties.
2. Click Content tab.
3. Select util_file to perform a full backup of SAP for Oracle data.
4. Click OK to save your settings.
1. From the CommCell Browser, right-click the Subclient and click Properties.
2. Click Content tab.
3. Select util_file_online to perform a full or selective online backup operations.
4. Click OK to save your settings.
Administration Guide - SAP for Oracle iDataAgent
Page 48 of 193
OPTIMIZING PERFORMANCE
In order to recover a database during the event of a failure or data loss, you need to ensure that you always have the latest and consistent copy of the SAP for Oracle database data. To do this, you need to plan and decide on the backups to be performed. It is always recommended that you create separate subclients for each of these backups.
Make sure that the database used for creating the subclient is up and running. This ensures that the system accesses the most recent configuration of the database.
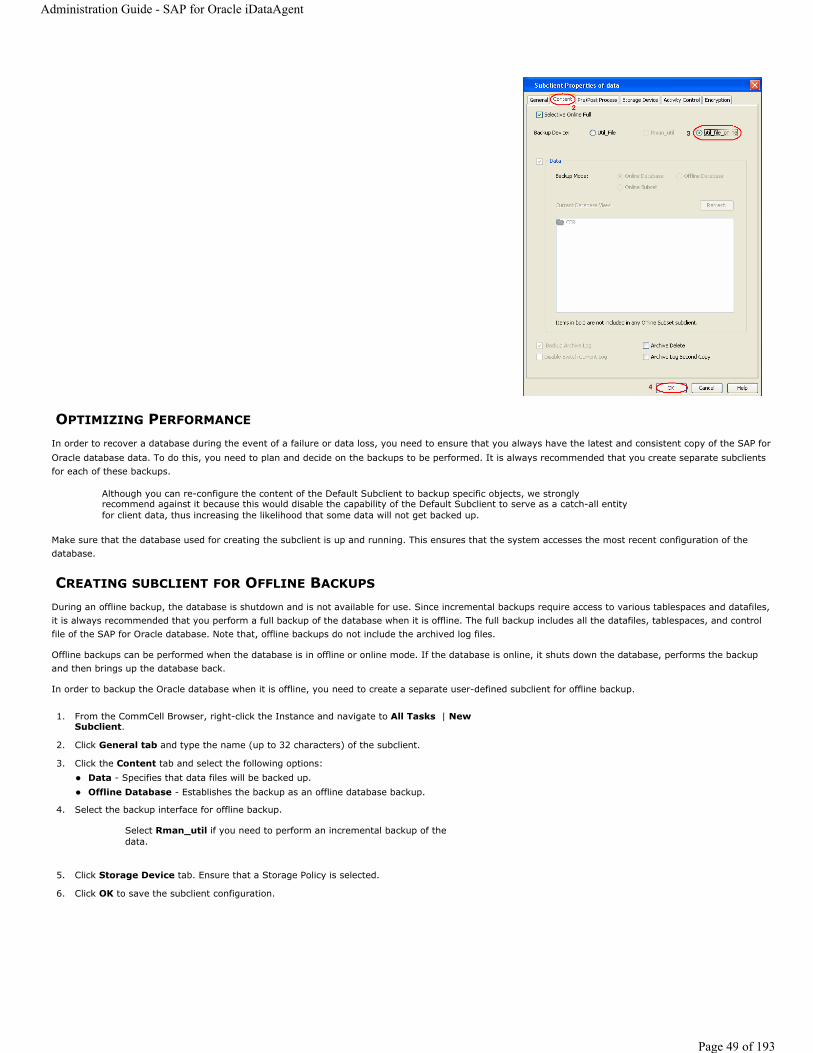
CREATING SUBCLIENT FOR OFFLINE BACKUPS
During an offline backup, the database is shutdown and is not available for use. Since incremental backups require access to various tablespaces and datafiles, it is always recommended that you perform a full backup of the database when it is offline. The full backup includes all the datafiles, tablespaces, and control file of the SAP for Oracle database. Note that, offline backups do not include the archived log files.
Offline backups can be performed when the database is in offline or online mode. If the database is online, it shuts down the database, performs the backup and then brings up the database back.
In order to backup the Oracle database when it is offline, you need to create a separate user-defined subclient for offline backup.
Although you can re-configure the content of the Default Subclient to backup specific objects, we strongly recommend against it because this would disable the capability of the Default Subclient to serve as a catch-all entity for client data, thus increasing the likelihood that some data will not get backed up.
1. From the CommCell Browser, right-click the Instance and navigate to All Tasks | New Subclient.
2. Click General tab and type the name (up to 32 characters) of the subclient.
3. Click the Content tab and select the following options: Data - Specifies that data files will be backed up. Offline Database - Establishes the backup as an offline database backup.
4. Select the backup interface for offline backup.
5. Click Storage Device tab. Ensure that a Storage Policy is selected.
6. Click OK to save the subclient configuration.
Select Rman_util if you need to perform an incremental backup of the data.
Administration Guide - SAP for Oracle iDataAgent
Page 49 of 193
CREATING SUBCLIENT FOR ONLINE BACKUPS
In some environments, it may not be possible to bring down the entire database to perform an offline backup. In such situations, you can choose online backups, where the database will be up and running during the backup.
You can perform either a full backup or incremental backup of the Oracle database when it is online. Since full backups includes all the datafiles, tab spaces and logs, it is very time consuming, hence you can plan for a full online backup less frequently (say, on weekly basis). On the other hand, incremental backups includes the data and logs that has been changed after the last full backup, they are faster and can be performed more frequently (say, on a daily basis). However, if you require to include the logs for the backups, ensure that the database is in ARCHIVELOG mode.
Incremental backups do not require database downtime and hence are extremely useful when you need to perform a point-in-time restore of the Oracle database.
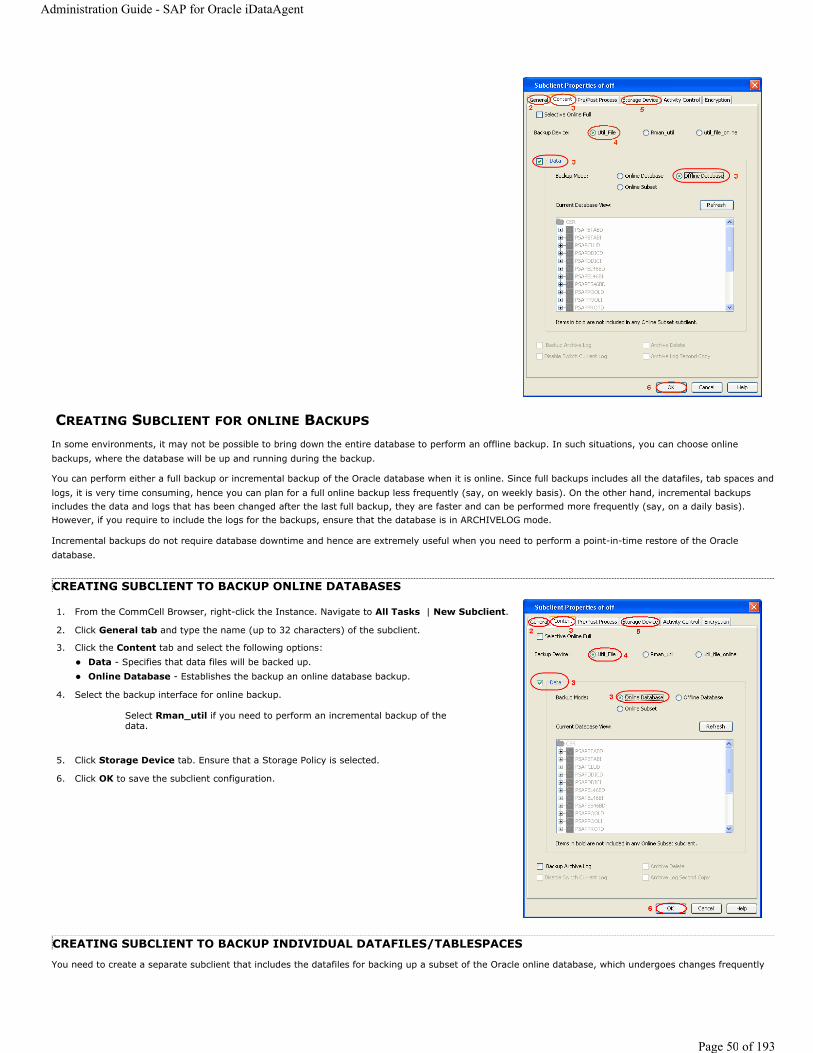
CREATING SUBCLIENT TO BACKUP ONLINE DATABASES
CREATING SUBCLIENT TO BACKUP INDIVIDUAL DATAFILES/TABLESPACES
You need to create a separate subclient that includes the datafiles for backing up a subset of the Oracle online database, which undergoes changes frequently
1. From the CommCell Browser, right-click the Instance. Navigate to All Tasks | New Subclient.
2. Click General tab and type the name (up to 32 characters) of the subclient.
3. Click the Content tab and select the following options: Data - Specifies that data files will be backed up. Online Database - Establishes the backup an online database backup.
4. Select the backup interface for online backup.
5. Click Storage Device tab. Ensure that a Storage Policy is selected.
6. Click OK to save the subclient configuration.
Select Rman_util if you need to perform an incremental backup of the data.
Administration Guide - SAP for Oracle iDataAgent
Page 50 of 193

and perform a full or incremental backup on that subclient at frequent intervals.
CREATING SUBCLIENT FOR SELECTIVE ONLINE FULL BACKUPS
You can perform a Selective Online Full backup, wherein the backup data is copied to a selective copy (during an auxiliary copy operation) from which it can be restored.
The advantage of this type of backup is that both data and logs use the same storage policy, which means that they reside together on the same media. They are completely self-contained for restore and long term archiving purposes. Also, the data aging rules for selective online full backups are different from regular full backups, as both data and logs are aged together under the same storage policy.
CREATING SUBCLIENT FOR LOG BACKUPS
Archive logs are required to recover database transactions that have been lost due to an operating system or disk failure. You can apply these archive logs to an online backup in order to recover a database.
Though online full backups can include both data and logs, because of their importance in recovering data, it is recommended that you create separate subclients for backing up archive log files.
1. From the CommCell Browser, right-click the Instance. Navigate to All Tasks | New Subclient.
2. Click the General tab and type the name (up to 32 characters) of the subclient.
3. Click the Content tab and select the following options: Data - Specifies that data files will be backed up. Online Subset - Establishes the backup of a subset of database objects. The database tree displays the subsets that are available in the database. Click the objects in the tree to include the subset objects for the subclient.
4. Select the backup interface for the backup of individual datafiles/ Tablespaces.
5. Click Storage Device tab. Ensure that a Storage Policy is selected.
6. Click OK to save the subclient configuration.
1. From the CommCell Browser, right-click the Instance. Navigate to All Tasks | New Subclient.
2. Click the General tab and type the name (up to 32 characters) of the subclient.
3. Click the Content tab and select the Selective Online Full.
4. Select util_file_online as SAP interface for online backup.
5. Click Storage Device tab. Ensure that a separate Storage Policy is selected for Selective Online Full backups.
6. Click OK to save the subclient configuration.
Administration Guide - SAP for Oracle iDataAgent
Page 51 of 193
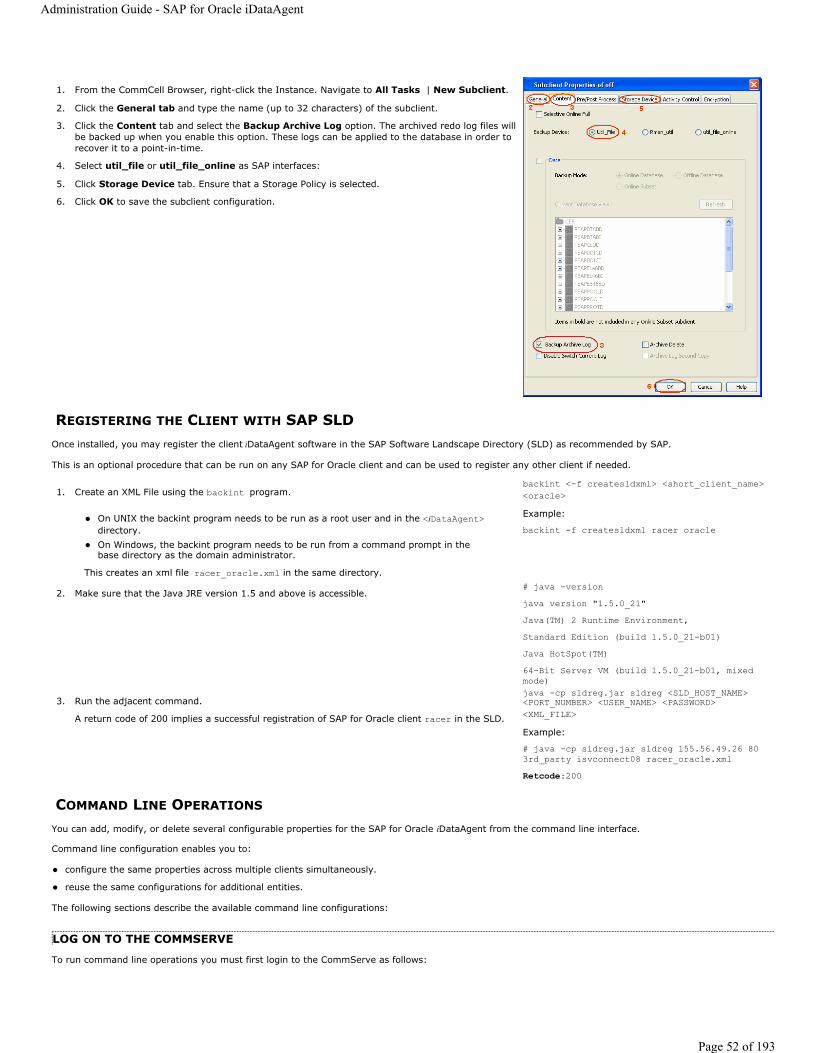
REGISTERING THE CLIENT WITH SAP SLDOnce installed, you may register the client iDataAgent software in the SAP Software Landscape Directory (SLD) as recommended by SAP.
This is an optional procedure that can be run on any SAP for Oracle client and can be used to register any other client if needed.
COMMAND LINE OPERATIONS
You can add, modify, or delete several configurable properties for the SAP for Oracle iDataAgent from the command line interface.
Command line configuration enables you to:
configure the same properties across multiple clients simultaneously.
reuse the same configurations for additional entities.
The following sections describe the available command line configurations:
LOG ON TO THE COMMSERVE
To run command line operations you must first login to the CommServe as follows:
1. From the CommCell Browser, right-click the Instance. Navigate to All Tasks | New Subclient.
2. Click the General tab and type the name (up to 32 characters) of the subclient.
3. Click the Content tab and select the Backup Archive Log option. The archived redo log files will be backed up when you enable this option. These logs can be applied to the database in order to recover it to a point-in-time.
4. Select util_file or util_file_online as SAP interfaces:
5. Click Storage Device tab. Ensure that a Storage Policy is selected.
6. Click OK to save the subclient configuration.
1. Create an XML File using the backint program.
On UNIX the backint program needs to be run as a root user and in the <iDataAgent>directory.On Windows, the backint program needs to be run from a command prompt in the base directory as the domain administrator.
This creates an xml file racer_oracle.xml in the same directory.
backint <-f createsldxml> <short_client_name> <oracle>Example:
backint -f createsldxml racer oracle
2. Make sure that the Java JRE version 1.5 and above is accessible. # java -versionjava version "1.5.0_21"Java(TM) 2 Runtime Environment,Standard Edition (build 1.5.0_21-b01)Java HotSpot(TM)64-Bit Server VM (build 1.5.0_21-b01, mixed mode)
3. Run the adjacent command.
A return code of 200 implies a successful registration of SAP for Oracle client racer in the SLD.
java -cp sldreg.jar sldreg <SLD_HOST_NAME> <PORT_NUMBER> <USER_NAME> <PASSWORD> <XML_FILE>Example:
# java -cp sldreg.jar sldreg 155.56.49.26 80 3rd_party isvconnect08 racer_oracle.xmlRetcode:200
Administration Guide - SAP for Oracle iDataAgent
Page 52 of 193
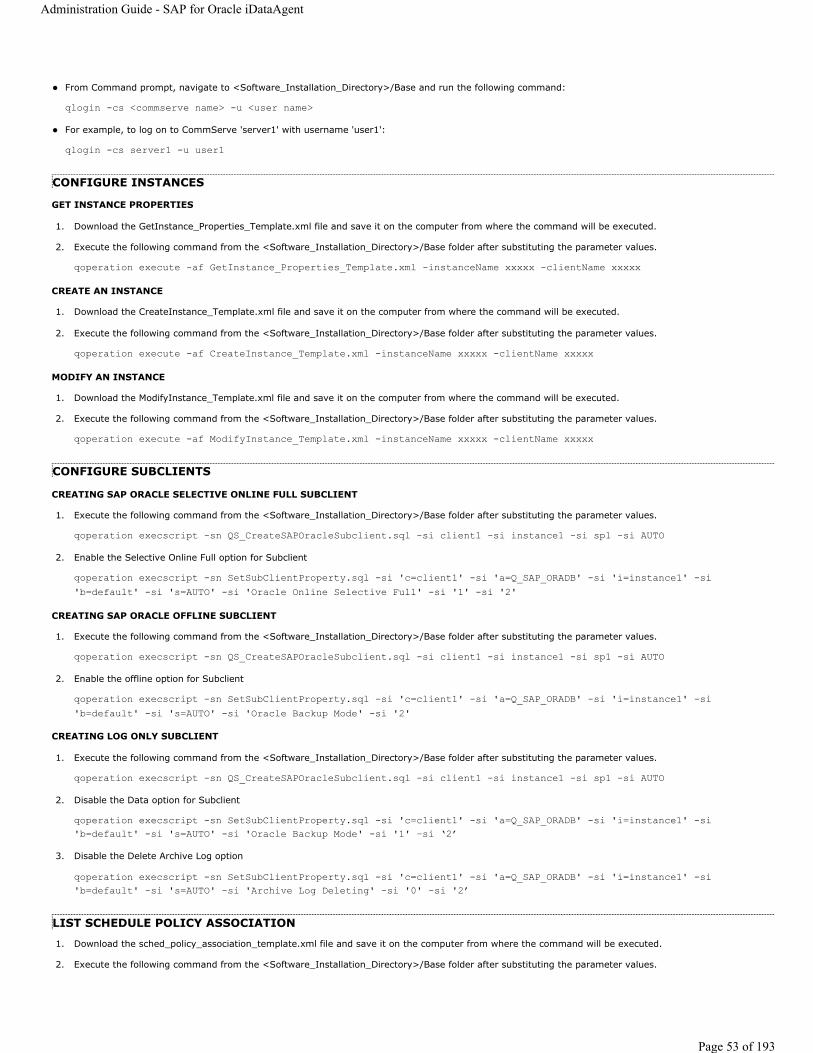
From Command prompt, navigate to <Software_Installation_Directory>/Base and run the following command:
qlogin -cs <commserve name> -u <user name>
For example, to log on to CommServe 'server1' with username 'user1':
qlogin -cs server1 -u user1
CONFIGURE INSTANCES
GET INSTANCE PROPERTIES
1. Download the GetInstance_Properties_Template.xml file and save it on the computer from where the command will be executed.
2. Execute the following command from the <Software_Installation_Directory>/Base folder after substituting the parameter values.
qoperation execute -af GetInstance_Properties_Template.xml -instanceName xxxxx -clientName xxxxx
CREATE AN INSTANCE
1. Download the CreateInstance_Template.xml file and save it on the computer from where the command will be executed.
2. Execute the following command from the <Software_Installation_Directory>/Base folder after substituting the parameter values.
qoperation execute -af CreateInstance_Template.xml -instanceName xxxxx -clientName xxxxx
MODIFY AN INSTANCE
1. Download the ModifyInstance_Template.xml file and save it on the computer from where the command will be executed.
2. Execute the following command from the <Software_Installation_Directory>/Base folder after substituting the parameter values.
qoperation execute -af ModifyInstance_Template.xml -instanceName xxxxx -clientName xxxxx
CONFIGURE SUBCLIENTS
CREATING SAP ORACLE SELECTIVE ONLINE FULL SUBCLIENT
1. Execute the following command from the <Software_Installation_Directory>/Base folder after substituting the parameter values.
qoperation execscript -sn QS_CreateSAPOracleSubclient.sql -si client1 -si instance1 -si sp1 -si AUTO
2. Enable the Selective Online Full option for Subclient
qoperation execscript -sn SetSubClientProperty.sql -si 'c=client1' -si 'a=Q_SAP_ORADB' -si 'i=instance1' -si 'b=default' -si 's=AUTO' -si 'Oracle Online Selective Full' -si '1' -si '2'
CREATING SAP ORACLE OFFLINE SUBCLIENT
1. Execute the following command from the <Software_Installation_Directory>/Base folder after substituting the parameter values.
qoperation execscript -sn QS_CreateSAPOracleSubclient.sql -si client1 -si instance1 -si sp1 -si AUTO
2. Enable the offline option for Subclient
qoperation execscript -sn SetSubClientProperty.sql -si 'c=client1' -si 'a=Q_SAP_ORADB' -si 'i=instance1' -si 'b=default' -si 's=AUTO' -si 'Oracle Backup Mode' -si '2'
CREATING LOG ONLY SUBCLIENT
1. Execute the following command from the <Software_Installation_Directory>/Base folder after substituting the parameter values.
qoperation execscript -sn QS_CreateSAPOracleSubclient.sql -si client1 -si instance1 -si sp1 -si AUTO
2. Disable the Data option for Subclient
qoperation execscript -sn SetSubClientProperty.sql -si 'c=client1' -si 'a=Q_SAP_ORADB' -si 'i=instance1' -si 'b=default' -si 's=AUTO' -si 'Oracle Backup Mode' -si '1' –si ‘2’
3. Disable the Delete Archive Log option
qoperation execscript -sn SetSubClientProperty.sql -si 'c=client1' -si 'a=Q_SAP_ORADB' -si 'i=instance1' -si 'b=default' -si 's=AUTO' -si 'Archive Log Deleting' -si '0' -si '2’
LIST SCHEDULE POLICY ASSOCIATION
1. Download the sched_policy_association_template.xml file and save it on the computer from where the command will be executed.
2. Execute the following command from the <Software_Installation_Directory>/Base folder after substituting the parameter values.
Administration Guide - SAP for Oracle iDataAgent
Page 53 of 193
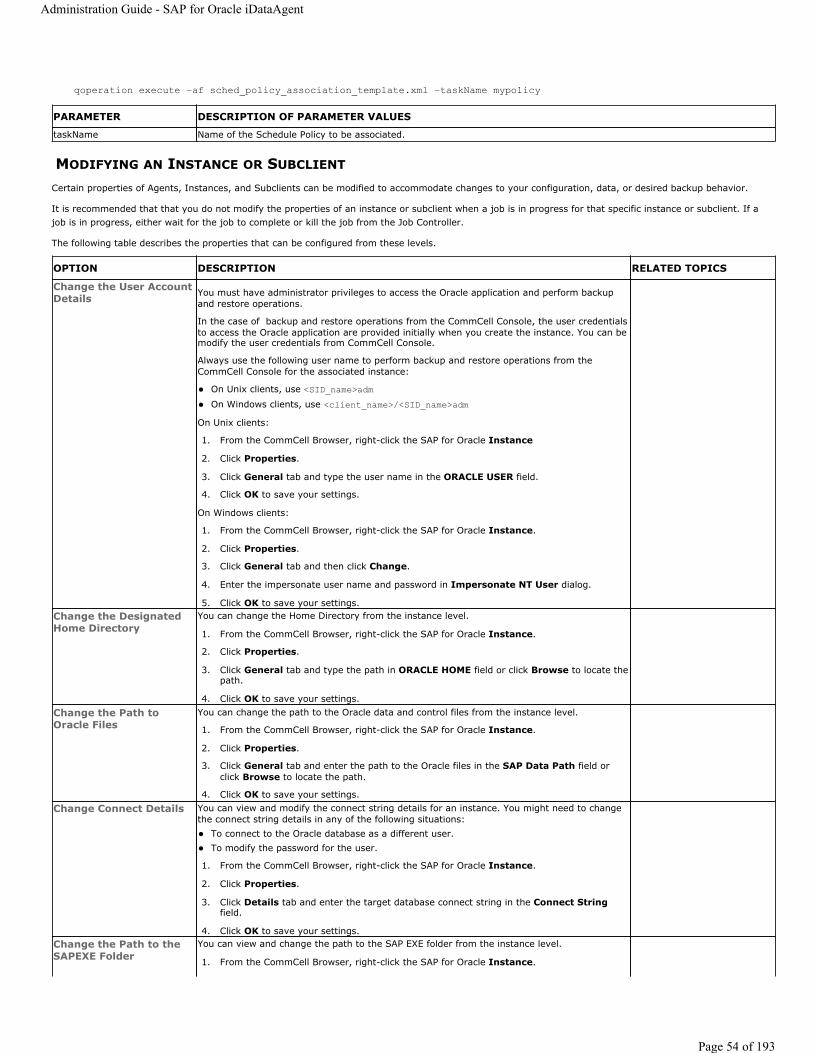
qoperation execute –af sched_policy_association_template.xml –taskName mypolicy
MODIFYING AN INSTANCE OR SUBCLIENT
Certain properties of Agents, Instances, and Subclients can be modified to accommodate changes to your configuration, data, or desired backup behavior.
It is recommended that that you do not modify the properties of an instance or subclient when a job is in progress for that specific instance or subclient. If a job is in progress, either wait for the job to complete or kill the job from the Job Controller.
The following table describes the properties that can be configured from these levels.
PARAMETER DESCRIPTION OF PARAMETER VALUES
taskName Name of the Schedule Policy to be associated.
OPTION DESCRIPTION RELATED TOPICS
Change the User Account Details You must have administrator privileges to access the Oracle application and perform backup
and restore operations.
In the case of backup and restore operations from the CommCell Console, the user credentials to access the Oracle application are provided initially when you create the instance. You can be modify the user credentials from CommCell Console.
Always use the following user name to perform backup and restore operations from the CommCell Console for the associated instance:
On Unix clients, use <SID_name>admOn Windows clients, use <client_name>/<SID_name>adm
On Unix clients:
1. From the CommCell Browser, right-click the SAP for Oracle Instance
2. Click Properties.
3. Click General tab and type the user name in the ORACLE USER field.
4. Click OK to save your settings.
On Windows clients:
1. From the CommCell Browser, right-click the SAP for Oracle Instance.
2. Click Properties.
3. Click General tab and then click Change.
4. Enter the impersonate user name and password in Impersonate NT User dialog.
5. Click OK to save your settings. Change the Designated Home Directory
You can change the Home Directory from the instance level.
1. From the CommCell Browser, right-click the SAP for Oracle Instance.
2. Click Properties.
3. Click General tab and type the path in ORACLE HOME field or click Browse to locate the path.
4. Click OK to save your settings. Change the Path to Oracle Files
You can change the path to the Oracle data and control files from the instance level.
1. From the CommCell Browser, right-click the SAP for Oracle Instance.
2. Click Properties.
3. Click General tab and enter the path to the Oracle files in the SAP Data Path field or click Browse to locate the path.
4. Click OK to save your settings. Change Connect Details You can view and modify the connect string details for an instance. You might need to change
the connect string details in any of the following situations: To connect to the Oracle database as a different user. To modify the password for the user.
1. From the CommCell Browser, right-click the SAP for Oracle Instance.
2. Click Properties.
3. Click Details tab and enter the target database connect string in the Connect Stringfield.
4. Click OK to save your settings. Change the Path to the SAPEXE Folder
You can view and change the path to the SAP EXE folder from the instance level.
1. From the CommCell Browser, right-click the SAP for Oracle Instance.
Administration Guide - SAP for Oracle iDataAgent
Page 54 of 193
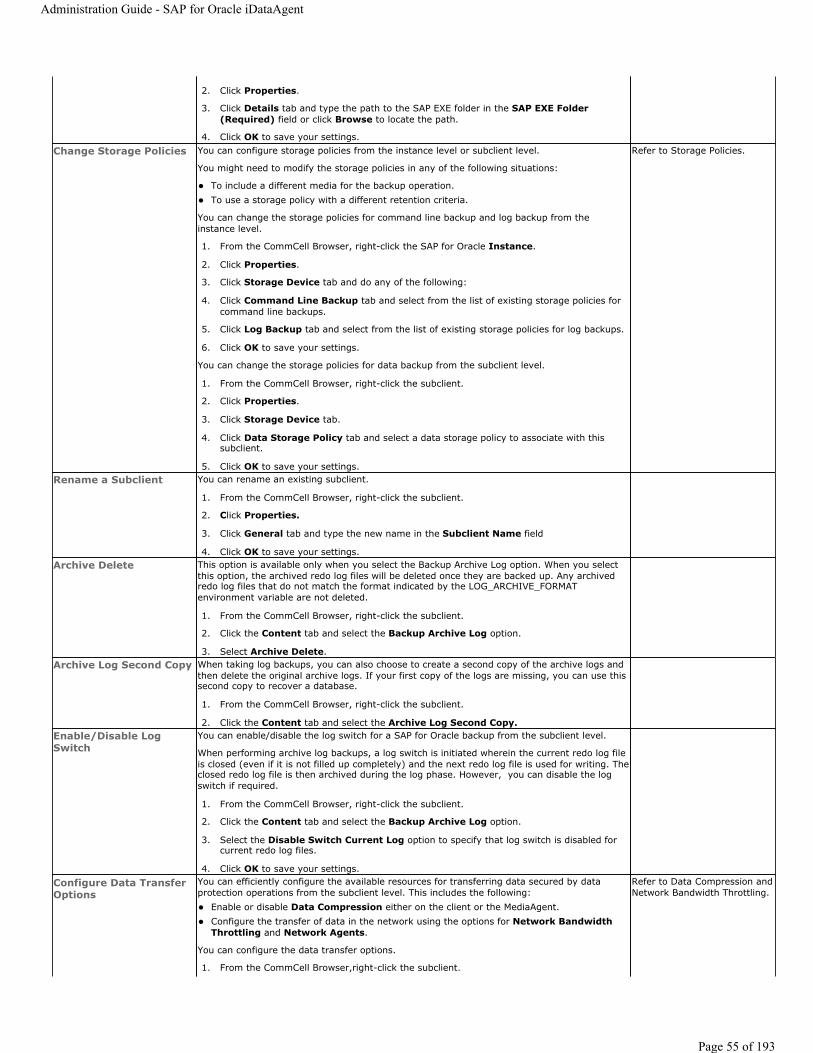
2. Click Properties.
3. Click Details tab and type the path to the SAP EXE folder in the SAP EXE Folder (Required) field or click Browse to locate the path.
4. Click OK to save your settings. Change Storage Policies You can configure storage policies from the instance level or subclient level.
You might need to modify the storage policies in any of the following situations:
To include a different media for the backup operation. To use a storage policy with a different retention criteria.
You can change the storage policies for command line backup and log backup from the instance level.
1. From the CommCell Browser, right-click the SAP for Oracle Instance.
2. Click Properties.
3. Click Storage Device tab and do any of the following:
4. Click Command Line Backup tab and select from the list of existing storage policies for command line backups.
5. Click Log Backup tab and select from the list of existing storage policies for log backups.
6. Click OK to save your settings.
You can change the storage policies for data backup from the subclient level.
1. From the CommCell Browser, right-click the subclient.
2. Click Properties.
3. Click Storage Device tab.
4. Click Data Storage Policy tab and select a data storage policy to associate with this subclient.
5. Click OK to save your settings.
Refer to Storage Policies.
Rename a Subclient You can rename an existing subclient.
1. From the CommCell Browser, right-click the subclient.
2. Click Properties.
3. Click General tab and type the new name in the Subclient Name field
4. Click OK to save your settings. Archive Delete This option is available only when you select the Backup Archive Log option. When you select
this option, the archived redo log files will be deleted once they are backed up. Any archived redo log files that do not match the format indicated by the LOG_ARCHIVE_FORMAT environment variable are not deleted.
1. From the CommCell Browser, right-click the subclient.
2. Click the Content tab and select the Backup Archive Log option.
3. Select Archive Delete. Archive Log Second Copy When taking log backups, you can also choose to create a second copy of the archive logs and
then delete the original archive logs. If your first copy of the logs are missing, you can use this second copy to recover a database.
1. From the CommCell Browser, right-click the subclient.
2. Click the Content tab and select the Archive Log Second Copy.Enable/Disable Log Switch
You can enable/disable the log switch for a SAP for Oracle backup from the subclient level.
When performing archive log backups, a log switch is initiated wherein the current redo log file is closed (even if it is not filled up completely) and the next redo log file is used for writing. The closed redo log file is then archived during the log phase. However, you can disable the log switch if required.
1. From the CommCell Browser, right-click the subclient.
2. Click the Content tab and select the Backup Archive Log option.
3. Select the Disable Switch Current Log option to specify that log switch is disabled for current redo log files.
4. Click OK to save your settings. Configure Data Transfer Options
You can efficiently configure the available resources for transferring data secured by data protection operations from the subclient level. This includes the following:
Enable or disable Data Compression either on the client or the MediaAgent. Configure the transfer of data in the network using the options for Network Bandwidth Throttling and Network Agents.
You can configure the data transfer options.
1. From the CommCell Browser,right-click the subclient.
Refer to Data Compression and Network Bandwidth Throttling.
Administration Guide - SAP for Oracle iDataAgent
Page 55 of 193

2. Click Properties.
3. Click Storage Device.
4. Click Data Transfer Option tab.
5. Choose the appropriate software compression option for this subclient.
6. Select Throttle Network Bandwidth and set the required bandwidth.
7. Click OK.View Data Paths You can view the data paths associated with the primary storage policy copy of the selected
storage policy or incremental storage policy. You can also modify the data paths including their priority from the subclient level.
1. From the CommCell browser, right-click the subclient.
2. Click Properties.
3. Click Storage Device.
4. Select Storage Policy from the drop-down menu.
5. Click Data Paths. Set the number of Streams
You can set the number of streams for log backup from the instance level.
1. From the CommCell Browser, right-click the SAP for Oracle Instance.
2. Click Properties.
3. Click Storage Device tab.
4. Click Log Backup tab and select Number of Data Backup Streams.
5. Click OK.
Similarly, you can set the number of streams for data backup from the subclient level.
1. From the CommCell Browser, right-click the subclient.
2. Click Properties.
3. Click Storage Device.
4. Click Data Transfer Option tab.
5. Select Number of Data Backup Streams.
6. Click OK.Configure a Subclient for Pre/Post Processing of Data Protection
You can add, modify or view Pre/Post processes for the subclient. These are batch files or shell scripts that you can run before or after certain job phases.
1. From the CommCell browser, right-click the subclient.
2. Click Properties.
3. Click Pre/Post Process.
4. Click one of the following phases and type the full path of the process that you want to execute during that phase. Alternatively, click Browse to locate the process (applicable only for paths that do not contain any spaces).
PreBackup ProcessPostBackup Process
5. Click OK.
6. Select Run Post Scan Process for all attempts to run a post scan process for all attempts .
7. Select Run Post Backup Process for all attempts to run a post backup process for all attempts.
8. For subclients on Windows platforms, Run As displays Not Selected.
If you want to change the account that has permission to run these commands, click Change.
a. In the User Account dialog box, select Use Local System Account, or select Impersonate User and enter the user name and password. Click OK.
b. If you selected Local System Account, click OK to the message advising you that commands using this account have rights to access all data on the client computer.
Refer to Pre/Post Processes.
Configure Activity Control
You can enable backup and restore operations from the agent and subclient level. However, you can enable restore operations only from the agent level.
1. From the CommCell browser, right-click the subclient.
2. Click Properties.
3. Click Activity Control, select or clear option(s) as desired.
4. Click OK.
Refer to Activity Control.
Administration Guide - SAP for Oracle iDataAgent
Page 56 of 193
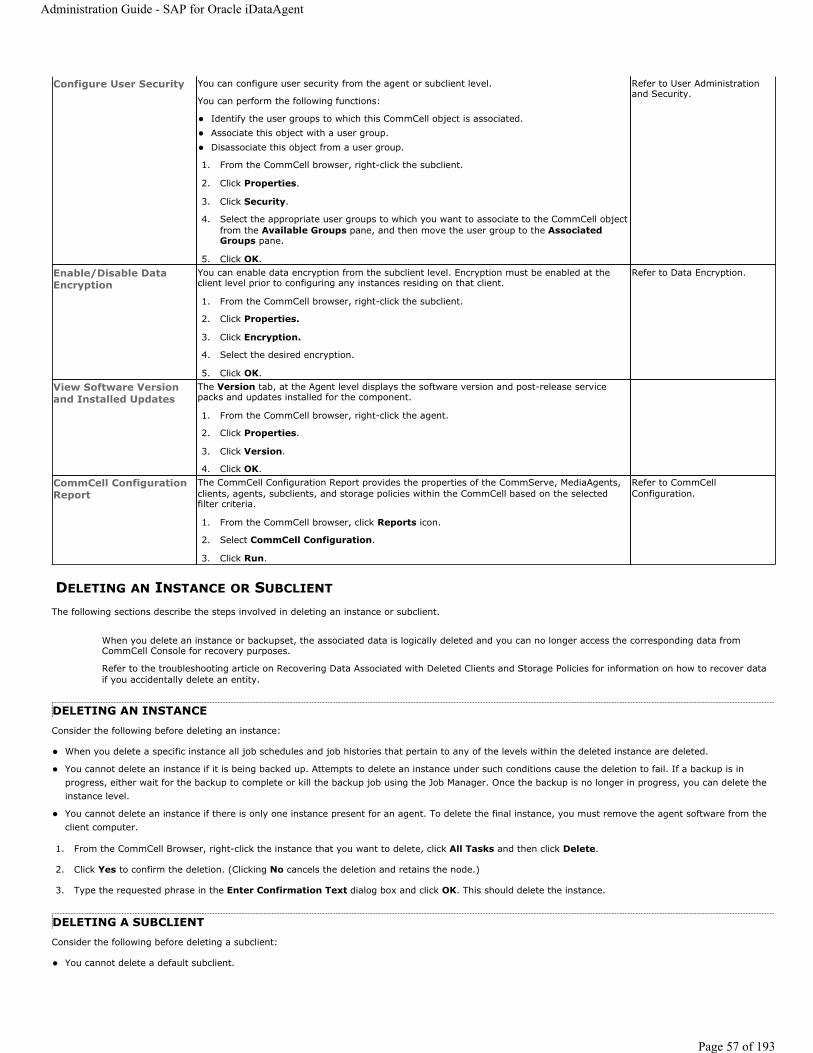
DELETING AN INSTANCE OR SUBCLIENT
The following sections describe the steps involved in deleting an instance or subclient.
DELETING AN INSTANCEConsider the following before deleting an instance:
When you delete a specific instance all job schedules and job histories that pertain to any of the levels within the deleted instance are deleted.
You cannot delete an instance if it is being backed up. Attempts to delete an instance under such conditions cause the deletion to fail. If a backup is in progress, either wait for the backup to complete or kill the backup job using the Job Manager. Once the backup is no longer in progress, you can delete the instance level.
You cannot delete an instance if there is only one instance present for an agent. To delete the final instance, you must remove the agent software from the client computer.
1. From the CommCell Browser, right-click the instance that you want to delete, click All Tasks and then click Delete.
2. Click Yes to confirm the deletion. (Clicking No cancels the deletion and retains the node.)
3. Type the requested phrase in the Enter Confirmation Text dialog box and click OK. This should delete the instance.
DELETING A SUBCLIENTConsider the following before deleting a subclient:
You cannot delete a default subclient.
Configure User Security You can configure user security from the agent or subclient level.
You can perform the following functions:
Identify the user groups to which this CommCell object is associated. Associate this object with a user group. Disassociate this object from a user group.
1. From the CommCell browser, right-click the subclient.
2. Click Properties.
3. Click Security.
4. Select the appropriate user groups to which you want to associate to the CommCell object from the Available Groups pane, and then move the user group to the Associated Groups pane.
5. Click OK.
Refer to User Administration and Security.
Enable/Disable Data Encryption
You can enable data encryption from the subclient level. Encryption must be enabled at the client level prior to configuring any instances residing on that client.
1. From the CommCell browser, right-click the subclient.
2. Click Properties.
3. Click Encryption.
4. Select the desired encryption.
5. Click OK.
Refer to Data Encryption.
View Software Version and Installed Updates
The Version tab, at the Agent level displays the software version and post-release service packs and updates installed for the component.
1. From the CommCell browser, right-click the agent.
2. Click Properties.
3. Click Version.
4. Click OK. CommCell Configuration Report
The CommCell Configuration Report provides the properties of the CommServe, MediaAgents, clients, agents, subclients, and storage policies within the CommCell based on the selected filter criteria.
1. From the CommCell browser, click Reports icon.
2. Select CommCell Configuration.
3. Click Run.
Refer to CommCell Configuration.
When you delete an instance or backupset, the associated data is logically deleted and you can no longer access the corresponding data from CommCell Console for recovery purposes.
Refer to the troubleshooting article on Recovering Data Associated with Deleted Clients and Storage Policies for information on how to recover data if you accidentally delete an entity.
Administration Guide - SAP for Oracle iDataAgent
Page 57 of 193

Schedules associated with the subclient are also automatically deleted.
1. From the CommCell Browser, navigate to Client Computers | <Client> | <Agent> | <Backup Set>.
2. Right-click the <subclient> that you want to delete, and then click Delete.
3. A confirmation message is displayed, asking if you want to delete the subclient.
Click No to cancel the deletion and retain the subclient, or click Yes to continue the deletion.
Back to Top
Administration Guide - SAP for Oracle iDataAgent
Page 58 of 193

Advanced - SAP for Oracle Backup
CHOOSING THE BACKUP INTERFACE
When defining your subclient for various backup operations, you need to choose the SAP interface to be used for the backup. You can use the following SAP backup interfaces for SAP for Oracle iDataAgent:
RMAN_UTILThe Rman_util interface (also referred to as the RMAN utility) is used when you need to perform an incremental backup of the online database. When you select this option, you actually allow the Oracle RMAN utility to control the backup operation.
For SAP for Oracle on Windows, if your backups use the RMAN utility, be sure to modify the SAP database init file (init<SID>.sap) by adding the following:
RMAN_PARMS="ENV=(CvClientName=<client name>,CvInstanceName=<instance name>"
For example:
RMAN_PARMS="ENV=(CvClientName=bumblebe,CvInstanceName=Instance001)"
For SAP for Oracle on Unix, if your backups will be using the RMAN utility, be sure to do the following before you run any backups:
Ensure that $ORACLE_HOME/lib and $ORACLE_HOME/lib64 are in the LD_LIBRARY_PATH environment variable.
Modify the SAP database init file (init<SID>.sap) under $ORACLE_HOME/dbs by adding the following:
RMAN_PARMS="SBT_LIBRARY=/<install path>/<Base directory version>/libobk.<xx>,ENV=(CvClientName=<client name>,CvInstanceName=<instance name>"
For Example:
RMAN_PARMS="SBT_LIBRARY=/opt/calypso/Base64/libobk.so,ENV=(CvClientName=aha,CvInstanceName=Instance001)"
UTIL_FILEThe util_file interface is used when you need to perform a full backup of the SAP for Oracle data files as File System data. When selecting this option for online backup, the Oracle database is locked till the full backup operation is completed.
UTIL_FILE_ONLINE
The util_file_online interface is similar to the util_file interface. you can use this interface to perform a full or selective online full backup operations. When selecting this option for online backup, the Oracle database locks each table space that is being backed up and releases it once that table space backup is completed.
Follow the procedure given below to choose the desired Backup interface.
1. From the CommCell Browser, right-click the Subclient and click Properties.
TABLE OF CONTENTS RELATED TOPICS
Choosing the Backup Interface
Full Backup
Incremental Backups
Offline Backups
Online Backups
Archive Log Backups
Backing Up Individual DataFiles/Table Spaces
Selective Online Full Backup
Selective Copy - Full Backup
Command Line Backups
Scheduling A Backup
Managing JobsRestarting JobsControlling Jobs
Additional Options
Command Line InterfaceProvides comprehensive information on running jobs from the command line.
SchedulingProvides comprehensive information on scheduling jobs.
Job ManagementProvides comprehensive information on managing jobs.
Administration Guide - SAP for Oracle iDataAgent
Page 59 of 193

2. Click Content tab.
3. Select the Backup Interface.
4. Click OK.
FULL BACKUP
A full backup contains all the data that comprises a subclient's contents. Though, full backups provide the most comprehensive protection of data, it consumes most amount of time and resources.
1. From the CommCell Console, navigate to <Client> | SAP for Oracle |<Instance>
2. Right-click the Subclient and click Backup.
3. Select Full as backup type and Immediate to run the job immediately.
4. Click OK.
5. You can track the progress of the job from the Job Controller window of the CommCell console.
6. Once job is complete, view the details of job from the Job History.
7. Right-click the client computer, click View and then click View Job History.
8. Click OK.
9. You can view the following details about the job by right-clicking the job:
Items that failed during the job
Items that succeeded during the job
Details of the job
Events of the job
Log files of the job
Media associated with the job
INCREMENTAL BACKUPS
An incremental backup contains only data that is new or has changed since the last backup, regardless of the type. On average, incremental backups consume far less media and place less of a burden on resources than full backups.
Always ensure that your first backup is a full backup.
The illustration on the right clarifies the nature of full and incremental backups. For simplicity, assume there is a database that contains six data files as represented in the figure.
Backup #1 is a full backup and therefore writes all the data, changed and unchanged, to the backup media. Backups #2 through #n-1 are incrementals and only back up those files that have changed since the time of the last backup, regardless of the type. For example, files A, B, and E changed after the full backup and were therefore backed up in Backup #2. Backup #4 backed up files A and D because both files were modified sometime after Backup #3 occurred. File F did not change; hence, it was not backed up in any of the incremental backups, but it was included in both full backups, which, by definition, back up everything.
For SAP for Oracle iDataAgent, incremental backups are performed using the rman_util backup interface.
1. From the CommCell Console, navigate to <Client> | SAP for Oracle | <Instance>.
2. Right-click the Subclient ,and click Backup.
3. From the Backup Options dialog box, select from the following options:
Backup Type:
Select Incremental.
Backup Schedule:
Select Run Immediately
4. Click OK.
5. You can track the progress of the backup job from the Job Controller window
If you are using a stand-alone drive, you are prompted to load a specific cartridge into the drive. If you are using a library, you will not receive this prompt. The system loads the tapes automatically. Your cartridges should be appropriately labeled. This will enable you to locate the correct cartridge for a restore job, if necessary.
Administration Guide - SAP for Oracle iDataAgent
Page 60 of 193
6. When the backup has completed, the Job Controller displays Completed.
OFFLINE BACKUPS
Offline backups are performed when the Oracle database is shut down and unavailable for use. Offline backups are always full backups and does not include the archived log files.
Offline backups can be performed when the database is in offline or online mode. If the database is online, it shuts down the database, performs the backup and then brings up the database back.
In order to backup the Oracle database when it is offline, you can create a separate user-defined subclient for offline backup. See Creating Subclient for Offline Backups for step-by-step instructions.
ONLINE BACKUPS
Online backups are performed when the database is online and in ARCHIVELOG mode. Data files and archived log files are included when you back up the database in online mode. You can perform a full or incremental backups when the database is online. These backups do not require database downtime and are extremely useful when you need to perform a point-in-time restore of the Oracle database.
In order to backup the Oracle database when it is online, you can create a separate user-defined subclient for online backup. See Creating Subclient for online Backups for step-by-step instructions.
BACKING UP INDIVIDUAL DATAFILES/TABLE SPACES
You can backup a subset of the online database which undergo changes frequently. To backup a subset of the online database, you can create a separate user-defined subclient. See Creating Subclient to Backup Individual DataFiles/Tablespaces for step-by-step instructions.
ARCHIVE LOG BACKUPS
Archive log backups are useful when you want to recover database transactions that have been lost due to an operating system or disk failure. You can apply these archive logs to an online backup in order to recover a database.
Full backups generally includes both the data and logs. However, you can also take backups of the archive logs only. In order to backup only the archive logs, you need to create a separate subclient for archive logs. See Creating Subclient for Log Backups for step-by-step instructions.
By default, the first backup operation on the default subclient will include the entire database (data and archive logs) when the database is online and in ARCHIVELOG mode.
If archive log destination is different than the default $SAPDATA_HOME/saparch location, set the sSAPARCH registry key to enable the GUI backup to obtain the new SAPARCH location.
SELECTIVE ONLINE FULL BACKUPS
Selective Online Full backup is a full backup taken when Oracle database is online, and the backup data is copied to a selective copy (during an auxiliary copy operation) from which it can be restored.
The advantage of this type of backup is that both data and logs use the same storage policy, which means that they reside together on the same media, and are completely self-contained for restore and long term archiving purposes. This is especially useful in disaster recovery situations by alleviating the need to locate different offsite media from various jobs to gather the necessary data and logs to recover the database. Also, the data aging rules for selective online full backups are different from regular full backups, as both data and logs are aged together under the same storage policy.
You need to create a separate subclient to perform a selective online full backup of the Oracle database. See Creating Subclient for Selective Online Full Backups for step-by-step instructions.
When performing selective online full backups, note the following:
You can run SAP for Oracle Selective Online Full backups from the CommCell Console only using the util_file and util_file_online utilities.
A selective online full backup job will wait for other SAP for Oracle backup jobs currently running on the same instance to complete before it begins.
For this type of backup, both data and archive logs will use the same storage policy as defined for data in the subclient and will ignore the storage policy setting for archive logs (which is defined at the instance level).
During selective online full backups, if the data streams (defined at the subclient level) is less than the archive log streams (defined at the instance level), then both the data phase and the archive log phase will use the same number of streams defined for the data in the subclient, and will ignore the number of
If you are using a stand-alone drive, you are prompted to load a specific cartridge into the drive. If you are using a library, you will not receive this prompt. The system loads the tapes automatically. Your cartridges should be appropriately labeled. This will enable you to locate the correct cartridge for a restore job, if necessary.
When performing SAP for Oracle offline backups from the CommCell Console, the database is forced to shutdown by default. However, you can disable this by setting the sNOOFFLINEFORCE registry key on the client computer with SAP for Oracle iDataAgent.
Administration Guide - SAP for Oracle iDataAgent
Page 61 of 193
streams set for the archive logs.
While the data backup phase of a selective online full backup is running, the only other SAP for Oracle backup jobs that are allowed to run on the same instance are archive log backups. During the log backup phase of a selective online full backup, no other SAP for Oracle backups are allowed to run (neither logs nor data) on the same instance.
If SAP for Oracle archive log backup jobs are run at the same time as the selective online full backup, they will be forced to use the same storage policy used by the selective online full backup during the time-frame in which the selective online full backup job is running, and will be included in the same Auxiliary Copy operation and aged together.
For more information on special data aging rules for selective online full backups, see Selective Online Full Backup Retention Rules.
To enable SAP for Oracle command line backups using selective copy from the client, include the SelectiveOnlineFull parameter in the param file and set the parameter value to 1.
SAP for Oracle command line backups cannot be run when a selective online full backup job is running in the data backup phase.
SELECTIVE COPY - FULL BACKUPS
A selective copy allows you to copy backup data selectively from a source copy to this copy, providing for better tape rotation. Since only selective backups can be copied to selective copies, the selective copies cannot be promoted to the primary copy, only synchronous copies can be promoted. Note that the data selection process does not have to be the same for all auxiliary copies.
Selective copy will not only copy Selective Online Full and Offline Full jobs, it will also copy log backup jobs that are linked to selective online full backup jobs.
1. Create a selective copy:
From the CommCell Browser, right-click the storage policy for which you wish to create the secondary copy, click All Tasks and then click Create New Copy.
From the General tab of the Copy Properties dialog box:
Enter the copy name in the Copy Name box.
Select the Selective Copy check box. The Selective Copy tab is enabled.
Select the library, MediaAgent, drive pool and scratch pool from the lists (drive pool and scratch pool are not applicable for disk libraries).
2. Associate a subclient with the storage policy copy:
From the CommCell Browser, right-click the instance for which you want to create a new subclient, click All Tasks and then click New Subclient.
Click the Subclient Properties (General) tab, type the name (up to 32 characters) of the subclient that you want to create.
Click the Subclient Properties (Content) tab to define the contents of the subclient.
Click the Subclient Properties (Storage Device) tab and select a storage policy copy to associate with this subclient from the storage policy list.
Click OK to save the subclient configuration.
3. Right-click the Subclient and click Backup.
4. Select Full as backup type and Immediate to run the job immediately.
5. Click OK.
COMMAND LINE BACKUPS
In addition to using CommCell Console, you can also perform full and incremental backups from the Command Line Interface.
You can perform Command Line backup operations using one of the following methods:
USING QCOMMANDS
You can use qcommands to perform backup operations from the command line interface. You can also integrate these qcommands into your own scripts or scheduling programs. In addition, you can also generate scripts for specific operations from the CommCell Console using the Save As Script option. These scripts can later be executed using the commands from the command line interface.
Usage: backup [-cs commserver] -c client -a iDataAgent -i instance -b backupset -s subclient -t Q_FULL|Q_INC|Q_DIFF|Q_SYNTH [-scid subclientId] [-af argsfile] [-tf tokenfile] [-tk token] [-h]
Example:
bash-3.00# ./qoperation backup -c sunsign -a Q_SAP_ORADB -i CER -s default -t Q_FULL 9251For comprehensive information on command line backups, refer to the Command Line Interface documentation.
USING SAP COMMAND LINEYou can perform backups from the SAP command line using the BRBACKUP and BRARCHIVE commands.
Administration Guide - SAP for Oracle iDataAgent
Page 62 of 193
brbackup -t offline/online -d util_file/rman_util/util_file_online -m full/incr
BRBACKUP command can back up control files and data files within one or more table spaces, and (if necessary) log files. BRBACKUP can back up all of these file types with the database either online or offline. Also, BRBACKUP saves the profiles and logs relevant to the backup.
Examples:
Perform a full backup using util_file interface
brbackup -t online -d util_file -m all -u /
Perform a full backup using rman_util interface
brbackup -t online -d rman_util -m FULL -u /
Perform an incremental backups using rman_util interface
brbackup -t online -d rman_util -m INCR -u /
The BRARCHIVE command is used to backup the archived redo log files.
Examples:
Perform a log backup using util_file interface
brarchive -sd -c -b -m all -t util_file
Perform a log backup using rman_util interface
brarchive -d rman_util -s
To archive the offline redo logs
brarchive -d util_file -s
To create a second copy of the offline redo log files which were already archived
brarchive -d util_file -sc
To archive the offline redo logs to two backup devices (tape devices) in parallel
brarchive -d util_file -ss
To archive offline redo log files and then delete these files
brarchive -d util_file -sd
To create a second copy of the offline redo log files that have already been archived and then delete these files
brarchive -d util_file -scd
To archive the offline redo logs to two backup devices (tape devices) in parallel and then delete the files
brarchive -d util_file -ssd
To create a second copy of offline redo log files that have already been archived and then archive the newly created offline redo log files
brarchive -d util_file -cs
To create a second copy of offline redo log files which were already archived. These are then deleted and archiving of the newly created offline redo log files is begun
brarchive -d util_file -cds
To delete offline redo log files that have been archived once
brarchive -d util_file -ds
To delete offline redo log files that have been copied twice
brarchive -d util_file -dc
Some of the command options commonly used by BRBACKUP and BRARCHIVE commands are listed below:
Option Argument Values-a -archive [<DB_SID>,<log_no>
[=<rest_dest>]-b -backup <log_name>|last-r -parfile <parameter_file>-c -confirm force-d -device util_file|rman_util-m -mode all|full|incr|-o -output dist|time
[,time|dist]
Administration Guide - SAP for Oracle iDataAgent
Page 63 of 193
PARAMETER FILE
Before you run backups from the SAP command line, ensure that the appropriate parameter file containing information regarding the instance and the client is in place. Be sure to include at least the CVInstanceName parameter name followed by the name of the instance and also the CVClientName parameter name followed by the name of the client.
For SAP for Oracle on Unix include this information in the init.utl file under the $ORACLE_HOME/dbs directory.
For SAP for Oracle on Windows, include this information in the init.utl file in any location and execute the BRBACKUP command with option –r .
For any software version, if your backups are using the SAP utility files, be sure to modify the init<SID>.utl file by adding values for the following parameters. Note that some parameters are optional.
CvInstanceName <name of instance>, which specifies the name of the instance for the iDataAgent (for example, Instance001)CvClientName <name of client>, which specifies the name of the computer with the installed iDataAgent (for example, bumblebee)numstreams <number of streams> (optional), which specifies the number of streams. Default value is 1 (for example,1)SelectiveOnlineFull <option> (optional), which specifies whether you can run a selective online full backup from the client. To enable this capability, set the parameter value to 1; to disable this capability, set the parameter value to 0.
snapBackup, which specifies that the SnapProtect backup is enabled. Default value is 0.
For example:
CvInstanceName
Instance001CvClientName
bumblebeenumstreams
1SelectiveOnlineFull
1
CONSISTENT ONLINE BACKUPS
In a consistent online backup, the database files and the offline redo log files are backed up together in the same backup volume. This backup type allows you to take logical consistent backups without having to shutdown the database.
The offline redo log files backed up along with the database are completely independent from the BRARCHIVE log backups.
Use the following steps to run a consistent online full backup:
BRTOOLS INTERFACE
In addition to SAP command line, you can also use the BRTools user interface to perform backup and restore operations. BRTools is an easy-to-use interface that provides menus to run different types of backup or restore operations. For detailed information on using the BRTools interface, see SAP documentation.
Prior to performing backup operations using BRTools interface, ensure to set the appropriate values in the parameter file.
A sample BRTools backup operation is given below:
-t -type online|offline
When performing backups from the command line, note the following:
Multi-stream log backups are supported only from the command line interface.
For comprehensive information on multi streaming, refer to the Streams documentation.
1. Include the instance name and client name parameters in the init.utl file.
For example:
CvInstanceNameInstance001CvClientNameclient1
2. From the SAP command line, type the command to run a consistent online full backup.
brbackup -t online_cons -d util_file -m full
1. From the BRTools interface main menu, select 4 to perform a backup operation.
BR*Tools main menu\par\par1 = Instance management\par2 - Space management\par3 - Segment management\par4 - Backup and database copy\par
Administration Guide - SAP for Oracle iDataAgent
Page 64 of 193
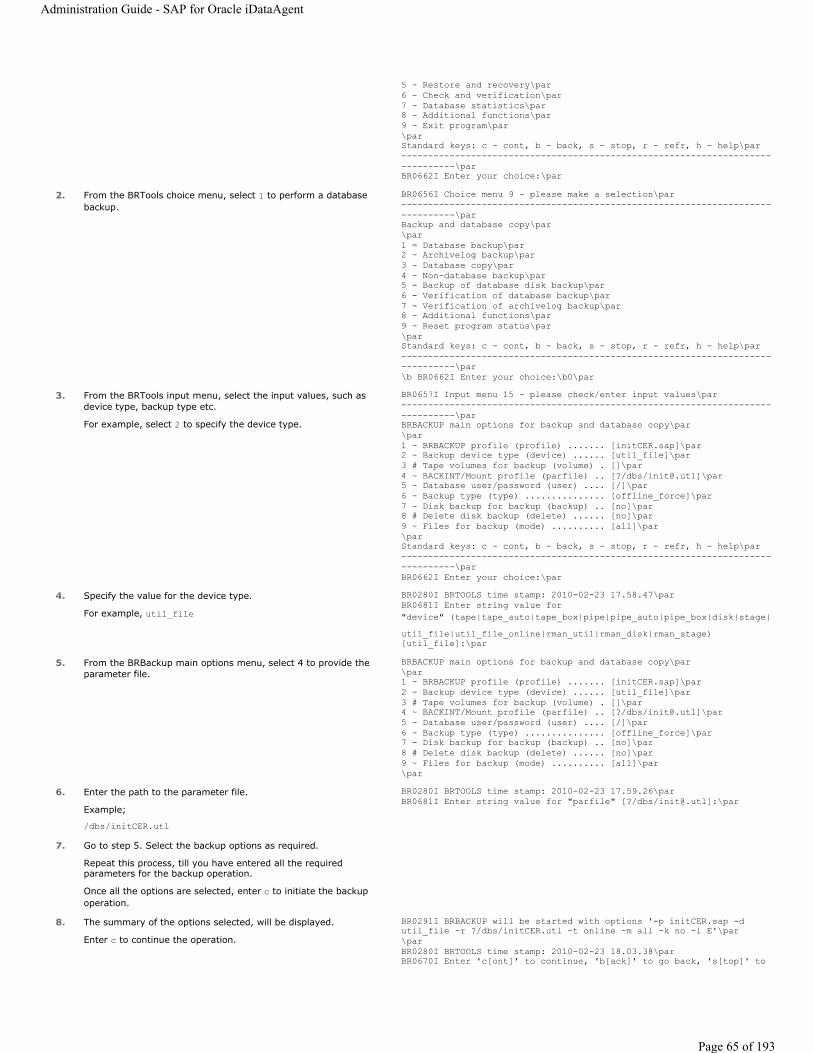
5 - Restore and recovery\par6 - Check and verification\par7 - Database statistics\par8 - Additional functions\par9 - Exit program\par\parStandard keys: c - cont, b - back, s - stop, r - refr, h - help\par-------------------------------------------------------------------------------\parBR0662I Enter your choice:\par
2. From the BRTools choice menu, select 1 to perform a database backup.
BR0656I Choice menu 9 - please make a selection\par-------------------------------------------------------------------------------\parBackup and database copy\par\par1 = Database backup\par2 - Archivelog backup\par3 - Database copy\par4 - Non-database backup\par5 - Backup of database disk backup\par6 - Verification of database backup\par7 - Verification of archivelog backup\par8 - Additional functions\par9 - Reset program status\par\parStandard keys: c - cont, b - back, s - stop, r - refr, h - help\par-------------------------------------------------------------------------------\par\b BR0662I Enter your choice:\b0\par
3. From the BRTools input menu, select the input values, such as device type, backup type etc.
For example, select 2 to specify the device type.
BR0657I Input menu 15 - please check/enter input values\par-------------------------------------------------------------------------------\parBRBACKUP main options for backup and database copy\par\par1 - BRBACKUP profile (profile) ....... [initCER.sap]\par2 - Backup device type (device) ...... [util_file]\par3 # Tape volumes for backup (volume) . []\par4 ~ BACKINT/Mount profile (parfile) .. [?/dbs/[email protected]]\par5 - Database user/password (user) .... [/]\par6 - Backup type (type) ............... [offline_force]\par7 - Disk backup for backup (backup) .. [no]\par8 # Delete disk backup (delete) ...... [no]\par9 ~ Files for backup (mode) .......... [all]\par\parStandard keys: c - cont, b - back, s - stop, r - refr, h - help\par-------------------------------------------------------------------------------\parBR0662I Enter your choice:\par
4. Specify the value for the device type.
For example, util_file
BR0280I BRTOOLS time stamp: 2010-02-23 17.58.47\parBR0681I Enter string value for "device" (tape|tape_auto|tape_box|pipe|pipe_auto|pipe_box|disk|stage|util_file|util_file_online|rman_util|rman_disk|rman_stage) [util_file]:\par
5. From the BRBackup main options menu, select 4 to provide the parameter file.
BRBACKUP main options for backup and database copy\par\par1 - BRBACKUP profile (profile) ....... [initCER.sap]\par2 - Backup device type (device) ...... [util_file]\par3 # Tape volumes for backup (volume) . []\par4 ~ BACKINT/Mount profile (parfile) .. [?/dbs/[email protected]]\par5 - Database user/password (user) .... [/]\par6 - Backup type (type) ............... [offline_force]\par7 - Disk backup for backup (backup) .. [no]\par8 # Delete disk backup (delete) ...... [no]\par9 ~ Files for backup (mode) .......... [all]\par\par
6. Enter the path to the parameter file.
Example;
/dbs/initCER.utl
BR0280I BRTOOLS time stamp: 2010-02-23 17.59.26\parBR0681I Enter string value for "parfile" [?/dbs/[email protected]]:\par
7. Go to step 5. Select the backup options as required.
Repeat this process, till you have entered all the required parameters for the backup operation.
Once all the options are selected, enter c to initiate the backup operation.
8. The summary of the options selected, will be displayed.
Enter c to continue the operation.
BR0291I BRBACKUP will be started with options '-p initCER.sap -d util_file -r ?/dbs/initCER.utl -t online -m all -k no -l E'\par\parBR0280I BRTOOLS time stamp: 2010-02-23 18.03.38\parBR0670I Enter 'c[ont]' to continue, 'b[ack]' to go back, 's[top]' to
Administration Guide - SAP for Oracle iDataAgent
Page 65 of 193
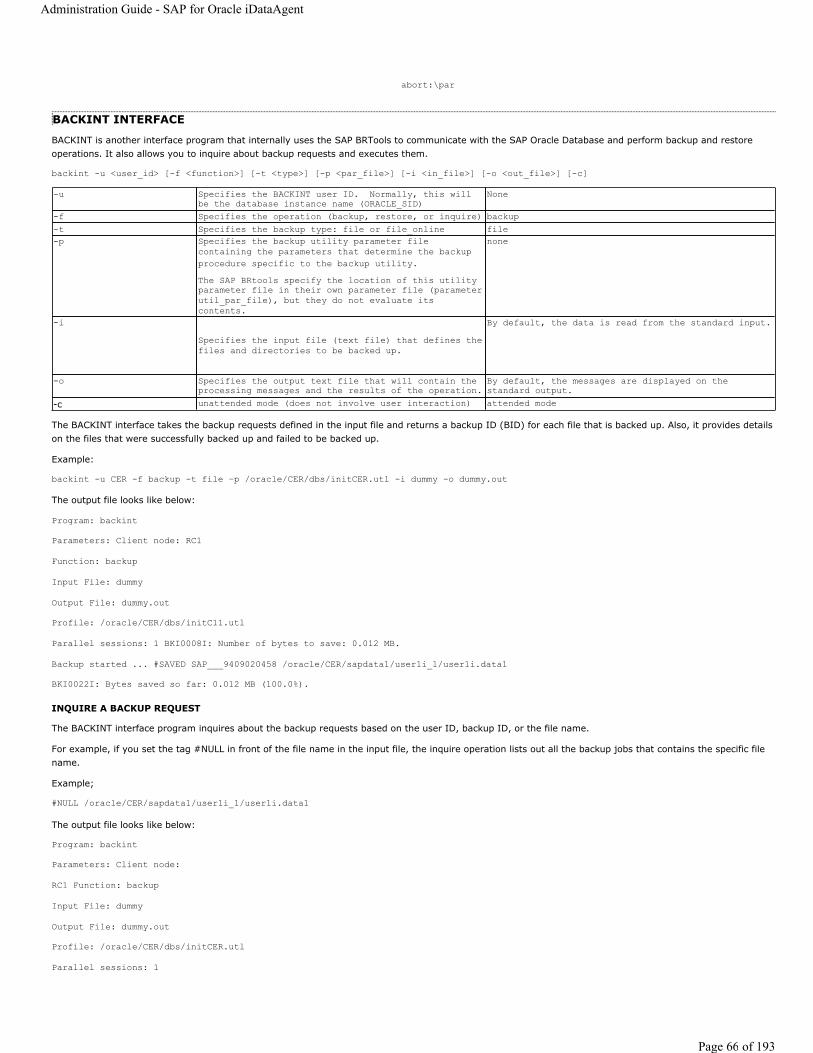
BACKINT INTERFACE
BACKINT is another interface program that internally uses the SAP BRTools to communicate with the SAP Oracle Database and perform backup and restore operations. It also allows you to inquire about backup requests and executes them.
backint -u <user_id> [-f <function>] [-t <type>] [-p <par_file>] [-i <in_file>] [-o <out_file>] [-c]
The BACKINT interface takes the backup requests defined in the input file and returns a backup ID (BID) for each file that is backed up. Also, it provides details on the files that were successfully backed up and failed to be backed up.
Example:
backint -u CER -f backup -t file –p /oracle/CER/dbs/initCER.utl -i dummy -o dummy.out
The output file looks like below:
Program: backint
Parameters: Client node: RC1
Function: backup
Input File: dummy
Output File: dummy.out
Profile: /oracle/CER/dbs/initC11.utl
Parallel sessions: 1 BKI0008I: Number of bytes to save: 0.012 MB.
Backup started ... #SAVED SAP___9409020458 /oracle/CER/sapdata1/user1i_1/user1i.data1
BKI0022I: Bytes saved so far: 0.012 MB (100.0%).
INQUIRE A BACKUP REQUEST
The BACKINT interface program inquires about the backup requests based on the user ID, backup ID, or the file name.
For example, if you set the tag #NULL in front of the file name in the input file, the inquire operation lists out all the backup jobs that contains the specific file name.
Example;
#NULL /oracle/CER/sapdata1/user1i_1/user1i.data1
The output file looks like below:
Program: backint
Parameters: Client node:
RC1 Function: backup
Input File: dummy
Output File: dummy.out
Profile: /oracle/CER/dbs/initCER.utl
Parallel sessions: 1
abort:\par
-u Specifies the BACKINT user ID. Normally, this will be the database instance name (ORACLE_SID)
None
-f Specifies the operation (backup, restore, or inquire) backup-t Specifies the backup type: file or file_online file-p Specifies the backup utility parameter file
containing the parameters that determine the backup procedure specific to the backup utility.The SAP BRtools specify the location of this utility parameter file in their own parameter file (parameter util_par_file), but they do not evaluate its contents.
none
-iSpecifies the input file (text file) that defines the files and directories to be backed up.
By default, the data is read from the standard input.
-o Specifies the output text file that will contain the processing messages and the results of the operation.
By default, the messages are displayed on the standard output.
-c unattended mode (does not involve user interaction) attended mode
Administration Guide - SAP for Oracle iDataAgent
Page 66 of 193
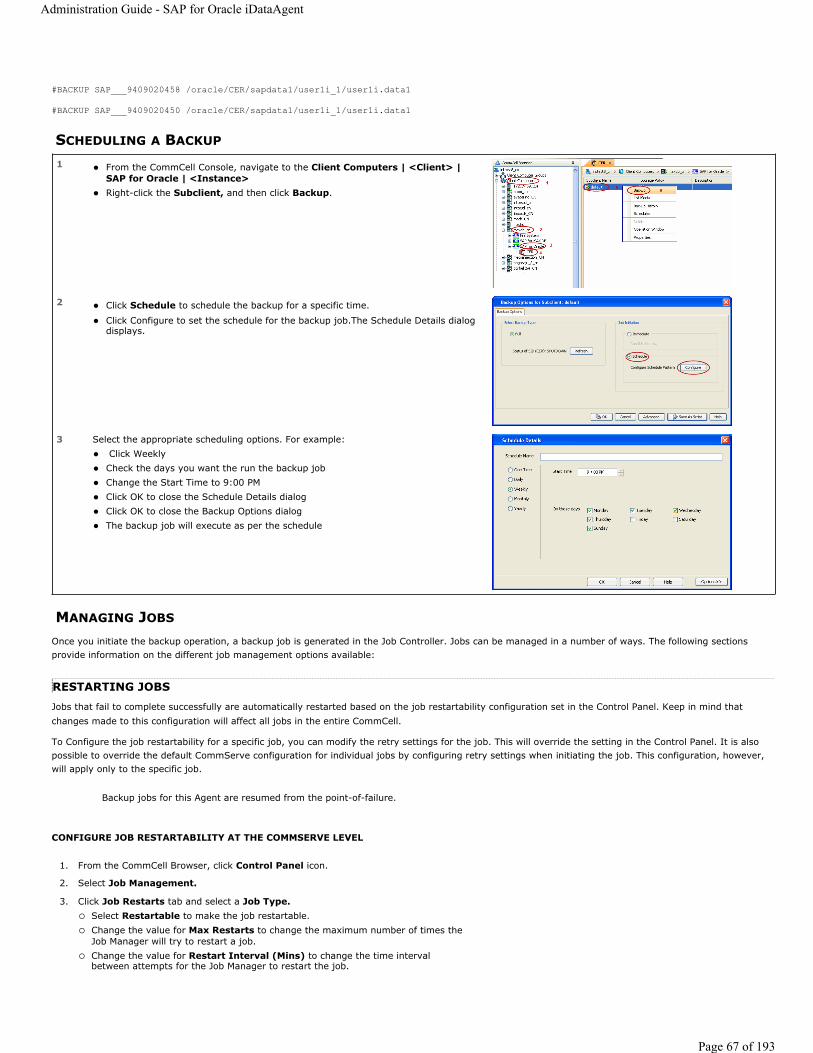
#BACKUP SAP___9409020458 /oracle/CER/sapdata1/user1i_1/user1i.data1
#BACKUP SAP___9409020450 /oracle/CER/sapdata1/user1i_1/user1i.data1
SCHEDULING A BACKUP
MANAGING JOBS
Once you initiate the backup operation, a backup job is generated in the Job Controller. Jobs can be managed in a number of ways. The following sections provide information on the different job management options available:
RESTARTING JOBSJobs that fail to complete successfully are automatically restarted based on the job restartability configuration set in the Control Panel. Keep in mind that changes made to this configuration will affect all jobs in the entire CommCell.
To Configure the job restartability for a specific job, you can modify the retry settings for the job. This will override the setting in the Control Panel. It is also possible to override the default CommServe configuration for individual jobs by configuring retry settings when initiating the job. This configuration, however, will apply only to the specific job.
CONFIGURE JOB RESTARTABILITY AT THE COMMSERVE LEVEL
1 From the CommCell Console, navigate to the Client Computers | <Client> | SAP for Oracle | <Instance>Right-click the Subclient, and then click Backup.
2 Click Schedule to schedule the backup for a specific time.
Click Configure to set the schedule for the backup job.The Schedule Details dialog displays.
3 Select the appropriate scheduling options. For example: Click Weekly Check the days you want the run the backup job Change the Start Time to 9:00 PM Click OK to close the Schedule Details dialog Click OK to close the Backup Options dialog The backup job will execute as per the schedule
Backup jobs for this Agent are resumed from the point-of-failure.
1. From the CommCell Browser, click Control Panel icon.
2. Select Job Management.
3. Click Job Restarts tab and select a Job Type.Select Restartable to make the job restartable. Change the value for Max Restarts to change the maximum number of times the Job Manager will try to restart a job. Change the value for Restart Interval (Mins) to change the time interval between attempts for the Job Manager to restart the job.
Administration Guide - SAP for Oracle iDataAgent
Page 67 of 193
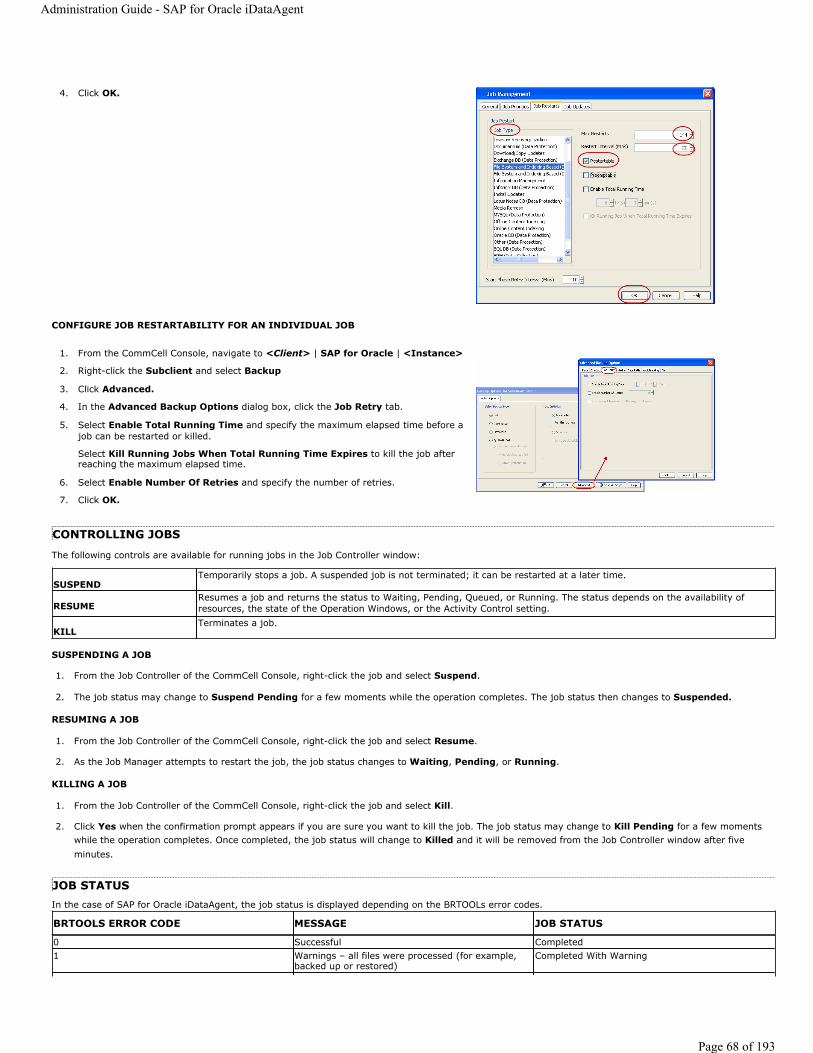
CONFIGURE JOB RESTARTABILITY FOR AN INDIVIDUAL JOB
CONTROLLING JOBS
The following controls are available for running jobs in the Job Controller window:
SUSPENDING A JOB
1. From the Job Controller of the CommCell Console, right-click the job and select Suspend.
2. The job status may change to Suspend Pending for a few moments while the operation completes. The job status then changes to Suspended.
RESUMING A JOB
1. From the Job Controller of the CommCell Console, right-click the job and select Resume.
2. As the Job Manager attempts to restart the job, the job status changes to Waiting, Pending, or Running.
KILLING A JOB
1. From the Job Controller of the CommCell Console, right-click the job and select Kill.
2. Click Yes when the confirmation prompt appears if you are sure you want to kill the job. The job status may change to Kill Pending for a few moments while the operation completes. Once completed, the job status will change to Killed and it will be removed from the Job Controller window after five minutes.
JOB STATUSIn the case of SAP for Oracle iDataAgent, the job status is displayed depending on the BRTOOLs error codes.
4. Click OK.
1. From the CommCell Console, navigate to <Client> | SAP for Oracle | <Instance>
2. Right-click the Subclient and select Backup
3. Click Advanced.
4. In the Advanced Backup Options dialog box, click the Job Retry tab.
5. Select Enable Total Running Time and specify the maximum elapsed time before a job can be restarted or killed.
Select Kill Running Jobs When Total Running Time Expires to kill the job after reaching the maximum elapsed time.
6. Select Enable Number Of Retries and specify the number of retries.
7. Click OK.
SUSPENDTemporarily stops a job. A suspended job is not terminated; it can be restarted at a later time.
RESUMEResumes a job and returns the status to Waiting, Pending, Queued, or Running. The status depends on the availability of resources, the state of the Operation Windows, or the Activity Control setting.
KILLTerminates a job.
BRTOOLS ERROR CODE MESSAGE JOB STATUS
0 Successful Completed1 Warnings – all files were processed (for example,
backed up or restored)Completed With Warning
Administration Guide - SAP for Oracle iDataAgent
Page 68 of 193
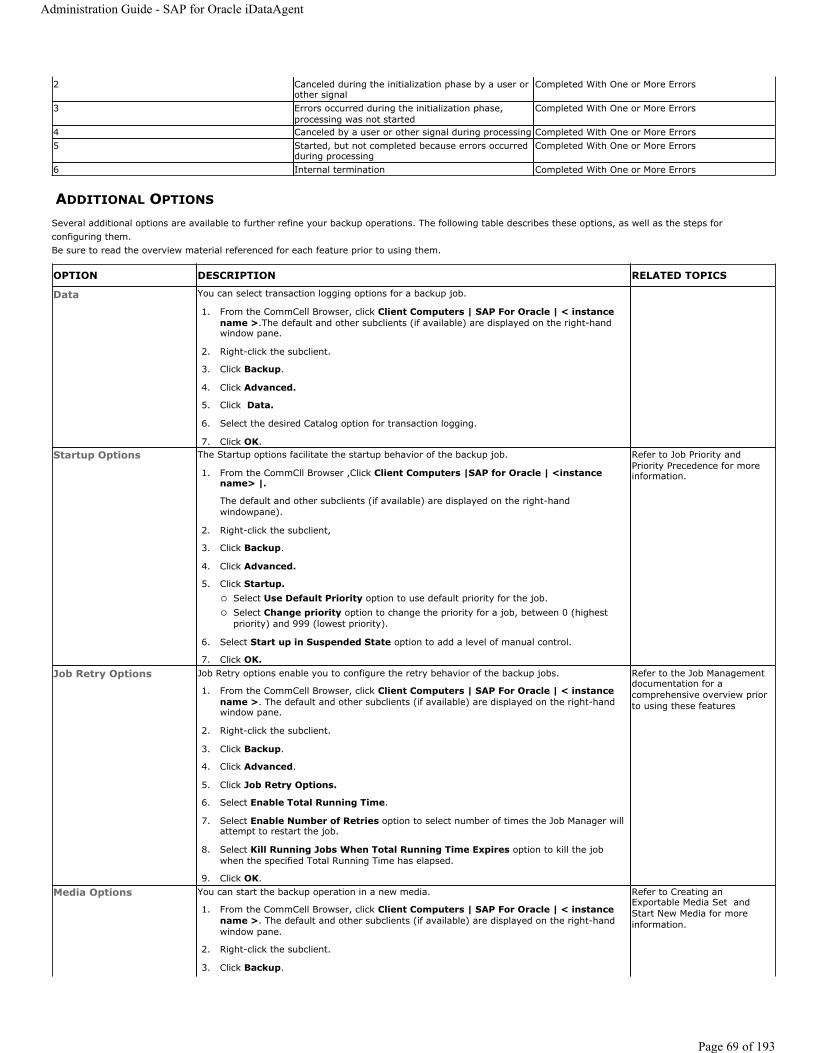
ADDITIONAL OPTIONS
Several additional options are available to further refine your backup operations. The following table describes these options, as well as the steps for configuring them. Be sure to read the overview material referenced for each feature prior to using them.
2 Canceled during the initialization phase by a user or other signal
Completed With One or More Errors
3 Errors occurred during the initialization phase, processing was not started
Completed With One or More Errors
4 Canceled by a user or other signal during processing Completed With One or More Errors5 Started, but not completed because errors occurred
during processingCompleted With One or More Errors
6 Internal termination Completed With One or More Errors
OPTION DESCRIPTION RELATED TOPICS
Data You can select transaction logging options for a backup job.
1. From the CommCell Browser, click Client Computers | SAP For Oracle | < instance name >.The default and other subclients (if available) are displayed on the right-hand window pane.
2. Right-click the subclient.
3. Click Backup.
4. Click Advanced.
5. Click Data.
6. Select the desired Catalog option for transaction logging.
7. Click OK. Startup Options The Startup options facilitate the startup behavior of the backup job.
1. From the CommCll Browser ,Click Client Computers |SAP for Oracle | <instance name> |.
The default and other subclients (if available) are displayed on the right-hand windowpane).
2. Right-click the subclient,
3. Click Backup.
4. Click Advanced.
5. Click Startup.Select Use Default Priority option to use default priority for the job. Select Change priority option to change the priority for a job, between 0 (highest priority) and 999 (lowest priority).
6. Select Start up in Suspended State option to add a level of manual control.
7. Click OK.
Refer to Job Priority and Priority Precedence for more information.
Job Retry Options Job Retry options enable you to configure the retry behavior of the backup jobs.
1. From the CommCell Browser, click Client Computers | SAP For Oracle | < instance name >. The default and other subclients (if available) are displayed on the right-hand window pane.
2. Right-click the subclient.
3. Click Backup.
4. Click Advanced.
5. Click Job Retry Options.
6. Select Enable Total Running Time.
7. Select Enable Number of Retries option to select number of times the Job Manager will attempt to restart the job.
8. Select Kill Running Jobs When Total Running Time Expires option to kill the job when the specified Total Running Time has elapsed.
9. Click OK.
Refer to the Job Managementdocumentation for a comprehensive overview prior to using these features
Media Options You can start the backup operation in a new media.
1. From the CommCell Browser, click Client Computers | SAP For Oracle | < instance name >. The default and other subclients (if available) are displayed on the right-hand window pane.
2. Right-click the subclient.
3. Click Backup.
Refer to Creating an Exportable Media Set and Start New Media for more information.
Administration Guide - SAP for Oracle iDataAgent
Page 69 of 193
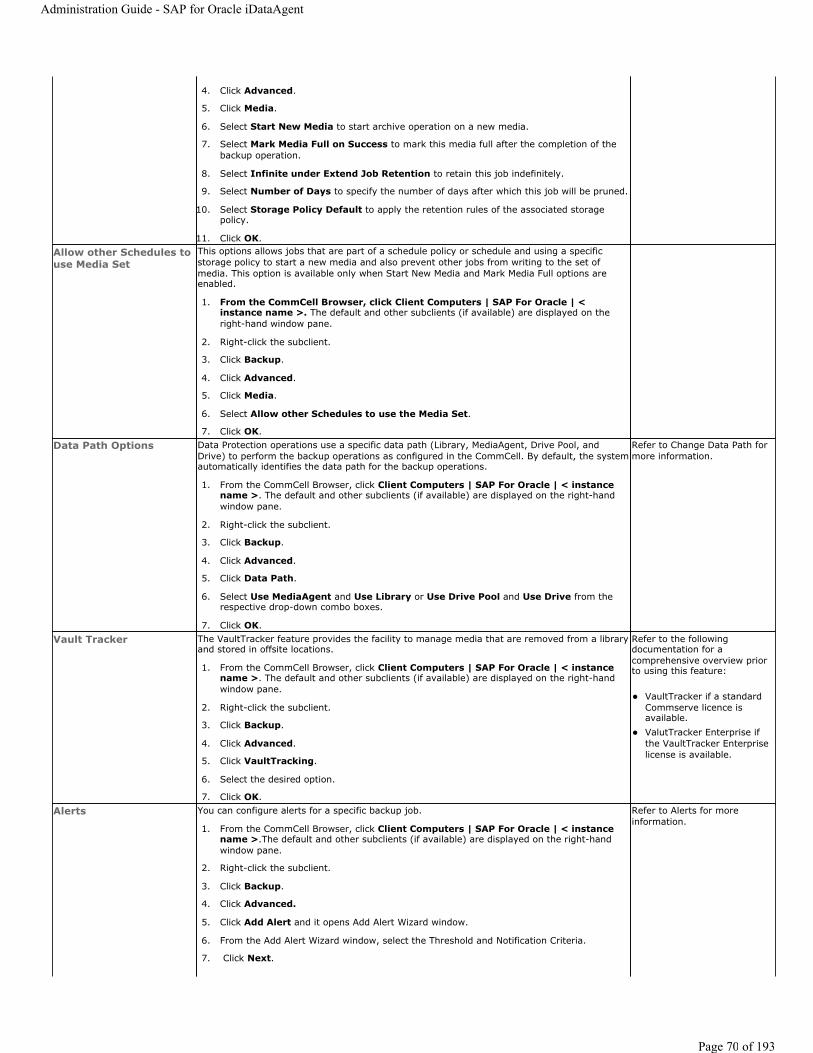
4. Click Advanced.
5. Click Media.
6. Select Start New Media to start archive operation on a new media.
7. Select Mark Media Full on Success to mark this media full after the completion of the backup operation.
8. Select Infinite under Extend Job Retention to retain this job indefinitely.
9. Select Number of Days to specify the number of days after which this job will be pruned.
10. Select Storage Policy Default to apply the retention rules of the associated storage policy.
11. Click OK. Allow other Schedules to use Media Set
This options allows jobs that are part of a schedule policy or schedule and using a specific storage policy to start a new media and also prevent other jobs from writing to the set of media. This option is available only when Start New Media and Mark Media Full options are enabled.
1. From the CommCell Browser, click Client Computers | SAP For Oracle | < instance name >. The default and other subclients (if available) are displayed on the right-hand window pane.
2. Right-click the subclient.
3. Click Backup.
4. Click Advanced.
5. Click Media.
6. Select Allow other Schedules to use the Media Set.
7. Click OK. Data Path Options Data Protection operations use a specific data path (Library, MediaAgent, Drive Pool, and
Drive) to perform the backup operations as configured in the CommCell. By default, the system automatically identifies the data path for the backup operations.
1. From the CommCell Browser, click Client Computers | SAP For Oracle | < instance name >. The default and other subclients (if available) are displayed on the right-hand window pane.
2. Right-click the subclient.
3. Click Backup.
4. Click Advanced.
5. Click Data Path.
6. Select Use MediaAgent and Use Library or Use Drive Pool and Use Drive from the respective drop-down combo boxes.
7. Click OK.
Refer to Change Data Path for more information.
Vault Tracker The VaultTracker feature provides the facility to manage media that are removed from a library and stored in offsite locations.
1. From the CommCell Browser, click Client Computers | SAP For Oracle | < instance name >. The default and other subclients (if available) are displayed on the right-hand window pane.
2. Right-click the subclient.
3. Click Backup.
4. Click Advanced.
5. Click VaultTracking.
6. Select the desired option.
7. Click OK.
Refer to the following documentation for a comprehensive overview prior to using this feature:
VaultTracker if a standard Commserve licence is available. ValutTracker Enterprise if the VaultTracker Enterprise license is available.
Alerts You can configure alerts for a specific backup job.
1. From the CommCell Browser, click Client Computers | SAP For Oracle | < instance name >.The default and other subclients (if available) are displayed on the right-hand window pane.
2. Right-click the subclient.
3. Click Backup.
4. Click Advanced.
5. Click Add Alert and it opens Add Alert Wizard window.
6. From the Add Alert Wizard window, select the Threshold and Notification Criteria.
7. Click Next.
Refer to Alerts for more information.
Administration Guide - SAP for Oracle iDataAgent
Page 70 of 193

Back to Top
8. Select the Notification Types and Click Next.
9. Select the Users and User Groups and Click Next.
10. Click Finish.
Administration Guide - SAP for Oracle iDataAgent
Page 71 of 193

Advanced - SAP for Oracle Restore
CHOOSING RESTORE TYPES
When restoring SAP for Oracle data, it is important to consider the backup type that was originally performed.
The following table illustrates the types of restores available for each backup type:
The restore operations automatically identifies and uses the same SAP Backup Interface that was used for the backup.
TABLE OF CONTENTS RELATED TOPICS
Choosing Restore Types
Choosing the Restore Destination
Restoring to a Different Client (Cross Machine Restore)Cross Machine Restore from CommCell ConsoleCross Machine Restore Using util_file Interface from Command LineCross Machine Restore Using rman_Util Interface from Command LineCross Client Restore to a Different SID Name Using BRRESTORE from Command LineCross Client Restore to a Different SID Name Using BRRECOVER from Command Line
Restoring Entire Database
Restoring Individual Data Files/Table Spaces
Restoring Archive LogsRestoring with Specific Log TimeRestoring with Log Serial Number
Restoring Control Files
Restoring Data From a Specific Time Range
Recovering a Database
Scheduling a Restore
Restoring from Command Line
Browse DataBrowsing Data From Before the Most Recent Full Backup
Listing MediaListing Media For a SubclientListing Media For a Backup Set or Instance
Restore by Jobs
Manage Restore JobsRestart JobsResubmit JobsControl JobsJob Status
Additional Restore Options
Capabilities and Required ActionsProvides comprehensive information on licensing.
Command Line InterfaceProvides comprehensive information on running jobs from the command line.
BACKUP TYPE RESTORE LEVEL NOTESOffline Backup Restore Entire Database
Recover Database
Since the database is offline and is consistent, there is no need for logs.
Online Backup Restore Entire Database
Restore Individual Data files/Table spaces
Restore Archive Logs
Restore Control File
Point-In-Time Restores
Control file restore can happen only when the database is in NOMOUNT mode.
Selective Online Full Backup Restore Entire Database
Restore Individual Data files/Table spaces
Restore Archive Logs
Restore Control File
Point-In-Time Restores
Control file restore can happen only when the database is in NOMOUNT mode.
Archive Log backup Restore Archive Logs
Administration Guide - SAP for Oracle iDataAgent
Page 72 of 193
CHOOSING THE RESTORE DESTINATION
By default, the SAP for Oracle iDataAgent restores data to the client computer from which it originated; this is referred to as an in-place restore. You can also restore the data to another client computer in the CommCell. Keep in mind the following considerations when performing such restores:
The destination client must reside in the same CommCell as the client whose data was backed up.
Note that when you perform restores other than in-place restores, the restored data assumes the rights (i.e., permissions) of the parent directory.
The following section enumerates the types of restore destinations that are supported by the SAP iDataAgent.
IN-PLACE RESTORE
When restoring data, the SAP for Oracle iDataAgent provides the facility to restore the data to the same path/destination on the client computer from which the data originated; this is referred to as an in-place restore.
1. From the CommCell Console, perform a Browse and Restore operation.
2. When browsing the data, select data that was initially backed up and click Recover All Selected.
3. Click OK.
4. Select the Destination Client that was the original computer from which the data originated.
5. Depending on the data selected to restore, choose one of more of the options (e.g., Restore Archive Log).
6. Click OK.
OUT-OF-PLACE RESTORE
All restore levels provide the facility to restore data to a different directory on the client computer from which the data originated; this is referred to as an out-of-place restore to a different path/destination. You can also restore data to a different client computer in the CommCell using the same path/destination. This can include restoring either individual data files or tablespaces, or the entire database to another computer.
1. From the CommCell Console, perform a Browse and Restore operation.
2. When browsing the data, select data that was initially backed up and click Recover All Selected.
3. Click OK.
4. Select the Destination Client that is a different computer from which the data originated.
5. Depending on the data selected to restore, choose one of more of the options (e.g., Restore Archive Log).
6. Click OK.
RESTORING TO A DIFFERENT CLIENT (CROSS MACHINE RESTORE)In cases when the original client computer is damaged, you need to restore the SAP for Oracle database to a different host. This is called a cross-machine restore. Whenever you perform such a restore, ensure that the destination machine has sufficient disk space to accommodate the restored database.
Prior to performing a cross-machine restore, do the following:
Ensure that the SAP application is installed in the destination client and an empty instance is created in the same directory structure as that in the source client.
Include the source client name in the initCER.utl file. For example,
srcCrossClient
<source client display name in CommCell Console>
Copy the initCER.sap and initCER.ora files from the source client to the destination client. You can either manually copy these files from the source client, or run the following commands to restore these files to the destination client.
brrestore -d util_file -b2 becmmcsy.anf -m /oracle_setup/dbs/init<SID>.ora
brrestore -d util_file -b2 becmmcsy.anf -m /oracle_setup/dbs/init<SID>.sap
Ensure that the following information is the same on both the source and destination clients:
ORACLE_SID name
/oracle/GRP/sapbackup/cntrlGRP.dbf path
Keep in mind the following considerations when performing out-of-place restores: The destination client must reside in the same CommCell as the client whose data was backed up.
Note that when you perform an out-of-place restore, the restored data assumes the rights (i.e., permissions) of the parent directory.
Administration Guide - SAP for Oracle iDataAgent
Page 73 of 193
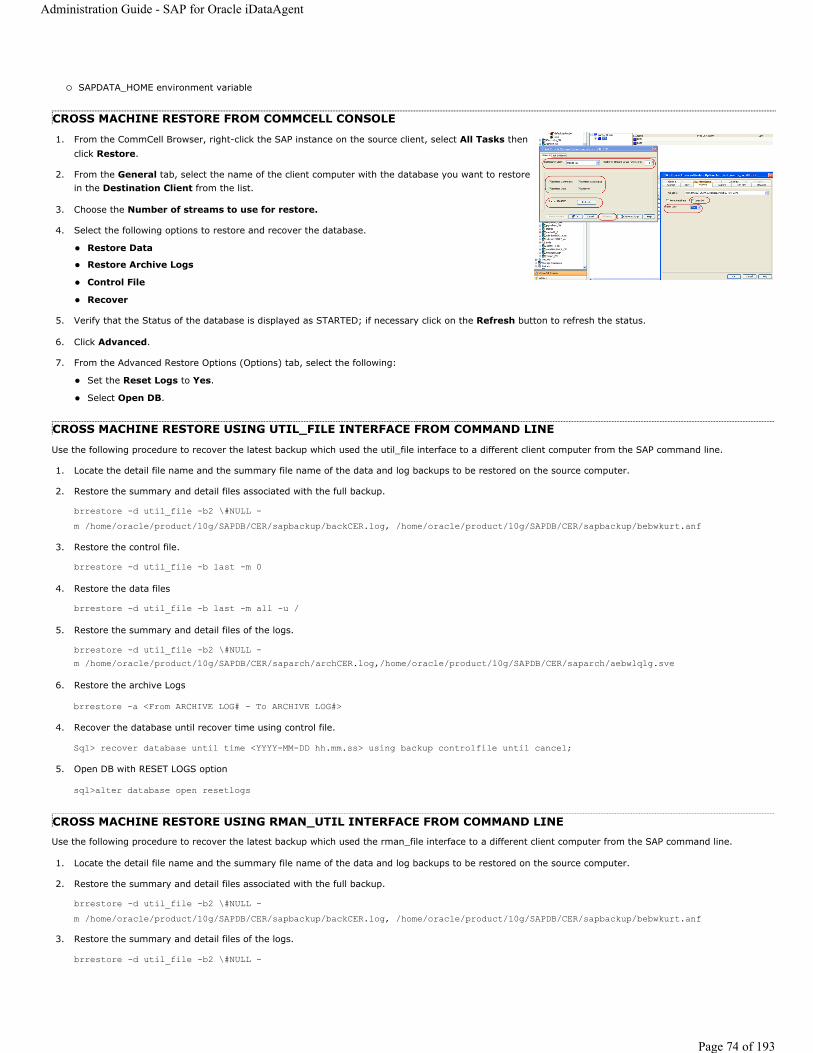
SAPDATA_HOME environment variable
CROSS MACHINE RESTORE FROM COMMCELL CONSOLE
1. From the CommCell Browser, right-click the SAP instance on the source client, select All Tasks then click Restore.
2. From the General tab, select the name of the client computer with the database you want to restore in the Destination Client from the list.
3. Choose the Number of streams to use for restore.
4. Select the following options to restore and recover the database.
Restore Data
Restore Archive Logs
Control File
Recover
5. Verify that the Status of the database is displayed as STARTED; if necessary click on the Refresh button to refresh the status.
6. Click Advanced.
7. From the Advanced Restore Options (Options) tab, select the following:
Set the Reset Logs to Yes.
Select Open DB.
CROSS MACHINE RESTORE USING UTIL_FILE INTERFACE FROM COMMAND LINE
Use the following procedure to recover the latest backup which used the util_file interface to a different client computer from the SAP command line.
1. Locate the detail file name and the summary file name of the data and log backups to be restored on the source computer.
2. Restore the summary and detail files associated with the full backup.
brrestore -d util_file -b2 \#NULL -m /home/oracle/product/10g/SAPDB/CER/sapbackup/backCER.log, /home/oracle/product/10g/SAPDB/CER/sapbackup/bebwkurt.anf
3. Restore the control file.
brrestore -d util_file -b last -m 0
4. Restore the data files
brrestore -d util_file -b last -m all -u /
5. Restore the summary and detail files of the logs.
brrestore -d util_file -b2 \#NULL -m /home/oracle/product/10g/SAPDB/CER/saparch/archCER.log,/home/oracle/product/10g/SAPDB/CER/saparch/aebwlqlg.sve
6. Restore the archive Logs
brrestore -a <From ARCHIVE LOG# - To ARCHIVE LOG#>
4. Recover the database until recover time using control file.
Sql> recover database until time <YYYY-MM-DD hh.mm.ss> using backup controlfile until cancel;
5. Open DB with RESET LOGS option
sql>alter database open resetlogs
CROSS MACHINE RESTORE USING RMAN_UTIL INTERFACE FROM COMMAND LINEUse the following procedure to recover the latest backup which used the rman_file interface to a different client computer from the SAP command line.
1. Locate the detail file name and the summary file name of the data and log backups to be restored on the source computer.
2. Restore the summary and detail files associated with the full backup.
brrestore -d util_file -b2 \#NULL -m /home/oracle/product/10g/SAPDB/CER/sapbackup/backCER.log, /home/oracle/product/10g/SAPDB/CER/sapbackup/bebwkurt.anf
3. Restore the summary and detail files of the logs.
brrestore -d util_file -b2 \#NULL -
Administration Guide - SAP for Oracle iDataAgent
Page 74 of 193
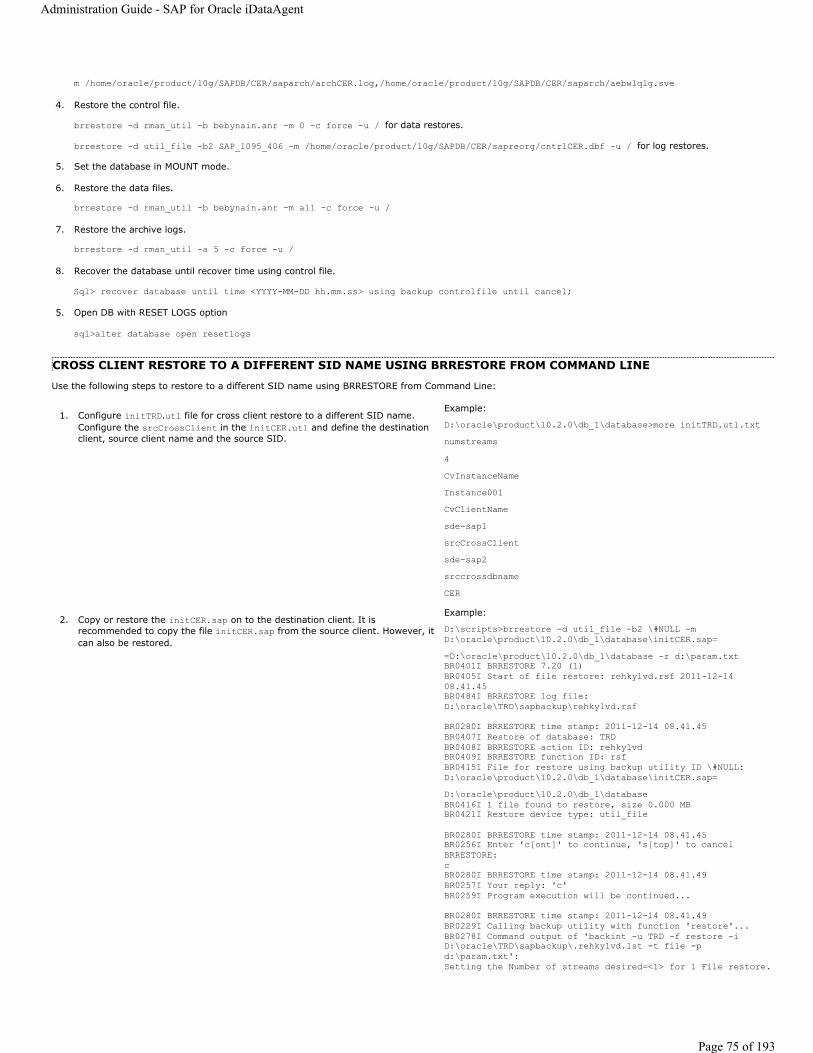
m /home/oracle/product/10g/SAPDB/CER/saparch/archCER.log,/home/oracle/product/10g/SAPDB/CER/saparch/aebwlqlg.sve
4. Restore the control file.
brrestore -d rman_util -b bebynain.anr -m 0 -c force -u / for data restores.
brrestore -d util_file -b2 SAP_1095_406 -m /home/oracle/product/10g/SAPDB/CER/sapreorg/cntrlCER.dbf -u / for log restores.
5. Set the database in MOUNT mode.
6. Restore the data files.
brrestore -d rman_util -b bebynain.anr -m all -c force -u /
7. Restore the archive logs.
brrestore -d rman_util -a 5 -c force -u /
8. Recover the database until recover time using control file.
Sql> recover database until time <YYYY-MM-DD hh.mm.ss> using backup controlfile until cancel;
5. Open DB with RESET LOGS option
sql>alter database open resetlogs
CROSS CLIENT RESTORE TO A DIFFERENT SID NAME USING BRRESTORE FROM COMMAND LINE
Use the following steps to restore to a different SID name using BRRESTORE from Command Line:
1. Configure initTRD.utl file for cross client restore to a different SID name. Configure the srcCrossClient in the initCER.utl and define the destination client, source client name and the source SID.
Example:
D:\oracle\product\10.2.0\db_1\database>more initTRD.utl.txtnumstreams4CvInstanceNameInstance001CvClientNamesde-sap1srcCrossClientsde-sap2srccrossdbnameCER
2. Copy or restore the initCER.sap on to the destination client. It is recommended to copy the file initCER.sap from the source client. However, it can also be restored.
Example:
D:\scripts>brrestore -d util_file -b2 \#NULL -m D:\oracle\product\10.2.0\db_1\database\initCER.sap==D:\oracle\product\10.2.0\db_1\database -r d:\param.txtBR0401I BRRESTORE 7.20 (1)BR0405I Start of file restore: rehkylvd.rsf 2011-12-14 08.41.45BR0484I BRRESTORE log file: D:\oracle\TRD\sapbackup\rehkylvd.rsf
BR0280I BRRESTORE time stamp: 2011-12-14 08.41.45BR0407I Restore of database: TRDBR0408I BRRESTORE action ID: rehkylvdBR0409I BRRESTORE function ID: rsfBR0415I File for restore using backup utility ID \#NULL: D:\oracle\product\10.2.0\db_1\database\initCER.sap=D:\oracle\product\10.2.0\db_1\databaseBR0416I 1 file found to restore, size 0.000 MBBR0421I Restore device type: util_file
BR0280I BRRESTORE time stamp: 2011-12-14 08.41.45BR0256I Enter 'c[ont]' to continue, 's[top]' to cancel BRRESTORE:cBR0280I BRRESTORE time stamp: 2011-12-14 08.41.49BR0257I Your reply: 'c'BR0259I Program execution will be continued...
BR0280I BRRESTORE time stamp: 2011-12-14 08.41.49BR0229I Calling backup utility with function 'restore'...BR0278I Command output of 'backint -u TRD -f restore -i D:\oracle\TRD\sapbackup\.rehkylvd.lst -t file -p d:\param.txt':Setting the Number of streams desired=<1> for 1 File restore.
Administration Guide - SAP for Oracle iDataAgent
Page 75 of 193

-------------------------- Output of restore -------------------------
BI_BACKUP=<PARTIAL>BI_CALLER=<BRRESTORE>BI_REQUEST=<NEW>
-------------------------- Parameter Specified -------------------------
CvInstanceName=<Instance001>CvClientName=<sde-sap1>numstreams=<1>srccrossclient=<sde-sap2>
srccrossdbname=<CER>
destdbname=<TRD>
-------------------------- backint Command Line -------------------------
backintCmd=[backint -u TRD -f restore -i D:\oracle\TRD\sapbackup\.rehkylvd.lst -t file -p d:\param.txt ]
CommServeHostName=satishpCommClientHostName=sde-sap1.idcprodcert.locGalaxy CommCellID=2Galaxy ClientID=219Src Cross Client=<sde-sap2>getInstanceId for InstanceName=[CER] client=[sde-sap1.prodcert.loc] clientId=219 AppType=61 FailedInstance=[CER] - May not have been configured.Galaxy SrcCrossClientID=218Galaxy CrossClientInstanceID=559Galaxy CrossClientAppType=61Galaxy CrossClientAppID=2283Number of streams desired=<1> Number of files to restore=<1> CMDLINE JobRestore has been requested
SID=[CER] BkpSet=[default] AppType=[61]Success in getting Job id=14424 Token=<14424:2:1>Success in init with JMCannot obtain the Index MediaAgent from the Archive Manager..Attaching CommServer SessionAfileNumber=19929, AcommCellId=2 AgroupNumber=23archfilename=D:\oracle\product\10.2.0\db_1\database\initCER.sap copy=36 BID=13310 reqBID=13310 afileFlags=4d
BR0280I BRRESTORE time stamp: 2011-12-14 08.42.27#FILE..... D:\oracle\product\10.2.0\db_1\database\initCER.sap D:\oracle\product\10.2.0\db_1\database\initCER.sap#RESTORED. 1021752_13310Successful restore; 1 File(s); total transferred bytes=12616Success in sending JMSUCCESS to serverSuccess in sending JMSUCCESS to server
BR0280I BRRESTORE time stamp: 2011-12-14 08.42.27BR0374I 1 of 1 file restored by backup utilityBR0230I Backup utility called successfully
BR0406I End of file restore: rehkylvd.rsf 2011-12-14 08.42.27BR0280I BRRESTORE time stamp: 2011-12-14 08.42.27BR0402I BRRESTORE completed successfully
3. Rename the file init<OLD_SID>.sap to init<NEW_SID>.sap.Example:
D:\oracle\product\10.2.0\db_1\database>move initCER.sap initTRD.sap1 file(s) moved
4. Edit the parameters in init<SID>.sap to customize it for cross client restore:Example:
backup_root_dir = D:\oracle\CER\sapbackupstage_root_dir = D:\oracle\CER\sapbackupcompress_cmd = "D:\usr\sap\CER\sys\exe\run\mkszip -c $ > $"uncompress_cmd = "D:\usr\sap\CER\sys\exe\run\uncompress -c $ > $"compress_dir = D:\oracle\CER\sapreorg
Administration Guide - SAP for Oracle iDataAgent
Page 76 of 193
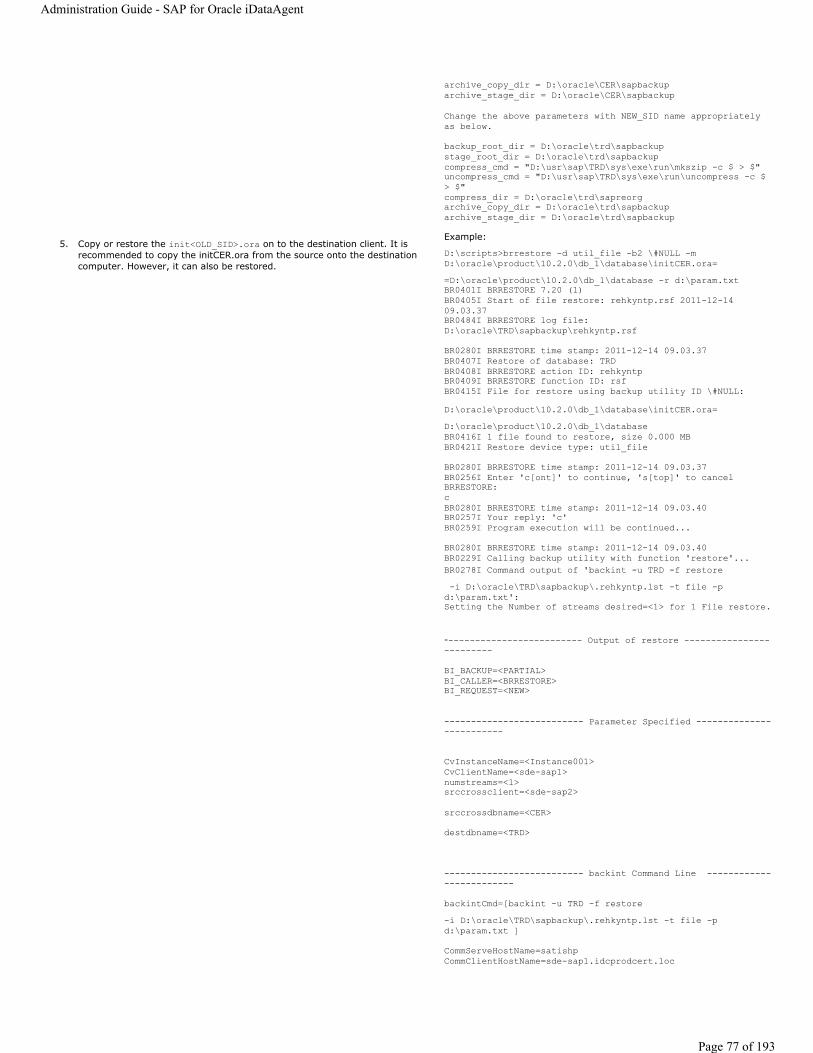
archive_copy_dir = D:\oracle\CER\sapbackuparchive_stage_dir = D:\oracle\CER\sapbackup
Change the above parameters with NEW_SID name appropriately as below.
backup_root_dir = D:\oracle\trd\sapbackupstage_root_dir = D:\oracle\trd\sapbackupcompress_cmd = "D:\usr\sap\TRD\sys\exe\run\mkszip -c $ > $"uncompress_cmd = "D:\usr\sap\TRD\sys\exe\run\uncompress -c $ > $"compress_dir = D:\oracle\trd\sapreorgarchive_copy_dir = D:\oracle\trd\sapbackuparchive_stage_dir = D:\oracle\trd\sapbackup
5. Copy or restore the init<OLD_SID>.ora on to the destination client. It is recommended to copy the initCER.ora from the source onto the destination computer. However, it can also be restored.
Example:
D:\scripts>brrestore -d util_file -b2 \#NULL -m D:\oracle\product\10.2.0\db_1\database\initCER.ora==D:\oracle\product\10.2.0\db_1\database -r d:\param.txtBR0401I BRRESTORE 7.20 (1)BR0405I Start of file restore: rehkyntp.rsf 2011-12-14 09.03.37BR0484I BRRESTORE log file: D:\oracle\TRD\sapbackup\rehkyntp.rsf
BR0280I BRRESTORE time stamp: 2011-12-14 09.03.37BR0407I Restore of database: TRDBR0408I BRRESTORE action ID: rehkyntpBR0409I BRRESTORE function ID: rsfBR0415I File for restore using backup utility ID \#NULL: D:\oracle\product\10.2.0\db_1\database\initCER.ora=D:\oracle\product\10.2.0\db_1\databaseBR0416I 1 file found to restore, size 0.000 MBBR0421I Restore device type: util_file
BR0280I BRRESTORE time stamp: 2011-12-14 09.03.37BR0256I Enter 'c[ont]' to continue, 's[top]' to cancel BRRESTORE:cBR0280I BRRESTORE time stamp: 2011-12-14 09.03.40BR0257I Your reply: 'c'BR0259I Program execution will be continued...
BR0280I BRRESTORE time stamp: 2011-12-14 09.03.40BR0229I Calling backup utility with function 'restore'...BR0278I Command output of 'backint -u TRD -f restore-i D:\oracle\TRD\sapbackup\.rehkyntp.lst -t file -p d:\param.txt':Setting the Number of streams desired=<1> for 1 File restore.
-------------------------- Output of restore -------------------------
BI_BACKUP=<PARTIAL>BI_CALLER=<BRRESTORE>BI_REQUEST=<NEW>
-------------------------- Parameter Specified -------------------------
CvInstanceName=<Instance001>CvClientName=<sde-sap1>numstreams=<1>srccrossclient=<sde-sap2>
srccrossdbname=<CER>
destdbname=<TRD>
-------------------------- backint Command Line -------------------------
backintCmd=[backint -u TRD -f restore -i D:\oracle\TRD\sapbackup\.rehkyntp.lst -t file -p d:\param.txt ]
CommServeHostName=satishpCommClientHostName=sde-sap1.idcprodcert.loc
Administration Guide - SAP for Oracle iDataAgent
Page 77 of 193

Galaxy CommCellID=2Galaxy ClientID=219Src Cross Client=<sde-sap2>getInstanceId for InstanceName=[CER] client=[sde-sap1.idcprodcert.loc] clientId=219 AppType=61 FailedInstance=[CER] - May not have been configured.Galaxy SrcCrossClientID=218Galaxy CrossClientInstanceID=559Galaxy CrossClientAppType=61Galaxy CrossClientAppID=2283Number of streams desired=<1> Number of files to restore=<1> CMDLINE JobRestore has been requested
SID=[CER] BkpSet=[default] AppType=[61]Success in getting Job id=14426 Token=<14426:2:1>Success in init with JMCannot obtain the Index MediaAgent from the Archive Manager..Attaching CommServer SessionAfileNumber=19928, AcommCellId=2 AgroupNumber=23 archfilename=D:\oracle\product\10.2.0\db_1\database\initCER.ora copy=36 BID=13310 reqBID=13310 afileFlags=4d
BR0280I BRRESTORE time stamp: 2011-12-14 09.04.04#FILE..... D:\oracle\product\10.2.0\db_1\database\initCER.ora D:\oracle\product\10.2.0\db_1\database\initCER.ora#RESTORED. 1021752_13310Successful restore; 1 File(s); total transferred bytes=4696Success in sending JMSUCCESS to serverSuccess in sending JMSUCCESS to server
BR0280I BRRESTORE time stamp: 2011-12-14 09.04.05BR0374I 1 of 1 file restored by backup utilityBR0230I Backup utility called successfully
BR0406I End of file restore: rehkyntp.rsf 2011-12-14 09.04.05BR0280I BRRESTORE time stamp: 2011-12-14 09.04.05BR0402I BRRESTORE completed successfully
6. Rename initCER.ora to initTRD.ora. Example:
D:\oracle\product\10.2.0\db_1\database>move initCER.ora initTRD.ora 1 file(s) moved
7. Edit the init<NEW_SID>.ora file and replace the parameters with a new directory Structure:
Example:
control_files = (D:\oracle\trd\sapdata1\cntrl\ctrlCER.ctl, D:\oracle\trd\sapdata2\cntrl\ctrlCER.ctl, D:\oracle\trd\saparch\cntrl\ctrlCER.ctl)background_dump_dest = D:\oracle\trd\saptrace\backgrounduser_dump_dest = D:\oracle\trd\saptrace\usertracelog_archive_dest = D:\oracle\trd\saparch
8. Create an SPFILE from the PFILE. Example:
D:\oracle\product\10.2.0\db_1\database>sqlplus / as sysdba
SQL*Plus: Release 10.2.0.4.0 - Production on Wed Dec 14 09:21:51 2011
Copyright (c) 1982, 2007, Oracle. All Rights Reserved.
Connected to an idle instance.
SQL> startup nomount;ORACLE instance started.
Total System Global Area 138412032 bytesFixed Size 2063992 bytesVariable Size 125829512 bytesDatabase Buffers 8388608 bytesRedo Buffers 2129920 bytesSQL> create spfile from pfile;
File created.
SQL>
9. Copy or restore the <OLD_SID>.log file.Example:
D:\scripts>brrestore -d util_file -b2 \#NULL -m D:\oracle\CER\sapbackup\backCER.log==D:\oracle\TRD\sapbackup -r d:\param.txt
Administration Guide - SAP for Oracle iDataAgent
Page 78 of 193

BR0401I BRRESTORE 7.20 (1)BR0405I Start of file restore: rehkyqtz.rsf 2011-12-14 09.37.35BR0484I BRRESTORE log file: D:\oracle\TRD\sapbackup\rehkyqtz.rsf
BR0280I BRRESTORE time stamp: 2011-12-14 09.37.35BR0407I Restore of database: TRDBR0408I BRRESTORE action ID: rehkyqtzBR0409I BRRESTORE function ID: rsfBR0415I File for restore using backup utility ID \#NULL: D:\oracle\CER\sapbackup\backCER.log=D:\oracle\TRD\sapbackupBR0416I 1 file found to restore, size 0.000 MBBR0421I Restore device type: util_file
BR0280I BRRESTORE time stamp: 2011-12-14 09.37.35BR0256I Enter 'c[ont]' to continue, 's[top]' to cancel BRRESTORE:cBR0280I BRRESTORE time stamp: 2011-12-14 09.37.37BR0257I Your reply: 'c'BR0259I Program execution will be continued...
BR0280I BRRESTORE time stamp: 2011-12-14 09.37.37BR0229I Calling backup utility with function 'restore'...BR0278I Command output of 'backint -u TRD -f restore -i D:\oracle\TRD\sapbackup\.rehkyqtz.lst -t file -p d:\param.txt':Setting the Number of streams desired=<1> for 1 File restore.
-------------------------- Output of restore -------------------------
BI_BACKUP=<PARTIAL>BI_CALLER=<BRRESTORE>BI_REQUEST=<NEW>
-------------------------- Parameter Specified -------------------------
CvInstanceName=<Instance001>CvClientName=<sde-sap1>numstreams=<1>srccrossclient=<sde-sap2>
srccrossdbname=<CER>
destdbname=<TRD>
-------------------------- backint Command Line -------------------------
backintCmd=[backint -u TRD -f restore -i D:\oracle\TRD\sapbackup\.rehkyqtz.lst -t file -p d:\param.txt ]
CommServeHostName=satishpCommClientHostName=sde-sap1.idcprodcert.locGalaxy CommCellID=2Galaxy ClientID=219Src Cross Client=<sde-sap2>getInstanceId for InstanceName=[CER] client=[sde-sap1.idcprodcert.loc] clientId=219 AppType=61 FailedInstance=[CER] - May not have been configured.Galaxy SrcCrossClientID=218Galaxy CrossClientInstanceID=559Galaxy CrossClientAppType=61Galaxy CrossClientAppID=2283Number of streams desired=<1> Number of files to restore=<1> CMDLINE JobRestore has been requested
SID=[CER] BkpSet=[default] AppType=[61]Success in getting Job id=14429 Token=<14429:2:1>Success in init with JMCannot obtain the Index MediaAgent from the Archive Manager..Attaching CommServer SessionAfileNumber=19914, AcommCellId=2 AgroupNumber=22 archfilename=D:\oracle\CER\sapbackup\backCER.log copy=35 BID=13310 reqBID=13310 afileFlags=0d
BR0280I BRRESTORE time stamp: 2011-12-14 09.38.00#FILE..... D:\oracle\CER\sapbackup\backCER.log
Administration Guide - SAP for Oracle iDataAgent
Page 79 of 193
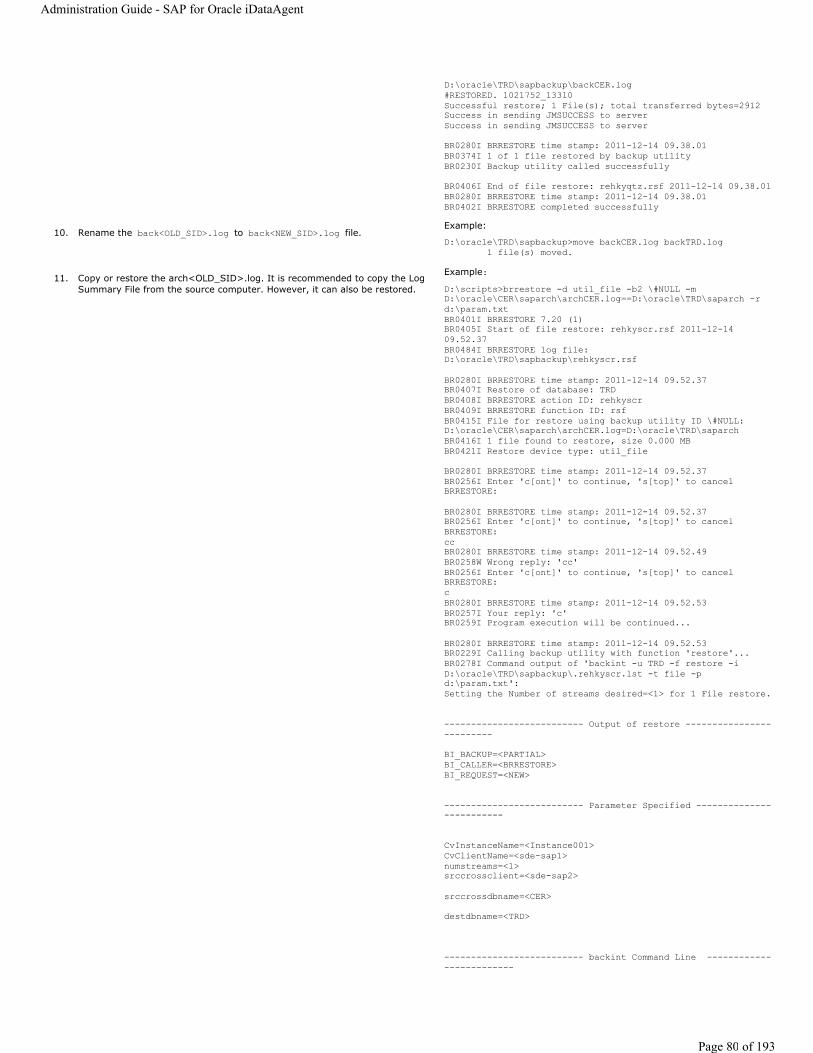
D:\oracle\TRD\sapbackup\backCER.log#RESTORED. 1021752_13310Successful restore; 1 File(s); total transferred bytes=2912Success in sending JMSUCCESS to serverSuccess in sending JMSUCCESS to server
BR0280I BRRESTORE time stamp: 2011-12-14 09.38.01BR0374I 1 of 1 file restored by backup utilityBR0230I Backup utility called successfully
BR0406I End of file restore: rehkyqtz.rsf 2011-12-14 09.38.01BR0280I BRRESTORE time stamp: 2011-12-14 09.38.01BR0402I BRRESTORE completed successfully
10. Rename the back<OLD_SID>.log to back<NEW_SID>.log file.Example:
D:\oracle\TRD\sapbackup>move backCER.log backTRD.log 1 file(s) moved.
11. Copy or restore the arch<OLD_SID>.log. It is recommended to copy the Log Summary File from the source computer. However, it can also be restored.
Example:D:\scripts>brrestore -d util_file -b2 \#NULL -m D:\oracle\CER\saparch\archCER.log==D:\oracle\TRD\saparch -r d:\param.txtBR0401I BRRESTORE 7.20 (1)BR0405I Start of file restore: rehkyscr.rsf 2011-12-14 09.52.37BR0484I BRRESTORE log file: D:\oracle\TRD\sapbackup\rehkyscr.rsf
BR0280I BRRESTORE time stamp: 2011-12-14 09.52.37BR0407I Restore of database: TRDBR0408I BRRESTORE action ID: rehkyscrBR0409I BRRESTORE function ID: rsfBR0415I File for restore using backup utility ID \#NULL: D:\oracle\CER\saparch\archCER.log=D:\oracle\TRD\saparchBR0416I 1 file found to restore, size 0.000 MBBR0421I Restore device type: util_file
BR0280I BRRESTORE time stamp: 2011-12-14 09.52.37BR0256I Enter 'c[ont]' to continue, 's[top]' to cancel BRRESTORE:
BR0280I BRRESTORE time stamp: 2011-12-14 09.52.37BR0256I Enter 'c[ont]' to continue, 's[top]' to cancel BRRESTORE:ccBR0280I BRRESTORE time stamp: 2011-12-14 09.52.49BR0258W Wrong reply: 'cc'BR0256I Enter 'c[ont]' to continue, 's[top]' to cancel BRRESTORE:cBR0280I BRRESTORE time stamp: 2011-12-14 09.52.53BR0257I Your reply: 'c'BR0259I Program execution will be continued...
BR0280I BRRESTORE time stamp: 2011-12-14 09.52.53BR0229I Calling backup utility with function 'restore'...BR0278I Command output of 'backint -u TRD -f restore -i D:\oracle\TRD\sapbackup\.rehkyscr.lst -t file -p d:\param.txt':Setting the Number of streams desired=<1> for 1 File restore.
-------------------------- Output of restore -------------------------
BI_BACKUP=<PARTIAL>BI_CALLER=<BRRESTORE>BI_REQUEST=<NEW>
-------------------------- Parameter Specified -------------------------
CvInstanceName=<Instance001>CvClientName=<sde-sap1>numstreams=<1>srccrossclient=<sde-sap2>
srccrossdbname=<CER>
destdbname=<TRD>
-------------------------- backint Command Line -------------------------
Administration Guide - SAP for Oracle iDataAgent
Page 80 of 193
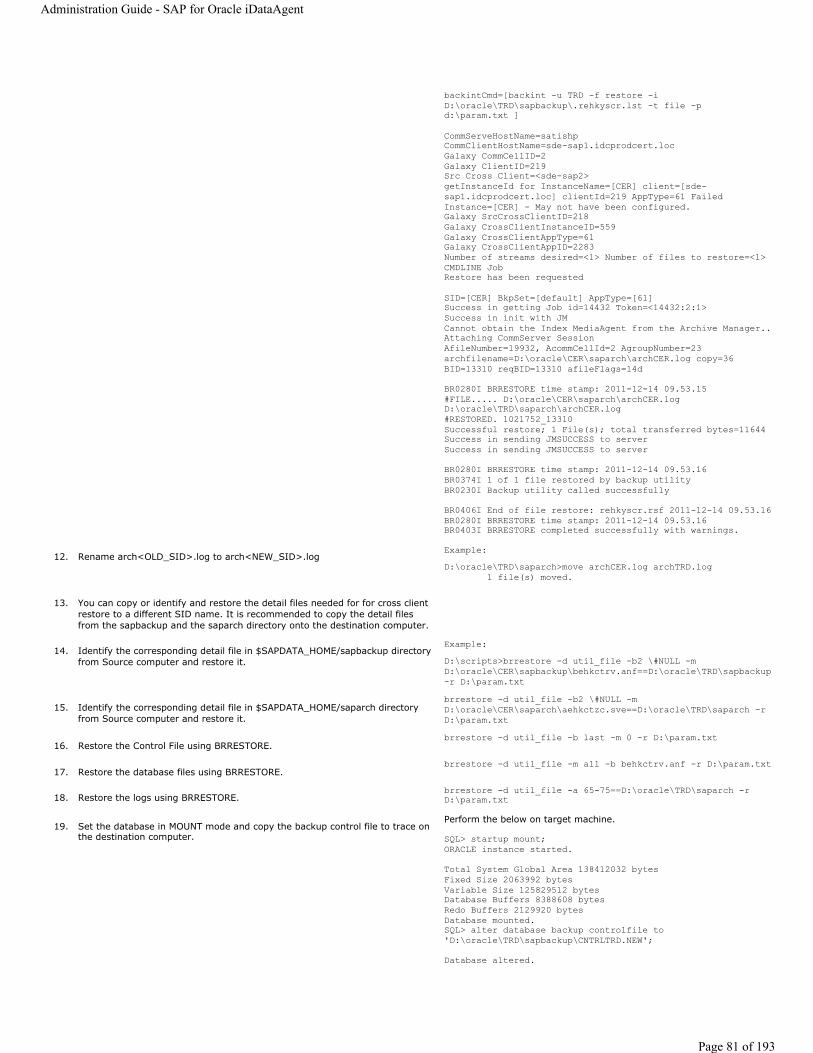
backintCmd=[backint -u TRD -f restore -i D:\oracle\TRD\sapbackup\.rehkyscr.lst -t file -p d:\param.txt ]
CommServeHostName=satishpCommClientHostName=sde-sap1.idcprodcert.locGalaxy CommCellID=2Galaxy ClientID=219Src Cross Client=<sde-sap2>getInstanceId for InstanceName=[CER] client=[sde-sap1.idcprodcert.loc] clientId=219 AppType=61 FailedInstance=[CER] - May not have been configured.Galaxy SrcCrossClientID=218Galaxy CrossClientInstanceID=559Galaxy CrossClientAppType=61Galaxy CrossClientAppID=2283Number of streams desired=<1> Number of files to restore=<1> CMDLINE JobRestore has been requested
SID=[CER] BkpSet=[default] AppType=[61]Success in getting Job id=14432 Token=<14432:2:1>Success in init with JMCannot obtain the Index MediaAgent from the Archive Manager..Attaching CommServer SessionAfileNumber=19932, AcommCellId=2 AgroupNumber=23 archfilename=D:\oracle\CER\saparch\archCER.log copy=36 BID=13310 reqBID=13310 afileFlags=14d
BR0280I BRRESTORE time stamp: 2011-12-14 09.53.15#FILE..... D:\oracle\CER\saparch\archCER.log D:\oracle\TRD\saparch\archCER.log#RESTORED. 1021752_13310Successful restore; 1 File(s); total transferred bytes=11644Success in sending JMSUCCESS to serverSuccess in sending JMSUCCESS to server
BR0280I BRRESTORE time stamp: 2011-12-14 09.53.16BR0374I 1 of 1 file restored by backup utilityBR0230I Backup utility called successfully
BR0406I End of file restore: rehkyscr.rsf 2011-12-14 09.53.16BR0280I BRRESTORE time stamp: 2011-12-14 09.53.16BR0403I BRRESTORE completed successfully with warnings.
12. Rename arch<OLD_SID>.log to arch<NEW_SID>.log Example:D:\oracle\TRD\saparch>move archCER.log archTRD.log 1 file(s) moved.
13. You can copy or identify and restore the detail files needed for for cross client restore to a different SID name. It is recommended to copy the detail files from the sapbackup and the saparch directory onto the destination computer.
14. Identify the corresponding detail file in $SAPDATA_HOME/sapbackup directory from Source computer and restore it.
Example:D:\scripts>brrestore -d util_file -b2 \#NULL -m D:\oracle\CER\sapbackup\behkctrv.anf==D:\oracle\TRD\sapbackup -r D:\param.txt
15. Identify the corresponding detail file in $SAPDATA_HOME/saparch directory from Source computer and restore it.
brrestore -d util_file -b2 \#NULL -m D:\oracle\CER\saparch\aehkctzc.sve==D:\oracle\TRD\saparch -r D:\param.txt
16. Restore the Control File using BRRESTORE.brrestore -d util_file -b last -m 0 -r D:\param.txt
17. Restore the database files using BRRESTORE.brrestore -d util_file -m all -b behkctrv.anf -r D:\param.txt
18. Restore the logs using BRRESTORE.brrestore -d util_file -a 65-75==D:\oracle\TRD\saparch -r D:\param.txt
19. Set the database in MOUNT mode and copy the backup control file to trace on the destination computer.
Perform the below on target machine.
SQL> startup mount;ORACLE instance started.
Total System Global Area 138412032 bytesFixed Size 2063992 bytesVariable Size 125829512 bytesDatabase Buffers 8388608 bytesRedo Buffers 2129920 bytesDatabase mounted.SQL> alter database backup controlfile to 'D:\oracle\TRD\sapbackup\CNTRLTRD.NEW';
Database altered.
Administration Guide - SAP for Oracle iDataAgent
Page 81 of 193
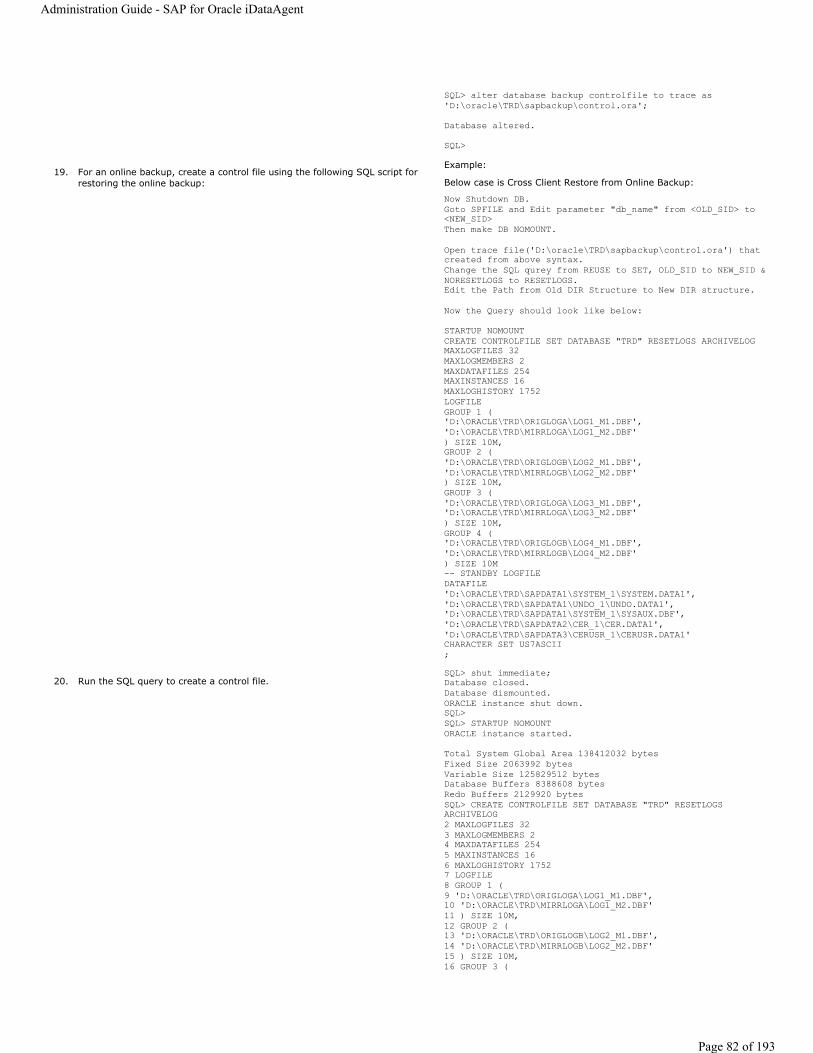
SQL> alter database backup controlfile to trace as 'D:\oracle\TRD\sapbackup\control.ora';
Database altered.
SQL>
19. For an online backup, create a control file using the following SQL script for restoring the online backup:
Example:
Below case is Cross Client Restore from Online Backup:
Now Shutdown DB.Goto SPFILE and Edit parameter "db_name" from <OLD_SID> to <NEW_SID>Then make DB NOMOUNT.
Open trace file('D:\oracle\TRD\sapbackup\control.ora') that created from above syntax.Change the SQL qurey from REUSE to SET, OLD_SID to NEW_SID & NORESETLOGS to RESETLOGS.Edit the Path from Old DIR Structure to New DIR structure.
Now the Query should look like below:
STARTUP NOMOUNTCREATE CONTROLFILE SET DATABASE "TRD" RESETLOGS ARCHIVELOGMAXLOGFILES 32MAXLOGMEMBERS 2MAXDATAFILES 254MAXINSTANCES 16MAXLOGHISTORY 1752LOGFILEGROUP 1 ('D:\ORACLE\TRD\ORIGLOGA\LOG1_M1.DBF','D:\ORACLE\TRD\MIRRLOGA\LOG1_M2.DBF') SIZE 10M,GROUP 2 ('D:\ORACLE\TRD\ORIGLOGB\LOG2_M1.DBF','D:\ORACLE\TRD\MIRRLOGB\LOG2_M2.DBF') SIZE 10M,GROUP 3 ('D:\ORACLE\TRD\ORIGLOGA\LOG3_M1.DBF','D:\ORACLE\TRD\MIRRLOGA\LOG3_M2.DBF') SIZE 10M,GROUP 4 ('D:\ORACLE\TRD\ORIGLOGB\LOG4_M1.DBF','D:\ORACLE\TRD\MIRRLOGB\LOG4_M2.DBF') SIZE 10M-- STANDBY LOGFILEDATAFILE'D:\ORACLE\TRD\SAPDATA1\SYSTEM_1\SYSTEM.DATA1','D:\ORACLE\TRD\SAPDATA1\UNDO_1\UNDO.DATA1','D:\ORACLE\TRD\SAPDATA1\SYSTEM_1\SYSAUX.DBF','D:\ORACLE\TRD\SAPDATA2\CER_1\CER.DATA1','D:\ORACLE\TRD\SAPDATA3\CERUSR_1\CERUSR.DATA1'CHARACTER SET US7ASCII;
20. Run the SQL query to create a control file. SQL> shut immediate;Database closed.Database dismounted.ORACLE instance shut down.SQL>SQL> STARTUP NOMOUNTORACLE instance started.
Total System Global Area 138412032 bytesFixed Size 2063992 bytesVariable Size 125829512 bytesDatabase Buffers 8388608 bytesRedo Buffers 2129920 bytesSQL> CREATE CONTROLFILE SET DATABASE "TRD" RESETLOGS ARCHIVELOG2 MAXLOGFILES 323 MAXLOGMEMBERS 24 MAXDATAFILES 2545 MAXINSTANCES 166 MAXLOGHISTORY 17527 LOGFILE8 GROUP 1 (9 'D:\ORACLE\TRD\ORIGLOGA\LOG1_M1.DBF',10 'D:\ORACLE\TRD\MIRRLOGA\LOG1_M2.DBF'11 ) SIZE 10M,12 GROUP 2 (13 'D:\ORACLE\TRD\ORIGLOGB\LOG2_M1.DBF',14 'D:\ORACLE\TRD\MIRRLOGB\LOG2_M2.DBF'15 ) SIZE 10M,16 GROUP 3 (
Administration Guide - SAP for Oracle iDataAgent
Page 82 of 193
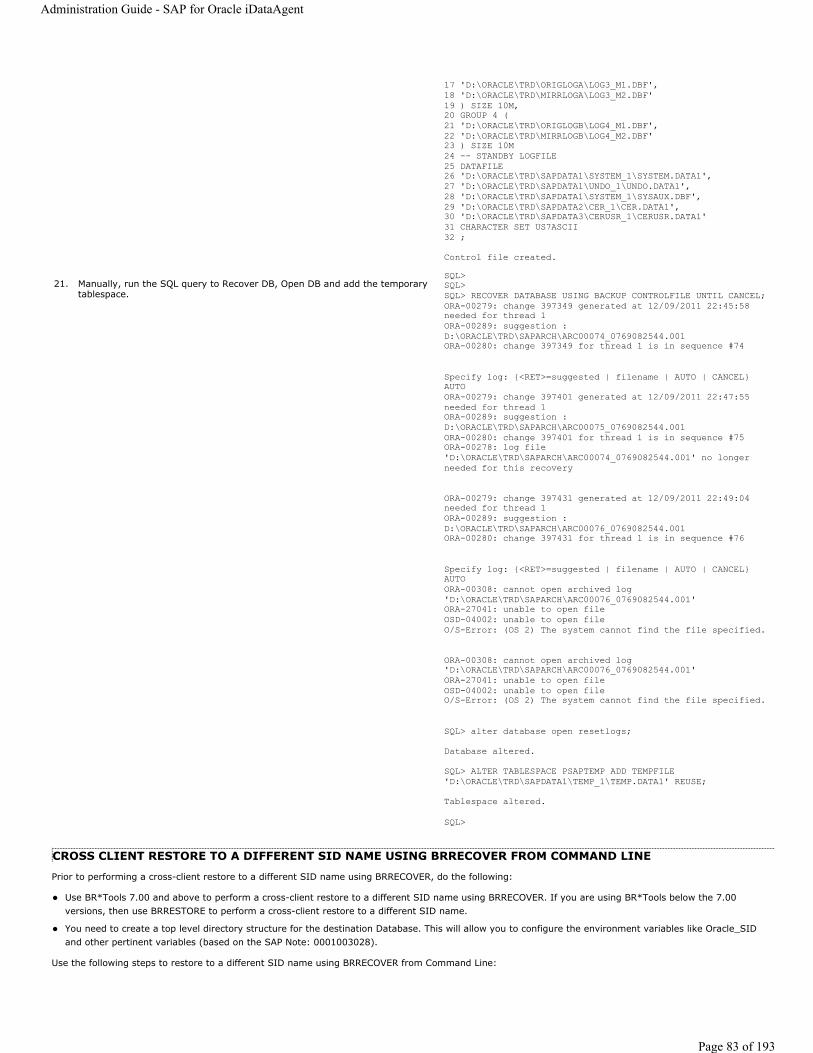
CROSS CLIENT RESTORE TO A DIFFERENT SID NAME USING BRRECOVER FROM COMMAND LINE
Prior to performing a cross-client restore to a different SID name using BRRECOVER, do the following:
Use BR*Tools 7.00 and above to perform a cross-client restore to a different SID name using BRRECOVER. If you are using BR*Tools below the 7.00 versions, then use BRRESTORE to perform a cross-client restore to a different SID name.
You need to create a top level directory structure for the destination Database. This will allow you to configure the environment variables like Oracle_SID and other pertinent variables (based on the SAP Note: 0001003028).
Use the following steps to restore to a different SID name using BRRECOVER from Command Line:
17 'D:\ORACLE\TRD\ORIGLOGA\LOG3_M1.DBF',18 'D:\ORACLE\TRD\MIRRLOGA\LOG3_M2.DBF'19 ) SIZE 10M,20 GROUP 4 (21 'D:\ORACLE\TRD\ORIGLOGB\LOG4_M1.DBF',22 'D:\ORACLE\TRD\MIRRLOGB\LOG4_M2.DBF'23 ) SIZE 10M24 -- STANDBY LOGFILE25 DATAFILE26 'D:\ORACLE\TRD\SAPDATA1\SYSTEM_1\SYSTEM.DATA1',27 'D:\ORACLE\TRD\SAPDATA1\UNDO_1\UNDO.DATA1',28 'D:\ORACLE\TRD\SAPDATA1\SYSTEM_1\SYSAUX.DBF',29 'D:\ORACLE\TRD\SAPDATA2\CER_1\CER.DATA1',30 'D:\ORACLE\TRD\SAPDATA3\CERUSR_1\CERUSR.DATA1'31 CHARACTER SET US7ASCII32 ;
Control file created.
21. Manually, run the SQL query to Recover DB, Open DB and add the temporary tablespace.
SQL>SQL>SQL> RECOVER DATABASE USING BACKUP CONTROLFILE UNTIL CANCEL;ORA-00279: change 397349 generated at 12/09/2011 22:45:58 needed for thread 1ORA-00289: suggestion : D:\ORACLE\TRD\SAPARCH\ARC00074_0769082544.001ORA-00280: change 397349 for thread 1 is in sequence #74
Specify log: {<RET>=suggested | filename | AUTO | CANCEL}AUTOORA-00279: change 397401 generated at 12/09/2011 22:47:55 needed for thread 1ORA-00289: suggestion : D:\ORACLE\TRD\SAPARCH\ARC00075_0769082544.001ORA-00280: change 397401 for thread 1 is in sequence #75ORA-00278: log file 'D:\ORACLE\TRD\SAPARCH\ARC00074_0769082544.001' no longerneeded for this recovery
ORA-00279: change 397431 generated at 12/09/2011 22:49:04 needed for thread 1ORA-00289: suggestion : D:\ORACLE\TRD\SAPARCH\ARC00076_0769082544.001ORA-00280: change 397431 for thread 1 is in sequence #76
Specify log: {<RET>=suggested | filename | AUTO | CANCEL}AUTOORA-00308: cannot open archived log'D:\ORACLE\TRD\SAPARCH\ARC00076_0769082544.001'ORA-27041: unable to open fileOSD-04002: unable to open fileO/S-Error: (OS 2) The system cannot find the file specified.
ORA-00308: cannot open archived log'D:\ORACLE\TRD\SAPARCH\ARC00076_0769082544.001'ORA-27041: unable to open fileOSD-04002: unable to open fileO/S-Error: (OS 2) The system cannot find the file specified.
SQL> alter database open resetlogs;
Database altered.
SQL> ALTER TABLESPACE PSAPTEMP ADD TEMPFILE 'D:\ORACLE\TRD\SAPDATA1\TEMP_1\TEMP.DATA1' REUSE;
Tablespace altered.
SQL>
Administration Guide - SAP for Oracle iDataAgent
Page 83 of 193
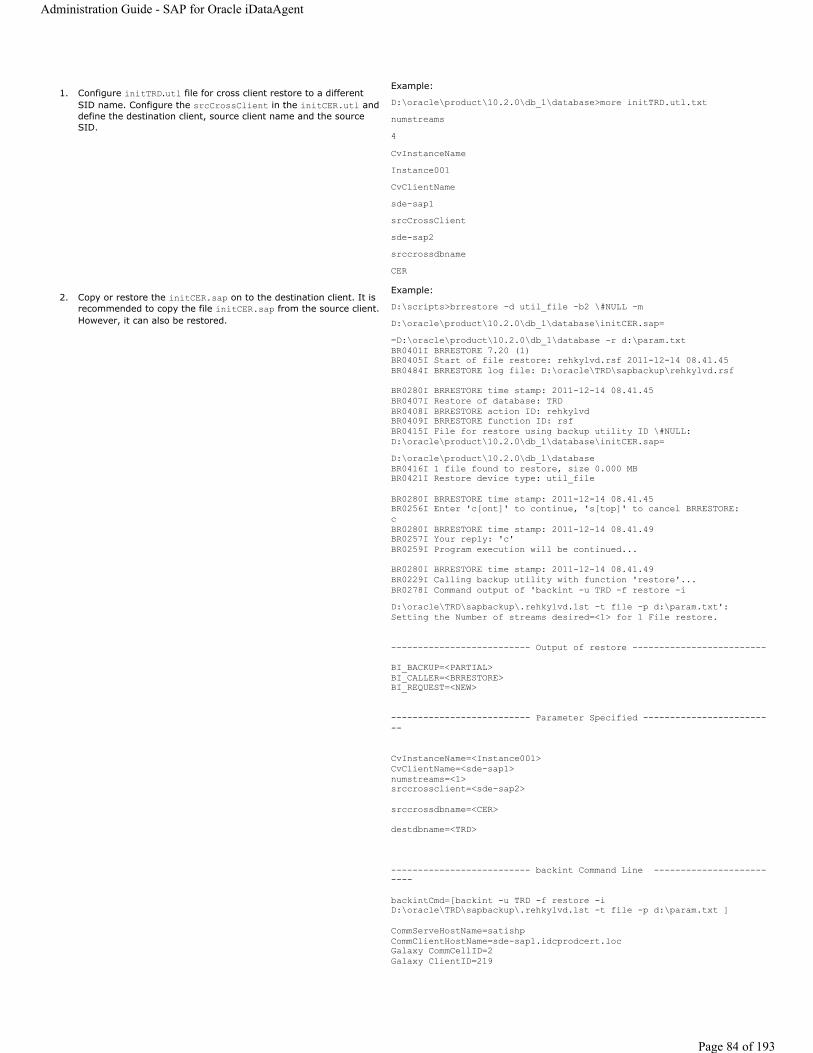
1. Configure initTRD.utl file for cross client restore to a different SID name. Configure the srcCrossClient in the initCER.utl and define the destination client, source client name and the source SID.
Example:
D:\oracle\product\10.2.0\db_1\database>more initTRD.utl.txtnumstreams4CvInstanceNameInstance001CvClientNamesde-sap1srcCrossClientsde-sap2srccrossdbnameCER
2. Copy or restore the initCER.sap on to the destination client. It is recommended to copy the file initCER.sap from the source client. However, it can also be restored.
Example:
D:\scripts>brrestore -d util_file -b2 \#NULL -m D:\oracle\product\10.2.0\db_1\database\initCER.sap==D:\oracle\product\10.2.0\db_1\database -r d:\param.txtBR0401I BRRESTORE 7.20 (1)BR0405I Start of file restore: rehkylvd.rsf 2011-12-14 08.41.45BR0484I BRRESTORE log file: D:\oracle\TRD\sapbackup\rehkylvd.rsf
BR0280I BRRESTORE time stamp: 2011-12-14 08.41.45BR0407I Restore of database: TRDBR0408I BRRESTORE action ID: rehkylvdBR0409I BRRESTORE function ID: rsfBR0415I File for restore using backup utility ID \#NULL: D:\oracle\product\10.2.0\db_1\database\initCER.sap=D:\oracle\product\10.2.0\db_1\databaseBR0416I 1 file found to restore, size 0.000 MBBR0421I Restore device type: util_file
BR0280I BRRESTORE time stamp: 2011-12-14 08.41.45BR0256I Enter 'c[ont]' to continue, 's[top]' to cancel BRRESTORE:cBR0280I BRRESTORE time stamp: 2011-12-14 08.41.49BR0257I Your reply: 'c'BR0259I Program execution will be continued...
BR0280I BRRESTORE time stamp: 2011-12-14 08.41.49BR0229I Calling backup utility with function 'restore'...BR0278I Command output of 'backint -u TRD -f restore -i D:\oracle\TRD\sapbackup\.rehkylvd.lst -t file -p d:\param.txt':Setting the Number of streams desired=<1> for 1 File restore.
-------------------------- Output of restore -------------------------
BI_BACKUP=<PARTIAL>BI_CALLER=<BRRESTORE>BI_REQUEST=<NEW>
-------------------------- Parameter Specified -------------------------
CvInstanceName=<Instance001>CvClientName=<sde-sap1>numstreams=<1>srccrossclient=<sde-sap2>
srccrossdbname=<CER>
destdbname=<TRD>
-------------------------- backint Command Line -------------------------
backintCmd=[backint -u TRD -f restore -i D:\oracle\TRD\sapbackup\.rehkylvd.lst -t file -p d:\param.txt ]
CommServeHostName=satishpCommClientHostName=sde-sap1.idcprodcert.locGalaxy CommCellID=2Galaxy ClientID=219
Administration Guide - SAP for Oracle iDataAgent
Page 84 of 193
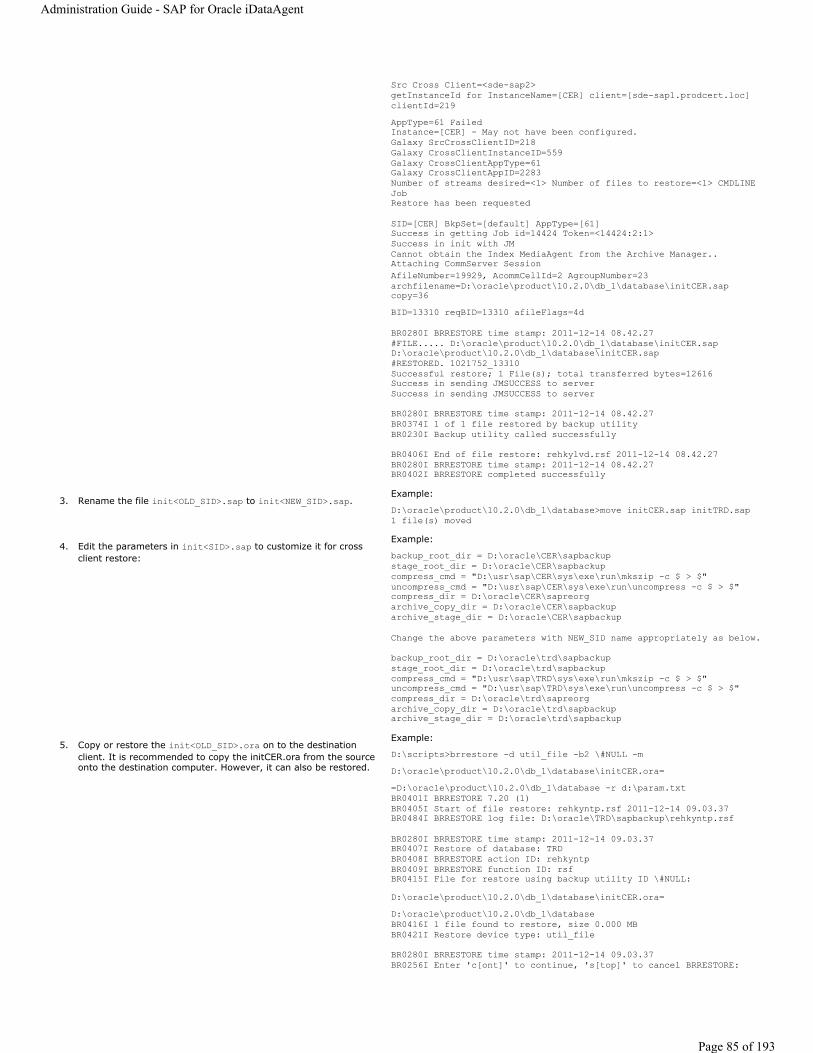
Src Cross Client=<sde-sap2>getInstanceId for InstanceName=[CER] client=[sde-sap1.prodcert.loc] clientId=219 AppType=61 FailedInstance=[CER] - May not have been configured.Galaxy SrcCrossClientID=218Galaxy CrossClientInstanceID=559Galaxy CrossClientAppType=61Galaxy CrossClientAppID=2283Number of streams desired=<1> Number of files to restore=<1> CMDLINE JobRestore has been requested
SID=[CER] BkpSet=[default] AppType=[61]Success in getting Job id=14424 Token=<14424:2:1>Success in init with JMCannot obtain the Index MediaAgent from the Archive Manager..Attaching CommServer SessionAfileNumber=19929, AcommCellId=2 AgroupNumber=23archfilename=D:\oracle\product\10.2.0\db_1\database\initCER.sap copy=36 BID=13310 reqBID=13310 afileFlags=4d
BR0280I BRRESTORE time stamp: 2011-12-14 08.42.27#FILE..... D:\oracle\product\10.2.0\db_1\database\initCER.sap D:\oracle\product\10.2.0\db_1\database\initCER.sap#RESTORED. 1021752_13310Successful restore; 1 File(s); total transferred bytes=12616Success in sending JMSUCCESS to serverSuccess in sending JMSUCCESS to server
BR0280I BRRESTORE time stamp: 2011-12-14 08.42.27BR0374I 1 of 1 file restored by backup utilityBR0230I Backup utility called successfully
BR0406I End of file restore: rehkylvd.rsf 2011-12-14 08.42.27BR0280I BRRESTORE time stamp: 2011-12-14 08.42.27BR0402I BRRESTORE completed successfully
3. Rename the file init<OLD_SID>.sap to init<NEW_SID>.sap.Example:
D:\oracle\product\10.2.0\db_1\database>move initCER.sap initTRD.sap1 file(s) moved
4. Edit the parameters in init<SID>.sap to customize it for cross client restore:
Example:
backup_root_dir = D:\oracle\CER\sapbackupstage_root_dir = D:\oracle\CER\sapbackupcompress_cmd = "D:\usr\sap\CER\sys\exe\run\mkszip -c $ > $"uncompress_cmd = "D:\usr\sap\CER\sys\exe\run\uncompress -c $ > $"compress_dir = D:\oracle\CER\sapreorgarchive_copy_dir = D:\oracle\CER\sapbackuparchive_stage_dir = D:\oracle\CER\sapbackup
Change the above parameters with NEW_SID name appropriately as below.
backup_root_dir = D:\oracle\trd\sapbackupstage_root_dir = D:\oracle\trd\sapbackupcompress_cmd = "D:\usr\sap\TRD\sys\exe\run\mkszip -c $ > $"uncompress_cmd = "D:\usr\sap\TRD\sys\exe\run\uncompress -c $ > $"compress_dir = D:\oracle\trd\sapreorgarchive_copy_dir = D:\oracle\trd\sapbackuparchive_stage_dir = D:\oracle\trd\sapbackup
5. Copy or restore the init<OLD_SID>.ora on to the destination client. It is recommended to copy the initCER.ora from the source onto the destination computer. However, it can also be restored.
Example:
D:\scripts>brrestore -d util_file -b2 \#NULL -m D:\oracle\product\10.2.0\db_1\database\initCER.ora==D:\oracle\product\10.2.0\db_1\database -r d:\param.txtBR0401I BRRESTORE 7.20 (1)BR0405I Start of file restore: rehkyntp.rsf 2011-12-14 09.03.37BR0484I BRRESTORE log file: D:\oracle\TRD\sapbackup\rehkyntp.rsf
BR0280I BRRESTORE time stamp: 2011-12-14 09.03.37BR0407I Restore of database: TRDBR0408I BRRESTORE action ID: rehkyntpBR0409I BRRESTORE function ID: rsfBR0415I File for restore using backup utility ID \#NULL: D:\oracle\product\10.2.0\db_1\database\initCER.ora=D:\oracle\product\10.2.0\db_1\databaseBR0416I 1 file found to restore, size 0.000 MBBR0421I Restore device type: util_file
BR0280I BRRESTORE time stamp: 2011-12-14 09.03.37BR0256I Enter 'c[ont]' to continue, 's[top]' to cancel BRRESTORE:
Administration Guide - SAP for Oracle iDataAgent
Page 85 of 193
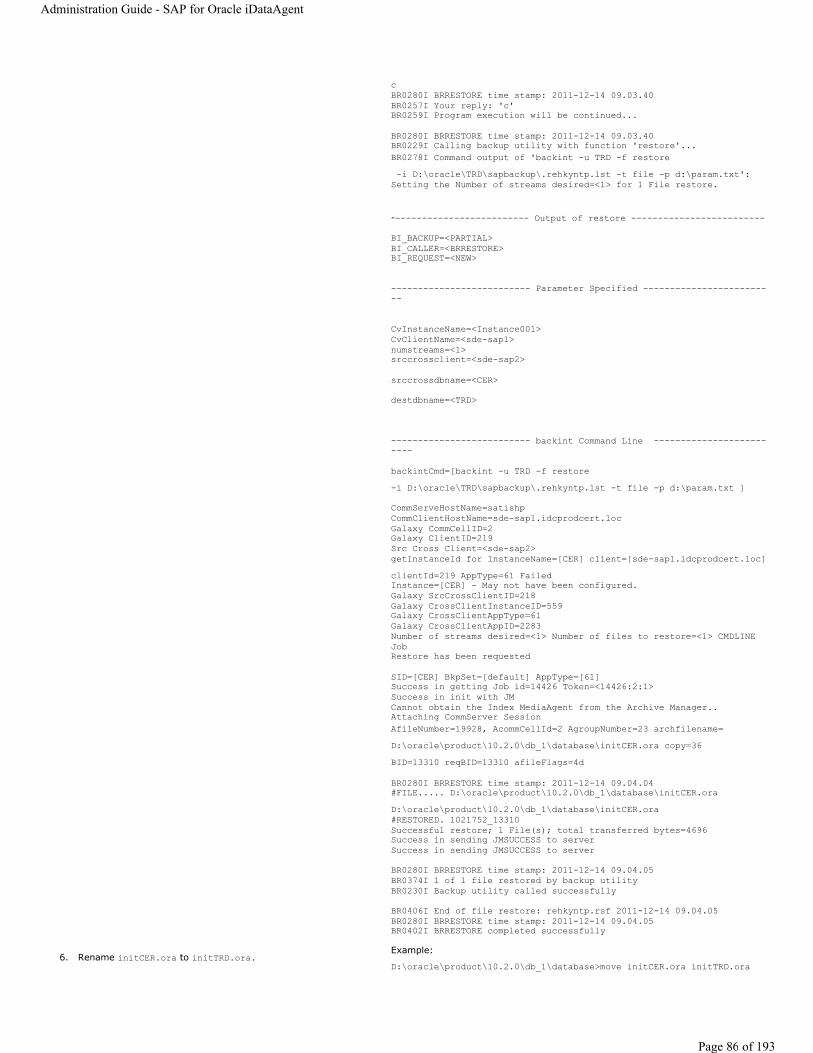
cBR0280I BRRESTORE time stamp: 2011-12-14 09.03.40BR0257I Your reply: 'c'BR0259I Program execution will be continued...
BR0280I BRRESTORE time stamp: 2011-12-14 09.03.40BR0229I Calling backup utility with function 'restore'...BR0278I Command output of 'backint -u TRD -f restore-i D:\oracle\TRD\sapbackup\.rehkyntp.lst -t file -p d:\param.txt':
Setting the Number of streams desired=<1> for 1 File restore.
-------------------------- Output of restore -------------------------
BI_BACKUP=<PARTIAL>BI_CALLER=<BRRESTORE>BI_REQUEST=<NEW>
-------------------------- Parameter Specified -------------------------
CvInstanceName=<Instance001>CvClientName=<sde-sap1>numstreams=<1>srccrossclient=<sde-sap2>
srccrossdbname=<CER>
destdbname=<TRD>
-------------------------- backint Command Line -------------------------
backintCmd=[backint -u TRD -f restore -i D:\oracle\TRD\sapbackup\.rehkyntp.lst -t file -p d:\param.txt ]
CommServeHostName=satishpCommClientHostName=sde-sap1.idcprodcert.locGalaxy CommCellID=2Galaxy ClientID=219Src Cross Client=<sde-sap2>getInstanceId for InstanceName=[CER] client=[sde-sap1.idcprodcert.loc] clientId=219 AppType=61 FailedInstance=[CER] - May not have been configured.Galaxy SrcCrossClientID=218Galaxy CrossClientInstanceID=559Galaxy CrossClientAppType=61Galaxy CrossClientAppID=2283Number of streams desired=<1> Number of files to restore=<1> CMDLINE JobRestore has been requested
SID=[CER] BkpSet=[default] AppType=[61]Success in getting Job id=14426 Token=<14426:2:1>Success in init with JMCannot obtain the Index MediaAgent from the Archive Manager..Attaching CommServer SessionAfileNumber=19928, AcommCellId=2 AgroupNumber=23 archfilename=D:\oracle\product\10.2.0\db_1\database\initCER.ora copy=36 BID=13310 reqBID=13310 afileFlags=4d
BR0280I BRRESTORE time stamp: 2011-12-14 09.04.04#FILE..... D:\oracle\product\10.2.0\db_1\database\initCER.ora D:\oracle\product\10.2.0\db_1\database\initCER.ora#RESTORED. 1021752_13310Successful restore; 1 File(s); total transferred bytes=4696Success in sending JMSUCCESS to serverSuccess in sending JMSUCCESS to server
BR0280I BRRESTORE time stamp: 2011-12-14 09.04.05BR0374I 1 of 1 file restored by backup utilityBR0230I Backup utility called successfully
BR0406I End of file restore: rehkyntp.rsf 2011-12-14 09.04.05BR0280I BRRESTORE time stamp: 2011-12-14 09.04.05BR0402I BRRESTORE completed successfully
6. Rename initCER.ora to initTRD.ora. Example:
D:\oracle\product\10.2.0\db_1\database>move initCER.ora initTRD.ora
Administration Guide - SAP for Oracle iDataAgent
Page 86 of 193

1 file(s) moved
7. Edit the init<NEW_SID>.ora file and replace the parameters with a new directory Structure:
Example:
control_files = (D:\oracle\trd\sapdata1\cntrl\ctrlCER.ctl, D:\oracle\trd\sapdata2\cntrl\ctrlCER.ctl, D:\oracle\trd\saparch\cntrl\ctrlCER.ctl)background_dump_dest = D:\oracle\trd\saptrace\backgrounduser_dump_dest = D:\oracle\trd\saptrace\usertracelog_archive_dest = D:\oracle\trd\saparch
8. Create an SPFILE from the PFILE. Example:
D:\oracle\product\10.2.0\db_1\database>sqlplus / as sysdba
SQL*Plus: Release 10.2.0.4.0 - Production on Wed Dec 14 09:21:51 2011
Copyright (c) 1982, 2007, Oracle. All Rights Reserved.
Connected to an idle instance.
SQL> startup nomount;ORACLE instance started.
Total System Global Area 138412032 bytesFixed Size 2063992 bytesVariable Size 125829512 bytesDatabase Buffers 8388608 bytesRedo Buffers 2129920 bytesSQL> create spfile from pfile;
File created.
SQL>
9. Copy or restore the <OLD_SID>.log file.Example:
D:\scripts>brrestore -d util_file -b2 \#NULL -m D:\oracle\CER\sapbackup\backCER.log==D:\oracle\TRD\sapbackup -r d:\param.txtBR0401I BRRESTORE 7.20 (1)BR0405I Start of file restore: rehkyqtz.rsf 2011-12-14 09.37.35BR0484I BRRESTORE log file: D:\oracle\TRD\sapbackup\rehkyqtz.rsf
BR0280I BRRESTORE time stamp: 2011-12-14 09.37.35BR0407I Restore of database: TRDBR0408I BRRESTORE action ID: rehkyqtzBR0409I BRRESTORE function ID: rsfBR0415I File for restore using backup utility ID \#NULL: D:\oracle\CER\sapbackup\backCER.log=D:\oracle\TRD\sapbackupBR0416I 1 file found to restore, size 0.000 MBBR0421I Restore device type: util_file
BR0280I BRRESTORE time stamp: 2011-12-14 09.37.35BR0256I Enter 'c[ont]' to continue, 's[top]' to cancel BRRESTORE:cBR0280I BRRESTORE time stamp: 2011-12-14 09.37.37BR0257I Your reply: 'c'BR0259I Program execution will be continued...
BR0280I BRRESTORE time stamp: 2011-12-14 09.37.37BR0229I Calling backup utility with function 'restore'...BR0278I Command output of 'backint -u TRD -f restore -i D:\oracle\TRD\sapbackup\.rehkyqtz.lst -t file -p d:\param.txt':Setting the Number of streams desired=<1> for 1 File restore.
-------------------------- Output of restore ------------------------BI_BACKUP=<PARTIAL>BI_CALLER=<BRRESTORE>BI_REQUEST=<NEW>
-------------------------- Parameter Specified ----------------------CvInstanceName=<Instance001>CvClientName=<sde-sap1>numstreams=<1>srccrossclient=<sde-sap2>
srccrossdbname=<CER>
destdbname=<TRD>
-------------------------- backint Command Line --------------------backintCmd=[backint -u TRD -f restore -i D:\oracle\TRD\sapbackup\.rehkyqtz.lst -t file -p d:\param.txt ]
Administration Guide - SAP for Oracle iDataAgent
Page 87 of 193
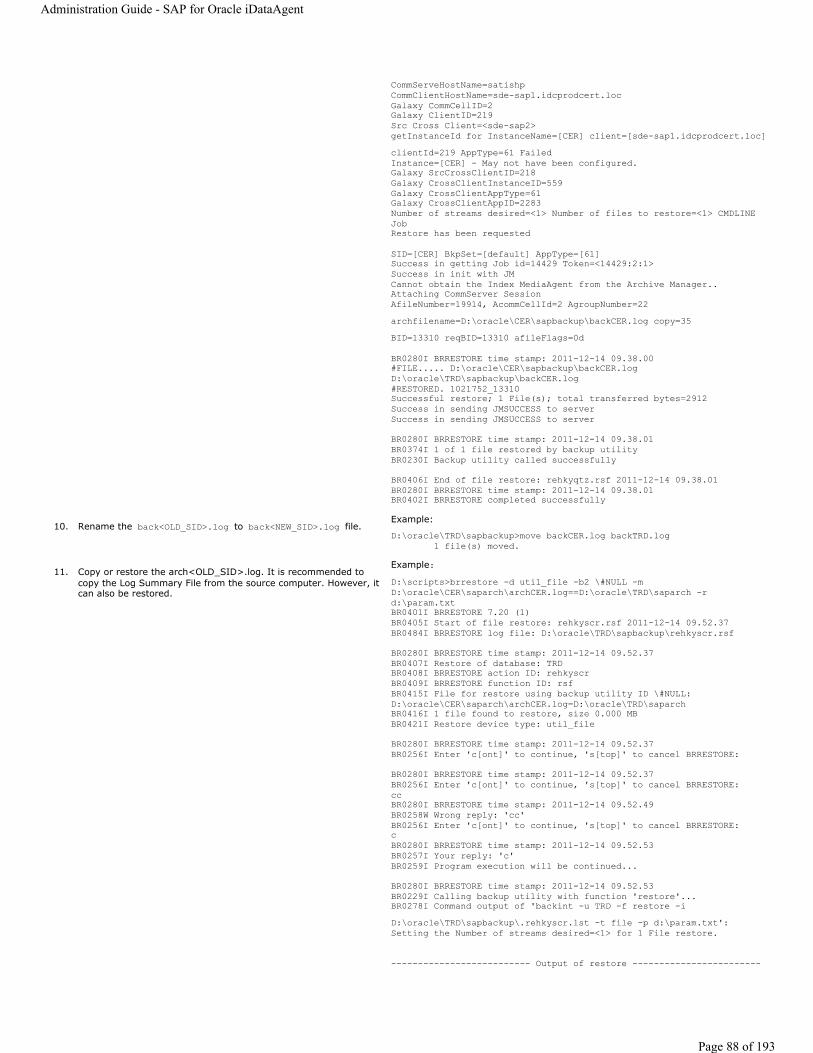
CommServeHostName=satishpCommClientHostName=sde-sap1.idcprodcert.locGalaxy CommCellID=2Galaxy ClientID=219Src Cross Client=<sde-sap2>getInstanceId for InstanceName=[CER] client=[sde-sap1.idcprodcert.loc] clientId=219 AppType=61 FailedInstance=[CER] - May not have been configured.Galaxy SrcCrossClientID=218Galaxy CrossClientInstanceID=559Galaxy CrossClientAppType=61Galaxy CrossClientAppID=2283Number of streams desired=<1> Number of files to restore=<1> CMDLINE JobRestore has been requested
SID=[CER] BkpSet=[default] AppType=[61]Success in getting Job id=14429 Token=<14429:2:1>Success in init with JMCannot obtain the Index MediaAgent from the Archive Manager..Attaching CommServer SessionAfileNumber=19914, AcommCellId=2 AgroupNumber=22 archfilename=D:\oracle\CER\sapbackup\backCER.log copy=35 BID=13310 reqBID=13310 afileFlags=0d
BR0280I BRRESTORE time stamp: 2011-12-14 09.38.00#FILE..... D:\oracle\CER\sapbackup\backCER.log D:\oracle\TRD\sapbackup\backCER.log#RESTORED. 1021752_13310Successful restore; 1 File(s); total transferred bytes=2912Success in sending JMSUCCESS to serverSuccess in sending JMSUCCESS to server
BR0280I BRRESTORE time stamp: 2011-12-14 09.38.01BR0374I 1 of 1 file restored by backup utilityBR0230I Backup utility called successfully
BR0406I End of file restore: rehkyqtz.rsf 2011-12-14 09.38.01BR0280I BRRESTORE time stamp: 2011-12-14 09.38.01BR0402I BRRESTORE completed successfully
10. Rename the back<OLD_SID>.log to back<NEW_SID>.log file.Example:
D:\oracle\TRD\sapbackup>move backCER.log backTRD.log 1 file(s) moved.
11. Copy or restore the arch<OLD_SID>.log. It is recommended to copy the Log Summary File from the source computer. However, it can also be restored.
Example:D:\scripts>brrestore -d util_file -b2 \#NULL -m D:\oracle\CER\saparch\archCER.log==D:\oracle\TRD\saparch -r d:\param.txtBR0401I BRRESTORE 7.20 (1)BR0405I Start of file restore: rehkyscr.rsf 2011-12-14 09.52.37BR0484I BRRESTORE log file: D:\oracle\TRD\sapbackup\rehkyscr.rsf
BR0280I BRRESTORE time stamp: 2011-12-14 09.52.37BR0407I Restore of database: TRDBR0408I BRRESTORE action ID: rehkyscrBR0409I BRRESTORE function ID: rsfBR0415I File for restore using backup utility ID \#NULL: D:\oracle\CER\saparch\archCER.log=D:\oracle\TRD\saparchBR0416I 1 file found to restore, size 0.000 MBBR0421I Restore device type: util_file
BR0280I BRRESTORE time stamp: 2011-12-14 09.52.37BR0256I Enter 'c[ont]' to continue, 's[top]' to cancel BRRESTORE:
BR0280I BRRESTORE time stamp: 2011-12-14 09.52.37BR0256I Enter 'c[ont]' to continue, 's[top]' to cancel BRRESTORE:ccBR0280I BRRESTORE time stamp: 2011-12-14 09.52.49BR0258W Wrong reply: 'cc'BR0256I Enter 'c[ont]' to continue, 's[top]' to cancel BRRESTORE:cBR0280I BRRESTORE time stamp: 2011-12-14 09.52.53BR0257I Your reply: 'c'BR0259I Program execution will be continued...
BR0280I BRRESTORE time stamp: 2011-12-14 09.52.53BR0229I Calling backup utility with function 'restore'...BR0278I Command output of 'backint -u TRD -f restore -i D:\oracle\TRD\sapbackup\.rehkyscr.lst -t file -p d:\param.txt':Setting the Number of streams desired=<1> for 1 File restore.
-------------------------- Output of restore ------------------------
Administration Guide - SAP for Oracle iDataAgent
Page 88 of 193
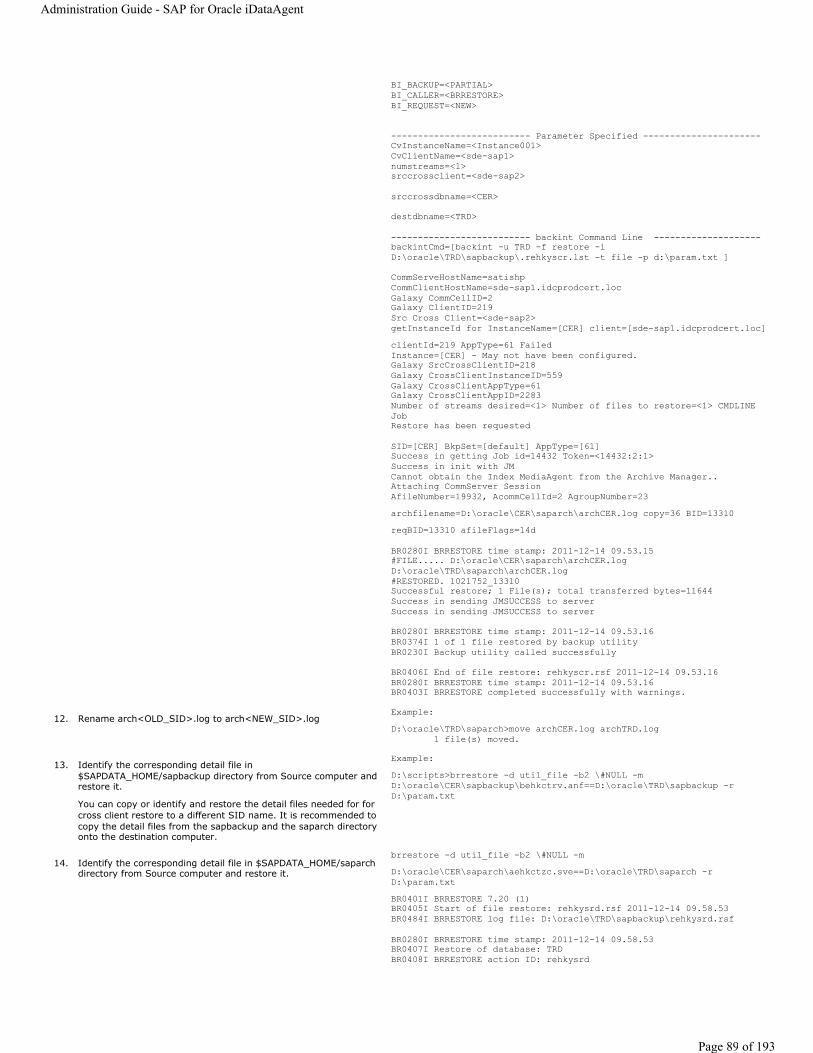
BI_BACKUP=<PARTIAL>BI_CALLER=<BRRESTORE>BI_REQUEST=<NEW>
-------------------------- Parameter Specified ----------------------CvInstanceName=<Instance001>CvClientName=<sde-sap1>numstreams=<1>srccrossclient=<sde-sap2>
srccrossdbname=<CER>
destdbname=<TRD>
-------------------------- backint Command Line --------------------backintCmd=[backint -u TRD -f restore -i D:\oracle\TRD\sapbackup\.rehkyscr.lst -t file -p d:\param.txt ]
CommServeHostName=satishpCommClientHostName=sde-sap1.idcprodcert.locGalaxy CommCellID=2Galaxy ClientID=219Src Cross Client=<sde-sap2>getInstanceId for InstanceName=[CER] client=[sde-sap1.idcprodcert.loc] clientId=219 AppType=61 FailedInstance=[CER] - May not have been configured.Galaxy SrcCrossClientID=218Galaxy CrossClientInstanceID=559Galaxy CrossClientAppType=61Galaxy CrossClientAppID=2283Number of streams desired=<1> Number of files to restore=<1> CMDLINE JobRestore has been requested
SID=[CER] BkpSet=[default] AppType=[61]Success in getting Job id=14432 Token=<14432:2:1>Success in init with JMCannot obtain the Index MediaAgent from the Archive Manager..Attaching CommServer SessionAfileNumber=19932, AcommCellId=2 AgroupNumber=23 archfilename=D:\oracle\CER\saparch\archCER.log copy=36 BID=13310 reqBID=13310 afileFlags=14d
BR0280I BRRESTORE time stamp: 2011-12-14 09.53.15#FILE..... D:\oracle\CER\saparch\archCER.log D:\oracle\TRD\saparch\archCER.log#RESTORED. 1021752_13310Successful restore; 1 File(s); total transferred bytes=11644Success in sending JMSUCCESS to serverSuccess in sending JMSUCCESS to server
BR0280I BRRESTORE time stamp: 2011-12-14 09.53.16BR0374I 1 of 1 file restored by backup utilityBR0230I Backup utility called successfully
BR0406I End of file restore: rehkyscr.rsf 2011-12-14 09.53.16BR0280I BRRESTORE time stamp: 2011-12-14 09.53.16BR0403I BRRESTORE completed successfully with warnings.
12. Rename arch<OLD_SID>.log to arch<NEW_SID>.log Example:D:\oracle\TRD\saparch>move archCER.log archTRD.log 1 file(s) moved.
13. Identify the corresponding detail file in $SAPDATA_HOME/sapbackup directory from Source computer and restore it.
You can copy or identify and restore the detail files needed for for cross client restore to a different SID name. It is recommended to copy the detail files from the sapbackup and the saparch directory onto the destination computer.
Example:D:\scripts>brrestore -d util_file -b2 \#NULL -m D:\oracle\CER\sapbackup\behkctrv.anf==D:\oracle\TRD\sapbackup -r D:\param.txt
14. Identify the corresponding detail file in $SAPDATA_HOME/saparch directory from Source computer and restore it.
brrestore -d util_file -b2 \#NULL -m D:\oracle\CER\saparch\aehkctzc.sve==D:\oracle\TRD\saparch -r D:\param.txtBR0401I BRRESTORE 7.20 (1)BR0405I Start of file restore: rehkysrd.rsf 2011-12-14 09.58.53BR0484I BRRESTORE log file: D:\oracle\TRD\sapbackup\rehkysrd.rsf
BR0280I BRRESTORE time stamp: 2011-12-14 09.58.53BR0407I Restore of database: TRDBR0408I BRRESTORE action ID: rehkysrd
Administration Guide - SAP for Oracle iDataAgent
Page 89 of 193
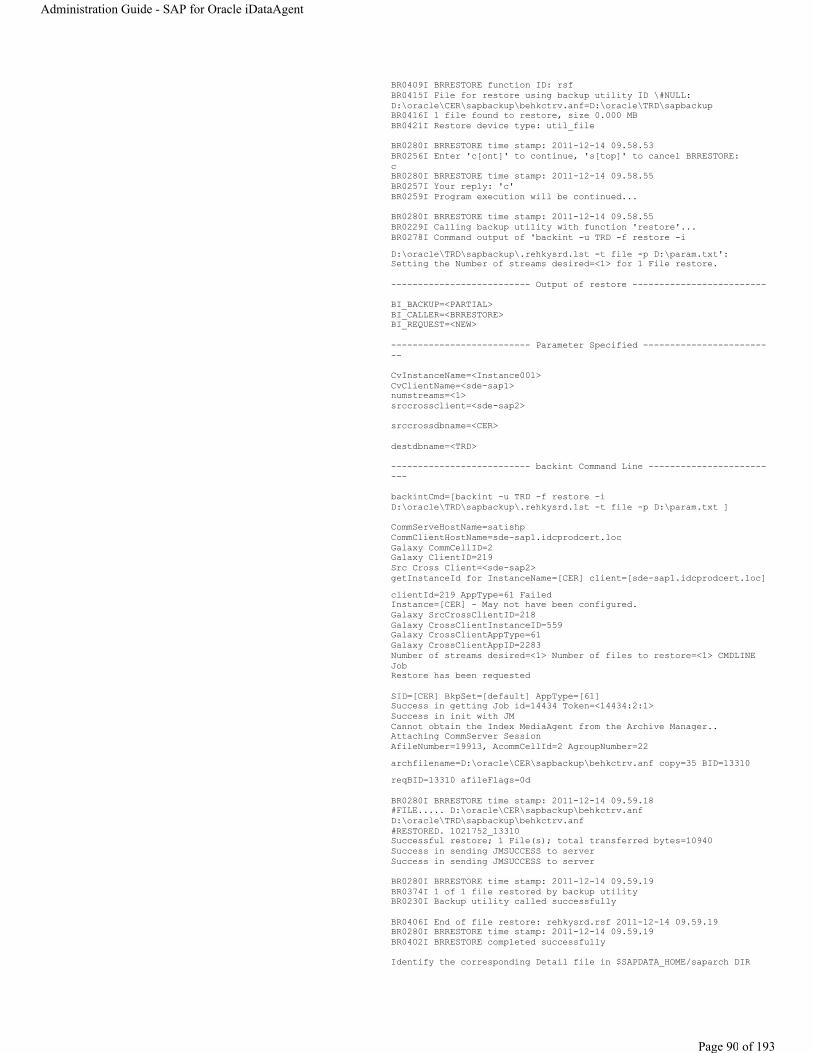
BR0409I BRRESTORE function ID: rsfBR0415I File for restore using backup utility ID \#NULL: D:\oracle\CER\sapbackup\behkctrv.anf=D:\oracle\TRD\sapbackupBR0416I 1 file found to restore, size 0.000 MBBR0421I Restore device type: util_file
BR0280I BRRESTORE time stamp: 2011-12-14 09.58.53BR0256I Enter 'c[ont]' to continue, 's[top]' to cancel BRRESTORE:cBR0280I BRRESTORE time stamp: 2011-12-14 09.58.55BR0257I Your reply: 'c'BR0259I Program execution will be continued...
BR0280I BRRESTORE time stamp: 2011-12-14 09.58.55BR0229I Calling backup utility with function 'restore'...BR0278I Command output of 'backint -u TRD -f restore -i D:\oracle\TRD\sapbackup\.rehkysrd.lst -t file -p D:\param.txt':Setting the Number of streams desired=<1> for 1 File restore.
-------------------------- Output of restore -------------------------
BI_BACKUP=<PARTIAL>BI_CALLER=<BRRESTORE>BI_REQUEST=<NEW>
-------------------------- Parameter Specified -------------------------
CvInstanceName=<Instance001>CvClientName=<sde-sap1>numstreams=<1>srccrossclient=<sde-sap2>
srccrossdbname=<CER>
destdbname=<TRD>
-------------------------- backint Command Line -------------------------
backintCmd=[backint -u TRD -f restore -i D:\oracle\TRD\sapbackup\.rehkysrd.lst -t file -p D:\param.txt ]
CommServeHostName=satishpCommClientHostName=sde-sap1.idcprodcert.locGalaxy CommCellID=2Galaxy ClientID=219Src Cross Client=<sde-sap2>getInstanceId for InstanceName=[CER] client=[sde-sap1.idcprodcert.loc] clientId=219 AppType=61 FailedInstance=[CER] - May not have been configured.Galaxy SrcCrossClientID=218Galaxy CrossClientInstanceID=559Galaxy CrossClientAppType=61Galaxy CrossClientAppID=2283Number of streams desired=<1> Number of files to restore=<1> CMDLINE JobRestore has been requested
SID=[CER] BkpSet=[default] AppType=[61]Success in getting Job id=14434 Token=<14434:2:1>Success in init with JMCannot obtain the Index MediaAgent from the Archive Manager..Attaching CommServer SessionAfileNumber=19913, AcommCellId=2 AgroupNumber=22 archfilename=D:\oracle\CER\sapbackup\behkctrv.anf copy=35 BID=13310 reqBID=13310 afileFlags=0d
BR0280I BRRESTORE time stamp: 2011-12-14 09.59.18#FILE..... D:\oracle\CER\sapbackup\behkctrv.anf D:\oracle\TRD\sapbackup\behkctrv.anf#RESTORED. 1021752_13310Successful restore; 1 File(s); total transferred bytes=10940Success in sending JMSUCCESS to serverSuccess in sending JMSUCCESS to server
BR0280I BRRESTORE time stamp: 2011-12-14 09.59.19BR0374I 1 of 1 file restored by backup utilityBR0230I Backup utility called successfully
BR0406I End of file restore: rehkysrd.rsf 2011-12-14 09.59.19BR0280I BRRESTORE time stamp: 2011-12-14 09.59.19BR0402I BRRESTORE completed successfully
Identify the corresponding Detail file in $SAPDATA_HOME/saparch DIR
Administration Guide - SAP for Oracle iDataAgent
Page 90 of 193
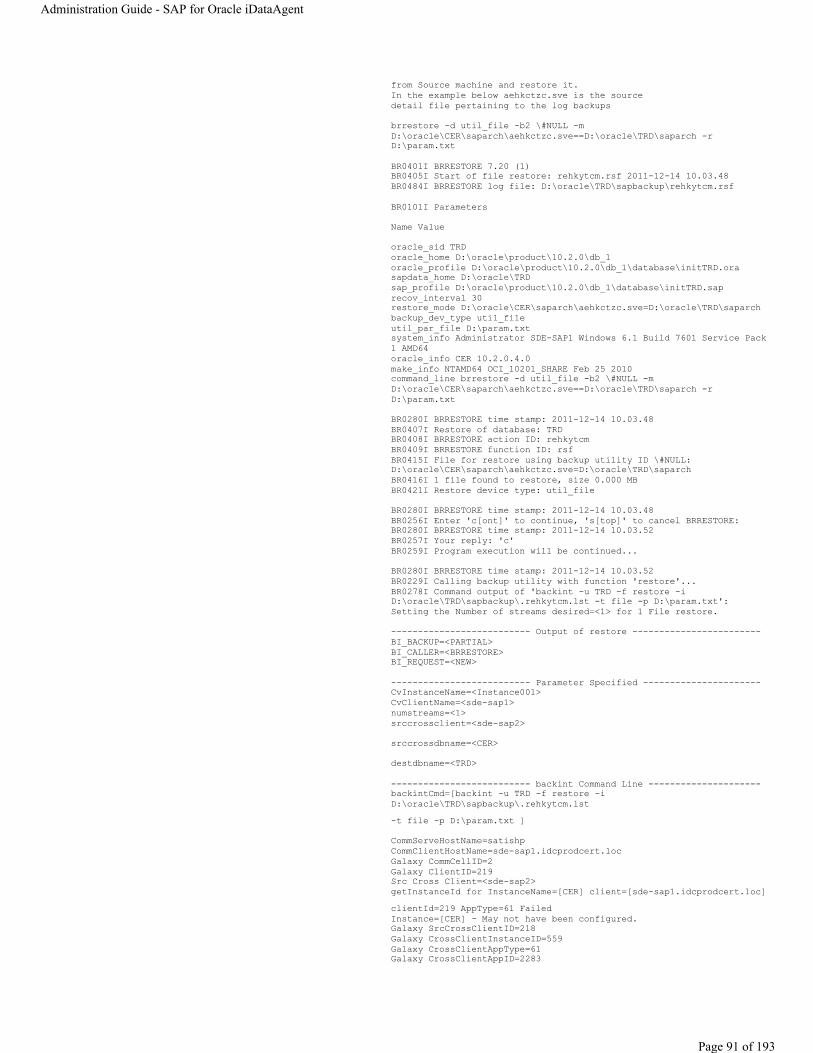
from Source machine and restore it.In the example below aehkctzc.sve is the source detail file pertaining to the log backups
brrestore -d util_file -b2 \#NULL -m D:\oracle\CER\saparch\aehkctzc.sve==D:\oracle\TRD\saparch -r D:\param.txt
BR0401I BRRESTORE 7.20 (1)BR0405I Start of file restore: rehkytcm.rsf 2011-12-14 10.03.48BR0484I BRRESTORE log file: D:\oracle\TRD\sapbackup\rehkytcm.rsf
BR0101I Parameters
Name Value
oracle_sid TRDoracle_home D:\oracle\product\10.2.0\db_1oracle_profile D:\oracle\product\10.2.0\db_1\database\initTRD.orasapdata_home D:\oracle\TRDsap_profile D:\oracle\product\10.2.0\db_1\database\initTRD.saprecov_interval 30restore_mode D:\oracle\CER\saparch\aehkctzc.sve=D:\oracle\TRD\saparchbackup_dev_type util_fileutil_par_file D:\param.txtsystem_info Administrator SDE-SAP1 Windows 6.1 Build 7601 Service Pack 1 AMD64oracle_info CER 10.2.0.4.0make_info NTAMD64 OCI_10201_SHARE Feb 25 2010command_line brrestore -d util_file -b2 \#NULL -m D:\oracle\CER\saparch\aehkctzc.sve==D:\oracle\TRD\saparch -r D:\param.txt
BR0280I BRRESTORE time stamp: 2011-12-14 10.03.48BR0407I Restore of database: TRDBR0408I BRRESTORE action ID: rehkytcmBR0409I BRRESTORE function ID: rsfBR0415I File for restore using backup utility ID \#NULL: D:\oracle\CER\saparch\aehkctzc.sve=D:\oracle\TRD\saparchBR0416I 1 file found to restore, size 0.000 MBBR0421I Restore device type: util_file
BR0280I BRRESTORE time stamp: 2011-12-14 10.03.48BR0256I Enter 'c[ont]' to continue, 's[top]' to cancel BRRESTORE:BR0280I BRRESTORE time stamp: 2011-12-14 10.03.52BR0257I Your reply: 'c'BR0259I Program execution will be continued...
BR0280I BRRESTORE time stamp: 2011-12-14 10.03.52BR0229I Calling backup utility with function 'restore'...BR0278I Command output of 'backint -u TRD -f restore -i D:\oracle\TRD\sapbackup\.rehkytcm.lst -t file -p D:\param.txt':Setting the Number of streams desired=<1> for 1 File restore.
-------------------------- Output of restore ------------------------BI_BACKUP=<PARTIAL>BI_CALLER=<BRRESTORE>BI_REQUEST=<NEW>
-------------------------- Parameter Specified ----------------------CvInstanceName=<Instance001>CvClientName=<sde-sap1>numstreams=<1>srccrossclient=<sde-sap2>
srccrossdbname=<CER>
destdbname=<TRD>
-------------------------- backint Command Line ---------------------backintCmd=[backint -u TRD -f restore -i D:\oracle\TRD\sapbackup\.rehkytcm.lst -t file -p D:\param.txt ]
CommServeHostName=satishpCommClientHostName=sde-sap1.idcprodcert.locGalaxy CommCellID=2Galaxy ClientID=219Src Cross Client=<sde-sap2>getInstanceId for InstanceName=[CER] client=[sde-sap1.idcprodcert.loc] clientId=219 AppType=61 FailedInstance=[CER] - May not have been configured.Galaxy SrcCrossClientID=218Galaxy CrossClientInstanceID=559Galaxy CrossClientAppType=61Galaxy CrossClientAppID=2283
Administration Guide - SAP for Oracle iDataAgent
Page 91 of 193

Number of streams desired=<1> Number of files to restore=<1> CMDLINE JobRestore has been requested
SID=[CER] BkpSet=[default] AppType=[61]Success in getting Job id=14438 Token=<14438:2:1>Success in init with JMCannot obtain the Index MediaAgent from the Archive Manager..Attaching CommServer SessionAfileNumber=19931, AcommCellId=2 AgroupNumber=23 archfilename=D:\oracle\CER\saparch\aehkctzc.sve copy=36 BID=13310 reqBID=13310 afileFlags=14d
BR0280I BRRESTORE time stamp: 2011-12-14 10.04.17#FILE..... D:\oracle\CER\saparch\aehkctzc.sve D:\oracle\TRD\saparch\aehkctzc.sve#RESTORED. 1021752_13310Successful restore; 1 File(s); total transferred bytes=8258 Success in sending JMSUCCESS to serverSuccess in sending JMSUCCESS to server
BR0280I BRRESTORE time stamp: 2011-12-14 10.04.17BR0374I 1 of 1 file restored by backup utilityBR0230I Backup utility called successfully
BR0406I End of file restore: rehkytcm.rsf 2011-12-14 10.04.17BR0280I BRRESTORE time stamp: 2011-12-14 10.04.17BR0402I BRRESTORE completed successfully
15. For an online backup, restore the data and logs, create a control file and recover and Open the database using BRRECOVER.
brrecover -f TRD -t dbpit -n last -c force -r D:\param.txt
BR0701I BRRECOVER 7.20 (1)BR0705I Start of database recovery: vehkytgp.dpt 2011-12-14 10.05.35BR0484I BRRECOVER log file: D:\oracle\TRD\sapbackup\vehkytgp.dpt
BR0101I Parameters
Name Value
oracle_sid TRDoracle_home D:\oracle\product\10.2.0\db_1oracle_profile D:\oracle\product\10.2.0\db_1\database\initTRD.orasapdata_home D:\oracle\TRDsap_profile D:\oracle\product\10.2.0\db_1\database\initTRD.saprecov_type dbpitrecov_copy_dir D:\oracle\TRD\sapbackuprecov_interval 30scroll_lines 20backup_dev_type tapesystem_info Administrator SDE-SAP1 Windows 6.1 Build 7601 Service Pack 1 AMD64oracle_info CER 10.2.0.4.0make_info NTAMD64 OCI_10201_SHARE Feb 25 2010command_line brrecover -f TRD -t dbpit -n last -c force -r D:\param.txt
BR0280I BRRECOVER time stamp: 2011-12-14 10.05.35BR0707I Recovery of database: TRDBR0708I BRRECOVER action ID: vehkytgpBR0709I BRRECOVER function ID: dptBR0710I Recovery type: dbpitBR0134I Unattended mode with 'force' active - no operator confirmation allowed
BR0280I BRRECOVER time stamp: 2011-12-14 10.05.35BR0655I Control menu 103 # please decide how to proceed-------------------------------------------------------------------------------Database point-in-time recovery main menu
1 = Set point-in-time for recovery2 * Select database backup or flashback3 * Check the status of database files4 * Restore control files5 * Restore data files6 * Restore split incremental control files7 * Restore and apply incremental backup8 * Restore and apply archivelog files9 * Restore archivelog files and flashback10 * Open database and post-processing11 * Exit program12 - Reset program status
Standard keys: c - cont, b - back, s - stop, r - refr, h - help-------------------------------------------------------------------------------
Administration Guide - SAP for Oracle iDataAgent
Page 92 of 193

BR0280I BRRECOVER time stamp: 2011-12-14 10.05.35BR0134I Unattended mode with 'force' active - continuing processing with default reply '1'
BR0280I BRRECOVER time stamp: 2011-12-14 10.05.35BR0657I Input menu 104 # please enter/check input values-------------------------------------------------------------------------------Options for point-in-time recovery of database CER
1 # Database instance of archivelog thread (instance) . []2 ~ Last archivelog sequence to apply (last_seq) ...... [99999999]3 ~ Last system change number to apply (last_scn) ..... []4 ~ End point-in-time for recovery (end_pit) .......... []
Standard keys: c - cont, b - back, s - stop, r - refr, h - help-------------------------------------------------------------------------------BR0280I BRRECOVER time stamp: 2011-12-14 10.05.35BR0134I Unattended mode with 'force' active - continuing processing with default reply 'cont'
BR0280I BRRECOVER time stamp: 2011-12-14 10.05.35BR0655I Control menu 103 # please decide how to proceed-------------------------------------------------------------------------------Database point-in-time recovery main menu
1 + Set point-in-time for recovery2 = Select database backup or flashback3 * Check the status of database files4 * Restore control files5 * Restore data files6 * Restore split incremental control files7 * Restore and apply incremental backup8 * Restore and apply archivelog files9 * Restore archivelog files and flashback10 * Open database and post-processing11 * Exit program12 - Reset program status
Standard keys: c - cont, b - back, s - stop, r - refr, h - help-------------------------------------------------------------------------------BR0280I BRRECOVER time stamp: 2011-12-14 10.05.35BR0134I Unattended mode with 'force' active - continuing processing with default reply '2'
BR0699I Reading log file D:\oracle\TRD\sapbackup\backTRD.log ...
BR0350I Backup utility will be inquired for backup confirmation
BR0280I BRRECOVER time stamp: 2011-12-14 10.05.35BR0229I Calling backup utility with function 'inquire'...BR0278I Command output of 'backint -u TRD -f inquire -i
D:\oracle\TRD\sapbackup\.vehkytgp.lst -t file -p D:\param.txt -c':
-------------------------- Output of inquire -------------------------
BI_BACKUP=<PARTIAL>BI_CALLER=<BRRECOVER>BI_REQUEST=<NEW>
-------------------------- Parameter Specified -------------------------
CvInstanceName=<Instance001>CvClientName=<sde-sap1>numstreams=<4>srccrossclient=<sde-sap2>
srccrossdbname=<CER>
destdbname=<TRD>
-------------------------- backint Command Line -------------------------
backintCmd=[backint -u TRD -f inquire -i
D:\oracle\TRD\sapbackup\.vehkytgp.lst -t file -p D:\param.txt -c ]
Administration Guide - SAP for Oracle iDataAgent
Page 93 of 193
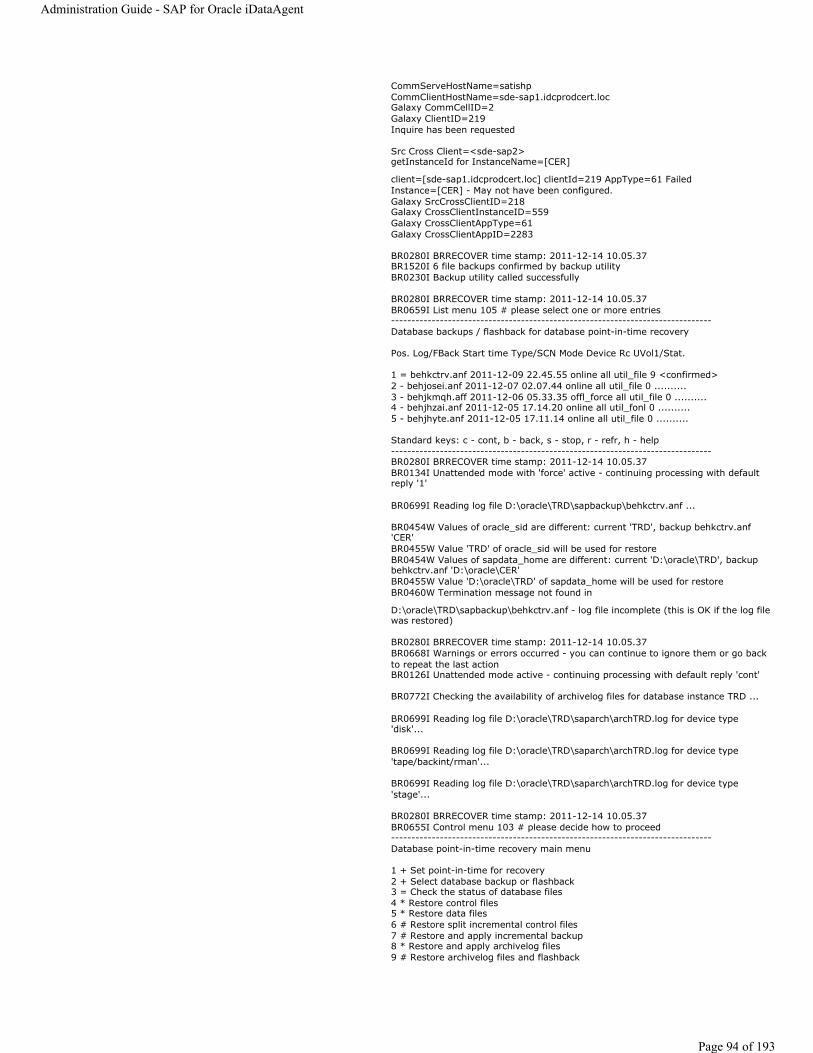
CommServeHostName=satishpCommClientHostName=sde-sap1.idcprodcert.locGalaxy CommCellID=2Galaxy ClientID=219Inquire has been requested
Src Cross Client=<sde-sap2>getInstanceId for InstanceName=[CER]
client=[sde-sap1.idcprodcert.loc] clientId=219 AppType=61 FailedInstance=[CER] - May not have been configured.Galaxy SrcCrossClientID=218Galaxy CrossClientInstanceID=559Galaxy CrossClientAppType=61Galaxy CrossClientAppID=2283
BR0280I BRRECOVER time stamp: 2011-12-14 10.05.37BR1520I 6 file backups confirmed by backup utilityBR0230I Backup utility called successfully
BR0280I BRRECOVER time stamp: 2011-12-14 10.05.37BR0659I List menu 105 # please select one or more entries-------------------------------------------------------------------------------Database backups / flashback for database point-in-time recovery
Pos. Log/FBack Start time Type/SCN Mode Device Rc UVol1/Stat.
1 = behkctrv.anf 2011-12-09 22.45.55 online all util_file 9 <confirmed>2 - behjosei.anf 2011-12-07 02.07.44 online all util_file 0 ..........3 - behjkmqh.aff 2011-12-06 05.33.35 offl_force all util_file 0 ..........4 - behjhzai.anf 2011-12-05 17.14.20 online all util_fonl 0 ..........5 - behjhyte.anf 2011-12-05 17.11.14 online all util_file 0 ..........
Standard keys: c - cont, b - back, s - stop, r - refr, h - help-------------------------------------------------------------------------------BR0280I BRRECOVER time stamp: 2011-12-14 10.05.37BR0134I Unattended mode with 'force' active - continuing processing with default reply '1'
BR0699I Reading log file D:\oracle\TRD\sapbackup\behkctrv.anf ...
BR0454W Values of oracle_sid are different: current 'TRD', backup behkctrv.anf 'CER'BR0455W Value 'TRD' of oracle_sid will be used for restoreBR0454W Values of sapdata_home are different: current 'D:\oracle\TRD', backup behkctrv.anf 'D:\oracle\CER'BR0455W Value 'D:\oracle\TRD' of sapdata_home will be used for restoreBR0460W Termination message not found in
D:\oracle\TRD\sapbackup\behkctrv.anf - log file incomplete (this is OK if the log file was restored)
BR0280I BRRECOVER time stamp: 2011-12-14 10.05.37BR0668I Warnings or errors occurred - you can continue to ignore them or go back to repeat the last actionBR0126I Unattended mode active - continuing processing with default reply 'cont'
BR0772I Checking the availability of archivelog files for database instance TRD ...
BR0699I Reading log file D:\oracle\TRD\saparch\archTRD.log for device type 'disk'...
BR0699I Reading log file D:\oracle\TRD\saparch\archTRD.log for device type 'tape/backint/rman'...
BR0699I Reading log file D:\oracle\TRD\saparch\archTRD.log for device type 'stage'...
BR0280I BRRECOVER time stamp: 2011-12-14 10.05.37BR0655I Control menu 103 # please decide how to proceed-------------------------------------------------------------------------------Database point-in-time recovery main menu
1 + Set point-in-time for recovery2 + Select database backup or flashback3 = Check the status of database files4 * Restore control files5 * Restore data files6 # Restore split incremental control files7 # Restore and apply incremental backup8 * Restore and apply archivelog files9 # Restore archivelog files and flashback
Administration Guide - SAP for Oracle iDataAgent
Page 94 of 193

10 * Open database and post-processing11 * Exit program12 - Reset program status
Standard keys: c - cont, b - back, s - stop, r - refr, h - help-------------------------------------------------------------------------------BR0280I BRRECOVER time stamp: 2011-12-14 10.05.37BR0134I Unattended mode with 'force' active - continuing processing with default reply '3'
BR0753W Control file 'D:\oracle\TRD\sapdata1\cntrl\ctrlCER.ctl' not foundBR0753W Control file 'D:\oracle\TRD\sapdata2\cntrl\ctrlCER.ctl' not foundBR0753W Control file 'D:\oracle\TRD\saparch\cntrl\ctrlCER.ctl' not found
BR0617I Database instance TRD is startedBR0064I Database instance TRD will be shut down now in mode 'IMMEDIATE'
BR0280I BRRECOVER time stamp: 2011-12-14 10.05.38BR0307I Shutting down database instance TRD ...
BR0280I BRRECOVER time stamp: 2011-12-14 10.05.42BR0308I Shutdown of database instance TRD successful
BR0751W Database instance TRD cannot be mounted due to missing control files
BR0755I Checking the status of database files for instance TRD...
BR0280I BRRECOVER time stamp: 2011-12-14 10.05.42BR0655I Control menu 103 # please decide how to proceed-------------------------------------------------------------------------------Database point-in-time recovery main menu
1 + Set point-in-time for recovery2 + Select database backup or flashback3 + Check the status of database files4 = Restore control files5 * Restore data files6 # Restore split incremental control files7 # Restore and apply incremental backup8 * Restore and apply archivelog files9 # Restore archivelog files and flashback10 * Open database and post-processing11 * Exit program12 - Reset program status
Standard keys: c - cont, b - back, s - stop, r - refr, h - help-------------------------------------------------------------------------------BR0280I BRRECOVER time stamp: 2011-12-14 10.05.42BR0134I Unattended mode with 'force' active - continuing processing with default reply '4'
BR0613I Database instance TRD is shut down
BR0280I BRRECOVER time stamp: 2011-12-14 10.05.43BR0657I Input menu 111 # please enter/check input values-------------------------------------------------------------------------------BRRESTORE main options for restore of database files
1 - BRRESTORE profile (profile) ........ [initTRD.sap]2 - BRBACKUP backup run (backup) ....... [behkctrv.anf]3 - Fill-up previous restores (fillup) . [no]4 - Restore device type (device) ....... [util_file]5 - BACKINT/Mount profile (parfile) .... [D:\param.txt]6 # Database user/password (user) ...... [system/*******]7 - Files for restore (mode) ........... [0]
Standard keys: c - cont, b - back, s - stop, r - refr, h - help-------------------------------------------------------------------------------BR0280I BRRECOVER time stamp: 2011-12-14 10.05.43BR0134I Unattended mode with 'force' active - continuing processing with default reply 'cont'
BR0280I BRRECOVER time stamp: 2011-12-14 10.05.43BR0657I Input menu 112 # please enter/check input values-------------------------------------------------------------------------------Additional BRRESTORE options for restore of database files
1 - Confirmation mode (confirm) ...... [force]2 - Query mode (query) ............... [no]3 # Compression mode (compress) ...... [no]4 # Parallel execution (execute) ..... [0]5 - Additional output (output) ....... [no]
Administration Guide - SAP for Oracle iDataAgent
Page 95 of 193

6 - Message language (language) ...... [E]7 - BRRESTORE command line (command) . [-p initTRD.sap -b behkctrv.anf -d util_file -r
D:\param.txt -m 0 -c force -l E]
Standard keys: c - cont, b - back, s - stop, r - refr, h - help-------------------------------------------------------------------------------BR0280I BRRECOVER time stamp: 2011-12-14 10.05.43BR0134I Unattended mode with 'force' active - continuing processing with default reply 'cont'
BR0291I BRRESTORE will be started with options '-p initTRD.sap -b behkctrv.anf -d util_file -r
D:\param.txt -m 0 -c force -l E'
=================================================
BR0401I BRRESTORE 7.20 (1)BR0405I Start of file restore: rehkytgx.rsb 2011-12-14 10.05.43BR0484I BRRESTORE log file: D:\oracle\TRD\sapbackup\rehkytgx.rsb
BR0454W Values of oracle_sid are different: current 'TRD', backup behkctrv.anf 'CER'BR0455W Value 'TRD' of oracle_sid will be used for restoreBR0454W Values of sapdata_home are different: current
'D:\oracle\TRD', backup behkctrv.anf 'D:\oracle\CER'BR0455W Value 'D:\oracle\TRD' of sapdata_home will be used for restoreBR0460W Termination message not found in D:\oracle\TRD\sapbackup\behkctrv.anf
- log file incomplete (this is OK if the log file was restored)
BR0427I Files from the old sapdata_home D:\oracle\CER
will be restored into the new sapdata_home D:\oracle\TRD
BR0280I BRRESTORE time stamp: 2011-12-14 10.05.43BR0407I Restore of database: TRDBR0408I BRRESTORE action ID: rehkytgxBR0409I BRRESTORE function ID: rsbBR0449I Restore mode: partialBR0411I Database files for restore: D:\oracle\CER\sapbackup\CNTRLCER.DBF=D:\oracle\TRD\sapbackupD:\oracle\CER\sapdata1\cntrl\ctrlCER.ctlD:\oracle\CER\sapdata2\cntrl\ctrlCER.ctlD:\oracle\CER\saparch\cntrl\ctrlCER.ctlBR0419I Files will be restored from backup: behkctrv.anf 2011-12-09 22.45.55BR0416I 1 file found to restore, size 10.766 MBBR0421I Restore device type: util_fileBR0134I Unattended mode with 'force' active - no operator confirmation allowed
BR0280I BRRESTORE time stamp: 2011-12-14 10.05.43BR0229I Calling backup utility with function 'restore'...BR0278I Command output of 'backint -u CER -f restore -i
D:\oracle\TRD\sapbackup\.rehkytgx.lst -t file -p D:\param.txt -c':Setting the Number of streams desired=<1> for 1 File restore.
-------------------------- Output of restore -------------------------
BI_BACKUP=<PARTIAL>BI_CALLER=<BRRESTORE>BI_REQUEST=<NEW>
-------------------------- Parameter Specified -------------------------CvInstanceName=<Instance001>CvClientName=<sde-sap1>numstreams=<1>srccrossclient=<sde-sap2>
srccrossdbname=<CER>
destdbname=<CER>-------------------------- backint Command Line -------------------------backintCmd=[backint -u CER -f restore -i
D:\oracle\TRD\sapbackup\.rehkytgx.lst -t file -p D:\param.txt -c ]
CommServeHostName=satishp
Administration Guide - SAP for Oracle iDataAgent
Page 96 of 193
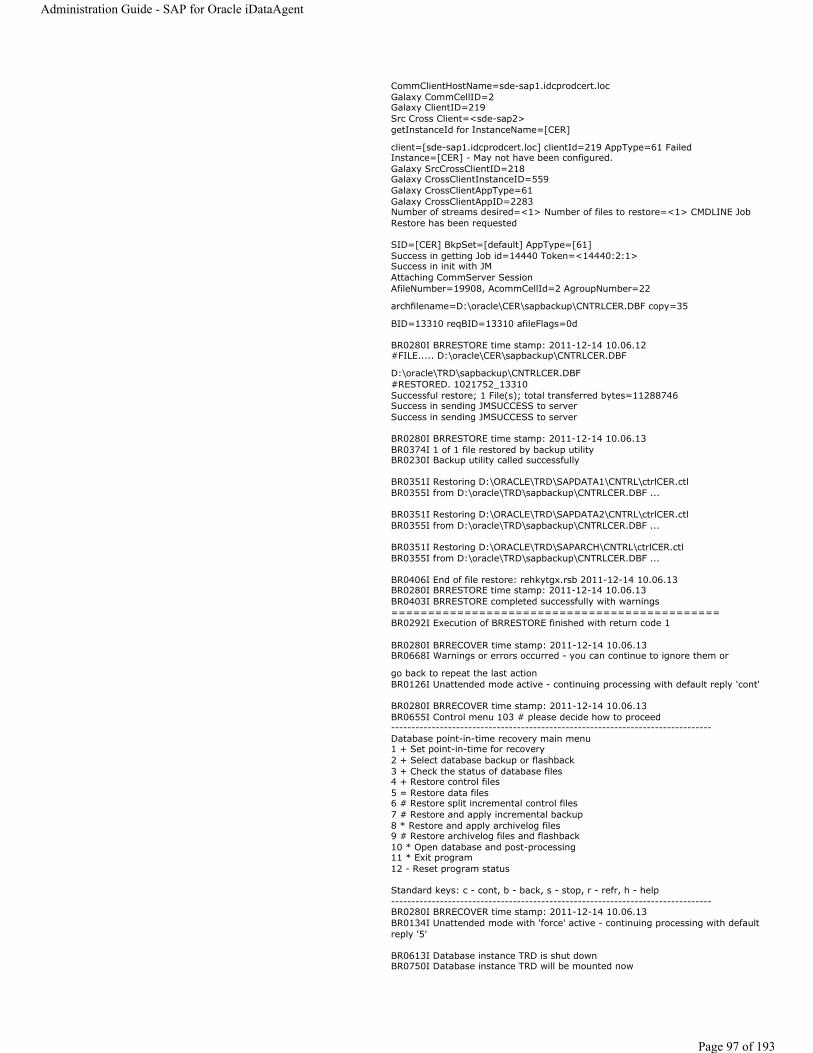
CommClientHostName=sde-sap1.idcprodcert.locGalaxy CommCellID=2Galaxy ClientID=219Src Cross Client=<sde-sap2>getInstanceId for InstanceName=[CER]
client=[sde-sap1.idcprodcert.loc] clientId=219 AppType=61 FailedInstance=[CER] - May not have been configured.Galaxy SrcCrossClientID=218Galaxy CrossClientInstanceID=559Galaxy CrossClientAppType=61Galaxy CrossClientAppID=2283Number of streams desired=<1> Number of files to restore=<1> CMDLINE JobRestore has been requested
SID=[CER] BkpSet=[default] AppType=[61]Success in getting Job id=14440 Token=<14440:2:1>Success in init with JMAttaching CommServer SessionAfileNumber=19908, AcommCellId=2 AgroupNumber=22
archfilename=D:\oracle\CER\sapbackup\CNTRLCER.DBF copy=35
BID=13310 reqBID=13310 afileFlags=0d
BR0280I BRRESTORE time stamp: 2011-12-14 10.06.12#FILE..... D:\oracle\CER\sapbackup\CNTRLCER.DBF
D:\oracle\TRD\sapbackup\CNTRLCER.DBF#RESTORED. 1021752_13310Successful restore; 1 File(s); total transferred bytes=11288746 Success in sending JMSUCCESS to serverSuccess in sending JMSUCCESS to server
BR0280I BRRESTORE time stamp: 2011-12-14 10.06.13BR0374I 1 of 1 file restored by backup utilityBR0230I Backup utility called successfully
BR0351I Restoring D:\ORACLE\TRD\SAPDATA1\CNTRL\ctrlCER.ctlBR0355I from D:\oracle\TRD\sapbackup\CNTRLCER.DBF ...
BR0351I Restoring D:\ORACLE\TRD\SAPDATA2\CNTRL\ctrlCER.ctlBR0355I from D:\oracle\TRD\sapbackup\CNTRLCER.DBF ...
BR0351I Restoring D:\ORACLE\TRD\SAPARCH\CNTRL\ctrlCER.ctlBR0355I from D:\oracle\TRD\sapbackup\CNTRLCER.DBF ...
BR0406I End of file restore: rehkytgx.rsb 2011-12-14 10.06.13BR0280I BRRESTORE time stamp: 2011-12-14 10.06.13BR0403I BRRESTORE completed successfully with warnings=============================================BR0292I Execution of BRRESTORE finished with return code 1
BR0280I BRRECOVER time stamp: 2011-12-14 10.06.13BR0668I Warnings or errors occurred - you can continue to ignore them or
go back to repeat the last actionBR0126I Unattended mode active - continuing processing with default reply 'cont'
BR0280I BRRECOVER time stamp: 2011-12-14 10.06.13BR0655I Control menu 103 # please decide how to proceed-------------------------------------------------------------------------------Database point-in-time recovery main menu1 + Set point-in-time for recovery2 + Select database backup or flashback3 + Check the status of database files4 + Restore control files5 = Restore data files6 # Restore split incremental control files7 # Restore and apply incremental backup8 * Restore and apply archivelog files9 # Restore archivelog files and flashback10 * Open database and post-processing11 * Exit program12 - Reset program status
Standard keys: c - cont, b - back, s - stop, r - refr, h - help-------------------------------------------------------------------------------BR0280I BRRECOVER time stamp: 2011-12-14 10.06.13BR0134I Unattended mode with 'force' active - continuing processing with default reply '5'
BR0613I Database instance TRD is shut downBR0750I Database instance TRD will be mounted now
Administration Guide - SAP for Oracle iDataAgent
Page 97 of 193

BR0280I BRRECOVER time stamp: 2011-12-14 10.06.14BR0330I Starting and mounting database instance TRD ...
BR0280I BRRECOVER time stamp: 2011-12-14 10.06.22BR0331I Start and mount of database instance TRD successful
BR0280I BRRECOVER time stamp: 2011-12-14 10.06.22BR0657I Input menu 111 # please enter/check input values-------------------------------------------------------------------------------BRRESTORE main options for restore of database files
1 - BRRESTORE profile (profile) ........ [initTRD.sap]2 - BRBACKUP backup run (backup) ....... [behkctrv.anf]3 - Fill-up previous restores (fillup) . [no]4 - Restore device type (device) ....... [util_file]5 - BACKINT/Mount profile (parfile) .... [D:\param.txt]6 # Database user/password (user) ...... [system/*******]7 - Files for restore (mode) ........... [all]
Standard keys: c - cont, b - back, s - stop, r - refr, h - help-------------------------------------------------------------------------------BR0280I BRRECOVER time stamp: 2011-12-14 10.06.22BR0134I Unattended mode with 'force' active - continuing processing with default reply 'cont'
BR0280I BRRECOVER time stamp: 2011-12-14 10.06.22BR0657I Input menu 112 # please enter/check input values-------------------------------------------------------------------------------Additional BRRESTORE options for restore of database files
1 - Confirmation mode (confirm) ...... [force]2 - Query mode (query) ............... [no]3 # Compression mode (compress) ...... [no]4 # Parallel execution (execute) ..... [0]5 - Additional output (output) ....... [no]6 - Message language (language) ...... [E]7 - BRRESTORE command line (command) . [-p initTRD.sap -b behkctrv.anf -d util_file -r
D:\param.txt -m all -c force -l E]
Standard keys: c - cont, b - back, s - stop, r - refr, h - help-------------------------------------------------------------------------------BR0280I BRRECOVER time stamp: 2011-12-14 10.06.22BR0134I Unattended mode with 'force' active - continuing processing with default reply 'cont'
BR0291I BRRESTORE will be started with options '-p initTRD.sap -b behkctrv.anf -d util_file -r
D:\param.txt -m all -c force -l E'=================================================BR0401I BRRESTORE 7.20 (1)BR0405I Start of file restore: rehkytik.rsb 2011-12-14 10.06.22BR0484I BRRESTORE log file: D:\oracle\TRD\sapbackup\rehkytik.rsb
BR0454W Values of oracle_sid are different: current 'TRD', backup behkctrv.anf 'CER'BR0455W Value 'TRD' of oracle_sid will be used for restoreBR0454W Values of sapdata_home are different: current 'D:\oracle\TRD', backup behkctrv.anf 'D:\oracle\CER'BR0455W Value 'D:\oracle\TRD' of sapdata_home will be used for restoreBR0460W Termination message not found in D:\oracle\TRD\sapbackup\behkctrv.anf
- log file incomplete (this is OK if the log file was restored)
BR0427I Files from the old sapdata_home D:\oracle\CER will be restored
into the new sapdata_home D:\oracle\TRDBR0370I Directory D:\ORACLE\TRD\SAPDATA2\CER_1 createdBR0370I Directory D:\ORACLE\TRD\SAPDATA3\CERUSR_1 created
BR0456I Probably the database must be recovered due to restore from online backup
BR0280I BRRESTORE time stamp: 2011-12-14 10.06.22BR0407I Restore of database: TRDBR0408I BRRESTORE action ID: rehkytikBR0409I BRRESTORE function ID: rsbBR0449I Restore mode: ALLBR0419I Files will be restored from backup: behkctrv.anf 2011-12-09 22.45.55
Administration Guide - SAP for Oracle iDataAgent
Page 98 of 193
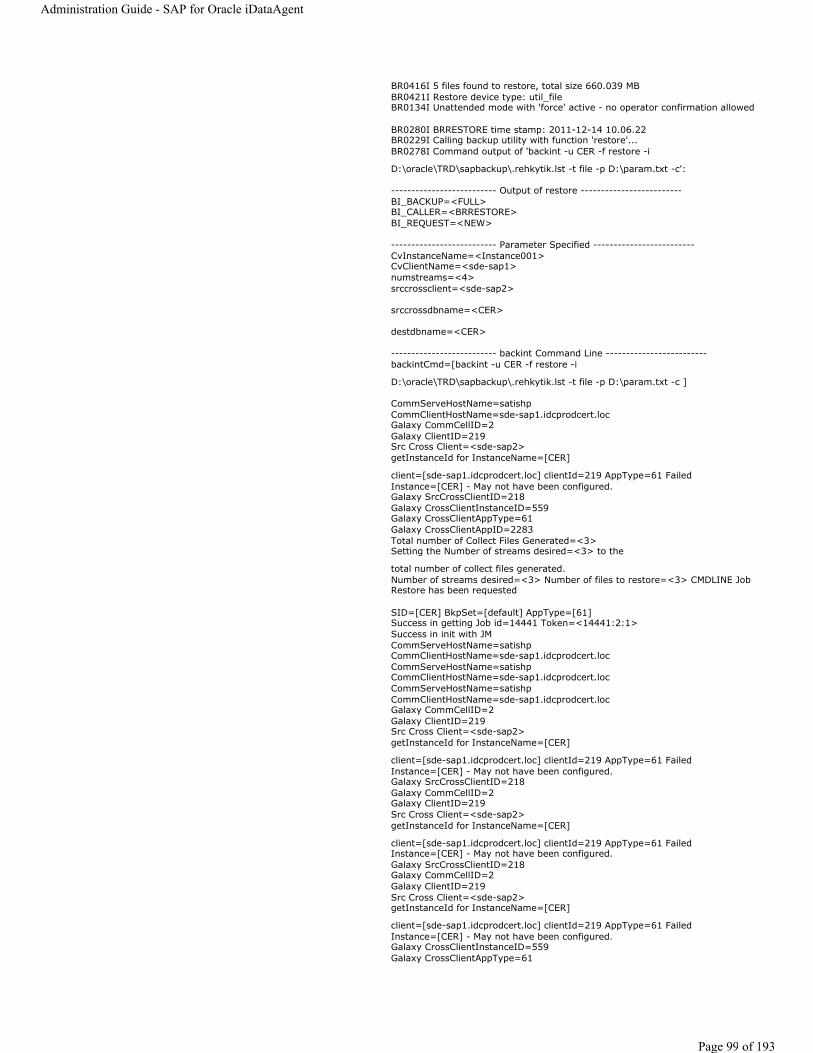
BR0416I 5 files found to restore, total size 660.039 MBBR0421I Restore device type: util_fileBR0134I Unattended mode with 'force' active - no operator confirmation allowed
BR0280I BRRESTORE time stamp: 2011-12-14 10.06.22BR0229I Calling backup utility with function 'restore'...BR0278I Command output of 'backint -u CER -f restore -i
D:\oracle\TRD\sapbackup\.rehkytik.lst -t file -p D:\param.txt -c':
-------------------------- Output of restore -------------------------BI_BACKUP=<FULL>BI_CALLER=<BRRESTORE>BI_REQUEST=<NEW>
-------------------------- Parameter Specified -------------------------CvInstanceName=<Instance001>CvClientName=<sde-sap1>numstreams=<4>srccrossclient=<sde-sap2>
srccrossdbname=<CER>
destdbname=<CER>
-------------------------- backint Command Line -------------------------backintCmd=[backint -u CER -f restore -i
D:\oracle\TRD\sapbackup\.rehkytik.lst -t file -p D:\param.txt -c ]
CommServeHostName=satishpCommClientHostName=sde-sap1.idcprodcert.locGalaxy CommCellID=2Galaxy ClientID=219Src Cross Client=<sde-sap2>getInstanceId for InstanceName=[CER]
client=[sde-sap1.idcprodcert.loc] clientId=219 AppType=61 FailedInstance=[CER] - May not have been configured.Galaxy SrcCrossClientID=218Galaxy CrossClientInstanceID=559Galaxy CrossClientAppType=61Galaxy CrossClientAppID=2283Total number of Collect Files Generated=<3>Setting the Number of streams desired=<3> to the
total number of collect files generated.Number of streams desired=<3> Number of files to restore=<3> CMDLINE JobRestore has been requested
SID=[CER] BkpSet=[default] AppType=[61]Success in getting Job id=14441 Token=<14441:2:1>Success in init with JMCommServeHostName=satishpCommClientHostName=sde-sap1.idcprodcert.locCommServeHostName=satishpCommClientHostName=sde-sap1.idcprodcert.locCommServeHostName=satishpCommClientHostName=sde-sap1.idcprodcert.locGalaxy CommCellID=2Galaxy ClientID=219Src Cross Client=<sde-sap2>getInstanceId for InstanceName=[CER]
client=[sde-sap1.idcprodcert.loc] clientId=219 AppType=61 FailedInstance=[CER] - May not have been configured.Galaxy SrcCrossClientID=218Galaxy CommCellID=2Galaxy ClientID=219Src Cross Client=<sde-sap2>getInstanceId for InstanceName=[CER]
client=[sde-sap1.idcprodcert.loc] clientId=219 AppType=61 FailedInstance=[CER] - May not have been configured.Galaxy SrcCrossClientID=218Galaxy CommCellID=2Galaxy ClientID=219Src Cross Client=<sde-sap2>getInstanceId for InstanceName=[CER]
client=[sde-sap1.idcprodcert.loc] clientId=219 AppType=61 FailedInstance=[CER] - May not have been configured.Galaxy CrossClientInstanceID=559Galaxy CrossClientAppType=61
Administration Guide - SAP for Oracle iDataAgent
Page 99 of 193

Galaxy CrossClientAppID=2283Restore has been requested
Success in init with JMGalaxy SrcCrossClientID=218Attaching CommServer SessionGalaxy CrossClientInstanceID=559Galaxy CrossClientAppType=61Galaxy CrossClientAppID=2283Restore has been requested
Success in init with JMAttaching CommServer SessionRestoring from MediaId=<22_MagVolId_9086>Galaxy CrossClientInstanceID=559Galaxy CrossClientAppType=61Galaxy CrossClientAppID=2283Restore has been requested
Success in init with JMAttaching CommServer SessionRestoring from MediaId=<22_MagVolId_9088>Restoring from MediaId=<22_MagVolId_9087>RESTORED backupId=<1021752_13310>
nextFile=<D:\ORACLE\CER\SAPDATA2\CER_1\CER.DATA1>
BR0280I BRRESTORE time stamp: 2011-12-14 10.06.48#FILE..... D:\ORACLE\TRD\SAPDATA2\CER_1\CER.DATA1#RESTORED. 1021752_13310RESTORED backupId=<1021752_13310>
nextFile=<D:\ORACLE\CER\SAPDATA3\CERUSR_1\CERUSR.DATA1>
BR0280I BRRESTORE time stamp: 2011-12-14 10.06.50#FILE..... D:\ORACLE\TRD\SAPDATA3\CERUSR_1\CERUSR.DATA1#RESTORED. 1021752_13310RESTORED backupId=<1021752_13310>
nextFile=<D:\ORACLE\CER\SAPDATA1\UNDO_1\UNDO.DATA1>
BR0280I BRRESTORE time stamp: 2011-12-14 10.06.56#FILE..... D:\ORACLE\TRD\SAPDATA1\UNDO_1\UNDO.DATA1#RESTORED. 1021752_13310Sending file=<#EOF> to the Child=<3912>Successful restore; 1 File(s); total transferred bytes=104865966 RESTORED backupId=<1021752_13310>
nextFile=<D:\ORACLE\CER\SAPDATA1\SYSTEM_1\SYSAUX.DBF>
BR0280I BRRESTORE time stamp: 2011-12-14 10.07.12#FILE..... D:\ORACLE\TRD\SAPDATA1\SYSTEM_1\SYSAUX.DBF#RESTORED. 1021752_13310Sending file=<#EOF> to the Child=<1920>Successful restore; 2 File(s); total transferred bytes=115360098 RESTORED backupId=<1021752_13310>
nextFile=<D:\ORACLE\CER\SAPDATA1\SYSTEM_1\SYSTEM.DATA1>
BR0280I BRRESTORE time stamp: 2011-12-14 10.11.16#FILE..... D:\ORACLE\TRD\SAPDATA1\SYSTEM_1\SYSTEM.DATA1#RESTORED. 1021752_13310Sending file=<#EOF> to the Child=<4536>Successful restore; 2 File(s); total transferred bytes=471875934 Success in sending JMSUCCESS to serverSuccess in sending JMSUCCESS to server
BR0280I BRRESTORE time stamp: 2011-12-14 10.11.26BR0374I 5 of 5 files restored by backup utilityBR0230I Backup utility called successfully
BR0406I End of file restore: rehkytik.rsb 2011-12-14 10.11.26BR0280I BRRESTORE time stamp: 2011-12-14 10.11.26BR0403I BRRESTORE completed successfully with warnings
=========================================BR0292I Execution of BRRESTORE finished with return code 1
BR0280I BRRECOVER time stamp: 2011-12-14 10.11.26BR0668I Warnings or errors occurred - you can continue to ignore them or go back to repeat the last actionBR0126I Unattended mode active - continuing processing with default reply 'cont'
BR0280I BRRECOVER time stamp: 2011-12-14 10.11.26
Administration Guide - SAP for Oracle iDataAgent
Page 100 of 193

BR0655I Control menu 103 # please decide how to proceed-------------------------------------------------------------------------------Database point-in-time recovery main menu
1 + Set point-in-time for recovery2 + Select database backup or flashback3 + Check the status of database files4 + Restore control files5 + Restore data files6 # Restore split incremental control files7 # Restore and apply incremental backup8 = Restore and apply archivelog files9 # Restore archivelog files and flashback10 * Open database and post-processing11 * Exit program12 - Reset program status
Standard keys: c - cont, b - back, s - stop, r - refr, h - help-------------------------------------------------------------------------------BR0280I BRRECOVER time stamp: 2011-12-14 10.11.26BR0134I Unattended mode with 'force' active - continuing processing with default reply '8'
BR0614I Database instance TRD is mounted
BR0280I BRRECOVER time stamp: 2011-12-14 10.11.28BR0370I Directory D:\oracle\TRD\sapbackup\vehkytgp created
BR0280I BRRECOVER time stamp: 2011-12-14 10.11.28BR1402I Dummy online redolog file 'D:\oracle\TRD\sapbackup\vehkytgp\dummy.redo' createdBR1403I Dummy online redolog file 'D:\oracle\TRD\sapbackup\vehkytgp\dummy.redo' dropped
BR0351I Restoring D:\ORACLE\TRD\ORIGLOGA\LOG1_M1.DBFBR0355I from D:\oracle\TRD\sapbackup\vehkytgp\dummy.redo ...
BR0351I Restoring D:\ORACLE\TRD\MIRRLOGA\LOG1_M2.DBFBR0355I from D:\oracle\TRD\sapbackup\vehkytgp\dummy.redo ...
BR0351I Restoring D:\ORACLE\TRD\ORIGLOGB\LOG2_M1.DBFBR0355I from D:\oracle\TRD\sapbackup\vehkytgp\dummy.redo ...
BR0351I Restoring D:\ORACLE\TRD\MIRRLOGB\LOG2_M2.DBFBR0355I from D:\oracle\TRD\sapbackup\vehkytgp\dummy.redo ...
BR0351I Restoring D:\ORACLE\TRD\ORIGLOGA\LOG3_M1.DBFBR0355I from D:\oracle\TRD\sapbackup\vehkytgp\dummy.redo ...
BR0351I Restoring D:\ORACLE\TRD\MIRRLOGA\LOG3_M2.DBFBR0355I from D:\oracle\TRD\sapbackup\vehkytgp\dummy.redo ...
BR0351I Restoring D:\ORACLE\TRD\ORIGLOGB\LOG4_M1.DBFBR0355I from D:\oracle\TRD\sapbackup\vehkytgp\dummy.redo ...
BR0351I Restoring D:\ORACLE\TRD\MIRRLOGB\LOG4_M2.DBFBR0355I from D:\oracle\TRD\sapbackup\vehkytgp\dummy.redo ...
BR0280I BRRECOVER time stamp: 2011-12-14 10.11.29BR1096I Database file 'D:\ORACLE\CER\SAPDATA2\CER_1\CER.DATA1' renamed successfully to 'D:\ORACLE\TRD\SAPDATA2\CER_1\CER.DATA1'BR1096I Database file 'D:\ORACLE\CER\SAPDATA3\CERUSR_1\CERUSR.DATA1' renamed successfully to 'D:\ORACLE\TRD\SAPDATA3\CERUSR_1\CERUSR.DATA1'BR0793I Temporary database file D:\ORACLE\CER\SAPDATA1\TEMP_1\TEMP.DATA1 has been droppedBR1096I Database file 'D:\ORACLE\CER\SAPDATA1\UNDO_1\UNDO.DATA1' renamed successfully to 'D:\ORACLE\TRD\SAPDATA1\UNDO_1\UNDO.DATA1'BR1096I Database file 'D:\ORACLE\CER\SAPDATA1\SYSTEM_1\SYSAUX.DBF' renamed successfully to 'D:\ORACLE\TRD\SAPDATA1\SYSTEM_1\SYSAUX.DBF'BR1096I Database file 'D:\ORACLE\CER\SAPDATA1\SYSTEM_1\SYSTEM.DATA1' renamed successfully to 'D:\ORACLE\TRD\SAPDATA1\SYSTEM_1\SYSTEM.DATA1'BR1096I Database file 'D:\ORACLE\CER\ORIGLOGA\LOG1_M1.DBF' renamed successfully to 'D:\ORACLE\TRD\ORIGLOGA\LOG1_M1.DBF'BR1096I Database file 'D:\ORACLE\CER\MIRRLOGA\LOG1_M2.DBF' renamed successfully to 'D:\ORACLE\TRD\MIRRLOGA\LOG1_M2.DBF'BR1096I Database file 'D:\ORACLE\CER\ORIGLOGB\LOG2_M1.DBF' renamed successfully to 'D:\ORACLE\TRD\ORIGLOGB\LOG2_M1.DBF'BR1096I Database file 'D:\ORACLE\CER\MIRRLOGB\LOG2_M2.DBF' renamed successfully to 'D:\ORACLE\TRD\MIRRLOGB\LOG2_M2.DBF'BR1096I Database file 'D:\ORACLE\CER\ORIGLOGA\LOG3_M1.DBF' renamed successfully to 'D:\ORACLE\TRD\ORIGLOGA\LOG3_M1.DBF'BR1096I Database file 'D:\ORACLE\CER\MIRRLOGA\LOG3_M2.DBF' renamed
Administration Guide - SAP for Oracle iDataAgent
Page 101 of 193
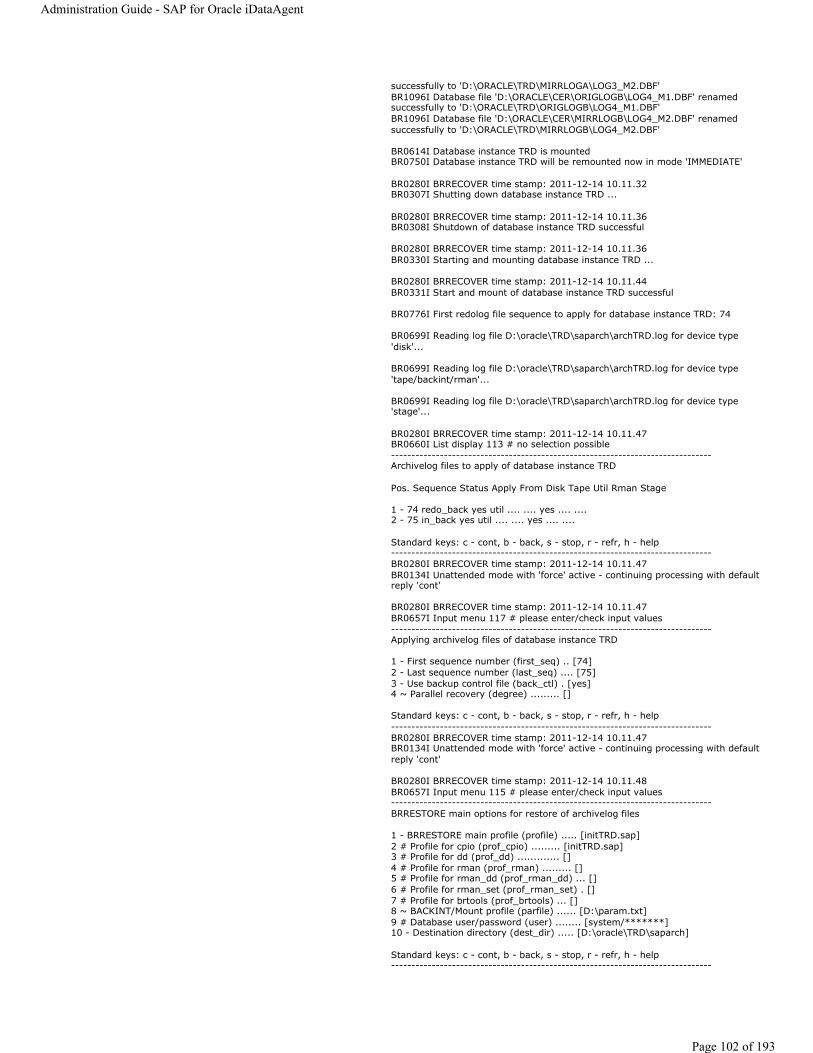
successfully to 'D:\ORACLE\TRD\MIRRLOGA\LOG3_M2.DBF'BR1096I Database file 'D:\ORACLE\CER\ORIGLOGB\LOG4_M1.DBF' renamed successfully to 'D:\ORACLE\TRD\ORIGLOGB\LOG4_M1.DBF'BR1096I Database file 'D:\ORACLE\CER\MIRRLOGB\LOG4_M2.DBF' renamed successfully to 'D:\ORACLE\TRD\MIRRLOGB\LOG4_M2.DBF'
BR0614I Database instance TRD is mountedBR0750I Database instance TRD will be remounted now in mode 'IMMEDIATE'
BR0280I BRRECOVER time stamp: 2011-12-14 10.11.32BR0307I Shutting down database instance TRD ...
BR0280I BRRECOVER time stamp: 2011-12-14 10.11.36BR0308I Shutdown of database instance TRD successful
BR0280I BRRECOVER time stamp: 2011-12-14 10.11.36BR0330I Starting and mounting database instance TRD ...
BR0280I BRRECOVER time stamp: 2011-12-14 10.11.44BR0331I Start and mount of database instance TRD successful
BR0776I First redolog file sequence to apply for database instance TRD: 74
BR0699I Reading log file D:\oracle\TRD\saparch\archTRD.log for device type 'disk'...
BR0699I Reading log file D:\oracle\TRD\saparch\archTRD.log for device type 'tape/backint/rman'...
BR0699I Reading log file D:\oracle\TRD\saparch\archTRD.log for device type 'stage'...
BR0280I BRRECOVER time stamp: 2011-12-14 10.11.47BR0660I List display 113 # no selection possible-------------------------------------------------------------------------------Archivelog files to apply of database instance TRD
Pos. Sequence Status Apply From Disk Tape Util Rman Stage
1 - 74 redo_back yes util .... .... yes .... .... 2 - 75 in_back yes util .... .... yes .... ....
Standard keys: c - cont, b - back, s - stop, r - refr, h - help-------------------------------------------------------------------------------BR0280I BRRECOVER time stamp: 2011-12-14 10.11.47BR0134I Unattended mode with 'force' active - continuing processing with default reply 'cont'
BR0280I BRRECOVER time stamp: 2011-12-14 10.11.47BR0657I Input menu 117 # please enter/check input values-------------------------------------------------------------------------------Applying archivelog files of database instance TRD
1 - First sequence number (first_seq) .. [74]2 - Last sequence number (last_seq) .... [75]3 - Use backup control file (back_ctl) . [yes]4 ~ Parallel recovery (degree) ......... []
Standard keys: c - cont, b - back, s - stop, r - refr, h - help-------------------------------------------------------------------------------BR0280I BRRECOVER time stamp: 2011-12-14 10.11.47BR0134I Unattended mode with 'force' active - continuing processing with default reply 'cont'
BR0280I BRRECOVER time stamp: 2011-12-14 10.11.48BR0657I Input menu 115 # please enter/check input values-------------------------------------------------------------------------------BRRESTORE main options for restore of archivelog files
1 - BRRESTORE main profile (profile) ..... [initTRD.sap]2 # Profile for cpio (prof_cpio) ......... [initTRD.sap]3 # Profile for dd (prof_dd) ............. []4 # Profile for rman (prof_rman) ......... []5 # Profile for rman_dd (prof_rman_dd) ... []6 # Profile for rman_set (prof_rman_set) . []7 # Profile for brtools (prof_brtools) ... []8 ~ BACKINT/Mount profile (parfile) ...... [D:\param.txt]9 # Database user/password (user) ........ [system/*******]10 - Destination directory (dest_dir) ..... [D:\oracle\TRD\saparch]
Standard keys: c - cont, b - back, s - stop, r - refr, h - help-------------------------------------------------------------------------------
Administration Guide - SAP for Oracle iDataAgent
Page 102 of 193

BR0280I BRRECOVER time stamp: 2011-12-14 10.11.48BR0134I Unattended mode with 'force' active - continuing processing with default reply 'cont'
BR0280I BRRECOVER time stamp: 2011-12-14 10.11.48BR0657I Input menu 116 # please enter/check input values-------------------------------------------------------------------------------Additional BRRESTORE options for restore of archivelog files
1 - Confirmation mode (confirm) . [force]2 - Additional output (output) .. [no]3 - Message language (language) . [E]
Standard keys: c - cont, b - back, s - stop, r - refr, h - help-------------------------------------------------------------------------------BR0280I BRRECOVER time stamp: 2011-12-14 10.11.48BR0134I Unattended mode with 'force' active - continuing processing with default reply 'cont'
BR0291I BRRESTORE will be started with options '-p initTRD.sap -a 74-75=D:\oracle\TRD\saparch -d util_file -r D:\param.txt -k no -c force -l E'
===============================================BR0401I BRRESTORE 7.20 (1)BR0405I Start of file restore: rehkytuy.rsa 2011-12-14 10.11.48BR0484I BRRESTORE log file: D:\oracle\TRD\sapbackup\rehkytuy.rsa
BR0414I Offline redolog files for restore of database instance TRD: D:\oracle\TRD\saparch:74,75
BR0280I BRRESTORE time stamp: 2011-12-14 10.11.49BR0407I Restore of database: TRDBR0408I BRRESTORE action ID: rehkytuyBR0409I BRRESTORE function ID: rsaBR0419I Files will be restored from backup: aehkctzc.sve 2011-12-09 22.49.04BR0416I 2 files found to restore, total size 2.202 MBBR0421I Restore device type: util_fileBR0134I Unattended mode with 'force' active - no operator confirmation allowed
BR0280I BRRESTORE time stamp: 2011-12-14 10.11.49BR0229I Calling backup utility with function 'restore'...BR0278I Command output of 'backint -u CER -f restore -i D:\oracle\TRD\sapbackup\.rehkytuy.lst -t file -p D:\param.txt -c':
-------------------------- Output of restore -------------------------BI_BACKUP=<ARCHIVE>BI_CALLER=<BRRESTORE>BI_REQUEST=<NEW>
-------------------------- Parameter Specified -------------------------CvInstanceName=<Instance001>CvClientName=<sde-sap1>numstreams=<4>srccrossclient=<sde-sap2>
srccrossdbname=<CER>
destdbname=<CER>
-------------------------- backint Command Line -------------------------backintCmd=[backint -u CER -f restore -i D:\oracle\TRD\sapbackup\.rehkytuy.lst -t file -p D:\param.txt -c ]
CommServeHostName=satishpCommClientHostName=sde-sap1.idcprodcert.locGalaxy CommCellID=2Galaxy ClientID=219Src Cross Client=<sde-sap2>getInstanceId for InstanceName=[CER] client=[sde-sap1.idcprodcert.loc] clientId=219 AppType=61 FailedInstance=[CER] - May not have been configured.Galaxy SrcCrossClientID=218Galaxy CrossClientInstanceID=559Galaxy CrossClientAppType=61Galaxy CrossClientAppID=2284Total number of Collect Files Generated=<2>Setting the Number of streams desired=<2> to the total number of collect files generated.Number of streams desired=<2> Number of files to restore=<2> CMDLINE JobRestore has been requested
Administration Guide - SAP for Oracle iDataAgent
Page 103 of 193
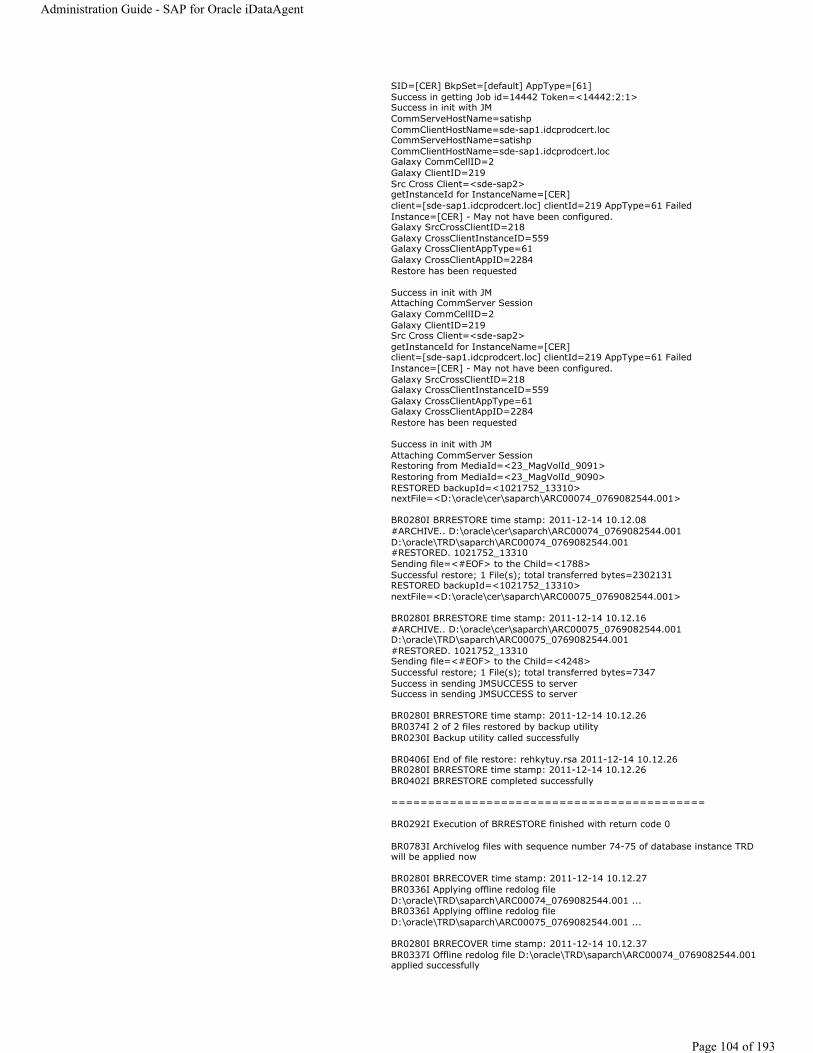
SID=[CER] BkpSet=[default] AppType=[61]Success in getting Job id=14442 Token=<14442:2:1>Success in init with JMCommServeHostName=satishpCommClientHostName=sde-sap1.idcprodcert.locCommServeHostName=satishpCommClientHostName=sde-sap1.idcprodcert.locGalaxy CommCellID=2Galaxy ClientID=219Src Cross Client=<sde-sap2>getInstanceId for InstanceName=[CER] client=[sde-sap1.idcprodcert.loc] clientId=219 AppType=61 FailedInstance=[CER] - May not have been configured.Galaxy SrcCrossClientID=218Galaxy CrossClientInstanceID=559Galaxy CrossClientAppType=61Galaxy CrossClientAppID=2284Restore has been requested
Success in init with JMAttaching CommServer SessionGalaxy CommCellID=2Galaxy ClientID=219Src Cross Client=<sde-sap2>getInstanceId for InstanceName=[CER] client=[sde-sap1.idcprodcert.loc] clientId=219 AppType=61 FailedInstance=[CER] - May not have been configured.Galaxy SrcCrossClientID=218Galaxy CrossClientInstanceID=559Galaxy CrossClientAppType=61Galaxy CrossClientAppID=2284Restore has been requested
Success in init with JMAttaching CommServer SessionRestoring from MediaId=<23_MagVolId_9091>Restoring from MediaId=<23_MagVolId_9090>RESTORED backupId=<1021752_13310> nextFile=<D:\oracle\cer\saparch\ARC00074_0769082544.001>
BR0280I BRRESTORE time stamp: 2011-12-14 10.12.08#ARCHIVE.. D:\oracle\cer\saparch\ARC00074_0769082544.001 D:\oracle\TRD\saparch\ARC00074_0769082544.001#RESTORED. 1021752_13310Sending file=<#EOF> to the Child=<1788>Successful restore; 1 File(s); total transferred bytes=2302131 RESTORED backupId=<1021752_13310> nextFile=<D:\oracle\cer\saparch\ARC00075_0769082544.001>
BR0280I BRRESTORE time stamp: 2011-12-14 10.12.16#ARCHIVE.. D:\oracle\cer\saparch\ARC00075_0769082544.001 D:\oracle\TRD\saparch\ARC00075_0769082544.001#RESTORED. 1021752_13310Sending file=<#EOF> to the Child=<4248>Successful restore; 1 File(s); total transferred bytes=7347 Success in sending JMSUCCESS to serverSuccess in sending JMSUCCESS to server
BR0280I BRRESTORE time stamp: 2011-12-14 10.12.26BR0374I 2 of 2 files restored by backup utilityBR0230I Backup utility called successfully
BR0406I End of file restore: rehkytuy.rsa 2011-12-14 10.12.26BR0280I BRRESTORE time stamp: 2011-12-14 10.12.26BR0402I BRRESTORE completed successfully
===========================================
BR0292I Execution of BRRESTORE finished with return code 0
BR0783I Archivelog files with sequence number 74-75 of database instance TRD will be applied now
BR0280I BRRECOVER time stamp: 2011-12-14 10.12.27BR0336I Applying offline redolog file D:\oracle\TRD\saparch\ARC00074_0769082544.001 ...BR0336I Applying offline redolog file D:\oracle\TRD\saparch\ARC00075_0769082544.001 ...
BR0280I BRRECOVER time stamp: 2011-12-14 10.12.37BR0337I Offline redolog file D:\oracle\TRD\saparch\ARC00074_0769082544.001 applied successfully
Administration Guide - SAP for Oracle iDataAgent
Page 104 of 193
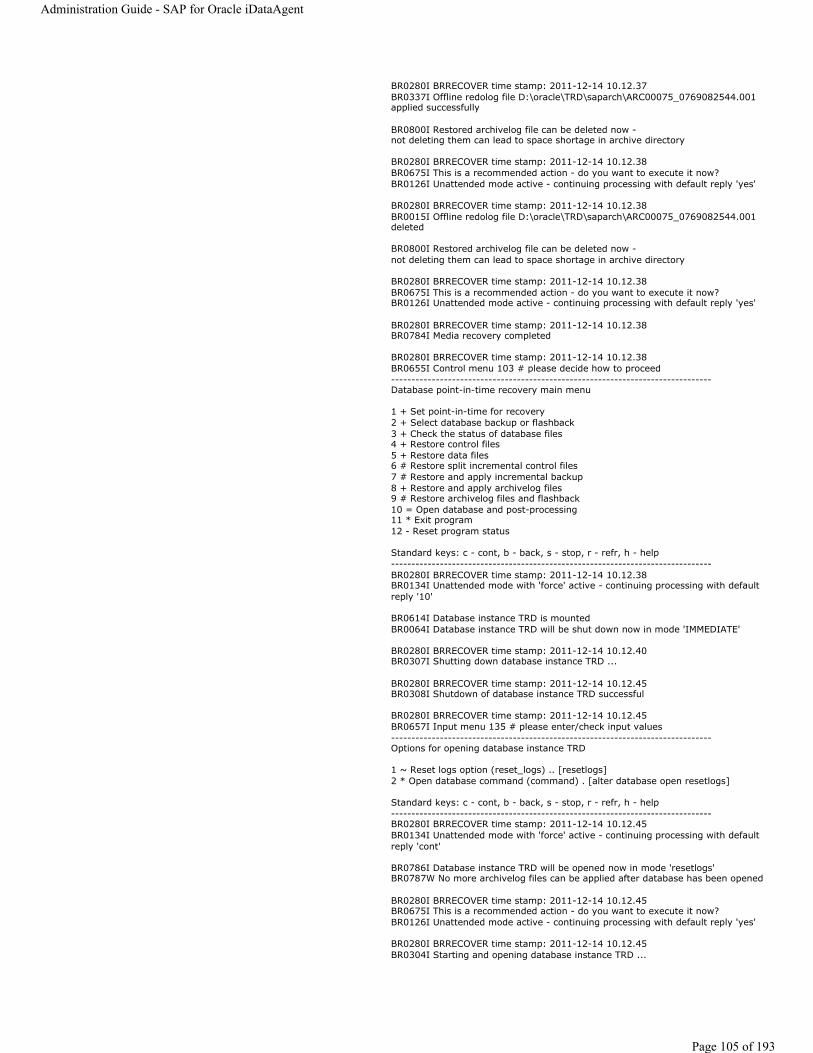
BR0280I BRRECOVER time stamp: 2011-12-14 10.12.37BR0337I Offline redolog file D:\oracle\TRD\saparch\ARC00075_0769082544.001 applied successfully
BR0800I Restored archivelog file can be deleted now -not deleting them can lead to space shortage in archive directory
BR0280I BRRECOVER time stamp: 2011-12-14 10.12.38BR0675I This is a recommended action - do you want to execute it now?BR0126I Unattended mode active - continuing processing with default reply 'yes'
BR0280I BRRECOVER time stamp: 2011-12-14 10.12.38BR0015I Offline redolog file D:\oracle\TRD\saparch\ARC00075_0769082544.001 deleted
BR0800I Restored archivelog file can be deleted now -not deleting them can lead to space shortage in archive directory
BR0280I BRRECOVER time stamp: 2011-12-14 10.12.38BR0675I This is a recommended action - do you want to execute it now?BR0126I Unattended mode active - continuing processing with default reply 'yes'
BR0280I BRRECOVER time stamp: 2011-12-14 10.12.38BR0784I Media recovery completed
BR0280I BRRECOVER time stamp: 2011-12-14 10.12.38BR0655I Control menu 103 # please decide how to proceed-------------------------------------------------------------------------------Database point-in-time recovery main menu
1 + Set point-in-time for recovery2 + Select database backup or flashback3 + Check the status of database files4 + Restore control files5 + Restore data files6 # Restore split incremental control files7 # Restore and apply incremental backup8 + Restore and apply archivelog files9 # Restore archivelog files and flashback10 = Open database and post-processing11 * Exit program12 - Reset program status
Standard keys: c - cont, b - back, s - stop, r - refr, h - help-------------------------------------------------------------------------------BR0280I BRRECOVER time stamp: 2011-12-14 10.12.38BR0134I Unattended mode with 'force' active - continuing processing with default reply '10'
BR0614I Database instance TRD is mountedBR0064I Database instance TRD will be shut down now in mode 'IMMEDIATE'
BR0280I BRRECOVER time stamp: 2011-12-14 10.12.40BR0307I Shutting down database instance TRD ...
BR0280I BRRECOVER time stamp: 2011-12-14 10.12.45BR0308I Shutdown of database instance TRD successful
BR0280I BRRECOVER time stamp: 2011-12-14 10.12.45BR0657I Input menu 135 # please enter/check input values-------------------------------------------------------------------------------Options for opening database instance TRD
1 ~ Reset logs option (reset_logs) .. [resetlogs]2 * Open database command (command) . [alter database open resetlogs]
Standard keys: c - cont, b - back, s - stop, r - refr, h - help-------------------------------------------------------------------------------BR0280I BRRECOVER time stamp: 2011-12-14 10.12.45BR0134I Unattended mode with 'force' active - continuing processing with default reply 'cont'
BR0786I Database instance TRD will be opened now in mode 'resetlogs'BR0787W No more archivelog files can be applied after database has been opened
BR0280I BRRECOVER time stamp: 2011-12-14 10.12.45BR0675I This is a recommended action - do you want to execute it now?BR0126I Unattended mode active - continuing processing with default reply 'yes'
BR0280I BRRECOVER time stamp: 2011-12-14 10.12.45BR0304I Starting and opening database instance TRD ...
Administration Guide - SAP for Oracle iDataAgent
Page 105 of 193

BR0280I BRRECOVER time stamp: 2011-12-14 10.13.01BR0305I Start and open of database instance TRD successful
BR0280I BRRECOVER time stamp: 2011-12-14 10.13.03BR0789I Temporary database file D:\ORACLE\TRD\SAPDATA1\TEMP_1\TEMP.DATA1 has been recreated
BR0118I Tablespaces and data files
Tablespace Status File Status Id. Size Creation time Creation scn Device Type Link
PSAPCER ONLINE D:\ORACLE\TRD\SAPDATA2\CER_1\CER.DATA1 ONLINE 4 52428800 2011-12-05 10.33.15 176706 3 FILE NOLINKPSAPCERUSR ONLINE D:\ORACLE\TRD\SAPDATA3\CERUSR_1\CERUSR.DATA1 ONLINE 5 10485760 2011-12-05 10.33.15 176736 3 FILE NOLINKPSAPTEMP ONLINE# D:\ORACLE\TRD\SAPDATA1\TEMP_1\TEMP.DATA1 ONLINE -1 104865792 2011-12-14 10.13.03 397522 3 FILE NOLINKPSAPUNDO ONLINE D:\ORACLE\TRD\SAPDATA1\UNDO_1\UNDO.DATA1 ONLINE 2 104857600 2011-12-05 10.02.42 8337 3 FILE NOLINKSYSAUX ONLINE D:\ORACLE\TRD\SAPDATA1\SYSTEM_1\SYSAUX.DBF ONLINE 3 104857600 2011-12-05 10.02.45 8460 3 FILE NOLINKSYSTEM ONLINE D:\ORACLE\TRD\SAPDATA1\SYSTEM_1\SYSTEM.DATA1 SYSTEM 1 419430400 2011-12-05 10.02.36 7 3 FILE NOLINK
BR0119I Redolog files
File Status Group Thread Sequence Size First time First scn Device Type Link
D:\ORACLE\TRD\ORIGLOGA\LOG1_M1.DBF INUSE 1 1 1 10485760 2011-12-14 10.12.52 397432 3 FILE NOLINKD:\ORACLE\TRD\MIRRLOGA\LOG1_M2.DBF INUSE 1 1 1 10485760 2011-12-14 10.12.52 397432 3 FILE NOLINKD:\ORACLE\TRD\ORIGLOGB\LOG2_M1.DBF INUSE 2 1 0 10485760 0000-00-00 00.00.00 0 3 FILE NOLINKD:\ORACLE\TRD\MIRRLOGB\LOG2_M2.DBF INUSE 2 1 0 10485760 0000-00-00 00.00.00 0 3 FILE NOLINKD:\ORACLE\TRD\ORIGLOGA\LOG3_M1.DBF INUSE 3 1 0 10485760 0000-00-00 00.00.00 0 3 FILE NOLINKD:\ORACLE\TRD\MIRRLOGA\LOG3_M2.DBF INUSE 3 1 0 10485760 0000-00-00 00.00.00 0 3 FILE NOLINKD:\ORACLE\TRD\ORIGLOGB\LOG4_M1.DBF INUSE 4 1 0 10485760 0000-00-00 00.00.00 0 3 FILE NOLINKD:\ORACLE\TRD\MIRRLOGB\LOG4_M2.DBF INUSE 4 1 0 10485760 0000-00-00 00.00.00 0 3 FILE NOLINK
BR0120I Control files
File Size Reset time Reset scn Device Type Link
D:\ORACLE\TRD\SAPDATA1\CNTRL\CTRLCER.CTL 11288576 2011-12-14 10.12.52 397432 3 FILE NOLINKD:\ORACLE\TRD\SAPDATA2\CNTRL\CTRLCER.CTL 11288576 2011-12-14 10.12.52 397432 3 FILE NOLINKD:\ORACLE\TRD\SAPARCH\CNTRL\CTRLCER.CTL 11288576 2011-12-14 10.12.52 397432 3 FILE NOLINK
BR0280I BRRECOVER time stamp: 2011-12-14 10.13.04BR0319I Control file copy created: D:\oracle\TRD\sapbackup\vehkytgp\CNTRLTRD.NEW 11288576
BR0280I BRRECOVER time stamp: 2011-12-14 10.13.04BR0595I Selecting indexes/partitions with NOLOGGING created during or after the selected backup behkctrv.anf 2011-12-09 22.45.55 ...BR0285I This function can take several seconds/minutes - be patient...
BR0280I BRRECOVER time stamp: 2011-12-14 10.13.05BR0596I No indexes found with NOLOGGING created during or after the selected backup behkctrv.anf 2011-12-09 22.45.55
BR0280I BRRECOVER time stamp: 2011-12-14 10.13.05BR1959I No index partitions found with NOLOGGING created during or after the selected backup behkctrv.anf 2011-12-09 22.45.55
BR1404I New control files can be created now
BR0280I BRRECOVER time stamp: 2011-12-14 10.13.05BR0675I This is a recommended action - do you want to execute it now?BR0126I Unattended mode active - continuing processing with default reply 'yes'
BR1404I New control files will be created now using SQL script D:\oracle\TRD\sapbackup\vehkytgp\control.sqlBR0064I Database instance TRD will be shut down now
Administration Guide - SAP for Oracle iDataAgent
Page 106 of 193
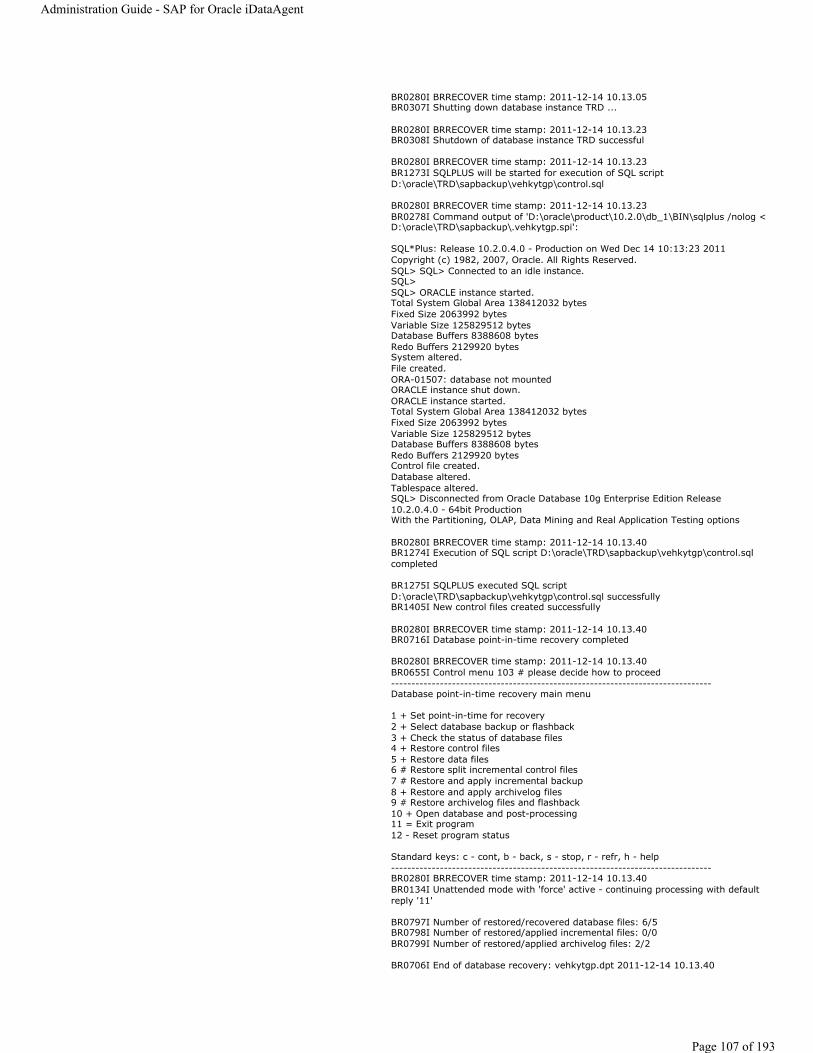
BR0280I BRRECOVER time stamp: 2011-12-14 10.13.05BR0307I Shutting down database instance TRD ...
BR0280I BRRECOVER time stamp: 2011-12-14 10.13.23BR0308I Shutdown of database instance TRD successful
BR0280I BRRECOVER time stamp: 2011-12-14 10.13.23BR1273I SQLPLUS will be started for execution of SQL script D:\oracle\TRD\sapbackup\vehkytgp\control.sql
BR0280I BRRECOVER time stamp: 2011-12-14 10.13.23BR0278I Command output of 'D:\oracle\product\10.2.0\db_1\BIN\sqlplus /nolog < D:\oracle\TRD\sapbackup\.vehkytgp.spi':
SQL*Plus: Release 10.2.0.4.0 - Production on Wed Dec 14 10:13:23 2011Copyright (c) 1982, 2007, Oracle. All Rights Reserved.SQL> SQL> Connected to an idle instance.SQL> SQL> ORACLE instance started.Total System Global Area 138412032 bytesFixed Size 2063992 bytesVariable Size 125829512 bytesDatabase Buffers 8388608 bytesRedo Buffers 2129920 bytesSystem altered.File created.ORA-01507: database not mountedORACLE instance shut down.ORACLE instance started.Total System Global Area 138412032 bytesFixed Size 2063992 bytesVariable Size 125829512 bytesDatabase Buffers 8388608 bytesRedo Buffers 2129920 bytesControl file created.Database altered.Tablespace altered.SQL> Disconnected from Oracle Database 10g Enterprise Edition Release 10.2.0.4.0 - 64bit ProductionWith the Partitioning, OLAP, Data Mining and Real Application Testing options
BR0280I BRRECOVER time stamp: 2011-12-14 10.13.40BR1274I Execution of SQL script D:\oracle\TRD\sapbackup\vehkytgp\control.sql completed
BR1275I SQLPLUS executed SQL script D:\oracle\TRD\sapbackup\vehkytgp\control.sql successfullyBR1405I New control files created successfully
BR0280I BRRECOVER time stamp: 2011-12-14 10.13.40BR0716I Database point-in-time recovery completed
BR0280I BRRECOVER time stamp: 2011-12-14 10.13.40BR0655I Control menu 103 # please decide how to proceed-------------------------------------------------------------------------------Database point-in-time recovery main menu
1 + Set point-in-time for recovery2 + Select database backup or flashback3 + Check the status of database files4 + Restore control files5 + Restore data files6 # Restore split incremental control files7 # Restore and apply incremental backup8 + Restore and apply archivelog files9 # Restore archivelog files and flashback10 + Open database and post-processing11 = Exit program12 - Reset program status
Standard keys: c - cont, b - back, s - stop, r - refr, h - help-------------------------------------------------------------------------------BR0280I BRRECOVER time stamp: 2011-12-14 10.13.40BR0134I Unattended mode with 'force' active - continuing processing with default reply '11'
BR0797I Number of restored/recovered database files: 6/5BR0798I Number of restored/applied incremental files: 0/0BR0799I Number of restored/applied archivelog files: 2/2
BR0706I End of database recovery: vehkytgp.dpt 2011-12-14 10.13.40
Administration Guide - SAP for Oracle iDataAgent
Page 107 of 193

BR0280I BRRECOVER time stamp: 2011-12-14 10.13.42BR0703I BRRECOVER completed successfully with warnings
16. For Offline backup, copy the corresponding ".aff" file from source computer sapbackup directory or restore it using BRRECOVER
brrecover -f TRD -t reset -c force -r D:\param.txt
BR0701I BRRECOVER 7.20 (1)BR0705I Start of database recovery: vehlbzto.drs 2011-12-15 01.57.36BR0484I BRRECOVER log file: D:\oracle\TRD\sapbackup\vehlbzto.drs
BR0101I Parameters
Name Value
oracle_sid TRDoracle_home D:\oracle\product\10.2.0\db_1oracle_profile D:\oracle\product\10.2.0\db_1\database\initTRD.orasapdata_home D:\oracle\TRDsap_profile D:\oracle\product\10.2.0\db_1\database\initTRD.saprecov_type resetrecov_copy_dir D:\oracle\TRD\sapbackuprecov_interval 30scroll_lines 20backup_dev_type tapesystem_info Administrator SDE-SAP1 Windows 6.1 Build 7601 Service Pack 1 AMD64oracle_info TRD 10.2.0.4.0make_info NTAMD64 OCI_10201_SHARE Feb 25 2010command_line brrecover -f TRD -t reset -c force -r D:\param.txt
BR0280I BRRECOVER time stamp: 2011-12-15 01.57.36BR0707I Recovery of database: TRDBR0708I BRRECOVER action ID: vehlbztoBR0709I BRRECOVER function ID: drsBR0710I Recovery type: resetBR0134I Unattended mode with 'force' active - no operator confirmation allowed
BR0280I BRRECOVER time stamp: 2011-12-15 01.57.36BR0655I Control menu 109 # please decide how to proceed-------------------------------------------------------------Whole database reset main menu
1 = Select database backup or restore point2 * Check the status of database files3 * Restore control files and redolog files4 * Restore data files5 * Restore and apply incremental backup6 * Apply archivelog files7 * Restore archivelog files and flashback8 * Open database and post-processing9 * Exit program10 - Reset program status
Standard keys: c - cont, b - back, s - stop, r - refr, h - help------------------------------------------------------------------BR0280I BRRECOVER time stamp: 2011-12-15 01.57.36BR0134I Unattended mode with 'force' active - continuing processing with default reply '1'
BR0699I Reading log file D:\oracle\TRD\sapbackup\backTRD.log ...
BR0350I Backup utility will be inquired for backup confirmation
BR0280I BRRECOVER time stamp: 2011-12-15 01.57.36BR0229I Calling backup utility with function 'inquire'...BR0278I Command output of 'backint -u TRD -f inquire -i D:\oracle\TRD\sapbackup\.vehlbzto.lst -t file -p D:\param.txt -c':
-------------------------- Output of inquire -----------------------BI_BACKUP=<PARTIAL>BI_CALLER=<BRRECOVER>BI_REQUEST=<NEW>
-------------------------- Parameter Specified ----------------------CvInstanceName=<Instance001>CvClientName=<sde-sap1>numstreams=<4>srccrossclient=<sde-sap2>
srccrossdbname=<CER>
Administration Guide - SAP for Oracle iDataAgent
Page 108 of 193
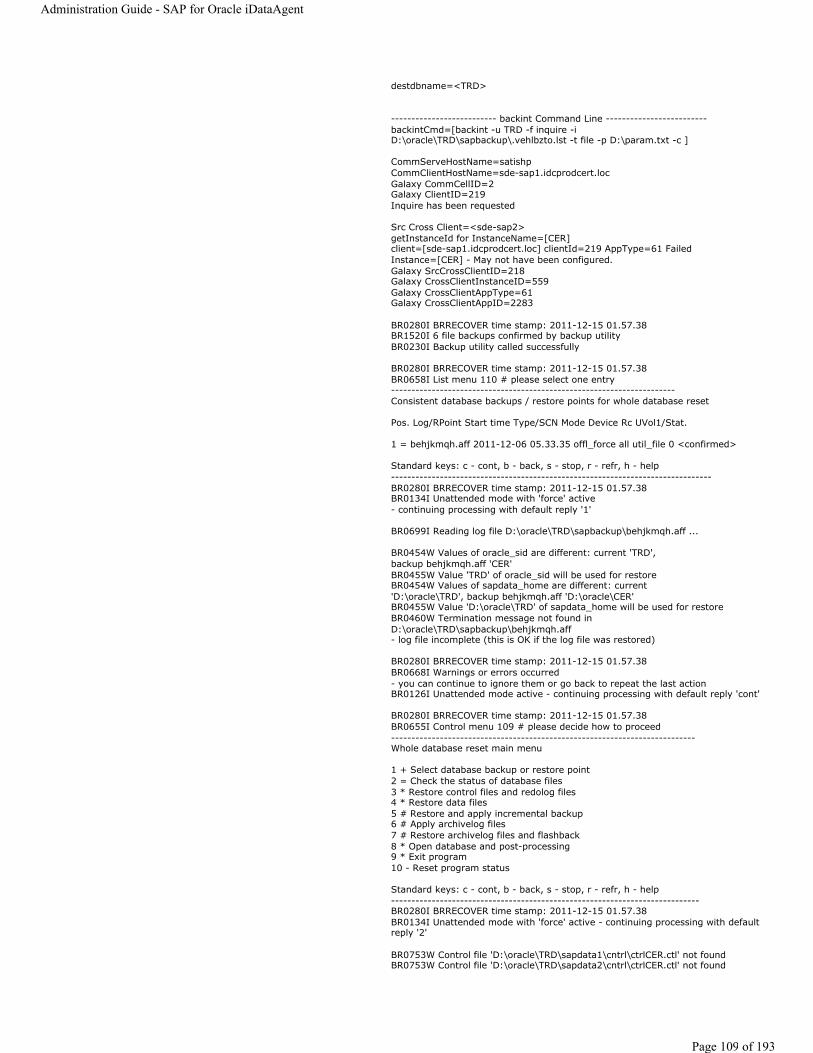
destdbname=<TRD>
-------------------------- backint Command Line -------------------------backintCmd=[backint -u TRD -f inquire -i D:\oracle\TRD\sapbackup\.vehlbzto.lst -t file -p D:\param.txt -c ]
CommServeHostName=satishpCommClientHostName=sde-sap1.idcprodcert.locGalaxy CommCellID=2Galaxy ClientID=219Inquire has been requested
Src Cross Client=<sde-sap2>getInstanceId for InstanceName=[CER] client=[sde-sap1.idcprodcert.loc] clientId=219 AppType=61 FailedInstance=[CER] - May not have been configured.Galaxy SrcCrossClientID=218Galaxy CrossClientInstanceID=559Galaxy CrossClientAppType=61Galaxy CrossClientAppID=2283
BR0280I BRRECOVER time stamp: 2011-12-15 01.57.38BR1520I 6 file backups confirmed by backup utilityBR0230I Backup utility called successfully
BR0280I BRRECOVER time stamp: 2011-12-15 01.57.38BR0658I List menu 110 # please select one entry----------------------------------------------------------------------Consistent database backups / restore points for whole database reset
Pos. Log/RPoint Start time Type/SCN Mode Device Rc UVol1/Stat.
1 = behjkmqh.aff 2011-12-06 05.33.35 offl_force all util_file 0 <confirmed>
Standard keys: c - cont, b - back, s - stop, r - refr, h - help-------------------------------------------------------------------------------BR0280I BRRECOVER time stamp: 2011-12-15 01.57.38BR0134I Unattended mode with 'force' active - continuing processing with default reply '1'
BR0699I Reading log file D:\oracle\TRD\sapbackup\behjkmqh.aff ...
BR0454W Values of oracle_sid are different: current 'TRD', backup behjkmqh.aff 'CER'BR0455W Value 'TRD' of oracle_sid will be used for restoreBR0454W Values of sapdata_home are different: current 'D:\oracle\TRD', backup behjkmqh.aff 'D:\oracle\CER'BR0455W Value 'D:\oracle\TRD' of sapdata_home will be used for restoreBR0460W Termination message not found in D:\oracle\TRD\sapbackup\behjkmqh.aff - log file incomplete (this is OK if the log file was restored)
BR0280I BRRECOVER time stamp: 2011-12-15 01.57.38BR0668I Warnings or errors occurred - you can continue to ignore them or go back to repeat the last actionBR0126I Unattended mode active - continuing processing with default reply 'cont'
BR0280I BRRECOVER time stamp: 2011-12-15 01.57.38BR0655I Control menu 109 # please decide how to proceed---------------------------------------------------------------------------Whole database reset main menu
1 + Select database backup or restore point2 = Check the status of database files3 * Restore control files and redolog files4 * Restore data files5 # Restore and apply incremental backup6 # Apply archivelog files7 # Restore archivelog files and flashback8 * Open database and post-processing9 * Exit program10 - Reset program status
Standard keys: c - cont, b - back, s - stop, r - refr, h - help----------------------------------------------------------------------------BR0280I BRRECOVER time stamp: 2011-12-15 01.57.38BR0134I Unattended mode with 'force' active - continuing processing with default reply '2'
BR0753W Control file 'D:\oracle\TRD\sapdata1\cntrl\ctrlCER.ctl' not foundBR0753W Control file 'D:\oracle\TRD\sapdata2\cntrl\ctrlCER.ctl' not found
Administration Guide - SAP for Oracle iDataAgent
Page 109 of 193

BR0753W Control file 'D:\oracle\TRD\saparch\cntrl\ctrlCER.ctl' not found
BR0613I Database instance TRD is shut down
BR0751W Database instance TRD cannot be mounted due to missing control files
BR0755I Checking the status of database files for instance TRD...
BR0428W File D:\ORACLE\TRD\SAPDATA2\CER_1\CER.DATA1 will be overwrittenBR0428W File D:\ORACLE\TRD\SAPDATA3\CERUSR_1\CERUSR.DATA1 will be overwrittenBR0428W File D:\ORACLE\TRD\SAPDATA1\TEMP_1\TEMP.DATA1 will be overwrittenBR0428W File D:\ORACLE\TRD\SAPDATA1\UNDO_1\UNDO.DATA1 will be overwrittenBR0428W File D:\ORACLE\TRD\SAPDATA1\SYSTEM_1\SYSAUX.DBF will be overwrittenBR0428W File D:\ORACLE\TRD\SAPDATA1\SYSTEM_1\SYSTEM.DATA1 will be overwritten
BR0280I BRRECOVER time stamp: 2011-12-15 01.57.39BR0668I Warnings or errors occurred - you can continue to ignore them or go back to repeat the last actionBR0126I Unattended mode active - continuing processing with default reply 'cont'
BR0280I BRRECOVER time stamp: 2011-12-15 01.57.39BR0655I Control menu 109 # please decide how to proceed-------------------------------------------------------------------------------Whole database reset main menu
1 + Select database backup or restore point2 + Check the status of database files3 = Restore control files and redolog files4 * Restore data files5 # Restore and apply incremental backup6 # Apply archivelog files7 # Restore archivelog files and flashback8 * Open database and post-processing9 * Exit program10 - Reset program status
Standard keys: c - cont, b - back, s - stop, r - refr, h - help-------------------------------------------------------------------------------BR0280I BRRECOVER time stamp: 2011-12-15 01.57.39BR0134I Unattended mode with 'force' active - continuing processing with default reply '3'
BR0613I Database instance TRD is shut down
BR0280I BRRECOVER time stamp: 2011-12-15 01.57.40BR0657I Input menu 111 # please enter/check input values-------------------------------------------------------------------------------BRRESTORE main options for restore of database files
1 - BRRESTORE profile (profile) ........ [initTRD.sap]2 - BRBACKUP backup run (backup) ....... [behjkmqh.aff]3 - Fill-up previous restores (fillup) . [no]4 - Restore device type (device) ....... [util_file]5 - BACKINT/Mount profile (parfile) .... [D:\param.txt]6 # Database user/password (user) ...... [system/*******]7 - Files for restore (mode) ........... [0,00]
Standard keys: c - cont, b - back, s - stop, r - refr, h - help-------------------------------------------------------------------------------BR0280I BRRECOVER time stamp: 2011-12-15 01.57.40BR0134I Unattended mode with 'force' active - continuing processing with default reply 'cont'
BR0280I BRRECOVER time stamp: 2011-12-15 01.57.40BR0657I Input menu 112 # please enter/check input values-------------------------------------------------------------------------------Additional BRRESTORE options for restore of database files
1 - Confirmation mode (confirm) ...... [force]2 - Query mode (query) ............... [no]3 # Compression mode (compress) ...... [no]4 # Parallel execution (execute) ..... [0]5 - Additional output (output) ....... [no]6 - Message language (language) ...... [E]7 - BRRESTORE command line (command) . [-p initTRD.sap -b behjkmqh.aff -d util_file -r D:\param.txt -m 0,00 -c force -l E]
Standard keys: c - cont, b - back, s - stop, r - refr, h - help
Administration Guide - SAP for Oracle iDataAgent
Page 110 of 193
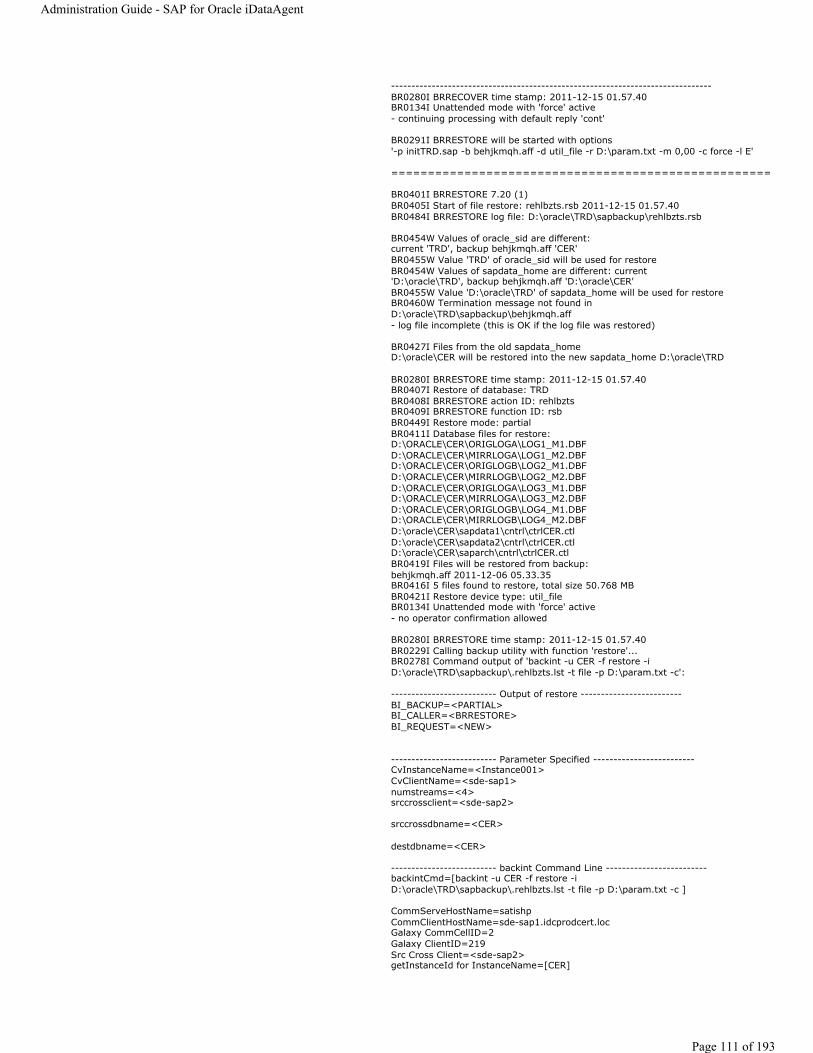
-------------------------------------------------------------------------------BR0280I BRRECOVER time stamp: 2011-12-15 01.57.40BR0134I Unattended mode with 'force' active - continuing processing with default reply 'cont'
BR0291I BRRESTORE will be started with options '-p initTRD.sap -b behjkmqh.aff -d util_file -r D:\param.txt -m 0,00 -c force -l E'
====================================================
BR0401I BRRESTORE 7.20 (1)BR0405I Start of file restore: rehlbzts.rsb 2011-12-15 01.57.40BR0484I BRRESTORE log file: D:\oracle\TRD\sapbackup\rehlbzts.rsb
BR0454W Values of oracle_sid are different: current 'TRD', backup behjkmqh.aff 'CER'BR0455W Value 'TRD' of oracle_sid will be used for restoreBR0454W Values of sapdata_home are different: current 'D:\oracle\TRD', backup behjkmqh.aff 'D:\oracle\CER'BR0455W Value 'D:\oracle\TRD' of sapdata_home will be used for restoreBR0460W Termination message not found in D:\oracle\TRD\sapbackup\behjkmqh.aff - log file incomplete (this is OK if the log file was restored)
BR0427I Files from the old sapdata_home D:\oracle\CER will be restored into the new sapdata_home D:\oracle\TRD
BR0280I BRRESTORE time stamp: 2011-12-15 01.57.40BR0407I Restore of database: TRDBR0408I BRRESTORE action ID: rehlbztsBR0409I BRRESTORE function ID: rsbBR0449I Restore mode: partialBR0411I Database files for restore: D:\ORACLE\CER\ORIGLOGA\LOG1_M1.DBFD:\ORACLE\CER\MIRRLOGA\LOG1_M2.DBFD:\ORACLE\CER\ORIGLOGB\LOG2_M1.DBFD:\ORACLE\CER\MIRRLOGB\LOG2_M2.DBFD:\ORACLE\CER\ORIGLOGA\LOG3_M1.DBFD:\ORACLE\CER\MIRRLOGA\LOG3_M2.DBFD:\ORACLE\CER\ORIGLOGB\LOG4_M1.DBFD:\ORACLE\CER\MIRRLOGB\LOG4_M2.DBFD:\oracle\CER\sapdata1\cntrl\ctrlCER.ctlD:\oracle\CER\sapdata2\cntrl\ctrlCER.ctlD:\oracle\CER\saparch\cntrl\ctrlCER.ctlBR0419I Files will be restored from backup: behjkmqh.aff 2011-12-06 05.33.35BR0416I 5 files found to restore, total size 50.768 MBBR0421I Restore device type: util_fileBR0134I Unattended mode with 'force' active - no operator confirmation allowed
BR0280I BRRESTORE time stamp: 2011-12-15 01.57.40BR0229I Calling backup utility with function 'restore'...BR0278I Command output of 'backint -u CER -f restore -i D:\oracle\TRD\sapbackup\.rehlbzts.lst -t file -p D:\param.txt -c':
-------------------------- Output of restore -------------------------BI_BACKUP=<PARTIAL>BI_CALLER=<BRRESTORE>BI_REQUEST=<NEW>
-------------------------- Parameter Specified -------------------------CvInstanceName=<Instance001>CvClientName=<sde-sap1>numstreams=<4>srccrossclient=<sde-sap2>
srccrossdbname=<CER>
destdbname=<CER>
-------------------------- backint Command Line -------------------------backintCmd=[backint -u CER -f restore -i D:\oracle\TRD\sapbackup\.rehlbzts.lst -t file -p D:\param.txt -c ]
CommServeHostName=satishpCommClientHostName=sde-sap1.idcprodcert.locGalaxy CommCellID=2Galaxy ClientID=219Src Cross Client=<sde-sap2>getInstanceId for InstanceName=[CER]
Administration Guide - SAP for Oracle iDataAgent
Page 111 of 193
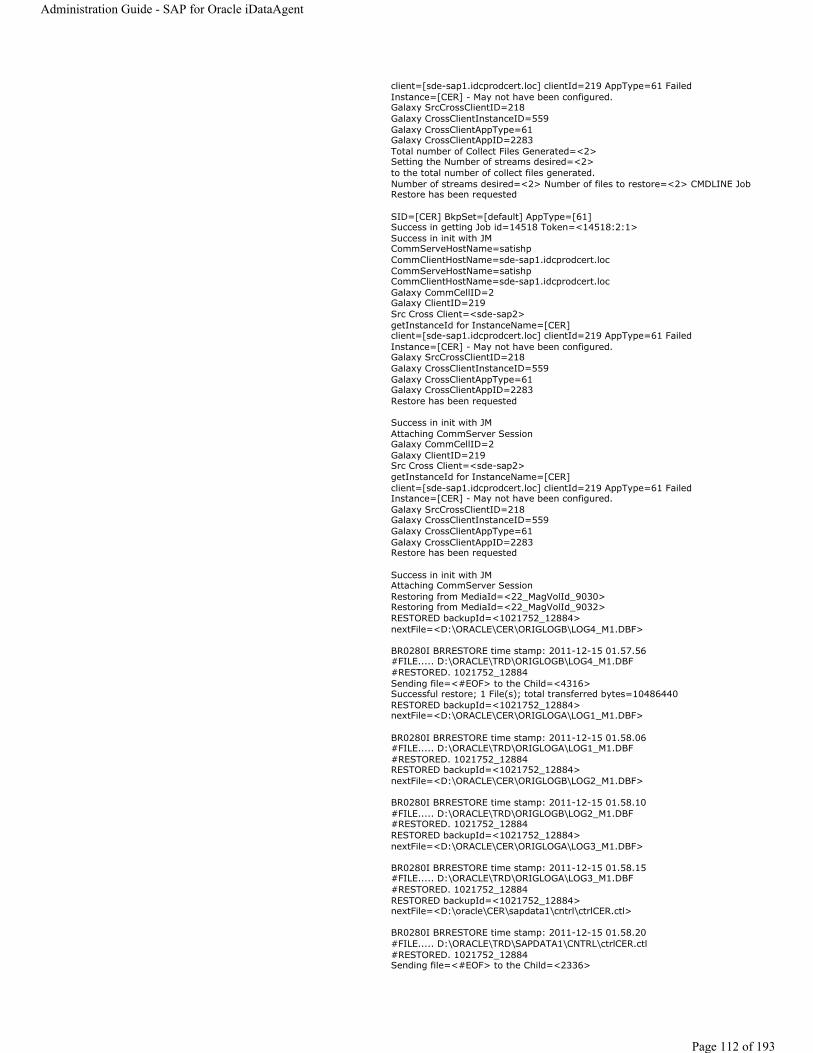
client=[sde-sap1.idcprodcert.loc] clientId=219 AppType=61 FailedInstance=[CER] - May not have been configured.Galaxy SrcCrossClientID=218Galaxy CrossClientInstanceID=559Galaxy CrossClientAppType=61Galaxy CrossClientAppID=2283Total number of Collect Files Generated=<2>Setting the Number of streams desired=<2> to the total number of collect files generated.Number of streams desired=<2> Number of files to restore=<2> CMDLINE JobRestore has been requested
SID=[CER] BkpSet=[default] AppType=[61]Success in getting Job id=14518 Token=<14518:2:1>Success in init with JMCommServeHostName=satishpCommClientHostName=sde-sap1.idcprodcert.locCommServeHostName=satishpCommClientHostName=sde-sap1.idcprodcert.locGalaxy CommCellID=2Galaxy ClientID=219Src Cross Client=<sde-sap2>getInstanceId for InstanceName=[CER] client=[sde-sap1.idcprodcert.loc] clientId=219 AppType=61 FailedInstance=[CER] - May not have been configured.Galaxy SrcCrossClientID=218Galaxy CrossClientInstanceID=559Galaxy CrossClientAppType=61Galaxy CrossClientAppID=2283Restore has been requested
Success in init with JMAttaching CommServer SessionGalaxy CommCellID=2Galaxy ClientID=219Src Cross Client=<sde-sap2>getInstanceId for InstanceName=[CER] client=[sde-sap1.idcprodcert.loc] clientId=219 AppType=61 FailedInstance=[CER] - May not have been configured.Galaxy SrcCrossClientID=218Galaxy CrossClientInstanceID=559Galaxy CrossClientAppType=61Galaxy CrossClientAppID=2283Restore has been requested
Success in init with JMAttaching CommServer SessionRestoring from MediaId=<22_MagVolId_9030>Restoring from MediaId=<22_MagVolId_9032>RESTORED backupId=<1021752_12884> nextFile=<D:\ORACLE\CER\ORIGLOGB\LOG4_M1.DBF>
BR0280I BRRESTORE time stamp: 2011-12-15 01.57.56#FILE..... D:\ORACLE\TRD\ORIGLOGB\LOG4_M1.DBF#RESTORED. 1021752_12884Sending file=<#EOF> to the Child=<4316>Successful restore; 1 File(s); total transferred bytes=10486440 RESTORED backupId=<1021752_12884> nextFile=<D:\ORACLE\CER\ORIGLOGA\LOG1_M1.DBF>
BR0280I BRRESTORE time stamp: 2011-12-15 01.58.06#FILE..... D:\ORACLE\TRD\ORIGLOGA\LOG1_M1.DBF#RESTORED. 1021752_12884RESTORED backupId=<1021752_12884> nextFile=<D:\ORACLE\CER\ORIGLOGB\LOG2_M1.DBF>
BR0280I BRRESTORE time stamp: 2011-12-15 01.58.10#FILE..... D:\ORACLE\TRD\ORIGLOGB\LOG2_M1.DBF#RESTORED. 1021752_12884RESTORED backupId=<1021752_12884> nextFile=<D:\ORACLE\CER\ORIGLOGA\LOG3_M1.DBF>
BR0280I BRRESTORE time stamp: 2011-12-15 01.58.15#FILE..... D:\ORACLE\TRD\ORIGLOGA\LOG3_M1.DBF#RESTORED. 1021752_12884RESTORED backupId=<1021752_12884> nextFile=<D:\oracle\CER\sapdata1\cntrl\ctrlCER.ctl>
BR0280I BRRESTORE time stamp: 2011-12-15 01.58.20#FILE..... D:\ORACLE\TRD\SAPDATA1\CNTRL\ctrlCER.ctl#RESTORED. 1021752_12884Sending file=<#EOF> to the Child=<2336>
Administration Guide - SAP for Oracle iDataAgent
Page 112 of 193
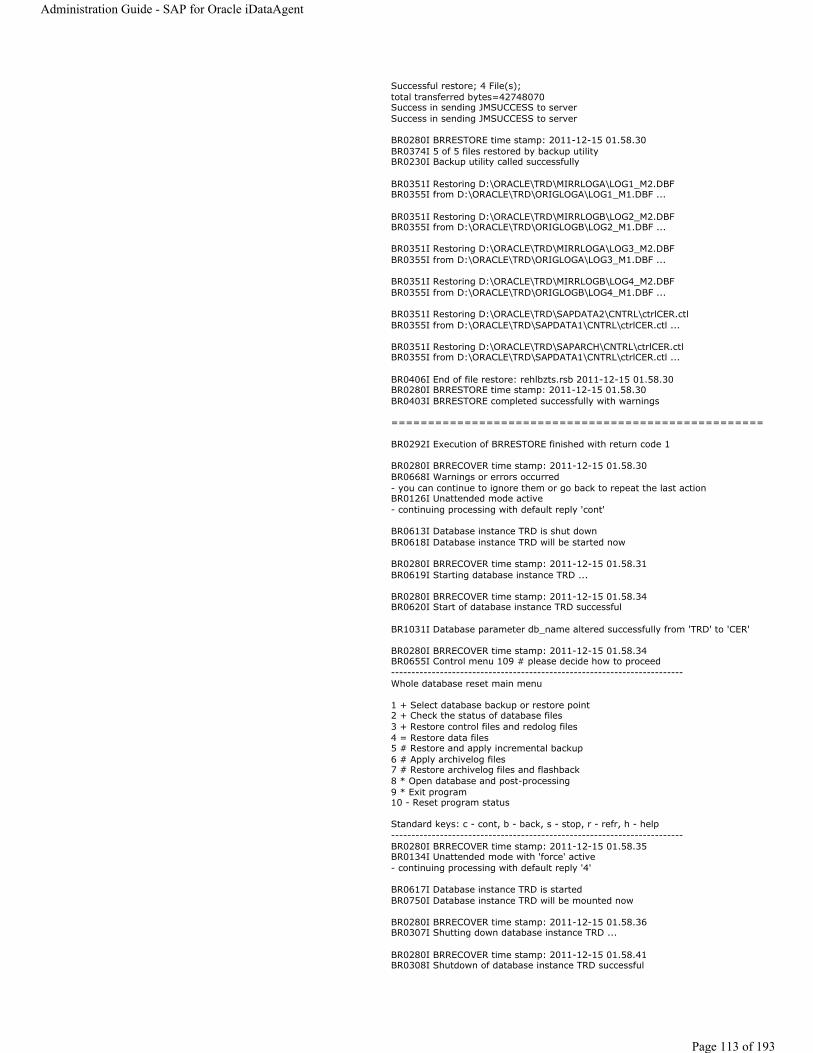
Successful restore; 4 File(s); total transferred bytes=42748070 Success in sending JMSUCCESS to serverSuccess in sending JMSUCCESS to server
BR0280I BRRESTORE time stamp: 2011-12-15 01.58.30BR0374I 5 of 5 files restored by backup utilityBR0230I Backup utility called successfully
BR0351I Restoring D:\ORACLE\TRD\MIRRLOGA\LOG1_M2.DBFBR0355I from D:\ORACLE\TRD\ORIGLOGA\LOG1_M1.DBF ...
BR0351I Restoring D:\ORACLE\TRD\MIRRLOGB\LOG2_M2.DBFBR0355I from D:\ORACLE\TRD\ORIGLOGB\LOG2_M1.DBF ...
BR0351I Restoring D:\ORACLE\TRD\MIRRLOGA\LOG3_M2.DBFBR0355I from D:\ORACLE\TRD\ORIGLOGA\LOG3_M1.DBF ...
BR0351I Restoring D:\ORACLE\TRD\MIRRLOGB\LOG4_M2.DBFBR0355I from D:\ORACLE\TRD\ORIGLOGB\LOG4_M1.DBF ...
BR0351I Restoring D:\ORACLE\TRD\SAPDATA2\CNTRL\ctrlCER.ctlBR0355I from D:\ORACLE\TRD\SAPDATA1\CNTRL\ctrlCER.ctl ...
BR0351I Restoring D:\ORACLE\TRD\SAPARCH\CNTRL\ctrlCER.ctlBR0355I from D:\ORACLE\TRD\SAPDATA1\CNTRL\ctrlCER.ctl ...
BR0406I End of file restore: rehlbzts.rsb 2011-12-15 01.58.30BR0280I BRRESTORE time stamp: 2011-12-15 01.58.30BR0403I BRRESTORE completed successfully with warnings
===================================================
BR0292I Execution of BRRESTORE finished with return code 1
BR0280I BRRECOVER time stamp: 2011-12-15 01.58.30BR0668I Warnings or errors occurred - you can continue to ignore them or go back to repeat the last actionBR0126I Unattended mode active - continuing processing with default reply 'cont'
BR0613I Database instance TRD is shut downBR0618I Database instance TRD will be started now
BR0280I BRRECOVER time stamp: 2011-12-15 01.58.31BR0619I Starting database instance TRD ...
BR0280I BRRECOVER time stamp: 2011-12-15 01.58.34BR0620I Start of database instance TRD successful
BR1031I Database parameter db_name altered successfully from 'TRD' to 'CER'
BR0280I BRRECOVER time stamp: 2011-12-15 01.58.34BR0655I Control menu 109 # please decide how to proceed------------------------------------------------------------------------Whole database reset main menu
1 + Select database backup or restore point2 + Check the status of database files3 + Restore control files and redolog files4 = Restore data files5 # Restore and apply incremental backup6 # Apply archivelog files7 # Restore archivelog files and flashback8 * Open database and post-processing9 * Exit program10 - Reset program status
Standard keys: c - cont, b - back, s - stop, r - refr, h - help------------------------------------------------------------------------BR0280I BRRECOVER time stamp: 2011-12-15 01.58.35BR0134I Unattended mode with 'force' active - continuing processing with default reply '4'
BR0617I Database instance TRD is startedBR0750I Database instance TRD will be mounted now
BR0280I BRRECOVER time stamp: 2011-12-15 01.58.36BR0307I Shutting down database instance TRD ...
BR0280I BRRECOVER time stamp: 2011-12-15 01.58.41BR0308I Shutdown of database instance TRD successful
Administration Guide - SAP for Oracle iDataAgent
Page 113 of 193
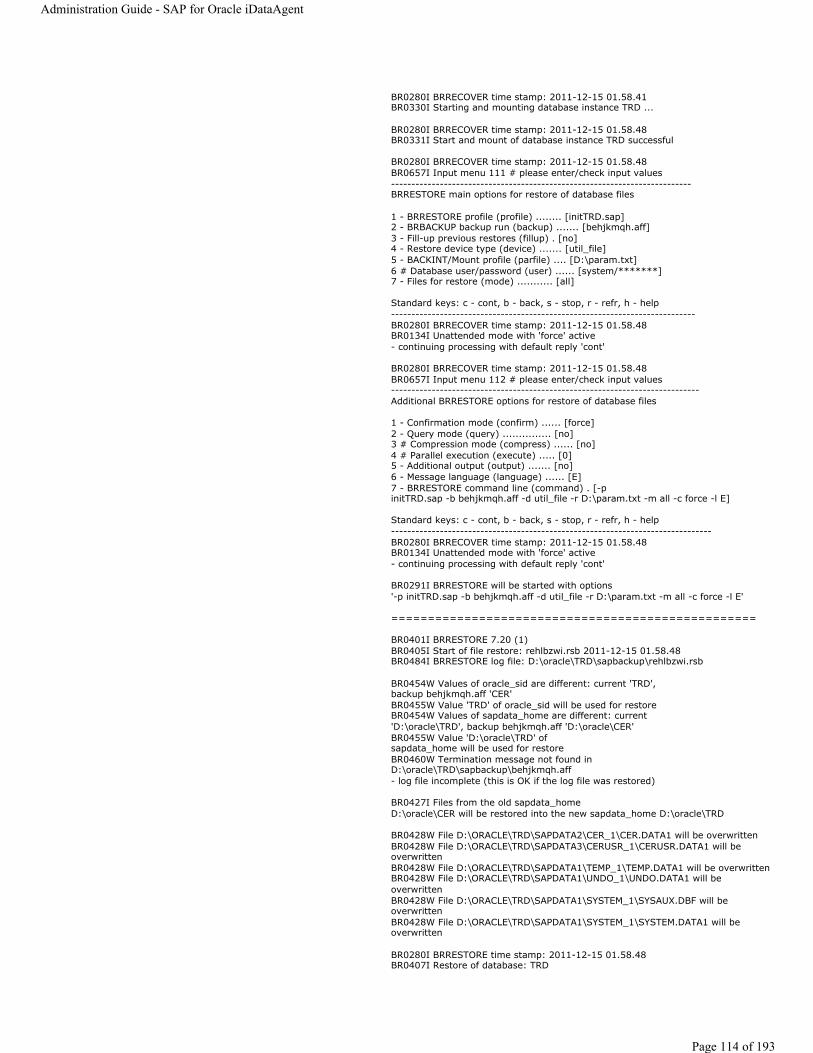
BR0280I BRRECOVER time stamp: 2011-12-15 01.58.41BR0330I Starting and mounting database instance TRD ...
BR0280I BRRECOVER time stamp: 2011-12-15 01.58.48BR0331I Start and mount of database instance TRD successful
BR0280I BRRECOVER time stamp: 2011-12-15 01.58.48BR0657I Input menu 111 # please enter/check input values--------------------------------------------------------------------------BRRESTORE main options for restore of database files
1 - BRRESTORE profile (profile) ........ [initTRD.sap]2 - BRBACKUP backup run (backup) ....... [behjkmqh.aff]3 - Fill-up previous restores (fillup) . [no]4 - Restore device type (device) ....... [util_file]5 - BACKINT/Mount profile (parfile) .... [D:\param.txt]6 # Database user/password (user) ...... [system/*******]7 - Files for restore (mode) ........... [all]
Standard keys: c - cont, b - back, s - stop, r - refr, h - help---------------------------------------------------------------------------BR0280I BRRECOVER time stamp: 2011-12-15 01.58.48BR0134I Unattended mode with 'force' active - continuing processing with default reply 'cont'
BR0280I BRRECOVER time stamp: 2011-12-15 01.58.48BR0657I Input menu 112 # please enter/check input values----------------------------------------------------------------------------Additional BRRESTORE options for restore of database files
1 - Confirmation mode (confirm) ...... [force]2 - Query mode (query) ............... [no]3 # Compression mode (compress) ...... [no]4 # Parallel execution (execute) ..... [0]5 - Additional output (output) ....... [no]6 - Message language (language) ...... [E]7 - BRRESTORE command line (command) . [-p initTRD.sap -b behjkmqh.aff -d util_file -r D:\param.txt -m all -c force -l E]
Standard keys: c - cont, b - back, s - stop, r - refr, h - help-------------------------------------------------------------------------------BR0280I BRRECOVER time stamp: 2011-12-15 01.58.48BR0134I Unattended mode with 'force' active - continuing processing with default reply 'cont'
BR0291I BRRESTORE will be started with options '-p initTRD.sap -b behjkmqh.aff -d util_file -r D:\param.txt -m all -c force -l E'
==================================================
BR0401I BRRESTORE 7.20 (1)BR0405I Start of file restore: rehlbzwi.rsb 2011-12-15 01.58.48BR0484I BRRESTORE log file: D:\oracle\TRD\sapbackup\rehlbzwi.rsb
BR0454W Values of oracle_sid are different: current 'TRD', backup behjkmqh.aff 'CER'BR0455W Value 'TRD' of oracle_sid will be used for restoreBR0454W Values of sapdata_home are different: current 'D:\oracle\TRD', backup behjkmqh.aff 'D:\oracle\CER'BR0455W Value 'D:\oracle\TRD' of sapdata_home will be used for restoreBR0460W Termination message not found in D:\oracle\TRD\sapbackup\behjkmqh.aff - log file incomplete (this is OK if the log file was restored)
BR0427I Files from the old sapdata_home D:\oracle\CER will be restored into the new sapdata_home D:\oracle\TRD
BR0428W File D:\ORACLE\TRD\SAPDATA2\CER_1\CER.DATA1 will be overwrittenBR0428W File D:\ORACLE\TRD\SAPDATA3\CERUSR_1\CERUSR.DATA1 will be overwrittenBR0428W File D:\ORACLE\TRD\SAPDATA1\TEMP_1\TEMP.DATA1 will be overwrittenBR0428W File D:\ORACLE\TRD\SAPDATA1\UNDO_1\UNDO.DATA1 will be overwrittenBR0428W File D:\ORACLE\TRD\SAPDATA1\SYSTEM_1\SYSAUX.DBF will be overwrittenBR0428W File D:\ORACLE\TRD\SAPDATA1\SYSTEM_1\SYSTEM.DATA1 will be overwritten
BR0280I BRRESTORE time stamp: 2011-12-15 01.58.48BR0407I Restore of database: TRD
Administration Guide - SAP for Oracle iDataAgent
Page 114 of 193

BR0408I BRRESTORE action ID: rehlbzwiBR0409I BRRESTORE function ID: rsbBR0449I Restore mode: ALLBR0419I Files will be restored from backup: behjkmqh.aff 2011-12-06 05.33.35BR0416I 6 files found to restore, total size 760.047 MBBR0421I Restore device type: util_fileBR0134I Unattended mode with 'force' active - no operator confirmation allowed
BR0280I BRRESTORE time stamp: 2011-12-15 01.58.48BR0229I Calling backup utility with function 'restore'...BR0278I Command output of 'backint -u CER -f restore -i D:\oracle\TRD\sapbackup\.rehlbzwi.lst -t file -p D:\param.txt -c':
-------------------------- Output of restore -------------------------BI_BACKUP=<FULL>BI_CALLER=<BRRESTORE>BI_REQUEST=<NEW>
-------------------------- Parameter Specified -------------------------CvInstanceName=<Instance001>CvClientName=<sde-sap1>numstreams=<4>srccrossclient=<sde-sap2>
srccrossdbname=<CER>
destdbname=<CER>
-------------------------- backint Command Line -------------------------backintCmd=[backint -u CER -f restore -i D:\oracle\TRD\sapbackup\.rehlbzwi.lst -t file -p D:\param.txt -c ]
CommServeHostName=satishpCommClientHostName=sde-sap1.idcprodcert.locGalaxy CommCellID=2Galaxy ClientID=219Src Cross Client=<sde-sap2>getInstanceId for InstanceName=[CER] client=[sde-sap1.idcprodcert.loc] clientId=219 AppType=61 FailedInstance=[CER] - May not have been configured.Galaxy SrcCrossClientID=218Galaxy CrossClientInstanceID=559Galaxy CrossClientAppType=61Galaxy CrossClientAppID=2283Total number of Collect Files Generated=<3>Setting the Number of streams desired=<3> to the total number of collect files generated.Number of streams desired=<3> Number of files to restore=<3> CMDLINE JobRestore has been requested
SID=[CER] BkpSet=[default] AppType=[61]Success in getting Job id=14519 Token=<14519:2:1>Success in init with JMCommServeHostName=satishpCommClientHostName=sde-sap1.idcprodcert.locCommServeHostName=satishpCommClientHostName=sde-sap1.idcprodcert.locCommServeHostName=satishpCommClientHostName=sde-sap1.idcprodcert.locGalaxy CommCellID=2Galaxy ClientID=219Src Cross Client=<sde-sap2>getInstanceId for InstanceName=[CER] client=[sde-sap1.idcprodcert.loc] clientId=219 AppType=61 FailedInstance=[CER] - May not have been configured.Galaxy SrcCrossClientID=218Galaxy CrossClientInstanceID=559Galaxy CrossClientAppType=61Galaxy CrossClientAppID=2283Restore has been requested
Success in init with JMGalaxy CommCellID=2Galaxy ClientID=219Src Cross Client=<sde-sap2>getInstanceId for InstanceName=[CER] client=[sde-sap1.idcprodcert.loc] clientId=219 AppType=61 FailedInstance=[CER] - May not have been configured.
Administration Guide - SAP for Oracle iDataAgent
Page 115 of 193
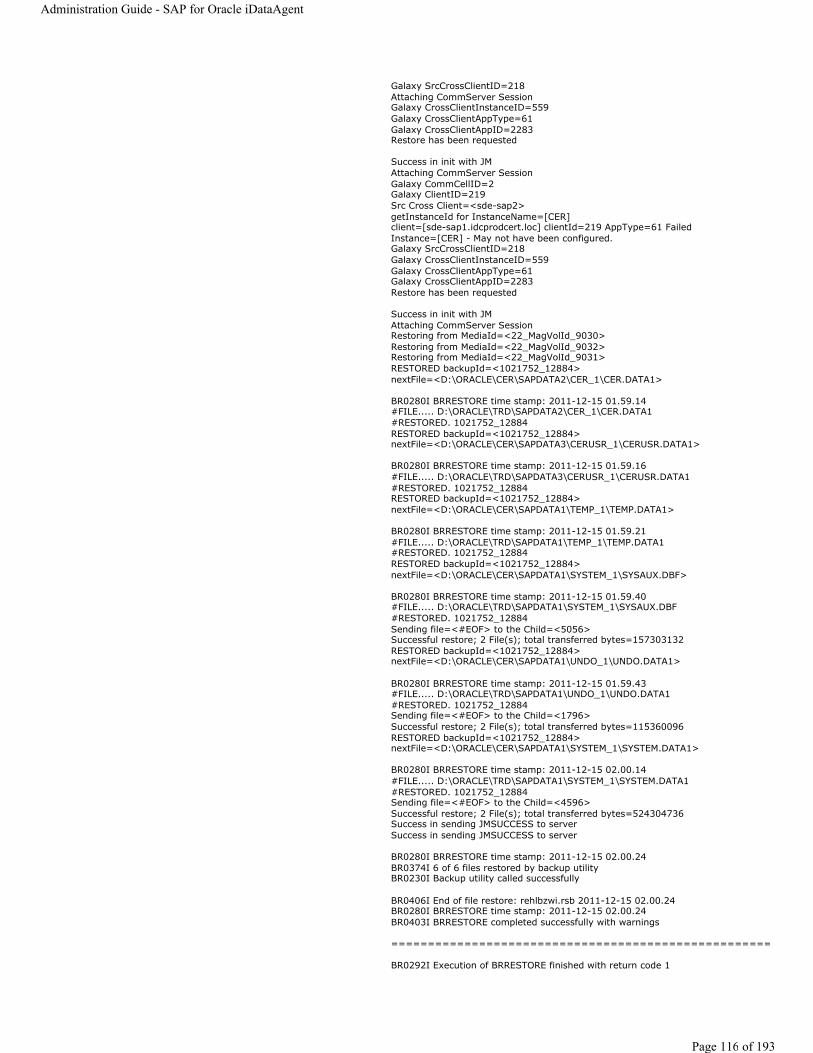
Galaxy SrcCrossClientID=218Attaching CommServer SessionGalaxy CrossClientInstanceID=559Galaxy CrossClientAppType=61Galaxy CrossClientAppID=2283Restore has been requested
Success in init with JMAttaching CommServer SessionGalaxy CommCellID=2Galaxy ClientID=219Src Cross Client=<sde-sap2>getInstanceId for InstanceName=[CER] client=[sde-sap1.idcprodcert.loc] clientId=219 AppType=61 FailedInstance=[CER] - May not have been configured.Galaxy SrcCrossClientID=218Galaxy CrossClientInstanceID=559Galaxy CrossClientAppType=61Galaxy CrossClientAppID=2283Restore has been requested
Success in init with JMAttaching CommServer SessionRestoring from MediaId=<22_MagVolId_9030>Restoring from MediaId=<22_MagVolId_9032>Restoring from MediaId=<22_MagVolId_9031>RESTORED backupId=<1021752_12884> nextFile=<D:\ORACLE\CER\SAPDATA2\CER_1\CER.DATA1>
BR0280I BRRESTORE time stamp: 2011-12-15 01.59.14#FILE..... D:\ORACLE\TRD\SAPDATA2\CER_1\CER.DATA1#RESTORED. 1021752_12884RESTORED backupId=<1021752_12884> nextFile=<D:\ORACLE\CER\SAPDATA3\CERUSR_1\CERUSR.DATA1>
BR0280I BRRESTORE time stamp: 2011-12-15 01.59.16#FILE..... D:\ORACLE\TRD\SAPDATA3\CERUSR_1\CERUSR.DATA1#RESTORED. 1021752_12884RESTORED backupId=<1021752_12884> nextFile=<D:\ORACLE\CER\SAPDATA1\TEMP_1\TEMP.DATA1>
BR0280I BRRESTORE time stamp: 2011-12-15 01.59.21#FILE..... D:\ORACLE\TRD\SAPDATA1\TEMP_1\TEMP.DATA1#RESTORED. 1021752_12884RESTORED backupId=<1021752_12884> nextFile=<D:\ORACLE\CER\SAPDATA1\SYSTEM_1\SYSAUX.DBF>
BR0280I BRRESTORE time stamp: 2011-12-15 01.59.40#FILE..... D:\ORACLE\TRD\SAPDATA1\SYSTEM_1\SYSAUX.DBF#RESTORED. 1021752_12884Sending file=<#EOF> to the Child=<5056>Successful restore; 2 File(s); total transferred bytes=157303132 RESTORED backupId=<1021752_12884> nextFile=<D:\ORACLE\CER\SAPDATA1\UNDO_1\UNDO.DATA1>
BR0280I BRRESTORE time stamp: 2011-12-15 01.59.43#FILE..... D:\ORACLE\TRD\SAPDATA1\UNDO_1\UNDO.DATA1#RESTORED. 1021752_12884Sending file=<#EOF> to the Child=<1796>Successful restore; 2 File(s); total transferred bytes=115360096 RESTORED backupId=<1021752_12884> nextFile=<D:\ORACLE\CER\SAPDATA1\SYSTEM_1\SYSTEM.DATA1>
BR0280I BRRESTORE time stamp: 2011-12-15 02.00.14#FILE..... D:\ORACLE\TRD\SAPDATA1\SYSTEM_1\SYSTEM.DATA1#RESTORED. 1021752_12884Sending file=<#EOF> to the Child=<4596>Successful restore; 2 File(s); total transferred bytes=524304736 Success in sending JMSUCCESS to serverSuccess in sending JMSUCCESS to server
BR0280I BRRESTORE time stamp: 2011-12-15 02.00.24BR0374I 6 of 6 files restored by backup utilityBR0230I Backup utility called successfully
BR0406I End of file restore: rehlbzwi.rsb 2011-12-15 02.00.24BR0280I BRRESTORE time stamp: 2011-12-15 02.00.24BR0403I BRRESTORE completed successfully with warnings
====================================================
BR0292I Execution of BRRESTORE finished with return code 1
Administration Guide - SAP for Oracle iDataAgent
Page 116 of 193
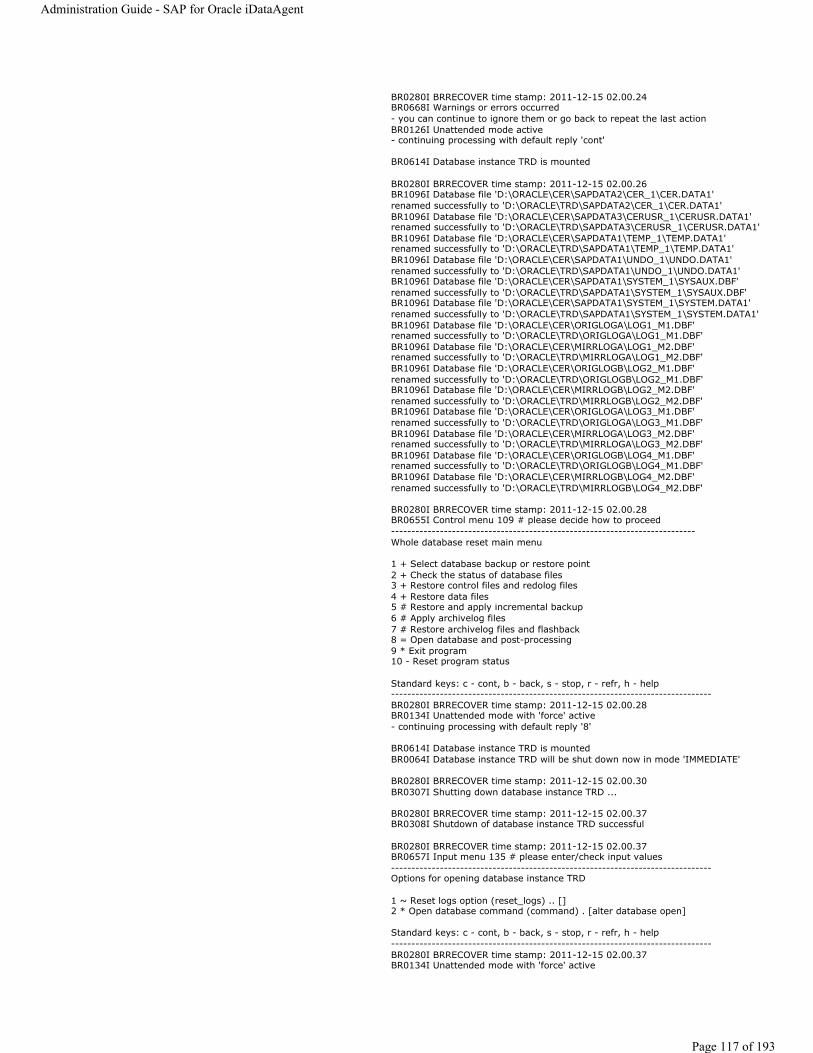
BR0280I BRRECOVER time stamp: 2011-12-15 02.00.24BR0668I Warnings or errors occurred - you can continue to ignore them or go back to repeat the last actionBR0126I Unattended mode active - continuing processing with default reply 'cont'
BR0614I Database instance TRD is mounted
BR0280I BRRECOVER time stamp: 2011-12-15 02.00.26BR1096I Database file 'D:\ORACLE\CER\SAPDATA2\CER_1\CER.DATA1' renamed successfully to 'D:\ORACLE\TRD\SAPDATA2\CER_1\CER.DATA1'BR1096I Database file 'D:\ORACLE\CER\SAPDATA3\CERUSR_1\CERUSR.DATA1' renamed successfully to 'D:\ORACLE\TRD\SAPDATA3\CERUSR_1\CERUSR.DATA1'BR1096I Database file 'D:\ORACLE\CER\SAPDATA1\TEMP_1\TEMP.DATA1' renamed successfully to 'D:\ORACLE\TRD\SAPDATA1\TEMP_1\TEMP.DATA1'BR1096I Database file 'D:\ORACLE\CER\SAPDATA1\UNDO_1\UNDO.DATA1' renamed successfully to 'D:\ORACLE\TRD\SAPDATA1\UNDO_1\UNDO.DATA1'BR1096I Database file 'D:\ORACLE\CER\SAPDATA1\SYSTEM_1\SYSAUX.DBF' renamed successfully to 'D:\ORACLE\TRD\SAPDATA1\SYSTEM_1\SYSAUX.DBF'BR1096I Database file 'D:\ORACLE\CER\SAPDATA1\SYSTEM_1\SYSTEM.DATA1' renamed successfully to 'D:\ORACLE\TRD\SAPDATA1\SYSTEM_1\SYSTEM.DATA1'BR1096I Database file 'D:\ORACLE\CER\ORIGLOGA\LOG1_M1.DBF' renamed successfully to 'D:\ORACLE\TRD\ORIGLOGA\LOG1_M1.DBF'BR1096I Database file 'D:\ORACLE\CER\MIRRLOGA\LOG1_M2.DBF' renamed successfully to 'D:\ORACLE\TRD\MIRRLOGA\LOG1_M2.DBF'BR1096I Database file 'D:\ORACLE\CER\ORIGLOGB\LOG2_M1.DBF' renamed successfully to 'D:\ORACLE\TRD\ORIGLOGB\LOG2_M1.DBF'BR1096I Database file 'D:\ORACLE\CER\MIRRLOGB\LOG2_M2.DBF' renamed successfully to 'D:\ORACLE\TRD\MIRRLOGB\LOG2_M2.DBF'BR1096I Database file 'D:\ORACLE\CER\ORIGLOGA\LOG3_M1.DBF' renamed successfully to 'D:\ORACLE\TRD\ORIGLOGA\LOG3_M1.DBF'BR1096I Database file 'D:\ORACLE\CER\MIRRLOGA\LOG3_M2.DBF' renamed successfully to 'D:\ORACLE\TRD\MIRRLOGA\LOG3_M2.DBF'BR1096I Database file 'D:\ORACLE\CER\ORIGLOGB\LOG4_M1.DBF' renamed successfully to 'D:\ORACLE\TRD\ORIGLOGB\LOG4_M1.DBF'BR1096I Database file 'D:\ORACLE\CER\MIRRLOGB\LOG4_M2.DBF' renamed successfully to 'D:\ORACLE\TRD\MIRRLOGB\LOG4_M2.DBF'
BR0280I BRRECOVER time stamp: 2011-12-15 02.00.28BR0655I Control menu 109 # please decide how to proceed---------------------------------------------------------------------------Whole database reset main menu
1 + Select database backup or restore point2 + Check the status of database files3 + Restore control files and redolog files4 + Restore data files5 # Restore and apply incremental backup6 # Apply archivelog files7 # Restore archivelog files and flashback8 = Open database and post-processing9 * Exit program10 - Reset program status
Standard keys: c - cont, b - back, s - stop, r - refr, h - help-------------------------------------------------------------------------------BR0280I BRRECOVER time stamp: 2011-12-15 02.00.28BR0134I Unattended mode with 'force' active - continuing processing with default reply '8'
BR0614I Database instance TRD is mountedBR0064I Database instance TRD will be shut down now in mode 'IMMEDIATE'
BR0280I BRRECOVER time stamp: 2011-12-15 02.00.30BR0307I Shutting down database instance TRD ...
BR0280I BRRECOVER time stamp: 2011-12-15 02.00.37BR0308I Shutdown of database instance TRD successful
BR0280I BRRECOVER time stamp: 2011-12-15 02.00.37BR0657I Input menu 135 # please enter/check input values-------------------------------------------------------------------------------Options for opening database instance TRD
1 ~ Reset logs option (reset_logs) .. []2 * Open database command (command) . [alter database open]
Standard keys: c - cont, b - back, s - stop, r - refr, h - help-------------------------------------------------------------------------------BR0280I BRRECOVER time stamp: 2011-12-15 02.00.37BR0134I Unattended mode with 'force' active
Administration Guide - SAP for Oracle iDataAgent
Page 117 of 193
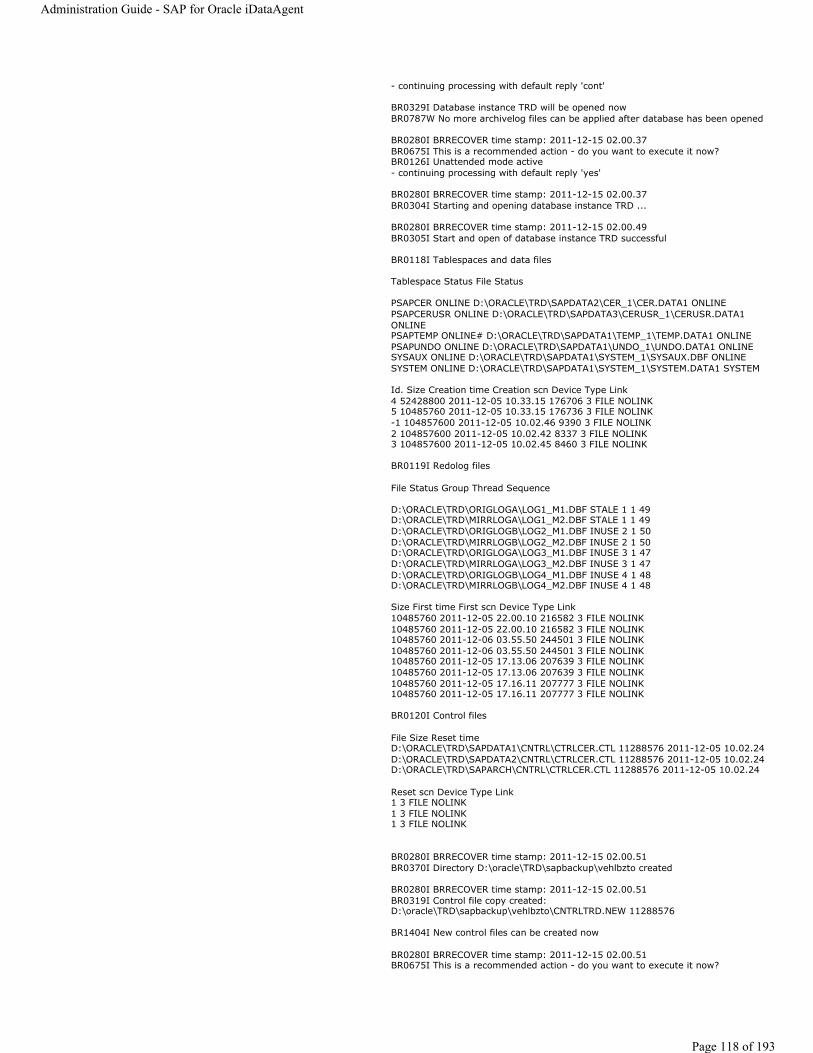
- continuing processing with default reply 'cont'
BR0329I Database instance TRD will be opened nowBR0787W No more archivelog files can be applied after database has been opened
BR0280I BRRECOVER time stamp: 2011-12-15 02.00.37BR0675I This is a recommended action - do you want to execute it now?BR0126I Unattended mode active - continuing processing with default reply 'yes'
BR0280I BRRECOVER time stamp: 2011-12-15 02.00.37BR0304I Starting and opening database instance TRD ...
BR0280I BRRECOVER time stamp: 2011-12-15 02.00.49BR0305I Start and open of database instance TRD successful
BR0118I Tablespaces and data files
Tablespace Status File Status
PSAPCER ONLINE D:\ORACLE\TRD\SAPDATA2\CER_1\CER.DATA1 ONLINEPSAPCERUSR ONLINE D:\ORACLE\TRD\SAPDATA3\CERUSR_1\CERUSR.DATA1 ONLINE PSAPTEMP ONLINE# D:\ORACLE\TRD\SAPDATA1\TEMP_1\TEMP.DATA1 ONLINEPSAPUNDO ONLINE D:\ORACLE\TRD\SAPDATA1\UNDO_1\UNDO.DATA1 ONLINESYSAUX ONLINE D:\ORACLE\TRD\SAPDATA1\SYSTEM_1\SYSAUX.DBF ONLINESYSTEM ONLINE D:\ORACLE\TRD\SAPDATA1\SYSTEM_1\SYSTEM.DATA1 SYSTEM
Id. Size Creation time Creation scn Device Type Link4 52428800 2011-12-05 10.33.15 176706 3 FILE NOLINK5 10485760 2011-12-05 10.33.15 176736 3 FILE NOLINK-1 104857600 2011-12-05 10.02.46 9390 3 FILE NOLINK2 104857600 2011-12-05 10.02.42 8337 3 FILE NOLINK3 104857600 2011-12-05 10.02.45 8460 3 FILE NOLINK
BR0119I Redolog files
File Status Group Thread Sequence
D:\ORACLE\TRD\ORIGLOGA\LOG1_M1.DBF STALE 1 1 49 D:\ORACLE\TRD\MIRRLOGA\LOG1_M2.DBF STALE 1 1 49 D:\ORACLE\TRD\ORIGLOGB\LOG2_M1.DBF INUSE 2 1 50 D:\ORACLE\TRD\MIRRLOGB\LOG2_M2.DBF INUSE 2 1 50 D:\ORACLE\TRD\ORIGLOGA\LOG3_M1.DBF INUSE 3 1 47 D:\ORACLE\TRD\MIRRLOGA\LOG3_M2.DBF INUSE 3 1 47 D:\ORACLE\TRD\ORIGLOGB\LOG4_M1.DBF INUSE 4 1 48 D:\ORACLE\TRD\MIRRLOGB\LOG4_M2.DBF INUSE 4 1 48
Size First time First scn Device Type Link10485760 2011-12-05 22.00.10 216582 3 FILE NOLINK10485760 2011-12-05 22.00.10 216582 3 FILE NOLINK10485760 2011-12-06 03.55.50 244501 3 FILE NOLINK10485760 2011-12-06 03.55.50 244501 3 FILE NOLINK10485760 2011-12-05 17.13.06 207639 3 FILE NOLINK10485760 2011-12-05 17.13.06 207639 3 FILE NOLINK10485760 2011-12-05 17.16.11 207777 3 FILE NOLINK10485760 2011-12-05 17.16.11 207777 3 FILE NOLINK
BR0120I Control files
File Size Reset timeD:\ORACLE\TRD\SAPDATA1\CNTRL\CTRLCER.CTL 11288576 2011-12-05 10.02.24D:\ORACLE\TRD\SAPDATA2\CNTRL\CTRLCER.CTL 11288576 2011-12-05 10.02.24D:\ORACLE\TRD\SAPARCH\CNTRL\CTRLCER.CTL 11288576 2011-12-05 10.02.24
Reset scn Device Type Link1 3 FILE NOLINK1 3 FILE NOLINK1 3 FILE NOLINK
BR0280I BRRECOVER time stamp: 2011-12-15 02.00.51BR0370I Directory D:\oracle\TRD\sapbackup\vehlbzto created
BR0280I BRRECOVER time stamp: 2011-12-15 02.00.51BR0319I Control file copy created: D:\oracle\TRD\sapbackup\vehlbzto\CNTRLTRD.NEW 11288576
BR1404I New control files can be created now
BR0280I BRRECOVER time stamp: 2011-12-15 02.00.51BR0675I This is a recommended action - do you want to execute it now?
Administration Guide - SAP for Oracle iDataAgent
Page 118 of 193
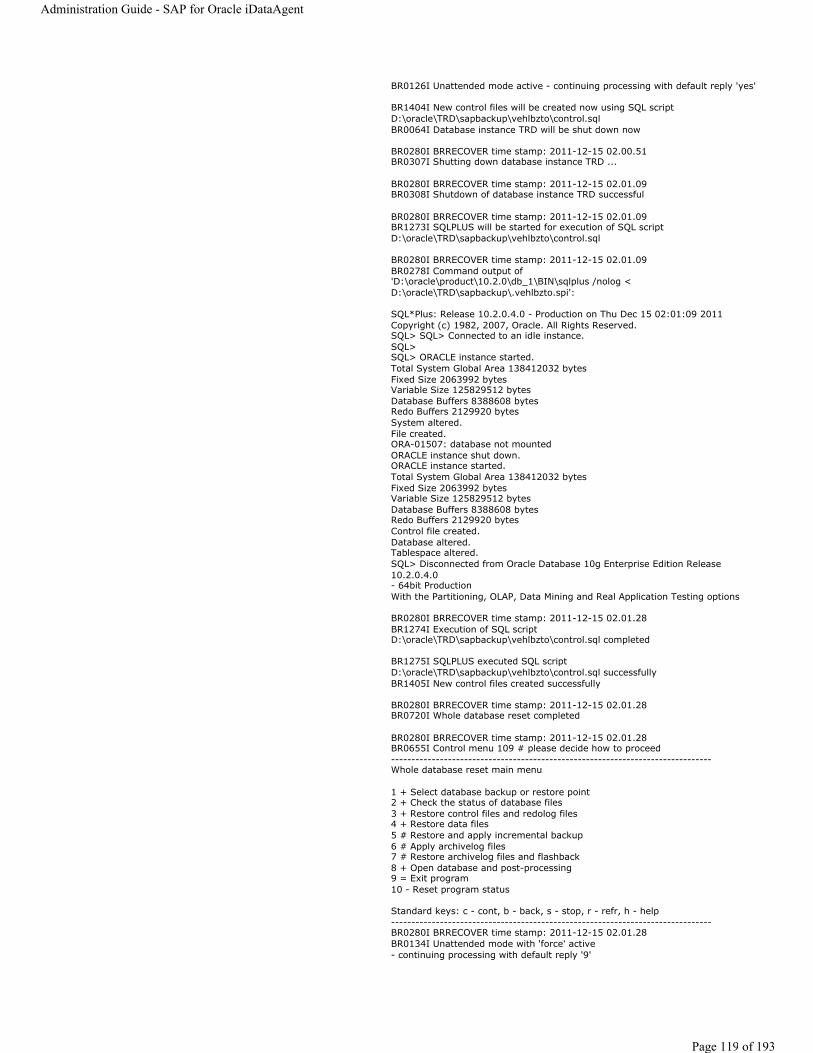
BR0126I Unattended mode active - continuing processing with default reply 'yes'
BR1404I New control files will be created now using SQL script D:\oracle\TRD\sapbackup\vehlbzto\control.sqlBR0064I Database instance TRD will be shut down now
BR0280I BRRECOVER time stamp: 2011-12-15 02.00.51BR0307I Shutting down database instance TRD ...
BR0280I BRRECOVER time stamp: 2011-12-15 02.01.09BR0308I Shutdown of database instance TRD successful
BR0280I BRRECOVER time stamp: 2011-12-15 02.01.09BR1273I SQLPLUS will be started for execution of SQL script D:\oracle\TRD\sapbackup\vehlbzto\control.sql
BR0280I BRRECOVER time stamp: 2011-12-15 02.01.09BR0278I Command output of 'D:\oracle\product\10.2.0\db_1\BIN\sqlplus /nolog < D:\oracle\TRD\sapbackup\.vehlbzto.spi':
SQL*Plus: Release 10.2.0.4.0 - Production on Thu Dec 15 02:01:09 2011Copyright (c) 1982, 2007, Oracle. All Rights Reserved.SQL> SQL> Connected to an idle instance.SQL> SQL> ORACLE instance started.Total System Global Area 138412032 bytesFixed Size 2063992 bytesVariable Size 125829512 bytesDatabase Buffers 8388608 bytesRedo Buffers 2129920 bytesSystem altered.File created.ORA-01507: database not mountedORACLE instance shut down.ORACLE instance started.Total System Global Area 138412032 bytesFixed Size 2063992 bytesVariable Size 125829512 bytesDatabase Buffers 8388608 bytesRedo Buffers 2129920 bytesControl file created.Database altered.Tablespace altered.SQL> Disconnected from Oracle Database 10g Enterprise Edition Release 10.2.0.4.0 - 64bit ProductionWith the Partitioning, OLAP, Data Mining and Real Application Testing options
BR0280I BRRECOVER time stamp: 2011-12-15 02.01.28BR1274I Execution of SQL script D:\oracle\TRD\sapbackup\vehlbzto\control.sql completed
BR1275I SQLPLUS executed SQL script D:\oracle\TRD\sapbackup\vehlbzto\control.sql successfullyBR1405I New control files created successfully
BR0280I BRRECOVER time stamp: 2011-12-15 02.01.28BR0720I Whole database reset completed
BR0280I BRRECOVER time stamp: 2011-12-15 02.01.28BR0655I Control menu 109 # please decide how to proceed-------------------------------------------------------------------------------Whole database reset main menu
1 + Select database backup or restore point2 + Check the status of database files3 + Restore control files and redolog files4 + Restore data files5 # Restore and apply incremental backup6 # Apply archivelog files7 # Restore archivelog files and flashback8 + Open database and post-processing9 = Exit program10 - Reset program status
Standard keys: c - cont, b - back, s - stop, r - refr, h - help-------------------------------------------------------------------------------BR0280I BRRECOVER time stamp: 2011-12-15 02.01.28BR0134I Unattended mode with 'force' active - continuing processing with default reply '9'
Administration Guide - SAP for Oracle iDataAgent
Page 119 of 193
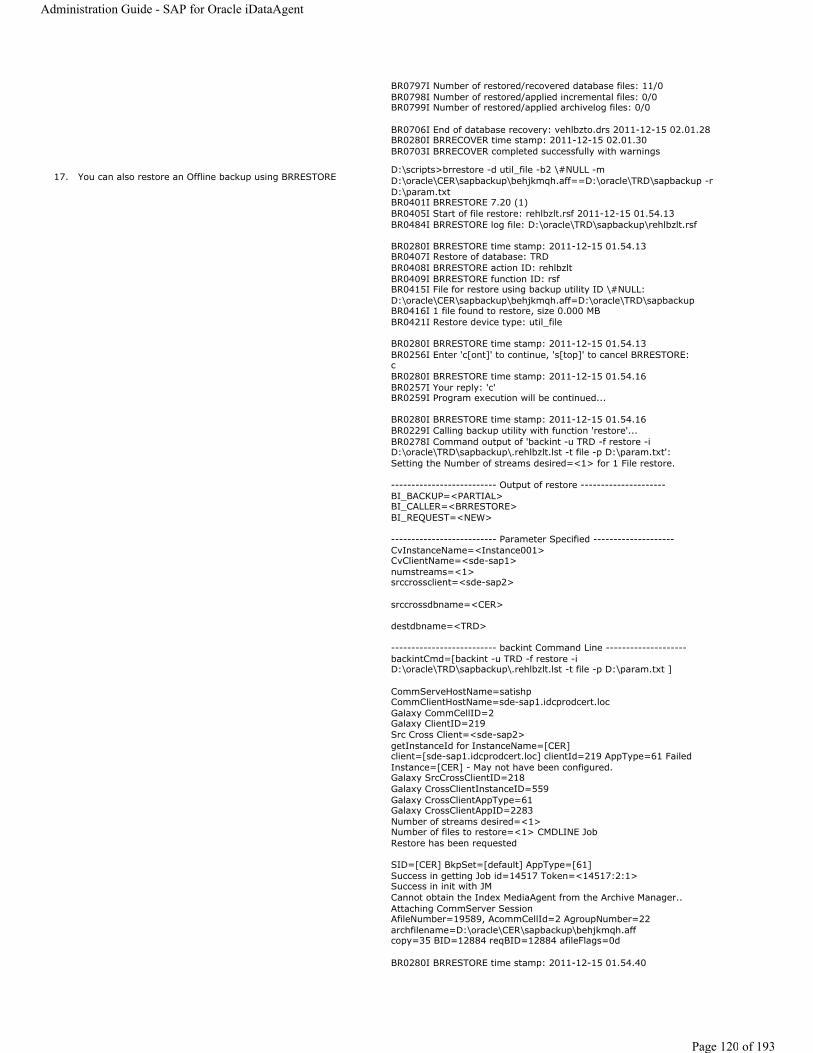
BR0797I Number of restored/recovered database files: 11/0BR0798I Number of restored/applied incremental files: 0/0BR0799I Number of restored/applied archivelog files: 0/0
BR0706I End of database recovery: vehlbzto.drs 2011-12-15 02.01.28BR0280I BRRECOVER time stamp: 2011-12-15 02.01.30BR0703I BRRECOVER completed successfully with warnings
17. You can also restore an Offline backup using BRRESTORE D:\scripts>brrestore -d util_file -b2 \#NULL -m D:\oracle\CER\sapbackup\behjkmqh.aff==D:\oracle\TRD\sapbackup -r D:\param.txtBR0401I BRRESTORE 7.20 (1)BR0405I Start of file restore: rehlbzlt.rsf 2011-12-15 01.54.13BR0484I BRRESTORE log file: D:\oracle\TRD\sapbackup\rehlbzlt.rsf
BR0280I BRRESTORE time stamp: 2011-12-15 01.54.13BR0407I Restore of database: TRDBR0408I BRRESTORE action ID: rehlbzltBR0409I BRRESTORE function ID: rsfBR0415I File for restore using backup utility ID \#NULL: D:\oracle\CER\sapbackup\behjkmqh.aff=D:\oracle\TRD\sapbackupBR0416I 1 file found to restore, size 0.000 MBBR0421I Restore device type: util_file
BR0280I BRRESTORE time stamp: 2011-12-15 01.54.13BR0256I Enter 'c[ont]' to continue, 's[top]' to cancel BRRESTORE:cBR0280I BRRESTORE time stamp: 2011-12-15 01.54.16BR0257I Your reply: 'c'BR0259I Program execution will be continued...
BR0280I BRRESTORE time stamp: 2011-12-15 01.54.16BR0229I Calling backup utility with function 'restore'...BR0278I Command output of 'backint -u TRD -f restore -i D:\oracle\TRD\sapbackup\.rehlbzlt.lst -t file -p D:\param.txt':Setting the Number of streams desired=<1> for 1 File restore.
-------------------------- Output of restore ---------------------BI_BACKUP=<PARTIAL>BI_CALLER=<BRRESTORE>BI_REQUEST=<NEW>
-------------------------- Parameter Specified --------------------CvInstanceName=<Instance001>CvClientName=<sde-sap1>numstreams=<1>srccrossclient=<sde-sap2>
srccrossdbname=<CER>
destdbname=<TRD>
-------------------------- backint Command Line --------------------backintCmd=[backint -u TRD -f restore -i D:\oracle\TRD\sapbackup\.rehlbzlt.lst -t file -p D:\param.txt ]
CommServeHostName=satishpCommClientHostName=sde-sap1.idcprodcert.locGalaxy CommCellID=2Galaxy ClientID=219Src Cross Client=<sde-sap2>getInstanceId for InstanceName=[CER]client=[sde-sap1.idcprodcert.loc] clientId=219 AppType=61 FailedInstance=[CER] - May not have been configured.Galaxy SrcCrossClientID=218Galaxy CrossClientInstanceID=559Galaxy CrossClientAppType=61Galaxy CrossClientAppID=2283Number of streams desired=<1> Number of files to restore=<1> CMDLINE JobRestore has been requested
SID=[CER] BkpSet=[default] AppType=[61]Success in getting Job id=14517 Token=<14517:2:1>Success in init with JMCannot obtain the Index MediaAgent from the Archive Manager..Attaching CommServer SessionAfileNumber=19589, AcommCellId=2 AgroupNumber=22 archfilename=D:\oracle\CER\sapbackup\behjkmqh.aff copy=35 BID=12884 reqBID=12884 afileFlags=0d
BR0280I BRRESTORE time stamp: 2011-12-15 01.54.40
Administration Guide - SAP for Oracle iDataAgent
Page 120 of 193
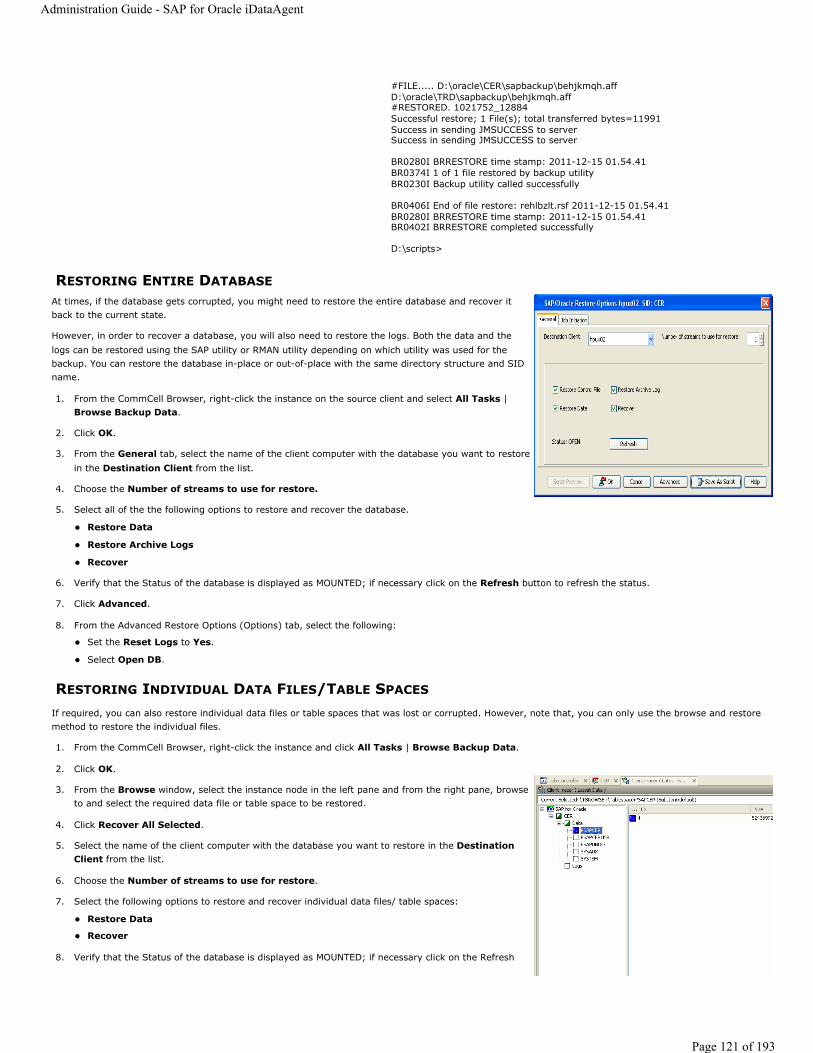
RESTORING ENTIRE DATABASEAt times, if the database gets corrupted, you might need to restore the entire database and recover it back to the current state.
However, in order to recover a database, you will also need to restore the logs. Both the data and the logs can be restored using the SAP utility or RMAN utility depending on which utility was used for the backup. You can restore the database in-place or out-of-place with the same directory structure and SID name.
1. From the CommCell Browser, right-click the instance on the source client and select All Tasks | Browse Backup Data.
2. Click OK.
3. From the General tab, select the name of the client computer with the database you want to restore in the Destination Client from the list.
4. Choose the Number of streams to use for restore.
5. Select all of the the following options to restore and recover the database.
Restore Data
Restore Archive Logs
Recover
6. Verify that the Status of the database is displayed as MOUNTED; if necessary click on the Refresh button to refresh the status.
7. Click Advanced.
8. From the Advanced Restore Options (Options) tab, select the following:
Set the Reset Logs to Yes.
Select Open DB.
RESTORING INDIVIDUAL DATA FILES/TABLE SPACES
If required, you can also restore individual data files or table spaces that was lost or corrupted. However, note that, you can only use the browse and restore method to restore the individual files.
1. From the CommCell Browser, right-click the instance and click All Tasks | Browse Backup Data.
2. Click OK.
3. From the Browse window, select the instance node in the left pane and from the right pane, browse to and select the required data file or table space to be restored.
4. Click Recover All Selected.
5. Select the name of the client computer with the database you want to restore in the Destination Client from the list.
6. Choose the Number of streams to use for restore.
7. Select the following options to restore and recover individual data files/ table spaces:
Restore Data
Recover
8. Verify that the Status of the database is displayed as MOUNTED; if necessary click on the Refresh
#FILE..... D:\oracle\CER\sapbackup\behjkmqh.aff D:\oracle\TRD\sapbackup\behjkmqh.aff#RESTORED. 1021752_12884Successful restore; 1 File(s); total transferred bytes=11991Success in sending JMSUCCESS to serverSuccess in sending JMSUCCESS to server
BR0280I BRRESTORE time stamp: 2011-12-15 01.54.41BR0374I 1 of 1 file restored by backup utilityBR0230I Backup utility called successfully
BR0406I End of file restore: rehlbzlt.rsf 2011-12-15 01.54.41BR0280I BRRESTORE time stamp: 2011-12-15 01.54.41BR0402I BRRESTORE completed successfully
D:\scripts>
Administration Guide - SAP for Oracle iDataAgent
Page 121 of 193

button to refresh the status.
9. Click OK.
RESTORING ARCHIVE LOGS
In addition to restoring data files/ table spaces, the SAP for Oracle iDataAgent also enables you to restore the archive logs. Archive logs can be restored along with the data or separately.
Archive logs can be restored from the latest log backups or from log backups from a specific point in time.
Consider the following scenarios:
In most cases, users will want to view the pertinent logs of a backup cycle. In such cases, you can specify Browse Latest Data or Specify Browse Time to view only the pertinent logs (logs pertaining to a cycle).
If, due to a hard disk corruption, logs from a specific time range were lost, you can restore them by performing a point in time restore of the logs. When you browse between a specific point of time range, the logs pertaining to all the cycles within the specified time range will be listed.
Assume there is a database failure and you need to restore the database as well as the logs to recover the database to the recent state. In such case, you will choose to restore all the logs.
In certain cases, you might need to restore only specific logs that are missing in the database. In such situations, you can browse the latest logs in the browse window, and choose specific individual logs for the restore operation.
RESTORING WITH SPECIFIC LOG TIME
RESTORING WITH LOG SERIAL NUMBER
When restoring based on the log serial number, note the following:
The end serial number must be greater than or equal to the start serial number.
The start and the end serial number cannot be 0.
The range of serial numbers to be restored could be from one or more backup jobs or from a part of a job and from one or more cycles.
If only the start sequence number is provided then the logs starting from that sequence number will be restored.
When restoring the archive logs based on the log time, if the data is also included in the restore, ensure that the time range is the same for both data and the logs.
1. From the CommCell Browser, right-click the instance and select All Tasks | Restore.
2. From the General tab, select these options: Select the name of the client computer with the Archived file you want to restore in the Destination Client from the list. Choose the Number of streams to use for restore and then select the option for Restore Archive Log to restore the Archive logs.
3. Click Advanced.
4. From the Restore tab, select Restore Archive Log.
5. Select By Log Time option and specify the point in time restore of archived log file.
6. Use the space to type the desired location or click Browse to find the location of the Target Directory.
7. Click OK.
8. Click OK to close the Restore Options window and initiate the job.
When restoring the archive logs based on the log time, if the data is also included in the restore, ensure that the time range is the same for both data and the logs.
1. From the CommCell Browser, right-click the instance and select All Tasks | Restore.
2. From the General tab, select these options: Select the name of the client computer with the Archived file you want to restore in the Destination Client from the list. Choose the Number of streams to use for restore and then select the option for Restore Archive Log to restore the Archive logs
3. Verify that the Status of the database is displayed as MOUNTED; if necessary click on the Refresh button to refresh the status.
4. Click Advanced.
5. From the Restore tab, select Restore Archive Log.
6. Select By Log Serial Number option and specify the restore between two serial numbers. Optionally, select From Second Copy.
Administration Guide - SAP for Oracle iDataAgent
Page 122 of 193

RESTORING CONTROL FILES
RESTORING DATA FROM A SPECIFIC TIME RANGE
A point in time restore job allows you to restore your database to a specific point in time, and, typically, this point in time would be just before an undesired transaction or update to your database.
When you select the Point in Time option, all necessary backups that are required to restore the database to the indicated time are restored.
1. From the CommCell Browser, right-click the SAP instance, select All Tasks then click Restore.
2. From the General tab, select these options:
Select the name of the client computer with the database you want to restore in the Destination Client from the list.
Choose the Number of streams to use for restore.
Select Restore Control File, Restore Data, Restore Archive Logs, and Recover options to restore and recover the entire database.
Verify that the Status of the database is displayed as STARTED; if necessary click on the Refresh button to refresh the status.
3. Click Advanced.
4. From the Restore tab, do the following:
Select Restore Data and Restore Control File.
Select To Point In Time option and specify the point in time to restore the database. When you select the To Point in Time option, the backups that are required to restore the database to the indicated time are restored.
Select By Log Time option and specify the point in time restore of Archived log file. If you select By Log Serial Number option, specify the restore between two serial numbers.
If you know the exact device SAP device type used for the backup, select the Sap Device Type and choose either the util_file (file level backups) or rman_util (Oracle RMAN backups) device. Alternatively, you may select Auto Detect Device to allow the system to choose the exact device type that
7. Use the space to type the desired location or click Browse to find the location of the Target Directory.
8. Click OK.
9. Click OK to close the Restore Options window and initiate the job.
The SAP for Oracle iDataAgent also enables to restore a missing control file. Control file is required to recover a database to the current state. You can restore the control file only when the database is in NOMOUNT mode.
1. From the CommCell Browser, right-click the instance and select All Tasks | Restore.
2. From the General tab, select Restore Control File.
3. Click Advanced.
4. Click the Ctrl Files tab of the Oracle Advanced Restore Options window, then select Restore Control File option and specify the name and location where the file need to be restored in the Restore Control File As text box.
If you do not specify a location, the control file is restored to the default location.
5. Click OK to save the settings and close the Advanced Restore Options window.
6. Click OK to close the Restore Options window and initiate the job.
Administration Guide - SAP for Oracle iDataAgent
Page 123 of 193

is used for the latest backup.
5. From the Recover tab, select Recover.
Select Current Time to Recover an entire database at the current time and to the original host or to a different host.
Select Point In Time option and specify the a specific point in time to restore the database. When you select the To Point in Time option, the backups that are required to restore the database to the indicated time are restored.
6. From the Options tab, select Reset Database.
7. Select Open DB to open the database after recovering the database. If required select Reset Logs to reset the logs after opening the database.
8. Click OK to save the settings and close the Advanced Restore Options window.
9. Click OK to close the Restore Options window and initiate the job.
RESTORING TO SPECIFIC TIME RANGE USING UTIL_INTERFACE FROM SAP COMMAND LINE
1. Restore the control file from the Full Backup detail file name
brrestore -d util_file -b [detailFileName] -m 0
eg:
brrestore -d util_file -b bebwkurt.anf -m 0
2. Restore the data files
brrestore -d util_file -b [detailFileName] -m all -u /
3. Restore the detail files and summary file pertaining to the log backups using b2 restores. Provide the appropriate SAP Backup Stamps. It is recommended to create a copy of the Original arch<SID>.log before a restore process.
eg:
brrestore -d util_file -b2 SAP_007_1005 -m
home/oracle/product/10g/SAPDB/CER/saparch/archCER.log,/home/oracle/product/10g/SAPDB/CER/saparch/aebwlqlg.sve
4. Restore the Archive Logs
brrestore -d util_file -a <From ARCHIVE LOG#>-<To ARCHIVE LOG#>
5. Recover the database until the recover time using the control file
sql> recover database until time 'YYYY-MM-DD hh.mm.ss' using backup controlfile until cancel;
6. Open DB with RESET Logs option
sql>alter database open resetlogs;
RECOVERING A DATABASE
In certain cases, you might restore the data and then recover the database at a later point of time. To facilitate this capability, SAP for Oracle iDataAgent allows you to perform a recover operation independently.
1. From the CommCell Browser, right-click the instance and select All Tasks | Restore.
2. From the General tab, select the following options:
Select the name of the client computer with the database you want to restore in the Destination Client from the list.
Choose the Number of streams to use for restore
Recover to restore and recover the database based on the criteria specified in Oracle/SAP for Oracle Restore Options.
Verify that the Status of the database is displayed as STARTED; if necessary click on the Refresh button to refresh the status.
3. Click Advanced.
4. From the Recover tab, select Recover.
Select Current Time to recover an entire database at the current time and to the original host or to a different host.
Select Point In Time option and specify the a specific point in time to restore the database. When you select the To Point in Time option, the backups that are required to restore the database to the indicated time are restored.
5. Select the Options tab and select Reset Database.
6. Select Open DB to open the database after recovering the database. If required select Reset Logs to reset the logs after opening the database.
7. Click OK.
Administration Guide - SAP for Oracle iDataAgent
Page 124 of 193
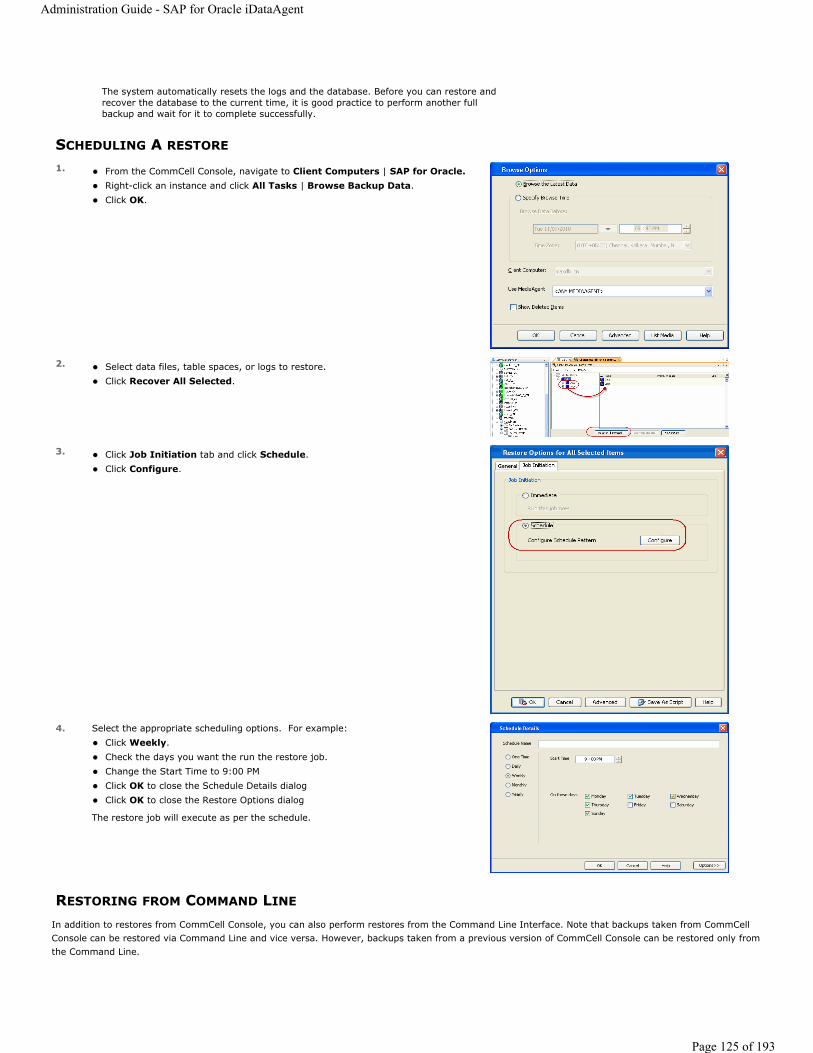
SCHEDULING A RESTORE
RESTORING FROM COMMAND LINE
In addition to restores from CommCell Console, you can also perform restores from the Command Line Interface. Note that backups taken from CommCell Console can be restored via Command Line and vice versa. However, backups taken from a previous version of CommCell Console can be restored only from the Command Line.
The system automatically resets the logs and the database. Before you can restore and recover the database to the current time, it is good practice to perform another full backup and wait for it to complete successfully.
1. From the CommCell Console, navigate to Client Computers | SAP for Oracle.Right-click an instance and click All Tasks | Browse Backup Data. Click OK.
2. Select data files, table spaces, or logs to restore. Click Recover All Selected.
3. Click Job Initiation tab and click Schedule. Click Configure.
4. Select the appropriate scheduling options. For example: Click Weekly. Check the days you want the run the restore job. Change the Start Time to 9:00 PM Click OK to close the Schedule Details dialog Click OK to close the Restore Options dialog
The restore job will execute as per the schedule.
Administration Guide - SAP for Oracle iDataAgent
Page 125 of 193
You can perform command line restores using one of the following methods:
Using Qcommands
Using SAP Command Line
Using BRTools Interface
However, SAP command line and BRTools are the most preferred methods for performing command line restores.
USING QCOMMANDS
You can use qcommands to perform restore operations from the command line interface. You can also integrate these qcommands into your own scripts or scheduling programs. In addition, you can also generate scripts for specific operations from the CommCell Console using the Save As Script option. These scripts can later be executed using the commands from the command line interface.
For comprehensive information on command line restores, refer to the Command Line Interface documentation.
USING SAP COMMAND LINEFor the SAP for Oracle iDataAgent, data is restored using the BRRESTORE command. From the SAP command line, these programs can restore the following:
Database data files, control files, and archive log files that were saved using BRBACKUPNon-database files that were saved using BRBACKUPProfiles and logs
To restore data from the SAP command line using the BRRESTORE program:
1. From the client prompt, type brrestore and press Enter.
2. Use the subsequent options that appear as appropriate.
When performing command line restores, note the following:
Customize init<SID>.utl and init<SID>.sap. If init<SID>.sap file do not exist under $ORACLE_HOME/dbs DIR, you need to create an empty init<SID>.sap file (For example: touch $ORACLE_HOME/dbs/init<SID>.sap), and then restore it using the following command:Brrestore -d util_file -b2 \#NULL -m $ORACLE_HOME/dbs/init<SID>.sap
Database should be in MOUNT mode before you begin a restore operation from command line. If you are restoring logs only from the command line, the database could be in OPEN Mode. If you are restoring the Control File, the database should be in the NOMOUNT mode.
If you want to restore the control file from a RMAN log backup (i.e,. BRARCHIVE backup) use the following command:
brrestore -b2 <archive file ID> -m <control file path>
For example,
brrestore -b2 SAP_1445_18400 -m /u01/app/oracer/product/10.2.0/db_1/CER/sapreorg/cntrlCER.dbf
If you want to restore an entire database, use the following command:
brrestore -d util_file -b last -m all
After a restore, you need to manually recover the database.
Whenever you restore the control file from Command Line Interface and manually recover the database, you need to reset the logs prior to opening the database. Refer Reset Logs for detailed information on resetting logs.
For SAP for Oracle iDataAgent, Job Details may display the name defaultDummyInstanceForSAP as the SID when a restore is run from the command line.
Examples:
Perform a full restore of the database using the util_file interface
brrestore -d util_file -m all -b beeonnpz.anf -u /
Perform a log only restore
brrestore -d util_file -a 1119-1121 -u /
Perform a control file restore
brrestore -b2 SAP_1020140_4613 -m /u01/app/oracer/product/10.2.0/db_1/CER/sapreorg/cntrlCER.dbf
Some of the command options commonly used by BRRestore command are listed below
Option Argument Values-a -archive [<DB_SID>,<log_no>
[=<rest_dest>]-b -backup <log_name>|last
Administration Guide - SAP for Oracle iDataAgent
Page 126 of 193

PARAMETER FILE
If your restores will be using the SAP utility files, be sure to customize the init<SID>.utl and init <SID>.sap files by adding values for the following parameters. Note that some parameters are optional.
CvInstanceName <name of instance>, which specifies the name of the instance for the iDataAgent (for example, Instance001)CvClientName <name of client>, which specifies the name of the computer with the installed iDataAgent (for example, bumblebee)numstreams <number of streams> (optional), which specifies the number of streams. Default value is 1 (for example,1)CV_restCopyPrec <name of copy> (optional), which specifies the copy to restore from. Default value is 0, which means any available copy (for example,1).This parameter can take values 0, 1, 2 etc,. However, in the case of selective copies, you need to specify values 1001,1002,etc.
srcCrossClient <name of source client> (optional), which specifies the name of the source client with the iDataAgent for cross-machine restore purposes (for example, hotdog)
RestoreSnapToTape, which specifies the source copy for restore. Default value is 0, which means that media will be used for restores.
RevertSnapVolume, which specifies that the revert operation is enabled. Default value is 0, which means that revert is disabled.
It is recommended to revert the data volumes, control file restores, log restores and recovery. You should reset the value of RevertSnapVolume to 0 to ensure that a revert operation is not unintentionally performed.
For example:
CvInstanceName
Instance001CvClientName
bumblebeenumstreams
1CV_restCopyPrec
1srcCrossClient
hotdog
RUNNING RMAN RESTORES FROM SAP COMMAND LINE
Use the following steps to run an RMAN restore from auxiliary copy using the SAP command line:
RESTORING FROM CONSISTENT ONLINE BACKUPS
When you restore from consistent online backups, the offline redo log files of the same backup can be imported.
Use the following steps to restore the data, logs, and the control file from a consistent online backup:
-b2 -backup2 <util_backup_id>|#NULL-c -confirm force-d -device util_file|rman_util-m -mode all|full|incr|-o -output dist|time
[,time|dist]
Ensure that the iDataAgent is installed on both the source computer and the target computer, and run the restore on the target computer.
1. Set the CV_restCopyPrec parameter in the init <SID>.sap file. For example:
rman_parms="BLKSIZE=1048576,SBT_LIBRARY=/opt/calypso/Base/libobk.so,ENV=(CvClientName=tigersnap2,CvInstanceName=Instance001,CV_restCopyPrec=4)"
2. Run the restore command from the SAP command line. For example:
brrestore -d rman_util -b last -m all
1. Include the instance name and client name parameters in the init.utl file. For example:
CvInstanceNameInstance001CvClientNameclient1
2. Run the restore command from the SAP command line. For example:
Administration Guide - SAP for Oracle iDataAgent
Page 127 of 193
Use the following steps to restore only the data from a consistent online backup:
Use the following steps to restore only the logs from a consistent online backup:
BRTOOLS INTERFACE
In addition to SAP command line, you can also use the BRTools user interface to perform backup and restore operations. BRTools is an easy-to-use interface that provides menus to run different types of backup or restore operations.
BACKINT INTERFACEBACKINT is another interface program that internally uses the SAP BRTools to communicate with the SAP Oracle Database and perform backup and restore operations. It also allows you to inquire about backup requests and executes them.
backint -u <user_id> [-f <function>] [-t <type>] [-p <par_file>] [-i <in_file>] [-o <out_file>] [-c]
The BACKINT interface allows you to restore files based on the user ID name, backup ID, or file name as specified in the input file. For example, if you include the tag #NULL in front of the file name, the specific file from the most recent backup will be restored.
backint -u C11 –f restore -t file –p /oracle/CER/dbs/initC11.utl -i dummy -o dummy.out
The output file looks like below:
Program: backint
Parameters:
Client node: RC1
Function: backup
brrestore -d util_file -m full -b begqxybq.fnf
1. Include the instance name and client name parameters in the init.utl file. For example:
CvInstanceNameInstance001CvClientNameclient1
2. Run the restore command from the SAP command line. For example:
brrestore -d util_file -m full -b begqxybq.fnf
1. Include the instance name and client name parameters in the init.utl file. For example:
CvInstanceNameInstance001CvClientNameclient1
2. Run the restore command from the SAP command line. For example:
brrestore -d util_file -b2 1020458_18262 -m /database/oracle/10GR2/CER/saparch/1_102_756928037.dbf
-u Specifies the BACKINT user ID. Normally, this will be the database instance name (ORACLE_SID)
None
-f Specifies the operation (backup, restore, or inquire) backup-t Specifies the backup type: file or file_online file-p Specifies the backup utility parameter file
containing the parameters that determine the backup procedure specific to the backup utility.The SAP BRtools specify the location of this utility parameter file in their own parameter file (parameter util_par_file), but they do not evaluate its contents.
none
-iSpecifies the input file (text file) that defines the files and directories to be backed up.
By default, the data is read from the standard input.
-o Specifies the output text file that will contain the processing messages and the results of the operation.
By default, the messages are displayed on the standard output.
-c unattended mode (does not involve user interaction) attended mode
Administration Guide - SAP for Oracle iDataAgent
Page 128 of 193
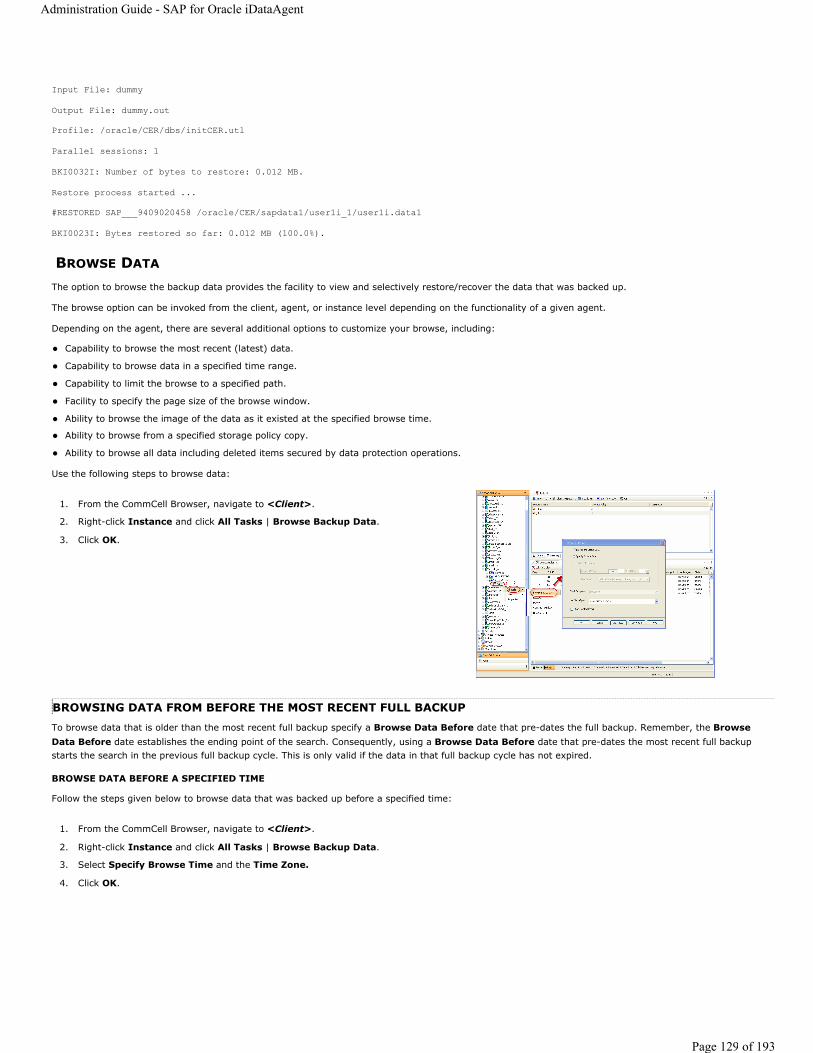
Input File: dummy
Output File: dummy.out
Profile: /oracle/CER/dbs/initCER.utl
Parallel sessions: 1
BKI0032I: Number of bytes to restore: 0.012 MB.
Restore process started ...
#RESTORED SAP___9409020458 /oracle/CER/sapdata1/user1i_1/user1i.data1
BKI0023I: Bytes restored so far: 0.012 MB (100.0%).
BROWSE DATA
The option to browse the backup data provides the facility to view and selectively restore/recover the data that was backed up.
The browse option can be invoked from the client, agent, or instance level depending on the functionality of a given agent.
Depending on the agent, there are several additional options to customize your browse, including:
Capability to browse the most recent (latest) data.
Capability to browse data in a specified time range.
Capability to limit the browse to a specified path.
Facility to specify the page size of the browse window.
Ability to browse the image of the data as it existed at the specified browse time.
Ability to browse from a specified storage policy copy.
Ability to browse all data including deleted items secured by data protection operations.
Use the following steps to browse data:
BROWSING DATA FROM BEFORE THE MOST RECENT FULL BACKUPTo browse data that is older than the most recent full backup specify a Browse Data Before date that pre-dates the full backup. Remember, the Browse Data Before date establishes the ending point of the search. Consequently, using a Browse Data Before date that pre-dates the most recent full backup starts the search in the previous full backup cycle. This is only valid if the data in that full backup cycle has not expired.
BROWSE DATA BEFORE A SPECIFIED TIME
Follow the steps given below to browse data that was backed up before a specified time:
1. From the CommCell Browser, navigate to <Client>.
2. Right-click Instance and click All Tasks | Browse Backup Data.
3. Click OK.
1. From the CommCell Browser, navigate to <Client>.
2. Right-click Instance and click All Tasks | Browse Backup Data.
3. Select Specify Browse Time and the Time Zone.
4. Click OK.
Administration Guide - SAP for Oracle iDataAgent
Page 129 of 193
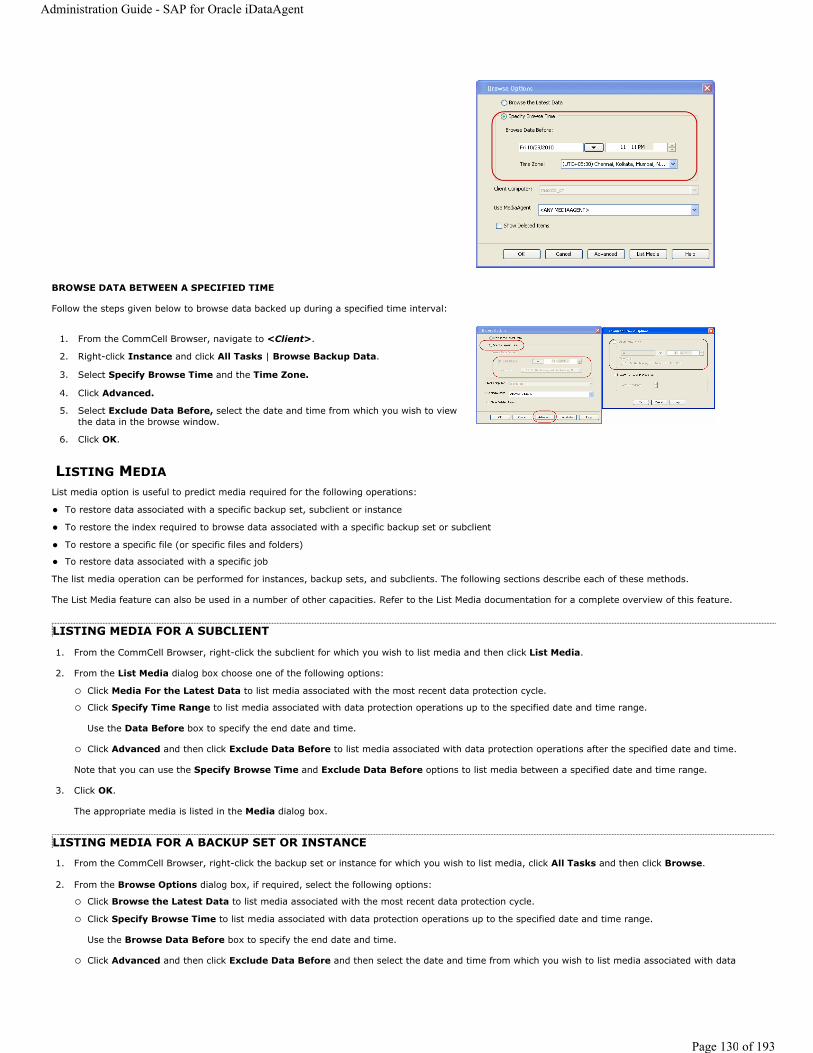
BROWSE DATA BETWEEN A SPECIFIED TIME
Follow the steps given below to browse data backed up during a specified time interval:
LISTING MEDIAList media option is useful to predict media required for the following operations:
To restore data associated with a specific backup set, subclient or instance
To restore the index required to browse data associated with a specific backup set or subclient
To restore a specific file (or specific files and folders)
To restore data associated with a specific job
The list media operation can be performed for instances, backup sets, and subclients. The following sections describe each of these methods.
The List Media feature can also be used in a number of other capacities. Refer to the List Media documentation for a complete overview of this feature.
LISTING MEDIA FOR A SUBCLIENT
1. From the CommCell Browser, right-click the subclient for which you wish to list media and then click List Media.
2. From the List Media dialog box choose one of the following options:
Click Media For the Latest Data to list media associated with the most recent data protection cycle.
Click Specify Time Range to list media associated with data protection operations up to the specified date and time range.
Use the Data Before box to specify the end date and time.
Click Advanced and then click Exclude Data Before to list media associated with data protection operations after the specified date and time.
Note that you can use the Specify Browse Time and Exclude Data Before options to list media between a specified date and time range.
3. Click OK.
The appropriate media is listed in the Media dialog box.
LISTING MEDIA FOR A BACKUP SET OR INSTANCE
1. From the CommCell Browser, right-click the backup set or instance for which you wish to list media, click All Tasks and then click Browse.
2. From the Browse Options dialog box, if required, select the following options:
Click Browse the Latest Data to list media associated with the most recent data protection cycle.
Click Specify Browse Time to list media associated with data protection operations up to the specified date and time range.
Use the Browse Data Before box to specify the end date and time.
Click Advanced and then click Exclude Data Before and then select the date and time from which you wish to list media associated with data
1. From the CommCell Browser, navigate to <Client>.
2. Right-click Instance and click All Tasks | Browse Backup Data.
3. Select Specify Browse Time and the Time Zone.
4. Click Advanced.
5. Select Exclude Data Before, select the date and time from which you wish to view the data in the browse window.
6. Click OK.
Administration Guide - SAP for Oracle iDataAgent
Page 130 of 193
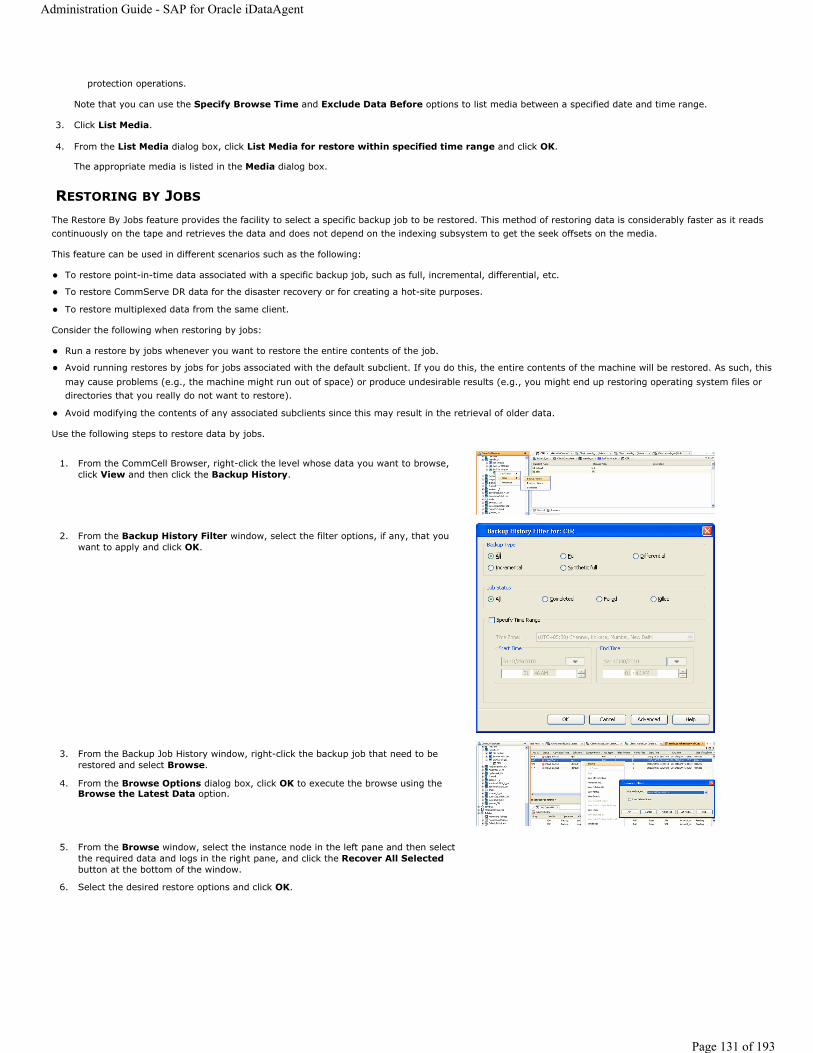
protection operations.
Note that you can use the Specify Browse Time and Exclude Data Before options to list media between a specified date and time range.
3. Click List Media.
4. From the List Media dialog box, click List Media for restore within specified time range and click OK.
The appropriate media is listed in the Media dialog box.
RESTORING BY JOBS
The Restore By Jobs feature provides the facility to select a specific backup job to be restored. This method of restoring data is considerably faster as it reads continuously on the tape and retrieves the data and does not depend on the indexing subsystem to get the seek offsets on the media.
This feature can be used in different scenarios such as the following:
To restore point-in-time data associated with a specific backup job, such as full, incremental, differential, etc.
To restore CommServe DR data for the disaster recovery or for creating a hot-site purposes.
To restore multiplexed data from the same client.
Consider the following when restoring by jobs:
Run a restore by jobs whenever you want to restore the entire contents of the job.
Avoid running restores by jobs for jobs associated with the default subclient. If you do this, the entire contents of the machine will be restored. As such, this may cause problems (e.g., the machine might run out of space) or produce undesirable results (e.g., you might end up restoring operating system files or directories that you really do not want to restore).
Avoid modifying the contents of any associated subclients since this may result in the retrieval of older data.
Use the following steps to restore data by jobs.
1. From the CommCell Browser, right-click the level whose data you want to browse, click View and then click the Backup History.
2. From the Backup History Filter window, select the filter options, if any, that you want to apply and click OK.
3. From the Backup Job History window, right-click the backup job that need to be restored and select Browse.
4. From the Browse Options dialog box, click OK to execute the browse using the Browse the Latest Data option.
5. From the Browse window, select the instance node in the left pane and then select the required data and logs in the right pane, and click the Recover All Selected button at the bottom of the window.
6. Select the desired restore options and click OK.
Administration Guide - SAP for Oracle iDataAgent
Page 131 of 193

MANAGE RESTORE JOBS
Once you initiate the restore operation, a restore job is generated in the Job Controller. Jobs can be managed in a number of ways. The following sections provide information on the different job management options available:
RESTART JOBS
Jobs that fail to complete successfully are automatically restarted based on the job restartability configuration set in the Control Panel. This configuration can be changed at any time; however, changes to this configuration will affect all jobs run in the entire CommCell.
It is also possible to override the default CommServe configuration for individual jobs by configuring retry settings when initiating the job. This configuration, however, will apply only to the specific job.
CONFIGURE JOB RESTARTABILITY AT THE COMMSERVE LEVEL
1. In the CommCell Console, click the Control Panel icon, then double-click Job Management.
2. In the Job Restarts tab of the Job Management dialog box, select a job type from the Job Type list, and then select the Restartable check box.
3. To change the maximum number of times the Job Manager will try to restart a job, select a number in the Max Restarts box.
4. To change the time interval between attempts by the Job Manager to restart the job, select a number of minutes in the Restart Interval (Mins) box.
5. Click OK to save your changes.
CONFIGURE JOB RESTARTABILITY FOR AN INDIVIDUAL JOB
1. From the Restore Options dialog box, click Advanced, then select the Job Retry tab and specify the following as desired:
Total Running Time - The maximum elapsed time, in hours and minutes, from the time that the job is created.
Number of Retries - The number of times that Job Manager will attempt to restart the job.
Kill Running Jobs When Total Running Time Expires - Option to kill the job when the specified Total Running Time has elapsed, even if its state is "Running".
2. Click OK.
RESUBMIT JOBSIf a restore job fails to complete successfully, you can resubmit the job without the need to reconfigure the original job's restore options using the Resubmit Job feature. When a job is resubmitted, all the original options, restore destinations, and other settings configured for the job remain in tact.
RESUBMIT A RESTORE JOB
1. From the CommCell Browser, right-click a client computer whose data recovery history you want to view, click View, then click to view a job history.
2. From the Job History Filter dialog box, select Restore.
If you want to view more advanced options for restores, from the Job History Filter, select Restore, then click Advanced.
From the Data Recovery History Advanced Filter select the destination client computer of the restores you would like to view, then click OK.
3. The system displays the results of the options you selected in the Data Recovery Job History window.
4. Right-click on any job, and select Resubmit.
5. Select the job options.
6. Click OK.
Restore jobs for this Agent are re-started from the beginning.
Administration Guide - SAP for Oracle iDataAgent
Page 132 of 193
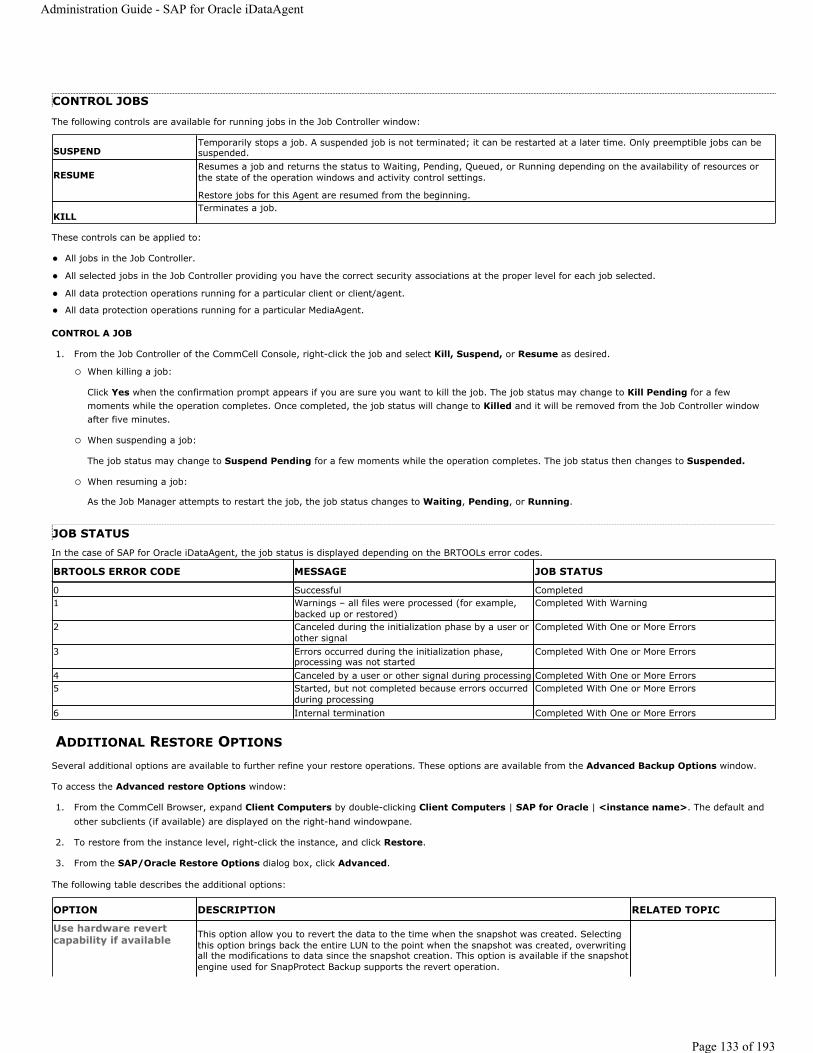
CONTROL JOBS
The following controls are available for running jobs in the Job Controller window:
These controls can be applied to:
All jobs in the Job Controller.
All selected jobs in the Job Controller providing you have the correct security associations at the proper level for each job selected.
All data protection operations running for a particular client or client/agent.
All data protection operations running for a particular MediaAgent.
CONTROL A JOB
1. From the Job Controller of the CommCell Console, right-click the job and select Kill, Suspend, or Resume as desired.
When killing a job:
Click Yes when the confirmation prompt appears if you are sure you want to kill the job. The job status may change to Kill Pending for a few moments while the operation completes. Once completed, the job status will change to Killed and it will be removed from the Job Controller window after five minutes.
When suspending a job:
The job status may change to Suspend Pending for a few moments while the operation completes. The job status then changes to Suspended.
When resuming a job:
As the Job Manager attempts to restart the job, the job status changes to Waiting, Pending, or Running.
JOB STATUSIn the case of SAP for Oracle iDataAgent, the job status is displayed depending on the BRTOOLs error codes.
ADDITIONAL RESTORE OPTIONS
Several additional options are available to further refine your restore operations. These options are available from the Advanced Backup Options window.
To access the Advanced restore Options window:
1. From the CommCell Browser, expand Client Computers by double-clicking Client Computers | SAP for Oracle | <instance name>. The default and other subclients (if available) are displayed on the right-hand windowpane.
2. To restore from the instance level, right-click the instance, and click Restore.
3. From the SAP/Oracle Restore Options dialog box, click Advanced.
The following table describes the additional options:
SUSPENDTemporarily stops a job. A suspended job is not terminated; it can be restarted at a later time. Only preemptible jobs can be suspended.
RESUMEResumes a job and returns the status to Waiting, Pending, Queued, or Running depending on the availability of resources or the state of the operation windows and activity control settings.
Restore jobs for this Agent are resumed from the beginning.
KILLTerminates a job.
BRTOOLS ERROR CODE MESSAGE JOB STATUS
0 Successful Completed1 Warnings – all files were processed (for example,
backed up or restored)Completed With Warning
2 Canceled during the initialization phase by a user or other signal
Completed With One or More Errors
3 Errors occurred during the initialization phase, processing was not started
Completed With One or More Errors
4 Canceled by a user or other signal during processing Completed With One or More Errors5 Started, but not completed because errors occurred
during processingCompleted With One or More Errors
6 Internal termination Completed With One or More Errors
OPTION DESCRIPTION RELATED TOPIC
Use hardware revert capability if available This option allow you to revert the data to the time when the snapshot was created. Selecting
this option brings back the entire LUN to the point when the snapshot was created, overwriting all the modifications to data since the snapshot creation. This option is available if the snapshot engine used for SnapProtect Backup supports the revert operation.
Administration Guide - SAP for Oracle iDataAgent
Page 133 of 193
1. From the CommCell Browser, click Client Computers | SAP for Oracle | <instance name>. The default and other subclients (if available) are displayed on the right-hand windowpane.
2. From the CommCell Browser, right-click the instance that contains the data you want to restore. Click All Tasks and then click Browse Backup Data.
3. From the Browse Options window, click OK.
4. From the browse window, select the data to be restored and click Recover all Selected.
5. From the Restore Options for All Selected Items dialog box, click Advanced.
6. From the Advanced Restore Options (General) tab, select Use hardware revert capability if available.
Startup Options The Job Manager will use the startup priority setting when allocating the required resources. This is useful if you have jobs that are very important and must complete, or jobs that can be moved to a lower priority.
1. From the CommCell Browser, click Client Computers | <agent> | <instance name>. The default and other subclients (if available) are displayed on the right-hand windowpane.
2. From the CommCell Browser, right-click the instance that contains the data you want to restore. Click All Tasks and then click Browse Backup Data.
3. From the Browse Options window, click OK.
4. From the browse window, select the data to be restored and click Recover all Selected.
5. From the Restore Options for All Selected Items dialog box, click Advanced.
6. From the Advanced Restore Options (General) tab, select Use Default Priorityoption.
7. Select Change Priority option to change the priority for a job, between 0 (highest priority) and 999 (lowest priority).
8. Select Start up in Suspended State option to specify the selected job to start in the Job Controller in a suspended state.
9. Click OK.
Refer to Job Priority and Priority Precedence.
Copy Precedence When you select Restore from copy precedence option, the system recovers or retrieves data from the selected storage policy copy (Synchronous Copy or Selective Copy). If data does not exist in the specified copy, the data recovery or retrieve operation fails even if the data exists in another copy of the same storage policy.
When cleared, (or by default) the system recovers or retrieves data from the storage policy copy with the lowest copy precedence. If the data was pruned from the primary copy, the system automatically recovers or retrieves from the other copies of the storage policy in the lowest copy precedence to highest copy precedence order. Once the data is found, it is recovered or retrieved, and no further copies are checked.
1. From the CommCell Browser, click Client Computers | <agent> | <instance name>. The default and other subclients (if available) are displayed on the right-hand windowpane.
2. From the CommCell Browser, right-click the instance that contains the data you want to restore. Click All Tasks and then click Browse Backup Data.
3. From the Browse Options window, click OK.
4. From the browse window, select the data to be restored and click Recover all Selected.
5. From the Restore Options for All Selected Items dialog box, click Advanced.
6. From the Advanced Restore Options (General) tab, select Restore from copy precedence option.
7. Select the number to change the selected copy's precedence. The numbers will move a copy to a higher or lower precedence in increments of 1.
8. Click OK.
Refer to Recovering Data From Copies.
Data Path OptionsData Recovery operations use a specific data path (Library, MediaAgent, Drive Pool, and Drive) to perform the restore operations as configured in the CommCell. By default, the system automatically identifies the data path for the restore operations. You can change the data path at the restore level by selecting a specific MediaAgent, library, drive pool or drive in the Advanced Restore Options dialog.
The following are some of the important situations where you may need to change the data path:
To free heavily loaded resources such as MediaAgents and libraries. A library suffers severe hardware damage and you need to move its media to a different library in order to access data secured by data protection operations. A drive pool within a library is being used much more frequently than another, and a storage policy copy from the more active drive pool can be assigned to the less active one.
Refer to Change Data Path.
Administration Guide - SAP for Oracle iDataAgent
Page 134 of 193
1. From the CommCell Browser, click Client Computers | <agent> | <instance name>. The default and other subclients (if available) are displayed on the right-hand windowpane.
2. From the CommCell Browser, right-click the instance that contains the data you want to restore. Click All Tasks and then click Browse Backup Data.
3. From the Browse Options window, click OK.
4. From the browse window, select the data to be restored and click Recover all Selected.
5. From the Restore Options for All Selected Items dialog box, click Advanced.
6. From the Advanced Restore Options (General) tab, select the MediaAgent and Library that you wish to perform the restore.
7. Select the Drive Pool and Drive for optical and tape libraries.
8. Click OK. Alerts The Alert option is used for setting up the criteria to raise notifications/alerts for job statuses
such as failure, success, or any other conditions triggered by the restore job. Adding alerts helps the user or the user group to get the notification automatically about the status of the restore job.
1. From the CommCell Browser, click Client Computers | <agent> | <instance name>. The default and other subclients (if available) are displayed on the right-hand windowpane.
2. From the CommCell Browser, right-click the instance that contains the data you want to restore. Click All Tasks and then click Browse Backup Data.
3. From the Browse Options window, click OK.
4. From the browse window, select the data to be restored and click Recover all Selected.
5. From the Restore Options for All Selected Items dialog box, click Advanced.
6. From the Advanced Restore Options (General) tab, click Add Alert.
7. From the Add Alert Wizard window, select the Threshold and Notification Criteria. Click Next.
8. Select the Notification Types. Click Next.
9. Select the Users and User Groups. Click Next.
10. Verify the Summary.
11. Click Finish.
Refer to Alert.
Reset Database When you select this option, a new database incarnation record is created for the new database after recovering the database.
1. From the CommCell Browser, click Client Computers | SAP for Oracle | <instance name>. The default and other subclients (if available) are displayed on the right-hand windowpane.
2. From the CommCell Browser, right-click the instance that contains the data you want to restore. Click All Tasks and then click Browse Backup Data.
3. From the Browse Options window, click OK.
4. From the browse window, select the data to be restored and click Recover all Selected.
5. From the Restore Options for All Selected Items dialog box, click Advanced.
6. From the Advanced Restore Options (Options) tab, select Reset Database option. Open DB Once you recover the database, you can choose whether to open the database after the
restore/recovery operation has completed. Selecting this option will open the database, and enable the Reset Logs option.
1. From the CommCell Browser, click Client Computers | SAP for Oracle | <instance name>. The default and other subclients (if available) are displayed on the right-hand windowpane.
2. From the CommCell Browser, right-click the instance that contains the data you want to restore. Click All Tasks and then click Browse Backup Data.
3. From the Browse Options window, click OK.
4. From the browse window, select the data to be restored and click Recover all Selected.
5. From the Restore Options for All Selected Items dialog box, click Advanced.
6. From the Advanced Restore Options (Options) tab, select Open DB option. Reset logs This option is available from the Options tab in the Advanced Restore Options window.
Whenever you restore the control file from Command Line Interface and manually recover the database, you need to reset the logs prior to opening the database.
To enable the Reset Logs option, the Open DB checkbox must be selected.
1. From the CommCell Browser, click Client Computers | SAP for Oracle | <instance
Administration Guide - SAP for Oracle iDataAgent
Page 135 of 193
Back to Top
name>. The default and other subclients (if available) are displayed on the right-hand windowpane.
2. From the CommCell Browser, right-click the instance that contains the data you want to restore. Click All Tasks and then click Browse Backup Data.
3. From the Browse Options window, click OK.
4. From the browse window, select the data to be restored and click Recover all Selected.
5. From the Restore Options for All Selected Items dialog box, click Advanced.
6. From the Advanced Restore Options (Options) tab, ensure the Open DB checkbox is selected.
You can Reset Logs as follows:
None - Open the database without any RESETLOGS option. Yes - Open the database with RESETLOGS option.
No - Open the database with NORESETLOGS option.
Administration Guide - SAP for Oracle iDataAgent
Page 136 of 193

Data Aging - SAP for Oracle iDataAgentTABLE OF CONTENTS
Getting Started
Extended Retention Rules
When are Log Backups Aged Along with Full Backups
Selective Online Full Backup Retention Rules
Command Line Retention Rules
Data Aging Rules for Jobs Completed with Errors
Data Aging Rules for Jobs Completed with Warning
GETTING STARTED
Data Aging is the process of removing old data from secondary storage to allow the associated media to be reused for future backups.
By default, all backup data is retained infinitely. However, you should change the retention of your data based on your needs. Note that if you continue to have infinite retention, you will also need infinite storage capacity.
1. From the CommCell Browser, navigate to Policies | Storage Policies.
2. Highlight the Storage Policy.
3. From the right pane, right-click the Storage Policy Copy and click the Properties.
4. Click the Retention tab. Click the Retain For in the Basic Retention Rules for All Backups area. Enter number of days to retain the data. Enter number of cycles to retain the data.
Administration Guide - SAP for Oracle iDataAgent
Page 137 of 193
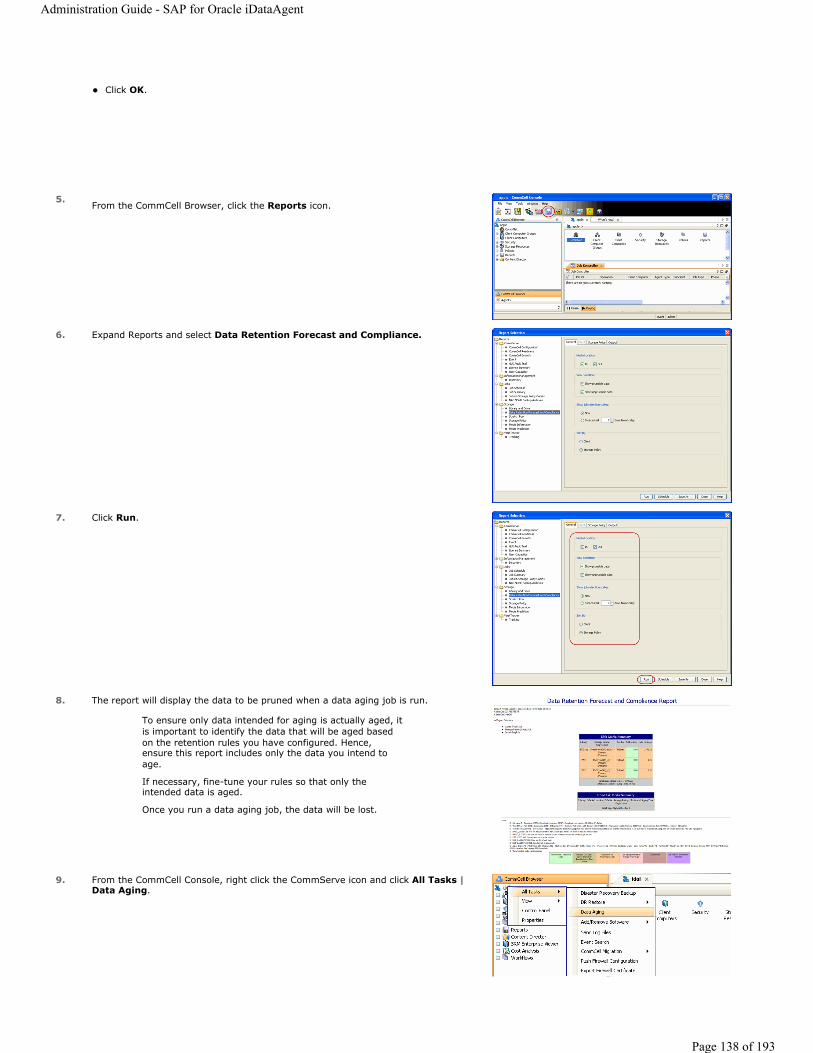
Click OK.
5.From the CommCell Browser, click the Reports icon.
6. Expand Reports and select Data Retention Forecast and Compliance.
7. Click Run.
8. The report will display the data to be pruned when a data aging job is run.
To ensure only data intended for aging is actually aged, it is important to identify the data that will be aged based on the retention rules you have configured. Hence, ensure this report includes only the data you intend to age.
If necessary, fine-tune your rules so that only the intended data is aged.
Once you run a data aging job, the data will be lost.
9. From the CommCell Console, right click the CommServe icon and click All Tasks | Data Aging.
Administration Guide - SAP for Oracle iDataAgent
Page 138 of 193
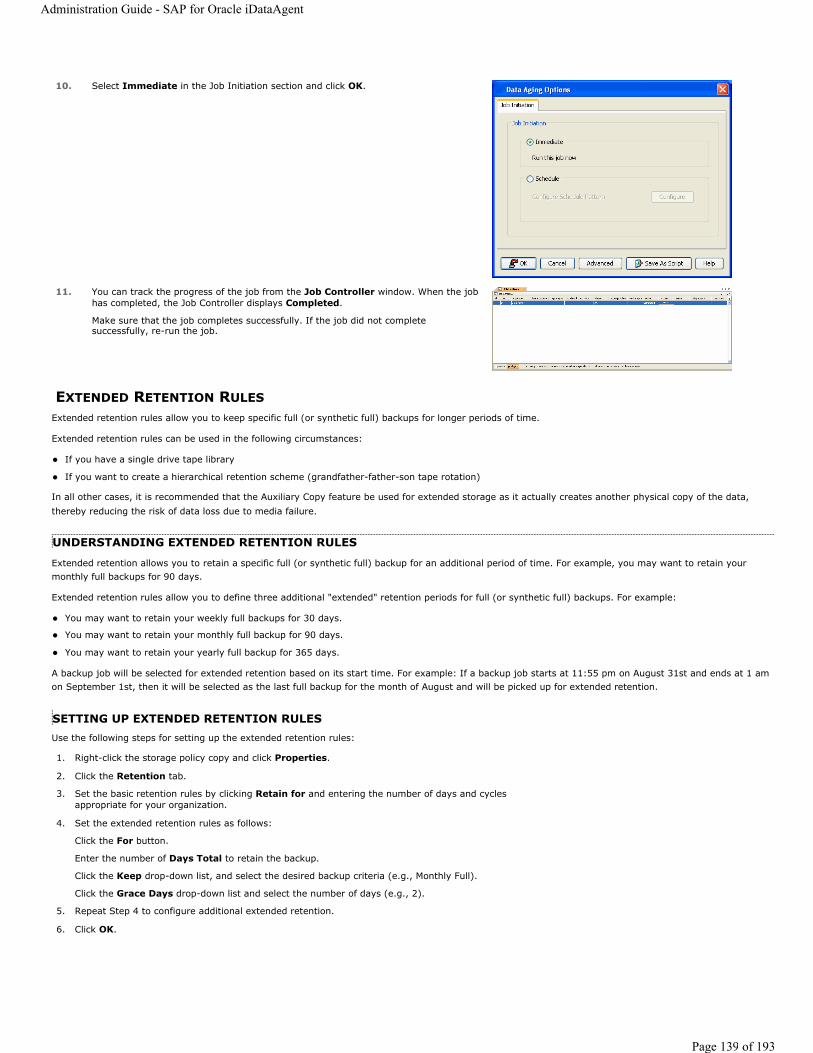
EXTENDED RETENTION RULESExtended retention rules allow you to keep specific full (or synthetic full) backups for longer periods of time.
Extended retention rules can be used in the following circumstances:
If you have a single drive tape library
If you want to create a hierarchical retention scheme (grandfather-father-son tape rotation)
In all other cases, it is recommended that the Auxiliary Copy feature be used for extended storage as it actually creates another physical copy of the data, thereby reducing the risk of data loss due to media failure.
UNDERSTANDING EXTENDED RETENTION RULES
Extended retention allows you to retain a specific full (or synthetic full) backup for an additional period of time. For example, you may want to retain your monthly full backups for 90 days.
Extended retention rules allow you to define three additional "extended" retention periods for full (or synthetic full) backups. For example:
You may want to retain your weekly full backups for 30 days.
You may want to retain your monthly full backup for 90 days.
You may want to retain your yearly full backup for 365 days.
A backup job will be selected for extended retention based on its start time. For example: If a backup job starts at 11:55 pm on August 31st and ends at 1 am on September 1st, then it will be selected as the last full backup for the month of August and will be picked up for extended retention.
SETTING UP EXTENDED RETENTION RULESUse the following steps for setting up the extended retention rules:
10. Select Immediate in the Job Initiation section and click OK.
11. You can track the progress of the job from the Job Controller window. When the job has completed, the Job Controller displays Completed.
Make sure that the job completes successfully. If the job did not complete successfully, re-run the job.
1. Right-click the storage policy copy and click Properties.
2. Click the Retention tab.
3. Set the basic retention rules by clicking Retain for and entering the number of days and cycles appropriate for your organization.
4. Set the extended retention rules as follows:
Click the For button.
Enter the number of Days Total to retain the backup.
Click the Keep drop-down list, and select the desired backup criteria (e.g., Monthly Full).
Click the Grace Days drop-down list and select the number of days (e.g., 2).
5. Repeat Step 4 to configure additional extended retention.
6. Click OK.
Administration Guide - SAP for Oracle iDataAgent
Page 139 of 193
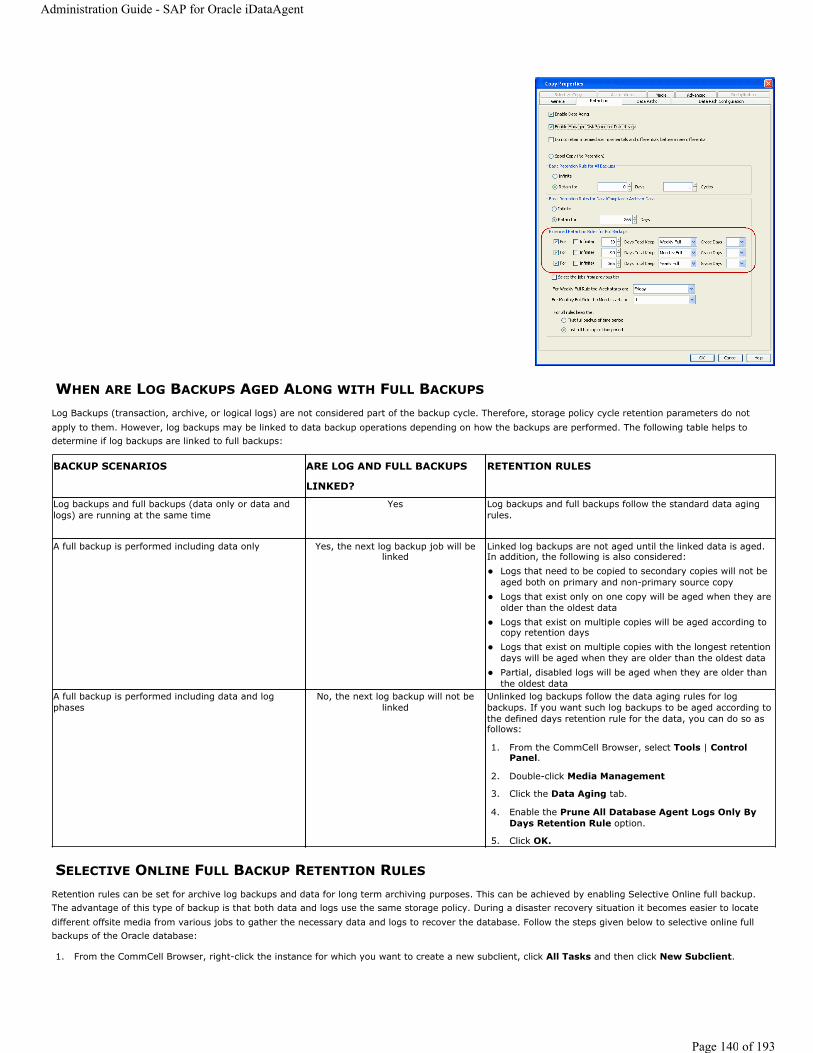
WHEN ARE LOG BACKUPS AGED ALONG WITH FULL BACKUPS
Log Backups (transaction, archive, or logical logs) are not considered part of the backup cycle. Therefore, storage policy cycle retention parameters do not apply to them. However, log backups may be linked to data backup operations depending on how the backups are performed. The following table helps to determine if log backups are linked to full backups:
SELECTIVE ONLINE FULL BACKUP RETENTION RULES
Retention rules can be set for archive log backups and data for long term archiving purposes. This can be achieved by enabling Selective Online full backup. The advantage of this type of backup is that both data and logs use the same storage policy. During a disaster recovery situation it becomes easier to locate different offsite media from various jobs to gather the necessary data and logs to recover the database. Follow the steps given below to selective online full backups of the Oracle database:
1. From the CommCell Browser, right-click the instance for which you want to create a new subclient, click All Tasks and then click New Subclient.
BACKUP SCENARIOS ARE LOG AND FULL BACKUPS
LINKED?
RETENTION RULES
Log backups and full backups (data only or data and logs) are running at the same time
Yes Log backups and full backups follow the standard data aging rules.
A full backup is performed including data only Yes, the next log backup job will be linked
Linked log backups are not aged until the linked data is aged. In addition, the following is also considered:
Logs that need to be copied to secondary copies will not be aged both on primary and non-primary source copy Logs that exist only on one copy will be aged when they are older than the oldest data Logs that exist on multiple copies will be aged according to copy retention days Logs that exist on multiple copies with the longest retention days will be aged when they are older than the oldest data Partial, disabled logs will be aged when they are older than the oldest data
A full backup is performed including data and log phases
No, the next log backup will not be linked
Unlinked log backups follow the data aging rules for log backups. If you want such log backups to be aged according to the defined days retention rule for the data, you can do so as follows:
1. From the CommCell Browser, select Tools | Control Panel.
2. Double-click Media Management
3. Click the Data Aging tab.
4. Enable the Prune All Database Agent Logs Only By Days Retention Rule option.
5. Click OK.
Administration Guide - SAP for Oracle iDataAgent
Page 140 of 193

2. From the General tab, type the name (up to 32 characters) of the subclient that you want to create.
3. From the Content tab, define the contents of the subclient.
4. Click Selective Online Full.
5. From the Storage Device tab, select a storage policy to associate with this subclient.
6. Select one of the following SAP interfaces:
util_file
util_file_online
7. Click OK.
COMMAND LINE RETENTION RULES
Command line log backups can be linked to third-party data backups as well as any other kind of backup data as per the regular data link rule.
Retention cycles are not used for copies involved in operations from the command line. For such operations, data is aged according to the associated retention time. However, you can manually set the retention time for each command line job from the storage policy copy. The command line log backups will be aged according to the retention time set for its associated command line data backup job.
DATA AGING RULES FOR JOBS COMPLETED WITH ERRORS
Jobs that are completed with errors are not treated as a valid full backup job and hence are pruned based on basic retention rules. However, in case if you require to apply extended retention rules to these jobs, you can exclude jobs that completed with errors during extended retention calculations. Note that this option is applicable only for SAP for Oracle Selective Online full backup jobs.
1. From the CommCell Browser, select Tools | Control Panel.
2. Double-click Media Management
3. Click the Data Aging tab.
4. Change the value for the Ignore Completed With Errors job option for Extended Retention calculations option from 1 to 0.
5. Click OK.
DATA AGING RULES FOR JOBS COMPLETED WITH WARNINGS
For jobs that are completed with warning are treated as regular full backup jobs and utilize the same data aging rules defined for regular full jobs.
Back to Top
ADVANCED TOPICS
Data Aging - AdvancedProvides comprehensive information on additional Data Aging capabilities.
Administration Guide - SAP for Oracle iDataAgent
Page 141 of 193
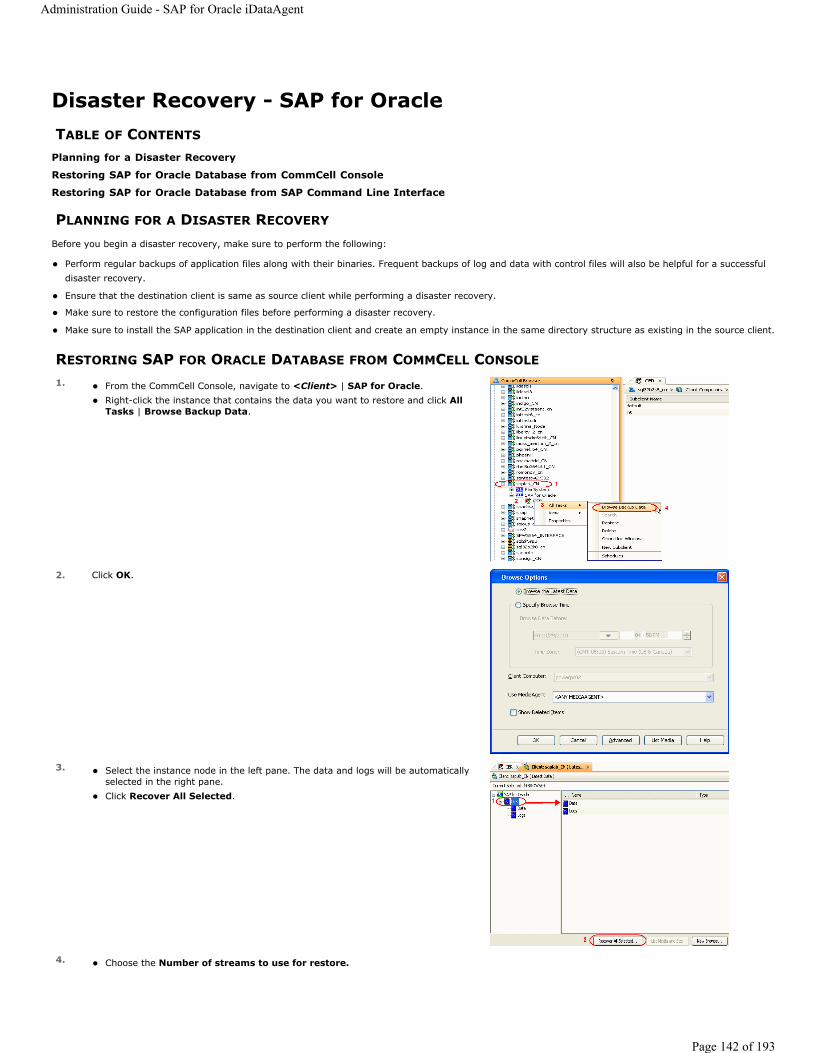
Disaster Recovery - SAP for OracleTABLE OF CONTENTS
Planning for a Disaster Recovery
Restoring SAP for Oracle Database from CommCell Console
Restoring SAP for Oracle Database from SAP Command Line Interface
PLANNING FOR A DISASTER RECOVERY
Before you begin a disaster recovery, make sure to perform the following:
Perform regular backups of application files along with their binaries. Frequent backups of log and data with control files will also be helpful for a successful disaster recovery.
Ensure that the destination client is same as source client while performing a disaster recovery.
Make sure to restore the configuration files before performing a disaster recovery.
Make sure to install the SAP application in the destination client and create an empty instance in the same directory structure as existing in the source client.
RESTORING SAP FOR ORACLE DATABASE FROM COMMCELL CONSOLE
1. From the CommCell Console, navigate to <Client> | SAP for Oracle. Right-click the instance that contains the data you want to restore and click All Tasks | Browse Backup Data.
2. Click OK.
3. Select the instance node in the left pane. The data and logs will be automatically selected in the right pane. Click Recover All Selected.
4. Choose the Number of streams to use for restore.
Administration Guide - SAP for Oracle iDataAgent
Page 142 of 193
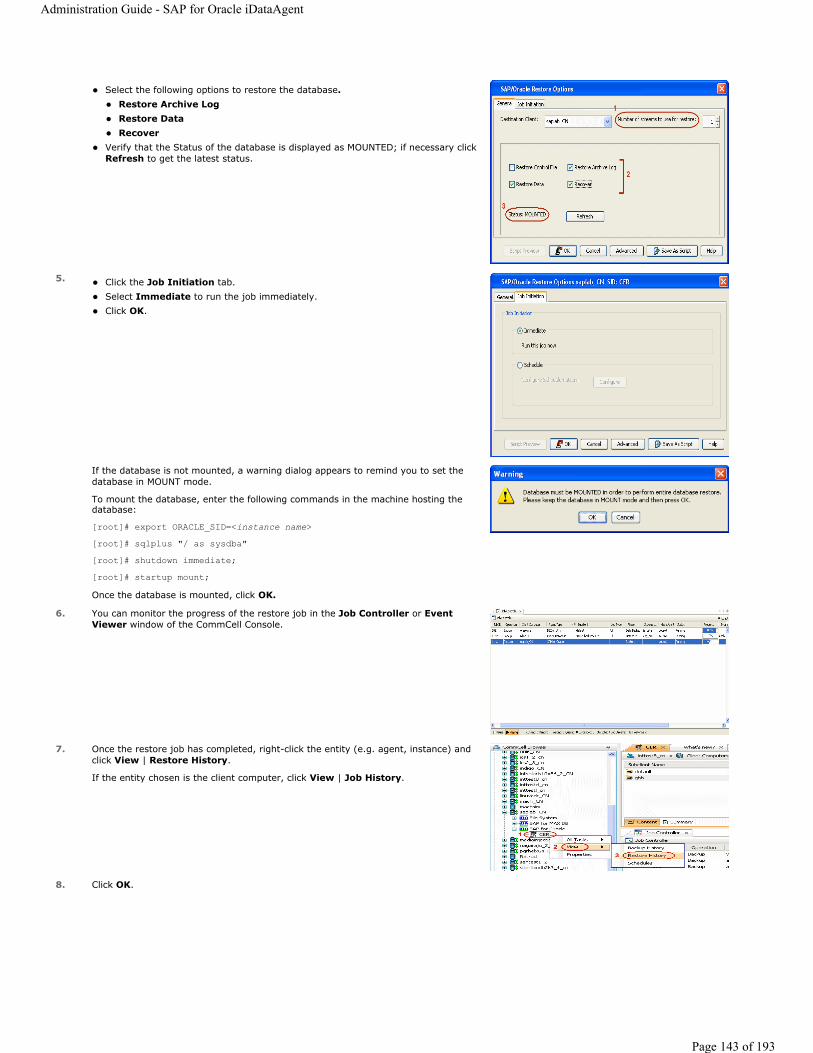
Select the following options to restore the database.Restore Archive LogRestore DataRecover
Verify that the Status of the database is displayed as MOUNTED; if necessary click Refresh to get the latest status.
5. Click the Job Initiation tab. Select Immediate to run the job immediately. Click OK.
If the database is not mounted, a warning dialog appears to remind you to set the database in MOUNT mode.
To mount the database, enter the following commands in the machine hosting the database:
[root]# export ORACLE_SID=<instance name>[root]# sqlplus "/ as sysdba"[root]# shutdown immediate;[root]# startup mount;Once the database is mounted, click OK.
6. You can monitor the progress of the restore job in the Job Controller or Event Viewer window of the CommCell Console.
7. Once the restore job has completed, right-click the entity (e.g. agent, instance) and click View | Restore History.
If the entity chosen is the client computer, click View | Job History.
8. Click OK.
Administration Guide - SAP for Oracle iDataAgent
Page 143 of 193
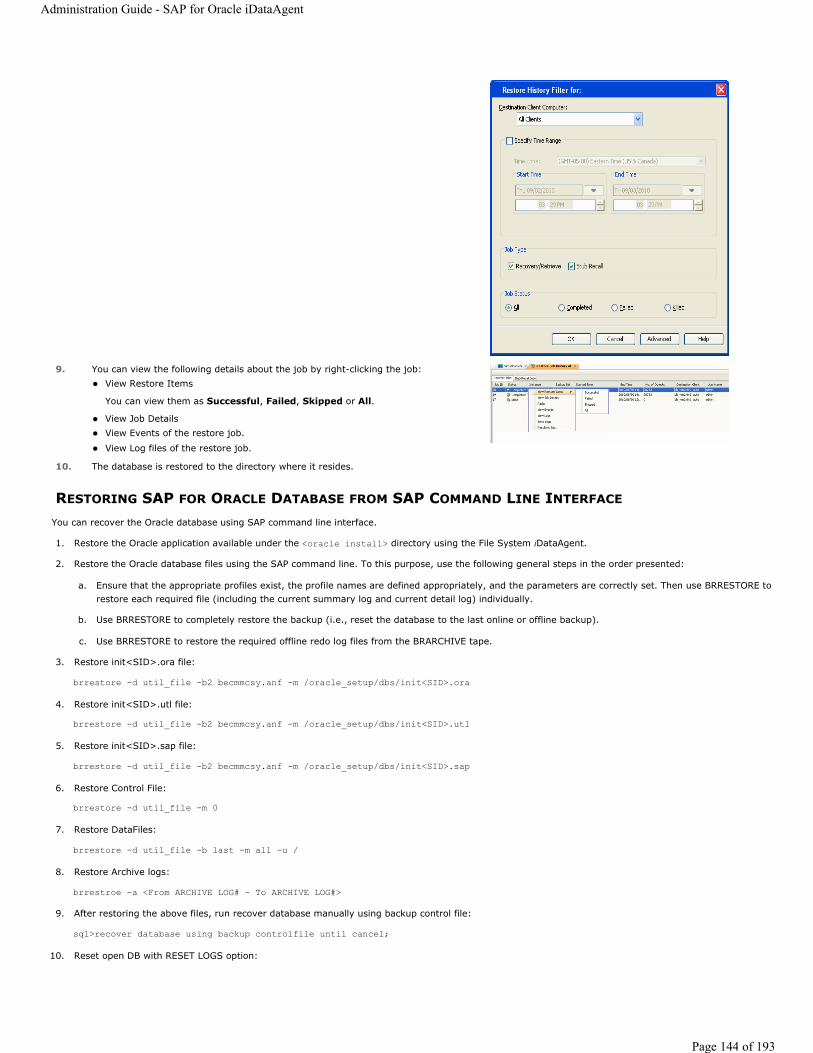
RESTORING SAP FOR ORACLE DATABASE FROM SAP COMMAND LINE INTERFACE
You can recover the Oracle database using SAP command line interface.
1. Restore the Oracle application available under the <oracle install> directory using the File System iDataAgent.
2. Restore the Oracle database files using the SAP command line. To this purpose, use the following general steps in the order presented:
a. Ensure that the appropriate profiles exist, the profile names are defined appropriately, and the parameters are correctly set. Then use BRRESTORE to restore each required file (including the current summary log and current detail log) individually.
b. Use BRRESTORE to completely restore the backup (i.e., reset the database to the last online or offline backup).
c. Use BRRESTORE to restore the required offline redo log files from the BRARCHIVE tape.
3. Restore init<SID>.ora file:
brrestore -d util_file -b2 becmmcsy.anf -m /oracle_setup/dbs/init<SID>.ora
4. Restore init<SID>.utl file:
brrestore -d util_file -b2 becmmcsy.anf -m /oracle_setup/dbs/init<SID>.utl
5. Restore init<SID>.sap file:
brrestore -d util_file -b2 becmmcsy.anf -m /oracle_setup/dbs/init<SID>.sap
6. Restore Control File:
brrestore -d util_file -m 0
7. Restore DataFiles:
brrestore -d util_file -b last -m all -u /
8. Restore Archive logs:
brrestroe -a <From ARCHIVE LOG# - To ARCHIVE LOG#>
9. After restoring the above files, run recover database manually using backup control file:
sql>recover database using backup controlfile until cancel;
10. Reset open DB with RESET LOGS option:
9. You can view the following details about the job by right-clicking the job: View Restore Items
You can view them as Successful, Failed, Skipped or All.
View Job Details View Events of the restore job.
View Log files of the restore job.
10. The database is restored to the directory where it resides.
Administration Guide - SAP for Oracle iDataAgent
Page 144 of 193

sql>alter database open resetlogs;
For more information on Disaster Recovery using BRRESTORE, refer SAP documentation.
Back to Top
init<SID>.ora, init<SID>.sap and init<SID>.utl can only be restored by SAP Command Line Interface. The remaining files such as control file, data files, archive log files can also be restored from CommCell Console.
Administration Guide - SAP for Oracle iDataAgent
Page 145 of 193
Additional Operations - SAP for Oracle
AUDIT TRAIL
The Audit Trail feature allows you to track the operations of users who have access to the CommCell. This capability is useful if a detrimental operation was performed in the CommCell and the source of that operation needs to be determined.
Audit Trail tracks operations according to four severity levels:
Critical: This level records operations that will result in imminent loss of data.
High: This level records operations that may result in loss of data.
Medium: This level records changes to the general configuration of one or more entities. Such changes may produce unintended results when operations are performed.
Low: This level records changes to status, addition of entities, and other operations that have minimal impact on existing CommCell functions.
To set Audit Trail retention periods:
1. From the Tools menu in the CommCell Console, click Control Panel, and then select Audit Trail.
2. From the Audit Trail dialog box, select the desired retention time (in days) for each severity level.
3. Click OK.
STORAGE POLICY
A Storage policy defines the data lifecycle management rules for protected data. Storage policies map data from its original location to a physical storage media and determine its retention period.
1. Expand the Policies node, right-click Storage Policies, and select New Storage Policy.
2. Click Next.
3. Select Data Protection and Archiving to create a regular storage policy or CommServe Disaster Recovery Backup to backup the CommServe database and click Next.
4. Click Next.
5. Enter the name of storage policy and click Next.
6. Enter the name of the primary copy and click Next.
7. From the drop down box, select the default library for the primary copy and click Next.
8. From the drop down box, select the MediaAgent and click Next.
9. Enter number of data streams and set the retention period for the policy and click Next.
10. Click Next.
11. Click Browse, browse to your designated deduplication store location and click Next.
12. Confirm your selections and click Finish.
SCHEDULE POLICY
A schedule policy is a defined schedule or group of schedules for specific operations to be performed on associated objects within the CommCell. When the
TABLE OF CONTENTS RELATED TOPICS
Audit Trail
Storage Policy
Schedule Policy
Auxiliary Copy
Operation Window
Operating System and Application Upgrades
Uninstalling Components
Online Help Links
SupportProvides comprehensive information on SAP for Oracle iDataAgent support.
Additional Operations - ConceptsProvides comprehensive information on additional operations procedures contained on this page.
Audit TrailStorage PoliciesStorage Policy CopiesSchedule PolicyAuxiliary CopyOperation WindowUninstalling Components
Administration Guide - SAP for Oracle iDataAgent
Page 146 of 193
schedules from a policy are run, the specified operations, (e.g., auxiliary copy, backup, etc.,) will be performed on the associated CommCell objects.
1. Expand the Policies node, right-click Schedule Policies and click Add.
2. Type the Name of the schedule policy.
3. Select the Type of schedule policy.
4. Select the Agent Type.
5. Type a description of the schedule policy.
6. Click Add.
7. Enter a schedule ion the Schedule Pattern tab.
8. Click OK.
9. On the Associations tab, select the objects to be associated with the schedule policy.
10. Click OK.
AUXILIARY COPY
An auxiliary copy operation allows you to create secondary copies of data associated with data protection operations, independent of the original copy.
1. Expand the Policies node, right-click storage policy for which you want to perform an auxiliary copy, click All Tasks, and then click Run Auxiliary Copy.
2. If you are starting the auxiliary copy operation from the CommServe level, select the storage policy for which you wish to perform the auxiliary copy.
3. If the source copy is configured with a shared library, select the Source MediaAgent for the auxiliary copy.
4. Click OK to start the auxiliary copy operation. A progress bar displays the progress of the operation.
OPERATION WINDOW
By default, all operations in the CommCell can run for 24 hours. To prevent certain operations from running during certain periods of the day, you can define operation rules so that these operations are disabled during those times.
When operation rules are configured, operations that are started within the time window specified will go to a queued (as opposed to pending) state. Once the time window specified in the operation rule has elapsed, these queued or running operations will resume automatically.
1. In the CommCell Browser, right-click the appropriate entity, click All Tasks, and then click Operation Window.
2. Click Add.
3. From the Operation Window dialog box:
Enter the name of the rule in the Name field.
Select either an administration, data protection (either full or non-full), and/or a data recovery operation from the Operations pane.
4. Click OK.
OPERATING SYSTEM AND APPLICATION UPGRADES
Operating system upgrades are only supported when upgrading from one version of an OS to a different version of the same OS (e.g., Win2003 to Win2008). The two methods of upgrading are:
Seamless Upgrade - This involves uninstalling the Agent software, upgrading the operating system, and then re-installing the Agent software.
Full OS Replacement - This involves performing a clean install of a new version of the OS, re-installing any application software, then re-installing the CommServe, MediaAgent, and/or Agent software.
For Full OS Replacement, the client computer must be configured to have the CommServe, MediaAgent, and/or Client software re-installed to the same location, the same Fully Qualified Domain Name or short domain name, the same partitions, disk drive format (FAT, NTFS, et. al.), and IP configuration as previously.
Use the following strategy to upgrade the operating system software:
Identify the computers you want to upgrade and the CommCell components installed on each of these computers.
If you are starting the auxiliary copy operation from the Storage Policy level, the Storage Policy field is already populated with the name of the Storage Policy you selected.
If it is necessary to remove Agent software to facilitate an operating system or application upgrade, do not delete the icon for the Agent from the CommCell Console, or all associated backed up data will be lost.
Administration Guide - SAP for Oracle iDataAgent
Page 147 of 193
Choose the type of upgrade procedure you want to use on each computer: seamless or full replacement.
CommServe, MediaAgent, and Client computers can be upgraded in any order.
NOTES ON SAP/ORACLE APPLICATION UPGRADESIf you want to upgrade both Oracle and SAP, be sure to upgrade the Oracle application software first and then the SAP application software.
To upgrade the Oracle application software:
1. Uninstall the SAP for Oracle iDataAgent.
2. Upgrade the Oracle application software.
3. Reinstall the SAP for Oracle iDataAgent.
4. Relink the Oracle application software.
To upgrade the SAP application software:
1. Uninstall the SAP for Oracle iDataAgent.
2. Upgrade the SAP application software.
3. Reinstall the SAP for Oracle iDataAgent.
4. Relink the SAP application software.
UNINSTALLING COMPONENTS
You can uninstall Windows components using one of the following methods:
METHOD 1: UNINSTALL WINDOWS COMPONENTS USING THE COMMCELL CONSOLE
1. From the CommCell Browser, right-click the desired Client Computer and click All Tasks -> Add/Remove Programs and click Uninstall Software.
2. Uninstall Software Options dialog will appear.
3. In the Uninstall Software tab, select Uninstall All to uninstall all the software packages.
4. In the Job Initiation tab, select Immediate to run the job immediately.
You can track the progress of the job from the Job Controller or Event Viewer.
METHOD 2: UNINSTALL WINDOWS COMPONENTS FROM ADD OR REMOVE PROGRAMS
1. Click the Start button on the Windows task bar and then click Control Panel.
2. Double-click Add/Remove Programs.
For Windows Vista/Windows 2008, click Uninstall a Program in the Control Panel.
3. Click Remove to uninstall the components in the following sequence:
1. SAP for Oracle iDataAgent
2. Windows File System iDataAgent
3. Base Software
UNINSTALLING UNIX AND MACINTOSH COMPONENTSIn order to uninstall the SAP for Oracle iDataAgent on a Unix computer, you need to remove the CVGxOrSAP Unix component using the cvpkgrm utility.
UNINSTALL SEQUENCE
When uninstalling a component on a Unix or Macintosh computer, the following sequence must be used:
1. Uninstall all application components and updates.
2. Uninstall the MediaAgent (if one exists)
3. Uninstall the Base software
Since the component software depends upon the Base software, you must uninstall the component software first.
Method 1: Uninstall Components Using the CommCell Console
Method 2: Uninstall Components from Add or Remove Programs
Administration Guide - SAP for Oracle iDataAgent
Page 148 of 193
UNINSTALLING COMPONENTS FROM A CLUSTER
The following sections provide general guidelines for uninstalling components from a Windows or Unix cluster.
ALL CLUSTERS
Verify that the cluster is set to its original state (i.e., the active and passive nodes are in the same state of ownership for their disk groups as they were during installation).
If the computer from which the component has been uninstalled is rebooted, services will not be restarted following the reboot. However, any cluster plug-ins available will continue to run.
WINDOWS CLUSTERS
The software for a virtual server must be uninstalled from each computer in the cluster configured to host that virtual server, on which the software had been installed.
For uninstalling a MediaAgent or Client from a cluster virtual server, it is recommended that users uninstall the active node first and then continue and uninstall all passive nodes. This will ensure that GxClusterPlugIn resources are removed properly.
For a CommServe in a clustered environment, it is possible to remove the CommServe software from just one node of the cluster, while allowing it to continue to function on the remaining node(s). To do so, you must ensure the computer from which you are uninstalling the CommServe is a passive node. If you uninstall the CommServe from an active node, this will cause it to stop functioning because this will also remove the database.
When you have more than one CommServe installed in a cluster and if you uninstall one of the CommServes from any of the nodes, leaving behind other installations, you need to re-register the DM2FastWebquery.dll using the following command line utility on the node where the CommServe was uninstalled:
<software installation path>\Base\CVGACUtil.exe /i /s DM2FastWebquery.dll
UNIX CLUSTERS
Clustered environments pertain only to HP-UX, Linux, and Solaris clients.
You will need to deconfigure the Unix File System iDataAgent from each virtual machine first before uninstalling it from the physical nodes.
You will then need to uninstall the Unix File System iDataAgent and Base software (cvpkgrm) from the client computer hosting the software. You can uninstall the Base software from your client computer by entering the cvpkgrm command from a command line and then completing the directives in the resulting script. This script deletes the appropriate files and executables, and it removes the registry entries from the system.
The component software allows you to Deconfigure virtual machines completely. It also allows you to Deconfigure individual modules for the virtual machines.
To Deconfigure a virtual machine, the virtual machine must be Deconfigured from all of the physical machines (hosts) on which it has been configured. This means that, within a clustered environment, each virtual machine must be Deconfigured from at least two hosts. To do this, follow the sequence outlined in Components on Unix.
ONLINE HELP LINKS
Use the following links to view the online help for the corresponding tabs in the CommCell Console:
OPERATIONS ENTITY ONLINE HELP LINKS SUB LINKS
CONFIGURATIONAgent SAP for Oracle Agent Properties (General)
SAP for Oracle Agent Properties (Version)
SAP for Oracle Agent Properties (Security)
SAP for Oracle Agent Properties (Activity Control)Instance SAP for Oracle Instance Properties (General)
SAP for Oracle Instance Properties (Details)
SAP for Oracle Instance Properties (Storage Device)
SAP for Oracle Instance Properties (Security)
SAP for Oracle Instance Properties (Encryption)
Impersonate NT User
Subclient SAP for Oracle Subclient Properties (General)
SAP for Oracle Subclient Properties (Content)
SAP for Oracle Subclient Properties (Pre/Post Process)
SAP for Oracle Subclient Properties (Activity Control)
SAP for Oracle Subclient Properties (Storage Device)
SAP for Oracle Subclient Properties (Encryption)
BACKUPBackup Options Backup Options Save As Script
Command Line XML OptionsAdvanced Backup Options
Advanced Backup Options (Data)
Advanced Backup Options (Startup)
Administration Guide - SAP for Oracle iDataAgent
Page 149 of 193

Back to Top
Advanced Backup Options (Job Retry)
Advanced Backup Options (Media)
Advanced Backup Options (Data Path)
Advanced Backup Options (VaultTracking)
Advanced Backup Options (Alert)
BROWSEBrowse Options
Advanced Browse Options
RESTORERestore Options SAP for Oracle Restore Options (General)
SAP for Oracle Restore Options (Job Initiation)
Save As Script
Command Line XML OptionsAdvanced Restore Options
Advanced Restore Options (General)
Advanced Restore Options (Copy Precedence)
Advanced Restore Options (Data Path)
Advanced Restore Options (Encryption)
Advanced Restore Options (Startup)
Advanced Restore Options (Alert)
Advanced Restore Options (Options)
Advanced Restore Options (Restore)
Advanced Restore Options (Ctrl Files)
Advanced Restore Options (Recover)
Administration Guide - SAP for Oracle iDataAgent
Page 150 of 193

Frequently Asked Questions - SAP for OracleCAN WE PROTECT DATA ON NON-GLOBAL ZONES IF THE FILE SYSTEM IDATAAGENT IS INSTALLED ONLY ON THE GLOBAL ZONE?
Yes. We can protect file system data on non-global zones if the File System iDataAgent is installed only on the global zone. However, in order to enable consistent backups of application specific data on the non-global zones, you will need to install the corresponding application specific iDataAgent on the non-global zone.
HOW DO WE PROTECT SAP FOR ORACLE DATA ON A NON-GLOBAL ZONE?
In order to enable consistent backups of SAP for Oracle data on a non-global zone, you need to install the SAP for Oracle iDataAgent on the non-global zone.
CAN I USE ENABLE INTERMEDIATE INDEX CACHE WITH SAP FOR ORACLE IDATAAGENT?
Use of Intermediate Index Cache is not supported with SAP for Oracle iDataAgent. You must uncheck this option in MediaAgent Properties before running a backup.
Administration Guide - SAP for Oracle iDataAgent
Page 151 of 193

Troubleshooting - SAP for Oracle Backup
The following section provides information on some of the troubleshooting scenarios related to backup:
BACKUP OPERATION FAILS IF THE INDEX CANNOT BE RECOVERED
SYMPTOM
Backup operation fails with an error message, if the index file present cannot be recovered.
RESOLUTIONAs a workaround to this issue, create the key CreateNewIndexForSapOracle before running a backup at the location mentioned below:
On Windows, create the key under C:\tmp (not C:\temp; create the folder tmp under C: drive).
On UNIX, create the key under /tmp.
Now run the backup operation. After the backup operation is complete, you might need to delete the key CreateNewIndexForSapOracle from its location (if it did not delete automatically).
BACKUP FAILURE
Backup Restore
From CommCell Console due to Invalid User Permissions
Make sure to use the following user accounts when creating SAP for Oracle instances:
For Unix clients:
<SID_name>admFor Windows clients:
<client_name>/<SID_name>admFrom CommCell Console when data and log storage policies use different Media Agents
During backups, if the data and log storage policies use different Media Agents, the backup fails with the following error:
UPDATEINDEX:Failed to ReOpen IndexCacheDirTo avoid this, ensure that the data and log storage polices use the same Media Agent.
If you want to use storage policies with different Media Agents, then it is recommended to create separate subclients for data and log backups.
On AIX when the CIO option is turned on
Make sure to mount the data volumes of JFS2 with "mount -o cio" option.
Online backup of oracle database not working with JFS2 and Oracle 10g:
As per SAP Note- 948294, Starting with Oracle 10g, the advanced I/O capabilities of JFS2 are used by default from the Oracle database server. If file system type JFS2 is detected by the database server, all Oracle data files residing on this file system are accessed using the CIO (Concurrent IO) option. CIO bypasses the file system cache from the AIX operating system, which results in better IO performance for the Oracle database. If a data file is opened in CIO mode by Oracle, all access to this data file via the regular file system cache is prohibited by the AIX OS. Tools like cp, dd, cpio, tar, dbv etc., do not open Oracle data files with the CIO option. Therefore these tools receive an error from the AIX operating system when trying to access the Oracle data files if the database is open.
You need to mount all JFS2 file systems containing Oracle data files (sap data directories) with the mount -o cio option. This enforces a bypass of the file systen cache for all programs.
Oracle redo log and control files are part of the Oracle data files. If these files are on JFS2 also (origlogA, mirrlogA, origlogB, mirrlogB), use the mount -o cio option accordingly.
Note that the access to the Oracle data files by all other programs which do not support CIO directly will probably be significantly slowed down. This is because caching, read ahead etc. is no longer possible.
To lessen performance penalty during database backup use the dd command with a big blocksize parameter.
Example from file initSID.sap:
tape_copy_cmd = dddisk_copy_cmd = dddd_flags = "bs=1024k"dd_in_flags = "bs=1024k"compress_cmd = "dd bs=1024k if=$ | ( compress -c > $ ) 2>&1"For restore:
uncompress_cmd = "uncompress -c $ | dd bs=1024k of=$ 2>&1"For verify:
uncompress_cmd = "uncompress -c $ > $"For "compress-only" (option "-k only"):
Administration Guide - SAP for Oracle iDataAgent
Page 152 of 193
COMMAND LINE ERRORS
Prior to running backups from the RMAN command line for SAP for Oracle iDataAgent, ensure that the SBT_LIBRARY path and environment variables for CvClientName and CvInstanceName are defined in the RMAN script.
For example, on a Solaris client, provide the path as given below:
util_par_file = ?/dbs/[email protected] rman_parms="BLKSIZE=1048576,SBT_LIBRARY=/opt/calypso/Base64/libobk.so,ENV=(CvClientName=sunsign,CvInstanceName=Instance001)" rman_channels=1
where Cvclientname and CvInstancename are the names of the Client and Instance (e.g., Instance001) on which the iDataAgent is installed.
The SBT_LIBRARY for the various platforms are listed below:
PENDING STATE FOR SAP FOR ORACLE BACKUPS
You may receive an error message indicating that the SAP for Oracle backup has gone to a pending state after a given percentage of the job has completed. This error has occurred because the SAPSECULIB (libsapsecu.so) library cannot be found or the permissions are not correct. To correct the problem, complete the following steps:
1. Ensure that the permissions for the br* executables are correct.
2. Ensure that the SHLIB_PATH and DIR_LIBRARY environment variables are set correctly.
3. On Unix systems, ensure that the DIR_LIBRARY environment variable is set on the directory that contains the libsapsecu library; for example:
DIR_LIBRARY = /usr/sap/<SID>/SYS/exe/run
This is especially important if you use an external scheduler (for example, cron, at, or BACKINT scheduler) to start the BR*Tools. Also, ensure that DIR_LIBRARY is set for both user ora<sid> and <sid>adm.
4. Ensure that the libsapsecu.so library is accessible.
5. Ensure that the SAPSYSTEMNAME environment variable is set correctly.
6. Ensure that the contents of the database (i.e., SAP tables and SAP owner) are accessible. This is especially important if you use an external scheduler (for example, cron, at, or BACKINT scheduler) to start BR*Tools. In such a case, the SAPSYSTEMNAME variable must be set in the environment of this scheduler (for example, in an environment file); in this case, it must be set within the backup profile of Calypso (be sure to consult your backup vendor).
7. You can verify this setup by appending "-TRC11" to the brbackup command line that is called by Calypso. The created trace file will contain all the active
compress_cmd = "dd bs=1024k if=$ | compress -c > $As an alternative, use a backup utility (BACKINT) which supports CIO.
Another alternative is the use of Oracle RMAN for online backup. The use of Oracle RMAN can be controlled by the BR*Tools.
With Oracle RMAN as backup utility, the mount -option -cio for JFS2 is not required when mounting file systems holding Oracle data files.
Do not mount JFS2 file systems holding $ORACLE_HOME, logfiles etc. with the -o cio option! Header Data
Shared Memory Error Issue:
The backup failed because the shared memory on the HP-UX PA-RISC client has not been configured per operational guidelines.
Resolution:
Add the DisableIPC_GLOBAL file in the /apps/simpana/Base directory on the client where the backup failed.
1. Stop the Calypso software.
2. Create an empty file called DisableIPC_GLOBAL in the /apps/simpana/Base directory. From the command line, enter the following:
touch /apps/simpana/Base/DisableIPC_Global3. Restart the Calypso software.
Platform SBT_LIBRARY AIX with 64 bit Oracle <Client Agent Install Path>/Base/libobk.a(shr.o)HP UX PA RISC 64 bit Oracle, <Client Agent Install Path>/Base64/libobk.slSolaris with 64 bit Oracle <Client Agent Install Path>/Base64/libobk.soLinux on System Z with 64 bit Oracle
<Client Agent Install Path>/Base64/libobk.so
All Other Unix platforms <Client Agent Install Path>/Base/libobk.so
SBT_LIBRARY is not applicable for Windows platform.
Administration Guide - SAP for Oracle iDataAgent
Page 153 of 193
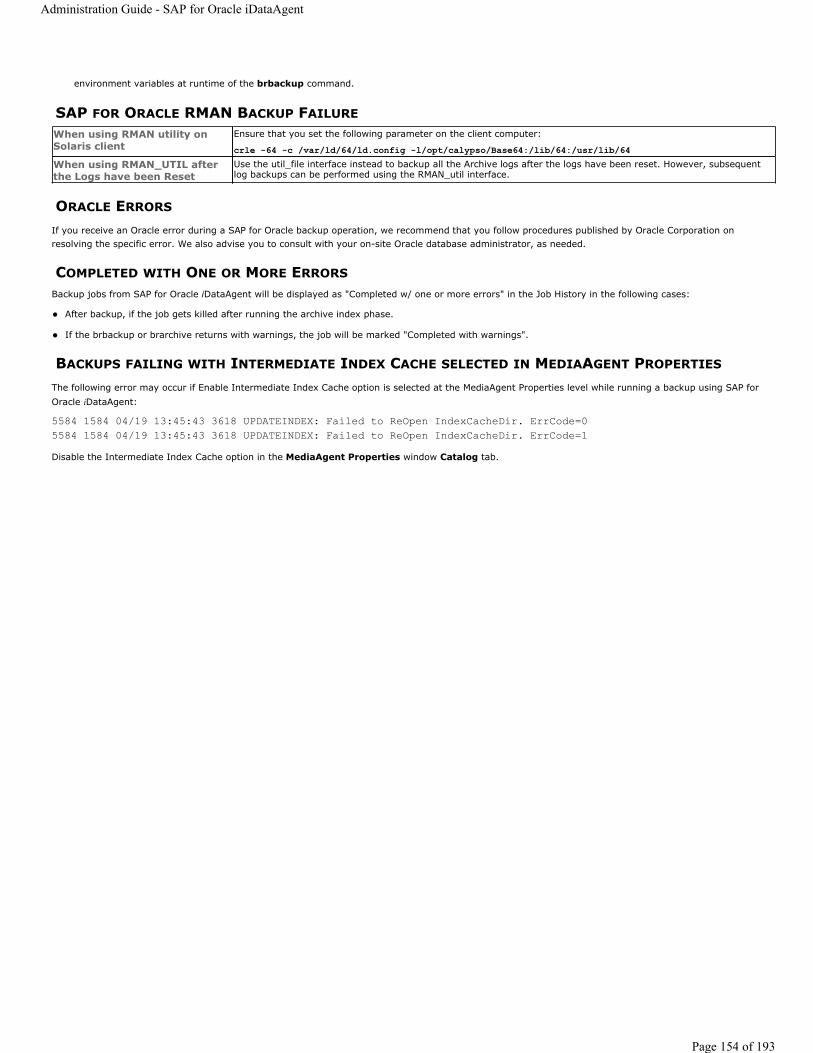
environment variables at runtime of the brbackup command.
SAP FOR ORACLE RMAN BACKUP FAILURE
ORACLE ERRORS
If you receive an Oracle error during a SAP for Oracle backup operation, we recommend that you follow procedures published by Oracle Corporation on resolving the specific error. We also advise you to consult with your on-site Oracle database administrator, as needed.
COMPLETED WITH ONE OR MORE ERRORSBackup jobs from SAP for Oracle iDataAgent will be displayed as "Completed w/ one or more errors" in the Job History in the following cases:
After backup, if the job gets killed after running the archive index phase.
If the brbackup or brarchive returns with warnings, the job will be marked "Completed with warnings".
BACKUPS FAILING WITH INTERMEDIATE INDEX CACHE SELECTED IN MEDIAAGENT PROPERTIES
The following error may occur if Enable Intermediate Index Cache option is selected at the MediaAgent Properties level while running a backup using SAP for Oracle iDataAgent:
5584 1584 04/19 13:45:43 3618 UPDATEINDEX: Failed to ReOpen IndexCacheDir. ErrCode=05584 1584 04/19 13:45:43 3618 UPDATEINDEX: Failed to ReOpen IndexCacheDir. ErrCode=1Disable the Intermediate Index Cache option in the MediaAgent Properties window Catalog tab.
When using RMAN utility on Solaris client
Ensure that you set the following parameter on the client computer:
crle -64 -c /var/ld/64/ld.config -l/opt/calypso/Base64:/lib/64:/usr/lib/64When using RMAN_UTIL after the Logs have been Reset
Use the util_file interface instead to backup all the Archive logs after the logs have been reset. However, subsequent log backups can be performed using the RMAN_util interface.
Administration Guide - SAP for Oracle iDataAgent
Page 154 of 193
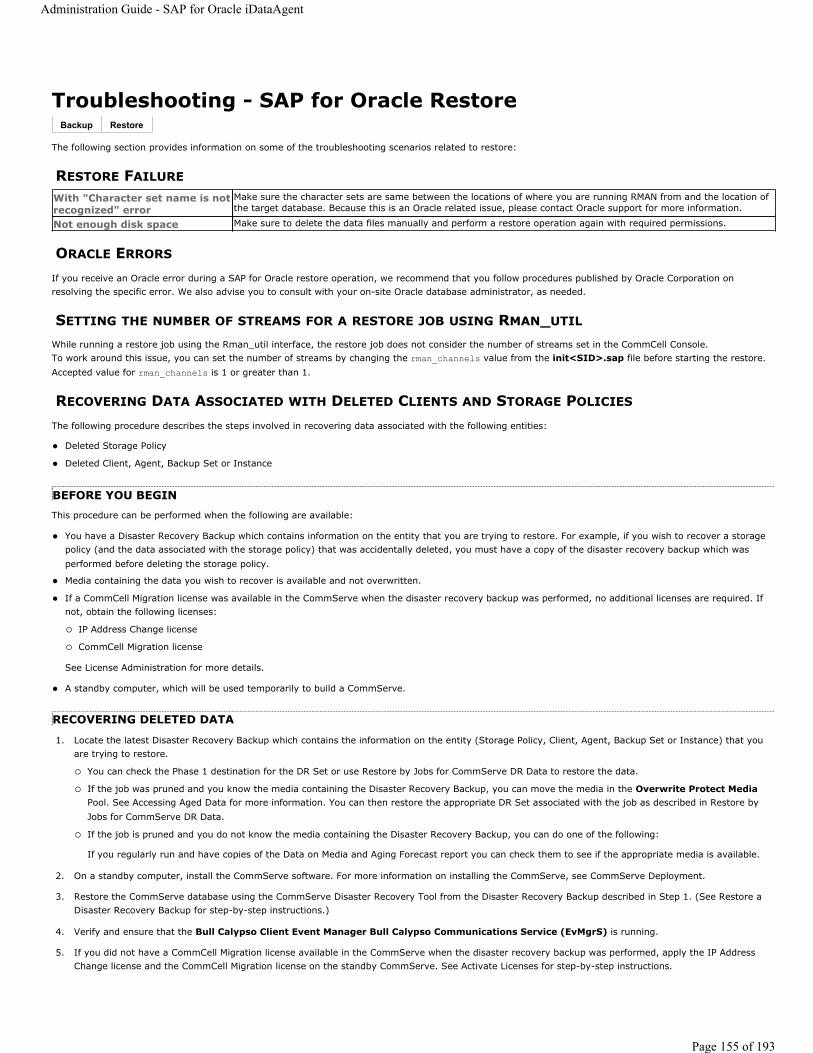
Troubleshooting - SAP for Oracle Restore
The following section provides information on some of the troubleshooting scenarios related to restore:
RESTORE FAILURE
ORACLE ERRORS
If you receive an Oracle error during a SAP for Oracle restore operation, we recommend that you follow procedures published by Oracle Corporation on resolving the specific error. We also advise you to consult with your on-site Oracle database administrator, as needed.
SETTING THE NUMBER OF STREAMS FOR A RESTORE JOB USING RMAN_UTIL
While running a restore job using the Rman_util interface, the restore job does not consider the number of streams set in the CommCell Console.To work around this issue, you can set the number of streams by changing the rman_channels value from the init<SID>.sap file before starting the restore. Accepted value for rman_channels is 1 or greater than 1.
RECOVERING DATA ASSOCIATED WITH DELETED CLIENTS AND STORAGE POLICIES
The following procedure describes the steps involved in recovering data associated with the following entities:
Deleted Storage Policy
Deleted Client, Agent, Backup Set or Instance
BEFORE YOU BEGINThis procedure can be performed when the following are available:
You have a Disaster Recovery Backup which contains information on the entity that you are trying to restore. For example, if you wish to recover a storage policy (and the data associated with the storage policy) that was accidentally deleted, you must have a copy of the disaster recovery backup which was performed before deleting the storage policy.
Media containing the data you wish to recover is available and not overwritten.
If a CommCell Migration license was available in the CommServe when the disaster recovery backup was performed, no additional licenses are required. If not, obtain the following licenses:
IP Address Change license
CommCell Migration license
See License Administration for more details.
A standby computer, which will be used temporarily to build a CommServe.
RECOVERING DELETED DATA
1. Locate the latest Disaster Recovery Backup which contains the information on the entity (Storage Policy, Client, Agent, Backup Set or Instance) that you are trying to restore.
You can check the Phase 1 destination for the DR Set or use Restore by Jobs for CommServe DR Data to restore the data.
If the job was pruned and you know the media containing the Disaster Recovery Backup, you can move the media in the Overwrite Protect MediaPool. See Accessing Aged Data for more information. You can then restore the appropriate DR Set associated with the job as described in Restore by Jobs for CommServe DR Data.
If the job is pruned and you do not know the media containing the Disaster Recovery Backup, you can do one of the following:
If you regularly run and have copies of the Data on Media and Aging Forecast report you can check them to see if the appropriate media is available.
2. On a standby computer, install the CommServe software. For more information on installing the CommServe, see CommServe Deployment.
3. Restore the CommServe database using the CommServe Disaster Recovery Tool from the Disaster Recovery Backup described in Step 1. (See Restore a Disaster Recovery Backup for step-by-step instructions.)
4. Verify and ensure that the Bull Calypso Client Event Manager Bull Calypso Communications Service (EvMgrS) is running.
5. If you did not have a CommCell Migration license available in the CommServe when the disaster recovery backup was performed, apply the IP Address Change license and the CommCell Migration license on the standby CommServe. See Activate Licenses for step-by-step instructions.
Backup Restore
With "Character set name is not recognized" error
Make sure the character sets are same between the locations of where you are running RMAN from and the location of the target database. Because this is an Oracle related issue, please contact Oracle support for more information.
Not enough disk space Make sure to delete the data files manually and perform a restore operation again with required permissions.
Administration Guide - SAP for Oracle iDataAgent
Page 155 of 193

6. Export the data associated with the affected clients from the standby CommServe as described in Export Data from the Source CommCell.
7. Import the exported data to the main CommServe as described in Import Data on the Destination CommCell.
This will bring back the entity in the CommServe database and the entity will now be visible in the CommCell Browser. (Press F5 to refresh the CommCell Browser if the entity is not displayed after a successful merge.)
8. If you have additional data that was backed up after the disaster recovery backup and before the deletion of the entity, use the procedure described in Import Metadata from a Tape or Optical Media to obtain the necessary information.
9. You can now browse and restore the data from the appropriate entity.
RESTORE COMPLETED WITH WARNINGSRestore jobs from SAP for Oracle iDataAgent will be displayed as "Completed with Warnings" in the Job History in the following cases:
When the database restore succeeds but it fails when recovering the database or opening the database.
When you start the Command Line Interface to capture data, use the name of the standby CommServe in the -commcell argument.
As a precaution, mark media (tape and optical media) associated with the source CommCell as READ ONLY before performing a data recovery operation in the destination CommCell.
Administration Guide - SAP for Oracle iDataAgent
Page 156 of 193
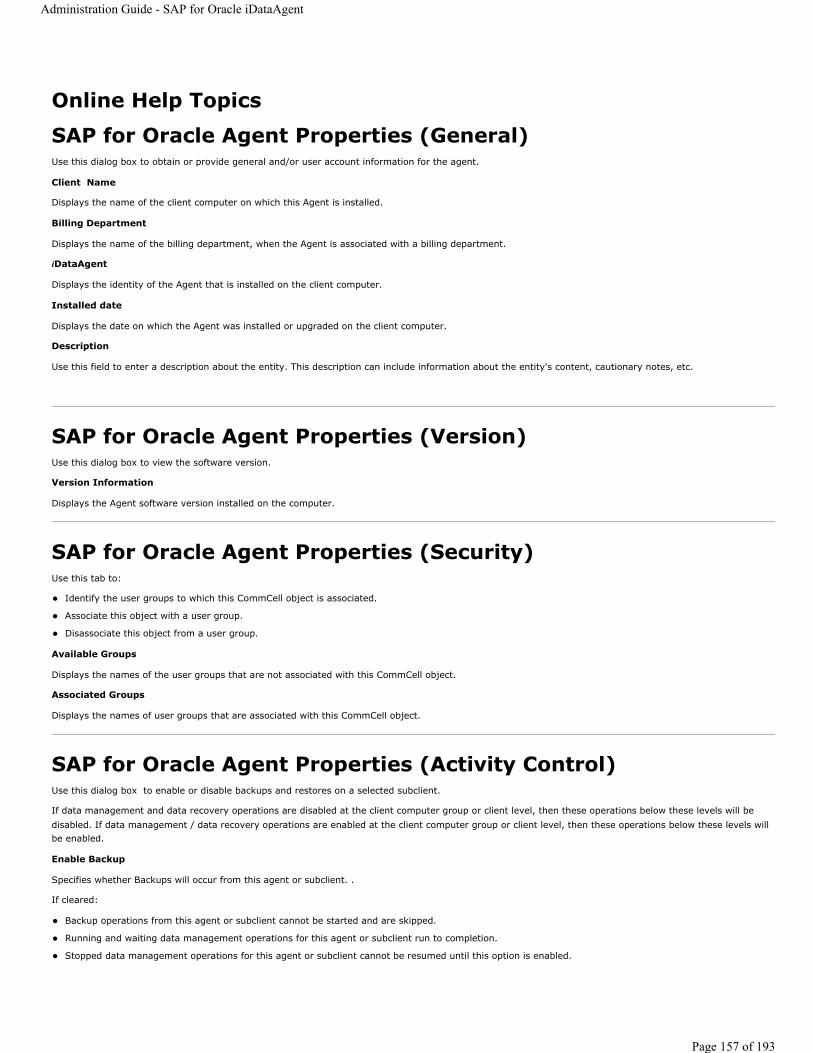
Online Help Topics
SAP for Oracle Agent Properties (General)Use this dialog box to obtain or provide general and/or user account information for the agent.
Client Name
Displays the name of the client computer on which this Agent is installed.
Billing Department
Displays the name of the billing department, when the Agent is associated with a billing department.
iDataAgent
Displays the identity of the Agent that is installed on the client computer.
Installed date
Displays the date on which the Agent was installed or upgraded on the client computer.
Description
Use this field to enter a description about the entity. This description can include information about the entity's content, cautionary notes, etc.
SAP for Oracle Agent Properties (Version)Use this dialog box to view the software version.
Version Information
Displays the Agent software version installed on the computer.
SAP for Oracle Agent Properties (Security)Use this tab to:
Identify the user groups to which this CommCell object is associated.
Associate this object with a user group.
Disassociate this object from a user group.
Available Groups
Displays the names of the user groups that are not associated with this CommCell object.
Associated Groups
Displays the names of user groups that are associated with this CommCell object.
SAP for Oracle Agent Properties (Activity Control)Use this dialog box to enable or disable backups and restores on a selected subclient.
If data management and data recovery operations are disabled at the client computer group or client level, then these operations below these levels will be disabled. If data management / data recovery operations are enabled at the client computer group or client level, then these operations below these levels will be enabled.
Enable Backup
Specifies whether Backups will occur from this agent or subclient. .
If cleared:
Backup operations from this agent or subclient cannot be started and are skipped.
Running and waiting data management operations for this agent or subclient run to completion.
Stopped data management operations for this agent or subclient cannot be resumed until this option is enabled.
Administration Guide - SAP for Oracle iDataAgent
Page 157 of 193
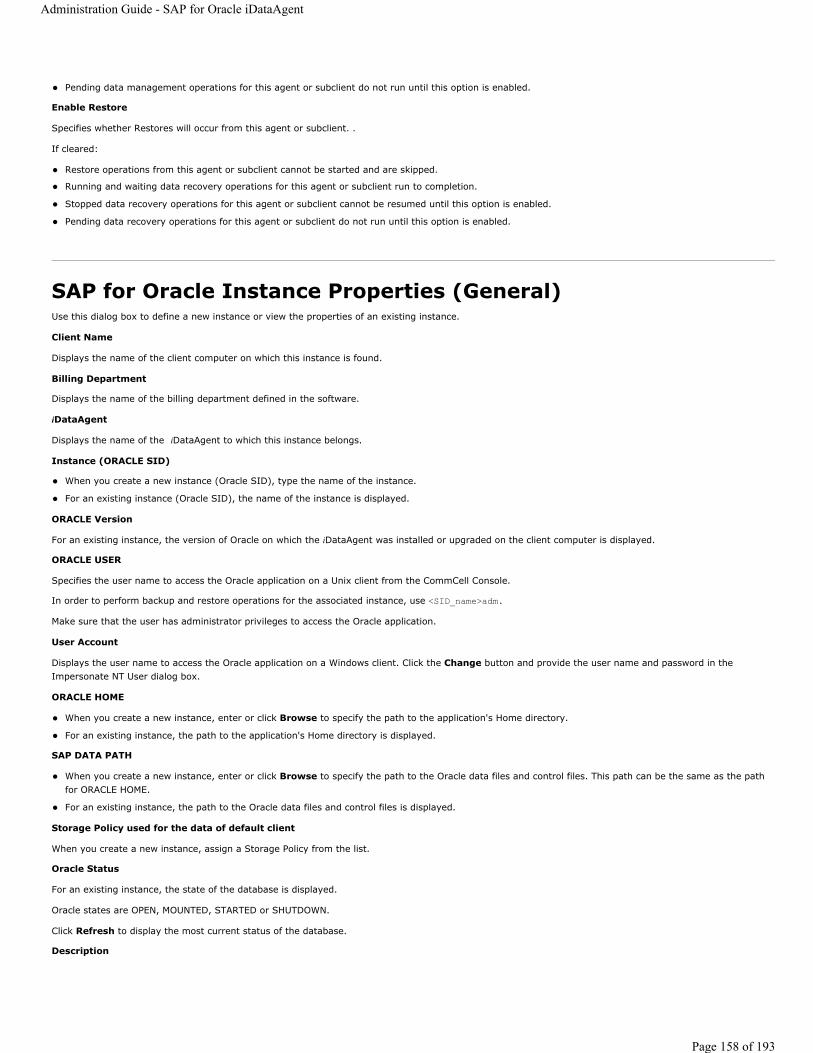
Pending data management operations for this agent or subclient do not run until this option is enabled.
Enable Restore
Specifies whether Restores will occur from this agent or subclient. .
If cleared:
Restore operations from this agent or subclient cannot be started and are skipped.
Running and waiting data recovery operations for this agent or subclient run to completion.
Stopped data recovery operations for this agent or subclient cannot be resumed until this option is enabled.
Pending data recovery operations for this agent or subclient do not run until this option is enabled.
SAP for Oracle Instance Properties (General)Use this dialog box to define a new instance or view the properties of an existing instance.
Client Name
Displays the name of the client computer on which this instance is found.
Billing Department
Displays the name of the billing department defined in the software.
iDataAgent
Displays the name of the iDataAgent to which this instance belongs.
Instance (ORACLE SID)
When you create a new instance (Oracle SID), type the name of the instance.
For an existing instance (Oracle SID), the name of the instance is displayed.
ORACLE Version
For an existing instance, the version of Oracle on which the iDataAgent was installed or upgraded on the client computer is displayed.
ORACLE USER
Specifies the user name to access the Oracle application on a Unix client from the CommCell Console.
In order to perform backup and restore operations for the associated instance, use <SID_name>adm.
Make sure that the user has administrator privileges to access the Oracle application.
User Account
Displays the user name to access the Oracle application on a Windows client. Click the Change button and provide the user name and password in the Impersonate NT User dialog box.
ORACLE HOME
When you create a new instance, enter or click Browse to specify the path to the application's Home directory.
For an existing instance, the path to the application's Home directory is displayed.
SAP DATA PATH
When you create a new instance, enter or click Browse to specify the path to the Oracle data files and control files. This path can be the same as the path for ORACLE HOME.
For an existing instance, the path to the Oracle data files and control files is displayed.
Storage Policy used for the data of default client
When you create a new instance, assign a Storage Policy from the list.
Oracle Status
For an existing instance, the state of the database is displayed.
Oracle states are OPEN, MOUNTED, STARTED or SHUTDOWN.
Click Refresh to display the most current status of the database.
Description
Administration Guide - SAP for Oracle iDataAgent
Page 158 of 193

Use this field to enter a description about the entity. This description can include information about the entity's content, cautionary notes, etc.
SAP for Oracle Instance Properties (Details)When you create a new instance, use this tab to add the details of the instance.
For an existing instance, use this tab to view or change the details of the selected instance.
Connect String
When you create a new instance, specify the database connect string.
For an existing instance, you can change the database connect string by entering 1) database user ID, 2) password for the user ID @ 3) Oracle instance name in the three spaces provided. The user ID must have SYSDBA, ALTER SYSTEM and SELECT ANY TABLE system privileges.
Alternatively, instead of the SELECT ANY TABLE privilege, you can create less powerful user IDs with the following object privileges:
SELECT ON "SYS"."V_$DATABASE"
SELECT ON "SYS"."V_$DATAFILE"
SELECT ON "SYS"."V_$SESSION"
SELECT ON "SYS"."DBA_TABLESPACES"
GRANT SELECT ON "SYS"."V_$ARCHIVE_DEST" TO "USER_NAME"
You can create a user ID with these privileges, or you can use the internal user ID.
SAP EXE Folder (Required)
When you create a new instance, specify the path to the SAP EXE folder. Type the path in the space provided or click Browse to specify the location.
For an existing instance, you can view the specified SAP EXE folder path to click Browse to change this location.
SAP for Oracle Instance Properties (Storage Device)When you create a new instance, use this tab to add the details of the instance.
For an existing instance, use this tab to view or change the storage policy used to back up data via the command line for the selected instance, select a storage policy for backing up logs on the selected instance, view or select a default storage policy for the selected instance or view or establish the options for Deduplication on the subclient.
Command Line Backup
Storage Policy used for user command backup of data
When you create a new instance (Oracle SID), specify the storage policy used for command line backups and restores
For an existing instance (Oracle SID), you can use this space to select another storage policy. A changed storage policy will apply only to new command line backup jobs (i.e., those command line backup jobs that you subsequently start).
Log Backup
Storage Policy used for all Archive Log backups
When you create a new instance (Oracle SID), specify the storage policy used by the subclients in this instance to back up archive log files.
For an existing instance (Oracle SID), you can use this space to select another storage policy.
Data Paths
Click to display the details of the data paths associated with the primary storage policy copy of the selected storage policy.
Number of Archive Log Backup Streams
When you create a new instance (Oracle SID), specify the number of backup streams to be used for backing up Archive Log files. The maximum number of streams is determined by the value established for the Storage Policy.
For an existing instance (Oracle SID), you can use this space to change the number of Archive Log Backup Streams.
Data Transfer Option
Software Compression
Select the software compression to be used for "Command Line Backup" in case hardware compression is not available or not selected on the destination storage policy copy.
On Client
Administration Guide - SAP for Oracle iDataAgent
Page 159 of 193
Use the client's software compression functionality.
On MediaAgent
Use the MediaAgent's software compression functionality.
Off
Do not use software compression.
Resource Tuning
Specify the number of processes (1-4) that the client uses to transfer data. Improvement in performance is resource dependent.
Throttle Network Bandwidth (MB/HR)
Specify the number of processors from available options.
DEDUPLICATION
Use this tab to establish the options for deduplication on the subclient. It indicates whether deduplication for the subclient is enabled or disabled, and if enabled whether the signature generation (a component of deduplication) is performed on the client or MediaAgent computer.
Note that deduplication is supported on disk storage devices. So the deduplication options are applicable only if the subclient is associated with a Storage Policy containing disk storage.
On Client
Click to enable signature generation on the client computer.
On MediaAgent
Click to enable signature generation on the MediaAgent computer.
SAP for Oracle Instance Properties (Security)You can view this tab associated only to an existing Instance.
Use this tab to:
Identify the user groups to which this CommCell object is associated.
Associate this object with a user group.
Disassociate this object from a user group.
Available Groups
Displays the names of the user groups that are not associated with this CommCell object.
Associated Groups
Displays the names of user groups that are associated with this CommCell object.
Encryption Use this dialog box to select the data encryption options for the selected content. When accessing this dialog box from the Subclient Properties Encryption tab, this setting applies only to the selected subclient content for operations run from the CommCell Console. When accessing this dialog box from the Instance Properties Encryption tab, this setting applies only to third-party Command Line operations. The functionality is not propagated to the Subclient Properties Encryption tabs.
None
When selected, no encryption will take place during a data protection operations.
Media Only (MediaAgent Side)
When selected, for data protection operations, data is transmitted without encryption and then encrypted prior to storage. During data recovery operations, data is decrypted by the client.
When using this setting in conjunction with the client property With a Pass-Phrase, you will be required to provide a pass-phrase for data recovery operations unless you export the client pass-phrase to the destination client(s). When using pass-phrase security for third-party Command Line operations or DataArchiver Agents stub recovery operations, you must export the pass- phrase to the destination client.
Network and Media (Agent Side)
Administration Guide - SAP for Oracle iDataAgent
Page 160 of 193
When selected, for data protection operations, data is encrypted before transmission and is stored encrypted on the media. During data recovery operations, data is decrypted by the client.
When using this setting in conjunction with the client property With a Pass-Phrase, you will be required to provide a pass-phrase for data recovery operations unless you export the client pass-phrase to the destination clients.
Network Only (Agent Encrypts, MediaAgent Decrypts)
When selected, for data protection operations, data is encrypted for transmission and then decrypted prior to storage on the media. During data recovery operations, data is encrypted by the MediaAgent and then decrypted in the client.
When using this setting in conjunction with the client property With a Pass-Phrase, you will not be required to provide a pass-phrase for data recovery operations.
Script Preview
Click to display the backup script, based on the current subclient configuration, that will be submitted to RMAN when backups are performed for the selected Oracle subclient.
SAP for Oracle Subclient Properties (General)Client Name
Displays the name of the Client computer to which this subclient belongs.
Billing Department
Displays the name of the billing department, when the subclient is associated with a billing department. For more information on Billing and Costing See the CommNet Books Online.
iDataAgent
Displays the name of the Agent to which this subclient belongs.
Instance (ORACLE SID)
Displays the name of the Instance to which this subclient belongs.
Subclient Name
Displays the name of this Subclient. You can use this space to enter or modify the name of the subclient.
Description
Use this field to enter a description about the entity. This description can include information about the entity's content, cautionary notes, etc.
SAP for Oracle Subclient Properties (Content)Use this tab to define the contents of a new subclient or to change the content of an existing subclient. Items included in subclient content are backed up by the subclient.
Selective Online Full
Specifies whether selective online full backups will be performed for this subclient.
Backup Device
Specifies the SAP for Oracle-specific device (Util_File, Rman_util, util_file_online) to use for backups. For more information, refer to the appropriate SAP for Oracle application documentation.
Data
Specifies whether data files will be backed up for this subclient, and provides you with a choice of backup modes - Online Database, Online Subset or Offline Database.
Backup Mode
A choice of modes is provided to specify the manner in which data file backups for this subclient will be conducted.
Online Database
Specifies the backup of the online database.
Online Subset
Administration Guide - SAP for Oracle iDataAgent
Page 161 of 193

Specifies the backup of a subset of database objects. Use the tree displayed in the Current Database View to add new or modify these subsets. The database must be online and in ARCHIVELOG mode when the backup is invoked.
Offline Database
Specifies the backup of the offline database. The database must be in the MOUNT mode when the backup is invoked.
Current Database View
Displays the subsets (tablespaces and datafiles) that are available in the database associated with this subclient.
Refresh
Click to refresh the content of the database.
Backup Archive Log
Specifies whether archived redo log files will be backed up. These logs can be applied to the database in order to recover it to a point-in-time. Keep in mind that when this option is selected, the Resync Catalog option on the Backup Arguments tab will automatically be selected by default. This option is not available when you select Offline Database.
Archive Delete
Specifies whether archived redo log files will be deleted once they are backed up. Any archived redo log files that do not match the format indicated by the LOG_ARCHIVE_FORMAT environment variable are not deleted. This option is available only when you select the Backup Archive Log option.
Disable Switch Current Log
When selected, log switching is disabled for the current redo log file during an archive log backup.
Archive Log Second Copy
When selected, creates a second copy of the archive logs and deletes the original archive logs.
Back to Top
SAP for Oracle Subclient Properties (Pre/Post Process)Use the Pre/Post Process tab to add, modify or view Pre/Post processes for the selected subclient.
Pre Backup process
Displays the name/path of the backup that you want to run before the respective phase. You can use this space to enter a path for the backup process that will execute before this phase on the subclient , or you can use the Browse button to search for and select the name/path of the process. The system allows the use of spaces in the name/path, provided they begin with an opening quotation mark and end with a closing quotation mark.
Post Backup process
Displays the name/path of the backup process that you want to run after the respective phase. You can use this space to enter a path for the backup process that will execute after this phase on the subclient, or you can use the Browse button to search for and select the name/path of the process. The system allows the use of spaces in the name/path, provided they begin with an opening quotation mark and end with a closing quotation mark.
Run Post Backup Process for all attempts
Specifies whether this process will execute for all attempts to run the phase. Selecting this option will execute the post backup process for all attempts to run the phase, including situations where the job phase is interrupted, suspended, or fails. Otherwise, when the checkbox is cleared the specified process will only execute for successful, killed, or failed jobs.
Browse
Click to search for and select the Pre/Post Process.
SAP for Oracle Subclient Properties (Activity Control)Use this dialog box to enable or disable backups on a selected subclient.
Enable Backup
Specifies whether backups will occur from this subclient.
If cleared:
Backups from this subclient cannot be started and are skipped.
Administration Guide - SAP for Oracle iDataAgent
Page 162 of 193

Running and waiting backups for this subclient run to completion.
Stopped backups for this subclient cannot be resumed until this option is enabled.
Pending backups for this subclient do not run until this option is enabled.
(Job states are indicated in the Job Controller.)
SAP for Oracle Subclient Properties (Storage Device)Use this dialog box to establish the storage device related settings on the selected subclient.
The following tabs are displayed:
(Data) Storage Policy
Data Transfer Option
Deduplication
(DATA) STORAGE POLICY
Use this tab to select or view storage policy settings on the selected subclient.
Data Storage Policy
Displays the storage policy to which this subclient is currently associated. To associate a storage policy to a new subclient or to change the storage policy associated with an existing subclient, click one in the list.
Data Paths
Click to view or modify the data paths associated with the primary storage policy copy of the selected storage policy.
Number of Data Backup Streams
Displays the number of streams used for backup operations. To change the number of streams, click one in the list. For DB2 DPF, be sure to set the appropriate number of streams for each database partition by double-clicking the appropriate Stream space and typing the desired number.
DATA TRANSFER OPTION
Use this tab to establish the options for data transfer.
Software Compression
Indicates whether software compression for the subclient or instance is enabled or disabled, and if enabled whether it is performed on the client or MediaAgent computer.
On Client
Click to enable software compression on the client computer.
On MediaAgent
Click to enable software compression on the MediaAgent computer.
Off
Click to disable software compression.
Note that hardware compression has priority over the software compression. Hardware compression is established in the Data Path Properties dialog box. The above software compression option will take effect when the data path is associated with a disk library, or when hardware compression is disabled in the data path associated with tape libraries.
Resource Tuning
Indicates the processes used by the client to transfer data based and whether bandwidth throttling is enabled or not.
Network Agents
Specifies the number of data pipes/processes that the client uses to transfer data over a network. Increasing this value may provide better throughput if the network and the network configuration in your environment can support it. On non-UNIX computers, the default value is 2 and a maximum of 4 can be established if necessary. On UNIX computers the default value is 1 and a maximum of 2 can be established if necessary.
If the subclient is associated with a storage policy copy that is deduplicated, then the compression settings on the storage policy copy takes precedence. See Copy Properties (Deduplication) - Advanced tab for compression settings on deduplicated storage policy copy.
Administration Guide - SAP for Oracle iDataAgent
Page 163 of 193
Throttle Network Bandwidth (MB/HR)
Specifies whether the backup throughput is controlled or not. (By default this option is not selected and therefore the throughput is not controlled). When selected, use the space to specify a value for the throughput. By default, this is set to 500. The minimum value is 1 and there is no limit to the maximum value. (In this case the backup throughput will be restricted to the maximum bandwidth on the network.)
Use this option to set the backup throughput, based on the network bandwidth in your environment. Use this option to reduce the backup throughput, so that the entire network bandwidth is not consumed, especially in slow links. Increasing this value will end up consuming the bandwidth with the maximum throughput limited to the network bandwidth capability.
Note that throttling is done on a per Network Agent basis.
DEDUPLICATION
Use this tab to establish the options for deduplication on the subclient. It indicates whether deduplication for the subclient is enabled or disabled, and if enabled whether the signature generation (a component of deduplication) is performed on the client or MediaAgent computer.
Note that deduplication is supported on disk storage devices. So the deduplication options are applicable only if the subclient is associated with a Storage Policy containing disk storage.
On Client
Click to enable signature generation on the client computer.
On MediaAgent
Click to enable signature generation on the MediaAgent computer.
SAP for Oracle Subclient Properties (Encryption)Use this dialog box to select the data encryption options for the selected subclient content for operations run from the CommCell Console.
None
When selected, no encryption will take place during a data protection operations.
Media Only (MediaAgent Side)
When selected, for data protection operations, data is transmitted without encryption and then encrypted prior to storage. During data recovery operations, data is decrypted by the client.
Network and Media (Agent Side)
When selected, for data protection operations, data is encrypted before transmission and is stored encrypted on the media. During data recovery operations, data is decrypted by the client.
Network Only (Agent Encrypts, MediaAgent Decrypts)
When selected, for data protection operations, data is encrypted for transmission and then decrypted prior to storage on the media. During data recovery operations, data is encrypted by the MediaAgent and then decrypted in the client.
Backup OptionsUse this dialog box to schedule or immediately run a backup job.
Select Backup Type
Full
Specifies the job as a Full backup, which backs up all data for the selected subclient(s).
Incremental
Specifies the job as an Incremental backup, which backs up only that portion of the data that is new or has changed since the last backup.
Oracle Incremental Level
Specify the level of incremental backup for Oracle backups. Valid values are from 1 to 4.
Cumulative
Specifies a Cumulative Incremental backup at level 1 to 4 for Oracle backups. When cleared, the system performs a non-cumulative backup.
Administration Guide - SAP for Oracle iDataAgent
Page 164 of 193

The Incremental backup and cumulative incremental backup with Oracle incremental level will be displayed only when you perform backup of RMAN Util.
Status of SID
Displays the state of the Oracle database. (OPEN, MOUNTED, STARTED or SHUTDOWN)
Refresh
Click to display the most current status of the database.
Job Initiation
Run Immediately
Specifies this job will run immediately.
Schedule
Specifies this job will be scheduled. Click Configure to specify the schedule details.
Configure Alert
Alert
The currently configured Alert.
Add/Modify Alert
When clicked, opens the Alert Wizard to configure alerts for this operation.
Delete Alert
When clicked, deletes any existing alerts that are already configured.
Advanced
Click to select advanced backup options, such as start priorities, Job retry, start new media, mark media as full, Vault Tracking etc.
Save As Script
Click to open the Save As Script dialog, which allows you to save this operation and the selected options as a script file (in XML format). The script can later be executed from the Command Line Interface using qoperation execute command.
When you save an operation as a script, each option in the dialog will have a corresponding xml parameter in the script file. When executing the script, you can modify the value for any of these XML parameters as per need.
To view the XML values for each of the options in the dialog, see the following:
Command Line XML Options
Advanced Backup/Archive Options (Data)You can select advanced backup/archive data options for the operation. Note that all the options described in this help may not be available and only the options displayed in the dialog box are applicable to the agent or enabler for which the information is being displayed.
Create new index
Specifies the system will create a new index with a full or On Demand data protection operation, and for archive operations. Selecting this option will cause the following to occur for this job only:
full backup transparent browse capability will be disabled, if it is supported by the agent.
override the Create new index on full backup option on the Agent Properties (Index) tab
for an On Demand Data Protection operation, override the Set index cycle to every nn backup jobs setting in the Subclient Properties (General) tab of the default subclient.
for Archiver Agents, a new index will be automatically created during the first archiving job run after January 1st provided the associated subclient was created prior to July 1st of the preceding year. If a subclient is created between July 1st and December 31st, the new index will be automatically created during the first archiving job run after January 1st of the year after the next. For example, Subclient A was created on March 1st, 2009. When Subclient A’s first archiving job of 2010 was run on January 15th 2010, a new index was automatically created. Subclient B, however, was created on August 5th, 2009. Therefore, a new index for Subclient B will not be created until the first archiving job run in 2011.
Still, a new index can always be created on-demand for an individual job at any time. This is possible by selecting the Create New Index option in the Advanced Backup Options of a backup or schedule policy dialog box.
Administration Guide - SAP for Oracle iDataAgent
Page 165 of 193
Perform Consistency Check
Select this option to perform a consistency check.
Throttle check for 1 second
Enter the number of I/O operations to complete before a consistency check is performed.
Create Backup Copy immediately
Select to create an inline backup copy to start movement of snapshot to media, immediately after the completion of the SnapProtect backup job.
Verify Synthetic Full
Specifies to include never-changing files in the next backup when Synthetic Full is selected in the Backup Options dialog box. This is especially useful if you run a conventional full backup only once for a given subclient, and then run incremental (or differential) backups with periodic synthetic full backups after that for an extended period of time.
Catalog
Use this section to select index cache sharing and granular restartability options for the job. Note that these options are not applicable for the disaster recovery data protection.
Use shared profile if present with transaction logging
Select this option if you wish to use the shared index cache profile of the MediaAgent (if configured) to save a copy of the job's index cache for index cache sharing with transaction logging feature for granular job restartbility.
Shared profile with transaction logging provides job restartability in failover situations. This is a recommended configuration.
Use shared profile if present without transaction logging
Select this option if you wish to use the shared index cache profile of the MediaAgent (if configured) to save a copy of the index cache for index cache sharing without transaction logging feature for granular job restartbility. This is not a recommended configuration.
Use transaction logging
Select this option to use transaction logging feature to provide granular job restartbility (without using shared profile for index cache sharing).
None
Select this option to use neither shared profile nor transaction logging.
Advanced Backup Options (Startup)You can specify advanced backup startup options for the operation. For more information, select one of the following:
Set Priority
Use Default Priority
Select this option to use default priority for the job.
Change Priority
Use this option to modify the priority of a job between 0 (highest priority) and 999 (lowest priority). The Job Manager will use the priority setting when allocating the required resources.
Start job in suspended state
Specifies that this job will start in the Job Controller in a suspended state and cannot run until the job is manually resumed using the Resume option.
Description
Use this field to enter a description about the entity. This description can include information about the entity's content, cautionary notes, etc.
Advanced Backup Options (Job Retry)You can specify advanced backup startup options for attempting to restart a job. For more information, select one of the following:
Enable Total Running Time
The maximum elapsed time, in hours and minutes, from the time that the job is created. When the specified maximum elapsed time is reached, as long as the job is in the "Running" state, it will continue; if the job is not in the "Running" state when the specified time is reached, Job Manager will kill the job.
Enable Number of Retries
Administration Guide - SAP for Oracle iDataAgent
Page 166 of 193
The number of times that Job Manager will attempt to restart the job. Once the maximum number of retry attempts has been reached, if the job has still not restarted successfully, Job Manager will kill the job. Note that this job-based setting will not be valid if restartability has been turned off in the Job Management Control Panel.
Kill Running Jobs When Total Running Time Expires
Option to kill the job when the specified Total Running Time has elapsed, even if its state is "Running". This option is available only if you have specified a Total Running Time.
Advanced Backup Options (Data Path)Select the data path to be used for the backup/archive operation.
Ensure that the Library, MediaAgent, Drive Pool, and Drive selected for this operation is available online and is a part of the associated Storage Policy.
Use MediaAgent
Specifies the name of the MediaAgent that will be used to perform the backup operation. If necessary, you can change the name of the MediaAgent.
For example, if the library is shared and you wish to use a specific MediaAgent (instead of the system selected MediaAgent, or a MediaAgent which may be idle, or less critical) or if you know that the library attached to the specified MediaAgent.
Use Library
Specifies the name of the library that will be used to perform the backup operation. Use this option when you wish to backup to a specific library.
Use Drive Pool
Specifies the name of the Drive Pool that will be used to perform the backup operation. Use this option when you wish to backup using a specific Drive Pool.
Use Drive
Specifies the name of the Drive that will be used to perform the backup operation. Use this option when you wish to backup using a specific Drive from the selected Drive Pool.
Vault TrackingSelect options to export and track media, using Vault Tracker.
Export media after the job finishes
Specifies the media used by the data protection operation and media with the specific Media Status (if specified) will be exported and tracked by Vault Tracker.
Exclude Media Not Copied
When selected, allows you to exclude media with jobs that have to be copied.
Media Status
All
Click to select all media. Clear this option to select media with a specific status.
Active
Click to select media with its status marked as active.
Full
Click to select media with its status marked as full.
Overwrite Protected
Click to select media with its status marked as read-only .
Bad
Click to select media with its status marked as bad.
Export Location
Vault Tracking Options will be displayed only when a Vault Tracker license is available in the CommServe.
Vault Tracking options are only applicable for data protection operations using a storage policy associated with a library containing removable media (e.g., tape, optical or stand-alone.)
Administration Guide - SAP for Oracle iDataAgent
Page 167 of 193
Specifies the destination location and lists the stationary locations entered using the Export Location Details dialog box.
Track Transit
Specifies that transit information must be tracked, and lists the transit locations entered using the Export Location Details dialog box.
Use Virtual Mail Slots
Specifies the exported media is stored within the library in the virtual mail slots defined in the Library Properties (Media) dialog box.
Filter Media By Retention
Specifies that the system must automatically filter media based on whether the media has extended retention jobs or not.
Media with extended retention job(s)
Specifies that media with at least one extended retention job will be exported.
Media with no extended retention job(s)
Specifies that media with no extended retention jobs will be exported.
AlertUse this tab to configure an alert for a schedule policy.
Configure Alert
Alert
The currently configured Alert.
Add/Modify Alert
When clicked, opens the Alert Wizard to configure alerts for this operation.
Delete Alert
When clicked, deletes any existing alerts that are already configured.
Browse OptionsUse this dialog box to select the basic options under which you want to browse the data secured by a data protection operation in the selected client, agent, instance/partition, or backup set level depending on the functionality of a given agent. The system provides several browse options. These options influence the behavior of the browse operation in the subsequent Browse window.
Browse the Latest Data
Specifies whether the browse operation must display data from the most recent data protection operation (from now back to the last full backup) in the Browse window. (This option is selected by default.)
Specify Browse Time
Specifies whether the browse operation must display data, up to the specified date and time in the Browse window. Data secured after the specified date and time will be omitted in this window.
Browse Data Before/Browse to Point-In-Time
Specifies the date and time that must be used to display the data in the Browse window.
Time Zone
Lists the time zones. To change the time zone, click one in the list.
Client Computer
Lists the client computers available for the browse operation. This option is available only when the browse operation is performed either from the client node in the CommCell Browser, Browse & Recover option from the Tools menu in the CommCell Console or when the New Browse button is clicked in the Browse window.
Use MediaAgent
Specifies the name of MediaAgent that will be used to perform the browse (and restore) operation. If necessary, you can change the name of the MediaAgent. For example, if the library is shared and you wish to use a specific MediaAgent (instead of the system selected MediaAgent, or a MediaAgent which may be idle, or less critical) or if you know that the media containing the data you wish to restore is available in the library attached to the specified MediaAgent.
If the media containing the data is not available in the tape/optical library attached to the MediaAgent, the system will automatically prompt you to insert the
Administration Guide - SAP for Oracle iDataAgent
Page 168 of 193

appropriate media. In the case of a disk library, the operation will fail if the requested data is not available in the disk library attached to the specified MediaAgent.
Show Deleted Items
Specifies whether the operation will browse all the data (including deleted items) secured by all data protection operations for the selected backup set as of the specified browse items.
Back to Top
Advanced Browse OptionsUse this dialog to access additional browse capabilities for the browse window.
Exclude Data Before
Specifies that the browse operation must return data that has been backed up after the specified date. Select the date and time from the list.
Time Zone
Lists the time zones. To change the time zone, click one in the list.
Browse from copy precedence
When selected, the system retrieves the data from the storage policy copy with the specified copy precedence number. If data does not exist in the specified copy, the operation fails even if the data exists in another copy of the same storage policy.
When cleared, (or by default) the system retrieves data from the storage policy copy with the lowest copy precedence. If the data was pruned from the primary copy, the system automatically retrieves the data from the other copies of the storage policy starting with the copy with the lowest copy precedence and proceeding through the copies with higher copy precedence. Once the data is found, it is retrieved, and no further copies are checked.
SAP for Oracle Restore Options (General)Use this dialog box to select restore options.
Destination Client/Computer/Server
Displays the name of the client computer to which the selected data will be restored. To change the destination computer, select one from the list. The list includes clients:
Which are established as clients within the CommCell.
Clients with Operating Systems that support the cross-platform restore operation from this client. (Refer to the topic titled Cross Platform Restore Operations in Books Online for additional information.)
By default, data is restored to the same computer from which it was backed up.
Number of streams to use for restore
Use this space to set the number of data channels through which data is restored.
Restore Control File
Specifies whether to restore the control file from the latest control file backup to its original location.
Restore Archive Log
Specifies whether to restore the archived redo log files based on the following:
If the archived redo log files exist in the LOG_ARCHIVE_DEST location and are not corrupted, the backed up archived redo log files are not restored.
If the archived redo log files do not exist or are unusable, the backed up archived redo log files are restored to the directory specified in LOG_ARCHIVE_DEST.
This field and Restore Data are selected by default. You must select this field and/or Restore Data before you run the restore.
Restore Data
Specifies whether to restore the database based on the selected options.
This field and Restore Archive Log are selected by default. You must select this field and/or Restore Archive Log before you run the restore.
Recover
Specifies whether to recover the database by applying any incremental backups and archive redo logs that are needed to bring the database back to the current time.
Administration Guide - SAP for Oracle iDataAgent
Page 169 of 193

Before using the Recover option in combination with the Point-In-Time option to recover the Oracle database to a point-in-time, read Caution on the Use of RESETLOGS.
To use this option for SAP for Oracle, you must also select Restore Archive Log; otherwise, you can only manually recover the database.
Refresh
Click to refresh the screen with the current status of the database
Advanced
Click to select additional restore options.
Save As Script
Click to open the Save As Script dialog, which allows you to save this operation and the selected options as a script file (in XML format). The script can later be executed from the Command Line Interface using qoperation execute command.
When you save an operation as a script, each option in the dialog will have a corresponding xml parameter in the script file. When executing the script, you can modify the value for any of these XML parameters as per need.
To view the XML values for each of the options in the dialog, see the following:
Command Line XML Options
Back to Top
Job InitiationSelect from the following options.
Immediate
Run This Job Now
Specifies this job will run immediately.
Schedule
Specifies this job will be scheduled. When you click Configure, the Schedule Details dialog box will open and allow you to configure the schedule pattern.
Advanced
Click to select additional options.
Save As Script
Click to open the Save As Script dialog, which allows you to save this operation and the selected options as a script file (in XML format). The script can later be executed from the Command Line Interface using qoperation execute command.
When you save an operation as a script, each option in the dialog will have a corresponding xml parameter in the script file. When executing the script, you can modify the value for any of these XML parameters as per need.
To view the XML values for each of the options in the dialog, see the following:
Command Line XML Options
Advanced Restore/Recover/Retrieve Options (General)Use this dialog box to access additional restore/recover/retrieve options. Note that all the options described in this help may not be available and only the options displayed in the dialog box are applicable to the component installed on the client.
Use hardware revert capability if available
Specifies whether to revert the data to the time when the snapshot was created. Selecting this option brings back the entire LUN to the point when the snapshot was created, overwriting all the modifications to data since the snapshot creation. This option is only available if the snapshot engine used for SnapProtect backup supports the revert operation.
Use RMAN Restore
Specifies whether to use RMAN for the restore operations.
Use FileSystem Restore
Administration Guide - SAP for Oracle iDataAgent
Page 170 of 193
Specifies whether to use file system for the restore operations.
Advanced Restore Options (Copy Precedence)Choose the copy from which you wish to recover or retrieve. Select from the following options:
Restore/recover from copy precedence
When selected, the system recovers or retrieves data from the selected storage policy copy (Synchronous Copy or Selective Copy). If data does not exist in the specified copy, the data recovery or retrieve operation fails even if the data exists in another copy of the same storage policy.
When cleared, (or by default) the system recovers or retrieves data from the storage policy copy with the lowest copy precedence. If the data was pruned from the primary copy, the system automatically recovers or retrieves from the other copies of the storage policy in the following order:
1. Lowest copy precedence to highest copy precedence among all synchronous copies.
2. Lowest copy precedence to highest copy precedence among all selective copies (if your agent supports selective copies).
Once the data is found, it is recovered or retrieved, and no further copies are checked.
Synchronous Copy Precedence
When selected, the system recovers or retrieves data from the synchronous copy with the specified precedence number.
Selective Copy Precedence
When selected, the system recovers or retrieves data from the selective copy with the specified precedence number.
Advanced Restore Options (Data Path)Select the data path for the restore/recovery operation. You can specify the MediaAgent, Library, Drive Pool, and Drive from which the restore operation must be performed.
Use MediaAgent
Specifies the name of the MediaAgent that will be used to perform the restore operation. If necessary, you can change the name of the MediaAgent.
For example, if the library is shared and you wish to use a specific MediaAgent (instead of the system selected MediaAgent, or a MediaAgent which may be idle, or less critical) or if you know that the media containing the data you wish to restore is available in the library attached to the specified MediaAgent.
If the media containing the data is not available in the tape/optical library attached to the MediaAgent, the system will automatically prompt you to insert the appropriate media. In the case of a disk library, the operation will fail if the requested data is not available in the disk library attached to the specified MediaAgent.
Use Library
Specifies the name of the library that will be used to perform the restore operation. Use this option when you wish to restore using a specific library.
For example, if you know that the media containing the data you wish to restore is available in a specific library.
Use Drive Pool
Specifies the name of the Drive Pool that will be used to perform the restore operation. Use this option when you wish to restore using a specific Drive Pool.
To restore NAS data, select the drive pool type that was used to perform the backup, i.e., if a drive pool associated with an NDMP Remote Server was used to perform the backup, select a drive pool associated with an NDMP Remote Server. Similarly, if an NDMP drive pool was used, specify an NDMP drive pool.
Use Drive
Specifies the name of the drive in the drive pool that will be used to perform the restore operation. Use this option when you wish to restore using a specific Drive in the Drive Pool.
Use Proxy
Specifies the name of the proxy server that will be used to perform the restore operation. Use this option when you wish to restore using a proxy server.
Advanced Restore Options (Encryption)Pass-Phrase
Enter the pass-phrase that is currently assigned to the client, whose data you are restoring. Note that if you have changed the pass-phrase since you secured the client data, you need to provide the new pass-phrase here, not the old one.
Administration Guide - SAP for Oracle iDataAgent
Page 171 of 193
Re-enter Pass-Phrase
Re-enter the pass-phrase for confirmation.
If you attempt an immediate restore of encrypted data that was pass-phrase protected without entering the pass-phrase here, the restore operation will fail.
If you have an exported pass-phrase set up, and you enter the pass-phrase under Decryption, you over-ride (not overwrite) the client properties pass-phrase. Thus, if you enter the pass-phrase incorrectly, the restore does not complete successfully.
StartupSelect from the following options. Note that all the options described in this help may not be available and only the options displayed in the dialog box are applicable to the operation for which the information is being displayed.
Priority
Use Default Priority
If selected, the default priority for this type of job will be used in determining how the Job Manager will allocate resources for this job.
Change Priority
Use this option to manually specify the priority for the job, between 0 (highest priority) and 999 (lowest priority). The Job Manager will use the priority setting when allocating the required resources. This is useful if you have jobs that are very important and must complete, or jobs that can be moved to a lower priority.
Start up in suspended state
Specifies that this job will start in the Job Controller in a suspended state and cannot run until the job is manually resumed using the Resume option. This option can be used to add a level of manual control when a job is started. For example, you could schedule jobs to start in the suspended state and then choose which scheduled jobs complete by resuming the operation started in the suspended state.
Description
Use this field to enter a description about the entity. This description can include information about the entity's content, cautionary notes, etc.
Advanced Restore Options (Options)Use this dialog box to choose additional restore options. Note that all the options described in this help may not be available and only the options displayed in the dialog box are applicable to the agent or feature for which the information is being displayed.
Time Zone
To view the information in the time zone that you require, click a time zone in the list.
Reset Database
Specifies whether the reset database command will direct RMAN to create a new database incarnation record in the Recovery Catalog. Selecting this option will reset the target database, and is to be used only when you open the database with the RESETLOGS option. Read Caution on the Use of RESETLOGS in Books Online before selecting this option.
Open DB
Specifies whether to open the database after the restore/recovery operation has completed. Selecting this option will open the database, and enable the Reset Logs option.
Reset Logs
Lists the following choices for resetting the logs when the database is opened:
None - Open the database without any RESETLOGS option.
Yes - Open the database with RESETLOGS option.
No - Open the database with NORESETLOGS option.
To change the setting, select one from the list. This option is only enabled when the Open DB checkbox is selected.
Back to Top
Administration Guide - SAP for Oracle iDataAgent
Page 172 of 193
Advanced Restore Options (Restore)Use this dialog box to restore data and archive logs.
Restore Data
Specifies whether to restore datafiles from the specified full backup. When cleared, the system does not restore datafiles.
Data is restored from the latest full backup only. If you have performed incremental backups and need to apply this data to the full backup, see the description of the Recover option below.
To Point In Time
Specifies that the system will restore data files from the full backup created at or before the point-in-time based on the date and time that you specify. For a Point-In-Time recovery, you should have all log files available up to that time.
To change the date, click one in the list. Also, use the space to set the appropriate time. Ensure that the date/time that you enter is equal to or later than the date and time that the backup completed. Also, ensure that the date/time to which the datafiles are restored is earlier than or equal to the date and time of the control files restore.
Restore Archive Log
Specifies whether to restore the archive log files.
If the archived log files exist in the LOG_ARCHIVE_DEST location and are not corrupted, the backed up archive log files are not restored.
If the archive log files do not exist or are unusable, the backed up archive log files are restored to the directory specified in LOG_ARCHIVE_DEST.
When cleared, the system does not restore the archive log files.
By Log Time
Specifies that the archive log files will be restored based on the specified dates and times that you specify.
Start
When selected and used without the End Log Time option, specifies that the system will restore all archive log files starting from the date and time that you specify and up to the current date. When selected and used with the End Log Time option, specifies that the system will restore all archive log files starting from the date and time that you specify and up to the date specified by End Log Time.
To change the start date, click one in the list. Also, use the space provided to enter a new start time.
End
When selected and used with the Start Log Time option, specifies that the system will restore archive log files starting from the date and time specified by Start Log Time up to the date and time specified by End Log Time. When selected and used without the Start Log Time option, specifies that the system will restore archive log files from the oldest active backed up archive log file up to the date and time specified by End Log Time.
To change the end date, click one in the list. Also, use the space provided to enter a new end time.
By LSN
Specifies that the system will restore the archive log files based on the specified Log Sequence Numbers (LSNs) that you specify.
Start
When selected and used without the END LSN option, specifies that the system will restore archive log files starting from the log file with the sequence number that you specify in START LSN and ending with the current log file.
When selected and used with the END LSN option, specifies that the system will restore archive log files starting from the log file with the sequence number that you specify in START LSN and ending with the log file sequence number that you specify in END LSN. Use the space to enter the start LSN.
End
When selected and used without the START LSN option, specifies that the system will restore archive log files from the oldest available archive log file and ending with the sequence number that you specify in END LSN. All the Log Sequence Numbers from log #1 must be backed up to tape. Use the space to enter the end LSN.
Auto Detect Device
For SAP for Oracle, specifies whether the system should automatically detect the device that was used for the backup. This field is selected by default. If you have old data, you may need to use the SAP Device Type field below as an alternative.
SAP Device Type
For SAP for Oracle, click to manually select the device that was used for backup. If you have old data, you may need to use this field as an alternative to the Auto Detect Device field above.
Target Directory
Administration Guide - SAP for Oracle iDataAgent
Page 173 of 193
Use this space to type the specified destination directory to which the archive log files will be restored. Alternatively, click Browse for this purpose.
If you leave this field blank, the archive log files are restored to the LOG_ARCHIVE_DEST location.
Browse
Click to establish the directory for restoring the archived log files.
Back to Top
Advanced Restore Options (Control Files)Use this dialog box to restore the control file and the server parameter file.
Restore Control File
Specifies whether the system will restore the control file of the target database. If the To Point in Time and the Restore Control File As options are not selected, the control files is restored from the latest control file backup to its original location. When cleared, the system will not restore the control file of the target database.
Restore Control File As
Specifies whether the system will restore the control file to the name and location that you specify. If you select this option, either use the space to type the desired location or click Browse to find this location. The restored control file will not be automatically replicated to the control files of the database, but this can be done manually. Restoring a control file to a new location can be performed even without a recovery catalog. The database should be mounted for this type of restore.
Browse
Click to restore to the specified destination directory and enter a name for the control file.
Back to Top
Advanced Restore Options (Recover)Use this dialog box to recover the database.
Recover
Specifies whether the system will recover the database. Recover applies and restores any incremental backups and archived redo log files that are needed to bring the database back to the specified time.
Current Time
Specifies that the database will be recovered to the current time.
Point In Time
Specifies whether the system will recover the database to a specific point in time that you specify. To change the date, select the appropriate date in the list. Also, use the space to enter the appropriate time. The date and time to which the database is recovered must be later than or equal to the date and time of the control files restore.
Command Line XML Backup Options - SAP for Oracle iDataAgentOptions
Task Request Information
Description Field Name Data Type Commandline Parameter
Task task
Policy Type policyType enum policyType
Type taskType enum taskType
Initiated From initiatedFrom enum initiatedFrom
Task Flags taskFlags
Disabled disabled boolean disabled
Administration Guide - SAP for Oracle iDataAgent
Page 174 of 193

Common Job Options
Description Field Name Data Type Commandline Parameter
StartUp Options startUpOpts
Startup in suspended state startInSuspendedState boolean startInSuspendedState
Priority priority integer priority
Use Default Priority useDefaultPriority boolean useDefaultPriority
Job Retry Options jobRetryOpts
Kill Running Job When Total Running Time Expires
killRunningJobWhenTotalRunningTimeExpires boolean killRunningJobWhenTotalRunningTimeExpires
Enable Number Of Retries enableNumberOfRetries boolean enableNumberOfRetries
Number Of Retries numberOfRetries integer numberOfRetries
Running Time runningTime
Enable Total Running Time enableTotalRunningTime boolean enableTotalRunningTime
Total Running Time totalRunningTime integer totalRunningTime
Backup Job Options
Description Field Name Data Type Commandline Parameter
Backup Type backupLevel enum backupLevel (t)
Run Incremental Backup runIncrementalBackup boolean runIncrementalBackup
Inc Level incLevel enum incLevel
Do Not Truncate Log doNotTruncateLog boolean doNotTruncateLog
Sybase Skip Full after Log Backup sybaseSkipFullafterLogBkp boolean sybaseSkipFullafterLogBkp
Enable Granular Recovery collectMetaInfo boolean collectMetaInfo
Media Backup Option mediaOpt
Allow Other Schedules To Use Media Set
allowOtherSchedulesToUseMediaSet boolean allowOtherSchedulesToUseMediaSet
Mark Media Full On Success markMediaFullOnSuccess boolean markMediaFullOnSuccess
Start New Media startNewMedia boolean startNewMedia
Days numberofDays integer numberofDays
Extend Job Retention retentionJobType enum retentionJobType
Data Backup Option dataOpt
Create new index createNewIndex boolean createNewIndex
Follow mount points followMountPoints boolean followMountPoints
Perform Consistency Check skipConsistencyCheck boolean skipConsistencyCheck
Vault Tracker Backup Option vaultTrackerOpt
Exclude Media Not Copied excludeMediaNotCopied boolean excludeMediaNotCopied
Export Media After Job Finishes exportMediaAfterJobFinishes boolean exportMediaAfterJobFinishes
Track Transit trackTransit boolean trackTransit
Use Virtual Mail Slots useVirtualMailSlots boolean useVirtualMailSlots
Filter Media By Retention filterMediaByRetention boolean filterMediaByRetention
Media with extended retention job(s)
mediaWithExtendedRetentionJobs boolean mediaWithExtendedRetentionJobs
Media Status mediaStatus
All all boolean all
Active active boolean active
Full full boolean full
Overwrite Protected overwriteProtected boolean overwriteProtected
Bad bad boolean bad
Export Location: exportLocation
Location Name locationName string exportLocation/locationName (loc)
In Transit Location inTransitLocation
Location Name locationName string inTransitLocation/locationName (loc)
Oracle Backup Option oracleOptions
Level level integer level
Administration Guide - SAP for Oracle iDataAgent
Page 175 of 193

Usage
Cumulative cumulative boolean cumulative
SubTask Options
Description Field Name Data Type Commandline Parameter
Sub Task Type subTaskType enum subTaskType (st)
Operation Type operationType enum operationType (op)
Associations
Description Field Name Data Type Commandline Parameter
Backupset Name backupsetName string backupsetName (b)
Subclient Name subclientName string subclientName (s)
Client Name clientName string clientName (c)
App Name appName string appName (a)
Instance Name instanceName string instanceName (i)
Task Request Information
Task
policyType Home
Type: enumDefault Value: DATA_PROTECTIONPossible Values: DATA_PROTECTION , AUX_COPY , SRM_REPORT , SINGLE_INSTANCING , SRM_JOBS , SUBCLIENT_FILTER , CONTENT_INDEX , CONTENT_INDEXCommand Line Paramter: policyTypeLocation: taskInfo/task/policyType
Policy Type
taskType Home
Type: enumDefault Value: IMMEDIATEPossible Values: NONE , IMMEDIATE , SCHEDULE , SAVED_REPORT , SCHEDULE_POLICY , WORKFLOW , PREVIEW , AUTOMATIC_COPY , AGENTLESS_SRM , AGENTLESS_SRMCommand Line Paramter: taskTypeLocation: taskInfo/task/taskType
Type
initiatedFrom Home
Type: enumDefault Value: GUIPossible Values: NONE , GUI , COMMANDLINE , SYSTEM , SCRIPT , SCHEDULE , SCHEDULECommand Line Paramter: initiatedFromLocation: taskInfo/task/initiatedFrom
Initiated From
Task Flags
disabled Home
Type: booleanPossible Values: true/falseCommand Line Paramter: disabledLocation: taskInfo/task/taskFlags/disabled
Disabled
Common Job Options
StartUp Options
startInSuspendedState Home
Type: booleanPossible Values: true/falseCommand Line Paramter: startInSuspendedStateLocation: taskInfo/subTasks/options/commonOpts/startUpOpts/startInSuspendedState
Startup in suspended state
priority Home
Type: integerCommand Line Paramter: priority
Administration Guide - SAP for Oracle iDataAgent
Page 176 of 193
Location: taskInfo/subTasks/options/commonOpts/startUpOpts/priority
Priority
useDefaultPriority Home
Type: booleanDefault Value: truePossible Values: true/falseCommand Line Paramter: useDefaultPriorityLocation: taskInfo/subTasks/options/commonOpts/startUpOpts/useDefaultPriority
Use Default Priority
Job Retry Options
killRunningJobWhenTotalRunningTimeExpires Home
Type: booleanPossible Values: true/falseCommand Line Paramter: killRunningJobWhenTotalRunningTimeExpiresLocation: taskInfo/subTasks/options/commonOpts/jobRetryOpts/killRunningJobWhenTotalRunningTimeExpires
Kill Running Job When Total Running Time Expires
enableNumberOfRetries Home
Type: booleanPossible Values: true/falseCommand Line Paramter: enableNumberOfRetriesLocation: taskInfo/subTasks/options/commonOpts/jobRetryOpts/enableNumberOfRetries
Enable Number Of Retries
numberOfRetries Home
Type: integerDefault Value: 0Command Line Paramter: numberOfRetriesLocation: taskInfo/subTasks/options/commonOpts/jobRetryOpts/numberOfRetries
Number Of Retries
Running Time
enableTotalRunningTime Home
Type: booleanPossible Values: true/falseCommand Line Paramter: enableTotalRunningTimeLocation: taskInfo/subTasks/options/commonOpts/jobRetryOpts/runningTime/enableTotalRunningTime
Enable Total Running Time
totalRunningTime Home
Type: integerDefault Value: 3600Command Line Paramter: totalRunningTimeLocation: taskInfo/subTasks/options/commonOpts/jobRetryOpts/runningTime/totalRunningTime
Total Running Time
Backup Job Options
backupLevel Home
Type: enumDefault Value: INCREMENTALPossible Values: NONE , FULL , INCREMENTAL , DIFFERENTIAL , SYNTHETIC_FULL , ASR , TRANSACTION_LOG , PRE_SELECT , QR_SNAPSHOT , QR_CREATE_QR_VOLUME , QR_INCREMENTALLY_UPDATE_QR_VOLUME , SRM_ANALYSIS , SRM_DISCOVERY , MINING , DATA_VERIFICATION , DATA_VERIFICATIONCommand Line Paramter: backupLevelLocation: taskInfo/subTasks/options/backupOpts/backupLevel
Backup Type
runIncrementalBackup Home
Type: booleanDefault Value: truePossible Values: true/falseCommand Line Paramter: runIncrementalBackupLocation: taskInfo/subTasks/options/backupOpts/runIncrementalBackup
Run Incremental Backup
incLevel Home
Type: enumDefault Value: BEFORE_SYNTHPossible Values: NONE , BEFORE_SYNTH , AFTER_SYNTH , AFTER_SYNTHCommand Line Paramter: incLevelLocation: taskInfo/subTasks/options/backupOpts/incLevel
Inc Level
Administration Guide - SAP for Oracle iDataAgent
Page 177 of 193
doNotTruncateLog Home
Type: booleanDefault Value: falsePossible Values: true/falseCommand Line Paramter: doNotTruncateLogLocation: taskInfo/subTasks/options/backupOpts/doNotTruncateLog
Do Not Truncate Log
sybaseSkipFullafterLogBkp Home
Type: booleanPossible Values: true/falseCommand Line Paramter: sybaseSkipFullafterLogBkpLocation: taskInfo/subTasks/options/backupOpts/sybaseSkipFullafterLogBkp
Sybase Skip Full after Log Backup
collectMetaInfo Home
Type: booleanDefault Value: truePossible Values: true/falseCommand Line Paramter: collectMetaInfoLocation: taskInfo/subTasks/options/backupOpts/collectMetaInfo
Enable Granular Recovery
Media Backup Option
allowOtherSchedulesToUseMediaSet Home
Type: booleanDefault Value: truePossible Values: true/falseCommand Line Paramter: allowOtherSchedulesToUseMediaSetLocation: taskInfo/subTasks/options/backupOpts/mediaOpt/allowOtherSchedulesToUseMediaSet
Allow Other Schedules To Use Media Set
markMediaFullOnSuccess Home
Type: booleanPossible Values: true/falseCommand Line Paramter: markMediaFullOnSuccessLocation: taskInfo/subTasks/options/backupOpts/mediaOpt/markMediaFullOnSuccess
Mark Media Full On Success
startNewMedia Home
Type: booleanPossible Values: true/falseCommand Line Paramter: startNewMediaLocation: taskInfo/subTasks/options/backupOpts/mediaOpt/startNewMedia
Start New Media
numberofDays Home
Type: integerCommand Line Paramter: numberofDaysLocation: taskInfo/subTasks/options/backupOpts/mediaOpt/numberofDays
Days
retentionJobType Home
Type: enumDefault Value: STORAGE_POLICY_DEFAULTPossible Values: INFINITE , NO_OF_DAYS , STORAGE_POLICY_DEFAULT , STORAGE_POLICY_DEFAULTCommand Line Paramter: retentionJobTypeLocation: taskInfo/subTasks/options/backupOpts/mediaOpt/retentionJobType
Extend Job Retention
Data Backup Option
createNewIndex Home
Type: booleanDefault Value: truePossible Values: true/falseCommand Line Paramter: createNewIndexLocation: taskInfo/subTasks/options/backupOpts/dataOpt/createNewIndex
Create new index
followMountPoints Home
Type: booleanDefault Value: truePossible Values: true/falseCommand Line Paramter: followMountPointsLocation: taskInfo/subTasks/options/backupOpts/dataOpt/followMountPoints
Follow mount points
Administration Guide - SAP for Oracle iDataAgent
Page 178 of 193
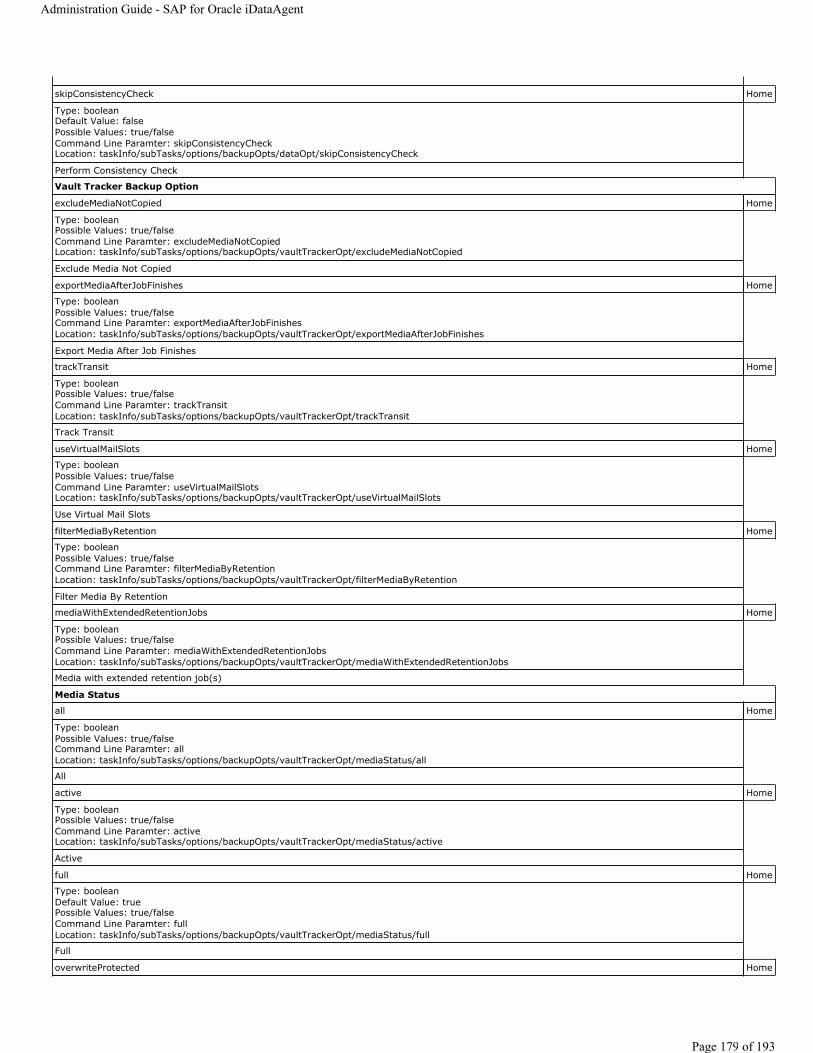
skipConsistencyCheck Home
Type: booleanDefault Value: falsePossible Values: true/falseCommand Line Paramter: skipConsistencyCheckLocation: taskInfo/subTasks/options/backupOpts/dataOpt/skipConsistencyCheck
Perform Consistency Check
Vault Tracker Backup Option
excludeMediaNotCopied Home
Type: booleanPossible Values: true/falseCommand Line Paramter: excludeMediaNotCopiedLocation: taskInfo/subTasks/options/backupOpts/vaultTrackerOpt/excludeMediaNotCopied
Exclude Media Not Copied
exportMediaAfterJobFinishes Home
Type: booleanPossible Values: true/falseCommand Line Paramter: exportMediaAfterJobFinishesLocation: taskInfo/subTasks/options/backupOpts/vaultTrackerOpt/exportMediaAfterJobFinishes
Export Media After Job Finishes
trackTransit Home
Type: booleanPossible Values: true/falseCommand Line Paramter: trackTransitLocation: taskInfo/subTasks/options/backupOpts/vaultTrackerOpt/trackTransit
Track Transit
useVirtualMailSlots Home
Type: booleanPossible Values: true/falseCommand Line Paramter: useVirtualMailSlotsLocation: taskInfo/subTasks/options/backupOpts/vaultTrackerOpt/useVirtualMailSlots
Use Virtual Mail Slots
filterMediaByRetention Home
Type: booleanPossible Values: true/falseCommand Line Paramter: filterMediaByRetentionLocation: taskInfo/subTasks/options/backupOpts/vaultTrackerOpt/filterMediaByRetention
Filter Media By Retention
mediaWithExtendedRetentionJobs Home
Type: booleanPossible Values: true/falseCommand Line Paramter: mediaWithExtendedRetentionJobsLocation: taskInfo/subTasks/options/backupOpts/vaultTrackerOpt/mediaWithExtendedRetentionJobs
Media with extended retention job(s)
Media Status
all Home
Type: booleanPossible Values: true/falseCommand Line Paramter: allLocation: taskInfo/subTasks/options/backupOpts/vaultTrackerOpt/mediaStatus/all
All
active Home
Type: booleanPossible Values: true/falseCommand Line Paramter: activeLocation: taskInfo/subTasks/options/backupOpts/vaultTrackerOpt/mediaStatus/active
Active
full Home
Type: booleanDefault Value: truePossible Values: true/falseCommand Line Paramter: fullLocation: taskInfo/subTasks/options/backupOpts/vaultTrackerOpt/mediaStatus/full
Full
overwriteProtected Home
Administration Guide - SAP for Oracle iDataAgent
Page 179 of 193
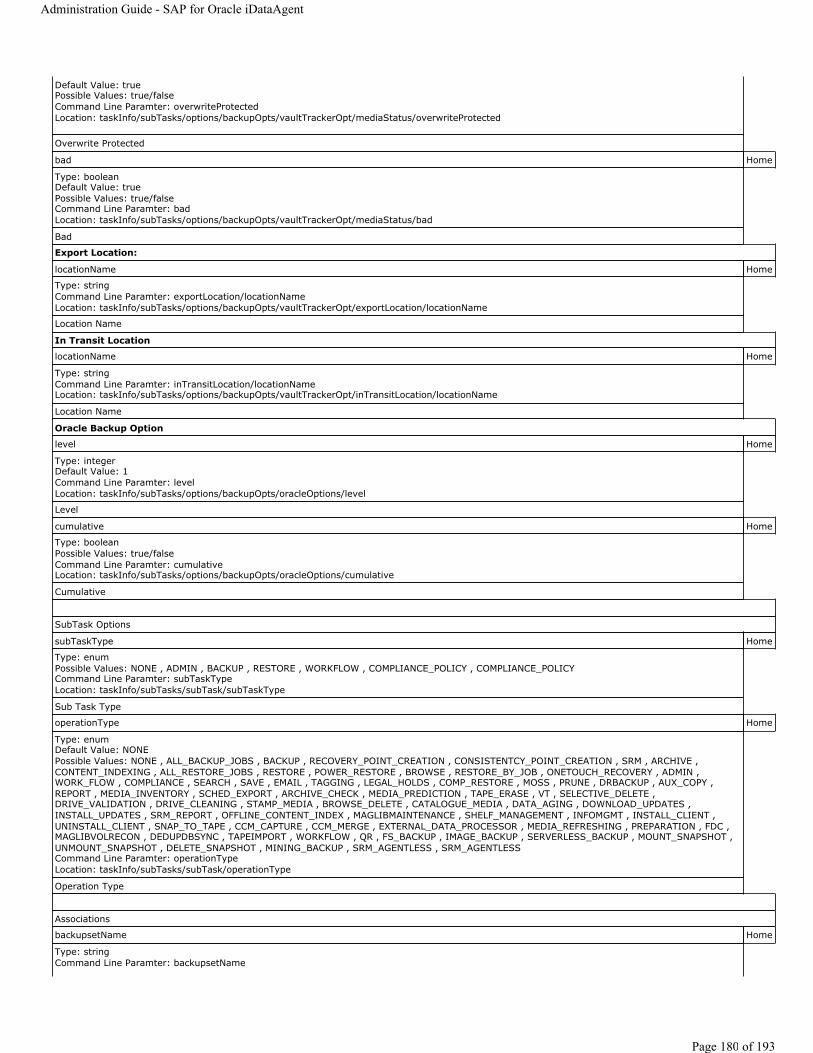
Default Value: truePossible Values: true/falseCommand Line Paramter: overwriteProtectedLocation: taskInfo/subTasks/options/backupOpts/vaultTrackerOpt/mediaStatus/overwriteProtected
Overwrite Protected
bad Home
Type: booleanDefault Value: truePossible Values: true/falseCommand Line Paramter: badLocation: taskInfo/subTasks/options/backupOpts/vaultTrackerOpt/mediaStatus/bad
Bad
Export Location:
locationName Home
Type: stringCommand Line Paramter: exportLocation/locationNameLocation: taskInfo/subTasks/options/backupOpts/vaultTrackerOpt/exportLocation/locationName
Location Name
In Transit Location
locationName Home
Type: stringCommand Line Paramter: inTransitLocation/locationNameLocation: taskInfo/subTasks/options/backupOpts/vaultTrackerOpt/inTransitLocation/locationName
Location Name
Oracle Backup Option
level Home
Type: integerDefault Value: 1Command Line Paramter: levelLocation: taskInfo/subTasks/options/backupOpts/oracleOptions/level
Level
cumulative Home
Type: booleanPossible Values: true/falseCommand Line Paramter: cumulativeLocation: taskInfo/subTasks/options/backupOpts/oracleOptions/cumulative
Cumulative
SubTask Options
subTaskType Home
Type: enumPossible Values: NONE , ADMIN , BACKUP , RESTORE , WORKFLOW , COMPLIANCE_POLICY , COMPLIANCE_POLICYCommand Line Paramter: subTaskTypeLocation: taskInfo/subTasks/subTask/subTaskType
Sub Task Type
operationType Home
Type: enumDefault Value: NONEPossible Values: NONE , ALL_BACKUP_JOBS , BACKUP , RECOVERY_POINT_CREATION , CONSISTENTCY_POINT_CREATION , SRM , ARCHIVE , CONTENT_INDEXING , ALL_RESTORE_JOBS , RESTORE , POWER_RESTORE , BROWSE , RESTORE_BY_JOB , ONETOUCH_RECOVERY , ADMIN , WORK_FLOW , COMPLIANCE , SEARCH , SAVE , EMAIL , TAGGING , LEGAL_HOLDS , COMP_RESTORE , MOSS , PRUNE , DRBACKUP , AUX_COPY , REPORT , MEDIA_INVENTORY , SCHED_EXPORT , ARCHIVE_CHECK , MEDIA_PREDICTION , TAPE_ERASE , VT , SELECTIVE_DELETE , DRIVE_VALIDATION , DRIVE_CLEANING , STAMP_MEDIA , BROWSE_DELETE , CATALOGUE_MEDIA , DATA_AGING , DOWNLOAD_UPDATES , INSTALL_UPDATES , SRM_REPORT , OFFLINE_CONTENT_INDEX , MAGLIBMAINTENANCE , SHELF_MANAGEMENT , INFOMGMT , INSTALL_CLIENT , UNINSTALL_CLIENT , SNAP_TO_TAPE , CCM_CAPTURE , CCM_MERGE , EXTERNAL_DATA_PROCESSOR , MEDIA_REFRESHING , PREPARATION , FDC , MAGLIBVOLRECON , DEDUPDBSYNC , TAPEIMPORT , WORKFLOW , QR , FS_BACKUP , IMAGE_BACKUP , SERVERLESS_BACKUP , MOUNT_SNAPSHOT , UNMOUNT_SNAPSHOT , DELETE_SNAPSHOT , MINING_BACKUP , SRM_AGENTLESS , SRM_AGENTLESSCommand Line Paramter: operationTypeLocation: taskInfo/subTasks/subTask/operationType
Operation Type
Associations
backupsetName Home
Type: stringCommand Line Paramter: backupsetName
Administration Guide - SAP for Oracle iDataAgent
Page 180 of 193
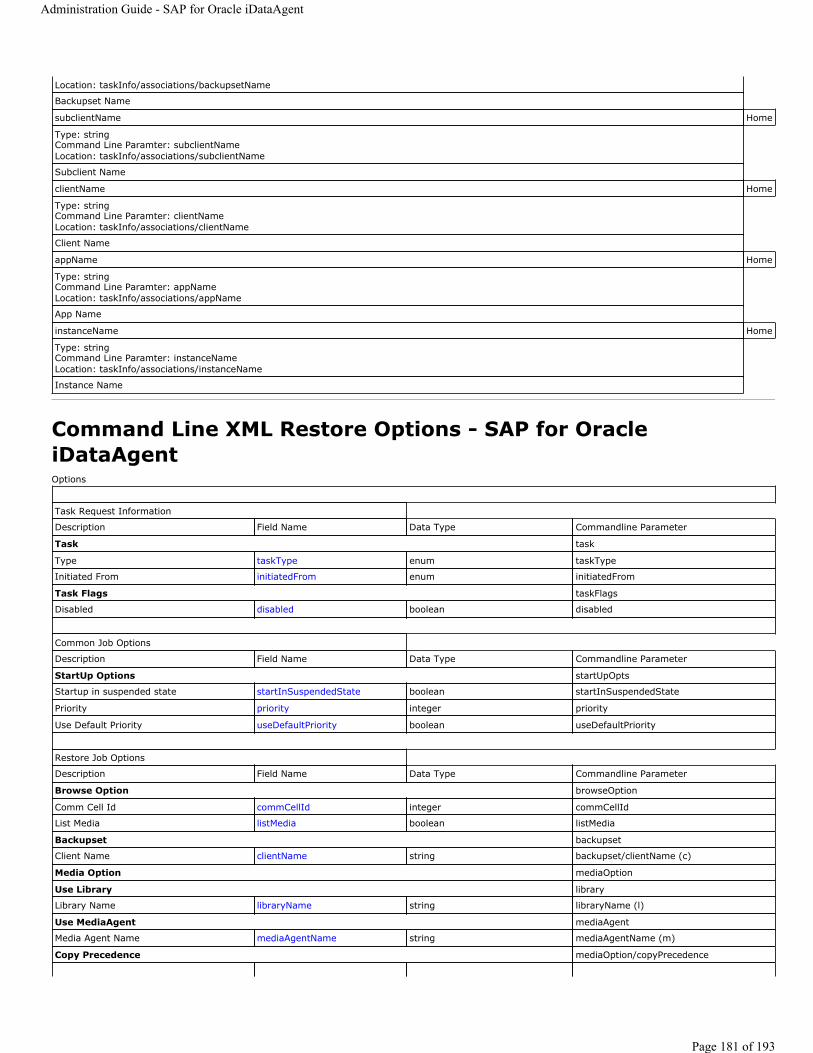
Command Line XML Restore Options - SAP for Oracle iDataAgentOptions
Location: taskInfo/associations/backupsetName
Backupset Name
subclientName Home
Type: stringCommand Line Paramter: subclientNameLocation: taskInfo/associations/subclientName
Subclient Name
clientName Home
Type: stringCommand Line Paramter: clientNameLocation: taskInfo/associations/clientName
Client Name
appName Home
Type: stringCommand Line Paramter: appNameLocation: taskInfo/associations/appName
App Name
instanceName Home
Type: stringCommand Line Paramter: instanceNameLocation: taskInfo/associations/instanceName
Instance Name
Task Request Information
Description Field Name Data Type Commandline Parameter
Task task
Type taskType enum taskType
Initiated From initiatedFrom enum initiatedFrom
Task Flags taskFlags
Disabled disabled boolean disabled
Common Job Options
Description Field Name Data Type Commandline Parameter
StartUp Options startUpOpts
Startup in suspended state startInSuspendedState boolean startInSuspendedState
Priority priority integer priority
Use Default Priority useDefaultPriority boolean useDefaultPriority
Restore Job Options
Description Field Name Data Type Commandline Parameter
Browse Option browseOption
Comm Cell Id commCellId integer commCellId
List Media listMedia boolean listMedia
Backupset backupset
Client Name clientName string backupset/clientName (c)
Media Option mediaOption
Use Library library
Library Name libraryName string libraryName (l)
Use MediaAgent mediaAgent
Media Agent Name mediaAgentName string mediaAgentName (m)
Copy Precedence mediaOption/copyPrecedence
Administration Guide - SAP for Oracle iDataAgent
Page 181 of 193
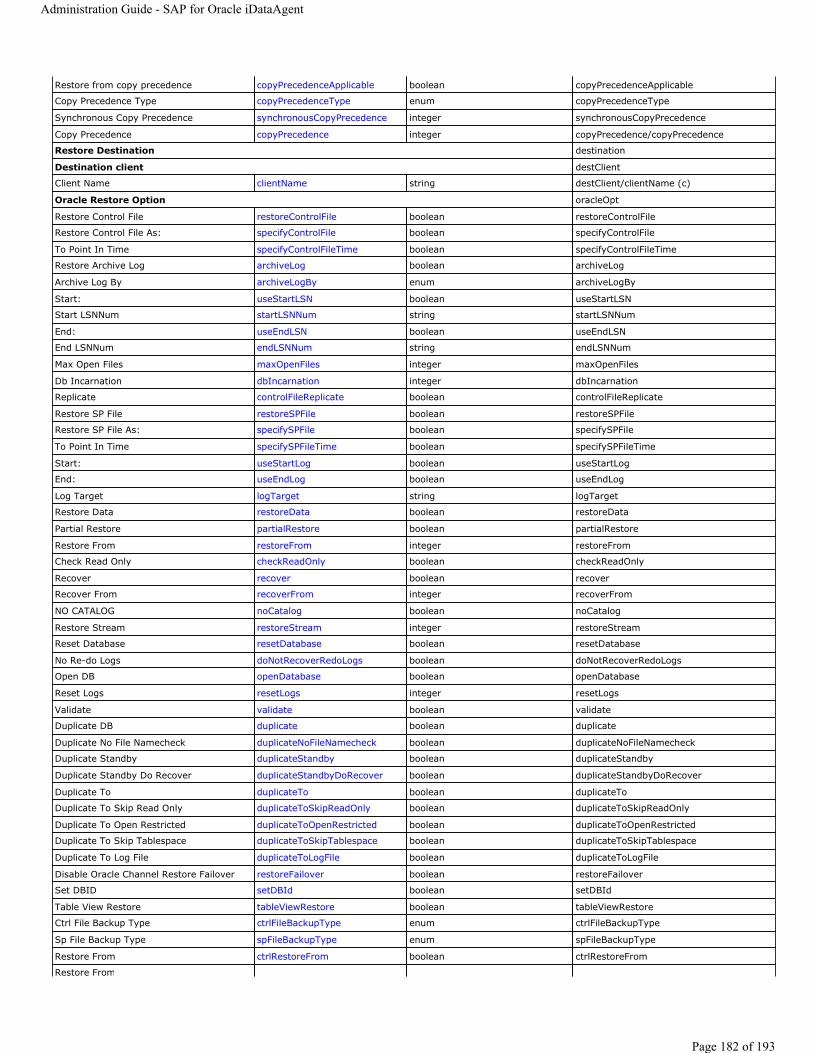
Restore from copy precedence copyPrecedenceApplicable boolean copyPrecedenceApplicable
Copy Precedence Type copyPrecedenceType enum copyPrecedenceType
Synchronous Copy Precedence synchronousCopyPrecedence integer synchronousCopyPrecedence
Copy Precedence copyPrecedence integer copyPrecedence/copyPrecedence
Restore Destination destination
Destination client destClient
Client Name clientName string destClient/clientName (c)
Oracle Restore Option oracleOpt
Restore Control File restoreControlFile boolean restoreControlFile
Restore Control File As: specifyControlFile boolean specifyControlFile
To Point In Time specifyControlFileTime boolean specifyControlFileTime
Restore Archive Log archiveLog boolean archiveLog
Archive Log By archiveLogBy enum archiveLogBy
Start: useStartLSN boolean useStartLSN
Start LSNNum startLSNNum string startLSNNum
End: useEndLSN boolean useEndLSN
End LSNNum endLSNNum string endLSNNum
Max Open Files maxOpenFiles integer maxOpenFiles
Db Incarnation dbIncarnation integer dbIncarnation
Replicate controlFileReplicate boolean controlFileReplicate
Restore SP File restoreSPFile boolean restoreSPFile
Restore SP File As: specifySPFile boolean specifySPFile
To Point In Time specifySPFileTime boolean specifySPFileTime
Start: useStartLog boolean useStartLog
End: useEndLog boolean useEndLog
Log Target logTarget string logTarget
Restore Data restoreData boolean restoreData
Partial Restore partialRestore boolean partialRestore
Restore From restoreFrom integer restoreFrom
Check Read Only checkReadOnly boolean checkReadOnly
Recover recover boolean recover
Recover From recoverFrom integer recoverFrom
NO CATALOG noCatalog boolean noCatalog
Restore Stream restoreStream integer restoreStream
Reset Database resetDatabase boolean resetDatabase
No Re-do Logs doNotRecoverRedoLogs boolean doNotRecoverRedoLogs
Open DB openDatabase boolean openDatabase
Reset Logs resetLogs integer resetLogs
Validate validate boolean validate
Duplicate DB duplicate boolean duplicate
Duplicate No File Namecheck duplicateNoFileNamecheck boolean duplicateNoFileNamecheck
Duplicate Standby duplicateStandby boolean duplicateStandby
Duplicate Standby Do Recover duplicateStandbyDoRecover boolean duplicateStandbyDoRecover
Duplicate To duplicateTo boolean duplicateTo
Duplicate To Skip Read Only duplicateToSkipReadOnly boolean duplicateToSkipReadOnly
Duplicate To Open Restricted duplicateToOpenRestricted boolean duplicateToOpenRestricted
Duplicate To Skip Tablespace duplicateToSkipTablespace boolean duplicateToSkipTablespace
Duplicate To Log File duplicateToLogFile boolean duplicateToLogFile
Disable Oracle Channel Restore Failover restoreFailover boolean restoreFailover
Set DBID setDBId boolean setDBId
Table View Restore tableViewRestore boolean tableViewRestore
Ctrl File Backup Type ctrlFileBackupType enum ctrlFileBackupType
Sp File Backup Type spFileBackupType enum spFileBackupType
Restore From ctrlRestoreFrom boolean ctrlRestoreFrom
Restore From
Administration Guide - SAP for Oracle iDataAgent
Page 182 of 193

Usage
spFileRestoreFrom boolean spFileRestoreFrom
Os ID osID integer osID
Restore Tablespace restoreTablespace boolean restoreTablespace
Auto Detect Device autoDetectDevice boolean autoDetectDevice
Sap Device Type isDeviceTypeSelected boolean isDeviceTypeSelected
Device Type deviceType enum deviceType
By Tag restoreByTag boolean restoreByTag
Switch Database mode for Restore switchDatabaseMode boolean switchDatabaseMode
Tag restoreDataTag boolean restoreDataTag
Catalog Connect2 catalogConnect2
Password password string password (p)
Control File Time controlFileTime
Time time integer controlFileTime/time
SPFile Time SPFileTime
Time time integer SPFileTime/time
Log Time logTime
From Time fromTime integer fromTime
To Time toTime integer toTime
Restore Time restoreTime
Time time integer restoreTime/time
Recover Time recoverTime
Time time integer recoverTime/time
Time Zone timeZone
Time Zone Name TimeZoneName string TimeZoneName
Restore Common Options commonOptions
Automatically Detect Regular Expressions detectRegularExpression boolean detectRegularExpression
Restore device files as regular files restoreDeviceFilesAsRegularFiles boolean restoreDeviceFilesAsRegularFiles
Restore Space Restrictions restoreSpaceRestrictions boolean restoreSpaceRestrictions
Ignore Namespace Requirements ignoreNamespaceRequirements boolean ignoreNamespaceRequirements
Skip errors and continue skipErrorsAndContinue boolean skipErrorsAndContinue
Use hardware revert capability if available revert boolean revert
Recover All Protected Mails recoverAllProtectedMails boolean recoverAllProtectedMails
Is From Browse Backup isFromBrowseBackup boolean isFromBrowseBackup
Cluster DBBackedup clusterDBBackedup boolean clusterDBBackedup
SubTask Options
Description Field Name Data Type Commandline Parameter
Sub Task Type subTaskType enum subTaskType (st)
Operation Type operationType enum operationType (op)
Associations
Description Field Name Data Type Commandline Parameter
Backupset Name backupsetName string backupsetName (b)
Client Name clientName string associations/clientName (c)
App Name appName string appName (a)
Instance Name instanceName string instanceName (i)
Task Request Information
Task
taskType Home
Type: enumDefault Value: IMMEDIATE
Administration Guide - SAP for Oracle iDataAgent
Page 183 of 193
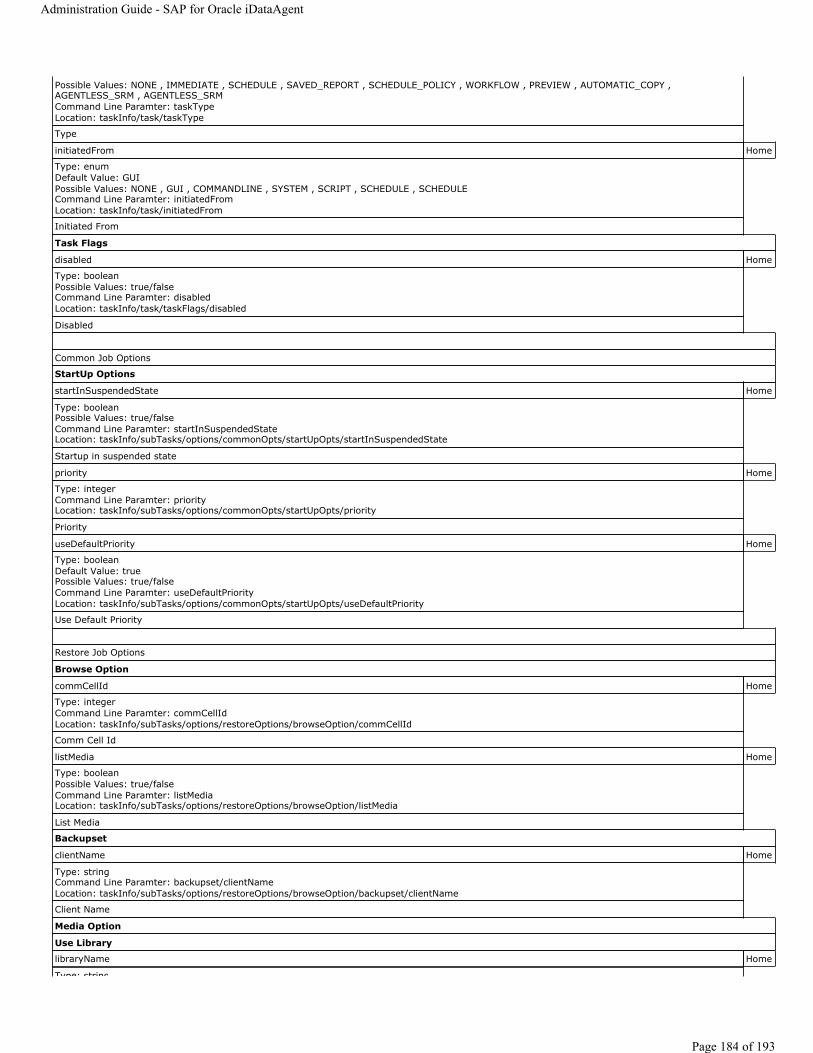
Possible Values: NONE , IMMEDIATE , SCHEDULE , SAVED_REPORT , SCHEDULE_POLICY , WORKFLOW , PREVIEW , AUTOMATIC_COPY , AGENTLESS_SRM , AGENTLESS_SRMCommand Line Paramter: taskTypeLocation: taskInfo/task/taskType
Type
initiatedFrom Home
Type: enumDefault Value: GUIPossible Values: NONE , GUI , COMMANDLINE , SYSTEM , SCRIPT , SCHEDULE , SCHEDULECommand Line Paramter: initiatedFromLocation: taskInfo/task/initiatedFrom
Initiated From
Task Flags
disabled Home
Type: booleanPossible Values: true/falseCommand Line Paramter: disabledLocation: taskInfo/task/taskFlags/disabled
Disabled
Common Job Options
StartUp Options
startInSuspendedState Home
Type: booleanPossible Values: true/falseCommand Line Paramter: startInSuspendedStateLocation: taskInfo/subTasks/options/commonOpts/startUpOpts/startInSuspendedState
Startup in suspended state
priority Home
Type: integerCommand Line Paramter: priorityLocation: taskInfo/subTasks/options/commonOpts/startUpOpts/priority
Priority
useDefaultPriority Home
Type: booleanDefault Value: truePossible Values: true/falseCommand Line Paramter: useDefaultPriorityLocation: taskInfo/subTasks/options/commonOpts/startUpOpts/useDefaultPriority
Use Default Priority
Restore Job Options
Browse Option
commCellId Home
Type: integerCommand Line Paramter: commCellIdLocation: taskInfo/subTasks/options/restoreOptions/browseOption/commCellId
Comm Cell Id
listMedia Home
Type: booleanPossible Values: true/falseCommand Line Paramter: listMediaLocation: taskInfo/subTasks/options/restoreOptions/browseOption/listMedia
List Media
Backupset
clientName Home
Type: stringCommand Line Paramter: backupset/clientNameLocation: taskInfo/subTasks/options/restoreOptions/browseOption/backupset/clientName
Client Name
Media Option
Use Library
libraryName Home
Type: string
Administration Guide - SAP for Oracle iDataAgent
Page 184 of 193
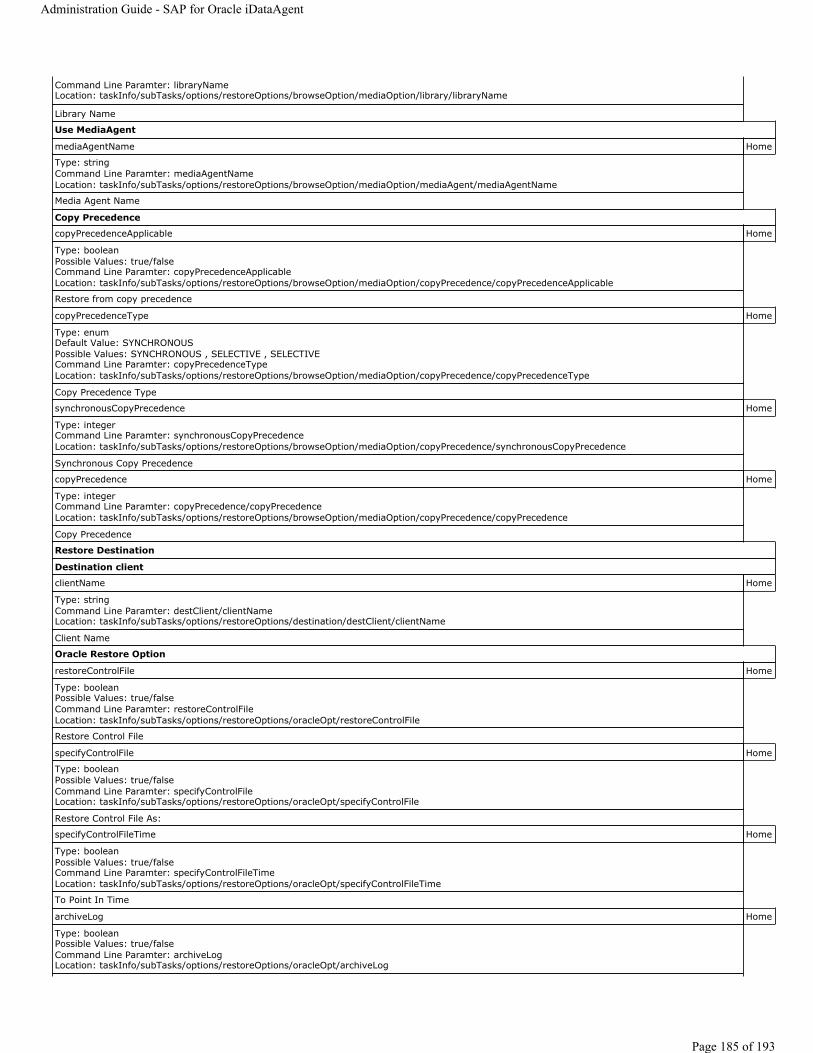
Command Line Paramter: libraryNameLocation: taskInfo/subTasks/options/restoreOptions/browseOption/mediaOption/library/libraryName
Library Name
Use MediaAgent
mediaAgentName Home
Type: stringCommand Line Paramter: mediaAgentNameLocation: taskInfo/subTasks/options/restoreOptions/browseOption/mediaOption/mediaAgent/mediaAgentName
Media Agent Name
Copy Precedence
copyPrecedenceApplicable Home
Type: booleanPossible Values: true/falseCommand Line Paramter: copyPrecedenceApplicableLocation: taskInfo/subTasks/options/restoreOptions/browseOption/mediaOption/copyPrecedence/copyPrecedenceApplicable
Restore from copy precedence
copyPrecedenceType Home
Type: enumDefault Value: SYNCHRONOUSPossible Values: SYNCHRONOUS , SELECTIVE , SELECTIVECommand Line Paramter: copyPrecedenceTypeLocation: taskInfo/subTasks/options/restoreOptions/browseOption/mediaOption/copyPrecedence/copyPrecedenceType
Copy Precedence Type
synchronousCopyPrecedence Home
Type: integerCommand Line Paramter: synchronousCopyPrecedenceLocation: taskInfo/subTasks/options/restoreOptions/browseOption/mediaOption/copyPrecedence/synchronousCopyPrecedence
Synchronous Copy Precedence
copyPrecedence Home
Type: integerCommand Line Paramter: copyPrecedence/copyPrecedenceLocation: taskInfo/subTasks/options/restoreOptions/browseOption/mediaOption/copyPrecedence/copyPrecedence
Copy Precedence
Restore Destination
Destination client
clientName Home
Type: stringCommand Line Paramter: destClient/clientNameLocation: taskInfo/subTasks/options/restoreOptions/destination/destClient/clientName
Client Name
Oracle Restore Option
restoreControlFile Home
Type: booleanPossible Values: true/falseCommand Line Paramter: restoreControlFileLocation: taskInfo/subTasks/options/restoreOptions/oracleOpt/restoreControlFile
Restore Control File
specifyControlFile Home
Type: booleanPossible Values: true/falseCommand Line Paramter: specifyControlFileLocation: taskInfo/subTasks/options/restoreOptions/oracleOpt/specifyControlFile
Restore Control File As:
specifyControlFileTime Home
Type: booleanPossible Values: true/falseCommand Line Paramter: specifyControlFileTimeLocation: taskInfo/subTasks/options/restoreOptions/oracleOpt/specifyControlFileTime
To Point In Time
archiveLog Home
Type: booleanPossible Values: true/falseCommand Line Paramter: archiveLogLocation: taskInfo/subTasks/options/restoreOptions/oracleOpt/archiveLog
Administration Guide - SAP for Oracle iDataAgent
Page 185 of 193
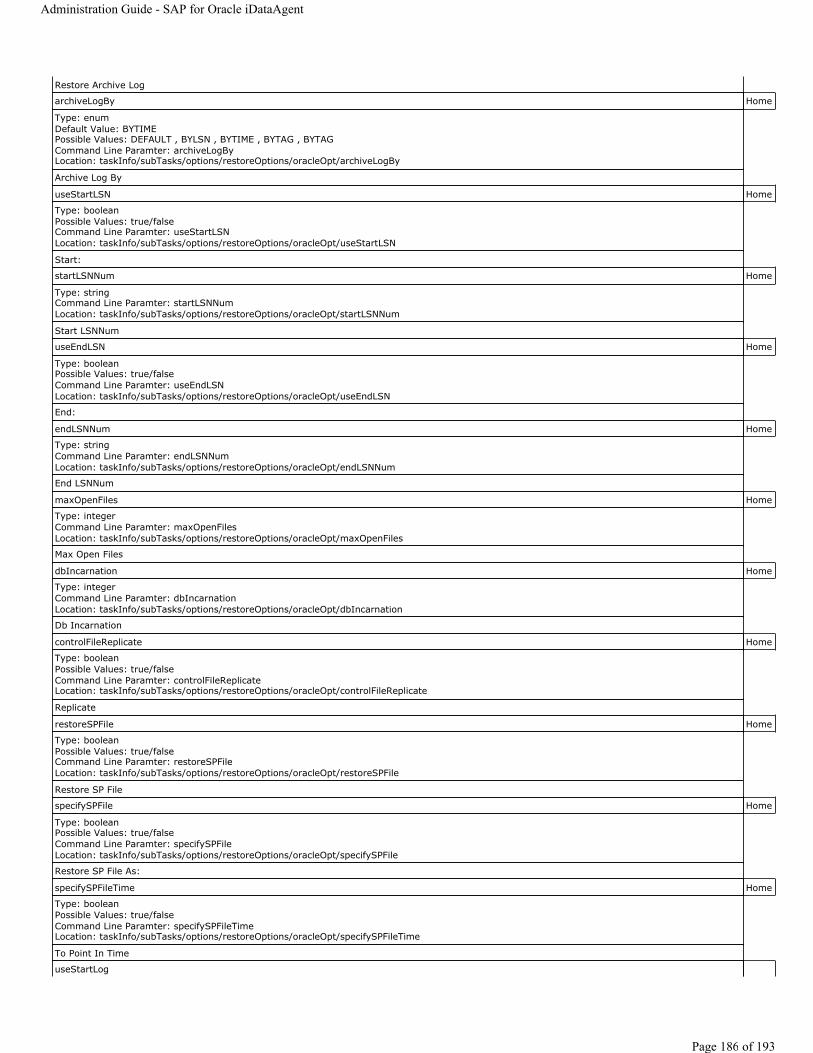
Restore Archive Log
archiveLogBy Home
Type: enumDefault Value: BYTIMEPossible Values: DEFAULT , BYLSN , BYTIME , BYTAG , BYTAGCommand Line Paramter: archiveLogByLocation: taskInfo/subTasks/options/restoreOptions/oracleOpt/archiveLogBy
Archive Log By
useStartLSN Home
Type: booleanPossible Values: true/falseCommand Line Paramter: useStartLSNLocation: taskInfo/subTasks/options/restoreOptions/oracleOpt/useStartLSN
Start:
startLSNNum Home
Type: stringCommand Line Paramter: startLSNNumLocation: taskInfo/subTasks/options/restoreOptions/oracleOpt/startLSNNum
Start LSNNum
useEndLSN Home
Type: booleanPossible Values: true/falseCommand Line Paramter: useEndLSNLocation: taskInfo/subTasks/options/restoreOptions/oracleOpt/useEndLSN
End:
endLSNNum Home
Type: stringCommand Line Paramter: endLSNNumLocation: taskInfo/subTasks/options/restoreOptions/oracleOpt/endLSNNum
End LSNNum
maxOpenFiles Home
Type: integerCommand Line Paramter: maxOpenFilesLocation: taskInfo/subTasks/options/restoreOptions/oracleOpt/maxOpenFiles
Max Open Files
dbIncarnation Home
Type: integerCommand Line Paramter: dbIncarnationLocation: taskInfo/subTasks/options/restoreOptions/oracleOpt/dbIncarnation
Db Incarnation
controlFileReplicate Home
Type: booleanPossible Values: true/falseCommand Line Paramter: controlFileReplicateLocation: taskInfo/subTasks/options/restoreOptions/oracleOpt/controlFileReplicate
Replicate
restoreSPFile Home
Type: booleanPossible Values: true/falseCommand Line Paramter: restoreSPFileLocation: taskInfo/subTasks/options/restoreOptions/oracleOpt/restoreSPFile
Restore SP File
specifySPFile Home
Type: booleanPossible Values: true/falseCommand Line Paramter: specifySPFileLocation: taskInfo/subTasks/options/restoreOptions/oracleOpt/specifySPFile
Restore SP File As:
specifySPFileTime Home
Type: booleanPossible Values: true/falseCommand Line Paramter: specifySPFileTimeLocation: taskInfo/subTasks/options/restoreOptions/oracleOpt/specifySPFileTime
To Point In Time
useStartLog
Administration Guide - SAP for Oracle iDataAgent
Page 186 of 193
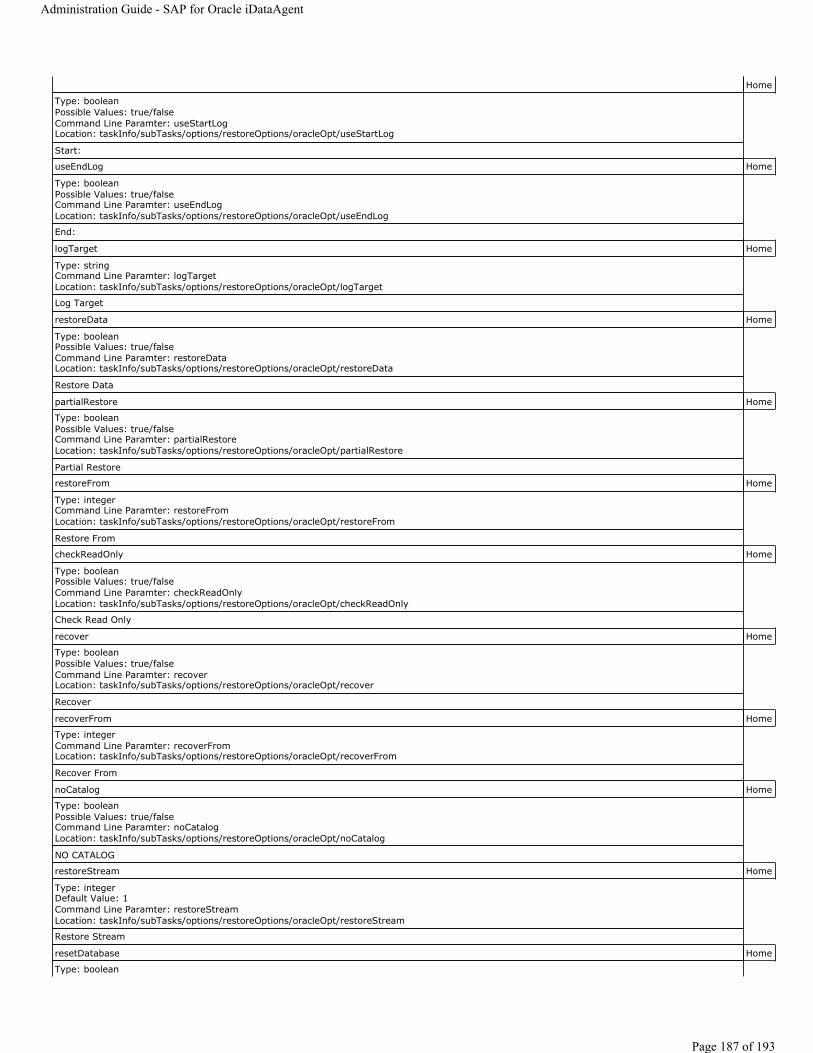
Home
Type: booleanPossible Values: true/falseCommand Line Paramter: useStartLogLocation: taskInfo/subTasks/options/restoreOptions/oracleOpt/useStartLog
Start:
useEndLog Home
Type: booleanPossible Values: true/falseCommand Line Paramter: useEndLogLocation: taskInfo/subTasks/options/restoreOptions/oracleOpt/useEndLog
End:
logTarget Home
Type: stringCommand Line Paramter: logTargetLocation: taskInfo/subTasks/options/restoreOptions/oracleOpt/logTarget
Log Target
restoreData Home
Type: booleanPossible Values: true/falseCommand Line Paramter: restoreDataLocation: taskInfo/subTasks/options/restoreOptions/oracleOpt/restoreData
Restore Data
partialRestore Home
Type: booleanPossible Values: true/falseCommand Line Paramter: partialRestoreLocation: taskInfo/subTasks/options/restoreOptions/oracleOpt/partialRestore
Partial Restore
restoreFrom Home
Type: integerCommand Line Paramter: restoreFromLocation: taskInfo/subTasks/options/restoreOptions/oracleOpt/restoreFrom
Restore From
checkReadOnly Home
Type: booleanPossible Values: true/falseCommand Line Paramter: checkReadOnlyLocation: taskInfo/subTasks/options/restoreOptions/oracleOpt/checkReadOnly
Check Read Only
recover Home
Type: booleanPossible Values: true/falseCommand Line Paramter: recoverLocation: taskInfo/subTasks/options/restoreOptions/oracleOpt/recover
Recover
recoverFrom Home
Type: integerCommand Line Paramter: recoverFromLocation: taskInfo/subTasks/options/restoreOptions/oracleOpt/recoverFrom
Recover From
noCatalog Home
Type: booleanPossible Values: true/falseCommand Line Paramter: noCatalogLocation: taskInfo/subTasks/options/restoreOptions/oracleOpt/noCatalog
NO CATALOG
restoreStream Home
Type: integerDefault Value: 1Command Line Paramter: restoreStreamLocation: taskInfo/subTasks/options/restoreOptions/oracleOpt/restoreStream
Restore Stream
resetDatabase Home
Type: boolean
Administration Guide - SAP for Oracle iDataAgent
Page 187 of 193

Possible Values: true/falseCommand Line Paramter: resetDatabaseLocation: taskInfo/subTasks/options/restoreOptions/oracleOpt/resetDatabase
Reset Database
doNotRecoverRedoLogs Home
Type: booleanPossible Values: true/falseCommand Line Paramter: doNotRecoverRedoLogsLocation: taskInfo/subTasks/options/restoreOptions/oracleOpt/doNotRecoverRedoLogs
No Re-do Logs
openDatabase Home
Type: booleanDefault Value: truePossible Values: true/falseCommand Line Paramter: openDatabaseLocation: taskInfo/subTasks/options/restoreOptions/oracleOpt/openDatabase
Open DB
resetLogs Home
Type: integerDefault Value: 1Command Line Paramter: resetLogsLocation: taskInfo/subTasks/options/restoreOptions/oracleOpt/resetLogs
Reset Logs
validate Home
Type: booleanPossible Values: true/falseCommand Line Paramter: validateLocation: taskInfo/subTasks/options/restoreOptions/oracleOpt/validate
Validate
duplicate Home
Type: booleanPossible Values: true/falseCommand Line Paramter: duplicateLocation: taskInfo/subTasks/options/restoreOptions/oracleOpt/duplicate
Duplicate DB
duplicateNoFileNamecheck Home
Type: booleanPossible Values: true/falseCommand Line Paramter: duplicateNoFileNamecheckLocation: taskInfo/subTasks/options/restoreOptions/oracleOpt/duplicateNoFileNamecheck
Duplicate No File Namecheck
duplicateStandby Home
Type: booleanPossible Values: true/falseCommand Line Paramter: duplicateStandbyLocation: taskInfo/subTasks/options/restoreOptions/oracleOpt/duplicateStandby
Duplicate Standby
duplicateStandbyDoRecover Home
Type: booleanPossible Values: true/falseCommand Line Paramter: duplicateStandbyDoRecoverLocation: taskInfo/subTasks/options/restoreOptions/oracleOpt/duplicateStandbyDoRecover
Duplicate Standby Do Recover
duplicateTo Home
Type: booleanPossible Values: true/falseCommand Line Paramter: duplicateToLocation: taskInfo/subTasks/options/restoreOptions/oracleOpt/duplicateTo
Duplicate To
duplicateToSkipReadOnly Home
Type: booleanPossible Values: true/falseCommand Line Paramter: duplicateToSkipReadOnlyLocation: taskInfo/subTasks/options/restoreOptions/oracleOpt/duplicateToSkipReadOnly
Duplicate To Skip Read Only
duplicateToOpenRestricted
Administration Guide - SAP for Oracle iDataAgent
Page 188 of 193
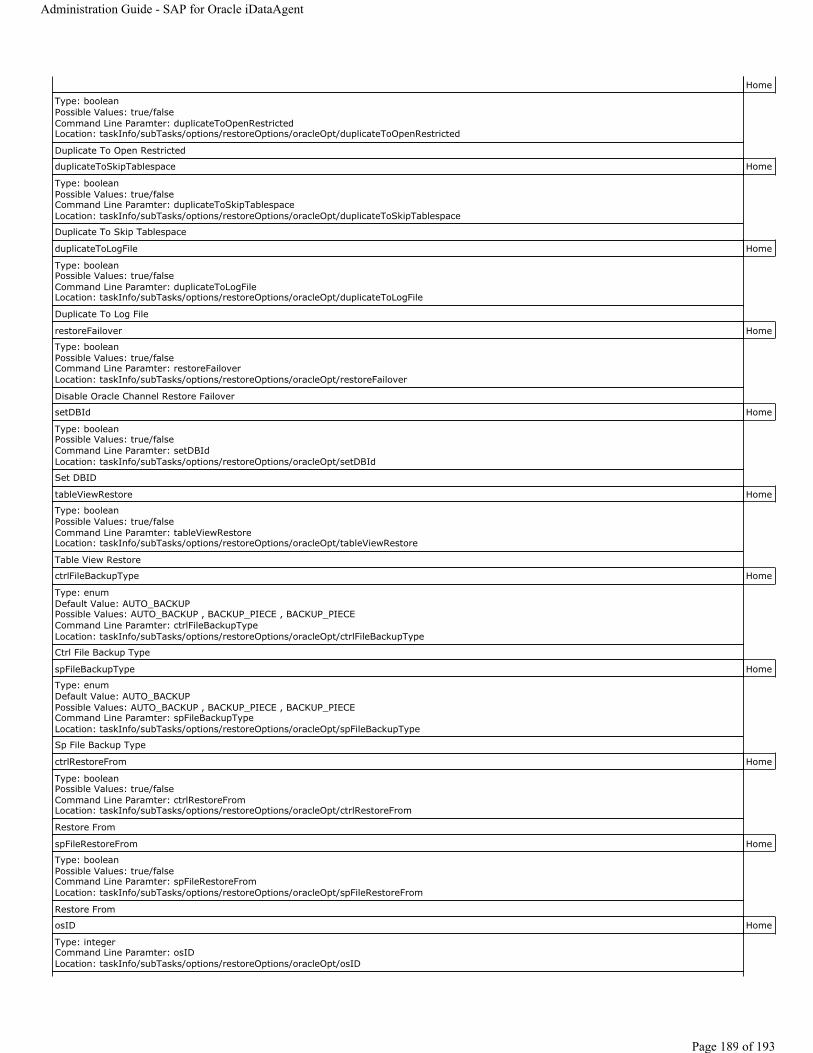
Home
Type: booleanPossible Values: true/falseCommand Line Paramter: duplicateToOpenRestrictedLocation: taskInfo/subTasks/options/restoreOptions/oracleOpt/duplicateToOpenRestricted
Duplicate To Open Restricted
duplicateToSkipTablespace Home
Type: booleanPossible Values: true/falseCommand Line Paramter: duplicateToSkipTablespaceLocation: taskInfo/subTasks/options/restoreOptions/oracleOpt/duplicateToSkipTablespace
Duplicate To Skip Tablespace
duplicateToLogFile Home
Type: booleanPossible Values: true/falseCommand Line Paramter: duplicateToLogFileLocation: taskInfo/subTasks/options/restoreOptions/oracleOpt/duplicateToLogFile
Duplicate To Log File
restoreFailover Home
Type: booleanPossible Values: true/falseCommand Line Paramter: restoreFailoverLocation: taskInfo/subTasks/options/restoreOptions/oracleOpt/restoreFailover
Disable Oracle Channel Restore Failover
setDBId Home
Type: booleanPossible Values: true/falseCommand Line Paramter: setDBIdLocation: taskInfo/subTasks/options/restoreOptions/oracleOpt/setDBId
Set DBID
tableViewRestore Home
Type: booleanPossible Values: true/falseCommand Line Paramter: tableViewRestoreLocation: taskInfo/subTasks/options/restoreOptions/oracleOpt/tableViewRestore
Table View Restore
ctrlFileBackupType Home
Type: enumDefault Value: AUTO_BACKUPPossible Values: AUTO_BACKUP , BACKUP_PIECE , BACKUP_PIECECommand Line Paramter: ctrlFileBackupTypeLocation: taskInfo/subTasks/options/restoreOptions/oracleOpt/ctrlFileBackupType
Ctrl File Backup Type
spFileBackupType Home
Type: enumDefault Value: AUTO_BACKUPPossible Values: AUTO_BACKUP , BACKUP_PIECE , BACKUP_PIECECommand Line Paramter: spFileBackupTypeLocation: taskInfo/subTasks/options/restoreOptions/oracleOpt/spFileBackupType
Sp File Backup Type
ctrlRestoreFrom Home
Type: booleanPossible Values: true/falseCommand Line Paramter: ctrlRestoreFromLocation: taskInfo/subTasks/options/restoreOptions/oracleOpt/ctrlRestoreFrom
Restore From
spFileRestoreFrom Home
Type: booleanPossible Values: true/falseCommand Line Paramter: spFileRestoreFromLocation: taskInfo/subTasks/options/restoreOptions/oracleOpt/spFileRestoreFrom
Restore From
osID Home
Type: integerCommand Line Paramter: osIDLocation: taskInfo/subTasks/options/restoreOptions/oracleOpt/osID
Administration Guide - SAP for Oracle iDataAgent
Page 189 of 193
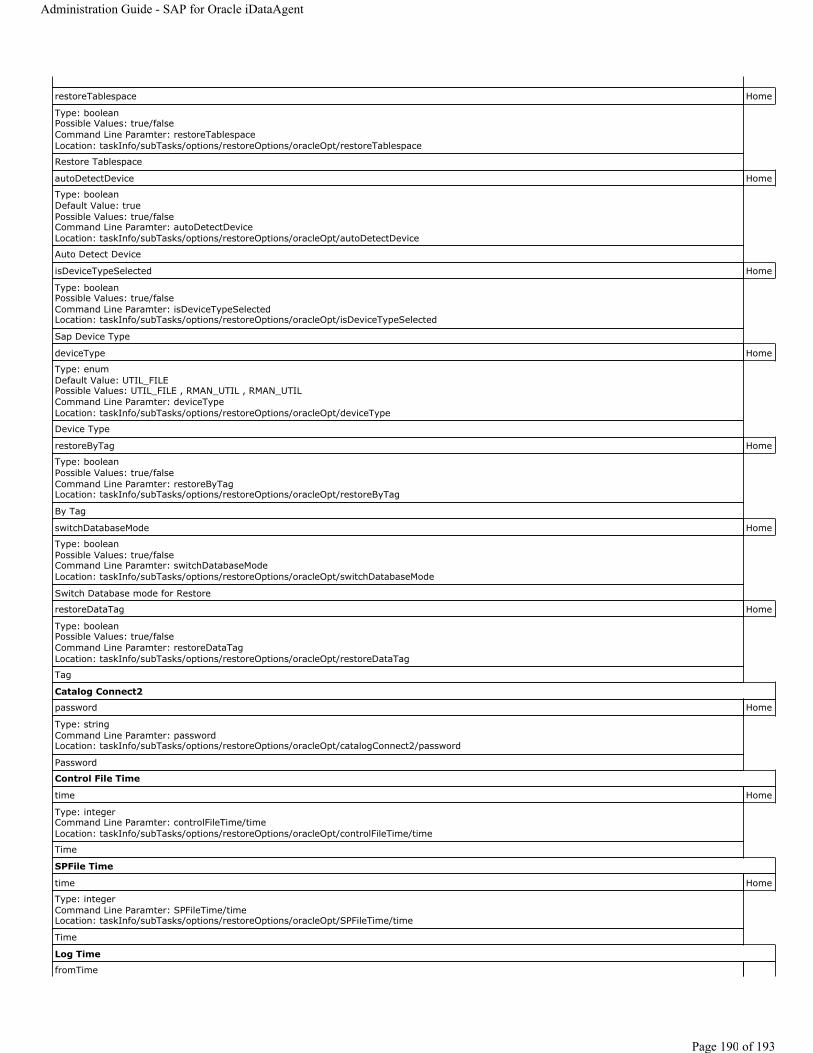
restoreTablespace Home
Type: booleanPossible Values: true/falseCommand Line Paramter: restoreTablespaceLocation: taskInfo/subTasks/options/restoreOptions/oracleOpt/restoreTablespace
Restore Tablespace
autoDetectDevice Home
Type: booleanDefault Value: truePossible Values: true/falseCommand Line Paramter: autoDetectDeviceLocation: taskInfo/subTasks/options/restoreOptions/oracleOpt/autoDetectDevice
Auto Detect Device
isDeviceTypeSelected Home
Type: booleanPossible Values: true/falseCommand Line Paramter: isDeviceTypeSelectedLocation: taskInfo/subTasks/options/restoreOptions/oracleOpt/isDeviceTypeSelected
Sap Device Type
deviceType Home
Type: enumDefault Value: UTIL_FILEPossible Values: UTIL_FILE , RMAN_UTIL , RMAN_UTILCommand Line Paramter: deviceTypeLocation: taskInfo/subTasks/options/restoreOptions/oracleOpt/deviceType
Device Type
restoreByTag Home
Type: booleanPossible Values: true/falseCommand Line Paramter: restoreByTagLocation: taskInfo/subTasks/options/restoreOptions/oracleOpt/restoreByTag
By Tag
switchDatabaseMode Home
Type: booleanPossible Values: true/falseCommand Line Paramter: switchDatabaseModeLocation: taskInfo/subTasks/options/restoreOptions/oracleOpt/switchDatabaseMode
Switch Database mode for Restore
restoreDataTag Home
Type: booleanPossible Values: true/falseCommand Line Paramter: restoreDataTagLocation: taskInfo/subTasks/options/restoreOptions/oracleOpt/restoreDataTag
Tag
Catalog Connect2
password Home
Type: stringCommand Line Paramter: passwordLocation: taskInfo/subTasks/options/restoreOptions/oracleOpt/catalogConnect2/password
Password
Control File Time
time Home
Type: integerCommand Line Paramter: controlFileTime/timeLocation: taskInfo/subTasks/options/restoreOptions/oracleOpt/controlFileTime/time
Time
SPFile Time
time Home
Type: integerCommand Line Paramter: SPFileTime/timeLocation: taskInfo/subTasks/options/restoreOptions/oracleOpt/SPFileTime/time
Time
Log Time
fromTime
Administration Guide - SAP for Oracle iDataAgent
Page 190 of 193

Home
Type: integerCommand Line Paramter: fromTimeLocation: taskInfo/subTasks/options/restoreOptions/oracleOpt/logTime/fromTime
From Time
toTime Home
Type: integerCommand Line Paramter: toTimeLocation: taskInfo/subTasks/options/restoreOptions/oracleOpt/logTime/toTime
To Time
Restore Time
time Home
Type: integerCommand Line Paramter: restoreTime/timeLocation: taskInfo/subTasks/options/restoreOptions/oracleOpt/restoreTime/time
Time
Recover Time
time Home
Type: integerCommand Line Paramter: recoverTime/timeLocation: taskInfo/subTasks/options/restoreOptions/oracleOpt/recoverTime/time
Time
Time Zone
TimeZoneName Home
Type: stringCommand Line Paramter: TimeZoneNameLocation: taskInfo/subTasks/options/restoreOptions/oracleOpt/timeZone/TimeZoneName
Time Zone Name
Restore Common Options
detectRegularExpression Home
Type: booleanDefault Value: truePossible Values: true/falseCommand Line Paramter: detectRegularExpressionLocation: taskInfo/subTasks/options/restoreOptions/commonOptions/detectRegularExpression
Automatically Detect Regular Expressions
restoreDeviceFilesAsRegularFiles Home
Type: booleanPossible Values: true/falseCommand Line Paramter: restoreDeviceFilesAsRegularFilesLocation: taskInfo/subTasks/options/restoreOptions/commonOptions/restoreDeviceFilesAsRegularFiles
Restore device files as regular files
restoreSpaceRestrictions Home
Type: booleanPossible Values: true/falseCommand Line Paramter: restoreSpaceRestrictionsLocation: taskInfo/subTasks/options/restoreOptions/commonOptions/restoreSpaceRestrictions
Restore Space Restrictions
ignoreNamespaceRequirements Home
Type: booleanPossible Values: true/falseCommand Line Paramter: ignoreNamespaceRequirementsLocation: taskInfo/subTasks/options/restoreOptions/commonOptions/ignoreNamespaceRequirements
Ignore Namespace Requirements
skipErrorsAndContinue Home
Type: booleanDefault Value: falsePossible Values: true/falseCommand Line Paramter: skipErrorsAndContinueLocation: taskInfo/subTasks/options/restoreOptions/commonOptions/skipErrorsAndContinue
Skip errors and continue
revert Home
Type: booleanPossible Values: true/false
Administration Guide - SAP for Oracle iDataAgent
Page 191 of 193
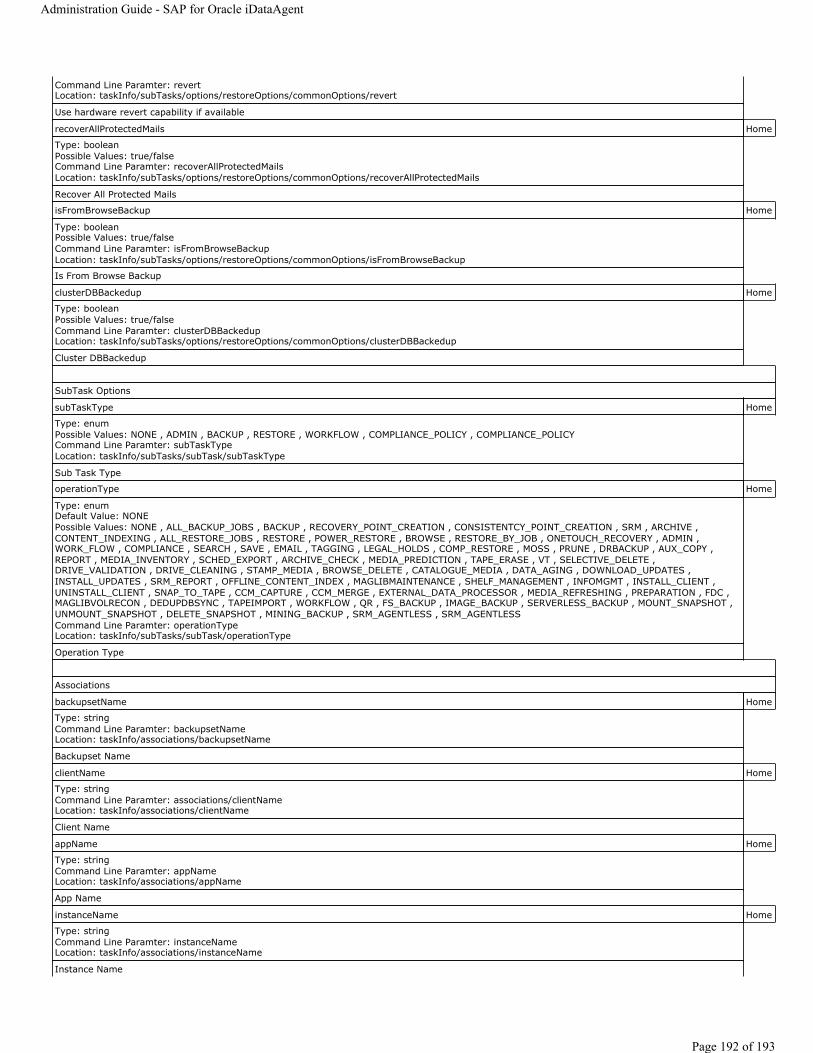
Command Line Paramter: revertLocation: taskInfo/subTasks/options/restoreOptions/commonOptions/revert
Use hardware revert capability if available
recoverAllProtectedMails Home
Type: booleanPossible Values: true/falseCommand Line Paramter: recoverAllProtectedMailsLocation: taskInfo/subTasks/options/restoreOptions/commonOptions/recoverAllProtectedMails
Recover All Protected Mails
isFromBrowseBackup Home
Type: booleanPossible Values: true/falseCommand Line Paramter: isFromBrowseBackupLocation: taskInfo/subTasks/options/restoreOptions/commonOptions/isFromBrowseBackup
Is From Browse Backup
clusterDBBackedup Home
Type: booleanPossible Values: true/falseCommand Line Paramter: clusterDBBackedupLocation: taskInfo/subTasks/options/restoreOptions/commonOptions/clusterDBBackedup
Cluster DBBackedup
SubTask Options
subTaskType Home
Type: enumPossible Values: NONE , ADMIN , BACKUP , RESTORE , WORKFLOW , COMPLIANCE_POLICY , COMPLIANCE_POLICYCommand Line Paramter: subTaskTypeLocation: taskInfo/subTasks/subTask/subTaskType
Sub Task Type
operationType Home
Type: enumDefault Value: NONEPossible Values: NONE , ALL_BACKUP_JOBS , BACKUP , RECOVERY_POINT_CREATION , CONSISTENTCY_POINT_CREATION , SRM , ARCHIVE , CONTENT_INDEXING , ALL_RESTORE_JOBS , RESTORE , POWER_RESTORE , BROWSE , RESTORE_BY_JOB , ONETOUCH_RECOVERY , ADMIN , WORK_FLOW , COMPLIANCE , SEARCH , SAVE , EMAIL , TAGGING , LEGAL_HOLDS , COMP_RESTORE , MOSS , PRUNE , DRBACKUP , AUX_COPY , REPORT , MEDIA_INVENTORY , SCHED_EXPORT , ARCHIVE_CHECK , MEDIA_PREDICTION , TAPE_ERASE , VT , SELECTIVE_DELETE , DRIVE_VALIDATION , DRIVE_CLEANING , STAMP_MEDIA , BROWSE_DELETE , CATALOGUE_MEDIA , DATA_AGING , DOWNLOAD_UPDATES , INSTALL_UPDATES , SRM_REPORT , OFFLINE_CONTENT_INDEX , MAGLIBMAINTENANCE , SHELF_MANAGEMENT , INFOMGMT , INSTALL_CLIENT , UNINSTALL_CLIENT , SNAP_TO_TAPE , CCM_CAPTURE , CCM_MERGE , EXTERNAL_DATA_PROCESSOR , MEDIA_REFRESHING , PREPARATION , FDC , MAGLIBVOLRECON , DEDUPDBSYNC , TAPEIMPORT , WORKFLOW , QR , FS_BACKUP , IMAGE_BACKUP , SERVERLESS_BACKUP , MOUNT_SNAPSHOT , UNMOUNT_SNAPSHOT , DELETE_SNAPSHOT , MINING_BACKUP , SRM_AGENTLESS , SRM_AGENTLESSCommand Line Paramter: operationTypeLocation: taskInfo/subTasks/subTask/operationType
Operation Type
Associations
backupsetName Home
Type: stringCommand Line Paramter: backupsetNameLocation: taskInfo/associations/backupsetName
Backupset Name
clientName Home
Type: stringCommand Line Paramter: associations/clientNameLocation: taskInfo/associations/clientName
Client Name
appName Home
Type: stringCommand Line Paramter: appNameLocation: taskInfo/associations/appName
App Name
instanceName Home
Type: stringCommand Line Paramter: instanceNameLocation: taskInfo/associations/instanceName
Instance Name
Administration Guide - SAP for Oracle iDataAgent
Page 192 of 193

Administration Guide - SAP for Oracle iDataAgent
Page 193 of 193


![[William Bull (Firm) materials] - Wikimedia Commons](https://static.fdokumen.com/doc/165x107/633233565696ca4473031c93/william-bull-firm-materials-wikimedia-commons.jpg)